

Sandstrom SDW60W10N, SDW60X10N Installation Instructions Manual
Installation / Instruction Manual
Dishwasher
SDW60W10N / SDW60X10N
Installation / Instruction Manual
Dishwasher
Installasjons- / brukerveiledning
Oppvaskmaskin
Installations- och bruksanvisning
Diskmaskin
Asennus / Käyttöopas
Astianpesukone
Installation / Instruktionsvejledning
Opvaskemaskine
GB
NO
SE
FI
DK
SDW60W10N
SDW60X10N


Contents
GB
Innhold
NO
Unpacking .........................................................................................................6
Installing Your Dishwasher ................................................................................7
Product Overview ............................................................................................11
Before Use .......................................................................................................13
Wash Cycle Table ......................................................................................13
Before Operating .....................................................................................14
Items Not Suitable for Use in the Dishwasher ..........................................14
Adding the Detergent or Detergent Tablet ...............................................15
Adding of Rinse Aid .................................................................................16
Adjusting Rinse Aid Reservoir ..................................................................17
Adding Salt .............................................................................................. 17
Adjusting Salt Consumption ....................................................................18
Loading the Dishwasher ..................................................................................19
Before Loading the Dishwasher ...............................................................19
Upper Basket ...........................................................................................19
Adjusting the Upper Basket ................................................................20
Loading the Upper Basket for 12 Place Settings .................................20
Hinged Cup Rack ................................................................................20
Lower Basket ...........................................................................................21
Hinged Spikes .....................................................................................21
Loading the Lower Basket .................................................................. 21
Cutlery Basket ..........................................................................................22
Loading the Cutlery Basket ................................................................22
Starting a Wash Cycle ............................................................................... 23
Changing a Programme ...........................................................................23
At the End of a Programme ......................................................................23
Switching O the Unit .............................................................................23
Unloading the Dishwasher .......................................................................24
Delay Start ............................................................................................... 24
Half Load .................................................................................................24
Cleaning After Use ...........................................................................................25
External Care ............................................................................................25
The Door and the Door Seal ................................................................25
The Control Panel ............................................................................... 25
Internal Care ............................................................................................ 25
Filtering System .................................................................................25
Spray Arms .........................................................................................26
Frost Precaution ..............................................................................................26
Moving the Dishwasher ..................................................................................26
Maintenance After Prolonged Period of Non-Operation ..................................26
Troubleshooting Guide ....................................................................................27
Fault Code ................................................................................................27
Technical Problems ..................................................................................27
Specication ...................................................................................................29
Safety First! ...................................................................................................126
Utpakking .......................................................................................................30
Installere oppvaskmaskinen ............................................................................31
Oversikt over produktet ...................................................................................35
Før bruk ...........................................................................................................37
Tabell over vaskesyklus ............................................................................37
Før du bruker enheten .............................................................................38
Elementer som ikke egner seg for oppvaskmaskinen ...............................38
Legge i vaskemiddel eller vasketablett ....................................................39
Ha i skyllemiddel .....................................................................................40
Justere skyllemiddelbeholder .................................................................. 41
Ha i salt ....................................................................................................41
Justere saltforbruk ...................................................................................42
Laste i oppvaskmaskinen ................................................................................43
Før du laster i oppvaskmaskinen ..............................................................43
Øvre kurv .................................................................................................43
Justere den øvre kurven .....................................................................44
Laste i den øvre kurven for 12 kuverter ..............................................44
Hengslet koppkurver ..........................................................................44
Nedre kurv ...............................................................................................45
Hengslete spisser ...............................................................................45
Laste inn den nedre kurven ................................................................45
Bestikkurv ................................................................................................46
Laste inn bestikkurven .......................................................................46
Starte et vaskeprogram............................................................................47
Endre program .........................................................................................47
Ved slutten av et program ........................................................................47
Slå av enheten .........................................................................................47
Laste ut av oppvaskmaskinen ..................................................................48
Forsinket start ..........................................................................................48
Halv vask .................................................................................................48
Rengjøring etter bruk ......................................................................................49
Vedlikehold av utsiden .............................................................................49
Døren og dørpakningen .....................................................................49
Kontrollpanelet ..................................................................................49
Vedlikehold av innsiden ........................................................................... 49
Filtreringssystem ................................................................................ 49
Spylearmer .........................................................................................50
Sikkerhetsforholdsregler for frost .................................................................... 50
Flytte oppvaskmaskinen .................................................................................50
Vedlikehold etter lange perioder uten bruk .....................................................50
Feilsøkingsguide .............................................................................................51
Feilkode ................................................................................................... 51
Tekniske problemer ..................................................................................51
Spesikasjon ................................................................................................... 53
Sikkerhet først! .............................................................................................. 127

Innehåll
SE
Sisältö
FI
Uppackning ..................................................................................................... 54
Installation av din diskmaskin ......................................................................... 55
Produktöversikt ...............................................................................................59
Före användning .............................................................................................61
Diskcykeltabell ......................................................................................... 61
Innan användning ...................................................................................62
Föremål som inte är lämpliga att använda i diskmaskinen ...................... 62
Lägga till diskmedel eller diskmedelstablett ...........................................63
Lägga till sköljmedel ................................................................................ 64
Inställning sköljmedelsbehållare .............................................................65
Lägga till salt ...........................................................................................65
Inställning av saltförbrukningen .............................................................. 66
Ladda diskmaskinen .......................................................................................67
Innan diskmaskinen laddas .....................................................................67
Övre korg .................................................................................................67
Justering av övre korgen.....................................................................68
Ladda den övre korgen med 12 kuvert ...............................................68
Fällbart koppställ ...............................................................................68
Nedre korgen ...........................................................................................69
Nedfällbara piggar .............................................................................69
Ladda den nedre korgen .....................................................................69
Bestickkorg .............................................................................................. 70
Ladda bestickkorgen ..........................................................................70
Start av diskcykeln ...................................................................................71
Byte av program ......................................................................................71
Vid slutet av programmet ........................................................................71
Stänga av enheten ...................................................................................71
Urplockning av diskmaskinen ..................................................................72
Fördröjd start ...........................................................................................72
Halvfullt ...................................................................................................72
Rengöring efter användning ...........................................................................73
Yttre vård ................................................................................................. 73
Luckan och lucktätningen ..................................................................73
Kontrollpanelen .................................................................................73
Inre vård ..................................................................................................73
Filtreringssystem ................................................................................ 73
Sprutarmar .........................................................................................74
Frostskydd .......................................................................................................74
Flyttning av diskmaskinen ..............................................................................74
Underhåll efter en lång period utan användning ............................................74
Felsökningsguide ............................................................................................ 75
Felkod ......................................................................................................75
Tekniska problem .....................................................................................75
Specikationer ................................................................................................ 77
Säkerheten först ............................................................................................ 128
Purkaminen pakkauksesta ..............................................................................78
Astianpesukoneen asentaminen .....................................................................79
Tuotteen yleiskatsaus ......................................................................................83
Ennen käyttöä .................................................................................................85
Pesuohjelmataulukko .............................................................................. 85
Ennen käyttöä .......................................................................................... 86
Astianpesukoneessa käytettäväksi sopimattomat kohteet.......................86
Pesuaineen tai pesuainetabletin lisääminen............................................87
Huuhtelukirkasteen lisääminen ...............................................................88
Huuhtelukirkastesäiliön säätö ..................................................................89
Suolan lisääminen ...................................................................................89
Suolan kulutuksen säätö ..........................................................................90
Astianpesukoneen täyttö ................................................................................91
Ennen astianpesukoneen täyttöä .............................................................91
Yläkori .....................................................................................................91
Yläkorin säätö .....................................................................................92
Yläkorin täyttö 12-paikkaisella asetuksella ........................................92
Kaatuva kuppiteline ...........................................................................92
Alakori .....................................................................................................93
Kaatuvat pidikkeet .............................................................................93
Alakorin täyttäminen .........................................................................93
Ruokailuvälinekori ...................................................................................94
Ruokailuvälinekorin täyttäminen ......................................................94
Pesuohjelman käynnistäminen ................................................................95
Pesuohjelman muuttaminen ................................................................... 95
Pesuohjelman lopussa .............................................................................95
Koneen sammuttaminen ......................................................................... 95
Astianpesukoneen tyhjentäminen ...........................................................96
Viivekäynnistys ........................................................................................96
Puolitäyttö ............................................................................................... 96
Puhdistus käytön jälkeen ................................................................................97
Ulkopuolen ylläpito .................................................................................97
Ovi ja oven tiiviste ..............................................................................97
Ohjauspaneeli ....................................................................................97
Sisäpuolen ylläpito ..................................................................................97
Suodatusjärjestelmä ..........................................................................97
Suihkuvarret ....................................................................................... 98
Jäätymisvarotoimet ........................................................................................98
Astianpesukoneen siirtäminen........................................................................98
Ylläpito pitkän käyttämättömyysjakson jälkeen .............................................98
Vianhakuopas .................................................................................................99
Vikakoodi ................................................................................................. 99
Tekniset ongelmat ...................................................................................99
Tekniset tiedot ..............................................................................................101
Turvallisuus ensin! .........................................................................................129

Indholdsfortegnelse
Udpakning ....................................................................................................102
Installation af din opvaskemaskine ...............................................................103
Produktoversigt.............................................................................................107
Inden brug ....................................................................................................109
Skema over vaskecyklus ......................................................................... 109
Før brug ................................................................................................. 110
Emner, der ikke er egnede til vask i opvaskemaskinen ...........................110
Tilførelse af opvaskemiddel eller opvaskemiddeltablet ..........................111
Tilførelse af skyllemiddel .......................................................................112
Justering af skyllemiddelbeholder .........................................................113
Tilføjelse af salt ......................................................................................113
Justering af saltforbrug .......................................................................... 114
Fyldning af opvaskemaskinen .......................................................................115
Før opvaskemaskinen fyldes .................................................................. 115
Øverste kurv...........................................................................................115
Justering af den øverste kurv............................................................116
Fyldning af den øverste kurv til 12 kuverter .....................................116
Hængslet hylde til kopper ................................................................116
Nederste kurv ........................................................................................117
Hængslede spyd ...............................................................................117
Fyldning af den nederst kurv ............................................................117
Bestikkurv ..............................................................................................118
Fyldning af beskikkurv .....................................................................118
Start af vaskecyklus ...............................................................................119
Skift af program .....................................................................................119
Ved programmets afslutning .................................................................119
Slukning af enheden ..............................................................................119
Tømning af opvaskemaskinen ................................................................120
Udskudt start .........................................................................................120
Halv last .................................................................................................120
Rengøring efter brug.....................................................................................121
Udvendig pleje.......................................................................................121
Låge og lågepakning ........................................................................121
Kontrolpanelet .................................................................................121
Indvendig pleje ......................................................................................121
Filtersystem ......................................................................................121
Spray-arme ......................................................................................122
Frostsikring ...................................................................................................122
Flytning af opvaskemaskinen ........................................................................ 122
Vedligeholdelse efter længere periode ude af drift .......................................122
Fejlndingsguide ..........................................................................................123
Fejlkode ................................................................................................. 123
Tekniske problemer ................................................................................123
Specikationer .............................................................................................. 125
Sikkerhed først! .............................................................................................130
DK
GB
Congratulations on the purchase of your new Sandstrøm Dishwasher.
These operating instructions will help you use it properly and safely.
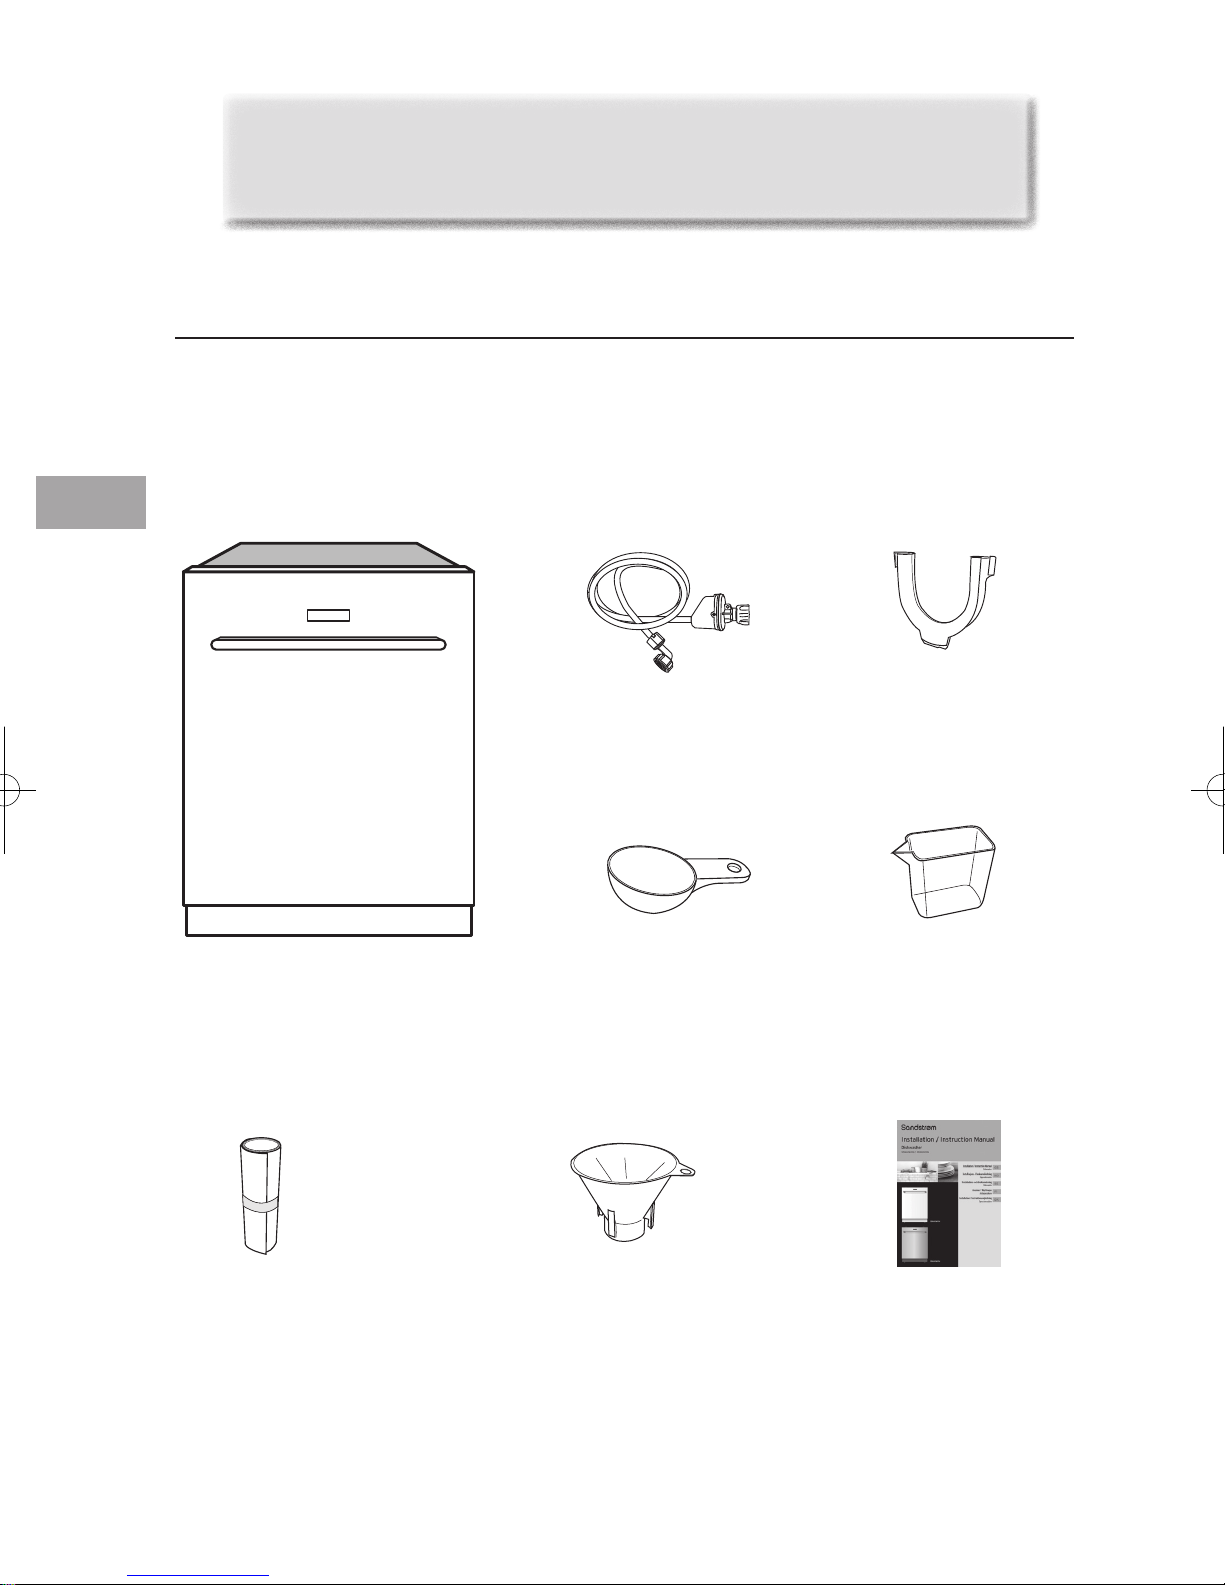
Unpacking
Remove all packaging from the unit. Retain the packaging. If you dispose of it please do so according to
local regulations.
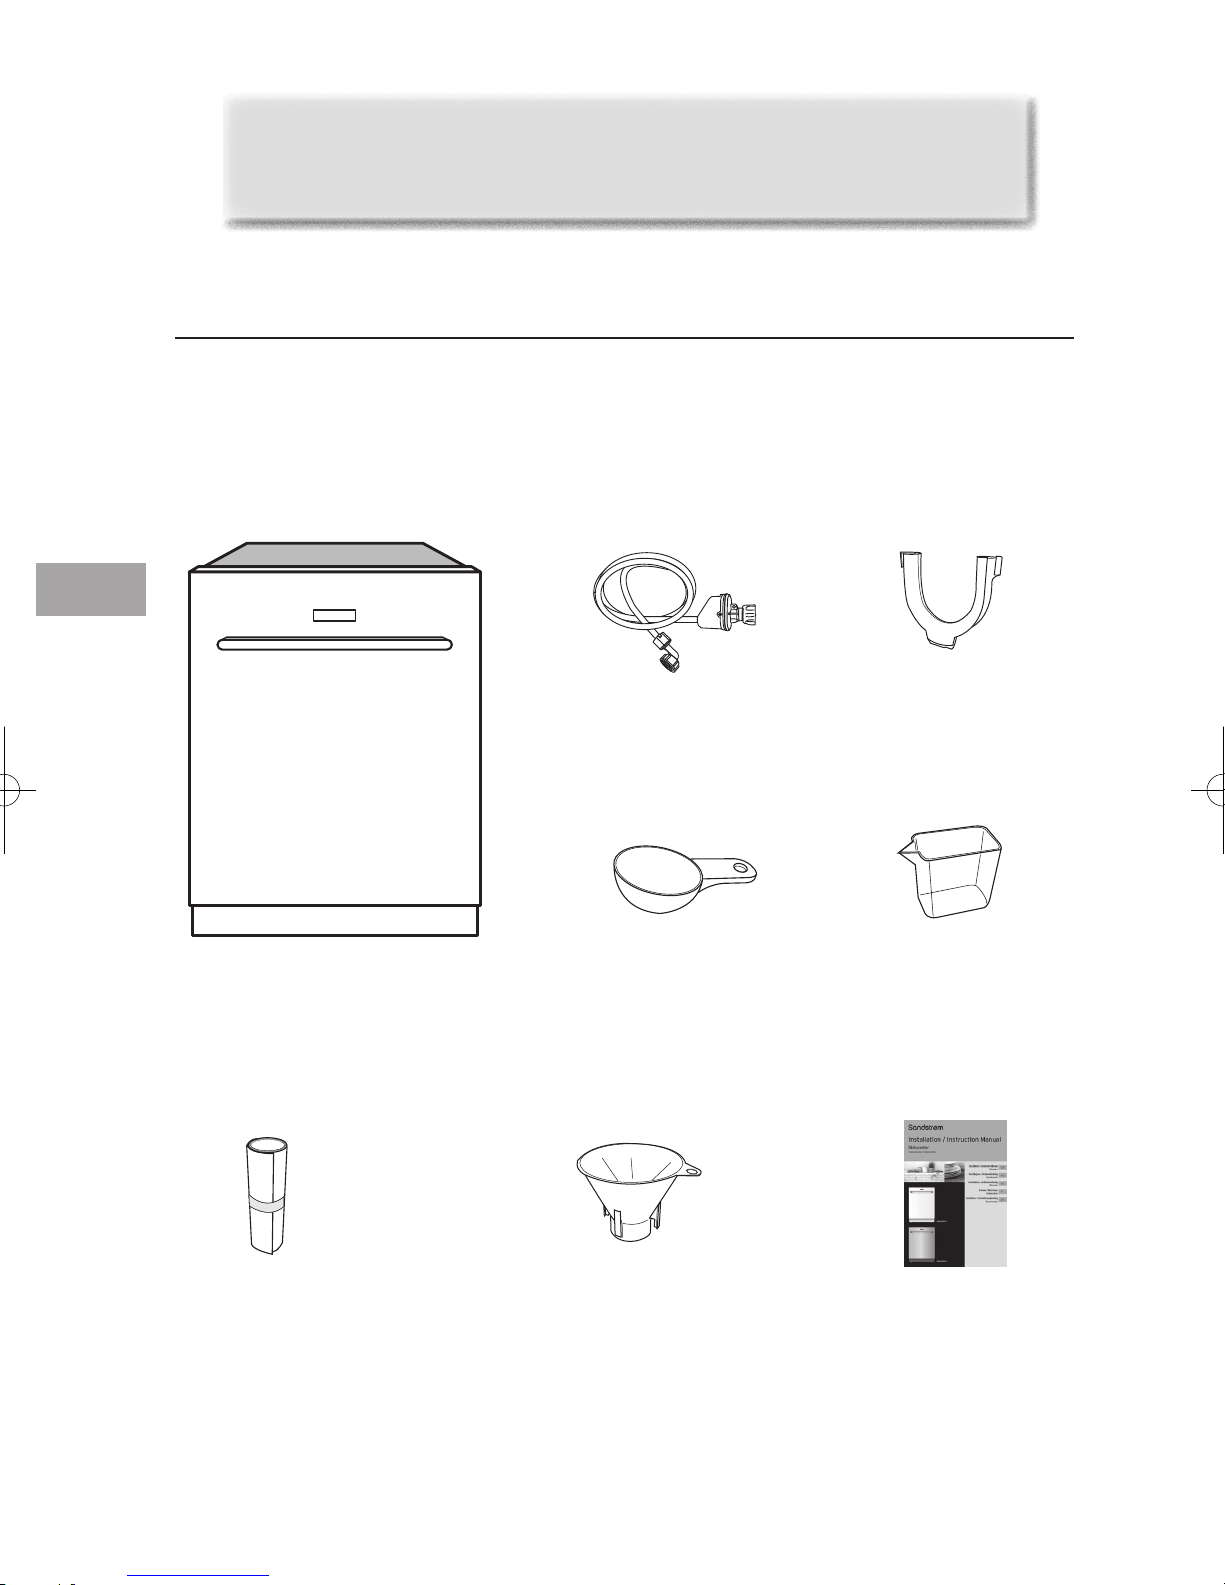
The following items are included:
The Main Unit
Safety Supply Hose x 1
P.N.: 673000900093
Detergent Measuring Spoon x 1
P.N.: 673002200079
1 full spoon = 20g (approx.)
U-shape Hose Holder x 1
P.N.: 673006200003
Measuring Cup x 1
P.N.: 673006200004
1 full cup = 60ml (approx.)
Condensation Strip x 1
P.N.: 675001300715
This product has been wet tested to ensure correct operation. As a result some water may remain inside
the unit. This is normal and safe.
Remove any water droplets from the exterior if necessary.
6
Salt Funnel x 1
P.N.:673002200043
Instruction Manual x 1
P.N.: SDW60W-X-10N-002

INSTALLATION
Installing Your Dishwasher
Please refer to this guide for the installation process.
1. Remove all packaging before positioning the machine.
2. Please ensure the dishwasher is installed by a qualified technician.
GB
3. Unscrew the two screws and adjust the distance of left and right plinth tab to your need. The
adjustable range is from 39mm to 134mm.
plinth tab
screw
plinth
4. Fix the plinth on the plinth tab. According to your need to adjust the plinth height, the adjustable
range is from 56mm to 122mm.
SCREW
CONE GEAR
screw
7
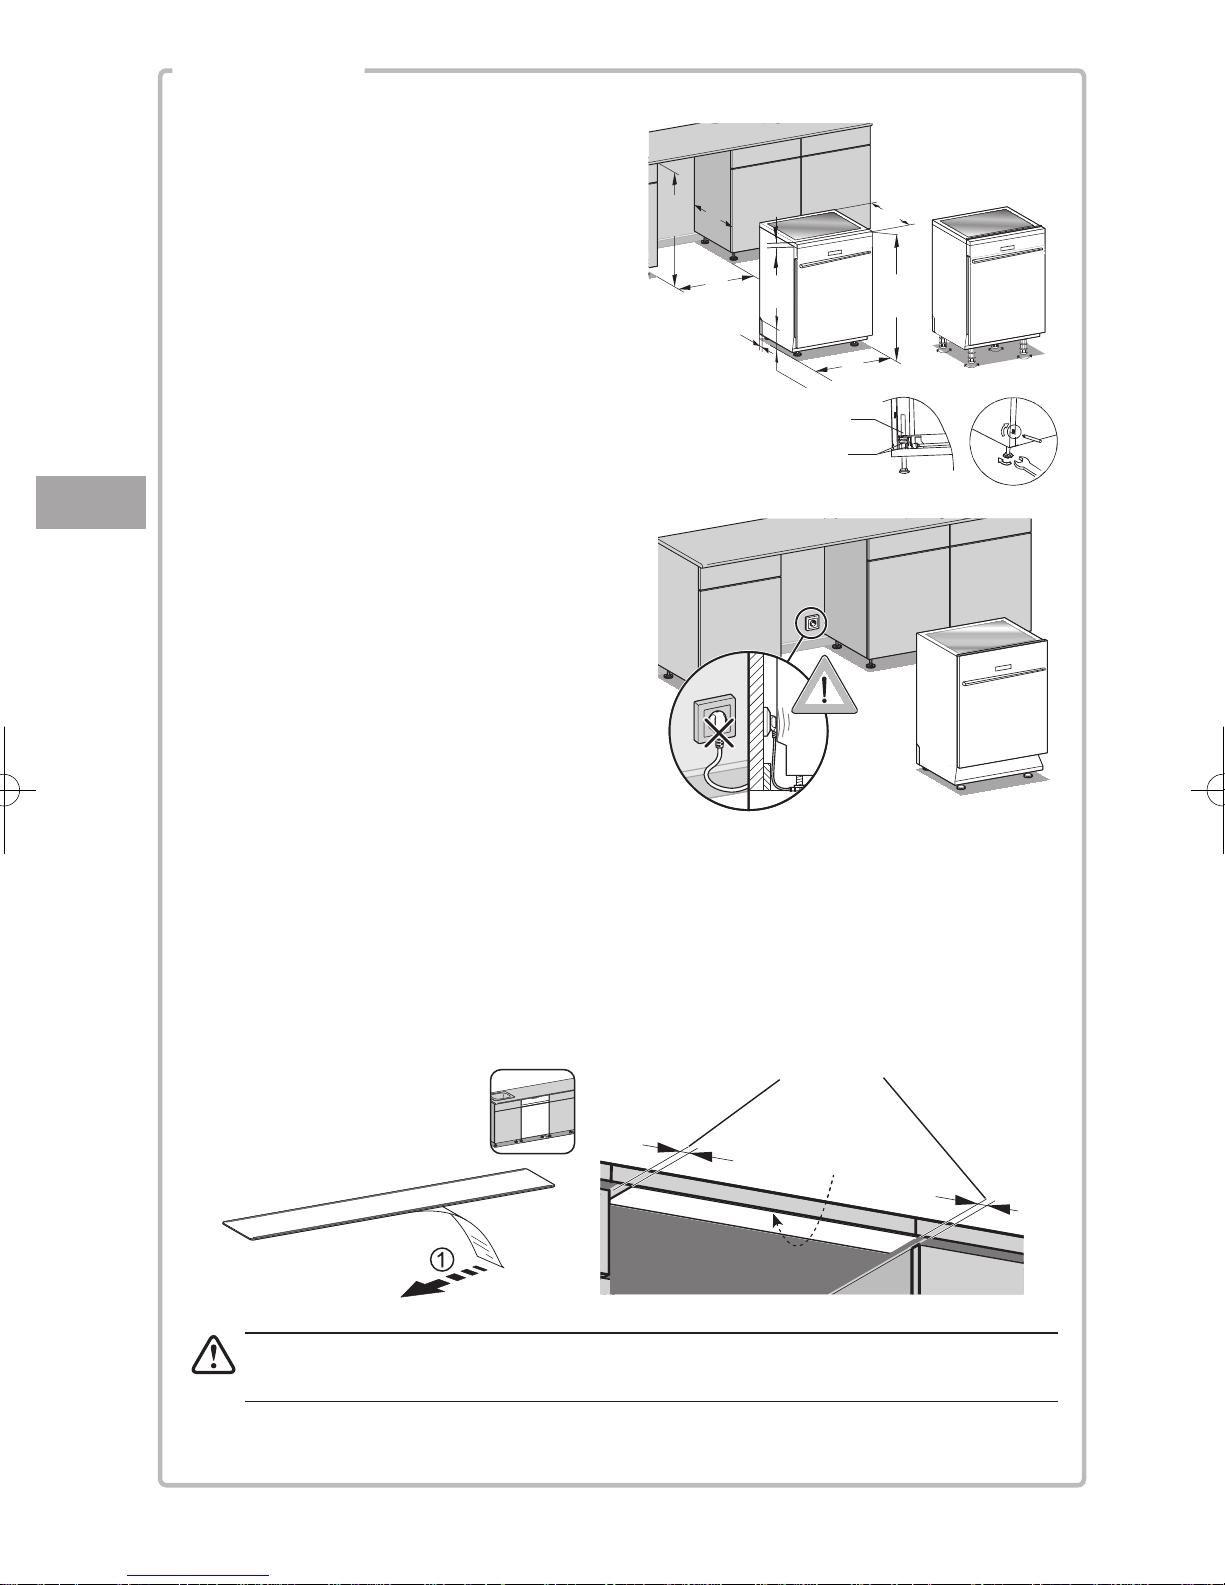
INSTALLATION
min.100
5. Ensure there is clearance each side of the
unit to allow slight sideways movement for
servicing when required. Good levelling is
essential for correct closure and sealing of
the door. When the unit is correctly levelled,
the door should not catch the inner liner on
either side of the cabinet. The adjustable feet
may be loosened or tightened in order to
obtain the optimum levelling of the unit.
620
820
600
Unit in mm
600
30
820
80
level
600
SCREW
CONE GEAR
level
level
level
GB
6. If required, the worktop of the dishwasher
can be removed. The height without the
worktop is 820 mm. The above figure outlines
the minimum dimensions required to
accommodate the dishwasher within fitted
kitchen furniture units.
Do not connect the unit to the mains before
installation. Ensure you are not installing the
unit right in front of the mains. This is to avoid
potential damage to the back of the unit.
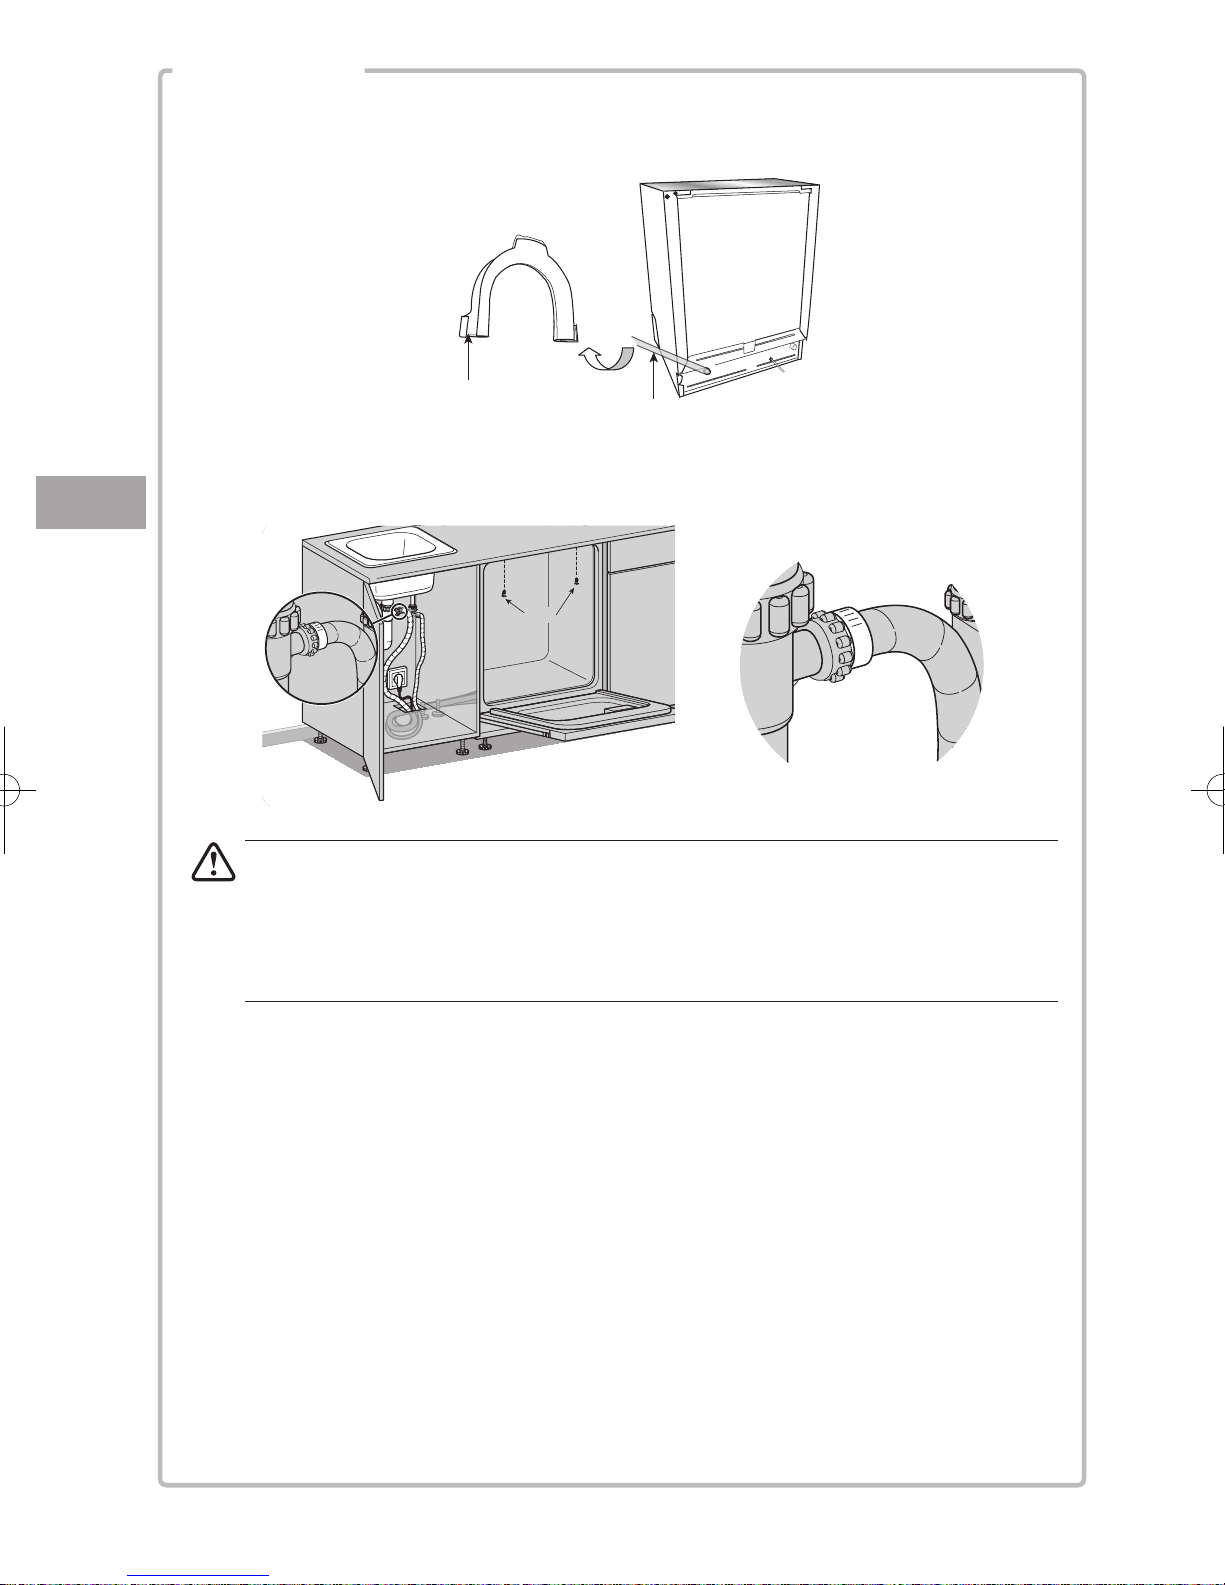
7. The condensation strip must be fitted to the underside of the worktop above your dishwasher to
protect it against any moisture. Its purpose is to protect your worktop’s underside from steam rising
from the dishwasher.
- Ensure the surface is clean prior to sticking the condensation strip to the underside of the
worktop.
- Remove the backing paper from the condensation strip.
- Stick the condensation strip to the underside of the worktop.
Leave some space
Failure to attach the condensation strip could result in damage to the underside of your
worktop!
8
Stick the Condensation
Strip under the worktop,
where you want to install
the dishwasher.
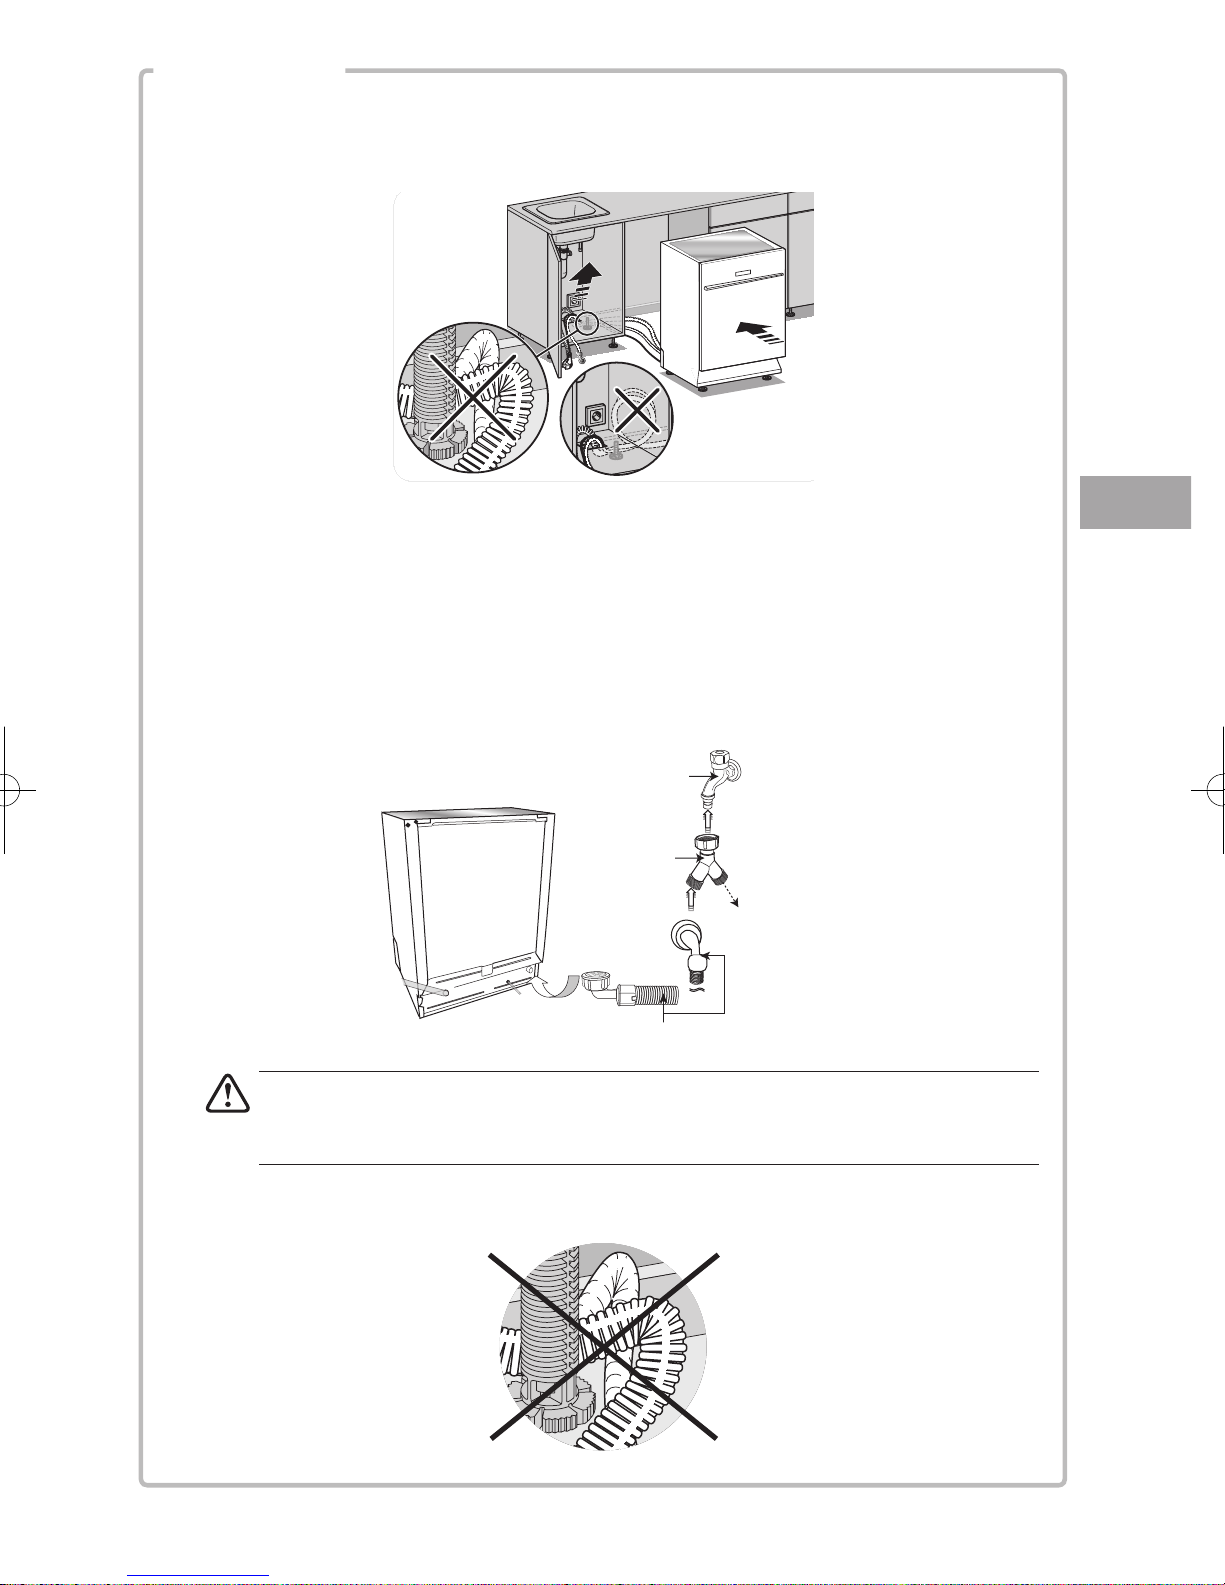
INSTALLATION
8. Position the dishwasher next to a water tap and a drain. Ensure the water inlet and drain hoses are
not kinked or squashed. The unit must not stand on the mains cable.
9. Make sure your plumbing is suitable for use with the dishwasher. If in doubt contact a qualified
plumber. This unit must be connected to cold water mains using the new water inlet hose. Old hose
sets must not be re-used. The water pressure from the water mains needs to be at a minimum of
0.04 MPa and a maximum of 1.00MPa.
- Connect one end of the safety water supply hose to your dishwasher, and then connect the other
end of the hose to your water mains. Please ensure the black rubber seal is in place.
- After connecting the hose, turn on your water mains and check for leaks.
- Connect the dishwasher to the mains socket.
Water mains
Y-Adaptor
(not included)
Safety water supply hose
Connect
to another
appliance
if required.
GB
You may use a Y-adaptor (not included) for additional water feed for another appliance,
for instance a washing machine. This is only applicable for cold water mains. A Y-adaptor is
available from most dry stores.
- Do not bend your drain hose.
9
GB
INSTALLATION
- You may use the U-shaped drain hose holder to secure your drain hose and to avoid bending it.
U-shaped drain
hose holder
- Secure the water drain hose to the waste pipe to avoid it coming off during the washing process.
ST4 screws
Water drain hose
• The waste pipe must only be connected to the foul drains and not the surface water drainage
system!
• The water drain hose should be placed between 40 cm and 100 cm from the floor level and
must not be extended, otherwise the unit may not be able to expel the waste water properly.
• Please close the hydrant after using.
10
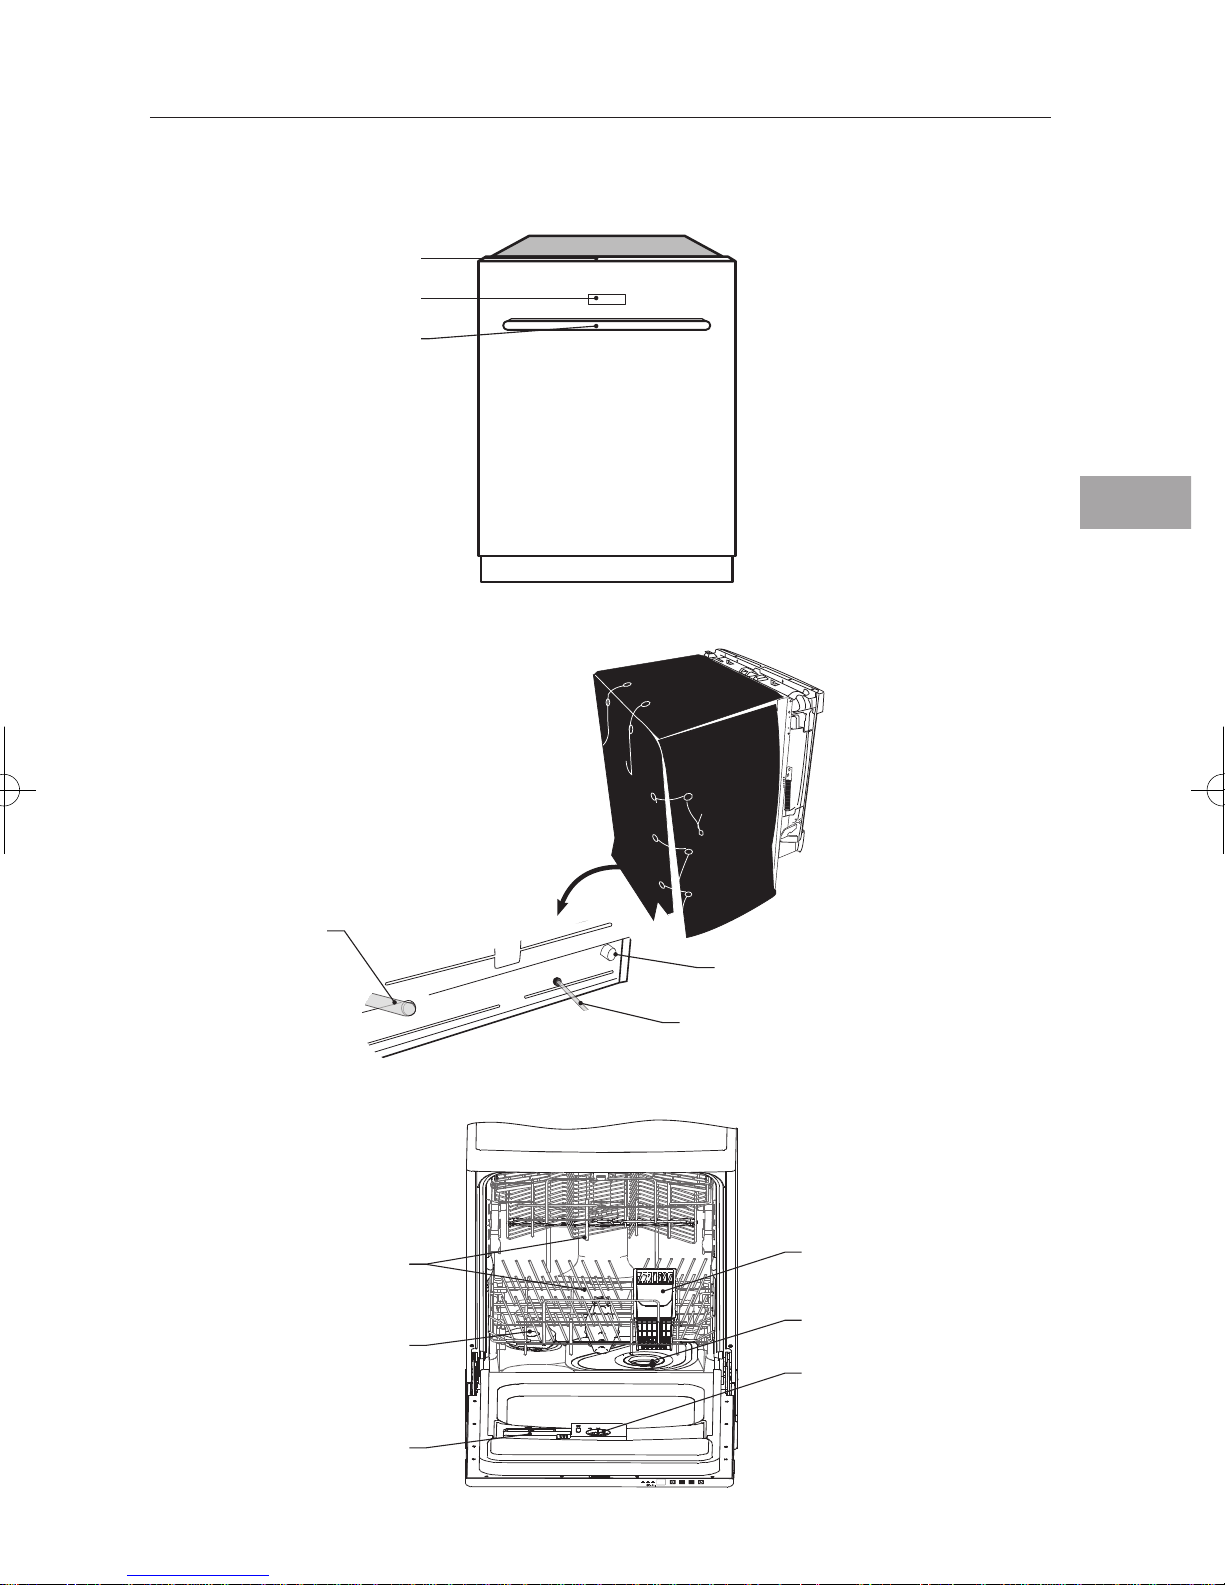
Product Overview
The Unit
(Front view)
Control Panel
Display Window
Door Handle
(Rear view)
GB
Drain Hose
(Internal view)
Detergent Dispenser
Spray Arms
Salt Reservoir
P1 P2 P3 P4 P5 P6 P7
3 in 1 intensive normal economy rinse glass rapid
Water Inlet
(connect to safety supply hose)
Mains Cable
(connect to electrical mains outlet)
Cutlery Basket
Filtering System
Rinse Aid Dispenser
p
1/2
1/2
11
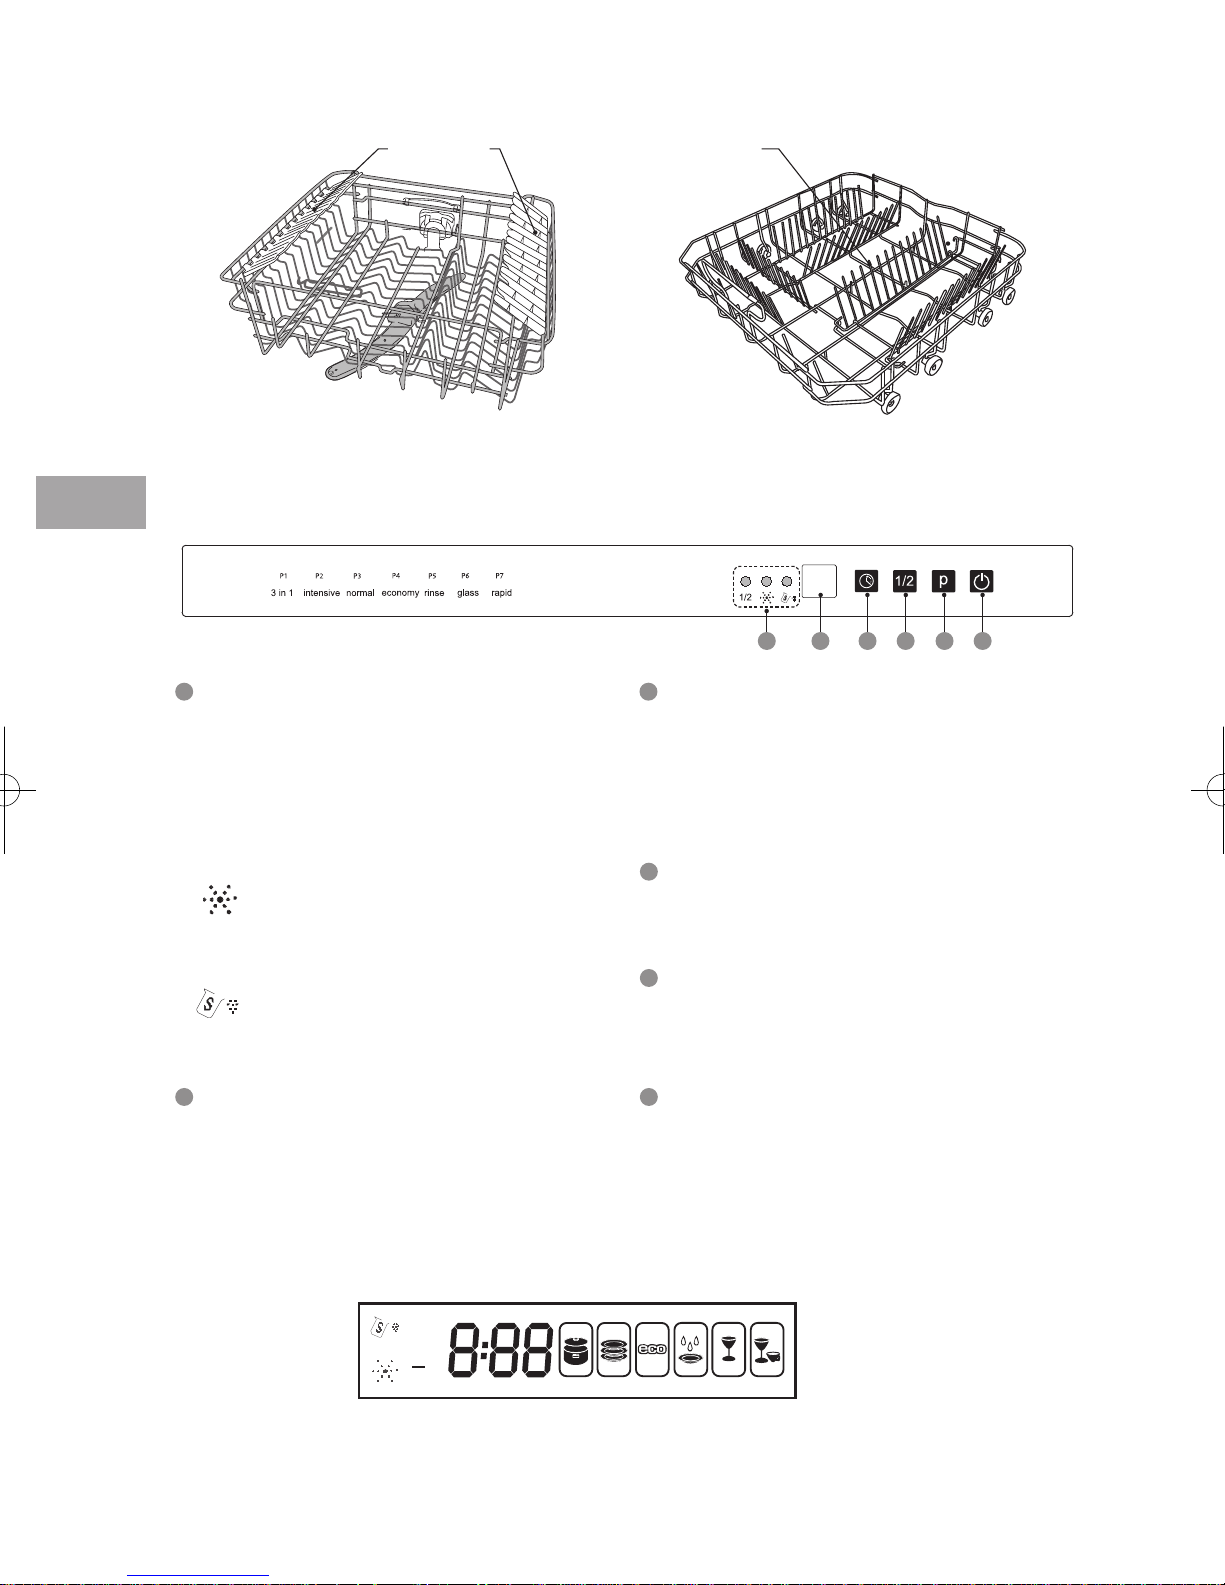
The Upper Basket
1/2
The Lower Basket
GB
The Control Panel
1
Half Load Indicator Light
• Illuminates when the half load
washing cycle is selected.
• Only the upper spray arms will be in
function.
• Load the soiled dishes in the upper
basket.
Rinse Aid Refill Warning Light
• Illuminates when the rinse aid
dispenser needs refilling.
Salt Refill Warning Light
• Illuminates when the salt reservoir
needs refilling.
Cup Racks
Spikes
1
223 4 5 6
3
Delay Start Button
• To preset the wash timer and delay the
starting time by up to 24 hours.
• Each press of this button
increases the delay start time by 1 hour
intervals.
4
Half Load Washing Button
• Press this button to select the half load
washing cycle.
5
Programme Button
• Press this button to select the washing
programme.
Display Window
• Display delay start time and fault codes.
The Exterior Display Window
• Displays programme selected, programme time, delay start time and fault codes etc.
12
3 in 1
1
2
6
On/Off Button
• To turn the dishwasher on and off.
• The led light illuminates when the
dishwasher is on.
Before Use
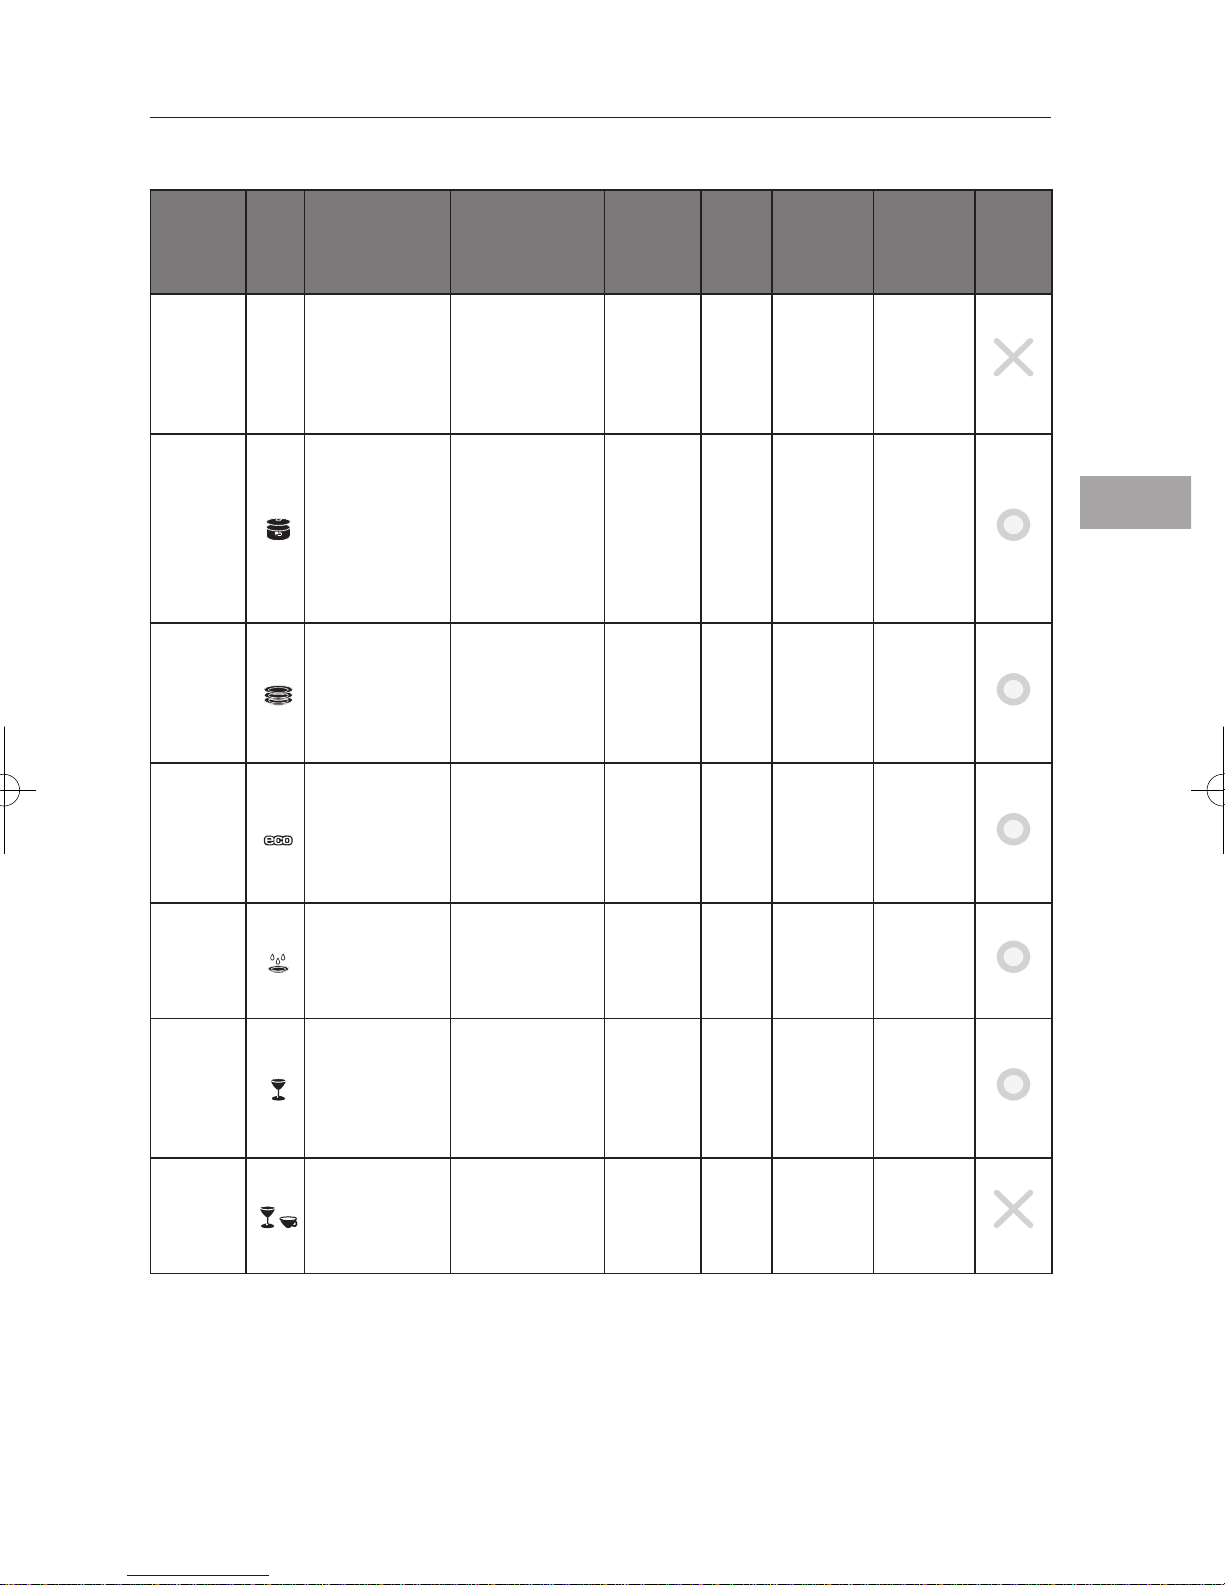
Wash Cycle Table
Programme Cycle
3 in 1 3 in 1
Intensive
Normal
Economy*
(EN50242)
Cycle
Selection
Information
Pots, utensils
and cutlery.
Highly soiled.
Pots, pans,
casserole dishes.
Dishes that have
been sitting
with dried food
on them for a
while.
Pots, plates,
glasses and
lightly soiled
pans. Normally
soiled.
Plates, glasses,
bowls. Lightly
soiled.
Process
• pre-wash (50°C)
• wash (50°C)
• rinse
• rinse (70°C)
• drying
• pre-wash (50°C)
• pre-wash
• wash (65°C)
• rinse
• rinse
• rinse (55°C)
• drying
• pre-wash (50°C)
• wash (50°C)
• rinse
• rinse (65°C)
• drying
• pre-wash
• wash (55°C)
• rinse (65°C)
• drying
Detergent
Amount
(Pre-wash /
Main wash)
• 3 in 1
• pre-wash
(5g)
• main
wash
(25g)
• pre-wash
(5g)
• main
wash
(25g)
• pre-wash
(5g)
• main
wash
(25g)
Running
Time
(min.)
155 1.2 16
130 1.4 22
160 1.2 16
155 1.13 12.8
Energy
Consumption
(Kwh)
Consumption
Water
(I)
Rinse
Aid
GB
Rinse
Glass
Rapid
For dishes that
need to be
rinsed and dried
only.
Glasses, crystal
and fine china.
A shorter wash
for lightly soiled
loads.
A shorter wash
for lightly soiled
loads that do
not need drying.
• wash (40°C)
• rinse (70°C)
• drying
• pre-wash
• wash (40°C)
• rinse
• rinse (60°C)
• drying
• wash (40°C)
• rinse
• rinse (45°C)
• n/a
80 0.8 8
• main
wash
(20g) 95 0.8 15
• main
wash
(20g)
30 0.45 12
* To comply with Standards of Performance, i.e. EN50242, please ensure to use economy washing cycle for
the test.
13
GB
Before Operating
To open the door
• Pull the door handle.
• If the door is opened during operation all functions are automatically interrupted.
To close the door
• After loading the dishes, push the baskets fully into the dishwasher.
• Lift the door upwards and push until it clicks into position.
• Do not slam the dishwasher door.
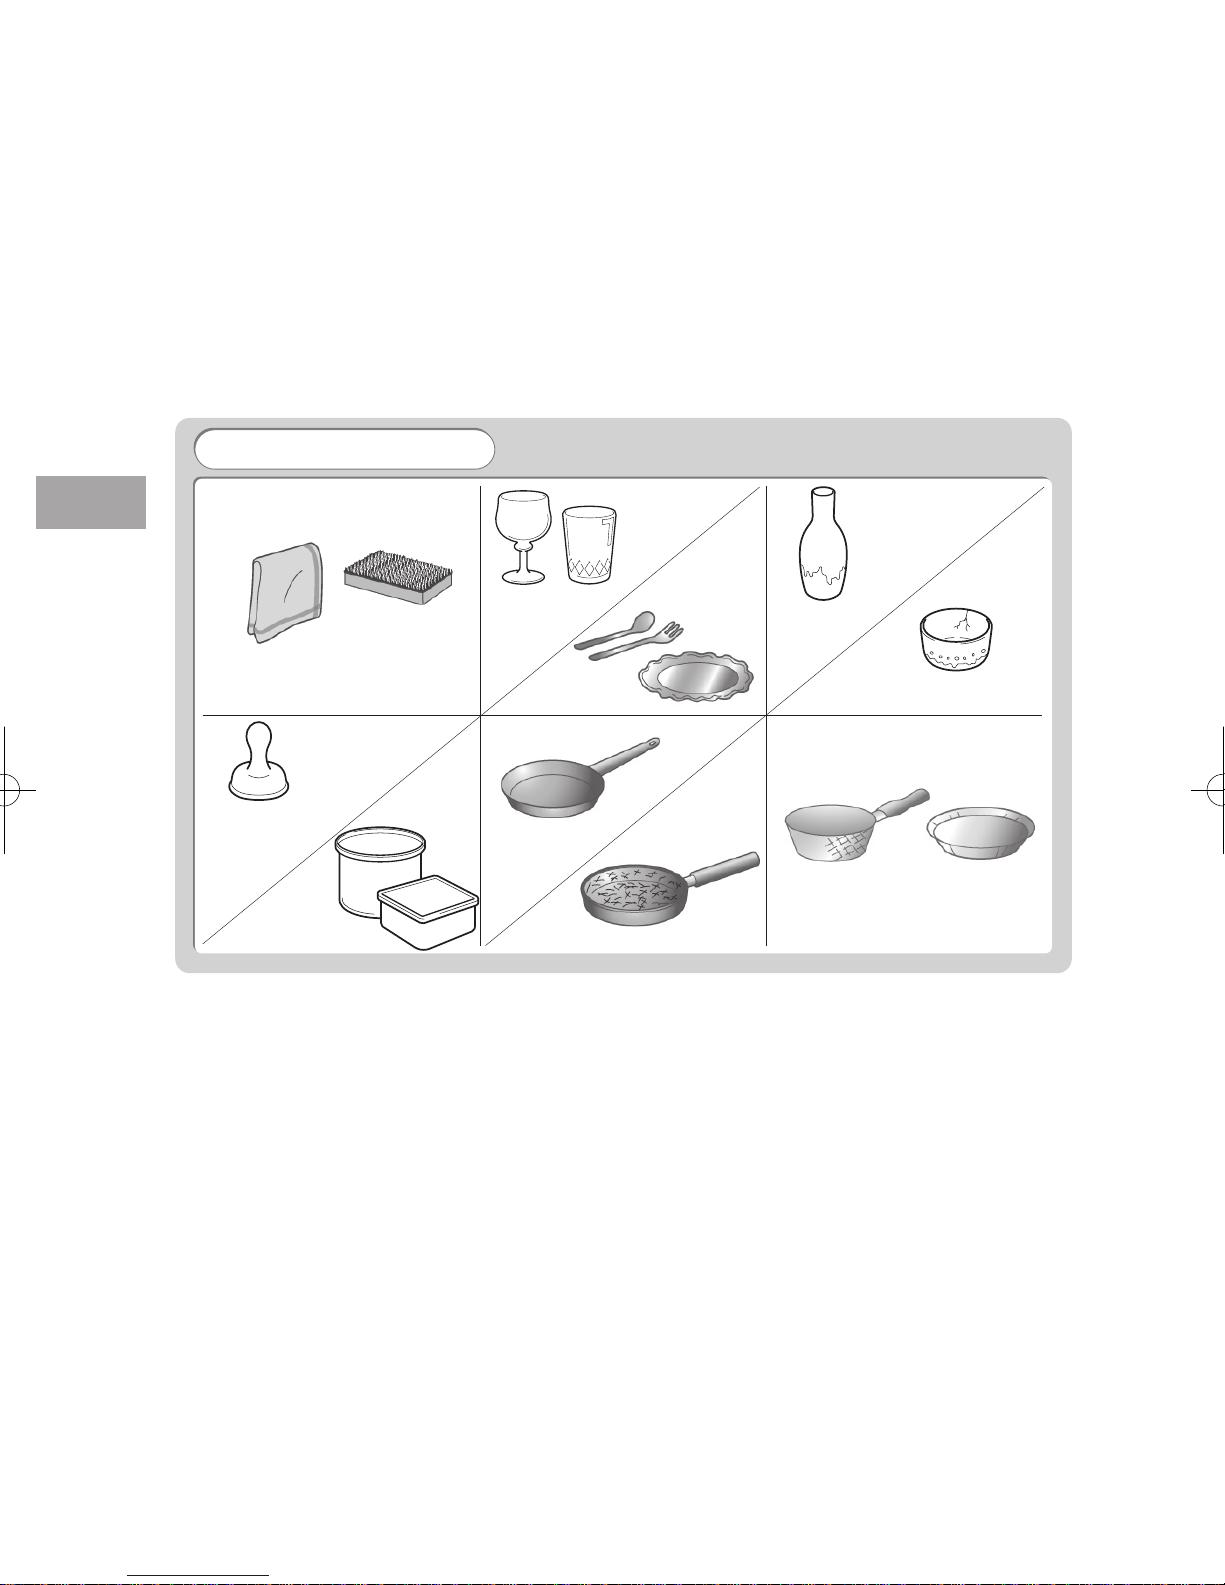
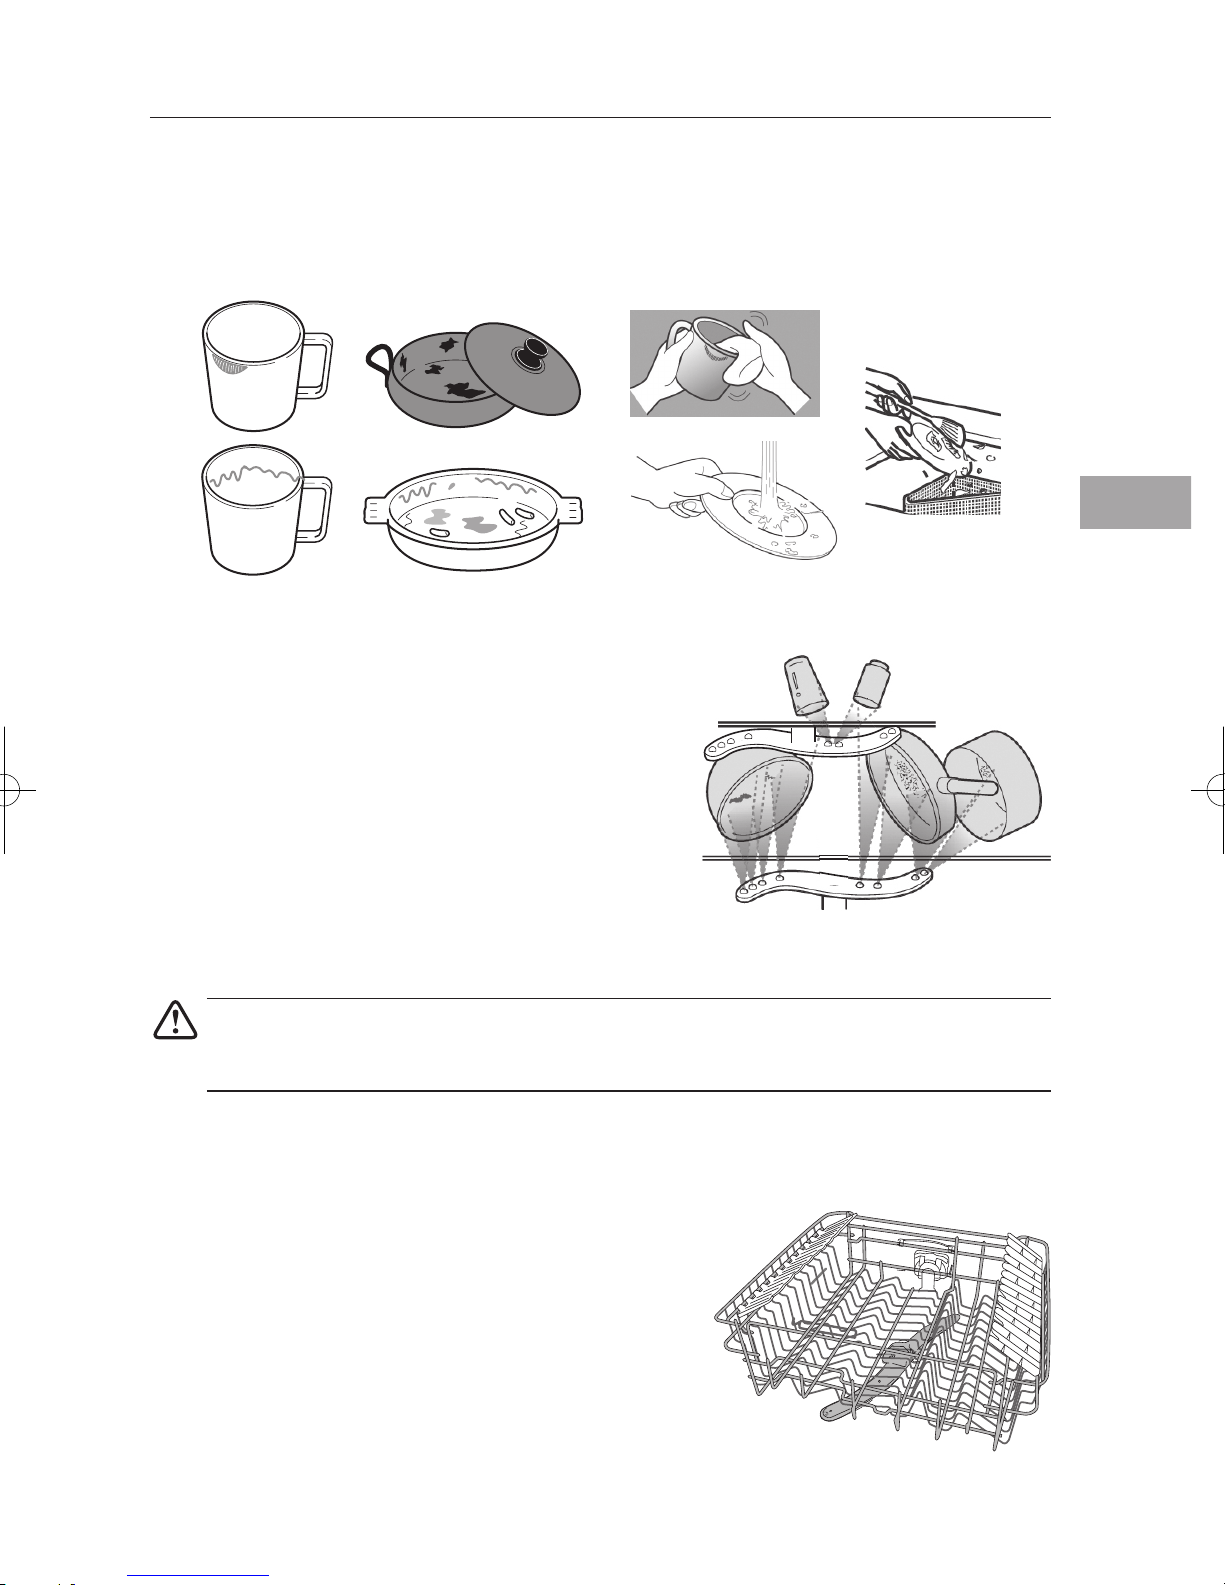
Items Not Suitable for Use in the Dishwasher
The following items are not suitable
Crystal glasses
Towels and sponges
Silverware
Valuable vases
Cracked / chipped china
Small plastic items
(Milk bottle nipple)
Plastic items that are
not dishwasher safe
Cast iron pans
Scratched non-stick cookware
Copper pots and pans
When purchasing new crockery and cutlery, please make sure they are dishwasher-proof. Some items are
not suitable for dishwashers.
• Wooden cutlery and crockery or items with wooden parts may discolour and fade. The glue used in
these items is not dishwasher proof and wooden handles may come loose after being washed in a
dishwasher.
• Craft items, antiques, valuable vases and decorative glassware are also not suitable for dishwashers.
• Plastic items (e.g. tupperware) which are not heat resistant may melt or loose shape due to the high
temperature in the dishwasher.
• Copper, brass, tin and aluminium items may discolour or become matt.
• Clouding may occur on glasses and delicate glassware after frequent washing. Do not wash delicate
glassware, or glassware containing lead crystal in a dishwasher. Wash delicate glassware by hand
instead.
• Silver and aluminium parts have a tendency to discolour during washing. Residues like egg white,
egg yolk and mustard often cause discolouring and staining on silver. Therefore, please clean the
residues from silver immediately after use.
14
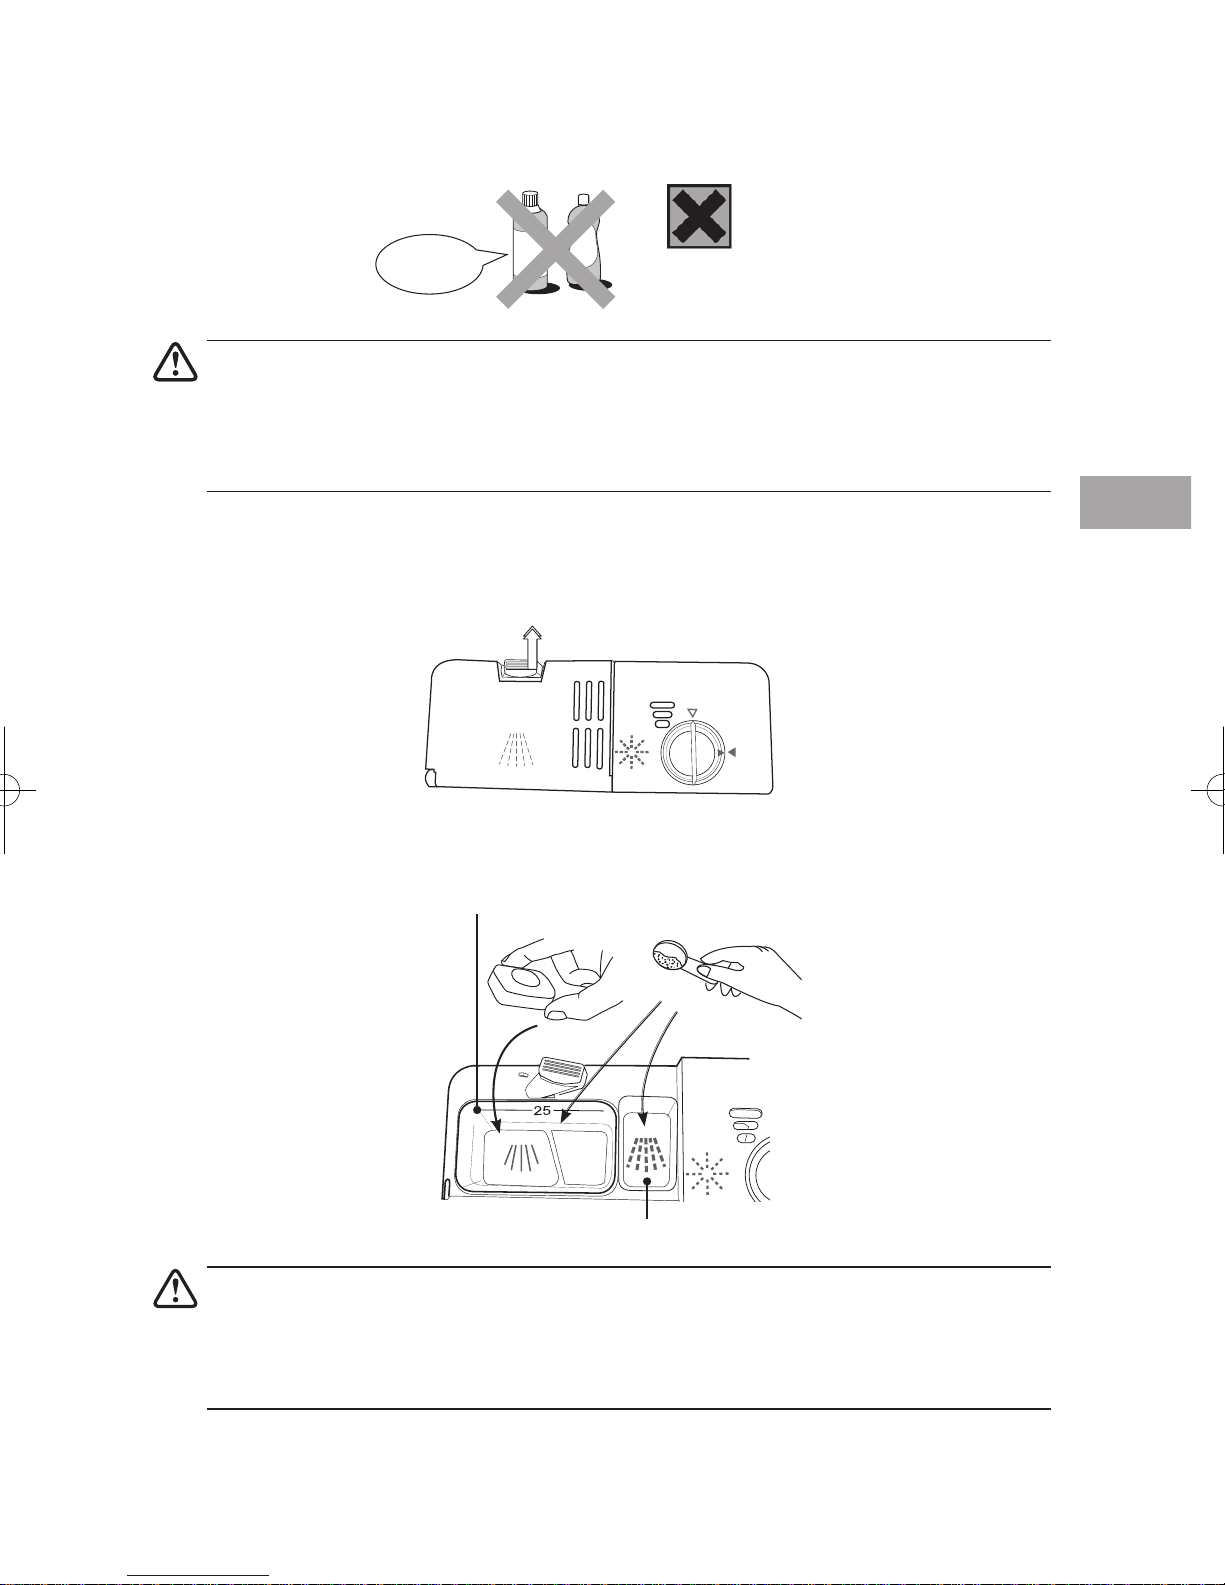
Adding the Detergent or Detergent Tablet
Only use detergents specifically designed for use in dishwashers. To be more environmentally friendly,
please use no more than the correct amount of detergent.
Irritant
Bleach and
Countertop detergent
Keep out of the reach of children
• Irritating to eyes.
• Avoid contact with eyes. In case of contact with eyes, rinse immediately with plenty of water and
seek medical advice.
• If swallowed, seek medical advice immediately..
Please follow the steps below to fill the detergent dispenser.
1. Push the button on the lid of the detergent dispenser in the direction of the arrow until the flap springs
open.
Push up from the right side
GB
2. Fill the detergent dispenser with detergent powder or insert the detergent tablet. The marking
indicates the filling level.
Main wash detergent chamber
or
Pre-wash detergent chamber
You can choose to add a detergent tablet alone or to add detergent powder to both the main
wash detergent chamber and the pre-wash detergent chamber for your selected wash cycle.
All programmes with pre-wash need an additional detergent dosage that must be placed in the
pre-wash detergent chamber. (Please refer to the wash cycle table) This detergent will take effect
during the pre-wash phase.
3. Close the lid firmly so that it clicks into place.
15
GB
1/2
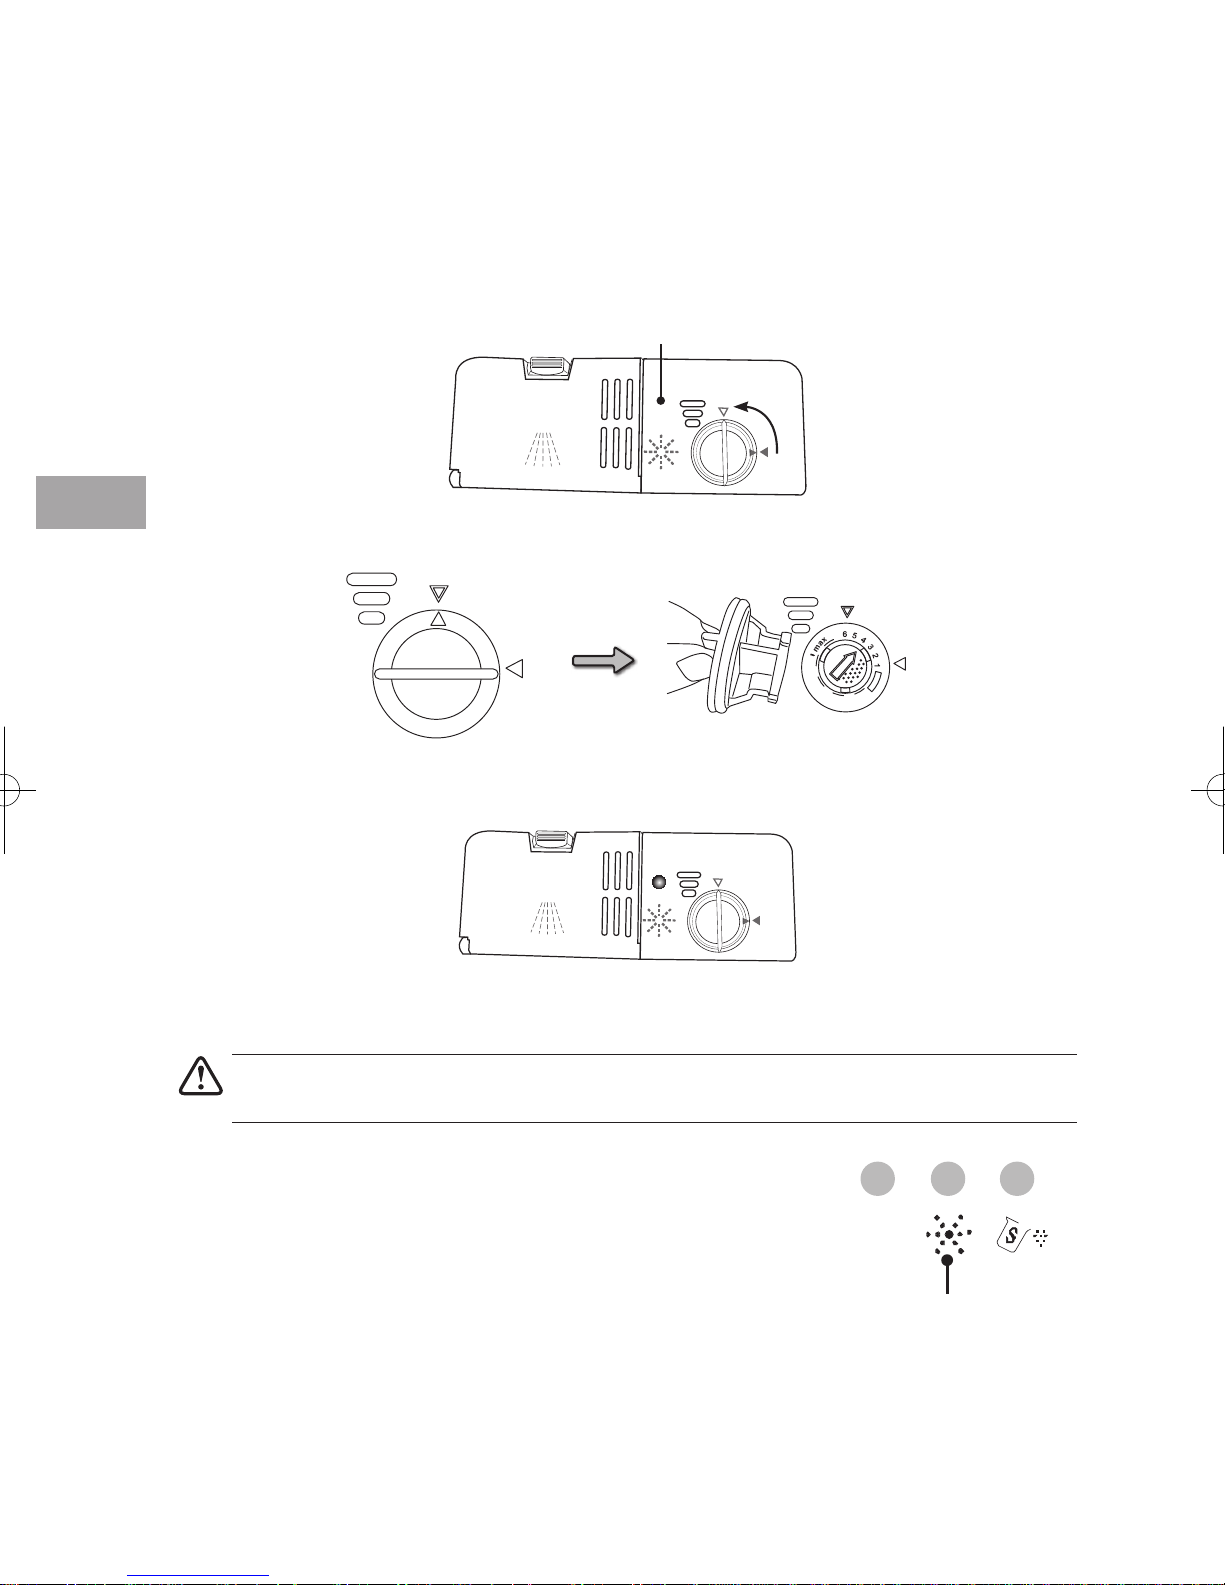
Adding of Rinse Aid
Rinse aid helps to ensure water does not cling and leave marks on crockery during the drying phase and
helps crockery dry faster after it has been washed. Only pour rinse aid that is for domestic dishwashers into
the reservoir. This model is designed to use liquid rinse aids only.
Please follow the steps below to pour the rinse aid into the storage reservoir, and the amount will dispense
automatically.
1. Turn the cap and open as indicated.
Rinse aid indicator
Open
2. When the cap open marking is aligned, you may lift the cap up.
3. Pour the rinse aid in until the level indicator turns completely black in colour and close the cap.
4. Be careful not to overfill the reservoir. Wipe up any spills. The approximate volume of the rinse aid
reservoir is 110ml.
If the water hardness in your area is soft, you may not need rinse aid as it may cause white film to
develop on your dishes.
Rinse aid warning light will illuminate when the reservoir is running out of
rinse aid and requires refilling.
Alternatively, you can judge the amount of rinse aid by checking the rinse
aid indicator right next to the reservoir’s cap. When the indicator is black, it
means it is full. When it is clear, it means it is almost empty.
Rinse Aid Warning Light
16
Adjusting Rinse Aid Reservoir
1/2
The rinse aid reservoir has six settings. Both the recommended setting
and the factory setting is “4.” If the dishes are not drying properly or are
spotted, adjust the dial to the next higher number until your dishes are
spot-free.
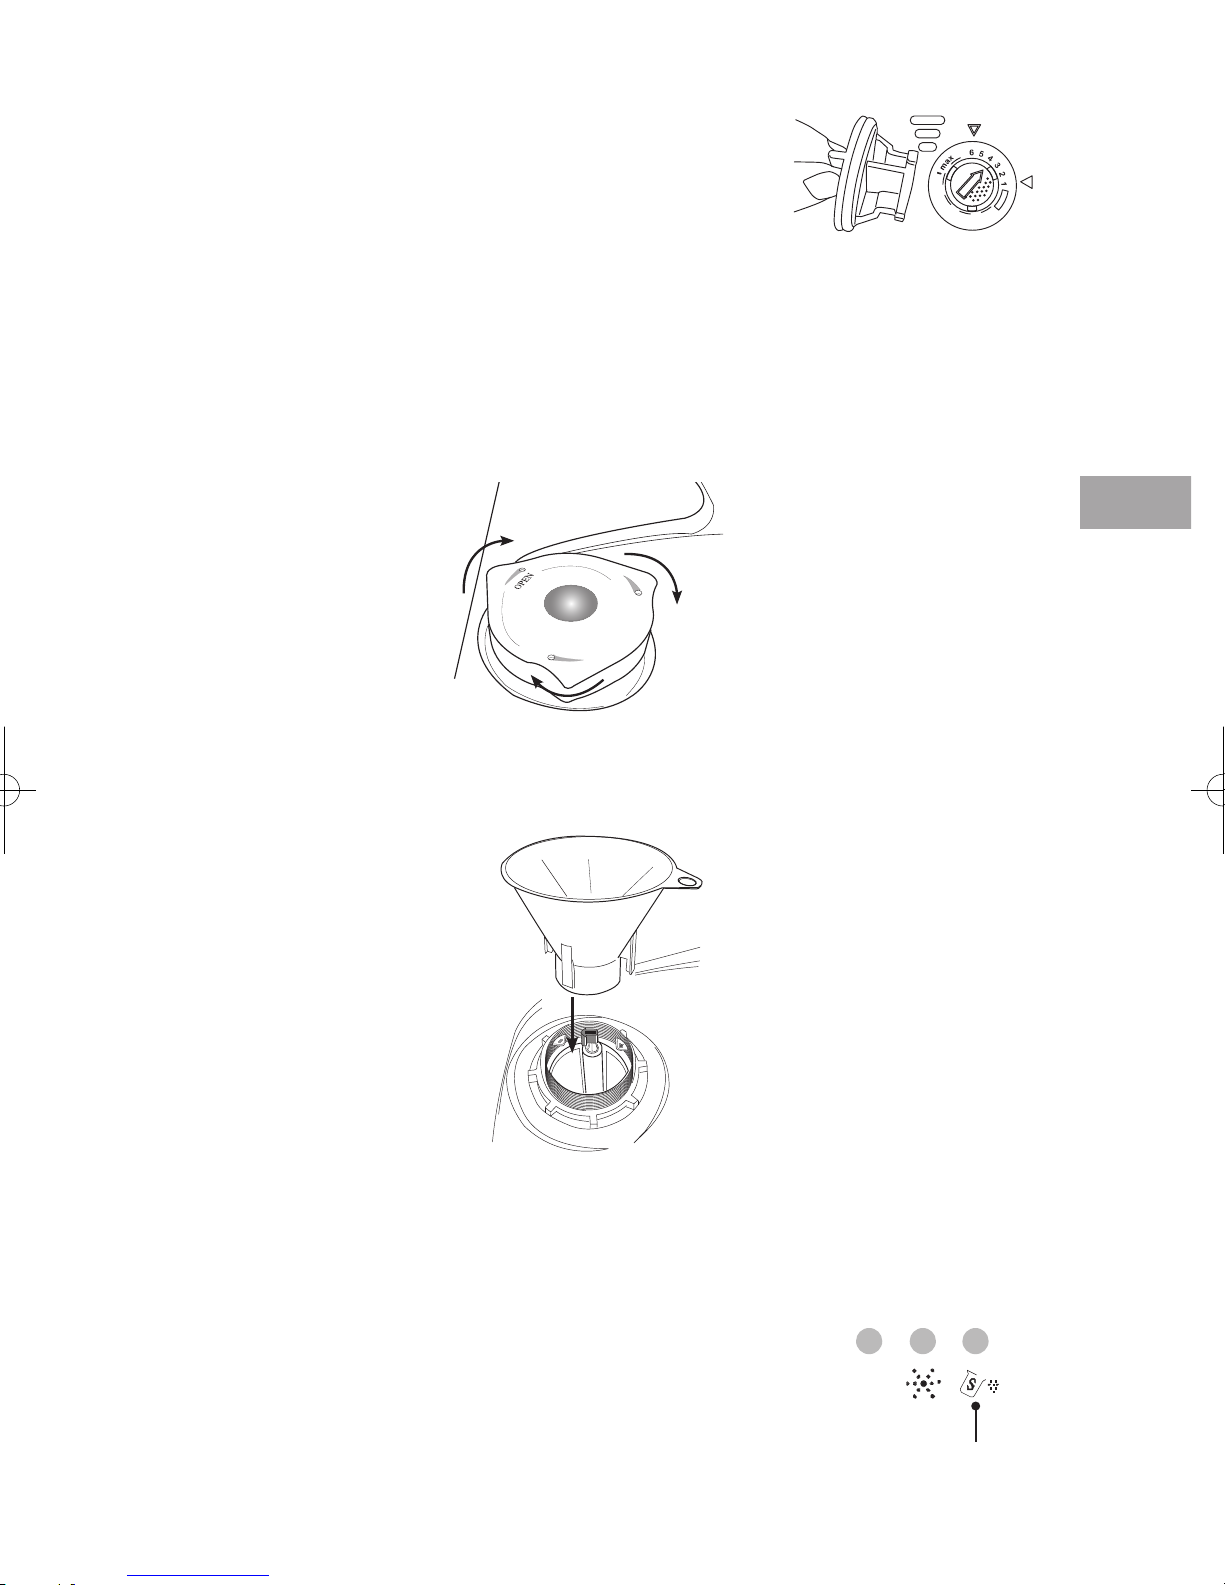
Adding Salt
If the water in your area is hard, deposits will form on your dishes and utensils. As such, this appliance
contains a salt reservoir for you to reduce the hardness of the water.
Please follow the steps below to pour the salt into the salt reservoir and it must be set to correspond to the
water hardness level in your area.
1. Remove the lower basket and unscrew the reservoir cap.
GB
Open
OPEN
Open
2. Fill the reservoir with approximately 500ml of water (first use only).
3. Place the funnel provided over the salt reservoir.
Open
4. Pour in approximately 1.2kg of dishwasher salt depending on the brand used.
5. Clean any excess salt from around the reservoir opening and then screw the cap on again firmly.
6. Run the “rapid” wash programme immediately (without any crockery in the dishwasher) to remove any
traces of salt from the compartment.
The salt warning light will illuminate when the reservoir is running out of salt
and requires re-filling. The salt warning light will cease to illuminate within a
few days depending on how quickly the salt dissolves.
Salt Warning Light
17
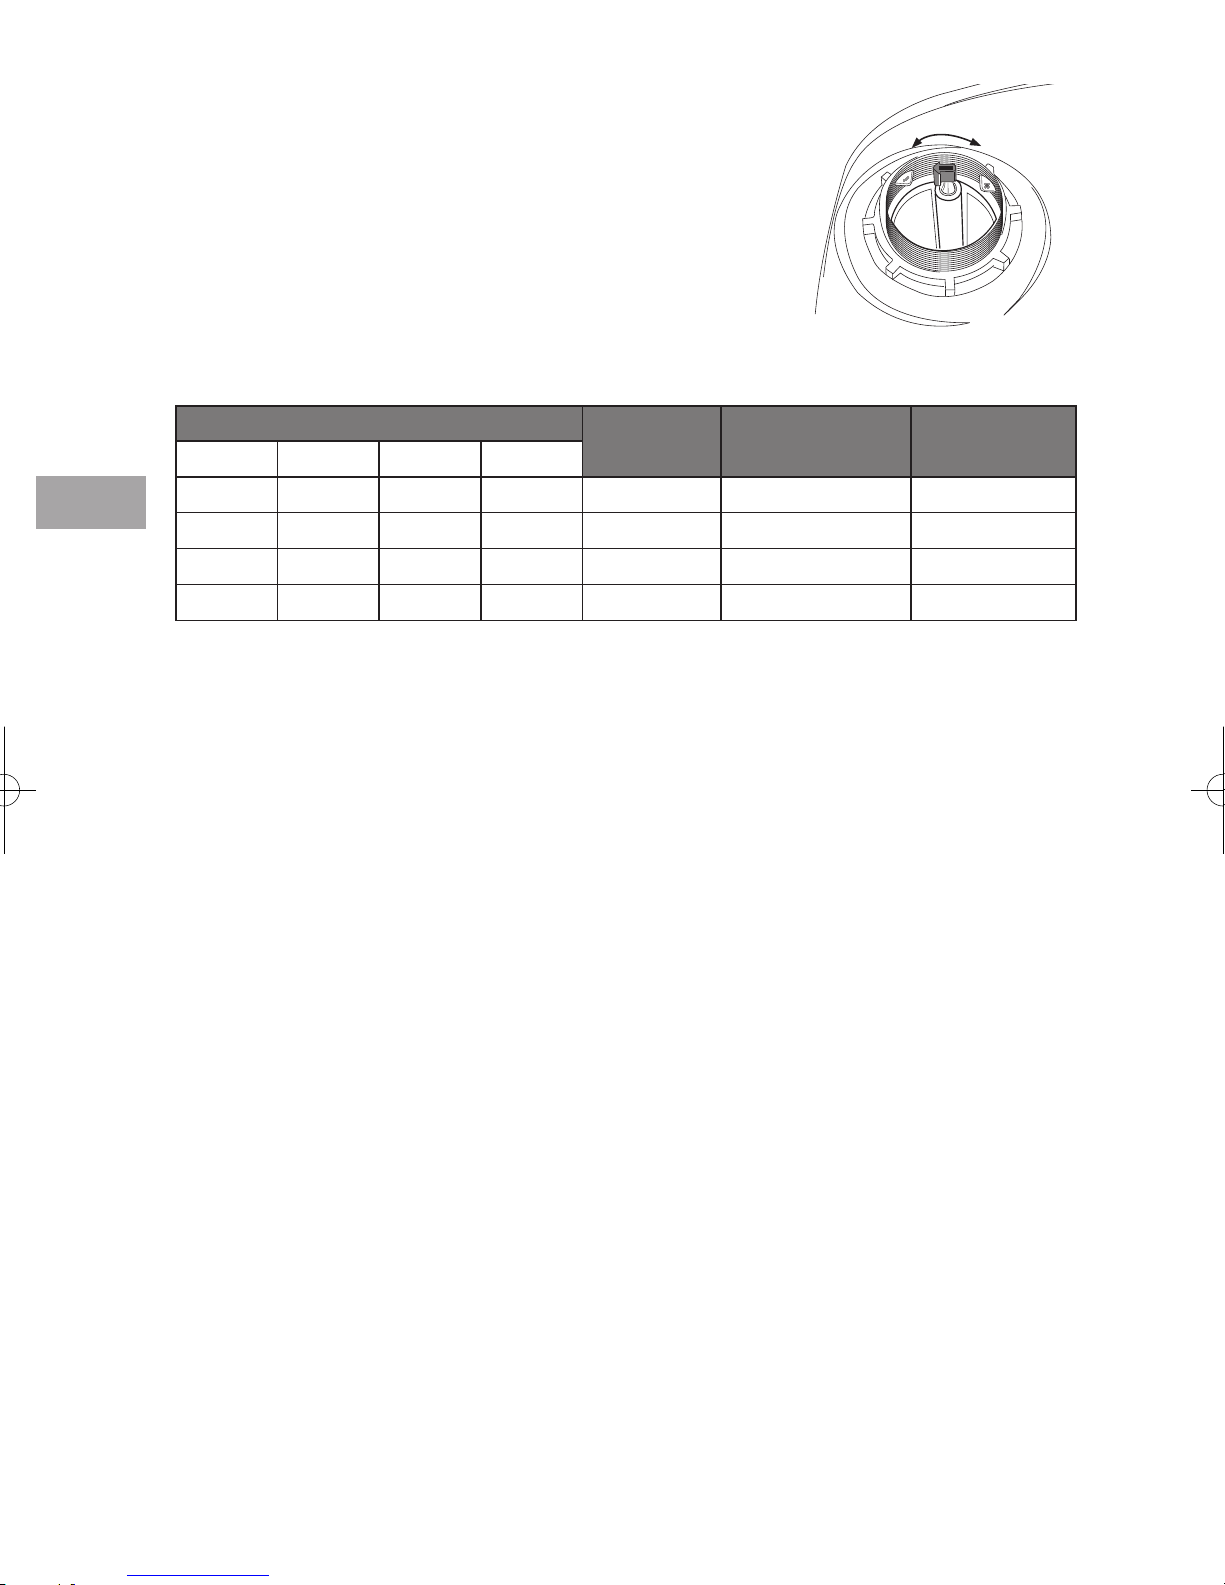
Adjusting Salt Consumption
To optimise and customise the level of salt consumption, please
follow the steps below to adjust the salt consumption.
1. Remove the lower basket and unscrew the reservoir cap.
2. There is an arrow-shaped indicator in the reservoir, which allows
you to turn. You may turn it to the “-” or “+” settings based on the
water hardness in your area.
It is recommended that adjustments should be made in accordance with the following chart.
Turn
GB
WATER HARDNESS
˚dh ˚fh ˚Clark mmol/l
0-8 0-14 0-10 0-1.4 / 0 /
8-22 14-39 10-28 1.4-3.9 - 20 60
22-45 39-80 28-56 3.9-8 Mid 40 30
>45 >80 >56 >8 + 60 20
1 ˚dh (German degree) = 1.25mmol/l 1 ˚fh (French degree) = 0.178mmol/l 1 ˚Clark (British degree) = 1.78mmol/l
Selector
Position
Salt Consumption
(gram/cycle)
Auto nomy
(cycle/1.2 kgs)
18
Loading the Dishwasher
Before Loading the Dishwasher
In general, please observe the following notes before loading your cutlery and crockery in the
basket.
• Remove lipstick stains and any food residues from crockery and dishes. Rinse if necessary.
• Dishes and cutlery must not lay inside one another, or cover each other.
• Load your cutlery and crockery so that water can access
all surfaces.
• Ensure all items are securely positioned.
• Hollow items such as cups, glasses, pans, etc. must be
placed upside down in the basket.
• Wide based items should be placed at an angle so that
water can run off them freely.
• The spray arms must not be blocked by items which are
too tall or hang through the baskets. If in doubt, test for
free movement by manually rotating the spray arms.
• Ensure that small items cannot fall through the holders in
the baskets.
GB
Do not wash items soiled with ash, sand, wax, lubricating grease or paint in the dishwasher. Ash
does not dissolve and can distribute in the dishwasher. Wax, sand, lubricating grease and paint
can cause damage to the dishwasher.
For safety reasons, do not operate the dishwasher without the upper and lower baskets in place.
Upper Basket
Please use the upper basket for small and lightweight items
such as cups, saucers, glasses, dessert bowls, etc. Shallow
pans or casserole dishes can also be placed in the upper
basket.
19
GB
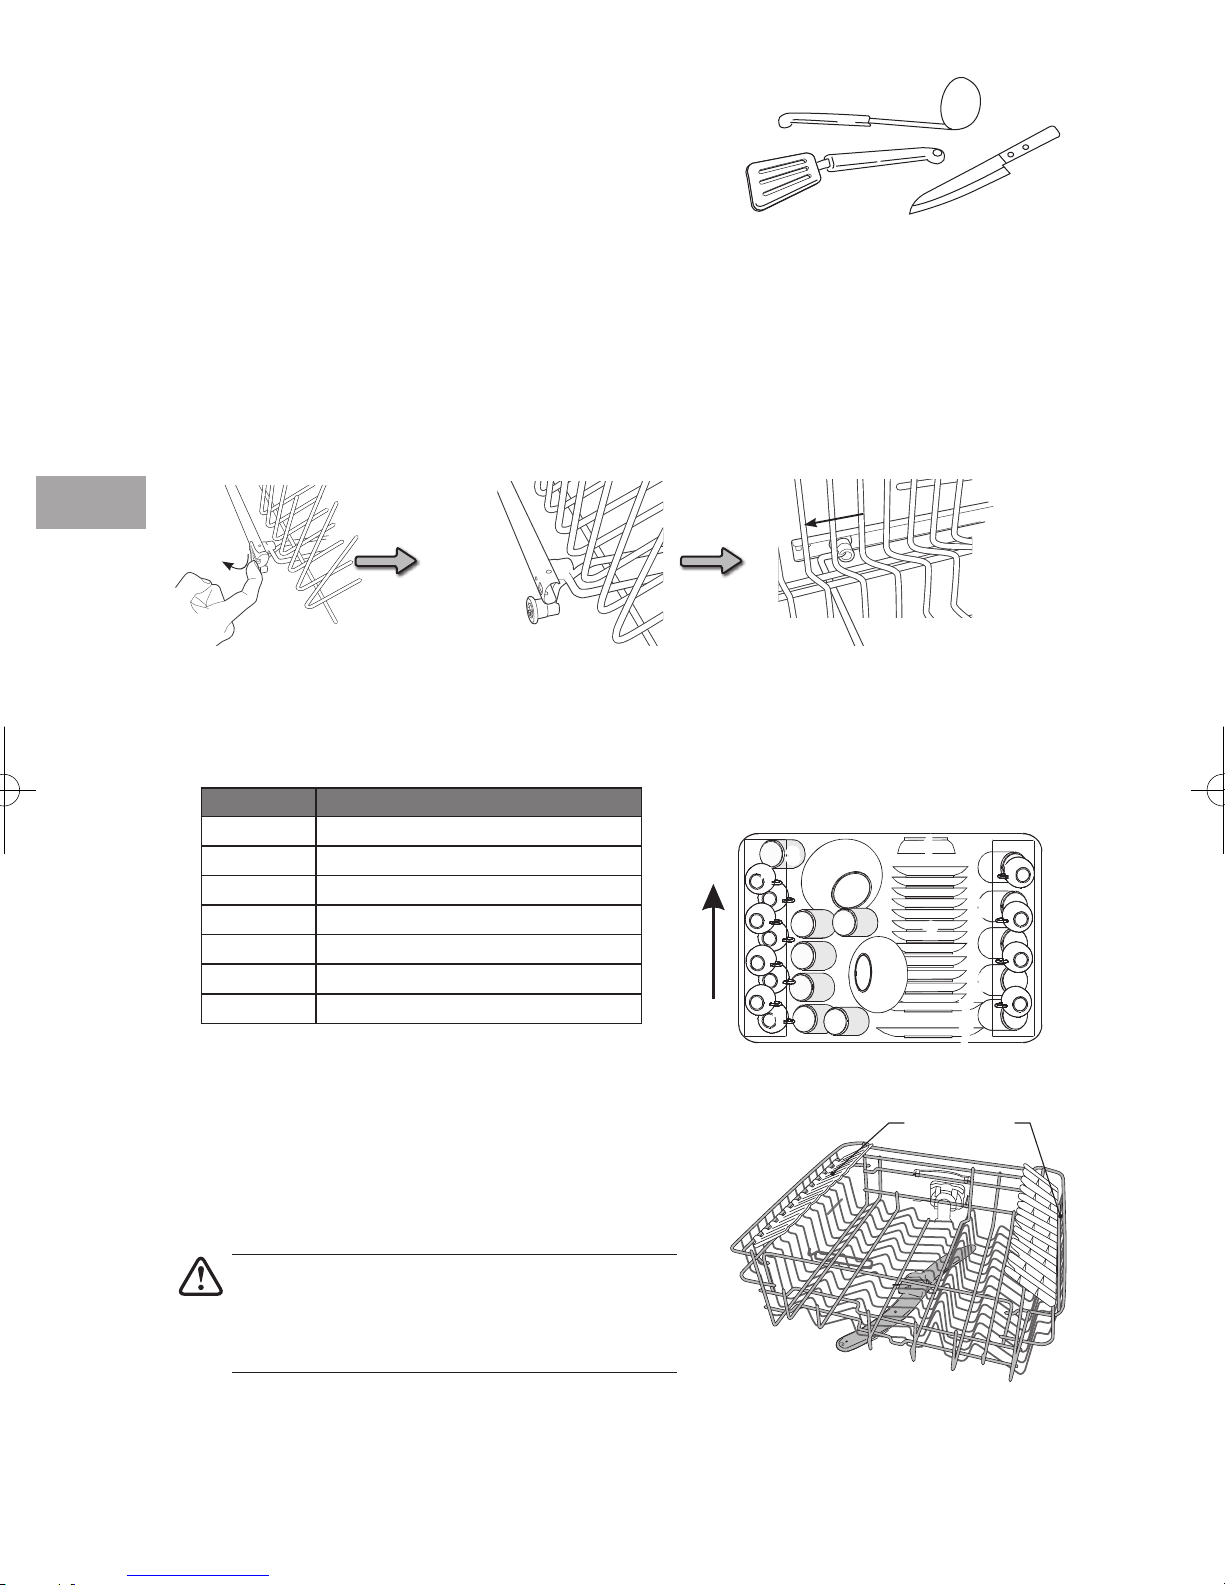
Long items such as soup ladles, mixing spoons and long knives
should be placed lying down across the front of the upper
basket.
Adjusting the Upper Basket
More space can be created for large items on the upper or lower baskets by adjusting the height of the
upper basket.
Ensure that the rail stop is placed back properly after the height adjustment.
Lift
Remove
the stop
slide the basket
out from the rail
Loading the Upper Basket for 12 Place Settings
For loading the upper basket, please refer to the table below.
Number Item
1 Cups
2 Saucers
3 Glasses
4 Small serving bowl
5 Medium serving bowl
6 Large serving bowl
7 Dessert dishes
IN
Hinged Cup Rack
To make room for taller items in the upper basket,
raise the cup rack upwards. You can then lean the
tall glasses against it. You can also remove it when
it is not required for use.
To prevent water dripping from the upper
basket onto the dishes in the lower basket, we
recommend that you empty the lower basket first
and then the upper basket.
4
3
3
6
11
6
3
3
3
3
1
1
3
3
3
3
4
5
5
Raise upwards
1
1
3
3
22
3
3
7
7
7
7
20

Lower Basket
We recommend that large and the most difficult to clean
items are placed in the lower basket, such as plates, serving
platters, saucepans, serving bowls, pots, pans, lids etc. We
recommend placing serving dishes and lids at the side of the
basket to avoid blocking the rotation of the spray arms.
Hinged Spikes
The spikes are used for holding plates and a platter. They can be lowered to make more room for large
items.
Please refer to figure below for the steps to lower the spikes.
Raise upwards Fold backwards
Loading the Lower Basket
For loading the lower basket, please refer to the table below.
Number Item
7 Dessert dishes
8 Dinner plates
9 Soup plates
10 Cutlery basket
11 Oval platter
IN
GB
8
1111
8
7
7
10
10
99
77
7
21
GB
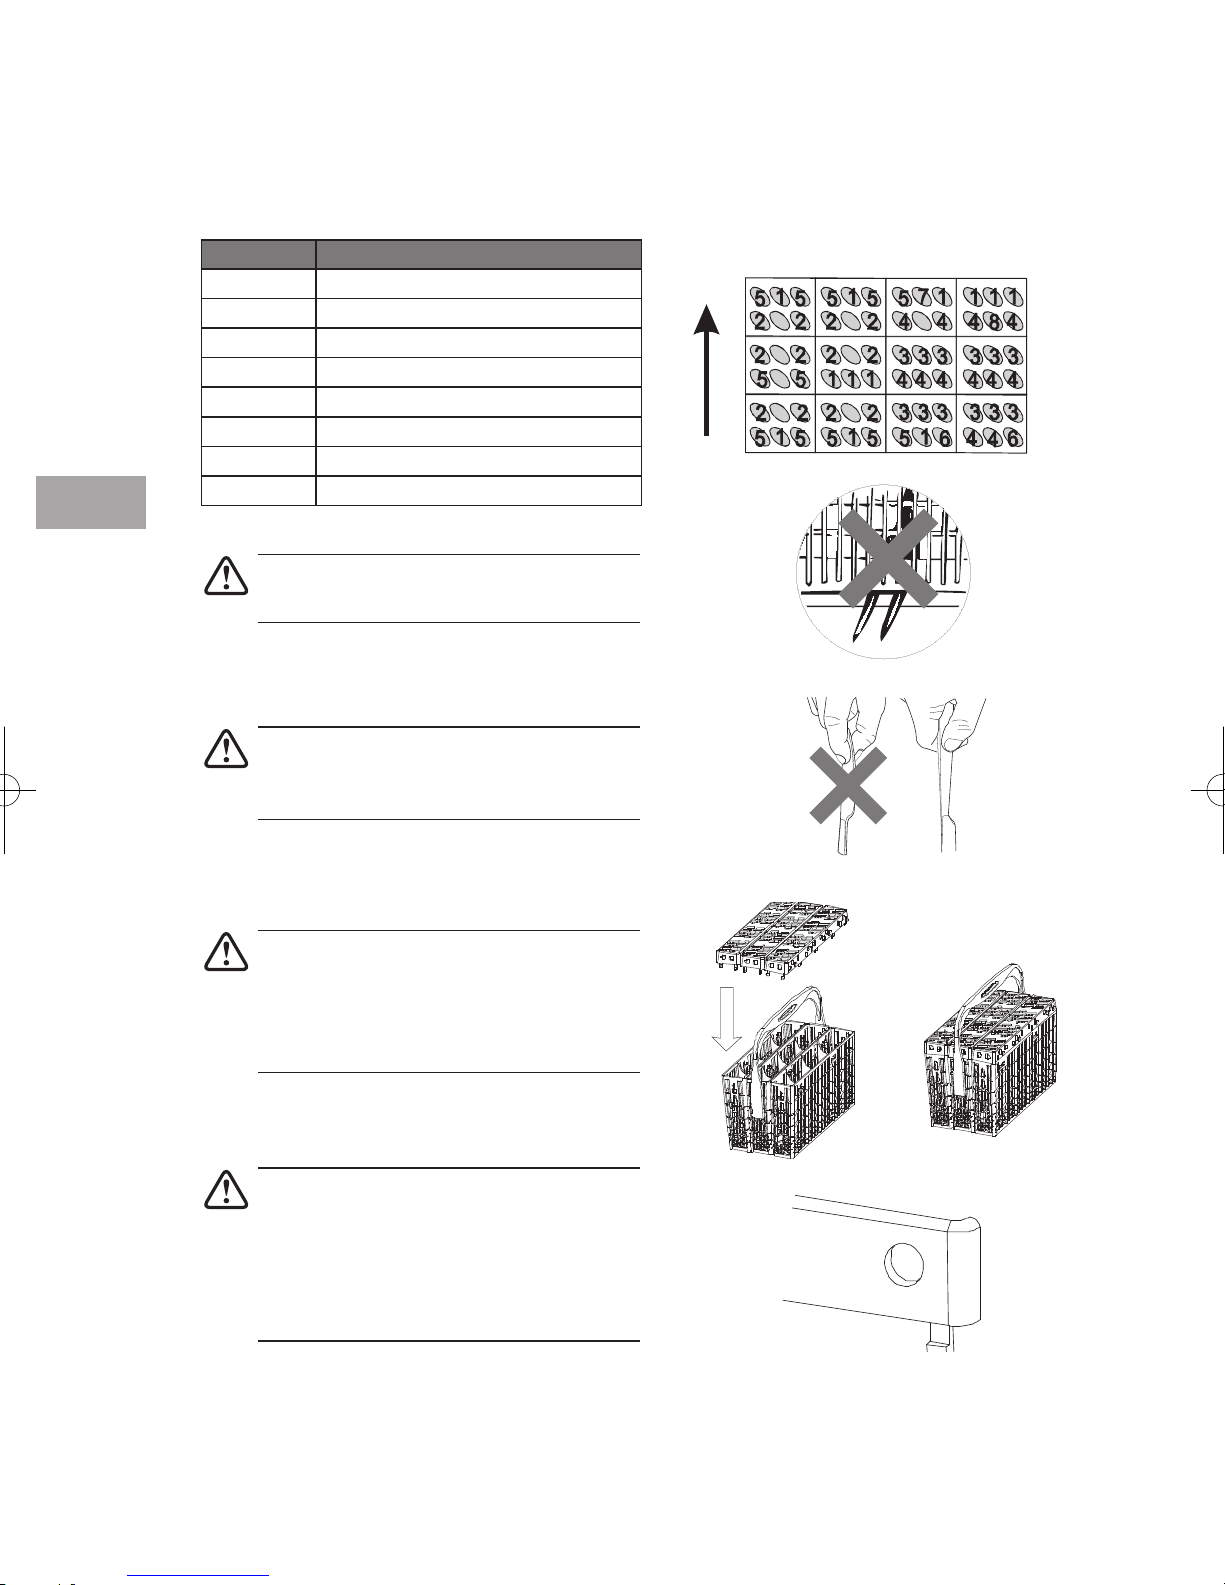
Cutlery Basket
Loading the Cutlery Basket
To make unloading much easier, cutlery should be grouped in zones and placed in the cutlery basket.
Please refer to the table below for placement method.
Number Item
1 Forks
2 Soup spoons
3 Dessert spoons
4 Teaspoons
5 Knives
6 Serving spoons
7 Gravy ladle
8 Serving fork
• Do not let any items extend through the
bottom of baskets.
IN
• To avoid the risk of injury, please load your
knives and forks with handles upwards.
Do not hold them by their sharp edges.
• The cutlery basket comes with covers,
and they are designed for you to load
the cutlery into appropriate slots. If you
use the basket without the cover, it may
reduce the washing results of your cutlery.
• Please ensure the cover is securely locked
to the basket before operation.
• To comply with Standards of Performance,
i.e. EN50242, please ensure all the
cutlery must be loaded according to the
instruction in this manual.
22
Starting a Wash Cycle
Please follow the steps below to start a wash cycle.
1. Ensure the unit is connected to the mains power and the water supply is on (water pressure between
0.04MPa and 1.00MPa).
2. Open the door. Pull out the lower and upper baskets, load the dishes and push the baskets back. It is
recommended that the lower basket is loaded first, and then the upper basket.
3. Pour in the detergent or place the detergent tablet in the detergent compartment and close firmly
afterwards.
4. Press the ON/OFF button.
5. Select the wash cycle programme based on the loading and soil requirements. Please refer to the
“Wash Cycle Table”.
6. The indicator light of the selected programme will illuminate.
7. Close the dishwasher door. A click sound should be heard when the door is closed correctly. Do not
slam the door.
8. The washing cycle will begin shortly.
If you open the dishwasher door during the washing cycle and then close it, the dishwasher will
continue the current washing programme after 10 seconds. However, if the door is not closed
correctly after 1 minute, the dishwasher will make an audible sound at 1 minute intervals.
GB
Changing a Programme
To change the programme if the washing cycle has already started, follow the steps below.
1. Open the door slightly to check if the unit has dispensed the detergent or detergent tablet. This will
depend on how long the washing cycle was running for.
2. If the detergent dispenser lid is opened, we suggest that you allow the wash cycle to finish.
3. If the detergent dispenser lid is still closed, press and hold down the programme button for 3 seconds
to cancel the programme. You can then press the required new programme button and close the
dishwasher door. The unit will start the new washing cycle shortly.
4. The display window shows the state of the dishwasher.
a. “-:--” means the unit is on stand by mode.
b. “H:MM” and not ashing means the unit is on pause.
c. “H:MM” and ashing means the unit is running.
At the End of a Programme
At the end of a programme, the dishwasher will make an audible sound.
The condensation strip helps to prevent the risk of steam damage to the worktop edging above
the dishwasher, it is advisable to leave the door closed until you are ready to unload the crockery.
However, you can also open the dishwasher door fully and wait until the dishes and crockery are
cool enough to unload. Do not leave the door only partially open.
Switching O the Unit
For energy saving, remember to switch the dishwasher off using the ON/OFF button. The dishwasher will
continue to use electricity until it is switched off with the ON/OFF button.
If the dishwasher is not going to be used for a long period of time, e.g. whilst on holiday, disconnect the
unit from the mains supply.
23

GB
Unloading the Dishwasher
Allowing dishes to cool down before unloading is important as dishes tend to break and chip more easily
when they are hot. Therefore, if you open the dishwasher door fully after switching off, it will allow the
dishes to cool down much faster.
We suggest:
Unload the lower basket first, followed by the cutlery basket and then the upper basket.
This will prevent water drops from the upper basket from falling onto the dishes in the lower basket.
Delay Start
The starting time of a washing programme can be delayed and adjusted.
Please follow the steps below.
1. Open the dishwasher door and load your soiled dishes and crockery.
2. Press the ON/OFF button to turn on the dishwasher.
3. Select your preferred programme.
4. Press the “delay start” button.
5. Set the required delay start time using the “delay start” button.
Each press of this button increases the delay start time by 1 hour increments.
6. Close the door and the unit will start the programme at the assigned time automatically.
Half Load
In case you do not have enough dishes for a full load, the half load option can be selected for washing with
upper spray only. Load the dishes in the upper basket only. This will bring about a savings in hot water and
electricity. Please follow the steps below.
1. Open the dishwasher door and load your soiled dishes and crockery onto the upper basket.
2. Press the ON/OFF button to turn on the dishwasher.
3. Select your preferred programme.
4. Press the “1/2” button.
5. Close the door and the unit will start the programme with upper spray only.
24
Cleaning After Use
External Care
The Door and the Door Seal
• Clean the door seals regularly with a soft damp cloth to remove food deposits.
• When the dishwasher is being loaded, food and drink residues may drip onto the sides of the
dishwasher door. These surfaces are outside the wash cabinet and are not accessed by water from the
spray arms. Any deposits should be wiped off before the door is closed.
The Control Panel
• If cleaning is required, the control panel should be wiped with a soft damp cloth ONLY.
To avoid penetration of water into the door lock and electrical components, do not use a spray
cleaner of any kind.
Never use abrasive cleaners or scouring pads on the outer surfaces because they may scratch the
finish. Some paper towels may also scratch or leave marks on the surface.
Internal Care
GB
Filtering System
The filtering system in the base of the wash cabinet captures large particles of suds solution. Build up of
these particles may cause the filters to block. Check the condition of the filters regularly and clean them if
necessary under running water.
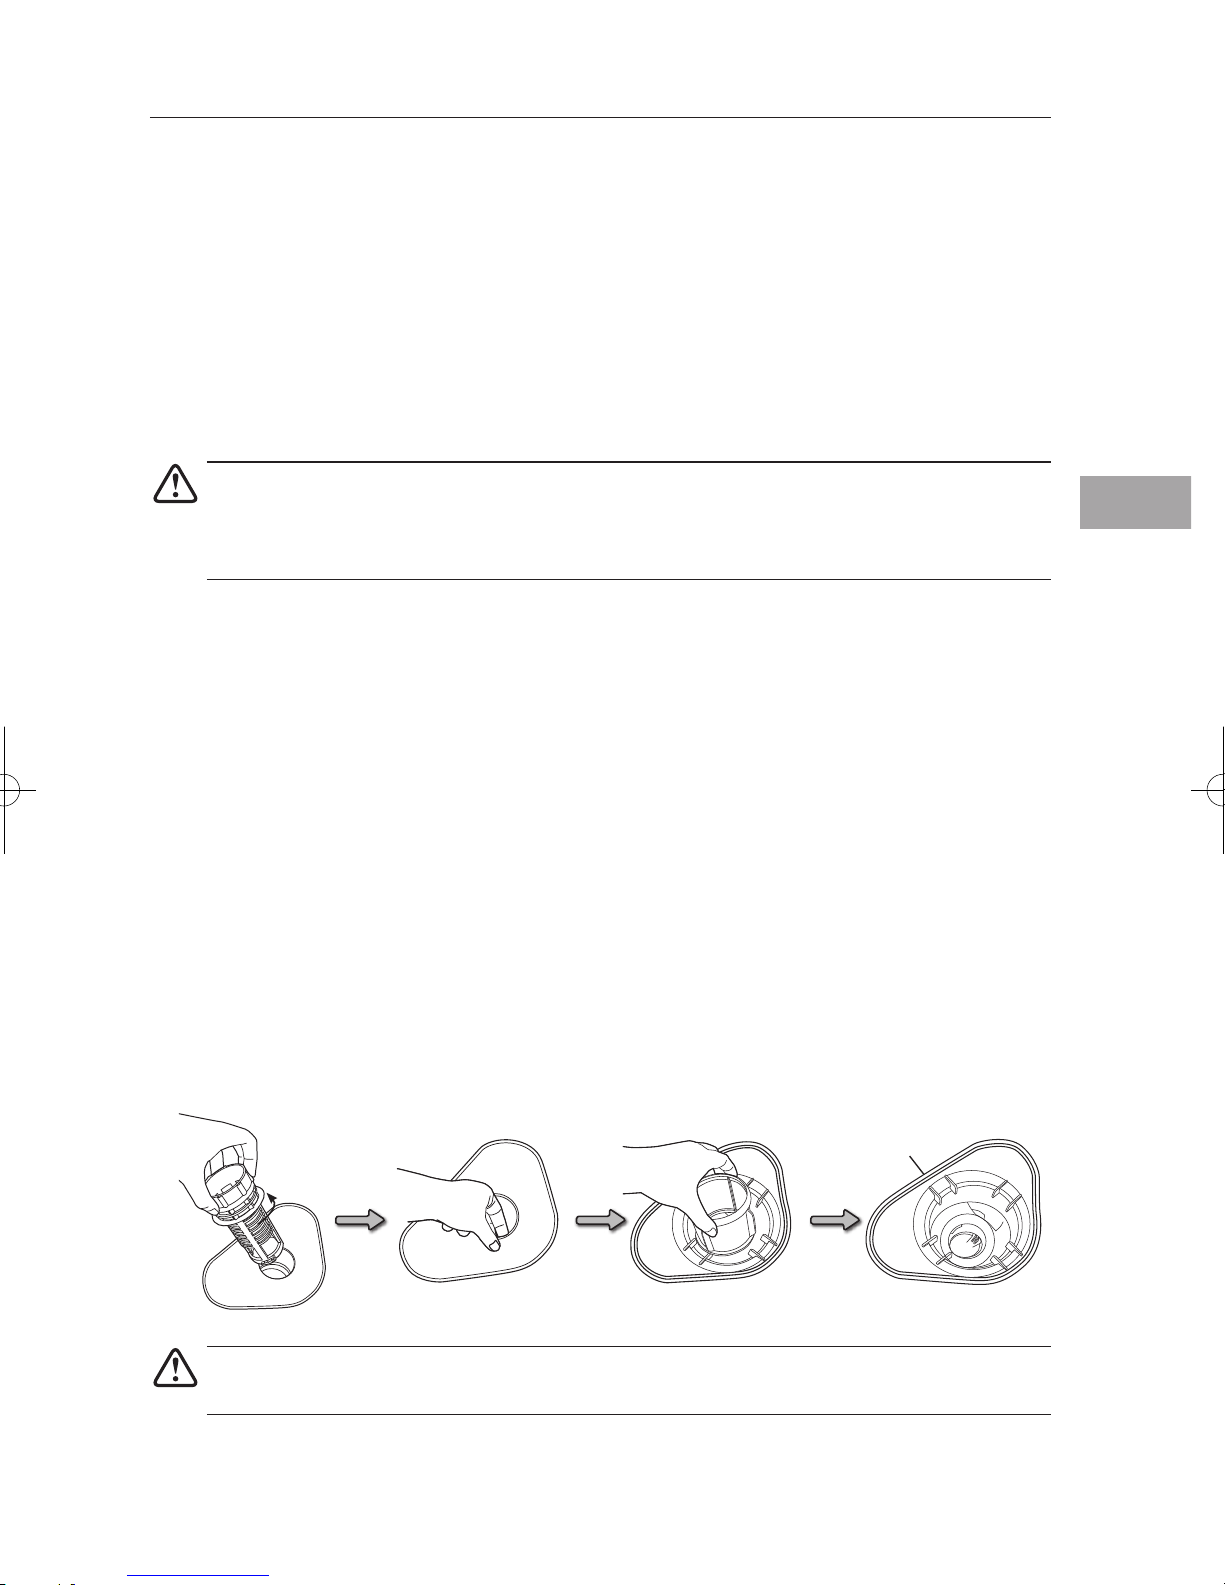
Follow the steps below to clean the filters in the wash cabinet.
• Ensure the dishwasher is switched off.
• Unscrew the coarse filter, and gently lift it out.
• Carefully lift the main filter out.
• Carefully lift the fine filter out with care.
• Rinse all the filters under running water, then refit all filters in the following order.
• Carefully refit the fine filter with care.
• Carefully refit the main filter.
• Gently unscrew the course filter in a clockwise direction.
Filter cylinder without
the lters
Do not over tighten the filters. Put the filters back in the filter cylinder in sequence securely.
Otherwise the residue could get into the system and cause a blockage.
NEVER use the dishwasher without filters in place. Improper replacement of the filter may reduce
the performance levels of the appliance and damage dishes and utensils.
25
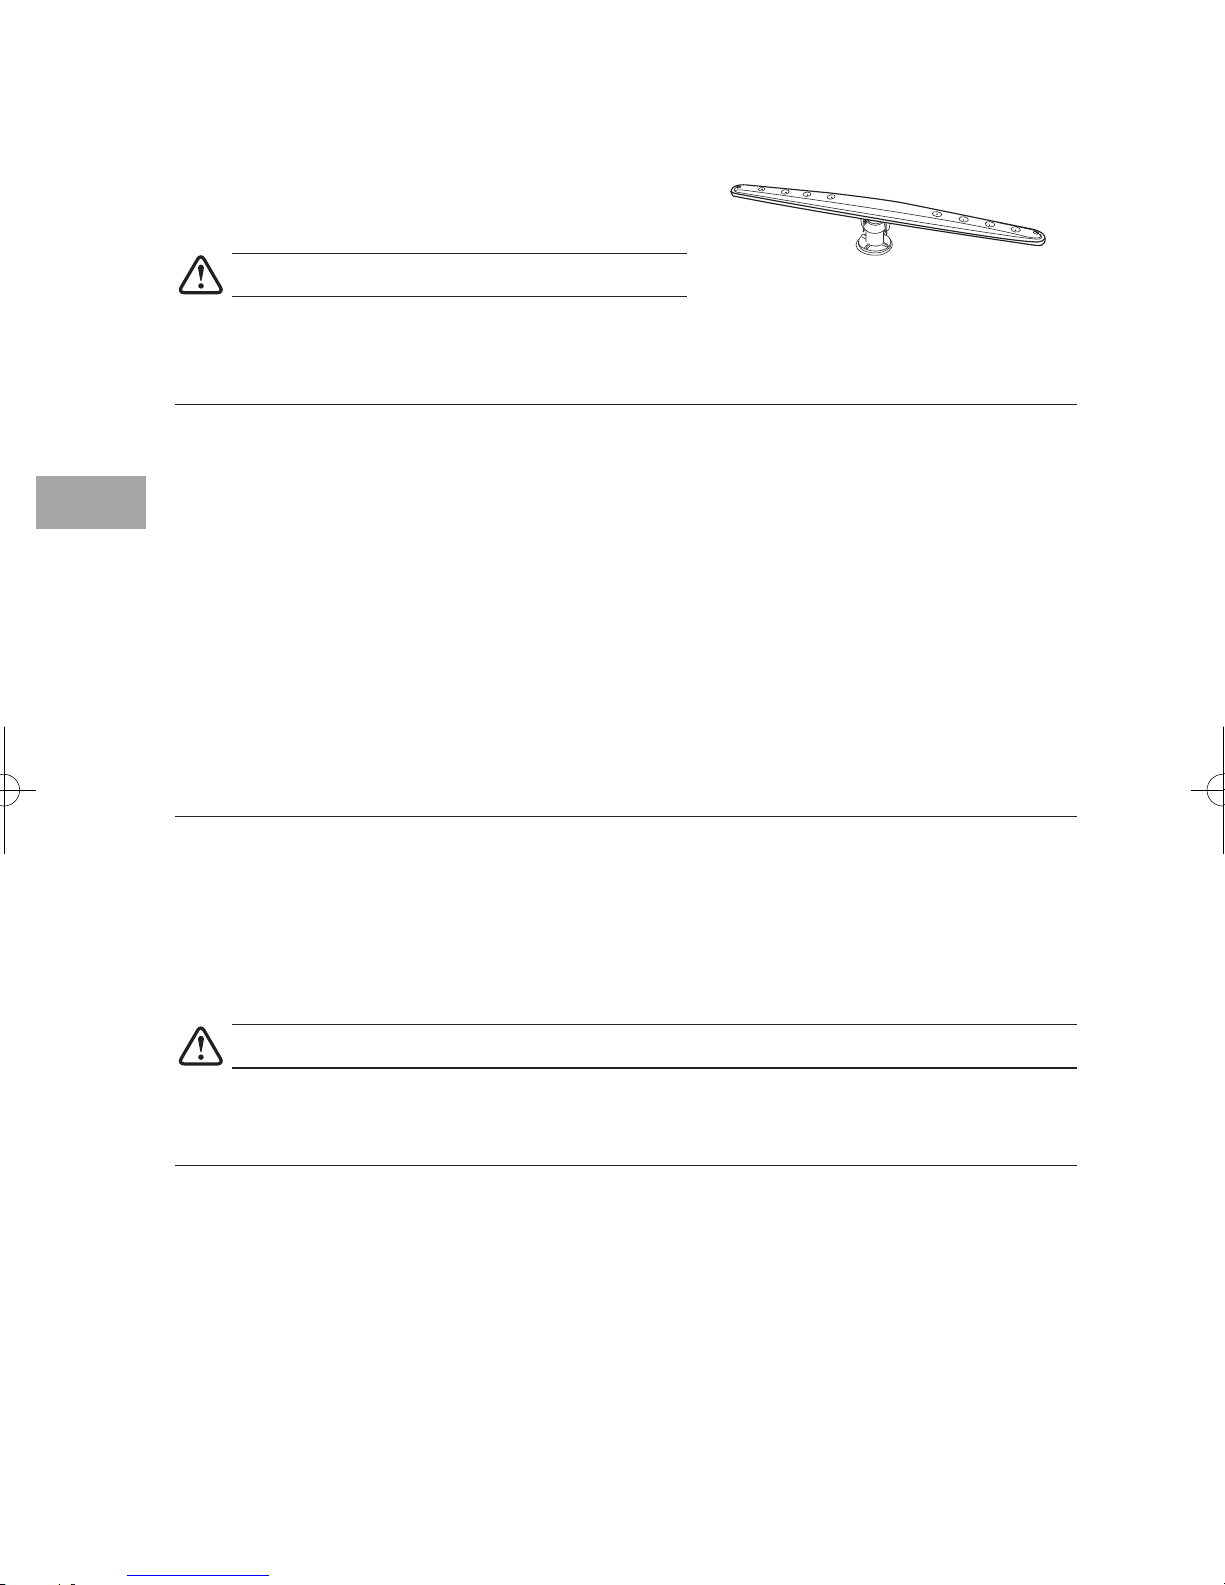
Spray Arms
Particles of food can get stuck in the spray arm jets and bearings. The spray arms should therefore be
checked and cleaned regularly.
• Use a pointed object, eg. a cocktail stick, to loosen food
particles in the spray arms’ jets.
Do not attempt to remove the spray arms.
Frost Precaution
Avoid placing the dishwasher in a location where the temperature is below 0˚C. If your appliance is left in
an unheated place over the winter, you are advised to:
GB
1. Disconnect the unit from the water inlet.
2. Turn on the unit. Select any washing cycle and let it runs for 1 minute only. This allows to drain out all
the excessive water that remains in the unit.
3. Disconnect from the mains.
4. Empty the dishwasher.
5. Close the dishwasher’s door.
6. Disconnect the unit from the water drain. Use a suitable receptacle to catch the water.
Should you encounter any difficulties with the above steps, please ask a service technician for assistance.
Moving the Dishwasher
If you have to move the unit, for instance due to moving house, you are advised to:
1. Disconnect the dishwasher from the mains.
2. Disconnect the unit from the water inlet and drain.
3. Remove the unit from the current location with the hoses discharged.
4. Pull the unit out together with the hoses.
Avoid over tilting the unit during transportation.
Maintenance After Prolonged Period of Non-Operation
If you are not going to use the unit for any prolonged period of time, you are advised to:
1. Disconnect the dishwasher from the mains.
2. Disconnect the unit from the water inlet and drain. Use a suitable receptacle to catch the water.
3. Open the door slightly to prevent unpleasant smells building up in the compartment.
4. Ensure the washing compartment of the dishwasher is clean.
26

Troubleshooting Guide
Repairs should only be carried out by a qualified technician in strict accordance with current local
and national safety regulations. Unauthorised or incorrect repairs could cause personal injury or
damage to the unit.
Fault Code
Codes Possible Causes Remedy
Water tap is not turned on. Turn on the water tap.
Low water pressure (<0.04MPa) Turn on the water tap and ensure it is in
E1
E4
Flow meter is broken.
The wire terminals which connect the flow
meter are loose.
The tank is leaking.
The hose is leaking.
The float switch is broken or PCB is faulty.
full position.
• Disconnect from the mains.
• Disconnect the water inlet.
• Call a qualified technician.
GB
Technical Problems
Technical problems
Problem Possible Causes Remedy
The door is not properly closed. Close the door firmly.
The dishwasher does not
start.
The drain pump is not
working properly.
General problems
Problem Possible Causes Remedy
Detergent residue is left in
the dispenser at the end of
the programme.
The detergent dispenser lid
cannot be closed properly.
Knocking noise in the wash
cabinet.
Smearing appears on
glassware and cutlery.
Dishes, cutlery and glasses
are not dry.
The unit is not connected to the
mains.
The unit is not switched on.
Fault code E4 - The anti-flooding
system has operated.
The detergent dispenser was still
damp when detergent was added.
Clogged detergent residue is
blocking the catch.
A spray arm is knocking against
an item in a basket.
The rinse aid dosage is set too
high.
The amount of rinse aid may
be insufficient, or the rinse aid
reservoir is almost empty.
Crockery was taken out of the
dishwasher too soon.
Connect the plug to the mains.
Press the “on/off “ button and select a
programme.
Make sure the dispenser is dry before
adding detergent.
Clean the catch.
Interrupt the programme, and
rearrange the items which are
obstructing the spray arm. See the
section “loading the dishwasher”
Adjust the dial of the rinse aid
dispenser to a lower setting.
Replenish the reservoir, adjust the
rinse aid dispenser dial to a higher
setting or change the brand of rinse
aid.
Leave the crockery in the dishwasher
until you hear the audible sound.
• Disconnect from the mains.
• Disconnect the water inlet.
• Call a qualified technician.
27

GB
General problems (continued)
Problem Possible Causes Remedy
Replenish the reservoir, adjust the
rinse aid dispenser dial to a higher
setting or change the brand of rinse
aid.
Fill the salt reservoir.
Ensure that it is screwed back on
correctly.
Change your detergent. Use a
dishwasher standard powder
detergent.
Select a higher salt consumption
setting.
Wash the non-dishwasher proof
glassware by hand.
Select a programme with a higher
wash temperature.
Change your detergent.
Pre-rinse or remove the stains with a
napkin prior to washing.
White residue is visible
on cutlery and crockery,
clouding occurs on
glassware; film can be
wiped off.
Glassware is dull and
discoloured; film cannot be
wiped off.
Tea or lipstick stains have
not been completely
removed.
Not enough rinse aid was used.
There is not enough salt in the salt
reservoir.
The salt reservoir cap has not
been screwed on correctly.
Unsuitable detergent has been
used.
The salt consumption setting is
too low.
The glassware is not dishwasher
proof. The surfaces are affected.
The wash temperature of the
selected programme was too low.
The bleaching effect of the
detergent used is too low.
Forgot to pre-rinse or remove
the stains with a napkin prior to
washing.
28
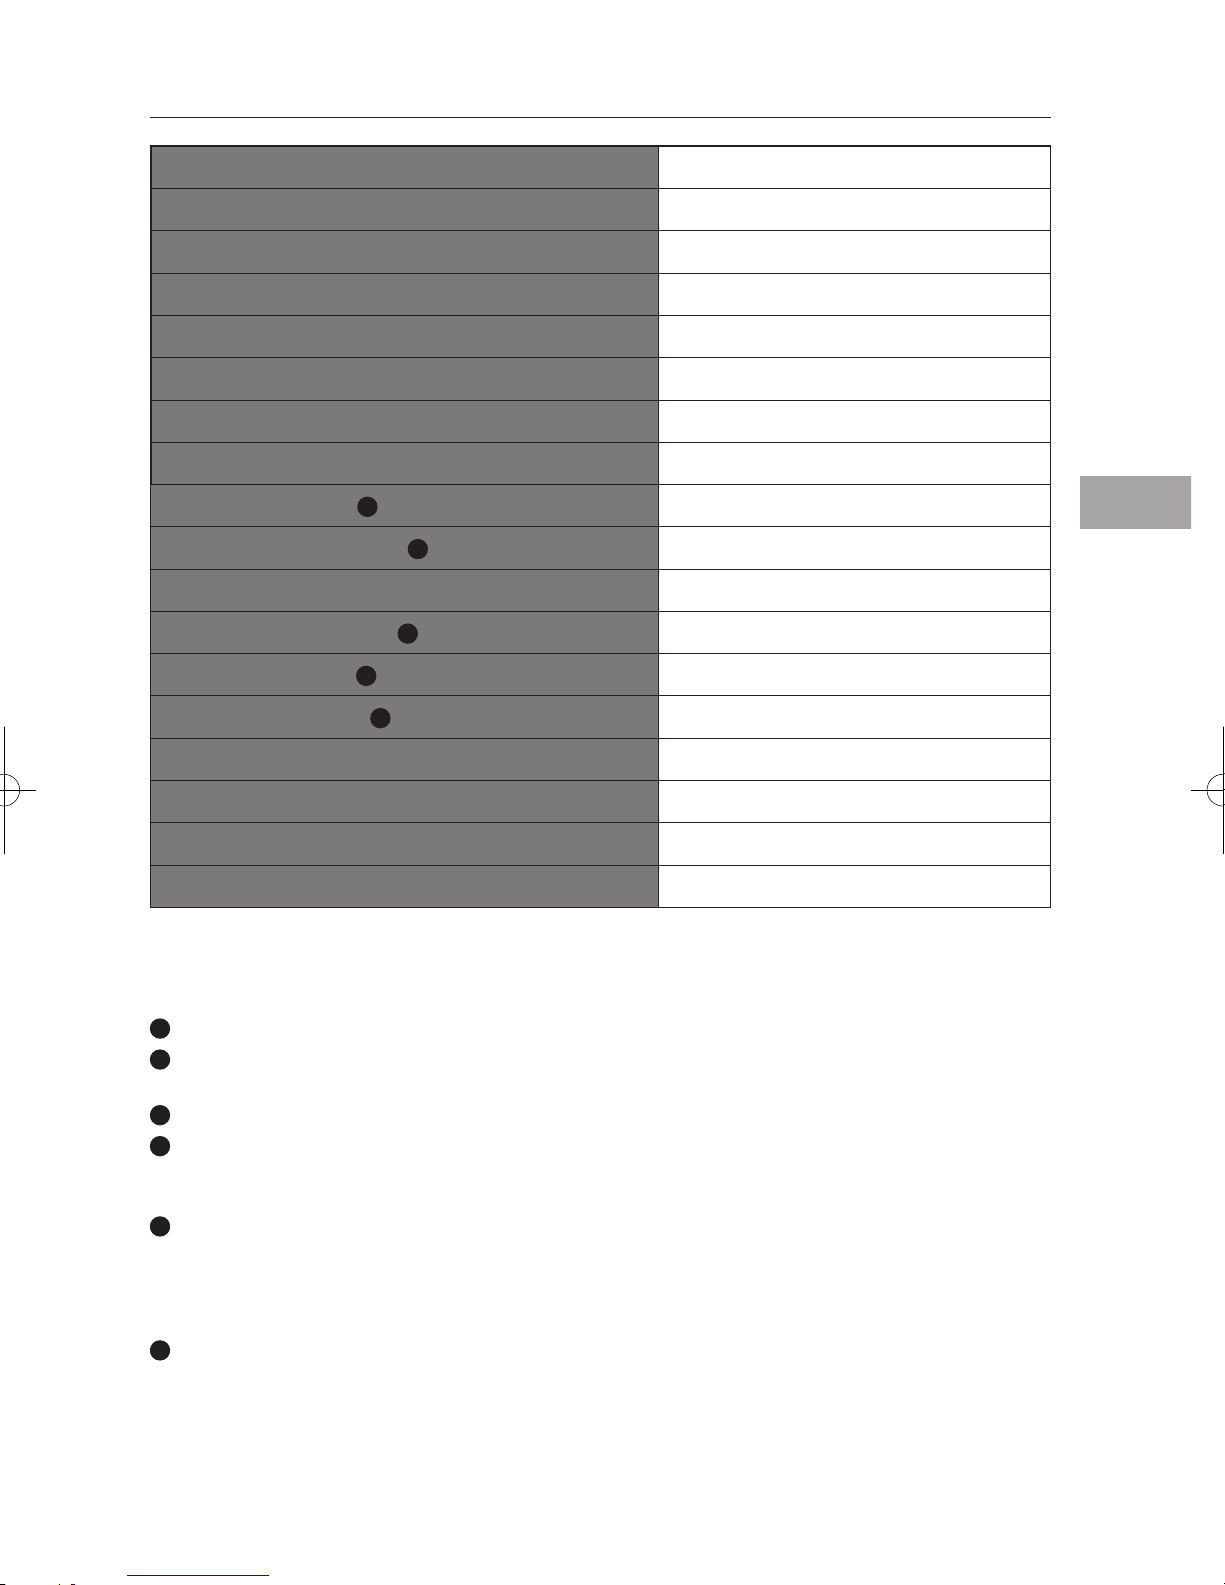
Specication
Model
Dimensions
Capacity
Water Pressure Required
Power Consumption
Rated Voltage
Off Mode Power Consumption
Left-on Mode Power Consumption
Energy Efficiency Class 1
Annual Energy Consumption 2
Energy Consumption of the Standard Cleaning Cycle
Annual Water Consumption 2
Drying Efficiency Class 3
Standard Cleaning Cycle 4
SDW60W10N / SDW60X10N
600 mm (W) x 630 mm (D) x 820 mm (H)
12 Place Settings
0.04 - 1.00MPa
1930W
230V~50Hz
0.3W
0.4W
A
320 kWh
1.13 kWh
3584 litres
A
ECO 55°C
GB
Program Duration of the Standard Cleaning Cycle
Noise Level
Mounting
Could be built-in
155 min
46 dB(A) re 1 pW
Build Under
Yes
Features and specifications are subject to change without prior notice.
Note:
A + + + (highest efficiency) to D (lowest efficiency)
1
Based on 280 standard cleaning cycles using cold water fill and the consumption of the low power
2
modes. Actual energy consumption will depend on how the appliance is used.
A (most efficient) to G (least efficient)
3
This is the program used for the Energy label information and is suitable for cleaning soiled normally
4
soiled tableware. It is the most efficient programme in terms of its combined energy and water
consumption for that type of tableware.
The device meets the European standards and the directives in the current version at delivery:
5
- LVD 2006/95/EC
- EMC2004/108/EC
- ERP 2009/125/EC
The above values have been measured in accordance with standards under specified operating
6
conditions. Results may vary greatly according to quantity and pollution of the dishes, water hardness,
amount of detergent, etc.
29
NO
Gratulerer med kjøpet av din nye Sandstrøm-oppvaskmaskin.
Disse brukerveiledningene vil hjelpe deg bruke mikrobølgeovnen på en trygg og
riktig måte.
Utpakking
Fjern all emballasje fra enheten. Ta vare på emballasjen. Ta hensyn til lokale bestemmelser om
avfallshåndtering hvis du kaster emballasjen.
Følgende elementer er inkludert:
Hovedenhet
Sikkerhetsforsyningsslange x 1
Delnr.: 673000900093
Målekopp for vaskemiddel x 1
Delnr.: 673002200079
1 full skje = 20 g (ca.)
U-formet slangeholder x 1
Delnr.: 673006200003
Målekopp x 1
Delnr.: 673006200004
1 full kopp = 60 ml (ca.)
Kondensstrimle x 1
Delnr.: 675001300715
Dette produktet har blitt testet med vann for å sikre riktig operasjon. Som et resultat av dette, kan noe
vann være igjen i enheten. Dette er normalt og sikkert.
Fjern eventuelle vanndråper fra utsiden hvis nødvendig.
30
Salttrakt x 1
Delnr.: 673002200043
Bruksanvisning x 1
Delnr.: SDW60W-X-10N-002
 Loading...