

Instruction Manual
Microwave / Combination Oven
S20MB10E
Instruction Manual
Microwave / Combination Oven
GB
Bruksanvisning
Mikrobølge- / Kombinasjonsovn
NO
Instruktionshandbok
Mikrovåg/kombinationsugn
SE
Käyttöohje
Yhdistelmämikroaaltouuni
FI
Brugervejledning
Mikrobølge / Kombinationsovn
DK
Návod na použití
Mikrovlnná / kombinovaná trouba
CZ
Návod na obsluhu
Mikrovlnná rúra/Kombinovaná rúra
SK

Contents
GB
Unpacking .........................................................................................................5
Product Overview ..............................................................................................6
Using Aluminium Foil in Your Microwave ..........................................................7
Getting Ready ...................................................................................................8
Introducing Microwave Cooking ........................................................................9
Cooking with a Microwave .........................................................................9
Microwave Heating Categories ...................................................................9
Steam ......................................................................................................10
Condensation ...........................................................................................10
Checking your Microwave ........................................................................ 10
Clock Setting ...................................................................................................11
Setting the Child Lock .....................................................................................12
Microwave Cooking .........................................................................................13
Two-Stage Cooking .........................................................................................14
Delay Start Cooking (Programme Set in Advance) ...........................................15
Auto Cooking ...................................................................................................16
Quick Start Cooking .........................................................................................18
Defrosting .......................................................................................................19
Defrost by Weight ....................................................................................19
Defrost by Time ........................................................................................19
Querying the Cooking Function ....................................................................... 20
Cleaning your microwave ................................................................................21
Frequently Asked Questions ............................................................................22
Specication ...................................................................................................23
Safety First! ...................................................................................................138
Innhold
NO
Pakke ut .......................................................................................................... 24
Produktoversikt ...............................................................................................25
Bruke aluminiumsfolie i mikrobølgeovnen .....................................................26
Klargjøring ......................................................................................................27
Introduserer tilberedning av mat med mikrobølgeovn ....................................28
Tilberedning av mat med mikrobølgeovn ................................................28
Oppvarmingskategorier i mikrobølgeovn ................................................28
Damp .......................................................................................................29
Kondens ...................................................................................................29
Kontrollere mikrobølgeovnen ..................................................................29
Klokkeinnstilling .............................................................................................30
Aktivere barnesikringen ..................................................................................31
Tilberedning av mat med mikrobølgeovn .......................................................32
Matlaging med to omganger ..........................................................................33
Forsinket start av tilberedning (Program innstilt på forhånd) .........................34
Automatisk tilberedning ................................................................................. 35
Tilberedning med hurtig start ......................................................................... 37
Opptining ........................................................................................................38
Opptining etter vekt ................................................................................38
Opptining etter tid ...................................................................................38
Undersøke tilberedningsfunksjon ...................................................................39
Rengjøre mikrobølgeovnen .............................................................................40
Spørsmål og svar .............................................................................................41
Spesikasjon ................................................................................................... 42
Sikkerheten først! ..........................................................................................139
Innehåll
SE
Uppackning .....................................................................................................43
Produktöverblick .............................................................................................44
Använda aluminiumfolie i din mikrovågsugn ..................................................45
Förberedelse ...................................................................................................46
Introduktion av tillagning i mikrovågsugn ......................................................47
Matlagning i en mikrovågsugn ................................................................ 47
Mikrovågsugn uppvärmningskategorier ..................................................47
Ånga ........................................................................................................48
Kondensation...........................................................................................48
Kontrollera mikrovågsugnen.................................................................... 48
Klockinställning ..............................................................................................49
Ställa in barnlåset ...........................................................................................50
Mikrovågstillagning ........................................................................................ 51
Två-stegstillagning .........................................................................................52
Fördröjd tillagningsstart (Program inställd i förväg) .......................................53
Auto tillagning ................................................................................................54
Snabbstart tillagning ......................................................................................56
Upptining ........................................................................................................57
Upptining efter vikt .................................................................................57
Upptining efter tid ................................................................................... 57
Fråga om tillagningsfunktion ..........................................................................58
Rengöra mikrovågsugnen ............................................................................... 59
Vanliga frågor .................................................................................................60
Specikationer ................................................................................................ 61
Säkerheten först! ...........................................................................................140
Sisältö
FI
Pakkauksesta purkaminen ..............................................................................62
Tuotteen yleiskatsaus ......................................................................................63
Alumiinifolion käyttö mikroaaltouunissa ........................................................64
Valmistelut ......................................................................................................65
Johdanto ruoanlaittoon mikroaaltouunilla .....................................................66
Ruoanvalmistus mikroaaltouunilla ..........................................................66
Mikroaaltolämmitysluokat ......................................................................66
Höyry .......................................................................................................67
Kondensaatio ...........................................................................................67
Mikroaaltouunin tarkistus ........................................................................67
Kelloasetukset .................................................................................................68
Lapsilukon asettaminen ..................................................................................69
Ruoanlaitto mirkroaaltouunilla .......................................................................70
Kaksivaiheinen ruoanlaitto .............................................................................71
Viipeellä kännistyvä kypsentäminen (Esiasetettu ohjelma) ............................72
Automaattinen kypsennys ..............................................................................73
Kypsentämisen pika-aloitus ............................................................................75
Sulattaminen ..................................................................................................76
Sulattaminen painon mukaan .................................................................76
Sulattaminen ajan mukaan .....................................................................76
Kysymyksiä kypsennystoiminnosta .................................................................77
Mikroaaltouunin puhdistus .............................................................................78
Usein kysyttyjä kysymyksiä .............................................................................79
Tekniset tiedot ................................................................................................80
Turvallisuus ensin! .........................................................................................141
Indholdsfortegnelse
DK
Udpakning ......................................................................................................81
Produktoversigt...............................................................................................82
Brug af alufolie i mikrobølgeovnen ................................................................. 83
Klargøring ....................................................................................................... 84
Introduktion til mikrobølgekogning ................................................................85
Madlavning med mikrobølgeovn .............................................................85
Mikrobølge - opvarmningskategorier ......................................................85
Damp .......................................................................................................86
Kondensering ..........................................................................................86
Tjek af mikrobølgeovnen .........................................................................86
Indstilling af ur ................................................................................................87
Indstilling af børnesikringen ...........................................................................88
Mikrobølgekogning .........................................................................................89
To-trins-kogning .............................................................................................90
Madlavning med forskudt opstart (Forindstillet program) ..............................91
Autom. kogning .............................................................................................. 92
Hurtigstartkogning .........................................................................................94
Optøning .........................................................................................................95
Optøning i henhold til vægt .....................................................................95
Optøning i henhold til tid.........................................................................95
Spørgsmål vedrørende kogefunktionen ..........................................................96
Rengøring af mikrobølgeovnen .......................................................................97
Hyppigt stillede spørgsmål..............................................................................98
Specikationer ................................................................................................ 99
Sikkerhed først! .............................................................................................142
Obsah
CZ
Vybalení ........................................................................................................100
Popis produktu ..............................................................................................101
Použití hliníkové fólie v mikrovlnné troubě ...................................................102
Příprava.........................................................................................................103
Úvod do vaření v mikrovlnné troubě.............................................................. 104
Vaření v mikrovlnné troubě .................................................................... 104
Kategorie mikrovlnného ohřevu ............................................................104
Pára .......................................................................................................105
Kondenzace ...........................................................................................105
Kontrola mikrovlnné trouby ...................................................................105
Nastavení hodin ............................................................................................ 106
Nastavení dětského zámku ...........................................................................107
Vaření v mikrovlnné troubě ...........................................................................108
Dvojstupňové vaření .....................................................................................109
Vaření s odloženým startem (Přednastavený program) .................................110
Automatické vaření .......................................................................................111
Rychlé zahájení vaření...................................................................................113
Rozmrazování ...............................................................................................114
Rozmrazování podle váhy ......................................................................114
Rozmrazování podle času .......................................................................114
Zjišťování funkce vaření .................................................................................115
Čištění mikrovlnné trouby .............................................................................116
Často kladené dotazy ....................................................................................117
Technické parametry .....................................................................................118
Bezpečnost především! .................................................................................143
Obsah
SK
Vybalenie ...................................................................................................... 119
Prehľad výrobku ............................................................................................120
Používanie hliníkovej fólie v mikrovlnnej rúre ...............................................121
Príprava.........................................................................................................122
Úvod do mikrovlnného varenia .....................................................................123
Varenie v mikrovlnnej rúre .....................................................................123
Kategórie mikrovlnného ohrevu ............................................................123
Para .......................................................................................................124
Kondenzácia ..........................................................................................124
Kontrola mikrovlnnej rúry ......................................................................124
Nastavenie hodín ..........................................................................................125
Nastavenie detskej poistky dverí ................................................................... 126
Mikrovlnné varenie .......................................................................................127
Dvojstupňové varenie ....................................................................................128
Oneskorený štart varenia (Vopred nastavený program) .................................129
Automatické varenie .....................................................................................130
Rýchly štart varenia .......................................................................................132
Rozmrazovanie ..............................................................................................133
Rozmrazovanie podľa hmotnosti ...........................................................133
Rozmrazovanie podľa času ..................................................................... 133
Pozastavenie funkcie Cooking (Varenie) ........................................................134
Čistenie mikrovlnnej rúry ..............................................................................135
Často kladené otázky.....................................................................................136
Technické parametre .....................................................................................137
Bezpečnosť je na prvom mieste! ...................................................................144

5
GB
If items are missing, or damaged please contact Partmaster (UK only).
Tel: 0844 800 3456 for assistance.
Congratulations on the purchase of your new Sandstrøm Microwave.
These operating instructions will help you use it properly and safely.
Before using your Sandstrøm Microwave
• Read these instructions carefully and retain for future reference.
• Remove all packaging labels. Please dispose of them properly.
Before calling for service
• Review the section on Troubleshooting. This will help you to solve some general
problems by yourself and reduce the need to ask for the help of professional
technicians.
Unpacking
Remove all packaging from the unit. Retain the packaging. If you dispose of it please do so according to
local regulations.
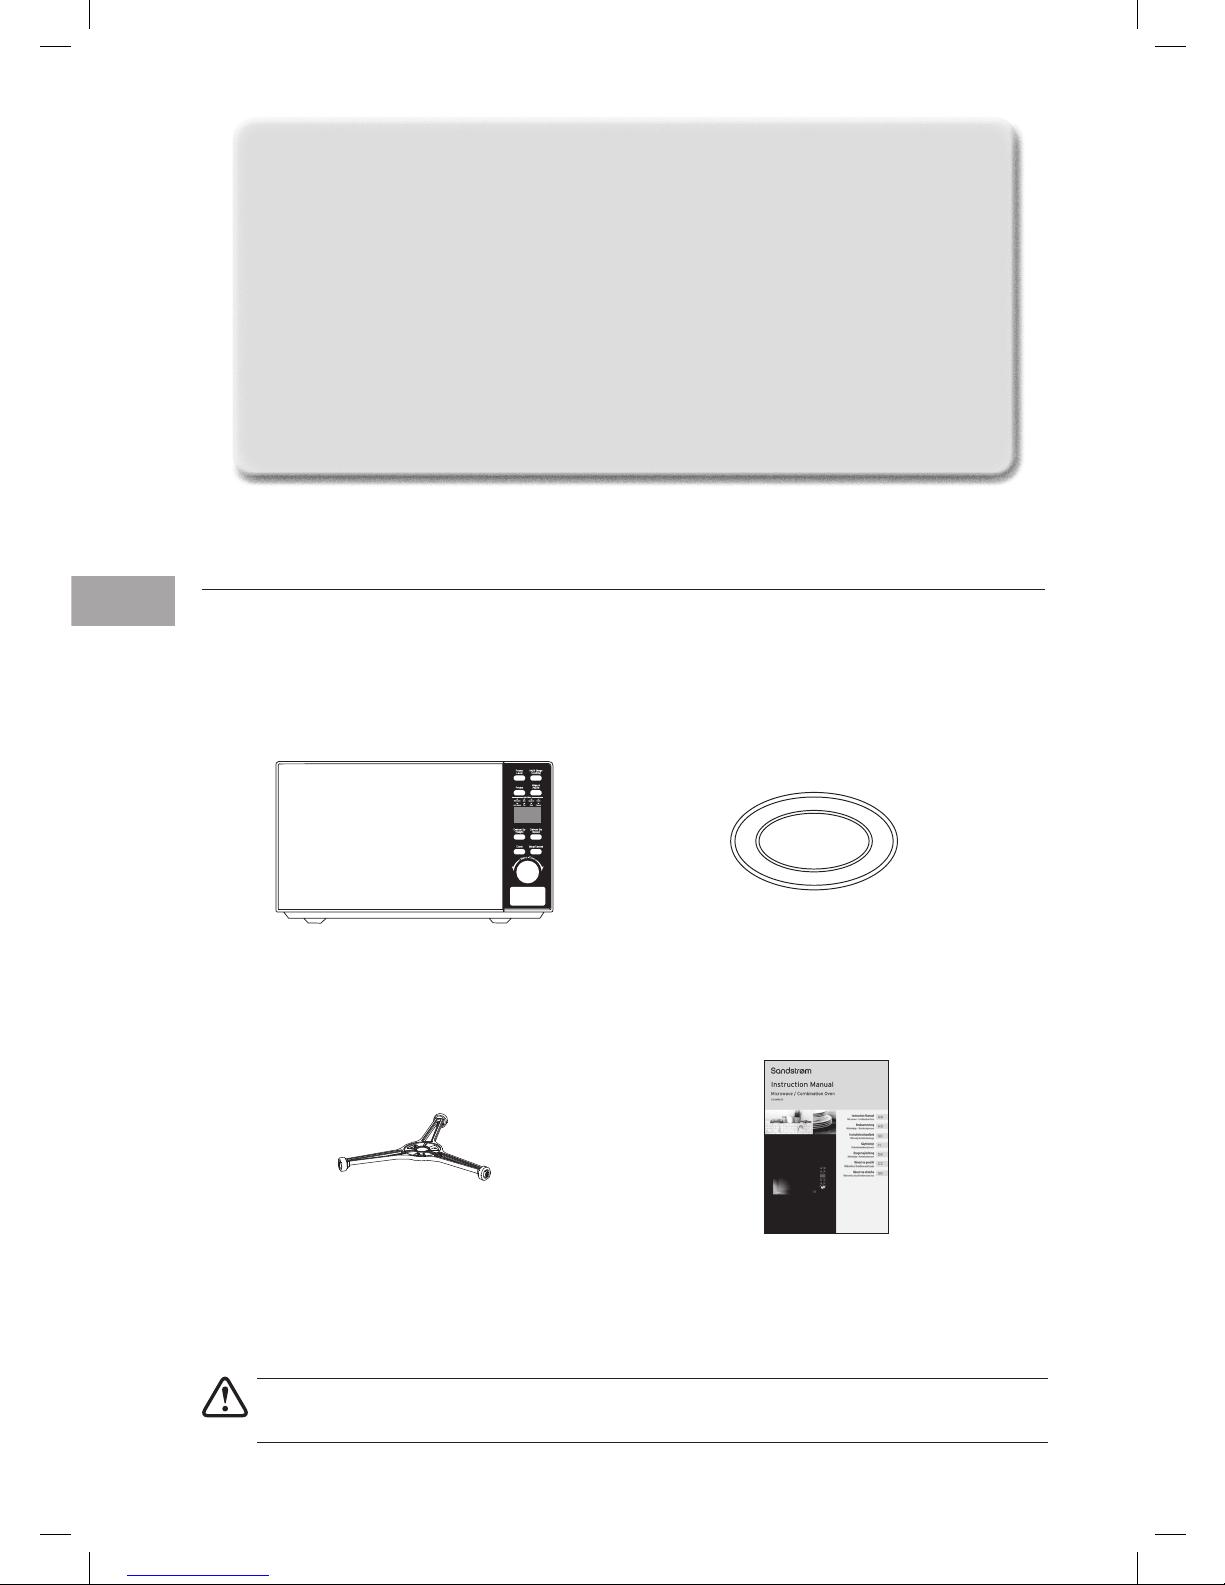
The following items are included:
The Main Unit
Glass Turntable x 1
P.N.: XGALS20MB10P12
Turntable Ring x 1
P.N.: XGALS20MB10P11
Instruction Manual x 1
P.N.: S20MB10E-001
6
GB
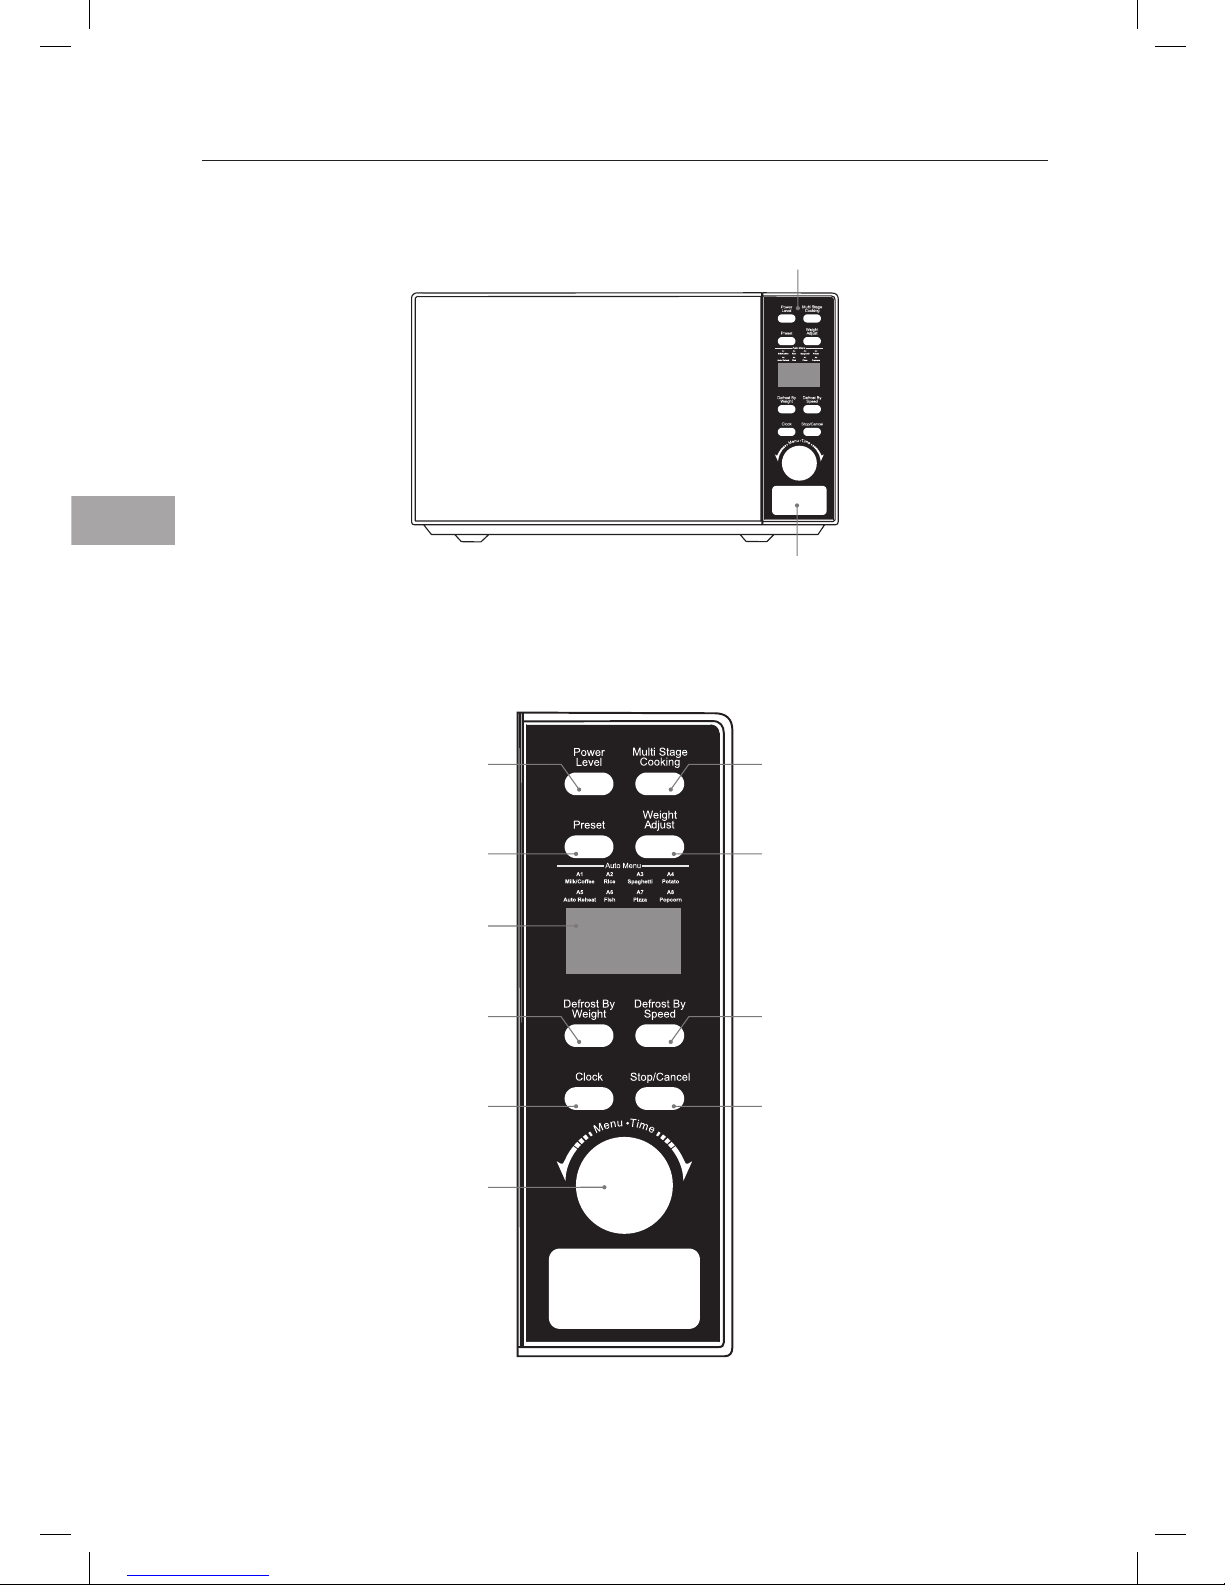
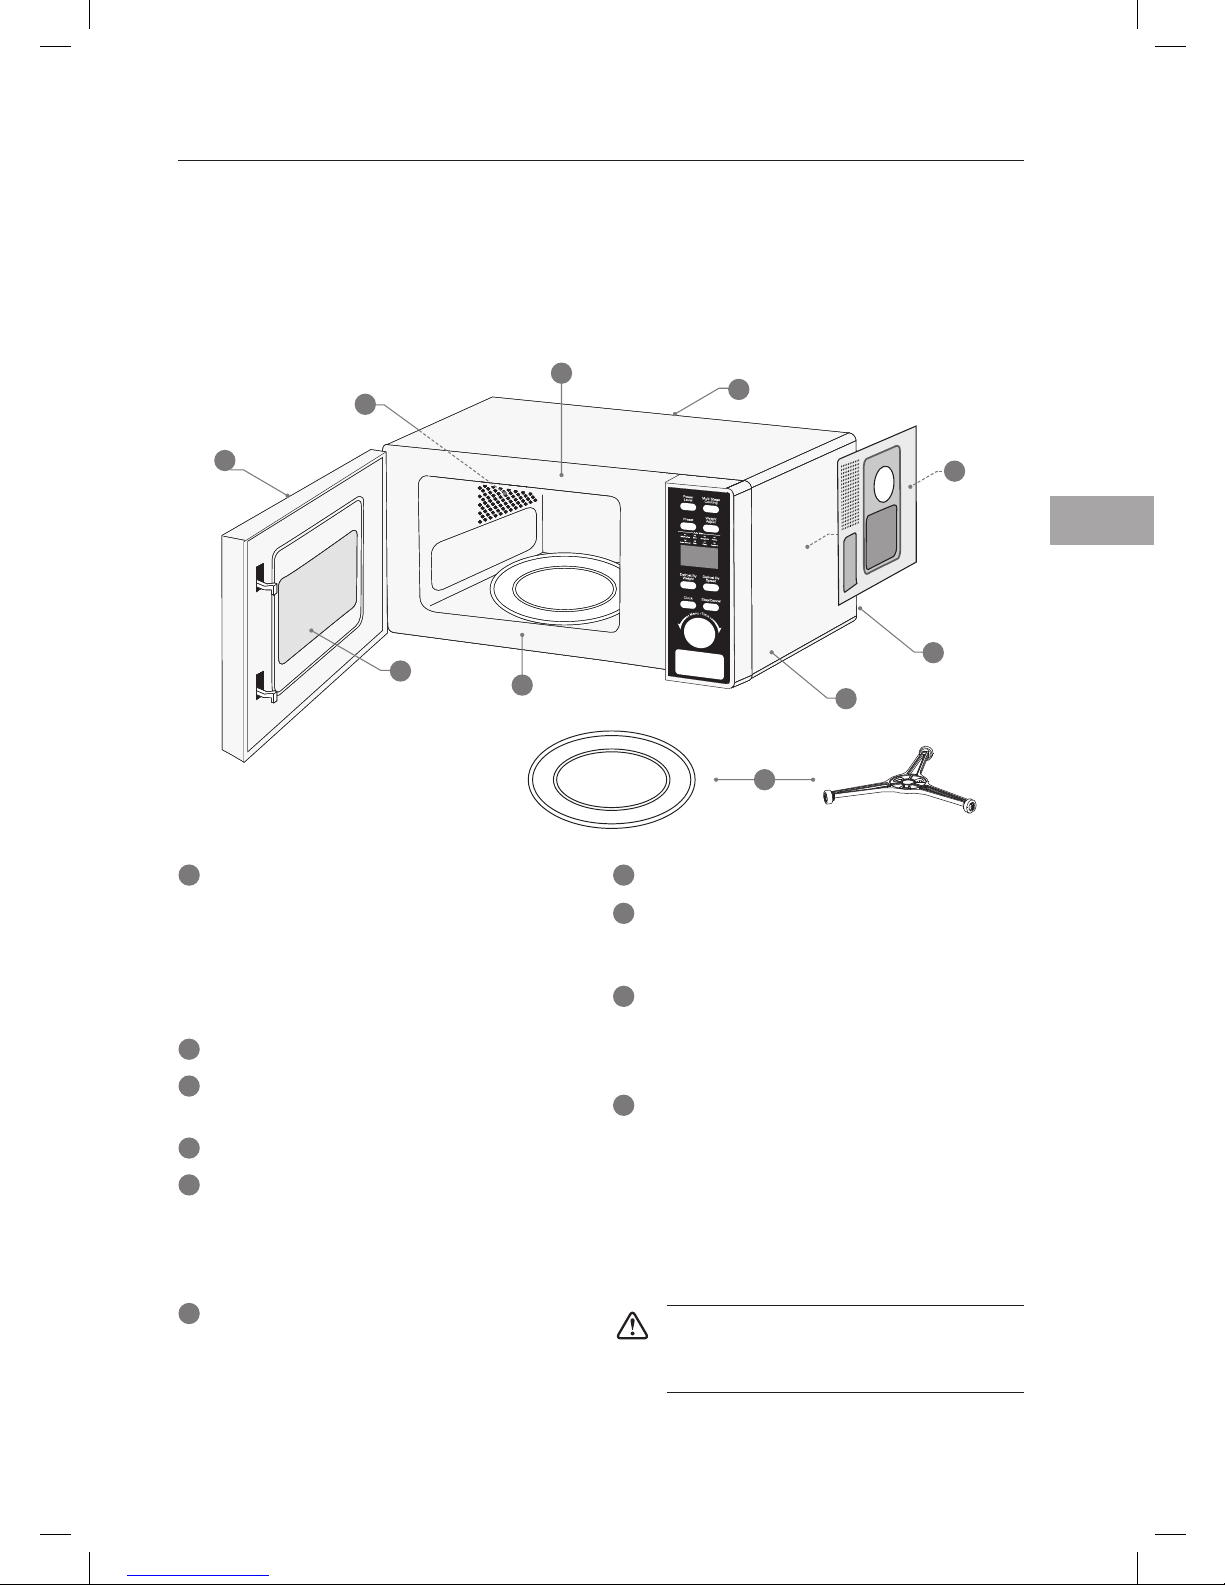
Product Overview
The Main Unit
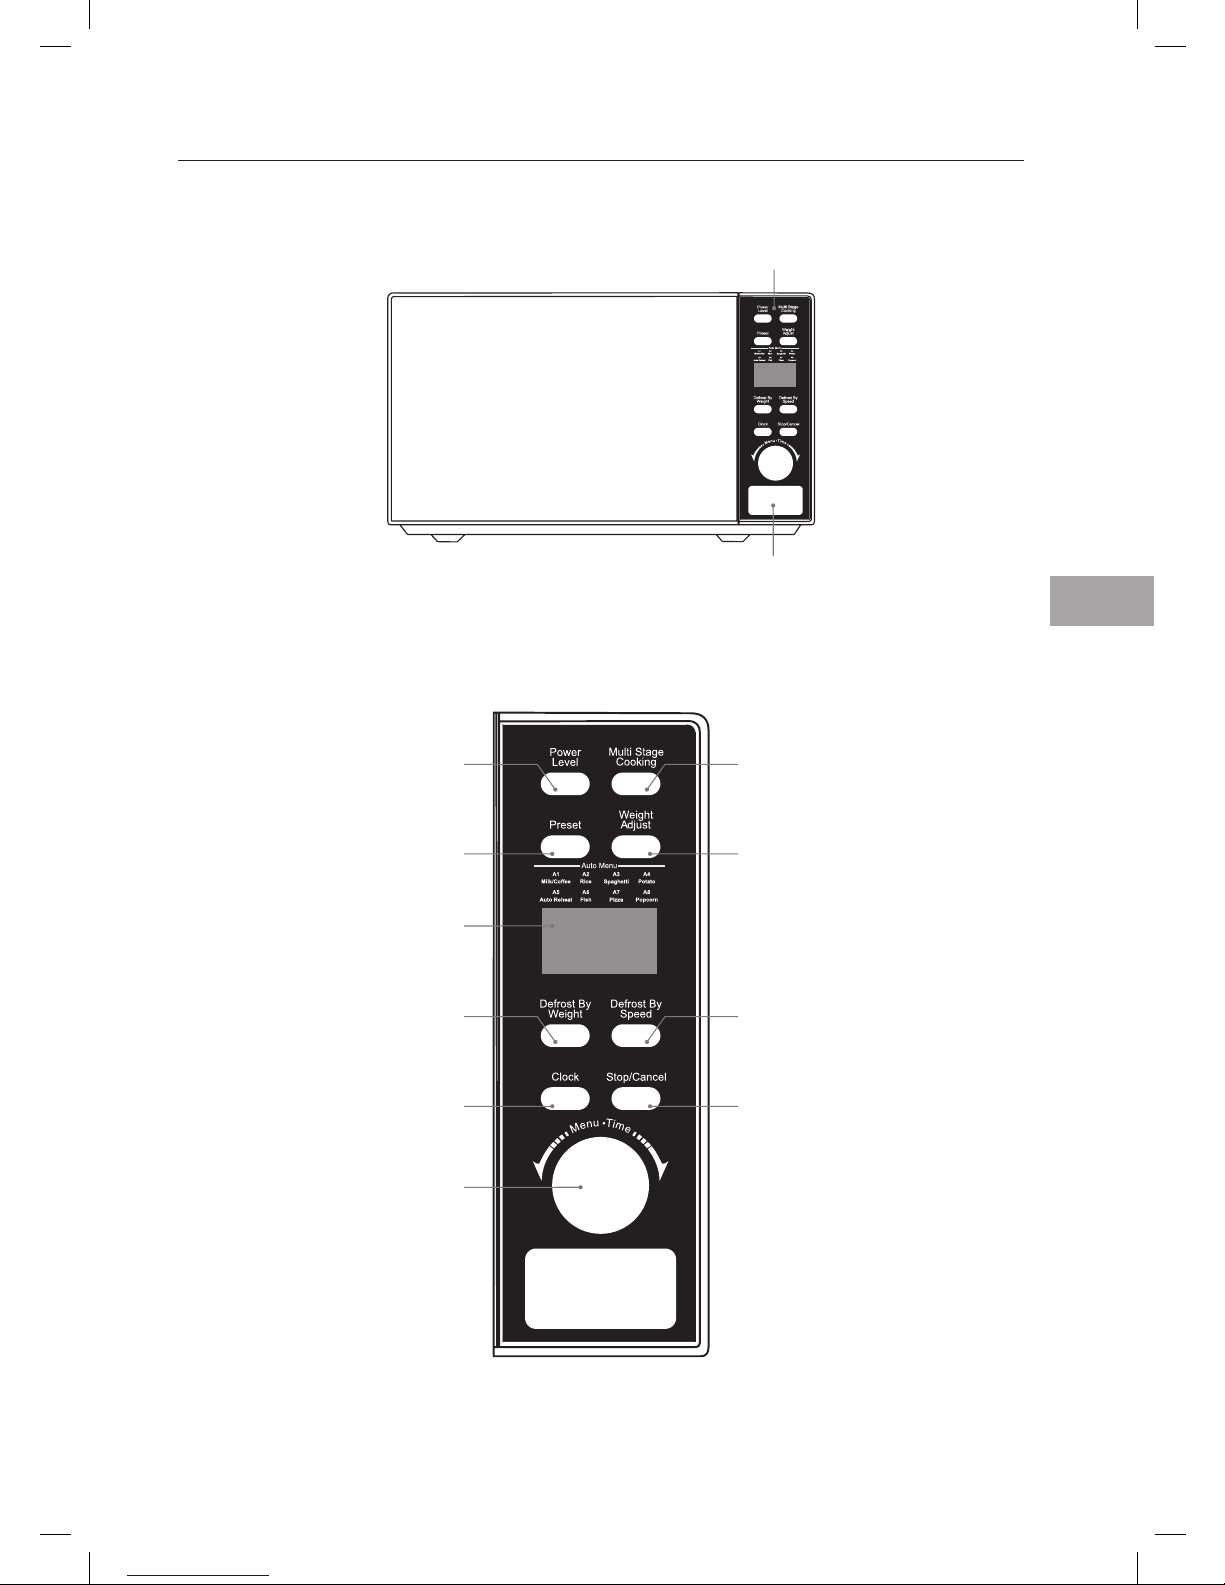
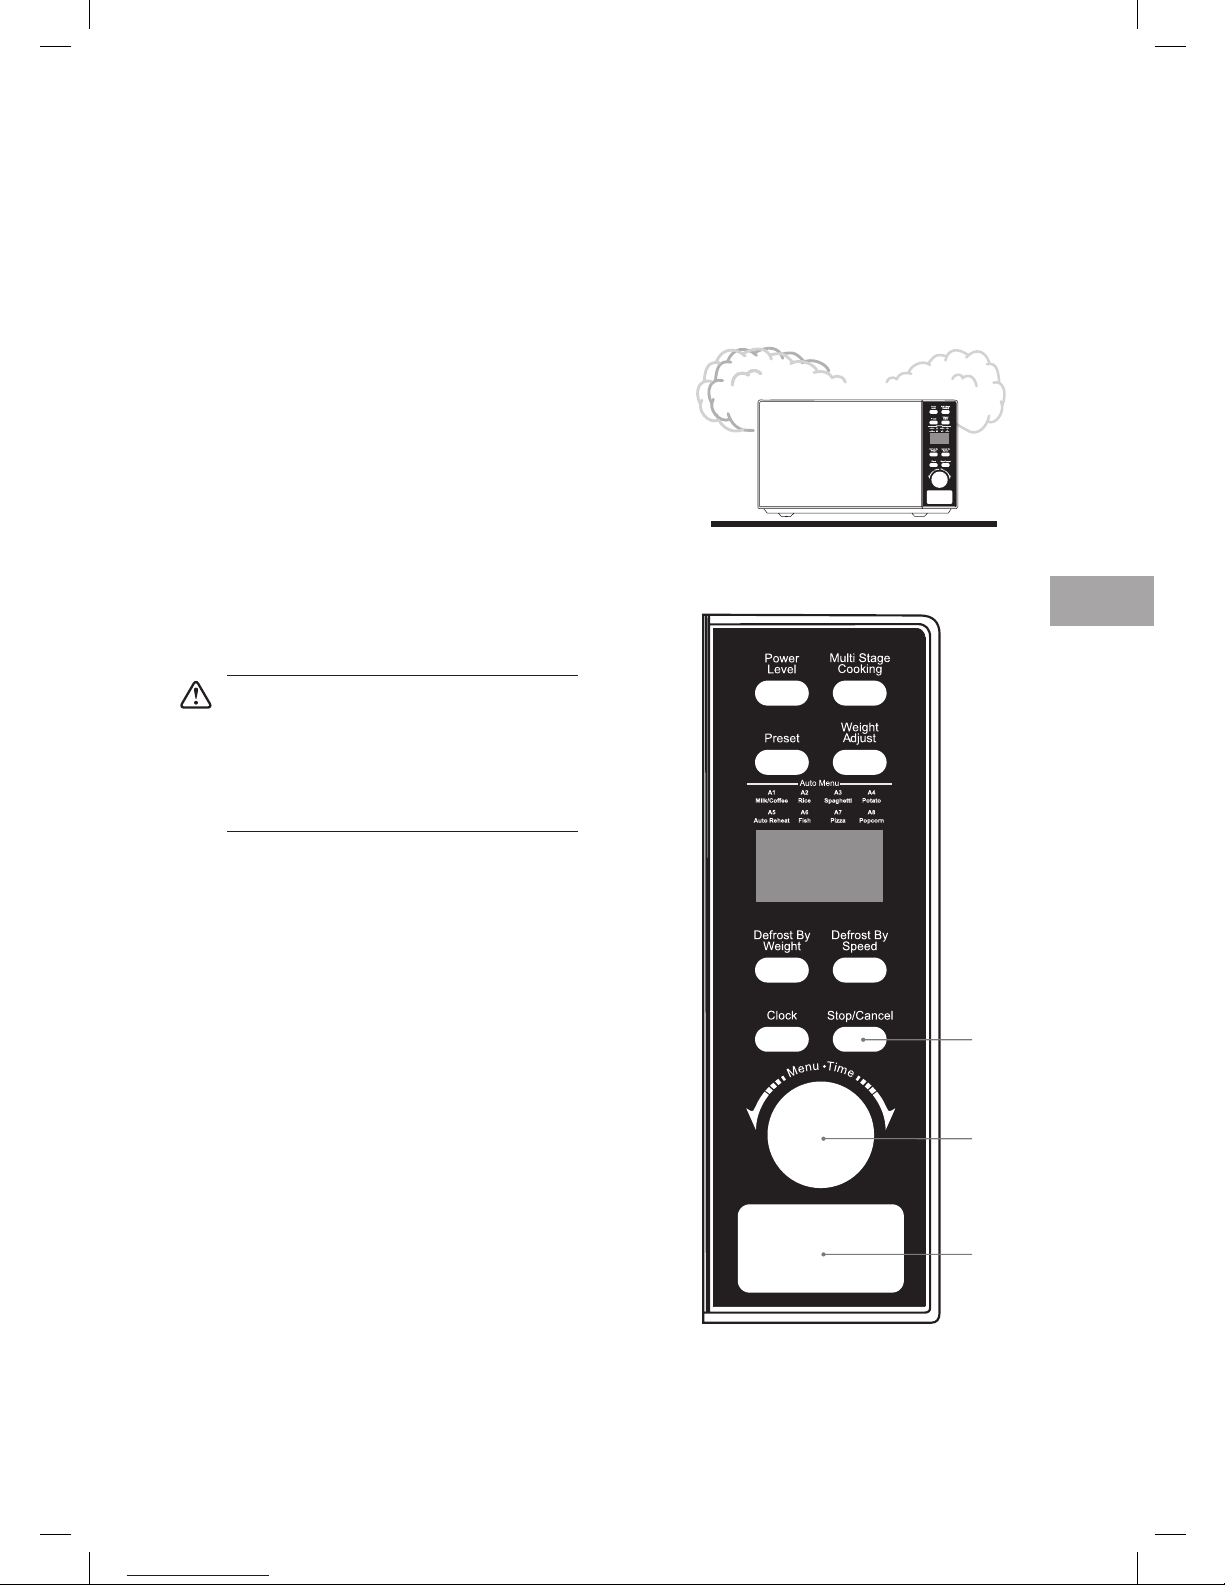
The Control Panel
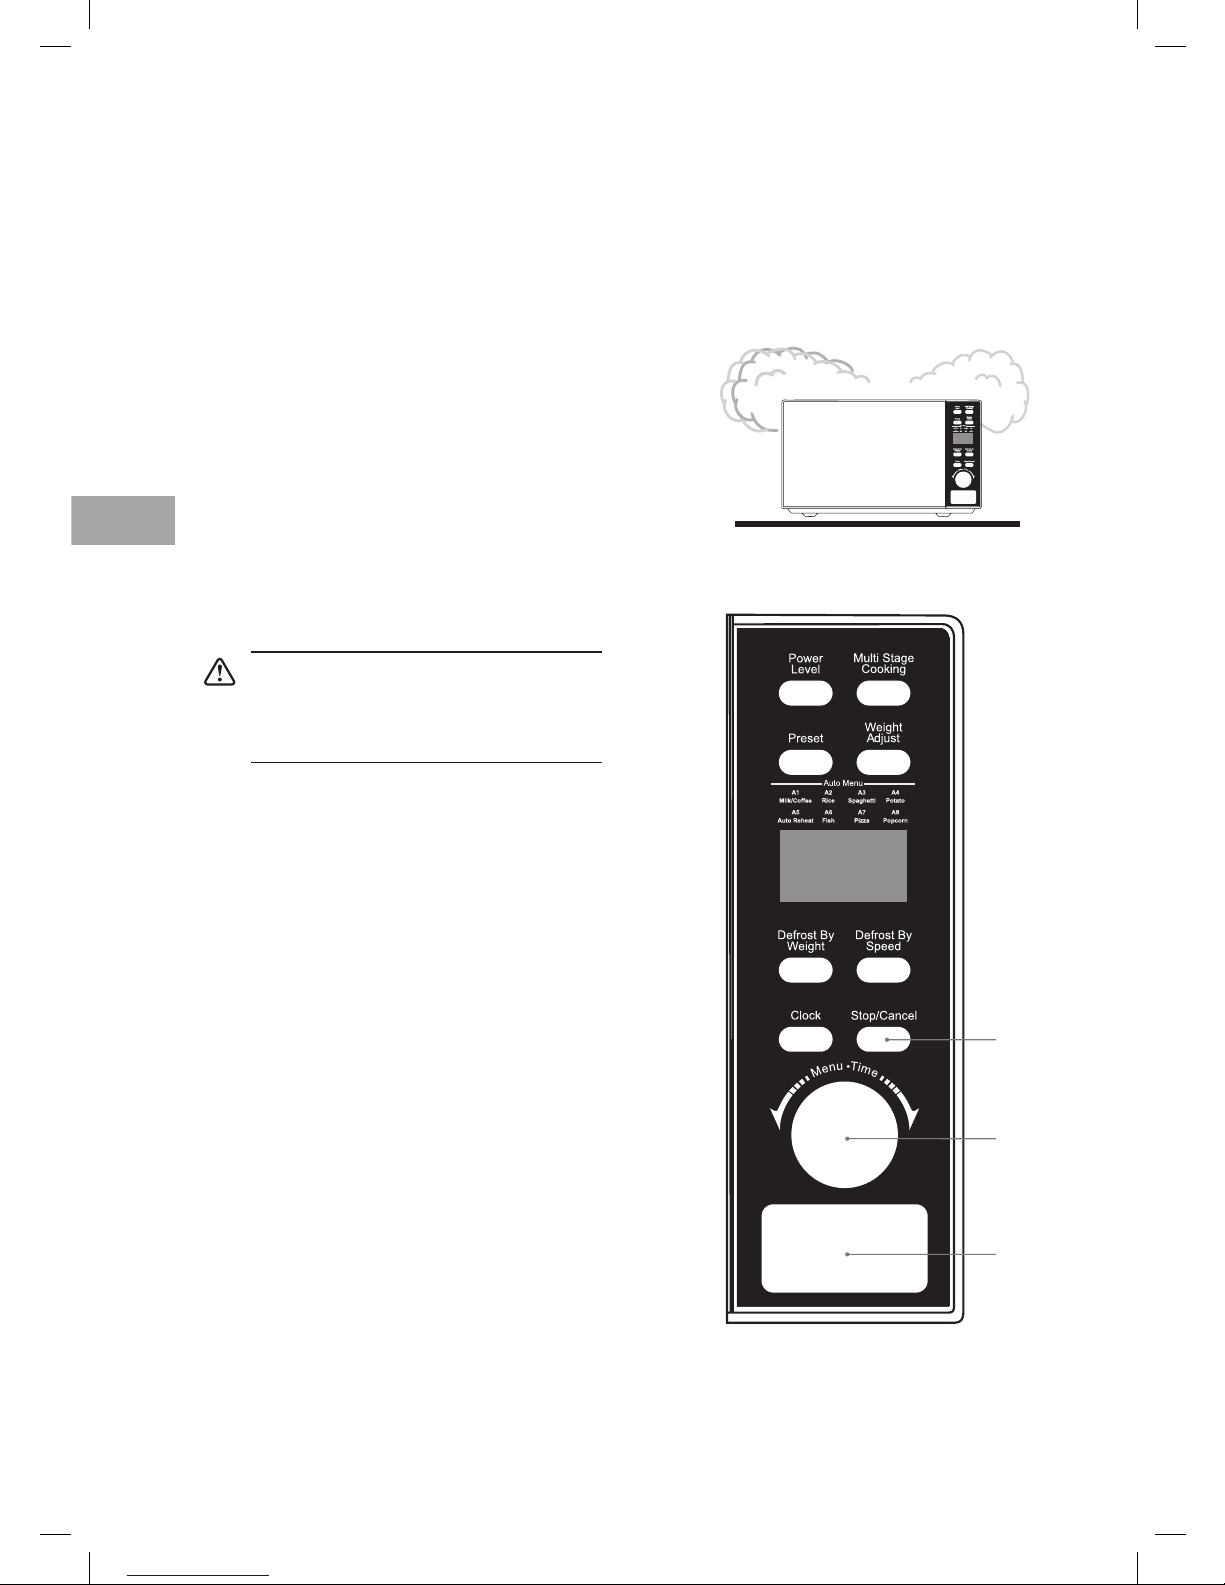
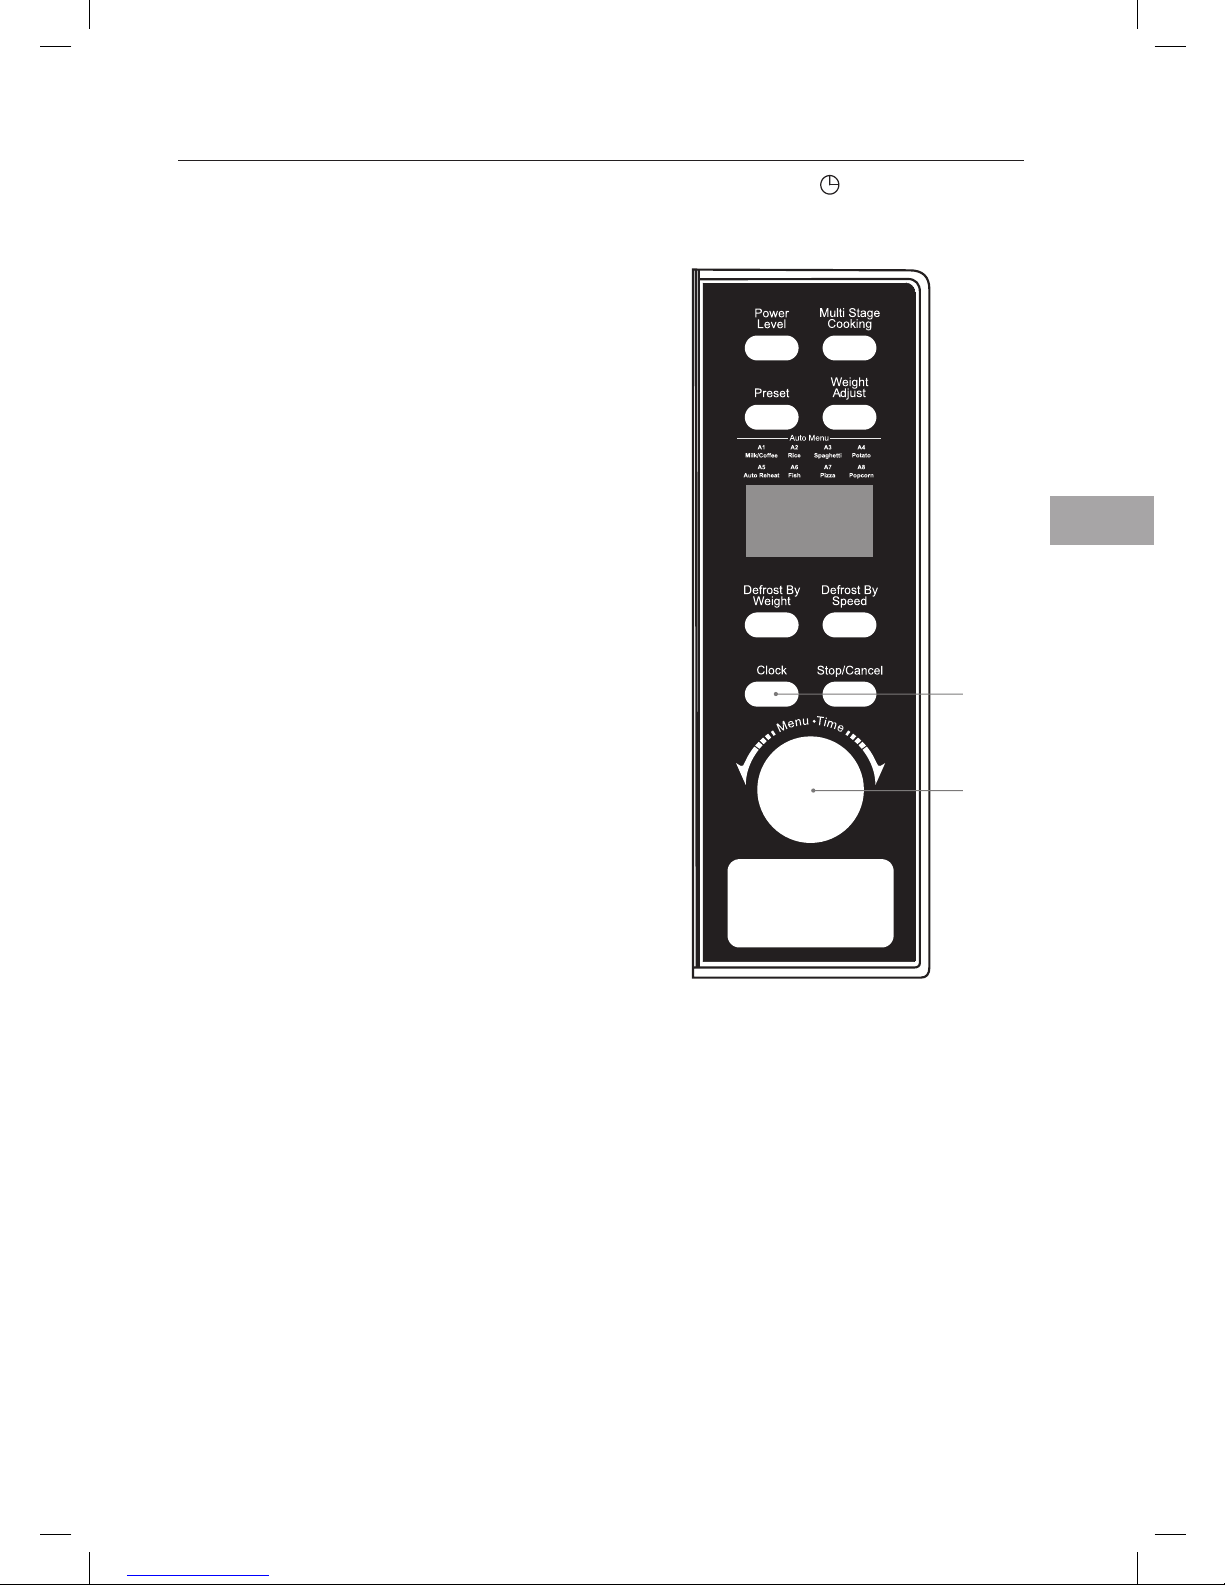
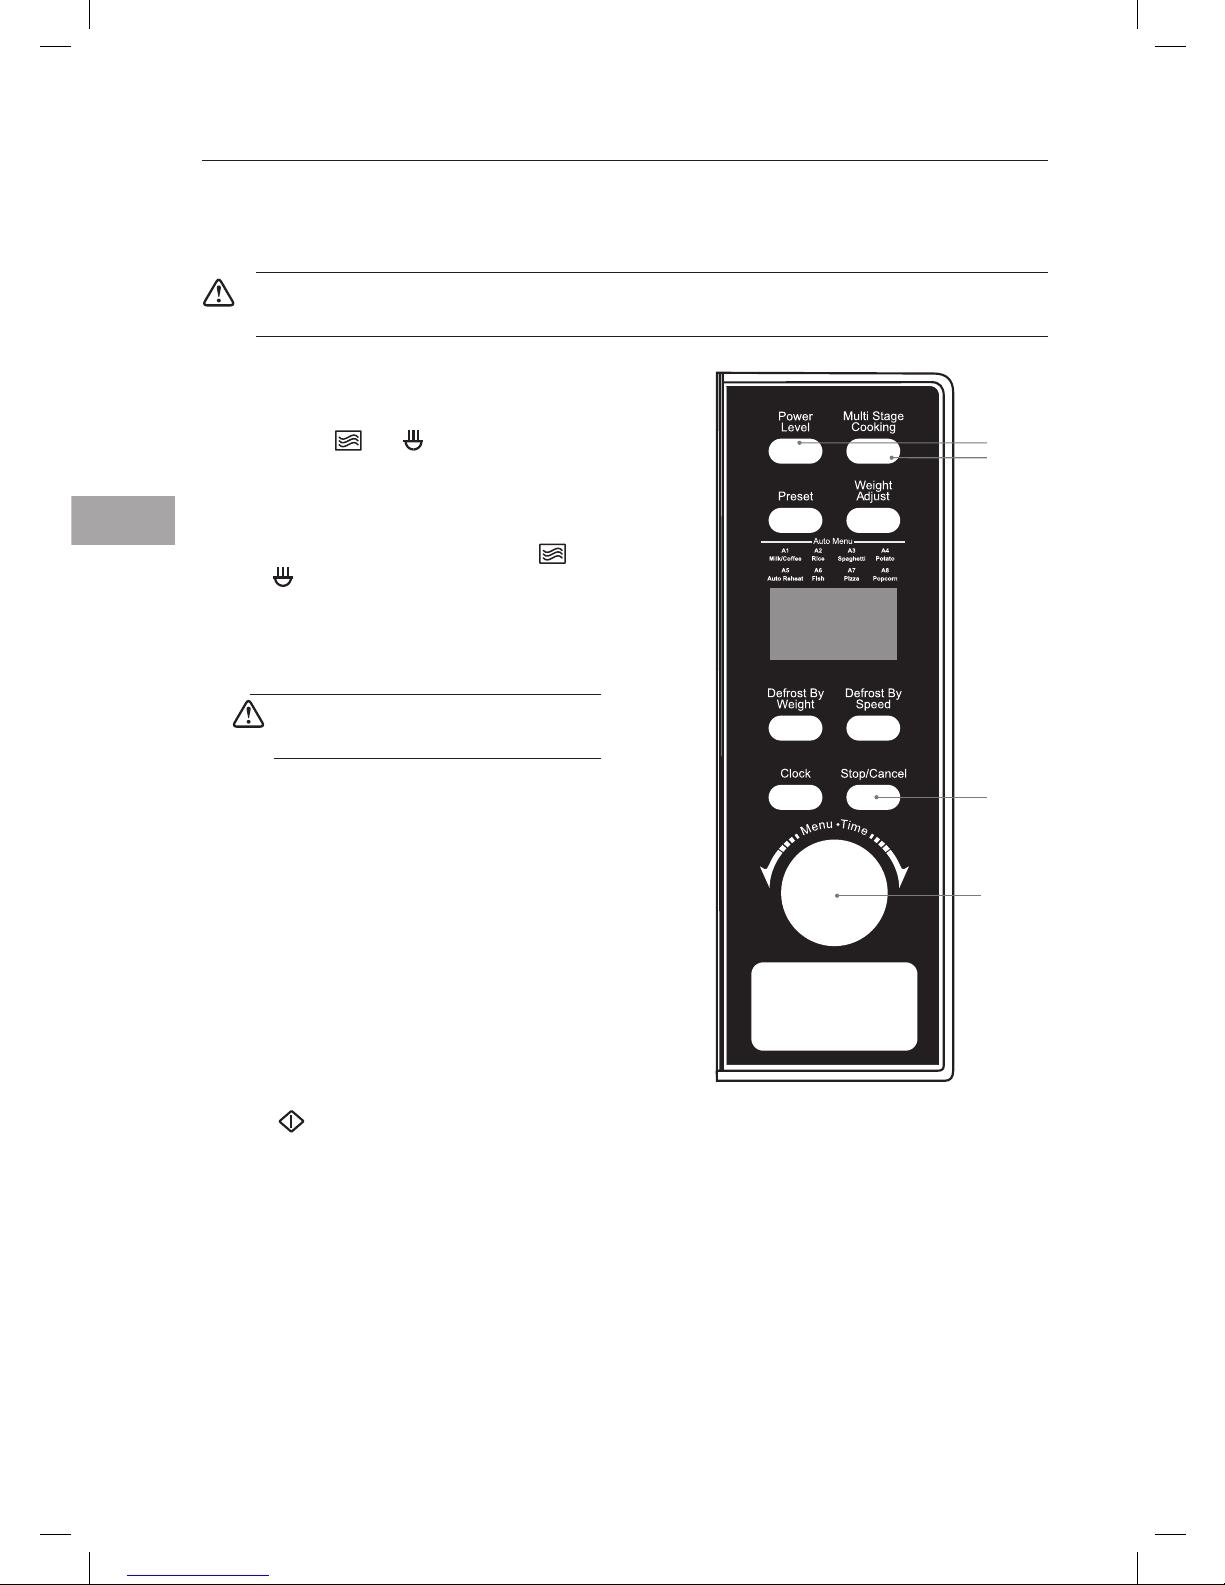
Control Panel
Power Level button
Use this button to select the
function of microwave and its
power level.
Defrost By Weight button
Use this button to defrost
food by weight.
Preset button
Use this button to preset
cooking time.
Clock button
Use this button to set the clock.
LED Display
Shows the clock, cooking time
and setting.
Menu / Time dial
Use this dial to set time and
auto menu programmes.
Multi Stage Cooking button
Use this button to select the
function of two-stage cooking.
Defrost By Speed button
Use this button to defrost food
by time.
Weight Adjust button
Use this button to set food
weight.
Stop / Cancel button
Use this button to stop cooking
and clear cooking settings.
Door Button

7
GB
Using Aluminium Foil in your Microwave
It is safe to use aluminium foil in your microwave as long as you follow these safety guidelines.
As with all metal, microwave energy cannot pass through foil, but provided that you keep the foil
away from the side of the microwave it will not cause sparks and there will not be any damage to your
microwave.
Using foil is a good way of shielding parts of food that you do not want to cook as quickly as others –
perhaps where the food is narrower and would otherwise overcook.
Place the foil over the area you want to shield, taking care that the foil will not touch the sides of the
microwave when the turntable rotates. Only use one piece of foil at a time so that you do not get sparks
between the separate pieces.
Follow these guidelines when using foil in your microwave:
• Remove foil lids from containers before using in the microwave. Some lids are made of card with a foil
covering – these should be removed too. Use a microwave safe transparent lid if possible.
• Stir food during cooking if the container has a lid or film cover.
• Always use the glass turntable.
• Use shallow containers with a large surface area. Do not use containers that are more than 1.25in
(3.5cm) deep.
• Use gloves when handling hot foil containers.
• Do not completely cover food with foil. The microwave energy cannot pass through the foil so the
food will not cook.
• Do not let aluminium foil touch the inside of the microwave.
• Do not use more than one piece of foil in the microwave at the same time.
8
GB
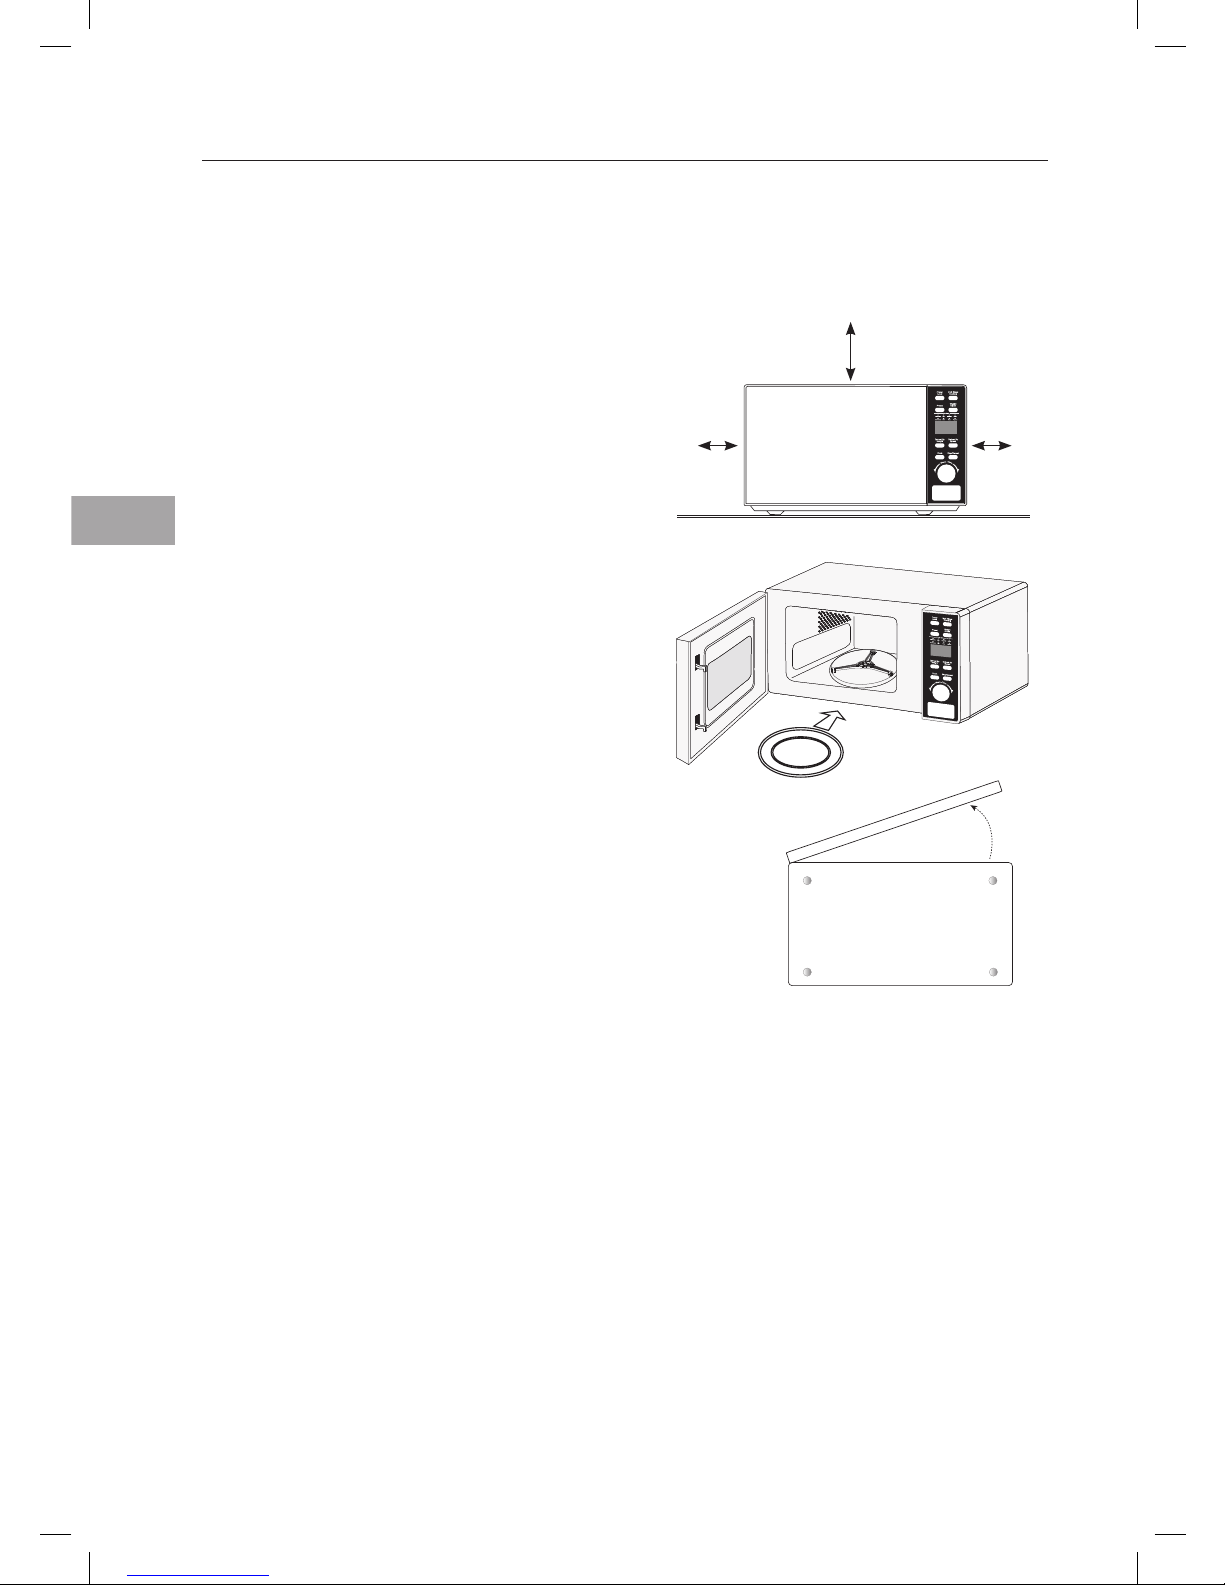
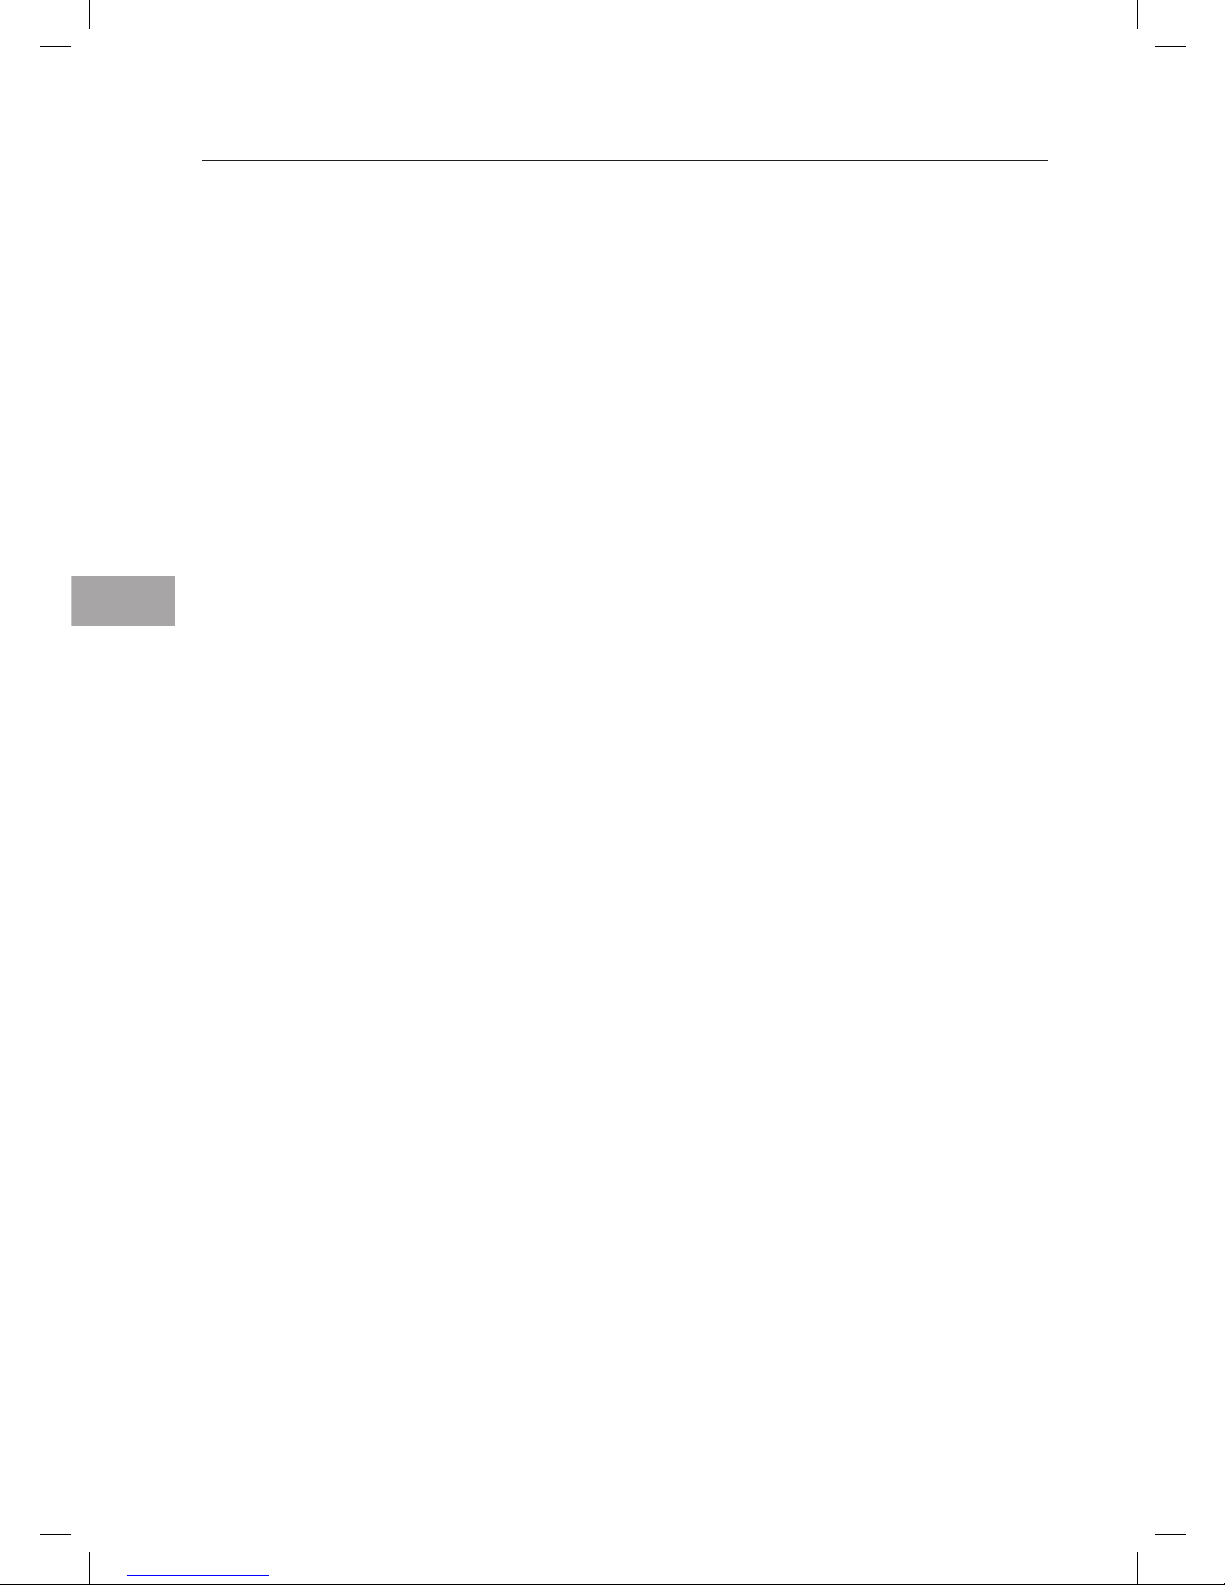
2. Choose a flat work surface for your microwave
away from heat sources such as radiators or
fires and away from cold areas. You should
allow a 10cm space all around the oven and
30cm above so that warm air can escape from
the vents during cooking – This microwave is
not designed to be built in.
Getting Ready
This microwave is designed for home use. It should not be used for commercial catering.
1. After unpacking your microwave, check that it has not been damaged whilst in the box. Make sure
there are no dents on the oven, and the door closes properly. A dented or damaged oven could
allow microwave energy to escape. Make sure that you have taken all the packaging from inside the
microwave. Please dispose of the plastic wrappings or bags safely and keep out of the reach of babies
and young children.
30cm
10cm10cm
3. Plug your microwave into a standard
household electrical socket (230-240 volt, 13
amp rated). Avoid using a socket that also has
an adaptor and other equipment plugged in.
Do not use a multi-adaptor.
4. Put the turntable ring inside the microwave
and place the glass turntable on top of the
ring. The turntable is shaped to sit securely on
the spindle. You must always use the turntable
and ring whenever you use the microwave.
5. To protect your work surface, we recommend
that you fix some non-slip cushion pads (not
included) to the underside of the microwave.
Underside View
9
GB
Introducing Microwave Cooking
Cooking with a Microwave
• Microwave ovens cook food using microwave energy that is similar to naturally occurring radio waves.
Normally, these “waves” would fade as they dispersed into the atmosphere but in a microwave they
are concentrated onto the food causing it to heat up.
• Microwave energy cannot pass through metal – so it cannot escape from inside your microwave – but
it can pass through materials like glass, porcelain, plastic and paper. These materials are used in the
manufacture of microwave safe cooking equipment.
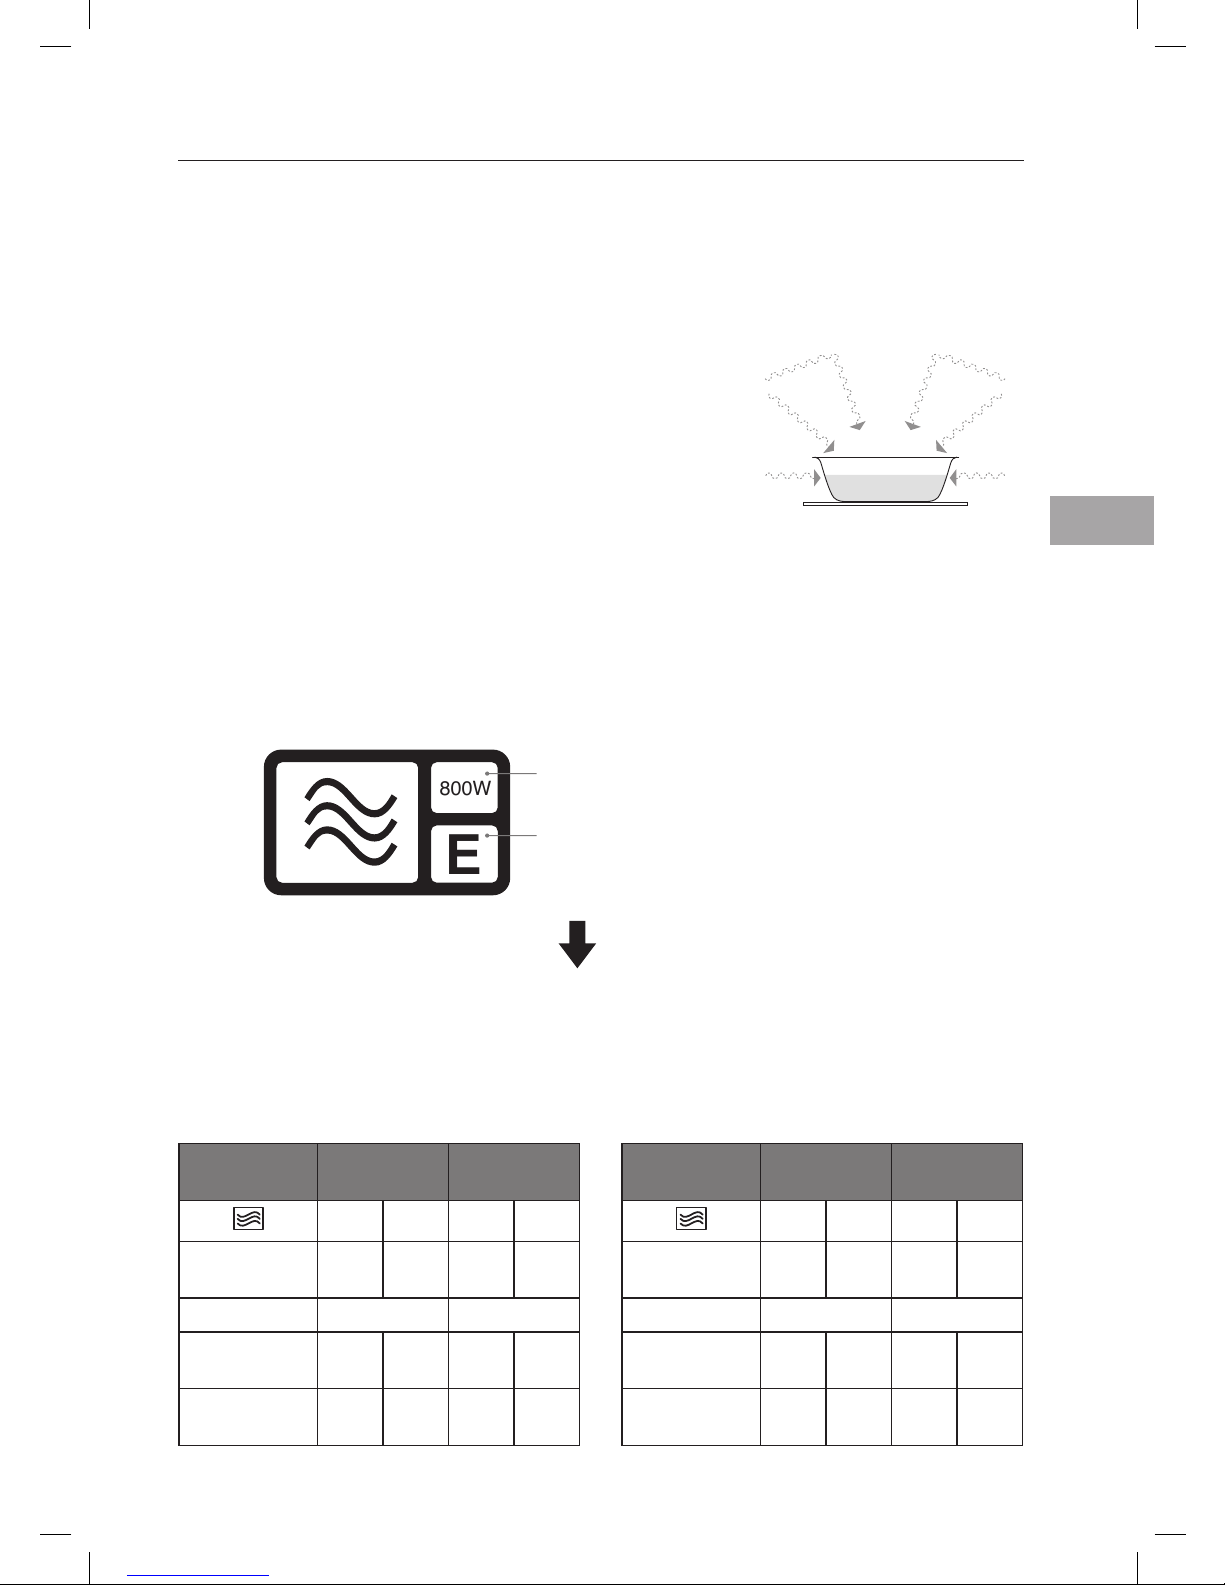
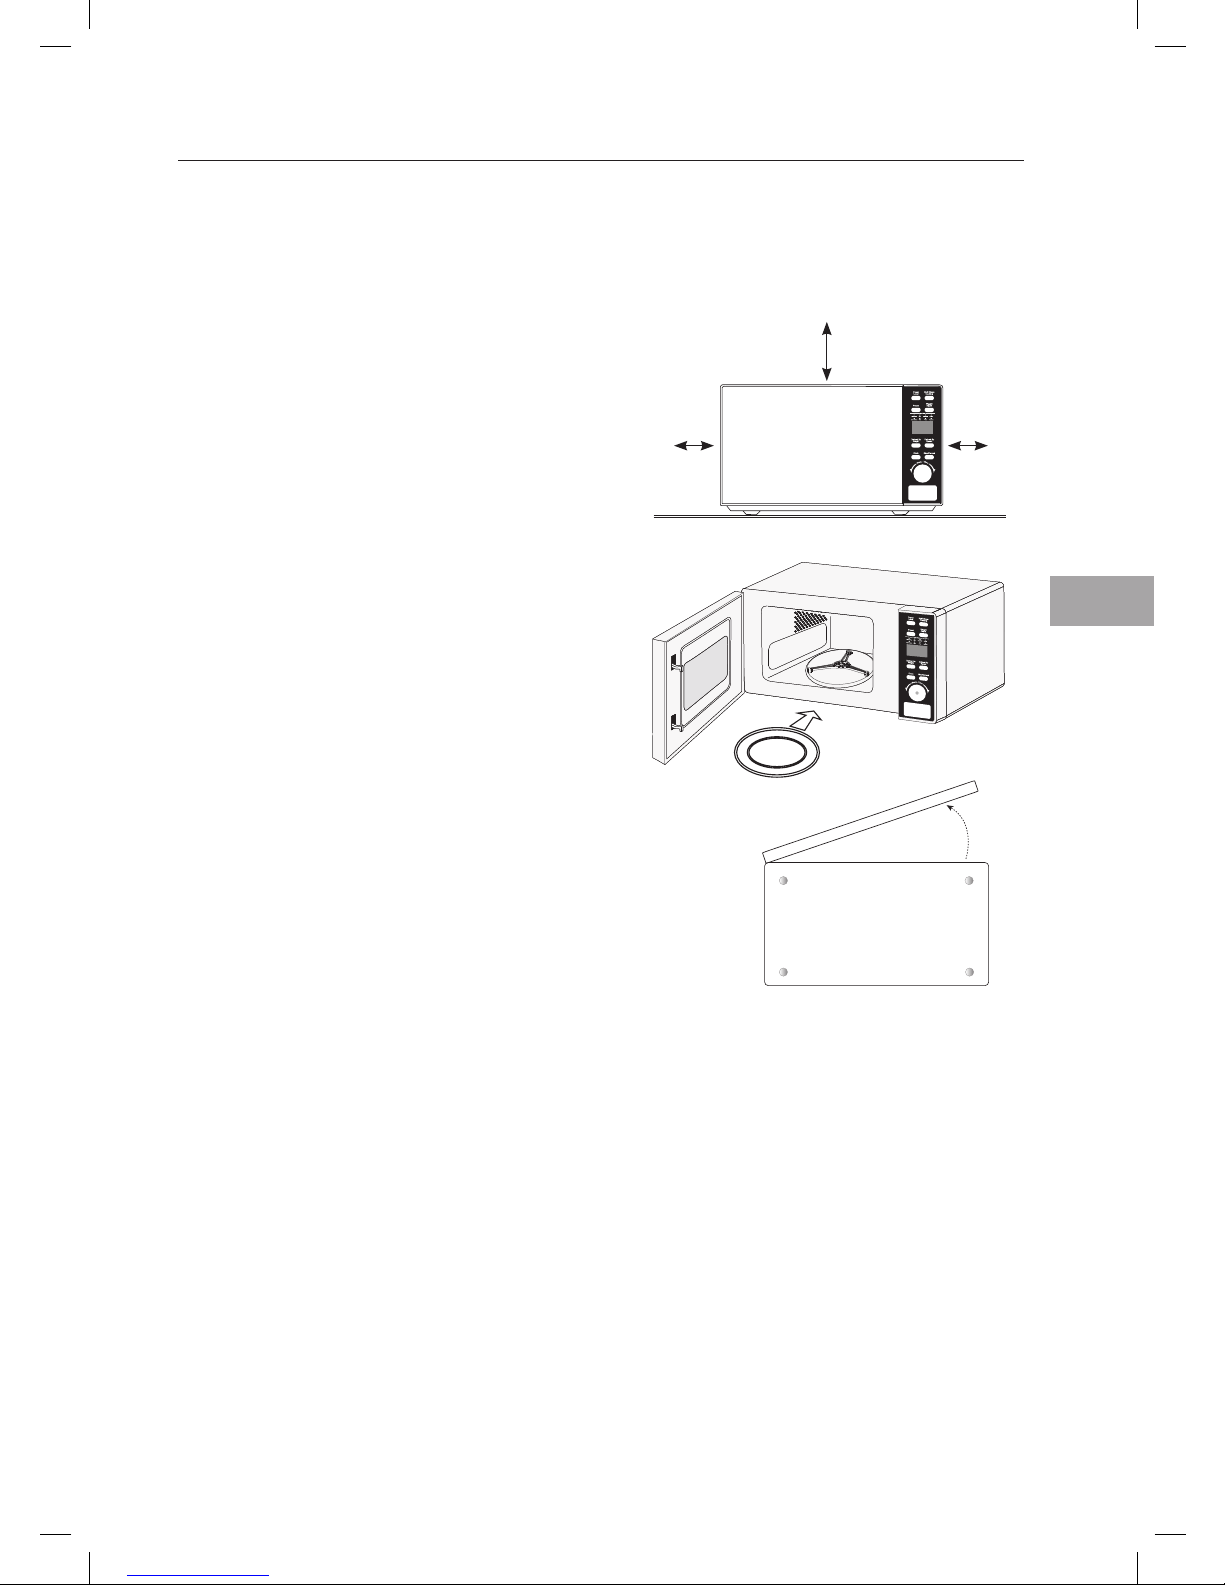
• Microwave safe cooking equipment will still get hot as the food it
contains heats up.
The microwave energy focuses on the moisture in the food causing
lots of tiny vibrations. The vibrations get so great that the moisture –
and the food – heat up.
Microwave Heating Categories
Your microwave has been tested and labelled to meet the government’s voluntary agreement on the
reheating of pre-cooked food.
The heating characteristics and output power levels of microwave ovens are usually calculated using a
relatively large portion of food (a 1000 gram load, IEC 705) but many packs of pre-cooked food are sold in
smaller packs, often about 350 grams.
The government, in partnership with food companies and microwave manufacturers, have set up a system
of heating categories to help you choose the reheating time for pre-cooked food.
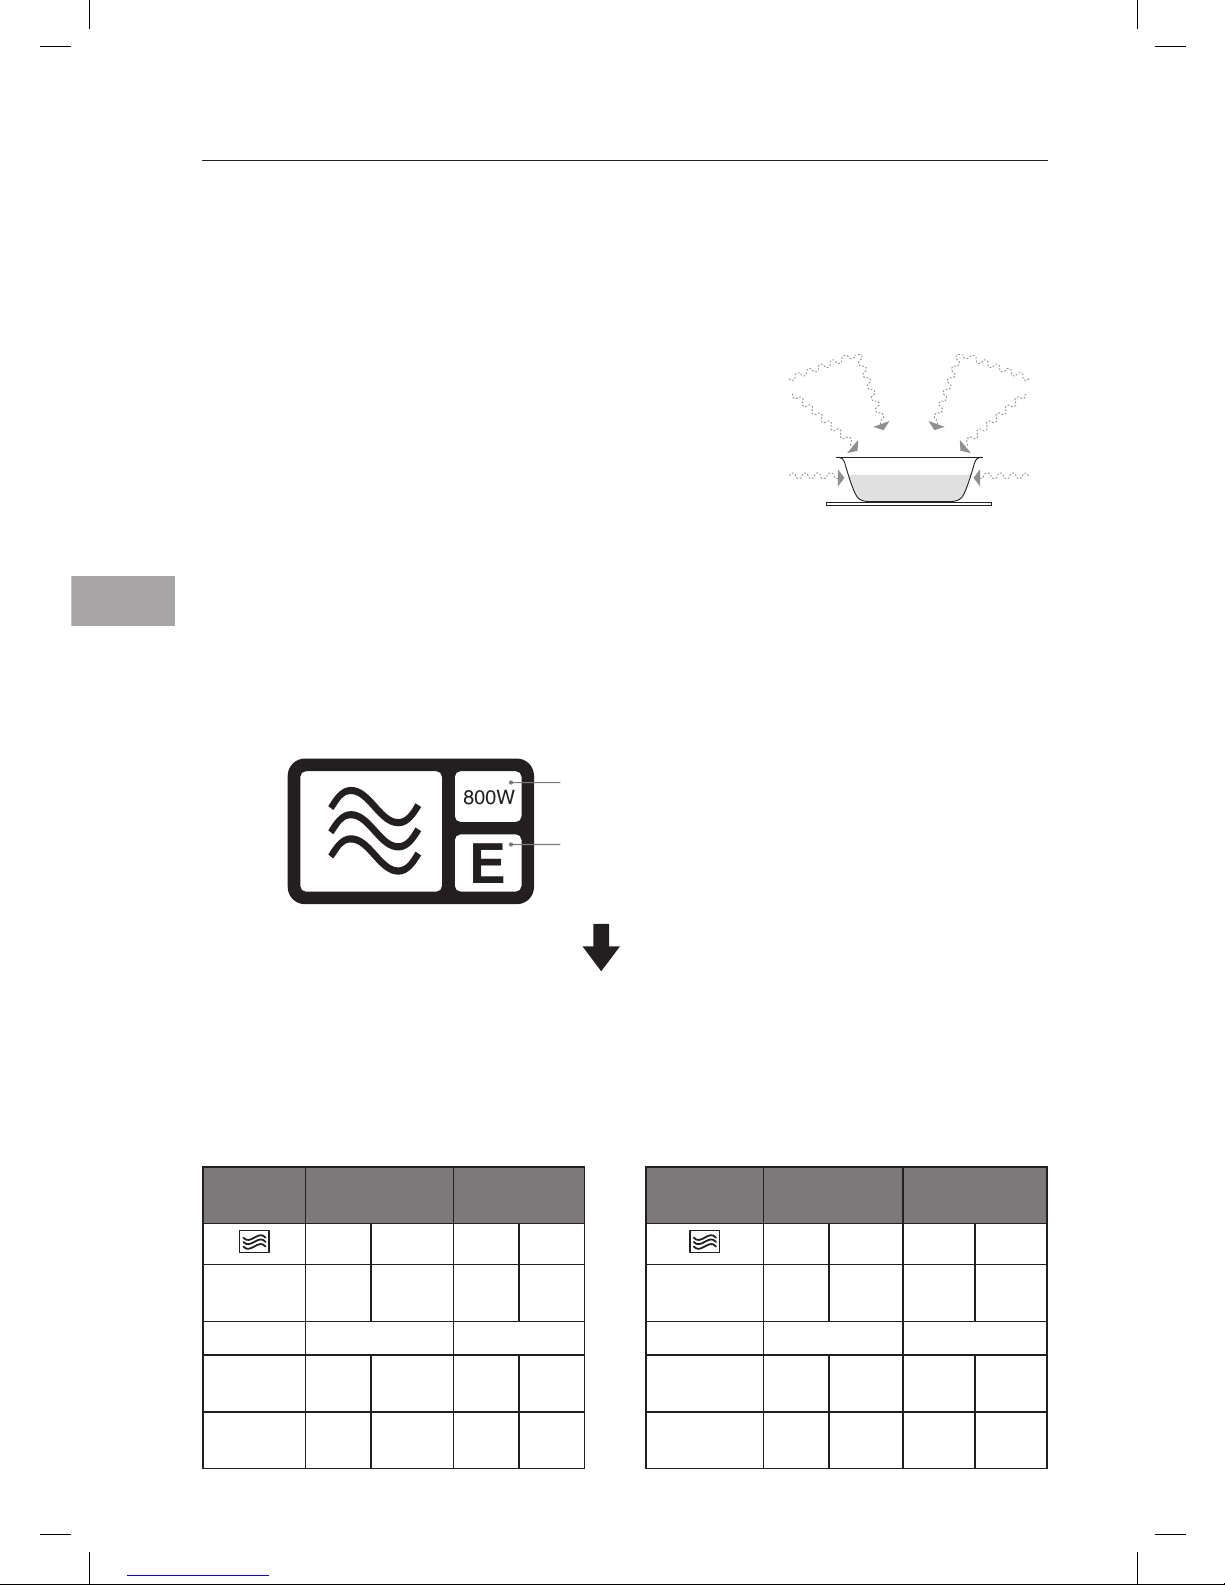
To Microwave:
1. Remove outer packaging.
2. Pierce film lid SEVERAL TIMES.
3. Place on a microwaveable plate.
4. Heat on full power.
5. Stir or turn halfway through heating.
Heating
Category
Wattage
(IEC705)
B D 650W 750W
Full power (in
minutes)
2 2 2 2
Stir / Turn Stir / Turn Stir / Turn
Full power
(in minutes)
2 1.5 2 1.5
Standing time
(in minutes)
1 1 1 1
To Microwave from frozen:
1. Remove outer packaging.
2. Pierce film lid SEVERAL TIMES.
3. Place on a microwaveable plate.
4. Heat on full power.
5. Stir or turn halfway through heating.
Heating
Category
Wattage
(IEC705)
B D 650W 750W
Full power (in
minutes)
3 2.5 3 2.5
Stir / Turn Stir / Turn Stir / Turn
Full power
(in minutes)
4 3.5 4 3.5
Standing time
(in minutes)
1 1 1 1
800W
E
800W is the output power of the microwave oven.
E is the heating category for your microwave oven.
Check the cooking times for category E on the
food’s packaging to see how long it should be
cooked for. Please see below example for reference.
10
GB
Steam
When you microwave food, steam is created as water in the food heats up and evaporates.
The steam formed during microwave cooking is entirely safe. It has to escape from the microwave to
prevent pressure from building up inside the oven. It does this through the vents on the back of the
microwave and from around the door.
Condensation
As the steam cools, you may find the condensation
gathers in small pools inside your microwave and on the
work surface beneath the door and vents. Always dry
the microwave after cooking foods with a high moisture
content.
Your microwave is designed to let steam escape from the
vents and around the door without microwave energy
escaping. There is no danger of microwave energy
escaping with the steam.
Checking your Microwave
Check your microwave after unpacking.
For your safety, the microwave stops if the
oven door is opened during cooking. Close
the door and press the Menu / Time dial to
continue the cooking cycle.
1. Push the button to open the oven door. Put
the turntable ring inside the oven and place
the glass turntable on top of the ring.
The inner ring of the turntable is shaped to sit
securely on the spindle.
You must always use the glass turntable
and turntable ring whenever you use the
microwave.
Place a cup of water on the glass turntable.
Make sure the cup is microwave safe - it
should not have any decorative metal trim.
2. Close the oven door.
3. Press the Stop / Cancel button to clear any
settings that have already been made.
4. Press the Menu / Time dial once to start a
simple 30-second microwave cooking cycle
and that allows you to check the operation of
the microwave oven.
5. When the cooking cycle has finished, the
water should be hot (be careful when you take
the cup out of the microwave). Press the Stop
/ Cancel button to clear any settings.
3,5
4
1
11
GB
1, 3, 5
2, 4
Clock Setting
When the microwave is connected to the mains power, the LED display will show and 1:00, and it will
sound once. Please ensure you have set the clock prior to use.
Please follow the steps below to set the clock.
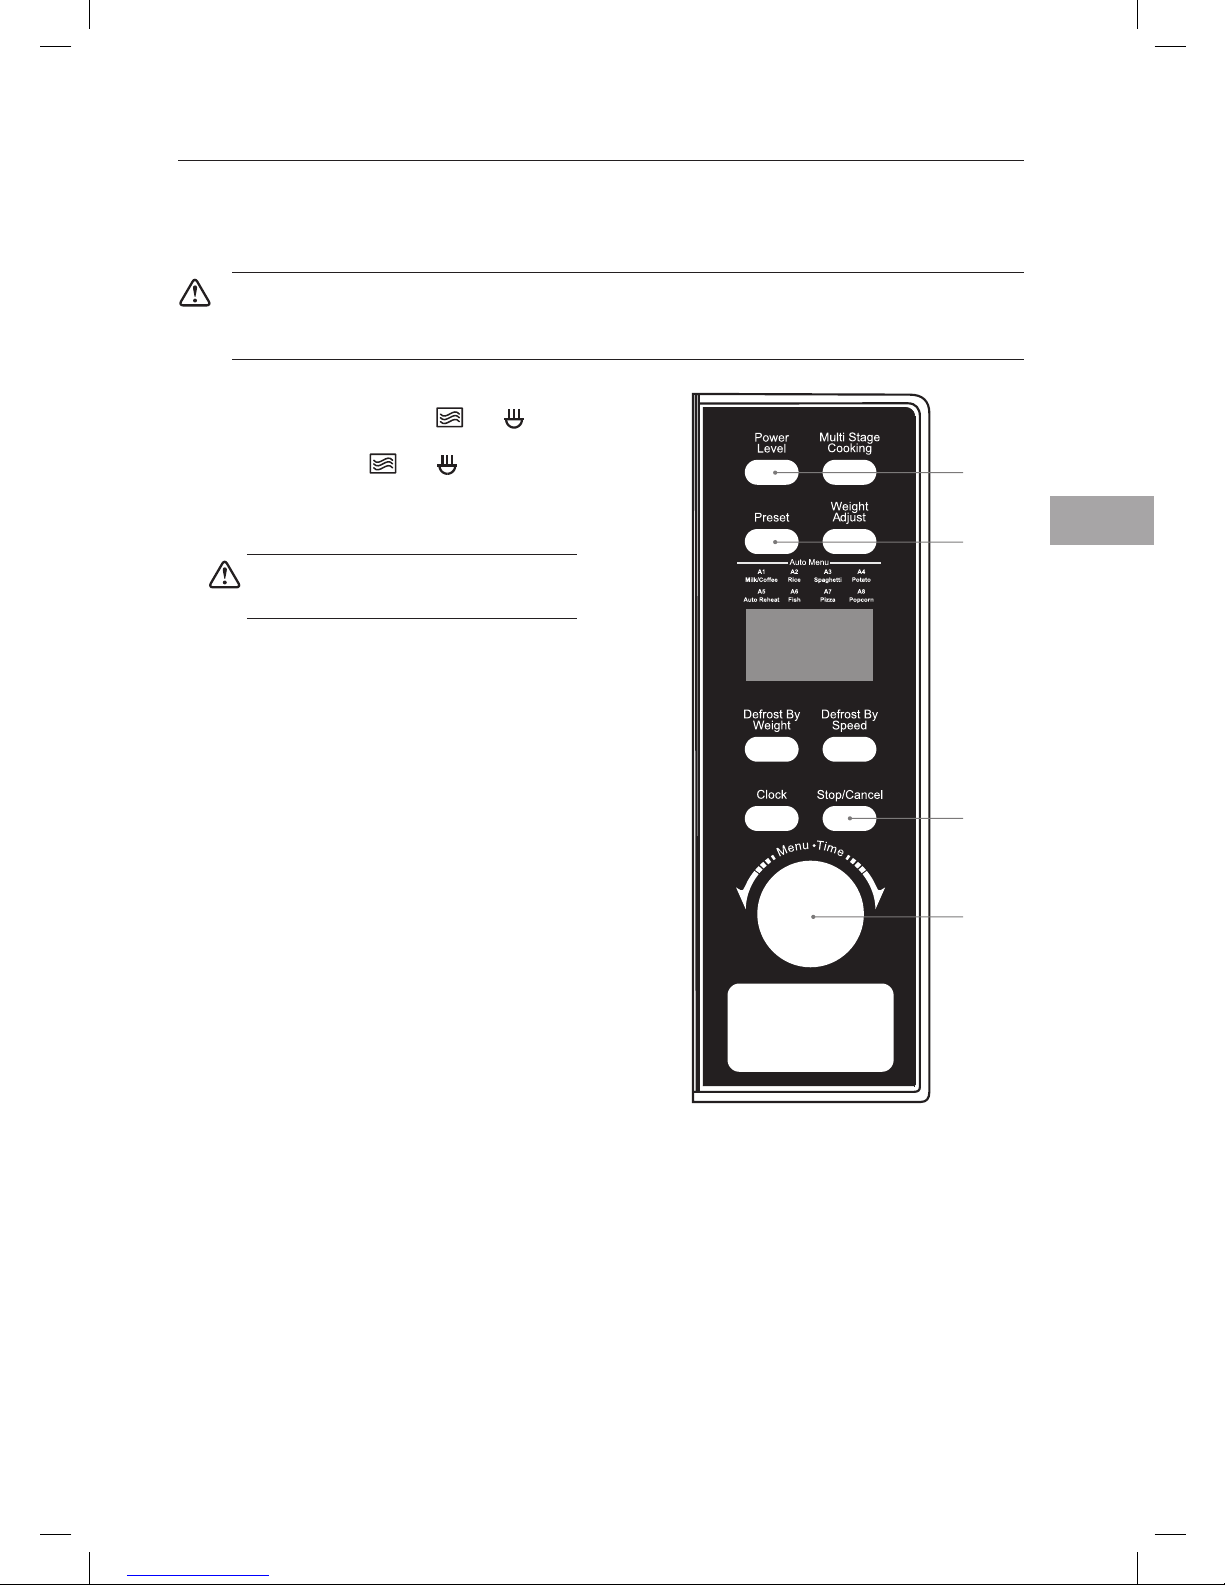
1. Press the Clock button and the hour figures
will flash.
2. Turn the Menu / Time dial to adjust the hour
figures. The input time has to be within 00-23.
3. Press the Clock button and the minute figures
will flash.
4. Turn the Menu / Time dial to adjust the
minute figures, the input time has to be within
00-59.
5. Press the Clock button again to complete the
clock setting.
The time will illuminate.

12
GB
Setting the Child Lock
This feature prevents the electronic operation of the microwave by locking the operation of the control
panel until you have cancelled it.
Please follow the steps below to set the child lock.
1. Press the Stop / Cancel button for 3 seconds
and a long tone will sound. The LED display
will also show
to indicate the microwave
has set the child lock.
2. To release the child lock, press the Stop /
Cancel button again for 3 seconds and a long
tone will sound to indicate that the microwave
has released the child lock.
The child lock function cannot be set
under delay start cooking.
1, 2

13
GB
Microwave Cooking
For simple Microwave Cooking, follow the steps below. For instance: If you want to use 80% microwave
power to cook for 20 minutes.
1. Press the Power Level button once and the
LED display will show 100%,
, 1S, .
Press the button again to change the
microwave power level to 80%,
, 1S, .
1s stands for 1st stage cooking.
2. Turn the Menu / Time dial to adjust the
cooking time until the LED display shows
20:00.
3. Press the Menu / Time dial to confirm and
start cooking.
4. Press the Stop / Cancel button once to stop
and hold the cooking. The LED display will
show
. Press again to cancel the setting.
Power Level Button Control
(For Microwave Cooking)
Order LED Display Microwave
Power
1
100%
100%
2
80%
80%
3
60%
60%
4
40%
40%
5
20%
20%
6
00%
Fan only
4
2, 3
1
14
GB
Two-Stage Cooking
For Two-Stage Cooking, please follow the steps below.
For instance: If you want to cook your food with 100% microwave power for 5 minutes and then to cook it
with 80% microwave power for 7 minutes.
You can only set 2 stages for Two-Stage Cooking. Neither defrosting programmes nor auto menu
programmes can be set in Two-Stage Cooking.
1. Press the Power Level button to initiate the
two-stage cooking with 100% microwave
power as the first stage. The LED display will
show 100%,
, 1S, .
2. Turn the Menu / Time dial to adjust the
cooking time until the LED display shows 5:00.
3. a Press the Multi Stage Cooking button once
and the LED display will show 100%,
,
2S,
.
b Then, press the Power Level button to
change the second stage power level from
100% to 80%.
1S stands for 1st stage cooking.
2S stands for 2nd stage cooking.
4. Turn the Menu / Time dial to adjust the
cooking time until the LED display shows 7:00.
5. Press the Menu / Time dial to confirm and
start cooking. The microwave will sound once
to indicate it has started the defrosting count
down.
The microwave will sound again as it starts
the microwave cooking (the second stage).
Once completed, the microwave will sound
five times and the LED display will show End
to indicate the completion.
6. Press the Stop / Cancel button once to stop
and hold the cooking. The LED display will
show
.
Press again to cancel the setting.
6
2, 4, 5
3a
1, 3b
15
GB
Delay Start Cooking (Programme Set in Advance)
For Delay Start Cooking, follow the steps below.
For instance: The current time is 12 o’clock (noon) and you want to cook with 80% microwave power for 5
minutes in 1 hour and 30 minutes time.
You can only set 2 stages for Delay Start Cooking. Neither defrosting programmes nor auto menu
programmes can be set in Delay Start Cooking. Ensure the oven door is closed prior to setting the
program.
1. Press the Power Level button once and the
LED display will show 100%,
, 1S, . Press
the button again to change the microwave
power level to 80%,
, 1S, .
2. Turn the Menu / Time dial to adjust the
cooking time until the LED display shows 5:00.
Do not press the Menu / Time dial at
this point.
3. a Press the Preset button to preset the
starting time for the cooking.
The hour figure will flash first.
b Turn the Menu / Time dial to adjust the
starting time until the LED display shows
13:00.
4. a Press the Preset button to preset the
starting time for the cooking.
The minute figure will flash first.
b Turn the Menu / Time dial to adjust the
starting time until the LED display shows
13:30.
5. Press the Menu / Time dial to complete the
setting. The microwave will sound 3 times
when the count down reaches the starting
time and cooking will start automatically.
6. To cancel the delay start cooking, press Preset
button and then press the Stop / Cancel
button.
6
2, 3b,
4b, 5
1
3a, 4a, 6
16
GB
Auto Cooking
This feature allows you to cook most of your food based on the food category and the weight.
Select the category and choose the default weight of the food. For quick reference of the cooking time and
the default weight, please refer to the Auto Menu table.
Auto Menu
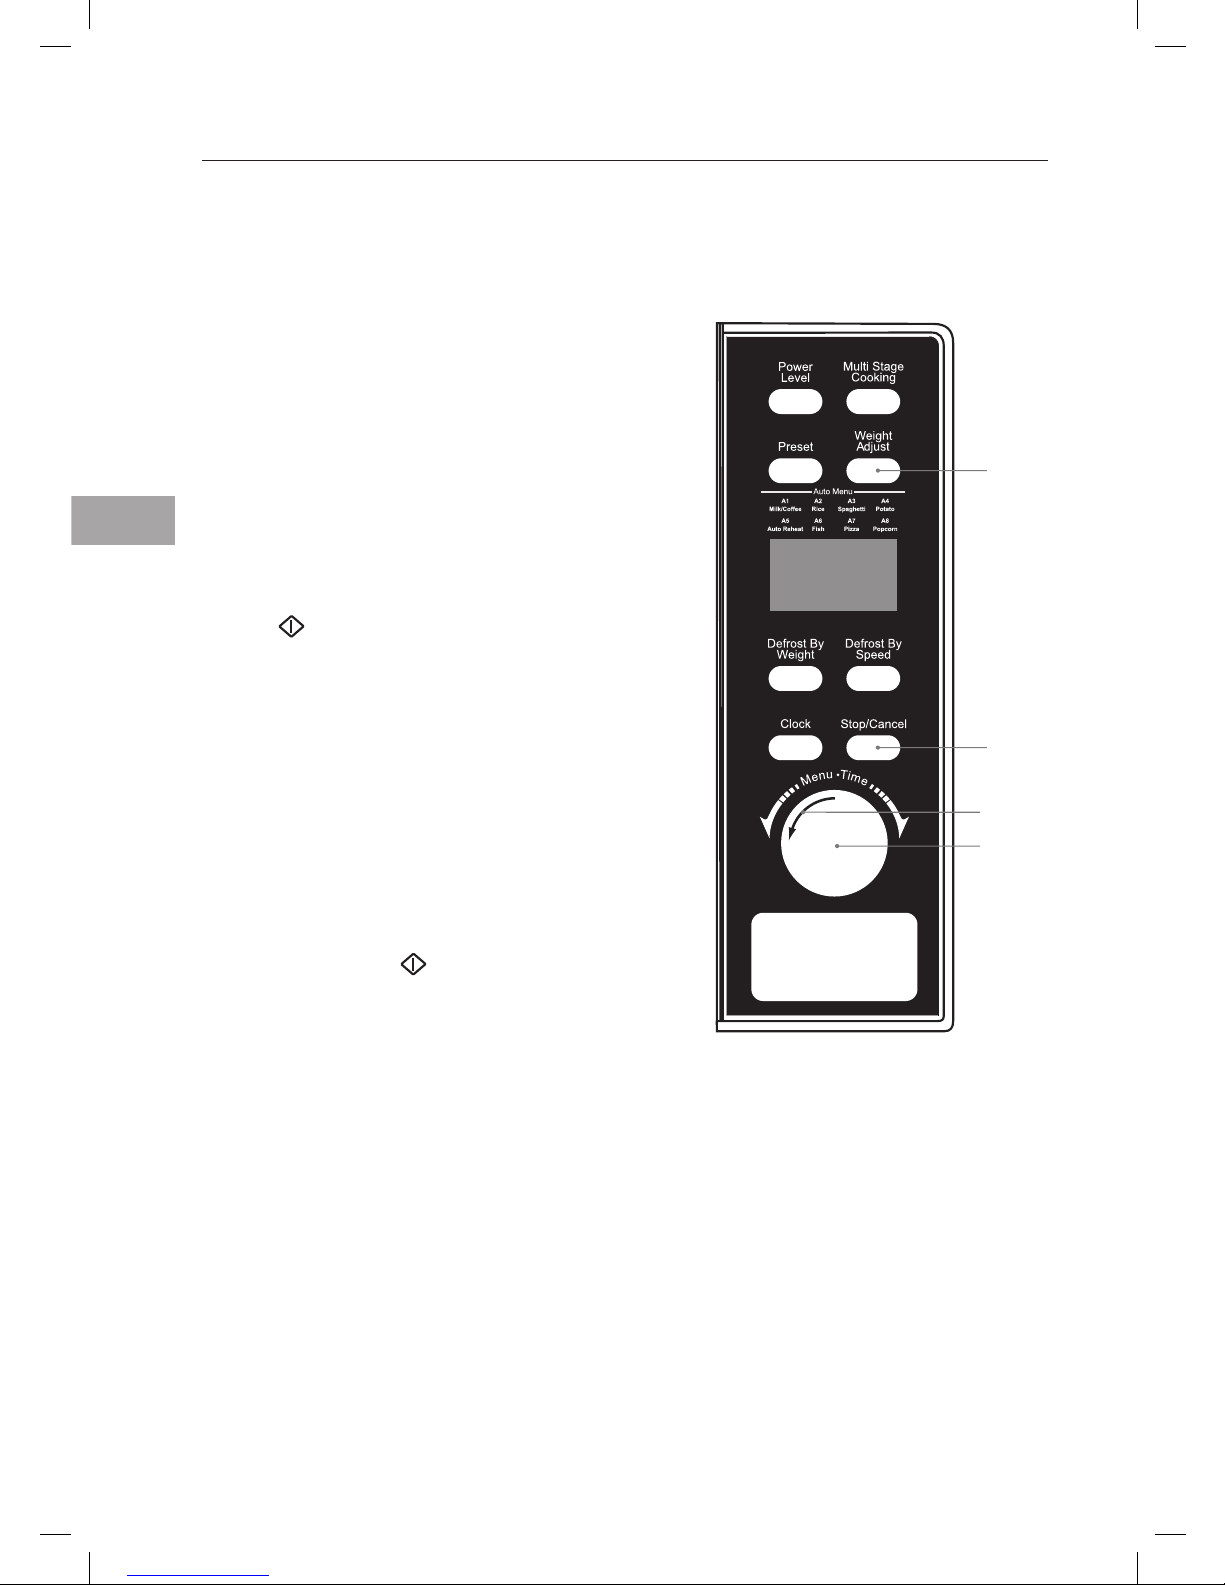
1. Turn the Menu / Time dial in anti-clockwise to
select the Auto Menu program required. The
LED display will show AUTO 8, 7, 6, etc.
2. Press the Weight Adjust button to choose the
default weight for your chosen program.
Please refer to the Auto Menu table for
information.
3. Press the Menu / Time dial to confirm and
start cooking.
4. Press the Stop / Cancel button once to stop
and hold the cooking. The LED display will
show
. Press again to cancel the setting.
For instance: If you want to cook 400g of fish
using the Auto Menu program, please follow the
steps below.
a. Turn the Menu / Time dial in anti-clockwise
to select Auto Menu program for sh. The
LED display will show AUTO 6.
b. Press the Weight Adjust button until the
LED display shows 400.
c. Press the Menu / Time dial to conrm and
start cooking.
d. Press the Stop / Cancel button once
to stop and hold the cooking. The LED
display will show
. Press again to
cancel the setting.
4
1
3
2

17
GB
The density and thickness of food can affect its cooking time. Ensure all food is piping hot
and cooked thoroughly before serving. It is essential that food is checked during and after the
recommended cooking time, even if Auto Menu was used.
Auto Menu Table
Menu Weight Display
Cooking
Time
Comments
AUTO 1
Milk / Coffee
200ml 1 1’30”
• Only use suitable microwavable containers and cling
film in the microwave oven. Pierce the film with a fork
before cooking.
• The preset cooking time is designed for 200ml per
cup.
400ml 2 2’40”
600ml 3 3’50”
AUTO 2
Rice
150g 150g 19’00”
150g of rice + 300ml
of cold water
• Only use suitable
microwavable containers and
cling film in the microwave
oven. Pierce the film with a
fork before cooking.
• Ensure to check the cooking
regularly to make sure the
water does not boil over.
300g 300g 22’00”
300g of rice + 600ml
of cold water
450g 450g 25’00”
450g of rice + 900ml
of cold water
600g 600g 28’00”
600g of rice + 1200ml
of cold water
AUTO 3
Spaghetti
100g 100g 22’00”
100g of spaghetti +
800 ml of cold water
• Only use suitable
microwavable containers and
cling film in the microwave
oven. Pierce the film with a
fork before cooking.
• Ensure to check the cooking
regularly to make sure the
water does not boil over.
200g 200g 27’00”
200g of spaghetti +
1600 ml of cold water
300g 300g 32’00”
300g of spaghetti +
2400 ml of cold water
AUTO 4
Potatoes
230g 1 5’00”
• For best results, pierce the potatoes’ skin before
cooking. Once the potatoes are cooked, wrap them
in aluminium foil for at least 5 minutes to ensure
they are cooked thoroughly.
• The preset cooking time is designed for 230g per
each potato.
460g 2 9’00”
690g 3 13’00”
AUTO 5
Auto reheat
200g 200g 1’30”
Make sure food is cooked thoroughly before
consuming. Additional cooking time may be
required for thicker pieces.
300g 300g 2’00”
400g 400g 2”30”
500g 500g 3’00”
600g 600g 3’30”
700g 700g 4’00”
800g 800g 4’30”
AUTO 6
Fish
200g 200g 3’00”
Make sure food is cooked thoroughly before
consuming. Additional cooking time may be
required for thicker pieces of fish.
300g 300g 4’20”
400g 400g 5’40”
500g 500g 7’00”
600g 600g 8’20”
AUTO 7
Pizza
150g 150g 0’50”
This setting is designed for re-heating cooked pizza
slices (not frozen pizza). Additional cooking time may
be required for thicker pieces of pizza.
300g 300g 1’20”
450g 450g 1’50”
AUTO 8
Popcorn
99g 99g 2’30”
For best results, we recommend using ready mix packed
popcorn. Cover it with microwavable lid.

18
GB
Quick Start Cooking
This feature allows you to quickly cook your food for 1 minute with 100% microwave power.
Please follow the steps below.
1. Press the Menu / Time dial to start the quick
start cooking. Press the button again to add
another 30 seconds. You may increase the
cooking time up to 10 minutes.
2. a. Alternatively, you can turn the Menu / Time
dial clockwise to set the cooking time with
100% microwave power first.
b. Then, press the Menu / Time dial to
start the quick start cooking.
2a, 2b
1
19
GB
Defrosting
This feature allows you to defrost your frozen foods simply by entering the weight or time. You may wish to
place the frozen food on a microwave safe plate or dish before placing it on the defrost rack (not supplied
in this microwave package). This is to ensure that any liquids released during defrosting will not spill and
dirty the interior of the oven.
Defrost by weight
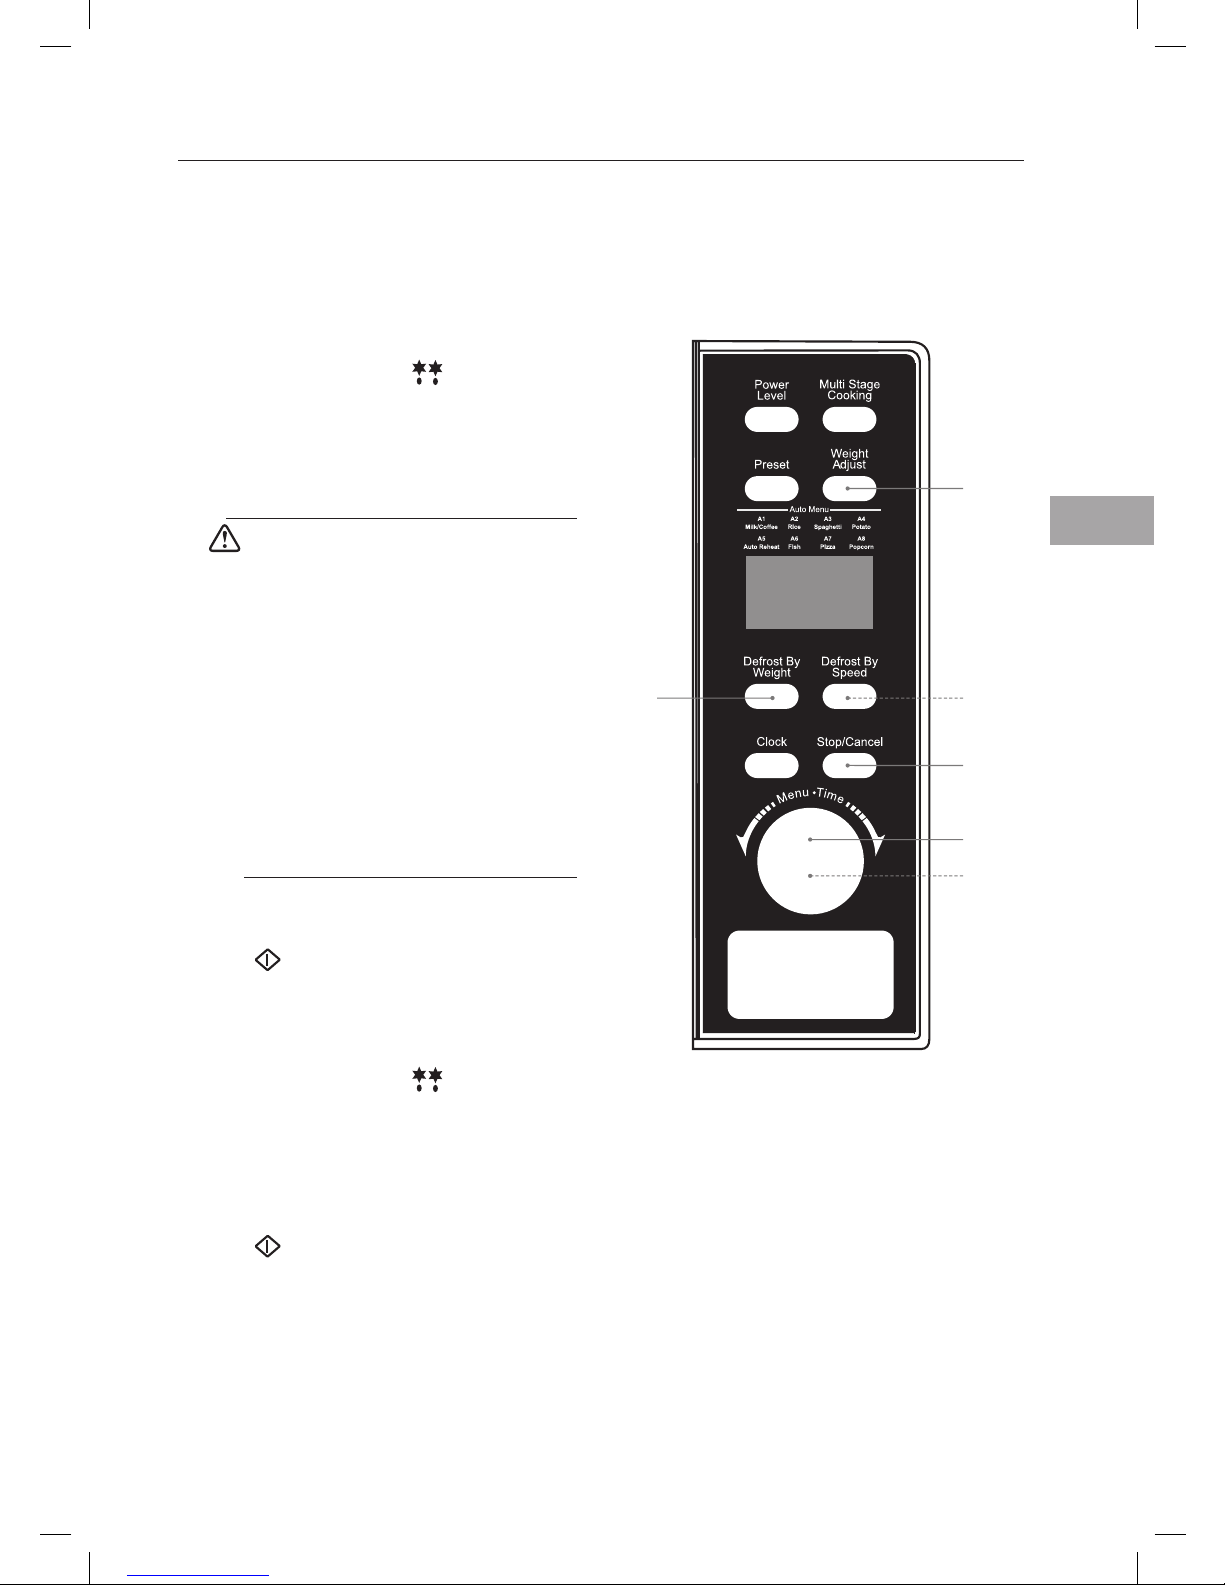
1. Press the Defrost By Weight button once and
the LED display will show
, AUTO.
2. Press the Weight Adjust button to adjust the
weight of your food. The default range is 100g
to 1800g.
3. Press the Menu / Time dial to start defrosting.
Large items may be frozen in the centre.
Therefore, to ensure even thawing,
turn them over from time to time and
break them into smaller pieces during
defrosting.
The oven will sound and pause after 2/3
running time. Open the oven door and
rotate the food. You need to press the
Menu / Time dial to restart defrosting.
Place roasts fat-side down or whole
poultry breastside down.
Drain liquids during defrosting as the
juices from food can get hot and cook
the food.
4. Press the Stop / Cancel button once to stop
and hold the defrosting. The LED display will
show
. Press again to cancel the setting.
Defrost by time
1. Press the Defrost By Speed button once and
the LED display will show
.
2. Turn the Menu / Time dial to set the
defrosting time.
3. Press the Menu / Time dial to start defrosting.
4. Press the Stop / Cancel button once to stop
and hold the defrosting. The LED display will
show
. Press again to cancel the setting.
4
3
1
2, 3
2
1

20
GB
Querying the Cooking Function
This feature allows you to check and view the current power, time and pre-set time of your selected
cooking program.
To nd out the current cooking power
1. Press the Power Level button once and the
LED display will show the current cooking
power while the oven is in microwave cooking.
However, this function will not be working in
Defrost by Weight, Defrost by Speed and Auto
Menu cooking. It will last for 3 seconds and
then return to its original display.
To nd out the time
2. Press the Clock button once and the LED
display will show the time while the oven is in
either microwave, combination, or auto menu
cooking. It will last for 3 seconds and then
return to its original display.
To nd out the pre-set time
3. While the oven is still in the pre-set state, press
the Preset button once and the LED display
will show the pre-set time. It will last for 3
seconds and then return to its original display.
1
3
2
21
GB
Cleaning Your Microwave
Cleaning your microwave each time you use it will help to prevent a build up of stubborn marks that can
be difficult to clean.
Unplug your microwave from the mains and wait for it to cool down completely before cleaning.
On the right hand side wall of the cavity is the wave guide cover, microwaves are passed though this to
enable your food to cook. It is important that this wave guide cover is kept clean at all times.
Wipe it with mild detergent and water and leave to dry.
10
Treat the glass turntable as you would any
glass plate. After you have used it for more
than 15 minutes, allow it to cool down before
you use it again. Do not wash the turntable in
very hot water, this could crack it.
Make sure the turntable is dry before you put it
back in the oven.
10
1
The oven walls have a special enamel coating
which makes cleaning very easy. Use a soft
damp cloth to wipe off any splashes or a paper
towel to mop up any spills. Wipe off grease
with a damp cloth and a little detergent. Dry
thoroughly. As with any oven, if grease is left to
accumulate, it can smoke and even catch fire.
1
Make sure you keep the outlet grids clean.
2
Keep the front of the oven clean so that the
door can close properly.
3
Be careful not to spill water into the vents.
4
Do not remove wave guide cover: It is
important to keep the cover clean in the same
manner as the inside of the oven. If grease
is left to accumulate, it can smoke and even
catch fire.
5
Keep the inside of the door clean with a damp
cloth. Use warm soapy water for stubborn
marks and dry thoroughly.
The inside of the door has a special coating
and must not be cleaned with abrasive pads or
cleaning powders.
6
Clean behind the door ledge.
7
Use warm soapy water to clean the outside of
the oven. Do not use abrasive pads or powders
that could scratch the surface.
8
Unplug the oven before cleaning the power
lead and the oven.
Wipe with a damp cloth and leave to dry
before plugging it back in.
9
4
5
2
6
7
8
9
3
Do not remove any fixed parts from the
inside of your microwave oven during
cleaning or at any other time.
22
GB
Frequently Asked Questions
Questions Answers
Why doesn’t the food seem to cook? Check that:
• the cooking time has been set
• the door is closed
• the power socket is not overloaded causing the fuse to blow.
Why does the food seem undercooked
or overcooked?
Check that:
• the correct cooking time has been set
• the correct power setting has been used.
How can I stop eggs from popping? When you bake or poach eggs in the microwave, the yolk can
sometimes pop as steam builds up inside it. You can stop the
egg from popping by piercing the yolk with a
toothpick before cooking.
Never cook eggs that are still in their shells.
Why is it so important that I allow
standing time after cooking?
With microwave cooking, many foods build cooking even after
they’ve been taken out of the microwave. Because microwave
cooking works from the outside of food inwards,
standing time lets you cook the centre of the food without the
outside being overcooked.
Why does my microwave sometimes
take longer to cook than it says in the
recipe?
First check that the microwave was set just as the recipe said.
Cooking times and heat settings are suggestions to help
prevent overcooking but differences in the weight, size, shape
and starting temperature of food will all affect how long it
takes to cook – just as it does with a conventional microwave.
Use your judgement along with the recipe to check whether
the food has been cooked properly.
Why do I get condensation on the
inside of the door?
Condensation is perfectly normal, especially when you are
cooking food with a high moisture content such as potatoes.
Does the microwave energy get
through the window on the door?
No. The door has a special metal screen with holes in that lets
you see inside but stops microwave energy from getting out.
Steam comes out of the side of the
door and vents. Can microwave energy
get out too?
No. The door and vents are carefully designed to let steam out
during cooking but keep microwave energy in. The gaps are
not big enough for microwave energy to escape.
What happens if the microwave is
switched on while the oven is empty?
The microwave will be damaged. Do not switch the
microwave on when there’s nothing inside the oven. It is a
good idea to keep a cup of water in the oven just in case
someone accidentally starts the microwave.
Why doesn’t the microwave’s light
illuminate?
Open the door. If the light does not illuminate, the bulb has
probably blown. Call a qualified technician – do not try to
change the bulb yourself.
There are sparks inside the microwave
when I use the microwave. Will this
cause any damage?
Yes. Make sure that you are not using any metal utensils and
that your containers don’t have a metal trim. You must not use
metal in your microwave when you cook (except aluminium
foil).
Light is showing through the vents and
door. Does this mean the microwave
energy can escape?
No. It is normal for the light to be visible and is nothing to be
concerned about.
Why do I get interference on my TV and
radio when I use the microwave?
Microwave ovens use radio waves similar to those received
by TVs and radios. You can lessen the interference by moving
your microwave further away from the TV or radio.
23
GB
Specication
Model S20MB10E
Input 230 - 240V~ 50Hz
Output 700 - 800 Watts
Microwave Frequency 2450MHz
Outside Dimensions
(width x deep x height)
452mm x 369mm x 262mm
Power consumption
Microwave 1250 - 1350 Watts
Complies with EEC directives 89/336/EEC and 92/31/EEC.
Because we continually strive to improve our products, we may change specifications without prior notice.
DSG Retail Limited is responsible for after sales service.
If you have a query about the product please contact our product support line
0844 561 6263 (Currys) and 08700 118 117 (Pixmania).
24
NO
Hvis elementer mangler eller er skadet, kontakt Partmaster (kun Storbritannia).
Tlf: 0844 800 3456 for hjelp.
Gratulerer med kjøpet av din nye Sandstrøm-mikrobølgeovn.
Disse brukerveiledningene vil hjelpe deg bruke mikrobølgeovnen på en trygg og riktig
måte.
Før du bruker Sandstrøm-mikrobølgeovnen
• Les disse instruksjonene nøye, og oppbevar dem for fremtidig bruk.
• Fjern alle emballasjeetikettene. Kast dem på en forsvarlig måte.
Før du ber om service
• Gå gjennom avsnittet om feilsøking. Dette vil hjelpe deg med å løse generelle
problemer selv og redusere behovet for å spørre etter hjelp fra profesjonelle
teknikere.
Pakke ut
Fjern all emballasje fra enheten. Ta vare på emballasjen. Hvis du kaster den, må du gjøre det i henhold til
lokale reguleringer.
Følgende elementer er inkluderte:
Hovedenheten
Dreieplate av glass x 1
Delnr: XGALS20MB10P12
Dreieplatering x 1
Delnr: XGALS20MB10P11
Brukerveiledning x 1
Delnr: S20MB10E-001
25
NO
Produktoversikt
Hovedenheten
Kontrollpanelet
Kontrollpanel
Strømnivå-knapp
Bruk denne knappen for å velge
funksjonen til mikrobølge og
strømnivået.
Tining etter vekt-knapp
Bruk denne knappen til å tine mat
etter vekt.
Forhåndsinnstill-knapp
Bruk denne knappen til å
forhåndsinnstille steketid.
Klokke-knapp
Bruk denne knappen for å stille
inn klokken.
LED-display
Viser klokken eller koketid/-
innstilling.
Meny / Tid-hjul
Bruk dette hjulet til å stille
inn tid og automatiske
menyprogrammer.
Steking med ere trinn-knapp
Bruk denne knappen til å velge
funksjonen med steking med to
trinn.
Tining etter hastighet-knapp
Bruk denne knappen til å tine
mat etter tid.
Vektjustering-knapp
Bruk denne knappen til å stille inn
matvekt.
Stopp/avbryt-knapp
Denne knappen vil stoppe
matlagingen og slette innstillinger.
Dør-knapp
26
NO
Bruke aluminiumsfolie i mikrobølgeovnen
Det er trygt å bruke aluminiumsfolie i mikrobølgeovnen så lenge du følger disse sikkerhetsretningslinjene.
Som med alt metall kan ikke mikrobølgeenergi trenge gjennom folie, men hvis du holder den unna
sideveggene i mikrobølgeovnen vil den ikke forårsake gnister og mikrobølgeovnen vil ikke bli skadet.
Bruk av folie er en god måte å dekke til deler av maten som du ikke ønsker skal koke like raskt som andre –
kanskje der delene er smalere og ellers ville bli overkokt.
Plasser folien over området du ønsker å skjerme og sørg for at folien ikke berører mikrobølgeovnsveggene
når dreieplaten roterer. Du må bare bruke et stykke folie av gangen, slik at du ikke får gnister mellom
separate stykker.
Følg disse retningslinjene når du bruker folie i mikrobølgeovnen:
• Fjern folielokk fra beholdere før du setter dem i mikrobølgeovnen. Noen lokk er laget av kartong med
et folietrekk – disse må også fjernes. Bruk om mulig et gjennomsiktig lokk som er trygt å bruke i en
mikrobølgeovn.
• Rør maten under tilberedningen dersom beholderen har lokk eller er dekket av film.
• Glassdreieplaten skal alltid brukes.
• Bruk grunne beholdere med stor overflate. Ikke bruk beholdere som er dypere enn 3,5 cm.
• Bruk grytekluter når du håndterer varme foliebeholdere.
• Ikke dekk maten helt med folie. Mikrobølgeenergien kan ikke trenge gjennom folien, så maten vil ikke
koke.
• Ikke la aluminiumsfolien berøre veggene inne i mikrobølgeovnen.
• Ikke bruk mer enn ett stykke folie i mikrobølgeovnen samtidig.
27
NO
2. Plasser mikrobølgeovnen på en flat overflate
unna varmekilder som varmeovner og åpne
flammer, og unna kalde områder. La det være
et mellomrom på 10 cm rundt hele ovnen
og 30 cm over slik at varmluft kan slippe ut
av luftehullene under matlaging –de er ikke
innebygget.
Klargjøing
Denne mikrobølgeovnen er beregnet på hjemmebruk. Det må ikke brukes til kommersiell catering.
1. Etter å ha pakket ut mikrobølgeovnen, må du kontrollere at den ikke er blitt skadet i esken. Kontroller
at det ikke er noen bulker i ovnen, og at døren lukkes ordentlig og uten skader. En bulket eller
skadet ovn kan gjøre at det slipper ut mikrobølgeenergi. Sørg for at du har tatt all emballasjen ut av
mikrobølgeovnen. Kast plastemballasjen eller posene på en forsvarlig måte, og bevar dem utenfor
rekkevidde for barn.
30cm
10cm10cm
3. Sett mikrobølgeovnens stikkontakt inn i
en standard veggkontakt (230-240 V, 13 A
merkestrøm). Unngå å bruke en kontakt der
det også står en adapter eller annet utstyr er
tilkoplet. Ikke bruk en multiadapter.
4. Sett dreieringen inn i mikrobølgeovnen og
sett glassplaten oppå ringen. Dreieplaten er
utformet for å sitte stødig på spindelen. Du
må alltid bruke dreieplaten og ringen når du
bruker mikrobølgeovnen.
5. For å beskytte arbeidsoverflaten din, anbefaler
vi at du fester noen antiskliputer (ikke
inkludert) til undersiden av mikrobølgeovnen.
Undersidevisning
28
NO
Introduserer tilberedning av mat med mikrobøgeovn
Tilberedning av mat med mikrobøgeovn
• Mikrobølgeovner koker mat med mikrobølgeenergi, som er tilsvarende naturlig forekommende
radiobølger. Normalt vil disse "bølgene" bli svakere ettersom de forsvinner inn i atmosfæren, men i en
mikrobølgeovn konsentreres de på maten og gjør at den varmes opp.
• Mikrobølgeenergi kan ikke trenge gjennom metall – så den kan ikke slippe ut fra mikrobølgeovnen
– men den kan trenge gjennom materialer som glass, porselen, plast og papir. Dette er materialene
som brukes til å lagre kokekar som det er trygt å bruke i
mikrobølgeovner.
• Kokekar som det er trygt å bruke i mikrobølgeovner blir likevel varme
ettersom maten de inneholder varmes opp.
Mikrobølgeenergien fokuserer på fuktigheten i maten og skaper en
masse små vibrasjoner. Vibrasjonene blir så store at fuktigheten – og
maten – varmes opp.
Oppvarmingskategorier i mikrobøgeovn
Mikrobølgeovnen er testet og merket for å tilfredsstille statens frivillige avtale om oppvarming av
forhåndstilberedt mat.
Oppvarmingsegenskapene og utgangseffekten i mikrobølgeovner beregnes vanligvis ved bruk av en
relativt stor matporsjon (1000 gram, IEC 705), men mange forhåndstilberedte matvarer selges i mindre
pakker, ofte rundt 350 gram.
Regjeringen har, i samarbeid med matvareselskaper og produsenter av mikrobølgeovner, satt opp et
system med oppvarmingskategorier slik at du lettere kan velge rett oppvarmingstid for forhåndstilberedt
mat.
Bruke mikrobølgeovn:
1. Fjern den ytre emballasjen.
2. Stikk hull på filmen på FLERE STEDER.
3. Legg den på en tallerken som det er trygt å
bruke i en mikrobølgeovn.
4. Varm opp med full effekt.
5. Snu halvveis gjennom oppvarmingen.
Oppvarming-
skategori
Wattage
(IEC705)
B D 650W 750W
Full styrke
(i minutter)
2 2 2 2
Rør / snu Rør / snu Rør / snu
Full styrke
(i minutter)
2 1,5 2 1,5
Hviletid
(i minutter)
1 1 1 1
Lage frossen mat i mikrobølgeovn:
1. Fjern den ytre emballasjen.
2. Stikk hull på filmen på FLERE STEDER.
3. Legg den på en tallerken som det er trygt å
bruke i en mikrobølgeovn.
4. Varm opp med full effekt.
5. Snu halvveis gjennom oppvarmingen.
Oppvarming-
skategori
Wattage
(IEC705)
B D 650W 750W
Full styrke (i
minutter)
3 2,5 3 2,5
Rør / snu Rør / snu Rør / snu
Full styrke (i
minutter)
4 3,5 4 3,5
Hviletid
(i minutter)
1 1 1 1
800W
E
Mikrobølgeovnen har en utgangseekt på 800 W.
Mikrobølgeovnen er i oppvarmingskategorien E.
Kontroller koketidene for kategori E på
matemballasjen for å se hvor lenge den skal kokes.
Eksempelet under kan brukes som referanse.
29
NO
Damp
Når du lager mat i en mikrobølgeovn dannes det damp ettersomvannet i maten varmes opp og fordamper.
Dampen som dannes under bruk av mikrobølgeovnen er ikke farlig. Den måslippe ut av mikrobølgeovnen
for å forhindre at det bygges opp trykk inne iovnen. Dette gjøres gjennom ventilene på baksiden av
mikrobølgeovnen og rundt døren.
Kondens
Ettersom dampen kjøles av kan du finne at det dannes
kondens i små pytterinne i mikrobølgeovnen og på
arbeidsområdet under døren og ventilene. Tørk alltid av
mikrobølgeovnen etter at du har laget mat med høyt
vanninnhold.
Mikrobølgeovnen er konstruert for å la damp slippe ut
gjennomventilene og rundt døren uten at det slipper ut
mikrobølgeenergi. Det er ingen fare for at det slipper ut
mikrobølgeenergi sammen med dampen.
Kontrollere mikrobøgeovnen
Undersøk mikrobølgeovnen etter at du har
pakket den ut.
For din egen sikkerhet stopper
mikrobølgeovnen hvis døren åpnes
under tillaging. Lukk døren for å fortsette
tillagingen. Lukk døren og trykk på
Menu / Time -hjulet for å fortsette
matlagingssyklusen.
1. Trykk på knappen for å åpne ovnsdøren. Sett
dreieringen inn i ovnen og sett glassplaten
oppå ringen.
Den indre ringen på dreieplaten er utformet
for å sitte stødig på spindelen.
Du må alltid bruke dreieplaten og -ringen når
du bruker mikrobølgeovnen.
Sett en kopp vann på dreieplaten. Sørg for at
koppen er trygg å bruke i en mikrobølgeovn –
den må ikke ha border av metall.
2. Lukk ovnsdøren.
3. Trykk på Stop / Cancel-knappen for å slette
eventuelle innstillingersom allerede er gjort.
4. Trykk på Menu / Time-hjulet én gang
for å starte en enkel 30-sekunders
mikrobølgetilberedning som lar deg sjekke
hvordan mikrobølgeovnen fungerer.
5. Når tilberedningen er klar, skal vannet være
varmt (vær forsiktig når du tar skålen ut av
ovnen). Trykk på Stop / Cancel-knappen for å
fjerne eventuelle innstillinger.
3,5
4
1

30
NO
Klokkeinnstilling
Når mikrobølgeovnen er koblet til strømuttaket, vil LED-displayet vise og 1:00, og en lyd vil høres én
gang. Sørg for at klokken er stilt før bruk.
Følg trinnene under for å stille klokken.
1. Trykk på Clock-knappen og time-tallene
blinker
2. Vri Menu / Time-hjulet for å justere
timetallene. Inntastet tid må være innenfor
00-23.
3. Trykk på Clock-knappen og minutt-tallene
blinker.
4. Vri Menu / Time-hjulet for å justere
timetallene, tiden bør være innen 00-59.
5. Trykk på Clock-knappen igjen for å fullføre
klokkeinnstillingen.
Tiden vil lyse opp.
1, 3, 5
2, 4

31
NO
Aktivere barnesikringen
Denne funksjonen hindrer elektronisk bruk av mikrobølgeovnen ved å låse kontrollpanelet til du avbryter
funksjonen.
Følg trinnene under for å aktivere barnesikringen.
1. Trykk på Stop / Cancel-knappen i 3
sekunder og en lang tonelyd vil lyde. LEDdisplayet vil også vise
for å indikere at
mikrobølgeovnen har aktivert barnesikringen.
2. Når du vil deaktivere barnesikringen, holder
du Stop / Cancel-knappen inne igjen i tre
sekunder; du vil høre en lang tone som
indikerer at barnesikringen er deaktivert.
Barnesikring-funksjonen kan ikke settes
under forsinket start-tilberedning.
1, 2

32
NO
Tilberedning av mat med mikrobøgeovn
For enkel tilberedning av mat med mikrobølger kan du følge stegene under. For eksempel: Hvis du vil
bruke 80 % strøm for å koke i 20 minutter.
1. Trykk én gang på Power Level og LEDdisplayet vil vise 100%,
, 1S, . Trykk på
knappen igjen for å endre mikrobølgeeffekten
til 80%,
, 1S, .
1s står for førstenivå matlaging.
2. Vri Menu / Time-hjulet for å endre
tilberedningstiden helt til LED-displayet viser
20:00.
3. Trykk på Menu / Time-hjulet for å bekrefte og
starte matlagingen.
4. Trykk én gang på Stop / Cancel-knappen
for å stoppe og pause matlagingen. LEDdisplayet vil vise
. Trykk igjen for å avbryte
innstillingen.
Strømnivknapp-kontroll
(for mikrobølgematlaging)
Rekkefølge LED-display Mikrobølgeeffekt
1
100%
100%
2
80%
80%
3
60%
60%
4
40%
40%
5
20%
20%
6
00%
Kun vifte
4
2, 3
1

33
NO
Matlaging med to omganger
Følg stegene under for tilberedning i to omganger.
For eksempel: Hvis du vil tilberede maten din med 100% mikrobølgestyrke for 5 minutter og deretter
tilberede den med 80% mikrobølgestyrke i 7 minutter.
Du kan kun stille inn 2 omganger for matlaging med to omganger. Verken tiningsprogrammer eller
automatiske menyprogrammer kan stilles inn i matlaging med to omganger.
1. Trykk på Power Level-knappen for å starte
matlagingen med to omganger med 100%
mikrobølgestyrke som den første omgangen.
LED-displayet vil vise 100%,
, 1S, .
2. Vri Menu / Time-hjulet for å endre
tilberedningstiden helt til LED-displayet viser
5:00.
3. a Trykk én gang på knappen Matlaging i to
omganger og LED-displayet vil vise 100%,
, 2S,
.
b Trykk deretter på Power Level-knappen for
å endre strømnivået for den andre omgangen
fra 100% til 80%.
1S står for førstenivå matlaging.
2S står for matlaging i andre nivå.
4. Vri Menu / Time-hjulet for å endre
tilberedningstiden helt til LED-displayet viser
7:00.
5. Trykk på Menu / Time-hjulet for å bekrefte
og starte matlagingen. Mikrobølgeovnen vil
gi fra seg en lyd to ganger for å indikere at
nedtellingen til opptiningen har begynt.
Mikrobølgeovnen vil gi fra seg en ny lyd
når tilberedningen med mikrobølger andre
stadium. Mikrobølgeovnen vil lyde fem
ganger når den er ferdig og LED-displayet vil
vise End for å indikere fullføringen.
6. Trykk én gang på Stop / Cancel-knappen for å
stoppe og pause matlagingen. LED-displayet
vil vise
.
Trykk igjen for å avbryte innstillingen.
6
2, 4, 5
3a
1, 3b

34
NO
Forsinket start av tilberedning (Program innstilt på forhånd)
Følg stegene under for forsinket start av tilberedning.
For eksempel: Gjeldende tid er 12 (lunsj) og du vil tilberede mat med 80 % mikrobølgeeffekt i fem minutter
om 1 time og 30 minutter.
Du kan kun stille inn 2 omganger for forsinket start av tilberedning. Verken tiningsprogrammer eller
automatiske menyprogrammer kan stilles inn i forsinket start av tilberedning. Forsikre deg om at
døren er lukket før du stiller inn programmet.
1. Trykk én gang på Power Level og LED-
displayet vil vise 100%,
, 1S, . Trykk på
knappen igjen for å endre mikrobølgeeffekten
til 80%,
, 1S, .
2. Vri Menu / Time-hjulet for å endre
tilberedningstiden helt til LED-displayet viser
5:00.
Ikke trykk på Menu / Time-hjulet på
dette tidspunktet.
3. a Trykk på Preset-knappen for å
forhåndsinnstille starttid for tilberedningen.
Timetallet vil blinke først.
b Vri Menu / Time-hjulet for å endre
startstiden helt til LED-displayet viser 13:00.
4. a Trykk på Preset-knappen for å
forhåndsinnstille starttid for tilberedningen.
Minuttallet vil blinke først.
b Vri Menu / Time-hjulet for å endre
startstiden helt til LED-displayet viser 13:30.
5. Trykk på Menu / Time-hjulet for å fullføre
innstillingen. Mikrobølgeovnen vil gi fra
seg en lyd 3 ganger når nedtellingen når
starttiden. Tilberedningen vil så starte
øyeblikkelig.
6. For å avbryte forsinket start av tilberedning,
trykk på Preset-knappen og trykk deretter på
Stop / Cancel-knappen.
6
2, 3b,
4b, 5
1
3a, 4a, 6

35
NO
Automatisk tilberedning
Med denne funksjonen kan du tilberede mat basert på typen mat og vekten.
Velg kategori og still inn matens standardvekt. Det henvises til automeny-tabellen for en hurtigreferanse til
tilberedningstid og standardvekt.
Automeny
1. Vri Menu / Time-hjulet mot klokken for
å velge ønsket Automeny-program. LEDdisplayet vil vise AUTO, 8, 7, 6, osv.
2. Trykk på Weight Adjust-knappen for å velge
standardvekt for ditt valgte program.
Det henvises til Auto Meny (automenyen) for
informasjon.
3. Trykk på Menu / Time-hjulet for å bekrefte og
starte matlagingen.
4. Trykk én gang på Stop / Cancel-knappen
for å stoppe og pause matlagingen. LEDdisplayet vil vise
. Trykk igjen for å avbryte
innstillingen.
For eksempel: Hvis du vil koke 400 gram med
fisk med Automeny-programmet, må du følge
trinnene under.
a. Vri Menu / Time-hjulet mot klokken for å
velge ønsket Automeny-program for sk.
AUTO 6 vises i LED-displayet.
b. Trykk på Weight Adjust-knappen til LED-
displayet viser 400.
c. Trykk på Menu / Time-hjulet for å
bekrefte og starte matlagingen.
d. Trykk én gang på Stop / Cancel-knappen
for å stoppe og pause matlagingen. LEDdisplayet vil vise
. Trykk igjen for å
avbryte innstillingen.
4
1
3
2

36
NO
Matens tetthet og tykkelse kan innvirke på tilberedningstiden. Forsikre deg om at all mat er
rykende varm og gjennomstekt før servering. Det er svært viktig at maten sjekkes under og etter
tilberedningstiden, selv når automeny brukes.
Automeny-tabell
Meny Vekt Skjerm Koketid Kommentar
AUTO 1
Melk/kaffe
200ml 1 1’30”
• Legg i en passende mikrobølgetrygg beholder, dekk
med plastfolie som egner seg for mikrobølgeovn.
Gjennomhull plastfolien med en gaffel før
tilberedning.
• Den forhåndsinnstilte tiden er designet for 200 ml per
kopp.
400ml 2 2’40”
600ml 3 3’50”
AUTO 2
Ris
150g 150g 19’00”
150g med ris + 300ml
med kaldt vann
• Legg i en passende
mikrobølgetrygg beholder,
dekk med plastfolie som
egner seg for mikrobølgeovn.
Gjennomhull plastfolien med
en gaffel før tilberedning.
• Sjekk ofte så vannet ikke koker
over.
300g 300g 22’00”
300g med ris + 600ml
med kaldt vann
450g 450g 25’00”
450g med ris + 900ml
med kaldt vann
600g 600g 28’00”
600g med ris +
1200ml
med kaldt vann
AUTO 3
Spagetti
100g 100g 22’00”
100 g med spagetti +
800 ml med kaldt
vann
• Legg i en passende
mikrobølgetrygg beholder,
dekk med plastfolie som
egner seg for mikrobølgeovn.
Gjennomhull plastfolien med
en gaffel før tilberedning.
• Sjekk ofte så vannet ikke koker
over.
200g 200g 27’00”
200g med spagetti +
1600 ml kaldt vann
300g 300g 32’00”
300g med spagetti +
2400 ml kaldt vann
AUTO 4
Poteter
230g 1 5’00”
• For best resultat, stikk hull på skinnet til potetene før
tilberedning. Straks potetene er kok, pakk dem inn i
aluminiumsfolie i minst fem minutter for å sikre at de
blir gjennomkokt.
• Den forhåndsinnstilte tiden er designet for 230 g for
hver potet.
460g 2 9’00”
690g 3 13’00”
AUTO 5
Automatisk
oppvarming
200g 200g 1’30”
Forsikre deg om at maten er gjennomstekt før servering.
Ekstra steketid kan være er nødvendig for tykkere biter.
300g 300g 2’00”
400g 400g 2”30”
500g 500g 3’00”
600g 600g 3’30”
700g 700g 4’00”
800g 800g 4’30”
AUTO 6
FISK
200g 200g 3’00”
Forsikre deg om at maten er gjennomstekt før servering.
Ytterligere steketid kan være nødvendig for tykke biter.
300g 300g 4’20”
400g 400g 5’40”
500g 500g 7’00”
600g 600g 8’20”
AUTO 7
Pizza
150g 150g 0’50”
Denne innstillingen er beregnet på ferske pizzaskiver
(ikke frossenpizza). Ytterligere steketid kan være
nødvendig for tykke biter med pizz.
300g 300g 1’20”
450g 450g 1’50”
AUTO 8
Popcorn
99g 99g 2’30”
For best resultat, anbefaler vi at du bruker ferdig
blandet og pakket popcorn. Dekk til med et
mikrobølgeovnlokk.

37
NO
Tilberedning med hurtig start
Med denne funksjonen kan du raskt tilberede maten i 1 minutt ved 100 % mikrobølgeeffekt.
Følg stegene under.
1. Trykk på Menu / Time-hjulet for å starte
hurtigstartstilberedning. Trykk på knappen
igjen for å legge til ekstra 30 sekunder. Du kan
øke steketiden med opptil 10 minutter.
2. a Alternativt kan du vri Menu / Time-hjulet
med klokken for å stille inn tilberedingstiden
med 100 % mikrobølgeeffekt først.
b Trykk deretter på Menu / Time-hjulet for å
starte hurtigstartstilberedning.
2a, 2b
1

38
NO
Opptining
Med denne funksjonen kan du tine opp frossen mat ved ganske enkelt å skrive inn vekten eller tiden. Det
kan være lurt å plassere frossen mat på en tallerken eller asjett som er egnet for bruk i mikrobølgeovn, før
du setter maten på opptiningsristen (følger ikke med denne mikrobølgeovnen). Dette for å sikre at væske
som frigjøres under opptiningen ikke skal søles og skitne til innsiden av ovnen.
Opptining etter vekt
1. Trykk på Defrost By Weight-knappen én
gang.
vil vises i LED-displayet, AUTO.
2. Trykk på Weight Adjust-knappen for å justere
vekten på maten. Standard spennvidde er fra
100 g til 1800g.
3. Trykk på Menu / Time-hjulet for å starte
opptining.
Store biter kan være frosen i midten.
Derfor bør du, for å sikre jevn tining,
vende dem fra tid til annen og dele
dem opp i mindre biter i løpet av
opptiningen.
Mikrobølgeovnen vil lyde og
pause etter 2/3 av tiden. Åpne
mikrobølgeovnsdøren og roter maten.
Du må trykke på Menu / Time-hjulet for
å starte opptiningen på nytt.
Plasser stek med fettsiden ned og helt
fjærkre med brystsiden ned.
Siden væske fra mat kan bli varm og
koke maten, bør du helle av væske mens
opptiningen pågår.
4. Trykk én gang på Stop / Cancel-knappen
for å stoppe og pause opptiningen. LEDdisplayet vil vise
. Trykk igjen for å avbryte
innstillingen.
Opptining etter tid
1. Trykk på Defrost By Speed-knappen én gang.
vil vises i LED-displayet.
2. Vri Menu / Time-hjulet for å stille inn
opptiningstiden.
3. Trykk på Menu / Time-hjulet for å starte
opptining.
4. Trykk én gang på Stop / Cancel-knappen
for å stoppe og pause opptiningen. LEDdisplayet vil vise
. Trykk igjen for å avbryte
innstillingen.
4
3
1
2, 3
2
1

39
NO
Undersøke tilberedningsfunksjon
Med denne funksjonen kan du se den aktuelle effekten, tiden og den forhåndsinnstilte tiden til det valgte
tilberedningsprogrammet.
For å nne aktuell tilberedningseekt
1. Trykk på Power Level-knappen. I LED-
displayet vil aktuell tilberedningseffekt
vises mens mat blir tilberedt i ovnen med
mikrobølger. Denne funksjonen vil derimot
ikke fungere i opptining etter vekt, opptining
etter hastighet og automeny-tilberedning. Det
vil vises i tre sekunder, og deretter vises den
originale displayet.
For å nne tiden
2. Trykk én gang på Clock-knappen og LED-
displayet vil vise tidne mens mikrobølgeovnen
er i enten mikrobølge, kombinasjon eller
automeny-tilberedning. Det vil vises i tre
sekunder, og deretter vises den originale
displayet.
For å nne den forhåndsinnstilte tiden
3. Mens ovnen fremdeles er i forhåndsinnstilt
tilstand, vil LED-displayet vise den
forhåndsinnstilte tiden hvis du trykker på
Preset-knappen. Det vil vises i tre sekunder,
og deretter vises den originale displayet.
1
3
2

40
NO
Rengjøre mikrobølgeovnen
Hvis du rengjør mikrobølgeovnen hver gang du har brukt den, vil det være lettere å unngå
gjenstridigeflekker som kan være vanskelig å fjerne.
Koble mikrobølgeovnen fra strømnettet og vent til ovnen er helt avkjølt før du rengjør den.
Bølgelederdekselet sitter på den høyre veggen i hulrommet, maten tilberedes ved at mikrobølger passerer
gjennom dette. Det er viktig at bølgelederen er ren til enhver tid.
Tørk av bølgelederen ved å bruke mildt rengjøringsmiddel, og la den tørke.
10
Dreieskiven kan behandles som enhver
glasstallerken. Etter at du har brukt den i mer
enn 15 minutter, må du la den avkjøles før
du bruker den igjen. Ikke vask dreieplaten
i meget varmt vann, da dette kan føre til
sprekkdannelser.
Sørg for at dreieplaten er tørr før du setter den
inn i ovnen igjen.
10
1
Ovnsveggene har et spesielt emaljebelegg som
gjør rengjøring meget lett. Bruk en myk, fuktig
klut til å tørke opp eventuell sprut eller et
papirhåndkle til å tørke opp eventuelt søl. Tørk
av fett med en fuktig klut og litt vaskemiddel.
Tørk godt opp. Som med alle ovner kan fett
utvikle røyk eller begynne å brenne hvis den
får lov til å hope seg opp.
1
Sørg for å holde utløpsgitteret rent.
2
Hold forsiden av ovnen ren slik at døren kan
lukkes helt igjen.
3
Vær forsiktig slik at du ikke søler vann i
luftehullene.
4
Ikke fjern bølgeguidedekselet: Det er viktig å
holde dekselet rent på lik linje med innsiden
av ovnen. Hvis det samler seg opp fett, kan det
danne seg røyk og til og med ta fyr.
5
Rengjør innsiden av døren med en fuktig klut.
Bruk varmt såpevann for gjenstridige flekker
og la den tørke godt.
Innsiden av døren har et spesialbelegg og
må ikke rengjøres med skureputer eller
skuremidler.
6
Rengjør bak dørlisten.
7
Bruk varmt såpevann til å rengjøre ovnen
utvendig. Ikke bruk skureputer eller
skuremidler som kan lage riper i overflaten.
8
Koble ovnen fra strømnettet før du rengjør
strømledningen og ovnen.
Tørk av med en fuktig klut, og la alt tørke før du
setter i støpselet igjen.
9
4
5
2
6
7
8
9
3
Ikke fjern noen fastsittende deler fra
innsiden av mikrobølgeovnen under
rengjøring, eller på noe annet tidspunkt.kt.

41
NO
Spørsmål og svar
Spørsmål Svar
Hvorfor virker det som om maten ikke
kokes?
Kontroller at:
• koketiden er angitt
• døren er lukket
• strømkontakten ikke er overbelastet og forårsaker at
sikringen ryker.
Hvorfor virker maten under- eller
overkokt?
Kontroller at:
• korrekt koketid er angitt
• den korrekte effektinnstillingen er brukt.
Hvordan kan jeg forhindre at egg
sprekker?
Når du baker eller posjerer egg i mikrobølgeovnen kan
eggeplommen noen ganger sprekke når det bygger seg opp
damp inne i den. Du kan forhindre at eggeplommen sprekker
ved å stikke hull på den med en tannstikker før koking.
Du må aldri koke egg som fremdeles har skallet på.
Hvorfor er det så viktig å sørge for
ståtid etter koking?
Med mikrobølgeovnkoking, fortsetter mye mat å koke
selv etter at de har blitt tatt ut av mikrobølgeovnen. Fordi
mikrobølger koker maten utenfra og inn, og ståtid gjør det
mulig å koke midten av maten riktig uten av den blir overkokt
utvendig.
Hvorfor tar det noen ganger lenger i
min mikrobølgeovn enn det som står i
oppskriften?
Sjekk først at mikrobølgeovnen ble satt akkurat som
oppskriften sa. Koketider og varmeinnstillinger er forslag
til hjelp for å forhindre overkoking, men forskjeller i vekt,
størrelse, form og starttemperatur vil påvirke hvor lang tid
det tar å koke mat – akkurat som i en konvensjonell ovn. Bruk
skjønn sammen med oppskriften til å kontroller om maten er
oppskriftsmessig kokt.
Sp. Hvorfor får jeg kondens på
innsidenav mikrobølgeovnsdøren?
Kondens er helt normalt, spesielt når du koker mat med høyt
vanninnhold, som for eksempel poteter.
Trenger mikrobølgeenergi
gjennomvinduet i døren?
Nei. Døren har en spesiell metallskjerm med hull som gjør
det mulig å se inn, men som stopper mikrobølgeenergi fra å
slippe ut.
Det kommer damp ut av siden
på dørenog luftehullene. Kan
mikrobølgeenergiogså slippe ut?
Nei. Døren og luftehullene er nøye designet for å slippe ut
damp under koking, men å holde mikrobølgeenergi inne.
Hullene er ikke store nok til at mikrobølgeenergi slipper ut.
Hva skjer hvis mikrobølgeovnen slåspå
mens den er tom?
Mikrobølgeovnen vil bli skadet. Ikke slå på mikrobølgeovnen
når det ikke er noe i den. Det er en god ide å la det stå en
kopp vann i ovnen, i tilfelle noen starter mikrobølgeovnen ved
et uhell.
Hvorfor lyser ikke mikrobølgelyset? Lukk døren. Hvis lampen ikke tennes, har nok pæren røket.
Tilkall en kvalifisert tekniker – ikke prøv å skifte pære selv.
Det er gnister inni mikrobølgeovnen
når jeg bruker mikrobølgeovnen. Er
dette skadelig?
Ja. Sørg for at du ikke bruker kokekar av metal og at
beholderne ikke har metallborder. Du må ikke bruke metall i
mikrobølgeovnen når du tilbereder mat (unntatt folie).
Lys er synlig gjennom luftehullene
ogdøren. Betyr dette at
mikrobølgeenergikan slippe ut?
Nei. Det er normalt at lyset er synlig og ikke noeå bekymre seg
over.
Hvorfor får jeg forstyrrelser på TV og
radio når jeg bruker mikrobølgeovnen?
Mikrobølgeovner bruker radiobølger som ligner på de
som mottas av TV- og radioapparater. Du kan reduserer
forstyrrelsen ved å flytte mikrobølgeovnen lenger vekk fra TVeller radioapparatet.

42
NO
Spesikasjon
Modell S20MB10E
Inngangsstrøm 230 - 240 V~ 50 Hz
Utgangseffekt 700 - 800 Watts
Mikrobølgefrekvens 2450MHz
Utvendige dimensjoner
(bredde x dybde x høyde)
452 mm x 369 mm x 262 mm
Strømforbruk
Mikrobølgeovn 1250 - 1350 Watts
Er i samsvar med EEC-direktivene 89/336/EEC og 92/31/EEC.
Da vi konstant streber etter å forbedre produktene våre, kan vi komme til å endre spesifikasjoner uten
forhåndsvarsel.
DSG Retail Limited er ansvarlig for service etter salg.
Hvis du har spørsmål om produktet, kan du kontakte produktsupporttelefonen vår 0844
561 6263 (Currys) og 08700 118 117 (Pixmania).

43
SE
Om någon post saknas eller är skadad kontakta Partmaster (endast Storbritannien).
Tel: 0844 800 3456 för hjälp.
Gratulerar till köpet av din nya Sandstrøm mikrovågsugn.
Denna bruksanvisning kommer att hjälpa dig att använd den på ett korrekt och säkert
sätt.
Innan du använder din Sandstrøm mikrovågsugn
• Läs noga igenom de här instruktionerna och spara dem för framtida bruk.
• Ta bort alla förpackningsetiketter. Kassera dem på rätt sätt.
Innan du ringer efter service
• Gå igenom avsnittet om felsökning. Detta kommer att hjälpa dig att lösa några
allmänna problem själv och minska behovet att be om hjälp hos professionella
tekniker.
Uppackning
Ta bort allt förpackningsmaterial från enheten. Behåll förpackningen. Om du kasserar den, följ lokala
föreskrifter.
Följande poster medföljer:
Huvudenheten
Glasplatta x 1
Art.nr.: XGALS20MB10P12
Vridbar ring x 1
Art.nr.: XGALS20MB10P11
Bruksanvisning x 1
Art.nr.: S20MB10E-001

44
SE
Produktöverblick
Huvudenheten
Kontrollpanelen
Kontrollpanel
Strömknapp
Använd denna knapp för att
funktionen för mikrovågorna och
eektnivå.
Upptining med viktknapp
Använd denna knapp för att ställa
in upptining efter vikt.
Förintällningsknapp
Använd denna knapp för att
förinställa tillagningstiden.
Klockknapp
Använd denna knapp för att
ställa in klockan.
LED-display
Visar klocka, tillagningstid och
inställning.
Meny-/Tidsratt
Använd denna ratt för att
ställa in tiden och automatiska
menyprogram.
Knapp för erstegstillagning
Använd denna knapp för att välja
funktionen för tvåstegstillagning.
Upptining med snabbknapp
Använd denna knapp för att
ställa in upptining efter tid.
Viktinställningsknapp
Använd denna knapp för att ställa
in livsmedlets vikt.
Stopp / avbrytknapp
Avbryt tillagning och rensa
tillagningsinställningarna.
Dörrknapp

45
SE
Använda aluminiumfolie i din mikrovågsugn
Det är säkert att använda aluminiumfolie i mikrovågsugnen så länge nedanstående riktliner efterföljs.
Precis som med all annan metall kan inte mikrovågsenergi passera igenom folie, men förutsatt att folien
inte kommer åt ugnssidorna kommer det inte att orsaka gnistor och ingen skada kommer att göras på
ugnen.
Folie är ett bra sätt att skydda de delar av maten som du inte vill skall tillagas lika snabbt som andra delar –
kanske där maten är tunnare och annars skulle kokas för länge.
Placera folien över det område du vill täcka över. Var noga med att se till att folien inte vidrör ugnssidorna
när brickan snurrar. Använd bara ett stycke folie åt gången så att inga gnistor uppstår mellan de olika
foliestyckena.
Följ dessa riktlinjer när du använder aluminiumfolie i mikrovågsugnen:
• Ta bort folielock från behållare innan de används i mikrovågsugnen. Vissa lock är gjorda av kartong
med foliebeläggning – de skall också tas bort. Om möjligt, använd ett genomskinligt mikrovågssäkert
lock.
• Rör om i maten vid tillagning om behållaren har ett lock eller är övertäckt av en film.
• Använd alltid den snurrande glasbrickan.
• Använd grunda behållare med stor yta. Använd inte behållare som är djupare än 3,5cm.
• Använd grytvantar vid hantering av varma foliebehållare.
• Täck inte över mat fullständigt med folie. Mikrovågsenergin kan inte passera igenom folien så maten
kommer inte att tillagas.
• Låt inte aluminiumfolien vidröra insidan av ugnen.
• Använd inte mer än ett stycke folie åt gången.

46
SE
2. Välj ut en flat arbetsyta för ugnen på avstånd
från värmekällor, t.ex. element eller brasor,
och kalla platser. Lämna ett utrymme på 10
cm runt ugnens sidor och 30 cm ovanför så att
varmluften kan komma ut ifrån ventilerna vid
matlagning - Den här mikrovågsugnen är inte
avsedd att byggas in.
Förberedelse
Den här mikrovågsugnen är avsedd för hemmabruk. Den får inte användas för kommersiellt bruk.
1. När ugnen packats upp, kontrollera att den inte skadats under tiden i kartongen. Se till att det inte
finns några bucklor i ugnen och att luckan kan stängas ordentligt. I en bucklig eller skadad ugn
kan mikrovågsenergin slippa ut. Se till att du tagit ut allt förpackningsmaterial inuti ugnen. Kassera
plastförpackningen eller påsarna på ett säkert sätt och håll utom räckhåll för spädbarn och små barn.
30cm
10cm10cm
3. Anslut ugnen till ett vanligt hushållseluttag
(230-240 volt, 13 amp). Undvik att använda
uttag där adapter och annan utrustning också
anslutits. Använd inte en multiadapter.
4. Placera vridplattans ring i ugnen och placera
vridplatta av glas ovanpå ringen. Glasbrickan
är utformad så att den skall sitta säkert på
vridanordningen. Använd alltid glasbrickan
och ringen när mikrovågsugnen används.
5. För att skydda din arbetsyta rekommenderar
vi att du faster några halkfria underlägg
(medföljer inte) på undersidan av
mikrovågsugnen.
Undersida Vy

47
SE
Introduktion av tillagning i mikrovågsugn
Matlagning i en mikrovågsugn
• Mikrovågsugnar tillagar med mikrovågsenergi som påminner om naturligt förekommande
radiovågor. Normalt försvinner dessa “vågor” när de sprids i atmosfären, men i en mikrovågsugn
koncentreras dem på mat och får den att hettas upp.
• Mikrovågenergi kan inte passera igenom metall - så den kan inte slippa ut ifrån ugnen -men den kan
passera igenom material som glas, porslin och papper. Dessa material används vid tillverkning av
mikrovågssäker tillagningsutrustning.
• Mikrovågssäker tillagningsutrustning värms dock också upp efterhand
som maten värms upp.
Mikrovågsenergin fokuseras på fuktigheten i maten och orsakar
massor av små vibrationer. Vibrationerna blir så stora att fukten, inte
maten, värms upp.
Mikrovågsugn uppvärmningskategorier
Din ugn har testats och märkts för att uppfylla regeringens frivilliga avtal om återuppvärmning av tillagad
mat.
Mikrovågsugnars uppvärmningskännetecknen och utgångseffektnivå beräknas vanligen med hjälp av en
ganska stor matportion (1000 gram, IEC 705), men många förpackningar med tillagad mat säljs i mindre
förpackningar, ofta ungefär 350 gram.
Tillsammans med matföretag och tillverkare av mikrovågsugnar har regeringen satt upp ett system med
uppvärmningskategorier för att hjälpa dig att välja uppvärmningstid för tillagad mat.
För tillagning i mikrovågsugn:
1. Ta bort den yttre förpackningen.
2. Stick FLERA hål i locket.
3. Placera på en mikrovågssäker tallrik.
4. Värm upp på full värme.
5. Rör eller vrid halvvägs igenom tillagningen.
Uppvärmning
Kategori
Wattförbrukning
(IEC705)
B D 650 W 750 W
Full effekt
(i minuter)
2 2 2 2
Rör om /
vrid
Rör om / vrid Rör om / vrid
Full effekt
(i minuter)
2 1,5 2 1,5
Ståtid
(i minuter)
1 1 1 1
Tillaga frusen mat i mikrovågsugn:
1. Ta bort den yttre förpackningen.
2. Stick FLERA hål i locket.
3. Placera på en mikrovågssäker tallrik.
4. Värm upp på full värme.
5. Rör eller vrid halvvägs igenom tillagningen.
Uppvärmning
Kategori
Wattförbrukning
(IEC705)
B D 650 W 750 W
Full effekt (i
minuter)
3 2,5 3 2,5
Rör om /
vrid
Rör om / vrid Rör om / vrid
Full effekt (i
minuter)
4 3,5 4 3,5
Ståtid
(i minuter)
1 1 1 1
800W
E
800 W är ugnens utmatningseekt.
E är ugnens uppvärmningskategori.
Kontrollera tillagningstiderna för kategori E på
matförpackningen för att se hur länge det skall
tillagas. Nedanstående exempel ges som referens.

48
SE
Ånga
Vid tillagning av mat i en mikrovågsugn utvecklas ånga när vattnet i maten hettas upp och avdunstar.
Den ånga som uppstår vid tillagning i en mikrovågsugn är helt säker. Den måste slippa ut från ugnen för
att förhindra att tryck byggs upp inuti ugnen. Det sker via ventilerna på ugnens baksida och runt luckan.
Kondensation
Efterhand som ångan kyls ned kan det hända att kondens
samlas i små polar inuti ugnen och på arbetsytan under
luckan och ventilerna. Torka alltid ur ugnen efter att ha
tillagat mat med hög fuktighet.
Mikrovågsugnen är formgiven så att ångan kan slippa ut
ur ventilerna och runt dörren utan att mikrovågsenergin
också slipper ut. Det finns ingen risk att mikrovågsenergi
slipper ut tillsammans med ångan.
Kontrollera mikrovågsugnen
Kontrollera mikrovågsugnen efter uppackningen.
För din säkerhets skull stängs ugnen av om
luckan öppnas under tillagningen. Stäng
dörren och tryck på Menu / Time ratten för
att fortsätta tillagningscykeln.
1. Tryck på knappen för att öppna ugnsluckan.
Placera vridplattans ring i ugnen och placera
vridplatta av glas ovanpå ringen.
Den inre ringen till glasbrickan är utformad så
att den skall sitta säkert på vridanordningen.
Du måste alltid använda glasbrickan och
ringen när mikrovågsugnen används.
Placera en kopp vatten på brickan. Försäkra
dig om att koppen är mikrovågssäker – det får
inte ha en dekorativ metallkant.
2. Stäng ugnsluckan.
3. Tryck på Stop / Cancel för att radera
inställningar som kanske redan gjorts.
4. Tryck på Menu / Time ratten en gång för att
starta en enkel tillagningscykel på 30 sekunder
som låter dig kontrollera att mikrovågsugnen
fungerar.
5. När tillagningen avslutats bör vattnet vara
varmt (var försiktig när du tar ut koppen ur
ugnen). Tryck på Stop / Cancel knappen för
att radera alla inställningar.
3,5
4
1

49
SE
Klockinställning
När mikrovågsugnen anslutits till elnätet visar LED-displayen och 1:00 och ljuder en gång. Se till att du
ställer in klockan före användning.
Ställ in klockan genom att följa nedanstående
steg.
1. Tryck på Clock-knappen och timsiffrorna
blinkar.
2. Vrid på Menu / Time ratten för att ställa in
timsiffrorna. Angiven tid måste vara mellan 00
och 23.
3. Tryck på Clock-knappen och minutsiffrorna
blinkar.
4. Vrid på Menu / Time ratten för att ställa in
minutsiffrorna, den inmatade tiden måste vara
inom 00 och 59.
5. Tryck på Clock-knappen igen för att avsluta
klockinställningen.
Tiden kommer att lysa.
1, 3, 5
2, 4

50
SE
Ställa in barnlåset
Denna funktion skyddar den elektroniska hanteringen av mikrovågsugnen genom att låsa kontrollpanelen
tills du avbryter det.
Ställ in barnlåset genom att följa nedanstående
steg.
1. Tryck på Stop / Cancel knappen i tre sekunder
och en lång ton ljuder. LED-displayen visar
också
för att indikera att barnlåset är
aktiverat på mikrovågsugnen.
2. Avaktivera barnlåset genom att trycka på
Stop / Cancel knappen igen i tre sekunder
och en låg ton ljuder för att indikera att
mikrovågsugnens barnlås avaktiverats.
Barnlåset kan inte ställas in under
fördröjd start av tillagning.
1, 2

51
SE
Mikrovågstillagning
För enkel tillagning i mikrovågsugn, se följande steg. Exempel: Du vill tillaga något i 20 minuter med 80%
av mikrovågseffekten.
1. Tryck på Power Level knappen en gång och
LED-displayen kommer att visa 100%,
, 1S,
. Tryck på knappen en gång till för att ändra
mikrovågseffekten till 80%,
, 1S, .
1s står för 1:a tillagningssteget.
2. Vrid på Menu / Time ratten för att ställa in
tillagningstiden tills LED-displayen visar 20:00.
3. Tryck på Menu / Time ratten) för att bekräfta
och börja tillagningen.
4. Tryck på Stop / Cancel knappen en gång
för att stoppa och pausa tillagningen. LEDdisplayen visar
. Tryck på för att avbryta
inställningen.
Kontrollknapp effektnivå
(för mikrovågstillagning)
Ordning LED-display Mikrovågseffekt
1
100%
100%
2
80%
80%
3
60%
60%
4
40%
40%
5
20%
20%
6
00%
Endast fläkt
4
2, 3
1

52
SE
Två-stegstillagning
För tillagning i flera steg, följ nedanstående steg.
Exempel: Om du vill tillaga din mat med 100 % mikrovågor i fem minuter och sedan tillaga med 80 %
mikrovågor i sju minuter.
Du kan endast ställa in två steg för tvåstegstillagning. Varken upptiningsprogram eller
menyprogram kan ställas in i tvåstegstillagning.
1. Tryck på Power Level knappen för att initiera
tvåstegstillagning med 100% mikrovågseffekt
som första steg. LED-displayen visar 100%,
, 1S, .
2. Vrid på Menu / Time ratten för att ställa in
tillagningstiden tills LED-displayen visar 5:00.
3. a Tryck på knappen Flerstegstillagning och
LED-displayen visar 100%,
, 2S, .
b Tryck sedan på Power Level knappen för
att ändra det andra stegets effektnivå från
100% till 80%.
1S står för 1:a tillagningssteget.
2S står för 2:a tillagningssteget.
4. Vrid på Menu / Time ratten för att ställa in
tillagningstiden tills LED-displayen visar 7:00.
5. Tryck på Menu / Time ratten för att bekräfta
och börja tillagningen. Ugnen ljuder en
gång för att indikera att den har på börjat
nedräkningen för upptiningen.
Den ljuder en gång till när den påbörjar
mikrovågstillagningen (det andra steget).
När det är klart ljuder mikrovågsugnen fem
gånger och LED-displayen kommer att visa
End för att indikera att det är klart.
6. Tryck på Stop / Cancel knappen en gång
för att stoppa och pausa tillagningen. LEDdisplayen visar
.
Tryck på för att avbryta inställningen.
6
2, 4, 5
3a
1, 3b

53
SE
Fördröjd tillagningsstart (Program inställd i förväg)
För försenad tillagningsstart, följ nedanstående steg.
Exempel: Aktuell tid är 12:00 och du vill tillaga med 80% mikrovågseffekt i fem minuter om en och en halv
time.
Du kan endast ställa in två steg för fördröjd tillagningsstart. Varken upptiningsprogram eller
menyprogram kan ställas in i tvåstegstillagning. Se till att ugnsluckan är stängd innan programmet
sätts igång.
1. Tryck på Power Level knappen en gång och
LED-displayen kommer att visa 100%,
, 1S,
. Tryck på knappen en gång till för att ändra
mikrovågseffekten till 80%,
, 1S, .
2. Vrid på Menu / Time ratten för att ställa in
tillagningstiden tills LED-displayen visar 5:00.
Tryck inte på Menu / Time ratten i detta
läge.
3. a Tryck på Preset knappen för att förinställa
starttiden för tillagningen.
Visad timme blinkar först.
b Vrid på Menu / Time ratten för att ställa in
tillagningstiden tills LED-displayen visar
13:00.
4. a Tryck på Preset knappen för att förinställa
starttiden för tillagningen.
Visad minut blinkar först.
b Vrid på Menu / Time ratten för att ställa in
tillagningstiden tills LED-displayen visar
13:30.
5. Tryck på Menu / Time ratten för att fullfölja
inställningen. Mikrovågsugnen ljuder tre
gånger när nedräkningen når starttiden och
tillagningen påbörjas automatiskt.
6. För att avbryta den fördröjda tillagningen
tryck på Preset knappen och tryck sedan på
Stop / Cancel knappen.
6
2, 3b,
4b, 5
1
3a, 4a, 6

54
SE
Auto tillagning
Med den här egenskapen kan du tillaga det mesta av din mat baserat på matkategori och vikt.
Välj kategori och sedan standardvikt för maten. För snabb referens om tillagningstid och matens
standardvikt, se Automeny-tabellen.
Auto Meny
1. Vrid Menu / Time ratten moturs för att ställa in
det auto-program som behövs. LED-displayen
visar AUTO 8, 7, 6, etc.
2. Tryck på Weight Adjust knappen för att välja
standardvikten för ditt valda program.
Se Automenytabellen för mer information.
3. Tryck på Menu / Time ratten) för att bekräfta
och börja tillagningen.
4. Tryck på Stop / Cancel knappen en gång
för att stoppa och pausa tillagningen. LEDdisplayen visar
. Tryck på för att avbryta
inställningen.
Exempel: Om du vill tillaga 400 g fisk med Automenyprogrammet, följ då stegen nedan.
a. Vrid Menu / Time ratten moturs för att
välja auto-menyprogrammet för sk. LEDdisplayen visar AUTO 6.
b. Tryck på Weight Adjust knappen tills
LED-displayen visar 400.
c. Tryck på Menu / Time ratten för att
bekräfta och börja tillagningen.
d. Tryck på Stop / Cancel knappen en gång
för att stoppa och pausa tillagningen.
LED-displayen visar
. Tryck på för att
avbryta inställningen.
4
1
3
2

55
SE
Densiteten och tjockleken hos livsmedlet kan påverka tillagningstiden. Se till att all mat är
rykande het och tillagad helt igenom innan servering. Det är väsentligt att maten kontrolleras
under och efter den rekommenderade tillagningstiden även om Auto meny används.
Automatisk menytabell
Meny Vikt Visning Tillagningstid Anmärkningar
AUTO 1
Mjölk / kaffe
200ml 1 1’30”
• Använd endast lämpliga mikrovågssäkra
behållare och plastfolie i mikrovågsugnen. Stick
hål på folien med en gaffel för tillagningen.
• Den förinställda tillagningstiden är avsedd för
200 ml per kopp.
400ml 2 2’40”
600ml 3 3’50”
AUTO 2
Ris
150g 150g 19’00”
150g ris + 300ml
kallt vatten
• Använd endast lämpliga
mikrovågssäkra
behållare och plastfolie i
mikrovågsugnen. Stick hål
på folien med en gaffel för
tillagningen.
• Kontrollera tillagningen
med jämna mellanrum för
att försäkra dig om vattnet
inte kokar över.
300g 300g 22’00”
300g ris + 600ml
kallt vatten
450g 450g 25’00”
450g ris + 900ml
kallt vatten
600g 600g 28’00”
600g ris + 1200ml
kallt vatten
AUTO 3
Spagetti
100g 100g 22’00”
100g spagetti +
800 ml kallt vatten
• Använd endast lämpliga
mikrovågssäkra
behållare och plastfolie i
mikrovågsugnen. Stick hål
på folien med en gaffel för
tillagningen.
• Kontrollera tillagningen
med jämna mellanrum för
att försäkra dig om vattnet
inte kokar över.
200g 200g 27’00”
200g spagetti
+ 1600 ml kallt
vatten
300g 300g 32’00”
300g spagetti
+ 2400 ml kallt
vatten
AUTO 4
Potatis
230g 1 5’00”
• För bästa resultat, stick igenom potatisarnas
skal innan tillagning. För bästa resultat när
potatisen tillagats, slå in den i aluminiumfolie i
minst fem minuter för att garantera att den är
ordentligt genomkokt.
• Den förinställda tillagningstiden är avsedd för
230g per potatis.
460g 2 9’00”
690g 3 13’00”
AUTO 5
Auto
återuppvärmning
200g 200g 1’30”
Se till att maten är ordentligt genomkokt innan
den äts. Ytterligare tillagningstid kan
krävas för tjockare delar.
300g 300g 2’00”
400g 400g 2”30”
500g 500g 3’00”
600g 600g 3’30”
700g 700g 4’00”
800g 800g 4’30”
AUTO 6
Fisk
200g 200g 3’00”
Se till att maten är ordentligt genomkokt innan
den äts. Extra tillagningstid kan behövas för
tjockare fiskbitar.
300g 300g 4’20”
400g 400g 5’40”
500g 500g 7’00”
600g 600g 8’20”
AUTO 7
PIZZA
150g 150g 0’50”
Denna inställning är avsedd för uppvärmning
av tillagade pizzabitar (inte fryst pizza). Extra
tillagningstid kan behövas för tjockare pizzabitar.
300g 300g 1’20”
450g 450g 1’50”
AUTO 8
Popcorn
99g 99g 2’30”
För bästa resultat rekommenderar vi att
färdigförpackade popcornsmix används. Täck med
mikrolocket.

56
SE
Snabbstart tillagning
Med den här egenskapen kan du snabbt laga till maten i 1 minut med 100% mikrovågseffekt.
Följ nedanstående steg.
1. Tryck på Menu / Time ratten för att starta
snabbtillagningen. Tryck igen för att lägga
till ytterligare 30 sekunder. Du kan öka
tillagningstiden upp till 10 minuter.
2. a Alternativt kan du vrida på Menu /
Time ratten medurs för att först ställa in
tillagningstiden med 100% mikroeffekt.
b Tryck sedan på Menu / Time ratten för att
starta snabbtillagningen.
2a, 2b
1

57
SE
Upptining
Med den här egenskapen kan du enkelt tina upp fryst mat genom att ange vikt eller tid. Du kanske vill
placera den frysta maten på en mikrovågssäker tallrik innan den placeras i upptiningsstället (medföljer ej
i det här mikrovågspaketet). Detta är för att se till att vätskor som avges vid upptiningen inte kommer att
spillas ut och smuts ned ugnens insida vid upptiningen.
Upptining efter vikt
1. Tryck på Defrost By Weight knappen en gång
och LED-displayen visar
, AUTO.
2. Tryck på Weight Adjust knappen för att ställa
in vikten på maten. Standardområdet är 100
gr till 1800 gr.
3. Tryck på Menu / Time ratten för att börja
upptiningen.
Stora föremål kan vara isiga i mitten. För
att garantera jämn upptining, vrid på
dem ibland och bryt upp dem i mindre
bitar under upptiningen.
Ugnen ljuder och pausar efter 2/3 körd
tid. Öppna sedan dörren och vänd på
maten. Tryck på Menu / Time ratten) för
att starta om upptiningen.
Placera stekar med fettsidan nedåt och
hel fågel med bröstet nedåt.
Häll av vätskor under upptiningen
eftersom safterna från maten kan
värmas upp och börja koka maten.
4. Tryck på Stop / Cancel knappen en gång
för att stoppa och pausa tillagningen. LEDdisplayen visar
. Tryck på för att avbryta
inställningen.
Upptining efter tid
1. Tryck på Defrost By Weight knappen en gång
och LED-displayen visar
.
2. Vrid på Menu / Time ratten för att ställa in
upptiningstiden.
3. Tryck på Menu / Time ratten för att börja
upptiningen.
4. Tryck på Stop / Cancel knappen en gång
för att stoppa och pausa tillagningen. LEDdisplayen visar
. Tryck på för att avbryta
inställningen.
4
3
1
2, 3
2
1

58
SE
Fråga om tillagningsfunktion
Med den här egenskapen kan du kontrollera och visa aktuell effekt, tid och förinställd tid för valt
tillagningsprogram.
Ta reda på aktuell tillagningseekt
1. Tryck på Power Level knappen en gång.
Displayen visar aktuell tillagningseffekt när
ugnen är inställd på mikrovågstillagning.
Denna funktion fungerar inte under Defrost by
Weight (upptining efter vikt), Defrost by Speed
(snabbupptining) och Auto Menu cooking
(auto-menytillagning). Effekten visas i tre
sekunder innan den ursprungliga displayen
visas igen.
information om tiden
2. Tryck på Clock knappen en gång och LED-
displayen visar tiden medan ugnen är i
antingen mikrovågs-, kombinations- eller
auto-menytillagning. Effekten visas i tre
sekunder innan den ursprungliga displayen
visas igen.
information om förinställd tid
3. När ugnen fortfarande är i förinställt läge,
tryck på Preset knappen en gång och LEDdisplayen visar den förinställda tiden. Effekten
visas i tre sekunder innan den ursprungliga
displayen visas igen.
1
3
2

59
SE
Rengöra mikrovågsugnen
Rengöring av ugnen varje gång hjälper dig att förebygga ansamling av envisa märken som kan vara svåra
att få bort.
Dra ur ugnens kontakt ur väggen och vänta på att den kyls ned före rengöring.
På högra väggen på insidan finns vågskyddet. Mikrovågorna passerar igenom det så att maten kan tillagas.
Det är viktigt att vågskyddet alltid är rent.
Torka av det med milt rengöringsmedel och låt torka.
10
Behandla glasbrickan på samma sätt vilken
annan glastallrik som helst. När du har använt
den i 15 minuter, låt den svalna innan den
används igen. Rengör inte skivtallriken i väldigt
varmt vatten eftersom det kan få den att
spricka.
Se till att skivtallriken är torr innan du sätter
tillbaka den i ugnen.
10
1
Ugnsväggarna har en speciell emaljbeläggning
som gör rengöring väldigt enkelt. Använd
en mjuk fuktig trasa till att torka bort stänk
eller en pappershandduk för att torka upp
spill. Torka av fett med en fuktig trasa och lite
rengöringsmedel. Torka noggrant. Om fett
ackumuleras kan det precis som i varje ugn
börja ryka eller till och med ta eld.
1
Se till att avloppsgallren är rena.
2
Håll ugnen ren framtill så att luckan går att
stänga ordentligt.
3
Var noga med att inte spilla vatten i ventilerna.
4
Ta inte bort vågskyddet: Det är viktigt att hålla
rent på samma sätt som insidan av ugnen. Om
fett ackumuleras kan det börja ryka eller till
och med ta eld.
5
Håll luckans insida ren med en fuktig trasa.
Använd varmt tvålvatten på envisa märken och
torka ordentligt.
Luckans insida har en speciell beläggning som
inte får rengöras med grova rengöringskuddar
eller rengöringsmedel.
6
Gör rent bakom luckans kant.
7
Använd en varm tvållösning för rengöring
av ugnens utsida. Använd inte grova
rengöringskuddar som kan komma att repa
ytan.
8
Dra ur ugnens kontakt innan nätsladden och
ugnen rengörs.
Torka med en fuktig trasa och låt torka innan
kontakten sätts i igen.
9
4
5
2
6
7
8
9
3
Ta inte bort några fasta delar från ugnens
insida vid rengöring eller något annat
tillfälle.

60
SE
Vanliga frågor
Fråga Svar
Varför ser inte maten tillagad ut? Kontrollera att:
• tillagningstiden ställts in
• luckan är stängd
• eluttaget inte är överbelastat så att en säkring gått.
Varför verkar det som om maten inte är
färdigkokt eller överkokt?
Kontrollera att:
• korrekt tillagningstid ställts in
• korrekt effektinställning använts.
Hur kan jag förhindra att äggen
exploderar?
När du kokar eller pocherar ägg i mikrovågsugnen exploderar
äggulan ibland när ånga byggs upp inuti den. Du kan
förhindra att den exploderar genom att sticka på hål på gulan
före tillagningen.
Laga aldrig till ägg med skalet på.
Varför är det så viktigt att maten får stå
ett tag efter tillagningen?
Med mikrovågstillagning fortsätter många maträtter att
tillagas även efter att de tagit ut ur mikrovågsugnen.
Mikrovågstillagning fungerar ifrån matens utsida och inåt kan
matens mitt kokas precis lagom utan att utsidan kokas för
länge om den får stå ett tag.
Varför tar det ibland längre tid att
laga till något i min ugn än det står i
receptet?
Kontrollera först att mikrovågsugnen var inställd såsom
receptet sa. Tillagningstider och värmeinställningar är förslag
för att hjälpa till att förhindra för lång koktid, men skillnader
i matens vikt, storlek, form och startemperatur påverkar hur
lång tid tillagningen tar, precis som med konventionella
ugnar. Använd ditt omdöme tillsammans med receptet för att
kontrollera om maten lagats till ordentligt.
Varför bildas kondens på ugnsluckans
insida?
Kondensbildning är fullständigt normalt, speciellt vid
tillagning av mat med högt vätskeinnehåll, som t.ex. potatis.
Slipper mikrovågsenergin ut genom
fönstret i ugnsluckan?
Nej. Luckan har en speciell metallskärm med hål i som låter
dig se in men som hindrar mikrovågorna från att komma ut.
Det kommer ut ånga från luckans sidor
och ventilerna Kan mikrovågsenergin
också komma ut?
Nej. Luckan och ventilerna är noggrant formgivna för att
släppa ut ånga vid tillagning medan mikrovågsenergin
stängs inne. Springorna är inte stora nog för att släppa ut
mikrovågsenergin.
Vad händer om mikrovågsugnen slås
på när ugnen är tom?
Mikrovågsugnen kommer att skadas. Slå inte på mikrovågorna
när ugnen är tom. Det är en god idé att ställa en kopp vatten i
ugnen ifall någon skulle sätta igång mikrovågorna av misstag.
Varför lyser inte mikrovågsugnens
lampa?
Öppna luckan. Om lampan inte lyser har förmodligen lampan
gått sönder. Ring efter en behörig reparatör – försök inte byta
lampa själv.
Det uppstår gnistor inuti
mikrovågsugnen när jag använder den.
Kan det vara skadligt?
Ja. Se till att du inte använder metallutensilier och att
behållarna inte har en metallkant. Med undantag för folie får
du inte använda metall vid matlagning i mikrovågsugnen.
Ljus kommer ut igenom ventilerna och
luckan. Betyder det att mikrovågsenergi
kan slippa ut?
Nej. Det är normalt att ljus syns och det är ingenting att oroa
sig för.
Varför uppstår störningar på min
tv och radio när jag använder
mikrovågsugnen?
Mikrovågsugnar använder radiovågor liknande de som tas
emot av TV- och radioapparater. Du kan minska störningarna
genom att flytta ugnen längre bort ifrån tv:n eller radion.

61
SE
Specikationer
Modell S20MB10E
Inmatning 230 - 240V~ 50Hz
Utmatning 700 - 800 Watt
Mikrovågsfrekvens 2450MHz
Yttre mått
(bredd x djup x höjd)
452mm x 369mm x 262mm
Energiförbrukning
Mikrovågsugn 1250 - 1350 Watt
Uppfyller EEC direktiv 89/336/EEC och 92/31/EEC.
Eftersom vi ständigt strävar efter att förbättra våra produkter kan specifikationer förändras utan
föregående meddelande.
DSG Retail Limited ansvarar för all after sales-service.
För frågor om produkten, kontakta vår produktsupportlinje 0844 561 6263 (Currys) och
08700 118 117 (Pixmania).

62
FI
Jos nimikkeitä puuttuu tai ne ovat vahingoittuneet, ota yhteys Partmasteriin (Vain Iso-Britannia).
Puh. 0844 800 3456 avun saamiseksi.
Onneksi olkoon uuden Sandstrøm-mikroaaltouunin ostamisesta.
Nämä käyttöohjeet opastavat sinua käyttämään sitä oikein ja turvallisesti.
Ennen kuin käytät Sandstrøm-mikroaaltouunia
• Lue nämä ohjeet huolellisesti ja säästä ne tulevaa tarvetta varten.
• Irrota pakkausmerkinnät. Hävitä ne asianmukaisesti.
Ennen huoltoon soittamista
• Tarkista osio Vianmääritys. Sen avulla voit ratkaista joitakin yleisimpiä ohjelmia itse.
Tämä auttaa ratkaisemaan joitakin yleisiä ongelmia itse ja vähentää tarvetta pyytää
ammattiteknikkojen apua.
Pakkauksesta purkaminen
Poista kaikki pakkausmateriaali laitteesta. Säilytä pakkaus. Jos hävität sen, tee se paikallisten säädösten
mukaisesti.
Seuraavat nimikkeet kuuluvat toimitukseen:
Päälaite
Lasilautanen x 1
Osanro: XGALS20MB10P12
Rengas x 1
Osanro: XGALS20MB10P11
Käyttöopas x 1
Osanro: S20MB10E-001

63
FI
Tuotteen yleiskatsaus
Päälaite
Ohjauspaneeli
Ohjauspaneeli
Tehotaso-painike
Valitse tällä painikkeella
mikroaaltouunin toiminto ja sen
tehotaso.
Sulattaminen painon mukaan-
painike
Sulata ruoka tällä painikkeella
painon mukaan.
Esiasetus-painike
Valitse kypsennysaika tällä
painikkeella.
Kello-painike
Aseta kello tällä painikkeella.
LED-näyttö
Näyttää kellon tai
ruoanvalmistusajan/asetuksen.
Valikko/Aika-valitsin
Käytä tätä valitsinta ajan ja
automaattivalikko-ohjelmien
asettamiseen.
Monivaiheinen ruoanvalmistus
-painike
Käytä tätä painiketta
kaksivaiheinen ruoanlaitto
-toiminnon valitsemiseen.
Sulattaminen nopeuden
mukaan -painike
Sulata ruoka tällä painikkeella
ajan mukaan.
Painonsäätö -painike
Aseta ruoan paino tällä
painikkeella.
Pysäytä/Peruuta-painike
Tämä painike lopettaa
ruoanvalmistustoiminnon ja
tyhjentää asetukset.
Luukkupainike

64
FI
Alumiinifolion käyttö mikroaaltouunissa
Alumiinifoliota on turvallista käyttää mikroaaltouunissa, kun vain seuraat näitä turvallisuusohjeita.
Mikroaaltoenergia ei pääse folion, eikä minkään muun metallin läpi, mutta jos pidät folion kaukana
mikroaaltouunin seinistä, kipinöitä ei pitäisi syntyä eikä mikroaaltouunin siten pitäisi vioittua.
Folion käyttäminen on hyvä tapa suojella niitä ruokapaloja, joiden et halua kypsyvän yhtä nopeasti kuin
toisten – kuten silloin, kun jotkut ruokapalat ovat ohuita ja kypsyisivät muutoin liikaa.
Aseta folio suojattavien ruokien päälle ja muista, että folio ei saa koskea mikroaaltouunin seiniä lasilautasen
pyöriessä. Käytä vain yhtä foliopalasta kerrallaan, ettei kipinöintiä synny erillisten palasten välillä.
Seuraa näitä ohjeita, kun käytät foliota mikroaaltouunissa:
• Poista foliokannet rasioista ennen kuin laitat ne mikroaaltouuniin. Jotkut kannet on tehty pahvista,
jossa on foliopäällyste – poista myös nämä kannet. Käytä mikroaaltouunissa käytettävää läpinäkyvää
kantta jos mahdollista.
• Sekoita ruokaa valmistuksen aikana, jos rasian päällä on kansi tai kelmu.
• Käytä aina lasilautasta.
• Käytä matalia, suuria rasioita. Älä käytä rasioita, jotka ovat syvempiä kuin 3,5 cm.
• Käytä aina patalappuja kun käsittelet kuumia foliorasioita.
• Älä peitä ruokaa kokonaan foliolla. Mikroaaltoenergia ei pääse folion läpi, joten ruoka ei kypsenny.
• Varmista, että alumiinifolio ei kosketa mikroaaltouunin seiniä.
• Älä käytä mikroaaltouunissa enempää kuin yhtä foliopalasta kerrallaan.

65
FI
2. Valitse mikroaaltouunille tasainen alusta,
joka ei ole lähellä lämmönlähteitä, kuten
lämpöpatteria tai takkaa, tai kylmiä alueita.
Mikroaaltouunin ympärillä tulee olla 10 cm
vapaata tilaa ja sen ylläpuolella 30 cm, niin
että kuuma ilma voi virrata vapaasti ulos
tuuletusaukoista – mikroaaltouunia ei ole
suunniteltu asennettavaksi suljettuun tilaan.
Valmistelut
Tämä mikroaaltouuni on tarkoitettu ainoastaan kotitalouskäyttöön. Sitä ei tule käyttää kaupallisissa tiloissa.
1. Kun olet purkanut mikroaaltouunin laatikosta, varmista, ettei se ole vahingoittunut. Varmista, ettei
uunissa ole lommoja ja luukku sulkeutuu kunnolla. Kolhiintuneesta tai viallisesta uunista voi vapautua
mikroaaltoenergiaa. Varmista, että olet poistanut kaiken pakkausmateriaalin mikroaaltouunin sisältä.
Poista muovikääreet ja -pussit turvallisesti ja säilytä ne vauvojen ja pienten lasten ulottumattomissa.
30cm
10cm10cm
3. Kiinnitä mikroaaltouunin virtajohto normaaliin
sähköpistorasiaan (230-240 volttia, 13
ampeeria). Vältä käyttämästä pistorasiaa, jossa
on jo verkkolaite ja muiden laitteiden johtoja.
Älä käytä multi-sovitinta.
4. Laita rengas mikroaaltouuniin ja aseta
lasilautanen sen päälle. Lasilautanenon
suunniteltu niin, että se pysyy vakaasti
renkaan päällä. Käytä aina lasilautasta ja
rengasta mikroaaltouunia käyttäessäsi.
5. Suojellaksesi työtasoa suosittelemme,
että kiinnität muutamia luistamattomia
suojapehmusteita (eivät kuulu toimitukseen)
mikroaaltouunin alle.
Näkymä alta

66
FI
Johdanto ruoanlaittoon mikroaaltouunilla
Ruoanvalmistus mikroaaltouunilla
• Mikroaaltouunit kypsentävät ruokaa käyttämällä mikroaaltoenergiaa, joka on luonnollisesti
esiintyvien radioaaltojen tapaista. Normaalisti nämä "aallot" häviäisivät ilmakehään, mutta
mikroaaltouunissa ne kohdistuvat ruokaan ja lämmittävät näin sitä.
• Mikroaaltoenergia ei pääse metallin läpi – joten se ei voi vuotaa uunin sisältä – mutta se pääsee lasin,
posliinin, muovin ja paperin kaltaisten materiaalien läpi. Näitä materiaaleja käytetään valmistettaessa
mikroaaltouuniin tarkoitettuja ruoanvalmistustarvikkeita.
• Mikroaaltouuniin tarkoitetut ruoanvalmistustarvikkeet lämpenevät
silti, koska ruoka kuumenee.
Mikroaaltoenergia kohdistuu ruoassa olevaan kosteuteen ja aiheuttaa
paljon pieniä värähtelyjä. Värähtelyitä on niin paljon, että kosteus – ja
ruoka – lämpenevät.
Mikroaaltolämmitysluokat
Mikroaaltouuni on testattu ja merkitty vastaamaan viranomaisten vapaaehtoista sopimusta esikypsennetyn
ruoan uudelleenlämmittämisestä.
Mikroaaltouunien lämmitysominaisuudet ja antotehovirta määritellään yleensä käyttämällä suhteellisen
suurta ruoka-annosta (1000 gramman annos, IEC 705) mutta monet esikypsennetyt ruoat myydään
pienemmissä pakkauksissa, jotka ovat yleensä n. 350 grammaa.
Viranomaiset ovat yhdessä elintarvikeyritysten ja mikroaaltouunivalmistajien kanssa määritelleet
lämmitysluokkajärjestelmän auttamaan esikypsennetyn ruoan lämmitysajan valitsemisessa.
Mikrouunissa kypsentäessäsi:
1. Poista pakkauksesta.
2. Pistele kalvokanteen reikiä USEITA kertoja.
3. Aseta mikroaaltouuninkestävälle lautaselle.
4. Lämmitä täydellä teholla.
5. Käännä lämmityksen puolessa välissä.
Lämmity-
sluokka
Wattia
(IEC705)
B D 650 W 750 W
Täysi teho
(minuuteissa)
2 2 2 2
Sekoita /
Käännä
Sekoita /
Käännä
Sekoita /
Käännä
Täysi teho
(minuuteissa)
2 1,5 2 1,5
Asettumisaika
(minuuteissa)
1 1 1 1
Pakastetun ruoan lämmittäminen:
1. Poista pakkauksesta.
2. Pistele kalvokanteen reikiä USEITA kertoja.
3. Aseta mikroaaltouuninkestävälle lautaselle.
4. Lämmitä täydellä teholla.
5. Käännä lämmityksen puolessa välissä.
Lämmity-
sluokka
Wattia
(IEC705)
B D 650 W 750 W
Täysi teho
(minuuteissa)
3 2,5 3 2,5
Sekoita /
Käännä
Sekoita /
Käännä
Sekoita /
Käännä
Täysi teho
(minuuteissa)
4 3,5 4 3,5
Asettumisaika
(minuuteissa)
1 1 1 1
800W
E
Mikroaaltouunin antoteho on 800 W.
Mikroaaltouunin lämmitysluokitus on E.
Tarkista kypsentämisajat kategorialle E ruoan
pakkauksesta nähdäksesi miten kauan sitä tulee
kypsentää. Katso seuraavasta viitteellisiä esimerkkejä.

67
FI
Höyry
Kun lämmität ruokaa mikroaaltouunissa, höyryä kehittyy ruoassa olevan veden lämmetessä ja haihtuessa.
Mikroaaltouunissa lämmittämisen aikana syntyvä höyry on täysin turvallista. Sen tulee päästä ulos
mikroaaltouunista, jotta painetta ei pääse kertymään uunin sisällä. Tämä tapahtuu tuuletusaukoista uunin
takana ja luukun ympärillä.
Kondensaatio
Kun höyry jäähtyy, voit havaita kondensaatiovettä
kertyvän pieniksi lammikoiksi mikroaaltouunin pohjalle
ja työtasolle luukun alapuolella sekä tuuletusaukkoihin.
Kuivaa aina mikroaaltouuni, kun olet kypsentänyt ruokia,
joiden kosteuspitoisuus on korkea.
Mikroaaltouuni on suunniteltu päästämään höyryä
ulos tuuletusaukoista ja oven ympäriltä ilman, että
mikroaaltoenergiaa pääsee ulos. Mikroaaltoenergia ei
pääse ulos höyryn mukana.
Mikroaaltouunin tarkistus
Tarkista mikroaaltouuni pakkauksen avaamisen
jälkeen.
Turvallisuutesi takaamiseksi mikroaaltouuni
pysähtyy, jos uunin luukku avataan
ruoanvalmistuksen aikana. Sulje luukku ja
jatka kypsennysjaksoa painamalla Menu /
Time -valitsin).
1. Avaa uunin luukku painamalla painiketta. Laita
rengas uuniin ja aseta lasilautanen sen päälle.
Lasilautasen alapuoli on suunniteltu niin, että
se pysyy vakaasti renkaan päällä.
Käytä aina rengasta ja lautasta
mikroaaltouunia käyttäessäsi.
Aseta vesikuppi lasilautaselle. Varmista, että
kuppi sopii käytettäväksi mikroaaltouunissa –
siinä ei saa olla metallisia koristereunuksia.
2. Sulje uunin luukku.
3. Paina Stop / Cancel -painiketta tyhjentääksesi
kaikki tekemäsi asetukset.
4. Painamalla Menu / Time -valitsin -painiketta
kerran voit käynnistää yksinkertaisen 30
sekunnin mikroaaltokypsennysjakson,
jonka avulla voit tarkistaa mikroaaltouunin
toimivuuden.
5. Kun kypsennys on valmis, veden pitäisi olla
kuumaa (ole varovainen, kun otat kupin
mikroaaltouunista). Tyhjennä kaikki asetukset
painamalla Stop / Cancel -painiketta.
3,5
4
1

68
FI
Kelloasetukset
Kun mikroaaltouuni on kytketty verkkovirtaan, LED-näytössä näkyy sekä 1:00, ja kuuluu yksi merkkiääni.
Aseta kello ennen käyttöä.
Aseta kello seuraavien ohjeiden mukaisesti.
1. Paina Clock -painiketta, tuntilukema alkaa
vilkkua.
2. Säädä tuntilukema kiertämällä Menu / Time
-valitsinta. Syötetyn ajan pitää olla välillä 00 -
23.
3. Paina Clock -painiketta, minuuttilukema alkaa
vilkkua.
4. Säädä minuuttilukema kiertämällä Menu /
Time -valitsinta. Syötetyn ajan pitää olla välillä
00 - 59.
5. Päätä kellon asettaminen painamalla Clock
-painiketta uudelleen.
Aika näkyy valaistuna.
1, 3, 5
2, 4

69
FI
Lapsilukon asettaminen
Tämä toiminto estää mikroaaltouunin käyttämisen lukitsemalla ohjauspaneelin käytön, kunnes toiminto
peruutetaan.
Aseta lapsilukko seuraavien ohjeiden mukaisesti.
1. Paina Stop / Cancel -painiketta 3 sekuntia,
kuuluu pitkä merkkiääni. LED-näytössä
näkyy myös symboli
, joka osoittaa, että
mikroaaltouunin lapsilukko on aktivoitu.
2. Vapauta lapsilukko painamalla Stop /
Cancel -painiketta uudelleen 3 sekunnin
ajan, jolloin pitkä merkkiääni ilmoittaa, että
mikroaaltouunin lapsilukko on kytketty pois
päältä.
Lapsilukkotoimintoa ei voi asettaa
viipeellä käynnistyvässä kypsentämisessä.
1, 2

70
FI
Ruoanlaitto mirkroaaltouunilla
Noudata seuraavia ohjeita yksinkertaista mikroaaltouunilla kypsentämistä varten. Esimerkiksi: Jos haluat
kuumentaa 20 minuutin ajan 80% teholla.
1. Paina kerran Power Level -painiketta, LEDnäyttö näyttää 100%,
, 1S, . Paina
uudelleen, mikroaaltouunin tehotasoksi tulee
80%,
, 1S, .
1s tarkoittaa 1. ruoanlaittovaihetta.
2. Kierrä Menu / Time -säädintä säätääksesi
kypsennysaikaa niin, että LED-näytössä näkyy
20:00.
3. Vahvista valinta painamalla Menu / Time
-valitsin) ja aloita kypsennys.
4. Paina kerran Stop / Cancel -painiketta
keskeyttääksesi kypsennyksen. LED-näytössä
näkyy
. Voit peruuttaa asetuksen
painamalla painiketta uudelleen.
Tehotason painikeohjaus
(mikroaaltokypsennykselle)
Järjestys LED-näyttö Mikroaaltoteho
1
100%
100%
2
80%
80%
3
60%
60%
4
40%
40%
5
20%
20%
6
00%
Vain tuuletin
4
2, 3
1

71
FI
Kaksivaiheinen ruoanlaitto
Noudata kaksivaiheisessa kypsennyksessä seuraavia ohjeita.
Esimerkiksi: Jos haluat kypsentää ruokaa 100 %:n mikroaaltoteholla viisi minuuttia ja sen jälkeen 80 %:n
mikroaaltoteholla seitsemän minuuttia.
Voit asettaa kaksivaiheisessa kypsennyksessä vain kaksi vaihetta. Kaksivaiheisessa ruoanlaitossa ei
voi asettaa sulatusohjelmia ei automaattivalikko-ohjelmia.
1. Paina Power Level -painiketta aloittaaksesi
kaksivaiheisen ruoanlaiton ensimmäisen
vaiheen 100 %:n mikroaaltoteholla. LEDnäytössä näkyy 100%,
, 1S, .
2. Kierrä Menu / Time -säädintä säätääksesi
kypsennysaikaa niin, että LED-näytössä näkyy
5:00.
3. a Paina kerran Monivaiheinen ruoanvalmistus
-painiketta kerran, LED-näytössä näkyy
100%,
, 2S, .
b Paina sitten Power Level -painiketta
muuttaaksesi toisen vaiheen tehotason 100
%:sta 80 %:iin.
1S tarkoittaa 1. ruoanlaittovaihetta.
2S tarkoittaa 2. ruoanlaittovaihetta.
4. Kierrä Menu / Time -säädintä säätääksesi
kypsennysaikaa niin, että LED-näytössä näkyy
7:00.
5. Vahvista valinta painamalla Menu / Time
-valitsin ja aloita kypsennys. Mikroaaltouunista
kuuluu merkkiääni, joka osoittaa sen
aloittaneen sulatuslaskennan.
Mikroaaltouunista kuuluu uusi merkkiääni,
kun se aloittaa mikroaaltokypsennyksen
(toisen vaiheen). Kun kypsennys on valmis,
mikroaaltouunista kuuluu merkkiääni viisi
kertaa, ja LED-näytössä näkyy End (Loppu)
merkkinä kypsennyksen valmistumisesta.
6. Paina kerran Stop / Cancel -painiketta
keskeyttääksesi kypsennyksen. LED-näytössä
näkyy
.
Voit peruuttaa asetuksen painamalla painiketta uudelleen.
6
2, 4, 5
3a
1, 3b

72
FI
Viipeellä käynnistyvä kypsentäminen (Esiasetettu ohjelma)
Noudata viipeellä käynnistyvässä kypsentämisessä seuraavia ohjeita.
Esimerkiksi: Nykyinen aika on 12:00 (keskipäivä) ja haluat kypsentää 80 %:n mikroaaltoteholla viisi
minuuttia 1 tunnin 30 minuutin kuluttua.
Voit asettaa viipeellä käynnistyvässä kypsennyksessä vain kaksi vaihetta. Viipeellä käynnistyvässä
kypsennyksessä ei voi asettaa sulatusohjelmia ei automaattivalikko-ohjelmia. Varmista, että uunin
luukku on kiinni ennen kuin asetat ohjelman.
1. Paina kerran Power Level -painiketta, LEDnäyttö näyttää 100%,
, 1S, . Paina
uudelleen, mikroaaltouunin tehotasoksi tulee
80%,
, 1S, .
2. Kierrä Menu / Time -säädintä säätääksesi
kypsennysaikaa niin, että LED-näytössä näkyy
5:00.
Älä paina tällöin Menu / TIme -valitsin.
3. a Aseta kypsennyksen aloitusaika painamalla
Preset -painiketta.
Tuntinumerot vilkkuvat ensin.
b Kierrä Menu / Time -säädintä säätääksesi
kypsennysaikaa niin, että LED-näytössä
näkyy 13:00.
4. a Aseta kypsennyksen aloitusaika painamalla
Preset -painiketta.
Minuuttinumerot vilkkuvat ensin.
b Kierrä Menu / Time -säädintä säätääksesi
kypsennysaikaa niin, että LED-näytössä
näkyy 13:30.
5. Päätä asetus painamalla Menu / Time -valitsin.
Mikroaaltouunista kuuluu äänimerkki kolme
kertaa, kun laskuri saavuttaa aloitusajan ja
aloittaa kypsennyksen automaattisesti.
6. Voit peruuttaa viipeellä käynnistyvän
kypsennyksen painamalla Preset (Esiasetus)painiketta ja painamalla sitten Stop / Cancelpainiketta.
6
2, 3b,
4b, 5
1
3a, 4a, 6

73
FI
Automaattinen kypsennys
Tämän toiminnon avulla voit kypsentää useimpia ruokiasi ruoan luokan ja painon perusteella.
Valitse luokka ja valitse ruoan oletuspaino. Viitteellisiä kypsennysaikoja ja oletuspainon voit katsoa nopeasti
Automaattivalikko-taulukosta.
Automaattivalikko
1. Kierrä Menu / Time -valitsinta vastapäivään
valitaksesi tarvittavan automaattivalikkoohjelman. LED-näytössä näkyy AUTO 8, 7, 6,
jne.
2. Paina Weight Adjust -painiketta valitaksesi
oletuspainon valitsemallesi ohjelmalle.
Katso tietoja Automaattivalikko-taulukosta.
3. Vahvista valinta painamalla Menu / Time
-valitsin) ja aloita kypsennys.
4. Paina kerran Stop / Cancel -painiketta
keskeyttääksesi kypsennyksen. LED-näytössä
näkyy
. Voit peruuttaa asetuksen
painamalla painiketta uudelleen.
Esimerkiksi: Jos haluat kypsentää 400 g kalaa
automaattivalikko-ohjelmalla, toimi seuraavien
ohjeiden mukaisesti.
a. Kierrä Menu / Time -valitsinta vastapäivään
valitaksesi automaattivalikko-ohjelman
kalaa varten. LED-näytössä näkyy AUTO 6.
b. Paina Weight Adjust -painiketta, kunnes
LED-näytössä näkyy 400.
c. Vahvista valinta painamalla Menu / Time
-valitsin ja aloita kypsennys.
d. Paina kerran Stop / Cancel -painiketta
keskeyttääksesi kypsennyksen. LEDnäytössä näkyy
. Voit peruuttaa
asetuksen painamalla painiketta
uudelleen.
4
1
3
2

74
FI
Ruoan tiheys ja paksuus voivat vaikuttaa kypsennysaikaan. Varmista ennen tarjoilua, että kaikki
ruoka on tulikuumaa ja läpikypsää. On oleellista, että ruoka tarkistetaan suositellun kypsennysajan
aikana ja sen jälkeen, vaikka Automaattivalikkoa käytettäisiin.
Automaattivalikko-taulukko
Valikko Paino Näyttö Kypsennysaika Kypsennysaika
AUTO 1
Maito/Kahvi
200ml 1 1’30”
• Käytä mikroaaltouunissa vain
mikroaaltouuniin sopivia astioita ja
tuorekelmua. Lävistä kalvo haarukalla ennen
kypsentämistä.
• Esiasetettu kypsennysaika on suunniteltu
määrälle 200 ml/kuppi.
400ml 2 2’40”
600ml 3 3’50”
AUTO 2
Riisi
150g 150g 19’00”
150g riisiä + 300ml
kylmää vettä
• Käytä
mikroaaltouunissa
vain mikroaaltouuniin
sopivia astioita ja
tuorekelmua. Lävistä
kalvo haarukalla
ennen kypsentämistä.
• Tarkista säännöllisesti
käytön aikana, ettei
vesi kiehu yli.
300g 300g 22’00”
300g riisiä + 600ml
kylmää vettä
450g 450g 25’00”
450g riisiä + 900ml
kylmää vettä
600g 600g 28’00”
600 g riisiä + 1200
ml kylmää vettä
AUTO 3
Spagetti
100g 100g 22’00”
100 g spagettia +
800 ml kylmää vettä
• Käytä
mikroaaltouunissa
vain mikroaaltouuniin
sopivia astioita ja
tuorekelmua. Lävistä
kalvo haarukalla
ennen kypsentämistä.
• Tarkista säännöllisesti
käytön aikana, ettei
vesi kiehu yli.
200g 200g 27’00”
200g spagettia +
1600 ml kylmää
vettä
300g 300g 32’00”
300g spagettia +
2400 ml kylmää
vettä
AUTO 4
Perunat
230g 1 5’00”
• Saat parhaat tulokset pistämällä perunan
kuoreen reikiä ennen kypsentämistä.
Kääri perunat kypsennyksen jälkeen
alumiinifolioon vähintään 5 minuutiksi
varmistaaksesi, että ne ovat läpikypsiä.
• Esiasetettu kypsennysaika on suunniteltu
määrälle 230 g/peruna.
460g 2 9’00”
690g 3 13’00”
AUTO 5
Automaattinen
uudelleenlämmitys
200g 200g 1’30”
Varmista ennen nauttimista, että ruoka on
läpikypsää. Lisäkypsennysaika voi olla
tarpeen, jos kappaleet ovat paksuja.
300g 300g 2’00”
400g 400g 2”30”
500g 500g 3’00”
600g 600g 3’30”
700g 700g 4’00”
800g 800g 4’30”
AUTO 6
Kala
200g 200g 3’00”
Varmista ennen nauttimista, että ruoka on
läpikypsää. Paksummat kalapalat voivat vaatia
pidemmän kypsennysajan.
300g 300g 4’20”
400g 400g 5’40”
500g 500g 7’00”
600g 600g 8’20”
AUTO 7
Pizza
150g 150g 0’50”
Tämä asetus on tuoreille pizzapaloille (ei
pakastepizzalle). Paksummat pizzapalat voivat
vaatia pidemmän kypsennysajan.
300g 300g 1’20”
450g 450g 1’50”
AUTO 8
Popcorn
99g 99g 2’30”
Parhaan tuloksen saavuttamiseksi
suosittelemme valmiiksi sekoitettua
pakkauspopcornia. Peitä se
mikroaaltouuninkestävällä kannella.

75
FI
Kypsentämisen pika-aloitus
Tällä toiminnolla voit nopeasti kypsentää ruokaa 1 minuutin ajan 100 %:n mikroaaltoteholla.
Noudata seuraavia vaiheita.
1. Paina Menu / Time -valitsin käynnistääksesi
kypsennyksen pika-aloituksen. Paina
painiketta uudelleen lisätäksesi toiset 30
sekuntia. Voit lisätä kypsennysajaksi enintään
10 minuuttia.
2. a Vaihtoehtoisesti voit kiertää Menu /
Time -säädintä vastapäivään, jos haluat
asettaa ensin kypsennysajan 100 %:n
mikroaaltoteholla.
b Paina sitten Menu / Time -valitsin
käynnistääksesi kypsentämisen pikaaloituksen.
2a, 2b
1

76
FI
Sulattaminen
Tämän toiminnon avulla voit sulattaa pakastetut ruoat antamalla painon tai ajan. Voit asettaa pakastetun
ruoan mikroaaltouunin kestävälle lautaselle tai astiaan ennen kuin asetat sen sulatusritilälle (ei sisälly
mikroaaltouunin toimitukseen). Näin voit varmistaa, että mahdolliset vapautuvat sulamisnesteet eivät valu
ja likaa uunin sisäpuolta.
Sulattaminen painon mukaan
1. Paina kerran Defrost By Weight -painiketta,
LED-näytössä näkyy
, AUTO.
2. Säädä ruoan paino painamalla Weight Adjust
-painiketta. Oletusalue on 100 g - 1800 g.
3. Käynnistä sulatus painamalla Menu / Time
-valitsin.
Suuret kohteet voivat olla jäisiä
keskeltä. Tasaista sulatusta varten ruoka
kannattaa sen vuoksi kääntää ympäri
ajoittain ja rikkoa pienempiin osiin
sulatuksen aikana.
Uuni päästää äänimerkin ja sen
toiminta keskeytyy, kun toiminta-ajasta
on kulunut 2/3. Avaa uunin luukku
ja käännä ruoka. Käynnistä sulatus
uudelleen painamalla Menu / Time
-valitsin.
Aseta paistit rasvapuoli alaspäin tai
kokonaiset linnut rintapuoli alaspäin.
Valuta nesteet sulatuksen aikana,
sillä ruoan nesteet voivat kuumeta ja
kypsentää ruokaa.
4. Paina kerran Stop / Cancel -painiketta
keskeyttääksesi sulatuksen. LED-näytössä
näkyy
. Voit peruuttaa asetuksen
painamalla painiketta uudelleen.
Sulattaminen ajan mukaan
1. Paina kerran Defrost By Speed -painiketta,
LED-näytössä näkyy
.
2. Säädä sulatusaika kiertämällä Menu / Time
-valitsinta.
3. Käynnistä sulatus painamalla Menu / Time
-valitsin.
4. Paina kerran Stop / Cancel -painiketta
keskeyttääksesi sulatuksen. LED-näytössä
näkyy
. Voit peruuttaa asetuksen
painamalla painiketta uudelleen.
4
3
1
2, 3
2
1

77
FI
Kysymyksiä kypsennystoiminnosta
Tällä toiminnolla voit tarkistaa valitun kypsennysohjelman tehon, ajan ja esiasetetun ajan.
Kypsennystehon tarkistaminen
1. Paina Power Level -painiketta kerran, jolloin
LED-näytössä näkyy nykyinen kypsennysteho,
kun uuni on mikroaaltokypsennyksessä.
Tämä toiminto ei kuitenkaan toimi Sulatus
painon mukaan -, Sulatus nopeuden mukaan
- ja Automaattivalikko-kypsennystilassa. Se
kestää 3 sekuntia, minkä jälkeen uuni palaa
alkuperäiseen näkymään.
Ajan tarkistaminen
2. Paina Clock -painiketta kerran, LED-
näytössä näkyy aika, kun uuni on
joko mikroaalto-, yhdistelmä- tai
automaattivalikkokypsennyksessä. Se
kestää 3 sekuntia, minkä jälkeen uuni palaa
alkuperäiseen näkymään.
Esiasetetun ajan tarkistaminen
3. Kun uuni on vielä esiasetustilassa, paina
Preset -painiketta kerran, LED-näytössä näkyy
esiasetettu aika. Se kestää 3 sekuntia, minkä
jälkeen uuni palaa alkuperäiseen näkymään.
1
3
2

78
FI
Mikroaaltouunin puhdistus
Jos puhdistat mikroaaltouunin joka kerta käytön jälkeen, uuniin ei jää vaikeasti puhdistettavia tahroja.
Irrota mikroaaltouuni pistorasiasta ja odota, että uuni jäähtyy täysin, ennen kuin puhdistat sen.
Uunin sisäpuolella oikealla laidalla on aalto-ohjain, jonka läpi mikroaallot kulkevat ruoan kypsentämistä
varten. On tärkeää pitää aalto-ohjain aina puhtaana.
Pyyhi se laimealla pesuaineella ja vedellä ja anna kuivua.
10
Käsittele uunin lasilautasta kuin mitä tahansa
muuta lasilautasta. Jos olet käyttänyt sitä
kauemmin kuin 15 minuuttia kerrallaan, anna
sen jäähtyä ennen kuin käytät sitä uudelleen.
Älä pese lasilautasta hyvin kuumassa vedessä
tai se voi haljeta.
Varmista, että lasilautanen on kuiva ennen kuin
laitat sen takaisin uuniin.
10
1
Uunien seinissä on erityinen emalipäällyste,
jonka ansiosta puhdistaminen on hyvin
helppoa. Käytä pehmeää, kosteaa liinaa
puhdistaaksesi roiskeet, tai talouspaperia
pyyhkiäksesi läikät. Puhdista rasva kostealla
liinalla ja käytä hieman puhdistusainetta.
Kuivaa huolellisesti. Kuten missä tahansa
uunissa, jos sinne jätetään rasvaa, se voi savuta
tai jopa syttyä tuleen.
1
Varmista, että pidät poistoritilät puhtaina.
2
Pidä uunin etuosa puhtaana, jotta ovi voi
sulkeutua oikein.
3
Varo, ettet roiski vettä ilma-aukkoihin.
4
Älä poista aalto-ohjaimen suojaa: kansi tulee
puhdistaa yhtä säännöllisesti kuin uunin
muutkin osat. Kanteen kerääntynyt rasva
saattaa aiheuttaa savuamista tai jopa syttyä
palamaan.
5
Puhdista oven sisäpuoli kostealla liinalla. Käytä
lämmintä saippuavettä pinttyneiden tahrojen
puhdistukseen ja kuivaa huolellisesti.
Luukun sisäpuolessa on erityinen päällyste eikä
sitä tule puhdistaa hiovilla puhdistustyynyillä
tai pulvereilla.
6
Puhdista luukun reunuksen takaosa.
7
Käytä lämmintä saippuavettä uunin
ulkopinnan puhdistamiseen. Älä käytä hiovia
puhdistustyynyjä tai pulvereita, jotka voivat
naarmuttaa pintaa.
8
Irrota uuni pistorasiasta ennen kuin puhdistat
virtalähteen ja uunin.
Pyyhi kostealla liinalla ja anna kuivua ennen
kuin kytket takaisin pistorasiaan.
9
4
5
2
6
7
8
9
3
Älä poista uunista mitään kiinnitettyjä osia
puhdistuksen aikana tai muulloin.

79
FI
Usein kysyttyjä kysymyksiä
Kysymykset Vastaukset
Miksi ruoka ei näytä valmistuvan? Tarkista, että:
• valmistusaika on asetettu
• luukku on suljettu
• pistorasia ei ole ylikuormitettu, mikä voi johtaa sulakkeen
palamiseen.
Miksi ruoka näyttää alikypsyneeltä
tai ylikypsyneeltä?
Tarkista, että:
• oikea valmistusaika on asetettu
• oikeaa tehoasetusta on käytetty.
Kuinka voin estää munia
poksahtelemasta?
Kun kypsennät tai keität munaa kuoretta mikroaaltouunissa,
keltuainen voi joskus poksahtaa, sillä sen sisälle kehittyy höyryä.
Voit estää munaa poksahtelemasta puhkaisemalla hammastikulla
keltuaiseen reiän ennen kuin laitat sen uuniin.
Älä koskaan kypsennä munia, joissa on kuori.
Miksi on tärkeää antaa ruoan
asettua valmistuksen jälkeen?
Mikroaaltokypsennyksessä monet ruoat kypsyvät vielä, kun ne on
otettu pois mikroaaltouunista. Koska mikroaaltouuni kypsentää
ruokaa ulkopuolelta sisälle päin, asettumisaikana sisäpuoli kypsyy
kunnolla ilman, että ulkopuolesta tulee ylikypsä.
Miksi ruoan valmistaminen
mikroaaltouunissa kestää joskus
kauemmin kuin reseptissä annetun
ajan?
Tarkista ensin, että mikroaaltouuni on asetettu reseptin ohjeiden
mukaisesti. Valmistusajat ja lämpöasetukset ovat ohjeellisia. Ne
estävät ylikypsentymisen, mutta erot ruoan painossa, koossa,
muodossa ja aloituslämpötilassa vaikuttavat siihen, miten kauan
ruoanvalmistus kestää – aivan kuten normaalissa uunissakin. Käytä
omaa arvostelukykyäsi reseptin ohella tarkistaaksesi onko ruoka
kypsynyt kunnolla.
Miksi uunin oven sisäpuolelle
kertyy kondenssivettä?
Kondenssiveden tiivistyminen on täysin normaalia. Etenkin
silloin, kun valmistat ruokaa, jonka kosteustaso on korkea, kuten
perunoita.
Pääseekö mikroaaltoenergiaa uunin
luukun ikkunan läpi?
Ei. Luukussa on erityinen metalli-ikkuna jossa on reikiä, joista voit
nähdä uunin sisälle, mutta niistä ei pääse energiaa ulos.
Luukun sivuilta ja tuuletusaukoista
tulee ulos höyryä. Voiko
mikroaaltoenergiaa päästä myös
läpi?
Ei. Luukku ja tuuletusaukot on huolellisesti suunniteltu niin, että
höyry pääsee ulos valmistuksen aikana, mutta mikroaaltoenergia
ei pääse. Aukot eivät ole niin suuria, että mikroaaltoenergia pääsisi
ulos.
Mitä tapahtuu, jos mikroaaltouuni
laitetaan päälle tyhjänä?
Mikroaaltouuni vioittuu. Älä laita uunia päälle jos se on tyhjä. On
hyvä pitää vesikuppia uunissa sen varalta, että joku laittaa uunin
vahingossa päälle.
Miksi mikroaaltouunin valo ei pala? Sulje luukku. Jos valo ei syty, lamppu on mahdollisesti palanut.
Ota yhteyttä valtuutettuun teknikkoon, älä yritä vaihtaa lamppua
itse.
Mikroaaltouunin sisällä näkyy
kipinöintiä käyttäessäni sitä. Voiko
uuni vioittua?
Kyllä. Varmista, että et käytä metallisia keittiövälineitä, ja ettei
rasioissa ole metallisia reunuksia. Älä koskaan käytä muuta
metallia kuin foliota valmistaessasi ruokaa uunissa.
Tuuletusaukoista ja luukusta tulee
läpi valoa. Tarkoittako tämä, että
mikroaaltoenergiaa pääsee ulos?
Ei. On normaalia, että valoa tulee läpi, siitä ei tarvitse huolestua.
Miksi televisio ja radio häiriintyvät,
kun käytän mikroaaltouunia?
Mikroaaltouunit käyttävät samantapaisia radioaaltoja, joita
televisiot ja radiot vastaanottavat. Voit vähentää häiriöitä
siirtämällä mikroaaltouunin kauemmaksi televisiosta tai radiosta.

80
FI
Tekniset tiedot
Malli S20MB10E
Tuloteho 230 - 240 V~ 50 Hz
Antoteho 700 - 800 Wattia
Mikroaaltotaajuus 2450MHz
Ulkomitat
(leveys x syvyys x korkeus)
452 x 369 x 262 mm
Virrankulutus
Mikroaaltouuni 1250 - 1350 Wattia
Noudattaa ETY -direktiivejä 89/336/ETY ja 92/31/ETY.
Koska pyrimme jatkuvasti parantamaan tuotteitamme, saatamme muuttaa teknisiä tietoja ilman erillistä
ilmoitusta.
DSG Retail Limited on vastuussa ostotapahtuman jälkeisistä palveluista.
Jos sinulla on kysymyksiä tuotteesta, ota yhteyttä tuotetukeemme numerossa 0844 561
6263 (Currys) tai 08700 118 117 (Pixmania).

81
DK
Hvis nogle af delene mangler eller er beskadiget, bedes du venligst kontakte Partmaster (kun
gældende i Storbritannien).
Tel: 0844 800 3456 for at få hjælp.
Tillykke med anskaffelsen af din nye Sandstrøm mikrobølgeovn.
Denne betjeningsvejleding vil hjælpe dig til et korrekt og sikkert brug.
Inden du bruger Sandstrøm mikrobølgeovnen
• Skal du læse disse instruktioner omhyggeligt og gemme dem til senere brug.
• Fjern alle indpakningsmærkater. Bortskaf dem på korrekt måde.
Inden du tilkalder service
• Se afsnittet vedrørende fejlfinding. Det vil hjælpe dig med selv at løse nogle
generelle problemer og nedsætte behovet for professionelle teknikeres hjælp.
Udpakning
Fjern alt indpakningsmateriale fra apparatet. Gem indpakningsmaterialet. Hvis du ønsker at bortskaffe
emballagen, skal det gøres i henhold til den lokale lovgivning.
Følgende ting følger med:
Hovedenheden
Drejeskive af glas x 1
P.N.: XGALS20MB10P12
Drejeskivering x 1
P.N.: XGALS20MB10P11
Brugervejledning x 1
P.N.: S20MB10E-001

82
DK
Produktoversigt
Hovedenheden
Kontrolpanelet
Kontrolpanel
Eektniveau
Brug denne knap til at vælge
mikrobølgeovnens funktion og
eektniveau.
Optøning i henhold til vægt
Brug denne knap til at optø i
henhold til vægt.
Preset (Forindstilling)
Brug denne knap til at
forindstille kogetid.
Ur
Brug denne knap til at
indstille uret.
LED display
Viser uret, kogetiden og
indstillingen.
Menu / Tid
Brug denne drejeknap
til indstilling af tid og
menuprogrammer.
Flertrinskogning
Brug denne knap til at vælge
funktionen "Totrinskogning".
Optøning i henhold til vægt
Brug denne knap til at optø i
henhold til vægt.
Indstilling af vægt
Brug denne knap til at indstille
madens vægt.
Stop / Annuller
Brug denne knap til at
stoppe kogningen og slette
kogeindstillinger.
Knap til låge

83
DK
Brug af alufolie i mikrobølgeovnen
Det er sikkert at bruge alufolie i din mikrobølgeovn, så længe du følger disse retningslinjer.
Som med al metal kan mikrobølgeenergi ikke passere gennem folie, men så længe folien holdes væk fra
ovnens sider, vil den ikke skabe gnister, og ovnen vil ikke være i fare.
Alufolie er en god måde at beskytte dele af maden, som du ikke ønsker at tilberede lige så hurtigt som
andre – måske, hvor maden er tyndere og ellers ville få for meget.
Placer folien omkring det område som du ønsker at beskytte. Sørg for, at den ikke berører ovnens sider,
når drejeskiven roterer. Brug kun ét stykke folie af gangen, så der ikke opstår gnister mellem de forskellige
stykker.
Følg disse retningslinjer når du bruger folie i mikrobølgeovnen:
• Fjern folielåg fra beholdere før de bruges i mikrobølgeovnen. Nogle låg er lavet af pap med en
foliebelægning. Disse bør også fjernes. Brug om muligt et mikrobølgesikkert, gennemsigtigt låg.
• Rør i maden under kogning, hvis beholderen har et låg eller er dækket med film.
• Brug altid glasdrejeskiven.
• Brug lave beholdere med et stort overfladeareal. Brug ikke beholdere, der er mere end 3,5 cm dybe.
• Brug grydelapper, når du håndterer varme foliebeholdere.
• Dæk ikke maden fuldstændigt med folie. Mikrobølgeenergien kan ikke passere gennem folien, så
maden vil ikke blive tilberedt.
• Lad ikke alufolien berøre ovnens inderside.
• Brug ikke mere end ét stykke alufolie i ovnen på samme tid.

84
DK
2. Vælg en flad arbejdsflade til mikrobølgeovnen,
væk fra varmekilder - såsom radiatorer og
åben ild - samt fra kolde områder. Der bør
være 10cm plads omkring ovnen og 30cm
over den, så varm luft kan komme ud af
lufthullerne under madlavning. Den er ikke
designet til indbygning.
Klargøring
Denne mikrobølgeovn er beregnet til brug i hjemmet. Den bør ikke bruges til kommerciel madlavning.
1. Efter at du har pakket ovnen ud, skal du kontrollere, at den ikke er blevet beskadiget, mens den var i
boksen. Kontroller, at der ikke er nogle buler i ovnen, at lågen lukker og åbner ordentlig og, at ovnen
ikke er beskadiget. En bulet eller skadet ovn kan lade mikrobølgeenergi undslippe. Kontroller, at alt
pakkematerialet er fjernet fra ovnens inderside. Bortskaf plastikemballage/ -poser på sikker måde, og
hold det væk fra babyer og mindre børn.
3. Forbind mikrobølgeovnen til et standard
husholdningsstik (230-240 volt, 13 ampere
nominelt). Undlad at bruge et stik, der også
har en adapter og andet udstyr tilsluttet. Brug
ikke en multi-adapter.
4. Læg drejeskiveringen ind i ovnen og anbring
glasdrejeskiven ovenpå. Drejeskiven er formet,
så den hviler sikkert på spindlen. Du skal
bruge drejepladen og ringen hver gang, du
bruger mikrobølgeovnen.
5. For at beskytte arbejdsoverfladen foreslår
vi, at du anbringer nogle glidesikre puder
(medfølger ikke) under mikrobølgeovnen.
Set nedefra
30cm
10cm10cm

85
DK
Introduktion til mikrobølgekogning
Madlavning med mikrobølgeovn
• Mikrobølgeovne tilbereder maden med mikrobølgeenergi, der svarer til naturligt forekomne
radiobølger. Normalt ville disse ”bølger” svinde bort efterhånden som de forsvinder ud i atmosfæren,
men i en mikrobølgeovn er de koncentreret på maden, hvilket varmer den op.
• Mikrobølgeenergi kan ikke bevæge sig gennem metal – så den kan ikke undslippe fra
mikrobølgeovnen – men den kan passere gennem materialer såsom glas, porcelæn, plastik og
papir. Disse materialer bruges til fremstilling af mikrobølgesikkert
køkkenudstyr.
• Mikrobølgesikkert køkkenudstyr vil stadig blive varmt efterhånden,
som maden varmes op.
Mikrobølgeenergien fokuserer på fugt i maden og forårsager en masse
små vibrationer. Vibrationerne bliver så store, at fugten – og maden –
varmes op.
Mikrobølge - opvarmningskategorier
Ovnen er testet og mærket, så den overholder myndighedernes frivillige aftale om genopvarmning af
tidligere tilberedt mad.
Opvarmningskarakteristikkerne og outputkraftniveauerne for mikrobølgeovne bliver normalt udregnet
med en relativt stor portion mad (1000g mængde, IEC 705), men mange pakker med færdigretter sælges i
mindre pakker, ofte omkring 350g.
Myndighederne har, i samarbejde med fødevarefirmaer og mikrobølgefabrikanter, oprettet et system af
opvarmningskategorier for at hjælpe dig med at vælge opvarmningstid for færdigretter.
Sådan tilberedes i mikrobølgeovn:
1. Fjern ydre emballage.
2. Prik FLERE HULLER i filmlåget.
3. Placer på en mikrobølgesikker tallerken.
4. Opvarm ved fuld effekt.
5. Rør eller drej halvvejs gennemopvarmningen.
Opvarmning
skategori
Watt (IEC705)
B D 650W 750W
Fuld effekt (i
minutter)
2 2 2 2
Rør / vend Rør / vend Rør / vend
Fuld effekt (i
minutter)
2 1,5 2 1,5
Ståtid
(i minutter)
1 1 1 1
Sådan tilberedes i mikrobølgeovn fra frossen
tilstand:
1. Fjern ydre emballage.
2. Prik FLERE HULLER i filmlåget.
3. Placer på en mikrobølgesikker tallerken.
4. Opvarm ved fuld effekt.
5. Rør eller drej halvvejs gennemopvarmningen.
Opvarmning
skategori
Watt (IEC705)
B D 650W 750W
Fuld effekt (i
minutter)
3 2,5 3 2,5
Rør / vend Rør / vend Rør / vend
Fuld effekt (i
minutter)
4 3,5 4 3,5
Ståtid
(i minutter)
1 1 1 1
800W
E
Mikrobølgeovnens outputeekt er 800W.
Mikrobølgeovnens opvarmningskategori er E.
Kontroller tilberedningstiderne for kategori E på
madens indpakning for at se hvor længe den skal
tilberedes. Brug venligst nedenstående eksempel
som reference.

86
DK
Damp
Når der tilberedes mad i mikrobølgeovnen, dannes der dampe, efterhånden som vandet i maden
opvarmes og fordamper.
Den damp, der skabes under madlavning i mikrobølgeovnen, er fuldstændig sikker. Den skal undslippe fra
mikrobølgeovnen for at forhindre opbygning af tryk inden i ovnen. Dette sker gennem lufthullerne bag på
ovnen og omkring lågen.
Kondensering
Efterhånden som dampen afkøles, kan der samles
kondens i små pytter inde i mikrobølgeovnen og på
arbejdsfladerne under lågen og lufthullerne. Tør altid
ovnen af efter tilberedning af mad med høj fugtighed.
Mikrobølgeovnen er designet til at lade damp
undslippe fra lufthuller og rundt om døren, uden at
mikrobølgeenergien undslipper. Der er ingen fare for, at
mikrobølgeenergien undslipper sammen med dampen.
Tjek af mikrobølgeovnen
Tjek mikrobølgeovnen efter udpakning.
Af hensyn til din sikkerhed stopper
mikrobølgeovnen, hvis lågen åbnes under
madlavning. Luk lågen og tryk på Menu /
Time for at fortsætte kogecyklussen.
1. Tryk på knappen for at åbne ovnlågen. Læg
drejeskiveringen ind i ovnen og anbring
glasdrejeskiven ovenpå.
Drejeskiveringen er udformet, så den hviler
sikkert på spindlen.
Du skal bruge glasdrejeskiven og ringen hver
gang, du bruger mikrobølgeovnen.
Anbring en kop vand på glasdrejeskiven. Sørg
for, at koppen er mikrobølgesikker. Den må
ikke have metalpynt.
2. Luk ovnlågen.
3. Tryk på Stop / Cancel or at fjerne eventuelle
indstillinger, der kan være foretaget.
4. Tryk én gang på Menu / Time for at begynde
en simpel 30-sekunders mikrobølgekogning
og tjekke mikrobølgeovnens drift.
5. Når kogningen er fuldført, er vandet varmt.
Vær forsigtig, når du tager koppen ud af
ovnen. Tryk på Stop / Cancel for at slette alle
indstillinger.
3,5
4
1

87
DK
Indstilling af ur
Når mikrobølgeovnen forbindes til strømforsyningen, viser ovnens display 1:00, og mikrobølgeovnen
afgiver en lyd én gang. Kontroller, at uret er indstillet inden brugen.
Indstil uret på følgende måde.
1. Tryk på Clock, hvorefter timetallene blinker.
2. Drej på Menu / Time or at indstille timetallene.
Inputtiden skal være mellem 00 og 23.
3. Tryk på Clock, hvorefter minuttallene blinker.
4. Drej på Menu / Time drejeknappen for at
indstille minuttallene, som skal være mellem
00 og 59.
5. Tryk på Clock igen for at afslutte indstillingen
af uret.
Tiden lyser.
1, 3, 5
2, 4

88
DK
Indstilling af børnesikringen
Denne funktion forhindrer drift af ovnen ved at låse kontrolpanelet, indtil funktionen er annulleret.
Indstil børnelåsen på følgende måde.
1. Tryk på Stop / Cancel i tre sekunder. Der
høres en lang lyd. LED displayet viser
for at
angive, at børnesikringen er indstillet.
2. Frigør børnesikringen ved igen at trykke på
Stop / Cancel i tre sekunder. En lang tone
angiver, at mikrobølgeovnens børnesikring er
annulleret.
Børnesikringsfunktionen kan ikke
indstilles ved udskudt kogestart.
1, 2

89
DK
Mikrobølgekogning
Simpel kogning i mikrobølgeovnen udføres på følgende måde. Eksempel: Hvis du kun ønsker at benytte
80% effekt til at koge i 20 minutter.
1. Tryk én gang på Power Level, hvorefter
LED displayet viser 100%,
, 1S,
. Tryk på knappen igen for at ændre
mikrobølgeeffekten til 80%,
, 1S, .
1s betyder kogning 1. trin.
2. Drej Menu / Time for at indstille kogetiden,
indtil LED displayet viser 20:00.
3. Tryk på Menu / Time for at bekræfte og
begynde kogningen.
4. Tryk én gang på Stop / Cancel for at stoppe
og holde kogningen. LED displayet viser
.
Tryk igen for at annullere indstillingen.
Effektniveau-kontrol
(til mikrobølgekogning)
Rækkefølge LED display Mikrobølgeeffekt
1
100%
100%
2
80%
80%
3
60%
60%
4
40%
40%
5
20%
20%
6
00%
Kun ventilator
4
2, 3
1

90
DK
To-trins-kogning
To-trins-kogning udføres på følgende måde.
Eksempel: Du ønsker at koge mad med 100% mikrobølgeeffekt i fem minutter og derefter med 80% effekt
i syv minutter.
Der kan kun indstilles to trin ved to-trins-kogning. Hverken optønings- eller auto.menu
programmer kan indstilles til to-trins-kogning.
1. Tryk på Power Level for at begynde to-trinskogningen med 100% mikrobølgeeffekt på
første trin. LED displayet viser 100%,
, 1S,
.
2. Drej Menu / Time for at indstille kogetiden,
indtil LED displayet viser 5:00.
3. a Tryk én gang på Multi Stage Cooking
(Flertrinskogning), hvorefter LED displayet
viser 100%,
, 2S, .
b Tryk derefter på Power Level for at ændre
det andet trins effektniveau fra 100% til
80%.
1S betyder kogning 1. trin.
2S betyder kogning andet trin.
4. Drej Menu / Time for at indstille kogetiden,
indtil LED displayet viser 07:00.
5. Tryk på Menu / Time for at bekræfte og
begynde kogningen. Der høres en lyd én gang
fra mikrobølgeovnen for at angive, at den har
begyndt optøningen.
Der høres en lyd igen, når den begynder
mikrobølgekogningen (det andet stadie). Når
den er færdig med opgaven afgiver ovnen
en lyd fem gange, og LED displayet viser End
(Slut) for at indikere, at opgaven er udført.
6. Tryk én gang på Stop / Cancel for at stoppe
og holde kogningen. LED displayet viser
.
Tryk igen for at annullere indstillingen.
6
2, 4, 5
3a
1, 3b

91
DK
Madlavning med udskudt opstart (Forindstillet program)
Madlavning med udskudt opstart udføres på følgende måde.
Eksempel: Klokken er nu 12 middag, og du ønsker at koge med 80% mikrobølgeeffekt i fem minutter om
en time og 30 minutter.
Der kan kun indstilles to trin ved to-trins-kogning. Hverken optønings- eller auto.menu
programmer kan indstilles til to-trins-kogning. Kontroller, at lågen er lukket inden indstilling af
programmet.
1. Tryk én gang på Power Level, hvorefter
LED displayet viser100%,
, 1S,
. Tryk på knappen igen for at ændre
mikrobølgeeffekten til 80%,
, 1S, .
2. Drej Menu / Time for at indstille kogetiden,
indtil LED displayet viser 5:00.
Tryk ikke på Menu / Time på dette
tidspunkt.
3. a Tryk på Preset for at forindstille tidspunktet
for kogningens begyndelse.
Timetallet blinker først.
b Drej Menu / Time for at indstille kogetiden,
indtil LED displayet viser 13:00.
4. a Tryk på Preset for at forindstille tidspunktet
for kogningens begyndelse.
Minuttallet blinker først.
b Drej Menu / Time for at indstille kogetiden,
indtil LED displayet viser 13:30.
5. Tryk på Menu / Time for at fuldføre
kogningen. Mikrobølgeovnen lyder tre gange,
når nedtællingen når starttidspunktet, og
kogningen automatisk begynder.
6. Annuller den udskudte kogestart ved at trykke
på Preset (Forindstilling) og tryk derefter på
Stop / Cancel.
6
2, 3b,
4b, 5
1
3a, 4a, 6

92
DK
Autom. kogning
Med denne funktion kan du koge det meste af din mad baseret på fødevarekategori og vægt.
Vælg kategorien og madvarernes standardvægt. For hurtig reference med hensyn til kogetid og
standardvægt, se Auto Menu (Autom. menu) tabellen.
Automatisk menu
1. Drej Menu / Time mod urets retning for at
vælge det ønskede Auto Menu program LED
displayet viser AUTO 8, 7, 6 osv.
2. Tryk på Weight Adjust for at vælge
standardvægten for det valgte program.
Se venligst Autom. menu tabellen for
yderligere oplysninger.
3. Tryk på Menu / Time for at bekræfte og
begynde kogningen.
4. Tryk én gang på Stop / Cancel for at stoppe
og holde kogningen. LED displayet viser
.
Tryk igen for at annullere indstillingen.
Eksempel: Hvis du ønsker at koge 400g fisk med
Auto. Menu programmet, skal du gøre som følger.
a. Drej Menu / Time mod urets retning for at
vælge det ønskede Auto Menu program for
sk. LED displayet viser AUTO 6.
b. Tryk på Weight Adjust indtil LED displayet
viser 400.
c. Tryk på Menu / Time for at bekræfte og
begynde kogningen.
d. Tryk én gang på Stop / Cancel for at
stoppe og holde kogningen. LED displayet
viser
. Tryk igen for at annullere
indstillingen.
4
1
3
2

93
DK
Madvarernes tykkelse og tæthed kan indvirke på kogetiden. Kontroller inden serveringen, at al
mad er brændende varm og gennemkogt. Det er meget vigtigt at tjekke maden under og efter
den anbefalede kogetid - selv hvis der blev brugt Auto Menu.
Autom. menu tabel
Menu Vægt Display Kogetid Bemærkninger
AUTO 1
Mælk / Kaffe
200ml 1 1’30”
• Anbring i en passende beholder til
mikrobølgeovne og tildæk med plastfolie til
mikrobølgeovne. Stik hul i filmen inden kogning.
• Den forindstillede kogetid er beregnet til 200ml
per kop.
400ml 2 2’40”
600ml 3 3’50”
AUTO 2
Ris
150g 150g 19’00”
150g ris + 300ml
koldt vand
• Anbring i en passende
beholder til mikrobølgeovne
og tildæk med plastfolie til
mikrobølgeovne. Stik hul i
filmen inden kogning.
• Kontrollér regelmæssigt under
brug for at sikre, at vandet
ikke koger over.
300g 300g 22’00”
300g ris + 600ml
koldt vand
450g 450g 25’00”
450g ris + 900ml
koldt vand
600g 600g 28’00”
600g ris + 1200ml
koldt vand
AUTO 3
Spagetti
100g 100g 22’00”
100g of spagetti +
800ml koldt vand
• Anbring i en passende
beholder til mikrobølgeovne
og tildæk med plastfolie til
mikrobølgeovne. Stik hul i
filmen inden kogning.
• Kontrollér regelmæssigt under
brug for at sikre, at vandet
ikke koger over.
200g 200g 27’00”
200g spagetti +
1600 ml koldt
vand
300g 300g 32’00”
300g spagetti +
2400ml koldt vand
AUTO 4
Kartofler
230g 1 5’00”
• De bedste resultater opnås ved at prikke hul i
kartoflerne inden kogningen. De bedste resultater
med kartofler opnås ved efter kogningen at
pakke dem ind i aluminiumsfolie i mindst 5
minutter for at sikre, at de er gennemkogte.
• Den forindstillede kogetid er beregnet til 230g
per kartoffel.
460g 2 9’00”
690g 3 13’00”
AUTO 5
Automatisk
genopvarmning
200g 200g 1’30”
Inden serveringen skal du kontrollere, at maden er
helt gennemkogt. Yderligere kogning kan være
nødvendig for tykkere stykker.
300g 300g 2’00”
400g 400g 2”30”
500g 500g 3’00”
600g 600g 3’30”
700g 700g 4’00”
800g 800g 4’30”
AUTO 6
Fisk
200g 200g 3’00”
Inden serveringen skal du kontrollere, at maden
er helt gennemkogt. Yderligere kogetid kan være
nødvendig for tykkere stykker fisk.
300g 300g 4’20”
400g 400g 5’40”
500g 500g 7’00”
600g 600g 8’20”
AUTO 7
Pizza
150g 150g 0’50”
Denne indstilling er beregnet på friske pizzaskiver
(ikke frossen pizza). Yderligere kogetid kan være
nødvendig for tykkere pizzastykker.
300g 300g 1’20”
450g 450g 1’50”
AUTO 8
Popcorn
99g 99g 2’30”
De bedste resultater opnås ved at bruge ready-mix
pakkede popcorn. Tildæk med et mikrobølgesikkert
låg.

94
DK
Hurtigstartkogning
Med denne funktion kan du koge din mad hurtigt i løbet af 1 minut med 100% mikrobølgeeffekt.
Gør som følger.
1. Tryk på Menu / Time for at begynde
kogningen. Tryk på knappen igen for at tilføje
yderligere 30 sekunder. Kogetiden kan øges
med op til ti minutter.
2. a Du kan også indstille kogetiden med 100%
mikrobølgeeffekt ved først at dreje Menu /
Time i urets retning.
b Tryk derefter på Menu / Time for at begynde
kogningen.
2a, 2b
1

95
DK
Optøning
Med denne funktion kan du optø frosne madvarer ved blot at indtaste vægt eller tid. Du kan ønske
at anbringe de frosne madvarer på mikrobølgesikker tallerken eller fad, inden de anbringes på
optøningsstativet (ikke vedlagt i denne pakke). Dette sikrer, at ingen væsker frigøres under optøningen og
forurener ovnens indre.
Optøning i henhold til vægt
1. Tryk én gang på Defrost By Weight, hvorefter
LED displayet viser
, AUTO.
2. Tryk på Weight Adjust for at indstille madens
vægt. Standardområdet er 100g til 1800g.
3. Tryk på Menu / Time for at begynde
optøningen.
Store ting kan være frosne inde i
midten. For at sikre en jævn optøning
skal du derfor fra tid til anden under
optøningen vende dem og brække dem
i mindre stykker.
Ovnen vil afgive en lyd og pausere efter
2/3 optøningstid. Åbn ovnlågen og
drej maden. Tryk på Menu / Time for at
fortsætte optøningen.
Vend fedtsiden på en steg og hele
fjerkræbryster nedad.
Fjern væsker under optøningen, idet saft
fra madvarer kan blive varme og koge
madvarerne.
4. Tryk én gang på Stop / Cancel for at stoppe
og holde optøningen. LED displayet viser
.
Tryk igen for at annullere indstillingen.
Optøning i henhold til tid
1. Tryk én gang på Defrost By Speed, hvorefter
LED displayet viser
.
2. Drej på Menu / Time for at indstille
optøningstiden.
3. Tryk på Menu / Time for at begynde
optøningen.
4. Tryk én gang på Stop / Cancel for at stoppe
og holde optøningen. LED displayet viser
.
Tryk igen for at annullere indstillingen.
4
3
1
2, 3
2
1

96
DK
Spørgsmål vedrørende kogefunktionen
Med denne funktion kan du tjekke og se den nuværende effekt, tid og forindstillede tid for det valgte
kogeprogram.
Sådan ndes den nuværende kogeeekt
1. Mens ovnen er i mikrobølgekogningstadiet,
tryk én gang på Power Level, hvorefter LED
displayet viser den nuværende kogeeffekt.
Denne funktion fungerer imidlertid ikke i
"Optøning i henhold til vægt", "Optøning i
henhold til hastighed" og "Autom. menu". Det
ses i 3 sekunder, hvorefter der vendes tilbage
til det oprindelige display.
Sådan ndes tiden
2. Tryk én gang på Clock, hvorefter LED displayet
viser den nuværende tid for ovnen under
henholdsvis mikrobølge-, kobinations- og
auto.menu kogning. Det ses i 3 sekunder,
hvorefter der vendes tilbage til det oprindelige
display.
Sådan ndes den forvalgte tid
3. Mens ovnen er i forvalgtilstand, tryk én gang
på Preset, hvorefter LED displayet viser den
forvalgte tid. Det ses i 3 sekunder, hvorefter
der vendes tilbage til det oprindelige display.
1
3
2

97
DK
Rengøring af mikrobølgeovnen
Rengør ovnen hver gang du bruger den. Det vil hjælpe med til at forhindre stædige pletter, der er svære at
fjerne.
Inden rengøringen skal du frakoble mikrobølgeovnen fra stikkontakten og vente på, at ovnen er kølet helt
af.
Til højre i ovnrummet findes bølgestyrdækslet. Mikrobølger passerer herigennem, så maden kan komme i
kog. Dette bølgestyrdæksel skal altid være rent.
Tør det af med et mildt rengøringsmiddel og med vand og lad det tørre.
10
Behandl glasdrejeskiven som du ville behandle
andre glasplader. Hvis du har brugt den i mere
end 15 minutter, skal den køle af, før den
bruges igen. Vask ikke drejeskiven i meget
varmt vand, da den kan knække.
Tjek at drejeskiven er tør, før den anbringes i
ovnen igen.
10
1
Ovnens vægge har en speciel
emaljebelægning, der gør dem meget nemme
at rengøre. Brug en blød, fugtig klud til at tørre
pletter væk, eller et stykke køkkenrulle til at
fjerne evt.spildte rester. Tør fedt væk med en
fugtig klud med en smule opvaskemiddel. Tør
grundigt. Som med enhver ovn kan fedt, der
får lov at samle sig, medføre røg eller endog
brand.
1
Sørg for at holde lufthullerne rene.
2
Hold ovnens forside ren så lågen lukker korrekt.
3
Vær forsigtig med ikke at spilde vand i
lufthullerne.
4
Fjern ikke bølgestyrdækslet: Det er vigtigt at
holde det rent på samme måde som indersiden
af ovnen. Hvis der samles fedt, kan det ryge og
endda antænde.
5
Hold lågens inderside ren med en fugtig klud.
Brug varmt sæbevand på stædige pletter og
tør grundigt.
Lågens inderside har en speciel belægning
og må ikke rengøres med skuresvampe eller
rengøringspulver.
6
Rengør bag lågens kant.
7
Brug varmt sæbevand til at rengøre ovnens
yderside. Brug ikke skuresvampe eller pulver,
der kan ridse overfladen.
8
Fjern ledningen fra stikkontakten, inden
ledningen og ovnen rengøres.
Tør af med en fugtig klud og lad tørre, inden
du tilslutter igen.
9
4
5
2
6
7
8
9
3
Fjern ikke faste dele fra mikrobølgeovnens
inderside under rengøring eller på noget
andet tidspunkt.

98
DK
Hyppigt stillede spørgsmål
Spørgsmål Svar
Hvorfor synes maden ikke at blive
kogt?
Kontroller, at:
• kogetiden er indstillet
• lågen er lukket
• strømstikket ikke er overbelastet og en sikring sprunget.
Hvorfor synes maden at have fået
for lidt eller for meget?
Kontroller, at:
• kogetiden er indstillet korrekt
• der er brugt den korrekte effektindstilling.
Hvordan kan jeg forhindre æg i at
springe?
Når du bager eller pocherer æg i mikrobølgeovnen, kan blommen
nogle gange springe efterhånden, som der opbygges damp inde
i den. Du kan forhindre ægget i at springe ved før kogningen at
prikke hul på blommen med en tandstikker.
Tilbered aldrig æg, der stadig er i skallen.
Hvorfor er det så vigtigt at lade ting
hvile efter kogning?
Ved mikrobølgekognig fortsætter megen mad med at koge,
selv efter, at den er taget ud af ovnen. Madlavning med
mikrobølgeovn fungerer udefra og ind i maden. Ståtiden lader
madvarens midte stege tilpas, uden at ydersiden får for meget.
Hvorfor bruger min ovn nogle
gange længere tid på at stege
maden, end der står i opskriften?
Tjek først, at mikrobølgeovnen er indstillet i henhold til opskriften.
Kogetid og varmeindstillinger er forslag til at forhindre at maden
får for meget, men variationer i madens vægt, størrelse, form og
starttemperatur vil indvirke på, hvor lang tid det tager at koge den
- præcis som med en almindelig ovn. Brug din sunde fornuft samt
opskriften til at kontrollere, om maden er blevet ordentligt kogt.
Hvorfor samler der sig kondens på
ovndørens inderside?
Kondens er helt normalt, især når der tilberedes mad med et høj
fugtindhold som for eksempel kartofler.
Kommer mikrobølgeenergien ud
gennem ruden i lågen?
Nej, lågen har en speciel metalskærm med huller der lader dig se
ind i ovnen, men ikke lader mikrobølgeenergien komme ud.
Der kommer damp ud gennem
lågens kant og lufthullerne. Kan der
også komme mikrobølgeenergi ud?
Nej, lågen og lufthullerne er specielt designet til at slippe damp
ud under madlavning, men holde mikrobølgeenergien inde.
Mellemrummene er ikke store nok til, at mikrobølgeenergi kan
slippe ud.
Hvad sker der, hvis der tændes for
ovnen, mens den er tom?
Mikrobølgeovnen vil blive skadet. Tænd ikke for mikrobølgeovnen,
mens den er tom. Det er en god ide at stille en kop vand i ovnen i
tilfælde af, at nogen kommer til at tænde for den.
Hvorfor tænder ovnens lys ikke? Åbn lågen. Hvis lyset ikke tænder, er pæren sikkert sprunget. Ring
efter en kvalificeret reparatør – forsøg ikke selv at skifte pæren.
Der er gnister indeni, når jeg bruger
mikrobølgeovnen. Vil dette skade
den?
Ja. Sørg for ikke at bruge metalredskaber og, at beholderen
ikke har metalpynt. Der må ikke bruges metal udover alufolie i
mikrobølgeovnen, når der laves mad.
Det lyser ud gennem lufthuller
og døren. Betyder dette at
mikrobølgeenergien kan slippe ud?
Nej, det er helt normalt, at der ses lys. Det er ikke noget at
bekymre sig om.
Hvorfor er der støj på tv og radio,
når jeg bruger mikrobølgeovnen?
Mikrobølgeovne bruger radiobølger, ligesom dem, der modtages
af tv og radio. Du kan reducere denne forstyrrelse ved at fjerne
mikrobølgeovnen fra tv'et eller radioen.

99
DK
Specikationer
Model S20MB10E
Input 230 - 240V~ 50Hz
Output 700 - 800W
Mikrobølgefrekvens 2450MHz
Ydre mål
(bredde x dybde x højde)
452mm x 369mm x 262mm
Strømforbrug
Mikrobølgeovn 1250 - 1350W
Overholder EEC direktiverne 89/336/EEC og 92/31/EEC.
Da vi konstant stræber efter at forbedre vores produkter, kan vi ændre specifikationerne uden forudgående
advarsel.
DSG Retail Limited er ansvarlig for eftersalgsservice.
Hvis du har spørgsmål vedrørende produktet, kontakt venligst vores kundehjælp på tel.
0844 561 6263 (Currys) og 08700 118 117 (Pixmania).

100
CZ
Pokud některé položky chybí nebo jsou poškozené, kontaktujte společnost Partmaster (pouze VB).
Tel.: 0844 800 3456 se žádostí o pomoc.
Blahopřejeme Vám k zakoupení nové mikrovlnné trouby Sandstrøm.
Tento návod k použití Vám pomůže správně a bezpečně ji používat.
Před tím, než začnete používat mikrovlnnou troubu Sandstrøm
• Pročtěte si pečlivě tyto pokyny a uschovejte je pro budoucí použití.
• Odstraňte veškeré obalové štítky s označením. Prosíme, abyste je řádně zlikvidovali.
Před voláním do servisu
• Prohlédněte si část k řešení problémů. To Vám pomůže vyřešit některé základní
problémy bez cizí pomoci a sníží to potřebu žádat o pomoc odborné techniky.
Vybalení
Odstraňte z produktu veškerý obal. Uschovejte obal. V případě likvidace postupujte podle místních
vyhlášek.
Balení obsahuje následující položky:
Hlavní jednotka
Skleněný otočný talíř x 1
Č. dílu: XGALS20MB10P12
Otočný kruh x 1
Č. dílu: XGALS20MB10P11
1 x návod k použití
Č. dílu: S20MB10E-001
 Loading...