

Page 1
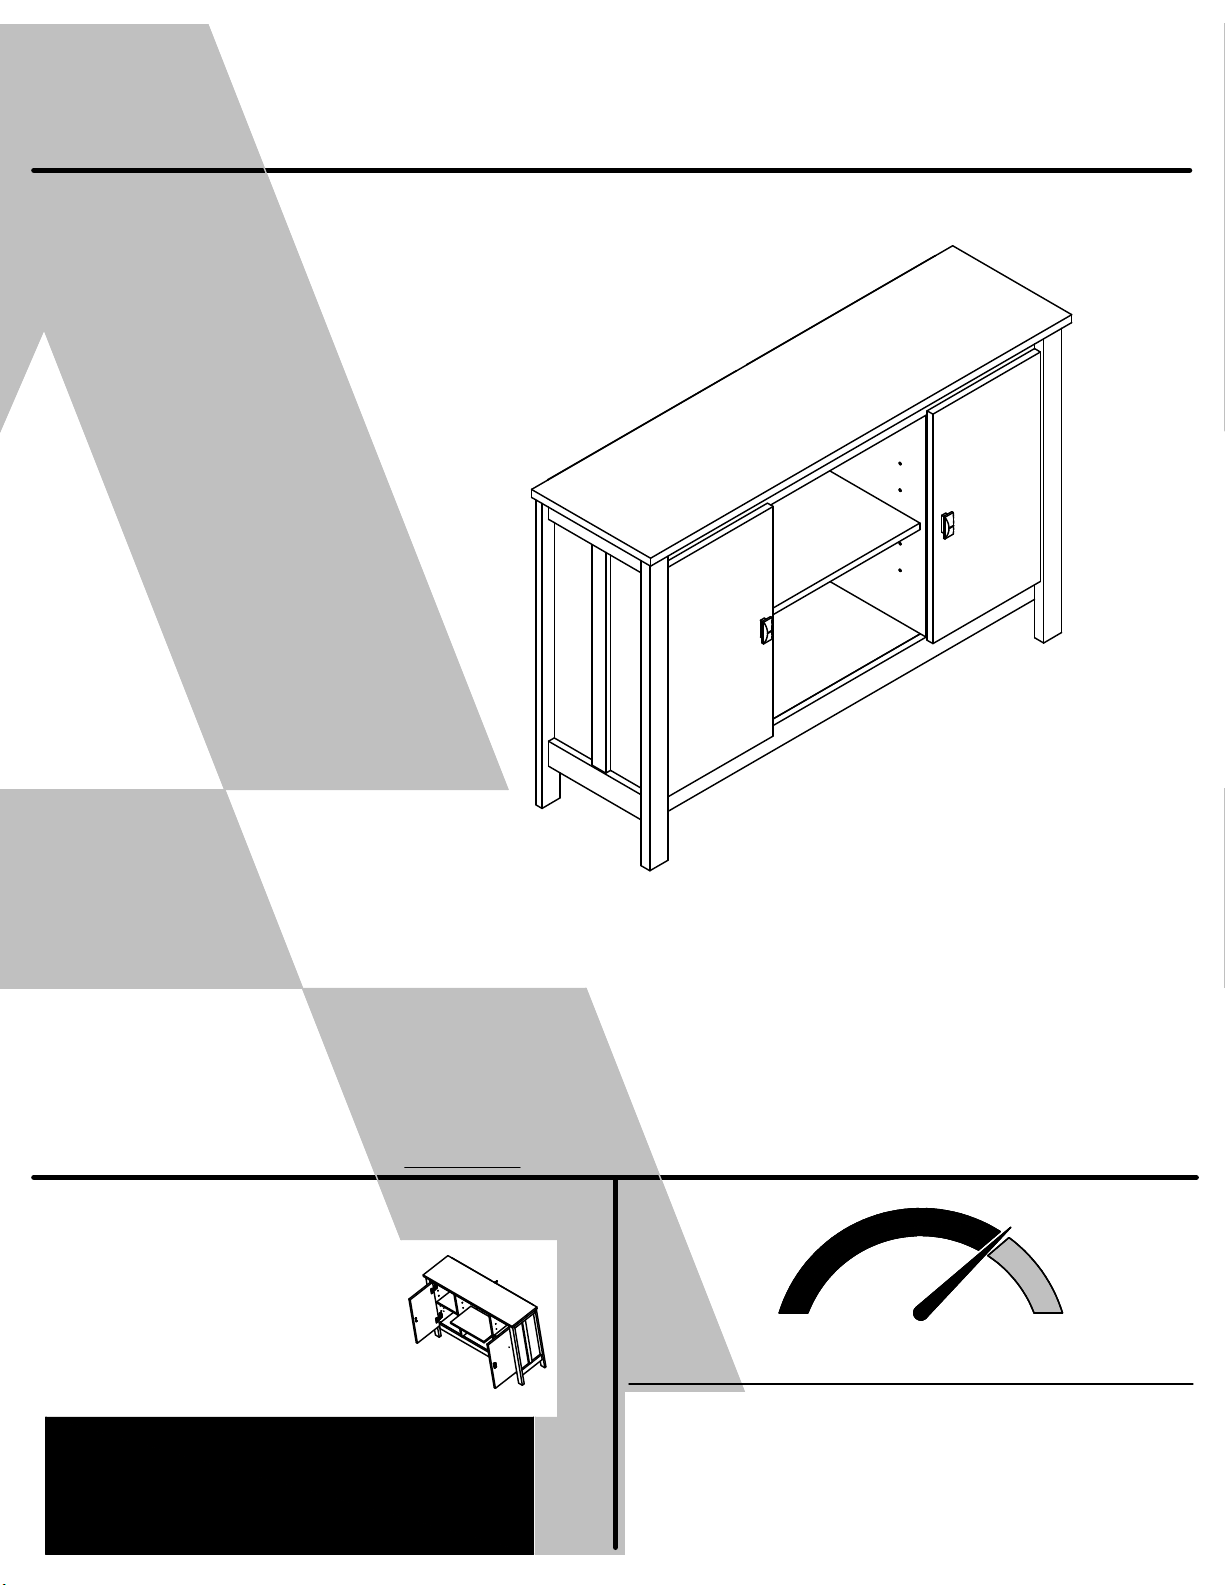
2011339COM
Storage Console
Date of Purchase ___ / ___ / ___
Lot Number:
B342011339COM0
THIS INSTRUCTION BOOKLET CONTAINS
IMPORTANT
SAFETY INFORMATION. PLEASE READ AND KEEP FOR FUTURE REFERENCE.
Secure Your Furniture
Keep your home and family safe
with the wall anchor kit that is
included with the product.
Serious or fatal crushing injuries can
occur from tipping furniture.
WARNING: Manufacturer assumes no liability
for improper installation or excessive loads
placed on screws or bracket. This wall anchor
is not a substitute for proper adult supervision.
Do Not Return This Product!
Contact our customer service team for help first.
Call: 1-800-489-3351 (toll free)
Monday-Friday 9am - 5pm CST
Visit: www.ameriwoodhome.com
Easy
Assembly Difficulty Meter
Tough
Follow Ameriwood Home
You
Tube
Page 2
Contact Us!
Do NOT return this product!
Contact our friendly customer service team first for help.
Call us!
1-800-489-3351
Monday-Friday
9am - 5pm CST
Assembly Tips
You
Tube
Visit ameriwoodhome.com to view the
limited warranty valid in the U.S. and Canada.
Helpful Hints
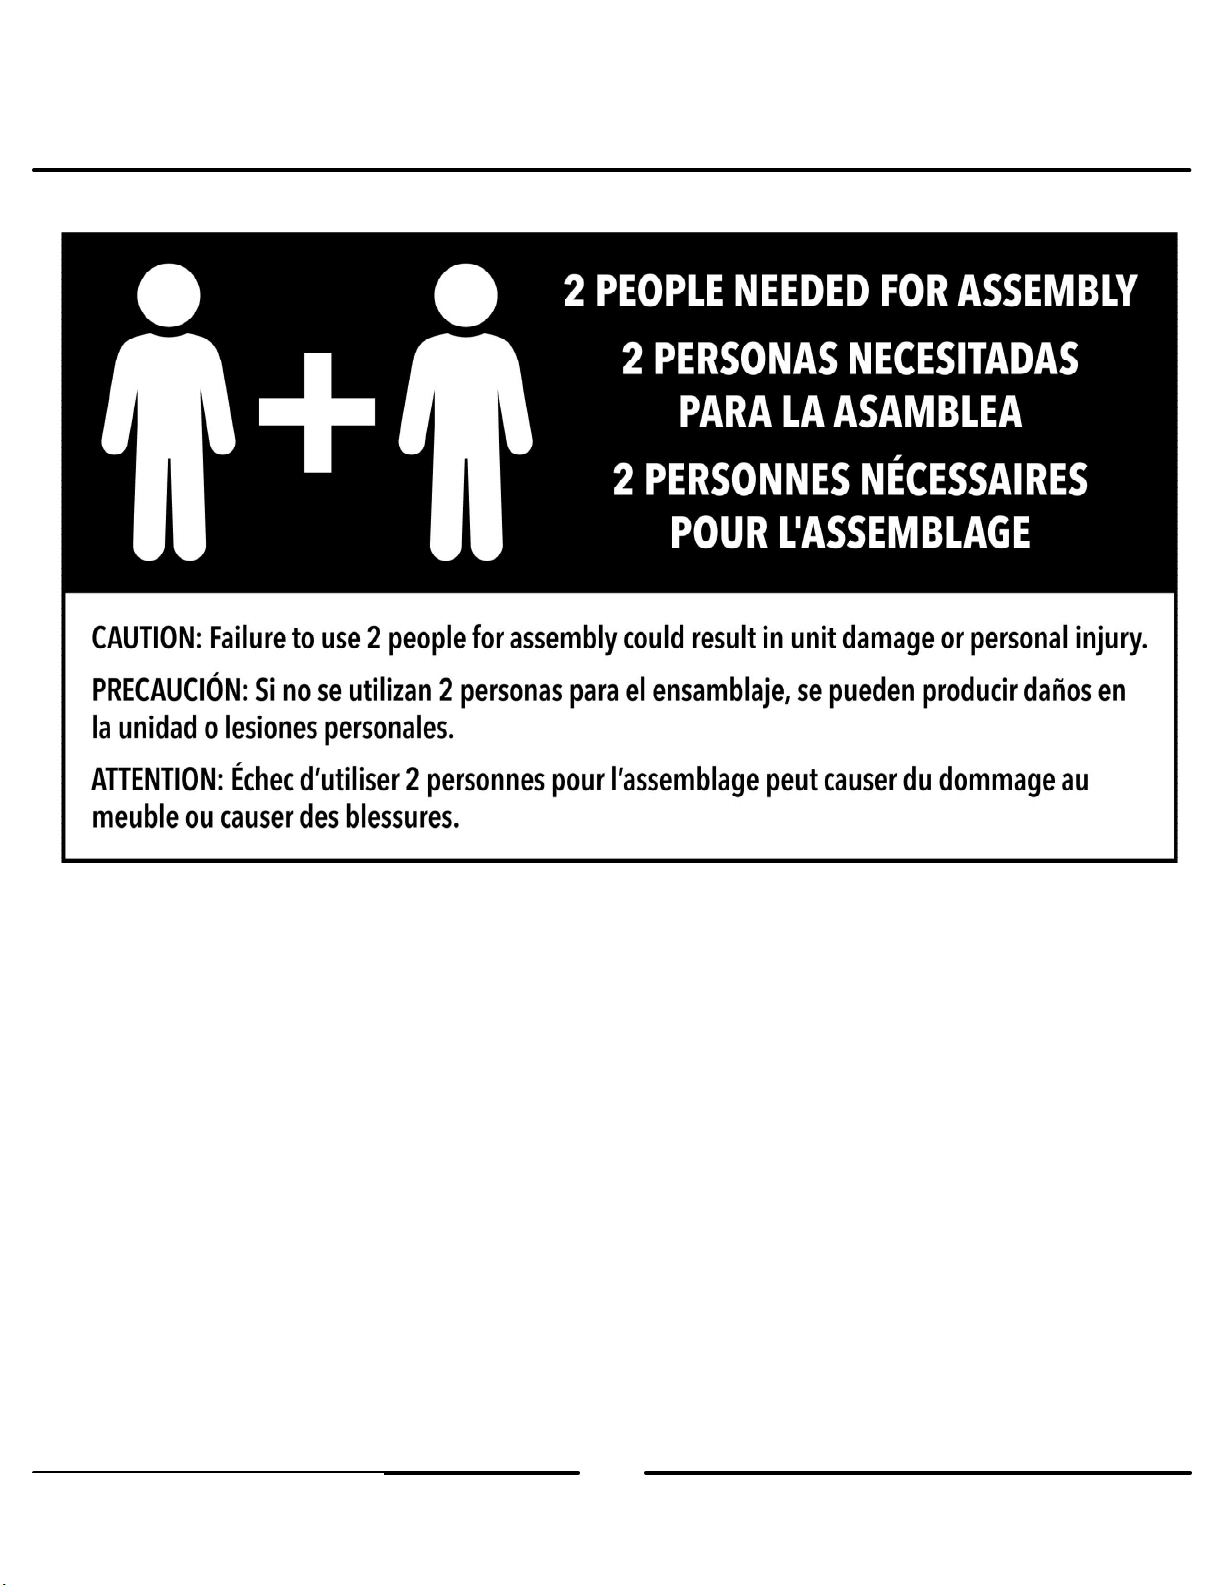
PEOPLE NEEDED FOR ASSEMBLY: 1-2
ESTIMATED ASSEMBLY TIME: 2 HOURS
- Open your item in the area you plan to keep it to avoid excessive heavy lifting.
- Identify, sort and count the parts before attempting assembly.
- Compression dowels are lightly tapped in with a hammer.
- Slides are labeled with a R (right) and L (left) for proper placement.
- Make sure to always face the point on the top of the Cam Lock towards the
outer edge.
- Use all the nails provided for the back panel and spread them out equally.
- Back panel must be used to make sure your unit is sturdy.
- Do NOT use harsh chemicals or abrasive cleaners on this item.
- Never push, pull, or drag your furniture.
2
ameriwoodhome.com
You
Tube
Page 3
k
c
A
Q
i
u
s
s
y
bl
m
e
p
i
T
Before You Start
Read through each step carefully and follow the proper order
P
P
P
P
P
Separate and count all your parts and hardware
Give yourself enough room for the assembly process
Have the following tools: Flat Head Screwdriver, #2 Phillips Head
Screwdriver and Hammer
Caution: If using a power drill or power screwdriver for screwing,
please be aware to slow down and stop when screw is tight.
Failure to do so may result in stripping the screw.
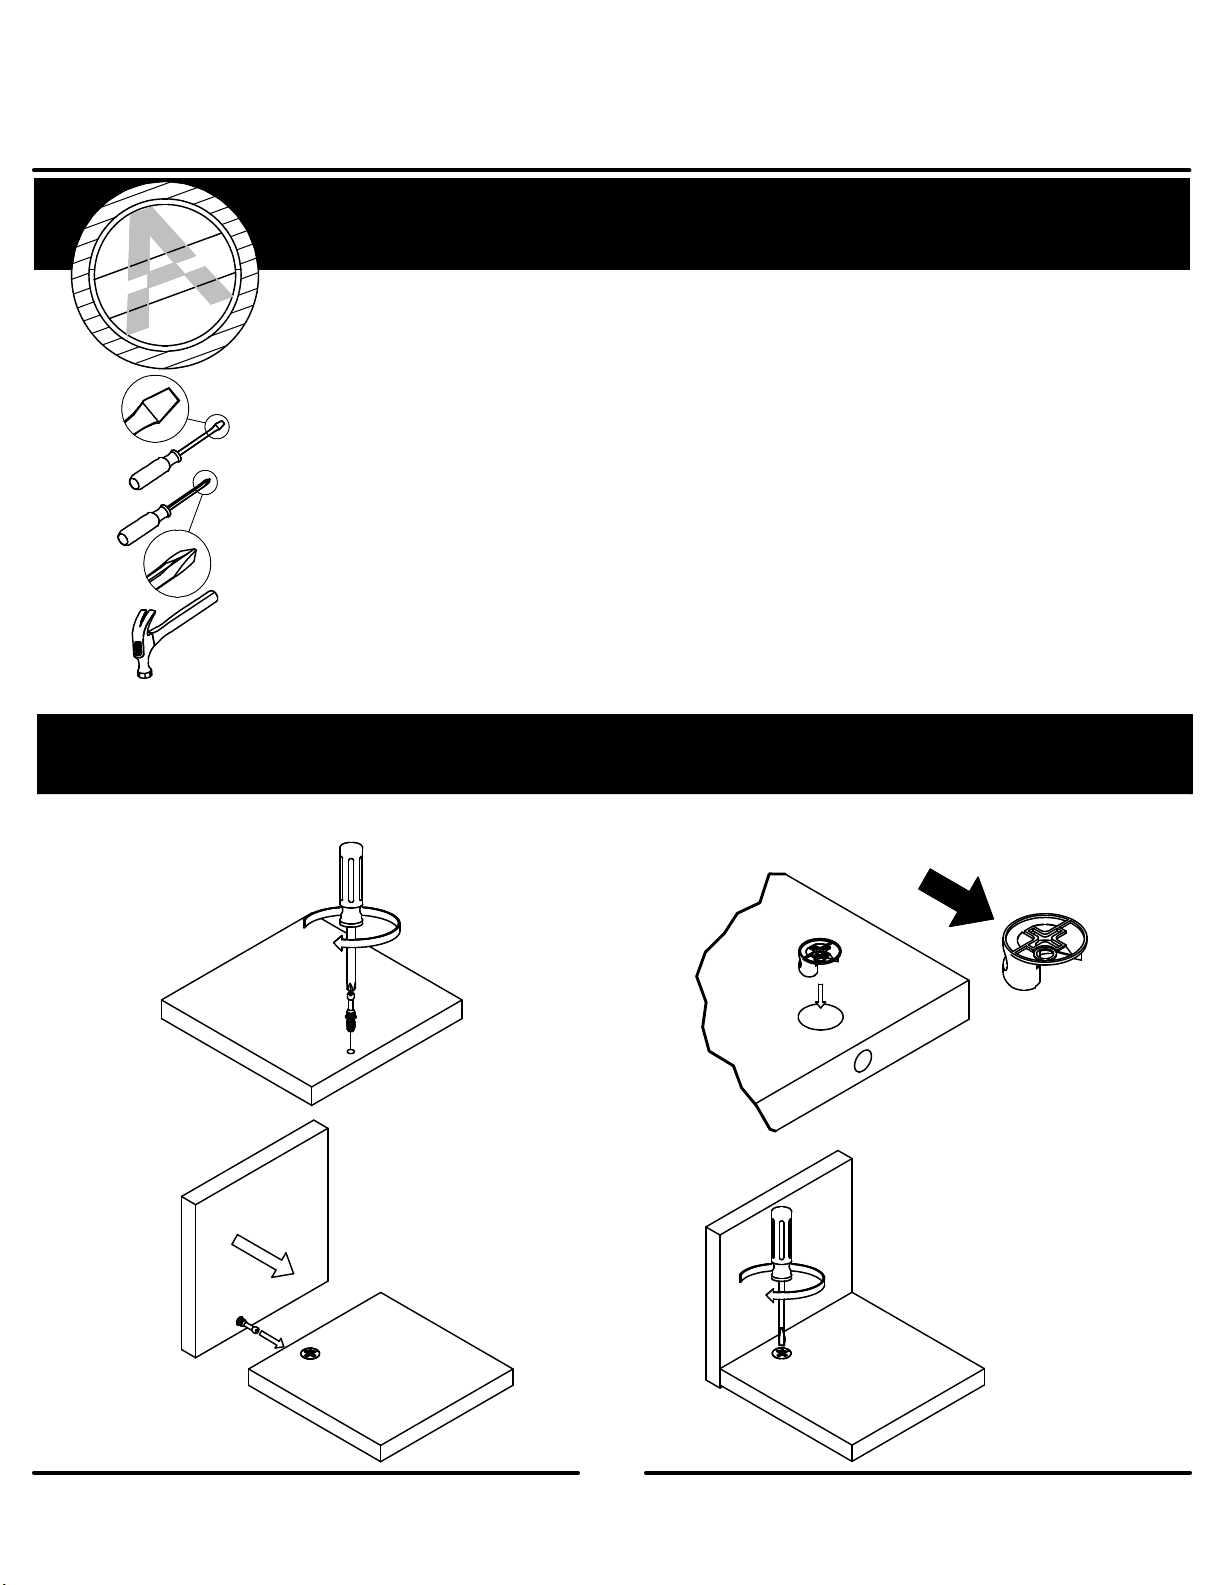
Cam Lock Fastening System
This Cam Lock Fastening System will be used throughout the assembly process.
1
3
2
4
ameriwoodhome.com
3
You
Tube
Page 4
ameriwoodhome.com
4
You
Tube
Page 5
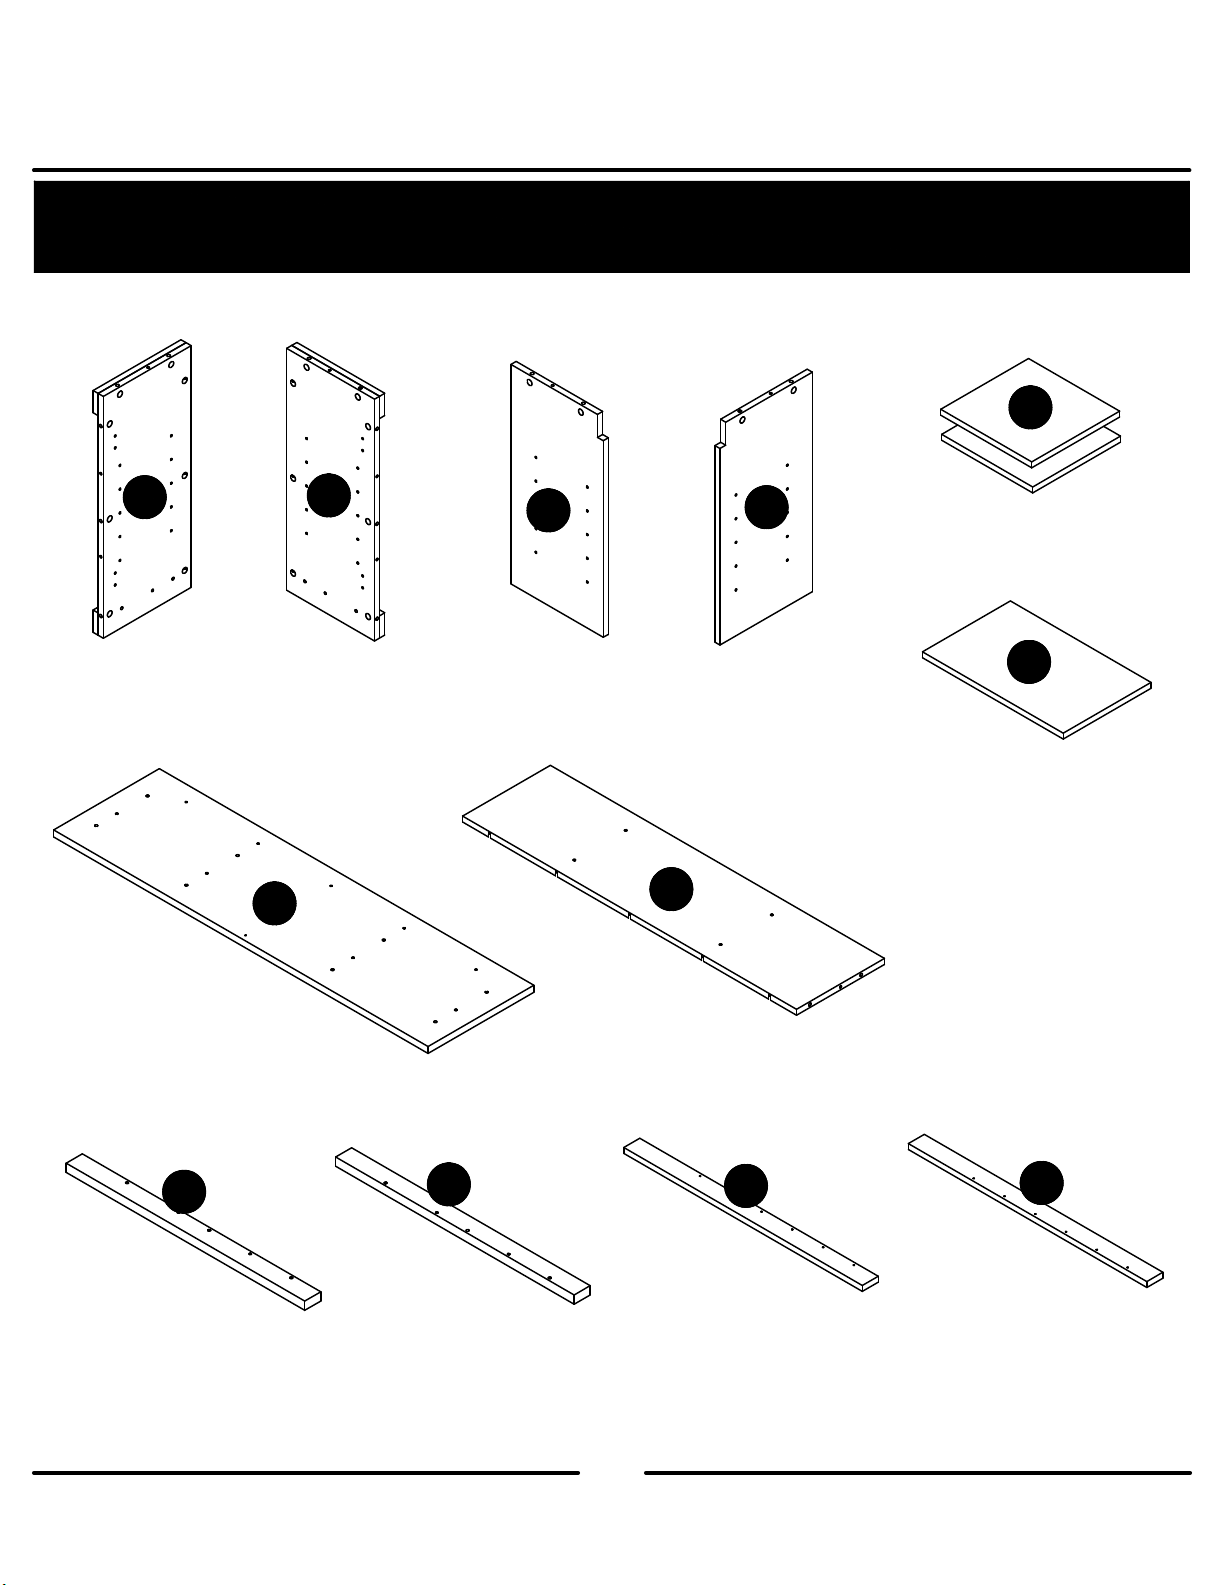
Board Identification
Not actual size
G
A
Left Panel
32011339010
Top
32011339050
B
Right Panel
32011339020
E
C
Left Partition
32011339030
Bottom
32011339060
D
Right Partition
32011339040
F
Adjustable Shelf (x2)
32011339070
H
Center Adjustable Shelf
32011339080
I
Left Front Leg
32011339090
ameriwoodhome.com
J
Right Front Leg
32011339100
5
K
Left Rear Leg
32011339110
L
Right Rear Leg
32011339120
Page 6
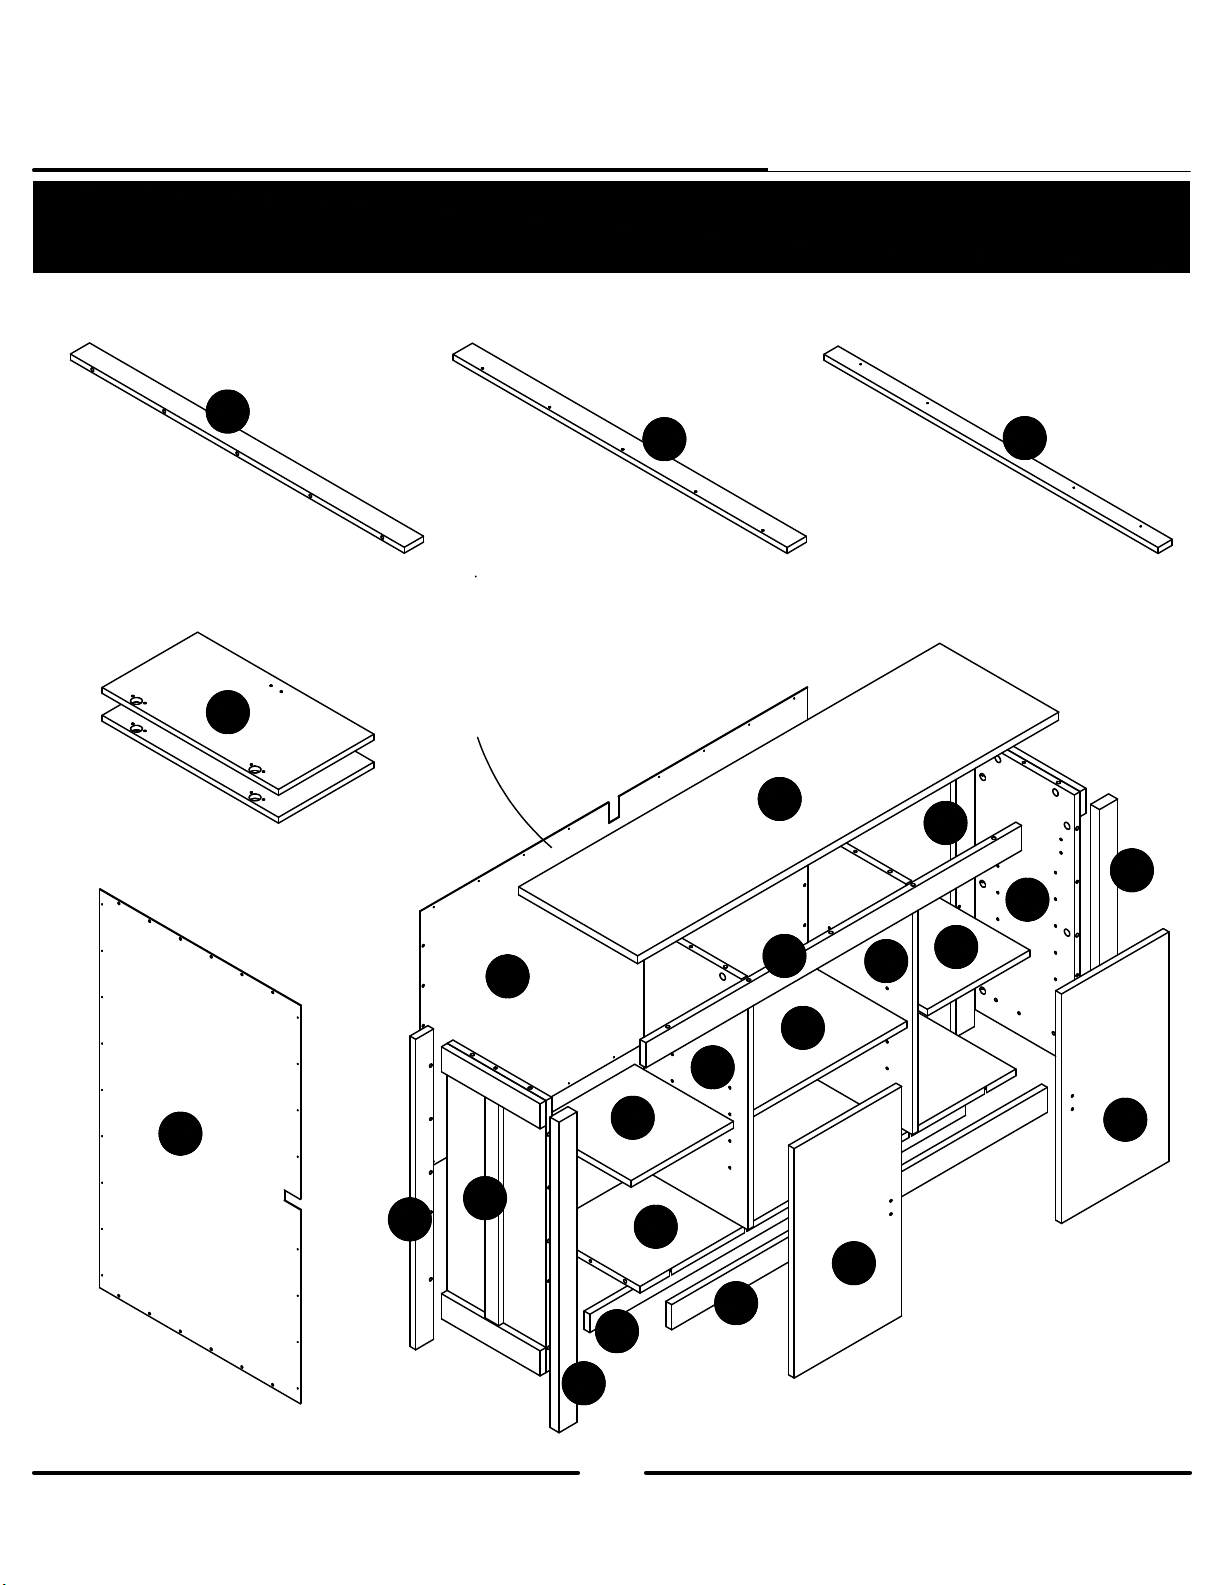
Board Identification
Not actual size
M
N
O
Upper Rail
32011339130
Door (x2)
32011339160
P
Lower Rail
32011339140
This piece is paperboard
construction. It is not made
from wood, but is required for
the assembly of your unit.
Q
C
E
M
H
Support
32011000150
L
D
G
J
B
Q
Back Panel
K201133900
ameriwoodhome.com
K
A
G
P
F
P
N
O
I
6
Page 7
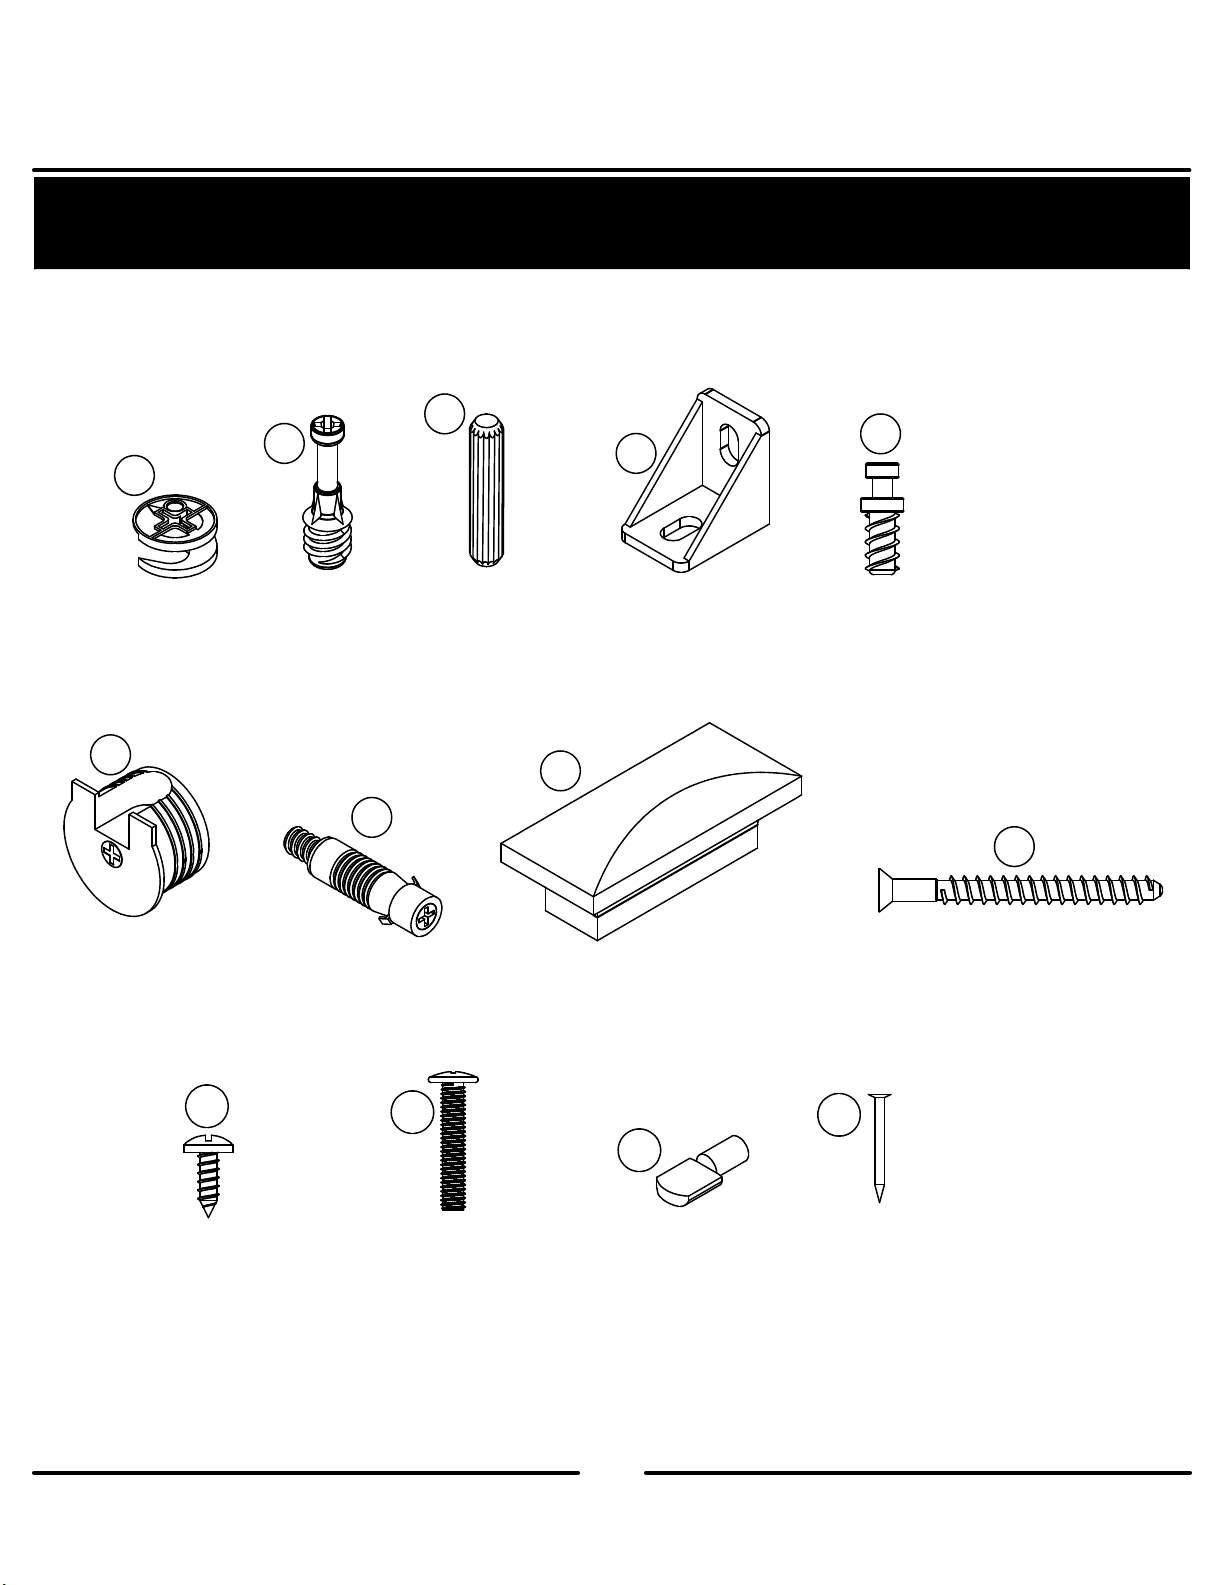
Part List
Please Note:
Your model may contain
extra hardware.
2
1
(x24)
#A22620
cam lock
(x24)
#A22610
cam bolt
6
7
Actual Size
3
(x14)
#A21670
wood dowel
8
4
(x4)
#A53510
angle bracket
5
(x5)
#A22910
connector bolt
9
(x5)
#A22920
connector
(x5)
#A21960
hidden fastener
10
(x20)
#A12120
#8 x 7/16" pan head
ameriwoodhome.com
11
(x4)
#A17400
8-32 x 7/8" truss
(x2)
#A52480
knob
13
(x12)
#A80250
shelf support
7
(x4)
#A23030
confirmat screw
14
(x17)
#A21110
nail
Page 8
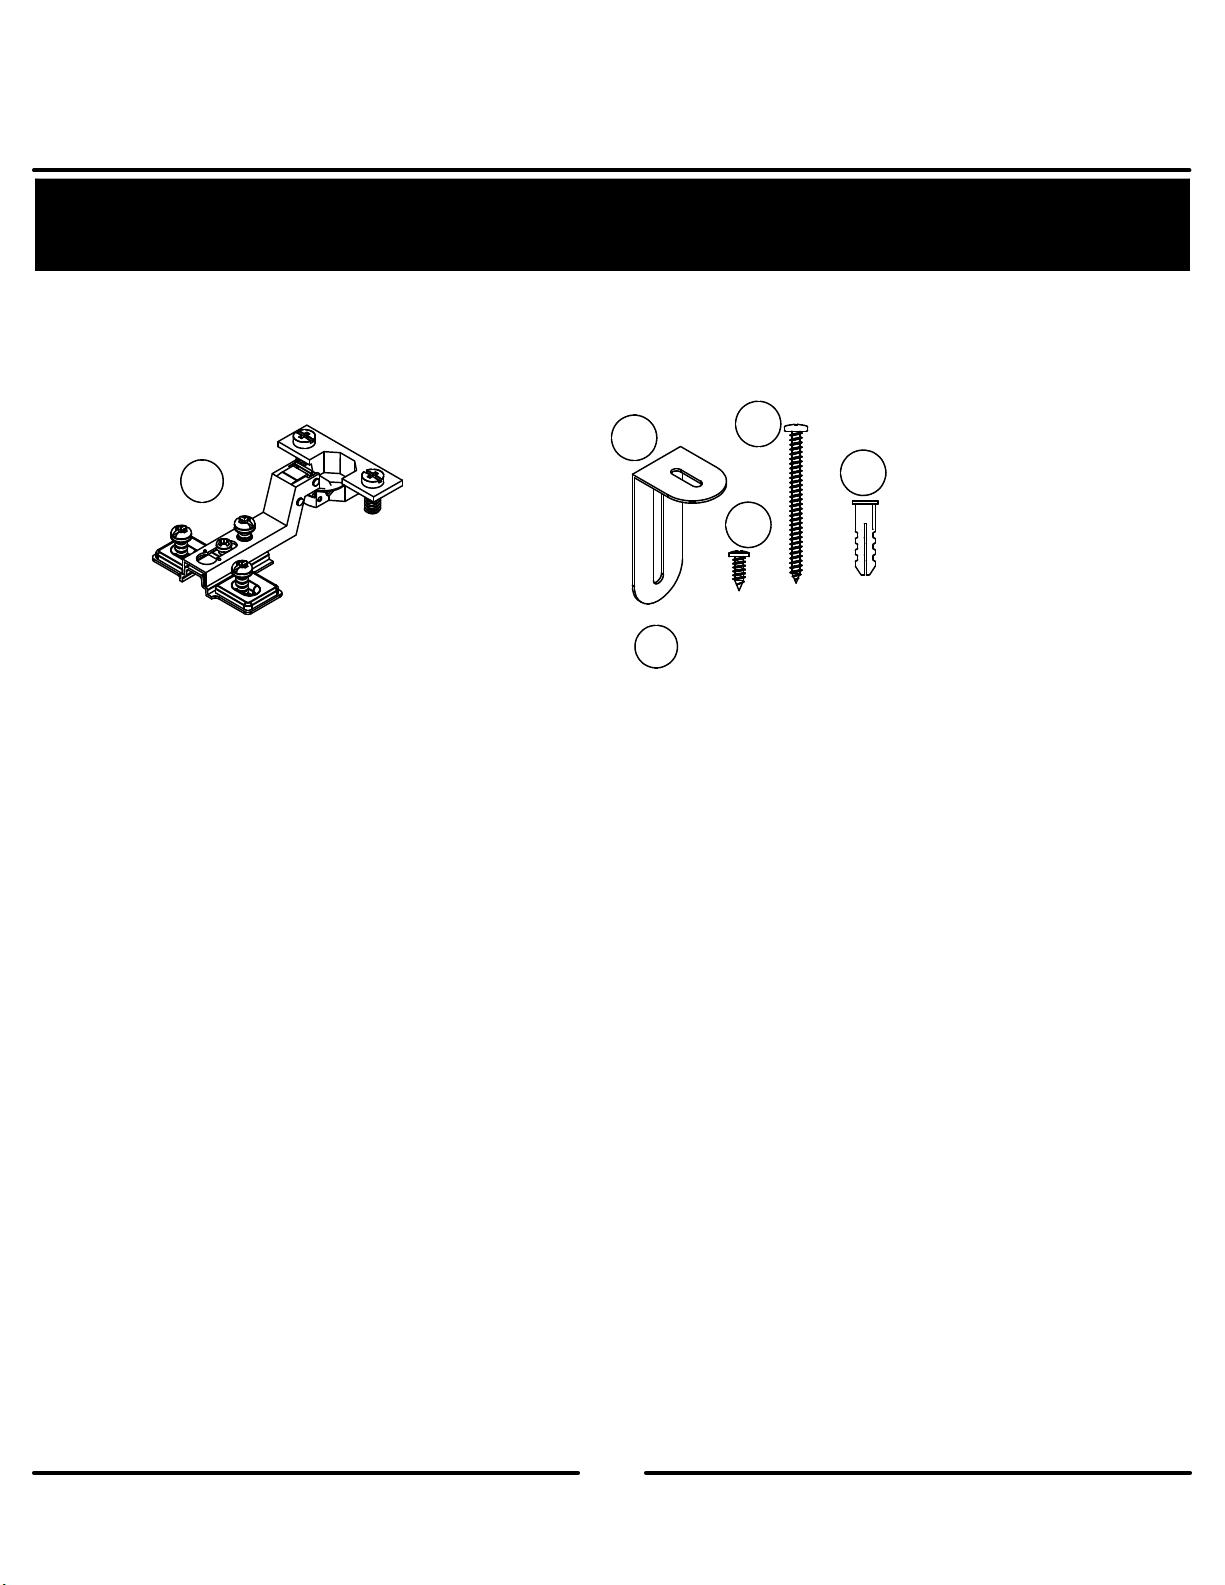
Part List
Not Actual Size
12
(x4)
#A65640
hinge
15a
15
15c
15d
15b
(x1)
#A84050
safety bracket kit
ameriwoodhome.com
8
Page 9
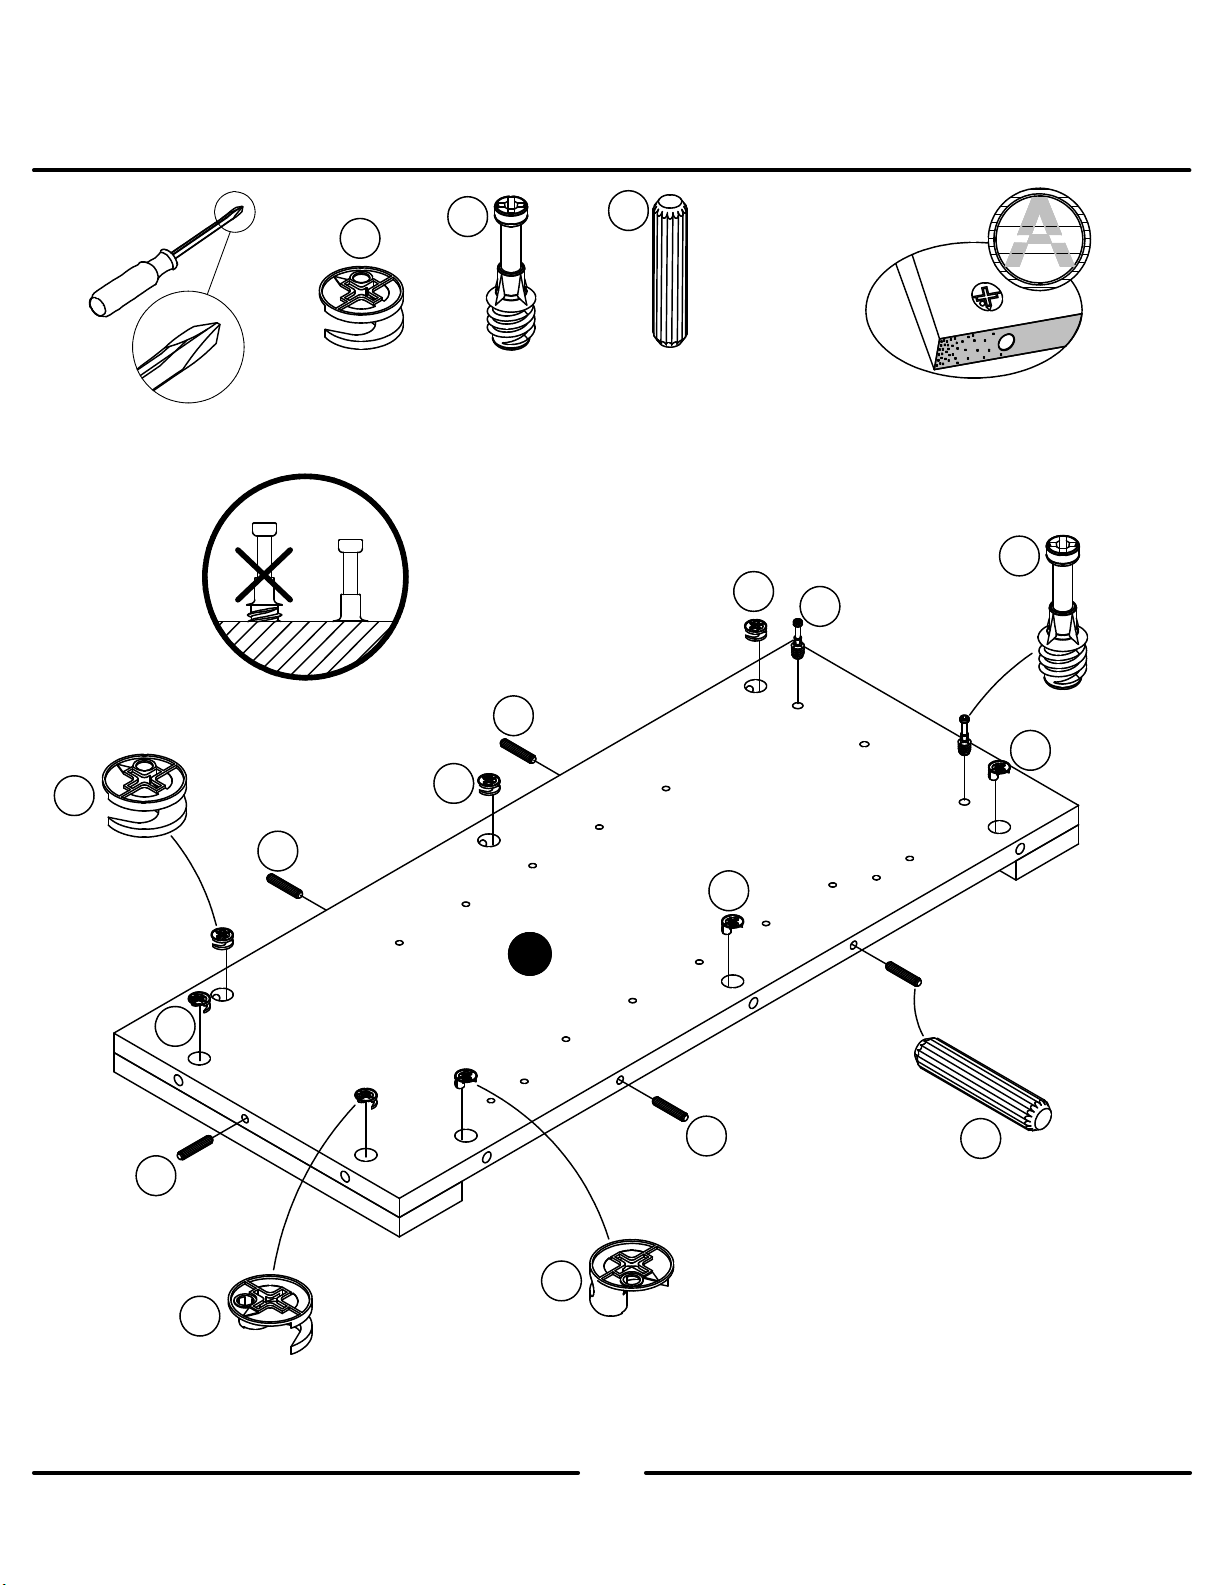
STEP
1
1
1
(x8)
#A22620
2
(x2)
#A22610
1
3
3
(x5)
#A21670
1
Quick
Assembly
Tip
Proper orientation of CAM LOCK
2
2
1
3
1
1
3
A
1
3
1
3
ameriwoodhome.com
9
Page 10
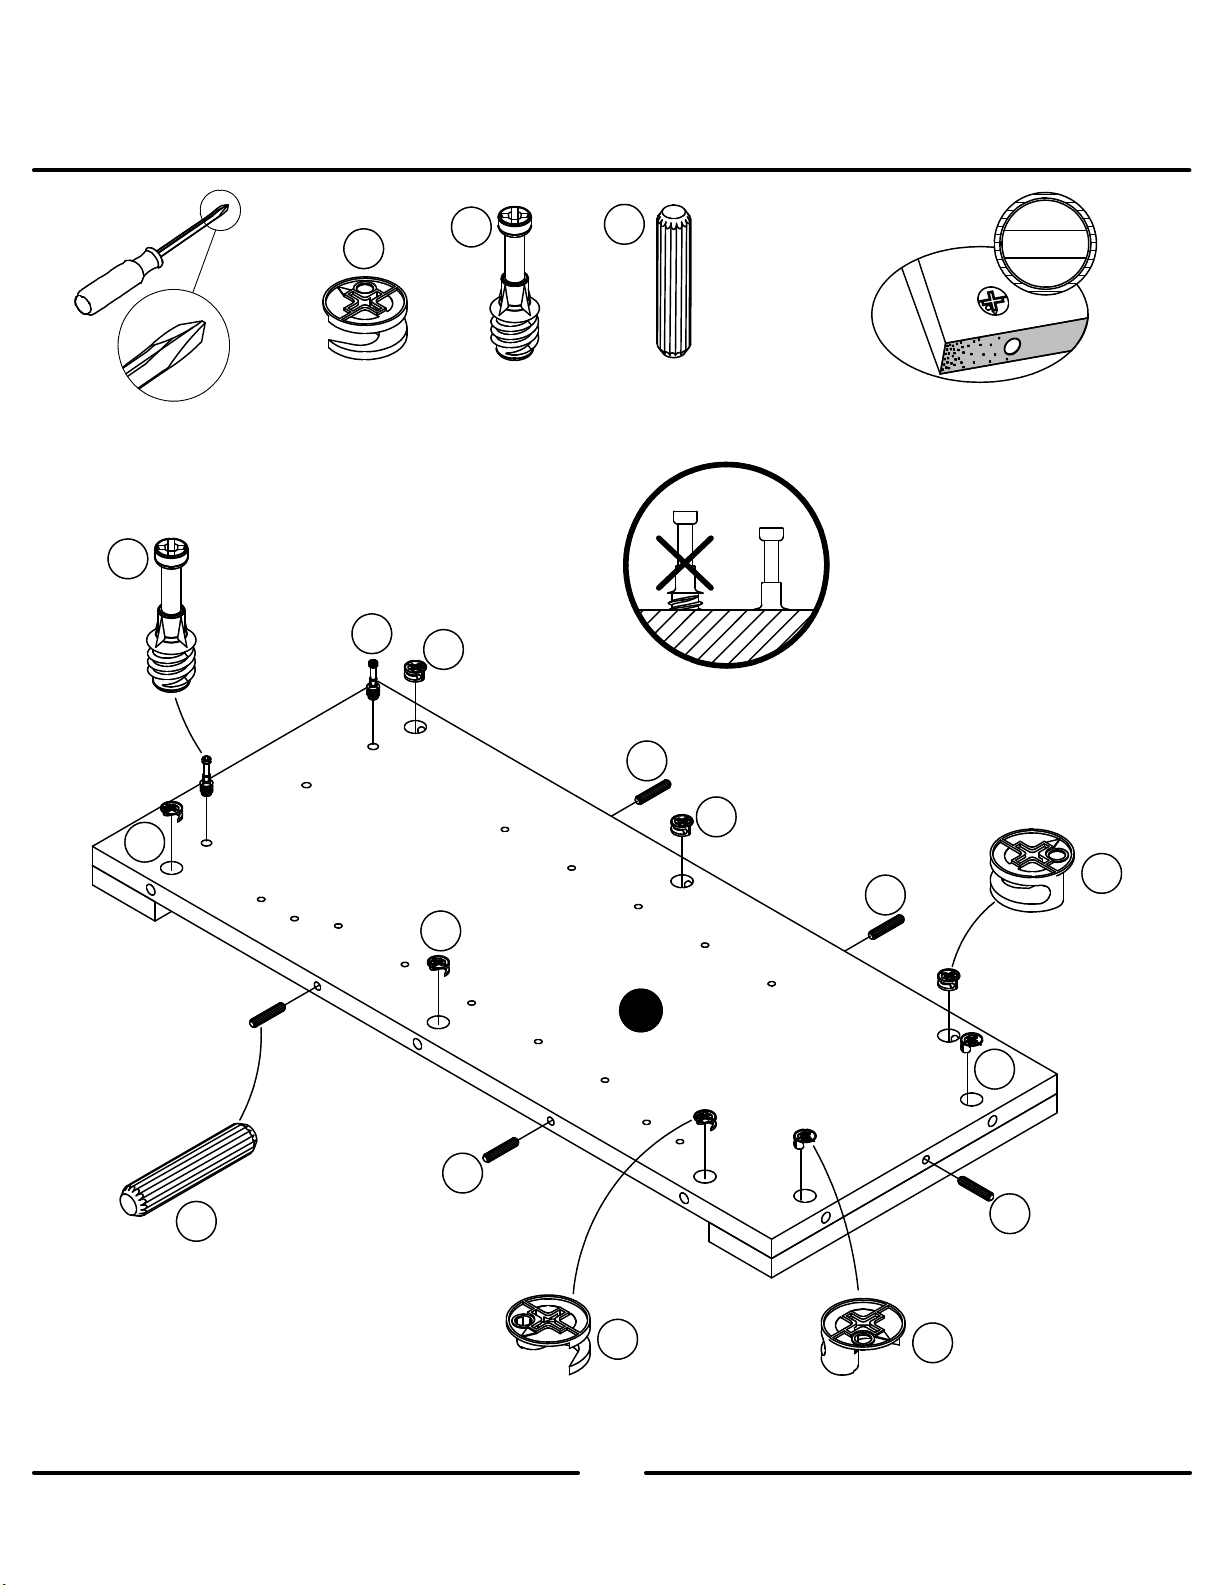
STEP2
2
1
(x8)
#A22620
2
2
(x2)
#A22610
1
3
(x5)
#A21670
3
Quick
Assembly
Tip
Proper orientation of CAM LOCK
1
3
1
3
1
1
1
3
B
1
3
1
ameriwoodhome.com
10
Page 11
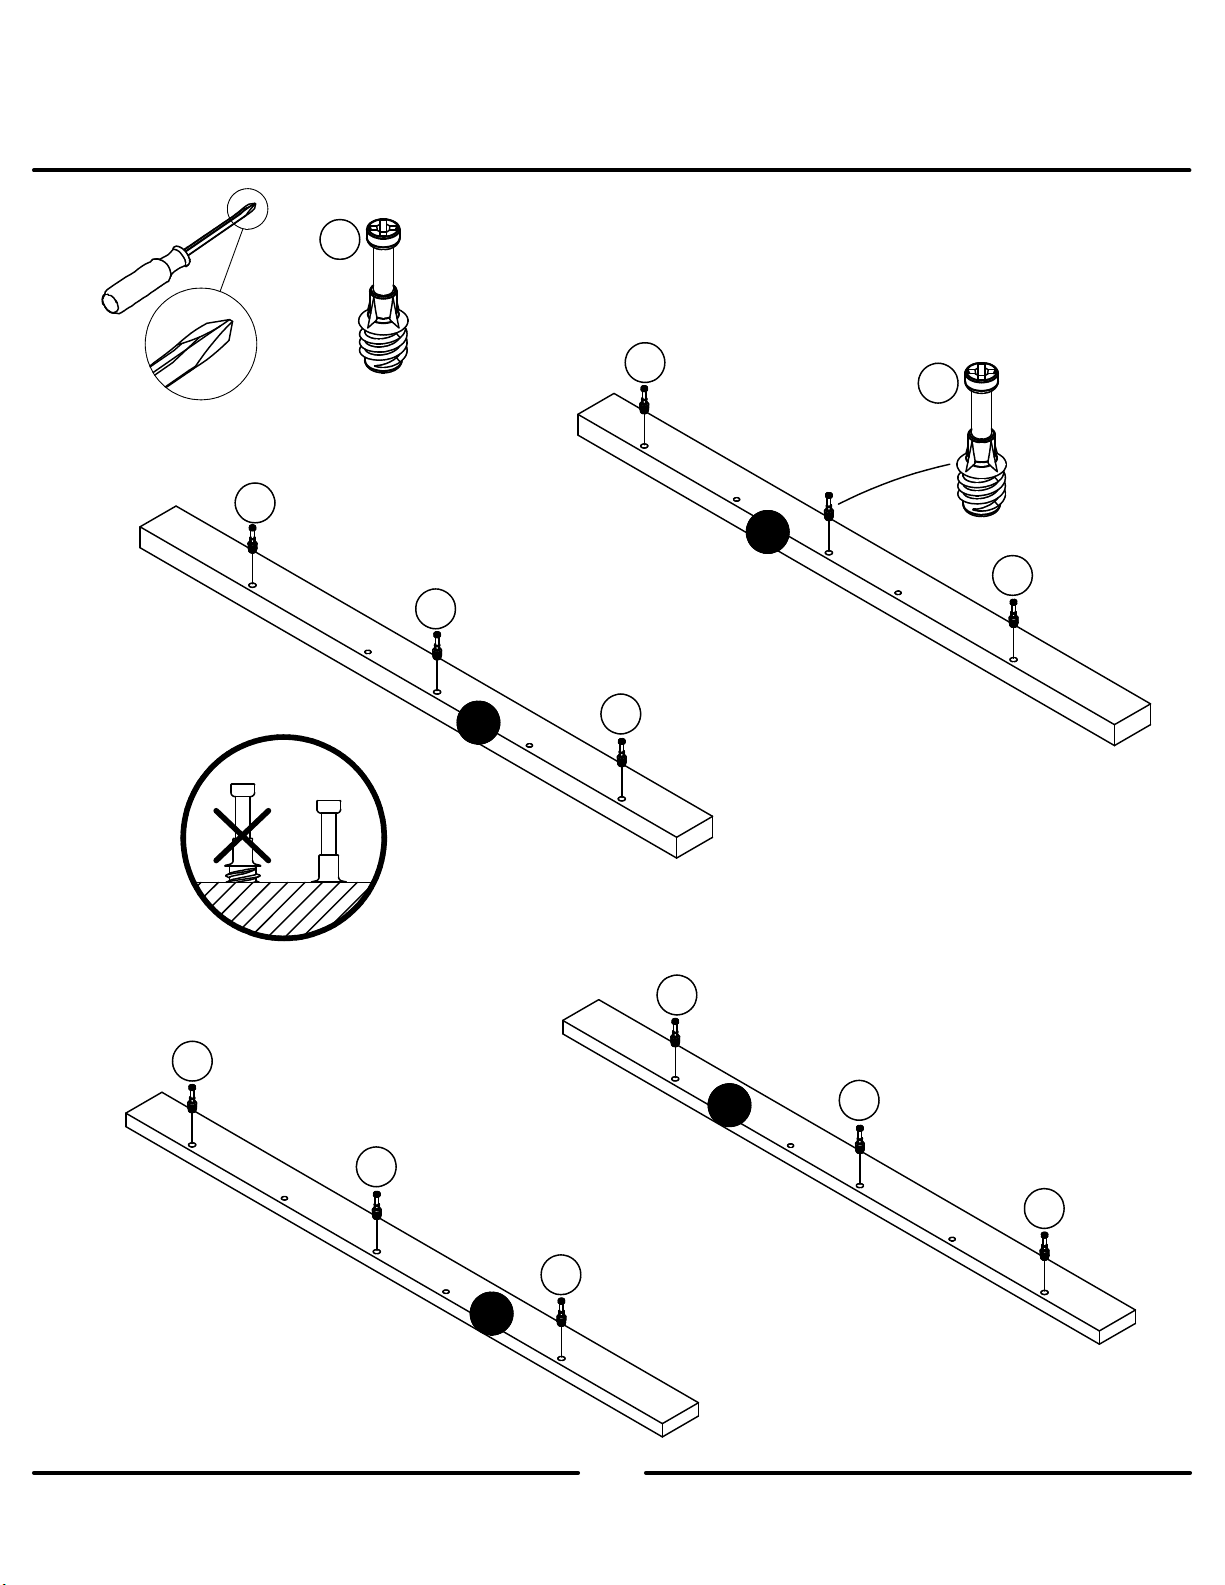
STEP3
2
2
(x12)
#A22610
2
2
I
2
2
2
2
J
2
2
2
K
2
2
ameriwoodhome.com
L
11
Page 12
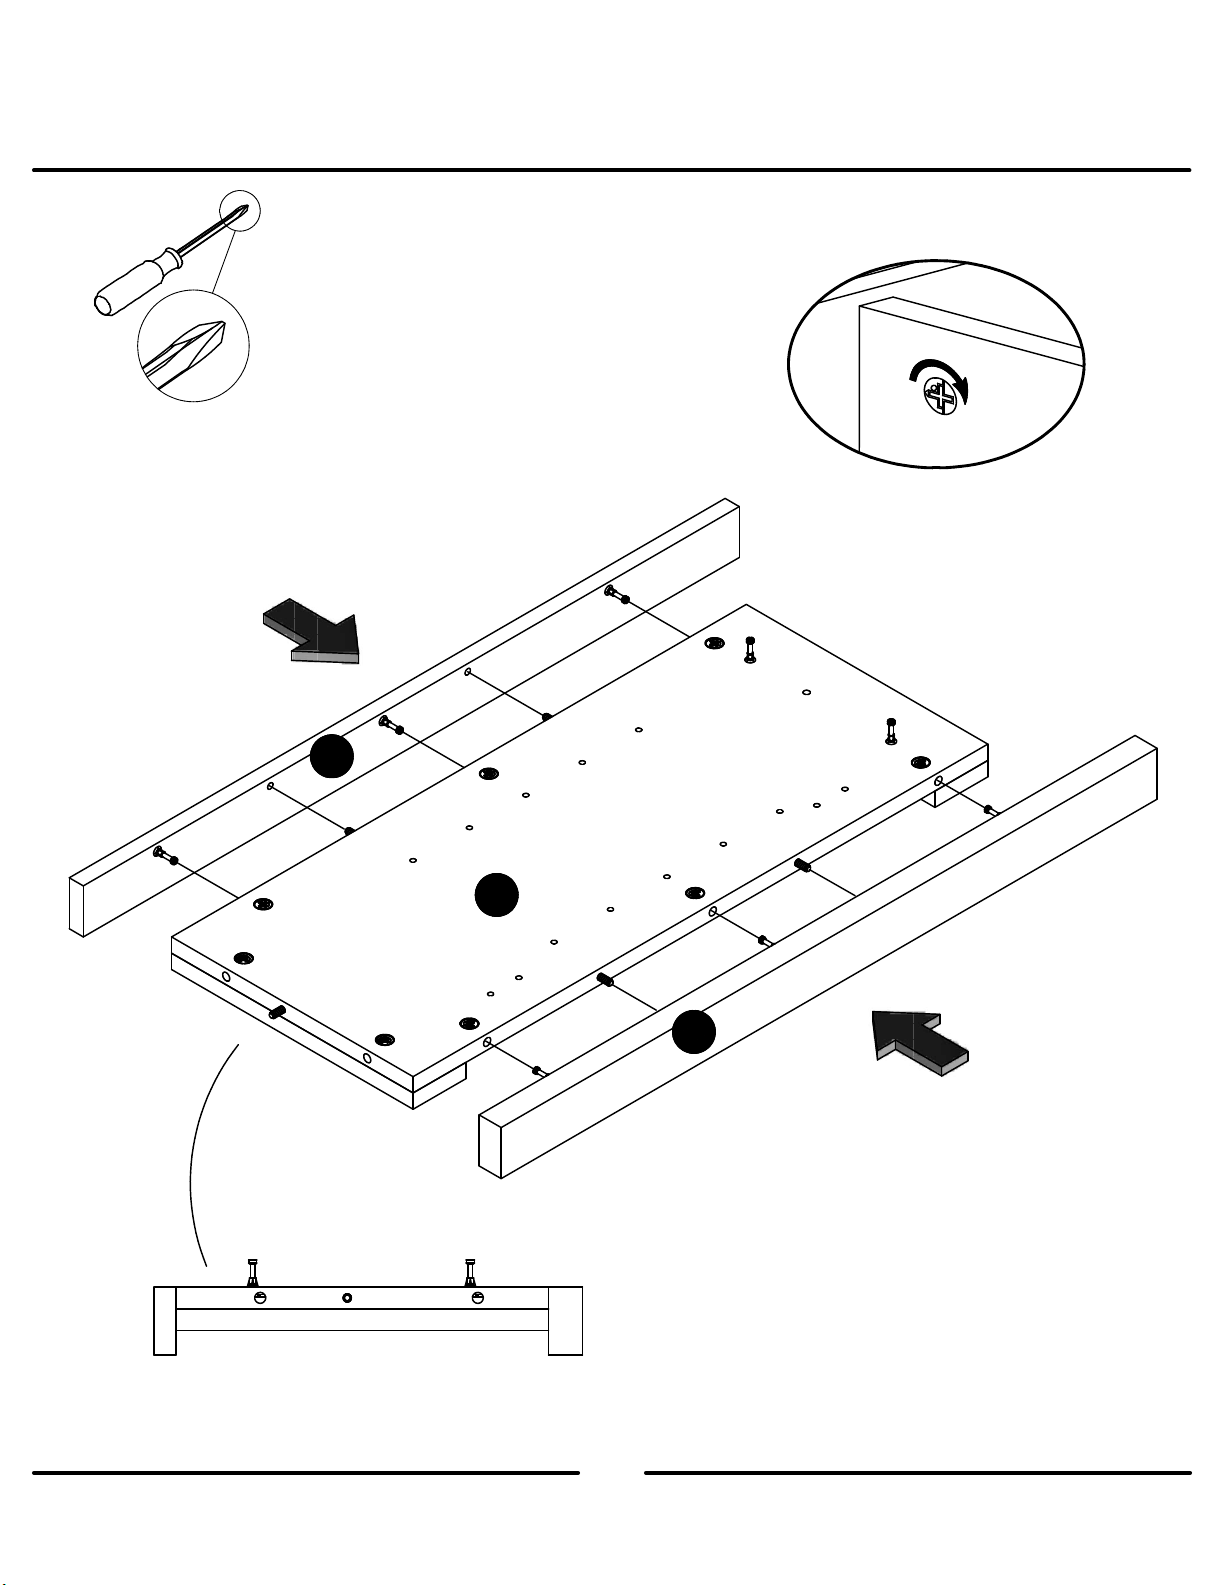
STEP
4
L
O
C
U
N
L
O
C
K
K
K
A
I
end view
ameriwoodhome.com
12
Page 13
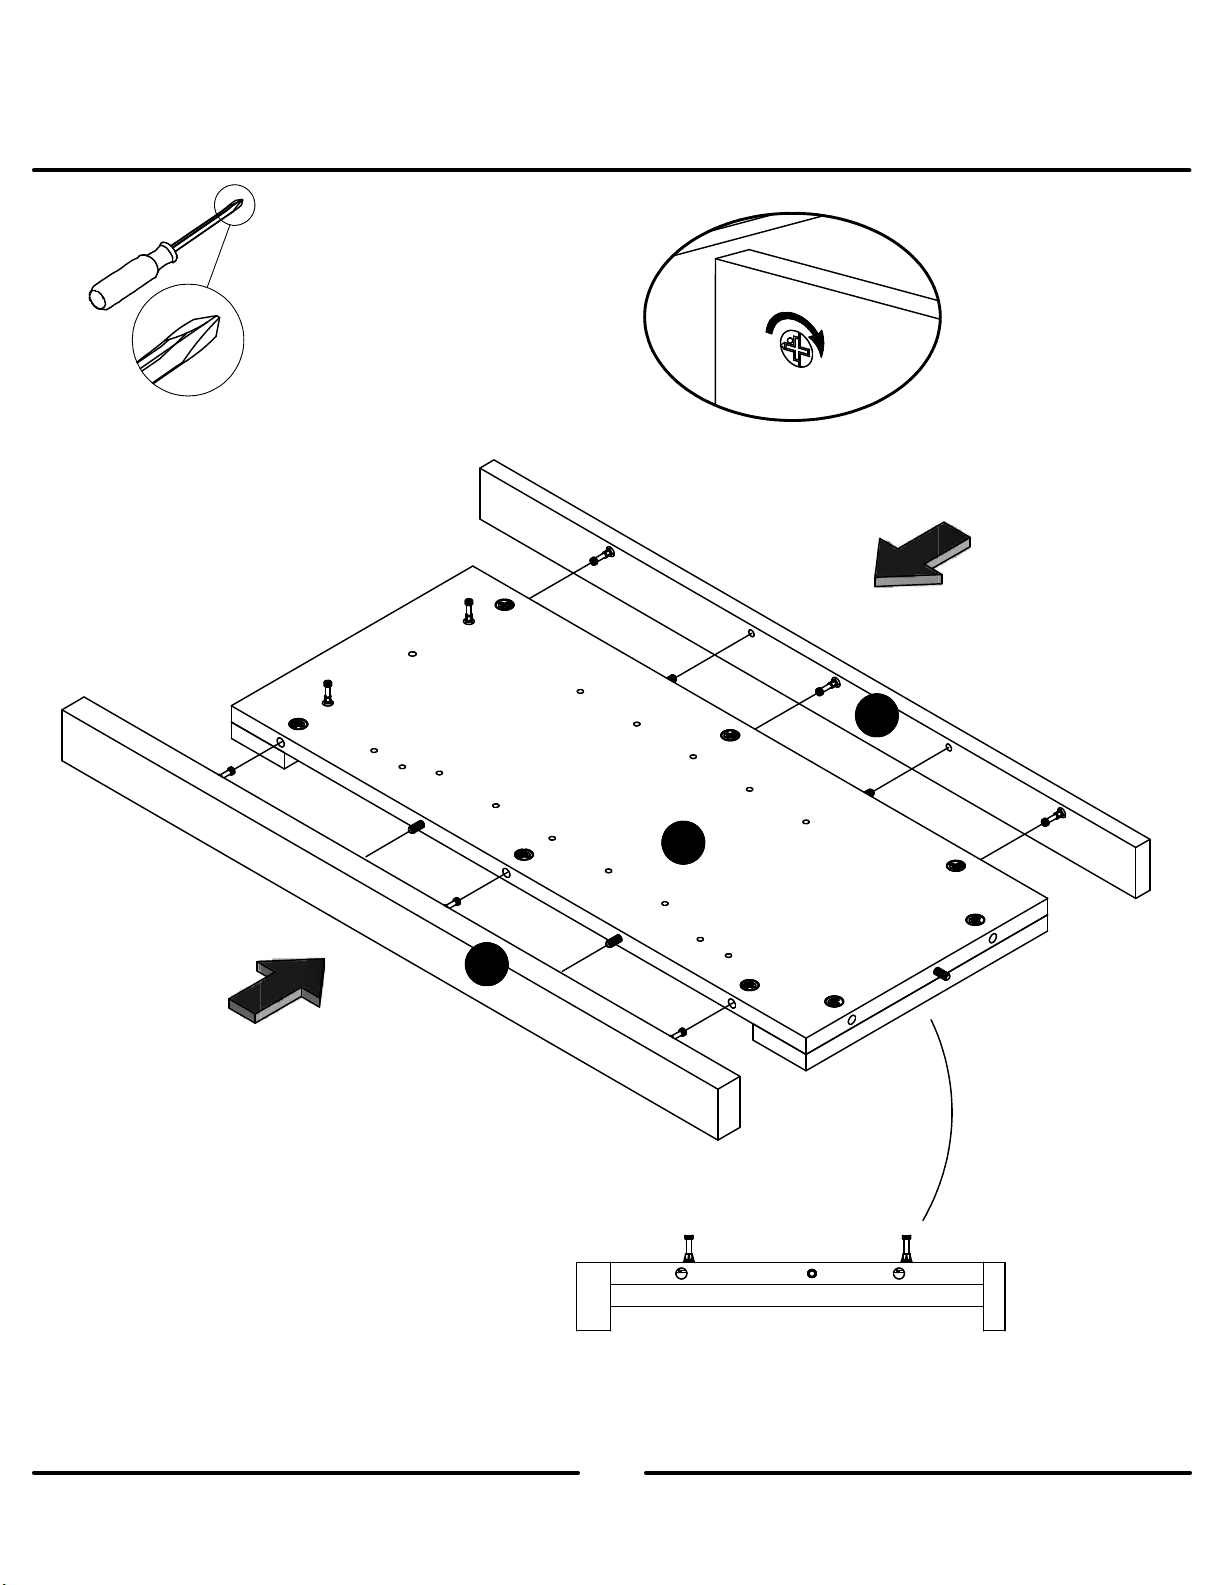
STEP
5
L
O
C
U
N
L
O
C
K
K
L
J
B
end view
ameriwoodhome.com
13
Page 14
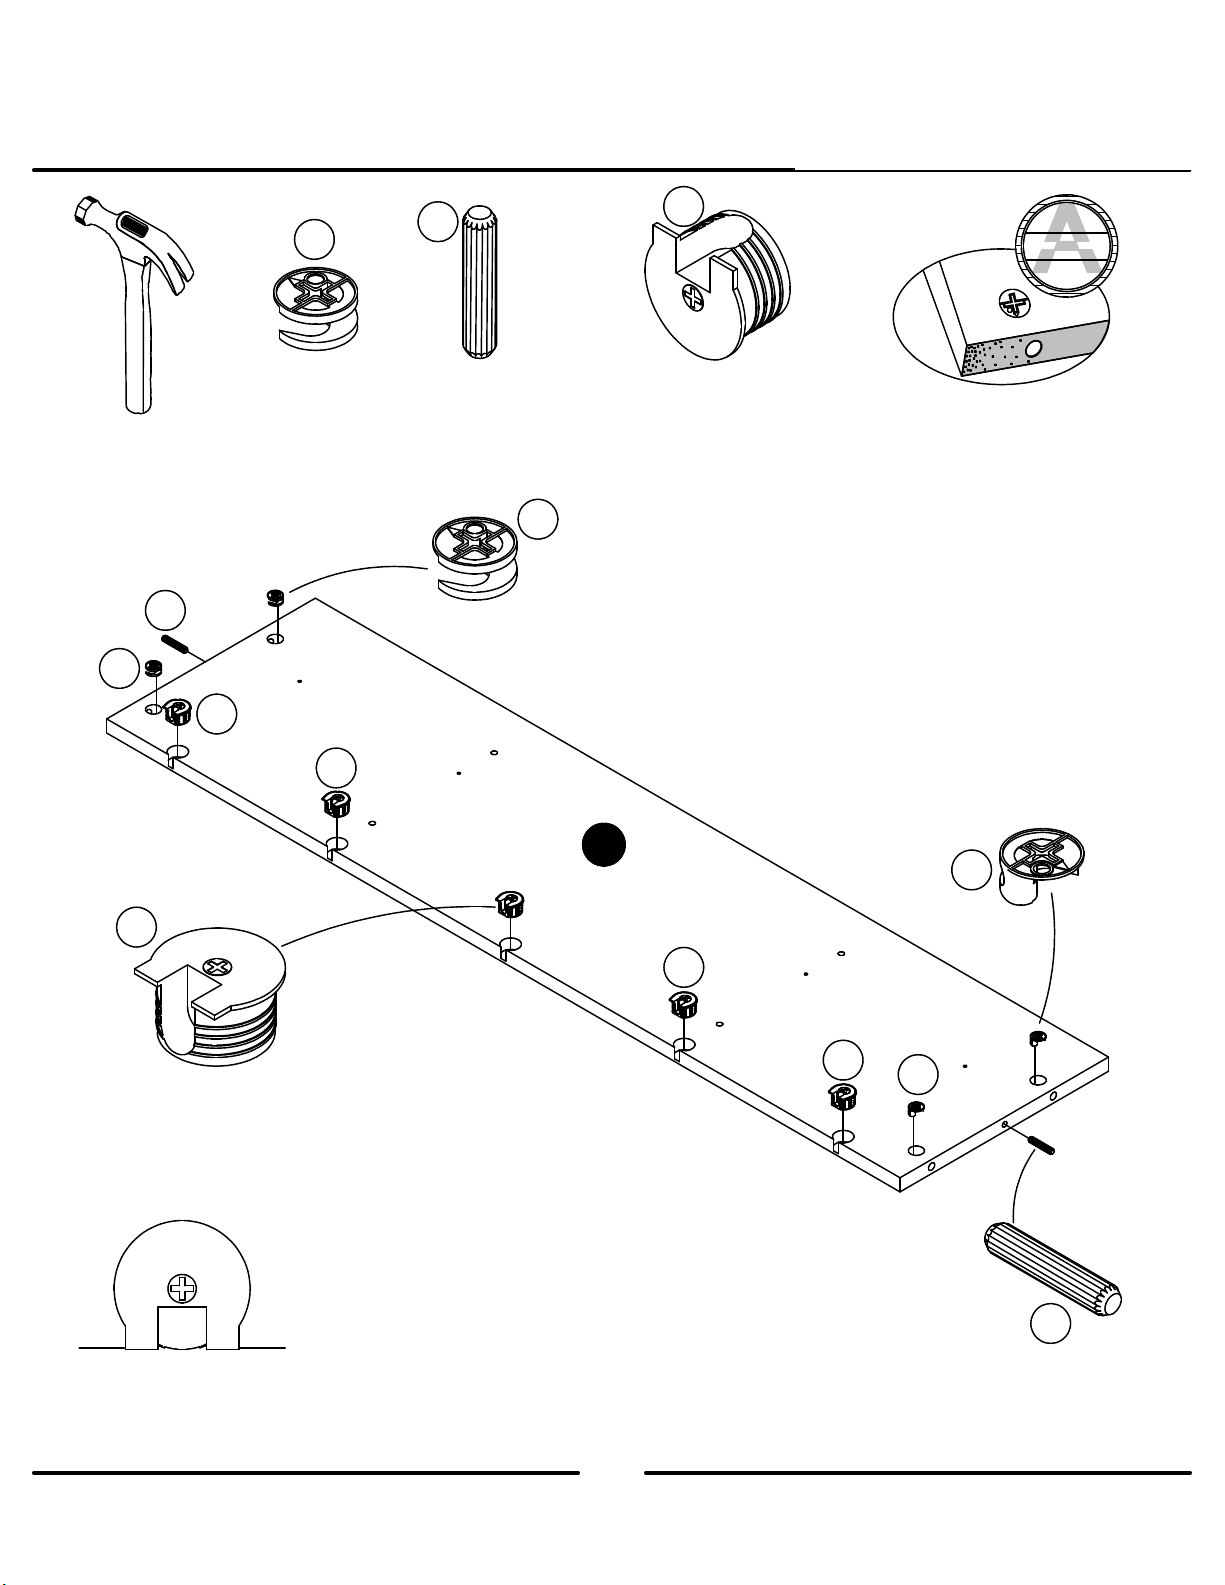
STEP6
1
3
6
1
(x4)
#A22620
6
3
(x2)
#A21670
1
6
(x5)
#A22920
Quick
Assembly
Tip
Proper orientation of CAM LOCK
6
F
6
You will need to tap the connector (6)
with a hammer to fully insert. Be sure
the connector is positioned as shown
before tapping into hole.
6
1
1
3
ameriwoodhome.com
14
Page 15
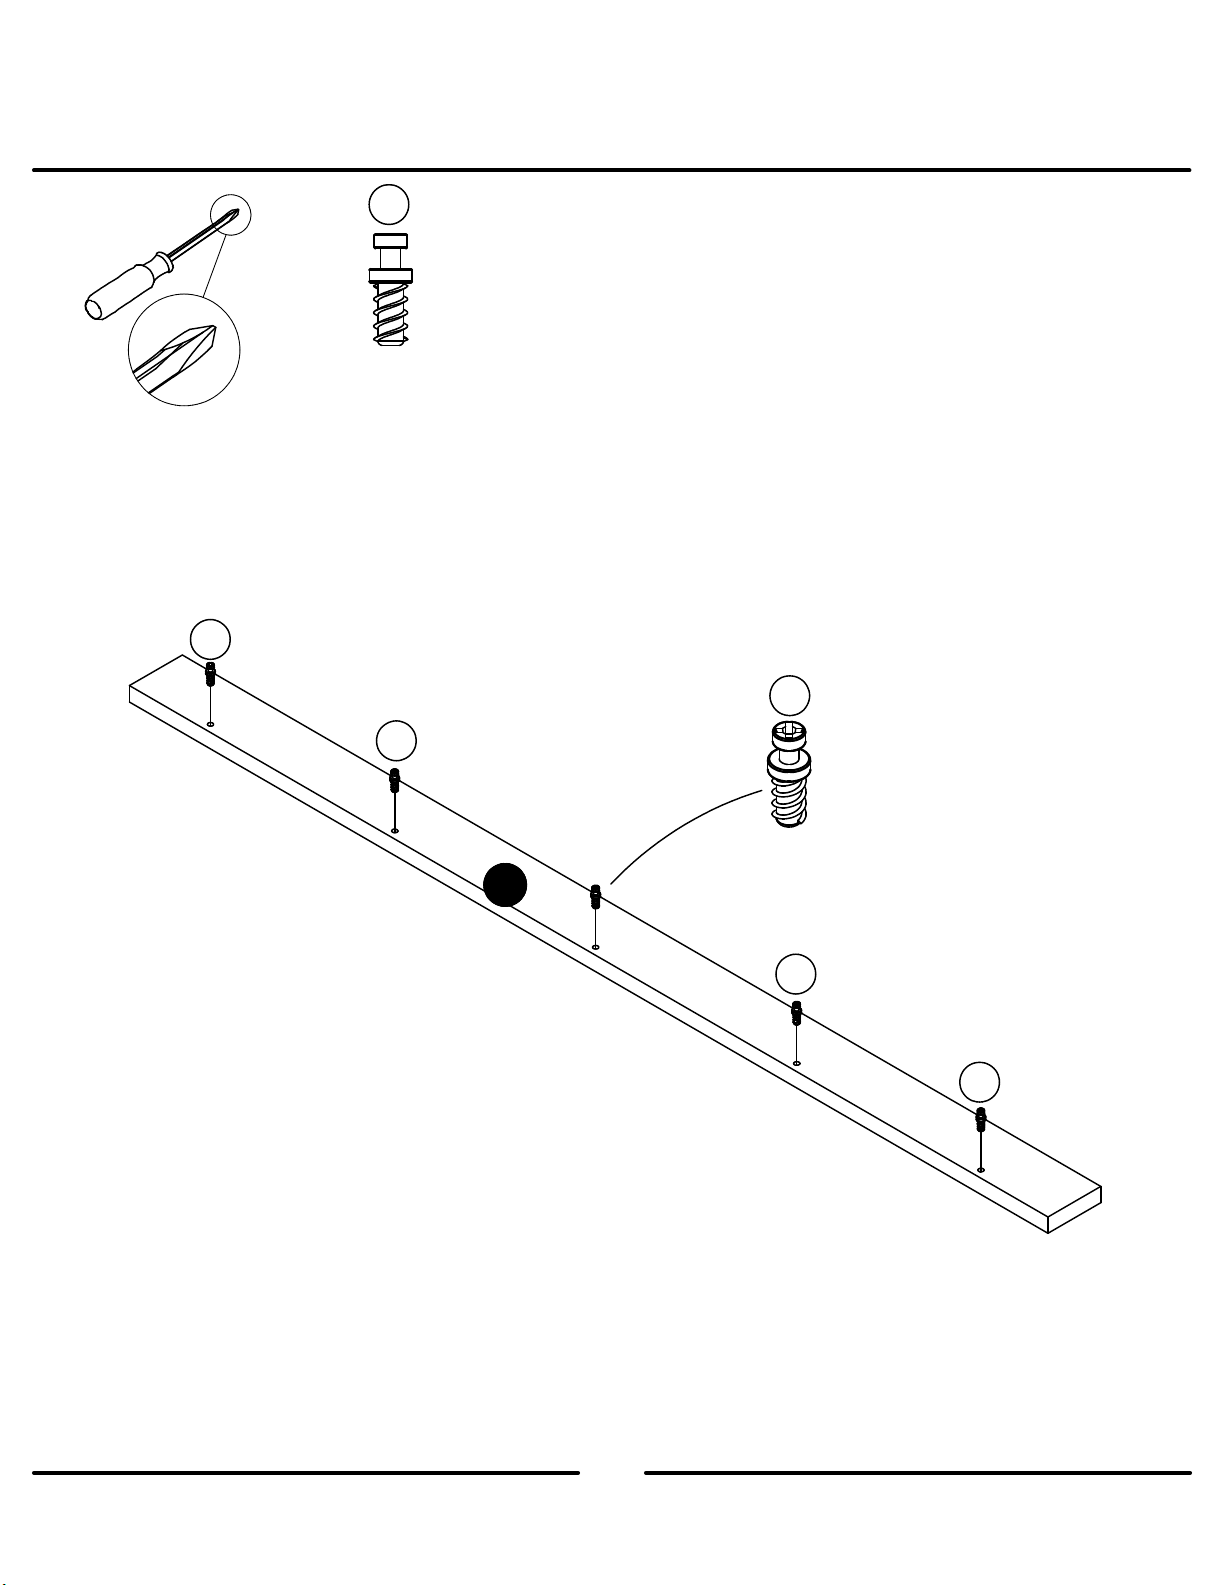
STEP
7
5
(x5)
#A22910
5
5
5
N
5
5
ameriwoodhome.com
15
Page 16
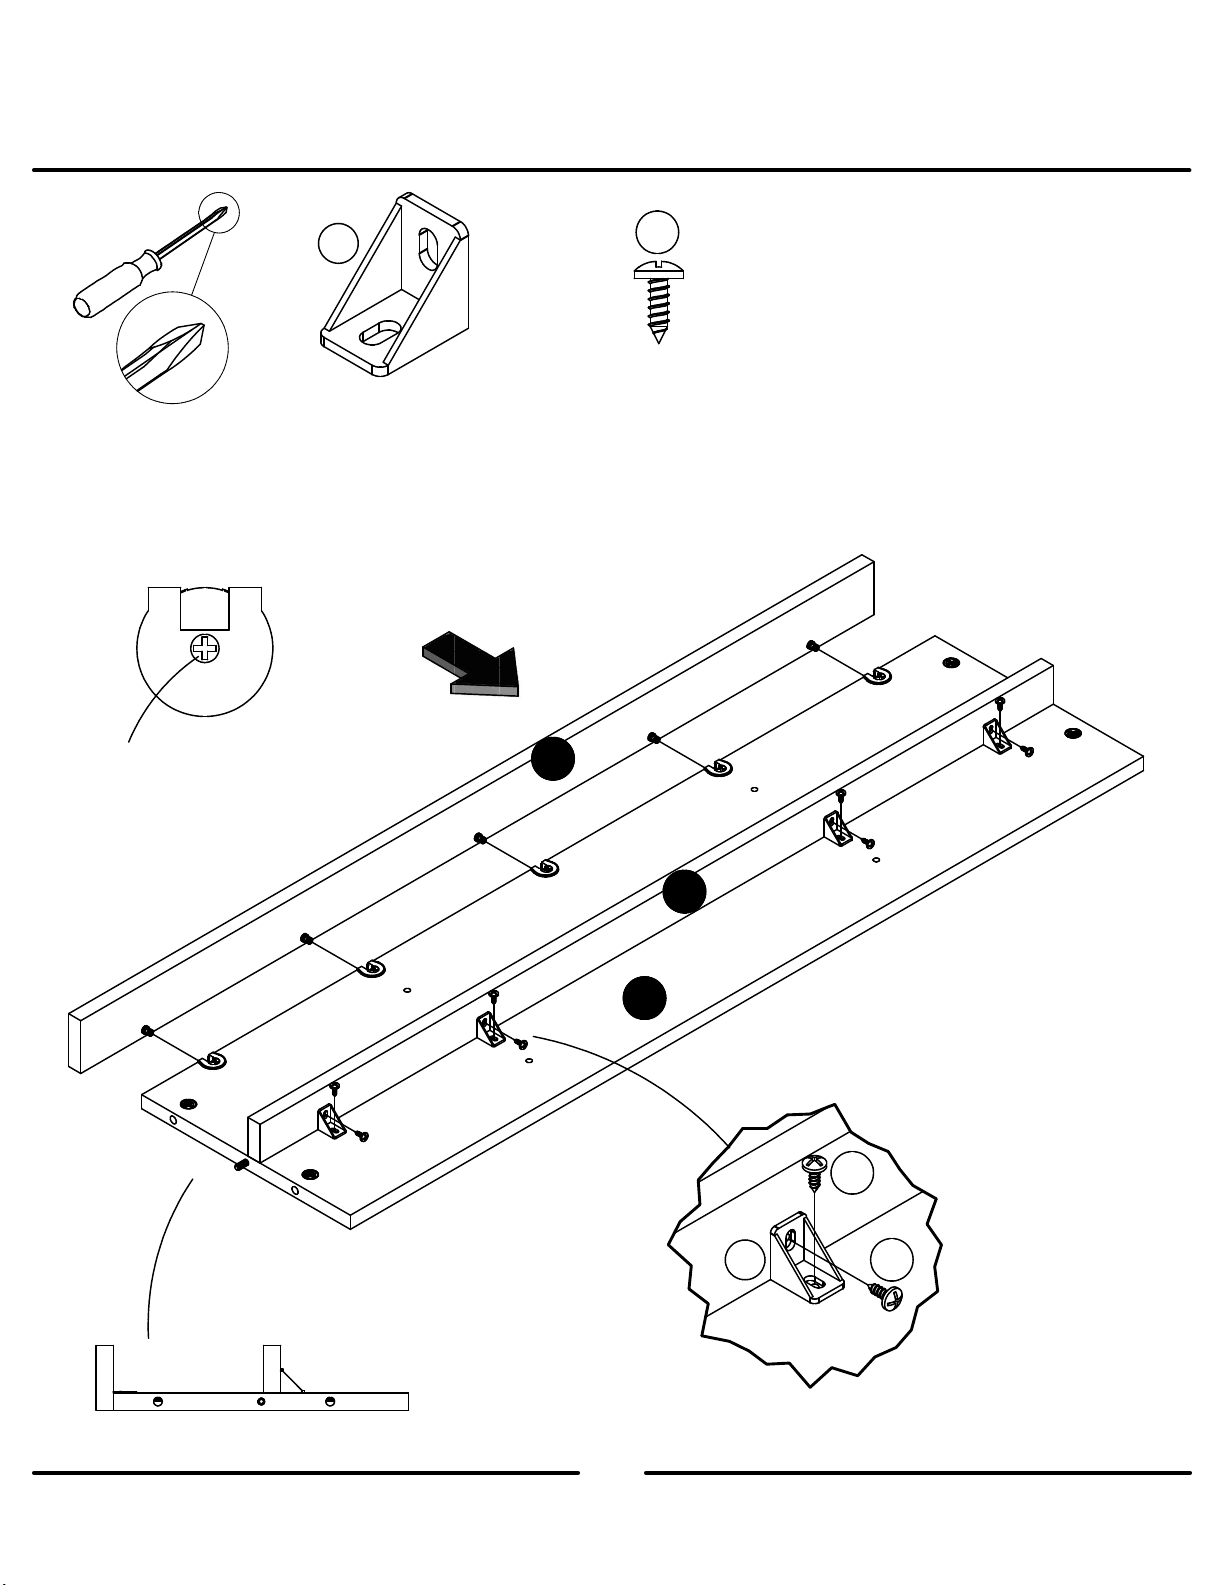
STEP8
4
Turn screw clockwise to
lock in place.
(x4)
#A53510
10
(x8)
#A12120
N
end view
ameriwoodhome.com
16
F
O
4
10
10
Page 17
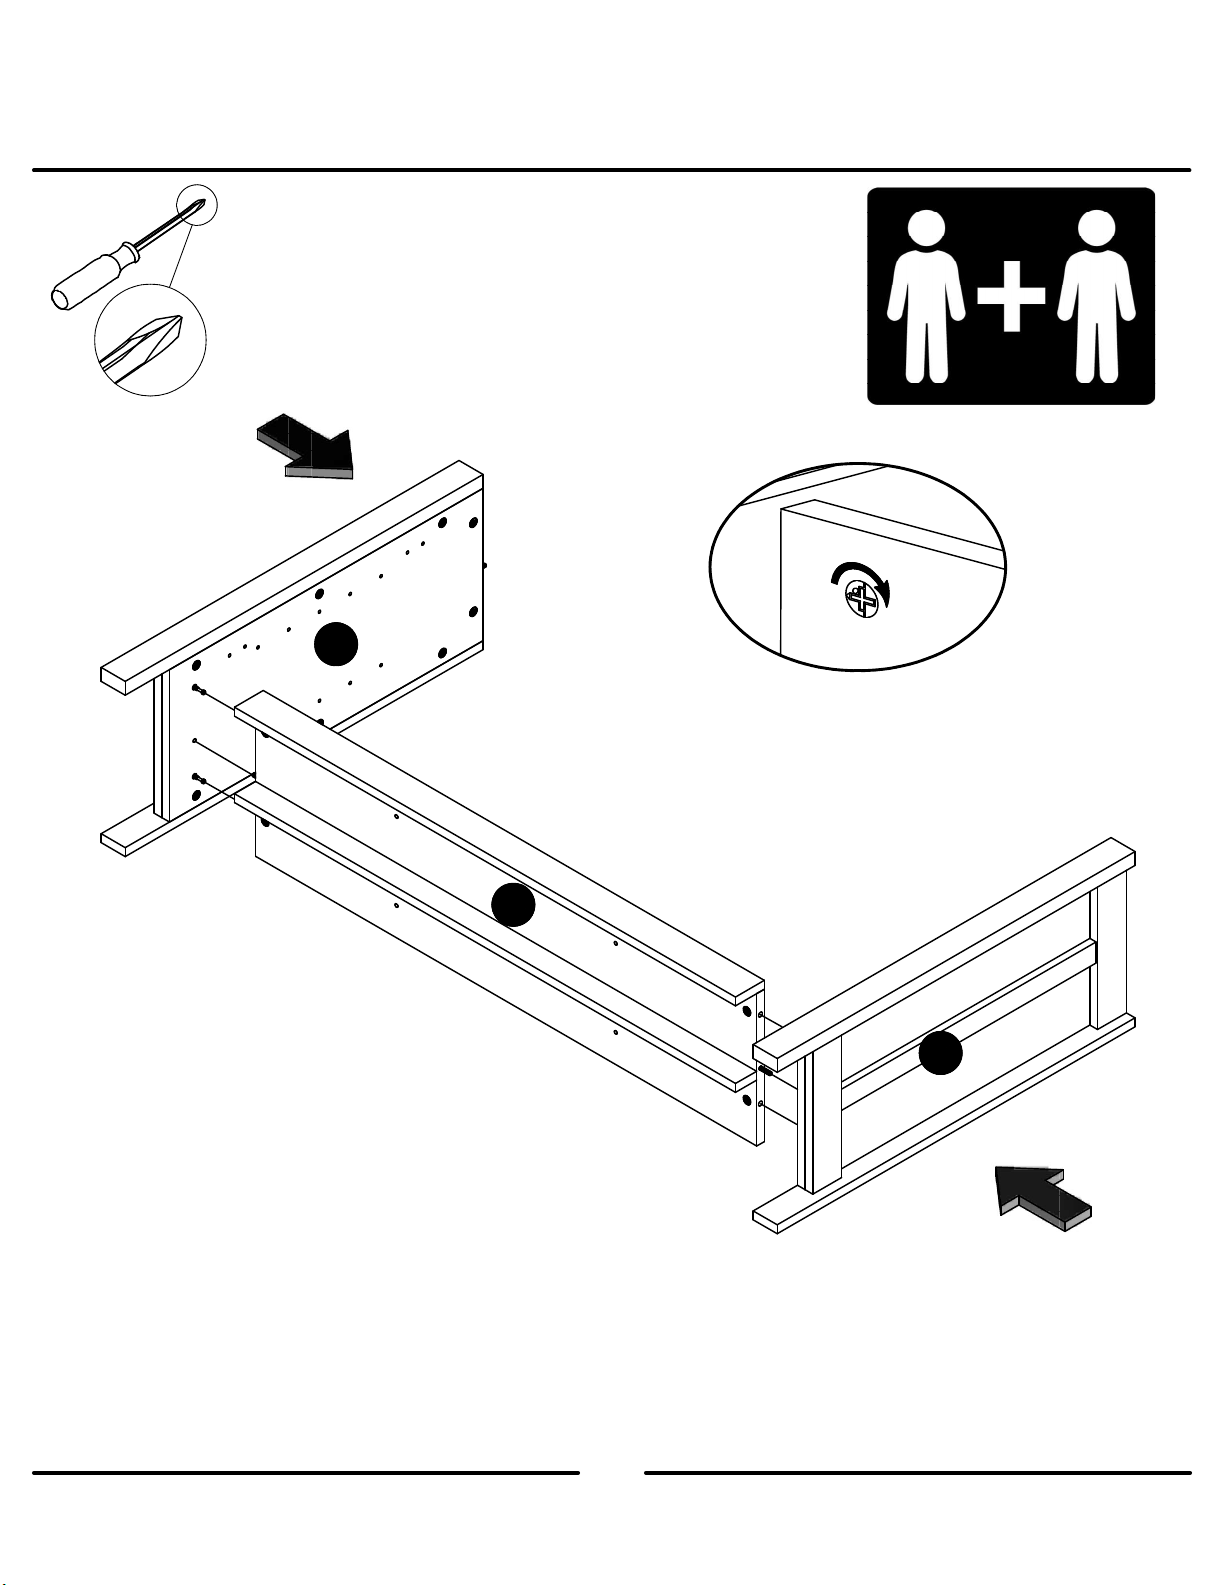
STEP9
A
L
O
C
U
N
L
O
C
K
K
ameriwoodhome.com
F
B
17
Page 18
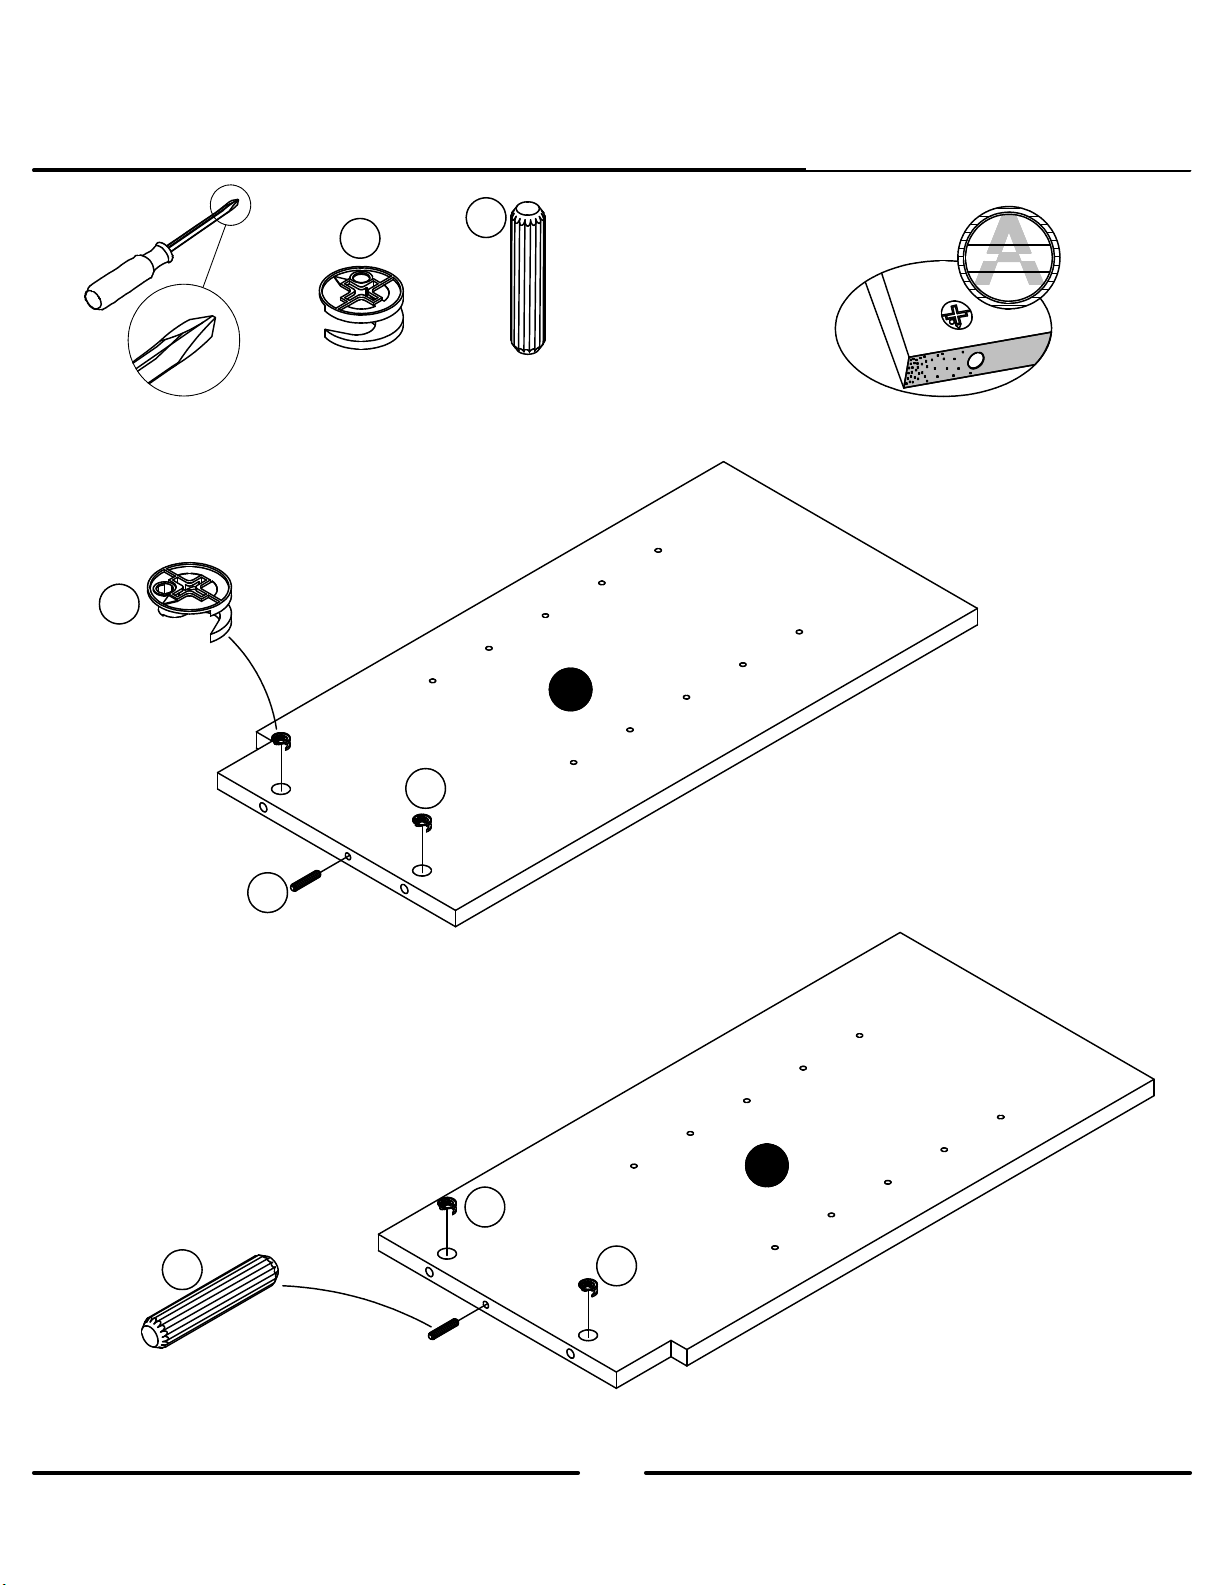
STEP10
1
1
(x4)
#A22620
1
3
(x2)
#A21670
Quick
Assembly
Tip
Proper orientation of CAM LOCK
C
3
3
D
1
1
ameriwoodhome.com
18
Page 19
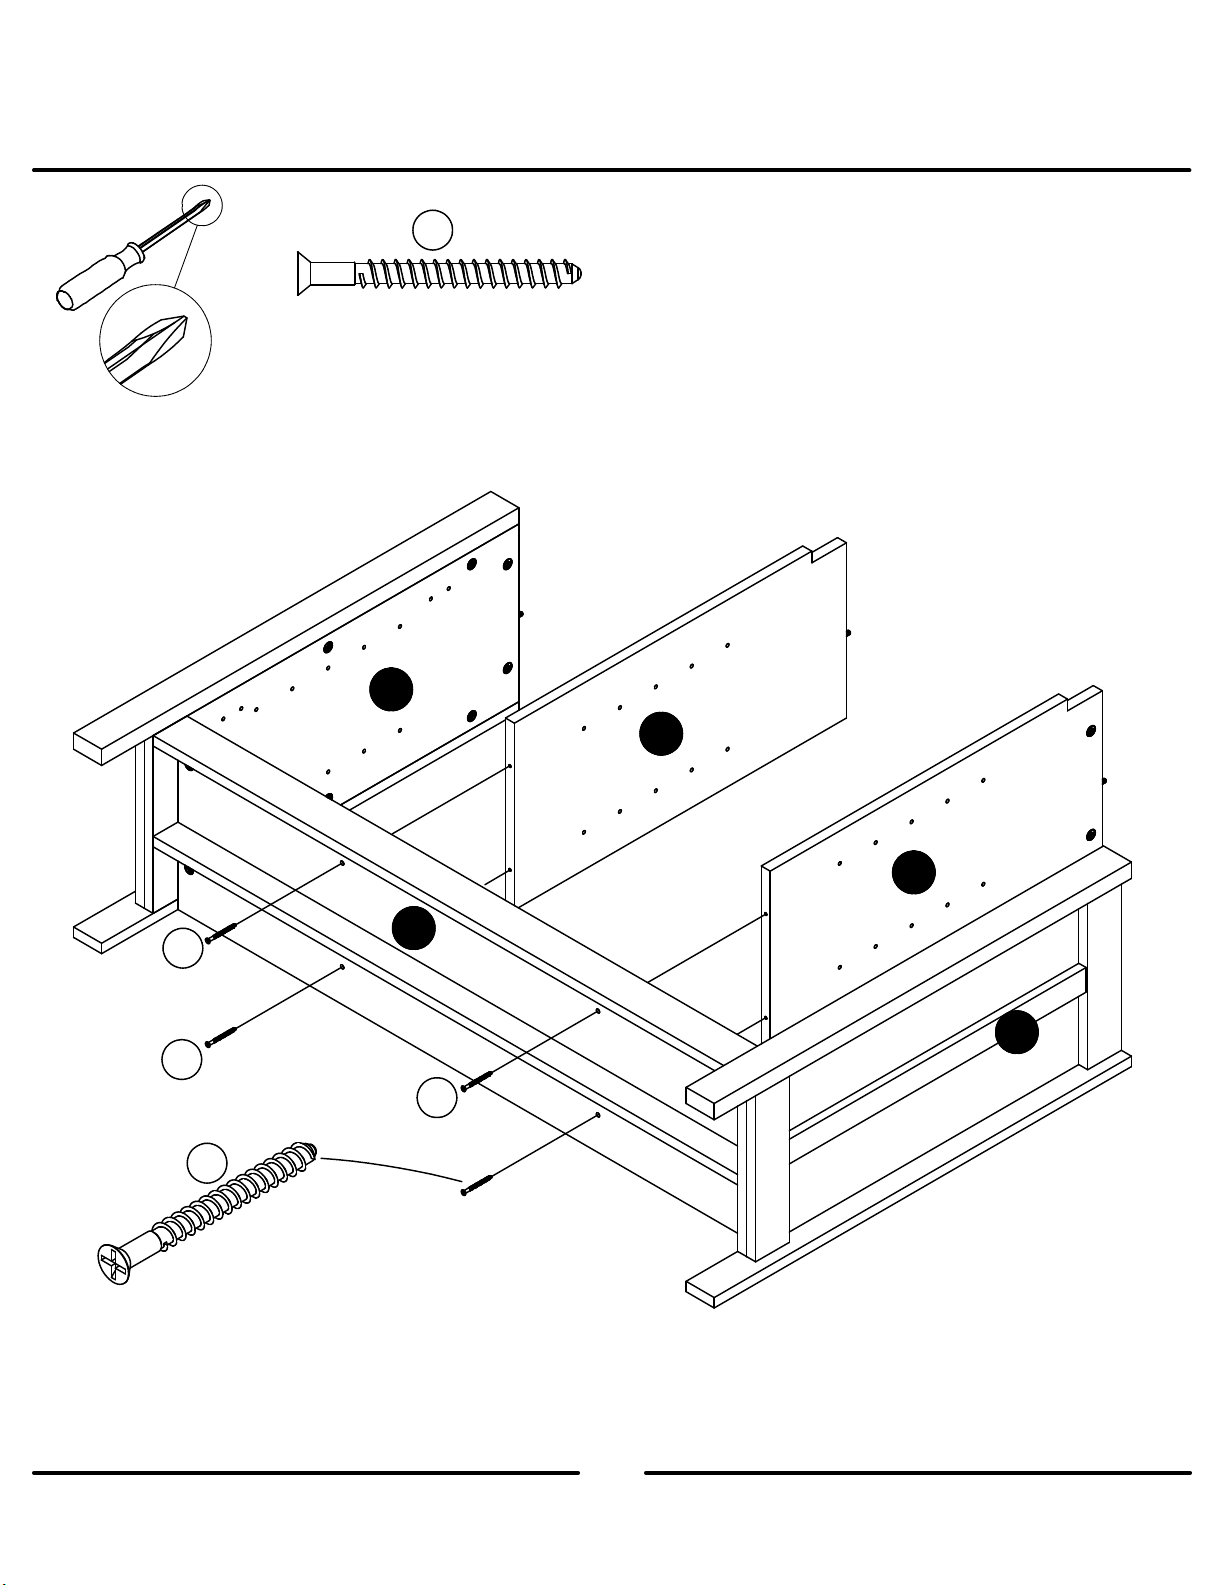
STEP
11
9
(x4)
#A23030
A
9
9
C
D
F
B
9
9
ameriwoodhome.com
19
Page 20
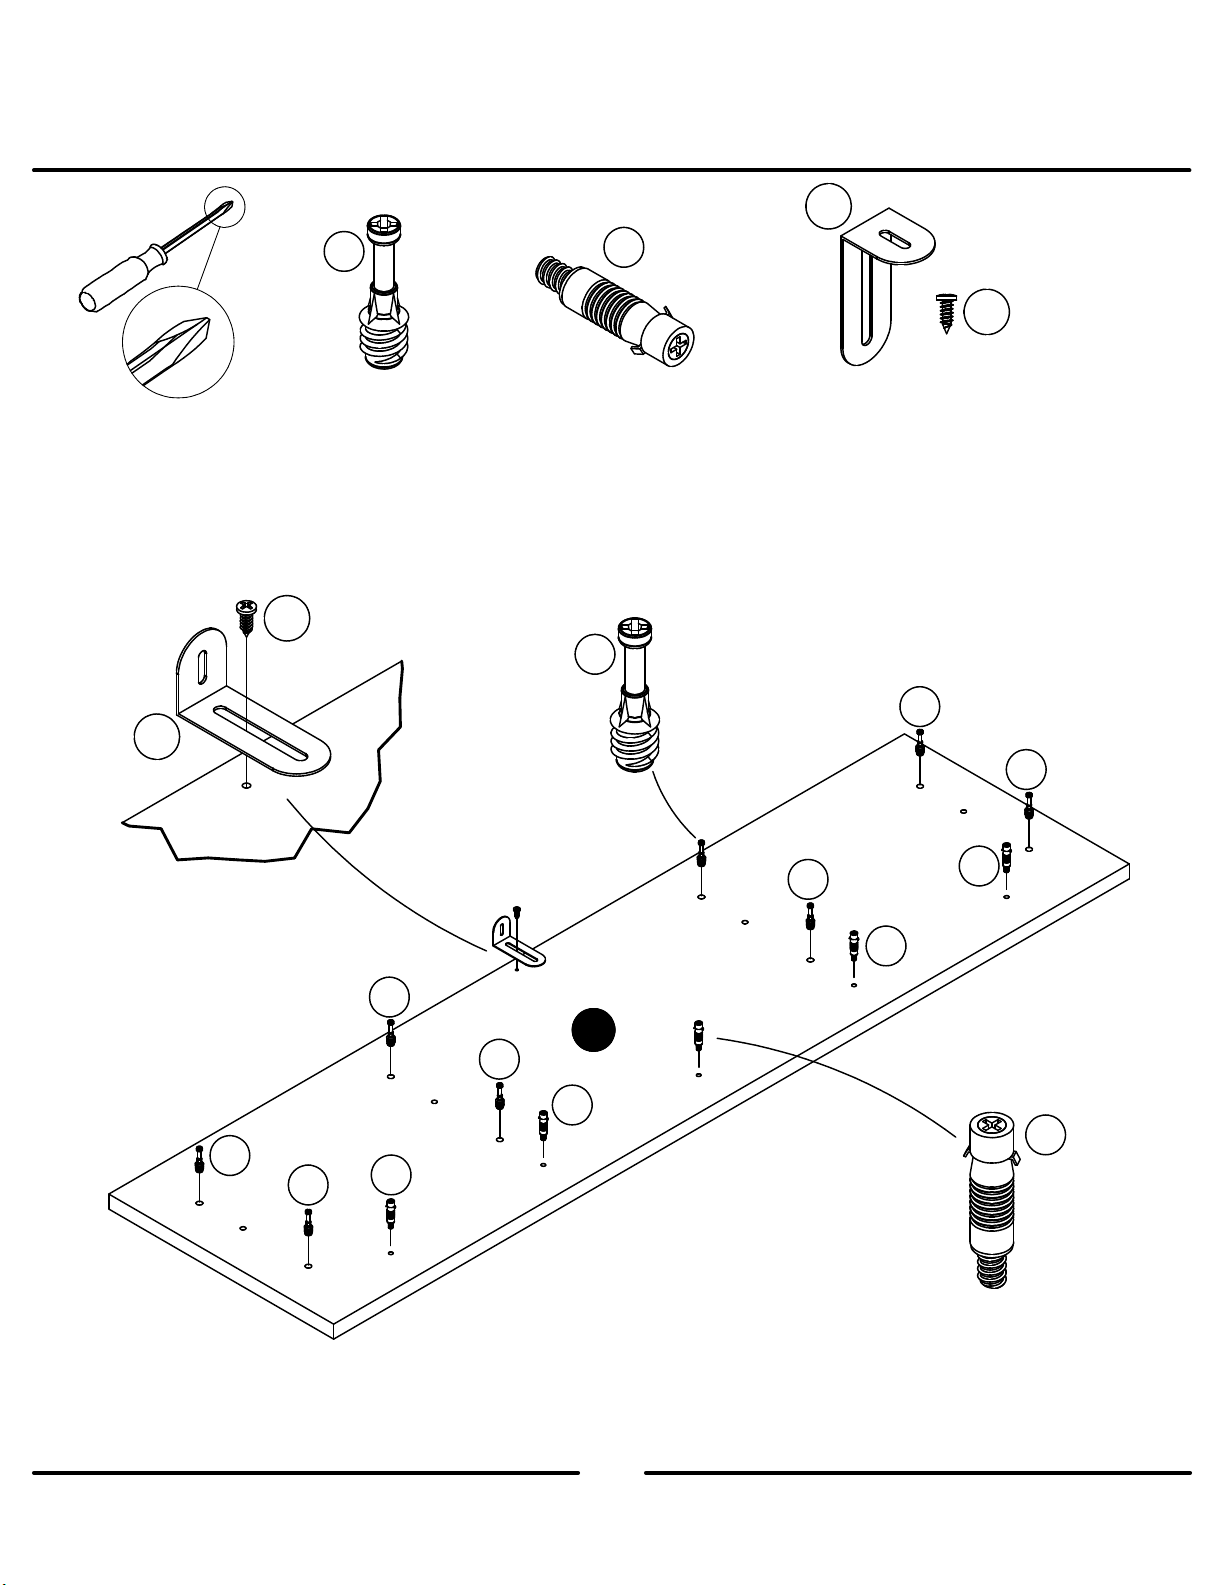
STEP12
15a
Do not fully
tighten screw.
15a
15b
2
(x8)
#A22610
7
(x5)
#A21960
2
15b
(x1)
#A84050
2
2
2
2
2
7
7
2
E
2
7
7
7
ameriwoodhome.com
20
Page 21
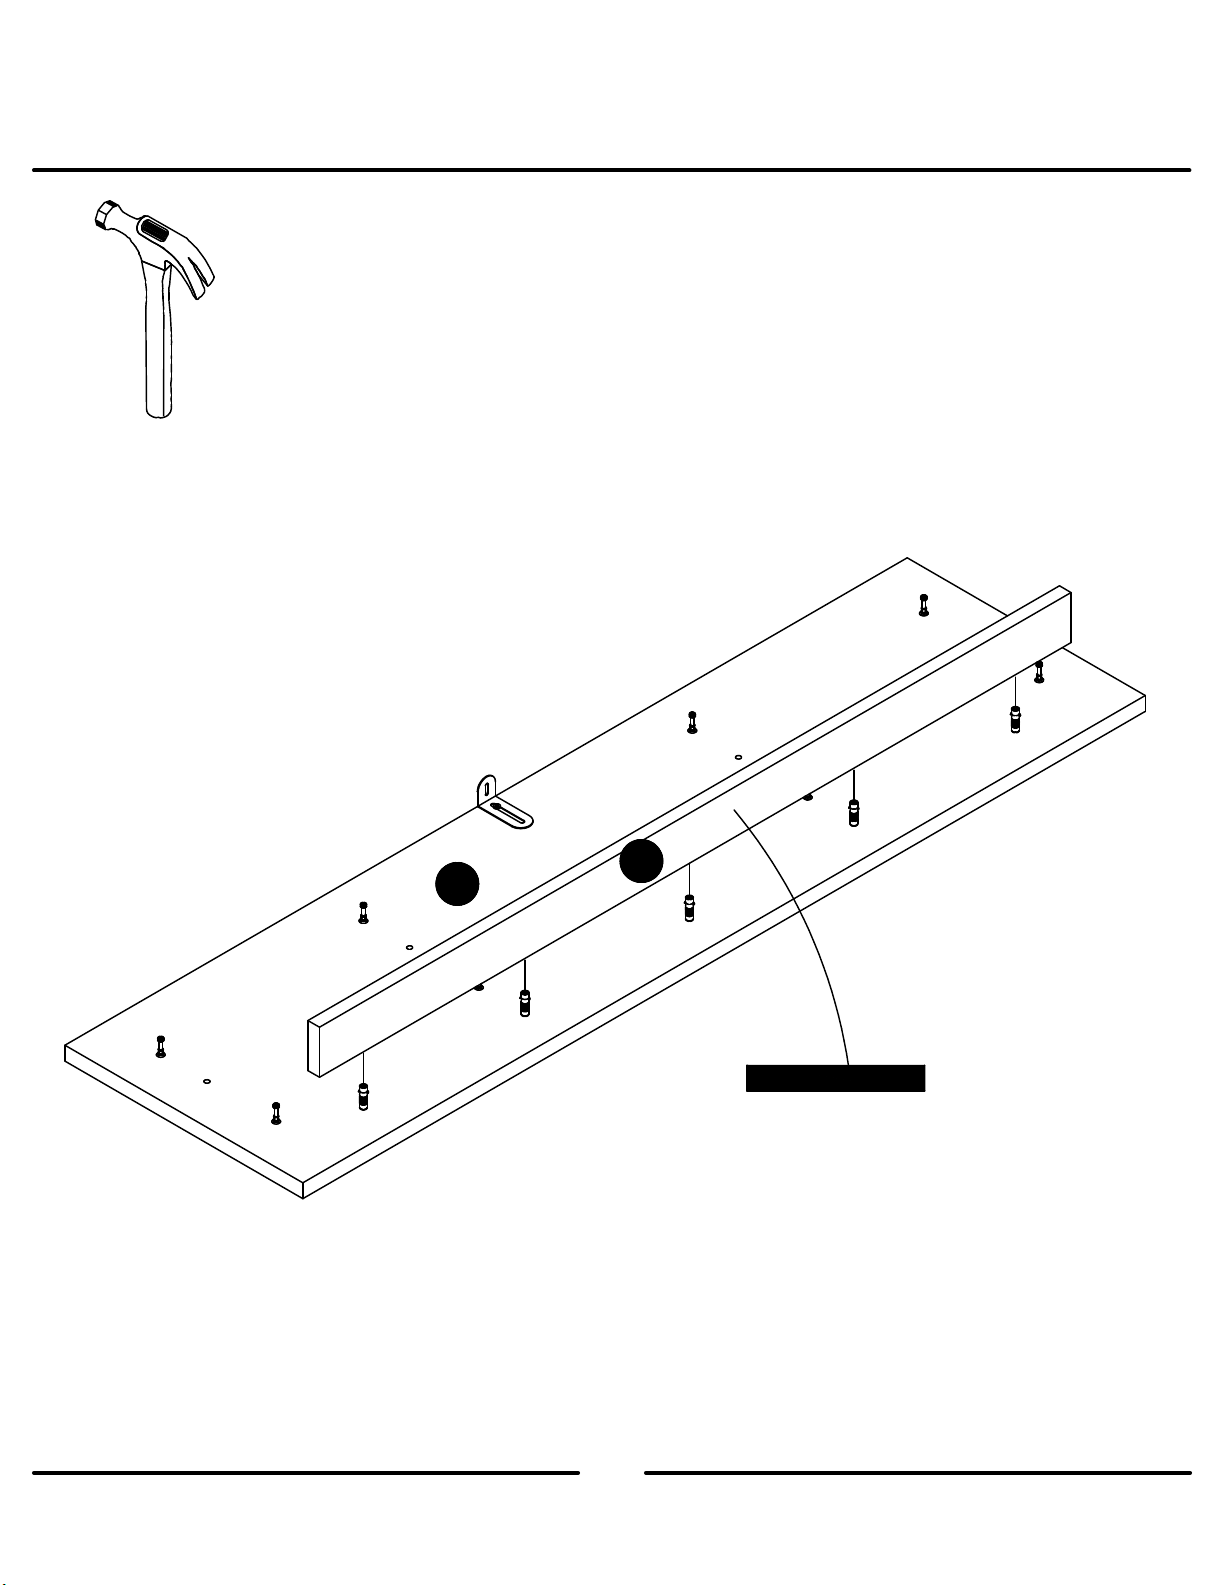
STEP13
Lightly
hidden fasteners (7).
Note: Caution should be used when tapping
with a hammer not to damage the edge of
the top rail (M).
tap with a hammer Top Rail (M) onto
M
E
ameriwoodhome.com
finished surface
21
Page 22
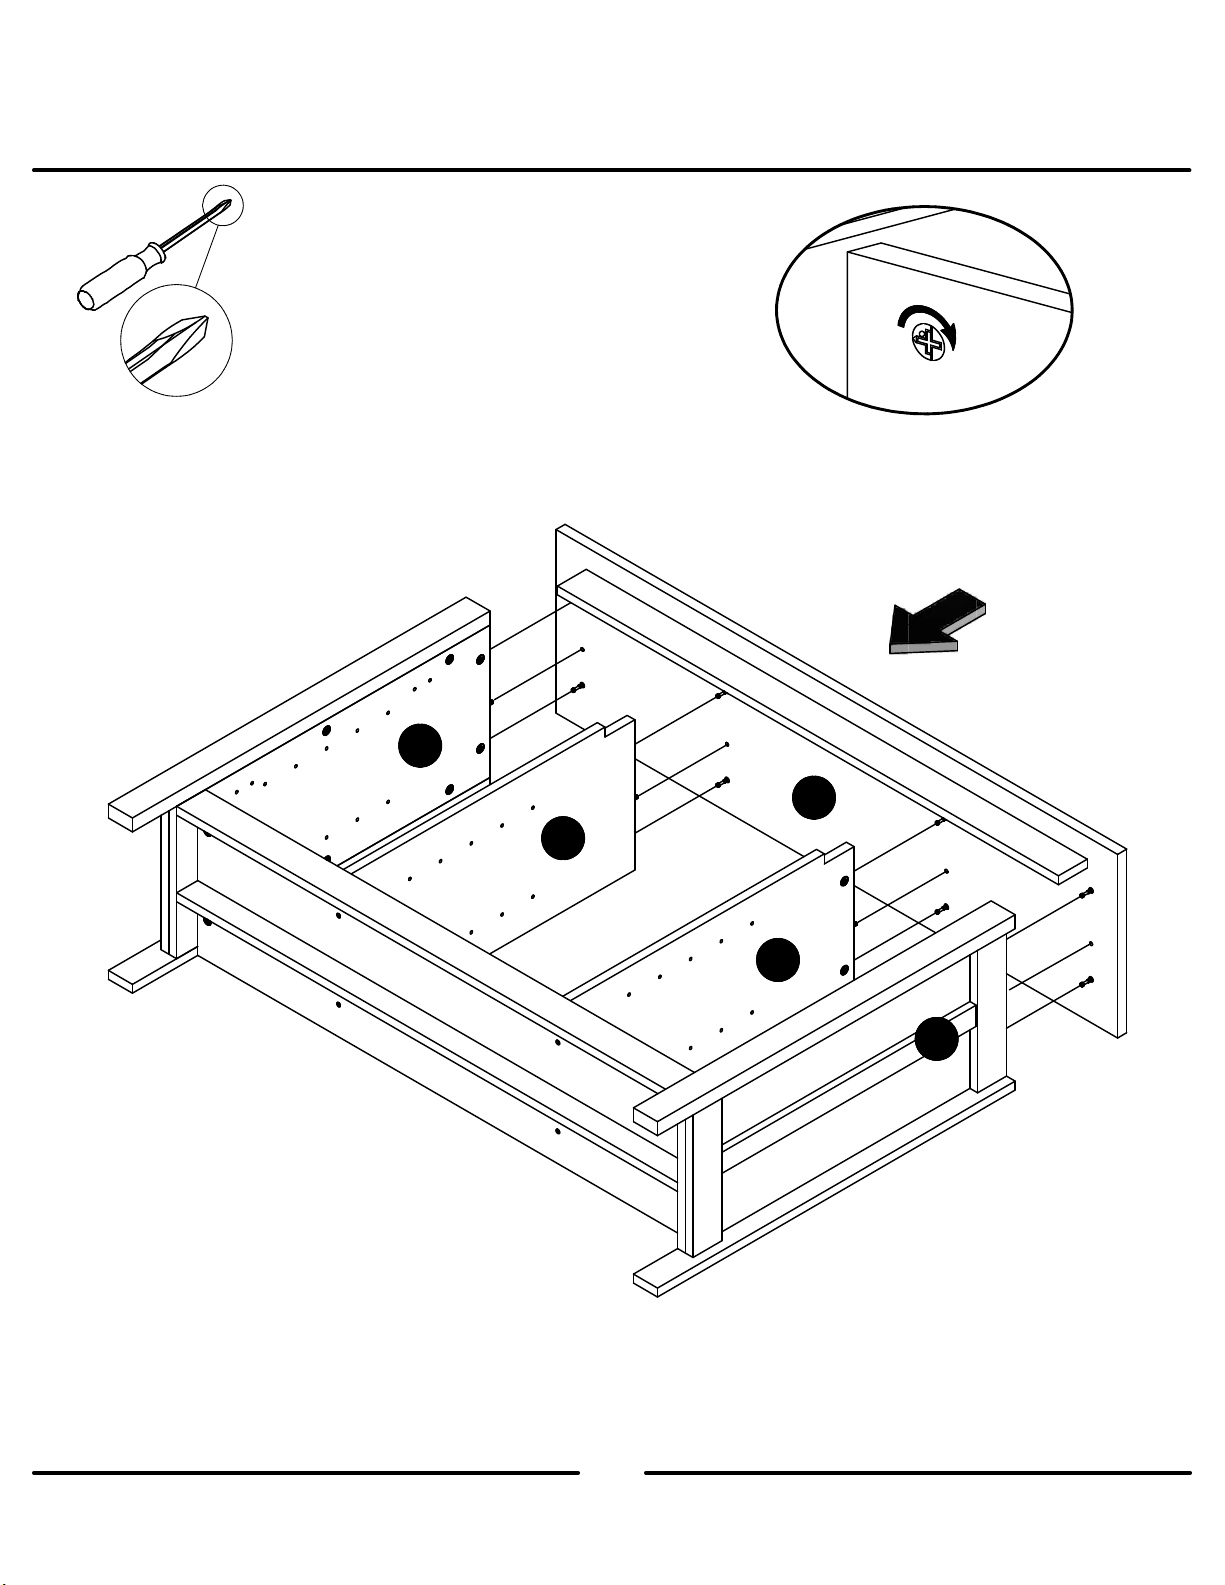
STEP
14
UN
L
O
C
L
O
C
K
K
A
E
C
D
B
ameriwoodhome.com
22
Page 23
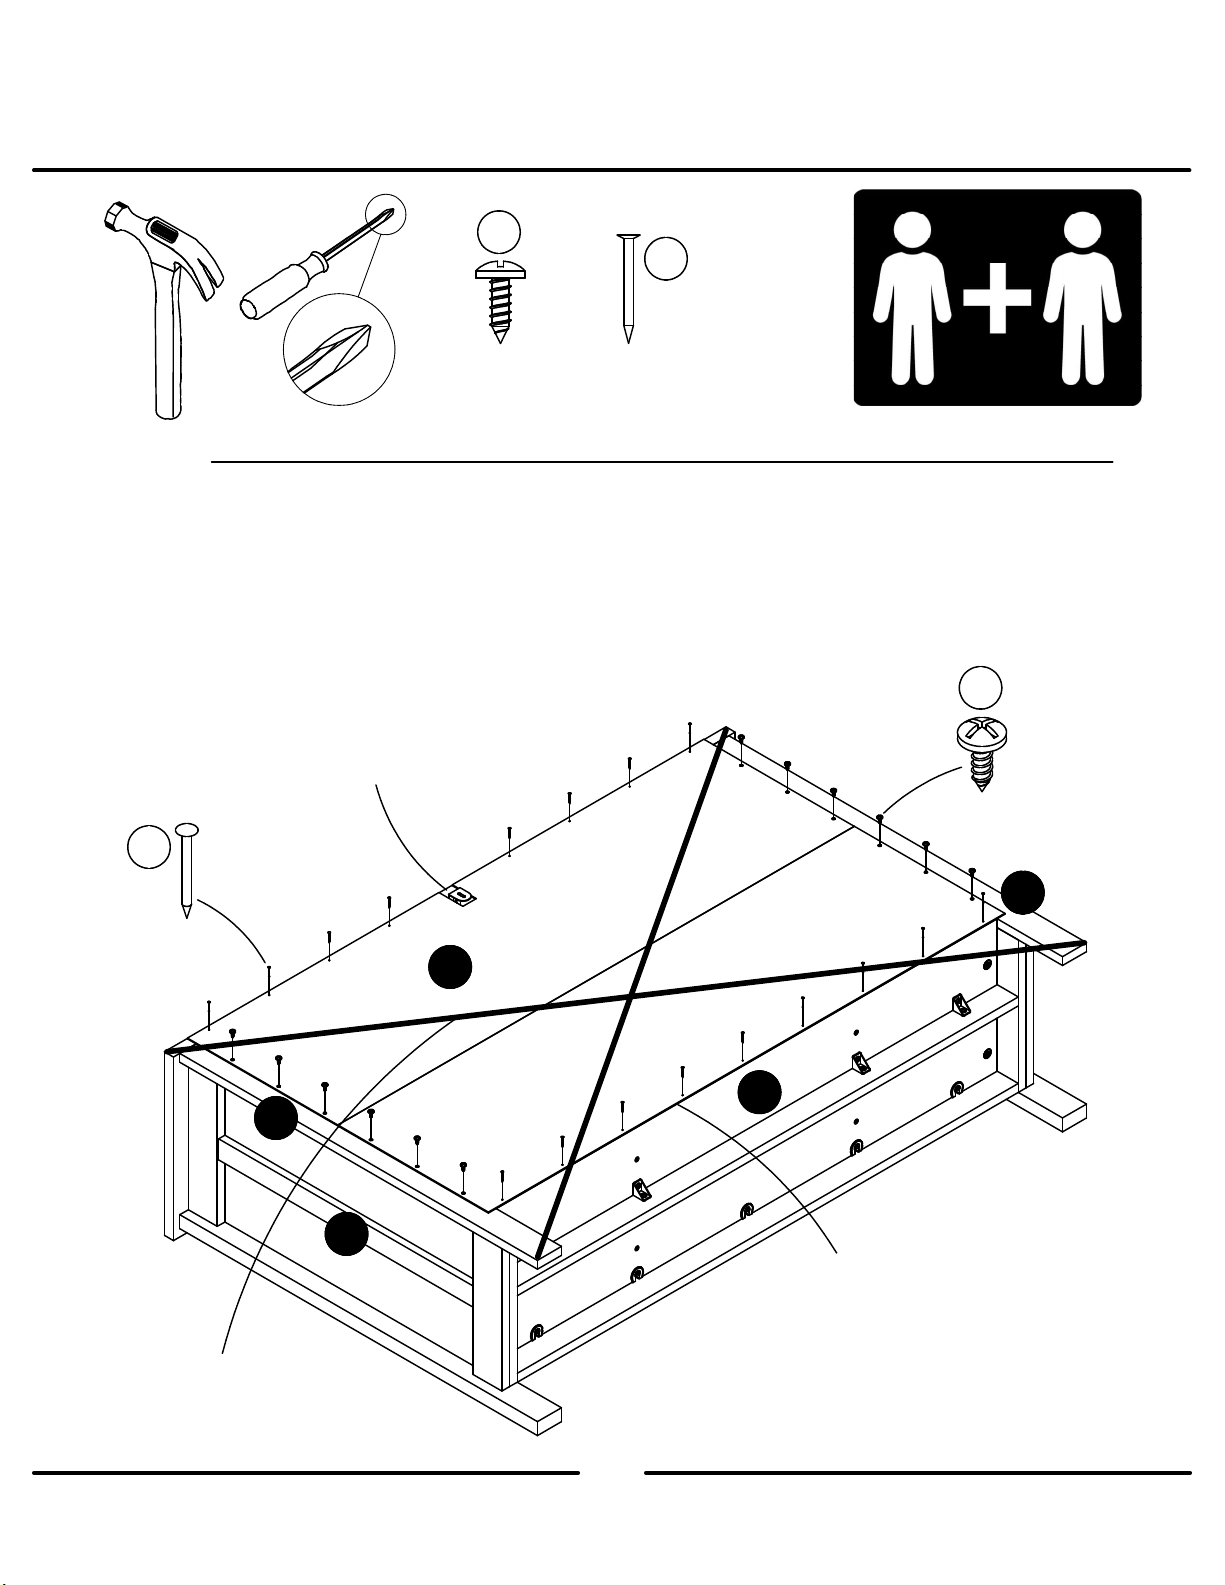
STEP
15
10
14
(x12)
#A12120
IMPORTANT!
With the help of another person, turn the unit over on its front side. Position back panel as shown.
Align squarely with outer edges. Attach back panel to rear legs (K&L) with screws (10) but do not
tighten. Flush bottom edge of back panel with bottom edge of the bottom and nail straight into
back edges of top (E) and bottom (F). Now tighten the screws (10).
THE BACK PANEL IS A STRUCTURAL PART OF THIS UNIT AND MUST BE INSTALLED PROPERLY.
(x17)
#A21110
10
Notch in back panel for safety
bracket located here.
14
raw surface
K
L
B
Assure that the unit is square.
Distance from corner to corner
must be equal as shown.
ameriwoodhome.com
Q
F
Make sure edge of back panel is
flush with bottom edge of the
bottom.
23
Page 24
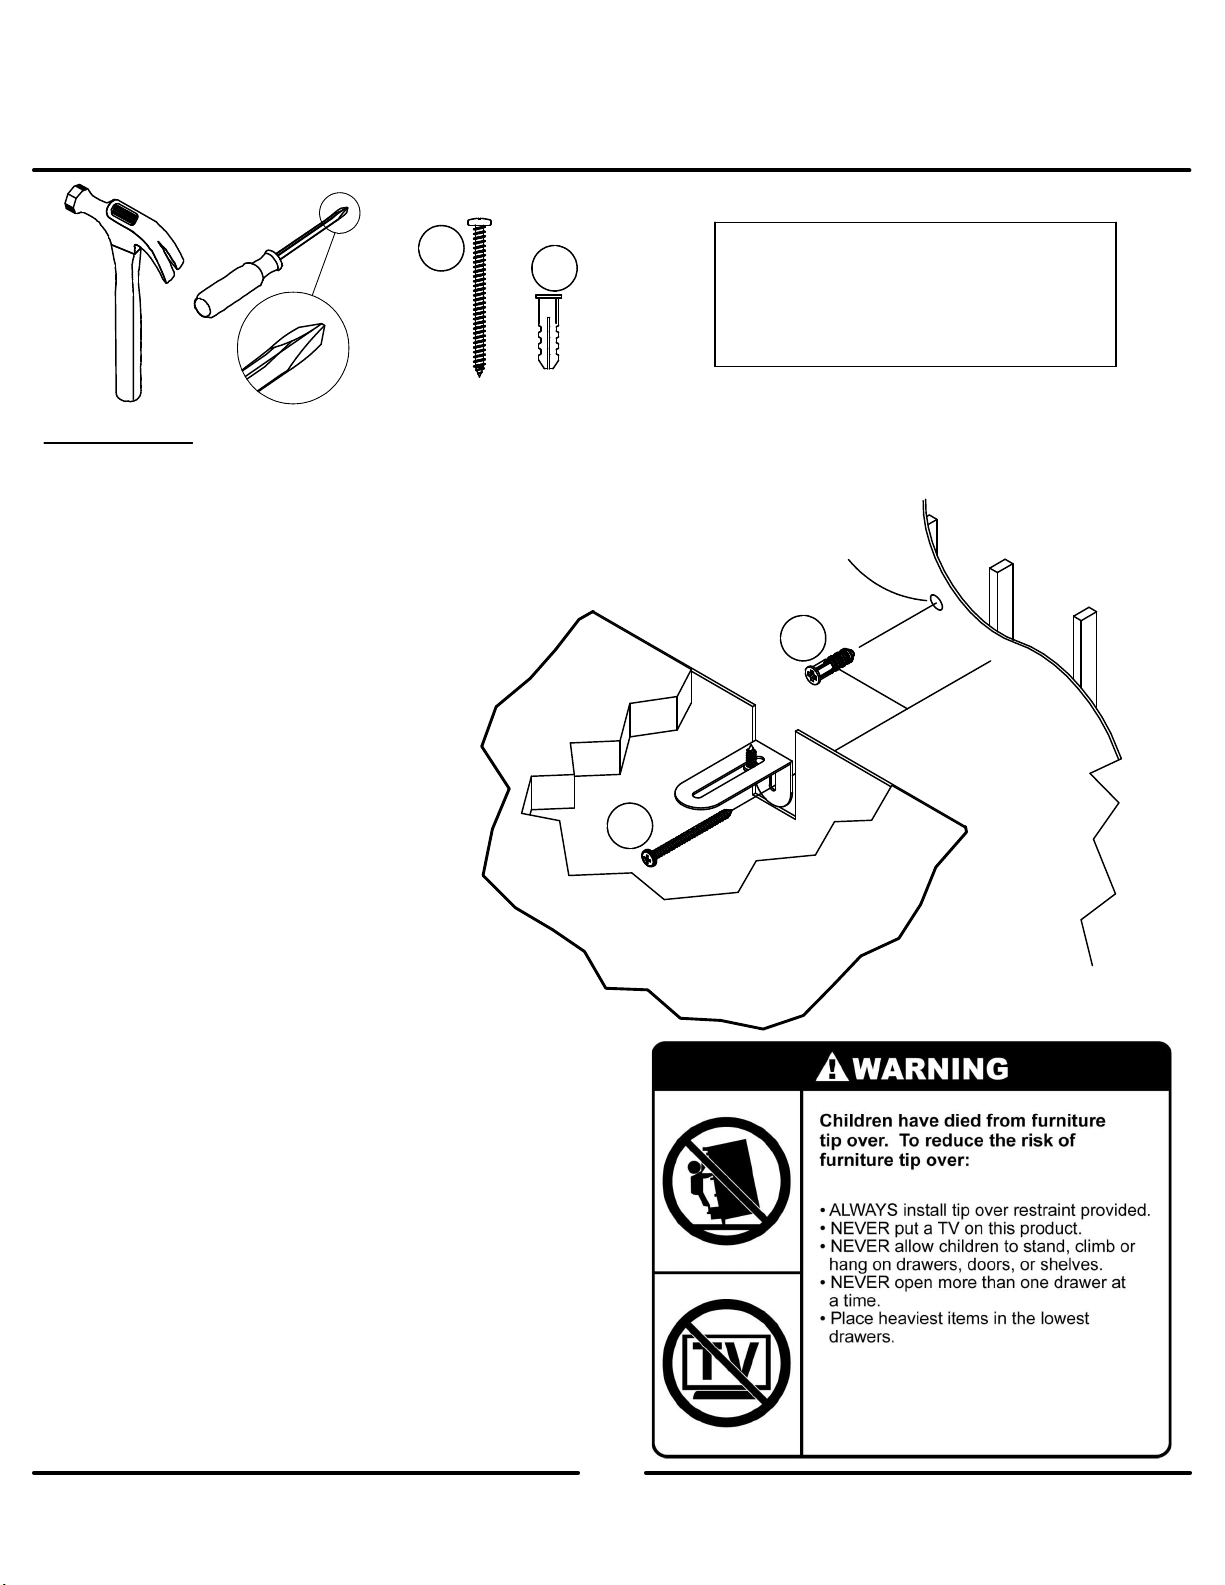
STEP16
15c
15d
IMPORTANT: THIS UNIT MUST BE SECURE TO THE WALL TO HELP PREVENT TIPOVER. FOLLOW
THESE INSTRUCTIONS TO INSTALL THE ANTI-TIPPING SAFETY BRACKET PROVIDED WITH THIS
PRODUCT.
OPTION 1: Attachment into a wall
stud (preferred method)
Using a stud finder, locate a stud in
the wall. Place your unit against the
wall, with the safety bracket aligned
in this location. To make driving the
screw easier, you can drill a 1/8"
diameter pilot hole (3mm) through
the safety bracket into the stud.
Drive the screw through the safety
bracket into the wall stud. Tighten
the screw that was not fully
tightened in step 12.
OPTION 2: Attachment into drywall
Locate your unit where desired
against a wall and mark the wall
through the safety bracket, then
move your unit aside. Drill a 3/16"
diameter hole (5mm) into the
wallboard. Tap the wall anchor into
the hole until it is flush. Move your
unit into location and fasten the wall
bracket to the wall anchor with the
screw. Tighten the screw that was
not fully tightened in step 12.
15c
For Masonry, Concrete, or other
wall materials:
Consult your local hardware store
for appropriate anchors to securely
attach the safety bracket.
hole
15d
wallboard
stud
ameriwoodhome.com
24
Page 25
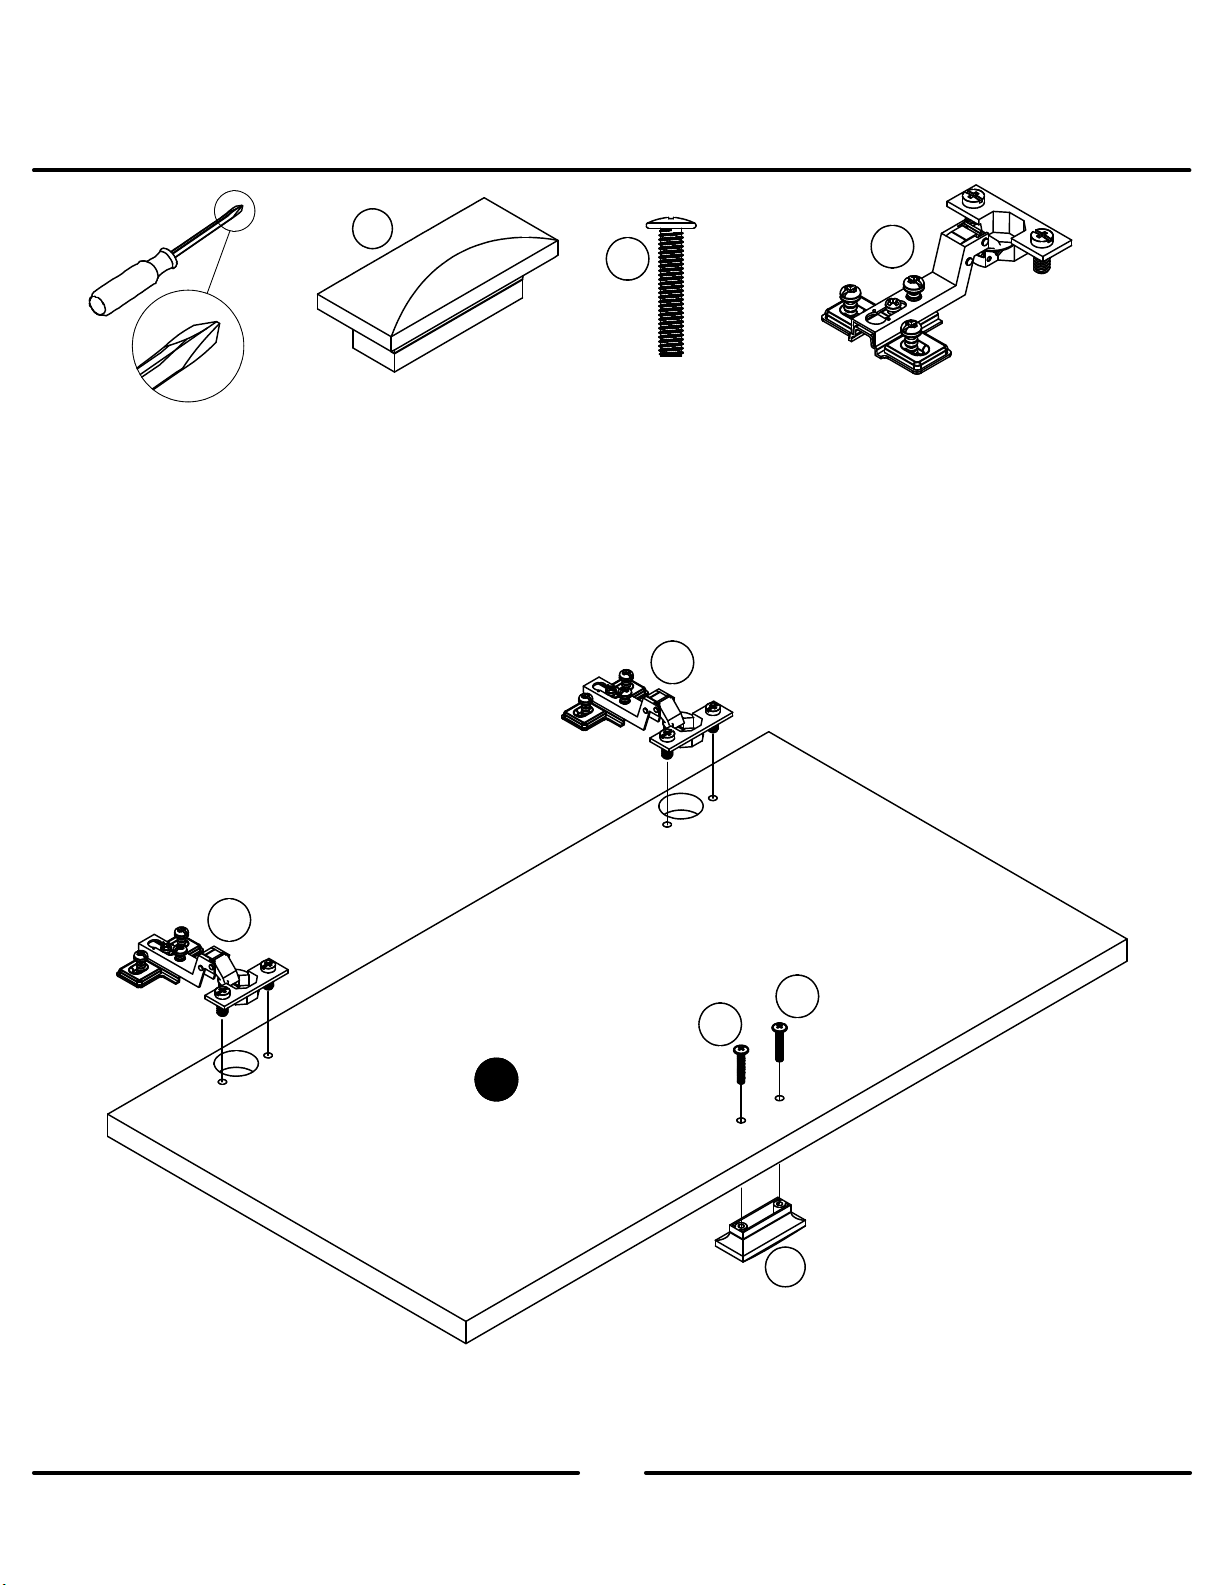
STEP
17
8
(x2)
#A52480
11
(x4)
#A17400
12
12
(x4)
#A65640
12
ameriwoodhome.com
11
11
P
x2
8
25
Page 26
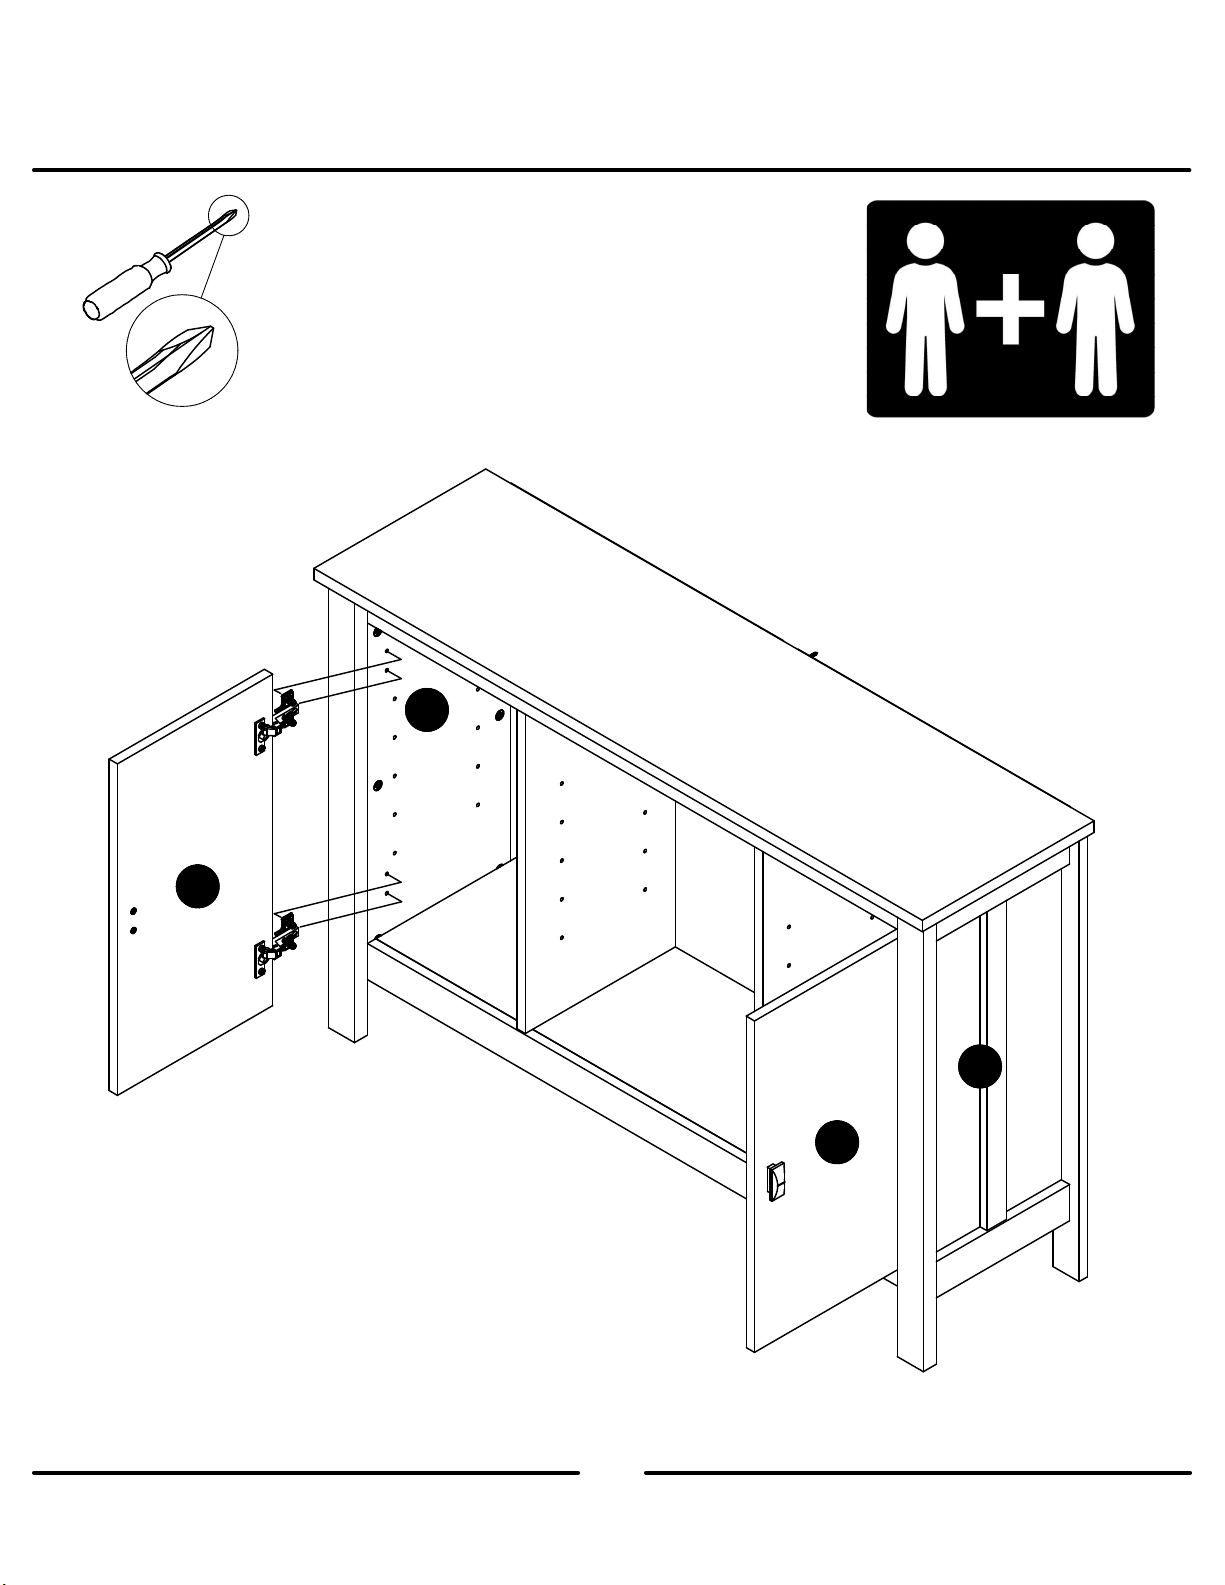
STEP18
A
P
B
P
ameriwoodhome.com
26
Page 27
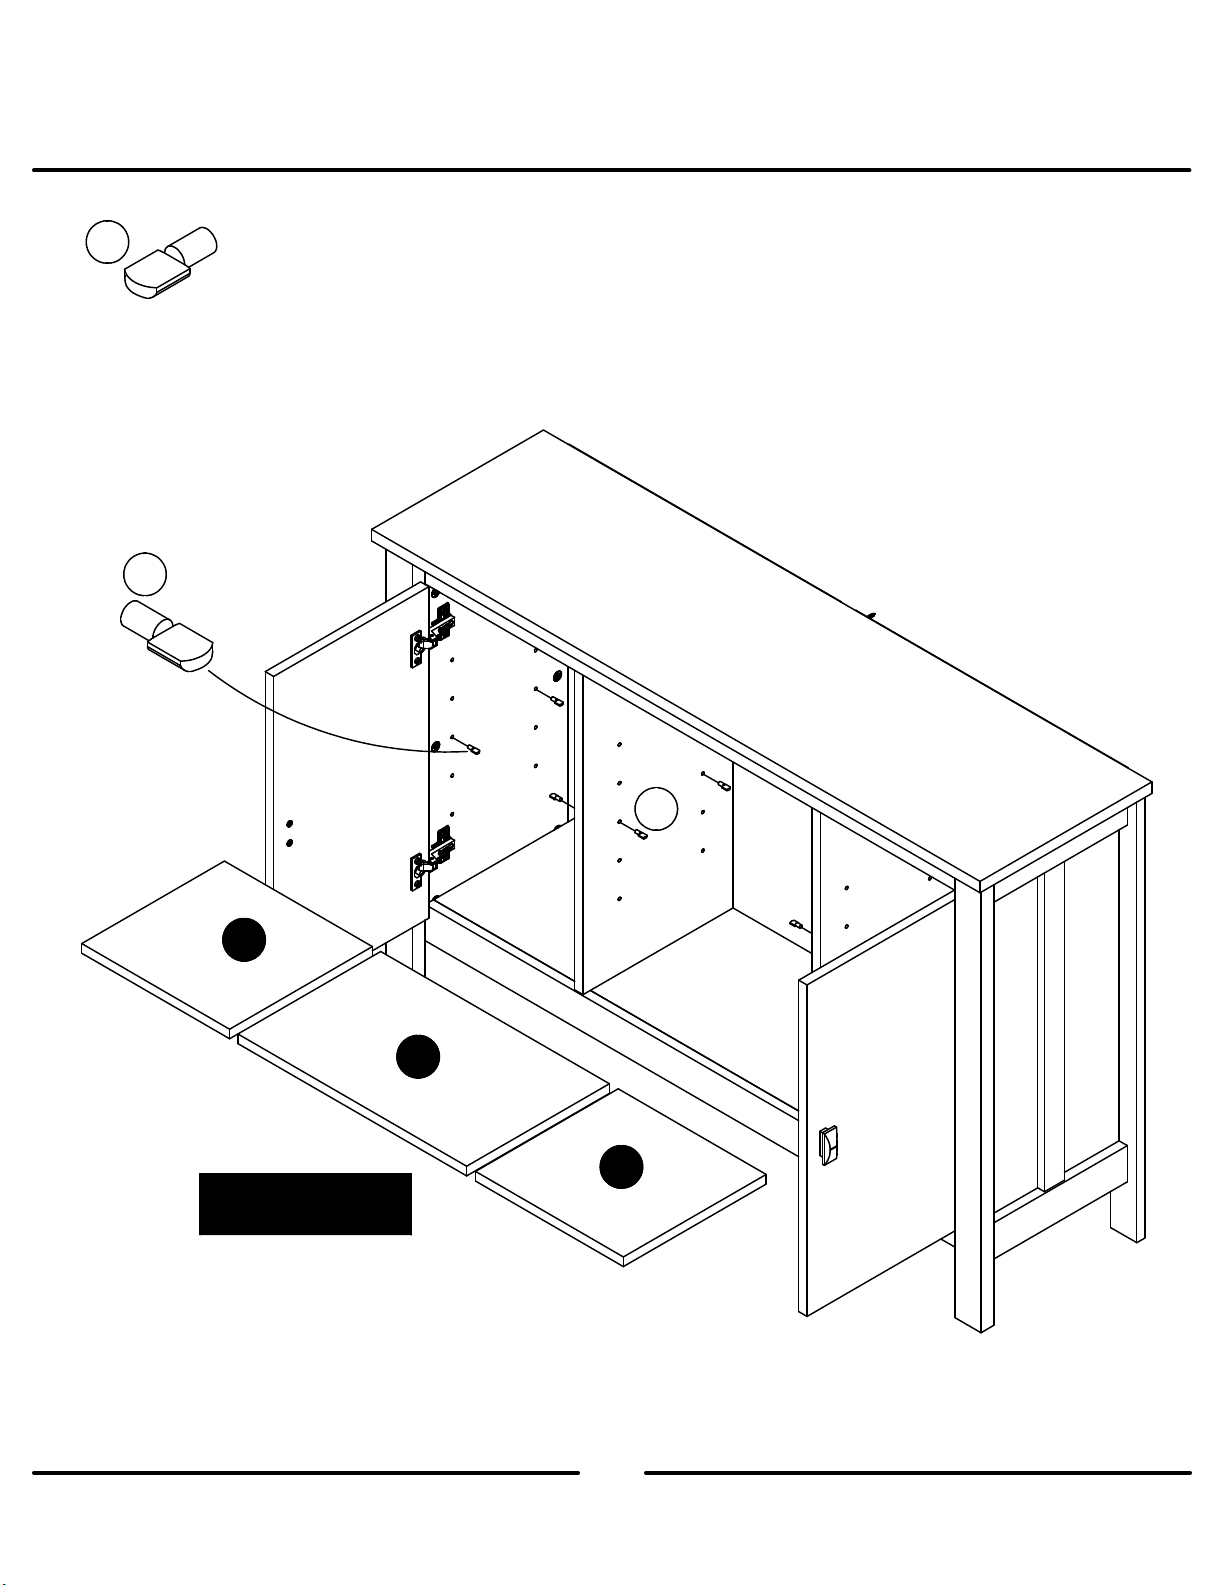
STEP19
13
(x12)
#A80250
13
G
finished edge out
finished surface up
13
H
G
ameriwoodhome.com
27
Page 28
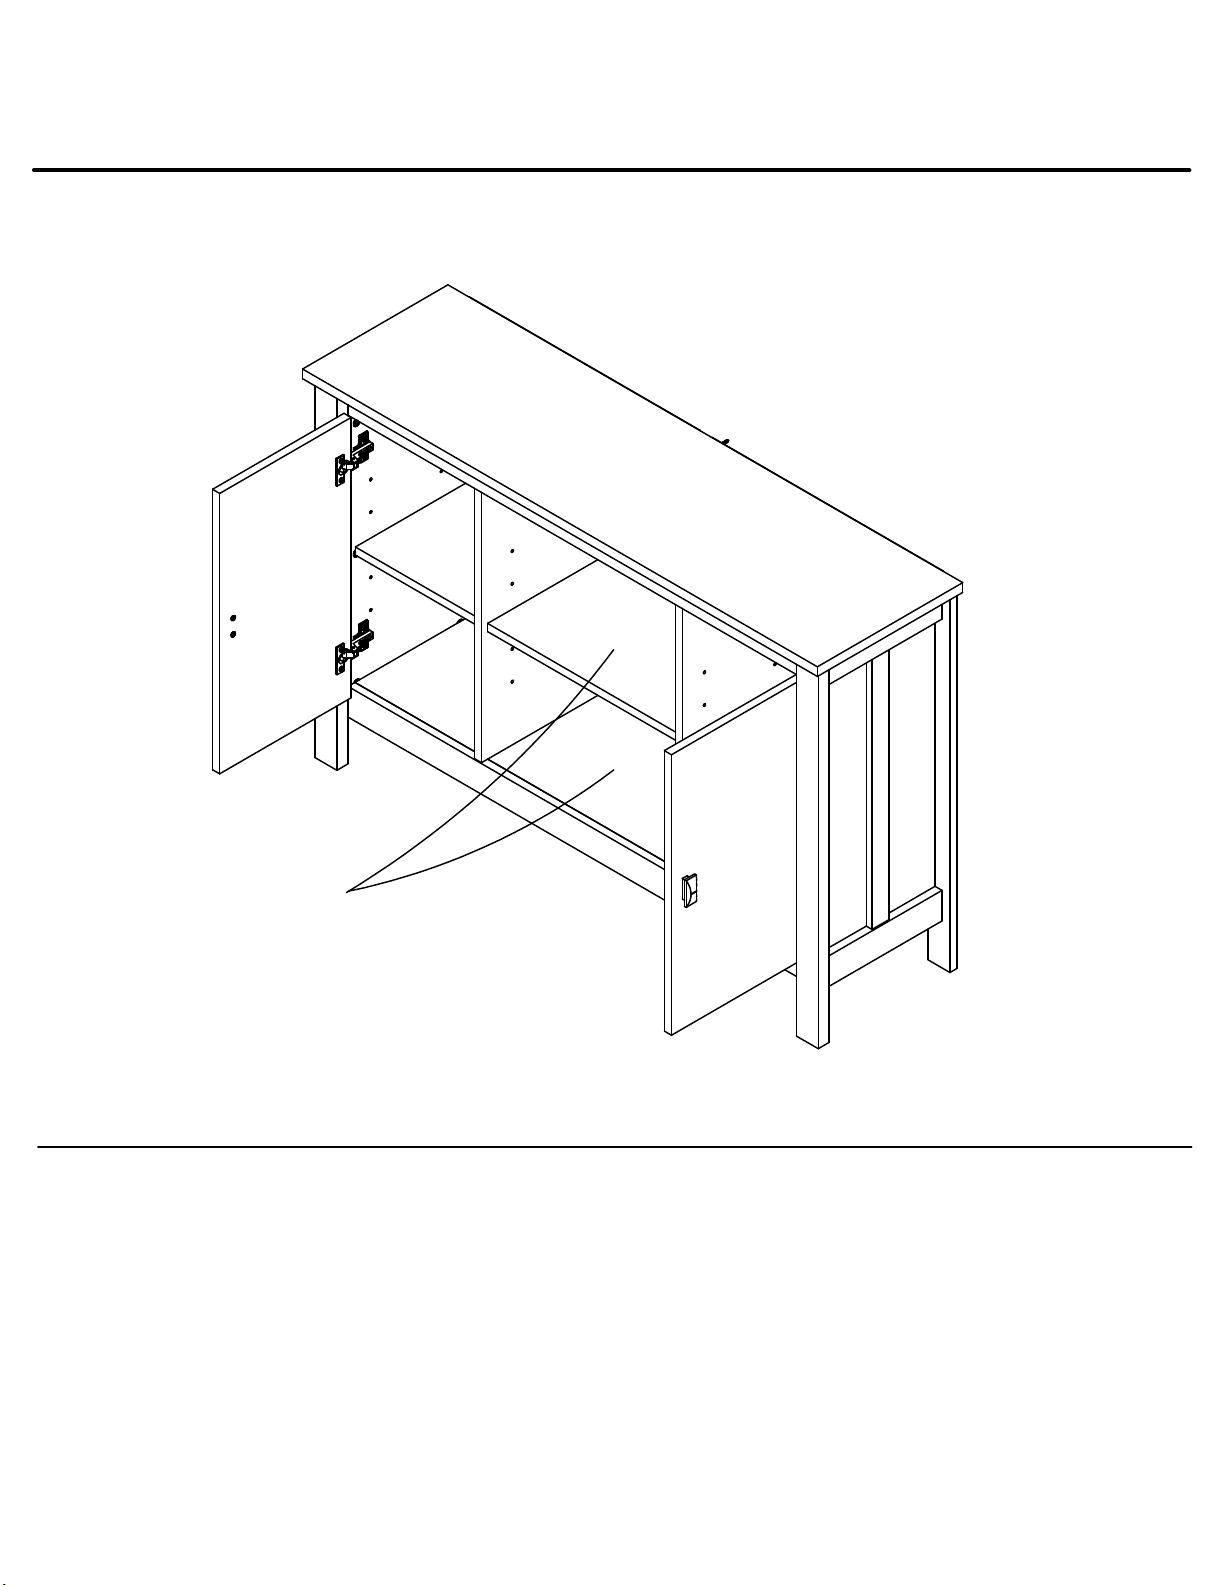
Maximum Loads
This unit has been designed to support the maximum loads shown. Exceeding these load limits
could cause sagging, instability, product collapse, and/or serious injury.
50 lbs
22.6 kg
15 lbs
6.8 kg
(each shelf and
bottom cubbies)
Warning: Risk of injury to persons - do not place a television on this furniture. This furniture is
not approved for use with a television.
Certificate of Conformity
1. This certificate applies to the Dorel Home Furnishings, Inc. product identified by this instruction manual.
2. This certificate applies to compliance of this product with the CPSC Ban on Lead-Containing Paint (16 CFR 1303).
3. This product is distributed by: Dorel Home Furnishings, Inc.
410 East First Street South
Wright City, MO 63390
636-745-3351
4. Site of Manufacture: Tiffin OH
5. See front page of instruction manual for date of manufacture.
28
ameriwoodhome.com
Page 29
Register your product to receive the following:
* New trend details - sneak peek on what's new
* Surveys - have a voice within our community
* Exclusive deals and discount codes
* Quick and easy replacement part service
To register your product, visit ameriwoodhome.com
Visit your local retailer's website, rate your purchased
product and leave us some feedback!
We would like to extend a big "Thank You" to all of
our customers for taking the time to assemble this
Ameriwood Home product, and to give us your
valuable feedback.
29
ameriwoodhome.com
Page 30

Español
Cubierta Delantera
Este libro de instrucciones contiene información
para referencia en el futuro.
No Regrese este producto!
ayuda.
Llamenos al: 1-800-489-3351 (Gratis) Lunes - Viernes 9am - 5pm CST
Visitar:
PRECAUCION
Este mueble puede volcarse y causar graves heridas y/o muerte.
Anclar el mueble a un poste de madera en la pared (si esto se requiere).
No Permita que los niños monten el mueble.
Mantenga los artículos más pesados en los cajones de abajo.
Consejos Útiles (página 2)
- Abra su artículo en el área donde usted planea utilizarlo para evitar levantar y moverlo menos
- Identificar, ordenar y contar las piezas antes de intentar ensamblar
- Las clavijas de compresión se golpean con un martillo
- Las diapositivas están marcadas con una R (derecha) y L (izquierda) para la colocación correcta
- Asegúrese de que siempre este el punto locaizado en la parte superior de bloqueador de leva
este volteadohacia borde exterior
- Utilizar todos los clavos para el panel de atras y distribuirlos por igual
- El panel de atras debe utilizarse para asegurarse de que la unidad quede fija y firme
- No use quimicas fuertes ni limpiadores abrasivos en este articulo
- Nunca empuje, tire ni arrastre los muebles
Antes de Que Empieces (página 3)
-Lea cuidadosamente cada paso y siga el orden correcto
-Separar y contar todas sus piezas y hardware
-Dése suficiente espacio para el proceso de ensamble
-Tenga las siguientes herramientas: destornillador de cabeza plana, #2 cabeza Phillips
Destornillador y martillo
-Precaución: Si usa un taladro electrónico o un destornillador eléctrico para atornillar, por favor asegúrese
que deje de atornillar cuando el tonillos este apretado. Fallar hacer esto puede causar barrer el tornillo.
Sistema de fijar el bloqueo de leva (página 3)
Esta sistema de fijar el bloqueo de leva sera usado en todo el proceso ensamble.
www.ameriwoodhome.com
Comuniquese con nuestro amistoso equipo de servicio al cliente para obtener
ameriwoodhome.com
IMPORTANTE
30
de seguridad. Por favor lea y manténgalo
Page 31
Español
Página 14
Martille ligeramente el conector (6) para insertarlo totalmente. Asegúrese de que el conector esté
colocado como se indica, antes de martillarlo contra el orificio.
Página 16
Gire el tornillo hacia la derecha para fijarlo en su lugar.
Página 20
No apriete completamente el tornillo.
Página 21
Martille ligeramente el riel superior (M) sobre los sujetadores ocultos (7).
Página 23
¡IMPORTANTE! EL PANEL POSTERIOR ES PARTE INTEGRAL DE ESTA UNIDAD Y DEBE INSTALARSE
CORRECTAMENTE.
Con la ayuda de otra persona, voltee la unidad sobre su parte delantera. Coloque el panel posterior como
se indica. Alinee en ángulo recto con los bordes exteriores. Fije el panel posterior a las patas posteriores
(K&L) con los tornillos (10), pero no los apriete. Alinee el borde inferior del panel posterior con el borde
inferior de la parte inferior y clávelo directamente en los bordes posteriores de la parte superior (E) e
inferior (F). Ahora, apriete los tornillos (10).
Aquí se ubica la muesca del panel posterior para el soporte de seguridad.
Asegúrese de que la unidad esté nivelada.
La distancia de esquina a esquina debe ser igual a la indicada.
Asegúrese de que el borde del panel posterior esté alineado con el borde inferior de la parte inferior.
Página 24
En caso de mampostería, concreto u otros materiales para paredes:Consulte con su ferretería local para
encontrar los anclajes adecuados para fijar firmemente el soporte de seguridad.
IMPORTANTE: ESTA UNIDAD DEBE ESTAR FIJADA A LA PARED PARA EVITAR QUE SE VUELQUE. SIGA
ESTAS INSTRUCCIONES PARA INSTALAR EL SOPORTE DE SEGURIDAD ANTIVUELCO QUE SE INCLUYE CON
ESTE PRODUCTO.
OPCIÓN 1: Fijación a montante (método preferido)
Con la ayuda de un detector de vigas, ubique una viga en la pared. Coloque la unidad contra la pared, con
el soporte de seguridad alineado en esta ubicación. Para facilitar la colocación del tornillo, puede
perforar un orificio guía de 1/8" de diámetro (3mm) a través del soporte de seguridad hasta el montante.
Introduzca el tornillo a través del soporte de seguridad hasta el montante. Apriete el tornillo que no se
apretó completamente en el paso 12.
ameriwoodhome.com
31
Page 32

Español
OPCIÓN 2: Fijación a drywall
Coloque la unidad en el lugar que desee contra la pared y márquela a través del soporte de seguridad.
Luego, mueva la unidad a un lado. Perfore un orificio de 3/16" de diámetro (5mm) en la placa. Golpee
ligeramente el anclaje de pared contra el orificio hasta que esté alineado. Mueva la unidad a su
ubicación y fije el soporte de pared al anclaje de pared con el tornillo. Apriete el tornillo que no se
apretó completamente en el paso 12.
Página 28
CARGA MAXIMA
Esta unidad ha sido diseñada para soportar la carga máxima anotada. El exceder estos límites puede
causar inestabilidad, colapsarse y/o causar serias lesiones.
ADVERTENCIA: Riesgo de lesiones a las personas - no coloque un televisor sobre muebles. Este mueble
no está aprobado para su uso con un televisor.
Página 29
Registre su producto para recibir lo siguiente:
* Detalles de nuevas tendencias - Vistazo a lo nuevo
* Encuestas - alec su voz entre su comunidad
* Códigos de ofertas y descuentos exclusivos
* Fácil y rápido servicio de partes de remplace
Para registrar su producto, visite ameriwoodhome.com
Clasificasión de 5 estrellas
Visite el sitio web de su tienda local, califique su comprado
y denos sus comentarios!
Nos gustaría enviar un gran "Agradecimiento" a todos nuestros clientes por tomarse el tiempo de
ensamblar este producto de Ameriwood Home, y por darnos sus valiosos comentarios.
Gracias
ameriwoodhome.com
32
Page 33

Français
Couverture Avant
CE LIVRET D'INSTRUCTION CONTIENT DES INFORMATIONS
ET GARDER POUR UNE RÉFÉRENCE FUTURE
Ne retournez pas ce produit!
de l'aide.
Appelez-nous:
Visitez:
ATTENTION
Le meuble peut basculer et causer des blessures graves ou la mort.
Ancrer le meuble à une planche murale dans le mur (si indiqué).
Ne laissez pas les enfants grimper sur le meuble.
Placez les articles lourds sur les étagères ou dans les tiroirs inférieurs.
Astuces Utiles (page 2)
-Ouvrez votre article dans la zone que vous prévoyez de le garder pour moins de levage lourd
-Identifier, trier et compter les pièces avant d'essayer d'assembler
-Les goujons de compression sont taraudés avec un Marteau
-Les glissières sont marquées d'un R (droit) et d'un L (gauche) pour un bon placement
-Assurez-vous toujours de faire face la pointe situé sur le haut de la Serrure de Came vers le bord extérieur
-Utiliser tous les clous fournis pour le panneau arrière et les répartir également
-Le panneau arrière doit être utilisé pour vous assurer que votre appareil est robuste
-N'utilisez pas de produits chimiques agressifs ou de nettoyants abrasifs sur cet appareil
-Ne jamais pousser, tirer, ou faire glisser votre meuble
Avant de Commencer (page 3)
-Lisez attentivement chaque étape et suivez le bon ordre
-Séparez et comptez toutes vos pièces et matériaux
-Donnez-vous suffisamment de place pour l'assemblage
-Avoir les outils suivants: tournevis à tête plate, #2 tournevis Phillips, et Marteau
-
Attention: Si vous utilisez une perceuse électrique ou un tournevis électrique pour visser, veillez à ralentir
et arrêter lorsque la vis est bien serrée. Le non-respect de cette consigne peut endommager la vis.
www.ameriwoodhome.com
1-800-489-3351 (sans frais) du Lundi au Vendredi de 9h à 17h Heure Centrale
Contactez notre équipe de service à la clientèle amicale d'abord pour obtenir
IMPORTANTES
SUR LA SÉCURITÉ. VEUILLEZ LIRE
Système de Fixation de Came (page 3)
Ce Système de Fixation de Came sera utilisé tout au long de l'assemblage
33
ameriwoodhome.com
Page 34
Français
Page 14
Vous devrez taper sur le connecteur (6) avec un marteau pour l'insérer complètement. Assurez-vous que
le connecteur est positionné tel que montré avant de taper dans le trou.
Page 16
Tournez la vis dans le sens des aiguilles d'une montre pour le fixer en place.
Page 20
Ne pas serrer complètement la vis.
Page 21
Taper légèrement le rail du haut (M) sur l'attache cachée (7) avec un marteau.
Page 23
IMPORTANT! LE PANNEAU ARRIÈRE EST UNE PARTIE STRUCTURELLE DE CE MEUBLE ET DOIT ÊTRE
INSTALLÉ CORRECTEMENT.
Avec l'aide d'une autre personne, retournez l'unité sur sa face avant. Positionnez le panneau arrière tel
que montré. Alignez-le bien droit avec les côtés extérieurs. Attachez le panneau arrière aux pattes arrière
(K&L) avec des vis (10) mais ne les serrez pas. Alignez le bord du bas du panneau arrière avec le bord
inférieur du bas et clouez directement dans les bords arrière du haut (E) et bas (F). Maintenant, serrez les
vis (10).
Faites une encoche dans le panneau arrière pour le support de sécurité situé ici.
Assurez-vous que l'unité soit d'équerre.
La distance d'un coin à un autre doit être égale tel que montré.
Assurez-vous que le panneau arrière est aligné avec le bord inférieur du bas.
Page 24
Pour la maçonnerie, le béton et tout autre matériau mural :
Consultez votre quincaillerie locale pour les chevilles appropriées pour attacher en sécurité le support de
sécurité.
IMPORTANT : CE MEUBLE DOIT ÊTRE BIEN ATTACHÉ AU MUR POUR PRÉVENIR LE BASCULEMENT. SUIVEZ
CES INSTRUCTIONS POUR INSTALLER LE SUPPORT DE SÉCURITÉ ANTI-BASCULEMENT FOURNI AVEC CE
PRODUIT.
OPTION 1 : Fixation à un montant de mur (méthode privilégiée)
En utilisant un détecteur de montant, localisez le montant dans le mur. Placez votre meuble contre le
mur, avec le support de sécurité aligné sur cet emplacement. Pour faire entrer la vis plus facilement, vous
pouvez percer un trou pilote de 1/8 po de diamètre (3 mm) à travers le support de sécurité dans le
montant. Enfoncez la vis à travers le montant de sécurité dans le montant de mur. Serrez la vis qui n'était
pas complètement serrée à l'étape 12.
ameriwoodhome.com
34
Page 35

Français
OPTION 2 : Fixation à un mur de plâtre
Placez votre meuble à l'endroit désiré contre un mur et marquez le mur à travers le support de
sécurité, puis déplacez votre unité. Faites un trou de 3/16 po de diamètre (5 mm) dans la plaque de
plâtre. Taper sur la cheville de mur pour qu'elle soit alignée. Mettez votre unité en place et fixez le
support de fixation à la cheville de mur avec la vis. Serrez la vis qui n'était pas complètement serrée à
l'étape 12.
Page 28
CHARGES MAXIMALES
Ce meuble a été conçu pour supporter les charges maximales indiquées. En excédant ces limites de
charge, le meuble pourrait devenir instable, s'effondrer, et/ou causer des blessures graves.
AVERTISSEMENT : Risque de blessure corporelle - ne pas placer une télévision sur ce meuble. Ce
meuble n'est pas approuvé pour une utilisation avec une télévision.
Page 29
Enregistrez votre produit pour recevoir les éléments suivantes:
* Détails sur les nouvelles tendances - un aperçu sur les nouveautés
* Sondages - avoir une voix au sein de notre communauté
* Offres exclusives et codes promo
* Service de pièces de rechange rapide et facile
Pour enregistrer votre produit, visitez ameriwoodhome.com
5 Étoiles
Visitez le site Web de votre détaillant local, évaluez votre produit
acheté et laissez-nous quelques commentaires !
Nous tenons à offrir un grand "Merci" à tous nos clients pour avoir pris le temps d'assembler ce
produit "Ameriwood Home", et de nous donner vos commentaires précieux.
Merci
ameriwoodhome.com
35
 Loading...