

Page 1
Installation Guide
Pleasego to our website for product cleaning tips.Go to the selection.
ToolsRequired: Flathead screwdriver, Phillips screwdriver,pliers, wire cutters, wire strippers,electrical tape, safety glasses.
LightSource:
FixtureHangingHeight:
EstimatedAssembly Time:
Preparation:
present.If any parts are missingor damaged, do not attemptto assemble, install, or operate the fixture. Missing Parts? Contact youroriginal place of
purchase.
(4)A19 Medium BaseBulb 100W Maximum, bulb notincluded.
MinimumHanging Height is 27.5”, MaximumHanging Height is 63.5”.
30-45minutes
Identifyand inspect all parts beforebeginning installation. Check package contentlist and diagrams below to ensure all parts are
Care+ Maintenance
Warnings and Cautions
Turn off electricity at circuit breaker or main fuse box before installation. Consult a licensed electrician if in doubt.
These instructions are provided for your safety. It is very important you read them completely before installing the fixture. We strongly
recommend that a licensed, professional electrician perform the installation.
Disconnect fixture from power source before replacing bulbs. Make sure bulbs are given sufficient time to cool before removal.
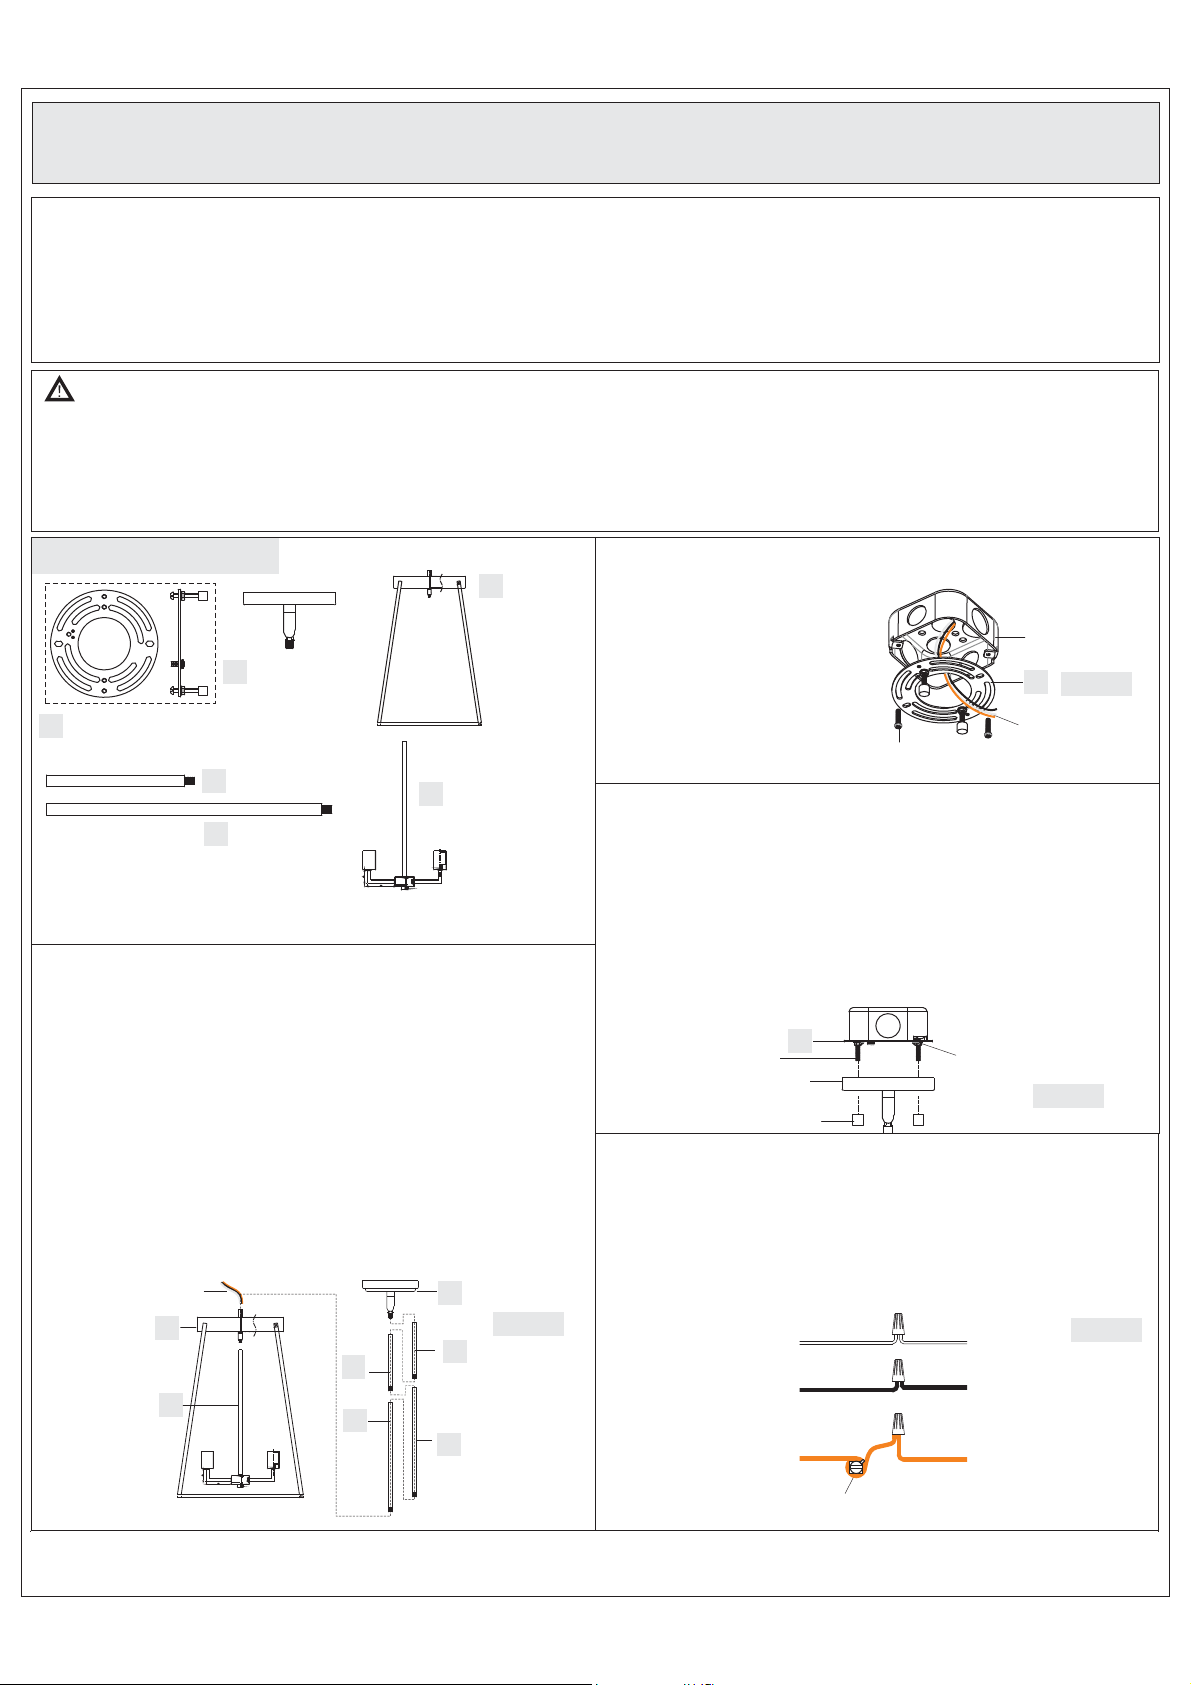
Package Contents
Cage
E
x1
Ceiling Canopy
D
x1
Crossbar Assembly
A
x1
6” Rod
B
x2
12” Rod
C
x2
STEP 1 - Install Ceiling Canopy, Rods and Fixture Body together
a. Thread the cage (E) and the socket assembly (F) together as shown,
Hand tighten until snug.
b. Determine the Rods (B/C) to be assembled to the Fixture Body
according to your hanging height.
c. Pass the supply wires and ground wire through the chosen rods
(B/C) and the Ceiling Canopy (D). Thread the Fixture Body, the
chosen Rods (B/C) and the Ceiling Canopy (D) together. Hand
tighten until snug.
Suggested rods for Ceiling height :
8’ ceiling : use (1) 6” rods
9’ ceiling : use (1) 6” rods and (1) 12” rods
10’ ceiling : use (1) 6” rods and (2) 12” rods
Supply Wires
and Ground Wire
E
B
F
C
F
Socket assembly
x1
D
Figure 1
B
C
STEP 2 - Installing the
Crossbar Assembly
A. Pass the supply wires from
outlet box through the
Crossbar Assembly (A).
Attach the CrossbarAssembly
(A) to the Outlet Box with the
head of the Green Ground
Screw facing you. Secure the
Crossbar Assembly (A) with
Outlet Box Screws (not
included). Tighten until snug.
STEP 3 Test Fitting Ceiling Canopy to Crossbar Assembly-
A.
Remove mounting balls from the Crossbar Assembly (A). Fit the
Fixture Canopy
mounting balls. Note: The should be snug against
the and the mounting balls. If
ceiling
nipple on the Crossbar Assembly (A) by unscrewing the
preassembled hex nut and lock washer and then screwing the
mounting screws in or out of the crossbar until the correct length is
achieved. Once the Fixture Canopy is secure, remove the mounting
ball and Fixture Canopy and proceed to Step 4.
Mounting Screw
STEP 4 - Wire Connections
Wrap bare or green ground wire around green ground screw on the
A.
crossbar, no less than 2 inches from the end of the wire. Tighten the
green ground screw.
B. Use standard wire connectors (not included) to make all wire
connections. Twist connectors until wires are tightly joined together.
Wrap each connection with approved electrical tape and carefully
stuff all the connected wires into the Outlet Box.
from outlet box
Black wire from
outlet box (or Red)
Bare, or Green
from outlet box
to the
Fixture Canopy
Mounting Ball
White wire
Ground wire
Green Ground Screw
on the Crossbar
Crossbar Assembly (A) and secure with
A
Outlet Box Screws
(not included)
Fixture Canopy
not, adjust the length of the
Hex Nut and
Lock Washer
Outlet Box
A
Supply Wires with
Ground Wire
Figure 3
White wire
from fixture
Black wire
from fixture
Ground wire
from Fixture
Figure 2
Figure 4
1of2
Page 2
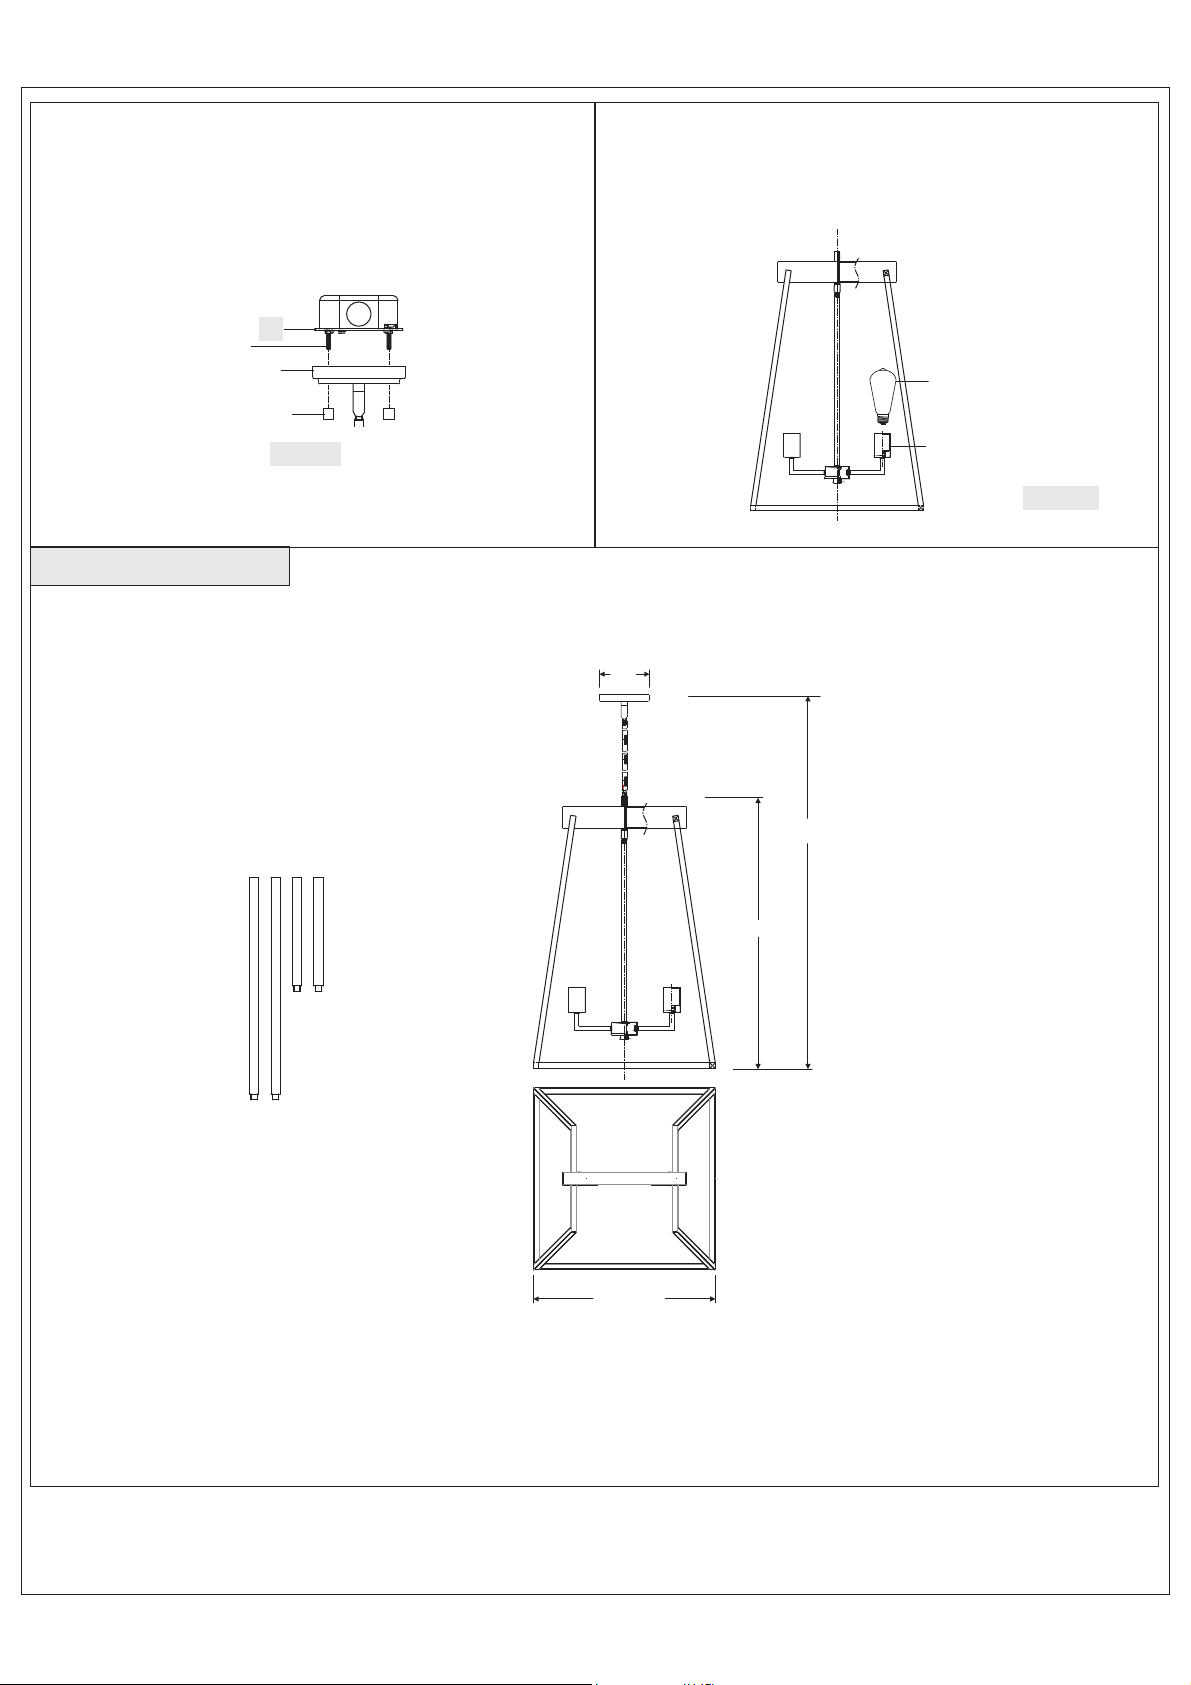
STEP 5 Install the Fixture-
A. Carefully tuck all wires into the outlet box and position the Fixture
Canopy over the outlet box.Align the holes in the ceiling canopy
with the mounting screws, then attach the Fixture Canopy using the
previously removed mounting balls. Hand tighten until snug.
STEP 6 - Install the Bulb
A. Insert the bulb onto socket and screw snugly into place.
Your fixture is now assembled and ready to use. Enjoy!
Mounting Screw
Fixture Canopy
Mounting Ball
FINISH: GREY ASH
A
Figure 5
Vintage Bulb
(recommended
but not included)
Socket
Figure 6
5” Dia.
63.5”
17”SQ.
25”
NOTE: ALL DIMENSIONS ARE ROUNDED
UP TO THE NEAREST 1/4"
2of2
 Loading...