

Page 1

Page i
Wireless LAN Card
User’s Guide
Page 2

FCC Information
This device complies with Part 15 of the FCC Rules. Operation is subject to
the following two conditions: (1) this device may not cause harmful
interference, and (2) this device must accept any interference received;
including interference that may cause undesired operation.
Federal Communications Commission (FCC) Statement
This Equipment has been tested and found to comply with the limits for a Class B digital
device, pursuant to Part 15 of the FCC rules. These limits are designed to provide
reasonable protection against harmful interference in a residential installation. This
equipment generates, uses and can radiate radio frequency energy and, if not installed and
used in accordance with the instructions, may cause harmful interference to radio
communications. However, there is no guarantee that interference will not occur in a
particular installation. If this equipment does cause harmful interference to radio or television
reception, which can be determined by turning the equipment off and on, the user is
encouraged to try to correct the interference by one or more of the following measures:
Reorient or relocate the receiving antenna.
Increase the separation between the equipment and receiver.
Connect the equipment into an outlet on a circuit different from that to which the
receiver is connected.
Consult the dealer or an experienced radio/TV technician for help.
FCC RF Radiation Exposure Statement:
1. This Transmitter must not be co-located or operating in conjunction with any other antenna or
transmitter.
2. This equipment complies with FCC RF radiation exposure limits set forth for an uncontrolled
environment. This equipment should be installed and operated with a minimum distance of 20
centimeters between the radiator and your body.
Page 3

Contents
Congratulations...................................................................................................1
Unpacking Package Contents......................................................................... 2
Checking System Requirements....................................................................3
Understanding..................................................................................................... 4
Setting Up the Wireless LAN Card for use with a Pocket PC .................. 6
Install ActiveSync ........................................................................................6
Establish a Connection................................................................................7
Install the Driver and Setup Utility ................................................................8
Install the Wireless LAN Card.......................................................................9
Assign an IP Address ..................................................................................9
Synchronize Connections ..........................................................................11
Reset the Pocket PC .................................................................................11
Removing the Wireless LAN Card ..............................................................11
Next Steps ................................................................................................11
Configuring the Wireless LAN Card for use with the Pocket PC ..........12
Status .......................................................................................................14
Configuration.............................................................................................16
Link...........................................................................................................18
Security.....................................................................................................19
About........................................................................................................21
Setting Up the Wireless LAN Card for use with Windows......................23
Installing the Wireless LAN Card ................................................................24
Removing the Wireless LAN Card ..............................................................25
Set up for Windows XP..............................................................................26
Set up for Windows 2000 ..........................................................................30
Set up for Windows NT 4.0........................................................................31
Set up for Windows 98/ME ........................................................................33
Configuring the Wireless LAN Card for use with Windows ...................35
The Wireless LAN Utility Icon .....................................................................35
Using the Wireless LAN Utility ....................................................................36
Configuration.............................................................................................38
Link Test ...................................................................................................49
AP Browser ...............................................................................................51
Site Survey................................................................................................52
About........................................................................................................52
Technical Support ............................................................................................53
Limited Warranty..............................................................................................54
Page 4

Page 5

Congratulations
Congratulations on your purchase of SanDisk’s low power Wireless LAN
(Local Area Network) Card. The Wireless LAN Card makes it possible for
PDA’s and laptop computers to establish a high-speed wireless Internet
connection to remote network information by the use of access points. The
access points of a wireless network are connected to a host computer with
Network or Internet Access.
Installing the SanDisk Wireless LAN card in your PDA or laptop computer
gives you the freedom to browse the web, check email, or transfer files and
information to or from remote network information without being physically
connected.
Access Point Locations
Access points can be located in office buildings, home offices, hospitals,
universities, hotels, airports, conference centers and coffee shops. Other
unique environments where access points might be set up so that mobile
workers can access network information include:
Buildings where wiring is difficult to install
Evolving workplace situations like manufacturing areas or retail stores
Trade shows, exhibition and construction sites that require a
temporary network
Businesses that require additional network access during peak periods
or need a quick installation of a small computer network
Features of the Wireless LAN Card
Plug and Play usage. Easy to install and set up.
IEEE 802.11b compatible (See UNDERSTANDING)
Low power consumption with advanced power management utilities to
optimize power and performance
Easy to use diagnostic tools
Working range up to 800 ft. in an open environment
Supports 11, 5.5, 2 and 1 Mbps data rate to provide optimal throughput
and range for connectivity
64bit and 128bit WEP encryption capable (See UNDERSTANDING)
Page 6

Unpacking Package Contents
Unpack the product box and make certain it contains the following items:
Wireless LAN Card
Wireless LAN Card Product CD
Wireless LAN Card User’s Guide
CompactFlash®/PCMCIA Adapter (optional)
If an item is missing or damaged, please contact SanDisk:
Visit: http/www.sandisk.com/
Email – go to: http://www.sandisk.com/tech/s_central.asp
and enter information
Phone: 1.866.SAN.DISK (1.866.726.3475)
5 Days a week: 7:00 a.m. - 4:00 p.m. PST
Page 7

Checking System Requirements
The Wireless LAN Card supports WinCE for Pocket PC, Pocket PC 2002, and
Windows 95/98/ME/NT/2000/XP operating systems
Before you install the Wireless LAN Card, take a few minutes to make sure
that your computer or Pocket PC is equipped with the right system
requirements.
Pocket PC (PPC) and Handheld PC (HPC)
Pocket PC, Pocket PC 2002, HPC 2000 or Handheld PC Pro
with Windows CE v2.11 or greater
Windows XP/2000/NT/98/ME
PCMCIA Type 1 slot
PCMCIA card and socket services compliant with revision 2.10 of the
PCMCIA specification (or higher)
Windows 98/ME/NT/2000/XP installation CD-ROM or diskettes
Minimum 500 Kbytes free disk space for installing the driver
and utility program
Page 8

Understanding
802.11b
IEEE 802.11b is a wireless networking standard created by the Institute of
Electrical and Electronics Engineers (IEEE).
Add-Hoc Mode
Ad-Hoc mode allows wireless devices to communicate directly with each other,
eliminating the need for an access point or any connection to a wired network.
Ad-Hoc mode is also called peer-to-peer mode or independent Basic Service
Set (IBSS). See INFRASTRUCTURE MODE.
BSS
When an access point is connected to a wired network and a set of wireless
devices, it is referred to as a Basic Service Set (BSS). An Extended Service Set
(ESS) is a set of two or more BSS that form a single sub network. See ESS ID.
DHCP
Dynamic Host Configuration Protocol (DHCP) is a procedure that computers on
a network follow to identify each other and make sure that information is
transferred correctly.
ESS ID
The ESS ID (Extended Service Set ID) is an identification assigned to the
access point the Wireless LAN Card connects to. Wireless devices connecting
to an access point must use the same ESS ID. The ESS ID can be up to 32
characters and is case sensitive. See BSS ID.
Infrastructure Mode
In infrastructure mode, the wireless network consists of at least one access
point connected to the wired network infrastructure and a set of wireless end
stations. See Ad-Hoc mode.
Page 9

IP Address
Computers and other networking devices on a network are assigned an
identifying number using the Internet Protocol (IP Address).
MAC Address
(Media Access Control) address, a hardware address that uniquely identifies
an access point (or the Wireless LAN card).
WEP Encryption
WEP (Wired Equivalent Privacy) is a security protocol for wireless local area
networks (WLANs) defined in the 802.11b standard. WEP is designed to
provide the same level of security as that of a wired LAN.
Page 10

Page 6
Setting Up the Wireless LAN Card
for use with a Pocket PC
There are six steps to setting up the Wireless LAN Card for use with the
Pocket PC 2002 / Win CE 3.0.
1. Install the ActiveSync program from the CD-ROM that came with the
Pocket PC.
If ActiveSync is already installed this step can be skipped.
2. Establish a connection between the host computer and the Pocket PC.
3. Install the driver and Setup utility on the host computer.
4. Install the Wireless LAN Card into the CompactFlash® slot of your
Pocket PC (automatically installs the driver and Setup utility on the
Pocket PC.)
5. Assign an IP address to the Wireless LAN Card.
6. Reset the Pocket PC.
Install ActiveSync
1. Locate the CD-ROM that came with your Pocket PC.
2. Insert the CD into the CD-ROM drive of your computer and install the
Microsoft ActiveSync program.
Page 11
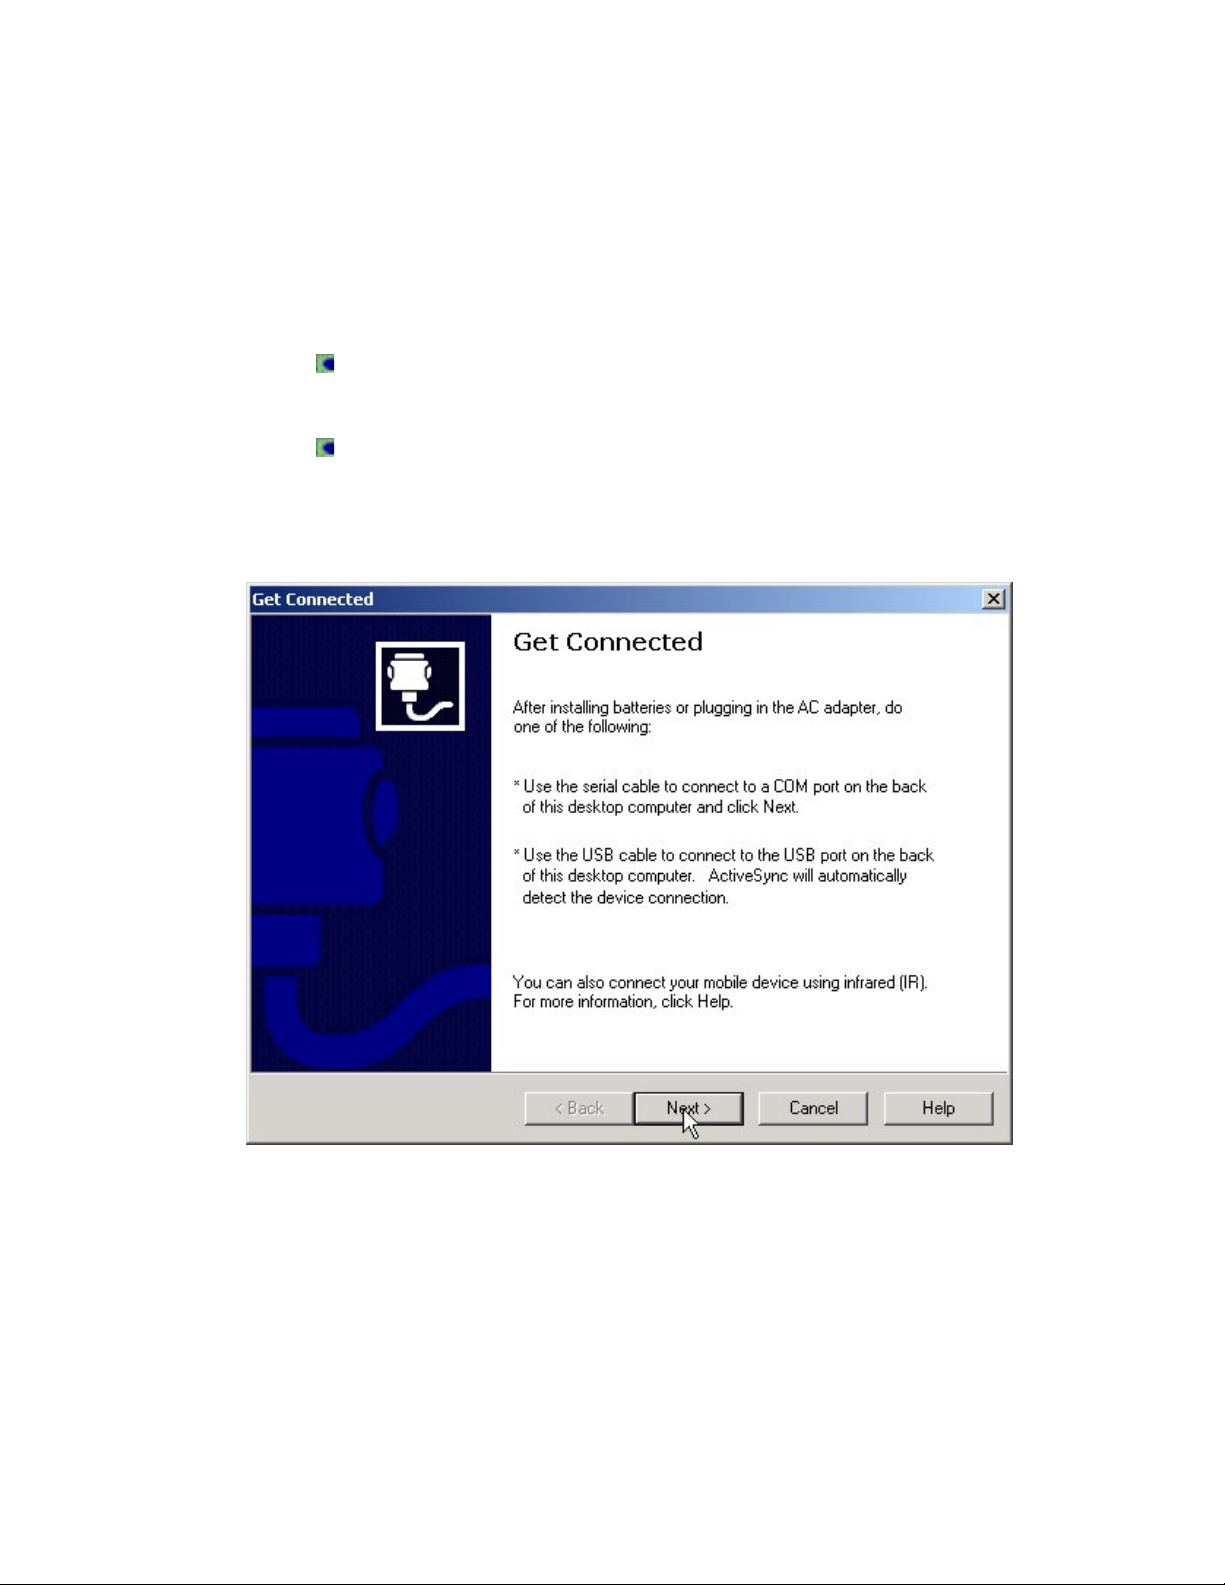
Establish a Connection
1. When the installation of ActiveSync is complete, establish an ActiveSync
connection between your computer and your Pocket PC using a serial
or USB cable. You can also establish a connection using an infrared
link.
When the connection has been established, a Connected message
will appear in the ActiveSync window.
For additional information about connecting your computer and
Pocket PC, refer to the Pocket PC instruction guide.
2. When prompted, click Finish to close the ActiveSync window.
Page 12

Install the Driver and Setup Utility
1. Locate the CD-ROM that came with the Wireless LAN card.
2. Insert the CD into the CD-ROM drive of your computer. The InstallShield
Wizard automatically opens and extracts the files needed to install the
Wireless LAN card utilities on your computer.
3. To continue, click Next.
4. When prompted to install the Wireless LAN Card driver and utility,
click YES.
The driver and setup utility will only work on the Wireless LAN Card
and Wireless LAN PCMCIA Card.
Driver and Utility Versions
The CD-ROM included with the Wireless LAN Card for CE Windows includes
the following driver and utility programs:
Driver Version 1.1.0 and above
Utility Version 1.1.0 and above
Updated versions of drivers and utilities can be downloaded from the SanDisk
web site www.sandisk.com/connect
For Technical Support:
Visit: http/www.sandisk.com/
Email – go to: http://www.sandisk.com/tech/s_central.asp
and enter information
Phone: 1.866.SAN.DISK (1.866.726.3475)
5 Days a week: 7:00 a.m. - 4:00 p.m. PST
Page 13

Install the Wireless LAN Card
Insert the Wireless LAN Card into the CompactFlash® slot of your Pocket PC.
The Pocket PC will automatically detect the card and install the correct driver
and utility.
The Wireless LAN Card has a green LED indicator.
When the LED is steady green, the Wireless LAN Card has successfully
connected to an access point or to computer that is not connected to a
wired network (Ad-Hoc mode).
When the LED is blinking the Wireless LAN Card is not connected to an
access point or the Power Save mode has been enabled.
Assign an IP Address
On the Start window of the Pocket PC you set the Wireless LAN Card to
automatically obtain an IP address from your DHCP server. The Internet
Protocol (IP Address) is an identifying number assigned to all network devices.
The default setting is Use server-assigned IP address. To use a specific IP
address, refer to CONFIGURING THE WIRELESS LAN CARD FOR USE WITH
THE POCKET PC.
When an IP address has been
detected, the Wireless LAN Card will
look for an access point. The green LED
on the card will blink until an access
point is located. Once the Wireless LAN
Card locates an access point, the green
LED will remain steady.
Page 14

Page 15

Synchronize Connections
The Pocket PC and Wireless LAN Card must be set to connect to the Internet
using the same settings:
1. In the Start menu, tap Settings.
2. Tap the Connections tab at the bottom of the display.
3. Tap Connections icon.
4. The setting for When needed, automatically… and the setting for My
network card… should be set to the same Internet settings.
Reset the Pocket PC
To complete the set up, reset your Pocket PC.
Removing the Wireless LAN Card
If you do not need the connectivity of your Wireless LAN Card, it is
recommended that you remove the card from the Pocket PC to extend the life
of the battery.
When removing the Wireless LAN Card, you will lose your connection to
the network. Prior to removing the card, make sure you have closed all
files and network applications.
Next Steps
The Wireless LAN Card is now ready to use. The default settings for the card
function for a typical Infrastructure wireless LAN. In infrastructure mode, the
wireless network consists of at least one access point connected to the wired
network infrastructure and a set of wireless end stations
If you want to modify the configuration of the Wireless LAN Card so that you
have more control of your wireless network, see CONFIGURING THE WIRELESS
LAN CARD FOR USE WITH THE POCKET PC.
Page 16

Configuring the Wireless LAN Card for use
with the Pocket PC
To modify, check or monitor the configuration of the Wireless LAN Card you
use the Wireless LAN Settings utility.
On the Pocket PC’s Task bar, tap the Wireless LAN Setting icon.
The Wireless LAN utility has five tabs:
Status
Configuration
Link
Security
About
Selecting a tab opens a page of settings that you can change to customize
your wireless network.
Page 17

Page 18

Status
The Status tab displays the current status of the Wireless LAN Card.
Adapter–Name of the card
Firmware–Firmware version of card.
Channel–Channel the card is using to communicate with the access point.
Domain–Radio Frequency regulation the card conforms to.
TX Rate–Transmission data rate
MAC Address–A hardware identification number that distinguishes the unit
from others.
Sync to AP–The Extended Service Set ID (ESSID) of the access point the card
connects to.
BSSID (Basic Service Set ID)–The unique ID of the access point the card
connects to.
Link Quality–Monitors the quality of the data transmission between the card
and an access point.
Page 19

Signal Level–Indicates the radio signal transmission strength from the
Wireless LAN Card to an associated access point.
Page 20

Configuration
The Configuration tab includes fields for viewing and changing the current
parameters of the Wireless LAN Card. After making changes to the
Configuration settings, tap Apply to finish.
Enter a Specific ESSID for the access point you want to connect to. This
prevents your Pocket PC from inadvertently connecting to other wireless
networks. Up to 32 characters (case sensitive) can be entered for the ESSID.
Network Type
Tap Infrastructure to access the Internet or a corporate network
through an access point.
Tap Ad-Hoc to connect to other wireless devices without an access
point. In Ad-Hoc mode, all wireless devices must be set to the same
Channel.
Tap 801.11 Ad-Hoc to connect to other wireless devices without an
access point using a virtual ESS ID. In 802.11 Ad-Hoc mode, all
ESSID
The ESSID (Extended Service Set ID)
is an identification assigned to the
access point the card connects to.
Pocket PC’s and other wireless
devices connecting to an access
point must use the same ESSID.
When Auto Detect is selected, the
Wireless LAN card can connect to
any working access point.
Page 21

wireless devices must specify the same ESS ID to connect to.
Power Saving Mode
Tap Enable to conserve the battery life of your Pocket PC. When the Power
Saving Mode is enabled, the Wireless LAN Card enters sleep mode to
minimize power consumption when possible (sleep mode may not be entered
immediately). Access points you connect to must also support power saving
when Enable is selected.
Tap Disable to turn off Power Saving Mode.
TX Rate
There are six transmission rate (TX Rate) settings:
Auto
1 Mbps (megabits per second)
2 Mbps
1M/2Mbps
5.5 Mbps
11 Mbps
The default setting for the transmission data rate is Auto. In Auto setting, the
Wireless LAN Card operates at the maximum data rate by automatically
finding the highest possible signal from an access point. When the
transmission signal from an access point weakens or drops, the Wireless
LAN Card automatically switches to a lower transmission rate to maintain a
reliable transmission. When the signal improves, the Wireless LAN Card
increases the transmission data rate to the highest signal available.
In most networking situations, the Auto setting is the most efficient
transmission rate. You can set a lower transmission rate to save power on the
Pocket PC. Higher transmission rates will use more power.
Page 22

Link
The Link tab includes fields for checking the point-to-point data transmission
between Pocket PCs or between a Pocket PC and an access point.
3. Select a Packet Size. The packet size is the amount of the test data that the
card sends to the device being tested.
4. Tap Start to begin the test.
5. Tap Stop to end the test.
Test Result
The Test Result area displays the IP Address of your Pocket PC, the number
of packets sent and received, and the elapsed time of the test.
Link Message
The Link Message area displays the results of the test. The reply from a
wireless device or access point associated with the IP address entered in the
Ping Command area is listed.
Ping Command
The Ping Command enables you to
check whether another wireless device
or access point is available.
1. Enter the IP address of a wireless
device or access point.
2. Select a Timeout period. The Timeout
period is time (in milliseconds) that
the card waits for an answer from the
host being tested. If the timeout is set
to 1000 milliseconds and the card
does not receive a response back
within that time, the device is
determined to be unreachable.
Page 23

Security
The Security tab includes fields for enabling secure data encryption so that
unauthorized wireless devices are prohibited from accessing data that is sent
to or from your Pocket PC over the network. This type of encryption is known as
WEP (Wired Equivalent Privacy). WEP provides security by encrypting data
over radio waves so that it is protected as it is transmitted from one point to
another.
WEP Key Type
To read an encrypted file, you must have access to a secret key or password
that enables you to decrypt it. The WEP Key Type setting allows you to create a
key or password using a pass phrase, character, or hexadecimal value.
To create encryption keys automatically:
1. Tap the WEP Key Type menu to pull down the key type list.
2. Tap PassPhrase and tap a character string in the Key in… field.
The four Key Settings are automatically generated.
3. Tap OK.
Encryption (WEP)
WEP Key Length
The higher level of data encryption (128-
bit) is more difficult to encrypt and
decrypt, but high levels of encryption will
reduce the performance of a wireless
network.
Tap 40-bit or 128-bit.
The Pocket PC must use the same level
of encryption as the access point
Page 24

Key Setting
1. Select one key from the four Key Settings.
2. Tap Apply to assign the key setting.
To create encryption keys manually:
1. Tap the WEP Key Type menu to pull down the key type list.
2. Tap Char or Hex.
3. In the Key in… field, tap in a character or hexadecimal string in the field.
4. Tap OK.
5. Select one key from the four Key Settings.
6. Tap Apply to assign the key setting.
Character and Hexadecimal Ranges for 40-bit Encryption
5 characters in the range of A-Z, a-z, and 0-9
for example: MyKey
10 digit hexadecimal values in the range of A-F, a-f, and 0-9.
for example: 11AA22BB33.
Character and Hexadecimal Ranges for 128-bit Encryption
13 characters in the range of A-Z, a-z, and 0-9
for example: MyKey12345678
26 digit hexadecimal values in the range of A-F, a-f, and 0-9.
for example: 11AA22BB33CAT456FENCE92647.
Authentication Type
The Authentication Type can be set to Open System or Shared Key.
The default Authentication Type is Open System. Open system
indicates no encryption.
When the Authentication Type is set to Shared Key, WEP keys must be
used. The Pocket PC and the access point must use the same WEP
encryption key for Shared Key encryption.
Page 25
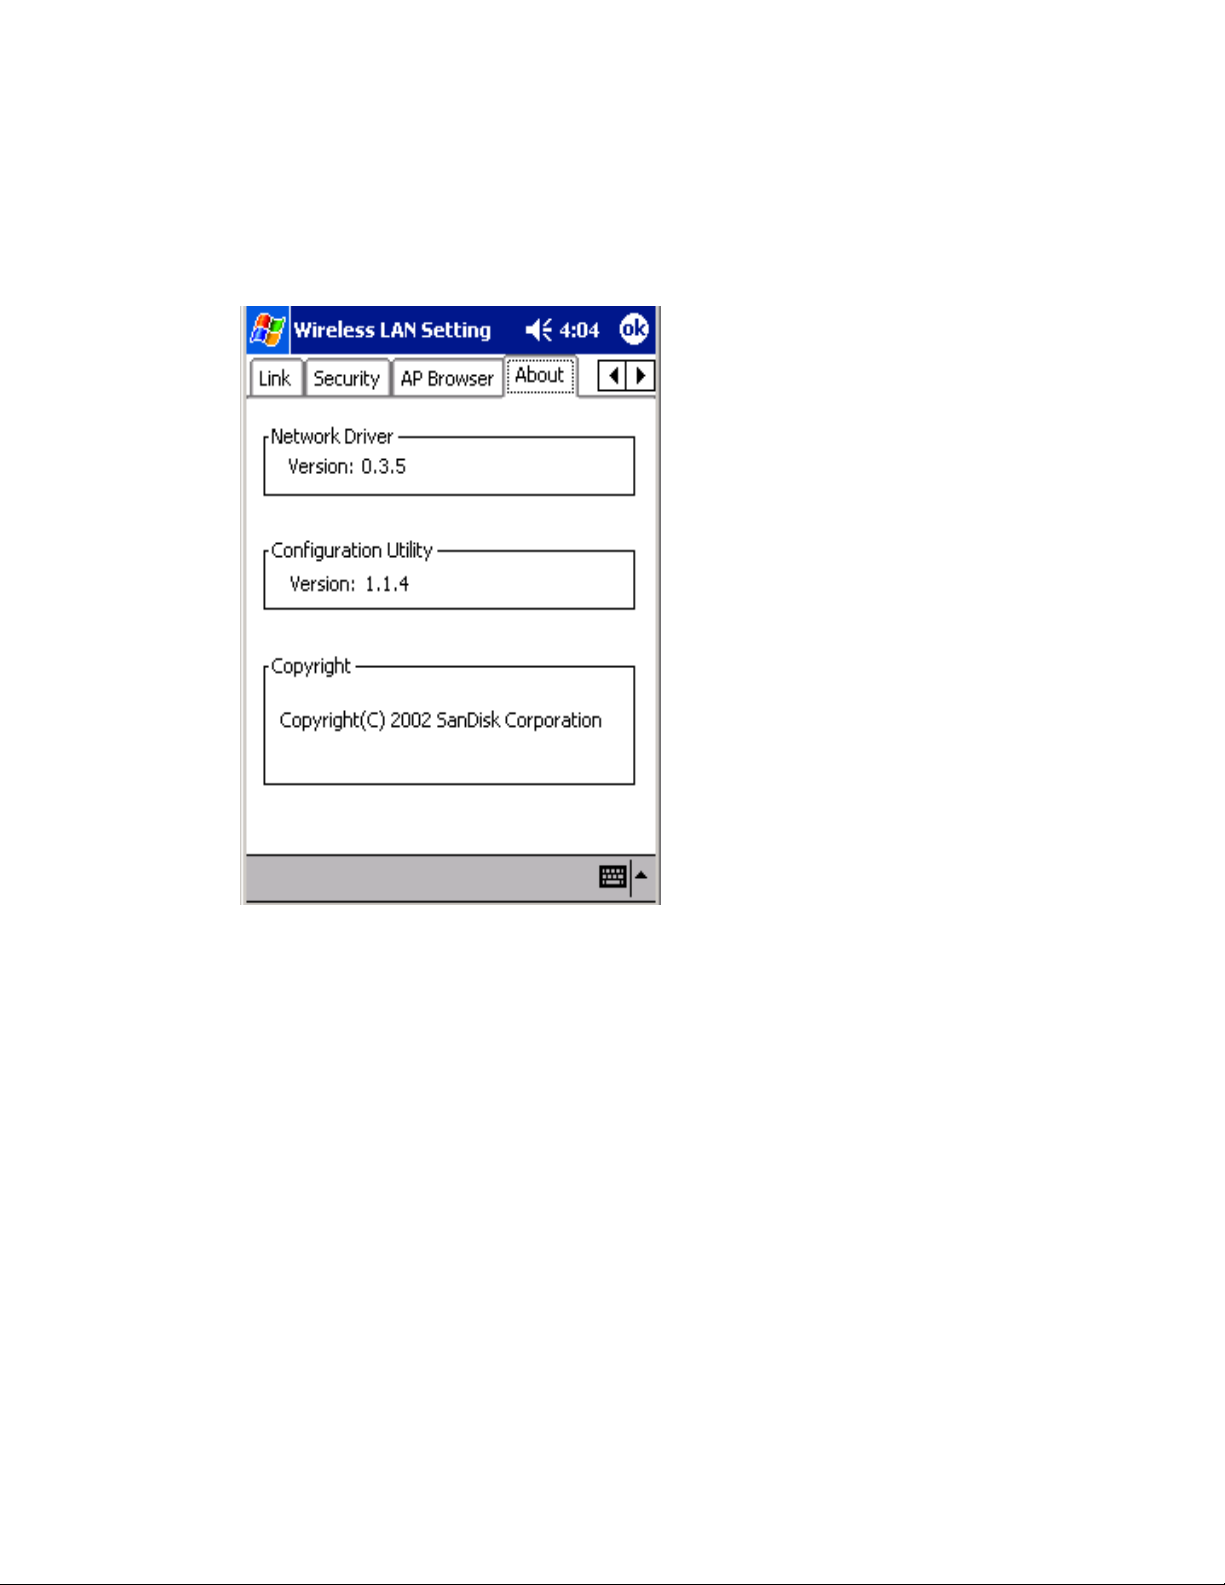
About
The About tab displays the version number of the Network Driver and
Configuration Utility.
Page 26

Page 27

Setting Up the Wireless LAN Card
for use with Windows
There are four steps to setting up the Wireless LAN Card for use with
Windows XP/2000/NT/98/ME operating systems.
1. Insert the Wireless LAN Card product CD in your computer.
2. Select the Setup Utility and follow the installation instructions on the
screen. Leave the product CD in the computer.
3. Insert the Wireless LAN Card in your computer.
4. Exit the Setup utility.
Since each operating system functions slightly in a different way, setup
instructions are independently described for:
1. Installing the driver for the card.
2. Confirming the card is working.
3. Choosing a wireless network.
Before setting up the Wireless LAN Card, locate the Windows
installation CD-ROM for your operating system. During the setup
process you may need files from the installation CD.
Driver and Utility Versions
The CD-ROM included with the Wireless LAN Card for Windows
XP/2000/NT/98/ME operating systems includes the following driver and utility
programs:
Driver Version 4.0.7
Utility Version 4.0.7
Updated versions of drivers and utilities can be downloaded from the SanDisk
web site www.sandisk.com/connect
Page 28
Installing the Wireless LAN Card
If your computer is equipped with a CompactFlash® Type 1 slot, insert the
Wireless LAN card into the slot.
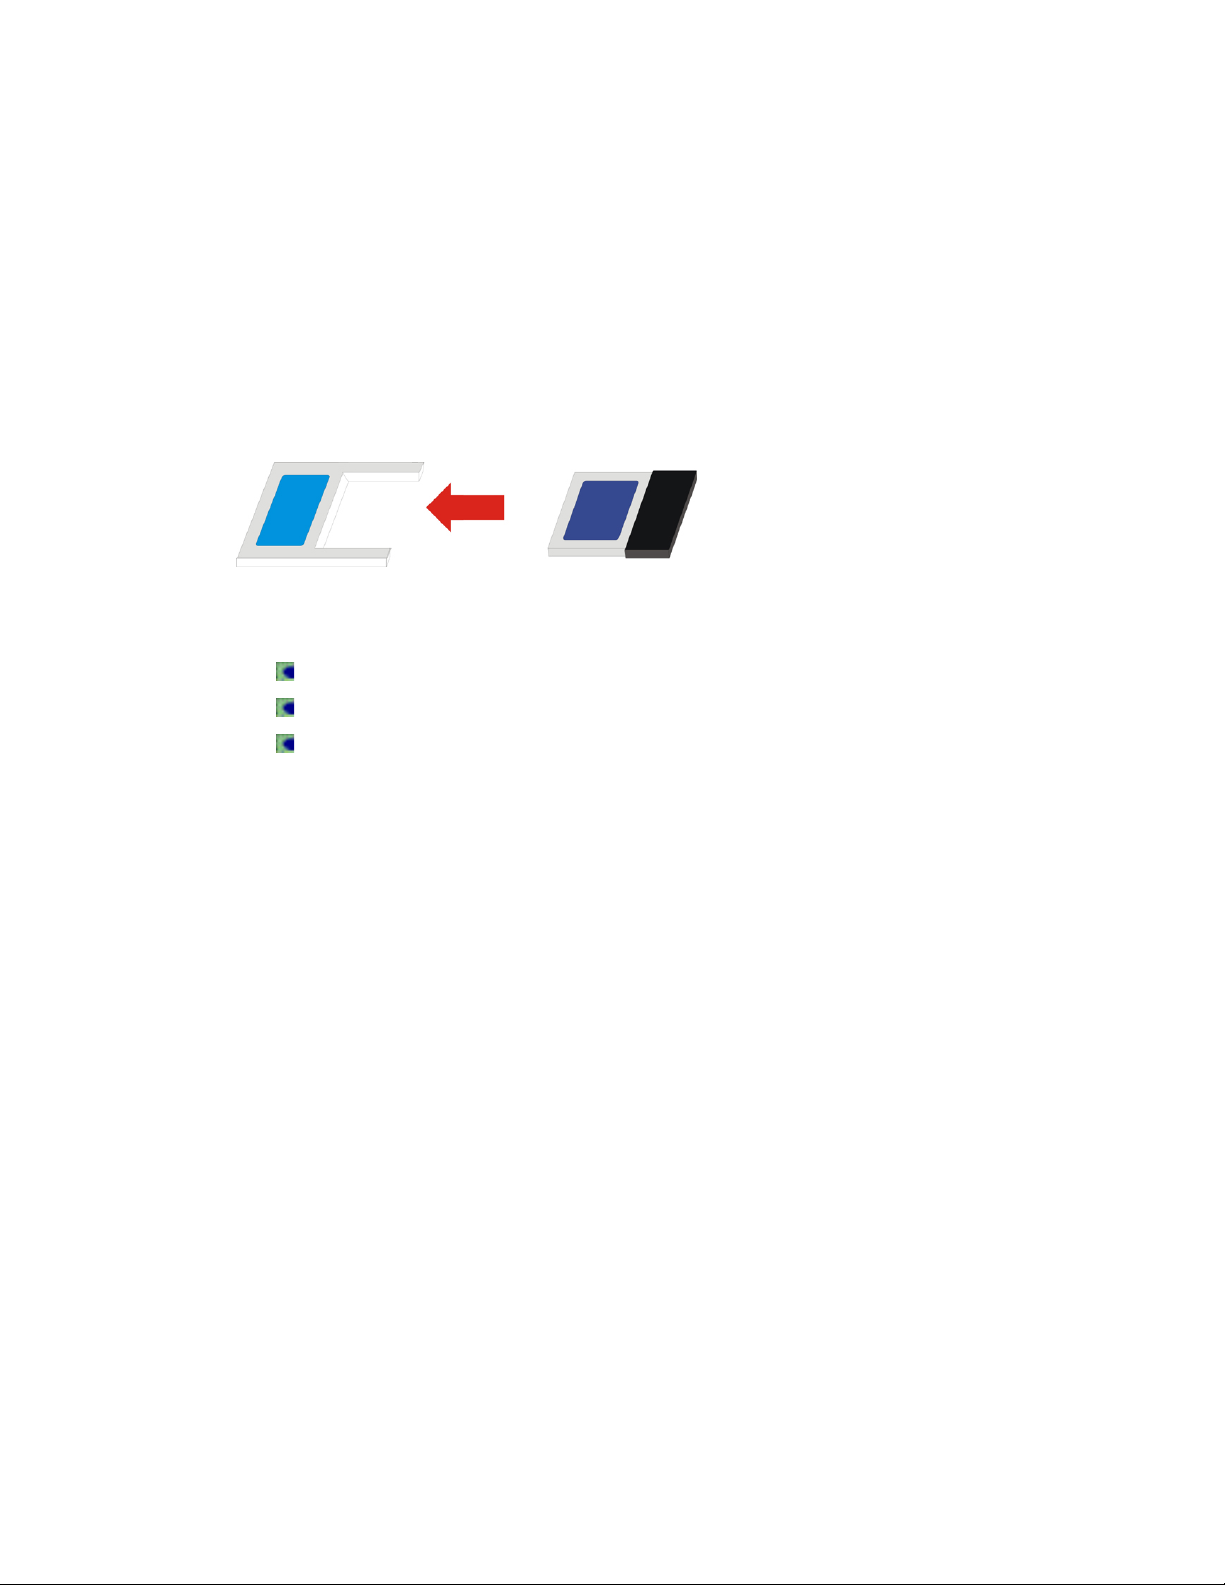
If your computer has a PCMCIA slot, you need to use the
CompactFlash®/PCMCIA adapter that is included with the Wireless LAN Card:
1. Insert the Wireless LAN card into the CompactFlash®/PCMCIA adapter.
2. Insert the adapter with the card into the PCMCIA slot of your computer
PCMCIA Adapter CompactFlash® Card
Do not force the adapter into the slot.
If the adapter does not insert easily, remove it and then reinsert.
Forcing the adapter into the computer will damage both the adapter and
the PCMCIA slot.
A Caution About Voltage
The Wireless LAN Card supports 3.3V. If your computer does not support 3.3V,
use of the Wireless LAN Card might cause damage to the PCMCIA slot.
Page 29

Disabling and Removing the Wireless LAN Card
If you do not need the connectivity of your Wireless LAN Card, it is
recommended that you disable and remove the card from the computer to
preserve battery life:
When removing the Wireless LAN Card, you will lose your connection to
the network. Prior to removing the card, make sure you have closed all
files and network applications.
Remove the Wireless LAN Card
To safely remove the Wireless LAN Card:
1. Click once on the Remove Hardware icon in the Windows task bar.
2. Select Stop Wireless LAN Card. This message may vary depending on
your operating system. For Windows XP, the message is Safely
Remove Wireless LAN Card.
3. When the system displays a message indicating you can safely remove
the card, click OK and then remove the Wireless LAN Card from your
computer.
Page 30

Set up for Windows XP
There are three steps to setting up the Wireless LAN Card for use with the
Windows XP operating system.
1. Install the driver.
2. Confirm the card is working.
3. Choose a wireless network.
Install the Driver
When the Wireless LAN Card is inserted into the PCMCIA slot of the computer,
Windows automatically installs the driver for the Wireless LAN Card.
If a window opens with an error message about Windows Logo Testing,
click Continue Anyway.
Confirm the Card is Working
1. On the desktop, right click on My Computer, then select Properties
2. Click the Hardware tab.
3. Under Device Manager, click the Device Manager button.
4. Locate the Network adapters category.
5. Click the plus sign to open the list of installed network adapters.
6. The list should contain the Wireless LAN Card entry. If there isn’t an
error icon next to the entry, the card is working.
Page 31

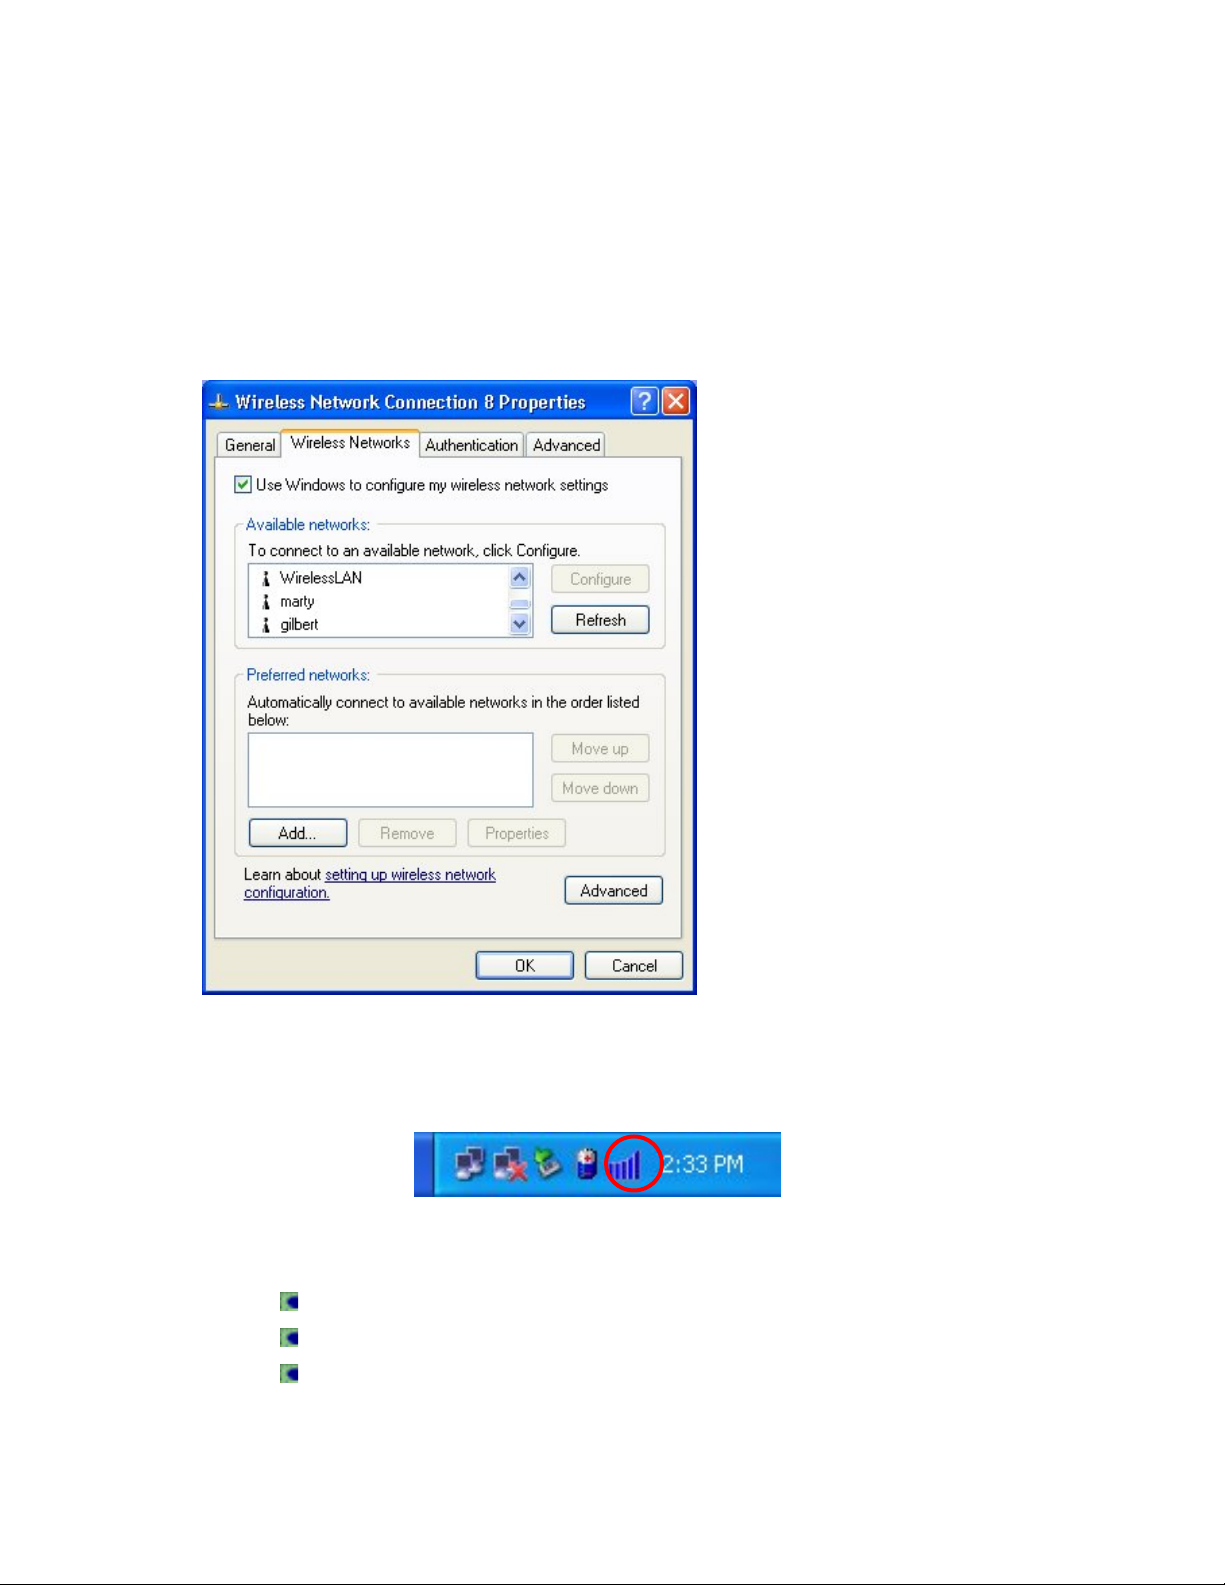
Choose a Wireless Network
After installing the Wireless LAN Card, the task bar displays a Wireless
Network Connection icon and a message about network availability.
1. Click on the Wireless Network Connection icon in the task bar to see a
list of available network access points.
2. Select a network access point from the list of available networks, and
then click Connect.
3. If you have difficulty making a connection to the wireless network that
you selected, click Advanced and then configure the settings in the
Wireless Networks tab
Refer to the Windows XP documentation for help with configuring
options on the Wireless Networks Tab.
Page 32

Page 33

Network Connection Not Found
If the Local Area Network icon on the task bar has an X through it, it means that
a network connection cannot be found.
1. Click on the Wireless Network Connection icon in the task bar to see a
list of available network access points.
2. If an access point shows in list of available networks, select it and then
click Connect.
3. If no access points are listed, click the Advanced button and then click
Refresh to scan for an access point. If no access point appears, then
there is a problem with the wireless network connection.
4. Select an access point in the list of Available Networks.
5. Click Configure. The Wireless Network Properties dialog opens. There
are no options that require setting in this window.
6. Click OK.
Wireless LAN Card Setup Utility
The setup utility that comes with the Wireless LAN Card provides additional
tools for configuring and monitoring the Wireless LAN Card connection. See
CONFIGURING THE WIRELESS LAN CARD FOR WINDOWS.
Page 34

Set up for Windows 2000
There are two steps to setting up the Wireless LAN Card for use with the
Windows 2000 operating system.
1. Install the driver from the New Hardware Wizard.
2. Confirm the card is working.
Install the Driver and Setup Utility
When the Wireless LAN Card is inserted into the PCMCIA slot, Windows auto-
detects the card and opens the Found New Hardware Wizard. The wizard
guides you through the installation of the device driver for the Wireless LAN
Card.
1. On the wizard’s Welcome screen, click Next to continue.
2. On the Install Hardware Device Drivers screen, select the radio button
for Search for a suitable driver for my device (Recommended).
3. Click Next.
4. Insert the CD-ROM for the Wireless LAN Card into the CD-ROM drive of
the computer.
5. Select the check box for Specify a location.
6. Click Next. When Windows recognizes the card, the Driver Files Search
Results window opens and displays the device and driver names.
7. To install the driver, click Next.
8. When the wizard has completed the installation, click Finish.
Confirm the Card is Working
1. On the Start menu, open the Control Panel, then select System Device
Manager.
2. Locate the Network adapters category.
3. Click the plus sign to open the list of installed network adapters.
4. The list should contain the Wireless LAN Card entry. If there isn’t an
error icon next to the entry, the card is working.
Page 35

Set up for Windows NT 4.0
There are four steps to setting up the Wireless LAN Card for use with the
Windows 2000 operating system.
1. Add a network adapter.
2. Install the driver.
3. Restart Windows.
4. Confirm the card is working.
Add a Network Adapter
1. On the Desktop, open the Control Panel, and then double-click
Network.
2. Go to the Adapters tab and click the Add button.
3. In the list of Network Adapters, select the Wireless LAN Card.
4. Click Have Disk.
Page 36

Install the Driver
1. Insert the CD-ROM for the Wireless LAN Card into the CD-ROM drive of
the computer and click OK.
2. When Windows recognizes the card, the Select OEM Option window
opens. Click OK to install the driver for the card.
Restart Windows
Restart Windows to complete the installation.
Confirm the Card is Working
1. On the Start menu, open the Control Panel, and then double-click
Devices.
2. Locate the Wireless LAN Card entry. The driver is successfully installed
and started when Started appears in the Status column.
Page 37

Set up for Windows 98/ME
There are three steps to setting up the Wireless LAN Card for use with the
Windows 98/ME operating systems.
1. Install the driver from the New Hardware Wizard.
2. Restart Windows.
3. Confirm the card is working.
Install the Driver
When the Wireless LAN Card is inserted into the PCMCIA slot, Windows auto-
detects the card and opens the Add New Hardware Wizard. The wizard
guides you through the installation of the device driver for the Wireless LAN
Card.
1. On the wizard’s Welcome screen, click Next to continue.
2. On the next Add New Hardware screen, select the radio button for
Search for the best driver for your device (Recommended).
3. Click Next.
4. Insert the CD-ROM for the Wireless LAN Card into the CD-ROM drive of
the computer.
5. Select the check box for CD-ROM drive.
6. Click Next. When Windows recognizes the card, the Windows Driver
Search window opens and displays the device name and
driver location.
7. To install the driver, click Next.
8. When the Insert Disk message appears, insert the disk labeled
‘Windows 98 Second Edition or ME CD-ROM’, and then click OK.
9. When the wizard has completed the installation, click Finish.
Page 38

Restart Windows
Restart Windows to complete the installation.
Confirm the Card is Working
1. On the Start menu, open the Control Panel and then select System
Properties.
2. Select the Device Manager tab.
3. Open the Network Adapters category.
4. Locate the Wireless LAN Card entry. If there isn’t an error icon next to
the entry, the card is working.
Page 39
Configuring the Wireless LAN Card
for use with Windows
Before you can use the Wireless LAN Setup utility, you have to disable the
Windows Automatic Wireless Network Configuration.
1. Right click on the Network
Connections icon in the Task
Bar.
2. Select Properties to open the
Wireless Network Connection
window.
3. Select the Wireless Networks
tab.
4. Uncheck the Use Windows to
configure my wireless
network settings check box.
5. Click OK.
The Wireless LAN Utility Icon
The Wireless LAN Utility icon appears in the Task Bar.
The colors of the bars on the Wireless LAN Utility icon represent the strength
of the wireless network connection.
Blue bars indicate a good connection.
Yellow bars indicate a weak but usable connection.
Red bars indicate a very poor or no connection.
Page 40
Using the Wireless LAN Utility
The Wireless LAN Utility is used to make configuration changes, monitor
performance, and perform simple diagnostics for the Wireless LAN Card used
in Windows XP/2000/NT/98/ME operating system environments.
Open the Wireless LAN Utility by clicking on its icon in the Task Bar.
There are five dialog boxes in the Wireless LAN Utility:
Configuration
Used to Change and monitor configuration and settings.
Link Test
Used to test the quality of data transmission for wireless network
devices
AP Browser
Shows information about available access points.
Site Survey
Graphically depicts the radio channel quality.
Page 41

About
Version numbers for Configuration Utility, Network Driver, and Firmware.
Page 42

Configuration
The Configuration dialog window is used to modify the configuration of the
Wireless LAN Card and monitor the quality of the wireless connection.
Open the Wireless LAN Utility by clicking on its icon in the Task Bar.
Adapter Select
In the Adapter Select drop down menu, select the Wireless LAN Card.
Profile
In the Profile field, you can assign a name to a specific network configuration.
For example, the settings for an Ad-Hoc configuration will be different than
those for an Infrastructure setting. If you select Ad-Hoc in the Profile drop down
menu, modify the settings in the Configuration dialog box, and then click Save
Page 43

(next to the Profile drop-down menu), the profile for Ad-Hoc is saved.
By setting up a profile for different configurations, you can easily switch to
another configuration without having to change each option in the
Configuration dialog window. You can modify a profile at any time.
Adding a Profile
1. In the Profile drop down menu, type a name for the profile.
2. Change the appropriate settings in the Configuration dialog window.
3. Select Save.
Changing a Profile
1. Select a profile name in the Profile drop down menu.
2. Change the appropriate settings in the Configuration dialog window.
3. Select Save.
Changing from one Profile to Another
1. Select a profile name in the Profile drop down menu.
2. Select Apply.
OR
1. Right-click on the Wireless LAN Utility in the Task Bar.
2. Select a profile name.
Delete a profile
To delete a profile, select its name in the Profile drop down menu and then
select Delete.
Page 44

Network Type
The Wireless LAN Card can operate in three network environments:
Infrastructure,
For access to the Internet or a corporate network via an access point.
Pesudo Ad-Hoc
For computer-to-computer wireless networks, where wireless stations
connect to each other directly using the same channel without an
access point. (See Ad-Hoc Channel).
802.11 Ad-Hoc (Recommended)
For computer-to-computer wireless networks, where wireless stations
connect to each other directly using the same ESS ID without an access
point. (See ESS ID).
Ad-Hoc Channel
The Ad-Hoc hoc channel drop down menu allows you to specify the channel
used for the Wireless LAN Card. The channel should be the same for all
wireless stations.
Transmit Rate
There are five transmission rate settings:
Fully Auto
1 or 2 Mbps (megabits per second)
5.5 Mbps
11 Mbps
The default setting for the transmission data rate is Fully Auto. In Fully Auto
setting, the Wireless LAN Card operates at the maximum data rate by
automatically finding the highest possible signal from an access point.
When the transmission signal from an access point weakens or drops, the
Wireless LAN Card automatically switches to a lower transmission rate to
maintain a reliable transmission. When the signal improves, the Wireless LAN
Card increases the transmission data rate to the highest signal available.
Page 45

In most networking situations, the Fully Auto setting is the most efficient
transmission rate. You can set a lower transmission rate to save power on the
Pocket PC. Higher transmission rates will use more power.
ESS ID
The ESS ID (Extended Service Set ID) is an identification assigned to the
access point the Wireless LAN Card connects to. Wireless devices connecting
to an access point must use the same ESS ID. The ESS ID can be up to 32
characters and is case sensitive.
The default ESS ID setting is ANY, which allows the Wireless LAN PC Card to
automatically associate to any available access point.
To specify a different ESS ID, select the ESS ID check box and enter the
new ESS ID.
BSS ID
When an access point is connected to a wired network and a set of wireless
devices, it is referred to as a Basic Service Set (BSS). Wireless devices in a
BSS must be configured with the same BSS ID.
If your network uses multiple access points with the same ESS ID, you can
specify the BSS ID (Basic Service Set ID) address of the access point that
offers the strongest wireless signal. This is also known as a MAC address
(Media Access Control) address, a hardware address that uniquely identifies
an access point.
To specify a unique BSS ID, select the BSS ID check box and enter the
ESS ID.
Page 46

WEP Enabled
WEP encryption (Wired Equivalent Privacy) is a security protocol that is used
to provide highly secure data encryption for wireless local area networks.
To use WEP encryption, select the WEP Enabled check box.
When connecting to an access point, the encryption key for the Wireless LAN
Card in your computer must match the encryption key of the access point you
connect to. Accordingly, if the Wireless LAN Card uses MyKey as a pass
phrase, the access point must use the MyKey as the encryption key.
There are two steps to setting up WEP encryption:
1. Select 64bit or 128bit encryption level.
2. Create encryption keys with a PassPhrase or manually.
Select an Encryption Level
Select 64bit or 128bit in the Encryption (WEP) drop down menu.
The higher level of data encryption (128bit) is more difficult to encrypt
and decrypt, but high levels of encryption will reduce the performance of
Page 47

a wireless network.
Page 48

Create Encryption Keys using a PassPhrase (128bit)
To read an encrypted file, you must have access to a secret key or password
that enables you to decrypt it. The Create Key with PassPhrase setting allows
you to create encryption keys using a pass phrase.
1. Select the radio button for Create Key with PassPhrase.
2. Type the name of the pass phrase.
See Character and Hexadecimal Ranges for constraints.
3. As you type, the four key settings are automatically generated.
4. Select one of the four key settings.
5. Click OK.
6. Click Apply.
Create Encryption Keys Manually (64bit)
1. Select the radio button for Create Keys Manually.
2. Select the radio button for Alphanumeric or Hexadecimal.
3. In the Key fields, enter the four key assignments. See Character and
Hexadecimal Ranges for constraints.
4. Select one of the four key settings.
5. Click OK.
6. Click Apply.
Character and Hexadecimal Ranges for 64-bit Encryption
5 alphanumeric characters in the range of A-Z, a-z, and 0-9
for example: MyKey
10 digit hexadecimal values in the range of A-F, a-f, and 0-9.
for example: 11AA22BB33.
Character and Hexadecimal Ranges for 128-bit Encryption
13 alphanumeric characters in the range of A-Z, a-z, and 0-9
for example: MyKey12345678
26 digit hexadecimal values in the range of A-F, a-f, and 0-9.
for example: 11AA22BB33CAT456FENCE92647.
Page 49

Advanced
The Advanced configuration dialog window is used to manage power usage
and performance of the Wireless LAN Card.
To access the Advanced dialog box, select Advanced on the
Configuration page.
Power Management
When Power Save is enabled, the Wireless LAN Card enters sleep mode to
minimize power consumption.
To conserve the battery on your computer, select the Power Save
Enabled check box.
The access point you connect to must also support power saving. If the
access point does not support power saving, a connection cannot be
established.
Page 50

RTS Threshold
Request to Send threshold (RTS Threshold) is a query for permission to
transmit data to an access point. Enabling this option prevents the data of two
wireless devices from arriving at the access point at the same time (colliding).
If two wireless transmissions collide at the access point, the data in each
transmission will be lost.
Transmission collision usually occurs when two wireless devices are within
range of the same access point, but are not within range of each other. In
effect, they are hidden from each another.
When RTS Threshold is enabled, the wireless device sends a Request to
Send message to the access point before transmitting data. The access point
returns a Clear to Send message to the wireless device confirming the
amount of time reserved for the transmission. At the same time, the access
point notifies all other wireless devices in range to defer transmission.
To enable RTS Threshold, select the Enable radio button.
Enter a packet size between 0 and 1500 in the text frame to the right of
the Enable button. This option should be used only when necessary.
The default setting for RTS Threshold is Disable. Enabling the RTS Threshold
burdens the network and will negatively affect its performance.
Frag. Threshold
Fragmentation is used to improve the efficiency of transmitting large files
(packets) across a wireless network. When Frag. Threshold is Enabled, large
files are be split before they are transmitted and reassembled at the access
point. The fragmentation value can be set from 256 to 1500.
The default value of Frag. Threshold is Disable.
IRQ NO.
This option is only available for Windows NT.
The IRQ (Interrupt Request Line) number specifies which hardware line a
device uses to send signals to the CPU of the device. To avoid conflict
between devices, you can select a specific IRQ number in the IRQ drop down
menu.
Page 51

IO Address
This option is only available for Windows NT.
The IO Address (Input/Output Address) number specifies a device that
transfers data to or from a computer or a peripheral device such as a printer.
To avoid conflict between devices, you can select a specific IO Address in the
IO Address drop down menu.
Default
The setting in the Configuration dialog window can be returned to their default
settings by clicking the Default button.
Default settings are:
Infrastructure mode
Fully auto transmission rate
Any access point
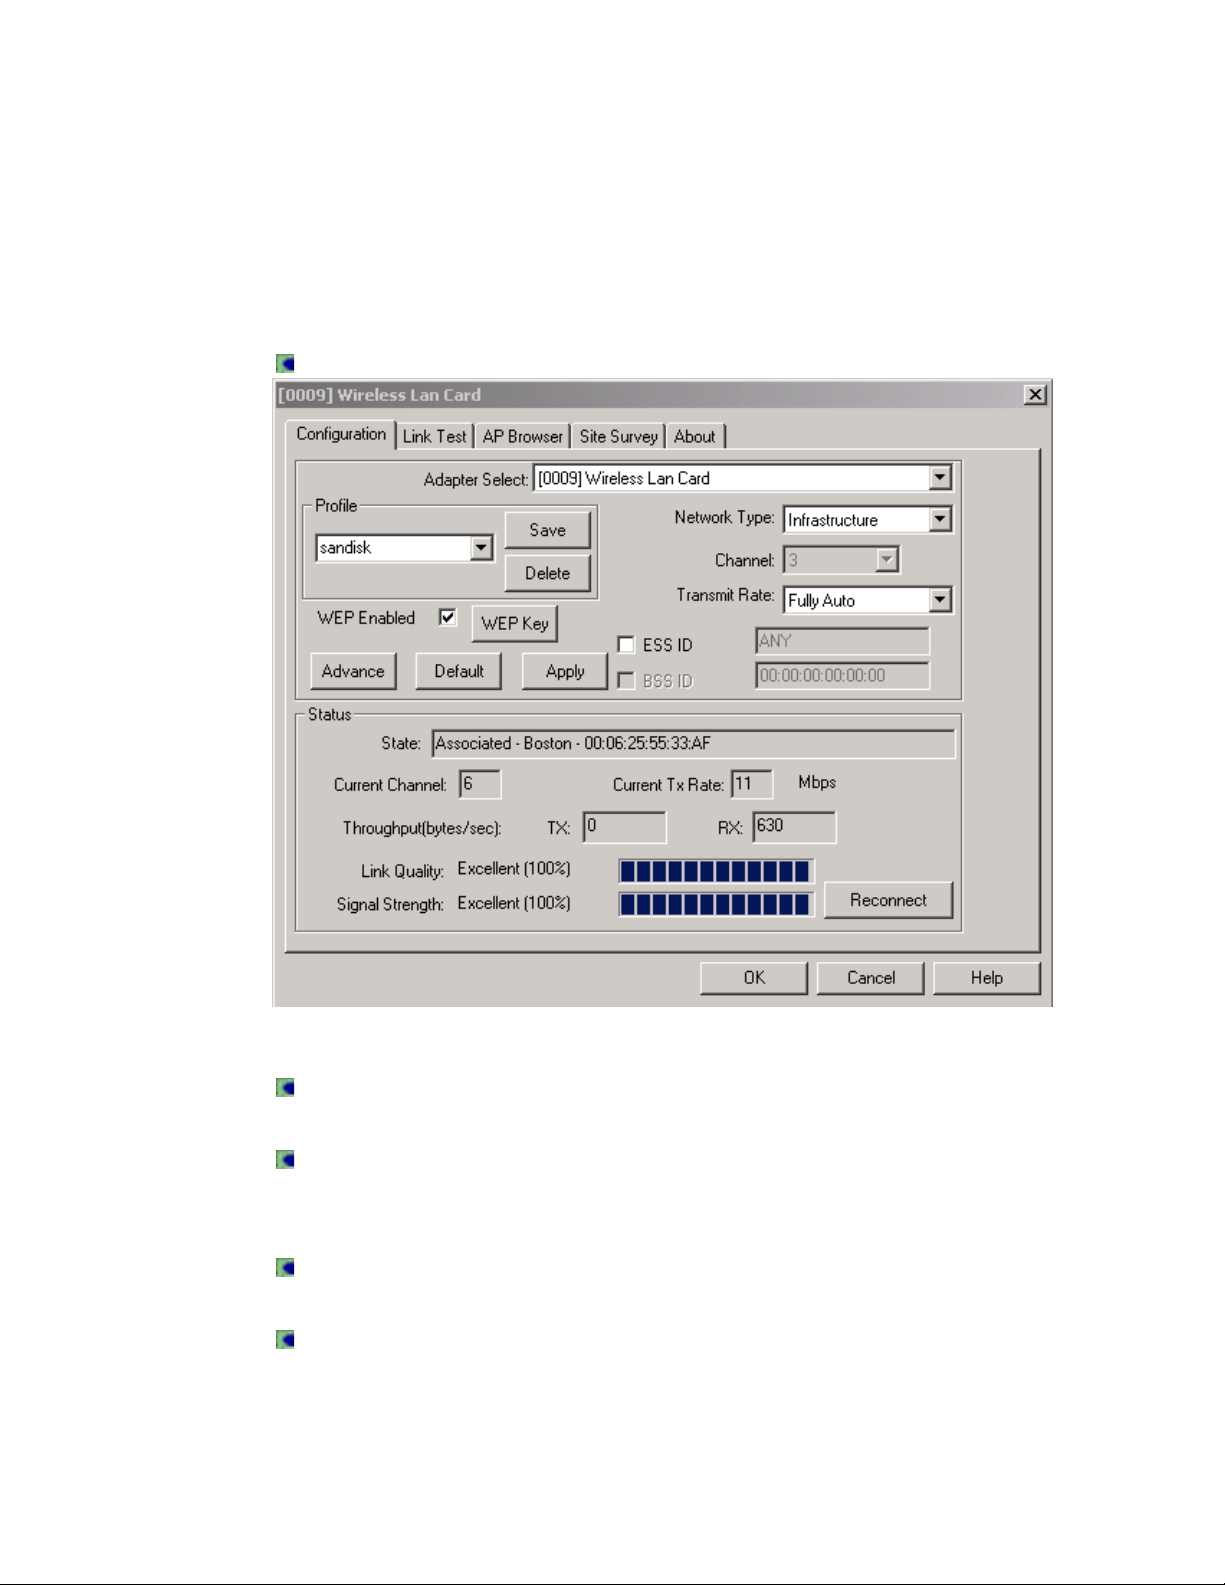
Status
The Status area of the Configuration dialog box provides information about the
performance of the Wireless LAN Card.
State
In Infrastructure mode, the State field displays the BSSID address of the
access point used by the Wireless LAN Card.
In Ad-Hoc mode, the State field displays the virtual BSSID used by wireless
devices on the network when the ESS ID check box is checked. It represents
Page 52

the connection between devices without an access point and no real BSSID.
Current Channel
The channel used for connection to the access point.
Current Tx Rate
The highest transmission rate in use.
Throughput
The rate of short-term transmission and receive in bytes/second. This field is
continuously updated.
Link Quality
The quality of a connection to an access point.
100%~80%–Excellent link
80%~60%–Good link
60%~40%–Fair link
Under 40%–Poor or no connection
Signal Strength
The quality of a signal from an access point.
100%~80%–Excellent signal
80%~60%–Good signal
60%~25%–Fair signal
Under 25%–Poor or no signal
Reconnect
Click the Reconnect button to rescan all available channels. If the link quality
or signal strength is weak, select Reconnect to search for a better connection
to another access point.
Page 53

Link Test
The Link Test dialog window is used to examine the quality of the data
transmission between the Wireless LAN Card and any device on the network.
IP Layer Link Test
The IP Layer link test is used to check the quality of transmission between
your computer and remote or local devices.
1. From the Remote Address drop down menu, select the address of a
device on the network that is not connected to your computer.
2. From the Local Address drop down menu, select the address of your
computer, or manually enter the address.
3. Enter a Ping Interval (a query to determine whether an IP address is
accessible). The Ping Interval is shown in milliseconds.
4. Enter a Packet Size.
5. Click the Ping button.
6. Click the Refresh button to set the counters to zero.
7. To stop the test, click Ping again
The results of the IP Layer link test appear on the right side of the dialog box.
Packet Count is the number of packets sent.
Failure Count is the number of failed packets.
Page 54

Percent is the percentage of failed packets.
MAC Layer Link Test
The MAC Layer link test is used to check the quality of transmission between
your computer and an access point. In Infrastructure mode, you don’t need to
enter a remote address.
1. If the network type is Ad-hoc mode, enter the MAC address in the
Remote Address field.
2. Enter a Test Interval (a time limit for the test). The Test Interval is shown
in milliseconds.
3. Enter a Packet Size.
4. Click Loop Back.
5. Click the Refresh button to set the counters to zero.
6. To stop the loop back test, click Loop Back again.
The results of the MAC Layer link test appear on the right side of
the dialog box.
Packet Count is the number of packets sent.
Failure Count is the number of failed packets.
Percent is the percentage of failed packets.
Page 55

AP Browser
The AP Browser dialog box displays information about access points that are
available on the network.
To connect to a listed access point, select the access point and then
click Join BSS.
Click the Refresh button to rescan and update information about
available access points.
ESSID
The name of the access point.
BSSID
The MAC address of the access point.
Channel
The channel used by the access point.
Capability
BSS or ESS. Or IBSS in AD-hoc mode
Signal
Strength of the signal to the access point.
Noise
Interference on the network.
Page 56

Rates
Available transmission rates for the access point.
Site Survey
The Site Survey dialog box displays the quality of the 14 radio channels used
by the Wireless LAN Card.
The higher a bar, the better the channel quality.
Blue bars indicate good quality
Yellow bars indicate fair quality
Red bars indicate poor quality
About
The About dialog box displays the version number of the Configuration Utility,
Network Driver and Firmware.
Page 57

Technical Support
Visit: http/www.sandisk.com/connect
Email – go to: http://www.sandisk.com/tech/s_central.asp
and enter information
Phone: 1.866.SAN.DISK (1.866.726.3475)
5 Days a week: 7:00 a.m. - 4:00 p.m. PST
Page 58

Limited Warranty
SanDisk warrants this product to meet all the published product specifications and to be free
of any defects in materials or workmanship that would prevent them from performing to
published product specifications for three years from the date of purchase. Incompatibility is
not a defect covered by SanDisk’s warranty. During the warranty period, SanDisk will, at its
option repair or replace the defective product at no charge when furnished with proof of
retail purchase, provided that you deliver the product to SanDisk or an authorized SanDisk
Service Center.
SanDisk Corporation, 140 Caspian Court, Sunnyvale, CA 94089, extends this express
warranty.
SanDisk’s products are not warranted to operate without failure. Accordingly, in any use of
the products in life support systems or other applications where failure could cause injury or
loss of life, the products should only be incorporated in systems designed with appropriate
redundancy, fault tolerant or back-up features. This product is intended for consumer enduse only, it is not intended for nor warranted for commercial applications.
You may register your product online at http://www.sandisk.com/registration SanDisk
Corporation general policy does not recommend the use of its products in life support
applications where in a failure or malfunction of the product may directly threaten life or
injury. Per SanDisk Terms and Conditions of Sale, the user of SanDisk products in life
support applications assumes all risk of such use and indemnifies SanDisk against all
damages. The information in this manual is subject to change without notice.
SanDisk Corporation shall not be liable for technical or editorial errors or omissions contained
herein; nor for incidental or consequential damages resulting from the furnishing,
performance or use of this material.
Copyright law protects all parts of SanDisk documentation and all rights are reserved. This
documentation may not, in whole or in part, be copied, photocopied, reproduced, translated
or reduced to any electronic medium or machine readable form without prior consent, in
writing, from SanDisk Corporation.
SanDisk and the SanDisk logo are registered trademarks of SanDisk Corporation.
Product names mentioned herein are for identification purposes only and may be trademarks
and/or registered trademarks of their respective companies.
© 2002 SanDisk Corporation. All rights reserved. Printed in U.S.A.
SanDisk products are covered or licensed under one or more of the following U.S. Patent
Nos. 5,070,032; 5,095,344;5,168,465; 5,172,338; 5,198,380; 5,200,959; 5,268,318;
5,268,870; 5,272,669; 5,418,752. Other U.S. and foreign patents awarded and pending.
Page 59

Duration of Hardware Warranty: Three Years from date of purchase
Replacement, Repair or Refund Procedure for Hardware:
If your unit needs a repair or replacement, return it to your dealer/distributor in its original
packaging. When returning a defective product for Warranty, always include the following
documents:
The Warranty Repair Card
A copy of the invoice/proof of purchase, and
The RMA Report Form (To receive a Return Materials Authorization form (RMA),
please contact SanDisk).
Upon proof-of-purchase we shall, at its option, repair or replace the defective item at no cost
to the buyer.
This warranty is contingent upon proper use in the application for which the products are
intended and does not cover products which have been modified without the reseller’s
approval or which have been subjected to unusual physical or electrical demands or
damaged in any way.
Page 60

Page i
Carte LAN sans fil
Guide d'utilisation
Page 61

Information relative au règlement de la
FCC
Ce dispositif est conforme à la section 15 du règlement de la FCC (Federal
Communication Commission aux États-Unis). Son utilisation est sujette aux
deux conditions suivantes : (1) l'équipement ne doit émettre aucune
interférence nuisible et (2) l'équipement doit accepter toute interférence reçue,
y compris les interférences pouvant affecter son fonctionnement.
Avis de la FCC
Cet équipement a subi des tests et a été trouvé conforme aux limites imposées aux
dispositifs numériques de classe B, en vertu de la section 15 du règlement de la FCC. Ces
limites ont été prévues pour assurer une protection raisonnable contre les interférences
nuisibles dans les installations chez les particuliers. Cet équipement génère, utilise et peut
émettre une énergie radiofréquence s'il n'est pas installé et utilisé conformément au mode
d'emploi, et peut produire des interférences affectant les communications radio. Cependant,
il n'existe aucune garantie comme quoi une installation particulière n'engendrera pas de
telles interférences. Dans le cas où cet équipement émettrait des interférences affectant la
réception de programmes radiophoniques ou télévisés (ce qui peut s'observer en éteignant
et en rallument le dispositif), l'utilisateur doit tenter de corriger cette interférence en suivant la
procédure suivante :
• Réorienter ou déplacer l'antenne de réception.
• Eloigner l'équipement du récepteur.
• Brancher l'équipement sur la prise d'un circuit sur lequel le récepteur
n'est pas connecté.
• Pour de l'aide, consulter le détaillant ou un technicien expérimenté en
radio/télévision.
Avis de la FCC sur l'exposition aux radiations RF :
1. Ce transmetteur ne doit pas être situé à proximité ou utilisé conjointement avec une autre
antenne ou un autre transmetteur.
2. Cet équipement est conforme aux limites d'exposition aux radiations établies par la FCC dans le
cas d'un environnement non contrôlé. Pour l'installation et l'utilisation, il faut prévoir une
distance minimale de 20 cm entre l'émetteur et votre corps.
Page 62

Table des matières
Félicitations..........................................................................................................1
Contenu de l'emballage.....................................................................................3
Vérification de la configuration du système................................................8
Définitions............................................................................................................. 5
Configuration de la carte LAN sans fil pour une utilisation avec un Pocket
PC ........................................................................................................................... 7
Installation de ActiveSync............................................................................7
Etablissement de la connexion....................................................................8
Installation du pilote et de l'utilitaire de configuration ...................................9
Installation de la carte LAN sans fil............................................................10
Affectation d'une adresse IP .....................................................................10
Synchronistion des connexions .................................................................12
Redémarrage du Pocket PC......................................................................12
Retrait de la carte LAN sans fil...................................................................12
Etapes suivantes...........................................................................................
Configuration de la carte LAN sans fil pour une utilisation avec un Pocket
PC .........................................................................................................................14
Status (Caractéristiques)............................................................................15
Configuration.............................................................................................17
Link (Liaison) .............................................................................................20
Security (Sécurité) .....................................................................................22
About (A propos de)..................................................................................25
Configuration de la carte LAN sans fil pour une utilisation avec Windows
...............................................................................................................................27
Installation de la carte LAN sans fil............................................................28
Désactivation et retrait de la carte LAN sans fil ..........................................29
Configuration pourWindows XP .................................................................30
Configuration pourWindows 2000..............................................................33
Configuration pourWindows NT 4.0............................................................35
Configuration pour Windows 98/ME...........................................................38
Configuration de la carte LAN sans fil pour une utilisation avec Windows
...............................................................................................................................40
Icône Wireless LAN Utility ..........................................................................40
Utilisation de l'utilitaire de connexion LAN sans fil ......................................42
Configuration.............................................................................................44
Link Test (Test de liaison) ..........................................................................56
AP Browser (Navigateur AP)......................................................................58
Site Survey (Etude du site)........................................................................59
Page 63

About (A propos de).................................................................................. 59
Support technique.................................................................................................
Garantie limitée..................................................Error! Bookmark not defined.
Page 64

1
Félicitations
Nous vous remercions d’avoir acheté la carte LAN (réseau local) sans fil
SanDisk à faible consommation d'énergie. Grâce à cette carte, il est possible
d'établir une connexion Internet haute vitesse sans fil entre un réseau à
distance et des assistants numériques ou ordinateurs portables, en passant
par des points d'accès. Ces points d'accès d'un réseau sans fil sont reliés à
un ordinateur hôte ayant un accès réseau ou Internet.
Après avoir installé la carte LAN sans fil de SanDisk sur votre assistant
numérique ou ordinateur portable, vous pourrez tout à loisir naviguer sur
Internet, vérifier votre courrier électronique et transférer des fichiers et de
l'information vers le réseau à distance ou à partir de celui-ci sans y être
physiquement connecté.
Emplacement des points d'accès
Les points d'accès peuvent se trouver dans un édifice à bureaux, un domicile,
un hôpital, une université, un hôtel, un aéroport, un centre de conférences ou
un café. On peut aussi les installer dans des milieux particuliers pour
permettre aux travailleurs mobiles d'accéder aux données du réseau, comme
par exemple :
• Bâtiments dans lesquels le câblage est difficile à installer
• Lieux de travail sujets à des modifications tels que les sites de
fabrication ou les magasins de détail
• Foires commerciales, lieux d'exposition et chantiers nécessitant
un réseau temporaire
• Entreprises nécessitant un accès réseau supplémentaire
pendant des périodes de pointe ou devant rapidement installer
un petit réseau informatique
Caractéristiques de la carte LAN sans fil
• « Branchez et utilisez »; installation et configuration faciles.
• Compatible avec la norme IEEE 802.11b (voir le paragraphe
DÉFINITIONS).
• Faible consommation d'énergie et utilitaires de gestion avancée
pour économiser l'énergie et optimiser la performance.
Page 65

• Outils de diagnostic faciles à utiliser.
• Fonctionne jusqu'à une distance de 243 m dans un
environnement ouvert
• Prend en charge des vitesses de transmission de données de
11, 5,5, 2 et 1 Mbps permettant une capacité et une portée
optimales pour la connectivité.
• Capacité de cryptage WEP de 64 et 128 bits (voir DÉFINITIONS).
Page 66

3
Contenu de l'emballage
Vérifiez que l'emballage contient les éléments suivants :
• Carte LAN sans fil
• CD de la carte LAN sans fil
• Guide d'installation
• Adaptateur CompactFlash®/PCMCIA (optionnel)
En cas d'élément manquant ou abîmé, veuillez contacter SanDisk.
Allez sur le site Web : http/www.sandisk.com/
Courriel – allez à : http://www.sandisk.com/tech/s_central.asp
et entrez votre message
Tél. : 1 (866) SANDISK - 1 (866) 726-3475
5 jours par semaine de 7 h à 16 h (heure normale du Pacifique.)
Page 67

Vérification de la configuration du système
La carte LAN sans fil est compatible avec les systèmes d'exploitation WinCE
pour ordinateur de poche, Pocket PC 2002 et Windows 95/98/ME/NT/2000/XP.
Avant l'installation, assurez-vous que votre ordinateur ou ordinateur de poche
possède la configuration de système nécessaire.
Ordinateur de poche et assistant numérique
• Ordinateur de poche, Pocket PC 2002, HPC 2000 ou assistant
numérique PC Pro avec Windows CE v2.11 ou version plus
récente
Windows XP/2000/NT/98/ME
• Fente PCMCIA de Type 1
• Carte PCMCIA et services de prise conformes à la version 2.10
(ou plus récente) de la spécification PCMCIA
• CD-ROM ou disquettes d'installation pour Windows
98/ME/NT/2000/XP
• Espace de disque dur disponible de 500 ko pour l'installation du
pilote et du programme utilitaire
Page 68

5
Définitions
802.11b
IEEE 802.11b est une norme de réseau sans fil établie par l'IEEE (Institute of
Electrical and Electronics Engineers).
Mode Ad-Hoc
Le mode Ad-Hoc permet aux dispositifs sans fil de communiquer directement
entre eux et élimine le besoin d'un point d'accès ou d'une connexion à un
réseau câblé. Ce mode est aussi appelé « égal à égal » ou IBBS (Independent
Basic Service Set). Voir le paragraphe MODE INFRASTRUCTURE.
BSS
Lorsqu'un point d'accès est relié au réseau câblé et à un ensemble de
dispositifs sans fil, on parle d'ensemble de services de base (BSS : Basic
Service Set). Un ensemble de services étendu (ESS : Extended Service Set)
est un ensemble de deux BSS ou plus formant un sous-réseau unique. Voir
ESS ID.
DHCP
Le protocole DHCP (Dynamic Host Configuration Protocol) est une procédure
que les ordinateurs d'un réseau suivent pour s'identifier entre eux et s'assurer
que l'information est transmise correctement.
ESS ID
ESS ID (Extended Service Set ID) est un identificateur affecté au point d'accès
auquel la carte LAN sans fil est connectée. Les dispositifs sans fil reliés à un
point d'accès doivent utiliser le même ESS ID. Ce dernier peut comprendre
jusqu'à 32 caractères avec discrimination majuscules-minuscules. Voir BSS
ID.
Mode Infrastructure
En mode Infrastructure, le réseau sans fil consiste en au moins un point
Page 69

d'accès relié à l'infrastructure du réseau câblé et un ensemble de terminaux
sans fil. Voir Mode Ad-Hoc.
Adresse IP
Dans un réseau, les ordinateurs et autres dispositifs de réseautique
possèdent un numéro identificateur utilisant le protocole Internet (adresse IP).
Adresse MAC
L'adresse MAC (Media Access Control) est une adresse d'équipement
technique qui ne fait qu'identifier le point d'accès (ou la carte LAN sans fil).
Cryptage WEP
WEP (Wired Equivalent Privacy) est un protocole de sécurité pour les réseaux
locaux sans fil (LAN sans fil) défini dans la norme 802.11b. Le WEP a été
conçu pour assurer le même niveau de sécurité que dans les réseaux locaux
câblés.
Page 70

Page 7
Configuration de la carte LAN sans fil pour
une utilisation avec un ordinateur de poche
La configuration de la carte LAN sans fil pour une utilisation avec Pocket PC
2002 / Win CE 3.0 s'effectue en six étapes :
1. Installez le programme ActiveSync à partir du CD-ROM fourni avec
l'ordinateur de poche.
• Si ActiveSync est déjà installé, sautez cette étape.
2. Etablissez une connexion entre l'ordinateur hôte et l'ordinateur de
poche.
3. Installez le pilote et l'utilitaire de configuration sur l'ordinateur hôte.
4. Installez la carte LAN sans fil dans la fente CompactFlash® de
l'ordinateur de poche (installe automatiquement le pilote et l'utilitaire de
configuration sur l'ordinateur de poche).
5. Affectez une adresse IP à la carte LAN sans fil.
6. Redémarrez l'ordinateur de poche.
Installation de ActiveSync
1. Repérez le CD-ROM fourni avec l'ordinateur de poche.
2. Insérez-le dans le lecteur de CD-ROM de l'ordinateur et installez le
programme Microsoft ActiveSync.
Page 71

8
Établissement de la connexion
1. Une fois ActiveSync installé, établissez une connexion ActiveSync entre
l'ordinateur et l'ordinateur de poche à l'aide d'un câble sériel ou USB. La
connexion peut également se faire par lien infrarouge.
• Une fois la connexion établie, le message Connected (Connecté)
s'affiche dans la fenêtre ActiveSync.
• Pour plus d'information sur la connexion entre votre ordinateur et de
votre ordinateur de poche, consultez le guide d'utilisation de
l'ordinateur de poche.
2. A l'invite, cliquez sur Finish (Terminer) pour fermer la fenêtre ActiveSync.
Page 72

9
Installation du pilote et de l'utilitaire de configuration
1. Repérez le CD-ROM fourni avec la carte LAN sans fil.
2. Insérez-le dans le lecteur de CD-ROM de votre ordinateur. L'assistant
InstallShield Wizard ouvre et extrait automatiquement les fichiers
nécessaires à l'installation des utilitaires de la carte sur l'ordinateur.
3. Cliquez sur Next (Suivant) pour continuer.
4. Quand un message vous indique d'installer le pilote et l'utilitaire de la
carte, cliquez sur YES (Oui).
• Le pilote et l'utilitaire de configuration fonctionneront uniquement
sur la carte LAN sans fil et la carte LAN PCMCIA.
Versions du pilote et de l'utilitaire
Le CD-ROM fourni avec la carte LAN sans fil pour CE Windows comprend le
pilote et l'utilitaire suivant :
• Pilote Version 1.1.0 et ultérieure
• Utilitaire Version 1.1.0 et ultérieure
Des mises à jour de pilotes et utilitaires sont téléchargeables à partir du site
Web de SanDisk : www.sandisk.com/connect
Support technique :
Allez sur le site Web : http/www.sandisk.com/
Courriel – allez à : http://www.sandisk.com/tech/s_central.asp
et entrez votre message.
Tél. : 1 (866) SANDISK - 1 (866) 726-3475
5 jours par semaine de 7 h à 16 h (heure normale du Pacifique)
Page 73

10
Installation de la carte LAN sans fil
Insérez la carte LAN sans fil dans la fente CompactFlash® de l'ordinateur de
poche. Ce dernier détectera automatiquement la carte et installera le pilote et
l'utilitaire nécessaires.
La carte est dotée d'un voyant DEL vert.
• Lorsque le voyant vert est constant, la carte est correctement
connectée à un point d'accès ou à un ordinateur non relié à un
réseau câblé (mode Ad-Hoc).
• Lorsque le voyant clignote, la carte n'est pas connectée à un
point d'accès ou le mode d'économie d'énergie a été activé.
Affectation d'une adresse IP
Configurez la carte LAN sans fil à partir de la fenêtre Start (Démarrer) de
l'ordinateur de poche pour obtenir automatiquement une adresse IP à partir
du serveur DHCP. Le protocole Internet (adresse IP) est un numéro
identificateur affecté à tous les dispositifs d'un réseau. Le paramètre par
défaut est Use server-assigned IP address (Utiliser l'adresse IP affectée par
le serveur). Pour utiliser une adresse IP particulière, consultez le paragraphe
CONFIGURATION DE LA CARTE LAN SANS FIL POUR UNE UTILISATION AVEC
UN.
ORDINATEUR DE POCHE
Une fois qu'une adresse IP a été
détectée, la carte cherchera un point
d'accès. Le voyant vert de la carte
clignotera jusqu'à la localisation
d'un point d'accès, après quoi il sera
constant.
Page 74

11
Page 75

12
Synchronisation des connexions
L'ordinateur de poche et la carte LAN sans fil doivent être configurés de façon
à être connectés à l'Internet en utilisant les mêmes paramètres :
1. A partir du menu Start (Démarrer), cliquez sur Settings (Paramètres).
2. Cliquez sur l'onglet Connections (Connexions) en bas de l'affichage.
3. Cliquez sur l'icône Connections.
4. L'option When needed, automatically… (Au besoin, connecter
automatiquement..) et l'option My network card… (Ma carte réseau...)
doivent comporter les mêmes paramètres Internet.
Redémarrage de l'ordinateur de poche
• Pour terminer la configuration, redémarrez votre ordinateur de
poche.
Retrait de la carte LAN sans fil
Quand vous n'avez pas besoin de la carte, il est recommandé de la retirer de
l'ordinateur de poche afin de prolonger la durée de vie de la pile.
• Le retrait de la carte entraînera la perte de connexion au réseau.
Avant de retirer la carte, assurez-vous d'avoir fermé tous les
fichiers et applications de réseau.
Etapes suivantes
La carte LAN sans fil est maintenant prête à l'emploi. Ses paramètres par
défaut fonctionnent pour un réseau local sans fil doté d'une infrastructure
typique. En mode Infrastructure, le réseau sans fil consiste en au moins un
point d'accès connecté à l'infrastructure de réseau câblé et d'un ensemble de
terminaux sans fil.
Si vous souhaitez modifier la configuration de la carte de façon à mieux
maîtriser votre réseau sans fil, consultez le paragraphe CONFIGURATION DE
LA CARTE LAN SANS FIL POUR UNE UTILISATION AVEC UN ORDINATEUR DE
POCHE.
Page 76

13
Page 77

14
Configuration de la carte LAN sans fil pour
une utilisation avec un ordinateur de poche
Utilisez l'utilitaire des paramètres de la carte LAN sans fil pour modifier,
vérifier ou surveiller sa configuration.
• A partir de la barre des tâches de l'ordinateur de poche, cliquez
sur l'icône Wireless LAN Setting (Paramètre de la carte LAN
sans fil).
L'utilitaire LAN sans fil contient cinq onglets :
• Status (État)
• Configuration
• Link (Liaison)
• Security (Sécurité)
• About (À propos de)
En cliquant sur un onglet, vous ouvrez une page présentant des paramètres
que vous pouvez modifier pour personnaliser votre réseau sans fil.
Page 78

15
Status (État)
L'onglet Status affiche l'état actuel de la carte LAN sans fil.
Adapter (Adaptateur) – Nom de la carte
Firmware (Microprogramme) – Version du microprogramme de la carte.
Channel (Canal) – Canal utilisé par la carte pour communiquer avec le point
d'accès.
Domain (Domaine) – Norme de radiofréquence à laquelle la carte est
conforme.
TX Rate (vitesse de transmission) – Vitesse de transmission des données
MAC Address (Adresse MAC) – Numéro identifiant le matériel pour distinguer
les dispositifs les uns des autres.
Sync to AP (Sync au point d'accès) – Identificateur ESS ID (Extended Service
Set ID) du point d'accès auquel la carte est connectée.
BSSID (Basic Service Set ID : identificateur de l'ensemble de services de
base) – Identificateur unique du point d'accès auquel la carte est connectée.
Link Quality (Qualité de la liaison) – Surveille la qualité de transmission des
Page 79

16
données entre la carte et le point d'accès.
Signal Level (Niveau de signal) – Indique la puissance de transmission du
signal radio de la carte à un point d'accès connecté.
Page 80

17
Configuration
L'onglet Configuration comprend les champs permettant d'afficher et de
modifier les paramètres actuels de la carte. Après toute modification des
paramètres de configuration, cliquez sur Apply (Appliquer) pour terminer.
correspondant au point d'accès auquel vous souhaitez vous connecter. Cela
empêche l'ordinateur de poche de se connecter par erreur à d'autres réseaux
sans fil. L'identificateur ESSID peut comporter jusqu'à 32 caractères
(discrimination majuscules-minuscules).
Type de réseau
• Cliquez sur Infrastructure pour accéder à l'Internet ou à un
réseau d'entreprise via un point d'accès.
• Cliquez sur Ad-Hoc pour vous connecter à d'autres dispositifs
sans fil sans passer par un point d'accès. En mode Ad-Hoc, tous
les dispositifs sans fil doivent être configurés pour fonctionner
ESSID
ESSID (Extended Service Set ID,
identificateur de l'ensemble de
services étendu) est un identificateur
affecté au point d'accès auquel la carte
est connectée. Les ordinateurs de
poche et autres dispositifs sans fil
connectés à un point d'accès doivent
utiliser le même ESSID.
Après avoir sélectionné Auto Detect
(Détection automatique), la carte peut
se connecter à tout point d'accès
opérationnel.
Entrez l'identificateur (Specific ESSID)
Page 81

18
sur le même canal (Channel).
• Sélectionnez l'option 801.11 Ad-Hoc pour vous connecter à
d'autres dispositifs sans fil sans passer par un point d'accès et
en utilisant un identificateur ESSID virtuel. Dans le mode 802.11
Ad-Hoc, tous les dispositifs sans fil doivent indiquer le même
identificateur ESSID pour le point d'accès auquel ils doivent se
connecter.
Power Saving Mode (Mode d'économie d'énergie)
Cliquez sur Enable (Activer) pour prolonger la durée de vie de la pile de
l'ordinateur de poche. En mode d'économie d'énergie, la carte LAN sans fil
entre en mode de veille pour minimiser la consommation d'énergie dans la
mesure du possible (le mode de veille n'est pas forcément activé
immédiatement). Les points d'accès auxquels vous vous connectez doivent
également prendre en charge le mode d'économie d'énergie quand l'option
Enable est sélectionnée.
Cliquez sur Disable (Désactiver) pour éteindre le mode d'économie d'énergie.
TX Rate (Vitesse de transmission)
Il existe six vitesses de transmission possibles :
• Auto (Automatique)
• 1 Mbps (mégabits/seconde)
• 2 Mbps
• 1M/2Mbps
• 5,5 Mbps
• 11 Mbps
La vitesse de transmission par défaut est réglée sur Auto. Dans ce mode, la
carte fonctionne à la vitesse maximum en trouvant automatiquement le signal
le plus puissant possible à partir d'un point d'accès. Dès que le signal de
transmission provenant du point d'accès faiblit, la carte passe directement à
une vitesse de transmission plus lente pour maintenir une transmission
fiable. Dès que la puissance du signal s'améliore, la carte augmente la
vitesse de transmission des données jusqu'au plus haut signal disponible.
Page 82

19
Dans la plupart des environnements réseautiques, le paramètre Auto permet
la vitesse de transmission la plus efficace. Vous pouvez choisir une vitesse
plus lente pour économiser l'énergie de l'ordinateur de poche. Les vitesses
de transmission plus élevées consomment davantage d'énergie.
Page 83

20
Link (Liaison)
L'onglet Link comprend des champs permettant de vérifier la transmission de
données d'égal à égal entre différents ordinateurs de poche ou entre un
ordinateur de poche et un point d'accès.
1.
paquet (Packet Size). Il s'agit du volume de données que la carte
envoie au dispositif testé.
4. Cliquez sur Start (Démarrer) pour commencer le test.
5. Cliquez sur Stop (Arrêter) pour le terminer.
Test Result (Résultat du test)
La section Test Result affiche l'adresse IP de l'ordinateur de poche, le nombre
de paquets envoyés et reçus ainsi que le temps écoulé pendant le test.
Ping Command (Commande Ping)
La Commande Ping permet de vérifier si
un autre dispositif sans fil ou point
d'accès est disponible.
1. Entrez l'adresse IP d'un dispositif sans
fil ou d'un point d'accès.
2. Sélectionnez une valeur dans le
champ Timeout (Temporisation). Il
s'agit du temps (en millisecondes)
que la carte attendra pour recevoir une
réponse de l'hôte testé. Si la carte n'a
pas reçu de réponse au bout du délai
d'attente (par exemple de 1000 ms),
elle considère le dispositif comme
inaccessible.
3. Sélectionnez une taille
Page 84

21
Link Message (Message de liaison)
La section Link Message affiche les résultats du test. La réponse d'un
dispositif sans fil ou d'un point d'accès associé à l'adresse IP saisie dans la
section Commande Ping est affichée.
Page 85

22
Security (Sécurité)
L'onglet Security comprend des champs pour activer le cryptage sécurisé des
données afin d'empêcher les dispositifs sans fil non autorisés d'accéder à
des données envoyées de votre ordinateur de poche vers le réseau et viceversa. Ce type de cryptage porte le sigle WEP (Wired Equivalent Privacy :
Sécurité équivalente à celle des réseaux câblés). Le cryptage WEP assure
la protection des données en les chiffrant avant de les envoyer via les ondes
radio pour une sécurité d'un point à l'autre de la transmission.
2. Cliquez sur 40 (40 bits) ou 128-bit
(128 bits).
L'ordinateur de poche doit utiliser le même
niveau de cryptage que le point d'accès.
Encryption (WEP) (Cryptage)
1. Pour activer l'option de cryptage
WEP, cliquez sur Enable (Activer).
WEP Key Length (Longueur de
clé WEP)
Lorsque le niveau de cryptage est réglé
sur la valeur la plus élevée (128-bit), les
données sont plus difficiles à encoder
et décoder, mais les niveaux de
cryptage élevés affectent la
performance des réseaux sans fil.
Page 86

23
WEP Key Type (Type de clé WEP)
Pour lire un fichier encodé, vous devez accéder à un clé secrète ou à un mot
de passe afin de le déchiffrer. Le paramètre WEP Key Type permet de créer
une clé ou un mot de passe utilisant une phrase, un caractère ou une valeur
hexadécimale.
Création automatique d'une clé de cryptage :
1. Cliquez sur le menu WEP Key Type pour faire dérouler la liste de types
de clé.
2. Cliquez sur PassPhrase (Phrase passe) et entrez une chaîne de
caractères dans le champ Key in… (Clé...).
Les quatre paramètres de clé sont automatiquement générés.
3. Cliquez sur OK.
Paramètre de la clé
1. Sélectionnez une clé parmi les quatre paramètres de clé.
2. Cliquez sur Apply (Appliquer) pour affecter un paramètre de clé.
Création manuelle d'une clé de cryptage :
1. Cliquez sur le menu WEP Key Type pour faire dérouler la liste des
types de clés.
2. Cliquez sur Char (Caractère) ou Hex (Hexadécimale).
3. Dans le champ Key in…, entrez une chaîne de caractères ou de valeurs
hexadécimales.
4. Cliquez sur OK.
5. Sélectionnez une clé parmi les quatre paramètres de clé.
6. Cliquez sur Apply (Appliquer) pour affecter un paramètre de clé.
Plages de caractères et d'hexadécimales pour le cryptage 40 bits
• 5 caractères dans la plage A-Z, a-z et 0-9
Exemple : MyKey
• 10 valeurs hexadécimales dans la plage A-F, a-f et 0-9.
Exemple : 11AA22BB33.
Plages de caractères et d'hexadécimales pour le cryptage 128 bits
• 13 caractères dans la plage A-Z, a-z et 0-9
Page 87

24
Exemple : MyKey12345678
• 26 valeurs hexadécimales dans la plage A-F, a-f et 0-9.
Exemple : 11AA22BB33CAT456FENCE92647.
Type d'authentification
Le type d'authentification par défaut peut être réglé sur Open System
(Système ouvert) ou Shared Key (Clé partagée).
• Le type d'authentification par défaut est Open System. Il indique
l'absence de cryptage.
• Lorsque le type d'authentification est réglé sur Shared Key, les
clés WEP doivent être utilisées. L'ordinateur de poche et le point
d'accès doivent utiliser la même clé de cryptage pour le cryptage
avec clé partagée.
Page 88

25
About (À propos de)
L'onglet About affiche le numéro de version du pilote de réseau et de l'utilitaire
de configuration.
Page 89

Page 90

Page 27
Configuration de la carte LAN sans fil pour
une utilisation avec Windows
La configuration de la carte LAN sans fil pour une utilisation avec les
systèmes d'exploitation Windows XP/2000/NT/98/ME s'effectue en quatre
étapes.
1. Insérez le CD de la carte LAN sans fil dans l'ordinateur.
2. Sélectionnez l'utilitaire de configuration et suivez les consignes
d'installation affichées à l'écran. Laissez le CD dans l'ordinateur.
3. Insérez la carte LAN sans fil dans l'ordinateur.
4. Quittez l'utilitaire de configuration.
Etant donné que les fonctions varient légèrement d'un système d'exploitation à
l'autre, le mode de configuration sera décrit séparément pour :
1. l'installation du pilote pour la carte;
2. la confirmation du bon fonctionnement de la carte;
3. le choix du réseau sans fil.
• Avant de configurer la carte LAN sans fil, repérez le CD-ROM
d'installation Windows pour votre système d'exploitation. Vous
aurez peut-être besoin de fichiers stockés sur ce CD au cours du
processus de configuration.
Versions du pilote et de l'utilitaire
Le CD-ROM fourni avec la carte LAN sans fil pour les systèmes d'exploitation
Windows XP/2000/NT/98/ME comprend le pilote et l'utilitaire suivant :
• pilote : version 4.0.7
• utilitaire : version 4.0.7
Des versions mises à jour des pilotes et des utilitaires peuvent être
téléchargées à partir du site Web de SanDisk : www.sandisk.com/connect
Page 91

28
Installation de la carte LAN sans fil
Si votre ordinateur est doté d'une fente CompactFlash® de Type 1, insérez la
carte LAN sans fil dans cette fente.
Si votre ordinateur est doté d'une fente PCMCIA, vous devez utiliser
l'adaptateur CompactFlash®/PCMCIA fourni avec la carte LAN sans fil.
1. Insérez la carte dans l'adaptateur CompactFlash®/PCMCIA.
2. Insérez ensuite l'adaptateur dans la fente PCMCIA de l'ordinateur.
Adaptateur PCMCIA Carte CompactFlash®
• Ne forcez pas en insérant l'adaptateur dans la fente.
• Si l'adaptateur n'entre pas facilement, retirez-le et réinsérez-le.
• Si vous insérez l'adaptateur dans l'ordinateur en forçant, vous
abîmerez l'adaptateur et la fente PCMCIA.
Mise en garde sur la tension
La carte LAN sans fil fonctionne sur une tension de 3,3 V. Si votre ordinateur
ne fonctionne pas sur 3,3 V, la carte risque d'abîmer la fente PCMCIA.
Page 92

29
Désactivation et retrait de la carte LAN sans fil
Si vous n'avez pas besoin de la carte, il est conseillé de la désactiver et de la
retirer de l'ordinateur pour prolonger la durée de vie de la pile.
• En retirant la carte, vous perdrez la connexion au réseau. Avant
de retirer la carte, assurez-vous donc de fermer tous les fichiers
et applications réseau.
Retrait de la carte LAN sans fil
Pour un retrait en toute sécurité :
1. Cliquez une fois sur l'icône Remove Hardware (Suppression de
matériel) sur la barre des tâches de Windows.
2. Sélectionnez Stop Wireless LAN Card (Arrêter la carte LAN sans fil). Ce
message peut varier en fonction du système d'exploitation. Dans
Windows XP, le message dit Safely Remove Wireless LAN Card
(Retirer la carte LAN sans fil en toute sécurité).
3. Une fois que le système indique que vous pouvez retirer la carte en
toute sécurité, cliquez sur OK et retirez-la de l'ordinateur.
Page 93

30
Configuration pour Windows XP
La configuration de la carte LAN sans fil pour Windows XP se fait en trois
étapes.
1. Installation du pilote.
2. Confirmation du bon fonctionnement de la carte.
3. Choix du réseau sans fil.
Installation du pilote
Une fois la carte insérée dans la fente PCMCIA de l'ordinateur, Windows
installe automatiquement le pilote pour la carte.
• Si une fenêtre s'ouvre et indique un message d'erreur sur
Windows Logo Testing, cliquez sur Continue Anyway (Continuer
quand même).
Confirmation du bon fonctionnement de la carte
1. Sur le bureau, cliquez avec le bouton droit de la souris sur Poste de
travail, puis sélectionnez Propriétés.
2. Cliquez sur l'onglet Périphériques.
3. Dans la section Gestionnaire de périphériques, cliquez sur le bouton
Gestionnaire de périphériques.
4. Repérez la catégorie Cartes réseau.
5. Cliquez sur le signe plus pour ouvrir la liste des cartes réseau
installées.
6. Cette liste doit contenir le nom de la carte LAN sans fil. Si aucune icône
d'erreur n'est affichée à côté du nom, la carte fonctionne correctement.
Page 94

31
Choix du réseau sans fil
Après avoir installé la carte LAN sans fil, une icône Wireless Network
Connection (Connexion réseau sans fil) apparaît sur la barre des tâches avec
un message sur la disponibilité du réseau.
1. Cliquez sur l'icône Wireless Network Connection pour afficher la liste
des points d'accès de réseau disponibles.
2. Sélectionnez un point d'accès à partir de la liste des réseaux
disponibles, puis cliquez sur Connect (Connecter).
3. Si vous avez des difficultés à établir une connexion au réseau sans fil
sélectionné, cliquez sur Advanced (Avancée) et configurez les
paramètres dans l'onglet Wireless Networks (Réseaux sans fil).
• Consultez la documentation Windows XP pour en savoir plus sur
les options de configuration dans l'onglet Wireless Networks.
Page 95

32
Connexion réseau introuvable
Si l'icône Local Area Network de la barre des tâches est barrée d'une croix,
cela signifie que la connexion réseau est introuvable.
1. Cliquez sur l'icône Wireless Network Connection dans la barre de
tâches pour afficher la liste des points d'accès des réseaux
disponibles.
2. Si un point d'accès est indiqué dans la liste des réseaux disponibles,
sélectionnez-le, puis cliquez sur Connect (Connecter).
3. Si aucun point d'accès n'est indiqué, cliquez sur le bouton Advanced
(Avancée), puis cliquez sur Refresh (Rafraîchir) pour chercher un point
d'accès. Si aucun n'apparaît, il existe un problème de connexion au
réseau sans fil.
4. Sélectionnez un point d'accès dans la liste des réseaux disponibles.
5. Cliquez sur Configure (Configurer). La boîte de dialogue Wireless
Network Properties (Propriétés du réseau sans fil) s'affiche. Aucune
option dans cette fenêtre ne nécessite de paramétrage.
6. Cliquez sur OK.
Utilitaire de configuration de la carte LAN sans fil
L'utilitaire de configuration fourni avec la carte LAN sans fil offre des outils
supplémentaires pour la configuration et la surveillance de la connexion avec
la carte. Voir le paragraphe CONFIGURATION DE LA CARTE LAN SANS FIL
POUR WINDOWS.
Page 96

33
Configuration pour Windows 2000
La configuration de la carte LAN sans fil avec le système d'exploitation
Windows 2000 s'effectue en deux étapes.
1. Installation du pilote à partir de l'Assistant Nouveau matériel.
2. Confirmation du bon fonctionnement de la carte.
Installation du pilote et de l'utilitaire
Une fois la carte insérée dans la fente PCMCIA de l'ordinateur, Windows la
détecte automatiquement et ouvre l'assistant Found New Hardware Wizard
(Assistant Nouveau matériel détecté). L'assistant vous guide à travers
l'installation du pilote de la carte.
1. Sur l'écran Welcome (Bienvenue) de l'assistant, cliquez sur Next
(Suivant) pour continuer.
2. Sur l'écran Install Hardware Device Drivers (Installer pilotes de
périphériques), cochez le bouton radio Search for a suitable driver for
my device, pour la recherche d'un pilote approprié au dispositif.
(Recommandé.)
3. Cliquez sur Next (Suivant).
4. Insérez le CD-ROM de la carte LAN sans fil dans le lecteur de CD-ROM
de l'ordinateur.
5. Cochez la case correspondant à Specify a location (Préciser un
emplacement).
6. Cliquez sur Next. Une fois que Windows a reconnu la carte, la fenêtre
Driver Files Search Results (Résultats de la recherche des fichiers du
pilote) s'ouvre et affiche les noms du dispositif et du pilote.
7. Pour installer le pilote, cliquez sur Next.
8. Une fois que l'assistant a terminé l'installation, cliquez sur Finish
(Terminer).
Confirmation du bon fonctionnement de la carte
1. Ouvrez le Panneau de configuration à partir du menu Démarrer, puis
sélectionnez Gestionnaire de périphériques.
Page 97

34
2. Repérez la catégorie Cartes réseau.
3. Cliquez sur le signe plus pour ouvrir la liste des cartes réseau
installées.
4. Cette liste doit contenir le nom de la carte LAN sans fil. Si aucune icône
d'erreur n'est affichée à côté du nom, la carte fonctionne correctement.
Page 98

35
Configuration pour Windows NT 4.0
La configuration de la carte LAN sans fil avec le système d'exploitation
Windows NT 4.0 s'effectue en quatre étapes.
1. Ajout d'une carte réseau.
2. Installation du pilote.
3. Redémarrage de Windows.
4. Confirmation du bon fonctionnement de la carte.
Ajout d'une carte réseau
1. Sur le bureau, ouvrez le Panneau de configuration, puis cliquez deux
fois sur Network (Réseau).
2. Sélectionnez l'onglet Adapters (Cartes), puis cliquez sur le bouton Add
(Ajouter).
3. Sélectionnez la carte LAN sans fil à partir de la liste Network Adapters
(Cartes réseau).
Page 99

36
4. Cliquez sur Have Disk (Disquette fournie).
Page 100

37
Installation du pilote
1. Insérez le CD-ROM de la carte LAN sans fil dans le lecteur de CD-ROM
de l'ordinateur, puis cliquez sur OK.
2. Une fois que Windows reconnaît la carte, la fenêtre Select OEM Option
(Sélectionner option OEM) s'ouvre. Cliquez sur OK pour installer le
pilote de la carte.
Redémarrage de Windows
• Redémarrez Windows pour terminer l'installation.
Confirmation du bon fonctionnement de la carte
1. Ouvrez le Panneau de configuration à partir du menu Démarrer, puis
cliquez deux fois sur Périphériques.
2. Repérez le nom Wireless LAN Card (Carte LAN sans fil). Le pilote est
correctement installé et lancé lorsque le message Started (Lancé) est
affiché dans la colonne Status (État).
 Loading...