

Page 1
SanDisk® Photo Album
User Guide
Contents
Package Contents............................................................................................…......................…….. 1
Product Specification...........................................................................................…..................……... 2
Minimum Requirements................................................…...................................…............................ 2
Installing SanDisk Photo Album............................................................................………………….… 2
Using SanDisk Photo Album.................................................................................………………….… 2
Displaying Photos & Video Clips................................ ........................................ ..………………..…… 3
Storing and Deleting Photos & Video Clips..........................................................………………..…… 4
Playing Photos with Music....................................................................................………………..…… 4
Playing Music.........................................................................................................…………………… 5
Files Mode.............................................................................................................………………….… 5
Settings & Options.................................................................................................……………….…… 5
USB Card Reader/Writer Mode....................................................... ......................……………………. 6
Troubleshooting...............…...................................................................................…………………… 7
Warranty...............................................................................................................………………..…… 8
Congratulations
Congratulations on your purchase of the SanDisk Photo Album. Now you can easily view and share
your digital photos and more on TV in the comfort of your living room. This user guide tells you how
to install and use your SanDisk Photo Album.
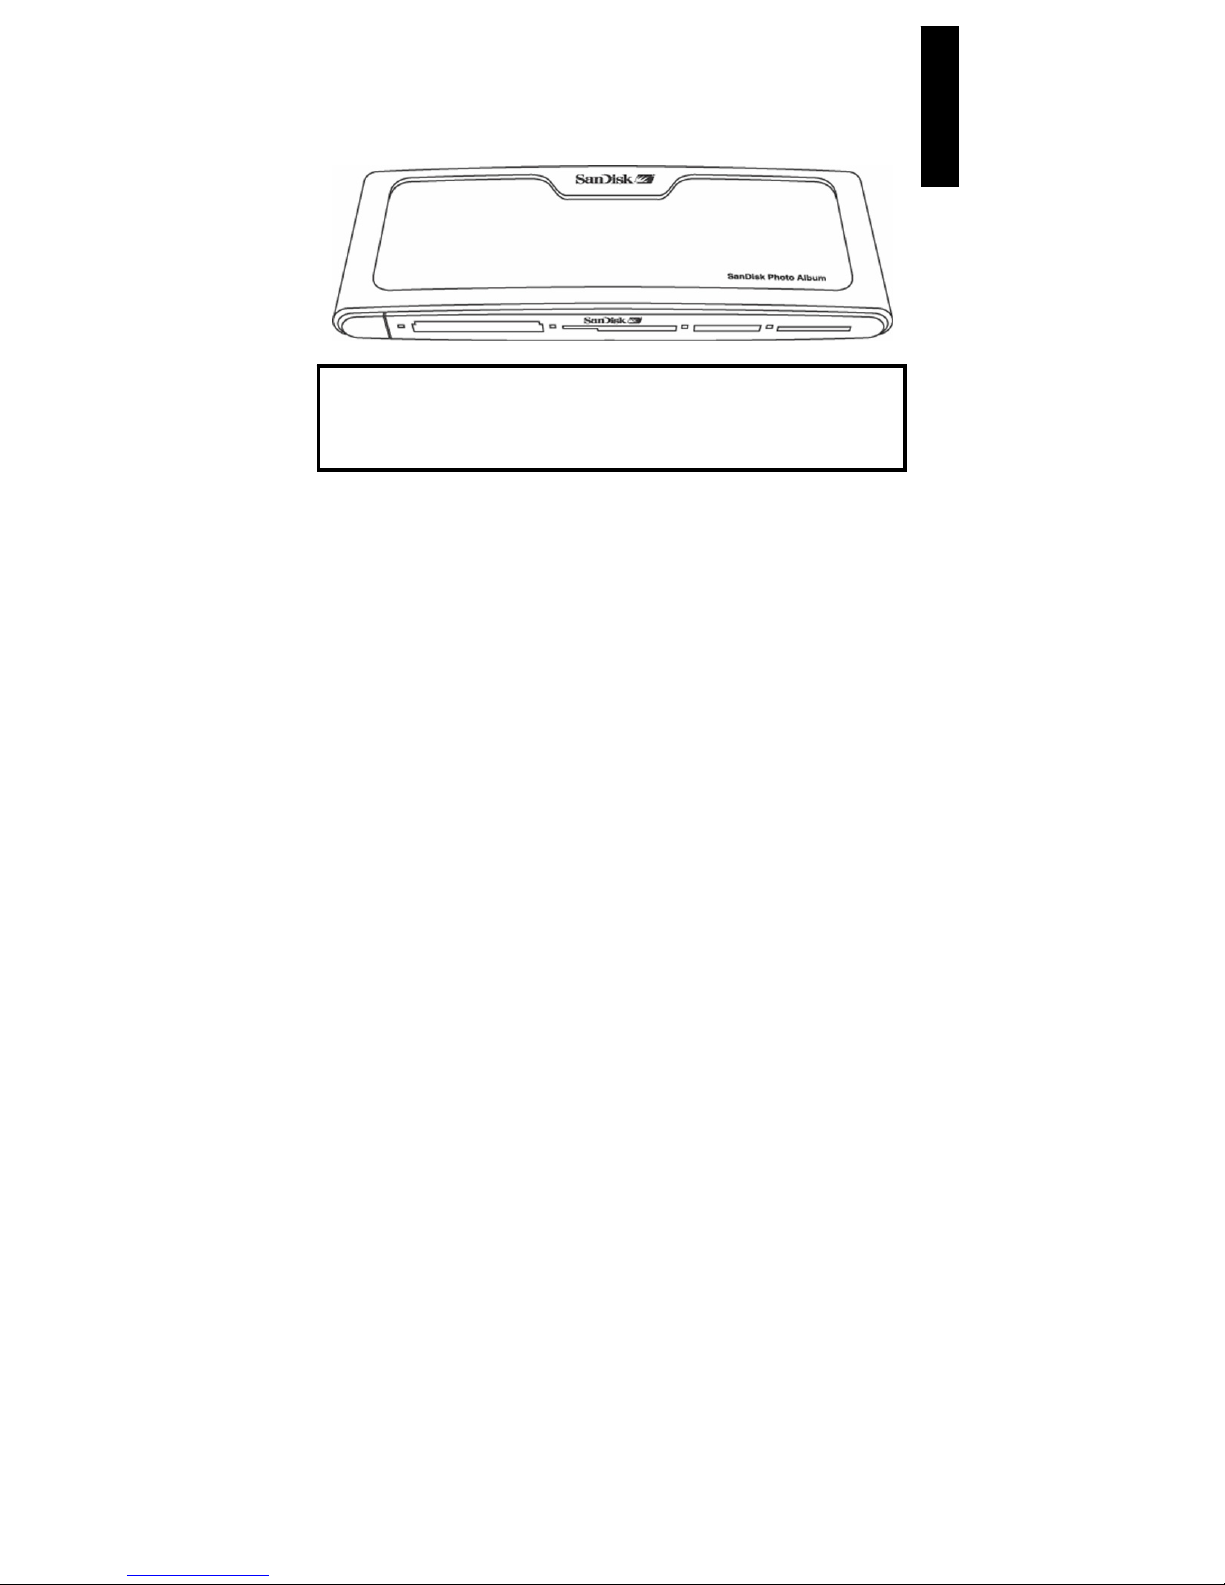
Package Contents
• SanDisk Photo Album
• Power Supply
• Audio/Video Cable
• Remote Control with Batteries
• User Guide
• CD-ROM (for use as an 8-in-1 card reader/writer)
• USB Cable (for use as an 8-in-1 card reader/writer)
You may register your product at
http://www.sandisk.com/registration
and receive e-mail alerts about new firmware versions that enhance the functionality of
your SanDisk Photo Album!
Failure to register your product will NOT diminish the rights you have under the product warranty.
ENGLISH
Page 2
2
Product Specification
• Content Format Support:
• JPEG (Baseline, up to 16 Megapixel)
• Motion JPEG
• MPEG-1 (QVGA resolution / up to 8 frames per second)
• MP3 (up to 320 Kbps)
• Connections:
• Video (Composite) and Audio (Stereo)
• Two USB 1.1 connectors (to PC & USB Flash Drive)
• Power
• Compatible Flash Memory Card Formats:
• CompactFlash® Type I / II
• SD™ / MultiMediaCard™
• Memory Stick™ / Memory Stick PRO™
• SmartMedia™ / xD
Minimum Requirements
For storing and playback:
• TV with RCA video (NTSC or PAL) and RCA audio connection (left + right)
For use as an 8-in-1 reader/writer:
• Windows: Pentium-class PC with USB support, CD-ROM Drive and Windows 98SE, ME, 2000 or
XP.
• Macintosh: Computer with USB support, CD-ROM Drive and Mac OS 10.1.2+
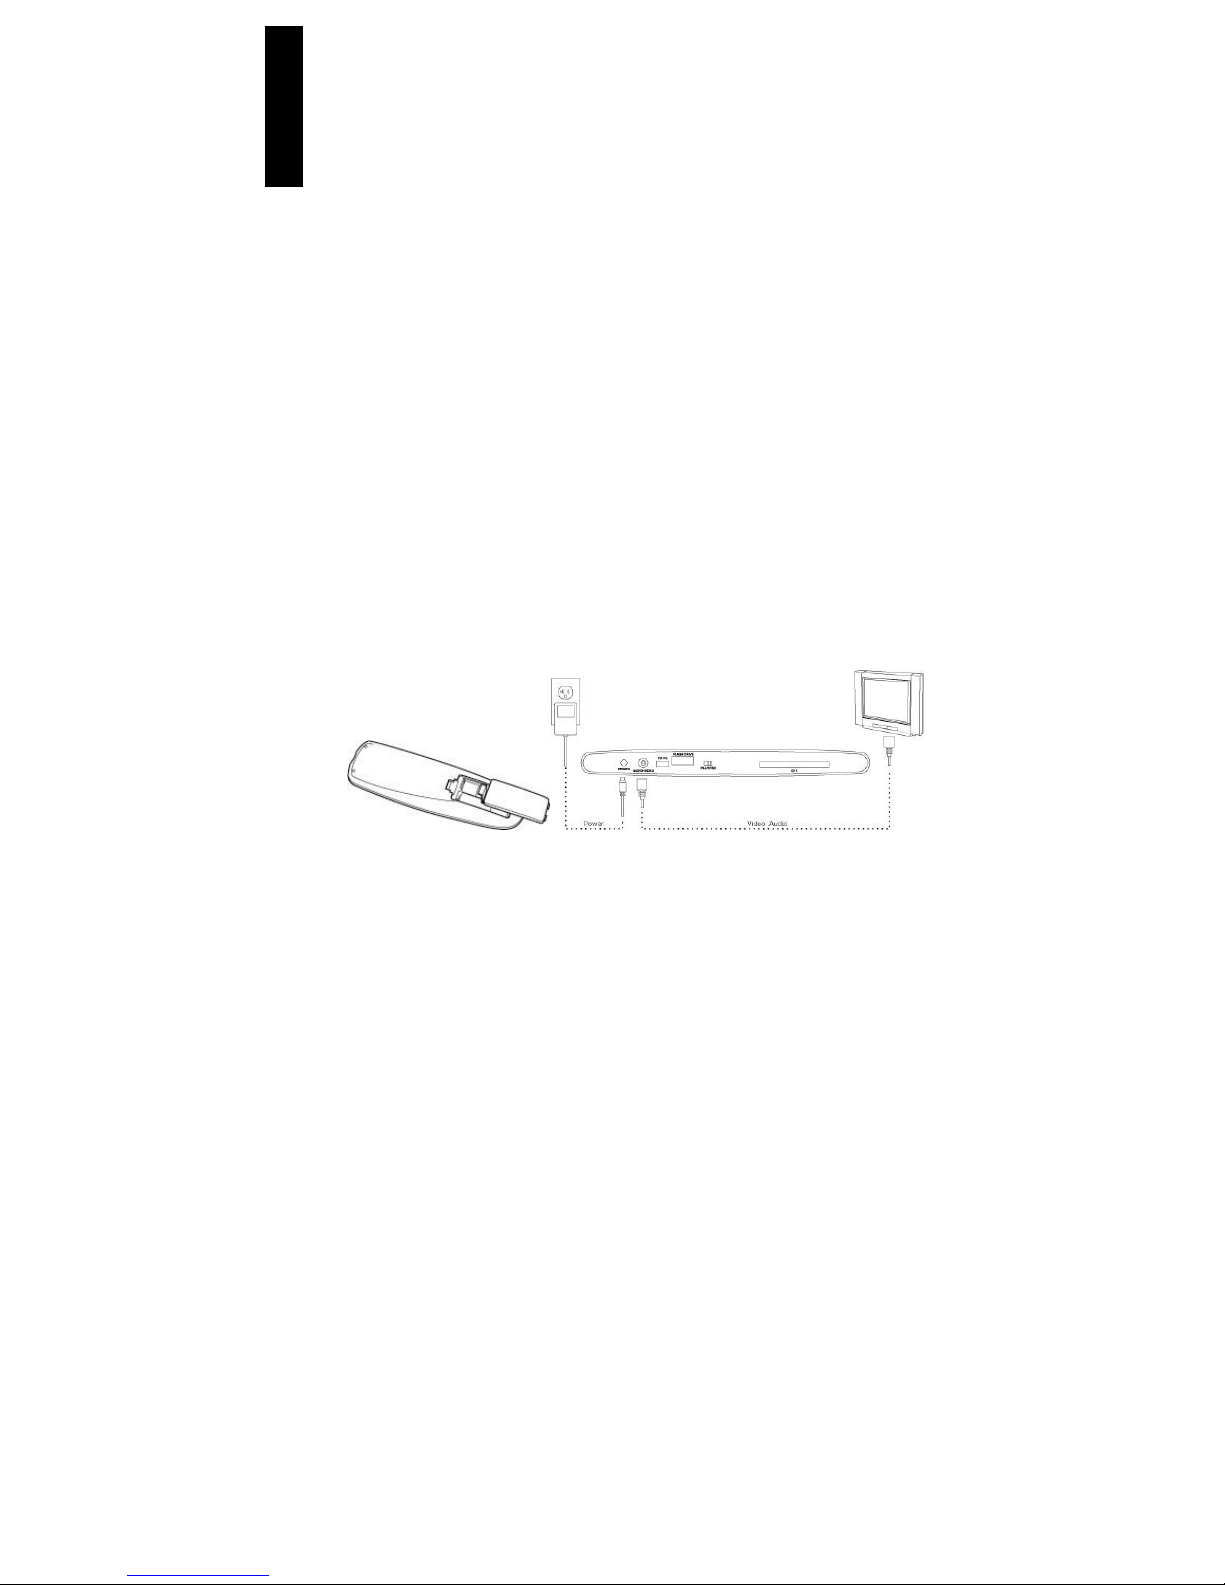
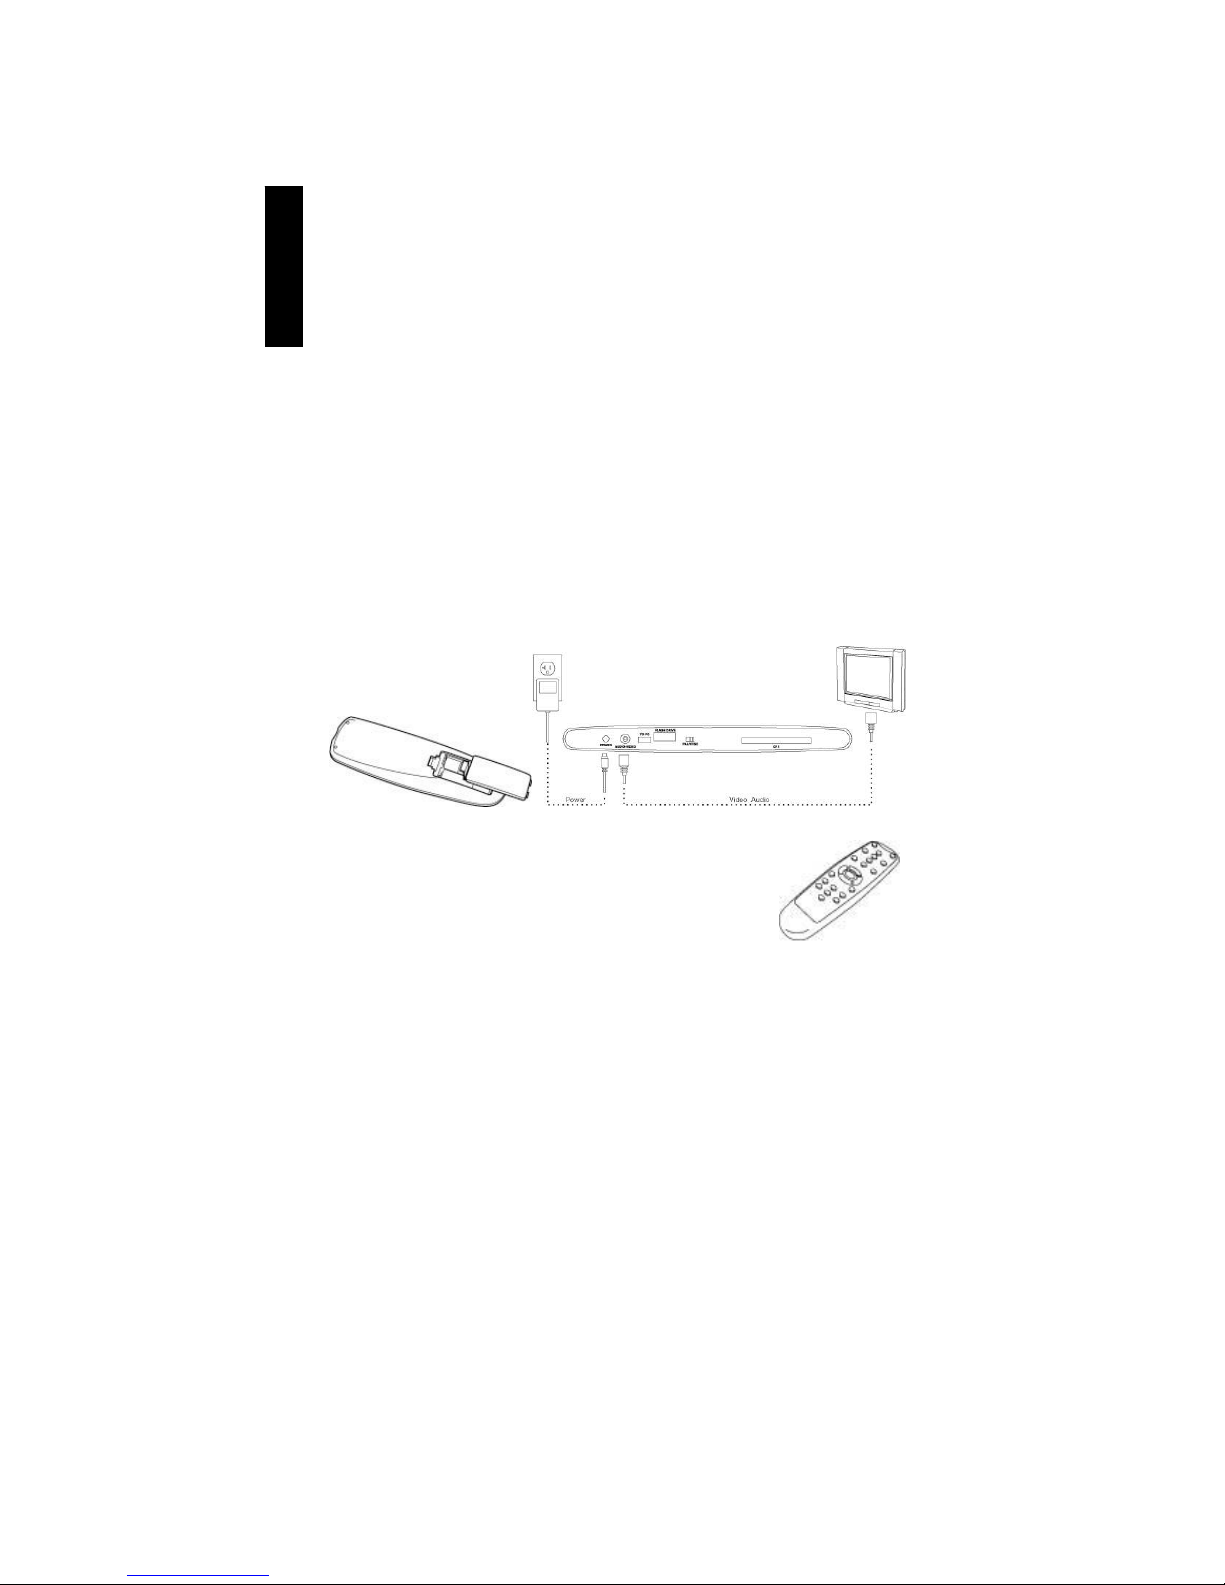
Installing SanDisk Photo Album
1. Plug the Power Supply into the back of the SanDisk Photo Album and plug the power supply
into a power outlet.
2. Connect the audio/video cable to the TV and/or audio system. On the TV, the yellow plug
should connect to Video In, the red plug should connect to Audio In (R), and the white plug
should connect to Audio In (L).
3. Connect the audio/video cable to the back of the SanDisk Photo Album.
4. Insert the batteries into the remote control.
5. Press the power button on the remote and the SanDisk Photo Album will start up (the SanDisk
logo lights up).
6. Turn on the TV and change the input source on the TV. Depending on the TV, the input source
may be called TV/Video, Input, or Source (consult the TV manual for more information). When
the correct source is selected,
you will see a message to insert
a memory card. The SanDisk
Photo Album is now ready for
use.
Using SanDisk Photo Album
Insert a flash memory card or USB Flash Drive (UFD) into the corresponding slot (for SmartMedia,
insert with gold-plated side facing down). When a card is inserted correctly, the green LED left of the
slot turns on and the SanDisk Photo Album will begin reading the card. If you have photos (JPEG) or
video clips (Motion JPEG or MPEG-1) stored on the card, you will automatically be taken to the
ENGLISH
Page 3
3
PHOTO & VIDEO menu. If you have music (MP3) on the card, but not one of the supported photo or
video file formats, you will be taken to the MUSIC menu.
The SanDisk Photo Album is operated with the included remote control. If you have more than one
memory card inserted, you can press SELECT CARD. Choose which card (or UFD) to use with the
up and down arrows buttons and then press OK to confirm your choice.
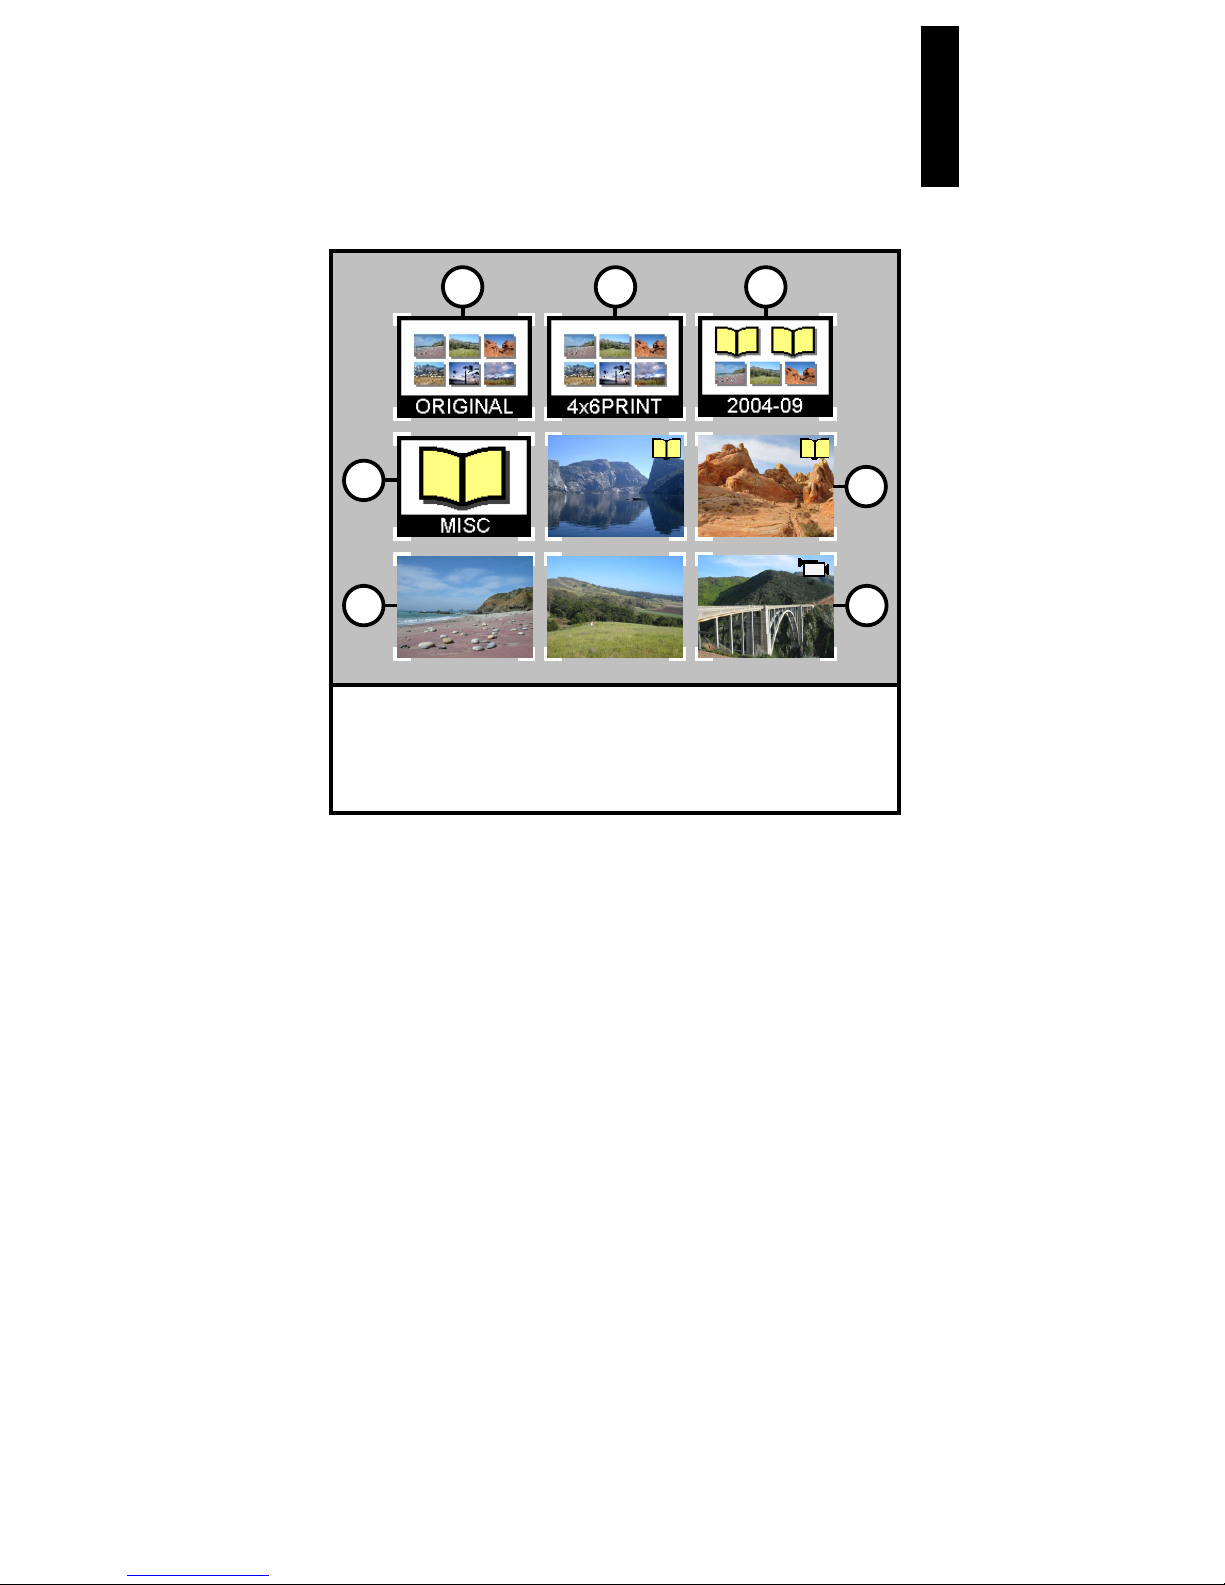
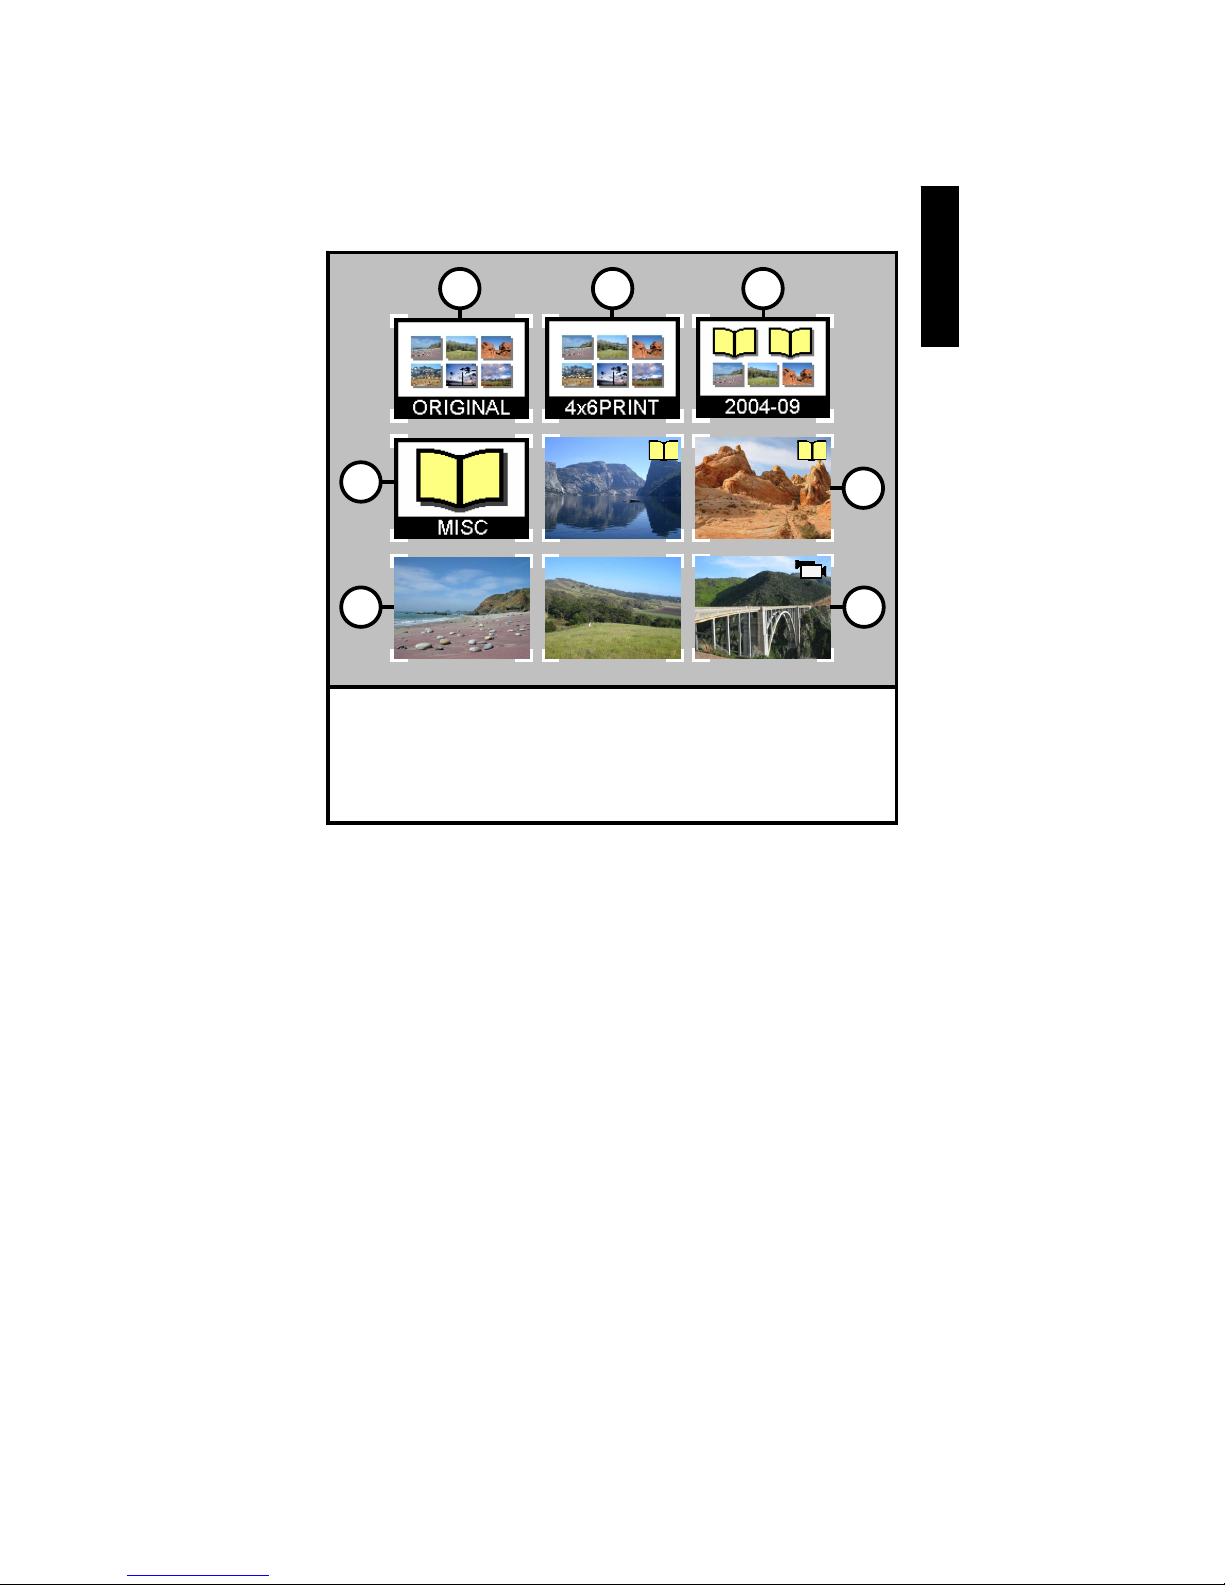
Displaying Photos & Video Clips
• Press the PHOTO/VIDEO button to display the thumbnails of photos and video clips stored on the
selected memory card or UFD.
• Photos and video clips can be inside an album (folder). Use the arrow buttons to select an album
and press OK to enter the album. Press play while the album is pre-selected to play the
photos/video clips as a slide show.
• Use the arrow buttons to select a thumbnail representing a photo or video and use PREVIOUS
and NEXT buttons to switch between pages.
• Press OK to display (photo) or play (video) full screen size. Press PLAY/PAUSE to start playing
photos and videos according to the SLIDE SHOW settings (see Settings & Options).
• Press PREVIOUS to go to the previous photo or video clip.
• Press NEXT to go to the next photo or video clip.
1. Album with photos/video clips stored in original resolutions
2. Album with photos stored in print resolution
3. Album with sub albums and photos/video clips
4. Album that is empty or without compatible content
5. Thumbnail of photo
6. Album with photos. The thumbnail is the first photo/video clip in the album
7. Thumbnail of video clip
4
5
1 2 3
6
7
ENGLISH
Page 4

4
• Use ZOOM + and ZOOM - buttons to zoom in/out on a photo or to expand the video to fit the
entire screen. When zoomed in on a photo, you can use the arrow buttons to move up, down, left
or right.
• Press the ROTATE button once to rotate the photo 90 degrees clockwise. Press again to rotate 90
degrees further.
• To stop and return to the PHOTO/VIDEO menu, press STOP or EXIT.
• Press the INFO button to view more information about the selected file or to display/hide the
progress bar during video playback.
Storing and Deleting Photos & Video Clips
• The SanDisk Photo Album has an extra CompactFlash Type I slot on the back side. When a
CompactFlash Type I card (not included) is inserted, you can store photos and video clips from
the UFD or from cards inserted in the front slots.
• To store a photo, press the STORE button when the photo is displayed full screen. From the menu
that appears, you can choose to store the photo in its original quality (resolution) or in TV
(640x480 pixels) quality. In TV quality, the photo looks the same on the TV screen as its original
(higher) resolution version but the storage size is only a fraction of its original size. For instance,
when using a 128 MB CompactFlash card in the back slot, you can store up to 2000 photos in TV
quality (based on average storage size of 60 KB per photo).
• Photos that are stored in original resolution are automatically stored in an album called ORIGINAL
• Photos that are stored in print resolution (postcard size) are automatically stored in an album
called PRINT
• Photos that are stored in TV resolution can be stored in an album depending on the storing
settings. Press the SETTINGS & OPTIONS button and select STORING and then ALBUM /
GROUPING. If the option “Group Photos per Day” is selected, then all photos made on the same
day are stored in one album. This happens at the moment that those photos are being stored on
the CompactFlash card in the back. The other options are storing per month (all photos of the
same month are stored in one album) and per year (all photos of the same year are stored in one
album). Photos that are already stored and albums that are already created are not affected when
changing the storing settings. The storing settings only apply to photos that are stored after
changing the settings.
• Video clips are stored in a similar fashion but can be stored only in their original size. Video clips
are automatically stored in an album called ORIGINAL. Be aware that the file size of a video clip is
often much bigger than a photo and can fill up your memory card quickly.
• To delete a photo, video clip or complete album, press the DELETE button when the item is preselected. Then follow the on-screen instructions. You can also delete a photo or video clip when it
is displayed full screen.
Playing Photos with Music
• You can display photos with (background) music. The photos need to be stored in TV quality on
the CompactFlash card inserted in the back. When an MP3 file (128 Kb per second or less) is
stored on the same card, the SanDisk Photo Album will play the photos with the music according
to the slide show settings. When one or more MP3 files are present in an album, the music will
play with the photos in that album.
• To enable or disable playing photos with music, press OPTIONS & SETTINGS, select SLIDE
SHOW and then MUSIC WITH SLIDE SHOW. Select YES (for music) or NO (no music) and press
OK.
• See USB Card Reader/Writer Mode for instructions about how to add MP3 files
• See Settings & Options for how to change slide show settings.
WARNING
Store photos ONLY in TV quality/resolution for TV playback purposes. Photos stored in TV
quality are NOT suitable for making quality prints. A photo stored in TV quality CANNOT
be changed back to its original quality/resolution.
The ori
g
inal photo is not affected.
ENGLISH
Page 5

5
Playing Music
• Press the MUSIC button to display the list of songs stored on the selected memory card or UFD.
• Use the arrow buttons to select a song and use PREVIOUS and NEXT buttons to switch between
pages.
• Press OK to play the highlighted song or press PLAY/PAUSE to start playing a series of songs
according to the MUSIC settings (see Settings & Options). During playback, you can press
PLAY/PAUSE to pause playback. Press it again to resume.
• Pressing PREVIOUS one time will skip to the beginning of the song. Press multiple times to go to
previous songs. Press and hold to go fast-backward.
• Pressing NEXT will skip to the next song. Press and hold to go fast-forward.
• Adjust the audio volume with the VOLUME +/- buttons. The maximum volume is the volume set on
the TV or connected audio system.
• To stop and return to the MUSIC menu, press STOP or EXIT.
• Press the INFO button to view more information about the selected file.
• You can also play music without a TV. Connect the A/V cable to the Left and Right Audio In
connection of an audio system. Select the input source on the audio system (if necessary). Insert
a card or UFD with ONLY MP3 files into the SanDisk Photo Album, turn it on and wait until the
LED stops blinking. Now press play and the first music file will start playing. At the end, the next
music file will start according to the music settings.
Files Mode
• Press the FILES button to see all supported files on the selected memory card or UFD.
• Use the arrow buttons to select different files and albums (folders), and press PREVIOUS and
NEXT to switch between pages.
• Use the OK or PLAY/PAUSE buttons to enter albums and to start playing files. Press STORE to
store files and INFO to view
• Once (dis)playing files from Files Mode, the other buttons operate the same way as in
PHOTO/VIDEO mode and MUSIC mode.
Settings & Options
• You can change various settings of the SanDisk Photo Album. Press the SETTINGS & OPTIONS
button on the remote control to access the Settings & Options menu. Use the arrow buttons and
OK button to enter sub-menus and to select options. The activated option is highlighted when you
enter the menu. Press EXIT to return to a previous menu or to leave the Settings & Options menu
without changing any settings.
• Select STORING to view or change the following settings:
• RESOLUTION – Choose the resolution for storing photos.
• ALBUM/GROUPING – Choose how photos should be organized when stored.
• Select SLIDE SHOW to view or change the following settings:
• PLAY ORDER – Choose whether to show photos and video clips in alphabetical order or
randomly.
• SLIDE INTERVAL – Choose how long each slide stays on the screen before changing to the
next one (actual interval times can be longer than setting due to longer file loading times).
• SHOW LENGTH – Choose whether to show every photo/video once and then stop, to loop
playback of photos/videos or to show photos until the music stops.
• TRANSITION EFFECT – Choose which effect to use when changing slides, to randomly
choose an effect each time or to use no effects at all.
• MUSIC WITH SLIDE SHOW – Choose whether music files should be played while showing
slides. This is only functional if the CompactFlash card in the back slot contains MP3 files
(see Playing Photos with Music).
• Select MUSIC to view or change the following settings:
• PLAY ORDER – Choose whether to play songs in alphabetical order or randomly.
• PLAY LENGTH – Choose whether to play every song once and then stop or to loop
playback of songs.
• Select PRINT SETTINGS to view or change the following settings:
ENGLISH
Page 6

6
• MARK FOR PRINTING – When selecting YES, the photo is marked for printing. If the card
with marked photos is inserted in a printer or photo kiosk that is DPOF compatible, the
printer/kiosk is automatically instructed which photos to print.
• NUMBER OF PRINTS – Select from 1 to 5 for the amount of prints of the marked photo. The
default selection is 1 print.
• SIZE – Select from the following sizes to specify the print size: 100 x 150 mm (4 x 6"), 130 x
180 mm (5 x 7") and 200 x 300 mm (8 x 10"). 100 x 150 mm is the default selection.
• Select FIRMWARE to view the version number of the software that is installed. Visit
www.sandisk.com/registration to sign up for new firmware alerts by e-mail and to download new
firmware versions.
USB Card Reader/Writer Mode
The SanDisk Photo Album can also function as an 8-in-1 USB Card Reader/Writer when connected
to a computer.
NOTE: you can only use ONE USB port on the SanDisk Photo Album at a time; the small USB
connector to connect to the computer OR the large USB connector to connect USB Flash Drives. Do
NOT attempt to use both USB connectors simultaneously.
Windows ME, 2000 and XP: Simply connect the small end of the USB cable to the back of the
SanDisk Photo Album and then connect the other end to the PC. The necessary drivers will load
automatically. Now, the four slots on the front of the SanDisk Photo Album will automatically show
up as four different removable drives in My Computer. You can access files on the memory card as if
it was another drive in the computer.
Windows 98SE:
1. Connect the small end of the USB cable to the back of the SanDisk Photo Album and then
connect the other end to the PC.
2. The New Hardware Wizard window appears. Click the NEXT button.
3. On the next screen, select “Search for the best driver for your device” and click the NEXT button.
4. On the next screen, select only the “CD-ROM drive” option. Insert the SanDisk CD in the CD-
ROM drive and click the NEXT button.
5. Click FINISH when Windows has finished installing the software.
6. Restart the PC. Go to My Computer. The four slots on the front of the SanDisk Photo Album
should now show up as four different removable drives in. You can access files on the memory
card as if it was another drive in the computer.
Macintosh OS 10.1.2+: Connect the small end of the USB cable to the back of the SanDisk Photo
Album and then connect the other end into the USB port on the Mac (do not connect to monitor or
keyboard). A new drive will appear on the desktop when a card is placed into one of the front slots
of the SanDisk Photo Album (you can use only one slot at a time). Drag and drop files to and from
the new drive as you would with any other disk or folder.
ENGLISH
Page 7

7
Removing Cards/UFD (Windows)
1. Open My Computer
2. Right-click on the corresponding drive icon
3. Select Eject (this is not applicable for Windows 98SE)
4. Pull the card/UFD out of the slot
Removing Cards/UFD (Macintosh)
Drag the ‘untitled’ removable disk icon to the desktop Trash icon and pull the card/UFD out of the
slot.
To avoid losing data or corrupting the card/UFD, NEVER remove the card/UFD or disconnect the
SanDisk Photo Album when the ACTIVITY LED is FLASHING or BLINKING
How to add music files to a slide show (Windows)
1. Connect the SanDisk Photo Album to the USB port on the PC.
2. Double click on the icon "My Computer" and browse to the folder where the music files are
stored.
3. Select the music files by holding down the Ctrl key and clicking on the music files that you want
to copy.
4. Release the Ctrl key, click once with the RIGHT mouse button and select COPY.
5. Take the CompactFlash card with photos in TV resolution out of the back slot and put it in the
front slot. Double click on the removable disk drive (for the CompactFlash slot on the front of the
SanDisk Photo Album), i.e. F: or G: or maybe E. Now you should see the contents stored on
this card.
6. Go up to the menu bar where it says EDIT and click on PASTE. Now the music files are being
copied to the CompactFlash card.
7. To determine the order of the music playback, rename the music files by putting numbers in
front of the names. To rename a file, click once with the RIGHT mouse button on the file, move
the mouse pointer over RENAME, click the LEFT mouse button to select RENAME, put the
mouse pointer at the beginning of the file name and click on the left mouse button. Now enter a
number and press the ENTER key on the keyboard. Now the file name is saved.
8. After the files have been copied, go back to My Computer, right-click on the drive icon for the
front CompactFlash slot and select Eject.
9. Remove the CompactFlash card and insert it in the back slot. Connect the SanDisk Photo
Album to the TV and you are ready to play a multimedia slide show!
How to add music files to a slide show (Macintosh)
1. Connect the SanDisk Photo Album to the USB port on the Mac (do not connect to monitor or
keyboard).
2. Take the CompactFlash card with photos in TV resolution out of the back slot and put it in the
front slot. A new drive will appear on the desktop called “untitled”.
3. Browse to the folder where the music files are stored.
4. Drag and drop the music files to the new drive as you would normally do with any other disk or
folder.
Troubleshooting
For Frequently Asked Questions and other SanDisk Photo Album support information, please go to
our website at http://www.sandisk.com/retail/support.asp
For assistance by phone please call toll free 866-SANDISK (866-726-3475) M-F 7AM till 4 PM PST.
When the drive(s) do not appear in reader mode (see instructions in USB CARD READER/WRITER
MODE), the USB connection of your computer might not provide enough power. Use the SanDisk
Photo Album with its power supply and restart your computer.
ENGLISH
Page 8

8
Limited Warranty
SanDisk warrants that this product will be free from material defects in design and manufacture and will substantially
conform to the published specifications under normal use for two years from your date of purchase, subject to the
conditions below. This warranty is provided to the original end user purchasing from SanDisk or an authorized
reseller, and is not transferable. Proof of purchase may be required. This product must be used with memory cards
that are compliant with the specifications of the CompactFlash Card Association, the SD Card Association, the
MultiMediaCard Association, or Memory Stick, Memory Stick PRO, SmartMedia and xD-Picture Card requirements as
applicable; use with any other product voids this warranty. SanDisk is not responsible for any failure or defect caused
by any third party product or component, whether authorized or not. This warranty does not apply to any third party
software provided with the product and you are responsible for all service and repair needed for such software. This
warranty is void if the memory card is not used in accordance with the product instructions, or if it is damaged as a
result of improper installation, misuse, unauthorized repair, modification or accident.
To obtain warranty service contact SanDisk at 1-866-SanDisk or send an email to: support@SanDisk.com. You must
return the product in tamper resistant packaging, freight prepaid, as instructed by SanDisk. You must obtain a
tracking confirmation number, which you may be required to provide to SanDisk. SanDisk will, at its option, repair or
replace the product with new or refurbished product of equal or greater capacity and functionality, or refund the
purchase price. The warranty duration on replaced product will be that time period remaining on the original product.
THIS CONSTITUTES SANDISK’S ENTIRE LIABILITY AND YOUR EXCLUSIVE REMEDY FOR BREACH OF THIS
WARRANTY.
SanDisk does not warrant, and shall not be responsible for, any lost data or images contained in any product
(including in any returned product), regardless of the cause of the loss. SanDisk’s products are not warranted to
operate without failure. SanDisk products should not be used in life support systems or other applications where
failure could threaten injury or life. This warranty gives you specific legal rights, and you may also have other rights
which vary by jurisdiction.
THE FOREGOING IS SANDISK’S SOLE WARRANTY. SANDISK DISCLAIMS ALL OTHER EXPRESS AND
IMPLIED WARRANTIES TO THE FULLEST EXTENT PERMITTED BY APPLICABLE LAW. THE IMPLIED
WARRANTIES OF MERCHANTABILITY AND FITNESS FOR A PARTICULAR PURPOSE ARE LIMITED TO THE
DURATION OF THE EXPRESS WARRANTY. SOME JURIDSICTIONS DO NOT ALLOW LIMITATION ON HOW
LONG AN IMPLIED WARRANTY LASTS, SO THE ABOVE LIMITATION MAY NOT APPLY TO YOU. IN NO EVENT
SHALL SANDISK OR ANY AFFILIATED OR SUBSIDIARY COMPANY BE LIABLE UNDER ANY CIRCUMSTANCES
FOR ANY DIRECT, INDIRECT, OR CONSEQUENTIAL DAMAGES, ANY FINANCIAL LOSS OR ANY LOST DATA
OR IMAGE, EVEN IF SANDISK HAS BEEN ADVISED OF THE POSSIBILITY OF SUCH DAMAGE. SOME
JURISDICTIONS DO NOT ALLOW THE EXCLUSION OR LIMITATION OF INCIDENTAL OR CONSEQUENTIAL
DAMAGES, SO THE ABOVE LIMITATION OR EXCLUSION MAY NOT APPLY TO YOU. IN NO EVENT WILL
SANDISK’S LIABILITY EXCEED THE AMOUNT PAID BY YOU FOR THE PRODUCT.
The information in this manual is subject to change without notice. SanDisk shall not be liable for technical or
editorial errors or omissions contained herein, nor for incidental or consequential damages resulting from the
furnishing, performance or use of this material. This documentation may not be copied, reproduced, translated or
reduced to any electronic medium, in whole or in part, without prior written permission from SanDisk.
SanDisk, the SanDisk logo and CompactFlash are trademarks of SanDisk Corporation, registered in the United
States and other countries. Store Your World in Ours is a trademark of SanDisk Corporation. SanDisk is an
authorized licensee of the SD, and MultiMediaCard trademarks. SmartMedia is a trademark of Toshiba Corporation.
Memory Stick and Memory Stick PRO are trademarks of Sony Corporation. Other brand names mentioned herein are
for identification purposes only and may be trademarks of their respective holder(s).
© 2004 SanDisk Corporation. All rights reserved.
ENGLISH
Page 9
9
SanDisk® Photo Album
Guide d’utilisation
Table des matières
Contenu de l’emballage.................................................................................…………………………. 09
Spécifications du produit................................................................................………………………… 10
Configuration système minimale....................................................................………………………… 10
Installation du SanDisk Photo Album.............................................................………………………… 10
Utilisation du SanDisk Photo Album..............................................................…………………………. 10
Affichage des photos et des clips vidéo.........................................................………………………… 11
Stockage et suppression des photos et clips vidéo.......................................…………………………. 12
Affichage des photos avec musique..............................................................…………………………. 12
Lecture de la musique....................................................................................………………………… 13
Mode Fichiers................................................................................................…………………………. 13
Paramètres et options....................................................................................………………………… 13
Mode Lecteur-graveur de cartes USB...........................................................…………………………. 14
Dépannage....................................................................................................…………………………. 16
Garantie.............................. ................... ................. ................... ................. ...…………………………. 16
Félicitations !
Nous vous remercions d’avoir acheté le SanDisk Photo Album. Vous pouvez désormais visionner et
partager facilement vos photos numériques, entre autres, sur votre téléviseur dans le confort de
votre salon. Ce guide explique comment installer et utiliser le SanDisk Photo Album.
Contenu de l’emballage
• SanDisk Photo Album
• Câble d’alimentation
• Câble audio/vidéo
• Télécommande et piles
• Guide d’utilisation
• CD-ROM (pour utiliser l’appareil comme un lecteur-graveur de cartes 8-en-1)
• Câble USB (pour utiliser l’appareil comme un lecteur-graveur de cartes 8-en-1)
Enregistrez votre produit à
http://www.sandisk.com/registration
pour recevoir des messages électroniques sur les nouvelles versions micrologicielles
qui améliorent la fonctionnalité de votre SanDisk Photo Album !
Le non enregistrement de votre produit ne limite PAS les droits qui vous sont accordés aux termes de sa garantie.
FRAN
Ç
AIS
Page 10
10
Spécifications du produit
• Formats de fichier pris en charge:
• JPEG (ligne de base, jusqu’à 16 mégapixels)
• MJPEG
• MPEG-1 (résolution QVGA / jusqu’à 8 images par seconde)
• MP3 (jusqu’à 320 Kbps)
• Connexions:
• Vidéo (composite) et audio (stéréo)
• Deux connecteurs USB 1.1 (vers l’ordinateur et le lecteur flash USB)
• Alimentation
• Formats de carte mémoire flash compatibles:
• CompactFlash® Type I / II
• SD™ / MultiMediaCard™
• Memory Stick™ / Memory Stick PRO™
• SmartMedia™ / xD
Configuration système minimale
Pour le stockage et la lecture:
• Téléviseur avec ports RCA vidéo (NTSC ou PAL) et RCA audio (gauche + droit)
Pour l’utilisation comme lecteur-graveur 8-en-1:
• Ordinateur de bureau de classe Pentium avec prise en charge de USB, lecteur de CD-ROM et
Windows 98SE, ME, 2000 ou XP.
• Macintosh: Ordinateur avec prise en charge de USB, lecteur de CD-ROM et Mac OS 10.1.2+
Installation du SanDisk Photo Album
1. Branchez le câble d’alimentation à l’arrière du SanDisk Photo Album et à une prise murale.
2. Raccordez le câble audio/vidéo au téléviseur ou à la chaîne stéréo. Sur le téléviseur, la fiche
jaune doit être branchée dans l’entrée vidéo (Video In), la fiche rouge dans l’entrée audio droite
(Audio In - R) et la fiche blanche dans l’entrée audio gauche (Audio In - L).
3. Connectez le câble audio/vidéo à l’arrière du SanDisk Photo Album.
4. Insérez les piles dans la télécommande.
5. Appuyez sur le bouton POWER de la télécommande pour démarrer le SanDisk Photo Album (le
logo SanDisk s’allume).
6. Allumez le téléviseur et changez sa source d’entrée. Selon le modèle de téléviseur, la source
d’entrée peut être TV/Vidéo, Entrée (Input) ou Source (consultez le manuel de votre téléviseur
pour de plus amples renseignements). Une fois la source sélectionnée, un message apparaît
pour vous inviter à insérer
une carte mémoire. Le
SanDisk Photo Album est
maintenant prêt à l’emploi.
Utilisation du SanDisk Photo Album
Insérez une carte mémoire flash ou un lecteur flash USB dans le logement
correspondant (si vous avez une carte SmartMedia, veillez à ce que la face
dorée soit tournée vers le bas). Lorsque la carte est correctement insérée,
le voyant vert, à gauche du logement, s’allume et le SanDisk Photo Album
commence à lire la carte. Si celle-ci contient des photos (JPEG) ou des
clips vidéo (MJPEG ou MPEG-1), le menu PHOTO & VIDEO s’affiche
automatiquement. Si la carte contient des morceaux de musique (MP3) et
FRAN
Ç
AIS
Page 11
11
aucun des formats de fichiers photo ou vidéo pris en charge, le menu MUSIC s’affiche.
Le SanDisk Photo Album fonctionne avec la télécommande fournie. Si vous avez inséré plus d’une
carte mémoire, vous pouvez appuyer sur SELECT CARD. Sélectionnez la carte ou le lecteur que
vous désirez utiliser à l'aide des touches fléchées haut et bas puis appuyez sur OK pour confirmer
votre choix.
Affichage des photos et des clips vidéo
• Appuyez sur le bouton PHOTO/VIDEO pour afficher les miniatures des photos et des clips vidéo
stockés sur la carte mémoire ou le lecteur flash USB sélectionné.
• Les photos et clips vidéo peuvent se trouver à l'intérieur d'un album (dossier). Utilisez les touches
fléchées pour sélectionner un album et appuyez sur OK pour l’ouvrir. Appuyez sur PLAY quand
l'album est présélectionné pour afficher les photos ou clips vidéo en diaporama.
• Utilisez les touches fléchées pour sélectionner une miniature représentant une photo ou un clip
vidéo et appuyez sur les touches PREVIOUS (page précédente) et NEXT (page suivante) pour
passer d’une page à l’autre.
• Appuyez sur OK pour afficher (une photo) ou lire (une vidéo) en format plein écran. Appuyez sur
PLAY/PAUSE pour visualiser les photos et vidéos en fonction des paramètres du SLIDE SHOW
(voir Paramètres et options).
• Appuyez sur PREVIOUS pour retourner à la photo ou au clip vidéo précédent.
• Appuyez sur NEXT pour passer à la photo ou au clip vidéo suivant.
1. Album avec photos/clips vidéo stockés dans leurs résolutions d’origine
2. Album avec photos stockées dans la résolution d’impression
3. Album avec sous-albums et photos/clips vidéo
4. Album vide ou sans contenu compatible
5. Miniature de photo
6. Album avec photos. La miniature est la première photo ou le premier clip vidéo de
l’album
7. Miniature de cli
p
vidéo
4
5
1 2 3
6
7
FRAN
Ç
AIS
Page 12

12
• Utilisez les touches ZOOM + et ZOOM pour voir des détails d'une photo en gros plan ou pour
agrandir la vidéo sur tout l'écran. Lorsque vous effectuez un zoom, vous pouvez vous déplacer
vers le haut, le bas, la gauche et la droite à l’aide des touches fléchées.
• Appuyez sur la touche ROTATE pour tourner la photo de 90 degrés dans le sens horaire.
Appuyez de nouveau sur la touche pour la faire pivoter encore de 90 degrés.
• Pour arrêter et retourner au menu PHOTO/VIDEO, appuyez sur STOP ou EXIT.
• Appuyez sur la touche INFO pour en savoir plus sur le fichier sélectionné ou pour
afficher/masquer la barre de progression pendant la lecture de la vidéo.
Stockage et suppression des photos et clips vidéo
• Au dos du SanDisk Photo Album se trouve un logement supplémentaire pour une carte
CompactFlash Type I. Lorsqu’une carte CompactFlash Type I (non fournie) est insérée, vous
pouvez y stocker des photos et des clips vidéo depuis le lecteur flash USB ou des cartes se
trouvant dans les logements sur la face avant de l’appareil.
• Pour stocker une photo, appuyez sur le bouton STORE lorsqu’elle s’affiche en plein écran. Dans
le menu qui s’affiche, vous pouvez choisir de stocker la photo dans sa qualité d’origine (résolution)
ou une qualité télévision (640 x 480 pixels). Une photo stockée en qualité télévision a le même
aspect sur l’écran que la version en résolution d’origine (plus élevée) mais sa taille de stockage ne
représente qu’une fraction de sa taille d’origine. Par exemple, si vous insérez une carte
CompactFlash de 128 Mo dans le logement arrière, vous pourrez y stocker jusqu’à 2 000 photos
en qualité télévision (chiffre basé sur la taille de stockage moyenne de 60 Ko par photo).
• Les photos stockées dans leur résolution d’origine sont automatiquement rangées dans un album
appelé ORIGINAL.
• Les photos stockées dans la résolution d’impression sont automatiquement rangées dans un
album appelé PRINT.
• Les photos stockées en résolution télévision peuvent être rangées dans un album en fonction des
paramètres de stockage. Appuyez sur la touche SETTINGS & OPTIONS et sélectionnez
STORING puis ALBUM / GROUPING. Si l’option « Grouper les photos par jour » est sélectionnée,
toutes les photos prises le même jour sont stockées dans un album. Ce regroupement s’effectue
lors du stockage des photos sur la carte CompactFlash insérée au dos de l’appareil. Les autres
options sont le stockage par mois (toutes les photos prises le même mois sont stockées dans un
album) et par année (toutes les photos prises la même année sont stockées dans un album). Les
photos déjà stockées et les albums déjà créés ne sont pas affectés par les modifications des
paramètres de stockage. Seules les photos qui sont stockées après la modification des
paramètres sont concernées.
• Le stockage des clips vidéo est similaire mais ceux-ci ne peuvent être stockés que dans leur taille
d’origine. Ils sont automatiquement rangés dans un album appelé ORIGINAL. Notez que la taille
de fichier d'un clip vidéo est souvent bien plus importante que celle d'une photo et que les clips
remplissent donc une carte mémoire plus rapidement.
• Pour supprimer une photo, un clip vidéo ou un album entier, sélectionnez-les et appuyez sur la
touche DELETE. Suivez ensuite les consignes affichées à l’écran. Vous pouvez aussi supprimer
une photo ou un clip vidéo pendant son affichage plein écran.
Affichage des photos avec musique
• Vous pouvez afficher les photos avec une musique de fond. Les photos doivent être stockées en
qualité télévision sur la carte CompactFlash insérée au dos de l'appareil. Lorsqu’un fichier MP3
(128 Ko par seconde ou moins) est stocké sur la même carte, le SanDisk Photo Album affiche les
photos avec la musique en fonction des paramètres du diaporama. Lorsqu’un album contient un
ou plusieurs fichiers MP3, la musique est lue avec les photos de cet album.
AVERTISSEMENT
Stockez les photos en qualité/résolution télévision UNIQUEMENT pour les visionner sur le
téléviseur. La qualité télévision ne convient PAS pour l’impression de beaux tirages. Une
photo stockée en qualité télévision NE PEUT PAS être restockée dans sa
qualité/résolution d'origine.
Cela n'affecte pas la photo d'origine.
FRAN
Ç
AIS
Page 13

13
• Pour activer ou désactiver l'affichage des photos avec la musique, appuyez sur la touche
OPTIONS & SETTINGS, sélectionnez SLIDE SHOW puis MUSIC WITH SLIDE SHOW.
Sélectionnez YES (pour entendre la musique) ou NO (pas de musique) et appuyez sur OK.
• Consultez la rubrique Mode Lecteur-graveur de cartes USB pour savoir comment ajouter des
fichiers MP3.
• Consultez la rubrique Paramètres et options pour savoir comment modifier les paramètres du
diaporama.
Lecture de la musique
• Appuyez sur la touche MUSIC pour afficher la liste des morceaux stockés sur la carte ou le lecteur
flash USB sélectionné.
• Utilisez les touches fléchées pour sélectionner une musique et les touches PREVIOUS et NEXT
pour passer d’une page à l’autre.
• Appuyez sur OK pour écouter le morceau en surbrillance ou sur PLAY/PAUSE pour écouter
plusieurs morceaux de musique en fonction des paramètres MUSIC (voir Paramètres et options).
Vous pouvez appuyer sur PLAY/PAUSE pour interrompre momentanément la lecture. Appuyez de
nouveau sur cette touche pour reprendre la lecture.
• Appuyez une seule fois sur PREVIOUS pour revenir au début du morceau. Appuyez sur cette
touche plusieurs fois pour revenir aux morceaux précédents. Maintenez la touche enfoncée pour
revenir en arrière rapidement.
• Appuyez sur NEXT pour passer au morceau suivant. Maintenez la touche enfoncée pour avancer
rapidement.
• Réglez le volume sonore avec les boutons VOLUME +/-. Le volume maximal est le volume réglé
sur le téléviseur ou la chaîne stéréo connectée.
• Pour arrêter et retourner au menu MUSIC, appuyez sur STOP ou EXIT.
• Appuyez sur la touche INFO pour en savoir plus sur le fichier sélectionné.
• Vous pouvez également lire la musique sans téléviseur. Branchez le câble A/V dans les ports
d’entrée audio gauche et droite de la chaîne stéréo. Sélectionnez la source d’entrée de la chaîne
stéréo (si nécessaire). Insérez une carte ou un lecteur flash USB contenant UNIQUEMENT des
fichiers MP3 dans le SanDisk Photo Album, allumez celui-ci et attendez que le voyant arrête de
clignoter. Appuyez sur la touche PLAY pour lancer la lecture du premier fichier de musique. À la
fin du premier fichier, le deuxième est lu en fonction des paramètres de musique.
Mode Fichiers
• Appuyez sur la touche FILES pour consulter tous les formats de fichier pris en charge sur la carte
mémoire ou le lecteur flash USB sélectionné.
• Utilisez les touches fléchées pour sélectionner différents fichiers et albums (dossiers) et appuyez
sur PREVIOUS et NEXT pour passer d’une page à l’autre.
• Utilisez les touches OK ou PLAY/PAUSE pour ouvrir les albums et lancer la lecture des fichiers.
Appuyez sur STORE pour stocker les fichiers et INFO pour les afficher.
• Une fois les fichiers affichés depuis Mode Fichiers, les autres touches fonctionnent de la même
manière qu’en modes PHOTO/VIDEO et MUSIC.
Paramètres et options
• Vous pouvez modifier plusieurs réglages du SanDisk Photo Album. Appuyez sur la touche
SETTINGS & OPTIONS de la télécommande pour accéder au menu SETTINGS & OPTIONS.
Utilisez les touches fléchées et OK pour ouvrir les sous-menus et sélectionner les options.
L’option activée est en surbrillance lorsque vous ouvrez le menu. Appuyez sur EXIT pour
retourner au menu précédent ou quitter le menu SETTINGS & OPTIONS sans modifier les
réglages.
• Sélectionnez STORING pour afficher ou modifier les paramètres suivants:
• RESOLUTION – Choisissez la résolution dans laquelle vous voulez stocker vos photos.
• ALBUM/GROUPING – Choisissez comment vous voulez organiser les photos lors de leur
stockage.
• Sélectionnez SLIDE SHOW pour afficher ou modifier les paramètres suivants:
FRAN
Ç
AIS
Page 14

14
• PLAY ORDER – Choisissez si vous voulez visionner les photos et clips vidéo dans l'ordre
alphabétique ou dans le désordre.
• SLIDE INTERVAL – Choisissez combien de temps chaque diapositive doit rester à l’écran
avant l'affichage de la suivante (les intervalles réels peuvent être plus longs que les
paramètres si le chargement prend plus de temps).
• SHOW LENGTH – Choisissez si vous voulez afficher chaque photo ou vidéo une fois avant
d’arrêter, afficher les photos ou vidéos en boucle ou afficher les photos jusqu’à la fin de la
musique.
• TRANSITION EFFECT – Choisissez si vous voulez utiliser un effet spécifique entre les
diapositives, utiliser un effet au hasard à chaque fois ou n’utiliser aucun effet.
• MUSIC WITH SLIDE SHOW – Choisissez si vous voulez lire des fichiers de musique
pendant la visualisation des diapositives. Cette option est disponible si la carte
CompactFlash insérée au dos de l'appareil contient des fichiers MP3 (voir la rubrique
Affichage des photos avec musique).
• Sélectionnez MUSIC pour afficher ou modifier les paramètres suivants:
• PLAY ORDER – Choisissez si vous voulez lire les fichiers de musique dans l'ordre
alphabétique ou dans le désordre.
• PLAY LENGTH – Choisissez si vous voulez passer chaque morceau une fois avant
d’arrêter ou lire les morceaux en boucle.
• Sélectionnez PRINT SETTINGS pour afficher ou modifier les paramètres suivants:
• MARK FOR PRINTING – Si vous sélectionnez OUI, la photo est marquée pour être
imprimée. Si la carte contenant des photos marquées est insérée dans une imprimante ou
un kiosque compatible avec DPOF, l'imprimante ou le kiosque détecte automatiquement
les photos à imprimer.
• NUMBER OF PRINTS – Sélectionnez un chiffre entre 1 et 5 correspondant au nombre de
tirages que vous désirez pour la photo marquée. La sélection par défaut est 1 tirage.
• SIZE – Sélectionnez parmi les formats suivants celui que vous désirez pour vos tirages:
100 x 150 mm (4 x 6 po), 130 x 180 mm (5 x 7 po) et 200 x 300 mm (8 x 10 po). 100 x 150
mm est la sélection par défaut.
• Sélectionnez FIRMWARE pour afficher le numéro de version du logiciel installé. Allez à
www.sandisk.com/registration pour vous inscrire et recevoir les messages électroniques
concernant les nouveaux micrologiciels et pour télécharger les nouvelles versions micrologicielles.
Mode Lecteur-graveur de cartes USB
Le SanDisk Photo Album peut également fonctionner comme un lecteur-graveur de cartes USB 8en-1 lorsqu’il est raccordé à l’ordinateur.
REMARQUE: vous ne pouvez utiliser qu’UN port USB à la fois sur le SanDisk Photo Album: le petit
connecteur USB pour le branchement à l’ordinateur OU le grand connecteur USB pour la connexion
d’un lecteur flash USB. N’essayez PAS d’utiliser les deux connecteurs USB en même temps.
Windows ME, 2000 et XP: branchez simplement la petite fiche du câble USB au dos du SanDisk
Photo Album et l'autre à l'ordinateur. Les pilotes nécessaires se chargent automatiquement. Les
quatre logements, à l’avant du SanDisk Photo Album, s’affichent automatiquement comme quatre
FRAN
Ç
AIS
Page 15

15
lecteurs amovibles distincts dans Poste de travail. Vous pouvez accéder aux fichiers de la carte
mémoire comme si celle-ci était un autre lecteur de l'ordinateur.
Windows 98SE:
1. Branchez la petite fiche du câble USB au dos du SanDisk Photo Album et l'autre à l'ordinateur.
2. La fenêtre Assistant Ajout de nouveau matériel s’ouvre. Cliquez sur le bouton SUIVANT.
3. Sur l’écran suivant, sélectionnez « Rechercher le meilleur pilote pour votre périphérique » et
cliquez sur le bouton SUIVANT.
4. Sur l’écran suivant, sélectionnez uniquement l’option « Lecteur de CD-ROM ». Insérez le CD
SanDisk dans le lecteur et cliquez sur le bouton SUIVANT.
5. Cliquez sur TERMINER lorsque Windows a fini d'installer le logiciel.
6. Redémarrez l’ordinateur. Sélectionnez Poste de travail. Les quatre logements, à l’avant du
SanDisk Photo Album, devraient maintenant s’afficher comme quatre lecteurs amovibles
distincts. Vous pouvez accéder aux fichiers de la carte mémoire comme si celle-ci était un autre
lecteur de l’ordinateur.
Macintosh OS 10.1.2+: branchez la petite fiche du câble USB au dos du SanDisk Photo Album et
l’autre fiche dans le port USB du Mac (ne la connectez pas au moniteur ou au clavier). Un nouveau
lecteur s’affiche sur le bureau lorsqu’une carte est insérée dans l’un des logements à l’avant du
SanDisk Photo Album (vous ne pouvez utiliser qu’un seul logement à la fois). Glissez et déposez
les fichiers vers ou depuis le nouveau lecteur comme vous le feriez avec n’importe quel disque ou
dossier.
Retrait des cartes ou du lecteur flash USB (Windows)
1. Ouvrez Poste de travail.
2. Faites un clic droit sur l’icône correspondant au lecteur.
3. Sélectionnez Éjecter (cela ne s’applique pas à Windows 98SE).
4. Retirez la carte ou le lecteur du logement.
Retrait des cartes ou du lecteur flash USB (Macintosh)
Faites glisser l’icône de disque amovible « sans titre » sur l'icône de la corbeille du bureau puis
retirez la carte ou le lecteur flash USB de son logement.
Pour éviter de perdre des données ou de corrompre la carte ou le lecteur flash USB, veillez à NE
JAMAIS retirer la carte ou le lecteur ni déconnecter le SanDisk Photo Album pendant que le
TEMOIN LUMINEUX CLIGNOTE.
Ajout de musique à un diaporama (Windows)
1. Branchez le SanDisk Photo Album au port USB de l’ordinateur.
2. Cliquez deux fois sur l’icône « Poste de travail » et naviguez jusqu'au dossier contenant les
fichiers de musique.
3. Sélectionnez les fichiers de musique que vous désirez copier en cliquant dessus tout en
maintenant la touche Ctrl enfoncée.
4. Relâchez la touche Ctrl, cliquez une fois sur le bouton DROIT de la souris et sélectionnez
COPIER.
5. Sortez la carte CompactFlash contenant les photos en résolution télévision du logement arrière
de l'appareil et insérez-la dans le logement avant. Cliquez deux fois sur le lecteur amovible
(correspondant au logement de la carte CompactFlash, à l'avant du SanDisk Photo Album), par
exemple, F:, G: ou E. Le contenu de la carte devrait apparaître.
6. Dans la barre de menus, sélectionnez ÉDITION et cliquez sur COLLER. Les fichiers de
musique sont maintenant copiés sur la carte CompactFlash.
7. Pour déterminer l’ordre de lecture des fichiers de musique, renommez ceux-ci en tapant un
chiffre devant leur nom. Pour renommer un fichier, cliquez une fois dessus avec le bouton
DROIT de la souris, placez le pointeur sur RENOMMER, cliquez avec le bouton GAUCHE de la
souris pour sélectionner RENOMMER, placez le pointeur au début du nom du fichier et cliquez
avec le bouton gauche de la souris. Tapez un chiffre et appuyez sur la touche ENTRÉE du
clavier. Le nom du fichier est enregistré.
8. Une fois les fichiers copiés, allez de nouveau dans Poste de travail, faites un clic droit sur
l’icône de lecteur correspondant au logement avant de la carte CompactFlash et sélectionnez
Éjecter.
FRAN
Ç
AIS
Page 16

16
9. Retirez la carte CompactFlash et insérez-la dans le logement arrière. Branchez le SanDisk
Photo Album au téléviseur; vous voici prêt à regarder un diaporama multimédia!
Ajout de musique à un diaporama (Macintosh)
1. Connectez le SanDisk Photo Album au port USB du Mac (ne le connectez pas au moniteur ou
au clavier).
2. Sortez la carte CompactFlash contenant les photos en résolution télévision du logement arrière
de l'appareil et insérez-la dans le logement avant. Un nouveau lecteur apparaît sur le bureau,
intitulé « sans titre ».
3. Naviguez jusqu’au dossier contenant les fichiers de musique.
4. Glissez et déposez les fichiers dans le nouveau lecteur comme vous le feriez avec n’importe
quel disque ou dossier.
Dépannage
Pour consulter la Foire aux questions et d’autres informations sur le SanDisk Photo Album, visitez
notre site Web à http://www.sandisk.com/retail/support.asp.
Pour toute assistance téléphonique, composez le numéro vert 866-SANDISK (866-726-3475) du
lundi au vendredi, entre 7 h et 16 h (heure de la côte ouest des États-Unis).
Si le ou les lecteurs n’apparaissent pas en mode Lecteur (voir la rubrique MODE LECTEURGRAVEUR DE CARTES USB), il est possible que la connexion USB de votre ordinateur ne
fournisse pas suffisamment de courant. Utilisez le SanDisk Photo Album avec son câble
d’alimentation et redémarrez l'ordinateur.
Garantie limitée
SanDisk garantit ce produit contre tout vice de fabrication et de main d’œuvre. Elle garantit en outre qu’il es t conforme aux caractéristiques
publiées dans des conditions norm ales d’utilisation, et ce pour une durée de deux ans à compter de la date d’ac hat, sous réserve des
stipulations ci-dessous. Cette garantie es t offerte à l’utilisateur final initial achetant son produit auprès de SanDisk ou d’un distributeur agréé,
et elle n’est pas transférable. Il est possi ble qu’une preuve d’achat doive être produite. Ce produit doit être utilisé a vec des cartes mémoire
conformes aux spécifications de la C ompactFlash Card Association, la SD Card Association et la MultiMediaCar d Association, ou aux
stipulations des cartes Memory Stick , Memory Stick PRO, SmartMedia et xD-Picture, le cas échéant ; toute utilisation d’un autre produit
annulerait cette garantie. SanDisk n’est p as responsable des défaillances ou défauts causés par tout produit ou com posant de partie tierce,
qu’il soit autorisé ou non. Cette garantie ne couvre aucun logiciel de partie tierce fourni avec le produit ; l’util isateur est responsable de
l‘entretien et des réparations nécess aires pour ledit logiciel. Cette garantie est nulle et non avenue si la carte mémoire n’est pas utilisée
conformément au mode d’emploi du produ it, ou si elle est endommagée à la suite d’une installation incorrecte, d ’un mauvais usage, d’une
réparation ou modification non autorisée o u d'un accident.
Pour bénéficier du service sous gar antie, contactez SanDisk au 1-866-SanDisk ou envoyez un courriel à: s upport@SanDisk.com. Le produit
devra être renvoyé dans un emballage inv iolable, fret prépayé, selon les instructions de SanDisk. Vous devre z obtenir un numéro de
confirmation de pistage qu’il vous faudr a peut-être fournir à SanDisk. SanDisk pourra, à sa discrétion, répare r le produit, le remplacer par un
produit neuf ou réusiné d’une capacité et f onctionnalité égales ou supérieures, ou rembourser le prix d’achat. La dur ée de garantie du
produit remplacé correspondra à la pério de restante de la durée de garantie du produit d'origine. CECI CONSTIT UE L’ENTIÈRE
RESPONSABILITÉ DE SANDISK ET VOTRE SEUL RECOUR S EN CAS DE RUPTURE DE GARANTIE.
SanDisk ne garantit pas et ne saurait êt re responsable de toute perte de données ou d’images contenues dans un produit (y compris un
produit renvoyé), quelle que soit la caus e de cette perte. SanDisk ne garantit pas ses produits contre le risque de déf aillance. Les produits
SanDisk ne doivent pas être utilisés dans des équipements de maintien des fonctions vitales ou toute applic ation où une défaillance pourrait
causer des blessures ou la mort. Cette garantie vous donne des droits spécifiques, et il se peut que vous bénéficiez d’autres dr oits, qui
varient selon la juridiction.
LES STIPULATIONS CI-DESSUS CONSTIT UENT LA SEULE GARANTIE DE SANDISK. SANDISK DÉCLINE TOUTES AUTRES
GARANTIES EXPRESSES ET IMPLICITES DANS LES LIMITES PERMISES PAR LA LOI EN VIGUEUR. LES GARANTIES IMPLICITES
DE QUALITÉ MARCHANDE ET D’APTITUDE À UN USAGE PARTICULIER SONT LIMITÉES À LA DURÉE DE LA GARANTIE EXPRESS E.
CERTAINES JURIDICTIONS N’AUTORISANT PAS LA LI MITATION DE LA DURÉE D’UNE GARANTIE IMPLICITE, LA LIMITATION
SUSMENTIONNÉE PEUT NE PAS S’APPLIQUER À VOT RE CAS. EN AUCUN CAS SANDISK OU TOUTE FILIALE OU SOCIÉTÉ
AFFILIÉE NE SERA RESPONSABLE, DANS QUELQUES CIRCONSTANCES QUE CE SOIT, DE TOUS DOMMAGES DIRECTS,
INDIRECTS OU CONSÉQUENTIELS, DE TOUT ES PERTES FINANCIÈRES OU PERTES DE DONNÉES OU D’IMAGES, MÊME SI
SANDISK A ÉTÉ AVERTIE DE LA POSSIBILIT É DE TELS DOMMAGES. CERTAINES JURIDICTIONS N’AUTORISANT PAS
L’EXCLUSION OU LA LIMITATION DES DO MMAGES ACCESSOIRES OU CONSÉQUENTIELS, LA LIMITATION OU EXCLUSION
SUSMENTIONNÉE PEUT NE PAS S’APPLIQUER À VOT RE CAS. EN AUCUN CAS LA RESPONSABILITÉ DE SANDISK N’EXCÈDERA
LE MONTANT QUE VOUS AUREZ PAYÉ POUR L E PRODUIT.
Les informations contenues dans ce guide s ont sujettes à modification sans préavis. SanDisk ne saurait être responsab le des erreurs
techniques ou rédactionnelles ou des om issions faites dans le présent document, ni des dommages accessoires ou conséq uentiels résultant
de la livraison, de la performance ou de l' utilisation de ce produit. Il est formellement interdit de copier, repro duire, traduire ou enregistrer
sous format électronique la présente docum entation, en tout ou en partie, sans l'accord préalable écrit de SanDisk.
SanDisk, le logo SanDisk et CompactF lash sont des marques commerciales de SanDisk Corporation, déposées aux Etats -Unis et dans
d’autres pays. Store Your World In Ours es t une marque commerciale de SanDisk Corporation. SanDisk est un titulaire autorisé des
marques commerciales SD et MultiMediaCar d. SmartMedia est une marque commerciale de Toshiba Corporation. Mem ory Stick et Memory
Stick PRO sont des marques commer ciales de Sony Corporation. Les autres noms mentionnés ici le sont uniquem ent à titre indicatif et
peuvent être les marques commerciales de leurs détenteurs respectifs.
© 2004 SanDisk Corporation. Tous droits r éservés.
FRAN
Ç
AIS
Page 17

17
SanDisk® Photo Album
Guía del usuario
Contenido
Contenido del paquete........................................................................................…………………...... 17
Ficha técnica................................................................................…………...........…………………… 18
Requisitos mínimos……........................................................................................…………………… 18
Instalación del SanDisk Photo Album...........................................................…………………………. 18
Uso del SanDisk Photo Album......................................................................…………………………. 18
Visualización de fotografías y clips de vídeo................. ................................ ........…………………… 19
Almacenamiento y borrado de fotografías y clips de vídeo.........................................……………… 20
Reproducción de fotografías con música...............................................................…………………... 21
Reproducción de música.......................................................................................…………………… 21
Modo de archivos...................................................................................................…………………... 21
Parámetros y opciones.......................................................................................……………………... 21
Modo de lector/escritor de tarjetas USB ...............................................................…………………… 22
Solución de problemas..........................................................................................…………………… 24
Garantía................................................................................................................……………………. 24
Enhorabuena
Enhorabuena por la compra del SanDisk Photo Album. Ahora podrá ver y compartir fácilmente sus
fotografías digitales en su televisor, en la comodidad de su hogar. En esta guía del usuario se indica
cómo instalar y usar el SanDisk Photo Album.
Contenido del paquete
• SanDisk Photo Album
• Alimentación eléctrica
• Cable de audio/vídeo
• Mando a distancia con pilas
• Guía del usuario
• CD-ROM (para su uso como lector/escritor de tarjetas 8 en 1)
• Cable USB (para su uso como lector/escritor de tarjetas 8 en 1)
Podrá registrar su producto en
http://www.sandisk.com/registration
y recibir alertas por correo electrónico acerca de nuevas versiones de firmware que
mejoran la funcionalidad de su SanDisk Photo Album.
Los derechos que le confiere la garantía del producto NO varían aunque no lo registre.
ESPAÑOL
Page 18

18
Ficha técnica
• Soporte de formato del contenido:
• JPEG (Baseline, hasta 16 megapixels)
• Motion JPEG
• MPEG-1 (resolución QVGA / hasta ocho imágenes por segundo)
• MP3 (hasta 320 Kbps)
• Conexiones:
• Vídeo (compuesto) y sonido (estéreo)
• Dos conectores USB 1.1 (a PC y unidad flash USB)
• Alimentación eléctrica
• Formatos de tarjeta de memoria flash compatibles:
• CompactFlash® Tipo I / II
• SD™ / MultiMediaCard™
• Memory Stick™ / Memory Stick PRO™
• SmartMedia™ / xD
Requisitos mínimos
Para almacenamiento y reproducción:
• TV con vídeo RCA (NTSC o PAL) y conexión audio RCA (izquierda + derecha)
Para su uso como lector/escritor de tarjetas 8 en 1:
• Windows: PC clase Pentium con soporte USB, unidad CD-ROM y Windows 98SE, ME, 2000 o XP.
• Macintosh: Ordenador con soporte USB, unidad CD-ROM y Mac OS 10.1.2+
Instalación del SanDisk Photo Album
1. Enchufe la alimentación eléctrica en la parte posterior del SanDisk Photo Album, así como a
una toma de corriente.
2. Conecte el cable de audio/vídeo al televisor y/o sistema de sonido. En el televisor, la clavija
amarilla debe conectarse a Video In (Entrada de vídeo), la roja a Audio In, R (Entrada de audio,
derecha) y la blanca a Audio In, L (Entrada de audio, izquierda).
3. Conecte el cable de audio/vídeo en la parte posterior del SanDisk Photo Album.
4. Coloque las pilas en el mando a distancia.
5. Pulse el botón POWER del mando a distancia y así se encenderá el Álbum Fotográfico
SanDisk (se ilumina la luz del logotipo de SanDisk).
6. Encienda el televisor y cambie la fuente de entrada del televisor. Dependiendo del tipo de
televisor, la fuente de entrada podría denominarse TV/Video, Input o Source (consulte el
manual del televisor para más información). Cuando se selecciona la fuente correcta, aparece
un mensaje indicando que se
introduzca una tarjeta de
memoria. El SanDisk Photo
Album está ahora listo para su
uso.
Uso del SanDisk Photo Album
Introduzca una tarjeta de memoria flash o una unidad flash USB (UFD) en la
ranura correspondiente (las tarjetas SmartMedia deben introducirse con el lado
dorado mirando hacia abajo). Cuando se introduce correctamente una tarjeta,
se enciende el indicador LED verde situado a la izquierda de la ranura y el
SanDisk Photo Album empieza a leer la tarjeta. Si la tarjeta tiene almacenadas
fotografías (JPEG) o clips de vídeo (Motion JPEG o MPEG-1), aparecerá
ESPAÑOL
Page 19

19
automáticamente el menú PHOTO & VIDEO. Si la tarjeta contiene música (MP3), pero no uno de
los formatos de archivos de fotografías o vídeo que soporta el sistema, aparecerá el menú MÚSICA.
El SanDisk Photo Album se acciona con el mando a distancia adjunto. Si se ha introducido más de
una tarjeta de memoria, puede pulsar SELECT CARD. Elija la tarjeta (o UFD) que desee usar con
los botones de flecha ascendente y descendente, y, a continuación, pulse OK para confirmar su
selección.
Visualización de fotografías y clips de vídeo
• Pulse el botón PHOTO/VIDEO para que aparezcan las imágenes en miniatura de las fotografías y
clips de vídeo almacenados en la tarjeta de memoria seleccionada o UFD.
• Las fotografías y los clips de vídeo pueden estar en un álbum (carpeta). Use los botones de
flecha para seleccionar un álbum y pulse OK para introducir el álbum. Pulse PLAY mientras el
álbum está preseleccionado para reproducir las fotografías y clips de vídeo como en una
presentación.
• Use los botones de flecha para seleccionar una imagen en miniatura que representa una
fotografía o vídeo y use los botones PREVIOUS y NEXT para cambiar de página.
• Pulse OK para visualizar (fotografía) o reproducir (vídeo) a toda pantalla. Pulse PLAY/PAUSE
para empezar la reproducción de fotografías y vídeos según la configuración PRESENTACIÓN
(consulte ell apartado “Parámetros y opciones”).
• Pulse PREVIOUS para pasar a la fotografía o clip de vídeo anterior.
1. Álbum con fotografías/clips de vídeo almacenados en resoluciones originales
2. Álbum con fotografías almacenadas en resolución de impression
3. Álbum con subálbums y fotografías/clip de videos
4. Álbum que está vacío o sin contenido compatible
5. Imagen en miniatura de una fotografía
6. Álbum con fotografías. La imagen en miniatura es la primera fotografía/clip de vídeo del
album
7. Ima
g
en en miniatura del clip de vídeo
4
5
1 2 3
6
7
ESPAÑOL
Page 20

20
• Pulse NEXT para pasar a la siguiente fotografía o clip de vídeo.
• Use los botones ZOOM + y ZOOM – para hacer zoom en una fotografía o ampliar el vídeo para
que ocupe toda la pantalla. Al hacer zoom en una fotografía se pueden usar los botones de flecha
para mover la imagen hacia arriba, abajo, izquierda o derecha.
• Pulse el botón ROTATE para hacer girar la fotografía 90 grados en la dirección de las manecillas
del reloj. Púlselo otra vez para que gire 90 grados más.
• Para parar y volver al menú PHOTO/VIDEO pulse STOP o EXIT.
• Pulse la tecla INFO para ver más información acerca del archivo seleccionado o para
visualizar/ocultar la barra de progreso durante la reproducción de un vídeo.
Almacenamiento y borrado de fotografías y clips de
vídeo
• El SanDisk Photo Album dispone de una ranura adicional CompactFlash Tipo I en su parte
posterior. Cuando se introduce una tarjeta CompactFlash Tipo I (no incluida), se pueden
almacenar fotografías y clips de vídeo desde el UFD o desde tarjetas insertadas en las ranuras
frontales.
• Para almacenar una fotografía, pulse el botón STORE cuando la fotografía aparezca a toda
pantalla. En el menú que aparecerá podrá elegir almacenar la fotografía en su calidad (resolución)
original o en calidad TV (640 x 480 pixels). En calidad TV, la fotografía tiene el mismo aspecto en
la pantalla del televisor que en su versión de resolución original (más alta), pero el tamaño
almacenado es mucho más pequeño que su tamaño original. Por ejemplo, al usar una tarjeta
CompactFlash de 128 MB en la ranura posterior, se pueden almacenar hasta fotografías en
calidad TV (basado en un tamaño medio de almacenamiento de 60 KB por fotografía).
• Las fotografías almacenadas en su resolución original se almacenan automáticamente en un
álbum denominado ORIGINAL.
• Las fotografías almacenadas en resolución de impresión (tamaño postal) se almacenan
automáticamente en un álbum denominado PRINT.
• Las fotografías almacenadas en resolución TV pueden almacenarse en un álbum dependiendo de
la configuración del almacenamiento. Pulse el botón SETTINGS & OPTIONS y seleccione
STORING y, a continuación, ALBUM / GROUPING. Si se selecciona la opción “Agrupar
fotografías por día”, todas las fotografías tomadas en un día se almacenan en un solo álbum. Esto
ocurre en el momento de almacenarse esas fotografías en la tarjeta CompactFlash situada en la
parte posterior. Las otras opciones son almacenarlas por mes (todas las fotografías del mismo
mes se almacenan en un álbum) y por año (todas las fotografías del mismo año se almacenan en
un álbum). Las fotografías que ya están almacenadas y los álbumes que ya han sido creados no
se ven afectados al cambiar la configuración de almacenamiento. La configuración de
almacenamiento se aplica únicamente a las fotografías que se almacenen después de cambiar la
configuración.
• Los clips de vídeo se almacenan de una manera similar pero solamente se pueden almacenar en
su tamaño original. Los clips de vídeo se almacenan automáticamente en un álbum denominado
ORIGINAL. Adviértase que el tamaño del archivo de un clip de vídeo es mucho mayor que el de
una fotografía y por ello puede llenar rápidamente la tarjeta de memoria.
• Para borrar una fotografía, clip de vídeo o un álbum completo, pulse el botón DELETE cuando el
objeto esté preseleccionado. A continuación, siga las instrucciones en pantalla. También podrá
borrar una fotografía o clip de vídeo cuando se visualice a toda pantalla.
ADVERTENCIA
Almacene fotografías SOLAMENTE en calidad/resolución TV para fines de
reproducción en su televisor. Las fotografías almacenadas en calidad TV NO
son idóneas para producir copias de calidad. Una fotografía almacenada en
calidad TV NO PUEDE volver a adoptar su calidad/resolución original.
ESPAÑOL
Page 21

21
Reproducción de fotografías con música
• Podrá visualizar las fotografías con música de fondo. Las fotografías tienen que estar
almacenadas en calidad TV en la tarjeta CompactFlash introducida en la parte posterior. Cuando
se almacena en la misma tarjeta un archivo MP3 (128 Kb por Segundo o menos), el SanDisk
Photo Album reproducirá las fotografías con la música, de acuerdo con la configuración de la
sesión de diapositivas. Cuando un álbum contenga uno o más archivos MP3, la música se
reproducirá con las fotografías incluidas en ese álbum.
• Para habilitar o inhabilitar la reproducción de fotografías con música, pulse el botón SETTINGS &
OPTIONS, seleccione SLIDE SHOW y, seguidamente, MUSIC WITH ELIDE SHOW. Seleccione
YES para incorporar música o NO para no incorporar música, y pulse OK.
• Consulte el apartado “Modo de lector/escritor de tarjetas USB” para instrucciones acerca de cómo
añadir archivos MP3.
• Consulte el apartado “Parámetros y opciones” para averiguar cómo cambiar la configuración de la
presentación.
Reproducción de música
• Pulse el botón MUSIC para visualizar la lista de canciones almacenadas en la tarjeta de memoria
seleccionada o UFD.
• Use los botones de flecha para seleccionar una canción y use los botones PREVIOUS y NEXT
para cambiar de página.
• Pulse OK para reproducir la canción resaltada o pulse PLAY/PAUSE para iniciar la reproducción
de una serie de canciones de acuerdo con la configuración MUSIC. Consulte el apartado
“Parámetros y opciones”. Durante la reproducción, podrá pulsar PLAY/PAUSE para detener la
reproducción. Púlselo otra vez para reanudar la reproducción.
• Al pulsar PREVIOUS una vez, se retrocede al comienzo de la canción. Púlselo varias veces para
retroceder a canciones anteriores. Si lo pulsa y lo mantiene pulsado se retrocederá rápidamente.
• Al pulsar NEXT se avanzará a la siguiente canción. Si lo pulsa y lo mantiene pulsado se avanzará
rápidamente.
• Ajuste el volumen del sonido con los botones VOLUME +/-. El volumen máximo es el volumen
establecido en el televisor o sistema de sonido conectado.
• Para parar y volver al menú MUSIC, pulse STOP o EXIT.
• Pulse el botón INFO para ver más información acerca del archivo seleccionado.
• También puede reproducir música sin necesidad de televisor. Conecte el cable A/V (Audio/vídeo)
a la conexión Audio In (Entrada de audio) derecha e izquierda de un sistema de sonido.
Seleccione la fuente de entrada del sistema de sonido (en caso necesario), Introduzca una tarjeta
o UFD con archivos MP3 SOLAMENTE en el SanDisk Photo Album, enciéndalo y espere hasta
que el indicador LED deje de parpadear. Seguidamente, pulse PLAY y comenzará a sonar el
primer archivo de música. Al finalizar, comenzará el siguiente archivo de música de acuerdo con
la configuración musical.
Modo de archivos
• Pulse el botón FILES para ver todos los archivos que soporta el sistema en la tarjeta de memoria
seleccionada o UFD.
• Use los botones de flecha para seleccionar los diferentes archivos y álbumes (carpetas), y pulse
PREVIOUS y NEXT para cambiar de página.
• Use los botones OK o PLAY/PAUSE para introducir álbumes y empezar a reproducir archivos.
Pulse STORE para almacenar archivos e INFO para ver.
• Una vez que los archivos se visualizan/reproducen desde el modo Archivos, los otros botones
funcionan de la misma manera en el modo PHOTO/VIDEO y en el modo MUSIC.
Parámetros y opciones
• Podrá cambiar diversas configuraciones del SanDisk Photo Album. Pulse el botón SETTINGS &
OPTIONS situado en el mando a distancia para acceder al menú SETTINGS & OPTIONS. Use
los botones de flecha y el botón OK para entrar a los submenús y seleccionar opciones. La opción
ESPAÑOL
Page 22

22
activada se resalta cuando se entra al menú. Pulse EXIT para regresar al menú anterior o para
salir del menú SETTINGS & OPTIONS sin cambiar la configuración.
• Seleccione STORING para ver o cambiar las siguientes configuraciones:
• RESOLUTION – Elija la resolución para almacenar fotografías.
• ALBUM/GROUPING –Elija cómo organizar las fotografías al almacenarlas.
• Seleccione SLIDE SHOW para ver o cambiar las siguientes configuraciones:
• PLAY ORDER – Elija entre mostrar las fotografías y vídeoclips en orden alfabético o al
azar.
• SLIDE INTERVAL – Elija cuánto tiempo permanecerá en pantalla cada diapositiva antes
de pasar a la siguiente. (El tiempo real de intervalo puede ser mayor del fijado debido a la
duración de la carga de los archivos).
• SHOW LENGTH – Elija si mostrar cada fotografía/clip de vídeo una vez y detenerse, ciclar
la reproducción de fotografías/vídeos o mostrar fotografías hasta que se detenga la música.
• TRANSITION EFFECT – Elija qué efecto usar al cambiar de diapositiva, elija un efecto al
azar cada vez o no use ningún efecto.
• MUSIC WITH SLIDE SHOW – Elija si reproducir o no archivos de música mientras se
muestran las diapositivas. Esto funciona únicamente si la tarjeta CompactFlash introducida
en la ranura posterior contiene archivos MP3 (consulte el apartado “Reproducción de
fotografías con música”).
• Seleccione MUSIC para ver o cambiar las siguientes configuraciones:
• PLAY ORDER – Elija entre reproducir las canciones en orden alfabético o al azar.
• PLAY LENGTH – Elija si reproducir cada canción y detenerse, o ciclar la reproducción de
las canciones.
• Seleccionar PRINT SETTINGS para ver o cambiar las siguientes configuraciones:
• MARK FOR PRINTING – Al seleccionar SÍ, se marca la fotografía para impresión. Si la
tarjeta con fotografías marcadas se introduce en una impresora o quiosco fotográfico
compatible con DPOF, la impresora/quiosco recibe instrucciones automáticamente acerca
de qué fotografías imprimir.
• NUMBER OF PRINTS – Seleccione desde 1 a 5 copias de la fotografía marcada. La
selección por omisión es 1 copia.
• SIZE – Seleccione entre los siguientes tamaños para especificar el tamaño de la copia:
100 x 150 mm (4 x 6"), 130 x 180 mm (5 x 7") y 200 x 300 mm (8 x 10"). 100 x 150 mm es
la selección por omisión.
• Seleccione FIRMWARE para ver el número de la versión del software instalado. Visite
www.sandisk.com/registration para inscribirse y recibir por correo electrónico alertas de nuevo
firmware y para descargar nuevas versiones de firmware.
Modo lector/escritor de tarjetas USB
El SanDisk Photo Album puede funcionar asimismo como un lector/escritor de tarjetas USB 8 en 1
cuando se conecta a un ordenador.
NOTA: Solamente se puede usar UNO de los puertos USB del SanDisk Photo Album al mismo
tiempo; el conector USB pequeño para conectar al ordenador o el conector USB grande para
conectar unidades flash USB. NO trate de usar ambos conectores USB simultáneamente.
ESPAÑOL
Page 23

23
Windows ME, 2000 y XP: Simplemente, conecte el extremo pequeño del cable USB en la parte
posterior del SanDisk Photo Album y, a continuación, conecte el otro extremo al PC. Los drivers
necesarios se cargarán automáticamente. Seguidamente, las cuatro ranuras situadas en la parte
frontal del SanDisk Photo Album aparecerán indicadas como cuatro unidades extraíbles diferentes
en My Computer (Mi PC). Podrá acceder a los archivos en la tarjeta de memoria como si se tratara
de otra unidad del ordenador.
Windows 98SE:
1. Conecte el extremo pequeño del cable USB en la parte posterior del SanDisk Photo Album y, a
continuación, conecte el otro extremo al PC.
2. Aparece la ventana “New Hardware Wizard” (Asistente de hardware nuevo). Pulse el botón
NEXT (Siguiente).
3. En la siguiente pantalla, seleccione “Search for the best driver for your device” (Buscar el mejor
driver para su dispositivo) y pulse el botón NEXT.
4. En la siguiente pantalla, seleccione solamente la opción “CD-ROM drive” (Unidad CD-ROM).
Introduzca el CD de SanDisk en la unidad CD-ROM y pulse el botón NEXT.
5. Pulse FINISH (Terminar) cuando Windows haya acabado de instalar el software.
6. Reinicie el PC. Vaya a My Computer (Mi PC). Las cuatro ranuras situadas en la parte frontal
del SanDisk Photo Album deberán aparecer indicadas como cuatro unidades extraíbles
diferentes. Podrá acceder archivos en la tarjeta de memoria como si se tratara de otra unidad
del ordenador.
Macintosh OS 10.1.2+: Conecte el extremo pequeño del cable USB en la parte posterior del
SanDisk Photo Album y, a continuación, conecte el otro extremo en el puerto USB del Mac (no se
debe conectar al monitor ni al teclado). Aparecerá una nueva unidad en el escritorio cuando se
introduzca en una de las cuatro ranuras frontales del SanDisk Photo Album (solamente se puede
usar una ranura al mismo tiempo). Arrastre y suelte archivos en esta nueva unidad como si se
tratara de un disco o carpeta cualquiera.
Extracción de tarjetas/UFD (Windows)
1. Abra My Computer (Mi PC)
2. Haga clic con el botón derecho del ratón sobre el icono de la unidad correspondiente
3. Seleccione Eject (Expulsar) (excepto en el caso de Windows 98SE)
4. Saque la tarjeta/UFD de la ranura
Extracción de tarjetas/UFD (Macintosh)
Arrastre el icono “untitled” (sin título) del disco extraíble al icono Trash (Papelera) del escritorio y
saque la tarjeta/UFD.
Para evitar la pérdida de datos o la alteración de la tarjeta/UFD, NUNCA quite la tarjeta/UFD ni
desconecte el SanDisk Photo Album cuando el indicador LED de ACTIVIDAD esté INTERMITENTE
o PARPADEE.
Cómo añadir archivos de música a una presentación (Windows)
1. Conecte el SanDisk Photo Album al puerto USB del PC.
2. Haga doble clic en el icono "My Computer" (Mi PC) y diríjase a la carpeta donde están
almacenados los archivos de música.
3. Seleccione los archivos de música sujetando la tecla Ctrl y haciendo clic en los archivos de
música que desee copiar.
4. Suelte la tecla Ctrl, haga clic una vez con el botón DERECHO del ratón y seleccione COPY
(Copiar).
5. Saque de la ranura posterior la tarjeta CompactFlash que contiene las fotografías en resolución
TV e introdúzcala en la ranura frontal. Haga doble clic en la unidad de disco extraíble (para la
ranura CompactFlash situada en la parte frontal del SanDisk Photo Album), p, ej. F: o G:, o
quizás E. Ahora deberá poder ver el contenido almacenado en esta tarjeta.
6. Diríjase a la barra del menú donde dice EDIT (Edición) y haga clic en PASTE (Pegar). Los
archivos de música se copiarán ahora a la tarjeta CompactFlash.
ESPAÑOL
Page 24

24
7. Para determinar el orden de reproducción de la música, modifique los archivos de música
anteponiendo un número a los nombres. Para modificar el nombre de un archivo, haga clic una
vez con el botón DERECHO del ratón en el archivo, sitúe el puntero del ratón sobre RENAME
(Renombrar), haga clic con el botón IZQUIERDO del ratón para seleccionar RENAME, sitúe el
puntero del ratón al comienzo del nombre del archivo y haga clic con el botón izquierdo del
ratón. A continuación, escriba un número y pulse la tecla ENTER (Intro) del teclado. El nombre
del archivo quedará así salvaguardado.
8. Una vez copiados los archivos, vuelva a My Computer (Mi PC), haga clic con el botón derecho
del ratón en el icono de la unidad de la ranura frontal CompactFlash y seleccione Eject
(Expulsar).
9. Saque la tarjeta CompactFlash e introdúzcala en la ranura posterior. Conecte el SanDisk
Photo Album al televisor... ¡y estará listo para disfrutar de una presentación multimedia!
Cómo añadir archivos de música a una presentación (Macintosh)
1. Conecte el SanDisk Photo Album al puerto USB del Mac (no lo conecte al monitor ni al teclado).
2. Saque de la ranura posterior la tarjeta CompactFlash que contiene las fotografías en resolución
TV e introdúzcala en la ranura frontal. Aparecerá en el escritorio una nueva unidad denominada
“untitled” (sin título).
3. Diríjase a la carpeta donde están almacenados los archivos de música.
4. Arrastre y suelte los archivos de música en la nueva unidad como si se tratara de un disco o
carpeta cualquiera.
Solución de problemas
Para obtener información sobre preguntas frecuentes y otra información de apoyo acerca del
SanDisk Photo Album, visite nuestro sitio web en: http://www.sandisk.com/retail/support.asp. Para
obtener asistencia telefónica, llame gratis al 866-SANDISK (866-726-3475), de lunes a viernes, de
7AM a 4 PM (horario del Pacífico, EE.UU.).
Si la unidad(es) no aparece(n) en modo de lector [consulte las instrucciones del apartado USB
CARD READER/WRITER MODE (Modo lector/escritor de tarjetas USB)], quizás se deba a que la
conexión USB de su ordenador no proporciona suficiente energía. Use el SanDisk Photo Album con
su alimentación eléctrica y reinicie el ordenador.
Garantía limitada
SanDisk garantiza que este producto carece de defectos esenciales en diseño y fabricación, y que se ajusta sustancialmente a las especificaciones publicadas en condiciones
de uso normales durante dos años a partir de la fecha de su compra, sujeto a las condiciones indicadas a continuación. Esta garantía se ofrece al usuario final original que
compre el producto a SanDisk o a un distribuidor autorizado, y no es transferible. Podría requerirse comprobante de compra. Este producto deberá usarse con tarjetas de
memoria que se ajusten a las especificaciones de la CompactFlash Card Association, la SD Card Association, la MultiMediaCard Association o a los requisitos de Memory
Stick, Memory Stick PRO, SmartMedia y xD-Picture Card, según corresponda; su uso con cualquier otro producto anulará esta garantía. SanDisk no es responsable de ningún
fallo o defecto causado por productos o componentes fabricados por terceros, ya estén o no autorizados. Esta garantía no se aplica a software de terceros que se incluya con
el producto y usted será responsable de todo el servicio de mantenimiento y reparaciones necesarios para dicho software. Esta garantía será nula si no se utiliza la tarjeta de
memoria de conformidad con las instrucciones del producto o si resulta dañada como consecuencia de su instalación inadecuada, uso indebido, reparación no autorizada,
modificación o accidente.
Para obtener servicio cubierto por la garantía, llame a SanDisk al 1-866-SanDisk o envíe un mensaje por correo electrónico a: support@SanDisk.com. Deberá devolver el
producto embalado de una manera segura, con portes pagados, según las instrucciones de SanDisk. Deberá obtener un número de confirmación de rastreo, que quizás deba
proporcionar a SanDisk. SanDisk, a su entera discreción, podrá reparar o reemplazar el producto por otro nuevo o restaurado de igual o mayor capacidad y funcionalidad, o
devolverle el importe del producto. La duración de la garantía del producto de reemplazo será la que le quede al producto original. ESTO CONSTITUYE LA
RESPONSABILIDAD TOTAL DE SANDISK Y EL RECURSO EXCLUSIVO A DISPOSICIÓN DE USTED EN CASO DE QUE NO SE CUMPLAN LOS TÉRMINOS DE ESTA
GARANTÍA.
SanDisk no garantiza ni será responsable de la pérdida de datos o imágenes contenidos en un producto cualquiera (incluido cualquier producto devuelto), al margen de la
causa de dicha pérdida. No se garantiza que los productos de SanDisk funcionen sin fallo alguno. Los productos de SanDisk no deben utilizarse en sistemas de soporte vital u
otras aplicaciones en las que un fallo podría amenazar la vida o provocar lesiones. Esta garantía le otorga derechos legales específicos, aparte de aquellos otros derechos que
pudiera tener según la jurisdicción.
LA INFORMACIÓN PRECEDENTE CONSTITUYE LA ÚNICA GARANTÍA DE SANDISK. SANDISK DENIEGA TODAS LAS DEMÁS GARANTÍAS EXPRESAS E IMPLÍCITAS
EN LA MEDIDA EN QUE LO PERMITA LA LEGISLACIÓN VIGENTE. LAS GARANTÍAS IMPLÍCITAS DE COMERCIA BILIDAD E IDONEIDAD PARA UN PROPÓSITO
DETERMINADO SE LIMITAN A LA DURACIÓN DE LA GARANTÍA EXPRESA. ALGUNAS JURISDICCIONES NO PERMITEN LIMITACIONES EN CUANTO A LA DURACIÓN
DE LAS GARANTÍAS IMPLÍCITAS. POR ELLO, LA LIMITACIÓN PRECEDENTE PODRÍA NO APLICARSE EN SU CASO. SANDISK, ASÍ COMO SUS COMPAÑÍAS
AFILIADAS O SUBSIDIARIAS, NO SERÁN RESPONSABLES DE NINGUNA MANERA Y BAJO NINGUNA CI RCUNSTANCIA DE NINGÚN DAÑO DIRECTO, INDIRECTO NI
ACCESORIO, PÉRDIDA ECONÓMICA O PÉRDIDA DE DATOS O IMÁGEN ES, AUNQUE SANDISK HAYA SIDO ADVERTIDA DE LA POSIBILIDAD DE DICHOS DAÑOS.
ALGUNAS JURISDICCIONES NO PERMITEN LA EXCLUSIÓN NI LIMITACIÓN DE DAÑOS Y PERJUICIOS CONCOMITANTES O ACCESORIOS. POR ELLO, LA
LIMITACIÓN PRECEDENTE PODRÍA NO APLICARSE EN SU CASO. LA RESPONSABILIDA D DE SANDISK NO EXCEDERÁ, DE NINGUN MANERA, LA CANTIDAD QUE
USTED PAGÓ POR EL PRODUCTO.
La información que contiene este manual está sujeta a cambios sin previo aviso. SanDisk no asume responsabilidad alguna por errores técnicos o de redacción, o por
omisiones en esta publicación, y tampoco se hará cargo de daños y perjuicios concomitantes o accesorios que resulten de la provisión o del rendimiento o uso de este material.
Este documento, ya sea en parte o en su totalidad, no puede ser copiado, reproducido, traducido o reducido a ningún medio electrónico sin el consentimiento previo por escrito
de SanDisk.
SanDisk, el logotipo de SanDisk y CompactFlash son marcas de SanDisk Corporation, registradas en los Estados Unidos y otros países. Store Your World in Ours es una
marca comercial de SanDisk Corporation. SanDisk es licenciatario autorizado de las marcas comerciales SD y MultiMediaCard. SmartMedia es una marca comercial de
Toshiba Corporation. Memory Memory Stick y Memory Stick PRO son marcas comerciales de Sony Corporation. Los nombres de otros productos mencionados en el presente
documento se utilizan únicamente con fines de identificación y pueden ser marcas comerciales de sus respectivas compañías.
© 2004 SanDisk Corporation. Reservados todos los derechos.
ESPAÑOL
Page 25

25
SanDisk® Photo Album
Guida dell’utente
Indice
Contenuto della confezione.......................................................... .........................…………………… 25
Dati tecnici.............................................................................................................…………………… 26
Requisiti.................................................................................................................…………………… 26
Installazione del SanDisk Photo Album.............................................. ...................…………………… 26
Utilizzo del SanDisk Photo Album.........................................................................…………………… 26
Visualizzazione di foto e videoclip.........................................................................…………………… 27
Memorizzazione e cancellazione di foto e videoclip..............................................…………………… 28
Visualizzazione di foto con sottofondo...................................................................…………………... 28
Riproduzione di brani musicali...............................................................................…………………… 29
Modalità d’uso dei file (FILES).......................................................... ................. ...……………………. 29
Impostazioni e opzioni............................................................................................…………………... 29
Modalità d’uso come unità di lettura/scrittura di schede USB....................................................……. 30
Guida alla soluzione dei problemi...........................................................................………………….. 32
Garanzia................................................................................................................…………………… 32
Grazie...
per l’acquisto del SanDisk Photo Album, un prodotto che vi permetterà di guardare in tutta comodità
a casa vostra foto digitali e altro ancora sullo schermo televisivo. La presente guida spiega come
installare e usare il SanDisk Photo Album.
Contenuto della confezione
• SanDisk Photo Album
• Alimentatore
• Cavo audio/video
• Telecomando con pile
• Guida dell’utente
• Unità CD-ROM (per l’uso come unità di lettura/scrittura 8 in 1)
• Cavo USB (per l’uso come unità di lettura/scrittura 8 in 1)
Si può registrare questo prodotto sul
sito
http://www.sandisk.com/registration
e ricevere tramite avvisi e-mail sulle nuove versioni del firmware che migliorano la
funzionalità di SanDisk Photo Album.
La mancata registrazione del prodotto NON riduce i diritti concessi dalla garanzia del prodotto.
ITALIANO
Page 26

26
Dati tecnici
• Formato dei file supportato:
• JPEG (baseline, fino a 16 megapixel)
• Motion JPEG
• MPEG-1 (risoluzione QVGA / sino a 8 frame al secondo)
• MP3 (sino a 320 kbit/s)
• Connessioni:
• Video (composito) e audio (stereo)
• Due connettori USB 1.1 (per il PC e l’unità flash USB)
• Alimentazione
• Formati delle schede di memoria flash compatibili:
• CompactFlash® tipo I / II
• SD™ / MultiMediaCard™
• Memory Stick™ / Memory Stick PRO™
• SmartMedia™ / xD
Requisiti
Per la memorizzazione e riproduzione:
• Televisore con connessione video RCA (NTSC o PAL) e connessione audio RCA (canali sinistro e
destro)
Per l’utilizzo come unità di lettura/scrittura 8-in-1:
• Windows: PC di classe Pentium con supporto USB, unità CD-ROM e Windows 98SE, ME, 2000 o
XP.
• Macintosh: computer con supporto USB, unità CD-ROM e Mac OS 10.1.2+.
Installazione del SanDisk Photo Album
1. Collegare l’alimentatore al pannello posteriore del SanDisk Photo Album e a una presa di
corrente alternata.
2. Collegare il cavo audio/video all’impianto televisivo e/o audio. Sul televisore, lo spinotto giallo va
collegato al jack Video In, quello rosso al jack Audio In del canale destro (R) e quello bianco al
jack Audio In del canale sinistro (L).
3. Collegare il cavo audio/video al pannello posteriore del SanDisk Photo Album.
4. Inserire le pile nel telecomando.
5. Premere il tasto Power del telecomando per avviare il SanDisk Photo Album (il logotipo SanDisk
si illumina).
6. Accendere il televisore e selezionare l’ingresso adatto, che a seconda della marca di televisore
può essere chiamato TV/Video, Input [ingresso] o Source [sorgente] (per ulteriori informazioni
consultare il manuale del televisore). Una volta selezionato l’ingresso, compare un messaggio
che richiede di inserire una
scheda di memoria. A questo
punto il SanDisk Photo Album è
pronto all’uso.
Utilizzo del SanDisk Photo Album
Inserire una memoria flash o un’unità flash USB nello slot corrispondente. Quando
una scheda viene inserita correttamente, si accende il LED verde a sinistra dello slot e
il SanDisk Photo Album inizia a leggerla. Se la scheda contiene foto (JPEG) o
videoclip (Motion JPEG o MPEG-1), si passa automaticamente al menu
PHOTO/VIDEO, mentre se contiene brani musicali (MP3) ma nessun file video o di
ITALIANO
Page 27

27
foto in un formato supportato, si passa al menu MUSIC.
Per usare il SanDisk Photo Album si adopera il telecomando in dotazione. Se nel SanDisk Photo
Album c’è più di una scheda, si può premere SELECT CARD e poi scegliere la scegliere la scheda
(o l’unità flash USB) da leggere mediante i tasti freccia su e giù; infine premere OK per confermare
la selezione.
Visualizzazione di foto e videoclip
• Premere il tasto PHOTO/VIDEO per visualizzare, in miniatura, le foto e i videoclip memorizzati
nella scheda di memoria o nell’unità flash USB.
• Le foto e i videoclip possono trovarsi in un album (ossia una cartella). Usare i tasti freccia per
selezionare un album e premere OK per aprirlo. Premere PLAY mentre l’album è selezionato per
riprodurre le foto e/o i videoclip come una sequenza di diapositive.
• Usare i tasti freccia per selezionare una vista in miniatura di una foto o un video e usare i tasti
PREVIOUS e NEXT per passare da una pagina all’altra.
• Premere OK per visualizzare la foto (o riprodurre il video) a tutto schermo; premere PLAY/PAUSE
per avviare la sequenza di foto e video secondo le impostazioni SLIDE SHOW (vedere la sezione
“Impostazioni e opzioni”).
• Premere PREVIOUS per andare alla foto o al videoclip precedente.
• Premere NEXT per andare alla foto o al videoclip successivo.
1. Album con foto/videoclip memorizzati alle risoluzioni originali
2. Album con foto memorizzate alla risoluzione di stampa
3. Album con album interni e foto/videoclip
4. Album vuoto o senza contenuti compatibili
5. Vista in miniatura di una foto
6. Album con delle foto. La vista in miniatura corrisponde alla prima foto o al primo
videoclip dell’album
7.
Vista in miniatura di un videoclip
4
5
1 2 3
6
7
ITALIANO
Page 28

28
• Usare i tasti ZOOM + e ZOOM – per ingrandire/ridurre una foto o espandere il video a tutto
schermo. Quando si ingrandisce una foto con lo zoom, si possono adoperare i tasti freccia per
spostarsi in su o in giù, a sinistra o a destra.
• Premere il tasto ROTATE una volta per girare la foto di 90 gradi in senso orario, premerlo di
nuovo per girarla di altri 90 gradi.
• Per interrompersi e ritornare al menu PHOTO/VIDEO, premere STOP o EXIT.
• Premere il tasto INFO per visualizzare ulteriori informazioni sul file selezionato o per
visualizzare/nascondere la barra di avanzamento percentuale durante la riproduzione del video.
Memorizzazione e cancellazione di foto e videoclip
• Il SanDisk Photo Album è dotato anche di uno slot CompactFlash tipo I sul pannello posteriore.
Quando si inserisce una scheda CompactFlash tipo I (non acclusa), si possono memorizzare foto
e videoclip contenute nell’unità flash USB o nelle schede inserite negli slot anteriori.
• Per memorizzare una foto, premere il tasto STORE mentre la foto è visualizzata a tutto schermo.
Dal menu che compare si può scegliere tra la memorizzazione della foto alla qualità (risoluzione)
originale o da schermo televisivo (640x480 pixel); in quest’ultimo caso, alla televisione la foto
compare con la stessa qualità (risoluzione) originale ma le dimensioni del file da memorizzare
sono solo una frazione di quelle originali. Ad esempio, se si inserisce una scheda CompactFlash
da 128 MB nello slot originale, si possono memorizzare sino a 2000 a risoluzione da schermo
televisivo (in base a una capacità media di memorizzazione pari a 60 KB per foto).
• Le foto memorizzate alla risoluzione originale vengono automaticamente conservate in un album
denominato ORIGINAL.
• Le foto memorizzate alla risoluzione di stampa (formato cartolina) vengono automaticamente
conservate in un album denominato PRINT.
• Le foto memorizzate alla risoluzione da schermo televisivo possono essere conservate
in un album a seconda delle impostazioni di memorizzazione. Premere il tasto SETTINGS &
OPTIONS, selezionare STORING e poi ALBUM/GROUPING. Se l’opzione selezionata è“Raggrup
foto per gior”, tutte le foto scattate nello stesso giorno vengono memorizzate in un solo album, nel
momento in cui esse vengono memorizzate sulla scheda CompactFlash inserita nello slot
posteriore. Le altre opzioni sono la memorizzazione “Raggrup foto per mese” e quella “Raggrup
foto per anno” (vengono memorizzate in un solo album tutte le foto scattate, rispettivamente, nello
stesso mese o nello stesso anno). Eventuali modifiche apportate alle impostazioni di
memorizzazione non influiscono né sulle foto memorizzate né sugli album creati in precedenza,
ma solo sulle foto memorizzate successivamente alle modifiche stesse.
• I videoclip vengono memorizzati con modalità analoghe, ma possono essere memorizzati solo alle
loro dimensioni originarie. I videoclip vengono memorizzati automaticamente in un album
denominato ORIGINAL. Tenere presente che le dimensioni del file di un videoclip in genere sono
molto maggiori di quelle del file di una foto e possono causare il rapido esaurimento della capacità
della scheda di memoria.
• Per cancellare un elemento (foto, videoclip o album completo), premere il tasto DELETE dopo
averlo preselezionato e poi seguire le istruzioni sullo schermo. Inoltre è possibile cancellare una
foto o un videoclip quando è visualizzato a tutto.
Visualizzazione di foto con sottofondo
• Le foto possono essere visualizzate con un sottofondo; a tale scopo devono essere memorizzate
con qualità da schermo televisivo sulla scheda CompactFlash inserita nel pannello posteriore.
Quando sulla stessa scheda viene memorizzato un file MP3 (128 kbit al secondo o meno), il
SanDisk Photo Album riproduce le foto con il sottofondo in base alle impostazioni relative alla
ATTENZIONE
Memorizzare le foto alla qualità (risoluzione) da schermo televisivo solo per la riproduzione alla
televisione. Le foto memorizzate con tale risoluzione NON sono adatte per ottenere stampe di
qualità. Una foto memorizzata alla risoluzione da schermo televisivo NON PUÒ essere
riportata alla risoluzione originale.
La foto originale non cambia.
ITALIANO
Page 29

29
sequenza di diapositive. Quando un album contiene uno o più file MP3, il sottofondo viene
riprodotto con le foto di tale album.
• Per abilitare o disabilitare la visualizzazione di foto con sottofondo, premere OPTIONS &
SETTINGS, selezionare SLIDE SHOW e poi MUSICA WITH SLIDE SHOW. Selezionare SÌ (se si
vuole il sottofondo) o NO (nessun sottofondo) e premere OK.
• Vedere la sezione “Modalità d’uso come unità di lettura/scrittura di schede USB” per istruzioni su
come aggiungere file MP3.
• Vedere la sezione “Impostazioni e opzioni” per istruzioni su come modificare le impostazioni
relative alla sequenza di diapositive.
Riproduzione di brani musicali
• Premere il tasto MUSIC per visualizzare l’elenco dei brani musicali memorizzati sulla scheda di
memoria o sull’unità flash USB selezionata.
• Usare i tasti freccia per selezionare un brano musicale, i tasti PREVIOUS e NEXT per passare da
una pagina all’altra.
• Premere OK per riprodurre il brano musicale evidenziato o PLAY/PAUSE per avviare la
riproduzione di una serie di brani musicali in base alle impostazioni MUSIC (vedere la sezione
Impostazioni e opzioni). Mentre la riproduzione è in corso la si può interrompere
temporaneamente premendo PLAY/PAUSE; per riavviarla premere di nuovo PLAY/PAUSE.
• Premendo una volta PREVIOUS si va all’inizio del brano musicale; premerlo ripetutamente per
andare a brani musicali precedenti; premerlo e mantenerlo premuto per andare indietro
velocemente.
• Premendo NEXT si va al brano musicale successivo; premerlo e mantenerlo premuto per andare
avanti velocemente.
• Regolare il volume con i tasti VOLUME +/-. Il volume massimo corrisponde al valore impostato sul
televisore o sull’impianto audio collegato.
• Per interrompere e ritornare al menu MUSIC, premere STOP o EXIT.
• Premere INFO per visualizzare ulteriori informazioni sul file selezionato.
• È possibile anche riprodurre brani musicali senza un televisore: collegare il cavo audio/video ai
jack Audio In dei canali sinistro (L) e destro (R) di un impianto audio e selezionare, se necessario,
la sorgente all’ingresso dell’impianto. Inserire nel SanDisk Photo Album una scheda o un’unità
flash USB contenente SOLTANTO file MP3, accenderlo e attendere finché il LED cessa di
lampeggiare. A questo punto premere PLAY: inizia la riproduzione del primo brano musicale; al
termine, comincia il brano successivo, in base alle relative impostazioni.
Modalità d’uso dei file (FILES)
• Premere il tasto FILES per vedere tutti i file, riproducibili, contenuti sulla scheda di memoria o
sull’unità flash USB selezionata.
• Usare i tasti freccia per selezionare vari file e album (cartelle); premere PREVIOUS o NEXT per
passare da una pagina all’altra.
• Usare i tasti OK o PLAY/PAUSE per aprire gli album e iniziare a riprodurre i file. Premere STORE
per memorizzare i file e INFO per visualizzarli.
• Mentre un file è visualizzato o viene riprodotto con questa modalità, il funzionamento degli altri
tasti è analogo a quello delle modalità PHOTO/VIDEO e MUSIC.
Impostazioni e opzioni
• È possibile modificare varie impostazioni del SanDisk Photo Album. Premere il tasto SETTINGS &
OPTIONS del telecomando per accedere al menu SETTINGS & OPTIONS. Usare i tasti freccia e
il tasto OK per andare ai sotto menu SETTINGS & OPTIONS; l’opzione attivata è evidenziata
quando si accede al menu. Premere EXIT per ritornare a un menu precedente o lasciare il menu
IMPOSTAZ E OPZ senza modificare alcuna impostazione.
• Selezionare MEMORIZ per visualizzare o modificare le seguenti impostazioni.
• RESOLUTION – Scegliere la risoluzione per la memorizzazione delle foto.
• ALBUM /GROUPING – Scegliere come le foto devono essere organizzate quando vengono
memorizzate.
• Selezionare SLIDE SHOW per visualizzare o modificare le seguenti impostazioni.
ITALIANO
Page 30

30
• PLAY ORDER – Per scegliere se visualizzare le foto e i videoclip in ordine alfabetico o
casuale.
• SLIDE INTERVAL – Per scegliere quanto tempo ciascuna diapositiva deve rimanere sullo
schermo prima che si visualizzi la successiva (gli intervalli effettivi possono essere più
lunghi di quello impostato a causa dei tempi di caricamento più lunghi dei file di notevoli
dimensioni).
• SHOW LENGTH – Per scegliere se: visualizzare ogni foto/video una volta e poi fermarsi,
visualizzare ciclicamente o visualizzare le foto fino al termine del sottofondo.
• TRANSITION EFFECT – Per scegliere quale effetto utilizzare nella transizione da una
diapositiva alla successiva o impostare la scelta casuale di un effetto ogni volta, oppure per
decidere di non utilizzare alcun effetto.
• MUSIC WITH SLIDE SHOW – Per scegliere se durante la visualizzazione delle diapositive
devono essere riprodotti brani musicali. Questa opzione funziona solo se la scheda
CompactFlash inserita nello slot posteriore contiene dei file MP3 (vedere la sezione
Visualizzazione di foto con sottofondo).
• Selezionare MUSIC per visualizzare o modificare le seguenti impostazioni.
• PLAY ORDER – Per scegliere se riprodurre i brani musicali in ordine alfabetico o casuale.
• PLAY LENGTH – Per scegliere se riprodurre ogni brano musicale una volta e poi fermarsi
o se riprodurli ciclicamente.
• Selezionare PRINT SETTINGS per visualizzare o modificare le seguenti impostazioni.
• MARK FOR PRINTING – Quando si seleziona SÌ, la foto viene contrassegnata per la
stampa. Se la scheda con le foto contrassegnate viene inserita in una stampante o in un
chiosco fotografico DPOF compatibile, vengono selezionate automaticamente le foto da
stampare.
• NUMBER OF PRINTS – Per selezionare il numero di copie da stampare, da 1 a 5, della
foto contrassegnata. L’impostazione predefinita è 1.
• SIZE – Consente di scegliere le dimensioni di stampa tra i seguenti valori: 100 x 150 mm (4
x 6 in), 130 x 180 mm (5 x 7 in) e 200 x 300 mm (8 x 10 in). L’impostazione predefinita è
100 x 150 mm.
• Selezionare FIRMWARE per visualizzare il numero di versione del software installato. Visitare il
sito www.sandisk.com/registration per iscriversi in modo da ricevere per posta elettronica avvisi
relativi alle nuove versioni del firmware e per scaricarle.
Modalità d’uso come unità di lettura/scrittura di
schede USB
Il SanDisk Photo Album può funzionare anche come unità di lettura/scrittura di schede USB 8 in 1
quando è collegato a un computer.
NOTA: si può adoperare solo UNA porta USB alla volta sul SanDisk Photo Album: il
connettore USB piccolo per il collegamento al computer OPPURE il connettore USB grande
per il collegamento alle unità flash USB. NON tentare di utilizzare entrambi i connettori USB
simultaneamente.
ITALIANO
Page 31

31
Windows ME, 2000 e XP: collegare l’estremità piccola del cavo USB al connettore sul pannello
posteriore del SanDisk Photo Album e l’altra estremità al PC. I driver necessari vengono caricati
automaticamente; a questo punto i quattro slot sul pannello anteriore del SanDisk Photo Album
vengono mostrati automaticamente come quattro unità rimovibili in Risorse del computer, e si può
accedere ai file sulla scheda di memoria come se essa fosse un’altra unità del computer.
Windows 98SE:
1. Collegare l’estremità piccola del cavo USB al connettore sul pannello posteriore del SanDisk
Photo Album e l’altra estremità al PC.
2. Si visualizza la finestra Installazione guidata Nuovo hardware. Fare clic sul pulsante Avanti.
3. Selezionare sulla schermata successiva “Cerca il miglior driver per la periferica” e fare clic sul
pulsante Avanti.
4. Sulla finestra successiva, selezionare solo l’opzione “Unità CD-ROM”. Inserire il CD SanDisk
nell’unità CD-ROM e fare clic sul pulsante Avanti.
5. Quando Windows termina l’installazione del software, fare clic su Fine.
6. Riavviare il computer e andare a Risorse del computer; i quattro slot sul pannello anteriore del
SanDisk Photo Album vengono mostrati automaticamente come quattro unità rimovibili e si può
accedere ai file sulla scheda di memoria come se essa fosse un’altra unità del computer.
Macintosh OS 10.1.2+: collegare l’estremità piccola del cavo USB al connettore sul pannello
posteriore del SanDisk Photo Album e l’altra estremità alla porta USB del Mac (fare attenzione a non
collegarla al monitor o alla tastiera). Quando si inserisce una scheda in uno degli slot anteriori del
SanDisk Photo Album, sul desktop compare una nuova unità (si può utilizzare solo uno slot alla
volta): trascinare i file tra essa e il computer come si farebbe con qualsiasi altra unità o cartella.
Rimozione di schede/unità flash USB (Windows)
1. Aprire Risorse del computer.
2. Fare clic con il pulsante destro del mouse sull’icona dell’unità corrispondente.
3. Selezionare Rimuovi (questa operazione non è pertinente se si usa Windows 98SE o XP).
4. Tirare la scheda/l’unità flash USB fuori dello slot.
Rimozione di schede/unità flash USB (Macintosh)
Trascinare l’icona dell’unità rimovibile ‘senza titolo’ sull’icona del cestino e tirare la scheda/l’unità
flash USB fuori dello slot.
Per evitare di perdere dati o danneggiare la scheda/l’unità flash USB, NON rimuoverla MAI né
scollegare il SanDisk Photo Album MENTRE IL LED LAMPEGGIA.
Aggiunta di un sottofondo a una sequenza di diapositive (Windows)
1. Collegare il SanDisk Photo Album alla porta USB del PC.
2. Fare doppio clic sull’icona "Risorse del computer" e selezionare la cartella dove risiedono i file
dei brani musicali.
3. Selezionare i file da copiare tenendo premuto il tasto Ctrl e facendo clic su di essi.
4. Rilasciare il tasto Ctrl, fare clic una volta con il pulsante DESTRO del mouse e selezionare
COPY.
5. Estrarre dallo slot posteriore la scheda CompactFlash contenente le foto alla risoluzione da
schermo televisivo e inserirla nello slot anteriore. Fare doppio clic sull’unità disco rimovibile (per
lo slot CompactFlash sul pannello anteriore del SanDisk Photo Album), cioè F: o G: o anche E:;
a questo punto si possono vedere i file memorizzati su questa scheda.
6. Andare alla barra dei menu e sotto EDIT, fare clic su PASTE: i file selezionati vengono copiati
sulla scheda CompactFlash.
7. Per determinare l’ordine con cui saranno riprodotti i file, rinominarli inserendo numeri all’inizio
dei nomi. Per rinominare un file, fare clic su di esso una volta con il pulsante DESTRO del
mouse, spostare il puntatore del mouse su RENAME, selezionare questo comando facendo clic
su di esso con il pulsante SINISTRO del mouse, spostare il puntatore all’inizio del nome del file
e fare clic con il pulsante sinistro del mouse. Immettere un numero e premere il tasto Invio sulla
tastiera: il nome del file viene salvato.
8. Una volta copiati i file, ritornare a Risorse del computer, fare clic con il pulsante destro del
mouse sull’icona dell’unità relativa allo slot CompactFlash anteriore e selezionare Rimuovi.
ITALIANO
Page 32

32
9. Estrarre la scheda CompactFlash, inserirla nello slot posteriore e collegare il SanDisk Photo
Album al televisore. Si è così pronti a riprodurre una sequenza di diapositive multimediale.
Aggiunta di un sottofondo a una sequenza di diapositive (Macintosh)
1. Collegare il SanDisk Photo Album alla porta USB del Mac (fare attenzione a non collegarlo alla
porta del monitor o della tastiera).
2. Estrarre dallo slot posteriore la scheda CompactFlash contenente le foto a risoluzione da
schermo televisivo e inserirla nello slot anteriore: sul desktop compare una nuova unità
denominata “senza titolo”.
3. Selezionare la cartella contenente i file dei brani musicali.
4. Trascinare i file sulla nuova unità come si farebbe con qualsiasi altra unità o cartella.
Guida alla soluzione dei problemi
Per esaminare le domande frequenti (FAQ, Frequently Asked Questions) e per altre informazioni di
supporto al SanDisk Photo Album, visitare il sito Web http://www.sandisk.com/retail/support.asp.
Per assistenza telefonica chiamare il numero verde (solo negli USA) 866-SANDISK (866-726-3475)
dal lunedì al venerdì, dalle 16:00 alle 01:00.
Se le unità non compaiono nella modalità d’uso come unità di lettura (vedere le istruzioni nella
sezione “Modalità d’uso come unità di lettura/scrittura di schede USB”), è possibile che la
connessione USB del computer non fornisca sufficiente potenza; adoperare il SanDisk Photo Album
con il suo alimentatore e riavviare il computer.
Garanzia limitata
La SanDisk garantisce che questo prodotto s arà esente da difetti materiali di progettazione e produzione e sarà sos tanzialmente conforme ai
dati tecnici pubblicati, in condizion i di uso normale, per un periodo di due anni a decorrere dalla data di acq uisto, secondo le condizioni
seguenti. Questa garanzia viene off erta all’utente finale originale che ha acquistato il prodotto presso SanDis k o un rivenditore autorizzato, e
non è trasferibile. Può essere richiest o lo scontrino. Questo prodotto deve essere utilizzato con schede di memor ia conformi alle specifiche
della CompactFlash Card Association, S D Card Associationo o della MultiMediaCard Association oppure, se pertinente, che soddisfano i
requisiti relativi a Memory Stick , Memory Stick PRO, SmartMedia o xD-Picture; l’utilizzo con qua lsiasi altro prodotto annulla questa garanzia.
La SanDisk non sarà responsabile in alc un modo di un guasto o difetti causati da un qualunque prodotto o com ponente di terzi, anche se
l’uso fosse stato autorizzato. Questa gar anzia non si applica ad alcun software di terzi fornito con il prodotto e l ’utente è responsabile di tutte
le operazioni di manutenzione o riparazion e necessarie per tale software. Questa garanzia è nulla se la scheda di m emoria non viene
adoperata seguendo le istruzioni per l’ uso del prodotto o se viene danneggiata in seguito a installazione im propria, abuso, riparazione non
autorizzata, modifica o incidente.
Per richiedere un intervento in garan zia contattare la SanDisk al numero 1-866-SanDisk o inviare un’e-m ail a: support@SanDisk.com. Il
prodotto deve essere restituito in un imballaggio a prova di manomissione, franco destinatario, secondo le is truzioni fornite dalla SanDisk.
Occorre ottenere un numero di conferm a utilizzabile per la ricerca della spedizione, che a richiesta potrebbe essere necessario fornire alla
SanDisk. A sua discrezione la SanDis k riparerà o sostituirà il prodotto con un prodotto nuovo o ricostruito di capacità e funzionalità uguali o
superiori, oppure rimborserà il prezzo di acquisto. La durata di validità della garanzia del prodotto sost itutivo sarà uguale al periodo di
garanzia rimanente per il prodotto origi nale. QUESTA GARANZIA STABILISCE L’INTERA RESPONSABILITÀ DELLA SAND ISK E
L’ESCLUSIVO RIMEDIO A DISPOSIZIONE DLEL ’UTENTE IN CASO DI INADEMPIENZA.
La SanDisk non garantisce contro perdit e di dati o immagini contenuti in qualsiasi prodotto (incluso un prodotto r estituito), né sarà
responsabile della loro perdita qualunqu e ne sia la causa. Non si garantisce che i prodotti SanDisk funzionino sen za guasti ed essi non
devono essere adoperati nell'ambito di sistemi di assistenza delle funzioni vitali o di altre applicazioni i n cui un guasto potrebbe avere
conseguenze anche fatali. Questa garan zia dà specifici diritti legali; a seconda della nazione in cui risiede, l’utente potrebbe avere anche altri
diritti.
QUESTA GARANZIA È L’UNICA GARANZIA OFF ERTA DALLA SANDISK. LA SANDISK DECLINA IN MODO ASSOLUTO, SECONDO
QUANTO PERMESSO DALLE NORME DI LEG GE, TUTTE LE ALTRE GARANZIE, ESPRESSE E IMPLICITE. LE GARANZI E IMPLICITE
DI COMMERCIABILITÀ E IDONEITÀ PER UNO SCOPO PARTICOLARE SO NO LIMITATE ALLA DURATA DELLA GARANZIA ESPLICITA.
ALCUNE NAZIONI NON CONSENTONO LIMITAZIO NI ALLA DURATA DI UNA GARANZIA IMPLICITA, QUINDI LA LIMITAZIONE
PRECEDENTE POTREBBE NON APPLICAR SI. NÉ LA SANDISK NÉ UNA SUA QUALSIASI AFFILIATA SARANNO RESPON SABILI, IN
NESSUN CASO, DI DANNI DIRETTI O INDIRETTI, PERDITE FINANZIARI E O PERDITA DI DATI O IMMAGINI, ANCHE SE LA SANDISK
FOSSE STATA AVVISATA DELLA POS SIBILITÀ DI TALI DANNI. ALCUNE NAZIONI NON CONSENTONO L’ESCLUSIONE O LA
LIMITAZIONE DI DANNI INCIDENTALI O INDIRETTI, QUINDI L’ESCLUSION E O LA LIMITAZIONE DI CUI SOPRA POTREBBE NON
APPLICARSI. LA RESPONSABILITÀ DELL A SANDISK NON SUPERERÀ IN NESSUN CASO L’IMPORTO PAGATO DALL’UTENTE PER
IL PRODOTTO.
Le informazioni contenute in questo m anuale sono soggette a modifica senza preavviso. La SanDisk non sarà responsa bile né di omissioni
oppure di errori tecnici o di revisione contenuti nel manuale né di danni incidentali o indiretti derivanti da lla fornitura, dalle prestazioni o
dall’uso di questo materiale. Questa docum entazione non può essere copiata, riprodotta, tradotta o convertita in un supporto elettronico,
anche parzialmente, senza previa autor izzazione scritta della SanDisk.
SanDisk, il logotipo SanDisk e Com pactFlash sono marchi della SanDisk Corporation, depositati negli St ati Uniti e in altre nazioni. Store Your
World in Ours è un marchio della SanDis k Corporation. SanDisk è un licenziatario dei marchi SD e MultiMedia Card. SmartMedia è un
marchio della Toshiba Corporation. Memory Stick e Memory Stick PRO sono marchi di fabbrica della Son y Corporation. Altri nomi
commerciali qui menzionati hanno so lo scopo identificativo e possono essere marchi dei rispettivi titol ari.
©2004 SanDisk Corporation. Tutti i diritti sono riservati.
ITALIANO
Page 33

33
SanDisk® Photo Album
Guia de Usuário
Índice
Conteúdo da Embalagem..........................................................................……………………………. 33
Especificação do Produto...............................................................................………………………… 34
Requerimentos Mínimos....................................................................................……………………… 34
Instalação do SanDisk Photo Album.............................................................................……………... 34
Como Usar o SanDisk Photo Album..................................................................................….………. 34
Exibição de Fotos e Videoclipes................................. ........... ............ ............... ..……………………... 35
Armazenamento e Eliminação de Fotos e Videoclipes......................................……………………… 36
Exibição de Fotos com Música.........................................................................………………………. 36
Reprodução de Música........................................................................................…………………….. 37
Modo de Arquivos.............................................................................................………………………. 37
Configuração e Opções..................................................................................………………………… 37
Modo de Leitora/Gravadora de Cartões USB..................................................……………………….. 38
Identificação de Problemas..............................................................................……………………….. 40
Garantia...............................................................................................................…………………….. 40
Parabéns
Parabéns pela sua compra do SanDisk Photo Album. Agora você pode facilmente visualizar e
partilhar de suas fotos digitais e mais na sua TV, no conforto da sua sala de estar. Este guia de
usuário o instrui na instalação e uso do seu SanDisk Photo Album.
Conteúdo da Embalagem
• SanDisk Photo Album
• Fonte de Energia
• Cabo de Áudio/Vídeo
• Controle Remoto com Pilhas
• Guia de Usuário
• CD-ROM (para uso como leitora/gravadora 8 em 1)
• Cabo USB (para uso como leitora/gravadora 8 em 1)
Você pode registrar o seu produto on-line em
http://www.sandisk.com/registration
e receber avisos por e-mail sobre novas versões de firmware para aperfeiçoar a
funcionalidade do seu SanDisk Photo Album!
A ausência de registro do produto não elimininará os seus direitos de garantia do produto.
PORTUGUÊS
Page 34

34
Especificação de Produto
• Suporte ao Formato de Conteúdo:
• JPEG (Linha de base, até 16 Megapixels)
• Motion JPEG
• MPEG-1 (resolução QVGA/ até 8 quadros por segundo)
• MP3 (até 320 Kbps)
• Conexões:
• Vídeo (Composto) e Áudio (Estéreo)
• Dois conectores USB 1.1 (para Unidade de Flash USB e PC)
• Energia
• Formatos Compatíveis de Cartões de Memória Flash:
• CompactFlash® Tipo I / II
• SD™ / MultiMediaCard™
• Memory Stick™ / Memory Stick PRO™
• SmartMedia™ / xD
Requerimentos Mínimos
Para armazenamento e reprodução:
• TV com conexão RCA de vídeo (NTSC ou PAL) e conexão RCA de áudio (direita e esquerda)
Para uso como leitora/gravadora 8 em 1:
• Windows: PC classe Pentium com suporte a USB, unidade de CD-ROM e Windows 98SE, ME,
2000 ou XP.
• Macintosh: Computador com suporte a USB, unidade de CD-ROM e Mac OS 10.1.2+
Instalação do SanDisk Photo Album
1. Ligue a Fonte de energia na parte traseira do SanDisk Photo Album e conecte a fonte de
energia em uma tomada.
2. Conecte o cabo de áudio/vídeo à TV e/ou sistema de som. Na TV, o conector amarelo deve
ser ligado à entrada de vídeo (Video In), o conector vermelho deve ser ligado à entrada direita
de áudio (Audio In - R), e o conector branco deve ser ligado à entrada esquerda de áudio
(Audio In - L).
3. Ligue o cabo de áudio/vídeo à parte traseira do SanDisk Photo Album.
4. Insira as pilhas no controle remoto.
5. Pressione o botão de liga/desliga no controle remoto e o SanDisk Photo Album será ativado (o
logo da SanDisk se acende).
6. Ligue a TV e mude a fonte de entrada de sinal na TV. Dependendo do modelo, a fonte de
entrada de sinal pode ser chamada TV/Vídeo, Input, ou Source (consulte o manual da sua TV
para mais informações). Quando a fonte correta for selecionada, verá uma mensagem
solicitando a inserção de um
cartão de memória. O SanDisk
Photo Album estará pronto
para uso.
Como Usar o SanDisk Photo Album
Insira um cartão de memória flash ou unidade Flash USB (UFD) no slot
correspondente (para SmartMedia, insira com a placa dourada voltada para
baixo). Quando um cartão é inserido corretamente, a luz indicadora verde à
esquerda do slot se acende e o SanDisk Photo Album começará a ler o
cartão. Caso tenha fotos (JPEG) ou videoclipes (Motion JPEG ou MPEG-1)
PORTUGUÊS
Page 35

35
armazenados no cartão, você será levado automaticamente ao menu PHOTO & VIDEO (Foto e
vídeo). Caso tenha música (MP3) no cartão, sem nenhum arquivo nos formatos suportados de foto
ou vídeo, você será levado ao menu MUSIC (Música).
O SanDisk Photo Album é operado com o controle remoto incluído no pacote. Caso tenha mais de
um cartão de memória inserido, pode pressionar SELECT CARD (selecionar cartão). Selecione o
cartão (ou UFD) a ser usado com os botões de seta para cima e para baixo, e depois pressione OK
para confirmar a sua seleção.
Exibição de Fotos e Videoclipes
• Pressione o botão PHOTO/VIDEO (Foto/Vídeo) para exibir as miniaturas de fotos e videoclipes
armazenados no cartão de memória ou UFD selecionado.
• Fotos e videoclipes podem estar localizados dentro de um álbum (pasta). Utilize os botões de
seta para selecionar um álbum e pressione OK para entrar no álbum. Pressione ‘play’ (reproduzir)
enquanto o álbum estiver pré-selecionado para exibir as fotos e reproduzir os videoclipes como
uma apresentação de slides.
• Utilize os botões de seta para selecionar uma miniatura representando uma foto ou videoclipe e
utilize os botões PREVIOUS (anterior) e NEXT (seguinte) para trocar de página.
• Pressione OK para exibir (foto) ou reproduzir (vídeo) em tamanho de tela completa. Pressione
PLAY/PAUSE (reproduzir/pausa) iniciar a reprodução de fotos e videoclipes de acordo com a
configuração de SLIDE SHOW (apresentação de slides) (consulte Configurações e Opções).
• Pressione PREVIOUS (anterior) para ir para a foto ou videoclipe anterior.
1. Álbum com fotos/videoclipes armazenados nas saus resoluções originais
2. Álbum com fotos armazenadas em resolução de impressão
3. Álbum com sub-álbuns e fotos/videoclipes
4. Álbum que está vazio ou tem conteúdo que não é compatível
5. Miniatura de foto
6. Álbum com fotos. A miniatura é da primeira foto ou videoclipe no álbum
7. Miniatura de videoclipe
4
5
1 2 3
6
7
PORTUGUÊS
Page 36

36
• Pressione NEXT (seguinte) para ir para a foto ou videoclipe seguinte.
• Utilize os botões ZOOM + e ZOOM – para aproximar ou afastar uma foto ou expandir o vídeo
para preencher toda a tela. Ao aproximar uma foto, você pode usar os botões de seta para movêla para cima, para baixo, esquerda ou direita.
• Pressione o botão ROTATE (girar) uma vez para girar a foto em 90 graus na direção do relógio.
Pressione novamente para girar mais 90 graus.
• Para interromper e retornar ao menu PHOTO/VIDEO, pressione STOP (parar) ou EXIT (sair).
• Pressione o botão INFO (informação) para ver mais informações sobre o arquivo selecionado ou
para exibir/esconder a barra de progresso durante a reprodução de vídeos.
Armazenamento e Eliminação de Fotos e Videoclipes
• O SanDisk Photo Album possui um slot adicional para CompactFlash Tipo I na parte traseira.
Quando um cartão CompactFlash Tipo I (não incluído) é inserido, você pode armazenar fotos e
videoclipes do UFD ou de cartões inseridos nos slots dianteiros.
• Para armazenar uma foto, pressione o botão STORE (armazenar) quando a foto for exibida em
tela completa. A partir do menu que é exibido, você pode optar por armazenar a foto em sua
qualidade original (resolução) ou em qualidade de TV (640x480 pixels). Em qualidade de TV, a
foto tem a mesma aparência na tela de TV que na sua versão de resolução original (superior)
mas o espaço de armazenamento é apenas uma fração do original. Por exemplo, ao usar um
cartão CompactFlash de 128 MB, você pode armazenar até 2.000 fotos em qualidade de TV
(baseado no espaço médio de armazenamento de 60 KB por foto).
• Fotos armazenadas em resolução original ficam localizadas automaticamente em um álbum
chamado ORIGINAL
• Fotos armazenadas em resolução de impressão (tamanho de cartão-postal) ficam localizadas
automaticamente em um álbum chamado PRINT (impressão)
• Fotos armazenadas em resolução de TV podem ser armazenadas em um álbum dependendo da
configuração de armazenamento. Pressione o botão SETTINGS & OPTIONS (configurações e
opções) e selecione STORING (armazenamento) e depois ALBUM / GROUPING
(álbum/agrupamento). Se a opção “Group Photos per Day” (agrupe fotos por dia) estiver
selecionada, então todas as fotos tiradas em um mesmo dia serão armazenadas em um álbum.
Isso acontece no momento em que as fotos estão sendo armazenadas no cartão CompactFlash
na parte traseira. As outras opções são armazenar por mês (todas as fotos de um mesmo mês
são armazenadas em um só álbum) e por ano (todas as fotos de um mesmo ano são
armazenadas em um só álbum). Fotos que já estejam armazenadas e álbuns já criados não são
afetados com a mudança de configuração de armazenamento. As configuração de
armazenamento só serão aplicadas a fotos que sejam armazenadas após a mudança da
configuração.
• Videoclipes são armazenados de forma parecida mas podem ser armazenados apenas no seu
tamanho original. Videoclipes são armazenados automaticamente em um álbum chamado
ORIGINAL. Fique ciente que o tamanho de um arquivo de videoclipe é freqüentemente muito
maior que o de uma foto e pode rapidamente preencher o seu cartão de memória.
• Para eliminar uma foto, videoclipe ou álbum completo, pressione o botão DELETE (eliminar)
quando o item estiver pré-selecionado. Depois, siga as instruções na tela. Você também pode
eliminar uma foto ou videoclipe enquanto a mesma está sendo exibida em tela completa.
Exibição de Fotos com Música
• Fotos podem ser exibidas com música (de fundo). As fotos precisam ser armazenadas em
qualidade de TV no cartão CompactFlash inserido na parte traseira. Quando um arquivo MP3
(128 Kb por segundo ou menos) for armazenado no mesmo cartão, o SanDisk Photo Album
exibirá as fotos com a música de acordo com a configuração de apresentação de slides. Quando
um ou mais arquivos MP3 estiverem presentes em um álbum, a música será reproduzida com as
fotos daquele álbum.
• Para habilitar ou desabilitar a exibição de fotos com música, pressione OPTIONS & SETTINGS,
selecione SLIDE SHOW e depois MUSIC WITH SLIDE SHOW (música com apresentação de
slides). Selecione YES (para música) ou NO (sem música) e pressione OK.
• Consulte o Modo de Leitora/Gravadora de Cartão USB para instruções sobre como adicionar
arquivos MP3.
PORTUGUÊS
Page 37

37
• Consulte Settings & Options sobre como alterar configurações de apresentação de slides.
Reprodução de Música
• Pressione o botão MUSIC (música) para exibir a lista de músicas armazenadas no UFD ou cartão
de memória selecionado.
• Use os botões de seta para selecionar uma música e utilize os botões PREVIOUS (anterior) e
NEXT (seguinte) para mudar de página.
• Pressione OK para reproduzir a música destacada ou pressione PLAY/PAUSE (reproduzir/pausa)
para iniciar a reprodução de uma série de músicas de acordo com a configuração MUSIC
(consulte Configurações e Opções). A reprodução pode ser interrompida se pressionar
PLAY/PAUSE. Pressione novamente o mesmo botão para recomeçar a reprodução.
• Pressionar PREVIOUS (anterior) uma vez o fará retornar ao princípio da música. Pressione várias
vezes para retornar a músicas anteriores. Pressione e mantenha pressionado para correr a
música para trás em alta velocidade.
• Pressionar NEXT (seguinte) o fará mudar para a próxima música. Pressione e mantenha
pressionado para correr a música para a frente em alta velocidade.
• Ajuste o volume de áudio com os botões VOLUME +/-. O volume máximo é o volume
determinado pela TV ou sistema de áudio.
• Para interromper e retornar ao menu MUSIC, pressione STOP (parar) ou EXIT (sair).
• Pressione o botão INFO para ver mais informações sobre o arquivo selecionado.
• Você também pode reproduzir música sem uma TV. Ligue o cabo de A/V às conexões de
Entrada Direita e Esquerda de Áudio de um sistema de som. Selecione a fonte de entrada no
sistema de áudio (caso necessário). Insira um cartão ou UFD que contenha APENAS arquivos
MP3 no SanDisk Photo Album, ligue-o e espere até a luz indicadora parar de piscar. Então,
pressione reproduzir e o primeiro arquivo de música será reproduzido. Ao final, a próxima música
será iniciada de acordo com a configuração de músicas.
Modo de Arquivos
• Pressione o botão FILES (arquivos) para ver todos os arquivos suportados no UFD ou cartão de
memória selecionado.
• Use os botões de seta para selecionar arquivos e álbuns (pastas) diferentes, e pressione
PREVIOUS (anterior) e NEXT (seguinte) para mudar de página.
• Use os botões OK ou PLAY/PAUSE para entrar nos álbuns e começar a reprodução de arquivos.
Pressione STORE para armazenar arquivos e INFO para visualizar informações.
• Durante a exibição ou reprodução de arquivos a partir do Modo de Arquivos, os outros botões
operam da mesma forma que nos modos PHOTO/VIDEO e MUSIC.
Configurações e Opções
• Você pode alterar várias configurações do SanDisk Photo Album. Pressione o botão SETTINGS
& OPTIONS no controle remoto para acessar o menu de Configurações e Opções. Use os botões
de seta e OK para entrar em submenus e selecionar opções. A opção ativa é destacada ao entrar
no menu. Pressione EXIT (sair) para retornar a um menu anterior ou para sair do menu de
configurações e opções sem alterar nenhum dos parâmetros.
• Selecione STORING (armazenar) para visualizar ou alterar os seguintes parâmetros:
• RESOLUTION – Escolha a resolução de fotos para armazenamento.
• ALBUM/GROUPING – Escolha como as fotos serão organizadas em armazenamento.
• Selecione SLIDE SHOW (apresentação de slides) para visualizar ou alterar os seguintes
parâmetros:
• PLAY ORDER – Escolha se a exibição de fotos e videoclipes será em ordem alfabética ou
aleatória.
• SLIDE INTERVAL – Escolha o tempo de permanência de cada slide na tela antes de
passar ao próximo (o tempo real pode ser maior que o determinado no parâmetro devido
ao tempo de carregamento do arquivo).
• SHOW LENGTH – Escolha se cada foto/videoclipe será exibido uma vez e então a
apresentação será interrompida, se a apresentação reciclará a reprodução de fotos e
videoclipes ou se as fotos serão exibidas até a música acabar.
PORTUGUÊS
Page 38

38
• TRANSITION EFFECT – Escolha qual o efeito a ser usado na mudança de slides, ou se o
efeito será escolhido aleatoriamente a cada oportunidade ou se nenhum efeito será usado.
• MUSIC WITH SLIDE SHOW – Escolha se arquivos de música devem ou não ser
reproduzidos durante a apresentação de slides. Este parâmetro só é funcional se o cartão
CompactFlash conectado no slot traseiro contiver arquivos MP3 (consulte Exibição de
Fotos com Música).
• Selecione MUSIC para visualizar ou alterar os seguintes parâmetros:
• PLAY ORDER – Escolha se a reprodução de músicas será em ordem alfabética ou
aleatória.
• PLAY LENGTH – Escolha se cada música será reproduzida uma vez e então a reprodução
interrompida ou se a reprodução das músicas será reciclada.
• Selecione PRINT SETTINGS para visualizar ou alterar os seguintes parâmetros:
• MARK FOR PRINTING – Ao selecionar YES (sim), a foto é marcada para impressão. Se o
cartão com fotos marcadas estiver inserido em uma impressora ou quiosque de fotos que
seja compatível com DPOF, a impressora/quiosque é automaticamente instruído sobre
quais fotos imprimir.
• NUMBER OF PRINTS – Selecione de 1 a 5 para selecionar a quantidade de cópias a
serem impressas da foto marcada. A seleção padrão é de 1 cópia.
• SIZE – Selecione um dos tamanhos seguintes para especificar o tamanho da cópia
impressa: 100 x 150 mm (4 x 6 pol.), 130 x 180 mm (5 x 7pol.) e 200 x 300 mm (8 x 10pol.).
100 x 150 mm é a seleção padrão.
• Selecione FIRMWARE para visualizar o número da versão do software instalado. Visite
www.sandisk.com/registration para registrar-se para alertas por e-mail de novos firmwares e para
fazer o download de novas versões de firmware.
Modo de Leitora/Gravadora de Cartões USB
O SanDisk Photo Album também pode funcionar como uma Leitora/Gravadora de Cartões 8 em 1
USB quando conectada a um computador.
NOTA: você pode usar apenas UMA porta USB no SanDisk Photo Album de cada vez; o pequeno
conector USB para ligar ao computador OU o grande conector USB para ligar a unidades Flash
USB. NÃO tente usar os dois conectores USB simultaneamente.
Windows ME, 2000 e XP: Simplesmente conecte a extremidade menor do cabo USB à parte
traseira do SanDisk Photo Album e depois conecte a outra extremidade ao PC. Os drivers
necessários serão carregados automaticamente. Então, os quatro slots na parte dianteira do
SanDisk Photo Album serão imediatamente exibidos como quatro discos removíveis em Meu
Computador. Você pode acessar arquivos no cartão de memória como se fosse apenas outra
unidade de disco no computador.
Windows 98SE:
1. Conecte a extremidade menor do cabo USB à parte traseira do SanDisk Photo Album e depois
conecte a outra extremidade ao PC.
PORTUGUÊS
Page 39

39
2. A janela Add New Hardware Wizard (assistente para adicionar novo hardware) aparece. Clique
no botão NEXT (avançar).
3. Na próxima tela, selecione “Search for the best driver for your device” (Procure o melhor driver
para o seu dispositivo) e clique no botão NEXT (avançar).
4. Na tela seguinte, selecione apenas a opção “CD-ROM drive” (unidade de CD-ROM). Insira o
CD da SanDisk na unidade de CD-ROM e clique no botão NEXT (avançar).
5. Clique FINISH (Concluir) quando Windows terminar de instalar o software.
6. Reinicialize o PC. Vá para Meu Computador. Os quatro slots na parte dianteira SanDisk Photo
Album devem estar sendo exibidos agora como quatro discos removíveis diferentes. Você
pode acessar arquivos no cartão de memória como se fosse apenas outra unidade de disco no
computador.
Macintosh OS 10.1.2+: Conecte a extremidade menor do cabo USB à parte traseira do SanDisk
Photo Album e depois conecte a outra extremidade à porta USB do Mac (não use a porta no
monitor ou no teclado). Uma nova unidade aparecerá na área de trabalho quando um cartão for
inserido em um dos slots dianteiros do SanDisk Photo Album (você pode usar apenas um slot por
vez). Arraste e solte arquivos de e para a nova unidade como faria com qualquer outro disco ou
pasta.
Como Remover Cartões/UFD (Windows)
1. Abra Meu Computador
2. Faça um clique com o botão direito do mouse no ícone de unidade correspondente
3. Selecione Ejetar (isso não é aplicável em Windows 98SE)
4. Retire o cartão/UFD do slot
Como Remover Cartões/UFD (Macintosh)
Arraste o ícone de disco removível rotulado como 'sem título' para o ícone de Lixo na área de
trabalho e depois retire o cartão/UFD do slot.
Para evitar a perda de dados ou corrupção do cartão/UFD, NUNCA remova o cartão/UFD nem
desconecte o SanDisk Photo Album enquanto o LED DE ATIVIDADE estiver PISCANDO ou
TREMELUZINDO.
Como adicionar arquivos de música a uma apresentação de slides (Windows)
1. Ligue o SanDisk Photo Album à porta USB no PC.
2. Faça um clique duplo sobre o ícone "Meu Computador" e navegue até a pasta em que aos
arquivos de música estão armazenados.
3. Selecione os arquivos de música mantendo pressionada a tecla Ctrl e clicando sobre os
arquivos de música que deseja copiar.
4. Solte a tecla Ctrl, clique uma vez com o botão DIREITO do mouse e selecione COPY (copiar).
5. Retire o cartão CompactFlash com fotos em resolução de TV do slot traseiro e coloque-o no
slot dianteiro. Faça um clique duplo sobre a unidade de disco removível (referente ao slot do
CompactFlash na parte dianteira do SanDisk Photo Album), por exemplo F:, G: ou talvez E.
Agora deve ser capaz de ver o conteúdo armazenado no cartão.
6. Vá para a barra de menu onde se encontra a opção EDIT (editar) e clique em PASTE (colar).
Os arquivos de música serão copiados para o cartão CompactFlash.
7. Para determinar a ordem de reprodução das músicas, renomeie os arquivos de música
colocando algarismos na frente dos nomes. Para renomear um arquivo, clique uma vez com o
botão DIREITO do mouse sobre o arquivo, mova o indicador do mouse até RENAME
(renomear), clique com o botão ESQUERDO do mouse para selecionar RENAME, coloque o
indicador do mouse no começo do nome do arquivo e clique com o botão esquerdo do mouse.
Agora digite um algarismo e pressione ENTER no teclado. O nome do arquivo será salvo.
8. Após copiar os arquivos, retorne para Meu Computador, faça um clique com o botão direito do
mouse no ícone de unidade para o slot dianteiro com o CompactFlash e selecione Ejetar.
9. Remova o cartão CompactFlash e recoloque-o no slot traseiro. Ligue o SanDisk Photo Album à
TV e estará pronto para exibir uma apresentação de slides em multimídia!
Como adicionar arquivos de música a uma apresentação de slides (Macintosh)
1. Ligue o SanDisk Photo Album à porta USB do Mac (não use a porta no monitor ou no teclado).
PORTUGUÊS
Page 40

40
2. Retire o cartão CompactFlash com fotos em resolução de TV do slot traseiro e coloque-o no
slot dianteiro. Uma nova unidade aparecerá na área de trabalho rotulada como “sem título”.
3. Navegue até a pasta em que aos arquivos de música estão armazenados.
4. Arraste e solte arquivos de e para a nova unidade como faria com qualquer outro disco ou
pasta.
Identificação de Problemas
Para perguntas freqüentes (FAQs) e outras informações de suporte ao SanDisk Photo Album, por
gentileza visite o nosso website em http://www.sandisk.com/retail/support.asp
Para auxílio por telefone, faça uma ligação gratuita para 866-SANDISK (866-726-3475), Seg-Sex
7hr até 16hr (horário do Pacífico)
Quando a(s) unidade(s) não aparecer(em) em modo de leitora (consulte as instruções em USB
CARD READER/WRITER MODE), pode ser que a conexão de USB do seu computador não forneça
energia suficiente. Use a fonte de energia do próprio SanDisk Photo Album e reinicialize o seu
computador.
Garantia Limitada
A SanDisk garante que este produto está li vre de defeitos materiais de desenho e manufatura e estará essencialmente em conformidade
com suas especificações publicadas so b condições normais de uso por dois anos a partir da data da compra, sujeit o às condições abaixo.
Essa garantia é fornecida ao usuário final or iginal que adquiriu o produto com a SanDisk ou com um revendedor autor izado, e não é
transferível. Um recibo de compra pode ser exigido. Este produto pode ser usado com cartões de memória que estejam em conformidade
com as especificações da CompactFlas h Card Association, da SD Card Association, da MultiMediaCard Association, ou com requerimentos
de Memory Stick, Memory Stick PRO, Sm artMedia e xD-Picture Card conforme aplicável; o uso com qualquer outro produto invalida esta
garantia. A SanDisk não assume res ponsabilidade por falha ou defeito causado por quaisquer produtos ou c omponentes de terceiros, sejam
eles autorizados ou não. Esta garantia nã o é aplicável a quaisquer softwares de terceiros fornecidos conjunt amente com o produto; o
usuário é o responsável por quaisquer s erviços e consertos necessários para tais softwares. Esta garantia anul a-se se o cartão de memória
não for usado de acordo com as instr uções do produto, ou se estiver danificado por instalação inadequada, mau us o, conserto não
autorizado, modificação ou acidente.
Para obter serviço de garantia, entre em contato com a SanDisk em 1-866-SanDisk ou envie um e-mail para: suppor t@SanDisk.com. O
produto deve ser retornado em uma em balagem resistente à violações, com o transporte pré-pago, conforme instruções da SanDisk. Você
deve obter um número de confirmaç ão de rastreamento, a ser fornecido à SanDisk. A SanDisk, à sua discrição, cons ertará ou substituirá o
produto por um produto novo ou recondici onado de funcionalidade e capacidade idêntica ou superior, ou reem bolsar o valor da compra. A
duração da garantia para o produto subst ituído será o tempo restante do período de garantia para o produto original. ISSO CONSTITUI A
RESPONSABILIZAÇÃO TOTAL DA SANDISK E O SEU ÚNICO RECURSO CONT RA A VIOLAÇÃO DESTA GARANTIA.
A SanDisk não fornece garantia para, e não será responsável por, quaisquer perdas de dados ou imagens contidas em qualquer produto
(inclusive em qualquer produto devolv ido) independente da causa de tal perda. Não há garantia de que os produt os da SanDisk operem
sem apresentar falhas. Os produtos da SanDis k não devem ser usados em sistema de suporte à vida ou outras aplicações o nde uma falha
possa gerar risco de vida ou lesão. Ess a garantia fornece-lhe direitos legais específicos, e você também pode ter outros direitos variados de
acordo com a jurisdição.
O PRECEDENTE É A ÚNICA GARANTIA D A SANDISK. A SANDISK RENUNCIA A TODAS AS OUTRAS GARANTIAS IMPLÍ CITAS OU
EXPRESSAS EM TODA A EXTENSÃO PER MITIDA PELA LEI VIGENTE. AS GARANTIAS IMPLÍCITAS DE COMERCIABILIDAD E E
ADEQUAÇÃO A UM PROPÓSITO EM PARTICULAR ESTÃO LIMITADAS À DURAÇÃO DA GARANTIA EXPRESSA. ALGUMAS
JURISDIÇÕES NÃO PERMITEM LIMITAÇÕES QU ANTO AO PERÍODO DE VALIDADE DE UMA GARANTIA IMPLÍCITA, PORTANTO A
LIMITAÇÃO ACIMA PODE NÃO SER APLICÁVEL AO SEU CASO. EM NENHUM CASO A SANDISK OU QUALQ UER COMPANHIA
AFILIADA OU SUBSIDIÁRIA SERÁ RESPONSÁVEL, SOB NENHUMA CIRCUNSTÂNCIA, POR QUAISQUER DANOS DIRET OS,
INDIRETOS OU CONSEQÜENTES, POR QUAISQU ER PERDAS FINANCEIRAS OU PERDA DE DADOS OU IMAGEM, MESMO QUE A
SANDISK TENHA SIDO ALERTADA PARA A POSSIBILIDADE DE TAL DANO. ALGUMAS JURISDIÇÕES NÃO PERMITEM A
LIMITAÇÃO OU EXCLUSÃO DE DANOS INCIDENT AIS OU CONSEQÜENTES, PORTANTO A LIMITAÇÃO OU EXCLUSÃO ACIMA PO DE
NÃO SER APLICÁVEL AO SEU CASO EM NENHUM CASO A RESPONSABILIZAÇÃO DA SA NDISK EXCEDERÁ O VALOR PAGO PELO
PRODUTO.
A informação nesse manual está sujeita a m udanças sem aviso prévio. A SanDisk não será responsável por om issões ou erros técnicos ou
editoriais aqui contidos; nem por danos incidentais ou resultante do fornecimento, desempenho ou uso deste mater ial. Esta documentação
não pode, em parte ou em sua totalidade, ser copiada, reproduzida, traduzida ou transferida para qualquer meio sem o c onsentimento
prévio, por escrito, da SanDisk.
SanDisk, o logotipo SanDisk e Com pactFlash são marcas comerciais da SanDisk Corporation, registradas no Es tados Unidos e em outros
países Store Your World in Ours é um a marca comercial da SanDisk Corporation. A SanDisk é um licenciado autorizado das marcas
comerciais SD e MultiMediaCard. Sm artMedia é uma marca comercial da Toshiba Corporation. Memory Stick e Memory Stick PRO são
marcas comerciais da Sony Corporation. O utros nomes de marcas são aqui mencionados apenas por fins de identific ação e podem ser
marcas registradas de seus respectivos pr oprietários
© 2004 SanDisk Corporation. Todos os dir eitos reservados.
PORTUGUÊS
Page 41

41
SanDisk® Photo Album
Bedienungsanleitung
Inhalt
Packungsinhalt………………………………………………………………………………………………..41
Produktspezifikationen…………………………………………………………………………………….... 42
Mindestvoraussetzungen…………………………………………………………………………………… 42
Installation des SanDisk Photo Album…………………………………………………………………….. 42
Verwendung des SanDisk Photo Album………………………………………………………………….. 42
Anzeigen von Fotos und Videoclips……………………………………………………………………….. 43
Ablegen und Löschen von Fotos und Videoclips………………………………………………………… 44
Anzeigen von Fotos mit Musik……………………………………………………………………………... 45
Abspielen von Musik………………………………………………………………………………………… 45
Dateien-Modus………………………………………………………………………………………………. 45
Einstellungen und Optionen………………………………………………………………………………… 46
USB-Kartenlese- und –schreibmodus…………………………………………………………………….. 46
Fehlerbehebung……………………………………………………………………………………………… 48
Garantie………………………………………………………………………………………………………. 49
Herzlichen Glückwunsch
Wir gratulieren Ihnen zum Erwerb des SanDisk Photo Album. Jetzt können Sie Ihre digitalen Fotos
und vieles mehr bequem und einfach auf Ihrem Fernseher anschauen und präsentieren. In dieser
Bedienungsanleitung erfahren Sie, wie Sie Ihr SanDisk Photo Album installieren und verwenden
können.
Packungsinhalt
• SanDisk Photo Album
• Netzteil
• Audio/Video-Kabel
• Fernbedienung mit Batterien
• Bedienungsanleitung
• CD-ROM (für den Einsatz als 8-in-1-Lese- und Schreibgerät)
• USB-Kabel (für den Einsatz als 8-in-1-Lese- und Schreibgerät)
DEUTSCH
Sie können Ihr Produkt unter folgender Adresse registrieren:
http://www.sandisk.com/registration
Sie werden dann per E-Mail auf aktualisierte Firmware-Versionen hingewiesen,
die das SanDisk Photo Album um neue Funktionen erweitern.
Sie können alle Rechte, die Ihnen im Rahm en der Produktgarantie zustehen, auch dann wahrnehmen, wenn Sie die Registr ierung
nicht durchführen.
Page 42

42
Produktspezifikationen
• Unterstützte Inhaltsformate:
• JPEG (Baseline, bis zu 16 Megapixel)
• Motion JPEG
• MPEG-1 (QVGA-Auflösung, bis zu 8 Bilder pro Sekunde)
• MP3 (bis zu 320 Kbps)
• Anschlüsse:
• Video (Composite) und Audio (Stereo)
• Zwei USB 1.1-Anschlüsse (für PC und USB-Flash-Laufwerk)
• Stromversorgung
• Kompatible Flash-Speicherkartenformate:
• CompactFlash® Typ I/II
• SD™/MultiMediaCard™
• Memory Stick™/Memory Stick PRO™
• SmartMedia™/xD
Mindestvoraussetzungen
Ablegen und Wiedergabe:
• Fernseher mit RCA-Videoanschluss (NTSC oder PAL) und RCA-Audioanschluss (links + rechts)
Einsatz als 8-in-1-Lese- und Schreibgerät:
• Windows: PC der Pentium-Klasse mit USB-Unterstützung, CD-ROM-Laufwerk und Windows
98SE, ME, 2000 oder XP.
• Macintosh: Computer mit USB-Unterstützung, CD-ROM-Laufwerk und Mac OS 10.1.2+
Installation des SanDisk Photo Album
1. Schließen Sie das Netzteil auf der Rückseite des SanDisk Photo Album und an eine Steckdose
an.
2. Verbinden Sie das Audio/Video-Kabel mit dem Fernseher und/oder einer Audioanlage. Beim
Fernseher sollten der gelbe Stecker in den Video-Eingang, der rote Stecker in den rechten
Audio-Eingang und der weiße Stecker in den linken Audio-Eingang eingesteckt werden.
3. Schließen Sie das Audio/Video-Kabel auf der Rückseite des SanDisk Photo Album an.
4. Setzen Sie die Batterien in die Fernbedienung ein.
5. Drücken Sie die POWER-Taste (Ein/Aus-Taste) auf der Fernbedienung, um das SanDisk Photo
Album einzuschalten (das SanDisk-Logo beginnt zu leuchten).
6. Schalten Sie den Fernseher ein, und schalten Sie auf die passende Eingangsquelle um. Der
genaue Name der Eingangsquelle hängt vom verwendeten Fernseher ab. Mögliche
Bezeichnungen sind: TV/Video, Input oder Quelle (weitere Informationen finden Sie in der
Bedienungsanleitung für ihr Fernsehgerät). Nach Auswahl der passenden Quelle werden Sie
durch eine Meldung
aufgefordert, eine
Speicherkarte einzusetzen.
SanDisk Photo Album ist jetzt
einsatzbereit.
Verwendung des SanDisk Photo Album
Setzen Sie eine Flash-Speicherkarte oder ein USB-Flash-Laufwerk (UFD) in
den entsprechenden Steckplatz ein (bei SmartMedia muss die goldene Seite
nach unten zeigen). Sobald eine Karte korrekt eingesetzt wurde, beginnt die
grüne LED links neben dem Steckplatz zu leuchten und das SanDisk Photo
DEUTSCH
Page 43

43
Album beginnt mit dem Lesen der Karte. Falls sich Fotos (JPEG) oder Videoclips (Motion JPEG
oder MPEG-1) auf der Karte befinden, wird automatisch das Menü PHOTO/VIDEO geöffnet. Falls
Musikdateien (MP3) auf der Karte gespeichert sind, aber keine Dateien in einem der unterstützten
Foto- oder Videodateiformate vorhanden sind, wird das Menü MUSIC geöffnet.
Die Bedienung des SanDisk Photo Album erfolgt über die mitgelieferte Fernbedienung. Falls
mehrere Speicherkarten eingesetzt sind, können Sie die Taste SELECT CARD (Karte wählen) auf
der Fernbedienung drücken. Wählen Sie die gewünschte Karte (bzw. das gewünschte USB-FlashLaufwerk) mithilfe der Pfeiltasten aus, und bestätigen Sie die Auswahl durch Drücken der OK-Taste.
Anzeigen von Fotos und Videoclips
• Drücken Sie die Taste PHOTO/VIDEO, um Miniaturansichten der Fotos und Videoclips
anzuzeigen, die auf der Speicherkarte oder dem UFD gespeichert sind.
• Fotos und Videoclips können sich in einem speziellen Album (Ordner) befinden. Wählen Sie das
gewünschte Album mit den Pfeiltasten aus, und drücken Sie die OK-Taste, um das Album zu
öffnen. Drücken Sie bei ausgewähltem Album die PLAY-Taste (Wiedergabe), um die
Fotos/Videoclips in Form einer Diashow wiederzugeben.
• Wählen Sie mit den Pfeiltasten eine der Miniaturansichten für die Fotos und Videoclips aus, und
wechseln Sie durch Drücken der Tasten PREVIOUS (Zurück) und NEXT (Weiter) zwischen den
verschiedenen Seiten.
1. Album mit Fotos/Videoclips in den Original-Auflösungen
2. Album mit Fotos in Druckauflösung
3. Album mit Unteralben und Fotos/Videoclips
4. Leeres Album oder Album ohne kompatiblen Inhalt
5. Miniaturansicht eines Fotos
6. Album mit Fotos. Die Miniaturansicht zeigt das erste Foto bzw. den ersten Videoclip im
Album
7. Miniaturansicht eines Videocli
p
s
4
5
1 2 3
6
7
DEUTSCH
Page 44

44
• Drücken Sie die OK-Taste, um das Foto oder Video in Vollbildgröße anzuzeigen. Drücken Sie die
Taste PLAY/PAUSE (Wiedergabe/Pause), um Fotos und Videos entsprechend den DIASHOWEinstellungen anzuzeigen (siehe „Einstellungen und Optionen“).
• Drücken Sie PREVIOUS, um zum vorherigen Foto bzw. Videoclip zurückzukehren.
• Drücken Sie NEXT, um zum nächsten Foto bzw. Videoclip zu wechseln.
• Über die Fernbedienung können Sie Ausschnitte vergrößern (ZOOM +) oder verkleinern (ZOOM -)
oder die Videoanzeige auf den gesamten Bildschirm erweitern. Bei einem vergrößerten Foto
können Sie den vergrößerten Ausschnitt mit den Pfeiltasten nach oben, unten, links oder rechts
verschieben.
• Drücken Sie die ROTATE-Taste (Drehen) einmal, um das Foto um 90 Grad im Uhrzeigersinn zu
drehen. Drücken Sie die Taste noch einmal, um das Foto um weitere 90 Grad zu drehen.
• Drücken Sie STOP oder EXIT (Beenden), um zum PHOTO/VIDEO-Menü zurückzukehren.
• Drücken Sie die INFO-Taste, um weitere Informationen über die ausgewählte Datei aufzurufen
oder um die Statusleiste während der Videowiedergabe ein- bzw. auszublenden.
Ablegen und Löschen von Fotos und Videoclips
• Auf der Rückseite des SanDisk Photo Album befindet sich ein zusätzlicher Steckplatz für
CompactFlash-Karten des Typs I. Wenn eine CompactFlash-Karte des Typs I (nicht inbegriffen)
eingesetzt wird, können Sie darauf Fotos und Videoclips vom angeschlossenen UFD oder von
anderen Karten in den Steckplätzen auf der Vorderseite ablegen.
• Um ein Foto abzulegen, drücken Sie die STORE-Taste (Speichern), wenn das Foto im
Vollbildmodus angezeigt wird. Im daraufhin angezeigten Menü können Sie entscheiden, ob das
Foto in seiner ursprünglichen Qualität (Auflösung) oder in TV-Qualität (640x480 Pixel) gespeichert
werden soll. In TV-Qualität sieht das Foto auf dem Bildschirm trotz seiner deutlich kleineren
Speichergröße wie das Original aus, das eine höhere Auflösung aufweist. Wenn Sie eine
CompactFlash-Karte mit 128 MB Speicherplatz in den hinteren Steckplatz einsetzen, können Sie
beispielsweise bis zu 2000 Fotos in TV-Qualität darauf ablegen (bei einer durchschnittlichen
Speichergröße von 60 KB pro Foto).
• Fotos, die in der ursprünglichen Auflösung gespeichert werden, werden automatisch in einem
Album mit der Bezeichnung ORIGINAL abgelegt.
• Fotos, die in Druckauflösung (Postkartengröße) gespeichert werden, werden automatisch in
einem Album mit der Bezeichnung PRINT (DRUCK) abgelegt.
• Fotos, die in TV-Auflösung gespeichert werden, werden je nach Speichereinstellungen in
unterschiedlichen Alben abgelegt. Drücken Sie die Taste SETTINGS & OPTIONS (Einstellungen
& Optionen), und wählen Sie STORING und dann ALBUM/GROUPING. Wenn die Option „Fotos
nach Tag gruppieren“ ausgewählt ist, werden alle Fotos, die am selben Tag aufgenommen
wurden, in einem Album gespeichert. Die Zuordnung erfolgt, sobald die Fotos auf der in der
Rückseite eingesetzten CompactFlash-Karte abgelegt werden. Die Fotos können außerdem nach
Monat (alle Fotos eines Monats werden in einem Album zusammengefasst) und nach Jahr (alle
Fotos eines Jahres werden in einem Album zusammengefasst) gruppiert werden. Änderungen in
den Speichereinstellungen haben keine Auswirkung auf bereits abgelegte Fotos und bereits
vorhandene Alben. Die neuen Speichereinstellungen gelten nur für die Fotos, die nach der
Änderung abgelegt werden.
• Videoclips werden auf ähnliche Weise abgelegt, können aber nur in der ursprünglichen Größe auf
die zusätzliche Karte übertragen werden. Videoclips werden automatisch in einem Album mit der
Bezeichnung ORIGINAL gespeichert. Denken Sie daran, dass die Dateien für Videoclips oft viel
größer sind als Fotodateien und dass sich die Speicherkarte schnell auffüllen kann.
• Um ein Foto, Videoclip oder Album zu löschen, wählen Sie die entsprechende Datei aus und
drücken Sie die DELETE-Taste (Löschen). Folgen Sie dann den Anweisungen auf dem Bildschirm.
Ein Foto oder Videoclip kann auch direkt im Vollbildmodus gelöscht werden.
WARNUNG
Fotos sollten NUR zum Anzeigen auf einem Fernseher in TV-Qualität/Auflösung abgelegt
werden. In TV-Qualität abgelegte Fotos eignen sich NICHT zum Erstellen qualitativ
hochwertiger Abzüge. Die Originalqualität bzw. -auflösung eines Fotos in TV-Qualität
lässt sich NICHT mehr wiederherstellen.
Das Original-Foto wird beim Ablegen nicht verändert.
DEUTSCH
Page 45

45
Anzeigen von Fotos mit Musik
• Fotos können auch mit Hintergrundmusik angezeigt werden. Die Fotos müssen dazu auf der auf
der Rückseite eingesetzten CompactFlash-Karte in TV-Qualität gespeichert werden. Wenn eine
MP3-Datei (128 KB pro Sekunde oder geringer) auf derselben Karte gespeichert wird, zeigt
SanDisk Photo Album die Fotos entsprechend den Diashow-Einstellungen mit Musik an. Wenn
dasselbe Album außer den Fotos auch eine oder mehrere MP3-Dateien enthält, werden diese
Dateien beim Anzeigen der Fotos abgespielt.
• Um die Wiedergabe von Fotos mit Musik zu aktivieren bzw. zu deaktivieren, drücken Sie
SETTINGS & OPTIONS (Einstellungen & Optionen), wählen Sie SLIDE SHOW und dann MUSIC
WITH SLIDE SHOW. Wählen Sie YES (für Musik) oder NO (keine Musik), und drücken Sie die
OK-Taste.
• Unter „USB-Kartenlese- und -schreibmodus“ finden Sie Anweisungen für das Hinzufügen von
MP3-Dateien.
• Unter „Einstellungen und Optionen“ finden Sie Hinweise zum Ändern der Diashow-Einstellungen.
Abspielen von Musik
• Drücken Sie die Taste MUSIC (Musik), um eine Liste der Musiktitel anzuzeigen, die auf der
ausgewählten Speicherkarte oder dem USB-Flash-Laufwerk gespeichert sind.
• Wählen Sie einen der Titel mit den Pfeiltasten aus, und wechseln Sie durch Drücken von
PREVIOUS (Zurück) und NEXT (Weiter) zwischen den verschiedenen Seiten.
• Drücken Sie die OK-Taste, um den markierten Titel wiederzugeben, oder drücken Sie
PLAY/PAUSE (Wiedergabe/Pause), um eine Reihe von Titeln entsprechend den MUSICEinstellungen abzuspielen (siehe „Einstellungen und Optionen“). Wenn Sie jetzt auf die
PLAY/PAUSE-Taste drücken, wird die Wiedergabe angehalten. Drücken Sie die Taste erneut, um
die Wiedergabe fortzusetzen.
• Durch einmaliges Drücken der PREVIOUS-Taste wird der Anfang des Titels angesteuert. Durch
mehrmaliges Drücken werden vorhergehende Titel ausgewählt. Halten Sie die Taste gedrückt, um
mehrere Lieder schnell rückwärts zu überspringen.
• Durch einmaliges Drücken der NEXT-Taste wird der nächste Titel aufgerufen. Halten Sie die
Taste gedrückt, um mehrere Lieder schnell vorwärts zu überspringen.
• Verwenden Sie die VOLUME +/-Tasten (Lautstärke) zum Regulieren der Lautstärke. Die höchste
Lautstärke entspricht der Lautstärkeeinstellung am Fernseher oder an der angeschlossenen
Audioanlage.
• Drücken Sie STOP oder EXIT (Beenden), um die Wiedergabe zu beenden und zum MUSIC-Menü
zurückzukehren.
• Drücken Sie die INFO-Taste, um weitere Informationen über die ausgewählte Datei zu sehen.
• Das Abspielen von Musik ist auch ohne Fernseher möglich. Verbinden Sie das Audio/Video-Kabel
mit dem linken und rechten Audioeingang der Audioanlage. Stellen Sie die Audioanlage
gegebenenfalls auf die entsprechende Eingangsquelle um. Setzen Sie eine Karte oder ein USBFlash-Laufwerk, auf der bzw. dem sich NUR MP3-Dateien befinden, in das SanDisk Photo Album
ein, schalten Sie das Gerät ein und warten Sie, bis die LED aufhört zu blinken. Wenn Sie jetzt die
Wiedergabetaste drücken, wird die erste Musikdatei abgespielt. Anschließend wird die nächste
Musikdatei entsprechend den gewählten Musikeinstellungen wiedergegeben.
Dateien-Modus
• Drücken Sie die Taste FILES (Dateien), um eine Liste der unterstützten Dateien anzuzeigen, die
auf der ausgewählten Speicherkarte oder dem USB-Flash-Laufwerk gespeichert sind.
• Wählen Sie die verschiedenen Dateien und Alben (Ordner) mit den Pfeiltasten aus, und
navigieren Sie durch Drücken von PREVIOUS (Zurück) und NEXT (Weiter) zu anderen Seiten.
• Drücken Sie OK oder PLAY/PAUSE (Wiedergabe/Pause), um Alben zu öffnen und Dateien
abzuspielen. Drücken Sie die STORE-Taste (Speichern), um Dateien zu speichern, und INFO, um
Informationen anzuzeigen.
• Beim Anzeigen bzw. Abspielen von Dateien im Dateien-Modus können durch Drücken der
verschiedenen Tasten dieselben Funktionen ausgeführt werden wie im PHOTO/VIDEO- und im
MUSIC-Modus.
DEUTSCH
Page 46

46
Einstellungen und Optionen
• Die verschiedenen Einstellungen von SanDisk Photo Album können jederzeit geändert werden.
Drücken Sie die Taste SETTINGS & OPTIONS (Einstellungen & Optionen) auf der Fernbedienung,
um das Menü „SETTINGS & OPTIONS“ zu öffnen. Drücken Sie die Pfeiltasten und die OK-Taste,
um Untermenüs zu öffnen und Optionen auszuwählen. Beim Öffnen des Menüs ist die jeweils
aktivierte Option markiert. Drücken Sie die EXIT-Taste (Beenden), um zu einem vorhergehenden
Menü zurückzukehren oder um das Menü „SETTINGS & OPTIONS“ zu verlassen, ohne die
Einstellungen zu ändern.
• Wählen Sie SPEICHERN, um die folgenden Einstellungen anzuzeigen oder zu ändern:
• RESOLUTION– Wählen Sie die Auflösung, in der Fotos gespeichert werden sollen.
• ALBUM/GROUPING – Legen Sie fest, wie Fotos beim Speichern organisiert werden sollen.
• Wählen Sie DIASHOW, um die folgenden Einstellungen anzuzeigen oder zu ändern:
• PLAY ORDER – Legen Sie fest, ob Fotos und Videoclips in alphabetischer oder in
zufälliger Reihenfolge wiedergegeben werden sollen.
• SLIDE INTERVAL – Bestimmen Sie, wie lange jedes Bild auf dem Bildschirm angezeigt
wird, bevor das nächste Bild aufgerufen wird (wegen eventuell längerer Ladezeiten können
die tatsächlichen Intervallzeiträume länger als die gewählte Einstellung sein).
• SHOW LENGTH – Sie haben die Möglichkeit, jedes Foto/Video nur einmal anzuzeigen, alle
vorhandenen Fotos/Videos in einer Endlosschleife unbegrenzt zu wiederholen oder die
Fotos so lange wiederzugeben, bis die Musik beendet ist.
• TRANSITION EFFECT – Wählen Sie einen Effekt für den Übergang von Dia zu Dia. Sie
können den Effekt für jedes Dia auch vom Programm nach dem Zufallsprinzip auswählen
lassen oder auf Übergangseffekte verzichten.
• MUSIC WITH SLIDE SHOW – Entscheiden Sie, ob Musikdateien während der Wiedergabe
der Bilder abgespielt werden sollen. Diese Funktion steht nur zur Verfügung, wenn die auf
der Rückseite eingesetzte CompactFlash-Karte MP3-Dateien enthält (siehe „Anzeigen von
Fotos mit Musik“).
• Wählen Sie MUSIC, um die folgenden Einstellungen anzuzeigen oder zu ändern:
• PLAY ORDER – Legen Sie fest, ob Musiktitel in alphabetischer oder in zufälliger
Reihenfolge wiedergegeben werden sollen.
• PLAY LENGTH – Bestimmen Sie, ob jeder Titel nur einmal wiedergegeben werden soll
oder ob die vorhandenen Titel in einer Endlosschleife unbegrenzt wiederholt werden sollen.
• Wählen Sie PRINT SETTINGS, um die folgenden Einstellungen anzuzeigen oder zu ändern:
• MARK FOR PRINTING – Wählen Sie JA, um das Foto für den Druck vorzumerken. Wenn
die Karte mit den markierten Fotos in einen Drucker oder einen Foto-Kiosk mit DPOFKompatibilität eingesetzt wird, kann der Drucker bzw. der Kiosk automatisch erkennen,
welche Fotos gedruckt werden sollen.
• NUMBER OF PRINTS – Sie können bis zu fünf Ausdrucke (Abzüge) von jedem markierten
Foto erstellen lassen. Die Standardeinstellung ist „1“.
• SIZE – Wählen Sie eine der folgenden Einstellungen für die Größe des Ausdrucks: 100 x
150 mm (4 x 6 Zoll), 130 x 180 mm (5 x 7 Zoll) and 200 x 300 mm (8 x 10 Zoll). Die
Standardeinstellung lautet: 100 x 150 mm.
• Wählen Sie FIRMWARE, um die Versionsnummer der installierten Software anzuzeigen.
Besuchen Sie www.sandisk.com/registration, wenn Sie per E-Mail über neue Firmware-Versionen
informiert werden oder die neuesten Firmware-Versionen herunterladen möchten.
USB-Kartenlese- und -schreibmodus
Wenn Sie das SanDisk Photo Album an Ihren Computer anschließen, können Sie es als Kartenleseund Schreibgerät für acht verschiedene Kartenformate einsetzen.
HINWEIS: Sie können immer nur jeweils einen USB-Anschluss am SanDisk Photo Album
verwenden. Verwenden Sie den kleinen USB-Anschluss für die Verbindung mit einem Computer und
den großen USB-Anschluss für USB-Flash-Laufwerke. Versuchen Sie NICHT, beide USB-
Anschlüsse gleichzeitig zu verwenden.
DEUTSCH
Page 47

47
Windows ME, 2000 und XP: Stecken Sie einfach den kleineren Stecker des USB-Kabels auf der
Rückseite des SanDisk Photo Album ein und schließen Sie das andere Ende am PC an. Die
notwendigen Treiber werden daraufhin automatisch geladen. Die vier Steckplätze auf der
Vorderseite des SanDisk Photo Album werden nun automatisch unter Arbeitsplatz als vier
separate, austauschbare Laufwerke angezeigt. Sie können auf die Dateien auf der Speicherkarte
genauso zugreifen wie auf Dateien in einem anderen Laufwerk des Computers.
Windows 98SE:
1. Stecken Sie den kleineren Stecker des USB-Kabels auf der Rückseite des SanDisk Photo
Album ein und schließen Sie das andere Ende am PC an.
2. Daraufhin wird der Hardware-Assistent geöffnet. Klicken Sie auf Weiter.
3. Wählen Sie im nächsten Fenster die Option Nach dem besten Treiber für das Gerät suchen,
und klicken Sie dann auf Weiter.
4. Wählen Sie im nächsten Fenster die Option CD-ROM-Laufwerk. Legen Sie die SanDisk-CD in
das CD-ROM-Laufwerk ein, und klicken Sie auf Weiter.
5. Klicken Sie auf Fertig stellen, wenn Windows die Installation der Software abgeschlossen hat.
6. Starten Sie den PC neu. Gehen Sie zu Arbeitsplatz. Die vier Steckplätze auf der Vorderseite
des SanDisk Photo Album sollten nun als vier separate, austauschbare Laufwerke angezeigt
werden. Sie können auf die Dateien auf der Speicherkarte genauso zugreifen wie auf Dateien in
einem anderen Laufwerk des Computers.
Macintosh OS 10.1.2+: Stecken Sie den kleineren Stecker des USB-Kabels auf der Rückseite des
SanDisk Photo Album ein, und schließen Sie das andere Ende am USB-Anschluss des MacintoshComputers an (stellen Sie den Anschluss nicht über den Monitor oder die Tastatur her). Wenn eine
Karte in einen der vorderen Steckplätze des SanDisk Photo Album eingesetzt wird, erscheint auf
dem Schreibtisch ein neues Laufwerk (es kann nur jeweils ein Steckplatz verwendet werden). Sie
können Dateien auf gewohnte Weise auf dieses neue Laufwerk ziehen und ablegen und von dort
verschieben.
Entfernen einer Karte bzw. eines USB-Flash-Laufwerks (Windows)
1. Öffnen Sie Arbeitsplatz.
2. Klicken Sie mit der rechten Maustaste auf das entsprechende Laufwerksymbol.
3. Wählen Sie Auswerfen (gilt nicht für Windows 98SE).
4. Ziehen Sie die Karte bzw. das USB-Flash-Laufwerk aus dem Steckplatz.
Entfernen einer Karte bzw. eines USB-Flash-Laufwerks (Macintosh)
Ziehen Sie das Symbol für den austauschbaren Datenträger mit der Bezeichnung „Ohne Titel“ in
den Papierkorb, und ziehen Sie die Karte bzw. das USB-Flash-Laufwerk aus dem Steckplatz.
Wenn bei BLINKENDER AKTIVITÄTS-LED die Karte bzw. das USB-Flash-Laufwerk herausgezogen
oder das SanDisk Photo Album abgetrennt wird, können Daten verloren gehen oder die Karte bzw.
das UFD kann beschädigt werden.
DEUTSCH
Page 48

48
So fügen Sie einer Diashow Musikdateien hinzu (Windows)
1. Schließen Sie das SanDisk Photo Album an den USB-Anschluss des PC an.
2. Doppelklicken Sie auf das Symbol Arbeitsplatz, und öffnen Sie den Ordner, in dem sich die
Musikdateien befinden.
3. Wählen Sie die Musikdateien aus, indem Sie die STRG-Taste gedrückt halten, während Sie auf
die zu kopierenden Musikdateien klicken.
4. Lassen Sie die STRG-Taste los, klicken Sie einmal mit der RECHTEN Maustaste, und wählen
Sie Kopieren.
5. Ziehen Sie die CompactFlash-Karte mit den Fotos in TV-Auflösung aus dem Steckplatz auf der
Rückseite heraus, und schieben Sie sie in den Steckplatz auf der Vorderseite. Doppelklicken
Sie auf das als austauschbarer Datenträger angezeigte Laufwerk (für den CompactFlashSteckplatz auf der Vorderseite des SanDisk Photo Album), z.B. „F:“ oder „G:“ oder
möglicherweise „E.“ Sie sollten nun die Dateien sehen, die auf der Karte gespeichert sind.
6. Klicken Sie in der Menüleiste auf Bearbeiten und dann auf Einfügen. Die Musikdateien werden
nun auf die CompactFlash-Karte kopiert.
7. Sie können die Abspielreihenfolge der Musikdateien festlegen, indem Sie Nummern vor den
Dateinamen einfügen. Klicken Sie dazu mit der RECHTEN Maustaste auf die Datei, deren
Namen Sie ändern möchten, zeigen Sie mit dem Mauszeiger auf Umbenennen, und klicken Sie
mit der LINKEN Maustaste. Platzieren Sie nun den Mauszeiger am Anfang des Dateinamens,
und klicken Sie mit der linken Maustaste. Geben Sie eine Nummer ein, und drücken Sie die
EINGABETASTE auf der Tastatur. Der Dateiname wird dadurch gespeichert.
8. Kehren Sie nach dem Kopieren der Dateien zu Arbeitsplatz zurück, klicken Sie mit der rechten
Maustaste auf das Laufwerksymbol für den CompactFlash-Steckplatz, und wählen Sie
Auswerfen.
9. Ziehen Sie die CompactFlash-Karte heraus, und schieben Sie sie wieder in den Steckplatz auf
der Rückseite. Verbinden Sie das SanDisk Photo Album mit dem Fernseher, und schon kann
Ihre Multimediashow beginnen.
So fügen Sie einer Diashow Musikdateien hinzu (Macintosh)
1. Schließen Sie das SanDisk Photo Album an den USB-Anschluss Ihres Macintosh an (schließen
Sie es nicht an den Bildschirm oder die Tastatur an).
2. Ziehen Sie die CompactFlash-Karte mit den Fotos in TV-Auflösung aus dem Steckplatz auf der
Rückseite heraus, und schieben Sie sie in den Steckplatz auf der Vorderseite. Auf dem
Schreibtisch wird daraufhin ein neues Laufwerk mit der Bezeichnung „Ohne Titel“ angezeigt.
3. Öffnen Sie den Ordner, in dem sich die Musikdateien befinden.
4. Sie können die Musikdateien auf gewohnte Weise auf dieses neue Laufwerk ziehen und
ablegen und von dort verschieben.
Fehlerbehebung
Antworten auf häufig gestellte Fragen und andere Supportinformationen für das SanDisk Photo
Album finden Sie auf unserer Website unter http://www.sandisk.com/retail/support.asp.
Telefonische Anfragen können Sie an die folgende Rufnummer richten: +1-866-726-3475, Mo–Fr
7.00 Uhr bis 16.00 Uhr (Pazifik-Standardzeit)
Falls im Lesemodus keine Laufwerke angezeigt werden (siehe die Anleitung unter „USB-Kartenleseund -schreibmodus“), ist die Stromversorgung über Ihren USB-Anschluss eventuell nicht
ausreichend. Verwenden Sie in diesem Fall das Netzteil des SanDisk Photo Album, und starten Sie
den Computer neu.
DEUTSCH
Page 49

49
Beschränkte Garantie
SanDisk garantiert, dass dieses Produkt innerhalb von zwei Jahren nach dem Kaufdatum frei von Material-,
Konstruktions- und Herstellungsschäden ist und bei normaler Verwendung im Wesentlichen den veröffentlichten
Spezifikationen entspricht. Im Einzelnen gelten dabei die unten aufgeführten Bedingungen. Diese Garantie wird dem
Originalkäufer gewährt, der das Produkt direkt bei SanDisk oder bei einem autorisierten Händler erworben hat. Die
Garantie ist nicht übertragbar. Unter Umständen ist ein Kaufnachweis erforderlich. Dieses Produkt muss mit
Speicherkarten verwendet werden, die den Spezifikationen der CompactFlash Card Association, der SD Card
Association, der MultiMediaCard Association oder den jeweiligen Anforderungen für Memory Stick-, Memory Stick
PRO-, SmartMedia- und xD-Picture-Karten entsprechen. Bei Verwendung mit anderen Produkten erlischt die
Garantie. SanDisk trägt keine Verantwortung, wenn ein Fehler oder Schaden durch Produkte oder Komponenten von
Drittanbietern verursacht wird, ganz gleich, ob die Verwendung mit diesen Produkten oder Komponenten autorisiert
ist oder nicht. Die Garantie erstreckt sich nicht auf Software von Drittanbietern, die mit dem Produkt geliefert wird. Sie
sind für alle im Zusammenhang mit dieser Software anfallenden Wartungs- und Reparaturarbeiten selbst
verantwortlich. Die Garantie erlischt, wenn die Speicherkarte nicht in Übereinstimmung mit den Produktanweisungen
verwendet wird oder aufgrund von falscher Installation, Missbrauch, unbefugter Reparatur, Veränderungen oder
durch einen Unfall beschädigt wird.
Wenden Sie sich bitte bei Garantieansprüchen unter der Telefonnummer +1-866-726-3475 an SanDisk oder senden
Sie eine E-Mail an: support@SanDisk.com. Sie müssen das Produkt in einer sicheren Verpackung und entsprechend
den Anweisungen von SanDisk auf eigene Kosten zurücksenden. Sie müssen darauf achten, dass Sie eine
Bestätigungsnummer zur Verfolgung der Sendung erhalten. Diese Nummer müssen Sie gegebenenfalls SanDisk
mitteilen. Es steht SanDisk frei, das Produkt nach eigenem Ermessen entweder zu reparieren, durch ein neues oder
überarbeitetes Produkt mit der gleichen oder besseren Kapazität und Funktionalität zu ersetzen oder den Kaufpreis
zurückzuerstatten. Die Garantie für das Ersatzprodukt gilt für den verbleibenden Zeitraum der ursprünglichen
Garantie. DIE GESAMTE HAFTUNG VON SANDISK UND IHRE AUSSCHLIESSLICHEN ANSPRÜCHE BEI EINEM
VERSTOSS GEGEN DIESE GARANTIE DURCH SANDISK SIND AUF DIE GENANNTEN MASSNAHMEN
BESCHRÄNKT.
SanDisk übernimmt keine Garantie und ist nicht verantwortlich für verloren gegangene Daten oder Bilder, die auf
einem Produkt (einschließlich zurückgesendeter Produkte) gespeichert waren. Die Ursache für den Verlust spielt
dabei keine Rolle. Es wird keine Garantie dafür übernommen, dass die Produkte von SanDisk jederzeit fehlerfrei
arbeiten. SanDisk-Produkte sollten nicht in lebenserhaltenden Systemen oder anderen Anwendungen verwendet
werden, bei denen ein Versagen zu Verletzungen oder zum Tod führen könnte. Aufgrund dieser Garantie stehen
Ihnen bestimmte Rechte zu. Je nach geltender Gesetzgebung haben Sie eventuell noch andere Rechte.
DIE OBIGEN ANGABEN BESCHREIBEN DIE GARANTIEVERPFLICHTUNGEN VON SANDISK IN VOLLEM
UMFANG. SANDISK SCHLIESST IM GESETZLICH ZULÄSSIGEN RAHMEN ALLE WEITEREN
AUSDRÜCKLICHEN UND STILLSCHWEIGENDEN GARANTIEN AUS. DIE STILLSCHWEIGENDEN GARANTIEN
DER MARKTFÄHIGKEIT UND EIGNUNG FÜR EINEN BESTIMMTEN ZWECK GELTEN NUR FÜR DIE DAUER
DER AUSDRÜCKLICHEN GARANTIE. IN MANCHEN RECHTSGEBIETEN IST DIE ZEITLICHE BESCHRÄNKUNG
EINER STILLSCHWEIGENDEN GARANTIE NICHT ZULÄSSIG. DIE OBEN GENANNTE BESCHRÄNKUNG TRIFFT
DARUM EVENTUELL NICHT AUF SIE ZU. SANDISK ODER VERBUNDENE BZW. TOCHTERUNTERNEHMEN
HAFTEN UNTER KEINEN UMSTÄNDEN FÜR DIREKTE, INDIREKTE ODER FOLGESCHÄDEN, FÜR
FINANZIELLE VERLUSTE ODER FÜR DEN VERLUST VON DATEN BZW. BILDERN. DIESE EINSCHRÄNKUNG
GILT AUCH DANN, WENN SANDISK AUF DIE MÖGLICHKEIT SOLCHER SCHÄDEN HINGEWIESEN WURDE. IN
MANCHEN RECHTSGEBIETEN IST DER AUSSCHLUSS ODER DIE BESCHRÄNKUNG VON NEBEN- ODER
FOLGESCHÄDEN NICHT ZULÄSSIG. DER OBIGE HINWEIS AUF EINE BESCHRÄNKUNG ODER EINEN
AUSSCHLUSS TRIFFT DARUM EVENTUELL NICHT AUF SIE ZU. UNTER KEINEN UMSTÄNDEN ÜBERSTEIGT
DIE HAFTUNG VON SANDISK DEN BETRAG, DEN SIE FÜR DAS PRODUKT BEZAHLT HABEN.
Die Informationen in dieser Anleitung können ohne vorherige Bekanntgabe geändert werden. SanDisk ist weder für
hierin enthaltene technische oder redaktionelle Fehler bzw. Auslassungen noch für Neben- oder Folgeschäden
verantwortlich, die auf die Lieferung, Leistung oder die Verwendung dieser Unterlagen zurückzuführen sind. Diese
Dokumentation darf ohne vorherige schriftliche Genehmigung von SanDisk weder teilweise noch vollständig kopiert,
reproduziert, übersetzt oder auf ein elektronisches Medium reduziert werden.
SanDisk, das SanDisk-Logo und CompactFlash sind Marken der SanDisk Corporation und sind in den USA und in
anderen Ländern eingetragen. „Store Your World in Ours“ ist eine Marke der SanDisk Corporation. SanDisk ist ein
autorisierter Lizenznehmer der SD- und MultiMediaCard-Marken. SmartMedia ist eine Marke der Toshiba Corporation.
Memory Stick und Memory Stick PRO sind Marken der Sony Corporation. Andere Markennamen werden nur zu
Identifikationszwecken verwendet und sind unter Umständen Marken der jeweiligen Inhaber.
© 2004 SanDisk Corporation. Alle Rechte vorbehalten.
DEUTSCH
Page 50

50
SanDisk
140 Caspian Court
Sunnyvale, CA 94089, USA
Headquarters: 1-408-542-0500
Technical Support: 1-866-SANDISK (726-3475)
http://www.sandisk.com
80-36-00354
 Loading...