

SanDisk Sansa SDMX1 1GB, Sansa SDMX1 256MB, Sansa SDMX1 512MB, SDMX1-1024, SDMX1-256 Quick Start Manual
...Page 1

1. Quick Start 1
Features 1
What You Need to Begin 2
Installing the Battery 2
The Basic Controls 4
Play Music 5
Listen to the FM Radio 7
Record Notes and Meetings 8
2. Playing Music 9
Connecting and Disconnecting 9
Using the Music Controls 9
Listening to Music 10
Organizing and Transferring Music 11
Creating Playlists 11
Deleting Music 11
Adjusting Settings 12
Contents
3. Listening to the FM Radio 14
Using the FM Radio Controls 14
Finding a Radio Station 15
Switching Between Normal and Preset Modes 15
Setting Preset Stations Automatically 16
Setting Stereo and Mono Modes 16
Save a Radio Station as a Preset 16
Delete a Preset Radio Station 17
4. Recording Notes and Meetings 18
Using the Recording Controls 18
Start a Recording 19
Pause a Recording 19
Playback a Recording 19
Delete a Recording 20
5. Navigating the Software Menus 21
6. Tips and Troubleshooting 27
7. Learn More, Service, and Warranty Information 28
8. Safety Tips and Cleaning Instructions 30
Page 2

1
This chapter helps you get started quickly playing
music, listening to the FM radio, and voice
recording with your SanDisk Digital Audio Player.
Quick Start
Congratulations on your purchase of a SanDisk Digital Audio Player! This chapter will help you
to become familiar with your new purchase as quickly as possible.
Features
Your Digital Audio Player is a full-featured music and recording device that can be carried with
you anywhere.
Plays MP3, WMA and WMA with Digital Rights Management (DRM) support.
Use the built-in microphone to capture notes and meetings.
The indigo graphic LCD display supports English (the default), German, Spanish,
French, Italian, Portuguese, Dutch, Finnish, and Norwegian. Also supports Traditional
Chinese, Simplified Chinese, Japanese, and Korean.
The digital FM radio offers both area setting and sensitivity settings so you can access
radio stations around the world. The radio also allows you to preset up to 20 of your
favorite radio stations.
With 6 equalizer types for the FM radio and music player, you can play music optimized
by type of music, for example, Normal, Rock, Jazz, Classic, Pops, and User-Defined.
Allows you to store and browse your music in folders, as well as the ability to copy,
move, or delete those files. You also can browse your music while in Play mode or Stop
mode.
Onscreen menus are tabbed so that you can easily check your music settings as you
play music, listen to the FM radio, or record notes or meetings.
Select a start point and an end point within an audio file so you can play that segment
over and over. This can be helpful for learning languages, for example.
USB 2.0 support is built-in for faster connections to your computer.
Quick Start ` 1
Page 3

Up to 15 hours of continuous playback using one AAA battery (included).
Musicmatch software is included to help organize your music.
Includes a carrying case, earphones, and an armband.
What You Need to Begin
To use your Digital Audio Player, you must have a computer with these features:
One of these operating systems: Windows 98SE, ME, W2K, XP, Mac OS 9.2x (or
higher), or Mac OS 10.2 (or higher).
Intel Pentium PC or equivalent or a Macintosh computer.
Handles MP3, WMA, and WMA DRM music files.
CD-ROM drive.
USB 2.0 port.
In addition, confirm that you have these items in the product packaging that contained your
SanDisk Digital Audio Player:
Your new Digital Audio Player
Earphones
Armband
AAA battery
USB 2.0 cable
CD with Musicmatch Jukebox software, User Guide, and Windows 98SE driver
One page Quick Start Guide
Installing the Battery
You will need to install the AAA battery included with your player. Follow these steps as shown
in Figure 1:
1. Turn your player over, so the backside faces up, and locate the battery door.
2. Firmly push the battery cover down and out towards the outside edge of your player
until you hear a snap. There is a directional arrow on the battery cover to help you.
3. Swing back the battery cover.
4. Push the battery down into the battery area of the player, placing the smooth
bottom of the battery against the spring in the battery area. The protruded top of the
battery slips down and under. The battery should fit snugly.
Quick Start ` 2
Page 4
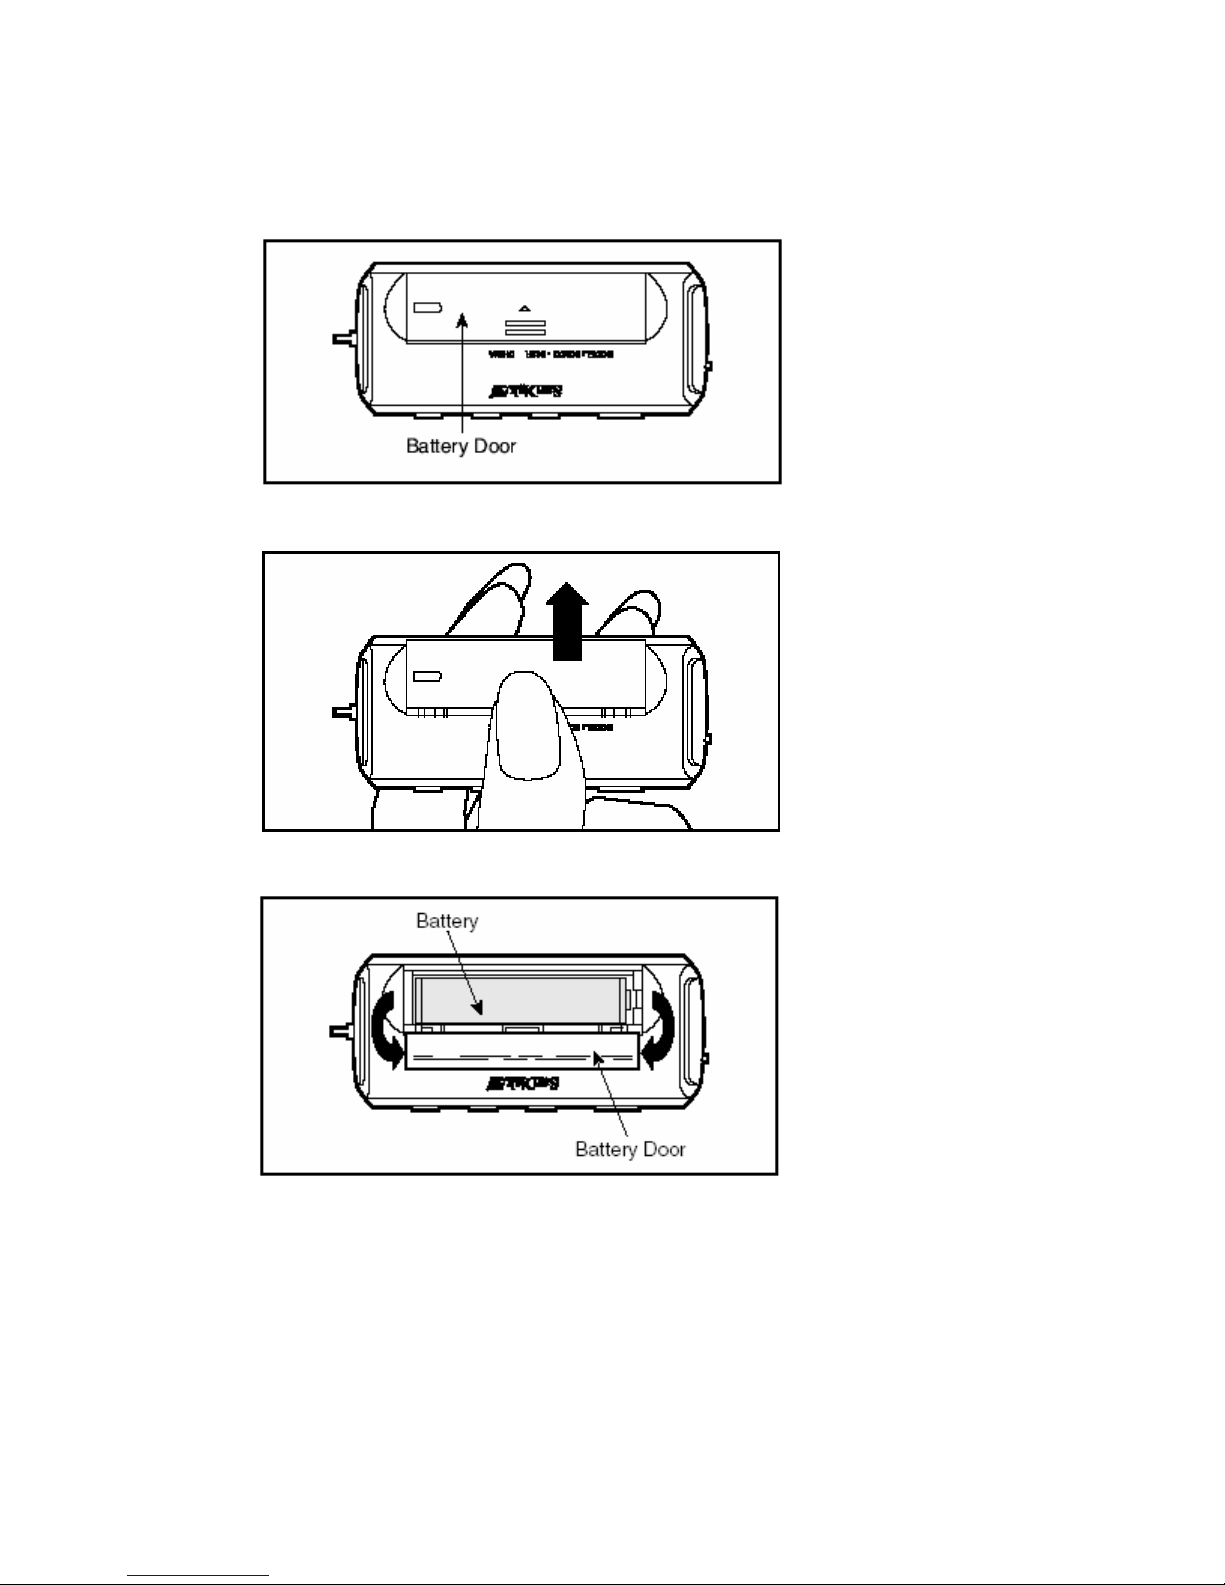
5. Swing the battery cover over the battery, and then push the cover towards the
center of the player until you hear a snap and the cover closes tight.
Step 1
Step 2
Step 3
Figure 1. Installing the AAA Battery
Quick Start ` 3
Page 5
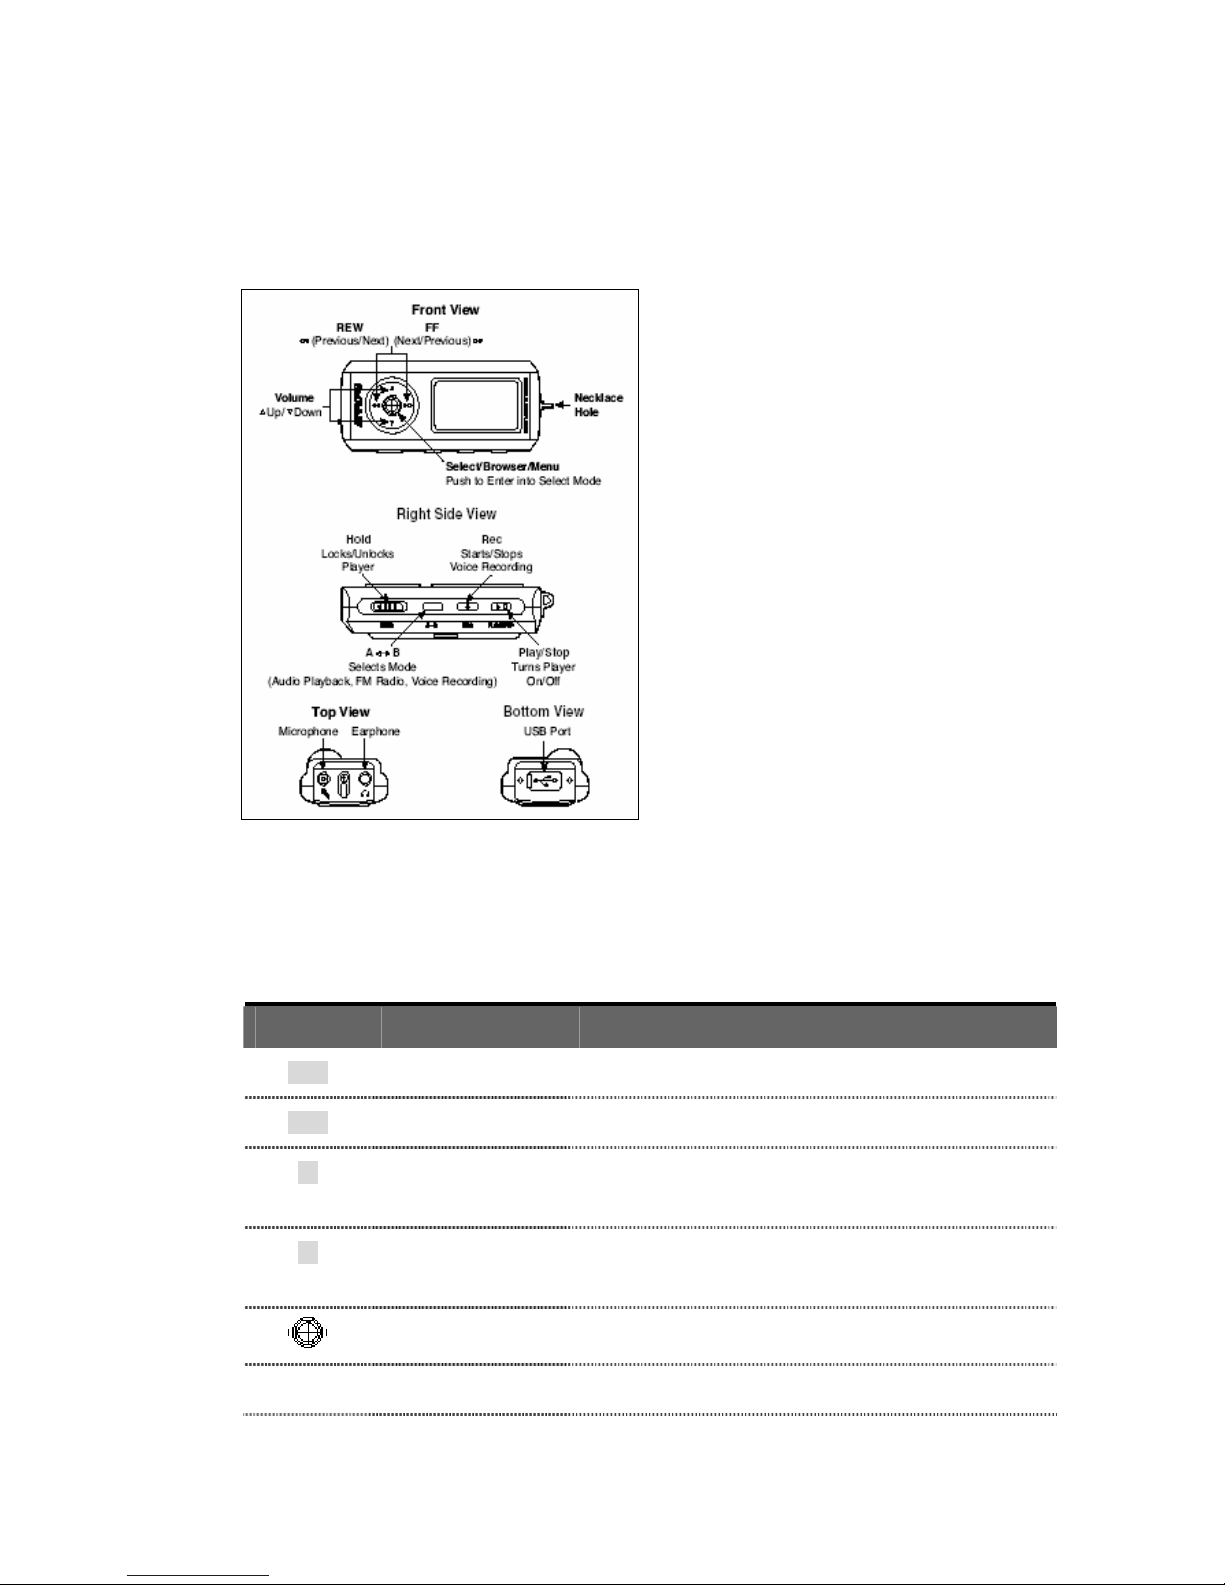
The Basic Controls
Your player has a small set of controls that provide a wide range of functionality. To get
started, however, you only need to understand the basic controls shown in Figure 2.
Figure 2: The Basic Controls
The control names and their functions are described in Table 1.
Table 1: Control Names and Functions
Control Name Function
◄◄ Left Button Press to Rewind or Move Backward
►► Right Button Press to Fast Forward or Move Forward
▲ Up Button Press to move up, for example, to increase the volume or
move the selector to a music file up higher in a list
▼ Down Button Press to move down, for example, to lower the volume or
move the selector to a music file lower down in a list
Select Button Press down to select a choice or to access screen menus
Play/Stop Play/Stop Button Press to play, stop, or turn your player on
Quick Start ` 4
Page 6

Control Name Function
Rec Record Button Press to record from the built-in microphone
A-B Change Mode Button Press to change modes, for example, between music, FM
radio, and record modes
Hold Lock/Unlock Button Slide to lock or unlock the player
USB USB Port Connect USB cable from player to your computer
Microphone Built-in Microphone Built-in microphone for recording
Earphone Earphone Port Connect earphones to listen to the player
To learn advanced information about what onscreen menus appear when you select these
controls, see the Navigating the Software Menus chapter that begins on Page 21.
Play Music
To play music files in MP3 and WMA formats, you need to upload music to your player then
use the controls to play your music files.
Upload Music
The first step to playing music is to upload files from your computer to your player. Follow
these steps:
1. Use the USB connector cable provided with your player to connect the USB port on
your player to an open USB port on your computer. The player will appear as a new
hard drive on your computer. (Can’t find the USB port on your player? See The Basic
Controls section on page 4.)
2. Drag your music files to the player or save music files to your player with software
tools like Musicmatch, the same way you save files on your hard drive from
Microsoft Word or other applications.
TIP: Because it appears and acts like a hard drive connected to your computer, you can
use your computer file browser to create folders and move music files on your player.
This can help make it easier to organize and find music on your player.
Play Music Files
Once you have uploaded music files, follow these steps:
Quick Start ` 5
Page 7
1. Press the Play/Stop button for two seconds. The SanDisk Welcome message will
appear onscreen for a moment then disappear. (Can’t find the Play/Stop button on
your player? See The Basic Controls section on page 4.)
WARNING: If the onscreen message says “Key Hold” and then shuts off, you
need to locate the Hold button on the side of your player. Slide that button
towards the Play/Stop button to unlock your device. Then repeat Step 1 above.
See The Basic Controls section on page 4 if you cannot find the Hold button.
NOTE: If you do not see music files onscreen, press the A-B Change Mode button
on the side of your player. (See The Basic Controls section on page 4 to find the
Change Mode button.) The Mode Menu will appear. Use the Left or Right buttons
to move left or right to highlight the Audio Play mode. Press the Select button once
to select Audio Play mode.
2. A list of your music files will display onscreen. Press down once on the Select
button. The file selector will highlight your first music file. (Can’t find the Select
button on your player? See The Basic Controls section on page 4.)
3. Press the Up or Down buttons to move the selector up or down in your list of files.
Press the Left or Right buttons to move between folders.
4. Press down once on the Select button to select a music file to play.
5. Briefly press the Play/Stop button to play your selected song. To stop the music,
briefly press the Play/Stop button again. Once your selected music has played, your
player will play each music file below that music file, one after another.
6. To change the volume of your music as it plays, press the Up or Down buttons.
7. To stop playing music, you have three choices:
Press the Play/Stop button until the SanDisk Goodbye screen appears
Navigate to another song, select it, then start to play that song
Press the A-B Change Mode button to switch to FM Radio or Record mode.
Once your music starts to play, you can use the player buttons to:
Skip backwards or forwards to the next song by pressing once on the Left button
(backwards) or Right button (forwards).
Want to switch to another song while music is playing? Press the Play/Stop button to
pause your current song. Press the Up or Down buttons to move up or down through
your music files. Press the Left button or Right button to move up or down file folders.
When your new song is highlighted, press the Select button to choose it. Then press
the Play/Stop button to play your newly selected music file.
Quick Start ` 6
Page 8
To learn more about how to play music with your player, see the Playing Music chapter that
begins on Page 9.
Listen to the FM Radio
Follow these steps:
1. Press the Play/Stop button for two seconds. The SanDisk Welcome message will
appear onscreen for a moment and then disappear. (Can’t find the Play/Stop button
on your player? See The Basic Controls section on page 4.)
WARNING: If the onscreen message says “Key Hold” and then shuts off, you
need to locate the Hold button on the side of your player. Slide that button
towards the Play/Stop button to unlock your device. Then repeat Step 1 above.
See The Basic Controls section on page 4 if you cannot find the Hold button.
NOTE: If you do not see the radio onscreen, press the A-B Change Mode button
on the side of your player. (Can’t find the Change Mode button on your player?
See The Basic Controls section on page 4.) The Mode Menu will appear. Use the
Left or Right buttons to move left or right until the FM Radio mode is highlighted.
Press the Select button once to select the FM Radio mode.
2. The radio has two modes to access stations: Normal and Preset. To change
modes, press the Select button briefly. The Preset mode allows you to store up to
20 of your favorite radio stations in the player’s memory.
3. To change stations, press the Left button or Right button to move up or down the
radio dial. Hold down either of these buttons to scan radio stations. In Preset mode,
you scan preset stations. In Normal mode, you scan by increments in the radio
spectrum.
4. To raise or lower the volume of the radio, press the Up or Down buttons.
5. To stop playing the FM radio, you have two choices:
Press the Play/Stop button until the SanDisk Goodbye screen appears
Press the A-B Change Mode button to switch to Audio Play or Record mode.
Once your radio starts to play, you can use the player buttons as follows:
To store only stations with strong signals as preset channels, press the A-B Change
Mode button for two seconds.
Press the Play/Stop button to switch between stereo and mono.
In Preset mode, press the Record button for two seconds to delete a preset channel.
Quick Start ` 7
Page 9

For more information about how to use the FM radio, see the Listening to the FM Radio
chapter that begins on Page 14.
Record Notes and Meetings
Follow these steps:
1. Press the Play/Stop button for two seconds. The SanDisk Welcome message will
appear onscreen for a moment then disappear
WARNING: If the onscreen message says “Key Hold” and then shuts off, you
need to locate the Hold button on the side of your player. Slide that button
towards the Play/Stop button to unlock your device. Then repeat Step 1 above.
See The Basic Controls section on page 4 if you cannot find the Hold button.
NOTE: If you do not see the Voice Record interface onscreen, press the A-B
Change Mode button on the side of your player. (See The Basic Controls section
on page 4 to find the Change Mode button.) The Mode Menu will appear. Use the
Left or Right buttons to move left or right to highlight the Voice Record mode.
Press the Select button once to select the Voice Record mode.
2. Press the Record button once on the side of your player to start recoding. Point the
built-in microphone towards you or the source you want to record.
3. To pause your recording, press the Play/Stop button once. To resume recording,
press the Play/Stop button again.
4. To stop recording, press the Record button.
In addition to recording, in Voice Record mode you can do as follows:
To access a recording, press the Select button. Use the Up button or Down button to
move from file to file until the file you want is highlighted. Press the Play/Stop button to
play the selected recording.
To play your current recording while it is paused, press the Play/Stop button. When you
have finished listening, press the Record button to start recording again.
Save your recordings to your computer, connect to your computer with the USB
connector cable and use your computer file browser to move your recordings to your
hard drive. You can delete recordings on your player and free up space the same way.
For more information about how to use the recording features, see the Recording Notes and
Meetings chapter that begins on Page 18.
Quick Start ` 8
Page 10

2
This chapter helps you get started playing music
on your SanDisk Digital Audio Player.
Playing Music
Your player can play music files stored in MP3 and WMA formats. This chapter shows you how
to upload and play your music files.
Connecting and Disconnecting
Your player includes a USB connection cable so that you can transfer music files from your
computer to your player. The small end fits into the USB port at one end of your player. The
larger flat end connects to the USB port on your computer.
To play music, first upload files from your computer to your player. Follow these steps:
1. Use the USB connector cable provided your player to connect the USB port on your
player to an open USB port on your computer. The player will appear as a new hard
drive on your computer. (Can’t find the USB port on your player? See The Basic
Controls section on page 4.)
2. Drag your music files to the player or save music files to your player with software
tools like Musicmatch, the same as you save files on your hard drive from Microsoft
Word or other applications.
Using the Music Controls
Your player has three modes of operation: Audio Play for music, FM Radio for radio, and Voice
Record to record notes and meetings. To play your MP3 and WMA files, you need to be in
Audio Play mode. Follow these steps:
1. Press the Play/Stop button for two seconds. The SanDisk Welcome message will
appear onscreen for a moment then disappear. See The Basic Controls section
on page 4 to find the Play/Stop button.
Playing Music ` 9
Page 11

WARNING: If the onscreen message says “Key Hold” and then shuts off, you
need to locate the Hold button on the side of your player. Slide that button
towards the Play/Stop button to unlock your device. Then repeat Step 1 above.
See The Basic Controls section on page 4 if you cannot find the Hold button.
2. If you do not see the Audio Play interface onscreen shown in Figure 3, press the AB Change Mode button on the side of your player. The Mode Menu will appear.
3. Use the Left or Right buttons to move left or right until the Audio Play mode is
highlighted.
4. Press the Select button once to select the Audio Play mode.
When you are in Audio Play mode, the screen shown in Figure 3 will appear on your player.
Figure 3: The Audio Play LCD screen
The control buttons and ports for your player are described in The Basic Controls section on
page 4. More detailed descriptions on how the controls work is included in the step-by-step
instructions throughout this document. In addition, the Navigating the Software Menus
chapter on Page 21 describes the onscreen menus that appear when you use these controls.
Listening to Music
Once you are in Audio Play mode, and you have uploaded music files (see Connecting and
Disconnecting section on Page 9), you can listen to music. Follow these steps:
1. A list of your music files will display onscreen (see Figure 3). Press down once on the
Select button. The file selector will highlight your first music file. (Can’t find the Select
button on your player? See The Basic Controls section on page 4.)
2. Press the Up or Down buttons to move the selector up or down in your list of files.
3. Press down once on the Select button to select a music file to play.
4. Briefly press the Play/Stop button to play your selected song. To stop the music,
briefly press the Play/Stop button again. Once your selected music has played, your
player will play each music file below that music file, one after another.
5. To change the volume of your music as it plays, press the Up or Down buttons.
Playing Music ` 10
Page 12

6. To stop playing music, you have three choices:
Press the Play/Stop button until the SanDisk Goodbye screen appears
Navigate to another song, select it, then start to play that song
Press the A-B Change Mode button to switch to FM Radio or Record mode.
Organizing and Transferring Music
Because your player appears and acts like a hard drive connected to your computer, you can
use your computer file browser to create folders and move music files on your player. This can
help make it easier to organize and find music on your player.
To organize music on your player:
1. Open the file browser on your computer and navigate through the folders to the drive
assigned to your player.
2. Create, rename, copy, and move files and folders on your player the same as you do
on your computer hard drive.
To transfer music to and from your computer and your player:
1. Open the file browser on your computer and navigate through the folders to the drive
assigned to your Digital Audio Player.
2. Drag and drop music files from your player to your computer. You also can use
Musicmatch and other software to save files directly to your player.
Creating Playlists
Playlists are not supported on the Player. You can use multiple folders to organize your music.
Deleting Music
Music files can be deleted from your computer as well as deleted from your player.
Deleting Music Files from Your Computer
When your player is connected to your computer with the USB connector, you can use your
computer file browser software to view all files and folders on your player. Your player will
appear as a hard drive. Follow these steps to delete any file or folder from your computer:
1. Use your computer file browser software to navigate to your player hard drive.
2. Highlight the file or folder you want to delete.
3. Press the delete key on your computer to delete the file or folder.
Playing Music ` 11
Page 13

Deleting Music Files from Your Player
Follow these steps:
1. Put your player in Audio Play mode. See Using the Music Controls on Page 9 if
you need help with this step.
2. Press the Select button to access the browser menu onscreen. See The Basic
Controls section on page 4 if you cannot find the Select button.
3. Use the Up and Down buttons to scroll up or down your list of files to find the file
you want to delete. Use the Left or Right buttons to navigate from folder to folder.
When you find the file to be deleted, it will be highlighted.
4. Press the Record button. The File Delete menu will appear.
5. Press the Play/Stop button to delete the file. Press the Record button to cancel your
request to delete the file.
After Step 5, your player screen will show the Audio Play screen shown in Figure 3.
Adjusting Settings
Your player allows you to define the equalizer and repeat settings for music.
Set Equalizer Playback
The sound of a musical piece can be optimized to account for the musical style and for
differences caused by instruments used within a piece of music. For example, some
instruments sound best when the bass notes are emphasized. Follow these steps:
1. Put your player in Audio Play mode. See Using the Music Controls on Page 9 if
you need help with this step.
2. Hold down the A-B Change Mode button for two seconds until the Equalizer screen
appears. See The Basic Controls section on page 4 if you cannot find the A-B
Change Mode button.
3. Press the Up and Down buttons to scroll through the top level settings based on
types of music: Pops, Jazz, Classical, Rock, Normal, and User defined.
4. Press the Left and Right buttons to jump between the five bands that make up each
equalizer setting.
5. When an equalizer band is highlighted, press the Up and Down arrows to move the
band setting higher or lower.
6. Repeat Steps 4 and 5 until you set all five bands to your preference.
Playing Music ` 12
Page 14

7. Press the Select button to save your new equalizer settings. All music played will
use these settings until you change to another equalizer setting.
Set Repeat Modes
Your player allows you to repeat all or part of a music or audio file. Follow these steps:
1. Put your player in Audio Play mode. See Using the Music Controls on Page 9 if
you need help with this step.
2. Hold down the A-B Change Mode button for two seconds until the Equalizer screen
appears. See The Basic Controls section on page 4 if you cannot find the A-B
Change Mode button.
3. Press the A-B Change Mode button again to display the Repeat Setting screen.
4. Press the Up or Down buttons to change the repetition mode.
5. Press the Left or Right buttons to change the repetition region.
6. Press the Record button to change the shuffle mode from on to off.
7. Press the Select button to save your repeat mode settings.
Playing Music ` 13
Page 15

3
This chapter helps you get started listening to the
FM radio with your SanDisk Digital Audio Player.
Listening to the FM Radio
Your player has an FM radio that can play stations in most parts of the world. This chapter
helps you to become familiar with its FM Radio features.
Using the FM Radio Controls
Your player has three modes of operation: FM Radio for radio, Audio Play for music, and Voice
Record to record notes and meetings. To play your FM radio, you need to be in FM Radio
mode. Follow these steps:
1. Press the Play/Stop button for two seconds. The SanDisk Welcome message will
appear onscreen for a moment then disappear. See The Basic Controls section
on page 4 to find the Play/Stop button.
WARNING: If the onscreen message says “Key Hold” and then shuts off, you
need to locate the Hold button on the side of your player. Slide that button
towards the Play/Stop button to unlock your device. Then repeat Step 1 above.
See The Basic Controls section on page 4 if you cannot find the Hold button.
2. If you do not see the FM Radio screen shown in Figure 4, press the A-B Change
Mode button on the side of your player. The Mode Menu will appear.
3. Use the Left or Right buttons to move left or right until the FM Radio mode is
highlighted.
4. Press the Select button once to select the FM Radio mode.
When you are in FM Radio mode, the screen shown in Figure 4 will appear on your player.
Listening to the FM Radio ` 14
Page 16

Figure 4: The FM Radio LCD screen
The control buttons and ports for your player are described in The Basic Controls section on
page 4. More detailed descriptions on how the controls work is included in the step-by-step
instructions throughout this document. In addition, the Navigating the Software Menus
chapter on Page 21 describes the onscreen menus that appear when you use these controls.
Finding a Radio Station
Once the FM Radio screen appears, you can listen to your FM radio and change settings.
Follow these steps:
1. The radio has two modes to access stations: Normal and Preset. To change
modes, press the Select button briefly. The Preset mode allows you to store up to
20 of your favorite radio stations in the player’s memory.
NOTE: If you press the Select button and the word Empty flashes onscreen, there are
no preset radio stations set for your player. See Save a Radio Station on Page 16 to
save a radio station as a preset station.
2. To change stations, press the Left or Right button to move up or down the radio
dial. Hold down either of these buttons to scan radio stations. In Preset mode, you
scan preset stations. In Normal mode, you scan increments in the radio spectrum.
3. To raise or lower the volume of the radio, press the Up or Down buttons.
4. To stop playing the FM radio, you have two choices:
Press the Play/Stop button until the SanDisk Goodbye screen appears.
Press the A-B Change Mode button to switch to Audio Play or Record mode.
Switching Between Normal and Preset Modes
The FM radio in your player operates in either Normal mode, where all stations can be
scanned, or Preset mode, where you save time by scanning only stations whose frequencies
you have saved to memory. Follow these steps to switch between these modes:
Listening to the FM Radio ` 15
Page 17

1. Put your player in FM Radio mode. See Using the FM Radio Controls on Page 14
if you need help with this step.
2. Press the Select button to switch between Normal and Preset modes. If the word
Empty appears onscreen, no radio station frequencies have been saved as presets.
See Save a Radio Station on Page 16 to save a radio station as a preset station.
Setting Preset Stations Automatically
In addition to manually selecting radio station frequencies as preset stations, your player can
automatically save all radio stations that have strong frequencies. Follow these steps;
1. Put your player in FM Radio mode. See Using the FM Radio Controls on Page 14
if you need help with this step.
2. Press the Select button to select Normal mode. If present, the rectangular box with
Preset text will disappear from the screen.
3. Press the A-B Change Mode button for two seconds. The text Auto Scanning will
appear on the player screen.
4. When the Auto Scanning text disappears, press the Select button to select the
Preset mode. The rectangular box with Preset text will appear onscreen.
5. Press the Right and Left buttons to scan from preset station to preset station.
Setting Stereo and Mono Modes
FM radio stations can be listened to in either stereo or mono modes. In some cases, an FM
radio station will sound clearer if listened to in mono mode. Follow these steps to change
listening modes:
1. Put your player in FM Radio mode. See Using the FM Radio Controls on Page 14
if you need help with this step.
2. Press the Play/Stop button to switch between Stereo and Mono listening modes.
Save a Radio Station as a Preset
You can save a favorite radio station as a preset station. Follow these steps:
1. Put your player in FM Radio mode. See Using the FM Radio Controls on Page 14
if you need help with this step.
2. If needed, use the Left and Right buttons to scan to a radio station frequency you
want to save.
Listening to the FM Radio ` 16
Page 18

3. Press the Record button for two seconds. The Memory icon will appear onscreen. A
number will appear to the right of the text. This is the next currently available preset.
4. Use the Left and Right buttons if you want to use a different preset number than the
number displayed onscreen.
5. Press the Select button to save your new preset station.
Delete a Preset Radio Station
Your player allows you to delete radio station frequencies that you have saved as presets.
Follow these steps:
1. Put your player in FM Radio mode. See Using the FM Radio Controls on Page 14
if you need help with this step.
2. Press the Select button to put the radio in Preset mode. The Preset box will appear
onscreen.
3. Use the Left and Right buttons to scan to the radio station frequency you want to
delete.
4. Press the Record button for two seconds to delete the preset radio station.
Listening to the FM Radio ` 17
Page 19

4
This chapter helps you get started using your
SanDisk Digital Audio Player to record your notes
and meetings.
Recording Notes and Meetings
Your player includes a built-in microphone so you can record notes, meetings, and other
material. This chapter helps you to become familiar with how to use your player to record.
Using the Recording Controls
Your player has three modes of operation: Voice Record to record notes and meetings, FM
Radio for radio, and Audio Play for music. To record, you need to be in Voice Record mode.
Follow these steps:
1. Press the Play/Stop button for two seconds. The SanDisk Welcome message will
appear onscreen for a moment then disappear. See The Basic Controls section
on page 4 to find the Play/Stop button.
WARNING: If the onscreen message says “Key Hold” and then shuts off, you
need to locate the Hold button on the side of your player. Slide that button
towards the Play/Stop button to unlock your device. Then repeat Step 1 above.
See The Basic Controls section on page 4 if you cannot find the Hold button.
2. If you do not see the Voice Record screen shown in Figure 5, press the A-B
Change Mode button on the side of your player. The Mode Menu will appear.
3. Use the Left or Right buttons to move left or right until the Voice Record mode is
highlighted.
4. Press the Select button once to select the Voice Record mode.
When you are in Voice Record mode, the screen shown in Figure 5 will appear on your player.
Recording Notes and Meetings ` 18
Page 20

Figure 5: The Voice Record LCD screen
The control buttons and ports for your player are described in The Basic Controls section on
page 4. More detailed descriptions on how the controls work is included in the step-by-step
instructions throughout this document. In addition, the Navigating the Software Menus
chapter on Page 21 describes the onscreen menus that appear when you use these controls.
Start a Recording
Follow these steps:
1. Put your player in Voice Record mode. See Using the Recording Controls on
Page 18 if you need help with this step.
2. Press the Record button to start recording.
3. Press the Record button to stop recording.
Pause a Recording
While recording, follow these steps:
1. Press the Play/Stop button to pause recording.
2. Press the Play/Stop button to resume recording.
Playback a Recording
When you record, an audio file is saved to your player in the Voice folder. Follow these steps
to playback recordings:
1. Put your player in Voice Record mode. See Using the Recording Controls on
Page 18 if you need help with this step.
2. Press the Select button. The contents of the Voice folder will appear onscreen.
3. Use the Up and Down buttons to scroll through your recording files until you find the
file you want to playback.
4. Press the Play/Stop button to playback the file.
Recording Notes and Meetings ` 19
Page 21

Delete a Recording
Recordings stored on your player can be deleted from your computer or player by using the
player controls.
Deleting Recordings from Your Computer
When your player is connected to your computer with the USB connector, you can use your
computer file browser software to view all files and folders on your player. Your player will
appear as a hard drive. Follow these steps:
1. Use your computer file browser software to navigate to your player hard drive.
2. Highlight the file or folder you want to delete.
3. Press the delete key on your computer to delete the file or folder.
Deleting Recordings from Your Player
Follow these steps:
1. Put your player in Voice Record mode. See Using the Recording Controls on
Page 18 if you need help with this step.
2. Press the Select button to access the browser menu onscreen. See The Basic
Controls section on page 4 if you cannot find the Select button.
3. Use the Up and Down buttons to scroll up or down your list of files to find the file
you want to delete. Use the Left or Right buttons to navigate from folder to folder.
When you find the file to be deleted, it will be highlighted.
4. Press the Record button. The File Delete menu will appear.
5. Press the Play/Stop button to delete the file. Press the Record button to cancel your
request to delete the file.
After Step 5, your player screen will show the Voice Record screen shown in Figure 5.
Recording Notes and Meetings ` 20
Page 22

5
This chapter provides reference information to
help you navigate the software menus within your
SanDisk Digital Audio Player.
Navigating the Software Menus
In addition to the ability to play music, listen to FM radio, and record, your player provides you
with the ability to customize features within the player. For example, you can set the language
of your player as well as the settings for the repeat feature. This chapter will help you to
navigate and use the software menus within your player.
The Basics
Before you access the advanced feature menus, you should familiarize yourself with how the
menus are structured, accessed, and navigated. The Example for Moving between Menus,
Settings, and Parameters section on page 23 shows how menus are woven together to
change settings.
Top Level Menus
There are three top level menus within your player that control its advanced features: Audio,
Display, and System, as shown in Figure 6.
Figure 6: Advanced Menus: Audio, Display, System
Each of these top level menus has additional sub menus that are shown in the Diagrams of
Menus section on page 24. Each submenu has its own settings and each setting has its own
parameters that you can configure.
Navigating the Software Menus ` 21
Page 23

Access the Top Level Menus
Follow these steps to access the top level menus:
1. Press the Play/Stop button for two seconds. The SanDisk Welcome message will
appear onscreen for a moment then disappear. See The Basic Controls section
on page 4 to find the Play/Stop button.
WARNING: If the onscreen message says “Key Hold” and then shuts off, you
need to locate the Hold button on the side of your player. Slide that button
towards the Play/Stop button to unlock your device. Then repeat Step 1 above.
See The Basic Controls section on page 4 if you cannot find the Hold button.
2. Press down the Select button for two seconds. One of the top level menus shown in
Figure 6 above will appear.
Move between Menus, Settings, and Parameters
When you have the top level menus displayed, as described above, you can move between
the menus, settings, and parameters as follows:
To navigate between the top level menus and between the sub menus underneath
each top level menu, press the Left and Right buttons.
To choose a top level menu or sub menu, as well as the setting you want to configure
and setting parameters you want to save, press down briefly on the Select button.
To scroll up or down settings for a sub menu press the Up and Down buttons.
To define the parameters of a sub menu setting, press the Up and Down buttons to
scroll through parameter options or press the Left and Right buttons to increase or
decrease the parameter.
To return to the next highest menu at any time, press the A/B button. See The Basic
Controls section on page 4 to find the A/B button. For example, if you are on a setting
screen for a submenu, pressing the A/B button will display the submenu for that setting.
WARNING: If you are on a parameter screen when you press the A/B button,
your new setting will not be saved. To save a setting, briefly press the Select
button before you press the A/B button.
To exit the software menus and return to the Audio, FM Radio, or Record modes, press
the Play/Stop button. See The Basic Controls section on page 4 to find the Play/Stop
button.
Navigating the Software Menus ` 22
Page 24

Example for Moving between Menus, Settings, and
Parameters
The following example shows how to use the player controls to navigate between menus,
settings, and a parameter under the Audio top level menu.
1. Press the Play/Stop button for two seconds. The SanDisk Welcome message will
appear onscreen for a moment then disappear. See The Basic Controls section
on page 4 to find the Play/Stop button.
WARNING: If the onscreen message says “Key Hold” and then shuts off, you
need to locate the Hold button on the side of your player. Slide that button
towards the Play/Stop button to unlock your device. Then repeat Step 1 above.
See The Basic Controls section on page 4 if you cannot find the Hold button.
2. Press down the Select button for two seconds. One of the top level menus shown in
Figure 6 above will appear.
3. Use the Left and Right buttons to navigate to the Audio menu as shown in Figure 7.
Figure 7: The Audio Top Level Menu
4. Press the Select button briefly to access the submenus under the Audio menu.
5. Press the Left and Right buttons to access the Speed submenu shown in Figure 8.
Figure 8: The Speed Submenu
Navigating the Software Menus ` 23
Page 25

6. Press the Select button briefly to access the Play Speed parameter shown in Figure
9.
Figure 9: The Play Speed parameter
7. Press the Left and Right buttons to decrease or increase the Play Speed
parameter.
8. To exit to the Audio, FM Radio, and Record mode, press the Play/Stop button. See
The Basic Controls section on page 4 to find the Play/Stop button.
Diagrams of Menus and Sub Menus
The software menus included with your player are described in more detail in this section.
They are divided based on the top level menu used to invoke the submenus.
Audio Menus
The Audio menus control the qualities of sound in your player, for example, the speed files are
played at as well as the amount of bass or treble. The top level Audio menu, its submenus,
and settings are shown below in Table 2.
Be sure to read The Basics on page 21 to learn how to navigate the menus, settings,
and parameters described in this section.
Table 2: Audio Menus
Submenu Setting Parameter and Function
Sound E/Q Setting Sets balance of bass, treble with either preset modes or
Balance Sets volume of left and right channels.
Fade In Sets whether songs fade in or not. Once set, you can
Navigating the Software Menus ` 24
custom settings for specific equalizer bands.
prevent abrupt volume changes when stopping or
playing back by using the Left or Right buttons.
Page 26

Submenu Setting Parameter and Function
Repeat Repeat Sets repetition mode. Press the Up or Down buttons to
change mode. Press the Left or Right buttons to change
the region. Press the REC button to change shuffle
mode to reverse order.
Shuffle Set playback to sequential or random.
Intro Set time duration for intro between files.
Speed Play Speed How fast music plays, from 50% to 150%.
Fast Skip Speed up file playback, from 1 to 10 times.
File Search Set file movement speed, from 1 to 10 seconds.
Control Resume Set whether resume function will perform or not.
Display Menus
The Display menus control the visual display of your player, for example, the contrast level of
the indigo graphic LCD display. The top level Display menu, its submenus, and settings are
shown below in Table 3.
Be sure to read The Basics on page 21 to learn how to navigate the menus, settings,
and parameters described in this section.
Table 3: Display Menus
Submenu Setting Function
User UI ID3 Tag Set whether ID3 tag will display in idle mode or
playback mode.
User UI Sets what will appear bottom right of LCD, either
Level Meter, Progress Bar, Equalizer, or Volume.
Scroll Speed Speed of scrolling on the player screen.
LCD Light Time Time screen backlight stays on.
Contrast Brightness of letters on LCD.
Rotation Rotate LCD screen to accommodate left-handed or
right-handed person.
Navigating the Software Menus ` 25
Page 27

System Menus
The System menus control the underlying features of your player, for example, the language
used onscreen and regional FM radio settings. The top level System menu, its submenus, and
settings are shown below in Table 4.
Be sure to read The Basics on page 21 to learn how to navigate the menus, settings,
and parameters described in this section.
Table 4: System Menus
Submenu Setting Function
System Language Set language used on LCD.
Format Start fast formatting which takes less time and
initializes player system files only.
Timer Auto P-off Time player stays on after inactivity.
Sleep Duration before sleep mode activates.
FM Setting FM Region Configure your player for your region, Korea, USA,
Japan, Europe, Others.
FM Sense Set FM scanning sensitivity for auto scan and FM radio
frequency searches. Higher settings will capture
weaker FM broadcasts.
Information Memory Size of total memory, used memory, and remaining
memory for your player.
Software Displays player firmware version and data.
Reset Default Restore factory settings for player software. Erases all
custom settings you may have configured.
Navigating the Software Menus ` 26
Page 28

This chapter provides tips and troubleshooting
information to help you get the most from your
SanDisk Digital Audio Player.
Tips and Troubleshooting
This chapter provides answers to common questions you may have about your player.
Question: How do I copy files to the Digital Audio Player?
Answer: You can copy files to the Digital Audio Player just like copying a file on your
Hard Drive.
Question: What file formats does the Digital Audio Player support?
Answer: The Digital Audio Player will support MP3, WMA and WMA-DRM
6
Question: Do I have to use Musicmatch in order to use my Digital Audio Player?
Answer: No, you can use the Digital Audio Player just like another hard drive to copy
your files.
Question: Why can't I delete my voice files from the Voice mode?
Answer: The voice mode is used to record voice files only. You will need to delete the
files using the Audio Play mode.
Tips and Troubleshooting ` 27
Page 29

7
This chapter provides information to help you get
service and support for your SanDisk Digital
Audio Player.
Learn More, Service, and
Warranty Information
This chapter provides information about how to get support for your player and the terms of
your warranty.
Getting Technical Support
Before you contact Technical Support, we encourage you to read the Tips and
Troubleshooting section on page 27 to see if your question is covered there.
If you have questions about the use or features of your player, please call the SanDisk
Technical Support Center at 1-866-SanDisk (1-866-726-3475), or fill out an on-line support
request at http://www.sandisk.com/retail/support.asp.
When you call or contact us for support, please include as much information as you can from
your packaging material. This will allow us to help you more quickly.
Learn More
You also can visit us on the web at http://www.sandisk.com to learn more about your player as
well as other SanDisk products.
Your Limited 1-Year SanDisk Warranty
SanDisk warrants that this product will be free from material defects in design and manufacture
and will substantially conform to the published specifications under normal use for one year
from your date of purchase, subject to the conditions below. This warranty is provided to the
Learn More, Service, and Support ` 28
Page 30

original end user purchasing from SanDisk or an authorized reseller, and is not transferable.
Proof of purchase may be required. SanDisk is not responsible for any failure or defect caused
by any third party product or component, whether authorized or not. This warranty does not
apply to any third party software provided with the product and you are responsible for all
service and repair needed for such software. This warranty is void if the product is not used in
accordance with the product instructions, or if it is damaged as a result of improper installation,
misuse, unauthorized repair, modification or accident.
To obtain warranty service contact SanDisk at 1-866-SanDisk or send an email
to:
support@SanDisk.com. You must return the product in tamper resistant packaging, freight
prepaid, as instructed by SanDisk. You must obtain a tracking confirmation number, which you
may be required to provide to SanDisk. SanDisk will, at its option, repair or replace the product
with new or refurbished product of equal or greater capacity and functionality, or refund the
purchase price. The warranty duration on replaced product will be that time period remaining
on the original product. THIS CONSTITUTES SANDISK’S ENTIRE LIABILITY AND YOUR
EXCLUSIVE REMEDY FOR BREACH OF THIS WARRANTY.
SanDisk does not warrant, and shall not be responsible for, any lost data or information
contained in any product (including in any returned product), regardless of the cause of the
loss. SanDisk’s products are not warranted to operate without failure. SanDisk products
should not be used in life support systems or other applications where failure could threaten
injury or life. This warranty gives you specific legal rights, and you may also have other rights
which vary by jurisdiction.
THE FOREGOING IS SANDISK’S SOLE WARRANTY. SANDISK DISCLAIMS ALL OTHER
EXPRESS AND IMPLIED WARRANTIES TO THE FULLEST EXTENT PERMITTED BY
APPLICABLE LAW. THE IMPLIED WARRANTIES OF MERCHANTABILITY AND FITNESS
FOR A PARTICULAR PURPOSE ARE LIMITED TO THE DURATION OF THE EXPRESS
WARRANTY. SOME JURIDSICTIONS DO NOT ALLOW LIMITATION ON HOW LONG AN
IMPLIED WARRANTY LASTS, SO THE ABOVE LIMITATION MAY NOT APPLY TO YOU. IN
NO EVENT SHALL SANDISK OR ANY AFFILIATED OR SUBSIDIARY COMPANY BE LIABLE
UNDER ANY CIRCUMSTANCES FOR ANY DIRECT, INDIRECT, OR CONSEQUENTIAL
DAMAGES, ANY FINANCIAL LOSS OR ANY LOST DATA OR IMAGE, EVEN IF SANDISK
HAS BEEN ADVISED OF THE POSSIBILITY OF SUCH DAMAGE. SOME JURISDICTIONS
DO NOT ALLOW THE EXCLUSION OR LIMITATION OF INCIDENTAL OR
CONSEQUENTIAL DAMAGES, SO THE ABOVE LIMITATION OR EXCLUSION MAY NOT
APPLY TO YOU. IN NO EVENT WILL SANDISK’S LIABILITY EXCEED THE AMOUNT PAID
BY YOU FOR THE PRODUCT.
Learn More, Service, and Support ` 29
Page 31

8
This chapter provides safety tips and instructions
to care for your SanDisk Digital Audio Player.
Safety Tips and Cleaning
Instructions
Your player is an electronic device and, therefore, has to be protected from water and other
hazards. Follow these tips to keep your player working well for a long time:
Read all instructions in this manual carefully before you use your player to ensure
proper usage.
Keep your packaging and this manual handy in case you have future questions.
Clean your player with the same soft lint-free cloth used to clean glass lenses.
Your player is not a toy. Do not let young children use your player unsupervised.
Permanent hearing loss can happen if you play your music at the highest volumes.
Exercise caution when setting the volume on your player.
Using your player while driving is not recommended. Driving is a complex activity that
requires your full attention. If you’re engaged in driving or any activity that requires your
full attention, we recommend that you not use your player.
Never force any connector into the ports of your player or your computer. Make sure
your connectors are the identical shape and size before you connect.
Keep your player away from sinks, drinks, bathtubs, showers, rain, and other sources
of moisture. Besides damage to your player, moisture can cause electric shocks with
any electronic device.
Use and store your player in normal operating temperatures. Leaving your player in
your car can subject it to extreme heat.
Safety Tips and Cleaning Instructions ` 30
 Loading...