

USER MANUAL
(For Use with Android™ Mobile Devices)
SanDisk Connect
™
Wireless Flash Drive

SanDisk is a trademark of SanDisk Corporation, registered in the United States and other
countries. SanDisk Connect is a trademark of SanDisk Corporation. microSDHC is a trademark
of SD-3C, LLC. Android is a trademark of Google Inc. Wi-Fi is a registered trademark of the Wi-Fi
Alliance. All other trademarks are the property of their respective owners.
©2013 SanDisk Corporation. All rights reserved.

Contents
1. Introduction . . . . . . . . . . . . . . . . . . . . . . . . . . . . . . . . . . . . . . . 1
Wireless Flash Drive Overview . . . . . . . . . . . . . . . . . . . . . . . . . . . . . . 1
Features . . . . . . . . . . . . . . . . . . . . . . . . . . . . . . . . . . . . . . . . . . . . . . . 1
System Requirements . . . . . . . . . . . . . . . . . . . . . . . . . . . . . . . . . . . . .1
Supported File Formats . . . . . . . . . . . . . . . . . . . . . . . . . . . . . . . . . . . 2
Hardware Specifications . . . . . . . . . . . . . . . . . . . . . . . . . . . . . . . . . . .2
2. Getting Started . . . . . . . . . . . . . . . . . . . . . . . . . . . . . . . . . . . . . 3
Charging the Wireless Drive . . . . . . . . . . . . . . . . . . . . . . . . . . . . . . . . 3
Wireless Drive LEDs . . . . . . . . . . . . . . . . . . . . . . . . . . . . . . . . . . . . . .4
Downloading the SanDisk Wireless Flash Drive App . . . . . . . . . . . . .4
Connecting to the Wireless Drive . . . . . . . . . . . . . . . . . . . . . . . . . . . . 4
Connecting via Wi-Fi . . . . . . . . . . . . . . . . . . . . . . . . . . . . . . . . . . .4
Accessing the Drive without an App . . . . . . . . . . . . . . . . . . . . . . . . 7
Loading Content on the Wireless Drive . . . . . . . . . . . . . . . . . . . . . . . .8
From a PC . . . . . . . . . . . . . . . . . . . . . . . . . . . . . . . . . . . . . . . . . . . 9
From a Mobile Device . . . . . . . . . . . . . . . . . . . . . . . . . . . . . . . . . . .9
3. Working with Files . . . . . . . . . . . . . . . . . . . . . . . . . . . . . . . . . 12
Wireless Drive Application Overview . . . . . . . . . . . . . . . . . . . . . . . . 12
Wireless Drive Start Screen . . . . . . . . . . . . . . . . . . . . . . . . . . . . .12
Wireless Drive Main Screen . . . . . . . . . . . . . . . . . . . . . . . . . . . . .13
Using the Wireless Drive App Menu . . . . . . . . . . . . . . . . . . . . . . . . . 14
Wireless Drive App Menu Options . . . . . . . . . . . . . . . . . . . . 15
Using the Wireless Drive File Menu 1 . . . . . . . . . . . . . . . . . . . . . . .5
Wireless Drive File Menu Options . . . . . . . . . . . . . . . . . . . . . 15
Accessing Files through the Wireless Drive App . . . . . . . . . . . . . . . .15
Toggling between List View and Grid View . . . . . . . . . . . . . . . . . . . .16
SanDisk Connect™ Wireless Flash Drive User Manual for Android i

Viewing Photos . . . . . . . . . . . . . . . . . . . . . . . . . . . . . . . . . . . . . . . . .17
Streaming Videos . . . . . . . . . . . . . . . . . . . . . . . . . . . . . . . . . . . . . . . .18
Playing Music . . . . . . . . . . . . . . . . . . . . . . . . . . . . . . . . . . . . . . . . . . .20
Playing Music in the Background While Outside the App . . . . . . 20
Moving Files . . . . . . . . . . . . . . . . . . . . . . . . . . . . . . . . . . . . . . . . . . . .21
Downloading Files . . . . . . . . . . . . . . . . . . . . . . . . . . . . . . . . . . . .21
Uploading Files . . . . . . . . . . . . . . . . . . . . . . . . . . . . . . . . . . . . . . .23
Creating a New Folder . . . . . . . . . . . . . . . . . . . . . . . . . . . . . 23
Uploading Files from the Phone Gallery or Downloads Folder 24
Uploading Files from Other Locations on the Mobile Device 26
Sharing Files . . . . . . . . . . . . . . . . . . . . . . . . . . . . . . . . . . . . . . . . .27
Allowing Access to your Wireless Drive . . . . . . . . . . . . . . . . 27
Sending Files to Others . . . . . . . . . . . . . . . . . . . . . . . . . . . . . 27
Deleting Files . . . . . . . . . . . . . . . . . . . . . . . . . . . . . . . . . . . . . . . . . . 28
Deleting a File . . . . . . . . . . . . . . . . . . . . . . . . . . . . . . . . . . . . . . . .29
Deleting a Folder . . . . . . . . . . . . . . . . . . . . . . . . . . . . . . . . . . . . .30
Unsupported File Formats . . . . . . . . . . . . . . . . . . . . . . . . . . . . . . . . 31
4. Managing the Wireless Drive . . . . . . . . . . . . . . . . . . . . . . . . . 32
Updating the Firmware . . . . . . . . . . . . . . . . . . . . . . . . . . . . . . . . . . . .32
Updating the App . . . . . . . . . . . . . . . . . . . . . . . . . . . . . . . . . . . . . . . .34
Managing Wireless Drive Settings . . . . . . . . . . . . . . . . . . . . . . . . . . .34
Saving Settings Changes . . . . . . . . . . . . . . . . . . . . . . . . . . . . . . 35
Changing the Wireless Drive Network Name . . . . . . . . . . . . . . . . 37
Creating/Changing a Password . . . . . . . . . . . . . . . . . . . . . . . . . .38
Restoring Factory Settings . . . . . . . . . . . . . . . . . . . . . . . . . . . . . .40
Setting the Power Save Timer . . . . . . . . . . . . . . . . . . . . . . . . . . .40
Connecting to the Internet . . . . . . . . . . . . . . . . . . . . . . . . . . . . . . 41
Adding a Preferred Network . . . . . . . . . . . . . . . . . . . . . . . . . 43
Setting the Downloads Directory . . . . . . . . . . . . . . . . . . . . . . . . .46
Resetting Messages and Warnings . . . . . . . . . . . . . . . . . . . . . . .47
SanDisk Connect™ Wireless Flash Drive User Manual for Android ii

Getting Support . . . . . . . . . . . . . . . . . . . . . . . . . . . . . . . . . . . . . . 49
Quick Start Guide . . . . . . . . . . . . . . . . . . . . . . . . . . . . . . . . . 49
About . . . . . . . . . . . . . . . . . . . . . . . . . . . . . . . . . . . . . . . . . . . 50
5. Product and Safety Information . . . . . . . . . . . . . . . . . . . . . . . 51
Product Specifications . . . . . . . . . . . . . . . . . . . . . . . . . . . . . . . . . . . .51
Regulatory Information . . . . . . . . . . . . . . . . . . . . . . . . . . . . . . . . . . . .51
Safety and Care . . . . . . . . . . . . . . . . . . . . . . . . . . . . . . . . . . . . . . . . .53
Cleaning . . . . . . . . . . . . . . . . . . . . . . . . . . . . . . . . . . . . . . . . . . . . . . .54
Maintenance and Storage . . . . . . . . . . . . . . . . . . . . . . . . . . . . . . . . .54
Standard Maintenance . . . . . . . . . . . . . . . . . . . . . . . . . . . . . . . . 54
Long Term Storage . . . . . . . . . . . . . . . . . . . . . . . . . . . . . . . . . . . .55
Recycling . . . . . . . . . . . . . . . . . . . . . . . . . . . . . . . . . . . . . . . . . . .55
Index . . . . . . . . . . . . . . . . . . . . . . . . . . . . . . . . . . . . . . . . . . . 56
SanDisk Connect™ Wireless Flash Drive User Manual for Android iii
1. Introduction Wireless Flash Drive Overview
1. Introduction
Wireless Flash Drive Overview
The SanDisk Connect™ Wireless Flash Drive stores, shares, and streams digital
content wirelessly across multiple mobile devices.
Features
• Share files with others. The Wireless Drive creates its own wireless network. Up
to eight mobile devices can be wirelessly connected and access files on the Drive
at the same time.
• Stay connected to the Internet while accessing content from the Wireless
Drive. In areas where Internet Wi-Fi access is available, you can stream content
from the Wireless Drive and keep your mobile device connected to the Internet at
the same time.
• Use the Wireless Drive for extra storage. Up to 32 GB of space can be used to
store digital content from a mobile device.
System Requirements
• Mobile phones or tablets running iOS version 5.0 or higher, Android version 2.3 or
higher, or other Wi-Fi-enabled devices with a web browser
SanDisk Connect™ Wireless Flash Drive User Manual for Android 1

1. Introduction Supported File Formats
• Computers running Windows® 8, Windows 7, Windows Vista®, Windows XP or
Mac OS 10.6 or higher
Supported File Formats
• Any file formats supported by your mobile device
• For additional information about supported formats, go to www.sandisk.com/
support
Hardware Specifications
• Drive Capacity: 16 GB or 32 GB
1
• USB: 2.0 compatible
• Battery: Non-user replaceable lithium-ion battery
• Battery Life: Up to 4 hours of continuous streaming and standby
• Maximum Wi-Fi range: 160 feet (50 meters)
• Wireless Drive Memory Card Format: FAT32
2
1
1GB=1,000,000,000 bytes. Actual user storage less.
2
Based on streaming 720p content at 2mbps to one device; actual life and performance may vary
depending upon usage and settings; battery not replaceable.
SanDisk Connect™ Wireless Flash Drive User Manual for Android 2
2. Getting Started Charging the Wireless Drive
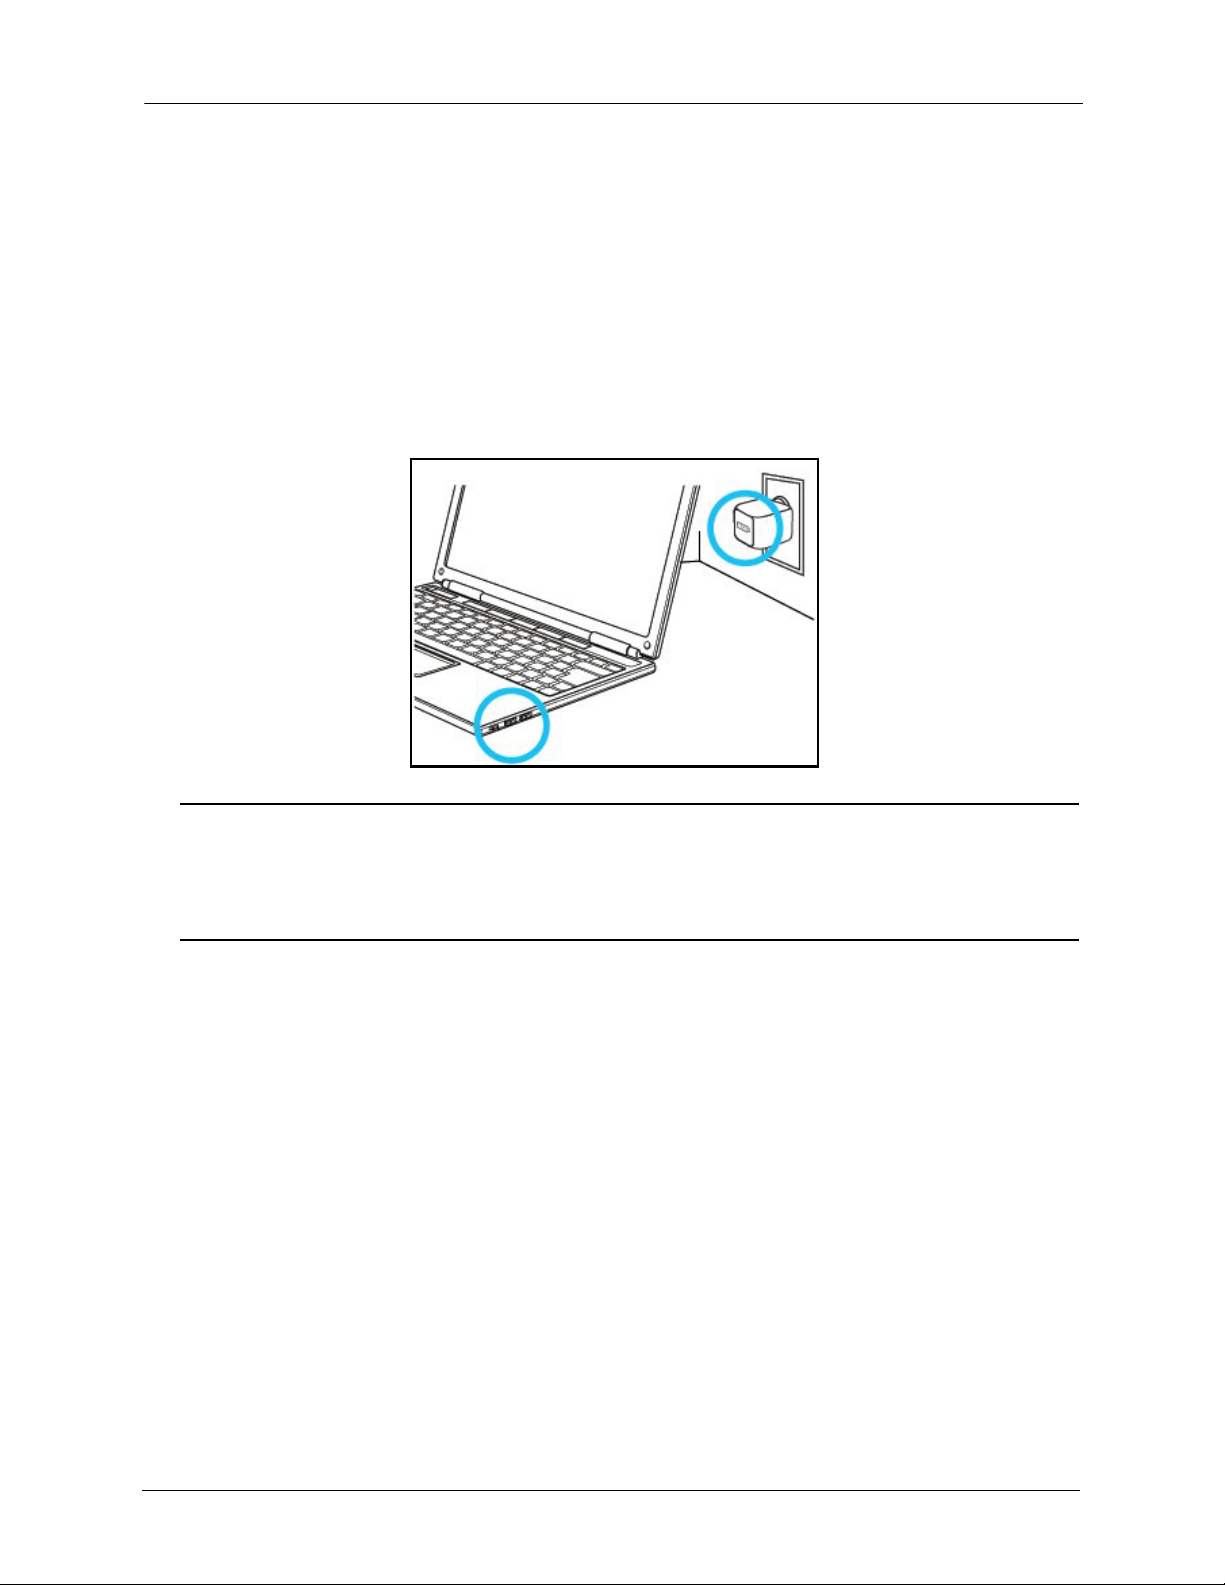
2. Getting Started
Charging the Wireless Drive
Although the Wireless Drive is shipped with a charged battery, we urge you to fully
charge the Drive before you begin to use it. (This can take up to two hours.)
• Plug your Wireless Drive into a computer USB port or a USB AC adaptor to
charge it:
Note: Although the Wireless Drive cannot be used wirelessly while it’s plugged into a
computer USB port, it can be used as a normal flash drive. However, the Drive can be
used wirelessly while it’s charging in a USB AC adaptor. If you want to use the Drive
while it’s plugged into an adaptor, be sure to turn it on before you plug it in.
SanDisk Connect™ Wireless Flash Drive User Manual for Android 3
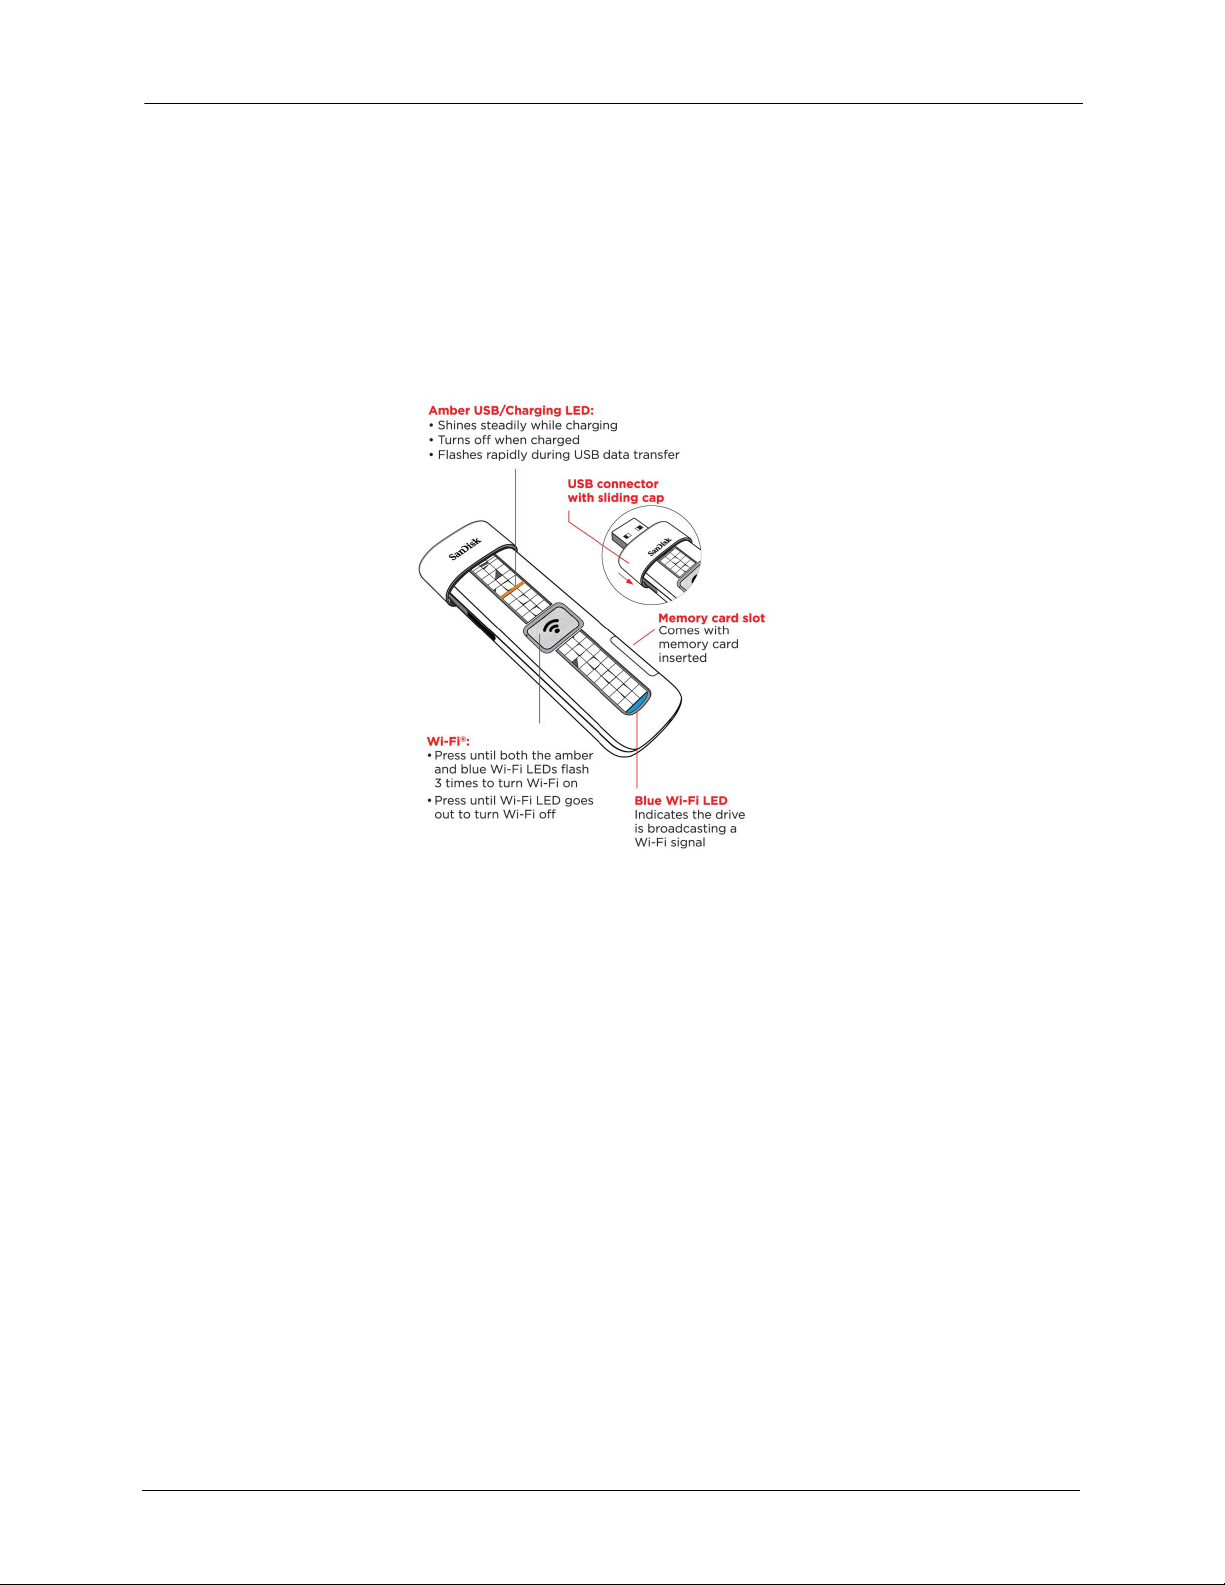
2. Getting Started Wireless Drive LEDs
Wireless Drive LEDs
Mode LEDs Activity
Wi-Fi on Blue Flashes
Turn Wi-Fi on and off Blue and Amber Flash three times
Wi-Fi data transfer in
progress
USB data transfer in
progress
Battery charging Amber Shines steadily
Battery fully charged Amber Off
Battery strength 5-10%
(Wi-Fi is on)
Factory Reset Blue and Amber Flash rapidly after Wi-Fi
Blue Flashes rapidly
Amber Flashes rapidly
Amber Repeatedly flashes
three times
button has been held in
for 30 seconds (does
NOT delete files stored
on the Drive)
Downloading the SanDisk Wireless Flash Drive App
1. Download the free SanDisk Wireless Flash Drive app from
your mobile device application store onto each mobile device
you want to use with the Drive.
2. Find the app icon on the mobile device and tap it to open the app.
Connecting to the Wireless Drive
You can connect to the Wireless Drive Wi-Fi network on your mobile device in two
ways:
• You can download the Wireless Flash Drive app and connect to the Drive via WiFi.
• You can access the Drive without installing the Wireless Drive app via a web
browser.
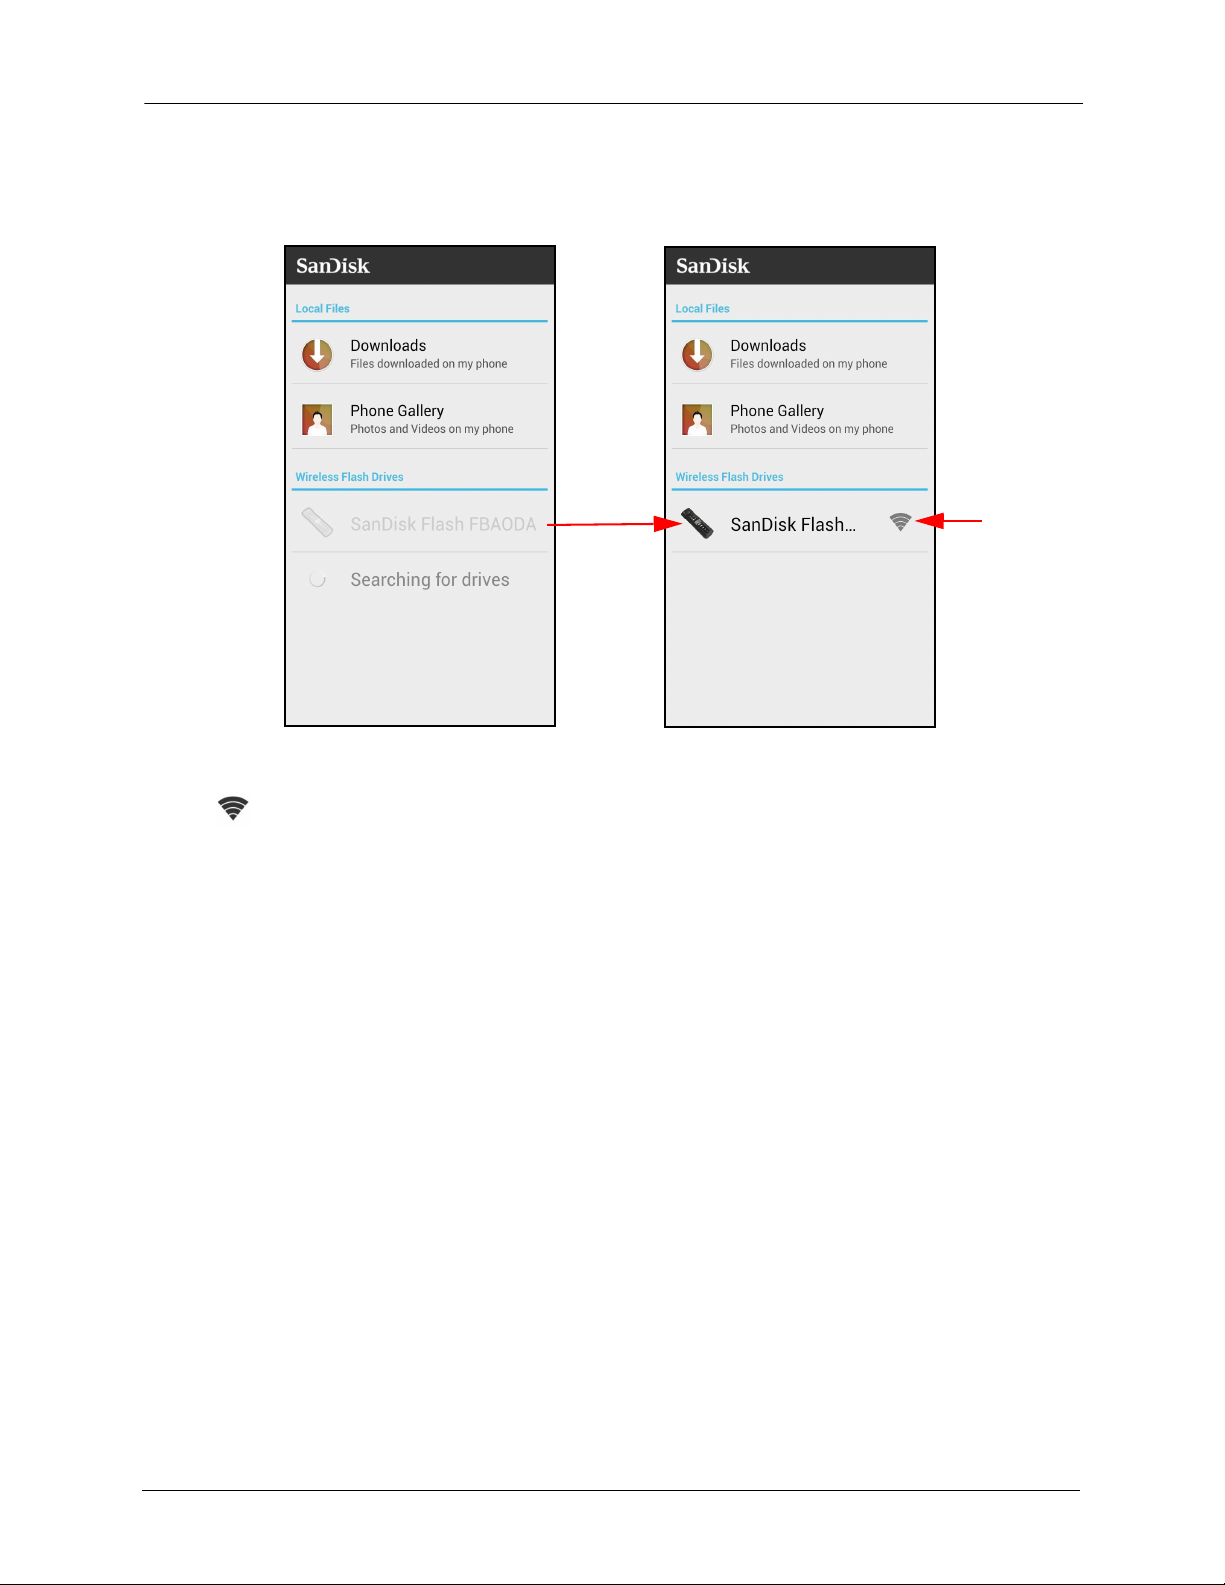
Connecting via Wi-Fi
After you launch the app, your mobile device automatically discovers the Wireless
Drive Wi-Fi network.
To connect to the Wireless Drive,
SanDisk Connect™ Wireless Flash Drive User Manual for Android 4
2. Getting Started Connecting to the Wireless Drive
Wi-Fi
detected
1. Tap the Wireless Flash Drive app icon on your mobile device to open the Wireless
Drive start screen:
Your mobile device searches for your Wireless Drive Wi-Fi network. The Wi-Fi icon
indicates that your Wireless Drive Wi-Fi has been detected.
2. When your Drive name appears below Wireless Flash Drives, tap it to connect to
the Drive.
SanDisk Connect™ Wireless Flash Drive User Manual for Android 5
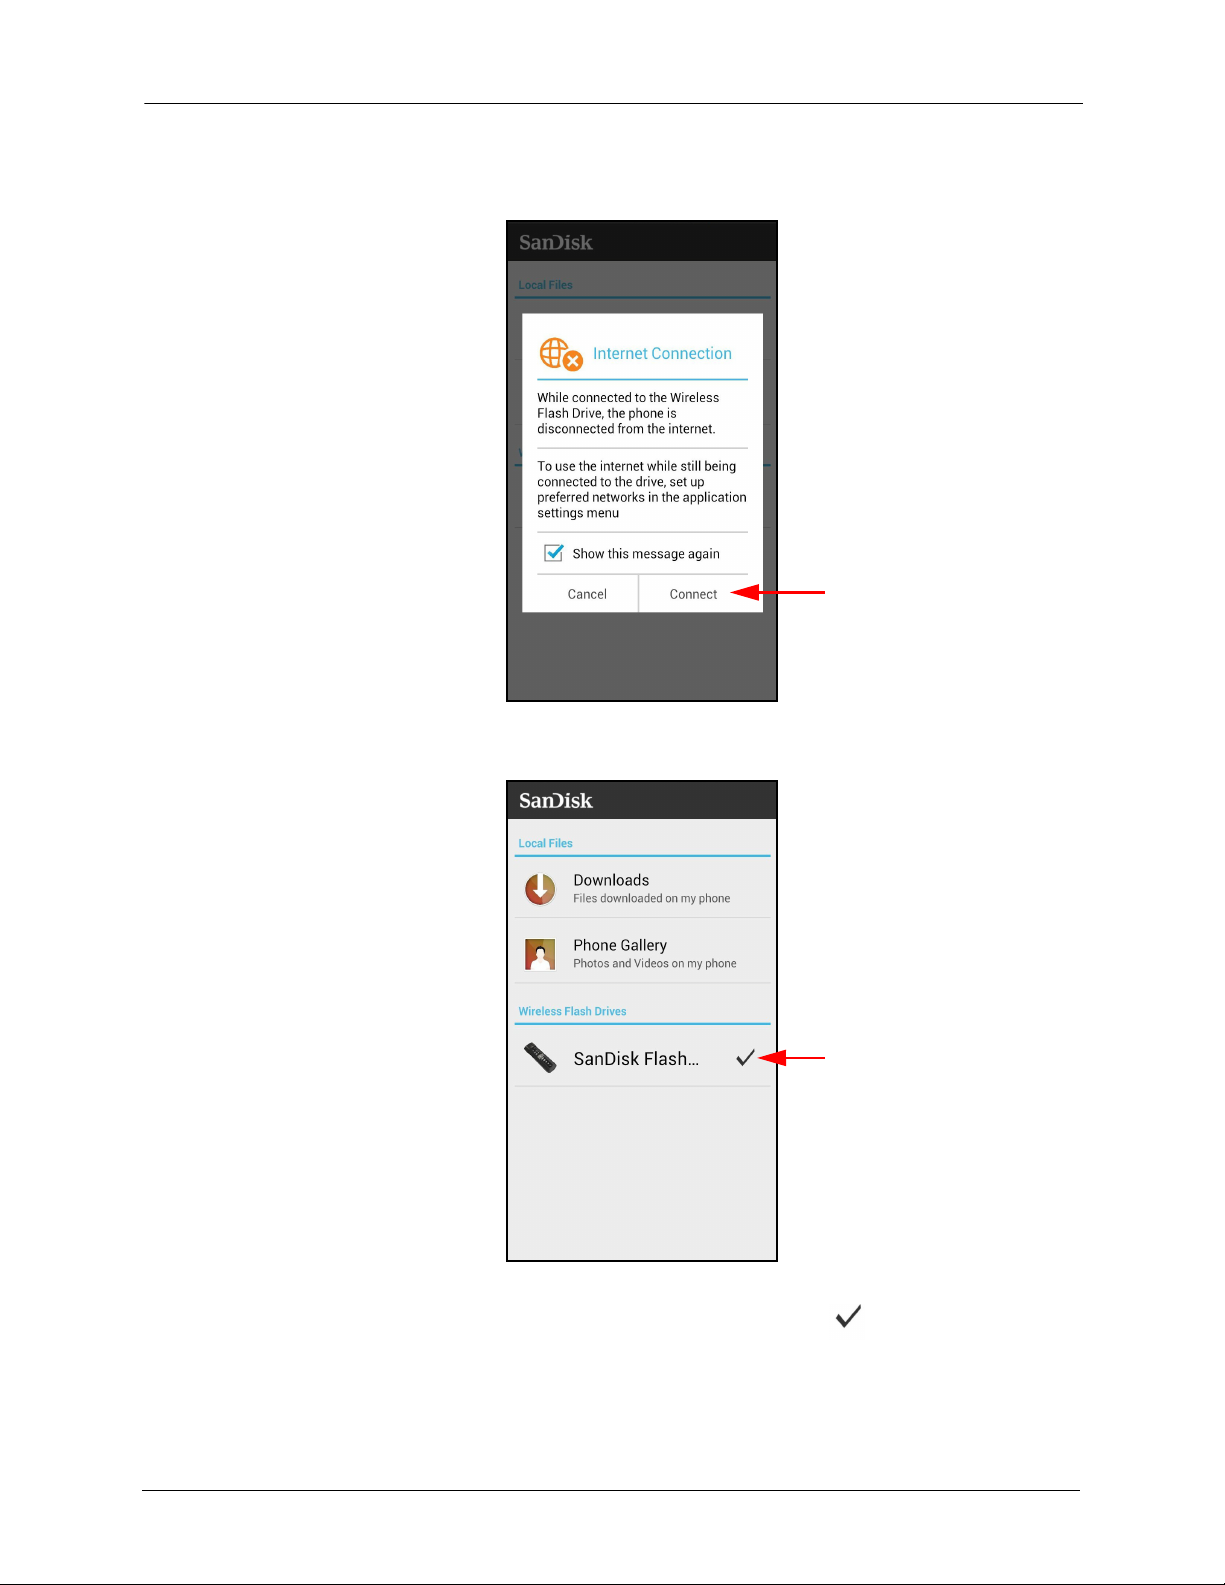
2. Getting Started Connecting to the Wireless Drive
The connection window provides
information about how to remain
connected to the Internet while
using your Drive by setting up a
Preferred Network.
After you’ve read and understood
the information provided here,
you can choose not to see this
message again. You can connect
directly to your Drive without using
You can always get this message
to show again by selecting Reset
this screen.
Messages and Warnings in
Settings.
Drive
connected
An Internet Connection window opens:
3. Tap Connect to connect your mobile device to the Drive:
You return to the start screen, where the Connection icon indicates that your
mobile device is now directly connected to the Wireless Drive.
4. Below Wireless Flash Drives, tap your Drive name.
SanDisk Connect™ Wireless Flash Drive User Manual for Android 6
2. Getting Started Connecting to the Wireless Drive
You see the Wireless Drive main screen:
Note: For information about enabling Internet access while using your Drive, see Chapter 4,
Managing Your Drive.
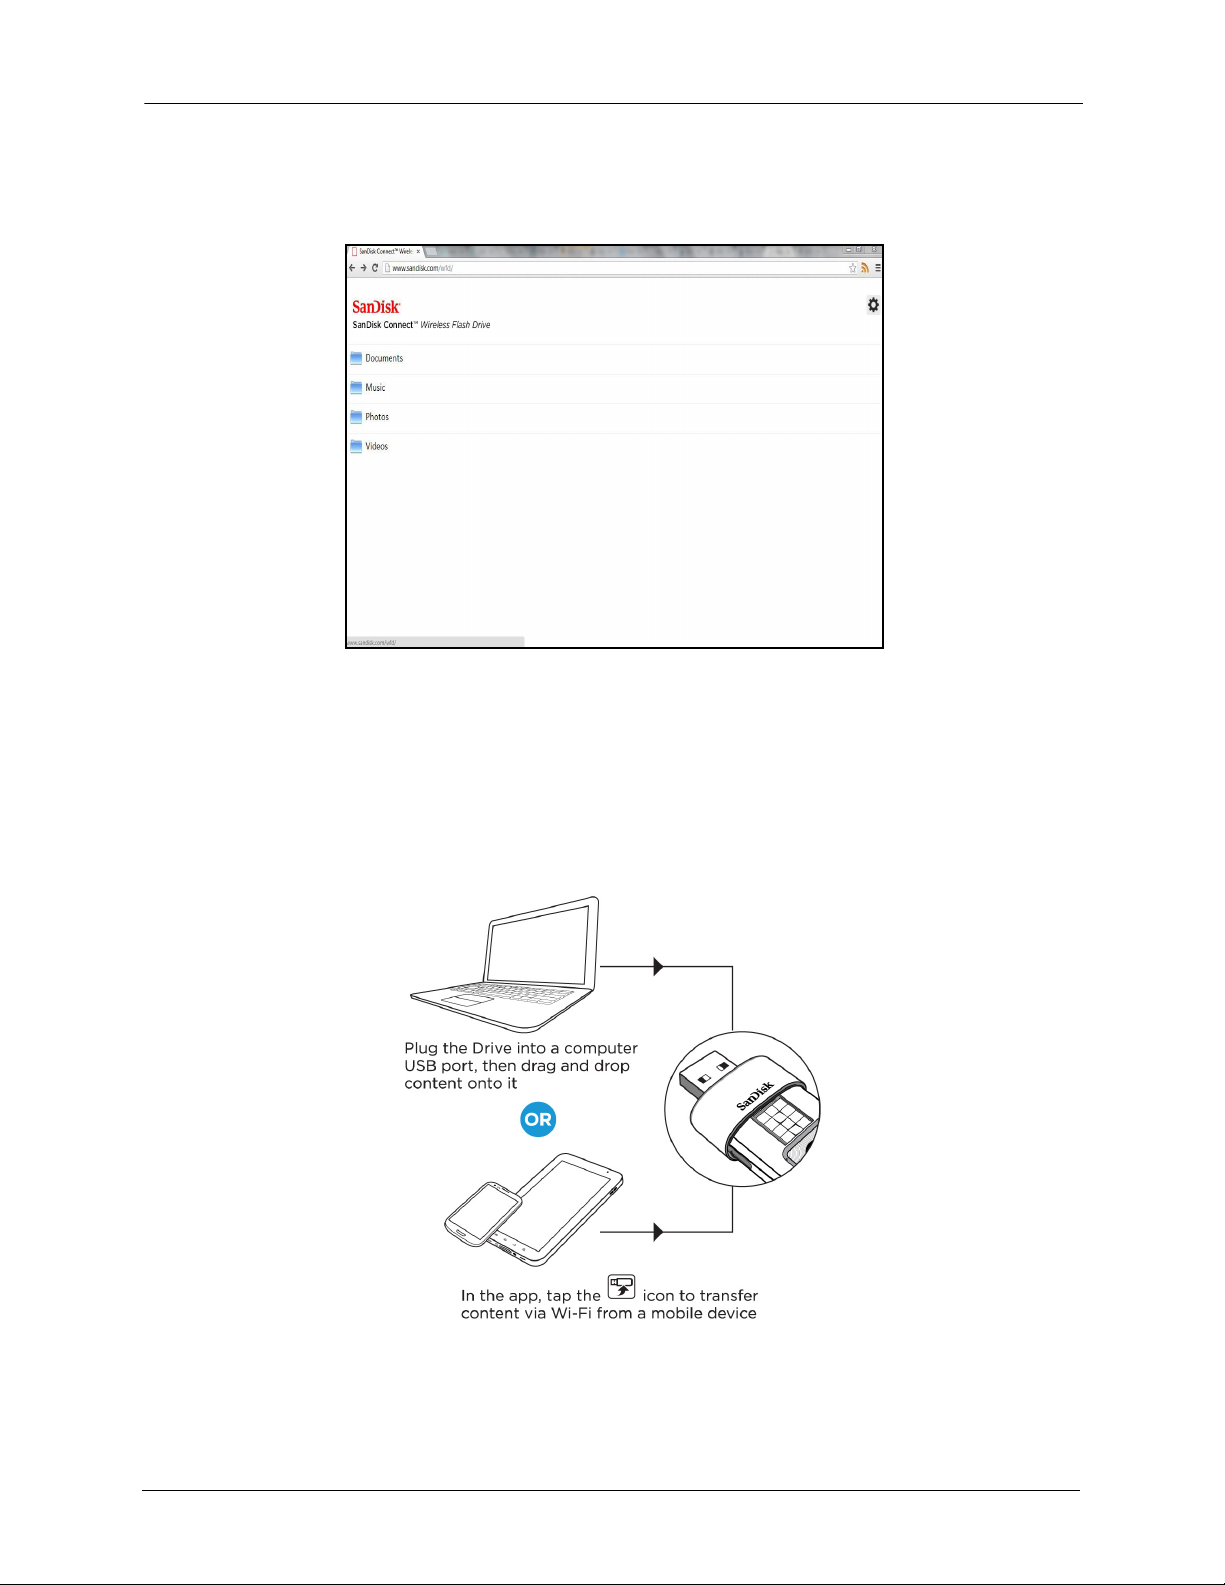
Accessing the Drive without an App
You can connect to the Wireless Drive Wi-Fi network on your mobile device, PC, or
Mac without downloading the Wireless Flash Drive app by using a web browser to
access the Drive.
1. In your mobile device Wi-Fi settings, connect to the Wireless Drive Wi-Fi network.
It appears in the list of available networks as SanDisk Flashxxxxxx (for example,
SanDisk Flash123456).
SanDisk Connect™ Wireless Flash Drive User Manual for Android 7
2. Getting Started Loading Content on the Wireless Drive
2. Launch an Internet browser and go to www.sandisk.com/wfd to connect to the
Wireless Drive:
Loading Content on the Wireless Drive
You can load content in two ways:
• Plug your Wireless Drive into your computer, then drag and drop content onto it.
• Transfer content via Wi-Fi from a mobile device to your Wireless Drive.
SanDisk Connect™ Wireless Flash Drive User Manual for Android 8
2. Getting Started Loading Content on the Wireless Drive
From a PC
You can transfer content between your Wireless Drive and your PC using a USB
connection.
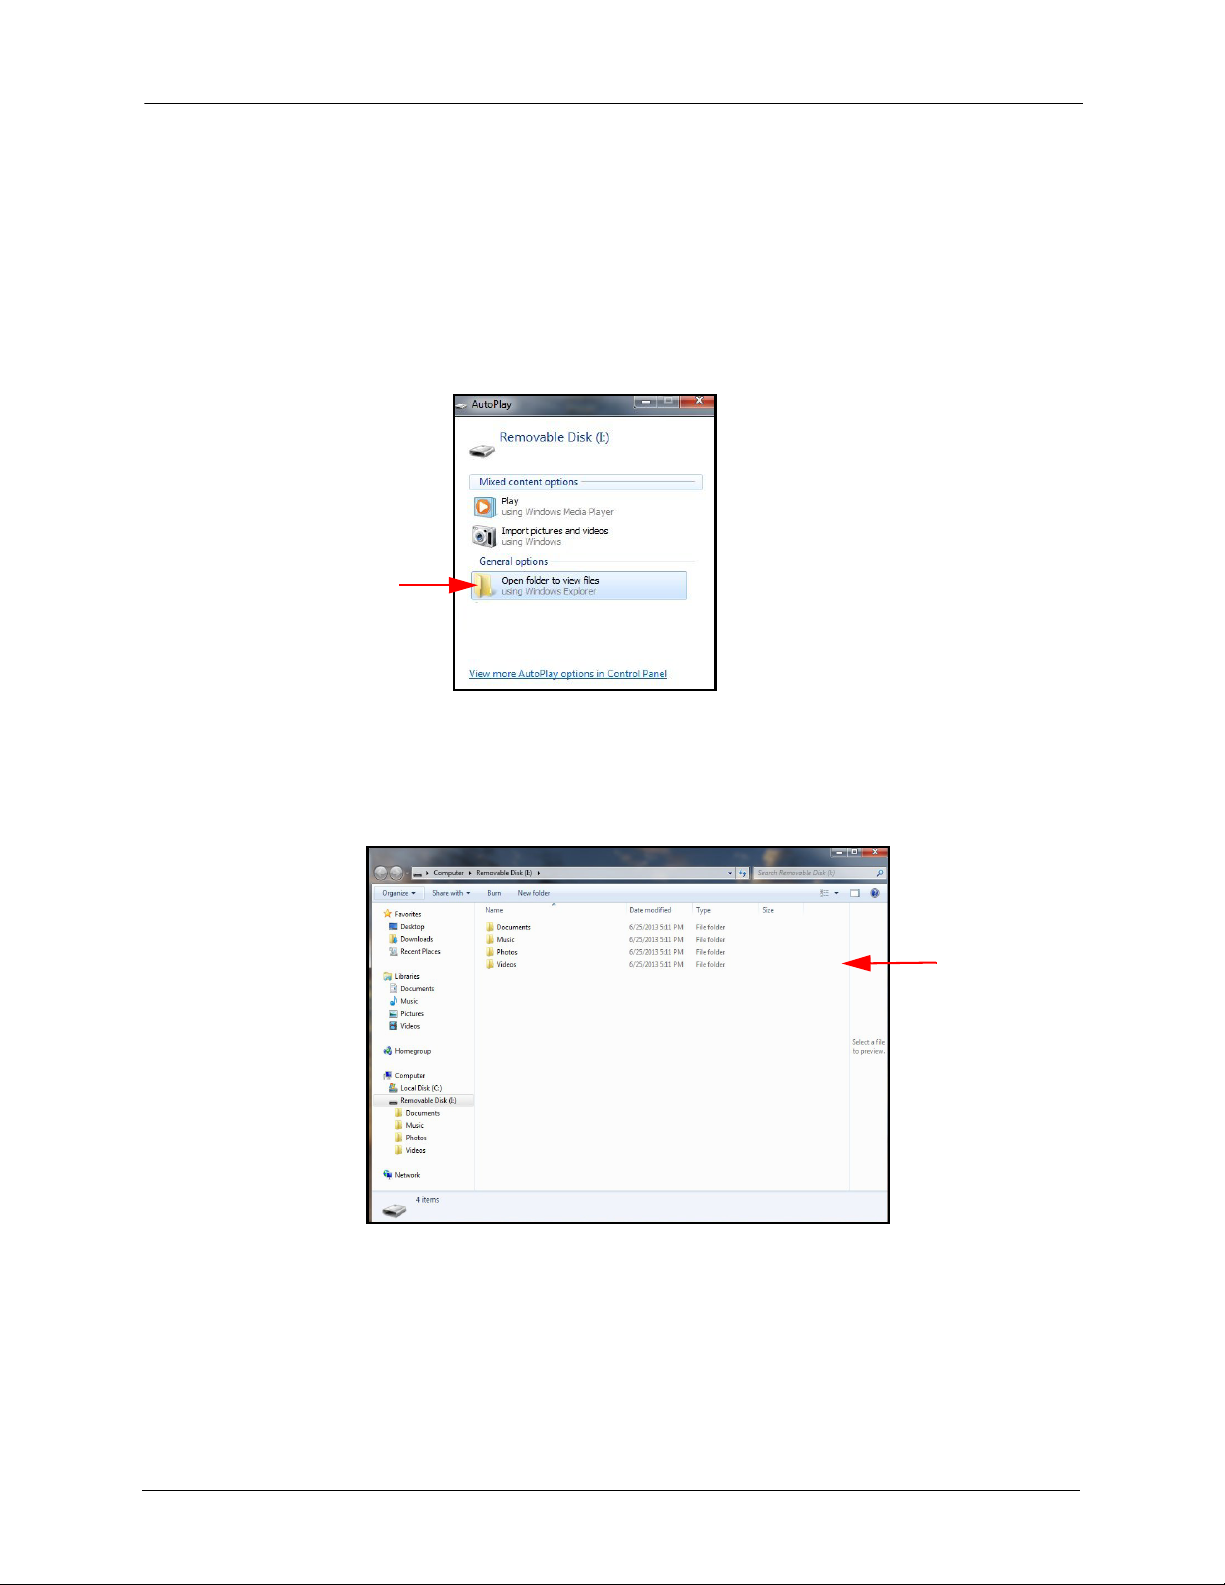
1. Plug your Wireless Drive into your computer USB port.
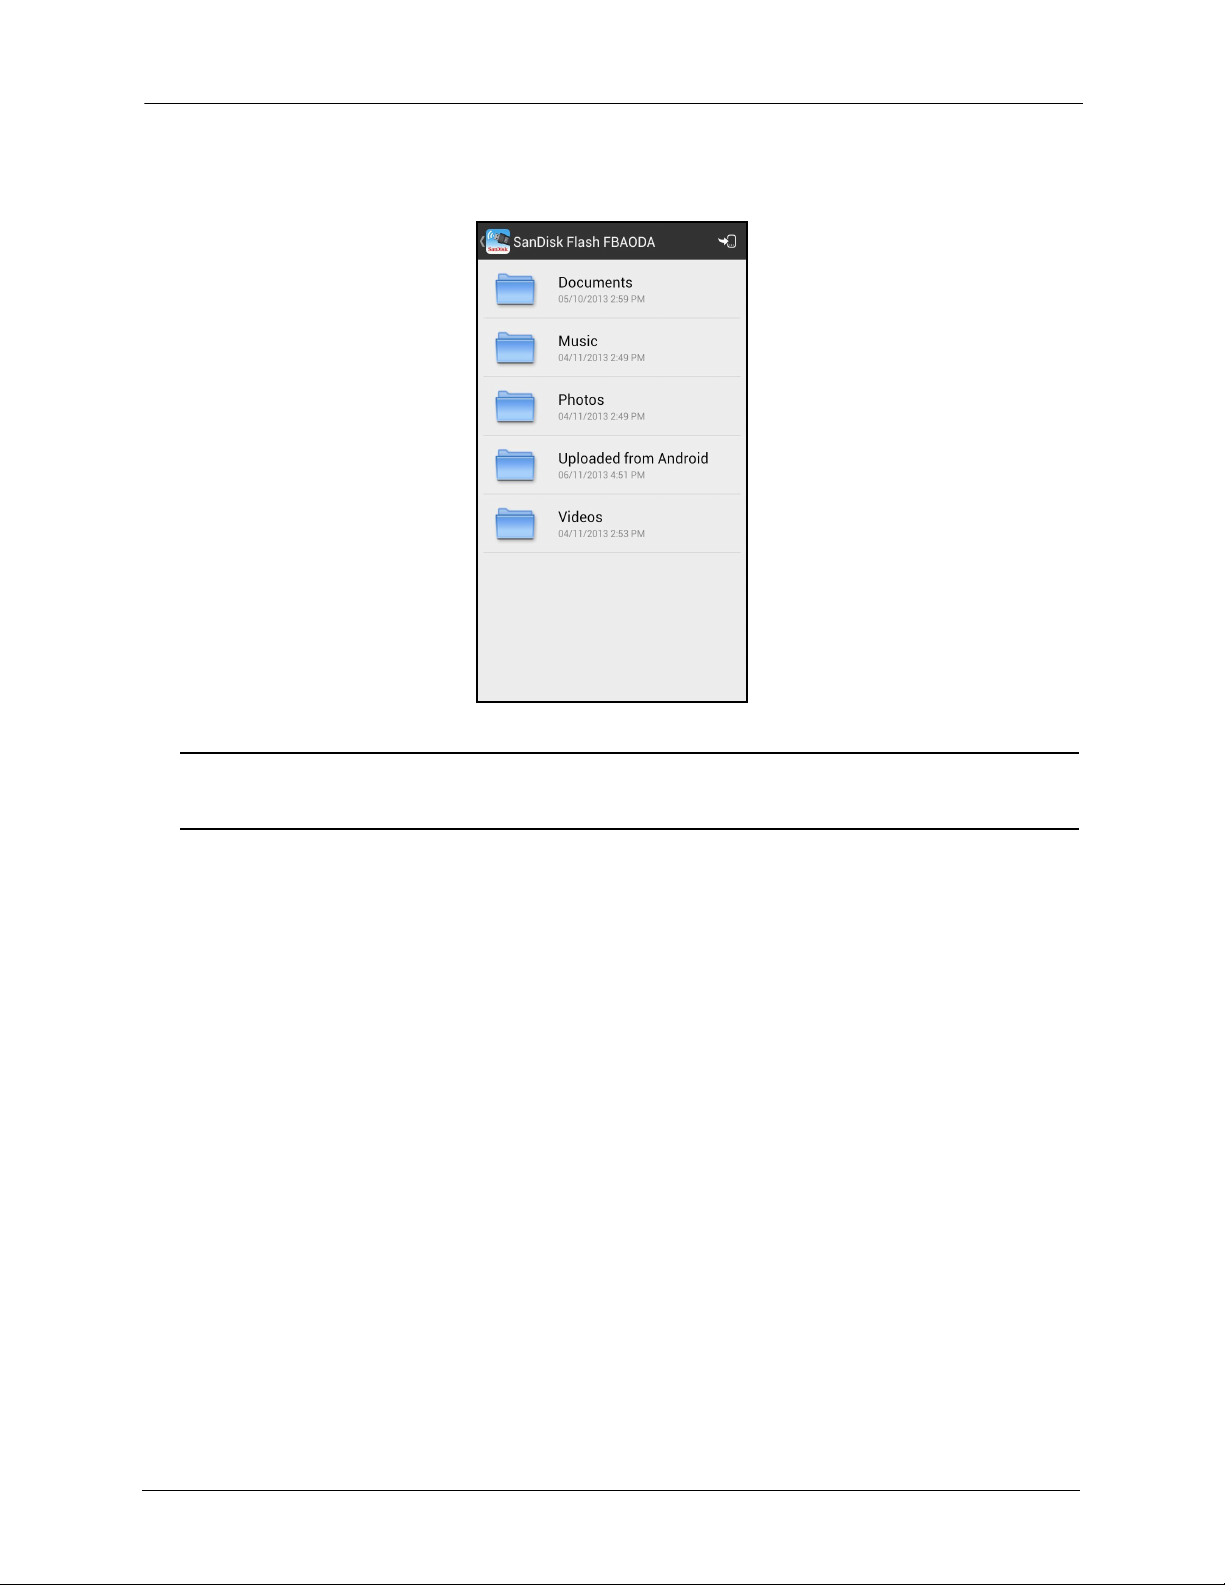
2. In the AutoPlay window, click Open folder to view files:
3. Drag and drop music, videos, photos, and documents from your computer into the
Wireless Drive window. You can drop your files anywhere on the Wireless Drive
or you can create folders and add content to them; for example, the Music,
Photos, Videos, and Documents folders in the window below:
You can also drag content from the Wireless Drive window onto your computer to
move files between your mobile devices and your computer.
From a Mobile Device
You can upload files and folders stored on your mobile device to the Wireless Drive.
SanDisk Connect™ Wireless Flash Drive User Manual for Android 9
2. Getting Started Loading Content on the Wireless Drive
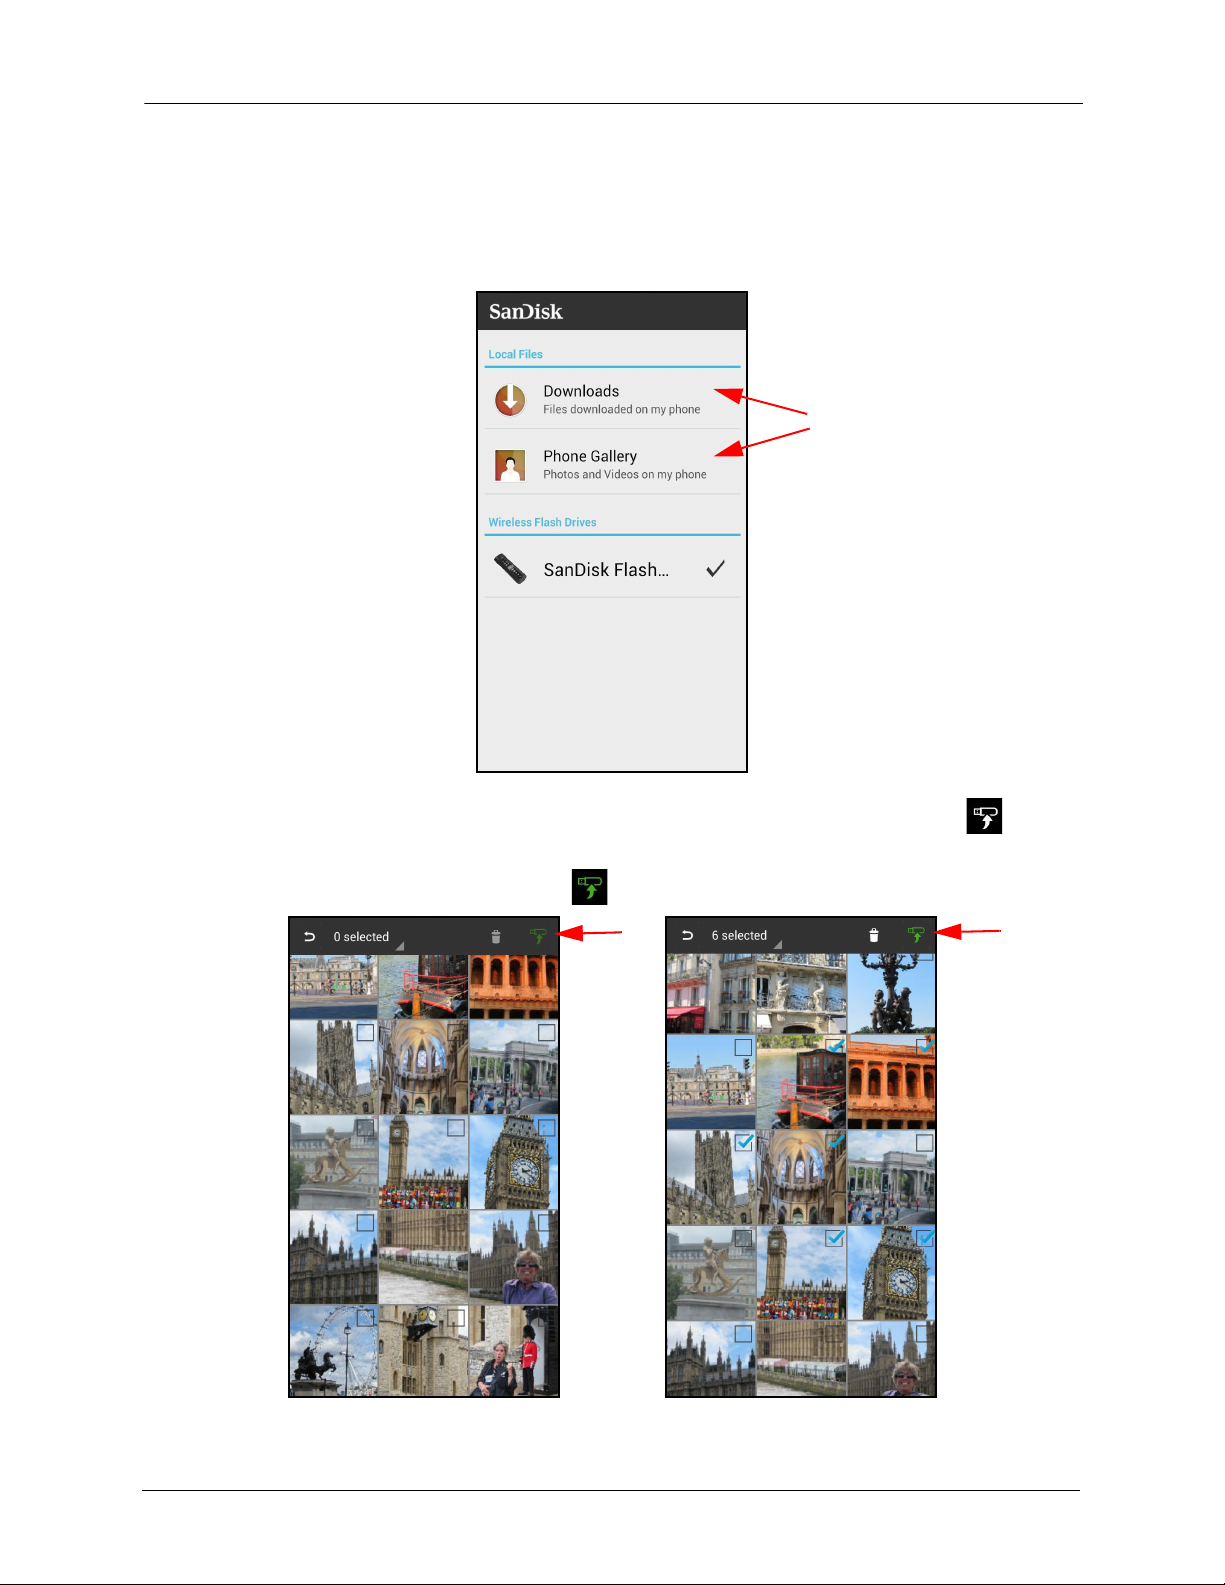
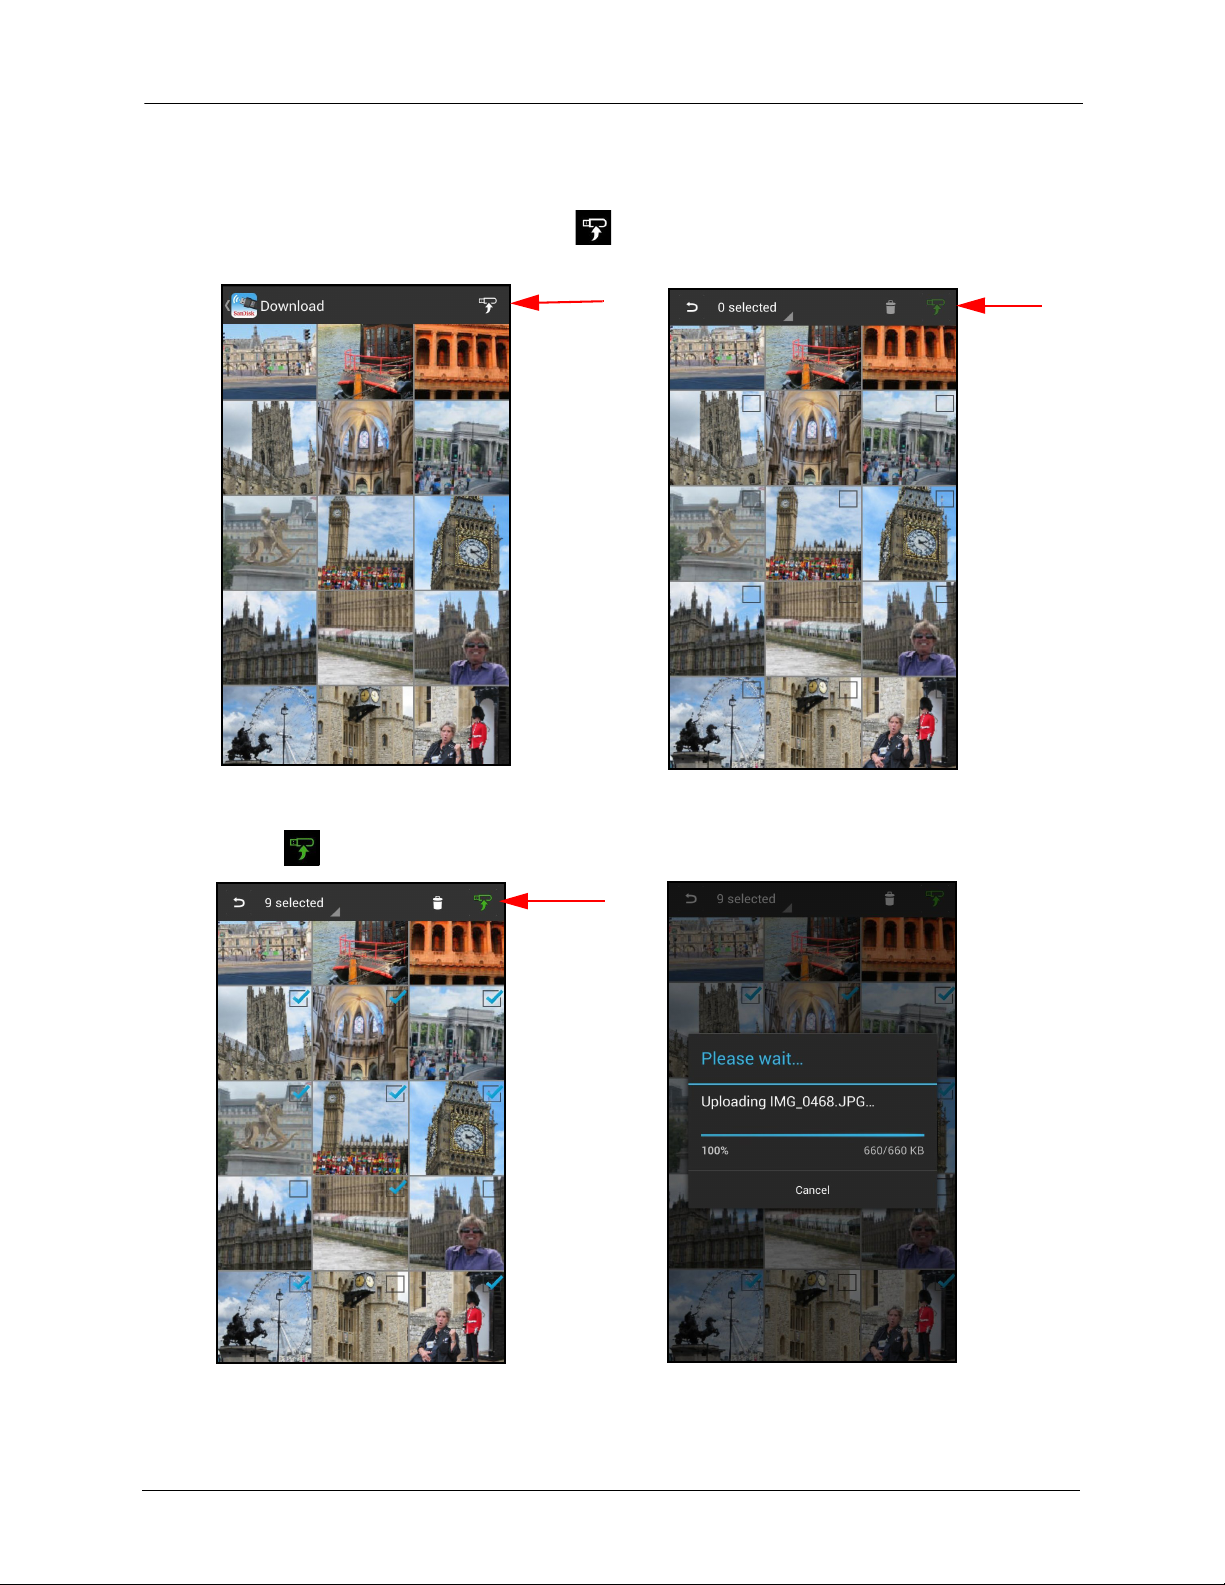
To upload files, photos, or videos from the Phone Gallery,
1. On the Wireless Drive start screen, tap Downloads or Phone Gallery to navigate
to the files you want to upload:
2. On the screen displaying the files to be uploaded, tap the Upload icon and
select the desired files (the selected files are outlined in blue). Then again tap the
Upload icon, which is now green :
SanDisk Connect™ Wireless Flash Drive User Manual for Android 10
2. Getting Started Loading Content on the Wireless Drive
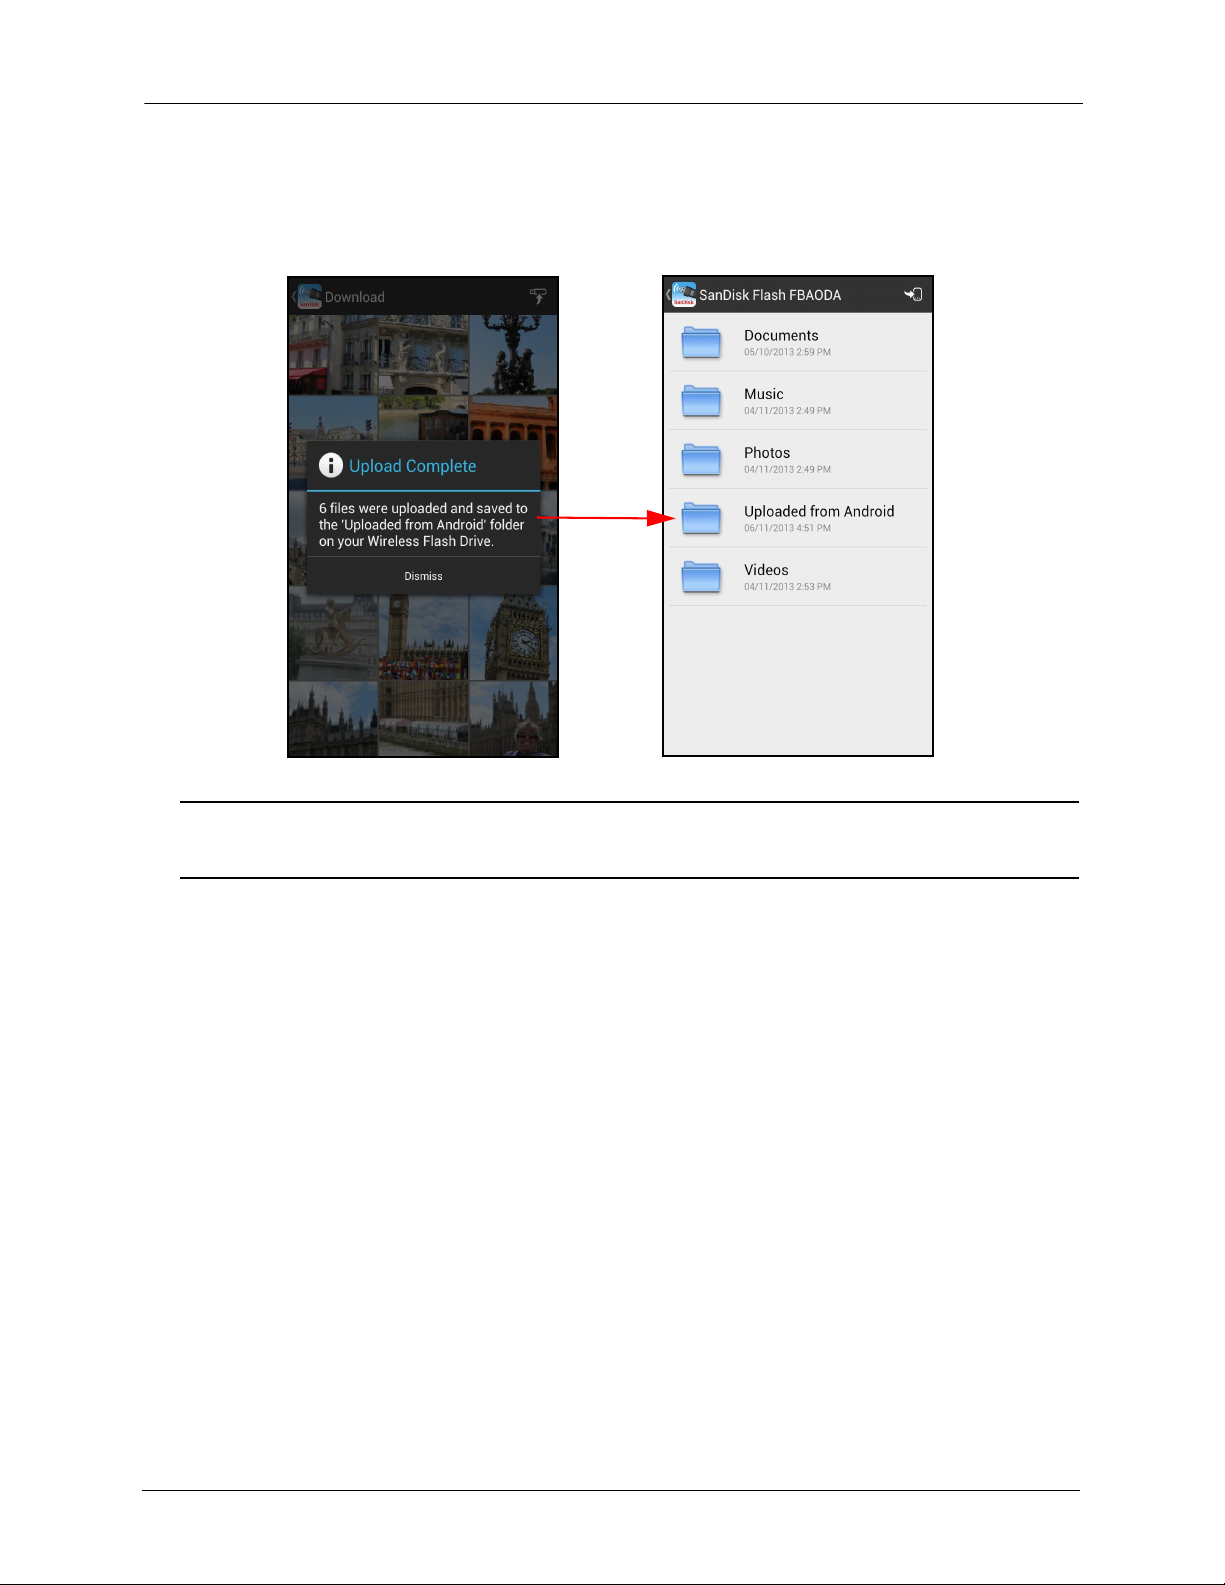
3. An Upload Complete window confirms a successful upload and informs you that
the uploaded files can be found in the Uploaded from Android folder on your
Drive:
Note: For more detailed information on using photo, music, and video files, see Chapter 3,
Working with Files.
SanDisk Connect™ Wireless Flash Drive User Manual for Android 11
3. Working with Files Wireless Drive Application Overview
Files downloaded
from Drive
Files stored
on mobile
device
Help link
Settings link
Wi-Fi
detected
3. Working with Files
Wireless Drive Application Overview
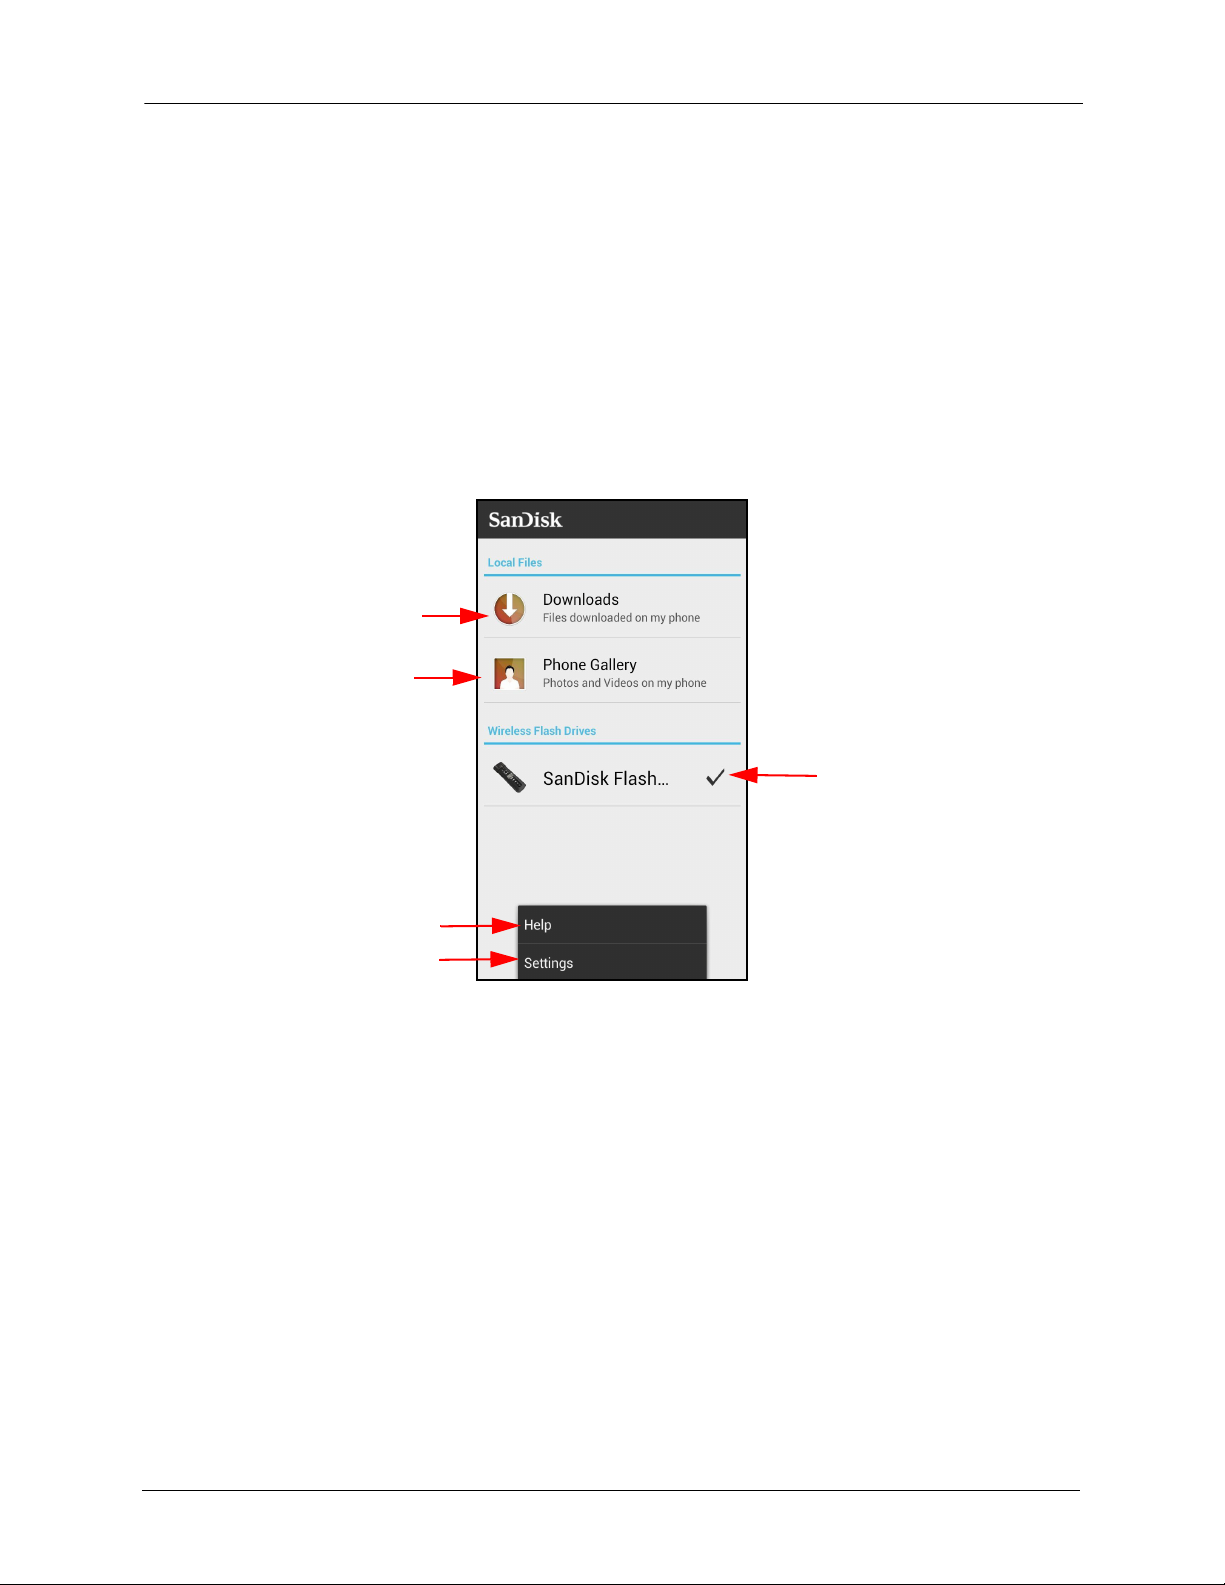
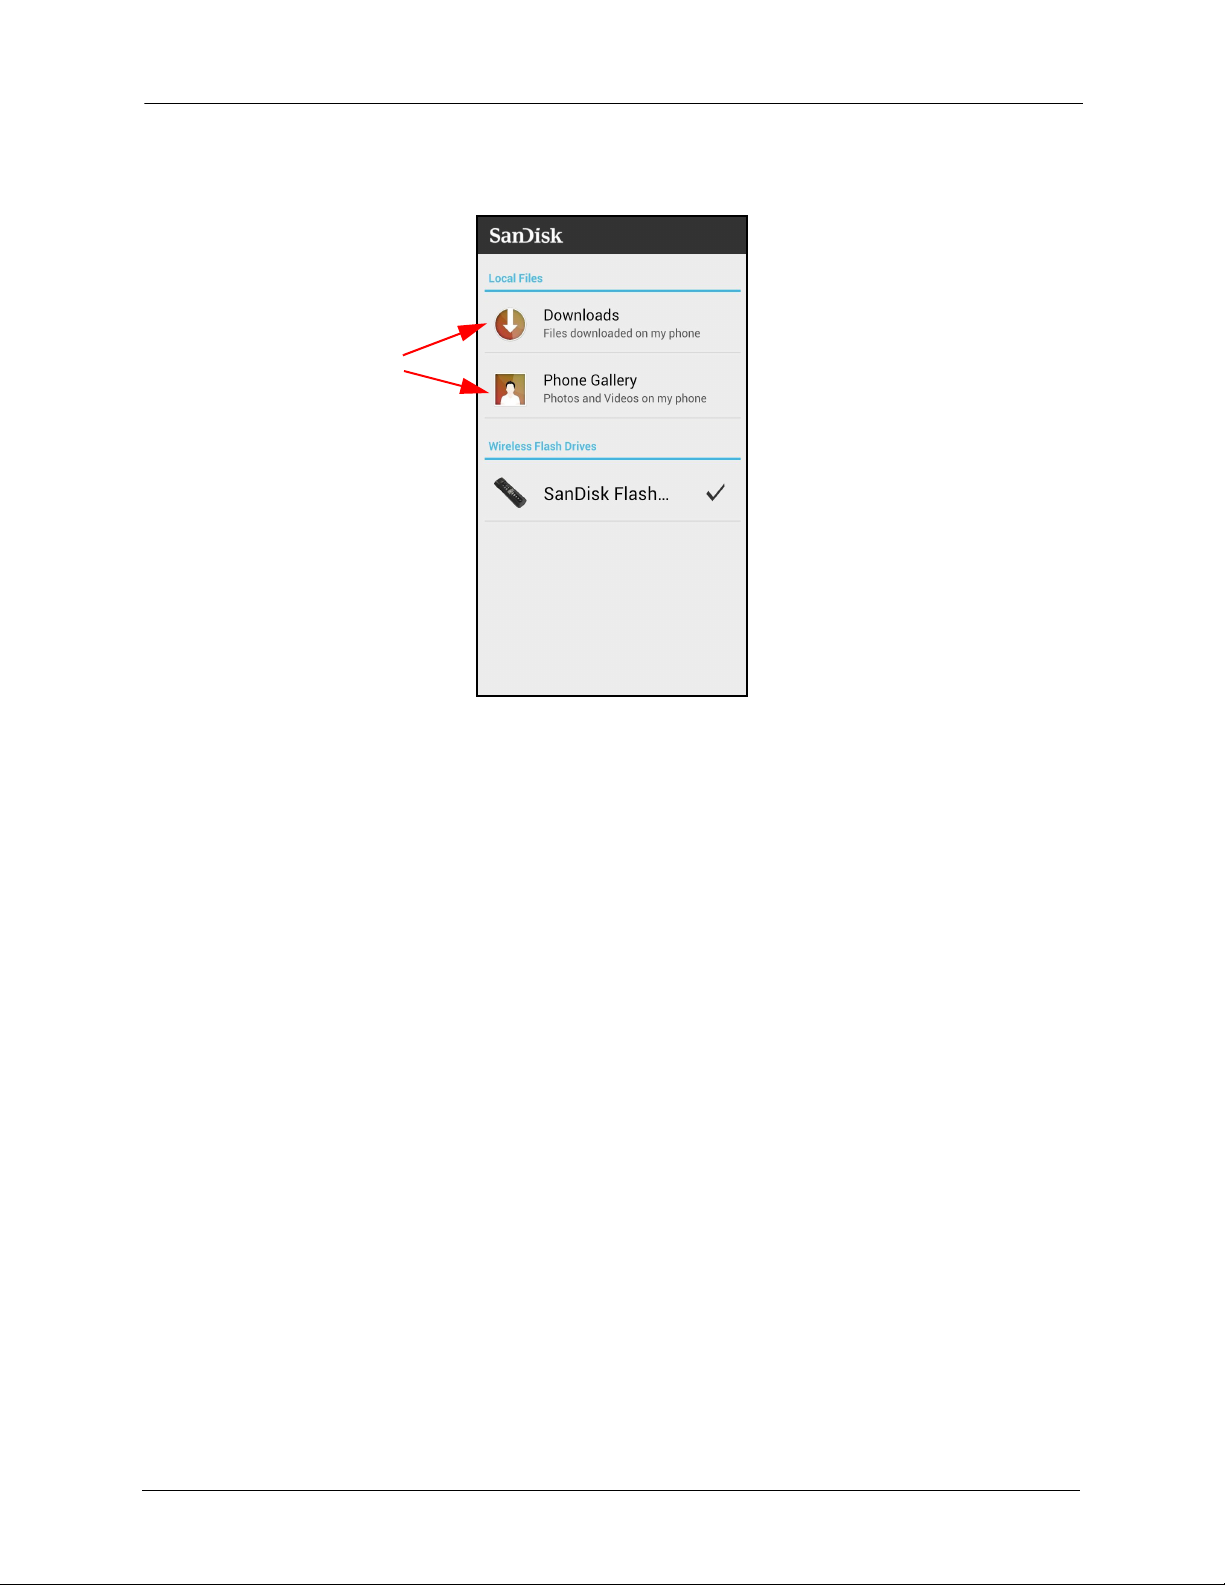
The Wireless Drive app start screen provides access to files stored on both your
Wireless Flash Drive and your mobile device. It also contains a Help link.
Wireless Drive Start Screen
SanDisk Connect™ Wireless Flash Drive User Manual for Android 12
3. Working with Files Wireless Drive Application Overview
App
menu
Files
stored
on Drive
Location Bar
Download
icon
Wireless Drive Main Screen
Note: The folders shown in these images illustrate just one of the ways you can choose to
organize and display the photo, video, music, and document files stored on your
Wireless Drive.
SanDisk Connect™ Wireless Flash Drive User Manual for Android 13
3. Working with Files Using the Wireless Drive App Menu
Menu
button
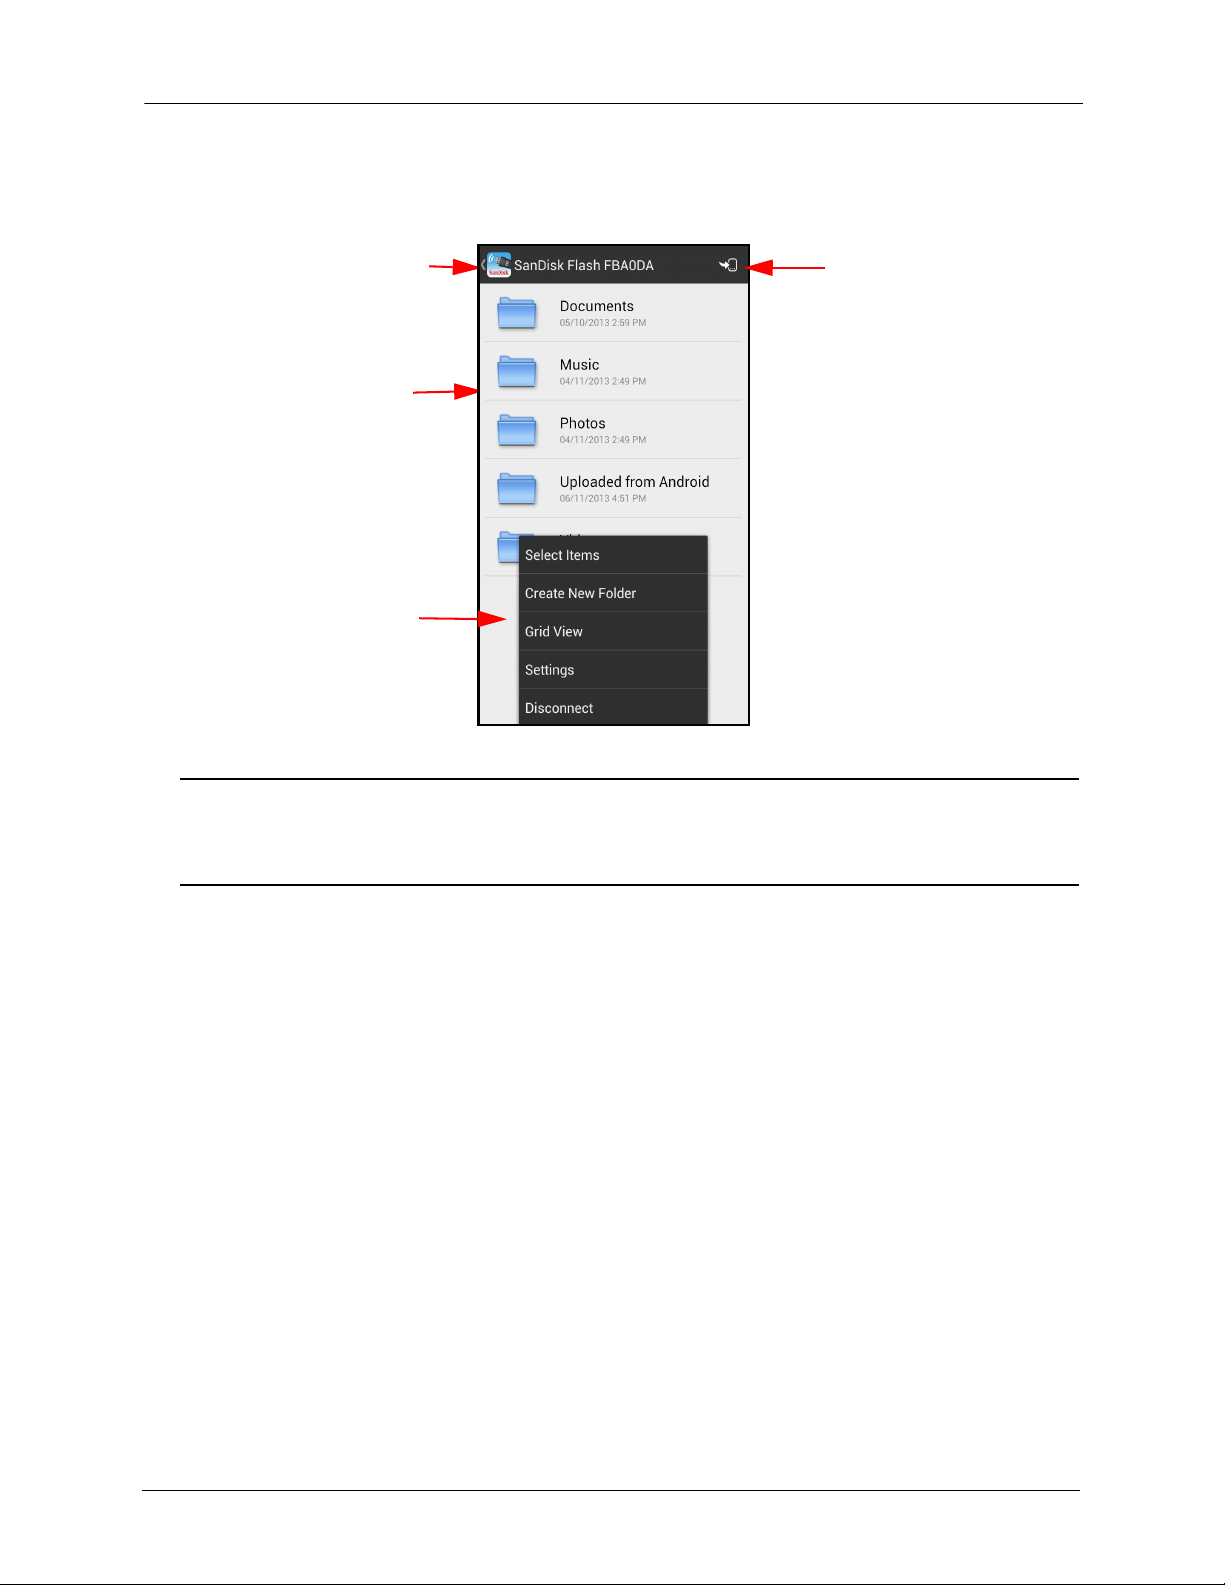
Using the Wireless Drive App Menu
You can tap your mobile device Menu button to display the Wireless Drive app menu
from anywhere in the app except on a video, music, and photo Play screen:
SanDisk Connect™ Wireless Flash Drive User Manual for Android 14
3. Working with Files Accessing Files through the Wireless Drive App
Wireless Drive App Menu Options
Select Items Identify files to be uploaded, downloaded, shared, or deleted
Create New Folder Add a new folder to the list of files and folders currently displayed on the screen
Grid View/List View Toggle between viewing files and folders as a list and viewing them in a grid
Settings Open the Wireless Drive Settings screen
Disconnect Disconnect from the Wireless Drive
Using the Wireless Drive File Menu
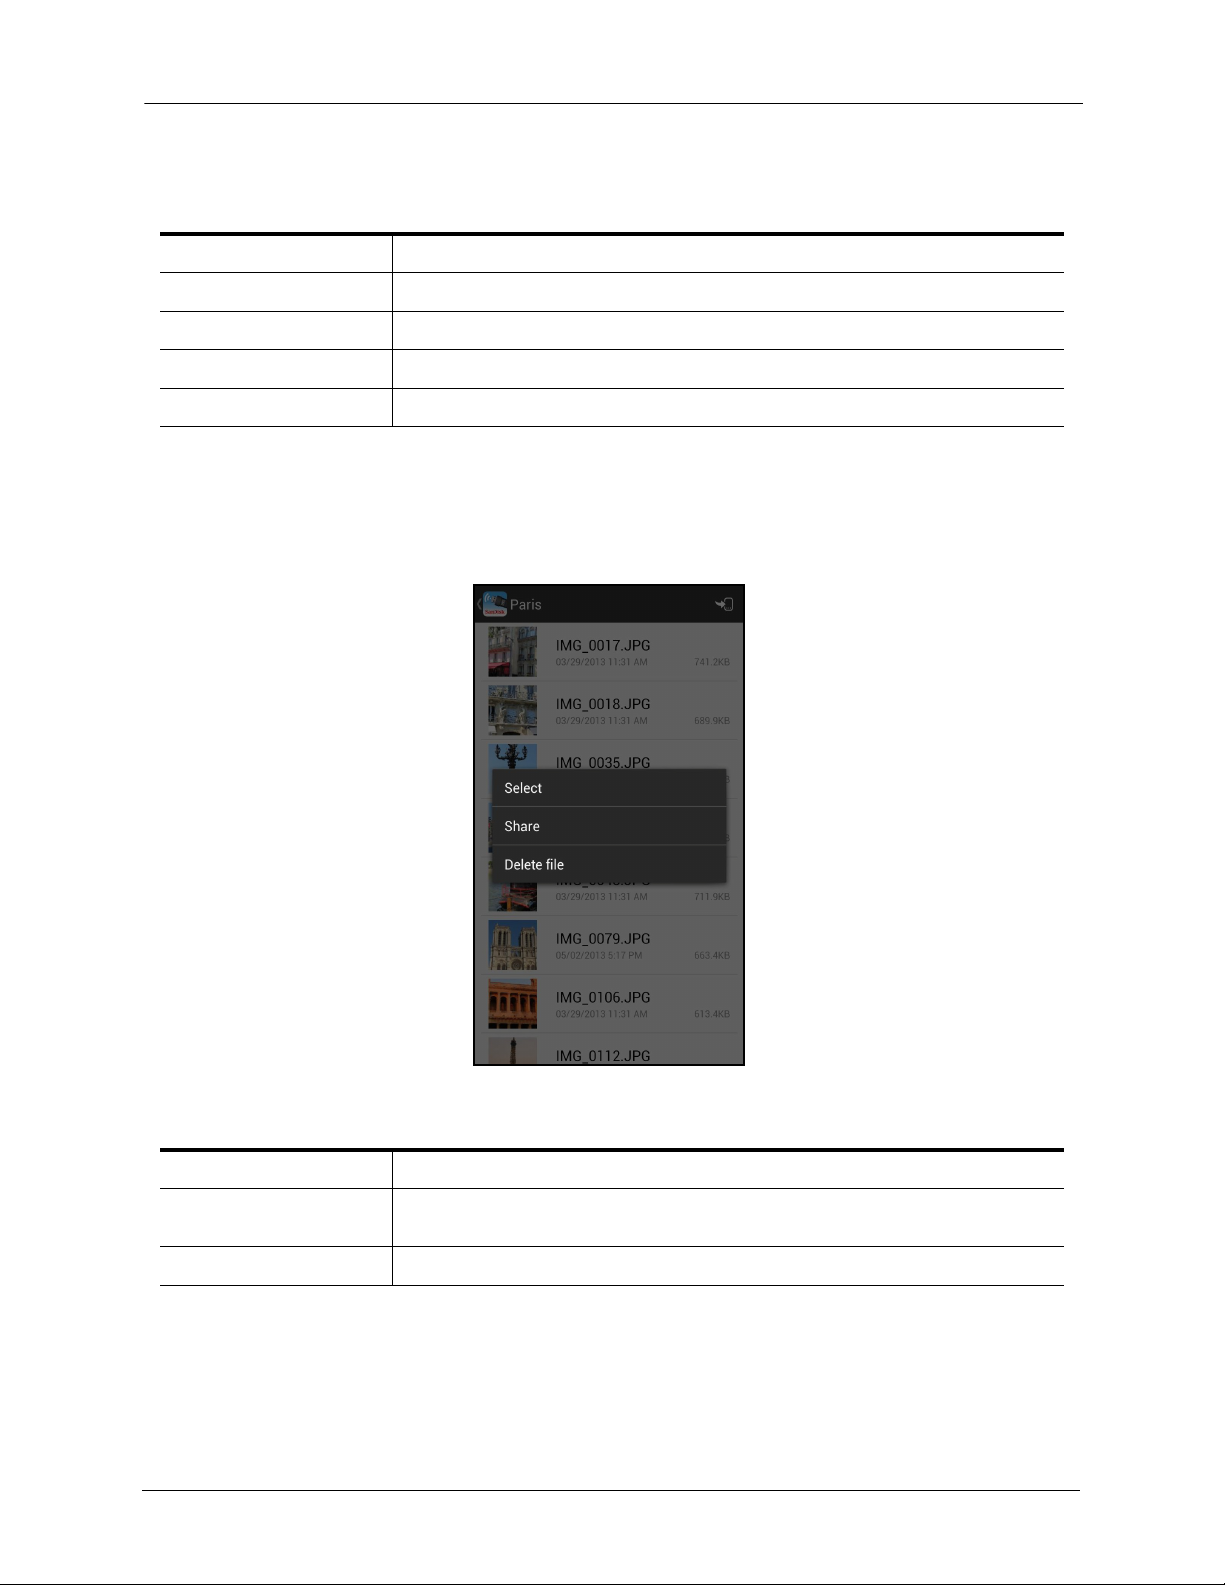
You can long press on a file (but not on a folder) to display the Wireless Drive file
menu from any screen that displays files:
Wireless Drive File Menu Options
Select Quickly select a file to download or delete it (additional files can be selected)
Share Send a file to others via email, social media, messaging, or Bluetooth (available
methods vary depending upon the features provided on your mobile device)
Delete file Delete a single file
Accessing Files through the Wireless Drive App
You can use the Wireless Drive app to access videos, music, photos, and documents
stored on the Drive or in the Downloads or Gallery folders on your mobile device.
SanDisk Connect™ Wireless Flash Drive User Manual for Android 15
3. Working with Files Toggling between List View and Grid View
1. On the Wireless Drive start screen, tap the location of the desired content:
2. Navigate to the desired file and tap it to open it in the Wireless Drive app.
Toggling between List View and Grid View
You can view the files and folders on any Wireless Drive app screen in either list view
or grid view.
SanDisk Connect™ Wireless Flash Drive User Manual for Android 16

3. Working with Files Viewing Photos
• Tap the mobile device Menu button to display the Wireless Drive app menu and
toggle between a list view and a grid view of your content:
Viewing Photos
You can use the Wireless Drive app to view photos stored on the Drive or in the
Downloads or Gallery folders on your mobile device.
1. Navigate to the photos you want to view.
SanDisk Connect™ Wireless Flash Drive User Manual for Android 17
3. Working with Files Streaming Videos
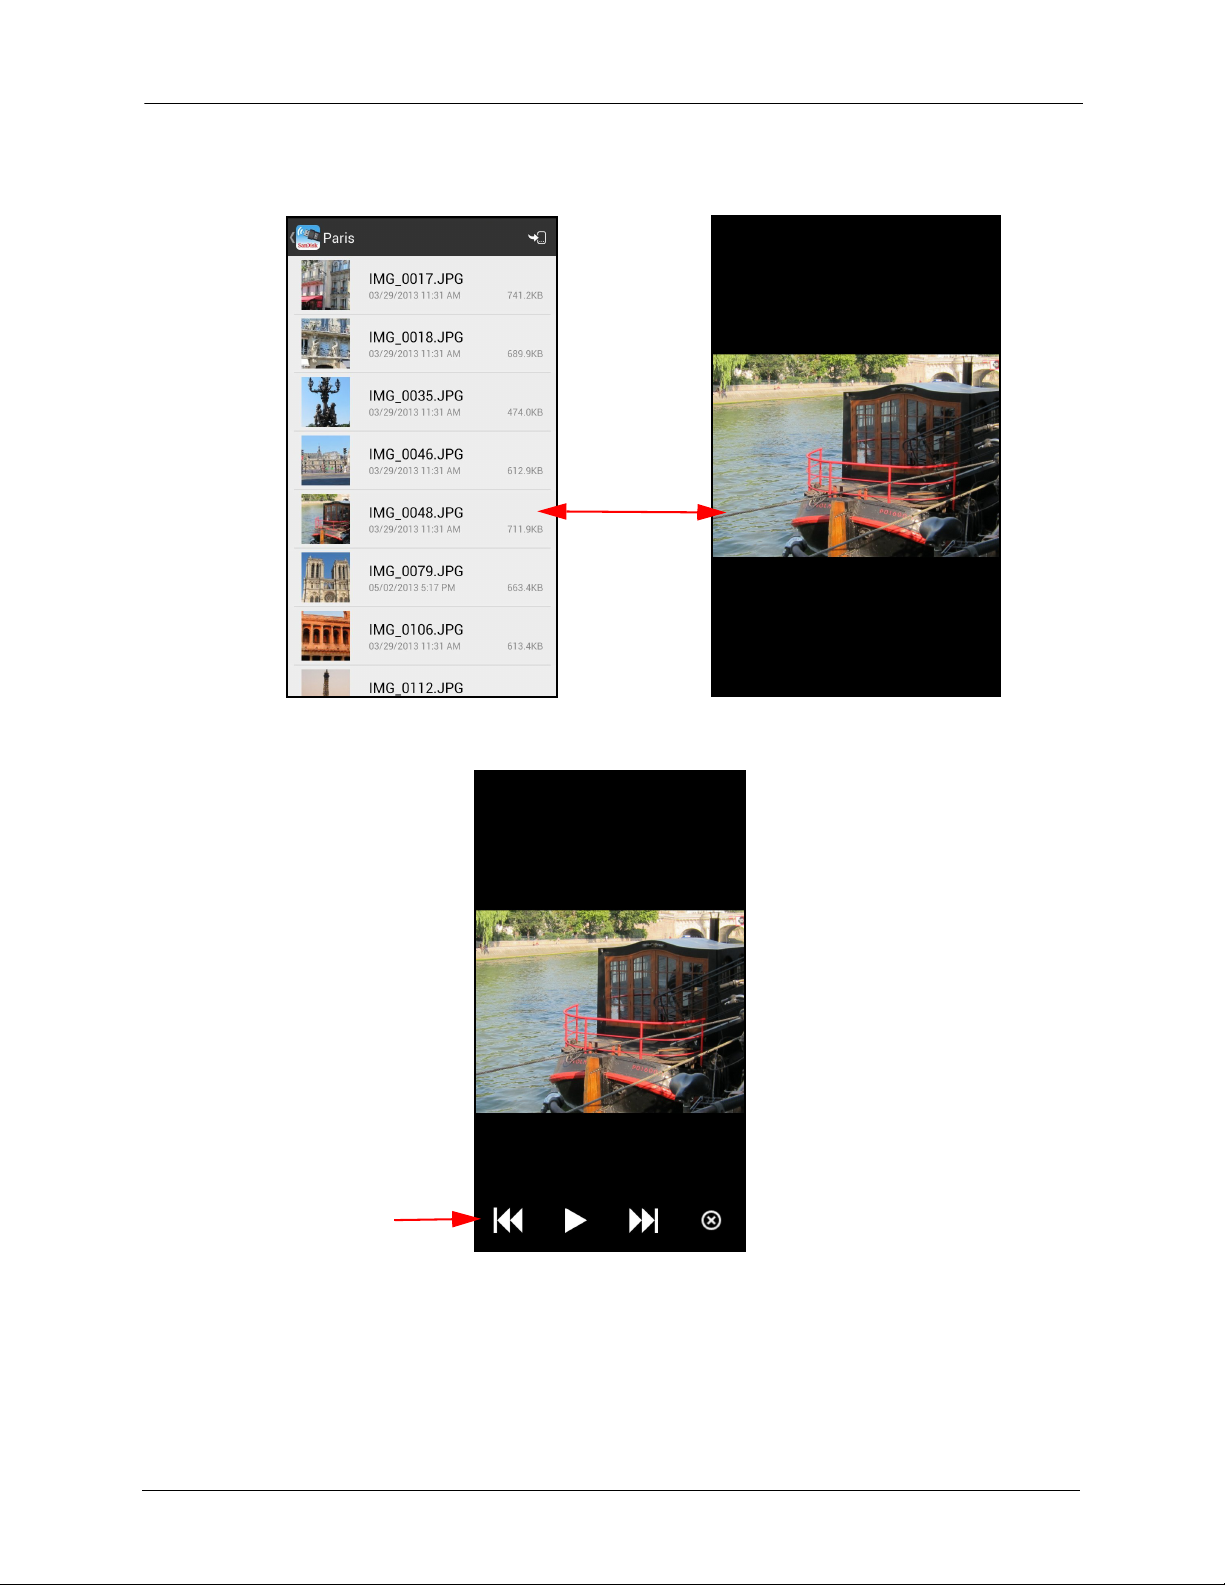
2. Tap a photo to display a full-screen image:
3. Tap the photo to display the photo controls:
Streaming Videos
You can use the Wireless Drive app to stream videos stored on the Drive or in the
Downloads or Gallery folders on your mobile device.
SanDisk Connect™ Wireless Flash Drive User Manual for Android 18
3. Working with Files Streaming Videos
Full
screen
Reverse Play/ Fast
Pause Forward
Picture-inPicture
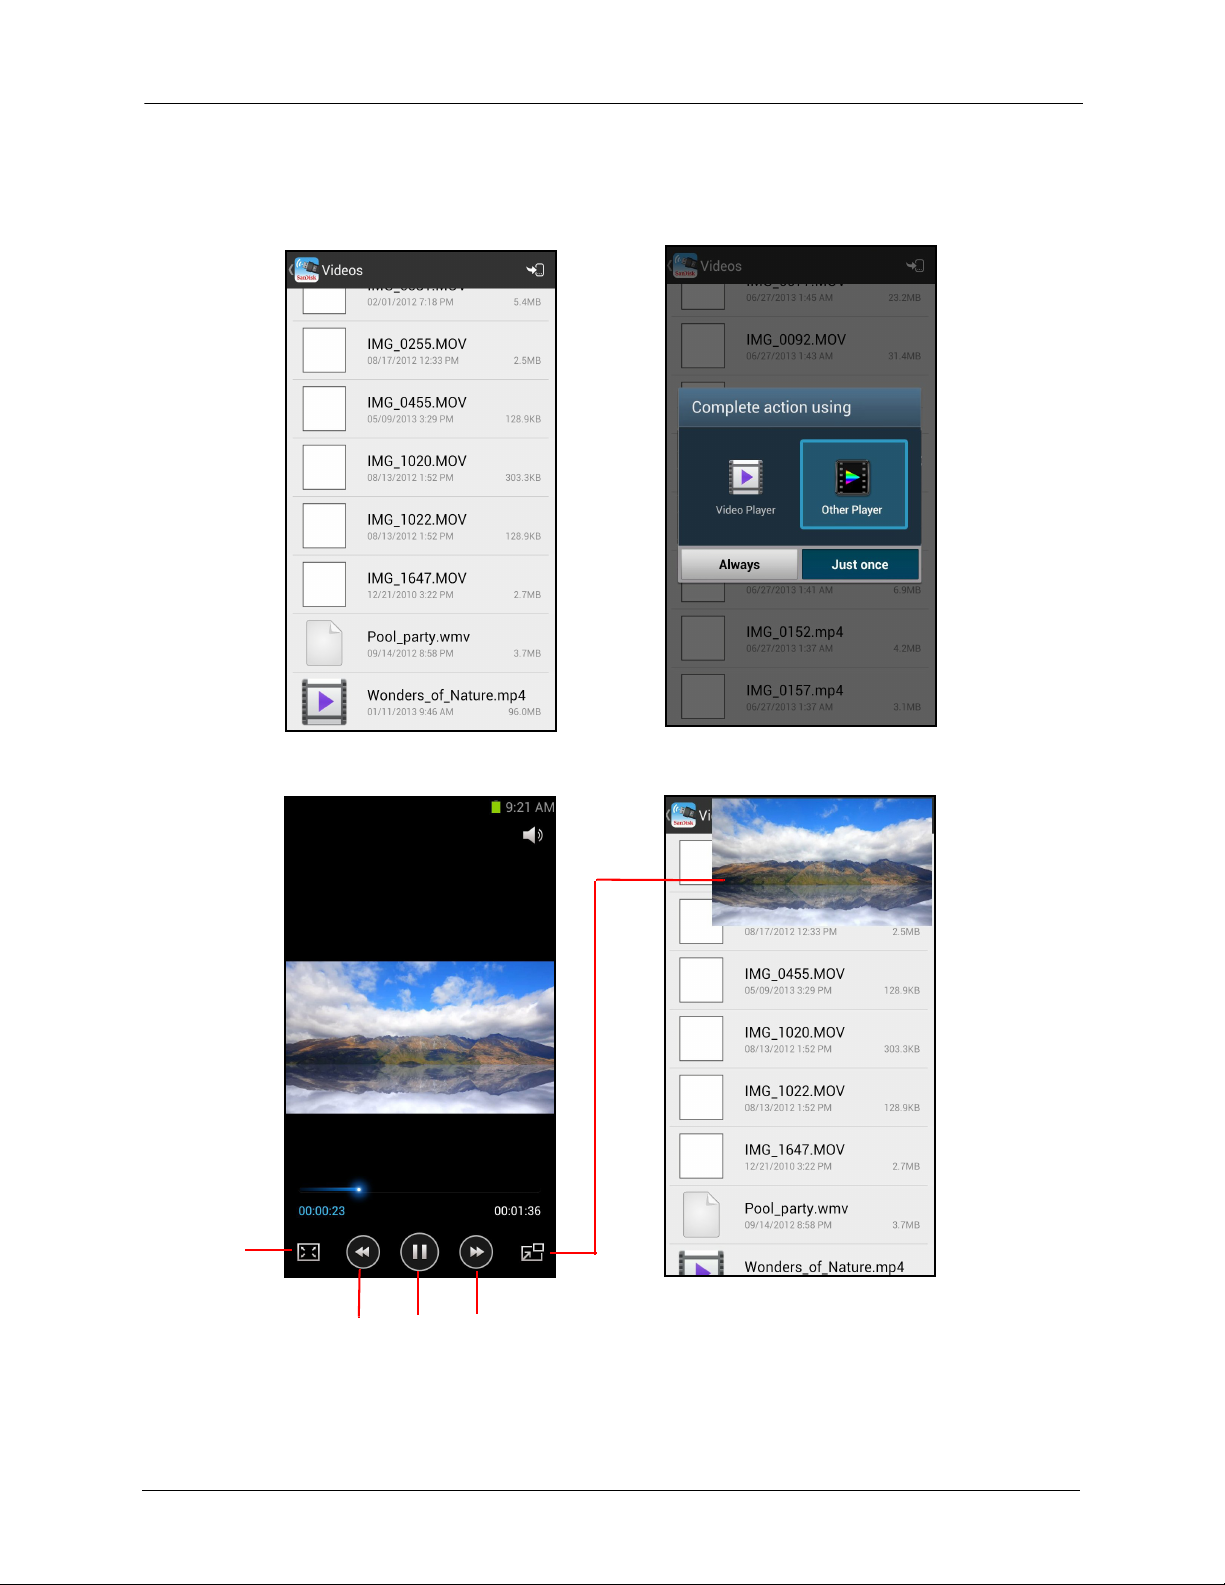
1. Navigate to the video you want to stream, tap on it, and select a video player with
which to stream it:
2. As the video starts to play, tap on it to display the video play controls:
SanDisk Connect™ Wireless Flash Drive User Manual for Android 19
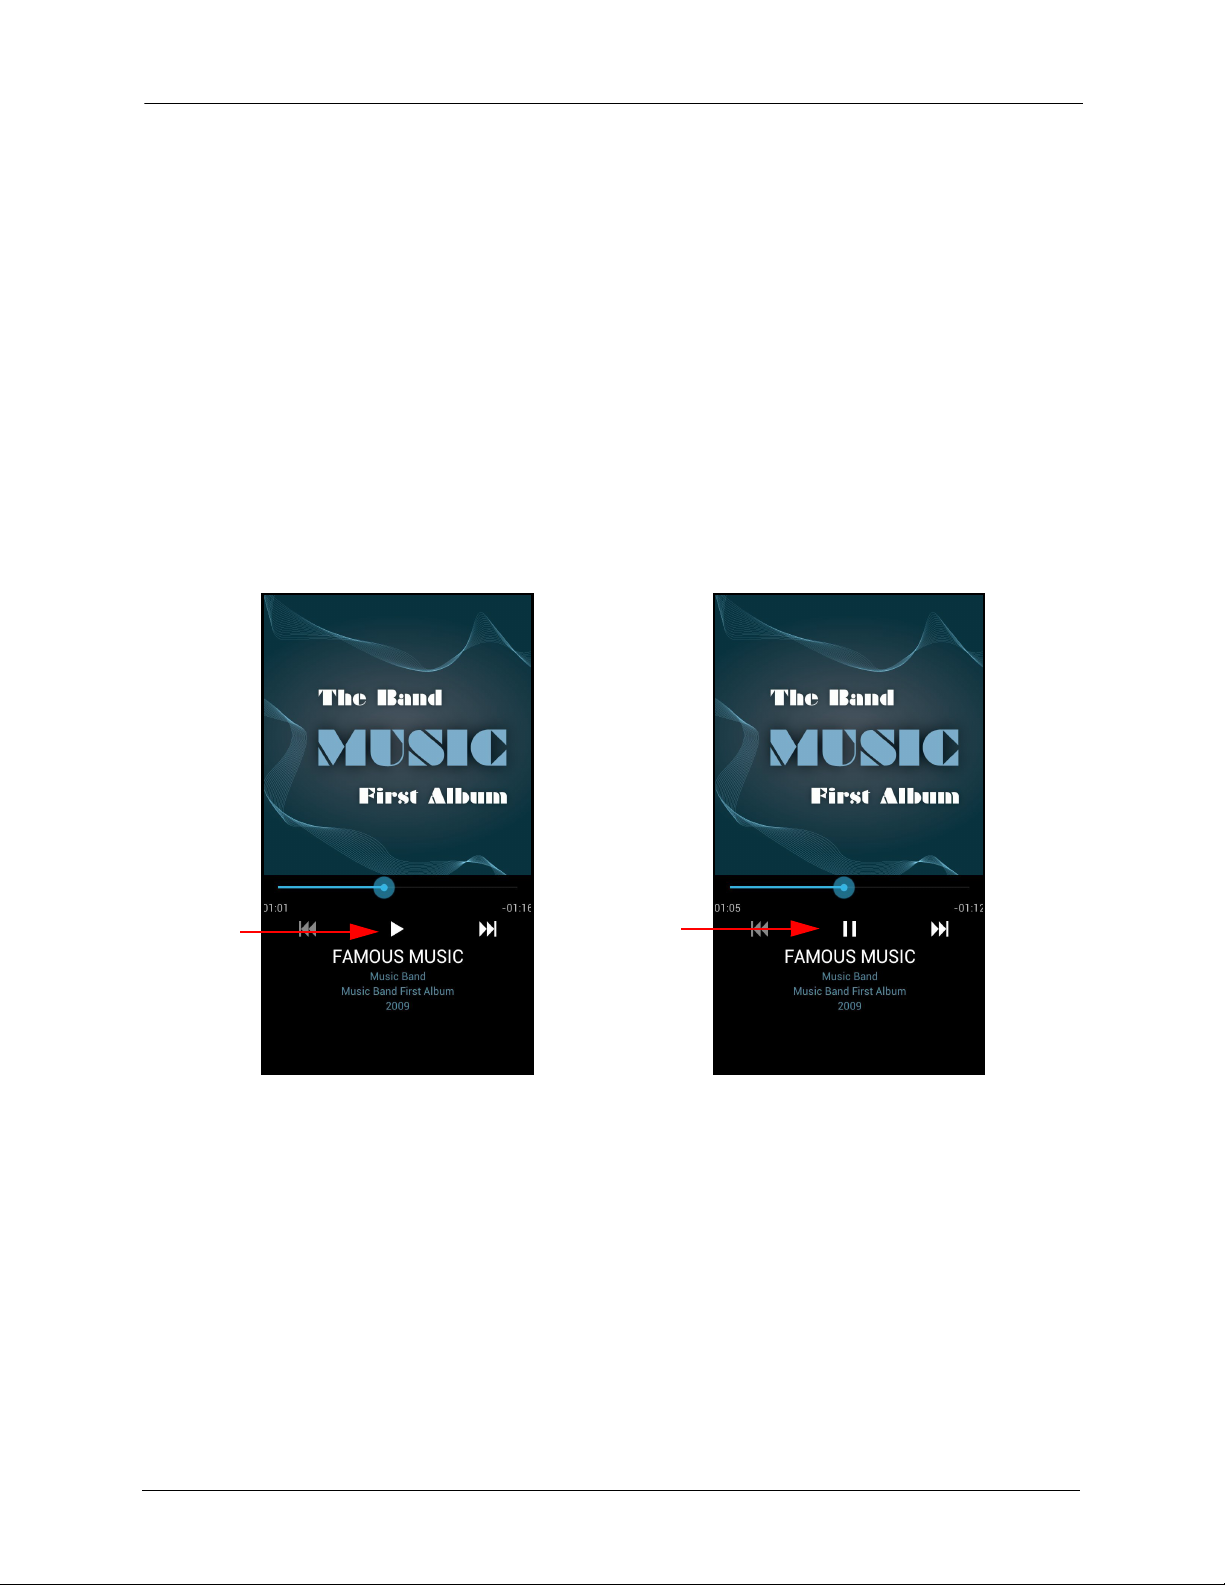
3. Working with Files Playing Music
Song
paused:
Tap to
play
Tap to
pause
Song
playing:
If you tap Picture-in-Picture, the video continues to stream in a small window when
you leave the video Play screen and move around in the Wireless Drive app or exit
the app and use your mobile device.
3. Tap the video window to return to the video Play screen and stop the video or
watch it on the full screen.
Playing Music
You can use the Wireless Drive app to play music stored on your Wireless Drive or in
the Downloads or Gallery folders on your mobile device.
1. Navigate to the music you want to play.
2. Tap a song to start playing it:
Playing Music in the Background While Outside the App
You can play the music in the background while you exit the app and use your mobile
device for other things. You always have access to the currently playing song.
1. Start the music playing.
2. Tap the Home button on your mobile device.
You are taken away from the music Play screen and out of the Wireless Drive app
to your mobile device desktop.
SanDisk Connect™ Wireless Flash Drive User Manual for Android 20

3. Working with Files Moving Files
3. You can return to the music Play screen and change or stop the music playing in
the background in either of two ways:
• Tap the Wireless Flash Drive icon on your mobile device Apps screen.
— OR —
• Pull down the Android notification drawer and tap the Wireless Flash entry
under Ongoing:
You’re returned to the music Play screen in the Wireless Drive app.
Moving Files
Files can be moved in three ways:
• Download files from your Wireless Drive to a mobile device.
• Upload files to your Wireless Drive from a mobile device.
• Share files with others directly from the Wireless Drive mobile app.
Downloading Files
To download files from your Wireless Drive to a mobile device,
SanDisk Connect™ Wireless Flash Drive User Manual for Android 21
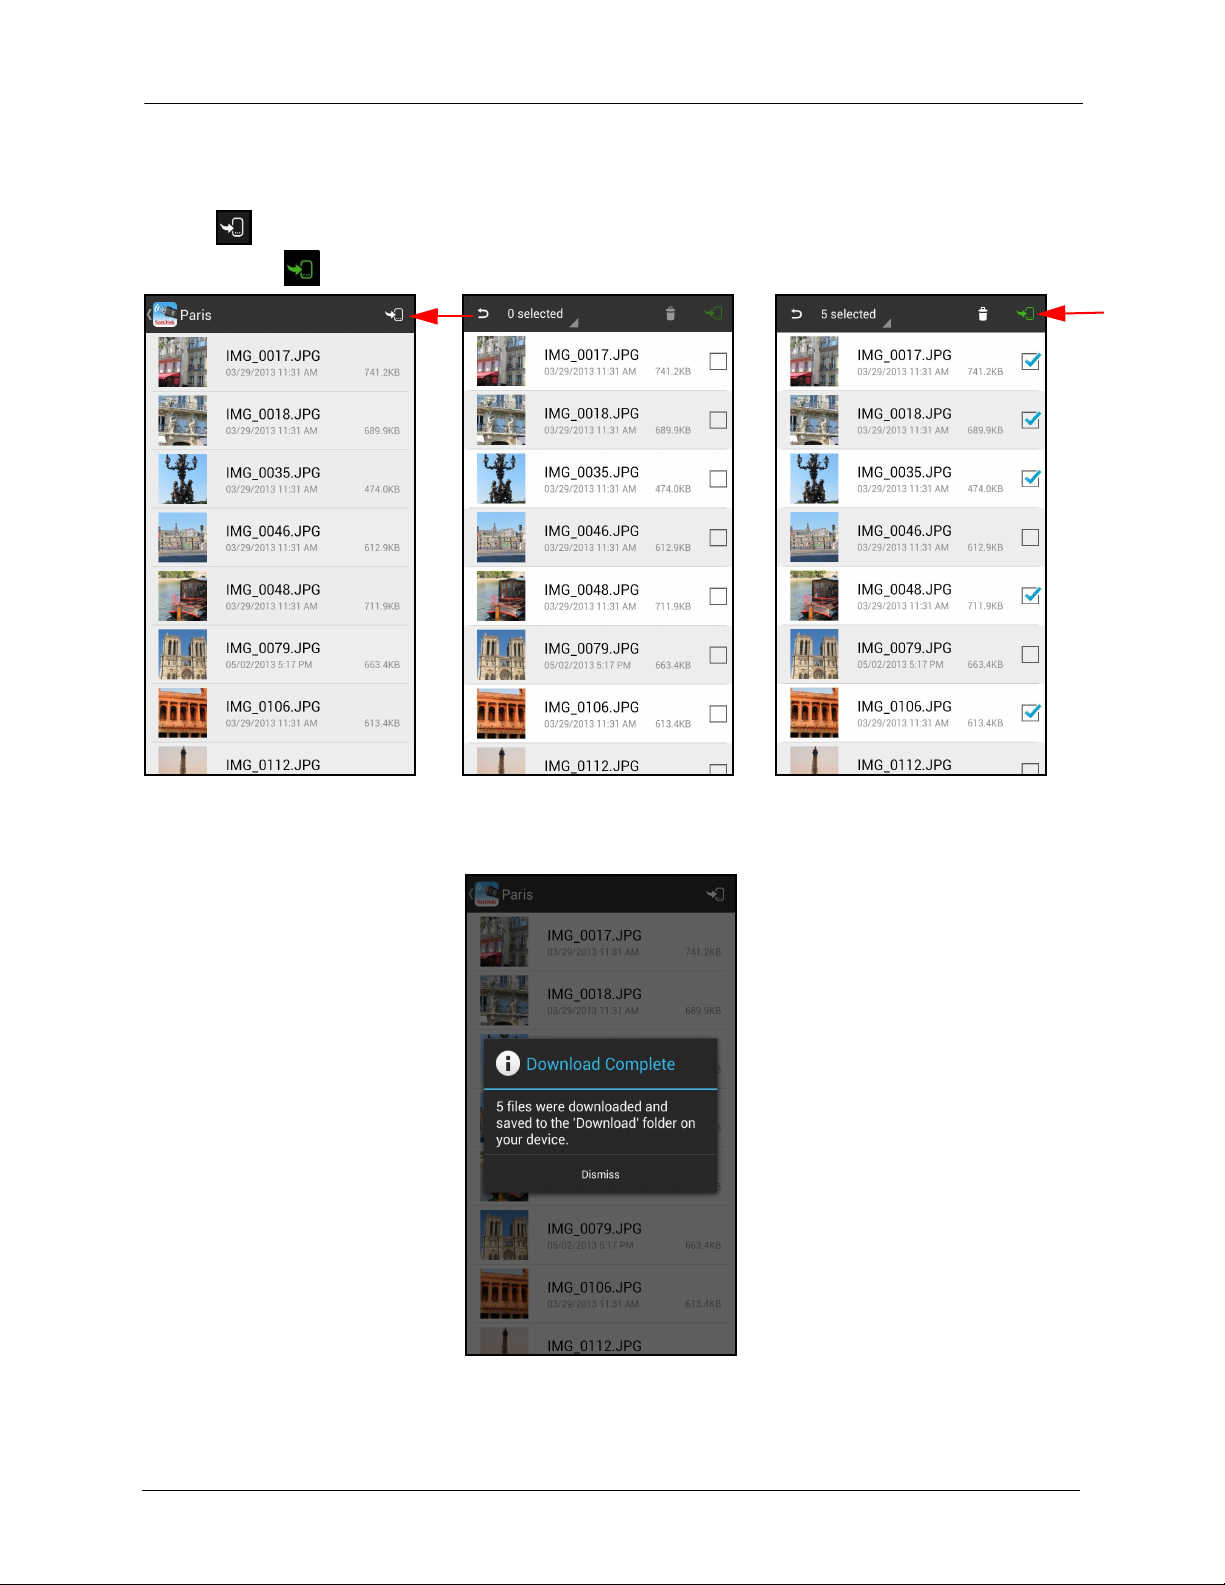
3. Working with Files Moving Files
1. Open the screen showing the files you want to download, tap the Download icon
, select the files to download, and again tap the Download icon, which is now
green ;
A Download Complete window confirms a successful download and tells you
where to find the downloaded files:
SanDisk Connect™ Wireless Flash Drive User Manual for Android 22
3. Working with Files Moving Files
Menu
button
Uploading Files
When you upload files from a mobile device to your Wireless Drive, you can choose
an existing destination (folder or album) to upload to or you can create a new folder
on the Drive and upload files into it.
You can upload files stored on your mobile device in two ways:
• Access the contents of your Downloads folder or mobile device Gallery from the
Wireless Drive start screen.
• Go directly to content stored in other locations on your mobile device.
Creating a New Folder
One way to create a folder on your Wireless Drive is to connect the Drive to your PC
or Mac and create a folder in the Drive window on the computer. But you can also
create a new folder within the Wireless Drive app on your mobile device, which can
be useful if you want a new folder into which to upload files to your Drive.
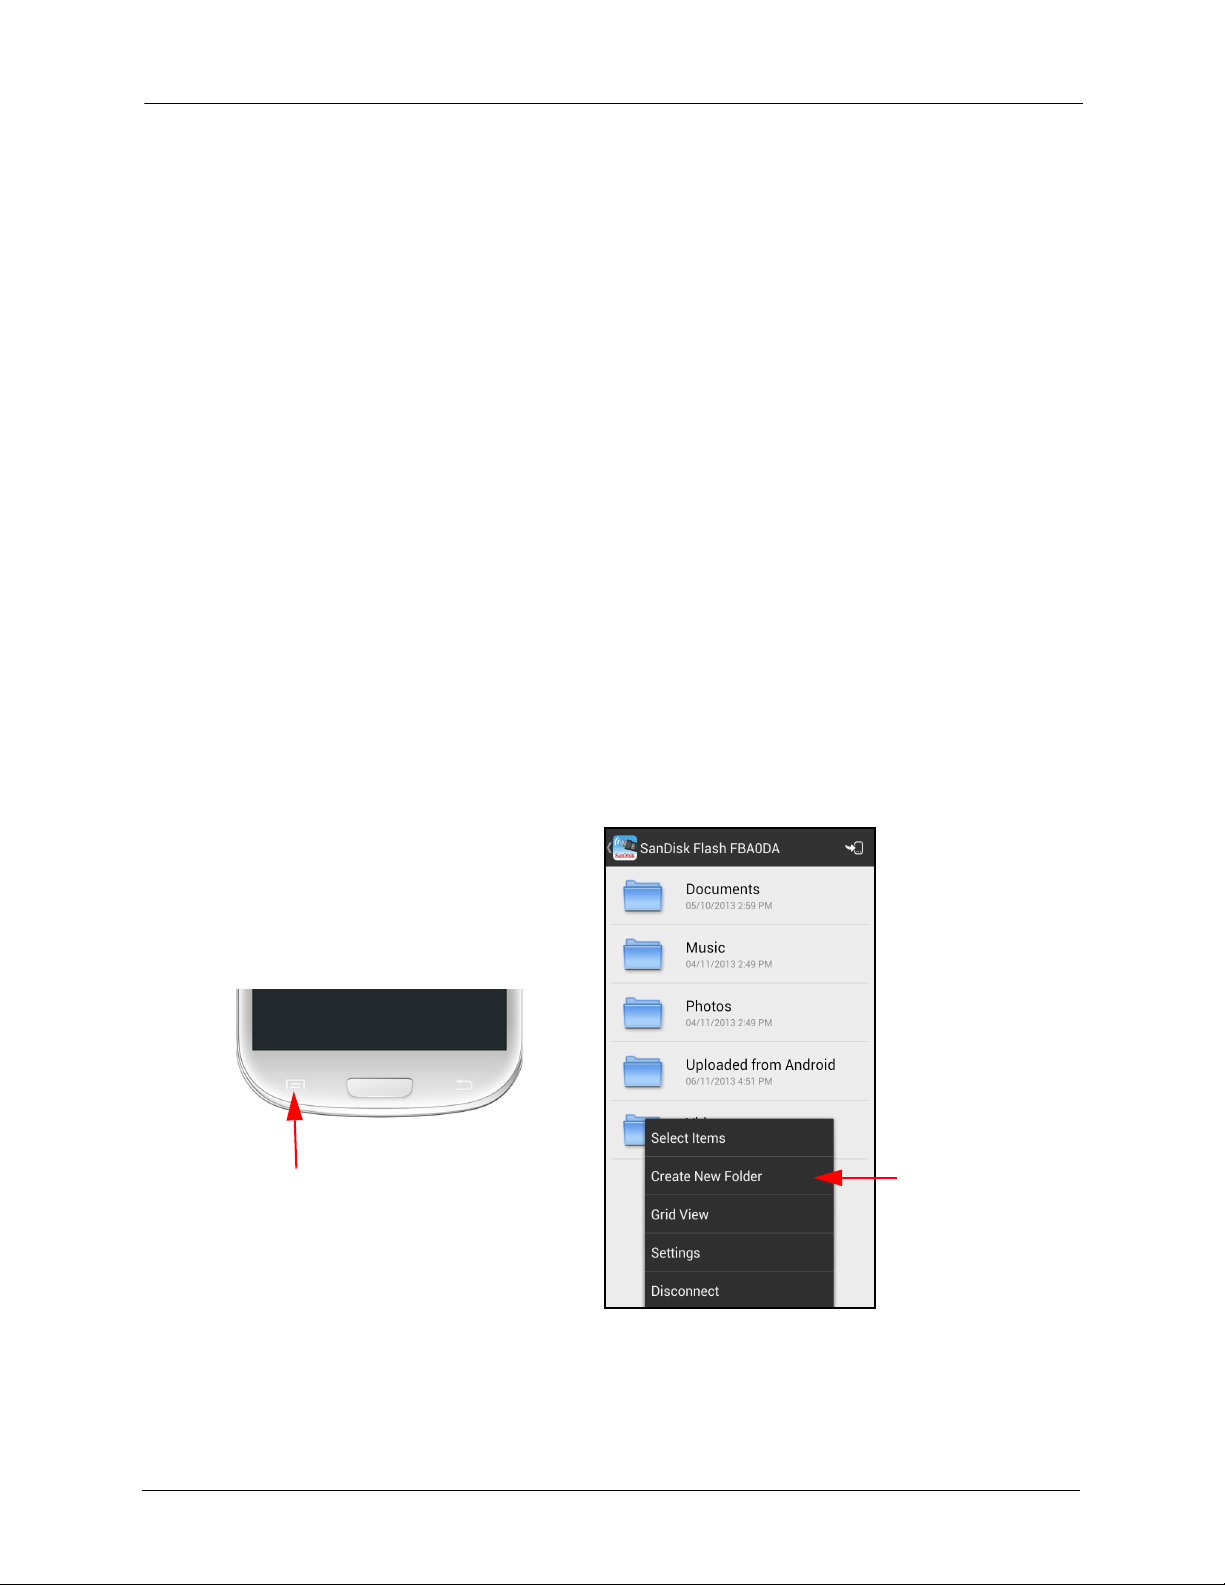
To create a new folder,
1. In the Wireless Drive app, navigate to the destination for the new folder, tap your
mobile device Menu button to display the Wireless Drive menu, and tap Create
New Folder:
SanDisk Connect™ Wireless Flash Drive User Manual for Android 23
3. Working with Files Moving Files
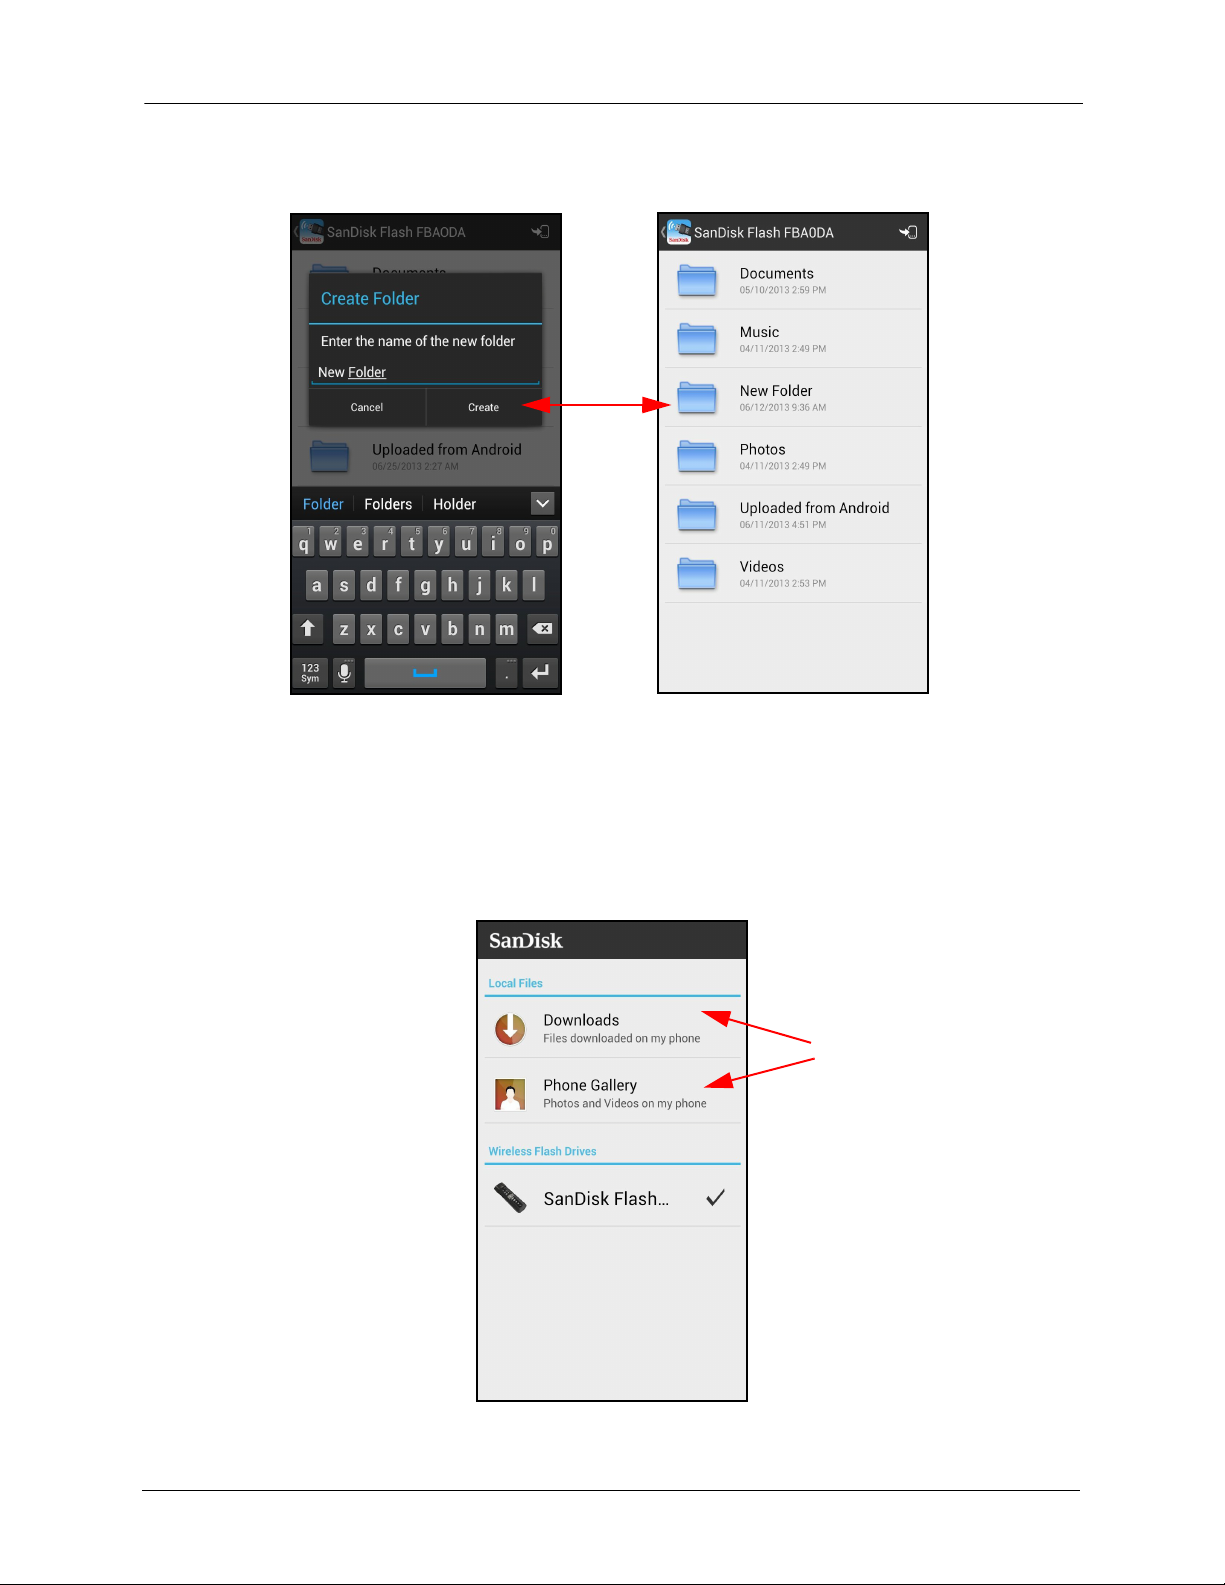
2. Enter a name for the new folder and tap Create:
The new folder is displayed on the screen from which you created it.
Uploading Files from the Phone Gallery or Downloads Folder
1. On the Wireless Drive start screen, tap Downloads or Phone Gallery to navigate
to the files you want to upload (the example below uploads photos from the Phone
Gallery):
SanDisk Connect™ Wireless Flash Drive User Manual for Android 24
3. Working with Files Moving Files
2. On the screen displaying the files to be uploaded, tap your mobile device Menu
button to display the Upload icon , tap the icon, and select the files for upload
(the selected files are outlined in blue):
3. Again tap the mobile device Menu button, then tap the Upload icon, which is now
green :
4. An Upload Complete window confirms a successful upload and informs you that
SanDisk Connect™ Wireless Flash Drive User Manual for Android 25

3. Working with Files Moving Files
the uploaded files can be found in the Uploaded from Android folder on your
Drive:
Uploading Files from Other Locations on the Mobile Device
1. On your mobile device, navigate to the file you want to upload.
2. Tap the file, then select Save to Wireless Drive in the Complete action using
window:
SanDisk Connect™ Wireless Flash Drive User Manual for Android 26

3. Working with Files Moving Files
Sharing Files
In addition to handing someone your Wireless Drive to plug into a computer USB
port, you can share files stored on your Drive in two ways:
• Allow others Wi-Fi access to your Wireless Drive so they can use their mobile
devices to connect to the files on your Drive.
• Send files to others via email, social media, messaging, or Bluetooth. The
methods available vary depending upon the features provided on your mobile
device.
Allowing Access to your Wireless Drive
You can allow others to connect directly to your Wireless Drive Wi-Fi network so they
can view your files and download them to their mobile devices.
People can share your files in two ways:
• They can install the free Wireless Drive app on their mobile devices.They do not
need to own their own Wireless Drives.
• They can connect to the Drive’s Wi-Fi network and use a web browser to access
the Drive content at www.sandisk.com/wfd.
Suppose you want to share your files with a friend using the Wireless Drive app:
1. Make sure she’s downloaded the Wireless Drive app from her mobile device
application store.
2. Turn on your Wireless Drive and place it within range (160 feet/50 meters) of your
friend.
3. Tell her the network name of your Drive so she can find it in the list of available
networks in Wi-Fi settings on her mobile device.
4. If your Drive is password-protected, give her the password.
When your friend’s mobile device has connected to your Wireless Drive, she can
open the Wireless Drive app on her mobile device and see your main screen. Now
she can view your files and even download them to her mobile device.
Sending Files to Others
You can share files by sending them to others in a variety of ways: email, social
media, messaging, and Bluetooth, to name a few. The methods available vary
depending upon the features available on your mobile device.
To send a file to someone,
SanDisk Connect™ Wireless Flash Drive User Manual for Android 27

3. Working with Files Deleting Files
1. Browse to the file you want to share, long press on the file to display the file
options, and tap Share:
2. Select a method to share your file and provide the required information. (The
options available on your mobile device vary.)
Deleting Files
You can delete individual files or you can delete an entire folder at one time.
SanDisk Connect™ Wireless Flash Drive User Manual for Android 28

3. Working with Files Deleting Files
Deleting a File
1. Open the screen containing the file you want to delete, long press on the file to
display the file options, and tap Delete file:
2. Tap Delete to confirm that you want to delete this file:
SanDisk Connect™ Wireless Flash Drive User Manual for Android 29

3. Working with Files Deleting Files
Deleting a Folder
1. Long press on a folder and tap Delete folder:
2. Tap Delete to confirm that you want to delete this folder:
SanDisk Connect™ Wireless Flash Drive User Manual for Android 30

3. Working with Files Unsupported File Formats
Unsupported File Formats
The Wireless Drive app can open all file formats that are supported by your mobile
device. If you try to open an unsupported file format, a message informs you that this
file type is not supported:
SanDisk Connect™ Wireless Flash Drive User Manual for Android 31

4. Managing the Wireless Drive Updating the Firmware
4. Managing the Wireless Drive
Updating the Firmware
New Firmware is made available just like any other application update.
1. Install the Firmware upgrade:
2. Tap Open to launch the Wireless Flash Drive app.
SanDisk Connect™ Wireless Flash Drive User Manual for Android 32

4. Managing the Wireless Drive Updating the Firmware
A popup message prompts you to update the Firmware on the Drive:
3. Tap OK.
When the new Firmware has been installed, instructions on how to complete the
update are displayed:
4. Turn off the Drive and connect it to a USB charger or a computer.
Both the blue and the amber LEDs blinking rapidly.
SanDisk Connect™ Wireless Flash Drive User Manual for Android 33

4. Managing the Wireless Drive Updating the App
5. Wait for several seconds after the rapid flashing stops, then eject the Drive from
the charger or computer.
6. Turn the Wireless Drive back on and launch the Wireless Flash Drive app.
Updating the App
You update the Wireless Flash Drive app the same way you update any other app on
your mobile device:
1. Tap your mobile device applications store icon.
2. Go to Menu > My Apps and scroll down to the Wireless
Flash Drive app under Installed.
3. Tap the Wireless Flash Drive app icon.
4. Follow the on-screen instructions to reconnect to the Wireless Drive Wi-Fi network
after the app update.
Managing Wireless Drive Settings
The Wireless Drive Settings screen provides access to all the functions you can
perform in the Wireless Flash Drive app, as well as information about the Drive and
the app.
To open the Settings screen,
SanDisk Connect™ Wireless Flash Drive User Manual for Android 34

4. Managing the Wireless Drive Managing Wireless Drive Settings
• Tap the mobile device Menu button to display the Settings option:
Saving Settings Changes
When you leave the Settings screen after changing a setting, a Settings changed
window confirms that you want to save your change and a Save settings window
advises you to restart your Wireless Drive in order for the new setting to take effect.
SanDisk Connect™ Wireless Flash Drive User Manual for Android 35

4. Managing the Wireless Drive Managing Wireless Drive Settings
1. In the Settings changed window, tap Save to confirm your changes:
2. In the Save settings window, tap OK to acknowledge that you must restart your
Wireless Drive to complete the setting change:
3. Turn your Wireless Drive off and then back on to complete the change.
SanDisk Connect™ Wireless Flash Drive User Manual for Android 36

4. Managing the Wireless Drive Managing Wireless Drive Settings
Changing the Wireless Drive Network Name
Your Wireless Drive Wi-Fi network comes uniquely identified as SanDisk Flashxxxxxx
(for example, SanDisk Flash ABCDEF).You can change the network name to make it
easier to identify your Drive.
1. On the Settings screen, tap Network to open the Network screen.
The current name of your Drive Wi-Fi network is displayed:
SanDisk Connect™ Wireless Flash Drive User Manual for Android 37

4. Managing the Wireless Drive Managing Wireless Drive Settings
2. Tap the area under the Wireless Drive name to open the Name change window,
enter a new name for the Drive, and tap OK:
3. In the Settings changed window, tap Save to save your changes.
4. In the Save settings window, tap OK to acknowledge that you must restart your
Drive.
5. Turn your Wireless Drive off and then back on to complete the network name
change.
6. On your mobile device, go to Settings > Wi-Fi and tap the new name of your
Wireless Drive to reconnect.
Creating/Changing a Password
The default Wi-Fi security setting is no password. We recommend that you set a WiFi password so that your Drive contents can’t be accessed by other people within
range (up to 160 feet) of the Wi-Fi network created by the Wireless Drive.
SanDisk Connect™ Wireless Flash Drive User Manual for Android 38

4. Managing the Wireless Drive Managing Wireless Drive Settings
1. On the Settings screen, tap Network to open the Network screen:
2. Tap the area under Wireless Drive Password to open the Wireless Drive
Password window, enter a password, and tap OK:
3. In the Settings changed window, tap Save to save your changes.
4. In the Save settings window, tap OK to acknowledge that you must restart your
Drive.
SanDisk Connect™ Wireless Flash Drive User Manual for Android 39

4. Managing the Wireless Drive Managing Wireless Drive Settings
5. Turn your Wireless Drive off and then back on to complete the password change.
Note: Creating a Wi-Fi password allows you to limit access to your Drive when you connect
directly to it. But the Wi-Fi password does not limit access when your Drive is
connected to an Internet Wi-Fi network, where anyone who has installed the Wireless
Flash Drive app can access your Drive.
Restoring Factory Settings
If you forget your password or if your Wireless Drive becomes unresponsive, you can
reset the Drive to its default factory settings. This erases your password and forces
the Drive to reboot, but it does NOT delete any content stored on the Drive. Once the
Drive has rebooted, you can set a new password.
To reset the Drive,
1. Turn off the Wireless Drive.
2. Hold in the Wi-Fi button for 20 seconds.
After about 20 seconds the amber and blue LEDs flash alternately two times (this
is the actual reset) and the drive resets and stays on.
Setting the Power Save Timer
You can set your Wireless Drive to power down after it’s been idle for a specified
amount of time.
SanDisk Connect™ Wireless Flash Drive User Manual for Android 40

4. Managing the Wireless Drive Managing Wireless Drive Settings
1. On the Settings screen, tap Power Save Timer to open the Power Save Timer
window:
2. Select the desired amount of time.
As soon as you make your selection, the Power Save Timer window closes and
the Settings screen displays the new selection.
Connecting to the Internet
Your mobile device or computer can wirelessly access content on your Drive and at
the same time remain connected to the Internet as long as a wireless Internet
network is available. (Some wireless networks might block this functionality.)
SanDisk Connect™ Wireless Flash Drive User Manual for Android 41

4. Managing the Wireless Drive Managing Wireless Drive Settings
1. On the Settings screen, tap Internet Connection to open the Internet
Connection screen:
2. Turn on Enable Internet Connection and select the desired network from the list
of Preferred Networks, then exit the Flash Drive app:
3. On your mobile device, go to Settings > Wi-Fi and connect to the Preferred
Network you selected in the app.
SanDisk Connect™ Wireless Flash Drive User Manual for Android 42

4. Managing the Wireless Drive Managing Wireless Drive Settings
Internet Connection
icon
Your Wireless Drive start screen indicates that your mobile device is connected to
the Internet:
You're now connected to both the Wireless Drive and the Internet. Whenever your
mobile device connects to this Internet network and you launch the Wireless Drive
app, the mobile device will automatically find the Drive.
Adding a Preferred Network
Once you identify an Internet Wi-Fi network (for example, a home, office, or coffee
shop network) as a Preferred Network, the Wireless Flash Drive app recognizes it
and automatically connects to it each time you launch the app within range of that WiFi network.
To add a Preferred Network,
SanDisk Connect™ Wireless Flash Drive User Manual for Android 43

4. Managing the Wireless Drive Managing Wireless Drive Settings
1. On the Settings screen, tap Internet Connection:
2. On the Internet Connection screen, tap Add Network and wait while the app
scans for available networks, then select the network to be added as a Preferred
Network:
SanDisk Connect™ Wireless Flash Drive User Manual for Android 44

4. Managing the Wireless Drive Managing Wireless Drive Settings
A window confirms that your Wi-Fi network is now a Preferred Network:
3. On your mobile device, go to Settings > Wi-Fi and select the Preferred Network.
4. Turn the Wireless Flash Drive off, then back on to complete the Internet
connection.
From now on, whenever you launch the Wireless Drive app within range of the
Preferred Network, it will automatically find your Wireless Drive so you can surf the
Internet while you access the content on the Drive.
SanDisk Connect™ Wireless Flash Drive User Manual for Android 45

4. Managing the Wireless Drive Managing Wireless Drive Settings
Setting the Downloads Directory
The default Downloads directory on the Wireless Drive comes is the Download folder
located on your mobile device:
You can change the location at which you want to download files from the Wireless
Drive.
1. On the Settings screen, tap Set Downloads Directory:
SanDisk Connect™ Wireless Flash Drive User Manual for Android 46

4. Managing the Wireless Drive Managing Wireless Drive Settings
2. Navigate to any existing folder on the mobile device until you reach a new
destination for your downloads, then tap Select:
From now on, your downloaded files will be stored in the new directory.
Resetting Messages and Warnings
In several Message and Warning pop-up windows in the Wireless Drive app, you’re
offered the option of electing not to see those messages again. However, you can
always change your mind and reset Messages and Warnings so that those windows
again appear.
SanDisk Connect™ Wireless Flash Drive User Manual for Android 47

4. Managing the Wireless Drive Managing Wireless Drive Settings
1. On the Settings screen, tap Reset Messages and Warnings:
A message confirms that you will once again see messages and warnings:
SanDisk Connect™ Wireless Flash Drive User Manual for Android 48

4. Managing the Wireless Drive Managing Wireless Drive Settings
Getting Support
Quick Start Guide
• On the Settings screen, tap Quick Start Guide for information about setting
up your Wireless Drive:
SanDisk Connect™ Wireless Flash Drive User Manual for Android 49

4. Managing the Wireless Drive Managing Wireless Drive Settings
About
•Tap About for details about your Wireless Drive, your mobile device, the
memory card currently inserted in your Drive, and legal information related to
the product
SanDisk Connect™ Wireless Flash Drive User Manual for Android 50

5. Product and Safety Information Product Specifications
5. Product and Safety Information
Product Specifications
Dimensions 78mm x 27mm x14mm (3.1'' x 1'' x 0.5'')
Weight 27gr (0.95 oz)
Memory Card Class 10 SanDisk Ultra microSDHC™ up to 32GB
1GB=1,000,000,000 bytes. Actual user storage less.
Battery Type Built-in, non-replaceable rechargeable lithium polymer battery
Operating Duration
Battery Charging Using a USB 2.0-powered connection (500mA): up to 2 hours
USB Connectivity USB 2.0 High Speed
Wireless Connectivity Wi-Fi: IEEE 802.11 b/g/n (2.4GHz)
Wireless Range Up to 160 feet (50m) line-of-sight
Wireless Security WPA2
Environmental Requirements Operating temperature: 0°C to 45°C (32°F to 113°F)
Maximum File Size
Wireless Access System
Requirements
Up to 4 hours of continuous usage
for full charge (device cannot be used wirelessly while
charging via a USB connection)
Drive can be used wirelessly while charging via a compatible
USB power adapter (turn Drive on before plugging it into an
adaptor)
Non-operating temperature: 20°C to 45°C (-4°F to 113°F)
Relative humidity: 5% to 95% non-condensing
Maximum operating altitude: 3,000m (10,000 feet)
≤4GB
Wi-Fi 802.11 b/g/n 2.4GHz capable device
Native iOS or Android™ app, Web browser, WebDAV client
1
USB Access System
Requirements
1
Based on streaming 720p content at 2mbps to one device; actual life and performance may vary
depending upon usage and settings; battery not replaceable.
Compatible with most operating systems that support USB
Mass Storage Class
Regulatory Information
FCC Compliance Statement: This device complies with Part 15 of the FCC Rules.
Operation is subject to the following two conditions: (1) This device may not cause
harmful interference, and (2) This device must accept any interference received,
including interference that may cause undesired operation.
SanDisk Connect™ Wireless Flash Drive User Manual for Android 51

5. Product and Safety Information Regulatory Information
Note: This equipment has been tested and found to comply with the limits of a Class
B digital device, pursuant to Part 15 of the FCC Rules. These limits are designed to
provide reasonable protection against harmful interference in a residential
installation. This equipment generates uses and can radiate radio frequency energy
and if not installed and used in accordance with the instructions, may cause harmful
interference to radio communications. However, there is no guarantee that
interference will not occur in a particular installation. If this equipment does cause
interference to radio or television reception, which can be determined by turning the
equipment off and then on, the user is encouraged to try to connect the interference
by one or more of the following measures:
• Reorient or relocate the receiving antenna.
• Increase the separation between the equipment and receiver.
• Connect the equipment to a different outlet so that the equipment and receiver are
on different branch circuits.
• Consult the dealer or an experienced radio/TV technician for help.
Important: Changes or modifications to this product not authorized by SanDisk could
void the electromagnetic compatibility (EMC) and wireless compliance and negate
your authority to operate the product. This product has demonstrated EMC
compliance under conditions that include the use of compliant peripheral devices and
shielded cables between system components. It is important that you use compliant
peripheral devices and shielded cables between system components to reduce the
possibility of causing interference to radios, televisions, and other electronic devices.
Radiation Exposure: The product complies with the FCC portable RF exposure limit
set forth for an uncontrolled environment and is safe for intended operation as
described in this manual. Further RF exposure reduction can be achieved if the
product is kept as far as possible from the user’s body or the device is set to a lower
power output if such a function is available.
EU Disposal Information: Disposal & Recycling - Applicable in the European Union
and other countries with separate collection systems. To prevent possible harm to the
environment or human health from uncontrolled waste disposal, please separate the
SanDisk Connect Wireless Flash Drive from other types of wastes and recycle it
responsibly to promote the sustainable reuse of material resources. Household users
should contact either the retailer where they purchased this product, or their local
government office, for details of where and how they can take this item for
environmentally safe recycling. Business users should contact their supplier and
check the terms and conditions of the purchase contract. This product should not be
mixed with other commercial waste for disposal.
SanDisk Connect™ Wireless Flash Drive User Manual for Android 52

5. Product and Safety Information Safety and Care
Recycling SanDisk Connect Wireless Flash Drive: Do not dispose of either the
SanDisk Connect Wireless Flash Drive with your household waste. In some countries
or regions, collection systems are set up to handle electrical and electronic waste
items. Contact your regional authorities for more details. If collection systems are not
available, please return unwanted accessories to any SanDisk Approved Service
Center in your region.
EU Declaration of Conformity: Hereby, SanDisk declares that this SanDisk
Connect Wireless Flash Drive is in compliance with the essential requirements and
other relevant provisions of Directive 1999/5/EC.
EN 300 328 v1.7.1 (2006-10)
EN 301 489-17 v1.3.2 (2008-04)
EN 62311: 2008
Safety and Care
All wireless devices are susceptible to interference which might affect the
performance of a Wireless Flash Drive.
Do not switch on a Wireless Flash Drive in restricted areas or areas where wireless
devices are prohibited. When instructed to do so, switch off the Wireless Flash Drive
in restricted areas such as those near medical equipment, fuel/chemicals, or blasting
areas, or when instructed to in aircraft.
The Wireless Drive contains a lithium polymer battery that has been fully tested for
safety. However, several precautions should be taken when using a Wireless Drive:
• When a Wireless Drive is in a pocket with other metallic objects, make sure the
cap is in place.
• Never charge a Wireless Drive unattended.
• Charge a Wireless Drive in an area away from flammable materials.
• Never intentionally heat a Wireless Drive in a microwave oven or dryer or place it
a fire. Never use the Wireless Drive in temperatures above 60°C(140°F).
• Stop using a Wireless Drive if any abnormal heat, odor, deformation,
discoloration, or other abnormal condition is detected. If any liquid leaks from a
Wireless Drive, wash your hands well with fresh water immediately. If liquid gets
into your eyes, wash with edible oil and see a doctor immediately.
The Wireless Flash Drive is not water resistant.
Do not store a Wireless Flash Drive in extreme temperatures. High temperatures can
shorten the life of the device by damaging the battery or cause warping or melting of
SanDisk Connect™ Wireless Flash Drive User Manual for Android 53

5. Product and Safety Information Cleaning
the plastic enclosure. Cold temperatures can also shorten the life of the Drive by
damaging the battery, causing the plastic enclosure to crack, or causing moisture to
condense on or inside the device.
Keep the Wireless Flash Drive dry. Water or other liquids can damage it. In addition,
high humidity can cause condensation to form. If a Wireless Flash Drive gets wet,
turn it off, place it in a low-humidity environment, and allow it to completely dry.
Do not store a Wireless Flash Drive in a dusty or dirty area because mechanical parts
may be damaged or cease to work.
Do not attempt to open or modify a Wireless Flash Drive. It contains no internal
serviceable parts. Attempting to modify a Wireless Flash Drive can damage the
device and cause it to operate in violation of government regulations and can cause a
safety concern.
Do not drop, shake, strike, crush, or blend a Wireless Flash Drive as this may
damage the device.
If a Wireless Flash Drive becomes damaged, halt use immediately.
Cleaning
Before cleaning a Wireless Flash Drive, disconnect it from any USB port or cable,
turn off Wi-Fi, and remove the memory card from the card slot. If the outside of the
Wireless Flash Drive is soiled, use a cloth that has been slightly dampened with water
to clean the outside. Do not allow water to enter the Wireless Flash Drive around the
power button, USB connector, or card slot.
If foreign material enters the Wireless Flash Drive through the card slot, attempt to
free it by lightly shaking the Drive with the card slot facing down. If this does not work,
try using a can of compressed air.
Maintenance and Storage
The Wireless Flash Drive contains a lithium polymer battery that needs proper care
for best usage. Note that while the lithium polymer battery does not have any memory
effect, proper care is required for the best usage.
Standard Maintenance
For proper maintenance of the battery, it is best to periodically let the Wireless Flash
Drive discharge. We do not recommended keeping the Wireless Flash Drive plugged
in. For the best battery life, we recommend charging and discharging the Wireless
Flash Drive battery at least once a month.
SanDisk Connect™ Wireless Flash Drive User Manual for Android 54

5. Product and Safety Information Maintenance and Storage
Long Term Storage
If the Wireless Flash Drive will not be used, it is best to keep the battery around 50%
charged. To charge the battery to approximately 50%, fully discharge the Wireless
Flash Drive until it turns itself off, then let it charge for 1 hour. Store the Wireless
Flash Drive at a temperature between 20° C and 45° C (4° F and 113° F) at a relative
humidity of 65% ± 20%.
Recycling
Please recycle all the Wireless Flash Drive packaging.
When the Wireless Flash Drive has reached the end of its useful life, return it to a
recycling station in your community to prevent uncontrolled waste disposal and
dispose of the battery properly.
SanDisk Connect™ Wireless Flash Drive User Manual for Android 55

Index
A
accessing files through the Wireless Drive app
accessing the Drive without an app
allowing access to your Wireless Drive
application overview
B
battery life
battery type
C
changing settings
changing the Wireless Drive network name
charging the Wireless Drive
cleaning
connecting
connecting to the Internet
connecting to the Wireless Drive
connecting via Wi-Fi
content
creating a new folder
creating/changing a password
D
deleting a file
deleting a folder 30
deleting content
deleting files
downloading files
downloading the app
Downloads directory
F
factory reset
files
2
2
54
via Wi-Fi
grid view
list view
4
17
17
29
deleting a file
deleting a folder 30
28
4, 40
12
35
3
41
4
23
29
21
4
46
7
27
37
4
38
15
moving
sharing
Firmware
upgrading
force restart
forgot password
G
getting started
H
hardware specifications
I
Internet
using the Wireless Drive while connected
L
LEDs
list view and grid view
changing
loading content
from a computer
from a mobile device
M
main screen
maintenance and storage
managing the Wireless Drive
moving files
downloading
uploading
music
playing
playing while outside the app
N
new folder
create
P
password
create/change
password reset
photos
full-screen image
21
27
32
40
40
3
2
4
16
8
9
9
13
54
32
21
21
23
20
20
23
38
40
18
41
SanDisk Connect™ Wireless Flash Drive User Manual for Android 56

Picture-in-Picture 20
playing music
playing music in the background while outside the
app
20
power save timer
product and safety information
product specifications
R
reboot Drive
regulatory information
reset Drive
reset password
resetting messages and warnings
restart unresponsive Drive
restore factory settings
S
safety and care
saving settings changes
select a video player
sending files to others
setting the power save timer
settings
Power Save Timer
sharing content
sharing files
allowing access to your Wireless Drive
sending files to others 27
software
upgrading
start screen 12
streaming videos
Picture-in-Picture
select a video player 19
video play controls
support
supported file formats 2
system requirements
T
toggling between list view and grid view
20
40
51
51
40
51
40
40
47
40
4, 40
53
35
19
27
40
40
27
27
32
18
20
19
49
1
16
U
unresponsive Drive
unsupported file formats
updating the app
upgrading the Firmware
uploading files
create new folder
from other locations on the mobile device
from the Gallery or the Downloads folder
using the Wireless Drive while charging
V
video play controls
viewing photos
W
Wireless Drive
about
50
accessing files
app menu options
charging
cleaning
connecting to
connecting to the Internet
connecting via Wi-Fi
downloading the app
features
file menu options
hardware specifications
loading content
main screen 13
maintenance and storage
product specifications
recycling 55
regulatory information
safety and care
start screen
supported file formats
system requirements
upgrading the app 34
upgrading the Firmware
54
1
40
31
34
32
23
23
19
17
15
15
3
4
41
4
4
15
2
8
54
51
51
53
5, 12
2
1
32
26
24
3
SanDisk Connect™ Wireless Flash Drive User Manual for Android 57

use while charging 3
Wireless Drive app menu
Wireless Drive Application overview
Wireless Drive file menu
Wireless Drive LEDs
Wireless Drive overview
Wireless Drive Quick Start Guide
Wireless Drive settings
about Wireless Drive
changing the Wireless Drive network name
14
12
15
4
1
49
34
50
37
connecting the Wireless Drive to the Internet
creating/changing a password
power save timer
resetting messages and warnings
saving settings changes
selecting a Downloads directory
support
Wireless Drive Wi-Fi network detected
Wireless Flash Drive app
working with files
49
40
4
12
38
47
35
46
41
5
SanDisk Connect™ Wireless Flash Drive User Manual for Android 58


SanDisk is a trademark of SanDisk Corporation, registered in the United States and
other countries. SanDisk Connect is a trademark of SanDisk Corporation. Apple, the
Apple logo, iPhone, iPad, and iPod touch are trademarks of Apple Inc., registered in the
U.S. and other countries. App Store is a service mark of Apple Inc. The microSDHC
mark is a trademark of SD-3C, LLC. Wi-Fi is a registered trademarks of the Wi-Fi
Alliance. All other trademarks are the property of their respective owners.
©2013 SanDisk Corporation. All rights reserved.

Contents
1. Introduction . . . . . . . . . . . . . . . . . . . . . . . . . . . . . . . . . . . . . . . 1
Wireless Flash Drive Overview . . . . . . . . . . . . . . . . . . . . . . . . . . . . . .1
Features . . . . . . . . . . . . . . . . . . . . . . . . . . . . . . . . . . . . . . . . . . . . . . . .1
System Requirements . . . . . . . . . . . . . . . . . . . . . . . . . . . . . . . . . . . . .2
Supported File Formats . . . . . . . . . . . . . . . . . . . . . . . . . . . . . . . . . . . 2
Hardware Specifications . . . . . . . . . . . . . . . . . . . . . . . . . . . . . . . . . . .2
2. Getting Started . . . . . . . . . . . . . . . . . . . . . . . . . . . . . . . . . . . . . 3
Charging the Wireless Drive . . . . . . . . . . . . . . . . . . . . . . . . . . . . . . . . 3
Understanding the Wireless Drive LEDs . . . . . . . . . . . . . . . . . . . . . . .4
Downloading the Wireless Flash Drive App . . . . . . . . . . . . . . . . . . . . .4
Connecting to the Wireless Drive . . . . . . . . . . . . . . . . . . . . . . . . . . . . 4
Connecting via Wi-Fi . . . . . . . . . . . . . . . . . . . . . . . . . . . . . . . . . . .5
Accessing the Drive without the App . . . . . . . . . . . . . . . . . . . . . . . 5
Loading Content on the Wireless Drive . . . . . . . . . . . . . . . . . . . . . . . .6
From a PC . . . . . . . . . . . . . . . . . . . . . . . . . . . . . . . . . . . . . . . . . . . 7
From a Mobile Device . . . . . . . . . . . . . . . . . . . . . . . . . . . . . . . . . . .8
3. Working with Files . . . . . . . . . . . . . . . . . . . . . . . . . . . . . . . . . 12
Wireless Drive Application Overview . . . . . . . . . . . . . . . . . . . . . . . . .12
Accessing Files through the Wireless Drive App. . . . . . . . . . . . . 12
Using Wireless Drive Main Screen . . . . . . . . . . . . . . . . . . . . . . . . 13
Viewing Photos . . . . . . . . . . . . . . . . . . . . . . . . . . . . . . . . . . . . . . . . . 14
Streaming Videos . . . . . . . . . . . . . . . . . . . . . . . . . . . . . . . . . . . . . . . .16
Using the Wireless Flash Drive with iTunes . . . . . . . . . . . . . . . . . . . .18
Playing Music . . . . . . . . . . . . . . . . . . . . . . . . . . . . . . . . . . . . . . . . . . .18
Controlling Music from Outside the Music Play Screen. . . . . . . . 20
Moving Files . . . . . . . . . . . . . . . . . . . . . . . . . . . . . . . . . . . . . . . . . . . .20
Downloading Files . . . . . . . . . . . . . . . . . . . . . . . . . . . . . . . . . . . .21
SanDisk Connect™ Wireless Flash Drive User Manual for iPhone, iPad, or iPod touch i

Uploading Files . . . . . . . . . . . . . . . . . . . . . . . . . . . . . . . . . . . . . . 23
Displaying the Upload Options . . . . . . . . . . . . . . . . . . . . . . . 23
Uploading Photos and Videos . . . . . . . . . . . . . . . . . . . . . . . . 24
Uploading Files from Your iPhone, iPad, or iPod touch . . . . 25
Creating a New Folder . . . . . . . . . . . . . . . . . . . . . . . . . . . . . 26
Sharing Your Files. . . . . . . . . . . . . . . . . . . . . . . . . . . . . . . . . . . . 27
Allowing Access to your Wireless Drive . . . . . . . . . . . . . . . . 28
Sending Files to Others . . . . . . . . . . . . . . . . . . . . . . . . . . . . . 28
Deleting Files and Folders . . . . . . . . . . . . . . . . . . . . . . . . . . . . . . . . .29
Unsupported File Formats . . . . . . . . . . . . . . . . . . . . . . . . . . . . . . . . .31
4. Managing the Wireless Drive . . . . . . . . . . . . . . . . . . . . . . . . . 32
Updating the Firmware . . . . . . . . . . . . . . . . . . . . . . . . . . . . . . . . . . . .32
Updating the App . . . . . . . . . . . . . . . . . . . . . . . . . . . . . . . . . . . . . . . 33
Managing Wireless Drive Settings . . . . . . . . . . . . . . . . . . . . . . . . . . 35
Changing the Wireless Drive Network Name . . . . . . . . . . . . . . . . 35
Creating/Changing a Password . . . . . . . . . . . . . . . . . . . . . . . . . .37
Restoring Factory Settings . . . . . . . . . . . . . . . . . . . . . . . . . . . . . .38
Using Internet Connection . . . . . . . . . . . . . . . . . . . . . . . . . . . . . .38
Setting the Power Save Timer . . . . . . . . . . . . . . . . . . . . . . . . . . .40
Compressing Videos During Transfer . . . . . . . . . . . . . . . . . . . . . 40
Getting Support . . . . . . . . . . . . . . . . . . . . . . . . . . . . . . . . . . . . . .40
Quick Start Guide . . . . . . . . . . . . . . . . . . . . . . . . . . . . . . . . . 40
About . . . . . . . . . . . . . . . . . . . . . . . . . . . . . . . . . . . . . . . . . . . 40
5. Product and Safety Information . . . . . . . . . . . . . . . . . . . . . . . 43
Product Specifications . . . . . . . . . . . . . . . . . . . . . . . . . . . . . . . . . . . .43
Regulatory Information . . . . . . . . . . . . . . . . . . . . . . . . . . . . . . . . . . . .43
Safety and Care . . . . . . . . . . . . . . . . . . . . . . . . . . . . . . . . . . . . . . . . .45
Cleaning . . . . . . . . . . . . . . . . . . . . . . . . . . . . . . . . . . . . . . . . . . . . . . .46
Maintenance and Storage . . . . . . . . . . . . . . . . . . . . . . . . . . . . . . . . .46
Standard Maintenance . . . . . . . . . . . . . . . . . . . . . . . . . . . . . . . . .46
SanDisk Connect™ Wireless Flash Drive User Manual for iPhone, iPad, or iPod touch ii

Long Term Storage . . . . . . . . . . . . . . . . . . . . . . . . . . . . . . . . . . . .47
Recycling . . . . . . . . . . . . . . . . . . . . . . . . . . . . . . . . . . . . . . . . . . .47
Index . . . . . . . . . . . . . . . . . . . . . . . . . . . . . . . . . . . . . . . . . . . 48
SanDisk Connect™ Wireless Flash Drive User Manual for iPhone, iPad, or iPod touch iii

1. Introduction Wireless Flash Drive Overview
1. Introduction
Wireless Flash Drive Overview
The SanDisk Connect™ Wireless Flash Drive stores, shares, and streams digital
content wirelessly across multiple mobile devices.
Features
• Share files with others. The Wireless Drive creates its own wireless network. Up
to eight mobile devices can be wirelessly connected and access files on the Drive
at the same time.
• Stay connected to the Internet while accessing content from the Wireless
Drive. In areas where Internet Wi-Fi access is available, you can stream content
from the Wireless Drive and keep your mobile device connected to the Internet at
the same time.
• Use the Wireless Drive for extra storage. Up to 32 GB of space can be used to
store digital content from a mobile device.
SanDisk Connect™ Wireless Flash Drive User Manual for iPhone, iPad, or iPod touch 1

1. Introduction System Requirements
System Requirements
• Mobile devices running iOS version 5.0 or higher or other Wi-Fi-enabled devices
with a web browser
• Computers running Windows® 8, Windows 7, Windows Vista®, Windows XP or
Mac OS 10.6 or higher
Supported File Formats
• Any file formats supported by your mobile device
• For additional information about supported formats, go to www.sandisk.com/
support
Hardware Specifications
• Drive Capacity: 16 GB or 32 GB
1
• USB: 2.0 compatible
• Battery: Non-user replaceable lithium-ion battery
• Battery Life: Up to 4 hours of continuous streaming and standby
• Maximum Wi-Fi range: 160 feet (50 meters)
• Wireless Drive Memory Card Format: FAT32
2
1
1GB=1,000,000,000 bytes. Actual user storage less.
2
Based on streaming 720p content at 2mbps to one device; actual life and performance may vary
depending upon usage and settings; battery not replaceable.
SanDisk Connect Wireless Flash Drive User Manual for iOS 2

2. Getting Started Charging the Wireless Drive
2. Getting Started
Charging the Wireless Drive
Although the Wireless Drive is shipped with a charged battery, we urge you to fully
charge the Drive before you begin to use it. (This can take up to two hours.)
• Plug your Wireless Drive into a computer USB port or a USB AC adaptor to
charge it:
Note: Although the Wireless Drive cannot be used wirelessly while it’s plugged into a
computer USB port, it can be used as a normal flash drive. However, the Drive can be
used wirelessly while it’s charging in a USB AC adaptor. If you want to use the Drive
while it’s plugged into an adaptor, be sure to turn it on before you plug it in.
SanDisk Connect™ Wireless Flash Drive User Manual for iPhone, iPad, or iPod touch 3

2. Getting Started Understanding the Wireless Drive LEDs
Understanding the Wireless Drive LEDs
Mode LEDs Activity
Wi-Fi on Blue Flashes
Turn Wi-Fi on and off Blue and Amber Flash three times
Wi-Fi data transfer in
progress
USB data transfer in
progress
Battery charging Amber Shines steadily
Battery fully charged Amber Off
Battery strength 5-10%
(Wi-Fi is on)
Factory Reset Blue and Amber Flash rapidly after Wi-Fi
Blue Flashes rapidly
Amber Flashes rapidly
Amber Repeatedly flashes
three times
button has been held in
for 30 seconds (does
NOT delete files stored
on the Drive)
Downloading the Wireless Flash Drive App
Download the free Wireless Drive app from the App Store onto
each mobile device you want to use with the Drive.
1. Download the Wireless Drive app.
2. Find the Wireless Drive app icon on your mobile device and
tap it to open the Wireless Drive app.
Connecting to the Wireless Drive
You can connect to the Wireless Drive Wi-Fi network on your mobile device in two
ways:
• You can download the Wireless Flash Drive app and connect to the Drive via Wi-
Fi.
• You can access the Drive without installing the Wireless Drive app via a web
browser.
SanDisk Connect™ Wireless Flash Drive User Manual for iPhone, iPad, or iPod touch 4

2. Getting Started Connecting to the Wireless Drive
Connecting via Wi-Fi
1. In your mobile device Wi-Fi settings, select the Wireless Drive network from the
list of available Wi-Fi networks. It appears as SanDisk Flash xxxxxx (in the
example below, SanDisk Flash ABCDEF):
2. Launch the app:
Accessing the Drive without the App
You can connect to the Wireless Drive Wi-Fi network on your mobile device, PC, or
Mac without downloading the Wireless Flash Drive app, then access the Wireless
Drive using a web browser.
SanDisk Connect™ Wireless Flash Drive User Manual for iPhone, iPad, or iPod touch 5

2. Getting Started Loading Content on the Wireless Drive
1. In your mobile device Wi-Fi settings, connect to the Wireless Drive Wi-Fi network.
It appears in the list of available networks as SanDisk Flashxxxxxx (for example,
SanDisk Flash123456).
2. Launch an Internet browser and go to www.sandisk.com/wfd to connect to the
Wireless Drive:
Loading Content on the Wireless Drive
You can load content in two ways:
• Plug your Wireless Drive into your computer, then drag and drop content onto it.
SanDisk Connect™ Wireless Flash Drive User Manual for iPhone, iPad, or iPod touch 6

2. Getting Started Loading Content on the Wireless Drive
• Transfer content via Wi-Fi from a mobile device to your Wireless Drive.
From a PC
You can transfer content between your Wireless Drive and your computer using a
USB connection.
1. Plug your Wireless Drive into your computer USB port.
2. In the AutoPlay window, click Open folder to view files:
3. Drag and drop music, videos, photos, and documents from your computer into the
Wireless Drive window. You can drop your files anywhere on the Wireless Drive
SanDisk Connect™ Wireless Flash Drive User Manual for iPhone, iPad, or iPod touch 7

2. Getting Started Loading Content on the Wireless Drive
Navigation
Bar
or you can create folders and add content to them; for example, the Music,
Photos, Videos, and Documents folders in the window below:
You can also drag content from the Wireless Drive window onto your computer to
move files between your mobile devices and your computer.
From a Mobile Device
1. In your mobile device Wi-Fi settings, connect to the Wireless Drive Wi-Fi network.
2. In the Navigation Bar on the left side of the Wireless Drive main screen, navigate
to the location at which you want to upload content:
SanDisk Connect™ Wireless Flash Drive User Manual for iPhone, iPad, or iPod touch 8

2. Getting Started Loading Content on the Wireless Drive
3. Tap the Upload icon to display the Upload options, then tap Upload Photos
and Videos to display the content available for upload from this mobile device:
4. Select the Album whose content you want to upload to the Wireless Drive:
SanDisk Connect™ Wireless Flash Drive User Manual for iPhone, iPad, or iPod touch 9

2. Getting Started Loading Content on the Wireless Drive
Tap to display only photos
Tap to display only videos
5. You can use the filter controls to display only photos or only videos for easier file
selection:
6. Tap on thumbnails to select them for upload. (You can tap Select All to select all
photos at once.) Then tap Upload:
SanDisk Connect™ Wireless Flash Drive User Manual for iPhone, iPad, or iPod touch 10

2. Getting Started Loading Content on the Wireless Drive
You see the progress of the upload and receive confirmation when it’s complete:
The files are uploaded to the location displayed in the Navigation Bar.
Note: For more detailed information on using photo, music, and video files, see Chapter 3,
Working with Content.
SanDisk Connect™ Wireless Flash Drive User Manual for iPhone, iPad, or iPod touch 11

3. Working with Files Wireless Drive Application Overview
Files previously
downloaded from a
a Wireless Drive to
this device
Files stored
on the Wireless Drive
Settings
3. Working with Files
Wireless Drive Application Overview
The Wireless Drive application connects you to content on both your Drive and your
mobile device. You can view, share, and manage videos, music, photos, and
documents.
Accessing Files through the Wireless Drive App
The Wireless Drive app start screen provides access to files stored on both your
Wireless Flash Drive and your mobile device. It also contains a Help link:
SanDisk Connect™ Wireless Flash Drive User Manual for iPhone, iPad, or iPod touch 12

3. Working with Files Wireless Drive Application Overview
Navigation
Bar
Content
folders
Download icon
Upload icon
Toggle between List view
and Grid view
Settings
icon
Using Wireless Drive Main Screen
Once you’ve selected your Wireless Drive (in the examples here, SanDisk
Flash123456) in the Navigation Bar, you can access the files stored on your Drive
and the app icons you use to move around in the app:
SanDisk Connect™ Wireless Flash Drive User Manual for iPhone, iPad, or iPod touch 13

3. Working with Files Viewing Photos
Viewing Photos
1. In the Navigation Bar on the Wireless Drive opening screen, select either the
Downloads folder under Saved on iPad (or Saved on iPhone or Saved on iPod
touch) or your Wireless Drive under Wireless Flash Drives:
SanDisk Connect™ Wireless Flash Drive User Manual for iPhone, iPad, or iPod touch 14

3. Working with Files Viewing Photos
a. In the Navigation Bar, tap Photos. b. Find the photo you want to view.
Delete
photo
View
previous
photo
Download View Send
photo next photo
photo
c. Tap the photo thumbnail in the d. Tap the photo to display the photo
Navigation Bar to open the photo. controls.
Full
screen
2. Navigate to the photo you want to view:
Note: The Photos folder used here is simply an example of one way to organize pictures on
your Drive. Photos can be stored anywhere you like on the Drive.
SanDisk Connect™ Wireless Flash Drive User Manual for iPhone, iPad, or iPod touch 15

3. Working with Files Streaming Videos
Streaming Videos
1. In the Navigation Bar on the Wireless Drive opening screen, select either the
Downloads folder under Saved on iPad (or Saved on iPhone or Saved on iPod
touch) or your Wireless Drive under Wireless Flash Drives:
SanDisk Connect™ Wireless Flash Drive User Manual for iPhone, iPad, or iPod touch 16

3. Working with Files Streaming Videos
a. In the Navigation Bar, tap Videos. b. Find the video you want to stream.
Delete
video
Play
previous
video
Download Stream Share
video next video
video
Play/
Pause
c. Tap the video thumbnail in the d. Tap the Play icon to stream the
Navigation Bar to open the video. video; tap the video itself to display
Full
screen
the Video controls.
Progress
indicator
Progress indicator: Press down on the Progress
indicator and slide it to move forward or backward
in the song
2. Navigate to the video you want to stream:
Note: The Videos folder used here is simply an example of one way to organize videos on
your Drive. Videos can be stored anywhere you like on the Drive.
SanDisk Connect™ Wireless Flash Drive User Manual for iPhone, iPad, or iPod touch 17

3. Working with Files Using the Wireless Flash Drive with iTunes
Using the Wireless Flash Drive with iTunes
You can use the Wireless Flash Drive app to play music, movies, and TV shows
you’ve purchased on iTunes.
To play iTunes content,
1. Make sure your mobile device is synced with iTunes:
• On your mobile device, launch the iTunes app and navigate to More >
Purchased > Music/Movies/TV Shows. If you see your content, your mobile
device is synced with iTunes.
Note: Up to 5 devices can be synced with the Apple ID that owns the purchased content. iTunes
is for legal or rightholder-authorized copying only. Don't steal music.
2. Drag and drop the music, movie, and TV show files from the iTunes library on
your PC or Mac to your Wireless Drive.
• Music plays on the mobile device music player.
• Movies and TV shows play in Safari.
Playing Music
1. In the Navigation Bar on the Wireless Drive opening screen, select either the
Downloads folder under Saved on iPad (or Saved on iPhone or Saved on iPod
touch) or your Wireless Drive under Wireless Flash Drives
SanDisk Connect™ Wireless Flash Drive User Manual for iPhone, iPad, or iPod touch 18

3. Working with Files Playing Music
a. In the Navigation Bar, tap Music. b. Find the song you want to play.
c. Tap the song thumbnail in the d. Tap the Play icon on the music
Navigation Bar to open the song. screen to play the song and display
Delete
song
Download Play Share
Full
screen
the Song controls.
Fast-
Forward
Pause
Restart
Progress
indicator
Volume
Control
song
Play/
song next song
song
previous
song
Play
Volume control: Press down on the Volume control and
move the slider to adjust the volume
Progress indicator: Press down on the Progress indicator
and slide it to move forward or backward in the song
2. Navigate to the music you want to stream:
3. Swipe from right to left across a song screen to return to a previous song or left to
right to move to the next song.
SanDisk Connect™ Wireless Flash Drive User Manual for iPhone, iPad, or iPod touch 19

3. Working with Files Moving Files
Controlling Music from Outside the Music Play Screen
You can use the Wireless Drive app to play music loaded on either your Wireless
Drive or in the Saved on iPad folder on your mobile device. You can play the music
in the background while you use other Wireless Drive app features or exit the app to
use your mobile device. You always have access to the currently playing song
whether you’re still inside the Wireless Drive app or outside it on your mobile device.
1. Start the music.
2. Leave the music Play screen and use other app features or leave the app and use
your mobile device for other purposes while the music continues to play in the
background.
3. To display the audio controls, double-tap the Home button and swipe the multitasking bar from left to right:
4. Tap the Wireless Drive app icon to open the Wireless Drive app Play screen and
regain control of the music.
Moving Files
You can move files in three ways:
• Download files from your Wireless Drive to a mobile device.
• Upload files to your Wireless Drive from a mobile device.
• Share files with others directly from the Wireless Drive mobile app.
In the Wireless Drive app, you use the Navigation Bar on the left side of the screen
either to select files to be downloaded or to select the destination at which files will be
SanDisk Connect™ Wireless Flash Drive User Manual for iPhone, iPad, or iPod touch 20

3. Working with Files Moving Files
uploaded.You can use existing albums or folders as upload destinations, or you can
create a new folder during the upload process.
Downloading Files
You can download files from your Wireless Drive to a mobile device by selecting them
in the Navigation Bar or you can download a single file while you’re viewing it.
To download files from the Navigation Bar,
1. In the Navigation Bar, navigate to the content you want to download to the mobile
device, tap the Download icon , select the files to download, and tap
Download:
SanDisk Connect™ Wireless Flash Drive User Manual for iPhone, iPad, or iPod touch 21

3. Working with Files Moving Files
2. A Downloading files window tells you where your downloaded content will be
located. Depending on whether you want to see this message each time you
download content, tap the appropriate option to continue with the download:
3. You’re informed of the progress of the download and are informed when it’s
successfully completed:
To download a file while you’re viewing it,
SanDisk Connect™ Wireless Flash Drive User Manual for iPhone, iPad, or iPod touch 22

3. Working with Files Moving Files
• On the photo View screen, tap the Download icon , then select an option in the
Downloading files window:
Uploading Files
When you upload content from a mobile device to your Wireless Drive, you can
choose an existing destination (folder or album) to upload to or you can create a new
folder on the Drive and upload content into it.
Displaying the Upload Options
To upload content from a mobile device to your Wireless Drive,
SanDisk Connect™ Wireless Flash Drive User Manual for iPhone, iPad, or iPod touch 23

3. Working with Files Moving Files
• In the Navigation Bar, open the destination on the Wireless Drive at which you
want to upload content from a mobile device. Then tap the Upload icon to
display the Upload options:
Upload Options:
• Upload Photos and Videos: Select the album on your mobile device
containing the files to be uploaded.
• Upload Files from iPad (or Upload Files from iPhone or Upload Files from
iPod touch): Select files to upload.
• Create New Folder: Create a new folder, then use it as the destination for the
files to be uploaded.
Uploading Photos and Videos
To upload photos and videos from your mobile device to the Drive,
1. In the Navigation Bar, select the destination folder for the files to be uploaded.
2. Tap the Upload icon to display the Upload options.
SanDisk Connect™ Wireless Flash Drive User Manual for iPhone, iPad, or iPod touch 24

3. Working with Files Moving Files
3. In the Upload options, tap Upload Photos and Videos, then tap the album
containing the files to be uploaded:
4. Select the files for upload and tap Upload:
The files are uploaded to the chosen location on the Wireless Drive.
Uploading Files from Your iPhone, iPad, or iPod touch
To upload files from your mobile device to your Wireless Drive,
1. In the Navigation Bar, select the destination folder for the uploaded files.
2. In the Upload options, tap Upload Files from iPad (or Upload Files from iPhone
or Upload Files from iPod touch), then select the folder containing the files to be
SanDisk Connect™ Wireless Flash Drive User Manual for iPhone, iPad, or iPod touch 25

3. Working with Files Moving Files
uploaded. The files available for upload from your mobile device are now
displayed in the Navigation Bar:
3. Select the files to be uploaded, then tap Upload:
An upload window keeps you apprised of the progress of the upload. When the
upload is complete, the Navigation Bar again displays the destination folder you
selected for the upload; it now contains the uploaded files.
Creating a New Folder
To create a new folder and then upload files into it,
1. In the Navigation Bar, navigate to the destination for the new folder.
SanDisk Connect™ Wireless Flash Drive User Manual for iPhone, iPad, or iPod touch 26

3. Working with Files Moving Files
2. In the Upload options, tap Create New Folder, use the keyboard to enter a name
for the folder, and tap Create:
The new folder (currently empty) is displayed in the Navigation Bar as your
destination folder.
3. Tap the Upload icon once again and select Upload Photos and Videos or
Upload Files from iPad to upload files to the new folder:
Sharing Your Files
In addition to handing someone your Wireless Drive to plug into a computer USB
port, you can share content stored on your Drive in two ways:
SanDisk Connect™ Wireless Flash Drive User Manual for iPhone, iPad, or iPod touch 27

3. Working with Files Moving Files
• Allow others Wi-Fi access to your Wireless Drive so they can use their mobile
devices to connect to the content on your Drive.
• Send content to others via email, social media, messaging, or Bluetooth. The
methods available vary depending upon the features provided on your mobile
device.
Allowing Access to your Wireless Drive
You can allow others to connect directly to your Wireless Drive Wi-Fi network so they
can view your content and download it to their mobile devices.
People can share your files in two ways:
• They can install the free Wireless Drive app on their mobile devices.They do not
need to own their own Wireless Drives.
• They can connect to the Drive’s Wi-Fi network and use a web browser to access
the Drive content at www.sandisk.com/wfd.
Suppose you want to share your files with a friend using the Wireless Drive app:
1. Make sure she’s downloaded the Wireless Drive app from her mobile device
application store.
2. Turn on your Wireless Drive and place it within range (160 feet/50 meters) of your
friend.
3. Tell her the network name of your Drive so she can find it in the list of available
networks in Wi-Fi settings on her mobile device.
4. If your Drive is password-protected, give her the password.
When your friend’s mobile device has connected to your Wireless Drive, she can
open the Wireless Drive app on her mobile device and see your main screen. Now
she can view your content and download it to her mobile device.
Sending Files to Others
You can share content by sending it to others in a variety of ways: email, social
media, messaging, and Bluetooth, to name a few. The methods available vary
depending upon the features available on your mobile device.
The sharing process is the same no matter what type of content you’re sharing. The
example below shows how to share a photo.
SanDisk Connect™ Wireless Flash Drive User Manual for iPhone, iPad, or iPod touch 28

3. Working with Files Deleting Files and Folders
1. Open the photo you want to share, tap it to display the Photo options, and tap the
Send icon :
2. Select a method to share your photo and provide the required information. (The
options available on your mobile device vary.)
Deleting Files and Folders
To delete a file you’re viewing,
1. Open the file you want to delete.
SanDisk Connect™ Wireless Flash Drive User Manual for iPhone, iPad, or iPod touch 29

3. Working with Files Deleting Files and Folders
2. Tap the Delete icon , then tap Delete File:
To delete a file or a folder in the Navigation Bar,
1. Swipe to the right on the item in the Navigation Bar:
2. Tap the Delete button.
SanDisk Connect™ Wireless Flash Drive User Manual for iPhone, iPad, or iPod touch 30

3. Working with Files Unsupported File Formats
Unsupported File Formats
The Wireless Drive app can open all file formats that are supported by your mobile
device. If you try to open an unsupported file format, a message informs you that this
file type is not supported:
SanDisk Connect™ Wireless Flash Drive User Manual for iPhone, iPad, or iPod touch 31

4. Managing the Wireless Drive Updating the Firmware
4. Managing the Wireless Drive
Updating the Firmware
You are notified in the Wireless Flash Drive app when a Firmware update is available
and asked if you want to install it. If you tap Yes, the app automatically uploads and
installs the update.
1. Tap the App Store icon:
2. Install the update.
3. Connect your mobile device to the Wireless Flash Drive Wi-Fi network and launch
the app.
A popup message prompts you to update the Firmware on the Drive:
4. Tap OK.
SanDisk Connect™ Wireless Flash Drive User Manual for iPhone, iPad, or iPod touch 32
 Loading...