

Sanders Sound Systems Model 10-B Owners manual

Sanders Sound Systems
Model 10b Electrostatic Speaker System
Table of Contents
UNPACKING and ASSEMBLY ............................................................................... 2
OWNERS MANUAL
POSITIONING ........................................................................................................... 4
ELECTRICAL CONNECTIONS .............................................................................. 5
ELECTRONIC CONTROLS ..................................................................................... 7
Level ............................................................................................................................ 7
Up/down Arrows ......................................................................................................... 8
Midrange ..................................................................................................................... 8
Bass ............................................................................................................................. 8
Loss of Power .............................................................................................................. 8
ESL/WOOFER PHASING ......................................................................................... 9
ADVANCED POSITIONING TECHNIQUES ...................................................... 10
LINE FUSE AND VOLTAGE SELECTOR ........................................................... 12
CLEANING / MAINTENANCE ............................................................................. 13
TROUBLESHOOTING ........................................................................................... 14
REMOTE CONTROL .............................................................................................. 17
SPECIFICATIONS ................................................................................................... 18
WARRANTY ........................................................................................................... 18

SETTING UP YOUR SPEAKER S
Setting up your new speakers is a three-part process that includes the following:
Unpacking / Assembly / Positioning
Electrical connections
Adjustment of the balance between the woofers and e lectrosta tic loud speak er (ESL ).
UNPACKING and ASSEMBLY
When you open the boxes, observe carefully how the pack aging is arranged so y ou can repack item s correctly
in the future. When removing the woofer cabinets from their boxes, it is easier to lift the box off the speaker
cabinet than to lift the cabinet out of the box.
To do so, open the box and remove the roll of bubble wrap and the foam pad. Then roll the box over with the
speaker in it, and lift th e box up and away from the cabinet.
The roll of bubble wrap contains the power cord, feet, cones, nuts, and screws. Be sure to unpack these items
before discarding the bubble wrap.
Begin assembly by turning the woofer cabinet on its back on a padded surface like a carpeted floor or a towel
on a table. Never place the cabinet facedown (woofer down) as this will damage the woofer.
1) Attach either smooth feet or cones into the base of the cabinet. The smooth feet are for use on floors,
while the sharp cones are for use on carpet. Speakers are not stable on carpet, so cones should be used to
penetrate through the carpet and rest firmly on the floor below.
You may prefer to install the smooth feet first, even on carpet, so you can easily move the sp eakers around to
find the location you prefer. Then install the cones after you have decided on the ideal position.
Both types of feet screw into steel inserts on the bottom of the speaker and can be adjusted by rotating them in
or out to get the speaker level and stable.
Lock nuts are provided to insure the feet or cones won't shift position or rattle. Put them on the threaded shaft
of the foot or cone before screwing it into t he bottom of the speaker. Once you have the feet or spikes
adjusted to your satisfaction, gently tighten the nut against the bottom of the speaker to lock the foot or spike
into position so i t w ill not shift over time.
2

2) Attach the steel beams to the front edges of the w oofer cabinet. Each beam is held in place by four sock et-head
screws that are in a small bag with an Allen w rench y ou can use to tighten them.
Note that the side of the beams with the Velcro faces towards y ou (when you are looking at the front of the cabinet) .
Install the scre w s by first mounting th em on the end of the Allen wrench. Then insert them through the hole in the
Velcro side of the beam. T he end of the screw will then stick through the beam where you can screw it into the
cabinet. When the beams are secure, it is a simple matter to attach the electrostatic panels, grill, and trim to them
using the Velcro that is already attached to these pa rts for y ou r conv enience.
3) Position the electrostatic panels approximately 1/4 of an inch (1/2 centimeter) above the top of the steel tubing.
The edge of the panels should be flush with the sides of the beams.
The panels' electrical connector hangs down near the left side of the woofer where you will see a mating connector
on the woofer cabinet. The panels will only fit one way as if you try to install them backwards, the Velcro won't
work.
Because the panel is held with Velcro, you can remove and readjust its position to get it fitted correctly.
4) Plug the panel's electrical connector into its mate on the woofer cabinet. The connectors are keyed so that they
will only fit one way so you cannot make a m istak e.
Note that the wires on the connector coming from the cabinet can be pulled out of the cabinet by several inches so
you can easily position the connector. Adjust the connectors so that the connector will be hidden under the woofer
grill and does not touch the woofer. Push any excess wire back inside the woofer cabinet.
Should you ever want to disconnect the panel, you can unplug the connector. Just remember to press the little lever
on the connector to disconnect the catch so you can pull the connect ors apart . They come apart very easily — but
only if you have released the catch.
5) Attach the woofer grill. It is held in place with Velcro like the panel. Press it firmly into the bottom of the
electrostatic panel so there is no gap between the panel and the grill as you press it into place on the rails. See the
photograph.
6) There are wood trim strips that run the full length of the beams. These fit with their narrow side facing forward
and their wide side on the side of the speaker. These are symmetrical so fit either way. They are held in place
with Velcro.
3

POSITIONING
All speakers sound best when they are equidistant from you.
Because the Model 10's imaging is so much more precise than
conventional speakers, they will reveal errors in equidistant
placement mo re than conventi onal speakers. The secti on of this
manual called “Ad vanced Positioning Techniques” will assist you
in obtaining the exact positioning needed.
Aim the speakers directly at yo ur listenin g lo cation — do not place them
parallel to the wa ll.
Equidistant to speakers
The speakers are designed to have a hard, reflective wall behind them — this will disperse the high
frequencies throughout the room so they sound good when you are out of the sweet-spot. So do not put
damping material on the wall behind the speakers unless you only listen at the sweet-spot and do not care
about the sound when you are off-axis.
The speakers may be positioned close to a wall — any wall, side or rear walls work equally well. You do not
have to place them out in the room.
Corner placement exaggerates undesirable bass and room resonances — it is best to avoid corner placement
for speakers.
The bass frequencies in all speakers are adversely affected by room acoustics. Depending on your room
dimensions and the positions of the speakers, bass resonances will occur that cause ragged bass frequency
response.
This problem cannot be avoided — but it can be minimized by trying to produce an infinite number of
infinitely small resonances instead of just a few large ones. Therefore, the worst bass will be produced with
both speakers are positioned symmetrically in the room. This will have them at the same distances from
walls and corners, which will cause them to produce the same two or three resonances and double their
magnitude.
It is much better to place the speakers randomly in the room so that they are each at different distances from
walls and corners. This will produce more resonances at many frequencies and will reduce the magnitude of
those resonances so the bass response will be smoother than symmetrical placement. You don't have to use
random placement, you can place the spe ak ers sym m etrically (most listeners do), but symmetrical placem ent
will compromise the smoothness of the bass.
Random placement of the speakers refers only to their relationship to the walls and corners of the room. It
does not apply to the relationship of the speakers to your listening location, which must always be set up so
that the speakers are equidistant from you and pointed directly at you.
4
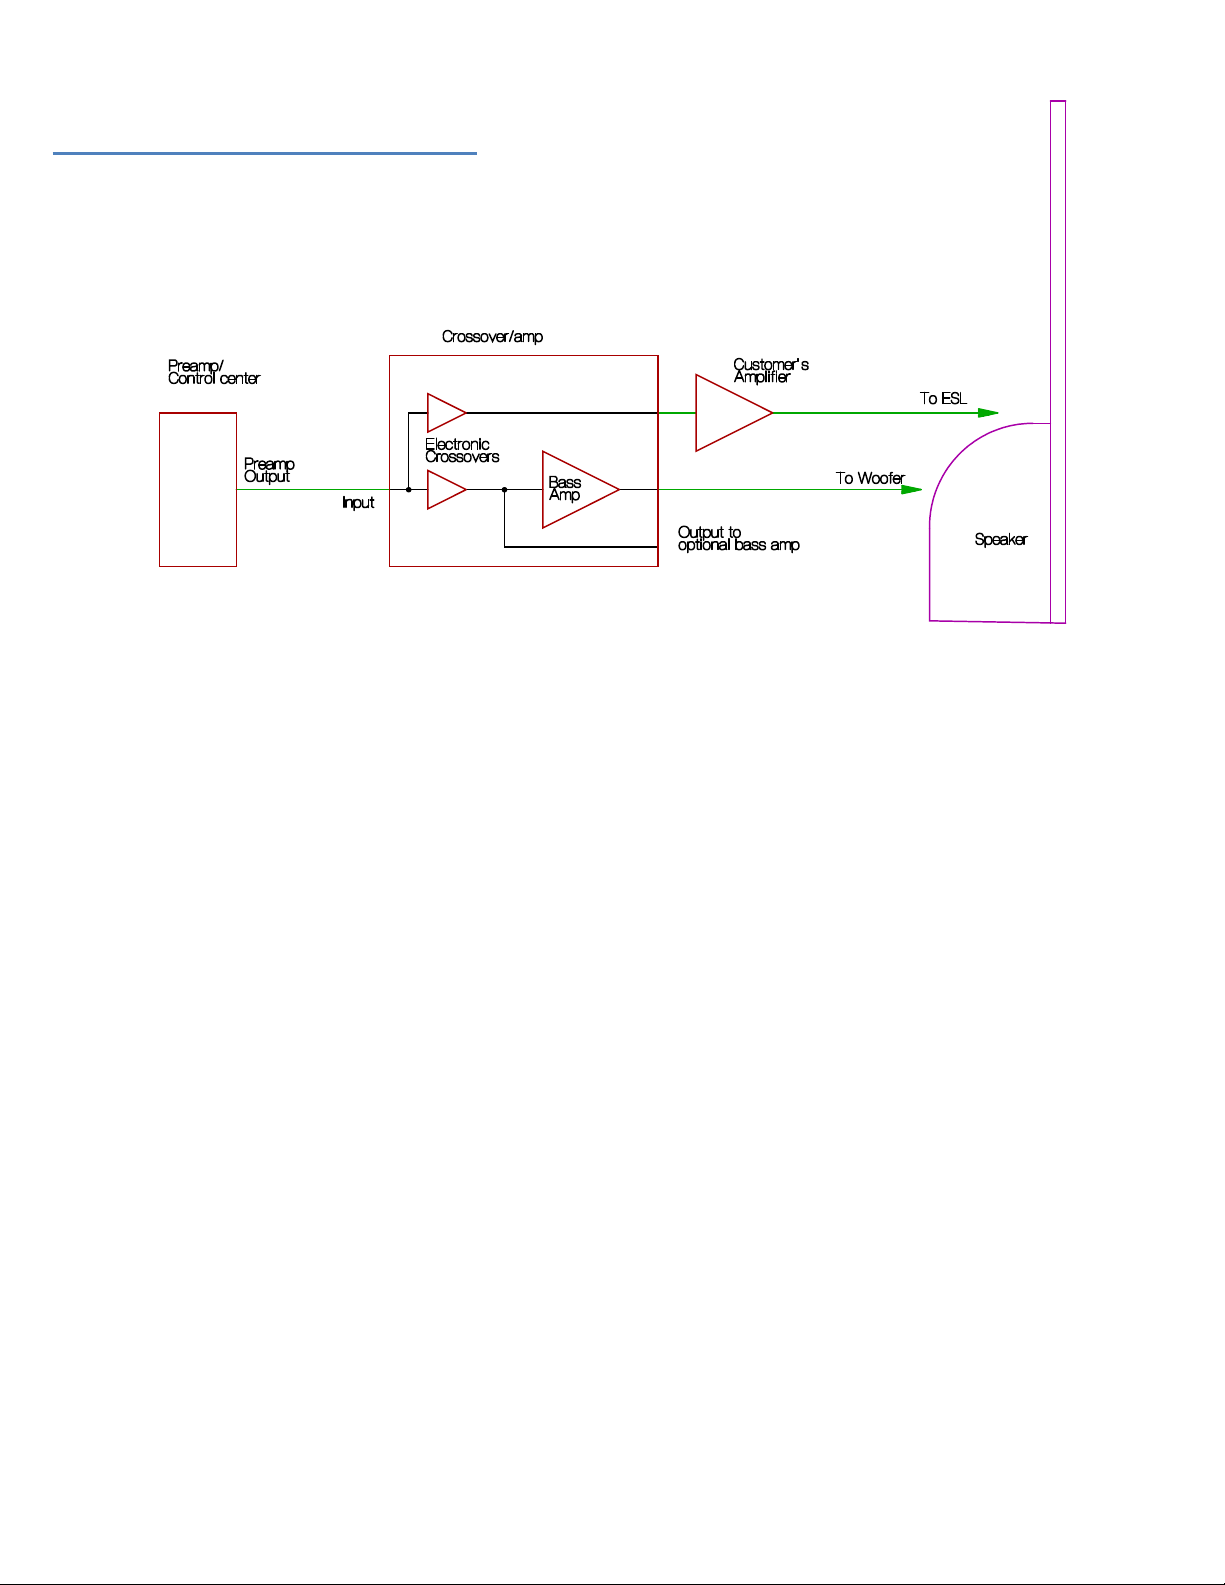
ELECTRICAL CONNECTIONS
The block diagram above shows how to connect the electronics to the speakers. The Model 10b is bi-amplified,
which means that two amplifiers are required, one to drive the woo fers and another to drive the electrostatic panels.
So that you do not have to buy an extra amplifier, Sanders Sound Systems supplies a very high quality, bass
amplifier in the same chassis as the ele ctron ic crosso v er — which is why the unit is called a “Crossov er/am plifier. ”
Connect your preamplifier outputs to the Crossover/amplifier inputs using either balanced or single-ended
interconnects. Connect t he “High Pass” outputs on the back of the Crossove r/ampli fier to t he amplifier that will
drive the electrostatic section of the Eros speakers.
The “Low Pass” outputs are not used when using the built-in bass amplifier. They are only used if you want to use
a different amplifier than the built-in bass amplifier. To use them, connect an interconnect from the “Low Pass”
outputs to the bass amplifier of your choice.
Be certain that you have the phasing correct by connecting the cables the same way on each speaker and am p lifier.
When using the built-in bass amplifier, connect speaker cables from the speaker binding posts on the back of the
Crossover/amplifier to the “Bass” binding posts on the r ear of each speak er. Connect another set of speaker cables
from the amplifier that you will use to drive the electrostatic panels to the “ESL” binding posts on the rear of the
speakers.
Plug the speakers into the wall receptacle. This will energiz e a tiny pow er supp ly that w ill produ ce a s tatic v olta ge
on the electrostatic diaphragms so they will play music loudly. Note that this power supply uses virtually no power
and may be left on continually. There is no need to turn it on and off.
5

COMMENTS ON CABLES
Surprisingly, some expensive interconnects are poorly designed in that they lack shielding. Avoid these as
they often cause buzzing sounds or even allow radio stations to be produced through your speakers. Properly
shielded interconnects will have an outer covering made of fine braided wire that forms a metal shield around
the wire(s) inside the shield. This is known as coaxial wire. Always used shielded interconnects.
Some speaker cable has very high capacitance and can cause high-quality, wide-bandwidth amplifiers to
oscillate at very high frequencies. You cannot hear this oscillation as it is supersonic, but it will cause the
amplifier to operate at full-power and can overheat and damage both the amplifier and the speakers. If you
notice that one or both channels of any amplifier is running much hotter than normal, suspect a supersonic
oscillation.
One brand of cable is notorious for causing this problem and that i s Goertz (Alpha core) cable. It is built as
two thin ribbons sandwiched together, one on top of the other. Do not use this brand or type of cable on
wide-bandwidth solid-state amplifiers (these are amplifiers that are capab le of linear high frequency response
to 100 KHz or beyond). You may use it on tube amplifiers because they have much more limited bandwidth
and cannot reproduce the high frequencies where the oscillation occurs. But because electrostatic speakers
are capacitors, it is best to avoid all high capacitance cab les as this just taxes y our amplifier more.
Speaker cables exert most of their influence on the sound of speakers by interacting with passive, high-level
crossovers present in most speaker systems to change the frequency response of the speaker. Because
Sanders Sound Systems speakers do not have passive crossovers, cables will have little if any effect. The
only basic requirement for the woofer cables is that they be large — at least 14 gauge, so that the amplifiers
will not be isolat ed fro m their driv ers by excessiv e im p edance.
Electrostatic speakers will operate best with cables that have extremely low inductance, moderately low
capacitance, and moderately high im pedance. Sanders Sound Systems manufactures cables that are ideal for
this purpose, but most other cables will be satisfactory as long as their inductance is very low (excessive
inductance will adversely affect the high frequency response of the speakers). You can find a detailed
discussion of this on the "Cable White Paper " found on the website www.sanderssoundsystems.com.
Each speaker has an internal POWER SUPPLY to energize the electrostatic panels. This is why each
speaker must be plugged into the mains. You may use the supplied 10-foot power cord, or the any special
power cord you prefer. Note that since the power supply is not involved in any audio circuits, there is no
reason to believe that using a special cord or power conditioner would have any effect on the sound.
COMMENTS ON AMPLIFIER POWER
What good does it do to have a wonderfully designed amplifier if it is usually overloaded and full of
distortion? Power is the most importa nt amplifier specifica tion . While most of the pow er is r equired in the
bass (which is why the included bass amplifier is very powerful), the electrostatic element requires a
surprisingly large power amplifier at high frequencies because the impedance drops to 2 ohms. Therefore, it is
best to drive it w ith at least a 60 watt/channel tu be amplifier or a 250 watt/ch ann el s o lid state amplifier.
Low-power amplifiers will work, but they will cause distortion if you play them loudly on dynamic material.
They may not sound obviously distorted, but they may sound “strained”, “harsh”, lack detail and dynamics, or
have other audible flaws. Sanders Sound Systems strongly recommends very powerful amplifiers.
6
 Loading...