


Inst
ruction Manua
l
22-Channel Handheld Two-Way-Radio (Walkie Talkie)
SAMCOM FWCN30A
Main Features
● Frequency: 462.5500~467.7125 MHz
● High/Low TX Power (0.5W/0.112W) Selectable
● 22 channels
● 154 codes (50 CTCSS & 104 CDCSS)
● 154
● 5 km optimal range
● Group function (Dual-Channel Watch)
● 3 VOX levels
● 10 Call tones
● Monitor
● S
● Scan
● Key lock function
● Built-in 1200mAh Li Polymer Battery
● Flashlight
● NOAA & Wheather Alert
codes (50 CTCSS & 104 CDCSS)
Facebook SANCON INC.
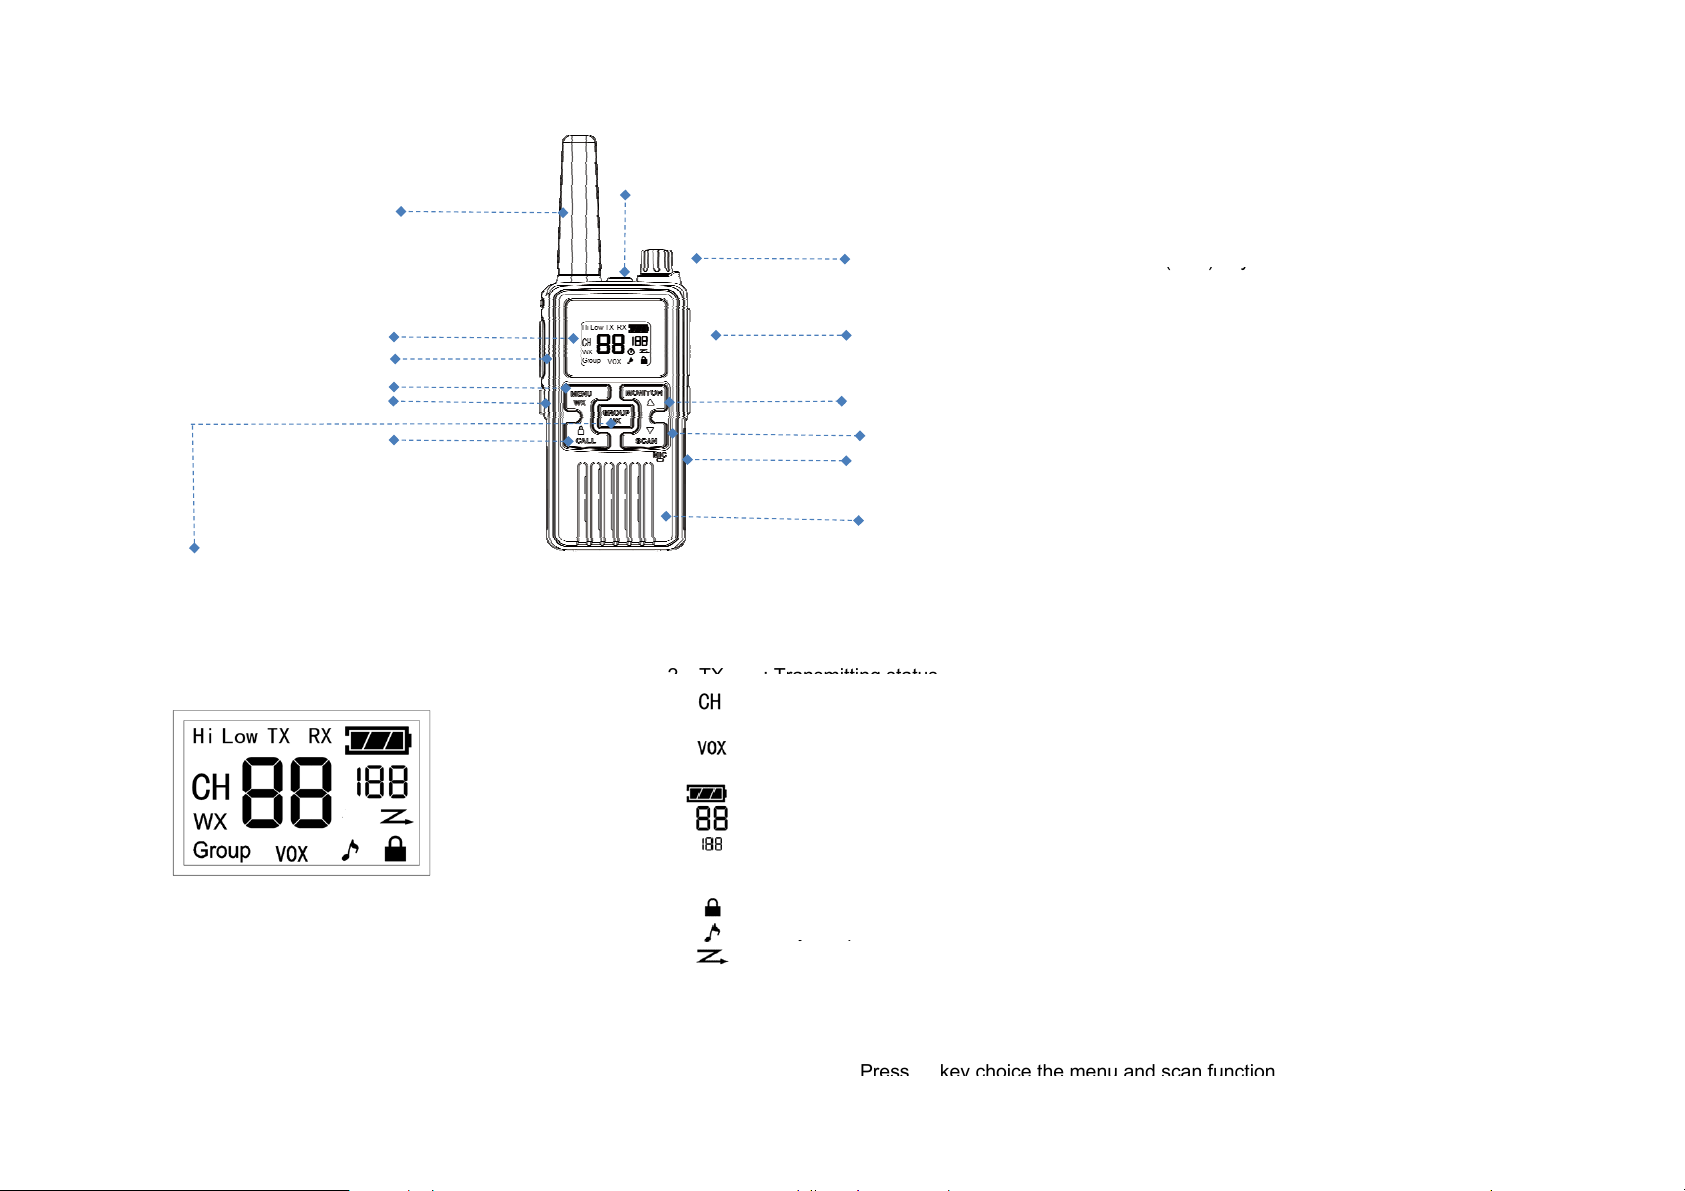
Overview
play
p
k
(
y
()y
p
y
y
p
y
y
14
4
9
Call Tone /Key Lock key
p
p
r
A
2
TX: T
itti
r
y
r
y
p
yp
y
,
12
12
3
8
95
● GROUP Button – A broadcasting function (one-to-all) to communicate with all other radios that are
programmed to monitor the same group channel (default group = CH 8). Great for home/office wide announcements or
check ins.
LCD Display Icons
13
6
10
11 14. Flashlight key
1 RX : Receiving status
ransm
3 : Main (Foreground) Channel
4 Group : Group (Background) Channel
5 : VOX (Voice-activiated TX)
6WX
7
8 : Channel Numbe
9 : CTCSS/CDCSS Code Number
10 Hi : High TX Power
11 Low : Low TX Power
12 : Key Lock
13 : Ke
14 : Channel Scan
: Weather Receive
: Batter
ng status
Level
Bee
1. LCD dis
2. Ear
3. Push-To-Talk
4. U
5. Down / Scan ke
6. Power / Volume Knob
7. Grou
8. Menu / WX ke
.
10. Micro
11. S
12.
13. Flashlight LED
hone & Charger Jac
PTT) ke
/ Monitor ke
/Ok ke
-
hone
eake
ntenna
Press the MENU ke
,enter into the menu selecting mode Press ▲ key choice the menu and monitor function
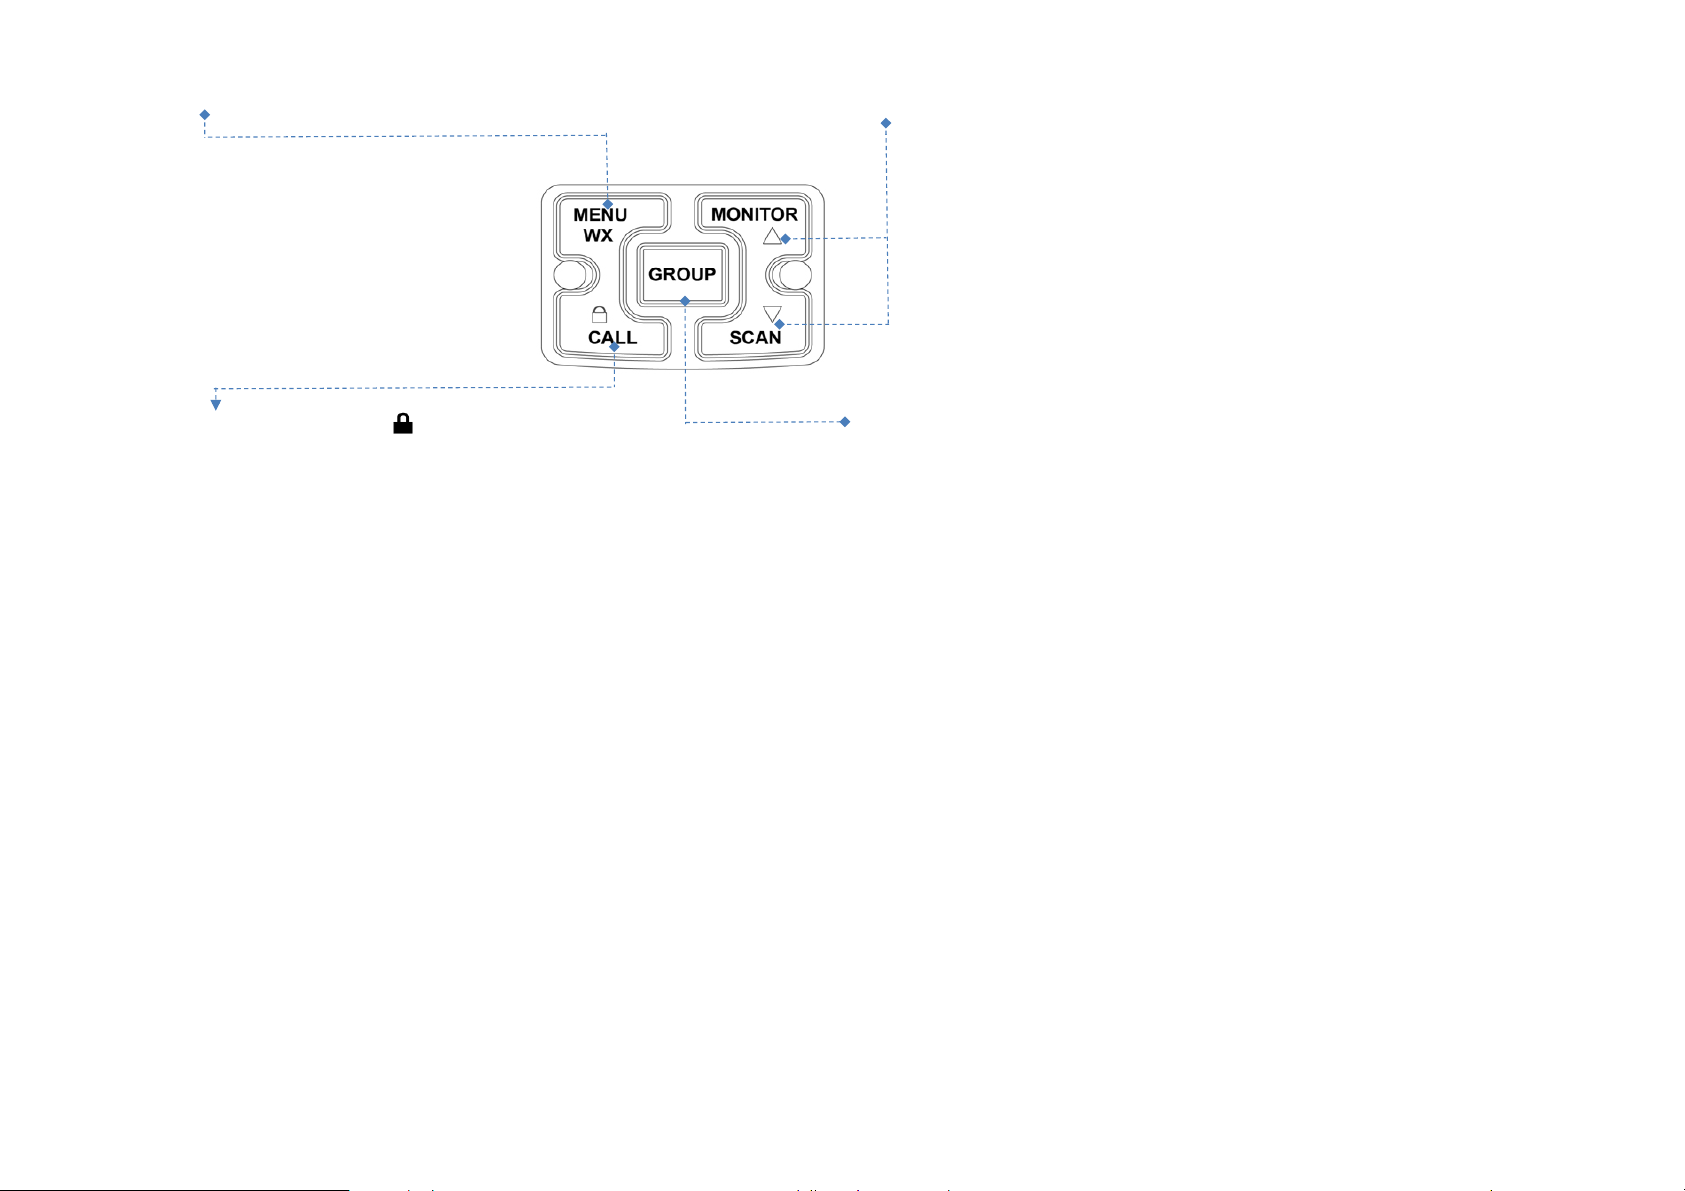
Keep press 3 seconds the key to lock,
y
press the key call function will opened
Press the GROUP ke
to speak to all channel ,
GENERAL OPERATIONS
g
p
t
p
pp
p
p
ff
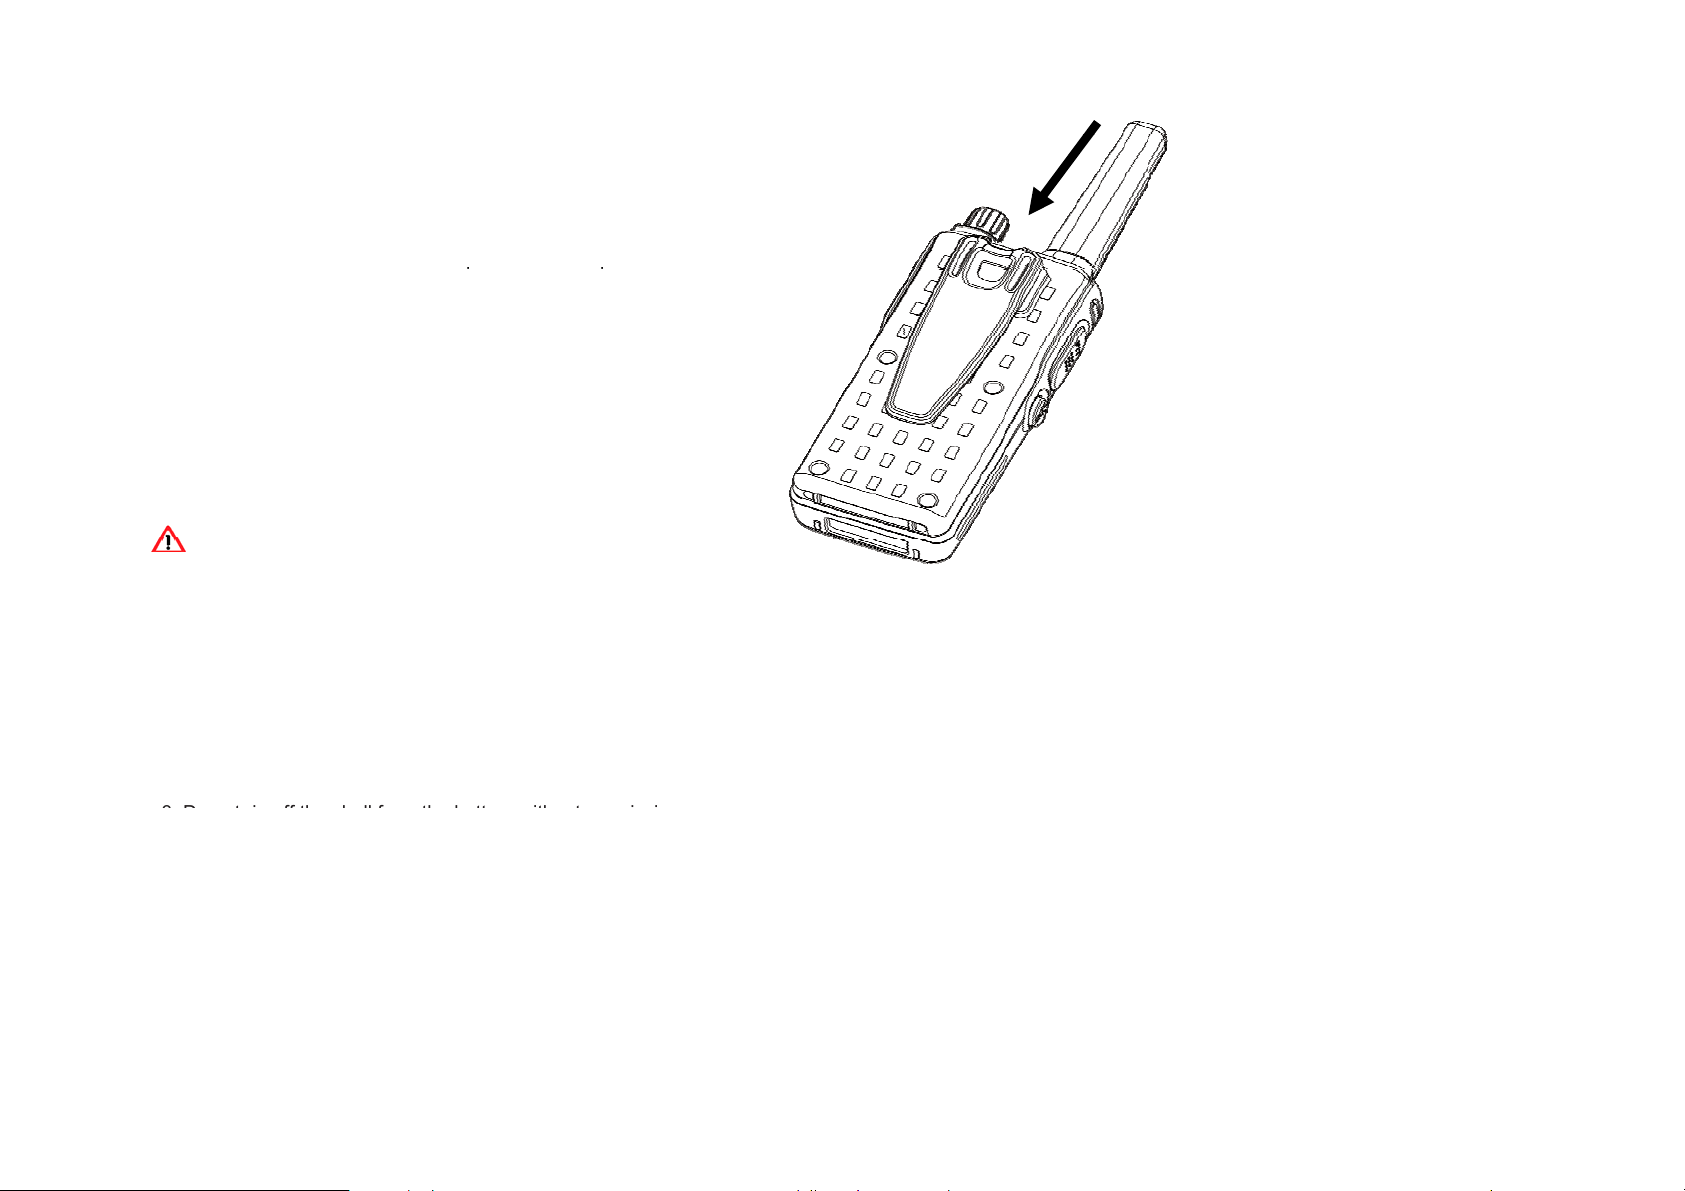
Install / Removing Belt Clip
Installin
● Slide the Belt cli
Belt Clip
into the slo
A “click” indicates the Belt Clip is locked into position.
Removing Belt Clip
● Pull the belt cli
● While
ulling the belt clip latch, push up the belt cli
latch forward
Battery on First Use
Since batteries leave factory without a fully charging, please charge the new batteries before using. Under normal
circumstances, the
battery on first use needs 5 hours of charging. The first three times of fully charging and discharging provides batteries the best
capacity.
When you find out the battery is low, it is required to charge or replace it.
Safety Precautions
1. Do not dispose the batteries in the fire.
2. Do not dispose the batteries as household wastes, and it must be collected and treated properly.
3. Do not rip o
the shell from the battery without permission.

Notes:
3. Do not put back and charge the battery that is already full, for it will significantly reduce the cycle life
loading or charging it
y
℃
1. When charging, the temperature should be between 5
battery.
2. Please shut down the transceiver with battery loaded before charging it. The use of the transceiver while charging is ongoing
will affect the normal battery charging.
4. Since continuous charging will shorten the life of the battery, it is unwise to place the transceiver or battery on the charger, or
take
the charger as a placement seat for the transceiver.
5. Do not charge the battery when it is wet. You should dry it first in order to avoid any danger.
6. If the battery’s usage time is very short even when it has been charged in completely correct way, it can be concluded that
the
battery life is due and should be replaced by a new one.
Extension of Battery life
1. The performance of the battery will be reduced when the temperature drops below 0℃. In cold weather, it is advised to
spare another battery for emergency. Please do not dispose the cold batteries that can not work at low temperature but may be
usable at room temperature.
2. It may affect the normal use or charge of the battery, if it is covered with dust. Please clean the battery with dry cloth before
.
Knowledge about Battery Storage
1. Since the battery will self-discharge, please do charge it fully before putting it aside so as to prevent damages caused by
over discharge.
2. Please take out the battery after storage for some time to fill it, in order to avoid the reduction of the battery capacity resulting
from
over discharge. It is proposed for lithium-ion / lithium-polymer batteries to be filled in every 6 months of storage.
3. Please pay attention to the humidity of the battery storage environment. Batteries are supposed to be stored in the
environment of room temperature, cool and dry air, to reduce the self-discharge.
~40 ℃,otherwise it may cause the leakage or even damage the
.
CHARGING BATTERIES
When the “Batter
level icon is low, you need to charge the battery with the enclosed AC/DC adaptor .

Charging with AC/DC adaptor
g
ged,
t
●
The LCD Battery Icon will flash
g
1
TRANSMITTING RANGE
,
● Plu
other end into the micro USB socket on the
of the radio.
● Each adaptor can connect 2 sets of radio for
charging.
● To charge fully from empty require about 5
hours.
● After char
the adaptor into the wall socket and
“
”
unplug the adaptor from the socke
.
WARNING
● To avoid damage to the radio use only original accessories.
● The radio will be sli
GENERAL OPERATIONS
htly warm during charging.
.
● The talk range depends on the environmental and terrain. It will be reach (up to about 5km) in wide open spaces
without obstructions such as hills or buildings. Don’t try to use two units which are less than 1.5m (5feet) apart.
If you do, you may have experience interference.
2. POWER ON/OFF

●Rotate the PWR/VOL control knob clockwise until a" ka-ka "sound is heard to turn on the power.
4
SPEAK TO OTHER RADIO
p
y
● The radio will automatically sound received signal from the other radio with the same channel and code, and
y
j
● Ti
itting by ch
lif
p
o
,
)
ygppp p y,
y,
p
y
When you receive calls ,the knob provides you the ability to change the volume for your listening
habits.When shutting down the transceeiver,you need to rotate it counterclockwise a "ka-ka"
sound is heard.
3. MAKING COMMUNICATIONS
The radio has 22 main frequencies and 154 CTCSS/CDCSS codes
You can communicate with any other user who is using the same combinations, providing they are within range.
.
● Press & hold the PTT key, LCD TX icon indicating the radio is transmitting.
● Hold the radio in a vertical
● When
5. LISTEN TO OTHER RADIO
ou finish speaking, release the PTT key.
osition with the microphone 3-5 cm from your mouth and then speak.
meanwhile LCD shows the icon
● When
● Ad
6. TALK TIME-OUT FUNCTION
● The radio will sto
release PTT and press again for further transmission.
● In VOX mode
You can re-activate VOX after the time-out. (Please refer to VOX function for detailed VOX operation).
7. GROUP FUNCTION ( Dual-Channel Watch)
The unit has dual-channel watch function. It can monitor two channels at the same time, which are the Main (foreground
and Group (Background) channels, i.e., it can detect signal on either channel.
When the unit detects a signal on the Group channel, it will automatically sound the received signal with LCD showing
"Group" icon, Group channel number and associated code number.
When you want to talk to a group of people that have their radios set the Group Channel number to be the same as yours,
just do the following.
● Press & hold the GROUP ke
● Hold the radio in a vertical
● When
ou press the PTT key, you can’t listen to other radios. Make sure you do not press PTT key for listening.
ust volume control if necessary.
me-out function can avoid transm
transmitting and sound a warning tone when PTT is held over 3 minutes. You then need t
the unit will stop transmitting and sound a warning tone after continuous talk for 3 minutes.
ou finish speaking, release the GROUP key.
RX
ance and prolong the battery
LCD displays TX icon, indicating the radio is transmitting on the Group channel.
osition with the microphone 3-5 cm from your mouth and then speak.
e.

You can use 1 of 10 different “Call Tones” to get attention of other user on the same channel with same code.
o
y
y
play
p
pg
y
The function is useful to check for activity on the main channel before you talk. When you find the main channel busy
● All keys are locked except PTT and GROUP /OK keys
13
High / l
, p
g
gg,pgy p
● Press the CALL
9. SCANNING CHANNELS
● Press the SCAN ke
● LCD dis
● It will sto
10. MONITOR Function
● Press and hold the MONITOR
key and the tone will sound, LCD will display the transmit ic
shows the scanning channel one by one.
at those channels with signal for a while.
once and LCD will displa
key to have the unit sound signal or noise, whichever occurs on the main channel.
and radio will start scanning.
and your call tone will be sent.
TX
● Release the MONITOR ke
, you can change the main channel number to a clear one. Moreover, it also can be handy for the user to verify the
volume level of the radio when the radio is not receiving. You can adjust the volume, if necessary.
11. LOCK KEYS
● Press and hold
● To unlock, press and hold
12. MICROPHONE / EARPHONE JACK
The unit is equipped with a microphone / Earphone jack located at the right side. You can use an optional earphone
(not included) for handsfree function.
.
14. Flashlight FUNCTION
ow TX Power Selection
The radio has defaut high TX power option for Channels 1 to 15. When you know your party is close by, you
can set the channels to low TX power option to conserve the energy of the radio's battery.
● When LCD shows the main screen
between High and Low.
When the radio is set to High TX power, the LCD displays the icon . When the radio is set to Low TX power,
the LCD displays the icon
Note: the channels 16 to 22 have and only have low TX power option, as per FCC regualtions.
To use the flashlight function
● When the flashli
● When the flashlight is illumining, press the Flashlight key to turn it off.
ht is not illumining, press the Flashlight key once to turn and keep it on.
to turn off the function.
key for 3 seconds, LCD display icon.
key for 3 seconds again.
ress and hold the key for 3 seconds to change the TX power option
Menu Operation
Press Menu key once to firstly enter main channel selection from the main screen, press again for next function selection etc.

Main Screen → Main Channel → CTCSS/CDCSS → GROUP (Dual-Channel Watch) → VOX → Call Tone →
y
r
This function can help you select your group (121 CTCSS/CDCSS codes) of users on the same channel
y
and continue next function setting
p
r
●
Desi
lly by
p
g
r
r
y
() jy g g p g
y
Ke
Beep → Roger Beep → Main Screen
9. SELECT CHANNEL
To select the main channel
● Press the MENU key once, Main channel number will flash.
● Press
● Press the GROUP/OK or PTT key to confirm and revert back to the main screen, or the MENU key to confirm
and continue next function setting.
You have 10 seconds to decide before auto-reverting back to the main screen
10. CTCSS/CODE FUNCTION
Only the users with the same CTCSS/CDCSS code can listen and talk to each other. Please note that selecting
a CTCSS/CDCSS code does not assure total privacy.
● Press the MENU key twice, CTCSS/CDCSS code will flash.
● Press
● Press the GROUP/OK or PTT ke
11. GROUP CHANNEL SETTING
By default, all radios have a default GROUP number channel setting of “8 ”. This is the channel that all radios
will receive on when someone in your group presses the “Group” button to send a message to everyone.
NOTE: There is no need to change the default GROUP number unless you either:
● Are ex
communications. For example, if you want three different buildings, each with its own group number.
This would be a more advanced configuration and is not needed for your average home or small office.
o
or
eriencing interference or cross talk from other radios or intercoms in the area on the current group channel, o
re advanced functiona
to select new Main channel
to select new CTCSS or CDCSS code
to confirm and revert back to the main screen, or the MENU key to confirm
.
organizing your radios into groups that call all receive separate grou
.
To chan
● Press the MENU key 3 times, GROUP with group channel number will flash.
● Press
● Press the GROUP/OK or PTT ke
and continue next function setting.
12. VOX (Hands-Free Function)
The unit has a built-in Voice Activated Circuit (VOX) function. You can enjoy talking and listening without pressing PTT
key. To have better performance, you can use this function with the external earphone (optional accessories).
● Press the MENU ke
● Press
key to select sensitivity level from “ , 1, 2, 3” for “OFF, Low, Medium and High respectively.
After turning on the VOX function, LCD will display icon. Press the GROUP/OK or PTT key to confirm
e the GROUP Numbe
o
4 times, LCD displays
or
to select new Group Channel
to confirm and revert back to the main screen, or the MENU key to confirm
icon and VOX sensitivity digit will flash.

Please speak close to the mic in order to activate VOX function.
y
y
g
y
g
y
y
●
Press the
GROUP/OK
PTT
key to confirm and revert back to the main screen, or the
MENU
key to confirm
●
Press the
GROUP/OK
PTT
key to confirm and revert back to the main screen, or the
MENU
key to confirm
y
y
, p
, p
14. SELECTING CALL TONE
● Press the MENU ke
● Press
● Press the GROUP/OK or PTT ke
and continue next function settin
15 KEY BEEP ON/OFF
The unit has the function to turn the key beep on or off.
● Press the MENU ke
● Press
and continue next function setting.
16. ROGER BEEP
The roger beep function enables a short tone signal which is transmitted after releasing the PTT button.
● Press the MENU ke
● Press
and continue next function setting.
WEATHER RECEIVER (WX) FUCNTION
The radio has the capability to tune in to broadcasts by the United States National Oceanic and Atmospheric Administration
(NOAA) Weather Radio and Environment Canada Weather Radio. You can listen to a weather channel or set your radio to
alert you to emergency weather broadcasts that interrupt routine broadcasts. When you listen to a weather channel,
you cannot use your radio in scan mode or for two-way communications.
5 times, LCD will displa
or to scroll between 1 to 10 and to select a call tone or turn off the CALL function.
to confirm and revert back to the main screen, or the MENU key to confirm
.
6 times, LCD displays the icon.
or
or
7 times, LCD displays the icon.
or
or
to turn the key beep on or off
to turn the Roger beep on or off
icon and call tone number will flash.
Entering the WX Mode
● In two-wa
, the LCD will display the icons and and the unit sounds a noise.
Setting the WX Channel
● In WX mode
● Press
● Press the
Setting the WX Alert
The radio can be set to respond to NOAA Weather Radion emergency meassages. A special alarm tone sounds an alert
and turns on the WX to give you immediate weather and emergency information.
● In WX mode
● Press
radio mode with the main screen display, press and hold the ke
ress
or
key to confirm and continue setting WX.
ress
or
for 3 seconds to enter WX mode
key 1 time unitl WX channel number flashes.
to select the appropriate channel with good reception in your area.
2 times unitl the icon or flashes
to turn the WX alert function On or OFF.

Exiting the WX Mode
, p
y
y
,
y
yypy
(
)
(
)
1
12
467.6625
146
Low
462.5625
154
High
(Hz)
(Hz)
(Hz)
(Hz)
(Hz)
(Hz)
(Hz)
(Hz)
● In WX set mode
ress and hold the ke
● After the WX mode is activiated either manuall
for 3 seconds to exit WX mode and return to two-way radio mode.
or by receiving an alert, if no keys are pressed for 5 minutes
the WX mode will automatically revert back to two-way radio mode.
ou turn on the WX alert function and return to two-way radio mode, the LCD will display the icon on the
If
main screen in two-way radio mode, which means the WX alert function has been activiated and the radio can detect
the weather channel signal and two-way radio channel signal at the same time.
FRS Channel Configuration Chart
FRS
Channel
Frequency
MHz
DefaultAssociated
Code
TXPower Frequency
FRS
Channel
MHz
DefaultAssociated
Code
TXPower
213
314
415
516
617
718
819
920
10 21
11 22
462.5875 134 High 467.6875 139 Low
462.6125 82 High 467.7125
462.6375 145 High 462.5500 High
462.6625 81 High 462.5750 High
462.7125 79 High 462.6250 140 High
467.5625 144 Low 462.6500 73 High
467.5875 78 High
467.6125 143 Low
467.6375 77 Low
Low
462.6750
462.7000
462.7250
75
142
141
72
71
70
Low
High74462.6875 80 High 462.6000
High
High
CTCSS Code Frequency Chart
Code
Freq.
Code
Freq.
Code
Freq.
Code
Freq.
Code
Freq.
Code
Freq.
Code
Freq.
No.
1 67.0 8 88.5 15 110.9 22 141.3 29 179.9 36 233.6 125 171.3 132 229.1
2 71.9 9 91.5 16 114.8 23 146.2 30 186.2 37 241.8 126 177.3 133 254.1
3 74.4 10 94.8 17 118.8 24 151.4 31 192.8 38 250.3 127 183.5
4 77.0 11 97.4 18 123.0 25 156.7 32 203.5 128 189.9
5 79.7 12 100.0 19 127.3 26 162.2 33 210.7 122 69.3 129 196.6
6 82.5 13 103.5 20 131.8 27 167.9 34 218.1 123 159.8 130 199.5
7 85.4 14 107.2 21 136.5 28 173.8 35 225.7 124 165.5 131 206.5
No.
No.
No.
No.
No.
No.
Code
No.
Freq.

CDCSS Octal Code Chart
T
T
T
T
T
T
T
T
43
03256125692238233195445
108
627
121
754
146
332
49
071621557526188371
101
516
114
703
139
225
152
462
e
y
ygqp , g y y
Code
No.
39 023 52 074 65 165 78 271 91 413 104 565 117 731 142 255
40 025 53 114 66 172 79 306 92 423 105 606 118 732 143 266
41 026 54 115 67 174 80 311 93 431 106 612 119 734 144 274
42 031 55 116 68 205 81 315 94 432 107 624 120 743 145 325
43 032 56 125 69 223 82 331 95 445 108 627 121 754 146 332
44 043 57 131 70 226 83 343 96 464 109 631 134 036 147 356
45 047 58 132 71 243 84 346 97 465 110 632 135 053 148 446
46 051 59 134 72 244 85 351 98 466 111 654 136 122 149 452
47 054 60 143 73 245 86 364 99 503 112 662 137 145 150 454
48 065 61 152 74 251 87 365 100 506 113 664 138 212 151 455
50 072 63 156 76 263 89 411 102 532 115 712 140 246 153 523
51 073 64 162 77 265 90 412 103 546 116 723 141 252 154 526
OC
Code
Code
No.
OC
Code
Code
No.
OC
Code
Code
No.
OC
Code
Code
No.
OC
Code
Code
No.
OC
Code
Code
No.
OC
Code
Code
No.
OC
Code
SAFETY TRAINING INFORMATION
Any changes or modifications not expressly approved by the party responsible for compliance could void the user's authority to
operate the equipment.
This device complies with part 15 of the FCC Rules. Operation is subject to the following two conditions: (1) This device may
not cause harmful interference, and (2) this device must accept any interference received, including interference that may
cause undesired operation.
Note: This equipment has been tested and found to comply with the limits for a Class B digital device, pursuant to part 15 of th
FCC Rules. These limits are designed to provide reasonable protection against harmful interference in a residential installation.
This equipment generates, uses and can radiate radio frequency energy and, if not installed and used in accordance with the
instructions, may cause harmful interference to radio communications. However, there is no guarantee that interference will not
occur in a particular installation. If this equipment does cause harmful interference to radio or television reception, which can be
determined b
turning the equipment off and on, the user is encouraged to try to correct the interference by one or more of the
following measures:
—Reorient or relocate the receiving antenna.
—Increase the separation between the equipment and receiver.
—Connect the equipment into an outlet on a circuit different from that to which the receiver is connected.
—Consult the dealer or an experienced radio/TV technician for help.

● CAUTION
Transmitting more than 50% of the time can cause FCC RF exposure compliance requirements to be exceeded. The radio
T
lit
A proper antenna is the antenna supplied with this radio by the manufacture or an antenna specifically authorized
by the manufacturer for use with this radio.
● DO NOT
is transmitting when the "TX indicator" lights red. You can cause the radio to transmit by pressing the " PTT" switch.
Unauthorized antennas,modidications or attachmens could damage the transmitter and may violate FCC regulations.
● ALWAYS
Accessories can cause the FCC RF exposure compliance requirements to be exceeded. Body-worn operations are restricted
to belt-clips, holsters or similar accessories that have no metallic component in the assembly.
o provide the recipients of your transmission the best sound qua
y, hold the antenna at least 2.5 cm from mouth,
and slightly off to one side.
The information listed above provides the user with the information needed to make him or her aware of RF exposure, and
what to do to assure that this radio operates within the FCC RF exposure limits of this radio.
 Loading...