

Page 1

GB ELECTRIC MINI OVEN USER'S MANUAL
RO MANUAL DE UTILIZARE CUPTOR ELECTRIC
MEDIU
Page 2

GB ELECTRIC MINI OVEN USER'S MANUAL......................5
RO MANUAL DE UTILIZARE CUPTOR ELECTRIC
MEDIU.......
.................................................................................16
Page 3

Dear customer,
Thank you for relying on products. We aim to allow you to optimally and
efficiently use this environment-friendly product produced in our modern facilities
under precise conditions with respect to sense of quality in total.
We advise you to read these operating manual thoroughly before using the mini oven
and keep it permanently so that the features of the mini oven you have
purchased will stay the same as the first day for a long time and serve in an optimum
efficient way.
NOTE:
This Operating Manual is prepared for multiple models. Your appliance may not
feature some functions specified in the manual.
The product images are schematic.
This product has been produced in modern environment-friendly facilities without
adversely affecting nature.
“Complies with AEE Regulation."
Page 4

Warnings...............................................................................................................
5
Electrical Connection and Safety .......................................................................
Explanation of the Oven and the Control Panel Technical Specifications ...........
Cooking Chart
Operation of the Oven
If Your Oven is not Working
Oven lamp
Maintenance
Yogurt fermentation and the use of steam cleaning..............................................
Function Digital clock usage (*).............................................................................
Compliance with AEEE regulations and Waste Disposal .....................................
Package Information..............................................................................................
......................................................................................................
...........................................................................................
...................................................................................
.............................................................................................................
and Cleaning....................................................................................
8
9
10
10
11
11
11
12
13
15
15
(*) option
Page 5

WARNINGS
This appliance is manufactured in accordance with
the safety regulations. Operation against the rules
cause harm both to the person and the appliance.
Do not put any flammable, ignitable materials or
material that may melt or deform due to the heat
inside the oven against possible risks even when
your appliance is not operated.
The appliance is not intended to be operated by
means of an external timer or separate remotecontrol system
Door surface may reach high temperatures when the
appliance is operated.
Do not pour cold water to the tray or inside the oven
while the surface of the appliance is still hot.
Surface of the appliance may get damaged as a
result of the sudden change in the temperature, and
it may cause scaldings.
Long term intense use of the appliance
may require extra ventilation, for example,
opening a window, or a better ventilation, such
as increasing the mechanical ventilation level.
Put curtains, tulles, paper or any flammable
(ignitable) material away from the appliance
before starting to use the appliance. Do not put
ignitable or flammable materials on or in
the appliance.
5
Page 6

Keep an eye on the children in the vicinity of the
appliance.
This appliance is not intended to be used by people
with physical, sensory and mental disabilities
(including children) or those who have not adequate
experience and knowledge regarding its use,
unless they are under the supervision of a person
responsible for the safety of the appliance.
Appliance may be used by children above age of
8, persons with limited physical, perceptual or
mental abilities or persons with a lack of experience
and knowledge if they are supervised or given
instructions on the operation of the appliance and any
relevant risks they may be encountered.
Children should not tamper with the appliance.
Cleaning and user maintenance of the appliance
shall not be performed by unattended children.
Appliance shall be very hot while it is being
operated or after a short while when it is operated;
do not touch heater surfaces, and let children to
touch these surfaces.
Keep the appliance and cord away from children
under 8. Children shall be supervised to ensure that
they do not play with the appliance.
6
Page 7

This appliance is intended to be used in household and similar applications
such as:
- Staff kitchen areas in shops, offices and other working environments;
- Farm houses;
- By clients in hotels, motels and other residential type environments;
- Bed and breakfast type environments.
Do not apply pressure on the oven door with heavy objects when the door
is open; do not lean, place heavy objects on the door or handle the appliance
by holding its door.
Use your appliance for cooking and heating your meal only. Do not use your
appliance for unintended purposes (heating the room, for commercial
purposes etc.).
Ensure that the appliance is unplugged before replacing the lamp of your
appliance to prevent a risk of electric shock.
CAUTION!
The surfaces of the areas with this label are hot.
Do not touch.
7
Page 8

ELECTRICAL CONNECTION AND SAFETY
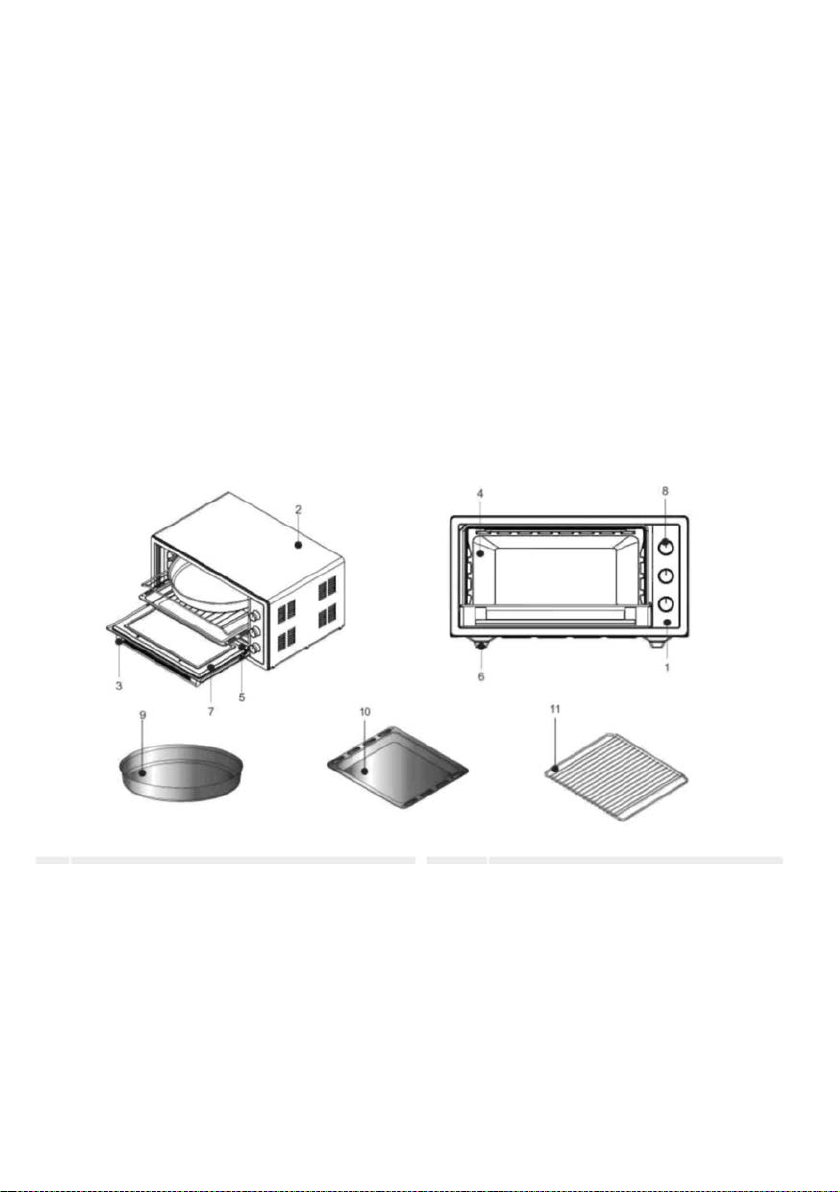
1-
Control panel
6-
Oven pedestals
2-
Oven body
7-
Oven glass door
3-
Handle
8-
Control buttons
4-
Cooker
9-
Circular tray (Option)
5-
Heaters
10-
Rectangular tray
11-
Wire grill
Your appliance requires a current of 13 Amperes. Have the
appliance installed by qualified persons, if required.
Your appliance is designed for a power supply of 220-240V, ~ 50/60Hz. If
your mains supply specifications are different from the specified
values, contact qualified persons.
Electrical connection of your appliance shall only be performed with earthed
outlets installed as per the regulations. Contact authorized service if an
earthed outlet is not available where the appliance shall be placed.
Manufacturer is not responsible for damages caused by unearthed outlets.
If the mains cord (plugged cord is damaged, this cord must be replaced by
the importer or its service agent or an equally qualified personnel to prevent a
hazardous situation.
Power cord of your appliance shall not come into contact with the hot
components of the appliance.
EXPLANATION OF THE OVEN AND THE CONTROL PANEL
8
Page 9
Top heater
Features
External width
External depth
470 mm
External height
330 mm
Internal width
440 mm
Internal depth
420 mm
Internal height
240 mm
Thermostat
Timer (*)
0 to 90 min.
Bottom heater
800 W
Top heater
600 W
Supply voltage
Turbo fan (*)
13 - 15 W
Oven lamp (*)
15 W
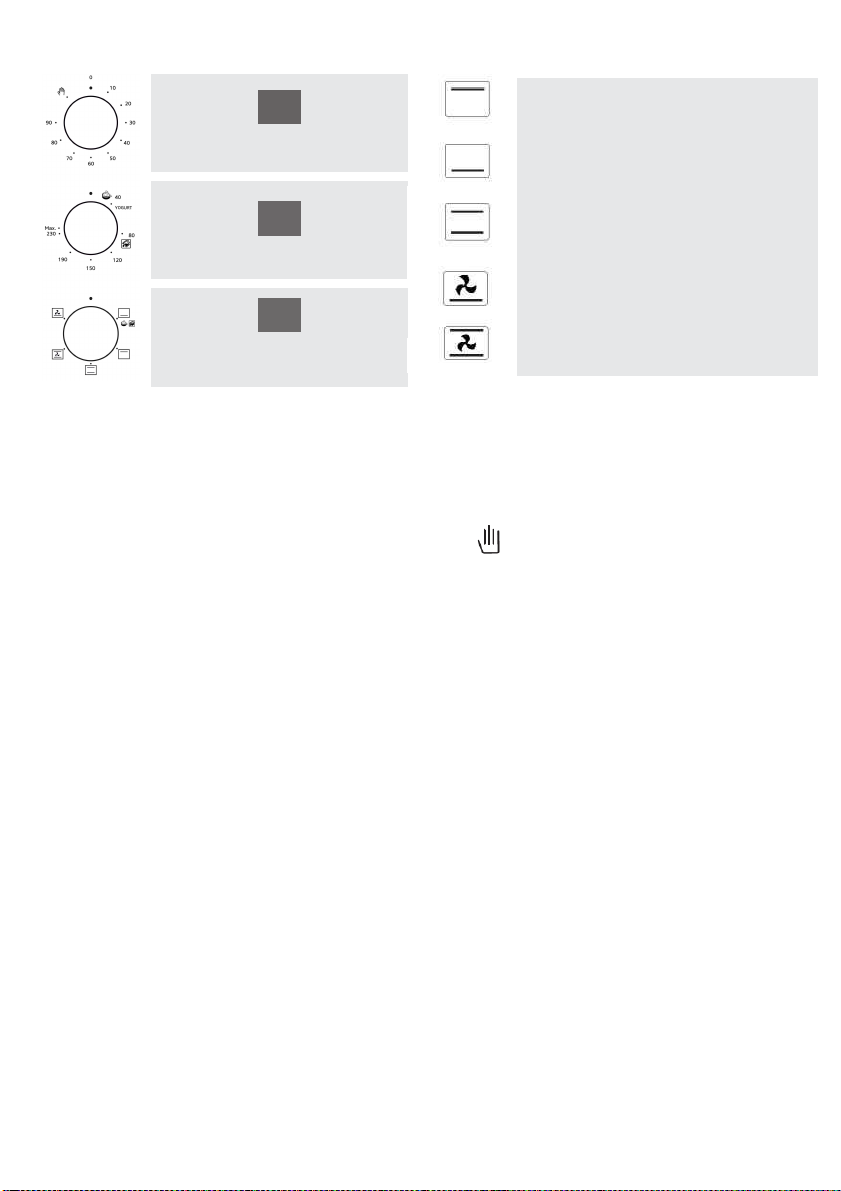
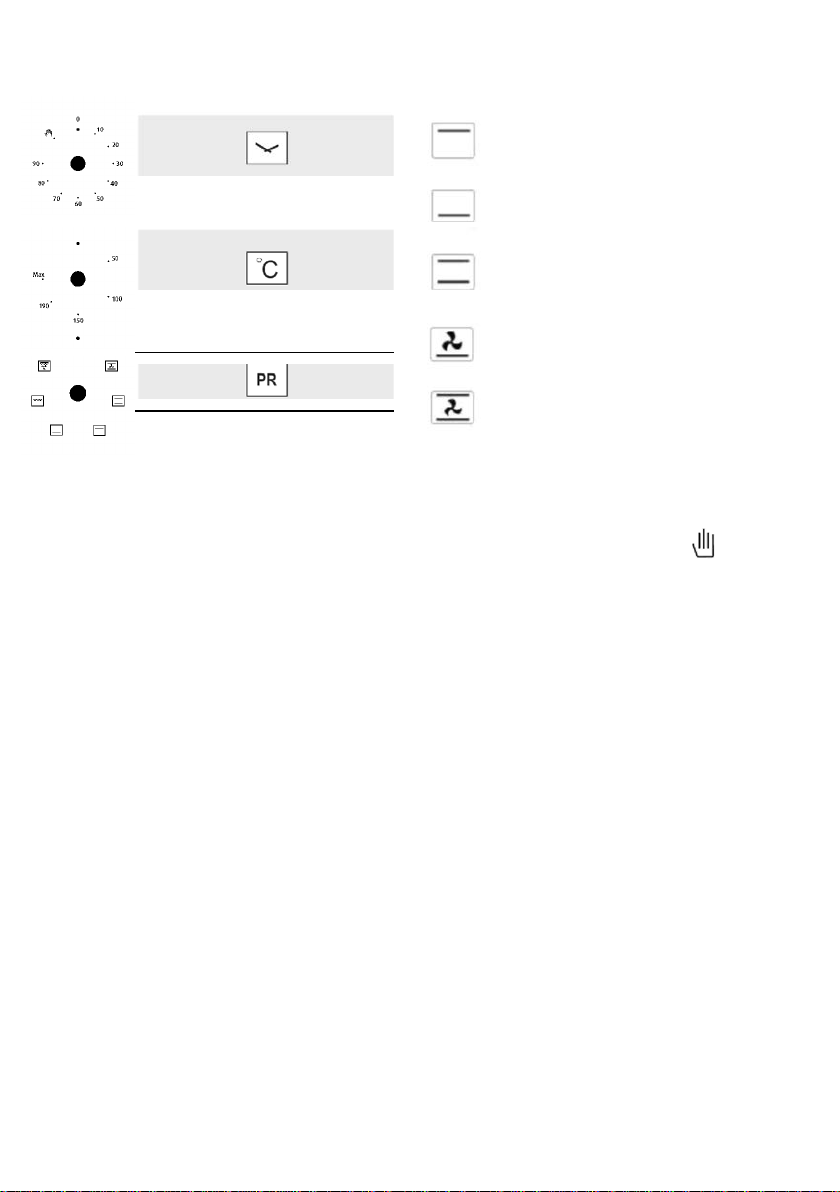
Timer
Bottom heater
Bottom and top heater
Thermostat
Bottom heater and Turbo Fan
Programmer
Bottom and Top heater
and Turbo fan
Timer: Set the timer to the recommended cooking time
at the desired thermostat degree. When the set time has expired, timer shall
cut off the power of the heaters and provide a warning with a tingling sound.
Set the timer, programmer and thermostat buttons to zero position to turn off
your device. When the timer is set to position, it will be working
independent of the time.
Thermostat: Thermostat ensures a temperature from 40 to 240 °C inside
the oven.
TECHNICAL SPECIFICATIONS
MINI OVEN 45 LT
590 mm
40 to 240°C
220-240V, ~ 50/60Hz.
(*): This feature is only available on some models.
9
Page 10

COOKING CHART
Cookie
170-180
Cake
170-190
Pie
180-220
Muffin
160-180
Pasta (baked)
190-210
Fish
220-MAX
Lamb
220-MAX
Mutton
220-MAX
Veal
220-MAX
Turkey
220-MAX
Poultry
220-MAX
Defrost
60-120
Below you may find the information about the food we have tested in our
laboratories to determined their cooking times. Cooking times may vary as per
mains voltage, quality, amount of the ingredients to be cooked, and the
temperature. Meals you cook using these values may not appeal to your
tastes. You may discover different values by making experiments to achieve
different flavours and results that appeal to your taste.
Food
Thermostat setting (°C) Cooking time (min.) Shelf order
25-30 Center shelf
30-40 Center shelf
40-50 Center shelf
30-40 Center shelf
20-30 Center shelf
30-40 Center shelf
90-120 Center shelf
90-120 Center shelf
90-120 Center shelf
45-55 Center shelf
75-100 Center shelf
55-60 Center shelf
"Pre-heat your oven before cooking.
You may consider the time required until the temperature light is turned off for
the first time as the pre-heating time."
OPERATION OF THE OVEN
Connect the plug to the earthed outlet. Bring the timer to manual or automatic cooking
position. Set the thermostat to a proper temperature as per the values in the cooking
chart. If you have set the timer to manual, you shall hear a warning sound at the end
of cooking.
Some smoke and odour may occur while the protective materials on the heaters
harden during the first operation of your oven. This is normal and not a manufacturing
fault.
In order to make yoghurt: Boil the unpasteurised milk. Cure the boiled milk after it is
cooled. Set the oven temperature to 40 - 50 °C, and operate the fan. Cook the cured
milk in the oven for 3 to 3.5 hours in a pan with a lid.
Thawing: Remove the food to be thawed from its container and place it on the grill.
Slide the rectangular tray under the grill to collect dripping water. Thus, thawed food
shall not be kept inside its thawed water. Do not use thawed water (for health
purposes) and discharge it.
You may use thawing feature as specified in the cooking chart,
10
Page 11

It is recommended that you use top and bottom heaters and the turbo
WARNING: To avoid electric shock, ensure that the
device circuit is open before changing the lamp. (Open
circuit means that the power is cut-off.)
Cut off the power supply of your appliance first, and
ensure that the it is cooled down.
Remove the glass protector by rotating as shown in the
figure.
Then, remove the lamp by rotating it, and install the
new lamp with the same specifications. Lamp
specifications shall be as follows:
15 W
Type E14
Finally, install the glass protector to its original position.
fan ( ) while thawing. As the thawing times vary as per the weight of
the food, check it once in a while.
Do not cook using the rectangular and circular trays at the same time
in the oven.
We recommend you to pre-heat your oven 8 to 10 minutes before
cooking.
This oven is intended for household cooking only. Do not use for other
purposes.
IF YOUR OVEN DOES NOT OPERATE
Please check if the power cord is plugged to the outlet securely.
Check the mains supply.
Check the fuse.
Check for any damage to the power cord. Contact the authorized
dealership if the issue is not resolved.
OVEN LAMP (*)
220-240 V , 50/60Hz.
MAINTENANCE AND CLEANING
Unplug your appliance.
Appliance may be very hot while it is being operated or after a short while
when it is operated.
In this case, do not touch hot parts.
Do not clean the interior parts, door, tray and other parts of the oven with
tools such as bristle brushes, steel wool or knives. Do not use abrasive and
scratching detergents.
11
Page 12
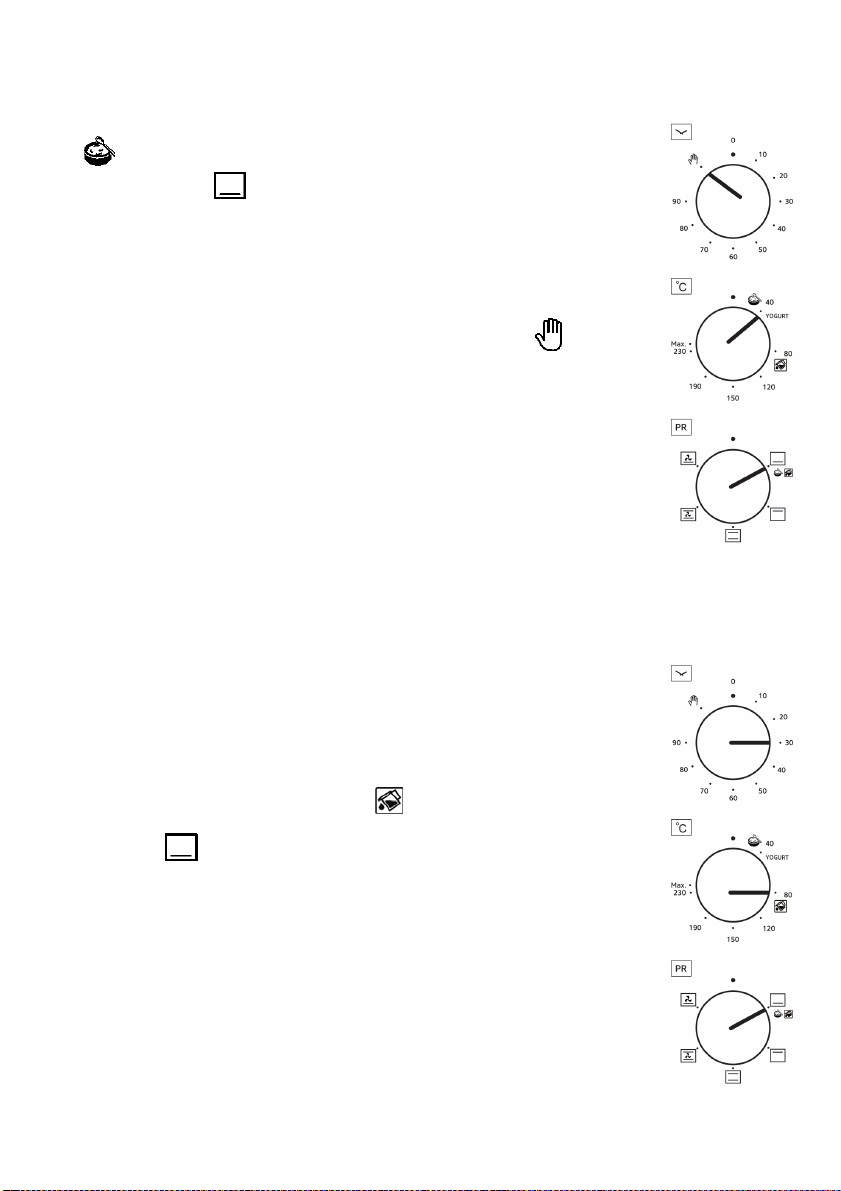
CURING YOGHURT
Select yoghurt mode from thermostat section while the oven is
empty, set the switch to lower resistance, pre-heat for 10 minutes
and start curing at somewhere else.
For curing, we boil the raw milk we have purchased at 90°C for
minutes, and then cool it down to 43-45°C (curing temperature). Add
yeast with a ratio of 1%-3% add stir slowly while the milk is at this
temperature. Put the milk added with yeast to the 1st shelf of the pre-
heated oven without closing its lid and close the oven door and set
the timer to manual. After 5 hours, remove the cured yoghurt from the
oven and keep it at room temperature for 15-20 minutes, and keep the
yoghurt without shaking it for 1 day at 4°C in a refrigerator. After 1
day, yoghurt is ready to be consumed. Bon appetite.
STEAM CLEANING
This allows cleaning of the dirt that is softened by the steam occurred
inside the oven without using chemicals.
Remove all accessories from the oven. Put 2 glasses of water
inside the square tray, and place the tray to the bottom shelf.
Bring the thermostat to steam cleaning mode.
Set the timer to 30 minutes.
Bring the switch to lower resistance mode.
After operating the oven for 30 minutes, open the door and wipe the
inner surface of oven with a damp cloth.
12
Page 13
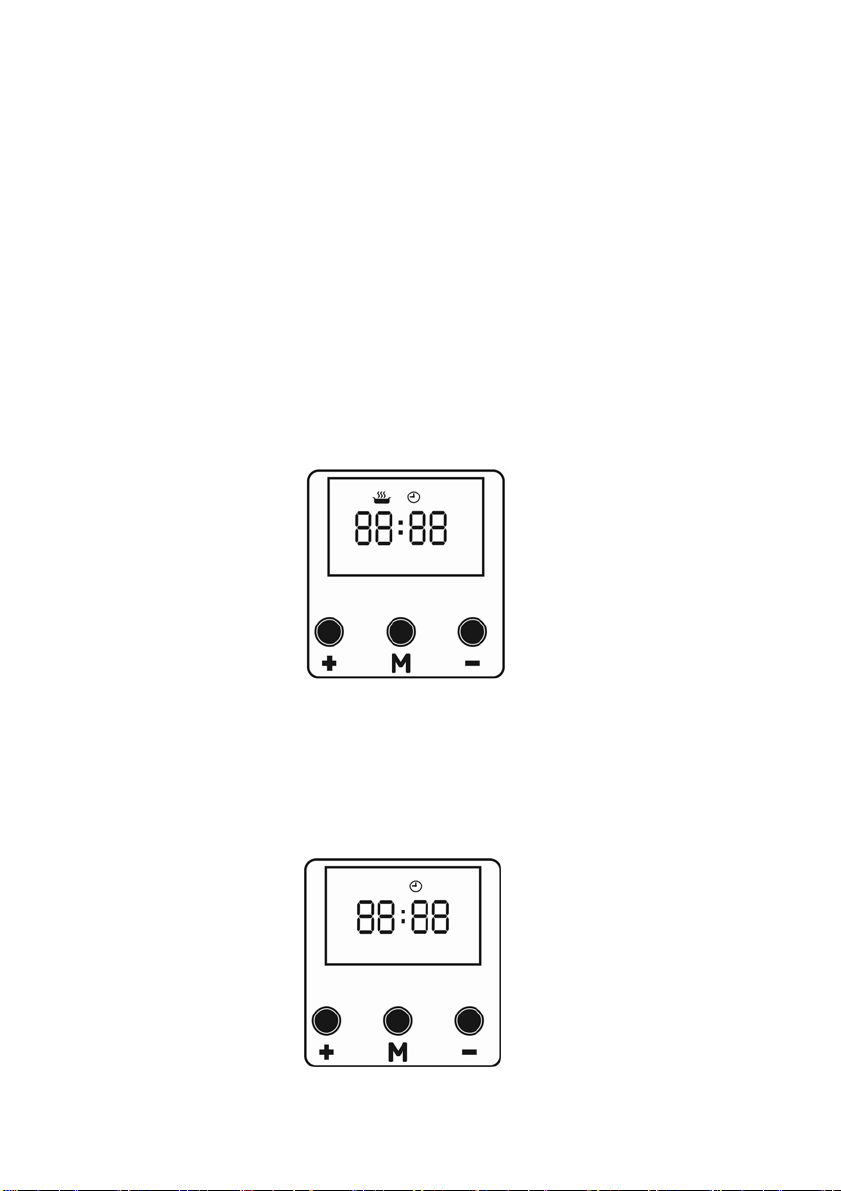
Digital clock usage
SUMMARY:
Whenthepoweristurnedonforthefirsttime,thetimer’slogoisdisplayedtogetherwith00:00,andthe
timesettingsectionflashes(theminutessectionremainsconstant00).Thetimecanbesetwiththe+,‐
buttons.Pressingthe"M"buttononce,directsyoutotheminutesettingsectionandtherelevantsection
startstoflash(thistimethehoursectionremainsconstant).Minutessettingcanbedonewiththe+,‐
buttons.Pressingthe"M"buttononceagainswitchestoautomaticcookingmode.Theautomaticcooking
logoandthetimesectionflash(theautomaticcookingminutessectionremainsconstant).Withthe+,‐
buttons,cookinghourtimecanbeadjusted.Pressingthe"M"buttononceagainshallcausetheauto‐
cookinglogoandminutesectiontoflash.
Withthe+,‐buttons,cookingtimecanbesetinminutes.Ifthecookingtimehasbeenset,theremaining
cookingtimeisdisplayedwhenthe"M"buttonispressedagain.Ifthecookingtimeisnotset,thecurrent
timeisdisplayedifthe"M"buttonispressedagain.Ifthe"M"keyisnotpressedduringthecasesthat
requireconfirmation,theautomaticconfirmationisgivenwithin20seconds.
GENERALOUTLOOK
WHENTHEPOWERISON
Whenthepowerisonforthefirsttime,theovenisoff.Thetimerandthetimer’slogoareflashingonthe
screen.Thetimedisplayedonthescreenisnotcorrectandmustbeset(seeTimesetting).
13
Page 14
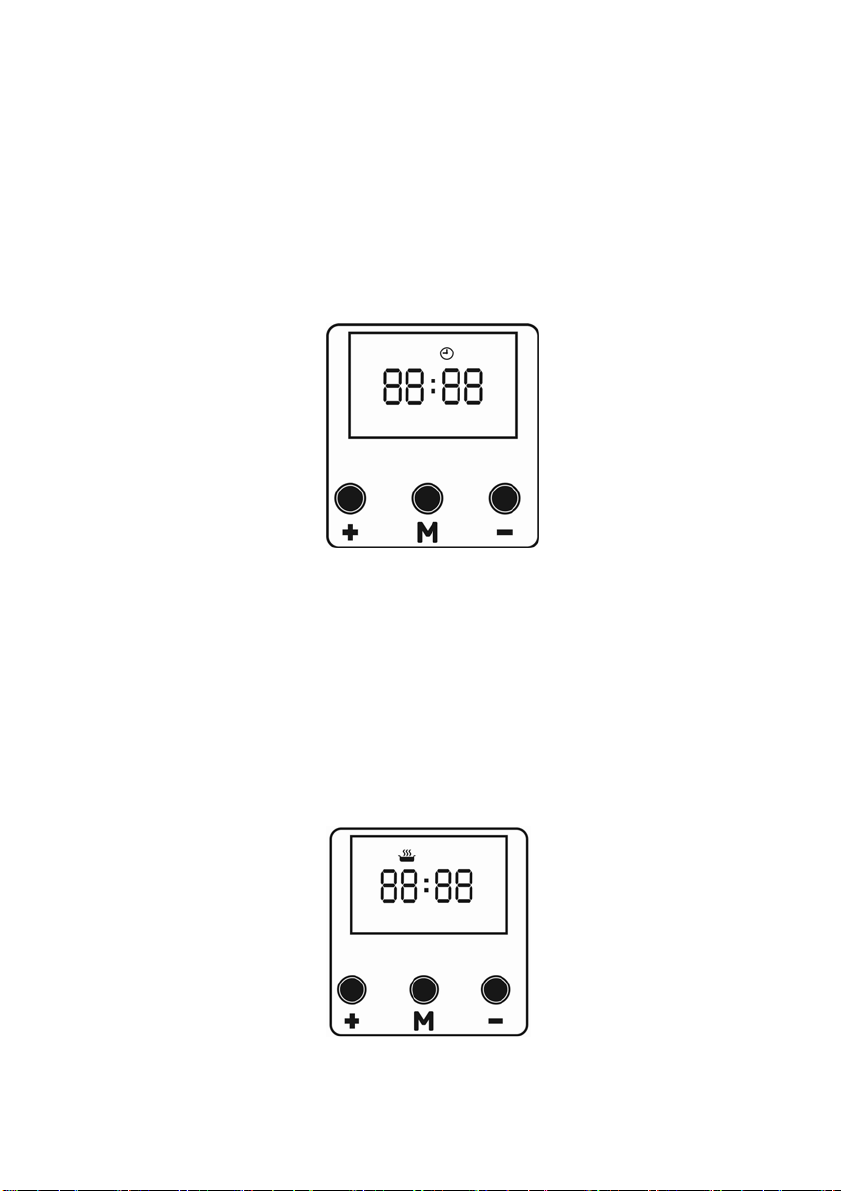
TIMESETTING
Press‘M’buttonfirstandthanyoucanadjustthetimeforwardbypressingbutton+and
backwardsbypressingbutton‐.Longpressonthesebuttonswillchangethetimefaster.
Note:Ifthe‐or+keyisnotpr
automatically.Youcanterminatethetimesettingmodeimmediatelybypressingthe
'M'key.
AUTOMATICCO
Cookingtimemustbese
Press"M"buttontosetcoo
or+button.Thenpressagainthe"M"buttonandtheminutessettingpartflashesandissetin
thesamewaywiththe‐or+key.Ifthebutton"M"ispressedagain,orifnobuttonispres
for20seconds,thecounterstartscounting.Anaudiblebuzzerwillnotifywhenthetimeis
over.The"M"buttoncanbeusedtoswitchoffthebuzzer.
OKINGPROGRAM
essedfor20seconds,thetimesettingmo
tinordertocookintheoven.
kingtimemode.First,thehoursectionflashesandissetwiththe‐
deends
sed
14
Page 15

COMPLIANCE WITH AEEE REGULATIONS AND WASTE DISPOSAL
2-
This product was manufactured from recyclable and reusable high quality
parts and materials. Therefore, do not dispose of this product with other
domestic wastes at the end of its life cycle. Take it to a collection point for
electrical and electronic equipment. You can ask your local administration
about these collection points.
You can help protect the environment and natural resources by delivering the used products for
recycling. Before disposing of the product, cut the power cord and render it non-functional for
1- This product does not contain the dangerous and prohibited materials indicated in
"Waste Electrical and Electronic Equipment Control Regulation" published by Ministry of
Environment and Urbanisation of Republic of Turkey. Complies with AEEE Regulation.
children's safety.
PACKAGE INFORMATION
The product's packaging is made of recyclable materials, in accordance with the National
Legislation. Do not dispose the packaging waste with the household waste or other wastes,
dispose it to the packaging collection areas specified by local authorities.
15
Page 16

Stimate client,
Vă mulțumim pentru că vă bazați pe produsele noastre. Scopul nostru este de a vă permite utilizarea optimă și
eficientă a acestui produs prietenos cu mediul înconjurător fabricat în fabrici moderne sub condiții precise
referitoare la sensul calității.
Înainte de utilizarea cuptorului, vă sfătuim să citiți acest manual de utilizare în întregime și să-l păstrați în
permanență astfel încât caracteristicile cuptorului Simfer pe care l-ați achiziționat să rămână la fel ca în prima
zi pe o durată lungă timp și să vă servească într-o modalitate eficientă și optimă.
REȚINEȚI:
Acest manual de utilizare este pregătit pentru multiple modele. Produsul dumneavoastră poate să nu conțină
unele funcții specificate în manual.
Imaginile produsului sunt schematice.
Acest produs a fost fabricat în fabrici moderne prietenoase cu mediul înconjurător fără a afecta natura.
"Este conform cu Reglementarea AEE”.
Page 17

CONȚINUT
17 Avertismente ................................................................................................................................
Conexiune electrică și siguranță ..................................................................................................20
Explicarea cuptorului și panoul de control ................................................................................... 20
21 Specificații technice......................................................................................................................
Diagramă de gătire ...................................................................................................................... 22
Utilizarea cuptorului .....................................................................................................................
Dacă cuptorul dumneavoastră nu funcționează...........................................................................
Lampă cuptor ..............................................................................................................................
Curățarea și întreținerea..............................................................................................................
Modul de utilizare a temporizatorului digital.................................................................................
Conformitate cu Reglementările AEEE și de eliminare a deșeurilor Informații despre ambalaj ..
22
23
23
23
24
26
(*) opțiune
Page 18

AVERTISMENTE
Acest produs este fabricat conform reglementărilor de
siguranță. Utilizarea neconformă a produsul ui poate ca uza
daune atât persoanei cât și a produsului.
Nu introduceți materiale imflamabile, sau materiale care se
pot topi sau deforma datorită căldurii din interiorul cuptorului
în ciuda posibilelor riscuri chiar și atunci când produsul nu
este funcțional.
Produsul nu este proiectat pentru a fi setat din telecomandă
sau pentru a fi controlat utilizând o telecomandă.
În momentul când produsul este funcțional, suprafața ușii
poate atinge temperaturi înalte.
În timp ce suprafața produsului este încă fierbinte, nu turnați
apă rece pe tavă sau în interiorul produsului. Suprafața
produsul se poate avaria ca rezultat a schimbării imediate a
temperaturii, iar acest lucru ducând la fierbere.
Utilizarea intensă pe termen lung a produsului poate necesita
o ventilare suplimentară, de exemplu, deschiderea unei
ferestre, sau o ventilare mai bună, cum ar fi creșterea
nivelului de ventilare mecanică. Înainte de pornirea acestuia,
îndepărtați perdelele, tulurile, hârtia sau orice material
flamabil (ușor de aprins) departe de produs. Nu plasați
materiale inflamabile în sau pe produs.
17
Page 19

Fiți atenți la copii care se află în vecinătatea produsului.
Acest produs nu este destinat a fi utilizat de către persoanele
cu dizabilități fizice, senzoriale sau mentale (inclusiv copii)
sau de către persoanele care nu au o experiență
corespunzătoare sau cunoștințe cu privire la utilizarea
produsului, doar dacă aceștia sunt supravegheați de către o
persoană responsabilă de siguranța produsului.
Produsul poate fi utilizat de către copii cu vârsta mai mare de
8 ani, persoanele cu abilități fizice, perceptive sau mentale
limitate sau persoanele cu lipsă de experiență și cunoștiințe,
dacă aceștia sunt supravegheați sau instruiți cu privire la
funcționarea produsului și cu privire la oricare riscuri
relevante care li se pot întâmpla.
Copii nu trebuie să se joace cu produsul.
Lucrările de curățare și întreținere ale produsului nu trebuie
să fie efectuate de către copii nesupravegheați.
Produsul poate fi foarte fierbinte în timp ce este utilizat sau
după un timp scurt după ce a fost utilizat; nu atingeți
suprafețele arzătorului și nu permiteți copiilor să atingă
aceste suprafețe.
Mențineți produsul și cablul de alimentare departe de copii
sub vârsta de 8 ani. Copii vor fi supravegheați pentru a se
asigura că nu se joacă cu produsul.
18
Page 20

Acest produs este potrivit pentru a fi utilizat în casă și medii similare.
În momentul când ușa produsului este deschisă, nu aplicați presiune pe aceasta utilizând
obiecte grele; nu vă sprijiniți, plasați obiecte grele pe ușă sau mânerul produsului.
Utilizați produsul pentru gătirea și încălzirea alimentelor. Nu utilizați produsul în alte scopuri
(încălzirea camerei, în scopuri comerciale etc.).
Înainte de înlocuirea lămpii și pentru prevenirea unui risc de șoc electric, asigurați-vă că
produsul este deconectat.
ATENȚIE!
Suprafețele zonelor evidențiate prin această etichetă sunt fierbinți.
Nu atingeți.
Pentru modele cu buton declanșator, acest buton poate fi apăsat atunci când se află în poziția
”0”. Butonul poate fi setat prin rotirea spre st ânga sau dreapta doar atunci când acesta este
scos.
19
Page 21
CONEXIUNE ELECTRICĂ ȘI SIGURANȚĂ
Produsul dumneavoastră necesită un curent de 13 amperi. Dacă este necesar, montajul
trebuie efectuat de către persoane calificate.
produsului
Produsul dumneavoastră este proiectat pentru o alimentare de 220-240V, ~ 50/60Hz
Dacă specificațiile
tensiunii de alimentare sunt diferite față de valorile specificate, contactați persoanele calificate.
Conexiunea electrică a produsului trebuie să fie efectuată doar prin intermediul prizelor cu
împământare montate conform reglementărilor. Contactați service-ul autorizat dacă o priză cu
împământare nu este disponibilă acolo unde produsul urmează a fi plasat.
Producătorul nu este responsabil pentru daunele cauzate de prizele fără împământare.
Dacă cablul de alimentare (ștecherul din cablu) este avariat, acest cablu trebuie să fie înlocuit de
către importator sau de către agentul său de service sau de cătr e un personal competent pentru a
preveni o situație periculoasă.
Cablul de alimentare al produsului dumneavoastră nu va veni în contact cu componentele fierbinți
ale produsului.
EXPLICAREA CUPTORULUI ȘI PANOUL DE CONTROL
1- P anou de control 6- Bazele cuptorului
2- C or p cuptor 7- Ușa din sticlă a cuptorului
3- Mâner 8- Butoane de control
4- Plită 9- Tavă circulară (opțiune)
5- Arzătoare 10- Tavă rectangulară
11- Grătar
20
Page 22
Arzător superior
SPECIFICAȚII TEHNICE
Caracteristici
CUPTOR MEDIU 45 LT
Lățime externă
590 mm
Adâncime externă
470 mm
Înălțime externă
330 mm
Lățime internă
440 mm
Adâncime internă
420 mm
Înălțime internă
240 mm
Termostat
Cronometru (*)
0 până la 90 min.
Arzător inferior
800 W
Arzător superior
600 W
Tensiune de alimentare
220-240V. ~ 50/60HZ.
Ventilator (*)
13- 15W
Lampă cuptor (*)
15W
Cronometru Arzător inferior
Arzător superior și inferior
Termostat
Program
Arzător inferior și turbo fan
Arzător superior și inferior și turbo fan
Cronometru: Setați cronometrul la timpul de gătire recomandat și la gradul dorit. În momentul
când timpul setat a expirat, cronometrul va deconecta alimentarea arzătoarelor și va furniza un
avertisment cu un sunet. Pentru oprirea dispozitivului, setați butoanele cronometrului, programului
și termostatului în poziția zero. În momentul când cronometrul este setat la poziția , acesta va
funcționa independent de oră.
Termostat: Termostatul asigură o temperatură de la 40 până la 240 °C în interiorul cuptorului.
40 până la 240 °C
(*): Această caracteristică este disponibilă doar pe anumite modele.
21
Page 23
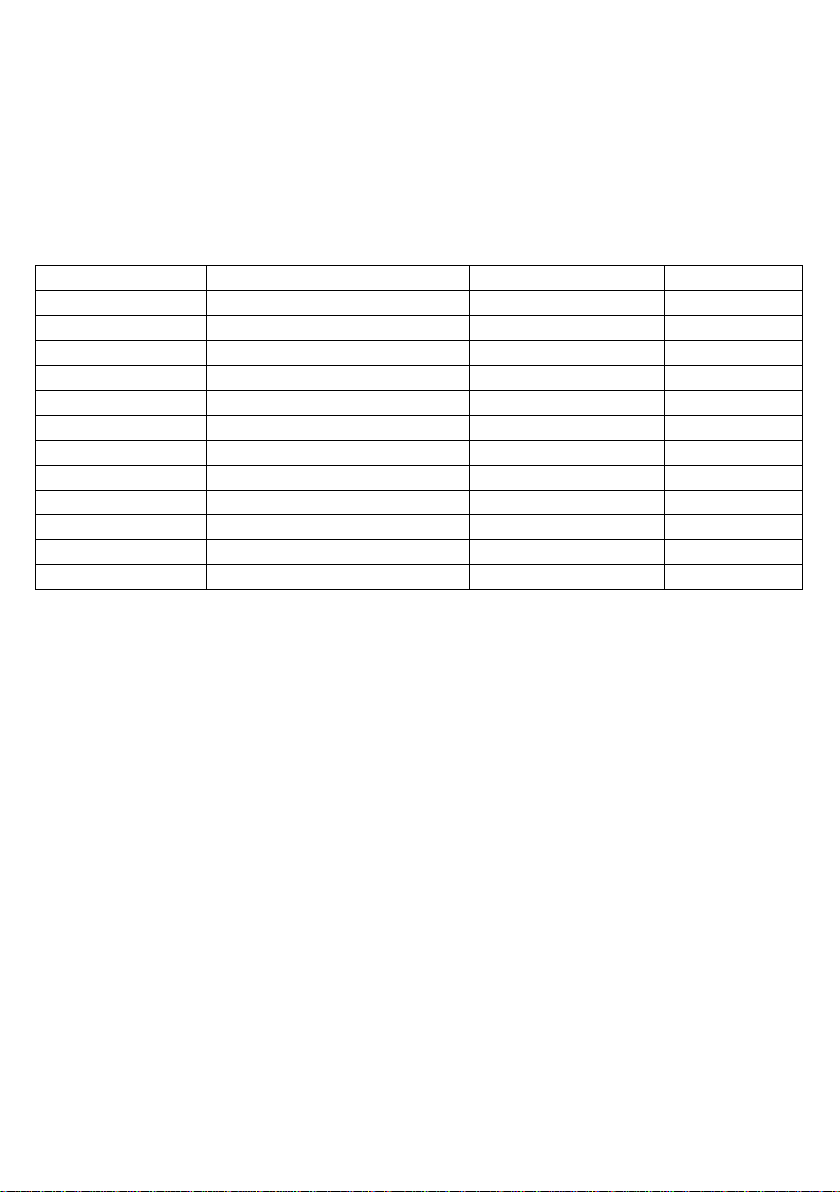
DIAGRAMĂ DE GĂTIRE
Aliment
Setarea termostat (°C)
Timp (min)
Ordine raft
Prăjituri
170
25
Raft central
Tort
170
30
Raft central
Plăcintă
180
40
Raft central
Brioșă
160
30
Raft central
Paste (coapte)
190
20
Raft central
Pește
220
30
Raft central
Miel
220
90
Raft central
Berbec
220
90
Raft central
Vițel
220
90
Raft central
Curcan
220-MAX
45-55
Raft central
Pasăre
220
75
Raft central
Decongelare
60
55
Raft central
Mai jos, dumneavoastră puteți găsi informații despre alimentele pe care le-am testat în
laboratoarele noastre pentru determinarea timpilor de gătire. Timpii de gătire pot varia datorită
tensiunii de alimentare, calității, cantității alimentelor care urmează a fi gătite și temperaturii.
Rețetele pe care le gătiți utilizând aceste valori nu se pot potrivi cu gustul dumneavoastră.
Dumneavoastră puteți descoperi valori diferite prin efectuarea experimentelor pentru obținerea
diferitelor miresme și rezultate care se potrivesc cu gustul dumneavoastră.
-180
-190
-220
-180
-210
-MAX
-MAX
-120
-30
-40
-50
-40
-30
-40
-120
-120
-120
-100
-60
*Înainte de gătire, preîncălziți cuptorul.
Puteți lua în considerare durata necesară până când lumina temperaturii este oprită pentru
prima dată ca timp de pre-încălzire."
UTILIZAREA CUPTORULUI
Conectați ștecherul la o priză cu împământare. Aduceți cronometrul în poziția manuală sau automată de
gătire. Setați termostatul la o temperatură corespunzătoare conform valorilor din diagrama de gătire. Dacă
dumneavoastră ați setat cronometrul în poziția manuală, dumneavoastră veți auzi un sunet de avertizare la
finalizarea gătirii.
În timpul primei funcționări a produsului, poate apărea fum și miros datorită întăririi materialelor de pe
suprafața arzătorului. Acest lucru este normal și nu este un defect de fabricare.
Pentru gătirea iaurtului: Fierbeți laptele nepasteurizat. După ce laptele este răcit, acesta trebuie tratat.
Setați temperatura cuptorului la 40 - 50 °C și utilizați ventilatorul. Gătiți laptele tratat în cuptor timp de 3
până la 3,5 ore într-o tigaie cu capac.
Decongelarea: Scoateți alimentele care urmează a fi decongelate din recipiente și apoi plasați-le pe grill.
Glisați tava rectangulară sub grill pentru colectarea apei decongelate. În acest fel, alimentele decongelate
nu vor fi lăsate în interiorul propriei ape. Nu utilizați apa decongelată (din motive de sănătate) și aruncați-o.
Dumneavoastră puteți utiliza caracteristica de decongelare după cum este specificat în diagrama de gătire,
22
Page 24
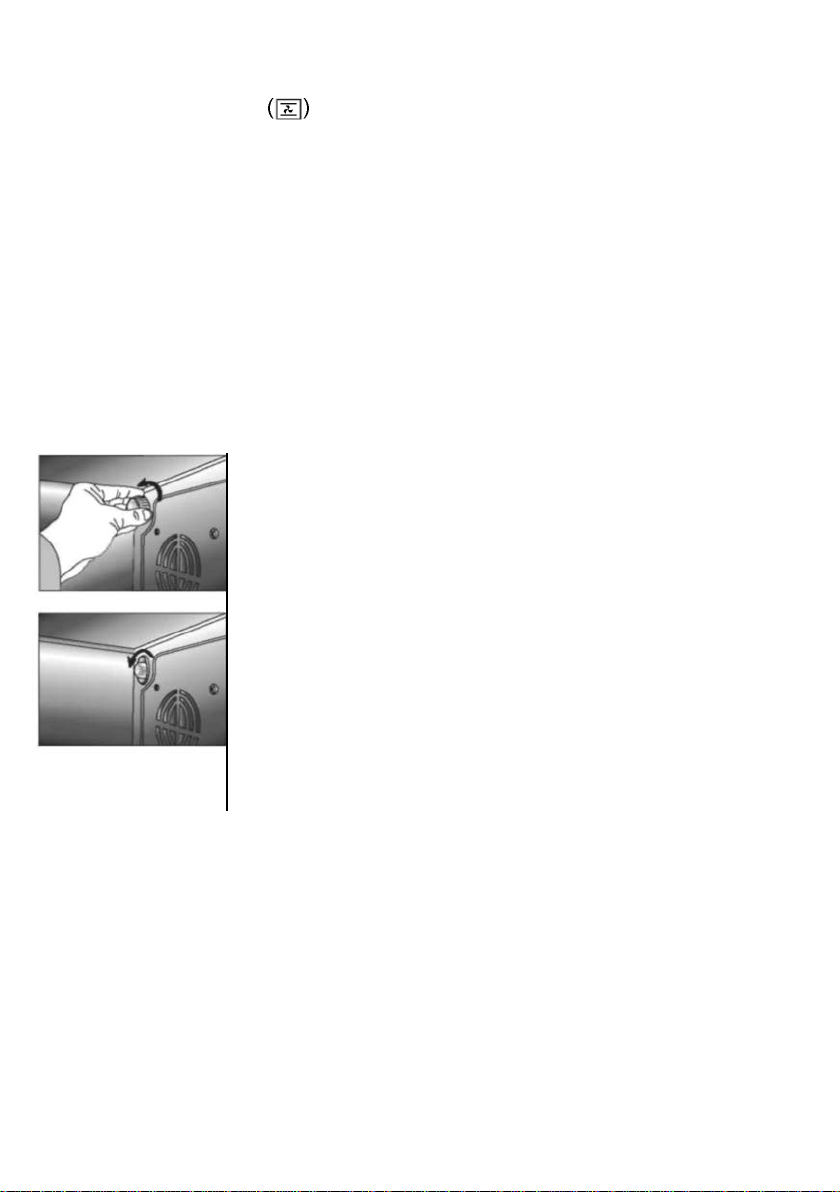
În timpul decongelării este recomandat să utilizați arzătoarele superioare și inferioare
AVERTISMENT: Pentru evitarea șocului electric, asigurați-vă că circuitul
îmagine.
cât și ventilatorul turbo. Deoarece timpii de decongelare variază în funcție de greutatea
alimentelor, verificați-le din când în când.
Nu gătiți utilizând tăvile rectangulare și circulare în același timp.
Înainte de gătire, noi recomandăm preîncălzirea cuptorului dumneavoastră 8 până la 10
minute.
Acest produs este destinat doar uzului casnic. Nu utilizați în alte scopuri.
DACĂ CUPTORUL NU FUNCȚIONEAZĂ
Vă rugăm să verificați dacă cablul de alimentare este conectat la priză în mod securizat.
Verificați tensiunea de alimentare a prizelor.
Verificați siguranța.
Verificați avariile cablului de alimentare. Contactați dealer-ul autorizat dacă problema nu
este rezolvată.
LAMPĂ CUPTOR(*)
dispozitivului este deschis înainte de înlocuirea lămpii. (Circuitul deschis
înseamnă că alimentarea este deconectată.)
Deconectați mai întâi alimentarea produsului, și asigurați-vă că acesta
este răcit.
Scoateți protecția sticlei prin rotirea acesteia după cum este prezentat în
Apoi, scoateți lampa prin rotirea acesteia, și montați noua lampă având
aceleași specificații. Specificațiile lămpii vor fi după cum urmează:
230 V, AC
15W
Tip E14
La final, montați protecția sticlei în poziția sa originală.
ÎNTREȚINEREA ȘI CURĂȚAREA
Deconectați produsul dumneavoastră.
Produsul poate fi foarte fierbinte în timp ce a fost utilizat sau după un timp scurt după ce a fost
utilizat.
În acest caz, nu atingeți componentele fierbinți.
Nu curățați componentele interioare, panoul, tăvile și celelalte părți ale produsului cu instrumente
dure cum ar fi perie aspră, burete de sârmă sau cuțit. Nu utilizați detergenți abrazivi.
23
Page 25
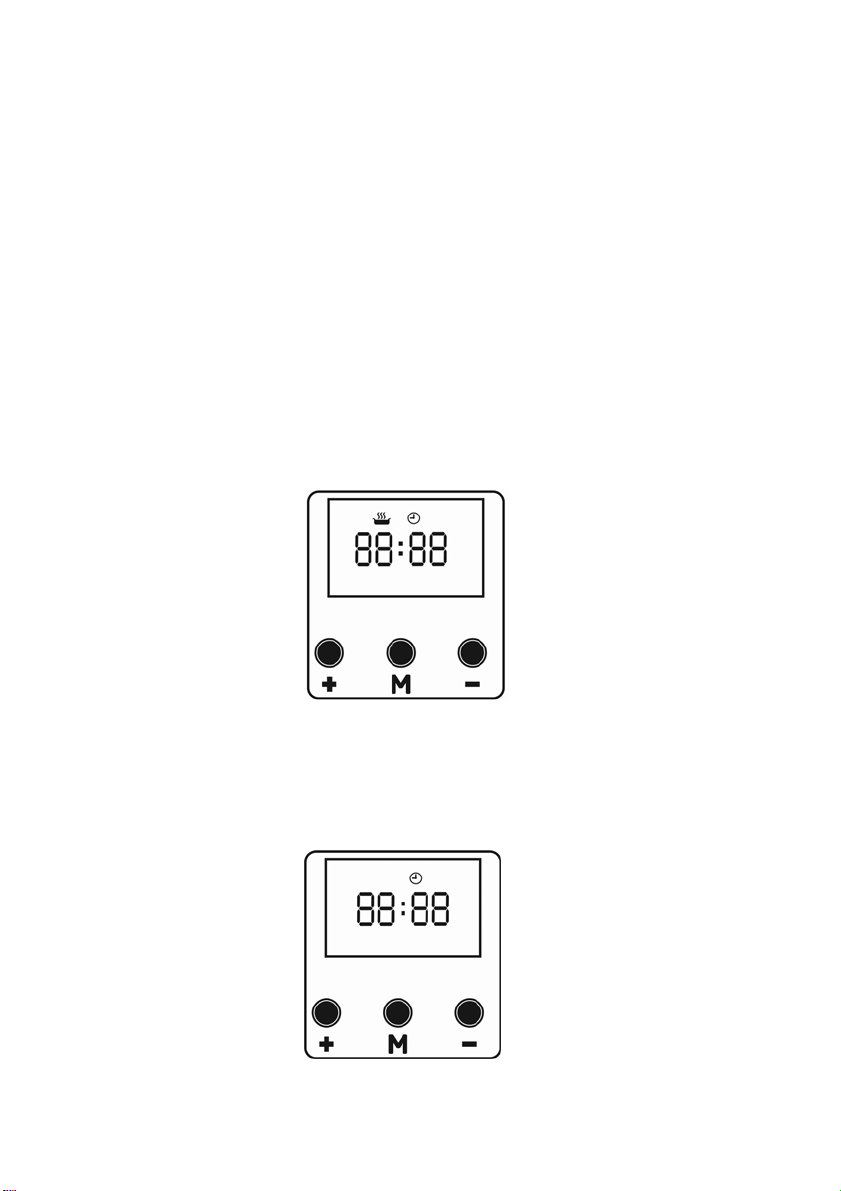
REZUMAT:
Moduldeutilizareatemporizatoruluidigital
Cândalimentareaes
iarsecțiuneacusetareadeorăseaprindeintermitent(secțiuneapentruminuterămâneconstantăla00).
Orapoatefisetatăfolosindbutoanele+,‐.Apăsândbutonul„M”odată,suntețidi
setăriipentruminuteșisecțiunearelevantăîncepesăseaprindăintermitent(deaceastădatăsecțiunea
pentruorărămâneconstantă).Setareaminutelorpoatefiefectuatăfolosindbutoanele+,‐.Apăsareaîncă
o datăabutonului„M”vacomutalamodu
pentruorăseaprindintermitent(secțiuneapentruminuteledegătitautomatrămâneconstantă).Folosind
butoanele+,‐setareadeorăpentrugătitpoatefireglată.Apăsareaîncăodatăabutonului„M”vacauz
dinnoucalogoulpentrugătitautomatșisecțiuneapentruminutesăseaprindăintermitent.
Folosindbutoanele+,‐,timpuldegătitpoatefisetatînminute.Dacătimpuldegătitafostsetat,timpulde
gătitrămasesteafișatatuncicâ
actualăesteafișatădacăseapasădinnoubutonul„M”.Dacătasta„M”nuafostapăsatăîncazurilecare
necesităconfirmare,după20desecundeseacordăoconfirmareautomată.
AȘTEPT
ĂRIGENERALE
CÂNDALIMENTA
Cândalimentareaestepornităpentruprimadată,cuptorulesteoprit.Temporizatorulșilogoul
temporizatoruluiseaprindintermitentpeecran.Oraafișatăpeecrannuestecorectășitrebuiesetată
(consultațiSetareadetimp).
tepornităpentruprimadată,logo‐ultemporizatoruluiesteafișatîmpreunăcu00:00,
recționațilasecțiunea
ldegătitautomat.Logoulpentrugătitautomatșisecțiunea
ndseapasădinnoubutonul„M”.Dacătimpuldegătitnuestesetat,ora
REAESTEPORNITĂ
a
24
Page 26
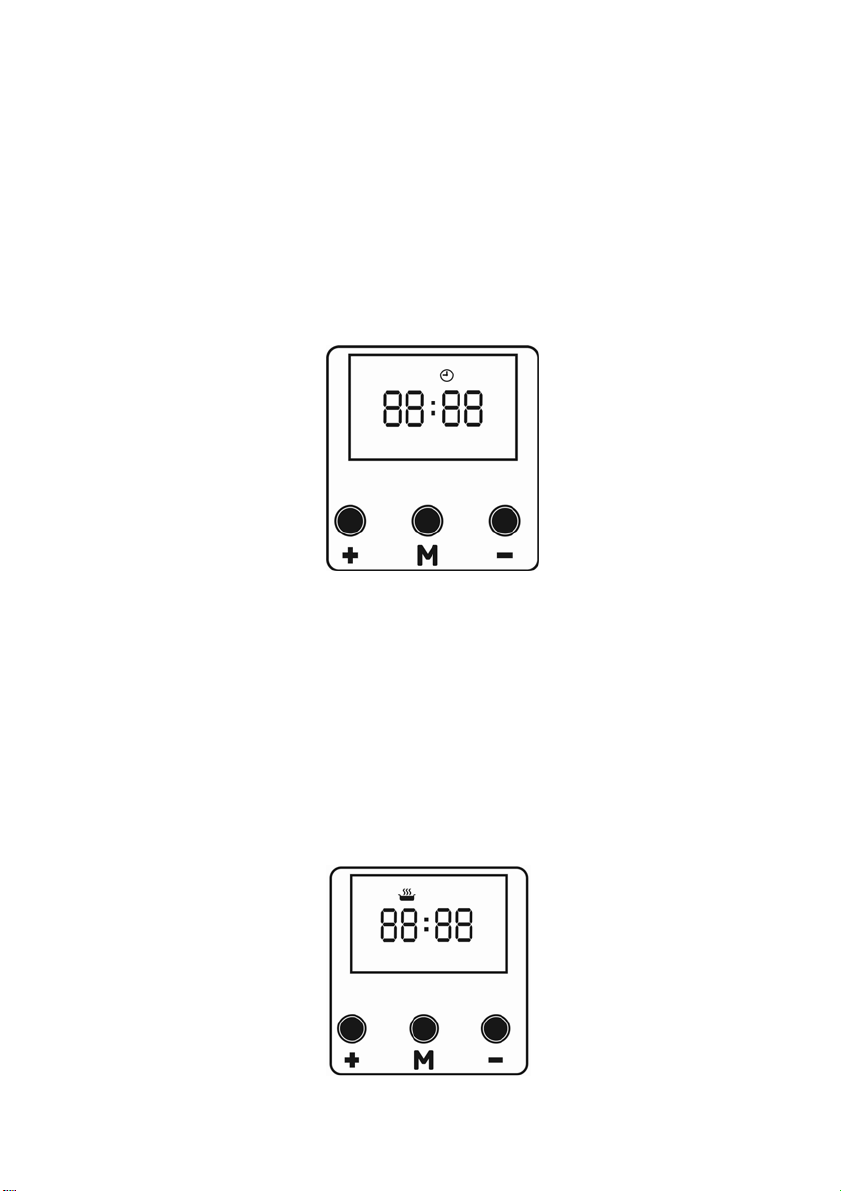
SETAREADETIMP
Maiîntâiapăsațibutonul„M”șiapoiputețiajustatimpulînainteprinapăsareabutonului+și
înapoiprinapăsareabutonului‐.Apăsareacontinuăaacestorbutoanevaschimbasetareade
timpmairapid.
Notă:Dacătasta+sau‐nues
setareadetimpseînchideînmodautomat.Putețiînchideimediatmodulpentru
setareadetimpapăsândtasta„M”.
PROGRAMULPENT
Timpuldegătittr
Apăsațibutonul„M”pen
orăseaprindeintermitentșiestesetatăcubutonul‐sau+.Apoiapăsațidinnoubutonul„M”
șiparteacusetareademinuteseaprindeintermitentșiestesetatăînacelașifel,folosind
tele‐sau+.Dacăbutonul„M”esteapăsatdinnou,saudacănuesteapăsatniciunbuton
tas
timpde20desecunde,temporizatorulseactivează.Unsemnalsonorvaindicaatuncicând
timpulaexpirat.Butonul„M”poatefiutilizatpentruaoprisemnalulsono
RUGĂ
ebuiesetatpentruagătifolosindcuptorul.
teapăsatătimpde20
TITAUTOMAT
truasetamodulpentrutimpuldegătit.Maiîntâi,secțiuneapentru
desecunde,modulpentru
r.
25
Page 27
CONFORMITATE CU REGLEMENTĂRILE AEEE ȘI DE ELIMINARE A
2-
Acest produs a fost produs din materiale și componente reutilizabile de
DEȘEURILOR
1- Acest produs nu conține materiale periculoase și înterzise indicate în ”Reglementarea de
control a echipamentului electric și electronic” publicată de către Ministerul Mediului și
Urbanizării al Republicii Turcia. Este conform cu Reglementarea AEEE.
calitate înaltă și reciclabile. Așadar, nu eliminați acest produs împreună
cu alte deșeuri menajere la finalizarea perioadei de funcționare.
Transportați-l la punctul de colectare destinat pentru reciclarea
echipamentului electric și electronic. Dumneavoastră vă puteți adresa
administrației locale cu privire la aceste puncte de colectare.
Ajutați la protejarea mediului înconjurător și a resurselor natural prin reciclarea produselor
utilizate. Înainte de eliminarea produsului, tăiați cablul de alimentare și faceți-l să fie
nefuncțional pentru siguranța copiilor.
INFORMAȚII DESPRE AMBALAJ
Ambalajul produsului este fabricat din materiale reciclabile, conform legislației naționale. Nu
eliminați materialele de ambalare împreună cu gunoiul menajer sau alte deșeuri, eliminați-l în
zone de colectare a materialului de ambalare specificat de către autoritățile locale.
26
Page 28

 Loading...