

Page 1

Reproductor MP3
manual del usuario
imagine las posibilidades
Gracias por adquirir este producto Samsung.
Para recibir un servicio más completo, registre
su producto en
www.samsung.com/global/register
Para prevenir cualquier mal funcionamiento y/o evitar daños, lea
detalladamente este manual de instrucciones antes de conectar y operar este
aparato. Conserve el manual para referencias futuras. (méxico sólo)
YP-U4
Page 2

funciones del nuevo reproductor MP3
Atractivo. Inteligente. Fiable. Y diversión por doquier. El nuevo
reproductor MP3 es todo esto y mucho más. Su diseño compacto
ocupa el mínimo espacio en el bolsillo y su tecnología de vanguardia
le ofrece un sonido potente. Le encantará su nuevo reproductor MP3,
mientras hace ejercicio, descarga sus canciones favoritas o escucha la
radio FM. Utilícelo y se preguntará cómo ha podido vivir sin él.
INTERFAZ DE USO SENCILLO
El reproductor MP3 es un producto con
USB integrado que no necesita cable USB,
que ofrece la velocidad de transferencia de
datos rápida y un medio práctico de recarga.
LIBERTAD DE SELECCIÓN DE SUS
FAVORITOS CON EL REPRODUCTOR MP3.
Puede crear listas de reproducción con su
música favorita.
EXPANSIÓN Y COMPATIBILIDAD
Con el nuevo reproductor, no está limitado
a archivos MP3. El reproductor admite los
formatos MP3, WMA y OGG.
NAVEGACIÓN TÁCTIL
Puede tocar el panel táctil para desplazarse
por los menús.
MAYOR TIEMPO DE REPRODUCCIÓN Y
MENOR TIEMPO DE DESCARGA.
Una batería totalmente cargada puede
reproducir hasta 16 horas de música.
Tiempos de descarga más cortos. Debido
a su capacidad USB 2.0, el reproductor es
mucho más rápido que los modelos que
tienen USB 1.1.
MARAVILLA ACÚSTICA
El nuevo reproductor MP3 tiene integrado
DNSe™ (Digital Natural Sound engine), la
única tecnología de sonido de Samsung™
creada para ofrecer un sonido más potente
y profundo para una experiencia de audición
inigualable.
DONDE FORMA Y FUNCIÓN CONVERGEN
Elegante, atractivo, y también fácil de
sujetar y utilizar.
Page 3
Información de seguridad
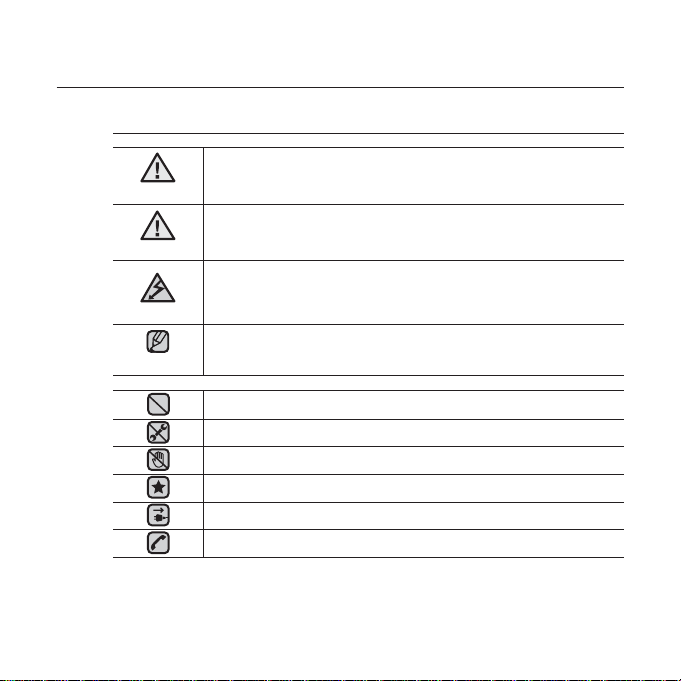
Signifi cado de los iconos y signos de este manual:
Signifi ca que existe riesgo de muerte o daños
ADEVERTENCIA
PRECAUCIÓN
PRECAUCIÓN
NOTA
Estos signos de advertencia se incluyen aquí para evitar daños
personales en usted y en otras personas.
Sígalos explícitamente.
Después de leer esta sección, guárdelo en un lugar seguro para
referencia futura.
personales serios.
Signifi ca que existe riesgo potencial de lesiones
personales o daños materiales.
Para reducir el riesgo de incendio, explosión, descarga
eléctrica o daños personales al utilizar el Reproductor
MP3, siga estas precauciones básicas de seguridad:
Signifi ca sugerencias o páginas de referencia que
pueden resultar de utilidad para utilizar el reproductor.
NO intentar.
NO desensamblar.
NO tocar.
Siga las directrices explícitamente.
Desconecte el enchufe de alimentación de la toma de corriente.
Llame al centro de servicio técnico para obtener ayuda.
Page 4
Información de seguridad
Este manual describe la forma de utilizar correctamente el nuevo
reproductor mp3.
Léalo detenidamente para evitar daños en el reproductor y lesiones
personales.
Preste especial atención a las siguientes advertencias serias:
PROTÉJASE
No desmonte, repare ni modifi que esta unidad por sí mismo.
No moje ni sumerja la unidad en agua. Si el producto se moja, no lo
encienda ya que podría producirse una descarga eléctrica. En su lugar,
PRECAUCIÓN
póngase en contacto con el Centro de atención al cliente más cercano
de Samsung.
No utilice el producto cuando haya tormentas eléctricas. De lo contrario,
causará una avería o existe riesgo de descarga eléctrica.
No utilice los audífonos mientras pasea en bicicleta, o conduce un
automóvil o una moto.
PRECAUCIÓN
Puede sufrir un accidente serio, además de estar prohibido por ley en algunos países.
El uso de los audífonos mientras camina o corre por la carretera, en concreto en
pasos de peatones, puede generar situaciones peligrosas de accidente.
Por su seguridad, cerciórese de que el cable de los audífonos no estorbe
el movimiento de los brazos ni de otros objetos mientras hace ejercicio o
camina.
Tenga cuidado al utilizar el reproductor con el enchufe USB extraído.
El enchufe de la conexión USB afi lada puede causarle daños.
No coloque la unidad en áreas húmedas, con polvo o con hollín, ya que
ADEVERTENCIA
estos entornos podrían provocar un incendio o una descarga eléctrica.
Page 5
PROTÉJASE
El uso de audífonos o de cascos durante un tiempo prolongado puede
ADEVERTENCIA
causar serias lesiones en el oído.
Si está expuesto a un sonido superior a los 85db durante un tiempo prolongado,
sus oídos pueden verse afectados adversamente. Cuanto más alto sea el sonido,
más daños se producirán en el oído (una conversación normal se realiza entre 50 y
60 db y el ruido de la carretera es aproximadamente 80 db).
Se recomienda encarecidamente fi jar el volumen en un nivel medio (el nivel medio
es generalmente menos de 2/3 del máximo).
Si siente que los oídos le pitan, baje el volumen o deje de utilizar los
audífonos o los cascos.
PROTEJA SU REPRODUCTOR MP3
No deje el reproductor en áreas con una temperatura superior a 35°C
(95°F), como una sauna o dentro de un coche estacionado.
No someta el reproductor a impactos fuertes por caídas.
No ponga objetos pesados encima del reproductor.
Evite la entrada de partículas extrañas o polvo en la unidad.
No coloque el producto cerca de objetos magnéticos.
Asegúrese de hacer copia de seguridad de datos importantes. Samsung no
se hace responsable de la pérdida de datos.
Utilice únicamente los accesorios suministrados o aprobados por
Samsung.
No pulverice agua sobre la unidad. Nunca limpie la unidad con
sustancias químicas como benceno o disolvente, ya que podría
PRECAUCIÓN
incendiarse, causar descargas eléctricas o deteriorar la superfi cie.
No seguir estas instrucciones podría llevar a sufrir lesiones físicas o daños en
PRECAUCIÓN
el reproductor.
Al imprimir este manual de usuario, recomendamos imprimirlo en color
NOTA
y marcar “Ajustar a la página” en la opción de impresión para una mejor
visualización.
Page 6

Índice
CONCEPTOS BÁSICOS
9
SAMSUNG MEDIA STUDIO
34
9 Componentes
10 Reproductor MP3
13 Pantallas
14 Utilización del botón táctil
15 Carga de la batería
16 Cuidado de la batería
16 Encendido y apagado
17 Reproducción de música
17 Control de volumen
18 Desactivación de los botones
18
Exploración de archivos utilizando
“File Browser” (Buscador Archivo)
19 Supresión de archivos con “File
Browser” (Buscador Archivo)
20 Cambio de ajustes y preferencias
20 Ajustes de música
23 Ajustes de radio FM
26 Ajustes de sonido
27 Ajustes de pantalla
28 Confi guración de Idioma
30 Ajustes de fecha/hora
31 Ajustes del sistema
33 Reincialización del sistema
34 Requisitos de la PC
35 Instalación de Samsung Media Studio
36 Transferencia de archivos al
reproductor con Media Studio de
Samsung
39 Utilización de un disco extraíble
40 Desconexión de la PC
Page 7

Índice
AUDICIÓN DE
MÚSICA
41
41 Audición por categoría
42 Retorno a la pantalla de reproducción
actual
43 Pausing
43 Búsqueda dentro de una pista
43 Reproducción desde el principio de
la pista actual
43 Reproducción de la pista anterior
43 Reproducción de la pista siguiente
44 Creación de una lista de
reproducción utilizando Media Studio
de Samsung
44 Creación de una lista de reproducción
45 Adición de archivos de música a una
lista de reproducción creada
46 Transferencia de una lista de
reproducción al reproductor con
Media Studio
47 Creación de una lista de
reproducción en el reproductor MP3
48 Reproducción de una lista de
reproducción
49 Eliminación de un archivo de la lista
de reproducción
49 Eliminación de todos los archivos de
la lista de reproducción
50 Función personalizada del botón
User (usuario)
50
Para fi jar el Modo del Botón User
(Usuario)
Page 8

S
Índice
MÁS QUE MÚSICA
54
OLUCIÓN DE PROBLEMAS
65
54 Audición de la radio FM
54 Para utilizar la función de silencio
55 Búsqueda de emisoras de fm
56 Para cambiar al modo predefi nido
56 Para cambiar al modo manual
56
Memorización de emisoras en la
memoria de presintonías
57 Para escuchar emisoras predefi nidas
57 Supresión de una presintonía
58 Para grabar una emisión de radio FM
58 Para detener la grabación
59 Utilización de los datacast
63 Grabación de voz
63 Para realizar una grabación de voz
64 Para detener la grabación de voz
65 Solución de problemas
APÉNDICE
68
68 Estructura del menú
69 Especifi caciones del producto
70 Licencia
Page 9
conceptos básicos
COMPONENTES
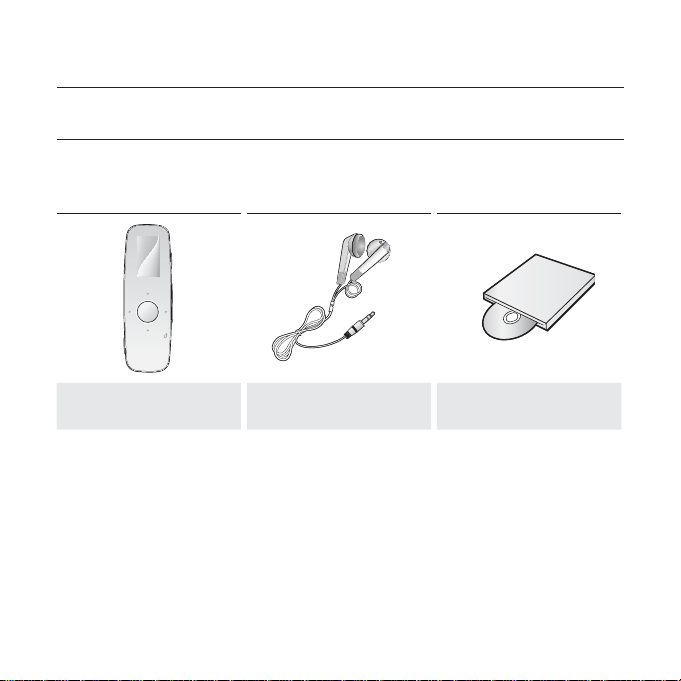
El nuevo reproductor mp3 incluye estos accesorios. Si echa de menos alguno de
estos componentes, póngase en contacto con el Centro de atención al cliente de
Samsung más cercano.
Reproductor Audífonos CD de instalación
Es posible que los accesorios de la caja tengan un aspecto diferente al que se
muestra.
conceptos básicos _ 9
Page 10
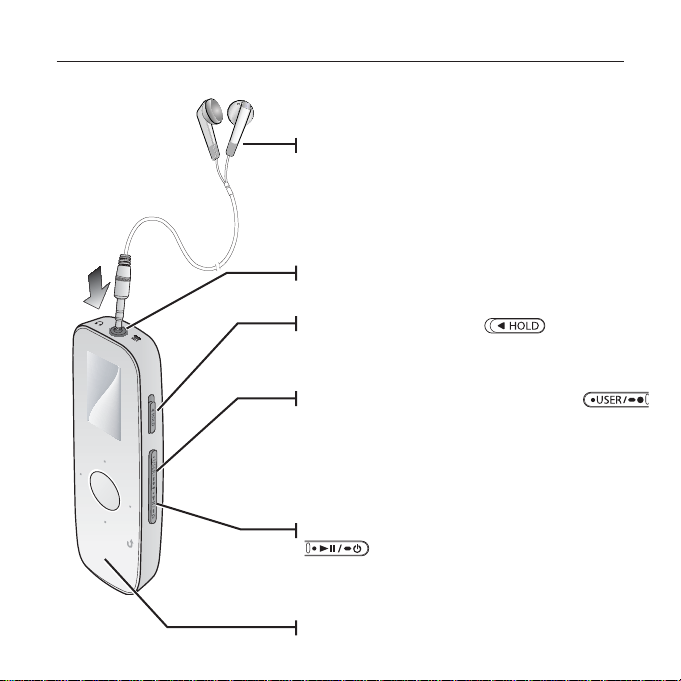
REPRODUCTOR MP3
Audífonos
La etiqueta “L” es para el oído izquierdo y
“R” para el oído derecho.
También sirve como antena para la radio FM
del reproductor MP3.
Toma de conexión de audífonos
Interruptor de bloqueo
Deslice en la dirección de la fl echa para
bloquear las funciones de botones.
Botón de grabación / User (Usuario)
Se presiona para establecer la repetición de
sección, DNSe, velocidad de reproducción, modo
de reproducción.
Se mantiene presionado para iniciar/detener la
radio FM o la grabación de voz.
Botón de Encendido y Reproducir / Pausa
Se mantiene presionado para encender y apagar.
Se presiona para reproducir/hacer una pausa.
10 _ conceptos básicos
Luz LED
Page 11
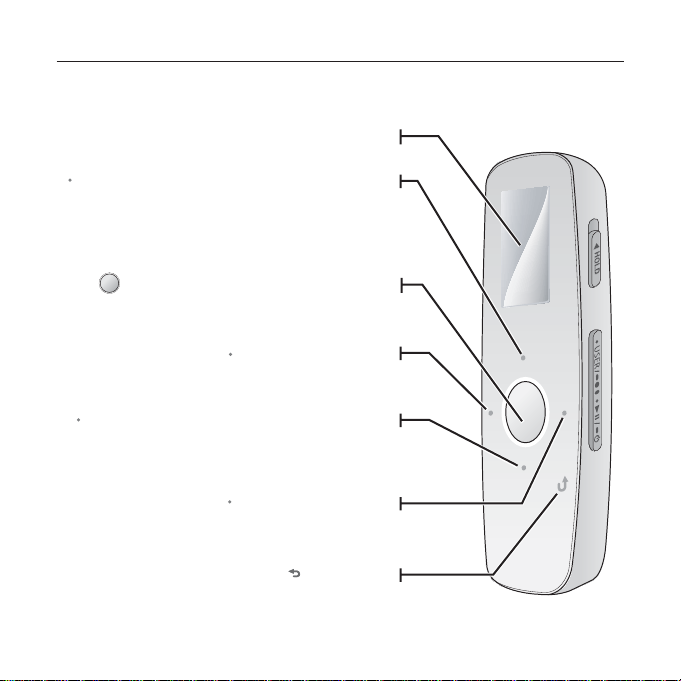
REPRODUCTOR MP3 (Cont.)
Estos botones son botones ‘sensibles al tacto’.
Pantalla
Botón izquierdo del explorador de archivos
Se toca para ir a la pista/menú anterior o reproducir
Se mantiene presionado brevemente para rastrear
Se toca para seleccionar la reproducción/pausa y
Se toca para bajar el volumen o ir a un elemento/
Botón derecho del explorador de archivos
Se mantiene presionado brevemente para
Se toca para subir el volumen o ir a un elemento/
la pista actual desde el principio.
rápidamente pistas.
Botón Reproducir / Pausa, Selección
función y para ir a la pantalla siguiente.
Botón Bajar volumen
menú inferior.
Se toca para ir a la pista/menú siguiente.
rastrear rápidamente pistas.
Botón Subir volumen
menú superior.
Se toca para ir a la pantalla anterior.
Botón Atrás
Se mantiene presionado brevemente para ir a la
pantalla del menú principal.
conceptos básicos _ 11
Page 12
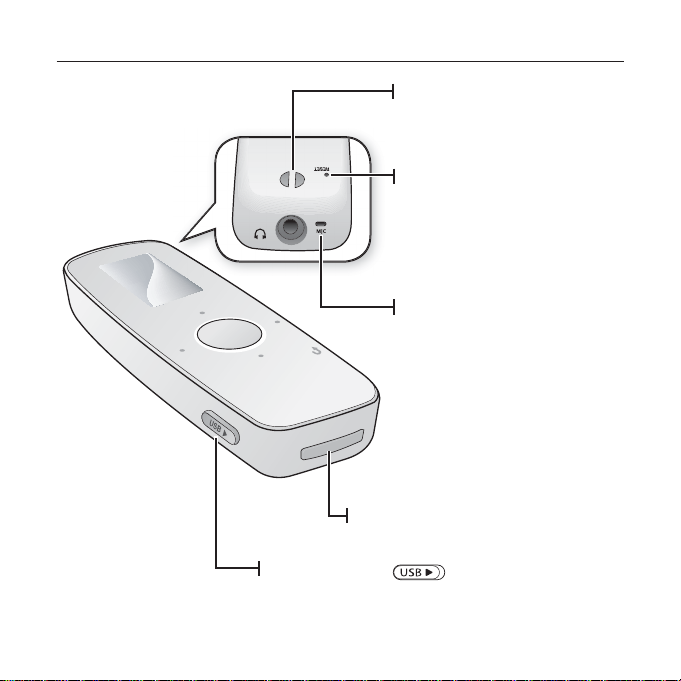
REPRODUCTOR MP3 (Cont.)
Interruptor USB
Introduce y extrae el enchufe USB.
Orifi cio del cordón para el
cuello
Orifi cio de reinicialización
Si se produce un fallo en el
reproductor, presione el orifi cio
de reinicialización con un objeto
con punta para reinicializar el
sistema.
Micrófono
Conector USB
12 _ conceptos básicos
Page 13
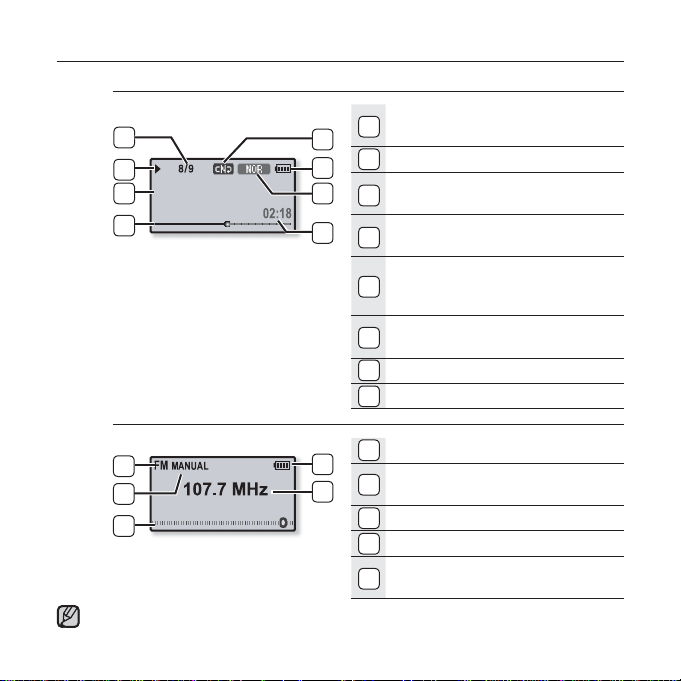
PANTALLAS
Música
Indicador de modo de
1
5
6
7
8
Rising Sun
1
2
3
4
Radio FM
3
4
5
Las imágenes de pantalla son únicamente ilustrativas. Es posible que difi eran de
la pantalla real.
NOTA
1
2
reproducción
2
Estado de la batería
Indicador de DNSe / Velocidad
3
de reproducción
Indicador de tiempo de
4
reproducción
Indicador de la pista actual en
5
reproducción / número total de
pistas
Indicador de reproducción/
6
pausa, búsqueda
7
Título de música
8
Barra de estado de reproducción
1
Estado de la batería
Indicador de frecuencia de
2
corriente (MHz)
3
Indicador de modo Radio
4
Indicador de manual/presintonía
Indicador de localización de
5
frecuencia
conceptos básicos _ 13
Page 14
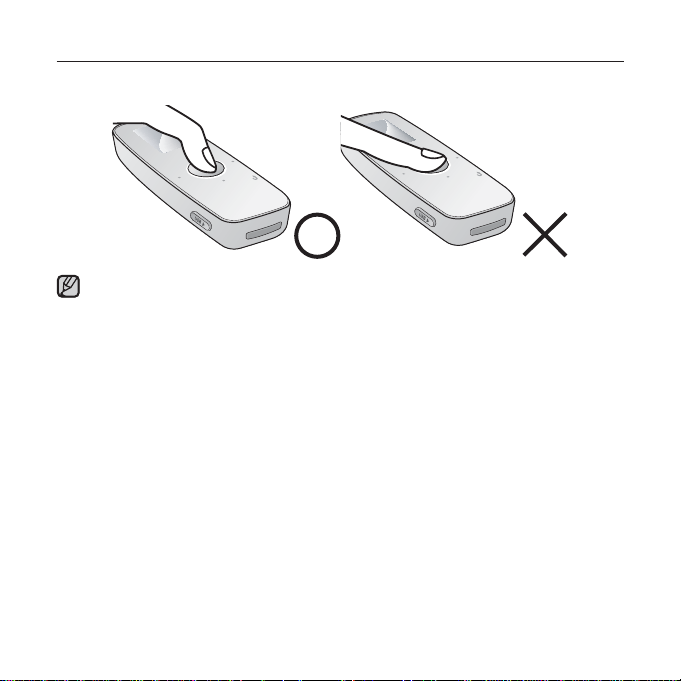
UTILIZACIÓN DEL BOTÓN TÁCTIL
Toque el botón táctil con la yema del dedo.
Para evitar daños en el botón táctil, no utilice ningún objeto que no sea sus dedos
para interactuar con ella.
NOTA
No toque el botón táctil si no tiene limpios los dedos.
No toque el botón táctil con guantes.
Es posible que el botón táctil no funcione si utiliza las uñas o instrumentos como un
bolígrafo.
14 _ conceptos básicos
Page 15
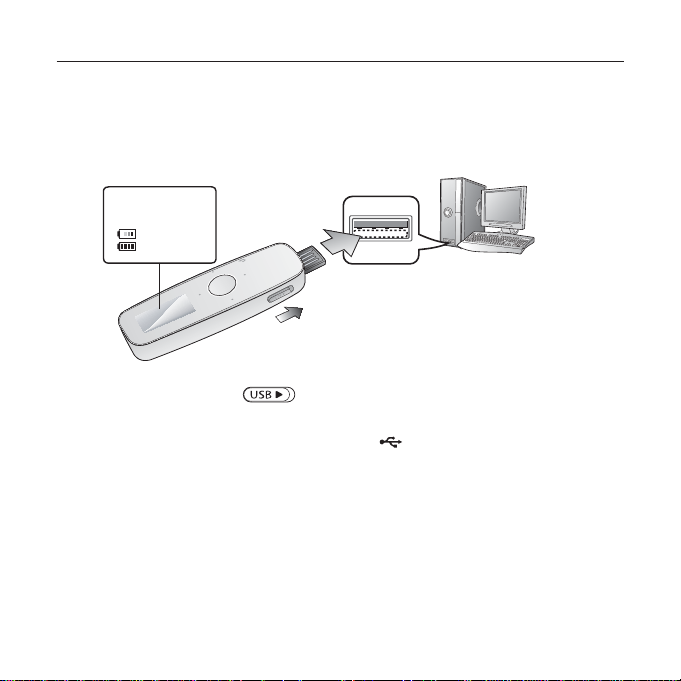
CARGA DE LA BATERÍA
Cárguelo antes de utilizar el reproductor por primera vez y cuando no lo haya
utilizado durante tiempo prolongado.
La batería del reproductor MP3 se cargará totalmente en 4 horas, aunque el
tiempo de recarga varía dependiendo del entorno de la PC.
Pantalla
USB connected (USB
conectado)
- Cargando
-
Carga completa
2
La dirección de inserción del puerto USB
puede diferir dependiendo de la PC.
Compruebe la dirección del conector USB
1
1. Deslice el interruptor [ ].
Se muestra el conector USB.
2. Inserte el conector USB en el puerto USB ( ) de la PC como se muestra en
la fi gura.
del reproductor antes de insertarlo.
conceptos básicos _ 15
Page 16
CUIDADO DE LA BATERÍA
La batería durará más tiempo si sigue estas instrucciones sencillas para
cuidado y almacenamiento del reproductor.
•
Recargue la batería dentro del rango de temperatura de 5°C~35°C (40°F~95°F).
• No la sobrecargue (más de 12 horas).
Una carga o descarga excesivas puede acortar la vida de la batería.
• Con el tiempo, la vida de la batería se acorta de forma natural.
Si está cargando el reproductor mientras está conectado a una computadora
portátil, asegúrese de que la batería del portátil esté también totalmente cargada o
NOTA
de que el portátil esté enchufado a su fuente de alimentación.
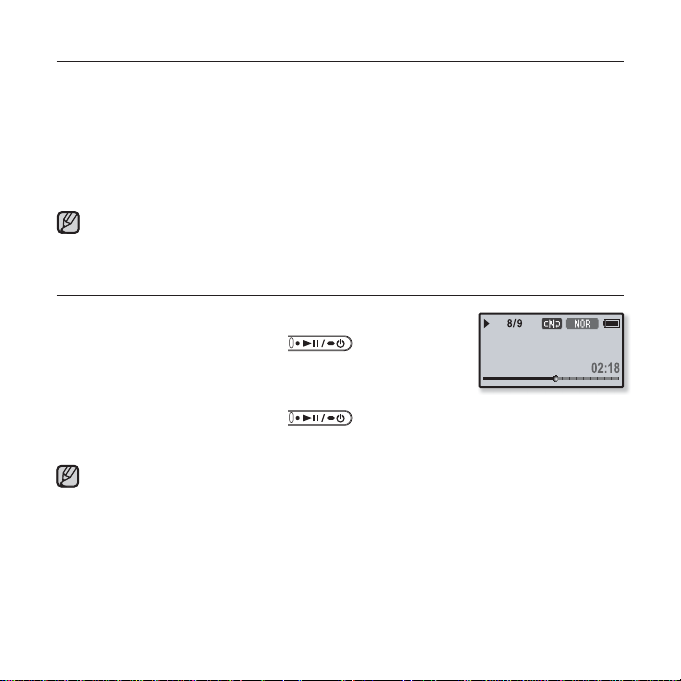
ENCENDIDO Y APAGADO
Encendido
Mantenga presionado el botón
ҏLa unidad se enciende.
Apagado
Mantenga presionado el botón
Se apaga la unidad.
El reproductor mp3 se apagará automáticamente si no se presiona ninguno de los
botones durante un período de tiempo específi co en el modo de pausa. El ajuste de
NOTA
fábrica de <Auto Power Off> (Apag. autom.) es 1 minuto, pero puede cambiar el
tiempo de duración. Consulte la página 32 para más información.
[ ].
[ ].
Rising Sun
16 _ conceptos básicos
Page 17
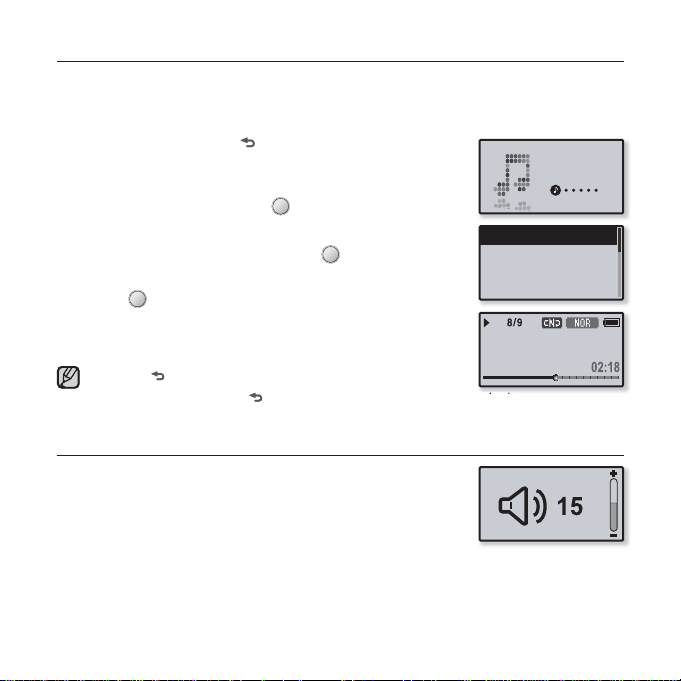
REPRODUCCIÓN DE MÚSICA
Cargue los archivos de música en el nuevo reproductor mp3 utilizando Media
Studio de Samsung.
Más información sobre Media Studio en la página 36.
1. Mantenga presionado [ ] para ir a la pantalla del
menú principal.
2. Toque el botón [Izquierda, Derecha] para seleccionar
Music
<Music> (Música) y toque [ ].
Aparece la lista <Music> (Música).
3. Utilice el botón [Arriba, Abajo] y [ ] para seleccionar
un archivo de música que desee.
Toque [ ] para reproducir el archivo de música
4.
Now Playing
Artists
Albums
Songs
seleccionado.
Comienza a reproducirse el archivo de música.
Toque
NOTA
[ ] para ir a la pantalla anterior.
Mantenga presionado [ ] para ir a la pantalla del menú principal.
Rising Sun
CONTROL DE VOLUMEN
Toque el botón [Arriba, Abajo].
Aparecerá el icono de control de volumen.
El rango del volumen se encuentra entre 00 y 30.
Toque el botón [Arriba] para subir el volumen y toque el
botón [Abajo] para bajarlo.
conceptos básicos _ 17
Page 18
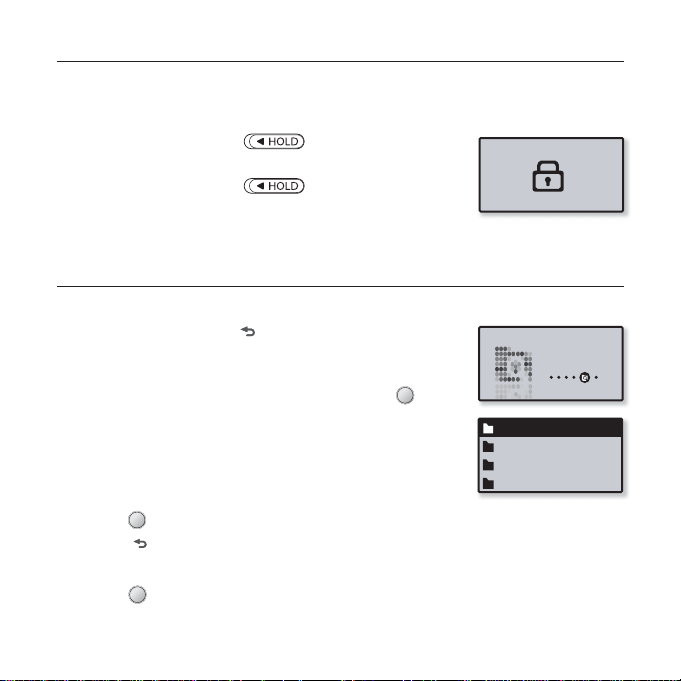
DESACTIVACIÓN DE LOS BOTONES
La función de bloqueo desactiva el resto de botones del reproductor mp3,
de forma que si accidentalmente toca uno, la música, por ejemplo, no se
interrumpirá.
1. Deslice el interruptor [ ] en la dirección de la
fl echa para activar la función de bloqueo.
2. Deslice el interruptor [ ] en la dirección
opuesta de la fl echa para liberar la función de bloqueo.
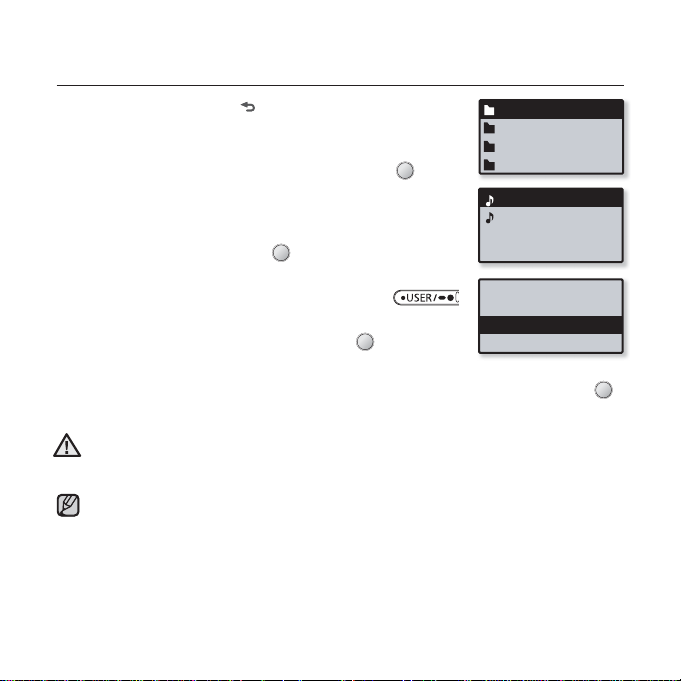
EXPLORACIÓN DE ARCHIVOS UTILIZANDO “FILE
BROWSER” (BUSCADOR ARCHIVO)
Busque fácilmente archivos utilizando la función “File Browser” (Buscador Archivo).
1. Mantenga presionado [ ] para ir a la pantalla del
menú principal.
2. Toque el botón [Izquierda, Derecha] para seleccionar
<File Browser> (Buscador Archivo) y toque [ ].
Aparece la lista de carpetas de <File Browser> (Buscador
Archivo) que contiene “Music, Playlists, Datacasts, Recorded
Files” (Música, Listas de repr., Datacasts, Archivos grabados).
3. Toque el botón [Arriba, Abajo] para seleccionar la
carpeta que desee.
4.
Toque
[ ]
para que aparezca la lista de archivos en la carpeta seleccionada.
Toque [ ] para ir a la pantalla anterior.
5. Toque el botón [Arriba, Abajo] para seleccionar el archivo que desee.
6. Toque [ ].
Se iniciará la reproducción del archivo.
18 _ conceptos básicos
File Browser
Music
Playlists
Datacasts
Recorded Files
Page 19
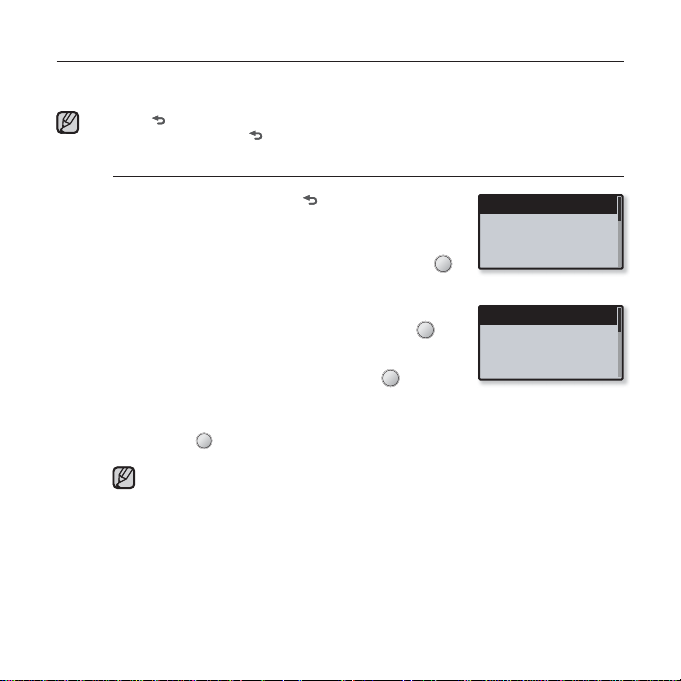
SUPRESIÓN DE ARCHIVOS CON “FILE BROWSER”
(BUSCADOR ARCHIVO)
1. Mantenga presionado [ ] para ir a la pantalla del
menú principal.
2. Toque el botón [Izquierda, Derecha] para seleccionar
<File Browser> (Buscador Archivo) y toque [ ].
Aparece la lista de carpetas <File Browser> (Buscador
Archivo).
3. Toque el botón [Arriba, Abajo] para seleccionar la
carpeta que desee
4.
Toque el botón [Arriba, Abajo] para seleccionar el
y toque
[ ]
.
archivo que desee borrar y presione el botón [ ].
5. Toque el botón [Arriba, Abajo] para seleccionar
<Delete File> (Borrar archivo) y toque [ ].
Aparecerá la ventana de confi rmación.
6.
Toque el botón [Izquierda, Derecha] para seleccionar <Yes> (Sí) y toque
Se borrará el archivo.
Una vez borrados los archivos, no es posible recuperarlos.
PRECAUCIÓN
El archivo en reproducción no se borrará.
NOTA
Music
Playlists
Datacasts
Recorded Files
Music Space.mp3
Rising Sun.mp3
Add to Playlist
Delete from Playl...
Delete File
[ ]
.
conceptos básicos _ 19
Page 20
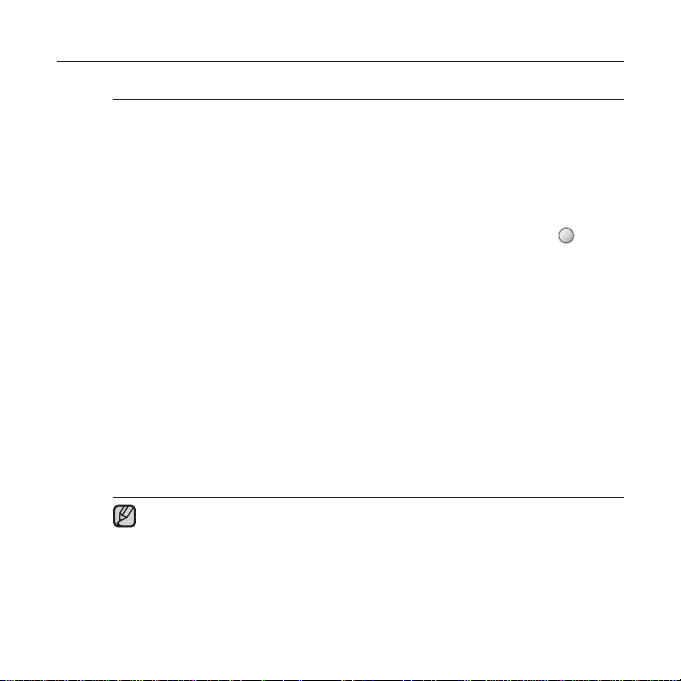
CAMBIO DE AJUSTES Y PREFERENCIAS
El reproductor mp3 viene con ajustes y preferencias defi nidos de fábrica, pero puede
cambiar estos valores predefi nidos para personalizar verdaderamente el reproductor.
Toque [ ] para ir a la pantalla anterior.
Mantenga presionado [
NOTA
Ajustes de música
] para ir a la pantalla del menú principal.
1. Mantenga presionado [ ] para ir a la pantalla
del menú principal.
2.
Toque el botón [Izquierda, Derecha] para
seleccionar <Settings> (Confi g.) y toque [ ].
Aparece el menú <Settings> (Confi g.).
3.
Toque el botón [Arriba, Abajo] para
seleccionar <Music> (Música) y toque [ ].
Aparece el menú <Music> (Música).
4.
Utilice el botón [Arriba, Abajo] y [ ] para
defi nir funciones.
Toque el botón [Arriba, Abajo] para subir o bajar a través del menú actual.
Toque [
NOTA
20 _ conceptos básicos
] para desplazarse al elemento siguiente o seleccionar el menú.
Si se abre la pantalla <Settings> (Confi g.) y no presiona ningún botón
durante 1 minuto, se perderán los ajustes no guardados y el reproductor
volverá a la pantalla anterior.
¿Qué es DNSe?
Digital Natural Sound Engine (DNSe) es una función de efecto de sonido para
reproductores MP3 desarrollados por Samsung. Proporciona diversos ajustes
de sonido para mejorar el tipo de música que esté escuchando.
Music
FM Radio
User Button Mode
Sound
Sound Effect
DNSe
Play Mode
Play Speed
Page 21
CAMBIO DE AJUSTES Y PREFERENCIAS (Cont.)
Opciones de los ajustes de Música
Sound Effect (Efecto de sonido): Puede establecer el modo de calle, la claridad y el
ecualizador maestro.
<Street Mode> (Modo Calle): Permite oír música al aire libre claramente fi ltrando algunos
ruidos de la calle. Seleccione <Off> (No) u <On> (Encendido).
<Clarity> (Claridad): Puede disfrutar de un sonido más clara con mayor calidad. Seleccione
entre <0-2>.
<Master EQ> (Ecualizador maestro): Puede optimizar los ajustes de sonido.
Toque el botón [Izquierda, Derecha] para seleccionar la frecuencia que desee ajustar. Toque
el botón [Arriba, Abajo] para ajustar el nivel de frecuencia seleccionado y toque [
DNSe: Permite seleccionar el sonido correcto para cada género musical. Seleccione entre
<Normal>, <Studio> (Estudio), <Rock>, <Classical> (Clásica), <Jazz>, <Ballad> (Balada),
<Club>, <R&B>, <Dance> (Baile), <Concert Hall> (Sala Concierto) y <User> (Usuario).
Puede también establecer <EQ> (Ecualizador) y <3D & BASS> (3D y GRAVES) en el modo
DNSe cuando haya seleccionado <User> (Usuario).
Play Mode (Modo de repr.): Seleccione el modo de reproducción como los ajustes de
repetición. Seleccione <Normal>, <Repeat> (Repetir), <Repeat One> (Repetir uno) o
<Shuffl e> (Aleatorio).
Play Speed (Vel. repr.): Ajusta la velocidad de reproducción de los archivos de música/
grabación. Seleccione entre <x0.7>, <x0.8>, <x0.9>,
<x1.3>.(Cuanto más alto sea el número, más rápida será la velocidad.)
Skip Interval (Intervalo de salto):
diferentes. Salte una pista completa o salte varios segundos de una vez.
<1 Song> (1 canción), <5sec> (5seg.), <10sec> (10seg.), <30sec> (30seg.) y <1 min>.
Tag (Etiqueta): Puede seleccionarla para mostrar la información de pista de un archivo de
música que contiene la etiqueta ID3. Seleccione <Off> (No) u <On> (Encendido).
Si el archivo se ha desarrollado con una velocidad de bits variable (VBR) o es
un archivo Ogg, es posible que la longitud real del intervalo de salto no sea
NOTA
exactamente la que seleccione.
La velocidad de reproducción ajustada puede diferir de la velocidad actual,
dependiendo del archivo.
¿Qué es una etiqueta ID3?
Es información relativa al archivo anexa a un MP3, como el título, el artista, el
álbum, el año, el género y un campo de comentarios.
Puede avanzar rápidamente en un archivo a intervalos
Consulte la página 22.
<x1.0(Normal)>, <x1.1>, <x1.2> o
Seleccione entre
conceptos básicos _ 21
].
Page 22
CAMBIO DE AJUSTES Y PREFERENCIAS (Cont.)
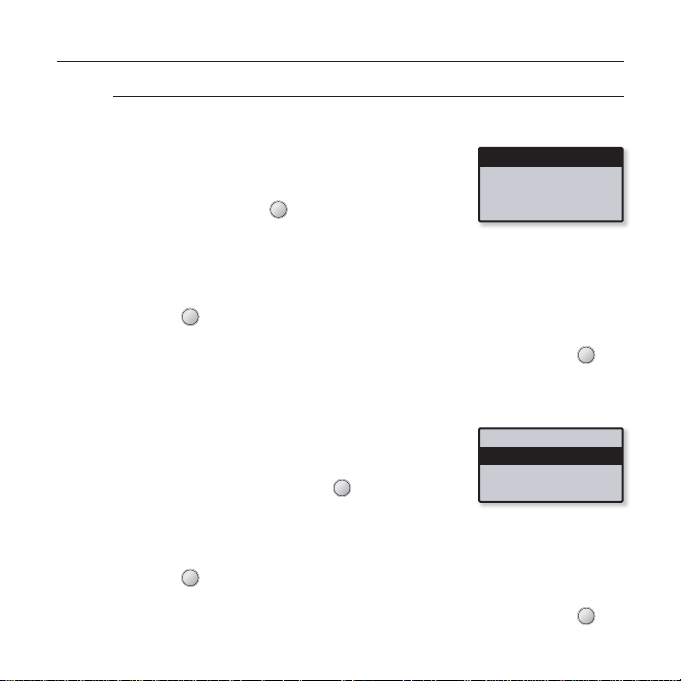
Para confi gurar Digital Natural Sound engine (DNSe) (Cont.)
<EQ> (Ecualizador)
Puede ajustar las frecuencias individuales para ajustar el sonido a su preferencia.
1 Toque el botón [Arriba, Abajo] en el menú DNSe para
seleccionar <User> (Usuario) y toque el botón [Derecha].
2. Toque el botón [Arriba, Abajo] para seleccionar <EQ>
(Ecualizador) y toque
Aparece la pantalla de ajuste de <EQ> (Ecualizador).
[ ].
3. Toque el botón [Izquierda, derecha] para seleccionar la frecuencia que desea
ajustar y toque el botón [Arriba, Abajo] para ajustar el nivel de frecuencia
seleccionado.
Puede seleccionar entre –10 y +10 para el nivel de frecuencia seleccionado.
4. Toque [ ].
Aparecerá la ventana de confi rmación.
5. Toque el botón [Izquierda, Derecha] para seleccionar <Yes> (Sí) y toque [ ].
El ajuste queda realizado.
<3D & BASS> (3D y Graves)
Puede defi nir el sonido 3D surround y el nivel de refuerzo de graves.
1. Toque el botón [Arriba, Abajo] en el menú DNSe para
seleccionar <User> (Usuario) y toque el botón [Derecha].
2. Toque el botón [Arriba, Abajo] para seleccionar <3D &
BASS> (3D y GRAVES) y toque
Aparece la pantalla de ajuste de <3D & BASS> (3D y GRAVES).
[ ].
3. Toque el botón [Izquierda, Derecha] para seleccionar <3D> o <Bass> (Graves) y
toque el botón [Arriba, Abajo].
Puede seleccionar un nivel <3D> entre 0 y 4, y <Bass> (Graves) entre 0 y 4.
4. Toque [ ].
Aparecerá la ventana de confi rmación.
5. Toque el botón [Izquierda, Derecha] para seleccionar <Yes> (Sí) y toque [ ].
El ajuste queda realizado.
22 _ conceptos básicos
EQ
3D & BASS
EQ
3D & BASS
Page 23
CAMBIO DE AJUSTES Y PREFERENCIAS (Cont.)
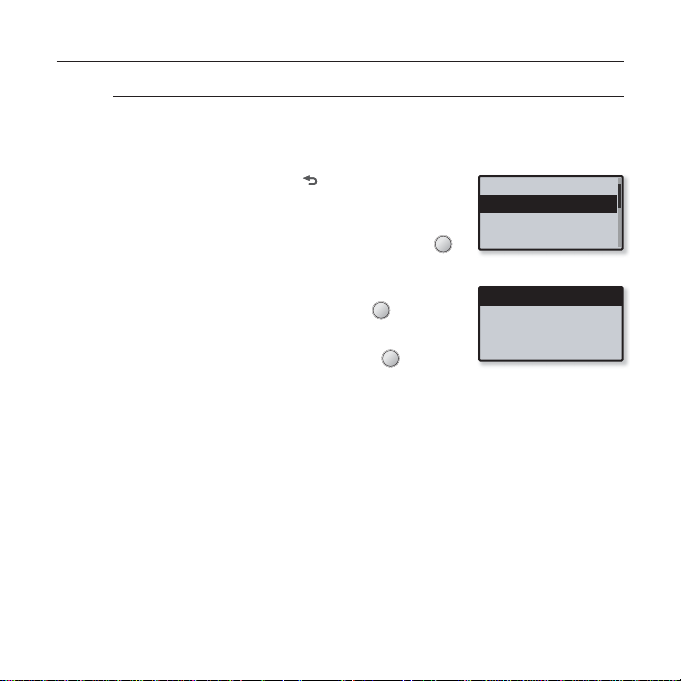
Ajustes de radio FM
Puede defi nir automáticamente las frecuencias de radio FM y también
seleccionar el modo de Radio FM, el área de recepción FM y la
sensibilidad.
1. Mantenga presionado [ ] para ir a la pantalla
del menú principal.
2.
Toque el botón [Izquierda, Derecha] para
seleccionar <Settings> (Confi g.) y toque [ ].
Aparece el menú <Settings> (Confi g.).
3.
Toque el botón [Arriba, Abajo] para seleccionar
<FM Radio> (Radio FM) y toque [ ].
Aparece el menú <FM Radio> (Radio FM).
4.
Utilice el botón [Arriba, Abajo] y [ ] para
defi nir funciones.
Music
FM Radio
User Button Mode
Sound
Mode
Auto Preset
FM Region
FM Sensitivity
conceptos básicos _ 23
Page 24
CAMBIO DE AJUSTES Y PREFERENCIAS (Cont.)
Opciones de ajustes de FM Radio (Radio FM)
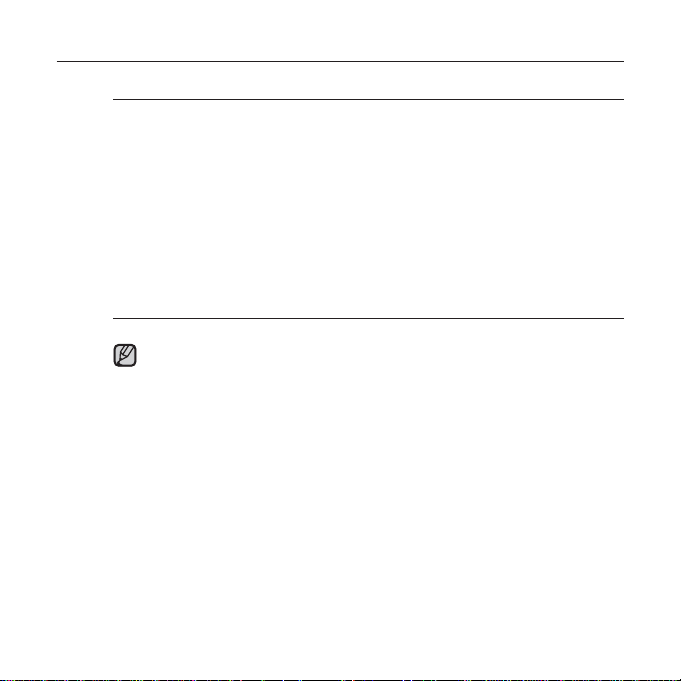
Mode (Modo): Puede cambiar al modo Manual o Predefi nir. Seleccione <Manual>
o <Preset> (Predefi nir). Si no se defi ne ninguna frecuencia predefi nida, el
reproductor cambiará al modo Predefi nir.
Auto Preset (Mem. autom.): Busca automáticamente las frecuencias disponibles.
Consulte la página 25.
FM Region (Región de FM): Puede cambiar el ajuste de un área de FM al
preparar viajes al extranjero. Seleccione entre <Korea/US> (Corea / EE.UU.),
<Japan> (Japón) y <Other Countries> (Otros Países).
FM Sensitivity (Sensibilidad FM): Para recibir más o menos frecuencias de radio
FM, ajuste <FM Sensitivity> (Sensibilidad FM). Seleccione entre <Low> (Baja),
<Middle> (Medio) y <High> (Alta). Si selecciona <High> (Alta), se recibirá el
mayor número de frecuencias.
Las frecuencias de radio anteriormente memorizadas se borrarán cuando
cambie la <FM Region> (Región de FM) del reproductor.
NOTA
ҏLa región de FM puede borrarse o cambiarse de acuerdo con la región de
destino del reproductor.
ҏRango de frecuencia por región
- Korea/US (Corea / EE.UU.): busca frecuencias de FM en incrementos de
100 kHz entre 87,5 MHz y 108.00 MHz.
- Japan (Japón): busca frecuencias de FM en incrementos de 100 kHz
entre 76.0 MHz y 108.00 MHz.
- Other Countries (Otros países): busca frecuencias de FM en incrementos
de 50 kHz entre 87.50 MHz y 108.00 MHz.
24 _ conceptos básicos
Page 25
CAMBIO DE AJUSTES Y PREFERENCIAS (Cont.)
Para defi nir Auto Preset (Mem. autom.)
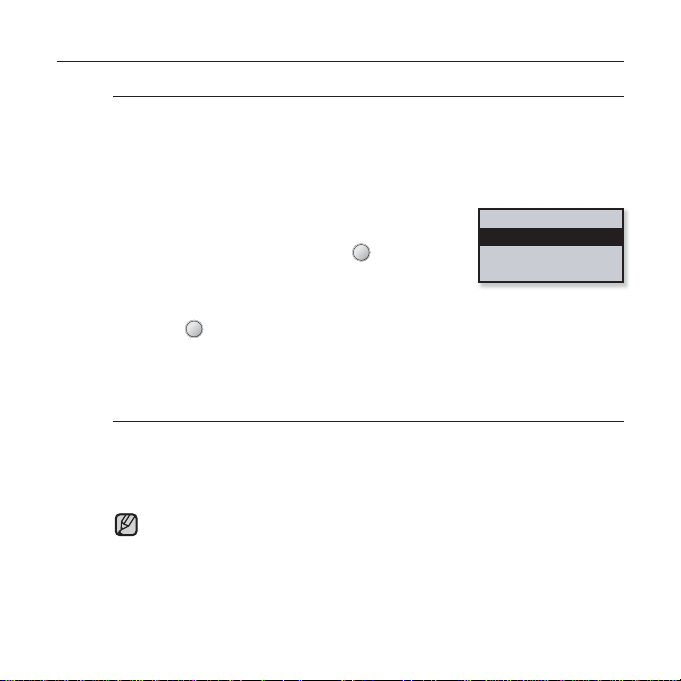
Puede predefi nir hasta 30 emisoras en la memoria del reproductor
MP3 y volver a ellos con la pulsación de un solo botón. Deje que el
reproductor MP3 busque y almacene emisoras automáticamente.
Automático - almacena automáticamente todas las emisoras que recibe el
reproductor.
1.
Toque el botón [Arriba, Abajo] en el menú
de ajuste de radio FM para seleccionar <Auto
Preset> (Mem. autom.) y toque [ ].
Aparecerá la ventana de confi rmación de Auto
Preset (Mem. autom.).
2.
Toque el botón [Izquierda, Derecha] para seleccionar <Yes> (Sí) y
toque
[ ]
.
Se defi nen automáticamente hasta 30 frecuencias.
Una vez completados los ajustes, toque el botón [Izquierda, Derecha] para
seleccionar la frecuencia predefi nida que desee en modo Predefi nir.
Para cancelar Auto Preset (Mem. autom.)
Para cancelar la memoria automática, presione cualquier botón durante
el proceso.
El ajuste de preajuste se cancela y sólo se memorizan las frecuencias
confi guradas.
Conecte siempre los audífonos al reproductor al buscar o ajustar frecuencias.
NOTA
Los audífonos sirven como antenas para la recepción de radio FM.
En áreas de baja recepción, es posible que el reproductor no encuentre una
frecuencia disponible.
Es posible que vuelva a reiniciar las emisoras memorizadas si va a
escuchar el reproductor MP3 en una ciudad diferente. Para borrar las
emisoras predefi nidas y memorizar nuevas, repita simplemente el proceso.
Mode
Auto Preset
FM Region
FM Sensitivity
conceptos básicos _ 25
Page 26
CAMBIO DE AJUSTES Y PREFERENCIAS (Cont.)
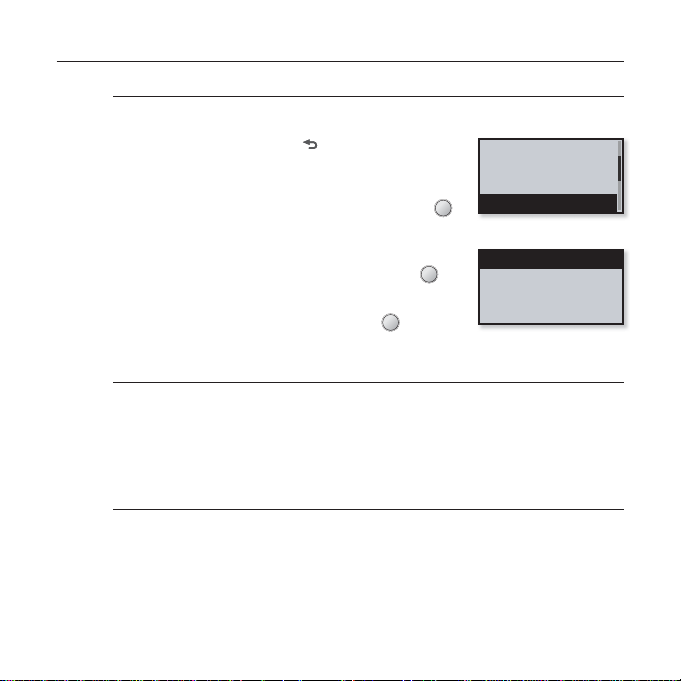
Ajustes de sonido
Puede establecer el sonido de pitido y el límite de volumen.
1. Mantenga presionado [ ] para ir a la pantalla
del menú principal.
2.
Toque el botón [Izquierda, Derecha] para
seleccionar <Settings> (Confi g.) y toque [ ].
Aparece el menú <Settings> (Confi g.).
3.
Toque el botón [Arriba, Abajo] para
seleccionar <Sound> (Sonido) y toque [ ].
Aparece el menú <Sound> (Sonido).
4.
Utilice el botón [Arriba, Abajo] y [ ] para
defi nir funciones.
Opciones de confi guración de Sonido
Beep Sound (Sonido de pitido): Activa y desactiva el sonido del pitido en la
utilización de botones. Seleccione entre <Off> (No) y <On> (Encendido).
Volume Limit (Límite de volumen): Puede evitar daños en el oído ajustando el
límite del volumen al utilizar los parlantes. <On> (Encendido) limitará el nivel de
volumen máximo a 15. El nivel de volumen máximo cuando el límite se defi ne en
<Off> (No) es 30.
15 para evitar daños en el oído cuando vuelva a encender el reproductor.
Incluso aunque seleccione <Off> (No), el volumen se defi nirá en
Music
FM Radio
User Button Mode
Sound
Beep Sound
Volume Limit
26 _ conceptos básicos
Page 27
CAMBIO DE AJUSTES Y PREFERENCIAS (Cont.)
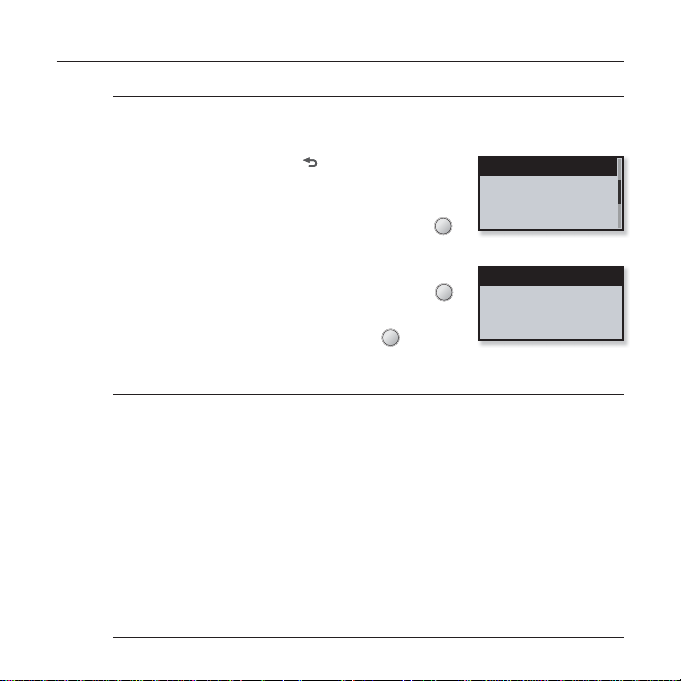
Ajustes de pantalla
Cambia el tiempo de apagado de la pantalla, el protector de pantalla y
el efecto de luz de fondo de LED.
1. Mantenga presionado [ ] para ir a la pantalla
del menú principal.
2.
Toque el botón [Izquierda, Derecha] para
seleccionar <Settings> (Confi g.) y toque [ ].
Aparece el menú <Settings> (Confi g.).
3.
Toque el botón [Arriba, Abajo] para
seleccionar <Display> (Pantalla) y toque [ ].
Aparece el menú <Display> (Pantalla).
4.
Utilice el botón [Arriba, Abajo] y [ ] para
defi nir funciones.
Opciones de confi guración de Display
Display Off (Visual. desactivada): Si no se toca ningún botón en el tiempo
defi nido entre las opciones que se incluyen a continuación, se apagará
automáticamente la pantalla. Seleccione <15 sec> (15 seg.), <30 sec> (30 seg.),
<1min>, <3min>, <5min> o <Always On> (Siempre activado). Presione cualquier
botón para volver a encender la pantalla.
Screen Saver (Protector de pantalla): Puede defi nir una imagen como protector
de pantalla. Seleccione la imagen del protector de pantalla en <Random>
(Aleatoria), la hora actual o las tres imágenes y seleccione el tiempo de espera
entre <15sec> (15 seg.), <30sec> (30 seg.), <1min>, <3min>, <5min> y <Off>
(No). Si no se toca ningún botón en el tiempo defi nido entre las opciones
mostradas, el reproductor mostrará la imagen del protector de pantalla.
LED Effect (Efecto de LED): Seleccione el efecto de fondo de luz del LED.
Seleccione <Off> (No), <Button> (Botón) (se enciende si se presiona un botón),
<Random> (Aleatoria) o <Always on> (Siempre activado).
Display
Language
Date/Time Set
System
Display Off
Screen Saver
LED Effect
conceptos básicos _ 27
Page 28
CAMBIO DE AJUSTES Y PREFERENCIAS (Cont.)
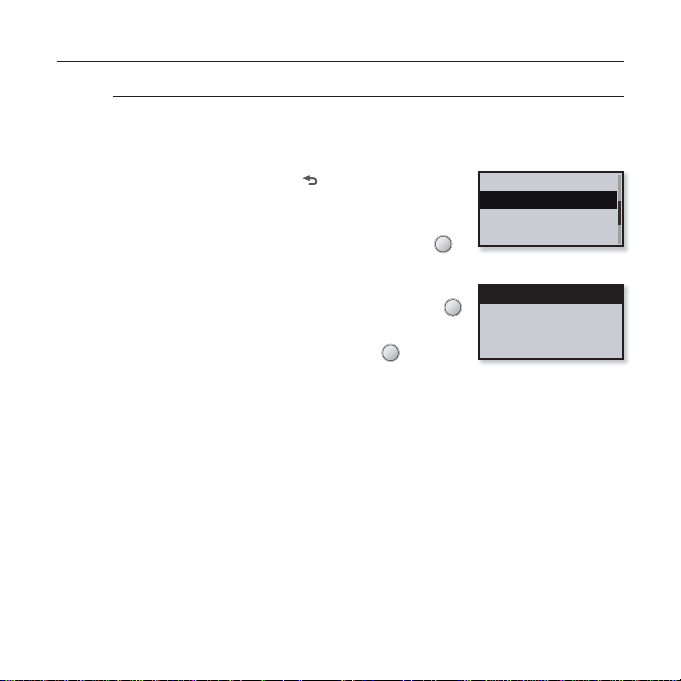
Confi guración de Idioma
Los menús del nuevo reproductor mp3 pueden ajustarse para verse en
una de los múltiples idiomas. Puede cambiar fácilmente el idioma que
prefi era.
Mantenga presionado [ ] para ir a la pantalla
1.
del menú principal.
2.
Toque el botón [Izquierda, Derecha] para
seleccionar <Settings> (Confi g.) y toque [ ].
Aparece el menú <Settings> (Confi g.).
3.
Toque el botón [Arriba, Abajo] para
seleccionar <Language> (Idioma) y toque [ ].
Aparece el menú <Language> (Idioma).
4.
Utilice el botón [Arriba, Abajo] y [ ] para
defi nir funciones.
Display
Language
Date/Time Set
System
Menu
ID3 T ag
28 _ conceptos básicos
Page 29
CAMBIO DE AJUSTES Y PREFERENCIAS (Cont.)
Opciones de confi guración de Idioma
Menu (Menú): Ajusta el idioma del menú. Seleccione entre <English>,
<한국어>, <Français>, <Deutsch>, <Italiano>, <日本語>, <Ё᭛ㅔԧ>,
<Ё᭛㐕储>, <Español>, <Ɋɭɫɫɤɢɣ>, <Magyar>, <Nederlands>, <Polski>,
<Português>, <Svenska>, <ѳъѕ>, <ýeština>, <ƧnjnjLjǎNJNjƽ>, <Türkçe>, <Norsk>,
<Dansk>, <Suomi>, <Español (Sudamérica)>, <Português (Brasil)>, <Indonesia>,
<TiӃng ViӋt>, <Bulgarian>, <Română>, <ɍɤɪɚʀɧɫɶɤɚ>, <Slovenšþina> o
<Slovenský>.
ID3 Tag (Etiqueta ID3): Permite ajustar el idioma en el que aparecerá la
información y el texto de la pista. Seleccione entre <English>, <Korean>,
<French>, <German>, <Italian>, <Japanese>, <Chinese(S)>, <Chinese(T)>,
<Spanish>, <Russian>, <Hungarian>, <Dutch>, <Polish>, <Portuguese>,
<Swedish>, <Thai>, <Finnish>, <Danish>, <Norwegian>, <Afrikaans>,
<Basque>, <Catalan>, <Czech>, <Estonian>, <Greek>, <Hrvatski>, <Icelandic>,
<Rumanian>, <Slovak>, <Slovene> <Turkish> o <Vietnamese>.
Es posible cambiar o añadir los idiomas admitidos.
NOTA
¿Qué es una etiqueta ID3?
Es información relativa al archivo anexa a un MP3, como el título, el artista,
el álbum, el año, el género y un campo de comentarios.
conceptos básicos _ 29
Page 30
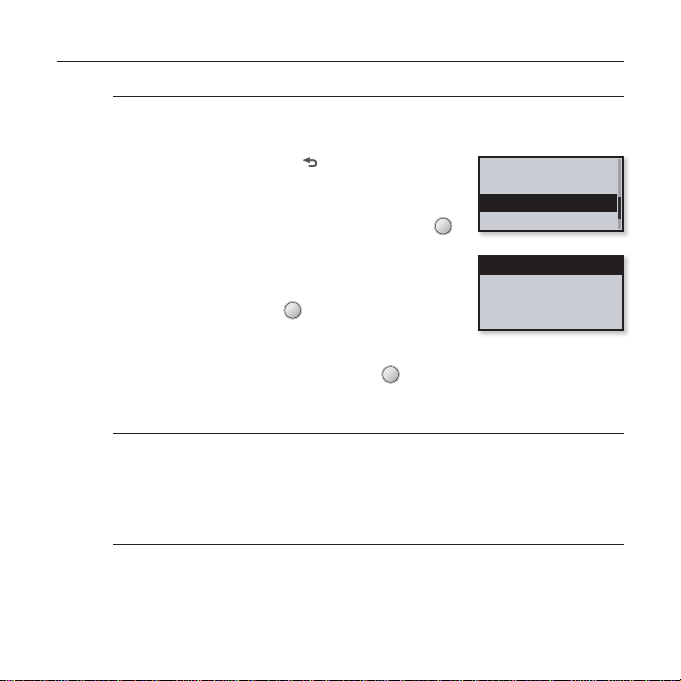
CAMBIO DE AJUSTES Y PREFERENCIAS (Cont.)
Ajustes de fecha/hora
Fijar la hora permitirá en la unida estampar la fecha y hora correctas en
los archivos grabados.
1. Mantenga presionado [ ] para ir a la pantalla
del menú principal.
2.
Toque el botón [Izquierda, Derecha] para
seleccionar <Settings> (Confi g.) y toque [ ].
Aparece el menú <Settings> (Confi g.).
3.
Toque el botón [Arriba, Abajo] para
seleccionar <Date/Time Set> (Confi gurar
fecha/hora) y toque [ ].
Aparece el menú <Date/Time Set> (Confi gurar
fecha/hora).
4.
Utilice el botón [Arriba, Abajo] y [ ] para defi nir funciones.
Opciones de ajuste de fecha/hora
Date (Fecha): Puede fi jar la fecha actual. Toque [Izquierda, Derecha] para ir a
<Year, Month, Date> (Año, Mes, Fecha) y toque [Arriba, Abajo] para ajustar cada
opción.
Time (Hora): Puede fi jar la hora actual. Toque [Izquierda, Derecha] para ir a
<Hour, Min, AM/PM> (Hora, Min, AM/PM) y toque [Arriba, Abajo] para ajustar cada
opción.
Display
Language
Date/Time Set
System
Date
Time
30 _ conceptos básicos
Page 31
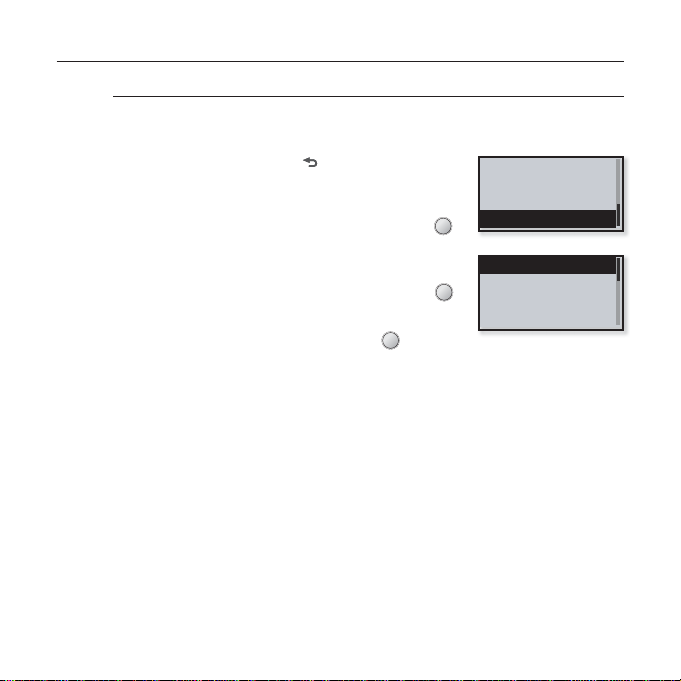
CAMBIO DE AJUSTES Y PREFERENCIAS (Cont.)
Ajustes del sistema
Elija los ajustes de espera, modo de inicio, apagado automático,
ajustes predeterminados que sean los más adecuados.
1.
Mantenga presionado [ ] para ir a la pantalla
del menú principal.
2.
Toque el botón [Izquierda, Derecha] para
seleccionar <Settings> (Confi g.) y toque [ ].
Aparece el menú <Settings> (Confi g.).
3.
Toque el botón [Arriba, Abajo] para
seleccionar <System> (Sistema) y toque [ ].
Aparece el menú <System> (Sistema).
4.
Utilice el botón [Arriba, Abajo] y [ ] para
defi nir funciones.
Display
Language
Date/Time Set
System
Sleep
Auto Power Off
Library Update
Default Set
conceptos básicos _ 31
Page 32
CAMBIO DE AJUSTES Y PREFERENCIAS (Cont.)
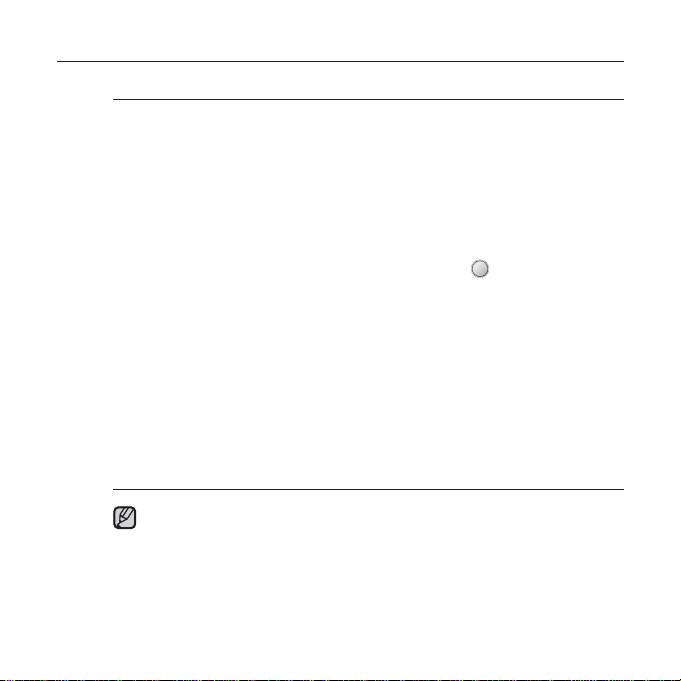
Opciones de confi guración de Sistema
Sleep (Desconexión): Apaga automáticamente tras el tiempo predefi nido.
Seleccione <Off> (No), <15min>, <30min>, <60min>, <90min> o <120min>.
Auto Power Off (Apag. autom.): Apaga automáticamente cuando no se utiliza
ningún botón tras el tiempo predefi nido en el modo de pausa. Seleccione entre
<15sec> (15seg.), <30sec> (30seg.), <1min>, <3min>, <5min> o <Always On>
(Siempre activado).
Library Update (Actual. biblioteca):
la biblioteca cuando extraiga el conector USB. No obstante, si la actualización de
la biblioteca no se realiza correctamente, actualícela manualmente. Toque el botón
[Izquierda, Derecha] para seleccionar <Yes> (Sí) y toque [
Default Set (Ajuste predet.): Cambia todos los ajustes a los valores
predeterminados. Seleccione <Yes> (Sí) o <No>. <Yes> (Sí) inicializa todos los
ajustes a los valores predeterminados. <No> anula los ajustes predeterminados.
Format (Formato): Da formato a la memoria interna. Seleccione <Yes> (Sí) o
<No>. Si selecciona <Yes> (Sí) se formateará la memoria interna y se borrarán
todos los archivos del reproductor. Si selecciona <No> no se formatea la memoria
interna. compruebe antes de formatear.
About (Acerca de): Comprueba la versión de fi rmware y la capacidad de la
memoria.
<Firmware Version> (Versión de Firmware) muestra la versión actual del fi rmware.
<Used> (Utilizado) indica el uso, <Available> (Disponible) indica la capacidad
restante y <Total> indica la capacidad total de la memoria.
Información sobre la memoria incorporada
1 GB = 1.000.000.000 bytes: la capacidad de formato real puede ser
NOTA
inferior ya que el fi rmware interno utiliza una parte de la memoria.
El reproductor actualizará automáticamente
].
32 _ conceptos básicos
Page 33
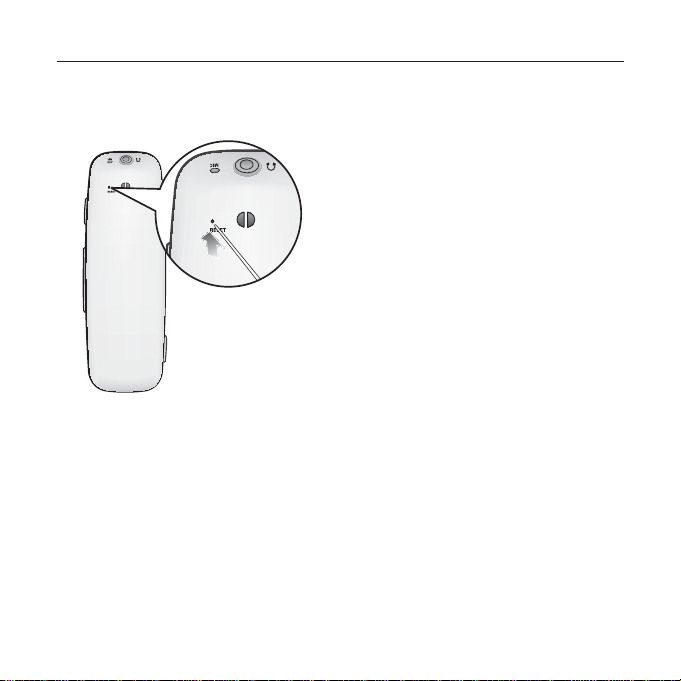
REINCIALIZACIÓN DEL SISTEMA
Si el reproductor mp3 no se enciende, no reproduce música o la computadora
no lo reconoce al conectarlo, tendrá que reinicializar el sistema.
Presione el orifi cio Reset en la parte
posterior del reproductor con un objeto
punzante como un clip.
El sistema se inicializará.
Los ajustes y los archivos no se verán
afectados.
conceptos básicos _ 33
Page 34

samsung media studio
Media Studio de Samsung es la aplicación de software fácil de utilizar
que ayuda a organizar los archivos de la PC. Con los archivos ya
almacenados y organizados en Media Studio, puede transferirlos
rápidamente al mp3 sin buscar el archivo correcto en todo el disco
duro.
REQUISITOS DE LA PC
El sistema de la PC debe cumplir las siguientes especifi caciones mínimas para
poder instalar y ejecutar Media Studio:
• Pentium 500 MHz o superior
• Puerto USB 2.0
• Windows 2000/XP/Vista
• DirectX 9.0 o superior
• 100 MB de espacio libre en el disco duro
• Unidad de CD Rom (2X o superior)
• Windows Media Player 9.0 o superior
• Resolución 1024 X 768 o superior
• Internet Explorer 6.0 o superior
• 512 MB de memoria RAM o más
34 _ samsung media studio
Page 35
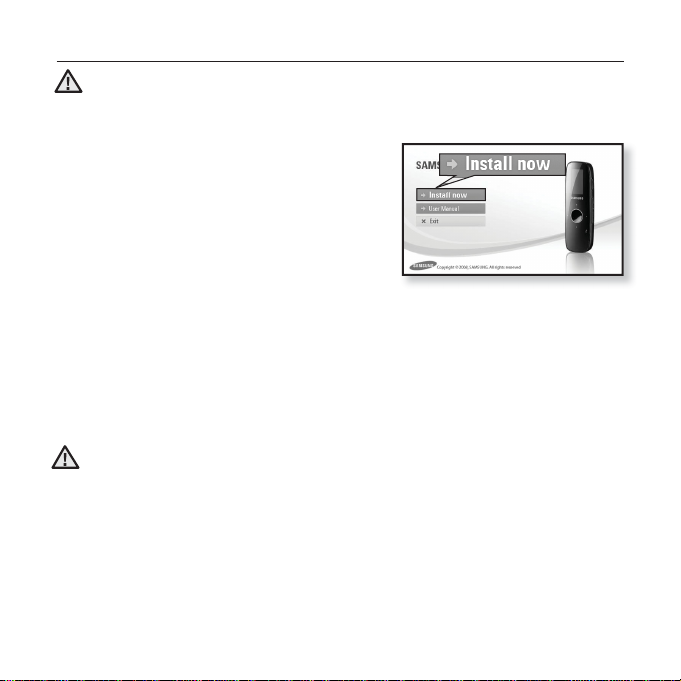
INSTALACIÓN DE SAMSUNG MEDIA STUDIO
Asegúrese de ejecutar el instalador de <Media Studio> en la cuenta de
administrador de la PC. De lo contrario, <Media Studio> no se instalará. Para
PRECAUCIÓN
buscar la cuenta del administrador, consulte el manual del usuario de la PC.
1. Inserte el CD de instalación que se facilita
con el reproductor en la unidad de CD-ROM
de la computadora.
2. Haga clic en <Install now>.
Siga las instrucciones para iniciar la instalación.
Se inicia la instalación de <Media Studio> y se crea un icono en el escritorio una vez
completada la instalación.
Tenga cuidado al insertar el Cd de instalación en la unidad de CD-ROM con
orientación vertical.
PRECAUCIÓN
samsung media studio _ 35
Page 36
TRANSFERENCIA DE ARCHIVOS AL REPRODUCTOR
CON MEDIA STUDIO DE SAMSUNG
<Media Studio> permite seleccionar y organizar los archivos y carpetas antes de
transferirlos al reproductor. Esto facilitará y acelerará la exploración de archivos
en el reproductor mp3. La transferencia de archivos de <Media Studio> es el
medio más sencillo de pasar los archivos de la PC al reproductor mp3.
2
La dirección de inserción del puerto USB puede diferir
dependiendo de la PC. Compruebe la dirección del
1
conector USB del reproductor antes de insertarlo.
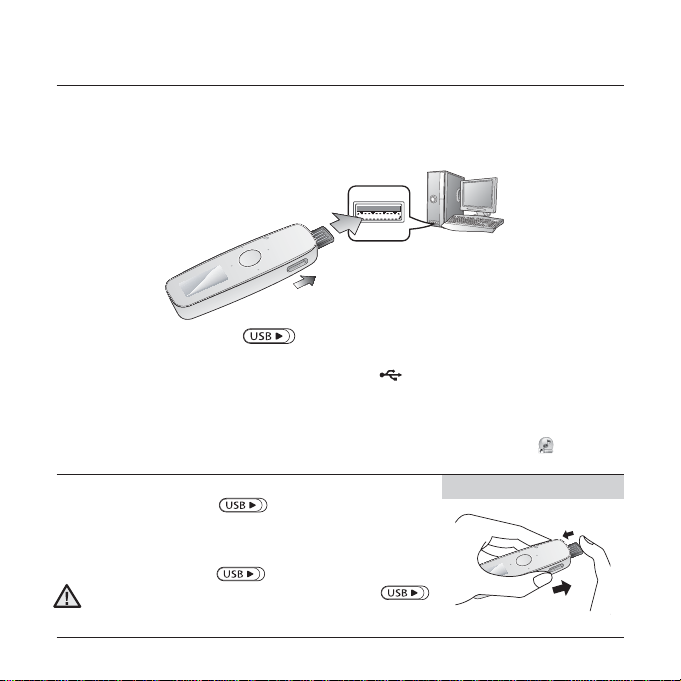
1. Deslice el interruptor [ ].
Se muestra el conector USB.
2. Inserte el conector USB en el puerto USB ( ) de la PC como se muestra en
la fi gura.
En la pantalla del reproductor aparece <USB connected> (USB conectado).
<Media Studio> se iniciará automáticamente cuando se conecte el reproductor a la PC.
Si no se inicia automáticamente el programa, haga doble clic en el icono de
<Media Studio> del escritorio.
Expulsión del conector USB
Deslice el interruptor [ ] para expulsar el conector
USB del reproductor.
Inserción del conector USB
Presione el conector USB en el reproductor mientras
desliza el interruptor
Asegúrese de mantener deslizado el interruptor
cuando introduzca el conector USB en el reproductor. Si no lo
PRECAUCIÓN
hace, podría dañar el reproductor.
36 _ samsung media studio
[ ].
[ ]
Inserción del conector USB
2
1
Page 37
TRANSFERENCIA DE ARCHIVOS AL REPRODUCTOR
CON SAMSUNG MEDIA STUDIO (Cont.)
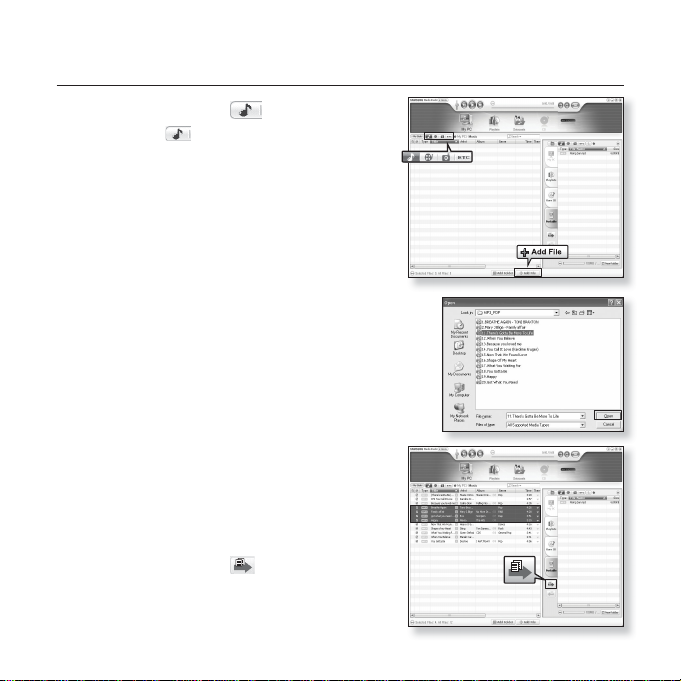
3. Haga clic en el icono .
Haga clic en para ver la lista de música.
4. Haga clic en <Add File> en la parte inferior
de <Media Studio>.
Aparecerá la ventana <Open>.
5. Seleccione los archivos que va a añadir y haga
clic en <Open>.
Los archivos se añaden a la lista del lado izquierdo de
la pantalla de <Media Studio>.
6. Seleccione el archivo que va a transferir en
la lista del lado izquierdo.
7. Haga clic en el icono .
El archivo seleccionado se transfi ere al reproductor.
3
4
6
7
samsung media studio _ 37
YP-U4
[YP-U4] > Music
5
YP-U4
[YP-U4] > Music
Page 38
TRANSFERENCIA DE ARCHIVOS AL REPRODUCTOR
CON SAMSUNG MEDIA STUDIO (Cont.)
No desconecte el conector USB durante la transferencia de archivos. Desconectar
durante la transferencia podría dañar el reproductor o la PC.
PRECAUCIÓN
Conecte el reproductor a la computadora directamente más en vez de hacerlo a
través del concentrador USB para evitar una conexión inestable.
Durante la conexión se desactivan todas las funciones.
NOTA
Si conecta el conector USB a la PC y la carga de la batería del reproductor es baja,
el reproductor se cargará durante varios minutos antes de conectarse a la PC.
Utilice FAT 32 para el sistema de archivos al formatear el reproductor en la PC.
En Windows Vista, haga clic en Restore device defaults (Restaurar valores por
omisión de dispositivo) y formatee.
Media Studio de Samsung cuenta con una función de ayuda minuciosa. Si no
puede encontrar la respuesta a su pregunta sobre Media Studio, haga clic en
<MENU> ĺ <Help> ĺ <Help> en la parte superior del programa <Media Studio>.
La tecnología de reconocimiento de música y los datos relacionados los facilita
Gracenote y Gracenote CDDB
CDDB es una marca registrada de Gracenote. El logotipo de Gracenote, el logotipo
de Gracenote CDDB y el logotipo de Powered by Gracenote CDDB son marcas
comerciales de Gracenote. Music Recognition Service y MRS son marcas de
servicio de Gracenote.
®
Music Recognition ServiceSM.
38 _ samsung media studio
Page 39
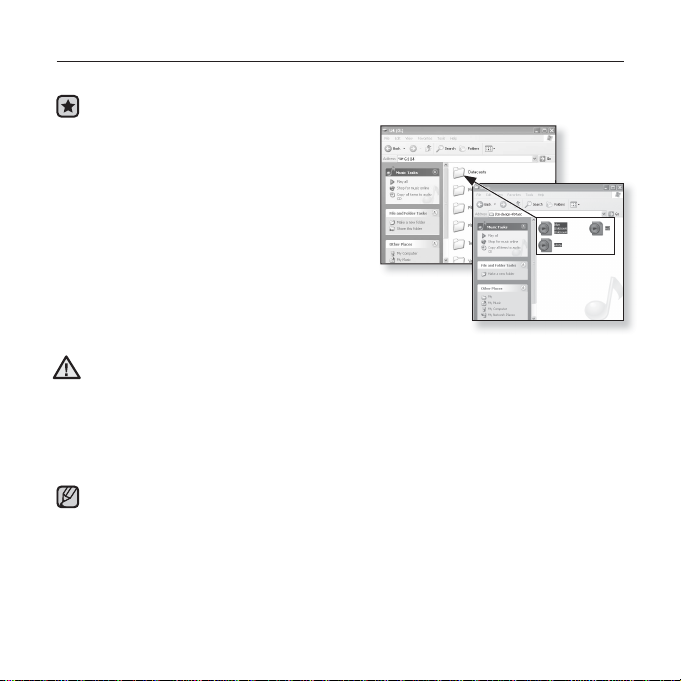
UTILIZACIÓN DE UN DISCO EXTRAÍBLE
Puede utilizar el reproductor como dispositivo de almacenamiento extraíble.
Antes de empezar - Conecte el reproductor a la PC.
1. Abra los archivos/carpetas que va a
transferir desde la PC.
2. Abra <My Computer> (Mi PC) <U4>
en el escritorio.
3. Seleccione los archivos/carpetas que va a
transferir desde la PC y arrástrelos hasta
una carpeta que elija en el <U4>.
Se transfi eren al reproductor los archivos y
carpetas seleccionados.
Aparecerá el mensaje de transferencia de archivo durante la carga o descarga.
La desconexión del enchufe USB mientras aparece el mensaje puede causar
PRECAUCIÓN
averías en el reproductor.
El orden de los archivos de música que aparece en la PC puede diferir del orden de
reproducción en el reproductor.
ҏSi transfi ere un archivo DRM (archivo cargado) al disco extraíble, no se reproducirá
el archivo.
¿Qué es DRM?
DRM (Digital Rights Management) es una tecnología y servicio para evitar el uso
NOTA
ilegal de contenido digital y proteger los benefi cios y derechos de los propietarios
del copyright. Los archivos DRM son archivos de música cargados con la
tecnología de protección de copia ilegal de música MP3 adquirida legalmente.
samsung media studio _ 39
Page 40
DESCONEXIÓN DE LA PC
Siga los pasos que se incluyen a continuación para evitar daños en el
reproductor y en datos al desconectar de la PC.
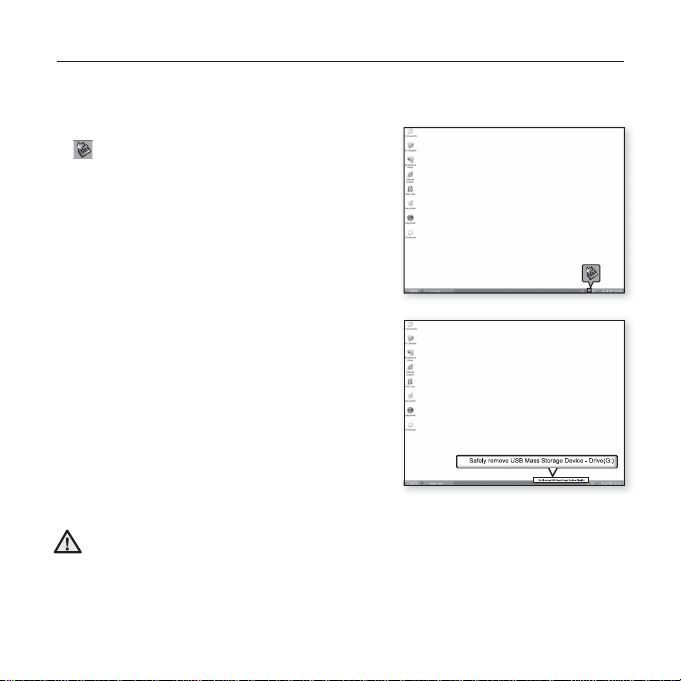
1. Coloque el cursor del ratón sobre el icono
de la barra de herramientas situado en
la esquina inferior derecha del escritorio y
haga clic en el botón de ratón izquierdo.
2. Haga clic en el mensaje <Safely Remove
USB Mass Storage Device Drive>
(Extracción segura de la unidad del
dispositivo de almacenamiento en masa
USB).
3. Desconecte el reproductor de la PC.
No desconecte el reproductor de la PC durante la transferencia de archivos. Esto
puede causar daños en los datos y en el reproductor.
PRECAUCIÓN
ҏNo puede retirar el reproductor mientras se estén reproduciendo en la PC los
archivos del reproductor. Pruebe de nuevo una vez que fi nalice la reproducción.
40 _ samsung media studio
2
1
Page 41
audición de música
Antes de empezar
Toque [ ] para ir a la pantalla anterior.
Mantenga presionado [
NOTA
AUDICIÓN POR CATEGORÍA
- Conecte los audífonos, encienda el reproductor y compruebe la
batería.
] para ir a la pantalla del menú principal.
243
Music
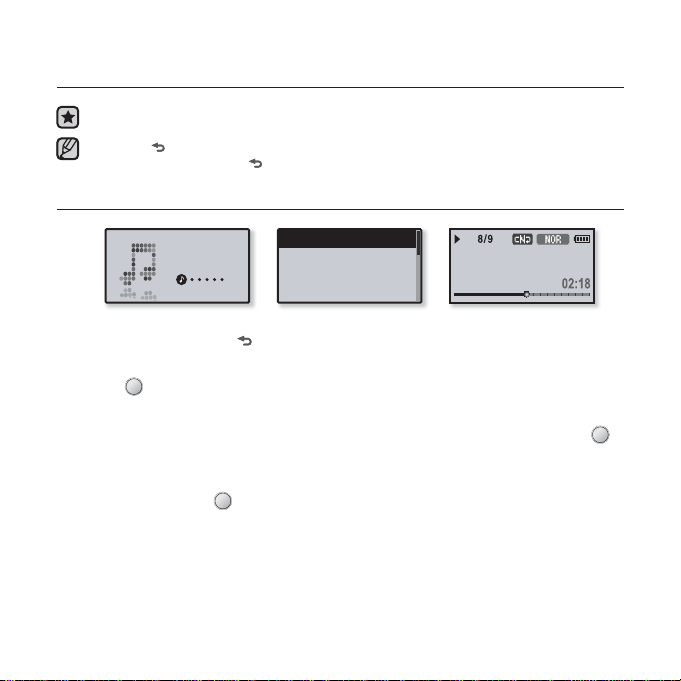
1.
Mantenga presionado
2. Toque el botón [Izquierda, Derecha] para seleccionar <Music> (Música) y
toque [ ].
Aparece la lista <Music> (Música).
3.
Toque el botón [Arriba, Abajo] para seleccionar la lista que desee y toque
Aparecen los archivos de música.
4. Toque el botón [Arriba, Abajo] para seleccionar el archivo que va a
reproducir y toque [ ].
Se iniciará la reproducción de la música.
Now Playing
Artists
Albums
Songs
[ ]
para ir a la pantalla del menú principal.
Rising Sun
[ ]
audición de música _ 41
.
Page 42
AUDICIÓN POR CATEGORÍA (Cont.)
Lista de música
La información del archivo incluido el nombre del artista, el nombre del álbum, el título y el género
de música aparecerán de acuerdo con la información de la etiqueta ID3 del archivo de música
correspondiente. Un archivo sin una etiqueta ID3 aparece como [Unknown] (Desconocido).
Now Playing (Reproduciendo): Reproduce el archivo reproducido recientemente o va a la
pantalla de reproducción del archivo actual.
Artists (Artistas): Para reproducir por artista
Albums (Álbumes): Para reproducir por álbum
Songs (Canciones): Para reproducir en orden numérico o alfabético
Genres (Géneros): Para reproducir por género
Playlists (Listas de repr.): Para reproducir por lista de reproducción.
Recently Added (Recién añadidos): El reproductor muestra la lista de archivos, ordenados por
fecha de transferencia.
Recorded Files (Archivos grabados): Muestra todos los archivos grabados.
Music Browser (Explorador de música): Muestra todos los archivos de música almacenados en
la carpeta de música.
Los archivos de música MP3, Ogg y WMA son compatibles con el reproductor.
Los archivos MP1 o MP2 que únicamente tienen su extensión cambiada a MP3
NOTA
puede que no funcionen en el reproductor.
¿Qué es una etiqueta ID3?
Es información relativa al archivo anexa a un MP3, como el título, el artista, el
álbum, el año, el género y un campo de comentarios.
RETORNO A LA PANTALLA DE REPRODUCCIÓN ACTUAL
Puede volver a la pantalla de reproducción actual en cualquier momento mientras
utiliza otras funciones.
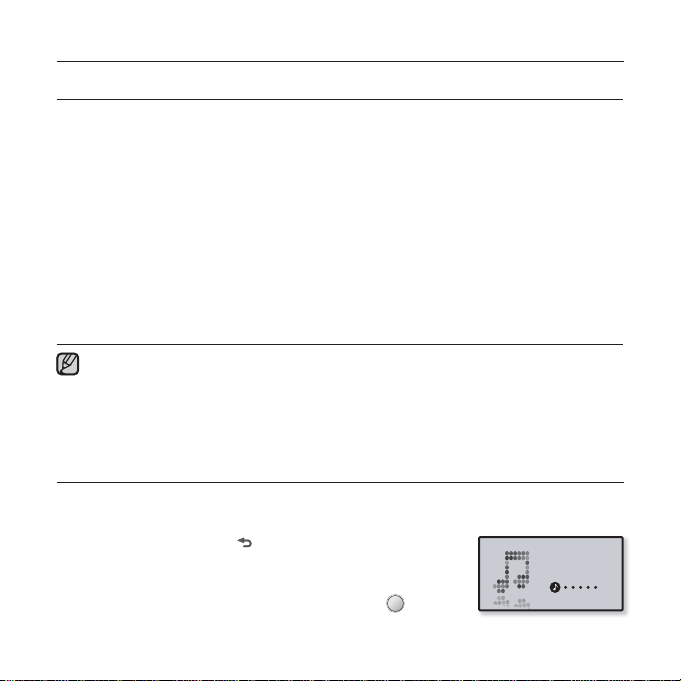
1.
Mantenga presionado
principal.
2. Toque el botón [Izquierda, Derecha] para seleccionar
<Music> (Música) y mantenga presionado [ ].
El reproductor vuelve a la pantalla de reproducción actual.
42 _ audición de música
[ ]
para ir a la pantalla del menú
Music
Page 43
PAUSING
1. Presione el botón [ ] mientras se reproduce la música.
Se interrumpirá la reproducción de la música.
2. Presione de nuevo el botón [ ].
La música se reproducirá desde el punto en el que se detuvo.
BÚSQUEDA DENTRO DE UNA PISTA
1.
Mantenga presionado brevemente el botón [Izquierda, Derecha] mientras se
reproduce la pista seleccionada.
Busca hasta el principio o el fi nal de la pista.
2. Libere el botón en el punto que desea comenzar.
Comienza la reproducción desde el punto en el que se libera el botón.
REPRODUCCIÓN DESDE EL PRINCIPIO DE LA PISTA ACTUAL
Toque el botón [Izquierda] una vez que hayan transcurrido 3 segundos de
reproducción desde el principio de la pista.
La pista actual comienza a reproducirse desde el principio.
REPRODUCCIÓN DE LA PISTA ANTERIOR
Toque el botón [Izquierda] antes de que hayan transcurrido 3 segundos de
reproducción desde el principio de la pista.
Toque el botón [Izquierda] dos veces una vez que hayan transcurrido 3
segundos de reproducción desde el principio de la pista.
Se iniciará la reproducción de la pista anterior.
REPRODUCCIÓN DE LA PISTA SIGUIENTE
Toque el botón [Derecha].
Se iniciará la reproducción de la pista siguiente.
Al reproducir los archivos con velocidad de bits variable (VBR), es posible que no
se reproduzca la pista anterior si toca el botón [Izquierda] antes de que transcurran
PRECAUCIÓN
3 segundos.
audición de música _ 43
Page 44
CREACIÓN DE UNA LISTA DE REPRODUCCIÓN
UTILIZANDO MEDIA STUDIO DE SAMSUNG
Con <Media Studio>, puede crear su propia recopilación o lista de reproducción
de archivos de audio.
Antes de empezar - Conecte el reproductor a la PC.
Debe tener instalado Media Studio en la PC.
Creación de una lista de reproducción
YP-U4
1
OK
3
[YP-U4] > Music
2
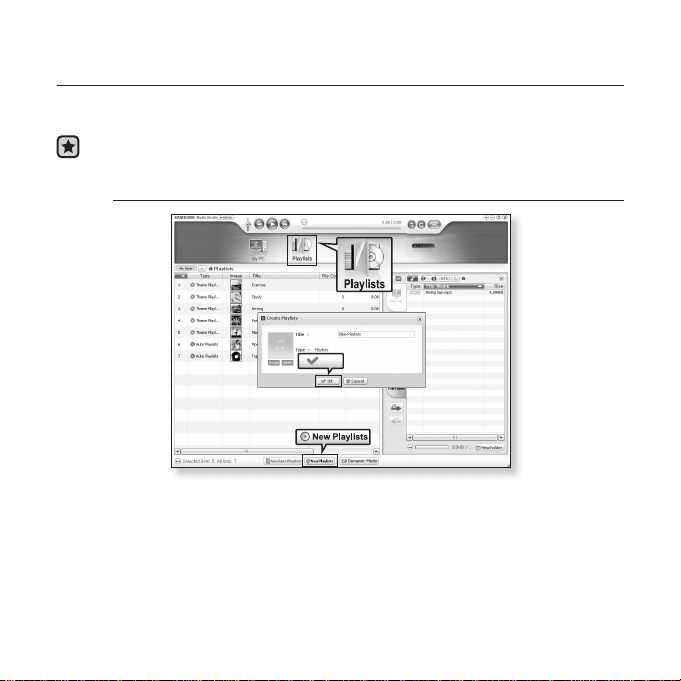
1. Haga clic en <Playlists>en la parte superior de <Media Studio>.
Aparecerá la ventana <Playlists>(Listas de repr).
2. Haga clic en <New Playlists> en la parte inferior.
Aparecerá la ventana <Create Playlists>.
3. Escriba el título de la lista de reproducción y haga clic en [OK].
Se creará una nueva lista de reproducción y se almacenará en la sección
44 _ audición de música
<Playlists> (Listas de repr). de <Media Studio>.
Page 45
CREACIÓN DE UNA LISTA DE REPRODUCCIÓN
UTILIZANDO MEDIA STUDIO DE SAMSUNG (Cont.)
Adición de archivos de música a una lista de
reproducción creada
1
4
5
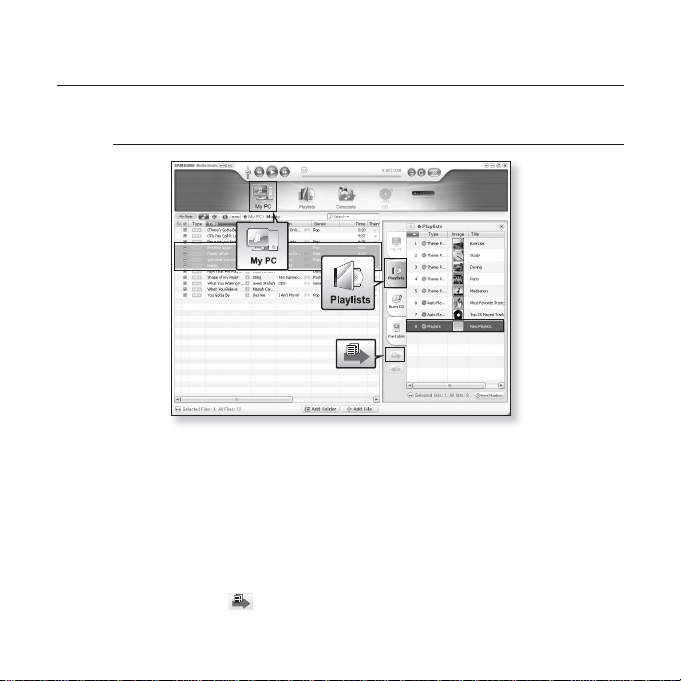
1. Haga clic en <My PC> en la parte superior de <Media Studio>.
Aparece la ventana <My PC>.
2. Haga clic en <Playlists> en la esquina derecha de la ventana.
Aparecerá la ventana <Playlists>((Listas de repr).).
3. Haga doble clic en una lista de reproducción en la ventana derecha.
4.
Seleccione los archivos que desea transferir en la ventana <My PC>.
5. Haga clic en .
Los archivos seleccionados se añadirán a la lista de reproducción.
YP-U4
2
3
audición de música _ 45
Page 46
CREACIÓN DE UNA LISTA DE REPRODUCCIÓN
UTILIZANDO MEDIA STUDIO DE SAMSUNG (Cont.)
Transferencia de una lista de reproducción al
reproductor con Media Studio
YP-U4
1
[YP-U4] > Music
2
3
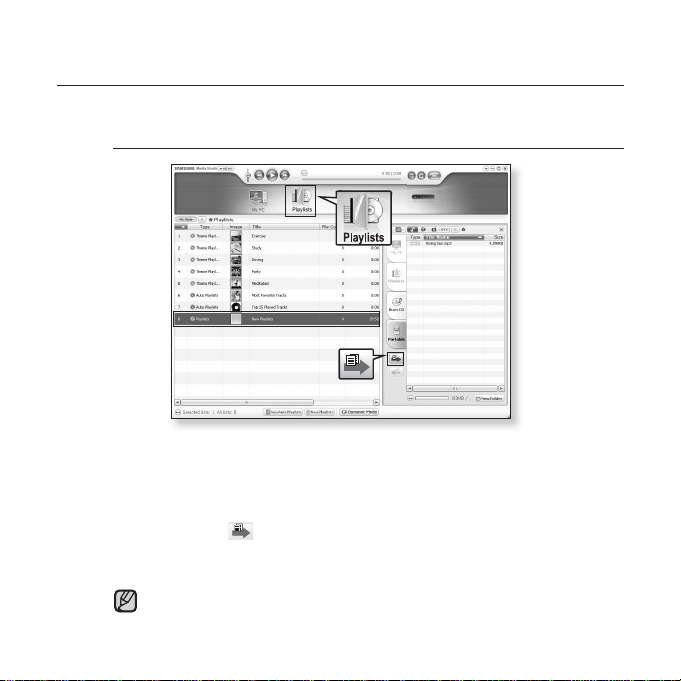
1. Haga clic en <Playlists> en la parte superior de <Media Studio>.
Aparecerá la ventana <Playlists>((Listas de repr).
2. Seleccione una lista de reproducción en la sección <Playslists>.
3. Haga clic en .
La lista de reproducción seleccionada se transferirá al reproductor en
<Music> (Música) ĺ <Playlists> (Listas de repr).
El reproductor puede reproducir hasta 400 archivos de música para cada
NOTA
lista de reproducción.
46 _ audición de música
Page 47
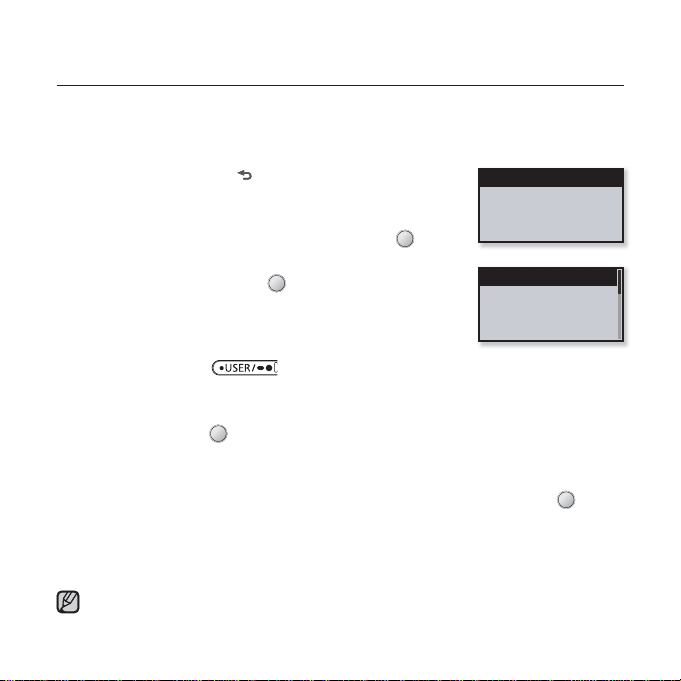
CREACIÓN DE UNA LISTA DE REPRODUCCIÓN EN
EL REPRODUCTOR MP3
Si ya ha descargado archivos al reproductor mp3, puede crear una lista de
reproducción de “Favorites” (Favoritos) sin necesidad de Media Studio ni de la
PC.
1.
Mantenga presionado
principal.
2. Toque el botón [Izquierda, Derecha] para seleccionar
<File Browser> (Buscador Archivo) y toque
3.
Toque el botón [Arriba, Abajo] para seleccionar
<Music> (Música) y toque [ ].
Aparece el archivo o archivos de música.
4. Toque el botón [Arriba, Abajo] para seleccionar el
archivo que va a añadir a la lista de reproducción y
presione el botón [ ].
Aparece el menú Playlists (Listas de repr.).
5.
Toque el botón [Arriba, Abajo] para seleccionar <Add to Playlist> (Añadir a
lista repr.) y toque [ ].
Aparece de <Playlist 1> (Lista repr. 1) a <Playlist 5> (Lista repr. 5).
6. Toque el botón [Arriba, Abajo] para seleccionar el número de la lista de
reproducción en la que va a añadir la lista de reproducción y toque
Los archivos seleccionados se añadirán a la lista.
Puede comprobar la lista de reproducción en <Music> (Música) ĺ <Playlists>
(Listas de repr.) ĺ <Playlist 1> (Lista repr. 1) a <Playlist 5> (Lista repr. 5) en el menú
principal.
Puede añadir hasta 400 archivos de música en cada lista de reproducción
(<Playlist 1> (Lista repr. 1) a <Playlist 5> (Lista repr. 5)).
NOTA
[ ]
para ir a la pantalla del menú
[ ]
Add to Playlist
Delete from Playl...
Delete File
.
Playlist 1
Playlist 2
Playlist 3
Playlist 4
audición de música _ 47
[ ]
.
Page 48
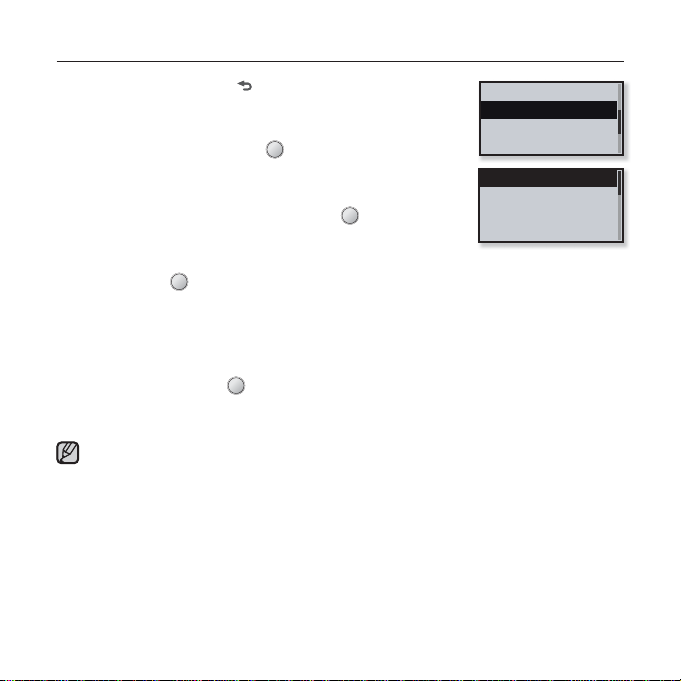
REPRODUCCIÓN DE UNA LISTA DE REPRODUCCIÓN
1.
Mantenga presionado
principal.
2.
Toque el botón [Izquierda, Derecha] para seleccionar
<Music> (Música) y toque
Aparece la lista <Music> (Música).
3. Toque el botón [Arriba, Abajo] para seleccionar
<Playlists> (Listas de repr.) y toque
Aparecen las listas de reproducción.
4. Toque el botón [Arriba, Abajo] para seleccionar la lista de reproducción que
elija y toque
Aparecen los archivos de música almacenados en la lista de reproducción.
Si no se encuentra ninguna lista de reproducción, aparecerá en pantalla el mensaje
<No File> (No hay archivos).
[ ]
5. Toque el botón [Arriba, Abajo] para seleccionar el archivo de música que va
a reproducir y toque
Se iniciará la reproducción del archivo de música.
Consulte de la página 44 a la 46 para ver cómo transferir la lista de reproducción
con <Media Studio>.
NOTA
[ ]
para ir a la pantalla del menú
[ ]
.
[ ]
.
Genres
Playlists
Recently Added
Recorded Files
Playlist 1
Playlist 2
Playlist 3
Playlist 4
.
[ ]
.
48 _ audición de música
Page 49
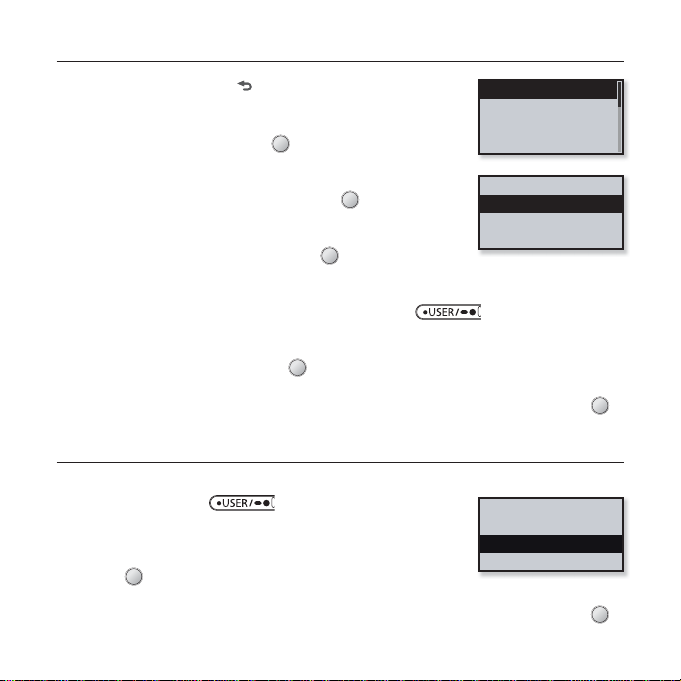
ELIMINACIÓN DE UN ARCHIVO DE LA LISTA DE REPRODUCCIÓN
1.
Mantenga presionado
principal.
2. Toque el botón [Izquierda, Derecha] para seleccionar
<Music> (Música) y toque [ ].
Aparece la lista <Music> (Música).
3. Toque el botón [Arriba, Abajo] para seleccionar
<Playlists> (Listas de repr.) y toque [ ].
Aparecen las listas de reproducción.
[ ]
para ir a la pantalla del menú
Playlist 1
Playlist 2
Playlist 3
Playlist 4
Add to Playlist
Delete from Playlist
Delete All from P...
4. Toque el botón [Arriba, Abajo] para seleccionar la lista
de reproducción que elija y toque [ ].
Aparecen los archivos de música almacenados en la lista de reproducción.
5. Toque el botón [Arriba, Abajo] para seleccionar el archivo que va a borrar
de la lista de reproducción y presione el botón [ ].
Aparece el menú <Playlist> (Lista de repr.).
6. Toque el botón [Arriba, Abajo] para seleccionar <Delete from Playlist>
(Borrar de lista repr.) y toque [ ].
Aparecerá la ventana de confi rmación de eliminación.
7.
Toque el botón [Izquierda, Derecha] para seleccionar <Yes> (Sí) y toque [ ].
El archivo seleccionado se borra de la lista de reproducción.
ELIMINACIÓN DE TODOS LOS ARCHIVOS DE LA LISTA DE REPRODUCCIÓN
Siga los pasos del 1 al 4 anteriores.
5. Presione el botón
Aparece el menú Playlist (Lista de reproducción).
6. Toque el botón [Arriba, Abajo] para seleccionar
<Delete All from Playlist> (Borrar todo de lista repr) y
toque
[ ]
Aparecerá la ventana de confi rmación de eliminación.
7.
Toque el botón [Izquierda, Derecha] para seleccionar <Yes> (Sí) y toque
Se borran todos los archivos de la lista de reproducción.
.
[ ].
Add to Playlist
Delete from Playl...
Delete All from Play
[ ]
audición de música _ 49
.
Page 50
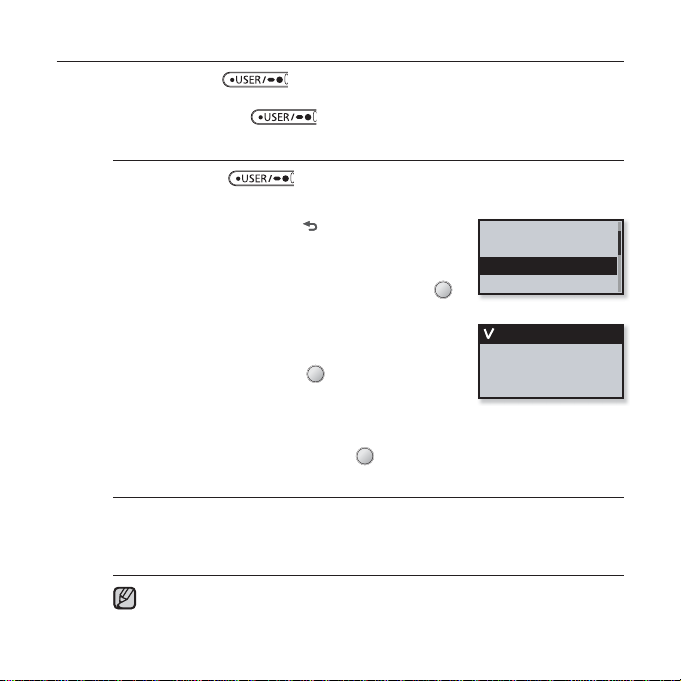
FUNCIÓN PERSONALIZADA DEL BOTÓN USER (USUARIO)
Puede defi nir el botón para controlar uno de los cuatro modos que
se enumeran a continuación. Después de defi nirlo, puede acceder al modo
directamente con el botón .
Para fi jar el Modo del Botón User (Usuario)
Utilice el botón durante la reproducción para cambio sencillo
de modo.
1. Mantenga presionado [ ] para ir a la pantalla
del menú principal.
2.
Toque el botón [Izquierda, Derecha] para
seleccionar <Settings> (Confi g.) y toque [ ].
Aparece el menú <Settings> (Confi g.).
3.
Toque el botón [Arriba, Abajo] para
seleccionar <User Button Mode> (Modo
Botón usuario) y toque [ ].
Aparece el menú <User Button Mode> (Modo
Botón Usuario).
4.
Toque el botón [Arriba, Abajo] para seleccionar el modo de botón
de usuario que desee y toque [ ].
Opciones del modo de botón de usuario
Repeat A-B (Repetir A-B): Ajusta la repetición de sección.
DNSe: Permite seleccionar un efecto de sonido apropiado para la música.
Play Speed (Vel. repr.): Ajusta la velocidad de reproducción entre rápida y lenta.
Play Mode (Modo de repr.): Selecciona el modo de repetición de reproducción.
El ajuste por omisión (de fábrica) del modo de botón de usuario se defi ne
NOTA
en <Repeat A-B> (Repetir A-B).
50 _ audición de música
Music
FM Radio
User Button Mode
Sound
Repeat A-B
DNSe
Play Speed
Play Mode
Page 51
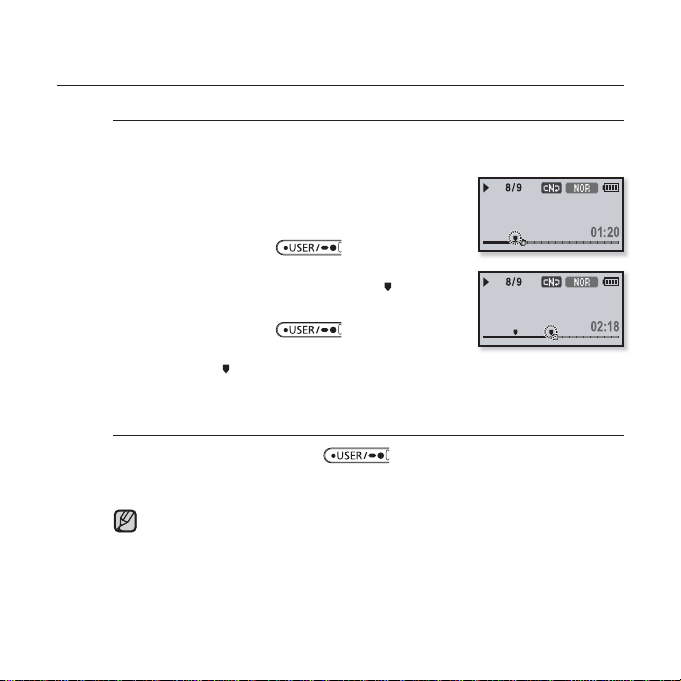
FUNCIÓN PERSONALIZADA DEL BOTÓN USER (USUARIO)
(Cont.)
Para fi jar la repetición de sección
Esta función permite escuchar de forma repetida partes específi cas de
una pista. Resulta de utilidad para estudiar un idioma.
1. Fije el modo del botón User en <Repeat A-B>
(Repetir A-B) y reproduzca el archivo que
desee.
2. Presione el botón [ ] al principio de la
sección que desee repetir.
Se defi ne el punto inicial y la marca < > aparecerá
en la barra de estado de reproducción.
3. Presione el botón [ ] de nuevo para
fi jar el fi nal de la sección que desea repetir.
La marca < > aparecerá en la barra de estado de reproducción y la
sección especifi cada se empezará a reproducir de forma repetida.
Para cancelar la repetición de sección
Presione de nuevo el botón
[ ] durante la repetición de
sección.
Se cancelará la repetición de sección.
La repetición de sección se cancelará automáticamente en el siguiente caso.
Se fi ja el punto inicial de la repetición de sección pero el punto fi nal no se fi ja
NOTA
hasta que fi nalice la pista actual.
No es posible especifi car el punto fi nal en menos de 3 segundos tras el
inicio de la repetición de sección.
Rising Sun
Rising Sun
audición de música _ 51
Page 52
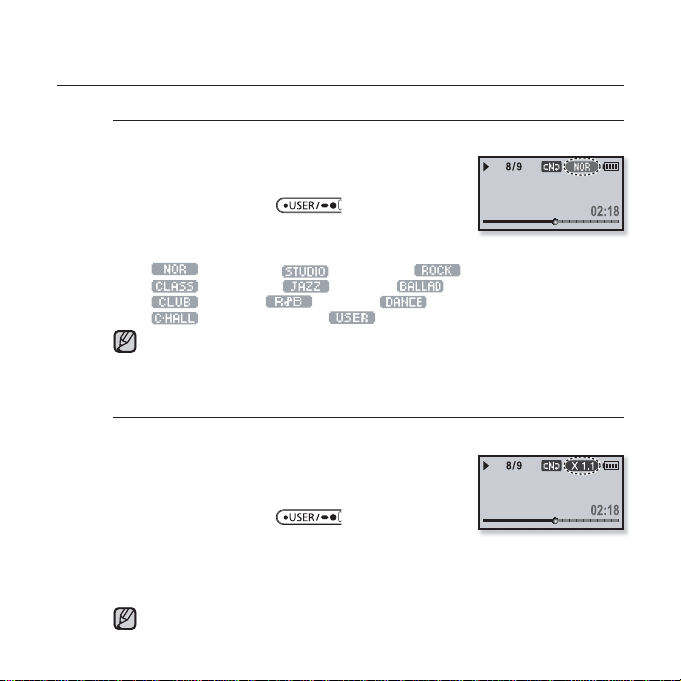
FUNCIÓN PERSONALIZADA DEL BOTÓN USER (USUARIO)
(Cont.)
Para utilizar el botón DNSe
Permite seleccionar el sonido correcto para cada género musical.
1. Fije el modo de botón de usuario en <DNSe> y
reproduzca el archivo que desee.
2. Presione el botón [
] para seleccionar
el DNSe que desee.
El modo DNSe cambia en el orden que se indica a
continuación cada vez que se presiona el botón:
(Normal) ĺ (Estudio) ĺ (Rock) ĺ
(Clásica) ĺ (Jazz) ĺ (Balada) ĺ
(Club) ĺ (R&B) ĺ (Baile) ĺ
(Sala Concierto) ĺ (Usuario).
¿Qué es DNSe?
Digital Natural Sound Engine (DNSe) es una función de efecto de sonido
NOTA
para reproductores MP3 desarrollados por Samsung. Proporciona diversos
ajustes de sonido para mejorar el tipo de música que esté escuchando.
Para utilizar el botón de velocidad de reproducción
Acelere o ralentice la música favorita ajustando la velocidad de reproducción.
1. Fije el modo de botón de usuario en <Play
Speed> (Vel. repr.) y reproduzca el archivo que
desee.
2. Presione el botón [
] para seleccionar
la velocidad de reproducción que desee.
La velocidad de reproducción cambia en el orden que se indica a continuación
cada vez que se presiona el botón:
<NOR(Normal)>, <X 1.1>, <X 1.2>, <X 1.3>, <X 0.7>, <X 0.8>, <X 0.9>.
Cuanto más alto sea el número, más rápida será la velocidad.
La velocidad de reproducción ajustada puede diferir de la velocidad actual,
dependiendo del archivo.
NOTA
52 _ audición de música
Rising Sun
Rising Sun
Page 53
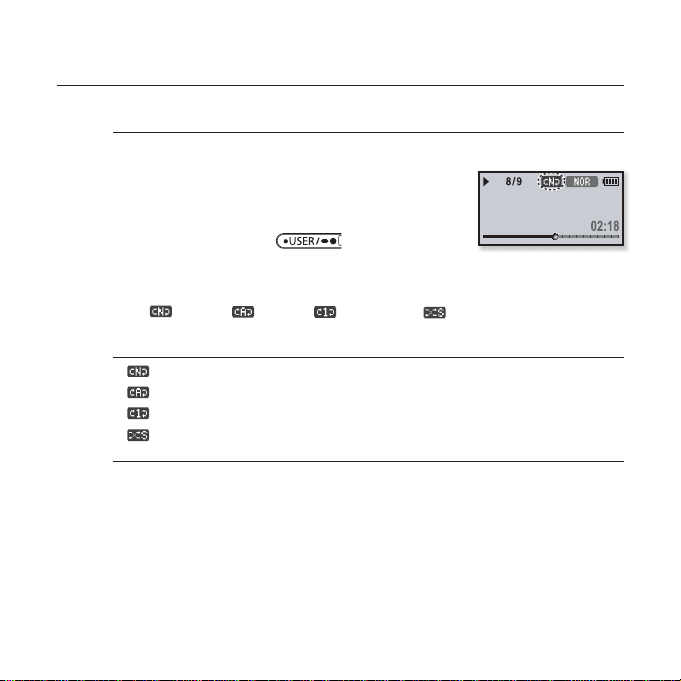
FUNCIÓN PERSONALIZADA DEL BOTÓN USER (USUARIO)
(Cont.)
Para utilizar el botón del modo de reproducción
Seleccione el modo de reproducción como los ajustes de repetición.
1. Fije el modo de botón de usuario en <Play
Mode> (Modo de repr.) y reproduzca el archivo
que desee.
2. Presione el botón [ ] para seleccionar
el modo de reproducción que desee.
El modo de reproducción cambia en el orden que se indica a continuación
cada vez que se presiona el botón:
(Normal) (Repetir) (Repetir uno) (Aleatorio).
Opciones del modo de reproducción
: Reproduce todos los archivos de la lista de música actual en orden.
: Repite la reproducción de todos los archivos de la lista de música actual.
: Repite la reproducción de un archivo.
: Repite la reproducción de todos los archivos de la lista de música actual
de forma aleatoria.
Rising Sun
audición de música _ 53
Page 54
más que música
Con el reproductor mp3 disfrutará de mucho más que música. Puede
escuchar la radio FM, utilizar Datacasts y grabar voz. El reproductor
mp3 le pone todas estas prestaciones en su mano.
AUDICIÓN DE LA RADIO FM
Antes de empezar - Conecte los audífonos, encienda el reproductor y compruebe
la batería.
Toque [
Mantenga presionado [
NOTA
1. Mantenga presionado [ ] para ir a la pantalla del
menú principal.
2.
Toque el botón [Izquierda, Derecha] para seleccionar
<FM Radio> (Radio FM) y toque
Se iniciará la recepción de la radio FM.
Conecte siempre los audífonos al reproductor al buscar o ajustar frecuencias.
Los audífonos sirven como antenas para la recepción de radio FM.
NOTA
En áreas de baja recepción, es posible que el reproductor no encuentre una
frecuencia disponible.
54 _ más que música
] para ir a la pantalla anterior.
] para ir a la pantalla del menú principal.
[ ]
.
FM Radio
Para utilizar la función de silencio
1. Presione el botón [ ] mientras escucha la radio FM.
Se silencia el sonido.
2. Vuelva a presionar el botón [ ] para reanudar la audición.
Page 55
AUDICIÓN DE LA RADIO FM (Cont.)
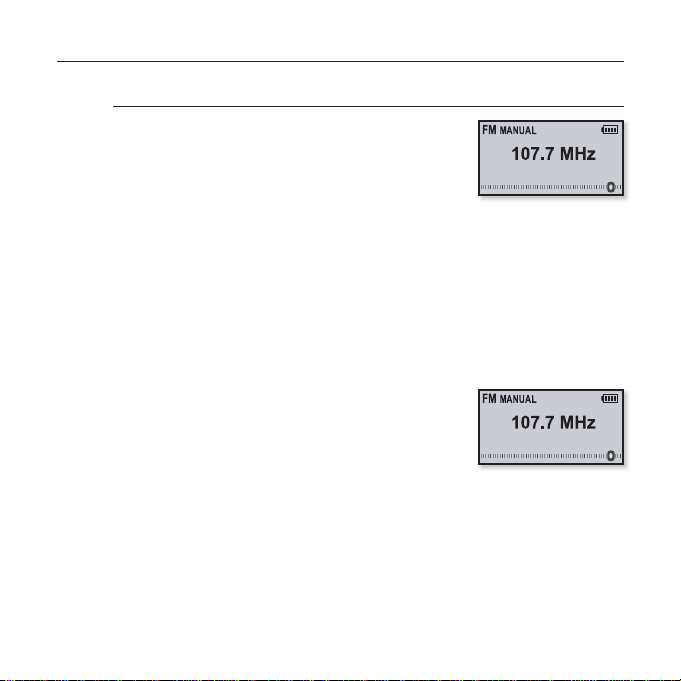
Búsqueda de emisoras de fm
1. Mantenga presionado el botón [Izquierda,
Derecha] y suéltelo en modo manual.
La búsqueda se detendrá en la frecuencia más
cercana al punto en el que se soltó el botón.
O bien
1. Toque el botón [Izquierda, Derecha] para
progresar a través de las frecuencias una a
una en modo manual.
Se mueve entre frecuencias siempre que se
presione el botón.
Searching
más que música _ 55
Page 56
AUDICIÓN DE LA RADIO FM (Cont.)
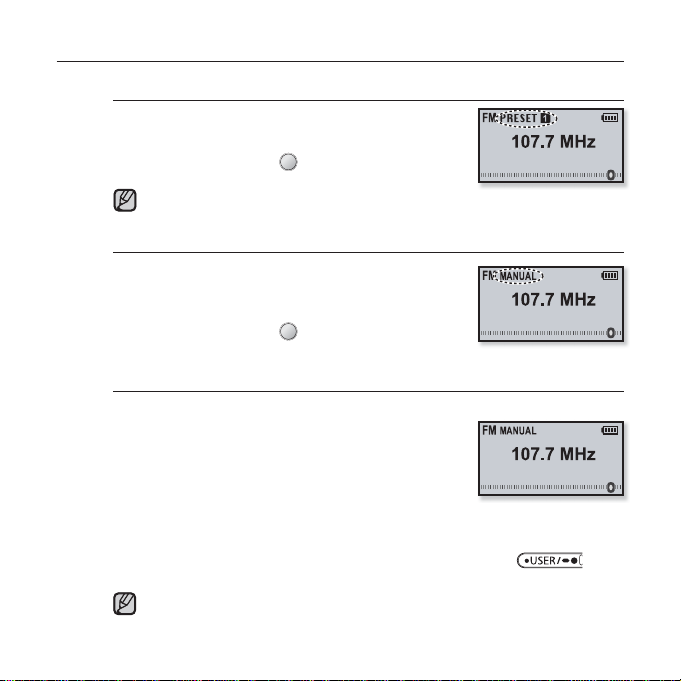
Para cambiar al modo predefi nido
Seleccione este modo para buscar a través de las
presintonías de FM de una en una.
Mantenga presionado [
Aparecerá en pantalla <PRESET> (Predefi nir).
Si no se defi ne ninguna frecuencia de presintonía, el reproductor cambiará
al modo Preselección.
NOTA
Para cambiar al modo manual
Seleccione este modo para buscar manualmente
a través de la banda FM de una en una
frecuencia.
Mantenga presionado [
Aparecerá en pantalla <MANUAL>.
Memorización de emisoras en la memoria de presintonías
Puede almacenar hasta 30 emisoras en la memoria del reproductor
MP3 y volver a ellos con la pulsación de un
solo número. Haga que el reproductor MP3 elija
únicamente las emisoras que desea utilizando
el proceso manual, o bien busque y memorice
automáticamente las emisoras locales.
Manual - elija únicamente las emisoras que desea memorizar
1. Toque el botón [Izquierda, Derecha] para seleccionar la frecuencia
que confi gurar en modo manual y presione el botón [ ].
La frecuencia seleccionada se añadirá a la lista de preselecciones.
Si se ha defi nido la misma frecuencia, se deshabilita el ajuste.
Para rastrear automáticamente la frecuencia de una presintonía, consulte
NOTA
56 _ más que música
la página 25.
] en Modo Manual.
] en modo Predefi nir.
Page 57
AUDICIÓN DE LA RADIO FM (Cont.)
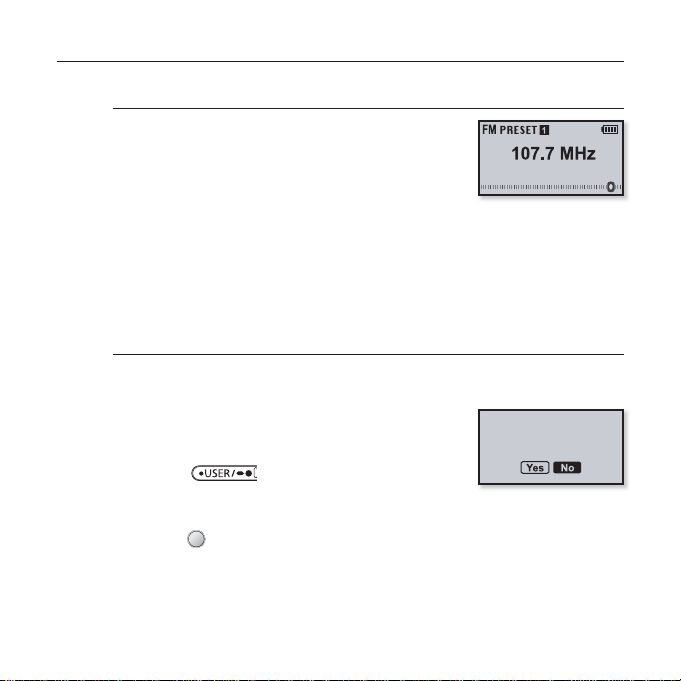
Para escuchar emisoras predefi nidas
En modo Predefi nido, toque el botón [Izquierda,
Derecha] para desplazarse por las emisoras
predefi nidas.
Puede escuchar la frecuencia de radio memorizada.
Supresión de una presintonía
Siga los pasos que se incluyen a continuación para borrar frecuencias
mientras se escucha radio FM.
1. En el modo Predefi nir, toque el botón
[Izquierda, Derecha] para buscar la
frecuencia que desea borrar y presione el
botón [ ].
Aparecerá la ventana de confi rmación de borrado.
2. Toque el botón [Izquierda, Derecha] para seleccionar <Yes> (Sí) y
toque [ ].
Se borrará la frecuencia seleccionada.
Si no va a borrar el número de preselección, seleccione <No>.
3. Para borrar otras frecuencias predefi nidas, siga los pasos 1 y 2
anteriores.
más que música _ 57
Delete?
Page 58
AUDICIÓN DE LA RADIO FM (Cont.)
Para grabar una emisión de radio FM
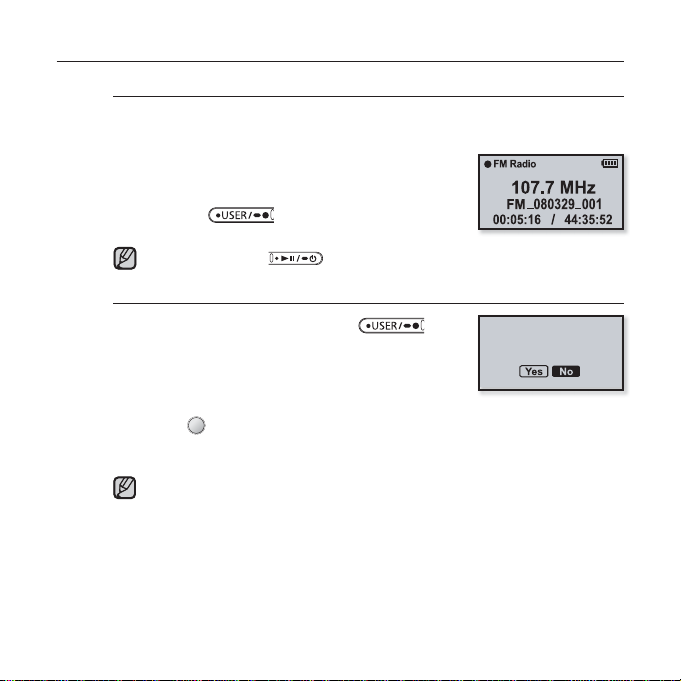
Puede grabar un programa de radio FM en cualquier momento al mismo
tiempo que escucha la radio.
1. Toque el botón [Izquierda, Derecha] para
seleccionar la frecuencia que grabar en la
pantalla de Radio FM y mantenga presionado
el botón [ ].
Se inicia la grabación.
Presione el botón
NOTA
Para detener la grabación
1.
Mantenga presionado el botón
durante la grabación.
Aparece un mensaje preguntando si desea
escuchar el archivo que acaba de grabar.
2. Toque el botón [Izquierda, Derecha] para seleccionar <Yes> (Sí) y
toque [ ].
Si se selecciona <Yes> (Sí) reproducirá el archivo grabado.
Si s selecciona <No> no reproducirá el archivo grabado.
El archivo grabado se almacena en <File Browser> (Buscador Archivo) ĺ
<Recorded Files> (Archivos grabados) ĺ <FM Radio> (Radio FM).
NOTA
Cada archivo de grabación de Radio FM puede tener una duración de 5 horas.
Puede almacenar un máximo de 999 archivos en la grabación de la radio FM.
Puede realizar una grabación de hasta 31 horas aproximadamente.
(basándose en 128 Kbps, 2 GB)
El nombre del archivo de grabación se especifi cará automáticamente, por
ejemplo, como “FM_YYMMDD_XXX.mp3”. “FM” indica que se trata de una
grabación de radio FM, “YYMMDD” indica la fecha de grabación y “XXX” es el
58 _ más que música
número del archivo de grabación.
[ ]
para detener temporalmente la grabación.
[ ]
Playback recorded
fi le?
Page 59
UTILIZACIÓN DE LOS DATACAST
Con <Media Studio>, puede transferir al reproductor para su entretenimiento un
archivo y la información del blog registrados en RSS.
¿Qué es RSS?
RSS viene del inglés Rich Site Summary o Really Simple Syndication. Es un sistema de
NOTA
transmisión de datos basado en xml utilizado para proporcionar información a los usuarios
sobre los sitios Web actualizados frecuentemente como noticias y blogs de una forma más
sencilla y práctica.
¿Qué es Datacasts?
Puede recibir automáticamente información actualizada sin tener que visitar las noticias,
blogs y sitios UCC que visite frecuentemente.
Antes de empezar -
Registro de un canal
Puede crear un nuevo canal registrando los sitios Web o las páginas Web
compatibles con RSS.
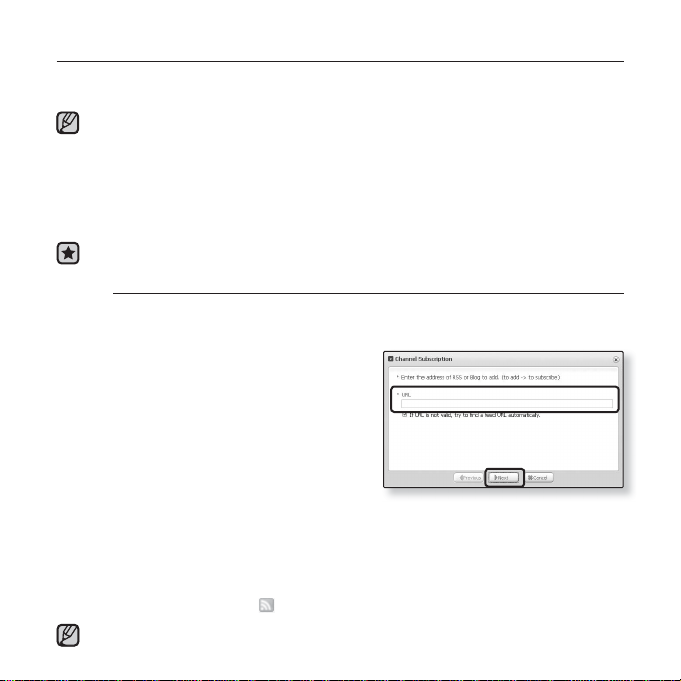
1. Haga clic en <Subscribe> en la
parte inferior de <Datacasts> en
<Media Studio>.
2. Introduzca una dirección en
<URL> y haga clic en <ŹNext>.
Cuando copie una dirección Web
y haga clic en <Subscribe>, la
dirección copiada aparecerá
automáticamente en <URL>.
Aparece la ventana de confi rmación del ajuste si la dirección Web es
compatible con RSS.
3. Haga clic en <OK>.
Se registra el canal que desee.
Aparece el icono
Consulte <Datacasts> de <Media Studio> para obtener instrucciones detalladas.
NOTA
Debe tener instalado Media Studio en la PC. Consulte la página 35.
2
2
en Datacasts para el canal registrado.
más que música _ 59
Page 60
UTILIZACIÓN DE LOS DATACAST (Cont.)
Creación de un nuevo grupo de canales
Puede crear un nuevo grupo para gestionar los canales por categoría.
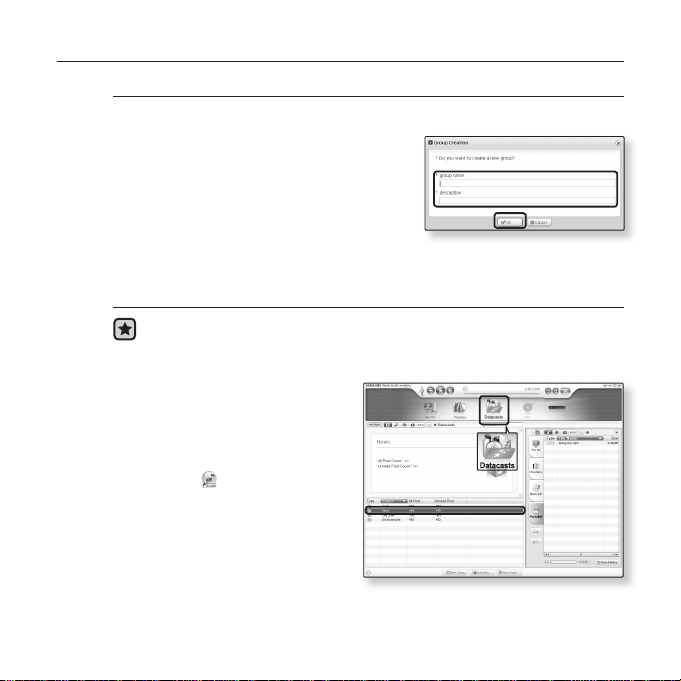
1. Haga clic en <New Group> en la parte
inferior de <Datacasts> en <Media
Studio>
2. Introduzca un nuevo grupo y una
descripción y haga clic en <OK>.
Transferencia de un datacast desde <Media Studio>
Antes de empezar - Conecte el reproductor a la PC.
1.
<Media Studio> se iniciará
automáticamente cuando se
conecte el reproductor a la PC.
Si no se inicia automáticamente
el programa, haga doble clic en
el icono
del escritorio.
de <Media Studio>
2. Haga clic en <Datacasts> en
la parte superior de <Media
Studio>.
Aparece la lista de canales del
grupo Datacasts.
3. Haga clic en el canal del grupo que desee.
60 _ más que música
Debe tener instalado Media Studio en la PC. Consulte
la página 35.
3
2
2
YP-U4
[YP-U4] > Music
Page 61
UTILIZACIÓN DE LOS DATACAST (Cont.)
Transferencia de un datacast desde <Media Studio>
(Cont.)
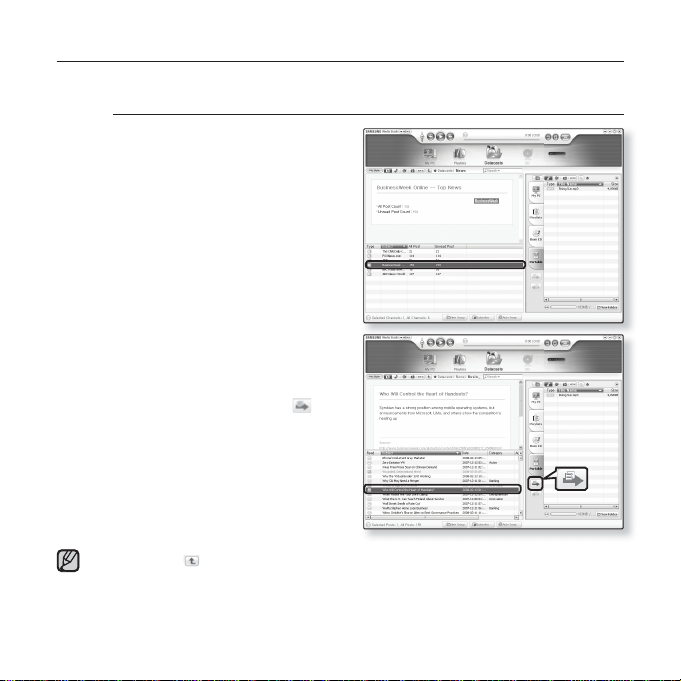
4. Haga clic en el canal que
desee.
4
4
5. Seleccione el Post que desea
transferir.
6. Haga clic en el icono
El Post del canal seleccionado
se transferirá al reproductor
en <File Browser> (Buscador
Archivo) ĺ <Datacasts>.
.
5
YP-U4
[YP-U4] > Music
YP-U4
[YP-U4] > Music
6
Haga clic en
NOTA
En <Datacasts> de <Media Studio>, si el Post tiene un anexo (archivo de música),
puede descargar el anexo en el reproductor.
Sin embargo, hay veces que el anexo no se descarga, dependiendo de la política
del sitio Web aplicable.
la parte superior de <Media Studio> para ir a la pantalla anterior.
más que música _ 61
Page 62
UTILIZACIÓN DE LOS DATACAST (Cont.)
Visualización de Datacasts
En el reproductor puede disfrutar de los archivos de música transferidos
en <Datacasts>.
Antes de empezar - transfi era el Post del canal que desea al reproductor
utilizando <Media Studio>. Consulte de la página 59 a la 61.
Toque [
NOTA
Mantenga presionado [
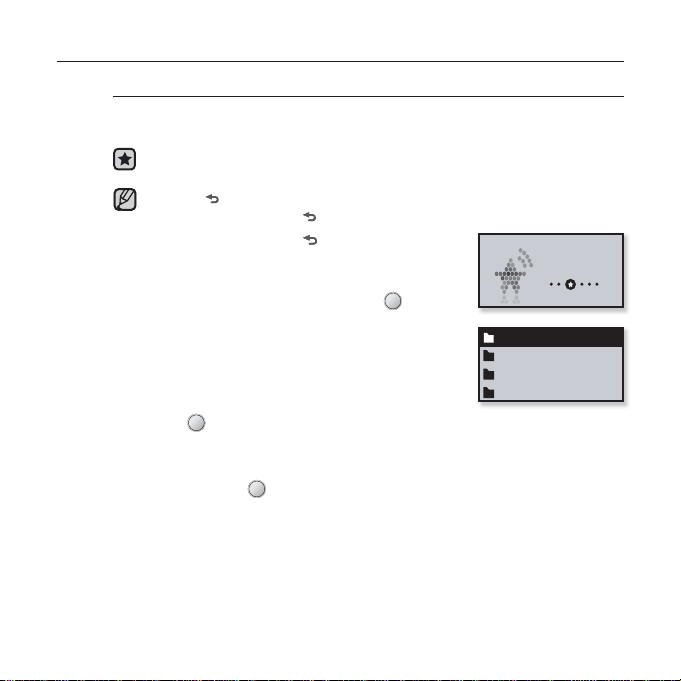
1. Mantenga presionado [ ] para ir a la pantalla
del menú principal.
Toque el botón [Izquierda, Derecha] para
2.
seleccionar <Datacasts> y toque [ ].
Aparece la lista de <Datacasts>.
Si no se encuentra ningún datacast, aparecerá en
pantalla el mensaje <No File> (No hay archivos).
3. Toque el botón [Arriba, Abajo] para
seleccionar la lista de canales que desee y
toque [ ].
Aparecen los archivos de música.
4. Toque el botón [Arriba, Abajo] para seleccionar el archivo que
desee y toque [ ].
Comienza a reproducirse el archivo de música seleccionado.
] para ir a la pantalla anterior.
] para ir a la pantalla del menú principal.
Datacasts
My Channel 1
My Channel 2
My Channel 3
My Channel 4
62 _ más que música
Page 63
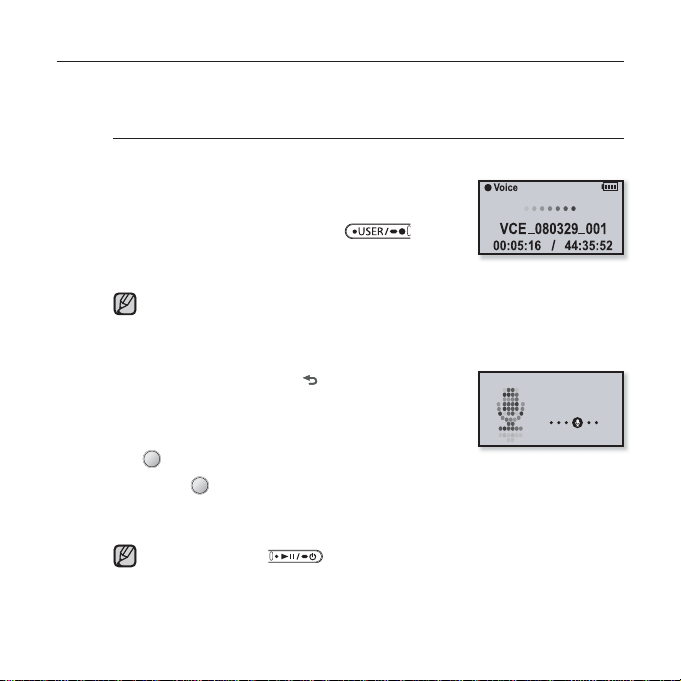
GRABACIÓN DE VOZ
Con el reproductor mp3 puede grabar su propia voz, discursos, conferencias y
otros sonidos exteriores.
Para realizar una grabación de voz
Método 1
Puede realizar una grabación de voz en cualquier
momento mientras utiliza otras funciones.
Mantenga presionado el botón
La grabación de voz se iniciará tan pronto como
aparezca el nombre de archivo.
La grabación de radio FM se iniciará mientras escucha la emisión de FM.
NOTA
Método 2
1. Mantenga presionado [ ] para ir a la pantalla
del menú principal.
2. Toque el botón [Izquierda, Derecha] para
seleccionar <Voice REC> (Grabar voz) y toque
].
[
3. Toque [ ].
La grabación de voz se iniciará tan pronto como aparezca el nombre de
archivo.
Presione el botón [ ] para detener temporalmente la grabación.
NOTA
[ ].
Voice REC
más que música _ 63
Page 64
VOICE RECORDING (Continued)
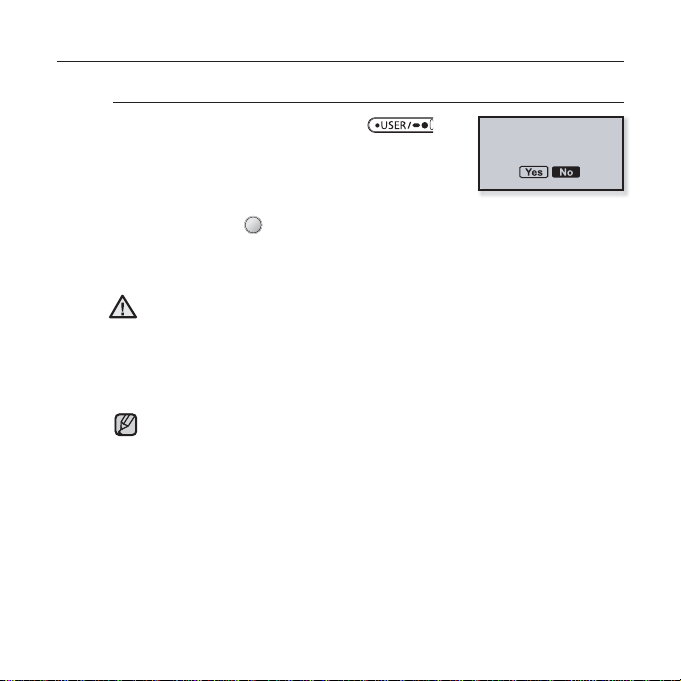
Para detener la grabación de voz
1. Mantenga presionado el botón [ ]
cuando quiera detener la grabación.
Aparece un mensaje preguntando si desea
escuchar el archivo que acaba de grabar.
2. Toque el botón [Izquierda, Derecha] para seleccionar <Yes> (Sí) o
<No> y toque [ ].
Si se selecciona <Yes> (Sí) reproducirá el archivo grabado.
Si s selecciona <No> no reproducirá el archivo grabado.
No coloque el micrófono demasiado cerca ni demasiado lejos de la boca,
ya que puede empobrecer la grabación.
PRECAUCIÓN
La grabación de voz no se realiza correctamente cuando la batería está
baja.
El archivo grabado se almacena en <File Browser> (Buscador Archivo) ĺ
<Recorded Files> (Archivos grabados) ĺ <Voice> (Voz).
NOTA
Cada archivo de grabación de voz puede tener una duración de 5 horas.
Puede almacenar un máximo de 999 archivos en la grabación de voz.
Puede realizar una grabación de hasta 42 horas aproximadamente.
(basado en 96 Kbps, 2 GB)
El nombre del archivo de grabación se especifi cará automáticamente, por
ejemplo, como “VCE_YYMMDD_XXX.mp3”. “VCE” signifi ca grabación de
voz, “YYMMDD” indica la fecha de grabación y “XXX” es el número del
archivo de grabación.
Playback recorded
fi le?
64 _ más que música
Page 65
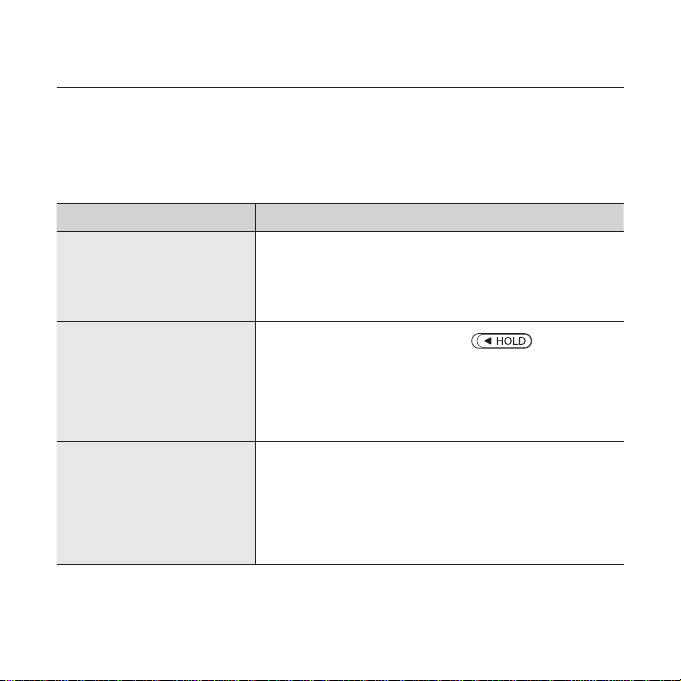
solución de problemas
Si tiene un problema con el nuevo reproductor mp3, busque la solución
en esta lista. Si el problema persiste, póngase en contacto con el
centro de servicio de atención al cliente de Samsung más cercano.
PROBLEMA SOLUCIÓN
• No se encenderá la unidad si la batería está
No se enciende a unidad.
Los botones no funcionan.
La pantalla no se enciende.
totalmente descargada. Recargue la batería y
encienda la unidad de nuevo.
• Presione el orifi cio Reset.
• Compruebe si el interruptor está en la
dirección de la posición de la fl echa.
• Compruebe si ha presionado el botón derecho y
púlselo de nuevo.
• Presione el orifi cio Reset.
• Si se selecciona <Display Off> (Visual.
desactivada) en <Settings> (Confi g.) ĺ <Display>
(Pantalla), la pantalla LCD se apagará. Toque
cualquier botón y verá si se apaga.
• Es posible que la pantalla no esté visible por la luz
directa del sol.
solución de problemas _ 65
Page 66

PROBLEMA SOLUCIÓN
• La unidad se apaga si la batería está totalmente
descargada. Recargue la batería.
Se apaga la unidad.
• Si se selecciona <Auto Power Off> (Apag. autom.)
en <Settings> (Confi g.) ĺ <System> (Sistema), se
apagará la unidad con el reproductor en modo de
pausa. Encienda el reproductor.
La vida de la
batería difi ere de lo
especifi cado en el
manual.
Funcionamiento
erróneo del programa
• El tiempo de la batería puede variar dependiendo
del modo de sonido y de los ajustes de la pantalla.
• La duración de la batería puede verse acortada si
se deja el reproductor durante períodos prolongados
bajo temperaturas bajas o altas.
• Compruebe si la PC cumple los requisitos básicos
del sistema.
Media Studio
• Compruebe si el conector USB está correctamente
conectado e inténtelo de nuevo.
Se desactiva la
conexión a la PC.
• Presione <Start>(Inicio) en la barra de herramientas
de la PC para ejecutar Windows Update. Seleccione
las actualizaciones clave y los Service Packs y
actualice todos. Reinicie la PC y vuelva a conectar.
• Compruebe si el archivo disponible se ha guardado
El reproductor no
reproduce.
en memoria.
• Compruebe si el archivo de música está dañado.
• Compruebe si hay carga sufi ciente en la batería.
66 _ solución de problemas
Page 67

PROBLEMA SOLUCIÓN
• Compruebe si el conector USB está correctamente
La carga de archivos
no funciona.
conectado. Vuelva a conectarlo en caso necesario.
• ҏCompruebe si la memoria está llena.
• Presione el orifi cio Reset.
• Compruebe si el conector USB se ha desconectado
durante la transmisión de archivos o datos. Si esto
Faltan archivos o
datos.
ha sucedido, puede causar serios daños no sólo en
los archivos/datos sino también en la unidad. Tiene
que poner un cuidado especial ya que Samsung no
se hace responsable de la pérdida de datos.
Visualización anormal
del tiempo de
• Compruebe si el archivo está en formato VBR
(velocidad en bits variable).
reproducción durante
la reproducción.
•
Visualización anormal
del nombre de archivo.
Vaya a <Settings> (Confi g.) ĺ ҏ<Language>
(Idioma) ĺ <ID3 Tag> (Etiqueta ID3) en la pantalla
del menú principal, defi na el idioma apropiado y
actualice manualmente la biblioteca.
El producto está
caliente.
• La recarga puede generar calor. Esto no tiene ningún
efecto en la vida ni en las funciones del producto.
• Si ha dado formato al reproductor en Windows
2000, puede demorarse la transferencia de
La velocidad de
transferencia de
archivos es demasiado
lenta.
archivos. Formatee el reproductor en Windows XP o
Vista e inténtelo de nuevo.
• Si está ejecutando varios programas en la PC
incluido Media Studio, la velocidad de transferencia
de archivos será lenta. Salga de programas que no
necesite e intente la transferencia de nuevo.
solución de problemas _ 67
Page 68
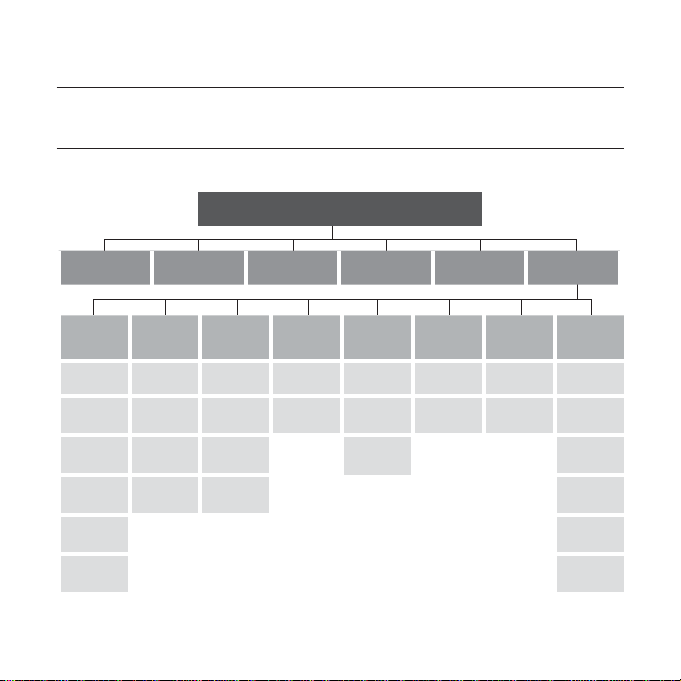
apéndice
ESTRUCTURA DEL MENÚ
A continuación se incluye la organización de menús y funciones del nuevo
reproductor mp3.
Pantalla de selección de menú
Music FM Radio Datacasts Voice REC File Browser Settings
Music FM Radio
Sound
Effect
DNSe Auto Preset DNSe
Play Mode FM Region Play Speed LED Effect
Play Speed
Interval
Sensitivity
Skip
Tag About
User Button
Mode
Mode Repeat A-B
FM
Play Mode Default set
Sound Display Language
Beep
Display Off Menu Date Sleep
Sound
Volume
Limit
Screen
Saver
ID3 Tag Time
Date/Time
Set
68 _ apéndice
System
Auto Power
Off
Library
Update
Format
Page 69
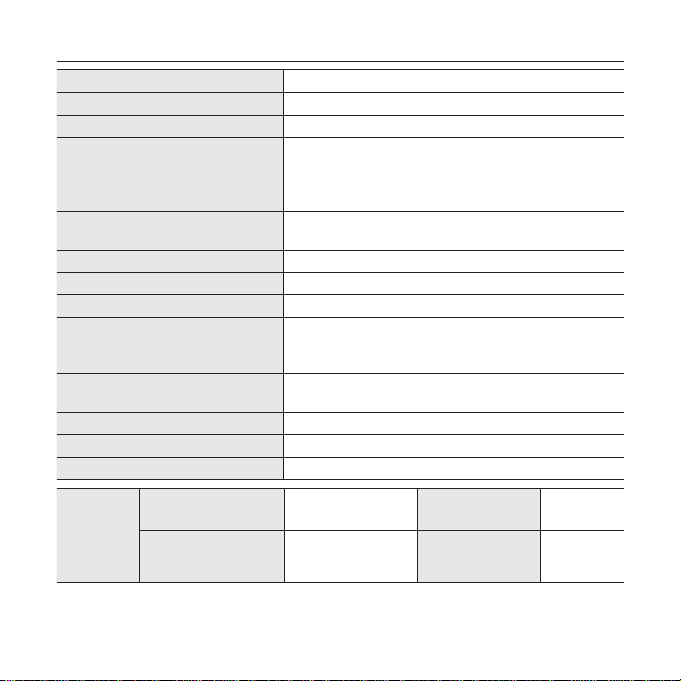
ESPECIFICACIONES DEL PRODUCTO
Nombre del modelo YP-U4
Califi cación 3,7V de CC/ 500mA
Alimentación de batería interna
Compatibilidad de archivos
Número de carpetas/archivos
admitidos
Salida de audífonos 20mW / Canal (basado en 16ȍ)
Rango de frecuencia de salida
Relación de señal a ruido 90 dB con 20kHz LPF (basado en 1kHz 0 dB)
Tiempo de reproducción
Rango de temperatura de
funcionamiento
Funda Plástico
Peso 27,5 g
Dimensiones (An. x Al. x P.) 27 X 83 X 13 mm
300 mAh / 3,7 V de CC
MPEG1/2/2.5 Layer3(8kbps ~ 320kbps,
8kHz ~ 48kHz)
WMA(48kbps ~ 192kbps, 8kHz ~ 48kHz),
Ogg(Q0~Q10)
Carpeta: máx. 1000 / Archivo: máx. 3000
40Hz~20kHz
Máximo de 16 horas de reproducción de música
(con: MP3 128 kbps, Volumen: 15, Modo Normal,
Pantalla apagada)
-5~35°C (23~95°F)
Radio
FM
Frecuencia de FM
Relación de señal a
ruido FM
87,5~108,0MHz FM T.H.D 1%
55 dB
Sensibilidad de
FM utilizable
38dB
El contenido de este manual está sujeto a cambio para su mejora sin aviso previo.
apéndice _ 69
Page 70

LICENCIA
La unidad del reproductor que incluye este manual del usuario se suministra
con licencia y bajo derechos de propiedad intelectual de terceros. Esta licencia
está limitada al uso no comercial privado de consumidores que sean usuarios
fi nales para contenido con licencia.
No se otorga ningún derecho para uso comercial.
La licencia no cubre a ningún reproductor del producto que no sea ésta y la
licencia no se extiende a ningún reproductor del producto o proceso sin licencia
en conformidad con el ISO/IEC 11172-3 o ISO/IEC 13818-3 utilizada o vencida
en combinación con este reproductor del producto. La licencia solo cubre el
uso de este reproductor para codifi car y/o descodifi car archivos de audio en
conformidad con el ISO/IEC 11172-3 o ISO/IEC 13818-3. No se otorga ningún
derecho bajo esta licencia para características o funciones del producto que no
estén conformes con el ISO/IEC 11172-3 o ISO/IEC 13818-3.
70 _ apéndice
Page 71

DECLARACIÓN PÚBLICA REQUERIDA SOBRE EL SOFTWARE
CON LICENCIA DE GPL/LGPL UTILIZADO EN ESTE PRODUCTO
Los siguientes ejecutables GPL y bibliotecas LGPL se utilizan en este producto y
están sujetos a los Acuerdos de licencia de GPL/LGPL incluidos como parte de esta
documentación. El código fuente de estos ejecutables y bibliotecas puede obtenerse
mediante el envío de un mensaje de correo electrónico a [email protected].
GPL EXECUTABLES:
- Linux Kernel, Busybox
GNU GENERAL PUBLIC LICENSE
Version 2, June 1991
Copyright (C) 1989, 1991 Free Software Foundation, Inc.
51 Franklin Street, Fifth Floor, Boston, MA 02110-1301, USA
Everyone is permitted to copy and distribute verbatim copies
of this license document, but changing it is not allowed.
Preamble
The licenses for most software are designed to take away
your freedom to share and change it. By contrast, the
GNU General Public License is intended to guarantee your
freedom to share and change free software--to make sure
the software is free for all its users. This General Public
License applies to most of the Free Software Foundation’s
software and to any other program whose authors commit
to using it. (Some other Free Software Foundation software
is covered by the GNU Lesser General Public License
instead.) You can apply it to your programs, too.
When we speak of free software, we are referring to freedom,
not price. Our General Public Licenses are designed to
make sure that you have the freedom to distribute copies
of free software (and charge for this service if you wish),
that you receive source code or can get it if you want it, that
you can change the software or use pieces of it in new free
programs; and that you know you can do these things.
To protect your rights, we need to make restrictions that
forbid anyone to deny you these rights or to ask you to
LGPL LIBRARIES
- uClibc, SDL
surrender the rights. These restrictions translate to certain
responsibilities for you if you distribute copies of the
software, or if you modify it.
For example, if you distribute copies of such a program,
whether gratis or for a fee, you must give the recipients all
the rights that you have. You must make sure that they, too,
receive or can get the source code. And you must show
them these terms so they know their rights.
We protect your rights with two steps: (1) copyright the
software, and (2) offer you this license which gives you legal
permission to copy, distribute and/or modify the software.
Also, for each author’s protection and ours, we want to
make certain that everyone understands that there is no
warranty for this free software. If the software is modifi ed
by someone else and passed on, we want its recipients to
know that what they have is not the original, so that any
problems introduced by others will not refl ect on the original
authors’ reputations.
Finally, any free program is threatened constantly by software
patents. We wish to avoid the danger that redistributors of
a free program will individually obtain patent licenses, in
effect making the program proprietary. To prevent this, we
have made it clear that any patent must be licensed for
everyone’s free use or not licensed at all.
The precise terms and conditions for copying, distribution
and modifi cation follow.
Page 72

TERMS AND CONDITIONS FOR COPYING,
DISTRIBUTION AND MODIFICATION
0. This License applies to any program or other work which
contains a notice placed by the copyright holder saying it may
be distributed under the terms of this General Public License.
The “Program”, below, refers to any such program or work,
and a “work based on the Program” means either the Program
or any derivative work under copyright law: that is to say, a
work containing the Program or a portion of it, either verbatim
or with modifi cations and/or translated into another language.
(Hereinafter, translation is included without limitation in the
term “modifi cation”.) Each licensee is addressed as “you”.
Activities other than copying, distribution and modifi cation are
not covered by this License; they are outside its scope. The
act of running the Program is not restricted, and the output
from the Program is covered only if its contents constitute
a work based on the Program (independent of having been
made by running the Program). Whether that is true depends
on what the Program does.
1. You may copy and distribute verbatim copies of the Program’ s
source code as you receive it, in any medium, provided that
you conspicuously and appropriately publish on each copy
an appropriate copyright notice and disclaimer of warranty;
keep intact all the notices that refer to this License and to the
absence of any warranty; and give any other recipients of the
Program a copy of this License along with the Program.
You may charge a fee for the physical act of transferring a
copy, and you may at your option offer warranty protection in
exchange for a fee.
2. You may modify your copy or copies of the Program or
any portion of it, thus forming a work based on the Program,
and copy and distribute such modifi cations or work under the
terms of Section 1 above, provided that you also meet all of
these conditions:
a) You must cause the modifi ed fi les to carry prominent
notices stating that you changed the fi les and the date
of any change.
b) Y ou must cause any work that you distribute or publish,
that in whole or in part contains or is derived from the
Program or any part thereof, to be licensed as a whole
at no charge to all third parties under the terms of this
License.
c) If the modifi ed program normally reads commands
interactively when run, you must cause it, when started
running for such interactive use in the most ordinary
way, to print or display an announcement including an
appropriate copyright notice and a notice that there
is no warranty (or else, saying that you provide a
warranty) and that users may redistribute the program
under these conditions, and telling the user how to
view a copy of this License. (Exception: if the Program
itself is interactive but does not normally print such an
announcement, your work based on the Program is not
required to print an announcement.)
These requirements apply to the modifi ed work as a whole.
If identifi able sections of that work are not derived from the
Program, and can be reasonably considered independent and
separate works in themselves, then this License, and its terms,
do not apply to those sections when you distribute them as
separate works. But when you distribute the same sections as
part of a whole which is a work based on the Program, the
distribution of the whole must be on the terms of this License,
whose permissions for other licensees extend to the entire
whole, and thus to each and every part regardless of who
wrote it.
Thus, it is not the intent of this section to claim rights or
contest your rights to work written entirely by you; rather,
the intent is to exercise the right to control the distribution of
derivative or collective works based on the Program.
In addition, mere aggregation of another work not based on
the Program with the Program (or with a work based on the
Program) on a volume of a storage or distribution medium does
not bring the other work under the scope of this License.
3. You may copy and distribute the Program (or a work based
on it, under Section 2) in object code or executable form
under the terms of Sections 1 and 2 above provided that you
also do one of the following:
Page 73

a) Accompany it with the complete corresponding machine-
readable source code, which must be distributed under
the terms of Sections 1 and 2 above on a medium
customarily used for software interchange; or,
b) Accompany it with a written offer, valid for at least three
years, to give any third party, for a charge no more than
your cost of physically performing source distribution, a
complete machine-readable copy of the corresponding
source code, to be distributed under the terms of
Sections 1 and 2 above on a medium customarily used
for software interchange; or,
c) Accompany it with the information you received as to
the offer to distribute corresponding source code. (This
alternative is allowed only for noncommercial distribution
and only if you received the program in object code
or executable form with such an offer, in accord with
Subsection b above.)
The source code for a work means the preferred form of
the work for making modifi cations to it. For an executable
work, complete source code means all the source code
for all modules it contains, plus any associated interface
defi nition fi les, plus the scripts used to control compilation
and installation of the executable. However, as a special
exception, the source code distributed need not include
anything that is normally distributed (in either source or binary
form) with the major components (compiler, kernel, and so
on) of the operating system on which the executable runs,
unless that component itself accompanies the executable.
If distribution of executable or object code is made by offering
access to copy from a designated place, then offering
equivalent access to copy the source code from the same
place counts as distribution of the source code, even though
third parties are not compelled to copy the source along with
the object code.
4. You may not copy, modify, sublicense, or distribute the
Program except as expressly provided under this License. Any
attempt otherwise to copy, modify, sublicense or distribute the
Program is void, and will automatically terminate your rights
under this License. However, parties who have received copies,
or rights, from you under this License will not have their licenses
terminated so long as such parties remain in full compliance.
5. You are not required to accept this License, since you have
not signed it. However, nothing else grants you permission
to modify or distribute the Program or its derivative works.
These actions are prohibited by law if you do not accept
this License. Therefore, by modifying or distributing the
Program (or any work based on the Program), you indicate
your acceptance of this License to do so, and all its terms
and conditions for copying, distributing or modifying the
Program or works based on it.
6. Each time you redistribute the Program (or any work
based on the Program), the recipient automatically receives
a license from the original licensor to copy, distribute or
modify the Program subject to these terms and conditions.
You may not impose any further restrictions on the recipients’
exercise of the rights granted herein. You are not responsible
for enforcing compliance by third parties to this License.
7. If, as a consequence of a court judgment or allegation
of patent infringement or for any other reason (not limited
to patent issues), conditions are imposed on you (whether
by court order, agreement or otherwise) that contradict the
conditions of this License, they do not excuse you from the
conditions of this License. If you cannot distribute so as to
satisfy simultaneously your obligations under this License
and any other pertinent obligations, then as a consequence
you may not distribute the Program at all. For example, if
a patent license would not permit royalty-free redistribution
of the Program by all those who receive copies directly or
indirectly through you, then the only way you could satisfy
both it and this License would be to refrain entirely from
distribution of the Program.
If any portion of this section is held invalid or unenforceable
under any particular circumstance, the balance of the
section is intended to apply and the section as a whole is
intended to apply in other circumstances.
It is not the purpose of this section to induce you to infringe any
patents or other property right claims or to contest validity of
any such claims; this section has the sole purpose of protecting
the integrity of the free software distribution system, which is
implemented by public license practices. Many people have
Page 74

made generous contributions to the wide range of software
distributed through that system in reliance on consistent
application of that system; it is up to the author/donor to decide
if he or she is willing to distribute software through any other
system and a licensee cannot impose that choice.
This section is intended to make thoroughly clear what is
believed to be a consequence of the rest of this License.
8. If the distribution and/or use of the Program is restricted
in certain countries either by patents or by copyrighted
interfaces, the original copyright holder who places the
Program under this License may add an explicit geographical
distribution limitation excluding those countries, so that
distribution is permitted only in or among countries not
thus excluded. In such case, this License incorporates the
limitation as if written in the body of this License.
9. The Free Software Foundation may publish revised
and/or new versions of the General Public License from
time to time. Such new versions will be similar in spirit to
the present version, but may differ in detail to address new
problems or concerns.
Each version is given a distinguishing version number. If the
Program specifi es a version number of this License which
applies to it and “any later version”, you have the option
of following the terms and conditions either of that version
or of any later version published by the Free Software
Foundation. If the Program does not specify a version
number of this License, you may choose any version ever
published by the Free Software Foundation.
10. If you wish to incorporate parts of the Program into other
free programs whose distribution conditions are different,
write to the author to ask for permission. For software which
is copyrighted by the Free Software Foundation, write to the
Free Software Foundation; we sometimes make exceptions for
this. Our decision will be guided by the two goals of preserving
the free status of all derivatives of our free software and of
promoting the sharing and reuse of software generally.
NO WARRANTY
11. BECAUSE THE PROGRAM IS LICENSED FREE OF
CHARGE, THERE IS NO WARRANTY FOR THE PROGRAM,
TO THE EXTENT PERMITTED BY APPLICABLE LAW.
EXCEPT WHEN OTHERWISE STATED IN WRITING
THE COPYRIGHT HOLDERS AND/OR OTHER PARTIES
PROVIDE THE PROGRAM “AS IS” WITHOUT WARRANTY
OF ANY KIND, EITHER EXPRESSED OR IMPLIED,
INCLUDING, BUT NOT LIMITED TO, THE IMPLIED
WARRANTIES OF MERCHANTABILITY AND FITNESS FOR
A PARTICULAR PURPOSE. THE ENTIRE RISK AS TO THE
QUALITY AND PERFORMANCE OF THE PROGRAM IS
WITH YOU. SHOULD THE PROGRAM PROVE DEFECTIVE,
YOU ASSUME THE COST OF ALL NECESSARY SERVICING,
REPAIR OR CORRECTION.
12. IN NO EVENT UNLESS REQUIRED BY APPLICABLE
LAW OR AGREED TO IN WRITING WILL ANY COPYRIGHT
HOLDER, OR ANY OTHER PARTY WHO MAY MODIFY
AND/OR REDISTRIBUTE THE PROGRAM AS PERMITTED
ABOVE, BE LIABLE TO YOU FOR DAMAGES,
INCLUDING ANY GENERAL, SPECIAL, INCIDENTAL OR
CONSEQUENTIAL DAMAGES ARISING OUT OF THE
USE OR INABILITY TO USE THE PROGRAM (INCLUDING
BUT NOT LIMITED TO LOSS OF DATA OR DATA BEING
RENDERED INACCURATE OR LOSSES SUSTAINED
BY YOU OR THIRD PARTIES OR A FAILURE OF THE
PROGRAM TO OPERATE WITH ANY OTHER PROGRAMS),
EVEN IF SUCH HOLDER OR OTHER PARTY HAS BEEN
ADVISED OF THE POSSIBILITY OF SUCH DAMAGES.
END OF TERMS AND CONDITIONS
How to Apply These Terms to Your New Programs
If you develop a new program, and you want it to be of
the greatest possible use to the public, the best way to
achieve this is to make it free software which everyone can
redistribute and change under these terms.
To do so, attach the following notices to the program. It is
safest to attach them to the start of each source fi le to most
effectively convey the exclusion of warranty; and each fi le
should have at least the “copyright” line and a pointer to
where the full notice is found.
one line to give the program’s name and an idea of what
it does.
Copyright (C) yyyy name of author
Page 75

This program is free software; you can redistribute it and/
or modify it under the terms of the GNU General Public
License as published by the Free Software Foundation;
either version 2 of the License, or (at your option) any
later version.
This program is distributed in the hope that it will be
useful, but WITHOUT ANY WARRANTY; without
even the implied warranty of MERCHANTABILITY or
FITNESS FOR A PARTICULAR PURPOSE. See the
GNU General Public License for more details.
You should have received a copy of the GNU General
Public License along with this program; if not, write to
the Free Software Foundation, Inc., 51 Franklin Street,
Fifth Floor, Boston, MA 02110-1301, USA.
Also add information on how to contact you by electronic
and paper mail.
If the program is interactive, make it output a short notice
like this when it starts in an interactive mode:
Gnomovision version 69, Copyright (C) year name of author
Gnomovision comes with ABSOLUTEL Y NO WARRANTY ;
for details type `show w’. This is free software, and you
are welcome to redistribute it under certain conditions;
type `show c’ for details.
The hypothetical commands `show w’ and `show c’ should
show the appropriate parts of the General Public License.
Of course, the commands you use may be called something
other than `show w’ and `show c’; they could even be
mouse-clicks or menu items--whatever suits your program.
You should also get your employer (if you work as a programmer)
or your school, if any, to sign a “copyright disclaimer” for the
program, if necessary. Here is a sample; alter the names:
Yoyodyne, Inc., hereby disclaims all copyright interest
in the program `Gnomovision’ (which makes passes at
compilers) written by James Hacker.
signature of Ty Coon, 1 April 1989
Ty Coon, President of Vice
This General Public License does not permit incorporating
your program into proprietary programs. If your program is a
subroutine library, you may consider it more useful to permit
linking proprietary applications with the library. If this is what
you want to do, use the GNU Lesser General Public License
instead of this License.
GNU LESSER GENERAL PUBLIC LICENSE
Version 2.1, February 1999
Copyright (C) 1991, 1999 Free Software Foundation, Inc.
51 Franklin Street, Fifth Floor, Boston, MA 02110-1301 USA
Everyone is permitted to copy and distribute verbatim copies
of this license document, but changing it is not allowed.
[This is the fi rst released version of the Lesser GPL. It
also counts as the successor of the GNU Library Public
License, version 2, hence the version number 2.1.]
Preamble
The licenses for most software are designed to take away
your freedom to share and change it. By contrast, the GNU
General Public Licenses are intended to guarantee your
freedom to share and change free software--to make sure
the software is free for all its users.
This license, the Lesser General Public License, applies
to some specially designated software packages--typically
libraries--of the Free Software Foundation and other authors
who decide to use it. You can use it too, but we suggest you
fi rst think carefully about whether this license or the ordinary
General Public License is the better strategy to use in any
particular case, based on the explanations below.
When we speak of free software, we are referring to freedom
of use, not price. Our General Public Licenses are designed
to make sure that you have the freedom to distribute copies of
free software (and charge for this service if you wish); that you
receive source code or can get it if you want it; that you can
change the software and use pieces of it in new free programs;
and that you are informed that you can do these things.
To protect your rights, we need to make restrictions that
forbid distributors to deny you these rights or to ask you to
Page 76

surrender these rights. These restrictions translate to certain
responsibilities for you if you distribute copies of the library
or if you modify it.
For example, if you distribute copies of the library, whether
gratis or for a fee, you must give the recipients all the rights
that we gave you. You must make sure that they, too,
receive or can get the source code. If you link other code
with the library, you must provide complete object fi les to the
recipients, so that they can relink them with the library after
making changes to the library and recompiling it. And you
must show them these terms so they know their rights.
We protect your rights with a two-step method: (1) we copyright
the library, and (2) we offer you this license, which gives you
legal permission to copy, distribute and/or modify the library.
To protect each distributor, we want to make it very clear that
there is no warranty for the free library. Also, if the library is
modifi ed by someone else and passed on, the recipients
should know that what they have is not the original version,
so that the original author’s reputation will not be affected by
problems that might be introduced by others.
Finally, software patents pose a constant threat to the existence
of any free program. We wish to make sure that a company
cannot effectively restrict the users of a free program by
obtaining a restrictive license from a patent holder. Therefore,
we insist that any patent license obtained for a version of the
library must be consistent with the full freedom of use specifi ed
in this license.
Most GNU software, including some libraries, is covered by the
ordinary GNU General Public License. This license, the GNU
Lesser General Public License, applies to certain designated
libraries, and is quite different from the ordinary General Public
License. We use this license for certain libraries in order to
permit linking those libraries into non-free programs.
When a program is linked with a library, whether statically or
using a shared library, the combination of the two is legally
speaking a combined work, a derivative of the original library.
The ordinary General Public License therefore permits
such linking only if the entire combination fi ts its criteria of
freedom. The Lesser General Public License permits more
lax criteria for linking other code with the library.
We call this license the “Lesser” General Public License
because it does Less to protect the user’s freedom than the
ordinary General Public License. It also provides other free
software developers Less of an advantage over competing
non-free programs. These disadvantages are the reason we
use the ordinary General Public License for many libraries.
However, the Lesser license provides advantages in certain
special circumstances.
For example, on rare occasions, there may be a special need
to encourage the widest possible use of a certain library, so
that it becomes a de-facto standard. To achieve this, nonfree programs must be allowed to use the library. A more
frequent case is that a free library does the same job as
widely used non-free libraries. In this case, there is little to
gain by limiting the free library to free software only, so we
use the Lesser General Public License.
In other cases, permission to use a particular library in nonfree programs enables a greater number of people to use a
large body of free software. For example, permission to use
the GNU C Library in non-free programs enables many more
people to use the whole GNU operating system, as well as
its variant, the GNU/Linux operating system.
Although the Lesser General Public License is Less
protective of the users’ freedom, it does ensure that the user
of a program that is linked with the Library has the freedom
and the wherewithal to run that program using a modifi ed
version of the Library.
The precise terms and conditions for copying, distribution and
modifi cation follow. Pay close attention to the difference between
a “work based on the library” and a “work that uses the library”.
The former contains code derived from the library, whereas the
latter must be combined with the library in order to run.
TERMS AND CONDITIONS FOR COPYING,
DISTRIBUTION AND MODIFICATION
0. This License Agreement applies to any software library or
other program which contains a notice placed by the copyright
holder or other authorized party saying it may be distributed
under the terms of this Lesser General Public License (also
called “this License”). Each licensee is addressed as “you”.
Page 77

A “library” means a collection of software functions and/
or data prepared so as to be conveniently linked with
application programs (which use some of those functions
and data) to form executables.
The “Library”, below, refers to any such software library or work
which has been distributed under these terms. A “work based
on the Library” means either the Library or any derivative
work under copyright law: that is to say, a work containing the
Library or a portion of it, either verbatim or with modifi cations
and/or translated straightforwardly into another language.
(Hereinafter, translation is included without limitation in the
term “modifi cation”.)
“Source code” for a work means the preferred form of the work
for making modifi cations to it. For a library, complete source
code means all the source code for all modules it contains,
plus any associated interface defi nition fi les, plus the scripts
used to control compilation and installation of the library.
Activities other than copying, distribution and modifi cation are
not covered by this License; they are outside its scope. The
act of running a program using the Library is not restricted,
and output from such a program is covered only if its contents
constitute a work based on the Library (independent of the
use of the Library in a tool for writing it). Whether that is true
depends on what the Library does and what the program that
uses the Library does.
1. You may copy and distribute verbatim copies of the Library’ s
complete source code as you receive it, in any medium,
provided that you conspicuously and appropriately publish on
each copy an appropriate copyright notice and disclaimer of
warranty; keep intact all the notices that refer to this License
and to the absence of any warranty; and distribute a copy of
this License along with the Library.
You may charge a fee for the physical act of transferring a
copy, and you may at your option offer warranty protection in
exchange for a fee.
2. You may modify your copy or copies of the Library or any
portion of it, thus forming a work based on the Library, and
copy and distribute such modifi cations or work under the
terms of Section 1 above, provided that you also meet all
of these conditions:
a) The modifi ed work must itself be a software library.
•b) You must cause the fi les modifi ed to carry prominent
notices stating that you changed the fi les and the date
of any change.
c) You must cause the whole of the work to be licensed
at no charge to all third parties under the terms of this
License.
d) If a facility in the modifi ed Library refers to a function or
a table of data to be supplied by an application program
that uses the facility, other than as an argument passed
when the facility is invoked, then you must make a good
faith effort to ensure that, in the event an application
does not supply such function or table, the facility still
operates, and performs whatever part of its purpose
remains meaningful.
(For example, a function in a library to compute square roots
has a purpose that is entirely well-defi ned independent of
the application. Therefore, Subsection 2d requires that any
application-supplied function or table used by this function
must be optional: if the application does not supply it, the
square root function must still compute square roots.)
These requirements apply to the modifi ed work as a whole. If
identifi able sections of that work are not derived from the Library,
and can be reasonably considered independent and separate
works in themselves, then this License, and its terms, do not
apply to those sections when you distribute them as separate
works. But when you distribute the same sections as part of
a whole which is a work based on the Library, the distribution
of the whole must be on the terms of this License, whose
permissions for other licensees extend to the entire whole, and
thus to each and every part regardless of who wrote it.
Thus, it is not the intent of this section to claim rights or
contest your rights to work written entirely by you; rather,
the intent is to exercise the right to control the distribution of
derivative or collective works based on the Library.
In addition, mere aggregation of another work not based
on the Library with the Library (or with a work based on the
Library) on a volume of a storage or distribution medium does
not bring the other work under the scope of this License.
Page 78

3. You may opt to apply the terms of the ordinary GNU
General Public License instead of this License to a given
copy of the Library. To do this, you must alter all the notices
that refer to this License, so that they refer to the ordinary
GNU General Public License, version 2, instead of to this
License. (If a newer version than version 2 of the ordinary
GNU General Public License has appeared, then you can
specify that version instead if you wish.) Do not make any
other change in these notices.
Once this change is made in a given copy, it is irreversible
for that copy, so the ordinary GNU General Public License
applies to all subsequent copies and derivative works made
from that copy.
This option is useful when you wish to copy part of the code
of the Library into a program that is not a library.
4. You may copy and distribute the Library (or a portion or
derivative of it, under Section 2) in object code or executable
form under the terms of Sections 1 and 2 above provided that
you accompany it with the complete corresponding machinereadable source code, which must be distributed under the
terms of Sections 1 and 2 above on a medium customarily
used for software interchange.
If distribution of object code is made by offering access to
copy from a designated place, then offering equivalent access
to copy the source code from the same place satisfi es the
requirement to distribute the source code, even though third
parties are not compelled to copy the source along with the
object code.
5. A program that contains no derivative of any portion of
the Library, but is designed to work with the Library by being
compiled or linked with it, is called a “work that uses the Library”.
Such a work, in isolation, is not a derivative work of the Library,
and therefore falls outside the scope of this License.
However, linking a “work that uses the Library” with the Library
creates an executable that is a derivative of the Library
(because it contains portions of the Library), rather than
a “work that uses the library”. The executable is therefore
covered by this License. Section 6 states terms for distribution
of such executables.
When a “work that uses the Library” uses material from a
header fi le that is part of the Library, the object code for the
work may be a derivative work of the Library even though the
source code is not. Whether this is true is especially signifi cant
if the work can be linked without the Library, or if the work is
itself a library. The threshold for this to be true is not precisely
defi ned by law.
If such an object fi le uses only numerical parameters, data
structure layouts and accessors, and small macros and small
inline functions (ten lines or less in length), then the use of the
object fi le is unrestricted, regardless of whether it is legally a
derivative work. (Executables containing this object code plus
portions of the Library will still fall under Section 6.)
Otherwise, if the work is a derivative of the Library, you may
distribute the object code for the work under the terms of
Section 6. Any executables containing that work also fall
under Section 6, whether or not they are linked directly with
the Library itself.
6. As an exception to the Sections above, you may also
combine or link a “work that uses the Library” with the Library
to produce a work containing portions of the Library, and
distribute that work under terms of your choice, provided that
the terms permit modifi cation of the work for the customer’s
own use and reverse engineering for debugging such
modifi cations.
You must give prominent notice with each copy of the work
that the Library is used in it and that the Library and its use
are covered by this License. You must supply a copy of this
License. If the work during execution displays copyright
notices, you must include the copyright notice for the Library
among them, as well as a reference directing the user to the
copy of this License. Also, you must do one of these things:
a) Accompany the work with the complete corresponding
machine-readable source code for the Library including
whatever changes were used in the work (which must
be distributed under Sections 1 and 2 above); and, if
the work is an executable linked with the Library, with
the complete machine-readable “work that uses the
Library”, as object code and/or source code, so that the
user can modify the Library and then relink to produce a
modifi ed executable containing the modifi ed Library. (It
Page 79

is understood that the user who changes the contents
of defi nitions fi les in the Library will not necessarily be
able to recompile the application to use the modifi ed
defi nitions.)
b) Use a suitable shared library mechanism for linking with
the Library. A suitable mechanism is one that (1) uses at
run time a copy of the library already present on the user’s
computer system, rather than copying library functions
into the executable, and (2) will operate properly with a
modifi ed version of the library, if the user installs one, as
long as the modifi ed version is interface-compatible with
the version that the work was made with.
c) Accompany the work with a written offer, valid for at
least three years, to give the same user the materials
specifi ed in Subsection 6a, above, for a charge no more
than the cost of performing this distribution.
d) If distribution of the work is made by offering access to
copy from a designated place, offer equivalent access to
copy the above specifi ed materials from the same place.
e) Verify that the user has already received a copy of these
materials or that you have already sent this user a copy.
For an executable, the required form of the “work that uses the
Library” must include any data and utility programs needed
for reproducing the executable from it. However, as a special
exception, the materials to be distributed need not include
anything that is normally distributed (in either source or binary
form) with the major components (compiler, kernel, and so
on) of the operating system on which the executable runs,
unless that component itself accompanies the executable.
It may happen that this requirement contradicts the license
restrictions of other proprietary libraries that do not normally
accompany the operating system. Such a contradiction
means you cannot use both them and the Library together in
an executable that you distribute.
7. You may place library facilities that are a work based on
the Library side-by-side in a single library together with other
library facilities not covered by this License, and distribute such
a combined library, provided that the separate distribution of the
work based on the Library and of the other library facilities is
otherwise permitted, and provided that you do these two things:
a) Accompany the combined library with a copy of the
same work based on the Library, uncombined with any
other library facilities. This must be distributed under the
terms of the Sections above.
b) Give prominent notice with the combined library of the
fact that part of it is a work based on the Library, and
explaining where to fi nd the accompanying uncombined
form of the same work.
8. You may not copy , modify , sublicense, link with, or distribute
the Library except as expressly provided under this License.
Any attempt otherwise to copy, modify, sublicense, link
with, or distribute the Library is void, and will automatically
terminate your rights under this License. However, parties
who have received copies, or rights, from you under this
License will not have their licenses terminated so long as
such parties remain in full compliance.
9. You are not required to accept this License, since you have
not signed it. However, nothing else grants you permission to
modify or distribute the Library or its derivative works. These
actions are prohibited by law if you do not accept this License.
Therefore, by modifying or distributing the Library (or any work
based on the Library), you indicate your acceptance of this
License to do so, and all its terms and conditions for copying,
distributing or modifying the Library or works based on it.
10. Each time you redistribute the Library (or any work
based on the Library), the recipient automatically receives a
license from the original licensor to copy, distribute, link with
or modify the Library subject to these terms and conditions.
You may not impose any further restrictions on the recipients’
exercise of the rights granted herein. You are not responsible
for enforcing compliance by third parties with this License.
11. If, as a consequence of a court judgment or allegation of
patent infringement or for any other reason (not limited to patent
issues), conditions are imposed on you (whether by court order,
agreement or otherwise) that contradict the conditions of this
License, they do not excuse you from the conditions of this
License. If you cannot distribute so as to satisfy simultaneously
your obligations under this License and any other pertinent
obligations, then as a consequence you may not distribute the
Library at all. For example, if a patent license would not permit
Page 80

royalty-free redistribution of the Library by all those who receive
copies directly or indirectly through you, then the only way you
could satisfy both it and this License would be to refrain entirely
from distribution of the Library.
If any portion of this section is held invalid or unenforceable
under any particular circumstance, the balance of the section
is intended to apply, and the section as a whole is intended to
apply in other circumstances.
It is not the purpose of this section to induce you to infringe any
patents or other property right claims or to contest validity of
any such claims; this section has the sole purpose of protecting
the integrity of the free software distribution system which is
implemented by public license practices. Many people have
made generous contributions to the wide range of software
distributed through that system in reliance on consistent
application of that system; it is up to the author/donor to decide
if he or she is willing to distribute software through any other
system and a licensee cannot impose that choice.
This section is intended to make thoroughly clear what is
believed to be a consequence of the rest of this License.
12. If the distribution and/or use of the Library is restricted in
certain countries either by patents or by copyrighted interfaces,
the original copyright holder who places the Library under this
License may add an explicit geographical distribution limitation
excluding those countries, so that distribution is permitted only
in or among countries not thus excluded. In such case, this
License incorporates the limitation as if written in the body of
this License.
13. The Free Software Foundation may publish revised and/
or new versions of the Lesser General Public License from
time to time. Such new versions will be similar in spirit to
the present version, but may differ in detail to address new
problems or concerns.
Each version is given a distinguishing version number. If the
Library specifi es a version number of this License which applies
to it and “any later version”, you have the option of following the
terms and conditions either of that version or of any later version
published by the Free Software Foundation. If the Library does
not specify a license version number, you may choose any
version ever published by the Free Software Foundation.
14. If you wish to incorporate parts of the Library into other free
programs whose distribution conditions are incompatible with
these, write to the author to ask for permission. For software
which is copyrighted by the Free Software Foundation, write to
the Free Software Foundation; we sometimes make exceptions
for this. Our decision will be guided by the two goals of
preserving the free status of all derivatives of our free software
and of promoting the sharing and reuse of software generally.
NO WARRANTY
15. BECAUSE THE LIBRARY IS LICENSED FREE OF
CHARGE, THERE IS NO WARRANTY FOR THE LIBRARY, TO
THE EXTENT PERMITTED BY APPLICABLE LAW. EXCEPT
WHEN OTHERWISE STATED IN WRITING THE COPYRIGHT
HOLDERS AND/OR OTHER P ARTIES PROVIDE THE LIBRARY
“AS IS” WITHOUT WARRANTY OF ANY KIND, EITHER
EXPRESSED OR IMPLIED, INCLUDING, BUT NOT LIMITED
TO, THE IMPLIED WARRANTIES OF MERCHANTABILITY
AND FITNESS FOR A PARTICULAR PURPOSE. THE ENTIRE
RISK AS TO THE QUALITY AND PERFORMANCE OF THE
LIBRARY IS WITH YOU. SHOULD THE LIBRARY PROVE
DEFECTIVE, YOU ASSUME THE COST OF ALL NECESSARY
SERVICING, REPAIR OR CORRECTION.
16. IN NO EVENT UNLESS REQUIRED BY APPLICABLE
LAW OR AGREED TO IN WRITING WILL ANY COPYRIGHT
HOLDER, OR ANY OTHER P AR TY WHO MA Y MODIFY AND/
OR REDISTRIBUTE THE LIBRARY AS PERMITTED ABOVE,
BE LIABLE TO YOU FOR DAMAGES, INCLUDING ANY
GENERAL, SPECIAL, INCIDENTAL OR CONSEQUENTIAL
DAMAGES ARISING OUT OF THE USE OR INABILITY TO
USE THE LIBRARY (INCLUDING BUT NOT LIMITED TO
LOSS OF DAT A OR DATA BEING RENDERED INACCURA TE
OR LOSSES SUSTAINED BY YOU OR THIRD PARTIES OR
A FAILURE OF THE LIBRARY TO OPERATE WITH ANY
OTHER SOFTWARE), EVEN IF SUCH HOLDER OR OTHER
PARTY HAS BEEN ADVISED OF THE POSSIBILITY OF
SUCH DAMAGES.
END OF TERMS AND CONDITIONS
How to Apply These Terms to Your New Libraries
If you develop a new library, and you want it to be of the
greatest possible use to the public, we recommend making
Page 81

it free software that everyone can redistribute and change.
You can do so by permitting redistribution under these terms
(or, alternatively, under the terms of the ordinary General
Public License).
To apply these terms, attach the following notices to the
library. It is safest to attach them to the start of each source
fi le to most effectively convey the exclusion of warranty;
and each fi le should have at least the “copyright” line and a
pointer to where the full notice is found.
one line to give the library’s name and an idea of what it
does.
Copyright (C) year name of author
This library is free software; you can redistribute it and/or
modify it under the terms of the GNU Lesser General Public
License as published by the Free Software Foundation;
either version 2.1 of the License, or (at your option) any
later version.
This library is distributed in the hope that it will be useful,
but WITHOUT ANY W ARRANTY; without even the implied
warranty of MERCHANTABILITY or FITNESS FOR A
PARTICULAR PURPOSE. See the GNU Lesser General
Public License for more details.
You should have received a copy of the GNU Lesser
General Public License along with this library; if not, write
to the Free Software Foundation, Inc., 51 Franklin Street,
Fifth Floor, Boston, MA 02110-1301 USA
Also add information on how to contact you by electronic
and paper mail.
You should also get your employer (if you work as a
programmer) or your school, if any, to sign a “copyright
disclaimer” for the library, if necessary. Here is a sample; alter
the names:
Yoyodyne, Inc., hereby disclaims all copyright interest in
the library `Frob’ (a library for tweaking knobs) written by
James Random Hacker.
signature of Ty Coon, 1 April 1990
Ty Coon, President of Vice
Page 82

- MÉXICO SÓLO AV. PRESIDENTE MASARIK No. 111 INT. 701
Col. Chapultepec Morales, DELEGACION MIGUEL HIDALGO
C.P. 11570, MEXICO, DISTRITO FEDERAL
Tel:01(55) 5747.5100/01.800.726.7864
Fax:01(55) 5747.5202/01.800.849.1743
REV.0.0
 Loading...