

Samsung YPN1 Users Manual

Personal
Navigation
Device
user manual
YP-N1

features of your new personal navigation devices
You have chosen a cutting-edge navigation system.
Congratulations! Please enjoy using it. This navigation system leads you
straight to your destination, whether you are traveling by car or on foot.
You may navigate and plan your route with an easy to use and intuitive
interface, just by using your fi nger. You may also use this application
to plan your trip to suit your personal preferences and interests and to
save interesting destinations before you set off on your trip. This manual
leads you through the main features of the system.
WHAT IS GPS (GLOBAL POSITIONING SYSTEM)
It means a system that provides the location,
height and velocity of the receiver based on
the signals from 4 or more GPS satellites.
EASY-TO-USE NAVIGATION
The easy-to-use intuitive menu enables
users to use the various functions easily
while driving a car.
FAST AND PRECISE PATH SEARCH
You can fi nd the optimal path to stopover
and destination so that you can reach the
destination faster and more conveniently.
If you drive away from the recommended
path, new path is automatically found in a
short time.
2 _ features of your new personal navigation devices
EASY DESTINATION SEARCH
You can easily search for a destination
by selecting a location from the map, or
specifying address, POI, or Favorites.
REAL-TIME VOICE ANNOUNCEMENT
Rest areas and gas stations as well as the
path are also announced in real-time.
BLUETOOTH COMPLIANCE (YP-N1BZ ONLY)
You can register a Bluetooth hands-free
(mobile phone) to the product and connect it
via Bluetooth wireless connection.

safety information
What the icons and signs in this user manual mean :
WARNING
CAUTION
CAUTION
NOTE
These warning signs are here to prevent injury to you and others.
Please follow them explicitly. After reading this section, keep it in a safe place for
future reference.
Means that death or serious personal injury is a risk.
Means that there is a potential risk for personal injury or
material damage.
To reduce the risk of fi re, explosion, electric shock, or
personal injury when using your product, follow these
basic safety precautions:
Means hints or referential pages that may be helpful to
operate the player.
Do NOT attempt.
Do NOT disassemble.
Do NOT touch.
Follow directions explicitly.
Unplug the power plug from the wall socket.
Call the service center for help.
safety information _ 3
safety information
This manual describes how to properly use your product. Read it carefully to
avoid damaging the product and injuring yourself.
Pay particular attention to the following serious warnings:
PROTECT YOURSELF
Only use an authorized charger to charge the product. Do not use
unauthorized power adapter to charge the product.
Do not connect multiple power cords to one wall outlet using a multi-tap.
Do not operate the product or stare at the screen while driving.
Avoid bending the power cord or placing a heavy object over the power cord.
Do not get the product wet or drop it in water. If the product gets wet, do
not switch it on because you could get an electric shock. Instead, contact a
Samsung Service Center near you.
Do not place the product in damp, dusty, or sooty areas because these
environments could lead to fi re or electric shock.
Do not pull the power cord out by holding the plug. If the cable is damaged, it
may cause a fi re or electric shock.
Since the map of this product may differ from the actual road information,
follow traffi c regulations in a real road situation for your safety.
Unplug the power cord when you do not use this product or it is lightning or
thunder storming.
4 _ safety information

PROTECT YOURSELF
Do not tap on the power cord with wet hands.
Do not disassemble, repair, or modify this product on your own.
If the system emits smoke, or unusual noise, or smells of burning, turn
the system off immediately, disconnect the power sources, and contact
CAUTION
Samsung customer service.
PROTECT YOUR PRODUCT
Do not leave the product in temperatures above 95°F (35°C), such as a
sauna or a parked car.
Do not drop the product or place heavy objects on top of it.
Prevent any foreign particles or dust from entering into the product.
Do not place the product near magnetic objects.
Do not remove the SD memory card during operation of the navigation
system.
Be sure to backup important data. Samsung is not responsible for
data loss.
Use only accessories provided by or approved by Samsung.
Start the engine after disconnecting the vehicle charger. Otherwise, the
product may be damaged.
Do not spray water on the product. Never clean the product with chemical
CAUTION
substances such as benzene or thinner, as it may cause fi re, electric
shock or deteriorate the surface.
safety information _ 5

PRECAUTIONS FOR ROUTE GUIDANCE
Some part of the map of this product may differ from the actual road
conditions and the information provided by the route guidance may be
incorrect. In this case, please drive according to the actual road situation
and traffi c regulations.
If the condition of the road guided by the route guidance is not good due
CAUTION
to bad weather, use alternative road depending on situation.
The position indicated by the GPS may be incorrect depending on the
NOTE
surrounding terrain condition and weather. In this case, since the current
location is incorrect, the route guide may provide incorrect information.
For newly built or expanded roads, the route guidance may provide
incorrect information. In this case, correct information will be given by the
route guidance as soon as the road of the map becomes consistent with
the real road.
The read condition is subject to change at any time. It is recommended to
keep your map up to date for safe driving. The route guidance is for your
reference while driving.
6 _ safety information

contents
THE BASICS
11
11 What’s included
12 Your personal navigation device
14 Cradle
15 Using the touch screen
16 screen displays
17 Installing the device onto your
vehicle
18 Separating the device from your
vehicle
19 Charging the battery
20 Charging the battery using the car
charger
21 Hardware power on/off switch
22 Using SD memory card
24 Installing external-type GPS antenna
(Not Supplied)
25 Installing TMC antenna
26 Changing the settings and
preperences
26 Map Settings
28 Display Settings
30 Route Settings
31 Sound Settings
32 General Settings
34 Language & Unit Settings
35 System Settings
36 About
37 Usingnavigation system
37 Zooming in/out the map
38 Controlling the volume
39 GPS data/traffi c infomation
40 Resetting the system

contents
USING THE NAVIGATION
41
41 Planning a route
42 Specifying a start point
43 Adding a stopover
43 Removing a stopover
43 Changing the fi nal destination
44 Saving locations in favorite
45 Saving the location of safety
camera
46 Saving the locations of home and
work place
47 Finding an address
48 Finding home or workplace
49 Finding out favorites
50 Finding a recently visited place
51 Finding POI (point of interest)
53 Coordinates
54 Route settings
54 Recalculate
55 Itinerary
56 Edit route
58 Clear route
58 Route Info
59 Simulation
59 Turn view
60 Manage track logs

contents
MORE THAN
NAVIGATION
62
62 Using Bluetooth
62 What is Bluetooth?
63 Bluetooth specifi cation
64 Using mobile phone
64 To pair a mobile phone
65 To search for a new mobile phone
65
To remove a mobile phone from the list
65 To rename a device
66 To pair a mobile phone
67 To search for a new mobile phone
67
To remove a mobile phone from the list
67 To rename a device
68 To redial using the recent call number
68 To answer an incoming call
68 To switch a call
69 To switch to the mobile phone while
talking on the hands-free device
(YP-N1)
69 To switch to the hands-free device
(YP-N1) while talking on the mobile
phone
69 To disconnect the mobile phone
70 To use the tone keyboard
70 To view my device information

contents
CONNECTING TO
YOUR PC
71
TROUBLESHOOTING
76
71 PC requirements
72 Connecting to your PC
73 Disconnecting from your PC
74 Using the map manager
APPENDIX
79
79 Menu tree
80 Product specifi cations
82 Contact samsung world wide

the basics
WHAT’S INCLUDED
Your new Personal Navigation Device comes with these accessories.
If you’re missing any of these items, contact a Samsung Service center near you.
Personal
Navigation Device
Installation CD Car Cradle Cradle USB Cable Carrying Case
The accessories in your box may look slightly different than these.
Car Charger
Power Adapter SD Memory Card
TMC antenna
(YP-N1BZ only)
the basics _ 11
01 THE BASICS
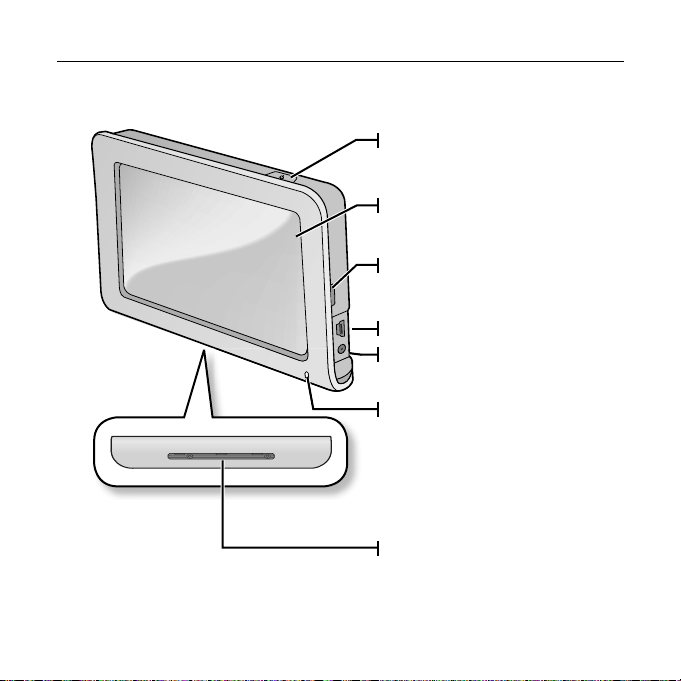
YOUR PERSONAL NAVIGATION DEVICE
Power button
Press and briefl y hold for power on/off
Touch screen display
Fixing Groove
Use it to fi x the main body on the
cradle.
USB Connection port
Power Connection port
Connect the power adapter or car
charger here.
Battery indicator
It is turned on when the power adapter
or car charger is connected.
Charging : Red
Charge Complete : Green
Fixing Groove
Use it to fi x the main body on the
cradle.
12 _ the basics
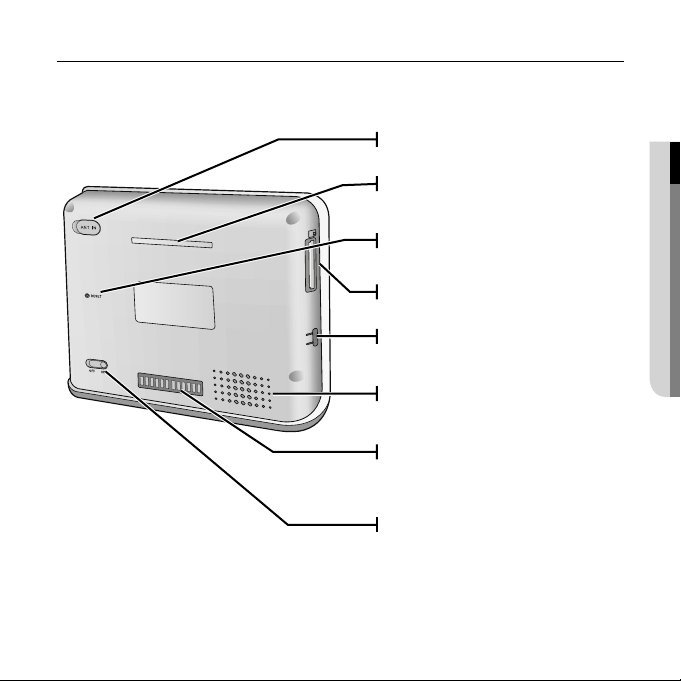
YOUR PERSONAL NAVIGATION DEVICE (Continued)
GPS antenna (not supplied)
input connection port
01 THE BASICS
Fixing Groove
Use it to fi x the main body on the
SD
cradle.
Reset hole
Press with a pointed object to reset
SD Memory card slot
Fixing Groove
Use it to fi x the main body on the
cradle.
Speaker
Cradle connecter terminal
Port connecting the main unit and the
cradle.
Hardware Power On/Off switch
To use the device on the built-in
battery power without connecting
an external power source, you have
to slide the Hardware Power On/Off
Switch to On.
the basics _ 13
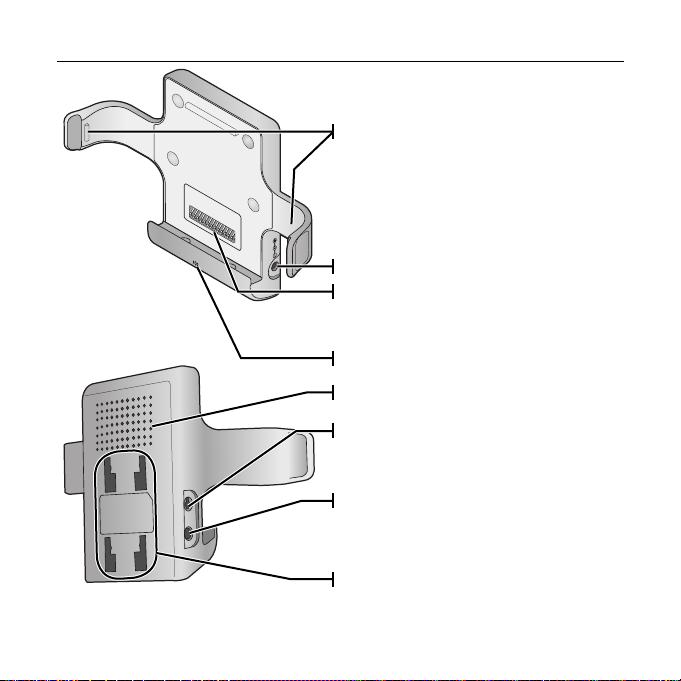
CRADLE
14 _ the basics
Side fi xing parts
Use it to fi x the main body on the cradle.
Power connection port
Main unit connector terminal
Port connecting the main unit and the cradle so
as to provide speaker and power connections.
Microphone
Speaker
TMC connection port
If you connect a TMC antenna, traffi c and
living information is provided.
External microphone connection port
You can connect a microphone and use it
to talk over the phone using the Bluetooth
function (YP-N1BZ only).
Cradle fi xing grooves
Fixing Groove used to fi x the cradle over the
stand.
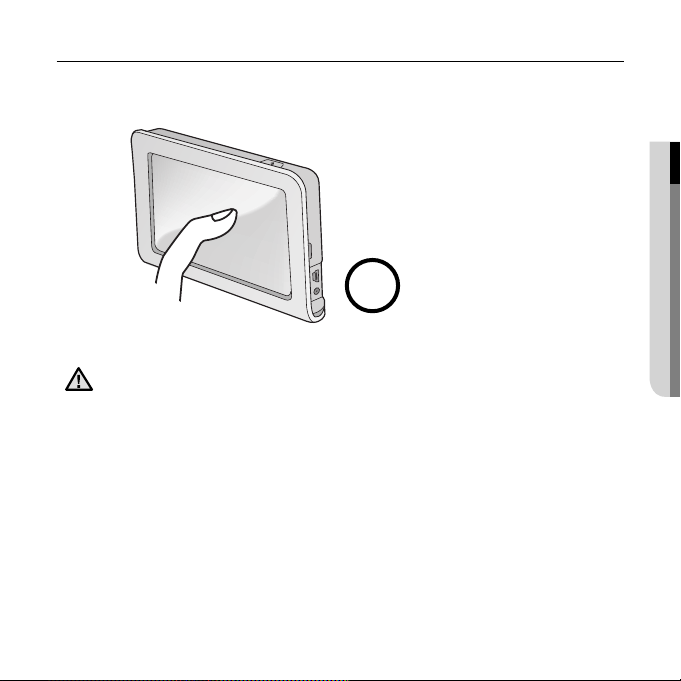
USING THE TOUCH SCREEN
Tap on over the screen with your fi nger tips.
Using a sharp object to tap on on the screen may cause damage to it.
CAUTION
Avoid tap on the touch screen with dirty fi ngers.
01 THE BASICS
the basics _ 15

SCREEN DISPLAYS
Main (Driving Mode)
The Blue tooth function supports only these models. (YP-N1BZ)
NOTE
16 _ the basics
1
2
3
4
5
6
7
8
9
10
11
12
13
14
GPS Signal Reception
1
Status
2
Find Location button
3
Current Time
Remaining Battery
4
Capacity
5
View Map button
6
Route button
7
Mobile phone button
8
Settings button
9
GPS button
Zoom-In/Zoom-Out Button
10
Volume Control button
11
Show/Hide Setup Route
12
Buttons
Compass
13
MENU button
14

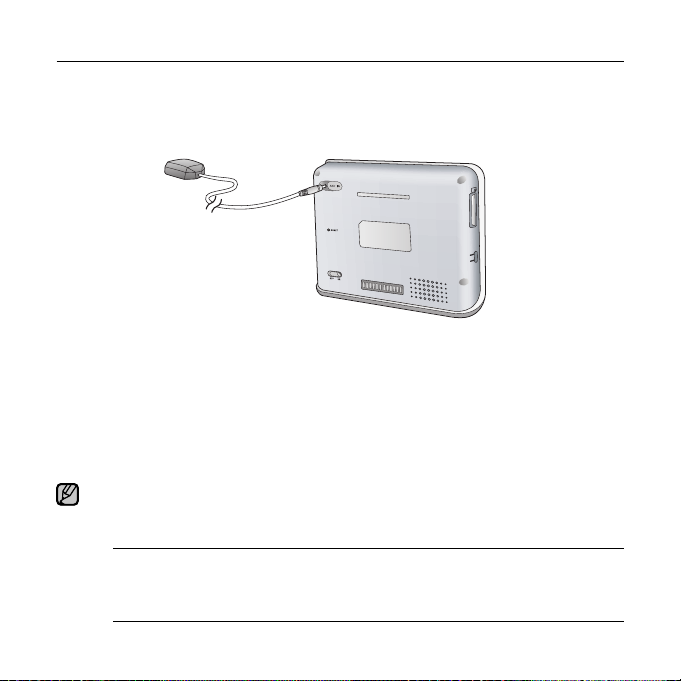
INSTALLING THE DEVICE ONTO YOUR VEHICLE
Before you start - Select a position to install the cradle that will not block driver’s
field of vision and clean the place before installation.
1.
Attach the suction cup to the place you selected
completely and push the locking tab in the
direction of the arrow shown by the fi gure.
The suction cup is secured.
2. Insert the catches of the stand to the Cradle
Fixing Grooves and slide the cradle so that
the catches are in the CLOSE position.
3. Insert the main unit into the cradle.
Put the main body into the cradle until it clicks
at the both side of the fi xing parts in order to
secure the installation.
4.
Adjust the angle of the support to facilitate
your visibility.
Release the adjustment screw 1 counterclockwise
slightly and adjust the angle between the 180
degrees in vertical and 360 degrees in horizontal. If
you fi nd a comfortable angle, fasten the adjustment
screw 1 by turning it clockwise.
Release the adjustment screw 2
counterclockwise slightly and adjust the
angle between the 180 degrees in horizontal.
If you fi nd a comfortable angle, fasten the
adjustment screw 2 by turning it clockwise.
the basics _ 17
01 THE BASICS
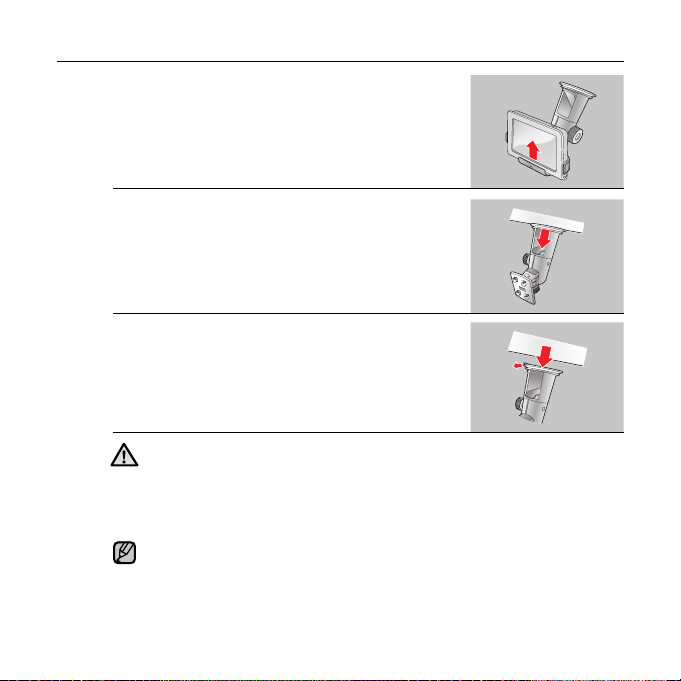
SEPARATING THE DEVICE FROM YOUR VEHICLE
1. Pull the both sides of fi xing parts of the cradle
outward and separate the main unit from the
cradle.
2. Pull the locking tab in the direction of the
arrow shown by the fi gure.
The suction cup is released.
3. Remove the suction cup by holding the
projected part.
The cradle is separated.
Install the cradle to a position that does not block driver’s fi eld of vision and
CAUTION
will not cause an injury of the driver or follow passenger even if it falls.
Note that the adsorption of the suction cup may decrease when the
temperature difference between outside and inside is high.
Separate the cradle from the vehicle for long time of no use.
The adsorption of the suction cup is the best when the temperature of the
NOTE
inside car is between 10~50ºC.
18 _ the basics
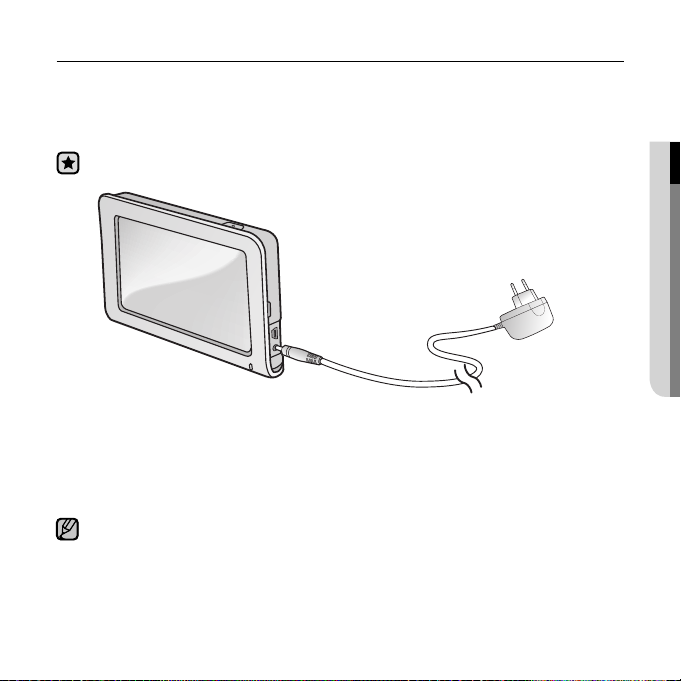
CHARGING THE BATTERY
Charge it before using the player for the fi rst time and when you haven’t used it
for a long time.
The battery for your mp3 player will fully charge in about three and a half hours,
although total charging time varies depending on your PC environment.
Before you start - Slide the Hardware Power On/Off Switch to OFF.
B
A
1. Connect the power adapter jack (A) to the Power connection port.
2. Plug the power adapter plug (B) to the wall outlet.
The LED turns on in red while charging the better and it turns to green when it is fully
charged.
It is recommended using the device by connecting it to a power source when you
use it in a house or vehicle where power source is available and moving the device
NOTE
is not frequently required.
The battery may be discharged when you first use this product. Fully recharge the
battery before use.
01 THE BASICS
the basics _ 19

CHARGING THE BATTERY USING THE CAR CHARGER
The battery for your mp3 player will fully charge in about three and a half hours.
A
B
1. Install the main unit into the cradle.
2. Connect the car charger jack (A) to the Power connection port of the cradle.
3. Plug the car charger plug (B) into the cigar jack of the vehicle.
CARING FOR THE BATTERY
Your battery will last longer if you follow these simple guidelines for caring for
and storing it.
• Recharge and store the battery within the temperature range of
(5°C~35°C ).
• Do not charge the battery longer than 12 hours.
40°F~95°F
20 _ the basics

HARDWARE POWER ON/OFF SWITCH
To use the built-in battery power without connecting the power adapter or car
charger, you have to slide the Hardware Power On/Off switch to On.
To turn the Hardware Power On/Off Switch on
S
Slide the Hardware Power On/Off switch to ON.
Alternatively you can turn the power on by pressing the
button.
D
To turn the Hardware Power On/Off Switch off
Slide the Hardware Power On/Off switch to OFF.
Even if you press the button, the power will not be
turned on.
When the product is left unused for an extended time, slide the Power On/Off switch
NOTE
to OFF to avoid discharged battery.
TURNING THE POWER ON & OFF
To turn the power on
Press and hold the
The power is turned on.
To turn the power off
Press and hold the
The power is turned off.
button.
button.
01 THE BASICS
the basics _ 21
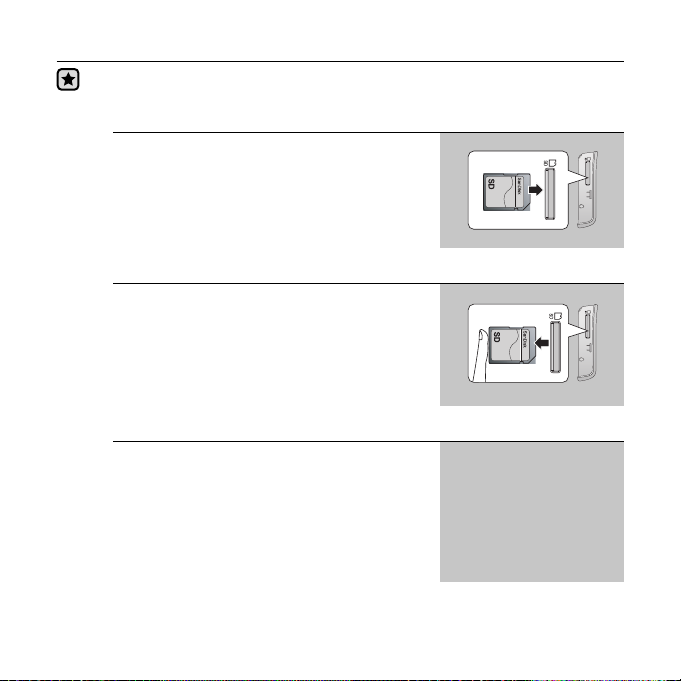
USING SD MEMORY CARD
Before you start - Insert or remove the SD memory card only when the power is
turned off.
Removing the SD memory card
Press the SD memory card tip slightly.
The SD memory card pops up.
Inserting the SD memory card
Insert the SD memory card as shown by the
fi gure.
Insert SD memory card so that the label faces
forward.
write protection switch
A SD card supports a mechanical write
protection switch. Setting the switch prevents
accidental erasure of fi les recorded on the SD
card.
To enable writing, move the switch up to the
direction of terminals. To set write protection,
move the switch down.
22 _ the basics
USING SD MEMORY CARD (Continued)
The SD memory card may have insuffi cient free space as it has stored the
map data. In this case, purchase another one in the Internet shopping mall
NOTE
or digital camera shop.
If an adapter is required for the memory card you have purchased, make
sure to use the memory card by using an appropriate adapter. If you use a
CAUTION
non-compatible card, it may be damaged or you will not be able to remove it.
Do not remove the memory card while the navigation system is running.
Do not insert a memory card upside down or in a wrong direction.
Unsupported memory cards
Some SD memory cards, if thick out of the specifi cation or with a label
attached onto it, may not be removed.
This product supports up to 4GB of memory capacity.
Memory cards other than SD such as T-Flash are not supported.
When you keep or carry a memory card, package it with the memory card
case because the data may be damaged by antistatic electricity.
Please note that manufacturer shall not be liable to the data loss due to the
damage of the memory card.
If you turn the main unit on under no memory card inserted, the
appears on the screen.
01 THE BASICS
icon
the basics _ 23
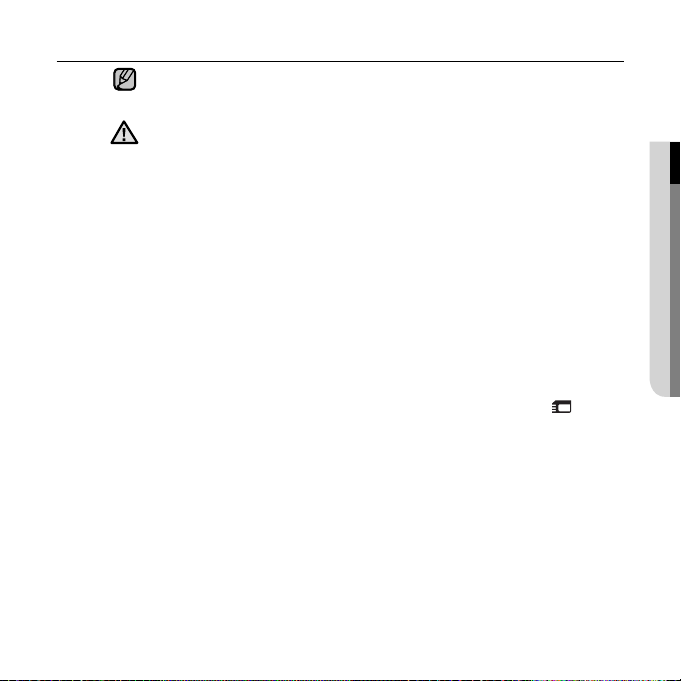
INSTALLING EXTERNAL-TYPE GPS ANTENNA (NOT SUPPLIED)
Installing en external-type SPG antenna when the received GPS signal strength
weak, will provide better GPS signal sensitivity.
S
D
1. Connect the GPS antenna jack (A) to the GPS antenna input connection
port of the main unit.
2. Install the GPS antenna (B) on the roof of the vehicle or a metal part of the
hood.
3. Arrange the GPS antenna cable so that it will not disturb driving.
The external-type GPS antenna is unbundled. You can purchase one in a navigation
device shop.
NOTE
Recommended GPS antenna models
24 _ the basics
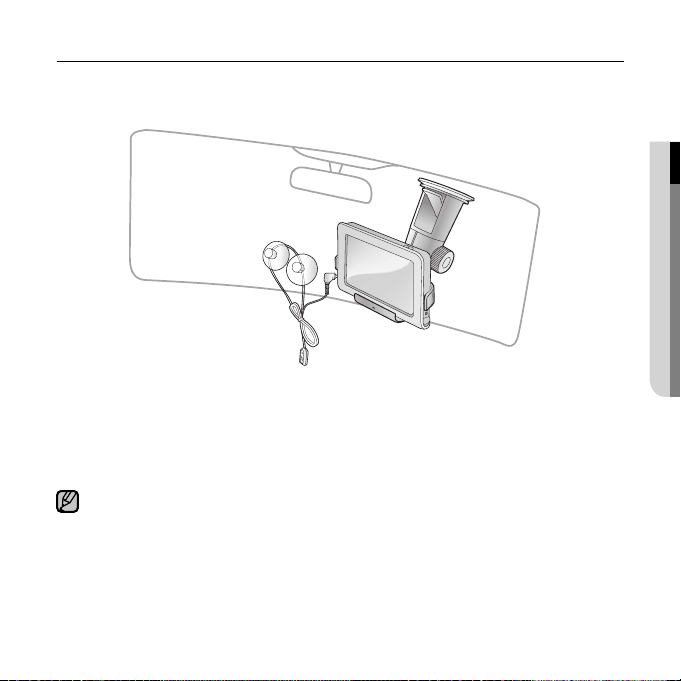
INSTALLING TMC ANTENNA
If you install TMC antenna, you can use useful information such as traffi c and
living information.
1. Clean up the windshield.
2. Attach the TMC antenna (A) to the windshield.
3. Connect the TMC antenna jack (B) to the TMC connection port (C) of the
cradle.
Arrange the TMC antenna cable so that it will not disturb your driving.
NOTE
In some areas, the TMC reception sensitivity may not be good enough.
01 THE BASICS
the basics _ 25

CHANGING THE SETTINGS AND PREPERENCES
Your Personal Navigation Device comes with settings and preferences that
were set up at the factory, but you can change these pre-set values to truly
customize your product.
Map Settings
You can confi gure map settings such as View Mode, Day/Night Mode,
Map Color, etc.
1. Tap “Settings” button in the main menu.
The “Settings” window appears.
2. Tap “Map” button.
The “Map” settings window appears.
3. Confi gure the settings you want by
tapping on a desired button.
Tap button to move to the previous screen.
NOTE
If you tap “View Map” button in the Map Settings window, you can move to
the map screen.
26 _ the basics
 Loading...