

Page 1
YP-K3J
Page 2
For Your Safety
Read this manual carefully to ensure proper use of the player and
to avoid any danger or physical damage.
2
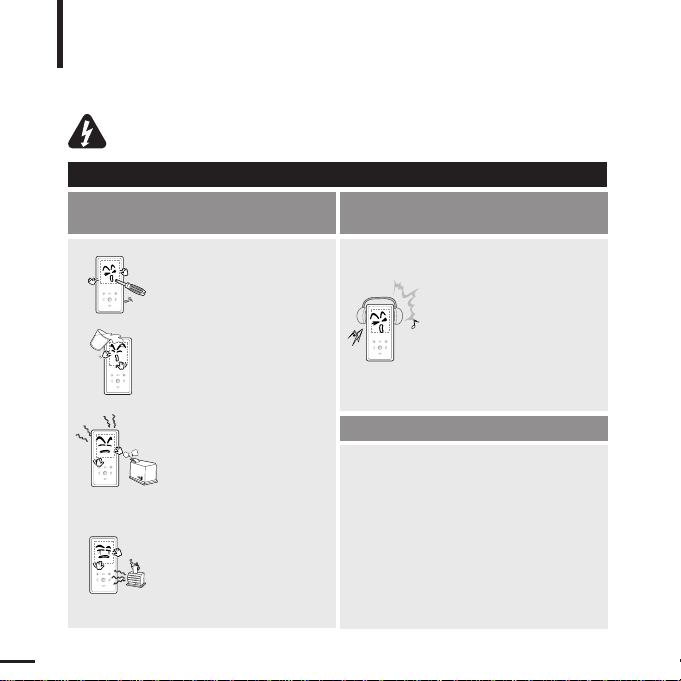
WARNING
Product Use
Improper use can result in explosion,
fire or electric shock.
To avoid your hearing damage
Do not disassemble, repair
or modify this player on
your own.
Do not get the player wet
or drop it in water.
If the player gets wet, do not
switch it on. Contact a Service
Center.
Do not place the player in
damp, dusty or sooty areas,
as it could result in fire or
electric shock.
Avoid using your player at
high volume levels, as it may
result in permanent
hearing damage.
If you experience ringing in
your ears while using the
earphone, remove the
earphone immediately and
lower the volume.
To avoid a risk of traffic accident
Do not use the earphones while you are
driving a bicycle, automobile or motorcycle.
It can cause a serious accident and furthermore,
is prohibited by law in some areas.
Using the earphones while walking, in particular,
on a crosswalk, can lead to a serious accident.
Take care not to tangle the earphone cable
around your arms or neighboring objects
while driving, working out or walking, as it
could result in a car accident or other
injuries.
Do not leave the player in
areas above 35°C(95°F)
(such as a sauna or inside
a parked car).
During hot weather, the
temperature inside a car may
rise up to 80°C(176°F).
Failing to heed the player instructions may cause serious injury.
Page 3
Chapter 1. Preparation
3
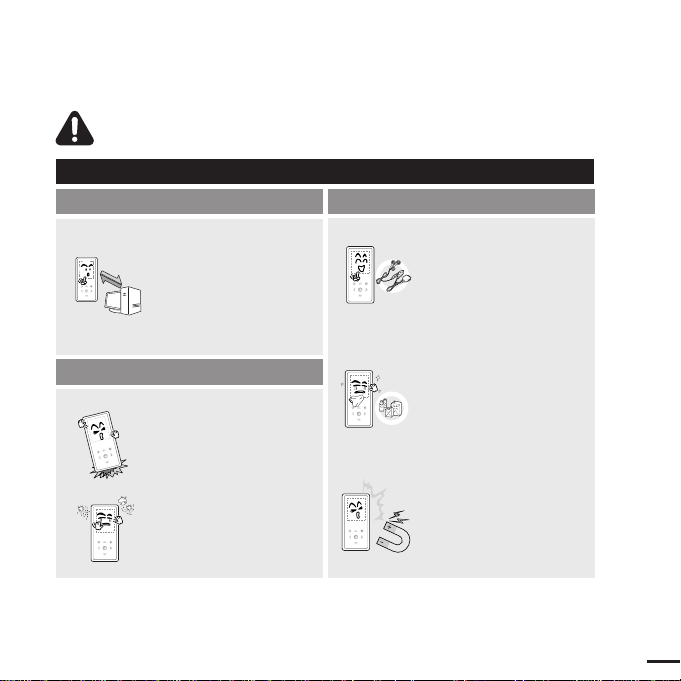
CAUTION
Product Use
Management of Important Data
Avoid malfunction
Be sure to back up
important data.
Please be aware that we
claim no responsibility for
damage from data loss due
to breakdown, repair or other
causes.
Avoid malfunction
Failure to follow all instructions lead to physical injuries or damage to the player.
Do not cause excessive
impact on the player by
dropping it. Do not place
heavy objects on top of the
player.
Prevent any foreign
particles or dust from
entering into the player.
Always use the accessories
provided by or approved by
Samsung.
Do not spray water on the
player. Never clean the
player with chemical
substances such as
benzene or thinner, as it may
cause fire, electric shock or
deteriorate the surface.
Do not place the player near
magnetic objects, as it may
cause a malfunction.
Page 4

Basic Information .......................................6
Components...............................................6
Screen Display Information........................9
Button Functions......................................10
Charging the battery ................................12
Basic Use.................................................13
Contents
4
Chapter 1. Preparation
Chapter 2.
Loading Your Desired File
Loading Your Desired File ......................16
Installing Samsung Media Studio ............16
Connecting to your PC.............................17
Adding Files/Folders in
Samsung Media Studio............................18
Transferring Files to the Player with
Samsung Media Studio............................20
Chapter 3. Multimedia function
Listening to Music ....................................22
Listening to Music....................................22
Creating a Playlist Using
Samsung Media Studio............................26
To Play a Playlist......................................28
Using the Music Option Menu..................29
Photo Viewing ...........................................31
Photo Viewing..........................................31
Using the Photo Option Menu..................32
Listening to FM Radio .............................33
Listening to FM Radio..............................33
Setting FM Presets ..................................36
To Delete Presets.....................................38
Setting FM Radio.....................................39
For Your Safety ..........................................2
Contents .......................................................4
Page 5

5
Chapter 4. Setting
Settings.......................................................40
Setting Display.........................................40
Setting Time ............................................42
Setting Language.....................................44
Setting the System ..................................45
Chapter 5. Troubleshooting
To Upgrade Firmware..............................47
Troubleshooting........................................49
Chapter 6. Appendix
Menu Tree...................................................51
Product Specifications............................52
Page 6
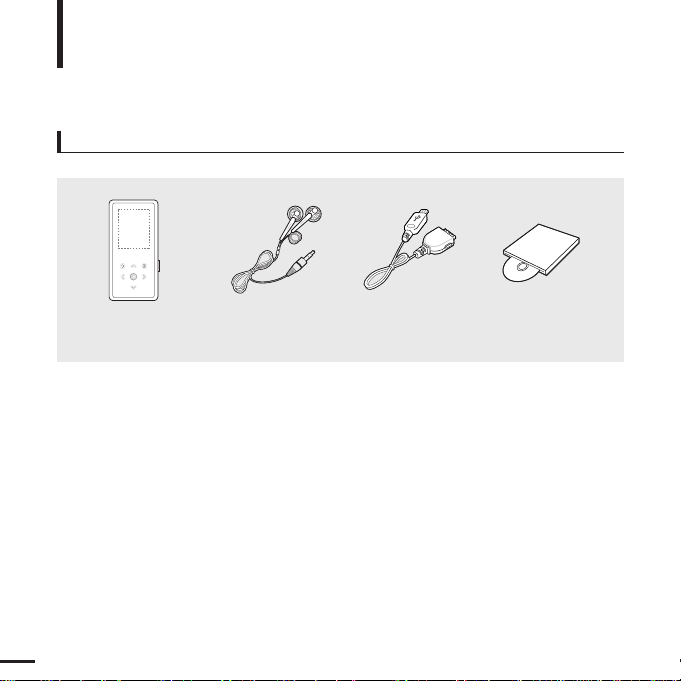
Components
Basic Information
6
Checking the Accessories
Player Earphones USB Cable
Installation CD
AH30-00087D(black) AH39-00899A AH80-00139D
■ Design of accessories is subject to change for the purpose of improvement, without notice.
Page 7
Chapter 1. Preparation
Components
7
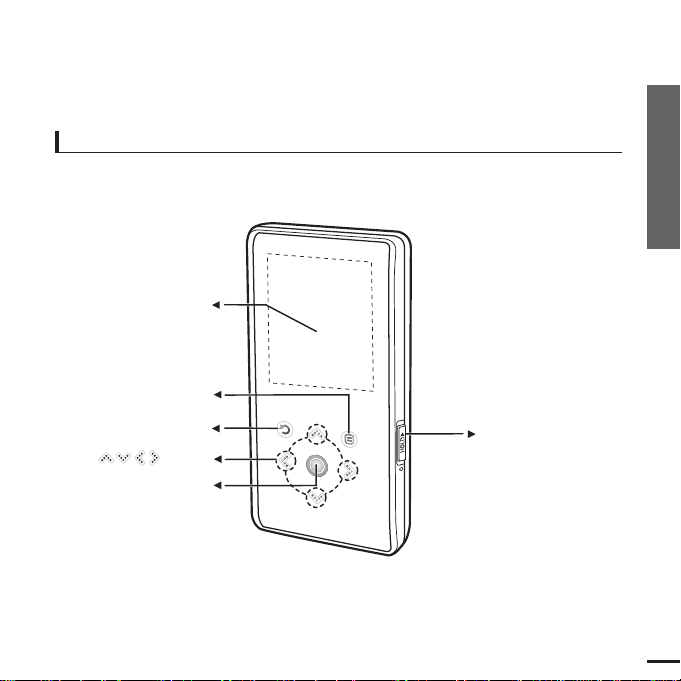
Front, Right Side
Power &
Hold Switch
Screen Display
Back Button
Play/Pause &
Select Button
Menu Button
Button
All buttons are 'Light-touch' buttons.
Page 8
8
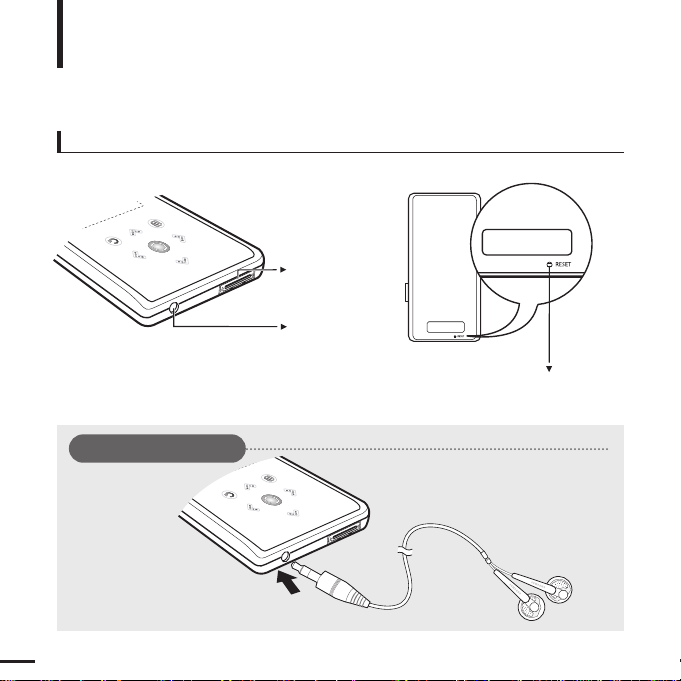
Bottom/Rear
USB
Connection
Port
Earphone
Jack
Reset Hole
Components (Continued)
Basic Information
[Rear]
[Bottom]
Earphone Connection
√ Bottom
Earphones
Page 9
Chapter 1. Preparation
Components/Screen Display Information
9
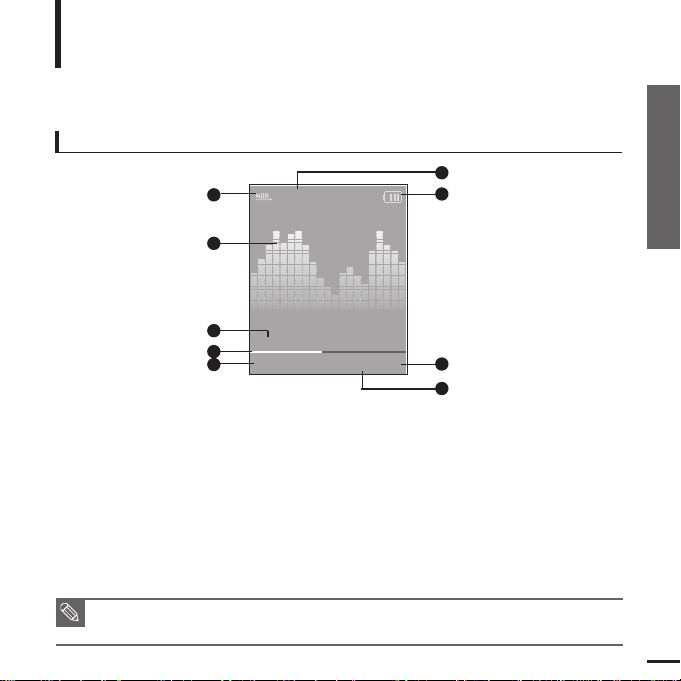
Screen Display Information
Basic Information
NOTE
■ The screen pictures are for illustration purposes only. The actual screen may differ.
Music
Normal
1.Life is cool
002/020
√√
00:02:20
1
2
3
4
5
6
7
8
9
1 Play Mode Display
2 Graphic Equalizer
3 Music Information
4 Play Status Bar
5 Current Music Number/
Total Number Display
6 Sound Effect Display
7 Battery Status Display
8 Play Time Display
9 Play/Pause Display
Page 10
10
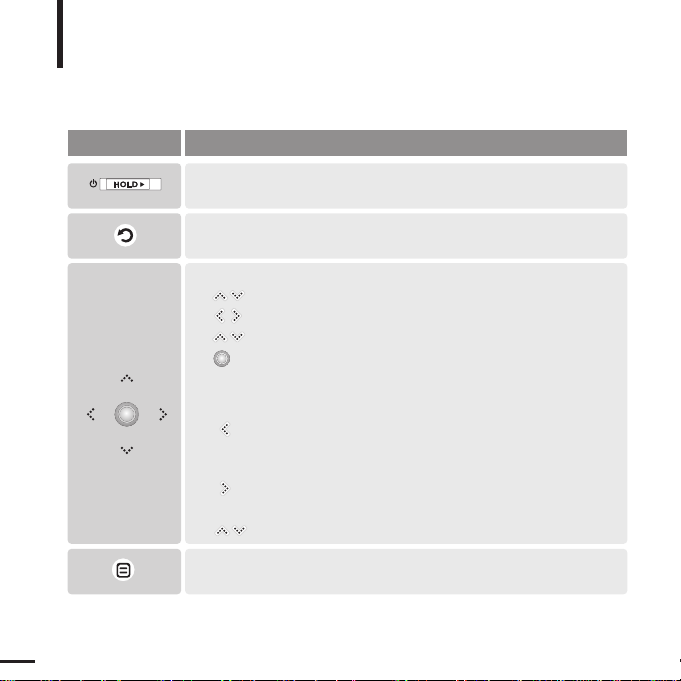
Button Functions
Basic Information
■
Slide and hold in the opposite direction of the arrow to turn the power on/off.
■ Slide in the arrow direction to lock the buttons.
■ Moving up, down, left and right and Function Selection.
Tap to move up or down by one selection.
Tap to move left or right by one selection.
Press and hold to move up or down continuously.
Short tap to select the play/pause and function, move to the
next screen.
■ Search for a track and control volume while listening to music.
Press and hold to scan to a point on the current track.
Tap to move to the previous track or to play the current track
from the start.
Press and hold to scan to a point on the current track.
Tap to move to the next track.
Tap to reduce/increase the volume.
■ Press and hold to move to the main menu.
■
Short tap to move to the previous screen.
Buttons Functions and Use
■
Tap to display the option menu.
Page 11
Chapter 1. Preparation
Button Functions
11
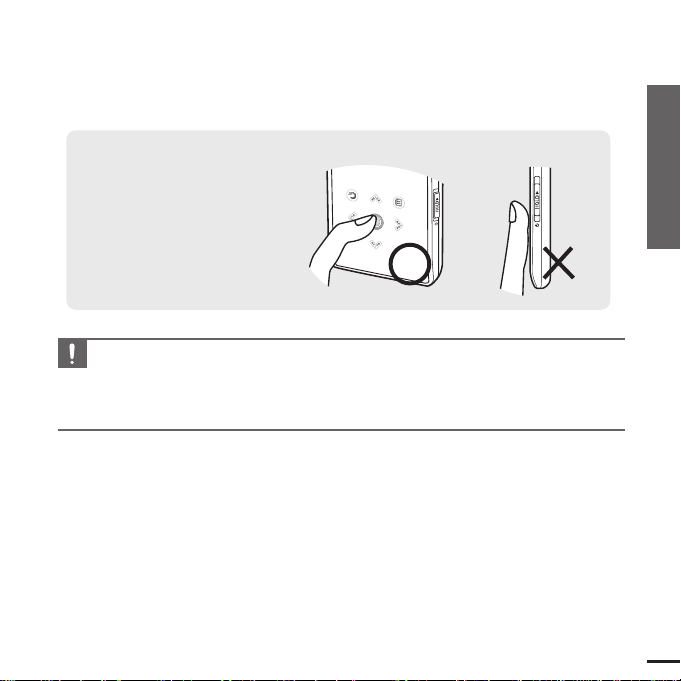
CAUTION
■ Do not use any sharp object other than your fingers to operate the touch screen.
Otherwise, touch screen may be damaged.
■ Do not tap on the touch screen if your fingers are not clean.
■
Do not tap on the touch screen with gloves on.
✽ Tap on touch screen with your
fingertip.
Page 12
12
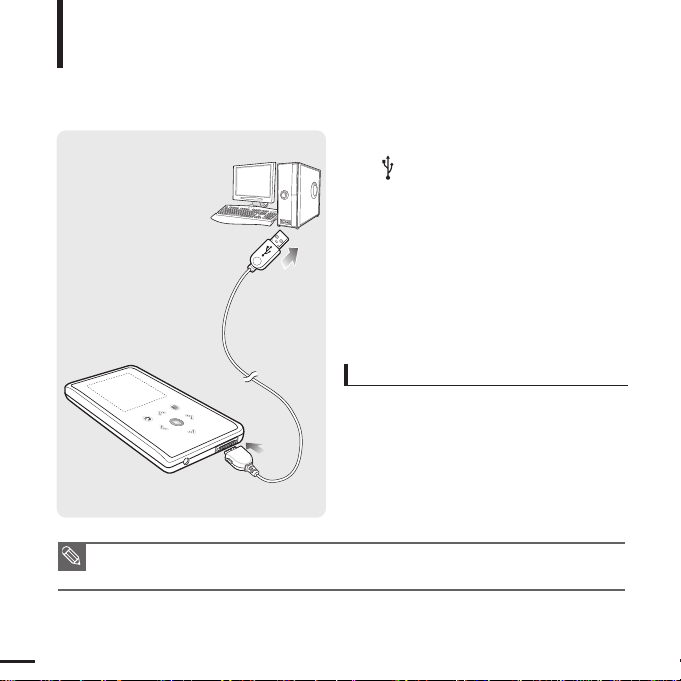
Charging the battery
Fully charge the rechargeable battery before using the
player for the first time or when it has not been used for a while.
Basic Information
1
Connect the USB cable to the USB port
( ) on your PC.
2
Connect the other end of the USB
cable to the USB Connection Port on
the bottom of the player.
■ When connected with the USB cable, it takes
about 4 hours for the player to fully charge
although this may vary depending on your PC
environment.
Battery Use
■ Recharge and store within the temperature range
of 5°C~35°C(40°F~95°F).
■ Do not overcharge (longer than 12 hours).
Excessive charging or discharging may shorten
the battery’s life.
■ Battery life naturally shortens slowly over time.
■ If you are charging the player while it is connected to your Notebook, make sure the Notebook's
battery is also fully charged.
NOTE
Page 13
Chapter 1. Preparation
Charging the battery/Basic Use
13
Basic Use
Basic Information
Turning the Power On & Off
Turning the Power On
Slide and hold the [HOLD√]
switch in the opposite direction
of the arrow.
■
Power is turned on.
Turning the Power Off
Slide and hold the [HOLD√]
switch in the opposite direction
of the arrow again.
■
Power is turned off.
■ Power is automatically turned off when none of the buttons have been tapped for a preset
period of time
(Default: 1 minute)
in the pause mode.
√ Page 42
NOTE
NOTE
■ Tap [
]
to move to the previous screen.
■ Press and hold
[]
to move to the main menu screen.
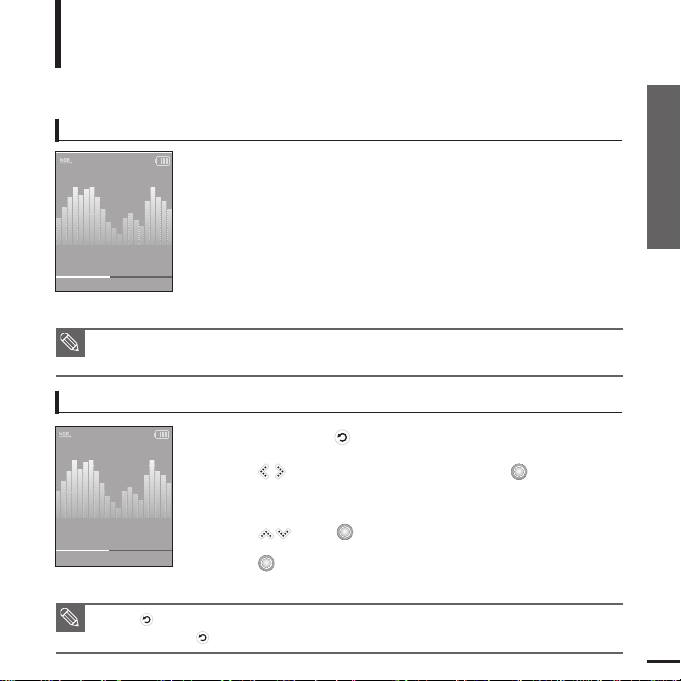
Playing Music
1
Press and hold [ ] to move to the main menu.
2
Tap [ ] to select <Music> and then tap [ ].
■ The Music Menu will appear.
3
Use [
]
and [ ] t o select a music file of your choice.
4
Tap [ ].
■ The music file will begin playing.
Normal
1.Life is cool
002/020
√√
00:02:20
Normal
1.Life is cool
002/020
√√
00:02:20
Page 14
14
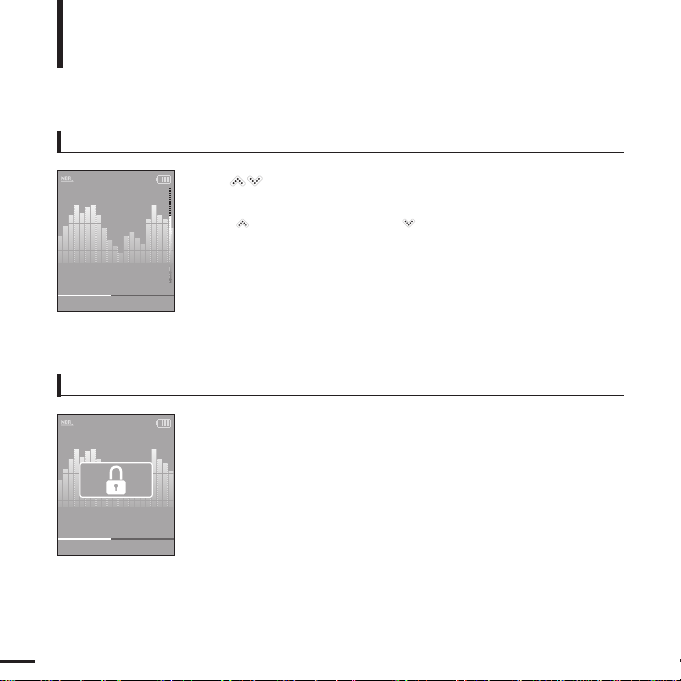
Volume Control
Lock Function
Tap [ ].
■ You will see a volume control icon.
■ Tap [
]
to increase the volume or []to decrease it.
In Hold mode, all buttons are disabled. This function is useful
when you are walking or jogging.
1
Slide the [
HOLD√]
switch
in the direction of the arrow.
2
Slide the [
HOLD√]
switch
in the opposite direction of the
arrow to release the Lock function.
Basic Use (Continued)
Basic Information
Normal
1.Life is cool
002/020 √√00:02:20
Normal
1.Life is cool
002/020
√√
00:02:20
Page 15
Chapter 1. Preparation
Basic Use
15
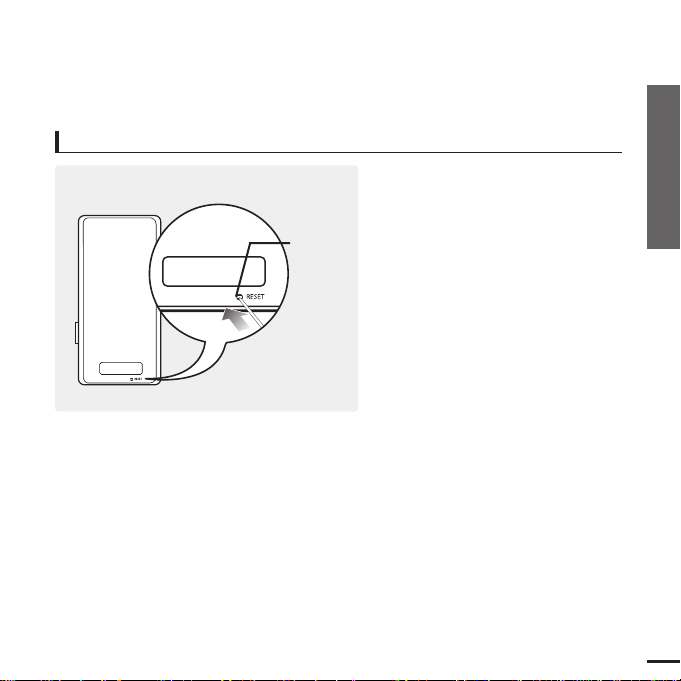
If a player malfunction occurs, you can
re-initialize the system by pressing the
Reset hole.
Press the Reset hole at the rear of the
player with a pointed object such as a
safety clip.
■
The system will be initialized.
■
Your settings and files will not be affected.
Reset Function
Reset hole
Page 16
16
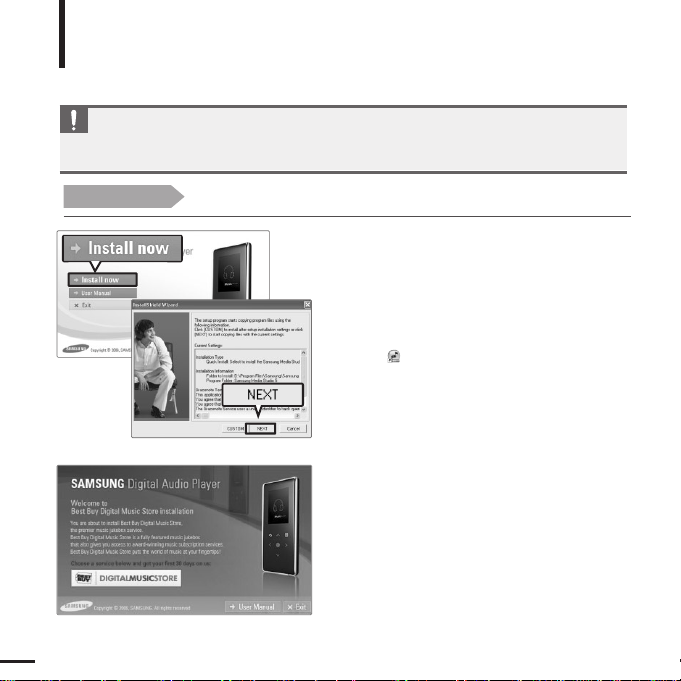
Before you start!
Insert the installation CD provided with the player into the CD-ROM drive.
2
Click <NEXT>.
■ Media Studio installation starts.
■ An icon is created on the desktop after
installation is complete and Media Studio starts.
Welcome to
Best Buy Digital Music Store installation
You are about to install Best Buy Digital Music Store,
the premier music jukebox service.
Best Buy Digital Music Store is a fully featured music jukebox
that also gives you access to award-winning music subscription services.
Best Buy Digital Music Store puts the world of music at your fingertips!
Choose a service below and get your first 30 days on us:
1
Click <Install now>.
Installing Samsung Media Studio
Use Media Studio to transfer music
files from your PC to the player.
Loading Your Desired File
If Media Studio is not installed automatically
■ Install the program on a PC running Windows XPafter logging on with an Administrator account.
Please refer to your PC's user manual to see how to do this.
CAUTION
Page 17
Chapter 2. Loading Your Desired File
Installing Samsung Media Studio/
Connecting to your PC
17
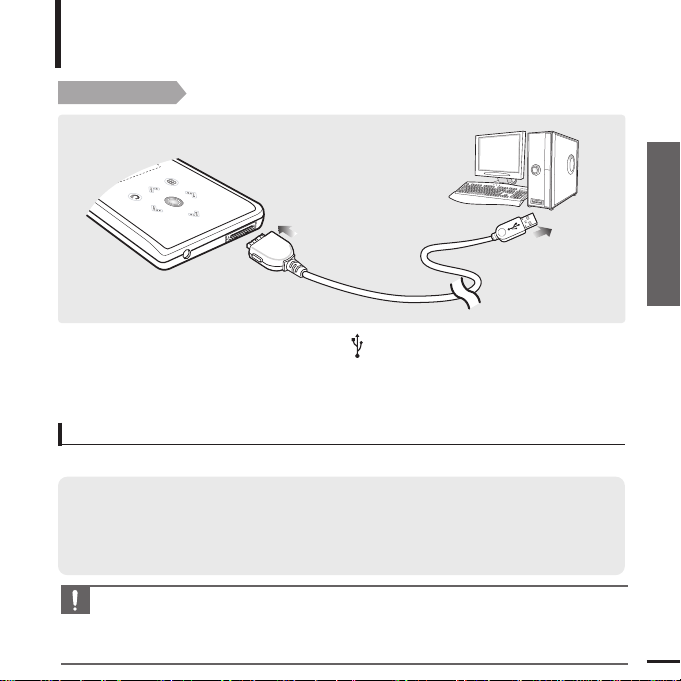
Connecting to your PC
Loading Your Desired File
Before you start!
Use the USB Cable provided when connecting the player to your PC.
1
1
Connect the USB cable to the USB port ( ) on your PC.
2
2
Connect the other end of the USB cable to the
USB Connection Port
on the
bottom of the player.
The PC system must meet the following minimum specifications:
■ Pentium 300MHz or higher ■ Windows XP Service Pack 2 or higher
■ DirectX 9.0 or higher ■ USB Port 2.0
■ 100MB of free hard disc space ■ CD Rom Drive (2X or higher)
■
Windows Media Player 10.0 or higher
■ Resolution 1024 X 768 or higher
PC Requirements
CAUTION
■
If you connect the player through a USB hub, the connection may be unstable. Please connect the
player to your PC directly.
■
If you connect the player to your PC and the battery charge is low, the player automatically checks
the battery status and charges itself for several minutes.
Page 18
18
Adding Files/Folders in
Samsung Media Studio
Loading Your Desired File
Please refer to Help for more information on how to use Media Studio.
■ Click <MENU> ➝ <Help> ➝ <Help> from the menu at the top of the Media Studio program.
Media Studio enables you to select and organize files and folders in preparation
for transfer to your player.
3
3
2
Page 19

Chapter 2. Loading Your Desired File
Adding Files/Folders in
Samsung Media Studio
19
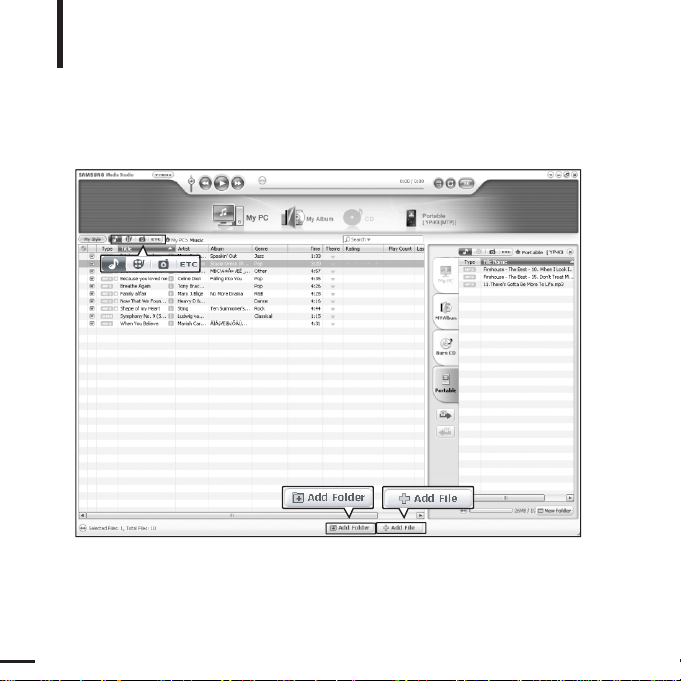
1
Media Studio will automatically start when the player is connected to your PC.
■ If the program does not start automatically, double-click the Media Studio icon on the desktop.
2
Click the desired file icon on the left side.
■
Choose the file type you want to transfer by clicking on one of these icons.
represents a music file and represents a photo.
■ Click icon to display etc list. The ETC list includes file types (ex: TXT, XOV, etc) other than
music and photo files.
3
Click <Add Folder> on the bottom of Media Studio.
■ The Open Folder window will appear.
Before you start!
■ Connect the player to your PC.
■ Media Studio must be installed on your PC.
To add folders
3
Click <Add File> on the bottom of Media Studio.
■ The Open window will appear.
4
Select the files to add and click <Open>.
■ The selected files are added to the list on the left side of the
Media Studio Screen.
To add files
4
4
4
Select the folder to add and click <OK>.
■ The files of the selected folder are added to the list on the left
side of the Media Studio Screen.
Page 20

20
Transferring Files to the Player with Samsung Media Studio
Loading Your Desired File
NOTE
■
Music recognition technology and related data are provided by Gracenote and
Gracenote CDDB®Music Recognition ServiceSM.
■
CDDB is a registered trademark of Gracenote. The Gracenote logo and logotype, the Gracenote
CDDB logo and logotype, and the "Powered by Gracenote CDDB" logo are
trademarks of Gracenote. Music Recognition Service and MRS are service marks of Gracenote.
Perform the following steps to transfer files from your PC to the player.
4
3
2
Portable
window
Page 21

Chapter 2. Loading Your Desired File
Transferring Files to the
Player with Samsung Media Studio
21
1
Media Studio will automatically start when the player is connected to your PC.
■ If the program does not start automatically, double-click the Media Studio icon on the desktop.
2
Click the desired file icon on the left side.
■
Choose the file type you want to transfer by clicking on one of these icons.
represents a music file and represents a photo.
■ Click icon to display etc list. The ETC list includes file types (ex: TXT, XOV, etc) other than
music and photo files.
3
Select the file to transfer in the left file list.
■ Do not disconnect the USB cable during file transfer. This may cause damage to the player or your PC.
CAUTION
■
When transferring a photo file to the player using <Media Studio>, it is automatically converted into
JPG format before transfer. The file size is automatically adjusted, too.
■
A photo file that is transferred to the player without using <Media Studio> can look different from
the source on the screen of the player.
NOTE
4
Click icon.
■ The Selected file is transferred to the player.
Before you start!
■ Connect the player to your PC.
■ Media Studio must be installed on your PC.
Page 22

22
Listening to Music
Listening to Music
Before you start!
Connect the earphones, then turn on the player, and check the battery.
1
Press and hold [ ] to move to the main menu.
2
Tap [ ] to select <Music> and then tap [ ].
■ The Music Menu will appear.
Music Menu
■ <Now Playing> : You can see the current song.
■ <Artists> : To play by artist
■ <Albums> : To play by album
■ <Tracks> : To play in numeric or alphabetical order
■ <Genres> : To play by genre
■ <Playlists> : To play by Playlist
NOTE
■ The music files compatible with the player are MP3, and WMA.
■ MP1 or MP2 files which only have a changed extension to MP3 may not play on the player.
■ A file without an ID3 Tag is displayed as [Unknown].
■ Files with an ID3 tag will automatically be organized on the player by Artists, Albums etc.
An ID3 tag is a hidden part of each music file and is used to categorize.
3
Tap [ ] to select <Artists> and then tap [ ].
1
2,3
Music
E.g. Playing by Artist
Page 23

Chapter 3. Multimedia Function
Listening to Music
23
4
Tap [ ] to select an artist, then tap [ ].
■ The albums for the artist will appear.
5
Tap [ ] to select an album, then tap [ ].
■ The music files for the selected album will appear.
6
Tap [ ] to select a music file to play, then
tap [ ].
■ The music will start playing.
4,5,6
Music
Now Playing
Artists
Albums
Tracks
Genres
Playlists
Page 24

24
Listening to Music (Continued)
Listening to Music
To Pause
1
Tap [ ] while the music is playing.
■ The music playback will be paused.
2
Tap [ ] again.
■ The music will play from the point where it stopped.
NOTE
■ Power is automatically turned off when none of the buttons have been tapped for a preset period of
time (Default: 1 minute) in the pause mode. √ Page 42
To search within a track
1
Press and hold [ ] while the selected track is playing.
■ It searches to the beginning or the end of the track.
2
Release the button at the point you want to start.
■ It starts playing from the point you release the button.
Page 25

Chapter 3. Multimedia Function
Listening to Music
25
To Play from the beginning of the current track
Tap [ ] after 3 seconds of play.
■ The current track starts playing from the beginning.
To Play the previous/next track
Tap [ ] within 3 seconds of play.
■ The previous track will start playing.
Tap [ ].
■ The next track will start playing.
CAUTION
■ When playing VBR files, the previous track may not play even if you tap
[ ]
within
3 seconds of play.
Page 26

26
Creating a Playlist Using Samsung Media Studio
Listening to Music
1
Click <My Album> on the top of Media Studio.
■ The <My Album> window appears.
A playlist is a list of your favorite songs.
2
Click <New Album> on the bottom.
■ The Creation window appears.
3
Type in the album title and click <OK>.
■ A new album (playlist) will be created and stored in the My Album section of Media Studio.
1
2
3
3
Page 27

Chapter 3. Multimedia Function
Creating a Playlist Using
Samsung Media Studio
27
Adding Music files to a Playlist
Exporting a Playlist to your Player Using Media Studio
1
Click <My PC> on the top of Media Studio.
■ The <My PC> window appears.
2
Click <My Album> in the right corner of the
window.
■ The Album window appears.
3
Double-click on a desired album in the right
window.
4
Select files that you want to transfer in the
<My PC> window.
1
Click <My Album> on the top of Media Studio.
■ The <My Album> window appears.
2
Click <Portable> in the right corner of the
window.
■ The <Portable> window appears.
3
Select a desired album in the <My Album> list.
4
Click icon.
■ The selected album will be transferred to the player
and stored in <Music>
➝
<Playlists>.
5
Click icon.
■ The selected files will be added to the album (playlist).
1
1
2
2
4
3
4
5
Page 28

28
To Play a Playlist
Listening to Music
Before you start!
For more information, see pages 26~27 to see how to create and transfer playlists
to your player.
Music
Now Playing
Artists
Albums
Tracks
Genres
Playlists
1
Press and hold [ ] to move to the main menu.
2
Tap [ ] to select <Music> and then tap [ ].
■ The Music Menu will appear.
3
Tap [ ] to select <Playlists> and then tap [ ].
■
The Playlist(s) will appear.
■
If there is no playlist found, you will see a message of <No File> on the
screen.
4
Tap [ ] to select the playlist of your choice, then tap [ ].
■ The music files saved in the selected playlist will appear.
5
Tap [ ] to select a music file to play, then tap [ ].
■ The music file will start playing.
Page 29

Chapter 3. Multimedia Function
To Play a Playlist/
Using the Music Option Menu
29
To select the sound effect
To select the graphic EQ display
1
Tap [ ] while listening to music.
■
The music option menu appears.
Different sound effects can be selected that enable you to enhance the music you
are listening to.
2
Tap [ ] to select <Sound Effect> and then tap [ ].
■
The sound effect menu appears.
3
Tap [ ] to select the desired sound effect and then tap [ ].
■
You can select either <Normal> <Vocal> <Bass Boost> <3D Sound>
or <Concert Hall>.
1
Tap [ ] while listening to music.
■
The music option menu appears.
2
Tap [ ] to select <Graphic EQ> and then tap [ ].
■
The graphic equalizer menu appears.
3
Tap [ ] to select <On> or <Off> and then tap [ ].
■
<On>: The graphic equalizer will be displayed on the screen.
■
<Off>: The graphic equalizer will not be displayed on the screen.
Using the Music Option Menu
Listening to Music
Sound Effect
Graphic EQ
Play Mode
Normal
Sound Effect
Graphic EQ
Play Mode
Normal
Page 30

30
To select the play mode
1
Tap [ ] while listening to music.
■
The music option menu appears.
2
Tap [ ] to select <Play Mode> and then tap [ ].
■
The play mode menu appears.
3
Tap [ ] to select the desired mode and then tap [ ].
■
You can select either <Normal> <Repeat One> <Repeat> or <Shuffle>.
Using the Music Option Menu (Continued)
Listening to Music
■
<Normal> : To play all the tracks in order one time.
■
<Repeat One> : To repeat one file.
■
<Repeat> : To repeat all files.
■
<Shuffle> : To play files at random.
Sound Effect
Graphic EQ
Play Mode
Normal
Page 31

Chapter 3. Multimedia Function
Using the Music Option Menu/
Photo Viewing
31
1
2,3
1, 2
1
Press and hold [ ] to move to the main
menu.
2
Tap [ ] to select <Photo> and then tap
[].
■ The Photo list will appear.
3
Tap [ ] to select the photo file of
your choice, then tap [ ].
■
The selected file will appear.
■
Large photos may take longer to display.
1
Tap [ ] in Photo Viewing mode.
■ The slideshow will start.
You can view your picture files in order as a
Slideshow.
2
Tap [ ] to stop the slideshow.
Slideshow Viewing
Tap [ ].
■ You can see the previous or next photo on the display.
To view the previous / next photo
NOTE
■ You will see thumbnail
photos if the appropriate
information is included in
the file.
For a file with no
information, you will
see instead.
Photo Viewing
Photo Viewing
Before you start!
See pages 20-21 to transfer Photo files to your player.
Photo
Page 32

32
To add a photo to the screen saver list
To listen to music while viewing your photo
1
Select a photo file that you want to add to the screen saver list.
2
Tap [ ] while viewing a photo.
■
The photo option menu appears.
3
Tap [ ] to select <Add to Screen Saver> and then tap
[].
■
The selected photo file is added to the screen saver list.
1
Tap [ ] while viewing a photo.
■
The photo option menu appears.
You can listen to the song that you last played while viewing your photo.
2
Tap [ ] to select <Background Music On> or <Background
Music Off>.
■
<Background Music On> : You can listen to the song that you last
played while viewing your photo.
■
<Background Music Off> : No background music is played while
viewing a photo.
Using the Photo Option Menu
Photo Viewing
Background Mu..
Add to Screen S..
Background Mu..
Add to Screen S..
NOTE
■ Select <Photo> from <Settings>
→
<Display>→<Screen Saver> and the selected photo is
displayed on the screen as a screen saver.
√
page 41
■ If you set <Default Set>, the screen saver will be initialized to <Analog Clock>.
Page 33

Chapter 3. Multimedia Function
Using the Photo Option Menu/
Listening to FM Radio
33
1
2
Listening to FM Radio
Listening to FM Radio
Before you start!
Connect the earphones, then turn on the player, and check the battery.
1
Press and hold [ ] to move to the main
menu.
2
Tap [ ] to select <FM Radio> and then tap
[].
■
FM radio reception will start.
Tap [ ] while listening to the FM radio.
■ Sound is muted.
■ Tap [ ] once again to hear sound.
To use Mute function
■ Always connect your earphones to the player when searching or setting frequencies. The earphones are
used as antennas to receive FM radio reception.
CAUTION
FM Radio
Page 34

34
To switch to Preset Mode
To switch to Manual mode
1
Tap [ ] in <Manual Mode>.
2
Tap [ ] to select <Go to Preset Mode> and then tap [ ].
■
You will see <Preset Mode> on the screen.
3
Tap [
]
to select the preset frequency.
■
Once <Preset Mode> appears on the screen, you can select a radio
frequency and listen to it.
1
Tap [ ] in <Preset Mode>.
Select this mode if you want to manually search through the FM band one frequency
at a time.
Select this mode if you want to search through your saved FM presets one preset at a time.
2
Tap [ ] to select <Go to Manual Mode> and then tap
[].
■
You will see <Manual Mode> on the screen.
NOTE
■ If no preset frequencies are set, you will see <Preset list does not exist.> and the player will not
switch to <Preset Mode>.
■ If you set <Default Set>, the saved preset lists are deleted.
■ If you select <Preset List> on the FM option menu, you will see the preset frequencies.
■ For more information on the preset setup, see pages 36~37.
Listening to FM Radio (Continued)
Listening to FM Radio
Go to Manual ..
Delete Preset
Auto Preset
Preset List
FM Sensitivity
Preset Mode
Go to Preset ..
Add Preset
Auto Preset
FM Sensitivity
Manual Mode
Page 35

Chapter 3. Multimedia Function
Listening to FM Radio
35
To manually search for frequencies
To automatically search for frequencies
Press and hold []in <Manual Mode>.
■
The broadcast station frequency nearest from the point the button is
released will be searched.
Tap [
]
in <Manual Mode>.
■
Moves to next frequency whenever the button is tapped.
Manual Mode
Manual Mode
Page 36

36
To automatically set Presets
1
Tap [ ] in FM Radio mode.
2
Tap [ ] to select <Auto Preset> and then tap [ ].
■
You will see the Auto Preset window on the screen.
3
Tap [ ] to select <Yes> and then tap [ ].
■
Up to 30 presets are automatically saved.
Setting FM Presets
Listening to FM Radio
You can set up to 30 presets in FM Radio mode.
To cancel during setting
Tap [ ] to cancel during auto scanning.
■ The auto preset setting is canceled and frequencies set up to then are stored.
■ Using <Auto Preset> deletes all previous presets.
NOTE
Go to Preset ..
Add Preset
Auto Preset
FM Sensitivity
Manual Mode
Page 37

Chapter 3. Multimedia Function
Setting FM Presets
37
To manually set Presets
To search for presets in Preset mode
1
Tap [ ] to select the desired frequency in <Manual Mode>.
2
Tap [ ].
3
Tap [ ] to select <Add Preset> and then tap [ ].
■ The selected frequency will be added to the preset list. Amaximum of
30 preset numbers are added to the list in sequential order.
Tap [
]
in <Preset Mode>.
■
The preset number is selected and you can listen to the stored radio
frequency.
4
To set a preset for other frequencies, follow steps 1-3 above.
■ If a frequency that you try to add already exists in the list, you will see <This preset already exists.> and
the selected frequency is not added to the preset list.
NOTE
■ If you want to check the preset list in <Preset Mode>, tap [
]
to select <Preset List> and Tap [].
NOTE
Go to Preset ..
Add Preset
Auto Preset
FM Sensitivity
Manual Mode
Preset Mode
Page 38

38
1
Tap [ ] in <Preset Mode>.
2
Tap [ ] to select <Delete Preset> and then tap [ ].
■
The preset frequencies will appear.
3
Tap [ ] to select the preset frequency you want to delete
and then tap [ ].
■ The confirmation window will appear.
4
Tap [ ] to select <Yes> and then tap [ ].
■ The selected preset will be deleted.
5
To select and delete other preset numbers, follow 1-4 steps
above.
To Delete Presets
Listening to FM Radio
89.1MHz
89.2MHz
89.3MHz
89.4MHz
Delete Preset
Page 39

Chapter 3. Multimedia Function
To Delete Presets/
Setting FM Radio
39
Listening to FM Radio
Setting FM Radio
To set FM Sensitivity
1
Tap [ ] in FM Radio mode.
2
Tap [ ] to select <FM Sensitivity> and then tap [ ].
■
The FM Sensitivity menu appears.
3
Tap [ ] to select the sensitivity and then tap [ ].
■ You can select from <High>, <Middle> and <Low>.
■ The higher FM sensitivity is, the more frequencies that can be received.
Go to Preset ..
Add Preset
Auto Preset
FM Sensitivity
Manual Mode
Page 40

40
Setting Display
You can adjust the screen saver and the turn-off time for the screen display.
Settings
1
Press and hold [ ] to move to the main menu.
2
Tap [ ] to select <Settings> and then tap [ ].
■
The Settings menu appears.
3
Tap [ ] to select <Display> and then tap [ ].
■
The Display menu appears.
4
Use the [ ] and [ ] to set the desired functions.
Button Operation
■ Tap [ ] to move up or down in the list.
■ Tap [ ] to select and confirm your settings.
■ Tap [ ] to return to the previous screen.
NOTE
Display
Time
Language
System
Settings
Settings
Page 41

Chapter 4. Setting
Setting Display
41
■
<Screen Saver>: You can set an image to use as a screen saver.
Select either
<Analog Clock>, <Animation1>, <Animation2> <Animation3>, and <Photo> and set
the wait time. <Photo> is a photo you designated as a screen saver in <Add to Screen Saver>.
√
page 32
You can select from <15sec>, <30sec>, <1min>, <3min>, <5min>, and <Off>. If no button is
tapped within the time set shown above, the player will display the screen saver image.
■
<
Display Off> : If no button is tapped within the time set shown below, the screen display will
automatically turn off.
Select either
<15sec>, <30
sec
>, <1
min
>, <3min>, <5min>, and <Always
On>. With the display turned off, tap any button to turn back on the screen display.
Screen Saver Setting
Photo
15 sec
1
Tap [ ] to select <Screen Saver> and then tap [ ].
■
The screen saver menu appears.
2
Tap [ ] to select the desired screen saver image and
then tap [ ].
3
Tap [ ] to select a wait time and then tap [ ].
■
The Confirmation window will appear.
4
Tap [ ] to select <Yes> and then tap [ ].
■
The screen saver setting is complete.
Screen Saver
Page 42

42
Setting Time
You can set the current Time, Sleep Timer and Auto Power Off.
Settings
1
Press and hold [ ] to move to the main menu.
2
Tap [ ] to select <Settings> and then tap [ ].
■
The Settings menu appears.
3
Tap [ ] to select <Time> and then tap [ ].
■
The Time menu appears.
4
Use the [ ] and [ ] to set the desired functions.
■ <Sleep Timer> : Turns off power automatically after the preset time.
Select either <Off>, <15min>, <30min>, <60min>, <90min>, or <120min>.
■
<Auto Power Off> : Automatically turns power off when there is no
button operation after the preset time in the pause mode.
Select either <15sec>, <30sec>, <1min>, <3min>, or <5min>.
■
<Time Set> : You can set the current time.
√ Page 43
Display
Time
Language
System
Settings
Page 43

Chapter 4. Setting
Setting Time
43
Time Set
1
Tap [ ] to select <Time set> and then tap [ ].
2
Tap [ ] to move to <AM/PM, Hour, Minute> and use the [ ]
to set the time.
3
Tap [ ].
■ The confirmation window will appear.
4
Tap [ ] to select <Yes> and then tap [ ].
■
The time setting will be saved.
Hour Min
PM 06 35
Time Set
Page 44

44
Setting Language
You can set the language for the menu.
Settings
1
Press and hold [ ] to move to the main menu.
2
Tap [ ] to select <Settings> and then tap [ ].
■
The Settings menu appears.
3
Tap [ ] to select <Language> and then tap [ ].
4
Use the [ ] and [ ] to select the language for the menu.
■
Select from <English>, < >, <Français>, <Deutsch>, <Italiano>,
< >, < >, < >, <Español>, < >, <Magyar>,
<Nederlands>, <Polski>, <Português>, and <Svenska>.
■ The supported languages can be changed or added.
NOTE
Display
Time
Language
System
Settings
Page 45

Chapter 4. Setting
Setting Language/
Setting the System
45
Setting the System
You can set various functions of the player.
Settings
1
Press and hold [ ] to move to the main menu.
2
Tap [ ] to select <Settings> and then tap [ ].
■
The Settings menu appears.
3
Tap [ ] to select <System> and then tap [ ].
■
The System menu appears.
4
Use the [ ] and [ ] to set the desired functions
■ Frequency range by region
- Korea/USA: Search for FM frequencies in 100 kHz increments between 87.5 MHz~108.0 MHz.
- Japan: Search for FM frequencies in 100 kHz increments between 76.0 MHz~108.0 MHz.
- Other Countries: Search for FM frequencies in 50 kHz increments between 87.50 MHz~108.00 MHz.
■ FM region can be deleted or changed according to the target region of the player.
■ If you change the FM region, the previously stored radio frequencies are deleted.
.
NOTE
■
<Resume>: You can set the start point where the player resumes playback after you stop
playing the music. Selecting <On> will resume playback from the last stopped point while <Off>
will resume playback from the beginning of the last played file.
■
<Beep>: Enables button sounds. Select either <On> or <Off>.
■
<Volume Limit>: You can avoid hearing damage by setting the limit of the volume when using
the earphone. <On> will limit the maximum volume level up to 20. The maximum volume level
when Volume Limit is set to <Off> is 30.
■
<FM Region>: You can select your regional area for FM radio. Select from <Korea/USA>,
<Japan> and <Other Countries>.
Display
Time
Language
System
Settings
Page 46

46
Default Set
1
Tap [ ] to select <Default Set> and then tap [ ].
■
The Confirmation window will appear.
2
Tap [ ] to select <Yes> and then tap [ ]
.
■
<Yes> : Initializes all settings to default.
■
<No> : Cancels default settings.
Setting the System (Continued)
Settings
■ <Default Set> : Returns all settings to the default value.
■ <About>: You can check the firmware version, memory capacity and file number.
■ Firmware Version : Displays the current firmware version.
■ Memory : Indicates the remaining memory capacity. <Used> indicates the usage, <Remain> indicates the
remaining capacity and <Total> indicates the total memory capacity.
■ Files : <Music> indicates the number of music files, <Photo> for the number of photos, and <Total> for the
number of entire files.
■ If you set <Default Set>, all functions you set are initialized to the default settings.
■ Regarding the Built-In Memory
The actual built-in memory available is slightly less than indicated as the internal firmware uses a
portion of the memory.
NOTE
Resume
Beep
Volume Limit
FM Region
Default Set
About
Settings
Page 47

Chapter 5. Troubleshooting
Setting the System/
To Upgrade Firmware
47
To Upgrade Firmware
1
Connect to http://www.samsung.com, select [SUPPORT] →[DOWNLOAD CENTER]
and then select your player.
Future upgrades may be available for this player to enhance performance and
compatibility.
2
When the player page appears, select [Firmware] below the model name to
download the latest firmware.
3
Uncompress the downloaded file onto your Desktop.
■
The uncompressed files will be displayed.
4
Connect the player to your PC with the USB cable.
5
Right click on the Start button on the
bottom left of your PC's screen,
then choose Explore to Open
Windows Explorer on your PC.
■
[Samsung YP-K3] is displayed in Windows
Explorer.
Page 48

48
7
Locate and select the Firmware update files
(right column) and drag-and-drop it into the
[Samsung YP-K3] →[Data] folder.
6
Locate and click on the Desktop icon in
Windows Explorer (left column).
The contents of the Desktop will appear in
the right column.
8
After disconnecting USB Cable, the player will be turned off automatically.
9
Slide and hold the [HOLD√]
switch in the opposite direction of the arrow.
■
The firmware will be upgraded.
■
When upgrading is complete, the player will be turned off automatically.
NOTE
■
Check the battery charge status of the player. If the battery is not sufficiently charged, the firmware
will not be upgraded.
■
You need to have at least 20 MB of free space on the player for the upgrade.
To Upgrade Firmware (Continued)
Page 49

Chapter 5. Troubleshooting
To Upgrade Firmware/
Troubleshooting
49
T roubleshooting
If a malfunction is experienced, check the following.
If the problem persists, contact 1-800-SAMSUNG for assistance.
Power will not turn on.
Buttons do not work.
The screen will not turn on.
Problem
Check points & Troubleshooting
■
Check if the [HOLD √] switch is in the direction of the arrow position.
■
Check if you tapped the right button, then tap again. √ Page 11
■
Press the Reset hole.
■
If <Display Off> is selected from <Settings> →<Display>, the
screen display will be turned off. Tap any button to turn on the
screen display or check the Display settings.
√ Page 41
■
The screen may not be visible under direct sunlight.
Battery life differs from
the Manual.
■
The battery time can vary, depending on the sound mode and
display setting.
■
The battery life may be shortened when left for extended periods
in low or high temperatures.
Program Malfunction
Connection to your PC
is disabled.
Please check if your PC requirements are met.
Press <Start> on the toolbar of your PC to run Windows Update.
Select Key Updates and Service Packs, then update all.
Reboot your PC and reconnect.
■
Power will not turn on if the battery is fully discharged.
Recharge the battery and turn on the player again.
■
Press the Reset hole.
Power is turning off.
■
Check the battery status.
■
The power is automatically turned off when the battery is fully
discharged. Recharge the battery.
■
If <Auto Power Off> is selected from <Settings> →<Time>, the
Power in the pause mode will be turned off. Turn on the Player.
Page 50

50
The player is hot.
Heat may be generated during recharging. This has no effect on
the player life or functions.
Playing is disabled.
File upload is disabled.
Files or data are missing.
Abnormal Play Time
Display during Play
Problem
Check points & Troubleshooting
■
Check if the available file has been saved in the player.
■
Check if the music file is damaged.
■
Check if there is enough battery power.
■
Check if the USB cable is securely connected.
Reconnect if necessary.
■
Check if the memory is full.
■
Press the Reset hole.
Check if the USB cable has been disconnected during file or data
transmission. If this is the case, it may cause serious damage not
only to files/data but also to the player. You have to be extra
cautious as Samsung cannot be not held responsible for data loss.
Check if the file is in VBR (Variable Bit Rate) format.
T roubleshooting
(Continued)
Page 51

Chapter 6. Appendix
Troubleshooting/
Menu Tree
51
Menu Select Screen
»≠∏È º≥¡§
Display
Music FM Radio Photo Settings
Screen Saver
Display Off
Time
Sleep Timer
Auto Power Off
Time Set
Language System
Resume
Beep
Volume Limit
FM Region
Default Set
About
Menu Tree
You can quickly view the menu structure.
Page 52

52
Product Specifications
Model Name
Power
Built-in Battery Power
Earphone Output
Output Frequency Range
Noise Ratio
Play Time
Temperature Range for Operation
Case
Weight
Dimension (WxHxD)
FM Frequency
FM Signal to Noise Ratio
FM T.H.D
FM Useable Sensitiivity
File
Compatibility
YP-K3
3.7V (Li-Polymer Rechargeable)
500mAh
Music : MPEG1/2/2.5 Layer3(8kbps~320kbps, 22kHz~48kHz)
WMA(48kbps~192kbps, 22kHz~48kHz)
Image : JPEG(ISO/IEC 10918-1/Annex F-Sequential DCT-based mode
of operation)
20mW(16Ω)
20Hz~20KHz
88 dB (based on 1KHz 0 dB)
Music 25 hrs (based on MP3 128kbps, volume level 15 and normal mode)
-5~35 °C(23~95°F)
Stainless, Plastic
1.76 oz (50g)
1.73 X 3.78 X 0.27 inches (44 X 96 X 6.95 mm)
87.5~108.0MHz
50dB
1%
38dBµ
●
The contents of this Manual are subject to change without prior notice for further
improvement.
Page 53

53
License
The product unit accompanying this user manual is licensed under certain intellectual
property rights of certain third parties. In particular, this product is licensed under the
following US patents : 5,991,715, 5,740,317, 4,972,484, 5,214,678, 5,323,396,
5,539,829, 5,606,618, 5,530,655, 5,777,992, 6,289,308, 5,610,985, 5,481,643,
5,544,247, 5,960,037, 6,023,490, 5,878,080, and under US Published Patent Application
No. 2001-44713-A1.
This license is limited to private non-commercial use by end-user consumers for licensed
contents. No rights are granted for commercial use. The license does not cover any
product unit other than this product unit and the license does not extend to any unli-censed
product unit or process conforming to ISO/IEC 11172-3 or ISO/IEC 13818-3 used
or sold in combination with this product unit. The license only covers the use of this
product unit to encode and/or decode audio files conforming to the ISO/IEC 11172-3 or
ISO/IEC 13818-3. No rights are granted under this license for product features or func-tions
that do not conform to the ISO/IEC 11172-3 or ISO/IEC 13818-3.
Page 54

54
Safety Information
If this equipment does cause harmful interference
to radio or television reception, which can be
determined by turning the equipment off and on,
the user is encouraged to try to correct the interference by one or more of the following measures:
◆ Reorient or relocate the receiving antenna.
◆ Increase the separation between the equipment
and receiver.
◆ Connect the equipment to an outlet on a circuit
different from that to which the receiver is
connected.
◆ Consult the dealer or an experienced radio/TV
technician for help.
FCC
This device complies with part 15 of the FCC
Rules. Operation is subject to the following two
conditions:
(1) This device may not cause harmful
interference, and (2) this device must accept any
interference received, including interference that
may cause undesired operation.
Caution: Any changes or modifications in
construction of this device which are not
expressly approved by the party responsible for
compliance could void the user’s authority to
operate the equipment
Note: This equipment has been tested and
found to comply with the limits for a Class B
digital device, pursuant to part 15 of the FCC
Rules. These limits are designed to provide
reasonable protection against harmful
interference in a residential installation.
This equipment generates, uses and can radiate
radio frequency ener-gy and, if not installed and
used in accordance with the instructions, may
cause harmful interference to radio
communications, However, there is no guarantee
that interference will not occur in a particular
installation.
Page 55

55
FCC
Any changes or modifications not expressly
approved by the grantee of this device could
void the user’s authority to operate the device.
Compliance
This product conforms to the following
Council Directive:
◆ Directive 89/336/EEC, 92/31/EEC(EMC)
Declaration of Conformity
Name: Samsung Electronics Co., Ltd
Address: 416, Maetan-3Dong, Yeongtong-Gu,
Suwon City, Kyungki-Do, Korea 442-742
declares under its sole responsibility that the
product
Trade Name: Samsung Electronics Co., Ltd
Model Number: YP-K3
has been tested according to the
FCC/CISPR22/95 requirements for Class B
devices and found compliant with the following
standards
EMI/EMC: FCC Part 15 Subpart B
This device complies with part 15 of the FCC
Rules.
Operation is subject to the following two
conditions:
1.This device may not cause harmful
interference, and
2.This device must accept any interference
received, including interference that may
cause undesirable operation.
Party Responsible for Product Compliance
Samsung Electronics America
QA Lab.
3351 Michelson Dr. Suite #290
Irvine, CA92612
Page 56

56
Warranty
Samsung warrants this product as free of
defects in material, design and workmanship
for a period of twelve(12) months from the
original date of purchase.
If during the period of warranty this product
proves defective under normal use and service,
you should return the product to the retailer
from whom it was originally purchased. The liability of Samsung and its appointed maintenance company is limited to the cost of repair
and/or replacement of the unit under warranty.
Return of the product for defective reasons
should be to the original purchaser; however,
Samsung Authorized Dealers and Authorized
Service Centers will comply with the warranty
on the terms issued to purchasers in the country concerned. For further information relating to
the Authorized Service Centers contact;
1-800-SAMSUNG (1-800-726-7864)
www.samsung.com
WARRANTY CONDITIONS:
1.The warranty is only valid when the warranty card
is properly completed, and upon presentation of the
proof of purchase consisting of original invoice or
sales slip confirmation, indicating the date of purchase, dealer’s name, model, serial No. and product
number.
Samsung reserves the right to refuse warranty service if this information has been removed or changed
after the original purchase of the product from the
dealer.
2.Samsung's obligations are to the repair of the
defective part, and at its discretion, replacement of
the product (service exchange unit).
3.Warranty repairs must be carried out by an
Authorized Samsung Dealer/Service Center. No
reimbursement will be made for repairs carried out
by non Samsung Centers, and warranty coverage
will not be valid for any repairs or damage caused by
such repairs.
4.Repair or replacement under the terms of this warranty does not give right to extension to or a new
starting of the period of warranty. Repair or direct
replacement under the terms of this warranty may be
fulfilled with functionally equivalent service exchange
units.
Page 57

57
5. The warranty is not applicable in cases other
than defects in material, design and workmanship. The warranty does not cover the following:
◆ Periodic checks, maintenance, repair and
replacement of parts due to normal wear and
tear.
◆ Abuse or misuse, including but not solely limit-
ed to the failure to use this product for its normal
purposed or in accordance with Samsung's
instructions usage and maintenance.
◆ Use of the product in conjunction with acces-
sories not approved by Samsung for use with
this product.
◆ Failure of the product arising from incorrect
installationor use not consistent with technical or
safety standardsin current force, or failure to
comply with productmanual instructions.
◆ Accidents, Acts of God or any cause beyond
the control of Samsung caused by lightning,
water, fire, public disturbances and improper
ventilation.
◆ Unauthorized modifications carried out for the
product to comply with local or national technical
standards in countries for which the Samsung
product was not originally designed.
◆ Repairs performed by non-authorized service
centers such as opening of the product by a nonauthorized person.
◆ The model, serial No. and product number on
the product has been altered, deleted, removed
or made illegible.
6. This warranty does not affect the consumer’s
statutory rights nor the consumers rights against
the dealer from their purchase/sales agreement.
Page 58

58
THERE ARE NO EXPRESS WARRANTIES
OTHER THAN THOSE LISTED AND
DESCRIBED ABOVE, AND NO WARRANTIES
WHETHER EXPRESS OR IMPLIED, INCLUDING
,
BUT NOT LIMITED TO, ANY
IMPLIED WAR-
RANTIES OF MERCHANTABILITY
OR FITNESS
FOR A PARTICULAR PURPOSE,
SHALLAPPLY AFTER THE EXPRESS WARRANTY
PERIODS STATED ABOVE, AND NO OTHER
EXPRESS WARRANTY OR GUARANTY GIVEN
BY ANY PERSON, FIRM OR
CORPORATION WITH RESPECTTO THIS
PRODUCT
SHALL BE BINDING ON SAMSUNG,
SAMSUNG
SHALL NOT BE LIABLE FOR LOSS
OF REVENUE OR PROFITS,FAILURE
TO
REALIZE SAVINGS OR OTHER BENEFITS,
OR
ANY OTHER SPECIAL, INCIDENTAL OR
CONSEQUENTIAL DAMAGES CAUSED BY THE
USE, MISUSE OR INABILITY TO USE THIS
PRODUCT, REGARDLESS OF THE LEGAL
THEORY ON WHICH THE CLAIM IS BASED,
AND EVEN IF SAMSUNG HAS BEEN ADVISED
OF THE POSSIBILITY OF SUCH DAMAGES.
NOR SHALL RECOVERY OF ANY KIND
AGAINST SAMSUNG BE GREATER IN AMOUNT
THAN THE PURCHASE PRICE OF THE
PRODUCT SOLD BY SAMSUNG AND
CAUSING THE ALLEGED DAMAGE.
WITHOUT LIMITING THE FOREGOING,
PURCHASER
ASSUMES ALL RISK AND LIABILITY FOR LOSS,
DAMAGE OR INJURY TO PURCHASER AND
PURCHASER’S PROPERTY AND TO OTHERS
AND THEIR PROPERTYARISING OUT OF THE
USE, MISUSE OR INABILITY TO USE THIS
PRODUCT SOLD BY SAMSUNG
NOT CAUSED
DIRECTLY BY THE NEGLIGENCE
OF SAMSUNG.
THIS LIMITED WARRANTY SHALL NOT EXTEND
TO ANYONE OTHER THAN THE ORIGINAL
PURCHASER OF THIS PRODUCT, IS
NONTRANSFERABLE AND STATES YOUR
EXCLUSIVE REMEDY.
Some states do not allow limitations on how long an
implied warranty lasts, or the exclusion or limitation of
incidental or consequential damages, so the above
limitations or exclusions may not apply to you.
This warranty gives you specific legal rights, and you may
also have other rights which vary from state to state.
This product is for personal use only, and is only for use in
compliance with the limitations of copyright and other laws.
To obtain warranty service, please contact SAMSUNG at:
Samsung Electronics America, Inc. 400 Valley Road, Suite
201 Mount Arlington, NJ 07856
1-800-SAMSUNG (1-800-726-7864) www.samsung.com
081299
Warranty
Page 59

REV 0.0
If you have any questions or comments relating to Samsung products,
please contact the SAMSUNG customer care center.
Samsung Electronics America, Inc.
1-800-SAMSUNG (7267864)
www.samsung.com
 Loading...