

Page 1
-
Mass Storage Device Support
-
MP3 & WMA Playback
-
Image File Viewer
-
Direct MP3 Recording
-
USB 2.0 High Speed Data Transfer
-
SRS WOW Surround Sound
-
1.5-inch 65,000 colour LCD
-
Upgradable
-
Built-in Rechargeable Li-Ion Battery
AH68-00000 (Rev 0.0)
SAMSUNG ELECTRONICS CANADA, INC.
HEADQUARTERS
7037 Financial Drive, Mississauga, Ontario, Canada L5N 6R3
TEL: 1-905-542-3535
www.samsung.ca
SERVICE DIVISION
7037 Financial Drive, Mississauga, Ontario, Canada L5N 6R3
1-800-SAMSUNG (1-800-726-7864)
Page 2

Connecting the player to your PC ......................................................................................................................12
Manual Installation of the USB Driver ................................................................................................................16
Disconnecting the USB cable ............................................................................................................................18
Formatting in PC ................................................................................................................................................19
Using Recovery Utilities......................................................................................................................................20
Using Music Studio ............................................................................................................................................21
● Downloading File ..........................................................................................................................................21
● Making Album ..............................................................................................................................................22
● Converting Audio Files ................................................................................................................................23
● Uploading recorded File ..............................................................................................................................24
To View Help on Music Studio ..........................................................................................................................25
Installing Multimedia Studio................................................................................................................................26
Using Multimedia Studio ....................................................................................................................................28
To View Help on Multimedia Studio ..................................................................................................................35
3
Contents
ENG
Contents
2
Browsing Your Music..........................................................................................................................................40
● Searching for and Selecting Music Files ......................................................................................................40
● Play Options(Artists, Albums, Tracks, Genres) ............................................................................................42
● Selecting a Playlist ........................................................................................................................................43
● Play Options(Playlist) ....................................................................................................................................43
● Searching for and Selecting Voice Files........................................................................................................44
● Play Options(Voice Recordings)....................................................................................................................44
Recording Voice ................................................................................................................................................45
Recording MP3s ................................................................................................................................................46
Viewing Image Files ..........................................................................................................................................47
Viewing Slide Show............................................................................................................................................48
I Additional Features
I Using Your Player
Playing music ....................................................................................................................................................36
Hold Feature / Loop Repeating ..........................................................................................................................37
Searching Within Music Files ............................................................................................................................38
Menu Mode ........................................................................................................................................................39
Safety Instructions................................................................................................................................................4
Battery Charger Safety ........................................................................................................................................6
Charging the battery ............................................................................................................................................7
Features ..............................................................................................................................................................8
Components ......................................................................................................................................................10
Display................................................................................................................................................................10
Location of Controls............................................................................................................................................11
I Using Your Player
I Customer Support
Troubleshooting..................................................................................................................................................57
Specifications ....................................................................................................................................................59
Shuffle and Repeat Playback ............................................................................................................................49
Equalizer Settings ..............................................................................................................................................50
SRS Settings ......................................................................................................................................................51
Recording Settings ............................................................................................................................................52
Backlight Setting ................................................................................................................................................52
Contrast Setting ................................................................................................................................................53
Power Save Screen Setting................................................................................................................................53
Fader Effect........................................................................................................................................................54
Power Off Settings..............................................................................................................................................55
Language Settings..............................................................................................................................................55
Restoring Default Settings..................................................................................................................................56
Player Information ..............................................................................................................................................56
I Preparations
I Connection to Computer
Page 3
Safety Instructions
4 5
Safety Instructions
ENG
Follow Traffic Safety Instructions
● Do not use the earphones while driving an automobile or riding a bicycle.
It’s not only dangerous, but also against the law.
● To avoid an accident, do not turn up the volume of the earphones too high while walking.
Protect your ears
● Do not turn up the volume too high. Doctors warn against prolonged exposure to high volume.
● Stop using the device or turn the volume down if you have ringing in your ears.
● Follow local guidelines for waste disposal when discarding packages, batteries, and old electronic
appliances.
● Your player is packaged with cardboard, polyethylene etc., and do not use any unnecessary materials.
● Ambient temperature : 5°C ~ 35°C (41°F ~ 95°F)
● Humidity : 10 ~ 75%
Please read and understand all the instructions to avoid injury to yourself and damage to the device
REC
A↔B
Do not expose to extreme
temperatures (above 35°C
or below -5°C). Do not
expose to moisture.
Do not apply excessive
pressure to the device.
Do not drop the player.
Do not try to disassemble
and repair the device
yourself.
Do not expose to
chemicals such as
benzene and thinners.
Do not expose to direct
sunlight or heat sources.
Do not store in dusty areas.
Do not let any foreign
matter spill into the device.
Do not place heavy
objects on top of the
device.
✽
Please be aware that we disclaim all responsibility for damages from loss of saved
or recorded data due to breakdown, repair or other causes.
Do not use the unit near
any appliance that generates
a strong magnetic field.
I Earphones
I Ambient operating conditions
I Environmental Information
Page 4
Battery Charger Safety
6 7
Charging the Battery
ENG
!
!
CAUTION
RISK OF ELECTRIC SHOCK. DO NOT OPEN
The uninsulated parts inside the charger could
cause electric shock.
For your safety, do not open the case of the
charger.
Read this User Manual to prevent any problems
that may occur while using the charger.
WWWWaaaarrrrnnnniiiinnnngg
gg
- Use the charger away from water sources to avoid fire or electric shock.
CCCCaaaauuuuttttiiiioooonn
nn
- To avoid electric shock, use the charger only with a power outlet that matches the shape of the
converter's plug.
- Make sure that the charger's plug is inserted all the way into the outlet.
A charger is supplied with your player.
Plug the charger into a wall outlet.
✻ The indicator light on the USB cable turns green
once charging is complete.
✻ The first time the battery is charged, it will take
approximately 3 hours.
Battery recharge time in normal operation is
approximately 2.5 hours.
CCCCaaaauuuuttttiiiioooonn
nn
- To avoid the risk of fire, do not charge longer than 12 hours.
- Do not plug several devices into the same outlet.
- Do not use a rechargeable battery or charger that is defective.
- When using the rechargeable battery for the first time or after several months of
non-use, fully charge it first.
- Overcharging will reduce the battery life.
- The rechargeable battery is a consumable item and its capacity will decrease gradually.
- To prolong the life of your battery, use the fully charged battery until it is completely discharged,
and then fully charge it again before use. If you charge the battery that is not completely drained,
the battery operating time will decrease. In this case, fully cycle (fully charge and then fully discharge)
the battery several times.
- Do not let metallic objects, such as necklaces or coins, come into contact with the terminals
(metallic parts) of the charger and the built-in rechargeable battery.
A fire or electric shock may result.
- Do not touch the charger with wet hands.
SELECT
MENU
D
IGITA
L AU
DIO P
LAY
ER Y
H
-820
REC
✍
✍
✍
Page 5

8 9
Mass Storage Device Support
● You can use the built-in 5GB hard drive to store your entire music library,
plus use it as an external drive on your PC to store other data files.
MP3 & WMA Playback
● Your player supports playback of both MP3 and WMA.
Image File Viewer
● You can view JPEG images. Image files edited with Multimedia Studio can be
viewed as slide shows.
Direct MP3 Recording
● You can convert music from CDs, cassettes, and radio into MP3 files without a PC.
USB 2.0 High Speed Data Transfer
● Maximum data speed transfer of 50 Mbps
SRS WOW Surround Sound
● The 3D surround(SRS) feature adds spaciousness to the sound.
1.5-inch 65,000 colour LCD
● The 1.5-inch 65,000 colour LCD supports viewing of high quality image files.
Upgradable
● You can upgrade the built-in programs when available.
Please check the home page (www.samsung.com) for upgrades.
Built-in Rechargeable Li-ion Battery
● The built-in rechargeable lithium battery provides up to 8.5 hours of play time.
Time may vary depending on usage pattern.
ENG
Features Features
Page 6
Components
10 11
Location of Controls
ENG
● The capacity of the useable built-in memory is less than indicated as the internal
firmware uses a part of the memory as well.
● The appearance of the accessories shown is subject to change for product improvement
without prior notice.
● The performance speed may slow if the internal memory does not have any free space.
Model
Built-in memory
YH-820 MC
5GB
Player
Earphones
Line-In Cable
User Manual
Charger
USB Cable
Belt clip
Installation CD
0:01:23
Now Playing : 1 of 10
Soul Tree
Sing a Song
Singer
PLAY
Mode indicator
Artist display
Track display
Elapsed track time
Album display
Battery remaining indicator
Song number display
LINE-IN
HOLD
MIC
REC
A↔B
MIC
HOLD switch
LINE IN jack
Skip/Search button
Skip/
Search button
Record button /
Loop Repeating button
USB Cable Connection Port
Power On/Off
Play/Pause button
VOLUME UP/
SCROLL UP button
Earphone jack
VOLUME DOWN/
SCROLL DOWN button
SELECT button
MENU button
RESET Hole
Display
Display
Page 7

13
Connecting the player to your PC
ENG
Connecting the player to your PC
12
Continued...
2
Follow the instructions in the window to complete the installation.
Before connecting the player to PC, make sure to install
Samsung Music Studio. If “Add New Hardware Wizard”
appears, press the [Cancel] button and install Samsung
Music Studio.
❑ System Requirements.
● Windows XP
● Windows Media Player 10
● Internet Explorer 6.0 or higher
● Pentium 200MHz or greater
● 50MB of available hard disk space
● CD-ROM drive
(double speed or greater)
● USB port (2.0) supported
● DirectX 8.0 or above.
NNNNoooottttee
ee
- Log into your PC as an administrator
(Main User) and install the supplied
software (Music/Multimedia Studio)
into using Windows 2000 or XP.
Otherwise, installation will not be
completed.
I
Installing software
1
Insert the Installation CD into CD-ROM drive.
The picture shown below appears.
Select [Install Samsung Music Studio].
✍
Page 8
Connecting the player to your PC
14 15
Connecting the player to your PC
ENG
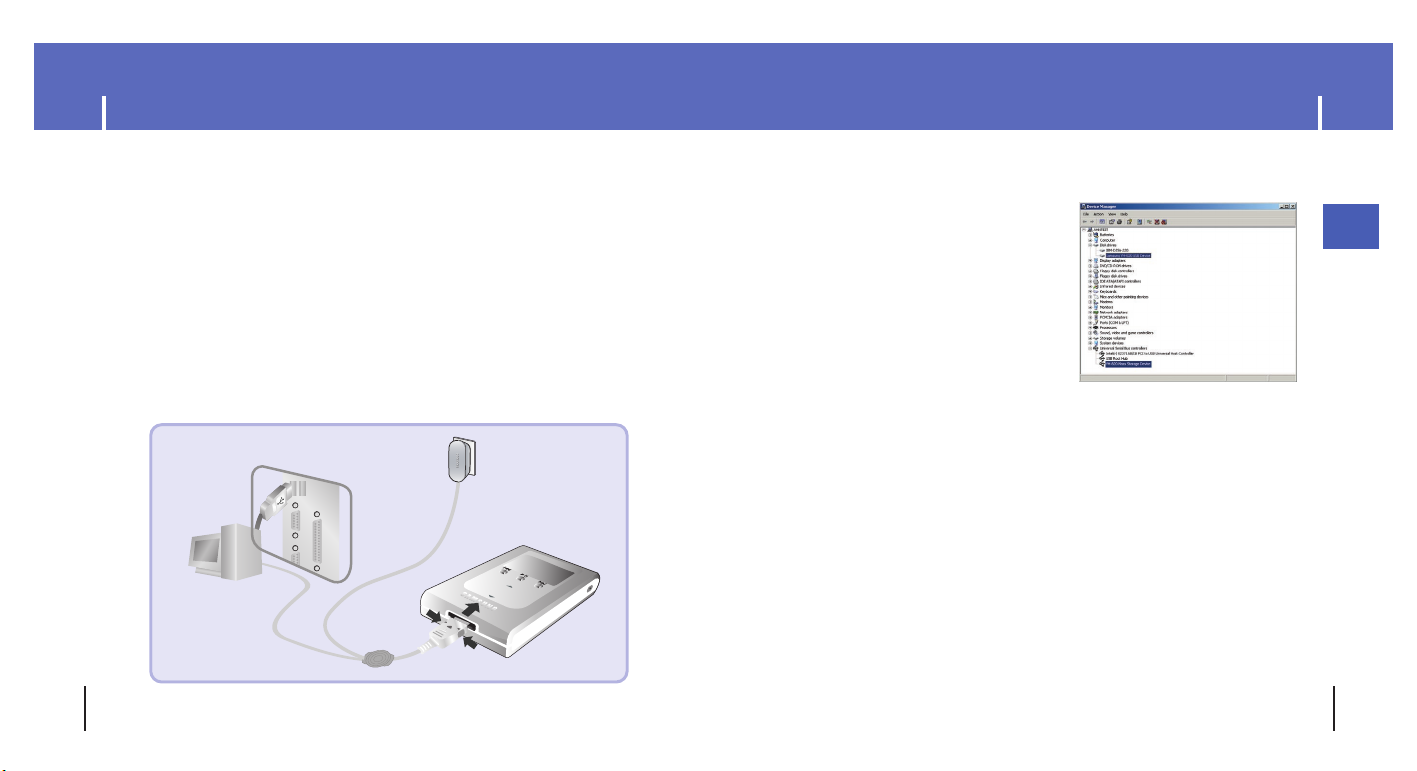
How to check USB driver
How to check USB driver
Windows 2000/XP:
1) Control Panel → System → Hardware →
Device Manager → Disk Drives →
Samsung YH-820 USB Device
2) Control Panel → System → Hardware → Device
Manager → Universal Serial Bus Controller →
YH-820 Mass Storage Device
When USB driver is not installed automatically, refer to next page.
7
SELECT
MENU
D
IG
IT
A
L
A
U
D
IO
P
L
A
Y
E
R
Y
H
-8
20
REC
Connect the USB cable to the USB port of the computer.
Connect the USB cable to the USB cable connection port on the player,
and then plug the charger to the power outlet.
● If you disconnect the USB cable from your PC while implementing a command or
intializing during USB driver installation, your PC may not function correctly.
4
Upon installation of the USB driver "Samsung YH-820 USB Device" will
appear in the [System Properties]→[Device Manager].
6
3
The USB driver is installed with a message saying that it is searching for a
new device. You may not see the display screen during installation.
Go to the device manager to check that installation has been successfully completed.
5
I Connecting the player to a PC with a USB cable
Charger
USB Cable
Player
PC
Page 9

17
Manual Installation of the USB Driver
ENG
Manual Installation of the USB Driver
16
After selecting the driver and click [Reinstall driver].
4
Select [Install the software automatically] and click [Next]
to finish.
5
Go to “Downloading File”(p21) if the USB driver is installed.
Follow these steps if the USB driver is not installed :
Check the device manager.
● Windows 2000/XP (Professional):
Control Panel
→
System →Hardware
→
Device Manager
1
Check if there is a device listed with an
exclamation point or a question mark
(displayed as unknown device or USB
device).
2
Double click on the device listed with an
exclamation point or a question mark.
3
I
When an error occurs during installation of the USB driver
NNNNoooottttiiiiccccee
ee
- If you are using Windows 2000 and your version of Windows does not recognize the USB
driver, please download and install the latest service pack from windowsupdate.microsoft.com
- The installation method may vary depending on the type of PC or operating system.
Contact your PC dealer or service center for installation information.
- If errors occur continuously when you install the USB driver, reconnect the USB cable after
rebooting your system.
✍
Page 10
Disconnecting the USB cable
18 19
Formatting in PC
ENG
1
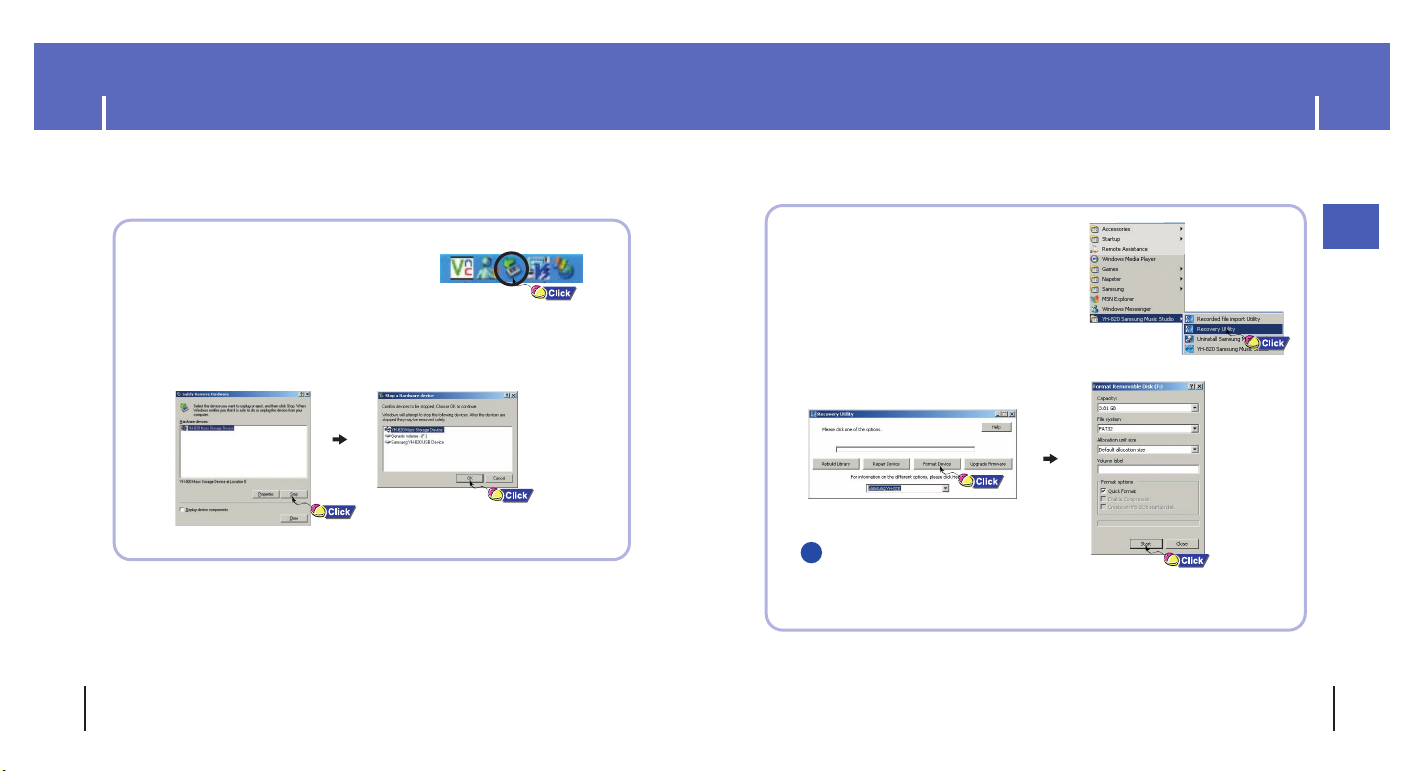
Select [Start]→[Programs]
→
[YH-820 Samsung Music Studio] in the
desktop,and then press [Recovery Utility].
2
Press the [Format Device] button.
When the format screen appears, select
the file system as FAT32 and then press
the [Start] button.
NNNNoooottttee
ee
- By formatting, all previously preset menus will be reset,and any pre-existing song or
data files will be erased.
- Care must be taken as formatted files can not be recovered.
● After completing the file transmission, you must disconnect the cable in the following way:
● Please close Music Studio and Multimedia Studio.
1
Double-click on the green arrow in the
taskbar on the bottom right of the
window.
2
When the [ Stop a Hardware device ] message appears,
press the [OK] button and disconnect the USB cable.
✍
Page 11

ENG
Using Recovery Utilities
20 21
The Recovery Utility can be used to recover your system in the event the following occurs:
● If one of the messages below appears:
- Connect to PC and repair firmware with recovery utility.
- Connect to PC and rebuild database with recovery utility.
● If the message "Loading" appears and the device does not operate when you turn on the power.
● If file search does not work properly in the Menu Library.
1
Connect the player to PC.
2
Select [Start]→[Programs]→[YH-820 Samsung Music Studio] in the desktop,
and then press [Recovery Utility].
● For more details on recovery, press [Help] to view the help.
3
Select the recovery method you want.
● See help for details on each method.
Using Music Studio
I
Downloading File
1
Connect the player to PC.
2
Press the [Add] button on the upper part of Play List window to get the file you
want to Play List window.
3
Select the file you want to move to the player, and then drag and drop it to
[Samsung YH-820] of the player or press the [ Transmit to your portable device]
button.
● The selected files will be downloaded to the player.
NNNNoooottttee
ee
- You can transmit the files from File List window to
the player in the same way as above.
- If you select [yes] in the [Get ID3 Tag] window during file
download, song information (ID3 Tag) of relevant file will be
modified to the accurate information.
- Refer to [Help] for more detailed information about using
Music Studio.
● Music Studio is the program that enables you to download music files to the player,
and play back music files on your PC.
● Files downloaded without using Music Studio cannot be played.
1
2
✍
Page 12

23
ENG
22
Using Music Studio
I
Making Album
1
Connect the player to PC.
2
Press the [To Album List] button from the Play List window to bring up the [Save album
name] window. Enter the name of the current playlist and press the [OK] button.
● Album List window will be displayed.
3
Press the [New Album] button to select the name, basic image and album
image of new album and then press [OK].
●
Play List window for the new album will be displayed.
NNNNoooottttee
ee
- You can download all albums to your player by selecting albums in Album List window.
- Refer to [Help] for more detailed information about using Music Studio.
●
Albums downloaded to the unit can be viewed at [Library] →[Playlists]
on the menu.
✍
Using Music Studio
1
Insert the CD containing the music for conversion into the PC.
2
Press the [To CD-ROM Mode] button in the File List window.
3
When [Match] window appears, press the [Accept Match] button.
●
Information of tracks on the CD will be displayed.
4
Select the file to convert, and then press the [CD Ripping] button.
● The selected file will be converted to an MP3 file and then saved in the [My Music]
folder of the C drive.
NNNNoooottttee
ee
- Right-click at the top of Music Studio and move to [Options] → [File Conversion Settings]
→ [Format] to change conversion settings.
- Refer to Help for more information.
I
Converting Audio Files
✍
Page 13

24 25
ENG
Using Music Studio
I
Uploading recorded File
1
Connect the player to PC.
2
Press the [Importing recorded file to PC] button in Portable Device window.
3
Select the folder to upload, and then press the [OK] button.
4
If a warning message window appears, press the [OK] button.
● Note that the recording file in the PC will be automatically deleted if you upload the
recorded file to PC.
NNNNoooottttee
ee
- Refer to [Help] for more detailed information about using Music Studio.
✍
To View Help on Music Studio
After executing Music Studio, click the button on the upper part of screen
or press the F1 key.
● Help will appear.
Move the arrow to the top of Music Studio and right click on the mouse.
The following selection window will appear.
● Click on Help and the Help window will appear.
NNNNoooottttee
ee
- Music recognition technology and related data are provided by Gracenote and Gracenote
CDDB® Music Recognition ServiceSM.
- CDDB is a registered trademark of Gracenote. The Gracenote logo and logotype,
the Gracenote CDDB logo and logotype, and the "Powered by Gracenote CDDB" logo are
trademarks of Gracenote. Music Recognition Service and MRS are service marks of
Gracenote.
?
✍
Page 14

Installing Multimedia Studio
26 27
Installing Multimedia Studio
ENG
3
Follow the instructions in the window to complete the installation.
1
Insert the installation CD into the CD-ROM drive.
Select [Install Multimedia Studio].
● Multimedia Studio is a program that supports image editing, video playback and format
conversion, and multimedia album creation.
2
Select language
Page 15

Using Multimedia Studio
28 29
Using Multimedia Studio
ENG
I Editing Images
1
Select the folder containing images to edit from the directory window at the
upper left-hand section of Multimedia Studio.
● The saved files will be displayed in the file list window on the right.
2
Select the image to edit.
● The selected image will be displayed in the [Preview image] window.
3
Press the [Edit Img] button.
● From the [Picture editor] window, you can perform functions like editing wallpaper images,
editing layers, inserting clip arts, making frames and other various editing functions.
NNNNoooottttee
ee
-
Refer to Help for more information.
●
Run Multimedia Studio from on the Desktop.
I Sending images
2
Select the image(s) to send to the player.
3
Select [File] → [Export images to device] at the top of the Multimedia Studio menu.
4
Select the device connected to PC from the [Select device] screen, and then
press the [OK] button.
1
Connect the player to PC.
● Files downloaded without using Multimedia Studio cannot be viewed on the screen.
✍
Page 16

31
Using Multimedia Studio
ENG
Using Multimedia Studio
30
I Making Albums for Slide Shows
2
Press the [Edit Alb] button at the top of Multimedia Studio.
● The [Making New Album] window will be displayed.
3
Select [Making Album for the use of PPL] and then
press the [OK] button.
● The [PPL Album] window will be displayed.
4
Press the [Add Image] button at the top of the [PPL Album] window to
select the image to edit.
●
If multiple images are selected, each image will be displayed for 5 seconds.
5
Press the [Add Music] button to add background
music.
●
Add BG Music: Images change every 5 seconds while
the selected music is played.
5
Set the size and path of the image at the [Resize images] window and
then click the [OK] button.
● The image will be sent to the selected device.
● The sent image can be viewed from [Photo] → [Albums] on the menu.
● The optimal image size for viewing on the unit is 128 x 96. Please adjust the image size
if the image does not display correctly on the player.
NNNNoooottttee
ee
- Image files saved in the player can be deleted by selecting [File] → [Delete images from device].
- Refer to Help for more information.
1
Connect the player to PC.
● Albums created from [Making Album for the use of PPL] can be viewed as slide shows
on the player.
✍
NNNNoooottttee
ee
- To add a copyright protected audio file, which can be played on the player,select [Add Music] →
[Add BG Music] → [Add from Device] and select the desired file on the connected player.
- Copyright protected audio files added from the player are marked DEVICE,and cannot be
played in the [PPL Album] window.
✍
Page 17

33
Using Multimedia Studio
ENG
Using Multimedia Studio
32
NNNNoooottttee
ee
-
Select [Delete Album From Device] to delete ppl file saved in the player.
-
Refer to [Help] for more detailed information
I
Capturing Video
1
Press the [Capture] button at the top of the Multimedia Studio menu.
●
The Media Player screen will be displayed.
2
Click [Menu] →[Open] on your PC and select the video to play.
●
The selected video will be played.
7
Select the directory to save to in the save
window and press the [Save] button.
● The edited album will be saved in the selected
directory.
8
Select [Album] → [Export] → [Export to Device] at the top of the [PPL Album]
window to send the saved ppl file to the device.
9
Enter the album name at the [Select device] screen and then press the [OK] button.
● The ppl file will be sent to the selected device.
● The sent ppl file can be viewed from [Album] → [Slide Show].
6
Press the [Save] button at the top of the [PPL Album] window when album
editing is complete.
✍
● This function allows you to capture a still frame from a video file and save it as a picture,
then transfer it to your YH820.
Page 18

35
To View Help on
Multimedia Studio
ENG
Using Multimedia Studio
34
Run Multimedia Studio and press the Help button at the top of the
screen.
●
Help will be displayed.
3
Press the [Capture] button and then press the [Capture] button
when the image you want to capture appears.
●
The selected image will be captured.
4
Press the [Save] button.
●
Save This captured image: saves the currently selected image.
●
Save All captured images: saves all captured images.
5
Select the directory to save to from the [Save As] window and press
the [Save] button.
●
The selected image will be saved.
NNNNoooottttee
ee
-
The player will only play back still images. It will not play back video.
-
Video playback and conversion codecs are not provided. It is recommended that you use
codecs of latest versions.
-
Refer to [Help] for more detailed information
✍
1
2
1
2
Page 19

Playing music
36 37
Hold Feature
ENG
Activate on the main unit.
●
When you activate the HOLD switch, a " " appears on the display.
Use the Hold feature to lock and disable all buttons. The Hold feature is useful to prevent your
Samsung player from being accidentally turned off or on when jogging, or to ensure
uninterrupted playback.
HOLD
I Starting Point
While playing a music file, press the A↔B
button at the beginning of the loop you want to set.
● A ↔ appears in the display.
Press the A↔B button again to set the end of the loop.
● A ↔ B appears in the display.
The loop is played repeatedly.
I Ending Point
NNNNoooottttee
ee
- Press the A ↔ B button to cancel the loop.
0:01:23
No Album
Brave heart Theme
Poul
PLAY
A
↔
B
NNNNoooottttee
ee
- Press and hold the SELECT key in Now Playing during file playback to display the current Playlist.
- In the Playlist, use the SCROLL UP/SCROLL DOWN buttons to move to a track, and press the
√» button to play the selected track.
I Playing Music
I Pausing Music
Turning Power On and Off
● Power On: Press and hold the √» button to turn on the power.
● Power Off: Press and hold the √» button to turn off the power.
Select Now Playing in the menu.
● Playback starts automatically.
Press the √» button to pause
playback.
● While in Pause mode, briefly press
√» again to resume playback.
Make sure the player is fully charged and the earphones are connected.
0:01:23
PLAY
Pause
PLAY
Soul Tree
Surfin’s safari
Tim
0:01:23
Now Playing : 1 of 10
Now Playing : 1 of 10
Now Playing : 1 of 10
Now Playing : 1 of 10
Soul Tree
Surfin’s safari
Tim
0:01:23
Soul Tree
Surfin’s safari
Tim
Press the VOLUME UP or DOWN button to
adjust the volume from 0 to 40.
I Adjusting the Volume
10
Loop Repeating
✍
✍
Page 20

Searching Within Music Files
38 39
Menu Mode
ENG
Press the MENU button to switch to Menu mode.
● Use the SCROLL UP/SCROLL DOWN buttons to select the menu item you want, and then
briefly press the SELECT button.
NNNNoooottttee
ee
- In Menu mode, press the Menu button to exit from the submenu you are in.
● Now Playing: Display the song currently playing.
● Library: Search and select music to play.
● Photo
:
View saved image files or slide shows
● Settings: Change the settings.
FM Radio
NNNNoooottttee
ee
- VBR (Variable Bit Rate) File: An MP3 file that has varying compression ratios.
- When playing a VBR file, even if you press button within 5 seconds after the start of playback,
the previous song may not be played.
- The actual play time and the time displayed on the main unit may differ for VBR files.
● During playback, press and hold the , buttons to forward or reverse search the
currently playing file.
I
Searching for Specific Parts in PLAY Mode
● During playback, briefly press the button to play the next track in the playlist.
● Press the button within 5 seconds after playback starts to move to and play the
previous track. Press the button after 5 seconds to play the current track from the
beginning.
I
Searching for Music Files in PLAY Mode.
● While in pause mode, press the , buttons to move to the previous or next track in the
playlist and play it automatically.
I
Searching for Music Files in PAUSE Mode.
✍
✍
Page 21

Browsing Your Music
40 41
Browsing Your Music
ENG
● Genres: Shows the song genre from the ID3 tag information stored in the music file.
● Press the √» button on the desired genre name.
All song titles corresponding to the genre name will be played.
● If you select an genre name, song titles corresponding to that genre will be displayed.
You can use the SCROLL UP/DOWN buttons to choose a song, and then press the
SELECT button to play the selected song.
● Tracks: Shows the song title from the ID3 tag information stored in the music file.
● You can use the SCROLL UP/DOWN buttons to move, and then press the SELECT button
to play the selected song.
009 5tion-Sorry
Tracks
027 Cami-You can it
073 U-groove
015.everything me
Blues
Genres
Ballad
Pop
Other
Hear My songs
Blues
Artists
Library
Albums
Tracks
Genres
Library
Albums
Tracks
Genres
Artists
In the Menu, use the SCROLL UP/SCROLL DOWN buttons to select the Library,
and press the SELECT button.
● Artists: Shows the artist name from the ID3 tag information stored in the music file.
● Press the √» button on the desired artist name.
All song titles corresponding to the artist name will be played.
● If you select an artist's name, song titles that correspond to the name will be displayed. You can
use the SCROLL UP/DOWN buttons to move, and then press the SELECT button
to play the selected song.
● Albums: Shows the album title from the ID3 tag information stored in the music file.
● Press the √» button on the desired album name.
All song titles corresponding to the album name will be played.
● If you select an album name, song titles corresponding to that album will be displayed.
You can use the SCROLL UP/DOWN buttons to choose a song, and then press the SELECT
button to play the selected song.
I
Searching for and Selecting Music Files
Artists
Library
Albums
Tracks
Genres
All Tracks
Artists
Jason
Micky
Simson
Michel- Theme
All Tracks
DOC-Class room
Micky-Old time is
My Heart Will Go On
Everyday I Dream
Albums
Building Birdages
Turning the Tide
Everyday I Dream
Waking Up Is Easy
Leaming Again
Perfect
Library
Albums
Tracks
Genres
Artists
Page 22

Browsing Your Music
42 43
Browsing Your Music
ENG
Select a title in the Playlists, and press and hold the SELECT button.
● Move to Play Options screen.
1
In the Play Options, use the SCROLL UP/SCROLL DOWN buttons to select the
desired play option, and press the SELECT button.
● To Mobile Playlist:
The selected title will be moved to Mobile Playlist.
● Cancel: Go back to the previous screen.
2
I Play Options (Playlists)
To Mobile Playlist
Play option
Cancel
Library
Albums
Tracks
Genres
Playlists
Mobile Playlist
New Songs
Playlists
037.Misi-Forever
009 Jini-Love Affair
027 Jack-Takin Care
009 Kelvin-Taylor
New Songs
In the Library, use the SCROLL UP/SCROLL DOWN buttons to select Playlists
and then press the SELECT button.
1
Select the playlist that you want to play, and then press the SELECT button.
● Saved files will appear in the selected playlist.
2
I Selecting a Playlist
Press the SELECT button on the desired file.
● The selected file will be played.
3
● Play: The selected title will be played.
If you select [Play] in Artist, Album and Genre, all titles corresponding to Artist,
Album and Genre will be played.
● To Mobile Playlist: The selected title will be added to Mobile Playlist.
If you select Add To Mobile Playlist in Artist, Album and Genre all titles
corresponding to each Artist, Album and Genre will be added to Mobile Playlist.
● Cancel: Go back to the previous screen.
Select Artist, Album, Track, Genre, and press and hold the SELECT button.
● Move to Play Options screen.
In the Play Options, use the SCROLL UP/SCROLL DOWN buttons to select the
desired play option, and press the SELECT button.
1
2
I Play Options (Artists, Albums, Tracks, Genres)
play
Play option
To Mobile Playlist
Cancel
NNNNoooottttee
ee
- Mobile Playlist
is a play list always present in the unit. Songs stored in the unit can be easily
added to or deleted from
Mobile Playlist.
✍
Page 23

45
Recording Voice
ENG
NNNNoooottttee
ee
- Even if you set the sampling and bit rates higher, voice recording will default to 8khz 32 kbps
-
Each voice recording file can be as long as 180 minutes.
1
Press and hold the REC button to start voice
recording.
Press the REC button.
● Recording stops and the file is created.
● Files are recorded and renamed Voice0001.mp3,
Voice0002.mp3, and so on.
●
MP3 files are automatically added to your Voice Rec in Library.
2
Voice rec
0003.mp3
00:00:06
8kHz : 32kbps
Rec level 8
Rec
✍
Browsing Your Music
44
Select a Voice file in the Voice Recordings, and press and hold the SELECT button.
● Move to Play Options screen.
1
In the Play Options, use the SCROLL UP/SCROLL DOWN buttons to select the
desired play option, and press the SELECT button.
● Play : The selected title will be played.
● Delete : The selected title will be deleted.
● Cancel : Go back to the previous screen.
2
I
Play Options (Voice Recordings)
Play
Play option
Delete
Cancel
In the Library, use the SCROLL UP/SCROLL DOWN buttons to select Voice
Recordings, and then press the SELECT button.
● Recorded voice file will appear.
1
Press the √» button or SELECT button on the desired file.
● The selected file will be played.
2
I
Searching for and Selecting Voice Files
Library
Tracks
Genres
Playlists
Voice Rec
Voice 0001
Voice 0002
Voice 0003
Voice Rec
Page 24

47
Viewing Image Files
ENG
Recording MP3s
46
NNNNoooottttee
ee
-
Please refer to “Sending Images” under “Using Multimedia Studio” to send images
to the player.
Press the MENU button.
In the Menu, select Photo and press the SELECT button.
1
Use the
SCROLL UP/SCROLL DOWN buttons
to select Albums.
2
Use the SCROLL UP/SCROLL DOWN buttons to move to the desired image file
and press the SELECT button.
● The selected image file will be displayed.
● While viewing the image file, press the MENU button to move to an upper menu.
● Press the button to view the previous image.
● Press the button to view the next image.
3
Photo
Albums
Slide Show
Albums
sea.jpg
land.jpg
sky.jpg
✍
1
While in Music mode, use the Line-In cable to connect the main unit's line in jack
and the line out jack of your external audio device.
NNNNoooottttee
ee
-
If the battery is not sufficiently charged, the player will not completely encode the file.
- Adjust the volume of the external audio source to a suitable level and encode it.
If the volume level is too high, the sound quality may be poor.
2
Press and hold the REC button.
● The music currently played on the external device will be saved as an MP3 file.
3
Press the REC button.
● Recording stops and the file is created.
● Files are recorded and renamed Line-in0001.mp3, Line-in0002.mp3, and so on.
●
MP3 files are automatically added to your Playlists in Library.
✍
Your player can be to used to record directly from any external audio source such as a CD player,
cassette player, home stereo or radio.
LINE-IN
HOLD
MIC
Page 25

49
Shuffle and Repeat Playback
ENG
Viewing Slide Show
48
In the Menu, use the SCROLL UP/SCROLL DOWN buttons to select Settings,
and then press the SELECT button.
1
Use the SCROLL UP/SCROLL DOWN buttons to select Repeat.
2
Press the SELECT button to choose Repeat Off, One, All or Shuffle.
● Select the desired mode, and then press the MENU button to go to the main menu.
● Off: Select this to listen to songs in the current playlist one
at a time in the given order.
● One ( ): Select this to repeatedly play just one track.
● All ( ): Select this to repeatedly play all tracks in the current playlist.
● Shuffle ( ): Select this to play all stored tracks in random order.
3
Settings
EQ-Off
SRS settings
Record Settings
Repeat-Off
Press the MENU button.
In the Menu, select Photo and press the SELECT button.
1
Use the
SCROLL UP/SCROLL DOWN buttons
to select Slide Show.
2
Use the SCROLL UP/SCROLL DOWN buttons to move to the desired file and
then press the SELECT button.
● The selected slide show will be displayed.
● While viewing the slide show, press the SCROLL UP/SCROLL DOWN
buttons to adjust the background music volume.
● While viewing the slide show, press the MENU button to move to the previous screen.
3
Photo
Albums
Slide Show
Slide Show
LJA.ppl
jay.ppl
people.ppl
NNNNoooottttee
ee
-
Slide show files can be created or edited in Multimedia Studio.
Please refer to “
Making Albums for Slide Shows
” under “Using Multimedia Studio” for
more information.
-
Music is played only if music was attached at the time of album editing.
-
Slide show viewing may be slow if too many files are selected or the image files are
too large.
✍
Page 26

51
SRS Settings
ENG
Equalizer Settings
50
In the Menu, use the SCROLL UP/SCROLL DOWN buttons to select Settings,
and then press the SELECT button.
1
Use the SCROLL UP/SCROLL DOWN buttons to select SRS settings, and then
press the SELECT button.
2
Use the SCROLL UP/SCROLL DOWN buttons to select SRS Level,
TruBass Level, Focus Level and Optimal, and then press the SELECT button to
make the desired SRS Settings.
3
● Complete the desired setting, and then press the MENU button to go to the main menu.
● SRS, TruBass, Focus Level: The level for SRS, TruBass and Focus can each be set
within the range of 0 to 10.
● Optimal: It optimizes the SRS function according to the device connected.
Earphone ➔ Speaker ➔ Headset ➔ Carpack
SRS settings
SRS Level-1
TruBass Level-5
Focus Level-0
Optimal-Earphone
Settings
EQ-Off
SRS settings
Record Settings
Repeat-Off
NNNNoooottttee
ee
-
SRS settings are available only if WOW, SRS, or TruBass are selected in the EQ
menu.
✍
In the Menu, use the SCROLL UP/SCROLL DOWN buttons to select Settings,
and then press the SELECT button.
1
Use the SCROLL UP/SCROLL DOWN buttons to select EQ.
2
Press the SELECT button until the desired mode appears.
● Select the desired mode, and then press the MENU button
to go to the main menu.
Off ➔ Jazz ➔ Classical ➔ Pop ➔ Rock ➔ Bass boost ➔
WOW ➔ SRS ➔ TruBass
3
NNNNoooottttee
ee
- is a trademark of SRS Labs, Inc.
WOW technology is incorporated under license from SRS labs, Inc..
- Please adjust the volume to a suitable level, as the volume may increase in the SRS setting.
- This unit supports sampling frequencies of 32KHz, 44.1KHz or 48KHz.
● WOW: This feature allows you to enjoy the SRS and Trubass features simultaneously.
● SRS: You will hear 3D Stereo sound.
● TruBass: This is a bass boost feature that adds fullness to the sound.
Settings
EQ-Off
SRS settings
Record Settings
Repeat-Off
✍
Page 27

53
Contrast Settings
ENG
Recording Settings
52
In the Menu, use the SCROLL UP/SCROLL DOWN buttons to select Settings,
and then press the SELECT button.
1
Use the SCROLL UP/SCROLL DOWN buttons to select Contrast.
2
Press the SELECT button until the desired screen
contrast appears.
●
The setting range of the contrast, which adjusts the contrast of
the screen, is 0 to 4.
3
SRS settings
Record Settings
Backlight-3sec
Contrast-2
Settings
In the Menu, use the SCROLL UP/SCROLL DOWN buttons to select Settings,
and then press the SELECT button.
1
Use the SCROLL UP/SCROLL DOWN buttons to select P.saver screen.
2
Press the SELECT button until the desired screen
power save time appears.
● Off → 15 sec → 30 sec → 45 sec → 1 min
● If the selected time elapses while playing music, the screen
switches to power save mode. In power save mode, the
music continues to play but the music information is not
displayed on the screen.
● Press the √» button in power save mode to return to the
normal playback screen.
3
Record Settings
Backlight-3sec
Contrast-2
P.Saver-3sec
Settings
Power Save Screen Settings
In the Menu, use the SCROLL UP/SCROLL DOWN buttons to select Settings,
and then press the SELECT button.
1
Use the SCROLL UP/SCROLL DOWN buttons to select Backlight.
2
Press the SELECT button until the desired
Backlight On-Time appears.
● Off, 3, 5, 10, 15, 30seconds and Always are available for
Backlight-On Time.
3
EQ-Off
SRS settings
Record Settings
Backlight-3sec
Settings
In the Menu, use the SCROLL UP/SCROLL DOWN buttons to select Settings,
and then press the SELECT button.
1
Use the SCROLL UP/SCROLL DOWN buttons to select Record Settings,
and then press the SELECT button.
2
Use the SCROLL UP/SCROLL DOWN buttons to select Sampling and Bit Rate,and
then briefly press the SELECT button to make the desired recording setting.
● Complete the desired setting, and then press the MENU button to go to the main menu.
● Sampling: Each time the Select button is pressed, the selection toggles between 32KHz
and 44KHz.
● Bit Rate: Each time the Select button is pressed, the selection changes as follows:
96 ➔ 128 ➔ 160Kbps.
● Selecting a higher bit rate results in better quality sound, but uses more memory space.
3
EQ-Off
SRS settings
Record Settings
Sampling-44khz
Bit Rate-128kbps
Record Settings
Settings
NNNNoooottttee
ee
-
Voice can be recorded only at
8KHz 32kbps.
Repeat-Off
Backlight Settings
✍
Page 28

55
Power Off Settings
ENG
Fader Effect
54
In the Menu, use the SCROLL UP/SCROLL DOWN buttons to select Settings,
and then press the SELECT button.
1
Use the SCROLL UP/SCROLL DOWN buttons to select Power off.
2
Press the SELECT button until the desired
power-off time appears.
● Select the desired power-off time, and then press the
MENU button to go to the main menu.
OFF ➔ 30sec ➔ 1min ➔ 5min ➔ 10min ➔ 15min.
3
Fader Effect
Power off-10min
Settings
In the Menu, use the SCROLL UP/SCROLL DOWN buttons to select Settings,
and then press the SELECT button.
1
Use the SCROLL UP/SCROLL DOWN buttons to select Language.
2
Use the SCROLL UP/SCROLL DOWN buttons to select the desired language,
and then press the SELECT button.
● English → Korean → Japanese → S.Chinese → T.Chinese → French → German →
Italian → Spanish → Russian
● The Menu Screen will appear in the language you set.
3
Power off-10min
Language
Settings
Language Settings
P.Saver-3sec
Contrast-2
Fader Effect
P.Saver-3sec
Fader Effect
In the Menu, use the SCROLL UP/SCROLL DOWN buttons to select Settings,
and then press the SELECT button.
1
Use the SCROLL UP/SCROLL DOWN buttons to select Fader Effect, and then
press the SELECT button.
2
Use the SCROLL UP/SCROLL DOWN buttons to select Fade, Curve,
and Duration, and then briefly press the SELECT button.
● Complete the desired setting, and then press the MENU button to go to the main menu.
● Fade: Each time the SELECT button is pressed, the selection changes as follows :
- Fade Off: Music is played back at the volume level you set.
- Fade In: Volume gradually increases only when playback starts.
- Fade Out: Volume gradually decreases at the end only.
- Fade In/Out: Volume gradually increases when playback starts and gradually
decreases at the end.
● Curve : Each time the SELECT button is pressed, the selection changes as follows :
- Linear: The speed at which the volume of music increases or decreases is fixed.
- Slow: The speed at which the volume of music increases or decreases is slow.
- Fast: The speed at which the volume of music increases or decreases is fast.
● Duration : Each time the SELECT button is pressed, the selection changes as follows :
3 ➔ 5 ➔ 10 ➔ 15sec
3
Fader Effect
Fade-Off
Curve-Fast
Duration-5sec
Fader Effect
Settings
P.Saver-3sec
Contrast-2
Backlight-3sec
Page 29

57
ENG
56
Troubleshooting
One of the messages below appears:
Connect to PC and repair firmware with recovery utility.
Connect to PC and rebuild database with recovery utility.
The message "Loading" appears and the device does not operate when you turn on
the power.
File search does not work properly in the Menu Library.
● Refer to “Using Recovery Utilities”
The player doesn't work. There is nothing showing on the display panel.
● Reset the Player
● Connect the charger.
● Make sure the Hold switch is in the off position.
There is no sound even if I press the Play button in Music mode.
● Check if there are MP3 or WMA files on the player.
● Non-playable file formats (e.g. MPEG1 LAYER 1 file) cannot be played.
● Files that have been downloaded without using the Music Studio cannot be played.
I cannot download files.
● Check the battery's power level.
● Check if the driver is installed correctly on your PC.
Reinstall the software from the installation CD.
● Check the USB connection between the player and your PC.
● Check if there is the “
unplug/eject” or “Safely Remove Hardware
” icon located in your
icon tray at the bottom of your screen.
Cannot view image files.
● Files downloaded without using Multimedia Studio cannot be viewed on the screen.
Restoring Default Settings
Use the SCROLL UP/SCROLL DOWN buttons to select About,
and then press the SELECT button.
● If you select About, you can check the total number of tracks, total capacity,
available capacity and software version information.
In the Menu, use the SCROLL UP/SCROLL DOWN buttons to select Settings,
and then press the SELECT button.
1
2
Tracks
Capacity
Available
Version
106
3.8GB
3.8GB
0.15
About
Power off-10min
Language
Reset
About
Settings
In the Menu, use the SCROLL UP/SCROLL DOWN buttons to select Settings,
and then press the SELECT button.
1
Use the SCROLL UP/SCROLL DOWN buttons to select Reset,
and then press the SELECT button.
● If you select Reset, all selected settings will be restored to the default setting.
2
Volume = 20
Repeat = Off
EQ = Off
Backlight = 5sec
Contrast = 2
Default Settings
Reset
Yes
NO
Reset all default
Settings?
Fader Effect
Power off-10min
Language
Reset
Settings
Player Information
Page 30

59
ENG
58
Specifications
Model
YH-820
Internal Memory Capacity
5GB
Built-in Rechargeable Battery Capacity
650mAh
Voltage
3.7V (Li-ion Rechargeable Battery)
Dimensions/Weight
49.8 X 88.1 X 13.8mm /84.5g
Case
Aluminum/Plastic
File Transfer Speed
Max. 50Mbps
Signal to Noise Ratio
90dB with 20KHz LPF(based on 1KHz OdB)
Earphone Jack Output Power
12mW(16Ω)
Output Frequency Range
22Hz~20KHz
Temperature Range
-5~ +35°C(23~95F)
File Support
MPEG1/2/2.5 Layer3(8Kbps ~ 320Kbps, 8KHz ~ 48KHz)
WMA (48Kbps ~ 192Kbps, 8KHz ~ 48KHz)
Troubleshooting
The Backlight is off.
●
Please check the Backlight settings.
●
Backlight is automatically disabled for longer playback in case of low battery power.
The playback time display during playback does not seem right.
● Check if you are not playing a VBR (Variable Bit Rate) file. VBR files are only partially supported.
The LCD window is too dark.
● Check the contrast in the Menu.
● Please check if the player is in power save mode
.
During playback, some unknown characters are displayed on the display panel.
● Unsupported languages will be indicated by an asterisk ( ✻ ).
A "/Noartist/Noalbum" file path appears on the playback screen in place of the
selected music file's song title.
● There is no ID3 tag information for the music file. Edit the song title, artist, and album
information of the song.
It takes a long time when I search songs by Song Title, Artist, or Album.
● If there are many music files on your player, it may take longer to read them .
Page 31

ELECTRONICS
Samsung Limited Warranty
Samsung Electronics Canada Inc. (SECA),
warrants that this product is free from defective material and workmanship.
SECA further warrants that if this product fails to operate properly within the
specified warranty period and the failure is due to improper workmanship or
defective material SECA will repair or replace the product at its option.
All warranty repairs must be performed by a SECA authorized service
centre. (The name and address of the location nearest you can be obtained by
calling toll free 1-800-726-7864 or visiting our web site at www.samsung.ca)
Labour Parts
one (1) year (carry-in) one (1) year
On carry-in models, transportation to and from the service centre is the
customer’s responsibility.
The original dated sales receipt must be retained by the customer and
is the only acceptable proof of purchase. It must be presented to the
authorized service centre at the time service is requested.
Exclusions
This warranty does not cover damage due to accident, fire flood and/or
other acts of God; misuse, incorrect line voltage, improper installation,
improper or unauthorized repairs, commercial use, or damage that occurs in shipping.
Exterior and interior finish, lamps and glass are not covered under this warranty.
Customer adjustments which are explained in the instruction manual are not covered
under the terms of this warranty. This warranty will automatically be voided for any unit
found with a missing or altered serial number. This warranty is valid only on products
purchased and used in Canada.
The product unit accompanying this user manual is licensed under certain
intellectual property rights of certain third parties. This license is limited to private
non-commercial use by end-user consumers for licensed contents. No rights are
granted for commercial use. The license does not cover any product unit other than
this product unit and the license does not extend to any unlicensed product unit or
process conforming to ISO/IEC 11172-3 or ISO/IEC 13818-3 used or sold in
combination with this product unit.
The license only covers the use of this product unit to encode and/or decode audio
files conforming to the ISO/IEC 11172-3 or ISO/IEC 13818-3. No rights are granted
under this license for product features or functions that do not conform to the
ISO/IEC 11172-3 or ISO/IEC 13818-3.
 Loading...