


YP-R1
Thank you for purchasing this Samsung
product. To receive more complete
service, please register your product at
www.samsung.com/register
MP3 Player
user manual
imagine the possibilities
Using this manual
Some of the contents in this manual may differ from your •
MP3 player depending on the firmware installed. Some
of the contents may be changed without prior notice.
To view the special features of your MP3 player, see •
"Special features of your MP3 player" on page 4.
To view troubleshooting, see "• Troubleshooting"
on page 80.
Icons used in this manual
Icon Description
Note
Notes, usage tips, or additional information
Caution
Safety warnings and precautions
< >
Menu names or text on the screen ;
for example: <Yes>
1
Safety
information
This manual describes how
to properly use your new
MP3 player. Read it carefully
to avoid damaging the player
and injuring yourself. Pay
particular attention to the
following serious warnings.
PROTECT YOURSELF
Do not disassemble, repair, or modify this product on your own.•
Do not get the product wet or drop it in water. If the product gets wet, do •
not switch it on because you could get an electric shock. Instead, contact a
Samsung Customer Service Center at 1-800-SAMSUNG.
Do not use the product during a thunderstorm, as it may cause malfunction or •
a risk of electric shock.
Do not use the earphones while you are driving a bicycle, automobile or •
motorcycle.
It can cause a serious accident, and furthermore, is prohibited by law in some
areas.
Using the earphones while walking or jogging on a road, in particular, on a
crosswalk can lead to a serious accident.
For your safety, make sure the earphone cable does not get in the way of your •
arm or other surrounding objects while you are taking exercise or a walk.
Do not place the product in damp, dusty, or sooty areas because these •
environments could lead to fi re or electric shock.
Do not use the product if the screen is cracked or broken. Broken glass •
or acrylic could cause injury to your hand or face. Bring the product to a
Samsung service center to replace the screen. Damage caused by careless
handling will void the warranty.
2
Safety information
PROTECT YOURSELF
Using earphones or headphones for an extended •
time may cause serious damage to your hearing.
If you are exposed to sound louder than 85db
for an extended time, you may adversely affect
your hearing. The louder the sound is, the more
seriously damaged your hearing may be (an
ordinary conversation is between 50 to 60 db and
road noise is approximately 80 db).
You are strongly advised to set the volume level to
medium (the medium level is usually less than 2/3
of the maximum).
If you feel a ringing in the ear(s), lower the volume •
or stop using the earphones or headphones.
Battery shall not be exposed to excessive heat •
such as sunshine, fi re or the like.
PROTECT YOUR MP3 PLAYER
Do not leave the player in temperatures above •
95° F (35° C), such as a sauna or a parked car.
Do not cause excessive impact on the player by •
dropping it.
Do not place heavy objects on top of the player.•
Prevent any foreign particles or dust from entering •
into the product.
Do not place the product near magnetic objects.•
Be sure to backup important data. Samsung is not •
responsible for data loss.
Use only accessories provided by or approved by •
Samsung.
Do not spray water on the product. Never clean •
the product with chemical substances such as
benzene or thinner, as it may cause fi re, electric
shock or deteriorate the surface.
Failure to follow these instructions may lead to •
physical injuries or damage to the player.
When printing this user manual, we recommend •
that you print in color and check “Fit to Page” in the
print option for better viewing.

3
FCC
This device complies with part 15 of the FCC Rules.
Operation is subject to the following two conditions:
(1) This device may not cause harmful interference, and
(2) This device must accept any interference received, including
interference that may cause undesired operation.
Caution: Any changes or modifi cations in construction of
this device which are not expressly approved by the party
responsible for compliance could void the user’s authority to
operate the equipment.
Note: This equipment has been tested and found to comply
with the limits for a Class B digital device, pursuant to part 15 of
the FCC Rules. These limits are designed to provide reasonable
protection against harmful interference in a residential installation.
This equipment generates, uses and can radiate radio
frequency energy and, if not installed and used in accordance
with the instructions, may cause harmful interference to
radio communications, However, there is no guarantee that
interference will not occur in a particular installation.
If this equipment does cause harmful interference to radio or
television reception, which can be determined by turning the
equipment off and on, the user is encouraged to try to correct
the interference by one or more of the following measures:
- Reorient or relocate the receiving antenna.
- Increase the separation between the equipment and receiver.
- Connect the equipment to an outlet on a circuit different from
that to which the receiver is connected.
- Consult the dealer or an experienced radio/TV technician for
help.
Declaration of Conformity
We, Samsung Electronics Co.,Ltd., declare under our sole
responsibility that the product, Trade name Samsung & Model
name YP-R1, has been tested according to the part 15 of the
FCC Rules.
Party responsible for Product Compliance
Samsung Electronics America QA Lab.
18600 Broadwick Street, Rancho Dominguez, CA 90220
Safety information
SAFETY INFORMATION
Special features of your MP3 player
Listen to true threedimensional sound with
the Samsung Digital
Natural Sound engine
(DNSe™)
Be a cool DJ and mix
music with your own
beats in Beat DJ
Customize your main
menu screen
Add your favorite widgets
to the main menu screen
No more complicated
buttons! Control your
player with one simple
touch
Listen to music with the
mini player while viewing
pictures or documents
Easily create Bluetooth
connections with a
single motion
Contents
7
Use basic functions
8
What's included
9
Your MP3 player
10
Connect to a PC and charge the
battery
12
Turn your player on and lock the
touch screen
13
Use the touch screen
15
Use the main menu screens
16
Change the menu style
16
Select a wallpaper
17
Organize your favorite menus
19
Use widgets
19
Add widgets to a main menu screen
20
Widget list
22
Use the quick tray and menu tray
23
Use the mini player
24
Enter text
24
Enter text using the virtual keyboard
25
Enter text with the smart fi nger
feature
26
Connect your player to a TV
27
Manage media fi les
28
Download media fi les
28
Supported fi le formats and PC
requirements
29
Download fi les with EmoDio
30
Download fi les using your player as a
removable disk
32
Search for fi les
33
Delete fi les
34
Play video and music
35
Video
35
Play video fi les
38
Use the video options
39
Music
39
Listen to music
43
Search for a music fi le
43
Create playlists
45
Use the music options
46
Beat DJ
49
Use additional
applications
50
Pictures
50
View pictures
51
Use the picture menus
52
Texts
52
View text fi les
54
Use the text options
55
FM Radio
55
Listen to the FM radio
57
Save radio stations
58
Use the FM radio options
59
Flash Player
60
Games
61
Bluetooth
61
Find and register other Bluetooth-
enabled devices
62
Connect Bluetooth-enabled devices
63
Use call functions (hands-free)
65
Transfer fi les
66
Use the Bluetooth options
66
Information for using Bluetooth
68
Datacasts
69
Voice REC
70
Address Book
Contents
71
Customize settings
72
Settings
73
Sound settings
73
Display settings
73
Language settings
74
Time settings
74
System settings
77
Appendix
78
Firmware upgrade
79
Maintenance of your player
80
Troubleshooting
82
Specifi cations
84
Warranty
86
License
What's included .................................................................8
Your MP3 player .................................................................9
Connect to a PC and charge the battery ...........................10
Turn your player on and lock the touch screen ..................12
Use the touch screen .........................................................13
Use the main menu screens ..............................................15
Use widgets .......................................................................19
Use the quick tray and menu tray ......................................22
Use the mini player .............................................................23
Enter text ............................................................................24
Connect your player to a TV ..............................................26
Use basic functions
Learn to perform basic operations with your player.

8
What's
included
Check your product box for the following items:
MP3 player Earphones
GM59-01011A (Black)
-
USB cable
GM39-01002A
Note
The items supplied with your player may appear different from the illustrations in this •
manual.
You can obtain additional accessories from your local Samsung dealer.•
9
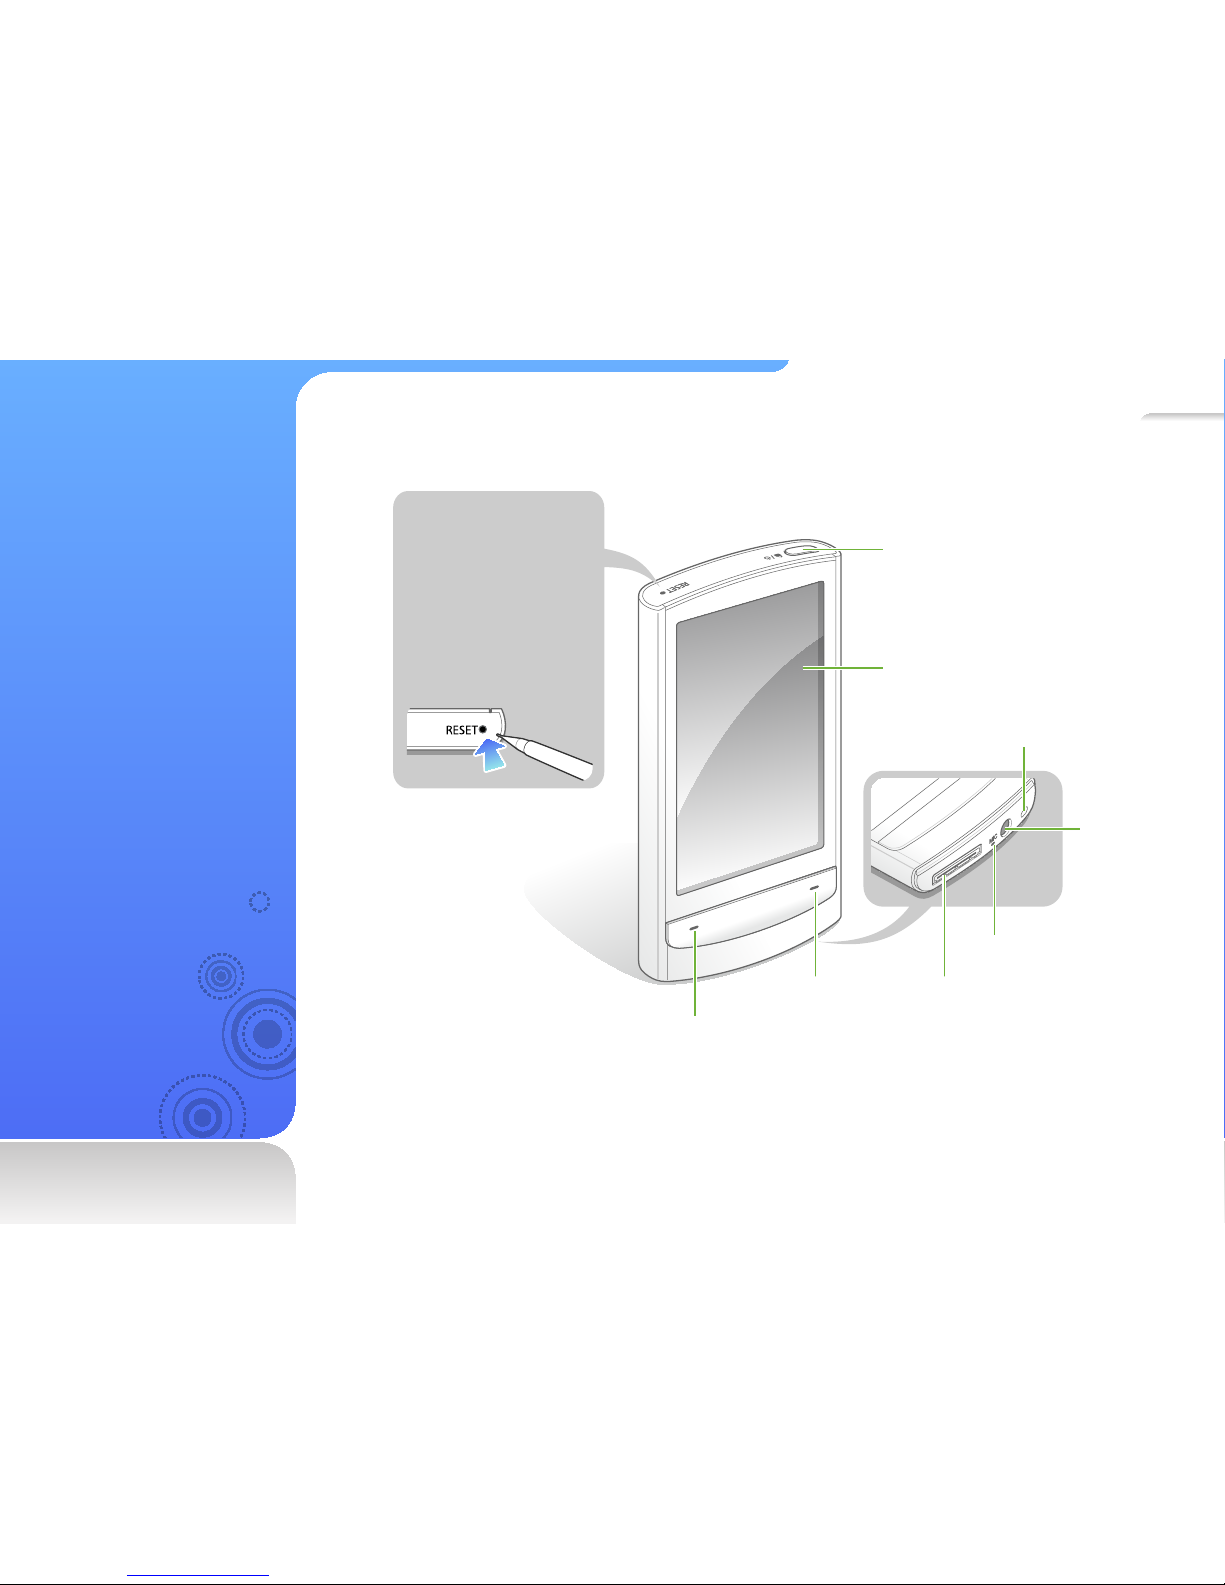
Your M P 3
player
Microphone
USB connection port
Volume button
(volume down)
Volume button
(volume up)
Power/lock button
Touch screen
Earphones
jack
Accessories hook
Reset hole
If your player is frozen
or unresponsive, insert
a pointed object (such
as a toothpick or paper
clip) into the reset hole.
The system will be
initialized.
10
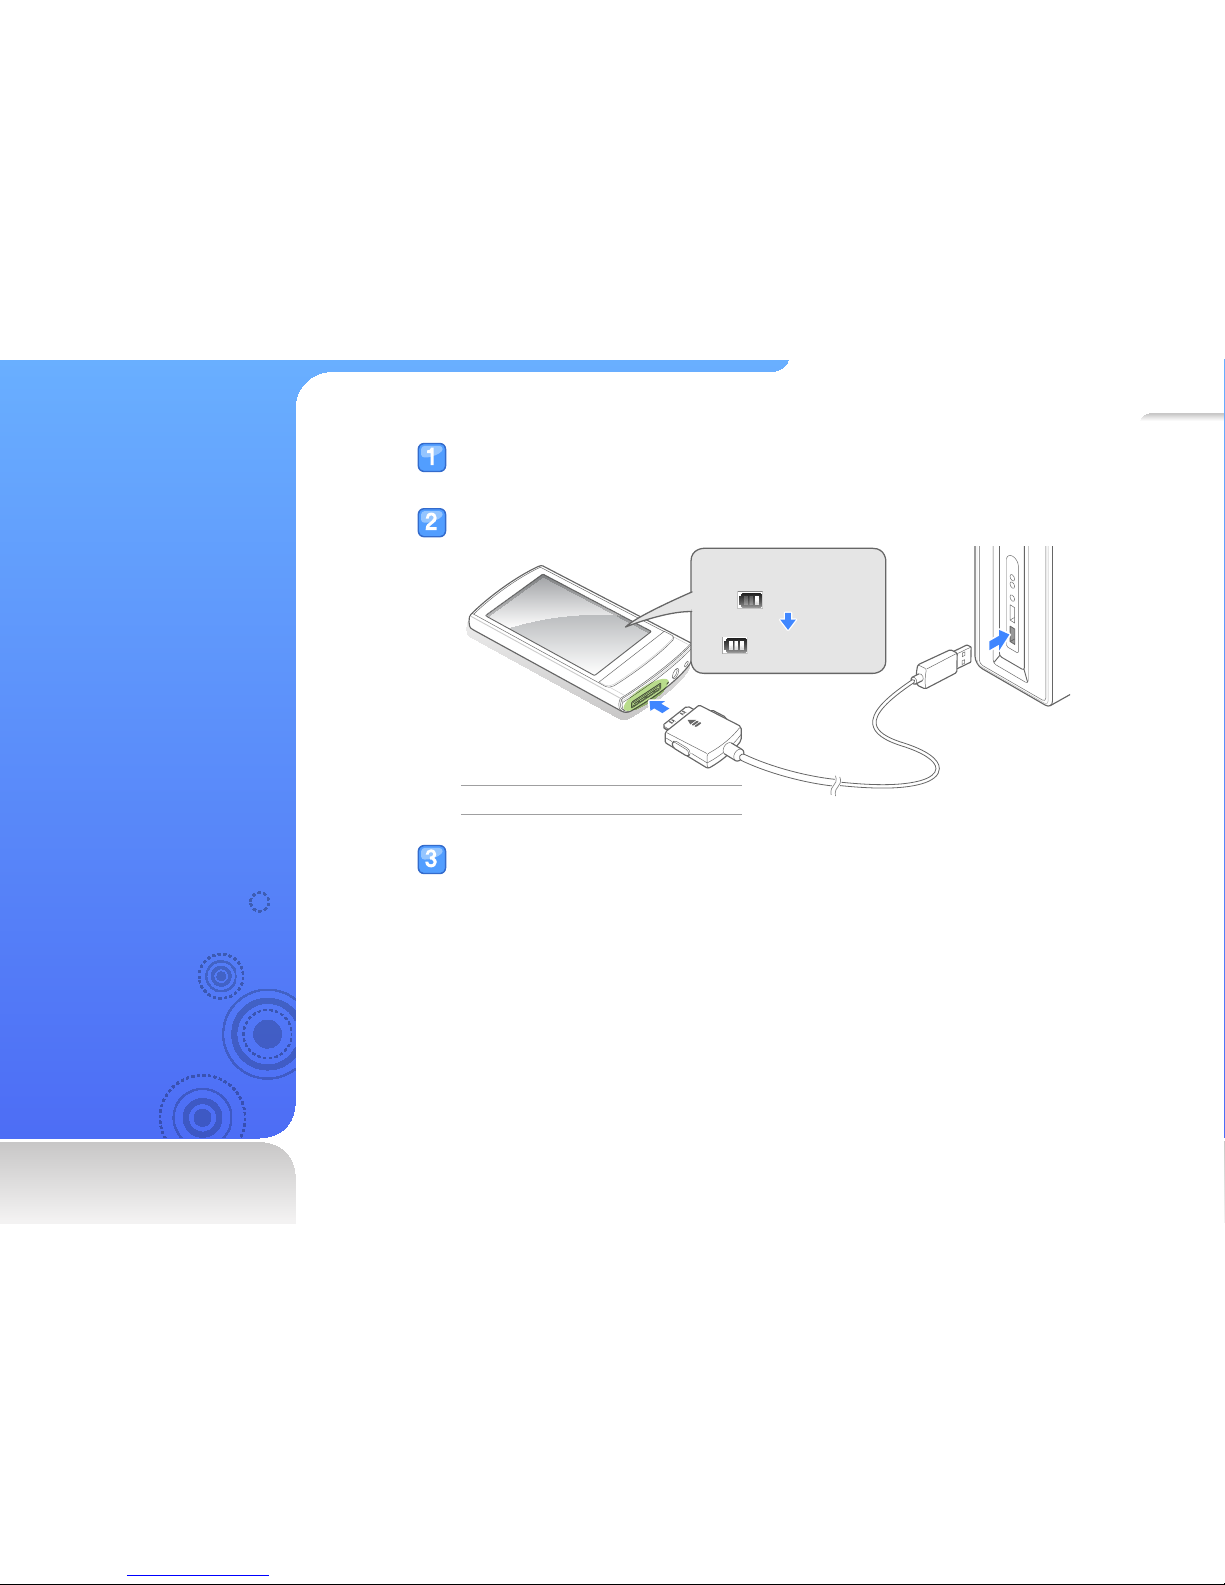
Connect to
a PC and
charge the
battery
Connect your player to a
PC and charge the battery
before you use your player
for the fi rst time or when
you have not used it for a
long time.
Connect the wider end of the USB cable (with the triangle facing up) to the
USB connection port at the bottom of your player.
Connect the thinner end of the USB cable to the USB port of a PC.
<USB connected>
< >: Charging
< >: Fully charged
When the battery is fully charged, unplug the USB cable from your player
and the PC.
Charging time About 3 hours
Use basic functions > Connect to a PC and charge the battery
11
About batteries
Charge and store the battery at 41˚ F ~ 95˚ F (5˚ C ~ 35˚ C).•
Do not charge the battery for more than 12 hours or leave the •
battery fully discharged for a long time. Doing so may shorten
the battery life.
Depending on how you use your player, actual battery life may •
vary and may be shorter than specifi ed.
Note
The charging time may differ depending on your PC’s •
capabilities.
If you want to charge the battery on your laptop, make sure •
that the laptop's battery is full or the laptop is plugged into
a power source.
The player can only be charged by connecting to your •
PC with the USB cable. Do not use a separate USB AC
Adapter as it may not charge the battery or allow proper
operation of the player.
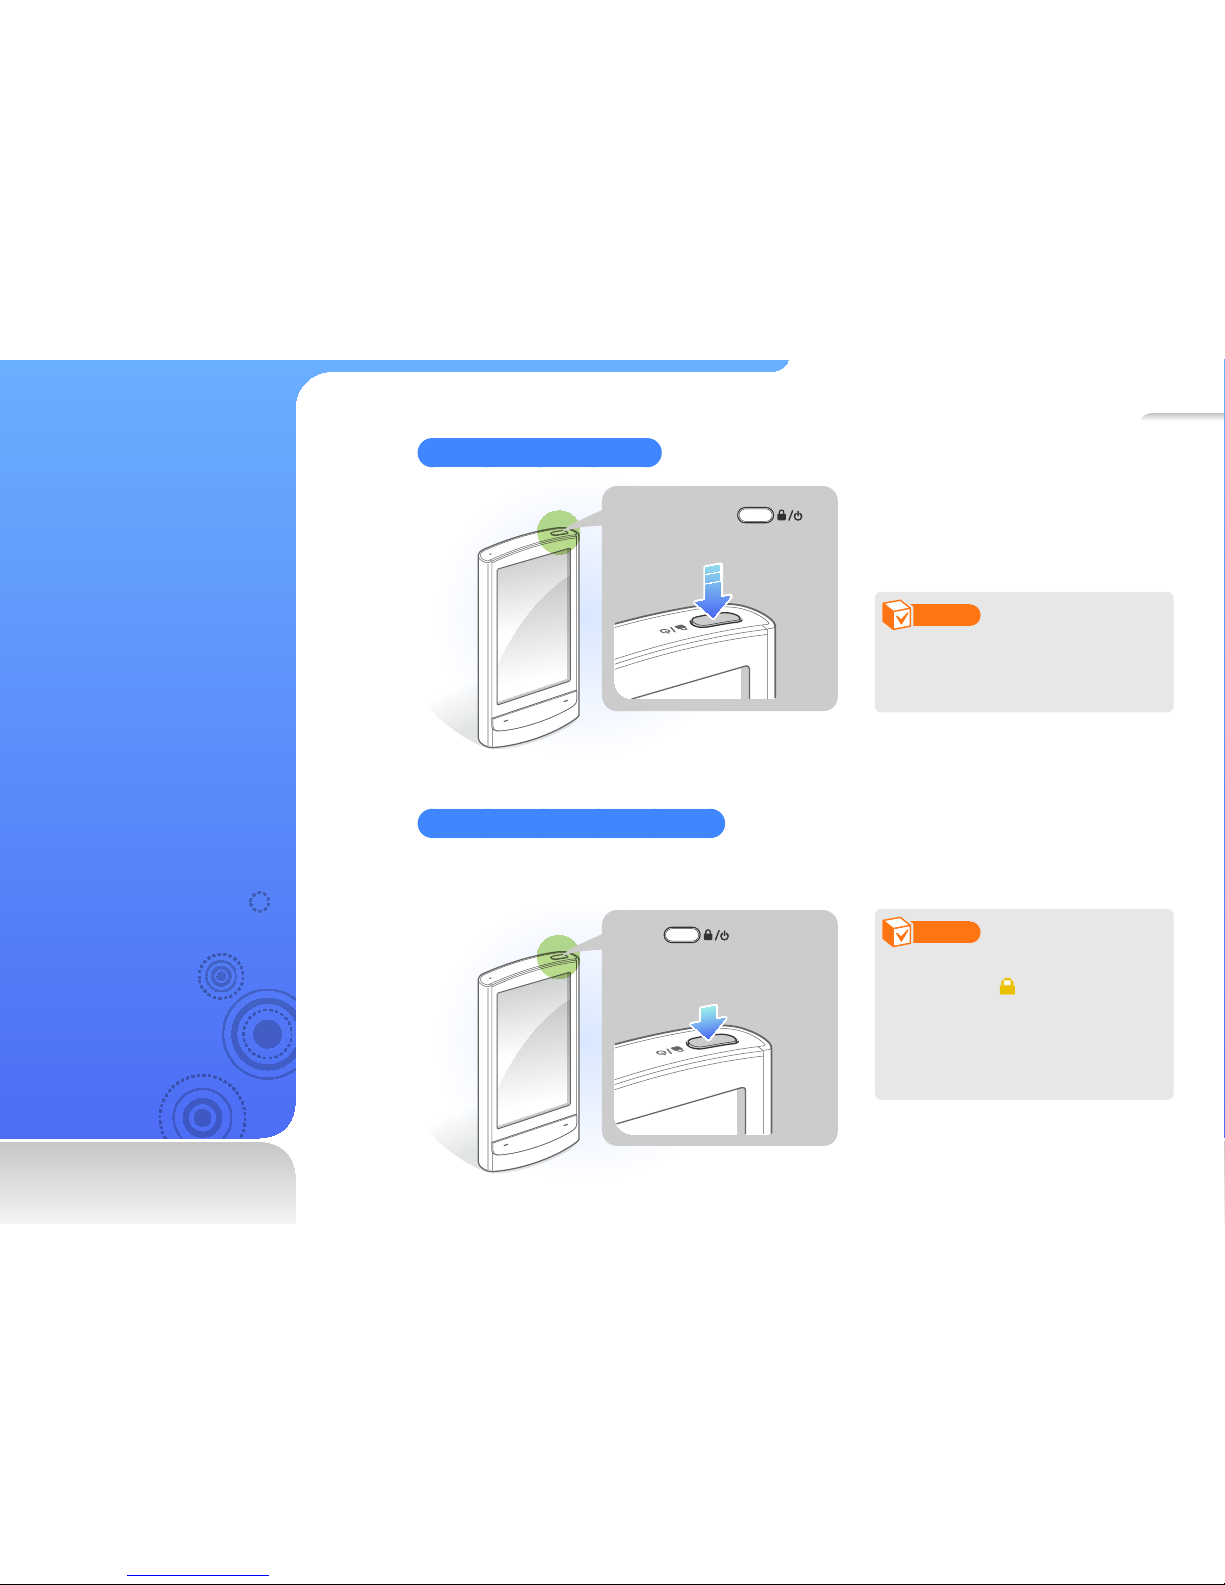
12
Turn your
player on
and lock the
touch screen
Turn your player on or off
Press and hold to
turn your player on or off.
Note
If you do not use your player for
5 minutes, it will automatically
turn off.
Lock or unlock the touch screen
Lock the touch screen to prevent any unwanted operations while listening to music or playing
videos.
Press to lock or
unlock the touch screen.
Note
When the touch screen is •
locked, will appear at the
top of the screen.
You can also set your player •
to lock the touch screen and
buttons. See page 75.
13
Use the
touch screen
Learn how to use the touch
screen and browse or
select items.
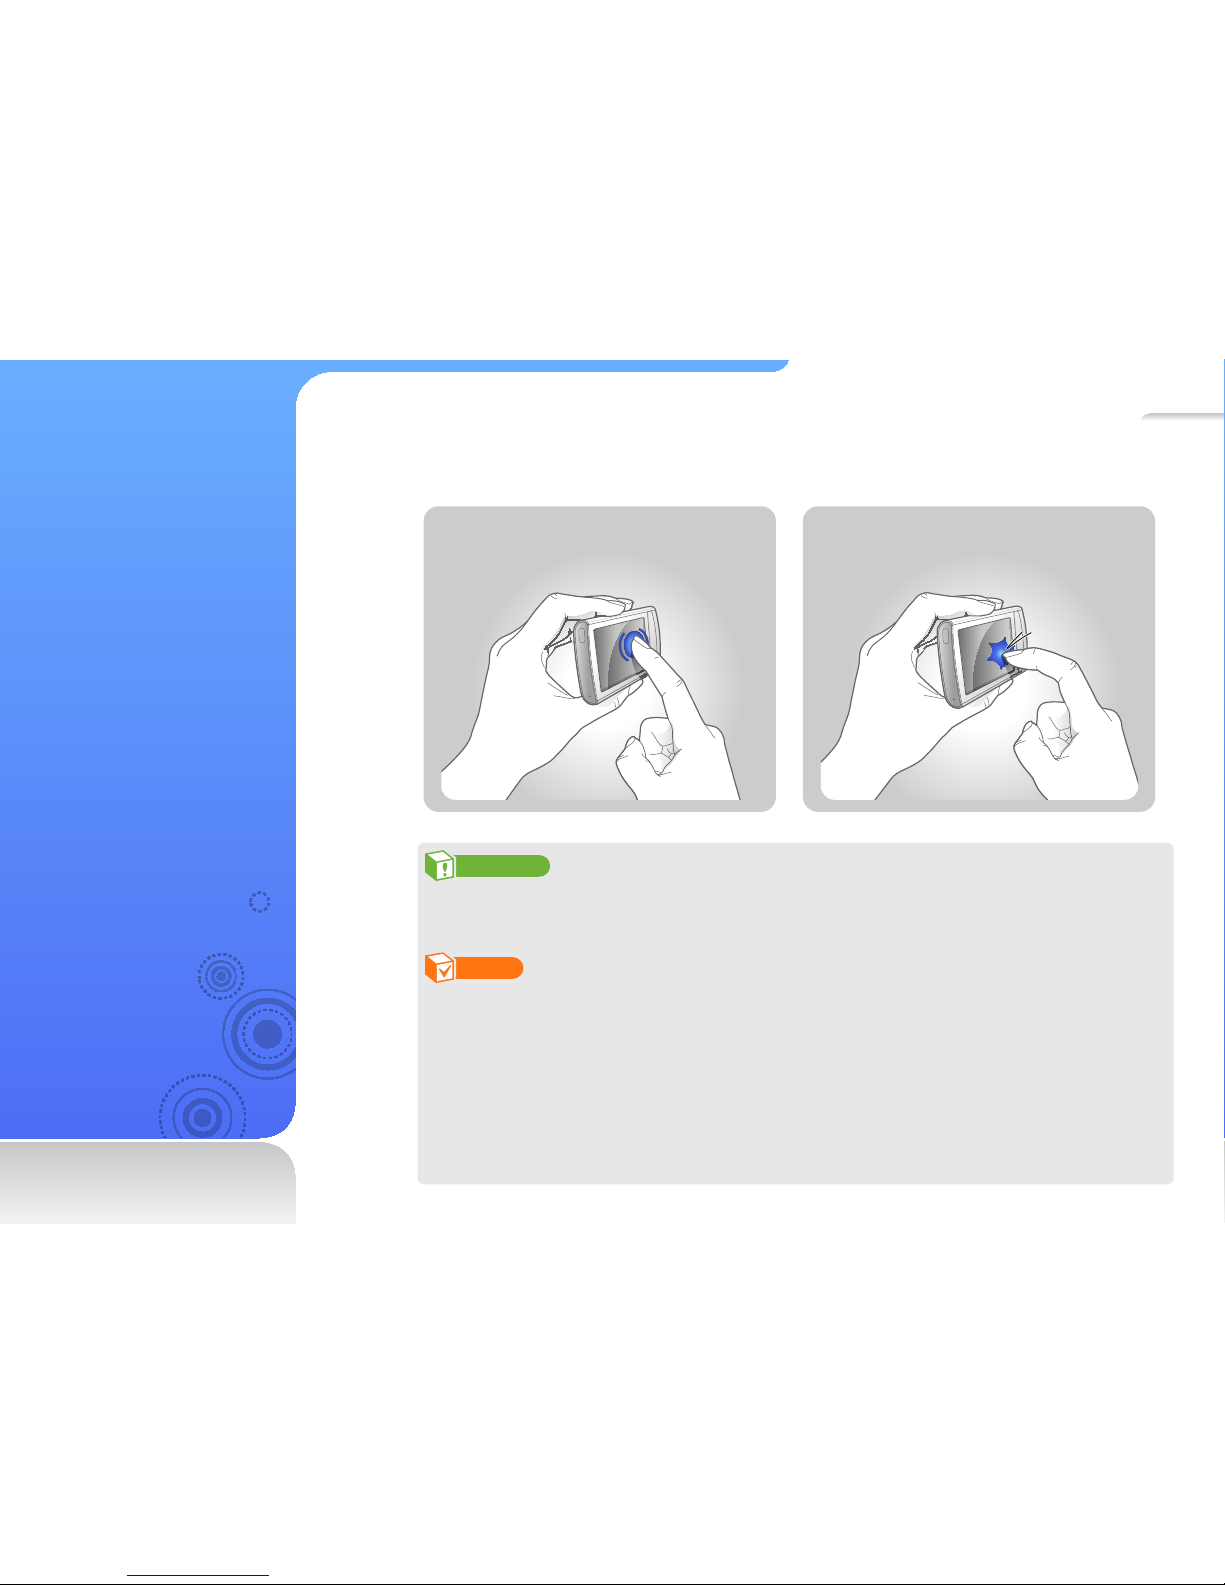
Your player’s touch screen lets you easily select items or perform functions. Tap the touch
screen using your fi ngertip.
CORRECT INCORRECT
Caution
To avoid damaging the touch screen, do not press too hard with your fi ngertips or use pointed
objects to touch the screen.
Note
Tap only one area of the touch screen at a time. Your player will not recognize your input •
when you tap two or more areas simultaneously.
Keep the touch screen dry. Humidity and liquids may lower the recognition of the touch •
screen.
For best results, do not use any protective fi lms on the touch screen and do not allow •
accessories to cover the touch screen.
The touch screen may not properly recognize inputs when you tap the screen with gloves, •
dirty fi ngers, fi ngernails, or sharp instruments such as ballpoint pens.
Use basic functions > Use the touch screen
14
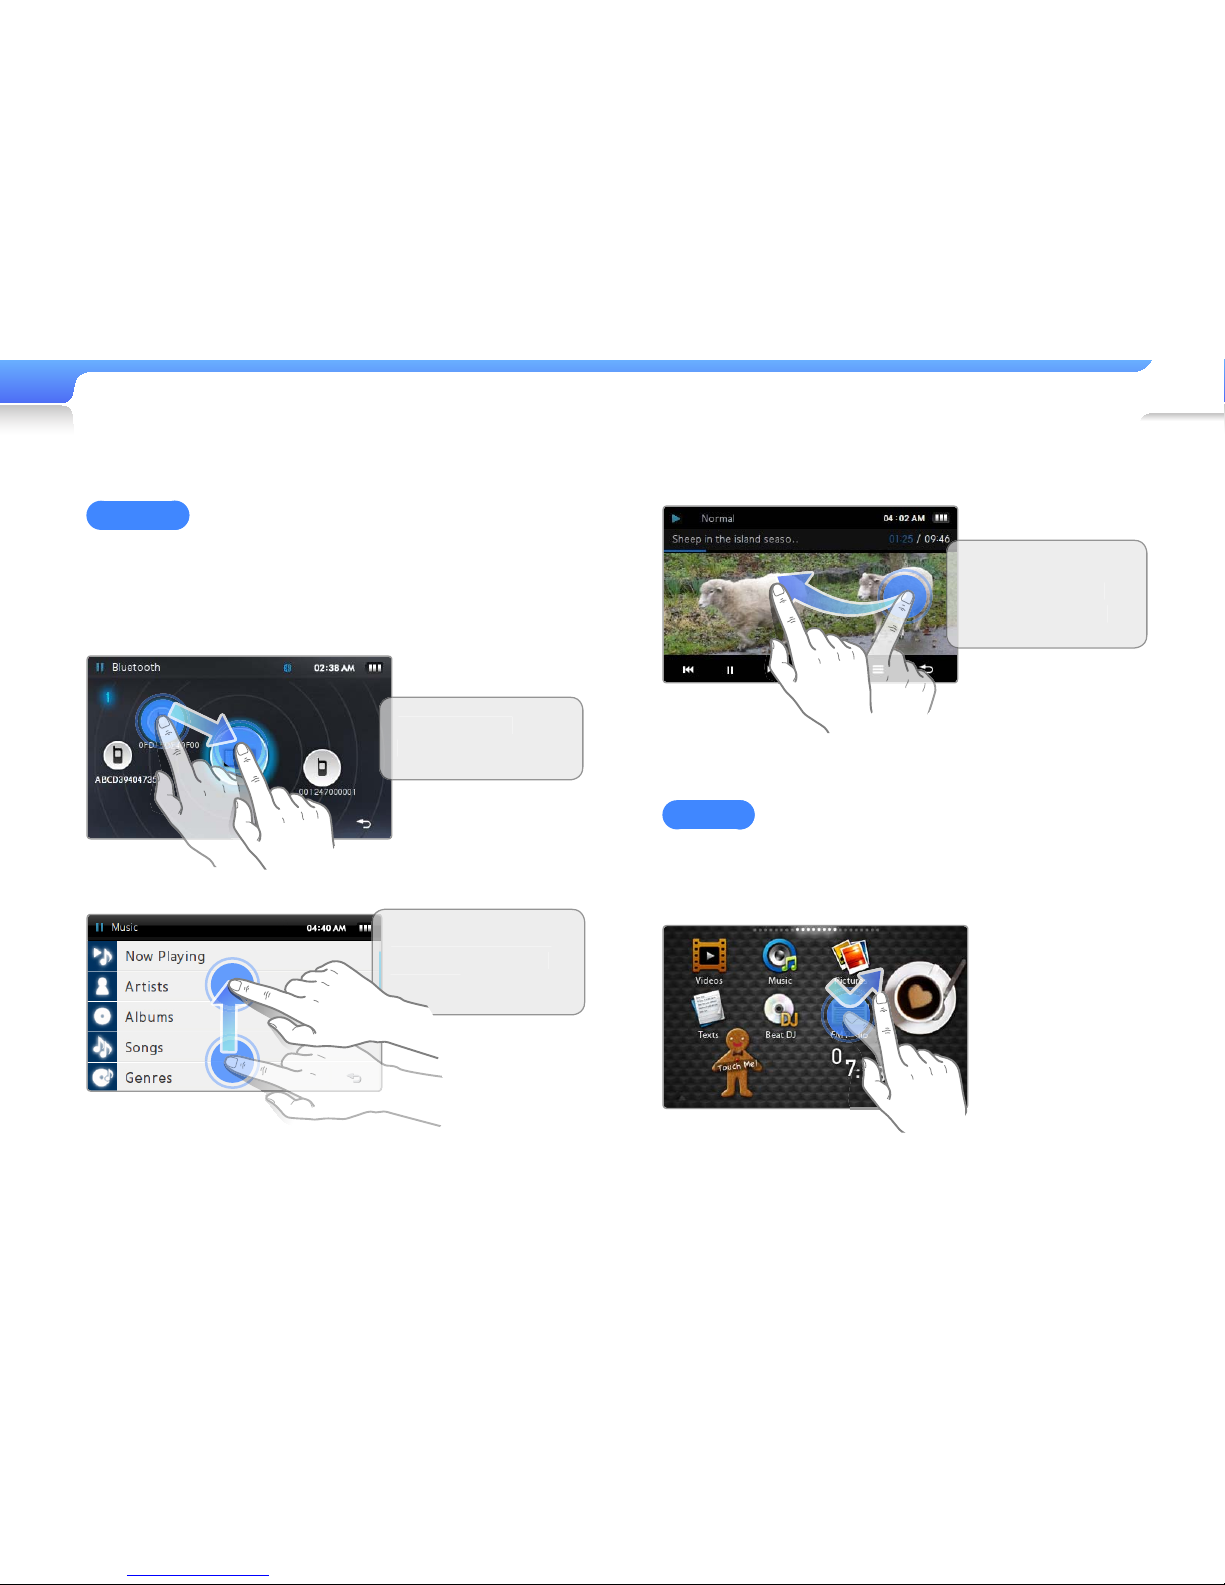
Dragging
To move an item on the screen or browse items, tap and hold
your fi nger on the screen and drag your fi nger.
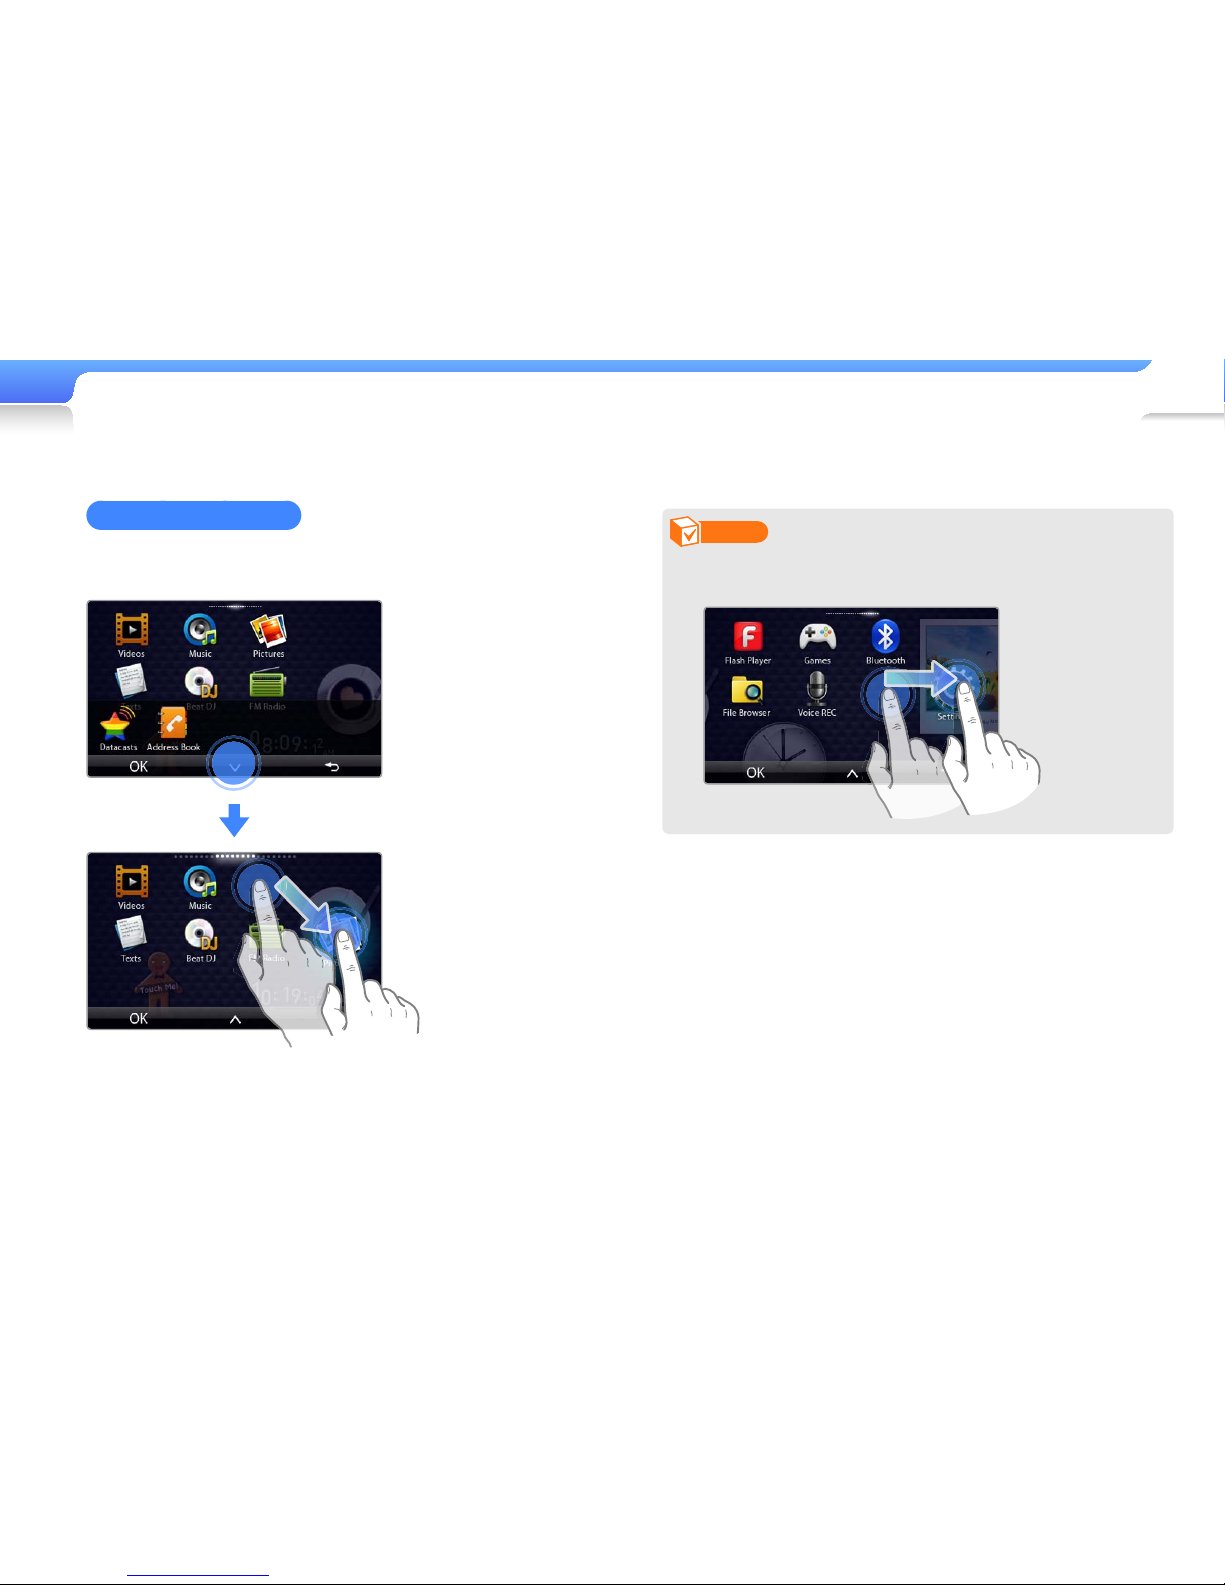
To move to the next screen or fl ip pages, quickly drag your
fi nger in the desired direction.
D
rag an item to
a location you want
Drag from the bottom
t
o the top to scroll up
on the lis
t
Q
uickly drag right to
l
eft to play the next
fi le during playback
Tapping
To select a menu or option, tap the screen once with your fi nger.
You can also open the quick tray or menu tray by tapping the
screen.
15
Use the main
menu screens
Learn to move between
the main menu screens,
change the menu style or
wallpaper, and organize
your favorite menus.
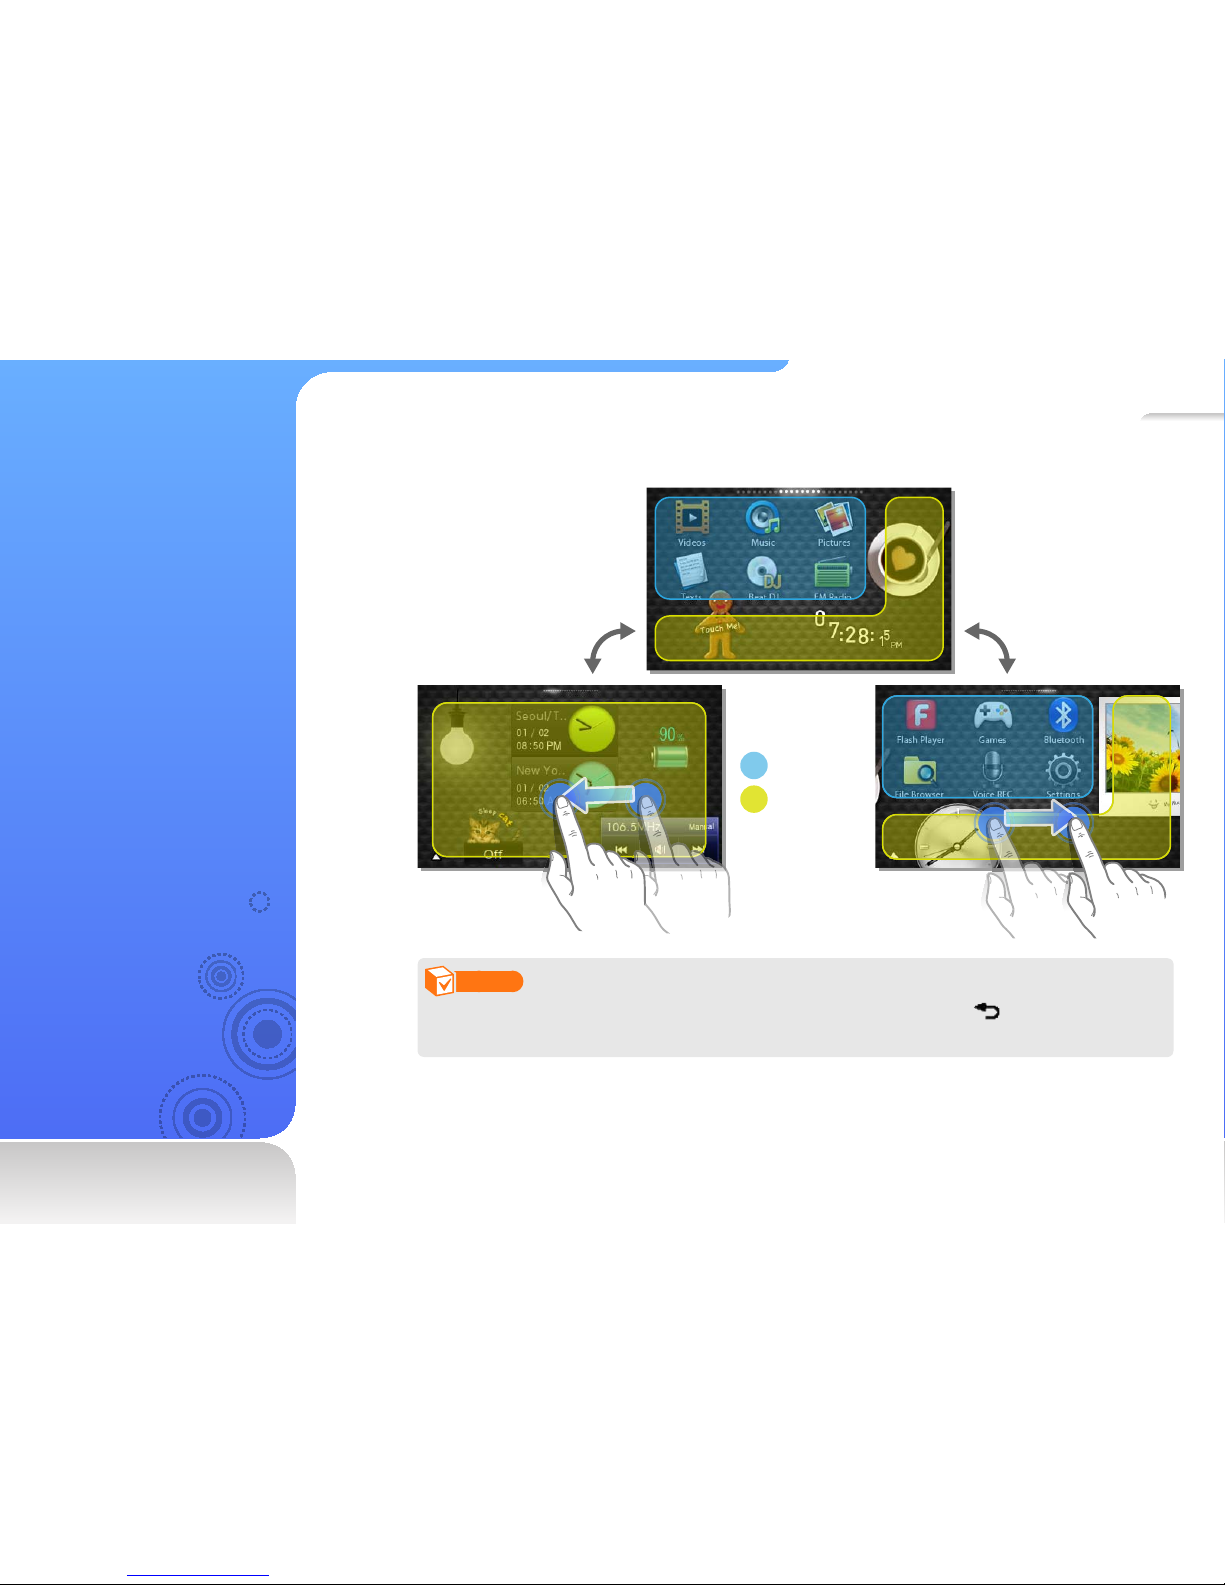
The main menu screens consist of menu icons and widget icons.
Menu icons
Widgets
Note
To return to a main menu screen while using a function, tap and hold at the bottom of the
screen.
Use basic functions > Use the main menu screens
16
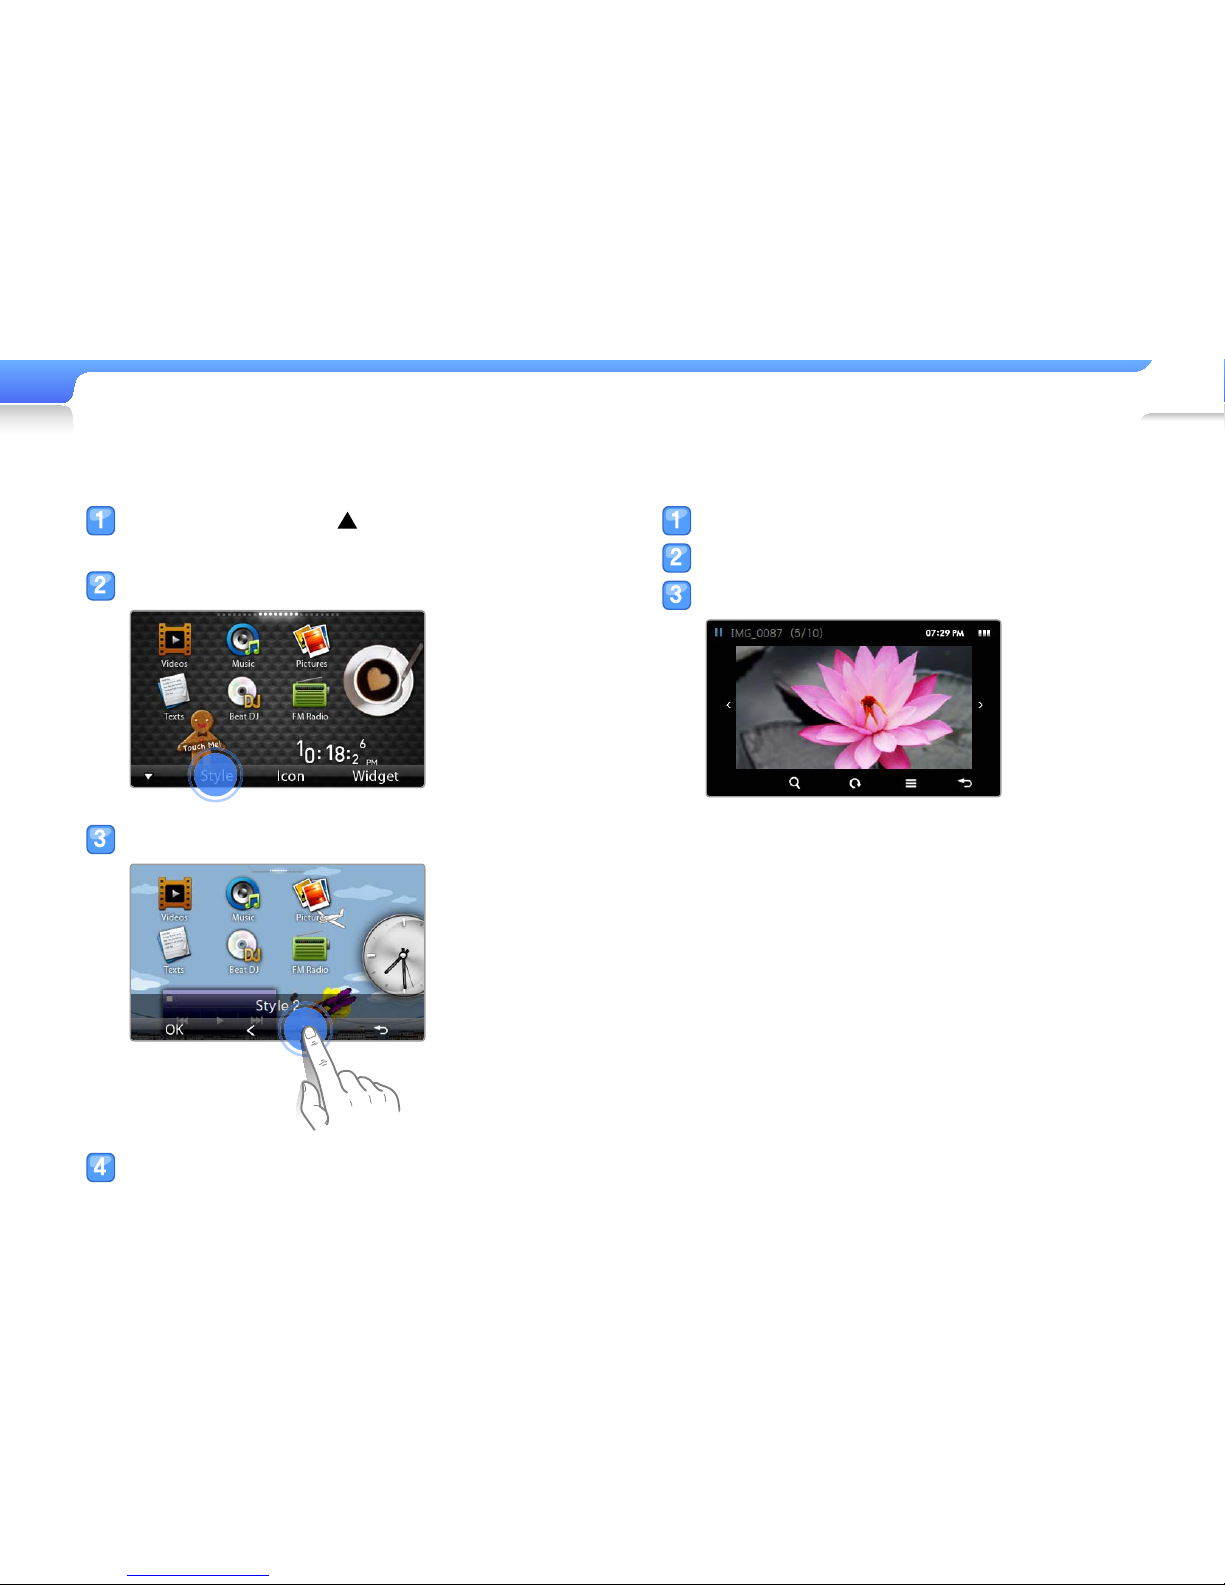
Change the menu style
In the main menu, tap at the bottom of the
screen.
Tap <Style> from the menu tray.
Tap < or > to select a style you want.
Tap <OK> to save the style.
Select a wallpaper
In the main menu, tap and hold an empty space.
Tap an image from the fi le list.
Tap <OK> to save the wallpaper image.

Use basic functions > Use the main menu screens
17
Organize your favorite menus
Your player has three main menu screens by default. You can
add two more screens, and add menu icons that you frequently
use to a menu screen or delete them from the menu screen.
In the main menu, tap at the bottom of the
screen.
Tap <Icon> from the menu tray.
Add or delete menu icons from the menu list.
When you are fi nished, tap <OK>.
Add a menu icon
Drag a menu icon from the menu list to a main menu screen.
Menu list
Delete a menu icon
Drag a menu icon from a main menu screen to the menu list.
Use basic functions > Use the main menu screens
18
Relocate a menu icon
Tap <V> to close the menu list and position the menu icon
anywhere on the screen.
Note
To move a menu icon to a new main menu screen, drag the
icon to the edge of the screen.
19
Use widgets
You can use functional and
decorative widgets.
Widgets are user friendly
shortcuts to commonly
used menus you can add to
a main menu screen.
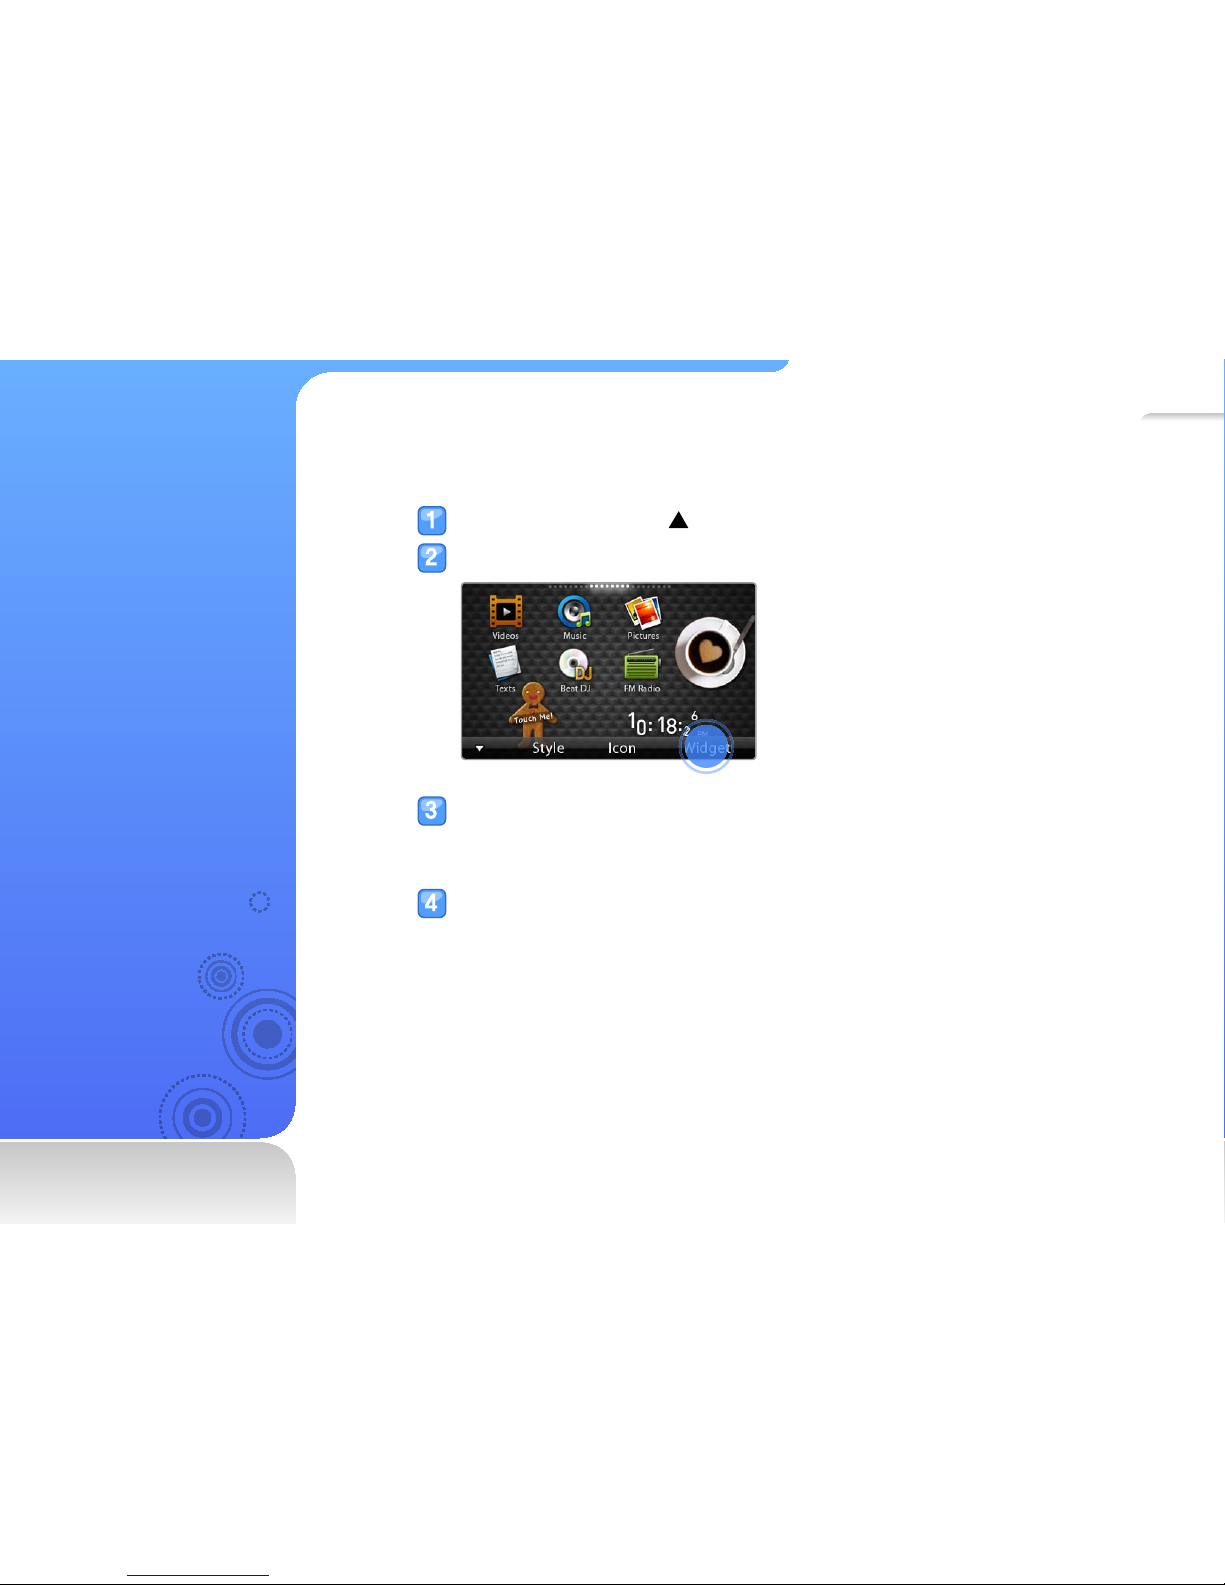
Add widgets to a main menu screen
In the main menu, tap at the bottom of the screen.
Tap <Widget> from the menu tray.
Add or delete widgets from the widget list.
For adding or deleting widgets, see " ■Organize your favorite menus" on page 17.
For information about your widgets, see "
■
Widget list" on page 20.
When you are fi nished, tap <OK>.
Use basic functions > Use widgets
20
Widget list
Widget Function
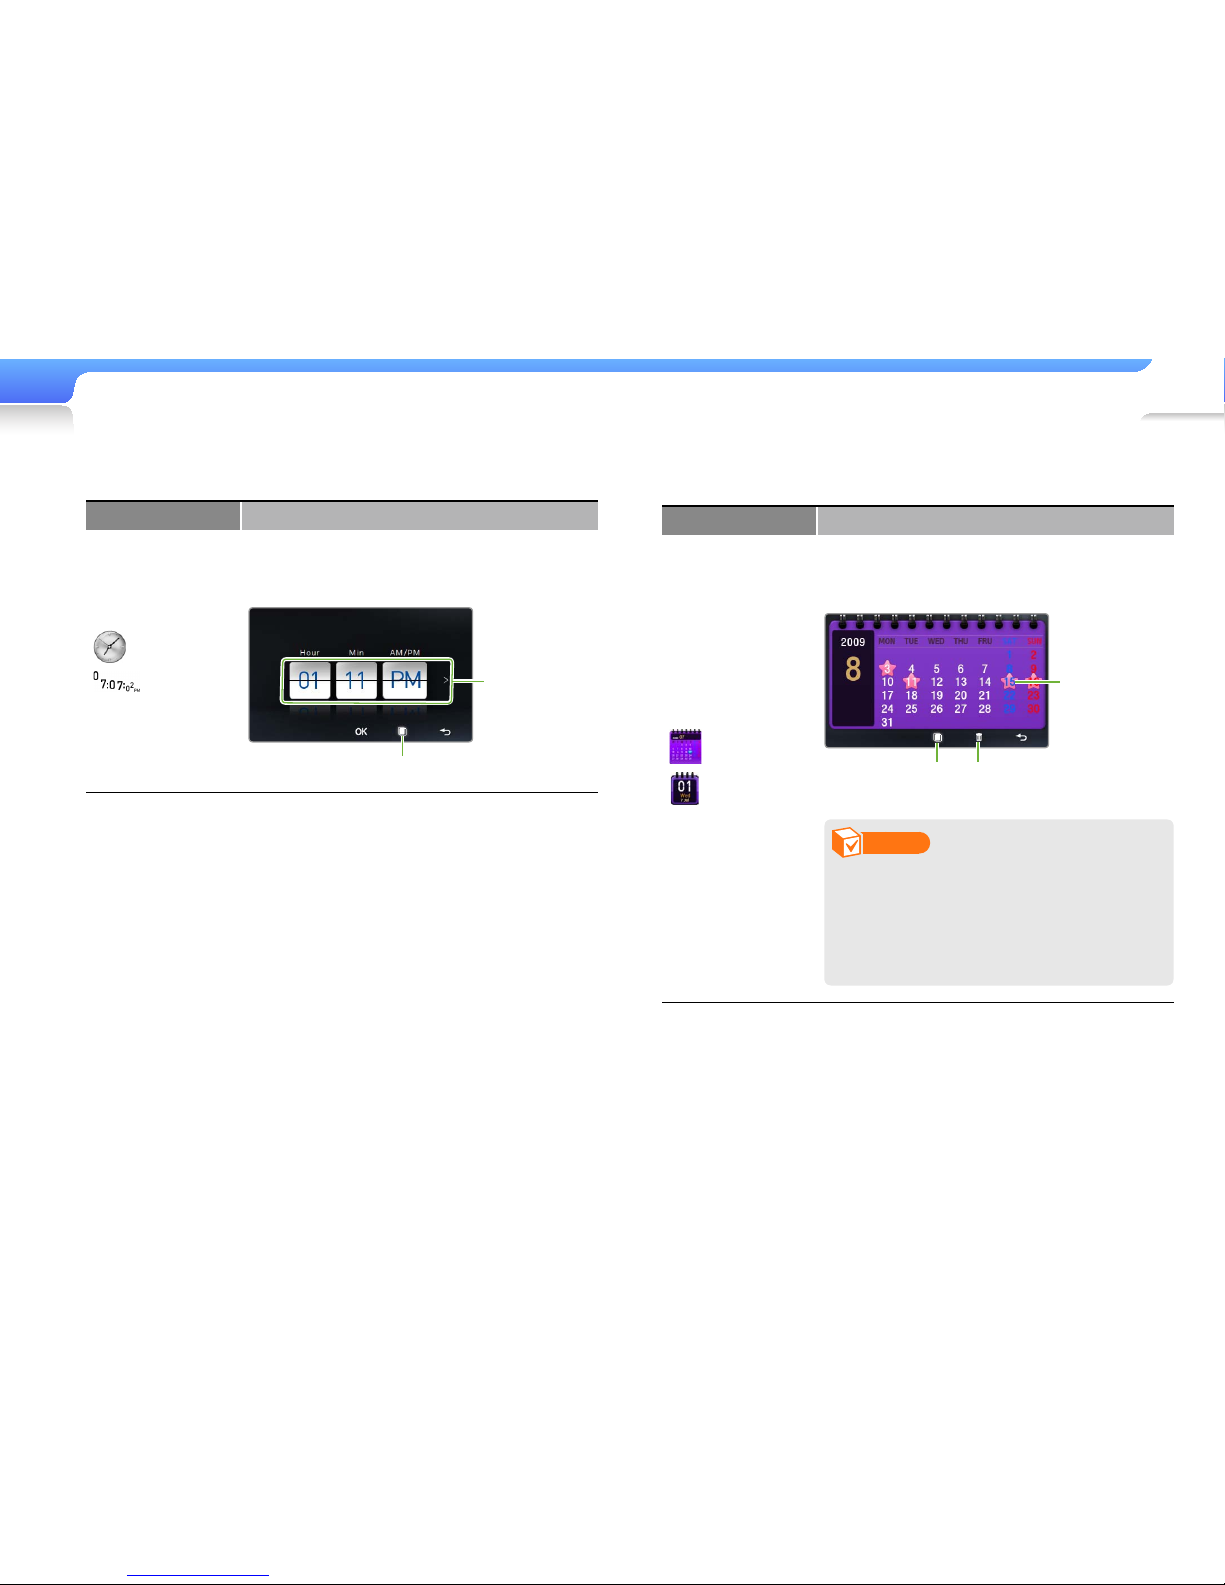
Analog
clock/
Digital clock
View the current time.•
Tap • > to set the current date.
Drag up or down on each unit.
Drag up or
down on each
unit to set the
current time.
Tap to change the clock style
Widget Function
Calendar
View the calendar and scheduled events.•
Drag up or down to move by month. •
Drag left or right to move by year.
Tap to view
scheduled events
for that day
Tap to delete all
scheduled events
T
ap to change the
calendar style
Note
To view scheduled events in the
calendar, download Microsoft Outlook
event fi les (.ics) from a PC. Event fi les
must be saved in <File Browser> →
<My Pack> → <Calendar>.
Use basic functions > Use widgets
21
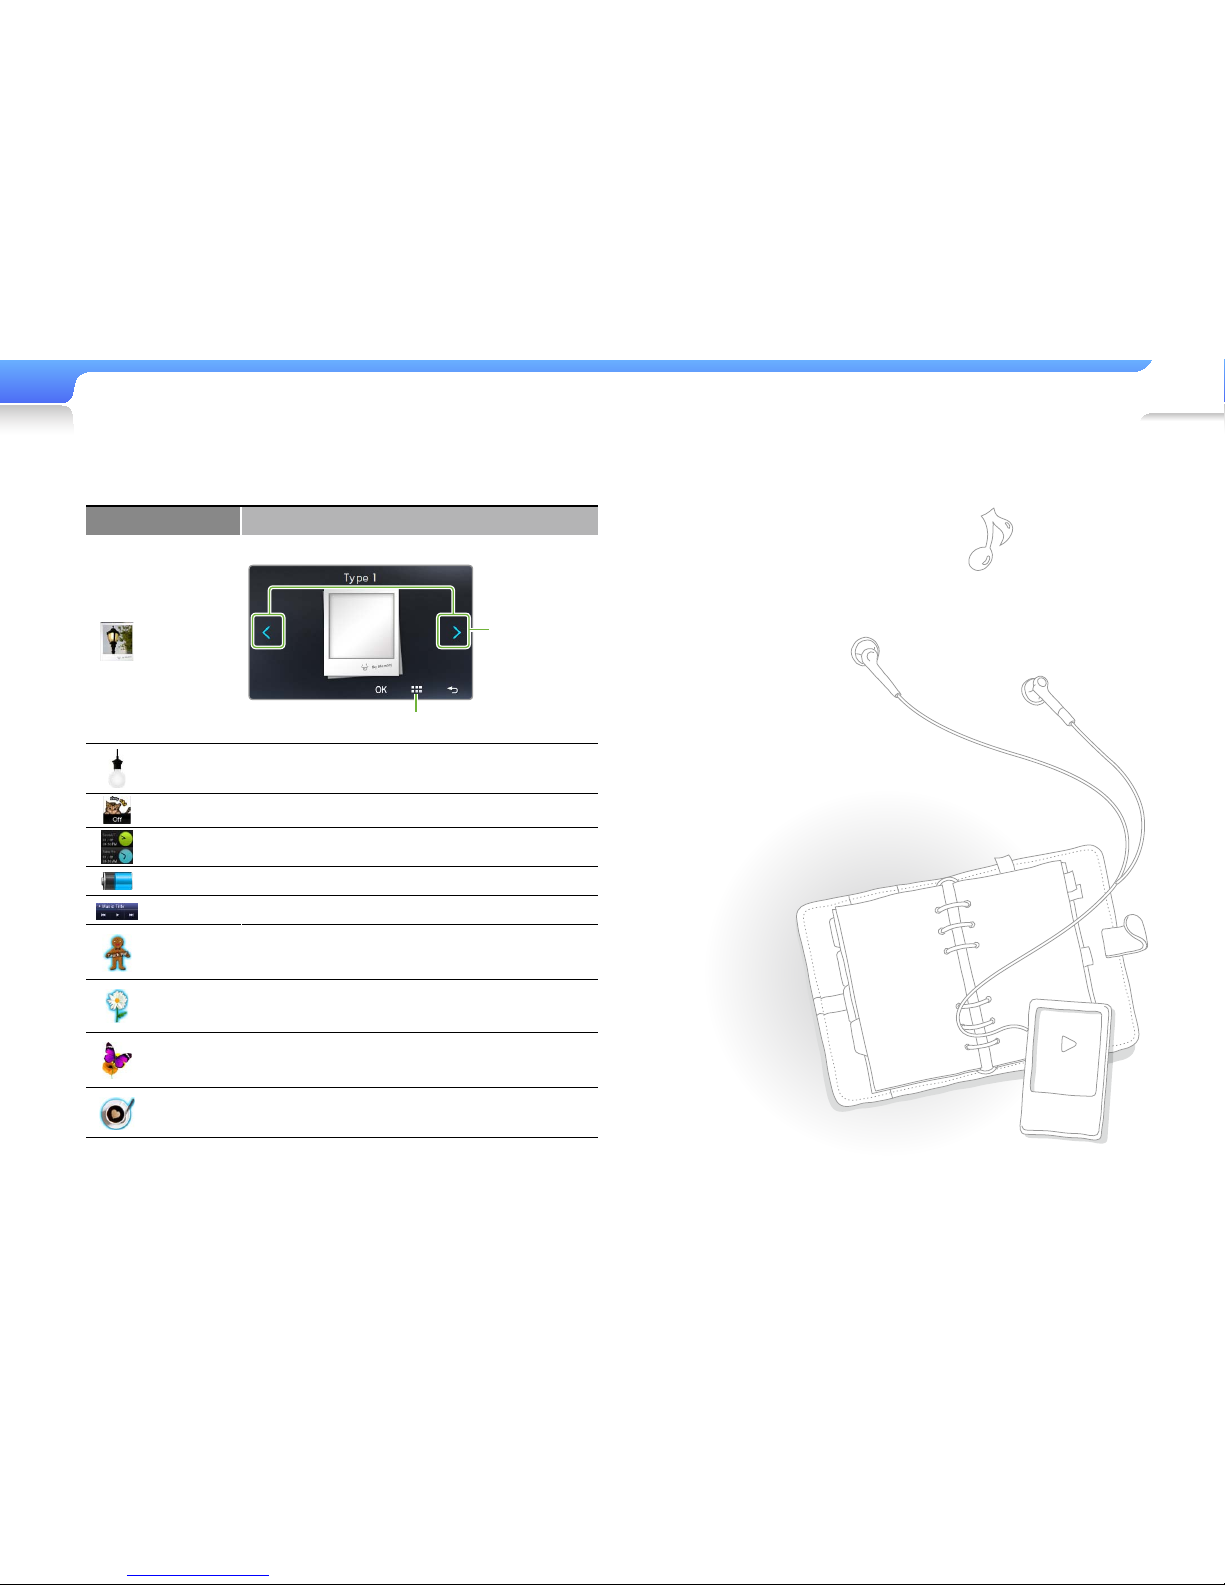
Widget Function
Picture
frame
View your pictures in a frame.
Tap < or > to
change the
frame style
Tap to select a picture to display
Brightness
Adjust the brightness of the screen.
See page 73.
Sleep time
Set the sleep time. See page 74.
Dual clock
View the current time in another country or city.
Battery
Check the remaining battery.
Mini player
Listen to music with the mini player.
Decoration
item
A cookie gradually crumbles.
Decoration
item
Flower petals fl utter.
Decoration
item
A butterfl y circles around a fl ower.
Decoration
item
A cup of coffee steams.
22
Use the quick
tray and
menu tray
Tap the top of the screen to
open the quick tray. Tap the
empty space of the screen
to open the menu tray.
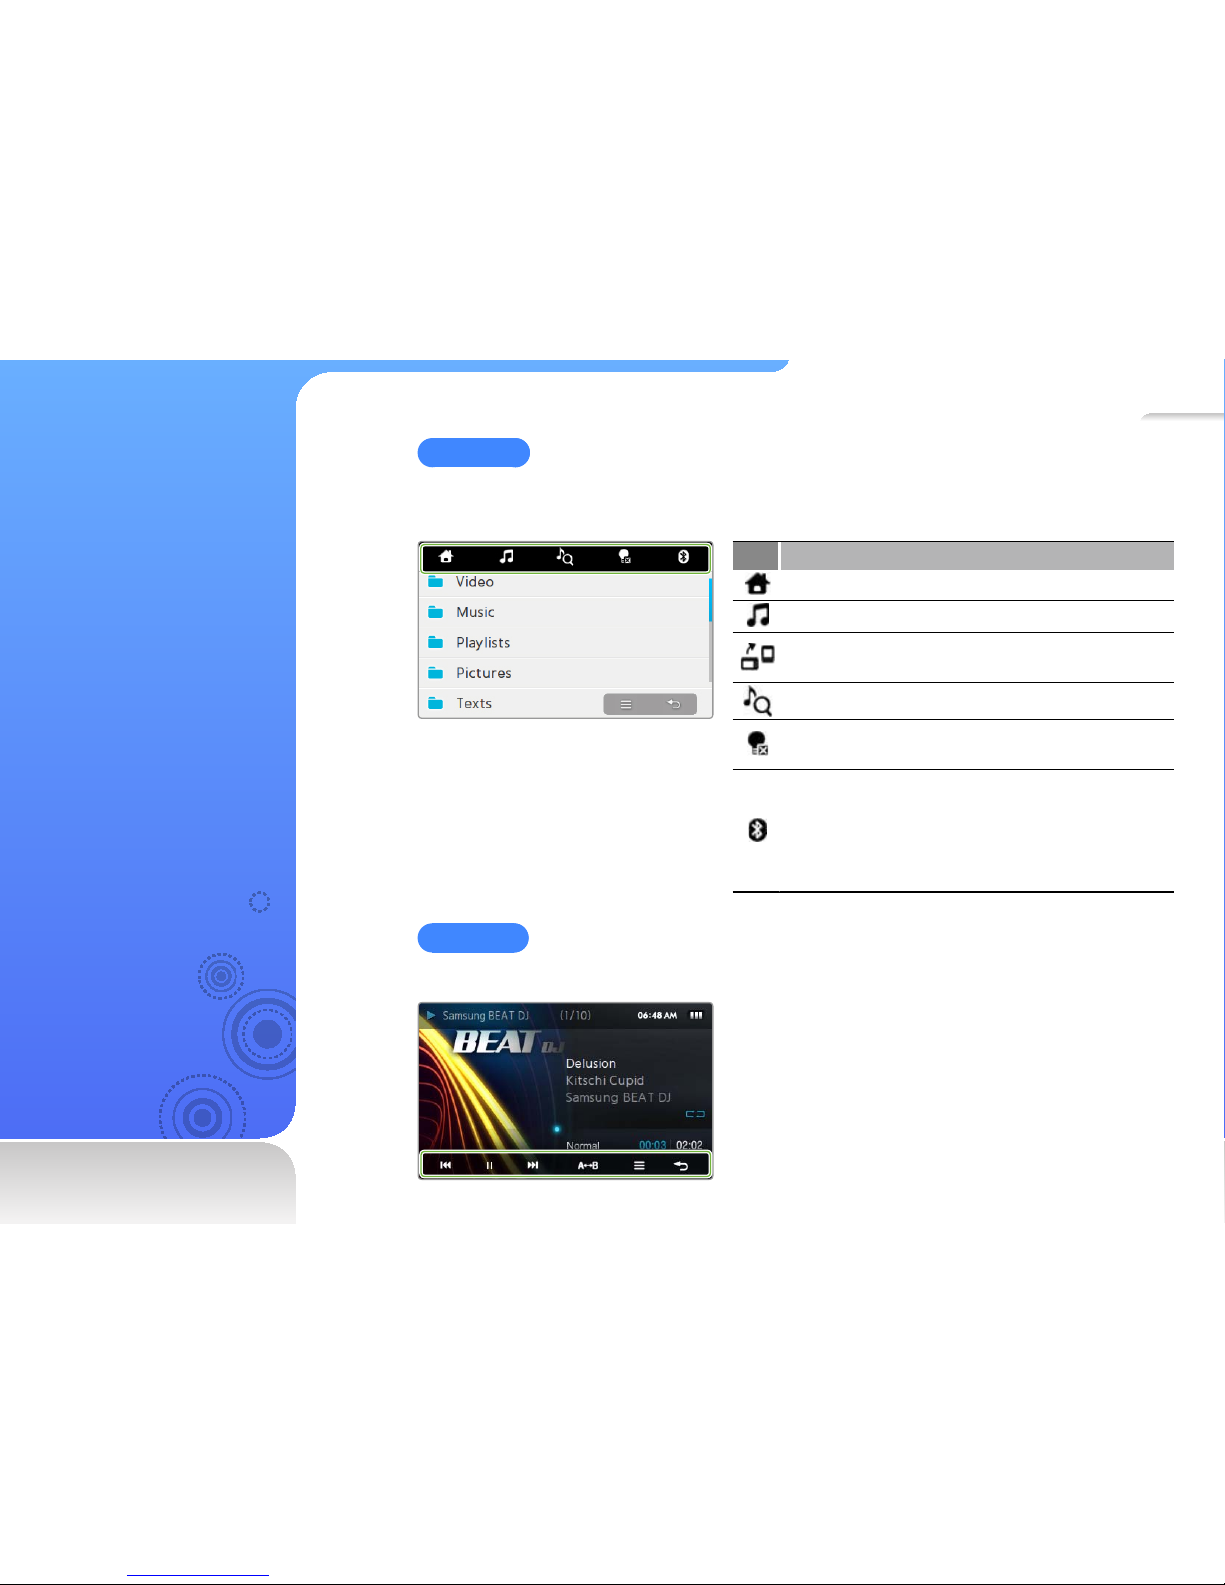
Quick tray
The quick tray provides shortcuts to other functions or allows you to return to a main menu
screen.
Icon Function
Return to a main menu screen.
Launch the mini player. See page 23.
Rotate the screen 90° clockwise (to the right). This
icon is available on the music playback screen.
Search for music fi les. See page 43.
Turn off the screen and lock the touch screen.
See page 75.
Connect the Bluetooth stereo headset your player
was last connected to. If you connect your player
to a Bluetooth-enabled device for the fi rst time, see
"Find and register other Bluetooth-enabled devices"
on page 61.
Menu tray
The menu tray displays options available in the current menu.

23
Use the mini
player
You can use the mini player
to listen to and easily
navigate music fi les while
viewing pictures or text fi les.
Open the quick tray and tap .
Listen to music with the mini player.
Tap to close the
player screen
To Do this
Skip to the previous fi le or the next fi le Tap
or
Search backward or forward in a fi le Tap and hold or
Pause or resume playback
Tap
or
24
Enter text
Enter text using the virtual
keyboard or with the smart
fi nger feature.
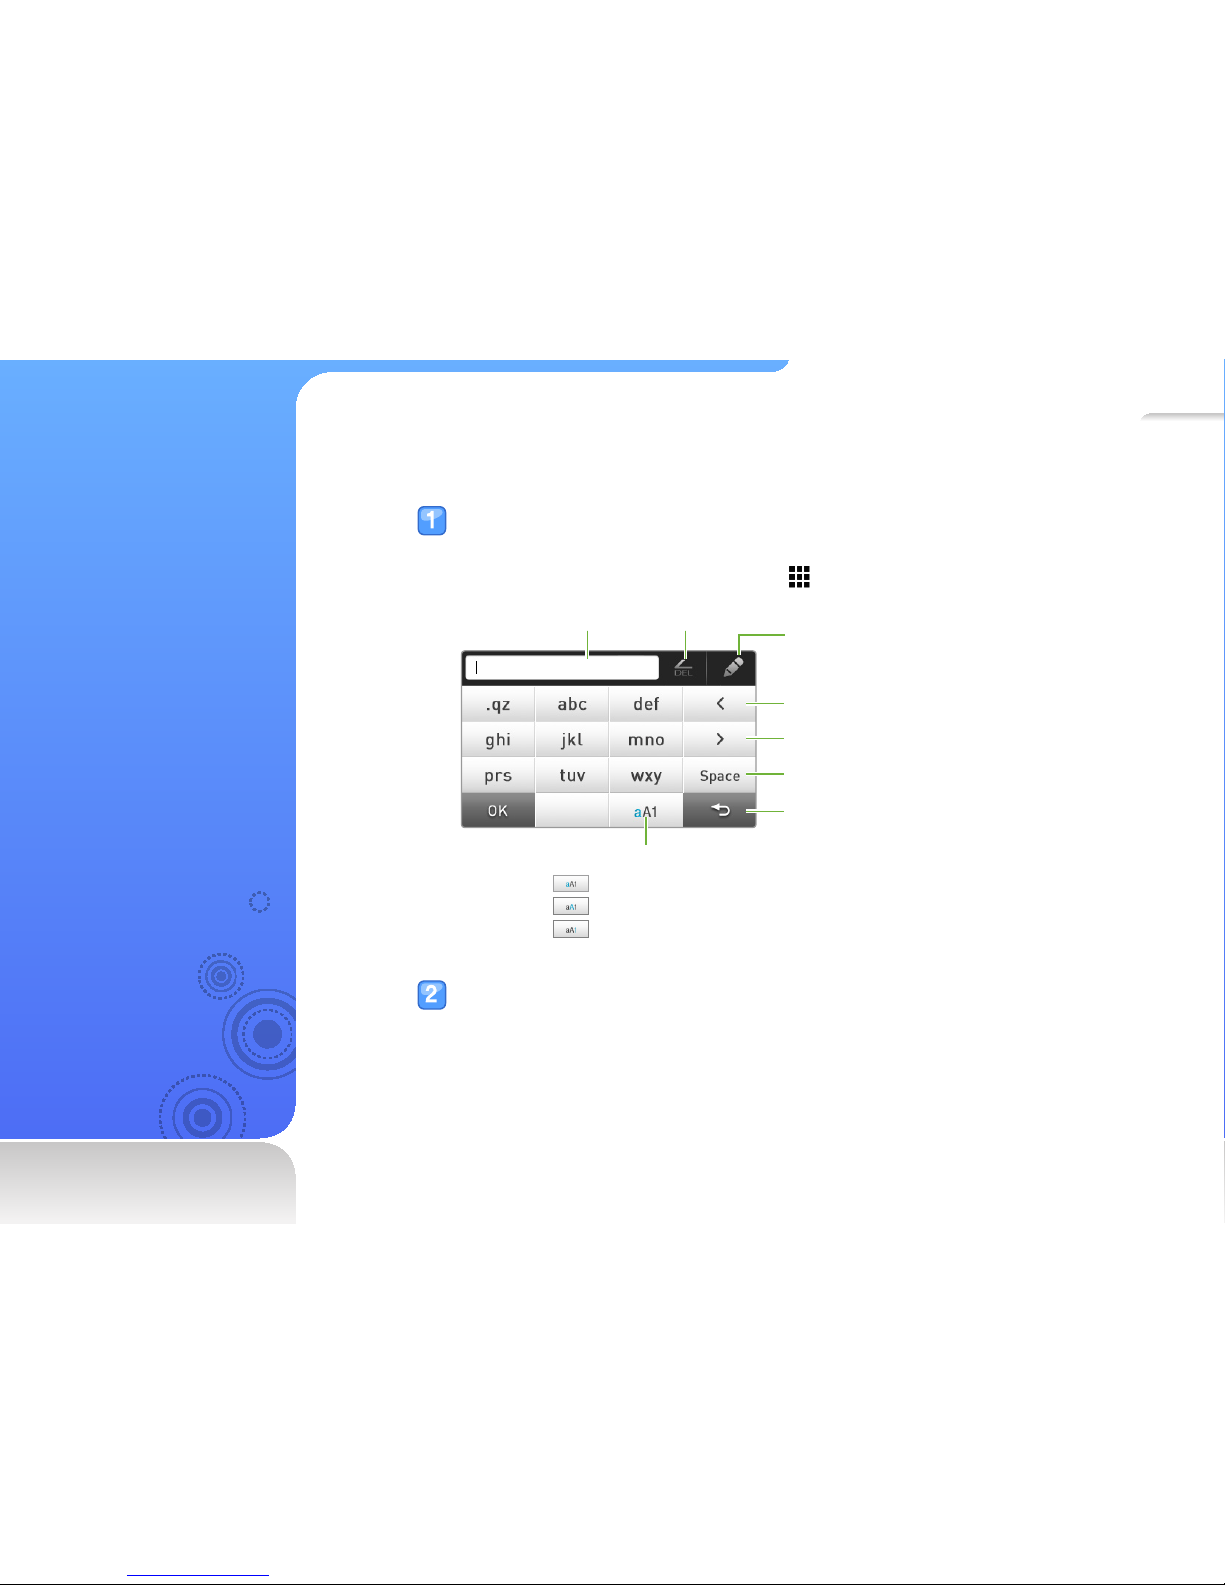
Enter text using the virtual keyboard
Tap an appropriate alphanumeric key until the character you want appears
on the screen.
If the smart fi nger screen appears, tap ■ to switch to the virtual keyboard.
Move the cursor to the left
Move the cursor to the right
Insert a space
Back to the previous screen
Change the text input mode
• : English (lowercase)
• : English (uppercase)
• : numbers
Input fi eld Delete
Switch the text input method
(virtual keyboard ↔ smart fi nger)
When you are fi nished, tap <OK>.
Use basic functions > Enter text
25
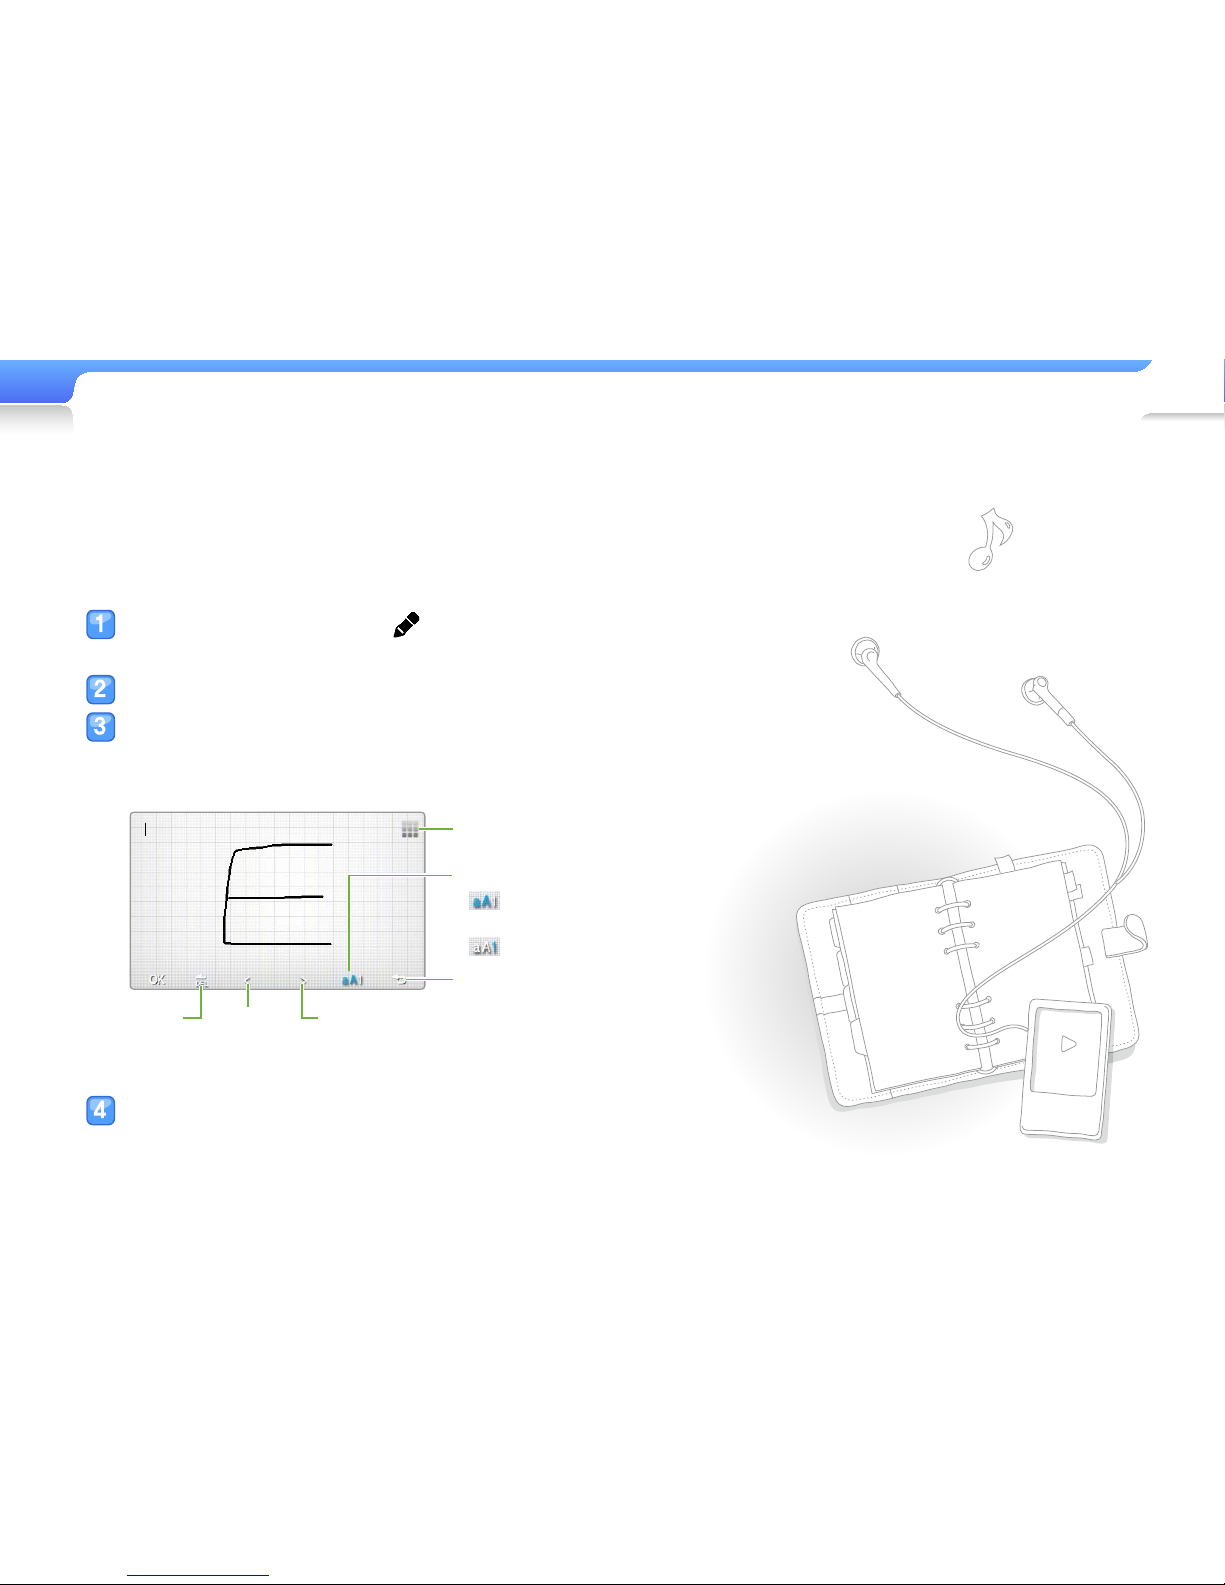
Enter text with the smart fi nger
feature
With the smart fi nger feature, you can write characters anywhere
on the screen using your fi nger.
On the virtual keyboard, tap to switch to the
smart fi nger.
Change the text input mode.
Write each character anywhere on the screen.
Your handwriting is converted to text.
■
▼ When entering a keyword in the music search screen
Move the
cursor to
the left
Move the cursor
to the right
Change the text input mode
•
: English (lowercase or
uppercase)
• : numbers
Back to the previous screen
Delete
Switch the text input method
(virtual keyboard ↔ smart fi nger)
When you are fi nished, tap <OK>.
26
C o n n e c t
your player to
a TV
You can connect your
player to a TV with an
optional TV-OUT cable and
view multimedia fi les, such
as pictures and videos, on
the TV screen.
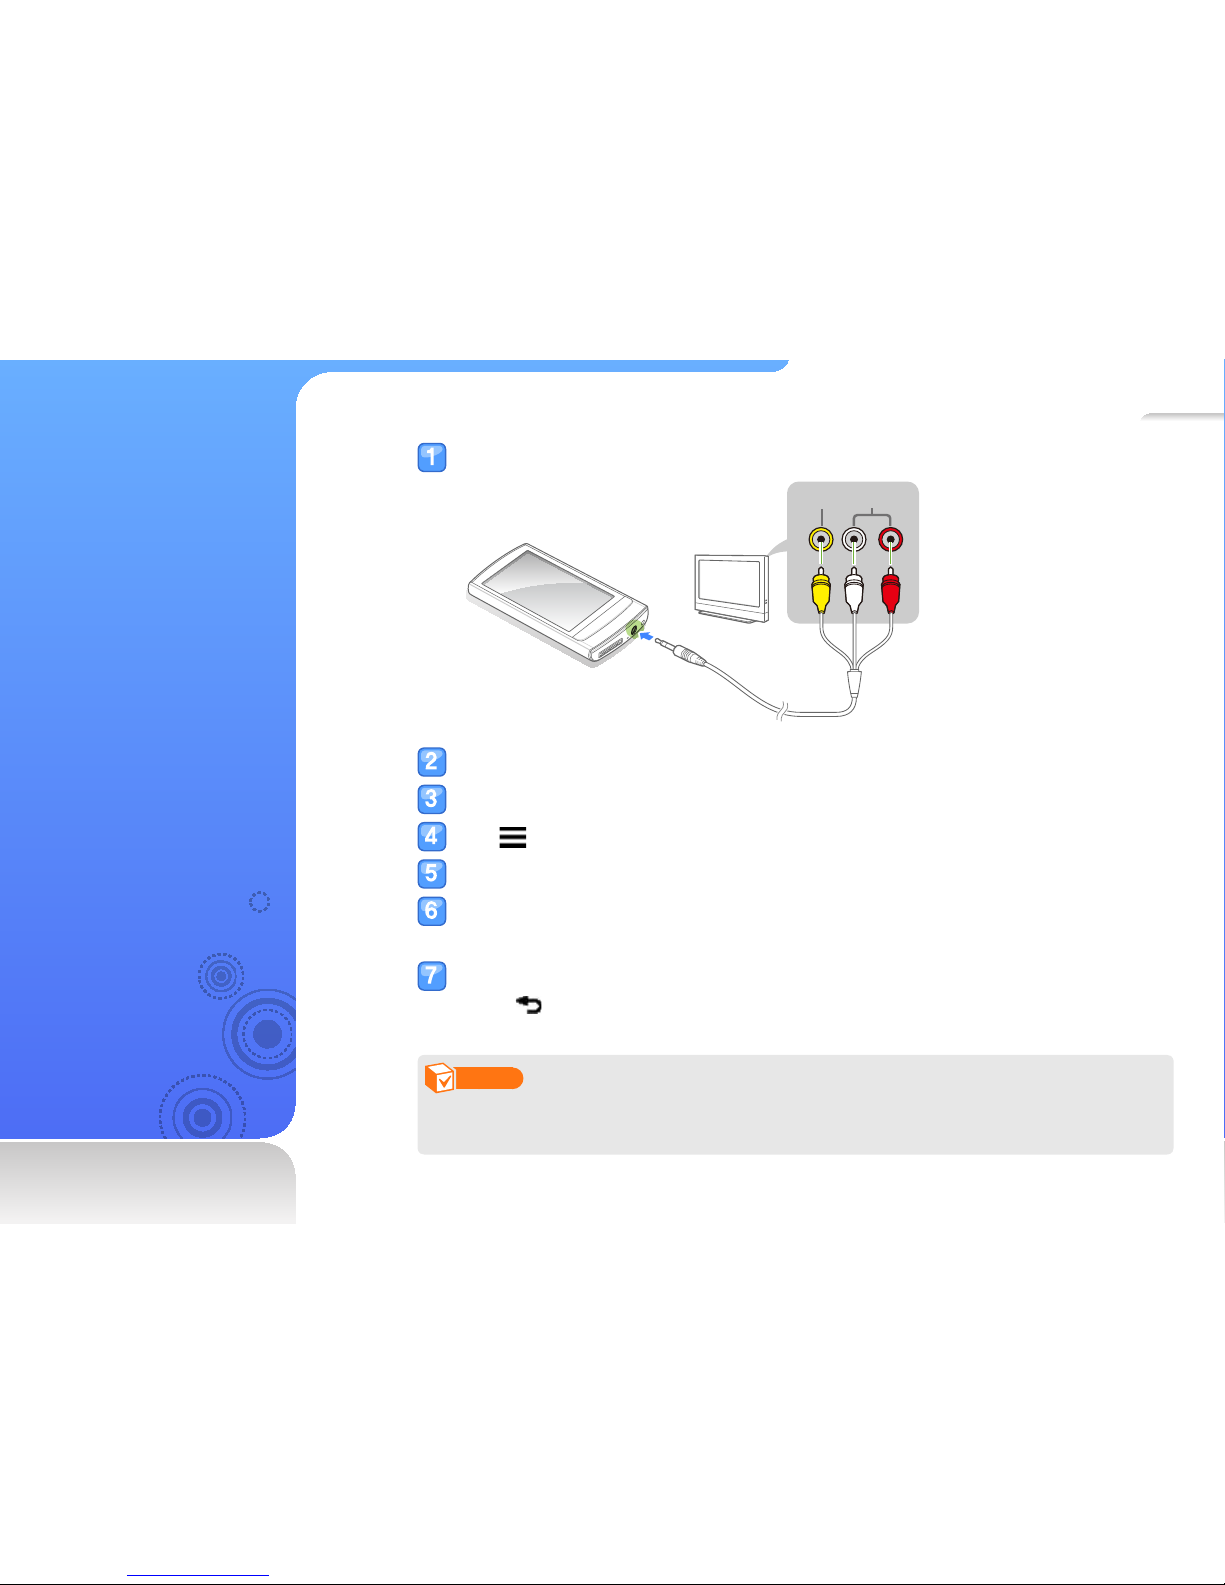
Connect your player to a TV using an optional TV-OUT cable.
Audio
Video
Turn on your TV and switch the TV to the appropriate external input mode.
Turn on your player and view a picture or video.
Tap on the playback screen.
Tap <TV Out> from the option list.
Tap <Yes> from the pop-up window.
The TV screen displays the picture or video you are viewing on your player.
■
Control playback using the menu tray of your player.
Tap ■ to end the connection with the TV.
Note
Some features of your player may not be available when your player is connected to a TV. •
Some TVs may not be compatible with your player.•
Download media fi les .........................................................28
Search for fi les ....................................................................32
Delete fi les ..........................................................................33
Manage media fi les
Download media fi les to your player, and search for or delete fi les
stored in your player.