

Page 1
Washing Machine
User manual
WW80K5***** / WW70K5*****
WW80K5210VW_DC68-03677L-01_EN.indd 1 2017/7/21 15:44:31
Page 2
Contents
Safety information 3
What you need to know about the safety instructions 3
Important safety symbols 3
Important safety precautions 4
Instructions about the WEEE 12
Contents
Installation 13
What’s included 13
Installation requirements 15
Step-by-step installation 17
Before you start 23
Initial settings 23
Laundry guidelines 23
Detergent drawer guidelines 26
Operations 29
Control panel 29
Simple steps to start 30
Cycle overview 31
Special features 34
Settings 36
Maintenance 37
Eco drum clean 37
Smart Check
Emergency drain 39
Cleaning 40
38
Maintenance 44
Recovery from freezing 44
Care against an extended time of disuse 44
Troubleshooting 45
Checkpoints 45
Information codes 49
Specications 52
Fabric care chart 52
Protecting the environment 53
Specication sheet 54
2 English
WW80K5210VW_DC68-03677L-01_EN.indd 2 2017/7/21 15:44:31
Page 3
Safety information
Congratulations on your new Samsung washing machine. This manual contains important
information on the installation, use and care of your appliance. Please take some time to read
this manual to take full advantage of your washing machines many features and benets.
What you need to know about the safety instructions
Please read this manual thoroughly to ensure that you know how to safely and efciently
operate the extensive features and functions of your new appliance. Please store the manual
in a safe location close to the appliance for future reference. Use this appliance only for its
intended purpose as described in this instruction manual.
Warnings and Important Safety Instructions in this manual do not cover all possible
conditions and situations that may occur. It is your responsibility to use common sense,
caution and care when installing, maintaining and operating your washing machine.
Because the following operating instructions cover various models, the characteristics of your
washing machine may differ slightly from those described in this manual and not all warning
signs may be applicable. If you have any questions or concerns, contact your nearest service
centre or nd help and information online at www.samsung.com.
Safety information
Important safety symbols
What the icons and signs in this user manual mean:
WARNING
Hazards or unsafe practices that may result in severe personal injury, death and/or property
damage.
CAUTION
Hazards or unsafe practices that may result in personal injury and/or property damage.
NOTE
Indicates that a risk of personal injury or material damage exists.
English 3
WW80K5210VW_DC68-03677L-01_EN.indd 3 2017/7/21 15:44:32
Page 4
Safety information
These warning signs are here to prevent injury to yourself and others.
Please follow them explicitly.
After reading this manual, store it in a safe place for future reference.
Read all instructions before using the appliance.
As with any equipment that uses electricity and moving parts, potential hazards exist. To
Safety information
safely operate this appliance, familiarise yourself with its operation and exercise care when
using it.
Important safety precautions
To reduce the risk of re, electric shock, or injury to persons when
using your appliance, follow basic precautions, including the following:
WARNING
1. This appliance is not to be used by persons (including children)
with reduced physical, sensory or mental capabilities, or lack of
experience and knowledge, unless they have been given supervision
or instruction concerning use of the appliance by a person
responsible for their safety.
2. For use in Europe: This appliance can be used by children aged from
8 years and above and persons with reduced physical, sensory or
mental capabilities or lack of experience and knowledge if they
have been given supervision or instruction concerning use of the
appliance in a safe way and understand the hazards involved.
Children shall not play with the appliance. Cleaning and user
maintenance shall not be made by children without supervision.
3. Children should be supervised to ensure that they do not play with
the appliance.
4. If the supply cord is damaged, it must be replaced by the
manufacturer, its service agent or similarly qualied persons in order
to avoid a hazard.
4 English
WW80K5210VW_DC68-03677L-01_EN.indd 4 2017/7/21 15:44:32
Page 5
5. Use the new hose-sets supplied with the appliance and do not reuse
the old hose-sets.
6. For appliances with ventilation openings in the base, the carpet must
not obstruct any openings.
7. For use in Europe: Children of less than 3 years should be kept away
unless continuously supervised.
CAUTION
8. In order to avoid a hazard due to inadvertent resetting of the
thermal cut-out, this appliance must not be supplied through an
external switching device, such as a timer, or connected to a circuit
that is regularly switched on and off by the utility.
Critical installation warnings
WARNING
Safety information
The installation of this appliance must be performed by a qualied technician or service
company.
• Failure to do so may result in electric shock, re, an explosion, problems with the product,
or injury.
The appliance is heavy, therefore take care when lifting it.
Plug the power cord into a wall socket that meets local electrical specications. Use the
socket for this appliance only, and do not use an extension cord.
• Sharing a wall socket with other appliances using a power strip or extending the power
cord may result in electric shock or re.
• Ensure that the power voltage, frequency, and current are the same as those of the
product specications. Failure to do so may result in electric shock or re. Plug the power
plug into the wall socket rmly.
English 5
WW80K5210VW_DC68-03677L-01_EN.indd 5 2017/7/21 15:44:32
Page 6
Safety information
Remove all foreign substances such as dust or water from the power plug terminals and
contact points using a dry cloth on a regular basis.
• Unplug the power plug and clean it with a dry cloth.
• Failure to do so may result in electric shock or re.
Plug the power plug into the wall socket so that the cord is running towards the oor.
• If you plug the power plug into the socket in the opposite direction, the electric wires
Safety information
Keep all packaging materials out of the reach of children as these may be dangerous.
• If a child places a bag over its head, it may suffocate.
This appliance must be properly grounded.
Do not ground the appliance to a gas pipe, plastic water pipe, or telephone line.
• This may result in electric shock, re, an explosion, or problems with the product.
• Never plug the power cord into a socket that is not grounded correctly and make sure
within the cable may be damaged and this may result in electric shock or re.
When the appliance, power plug or power cord is damaged, contact your nearest service
centre.
that it is in accordance with local and national regulations.
Do not install this appliance near a heater or any inammable material.
Do not install this appliance in a humid, oily or dusty location, or in a location exposed to
direct sunlight or water (rain drops).
Do not install this appliance in a location exposed to low temperatures.
• Frost may cause the tubes to burst.
Do not install this appliance in a location where gas may leak.
• This may result in electric shock or re.
Do not use an electric transformer.
• This may result in electric shock or re.
Do not use a damaged power plug, damaged power cord, or loose wall socket.
• This may result in electric shock or re.
Do not pull or excessively bend the power cord.
Do not twist or tie the power cord.
Do not hook the power cord over a metal object, place a heavy object on the power cord,
insert the power cord between objects, or push the power cord into the space behind the
appliance.
• This may result in electric shock or re.
6 English
WW80K5210VW_DC68-03677L-01_EN.indd 6 2017/7/21 15:44:32
Page 7
Do not pull the power cord when unplugging the power plug.
• Unplug the power plug by holding the plug.
• Failure to do so may result in electric shock or re.
This appliance should be positioned so that the power plug, the water supply taps, and the
drain pipes are accessible.
Installation cautions
CAUTION
This appliance should be positioned in such a way that the power plug is easily accessible.
• Failure to do so may result in electric shock or re due to electric leakage.
Install your appliance on a solid, level oor that can support its weight.
• Failure to do so may result in abnormal vibrations, movement, noise, or problems with
the product.
Critical usage warnings
Safety information
WARNING
If the appliance is ooded, turn off the water & power supplies immediately and contact your
nearest service centre.
• Do not touch the power plug with wet hands.
• Failure to do so may result in electric shock.
If the appliance generates a strange noise, a burning smell, or smoke, unplug the power plug
immediately and contact your nearest service centre.
• Failure to do so may result in electric shock or re.
In the event of a gas leak (such as propane gas, LP gas, etc.), ventilate immediately without
touching the power plug. Do not touch the appliance or power cord.
• Do not use a ventilating fan.
• A spark may result in an explosion or re.
Do not let children play in or on the washing machine. In addition, when disposing of the
appliance, remove the washing machine door lever.
• If trapped inside the product, children may suffocate to death.
Make sure to remove the packaging (sponge, styrofoam) attached to the bottom of the
washing machine before using it.
English 7
WW80K5210VW_DC68-03677L-01_EN.indd 7 2017/7/21 15:44:32
Page 8
Safety information
Do not wash items contaminated with gasoline, kerosene, benzene, paint thinner, alcohol or
other inammable or explosive substances.
• This may result in electric shock, re, or an explosion.
Do not open the washing machine door by force while it is operating (high-temperature
washing/drying/spinning).
• Water owing out of the washing machine may result in burns or cause the oor to be
Safety information
• Opening the door by force may result in damage to the product or injury.
Do not insert your hand under the washing machine while an operation is in progress.
• This may result in injury.
Do not touch the power plug with wet hands.
• This may result in electric shock.
Do not turn the appliance off by unplugging the power plug while an operation is in progress.
• Plugging the power plug into the wall socket again may cause a spark and result in
slippery. This may result in injury.
electric shock or re.
Do not let children or the inrm use this washing machine without proper supervision. Do
not let children climb in or onto the appliance.
• This may result in electric shock, burns or injury.
Do not insert your hand or a metal object under the washing machine while it is operating.
• This may result in injury.
Do not unplug the appliance by pulling the power cord. Always grip the plug rmly and pull
it straight out of the outlet.
• Damage to the power cord may cause a short-circuit, re and/or electric shock.
Do not attempt to repair, disassemble, or modify the appliance yourself.
• Do not use a fuse (such as copper, steel wire, etc.) other than a standard fuse.
• When the appliance needs to be repaired or reinstalled, contact your nearest service
centre.
• Failure to do so may result in electric shock, re, problems with the product, or injury.
If the water supply hose comes loose from the water tap and oods the appliance, unplug the
power plug.
• Failure to do so may result in electric shock or re.
Unplug the power plug when the appliance is not being used for long periods of time or
during a thunder or lightning storm.
• Failure to do so may result in electric shock or re.
8 English
WW80K5210VW_DC68-03677L-01_EN.indd 8 2017/7/21 15:44:32
Page 9
If any foreign substance enters into the appliance, unplug the power plug and contact you
nearest Samsung Customer Service.
• This may result in electric shock or re.
Do not let children (or pets) play in or on your washing machine. The washing machine door
does not open easily from the inside and children may be seriously injured if trapped inside.
Usage cautions
CAUTION
When the washing machine is contaminated by a foreign substance such as detergent, dirt,
food waste, etc., unplug the power plug and clean the washing machine using a damp, soft
cloth.
• Failure to do so may result in discolouration, deformation, damage, or rust.
The front glass may be broken by a strong impact. Take care when using the washing
machine.
• If the glass is broken, it may result in injury.
After a water supply failure or when reconnecting the water supply hose, open the water tap
slowly.
Safety information
Open the water tap slowly after a long period of non-use.
• The air pressure in the water supply hose or the water pipe may damage a product part
or result in a water leak.
If a draining error occurs during an operation, check if there is a draining problem.
• If the washing machine is used when it is ooded because of a draining problem, it may
result in electric shock or re.
Insert the laundry into the washing machine completely so that the laundry does not get
caught in the door.
• If laundry gets caught in the door, it may result in damage to the laundry or the washing
machine, or result in a water leak.
Turn the water supply off when the washing machine is not being used.
Ensure that the screws on the water supply hose connector are properly tightened.
• Failure to do so may result in property damage or injury.
Ensure that the rubber seal and front door glass are not contaminated by a foreign substance
(e.g. waste, thread, hair, etc.).
• If a foreign substance is caught in the door or the door is not completely closed, it may
cause a water leak.
English 9
WW80K5210VW_DC68-03677L-01_EN.indd 9 2017/7/21 15:44:32
Page 10
Safety information
Open the water tap and check if the water supply hose connector is rmly tightened and that
there is no water leak before using the product.
• If the screws on the water supply hose connector are loose, it may result in a water leak.
The product you have purchased is designed for domestic use only.
Using the product for business purposes qualies as a product misuse. In this case, the
Safety information
product will not be covered by the standard warranty provided by Samsung and no
responsibility can be attributed to Samsung for malfunctions or damages resulting from such
misuse.
Do not stand on the appliance or place objects (such as laundry, lighted candles, lighted
cigarettes, dishes, chemicals, metal objects, etc.) on the appliance.
• This may result in electric shock, re, problems with the product, or injury.
Do not spray volatile material such as insecticide onto the surface of the appliance.
• As well as being harmful to humans, this may result in electric shock, re or problems
Do not place objects that generate electromagnetic elds near the washing machine.
• This may result in injury due to a malfunction.
with the product.
Water drained during a high-temperature wash or drying cycle is hot. Do not touch the water.
• This may result in burns or injury.
Do not wash, spin, or dry water-proof seats, mats, or clothing (*) unless your appliance has a
special cycle for washing these items.
(*): Woollen bedding, rain covers, shing vests, ski pants, sleeping bags, diaper covers, sweat
suits, and bicycle, motor cycle and car covers, etc.
• Do not wash thick or hard mats even if the washing machine mark is on the care label.
This may result in injury or damage to the washing machine, walls, oor, or clothing due
to abnormal vibrations.
• Do not wash throw rugs or doormats with rubber backing. The rubber backing may come
off and stick to inside the drum, and this may result in malfunction such as a drainage
error.
Do not operate the washing machine when the detergent drawer is removed.
• This may result in electric shock or injury due to a water leak.
Do not touch the insides of the drum during or just after drying as it is hot.
• This may result in burns.
Do not insert your hand into the detergent drawer.
• This may result in injury as your hand may be caught by the detergent input device.
• The liquid detergent guide (applicable models only) is not used for powder detergent.
Remove the guide when using powder detergent.
10 English
WW80K5210VW_DC68-03677L-01_EN.indd 10 2017/7/21 15:44:32
Page 11
Do not place any objects (such as shoes, food waste, animals) other than laundry into the
washing machine.
• This may result in damage to the washing machine, or injury and death in the case of
pets due to the abnormal vibrations.
Do not press the buttons using sharp objects such as pins, knifes, ngernails, etc.
• This may result in electric shock or injury.
Do not wash laundry contaminated by oils, creams or lotions usually found in skincare shops
or massage clinics.
• This may cause the rubber seal to become deformed and result in a water leak.
Do not leave metal objects such as safety pins, hair pins or bleach in the drum for long
periods of time.
• This may cause the drum to rust.
• If rust starts appearing on the surface of the drum, apply a (neutral) cleansing agent to
the surface and use a sponge to clean it. Never use a metal brush.
Do not use dry cleaning detergent directly and do not wash, rinse, or spin laundry
contaminated by dry cleaning detergent.
• This may result in spontaneous combustion or ignition due to the heat from the oxidation
of the oil.
Do not use water from water cooling/heating devices.
• This may result in problems with the washing machine.
Safety information
Do not use natural hand-washing soap for the washing machine.
• If it hardens and accumulates inside the washing machine, it may result in problems with
the product, discolouration, rust, or bad odours.
Place socks and brassieres in a washing net and wash them with the other laundry.
Do not wash large laundry items such as bedding in the washing net.
• Failure to do so may result in injury due to abnormal vibrations.
Do not use hardened detergent.
• If it accumulates inside the washing machine, it may result in a water leak.
Make sure that the pockets of all the clothing items to be washed are empty.
• Hard, sharp objects such as coins, safety pins, nails, screws, or stones can cause extensive
damage to the appliance.
Do not wash clothing with large buckles, buttons or other heavy metal objects.
Sort the laundry by colour on the basis of its colorfastness and select the recommended
cycle, water temperature and additional functions.
• This may result in discolouration or fabric damage.
English 11
WW80K5210VW_DC68-03677L-01_EN.indd 11 2017/7/21 15:44:32
Page 12
Safety information
Take care that children’s ngers are not caught in the door when you close it.
• Failure to do so may result in injury.
Critical cleaning warnings
WARNING
Safety information
Do not clean the appliance by spraying water directly onto it.
Do not use the a strong acidic cleaning agent.
Do not use benzene, thinner or alcohol to clean the appliance.
• This may result in discolouration, deformation, damage, electric shock or re.
Before cleaning or performing maintenance, unplug the appliance from the wall socket.
• Failure to do so may result in electric shock or re.
Instructions about the WEEE
For information on Samsung’s environmental commitments and product speci regulatory
obligations e.g. REACH visit: samsung.com/uk/aboutsamsung/samsungelectronics/
corporatecitizenship/data_corner.html
Correct Disposal of This Product (Waste Electrical & Electronic
Equipment)
(Applicable in countries with separate collection systems)
This marking on the product, accessories or literature indicates that
the product and its electronic accessories (e.g. charger, headset,
USB cable) should not be disposed of with other household waste
at the end of their working life. To prevent possible harm to the
environment or human health from uncontrolled waste disposal,
please separate these items from other types of waste and recycle
them responsibly to promote the sustainable reuse of material
resources.
Household users should contact either the retailer where they
purchased this product, or their local government ofce, for details
of where and how they can take these items for environmentally
safe recycling.
Business users should contact their supplier and check the terms and
conditions of the purchase contract. This product and its electronic
accessories should not be mixed with other commercial wastes for
disposal.
12 English
WW80K5210VW_DC68-03677L-01_EN.indd 12 2017/7/21 15:44:33
Page 13
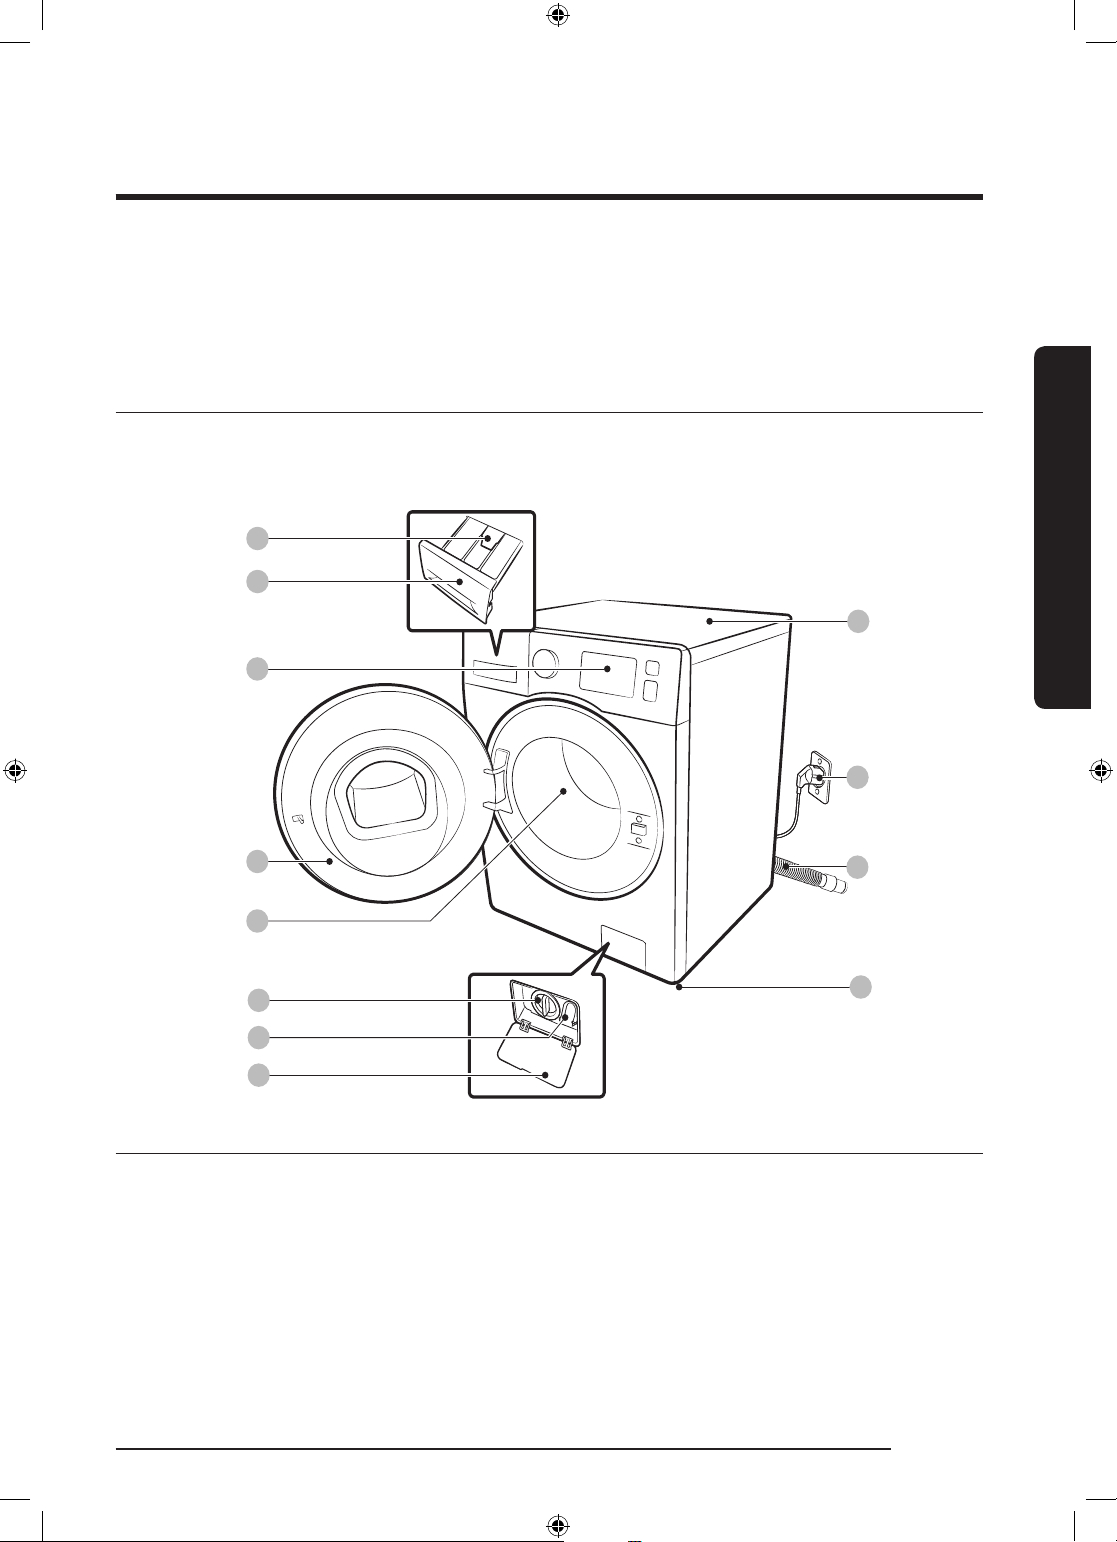
Installation
06
08
07
01
02
03
04
05
12
09
10
11
Follow these instructions carefully to ensure proper installation of the washing machine and
to prevent accidents when doing laundry.
What’s included
Make sure all the parts are included in the product package. If you have a problem with
the washing machine or the parts, contact a local Samsung customer centre or the retailer.
Installation
01 Release lever 02 Detergent drawer 03 Control panel
04 Door 05 Drum 06 Pump lter
07 Emergency drain tube 08 Filter cover 09 Worktop
10 Power plug 11 Drain hose 12 Levelling feet
English 13
WW80K5210VW_DC68-03677L-01_EN.indd 13 2017/7/21 15:44:37
Page 14
Installation
Installation
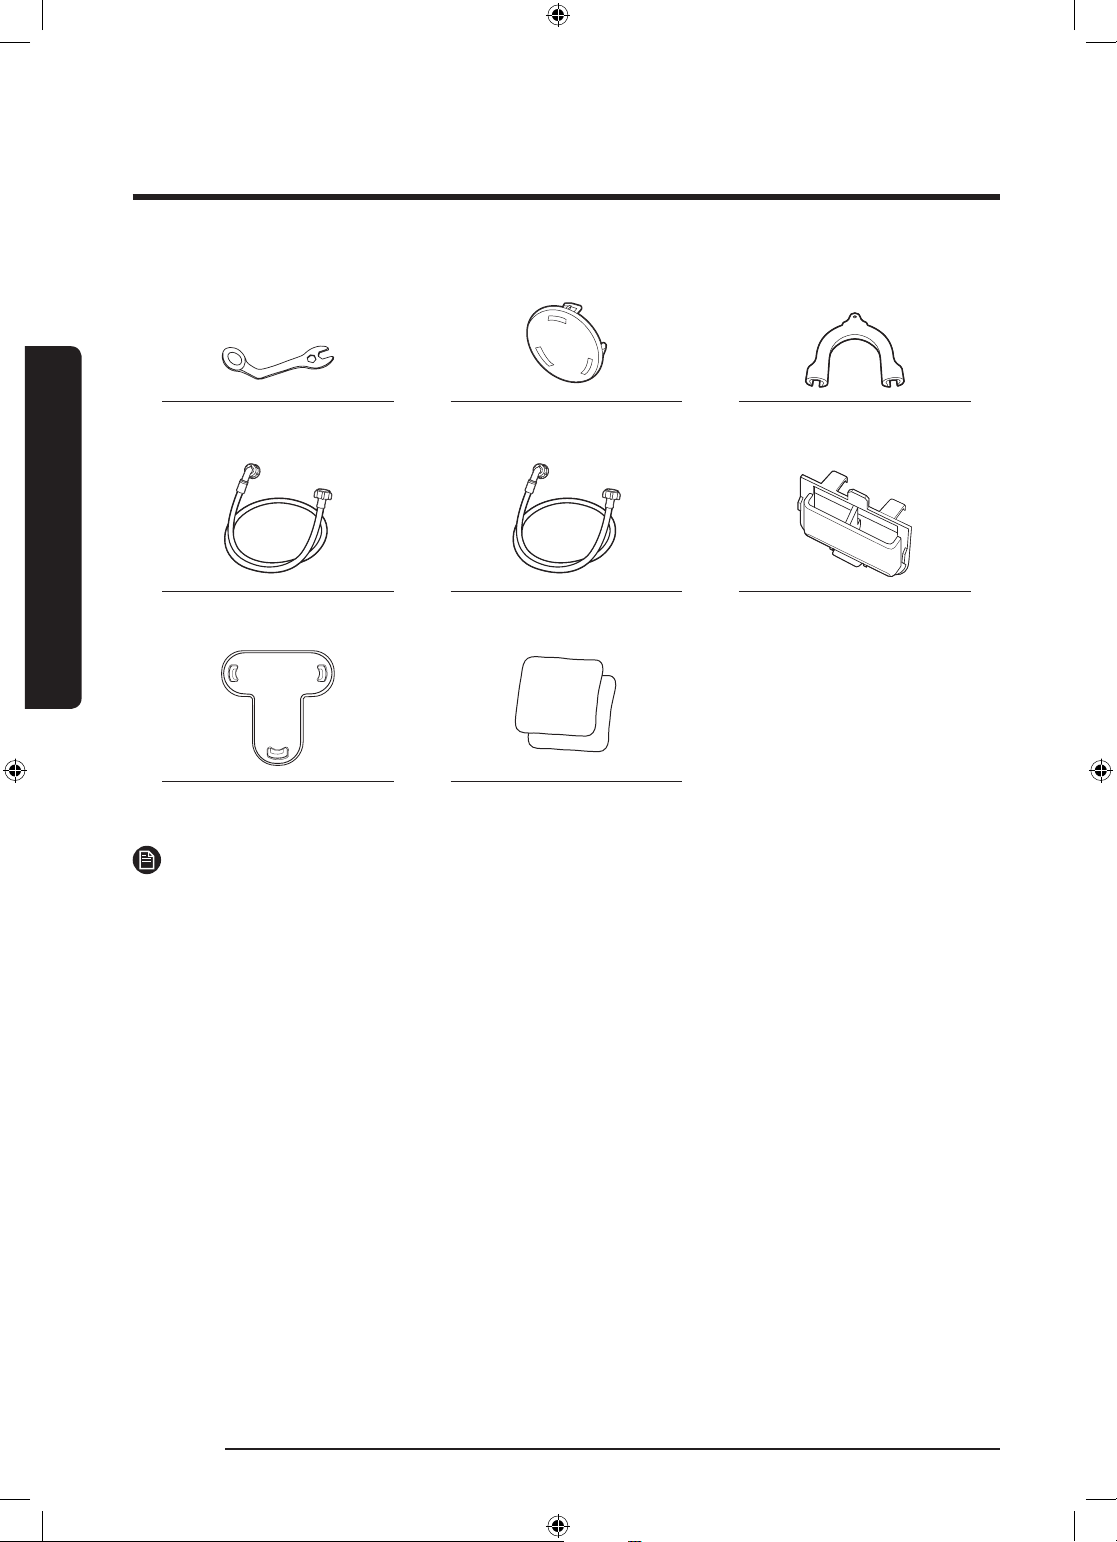
Spanner Bolt caps Hose guide
Cold water hose Hot water hose Liquid detergent guide
Cap Fixer Anti-slip pads
NOTE
• Bolt caps : The provided number (3 to 6) of bolt caps depends on the model.
• Hot water hose: Applicable models only.
• Liquid detergent guide: Applicable models only.
14 English
WW80K5210VW_DC68-03677L-01_EN.indd 14 2017/7/21 15:44:42
Page 15
Installation requirements
Electrical supply and grounding
• AC 220-240 V / 50 Hz fuse or circuit
breaker is required
• Use an individual branch circuit specic
to the washing machine
To ensure proper grounding, the washing
machine comes with a power cord featuring
a three-prong grounding plug for use in a
properly installed and grounded outlet.
Check with a qualied electrician or
serviceperson if you are not sure about the
grounding.
Do not modify the provided plug. If it does
not t the outlet, call a qualied electrician
to install a proper outlet.
WARNING
• Do NOT use an extension cord.
• Use only the power cord that comes
with the washing machine.
• Do NOT connect the ground wire to
plastic plumbing, gas lines, or hot water
pipes.
• Improperly connected grounding
conductors may cause electric shock.
Water supply
A proper water pressure for this washing
machine is between 50 kPa and 800 kPa.
Water pressure less than 50 kPa may cause
the water valve not to close completely. Or,
it may take longer to ll the drum, causing
the washing machine to turn off. Water taps
must be within 120 cm from the rear of the
washing machine so that the provided inlet
hoses reach the washing machine.
To reduce the risk of leaks:
• Make sure water taps are easily
accessible.
• Turn off the taps when the washing
machine is not in use.
• Check for any leaks at the water inlet
hose ttings on a regular basis.
CAUTION
Before using the washing machine for the
rst time, check all connections at the water
valve and taps for any leaks.
Drain
Samsung recommends a standpipe in
height of 60-90 cm. The drain hose must
be connected through the hose clip to the
standpipe, and the standpipe must fully
cover the drain hose.
Installation
English 15
WW80K5210VW_DC68-03677L-01_EN.indd 15 2017/7/21 15:44:42
Page 16
Installation
Installation
Flooring
For best performance, the washing
machine must be installed on a solid oor.
Wood oors may need to be reinforced
to minimize vibration and/or unbalanced
loads. Carpeting and soft tile surfaces are
not a good resistance to vibrations and may
cause the washing machine to move slightly
during the spin cycle.
CAUTION
Do NOT install the washing machine on a
platform or a poorly supported structure.
Water temperature
Do not install the washing machine in areas
where water may freeze as the washing
machine always retains some water in its
water valves, pumps, and/or hoses. Frozen
water left in the connection parts may
cause damage to belts, the pump, and other
components of the washing machine.
Alcove or closet installation
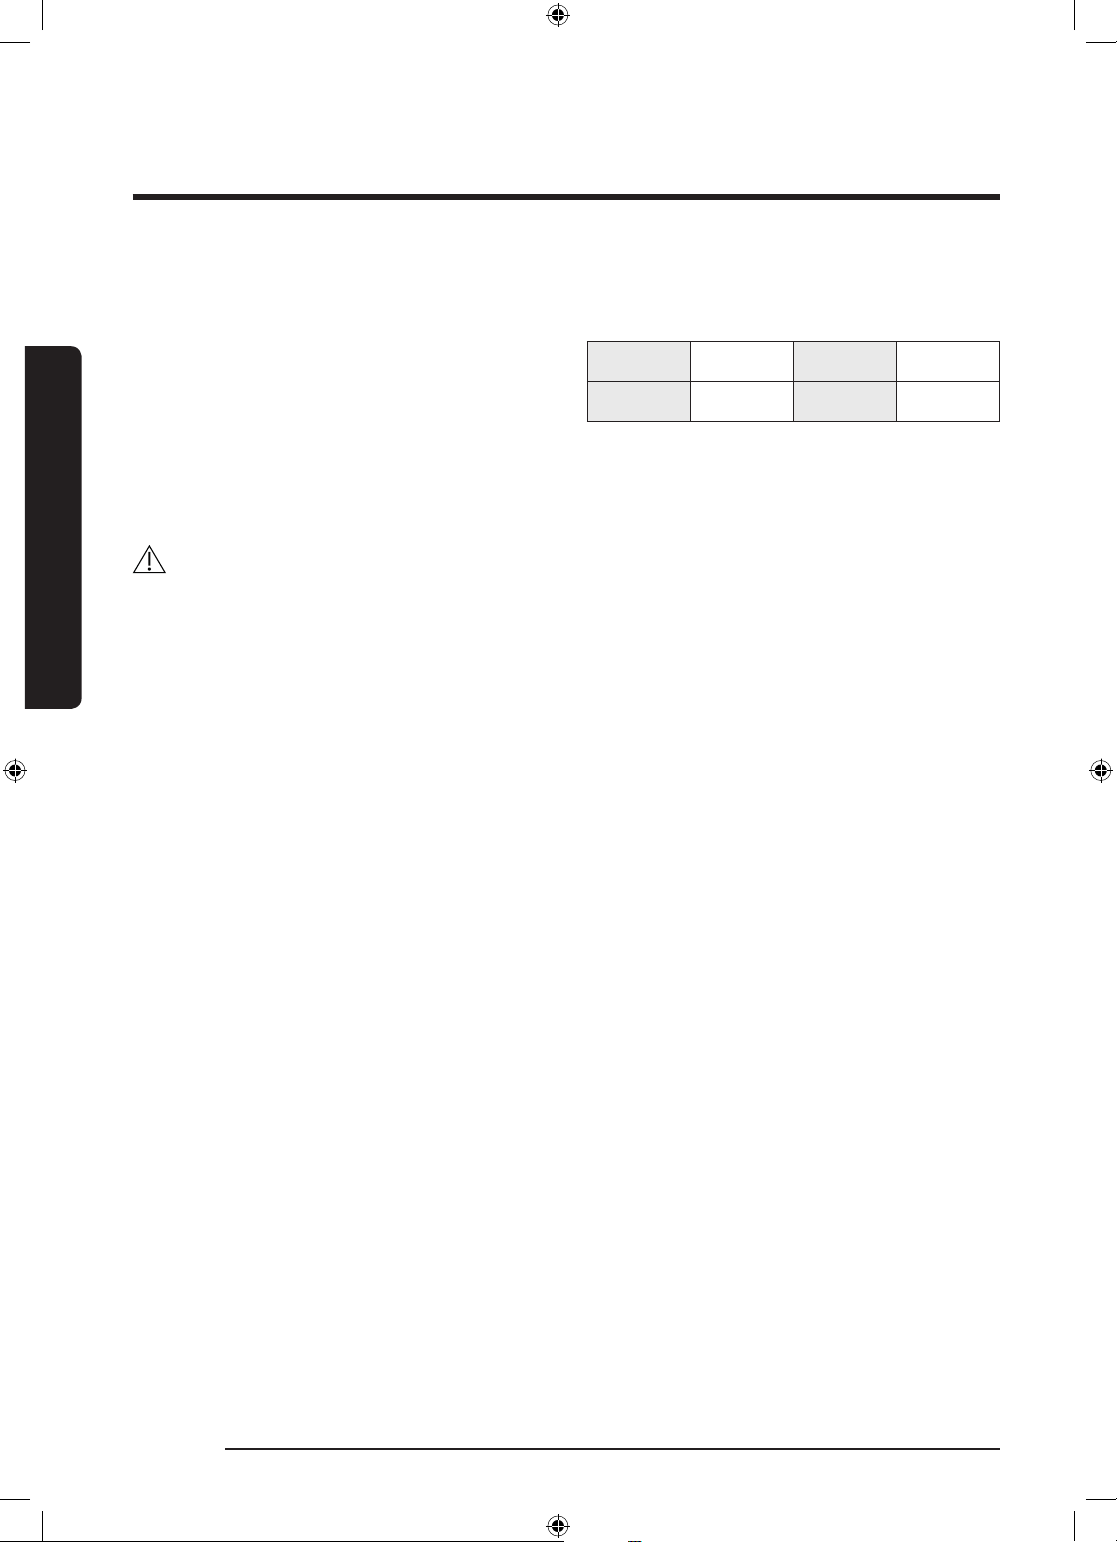
Minimum clearance for stable operation:
Sides 25 mm Rear 50 mm
Top 25 mm Front 550 mm
If both the washing machine and a dryer
are installed in the same location, the front
of the alcove or closet must have at least
a 550 mm unobstructed air opening. Your
washing machine alone does not require a
specic air opening.
16 English
WW80K5210VW_DC68-03677L-01_EN.indd 16 2017/7/21 15:44:42
Page 17
Step-by-step installation
STEP 1 Select a location
Location requirements:
• Solid, level surface without carpeting or ooring that may obstruct ventilation
• Away from direct sunlight
• Adequate room for ventilation and wiring
• The ambient temperature is always higher than the freezing point (0 ˚C)
• Away from a heat source
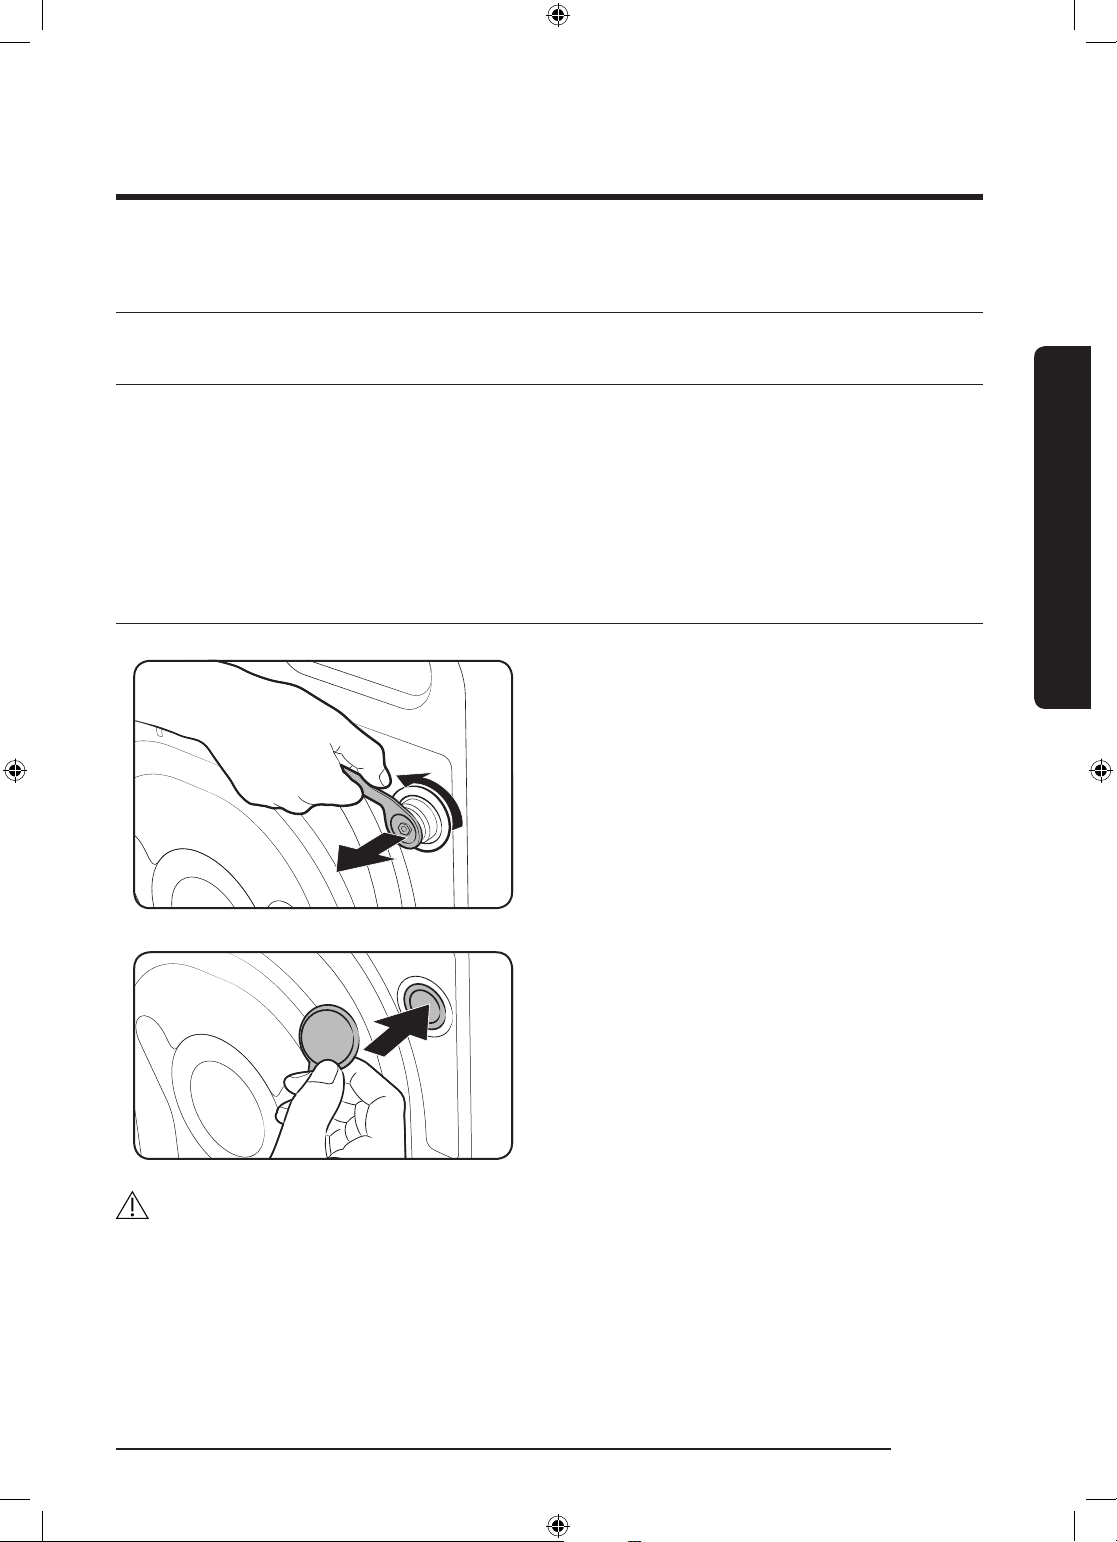
STEP 2 Remove the shipping bolts
Unpack the product package and remove all
shipping bolts.
1. Loosen all shipping bolts on the rear of
the machine using the supplied spanner.
Installation
2. Fill the holes with the supplied plastic
bolt caps.
Keep the shipping bolts for future use.
WARNING
Packaging materials can be dangerous to children. Dispose all packaging material (plastic
bags, polystyrene, etc.) out of children’s reach.
English 17
WW80K5210VW_DC68-03677L-01_EN.indd 17 2017/7/21 15:44:43
Page 18
Installation
Installation
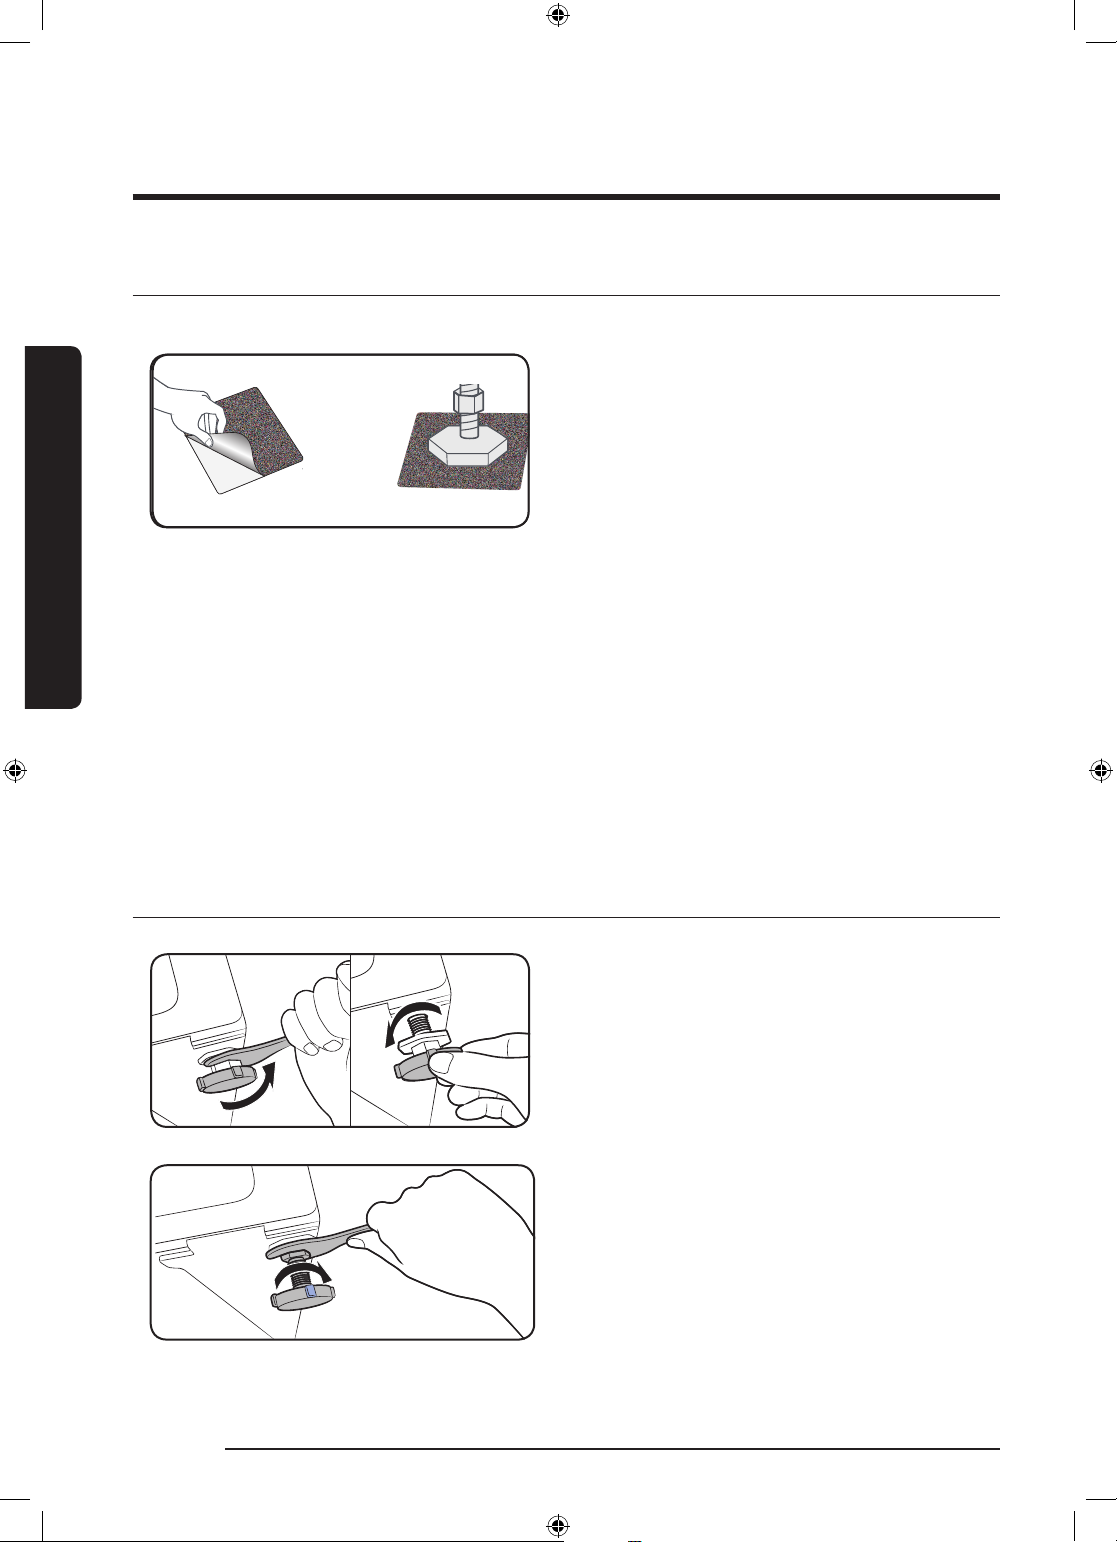
STEP 3 Installing the anti-slip pad
1. Completely clean the bottoms of the
adjustable legs and wipe away any dust
and oil.
2. Mark the locations of the adjustable
front legs of the washing machine where
the anti-slip pads should be installed.
3. Attach the anti-slip pad by tilting or
moving the washing machine. When you
attach the pad, remove the plastic lm
from the pad and attach the sticker side
of the pad to the oor so that the rough
side is facing upward. You should not
attach the sticker side of the pad to an
adjustable leg.
4. After installing the washing machine and
anti-slip pad, check if the adjustable legs
are level again.
STEP 4 Adjust the levelling feet
18 English
1. Gently slide the washing machine into
position. Excessive force may damage
the levelling feet.
2. Level the washing machine by manually
adjusting the levelling feet.
3. When levelling is complete, tighten the
nuts using the spanner.
WW80K5210VW_DC68-03677L-01_EN.indd 18 2017/7/21 15:44:44
Page 19
STEP 5 Connect the water hose
C
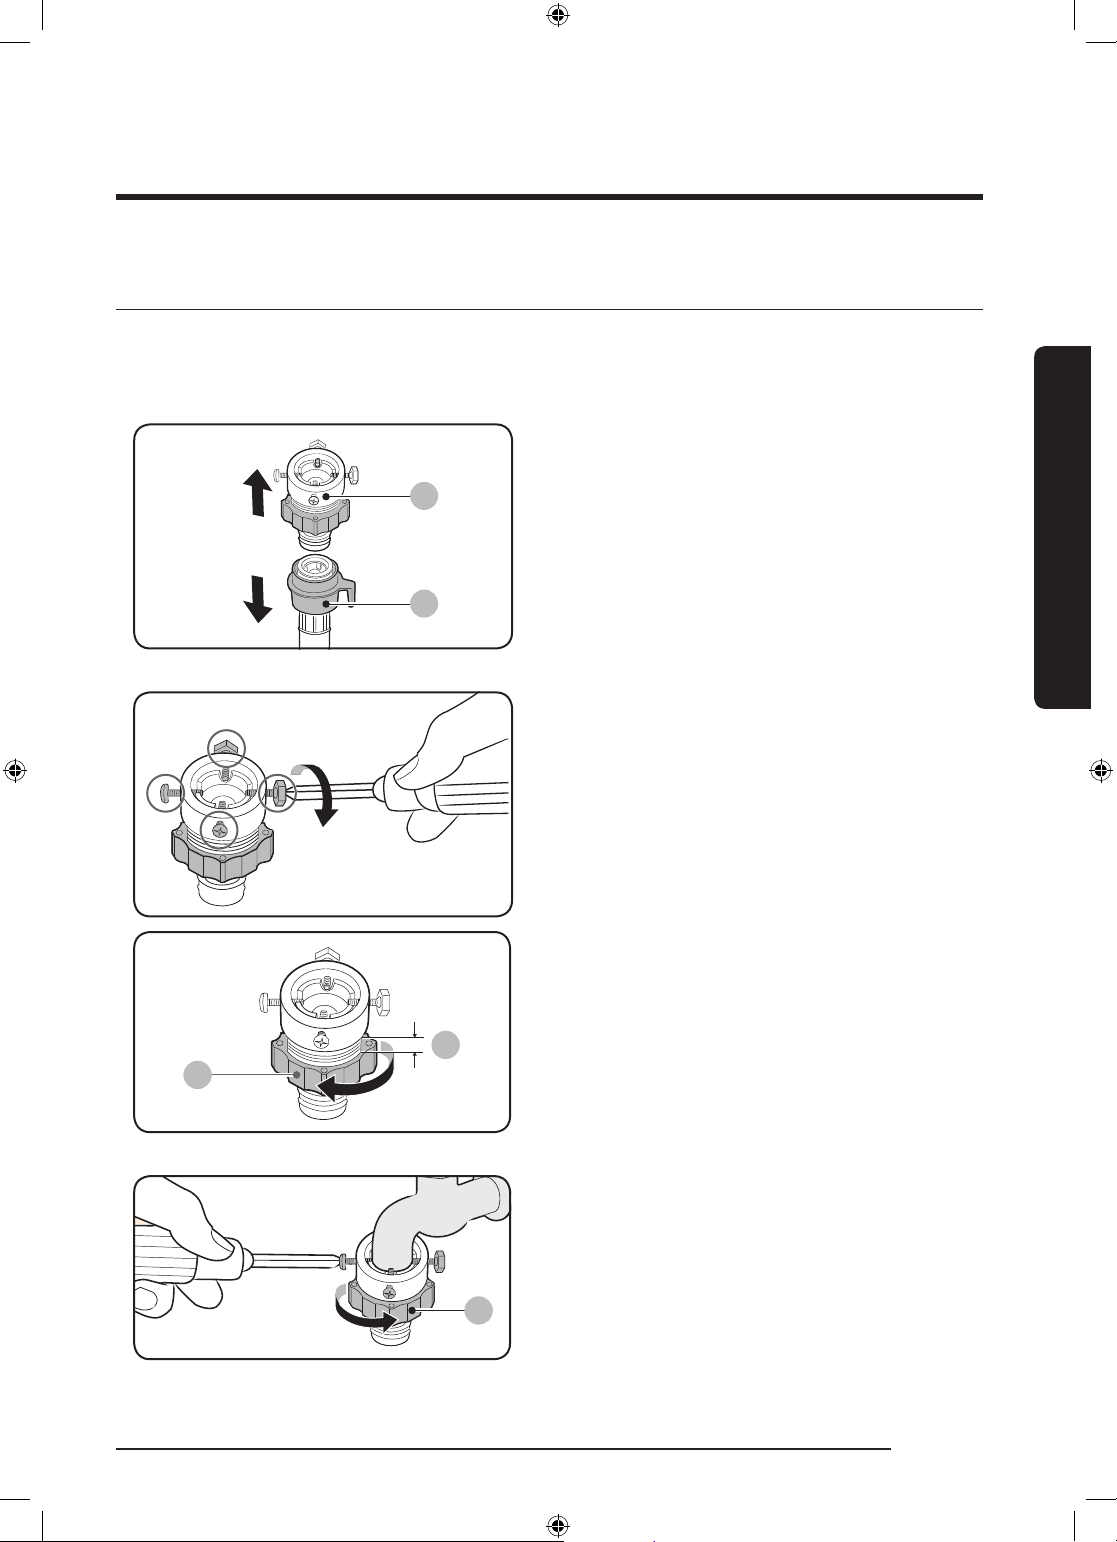
The provided hose adaptor may differ with the model. This step guides you through
connecting the connector-type adaptor. If you are provided with the screw-type adaptor, go
to 7.
Connect the water hose to the water tap.
1. Remove the adaptor (A) from the water
A
B
hose (B).
Installation
2. Use a Philips screwdriver to loosen four
screws on the adaptor.
3. Holde the adaptor and turn part (C) in
the arrow direction to loosen it by 5 mm
(*).
C
4. Insert the adaptor into the water tap,
and tighten the screws while lifting up
the adaptor.
5. Turn part (C) in the arrow direction to
tighten it.
English 19
WW80K5210VW_DC68-03677L-01_EN.indd 19 2017/7/21 15:44:46
Page 20
Installation
Installation
E
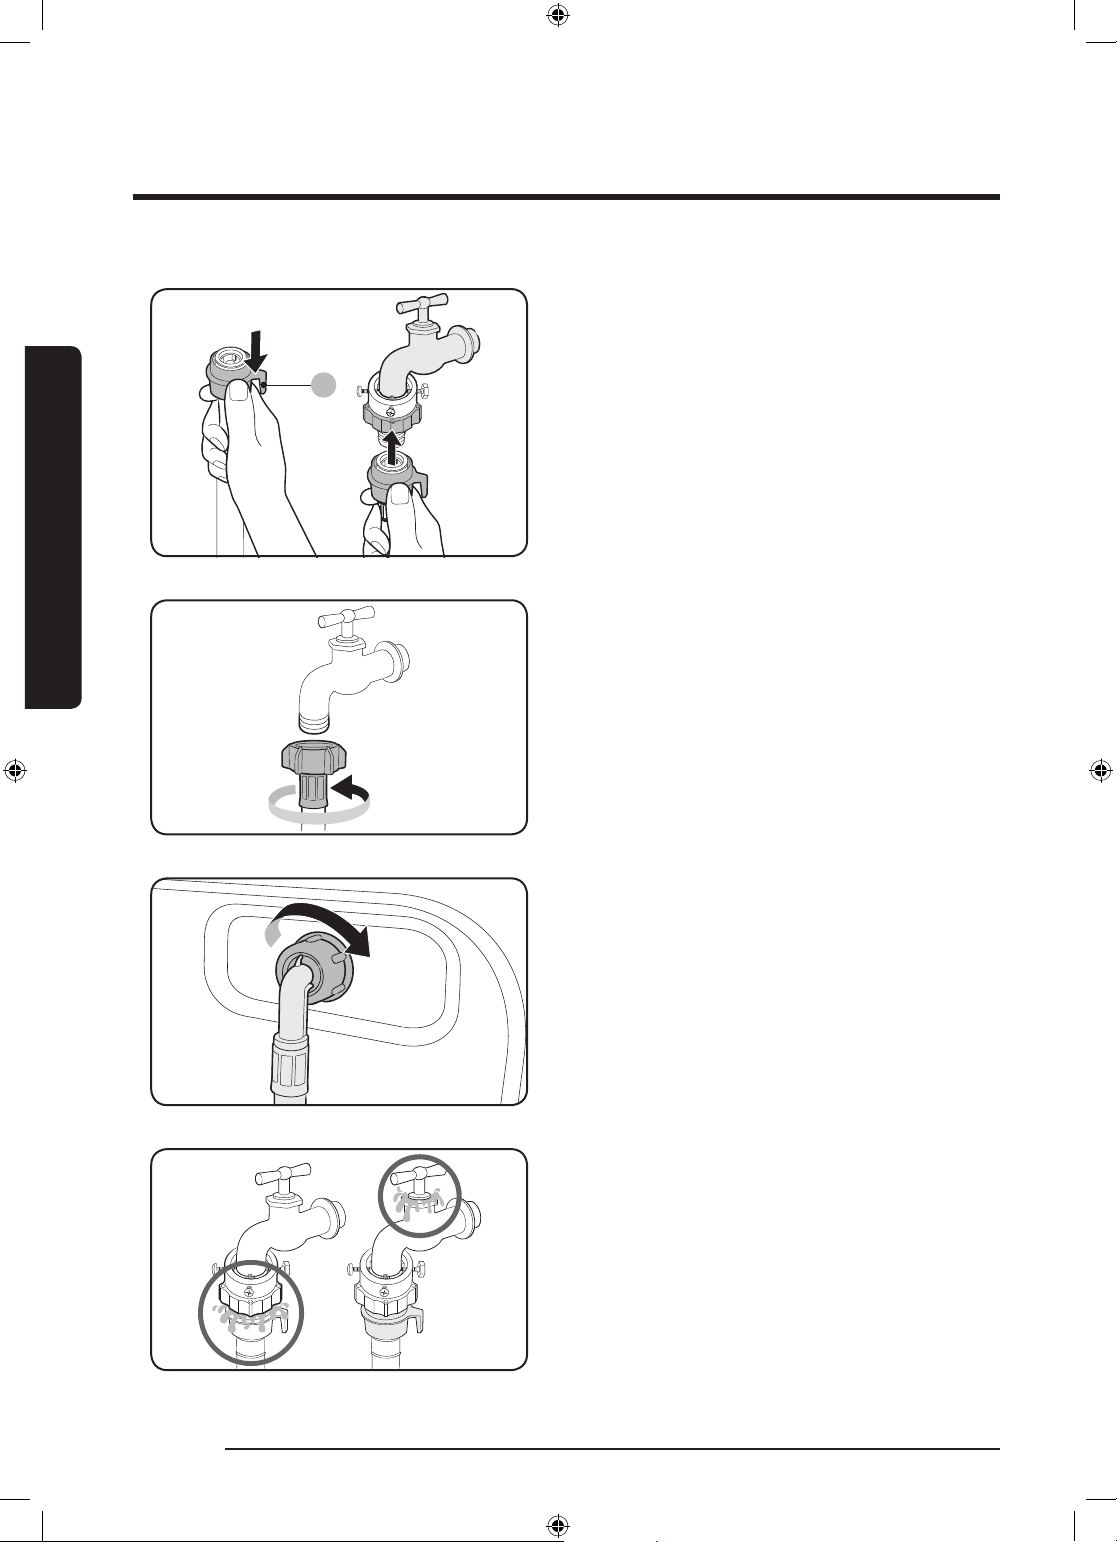
6. While holding down part (E), connect the
water hose to the adaptor. Then, release
part (E). The hose ts into the adaptor
with a clicking sound.
7. If you are using a screw type of water
tap, use the provided screw-type
adaptor to connect to the water tap as
shown.
20 English
8. Connect the other end of the water
hose to the inlet valve on the back of
the washing machine. Turn the hose
clockwise to tighten.
9. Open the water tap and check if there
are any leaks around the connection
areas. If there are water leaks, repeat the
steps above.
WW80K5210VW_DC68-03677L-01_EN.indd 20 2017/7/21 15:44:47
Page 21
WARNING
A
Stop using the washing machine if there is a water leak, and contact a local Samsung service
centre. Otherwise, this may cause electric shock.
CAUTION
Do not stretch the water hose by force. If the hose is too short, replace the hose with a
longer, high-pressure hose.
NOTE
• After connecting the water hose to the adaptor, check if it is connected properly by
pulling the water hose downwards.
• Use a popular type of water taps. If the tap is square-shaped or too big, remove the
spacer ring before inserting the tap into the adaptor.
For models with an additional hot water
inlet:
1. Connect the red end of the hot water
hose to the hot water inlet on the back
of the machine.
2. Connect the other end of the hot water
hose to the hot water tap.
Installation
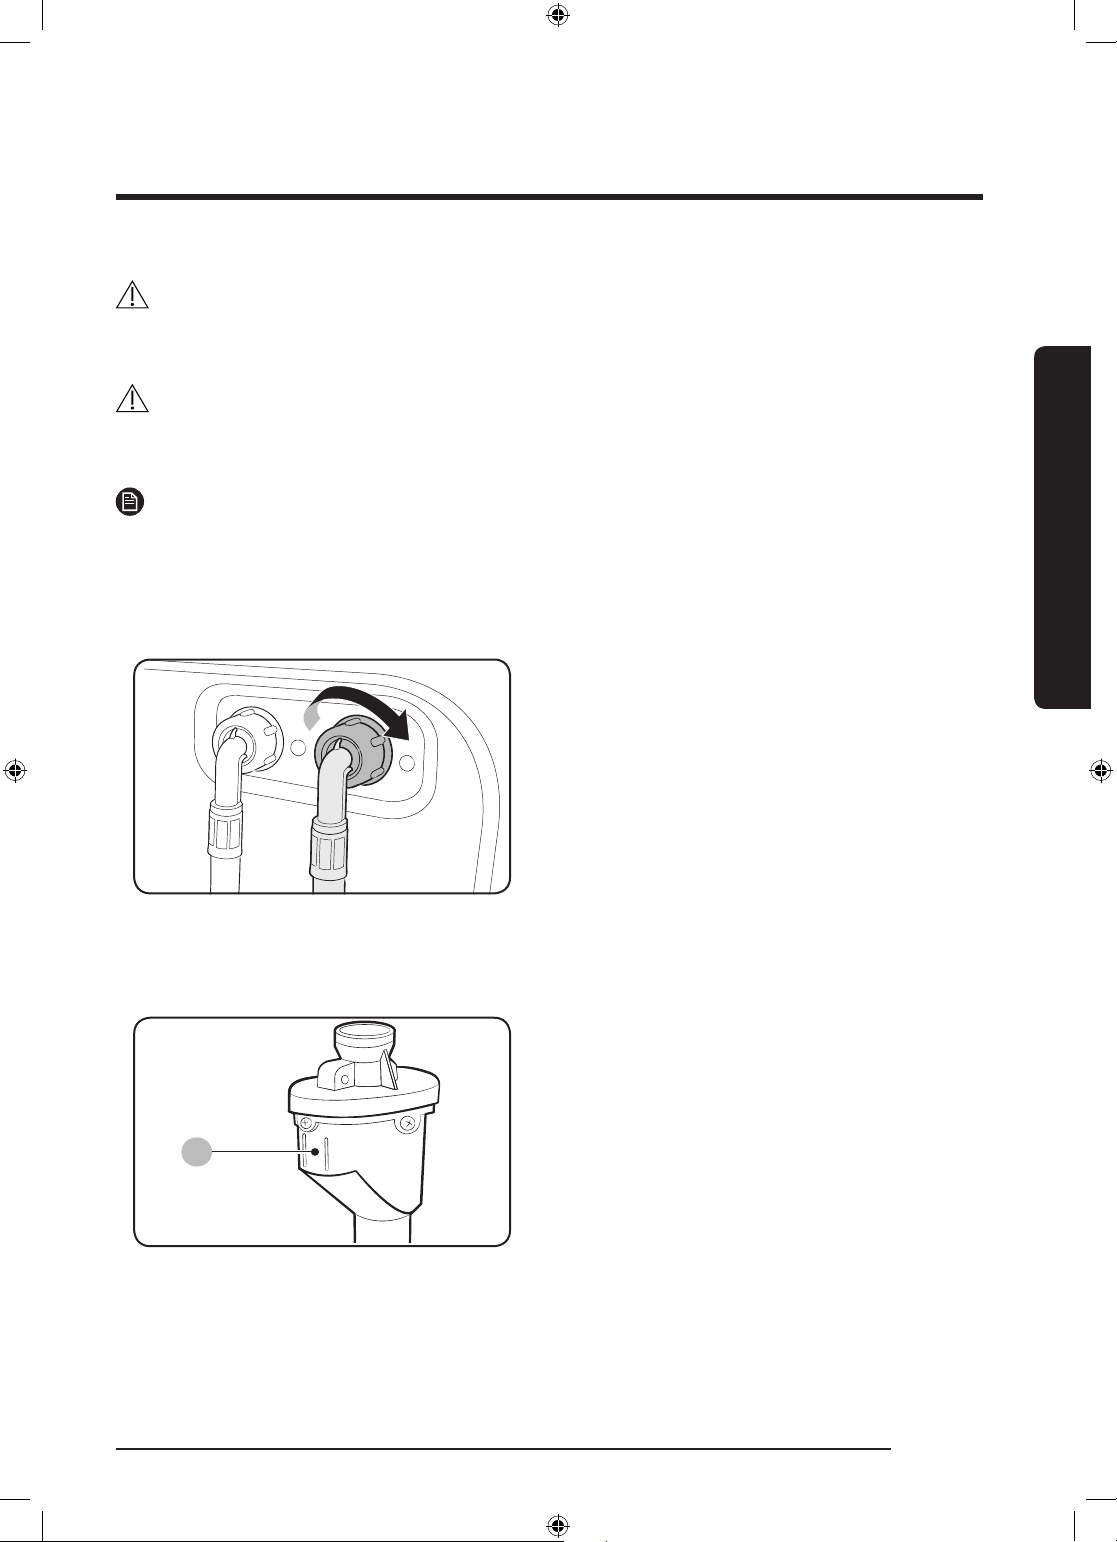
Aqua hose (applicable models only)
The aqua hose alerts users of a risk of water
leaks. It senses the water ow and turns red
on the centre indicator (A) in case of a leak.
WW80K5210VW_DC68-03677L-01_EN.indd 21 2017/7/21 15:44:47
English 21
Page 22
Installation
A
Installation
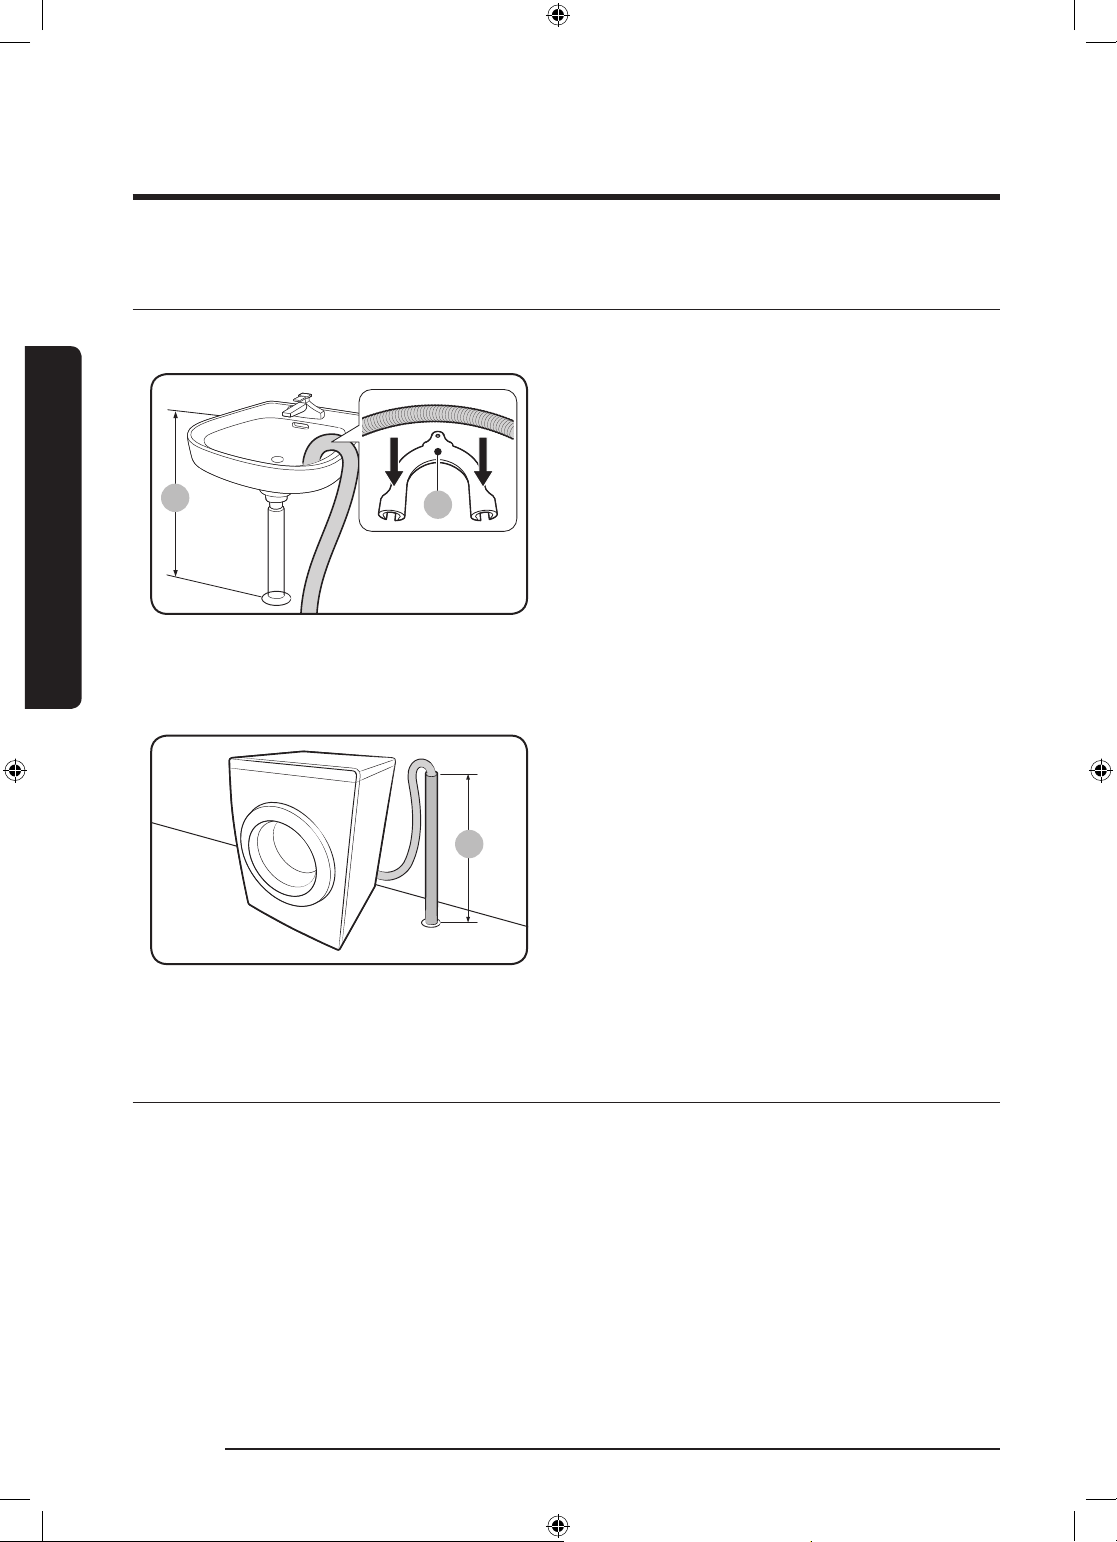
STEP 6 Position the drain hose
The drain hose can be positioned in three ways:
Over the edge of a wash basin
The drain hose must be placed at a height
of between 60 cm and 90 cm (*) from the
oor. To keep the spout of the drain hose
bent, use the supplied plastic hose guide (A).
Secure the guide to the wall using a hook to
ensure stable drainage.
ln a sink drain pipe
The drain pipe must be above the sink
siphon so that the end of the hose is at least
60 cm above the oor.
ln a drain pipe
The drain pipe should be between 60 cm
and 90 cm high (*). It is advisable to use
a 65 cm high vertical pipe. Make sure the
drain hose is connected to the stand pipe at
a slant.
Drain standpipe requirements:
• Minimum diameter of 5 cm
• Minimum carry-away capacity of
60 litres per minute
STEP 7 Power on
Plug the power cord into a wall socket featuring an AC 220-240 V / 50 Hz approved electrical
outlet protected by a fuse or circuit breaker. Then, press Power to turn on the washing
machine.
22 English
WW80K5210VW_DC68-03677L-01_EN.indd 22 2017/7/21 15:44:47
Page 23
Before you start
Initial settings
Run Calibration (recommended)
Calibration ensures accurate weight detection by the washing machine. Make sure the drum
is empty before running Calibration.
1. Power off, and then power on the washing machine.
2. Hold down Temp. and Delay End simultaneously for 3 seconds to enter Calibration mode.
The “CB” message appears.
3. Press Start/Pause to run the Calibration cycle.
4. The drum will rotate clockwise and counter-clockwise for about 3 minutes.
5. When the cycle is complete, “0” appears on the display and the washing machine will turn
off automatically.
6. The washing machine is now ready for use.
Before you start
Laundry guidelines
STEP 1 Sort
Sort the laundry according to these criteria:
• Care Label: Sort the laundry into cottons, mixed bres, synthetics, silks, wools, and rayon.
• Colour: Separate whites from colours.
• Size: Mixing different-sized items together in the drum improves the washing
performance.
• Sensitivity: Wash delicate items separately for pure, new woollen items, curtains, and silk
items. Check the labels on the items.
NOTE
Make sure to check the care label on the clothing, and sort them accordingly before starting
the wash.
English 23
WW80K5210VW_DC68-03677L-01_EN.indd 23 2017/7/21 15:44:48
Page 24
Before you start
STEP 2 Empty pockets
Empty all the pockets of your laundry items
• Metal objects such as coins, pins, and buckles on clothing may damage other laundry
items as well as the drum.
Turn clothing with buttons and embroideries inside out
• If pants or jacket zippers are open while washing, the drum may be damaged. Zippers
should be closed and xed with a string.
• Clothing with long strings may become entangled with other clothes. Make sure to tie the
strings before starting the wash.
STEP 3 Use a laundry net
• Brassieres (water washable) must be placed in a laundry net. Metal parts of the brassieres
may break through and tear other laundry items.
Before you start
• Small, light clothing such as socks, gloves, stockings, and handkerchiefs may become
caught around the door. Place them inside a ne laundry net.
• Do not wash the laundry net by itself without other laundry. This may cause abnormal
vibrations that could move the washing machine and result in injury.
STEP 4 Prewash (if necessary)
Select the Prewash option for the selected course if the laundry is heavily soiled. Do not use
the Prewash option when detergent is manually added into the drum or if applying liquid
detergent.
STEP 5 Determine the load capacity
Do not overload the washing machine. Overloading may cause the washing machine to not
wash properly. For the load capacity for the type of clothing, see page 31.
NOTE
When washing bedding or bedding covers, the wash time may be lengthened or the spin
efciency may be reduced. For bedding or bedding covers, the recommended maximum spin
cycle speed is 800 rpm, and the load capacity is 2.0 kg or less.
CAUTION
If the laundry is unbalanced and the “Ub” information code is displayed, redistribute the load.
Unbalanced laundry may reduce the spinning performance.
24 English
WW80K5210VW_DC68-03677L-01_EN.indd 24 2017/7/21 15:44:48
Page 25
STEP 6 Apply a proper detergent type
The type of detergent depends on the type of fabric (cotton, synthetic, delicate items, wool),
colour, wash temperature, and degree of soiling. Always use “low suds” laundry detergent,
which is designed for automatic washing machines.
NOTE
• Follow the detergent manufacturer’s recommendations based on the weight of the
laundry, the degree of soiling, and the hardness of the water in your local area. If you are
not sure about the water hardness, contact a local water authority.
• Do not use detergent that tends to be hardened or solidied. This detergent may remain
after the rinse cycle, blocking the drain outlet.
CAUTION
When washing wool using the wool course, use only a neutral liquid detergent. If used with
the Wool course, powder detergent may remain on the laundry and discolour the laundry.
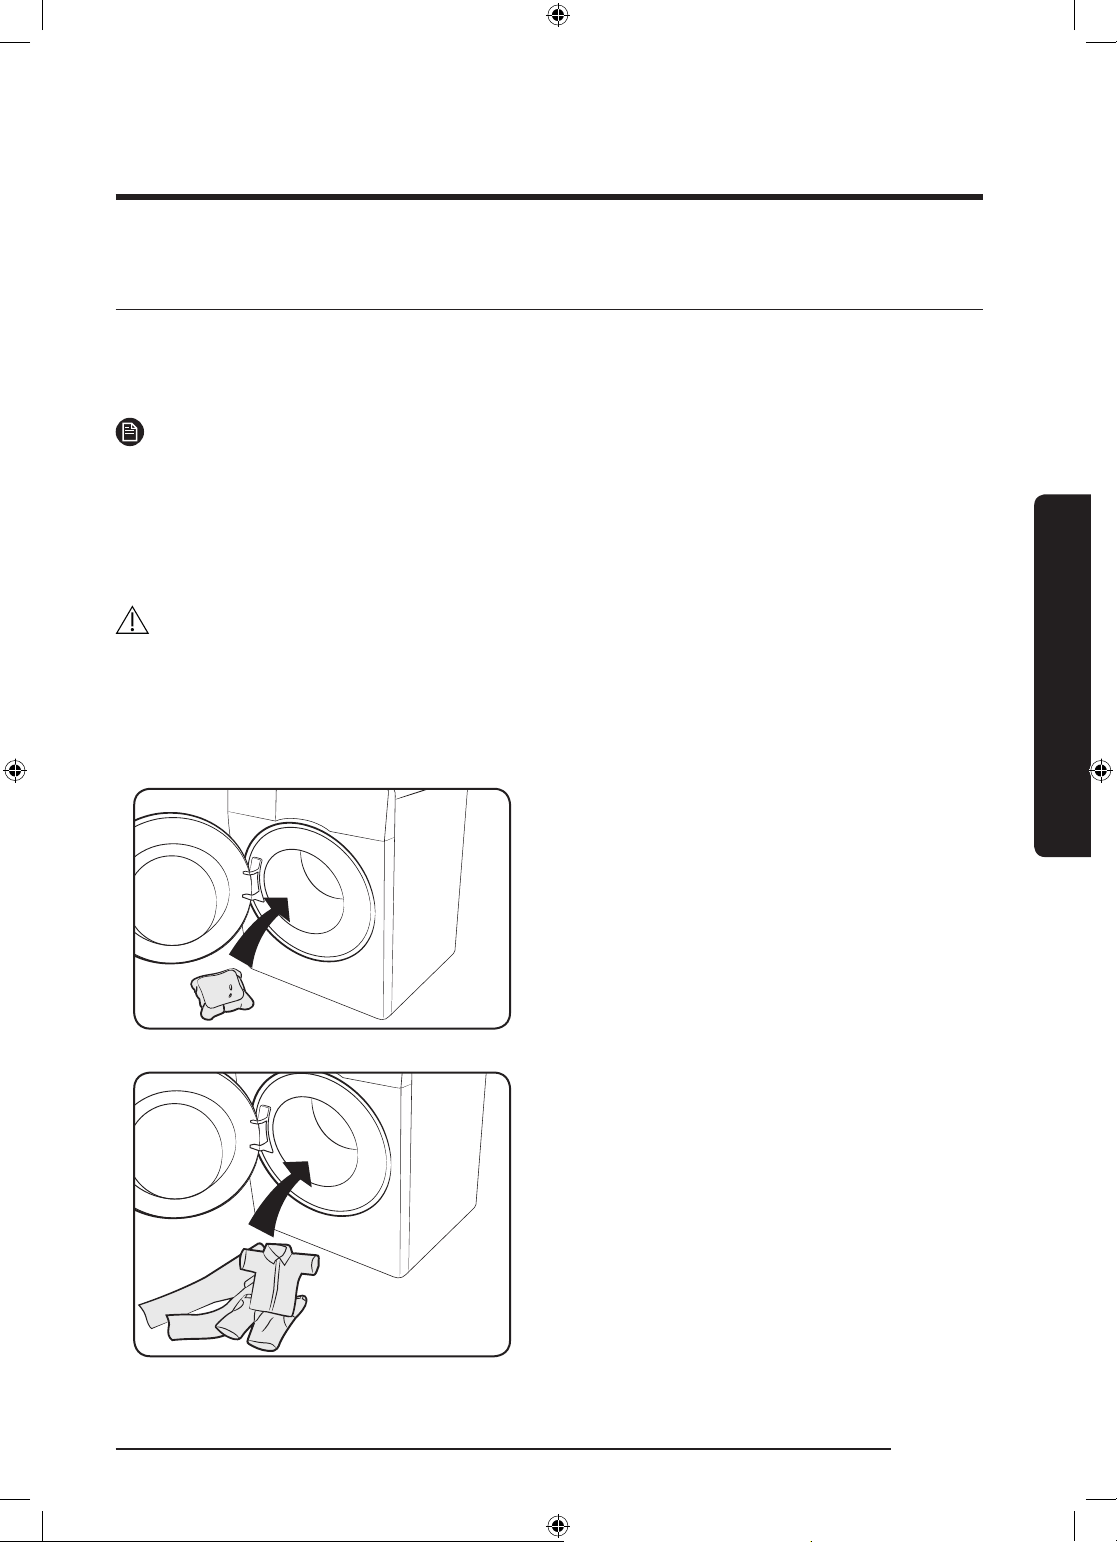
Laundry capsules
To get the best results from using laundry capsules, please follow these instructions.
1. Put the capsule in the bottom of the
empty drum towards the rear.
Before you start
2. Put the laundry in the drum on top of
the capsule.
English 25
WW80K5210VW_DC68-03677L-01_EN.indd 25 2017/7/21 15:44:48
Page 26
Before you start
A
Detergent drawer guidelines
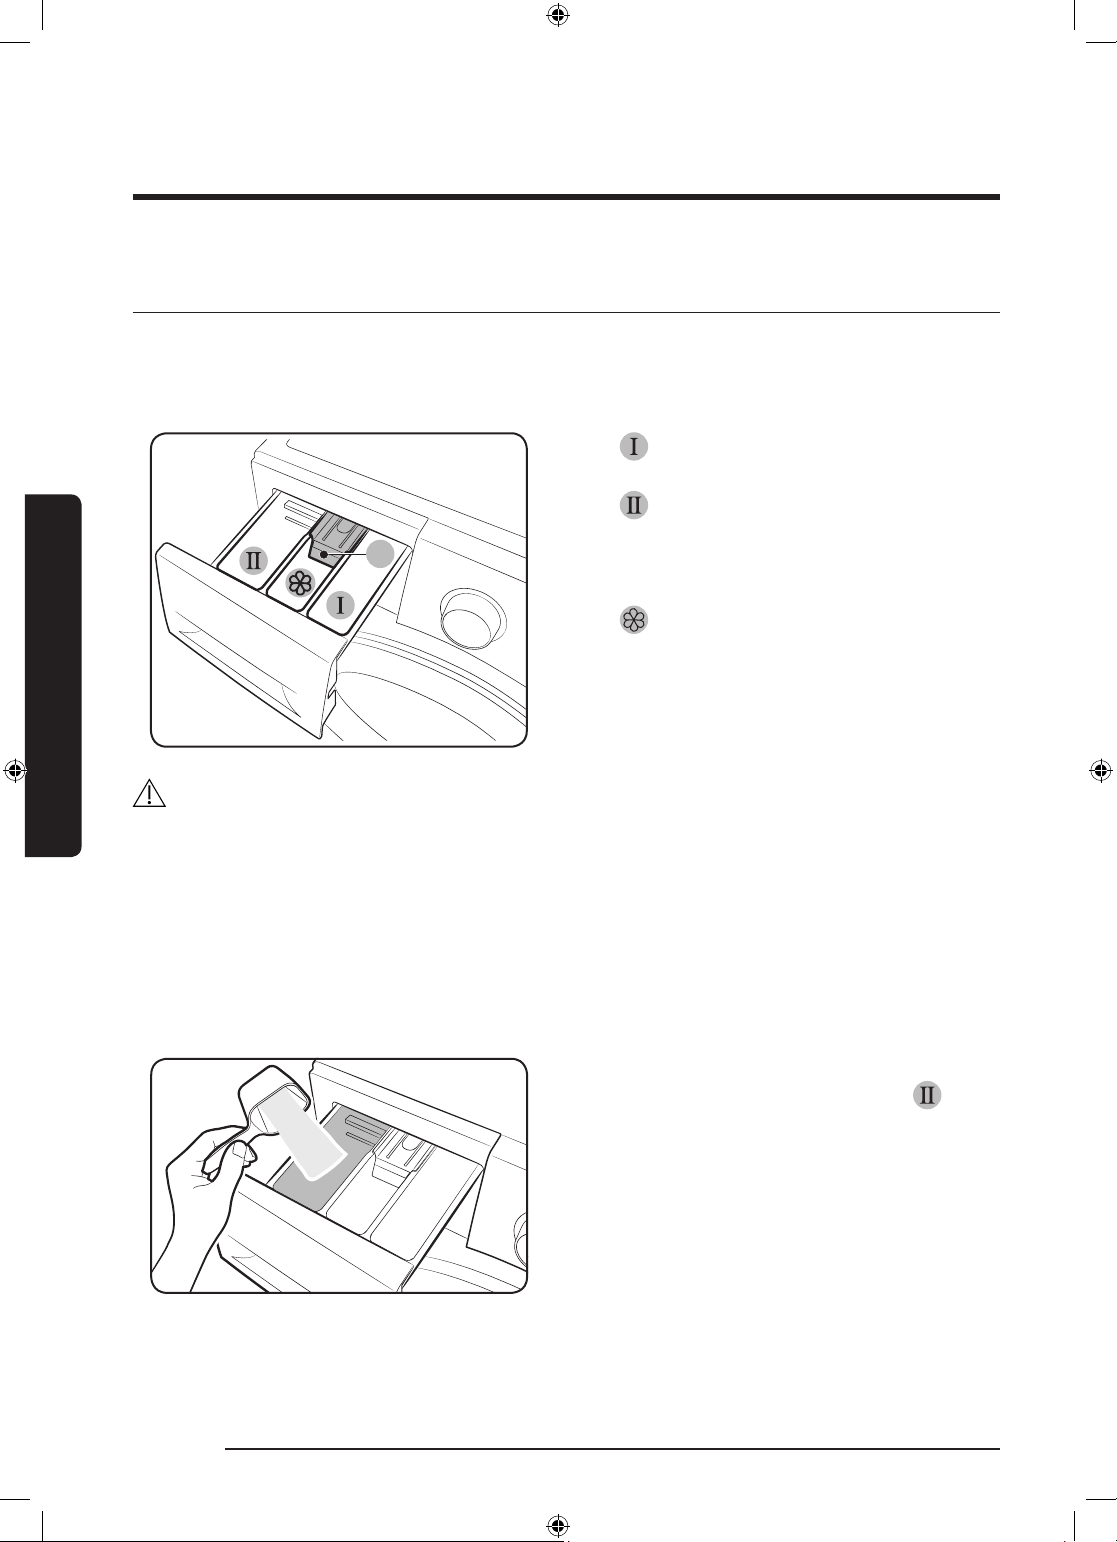
The washing machine provides a three-compartment dispenser: the left compartment for the
main wash, the middle compartment for fabric softeners, and the right compartment for the
preliminary wash.
01 Prewash compartment: Apply
prewash detergent or starch.
02
03
Before you start
Main-wash compartment: Apply
main-wash detergent, water softener,
soaking detergent, bleach, and/or stain
removers.
Softener compartment: Apply
additives such as fabric softener. Do not
exceed the max line (A).
CAUTION
• Do not open the detergent drawer while the washing machine is operating.
• Do not use the following types of detergent:
• Tablet or capsule types
• Ball or net types
• To prevent the compartment clogging, concentrated or highly-enriched agents (fabric
softener or detergent) must be diluted with water before being applied.
To apply washing agents to the detergent drawer
1. Slide open the detergent drawer.
2. Apply laundry detergent to the
main-wash compartment as instructed
or recommended by the manufacturer.
To use liquid detergent, see page 28.
26 English
WW80K5210VW_DC68-03677L-01_EN.indd 26 2017/7/21 15:44:49
Page 27
A
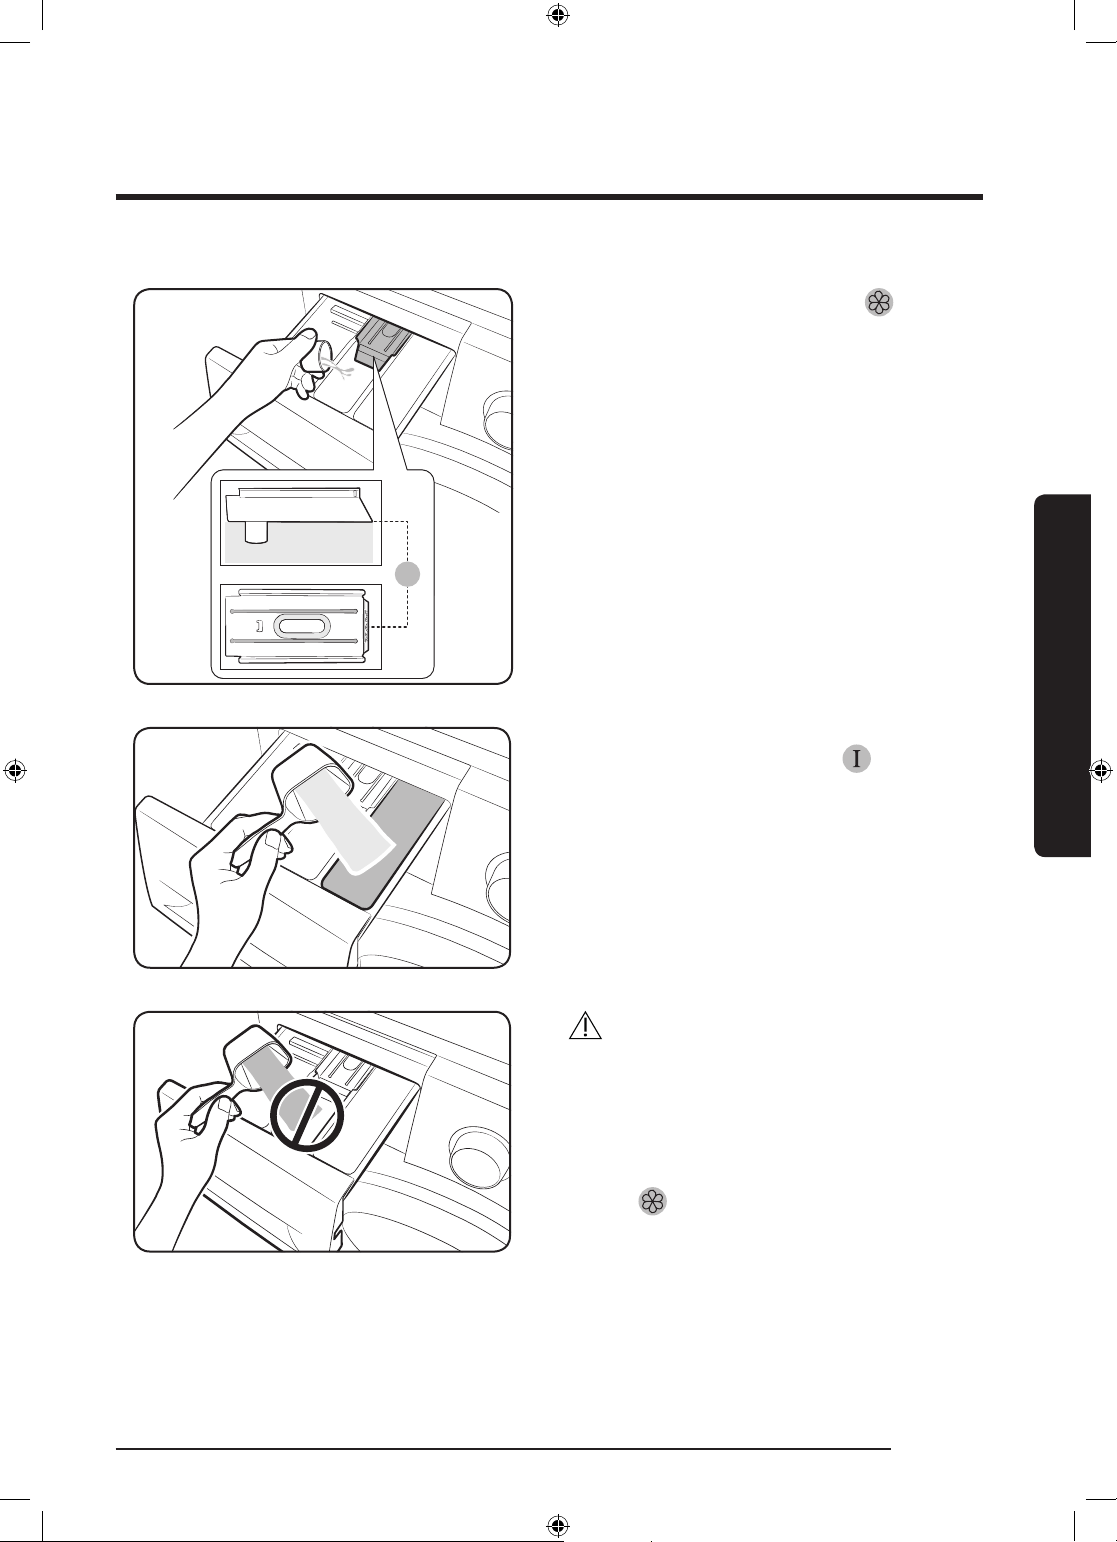
3. Apply fabric softener to the softener
compartment. Do not exceed the max
line (A).
4. If you want to prewash, apply
prewash detergent to the
prewash
compartment as instructed or
recommended by the manufacturer.
5. Close the detergent drawer.
Before you start
CAUTION
• Do not apply powder detergent to the
liquid detergent guide.
• Concentrated fabric softener must be
diluted with water before applied.
• Do not apply main-wash detergent to
the
WW80K5210VW_DC68-03677L-01_EN.indd 27 2017/7/21 15:44:49
softener compartment.
English 27
Page 28
Before you start
A
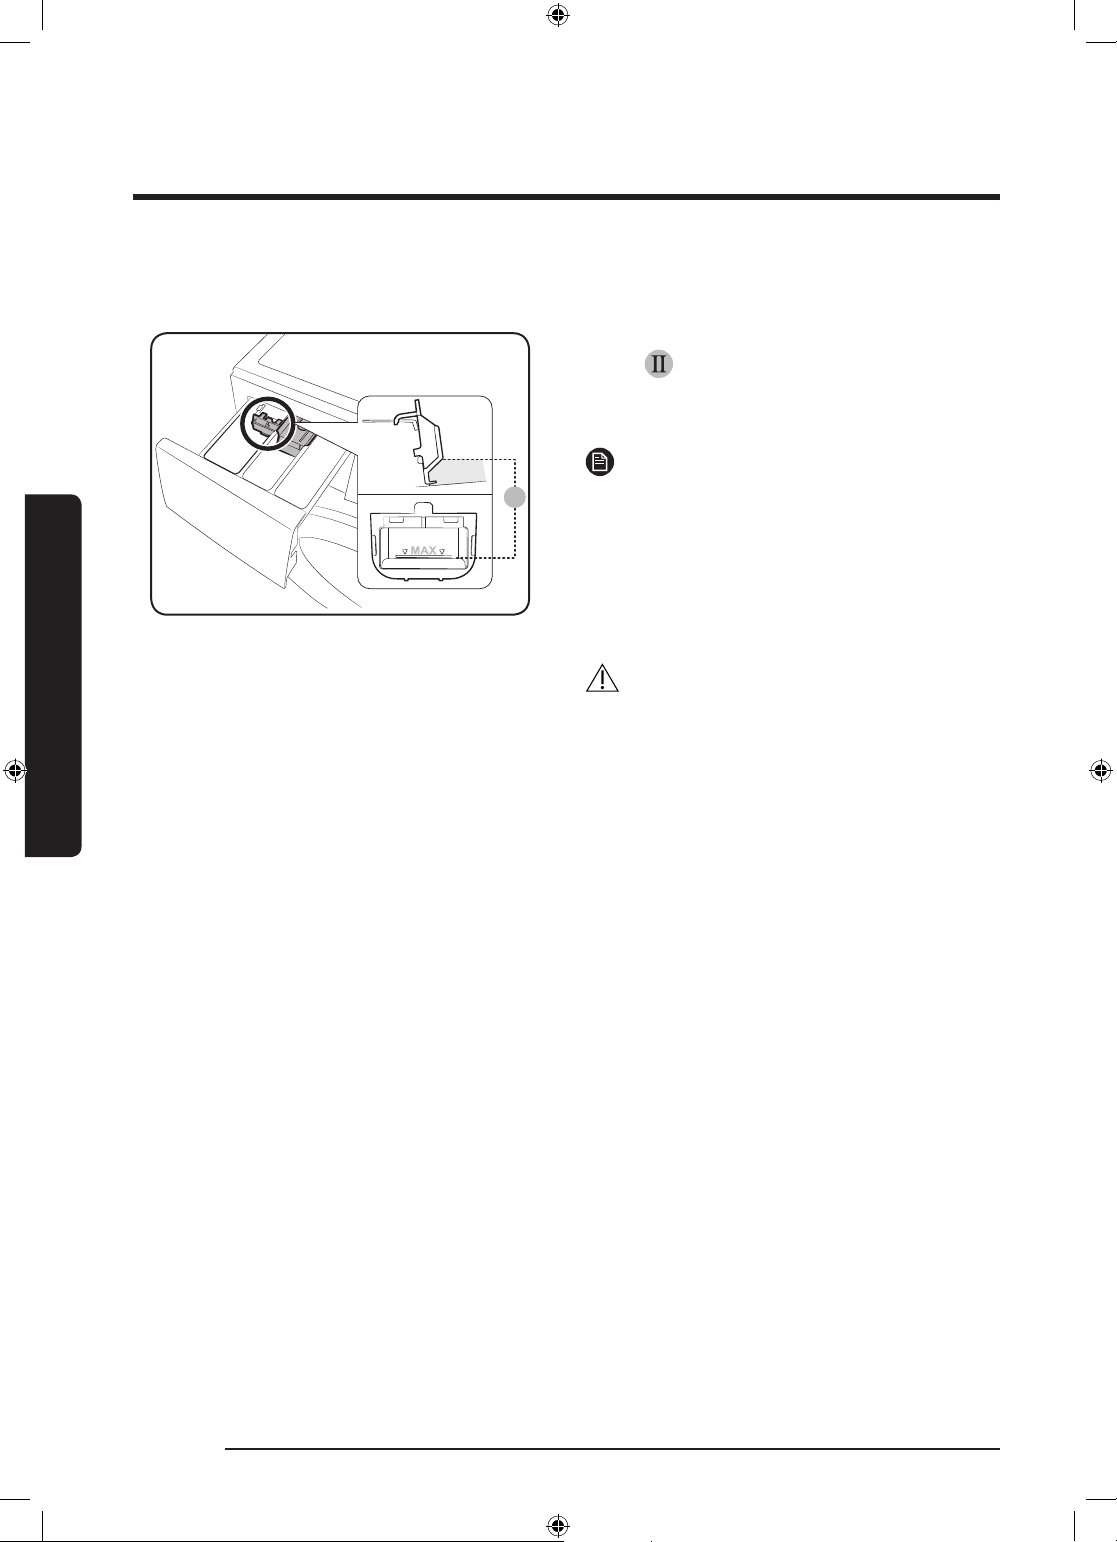
To use liquid detergent (applicable models only)
First insert the provided liquid container
in the
apply liquid detergent to the container
below the marked max line (A).
• Insert the liquid detergent guide only
• After a wash, some liquid detergent may
• Do not exceed the max line that is
Before you start
• Remove the liquid container if using
main-wash compartment. Then,
NOTE
after you remove the detergent drawer
from the washing machine by pressing
release lever (A).
remain in the detergent drawer.
CAUTION
marked inside the container.
powder detergent.
28 English
WW80K5210VW_DC68-03677L-01_EN.indd 28 2017/7/21 15:44:50
Page 29
Operations
10
02
09
08
11
03
04
05
06
07
01
10
02
09
08
11
03
04
05
06
07
01
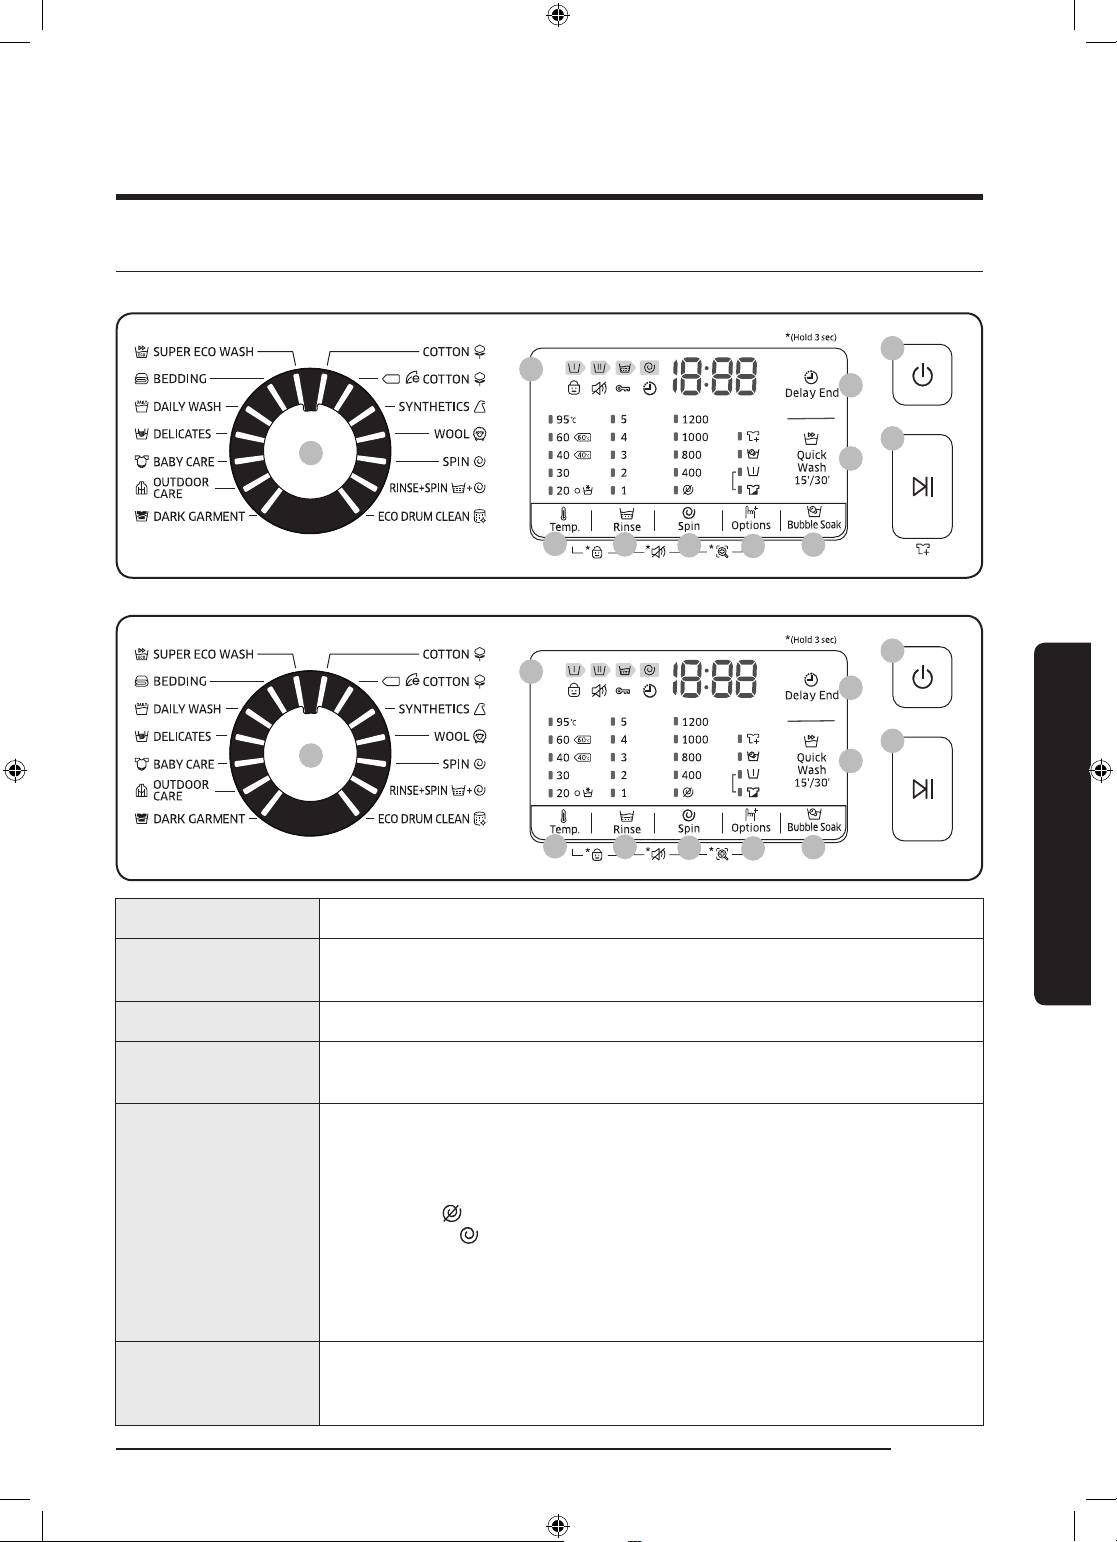
Control panel
WW80K5210VW, WW70K5210XW
WW80K5210VX
01 Cycle Selector Turn the dial to select a cycle.
02 Display
The display shows current cycle information and estimated time
remaining, or an information code when a problem occurs.
03 Temp. Press to change the water temperature for the current cycle.
04 Rinse
Press to change the rinse count for the current cycle. You can set the
rinse count to a max of 5, depending on the cycle.
Press to change the spinning speed for the current cycle.
• Rinse Hold (No indicator): The nal rinse process is suspended so
that the laundry remains in the water. To unload the laundry, run
a drain or spin process.
05 Spin
• No Spin
• Spin Only : To run the Spin Only cycle, press Spin for 3 seconds.
: The drum does not spin after the nal drain process.
When the cycle time and spinning speed appear, press Spin
repeatedly until a desired spinning speed is selected. Then, press
06 Options
Start/Pause to start the cycle. The spinning time depends on the
selected cycle.
Press to select an option from Intensive, Pre Wash, Press again to
deselect.
• Availability of the options depends on the cycle.
Operations
English 29
WW80K5210VW_DC68-03677L-01_EN.indd 29 2017/7/21 15:44:50
Page 30
Operations
3
4
1
6
2
5
Operations
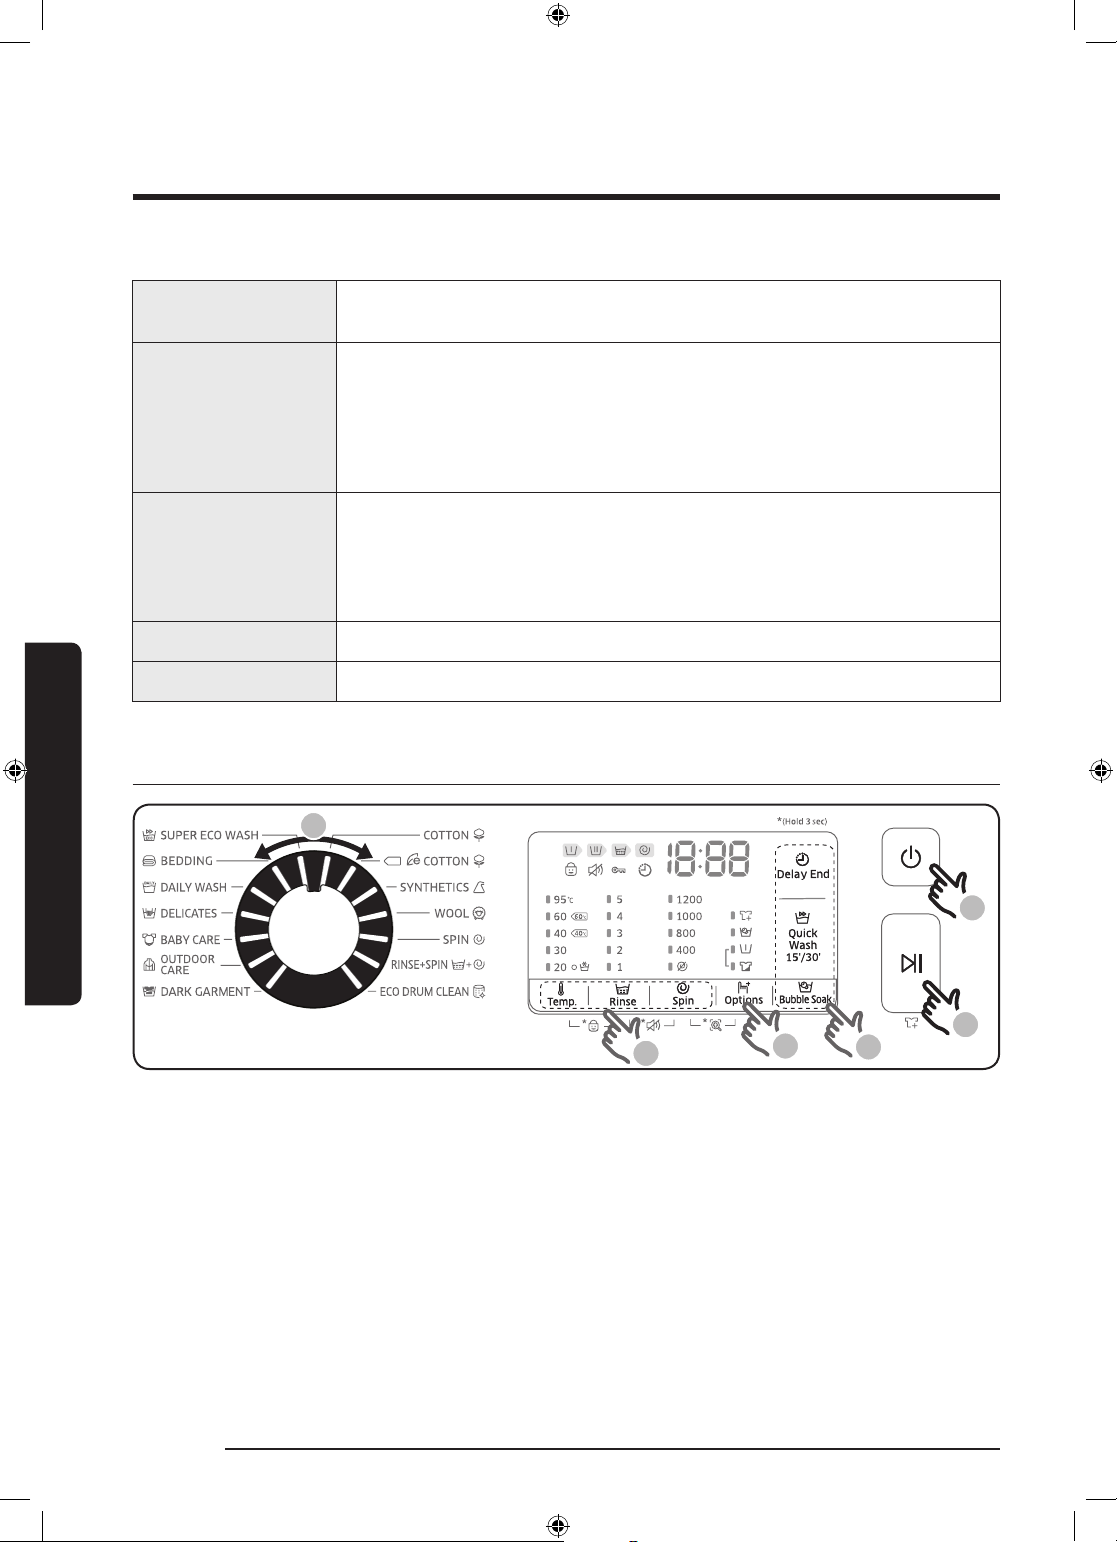
07 Bubble Soak
Press to activate/deactivate the Bubble Soak function. This
function helps remove a wide variety of stubborn stains.
Delay End lets you set the end time of the current cycle. Based
on your settings, the start time of the cycle will be determined
08 Delay End
by the machine’s internal logic. For example, this setting is useful
for programming your machine to nish a wash at the time you
normally return home from work.
• Press to choose a preset unit of hours.
For lightly soiled garments of less than 2 kg that you want to wash
09 Quick Wash
15’/30’
quickly.
• This option is available only when the COTTON cycle is selected.
• The cycle time is subject to change, depending on the detergent
amount, water level, and contamination level of the load.
10 Power Press to turn on/off the washing machine.
11 Start/Pause Press to start or stop operation.
Simple steps to start
1. Press Power to turn on the washing machine.
2. Turn the Cycle Selector to select a course.
3. Change the cycle settings (Temp., Rinse, and Spin) as necessary.
4. To add an option, press Options. Use the button again to choose a preferred item.
5. The machine provides two respective buttons for Bubble Soak and Delay End for easy
access. If you want to use one of these options, press the corresponding button.
6. Press Start/Pause.
To change the cycle during operation
1. Press Start/Pause to stop operation.
2. Select a different cycle.
3. Press Start/Pause again to start the new cycle.
30 English
WW80K5210VW_DC68-03677L-01_EN.indd 30 2017/7/21 15:44:51
Page 31
Cycle overview
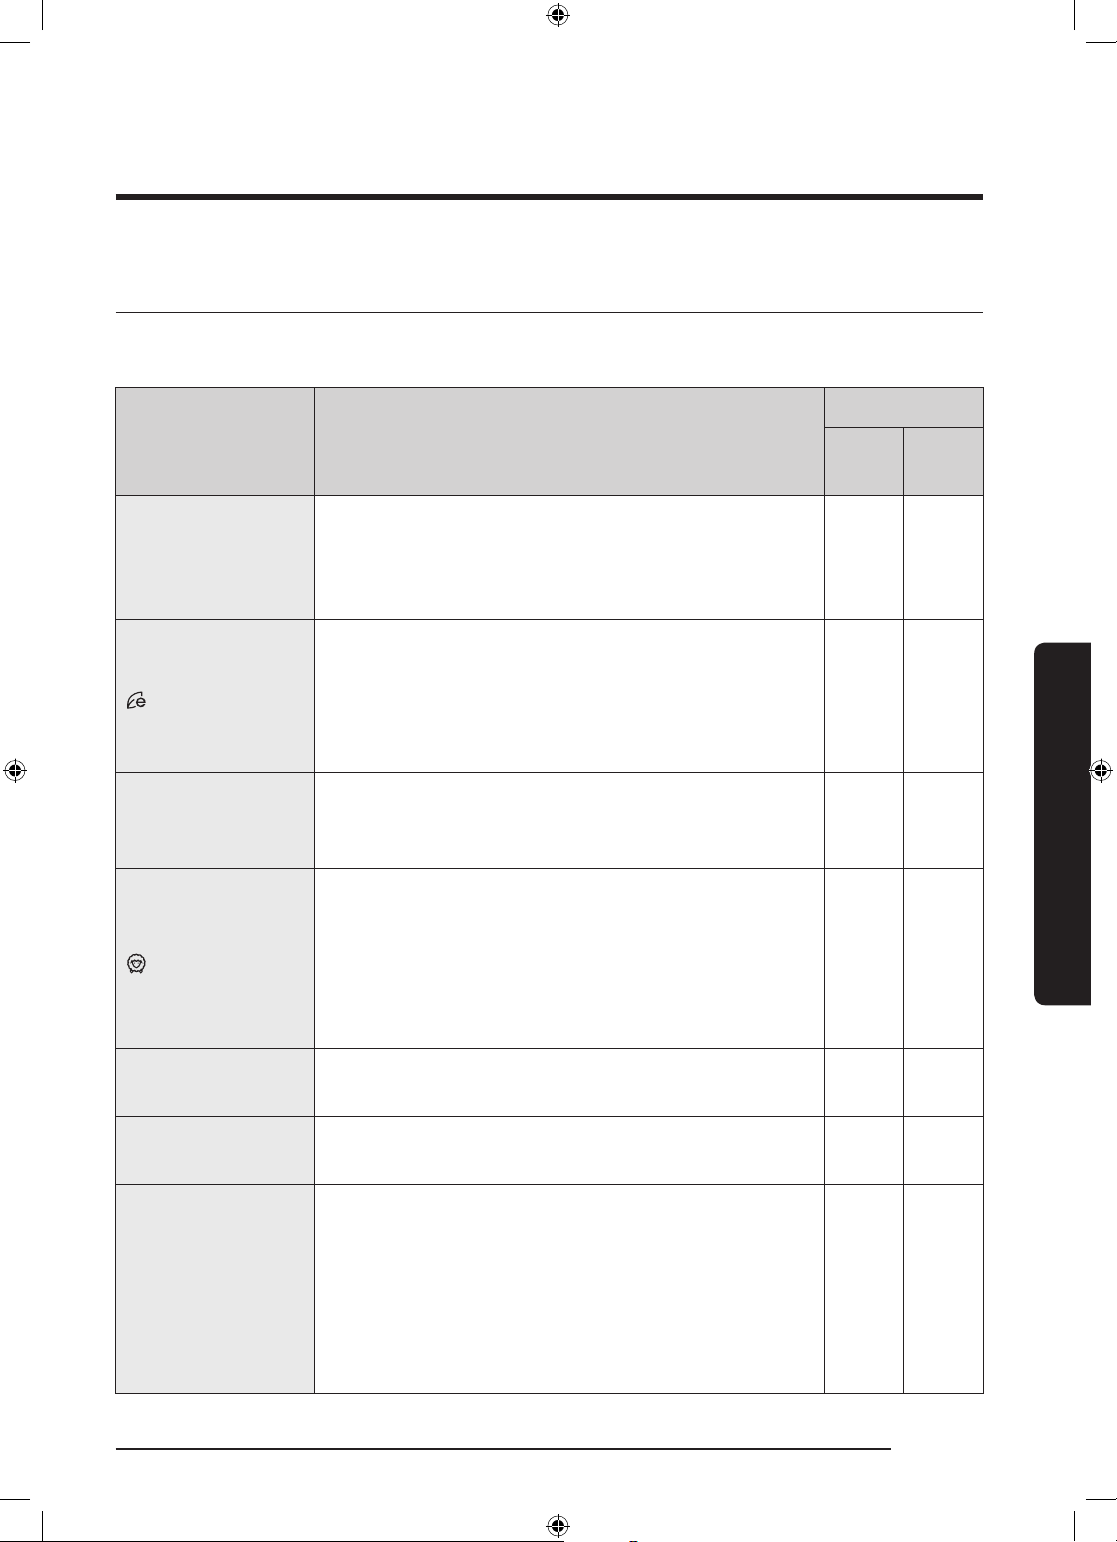
Standard cycles
Max load (kg)
Cycle Description
COTTON
COTTON
SYNTHETICS
WOOL
• For cottons, bed linens, table linens, underwear,
towels, or shirts.
The washing time and the rinse count are
automatically adjusted according to the load.
• Optimal performance with lower energy
for cotton fabrics, bed linens, table linens,
underwear, towels, or shirts. For energy saving,
the actual washing temperature may be lower
than specied
• For blouses or shirts that are made of polyester
(diolen, trevira), polyamide (perlon, nylon), or the
like.
• Specic for machine-washable wool for loads
less than 2.0 kg.
• The WOOL cycle features gentle cradling
and soaking to protect the wool bres from
shrinkage/distortion.
• A neutral detergent is recommended.
8kg
Model
7kg
Model
Max Max
Max Max
3 3
2 2
Operations
SPIN
RINSE+SPIN
• Featuring an additional spin process to
effectively remove moisture from laundry.
• Featuring an additional rinse process after
applying fabric softener to the laundry.
- -
- -
• Cleans the drum by removing dirt and bacteria
from the drum.
• Perform once every 40 washes with no
ECO DRUM CLEAN
detergent or bleach applied.
- -
• Make sure the drum is empty.
• Do not use any cleaning agents for cleaning the
drum.
English 31
WW80K5210VW_DC68-03677L-01_EN.indd 31 2017/7/21 15:44:51
Page 32
Operations
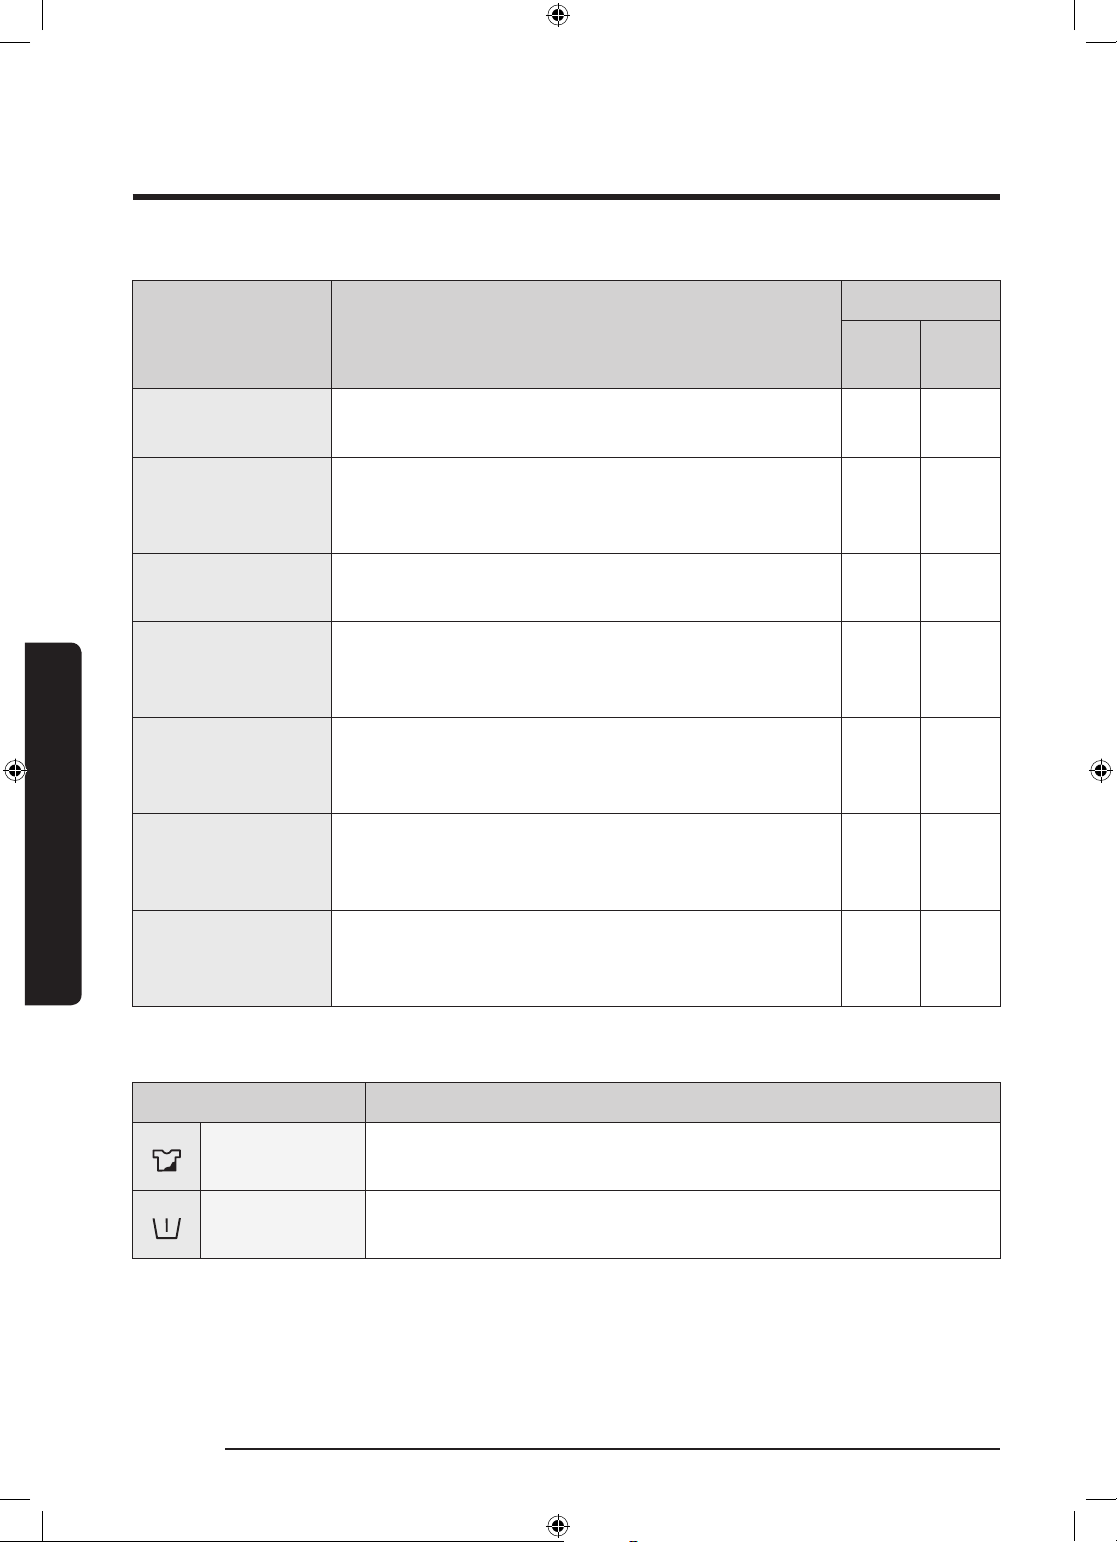
Max load (kg)
Operations
Cycle Description
SUPER ECO WASH
BEDDING
DAILY WASH
DELICATES
BABY CARE
OUTDOOR CARE
• Low temperature ecobubble cycle helps reduce
power consumption.
• For bed spreads, bed sheets, bedding covers, etc.
• For best results, wash only 1 type of bedding
and make sure the load weighs less than 2.0 kg.
• For everyday items such as underwear and
shirts.
• For sheer fabrics, bras, lingerie (silk), and other
handwash-only fabrics.
• For best performance, use liquid detergent.
• Featuring a high-temperature wash and extra
rinses to help remove the remaining detergent
effectively.
• For outdoor clothes, skiwear, and sportswear
that are made of functional materials such as
spandex, stretch, and micro-bre
8kg
Model
4 4
2 2
4 4
2 2
4 4
2 2
7kg
Model
DARK GARMENT
Options
32 English
• Featuring additional rinses and reduced spinning
to ensure that the laundry is washed gently and
rinsed thoroughly.
Option Description
Intensive
Pre Wash
• For badly soiled laundry. The operation time for each cycle is
longer than normal.
• This will add a preliminary washing cycle before the main
wash cycle.
4 4
WW80K5210VW_DC68-03677L-01_EN.indd 32 2017/7/21 15:44:51
Page 33
Option Description
• Bubble Soak helps remove a variety of stubborn stains.
• With Bubble Soak selected, laundry is thoroughly soaked in
Bubble Soak
water bubbles for effective washing.
• Bubble Soak is available with and adds up to 30 minutes to 5
cycles: COTTON, SYNTHETICS, BEDDING, DAILY WASH, BABY
CARE.
Delay End
You can set the washing machine to nish your wash automatically at a later time, choosing
a delay of between 1(60minutes) to 24 hours (in 1 hour increments). The hour displayed
indicates the time the wash will nish.
1. Select a cycle. Then change the cycle settings if necessary.
2. Press Delay End repeatedly until a desired end time is set.
3. Press Start/Pause.
The corresponding indicator turns on with the clock running.
4. To cancel the Delay End, restart the washing machine by pressing Power.
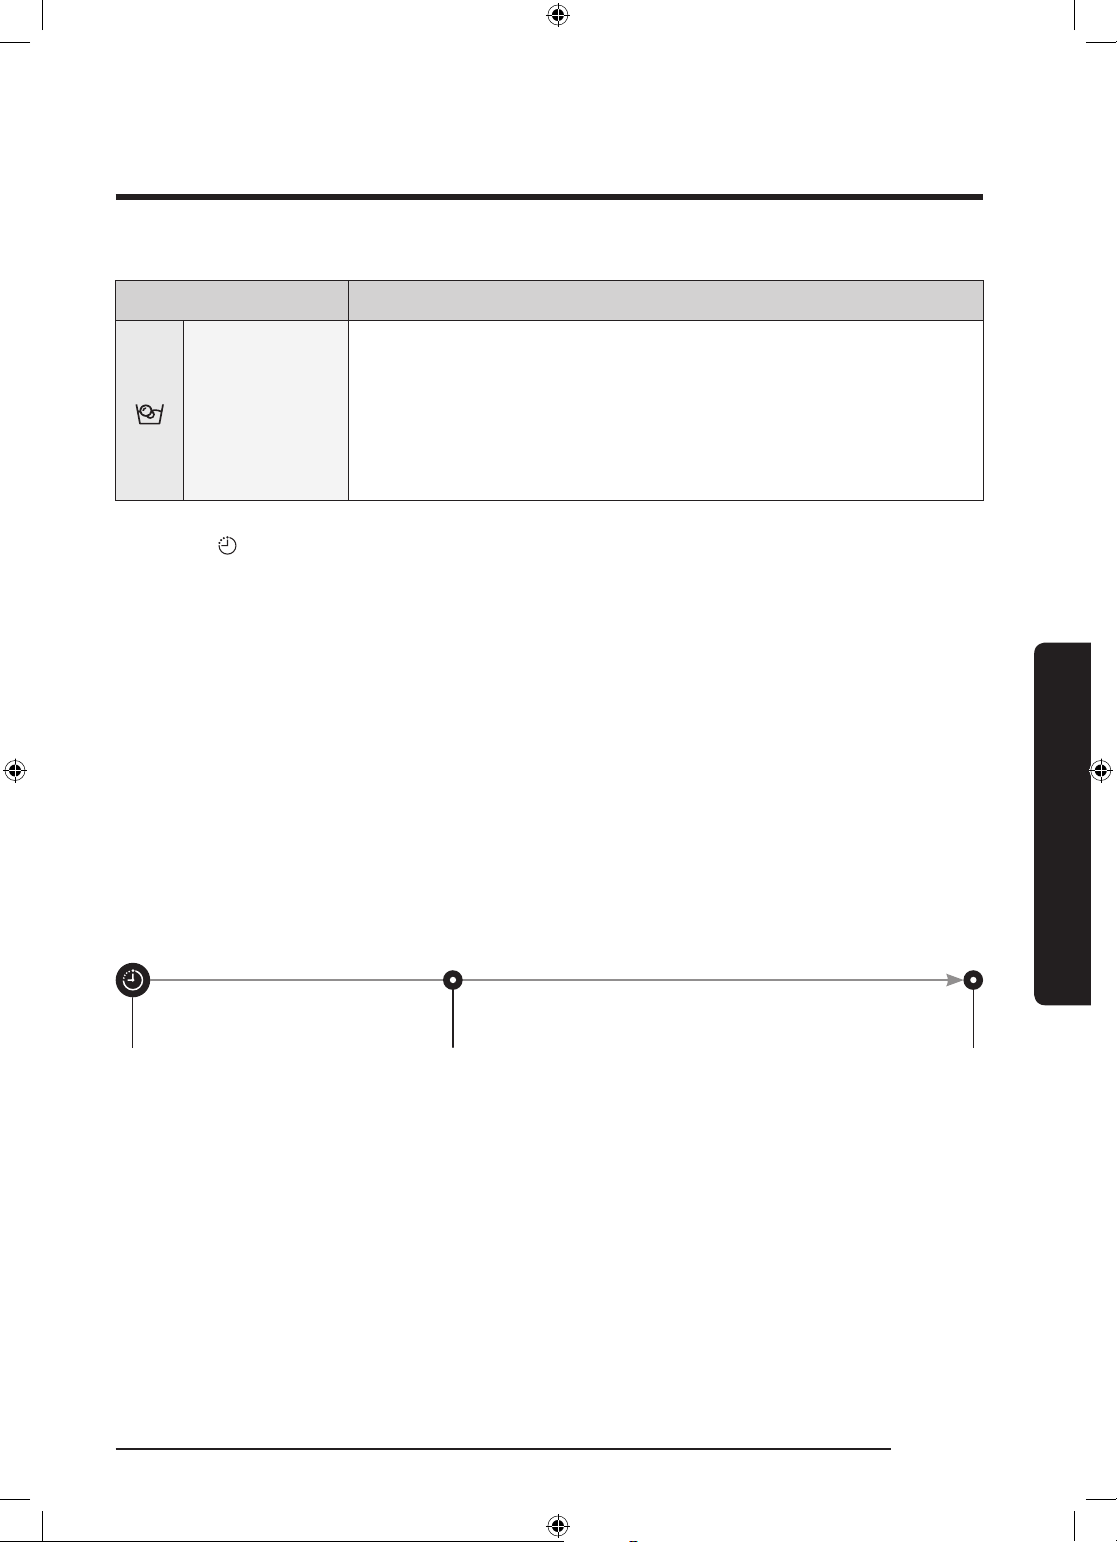
Real-life case
You want to nish a two-hour course 3 hours later from now. For this, you add the Delay End
option to the current cycle with the 3-hour setting, and press Start/Pause at 2:00 p.m.
Then, what happens? The washing machine starts operating at 3:00 p.m., and ends at 5:00
p.m. Provided below is the time line for this example.
Operations
2:00 pm
Set the Delay End to 3 hours
WW80K5210VW_DC68-03677L-01_EN.indd 33 2017/7/21 15:44:52
3:00 pm
Start
5:00 pm
End
English 33
Page 34
Operations
Special features
AddWash
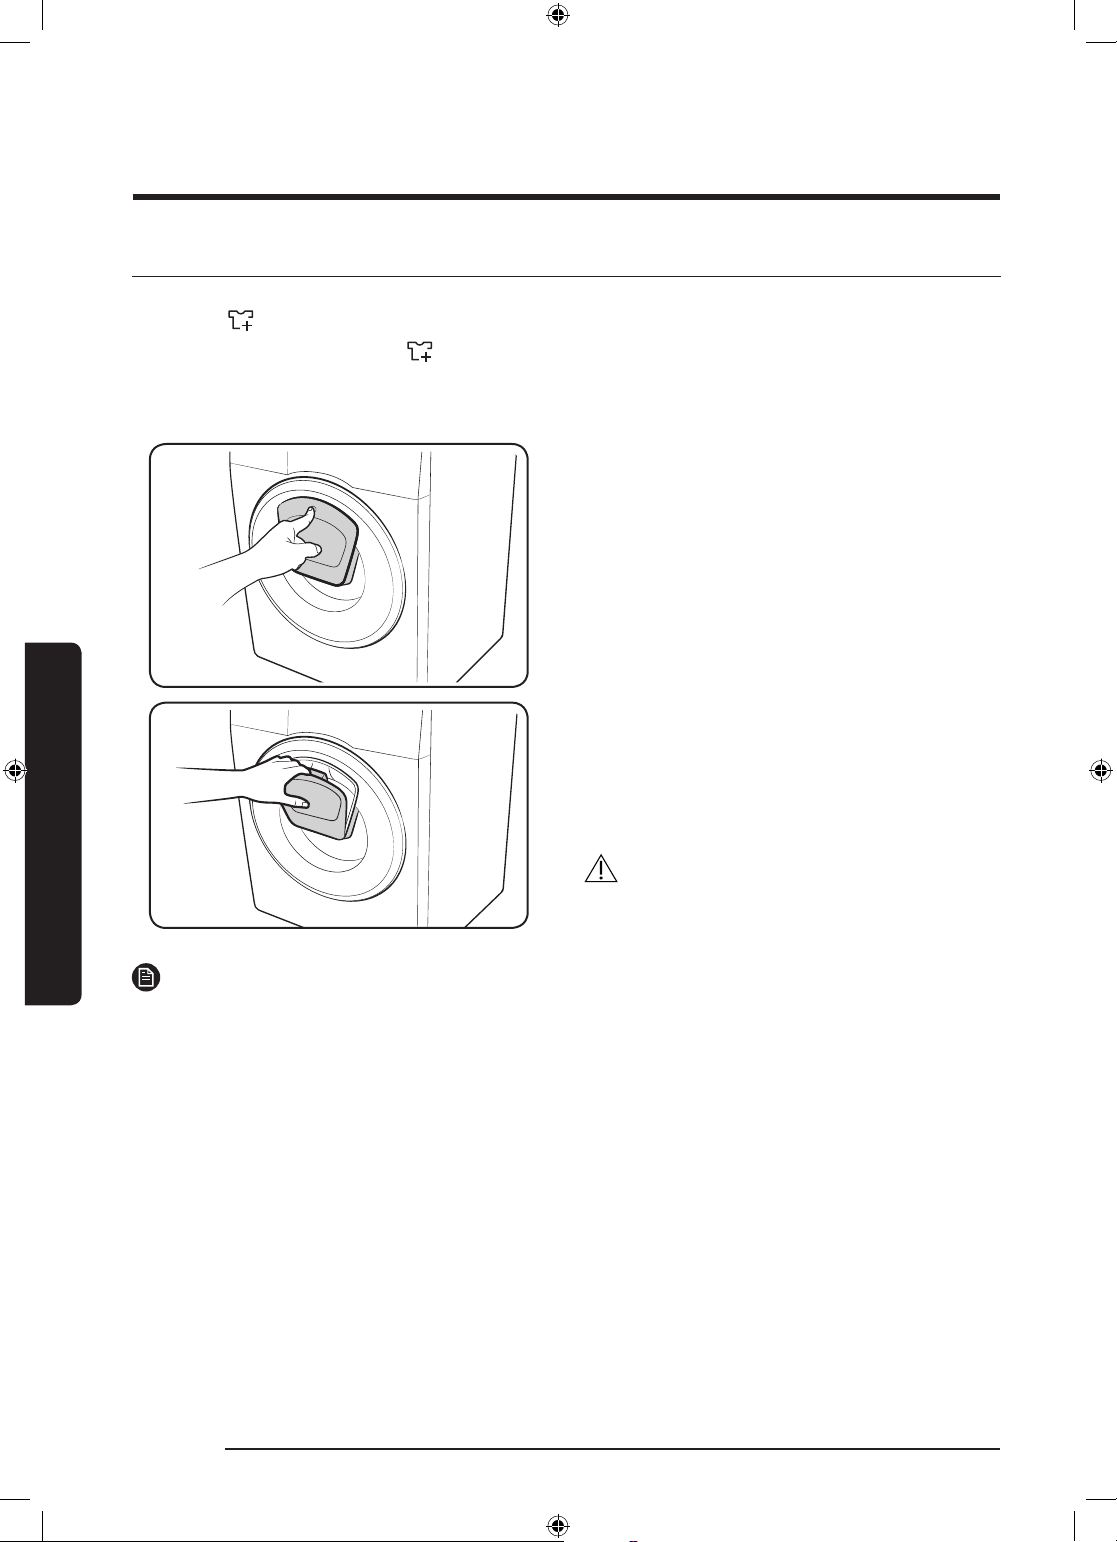
When the AddWash indicator turns on, you can stop operation of the machine and put
additional laundry or softener into the drum. The Add Door opens by more than 130° for
easy access.
1. Press Start/Pause to stop operation.
2. Press the upper area of the Add Door
until you hear a clicking sound to unlock.
Pull the handle of the Add Door to open.
3. Open the Add Door and insert additional
laundry or softener into the drum.
4. Push to lock the Add Door until you hear
a clicking sound.
5. Press Start/Pause to resume operation.
Operations
34 English
CAUTION
Do not put excessive force on the Add Door.
It may break.
NOTE
The water inside the drum does not leak if the Add Door is closed properly. Water drops may
form around the window, but they do not leak from inside the drum.
WW80K5210VW_DC68-03677L-01_EN.indd 34 2017/7/21 15:44:52
Page 35
CAUTION
• Do not open the Add Door if suds have formed inside the drum that rise above the level
of the Add Door.
• Do not attempt to open the Add Door while the machine is operating without rst
pressing Start/Pause. Please note that the Add Door can be opened unintentionally
(without pressing Start/Pause) when the wash is complete.
• Do not add an excessive load through the Add Door. Performance may be degraded.
• Do not use the lower area of the Add Door as a handle. Your ngers may be caught.
• Make sure that no laundry is caught in the Add Door.
• Keep your pets out of the washing machine, especially the Add Door.
• When using hot water for the wash, the Add Door seems to leak water after opening and
closing the Add Door. This is normal, simply because steam emerging from the open Add
Door has cooled and formed water drops on the surface.
• When the Add Door closes, the door seals up and no water can leak. However, you
may encounter what appears to be water leak around the door - some residual water
remaining around the Add Door may form water drops. This is normal.
• Neither the main door or the Add Door can opened when the water temperature is over
50 ˚C. If the water level inside the drum is over a certain point, the main door cannot be
opened.
• If an information code of DDC appears on the display, see the “Information codes” section
for further actions.
Operations
English 35
WW80K5210VW_DC68-03677L-01_EN.indd 35 2017/7/21 15:44:52
Page 36
Operations
Settings
Operations
Child Lock
To prevent accidents by children, Child Lock
locks all buttons except for Power.
• To set the Child Lock function, hold
down Temp. and Rinse simultaneously
for 3 seconds. To activate, press
Start/ Pause.
NOTE
In the Child Lock state, you must rs
deactivate the Child Lock if you want to add
detergent or laundry, or change the current
settings.
To cancel the Child Lock
Press and hold Temp. and Rinse
simultaneously for 3 seconds.
Sound On/Off
You can turn on or off the key. Your setting
will remain effective after you restart the
machine.
• To mute the sound, hold down Rinse and
Spin simultaneously for 3 seconds.
• To unmute the sound, hold down again
for 3 seconds.
36 English
WW80K5210VW_DC68-03677L-01_EN.indd 36 2017/7/21 15:44:53
Page 37
Maintenance
Keep the washing machine clean to prevent deteriorated performance and to preserve its life
cycle.
Eco drum clean
Perform this cycle regularly to clean the drum and to remove bacteria from it.
1. Press Power to turn on the washing machine.
2. Turn the Cycle Selector to select ECO DRUM CLEAN.
3. Press Start/Pause.
NOTE
The water temperature for ECO DRUM CLEAN is set to 70 °C, which cannot be changed.
Due to the features of the washing machine, the water temperature is set to 70 ˚C during
the Eco Drum Clean cycle, but the display can only show 60 ˚C on the control panel.
CAUTION
Do not use any cleaning agents for cleaning the drum. Chemical residue in the drum
deteriorates the washing performance.
English 37
Maintenance
WW80K5210VW_DC68-03677L-01_EN.indd 37 2017/7/21 15:44:54
Page 38
Maintenance
Smart Check
To enable this function, you must rst download the Samsung Smart Washer app at the Play
Store or the App Store, and install it on a mobile device featuring a camera function.
The Smart Check function has been optimized for Galaxy & iPhone series (applicable models
only).
1. Press and hold the Spin and Options buttons simultaneously for 3 seconds to enter the
Smart Check mode.
2. The washing machine starts the self-diagnosis procedure and display an information code
if a problem is detected.
3. Run the Samsung Smart Washer app on your mobile device, and tap Smart Check.
4. Put the mobile device close to the washing machine’s display so that the mobile device
and the washing machine face each other. Then, the information code will be recognized
automatically by the app.
5. When the information code is recognized correctly, the app provides detailed information
about the problem with applicable counteractions.
NOTE
• Smart Check mode will be disabled once you press a button or control after the machine
powers on.
• The function name, Smart Check, may differ depending on the language.
• If there is strong reected light on the washing machine display, the app may fail to
recognize the information code.
• If the app fails to recognize the Smart Check code consecutively, enter the information
code manually onto the app screen.
Maintenance
38 English
WW80K5210VW_DC68-03677L-01_EN.indd 38 2017/7/21 15:44:54
Page 39
Emergency drain
A
B
C
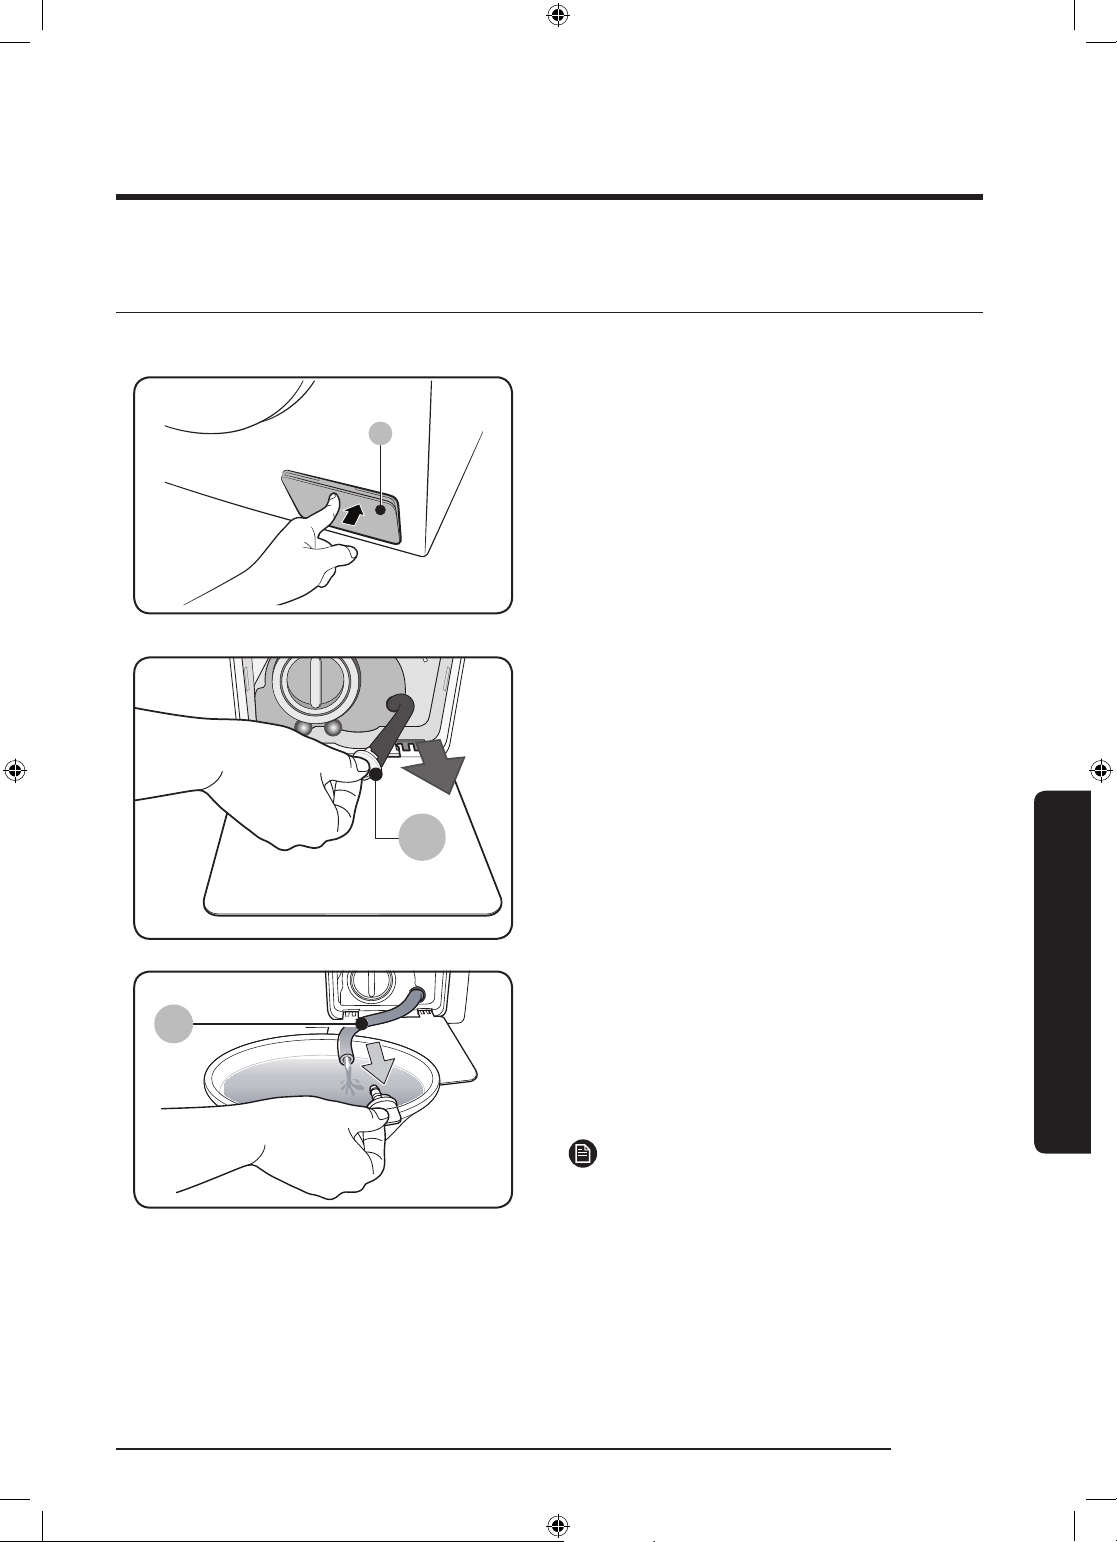
In case of a power failure, drain the water inside the drum before taking out the laundry.
1. Power off and unplug the washing
machine from the electrical outlet.
2. Gently press the top area of the lte
cover (A) to open.
3. Put an empty, spacious container around
the cover, and stretch the emergency
drain tube to the container while holding
the tube cap (B).
Maintenance
4. Open the tube cap and let water in the
Emergency drain tube (C) ow into the
container.
5. When done, close the tube cap, and
reinsert the tube. Then, close the lter
cover.
NOTE
Use a spacious container because the water
in the drum may be more than expected.
English 39
WW80K5210VW_DC68-03677L-01_EN.indd 39 2017/7/21 15:44:55
Page 40
Maintenance
A
Cleaning
Surface of the washing machine
Use a soft cloth with a nonabrasive household detergent. Do not spray water onto the
washing machine.
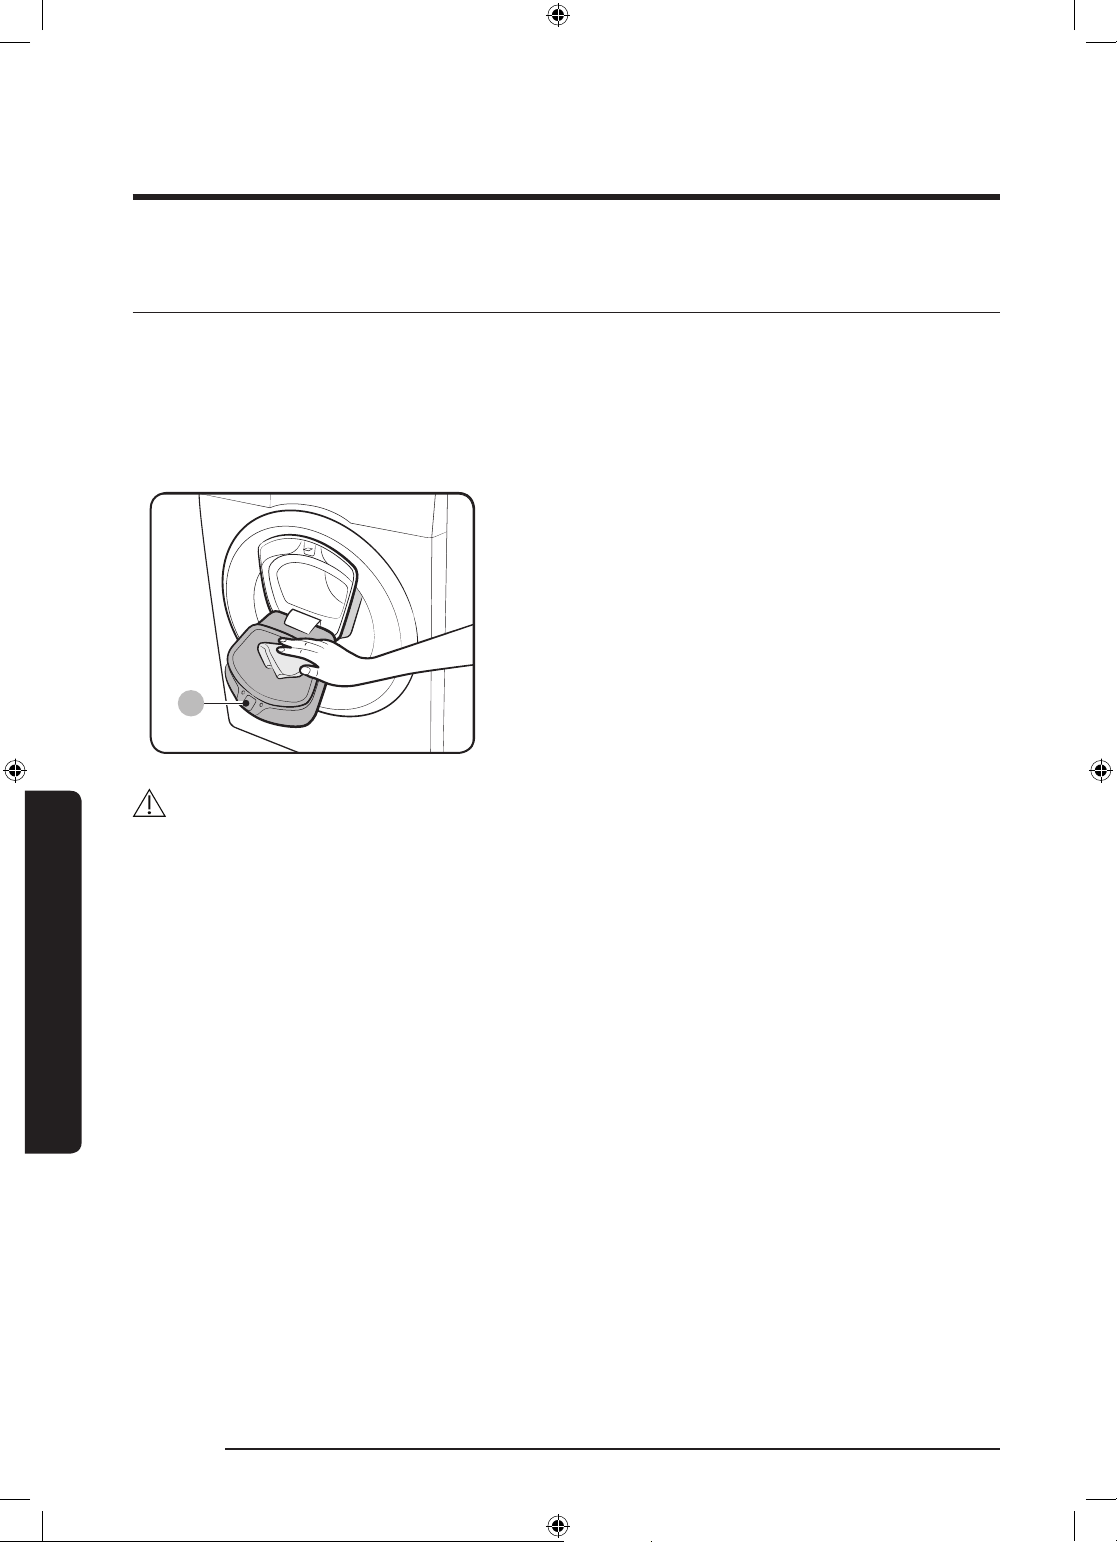
Add Door
1. Open the Add Door.
2. Use a wet cloth to clean the Add Door.
- Do not use cleaning agents.
Discolouration may occur.
- Use caution when cleaning the rubber
packing and the locking mechanism
(A).
- Dust off the window area regularly.
3. Wipe up and close the Add Door until
you hear a clicking sound.
CAUTION
• Do not apply force on the Add Door. It may break.
• Do not leave the Add Door open while the machine is operating.
• Do not put heavy objects on the Add Door at any time.
• To prevent physical injury, do not touch the Add Door while the drum is rotating.
• Do not open the Add Door while the machine is operating. This may cause physical injury.
• Do not manipulate the feature panel while the Add Door is open. This may cause physical
Maintenance
injury or system failure.
• Do not input objects other than laundry.
• Do not input bulky items to the drum through the Add Door.
• Do not pull out the rubber packing of the Add Door when cleaning. This may cause
damage.
40 English
WW80K5210VW_DC68-03677L-01_EN.indd 40 2017/7/21 15:44:55
Page 41
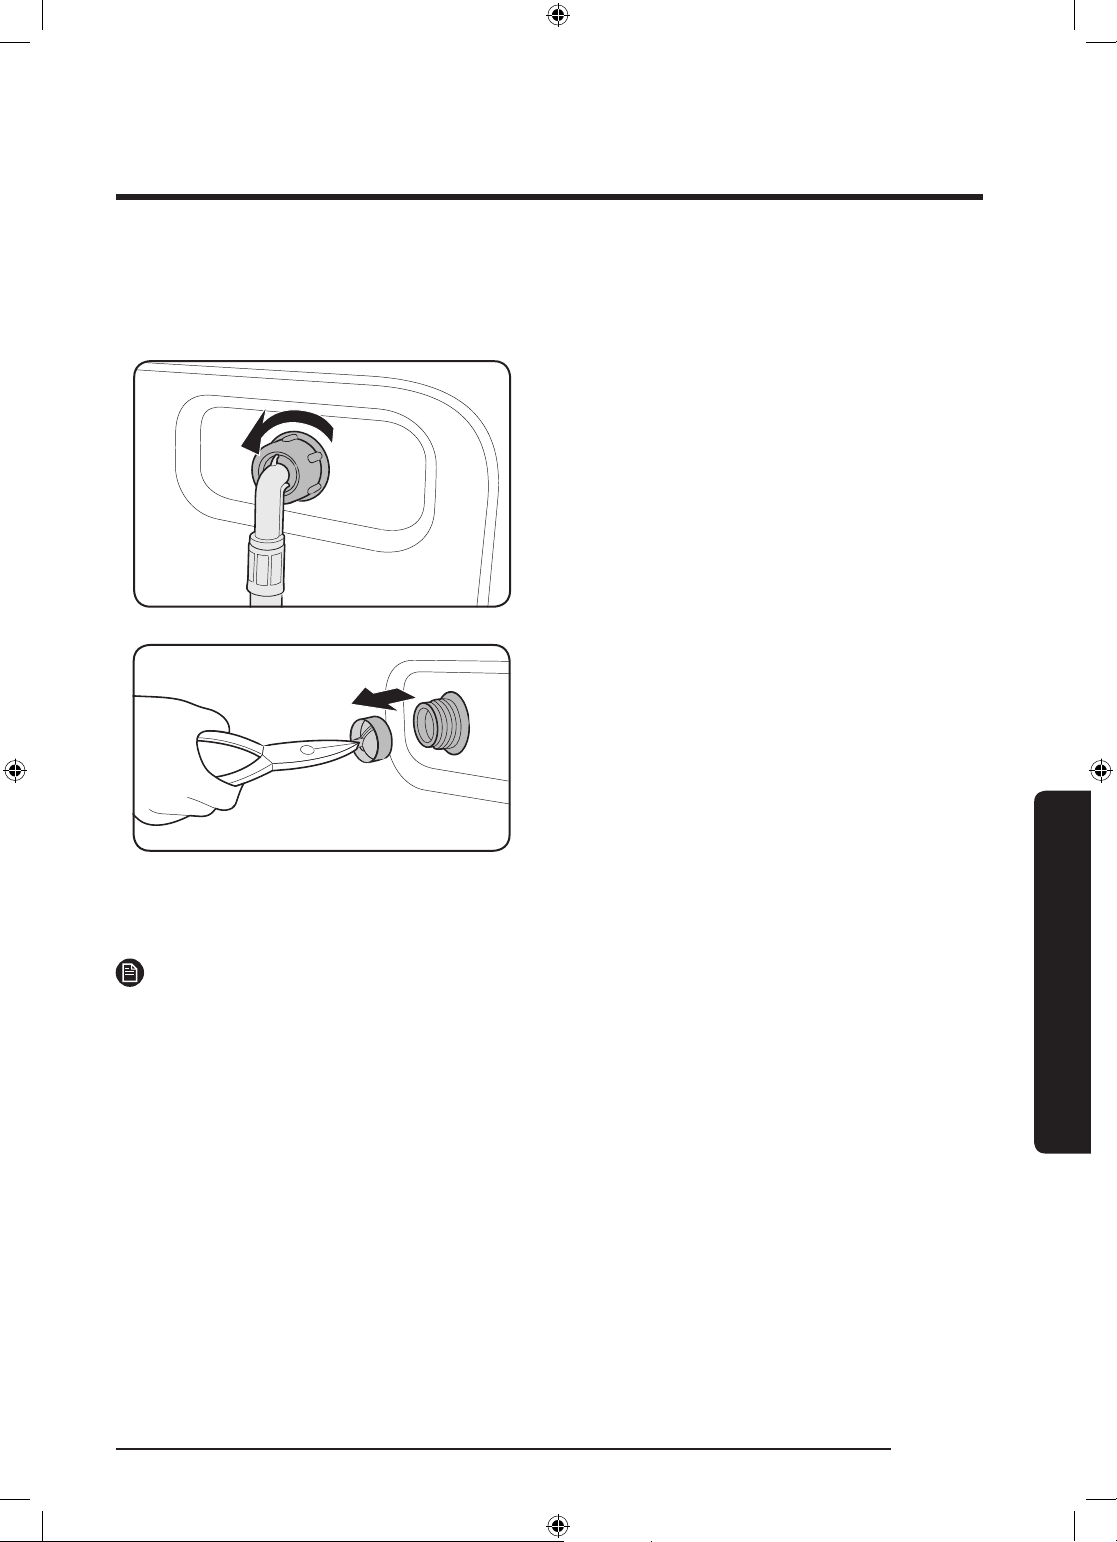
Mesh lter
Clean the mesh lter of the water hose once or twice a year.
1. Turn off the washing machine, and
unplug the power cord.
2. Close the water tap.
3. Loosen and disconnect the water hose
from the back of the washing machine.
Cover the hose with a cloth to prevent
water from gushing out.
4. Use pliers to pull out the mesh lter
from the inlet valve.
5. Submerge the mesh lter deeply in
water so that the threaded connector is
also submerged.
6. Dry the mesh lter completely in the
shade.
7. Reinsert the mesh lter into the inlet
valve, and reconnect the water hose to
the inlet valve.
8. Open the water tap.
Maintenance
NOTE
If the mesh lter is clogged, an information code of “4C” appears on the screen.
English 41
WW80K5210VW_DC68-03677L-01_EN.indd 41 2017/7/21 15:44:55
Page 42
Maintenance
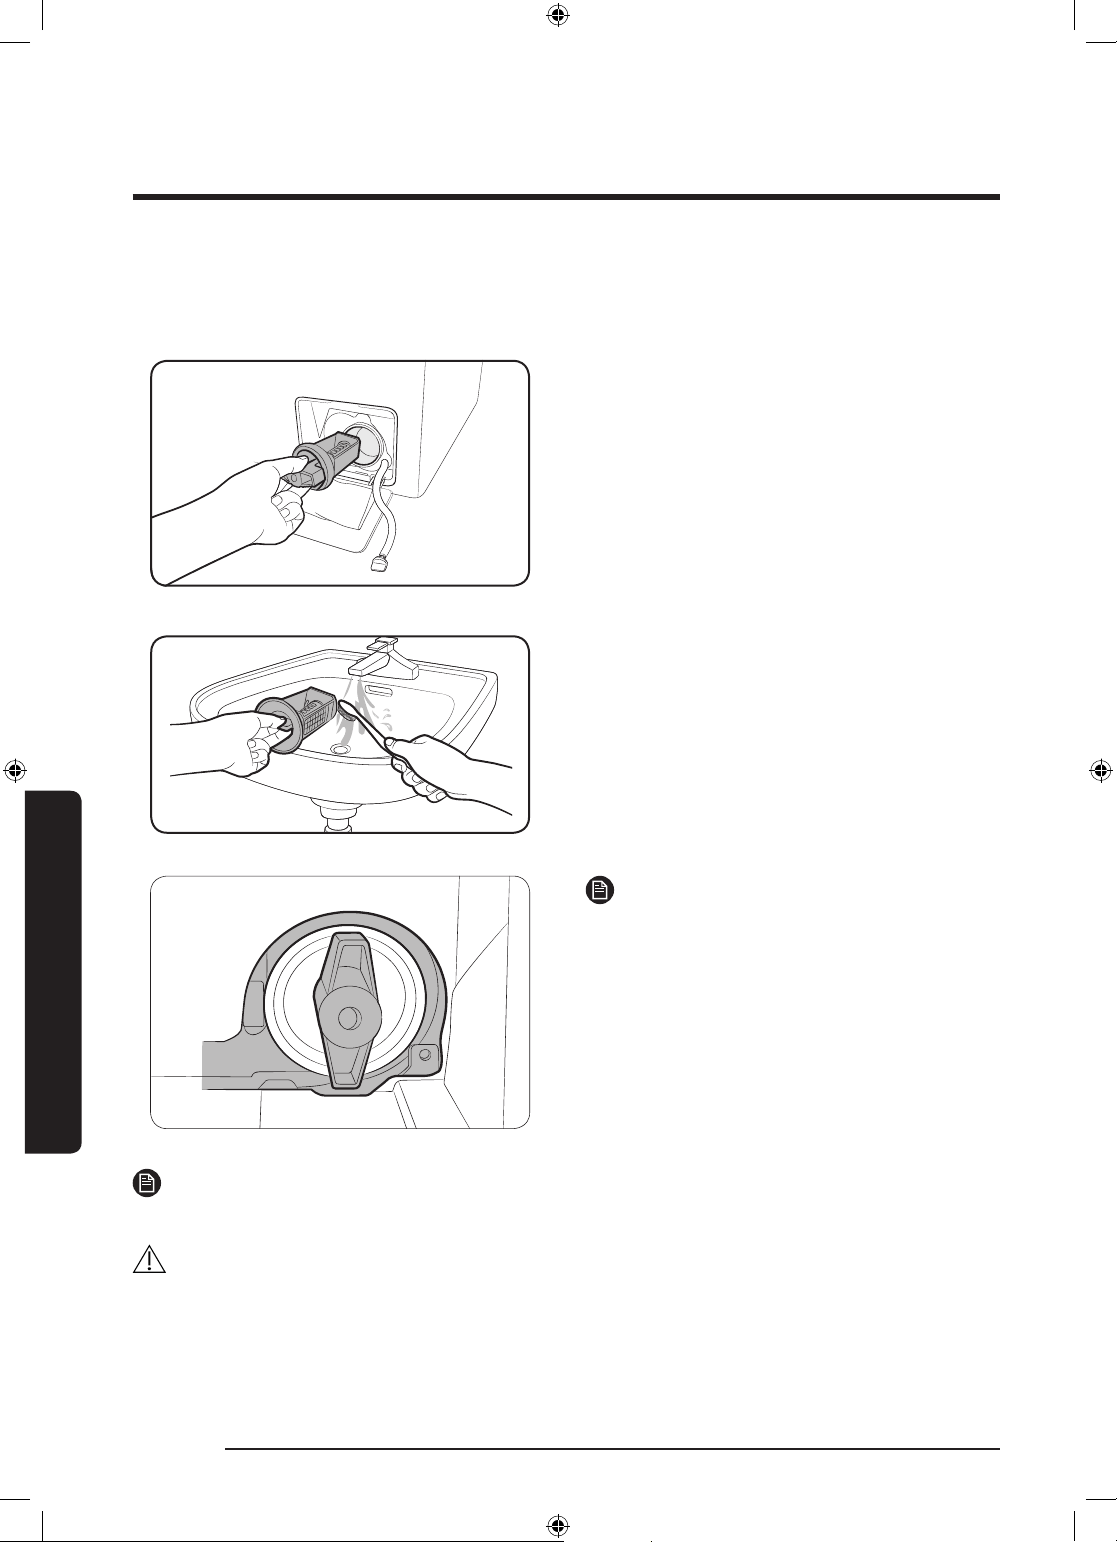
Pump lter
It is advisable to clean the pump lter 5 or 6 times a year to prevent its clogging. A clogged
pump lter may reduce the bubble effect.
1. Turn off the washing machine, and
unplug the power cord.
2. Drain the remaining water inside the
drum drum. See the “Emergency drain”
section.
3. Gently press the top area of the lte
cover to open.
4. Turn the pump lter knob to the left, and
drain off the remaining water.
5. Clean the pump lter using soft brushes.
Make sure the drain pump propeller
inside the lter is unclogged.
6. Reinsert the pump lter, and turn the
lter knob to the right.
Maintenance
42 English
NOTE
• Some pump lters feature a safety knob
that is designed to prevent accidents
by children. To open the safety knob
of the pump lter, push in and turn it
anticlockwise. The spring mechanism of
the safety knob helps open the lter.
• To close the safety knob of the pump
lter, turn it clockwise. The spring makes
a rattling sound, which is normal.
NOTE
If the pump lter is clogged, an information code of “5C” appears on the screen.
CAUTION
• Make sure the lter knob is closed properly after cleaning the lter. Otherwise, this may
cause a leak.
• Make sure the lter is inserted properly after cleaning it. Otherwise, this may cause an
operational failure or a leak.
WW80K5210VW_DC68-03677L-01_EN.indd 42 2017/7/21 15:44:56
Page 43
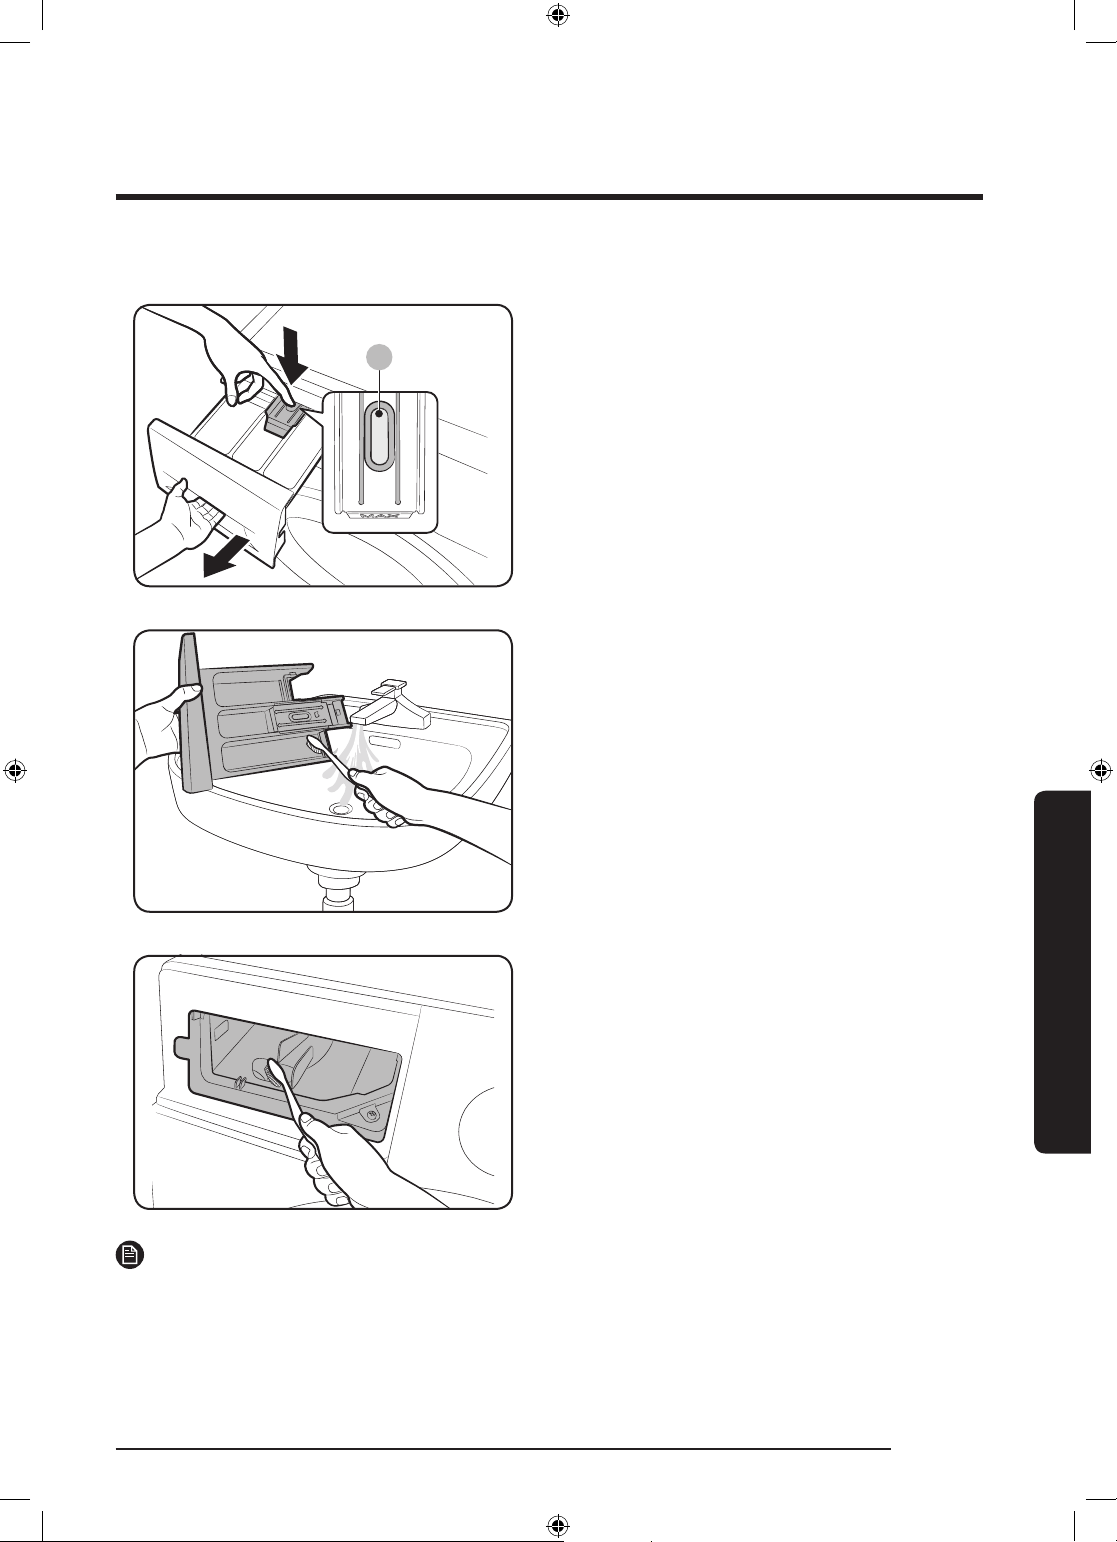
Detergent Drawer
A
1. While holding down the release lever (A)
on the inner of the drawer, slide open
the drawer.
2. Remove the release lever and the Liquid
detergent guide from the drawer.
3. Clean the drawer components in owing
water using a soft brush.
4. Clean the drawer recess using a soft
brush.
5. Reinsert the release lever and the Liquid
detergent guide to the drawer.
6. Slide the drawer inward to close it.
NOTE
To remove remaining detergent, perform the RINSE+SPIN cycle with the drum being empty.
English 43
Maintenance
WW80K5210VW_DC68-03677L-01_EN.indd 43 2017/7/21 15:44:56
Page 44
MaintenanceMaintenance
Recovery from freezing
The washing machine may freeze when it drops below 0 °C.
1. Turn off the washing machine, and unplug the power cord.
2. Pour warm water over the water tap to loosen the water hose.
3. Disconnect the water hose, and soak it in warm water.
4. Pour warm water into the drum and leave it for about 10 minutes.
5. Reconnect the water hose to the water tap.
NOTE
If the washing machine still doesn’t operate normally, repeat the above steps until it operates
normally.
Care against an extended time of disuse
Avoid leaving the washing machine unused for an extended time. If this is the case, drain the
washing machine and unplug the power cord.
1. Turn the Cycle Selector to select a RINSE+SPIN.
2. Empty the drum, and press Start/Pause.
3. When the cycle is complete, close the water tap and disconnect the water hose.
4. Turn off the washing machine, and unplug the power cord.
5. Open the door to let air circulate through the drum.
Maintenance
44 English
WW80K5210VW_DC68-03677L-01_EN.indd 44 2017/7/21 15:44:56
Page 45
Troubleshooting
Checkpoints
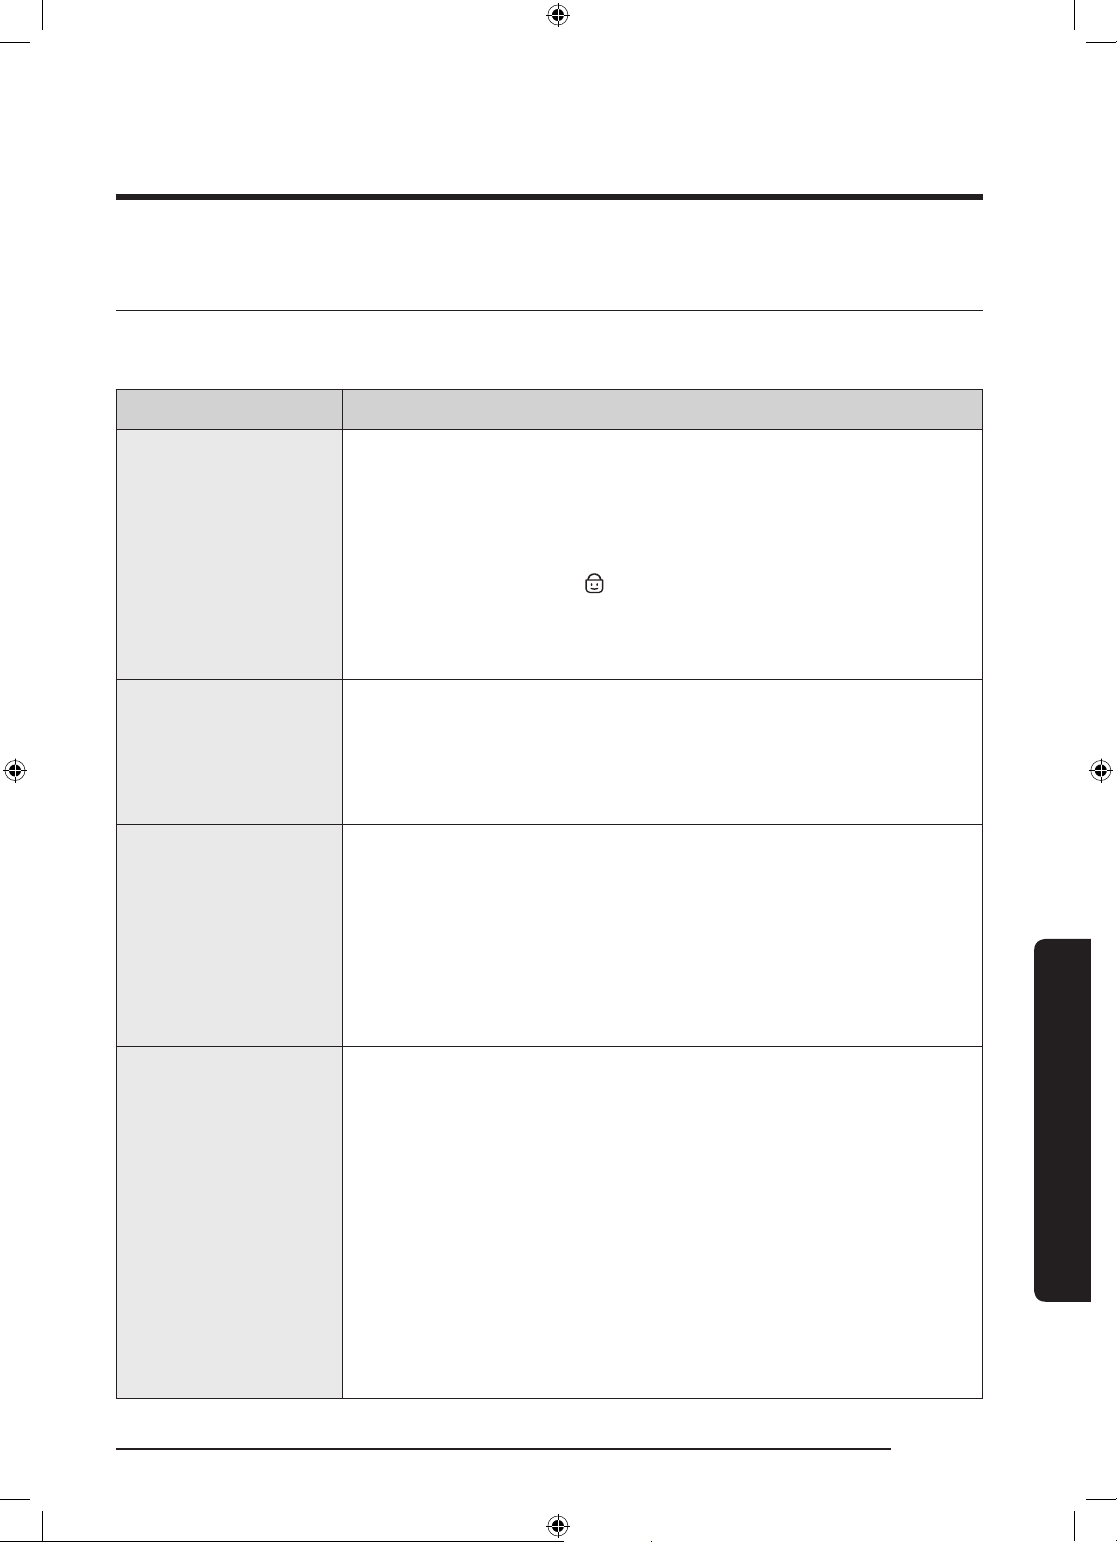
If you encounter a problem with the washing machine, rst check the table below and try the
suggestions.
Problem Action
• Make sure the washing machine is plugged in.
• Make sure the door is properly closed.
• Make sure the water taps are open.
• Make sure to press or tap Start/Pause to start the washing
Does not start.
Water supply is
insufcient, or no
water is supplied.
machine.
• Make sure Child Lock
• Before the washing machine starts to ll, it will make a series of
clicking noises to check the door lock and does a quick drain.
• Check the fuse or reset the circuit breaker.
• Fully open the water tap.
• Make sure the door is properly closed.
• Make sure the water supply hose is not frozen.
• Make sure the water supply hose is not kinked or clogged.
• Make sure there is sufcient water pressure.
is not activated.
After a cycle,
detergent remains in
the detergent drawer.
Excessive vibrations
or makes noise.
• Make sure the washing machine is running with sufcient water
pressure.
• Make sure the detergent is added to the centre of the detergent
drawer.
• Make sure the rinse cap is inserted properly.
• If using granular detergent, make sure the detergent selector is
in the upper position.
• Remove the rinse cap and clean the detergent drawer.
• Make sure the washing machine is installed on a level, solid
oor that is not slippery.
If the oor is not level, use the levelling feet to adjust the
height of the washing machine.
• Make sure the shipping bolts are removed.
• Make sure the washing machine is not contacting any other
object.
• Make sure the laundry load is balanced.
• The motor can cause noise during normal operation.
• Overalls or metal-decorated clothes can cause noise while being
washed. This is normal.
• Metal objects such as coins can cause noise. After washing,
remove these objects from the drum or lter case.
Troubleshooting
English 45
WW80K5210VW_DC68-03677L-01_EN.indd 45 2017/7/21 15:44:56
Page 46
Troubleshooting
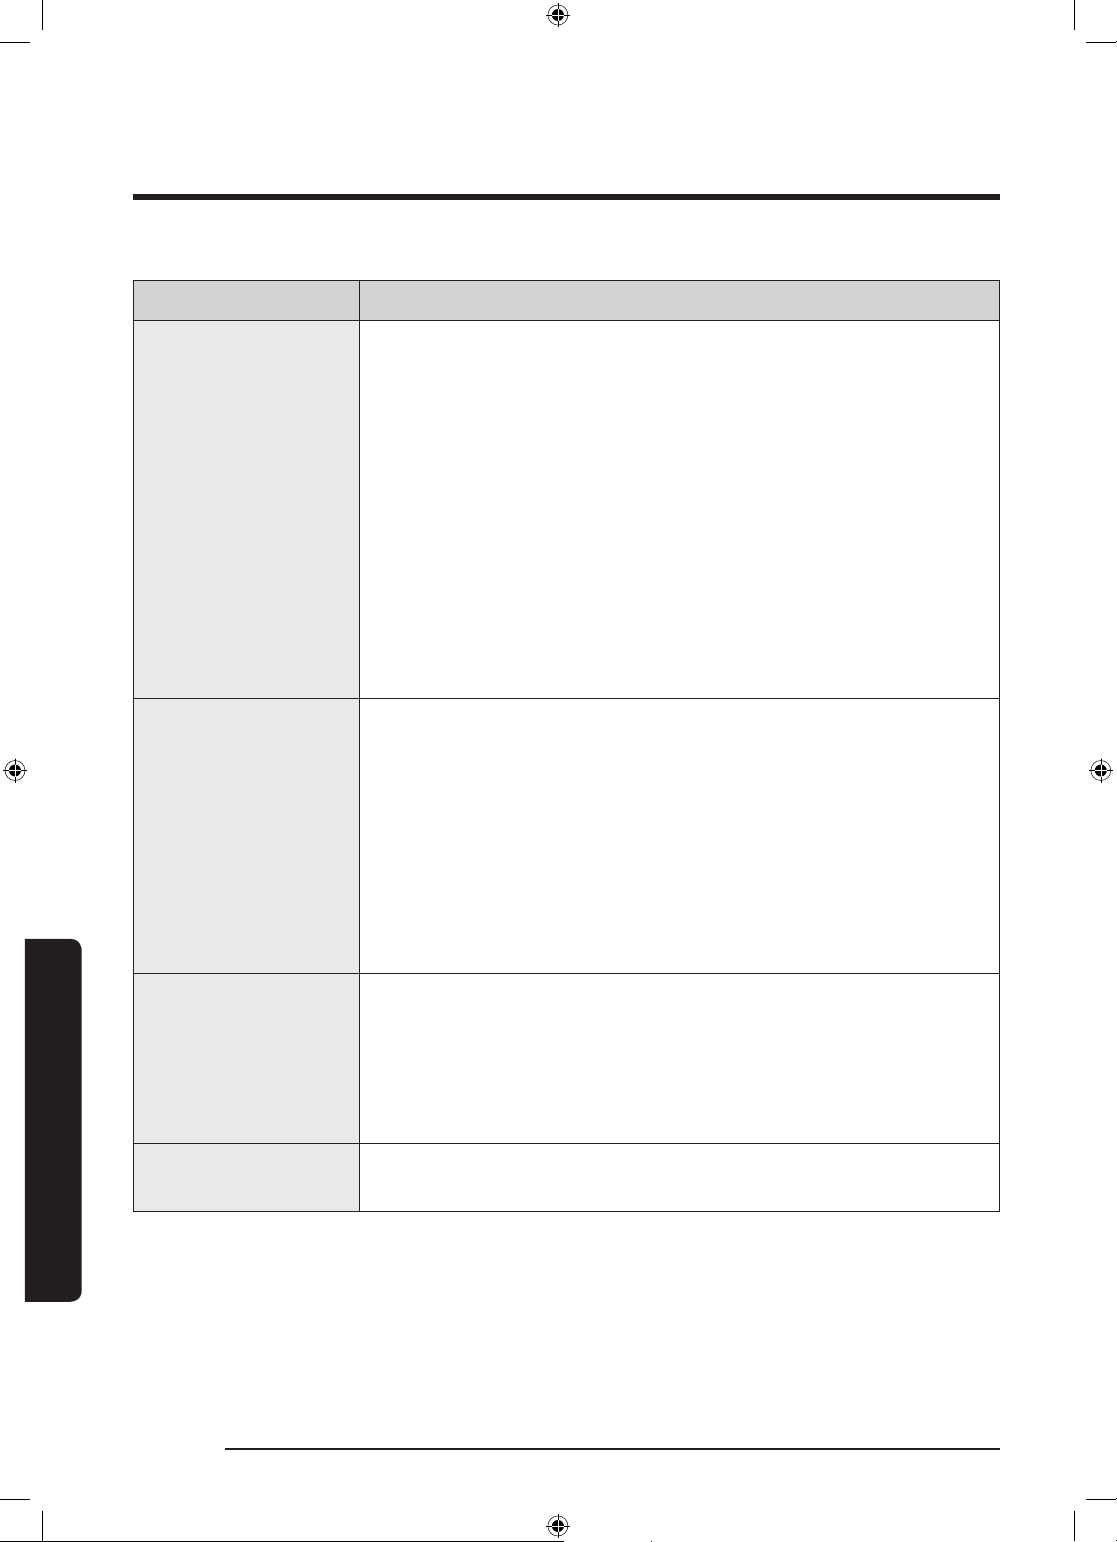
Problem Action
• Make sure the drain hose is straightened all the way to the
drain system. If you encounter a drain restriction, call for
service.
• Make sure the debris lter is not clogged.
• Close the door and press or tap Start/Pause. For your safety,
the washing machine will not tumble or spin unless the door is
Does not drain and/
or spin.
The door does not
open.
closed.
• Make sure the drain hose is not frozen or clogged.
• Make sure the drain hose is connected to a drain system that is
not clogged.
• If the washing machine is not supplied with sufcient power,
the washing machine temporarily will not drain or spin.
As soon as the washing machine regains sufcient power, it will
operate normally.
• Press or tap Start/Pause to stop the washing machine.
• It may take a few moments for the door lock mechanism to
disengage.
• The door will not open until 3 minutes after the washing
machine has stopped or the power turned off.
• Make sure all the water in the drum is drained.
• The door may not open if water remains in the drum. Drain the
drum and open the door manually.
• Make sure the door lock light is off. The door lock light turns off
after the washing machine has drained.
• Make sure you use the recommended types of detergent as
appropriate.
Excessive suds.
Cannot apply
Troubleshooting
WW80K5210VW_DC68-03677L-01_EN.indd 46 2017/7/21 15:44:56
additional detergent.
46 English
• Use high efciency (HE) detergent to prevent oversudsing.
• Reduce the detergent amount for soft water, small loads, or
lightly soiled loads.
• Non-HE detergent is not recommended.
• Make sure the remaining amount of detergent and fabric
softener is not over the limit.
Page 47
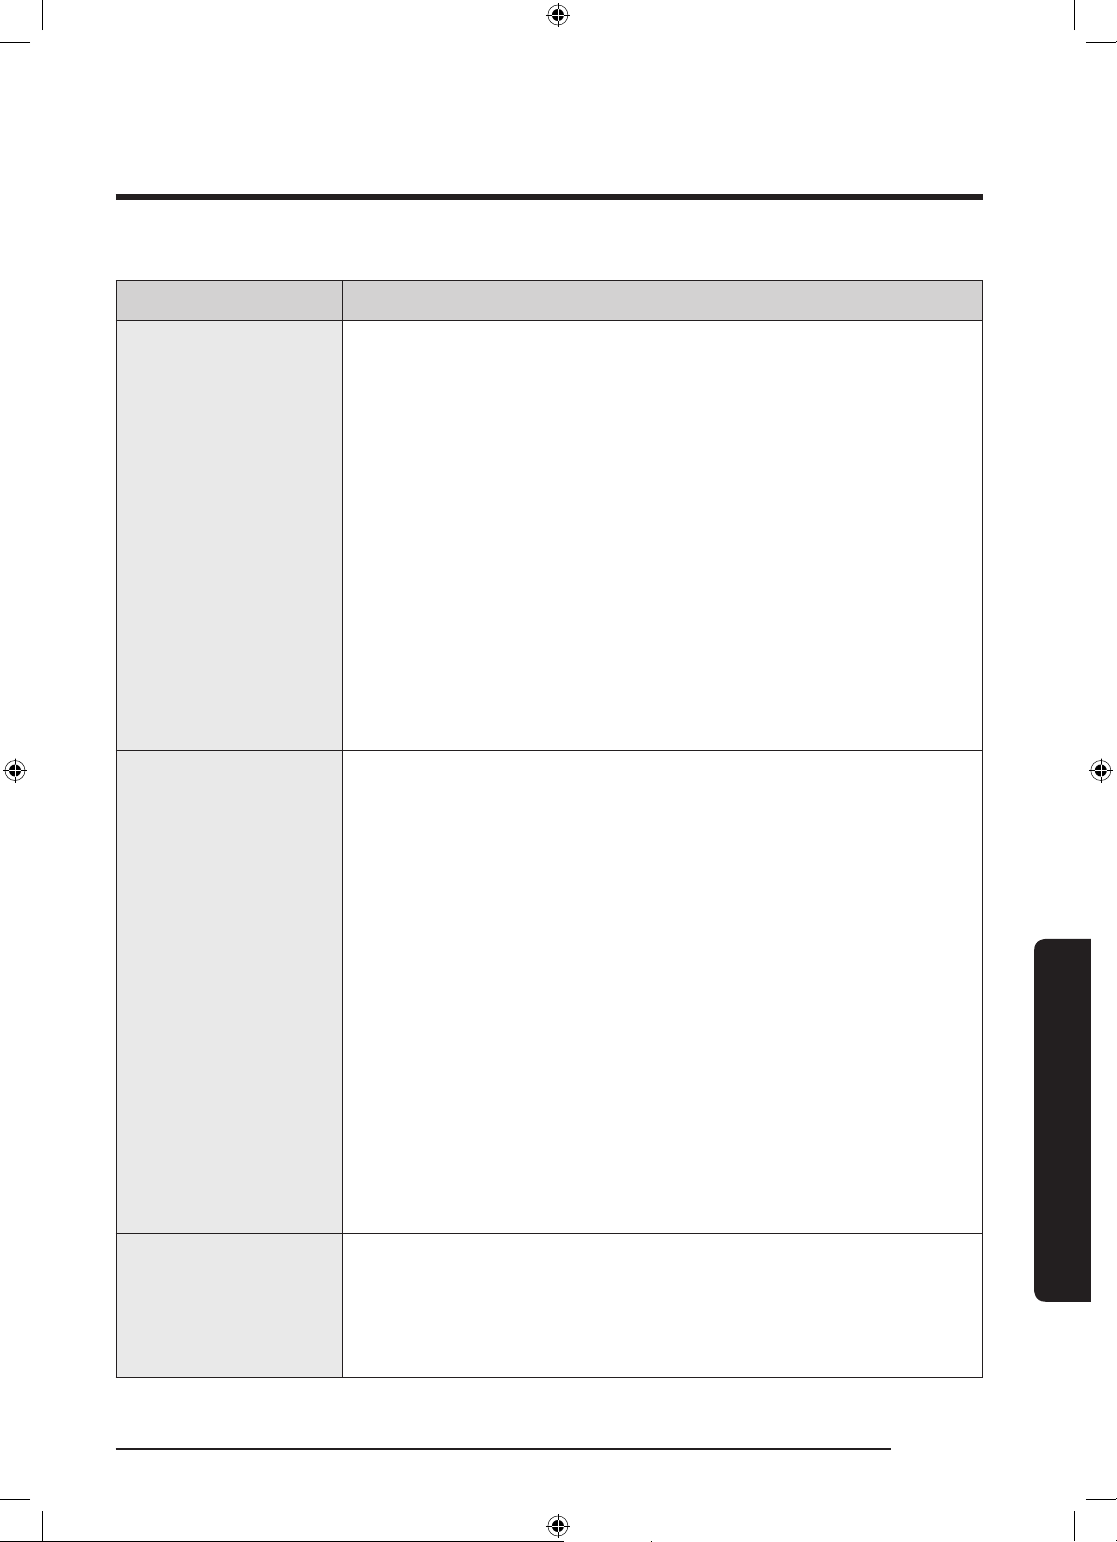
Problem Action
Stops.
Fills with the wrong
water temperature.
• Plug the power cord into a live electrical outlet.
• Check the fuse or reset the circuit breaker.
• Close the door and press the Start/Pause button to start the
washing machine.
For your safety, the washing machine will not tumble or spin
unless the door is closed.
• Before the washing machine starts to ll, it will make a series of
clicking noises to check the door lock and does a quick drain.
• There may be a pause or soak period in the cycle. Wait briey
and the washing machine may start.
• Make sure the mesh lter of the water supply hose at the water
taps are not clogged. Periodically clean the mesh lter.
• If the washing machine is not supplied with sufcient power,
the washing machine temporarily will not drain or spin. As soon
as the washing machine regains sufcient power, it will operate
normally.
• Fully open both taps.
• Make sure the temperature selection is correct.
• Make sure the hoses are connected to the correct taps. Flush
water lines.
• Make sure the water heater is set to supply a minimum 120 °F
(49 °C) hot water at the tap. Also, check the water heater
capacity and recovery rate.
• Disconnect the hoses and clean the mesh lter. The mesh lter
may be clogged.
• While the washing machine lls, the water temperature may
change as the automatic temperature control feature checks
incoming water temperature. This is normal.
• While the washing machine lls, you may notice just hot and/or
just cold water going through the dispenser when cold or warm
temperatures are selected.
This is a normal function of the automatic temperature
control feature as the washing machine determines the water
temperature.
Troubleshooting
• Use the High or Extra High spin speed.
Load is wet at the
end of a cycle.
• Use high efciency (HE) detergent to reduce oversudsing.
• Load is too small. Small loads (one or two items) may become
unbalanced and not spin completely.
• Make sure the drain hose is not kinked or clogged.
English 47
WW80K5210VW_DC68-03677L-01_EN.indd 47 2017/7/21 15:44:56
Page 48
Troubleshooting
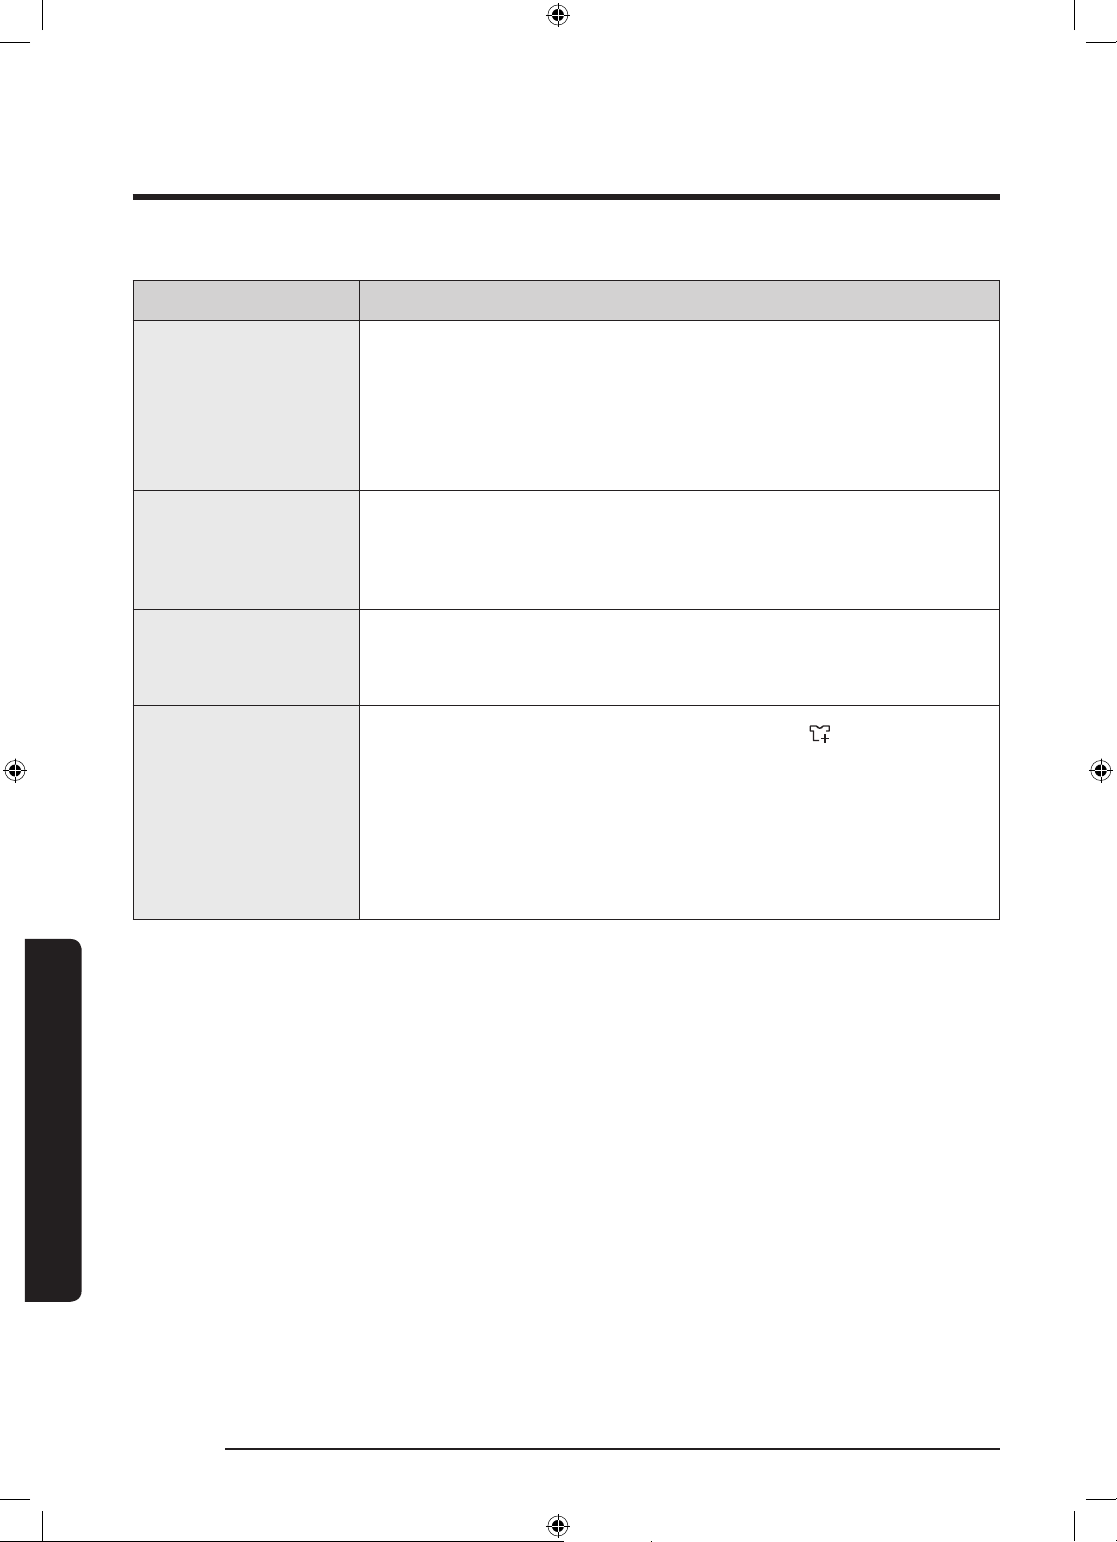
Problem Action
• Make sure the door is properly closed.
• Make sure all hose connections are tight.
Leaks water.
Has odours.
• Make sure the end of the drain hose is correctly inserted and
secured to the drain system.
• Avoid overloading.
• Use high efciency (HE) detergent to prevent oversudsing.
• Excessive suds collect in recesses and can cause foul odours.
• Run cleansing cycles to sanitize periodically.
• Clean the door seal (diaphragm).
• Dry the washing machine interior after a cycle has nished.
Troubleshooting
No bubbles are seen
(Bubbleshot models
only).
Can I open the Add
Door at any time?
If a problem persists, contact a local Samsung service centre.
• Overloading may screen bubbles.
• Severely contaminated laundry may not generate bubbles.
• The Add Door can be opened only when the indicator
appears. However, it does not open in the following cases:
- When the boiling or drying process is running and the
internal temperature becomes high.
- If you set the Child Lock for safety reasons.
- When the drum wash or drum drying cycle is running that
does not involve additional laundry.
48 English
WW80K5210VW_DC68-03677L-01_EN.indd 48 2017/7/21 15:44:56
Page 49
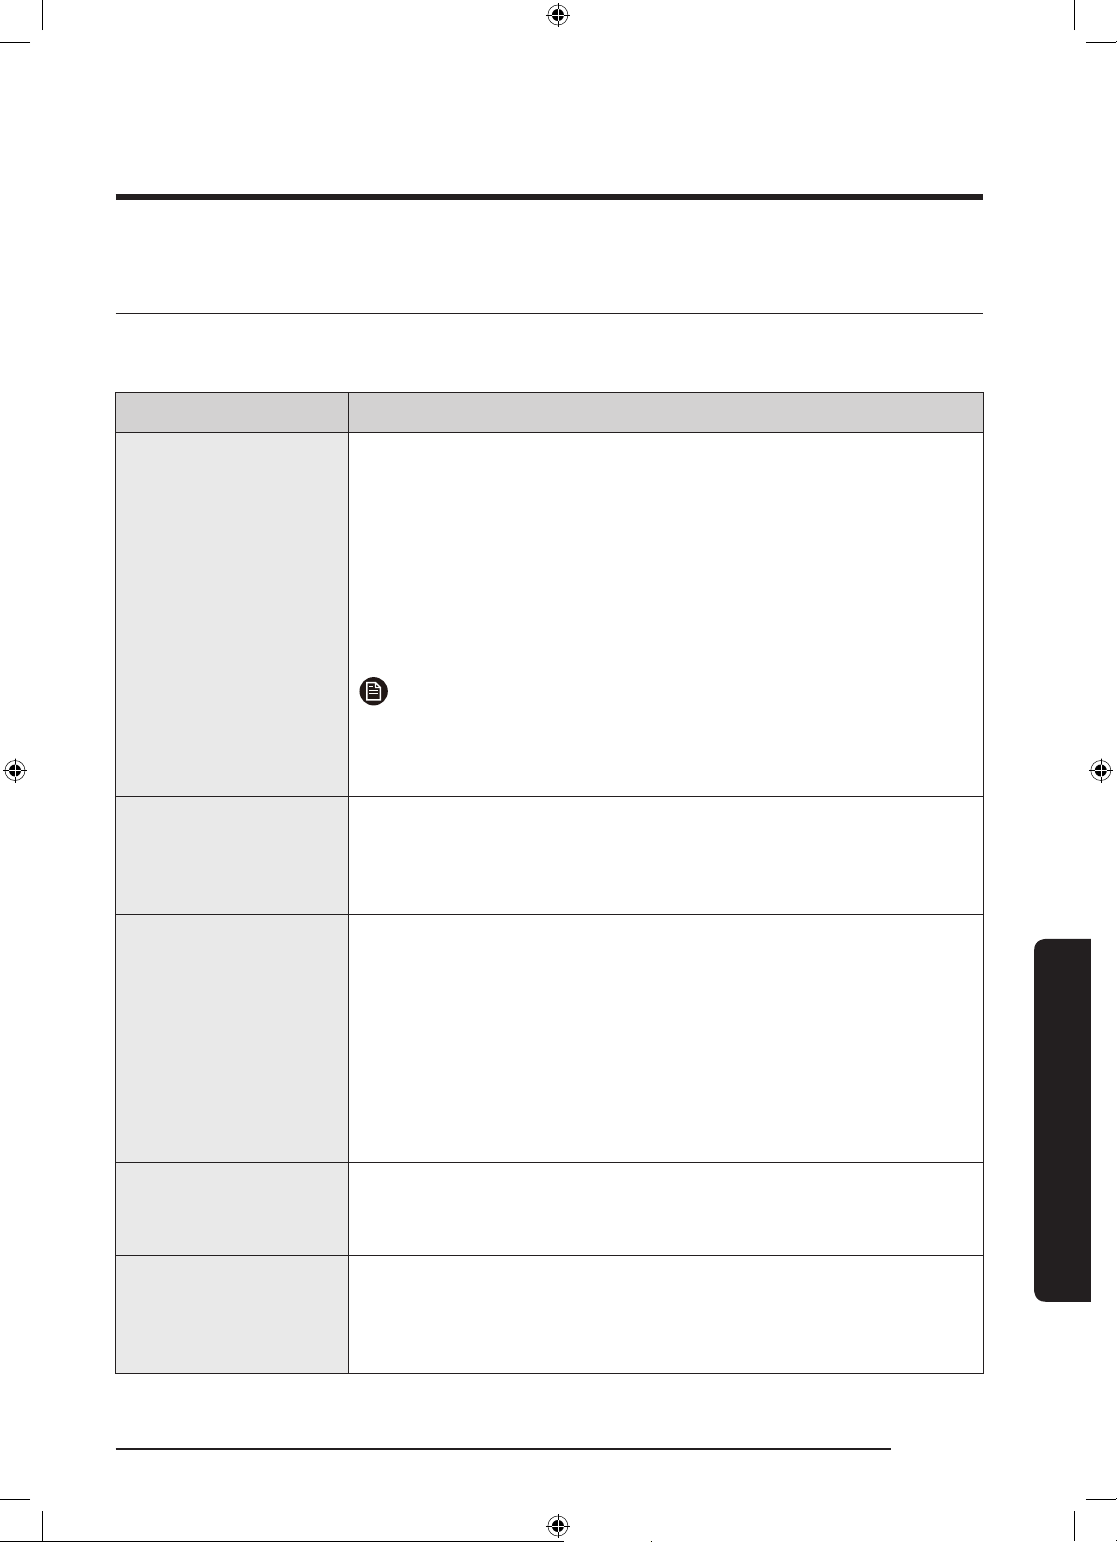
Information codes
If the washing machine fails to operate, you may see an information code on the screen.
Check the table below and try the suggestions.
Code Action
Water is not supplied.
• Make sure the water taps are open.
• Make sure the water hoses are not clogged.
• Make sure the water taps are not frozen.
• Make sure the washing machine is operating with sufcient
water pressure.
4C
4C2
• Make sure that the cold water tap and the hot water tap are
properly connected.
• Clean the mesh lter as it may be clogged.
NOTE
When the washer displays the “4C” code, the washer do
draining for 3 minutes. During this time, the Power button is
inoperative.
• Make sure the cold water supply hose is rmly connected to
the cold water tap.
If it is connected to the hot water tap, the laundry may be
deformed with some cycles.
5C
DC
DC1
Water is not draining.
• Make sure the drain hose is not frozen or clogged.
• Make sure the drain hose is positioned correctly, depending on
the connection type.
• Clean the debris lter as it may be clogged.
• Make sure the drain hose is straightened all the way to the
drain system.
• If the information code remains, contact a customer service
centre.
Operating the washer with the door open.
• Make sure the door is properly closed.
• Make sure laundry is not caught in the door.
The Main Door lock/unlock is not working properly.
• Turn the machine off, and restart the cycle.
• If the information code remains, contact a customer service
centre.
English 49
Troubleshooting
WW80K5210VW_DC68-03677L-01_EN.indd 49 2017/7/21 15:44:57
Page 50
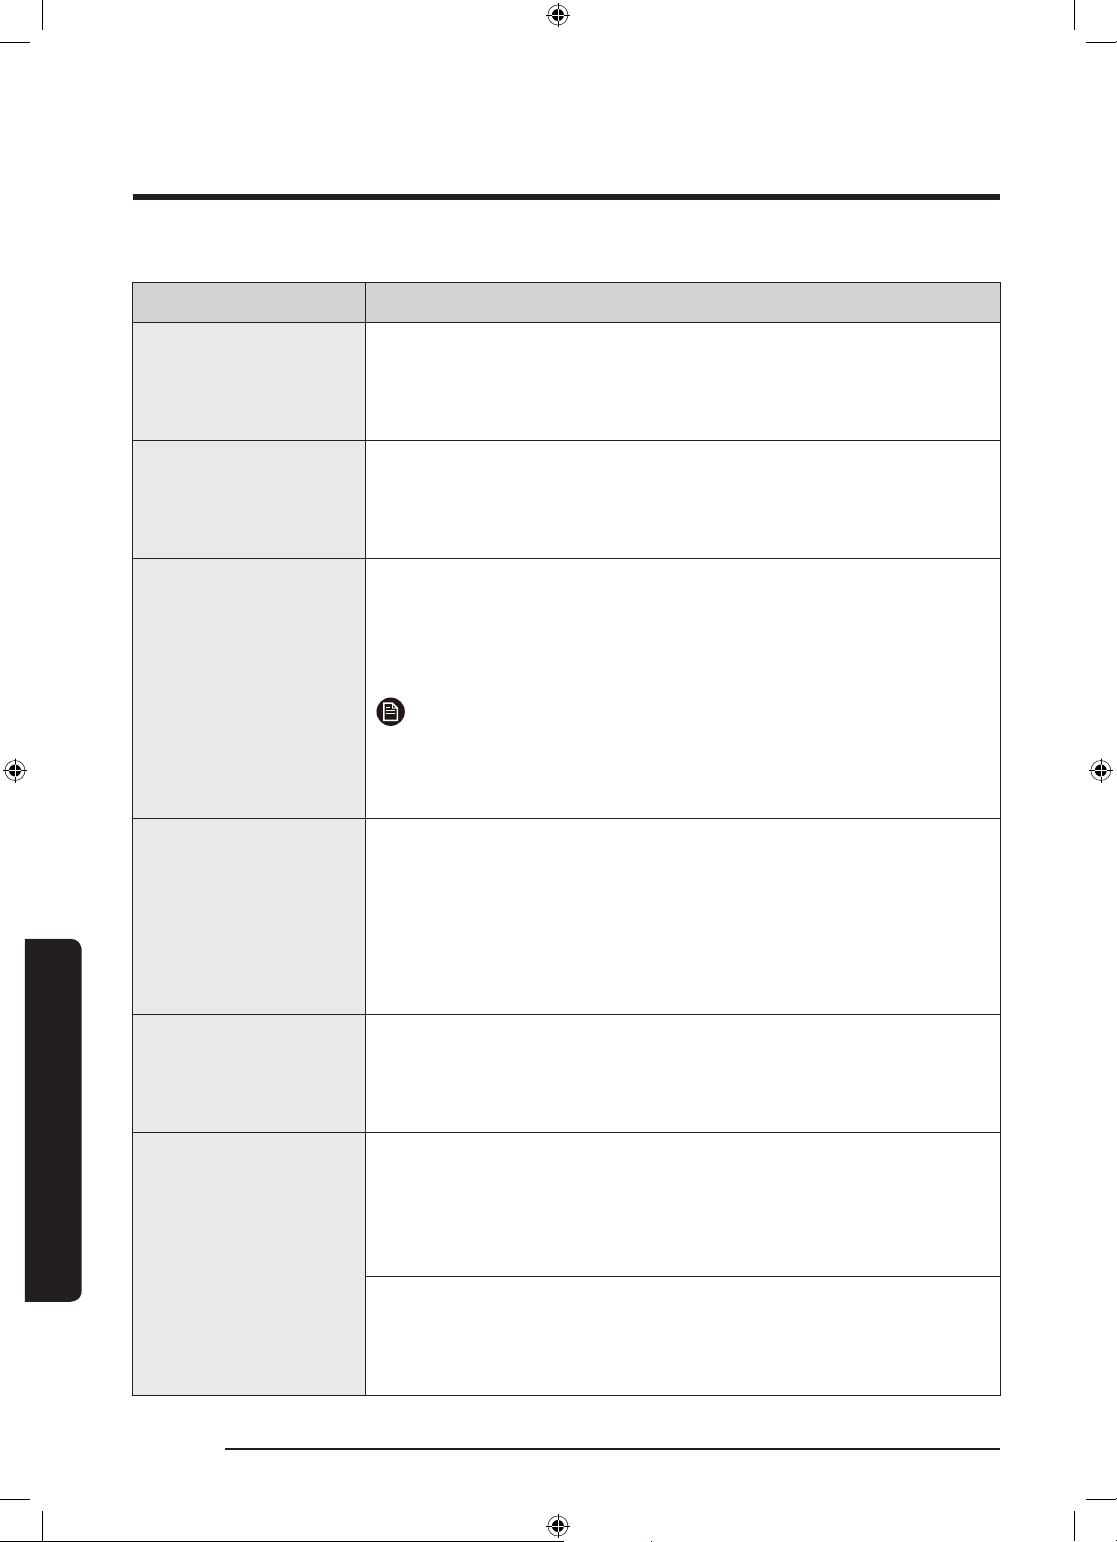
Troubleshooting
Code Action
The Add Door lock/unlock is not working properly.
DC3
OC
LC, LC1
• Turn the machine off, and restart the cycle.
• If the information code remains, contact a customer service
centre.
Water is overowed.
• Restart after spinning.
• If the information code remains on the display, contact a local
Samsung service centre.
Check the drain hose.
• Make sure the end of the drain hose is placed on the oor.
• Make sure the drain hose is not clogged.
• If the information code remains, contact a customer service
centre.
NOTE
When the washer displays the “LC,LC1” code, the washer do
draining for 3 minutes. During this time, the Power button is
inoperative.
Troubleshooting
UB
3C
UC
Spinning does not work.
• Make sure laundry is spread out evenly.
• Make sure the washing machine is on a at, stable surface.
• Redistribute the load. If only one item of clothing needs
washing, such as a bathrobe or pair of jeans, the nal spin
result might be unsatisfactory, and an “UB” check message will
be shown in the display.
Check the motor for operation.
• Try restarting the cycle.
• If the information code remains, contact a customer service
centre.
The electronic control needs to be checked (Over Voltage Error).
• Check the PCB and wire harness.
• Check if power is supplied properly.
• If the information code remains, contact a customer service
centre.
Low voltage detected
• Check if the power cord is plugged in.
• If the information code remains, contact a customer service
centre.
50 English
WW80K5210VW_DC68-03677L-01_EN.indd 50 2017/7/21 15:44:57
Page 51
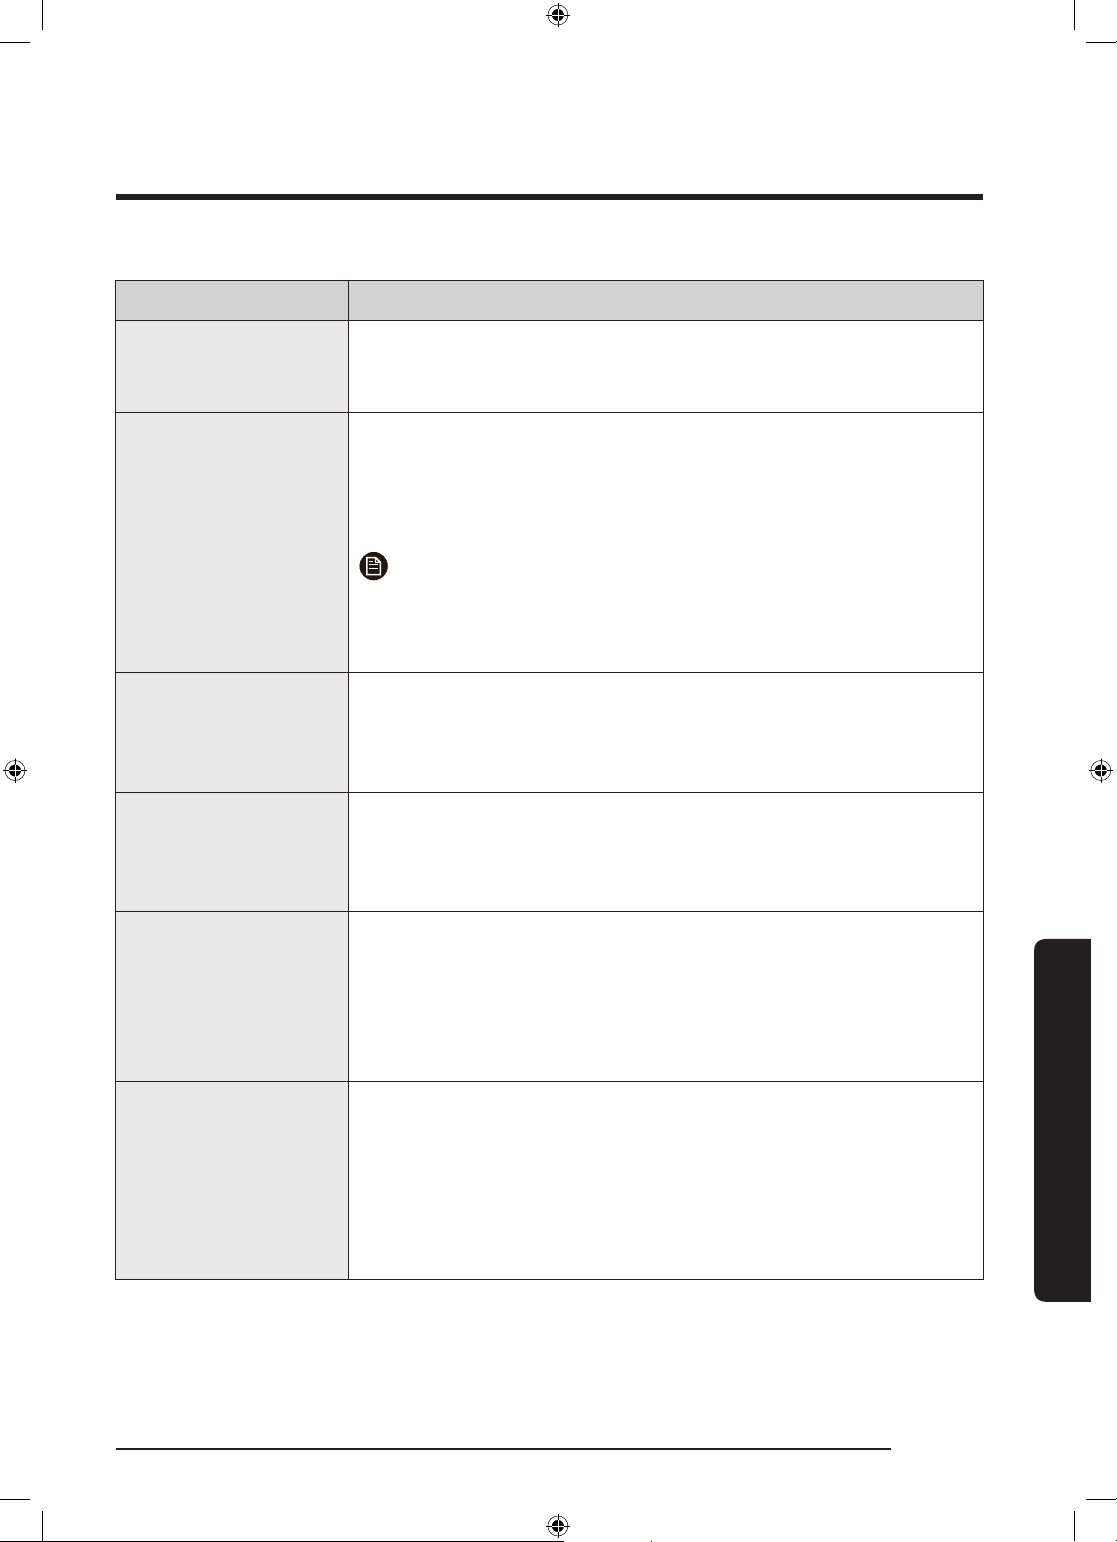
Code Action
High temperature heating check
HC
• If the information code remains, contact a customer service
centre.
The Water Level sensor is not working properly.
• Try power off and restarting the cycle.
• Check WaterLevel Sensor wire harness.
• If the information code remains, contact a customer service
1C
centre.
NOTE
When the washer displays the “1C” code, the washer do
draining for 3 minutes. During this time, the Power button is
inoperative.
The MEMS sensor is not working properly.
8C
• Turn the machine off, and restart the cycle.
• If the information code remains, contact a customer service
centre.
Check communications between main and sub PBAs.
AC
• Try power off and restarting the cycle.
• If the information code remains, contact a customer service
centre.
Check communications between main and inverter PBAs.
• Depending on the state, the machine may automatically returns
AC6
to normal operation.
• Turn the machine off, and restart the cycle.
• If the information code remains, contact a customer service
centre.
This message appears when you open the Add Door without
pressing Pause. If this happens, do one of the following:
• To add laundry, press the Add Door to close it properly. Then,
DDC
press Start/Pause and try again.
• If you press the Add Door by mistake, press the Add Door
again to close it properly. Then, press Start/Pause to resume
operation.
If any information code keeps appearing on the screen, contact a local Samsung service
centre.
English 51
Troubleshooting
WW80K5210VW_DC68-03677L-01_EN.indd 51 2017/7/21 15:44:57
Page 52
SpecicationsSpecications
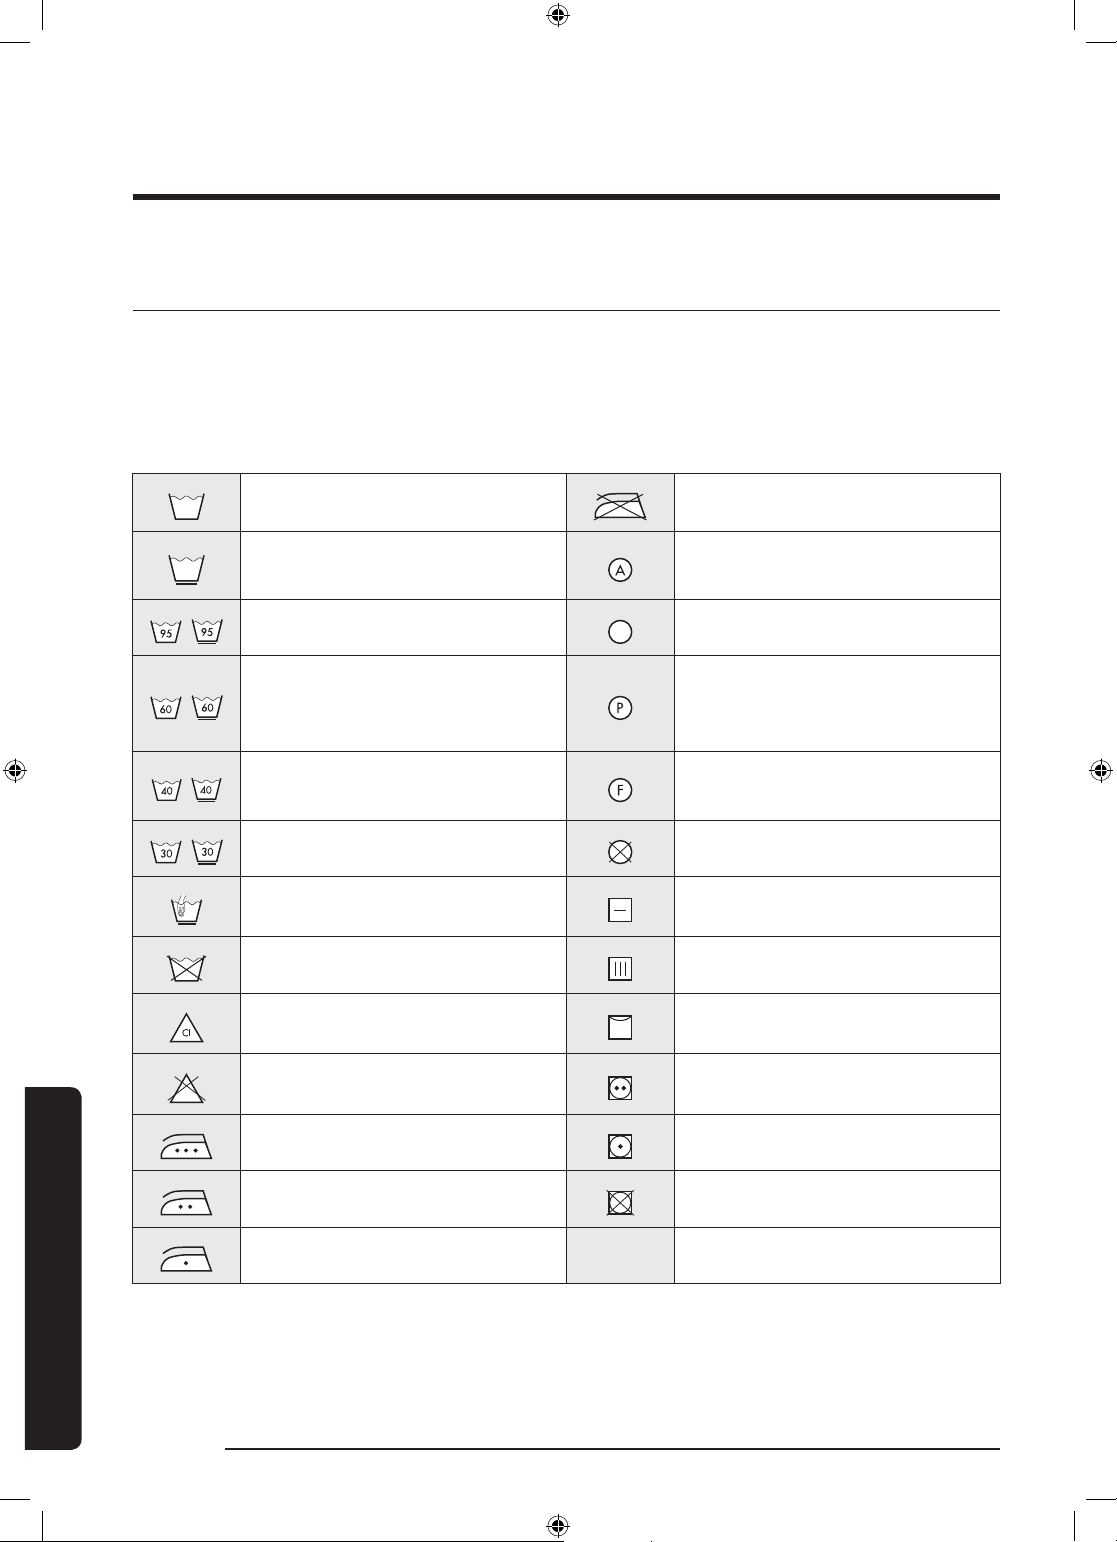
Fabric care chart
The following symbols provide garment care directions. The care labels include four symbols
in this order: washing, bleaching, drying and ironing (and dry cleaning when necessary).
The use of symbols ensures consistency among garment manufacturers of domestic and
imported items. Follow the care label directions to maximize garment life and reduce laundry
problems.
Resistant material Do not iron
Delicate fabric
Item can be washed at 95 ˚C Dry Clean
Item can be washed at 60 ˚C
Item can be washed at 40 ˚C
Item can be washed at 30 ˚C Do not dry clean
Hand wash only Dry at
Dry clean only Can be hung to dry
Can be bleached in cold water Dry on clothes hanger
Do not bleach Tumble dry, normal heat
Can be dry cleaned using any
solvent
Dry clean with perchloride,
lighter fuel, pure alcohol or
R113 only
Dry clean with aviation fuel,
pure alcohol or R113 only
Can be ironed at 200 ˚C max Tumble dry, reduced heat
Can be ironed at 150 ˚C max Do not tumble dry
Can be ironed at 100 ˚C max
Specications
52 English
WW80K5210VW_DC68-03677L-01_EN.indd 52 2017/7/21 15:45:02
Page 53
Protecting the environment
• This appliance is manufactured from recyclable materials. If you decide to dispose of this
appliance, please observe local waste disposal regulations. Cut off the power cord so that
the appliance cannot be connected to a power source. Remove the door so that animals
and small children cannot get trapped inside the appliance.
• Do not exceed the detergent quantities recommended in the detergent manufacturer’s
instructions.
• Use stain removal products and bleaches before the wash cycle only when strictly
necessary.
• Save water and electricity by only washing full loads (the exact amount depends upon the
program used).
English 53
WW80K5210VW_DC68-03677L-01_EN.indd 53 2017/7/21 15:45:02
Specications
Page 54
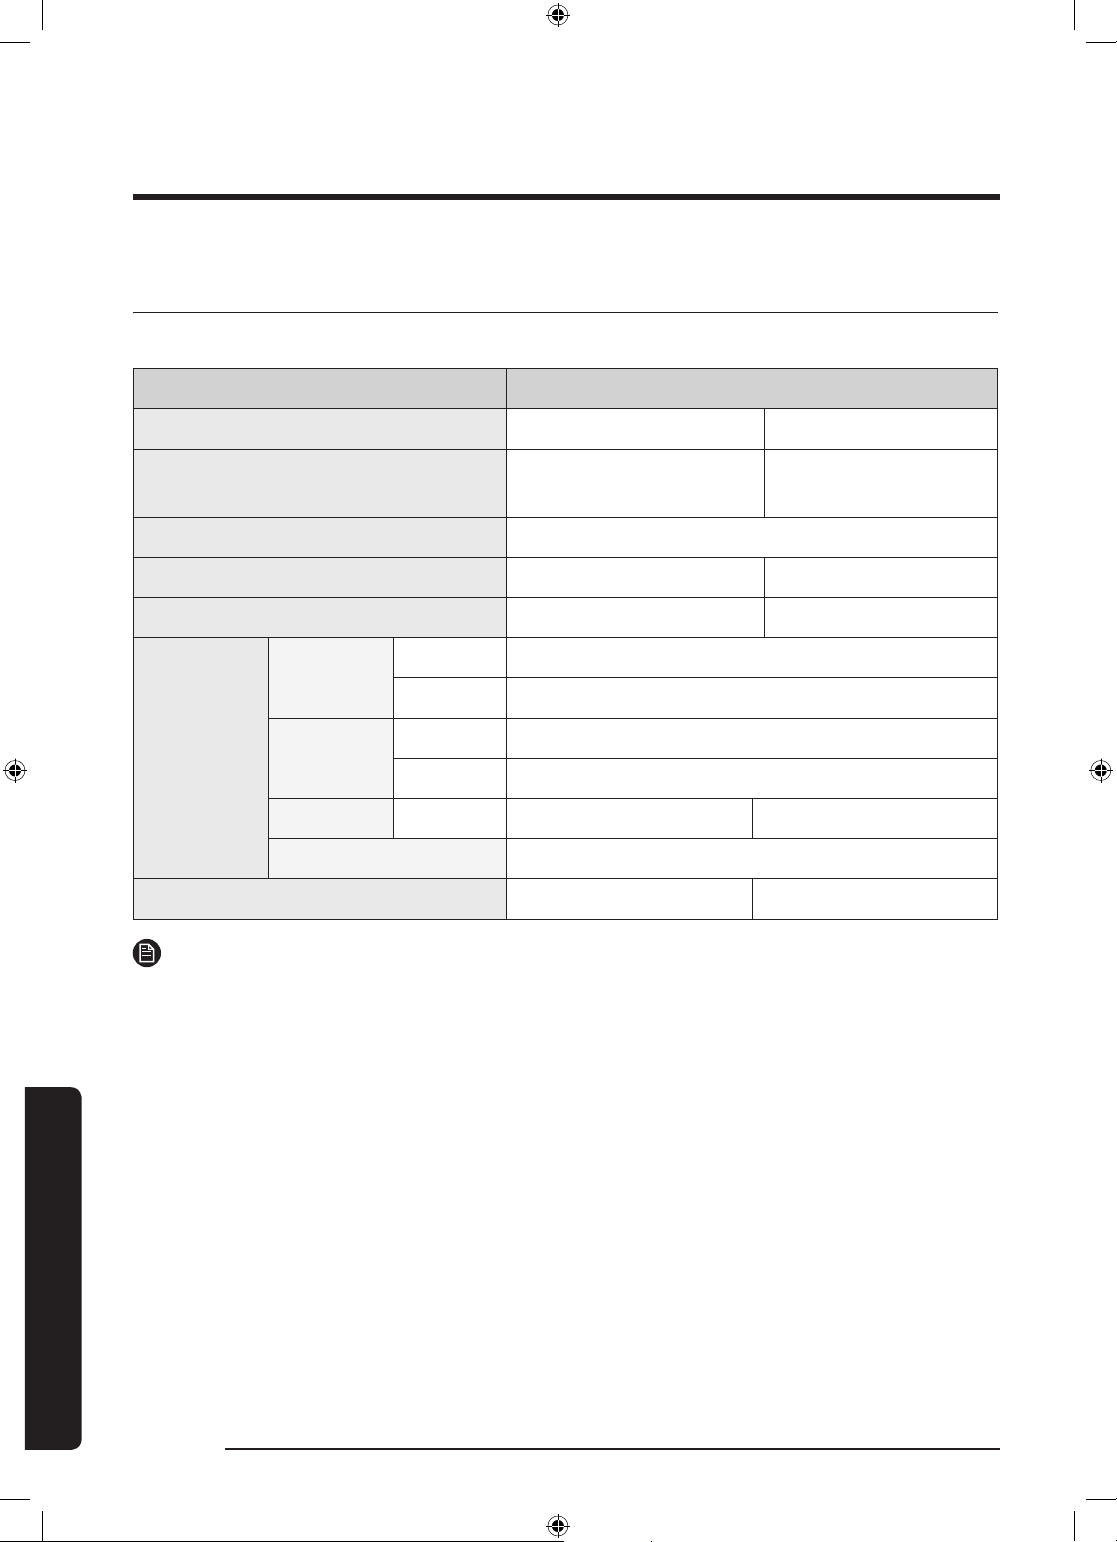
Specications
Specication sheet
“ * “ Asterisk(s) means variant model and can be varied (0-9) or (A-Z).
Type Front loading washing machine
Model name WW80K52**** WW70K52****
Dimensions
Water pressure 50 kPa - 800 kPa
NET weight 67 kg 69 kg
Wash and spin capacity 8.0 kg 7.0 kg
220 V 80 W
Washing
240 V 80 W
Power
consumption
NOTE
The design and specications are subject to change without notice for quality improvement
purposes.
Washing
and heating
Spin 220-240 V 500 W 500 W
Pumping 30 W
Spin revolutions 1200 rpm 1200 rpm
220 V 2000 W
240 V 2400 W
W600 x D456 x H850
(mm)
W600 x D456 x H850
(mm)
Specications
54 English
WW80K5210VW_DC68-03677L-01_EN.indd 54 2017/7/21 15:45:02
Page 55
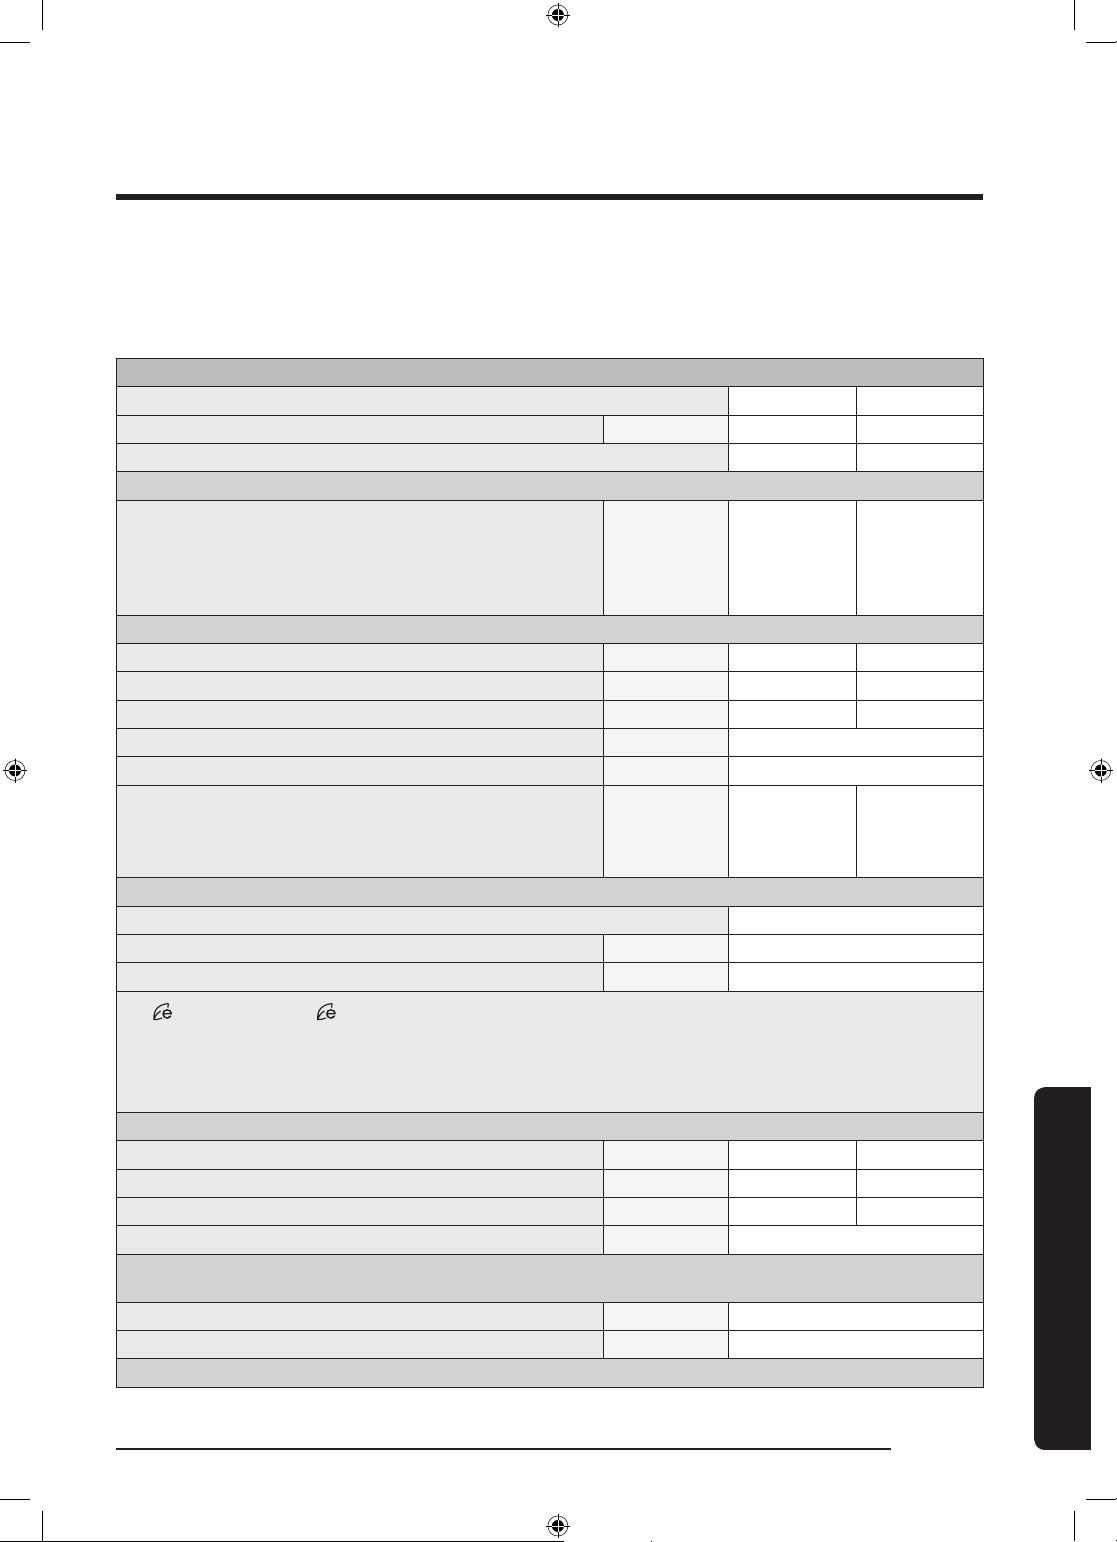
According to Regulation (EU) No. 1061/2010
“ * “ Asterisk(s) means variant model and can be varied (0-9) or (A-Z).
Samsung
Model Name WW80K52**** WW70K52****
Capacity kg 8.0 7.0
Energy Efciency on a scale from D (least efcient) to A+++ (most efcient) A+++ A+++
Awarded an “EU Ecolabel award” under Regulation (EC) No. 66/2010
Annual energy consumption (It is based on 220 standard
washing cycles for standard cotton course at 60 °C and 40 °C
at full and partial load, and the consumption of off and left-on
modes. Actual energy consumption will depend on how the
appliance is used.)
Energy Consumption
The standard 60 °C cotton programme at full load kWh 0.69 0.76
The standard 60 °C cotton programme at partial load kWh 0.63 0.61
The standard 40 °C cotton programme at partial load kWh 0.44 0.42
Weighted power consumption of the off-mode. W 0.48
Weighted power consumption of the left-on mode. W 5
Annual water consumption (It is based on 220 standard washing
cycles for standard cotton course at 60 °C and 40 °C at full and
partial load. Actual water consumption will depend on how the
appliance is used.)
Spin efciency class
Spin-drying efciency class on a scale from G (least efcient) to A (most efcient) B
Maximun Spin Speed rpm 1200
Residual moisture % 53
COTTON 60 °C and COTTON 40 °C programs are the ‘standard cotton 60 °C program’ and the ‘standard
The
cotton 40 °C program’. They are suitable to clean normally soiled cotton laundry and they are the most efcient
(concerning water and energy consumption) for this type of laundry. In these programs the actual water
temperature may differ from the declared temperature. Please run Calibration Mode after the installation (refer to
the “Run Calibration (recommended)” section on page 23).
Program duration of the standard program
The standard 60 °C cotton programme at full load min 273 263
The standard 60 °C cotton programme at partial load min 253 243
The standard 40 °C cotton programme at partial load min 233 223
The duration of the left-on mode (Tl) min 2
Airborne acoustical noise emissions expressed in dB(A) re 1 pW and rounded to the nearest integer during the
washing and spinning phases for the standard 60 °C cotton programme at full load;
Wash dB (A) re 1 pW 56
Spin dB (A) re 1 pW 75
Free Standing
kWh/yr 136 140
L/yr 8100 7400
Specications
English 55
WW80K5210VW_DC68-03677L-01_EN.indd 55 2017/7/21 15:45:02
Page 56
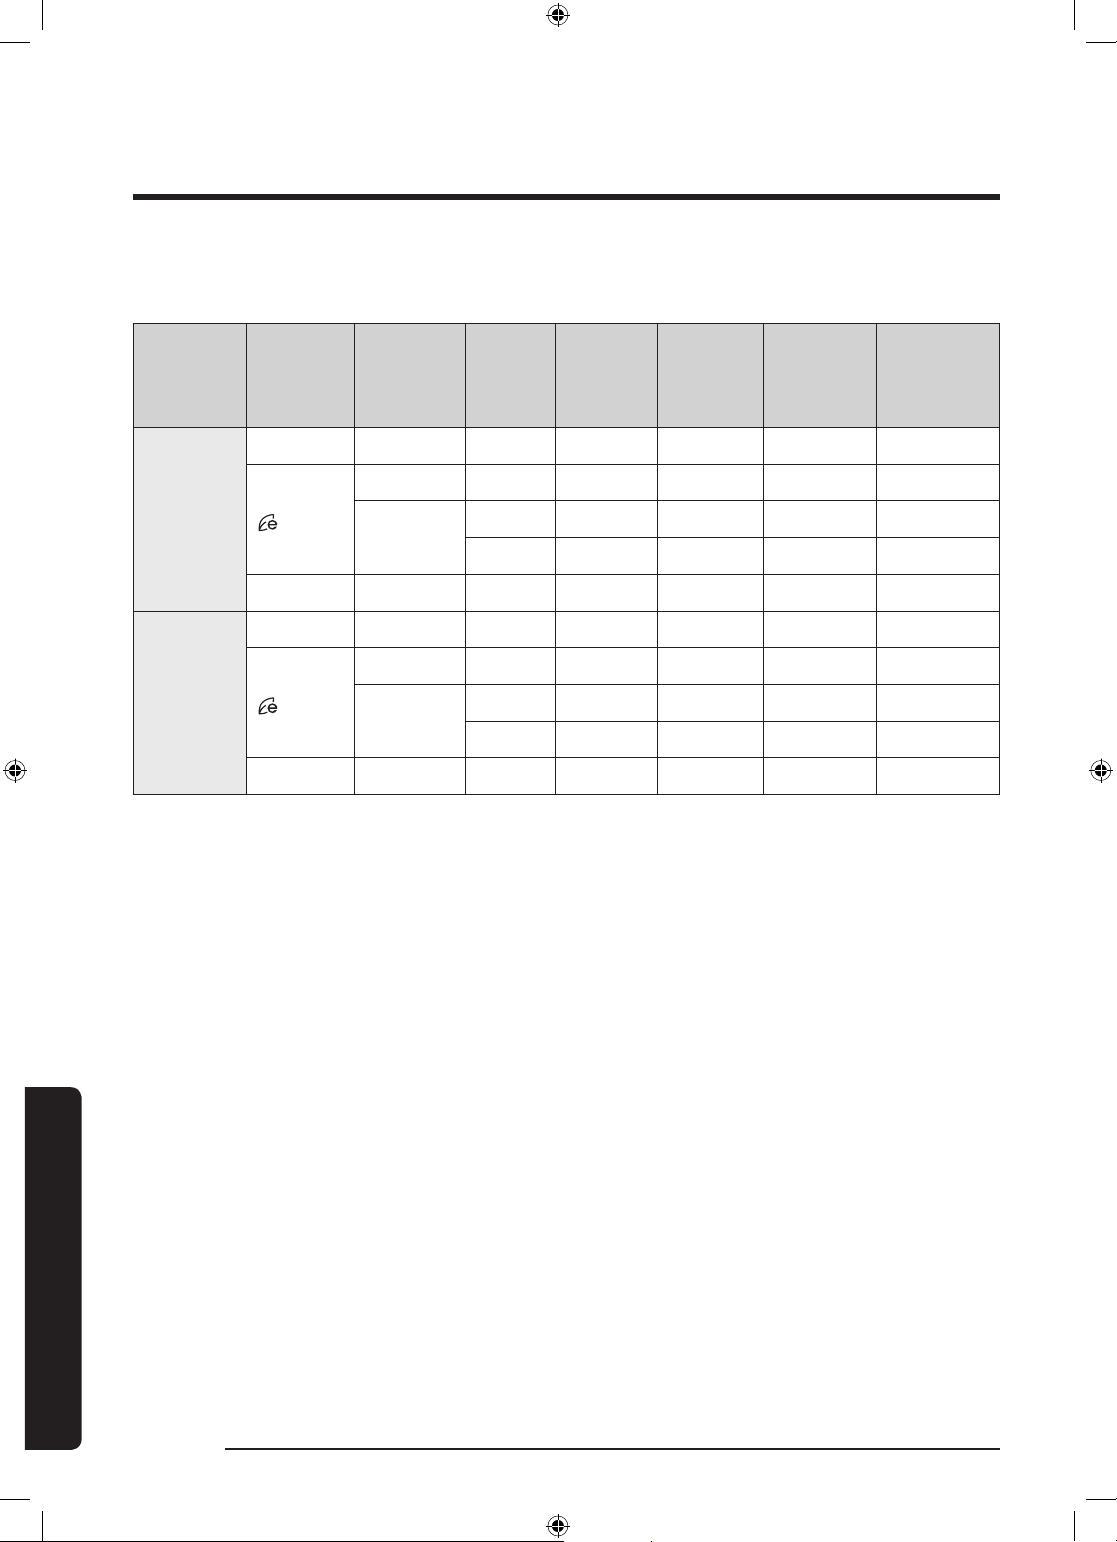
Specications
Information of main washing programmes
Model Cycles
WW80K52***
SYNTHETICS 40 3.0 152 38 41 0.71
WW70K52***
SYNTHETICS 40 3.0 152 38 41 0.71
Residual
Temperature
(°C)
COTTON 20 4.0 145 60 54 0.40
40 4.0 233 53 33 0.44
COTTON
COTTON 20 3.5 145 60 51 0.39
COTTON
60
40 3.5 223 53 30 0.42
60
Capacity
(kg)
4.0 253 53 33 0.63
8.0 273 53 41 0.69
3.5 243 53 30 0.61
7.0 263 53 38 0.76
Cycle Time
(min)
Moisture
Content
(%)
Water
Consumption
(L/cycle)
Energy
Consumption
(kWh/Cycle)
The values on the table have been measured under the conditions specied in Standard
IEC60456/EN60456. Autual values will depend on how the appliance is used
Specications
56 English
WW80K5210VW_DC68-03677L-01_EN.indd 56 2017/7/21 15:45:02
Page 57
Memo
WW80K5210VW_DC68-03677L-01_EN.indd 57 2017/7/21 15:45:02
Page 58
WW80K5210VW_DC68-03677L-01_EN.indd 58 2017/7/21 15:45:02
Page 59
WW80K5210VW_DC68-03677L-01_EN.indd 59 2017/7/21 15:45:02
Page 60
QUESTIONS OR COMMENTS?
COUNTRY CALL OR VISIT US ONLINE AT
BULGARIA
ROMANIA
GREECE
LITHUANIA
LATVIA
ESTONIA
CROATIA
SLOVENIA
SERBIA
CZECH
SLOVAKIA
HUNGARY
800 111 31 , Безплатна телефонна линия www.samsung.com/bg/support
*8000 (apel in retea)
08008-726-78-64 (08008-SAMSUNG) Apel
www.samsung.com/ro/support
GRATUIT
80111-SAMSUNG (80111 726 7864) only
from land line
www.samsung.com/gr/support
(+30) 210 6897691 from mobile and land line
8-800-77777 www.samsung.com/lt/support
8000-7267 www.samsung.com/lv/support
800-7267 www.samsung.com/ee/support
072 726 786 www.samsung.com/hr/support
080 697 267 (brezplačna številka) www.samsung.com/si/support
011 321 6899 www.samsung.com/rs/support
800 - SAMSUNG (800-726786) www.samsung.com/cz/support
0800 - SAMSUNG (0800-726 786) www.samsung.com/sk/support
0680SAMSUNG (0680-726-786)
0680PREMIUM (0680-773-648)
www.samsung.com/hu/support
WW80K5210VW_DC68-03677L-01_EN.indd 60 2017/7/21 15:45:03
DC68-03677L-01
Page 61
Перална машина
Ръководство за потребителя
WW80K5***** / WW70K5*****
WW80K5210VW_DC68-03677L-01_BG.indd 1 2017/7/21 15:48:03
Page 62
Съдържание
Съдържание
Информация за безопасността 3
Какво трябва да знаете относно инструкциите за безопасност 3
Важни символи за безопасност 3
Важни предпазни мерки за безопасност 4
Инструкция за ОЕЕО 12
Монтаж 13
Какво се доставя 13
Изисквания към монтажа 15
Подробни инструкции за монтаж 17
Преди да стартирате 23
Първоначални настройки 23
Напътствия за прането 23
Указания за чекмеджето за перилен препарат 26
Операции 29
Контролен панел 29
Елементарни стъпки за стартиране 30
Преглед на програмите 31
Специални функции 34
Настройки 36
Поддръжка 37
Eco drum clean (Икономично почистване на барабана) 37
Smart Check
Аварийно източване 39
Почистване 40
38
Поддръжка 44
Възстановяване след замръзване 44
Грижи преди продължителен срок на неупотреба 44
Отстраняване на неизправности 45
Контролни точки 45
Информационни кодове 49
Спецификация 52
Таблица за грижи за тъканите 52
Опазване на околната среда 53
Спецификации 54
2 Български
WW80K5210VW_DC68-03677L-01_BG.indd 2 2017/7/21 15:48:03
Page 63
Информация за безопасността
Поздравления за вашата нова перална машина Samsung. Това ръководство съдържа важна информация
за монтажа употребата и грижата за Вашия уред. Отделете време, за да прочетете ръководството и да се
възползвате пълноценно от множеството полезни функции на вашата перална машина.
Какво трябва да знаете относно инструкциите за безопасност
Прочетете внимателно това ръководство, за да се уверите, че знаете как безопасно и ефективно да използвате
множеството функции на вашия нов уред. Запазете това ръководство на сигурно място близо до уреда за
бъдеща справка. Използвайте този уред само по предназначение, както е описано в това ръководство с
инструкции.
Бележките за предупреждения и важните инструкции за безопасност в настоящото ръководство не обхващат
всички възможни състояния и ситуации, които може да възникнат. Ваша е отговорността да използвате здрав
разум, внимание и грижи, когато инсталирате, поддържате и работите с вашата перална машина.
Тъй като дадените по-долу инструкции за експлоатация се отнасят за различни модели, възможно е
характеристиките на вашата перална машина малко да се различават от описаните в това ръководство и е
възможно не всички предупреждения да са валидни и за вас. Ако имате някакви въпроси или сте загрижени
за нещо, свържете се с най- близкия сервиз или потърсете помощ и информация онлайн на адрес www.
samsung.com.
Информация за безопасността
Важни символи за безопасност
Какво е значението на иконите и знаците в това ръководство на потребителя:
ПРЕДУПРЕЖДЕНИЕ
Рискове или небезопасна практика, която може да доведе до тежко нараняване или смърт на лица.
ВНИМАНИЕ
Рискове или небезопасна практика, която може да доведе до леко нараняване или повреда на имущество.
ЗАБЕЛЕЖКА
Означава, че съществува опасност от травма или материални щети.
Български 3
WW80K5210VW_DC68-03677L-01_BG.indd 3 2017/7/21 15:48:03
Page 64
Информация за безопасността
Тези предупредителни знаци са предназначени за предотвратяване на наранявания на вас и други лица.
Моля, следвайте ги точно.
След като прочетете това ръководство, запазете го на безопасно място за справки в бъдеще.
Прочетете всички инструкции преди използването на уреда.
Както при всяко оборудване, в което се използва електрически ток и движещи се части, и тук съществува
потенциална опасност. За да работите безопасно с този уред, запознайте се с начина на експлоатация и бъдете
внимателни, когато го използвате.
Информация за безопасността
Важни предпазни мерки за безопасност
ПРЕДУПРЕЖДЕНИЕ
За да намалите риска от пожар, електрически удар или нараняване на лица при
използването на вашия уред, спазвайте основни предпазни мерки, включително:
1. Този уред не трябва да се използва от лица (включително деца) с намалени
физически, сетивни или умствени възможности, с недостатъчен опит и познания,
освен ако не се наблюдават или са им дадени инструкции за употребата на уреда
от лице, отговорно за тяхната безопасност.
2. За използване в Европа: Този уред може да се използва от деца на възраст
8 години и по-големи и лица с намалени физически, сетивни или умствени
възможности или с недостатъчен опит и познания, ако се наблюдават или са
им дадени инструкции относно безопасното използване на уреда и разбират
съответните рискове. Децата не бива да си играят с уреда. Почистването и
поддръжката от потребителя не трябва да се правят от деца без наблюдение.
3. Децата трябва да бъдат наблюдавани за да се гарантира, че не си играят с уреда.
4. Ако захранващият кабел е повреден, той трябва да бъде заменен от
производителя, негов сервизен представител или лице със сходна квалификация,
за да се избегне евентуален риск.
5. Да се използват доставените с уреда нови маркучи; старите не трябва да се
използват повторно.
4 Български
WW80K5210VW_DC68-03677L-01_BG.indd 4 2017/7/21 15:48:03
Page 65
6. За уреди с вентилационни отвори в основата се погрижете да няма килим, който
да пречи на отворите.
7. За използване в Европа: Да не се допускат в близост деца под 3 години, освен
ако не се наблюдават непрекъснато.
ВНИМАНИЕ
8. С цел да се избегне опасността от непреднамерено нулиране на топлинния
предпазител, този уред не трябва да бъде захранван чрез външно превключващо
устройство, като например таймер, или да бъде свързан към верига, която се
включва и изключва редовно от електроснабдителната компания.
Важни предупреждения при инсталация
ПРЕДУПРЕЖДЕНИЕ
Монтажът на този уред трябва да бъде извършен от квалифициран техник или сервизна фирма.
• В противен случай може да възникне електрически удар, пожар или експлозия, проблеми с уреда или
наранявания.
Информация за безопасността
Уредът е тежък, следователно го вдигайте внимателно.
Включете кабела за електрозахранване в стенен контакт, който отговаря на местните спецификации за
електрозахранване. Използвайте кабела само за този уред и не използвайте удължител.
• Възможно е споделянето на стенен контакт с други уреди с помощта на разклонител, или удължаването
на захранващия кабел да доведат до електрически удар или пожар.
• Проверете дали напрежението, честотата и амперажът на електрозахранването отговарят на
спецификациите на продукта. Неспазването на това изискване може да доведе до електрически удар или
пожар. Избягвайте нестабилно включване на щепсела на захранването в контакта.
Редовно премахвайте всички чужди вещества, като вода или прах, от клемите на щепсела и точките на допир с
контакта със суха кърпа.
• Извадете захранващия щепсел и го почистете със суха кърпа.
• Неспазването на това изискване може да доведе до електрически удар или пожар.
Поставете щепсела в стенен контакт, като кабелът върви към пода.
• Ако щепселът се включи в стенния контакт обратно, електрическите проводници в кабела може да се
повредят, което от своя страна може да доведе до електрически удар или пожар.
Пазете всички опаковъчни материали далеч от деца, тъй като може да са опасни.
Български 5
WW80K5210VW_DC68-03677L-01_BG.indd 5 2017/7/21 15:48:03
Page 66
Информация за безопасността
• Ако дете сложи на главата си някоя от торбите, това може да доведе до задушаване.
Ако уредът или щепселът или електрическият кабел са повредени, обърнете се към най-близкия сервиз.
Този уред трябва да бъде подходящо заземен.
Не заземявайте уреда към тръба за газ, пластмасова тръба за вода или телефонна линия.
• Това може да доведе до електрически удар, пожар, експлозия или проблеми с уреда.
• Никога не включвайте кабел за електрозахранване в контакт, който не е правилно заземен, и се уверете,
че е в съответствие с местната и национална нормативна уредба.
Информация за безопасността
Не инсталирайте този уред близо до топлинен източник или какъвто и да е запалим материал.
Не инсталирайте този уред във влажно, мазно или прашно място или в място, изложено на директна слънчева
светлина или вода (капки дъжд).
Не инсталирайте уреда на място с ниска температура.
• Заледяване или заскрежаване може да предизвика скъсване на маркучи.
Не монтирайте този уред на място, където може да има изтичане на газ.
• Това може да доведе до електрически удар или пожар.
Не използвайте електрически трансформатор.
• Това може да доведе до електрически удар или пожар.
Не използвайте повреден щепсел, повреден захранващ кабел или разхлабен контакт.
• Това може да доведе до електрически удар или пожар.
Не дърпайте или сгъвайте прекалено захранващия кабел.
Не усуквайте или връзвайте захранващия кабел.
Не окачайте захранващия кабел на метален предмет, не поставяйте тежки предмети на него, не го поставяйте
между предмети и не го пъхайте в мястото зад уреда.
• Това може да доведе до електрически удар или пожар.
Не дърпайте захранващия кабел, когато изваждате щепсела.
• Извадете щепсела като го държите.
• Неспазването на това изискване може да доведе до електрически удар или пожар.
Този уред трябва да се разположи в такова положение, че да има достъп до щепсела на захранването,
крановете на водата и тръбите за оттичане.
Предупреждения при инсталацията
ВНИМАНИЕ
Този уред трябва да бъде разположен така, че да има лесен достъп до щепсела.
6 Български
WW80K5210VW_DC68-03677L-01_BG.indd 6 2017/7/21 15:48:03
Page 67
• В противен случай може да възникне електрически удар или пожар поради утечка на ток.
Инсталирайте вашия уред върху равен и твърд под, който може да издържи тежестта му.
• В противен случай може да възникнат необичайни вибрации, движение, шум или проблеми с уреда.
Важни предупреждения при използването
ПРЕДУПРЕЖДЕНИЕ
Ако уредът се наводни, веднага спрете подаването на вода, изключете електрозахранването и се свържете с
най-близкия сервиз.
• Не докосвайте щепсела с мокри ръце.
• В противен случай това може да предизвика електрически удар.
Ако уредът издава странен шум, мирис на изгоряло или дим, извадете незабавно щепсела и се свържете с найблизкия сервизен център.
• Неспазването на това изискване може да доведе до електрически удар или пожар.
В случай на изтичане на газ (като пропан-бутан, метан и т.н), проветрете незабавно, без да пипате щепсела на
захранването. Не пипайте уреда или захранващия кабел.
• Да не се използва вентилатор.
• Появата на искра може да доведе до експлозия или пожар.
Информация за безопасността
Не позволявайте деца да играят във или върху пералната машина. Освен това, когато изхвърляте уреда,
махнете дръжката на вратичката на пералната машина.
• Ако попаднат вътре в уреда, децата може да се задушат.
Преди да я използвате, се уверете, че сте премахнали частите от опаковката (гъби, стиропор), прикрепени към
дъното на пералната машина.
Не перете неща замърсени с бензин, керосин, бензен, разредител за боя, спирт или други запалими или
взривни вещества.
• Това може да доведе до електрически удар, пожар или експлозия.
Не отваряйте насила вратичката на пералната, докато работи (висока температура по време на пране/сушене/
центрофугиране).
• Изтичащата вода от пералната машина може да предизвика изгаряния или плъзгане по пода. Това може
да причини нараняване.
• Отварянето на вратичката със сила може да доведе до повреда на уреда или нараняване.
Не вкарвайте ръката си под пералната машина, докато тя работи.
• Това може да причини нараняване.
Не докосвайте щепсела с мокри ръце.
• Това може да доведе до електрически удар.
Български 7
WW80K5210VW_DC68-03677L-01_BG.indd 7 2017/7/21 15:48:03
Page 68
Информация за безопасността
Не изключвайте уреда чрез изваждане на щепсела, докато е в процес на работа.
• Повторно вкарване на щепсела в контакта може да доведе до искра и електрически удар или пожар.
Не позволявайте на деца или немощни хора да използват тази перална машина без подходящо наблюдение.
Не позволявайте деца да влизат в пералната машина или да се качват върху нея.
• Това може да доведе до електрическо удар, изгаряния или нараняване.
Не пъхайте ръка или метален предмет под пералната машина, докато работи.
• Това може да причини нараняване.
Информация за безопасността
Не изключвайте щепсела на уреда, като дърпате захранващия кабел. Винаги дръжте здраво щепсела и го
издърпвайте право и директно от контакта.
• Повреда на захранващия кабел може да предизвика късо съединение, пожар и/или електрически удар.
Не се опитвайте сами да разглобявате, поправяте или модифицирате уреда.
• Не използвайте предпазители, различни от стандартните (например предпазители с медна или стоманена
жичка и др.).
• Когато уредът трябва да се поправи или инсталира повторно, се свържете с най-близкия сервизен център.
• В противен случай може да възникне електрически удар, пожар или проблеми с уреда, както и
наранявания.
Ако маркучът за подаване на вода се разхлаби от крана и наводни уреда, извадете щепсела на захранването.
• Неспазването на това изискване може да доведе до електрически удар или пожар.
Изваждайте щепсела, когато уредът няма да бъде използван продължително време или по време на
гръмотевична буря.
• Неспазването на това изискване може да доведе до електрически удар или пожар.
Ако в пералнята попадне чуждо тяло, извадете захранващия кабел и се свържете с най-близкия център за
обслужване на клиенти на Samsung.
• Това може да доведе до електрически удар или пожар.
Не позволявайте деца (или домашни любимци) да играят върху или във вашата перална машина. Вратата на
пералната машина не се отваря лесно отвътре, и децата могат да се наранят сериозно, ако попаднат вътре.
Предупреждения при използването
ВНИМАНИЕ
Когато пералната машина е замърсена с чуждо тяло, като перилен препарат, кал, остатъци от храна и др.,
извадете щепсела на захранването и почистете пералната машина с влажна мека кърпа.
• В противен случай може да възникне промяна на цвета, деформация, повреда или поява на ръжда.
Предното стъкло може да се счупи от силен натиск. Внимавайте, когато използвате пералната машина.
• При счупване на стъклото може да възникнат наранявания.
8 Български
WW80K5210VW_DC68-03677L-01_BG.indd 8 2017/7/21 15:48:04
Page 69
След повреда с подаването на вода или когато свързвате повторно маркуча за подаване на вода, отворете
крана за водата бавно.
Отворете бавно крана за вода след продължителен период на неупотреба.
• Налягането на въздуха в маркуча за подаване на вода или във водопроводната тръба може да доведе до
повреда на някаква част или да предизвика теч.
Ако по време на работа възникне неизправност при оттичане, проверете дали има проблеми с оттичането.
• Ако пералната машина се използва, когато е наводнена поради проблем с оттичането, това може да
доведе до електрически удар или пожар.
Вкарвайте докрай прането в пералната машина, за да не бъде защипано от вратичката.
• Ако пране бъде защипано от вратичката, това може да доведе до повреда на прането или на пералната
машина, както и да доведе до теч на вода.
Прекратете подаването на вода, когато пералната машина не се използва.
Проверете дали винтовете на съединителя на маркуча за подаване на вода са затегнати добре.
• В противен случай може да възникне повреда на имущество или нараняване.
Внимавайте гуменото уплътнение и стъклото на предната вратичка да не се замърсяват от чужди тела
(отпадъци, влакна, косми и т.н.).
• Ако във вратичката се захване чуждо тяло или тя не е затворена добре, това може да доведе до теч на
вода.
Информация за безопасността
Преди да използвате уреда, отворете крана за вода и проверете дали съединителят на маркуча за подаване на
вода е здраво затегнат и дали няма теч на вода.
• Ако винтовете на съединителя на маркуча за подаване на вода са разхлабени, това може да доведе до теч
на вода.
Уредът, който сте закупили, е предназначен само за домашна употреба.
Използването на продукта за бизнес цели се счита за неправилно използване на продукта. В този случай
продуктът не се покрива от стандартната гаранция, предоставена от Samsung, и Samsung не носи отговорност
за неизправности или повреди, причинени от такова неправилно използване.
Не се качвайте върху уреда и не поставяйте предмети върху уреда (например пране, запалени свещи,
запалени цигари, кухненски съдове, химикали, метални предмети и др.).
• Това може да доведе до електрически удар, пожар, проблеми с продукта или травма.
Не пръскайте летливи вещества като инсектициди върху повърхността на уреда.
• Освен че са вредни за хората, те могат също така да доведат и до електрически удар, пожар или проблеми
с уреда.
Не поставяйте предмети, които генерират електромагнитни полета близо до пералната машина.
• Това може да доведе до нараняване поради неизправност.
Български 9
WW80K5210VW_DC68-03677L-01_BG.indd 9 2017/7/21 15:48:04
Page 70
Информация за безопасността
Водата, източена по време на пране при висока температура или при цикъл на сушене, е гореща. Не
докосвайте водата.
• Това може да доведе до изгаряне или травма.
Не перете, не центрофугирайте и не сушете непромокаеми седалки, изтривалки или дрехи (*), освен ако
вашият уред няма специален цикъл за пране на такива неща.
(*): Вълнени завивки, дъждобрани, елеци за риболов, ски грейки, спални чували, непромокаеми чаршафи,
облекла за изпотяване, покривала за велосипеди, мотоциклети, автомобили и др.
Информация за безопасността
• Не перете дебели или плътни килими, дори ако върху етикета им за третиране има знак за пране. Това
може да доведе до нараняване или повреда на пералната машина, стените, пода или дрехите поради
прекомерни вибрации.
• Не перете постелки и изтривалки с гумена подложка. Гумената подложка може да се отлепи и да залепне
за вътрешността на барабана, което да доведе до неизправност, например при източване.
Не включвайте пералната машина, когато чекмеджето за перилен препарат е махнато.
• Това може да доведе до електрически удар или нараняване поради теч на вода.
Не пипайте вътрешността на барабана по време на или непосредствено след сушене, тъй като е гореща.
• Това може да доведе до изгаряния.
Не пъхайте ръка в чекмеджето за перилния препарат.
• Това може да доведе до нараняване, тъй като ръката ви може да бъде захваната от устройството за
подаване на перилен препарат.
• Водачът за течен перилен препарат (само приложими модели) не се използва за прахообразен перилен
препарат. Ако използвате прахообразен перилен препарат, махнете водача.
Не слагайте в пералната машина други предмети (например обувки, остатъци от храна, животни) освен пране.
• Това може да доведе до повреда на пералната машина или нараняване или смърт в случай на домашни
животни, поради прекомерни анормални вибрации.
Не натискайте бутоните използвайки остри предмети като игли, ножове, нокти и т.н.
• Това може да доведе до електрически удар или нараняване.
Не изпирайте пране замърсено с масла, кремове или лосиони, които обикновено се намират в козметичните
салони или масажните клиники.
• Това може да доведе до деформиране на гуменото уплътнение и теч на вода.
Не оставяйте метални предмети, като безопасни игли или фиби, както и белина в барабана за продължително
време.
• Това може да доведе до ръждясване на барабана.
• Ако по повърхността на барабана започне да се появява ръжда, използвайте препарат за почистване
(неутрален) и гъба, за да я почистите. Никога не използвайте метална четка. Никога не използвайте
метална четка.
10 Български
WW80K5210VW_DC68-03677L-01_BG.indd 10 2017/7/21 15:48:04
Page 71
Не използвайте директно препарат за сухо почистване и не изпирайте, изплаквайте или центрофугирайте
пране замърсено от такъв препарат.
• Това може да доведе до внезапно избухване или запалване, предизвикано от топлината от оксидирането
на маслото.
Не използвайте вода от уреди за охлаждане/нагряване на вода.
• Това може да доведе до проблеми с пералната машина.
Не използвайте естествен сапун за миене на ръце за пералната машина.
• Ако се втвърди и се натрупа във вътрешността на пералната машина, това може да причини проблеми с
уреда, промяна на цвета, ръжда или неприятна миризма.
Слагайте чорапите и сутиените в мрежата за пране и ги перете заедно с другото пране.
Не изпирайте в перилната мрежа големи предмети за пране, като завивки.
• В противен случай може да възникне нараняване поради прекомерни вибрации.
Не използвайте втвърдяващи се перилни препарати.
• Ако се натрупа във вътрешността на пералната машина, това може да доведе до теч на вода.
Уверете се, че джобовете на дрехите от прането са празни.
• Твърди, остри предмети, като монети, карфици, гвоздеи, винтове или камъни, могат да предизвикат
сериозна повреда на уреда.
Информация за безопасността
Не перете дрехи с големи катарами, копчета или други тежки метални предмети.
Сортирайте прането по цвят въз основа на това дали пуска и изберете препоръчания цикъл, температура на
водата и допълнителни функции.
• Това може да доведе до обезцветяване или увреждане на тъканите.
Внимавайте да не захванете пръстите на децата с вратата, когато я затваряте.
• В противен случай това може да предизвика нараняване.
Важни предупреждения при почистване
ПРЕДУПРЕЖДЕНИЕ
Не почиствайте уреда чрез пръскане на вода директно в него.
Не използвайте силен препарат за почистване на киселинна основа.
Не използвайте бензол, разредител или алкохол за да почистите уреда.
• Това може да доведе до промяна на цвета, деформации, повреди, електрически удар или пожар.
Преди почистване или дейности по поддръжка, разкачете уреда от контакта.
• Неспазването на това изискване може да доведе до електрически удар или пожар.
Български 11
WW80K5210VW_DC68-03677L-01_BG.indd 11 2017/7/21 15:48:04
Page 72
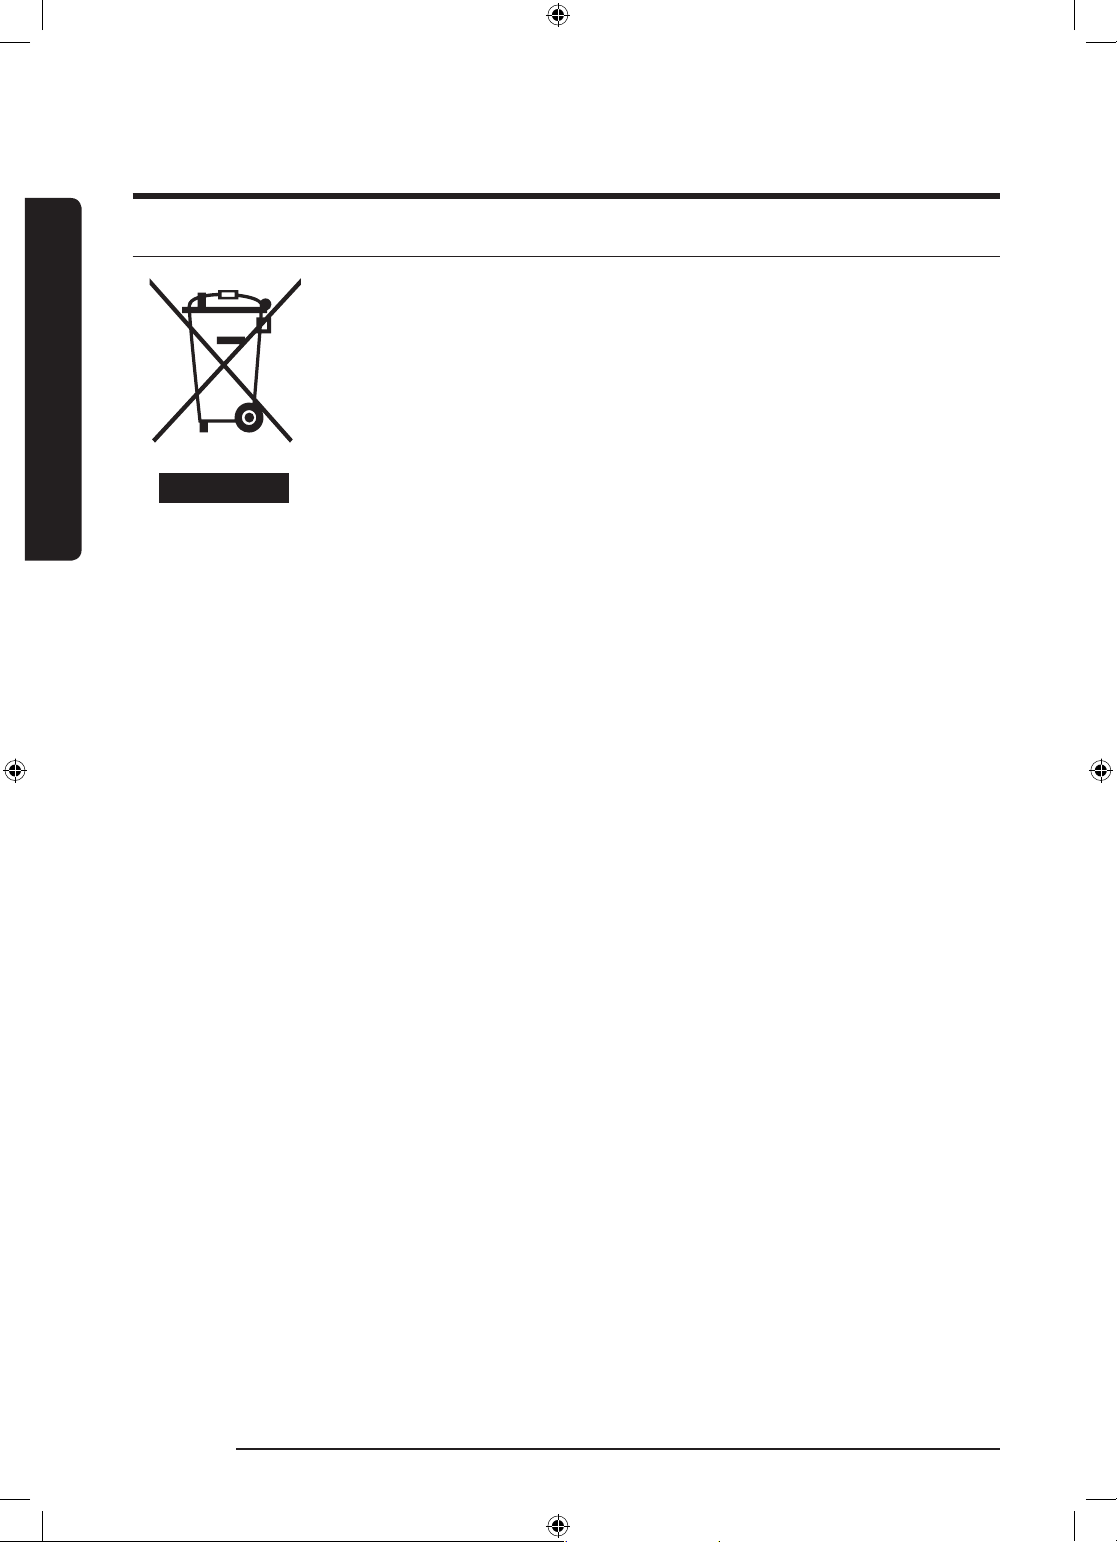
Информация за безопасността
Инструкция за ОЕЕО
Правилно третиране на изделието след края на експлоатационния му
живот
(Налично в страни със системи за разделно сметосъбиране)
Този знак, поставен върху изделието, негови принадлежности или печатни
материали, означава, че продуктът и принадлежностите (например зарядно
устройство, слушалки, USB кабел) не бива да се изхвърлят заедно с другите
битови отпадъци, когато изтече експлоатационният му живот. Отделяйте тези
Информация за безопасността
За информация относно грижите на Samsung за околната среда и специфичните за продукта нормативни
задължения, напр. REACH, посетете:samsung.com/uk/aboutsamsung/samsungelectronics/corporatecitizenship/
data_corner.html
устройства от другите видови отпадъци и ги предавайте за рециклиране.
Спазвайки това правило не излагате на опасност здравето на други хора и
предпазвате околната среда от замърсяване, предизвикано от безконтролно
изхвърляне на отпадъци. Освен това, подобно отговорно поведение създава
възможност за повторно (екологично съобразно) използване на материалните
ресурси.
Домашните потребители трябва да се свържат с търговеца на дребно, от когото
са закупили изделието, или със съответната местна държавна агенция, за да
получат подробни инструкции къде и кога могат да занесат тези устройства за
рециклиране, безопасно за околната среда.
Корпоративните потребители следва да се свържат с доставчика си и да
проверят условията на договора за покупка. Това изделие и неговите електронни
принадлежности не бива да се сместват с другите отпадъци на търговското
предприятие.
12 Български
WW80K5210VW_DC68-03677L-01_BG.indd 12 2017/7/21 15:48:04
Page 73
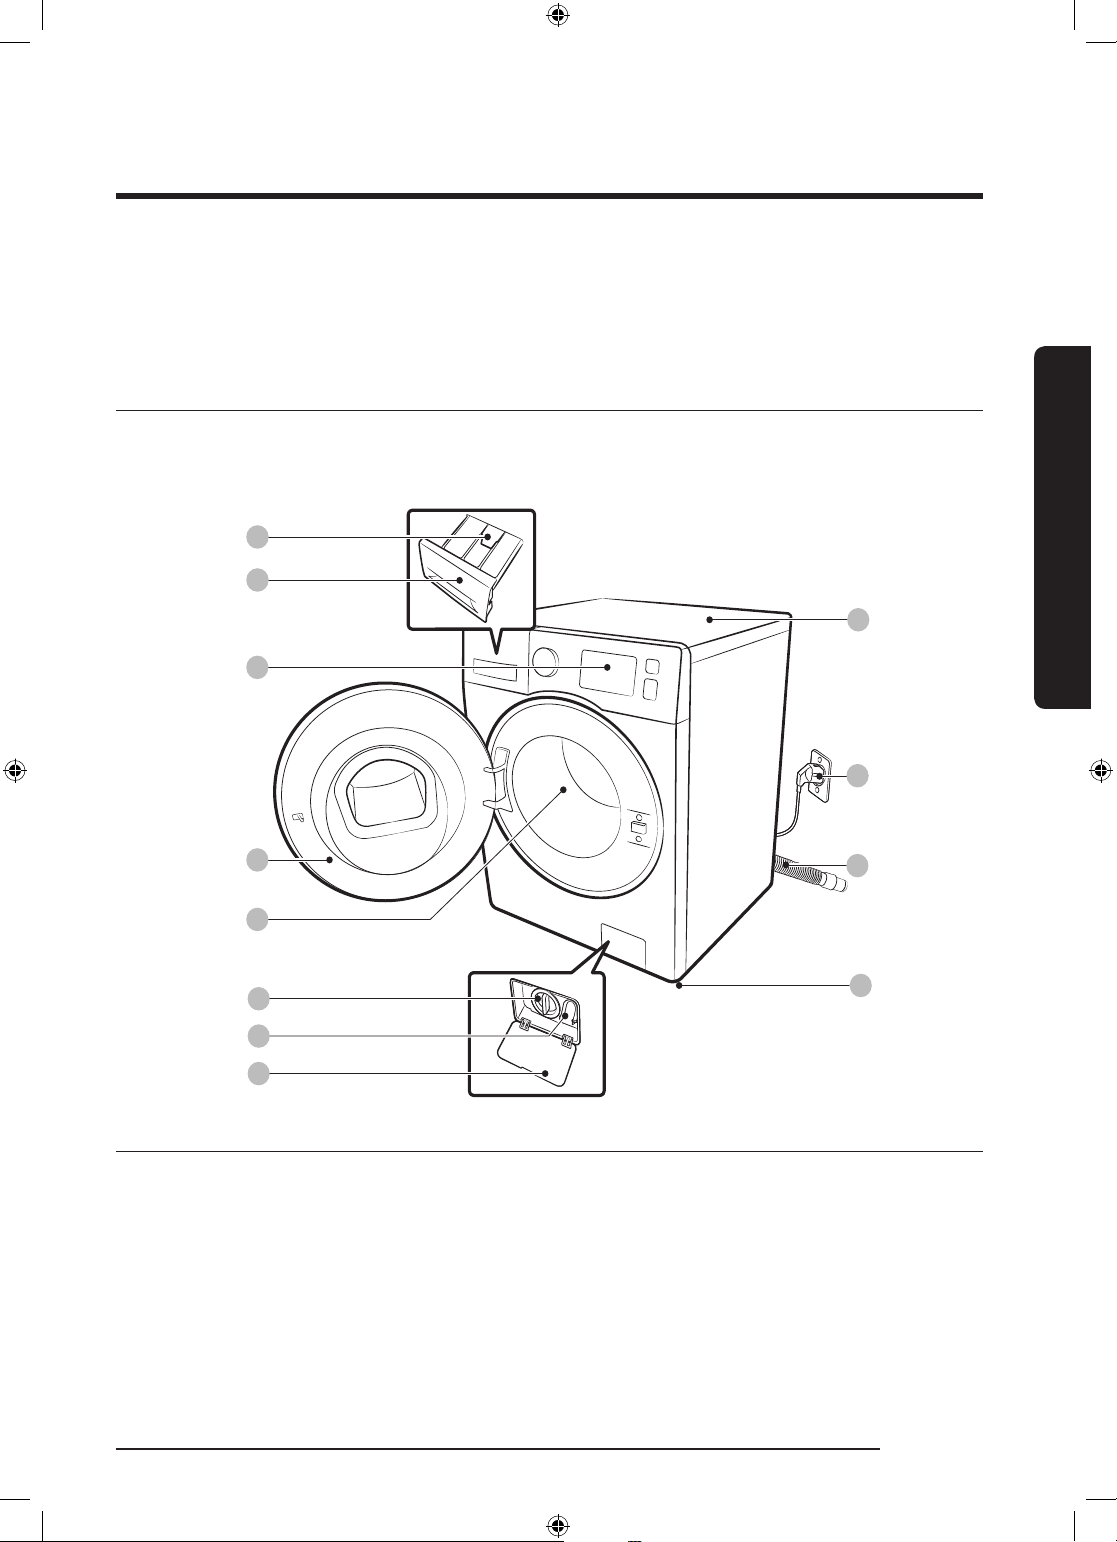
Монтаж
06
08
07
01
02
03
04
05
12
09
10
11
Следвайте внимателно тези инструкции, за да осигурите правилното инсталиране на пералната машина и да
предотвратите инциденти при пране.
Какво се доставя
Проверете дали всички части са доставени в опаковката на продукта. Ако имате проблем с пералната
машина или с частите, трябва да се свържете с местния клиентски център на Samsung или с продавача.
Монтаж
01 Освобождаващ лост 02 Чекмедже за перилен
03 Контролен панел
препарат
04 Вратичка 05 Барабан 06 Филтър на помпата
07 Тръба за аварийно източване 08 Капак на филтъра 09 Работна повърхност
10 Щепсел 11 Маркуч за източване 12 Регулируеми крачета
Български 13
WW80K5210VW_DC68-03677L-01_BG.indd 13 2017/7/21 15:48:04
Page 74
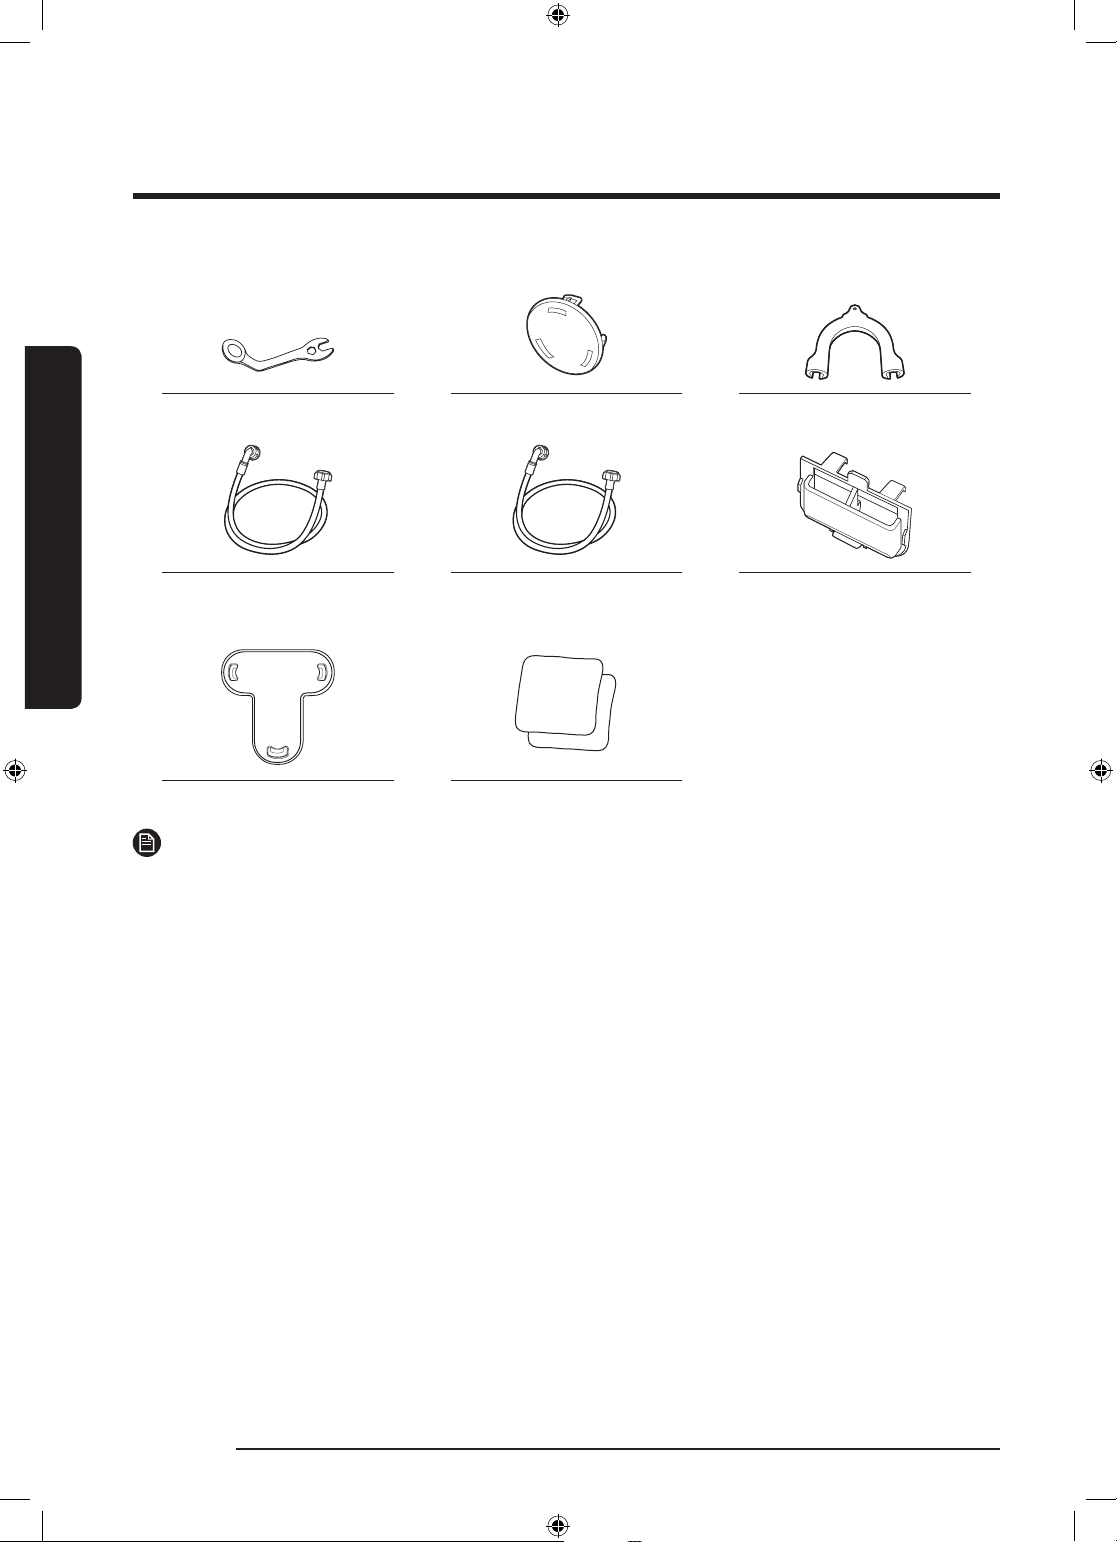
Монтаж
Монтаж
Гаечен ключ Капачки за болтовете Водач за маркуча
Маркуч за подаване на студена
вода
Кап фиксатор Подложки против плъзгане
ЗАБЕЛЕЖКА
• Капачки за болтовете : Броят на предоставените капачки за отворите на болтовете (от 3 до 6) зависи от
модела.
• Маркуч за подаване на гореща вода: само за пригодени модели.
• Контейнер за течен перилен препарат: само за пригодени модели.
Маркуч за подаване на гореща
вода
Контейнер за течен перилен
препарат
14 Български
WW80K5210VW_DC68-03677L-01_BG.indd 14 2017/7/21 15:48:05
Page 75
Изисквания към монтажа
Електрозахранване и заземяване
• Изисква се предпазител или прекъсвач за AC
220-240 V/50 Hz
• Използвайте отделно електрическо
разклонение, специално за пералната машина
За да се гарантира правилно заземяване, пералната
машина се доставя с кабел за електрозахранване
със заземителен щепсел с три проводника, който се
използва с правилно монтиран и заземен контакт.
Ако не изпитвате увереност относно заземяването,
консултирайте се с квалифициран електротехник
или сервизен представител.
Не изменяйте доставения щепсел. Ако той не е
подходящ за контакта, извикайте квалифициран
електротехник, който да монтира подходящ контакт.
ПРЕДУПРЕЖДЕНИЕ
• НЕ използвайте удължаващ кабел.
• Използвайте само захранващия кабел, който се
предоставя с пералната машина.
• НЕ свързвайте проводника за заземяване
към пластмасови водопроводни тръби,
газопроводни тръби или тръби за гореща вода.
• Възможно е неправилно свързаните
заземителни проводници да причинят
електрически удар.
Водоснабдяване
Подходящото налягане на водата за тази перална
машина е между 50 кПа и 800 кПа. Налягане на
водата под 50 кПа може да стане причина водният
клапан да не затвори напълно. Може също да
е необходимо повече време за напълване на
барабана, което да доведе до изключване на
пералната машина. Крановете за водата трябва
да са на разстояние до 120 см от задната част на
пералната машина, за да могат доставените маркучи
за подаване на вода да стигнат до машината.
За да се намали опасността от течове:
• Крановете за вода трябва да са лесно достъпни.
• Затваряйте крановете за вода, когато пералната
машина не се използва.
• Редовно проверявайте за течове накрайниците
на маркуча за подаване на вода.
ВНИМАНИЕ
Преди да използвате пералната машина за пръв
път, проверете всички връзки при водния клапан и
крановете за течове.
Изцеждане
Samsung препоръчва щранг с височина 60-90 см.
Маркучът за източване трябва да бъде свързан с
щранга чрез скобата на маркуча, а щрангът трябва
да покрива напълно маркуча за източване.
Монтаж
Подова настилка
За най-добри резултати пералната машина трябва
да е монтирана върху твърд под. Дървените подове
трябва да бъдат подсилени, за да бъдат сведени
до минимум вибрациите и/или небалансираното
натоварване. Килимите и плочките с меки
повърхности не са устойчиви на вибрации и могат
да станат причина вашата перална машина леко да
се мести по време на центрофугиране.
Български 15
WW80K5210VW_DC68-03677L-01_BG.indd 15 2017/7/21 15:48:05
Page 76
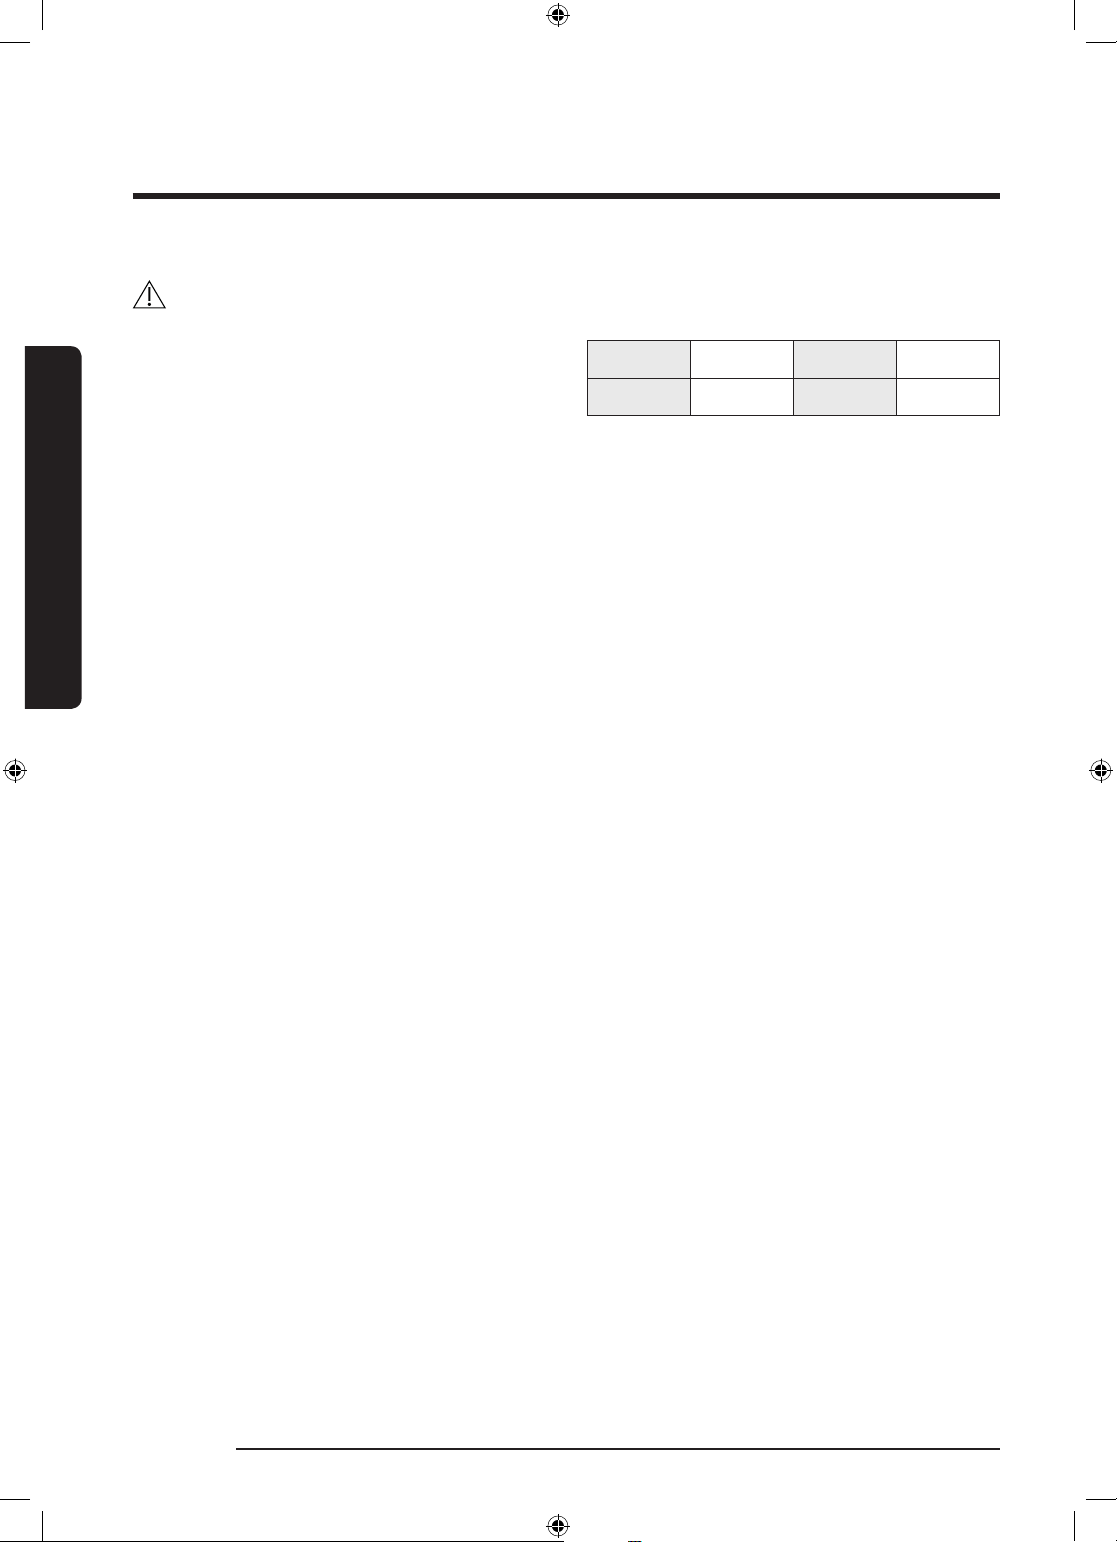
Монтаж
Монтаж
ВНИМАНИЕ
Никога НЕ инсталирайте пералната машина на
платформа или недобре укрепена конструкция.
Температура на водата
Не монтирайте пералната машина на места, където
водата може да замръзне, тъй като в пералната
машина винаги се задържа малко вода в клапана,
в помпата и/или в маркучите. Останалата в
съединителните части замръзнала вода може да
причини повреда на ремъците, помпата и други
компоненти на пералната машина.
Монтиране в ниша или шкаф
Минимални отстояния за стабилна работа:
Отстрани 25 мм Отзад 50 мм
Отгоре 25 мм Отпред 550 мм
Ако пералната машина и сушилнята се инсталират
на едно и също място, в предната част на нишата
или шкафа трябва да има поне 550 мм свободно
пространство за въздух. Ако пералната машина е
монтирана сама, не е необходим специален отвор за
въздух.
16 Български
WW80K5210VW_DC68-03677L-01_BG.indd 16 2017/7/21 15:48:05
Page 77
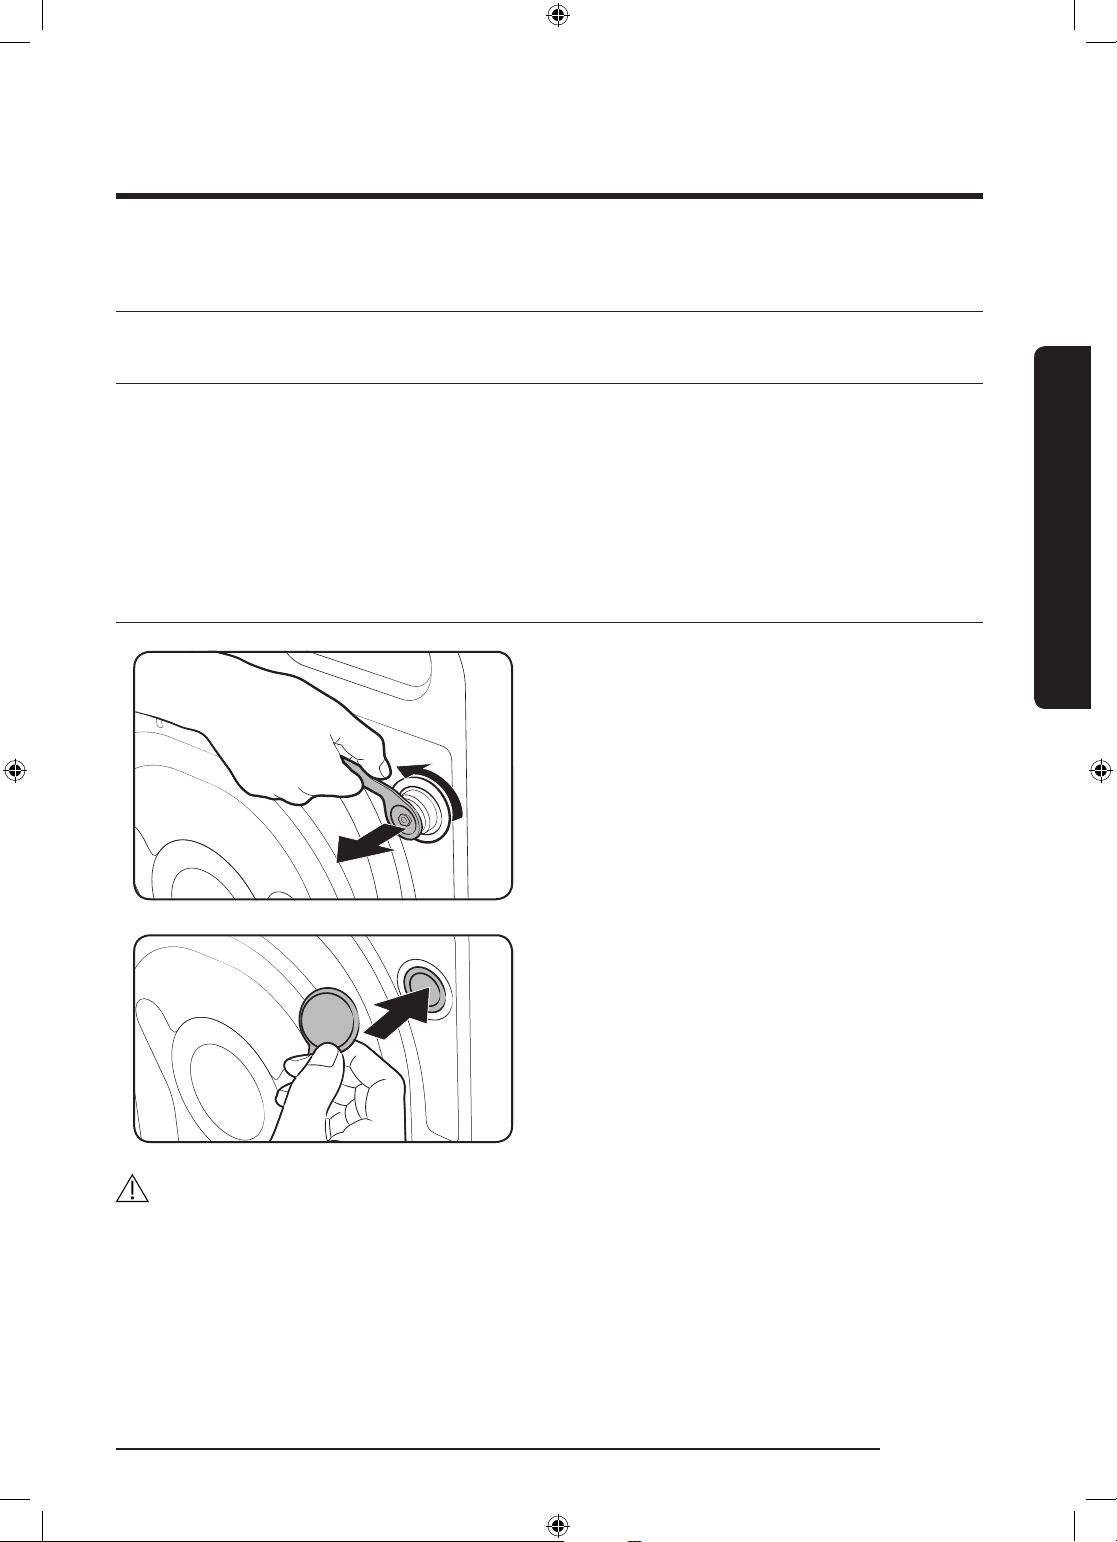
Подробни инструкции за монтаж
СТЪПКА 1 - Избор на място
Изисквания към мястото:
• Твърда, равна повърхност, без килим или подова настилка, която може да попречи на вентилацията
• Далече от пряка слънчева светлина
• Достатъчно място за вентилация и окабеляване
• Околната температура е постоянно над точката на замръзване (0 ˚C)
• Далече от източник на топлина
СТЪПКА 2 - Сваляне на транспортните болтове
Разопаковайте продукта и свалете всички
транспортни болтове.
1. Развийте всички транспортни болтове на
задната част на машината с помощта на
доставения ключ.
Монтаж
2. Затворете отворите с доставените пластмасови
капачки за болтове.
Запазете транспортните болтове за употреба в
бъдеще.
ПРЕДУПРЕЖДЕНИЕ
Опаковъчните материали може да бъдат опасни за деца. Освободете се от опаковъчните материали
(пластмасови пликове, полистирол и др.) така, че да са извън достъпа на деца.
Български 17
WW80K5210VW_DC68-03677L-01_BG.indd 17 2017/7/21 15:48:05
Page 78
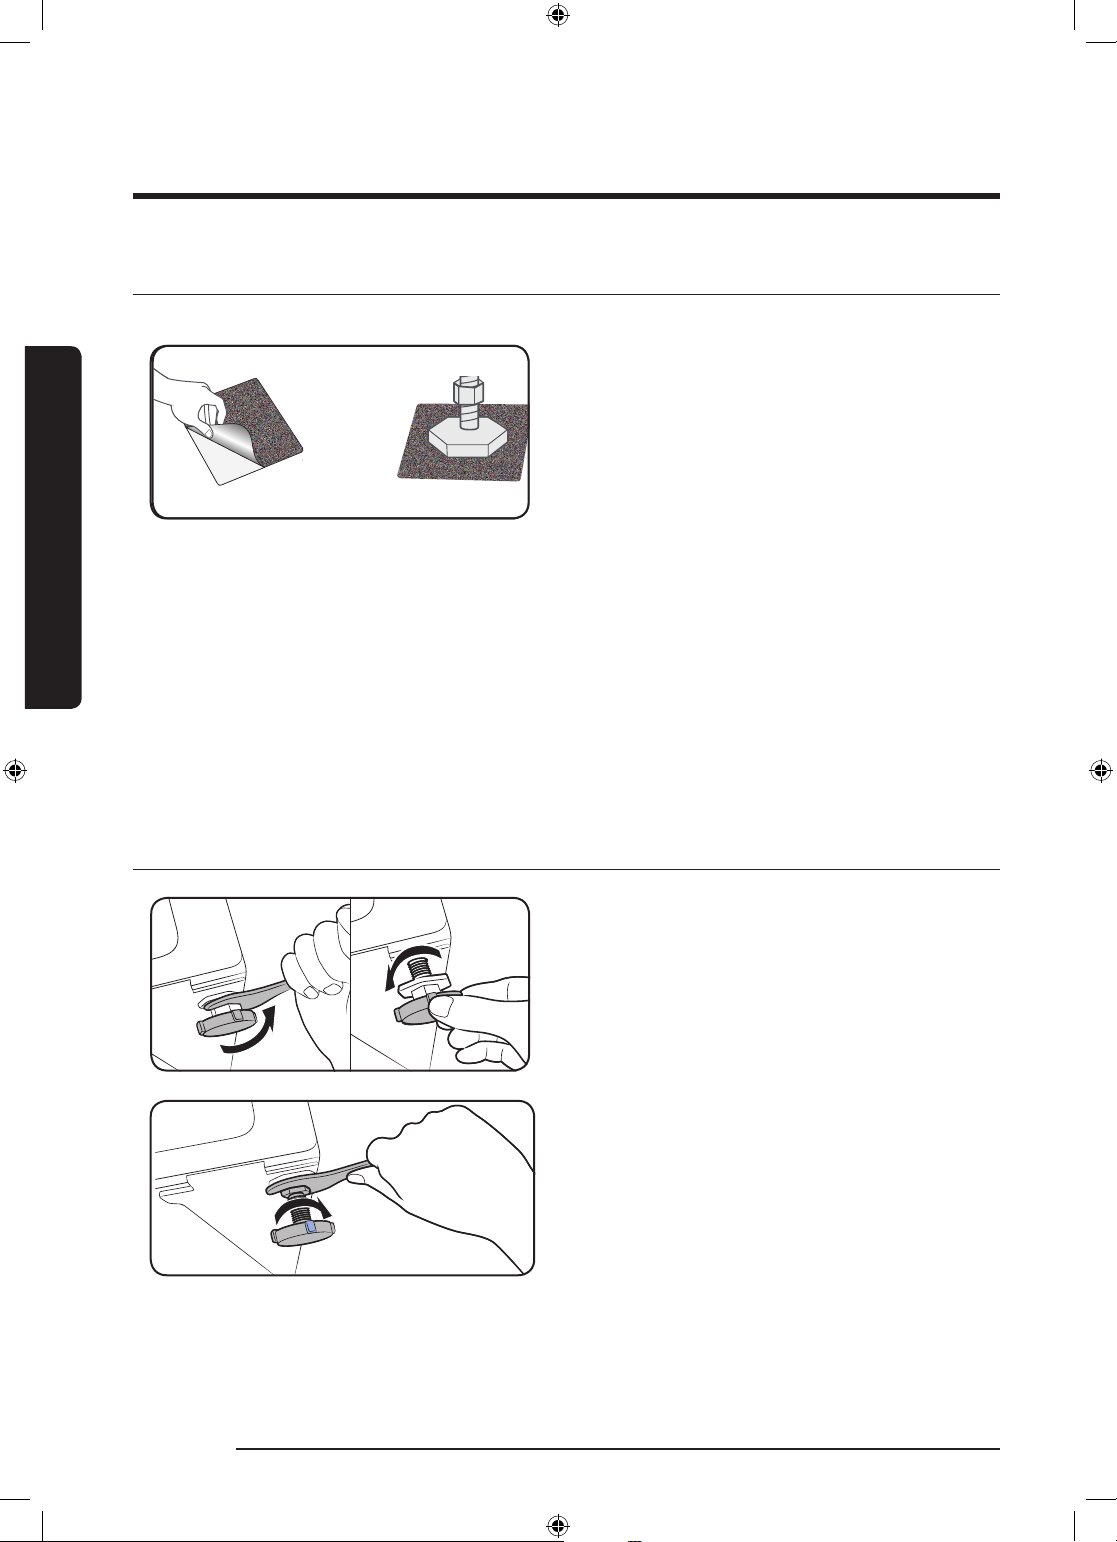
Монтаж
Монтаж
СТЪПКА 3 - Монтиране на подложката против плъзгане
1. Почистете добре долната част на регулируемите
крака и изчистете праха и маслото.
2. Обозначете местата на регулируемите предни
крака на пералната машина, където трябва да се
монтират подложките против плъзгане.
3. Прикрепете подложката против плъзгане като
наклоните или преместите пералната машина.
Когато прикрепвате подложката, отстранете
пластмасовото фолио от подложката и и
прикрепете лепливата страна на подложката
към пода, така че грубата страна да сочи нагоре.
Не трябва да прикрепвате лепливата страна на
подложката към регулируем крак.
4. След като монтирате пералната машина и
подложката против плъзгане, проверете отново
дали регулируемите крака са нивелирани.
СТЪПКА 4 - Регулирайте нивелиращите пети
1. Внимателно плъзнете пералната машина на
мястото й. Прекомерната сила може да повреди
нивелиращите пети.
2. Нивелирайте пералната машина с ръчно
регулиране на нивелиращите пети.
3. Когато приключите с нивелирането, затегнете
гайките с помощта на ключ.
18 Български
WW80K5210VW_DC68-03677L-01_BG.indd 18 2017/7/21 15:48:06
Page 79
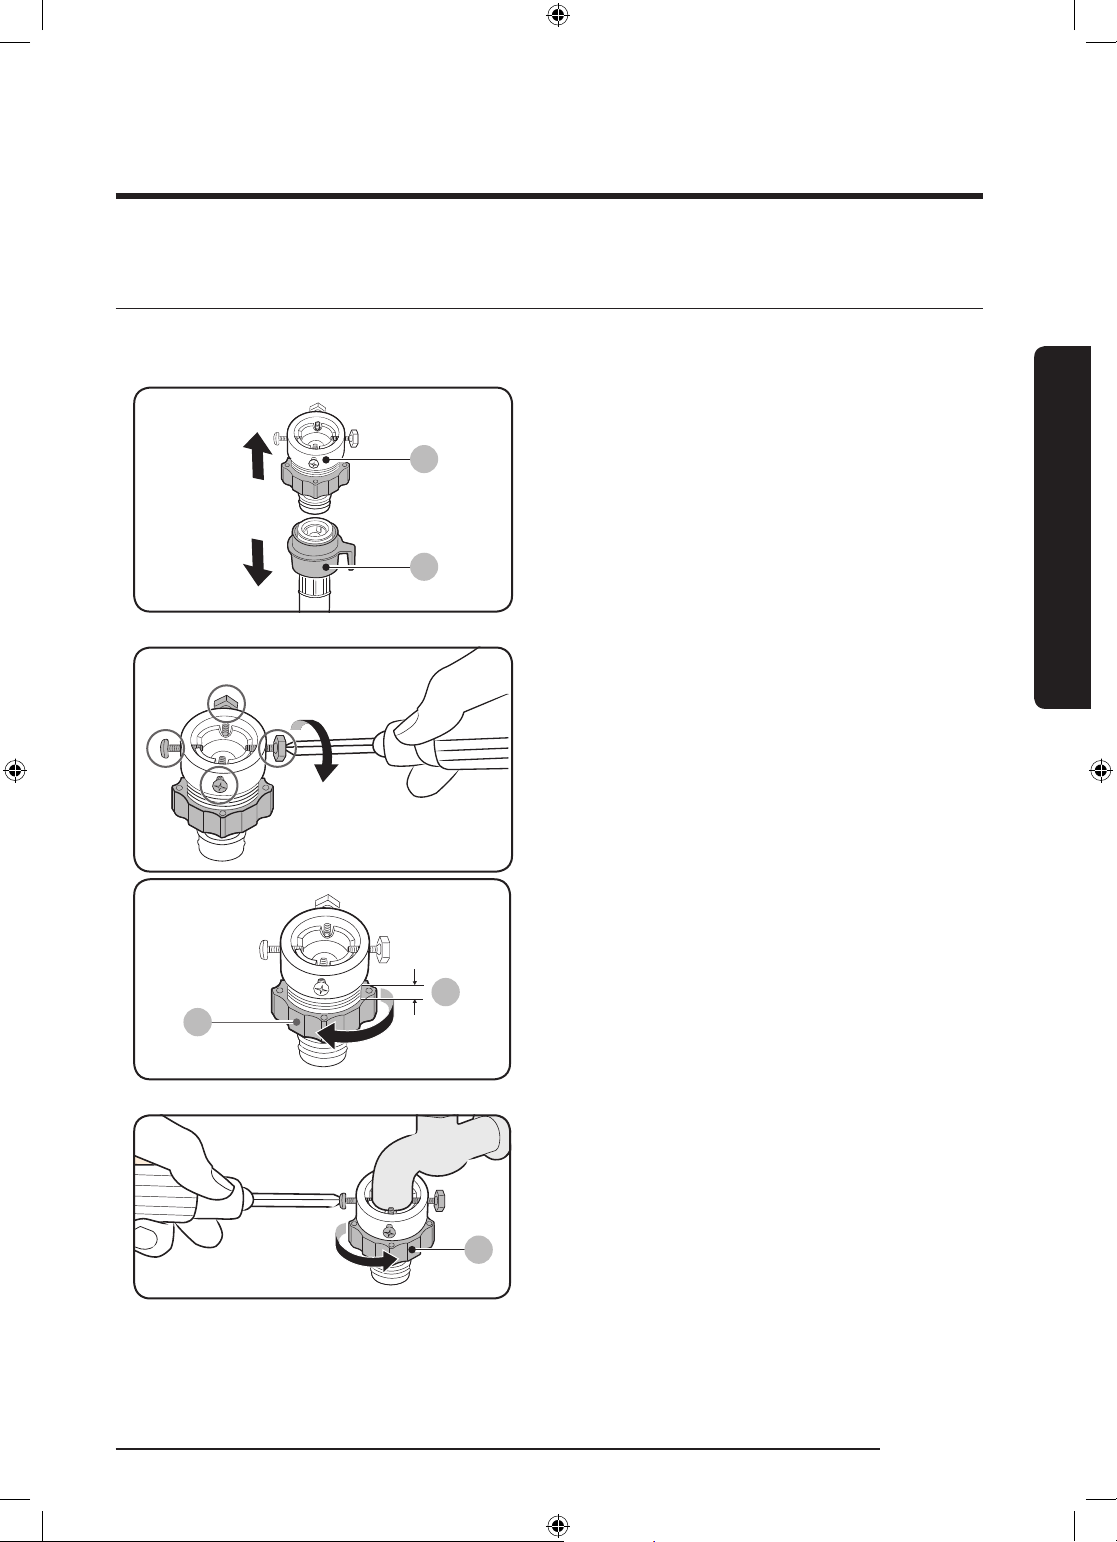
СТЪПКА 5 - Свързване на маркуча за вода
C
Възможно е предоставеният адаптер за маркуч да се различава в зависимост от модела. Тази стъпка ви
ръководи относно свързването на адаптер тип конектор. Ако имате адаптер тип винтов, преминете към 7.
Свържете маркуча за подаване на вода към
крана за вода.
A
B
1. Свалете адаптера (A) от маркуча за подаване
на вода (B).
2. С помощта на отвертка Philips развийте
четирите винта на адаптера.
Монтаж
3. Хванете адаптера и завъртете част (C) по посока
на стрелката, за да развиете с 5 мм (*).
C
4. Поставете адаптера на крана за вода и затегнете
винтовете, като същевременно повдигате
адаптера.
5. Завъртете част (C) по посока на стрелката, за да
я затегнете.
Български 19
WW80K5210VW_DC68-03677L-01_BG.indd 19 2017/7/21 15:48:06
Page 80
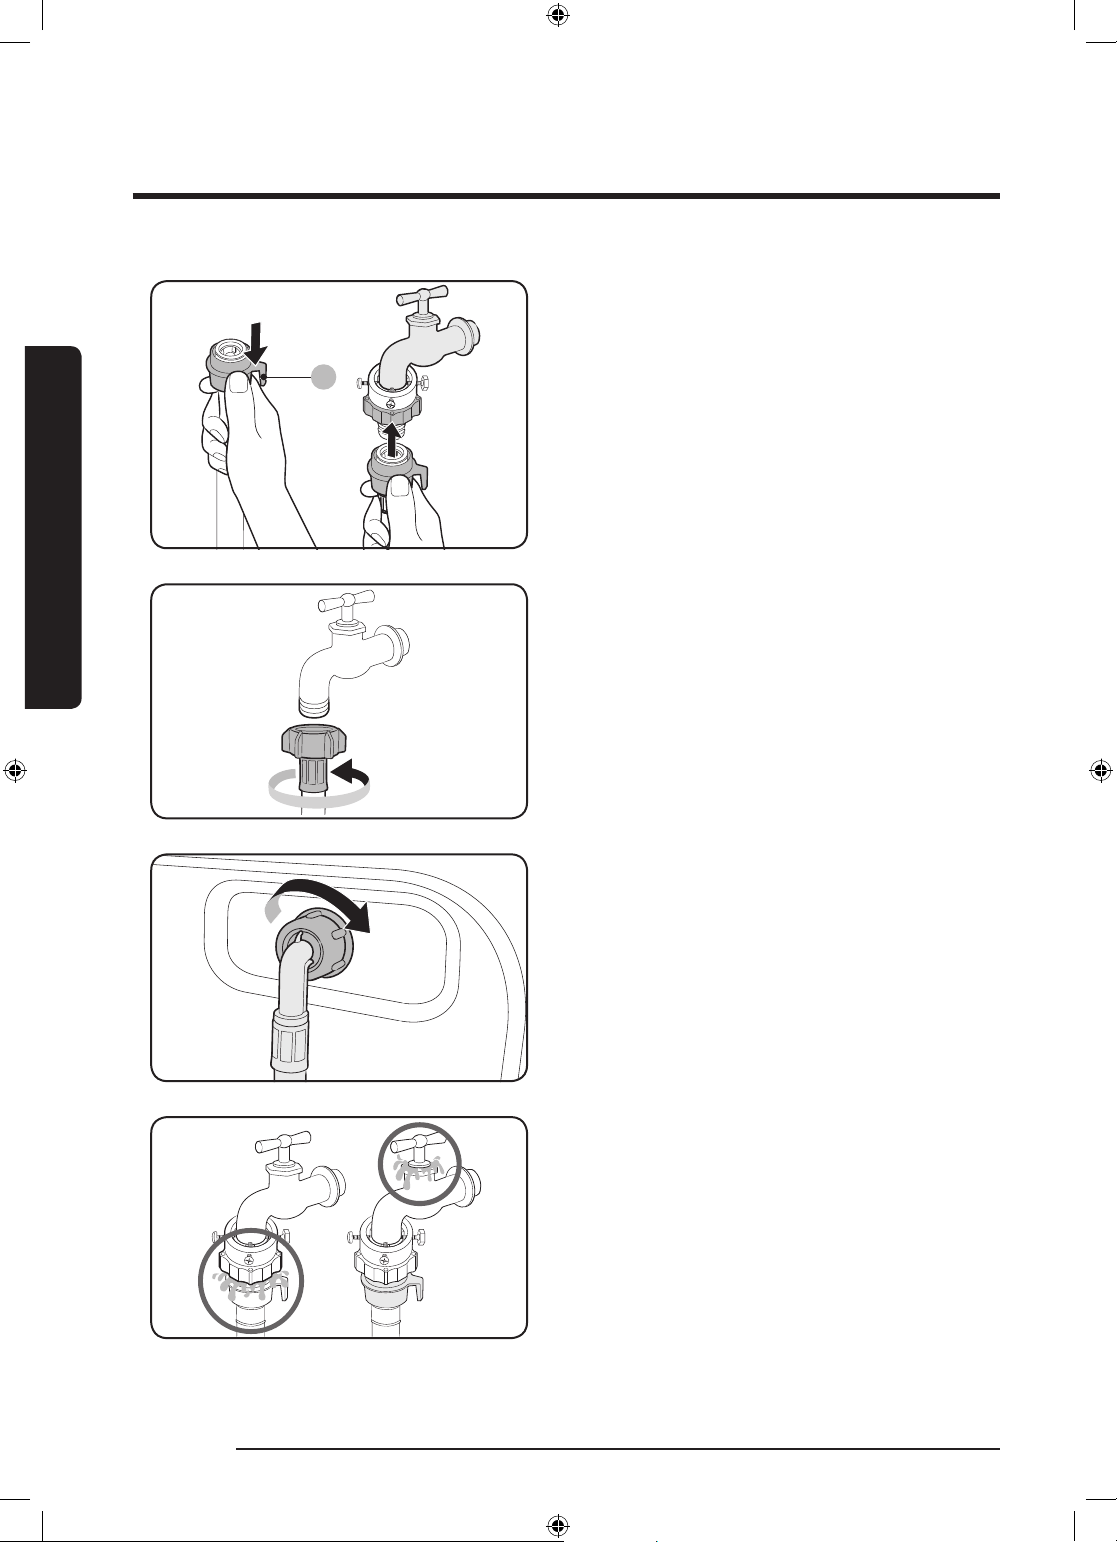
Монтаж
Монтаж
6. Придържайки долу част (E), свържете маркуча
за подаване на вода с адаптера. След това
освободете част (E). Маркучът се вмества в
E
адаптера с щракване.
7. Ако използвате кран тип винтов, използвайте
предоставения адаптер тип винтов за свързване
с крана за вода, както е показано.
8. Свържете другия край на маркуча за подаване
на вода към клапана за подаване на вода на
гърба на пералната машина. Завъртете маркуча
по посока на часовниковата стрелка, за да
затегнете.
9. Отворете крана за водата и проверете за течове
около съединенията. Ако има течове, повторете
стъпките по-горе.
20 Български
WW80K5210VW_DC68-03677L-01_BG.indd 20 2017/7/21 15:48:06
Page 81
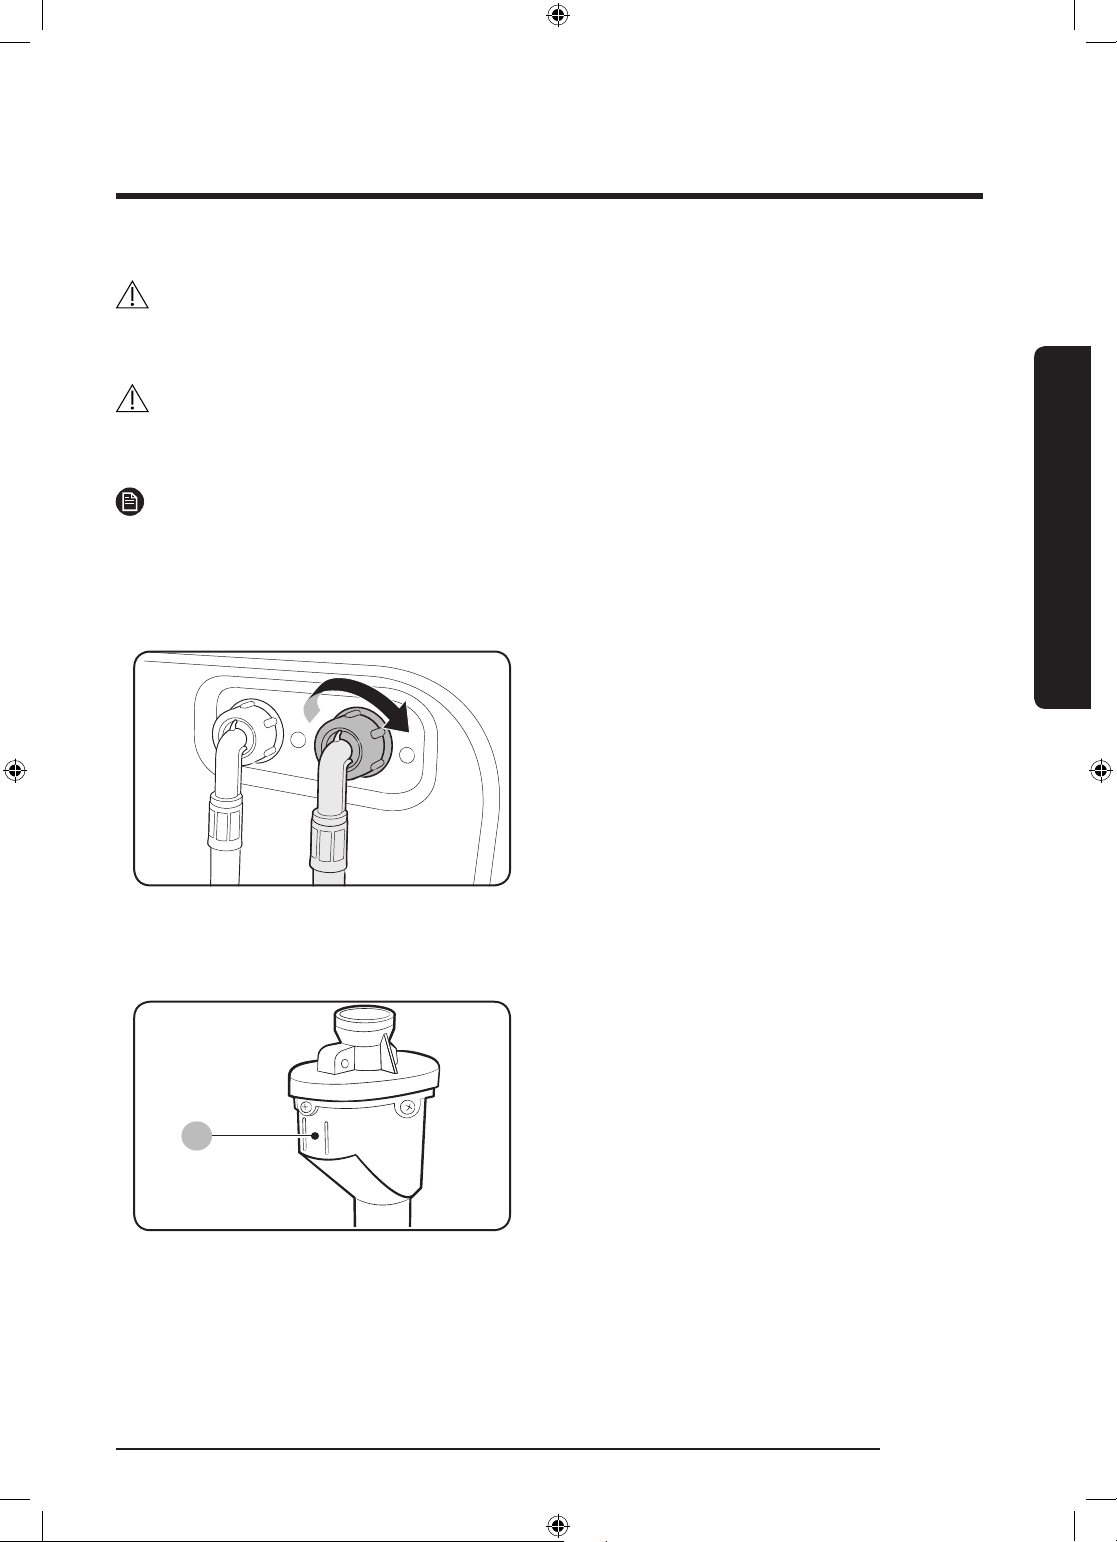
ПРЕДУПРЕЖДЕНИЕ
A
Прекратете употребата на пералната машина при поява на теч и се свържете с местния сервиз на Samsung. В
противен случай това може да причини електрически удар.
ВНИМАНИЕ
Не опъвайте маркуча за подаване на вода със сила. Ако маркучът е твърде къс, заменете го с по-дълъг маркуч
за високо налягане.
ЗАБЕЛЕЖКА
• След свързването на маркуча за подаване на вода към адаптера проверете дали е свързан правилно, като
дръпнете маркуча за подаване на вода надолу.
• Използвайте популярен тип кран за вода. В случай че кранът е квадратен или твърде голям, преди да
поставите крана в адаптера свалете раздалечителния пръстен.
При определени модели с допълнителен вход
за гореща вода:
1. Свържете червения край на маркуча за
подаване на топла вода към входа за подаване
на вода на гърба на пералната машина.
2. Свържете другия край на маркуча за подаване
на топла вода към крана за топла вода.
Монтаж
Маркуч Aqua Нose (само за пригодени модели)
Маркучът Aqua Нose предупреждава потребителите
за опасност от теч. Той следи водния поток
и в случай на теч средата на индикатора (A)
почервенява.
WW80K5210VW_DC68-03677L-01_BG.indd 21 2017/7/21 15:48:07
Български 21
Page 82
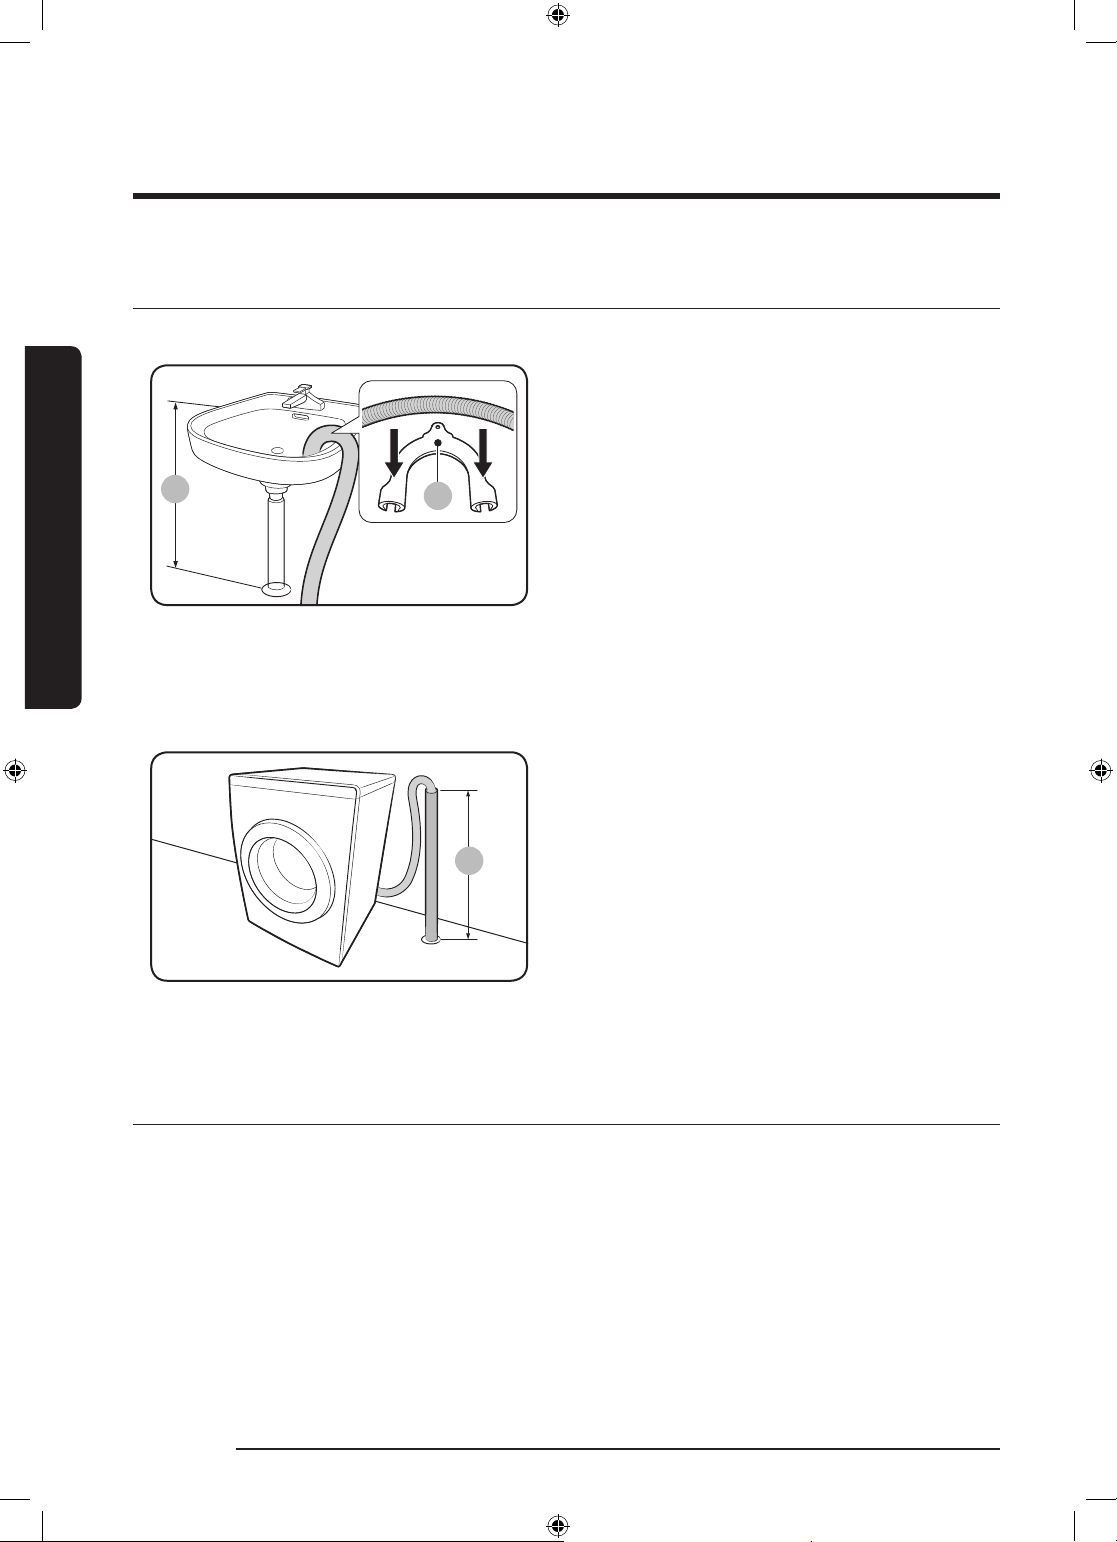
Монтаж
A
Монтаж
СТЪПКА 6 - Разполагане на маркуча за източване
Маркучът за източване може да се разположи по три начина:
През ръба на мивка
Маркучът за източване трябва да бъде поставен
на височина между 60 см и 90 см (*) от пода. За
да запазите накрайника на огънатия маркуч за
източване, използвайте доставения пластмасов
водач на маркуча (A). Закрепете водача към
стената с помощта на кука, за да осигурите стабилно
източване.
В тръбата на канала на мивката
Тръбата за източване трябва да се намира над
сифона на мивката, така че краят на маркуча да е
поне на 60 см над пода.
В канална тръба
Каналната тръба трябва да бъде висока между 60
см и 90 см (*). За препоръчване е да се използва
вертикална тръба с височина 65 см. Проверете
дали маркучът за източване е свързан с щранга под
наклон.
Изисквания към щранга за източване:
• Минимален диаметър 5 см
• Минимален капацитет на оттичане 60 литра в
минута
СТЪПКА 7 - Включване на електрозахранването
Включете кабела за електрозахранване в стенен контакт, одобрен тип контакт за AC 220-240V / 50Hz, защитен
с предпазител или подобен прекъсвач на електрическата верига. Натиснете бутона за Захранване, за да
включите пералната машина.
22 Български
WW80K5210VW_DC68-03677L-01_BG.indd 22 2017/7/21 15:48:07
Page 83
Преди да стартирате
Първоначални настройки
Стартиране на Calibration (Калибриране) (препоръчително)
Calibration (Калибриране) осигурява точно определяне на теглото от пералната машина. Барабанът трябва да е
празен, преди да изпълните Calibration (Калибриране).
1. Изключете и след това включете захранването на пералната машина.
2. Натиснете едновременно и задръжте Temp. (Температура) и Delay End (Отложено завършване) за 3
секунди, за да влезете в режим за калибриране. Появява се съобщението “CB”.
3. Натиснете Старт/Пауза, за да включите програмата за калибриране.
4. Барабанът се върти по часовниковата и обратно на часовниковата стрелка за около 3 минути.
5. Когато програмата приключи, на дисплея се появява “0” и пералната машина се изключва автоматично.
6. Сега пералната машина е готова за използване.
Напътствия за прането
Преди да стартирате
СТЪПКА 1 - Сортиране
Сортирайте прането съобразно тези критерии:
• Според етикета: Сортирайте прането на памук, смесени влакна, синтетика, коприна, вълна и изкуствена
коприна.
• Цвят: Разделете бялото пране от цветното.
• Размер: Смесването на различни по големина дрехи в барабана подобрява изпирането.
• Чувствителност: Перете деликатните материи отделно - нови вълнени дрехи, завеси, копринени материи.
Проверете етикетите по дрехите.
ЗАБЕЛЕЖКА
Непременно проверявайте етикетите по дрехите и ги сортирайте според указанията преди да започнете
прането.
Български 23
WW80K5210VW_DC68-03677L-01_BG.indd 23 2017/7/21 15:48:07
Page 84
Преди да стартирате
СТЪПКА 2 - Изпразване на джобовете
Изпразнете всички джобове на дрехите за пране
• Металните предмети, като монети, топлийки и катарами по дрехите може да увредят другото пране, както
и барабана.
Обърнете наопаки дрехите с копчета и бродерия
• Ако циповете на панталони или якета са отворени по време на пране, барабанът може да се повреди.
Циповете трябва да са затворени и фиксирани с конец.
• Дрехи с дълги ресни могат да се заплетат с други дрехи. Преди да започнете прането, завържете ресните.
СТЪПКА 3 - Използвайте мрежа за пране
• Сутиените (които се перат) трябва да се поставят в мрежа за пране. Металните части на сутиените могат да
се измъкнат и да скъсат другите изделия в прането.
• Малки и леки дрехи като чорапи, ръкавици, чорапогащи и кърпички могат да се захванат в близост до
входа. Поставяйте ги във фина мрежа за пране.
Преди да стартирате
• Не перете мрежата за пране самостоятелно без друго пране. Това може да причини ненормални
вибрации, които да преместят пералнята и да доведат до нараняване.
СТЪПКА 4 - Предпране (при необходимост)
Изберете опцията Предпране за избраната програма, ако прането е силно замърсено. Не използвайте опцията
за предварително пране, когато добавяте перилния препарат ръчно в барабана, или когато използвате течен
перилен препарат.
СТЪПКА 5 - Определяне на максималното зареждане
Не претоварвайте пералната машина. Претоварването може да стане причина пералната машина да не пере,
както трябва. За максималното натоварване съобразно вида на дрехите вижте страница 31.
ЗАБЕЛЕЖКА
Възможно е при пране на спално бельо или кувертюри времето за изпиране да бъде удължено, или ефектът
от центрофугата - влошен. Препоръчителната максимална скорост на центрофугата за спално бельо или
кувертюри е 800 об./мин. при максимално натоварване 2,0 кг или по-малко.
ВНИМАНИЕ
Ако прането не е подредено равномерно и се появи код за грешка „Ub“, разпределете го отново. Неправилно
разпределеното пране може да намали ефекта от центрофугирането.
24 Български
WW80K5210VW_DC68-03677L-01_BG.indd 24 2017/7/21 15:48:07
Page 85
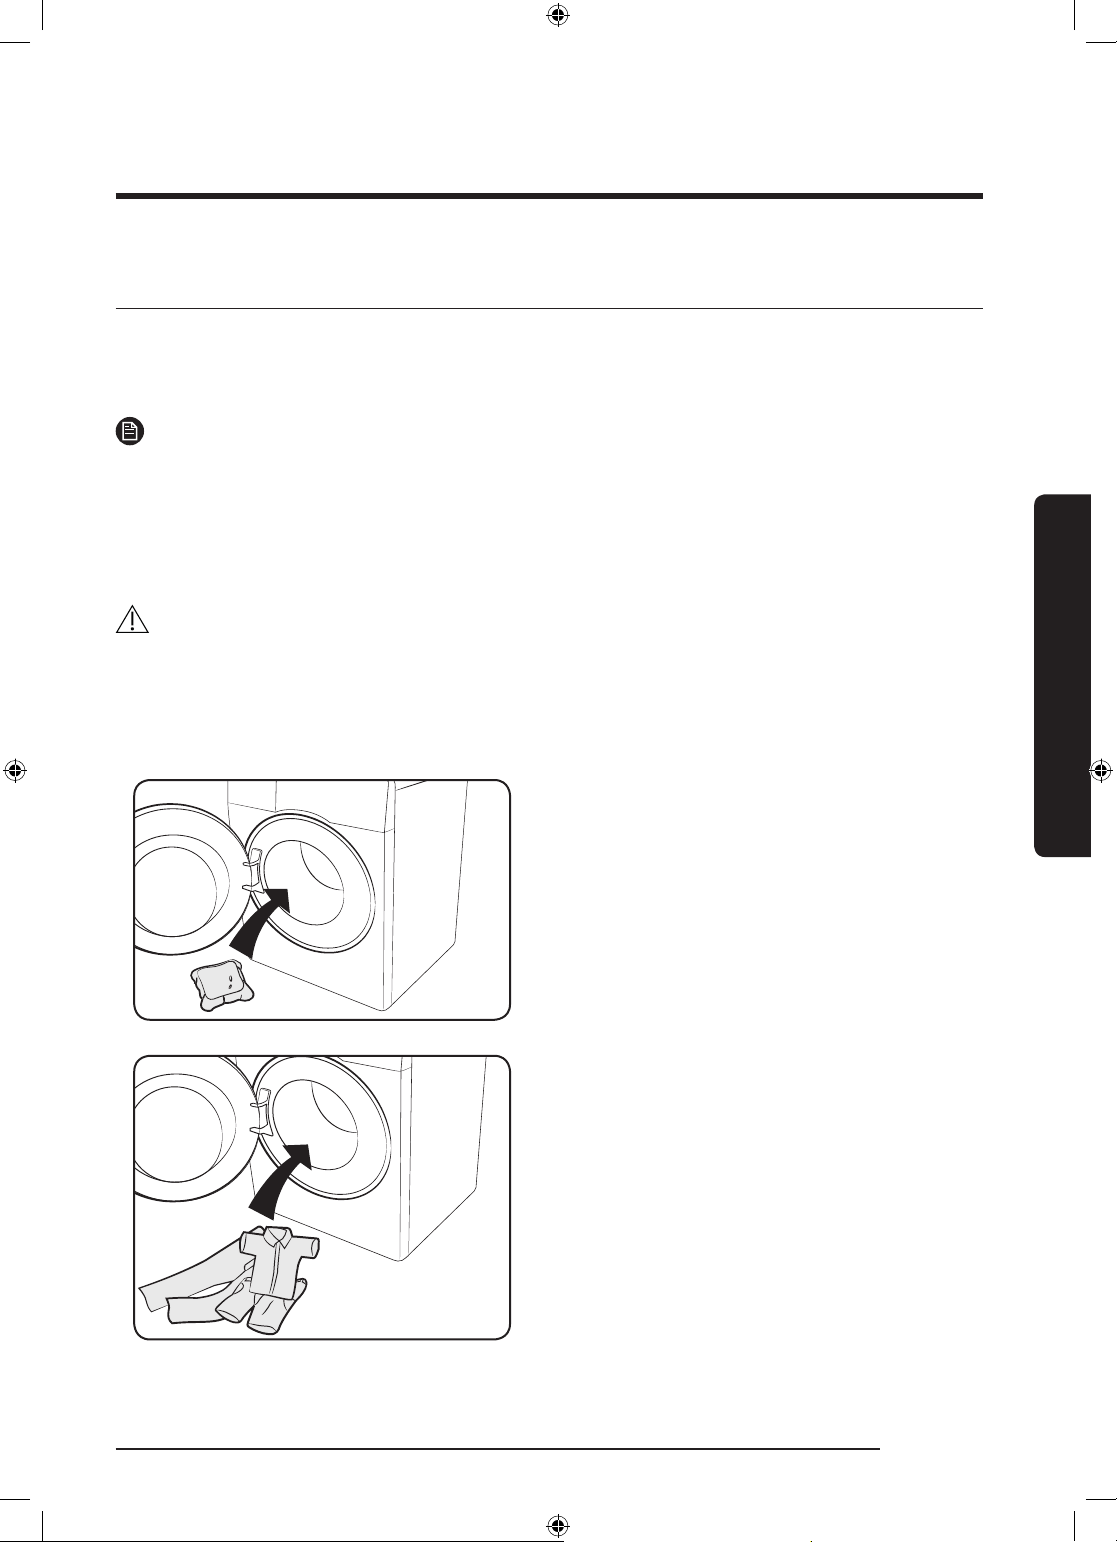
СТЪПКА 6 - Сложете правилен тип перилен препарат
Типът перилен препарат зависи от вида на тъканта (памук, синтетична, фина, вълна), цвета, температурата
на пране и степента на замърсяване. Винаги използвайте перилни препарати с ниска пенливост, които са
предназначени за автоматични перални машини.
ЗАБЕЛЕЖКА
• Следвайте препоръките на производителя въз основа на теглото на прането, степента на замърсяване
и твърдостта на водата във вашата зона. Ако не изпитвате увереност относно твърдостта на водата,
свържете се с водоснабдителната компания.
• Не използвайте перилен препарат, който е склонен към втвърдяване или образуване на бучки. Този
препарат може да остане след плакненето и да задръсти изхода за източване.
ВНИМАНИЕ
При пране на вълнени материи с програмата за вълна да се използва само неутрален течен перилен препарат.
Ако се използва с програмата за вълна, прахът за пране може да остане по прането и да промени цвета му.
Капсули за пране
За най-добри резултати от използването на капсули за пране спазвайте следните инструкции.
1. Поставете капсулата на дъното на празния
барабан, към задната част.
Преди да стартирате
2. Поставете прането в барабана, върху капсулата.
Български 25
WW80K5210VW_DC68-03677L-01_BG.indd 25 2017/7/21 15:48:07
Page 86
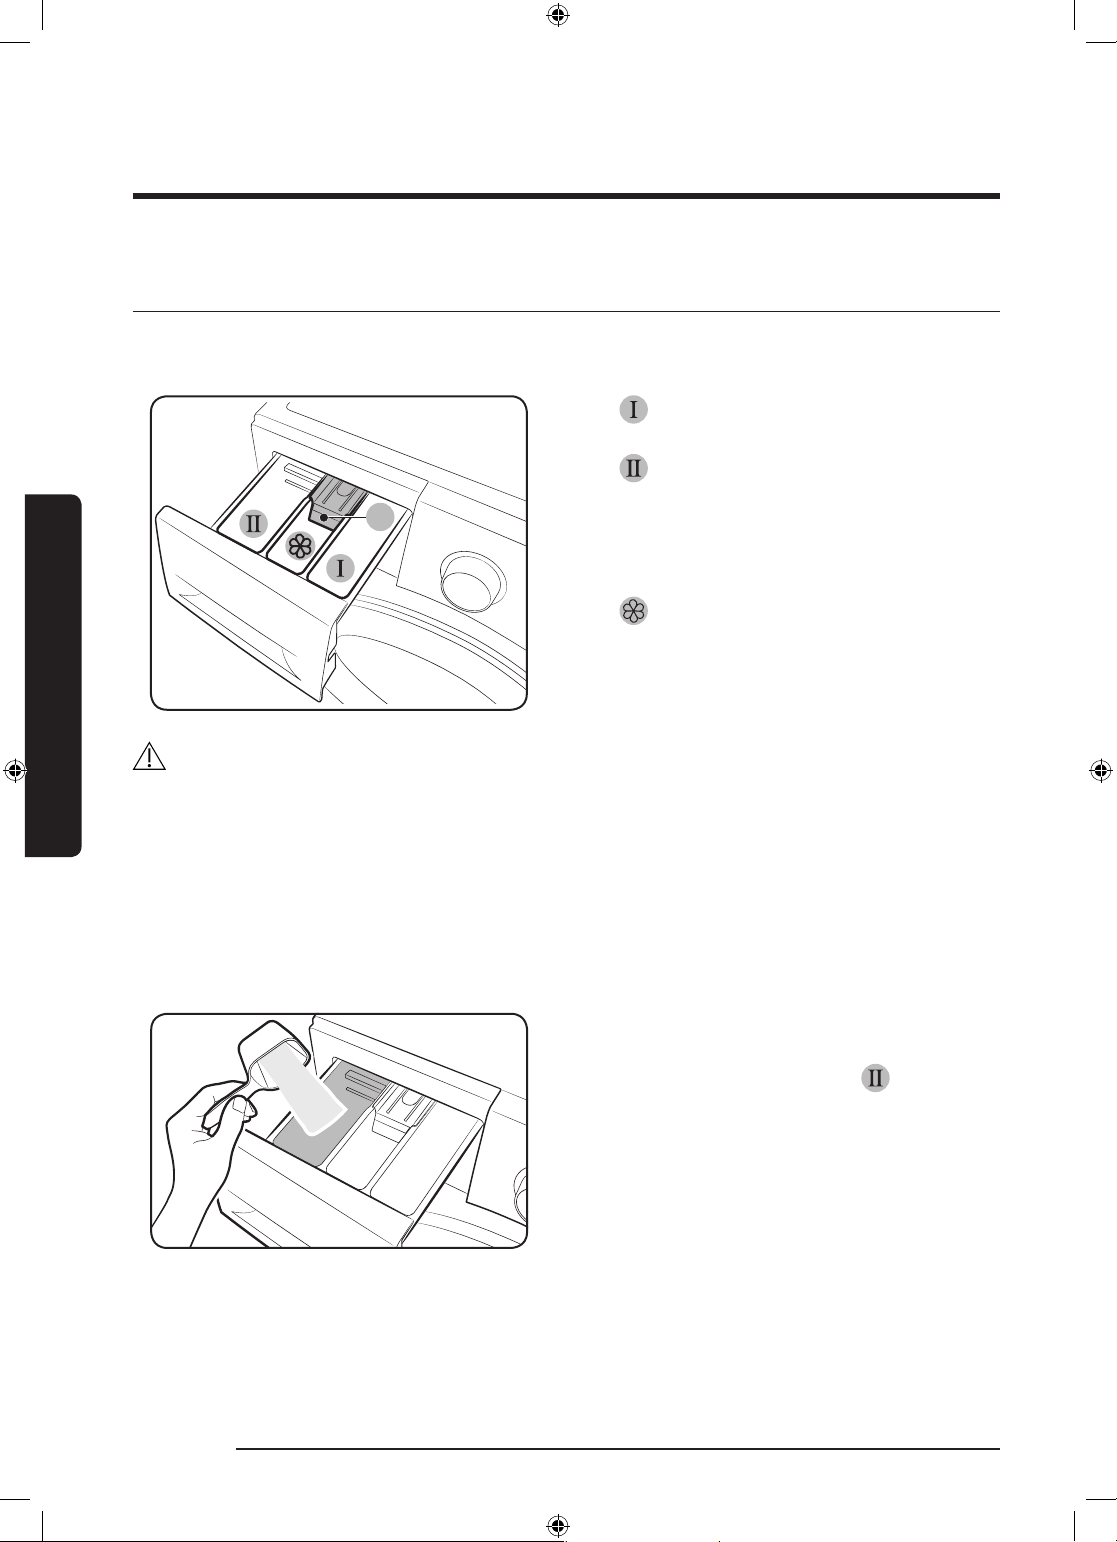
Преди да стартирате
A
Указания за чекмеджето за перилен препарат
Чекмеджето на пералната машина има три отделения: лявото е за основното пране, средното - за
омекотители, а дясното - за предварителното пране.
01 Отделение за предпране: Поставете
перилен препарат за предпране или колосване.
02
03
Отделение за основното пране: Поставете
перилен препарат за основното пране,
омекотител на водата, препарат за накисване,
белина и/или препарати за отстраняване на
петна.
Отделение за омекотител: Поставете
допълнителни препарати, като например
омекотител на тъканите. Не превишавайте
линията за максимум (A).
Преди да стартирате
ВНИМАНИЕ
• Не отваряйте чекмеджето за перилен препарат по време на работа на пералната машина.
• Не използвайте следните видове перилни препарати:
• Под формата на таблетки или капсули
• Използващи топка или мрежа
• За да се предотврати задръстване на отделението, концентрираните или високо обогатени агенти
(омекотител или перилен препарат) трябва да бъдат предварително разредени с вода.
За поставяне на перилни агенти в чекмеджето за перилен препарат
1. Отворете чекмеджето за перилния препарат с
плъзгане.
2. Поставете перилен препарат в
за основното пране според инструкциите или
препоръките на производителя. За използване
на течен перилен препарат вижте страница 28.
отделението
26 Български
WW80K5210VW_DC68-03677L-01_BG.indd 26 2017/7/21 15:48:08
Page 87
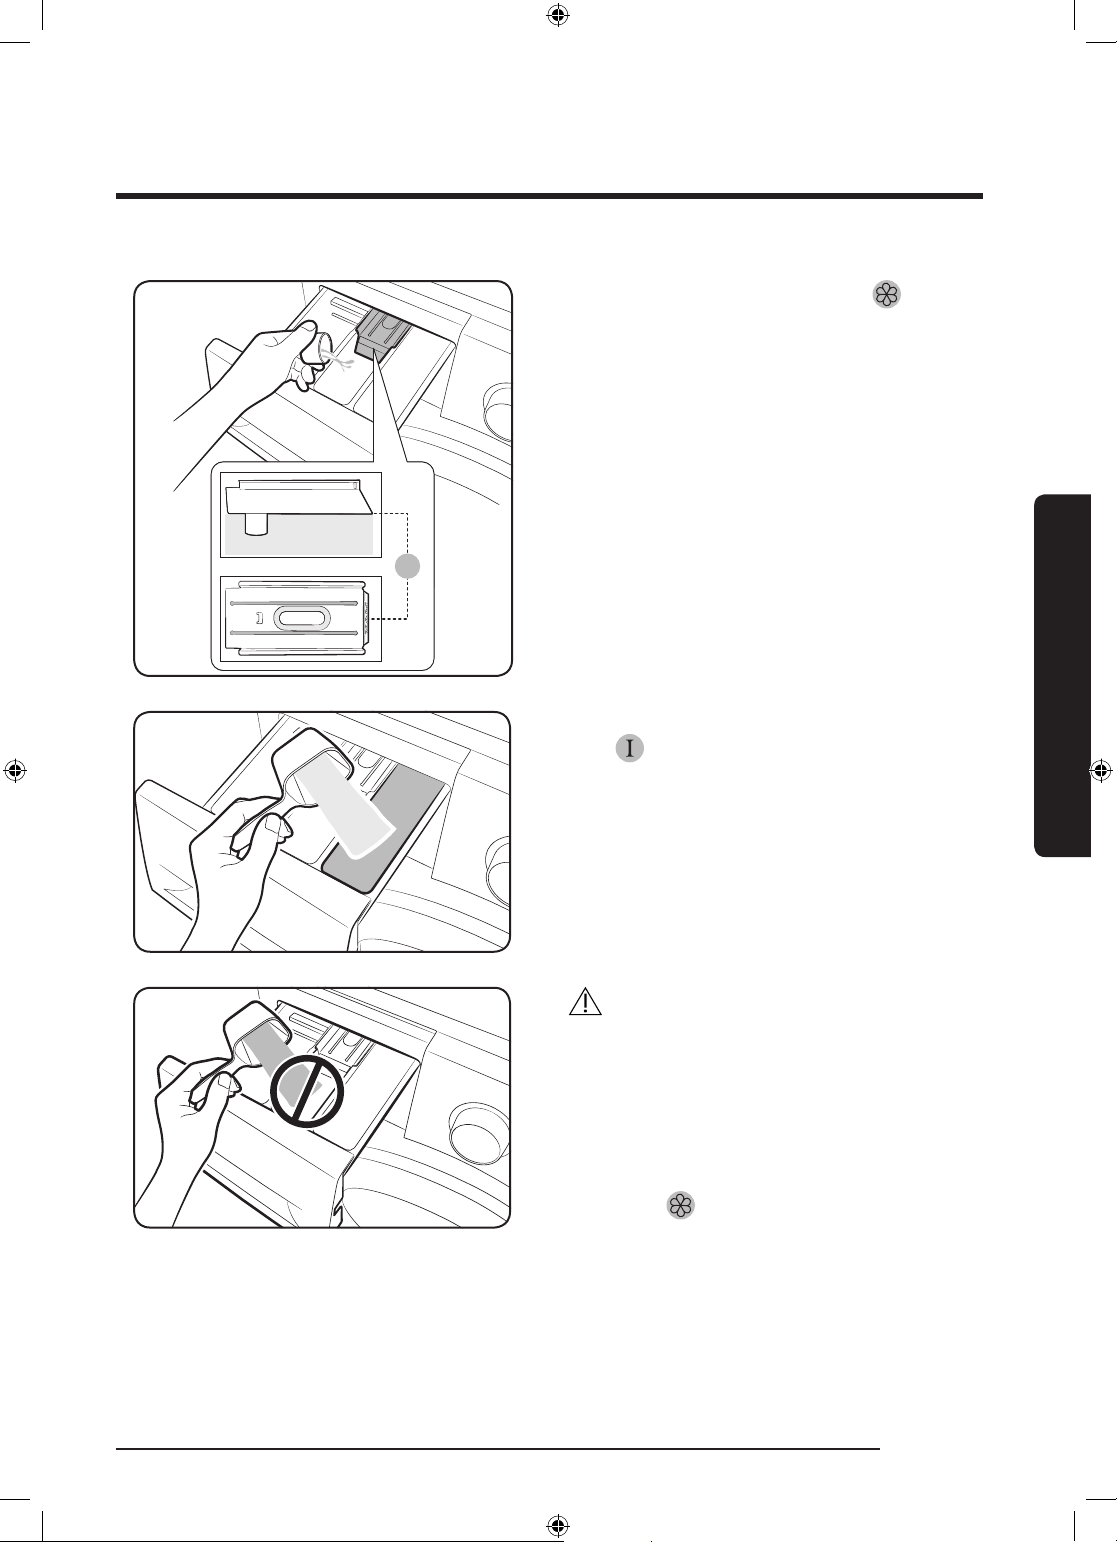
A
3. Поставете омекотител за тъкани в
отделението за омекотители. Не превишавайте
линията за максимум (A).
4. Ако желаете предпране, поставете препарат
отделението за предпране според
в
инструкциите и препоръките на производителя.
5. Затворете чекмеджето за перилни препарати.
Преди да стартирате
ВНИМАНИЕ
• Не поставяйте прахообразен перилен препарат
в контейнера за течен.
• Преди да се постави, концентрираният
омекотител за тъкани трябва да бъде разреден
с вода.
• Не поставяйте перилен препарат за основното
пране в
WW80K5210VW_DC68-03677L-01_BG.indd 27 2017/7/21 15:48:08
контейнера за омекотители.
Български 27
Page 88
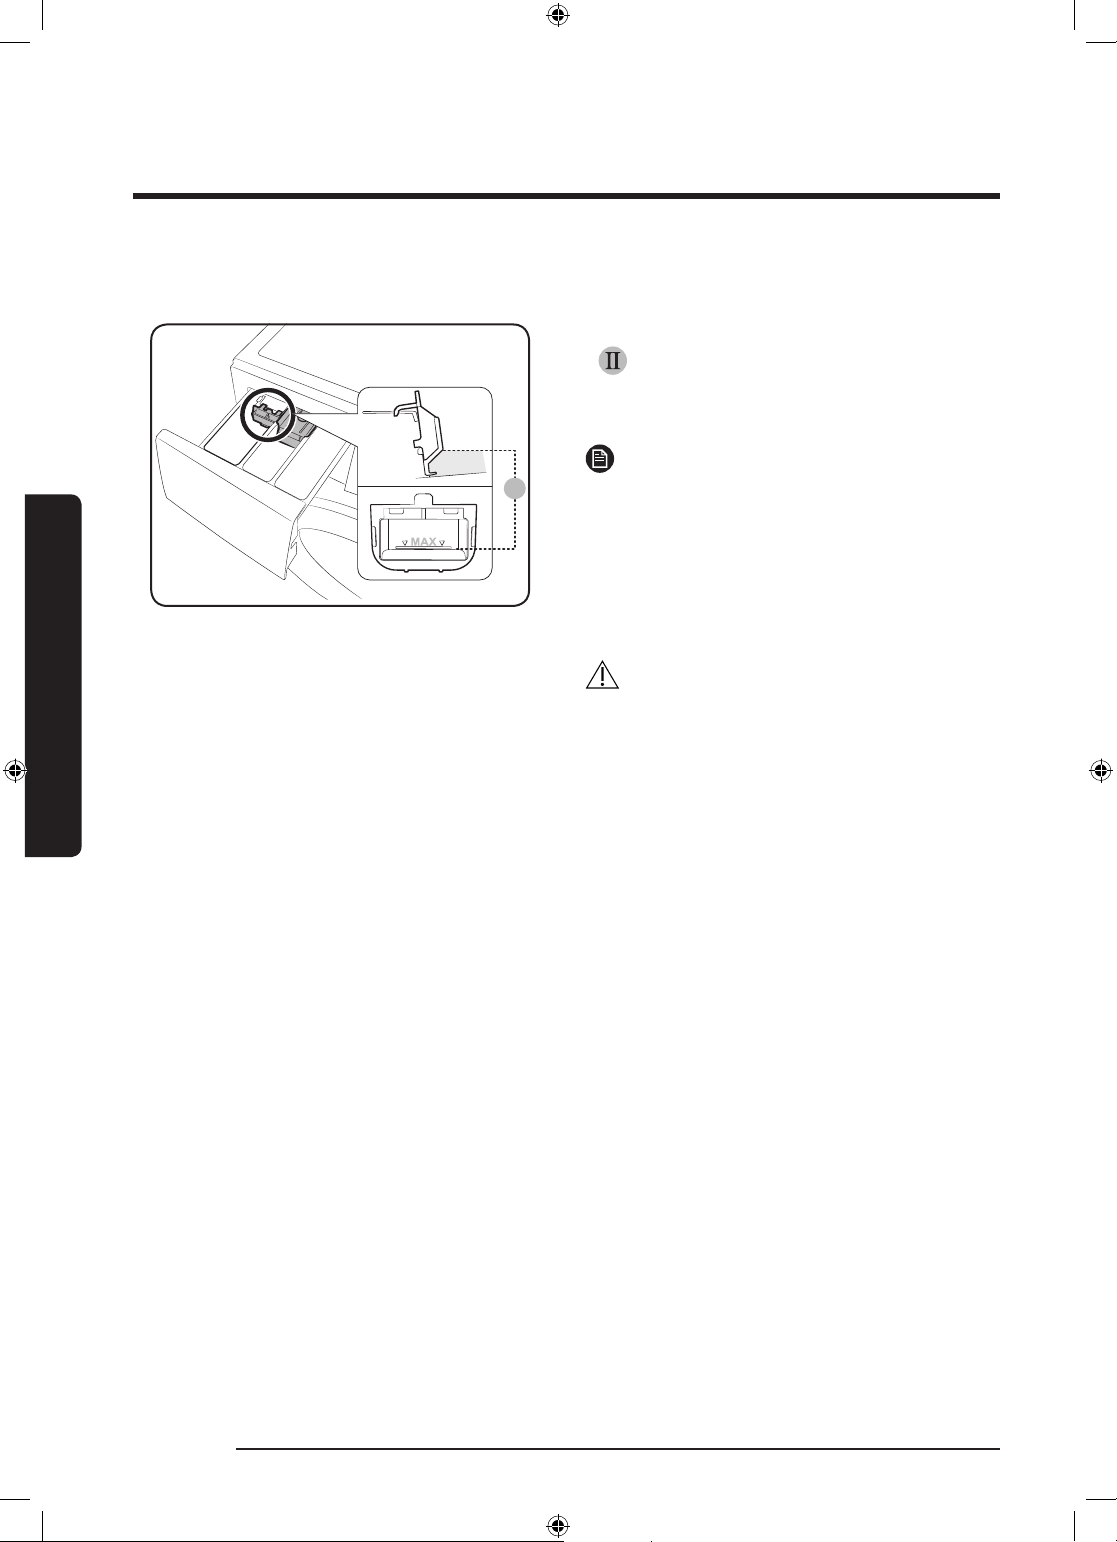
Преди да стартирате
A
За използване на течни перилни препарати (само приложими модели)
Първо поставете доставения контейнер за течности
отделението за основното пране. След това
в
налейте течния перилен препарат до под линията
за максимум (A).
ЗАБЕЛЕЖКА
• Поставяйте водача за течен перилен препарат
само след като сте извадили чекмеджето за
перилен препарат от машината чрез натискане
на лоста за освобождаване (А).
• След края на прането в чекмеджето за перилен
препарат може да остане малко течен препарат.
ВНИМАНИЕ
• Не превишавайте линията за максимум,
Преди да стартирате
отбелязана в контейнера.
• Ако използвате прахообразен перилен
препарат, махнете контейнера за течен перилен
препарат.
28 Български
WW80K5210VW_DC68-03677L-01_BG.indd 28 2017/7/21 15:48:08
Page 89
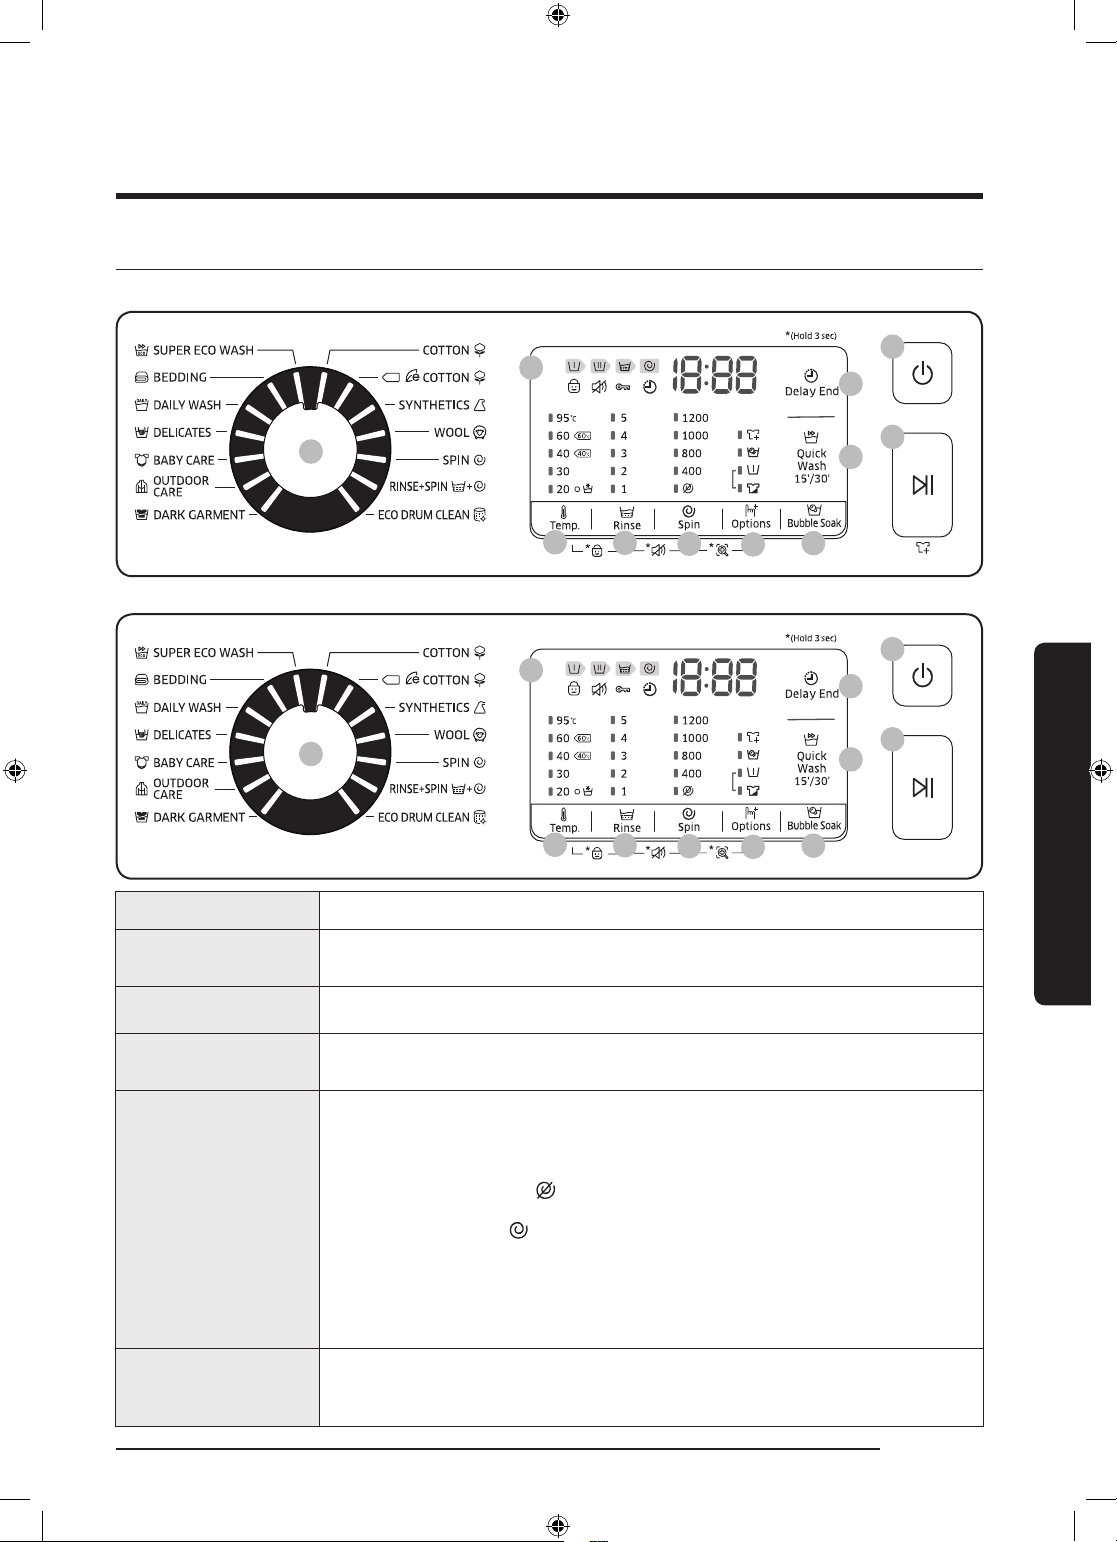
Операции
10
02
09
08
11
03
04
05
06
07
01
10
02
09
08
11
03
04
05
06
07
01
Контролен панел
WW80K5210VW, WW70K5210XW
WW80K5210VX
01 Селектор за цикъл Завъртете и изберете програма.
02 Дисплей
03 Temp.
(Температура)
04 Rinse (Изплакване)
Дисплеят показва информация за текущата програма и оставащото време или
информационен код при възникване на проблем.
Натиснете за промяна на температурата на водата за текущата програма.
Натиснете за промяна на броя на изплакванията за текущата програма. Можете
да zзададете максимум 5 изплаквания в зависимост от цикъла.
Натиснете за промяна на оборотите на центрофугата за текущата програма.
• Задържане на изплакването (без индикатор): Последното изплакване се
прекратява с цел прането да остане във вода. За да освободите пералнята от
водата, включете програмата за източване или центрофугата.
05 Spin (Центрофуга)
• Без центрофугиране
източване.
• Само центрофуга : За да включите цикъла Само центрофуга, натиснете
: Барабанът не се завърта след последното
Spin (Центрофуга) за 3 скунди. Когато се появят времето на цикъла и
оборотите на центрофугата, натискайте Spin (Центрофуга) неколкократно
до появата на желаните обороти за центрофугиране. След това натиснете
Старт/Пауза, за да стартирате цикъла. Времето за центрофугиране зависи от
избрания цикъл.
Натиснете, за да изберете опция сред Интензивно и Предпране. Натиснете
06 Options (Опции)
отново, за да отмените направения избор.
• Наличието на опциите зависи от цикъла.
Операции
Български 29
WW80K5210VW_DC68-03677L-01_BG.indd 29 2017/7/21 15:48:09
Page 90
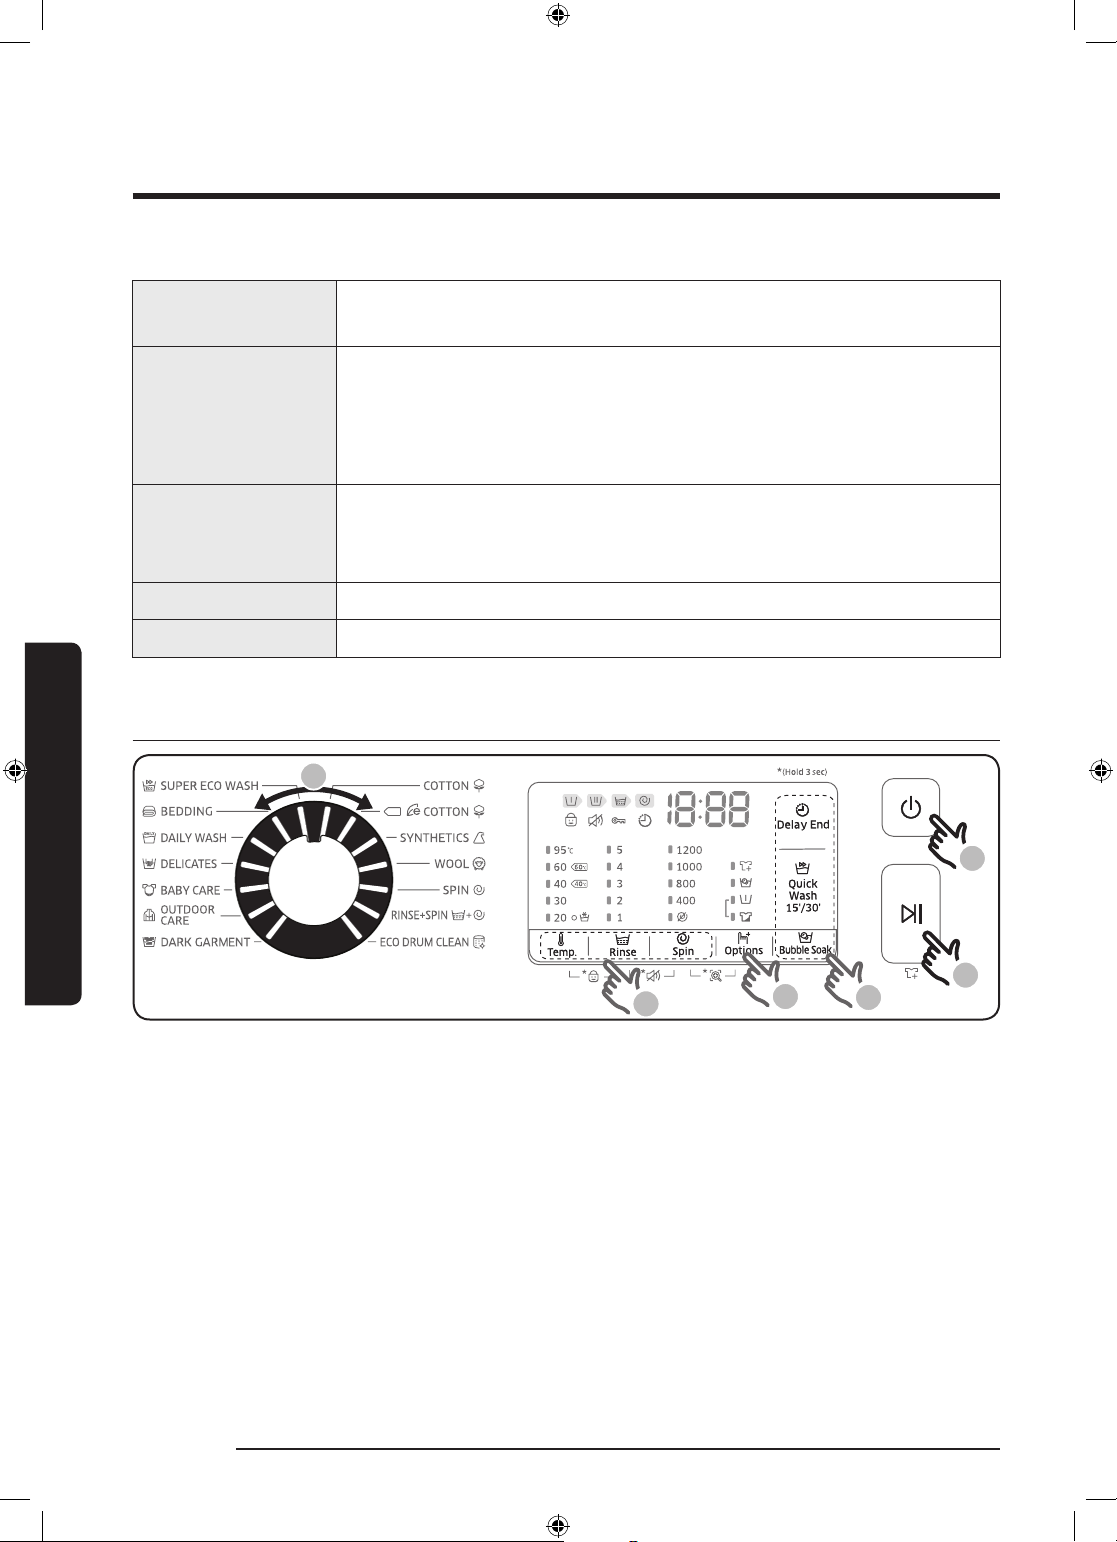
Операции
3
4
1
6
2
5
Елементарни стъпки за стартиране
Операции
07 Bubble Soak
(Накисване с
мехурчета)
Натиснете, за да активирате/деактивирате функцията Bubble Soak (Накисване с
мехурчета). Тя помага за отстраняване на различни упорити петна.
Delay End (Отложено завършване) дава възможност да зададете времето на
08 Delay End
(Отложено
завършване)
завършване на текущия цикъл. Въз основа на Вашите настройки времето за
стартиране на цикъла ще се определи от вътрешната логика на машината. Тази
настройка е полезна например за програмиране на машината така, че тя да
приключи прането, когато обикновено се връщате у дома след работа.
• Натиснете, за да изберете предварително зададените часове.
09 Quick Wash 15’/30’
(Бързо пране
15'/30')
За слабо замърсени дрехи и по-малко от 2 кг пране, които ви трябват бързо.
• Тази опция се предлага само при избран цикъл COTTON (ПАМУК).
• Времето на цикъла подлежи на промяна в зависимост от количеството
перилен препарат, нивото на водата и нивото на замърсяване на товара.
10 Захранване Натиснете, за да включите/изключите пералната машина.
11 Старт/Пауза Натиснете за стартиране или спиране на работата.
1. Натиснете Захранване, за да включите пералната машина.
2. Завъртете Селектор за цикъл и изберете програма.
3. Променете настройките на програмата ((Temp. (Темп.), Rinse (Изплакване) и Spin (Центрофуга))
съобразно необходимостта.
4. За да добавите опция, натиснете Options (Опции). Използвайте бутона отново, за да изберете
предпочитания елемент.
5. На машината има два бутона за Bubble Soak (Накисване с мехурчета) и Delay End (Отложено завършване)
за лесен достъп. Ако желаете да използвате някоя от тези опции, натиснете съответния бутон.
6. Натиснете Старт/Пауза.
За смяна на програмата по време на работа
1. Натиснете бутона Старт/Пауза, за да спрете работата.
2. Изберете друга програма.
3. Отново натиснете бутона Старт/Пауза, за да започнете новата програма.
30 Български
WW80K5210VW_DC68-03677L-01_BG.indd 30 2017/7/21 15:48:09
Page 91
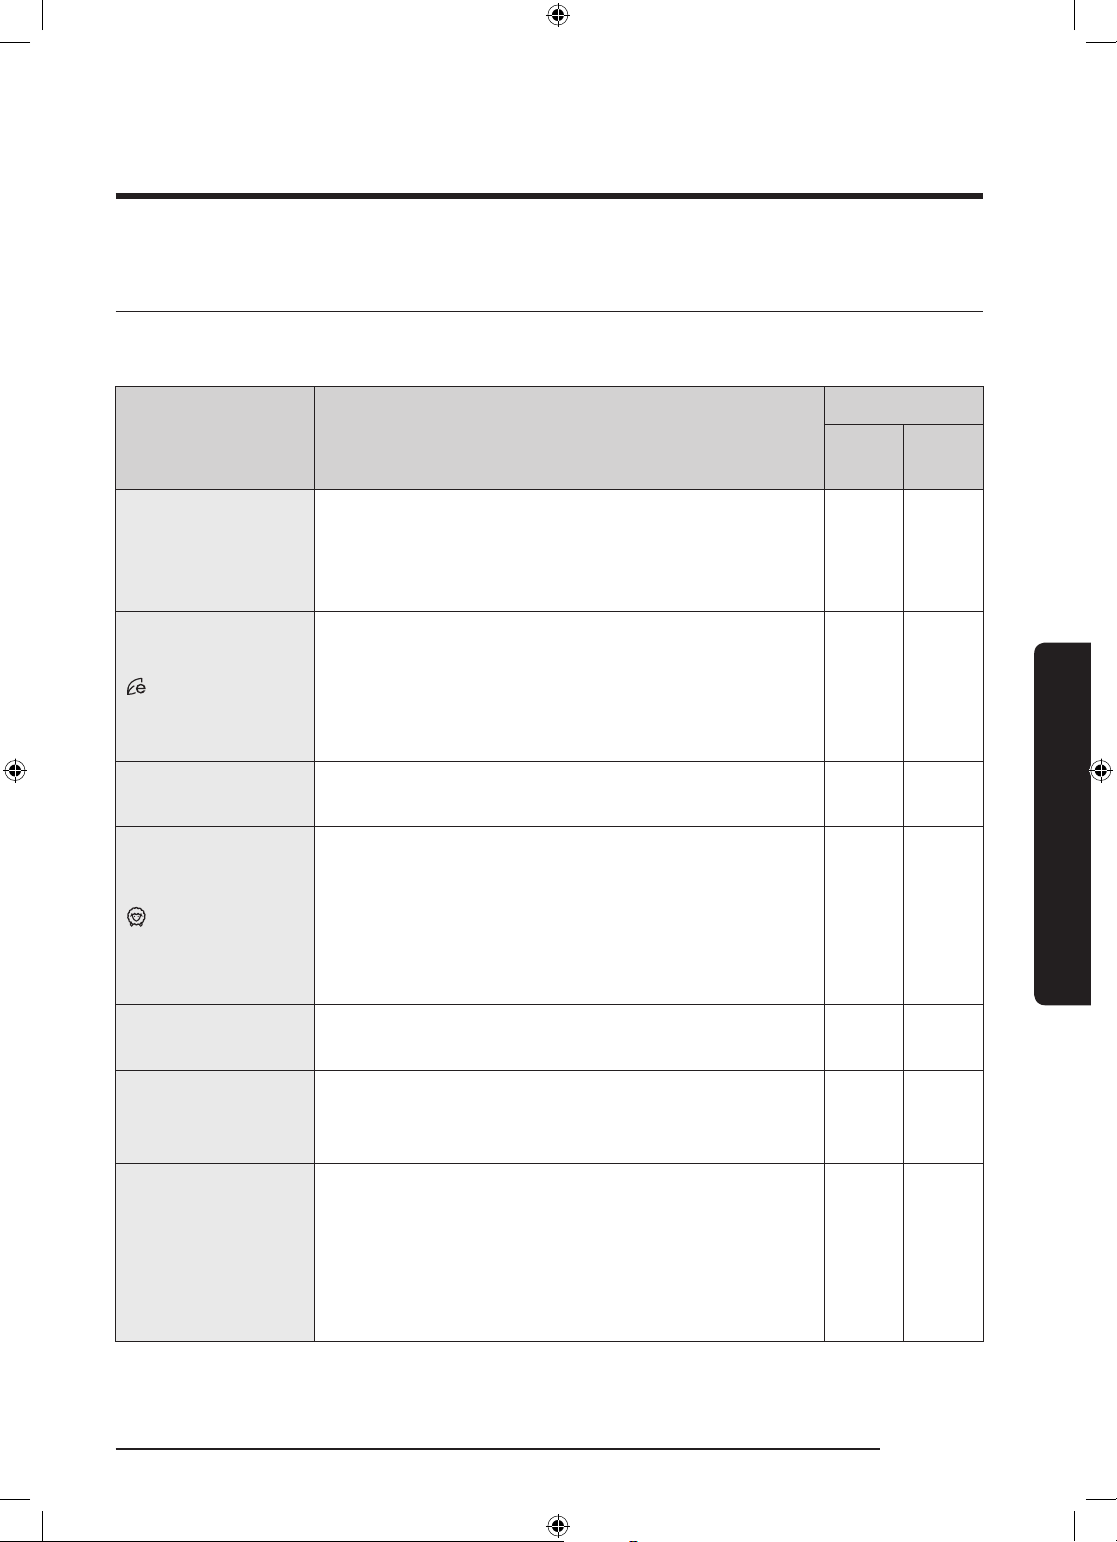
Преглед на програмите
Стандартни програми
Режим Описание
• За памук, спално бельо, покривки за маса, бельо,
COTTON (ПАМУК)
COTTON (ПАМУК)
SYNTHETICS
(СИНТЕТИКА)
WOOL (ВЪЛНА)
хавлиени кърпи или ризи.
Времето за пране и броят на изплакванията се задават
автоматично според килограмите на прането.
• Оптимално изпълнение с по-нисък разход на енергия
за памучни тъкани, спално бельо, покривки за маса,
бельо, хавлиени кърпи или ризи. За пестене на енергия
действителната температура на пране може да е по-ниска
от посочената.
• За блузи или ризи от полиестер (диолен, тревира),
полиамид (перлон, найлон) и други подобни.
• Специално за вълнени тъкани, които може да се перат в
перална машина, с тегло под 2,0 кг.
• Цикълът WOOL (ВЪЛНА) се отличава с нежно люлеене
и киснене с цел предпазване на вълнените материи от
свиване/деформиране.
• Препоръчва се неутрален перилен препарат.
Макс. тегло (кг)
Модел
за 8 кг
Модел
за 7 кг
Макс. Макс.
Макс. Макс.
3 3
2 2
Операции
SPIN (ЦЕНТРОФУГА)
RINSE + SPIN
(ИЗПЛАКВАНЕ +
ЦЕНТРОФУГИРАНЕ)
• Допълнително центрофугиране за ефективно
отстраняване на влагата от прането.
• Допълнително изплакване след включване на
омекотителя за тъкани към прането.
- -
- -
• Почиства барабана, премахвайки от него замърсявания
ECO DRUM CLEAN
(ИКОНОМИЧНО
ПОЧИСТВАНЕ НА
БАРАБАНА)
и бактерии.
• Изпълнява се на всеки 40 пранета без перилен препарат
или белина.
• Барабанът трябва да бъде празен.
- -
• Да не се използват почистващи агенти.
Български 31
WW80K5210VW_DC68-03677L-01_BG.indd 31 2017/7/21 15:48:09
Page 92
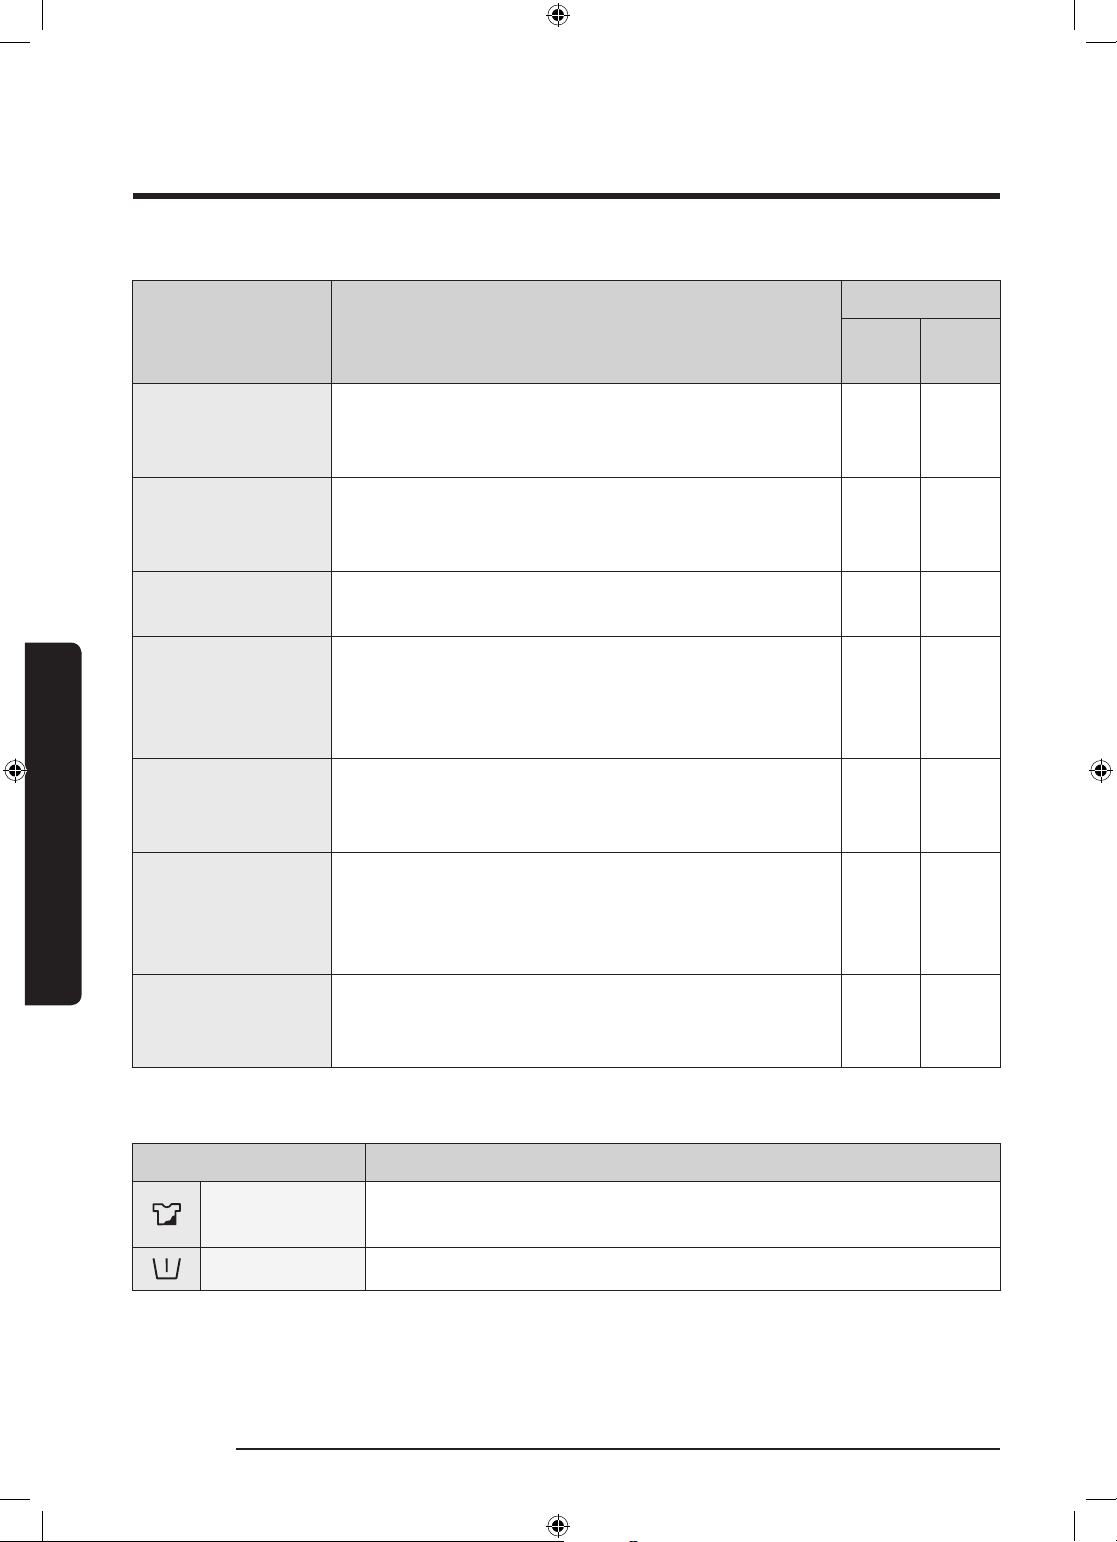
Операции
Режим Описание
Макс. тегло (кг)
Модел
за 8 кг
Модел
за 7 кг
Операции
SUPER ECO WASH
(СУПЕР ИКОНОМИЧНО
ПРАНЕ)
BEDDING (СПАЛНО
БЕЛЬО)
DAILY WASH
(ЕЖЕДНЕВНО ПРАНЕ)
DELICATES (ФИНО)
BABY CARE (ГРИЖА ЗА
ДЕТЕТО)
OUTDOOR CARE
(ВРЪХНИ ДРЕХИ
СЪС СПЕЦИАЛНО
ПОКРИТИЕ)
• Цикълът с икономична пяна помага да се намали
консумацията на енергия.
• За покривки на легла, чаршафи, кувертюри и др.
• За максимално добри резултати перете само един вид
пране с тегло под 2,0 кг.
• Използва се за дрехи, които се перат всеки ден,
например, бельо и ризи.
• За ефирни материи, сутиени, бельо (копринено) и други
тъкани само за ръчно пране.
• За максимално добри резултати използвайте течен
перилен препарат.
• Отличава се с високотемпературно пране и
допълнителни изплаквания, целящи ефективното
отстраняване на перилния препарат.
• За планински, ски и спортни екипи, изработени от
функционални материали, като например спандекс, стреч
и микрофибър.
4 4
2 2
4 4
2 2
4 4
2 2
DARK GARMENT
(ТЪМНО ОБЛЕКЛО)
Опции
Опция Описание
Интензивно
Пред-пране • Добавя предварителен цикъл на пране преди основното пране.
32 Български
WW80K5210VW_DC68-03677L-01_BG.indd 32 2017/7/21 15:48:09
• Отличава се с допълнителни изплаквания и намалено
центрофугиране, които целят прането да се изпере
внимателно и да се изплакне добре.
• За силно замърсено пране. Времето на всеки цикъл е по-дълго от
нормалното.
4 4
Page 93
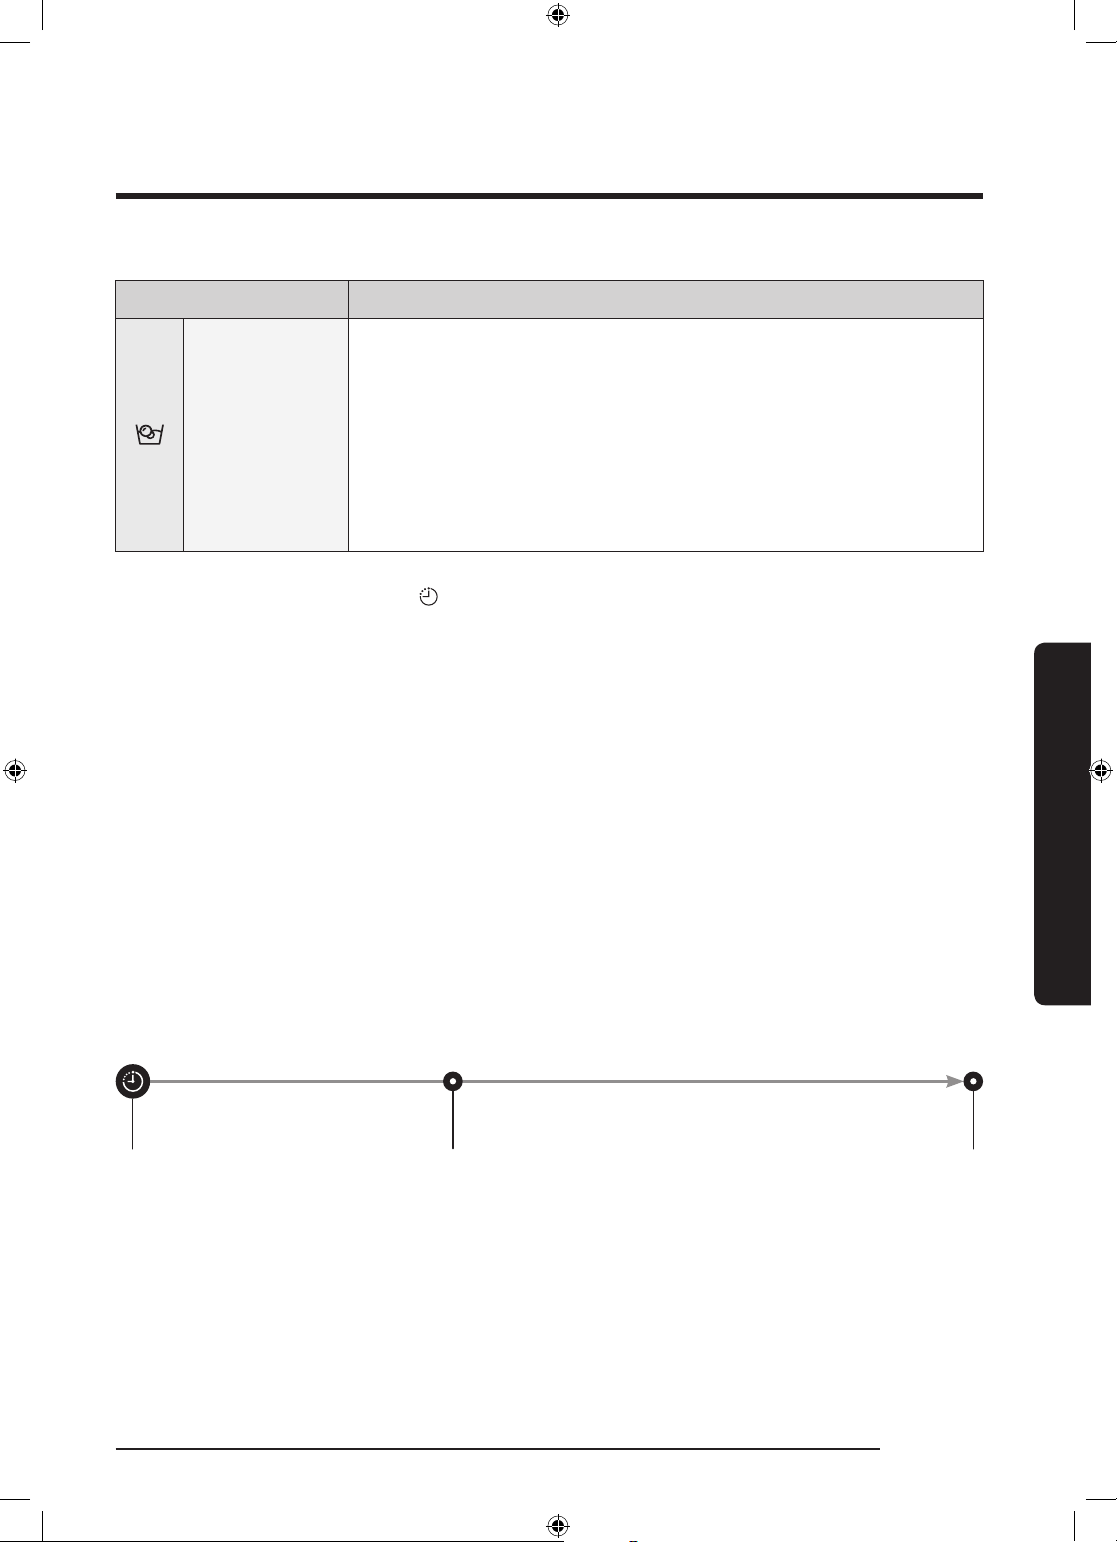
Опция Описание
• Bubble Soak (Накисване с мехурчета) помага за отстраняването на
различни упорити петна.
Bubble Soak
(Накисване с
мехурчета)
• При избрана Bubble Soak (Накисване с мехурчета) прането се кисне добре
във водни мехурчета за ефективно изпиране.
• Bubble Soak (Накисване с мехурчета) е възможна с 5 цикъла и добавя
до 30 минути към тях: COTTON (ПАМУК), SYNTHETICS (СИНТЕТИКА),
BEDDING (СПАЛНО БЕЛЬО), DAILY WASH (ЕЖЕДНЕВНО ПРАНЕ), BABY
CARE (ГРИЖА ЗА ДЕТЕТО).
Delay End (Отложено завършване)
Можете да зададете машината да завърши прането ви автоматично в по-късен момент, като изберете
забавяне от 1(60 минути ) до 24 часа (на стъпки от 1 час). Показаният час означава времето, когато ще бъде
завършен цикъла на пране.
1. Изберете програма. След това променете настройките при необходимост.
2. Натиснете Delay End (Отложено завършване) неколкократно, докато зададете желаното време за
завършване.
3. Натиснете Старт/Пауза.
Съответният индикатор се включва и часовникът започва да отчита.
4. За да отмените Delay End (Отложено завършване), рестартирайте пералната машина с натискане на
Захранване.
Операции
Примерно използване
Желаете да завършите двучасова програма след 3 часа от този момент. За целта добавяте към текущата
програма опцията Delay End (Отложено завършване) с настройка 3 часа и натискате бутона Старт/Пауза в
14:00 часа. Какво се случва тогава? Пералната машина започва работа в 15:00 часа и приключва в 17:00 часа.
По-долу е показана времевата скала за този случай.
14:00 ч.
Задайте отложеното завършване на 3 часа
15:00 ч.
Старт
17:00 ч.
Край
Български 33
WW80K5210VW_DC68-03677L-01_BG.indd 33 2017/7/21 15:48:10
Page 94
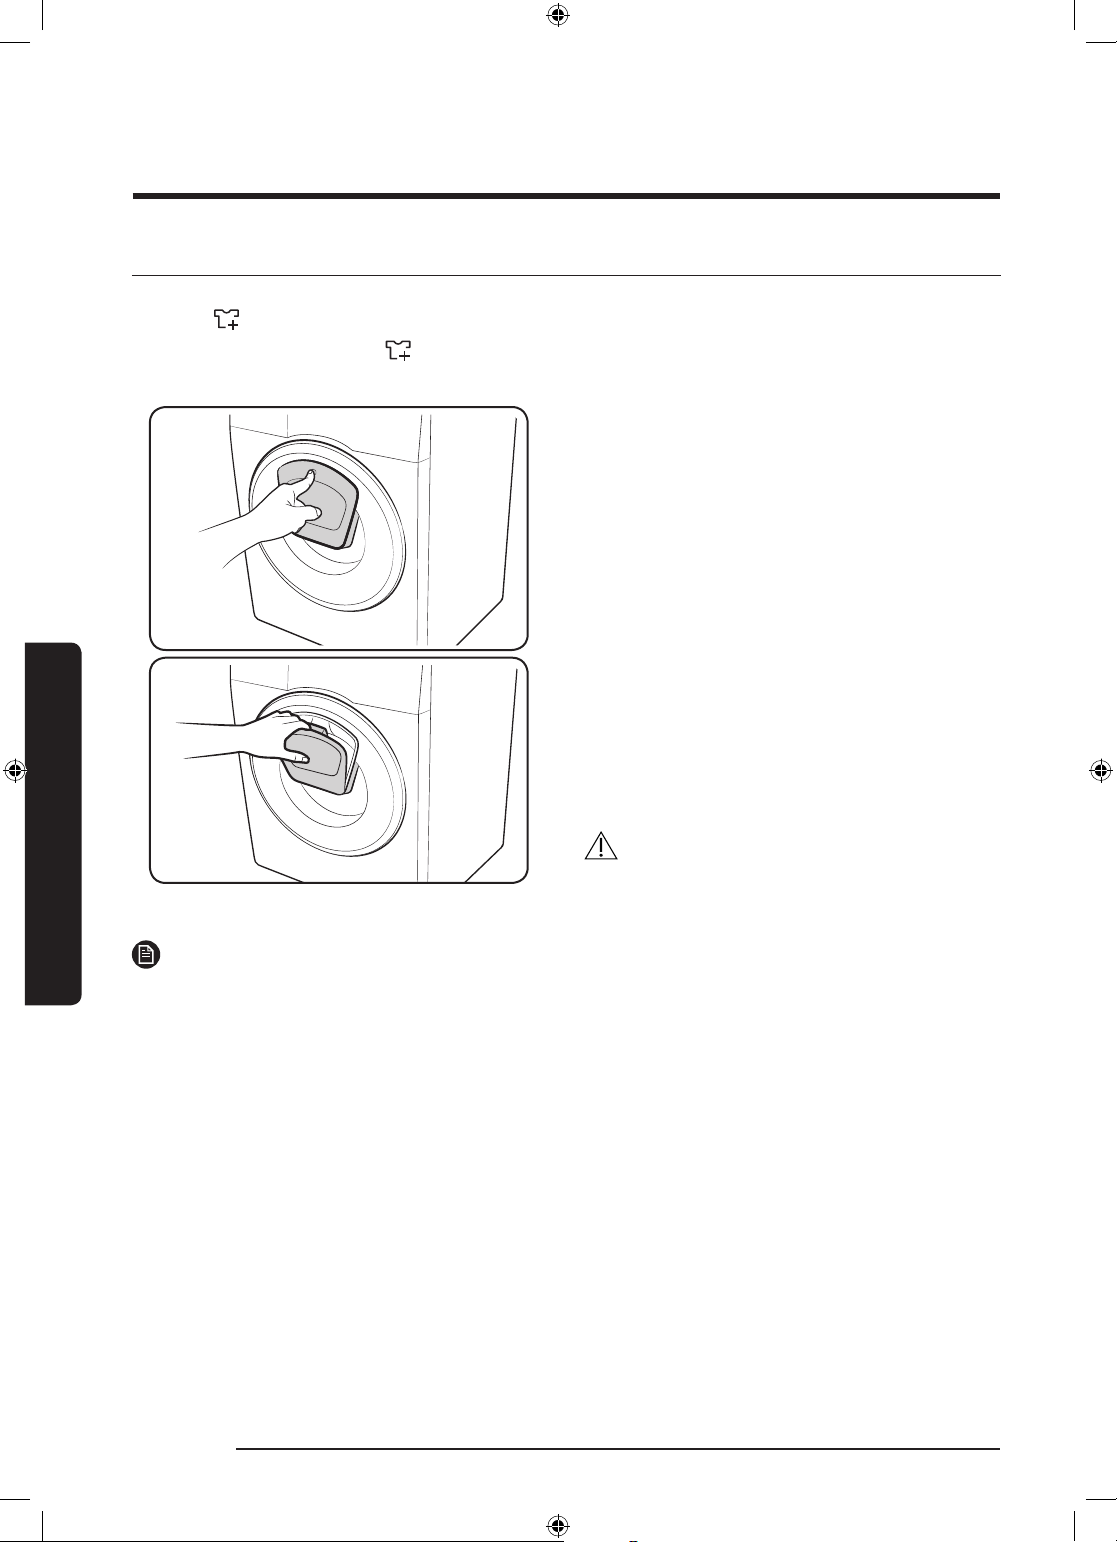
Операции
Специални функции
AddWash
Когато индикаторът за AddWash е включен, можете да спрете работата на пералнята и да поставите
допълнително пране или омекотител в барабана. Add Door се отваря повече от 130° за лесен достъп.
1. Натиснете бутона Старт/Пауза, за да спрете
работата.
2. Натиснете горната част на Add Door, докато
чуете щракване, за да отключите. Издърпайте
дръжката на Add Door, за да отворите.
3. Отворете Add Door и поставете допълнително
пране или омекотител в барабана.
4. Натиснете Add Door, докато чуете щракване, за
да затворите.
5. Натиснете Старт/Пауза, за да подновите
работата.
Операции
Водата в барабана няма да протече, ако Add Door е затворена правилно. Около водата могат да се формират
водни капки, но те няма да протекат от вътрешността на барабана.
ВНИМАНИЕ
НЕ прилагайте прекомерна сила върху Add Door.
Може да се счупи.
ЗАБЕЛЕЖКА
34 Български
WW80K5210VW_DC68-03677L-01_BG.indd 34 2017/7/21 15:48:10
Page 95
ВНИМАНИЕ
• Не отваряйте Add Door, ако в барабана се е образувала пяна, която стига над нивото на Add Door.
• Не се опитвайте да отворите Add Door, докато пералнята работи, без първо да натиснете Старт/Пауза.
Отбележете, че Add Door може да се отвори неволно (без натискане на Старт/Пауза), когато прането
завърши.
• Не добавяйте прекомерно количество пране през Add Door. Качеството на пране може да се влоши.
• Не използвайте долната част на Add Door като дръжка. Пръстите ви могат да бъдат захванати.
• Уверете се, че няма захванато пране в Add Door.
• Дръжте домашните любимци далеч от пералната, особено Add Door.
• Когато перете с гореща вода, може да изглежда, че Add Door пропуска вода при отваряне и затваряне на
Add Door. Това е нормално и се дължи на това, че парата, излизаща от отворената Add Door се охлажда и
кондензира по повърхността.
• Когато Add Door се затвори, вратата се уплътнява и не може да протече вода. Обаче може да забележите
нещо, наподобяващо на протичане на вода около вратата – част от остатъчната вода около Add Door
може да формира водни капки. Това е нормално.
• Нито главната врата, нито Add Door могат да се отварят, когато температурата е над 50 °C. Ако нивото на
водата вътре в барабана е над определено ниво, главната врата не може да се отваря.
• Ако на дисплея се появява информационен код DDC, вижте раздел "Информационни кодове" за
допълнителни инструкции.
Операции
Български 35
WW80K5210VW_DC68-03677L-01_BG.indd 35 2017/7/21 15:48:10
Page 96
Операции
Настройки
Заключване за деца
За да се предотвратя инциденти с деца, Заключване
за деца заключва всички бутони без Захранване.
• За да зададете функцията Заключване за деца,
Ако желаете да добавите перилен препарат или
пране, или да промените текущите настройки,
когато сте в състояние Заключване за деца, първо
трябва да деактивирате функцията Заключване за
деца.
За отмяна на функцията Заключване за деца
Натиснете и задръжте Temp. (Температура) и Rinse
(Изплакване) едновременно за 3 секунди.
Операции
натиснете и задръжте Temp. (Температура)
и Rinse (Изплакване) едновременно за 3
секунди. За да активирате, натиснете Старт/
Пауза.
ЗАБЕЛЕЖКА
Включване/Изключване на звуковата
сигнализация
Можете да включвате и изключвате бутона.
Настройката ще остане активна след рестартиране
на машината.
• За да изключите звука, натиснете едновременно
и задръжте бутоните Rinse (Изплакване) и Spin
(Центрофуга) за 3 секунди.
• За да включите звука, отново натиснете и
задръжте за 3 секунди.
36 Български
WW80K5210VW_DC68-03677L-01_BG.indd 36 2017/7/21 15:48:11
Page 97
Поддръжка
Поддържайте пералната машина чиста, за да предотвратите влошаване на резултатите и да съхраните срока й
на годност.
Eco drum clean (Икономично почистване на барабана)
Изпълнявайте тази програма редовно с цел почистване на барабана и отстраняване на бактериите по него.
1. Натиснете Захранване, за да включите пералната машина.
2. Завъртете Селектора на програми, за да изберете цикъла ECO DRUM CLEAN (ИКОНОМИЧНО
ПОЧИСТВАНЕ НА БАРАБАНА).
3. Натиснете Старт/Пауза.
ЗАБЕЛЕЖКА
Температурата на водата за ECO DRUM CLEAN (ИКОНОМИЧНО ПОЧИСТВАНЕ НА БАРАБАНА) е зададена на 70
°C и тя не може да бъде променена.
Според характеристиките на пералната машина, по време на цикъла за почистване на барабана Eco Drum
Clean (Икономично почистване на барабана), температурата на водата е 70 °C, въпреки че дисплеят на
контролния панел може да показва само 60 °C.
ВНИМАНИЕ
Да не се използват почистващи агенти. Химическите остатъци по барабана влошават качеството на изпиране.
Български 37
Поддръжка
WW80K5210VW_DC68-03677L-01_BG.indd 37 2017/7/21 15:48:11
Page 98
Поддръжка
Smart Check
За да включите тази функция, първо трябва да изтеглите приложението “Samsung Smart Washer” от Play Store
или App Store и да го инсталирате на мобилно устройство с камера.
Функцията Smart Check е оптимизирана за: сериите Galaxy и iPhone (само приложими модели).
1. Натиснете и задръжте едновременно бутоните Spin (Центрофуга) и Options (Опции) за 3 секунди, за да
влезете в режим Smart Check (Интелигентна проверка).
2. Пералната машина започва процедура за самодиагностика и при установяване на проблем показва
информационен код.
3. Включете приложението Samsung Smart Washer на вашето мобилно устройство и натиснете Smart Check.
4. Поставете мобилното устройство близо до дисплея на пералната машина така, че да се „гледат“ взаимно.
Така информационният код ще бъде разпознат автоматично от приложението.
5. Когато информационният код е разпознат правилно, приложението предлага подробна информация за
проблема и приложими противодействия.
ЗАБЕЛЕЖКА
• Режимът Smart Check ще бъде деактивиран веднага щом натиснете бутон или управление след
захранване на машината.
• Възможно е името на функцията, Smart Check, да варира в зависимост от езика.
• Ако дисплеят на пералната машина отразява светлина, възможно е приложението да не може да
разпознае информационния код.
• Ако приложението не може да разпознае кода на Smart Check последователно, въведете
информационния код ръчно на екрана на приложението.
Поддръжка
38 Български
WW80K5210VW_DC68-03677L-01_BG.indd 38 2017/7/21 15:48:11
Page 99
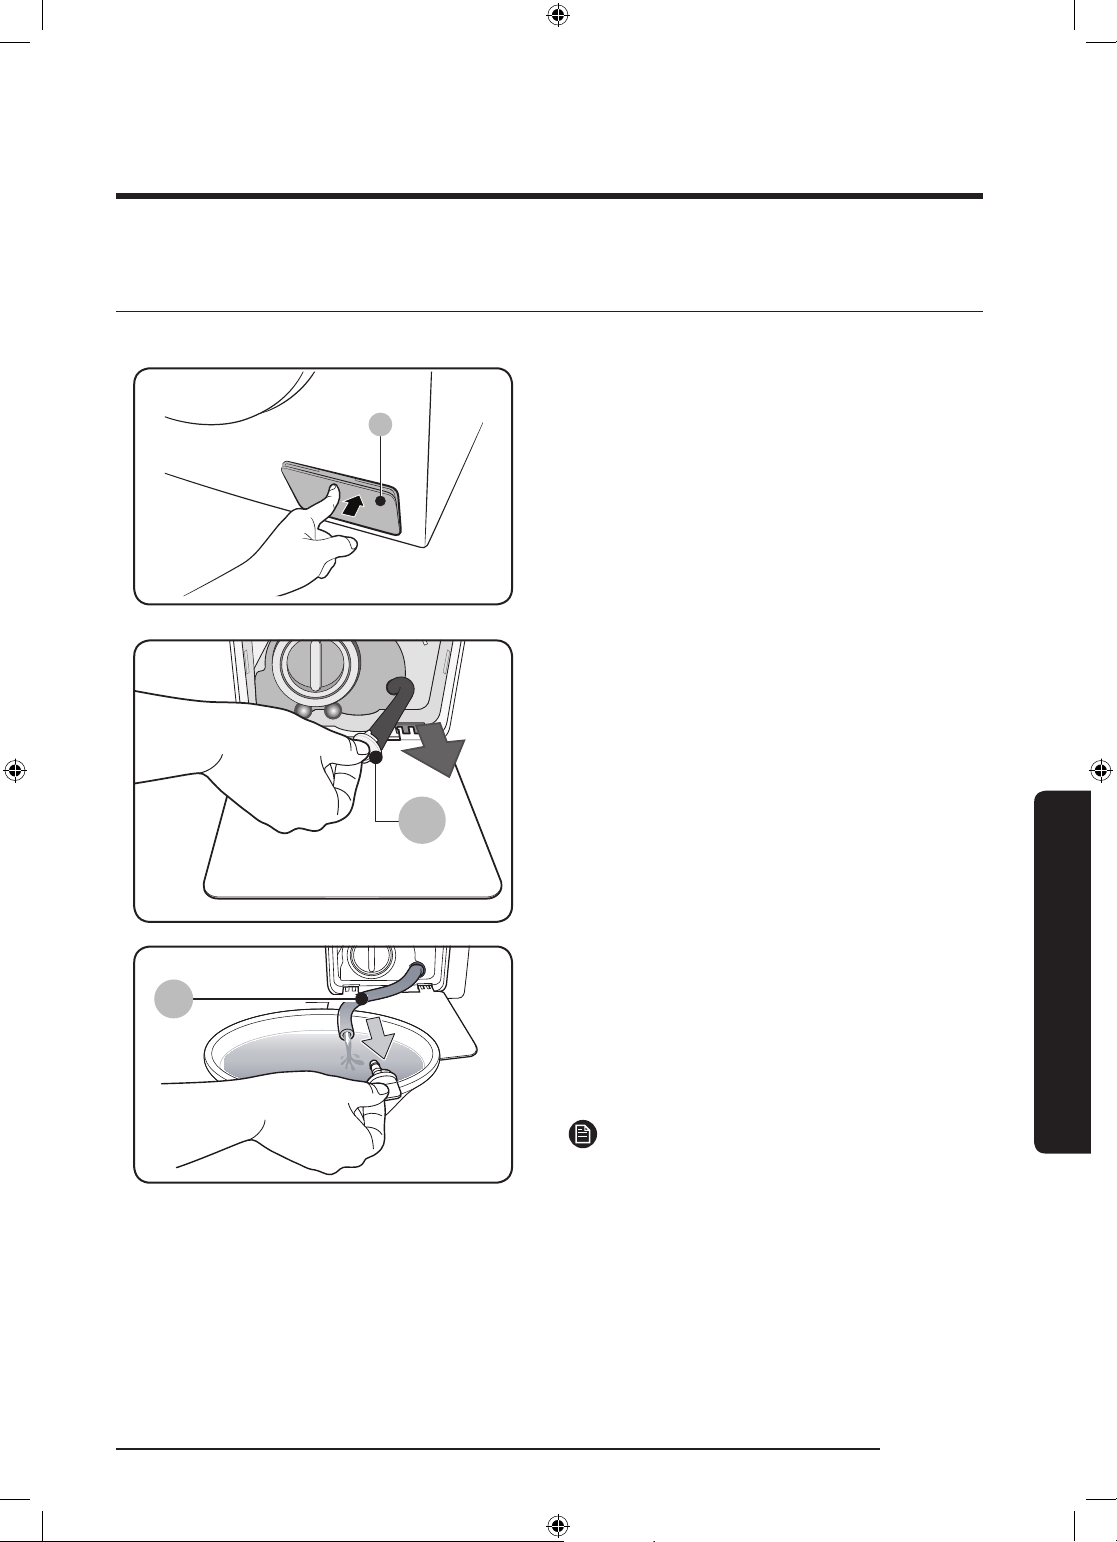
Аварийно източване
A
B
C
В случай на неизправност на захранването източете водата от барабана преди да извадите прането.
1. Изключете захранването на пералната машина
и извадете кабела й от мрежовия контакт.
2. Леко натиснете горната част на капака на
филтъра (А), за да го отворите.
3. Поставете празен, широк съд около капака и
изтеглете маркуча за аварийно източване до
съда, придържайки капачката на маркуча (B).
Поддръжка
4. Отворете капачката на маркуча и оставете
водата в маркуча за аварийно източване (C) да
тече в съда.
5. Когато приключите, затворете капачката на
маркуча и го върнете на мястото му. След това
затворете капака на филтъра.
ЗАБЕЛЕЖКА
Използвайте широк съд, защото водата в барабана
може да бъде повече от очакваното.
Български 39
WW80K5210VW_DC68-03677L-01_BG.indd 39 2017/7/21 15:48:12
Page 100
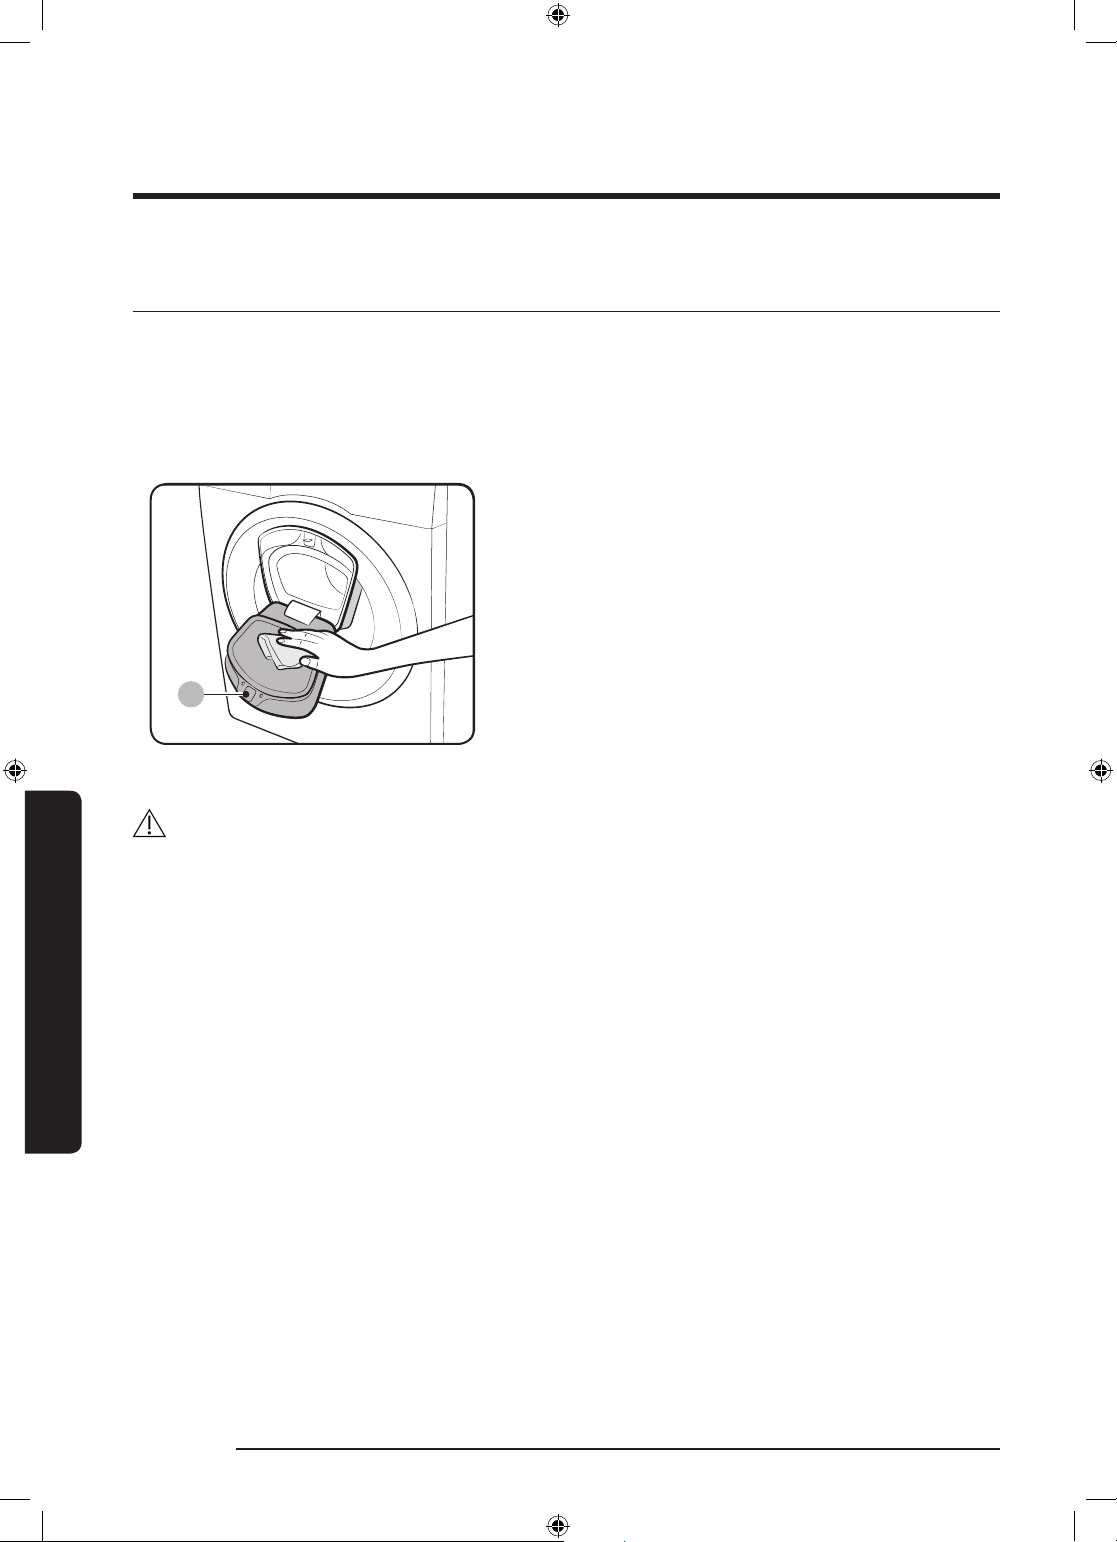
Поддръжка
A
Почистване
Повърхност на пералната машина
Използвайте мека кърпа с неабразивен домакински измиващ препарат. Не пръскайте вода по пералната
машина.
Add Door
1. Отворете Add Door.
2. Използвайте влажна кърпа, за да почистите Add
Door.
- Не използвайте почистващи препарати. Може
да възникне обезцветяване.
- Внимавайте, когато почиствате гумената
подложка и заключващия механизъм (A).
- Избърсвайте редовно праха от областта на
вратата.
3. Избършете и затворете Add Door, докато чуете
щракване.
ВНИМАНИЕ
• Не прилагайте сила върху Add Door. Може да се счупи.
• Не оставяйте Add Door отворена, докато машината работи.
• Никога не поставяйте тежки предмети върху Add Door.
• За да предотвратите телесни повреди, не пипайте Add Door, докато барабанът се върти.
• Не отваряйте Add Door, докато машината работи. Това може да причини телесна повреда.
Поддръжка
• Не работете с панела с функции, докато Add Door е отворена. Това може да причини телесни повреди или
неизправност на системата.
• Не слагайте вътре други предмети освен пране.
• Не слагайте обемни неща в барабана през Add Door.
• Не дърпайте гумената подложка на Add Door при почистване. Това може да причини повреда.
40 Български
WW80K5210VW_DC68-03677L-01_BG.indd 40 2017/7/21 15:48:12
 Loading...