

Page 1
Washer
User manual
WW22N6850Q*
WW22N6850QX_DC68-03645B_EN.indd 1 2018/3/1 9:37:17
Page 2
Contents
Contents
Safety information 4
What you need to know about the safety instructions 4
Important safety symbols 4
Important safety precautions 5
Critical installation warnings 6
Installation cautions 7
Critical usage warnings 8
Usage cautions 10
Critical cleaning warnings 13
Regulatory Notice 14
Installation 16
What’s included 16
Installation requirements 18
Step-by-step installation 22
Before you start 28
Initial settings 28
Laundry guidelines 28
Detergent drawer guidelines 30
Operations 33
Feature panel 33
Simple steps to start 35
Cycle overview 36
Special features 39
Maintenance 45
SELF CLEAN 45
Smart Care
Emergency drain 47
Cleaning 48
Recovery from freezing 51
Care against an extended time of disuse 51
Cleaning the exterior 52
Cleaning the interior 52
46
English2
WW22N6850QX_DC68-03645B_EN.indd 2 2018/3/1 9:37:18
Page 3
Troubleshooting 53
Checkpoints 53
Information codes 57
Specications 59
Fabric care chart 59
Protecting the environment 60
Declaration of conformity 60
Specication sheet 61
Cycle chart 62
Contents
English 3
WW22N6850QX_DC68-03645B_EN.indd 3 2018/3/1 9:37:18
Page 4

SAVE THESE INSTRUCTIONS
Safety information
Congratulations on your new Samsung washer. This manual contains important
information on the installation, use and care of your appliance. Please take some time to
read this manual to take full advantage of your washer’s many benets and features.
Safety information
What you need to know about the safety instructions
Please read this manual thoroughly to ensure that you know how to safely and efciently
operate the extensive features and functions of your new appliance. Please store the
manual in a safe location close to the appliance for future reference. Use this appliance
only for its intended purpose as described in this instruction manual.
Warnings and Important Safety Instructions in this manual do not cover all possible
conditions and situations that may occur. It is your responsibility to use common sense,
caution, and care when installing, maintaining and operating your washer.
Because the following operating instructions cover various models, the characteristics of
your washer may differ slightly from those described in this manual and not all warning
signs may be applicable. If you have any questions or concerns, contact your nearest
service center or nd help and information online at www.samsung.com.
Important safety symbols
What the icons and signs in this user manual mean:
WARNING
Hazards or unsafe practices that may result in severe personal injury, death and/or
property damage.
CAUTION
Hazards or unsafe practices that may result in personal injury and/or property damage.
NOTE
Indicates that a risk of personal injury or material damage exists.
These warning signs are here to prevent injury to yourself and others.
Please follow them explicitly.
After reading this manual, store it in a safe place for future reference.
Read all instructions before using the appliance.
As with any equipment that uses electricity and moving parts, potential hazards exist.
To safely operate this appliance, familiarize yourself with its operation and exercise care
when using it.
English4
WW22N6850QX_DC68-03645B_EN.indd 4 2018/3/1 9:37:18
Page 5
SAVE THESE INSTRUCTIONSSAVE THESE INSTRUCTIONS
Important safety precautions
WARNING
To reduce the risk of re, electric shock, or injury to persons
when using your appliance, follow basic precautions, including the
following:
1. Read all instructions before using the appliance.
2. Do not wash or dry articles that have been previously cleaned in, washed in, soaked
in, or spotted with gasoline, dry-cleaning solvents, other ammable or explosive
substances as they give off vapors that could ignite or explode.
3. Do not allow children to play on or in the appliance. Close supervision of children is
necessary when the appliance is used near children.
4. Before the appliance is removed from service or discarded, remove the door to the
washing or drying compartment.
5. Do not reach into the appliance if the drum is moving.
6. Do not install or store this appliance where it will be exposed to the weather.
7. Do not tamper with controls.
8. Do not repair or replace any part of the appliance or attempt any servicing unless
specically recommended in the user-maintenance instructions or in published user
repair instructions that you understand and have the skills to carry out.
Safety information
9. Do not add gasoline, dry-cleaning solvents, or other ammable or explosive substances
to the wash water. These substances give off vapors that could ignite or explode.
10. Under certain conditions, hydrogen gas may be produced in a hot water system
that has not been used for 2 weeks or more. HYDROGEN GAS IS EXPLOSIVE. If the
hot water system has not been used for such a period, before using a washer or
combination washer-dryer, turn on all hot water faucets and let the water ow from
each for several minutes. This will release any accumulated hydrogen gas. As the gas
is ammable, do not smoke or use an open ame during this time.
English 5
WW22N6850QX_DC68-03645B_EN.indd 5 2018/3/1 9:37:18
Page 6

SAVE THESE INSTRUCTIONS
Safety information
SAVE THESE INSTRUCTIONS
Critical installation warnings
Safety information
State of California Proposition 65 Warnings (US only)
This product contains chemicals known to the State of California to
cause cancer and birth defects or other reproductive harm.
The installation of this appliance must be performed by a qualied technician or service
company.
• Failure to do so may result in electric shock, re, an explosion, problems with the
product, or injury.
The appliance is heavy, therefore take care when lifting it.
Plug the power cord into a wall socket that meets local electrical specications. Use the
socket for this appliance only, and do not use an extension cord.
• Sharing a wall socket with other appliances, using a power strip, or extending the
power cord may result in electric shock or re.
• Ensure that the voltage, frequency, and current supplied to the washer matches those
listed in the product specications. Failure to do so may result in electric shock or re.
Plug the power plug into the wall socket rmly.
Remove all foreign substances such as dust or water from the power plug terminals and
contact points using a dry cloth on a regular basis.
• Unplug the power plug and clean it with a dry cloth.
• Failure to do so may result in electric shock or re.
Plug the power plug into the wall socket so that the cord is running towards the oor.
• If you plug the power plug into the socket in the opposite direction, the electric wires
within the cable may be damaged and this may result in electric shock or re.
Keep all packaging materials out of the reach of children as these may be dangerous.
• If a child places a plastic bag over his or her head, he or she can suffocate.
If the appliance, power plug, or power cord is damaged, contact your nearest Samsung
service center for service.
This appliance must be properly grounded.
Do not ground the appliance to a gas pipe, plastic water pipe, or telephone line.
• This may result in electric shock, re, an explosion, or problems with the product.
English6
WW22N6850QX_DC68-03645B_EN.indd 6 2018/3/1 9:37:18
Page 7

SAVE THESE INSTRUCTIONSSAVE THESE INSTRUCTIONS
• Never plug the power cord into a socket that is not grounded correctly. Make sure that
the socket is in accord with local and national regulations.
Do not install this appliance near a heater or any ammable material.
Do not install this appliance in a humid, oily or dusty location, or in a location exposed to
direct sunlight or water (rain drops).
Do not install this appliance in a location exposed to low temperatures.
• Frost may cause the tubes to burst.
Do not install this appliance in a location where gas may leak.
• This may result in electric shock or re.
Do not use an electric transformer to power the washer.
• This may result in electric shock or re.
Do not use a damaged power plug, damaged power cord, or loose wall socket.
• This may result in electric shock or re.
Do not pull or bend the power cord excessively.
Do not twist or tie the power cord.
Do not hook the power cord over a metal object, place a heavy object on the power cord,
insert the power cord between objects, or push the power cord into the space behind the
appliance.
• This may result in electric shock or re.
Safety information
Do not pull the power cord when unplugging the power plug.
• Unplug the power plug by pulling the plug.
• Failure to do so may result in electric shock or re.
This appliance should be positioned so that the power plug, the water supply taps, and the
drain pipes are accessible.
Installation cautions
CAUTION
This appliance should be positioned in such a way that the power plug is easily accessible.
• Failure to do so may result in electric shock or re due to electric leakage.
English 7
WW22N6850QX_DC68-03645B_EN.indd 7 2018/3/1 9:37:18
Page 8
SAVE THESE INSTRUCTIONS
Safety information
SAVE THESE INSTRUCTIONS
Install your appliance on a solid, level oor that can support its weight.
Safety information
• Failure to do so may result in abnormal vibrations, movement, noise, or problems with
the product.
Critical usage warnings
WARNING
If the appliance is ooded, turn off the water and power supplies immediately and contact
your nearest Samsung service center.
• Do not touch the power plug with wet hands.
• Failure to do so may result in electric shock.
If the appliance generates a strange noise, a burning smell, or smoke, unplug the power
plug immediately and contact your nearest Samsung service center.
• Failure to do so may result in electric shock or re.
In the event of a gas leak (such as propane gas, LP gas, etc.), ventilate the room
immediately without touching the power plug. Do not touch the appliance or power cord.
• Do not use a ventilating fan. Do not turn on a light.
• A spark may result in an explosion or re.
Do not let children play in or on the washer. In addition, when disposing of the appliance,
remove the washer door lever.
• Children can suffocate to death if trapped inside the product.
Make sure to remove the packaging (sponge, styrofoam) attached to the bottom of the
washer before using it.
Do not wash items contaminated with gasoline, kerosene, benzene, paint thinner, alcohol
or other inammable or explosive substances in the washer.
• This may result in electric shock, re, or an explosion.
Do not open the washer door by force while it is operating (high-temperature washing/
drying/spinning).
• Water owing out of the washer may result in burns or cause the oor to be slippery.
This may result in injury.
• Opening the door by force may result in damage to the product or injury.
Do not insert your hand under the washer while an operation is in progress.
• This may result in injury.
English8
WW22N6850QX_DC68-03645B_EN.indd 8 2018/3/1 9:37:18
Page 9

SAVE THESE INSTRUCTIONSSAVE THESE INSTRUCTIONS
Do not touch the power plug with wet hands.
• This may result in electric shock.
Do not turn the appliance off by unplugging the power plug while an operation is in
progress.
• Plugging the power plug into the wall socket again may cause a spark and result in
electric shock or re.
Do not let children or the inrm use this washer without proper supervision. Do not let
children climb in or onto the appliance.
• This may result in electric shock, burns, or injury.
Do not insert your hand or a metal object under the washer while it is operating.
• This may result in injury.
Do not unplug the appliance by pulling the power cord. Always grip the plug rmly and
pull it straight out of the outlet.
• Damage to the power cord may cause a short-circuit, re, and/or electric shock.
Do not attempt to repair, disassemble, or modify the appliance yourself.
• Do not use a fuse (such as copper, steel wire, etc.) other than a standard fuse.
• If the appliance needs to be repaired or reinstalled, contact your nearest Samsung
service center.
• Failure to do so may result in electric shock, re, problems with the product, or injury.
Safety information
If the water supply hose comes loose from the faucet and oods the appliance, unplug the
power plug.
• Failure to do so may result in electric shock or re.
Unplug the power plug when the appliance is not being used for long periods of time or
during a thunder or lightning storm.
• Failure to do so may result in electric shock or re.
If any foreign substance enters the appliance, unplug the power plug and contact your
nearest Samsung service center.
• This may result in electric shock or re.
English 9
WW22N6850QX_DC68-03645B_EN.indd 9 2018/3/1 9:37:18
Page 10

SAVE THESE INSTRUCTIONS
Safety information
SAVE THESE INSTRUCTIONS
Do not let children (or pets) play in or on your washer. The washer door does not open
Safety information
easily from the inside and children may be seriously injured if trapped inside.
Usage cautions
CAUTION
If the washer is contaminated by a foreign substance such as detergent, dirt, food waste,
etc., unplug the power plug and clean the washer using a damp, soft cloth.
• Failure to do so may result in discoloration, deformation, damage, or rust.
The front glass may be broken by a strong impact. Take care when using the washer.
• If the glass is broken, it may result in injury.
After a water supply failure or when reconnecting the water supply hose, open the faucet
slowly.
Open the faucet slowly after a long period of non-use.
• The air pressure in the water supply hose or the water pipe may damage a product
part or result in a water leak.
If a draining error occurs during an operation, check if there is a draining problem.
• If the washer is used when it is ooded because of a draining problem, it may result in
electric shock or re.
Insert the laundry into the washer completely so that the laundry does not get caught in
the door.
• If laundry gets caught in the door, it may result in damage to the laundry or the
washer, or result in a water leak.
Turn the water supply off when the washer is not being used.
• Ensure that the water supply hose connectors are properly tightened.
Ensure that the rubber seal and front door glass are not contaminated by a foreign
substance (e.g. waste, thread, hair, etc.).
• If a foreign substance is caught in the door or the door is not completely closed, it may
cause a water leak.
English10
WW22N6850QX_DC68-03645B_EN.indd 10 2018/3/1 9:37:18
Page 11

SAVE THESE INSTRUCTIONSSAVE THESE INSTRUCTIONS
Open the faucet and check if the water supply hose connectors are rmly tightened and
that there are no water leaks before using the product.
• If the connectors on the water supply hoses connector are loose, it may result in a
water leak.
The product you have purchased is designed for domestic use only.
Using the product for business purposes qualies as product misuse. If the product is used
for business purposes, the product will not be covered by the standard warranty provided
by Samsung and no responsibility can be attributed to Samsung for malfunctions or
damages resulting from such misuse.
Do not stand on the appliance or place objects (such as laundry, lighted candles, lighted
cigarettes, dishes, chemicals, metal objects, etc.) on the appliance.
• This may result in electric shock, re, problems with the product, or injury.
Do not spray volatile material such as insecticide onto the surface of the appliance.
• As well as being harmful to humans, this may result in electric shock, re, or problems
with the product.
Do not place objects that generate electromagnetic elds near the washer.
• This may result in injury due to a malfunction.
Water drained during a high-temperature wash or drying cycle is hot. Do not touch the
water.
• This may result in burns or injury.
Safety information
Do not wash, spin, or dry water-proof seats, mats, or clothing (*) unless your appliance has
a special cycle for washing these items.
(*): Woollen bedding, rain covers, shing vests, ski pants, sleeping bags, diaper covers,
sweat suits, and bicycle, motor cycle and car covers, etc.
• Do not wash thick or hard mats even if the washer mark is on the care label. This may
result in injury or damage to the washer, walls, oor, or clothing due to abnormal
vibrations.
• Do not wash throw rugs or doormats with rubber backing. The rubber backing may
come off and stick to inside the drum, and this may result in a malfunction such as a
drainage error.
Do not operate the washer when the detergent drawer is removed.
• This may result in electric shock or injury due to a water leak.
English 11
WW22N6850QX_DC68-03645B_EN.indd 11 2018/3/1 9:37:18
Page 12

SAVE THESE INSTRUCTIONS
Safety information
SAVE THESE INSTRUCTIONS
Do not touch the insides of the drum during or just after drying as it is hot.
Safety information
• This may result in burns.
Do not insert your hand into the detergent drawer.
• This may result in injury as your hand may be caught by the detergent input device.
• Do not use the liquid detergent container (on applicable models only) for powdered
detergent. Remove the container and put powdered detergent directly into the Main
wash compartment.
Do not place any objects (such as shoes, food waste, animals) other than laundry into the
washer.
• This may result in damage to the washer, or injury and death in the case of pets due to
abnormal vibrations.
Do not press the buttons using sharp objects such as pins, knifes, ngernails, etc.
• This may result in electric shock or injury.
Do not wash laundry contaminated by oils, creams, or lotions usually found in skincare
shops or massage clinics.
• This may cause the rubber seal to become deformed and result in a water leak.
Do not leave metal objects such as safety pins or hair pins in the drum for long periods of
time. Do not leave bleach in the drum for long periods of time.
• Doing either may cause the drum to rust.
• If rust starts appearing on the surface of the drum, apply a (neutral) cleansing agent to
the surface and use a sponge to clean it. Never use a metal brush.
Do not use dry cleaning detergent directly and do not wash, rinse, or spin laundry
contaminated by dry cleaning detergent.
• This may result in spontaneous combustion or ignition due to the heat from the
oxidation of the oil.
Do not use water from water cooling/heating devices.
• This may result in problems with the washer.
Do not use natural hand-washing soap in the washer.
• If it hardens and accumulates inside the washer, it may result in problems with the
product, discoloration, rust, or bad odours.
English12
WW22N6850QX_DC68-03645B_EN.indd 12 2018/3/1 9:37:18
Page 13
SAVE THESE INSTRUCTIONSSAVE THESE INSTRUCTIONS
Place socks and brassieres in a washing net and wash them with the other laundry.
Do not wash large laundry items such as bedding in the washing net.
• Failure to do so may result in injury due to abnormal vibrations.
Do not use hardened detergent.
• If it accumulates inside the washer, it may result in a water leak.
Make sure that the pockets of all the clothing items to be washed are empty.
• Hard, sharp objects such as coins, safety pins, nails, screws, or stones can cause
extensive damage to the appliance.
Do not wash clothing with large buckles, buttons, or other heavy metal objects in the
washer.
Sort the laundry by color on the basis of its colorfastness and select the recommended
cycle, water temperature, and additional functions.
• Failure to do this may result in discoloration or fabric damage.
Take care that children’s ngers are not caught in the door when you close it.
• Failure to do so may result in injury.
Critical cleaning warnings
WARNING
Safety information
Do not clean the appliance by spraying water directly onto it.
Do not use a strong acidic cleaning agent.
Do not use benzene, thinner, or alcohol to clean the appliance.
• This may result in discoloration, deformation, damage, electric shock, or re.
Before cleaning the washer or performing maintenance, unplug the appliance from the
wall socket.
• Failure to do so may result in electric shock or re.
English 13
WW22N6850QX_DC68-03645B_EN.indd 13 2018/3/1 9:37:18
Page 14

SAVE THESE INSTRUCTIONS
Safety information
SAVE THESE INSTRUCTIONS
Regulatory Notice
Safety information
1. FCC Notice
FCC CAUTION:
CAUTION
Any changes or modications not expressly approved by the party responsible for
compliance could void the user’s authority to operate the equipment.
This device complies with Part 15 of FCC Rules. Operation is Subject to following two
conditions:
1. This device may not cause harmful interference, and
2. This device must accept any interference received including interference that cause
undesired operation.
For product available in the USA/Canada market, only channel 1~11 can be operated.
Selection of other channels is not possible.
FCC STATEMENT:
This equipment has been tested and found to comply within the limits for a Class B
digital device, pursuant to part 15 of the FCC Rules. These limits are designed to provide
reasonable protection against harmful interference in a residential installation.
This equipment generates, uses, and can radiate radio frequency energy and, if not
installed and used in accordance with the instructions, may cause harmful interference
to radio communications. However, there is no guarantee that interference will not occur
in a particular installation. If this equipment does cause harmful interference to radio or
television reception, which can be determined by turning the equipment off and on, the
user is encouraged to try to correct the interference by one or more of the following
measures:
• Reorient or relocate the receiving antenna
• Increase the separation between the equipment and receiver
• Connect the equipment into an outlet on a different circuit from that to which the
receiver is connected
• Consult the dealer or an experienced radio/TV technician for help.
FCC RADIATION EXPOSURE STATEMENT:
This equipment complies with FCC radiation exposure limits set forth for an uncontrolled
environment. This equipment should be installed and operated with a minimum distance
of 20cm between the radiator and your body. This device and its antenna(s) must not be
co-located or operation in conjunction with any other antenna or transmitter.
English14
WW22N6850QX_DC68-03645B_EN.indd 14 2018/3/1 9:37:18
Page 15

SAVE THESE INSTRUCTIONSSAVE THESE INSTRUCTIONS
2. IC Notice
The term “IC” before the radio certication number only signies that Industry Canada
technical
specications were met. Operation is subject to the following two conditions: (1) this
device may not cause interference, and (2) this device must accept any interference,
including interference that may cause undesired operation of the device.
This Class B digital apparatus complies with Canadian ICES-003.
Cet appareil numérique de la classe B est conforme á la norme NMB-003 du Canada.
For product available in the USA/Canada market, only channel 1~11 can be operated.
Selection of other channels is not possible.
IC RADIATION EXPOSURE STATEMENT:
This equipment complies with IC RSS-102 radiation exposure limits set forth for an
uncontrolled environment. This equipment should be installed and operated with minimum
distance 20cm between the radiator & your body. This device and its antenna(s) must not
be co-located or operation in conjunction with any other antenna or transmitter.
Open Source License Notice
This device uses open source software. Open Source Licenses are available on the product
menu.
Safety information
Tap “Settings > Network > Software Update > Legal Information” on the device for more
details.
English 15
WW22N6850QX_DC68-03645B_EN.indd 15 2018/3/1 9:37:18
Page 16
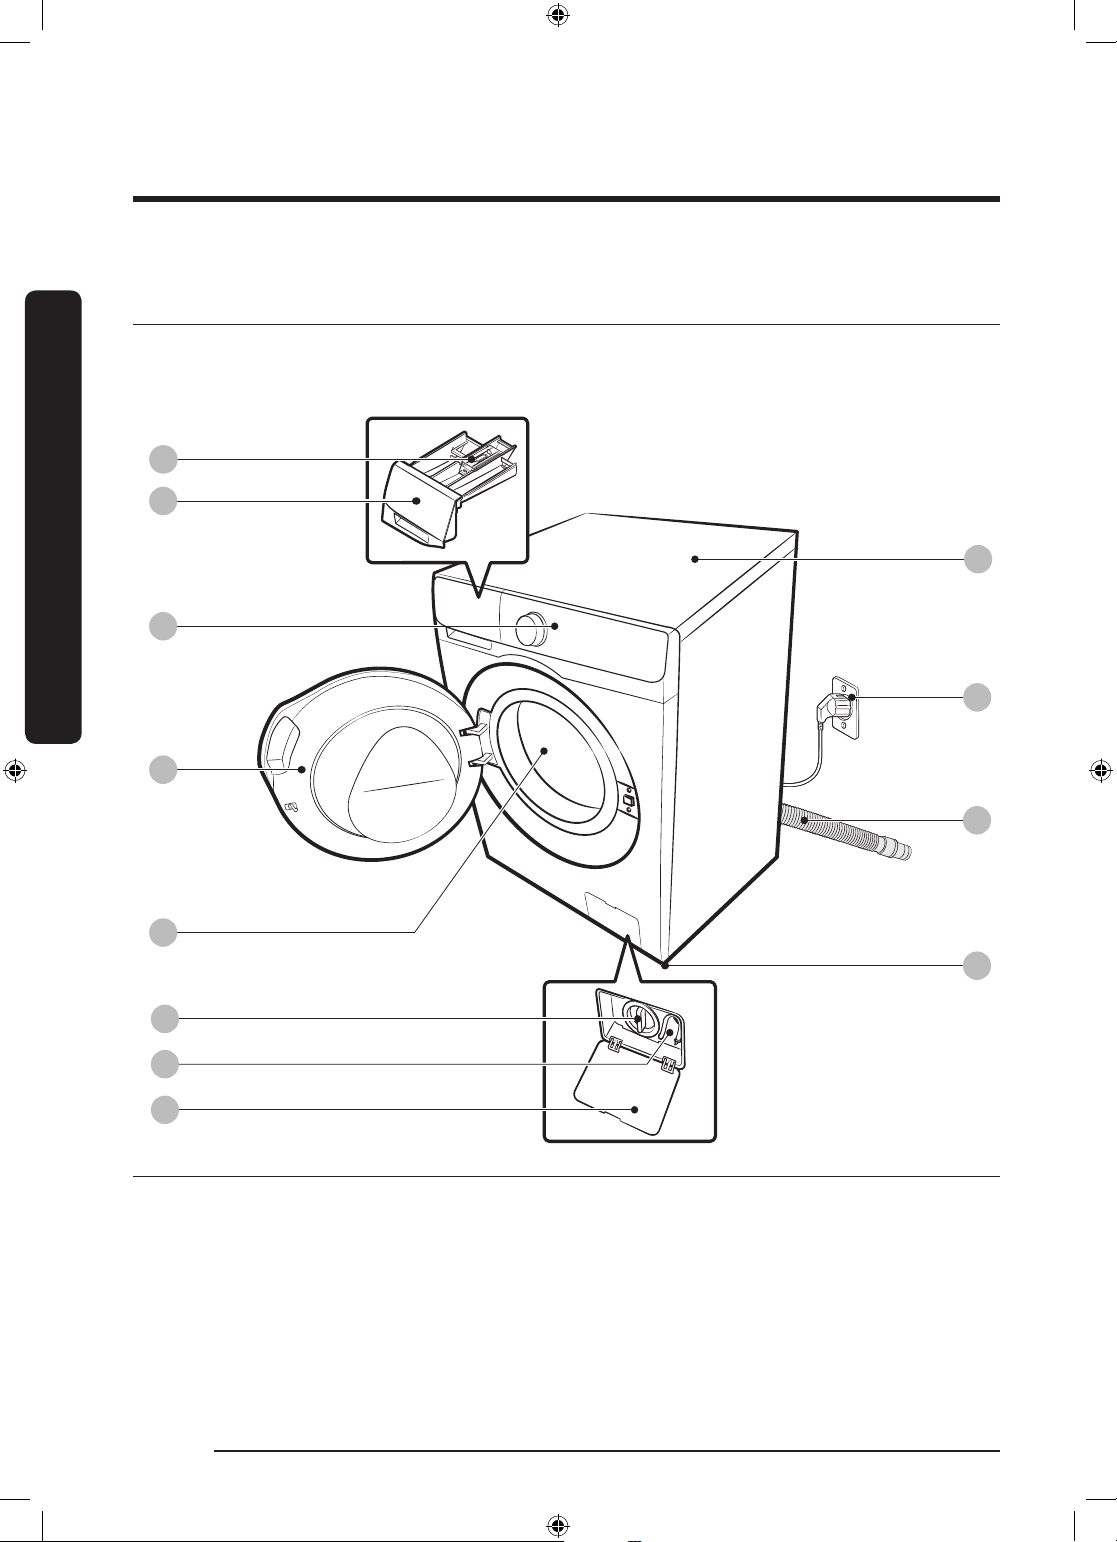
Installation
12
06
08
07
01
02
03
04
05
10
09
11
Follow these instructions carefully to ensure proper installation of the washer and to
prevent accidents when doing laundry.
What’s included
Make sure all the parts are included in the product package. If you have a problem with
the washer or the parts, contact a local Samsung customer center or your retailer.
Installation
01 Release lever 02 Detergent drawer 03 Control panel
04 Door 05 Drum 06 Pump lter
07 Emergency drain tube 08 Filter cover 09 Worktop
10 Power plug 11 Drain hose 12 Levelling feet
* The design of the drawer and/or the lever differs with the model.
WW22N6850QX_DC68-03645B_EN.indd 16 2018/3/1 9:37:19
English16
Page 17
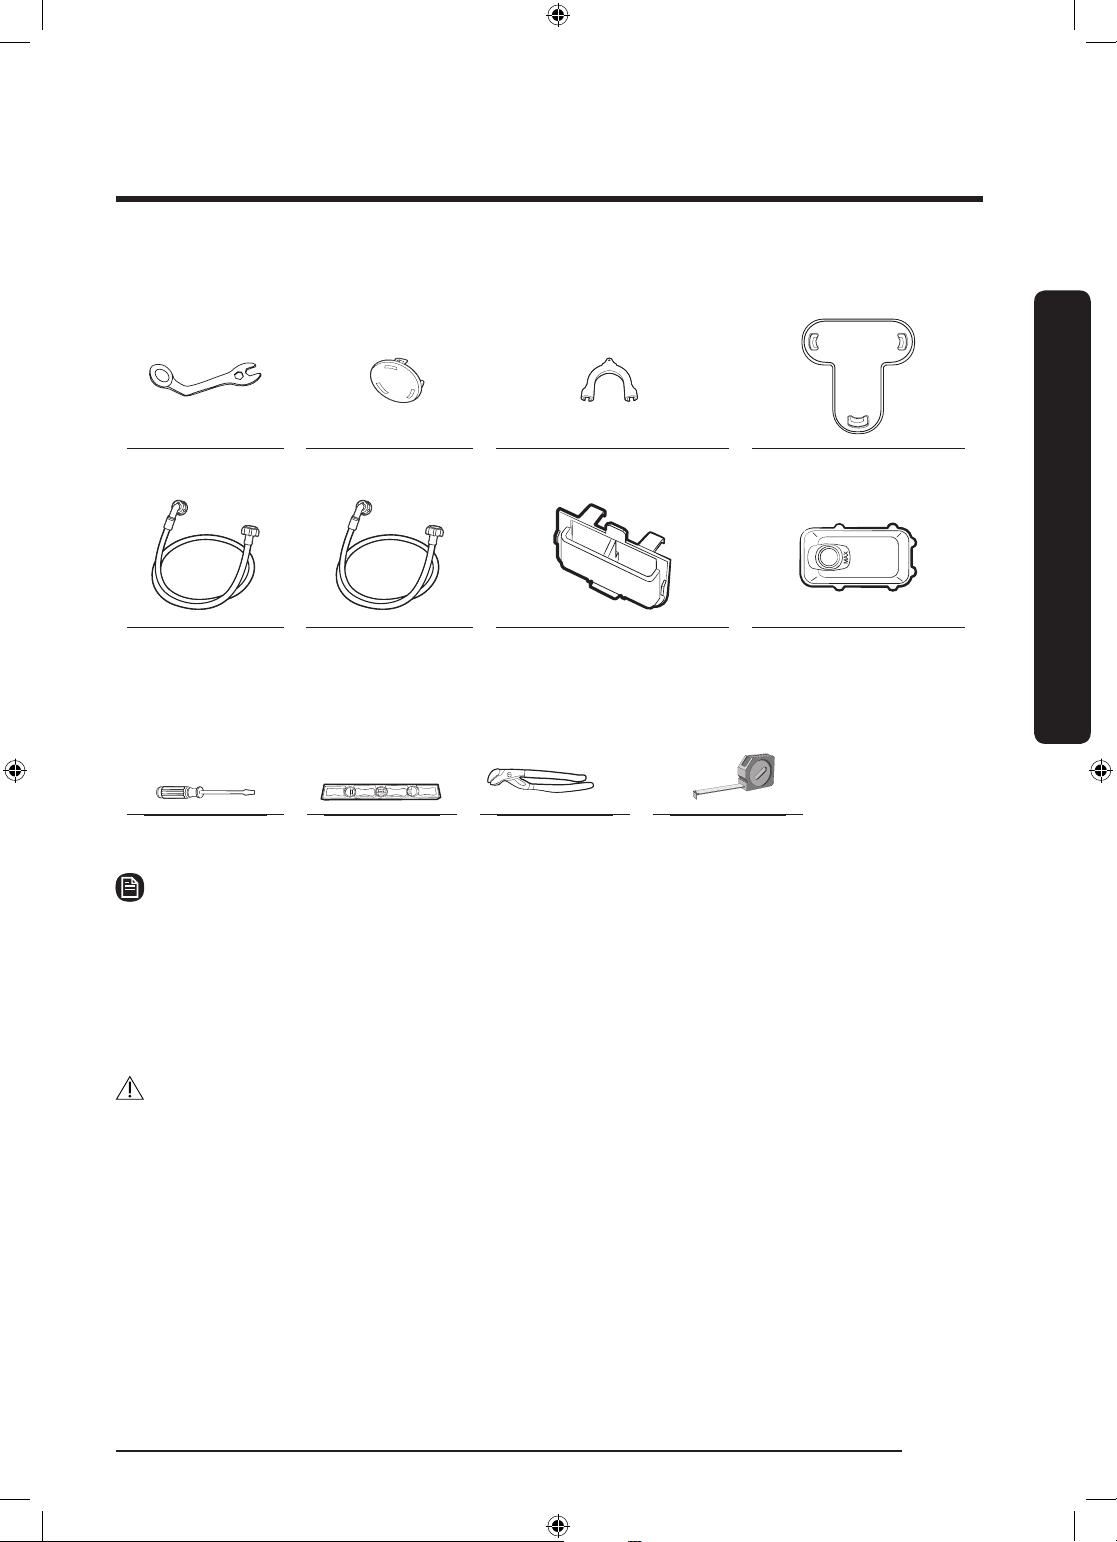
Parts supplied
Spanner Bolt caps Hose guide Cap Fixer
Cold water hose Hot water hose Liquid detergent guide
(applicable models only)
Liquid detergent
guide
Tools needed for installation
Philips screwdriver Level Adjustable Plier Measuring tape
NOTE
• Bolt caps: The provided number (3 to 6) of bolt caps depends on the model.
• The appearance of the machine and provided accessories may differ with the model.
• To purchase an accessory or lost part, contact a local Samsung service center, Samsung
Customer Care, or your retailer.
• Hot water hose: Applicable models only.
• Liquid detergent guide: Applicable models only.
CAUTION
• Do not reuse old water hoses, which may leak or burst, causing ooding and/or
property damage.
• Make sure rubber washers are inserted in each coupling of the water hose.
Installation
English 17
WW22N6850QX_DC68-03645B_EN.indd 17 2018/3/1 9:37:20
Page 18
Installation
Installation requirements
Electrical supply and grounding
• AC 120 V / 60 Hz fuse or circuit breaker is required.
• Use an individual branch circuit. Connect only the washer to the circuit.
To ensure proper grounding, the washer comes with a power cord featuring a three-prong
Installation
grounding plug for use in a properly installed and grounded outlet.
Check with a qualied electrician or service person if you are not sure about the
grounding.
Do not modify the provided plug. If it does not t the outlet, call a qualied electrician to
install a proper outlet.
• Do NOT use an extension cord.
• Use only the power cord that comes with the washer.
• Do NOT connect the ground wire to plastic plumbing, gas lines, or hot water pipes.
• Improperly connected grounding conductors may cause electric shock.
• To prevent unnecessary risk of re, electrical shock, or personal injury, all wiring and
WARNING
grounding must be done in accordance with local codes, or in the absence of local
codes, in accordance with the National Electrical Code, ANSI/ NFPA No. 70-Latest
Revision (for the U.S.) or the Canadian Electrical Code CSA C22.1 – Latest Revisions
and local codes and ordinances. It is your responsibility to provide adequate electrical
service for your washer.
Water supply
Proper water pressure for this washer is between 20-116 psi (137-800 kPa). Water
pressure less than 20 psi (137 kPa) may cause the water valve not to close completely. Or,
it may take longer to ll the drum, causing the washer to turn off. Faucets must be within
4 feet (122 cm) from the rear of the washer so that the provided inlet hoses reach the
washer.
To reduce the risk of leaks:
• Make sure faucets are easily accessible.
• Turn off the taps when the washer is not in use.
• Check for any leaks at the water inlet hose ttings on a regular basis.
CAUTION
Before using the washer for the rst time, check all connections at the water valve and
taps for any leaks.
Drain
Samsung recommends a standpipe 18 in (46 cm) high. The drain hose must be connected
through the hose clip to the standpipe, and the standpipe must fully cover the drain hose.
English18
WW22N6850QX_DC68-03645B_EN.indd 18 2018/3/1 9:37:20
Page 19
Flooring
For best performance, the washer must be installed on a solid oor. Wood oors may
need to be reinforced to minimize vibration and/or unbalanced loads. Carpeting and soft
tile surfaces do not provide good resistance to vibrations and may cause the washer to
move slightly during the spin cycle.
CAUTION
Do NOT install the washer on a platform or a poorly supported structure.
Water temperature
Do not install the washer in areas where water may freeze as the washer always retains
some water in its water valves, pumps, and/or hoses. Frozen water left in the connection
parts may cause damage to belts, the pump, and other components of the washer.
Alcove or closet installation
Minimum clearance for stable operation:
Sides 1 in. (25 mm)
Top 17 in. (432 mm)
Rear 5.9 in. (150 mm)
Front 2 in. (51 mm)
If both the washer and a dryer are installed in the same location, the front of the alcove or
closet must have at least a 72 in² (465 cm²) unobstructed air opening. Your washer alone
does not require a specic air opening.
Installation
Undercounter installation
A
B
C
D
A 33.9 in. (860 mm) C 23.6 in. (600 mm)
B 1 in. (25 mm) D 1 in. (25 mm)
English 19
WW22N6850QX_DC68-03645B_EN.indd 19 2018/3/1 9:37:20
Page 20
Installation
Side by side installation
Installation
*This clearance is not applicable to standalone washers.
A
A
B B
C
A
E
D
F
A* 1 in. (25 mm) D 27.1 in. (688 mm)
B 23.6 in. (600 mm) E 3 in. (76 mm)
C 17 in. (432 mm) F 3 in. (76 mm)
English20
WW22N6850QX_DC68-03645B_EN.indd 20 2018/3/1 9:37:20
Page 21
Stacked installation (Model: SK-DH)
A
B
E
I
Installation
F
C
D
H J K
LG
A 3 in. (76 mm) G 1 in. (25 mm)
B 48 in². (310 mm²) H 23.6 in. (600 mm)
C 24 in². (155 mm²) I 5.5 in. (140 mm)
D 3 in. (76 mm) J 3 in.(76mm)
E 6 in. (152 mm) K 27.1 in. (688 mm)
F 67 in. (1702 mm) L 5.9 in. (150 mm)
WARNING
• Samsung’s washers and dryers can be stacked to maximize usable space.
• The dryer legs need to be removed to stack the washer and dryer. You can purchase an
optional stacking kit from your Samsung retailer.
English 21
WW22N6850QX_DC68-03645B_EN.indd 21 2018/3/1 9:37:20
Page 22
Installation
Step-by-step installation
STEP 1 Select a location
Location requirements:
• A solid, level surface without carpeting or ooring that may obstruct ventilation
• No direct sunlight
Installation
• Adequate room for ventilation and wiring
• Ambient temperature always higher than the freezing point (32 ˚F/0 ˚C)
• Away from heat sources
STEP 2 Remove the shipping bolts
Unpack the product package and remove
all shipping bolts.
1. Loosen all shipping bolts on the rear of
the machine using the spanner.
NOTE
An adjustable wrench or 10 mm openend wrench is required for removing
the shipping bolts.
2. Fill the holes with the supplied plastic
bolt caps.
Keep the shipping bolts for future use.
WARNING
Packaging materials can be dangerous to children. Dispose all packaging material (plastic
bags, polystyrene, etc.) out of children’s reach.
English22
WW22N6850QX_DC68-03645B_EN.indd 22 2018/3/1 9:37:20
Page 23
STEP 3 Adjust the levelling feet
STEP 4 Connect the water hose
A
1. Gently slide the washer into position.
Excessive force may damage the
levelling feet.
2. Level the washer by manually adjusting
the levelling feet.
Installation
3. When levelling is complete, tighten the
nuts using the spanner.
NOTE
An adjustable wrench or 17 mm openend wrench is required to loosen or
tighten the leveling feet.
CAUTION
• Make sure you use a new water hose,
and there are rubber gaskets (B) inside
the couplings (A) at either end of the
water hose. A water hose without the
gasket may leak.
• If there is a water leak, stop using the
washer and contact a local Samsung
B
service center. A water leak may cause
electric shock.
• Do not stretch the water hose by force.
If the hose is too short, replace the hose
with a longer, high-pressure hose.
• To prevent leaks, make sure both water
hoses are not bent or kinked. A water
leak may cause electric shock.
English 23
WW22N6850QX_DC68-03645B_EN.indd 23 2018/3/1 9:37:21
Page 24
Installation
Installation
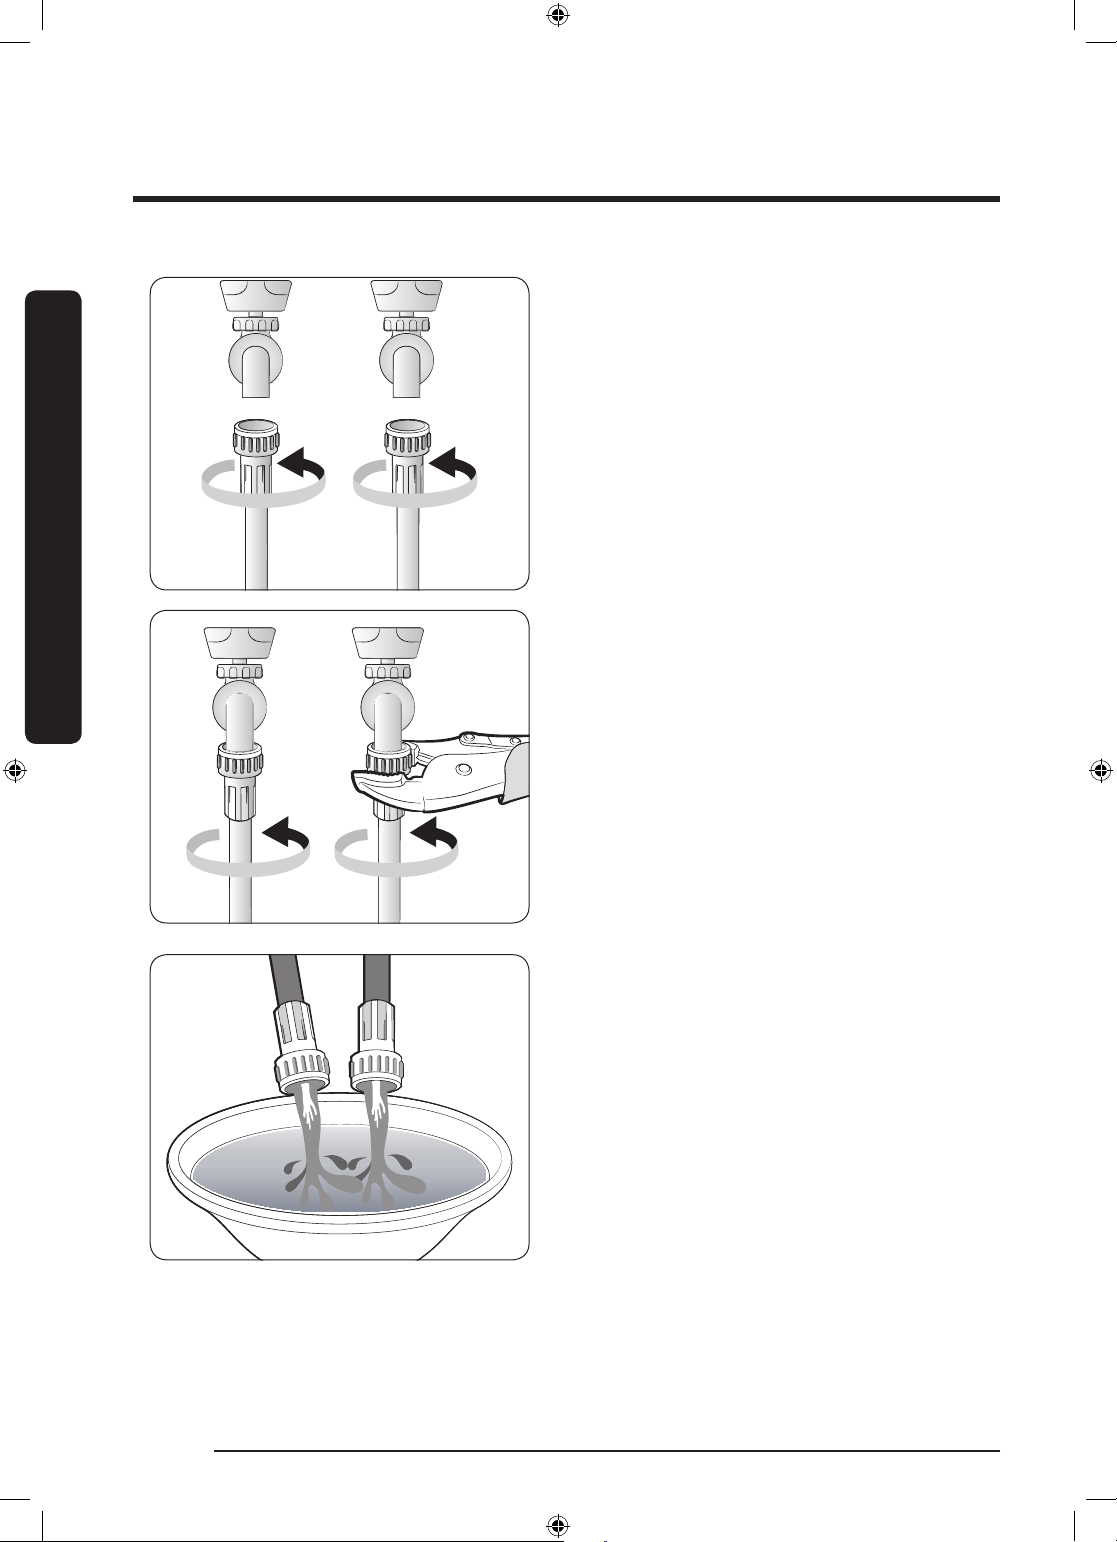
To connect the water hoses to the faucets:
1. Connect one end of each water hose to
the Hot or Cold tap.
2. Turn the ttings by hand until they are
tight, and then tighten them by just an
additional two-thirds of a turn with a
plier. Do not overtighten the ttings.
You can damage them.
3. When done, pull the water hoses up
and down to check if they are properly
connected.
4. Put the other ends of the hoses into
a bucket and open the taps for 10-15
seconds to remove impurities. When
done, close the taps.
English24
WW22N6850QX_DC68-03645B_EN.indd 24 2018/3/1 9:37:21
Page 25
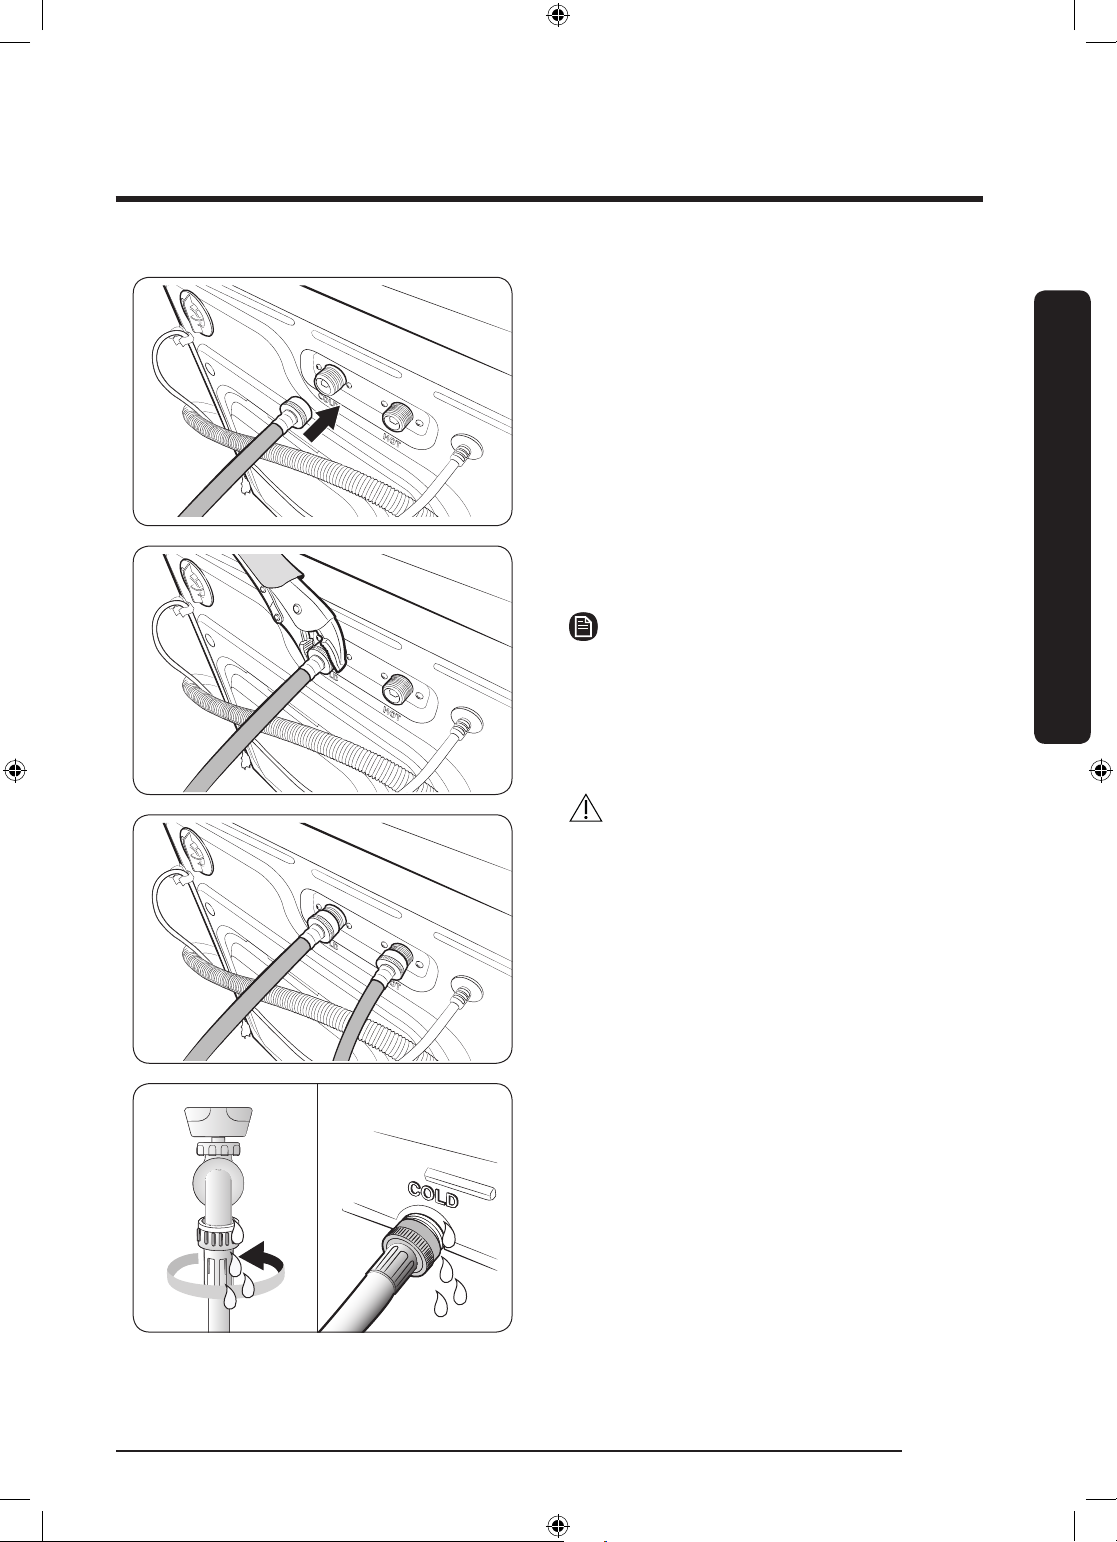
5. Connect the other ends of the water
hoses to the corresponding inlets on the
rear of the machine as specied. Make
sure the hot water hose is connected to
the hot inlet, and the cold water hose to
the cold inlet.
6. Repeat step 2 above on the other
ttings. Make sure both water hoses
are connected properly. See the ‘4C’
information code for troubleshooting.
7. Open both faucets, and check if there is
a leak.
NOTE
If you do not want to use the hot water
hose, insert the inlet cap into the hot water
inlet. In this case, you must select Tap Cold
for the water temperature. All other water
indicators turn off.
CAUTION
To prevent water hoses from being bent or
kinked, make sure there is at least a 6 inch
(150 mm) space between the washer and
the rear wall.
Installation
English 25
WW22N6850QX_DC68-03645B_EN.indd 25 2018/3/1 9:37:21
Page 26
Installation
AA
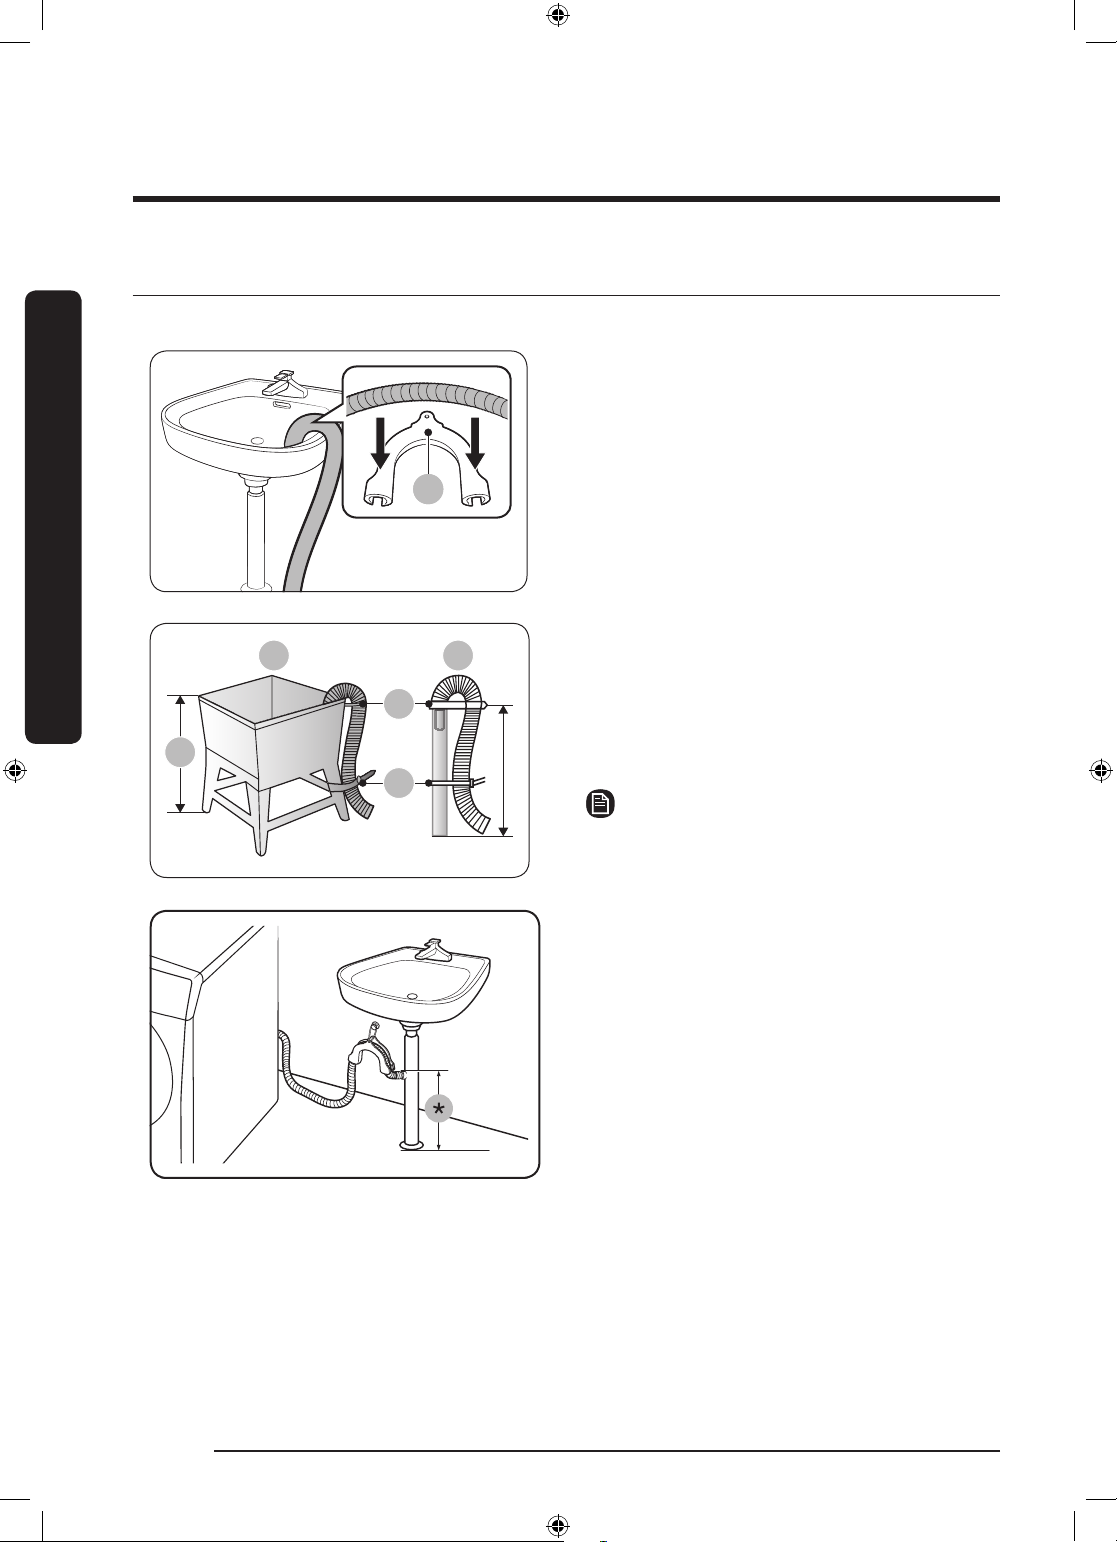
STEP 5 Position the drain hose
The drain hose can be positioned in three ways:
Installation
Over the edge of a wash basin
The drain hose must be placed at a height
of between 24 in. (60 cm) and 35 in.
(90 cm) from the oor. To keep the spout
of the drain hose bent, use the supplied
plastic hose guide (A). Secure the guide
to the wall using a hook to ensure stable
drainage.
ln a standpipe or laundry tub
B C
D
*
E
The laundry tub (B) or standpipe (C) must
be no shorter than 18 in. (46 cm) and no
higher or longer than 96 inches (245 cm).
Make sure the drain hose and the
standpipe are not airtight.
NOTE
D: Hose retainer / E: Tie straps
In a sink drain pipe branch
The drain pipe branch mush be above the
sink siphone so that the end of the hose is
at least 24 in. (60 cm) above the ground.
(*) : 24 in. (60 cm)
English26
WW22N6850QX_DC68-03645B_EN.indd 26 2018/3/1 9:37:22
Page 27
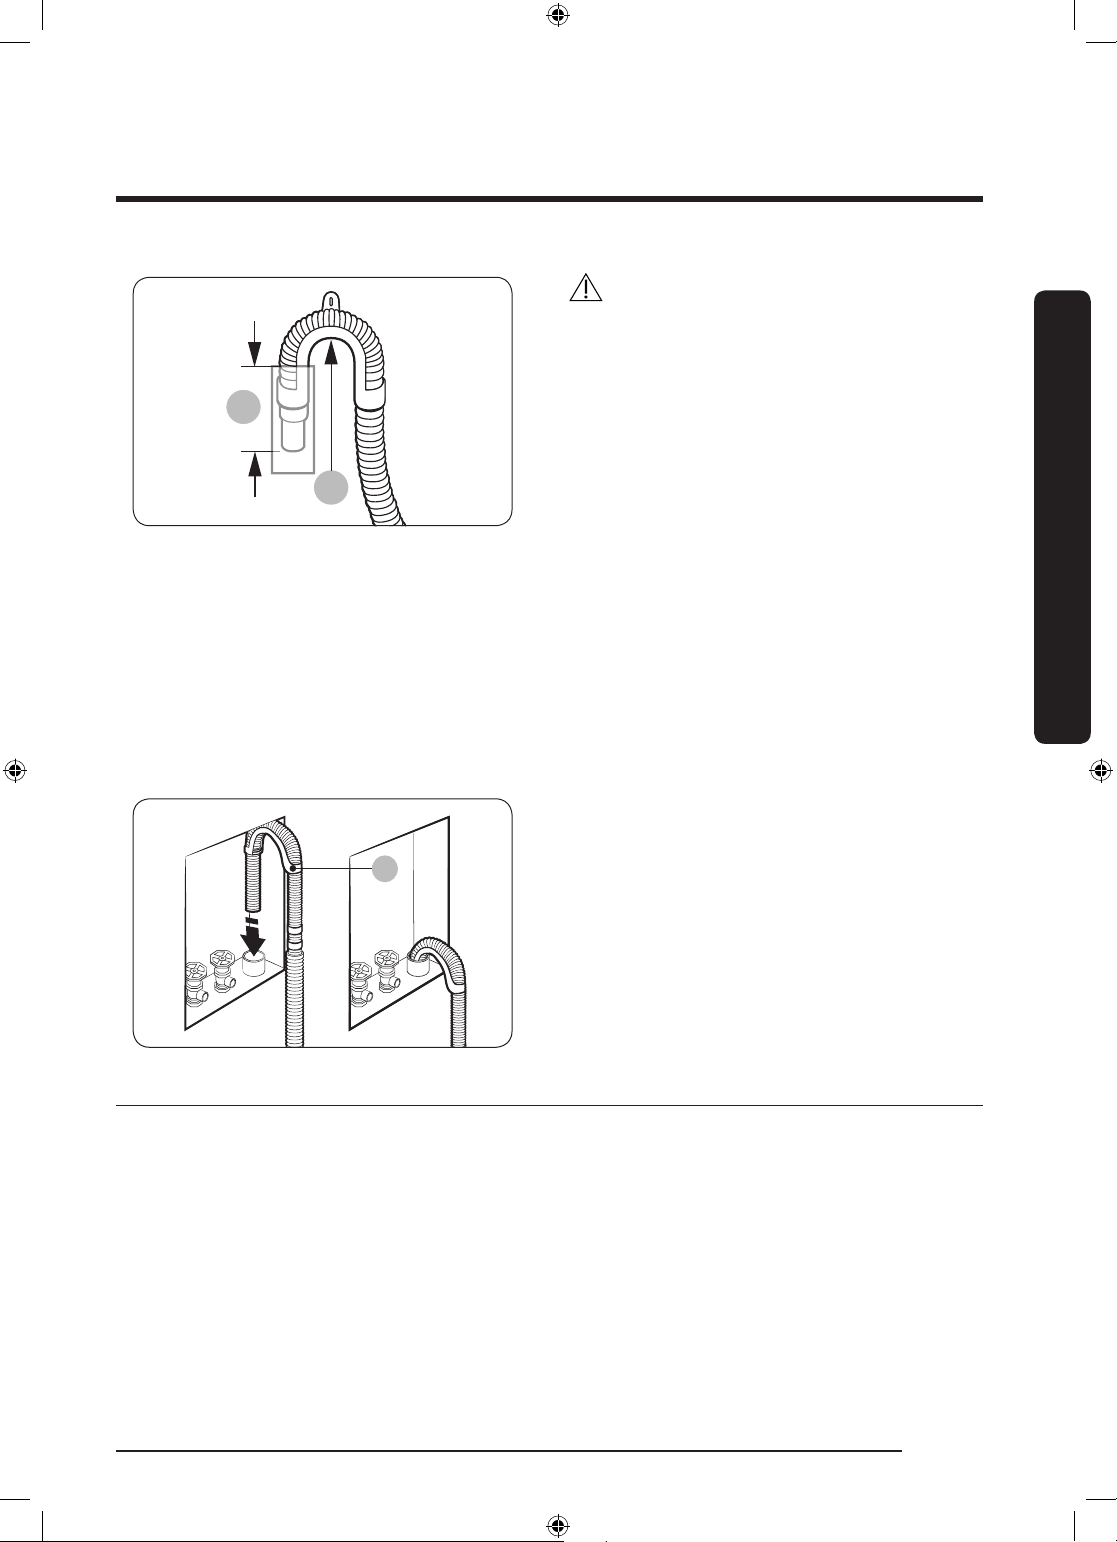
*
A
CAUTION
A
• Connect the hose guide (A) within 6 in.
(15 cm)* of the end of the drain hose.
If the drain hose is extended beyond
the end of the hose guide, mold or
microorganisms could spread inside the
washer.
• The drain hose can be installed up to
96 in. (245 cm) high, but the draining
capability can be reduced at the
maximum height. Water remaining in
the drain system may cause an odour.
• If the drain hose is installed less than
18 in. (46 cm) high, water can be
drained during the process due to a
siphon phenomenon. If this happens, a
‘4C’ information code appears on the
display.
Wall standpipe drain system
The drain hose must be placed into a wall
standpipe drain system. To keep the end of
the drain hose bent, use the supplied hose
guide (A). Secure the guide to the wall
using a hook to ensure stable drainage.
Installation
STEP 6 Power on
Plug the power cord into an AC 120 V / 60 Hz approved electrical outlet protected by a
fuse or circuit breaker. Then, press Power to turn on the washer.
WW22N6850QX_DC68-03645B_EN.indd 27 2018/3/1 9:37:22
English 27
Page 28
Before you start
Initial settings
Run Calibration (recommended)
Calibration ensures accurate weight
detection by the washer. Make sure the
drum is empty before running Calibration.
1. Press Power to turn on the washer.
2. Press and hold Temp. and Delay End
Before you start
simultaneously for 3 seconds.
Laundry guidelines
STEP 1 Sort
Sort the laundry according to these
criteria:
• Care Label: Sort the laundry into
cottons, mixed bres, synthetics, silks,
wools, and rayon.
• Color: Separate whites from colors.
• Size: Mixing different sized items
together in the drum improves the
washing performance.
• Sensitivity: Wash delicate items
separately for pure, new woollen items,
curtains, and silk items. Check the labels
on the items.
NOTE
Make sure to check the care label on all
clothing, and sort clothing accordingly
before starting the wash.
STEP 2 Empty pockets
Empty all the pockets of your laundry
items
• Metal objects such as coins, pins, and
buckles on clothing may damage other
laundry items as well as the drum.
3. Press Start/Pause to start Calibration.
- The door is locked during the
operation.
- The drum keeps rotating clockwise
and anticlockwise for several
minutes.
4. When complete, the washer turns off
automatically.
Turn clothing with buttons and
embroideries inside out
• If pants or jacket zippers are open while
washing, the drum may be damaged.
Zippers should be closed and xed with
a string.
• Clothing with long strings may become
entangled with other clothes. Make sure
to tie the strings before starting the
wash.
STEP 3 Use a laundry net
• Brassieres (water washable) must be
placed in a laundry net. Metal parts of
the brassieres may break through and
tear other laundry items.
• Small, light clothing such as socks,
gloves, stockings, and handkerchiefs
may become caught around the door.
Place them inside a ne laundry net.
• Do not wash the laundry net by itself
without other laundry. This may cause
abnormal vibrations that could move
the washer and result in injury.
English28
WW22N6850QX_DC68-03645B_EN.indd 28 2018/3/1 9:37:22
Page 29
STEP 4 Prewash (if necessary)
Select the Prewash option for the selected
cycle if the laundry is heavily soiled. Do
not use the Prewash option if you will be
adding detergent manually to the drum.
STEP 5 Determine the load capacity
Do not overload the washer. Overloading
may cause the washer to wash improperly.
• Do not use detergent that tends to be
hardened or solidied. This detergent
may remain after the rinse cycle,
blocking the drain outlet.
CAUTION
When washing wool using the WOOL,
use only a neutral liquid detergent. If used
with WOOL, powder detergent may remain
on the laundry and discolor the laundry.
NOTE
When washing bedding or bedding
covers, the wash time may be lengthened
or the spin efciency may be reduced.
For bedding or bedding covers, the
recommended maximum spin level is “Low
or Medium Spin”, and the load capacity is
3.0 kg or less.
CAUTION
If the laundry is unbalanced and the “Ub”
information code is displayed, redistribute
the load. Unbalanced laundry may reduce
the spinning performance.
STEP 6 Add the correct detergent
type
The type of detergent depends on the
type of fabric (cotton, synthetic, delicate
items, wool), color, wash temperature, and
degree of soiling. Always use “low suds”
HE laundry detergent which is designed
for automatic washers.
NOTE
• Follow the detergent manufacturer’s
recommendations based on the weight
of the laundry, the degree of soiling,
and the hardness of the water in your
local area. If you are not sure about the
water hardness, contact a local water
authority.
Use HE detergent only
Your washer is designed to use high
efciency (HE) detergents.
• For the best cleaning results, use a high
efciency detergent such as Tide HE,
Wisk HE, Cheer HE or Gain HE*. High
efciency detergents contain suds
suppressors that reduce or eliminate
suds. When fewer suds are produced,
the load tumbles more efciently and
cleaning is maximized. (* Brand names
are trademarks of their respective
manufacturers.)
WARNING
Regular detergent is not recommended.
Use HE detergents only.
Before you start
English 29
WW22N6850QX_DC68-03645B_EN.indd 29 2018/3/1 9:37:22
Page 30
Before you start
1
2
A
3
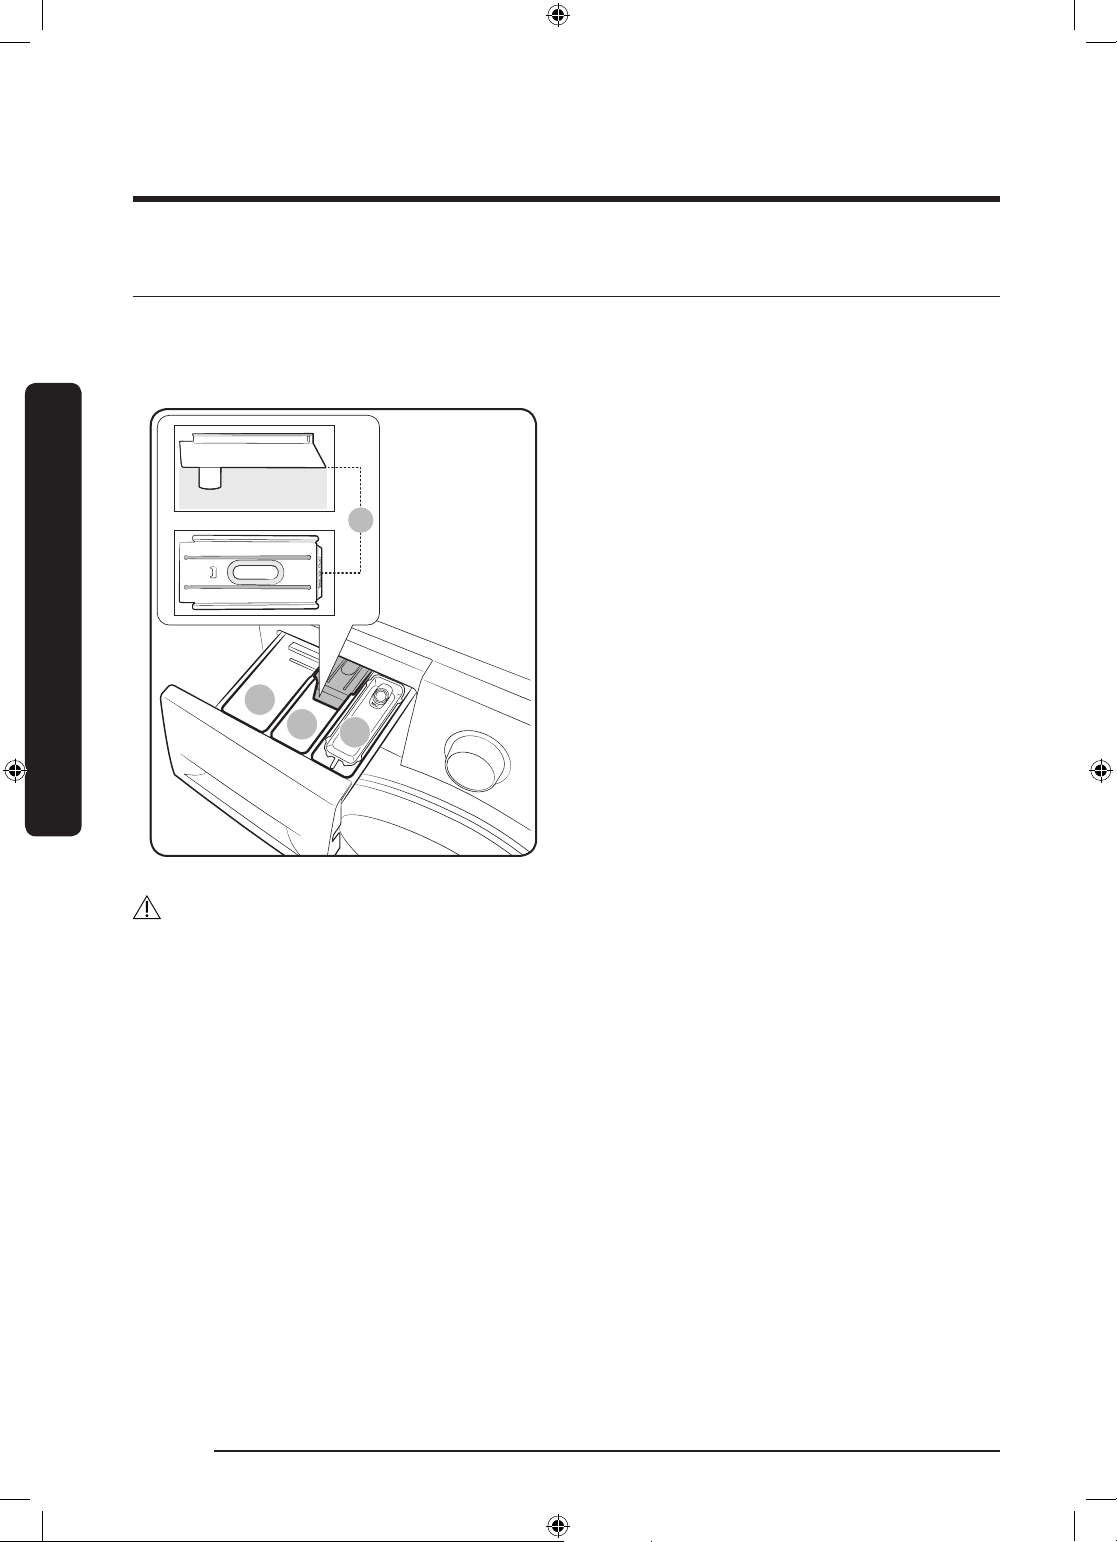
Detergent drawer guidelines
The washer provides a four-compartment dispenser: the front-left compartment for the
main wash, the rear-left for pre-wash, the front-right for fabric softeners, and the rearright for the liquid chlorine bleach.
Before you start
1. Main-wash compartment: Apply main-
wash detergent, water softener, soaking
detergent, color–safe, non–chlorine
bleach, and/or stain removers.
2. Softener compartment: Apply fabric
softener. Do not exceed the max line
(A).
3. Bleach compartment: Apply liquid
chlorine bleach.
CAUTION
• Do not open the detergent drawer while the washer is operating.
• Do not use the following types of detergent:
- Tablet or capsule types
- Ball or net types
• To prevent the compartment clogging, concentrated or highly-enriched agents (fabric
softener or detergent) must be diluted with water before being applied.
• Before moving the washing machine, make sure to empty the detergent drawer that
might contain detergent and/or fabric softener. The content in the drawer may spill out
on the oor.
English30
WW22N6850QX_DC68-03645B_EN.indd 30 2018/3/1 9:37:22
Page 31

To add washing agents to the detergent drawer
1. Slide open the detergent drawer.
2. Apply laundry detergent to the main-
wash compartment as instructed or
recommended by the manufacturer. To
use liquid detergent, see page <32>.
3. Apply fabric softener to the softener
compartment. Do not exceed the max
line (A).
4. Close the detergent drawer.
Before you start
CAUTION
• Do not apply powder detergent to the
liquid detergent container.
• Concentrated fabric softener must be
diluted with water before applied.
• Do not apply main-wash detergent to
the softener compartment.
English 31
WW22N6850QX_DC68-03645B_EN.indd 31 2018/3/1 9:37:23
Page 32

Before you start
A
A
To add washing agents to the detergent drawer
Before you start
To use liquid detergent
First insert the provided liquid container in
the main-wash compartment. Then, apply
liquid detergent to the container below the
marked max line (A).
CAUTION
Do not exceed the max line that is marked
inside the container.Remove the liquid
container if using power detergent.
To use bleach compartment
First insert the provided drawer bleach in
the bleach compartment.
Apply only liquid chlorine bleach to the
drawer bleach. Do not exceed the max line
(A).
CAUTION
Do not apply undiluted liquid chlorine
bleach directly onto the load or into the
drum. It is a powerful chemical and can
cause fabric damage,
To use oxi-type boosters or color-safe bleach
Oxygen boosters or color-safe bleach can increase washing performance.Make sure to add
the oxygen booster or color-safe bleach after putting the laundry into the drum.
NOTE
To use both powder detergent and powder oxygen booster or powder color-safe bleach, it
is more effective to put them together into the drum before loading the laundry.
English32
WW22N6850QX_DC68-03645B_EN.indd 32 2018/3/1 9:37:23
Page 33

Operations
01
02
03
07
12
11
09
08 10
06
04
05
WARNING
To reduce the risk of re, electric shock, or injury to persons, read the IMPORTANT SAFETY
INSTRUCTIONS before operating this appliance.
Feature panel
01 Cycle Selector Turn the dial to select a cycle.
Operations
02 Display
03 Temp.
The display shows current cycle information and estimated time
remaining, or an information code when a problem occurs.
Press to change the water temperature for the current cycle.
• Extra Hot: Heavily soiled, colorfast items. Only available with
NORMAL, HEAVY DUTY, and SANITIZE.)
• Hot: Whites and heavily soiled, colorfast items.
• Warm: Colorfast items.
• Cool: Brightly colored, very lightly soiled items. The washer
supplies additional hot water or uses the heater to warm up the
water if it is below 60 °F (16 °C)
• Cold: Uses only cold water without using the heater. No warm
water is supplied.
WW22N6850QX_DC68-03645B_EN.indd 33 2018/3/1 9:37:23
English 33
Page 34

Operations
04 Spin
Operations
Press to change the spinning speed for the current cycle.
• Extra High: Extends the spinning process to effectively remove
moisture from the load.
NOTE
Extra High uses a stronger spinning process to remove
moisture, so it is not suitable for wrinkle-free or no-iron fabrics,
or overloads.
• High: Underwear, t-shirts, jeans and sturdy cottons.
• Medium: Jeans, wrinkle-free or wash-and-wear items and
synthetics.
• Low: Delicate items that requires a lower spinning speed.
• No Spin: The drum does not spin after the nal drain process.
• Rinse Hold (No lamp turns on): The nal rinse process is
suspended so that the laundry remains in the water. To unload
the laundry, run a drain or spin process.
NOTE
Spin Only: This cycle runs a spin cycle only. Press and hold Spin
for 3 seconds. With the cycle time on the display, press Spin
repeatedly until a desired spinning speed is selected. Then, press
Start/Pause (Hold to Start) to start the cycle.
This cycle is available only when no specic cycle is selected
05 Soil
06 Extra Rinse
07 Delay End
08 My cycle
English34
Press the button to select the soil level/washing time.
• Extra Heavy: For extremely soiled loads.
• Heavy : For heavily soiled loads.
• Normal: For moderately soiled loads. This setting is best for
most loads.
• Light: For lightly soiled loads.
• Extra Light: For barely soiled loads.
Press this button to add an additional rinse at the end of the cycle
to remove laundry additives more thoroughly.
Delay End lets you set the end time of the current cycle. Based
on your settings, the start time of the cycle will be determined
by the machine’s internal logic. For example, this setting is useful
for programming your machine to nish a wash at the time you
normally return home from work.
• Press to choose a preset unit of hours.
• Choose your favorite cycle including temperature, spin, soil
level, options, etc. (see page 42)
WW22N6850QX_DC68-03645B_EN.indd 34 2018/3/1 9:37:24
Page 35

Press this button if you need to shorten the washing time,
2
1
6
5
3
4
09 Super Speed
applicable for Normal, Deep steam, Heavy Duty or Allergen course.
The shortened time may differ depending on the Cycles/Load/
Option.
Press to activate/deactivate the Smart Control function. When the
10 Smart Control
Smart Control function is activated, you can control your washing
machine using your mobile device. For more information, see the
SmartThings section on page <41>.
11 Power Press to turn on/off the washer.
12 Start/Pause
(Hold to Start)
Press to start or stop operation.
Simple steps to start
1. Press Power to turn on the washer.
2. Turn the Cycle Selector to select a cycle.
3. Change the cycle settings (Temp., Spin, and Soil) as necessary.
4. To add an option, press Options. Use the button again to choose a preferred item.
5. The machine provides three easy to access buttons for My Cycle, Super Speed and
Smart Control forfor easy access. To use an option item, press the corresponding
button.
6. Press Start/Pause (Hold to Start).
Operations
To change the cycle during operation
1. Press Start/Pause (Hold to Start) to stop operation.
2. Select a different cycle.
3. Press Start/Pause (Hold to Start) again to start the new cycle.
WW22N6850QX_DC68-03645B_EN.indd 35 2018/3/1 9:37:24
English 35
Page 36

Operations
Cycle overview
Standard cycles
Cycle Description
NORMAL
DEEP STEAM
HEAVY DUTY • For sturdy, colorfast fabrics and heavily soiled items.
WHITES • For white items with or without bleach.
Operations
SANITIZE
ALLERGEN
TOWELS • For bath towels, washcloths, and mats.
15’ EXPRESS
• For most fabrics including cottons, linens, and normally
soiled items.
• For heavily soiled, colorfast items. This cycle uses steam and
a high water temperature to effectively remove stains.
• For heavily soiled, colorfast items. This cycle heats the water
to 150 °F to eliminate bacteria.
NOTE
If you press Start/Pause (Hold to Start) during the heating
portion of Sanitize cycle, your washer door will remain locked
for your safety.
• This cycle removes dust mites, pet dander, and other allergy
causing substances from fabric.
For lightly soiled items in less than 4.4 pounds (2.0 kg) that you
want to wash quickly.
• Use less than 0.044 pounds (20 g) of detergent. Using more
than 0.044 pounds (20 g) of detergent may leave detergent
residue.
• For liquid detergent, use a max of 20 ml of liquid detergent.
• For sheer fabrics, bras, lingerie (silk), and other handwash-
DELICATES
WOOL
English36
WW22N6850QX_DC68-03645B_EN.indd 36 2018/3/1 9:37:24
only fabrics.
• For best performance, use liquid detergent.
For machine-washable wool. Loads should be under 8 pounds
(3.63kg). For best results, we recommend a load of 4.4 pounds
(2.0kg) or less.
• The Wool cycle washes laundry by moving the wash drum
horizontally to maintain the characteristics of the wool bers
and to prevent damage to the cloth. It then stops for a period
of time to allow the laundry to soak in the water after which
it re-starts.
• We recommend you use a neutral detergent to prevent
damage to the cloth and to improve the washing results.
Page 37

Cycle Description
PERM PRESS
ACTIVE WEAR
RINSE+SPIN
SELF CLEAN
Options
Option Description
Alarm off
• For wash-and-wear, synthetic fabrics, and lightly to normally
soiled items.
• Use this cycle to wash exercise wear such as sports jerseys,
training pants, shirts/tops and other performance clothing.
This cycle provides effective soil removal with gentle action
for special fabric care.
• Use for loads that need rinsing only or to add rinse-aided
fabric softener to a load.
• Cleans the drum by removing dirt and bacteria from the
drum.
• Perform once every 40 washes with no detergent or bleach
added.
• Make sure the drum is empty.
• Do not add any drum cleaning agents.
• You can turn on or off the sound from the washing machine.
When this function is set to Off, the alarm, the melody of
cycle completion, and the power-off beep will not sound.
However, the other sounds stay active.
Operations
Extra Rinse
WW22N6850QX_DC68-03645B_EN.indd 37 2018/3/1 9:37:24
• Add an additional rinse at the end of the cycle to remove
laundry additives more thoroughly.
English 37
Page 38

Operations
Delay End
You can set the washer to nish your wash automatically at a later time by choosing a
delay of between 1 to 24 hours (in 1 hour increments). The hour displayed indicates the
time the wash will nish.
1. Select a cycle. Then, change the cycle settings if necessary.
2. Press Delay End (or the +/- button) repeatedly until a desired end time is set.
3. Press and hold Start/Pause (Hold to Start). The Delay End indicator blinks and the
4. To cancel the Delay End, restart the washing machine by pressing Power.
Real-life case
Operations
You want to nish a two-hour cycle 3 hours from now. To do this, you add the Delay End
option to the current cycle with a 3-hour setting, and then press Start/Pause (Hold to
Start) at 2:00 p.m. The washer starts operating at 3:00 p.m. and ends at 5:00 p.m. Provided
below is the time line for this example.
washing machine tumbles the drum to sense the weight of the load if load sensing is
preset for the selected cycle. When complete, it displays your set time with the timer
running.
2:00 pm
Set the Delay End to 3 hours
3:00 pm
Start
5:00 pm
End
Load sensor
The load sensor icon lights up when you select a cycle that supports load sensing. Some
cycles may not support loading sensing. Once you start the cycle, the icon blinks or stays
solid during the load sensing process, and turns off when the process is complete.
English38
WW22N6850QX_DC68-03645B_EN.indd 38 2018/3/1 9:37:24
Page 39

Special features
Child Lock
To prevent accidents by children, Child Lock locks all buttons except for Power.
To activate Child Lock
• On the manual dispenser models, press and hold - and + (of the Delay End option)
simultaneously for 3 seconds. Then, press and hold Start/Pause (Hold to Start) to
activate. The door locks and the Child Lock indicator turns on.
To deactivate Child Lock temporarily
On the manual dispenser models, press and hold - and + (of the Delay End option)
simultaneously for 3 seconds.
NOTE
• If you open the door 1 minute or more after deactivating Child Lock, an alarm sounds
for up to 2 minutes.
• If you close the door within 2 minutes, the door locks and Child Lock is reactivated. If
you do not close the door or the door is not properly closed, the alarm keeps sounding
for 2 minutes.
• To add laundry after activating Child Lock, rst deactivate Child Lock or restart the
washing machine.
To cancel the Child Lock
• On the manual dispenser models, press and hold - and + (of the Delay End option)
simultaneously for 3 seconds to deactivate, and then press and hold the buttons again
for 3 seconds to cancel Child Lock. The door unlocks and the Child Lock indicator turns
off.
Operations
Sound On/Off
You can turn on or off the sound from the washing machine. When this function is set to
Off, the alarm, the melody of cycle completion, and the power-off beep will not sound.
However, the other sounds stay active.
• To mute the sound, press and hold Options for 3 seconds.
• To unmute the sound, press and hold again for 3 seconds.
• Your setting will be kept even after restarting the machine.
English 39
WW22N6850QX_DC68-03645B_EN.indd 39 2018/3/1 9:37:25
Page 40

Operations
My Cycle
Create your own washing cycle with preferred settings and use the with the push of the
push of a single button.
To create your own cycle
1. Turn the Cycle Selector to select a cycle.
2. Change the cycle settings (Temp., Spin, and Soil Level) as necessary.
3. To add an option, press the corresponding buttons.
4. Press and hold My Cycle for 3 seconds to save your settings. Applicable indicators
Using Steam Wash
Operations
If you select Deep Steam course, the steam acts at the most effective times for the
detected amount of laundry, maximizing the effect of the steam, increasing the wash
temperature, enhancing the Soak effect, and improving wash performance.
1. Load the washer.
2. Press the Power button.
3. Turn the Cycle Selector and select a Deep Steam Course.
4. Add detergent to the dispenser tray and add fabric softener up to the marked line.
5. Press the Start/Pause (Hold to Start) button. The washer automatically selects the
blink for 3 seconds.
Once you save the cycle, you can use it by pressing My Cycle.
optimal wash conditions by sensing the weight of the laundry.
ATC (Auto Temperature Control)
ATC enables the washer to control water temperatures in each washing cycle using the
washer’s internal thermistor. It is designed to maintain certain washing temperatures for
best results.
NOTE
• If you select cycle, this cycle is the regulation cycle. Since new washer must reduce
the amount of energy usage as a rst priority, customers will notice more cold water
entering the washers, but this is normal and not a prblem.
• In these cycles, the Hot temperature is similar to bath-water temperatures, and the
Warm temperature to comfortable swimming pool temperatures.
• To wash clothes at a specic temperature, you must choose a different cycle rst.
English40
WW22N6850QX_DC68-03645B_EN.indd 40 2018/3/1 9:37:25
Page 41

SmartThings
Wi-Fi connection
On your smartphone, go to the Settings and turn on the wireless connection and select an
AP (Access Point).
NOTE
• This device is designed for household use only (Class B), and can be used in all
residential areas.
• This device may cause wireless interference, and neither the manufacturer or the
installer of this device can provide a safety measure of any kind.
• Recommended encryption methods are WPA/TKIP and WPA2/AES. Newly developed
Wi-Fi protocols or unapproved Wi-Fi protocols are not supported.
• The reception sensitivity of a wireless network may be affected by surrounding
wireless environments.
• If your Internet provider has registered the MAC address of your PC or the modem
module for permanent use, your Samsung washing machine fails to connect to the
Internet. If this is the case, contact your Internet provider.
• The Internet rewall may interrupt your Internet connection. If this happens, contact
your Internet provider.
• If Internet failure continues after following the measurement of your Internet provider,
contact a local Samsung retailer or service centre.
• For installing wired and wireless routers, refer to the user manual of the router you
use.
• Samsung washing machine supports the Wi-Fi 2.4 GHz protocols.
• Samsung washing machine supports the IEEE802.11 b/g/n (2.4 GHz), Soft-AP protocols.
(IEEE802.11n is recommended)
• An unapproved wired/wireless router may fail to connect to Samsung washing
machine.
Operations
Download
On an app market (Google Play Store, Apple App Store, Samsung Galaxy Apps), nd the
SmartThings app with a search term of “SmartThings”. Download and install the app on
your device.
NOTE
• The SmartThings app is available on third-party devices with Android OS 6.0
(Marshmallow) or higher, Samsung devices with Android OS 5.0 (Lollipop) or higher,
and iOS devices with iOS 10.0 or higher. (For iPhones, it must be iPhone 6 or higher).
The app is optimised for Samsung smartphones (Galaxy S and Note series).
• Some functions of the app may operate differently on third-party devices.
• The app is subject to change without notice for improved performance.
English 41
WW22N6850QX_DC68-03645B_EN.indd 41 2018/3/1 9:37:25
Page 42

Operations
Log in
You must rst log into SmartThings with your Samsung account. To create a new Samsung
account, follow the instructions on the app. You don’t need a separate app to create your
account.
If you have a Samsung account, use the
account to log in. A registered Samsung
To register your device to SmartThings
1. Make sure your smartphone is connected to a wireless network. If not, go to the
2. Select to run SmartThings on your smartphone.
Operations
3. When a message of “A new device is found.”, select Add.
4. If no message appears, select + and select your washing machine in a list of devices
5. Register your washing machine to the SmartThings app as follows.
NOTE
Settings and turn on the wireless connection and select an AP (Access Point).
available. If your washing machine is not listed, select Device Type > Specic Device
Model, and then add your washing machine manually.
a. Log into SmartThings with your Samsung account.
b. Turn a Wi-Fi connection on.
c. Add your washing machine to SmartThings. Make sure your washing machine is
connected to SmartThings.
d. When registration is complete, your washing machine appears on your smartphone.
smartphone user automatically logs in.
Washing Machine app
Integrated control: You can monitor and control your washing machine both at home and
on the go.
• Select the Washing Machine icon on SmartThings. The Washing Machine page appears.
• Check the operation status or notications related to your washing machine, and
change options or settings if necessary.
English42
WW22N6850QX_DC68-03645B_EN.indd 42 2018/3/1 9:37:25
Page 43

SmartThings
Category Checkpoint Description
You can check the current cycle and its
options, and the remaining cycle time.
The Smart Control status is shown for the
washing machine.
Use this to check if the washing machine
operates normally.
Use this to monitor the energy
consumption status.
Select a cycle and necessary options, and
then select Start/Pause/Cancel to start an
operation, to stop temporarily, or to cancel
the current operation.
Add frequently used cycles and options to
My Favorite for later use.
Noties you of the addition of a new load.
Noties you of any laundry left after a
cycle is complete.
You can select the fabric type, color, and
the soil level to get recommended options
and wash cycles that you can start right
away.
You can set the desired time for a wash
cycle to nish.
After you set the desired time, you will get
a recommended cycle that will end within
the time you set, and you can start or
reserve the recommended cycle.
Provides a regular report with an analysis
of the machine operation state in a userset frequency (every week/month).
You can use this regular report to
check your usage pattern, maintenance
requirements, and energy consumption **
for the set period of time.
Monitoring
Control
Notication
Q-Rator
Washing status
Smart Control
Self Check
Energy monitoring
Start/Pause (Hold to Start)/
Cancel
My Favorite
Cycle completed Noties you the current cycle is complete.
alarm (applicable models
only)
Remaining laundry (applicable
models only)
Laundry Recipe*
Laundry Planner*
HomeCare Wizard *
* Requires ‘SmartThings’, available on Android and iOS.
Registration required.
** Indicative results only.
Operations
English 43
WW22N6850QX_DC68-03645B_EN.indd 43 2018/3/1 9:37:25
Page 44

Operations
Open Source Announcement
The software included in this product contains open source software. You may obtain the
complete corresponding source code for a period of three years after the last shipment of
this product by sending an email to mailto:oss.request@samsung.com.
It is also possible to obtain the complete corresponding source code in a physical medium
such as a CD-ROM; a minimal charge will be required.
The following URL http://opensource.samsung.com/opensource/SMART_AT_051/seq/0
leads to the download page of the source code made available and open source license
information as related to this product. This offer is valid to anyone in receipt of this
information.
Operations
NOTE
Hereby, Samsung Electronics, declares that the radio equipment type appliance is in
compliance with Directive 2014/53/EU. The full text of the EU declaration of conformity is
available at the following internet address: The ofcial Declaration of conformity may be
found at http://www.samsung.com, go to Support > Search Product Support and enter the
model name.
Wi-Fi max transmitter power : 20 dBm at 2.412 GHz – 2.472 GHz
English44
WW22N6850QX_DC68-03645B_EN.indd 44 2018/3/1 9:37:25
Page 45

Maintenance
Keep the washer clean to prevent its performance from deteriorating and to preserve its
life cycle.
SELF CLEAN
Perform this cycle regularly to clean the drum and to remove bacteria from it.
1. Make sure the drum is empty.
2. Press Power to turn on the washer.
3. Press SELF CLEAN
4. Press Start/Pause (Hold to Start).
NOTE
.
The water temperature for SELF CLEAN
CAUTION
Do not use any cleaning agents. Do not add detergent or bleach. Chemical residue in the
drum degrades the cleaning performance.
is set to EXTRA HOT, which cannot be changed.
SELF CLEAN reminder
• The SELF CLEAN reminder appears on the main screen once every 40 washes. It is
advisable to perform the SELF CLEAN regularly.
• If you do not run the cycle within 1 hour when the SELF CLEAN reminder appears,
the reminder turns off automatically.
• When you rst see this reminder, you can ignore the reminder for 6 consecutive
washes. From the 7th wash, the reminder no longer appears. However, it appears again
on the second 40th wash.
Maintenance
English 45
WW22N6850QX_DC68-03645B_EN.indd 45 2018/3/1 9:37:25
Page 46

Maintenance
Smart Care
To enable this function, you must rst download the Samsung Smart Washer app at
the Play Store or the Apple Store, and install it on a mobile device featuring a camera
operation.
The Smart Care function has been optimized for Galaxy & iPhone series (applicable models
only).
1. When the washing machine detects an issue to check, an information code appears on
2. The washing machine starts the self-diagnosis procedure and display an information
3. Run the Samsung Smart Washer app on your mobile device, and tap Smart Care.
4. Put the mobile device close to the washing machine’s display so that the mobile
Maintenance
5. When the information code is recognized correctly, the app provides detailed
the display. To enter Smart Care mode, press and hold Soil and Spin simultaneously for
3 seconds.
code if a problem is detected.
device and the washing machine face each other. Then, the information code will be
recognized automatically by the app.
information about the problem with applicable counteractions.
NOTE
• The function name, Smart Care, may differ depending on the language.
• If there is strong reected light on the washing machine display, the app may fail to
recognize the information code.
• If the app fails to recognize the Smart Care code consecutively, enter the information
code manually onto the app screen.
English46
WW22N6850QX_DC68-03645B_EN.indd 46 2018/3/1 9:37:25
Page 47

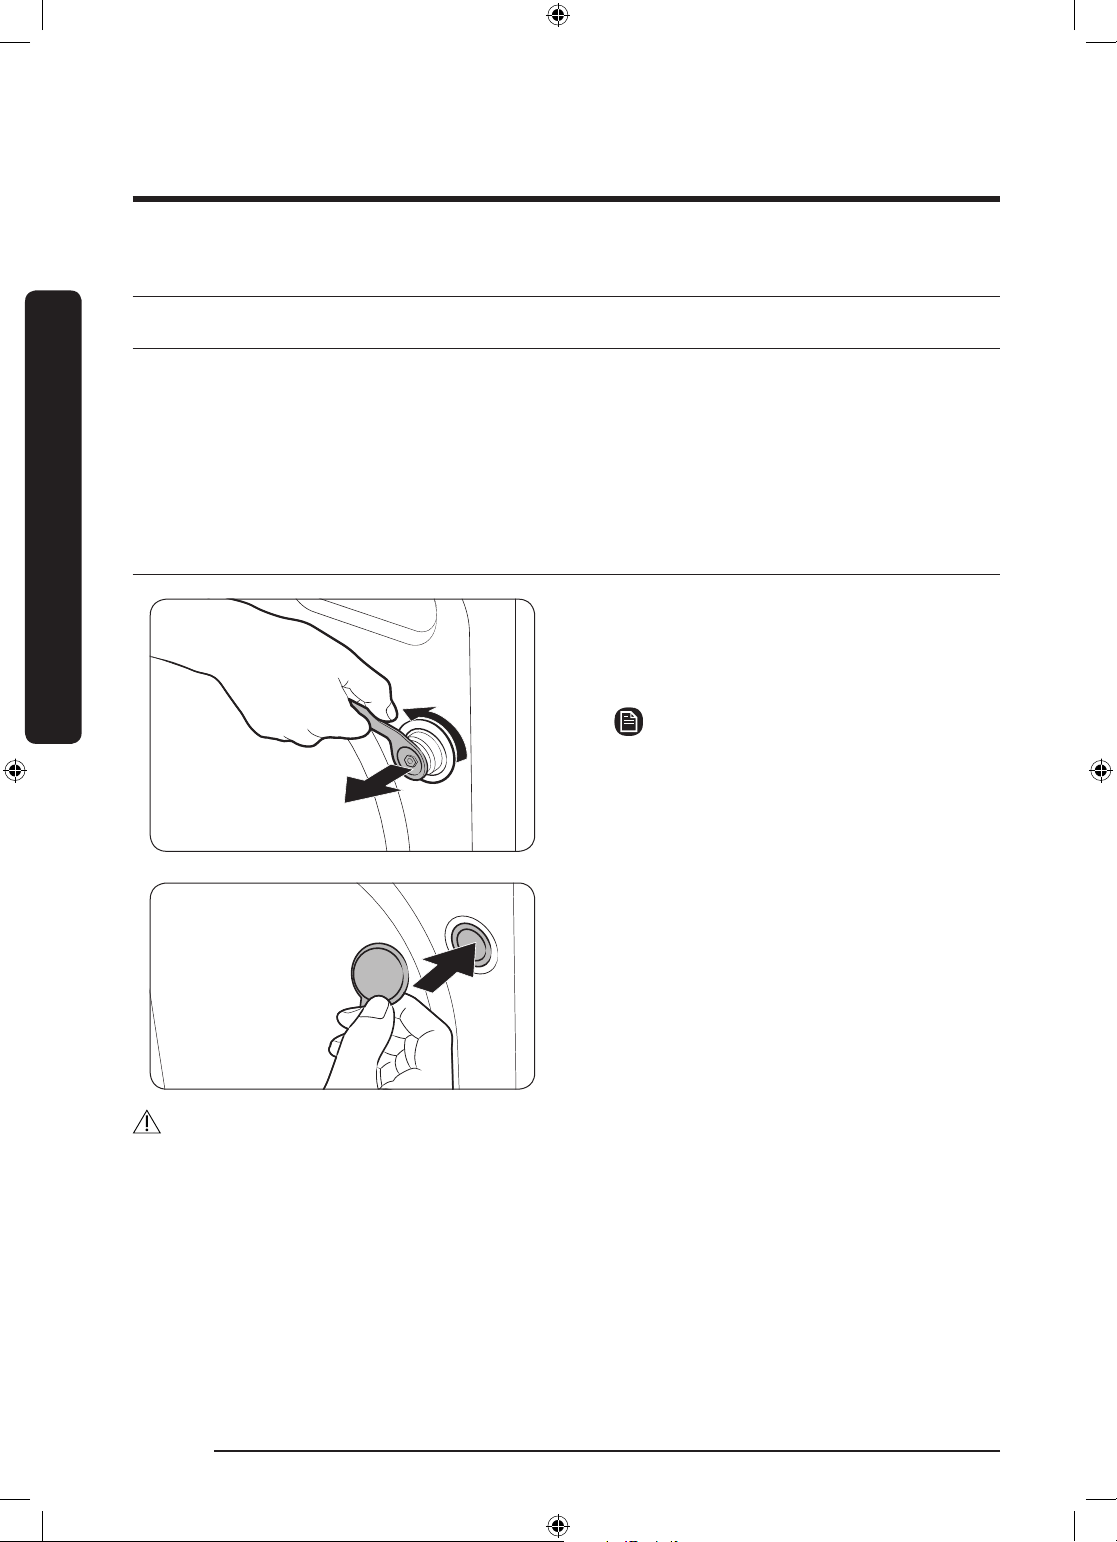
Emergency drain
A
In case of a power failure, drain the water inside the drum before taking out the laundry.
1. Power off the washer, and then unplug
it from the electrical outlet.
2. Gently press the top area of the lte
cover to open.
3. Put an empty, spacious container
around the cover, and stretch the
emergency drain tube to the container
while holding the tube cap (A).
Maintenance
4. Open the tube cap and let water in the
Emergency drain tube (B) ow into the
container.
5. When done, close the tube cap, and
reassemble the tube. Then, close the
lter cover.
NOTE
Use a spacious container because the
water in the drum may be more than
expected.
WW22N6850QX_DC68-03645B_EN.indd 47 2018/3/1 9:37:26
English 47
Page 48

Maintenance
Cleaning
Surface of the washer
Use a soft cloth with a nonabrasive household detergent. Do not spray water onto the
washer.
Mesh lter
Clean the mesh lter of the water hose once or twice a year.
Maintenance
1. Turn off the washer, and then unplug
the power cord.
2. Close the faucet.
3. Loosen and disconnect the water hose
from the back of the washer. Cover the
hose with a cloth to prevent water from
gushing out.
4. Use pliers to pull out the mesh lter
from the inlet valve.
5. Submerge the mesh lter deeply in
water so that the threaded connector is
also submerged.
6. Dry the mesh lter completely in a
shaded area.
7. Reinsert the mesh lter into the inlet
valve, and reconnect the water hose to
the inlet valve.
8. Open the faucet.
NOTE
If the mesh lter is clogged, the “4C” information code appears on the the washer’s display
screen.
English48
WW22N6850QX_DC68-03645B_EN.indd 48 2018/3/1 9:37:26
Page 49

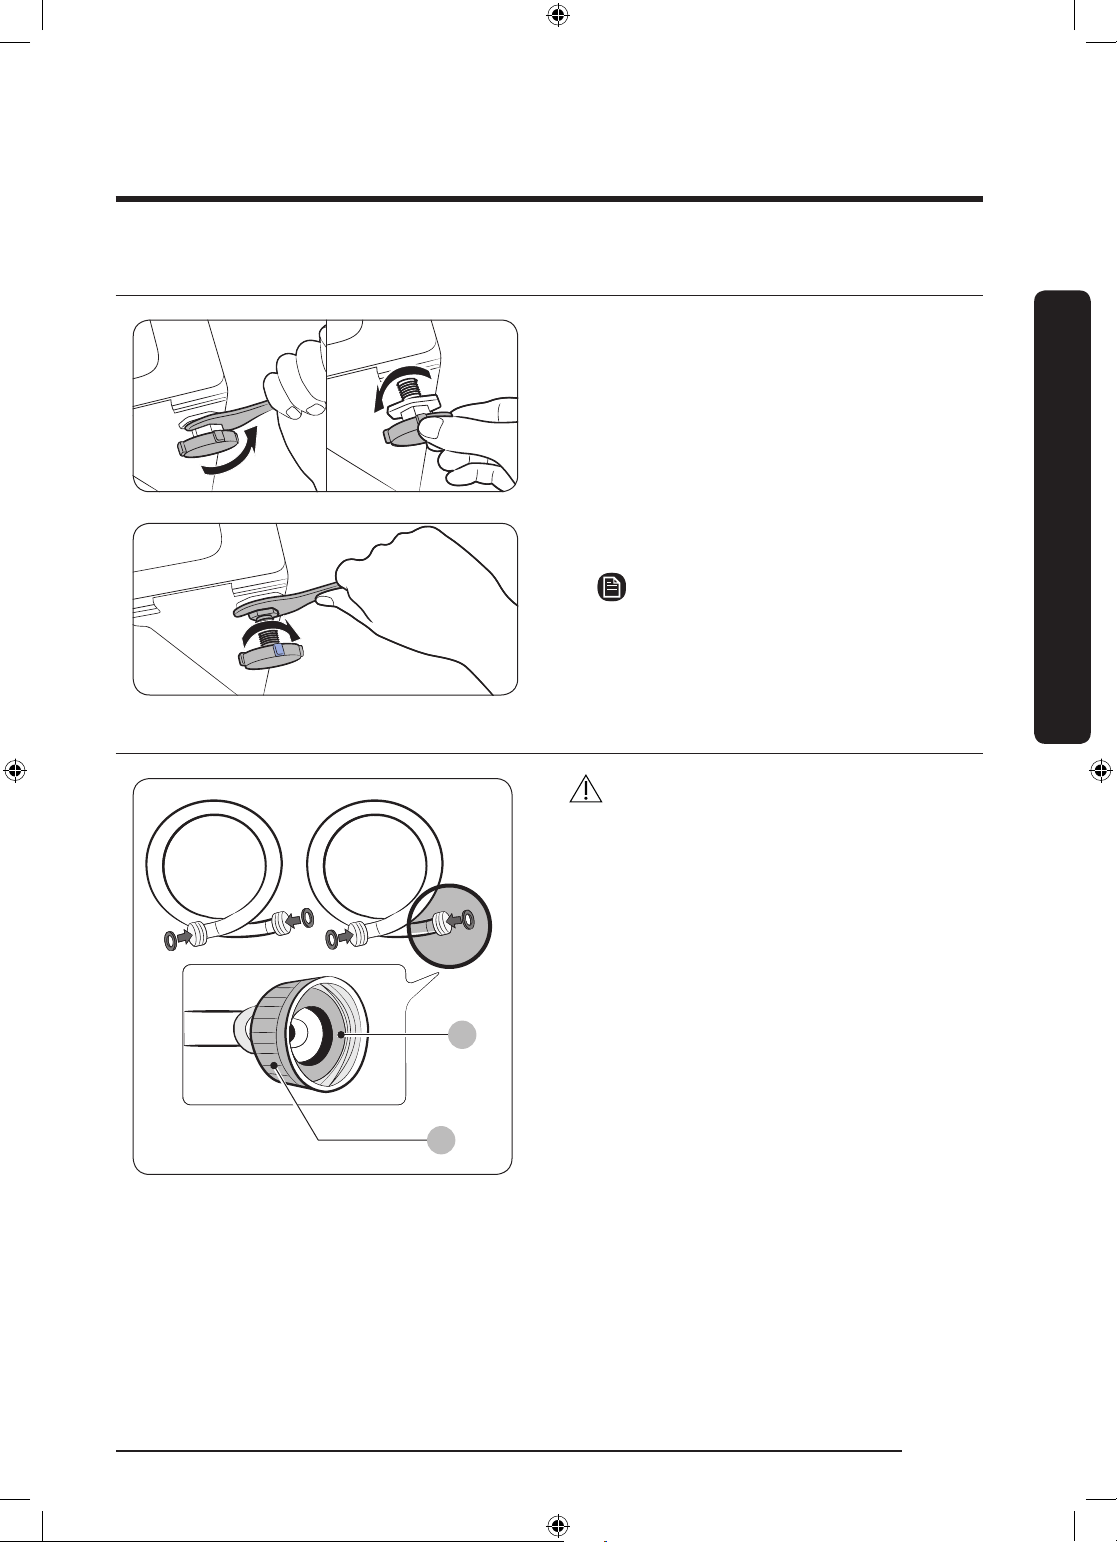
Pump lter
A
It is advisable to clean the pump lter 5 or 6 times a year to prevent it from clogging. A
clogged pump lter may reduce the bubble effect.
1. Turn off the washer, and then unplug
the power cord.
2. Drain the remaining water inside
the drum. See the “Emergency drain”
section on page 49.
3. Gently press the top area of the lte
cover to open.
4. Turn the pump lter knob (A) to the left,
and drain off the remaining water.
5. Clean the pump lter using a soft brush.
Make sure the drain pump propeller
inside the lter is unclogged.
6. Reinsert the pump lter, and then turn
the lter knob to the right.
7. Close the lter cover.
Maintenance
NOTE
• Some pump lters feature a safety
knob that is designed to prevent
accidents by children. To open the
safety knob of the pump lter, push in
and turn it counterclockwise. The spring
mechanism of the safety knob helps
open the lter.
• To close the safety knob of the pump
lter, turn it clockwise. The spring
makes a rattling sound, which is normal.
NOTE
If the pump lter is clogged, the “5C” information code appears on the washer’s display
screen.
English 49
WW22N6850QX_DC68-03645B_EN.indd 49 2018/3/1 9:37:26
Page 50

Maintenance
• Make sure the lter knob is closed properly after cleaning the lter. Otherwise, this
may cause a leak.
• Make sure the lter is inserted properly after cleaning it. Otherwise, this may cause an
operational failure or a leak.
Detergent drawer
Maintenance
CAUTION
1. While holding down the release lever
(A) inside the drawer, slide open the
drawer, and then remove the drawer
from the washer.
2. Remove the Liquid detergent container
from the drawer.
3. Clean the drawer components in
owing water using a soft brush.
NOTE
Other parts of the drawer can also be
removed. They can fall out if you hold the
drawer upside down.
4. Clean the drawer recess using a soft
brush.
5. Reinsert the liquid detergent container
into the Detergent Drawer.
6. Slide the drawer into the drawer recess,
and then push it inward until it is fully
closed.
NOTE
To remove remaining detergent, perform a RINSE+SPIN cycle with the drum empty.
English50
WW22N6850QX_DC68-03645B_EN.indd 50 2018/3/1 9:37:27
Page 51

Door diaphragm
A
1. Open the door and empty the drum.
2. Turn over the diaphragm (A).
3. Combine 3/4 cups of liquid chlorine
bleach and 1 gallon of warm tap water.
4. Wearing rubber gloves, use a soft, clean
cloth dipped in the water and chlorine
solution to clean the diaphragm.
5. Let stand 5 minutes, and then wipe up
and dry well.
6. Put the diaphragm back to position.
CAUTION
Use bleach carefully and be sure to follow the bleach manufacturer’s use and care
instructions.
Recovery from freezing
The washer may freeze when the temperature in its location drops below 0 °C.
1. Turn off the washer, and then unplug the power cord.
2. Pour warm water over the faucet to loosen the water hose.
3. Disconnect the water hose, and soak it in warm water.
4. Pour warm water into the drum and leave it for about 10 minutes.
5. Reconnect the water hose to the faucet.
Maintenance
NOTE
If the washer still doesn’t operate normally, repeat the steps above until it operates
normally.
Care against an extended time of disuse
Avoid leaving the washer unused for an extended time. If you intend to leave the washer
unused for a long period of time, follow the directions below:
1. Press the Power button, and then turn the Cycle Selector to RINSE+SPIN.
2. Empty the drum, close the door, and then press Start/Pause (Hold to Start).
3. When the cycle is complete, close the faucets and disconnect the water hoses.
4. Turn off the washer, and then unplug the power cord.
5. Open the door to let air circulate through the drum.
WW22N6850QX_DC68-03645B_EN.indd 51 2018/3/1 9:37:27
English 51
Page 52

Maintenance
Cleaning the exterior
1. Turn off the water faucets after nishing the day’s washing.
This will shut off the water supply to your washer and prevent the unlikely possibility
of damage from escaping water. Leave the door open to allow the inside of your
washer to dry out.
2. Use a soft cloth to wipe up all detergent, bleach, or other spills as they occur.
Clean the following as recommended below:
- Control Panel – Clean with a soft, damp cloth. Do not use abrasive powders or
- cleaners directly on the panel.
- Cabinet – Clean with soap and water.
Cleaning the interior
Clean the interior of your washer periodically to remove any dirt, soil, odor, mold, mildew,
Maintenance
or bacterial residue that may remain in your washer as a result of washing clothes.
Failure to follow these instructions may result in unpleasant conditions, including odors
and/or permanent stains on your washer or laundry.
cleaning pads. Do not spray.
CAUTION
NOTE
Hard water deposits may be removed, if needed. Use a cleaner labeled “Washer safe”.
English52
WW22N6850QX_DC68-03645B_EN.indd 52 2018/3/1 9:37:27
Page 53

Troubleshooting
Checkpoints
If you encounter a problem with the washer, rst check the table below and try the
suggestions.
Problem Action
• Make sure the washer is plugged in.
• Make sure the door is properly closed.
• Make sure the faucets are open.
• Make sure to press or tap Start/Pause (Hold to Start) to start
Does not start.
Water supply is
insufcient, or no
water is supplied.
After a cycle,
detergent remains
in the detergent
drawer.
the washer.
• Make sure Child Lock is not activated.
• Before the washer starts to ll, it will make a series of
clicking noises to check the door lock and does a quick drain.
• Check the fuse or reset the circuit breaker.
• Fully open the faucet.
• Make sure the door is properly closed.
• Make sure the water supply hose is not frozen.
• Make sure the water supply hose is not kinked or clogged.
• Make sure there is sufcient water pressure.
• Make sure the washer is running with sufcient water
pressure.
• If you are using powdered detergent, do not use more than
recommended.
• If you are using liquid detergent, do not over ll the liquid
detergent compartment.
• Remove the liquid detergent and softener containers, and
then clean the detergent drawer.
Troubleshooting
• Make sure the washer is installed on a level, solid oor that is
not slippery. If the oor is not level, use the levelling feet to
adjust the height of the washer.
• Make sure the shipping bolts are removed.
Excessive vibrations
or makes noise.
WW22N6850QX_DC68-03645B_EN.indd 53 2018/3/1 9:37:27
• Make sure the washer is not contacting any other object.
• Make sure the laundry load is balanced.
• The motor can cause noise during normal operation.
• Overalls or metal-decorated clothes can cause noise while
being washed. This is normal.
• Metal objects such as coins can cause noise. After washing,
remove these objects from the drum or lter case.
English 53
Page 54

Troubleshooting
Does not drain and/
or spin.
Troubleshooting
The door does not
open.
Problem Action
• Make sure the drain hose is neither kinked nor obsructed all
the way to the drain system. If you there is a drain restriction,
call for service.
• Make sure the debris lter is not clogged.
• Close the door and press or tap Start/Pause (Hold to Start).
For your safety, the washer will not tumble or spin unless the
door is closed.
• Make sure the drain hose is not frozen or clogged.
• Make sure the drain hose is connected to a drain system that
is not clogged.
• If the washer is not supplied with sufcient power, the
washer temporarily will not drain or spin. As soon as the
washer regains sufcient power, it will operate normally.
• Press or tap Start/Pause (Hold to Start) to stop the washer.
• It may take a few moments for the door lock mechanism to
disengage.
• The door will not open until 3 minutes after the washer has
stopped or the power has been turned off.
• Make sure all the water in the drum is drained.
• The door may not open if water remains in the drum. Drain
the drum and open the door manually.
• Make sure the door lock light is off. The door lock light turns
off after the washer has drained.
• Make sure you use the recommended types of detergent.
• Use high efciency (HE) detergent to prevent oversudsing.
Excessive suds.
Cannot add additional
detergent.
English54
WW22N6850QX_DC68-03645B_EN.indd 54 2018/3/1 9:37:27
• Reduce the detergent amount for soft water, small loads, or
lightly soiled loads.
• Non-HE detergent is not recommended.
• Make sure the remaining amount of detergent and fabric
softener is not over the limit.
Page 55

Problem Action
The washer stops.
The washer lls with
the wrong water
temperature.
• Plug the power cord into a live electrical outlet.
• Check the fuse or reset the circuit breaker.
• Close the door and press the Start/Pause (Hold to Start)
button to start the washer. For your safety, the washer will
not tumble or spin unless the door is closed.
• Before the washer starts to ll, it will make a series of
clicking noises to check the door lock and does a quick drain.
• There may be a pause or soak period in the cycle. Wait and
the washer may start.
• Make sure the mesh lter of the water supply hose at the
faucets is not clogged. Periodically clean the mesh lter.
• If the washer is not supplied with sufcient power, the
washer temporarily will not drain or spin. As soon as the
washer regains sufcient power, it will operate normally.
• Fully open both taps.
• Make sure the temperature selection is correct.
• Make sure the hoses are connected to the correct taps. Flush
the water lines.
• Make sure your water heater is set to supply hot water with a
minimum temperature of 120 °F (49 °C) at the tap. Also, check
the water heater capacity and recovery rate.
• Disconnect the hoses and clean the mesh lter. The mesh
lter may be clogged.
• While the washer lls, the water temperature may change
as the automatic temperature control feature checks the
incoming water temperature. This is normal.
• While the washer lls, you may notice just hot and/or just
cold water going through the dispenser when cold or warm
temperatures are selected. This is a normal function of
the automatic temperature control feature as the washer
determines the water temperature.
Troubleshooting
• Use the High or Extra High spin speed.
The load is wet at the
end of a cycle.
• Use high efciency (HE) detergent to reduce oversudsing.
• The load is too small. Small loads (one or two items) may
become unbalanced and not spin completely.
• Make sure the drain hose is not kinked or clogged.
English 55
WW22N6850QX_DC68-03645B_EN.indd 55 2018/3/1 9:37:27
Page 56

Troubleshooting
Problem Action
• Make sure the door is properly closed.
• Make sure all hose connections are tight.
Leaks water.
Has odours.
• Make sure the end of the drain hose is correctly inserted and
secured to the drain system.
• Avoid overloading.
• Use high efciency (HE) detergent to prevent oversudsing.
• Excessive suds collect in recesses and can cause foul odours.
• Run cleansing cycles to sanitize periodically.
• Clean the door seal (diaphragm).
• Dry the washer interior after a cycle has nished.
No bubbles are seen
(Bubbleshot models
only).
If a problem persists, contact a local Samsung service center.
Troubleshooting
• Overloading may screen bubbles.
• Severely contaminated laundry may not generate bubbles.
English56
WW22N6850QX_DC68-03645B_EN.indd 56 2018/3/1 9:37:27
Page 57

Information codes
If the washer fails to operate, you may see an information code on the screen. Check the
table below and try the suggestions.
Code Action
Check the water level sensor.
• Power off and then power the washer on after 2-3 minutes, and
1C
DC
DC1
then try again.
• Depending on the model, the drain system drains water
automatically. The POWER and Start/Pause (Hold to Start) buttons
may be disabled during this process.
The door is open.
• Close the door, and then press Start/Pause (Hold to Start) to
resume operation.
Check the door switch.
• Power off and then power the washer on after 2-3 minutes, and
then try again.
LC
4C
4C2
Check for water leaks.
• Power the washer off, and then check the drain system for any
leaks. Once the leak issue is resolved, power the washer on after
2-3 minutes.
• Depending on the model, the drain system drains water
automatically. The POWER and Start/Pause (Hold to Start) buttons
may be disabled during this process.
Check the water supply line.
• Check the connection to the water line (including water taps).
• Power off and then power the washer on after 2-3 minutes, and
then try again.
• Depending on the model, the drain system drains water
automatically. The POWER and Start/Pause (Hold to Start) buttons
may be disabled during this process.
Laundry needs protection because the water being supplied is too
hot.
• Make sure the cold and hot water taps are properly connected.
• Power off and then power the washer on after 2-3 minutes, and
then try again.
Troubleshooting
English 57
WW22N6850QX_DC68-03645B_EN.indd 57 2018/3/1 9:37:27
Page 58

Troubleshooting
Code Action
Check the drain system.
5C
HC
UB
8C, 8C1, 8C2
• Make sure the drain lter is not clogged.
• If the drain lter is clogged, clean the lter lter, and then restart
the washer.
Check the washing heater.
• Power off the washer, and then contact a Samsung customer
service center.
Check the spinning process.
• The load may not be balanced inside the drum. Check the drum
and make sure the load is balanced.
• Press START/PAUSE to resume operation, or power off and then
power the washer on after 2-3 minutes, and then try again.
Check the MEMS sensor.
• Power off and then power the washer on after 2-3 minutes, and
then try again.
Troubleshooting
9C1/9C2
If any information code keeps appearing on the screen, contact a local Samsung service
center.
OC
3C
AC6
SF
Water may overow.
• Close the water tap, and then call for service.
Check the motor.
• Power off and then power the washer on after 2-3 minutes, and
then try again.
Check the PBA communication status.
• Power off and then power the washer on after 2-3 minutes, and
then try again.
The electronic control needs to be checked.
• Check if power is supplied properly.
• If the information code remains, contact a Samsung service
center.
System failed.
• Power off the washer, and then contact a Samsung service center.
English58
WW22N6850QX_DC68-03645B_EN.indd 58 2018/3/1 9:37:27
Page 59

Specications
Fabric care chart
The following symbols provide garment
care direction. The clothing care labels
include symbols for drying, bleaching,
drying and ironing, or dry cleaning when
necessary. The use of symbols ensures
consistency among garment manufacturers
of domestic and imported items. Follow
care label directions to optimize garment
life and reduce laundering problems.
Wash cycle
Normal
Permanent press/Wrinkle
resistant/Wrinkle control
Gentle/Delicates
Hand wash
Water temperature
Bleach
Any bleach (when needed)
Only non-chlorine (color-safe)
bleach (when needed)
Tumble dry
Normal
Permanent press/Wrinkle
resistant/Wrinkle control
Gentle/Delicates
Special instructions
Line dry/Hang to dry
Drip dry
Dry at
Hot
Warm
Cold
NOTE
This represents appropriate wash water
temperatures for various items. The
temperature range for Hot below 135
°F (57 °C), Warm below 90 °F (32 °C) and
Cold below 70 °F (20 °C). (Wash water
temperature must be a minimum of 16
°C for detergent activation and eff ective
cleaning.)
Heat setting
High
Medium
Low
Any heat
No heat / Air
Specications
English 59
WW22N6850QX_DC68-03645B_EN.indd 59 2018/3/1 9:37:29
Page 60

Specications
Specications
Iron dry or steam temperatures
High
Medium
Low
Warning symbols for laundering
Do not wash
Do not wring
Do not bleach
Do not tumble dry
Protecting the environment
• This appliance is manufactured from
recyclable materials. If you decide to
dispose of it, please observe local waste
disposal regulations. Cut off the power
cord so that the appliance cannot be
connected to a power source. Remove
the lid so that animals and small
children cannot get trapped inside the
appliance.
No steam (added to iron)
Do not iron
Dry-clean
Dry-clean
Do not dry-clean
Line dry / Hang to dry
Drip dry
Dry at
• Do not exceed the detergent quantities
recommended in the detergent
manufacturers’ instructions.
• Use stain removal products and
bleaches before the wash cycle only
when necessary.
• Save water and electricity by only
washing full loads (the exact amount
depends upon the program used).
Declaration of conformity
This appliance complies with UL2157.
English60
WW22N6850QX_DC68-03645B_EN.indd 60 2018/3/1 9:37:31
Page 61

Specication sheet
A
B
C
D
Type Front loading washer
Model WW22N6850Q*
A. Width 23.6 (600)
Dimensions
(inches (mm))
consumption
Power
B. Height-overall 33.5 (850)
C. Depth 27.1 (688)
D. Depth with door open 43.9 (1115)
Water pressure (psi (kPa)) 20 - 116 (137 - 800)
NET weight (lb (kg)) 170 (77)
Spin revolution 1400 rpm
Heater rating 900 W
Washing 120 V 200 W
Washing and heating 120 V 1150 W
Spin 120 V 550 W
Drain 120 V 80 W
Specications
English 61
WW22N6850QX_DC68-03645B_EN.indd 61 2018/3/1 9:37:31
Page 62

Specications
Specications
Cycle chart
Use this chart to set the best cycle and options for you laundry.
NOTE
Setting Temp. Spin Soil Level
: factory setting EH: Extra Hot EH: Extra High EH: Extra Heavy
: can be selected H: Hot H: High H: Heavy
W: Warm M: Medium N: Normal
C: Cool L: Low L: Light
CD: Cold NS: No Spin EL: Extra Light
WW22N6850Q*
Cycle
NORMAL
DEEP STEAM
HEAVY DUTY
WHITES
SANITIZE
ALLERGEN
TOWELS
15’ EXPRESS
DELICATES
WOOL
PERM PRESS
ACTIVE WEAR
RINSE + SPIN
SELF CLEAN+
EH H W C CD EH H M L NS EH H N L EL
Temp. Spin Soil
English62
WW22N6850QX_DC68-03645B_EN.indd 62 2018/3/1 9:37:31
Page 63

Cycle
NORMAL
DEEP STEAM
HEAVY DUTY
WHITES
SANITIZE
ALLERGEN
TOWELS
15’ EXPRESS
DELICATES
WOOL
PERM PRESS
ACTIVE WEAR
RINSE + SPIN
SELF CLEAN+
Options
Extra Rinse Super Speed Delay End My cycle Alarm off
English 63
WW22N6850QX_DC68-03645B_EN.indd 63 2018/3/1 9:37:31
Specications
Page 64

Warranty (U.S.A)
Warranty (U.S.A)
SAMSUNG WASHER
LIMITED WARRANTY TO ORIGINAL PURCHASER
This SAMSUNG brand product, as supplied and distributed by SAMSUNG ELECTRONICS
AMERICA, INC. (SAMSUNG) and delivered new, in the original carton to the original
consumer purchaser, is warranted by SAMSUNG against manufacturing defects in
materials and workmanship for a limited warranty period of:
One (1) year part and labor, Three (3) years stainless tub part (Part Only), Ten (10) years
washing Digtial Inverter Motor part (Part Only)
This limited warranty begins on the original date of purchase, and is valid only on
products purchased and used in the United States. To receive warranty service, the
purchaser must contact SAMSUNG for problem determination and service procedures.
Warranty service can only be performed by a SAMSUNG authorized service center.
The original dated bill of sale must be presented upon request as proof of purchase to
SAMSUNG or SAMSUNG’s authorized service center. SAMSUNG will provide in-home
service during the warranty period at no charge, subject to availability within the
contiguous United States. In-home service is not available in all areas.
To receive in-home service, product must be unobstructed and accessible to the service
agent. If service is not available, SAMSUNG may elect to provide transportation of the
product to and from an authorized service center.
English64
WW22N6850QX_DC68-03645B_EN.indd 64 2018/3/1 9:37:31
Page 65

SAMSUNG will repair, replace, or refund this product at our option and at no charge as
stipulated herein, with new or reconditioned parts or products if found to be defective
during the limited warranty period specied above. All replaced parts and products
become the property of SAMSUNG and must be returned to SAMSUNG. Replacement parts
and products assume the remaining original warranty, or ninety (90) days, whichever is
longer.This limited warranty covers manufacturing defects in materials and workmanship
encountered in normal, noncommercial use of this product and shall not apply to the
following: damage that occurs in shipment; delivery and installation; applications and
uses for which this product was not intended; altered product or serial numbers; cosmetic
damage or exterior nish; accidents, abuse, neglect, re, water, lightning, or other acts
of nature or God; use of products, equipment, systems, utilities, services, parts, supplies,
accessories, applications, installations, repairs, external wiring or connectors not supplied
or authorized by SAMSUNG that damage this product or result in service problems;
incorrect electrical line voltage, uctuations and surges; customer adjustments and
failure to follow operating instructions, maintenance and environmental instructions that
are covered and prescribed in the instruction book; product removal and reinstallation;
problems caused by pest infestations. This limited warranty does not cover problems
resulting from incorrect electric current, voltage or supply, light bulbs, house fuses, house
wiring, cost of a service call for instructions, or xing installation errors. SAMSUNG does
not warrant uninterrupted or error-free operation of the product.
EXCEPT AS SET FORTH HEREIN, THERE ARE NO WARRANTIES ON THIS PRODUCT EITHER
EXPRESS OR IMPLIED, AND SAMSUNG DISCLAIMS ALL WARRANTIES INCLUDING, BUT
NOT LIMITED TO, ANY IMPLIED WARRANTIES OF MERCHANTABILITY, INFRINGEMENT OR
FITNESS FOR A PARTICULAR PURPOSE.
English 65
WW22N6850QX_DC68-03645B_EN.indd 65 2018/3/1 9:37:31
Page 66

Warranty (U.S.A)
NO WARRANTY OR GUARANTEE GIVEN BY ANY PERSON, FIRM, OR CORPORATION WITH
RESPECT TO THIS PRODUCT SHALL BE BINDING ON SAMSUNG. SAMSUNG SHALL NOT BE
LIABLE FOR LOSS OF REVENUE OR PROFITS, FAILURE TO REALIZE SAVINGS OR OTHER
BENEFITS, OR ANY OTHER SPECIAL, INCIDENTAL OR CONSEQUENTIAL DAMAGES CAUSED
BY THE USE, MISUSE, OR INABILITY TO USE THIS PRODUCT, REGARDLESS OF THE LEGAL
THEORY ON WHICH THE CLAIM IS BASED, AND EVEN IF SAMSUNG HAS BEEN ADVISED OF
THE POSSIBILITY OF SUCH DAMAGES.
NOR SHALL RECOVERY OF ANY KIND AGAINST SAMSUNG BE GREATER IN AMOUNT THAN
THE PURCHASE PRICE OF THE PRODUCT SOLD BY SAMSUNG AND CAUSING THE ALLEGED
DAMAGE. WITHOUT LIMITING THE FOREGOING, PURCHASER ASSUMES ALL RISK AND
LIABILITY FOR LOSS, DAMAGE, OR INJURY TO PURCHASER AND PURCHASER’S PROPERTY
AND TO OTHERS AND THEIR PROPERTY ARISING OUT OF THE USE, MISUSE, OR INABILITY
TO USE THIS PRODUCT. THIS LIMITED WARRANTY SHALL NOT EXTEND TO ANYONE OTHER
THAN THE ORIGINAL PURCHASER OF THIS PRODUCT, IS NONTRANSFERABLE AND STATES
YOUR EXCLUSIVE REMEDY.
Some states do not allow limitations on how long an implied warranty lasts, or the
exclusion or limitation of incidental or consequential damages, so the above limitations
or exclusions may not apply to you. This warranty gives you specic rights, and you may
also have other rights, which vary from state to state.
To obtain warranty service, please contact SAMSUNG at:
Samsung Electronics America, Inc.
85 Challenger Road
Ridgeeld Park, NJ 07660
1-800-SAMSUNG (726-7864)
www.samsung.com/us/support
Visits by a Service Engineer to explain functions, maintenance or installation is not
covered by warranty.
Please contact the Samsung call center for help with any of these issues.
English66
WW22N6850QX_DC68-03645B_EN.indd 66 2018/3/1 9:37:31
Page 67

Warranty (CANADA)
SAMSUNG WASHER
LIMITED WARRANTY TO ORIGINAL PURCHASER
This SAMSUNG brand product, as supplied and distributed by SAMSUNG ELECTRONICS
CANADA, INC. (SAMSUNG) and delivered new, in the original carton to the original
consumer purchaser, is warranted by SAMSUNG against manufacturing defects in
materials and workmanship for a limited warranty period of:
One (1) year part and labor, Ten (10) years washing Digtial Inverter Motor (Part only)
This limited warranty begins on the original date of purchase, and is valid only on
products purchased and used in the Canada. To receive warranty service, the purchaser
must contact SAMSUNG for problem determination and service procedures. Warranty
service can only be performed by a SAMSUNG authorized service center. The original
dated bill of sale must be presented upon request as proof of purchase to SAMSUNG or
SAMSUNG’s authorized service center. SAMSUNG will provide in-home service during the
warranty period at no charge, subject to availability within the Canada. In-home service is
not available in all areas.
To receive in-home service, product must be unobstructed and accessible to the service
agent. If service is not available, SAMSUNG may elect to provide transportation of the
product to and from an authorized service center.
English 67
WW22N6850QX_DC68-03645B_EN.indd 67 2018/3/1 9:37:31
Page 68

Warranty (CANADA)
SAMSUNG will repair, replace, or refund this product at our option and at no charge as
stipulated herein, with new or reconditioned parts or products if found to be defective
during the limited warranty period specied above. All replaced parts and products
become the property of SAMSUNG and must be returned to SAMSUNG. Replacement parts
and products assume the remaining original warranty, or ninety (90) days, whichever is
longer.This limited warranty covers manufacturing defects in materials and workmanship
encountered in normal, noncommercial use of this product and shall not apply to the
following: damage that occurs in shipment; delivery and installation; applications and
uses for which this product was not intended; altered product or serial numbers; cosmetic
damage or exterior nish; accidents, abuse, neglect, re, water, lightning, or other acts
of nature or God; use of products, equipment, systems, utilities, services, parts, supplies,
accessories, applications, installations, repairs, external wiring or connectors not supplied
or authorized by SAMSUNG that damage this product or result in service problems;
incorrect electrical line voltage, uctuations and surges; customer adjustments and
failure to follow operating instructions, maintenance and environmental instructions that
are covered and prescribed in the instruction book; product removal and reinstallation;
problems caused by pest infestations. This limited warranty does not cover problems
resulting from incorrect electric current, voltage or supply, light bulbs, house fuses, house
wiring, cost of a service call for instructions, or xing installation errors. SAMSUNG does
not warranty uninterrupted or error-free operation of the product.
EXCEPT AS SET FORTH HEREIN, THERE ARE NO WARRANTIES ON THIS PRODUCT EITHER
EXPRESS OR IMPLIED, AND SAMSUNG DISCLAIMS ALL WARRANTIES INCLUDING, BUT
NOT LIMITED TO, ANY IMPLIED WARRANTIES OF MERCHANTABILITY, INFRINGEMENT OR
FITNESS FOR A PARTICULAR PURPOSE.
English68
WW22N6850QX_DC68-03645B_EN.indd 68 2018/3/1 9:37:31
Page 69

NO WARRANTY OR GUARANTEE GIVEN BY ANY PERSON, FIRM, OR CORPORATION WITH
RESPECT TO THIS PRODUCT SHALL BE BINDING ON SAMSUNG. SAMSUNG SHALL NOT BE
LIABLE FOR LOSS OF REVENUE OR PROFITS, FAILURE TO REALIZE SAVINGS OR OTHER
BENEFITS, OR ANY OTHER SPECIAL, INCIDENTAL OR CONSEQUENTIAL DAMAGES CAUSED
BY THE USE, MISUSE, OR INABILITY TO USE THIS PRODUCT, REGARDLESS OF THE LEGAL
THEORY ON WHICH THE CLAIM IS BASED, AND EVEN IF SAMSUNG HAS BEEN ADVISED OF
THE POSSIBILITY OF SUCH DAMAGES.
NOR SHALL RECOVERY OF ANY KIND AGAINST SAMSUNG BE GREATER IN AMOUNT THAN
THE PURCHASE PRICE OF THE PRODUCT SOLD BY SAMSUNG AND CAUSING THE ALLEGED
DAMAGE. WITHOUT LIMITING THE FOREGOING, PURCHASER ASSUMES ALL RISK AND
LIABILITY FOR LOSS, DAMAGE, OR INJURY TO PURCHASER AND PURCHASER’S PROPERTY
AND TO OTHERS AND THEIR PROPERTY ARISING OUT OF THE USE, MISUSE, OR INABILITY
TO USE THIS PRODUCT. THIS LIMITED WARRANTY SHALL NOT EXTEND TO ANYONE OTHER
THAN THE ORIGINAL PURCHASER OF THIS PRODUCT, IS NONTRANSFERABLE AND STATES
YOUR EXCLUSIVE REMEDY.
Some provinces do not allow limitations on how long an implied warranty lasts, or the
exclusion or limitation of incidental or consequential damages, so the above limitations or
exclusions may not apply to you.
This warranty gives you specic rights, and you may also have other rights, which vary
from province to province.
To obtain warranty service, please contact SAMSUNG at:
Samsung Electronics Canada Inc.
2050 Derry Road West,
Mississauga, Ontario L5N 0B9 Canada.
1-800-SAMSUNG (726-7864)
www.samsung.com/ca/support (English)
www.samsung.com/ca_fr/support (French)
FAX : 1-866-436-4617
Visits by a Service Engineer to explain functions, maintenance or installation is not
covered by warranty.
Please contact the Samsung call center for help with any of these issues.
English 69
WW22N6850QX_DC68-03645B_EN.indd 69 2018/3/1 9:37:31
Page 70

Memo
WW22N6850QX_DC68-03645B_EN.indd 70 2018/3/1 9:37:31
Page 71

Memo
WW22N6850QX_DC68-03645B_EN.indd 71 2018/3/1 9:37:31
Page 72

Scan this with your smartphone
QUESTIONS OR COMMENTS?
COUNTRY CALL OR VISIT US ONLINE AT
U.S.A 1-800-SAMSUNG (726-7864) www.samsung.com/us/support
CANADA 1-800-SAMSUNG (726-7864)
WW22N6850QX_DC68-03645B_EN.indd 72 2018/3/1 9:37:32
www.samsung.com/ca/support (English)
www.samsung.com/ca_fr/support (French)
DC68-03645B-00
Page 73

Lave-linge
Manuel d'utilisation
WW22N6850Q*
WW22N6850QX_DC68-03645B_CFR.indd 1 2018/3/1 9:34:40
Page 74

Français
Table des matières
Consignes de sécurité 4
Table des matières
Remarques importantes sur les consignes de sécurité 4
Importants symboles de sécurité 4
Consignes de sécurité importantes 5
Avertissements critiques pour l'installation 6
Précautions d'installation 7
Avertissements critiques pour l'utilisation 8
Précautions d'utilisation 10
Avertissements critiques pour le nettoyage 13
Avis réglementaire 14
Installation 16
Pièces incluses 16
Exigences d'installation 18
Installation pas à pas 22
Avant de démarrer 28
Réglages initiaux 28
Instructions de lavage 28
Conseils d'utilisation du tiroir à lessive 30
Fonctionnement 33
Panneau de commande 33
Étapes simples pour démarrer 35
Vue d'ensemble des programmes 36
Fonctions spéciales 39
Maintenance 45
SELF CLEAN (AUTONETTOYAGE) 45
Smart Care
Vidange d’urgence 47
Nettoyage 48
Récupération après gel 51
Faites attention à une inutilisation prolongée 51
Nettoyer l'extérieur 52
Nettoyer l'intérieur 52
2
WW22N6850QX_DC68-03645B_CFR.indd 2 2018/3/1 9:34:41
46
Page 75

Français
Dépannage 53
Contrôles à effectuer 53
Codes d'information 57
Caractéristiques techniques 59
Tableau des symboles d’entretien des textiles 59
Protection de l’environnement 60
Déclaration de conformité 60
Fiche technique 61
Tableau des programmes 62
Table des matières
3
WW22N6850QX_DC68-03645B_CFR.indd 3 2018/3/1 9:34:41
Page 76

CONSERVEZ SOIGNEUSEMENT CES CONSIGNES
Français
Consignes de sécurité
Félicitations pour l’achat de votre nouveau lave-linge Samsung. Ce manuel contient de précieuses
informations concernant l'installation, l'utilisation et l'entretien de votre appareil. Prenez le temps
de le lire an de tirer pleinement prot de toutes les fonctionnalités qu'offre votre lave-linge.
Consignes de sécurité
Remarques importantes sur les consignes de sécurité
Veuillez lire attentivement ce manuel pour vous assurer que vous savez comment utiliser
efcacement toutes les caractéristiques et fonctions de votre nouvel appareil en toute sécurité.
Conservez-le dans un endroit sûr à proximité de l’appareil pour vous y référer ultérieurement.
Utilisez uniquement cet appareil pour son usage prévu, tel que décrit dans ce manuel d’utilisation.
Les avertissements et les consignes de sécurité importantes cités dans ce manuel ne couvrent pas
toutes les conditions et les situations susceptibles de se produire. Il est de votre responsabilité de
faire preuve de bon sens, de prudence et de discernement lors de l'installation, de l'entretien ou
de l'utilisation de votre lave-linge.
Parce que les consignes d’utilisation suivantes concernent plusieurs modèles, les caractéristiques
de votre lave-linge sont peut-être légèrement différentes de celles décrites dans ce manuel et
l’ensemble des symboles d’avertissement peuvent ne pas s’appliquer à vous. Pour toute question
ou renseignement, contactez le service après-vente le plus proche ou recherchez des informations
et consultez l’aide en ligne sur www.samsung.com.
Importants symboles de sécurité
Signication des icônes et signes repris dans ce manuel d'utilisation :
AVERTISSEMENT
Risques ou pratiques dangereuses susceptibles de provoquer des blessures corporelles graves, le
décès et/ou des dommages matériels.
ATTENTION
Risques ou pratiques dangereuses susceptibles de provoquer des blessures corporelles graves et/
ou des dommages matériels.
NOTE
Indique qu'un risque de blessure à la personne ou de dommage matériel existe.
Ces symboles d’avertissement sont présents pour prévenir toute blessure, à vous-même ou à
d’autres personnes.
Veuillez les respecter scrupuleusement.
Après avoir lu ce manuel, conservez-la dans un endroit sûr pour vous y référer ultérieurement.
Lisez attentivement toutes les consignes avant d'utiliser l'appareil.
Comme pour tout appareil électrique comportant des parties mobiles, des risques existent. Pour
utiliser cet appareil en toute sécurité, familiarisez-vous avec son fonctionnement et faites preuve
de prudence lorsque vous l’utilisez.
4
WW22N6850QX_DC68-03645B_CFR.indd 4 2018/3/1 9:34:41
Page 77

CONSERVEZ SOIGNEUSEMENT CES CONSIGNESCONSERVEZ SOIGNEUSEMENT CES CONSIGNES
Français
Consignes de sécurité importantes
AVERTISSEMENT
An de réduire les risques d'incendie, d'électrocution ou de
blessures physiques lors de l'utilisation de l'appareil, des
précautions de base doivent être prises :
1. Lisez attentivement toutes les consignes avant d'utiliser l'appareil.
2. Ne lavez et ne faites sécher aucun article ayant été en contact de quelque manière que ce soit
(nettoyage, lavage, immersion ou tache) avec de l'essence, des solvants de nettoyage à sec
ou toute autre substance inammable ou explosive. Ces substances dégagent en effet des
vapeurs qui risquent de s'enammer ou d'exploser.
3. Ne laissez pas les enfants jouer sur ou dans l'appareil. Une surveillance attentive s'impose
lorsque l'appareil est utilisé à proximité d'enfants.
4. Avant la mise hors service ou au rebut de l'appareil, retirez le hublot du compartiment de
lavage ou de séchage.
5. Ne tentez pas d'ouvrir l'appareil lorsque le tambour est en mouvement.
6. N'installez et n'entreposez jamais cet appareil dans un endroit exposé aux intempéries.
Consignes de sécurité
7. Ne jouez pas avec les commandes internes de l'appareil.
8. Ne procédez pas à la réparation ou au remplacement des pièces de l'appareil et ne tentez pas
non plus de le réparer vous-même, sauf si le manuel d'entretien ou de réparation contient des
recommandations spéciques en la matière que vous comprenez et êtes en mesure d'exécuter.
9. N'ajoutez jamais d'essence, de solvant de nettoyage à sec ou d'autres substances inammables
ou explosives dans l'eau du lave-linge. Ces substances dégagent en effet des vapeurs qui
risquent de s'enammer ou d'exploser.
10. Dans certaines conditions, de l'hydrogène peut s'accumuler dans les systèmes de production
d'eau chaude qui n'ont pas été utilisés depuis au moins deux semaines. L'HYDROGÈNE EST
UN GAZ EXPLOSIF. Si votre réseau d'eau chaude n'a pas été utilisé pendant au moins deux
semaines, ouvrez tous les robinets d'eau chaude de votre maison et laissez l'eau couler
plusieurs minutes avant d'utiliser votre lavelinge ou votre lave-linge/sèche linge combiné.
Cela permettra d'éliminer l'éventuelle accumulation d'hydrogène. L'hydrogène étant un gaz
inammable, ne fumez pas et ne créez aucune amme ni étincelle pendant cette opération.
5
WW22N6850QX_DC68-03645B_CFR.indd 5 2018/3/1 9:34:41
Page 78

CONSERVEZ SOIGNEUSEMENT CES CONSIGNES
Consignes de sécurité
CONSERVEZ SOIGNEUSEMENT CES CONSIGNES
Français
Avertissements critiques pour l'installation
Consignes de sécurité
Avertissements de la proposition 65 de l’État de Californie
(États-Unis uniquement)
Ce produit contient une substance chimique considérée par l'État de
Californie comme étant cancérigène ou à l’origine de malformations
congénitales ou d’autres troubles de la reproduction.
Cet appareil doit être installé par un technicien qualié ou par une entreprise spécialisée.
• Le non-respect de cette consigne pourrait provoquer un choc électrique, un incendie, une
explosion, des problèmes avec le produit ou des blessures.
L’appareil est lourd, soyez donc prudent lorsque vous le soulevez.
Branchez le cordon d'alimentation dans une prise murale qui répondent aux spécications
électriques locales. Utilisez la prise uniquement pour cet appareil et n'utilisez pas de rallonge.
• Le fait de partager une prise murale avec d'autres appareils à l'aide d'une multiprise ou d'une
rallonge peut entraîner des chocs électriques ou des incendies.
• Assurez-vous que la tension, la fréquence et le courant alimentant le lave-linge correspondent
à ceux indiqués dans les spécications du produit. Le non-respect de cette consigne pourrait
provoquer un choc électrique ou un incendie. Branchez correctement le cordon d'alimentation
dans la prise murale.
Éliminez régulièrement toute eau, poussière ou corps étranger des prises murales et zones de
contact à l'aide d'un chiffon sec.
• Débranchez le cordon d'alimentation et nettoyez-le à l'aide d'un chiffon sec.
• Le non-respect de cette consigne pourrait provoquer un choc électrique ou un incendie.
Branchez la prise d’alimentation dans la prise murale de manière à ce que le cordon soit orienté
vers le sol.
• Si vous branchez le cordon d'alimentation dans l'autre sens, les ls électriques à l'intérieur du
câble pourront être endommagés, entraînant un risque de choc électrique ou d'incendie.
Conservez tous les éléments d’emballage hors de portée des enfants, car ils présentent un danger
pour les enfants.
• Si un enfant place un sac en plastique sur sa tête, il peut suffoquer.
Si l'appareil, la prise électrique ou le cordon d'alimentation sont endommagés, contactez votre
centre de service après-vente Samsung le plus proche pour le faire réparer.
Cet appareil doit être correctement mis à la terre.
Ne reliez pas le conducteur de terre de l'appareil à un tuyau de gaz, un tuyau de canalisation en
plastique ou une ligne téléphonique.
• Cela pourrait provoquer un choc électrique, un incendie, une explosion ou des problèmes avec
le produit.
6
WW22N6850QX_DC68-03645B_CFR.indd 6 2018/3/1 9:34:41
Page 79

CONSERVEZ SOIGNEUSEMENT CES CONSIGNESCONSERVEZ SOIGNEUSEMENT CES CONSIGNES
Français
• Ne branchez jamais le cordon d'alimentation sur une prise qui n'est pas correctement mise à la
terre. Assurez-vous que la prise est conforme aux réglementations locales et nationales.
N'installez jamais cet appareil près d'un radiateur ou de matériaux inammables.
N’installez pas cet appareil dans un endroit humide, gras, poussiéreux, directement exposé à la
lumière du jour ou à de l’eau (gouttes de pluie).
N’installez pas cet appareil dans un endroit à basses températures.
• Le gel pourrait provoquer la rupture des tuyaux.
N'installez pas cet appareil dans un endroit présentant un risque de fuites de gaz.
• Cela pourrait entraîner un choc électrique ou un incendie.
N'utilisez pas de transformateur électrique pour alimenter le lave-linge.
• Cela pourrait entraîner un choc électrique ou un incendie.
N'utilisez pas de prise ou de cordon d'alimentation endommagé(e) ou de prise murale mal xée.
• Cela pourrait entraîner un choc électrique ou un incendie.
Ne tirez pas et ne pliez pas excessivement le cordon d'alimentation.
Ne vrillez pas et n'attachez pas le cordon d'alimentation.
N'accrochez pas le cordon d'alimentation sur un objet métallique, ne posez pas d'objet lourd sur
le cordon d'alimentation, ne l'insérez pas entre des objets et ne le coincez pas dans l'espace situé
derrière l'appareil.
• Cela pourrait entraîner un choc électrique ou un incendie.
Consignes de sécurité
Ne tirez pas sur le cordon d'alimentation pour le débrancher.
• Débranchez la prise électrique en tirant sur la prise.
• Le non-respect de cette consigne pourrait provoquer un choc électrique ou un incendie.
Cet appareil doit être placé de sorte que la che d'alimentation, les robinets d'alimentation d'eau
et les tuyaux d'évacuation soient accessibles.
Précautions d'installation
ATTENTION
Cet appareil doit être placé de façon à laisser libre accès à la prise d’alimentation.
• Le non-respect de cette consigne pourrait provoquer un choc électrique ou un incendie dû à
une fuite électrique.
Installez votre appareil sur un sol plat et dur qui pourra supporter son poids.
• Le non-respect de cette consigne pourrait provoquer des vibrations, déplacements et bruits
anormaux ou provoquer des problèmes avec le produit.
7
WW22N6850QX_DC68-03645B_CFR.indd 7 2018/3/1 9:34:41
Page 80

CONSERVEZ SOIGNEUSEMENT CES CONSIGNES
Consignes de sécurité
CONSERVEZ SOIGNEUSEMENT CES CONSIGNES
Français
Avertissements critiques pour l'utilisation
Consignes de sécurité
AVERTISSEMENT
Si l'appareil est inondé, fermez immédiatement l'alimentation en eau et en électricité et
contactez votre centre de service Samsung le plus proche.
• Ne touchez pas la prise d'alimentation avec des mains mouillées.
• Le non-respect de cette consigne pourrait provoquer un choc électrique.
Si l'appareil génère un bruit étrange, une odeur de brûlé ou de la fumée, débranchez
immédiatement la prise électrique et contactez votre centre de service Samsung le plus
proche.
• Le non-respect de cette consigne pourrait provoquer un choc électrique ou un
incendie.
En cas de fuite de gaz (gaz propane, gaz de pétrole liquéé, etc.), aérez immédiatement
la pièce sans toucher à la prise électrique. Ne touchez ni l’appareil, ni le cordon
d’alimentation.
• N'utilisez pas de ventilateur. N’allumez pas la lumière.
• Une étincelle peut entraîner une explosion ou un incendie.
Ne laissez pas les enfants jouer sur ou à l’intérieur du lave-linge. Lors de l’élimination
de l’appareil, pensez à retirer le levier de la porte.
• Les enfants peuvent suffoquer jusqu’à la mort s'ils sont coincés à l'intérieur du
produit.
Assurez-vous de retirer l'emballage (mousse, polystyrène) xé au bas du lave-linge
avant d'utiliser celui-ci.
Ne lavez pas d’articles contaminés avec de l'essence, du kérosène, du benzène, du
diluant à peinture, de l'alcool ou d'autres substances inammables ou explosives dans le
lave-linge.
• Risque de choc électrique, d'incendie ou d'explosion.
N’ouvrez pas la porte du lave-linge de force pendant qu’il fonctionne (lavage / séchage
/ essorage à haute température).
• Un écoulement d'eau hors du lave-linge peut entraîner des brûlures ou rendre le sol
glissant. Cela pourrait provoquer des blessures.
• Ouvrir la porte de force pourrait endommager le produit ou provoquer des blessures.
N'insérez pas votre main sous le lave-linge quand celui-ci est en fonctionnement.
• Cela pourrait provoquer des blessures.
Ne touchez pas la prise d'alimentation avec des mains mouillées.
• Cela pourrait entraîner un choc électrique.
8
WW22N6850QX_DC68-03645B_CFR.indd 8 2018/3/1 9:34:41
Page 81

CONSERVEZ SOIGNEUSEMENT CES CONSIGNESCONSERVEZ SOIGNEUSEMENT CES CONSIGNES
Français
N’éteignez pas l’appareil en débranchant la prise d’alimentation pendant qu’une
opération est en cours.
• Le fait de rebrancher la prise d'alimentation dans la prise murale peut provoquer une
étincelle et entraîner un choc électrique ou un incendie.
Ne laissez pas les enfants ou les personnes handicapées utiliser ce lave-linge sans une
supervision appropriée. Ne laissez pas les enfants grimper dans ou sur l’appareil.
• Cela pourrait provoquer un choc électrique, des brûlures ou des blessures.
N'insérez pas votre main ou un objet métallique sous le lave-linge pendant son
fonctionnement.
• Cela pourrait provoquer des blessures.
Ne débranchez pas l'appareil en tirant sur le cordon d’alimentation. Attrapez toujours
fermement la prise et tirez-la hors de la prise.
• L’endommagement du cordon d’alimentation pourrait provoquer un court-circuit, un
incendie et/ou un choc électrique.
Ne tentez pas de réparer, de démonter ou de modier l'appareil vous-même.
• N’utilisez pas de fusibles (comme un l de cuivre ou d’acier, etc.) autres que les
fusibles standards.
• Si l'appareil doit être réparé ou réinstallé, contactez le centre de service Samsung le
plus proche.
• Le non-respect de ces consignes pourrait provoquer un choc électrique, un incendie,
des problèmes avec le produit ou des blessures.
Si le tuyau d'arrivée d'eau se déconnecte du robinet et inonde l'appareil, débranchez le
lave-linge.
• Le non-respect de cette consigne pourrait provoquer un choc électrique ou un
incendie.
Consignes de sécurité
Débranchez la prise d’alimentation lorsque l’appareil n’est pas utilisé pendant longtemps
ou lorsqu’il y a de l’orage.
• Le non-respect de cette consigne pourrait provoquer un choc électrique ou un
incendie.
Si une substance étrangère entre dans l'appareil, débranchez la prise électrique et
contactez votre centre de service Samsung le plus proche.
• Cela pourrait entraîner un choc électrique ou un incendie.
9
WW22N6850QX_DC68-03645B_CFR.indd 9 2018/3/1 9:34:41
Page 82

CONSERVEZ SOIGNEUSEMENT CES CONSIGNES
Consignes de sécurité
CONSERVEZ SOIGNEUSEMENT CES CONSIGNES
Français
Ne laissez pas les enfants (ou les animaux) jouer sur ou à l’intérieur de votre lave-linge.
Consignes de sécurité
La porte du lave-linge ne s’ouvre pas facilement de l’intérieur, et il existe un risque de
blessure grave si un enfant est enfermé à l’intérieur.
Précautions d'utilisation
ATTENTION
Si le lave-linge est contaminé par des corps étrangers (ex. : détergent, saletés, déchets
alimentaires etc.), débranchez-le et nettoyez-le à l'aide d'un chiffon doux humide.
• À défaut, une décoloration, une déformation, des dommages ou de la rouille peuvent
apparaître.
La partie en verre de la face avant de l’appareil est susceptible de se briser suite à un impact fort.
Utilisez le lave-linge avec précaution.
• Le bris du verre pourrait provoquer des blessures.
Après une interruption d'arrivée d'eau ou en rebranchant le tuyau d'arrivée d'eau au robinet,
ouvrez celui-ci lentement.
Ouvrez le robinet d'arrivée d'eau lentement après une période prolongée de non-utilisation.
• La pression de l’air dans le tuyau d’arrivée d’eau ou dans le tuyau d’eau pourrait endommager
un élément de l’appareil ou provoquer une fuite d’eau.
Si une erreur de vidange survient pendant une opération, vériez s’il y a un problème avec
l’évacuation de l’eau.
• En cas d'utilisation du lave-linge ors d'une inondation du fait d'un problème de vidange, cela
peut entraîner un choc électrique ou un incendie.
Placez le linge entièrement dans le lave-linge an qu’il ne se coince pas dans la porte.
• Si du linge se coince dans la porte, cela pourrait endommager le linge, le lave-linge, ou
provoquer une fuite d’eau.
Coupez l'alimentation d'eau quand le lave-linge n'est pas en service.
• Assurez-vous que les raccords du tuyau d'arrivée d'eau sont correctement serrés.
Faire attention à ce que le joint en caoutchouc et le verre de la porte avant ne soient pas
contaminés par une substance étrangère (ex. déchet, ls, cheveux, etc.).
• Si une substance étrangère est prise dans la porte ou que la porte n’est pas complètement
fermée, cela peut entraîner une fuite d’eau.
10
WW22N6850QX_DC68-03645B_CFR.indd 10 2018/3/1 9:34:42
Page 83

CONSERVEZ SOIGNEUSEMENT CES CONSIGNESCONSERVEZ SOIGNEUSEMENT CES CONSIGNES
Français
Ouvrez le robinet et vériez si les connecteurs du tuyau d'alimentation en eau sont bien serrés et
s'il n'y a pas de fuite d'eau avant d'utiliser le produit.
• Si les connecteurs du connecteur de tuyaux d'alimentation en eau sont desserrés, cela peut
entraîner une fuite d'eau.
Le produit que vous avez acheté est prévu pour une utilisation domestique uniquement.
L’utilisation à des ns professionnelles est considérée comme une utilisation non conforme
du produit. Si le produit est utilisé à des ns commerciales, le produit ne sera pas couvert
par la garantie standard fournie par Samsung et Samsung ne peut être tenu responsable des
dysfonctionnements ou dommages résultant d'une telle utilisation abusive.
Ne montez pas sur l’appareil, ne placez pas d’objets (linge, bougies allumées, cigarettes allumées,
vaisselle, produits chimiques, objets métalliques, etc.) sur l’appareil.
• Cela pourrait causer des chocs électriques, des incendies, des problèmes avec l'appareil ou des
blessures.
Ce pulvérisez pas de matières volatiles telles que de l'insecticide sur la surface de l'appareil.
• En plus d’être potentiellement dangereux pour l’homme, cela pourrait également provoquer un
choc électrique, un incendie ou des problèmes avec le produit.
Ne placez pas d'objets qui génèrent des champs électromagnétiques à proximité du lave-linge.
• Ceci pourrait entraîner des blessures résultant de dysfonctionnements.
L'eau vidangée pendant un programme de lavage à haute température ou de séchage est chaude.
Ne touchez pas l'eau.
• Cela pourrait entraîner des brûlures ou des blessures.
Consignes de sécurité
Ne lavez pas, n’essorez pas et ne séchez pas de sièges, tapis ou vêtements imperméables (*) sauf
si votre appareil possède un programme spécique pour laver ces articles.
(*): Linges de lit en laine, housses pour la pluie, gilets de pêche, combinaisons de ski, couvrecouches, survêtements et housses pour bicyclettes, etc.
• Ne lavez pas de tapis épais et durs même s'ils portent le sigle lave-linge sur leur étiquette
d'entretien. Risque de vibrations anormales, de blessures ou de dégâts matériels (lave-linge,
murs, sol ou linge).
• Ne lavez pas de paillassons ni tapis de sol avec fond en caoutchouc. Le fond en caoutchouc
pourrait se détacher et coller à l'intérieur du tambour, et cela pourrait entraîner un
dysfonctionnement tel qu'une erreur de vidange.
Ne faites pas fonctionner le lave-linge lorsque le compartiment à lessive a été retiré.
• Cela pourrait provoquer un choc électrique ou des blessures résultants d’une fuite d’eau.
Ne touchez pas l’intérieur du tambour pendant ou juste après un séchage car il est chaud.
• Cela pourrait provoquer des brûlures.
11
WW22N6850QX_DC68-03645B_CFR.indd 11 2018/3/1 9:34:42
Page 84

CONSERVEZ SOIGNEUSEMENT CES CONSIGNES
Consignes de sécurité
CONSERVEZ SOIGNEUSEMENT CES CONSIGNES
Français
N'insérez pas vos mains dans le tiroir à lessive.
Consignes de sécurité
• Cela pourrait provoquer des blessures si votre main était coincée par le mécanisme d’insertion
de lessive.
• N'utilisez pas le bac de détergent liquide (sur les modèles concernés uniquement) pour les
détergents en poudre. Retirez le bac et placez le détergent en poudre directement dans le
compartiment de lavage principal.
Ne mettez aucun objet (tel que chaussures, résidus alimentaires, animaux) autres que du linge
dans le lave-linge.
• Cela pourrait endommager le lave-linge ou provoquer des blessures ou le décès de l’animal,
résultant des vibrations anormales.
N'actionnez pas les boutons à l'aide d'objets tranchants tels que des aiguilles, des couteaux, les
ongles etc.
• Cela pourrait entraîner un choc électrique ou des blessures.
Ne lavez pas de linge entré en contact avec des huiles, crèmes ou lotions utilisées dans les salons
de beauté ou de massage.
• Le joint en caoutchouc pourrait être déformé et entraîner une fuite d'eau.
Ne laissez pas d'objets métalliques tels que des épingles de sûreté ou des épingles à cheveux
dans le tambour pendant de longues périodes. Ne laissez pas d'eau de Javel dans le tambour
pendant de longues périodes.
• L’une ou l'autre action peut occasionner la rouille du tambour.
• Si de la rouille commence à apparaître sur la surface du tambour, appliquez un nettoyant
(neutre) sur la surface et utilisez une éponge pour le nettoyer. N'utilisez jamais de brosse
métallique.
N'utilisez pas directement de solvants de nettoyage à sec et ne lavez, ne rincez et n'essorez pas
de linge entré en contact avec des solvants de nettoyage à sec.
• Cela pourrait provoquer une combustion spontanée due à la chaleur générée par l’oxydation
de l’huile.
N’utilisez pas d’eau provenant d’appareils de refroidissement/chauffage de l’eau.
• Ceci pourrait entraîner des dysfonctionnements du lave-linge.
N'utilisez pas de savon naturel pour les mains dans le lave-linge.
• Risque de dysfonctionnement, de décoloration, d'oxydation ou de dégagement de mauvaises
odeurs.
12
WW22N6850QX_DC68-03645B_CFR.indd 12 2018/3/1 9:34:42
Page 85

CONSERVEZ SOIGNEUSEMENT CES CONSIGNESCONSERVEZ SOIGNEUSEMENT CES CONSIGNES
Français
Mettez les chaussettes et les soutien-gorge dans le let de lavage et mettez-le avec le reste du
linge.
Ne lavez pas d'articles de grande taille tels que du linge de lit dans un let de lavage.
• Le non-respect de ces consignes pourrait provoquer des blessures résultant des vibrations
anormales.
N'utilisez pas de détergent solidié.
• S'il s'accumule dans le lave-linge, des fuites d'eau peuvent en résulter.
Assurez-vous que toutes les poches des vêtements à laver soient vides.
• Les objets durs ou pointus tels que les pièces de monnaie, les épingles à nourrice, les ongles,
les vis ou les cailloux sont susceptibles de gravement endommager l’appareil.
Ne lavez pas les vêtements avec de grandes boucles, des boutons ou d'autres objets métalliques
lourds dans le lave-linge.
Triez le linge par couleur sur la base de la solidité des couleurs et sélectionnez le cycle
recommandé, la température de l'eau et les fonctions additionnelles.
• Le non-respect de cela peut entraîner une décoloration ou des dommages au tissu.
Faites attention à ce que les doigts des enfants ne soient pas pris dans le hublot quand vous le
refermez.
• Le non-respect de cette consigne pourrait provoquer une blessure.
Consignes de sécurité
Avertissements critiques pour le nettoyage
AVERTISSEMENT
Ne nettoyez pas l'appareil en pulvérisant directement de l'eau dessus.
Ne pas utiliser d’agent nettoyant à l’acide puissant.
N'utilisez pas de benzène, de diluant ou d'alcool pour nettoyer l'appareil.
• Cela pourrait entraîner des décolorations, des déformations, des dommages, des chocs
électriques ou un incendie.
Avant de nettoyer le lave-linge ou d'effectuer l'entretien, débranchez l'appareil de la prise murale.
• Le non-respect de cette consigne pourrait provoquer un choc électrique ou un incendie.
13
WW22N6850QX_DC68-03645B_CFR.indd 13 2018/3/1 9:34:42
Page 86

CONSERVEZ SOIGNEUSEMENT CES CONSIGNES
Consignes de sécurité
CONSERVEZ SOIGNEUSEMENT CES CONSIGNES
Français
Avis réglementaire
Consignes de sécurité
1. Avis concernant la FCC
AVERTISSEMENT DE LA FCC :
ATTENTION
Tous les changements ou modications non expressément approuvé(e)s par l'autorité responsable
de la conformité à la réglementation peut annuler le droit de l'utilisateur à utiliser cet appareil.
Cet appareil est conforme aux dispositions de la section 15 du règlement de la FCC. Le
fonctionnement est soumis aux deux conditions suivantes :
1. Cet appareil ne doit pas causer d'interférences nuisibles ; et
2. Cet appareil doit accepter toute autre interférence reçue, y compris les interférences pouvant
entraîner un fonctionnement non désiré.
Pour les appareils disponibles sur le marché américain/canadien, seuls les canaux 1 à 11 peuvent
être utilisés. La sélection des autres canaux est impossible.
DÉCLARATION DE LA FCC :
Cet équipement a été testé et s'est avéré conforme aux limites d'un dispositif numérique de classe
B, conformément à la section 15 du règlement de la FCC. Ces limites sont conçues pour assurer la
protection raisonnable contre des interférences nuisibles dans une installation résidentielle.
Cet appareil génère, utilise et peut émettre de l'énergie radio électrique et, s'il n'est pas installé
et utilisé conformément aux instructions, peut provoquer des interférences nuisibles aux
communications par signal radio. Cependant, il n'y a aucune garantie que des interférences ne se
produiront pas dans une installation particulière. Si cet appareil cause des interférences nuisibles
à la réception des signaux de radio ou de télévision, ce qui peut être déterminé en allumant et
en éteignant l'appareil, l'utilisateur est encouragé à essayer de corriger l'interférence par une ou
plusieurs des mesures suivantes :
• Réorienter ou déplacer l'antenne de réception
• Espacer davantage l'appareil du récepteur
• Connecter l'équipement dans une prise sur un circuit différent de celui auquel le récepteur est
connecté
• Consulter le revendeur ou un technicien expérimenté en radio/télévision pour obtenir de
l'aide.
DÉCLARATION DE LA FCC SUR L'EXPOSITION AUX RADIATIONS :
Cet appareil est conforme aux limitations prévues par la FCC pour l'exposition aux radiations
dans le cadre d'un environnement d'accès libre. Cet appareil doit être installé et utilisé avec une
distance minimale de 20 cm entre le radiateur et votre corps. Ce dispositif et son(ses) antenne(s)
ne doivent pas être coimplantés ni utilisés à proximité d'une autre antenne ou émetteur.
14
WW22N6850QX_DC68-03645B_CFR.indd 14 2018/3/1 9:34:42
Page 87

CONSERVEZ SOIGNEUSEMENT CES CONSIGNESCONSERVEZ SOIGNEUSEMENT CES CONSIGNES
Français
2. Notication IC
Le terme « IC » précédant le numéro d'homologation radio signie uniquement que
les spécications techniques d'Industry Canada ont été atteintes . Le fonctionnement
est soumis aux deux conditions suivantes : (1) Cet appareil ne doit pas causer
d'interférences ; et (2) Cet appareil doit accepter toute autre interférence, y compris les
interférences pouvant entraîner un fonctionnement non désiré de l'appareil.
Cet appareil numérique de la classe B est conforme á la norme NMB-003 du Canada.
Pour les appareils disponibles sur le marché américain/canadien, seuls les canaux 1 à
11 peuvent être utilisés. La sélection des autres canaux est impossible.
DÉCLARATION IC SUR L'EXPOSITION AUX RADIATIONS :
Cet appareil est conforme aux limitations prévues par la norme IC RSS-102 pour
l'exposition aux radiations dans le cadre d'un environnement d'accès libre. Cet appareil
doit être installé et utilisé avec une distance minimale de 20 cm entre le radiateur et
votre corps. Ce dispositif et son(ses) antenne(s) ne doivent pas être coimplantés ni
utilisés à proximité d'une autre antenne ou émetteur.
Notication de licence de source libre
Cet appareil utilise un logiciel open source. Les licences Open Source sont disponibles
dans le menu du produit.
Consignes de sécurité
Appuyez sur « Paramètres > Réseau > Mise à jour logicielle > Informations légales » sur
l'appareil pour plus de détails.
15
WW22N6850QX_DC68-03645B_CFR.indd 15 2018/3/1 9:34:42
Page 88

Installation
Français
12
06
08
07
01
02
03
04
05
10
09
11
Installation
Suivez attentivement ces conseils pour garantir une installation correcte du lave-linge,
et pour éviter les accidents lors du lavage.
Pièces incluses
Assurez-vous que toutes les pièces sont incluses dans l'emballage de l'appareil. Si
vous rencontrez un problème avec le lave-linge ou les pièces, contactez un centre
d'assistance clientèle Samsung local ou le magasin.
01 Manette d’ouverture 02 Tiroir à lessive 03 Panneau de commande
04 Hublot 05 Tambour 06 Filtre de la pompe
07 Tuyau de vidange d’urgence 08 Capot du ltre 09 Dessus du lave-linge
10 Prise d’alimentation 11 Tuyau de vidange 12 Pieds réglables
* La conception du tiroir et/ou du levier varie en fonction du modèle.
16
WW22N6850QX_DC68-03645B_CFR.indd 16 2018/3/1 9:34:42
Page 89

Français
Pièces fournies
Clé à ergots Caches-boulons Guide du tuyau de
Fixation d’embout
vidange
Tuyau d’arrivée
d’eau froide
Tuyau d'arrivée
d'eau chaude
Compartiment à lessive
liquide
Compartiment à
lessive liquide
(Modèles applicables
uniquement)
Outils requis pour l’installation
Tournevis
cruciforme
NOTE
• Caches-boulons: les numéros attribués à chaque cache (3 à 6) varient selon le modèle
du produit.
• L'aspect de l'appareil et des accessoires fournis peut différer selon le modèle.
• Pour acheter un accessoire ou une pièce perdue, contactez un centre de service
Samsung local, le service clientèle de Samsung ou votre revendeur.
• Tuyau d'arrivée d'eau chaude: Modèles applicables uniquement.
• Compartiment à lessive liquide: Modèles applicables uniquement.
ATTENTION
• Ne réutilisez pas les vieux tuyaux d'eau qui sont susceptibles de fuir ou de se rompre
et de provoquer une inondation et/ou des dommages matériels.
• Assurez-vous que les rondelles en caoutchouc sont insérées dans chaque raccord du
tuyau d'eau.
Niveau Pince réglable Mètre ruban
Installation
17
WW22N6850QX_DC68-03645B_CFR.indd 17 2018/3/1 9:34:43
Page 90

Installation
Français
Installation
Exigences d'installation
Alimentation électrique et mise à la terre
• Fusible ou disjoncteur 120 V c.a./ 60 Hz.
• Utilisez un circuit de dérivation individuel. Connectez seulement le lave-linge au circuit.
Pour assurer une mise à la terre correcte, votre lave-linge est équipé d’un cordon doté d’une
prise à 3 broches avec conducteur de terre destinée à être branchée sur une prise correctement
installée et reliée à la terre.
Vériez avec un électricien ou un technicien qualié si vous n'êtes pas sûr de la mise à la terre.
Ne modiez pas le cordon fourni. S'il ne correspond pas à la prise, appelez un électricien qualié
et installez une prise appropriée.
AVERTISSEMENT
• N'utilisez PAS de rallonge.
• Utilisez uniquement le cordon d’alimentation fourni avec votre lave-linge.
• Ne reliez PAS un conducteur de terre à une conduite de plomberie en plastique, une conduite
de gaz ou une conduite d’eau chaude.
• Des conducteurs de terre mal raccordés peuvent entraîner un choc électrique.
• Pour prévenir tout risque d’incendie, d’électrocution ou de blessure, l’intégralité du câblage
et des mises à la terre doit être réalisée conformément aux réglementations locales ou,
en l’absence de ces dernières, au code électrique national (National Electrical Code) ANSI/
NFPA dernière révision n°70 (pour les États-Unis) ou aux dispositions canadiennes sur
l’électricité CSA C22.1 (dernières révisions) et aux réglementations locales. Il relève de votre
responsabilité de fournir des services électriques adaptés à votre lave-linge.
Arrivée d’eau
Une pression d'eau correcte pour ce lave-linge se situe entre 20-116 psi (137-800 kPa). Une
pression inférieure à 20 psi (137 kPa) risque d'empêcher la fermeture correcte de la soupape
d'admission d'eau ou de retarder le remplissage du tambour et l'extinction du lave-linge. Les
robinets d’arrivée d’eau doivent se trouver à moins de 4 pieds (122 cm) de l’arrière de votre lavelinge an que les tuyaux fournis puissent être reliés à l’appareil.
Pour réduire un risque de fuite:
• Faites en sorte que les robinets d’arrivée d’eau soient facilement accessibles.
• Fermez les robinets d’arrivée d’eau lorsque vous n’utilisez pas le lave-linge.
• Vériez régulièrement s'il y a des fuites sur les raccords des tuyaux d'arrivée d'eau.
ATTENTION
Avant d’utiliser votre lave-linge pour la première fois, vériez l’absence de fuites au niveau des
raccords avec la vanne d’arrivée d’eau et les robinets.
Vidange
Samsung recommande une colonne verticale de 18 po (46 cm) de hauteur. Le tuyau d'évacuation
doit être raccordé par le exible au tube vertical, et le tube vertical doit couvrir complètement le
tuyau d'évacuation.
18
WW22N6850QX_DC68-03645B_CFR.indd 18 2018/3/1 9:34:43
Page 91

Français
Sol
Pour un fonctionnement optimal, votre lave-linge doit être installé sur un sol stable. Si le sol est
en bois, il est possible qu’il doive être renforcé an de réduire les vibrations et les problèmes de
déséquilibre. La présence de moquette ou de surfaces molles n'offre pas une bonne résistance
aux vibrations et votre lave-linge aura tendance à se déplacer légèrement durant l’essorage.
ATTENTION
N’installez PAS votre lave-linge sur une plate-forme ou sur une structure dont le soutien
est insufsant.
Température de l'eau
N’installez pas votre lave-linge dans une zone où l’eau peut geler car il subsistera
toujours une certaine quantité d’eau dans le robinet de prise d’eau, la pompe ou les
tuyaux. La présence d’eau gelée dans les parties de raccordement peut endommager les
courroies, la pompe et d’autres composants du lave-linge.
Encastrement dans une niche ou installation dans un placard
Espace minimum pour un fonctionnement stable :
Côtés 1 pouce (25 mm)
Haut 17 pouces (432 mm)
Arrière 5,9 pouces (150 mm)
Avant 2 pouces (51 mm)
Installation
Si vous installez le lave-linge dans la même pièce qu'un sèche-linge, laissez un espace
libre d'au moins 72 pouces² (465 cm²) in à l'avant de la niche ou du placard. Installé
seul, votre lave-linge ne nécessite aucun dégagement.
Installation sous plan
A
B
C
D
A 33,9 pouces (860 mm) C 23,6 pouces (600 mm)
B 1 pouce (25 mm) D 1 pouce (25 mm)
19
WW22N6850QX_DC68-03645B_CFR.indd 19 2018/3/1 9:34:43
Page 92

Installation
Français
Installation côte à côte
Installation
A
A
B B
C
A
E
A* 1 pouce (25 mm) D 27,1 pouces (688 mm)
B 23,6 pouces (600 mm) E 3 pouces (76 mm)
C 17 pouces (432 mm) F 3 pouces (76 mm)
*Ce dégagement n'est pas applicables aux lave-linge autonomes.
D
F
20
WW22N6850QX_DC68-03645B_CFR.indd 20 2018/3/1 9:34:43
Page 93

Français
Installation empilée (Modèle : SK-DH)
A
B
E
I
Installation
F
C
D
H J K
LG
A 3 pouces (76 mm) G 1 pouce (25 mm)
B 48 pouces² (3100 mm²) H 23,6 pouces (600 mm)
C 24 pouces² (1550 mm²) I 5,5 pouces (140 mm)
D 3 pouces (76 mm) J 3 pouces(76mm)
E 6 pouces (152 mm) K 27,1 pouces (688 mm)
F 67 pouces (1702 mm) L 5,9 pouces (150 mm)
AVERTISSEMENT
• Les lave-linge et sèche-linge de Samsung peuvent être empilés pour optimiser
l'espace utilisable.
• Les pieds du sèche-linge doivent être enlevés pour empiler le lave-linge et le sèchelinge. Vous pouvez acheter un kit d'empilage en option auprès de votre revendeur
Samsung.
21
WW22N6850QX_DC68-03645B_CFR.indd 21 2018/3/1 9:34:44
Page 94

Installation
Français
Installation
Installation pas à pas
ÉTAPE 1 Choix de l'emplacement
Exigences d'emplacement :
• Surface dure et de niveau, sans moquette ou autre revêtement de sol susceptible
d’obstruer l’aération
• Pas de lumière directe du soleil
• Pièce appropriée pour l'aération et le câblage
• La température ambiante est toujours supérieure au point de congélation (32 ˚F/0 ˚C)
• Loin d'une source de chaleur
ÉTAPE 2 Enlever les vis de transport
Déballez l'emballage du produit et
enlever tous les boulons de xation.
1. Desserrez tous les boulons de xation
à l'arrière de la machine en utilisant la
clé.
NOTE
Une clé réglable ou une clé plate de
10 mm est requise pour enlever les
boulons de transport.
2. Bouchez les trous avec les caches en
plastique fournis.
Gardez les boulons de xation en vue
d'une utilisation future.
AVERTISSEMENT
Les matériaux d'emballage peuvent être dangereux pour les enfants. Placez tous les
matériaux d'emballages (sacs plastiques, polystyrène, etc.) hors de la portée des enfants.
22
WW22N6850QX_DC68-03645B_CFR.indd 22 2018/3/1 9:34:44
Page 95

Français
ÉTAPE 3 Ajuster les pieds réglables
ÉTAPE 4 Raccordez le tuyau d'eau
B
A
1. Mettez le lave-linge en place en
le faisant glisser doucement. Une
pression excessive peut endommager
le pied de mise à niveau.
2. Mettez le lave-linge à niveau en
réglant manuellement le pied de mise
à niveau.
3. Quand la mise à niveau est terminée,
resserrez les boulons en utilisant la clé.
NOTE
Une clé réglable ou une clé plate de
17 mm est requise pour desserrer ou
resserrer les pieds de réglage.
ATTENTION
• Assurez-vous d'utiliser un nouveau
tuyau d'eau, et qu'il y a des joints
en caoutchouc (B) à l'intérieur des
raccords (A) à chaque extrémité du
tuyau d'eau. Un tuyau d'eau sans joint
peut provoquer une fuite d'eau.
• S'il y a une fuite d'eau, arrêtez d'utiliser
le lave-linge et contactez un centre de
service local Samsung. Une fuite d'eau
peut provoquer un choc électrique.
• Ne tendez pas le tuyau d’arrivée d’eau
en forçant. Si le tuyau est trop court,
remplacez-le par un tuyau haute
pression plus long.
• Pour éviter les fuites, assurez-vous que
les deux tuyaux d'eau ne soient pas
courbés ni entortillés. Une fuite d'eau
peut provoquer un choc électrique.
Installation
23
WW22N6850QX_DC68-03645B_CFR.indd 23 2018/3/1 9:34:44
Page 96

Installation
Français
Installation
Pour raccorder le tuyau d’arrivée d’eau au
robinet d'eau:
1. Raccordez une extrémité de chaque
tuyau d'eau au robinet d'eau chaude ou
d'eau froide.
2. Tournez manuellement les raccords
jusqu'au bout, puis resserrez-les
simplement d'un deux-tiers de tour
supplémentaire à l'aide d'une pince. Ne
les serrez pas trop pour éviter. Tout
dommage aux raccords.
3. Quand c'est terminé, tirez le s tuyaux
d'eau vers le haut ou vers le bas pour
vérier s'ils sont bien raccordés.
4. Placez les autres extrémités des
tuyaux dans un seau et ouvrez les
robinets pendant 10 à 15 secondes
pour enlever les impuretés. Quand
c'est terminé, fermez les robinets.
24
WW22N6850QX_DC68-03645B_CFR.indd 24 2018/3/1 9:34:45
Page 97

Français
5. Raccordez les autres extrémités
des tuyaux d’eau aux arrivées
correspondantes situées à l’arrière du
lave-linge tel que spécié. Assurezvous que le tuyau d'eau chaude est
raccordé à l'arrivée d'eau chaude et
le tuyau d'eau froide à l'arrivée d'eau
froide.
6. Répétez l'étape 2 ci-dessus pour les
autres raccords. Assurez-vous que les
deux tuyaux d'eau sont bien raccordés.
Consultez le code d'information '4C'
pour tout dépannage.
7. Ouvrez les deux robinets et vériez s'il
y a une fuite.
NOTE
Si vous ne souhaitez pas utiliser le
tuyau d'eau chaude, insérez le bouchon
d'arrivée d'eau dans l'orice d'arrivée
d'eau chaude. Dans ce cas, vous devez
sélectionner l'option Tap Cold (Robinet
d'eau froide) pour la température de l'eau.
Tous les autres indicateurs d'eau sont
éteints.
Installation
ATTENTION
Pour éviter que les tuyaux d'eau ne
soient pliés ou entortillés, assurez-vous
de sécuriser une distance d'au moins 6
pouces (150 mm) de la paroi arrière.
25
WW22N6850QX_DC68-03645B_CFR.indd 25 2018/3/1 9:34:45
Page 98

Installation
Français
Installation
ÉTAPE 5 Positionnez le tuyau d'eau
L’extrémité du tuyau de vidange peut être positionnée de trois façons différentes :
Sur le bord d'un lavabo
Le tuyau de vidange doit être placé à
une hauteur entre 24 pouces (60 cm)
et 35 pouces (90 cm) du sol. Pour que
l'embout du tuyau de vidange reste
courbé, utilisez le guide plastique (A)
du tuyau fourni. Fixez le guide au mur
en utilisant un crochet pour assurer une
vidange stable.
Dans une conduite d'évacuation ou un
B C
D
*
E
bac à laver
La longueur du bac à laver (B) et du tuyau
d'évacuation (C) doit être comprise entre
18 pouces (46 cm) et 96 pouces (245 cm).
Assurez-vous que le tuyau de vidange
et la conduite d'évacuation ne sont pas
étanches à l'air.
NOTE
D: Fixation pour tuyau / E: Collier de
xation
Raccordé au tuyau d’évacuation du
lavabo
Le tuyau d’évacuation doit être situé
au-dessus du siphon du lavabo, an que
son extrémité soit au moins à 24 pouces
(60 cm) du sol.
(*) : 24 pouces (60 cm)
26
WW22N6850QX_DC68-03645B_CFR.indd 26 2018/3/1 9:34:45
Page 99

Français
*
A
ATTENTION
A
• Raccordez le guide du tuyau de
vidange (A) à maximum 6 pouces
(15 cm)* de distance de l'extrémité
du tuyau de vidange. Si le tuyau
de vidange se prolonge au delà de
l’extrémité du guide de tuyau, des
moisissures ou microorganismes
pourraient se diffuser à l’intérieur du
lave-linge.
• Le tuyau de vidange peut être installé
jusqu’à 96 pouces (245 cm) de hauteur,
mais la capacité de drainage peut être
réduite à cette hauteur. L'eau restante
dans le système de vidange peut
provoquer des odeurs.
• Si le tuyau de vidange est installé endessous de 18 pouces (46 cm), l’eau
peut être vidangée durant le processus
du fait d'un phénomène de siphon. Si
cela se produit, un code d'information
'4C' apparaît sur l'écran.
Installation
Système de vidange du tube vertical
mural
Le tuyau de vidange doit être placé dans
un système de vidange de tube vertical
mural. Pour que l'extrémité du tuyau de
vidange reste courbé, utilisez le guide
plastique (A) fourni. Fixez le guide au mur
en utilisant un crochet pour assurer une
vidange stable.
ÉTAPE 6 Marche
Branchez le cordon d'alimentation dans une prise électrique approuvée CA 120 V / 60
Hz protégée par un fusible ou un disjoncteur. Appuyez sur le bouton Marche/Arrêt pour
mettre le lave-linge en marche.
WW22N6850QX_DC68-03645B_CFR.indd 27 2018/3/1 9:34:46
27
Page 100

Français
Avant de démarrer
Réglages initiaux
Avant de démarrer
Lancer un calibrage (recommandé)
L'option Calibrage permet à l'appareil de
calculer précisément le poids du linge.
Assurez-vous que le tambour est vide
avant d'activer l'option Calibrage.
1. Appuyez sur le bouton Marche/Arrêt
pour allumer votre lave-linge.
2. Maintenez simultanément enfoncés
les boutons Temp. et Delay End (Arrêt
différé) pendant 3 secondes.
Instructions de lavage
ÉTAPE 1 Tri
Triez le linge selon ces critères :
• Symbole textile : séparez le coton, les
bres mélangées, les synthétiques, la soie,
la laine et les rayonnes.
• Couleurs: séparez le blanc et les couleurs.
• Taille : Le mélange d'articles de tailles
différentes dans le tambour améliore les
résultats de lavage.
• Sensibilité : Lavez les articles délicats
séparément pour les articles neufs en
laine vierge et en soie, ainsi que pour
les rideaux. Vériez les étiquettes sur les
articles.
NOTE
Assurez-vous de vérier l'étiquette
d'entretien sur tous les vêtements et de trier
les vêtements en conséquence avant de
commencer le lavage.
ÉTAPE 2 Vider les poches
Videz toutes les poches de vos vêtements à
laver
• Les objets métalliques comme les pièces,
pinces et boucles sur les vêtements
peuvent endommager d'autres articles à
laver mais aussi le tambour.
3. Appuyez sur le bouton Départ/Pause
pour lancer l'étalonnage.
- Le hublot est verrouillé pendant
l'opération.
- Le tambour continue de tourner
dans le sens horaire et antihoraire
pendant plusieurs minutes.
4. Quand il a terminé, le lave-linge
s'arrête automatiquement.
Mettez les vêtements pourvus de boutons ou
de broderies sur l’envers
• Si les fermetures à glissière des pantalons
et vestes sont ouvertes lors du lavage,
cela peut endommager le tambour.
Les fermetures à glissière doivent être
maintenues fermées à l’aide d’un l.
• Les lanières des vêtements risquent de
s'emmêler avec le reste du linge. Nouez-les
avant de lancer le programme.
ÉTAPE 3 Utilisez un let à linge
• Les soutiens-gorge (lavables à l'eau)
doivent être placés dans un let à linge.
Les parties métalliques des soutiens-gorge
peuvent se casser et déchirer les autres
articles à laver.
• Les vêtements légers et de petite taille,
tels que les chaussettes, gants, bas et
mouchoirs, peuvent se coincer entre le
hublot et la paroi du lave-linge. Placez-les
dans un sac à linge n.
• Ne lavez pas le sac à linge seul, sans linge.
Ceci pourrait provoquer des vibrations
anormales susceptibles d’entraîner des
déplacements de la machine impliquant des
blessures.
28
WW22N6850QX_DC68-03645B_CFR.indd 28 2018/3/1 9:34:46
 Loading...