

Page 1
BEFORE USING THE WASHER
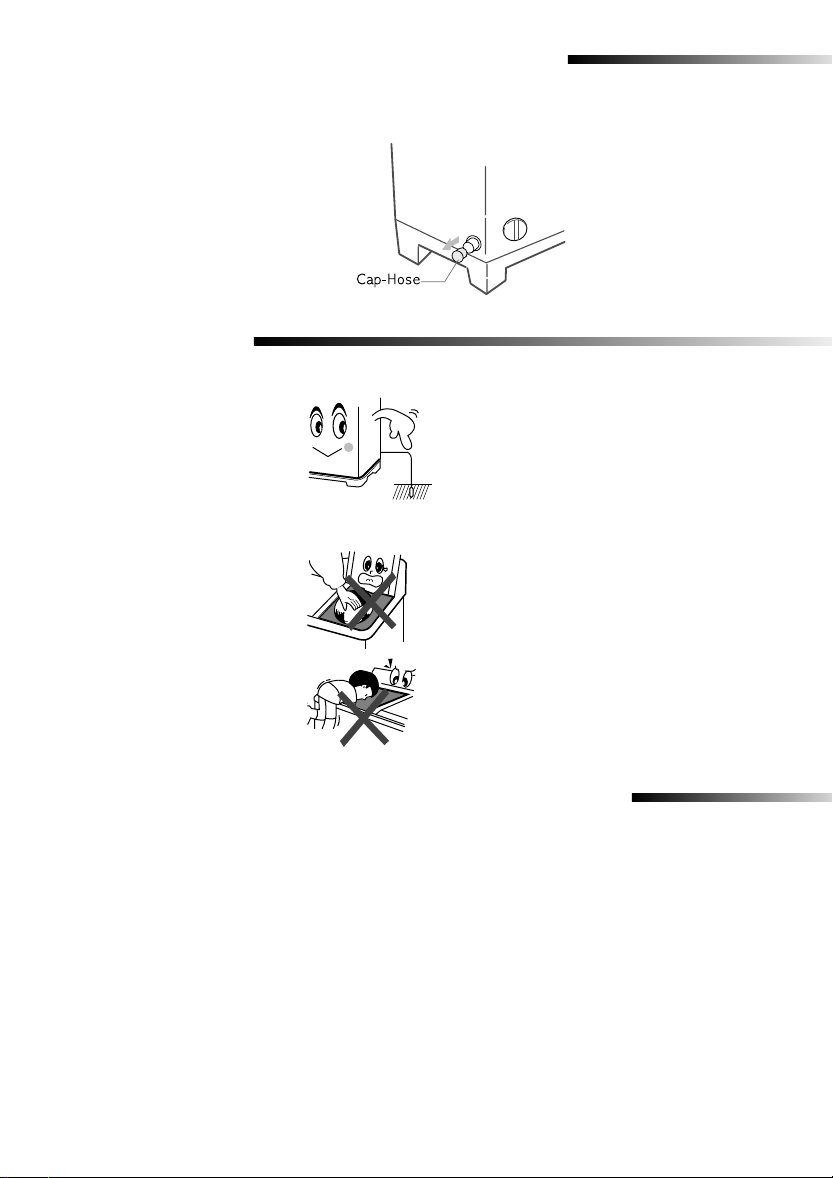
In ca s e of pump drained was her,
remove the cap-hose from
the drain hole.
CAUTIONS
B e sure that the was her is gro und ed.
To a void electrica l s hock,use
a metal pipe for the ground
conne ction. B ut, don't ground
the wa she r with gas pipes or
telephone lines to a void to
dange rs of explos ion or lightning s trike.
Dis co nne ct the po wer cord fro m th e
power s upply wh en not in us e.
Ve ntila tion
by carpeting when the wa shing ma chine is
installed on a carpeted floor.
opnning mus t not be obstructed
Do no t put y our ha nds into the s pin
dr yer ba ske t when it is s pi nnin g.
Your fingers can be c aught
by spinning laundry and
dama ged.
Ne ver allo w c hildren to ope rate
or play with the wa s her.
C hildren playing with the wa sher
may a ccidentally fall into the
was hing tub.
If the s upply
it mus t only be re pla ced by a repa ir shop
appointed by the manufacturer,because
specia l purpose tools are required.
T o
avoid overfilling and damage s this appliance
mus t be filled with the operator prese nt us ing a
modera te water supply pressure only.
cord of this appliance is dama ged,
PRECAUTIONS WHEN OPERATING
Do n't us e exc es s ively hot water.
(50ûC or more)
P lastic parts ma y be deformed or damaged.
Als o, c lothing may be deforme d or decolored.
B efo re was hing,c hec k all poc kets .
If nails or pins re main in pockets,they ma y
dama ge the was her or clothes .
C los e the wa ter tap a little if the
water pres s ure is too h igh.
B e s ur e to cov er with the i nner
cov er o n laundry befor e s pinnin g.
This prevents laundry from
being tos sed out a nd da mage d.
To a vo id water s plas hes ,
clos e the was h tub lid.
B e s ur e lay the drain hos e down
(in ca se no dr ain pump )
Ne ve r s plas h water on the control pan el.
1
Page 2
DESCRIPTION OF PARTS
S PIN DR Y ER L ID
When you open this lid while
the s pin bas ket is spinning,
the s pinning will be stopped
by bre ake sys tem.
INNE R L ID
DR A IN HOS E
(W IT H P UM P)
OVE R F LOW
FILTE R
WA SH TUB
S TR A INE R
WA SH TUB LID
B e s ure to keep the lid
clos ed during was hing
(F ILT E R )
and spinning.
WAT E R D R AIN HO S E
(W IT HOU T P UMP )
1.WA S H T IME R
This is used to s et the wash time, 1-15 minutes .
2.C YCLE S E LE CT OR
This is used to s elec t the Washing /
R insing or draining
P OWE R COR D
The plugÕs s hape may not
corre spond with this drawing.
S PIN DR Y ER
B AS K E T
P UL SATOR
DR A IN FILT E R
(with pump)
CONTROL PANEL
3. S PIN DR Y T IME R
This is used to s et the spin time, 1-5 minutes .
4.WATE R S E LE CTOR (F OR B TY PE )
During washing, WAT E R S E LE C TO R K NOB s hould
be se lec ted to wa sh.D uring spin rinsing, WAT E R
S E LE CTO R K NOB s hould be selected to spin.
F OR A TY P E
F OR B T YP E
2
Page 3
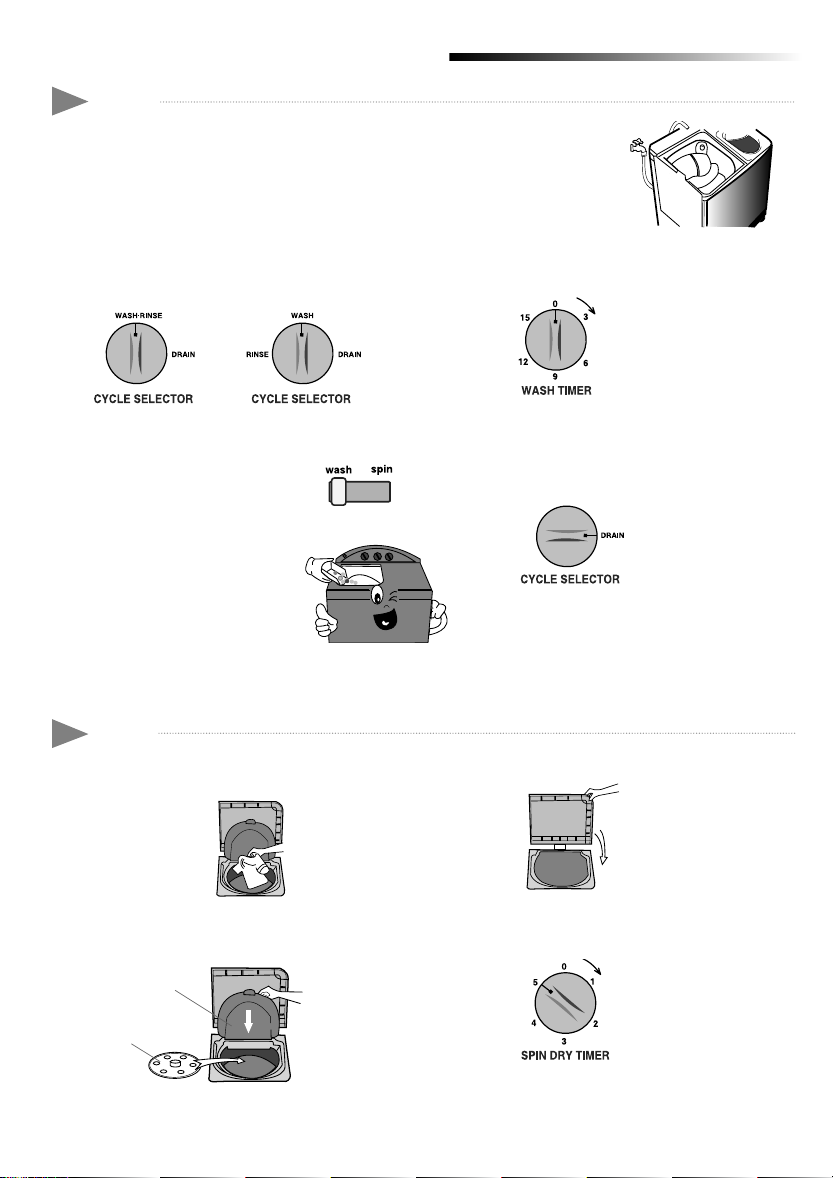
WASHING PROCEDURE
TO WA S H
1. B efore s tartin g wa shin g, ch eck the following;
C onnec t the water supply hos e a nd ope n the wa ter tap.
- La y the drain hose down towa rd a s inkhole.
(I n ca se no drain pump)
- Pla ce the dra in hos e in s ink or bath.
(I n ca se dra in pump)
-C onnec t the powe r cord to the powe r s upply outlet .
2. S et the CYCLE S E LE C TO R K NO B to
‘ WAS H
‘
R INS E . (in ca se drain pump “W AS H )
5. L oad l aundry in the
was h tub a nd fill
water to H high
water le vel.
“
6. S et the WA S H T IME R 1-15minu tes .
‘
‘
3. S et the WAT ER S E LE C TO R
K NOB to WAS H .
F OR B T YP E
4. F ill wa ter in the wash tub
an d add the detergent.
S PIN DRY
1. Trans fer the c lothes into the s pin bas ket
an d arrange the clothes ev enly.
clos e the inn er lid.
inner lid
sa fty co ver
7. A fter wa shing,s et the
C YC LE S E LE C TO R K NOB
to ÔDR AINÕ for dr ain.
3. C los e the s pin dryer lid.
4. S et the S PIN DR Y TIME R 1-5mi nutes.2. B e su re to attach the sa fety c over and
3
Page 4

R INS ING
1. S et the C YC L E S E LE CT OR K NOB to
WA SH R INS E (In cas e dra in pump “ WAS H )
‘
2. S upply the pr oper amo unt of water
as not to overflow the top of the
was hing tub.
‘
OVE R F LOW R INS E
1.K eep s upplin g wa ter
Adjus t water pressure to ensure
that the amount of water supplied
does not exceed that water drained.
“
3. S et the WAS H T IME R
2~3m inute s.
4. Drain the wate r.
S et the CYCL E
S E LE C TO R
K NOB to DR A IN
5.R epeat this cy cle u ntil drain water
is c lea n. (2~3 c ycle)
3.As s oon as the WAS H T IME R
s huts o ff, turn off the wa ter tap.
‘
‘
(W ithou t pum p)
2.S et the WA SH
TIME R 6~8min utes .
ADDIT IONAL R INS E
After rinsing you c an se lect this
cours e for more effe ctive rins e
1
(D on't se lect only this cours e
for rins e. ) Loa d the la undry
eve nly into the spin bas ket.
S et the WA T E R S E L E C T OR K NO B to
2
S P IN and C YC L E
S E L E C TO R KN OB to
ÔDR A INÕ.
S upply water for a bout 1minute.
3
Adjus t the wa te r flow to pre vent
over flow from the wa sh tub.
(wi th pu mp)
4. S et the CYCLE
S E LE C TO R K NO B
to ÔDR A INÕ.
inner lid
sa fety cove r
4
After stopping wa ter
4
s upply, cove r the
laundry with s afety cover
and clos e the inner lid.
C lose the spin dryer
5
lid.
S et the S P IN DR Y
6
T IME R 2~3 minutes .
Page 5

INSTALLATION
E NV IR ONME NT
L eave s om e s pac e
S pac e a t la st 1 5cm be twee n the wa sher
and the wall.
P lac e the was he r o n a s tur dy fla t s urface .
If the was her is placed on an unev en or weak
s urface , nois e or vibra tion ma y be occure d.
(A llowable is 2û)
Ne ver in stall th e w as her nea r water.
Do not place the wa she r in s teamy rooms or
where the wa sher is directly expos ed to ra in.
Mois ture may des troy the electrica l ins ulation
and ca use a n ele ctrical shock ha zard.
Av oid direct s unligh t or he atin g devic es .
As plastic and e lectrical compone nts are
affec ted by direc t he at, never place the
was her near heaters , boilers,etc.
Do not place under direct s unlight.
Ins ta ll the drain hose about
70~8 0cm above the ground
for pump model.
HO W T O C LE AN T HE F ILT E R (In cas e drain pump)
1.
2.
3. R e move dirts and rotate
C ONNE C T ING T HE DR AIN HO SE
After pres sing the joint ring(a ), inse rt the dra in hos e( b)
to drain direction.
CLEANING THE MACHINE
P lace a rag under the wa sher filter
not to wet the floor.
R otate the filter c ounterc lockwise
and pull out the filter.
the filter clockwis e until it
locks in position.
a
b
1. OV E R F L OW FILTE R
P ull the upper s ide of the
overflow filter with
your fingers into the holes
2. CL E ANING T HE F ILT E R
P ush the straine r(filter) out and take up the
filter as s hown in figure.
Wa sh the filter and was hing tub.
in the direction of arrow as
shown in the figure.
3. CL E ANING T HE WAS HE R B ODY
Wipe off strains on the cabinet and operation pa nel with s oft c loth.
Do not use benz ene, thinne rs, cleanser,or wax, nor sc rub the wa sher with a brus h.
P ainted surface s or plas tic parts will be dama ged.
5
Page 6

LAUNDRY GUIDE
WA SHING TIME
K IND S O F C LOT HIN G
E xtremely solid he avy fabric
Line n,cotton,etc.
Ordinary clothes
(underwear,etc)
S lightly solied synthetic
fiber
100 %wool,mixed wool knitting,
thin synthetic fiber with tags
indicating ha nd was hing
WHE N YOU L OAD T HE L AUNDRY IN TO
THE S P IN B A SK ET.
P res s the la undry evenly and put the sa fety
cove r into the spin basket drum as shown in
the figure .
WA SHING T IME
10 to15minutes
8 to10minutes
7minutes
2 to 5minutes
2 to 5minutes
S PIN DRY TIME
TIME
1min.
1~2min.
3~5min.
5min.
TYP E O F L A UNDR Y
Thin(synthetic fiber)
wool
cotton
thick(c otton)
DE T E R GE NT
In cas e the water le vel is at High ,
amount of water is 4 2l.
‘
-H-
F ollow the directions printed on the
package for amount of deterge nt.
C hoose the a mount of deterge nt
depending on the fa bric type and
water level.
‘
‘
MAINTENANCE
‘
TR OUB L E
The was her
does n ot work.
C lothes will
not m ove freely.
Inco mplete
s pinning
TROUBLE SHOOTING
C HE CK P OINT
C hec k tha t the power c ord is
connec ted to a po wer o utlet well.
P ower s toppage?
Is th e laundry overloaded?
Are the la undry a rranged evenly ?
6
TR OUB L E
Inco mplete
draining
The s pin dr yer
bas ket will not
run.
C HE CK P OINT
Is the filter clogged
with lin t?
S ee ÒC leaning th e
ma chineÓ o n page 5.
Is the sp in dr yer lid c los ed
c omple tely ?
A re la undr y(s oc ks ,e tc. )fal ling
ou t of the s pin d ryer bas k et and
c lingi ng to the a xle?
S ee ÒTo pic k ou t...Ó
on page 6.
Page 7

Owner's Ins truc tions
B efore opera ting the unit, plea se read this manua l throughly,
B E FO RE US IN G THE WAS HE R 1
C AUTIONS 1
P RE CA UT ION S W HE N O PE RAT ING 1
DE S C R IP TIO N O F PAR TS 2
C ONT R OL PAN EL 2
WA SHING P ROC E DUR E 3
TO WAS H 3
S PIN DR Y 3
R INS IN G 4
OVE R F LO W R INS E 4
ADDIT IONAL R INS E 4
INS TAL L ATI ON 5
E NV IR ONME NT 5
HO W T O C LE A N T H E F ILT E R 5
C ON NE C T IN G DR A IN HO S E 5
C LE A NING T HE MA CHIN E 5
L AUNDRY G UID E 6
MA INT ENA NC E 6
TR OUB LE SHOOT ING 6
S PE CIFIC ATION S
and retain for future reference .
Page 8

IF Y OU N E E D HE LP.
Do not hesitate to call your local s amsung service center.
They will be willing to he lp you.
B e sure to give them your na me,a ddres s,telephone number and the purpose of the c all.
S PE C IF IC ATION
DIME NS ION S (mm)
WATE R P R E S S UR E
WE IG HT
E XTR ACTIO N E F F IC IE NC Y
S TA NDAR D QUA NT IT Y O F WATE R
NO MAL C APA C ITY
MO TO R INP UT
MO TO R MA X IN PU T
R AT ING TIME
W715 mmxD430mmxH 870mm
0.05~0.78 MPa
0.5 ~ 8.0 kg.f/cm2
With out pump 19kg W ith pump 21kg
60 %
42 l
Wa shing : 3.8 kg S pinning : 3.8 kg
W as hing : 280 W Spinning : 1 10 W
350 W
Wa shing 1Hour S pinning 15minutes
DC 68-0128 2A
 Loading...