

Samsung WT21MFF Users Manual

Cleaning the Drum
You can clean the OPC drum of the toner cartridge manually or
automatically.
If there are streaks or spots on documents you print, the OPC
drum of the toner cartridge may require manual cleaning.
1
Before starting the cleaning procedure, make sure that
paper is loaded in the machine.
2
Press
Menu
on the control panel until “Maintenance”
appears on the top line of the display.
The first available menu item, “Clean Drum”, displays on
the bottom line.
3
Press
Enter
.
The first available menu item, “Yes” displays on the
bottom line.
4
Press
Enter
.
The machine prints out a cleaning page. Toner particles on
the drum surface are affixed to the paper.
5
If the problem remains, repeat steps 1 through 4.
6
To return to Standby mode, press
Stop/Clear
.
Consumables and Replacement
Parts
From time to time, you needs to replace the toner cartridge,
roller, and fuser unit to maintain top performance and to avoid
print quality problems and paper feed problems resulting from
worn parts.
The following items should be replaced after you have printed
the specified number of pages:
Items Yield (Average)
ADF rubber pad Approx. 20,000 pages
ADF roller Approx. 50,000 pages
Paper feeding roller Approx. 50,000 pages
Transfer roller Approx. 50,000 pages
Fuser unit Approx. 50,000 pages
Ignoring the Toner Empty Message
(Only for
When the toner cartridge is nearly empty, the machine shows
the “[Toner Empty]” message and continues printing except
incoming faxes. In this case, incoming faxes are saved in
memory.
However, you can set the machine to print incoming faxes, even
though print quality is not optimal.
1
Press
2
Press the scroll button ( or ) until “Ignore Toner”
appears on the bottom line and press
3
Press the Scroll button ( or ) to select “On” or “Off”.
4
Press
5
To return to Standby mode, press
SCX-4521F
Menu
until “Machine Setup” appears on the display.
Select “On” to ignore the [Toner Empty] message.
Select “Off” to stop printing incoming faxes when the
message appears. This is the default setting.
Enter
to save the selection.
)
Enter
.
Stop/Clear
.
To purchase consumables and replacement parts, contact your
Samsung dealer or the retailer where you bought your
machine. We strongly recommend that these items be installed
by a trained service professional, except for the toner cartridge
(see “Replacing the Toner Cartridge” on page 8.4) and the ADF
rubber pad (see “Replacing the ADF Rubber Pad” on page 8.6).
8.5
Maintenance
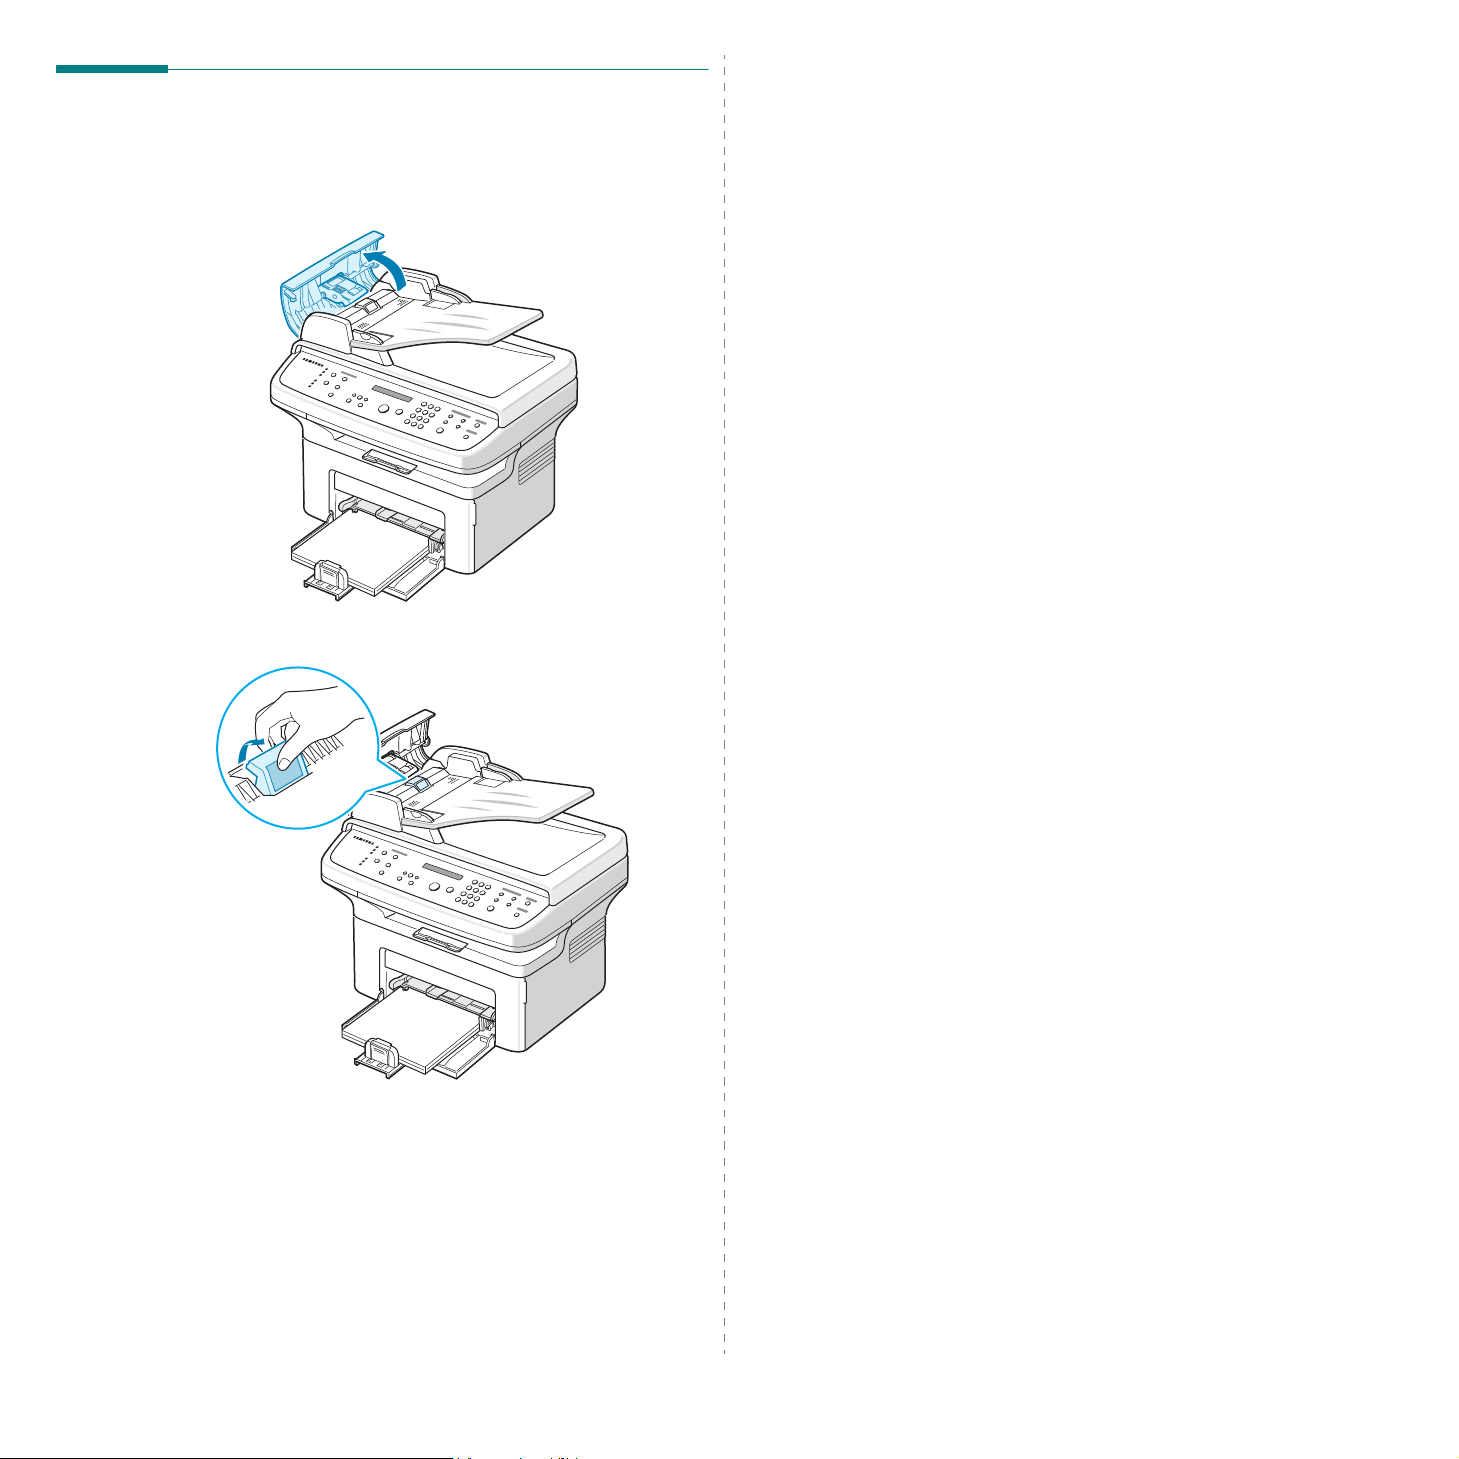
Replacing the ADF Rubber Pad
You can purchase an ADF rubber pad from your Samsung
dealer or the retailer where you bought your machine.
1
Open the ADF cover.
2
Remove the ADF rubber pad from the ADF, as shown.
3
Insert a new ADF rubber pad into place.
4
Close the ADF cover.
8.6
Maintenance

9 Troubleshooting
Clearing Document Jams
This chapter gives helpful information for what to do if you
encounter an error.
This chapter includes:
• Clearing Document Jams
• Clearing Paper Jams
• Clearing LCD Error Messages
• Solving Other Problems
• Common Linux Problems
• Common Macintosh Problems
When a document jams while passing through the ADF
(Automatic Document Feeder), “[Document Jam]” appears on
the display.
Input Misfeed
1
Remove any remaining page(s) from the ADF.
2
Open the ADF cover.
3
Pull the document gently out of the ADF.
4
Close the ADF cover. Then load the removed page(s), if
any, back into the ADF.
N
OTE
: To prevent document jams, use the document glass for
thick, thin, or mixed paper-type documents.
9.1
Troubleshooting
Exit Misfeed
1
Remove any remaining page(s) from the ADF.
2
Open the ADF cover.
3
Remove the misfed documents from the document output
tray.
4
Close the ADF cover. Then load the removed page(s), if
any, back into the ADF.
In the Tray
1
Remove the jammed paper in the tray by gently pulling it
straight out.
If there is any resistance and the paper does not move
when you pull, or if you cannot see the paper in this area,
check the fuser area around the toner cartridge. See
page 9.3.
2
Open and close the front door to resume printing.
Clearing Paper Jams
When a paper jam occurs, “Paper Jam” appears on the display.
Refer to the table below to locate and clear the paper jam.
Message Location of Jam Go to
[Paper Jam 0]
Open/Close Door
[Paper Jam 1]
Open/Close Door
[Paper Jam 2]
Check Inside
To avoid tearing the paper, pull out the jammed paper gently
and slowly. Follow the instructions in the following sections to
clear the jam.
In the tray or manual
tray
In the fuser area or
around the toner
cartridge.
In the paper exit area page 9.3
page 9.2
page 9.3
In the Manual Tray
1
Remove the jammed paper in the tray by gently pulling it
straight out.
If there is any resistance and the paper does not move
when you pull, or if you cannot see the paper in this area,
check the fuser area around the toner cartridge. See
page 9.3.
2
Open and close the front door to resume printing.
9.2
Troubleshooting

In the Fuser Area or Around the Toner
Cartridge
N
OTE
: The fuser area is hot. Take care when removing paper
from the machine.
1
Open the front door.
2
Pull the toner cartridge out, lightly pushing it down.
3
If necessary, pull the manual tray out.
4
Remove the jammed paper by gently pulling it straight
out.
5
If necessary, push the manual tray back into the machine.
6
Reinstall the toner cartridge and close the front door.
Printing automatically resumes.
In the Paper Exit Area
1
Open and close the front door. The jammed paper
automatically exits the machine.
If the paper does not exit, continue to step 2.
2
Gently pull the paper out of the output tray.
9.3
Troubleshooting
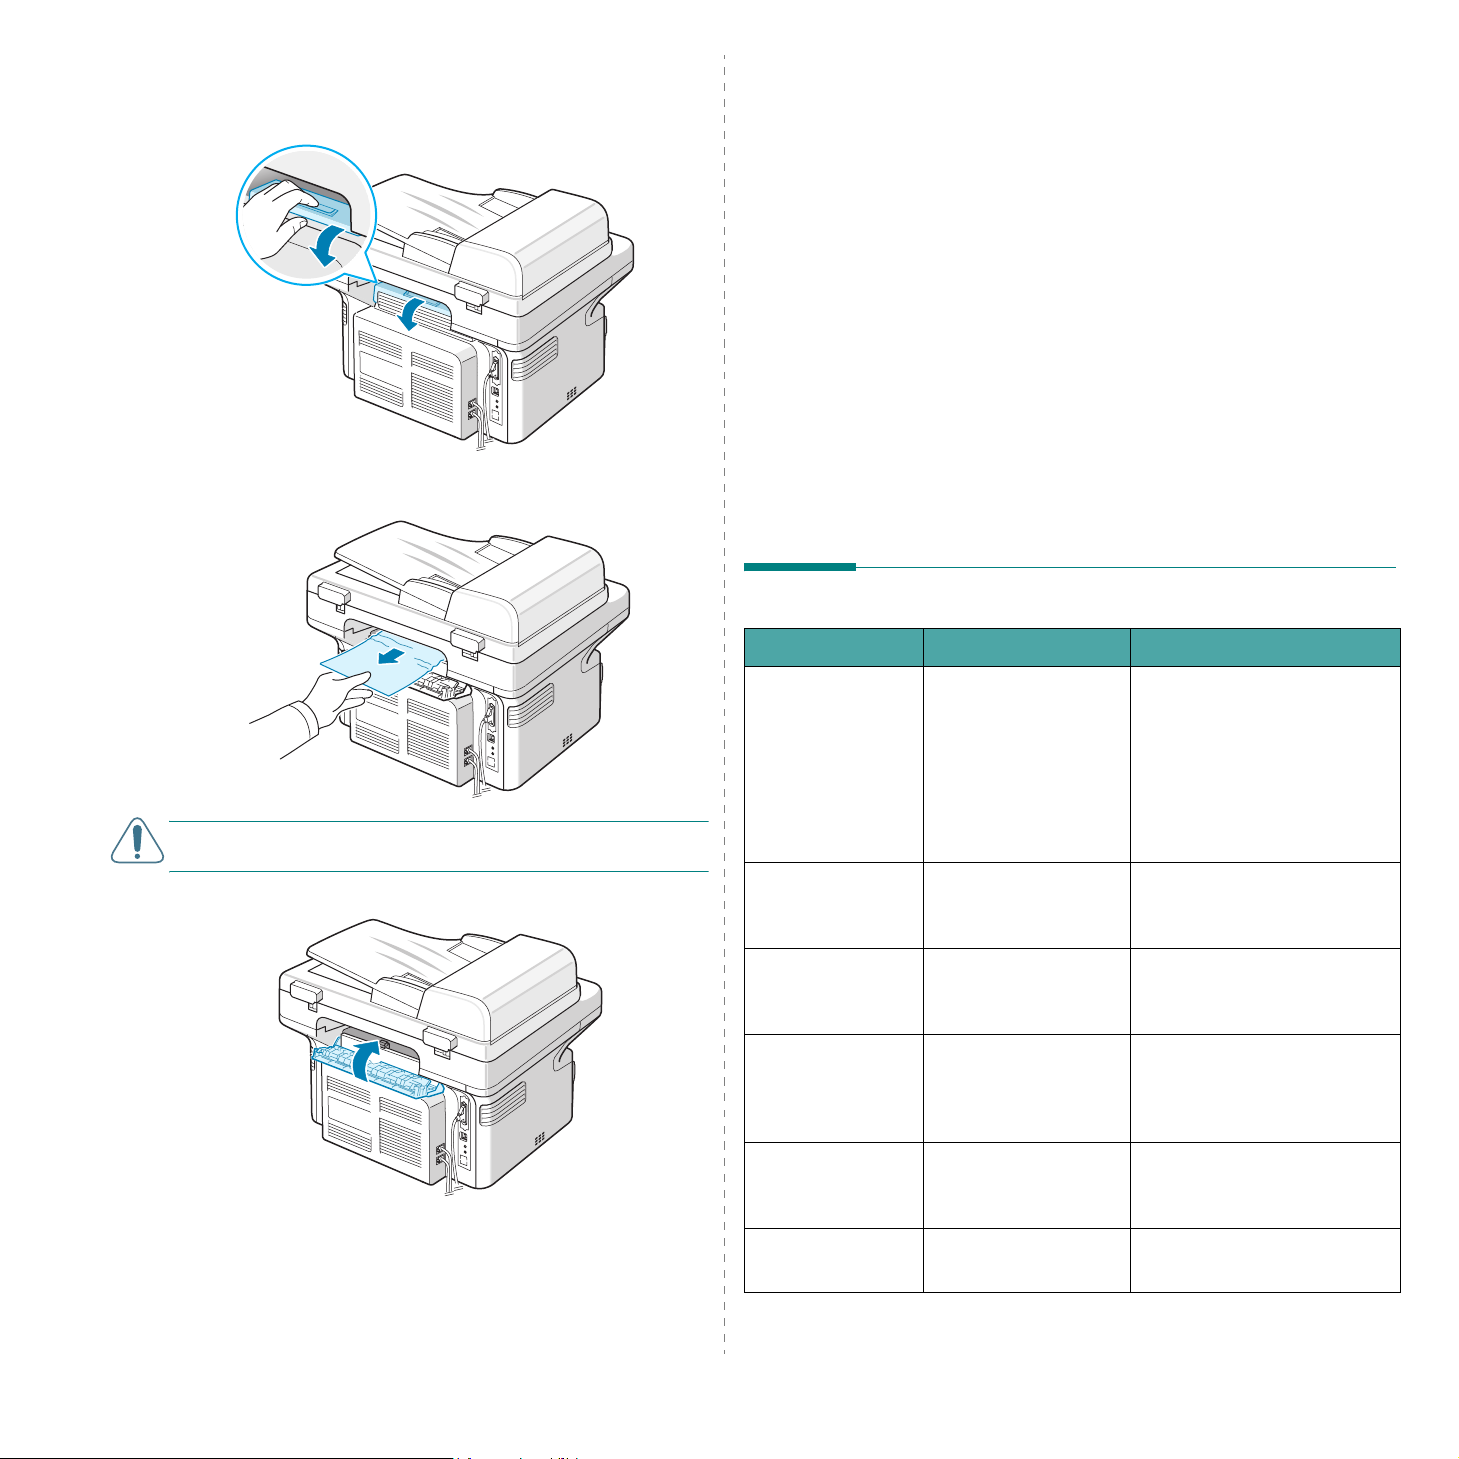
3
If there is any resistance and the paper does not move
when you pull, or if you cannot see the paper in the output
tray, open the rear cover by pulling the tab on it.
4
Remove the jammed paper by gently pulling it straight
out.
Tips for Avoiding Paper Jams
By selecting the correct paper types, most paper jams can be
avoided. When a paper jam occurs, follow the steps outlined in
“Clearing Paper Jams” on page 9.2.
• Follow the procedures in “Loading Paper” on page 2.3.
Ensure that the adjustable guides are positioned
correctly.
• Do not overload the tray.
• Do not remove paper from the tray while your machine is
printing.
• Flex, fan, and straighten the paper before loading.
• Do not use creased, damp, or highly curled paper.
• Do not mix paper types in the tray.
• Use only recommended print materials. See “Paper
Specifications” on page 10.3.
• Ensure that the recommended print side of print
materials is facing up in the tray.
Clearing LCD Error Messages
Display Meaning Suggested solutions
C
AUTION
removing paper from the machine.
5
6
: Inside of the machine is hot. Take care when
Close the rear cover.
Open and close the front door to resume printing.
Cancel ?
1:Yes 2:No
(only for SCX4521F)
[Comm. Error]
(only for SCX4521F)
CRU Fuse Error The toner cartridge is
[Document Jam] The loaded document
[Front or Rear]
[Cover Open]
Enter Again You entered an
Your machine’s
memory has become
full while trying to
store a document into
memory.
The machine has a
communication
problem.
not installed correctly.
has jammed in the
ADF (Automatic
Document Feeder).
The front door or rear
cover is not securely
latched.
unavailable item.
To cancel the fax job, press
1
button to accept “Yes”.
the
If you want to send the pages
that have been successfully
2
stored, press the
accept “No”. You should send
the remaining pages later,
when memory is available.
Ask the sender to try again.
Install the toner cartridge
correctly. See “Replacing the
Toner Cartridge” on page 8.4.
Clear the document jam. See
“Clearing Document Jams” on
page 9.1.
Close the door until it locks
into place.
Enter the correct item again.
button to
9.4
Troubleshooting
Display Meaning Suggested solutions
Display Meaning Suggested solutions
Low Heat Error There is a problem in
Open Heat Error
[Over Heat]
Group Not
Available
(only for SCX4521F)
[Incompatible]
(only for SCX4521F)
[Line Busy]
(only for SCX4521F)
[Line Error]
(only for SCX4521F)
Load Document You have attempted
the fuser unit.
You have tried to
select a group location
number where only a
single location
number can be used,
such as when adding
locations for a
broadcast operation.
The remote machine
did not have the
requested feature,
such as a delayed
transmission.
This message also
occurs if the remote
machine does not
have enough memory
space to complete the
operation you are
attempting.
The receiving party
did not answer or the
line is already
engaged.
Your machine cannot
connect with the
remote machine or
has lost contact
because of a problem
with the phone line.
to set up a copy or fax
operation with no
document loaded into
the ADF.
Unplug the power cord and
plug it back in. If the problem
persists, please call for
service.
Use a speed dial number or
dial a number manually using
the number keypad.
Reconfirm the remote
machine’s features.
Try again after a few minutes.
Try a g a in. I f the p r oble m
persists, wait an hour or so
for the line to clear and try
again.
Or, turn the ECM mode on.
See “ECM Mode (Error
Correction Mode)” on
page 7.15.
Lo ad a docume nt int o the A DF
and try again.
Memory Full
(only for SCX4521F)
[No Answer]
(only for SCX4521F)
[No Cartridge] The toner cartridge is
Assigned
Not
(only for SCX4521F)
[No Paper]
Add Paper
Operation
Not Assigned
(only for SCX4521F)
Out of Range The current date and
[Paper Jam 0]
Open/Close Door
[Paper Jam 1]
Open/Close Door
The memory is full. Delete unnecessary
The receiving fax
machine has not
answered after
several redial
attempts.
not installed.
• The speed dial
location you tried to
use has no number
assigned to it.
• The ID you entered
is not assigned
The paper in the tray
has run out.
You are doing the
Add/Cancel operation,
but there are no jobs
waiting.
time you entered is
not correct
Paper has jammed in
the feeding area of
the tray.
Paper has jammed in
the fuser area or
around the toner
cartridge.
.
.
documents and retransmit
after more memory becomes
available. Alternatively, split
the transmission into more
than one operation.
Try again. Make sure that the
receiving machine is
operational.
Install the toner cartridge.
See “Installing the Toner
Cartridge” on page 2.2.
• Dial the number manually
using the number keypad or
assign the number. For
storing a number, see
“Automatic Dialing” on
page 7.9.
• Enter the correct ID
page 2.10
Load paper in the tray. See
“Loading Paper” on page 2.3.
Check the display to see if
there are any scheduled jobs.
The display should indicate
them in Standby mode; for
example, Delay Fax.
Enter the correct date and
.
time
Clear the jam. See “In the
Tray” on page 9.2.
Clear the jam. See “In the
Fuser Area or Around the
Toner Cartridge” on page 9.3.
.
[LSU Error] A problem has
occurred in the LSU
(Laser Scanning Unit).
Memory Dial Full
(only for SCX4521F)
The fax jobs queue in
the memory is full.
Unplug the power cord and
plug it back in. If the problem
persists, please call for
service.
Cancel unnecessary fax jobs
in the memory.
Troubleshooting
[Paper Jam 2]
Check Inside
[Power Failure] Power has turned off
Paper has jammed in
the paper exit area.
then on and the
machine’s memory
has not been saved.
9.5
Clear the jam. See “In the
Paper Exit Area” on page 9.3.
The job which you were trying
to do before the power failure
must be completely re-done.
Display Meaning Suggested solutions
Remove Documents
from ADF
[Retry Redial?]
(only for SCX4521F)
Scanner Locked The scanner module is
[Stop Pressed] The
[Toner Empty] The toner cartridge
[Toner Low] The toner is almost
The Favorite Copy
button is set to Clone,
Autofit, ID Card Copy
or Poster and you
press the button.
The machine is
waiting for a specified
time interval to redial
a previously busy
station.
locked.
Stop/Clear
button has been
pressed during a copy
or fax operation.
has run out.
empty.
The Clone, Autofit, ID Card
Copy or Poster feature does
not work with ADF. Remove
the documents in the ADF.
You can press
immediately redial, or
to cancel the redial
Clear
operation.
Upload the power cord and
plug it back in.
Try a g a in.
Replace the toner cartridge
with a new one. See
“Replacing the Toner
Cartridge” on page 8.4.
Take out the toner cartridge
and gently shake it. By doing
this, you can temporarily
reestablish printing
operations. See
“Redistributing Toner” on
page 8.4.
Enter
to
Stop/
Solving Other Problems
The following chart lists some conditions that may occur and
the recommended solutions. Follow the suggested solutions
until the problem is corrected. If the problem persists, please
call for service.
Paper Feeding Problems
Condition Suggested solutions
Paper is jammed
during printing.
Paper sticks
together.
Multiple sheets of
paper do not feed.
Paper does not feed
into the machine.
Clear the paper jam. See “Clearing Paper Jams” on
page 9.2.
• Ensure that there is not too much paper in the tray.
The tray can hold up to 150 sheets of paper,
depending on the thickness of your paper.
• Make sure that you are using the correct type of
paper. See “Paper Specifications” on page 10.3
• Remove paper from the tray and flex or fan the
paper.
• Humid conditions may cause some paper to stick
together.
• Different types of paper may be stacked in the tray.
Load paper of only one type, size, and weight.
• If multiple sheets have caused a paper jam, clear
the paper jam. See “Clearing Paper Jams” on
page 9.2.
• Remove any obstructions inside the machine.
• Paper has not been loaded correctly. Remove paper
from the tray and reload it correctly.
• There is too much paper in the tray. Remove excess
paper from the tray.
• The paper is too thick. Use only paper that meets
the specifications required by the machine. See
“Paper Specifications” on page 10.3.
.
The paper keeps
jamming.
Transparencies stick
together in the
paper exit.
Envelopes skew or
fail to feed
correctly.
9.6
Troubleshooting
• There is too much paper in the tray. Remove excess
paper from the tray. If you are printing on special
materials, use one sheet of paper at a time.
• An incorrect type of paper is being used. Use only
paper that meets the specifications required by the
machine. See “Paper Specifications” on page 10.3.
• There may be debris inside the machine. Open the
front door and remove the debris.
Use only transparencies specifically designed for laser
printers. Remove each transparency as it exits from
the machine.
Ensure that the paper guides are against both sides of
the envelopes.
Printing Problems
Condition Possible cause Suggested solutions
Condition Possible cause Suggested solutions
The machine
does not
print.
The machine is not
receiving power.
The machine is not
selected as the default
printer.
Check the machine for
the following:
• The front door is not
closed.
• Paper is jammed.
• No paper is loaded.
• The toner cartridge
is not installed.
Check the power cord
connections. Check the power
switch and the power source.
your printer
Select
default printer in your Windows.
After locating the problem, clear
it.
• Close the door.
• Clear the paper jam. See
“Clearing Paper Jams” on
page 9.2.
• Load paper. See “Loading
Paper” on page 2.3.
• Install the toner cartridge. See
“Installing the Toner Cartridge”
on page 2.2.
If a printer system error occurs,
contact your service
representative.
as your
The machine
selects print
materials
from the
wrong paper
source.
A print job is
extremely
slow.
Half the page
is blank.
The paper source
selection in the printer
properties may be
incorrect.
The job may be very
complex.
If you are using
Windows 98/Me, the
Spooling Setting may
be set incorrectly.
The page orientation
setting may be
incorrect.
For many software applications,
the paper source selection is
Paper
found under the
the printer properties. Select the
correct paper source. For details,
Software User’s Guide
see
Reduce the complexity of the
page or try adjusting the print
quality settings.
The maximum print speed of your
machine is 20 PPM for Letter-sized
paper and 20 PPM for A4-sized
paper.
From the
Settings
click the
choose
Details
Spool Settings
the desired spool setting.
Change the page orientation in
your application. For details, see
Software User’s Guide
Start
and
Printers
your printer
Properties
tab, and then choose the
tab within
.
menu, choose
. Right-
icon,
, click the
button. Select
.
The connection cable
between the computer
and the machine is not
connected properly.
The connection cable
between the computer
and the machine is
defective.
The port setting is
incorrect.
The machine may be
configured incorrectly.
The printer driver may
be incorrectly
installed.
The machine is
malfunctioning.
Disconnect the printer cable and
reconnect it.
If possible, attach the cable to
another computer that is working
properly and print a job. You can
also try using a different printer
cable.
Check the Windows printer setting
to make sure that the print job is
sent to the correct port, for
example, LPT1. If the computer
has more than one port, make
sure that the machine is attached
to the correct one.
Check the printer properties to
ensure that all of the print
settings are correct.
Repair the printer software. For
details, see
Guide
Check the display message on the
control panel to see if the
machine is indicating a system
error.
Software User’s
.
The machine
prints, but the
text is wrong,
garbled, or
incomplete.
The paper size and the
paper size settings do
not match.
The printer cable is
loose or defective.
The wrong printer
driver was selected.
The software
application is
malfunctioning.
The operating system
is malfunctioning.
Ensure that the paper size in the
printer driver settings matches
the paper in the tray.
Or, ensure that the paper size in
the printer driver settings
matches the paper selection in the
software application settings you
use.
Disconnect the printer cable and
reconnect. Try a print job that you
have already printed successfully.
If possible, attach the cable and
the machine to another computer
and try a print job that you know
works. Finally, try a new printer
cable.
Check the application’s printer
selection menu to ensure that
your machine is selected.
Try printing a job from another
application.
Exit Windows and reboot the
computer. Turn the machine off
and then back on again.
9.7
Troubleshooting
Condition Possible cause Suggested solutions
Pages print,
but are blank.
An error
occurs
repeatedly
when you are
printing with
the USB
connection.
The toner cartridge is
defective or out of
toner.
The file may have
blank pages.
Some parts, such as
the controller or the
board, may be
defective.
When the USB mode is
set to “Fast”, some PC
user may experience
poor USB
communication.
Redistribute the toner, if
necessary. See “Redistributing
Toner” on page 8.4.
If necessary, replace the toner
cartridge.
Check the file to ensure that it
does not contain blank pages.
Contact a service representative.
Change the USB mode to “Slow”.
To do so, follow these steps:
Menu
1. Press
Setup” appears on the display.
2. Press the scroll
until “USB Mode” appears on
the bottom line and press
Enter
3. Press the scroll
to select “Slow”.
4. Press
selection.
5. Press
Standby Mode.
until “Machine
button ( or )
.
button ( or )
Enter
to save the
Stop/Clear
to return to
Printing Quality Problems
If the inside of the machine is dirty or paper has been loaded
improperly, you may notice a reduction in print quality. See the
table below to clear the problem.
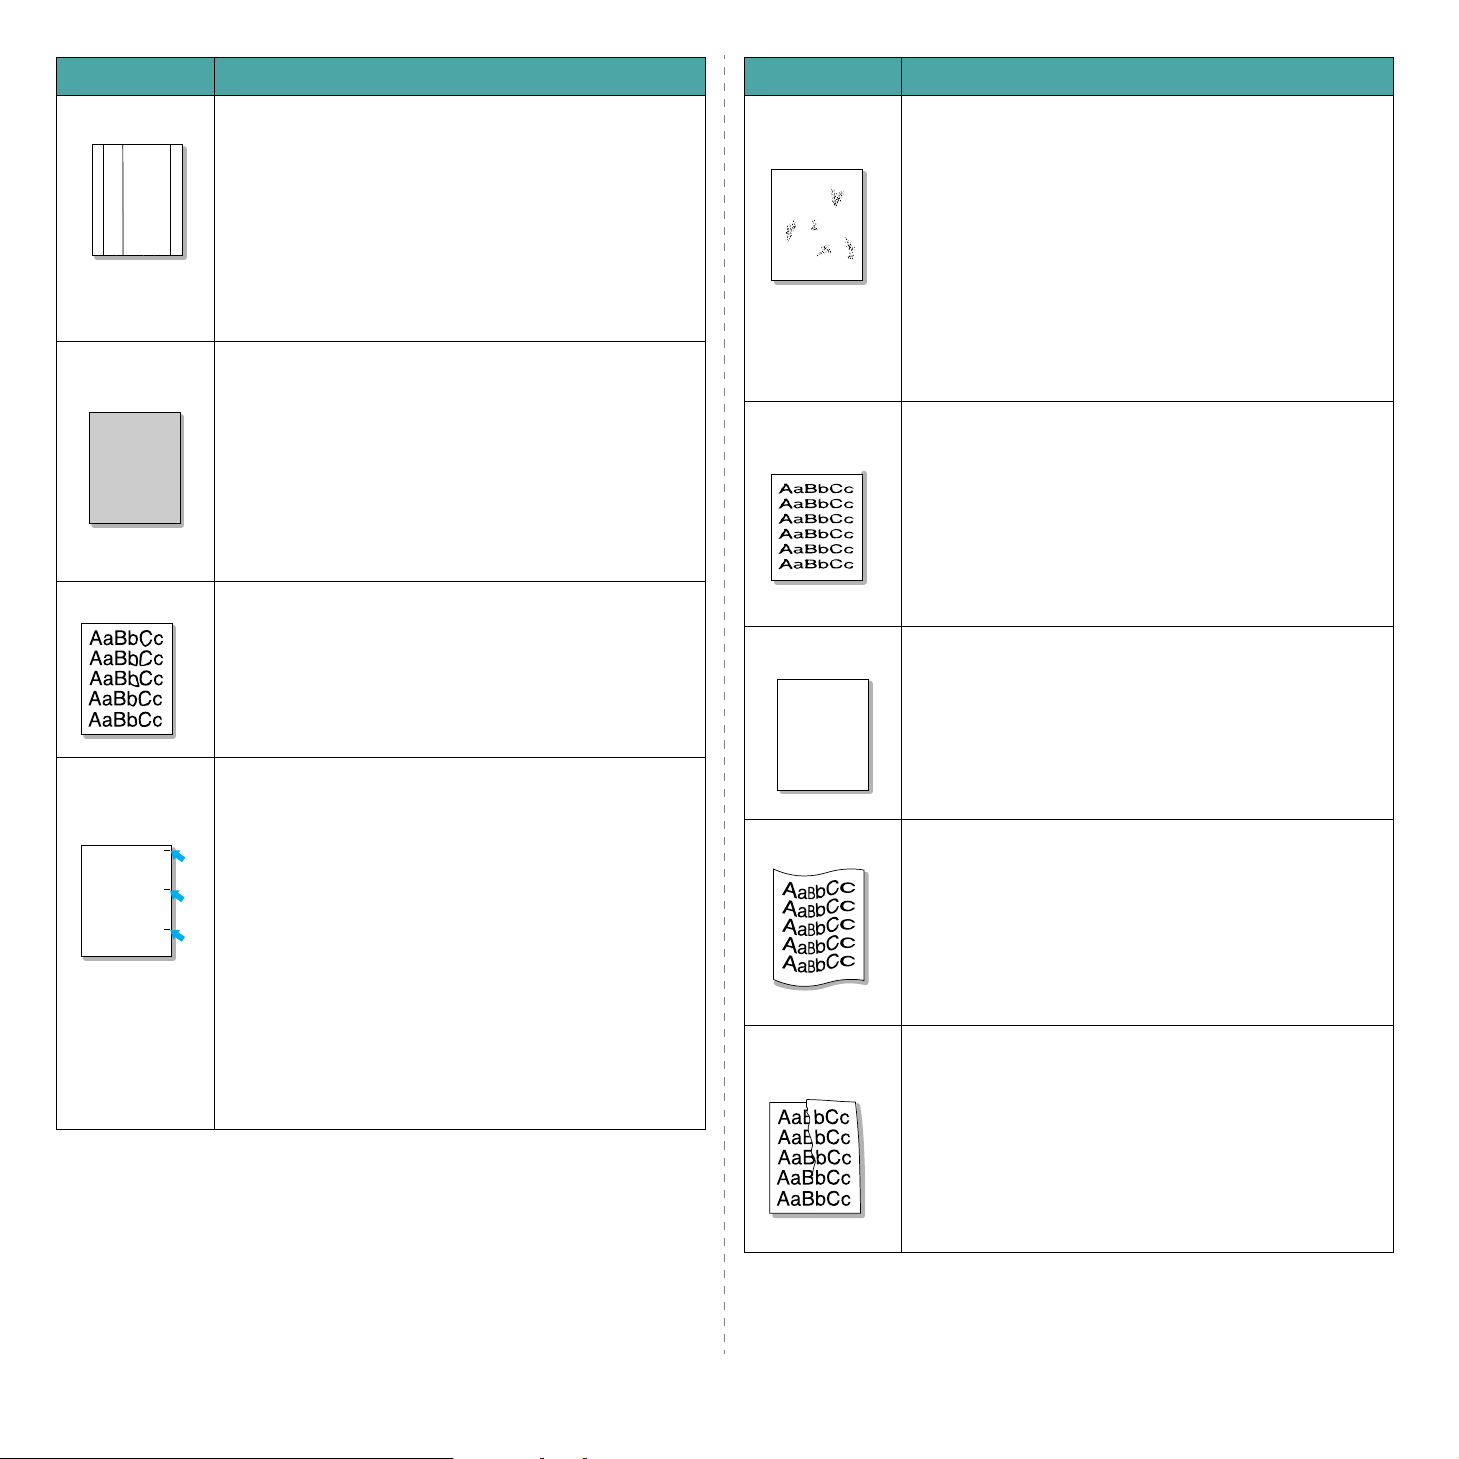
Condition Suggested solutions
Light or faded
print
AaBbCc
AaBbCc
AaBbCc
AaBbCc
AaBbCc
Toner specs
AaBbCc
AaBbCc
AaBbCc
AaBbCc
AaBbCc
If a vertical white streak or faded area appears on the
page:
• The toner supply is low. You may be able to temporarily
• extend the toner cartridge life. See “Redistributing
Toner” on page 8.4. If this does not improve the print
quality, install a new toner cartridge.
• The paper may not meet paper specifications; for
example, the paper is too moist or too rough. See
“Paper Specifications” on page 10.3.
• If the entire page is light, the print resolution setting is
too low or the toner save mode is on. Adjust the print
resolution and turn the toner save mode off. For
details, see
Mode” on page 2.11, respectively.
• A combination of faded or smeared defects may
indicate that the toner cartridge needs cleaning. See
“Cleaning the Drum” on page 8.5.
• The surface of the LSU part inside the machine may be
dirty. Clean the LSU (“Cleaning the Inside” on
page 8.2). Contact a service representative.
• The paper may not meet specifications; for example,
the paper is too moist or too rough. See “Paper
Specifications” on page 10.3.
• The transfer roller may be dirty. Clean the inside of
your machine. See “Cleaning the Inside” on page 8.2.
• The paper path may need cleaning. See “Cleaning the
Drum” on page 8.5.
Software User’s Guide
and “Toner Save
Dropouts
AaBbCc
AaBbCc
9.8
Troubleshooting
AaBbCc
AaBbCc
AaBbCc
If faded areas, generally rounded, occur randomly on the
page:
• A single sheet of paper may be defective. Try reprinting
the job.
• The moisture content of the paper is uneven or the
paper has moist spots on its surface. Try a different
brand of paper. See “Paper Specifications” on
page 10.3.
• The paper lot is bad. The manufacturing processes can
cause some areas to reject toner. Try a different kind or
brand of paper.
• The toner cartridge may be defective. See “
repetitive defects
• If these steps do not correct the problem, contact a
service representative.
” on page 9.9.
Vertical
Condition Suggested solutions
Condition Suggested solutions
Vertical lines
AaBbCc
AaBbCc
AaBbCc
AaBbCc
AaBbCc
Gray
background
AaBbCc
AaBbCc
AaBbCc
AaBbCc
AaBbCc
Toner smear
Vertical
repetitive
defects
AaBbCc
AaBbCc
AaBbCc
AaBbCc
AaBbCc
If black vertical streaks appear on the page:
• The drum inside the toner cartridge has probably been
scratched. Remove the toner cartridge and install a
new one. See “Replacing the Toner Cartridge” on
page 8.4.
If white vertical streaks appear on the page:
• The surface of the LSU part inside the machine may be
dirty. Clean the LSU (“Cleaning the Inside” on
page 8.2). Contact a service representative.
If the amount of background shading becomes
unacceptable:
• Change to a lighter weight paper. See “Paper
Specifications” on page 10.3.
• Check the machine’s environment: very dry (low
humidity) or high humidity (higher than 80% RH)
conditions can increase the amount of background
shading.
• Remove the old toner cartridge and install a new one.
See “Replacing the Toner Cartridge” on page 8.4.
• Clean the inside of the machine. See “Cleaning the
Inside” on page 8.2.
• Check the paper type and quality. See “Paper
Specifications” on page 10.3.
• Remove the toner cartridge and install a new one. See
“Replacing the Toner Cartridge” on page 8.4.
If marks repeatedly appear on the printed side of the
page at even intervals:
• The toner cartridge may be damaged. If a repetitive
mark occurs on the page, print a cleaning sheet several
times to clean the cartridge; see “Cleaning the Drum”
on page 8.5. After the printout, if you still have the
same problems, remove the toner cartridge and install
a new one. See “Replacing the Toner Cartridge” on
page 8.4.
• Parts of the machine may have toner on them. If the
defects occur on the back of the page, the problem will
likely correct itself after a few more pages.
• The fusing assembly may be damaged. Contact a
service representative.
• If you use inferior quality paper; see “Cleaning the
Drum” on page 8.5.
Background
scatter
A
Misformed
characters
Page skew
AaBbCc
AaBbCc
AaBbCc
AaBbCc
AaBbCc
Curl or wave
Wrinkles or
creases
Background scatter results from bits of toner randomly
distributed on the printed page.
• The paper may be too damp. Try printing with a
different batch of paper. Do not open packages of
paper until necessary so that the paper does not
absorb too much moisture.
• If background scatter occurs on an envelope, change
the printing layout to avoid printing over areas that
have overlapping seams on the reverse side. Printing
on seams can cause problems.
• If background scatter covers the entire surface area of
a printed page, adjust the print resolution through your
software application or the printer properties.
• If characters are improperly formed and producing
hollow images, the paper stock may be too slick. Try a
different paper. See “Paper Specifications” on
page 10.3.
• If characters are improperly formed and producing a
wavy effect, the scanner unit may need service. For
service, contact a service representative.
• Ensure that the paper is loaded properly.
• Check the paper type and quality. See “Paper
Specifications” on page 10.3.
• Ensure that the paper or other material is loaded
correctly and the guides are not too tight or too loose
against the paper stack.
• Ensure that the paper is loaded properly.
• Check the paper type and quality. Both high
temperature and humidity can cause paper curl. See
“Paper Specifications” on page 10.3.
• Turn over the stack of paper in the tray. Also try
rotating the paper 180° in the tray.
• Ensure that the paper is loaded properly.
• Check the paper type and quality. See “Paper
Specifications” on page 10.3.
• Turn over the stack of paper in the tray. Also try
rotating the paper 180° in the tray.
9.9
Troubleshooting
Condition Suggested solutions
Copying Problems
Back of
printouts are
dirty
Black pages
A
Loose toner
Character
Voids
A
Horizontal
stripes
AaBbCc
AaBbCc
AaBbCc
AaBbCc
AaBbCc
Check for leaking toner. Clean the inside of the machine.
See “Cleaning the Inside” on page 8.2.
• The toner cartridge may not be installed properly.
Remove the cartridge and reinsert it.
• The toner cartridge may be defective and need
replacing. Remove the toner cartridge and install a new
one. See “Replacing the Toner Cartridge” on page 8.4.
• The machine may require repair. Contact a service
representative.
• Clean the inside of the machine. See “Cleaning the
Inside” on page 8.2.
• Check the paper type and quality. See “Paper
Specifications” on page 10.3.
• Remove the toner cartridge and install a new one. See
“Replacing the Toner Cartridge” on page 8.4.
• If the problem persists, the machine may require
repair. Contact a service representative.
Character voids are white areas within parts of characters
that should be solid black:
• If you are using transparencies, try another type of
transparency. Because of the composition of
transparencies, some character voids are normal.
• You may be printing on the wrong surface of the paper.
Remove the paper and turn it around.
• The paper may not meet paper specifications. See
“Paper Specifications” on page 10.3.
If horizontally aligned black streaks or smears appear:
• The toner cartridge may be installed improperly.
Remove the cartridge and reinsert it.
• The toner cartridge may be defective. Remove the
toner cartridge and install a new one. See “Replacing
the Toner Cartridge” on page 8.4.
• If the problem persists, the machine may require
repair. Contact a service representative.
Condition Suggested solutions
Copies are too light or
too dark.
Smears, lines, marks,
or spots appears on
copies.
Copy image is skewed. • Ensure that the original is face down on the
Blank copies print out. Ensure that the original is face down on the
Image rubs off the
copy easily.
Frequent copy paper
jams occur.
Toner cartridge
produces fewer copies
than expected before
running out of toner.
Use the
background of the copies.
• If defects are on the original, press the
• If no defects are on the original, clean the scan
• Check that the copy paper is loaded correctly.
document glass or face up in the ADF.
• Replace the paper in the tray with paper from a
• In high humidity areas, do not leave paper in the
• Fan the stack of paper, then turn it over in the
• Ensure that the paper is the proper paper
• Check for copy paper or pieces of copy paper
• Your originals may contain pictures, solids, or
• The machine may be turned on and off
• The document cover may be left open while
Darkness
Darkness
your copies.
unit. See “Cleaning the Scan Unit” on page 8.3.
document glass or face up in the ADF (Automatic
Document Feeder).
new package.
machine for extended periods of time.
tray. Replace the paper in the tray with a fresh
supply. Check/adjust the paper guides, if
necessary.
weight. 20 lb (75 g/m
recommended.
remaining in the machine after a paper jam has
been cleared.
heavy lines. For example, your originals may be
forms, newsletters, books, or other documents
that use more toner.
frequently.
copies are being made.
button to darken or lighten the
button to lighten the background of
2
bond) paper is
Curl
If the printed paper is curled or paper does not feed into
the machine:
• Turn over the stack of paper in the tray. Also try
rotating the paper 180° in the tray.
9.10
Troubleshooting
Scanning Problems
Condition Suggested solutions
Condition Suggested solutions
The scanner does
not work.
The unit scans very
slowly.
Fax Problems
• Make sure that you place the document to be
scanned face down on the document glass, or face
up in the Automatic Document Feeder.
• There may not be enough available memory to hold
the document you want to scan. Try the Prescan
function to see if that works. Try lowering the scan
resolution rate.
• Check that the USB or parallel cable is connected
properly.
• Make sure that the USB or parallel cable is not
defective. Switch the cable with a known good
cable. If necessary, replace the cable.
• If you are using a parallel cable, ensure that it is
compliant with IEEE 1284 standards.
• Check that the scanner is configured correctly.
Check scan setting in the SmarThru Configuration
or the application you want to use to make certain
that the scanner job is being sent to the correct
port, for example, LPT1.
• Check if the machine is printing received data. If so,
scan the document after the received data has been
printed.
• Graphics are scanned more slowly than text.
• Communication speed slows in scan mode because
of the large amount of memory required to analyze
and reproduce the scanned image. Set your
computer to the ECP printer mode through BIOS
setting. It will help to increase the speed. For
details about how to set BIOS, refer to your
computer User’s Guide.
(Only for
SCX-4521F
The document does
not feed into the
machine.
Faxes are not
received
automatically.
The machine does
not send.
The incoming fax has
blank spaces or is of
poor-quality.
Some of the words
on an incoming fax
are stretched.
There are lines on
the documents you
send.
The machine dials a
number, but a
connection with the
)
other fax machine
fails.
• Make sure that the document is not wrinkled and
you are putting it in correctly. Check that the
document is the right size, not too thick or thin.
• Make sure that the ADF (Automatic Document
Feeder) cover is firmly closed.
• Fax mode should be selected.
• Make sure that there is paper in the tray.
• Check to see if the display shows “Memory Full”.
• Make sure that the document is loaded in the ADF
or on the document glass.
• “TX” should show up on the display.
• Check the fax machine you are sending to, to see
if it can receive your fax.
• The fax machine sending you the fax may be
faulty.
• A noisy phone line can cause line errors.
• Check your machine by making a copy.
• The toner cartridge may be empty. Replace the
toner cartridge, referring to “Replacing the Toner
Cartridge” on page 8.4.
The fax machine sending you the fax had a
temporary document jam.
Check your scanning glass for marks and clean it.
See “Cleaning the Scan Unit” on page 8.3.
The other fax machine may be turned off, out of
paper, or cannot answer incoming calls. Speak with
the other machine operator and ask her/him to sort
out the problem.
Condition Suggested solutions
The machine is not
working, there is no
display and the
buttons are not
working.
No dial tone sounds. • Check that the phone line is connected properly.
The numbers stored
in memory do not
dial correctly.
• Unplug the power cord and plug it in again.
• Ensure that there is power to the electrical outlet.
• Check that the phone socket in the wall is working
by plugging in another phone.
Make sure that the numbers are stored in memory
correctly. Print a Phonebook list, referring to
“Phonebook List” on page 7.14.
Troubleshooting
Documents are not
stored in memory.
Blank areas appear
at the bottom of each
page or on other
pages, with a small
strip of text at the
top.
9.11
There may not be enough memory to store the
document. If the display shows a “Memory Full”
message, delete from memory any documents you
no longer need and then try again to store the
document.
You may have chosen the wrong paper settings in
the user option setting. For details about paper
settings, see “Setting the Paper Size and Type” on
page 2.10.
Common Linux Problems
Problem Possible Cause and Solution
The machine
doesn’t print.
• Check if the printer driver is installed in your system.
Open MFP configurator and switch to the Printers tab in
Printers configuration window to look at the list of
available printers. Make sure that your machine is
displayed on the list. If not, please, invoke Add new
printer wizard to set up your device.
• Check if the printer is started. Open Printers
configuration and select your machine on the printers list.
Look at the description in the Selected printer pane. If its
status contains “(stopped)” string, please, press the
Start
button. After that normal operation of the printer
should be restored. The "stopped" status might be
activated when some problems in printing occurred. For
instance, this could be an attempt to print document
when MFP port is claimed by a scanning application.
• Check if the MFP port is not busy. Since functional
components of MFP (printer and scanner) share the same
I/O interface (MFP port), the situation of simultaneous
access of different “consumer” application to the same
MFP port is possible. To avoid possible conflicts, only one
of them at a time is allowed to gain control over the
device. The other “consumer” will encounter “device
busy” response. You should open MFP ports configuration
and select the port assigned to your printer. In the
Selected port pane you can see if the port is occupied by
some other application. If this is the case, you should
wait for completion of the current job or should press
Release port button, if you are sure that the present
owner is not functioning properly.
Check if your application has special print option such
as “-oraw”. If “-oraw” is specified in the command
line parameter then remove it to print properly. For
Gimp front-end, select “print” -> “Setup printer” and
edit command line parameter in the command item.
Problem Possible Cause and Solution
The machine
doesn’t appear
on the
scanners list.
The machine
doesn’t scan.
• Check if your machine is attached to your computer.
Make sure that it is connected properly via the USB port
and is turned on.
• Check if the scanner driver for you machine is installed in
your system. Open MFP Configurator, switch to Scanners
configuration, then press
with a name corresponding to your machine's name is
listed in the window.
• Check if the MFP port is not busy. Since functional
components of MFP (printer and scanner) share the same
I/O interface (MFP port), the situation of simultaneous
access of different “consumer” application to the same
MFP port is possible. To avoid possible conflicts, only one
of them at a time is allowed to gain control over the
device. The other “consumer” will encounter “device
busy” response. This can usually happen while starting
scan procedure, and appropriate message box displays.
To identify the source of the problem, you should open
MFP ports configuration and select the port assigned to
your scanner. MFP port's symbol /dev/mfp0 corresponds
to LP:0 designation displayed in the scanners’ options, /
dev/mfp1 relates to LP:1 and so on. USB ports start at /
dev/mfp4, so scanner on USB:0 relates to /dev/mfp4
respectively and so forth sequentially. In the Selected
port pane you can see if the port is occupied by some
other application. If this is the case, you should wait for
completion of the current job or should press Release
port button, if you are sure that the present port's owner
is not functioning properly.
• Check if a document is loaded into the machine.
• Check if your machine is connected to the computer.
Make sure if it is connected properly if I/O error is
reported while scanning.
• Check if MFP port is not busy. Since functional
components of MFP (printer and scanner) share the same
I/O interface (MFP port), the situation of simultaneous
access of different “consumer” application to the same
MFP port is possible. To avoid possible conflicts, only one
of them at a time is allowed to gain control over the
device. The other “consumer” will encounter “device
busy” response. This can usually happen while starting
scan procedure, and appropriate message box will be
displayed.
Drivers
. Make sure that driver
The machine
doesn’t scan.
(continued)
9.12
Troubleshooting
• To identify the source of the problem, you should open
MFP ports configuration and select the port assigned to
your scanner. MFP port’s symbol /dev/mfp0 corresponds
to LP:0 designation displayed in the scanners’ options, /
dev/mfp1 relates to LP:1 and so on. USB ports start at /
dev/mfp4, so scanner on USB:0 relates to /dev/mfp4
respectively and so forth sequentially. In the Selected
port pane you can see if the port is occupied by some
other application. If this is the case, you should wait for
completion of the current job or should press Release
port button, if you are sure that the present port’s owner
is not functioning properly.

Problem Possible Cause and Solution
I can’t print
when I
installed both
Linux Print
Package (LPP)
and MFP driver
on the same
machine
simultaneously.
• Since both Linux Printer Package and MFP driver make a
symbolic link to “lpr” printing command, which is
commonly used on Unix clones, it is not recommended to
use both package on the same machine.
• If you still want to use both packages simultaneously,
please install the LPP first.
• If you want to uninstall only one of them, please uninstall
both packages and install that one you want to use again.
• If you don’t want to uninstall MFP driver and install it
again, you may make the necessary symbolic link
yourself. Please, log in as root user and invoke the
following command:
ln -sf /usr/local/bin/samsung/slpr /usr/bin/lpr
Common Macintosh Problems
Problems in Printer Setup Utility
Problem Possible Cause and Solution
There is described
"driver not
installed" at Product
List Window after
you click Add and
Select USB.
• Software is not installed correctly. Reinstall the
software. See
• Make sure that you are using a high-quality cable.
Software User’s Guide
.
Can’t scan via
Gimp Frontend.
I encounter
error “Cannot
open MFP port
device file”
when printing
a document.
• Check if Gimp Front-end has “Xsane:Device dialog..” on
the “Acquire” menu. If not, you should install Xsane plugin for Gimp on the your computer. You can find Xsane
plug-in package for Gimp on Linux distribution CD or
Gimp home page. For the detail information, refer to the
Help for Linux distribution CD or Gimp Front-end
application.
If you wish to use other kind of scan application, refer to
the Help for application.
Please avoid changing print job parameters (via SLPR
utility, for example) while a print job is in progress. Known
versions of CUPS server break the print job whenever print
options are changed and then try to restart the job from
the beginning. Since Linux MFP driver locks MFP port while
printing, the abrupt termination of the driver keeps the port
locked and therefore unavailable for subsequent print jobs.
If this situation occurred, please, try to release the MFP
port.
Your product not
listed at Product
List Window after
you click Add and
Select USB.
• Make sure that the cables are connected correctly
and the printer is turned on.
• Check if “Ready” appears on the display of the
control panel. If not, clear the problem depending
on the error message; see “Clearing LCD Error
Messages” on page 9.4.
• Make sure that the correct printer driver has been
selected at Product List Window after you click Add
and Select USB.
9.13
Troubleshooting
10
Specifications
General Specifications
This chapter includes:
• General Specifications
• Scanner and Copier Specifications
• Printer Specifications
• Facsimile Specifications
• Paper Specifications
(Only for
SCX-4521F
Item Description
Model name
)
Automatic document
feeder
ADF document size
Paper input capacity
Paper output capacity 50 sheets
Paper type
Consumables 1-piece toner cartridge system
Power requirements
Power consumption
SCX-4321(WT21MFC)
SCX-4521F(WT21MFF)
2
Up to 30 sheets (20 lb, 75 g/m
Width: 5.6 to 8.5 inches (142 to 216 mm)
Length: 5.8 to 14 inches (148 to 356 mm)
Tray with multi-pages: 150 multi-pages for plain
paper (20 lb, 75 g/m
Tray with single page and manual tray: 1 single page
for plain paper, card stock, labels, transparencies,
and envelopes (16 ~43 lb, 60 ~ 165 g/m
Plain paper, Transparencies, Labels, Card stock,
Envelopes
110 - 127 VAC, 50/60 Hz, 4.5 A
220 - 240 VAC, 50/60 Hz, 2.5 A
Sleep mode: Under 10 W
Average: 350 W
2
bond)
bond)
2
bond)
Standby mode: Less than 35 dBA
*
Noise
Warm-up time Less than 35 seconds
Operating conditions
LCD 16 characters x 2 lines
Toner cartridge life
SET dimension
(W x D x H)
Weight 10.1 Kg (including consumables)
Package weight
Duty cycle (Monthly) Print: Up to 4,200 pages
*.Sound Pressure Level, ISO7779
**.The number of pages may be affected by operating environment, printing
interval, media type, and media size.
Warm up: Less than 49 dBA
Copying: Less than 55 dBA
Printing: Less than 50 dBA
Temperature: 50
Humidity: 20 % to 80 % RH
3,000 pages (for starter, 1,000 pages) @ ISO 19752
**
5 % coverage
17.2 x 14.7x 14.5 in. (438 x 374 x 368 mm)
Paper: 1.2 Kg
Plastic: 0.5 Kg
o
F to 89 oF (10 oC to 32 oC)
10.1
Specifications
Scanner and Copier
Printer Specifications
Specifications
Item Description
Compatibility TWAIN standard / WIA standard
Scanning method
Resolution
Effective scanning length
Effective scanning width Max. 8.2 in. (208 mm)
Color bit depth 24 bit
Mono bit depth
Copy speed
First copy out time
Copy resolution
*
ADF and Flat-bed CIS (Contact Image Sensor)
module
Optical: 600 x 600 dpi (Mono and color)
Enhanced: 4,800 x 4,800 dpi
Platen: 11.7 in. (297 mm)
ADF: 14 in. (356 mm)
1 bit for Black & White mode
8 bit for Gray mode
Up to 20 ppm in A4 (20 ppm in Letter)
Standby mode: 11 seconds
Power save mode: 40 seconds
Scan: 600 x 300 (Text, Text/Photo)
600 x 600 (Photo using Platen)
600 x 300 (Photo using ADF)
Print: 600 x 600 (Text, Text/Photo, Photo)
Item Description
Printing method Laser Beam Printing
Printing speed
First print out time
Paper size
Printer resolution 600 x 600 dpi
Emulation SPL (Samsung Printer Language)
OS Compatibility
Memory 10 MB (Non-expendable)
Inteface
*. Print speed will be affected by operating system used, computing
performance, application software, connecting method, media type,
media size, and job complexity.
**.Please visit www.samsungprinter.com to download the latest soft-
ware version.
*
**
Up to 20 ppm in A4 (20 ppm in Letter)
Standby mode: 11 seconds
Power save mode: 41 seconds
Letter, Legal, A4, Folio, Executive, A5, A6 card,
Envelope 10, Envelope DL, Envelope C5, Envelope
C6, Envelope 7-3/4 (Monarch), JIS B5, ISO B5
* Min.: 3 x 5 in. (76 x 127 mm)
Max.: 8.5 x 14 in. (216 x 356 mm)
Windows 98/2000/NT 4.0/Me/XP, Various Linux OS
(USB only), Macintosh 10.3
IEEE 1284 Parallel,
USB 1.1 (Compatible with USB 2.0)
Zoom rate
Multiple copies 1-99 pages
Gray scale 256 levels
*. Copy Speed is based on Single Document Multiple Copy.
Platen: 25 ~ 400 %
ADF: 25 ~ 100 %
10.2
Specifications
Facsimile Specifications
(Only for SCX-4521F)
Paper Specifications
Item Description
Compatibility ITU-T Group 3
Applicable line
Data coding MH/MR/MMR (ECM Mode)/JPEG
Modem speed 33.6 Kbps
Transmission speed
Maximum document
length
Paper size Letter, A4, Legal, Folio, Executive, B5
Resolution
Memory 2 MB
Halftone 256 levels
Public Switched Telephone Network (PSTN) or
behind PABX
Approx. 3 seconds/page
* Transmission time applies to memory
transmission of text data with ECM compression
using only ITU-T No.1 Chart.
Platen: 11.7 in. (297 mm)
ADF: 14 in. (356 mm)
Standard: 203 x 98 dpi
Fine: 203 x 196 dpi
Super Fine: 300 x 300 dpi
Photo: 203 x 196 dpi
Color: 200 x 200 dpi
Overview
Your machine accepts a variety of print materials, such as cutsheet paper (including up to 100% recycled fiber content
paper), envelopes, labels, transparencies and custom-size
paper. Properties, such as weight, composition, grain and
moisture content, are important factors affecting the machine’s
performance and the output quality. Paper that does not meet
the guidelines outlined in this user’s guide can cause the
following problems:
•Poor print quality
• Increased paper jams
• Premature wear on the machine.
N
OTES
:
• Some paper may meet all of the guidelines in this guide and
still not produce satisfactory results. This may be the result
of improper handling, unacceptable temperature and
humidity levels, or other variables over which Samsung has
no control.
• Before purchasing large quantities of paper, insure the paper
meets the requirements specified in this user’s guide.
C
AUTION
specifications may cause problems, requiring repairs. These
repairs are not covered by the Samsung warranty or service
agreements.
: Using paper that does not meet these
Auto dialer Speed dialing (up to 100 numbers)
10.3
Specifications
Paper
Letter
A4
Executive
Legal
A5
A6
ISO B5
JIS B5
Folio
Supported Sizes of Paper
Dimensions
8.5 x 11 in.
(216 x 279 mm)
8.3 x 11.7 in.
(210 x 297 mm)
7.3 x 10.5 in.
(184 x 267 mm)
8.5 x 14 in.
(216 x 356 mm)
5.8 x 8.2 in.
(148 x 210 mm)
4.1 x 5.8 in.
(105 x 148 mm)
6.9 x 9.8 in.
(176 x 250 mm)
7.2 x 10.1 in.
(182 x 257 mm)
8.5 x 13 in.
(216 x 330 mm)
*
Weight
• 16 to 24 lb
(60 to 90 g/m
bond) for the tray
with multi-pages
feeding
• 16 to 43 lb
(60 to 165 g/m
bond) for the tray
with single page
feeding and the
manual tray
Guidelines for Using Paper
Capacity
**
• 150
2
2
sheets of
20 lb
(75 g/m
2
bond)
paper for
the tray
• 1 sheet of
paper for
the tray or
Poor print quality or
toner adhesion,
problems with feeding
Dropout, jamming,
curl
manual
tray
Increased gray
background shading/
printer wear
Excessive curl
problems with feeding
For the best result, use conventional 20 lb (75 g/m2 bond)
paper. Ensure that the paper is of good quality, and free of cuts,
nicks, tears, spots, loose particles, dust, wrinkles, voids, and
curled or bent edges.
If you are unsure of what type of paper you are loading, such
as bond or recycled paper, check the label on the package.
The following problems may cause print quality deviations,
jamming or even damage to the machine:
Symptom Problem with Paper Solution
Too moist, too rough,
too smooth or
embossed; faulty paper
lot
Try another kind of
paper, between 100 ~
400 Sheffield, 4 ~ 5 %
moisture content.
Store paper flat in its
Stored improperly
moisture-proof
wrapping.
Too heavy Use lighter paper.
Too moist, wrong grain
direction or short-grain
Use long-grain paper.
construction
Minimum size
(custom)
3 x 5 in
(76 x 127 mm)
16 to 43 lb (60 to 165
2
g/m
bond) for the
tray with single page
Maximum size
(custom)
Transparency
Labels
Cards
Envelopes
8.5 x 14 in
(216 x 356 mm)
Same minimum
and maximum
paper sizes as
listed above.
feeding and the
manual tray
138 to 146 g/m
120 to 150 g/m
90 to 163 g/m
75 to 90 g/m
2
2
2
2
*. The machine supports a wide range of media sizes. See “Paper
Type, Input Sources, and Capacities” on page 3.1
**.Capacity may differ depending on media weight, thickness, and
environmental conditions.
N
OTE
: You may experience jams when using print materials
with a length of less than 5 in. (127 mm). For optimum
performance, ensure that you are storing and handling the
paper correctly. Please refer to “Paper Storage Environment”
on page 10.5.
1 sheet of
paper for
the tray or
manual tray
Jamming, damage to
machine
Cutouts or perforations
Do not use paper with
cutouts or perforations.
Problems with feeding Ragged edges Use good quality paper.
N
OTES
:
• Do not use letterhead paper printed with low-temperature
inks, such as those used in some types of thermography.
• Do not use raised or embossed letterhead.
• The machine uses heat and pressure to fuse toner to the
paper. Insure that any colored paper or preprinted forms use
inks that are compatible with this fusing temperature (200
°C or 392 °F for 0.1 second).
10.4
Specifications
Paper Specifications
Category Specifications
Acid content 5.5 pH or lower
Caliper 3.0 ~ 7.0 mils (0.094 ~ 0.18 mm)
Curl in ream Flat within 0.02 in. (5 mm)
Cut edge conditions Cut with sharp blades with no visible fray.
Must not scorch, melt, offset or release hazardous
Fusing compatibility
Grain Long grain
Moisture content 4 % ~ 6 % by weight
Smoothness 100 ~ 400 Sheffield
emissions when heated to 200 °C (392 °F) for 0.1
second.
Paper Output Capacity
Output Location Capacity
Face-down output tray
50 sheets of 20 lb (75 g/m
2
bond) paper
Paper Storage Environment
Paper storage environmental conditions directly affect the feed
operation.
Ideally, the machine and paper storage environment should be
at or near room temperature, and not too dry or humid.
Remember that paper is hygroscopic; it absorbs and loses
moisture rapidly.
Heat works with humidity to damage paper. Heat causes the
moisture in paper to evaporate, while cold causes it to
condense on the sheets. Heating systems and air conditioners
remove most of the humidity from a room. As paper is opened
and used, it loses moisture, causing streaks and smudging.
Humid weather or water coolers can cause the humidity to
increase in a room. As paper is opened and used it absorbs any
excess moisture, causing light print and dropouts. Also, as
paper loses and gains moisture it can become distorted. This
can cause paper jams.
Care should be taken not to purchase more paper than can be
used in a short time (about 3 months). Paper stored for long
periods may experience heat and moisture extremes, which
can cause damage. Planning is important to prevent damage to
large supplies of paper.
Unopened paper in sealed reams can remain stable for several
months before use. Opened packages of paper have more
potential for environment damage, especially if they are not
wrapped with a moisture-proof barrier.
The paper storage environment should be properly maintained
to ensure optimum performance. The required condition is 20
to 24 °C (68 to 75 °F), with a relative humidity of 45 % to 55
%. The following guidelines should be considered when
evaluating the paper’s storage environment:
• Paper should be stored at or near room temperature.
• The air should not be too dry or too humid.
• The best way to store an opened ream of paper is to
rewrap it tightly in its moisture-proof wrapping. If the
machine environment is subject to extremes, unwrap
only the amount of paper to be used during the day’s
operation to prevent unwanted moisture changes.
Envelopes
Envelope construction is critical. Envelope fold lines can vary
considerably, not only between manufacturers, but also within
a box from the same manufacturer. Successful printing on
envelopes depends upon the quality of the envelopes. When
selecting envelopes, consider the following components:
• Weight: The weight of the envelope paper should not
exceed 20 lb (75 g/m
• Construction: Prior to printing, envelopes should lie flat
with less than 0.25 in. (6 mm) curl, and should not
contain air.
• Condition: Envelopes should not be wrinkled, nicked or
otherwise damaged.
• Temperature: You should use envelopes that are
compatible with the heat and pressure of the machine.
• Size: You should only use envelopes within the following
size ranges.
Minimum Maximum
3 x 5 in.
(76 x 127 mm)
N
OTES
:
• Load only one sheet of paper at a time to print envelopes.
• You may experience some paper jams when using any media
with a length less than 5.5 in. (140 mm). This may be
caused by paper that has been affected by environmental
conditions. For optimum performance, make sure you are
storing and handling the paper correctly. Please refer to
“Paper Storage Environment” on page 10.5.
2
bond
) or jamming may occur.
8.5 x 14 in.
(216 x 356 mm)
10.5
Specifications
 Loading...