

Samsung WIP-6000 User Manual


1
SAFETY CONCERNS
For product safety and correct operation, please read
the following information before using the WIP 6000
phone.
Conventions
WARNING
Provides information or instructions that the reader
should follow in order to avoid personal injury or
fatality.
CAUTION
Provides information or instructions that the reader
should follow in order to avoid a service failure or
damage to the system.
NOTE
Indicates additional information as a reference.
Symbols
Indication of a general caution.
Indication for prohibiting an action for a product.
Indication for commanding a specifically required
action.
WIP-6000 User Guide
2
Warning
WARNING
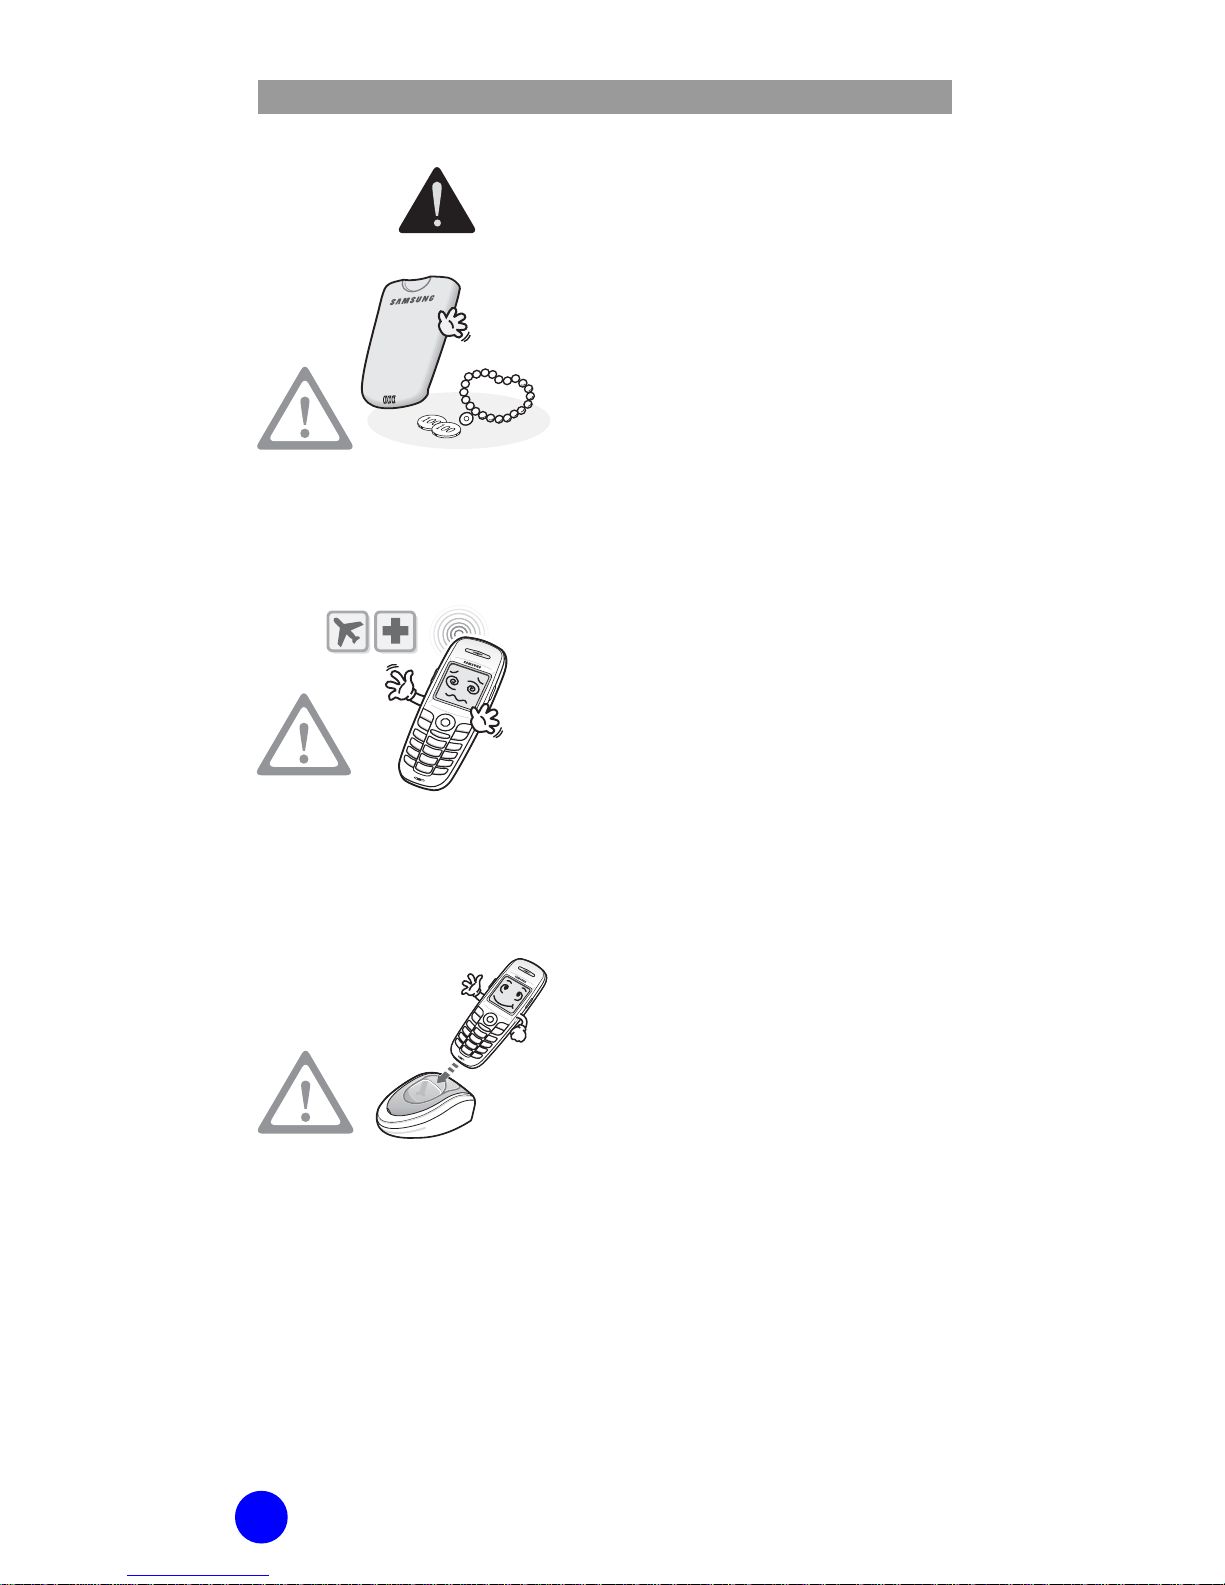
Do not connect conductive
objects, such as neckless or
coins, to the charging
terminals of the battery
(metallic part).
The object may explode and
cause fire due to overheating.
Wireless phones can cause
interference. Always follow
any special regulations
enforced in your immediate
environment, such as
hospitals or airplanes.
It may cause interference or
danger.
Only use batteries approved
for use with this unit.
(Type: Hitachi/
ICP053450GH/1000 mAh,
Manufacturer: Neo Prime
Tech.)
Using other batteries and
accessories can result in
overheating or explosion and
may cause malfunction.

WIP-6000 User Guide
3
Do not place the phone in a
dusty area or in fluctuating
temperature environments.
It may cause a fire or electric
shocks.
Do not install the phone
near a heater(cigarette
lighter, heating apparatus,
etc.).
It may cause a fire or electric
shocks.
Do not use the phone at a
refueling point(service
station) or near fuels or
chemicals.
It may cause a fire or electric
shocks.
Do not use inflammable
solvent or material near the
phone. Do not store them
near the phone.
It may cause a fire or electric
shocks.
Use the battery ONLY for
the WIP-6000 phone.
Using the battery for other
purposes may cause
malfunction, a fire, or electric
shocks.
WIP-6000 User Guide
4
Caution
CAUTION
Use a soft dry cloth to clean
the phone. Do not use any
chemical solvents like wax,
benzene, alcohol, thinner,
mosquito spray, aerosol,
lubricant, or detergent.
The use of chemicals on the
phone may cause
fading/discoloring or damage
to the parts.
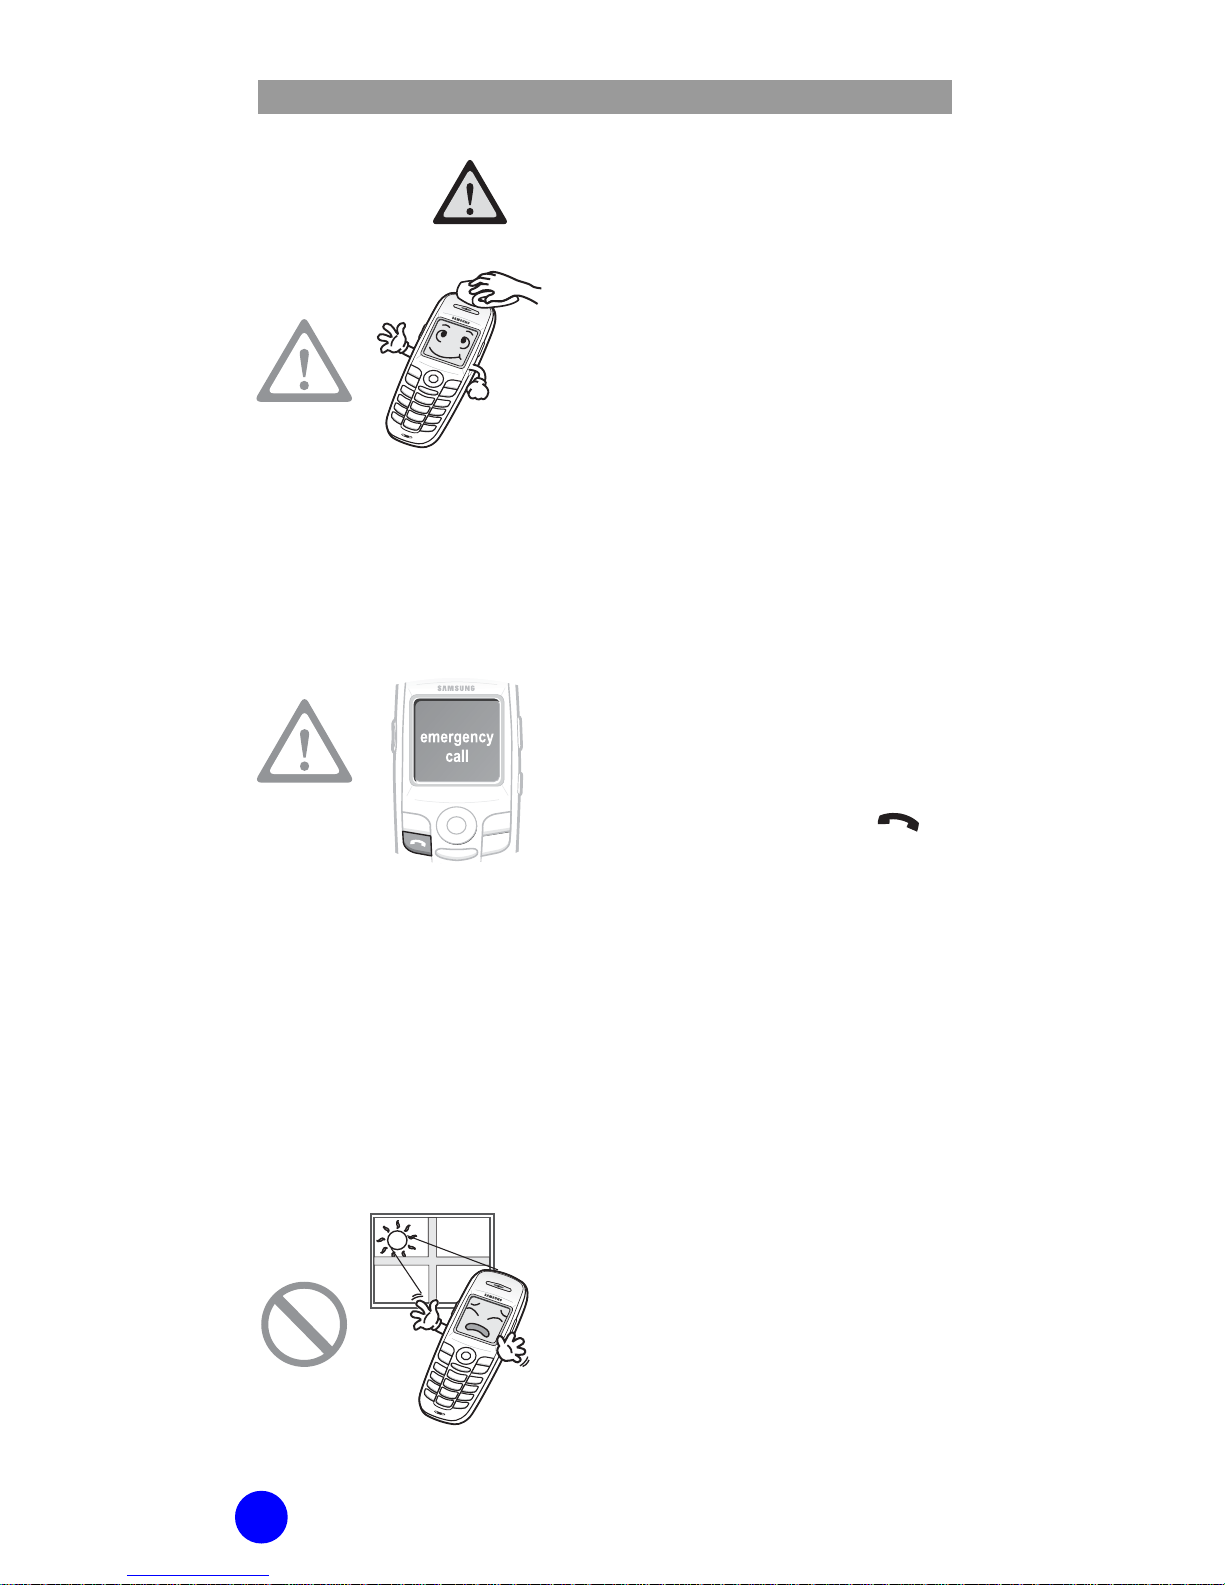
Ensure the phone is
switched on and in service.
Key in the emergency
number for your present
location, then press the
key. If certain features are
in use, deactivate those
features before you can
make an emergency call.
Give all the necessary
information as accurately as
possible. Do not cut off the
call until given permission to
do so.
Do not install the phone on
an unstable place or near
the direct rays of sunlight.
It may cause severe damage
to the parts of the phone,
and your phone may not
work properly.
WIP-6000 User Guide
5
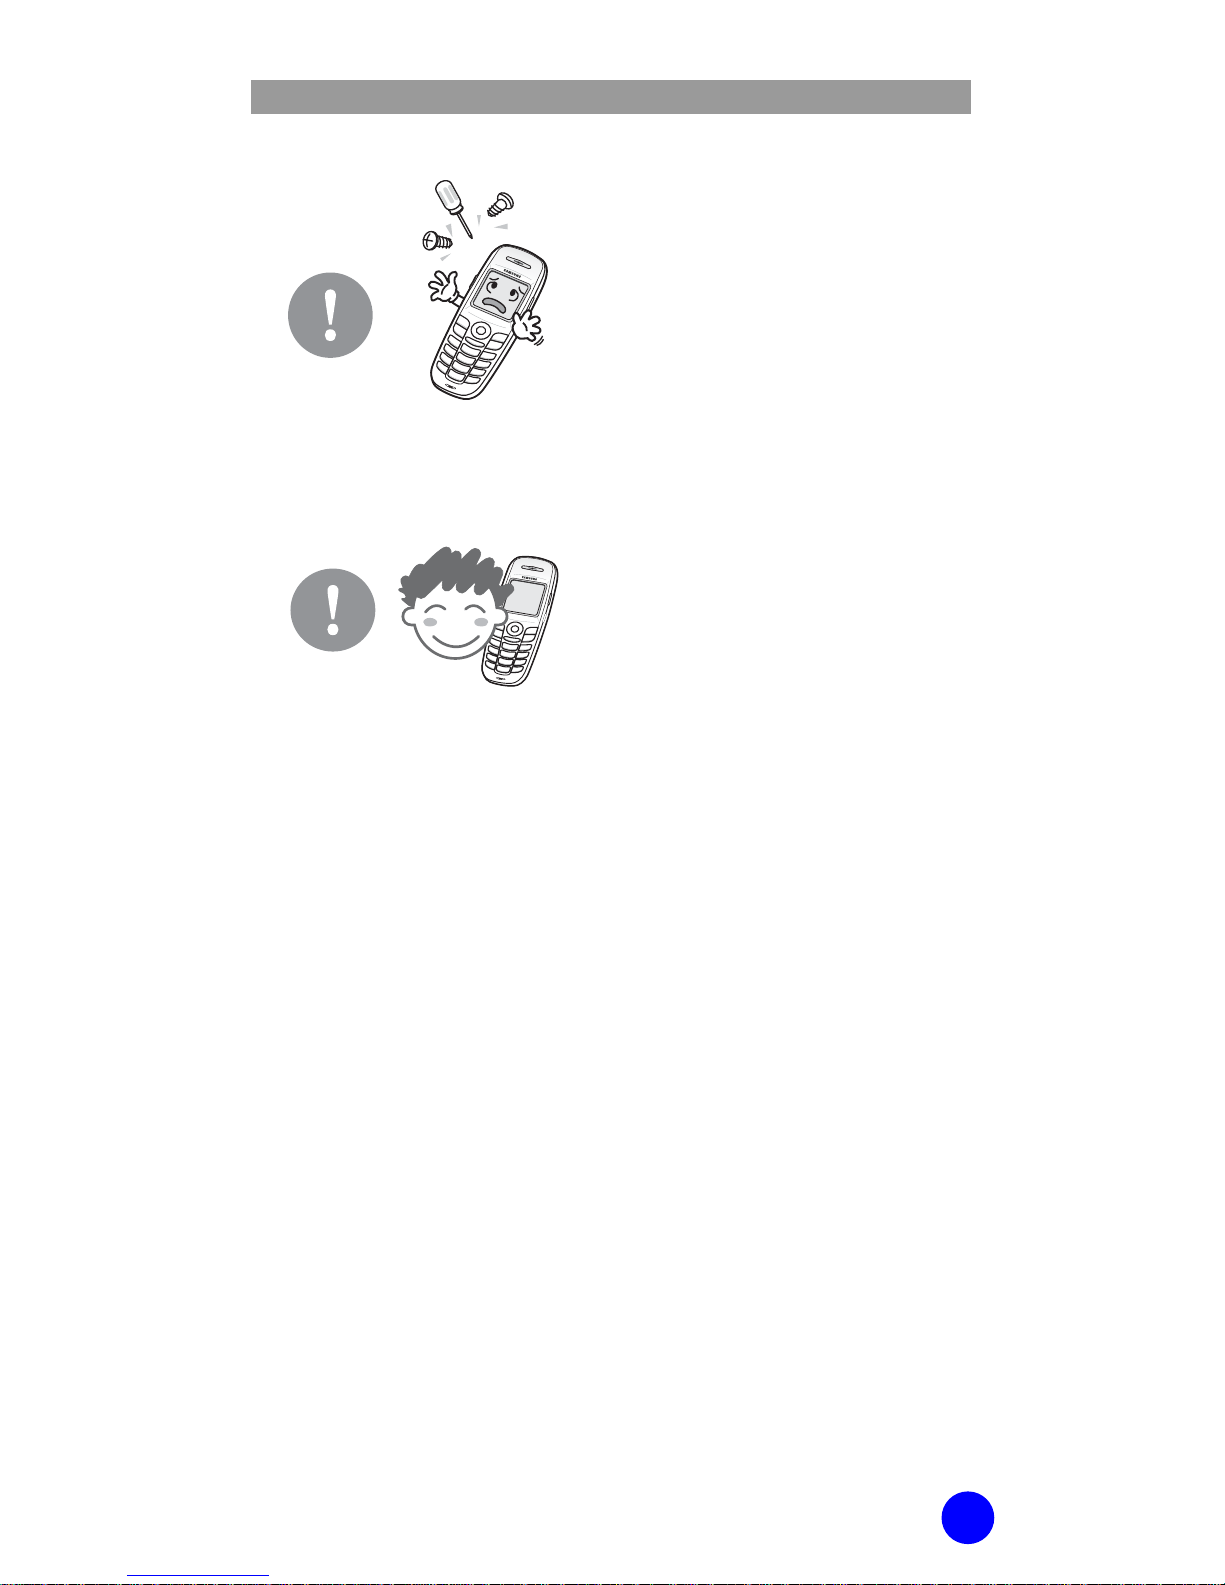
Do not separate, repair nor
remodel the phone
arbitrarily. Only qualified
service personnel should
repair your phone.
For more detailed safety
information, see ‘Health and
Safety Information’ section of
this guide.
Use only in the normal
position (held to the ear).

6
TABLE OF CONTENTS
SAFETY CONCERNS 1
Conventions.......................................................1
Symbols ............................................................1
Warning ............................................................2
Caution .............................................................4
PREPARATION 9
About This Guide ...............................................9
Overview of WIP-6000 .......................................9
Unpacking .......................................................10
Phone Layout...................................................11
Display............................................................15
Backlight .........................................................17
Service Light....................................................18
Camera ...........................................................18
GETTING STARTED 19
Before You Start...............................................19
Installing/Removing/ the Battery.......................20
Inserting/Removing the SIM Card
(Not Supported by
VoiceDirector)
................................................22
Access Codes...................................................24
Switching the Phone On/Off..............................25

WIP-6000 User Guide
7
Selecting Functions and Options....................... 28
Locking/Unlocking the Keypad.......................... 30
Entering Text................................................... 31
BASIC FEATURES 40
Making a Call................................................... 40
Ending a Call................................................... 43
Answering a Call.............................................. 43
Rejecting a Call................................................ 43
Adjusting the Volume....................................... 43
Accessing Options During a Call........................ 44
Using the Ear-microphone ................................ 48
MENUS 49
Accessing a Menu Function ............................... 49
Menu Structure................................................ 51
Phonebook...................................................... 57
Messages –
(Not Supported by VoiceDirector)
... 66
Call Records .................................................... 99
Network Services............................................102
Images & Sounds ...........................................105
Settings .........................................................109
Utilities...........................................................131
Games ...........................................................147
Camera..........................................................149

WIP-6000 User Guide
8
TROUBLESHOOTING 158
ANNEX 161
Health and Safety Information ........................ 161
Glossary ........................................................169
Product Specifications ....................................171
WIP-6000 Quick Reference Card 175

9
PREPARATION
About This Guide
This user guide provides instructions for the use of
Samsung’s WIP-6000 Wi-Fi phone. Please take the
time to study this guide to become familiar with the
operation of the WIP-6000.
Keep this guide handy. You may need to look up
instructions for infrequently used features.
Overview of WIP-6000
WIP-6000 is a wireless phone for residential use.
It supports both of the IEEE 802.11b standard and VoIP
(Voice over IP) technologies.
WIP-6000 provides a variety of functions such as call
service, messaging service (SMS, E MS and M MS), call
record management, camera, games, utilities,
phonebook management and so on.
WIP-6000 User Guide
10
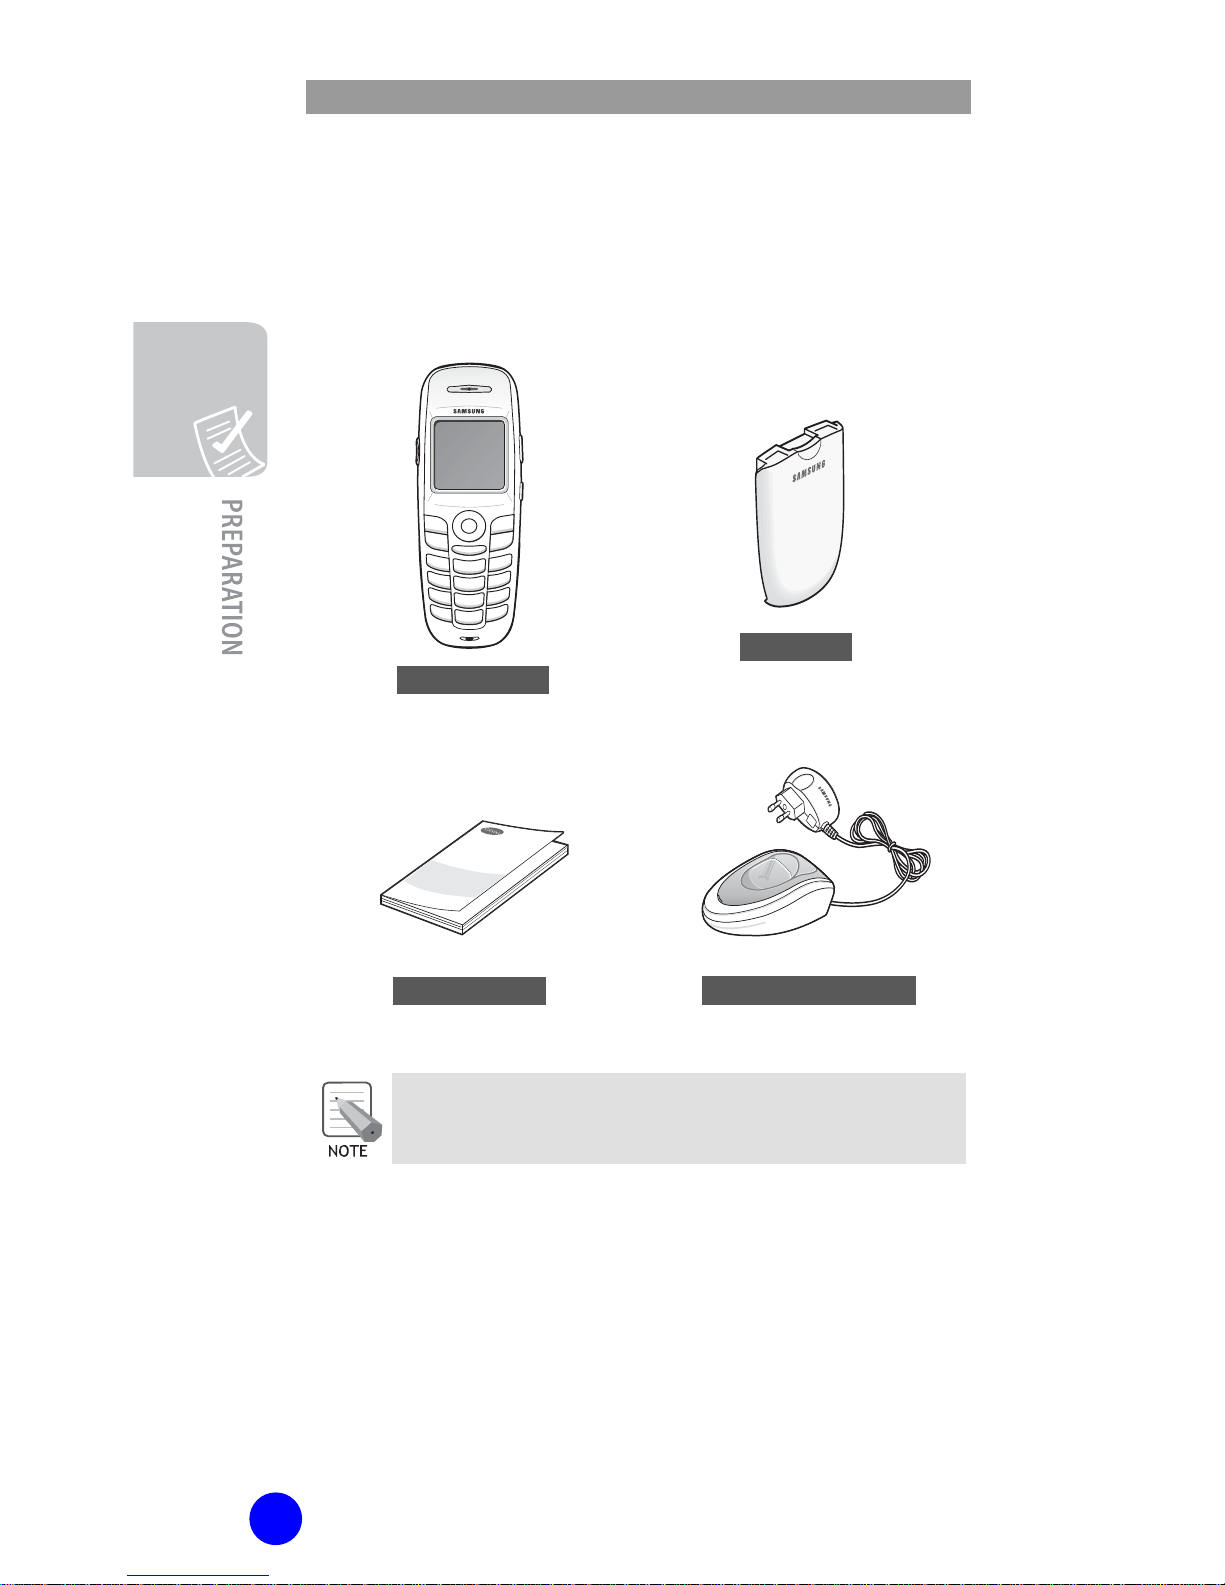
Unpacking
After purchasing the WIP-6000 phone, ensure the
following items are included in the box.
The items supplied with your phone may be
different depending on the country.
In addition, you can obtain the following accessories
for your phone from your local Samsung dealer:
Wearable Ear-Microphone
WIP-6000
Battery
(1 standard type)
User Guide
Battery Charger
WIP-6000 User Guide
11
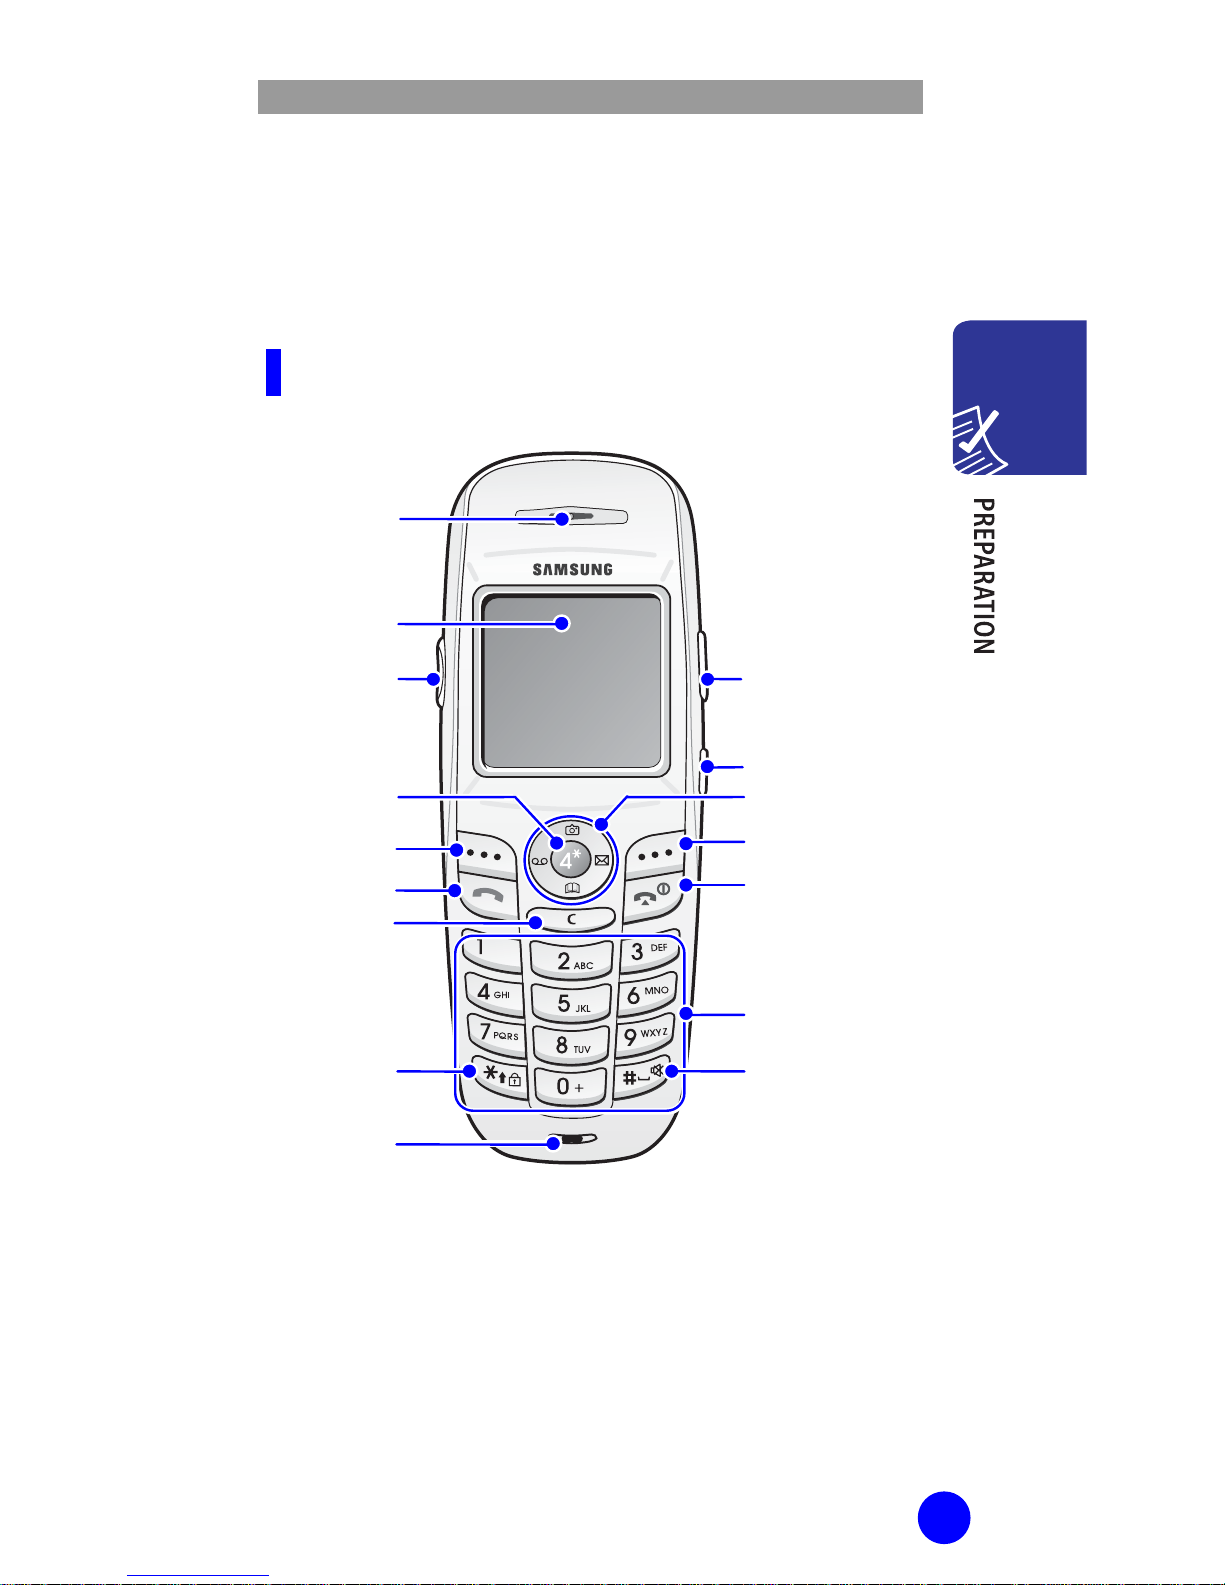
Phone Layout
The following figure shows the main elements of your
phone.
Front View
V
olume keys
Left Softkey
Send Ke
y
Navigation Keys
Right Softkey
End/Po wer Key
Microphone
Speaker
LCD Screen
Headset
Connection
Key Loc
k
mode Ke
y
Camera key
OK Key
Dial Keys
Quiet Mode Key
WIP-6000 User Guide
12
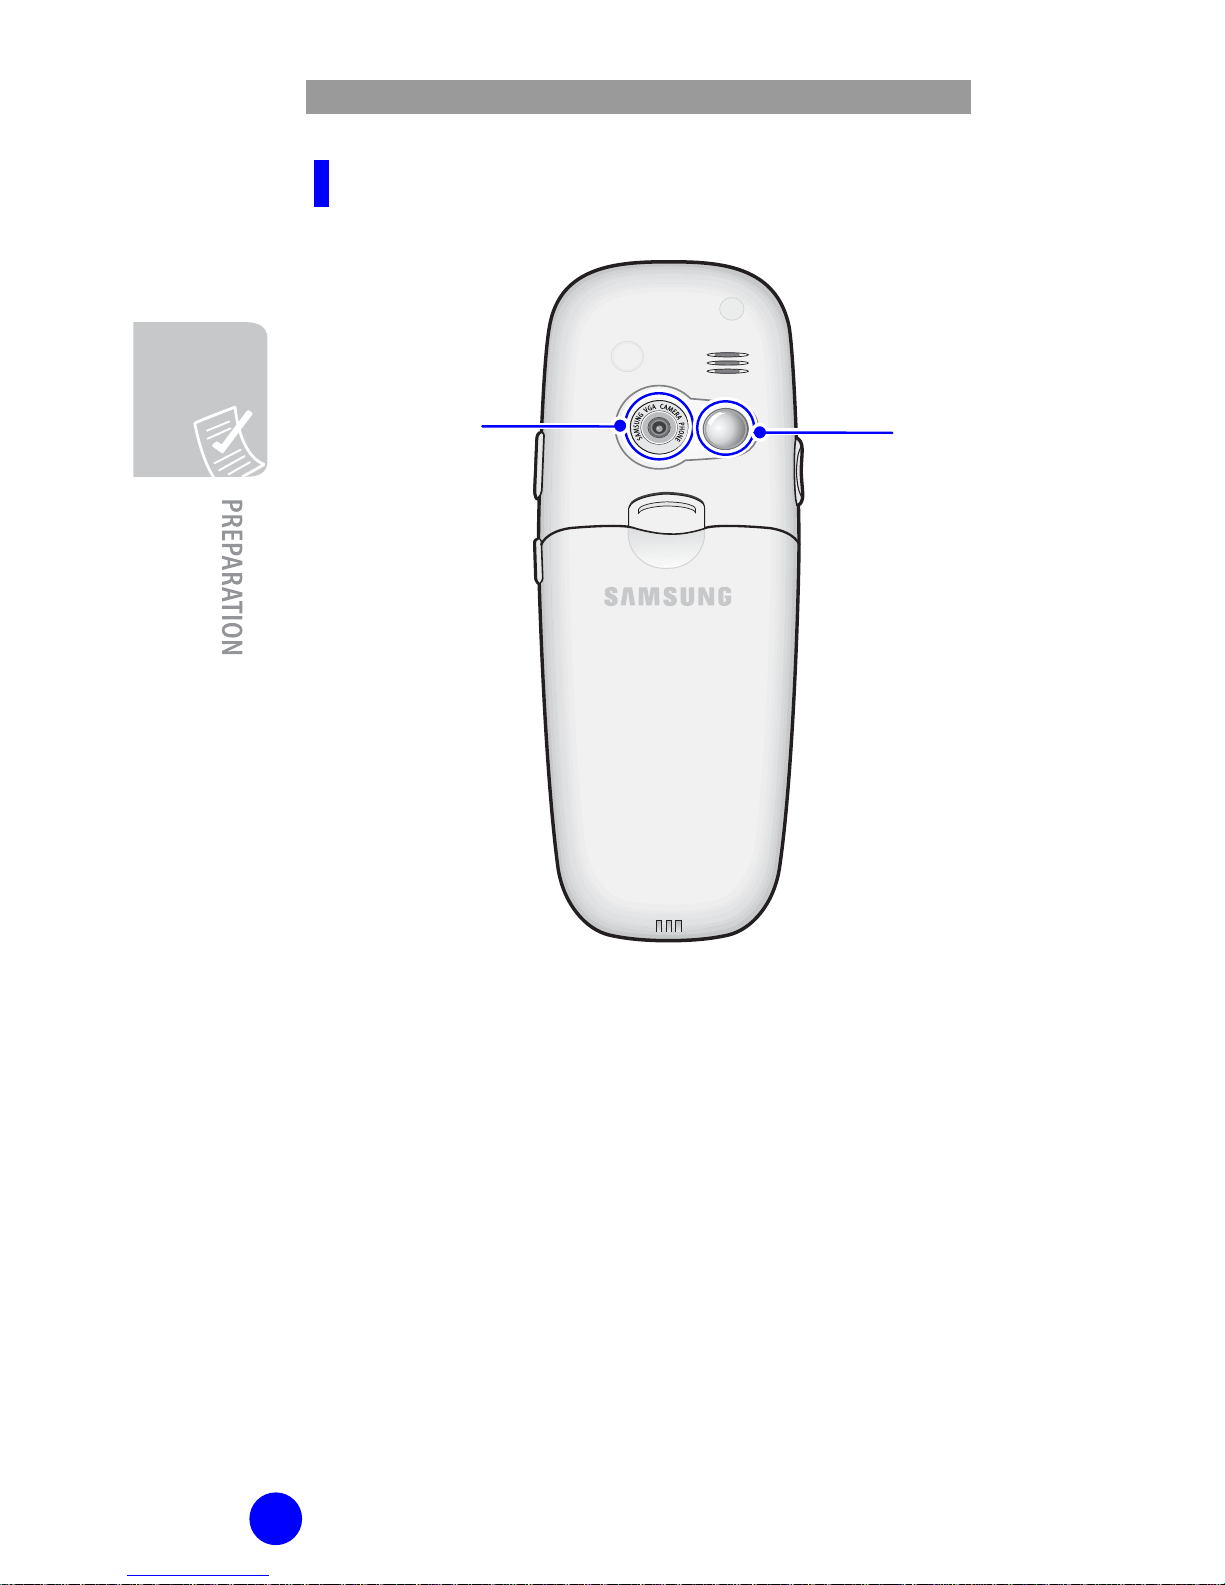
Rear View
Camera Lens
Mirror
WIP-6000 User Guide
13
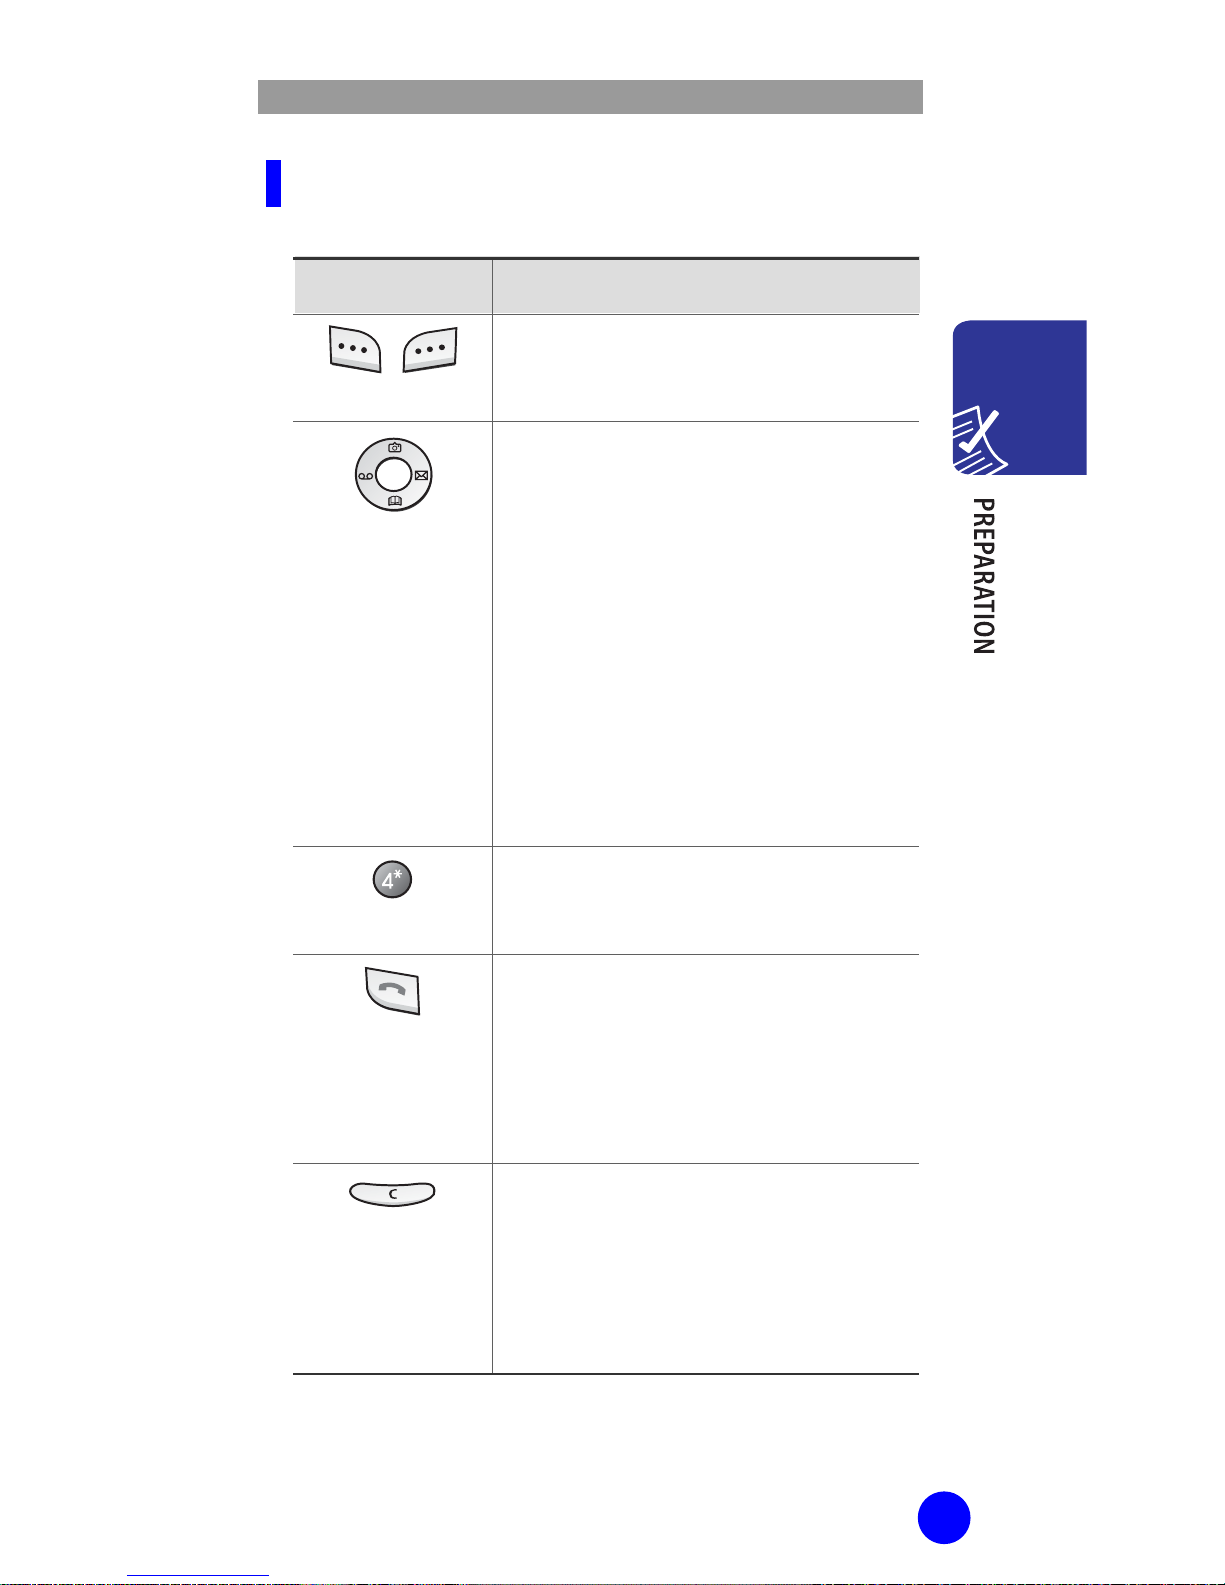
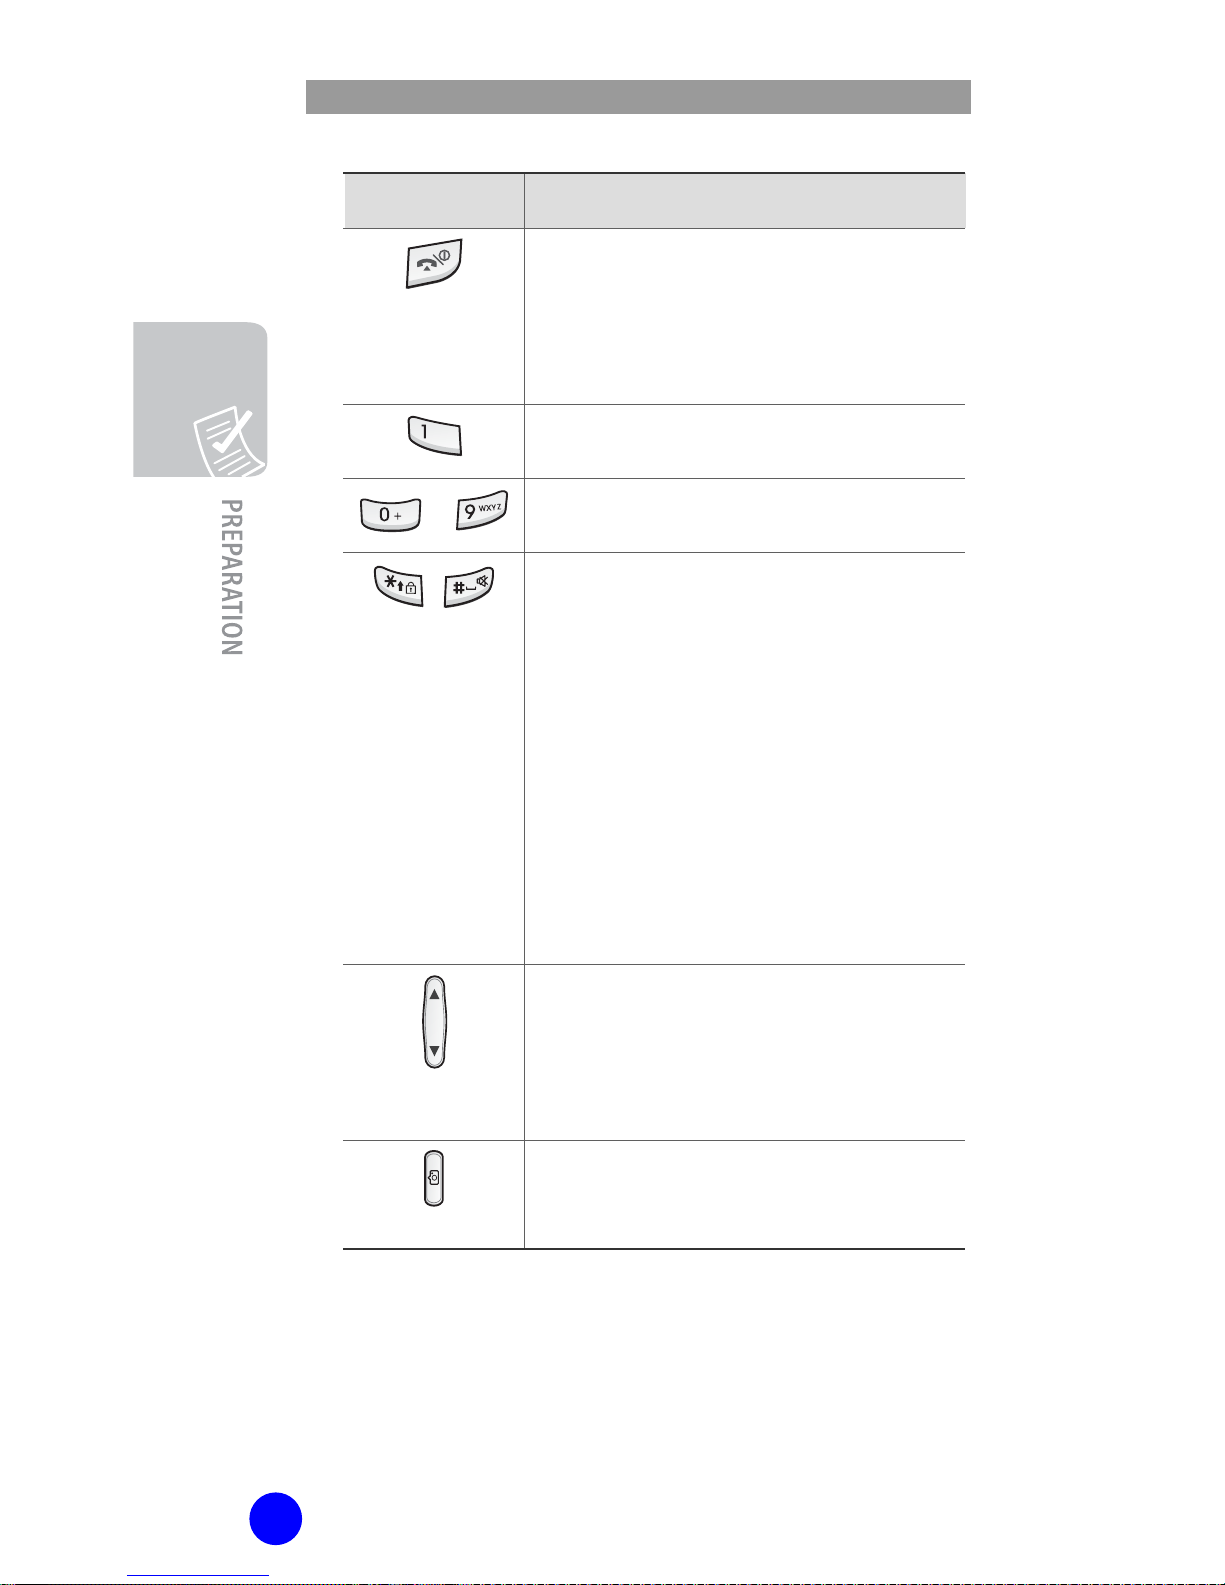
Key Description
Key(s) Description
,
Softkeys
Perform the functions indicated by the
text above them, on the bottom line of
the LCD display.
Navigation Keys
(up/down/left/ri ght)
In Menu Mode: Scroll through the
menu options.
In Idle Mode:
- Left key enters the Voice mail
server connection screen.
- Right key enters the SMS main
menu screen
- Up key enters the Camera menu,
when pressed and held it switches
the phone to the capture mode.
- Down key enters the Find name
menu.
OK key
- In Menu Mode: Performs as Ok key.
- In Idle Mode: Accesses the main
menu.
Send key
Initiates or answers a call.
In Idle Mode: Accesses the call log list.
In Menu Mode: Selects a menu
function or stores information that you
have entered, such as a name in the
phone or SIM memory.
Cancel/Back/
Correction key
Deletes characters from the display.
When pressed and held in Idle Mode,
quickly accesses the New memo
screen.
In Menu Mode, returns to previous
menu.
WIP-6000 User Guide
14
Key(s)
Description
End key
Ends a call.
When pressed and held: Switches the
phone on or off.
In menu Mode: Cancels your input and
returns to Idle Mode.
When pressed and held in Idle Mode:
Accesses your voicemail server.
~
Enter numbers, letters and some special
characters.
,
Used for various purposes in different
functions.
When pressed and held while entering a
phone number, * key insert ‘P’ (pause).
The number before ‘P’ means the
dialing number and the number after ‘P’
means the DTMF digit after call set-up is
completed.
When pressed and held in Idle Mode,
the # key enters or exits the Quiet
Mode and * key enters the Key Lock
Mode.
Volume keys
(On the left side of the phone)
During a call, adjust the earpiece volume.
In Idle Mode, adjust the key tone volume.
In the capture mode, flip the picture up
and down.
Camera key
(On the right side of the phone)
In Idle Mod e, long press Camera key
enters the photo capture mode.
WIP-6000 User Guide
15
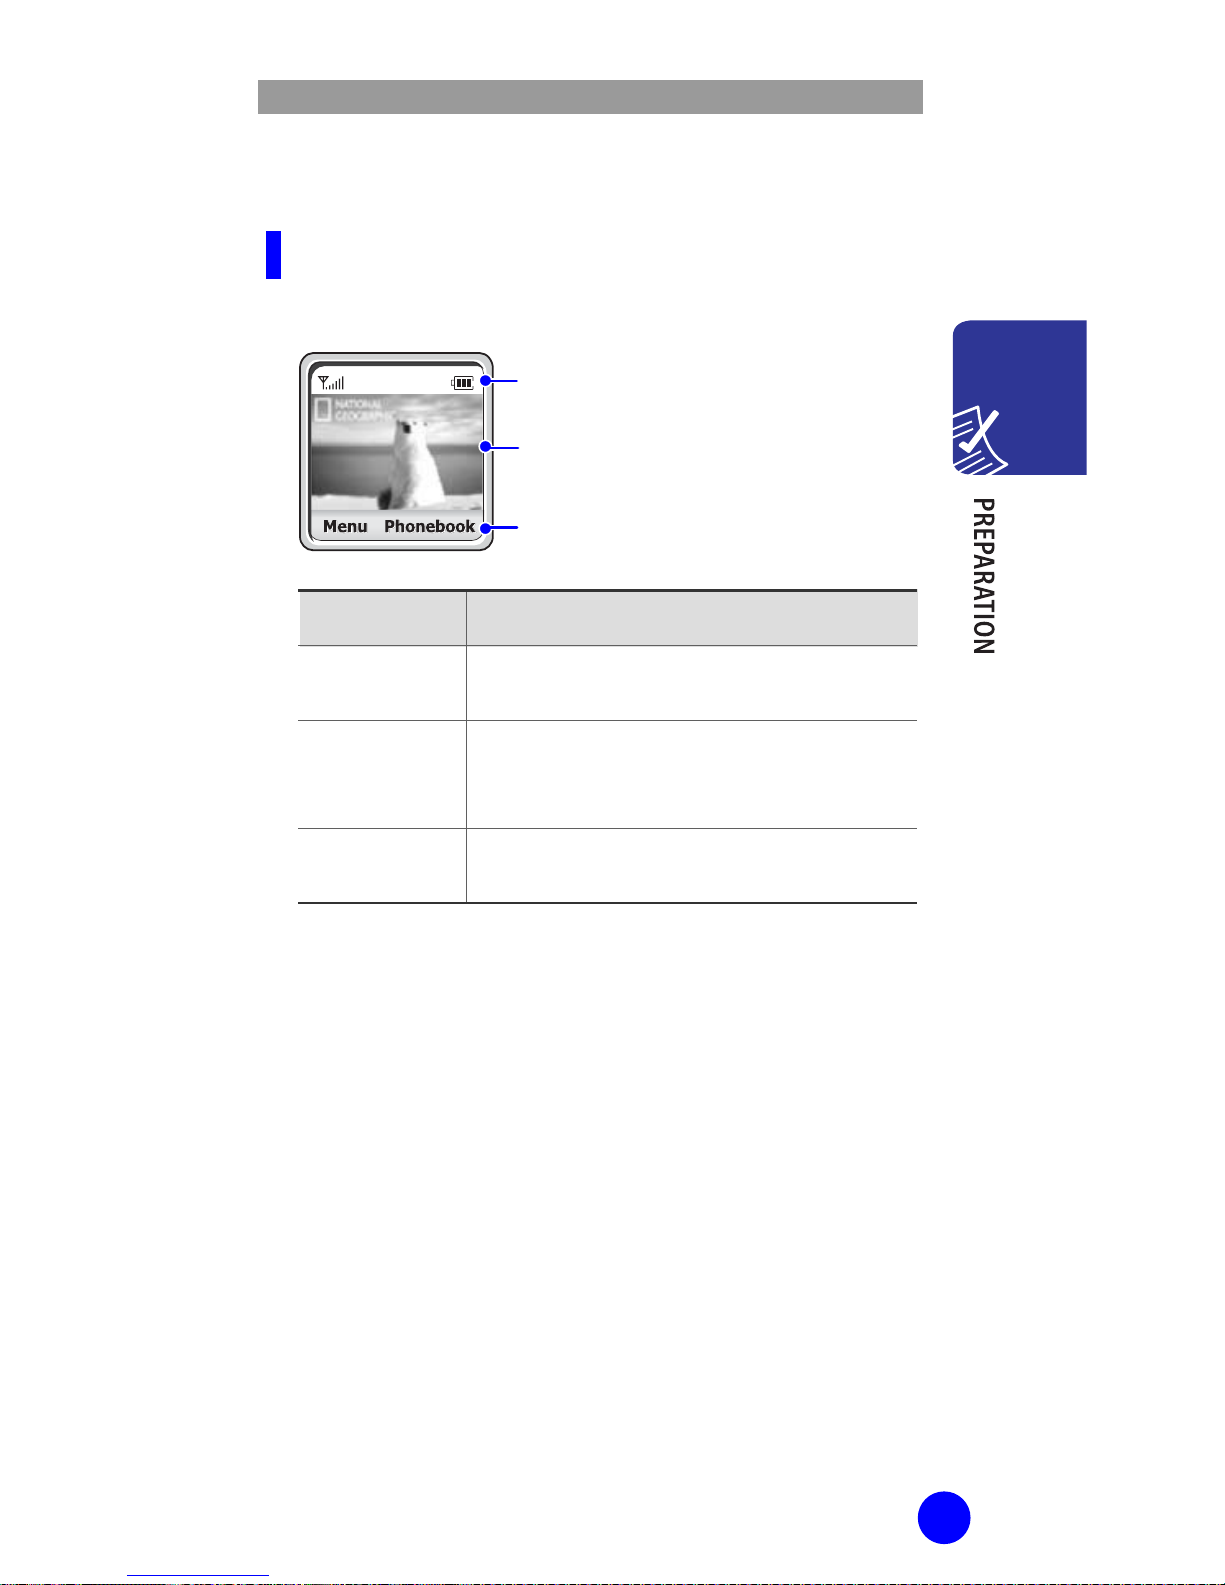
Display
Display Layout
The display has three areas:
Area Description
First line Displays various icons. See ‘Icon
Description’ section of this g uide.
Middle lines Display messages, instructions and any
information that you enter, such as
number to be dialed.
Last line Shows the functions currently assigned
to the two softkeys.
Icons
T
ext and graphic area
Softkeys Indications
WIP-6000 User Guide
16
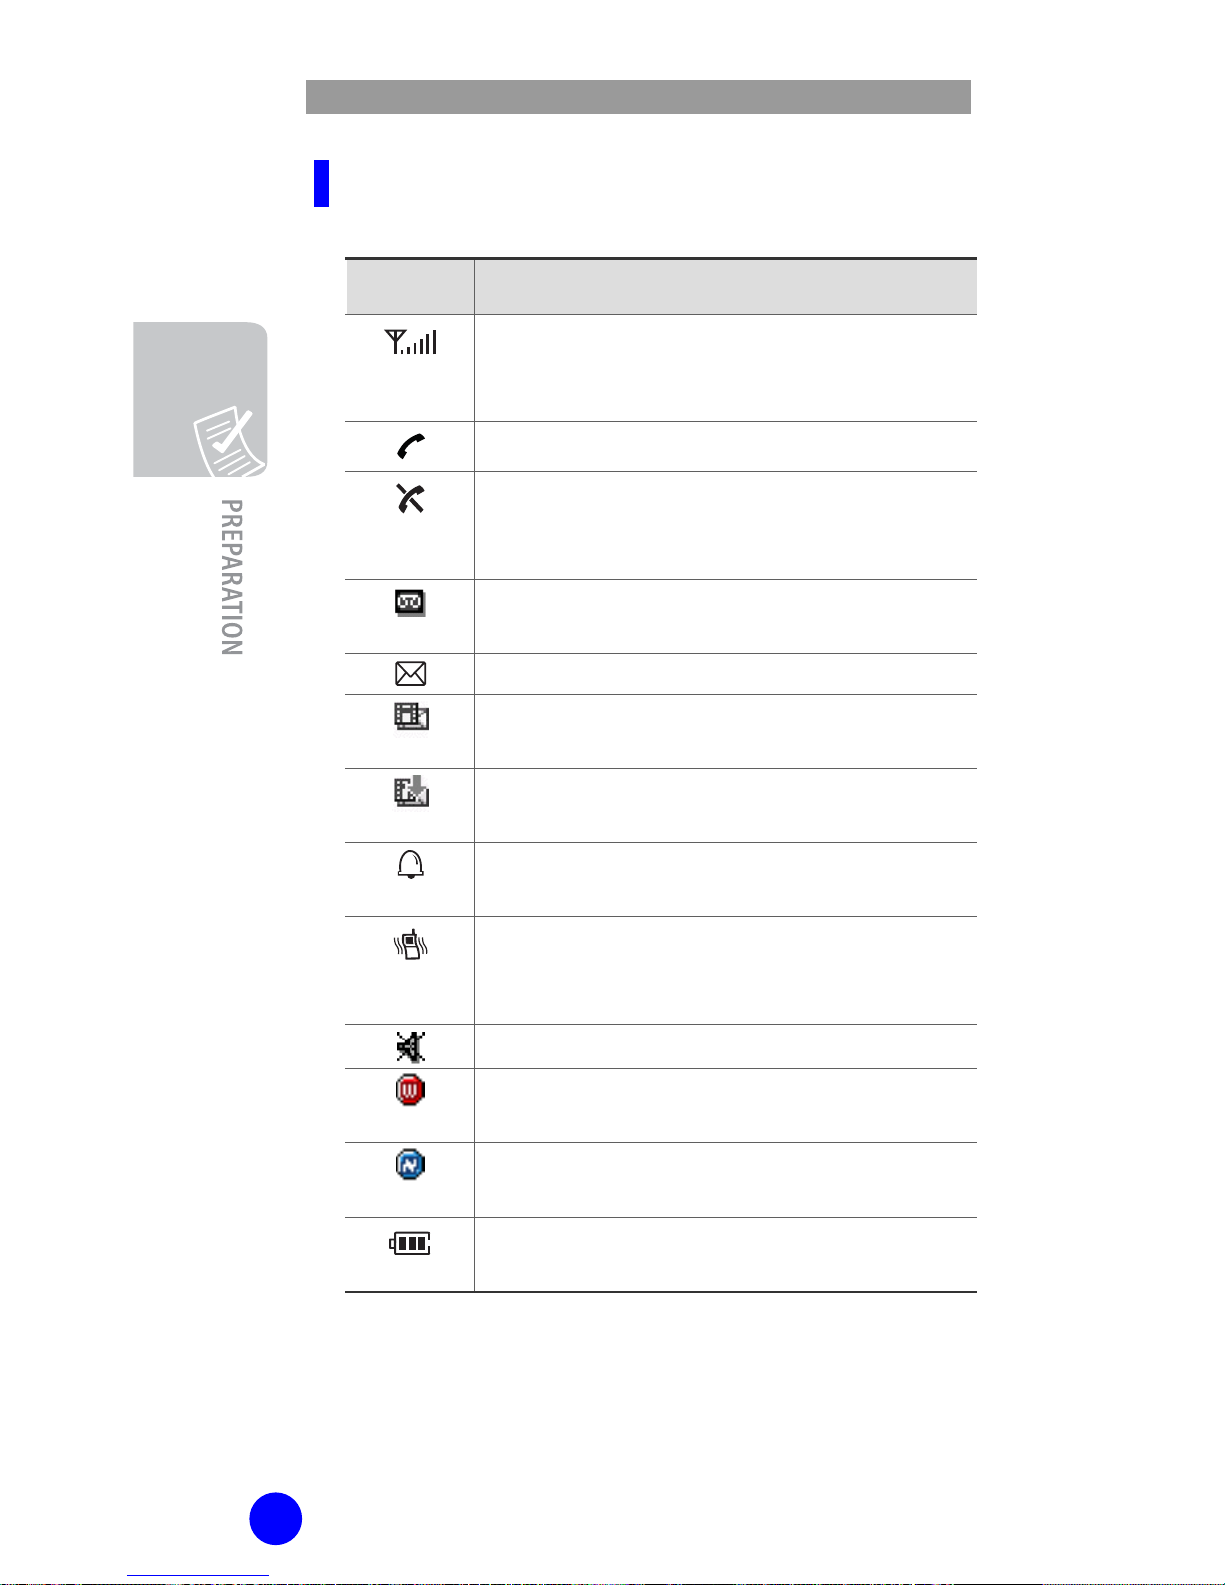
Icon Description
Icon
Description
Shows the received signal strength.
The more the number of bars, the stronger
the signal.
Appears when a call is in progress.
Appears when you are out of a service area.
When it displays, yo u cannot make or
receive calls.
Appears when you have new voicemail
messages.
Appears when you have new text messages.
Appears when you have new multimedia
messages.
Appears when you are retrieving a
multimedia message.
Appears when you set the alarms to ring at
a specified time.
Appears when you set the alert type for
incoming calls to Vibration or Vibration then
melody.
Appears when the Quiet Mode is active.
Appears when your phone receives Wi-Fi
signal (You can not make a call yet).
Appears when you are connected to the
network (You can make a call).
Shows the level of your battery. The more
bars you s e e, the more power you have left.

WIP-6000 User Guide
17
Dimming Mode
If you don’t press any key in a given period of time,
which you can set in the Backlight menu optio n
(Menu 5.3.3), the backlight turns to dim to save the
power. Press any key to awake the display from the
Dimming Mode.
Clock Mode
If you don’t press any key in a minute after
dimming of the display, the display goes into the
Clock Mode to save the power. Press any key to
awake the display from the Clock Mode.
Backlight
The display and the keypad are illuminated by a
backlight. When you press any key, the backlight
illuminates. It turns off if you don’t press any key
within a given period of time, depending on the
Backlight menu option.
WIP-6000 User Guide
18
Service Light
The service light’s activity depends on the Service
light menu option. See ‘Service Light (Menu 5.9)’
section of this guide. The operation (On/Off) of
service light is also selectable from the Settings
menu.
Camera
The camera embedded in your phone allows you to
take a picture of people or events while on the move.
For further details about using the Camera feature,
see the ‘Camera’ section of this guide.
Service Light
19
GETTING STARTED
Before You Start
Installation of WIP-6000 charger
After deciding where to install the charger:
Put the adapter’s jack into the round plug of the charger.
Put the adapter in a 110V plug.
A LED on the charger turns on showing 3 colors: red,
green, and orange. Then the LED turns off.
Technical Data
The adapter and the charger have the following
working values:
100/240 VAC, 50/60 Hz 150 mA Adapter
5.0 VDC 700 mA
Charger 5.0 VDC 700 mA
Recharging
To recharge the battery:
Put the handset into the charger.
A red LED displays during the rech arge
When a green LED displays, the phone is fully charged.
If an orange LED displays, the handset is not
correctly aligned in the charger.
A
WIP-6000 User Guide
20
Installing/Removing/
the Battery
A rechargeable lithium-ion battery powers your phone.
Use only approved batteries and chargers.
Ask your local Samsung dealer for further details.
Y ou must fully charge the battery before using your
phone for the first time. A discharged standard battery
is fully r echar ge d in appr ox imat ely 1 20 m inute s.
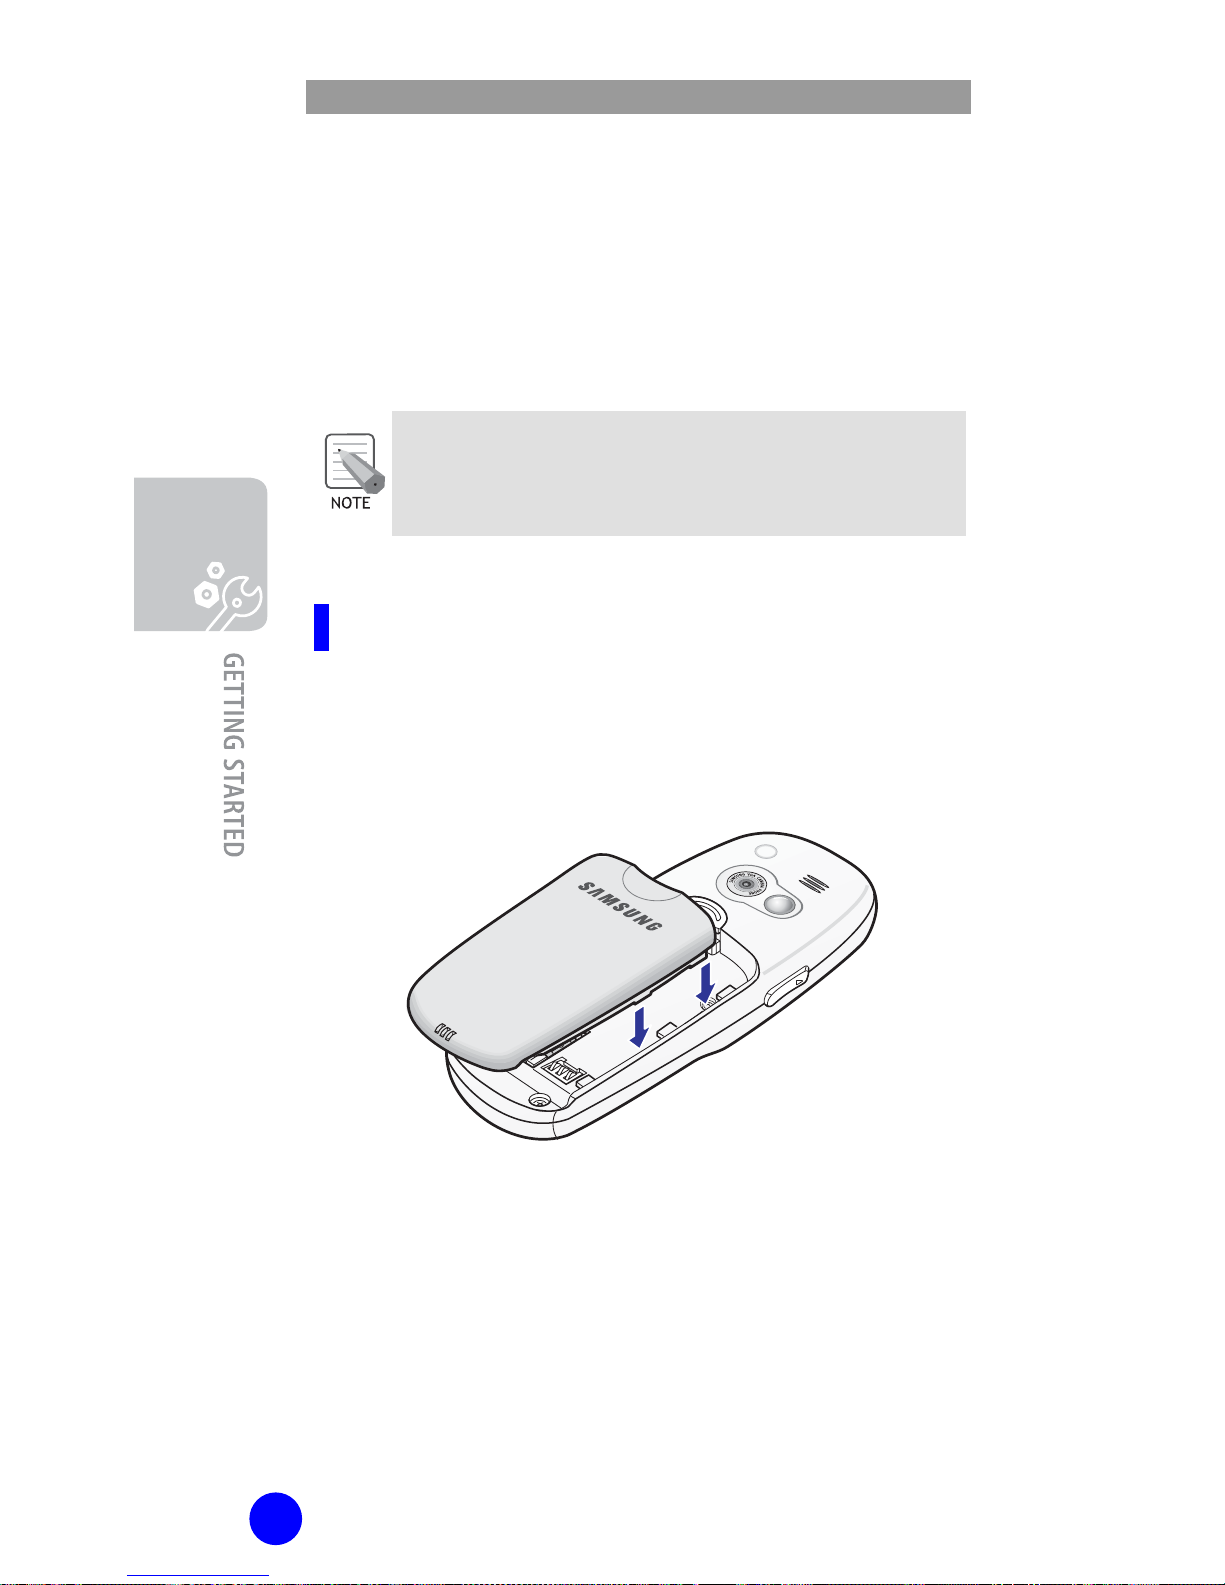
Installing the Battery
1. Place the battery back on the phone. Make
sure each side tab of the battery placed into
corresponding slot on the phone.
WIP-6000 User Guide
21
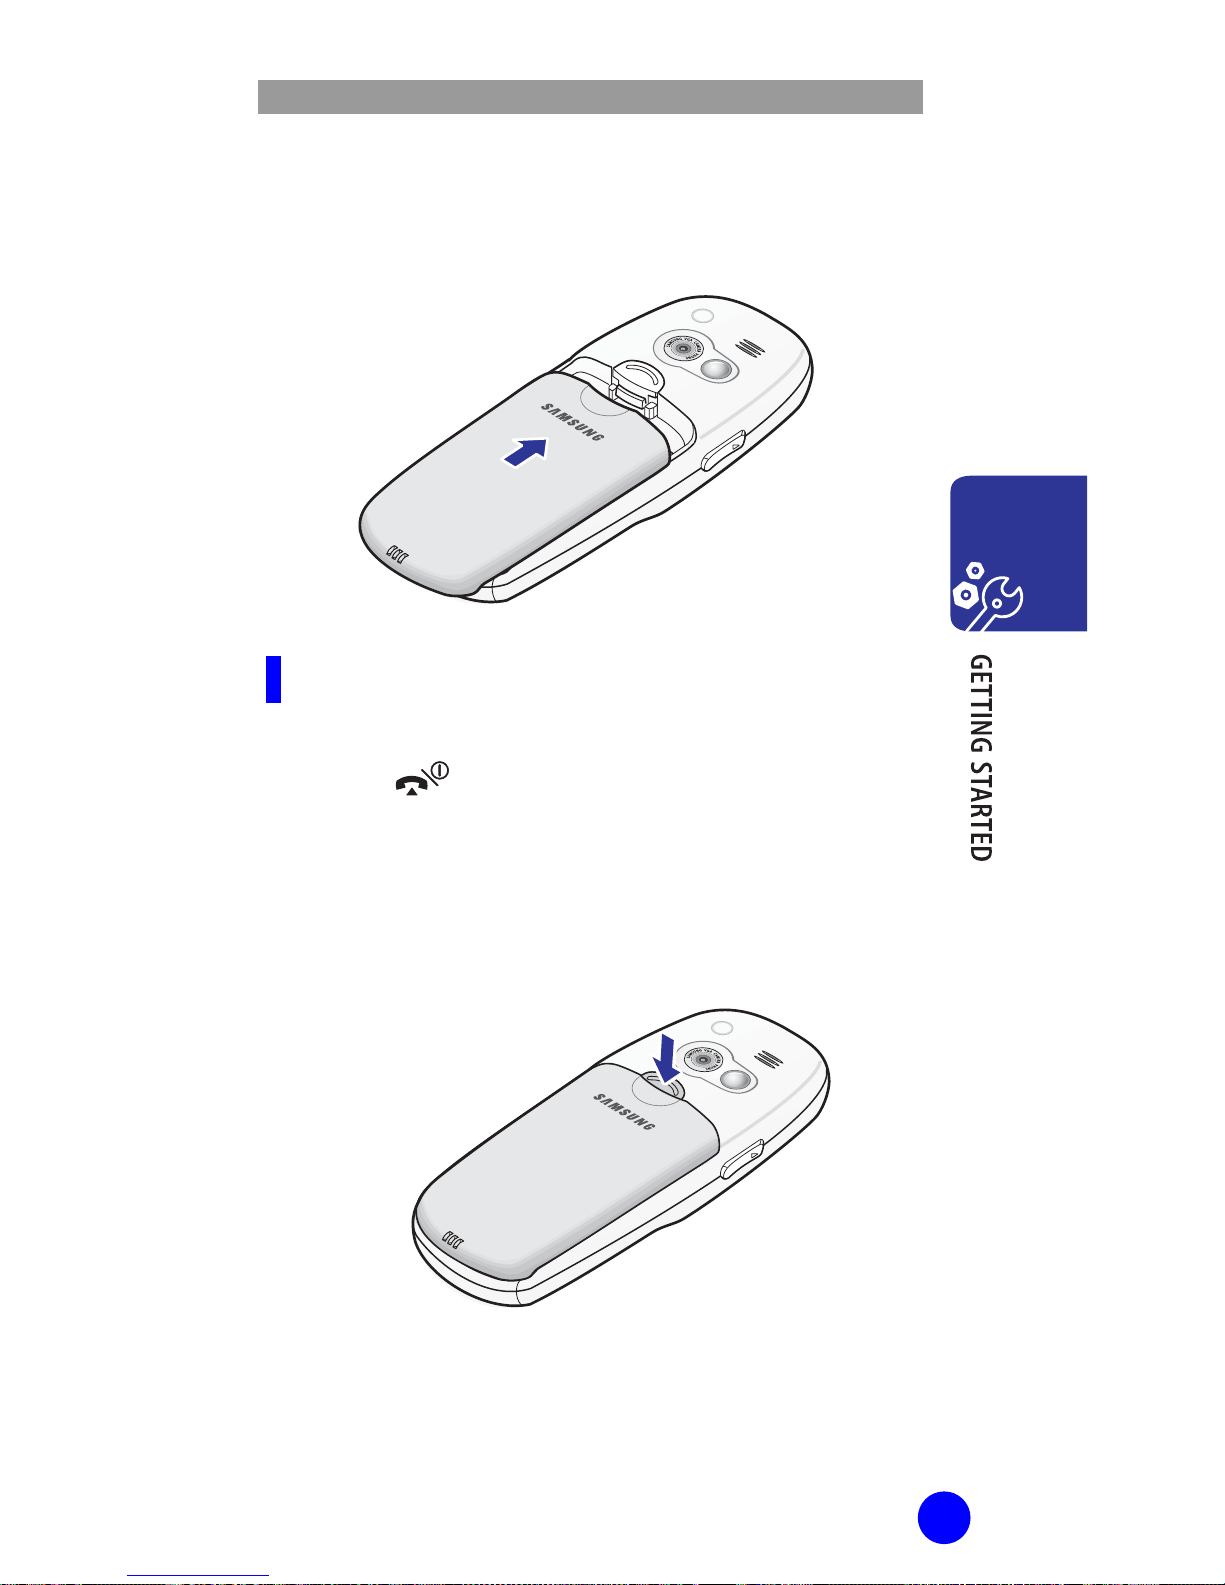
2. Slide the battery up towards the catch until it
locks into place.
Removing the Battery
1. Switch off the phone by pressing and holding
the
key.
2. Press and hold the catch above the battery on
the back of the phone and slide the battery
away.
WIP-6000 User Guide
22
Low Battery Indicator
When battery power is low, the battery sensor
informs you in the following ways: an empty
battery icon flashes (
), you hear a warning tone
and a message repeats at regular intervals on the
display.
When the battery becomes too weak for the phone
to operate, it switches off automatically.
Inserting/Removing the
SIM Card
(Not Supported by
VoiceDirector)
When you subscribe to a cellular network, you are
provided with a SIM (Subscriber Identifi cation
Module) card loaded w ith your subscription details,
such as your PIN, any optional services available.
WIP-6000 supports the copying from phonebook
entries to the SIM card and vice versa. Also WIP-6000
supports transferring the SMS from the SIM card to
the phone’s memory. Please remember that WIP-6000
only supports the copying contents of the SIM card,
not the general SIM card function ality.
- Keep all miniature SIM cards out of the reach of
small children.
- The SIM card and its data can be easily
damaged by scratches or bending, so be careful
when handling, inserting or removing the card.
- When installing the SIM card, always make sure
that the phone is switched off before you
remove the battery.
WIP-6000 User Guide
23
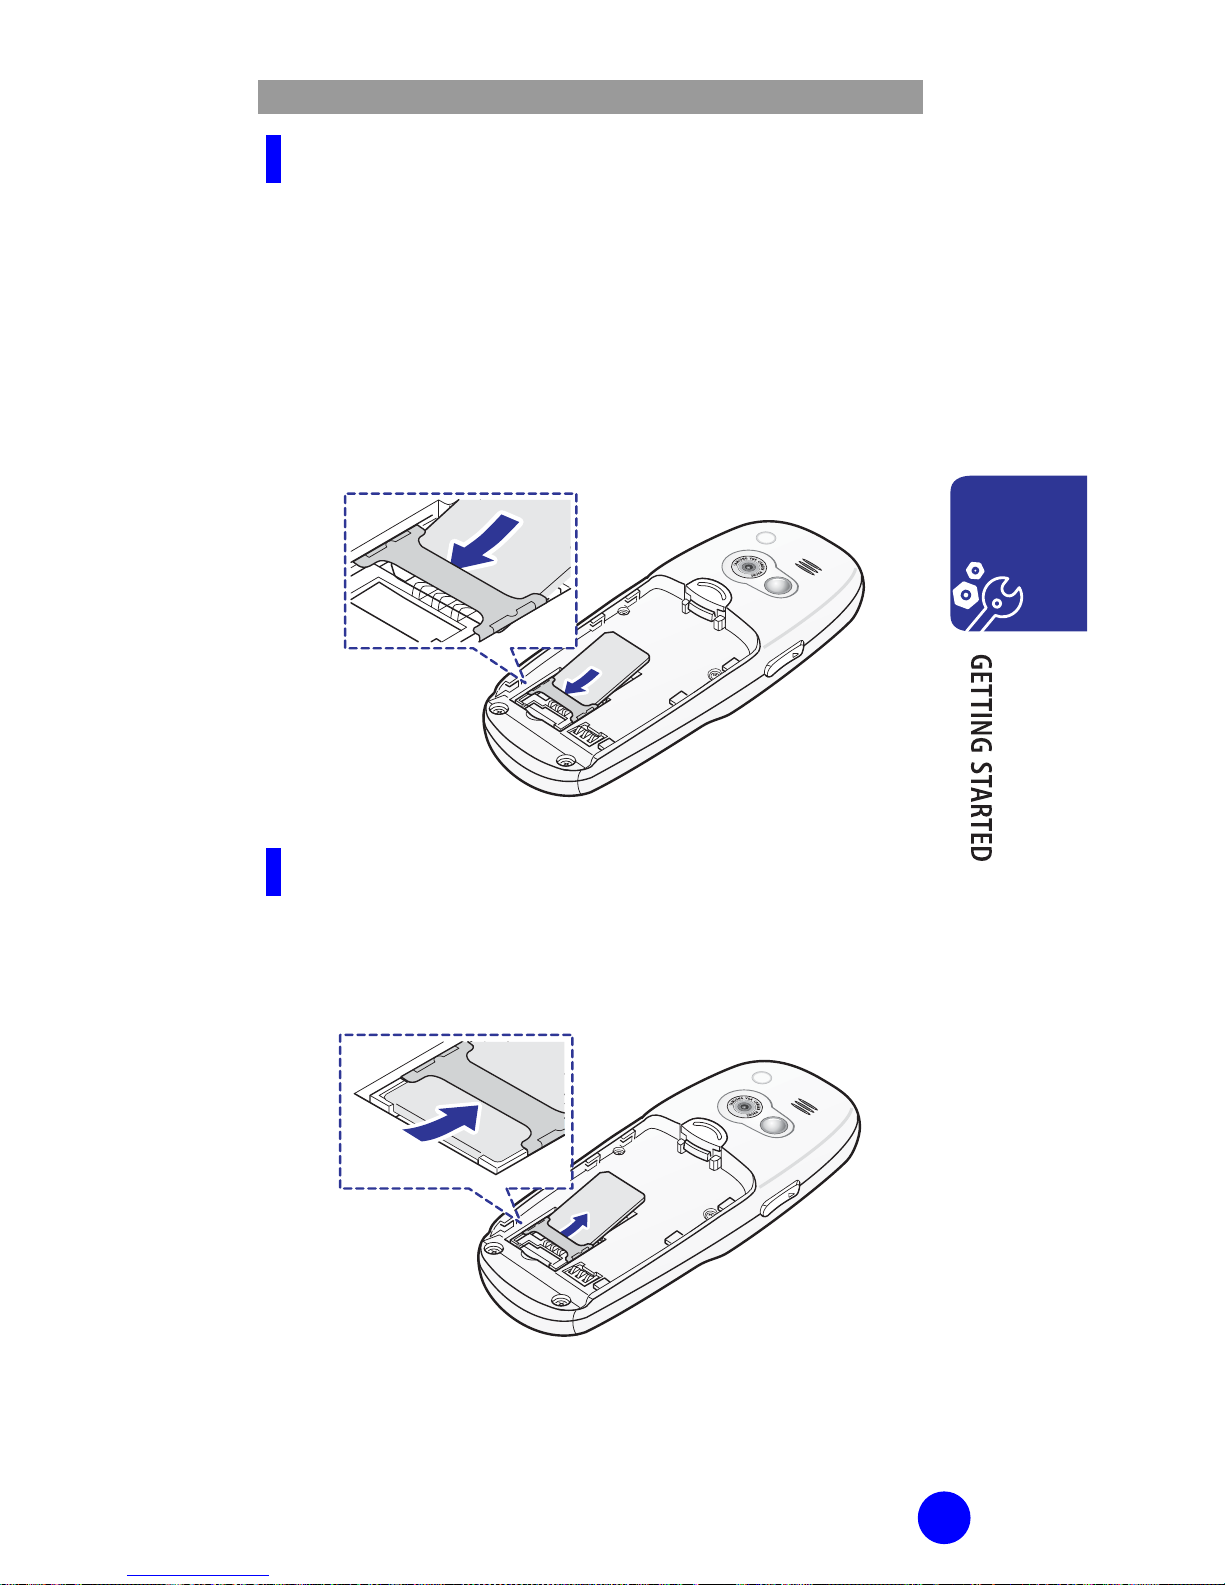
Inserting the SIM Card
1. Remove the battery.
2. Insert and slide the SIM card under the tab,
ensuring that the notched corner is top left
and the gold contacts of the card face into
the phone.
Removing the SIM Card
To remove the SIM card, slide the card out of the
holder, as shown.

WIP-6000 User Guide
24
Access Codes
There are several access codes that are used by your
phone and its SIM card. These codes help you protect
the phone against unauthorized use. For further
details, see ‘Security (Menu 5.7)’ section of this guide.
Some access codes can be changed using the
Security menu option (Menu 5.7).
Phone Password
Use the phone password feature to protect your
phone from unauthorized use.
The phone password is preset to ‘00000000’ (8
zeros) at the factory.
To change the password, use the Change
Password menu option (Me nu 5.7.3).
PIN
(Not Supported by
VoiceDirector)
This is usable when SIM card is inserted in Wi-Fi
phone.
The PIN (Personal Identification Number) protects
your SIM card against unauthorized use. When the
PIN Check feature is enabled, you must enter the
PIN each time you switch on the phone.
See ‘Security (Menu 5.7)’ section of this guide.
If you enter an incorrect PIN thre e tim es in
succession, enter the PUK and p ress the OK
softkey to unlock the phone. Enter a new PIN and
press the OK softkey. Enter the new PIN again and
press the OK softkey.
WIP-6000 User Guide
25
PUK
(Not Supported by
VoiceDirector)
This is usable when SIM card is inserted in Wi-Fi phone.
The PUK (PIN Unblocking Key) is required to
change a blocked PIN. The PUK may be supplied
with the SIM card. If not, contact your local s e rvice
provider.
If you enter an incorrect PUK ten tim es in
succession, the SIM card cannot be used anymore.
Contact your service provider for a new card.
You cannot change the PUK. If you lose the code,
contact your service provider.
Switching the Phone On/Off
To Switch the Phone On
1. Press and hold the
key until the phone
switches on.
2. If the phone asks for a PIN, enter the PIN and
press the OK softkey. For further details, see
‘PIN Check (Menu 5.7.1)’ section of this guide.
If multiple networks are found, steps 3, 4, 5 are
necessary. Otherwise, proceed to step 6.
3. The phone searches for your network and the
SSID (Service Set Identifier) list that contains
single or several SSIDs is displayed on the
screen.

WIP-6000 User Guide
26
4.
Select your wireless network from the SSID list.
5. If the network requires a WEP key the phone
will prompt you to enter one. Please select
the authentication type from between ASCII
and Hex.
6. The phone will then start DHCP and ask for a
telephone number. Please enter the extension
number assigned to the phone by your
VoiceDirector administrator. [If you need to
set a static IP or hit an SSID, please
enter your extension number when
prompted, and see page 120 for hidden
SSID, and page 126 for static IP. To
enable or disable DHCP see page 124.]
7. The selected SSID, current date and time
appear on the display and you can make or
receive a call.
Otherwise, an error message will be displayed
on the screen.
The possible error cases are as follows:
MAC address filtering: The selected SSID may be
filtering MAC addresses. Please add your MAC
address to the allow list (you can obtain the MAC
address by pressing the end key an d then selecting
Menu -> Settings -> Test Mode -> Production).
WEP Encryption: Please verify that you entered
the WEP key correctly.
DHCP: DHCP might not be working correctly please
contact your network administrator.

WIP-6000 User Guide
27
To change the language, use the Language menu
option (Menu 5.6).
WIP-6000 User Guide
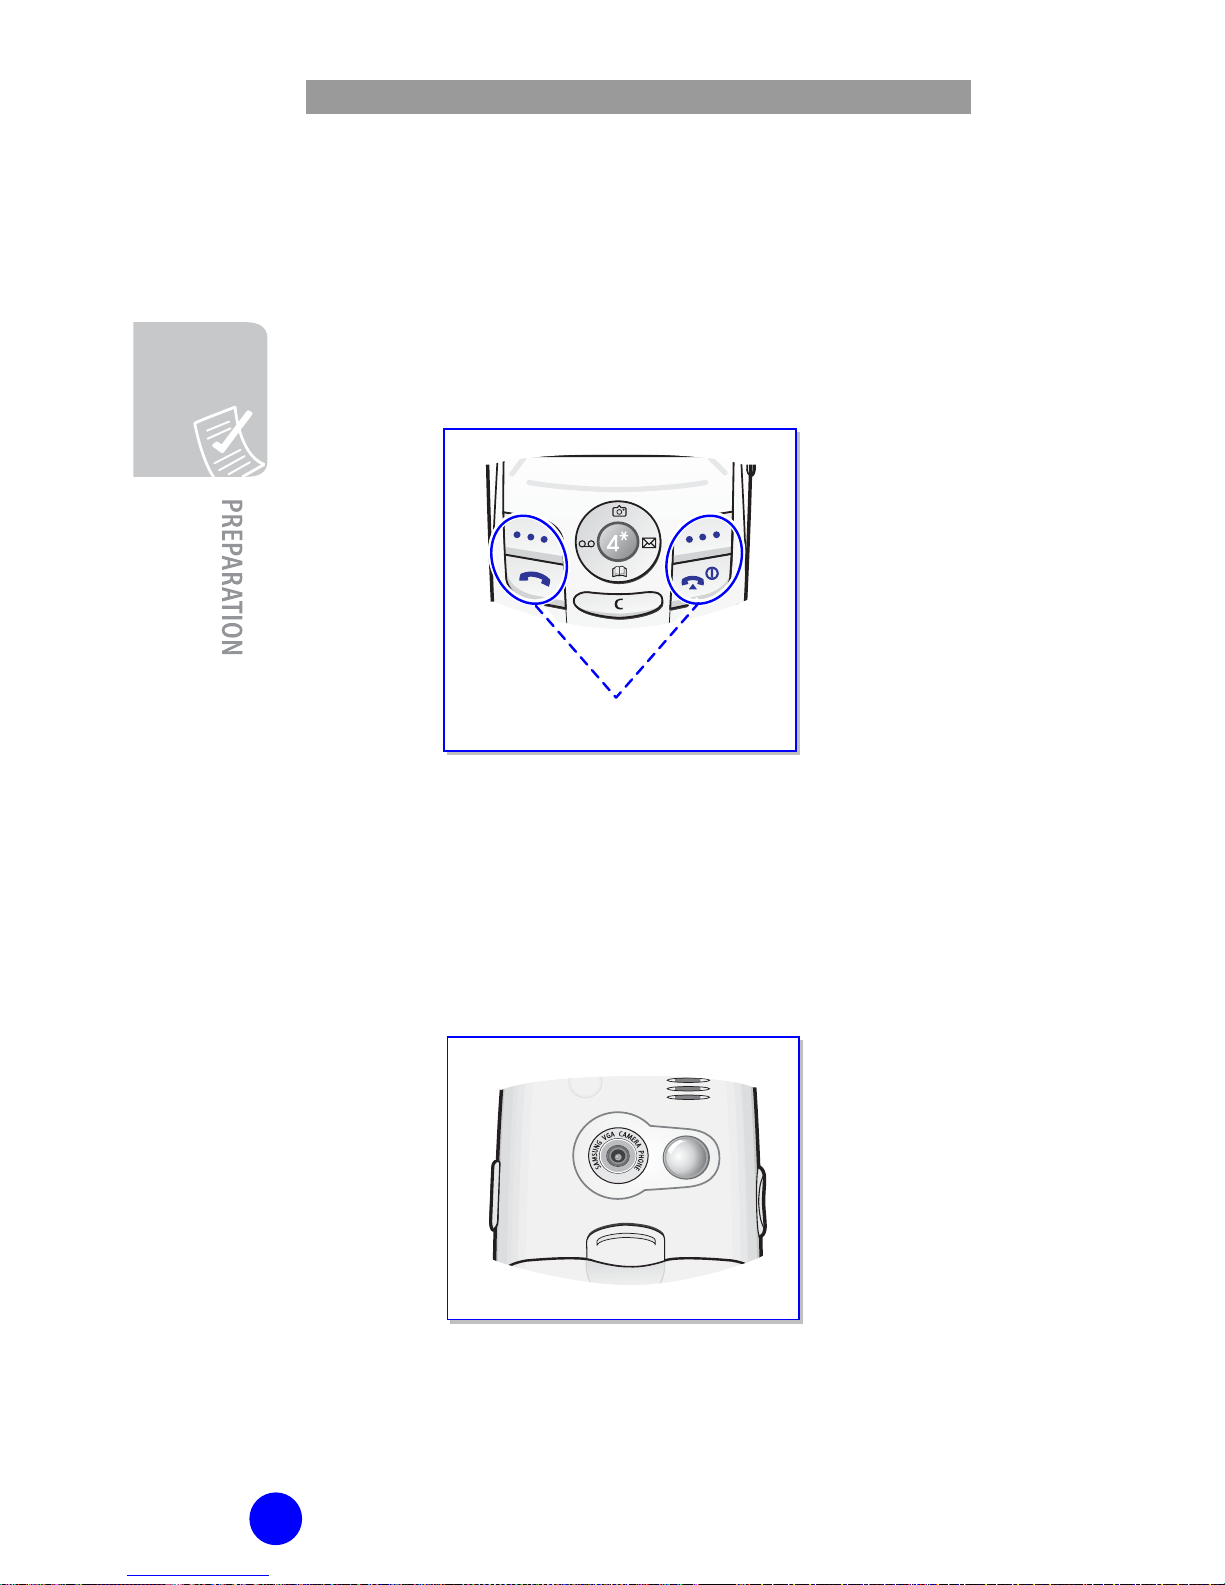
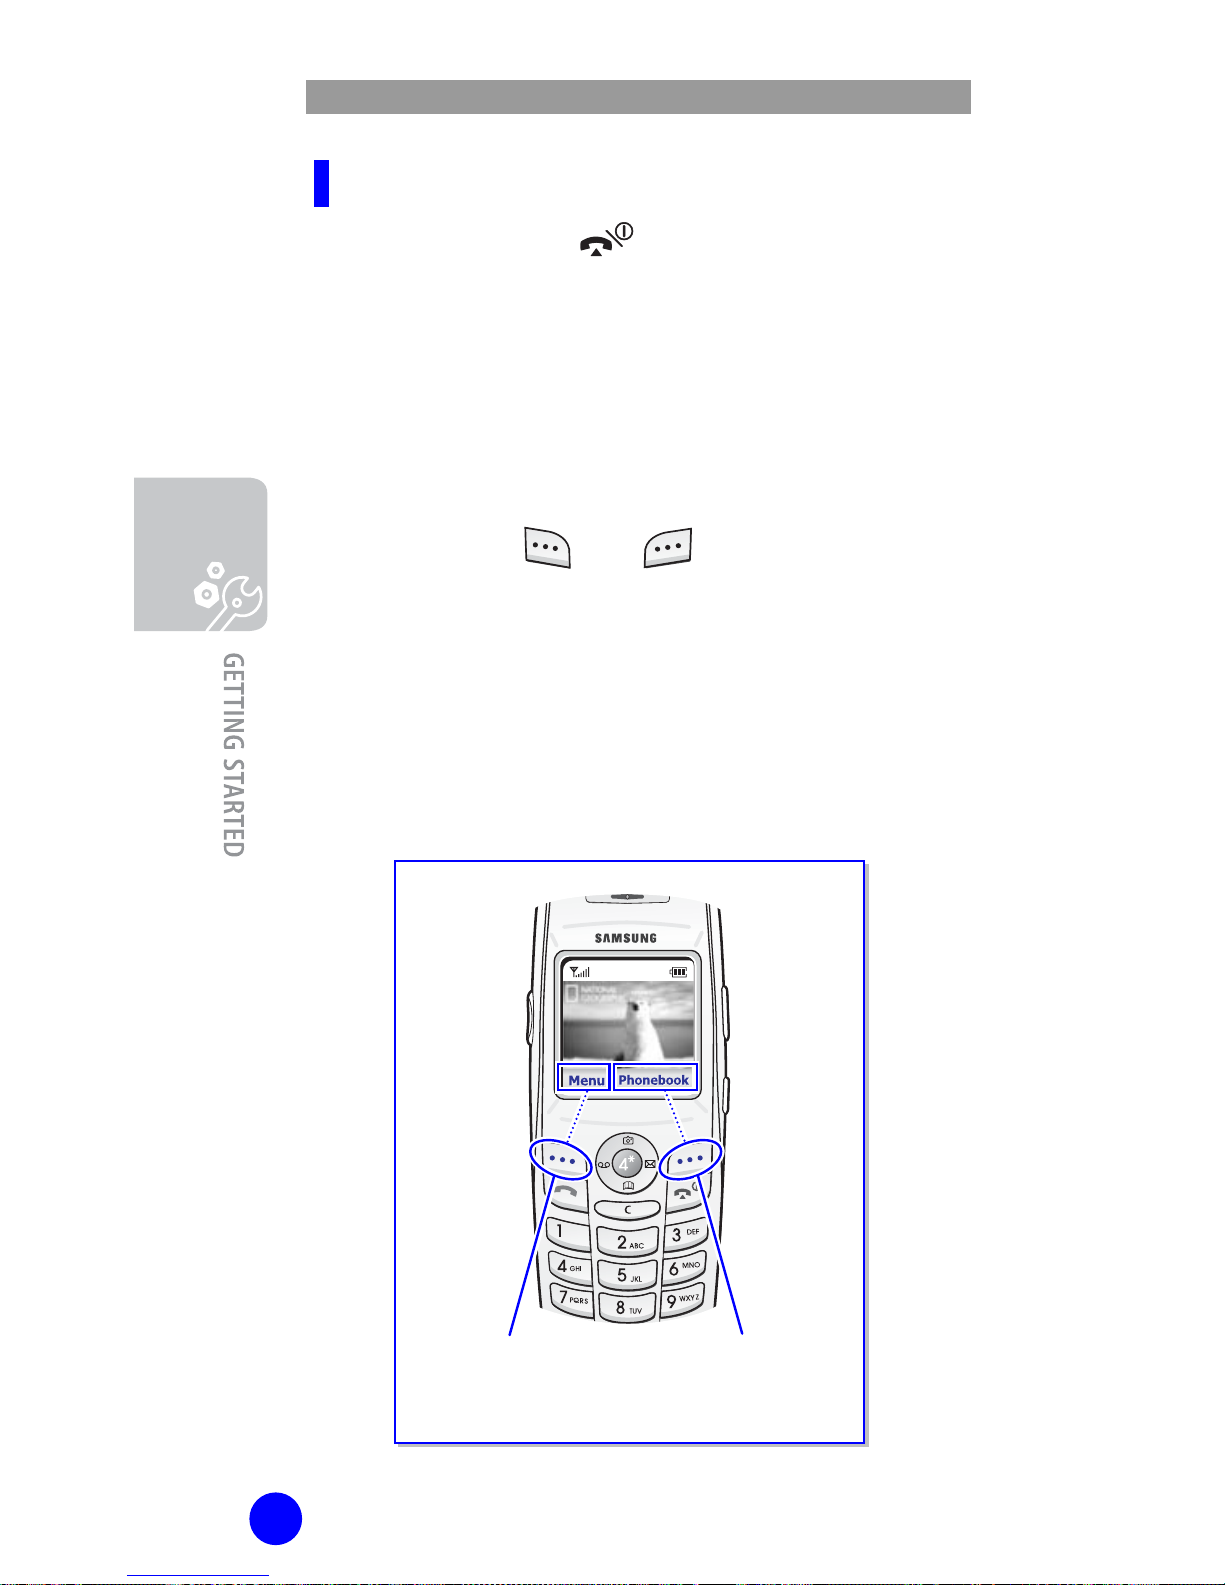
28
Press the left sof
t
Key to access the
Menu functions.
Press the right sof
t
Key to access the
Phonebook functions.
To Switch the Phone Off
Press and hold the key until the power-off
animation displays.
Selecting Functions and
Options
Your phone offers a set of functions that allow you to
customize your phone. These functions are arranged
in menus and sub-menus, accessed via the two
softkeys marked
and
.
Each menu and submenu allows you to view and alter the settings of a
particular function.
The roles of the softkeys vary according to the current
context; the labels or icons on the bottom line of the
display and just above the softkeys indicate their
current roles.
 Loading...