

Page 1
Enterprise IP Solutions OfficeServ WIP Phone
User Guide
Page 2

Page 3

COPYRIGHT
This manual is proprietary to SAMSUNG Electronics Co., Ltd. and is protected by copyright.
No information contained herein may be copied, translated, transcribed or duplicated for any
commercial purposes or disclosed to third parties in any form without the prior written consent
of SAMSUNG Electronics Co., Ltd.
TRADEMARKS
OfficeServ™, WIP-5000M™ are the trademarks of SAMSUNG Electronics Co., Ltd.
Product names mentioned in this document may be trademarks and/or registered trademarks
of their respective companies.
Page 4

Please read this guide before using the WIP-5000M phone, and follow the instructions to use the
the WIP-5000M phone safely and correctly.
This guide may be changed for the product improvement, standardization and other technical reasons
without prior notice.
For further information on the updated manual or have a question the content of manual, co ntact your
Authorised Samsung Reseller.
©2003 SAMSUNG Electronics Co., Ltd. All rights reserved.
Page 5
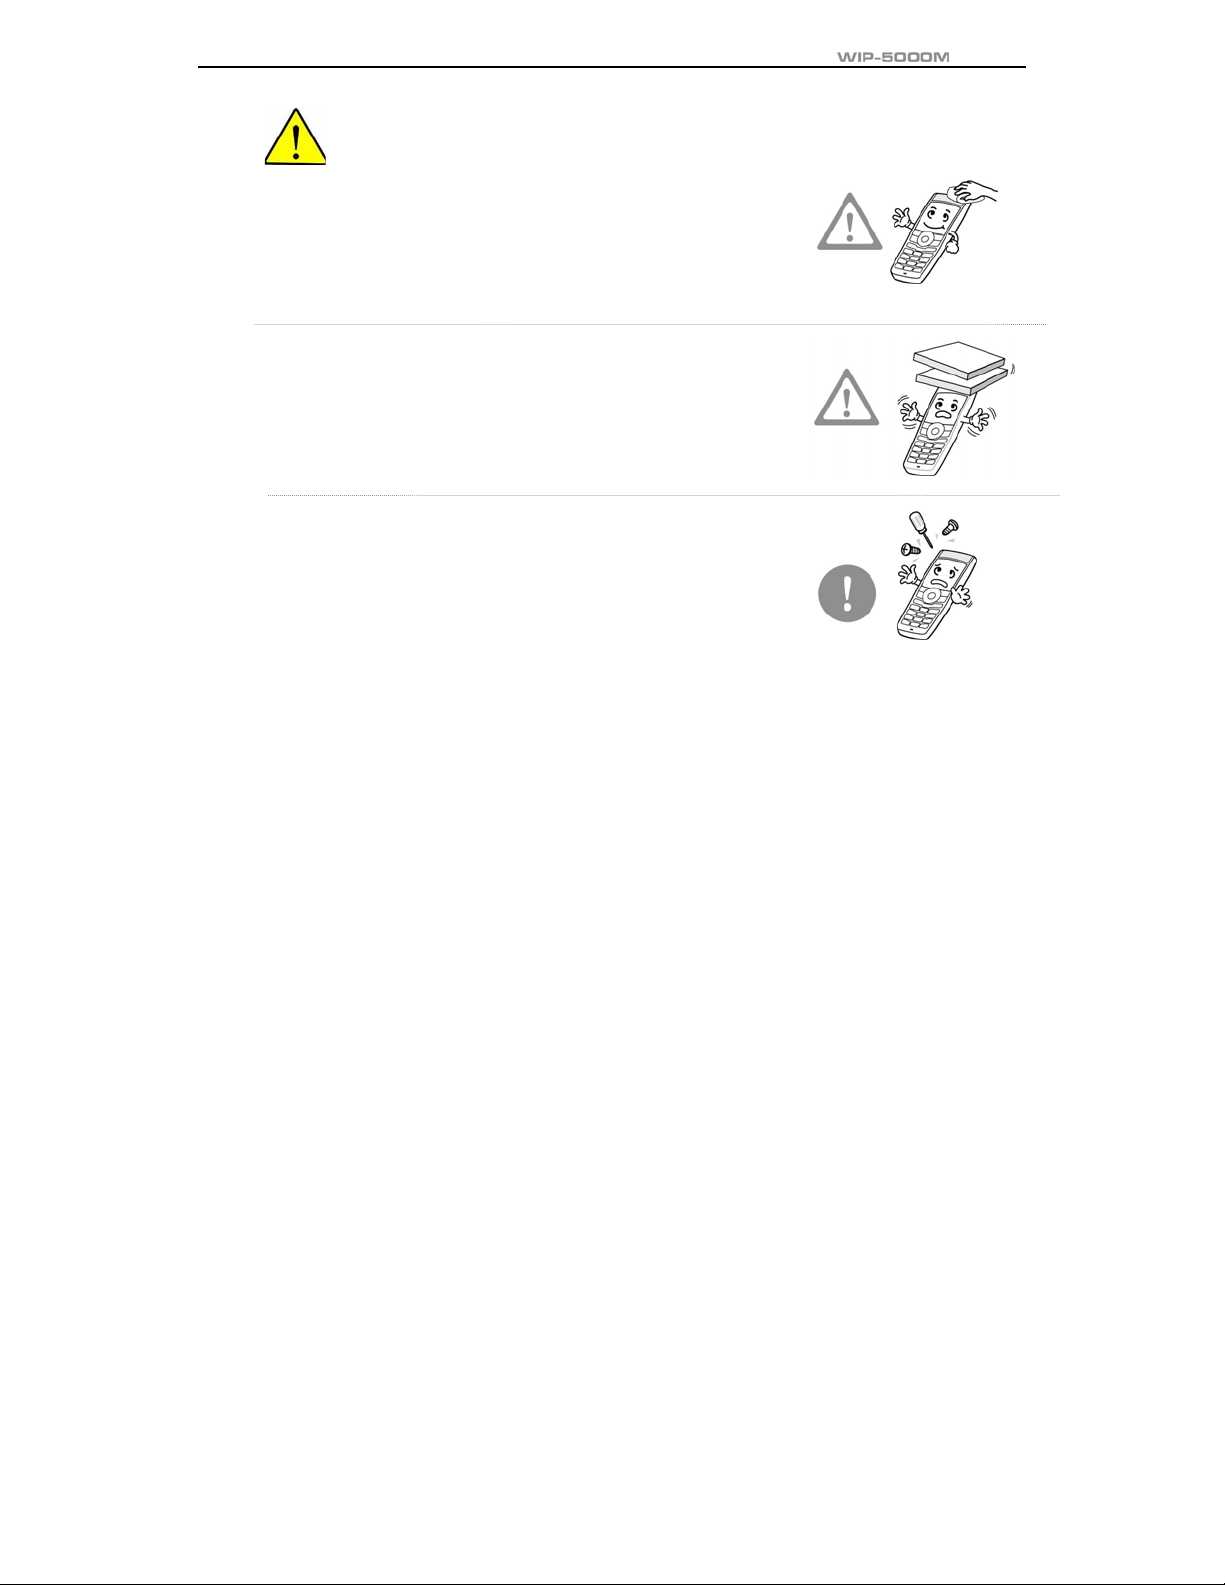
SAFETY CONECRNS
This is a user's guide for the users of the WIP-5000M Phone. For product safety and correct
operation, the following information must be given to the operator/user and shall be read before the
installation and operation o f WIP-5000M Phone.
Symbols
Caution
Indication of a general caution
Restriction
Indication for prohibiting an action for a product
Instruction
© SAMSUNG Electronics Co., Ltd.
Page I
Page 6

SAFETY CONCERNS
Indication for commanding a specifically required action
Page II
© SAMSUNG Electronics Co., Ltd.
Page 7
User Guide
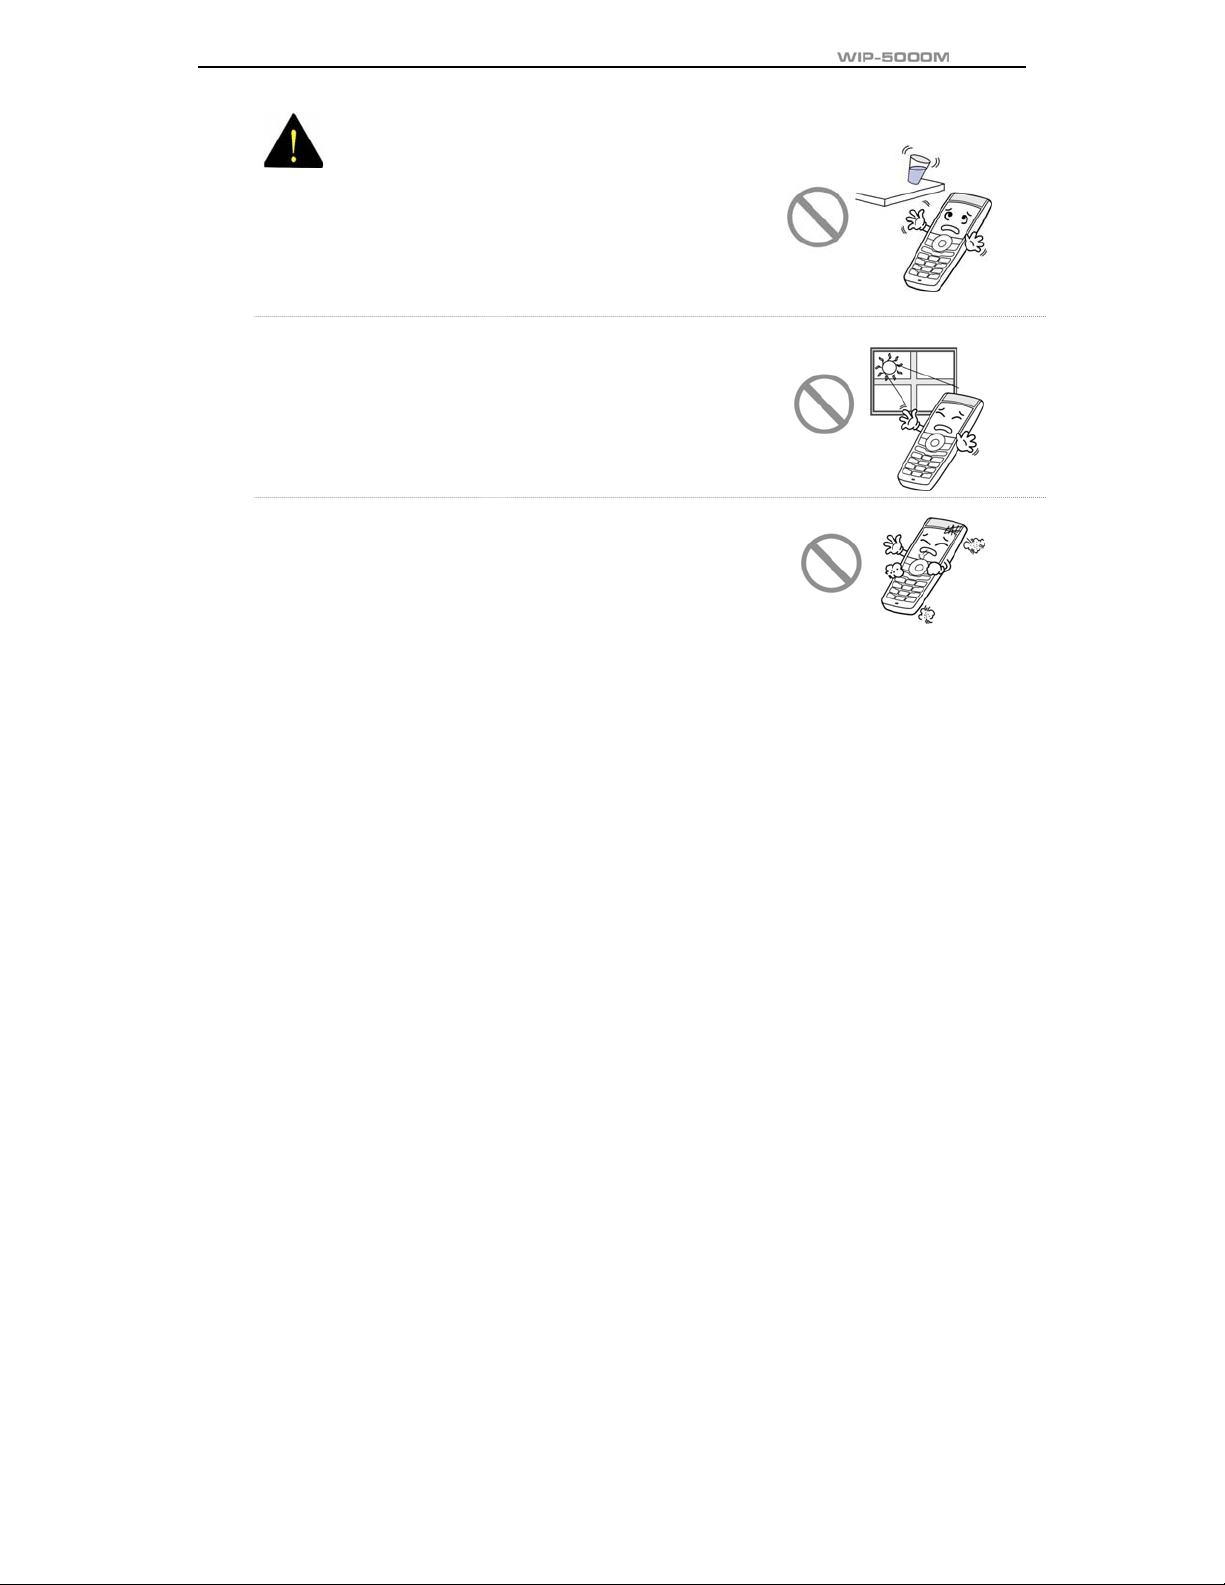
WARNING
WARNING
Do not put instruments that contain water such as vases,
cups, cosmetics, and medicines, or small met a ls near
the phone.
Moisture in the phone can cause a fire and electric shocks.
Do not install the phone on an unstable place or near
the direct rays of sunlight.
It may cause severe damage to the parts of the digital
phone, and your phone may not work properly.
Do not place the phone in a dusty area or in fluctuating
temperature environments.
It may cause a fire or electric shocks.
© SAMSUNG Electronics Co., Ltd.
Page III
Page 8
SAFETY CONCERNS
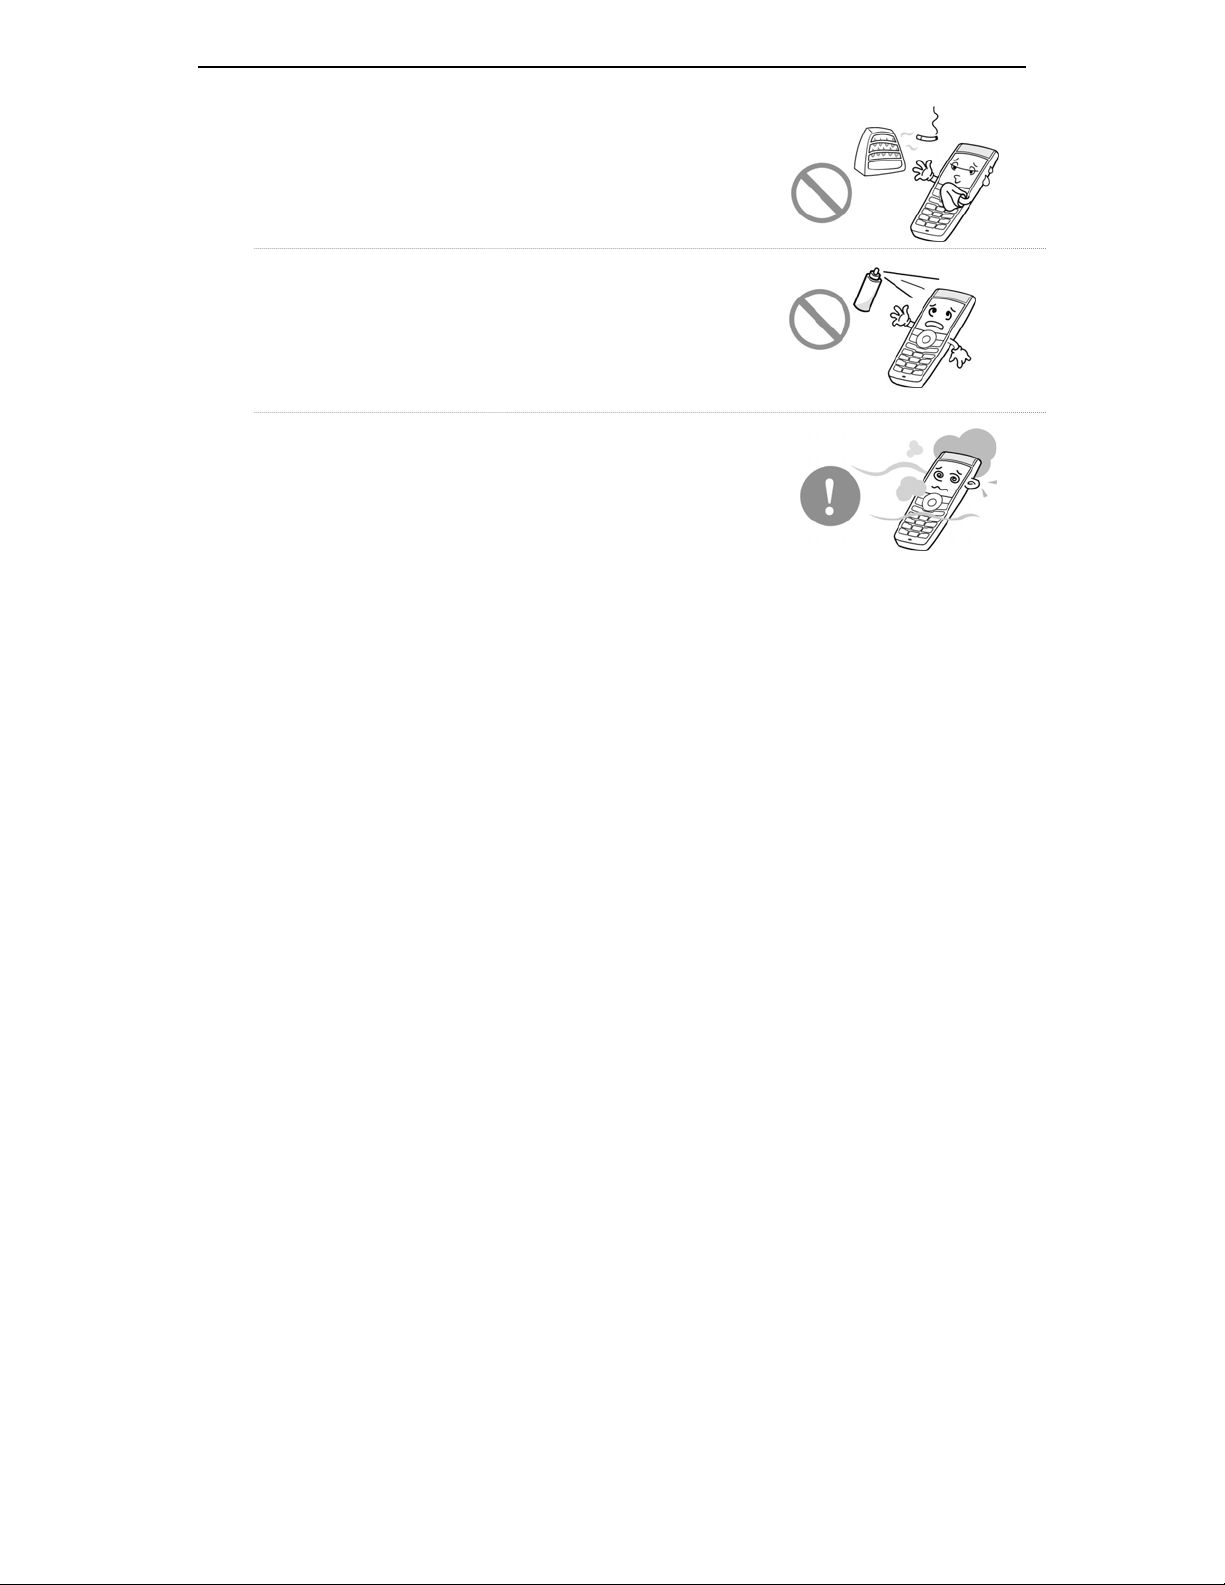
Do not install the phone nea r a heater(cigarette lighter,
heating apparatus, etc.).
It may cause a fire or electric shocks.
Do not use inflammable solvent or materi al near the phone .
Do not store them near the phone.
It may cause a fire or electric shocks.
If the phone makes(horrible) noise, bad smell, or smoke,
immediately call the Service Center.
It may cause a fire or electric shocks.
Page IV
© SAMSUNG Electronics Co., Ltd.
Page 9
User Guide
CAUTION
CAUTION
Use a soft dry cloth to clean the phone.
Do not use any chemical solvents like wax, benzene, alco hol ,
thinner, mo sq uito sp ray, aerosol, lubricant, or detergent.
The use of chemicals on the phone may cause
fading/discoloring or damage to the parts.
Do not place heavy things on the phone.
It may cause damage to the parts.
Do not separate, repai r nor remodel the phone arbi trarily.
If a repair is needed, please contact where the phone
was purchased or call the Service Center.
© SAMSUNG Electronics Co., Ltd.
Page V
Page 10

Page 11

ABOUT THIS GUIDE
This user guide provides instructions for the use of Sa msung’ s la test WIP-5000M w ireless IP phone
Mobile type that can be used in connection with the Samsung’s Enterprise IP Solutions OfficeServ
System.
Please take the time to study this guide to become familiar with the operation of your WIP- 5000M
and the benefits this new phone can provide . Keep thi s guide h andy. Y ou may nee d to loo k up
instructions for infrequently used features.
© SAMSUNG Electronics Co., Ltd.
Page VII
Page 12
ABOUT THIS GUIDE
Conventions
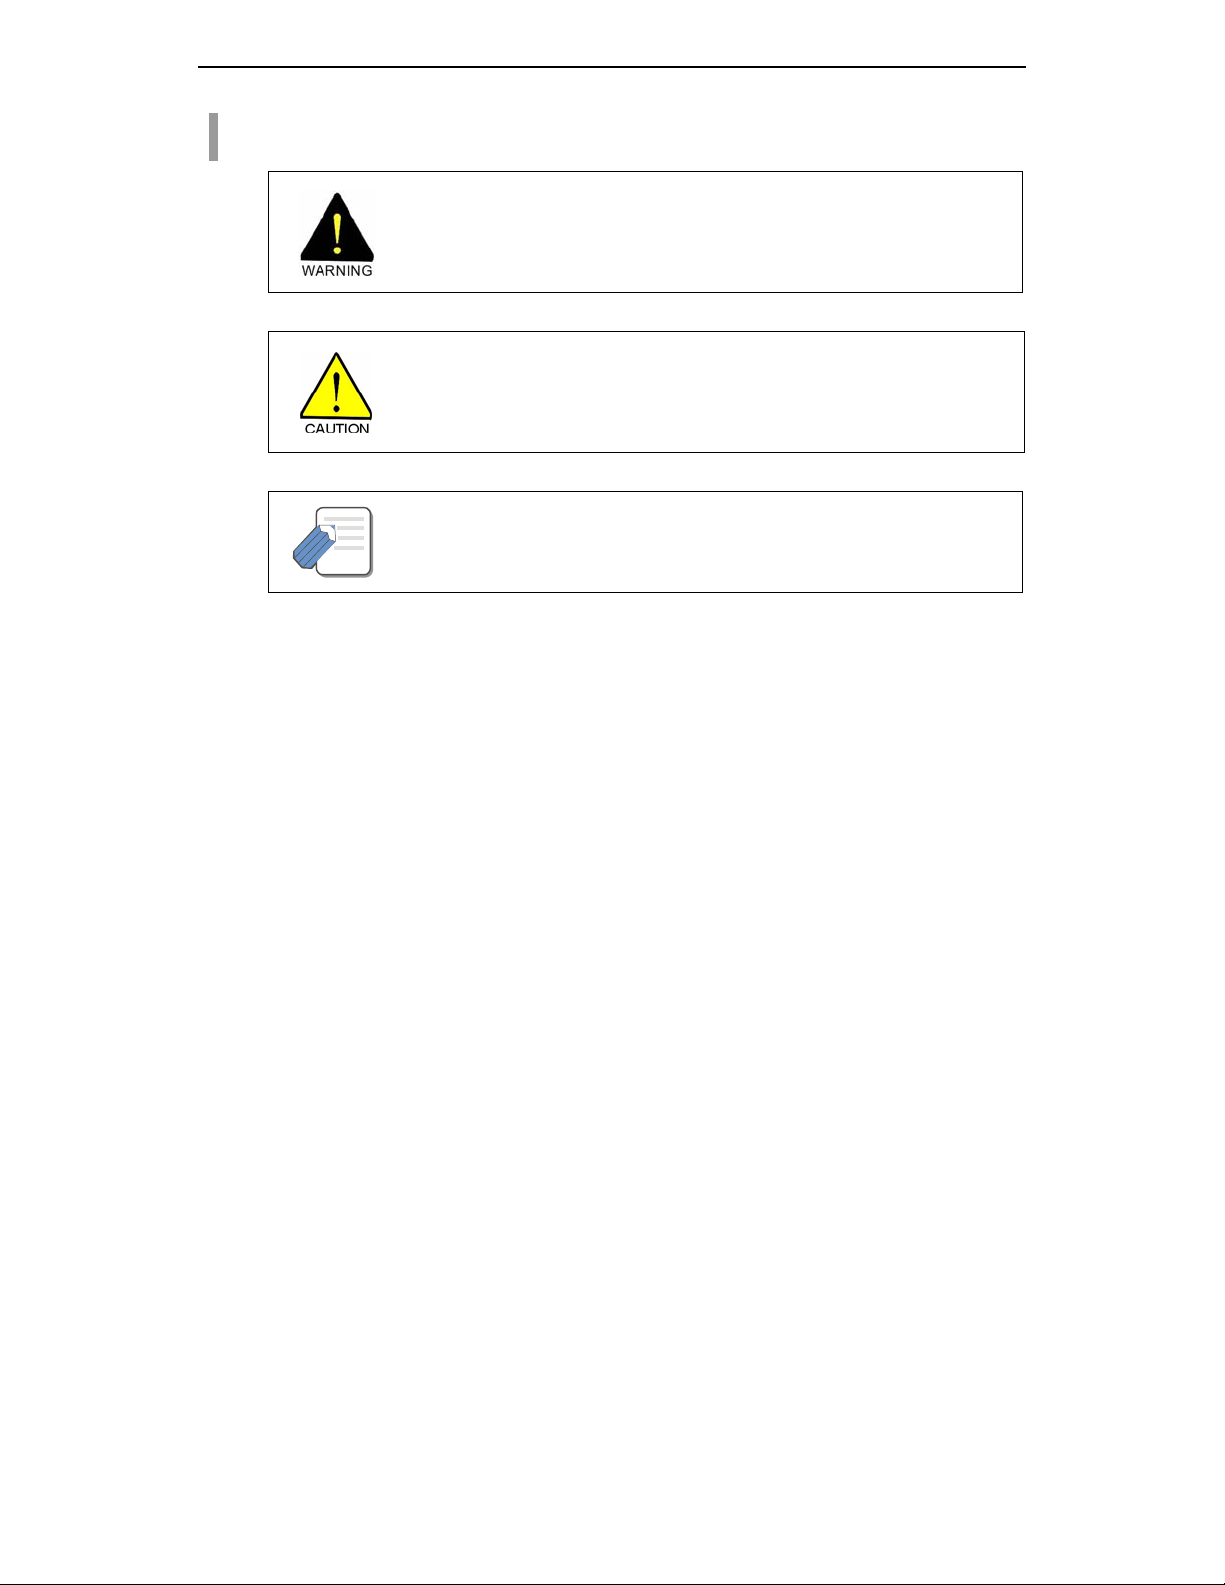
WARNING
Indicates a potentially hazardous situation, which if not avoided, could result in serious
CAUTION
Indicates a potentially hazardous situation, which if not avoided, may result in injury or damage
NOTE
Indicates additional information for referen ce.
injury or major damage t o y our WIP-5000M phone.
to your WIP-5000M phone. It may also be used to alert against unsafe practices.
NOTE
Page VIII
© SAMSUNG Electronics Co., Ltd.
Page 13

TABLE OF CONTENTS
SAFETY CONCERNS
Symbols ..........................................................................................................................................................I
Warning.........................................................................................................................................................III
Caution.......................................................................................................................................................... V
ABOUT THIS GUIDE
Conventions...............................................................................................................................................VIII
PREPARATION
Introduction to the WIP-5000M .................................................................................................... 1
Checking the Parts in the Package ............................................................................................ 2
Names and Features for the WIP-5000M Phone......................................................................... 3
Button Descriptions........................................................................................................................................4
Icon Descriptions on the Screen....................................................................................................................6
© SAMSUNG Electronics Co., Ltd.
Page IX
Page 14

TABLE OF CONTENTS
Inserting / Removing the Battery................................................................................................. 7
To Insert the Battery.......................................................................................................................................7
To Take out the Battery ..................................................................................................................................8
Charging the Battery .................................................................................................................... 9
Checking the Battery Status...................................................................................................... 10
Low Battery Indication..................................................................................................................................10
BASIC FEATURES
Turning the Phone On / Off.........................................................................................................11
To Turn the Power On..................................................................................................................................11
To Turn the Power Off..................................................................................................................................12
Making a call ............................................................................................................................... 14
Making a Call by Pressing the Phone Numbers...........................................................................................14
Answering a call.......................................................................................................................... 15
Calling from Your Recent Call Log............................................................................................ 15
Voice Volume Adjustment .......................................................................................................... 17
Page X
© SAMSUNG Electronics Co., Ltd.
Page 15

Setting / Disabling the Automatic Key Lock............................................................................. 17
To Set up the Automatic Key Lock...............................................................................................................18
To Disable the Automatic Key Lock..............................................................................................................18
Setting the Etiquette Mode......................................................................................................... 19
To Set up the Etiquette Mode.......................................................................................................................19
To Disable the Etiquette Mode.....................................................................................................................19
Call Transfer................................................................................................................................ 20
Call Status Indication..................................................................................................................21
Call Busy......................................................................................................................................................21
Call Forwarding............................................................................................................................................21
Call Camp on ...............................................................................................................................................22
Call Back......................................................................................................................................................22
Call Hold.......................................................................................................................................................22
APPLICATION MENUS
Entering the Application Menus................................................................................................ 21
Phone Book................................................................................................................................. 22
User Guide
Page 16

TABLE OF CONTENTS
Calling from the Lists of the Latest Calling Number.....................................................................................25
Calling from the Lists of the Latest Called Number......................................................................................27
Searching/Calling a Phone Number Using Name........................................................................................29
Searching/Calling a Phone Number Using Address.....................................................................................31
Searching/Calling a Phone Number Using a Speed Dial Number...............................................................33
Registering a Phone Number.......................................................................................................................34
Modifying the Saved Phone Number ...........................................................................................................37
Utilities ......................................................................................................................................... 40
Setting/Disabling the Alarm Time.................................................................................................................43
Schedule Management................................................................................................................................45
Using the Electronic Calculator....................................................................................................................47
Checking World Time...................................................................................................................................47
Soft Menu.....................................................................................................................................48
Volume A djustment.....................................................................................................................49
Selecting the Bell and Vibration...................................................................................................................50
Selecting the Bell Sound..............................................................................................................................52
Adjusting the Bell Volume............................................................................................................................53
Adjustung the Volume of the Key Buttons....................................................................................................54
Setting My Phone........................................................................................................................ 55
Page XII
© SAMSUNG Electronics Co., Ltd.
Page 17

User Guide
Viewing My Extension Number....................................................................................................................56
Entering the Users’ Names..........................................................................................................................57
Selecting the Background Screen................................................................................................................59
Changing a Password..................................................................................................................................60
Setting the Language...................................................................................................................................62
Deleting a Phone Number............................................................................................................................63
Selecting the Screen Lighting ......................................................................................................................67
Setting the Forward Type.............................................................................................................................70
Setting the Programmed Message...............................................................................................................72
Locking the Phone .......................................................................................................................................73
Initialization ..................................................................................................................................................74
Setting Auto Lock .........................................................................................................................................77
Setting the System...................................................................................................................... 78
Registering a Phone.....................................................................................................................................79
Selecting a System ......................................................................................................................................82
Viewing the IP of a Phone............................................................................................................................83
Viewing the MAC Address of the Phone......................................................................................................84
Viewing the Signal Quality of the Phone......................................................................................................85
Setting LCD Contrast of the Phone..............................................................................................................86
Page 18

TABLE OF CONTENTS
ANNEX
Entering Characters.................................................................................................................... 87
Buttons Used for Entering Characters .........................................................................................................87
Entering Characters.....................................................................................................................................87
Page XIV
© SAMSUNG Electronics Co., Ltd.
Page 19

PREPATATION
Introduction to the WIP-5000M
The WIP-5000M(Wireless IP-Phone Mobile type) is the wireless mobile phone
that allows a voice communication through IEEE 802.11b wireless LAN. As the
wireless IP phone, the voice data is compressed into a packet form(Voice over
WLAN) to satisfy the wireless LAN specifications and the data is
transferred/received through IP network. When moving between Access
Points(WBS24), as well as between the data terminals like laptop computers
with wireless LAN card, the handover function is supplied.
© SAMSUNG Electronics Co., Ltd.
Page 1
Page 20
PREPATATION
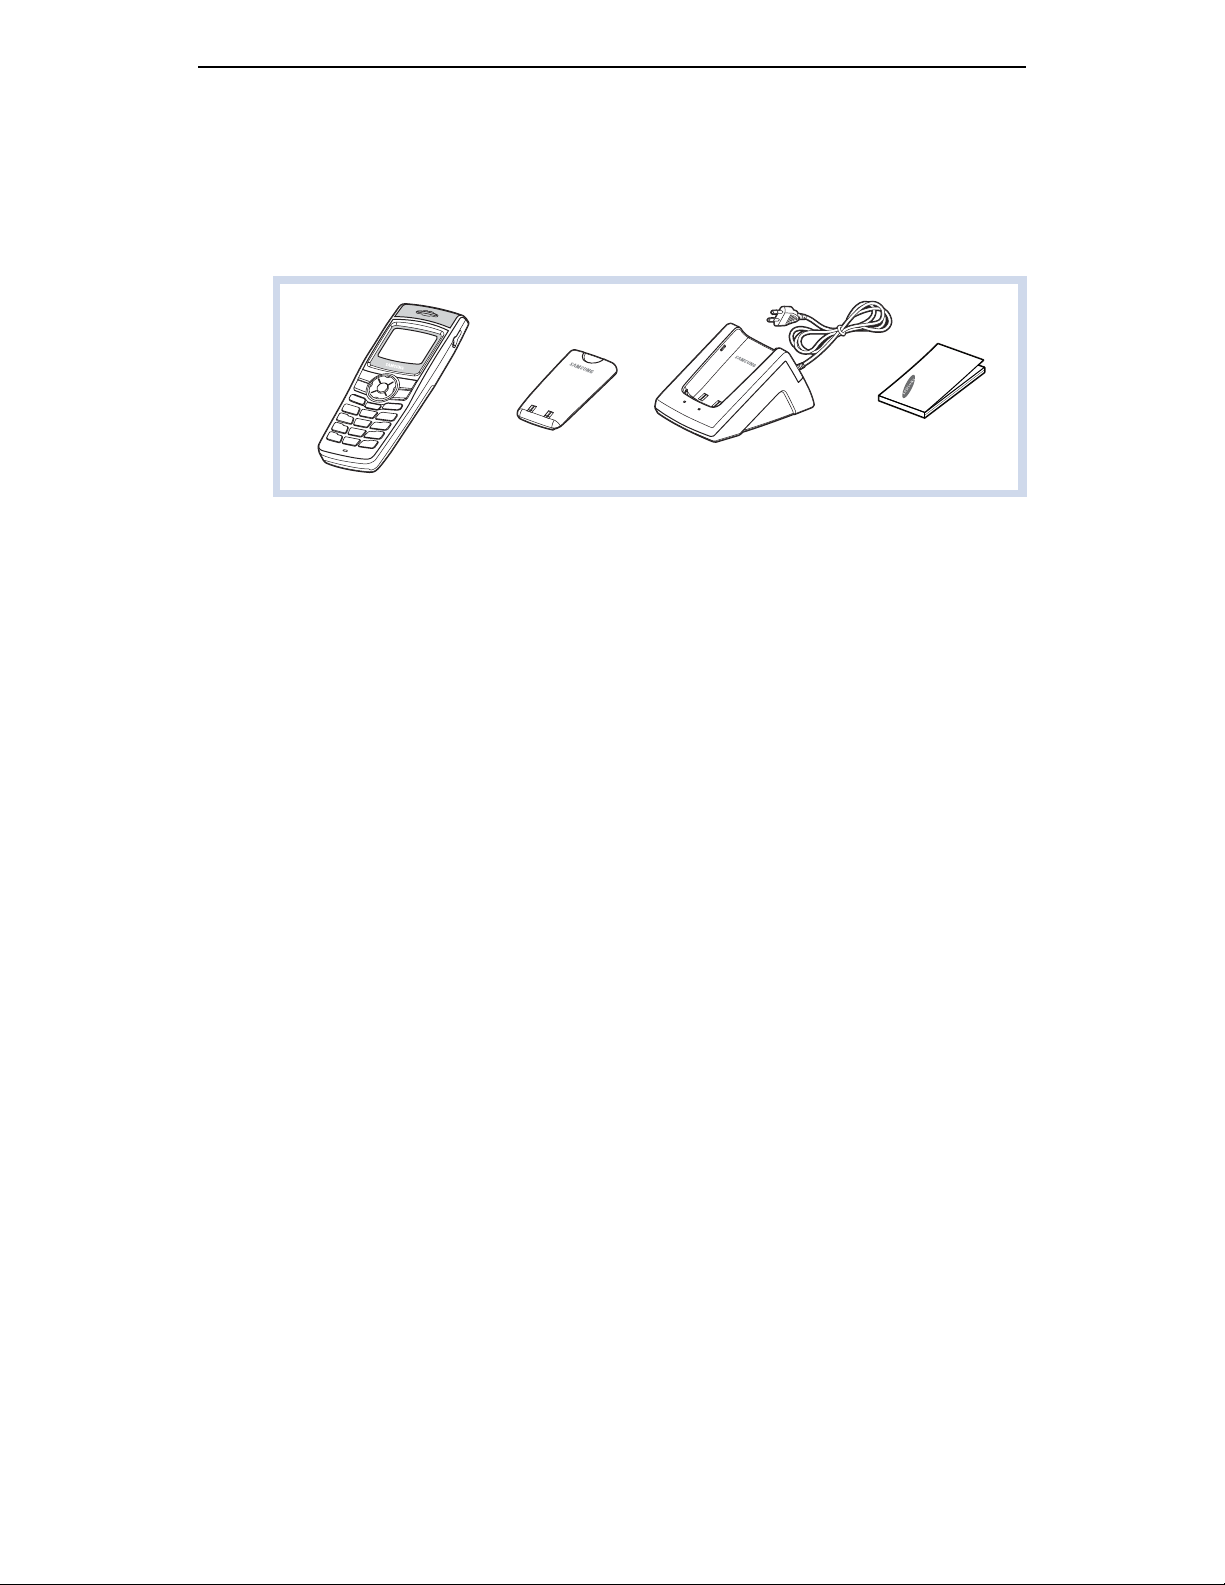
Checking the Parts in the Package
After purchasing the WIP-5000M phone, you have to check that the following items
have been packed in the box.
Page 2
WIP-5000M
Mobile Phone
Battery
(1 standard type)
Charger
User Guide
© SAMSUNG Electronics Co., Ltd.
Page 21

Names and Features for the WIP-5000M Phone
Speaker
Headset Connection Hole
LCD Screen
Volume Buttons
User Guide
Hold Buttons
Transfer Buttons
Microphone
© SAMSUNG Electronics Co., Ltd.
Navigation Buttons
Conference Buttons
Dial Buttons
Page 3
Page 22

PREPATATION
Button Descriptions
Button Names Features
[ ] Used when calling or receiving an outside trunk call/when transferring a call
[MENU] Used when entering the menu mode
[ ] Used when moving the menu bar upward
[ ] Used when moving the menu bar downward
[ ] Used when moving the menu bar to the right direction/Director y/Call on Hol d
[ ] Used when moving the menu bar to the left direction/Message/Conference call
[OK] Used when selecting or saving the selecte d item for funct ion sett ings
[C/MUTE] Used when erasing letters or moving to an upper menu
[TRSF]
Used when connecting to another phone number while a phone call is in progress
Page 4
© SAMSUNG Electronics Co., Ltd.
Page 23
Button Names Features
[HOLD] Used when holing a call
[CONF] Used when making a conference
[*/ ]
[0]~[9]
[#/ ]
[ ] Used when turning the power on/off or when returning to the initial screen
Used when applying the etiquette mode
Used when dialing or e nt er i ng ch ara ct er s
Used when applying the automatic key lock
User Guide
© SAMSUNG Electronics Co., Ltd.
Page 5
Page 24
PREPATATION
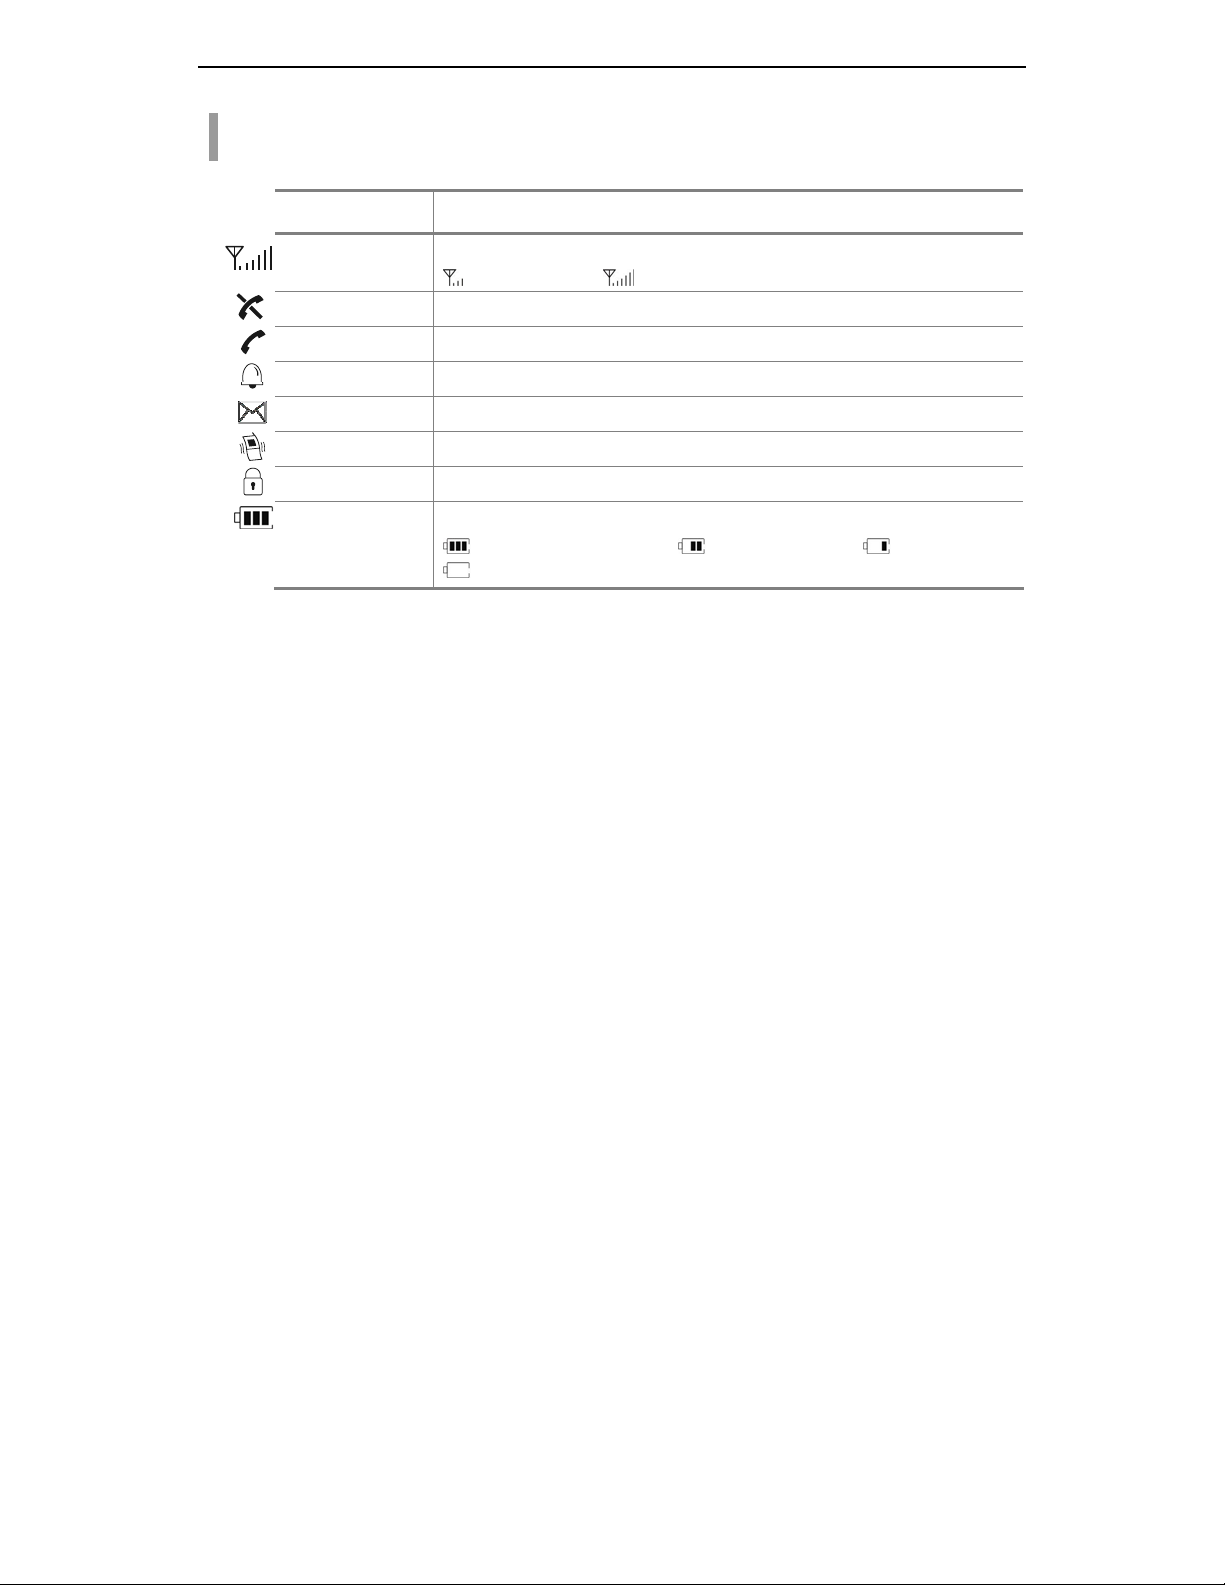
Icon Descriptions on the Screen
Icon Features
Page 6
This turns on when the service is not available.
Blinks when trying to make a call and turns on when a call is connected.
The status that indicates an alarm is set.
When a message is received.
Etiquette function or vibration function is enabled.
Indicates that the automatic key lock is enabled.
This indicates the signal intensity.
: weak signal : strong signal
Indicates the battery charging level.
: fully charged : sufficient : insufficient
: needs to be charged immediately
© SAMSUNG Electronics Co., Ltd.
Page 25
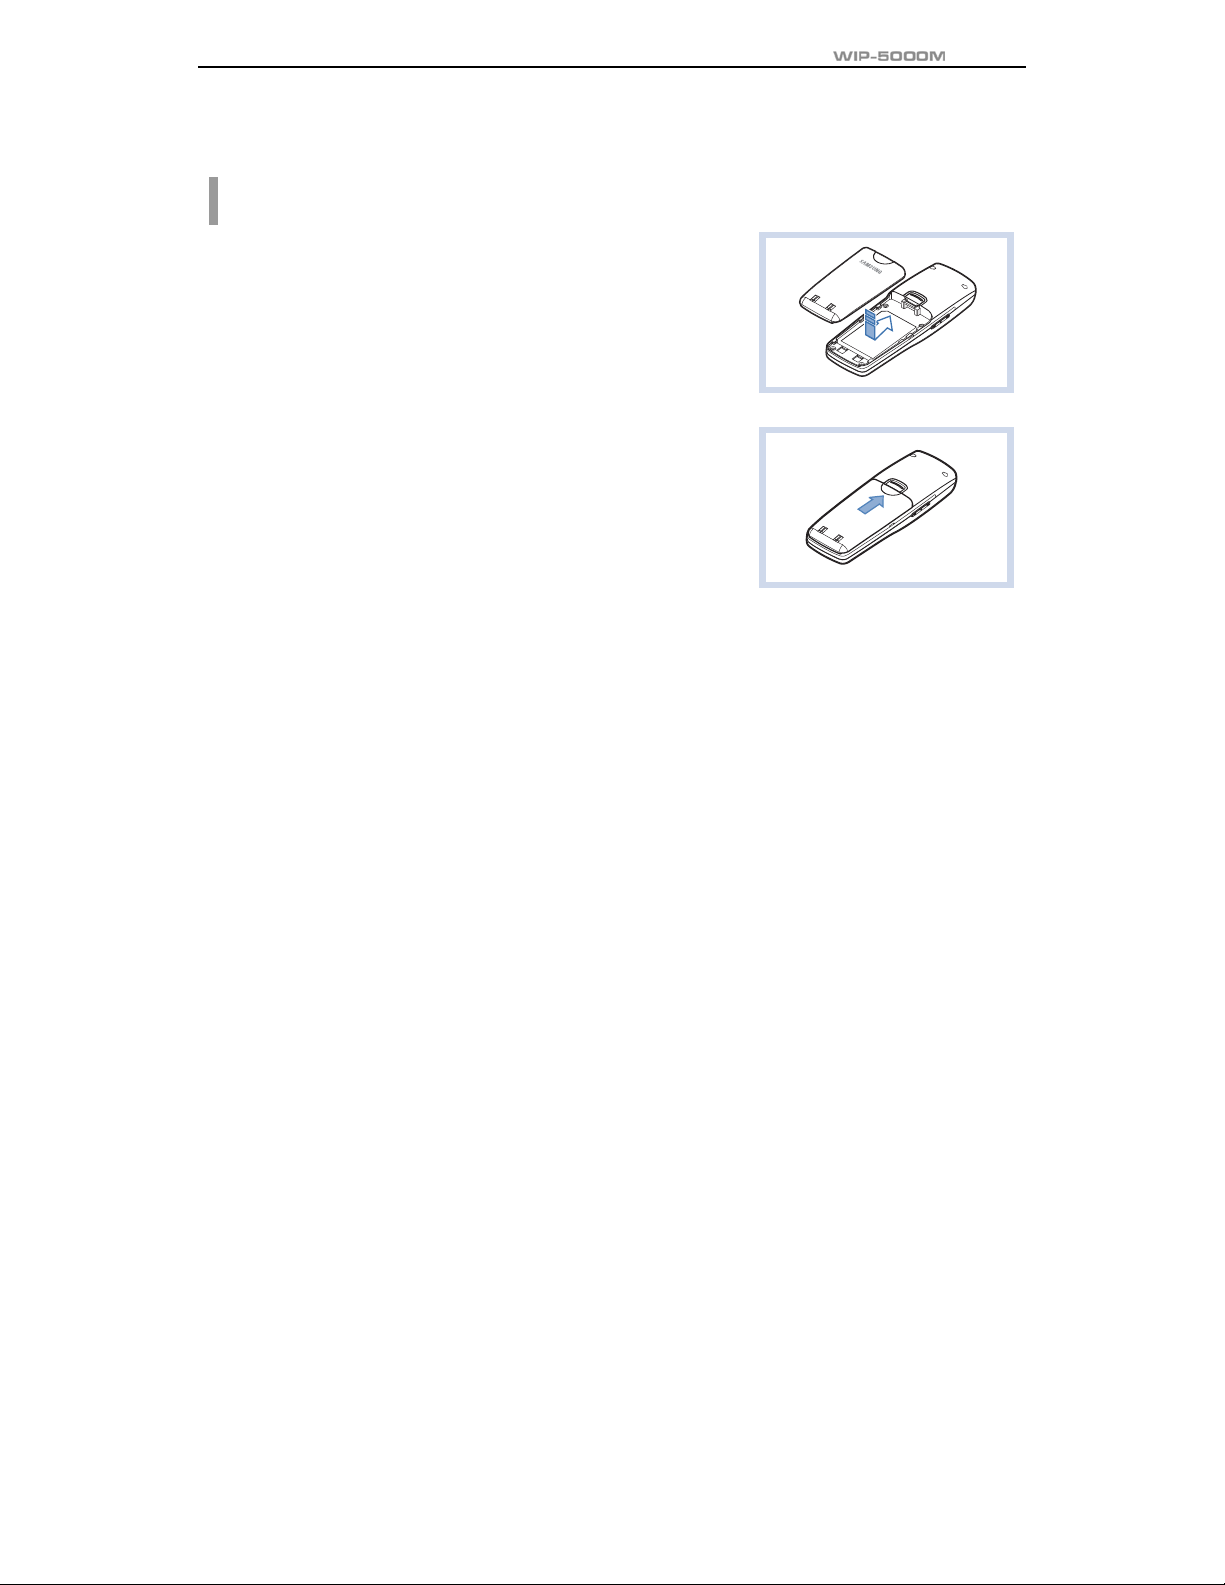
Inserting / Removing the Battery
T o Insert the Battery
1. Insert the projecting part at the bottom of battery into the
recess compartment area of the back of the WIP-5000M
phone.
2. Press it in the direction of the arrow until it clicks into place.
User Guide
© SAMSUNG Electronics Co., Ltd.
Page 7
Page 26

PREPATATION
T o Take out the Battery
In order to take out the battery from the WIP-5000M phone,
slide the battery cover in the direction of the arrow while
simultaneously pressing the separator button.
Page 8
© SAMSUNG Electronics Co., Ltd.
Page 27
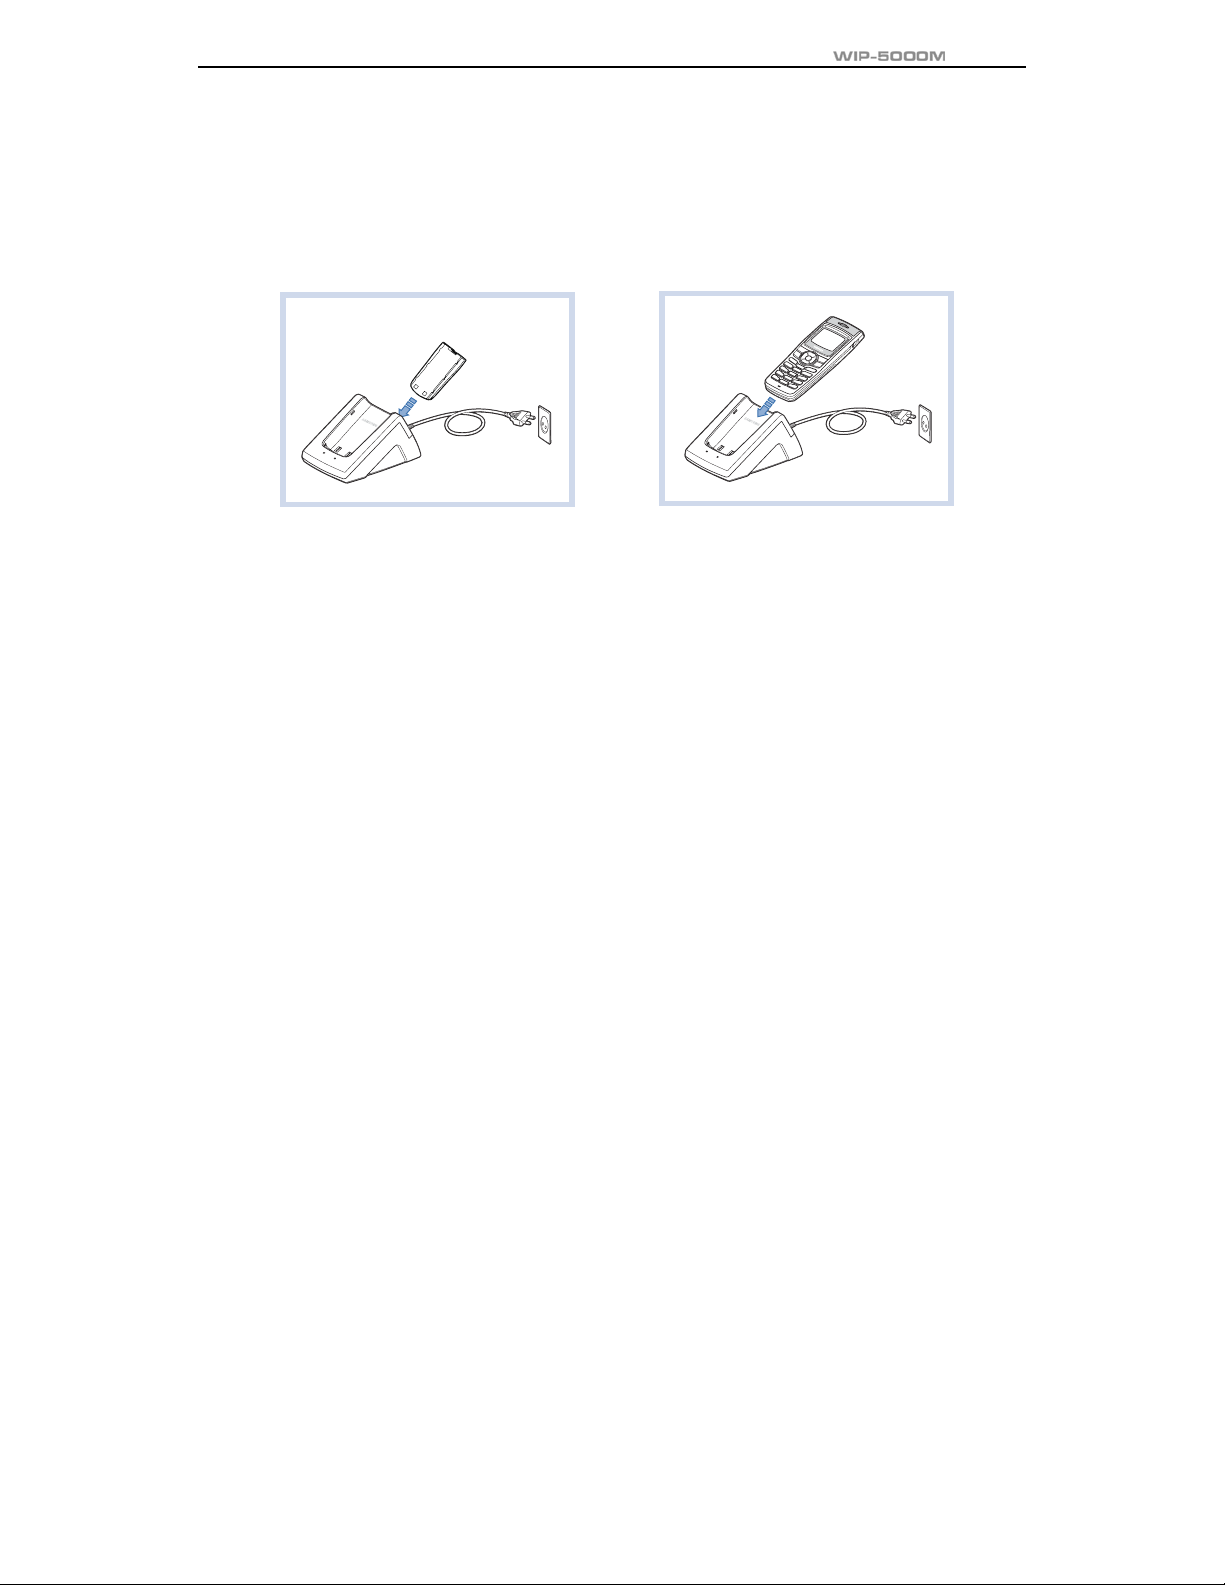
Charging the Battery
After checking each component of the WIP-5000M phone, charge the battery as shown
in the figure below.
OR
User Guide
© SAMSUNG Electronics Co., Ltd.
Page 9
Page 28
PREPATATION
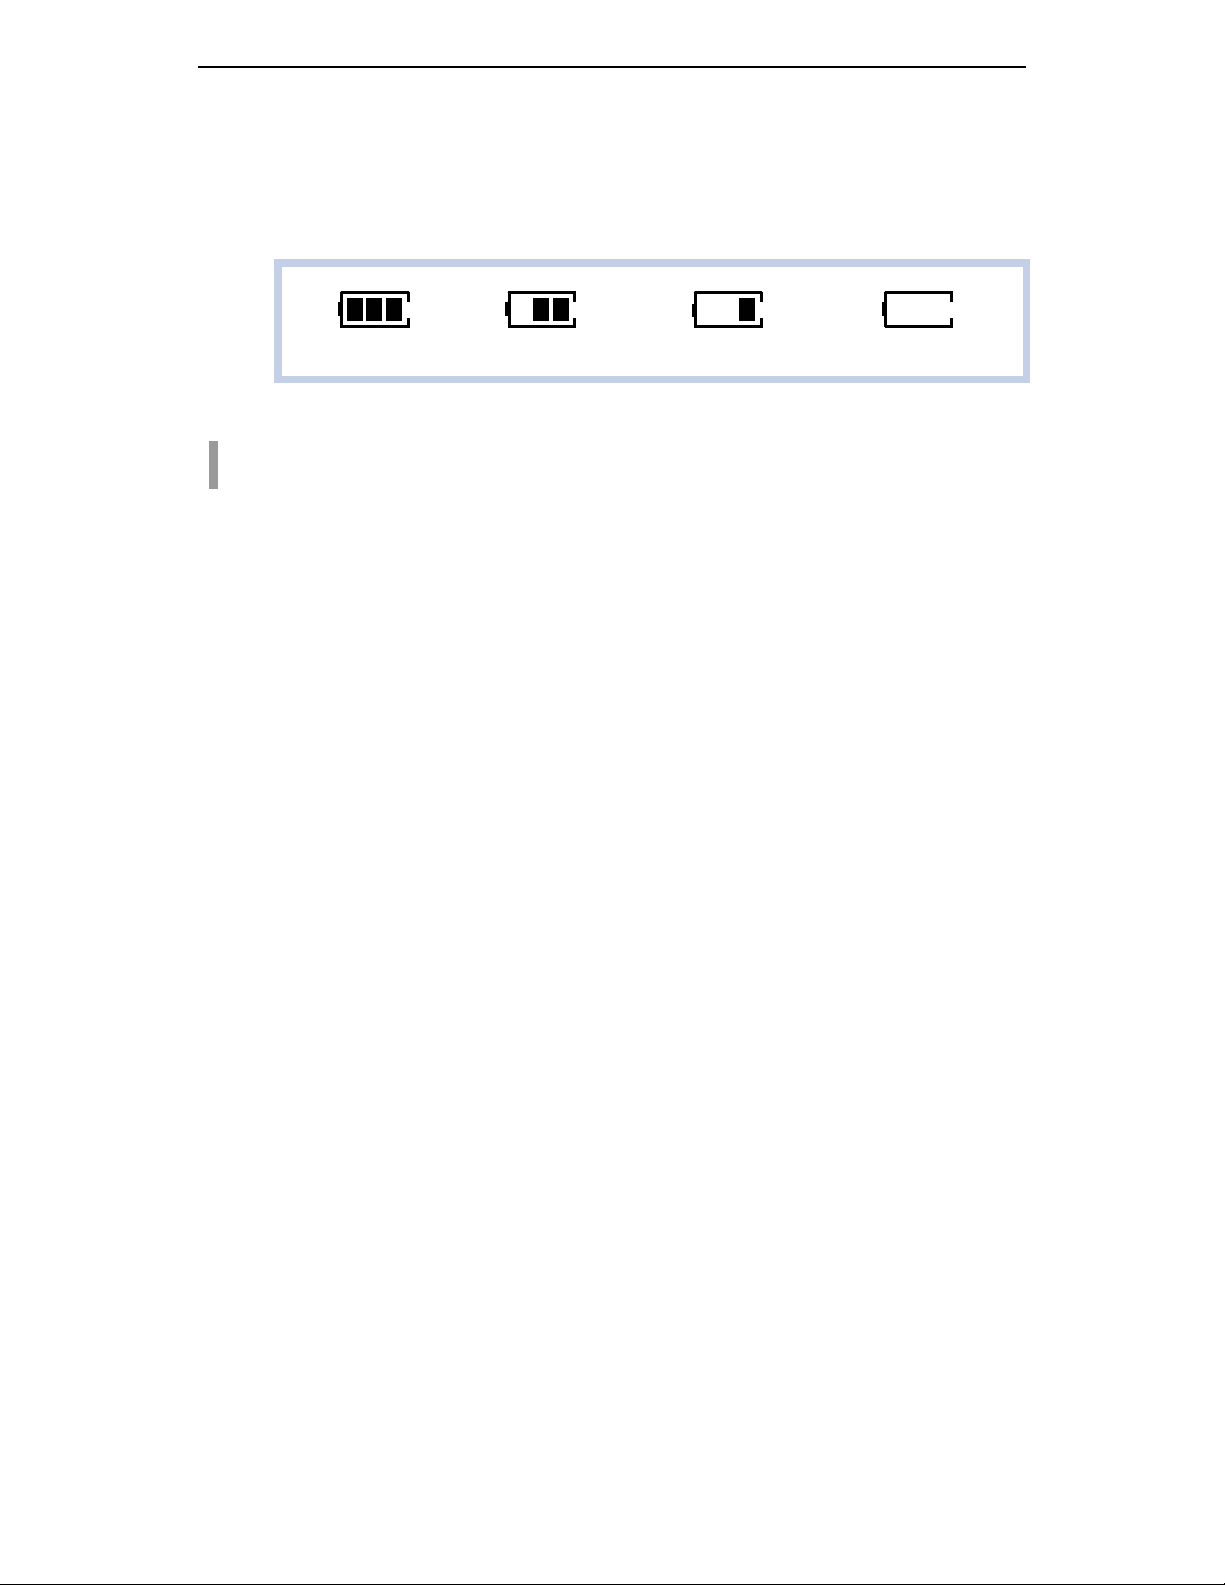
Checking the Battery Status
The battery status can be checked by looking at the battery status icons given below
that appear on the LCD panel of the WIP-5000M phone.
Fully charged Partially consumed Almost discharged Fully discharged
Low Battery Indication
When the battery energy is almost discharged , the phone ma ke s a warnin g soun d and the
battery icon starts to blin k. It is reco mmended to change to a new battery or charge the ba ttery
immediately. If the phone is still used after the warning sound and blinking, the battery will be
completely discharged and the power will automatically go off.
Page 10
Æ Æ Æ
© SAMSUNG Electronics Co., Ltd.
Page 29
BASIC FEATURES
Turning the Phone On / Off
T o Turn the Power On
1. Press the [ ] button for more than 2 seconds .
2. Samsung logo will then be displayed as show n on the
right-hand side picture and an ani ma tion shows up until
the phone has been normally re gistered to the system.
After that, the service becomes available and the initial
screen will appear as shown next page.
z If the registration has failed, a ‘registration failed’ message will be indicated on the top
of the screen.
z After purchasing the WIP-5000M phone and first turning the power on, the ‘UNREGISTERED’
message will show up on the top of the initial screen.
z For the initial screen, one picture can be selected from three pictures shown in the next
© SAMSUNG Electronics Co., Ltd.
Page 11
Page 30
BASIC FEATURES
page.
07/12[Sa] 4 : 05 PM
1234 1234 1234
07/12[Sa] 4 : 05 PM
12 : 34 am
07/12[Sa]
Samsung Logo
Refer to ‘Selecting the background picture’ section in ‘Application Menus’ of this guide
NOTE
T o Turn the Power Off
Press the [ ] button for more than 2 seconds.
Page 12
for selecting the initial screen.
Name Logo
Time Logo
© SAMSUNG Electronics Co., Ltd.
Page 31

The short animation is displayed on the screen
and then the phone automatically turns off.
User Guide
© SAMSUNG Electronics Co., Ltd.
Page 13
Page 32

BASIC FEATURES
Making a call
There are several ways to make a call for the convenience of you. However, only the
basic function will be introduced in this guide.
Refer to ‘Using the Directory’ section in ‘Application Menus’ of this guide for how to
NOTE
use the latest originating number, latest called number, directory or abbreviated dial
numbers.
Making a Call by Pressing the Phone Numbers
1. Press the phone numbers.
z Press the [C/MUTE] button for a short time to
modify an incorrectly entered number, one by one.
Press the [C/MUTE] button for a long time to
completely delete all the incorrectly entered numbers
at once.
Page 14
0668164812
© SAMSUNG Electronics Co., Ltd.
Page 33

2. Press the [ ] button. When the animation appears on
the screen, the call is being con nected.
3. After the phone conversation, press the [ ] button to
hang up and end the conne ction .
User Guide
Answering a call
If the right-hand side ‘receiving a call’ animation shows up
while the phone is ringing, press the [
to start a conversation. After the call is finished,
press the [
© SAMSUNG Electronics Co., Ltd.
] button.
Page 15
] button
Page 34

BASIC FEATURES
Calling from Your Call List Log
You can query not only the latest calls or received phone numbers but also absent subscriber
messages. This is achieve d by simply selecting the desired phone nu mber for information or to
make a call.
z The maximum of up to 64 phone numbers can be saved in the list. If they are all
filled up, the oldest phone number will be erased when a new phone number is saved.
1. Press the [ ] button on the initial screen once.
2. The latest call history will then appear as given n ext.
3. Using the [ ]/[ ] buttons to query the call history.
Each icon next to the ph one number has the following
meanings.( : Latest received number : Latest
called number)
Call List
1 : 06-6702-5322
2 : 411-1204-5688
3 : #9876
Page 16
© SAMSUNG Electronics Co., Ltd.
Page 35

4. Select the desired phone number and press the [ ] button to make a call.
User Guide
Voice Volume Adjustment
While having a conversation on the phone, the voice
volume from the other party can be controlled by pressing
either volume button to choose the desired volume from
five different volume levels.
Setting / Disabling the Automatic Key Lock
The automatic key lock feature is for preventing the phone keys from being pressed
accidentally, regardless of one’s intention. If this feature is set up, all buttons except
for the [
particular time, you can receive a call by pressing the [
© SAMSUNG Electronics Co., Ltd.
] button are all disabled. However, if there is an incoming call at this
Page 17
] button.
Page 36

BASIC FEATURES
T o Set up the Automatic Key Lock
Press the [#/ ] button for more than 2 seconds on the
initial screen. Then, the screen will displ ay the automa tic key
lock icon(
).
T o Disable the Automatic Key Lock
At the automatic key lock status, press the [#/ ] button for a long time and then the password
input window will appear. Once the password is entere d , the phone re turn s to the initial screen
and the automatic key lock function is disabled.
Page 18
Key Lock 1234
07/12[Sa] 4 : 05 PM
© SAMSUNG Electronics Co., Ltd.
Page 37

Setting the Etiquette Mode
For not interrupting other people in public places or during a meeting, you can set the
phone to vibration instead of ringing.
T o Set up the Etiquette Mode
Press the [*/ ] button for more than 2 seconds. Then the etiquette mode icon( ) will be
displayed on the top of phone screen and the phone w ill vibrate instead of ringing if there is an
incoming call.
T o Disable the Etiquette Mode
Press the [*/ ] button for more than 2 seconds. Then the etiquette mo de icon disappears and
the etiquette mode will be disabled.
User Guide
© SAMSUNG Electronics Co., Ltd.
Page 19
Page 38

BASIC FEATURES
Call Transfer
This function is used to transfer a call to a designated phone number during a phone
conversation.
1. Press the [ ] button during a phone conversation.
2. Enter the phone number to be transferred, then press the [ ] button and hang up.
Page 20
© SAMSUNG Electronics Co., Ltd.
Page 39

Call Status Indication
The WIP-5000M phone provides various animation icons to indicate other statuses
beside the connection status.
Call Busy (Phone Engaged)
This icon indicates that when you call someone , the recipient
is busy on the phone talking to anoth er pe rson .
Call Forwarding
User Guide
When you are absent or cannot come to the phone, thi s
function allows a call to be forwarded to another person’s
phone or phone number of a specific loca tion. The setting
or other supplementary functions can be modified using
the soft keys on the menu. If this function is se t u p,
the ‘FWD’ message w ill be di splay ed on the initial screen.
© SAMSUNG Electronics Co., Ltd.
FWD
07/12[Sa]
Page 21
Page 40

BASIC FEATURES
Call Camp on
When you call another internal station and receive a busy
signal, you can give the called station an off-hook ring tone
and wait for a little while.
Call Back
If the other party is busy, you can reserve a busy station
callback. When the busy station becomes free, your phone
will ring. If you receive the call, the other person’s phone will
also ring.
Page 22
© SAMSUNG Electronics Co., Ltd.
Page 41

APPLICATION MENUS
Entering the Application Menus
Press the [Menu] button, then the main appl ica tion men u will appea r on the LCD scre en.
1. Phone book
Press the
4. Vol/Effect
[ ]/[ ] buttons
© SAMSUNG Electronics Co., Ltd.
Page 23
Page 42

APPLICATION MENUS
Phone book
Press the [MENU] button and the [1. Phone book] icon
to find out various methods to make a call.
1. Phone book
Page 24
© SAMSUNG Electronics Co., Ltd.
Page 43

Calling from the Lists of the Latest Calling Number
After querying only the latest called phone numbers, select th e desired phone number and make
a call.
z The maximum of up to 32 phone numbers can be saved in the list.
If they are all filled up, the oldest phone number is erased when the newly called phone
number is saved.
z If there are no called numbers saved, the phone screen will not display anything and
returns to the initial screen.
[MENU] → [1] → [1] → [ ]/[ ] → [OK] : Query
→
[MENU]
[MENU]
[1] → [1] → [ ]/[ ] → [OK] → [ ] : Query and call
→
[1] → [1] → [ ]/[ ] → [ ] : Call
User Guide
© SAMSUNG Electronics Co., Ltd.
Page 25
Page 44

APPLICATION MENUS
Page 26
1. Press the [MENU] button, then select the [1. Phoneboo k]
icon and press the [OK] button. If the [1. Dialed Call] is
selected, the latest called number list will be
displayed.
( : Latest called number, : Failed call)
Dialed Call
1 : 06-6702-5322
2 : #4321
3 : #9876
2. Using the [ ]/[ ] buttons, select the desired phone number.
3. If the [OK] button is pressed, you can check the information on the selected number
(e.g., calling date, time and phone number) and can make a call righ t away by simply
pressing the [
] button.
© SAMSUNG Electronics Co., Ltd.
Page 45

Calling from the Lists of the Latest Called Number
After only querying the la te st received phone numbers, select the de sired phone number and
make a call.
z The maximum of up to 32 phone numbers can be saved in the list. If they are all
filled up, the oldest phone number is erased when a new received phone number is saved.
z If there is no received phone numbers saved, the phone screen will not display anything
and returns to the initial screen.
[MENU] → [1] → [2] → [ ]/[ ] → [OK] : Query
→
[MENU]
[MENU]
[1] → [2] → [ ]/[ ] → [OK] → [ ]: Query and call
→
[1] → [2] → [ ]/[ ] → [ ]: Call
User Guide
© SAMSUNG Electronics Co., Ltd.
Page 27
Page 46

APPLICATION MENUS
1. Press the [MENU] button, then select the [1. Phoneboo k]
icon and press the [OK] button. If the [2. Recent Call] is
selected, the latest received phone numbers will be display ed.
( : Latest received number, : Failed call)
2. Using the [ ]/[ ] buttons, select the desired phone number.
3. If the [OK] button is pressed, you can check the information on the selected phone
number(e.g., calling date, time and phone number) and can ma ke a call right away by
] button.
Page 28
pressing the [
Recent Call
1 : 06-6702-5322
2 : 411-1204-5688
3 : #9876
© SAMSUNG Electronics Co., Ltd.
Page 47

Searching/Calling a Phone Number Using Name
You can query the desired phone number from the phon e number list saved i n the phone usin g
a name and then make a call.
[MENU] → [1] → [3] → [1] → Name Input → [OK] → [ ]
: Query with names and then call
[MENU] → [1] → [3] → [1] → [OK] → [ ]/[ ] → [ ]
: Select from the phone number list and then call
1. Press the [MENU] button, then select the [1. Phone book] icon and press the [OK] button.
2. Select the [3. Search] and then press the [OK] button.
3. Select the [1. Search Name] and then press the [OK] button.
User Guide
© SAMSUNG Electronics Co., Ltd.
Page 29
Page 48

APPLICATION MENUS
4. The name input field will th en appear on the screen. En ter the na me to be fou nd and
press the [OK] button.
z When entering a name, press the first letter of that name
and hit the [OK] button. Then, the numbers of all the
phone numbers starting with that letter will be displayed
and the related phone number list will show up
automatically. (e.g., Enter the name ‘J’ in the input
field and press the [OK] button. All the names starting
with ‘J’ will be listed.)
z Press the [OK] button without entering a name.
Then, all the numbers in the entire list saved will be displayed.
z If a name is not saved, the screen will show ‘Search Result is Nothing’ message.
z When the related phone number list appears, use the [ ]/[ ] buttons to select
the required phone number and press the [
5. When the related phone numbe r a ppears on the screen, press the [ ] button
to make a call.
06-6702-5322
Jack
James
Jane
] button to make a call.
Page 30
© SAMSUNG Electronics Co., Ltd.
Page 49

Searching/Calling a Phone Number Using Address
You can query the desired phone number from the phon e number list saved i n the phone usin g
an address and then make a call .
[MENU] → [1] → [3] → [2] → Address Input → [OK] → [ ]
: Query with addresses and then call
[MENU] → [1] → [3] → [2] → [OK] → [ ]/[ ] → [ ]
: Select from the phone number list and then call
1. Press the [MENU] button, then select [1. Phone book] icon and press the [OK] button.
2. Select [3. Search] and then press the [OK] button.
3. Select [2. Search Number] and then press the [OK] button.
User Guide
© SAMSUNG Electronics Co., Ltd.
Page 31
Page 50

APPLICATION MENUS
4. The address input field will appea r on the screen. En te r the add re ss to find and
press the [OK] button.
z If the [OK] button is pressed without entering an address, the entire phone number list
saved in the phone will be displayed.
If an address is not saved, the screen will show the ‘Search Result is Nothing’ message.
5. The phone numb er list including the related p hone
number will be displayed in the order of addresses.
(e.g., When the address ‘2’ is entered, the fo llow ing phone
lists which include number 2 and corresponding phone
number will be displayed.)
6. Select the number using the [ ]/[ ] buttons and press the [OK] button to make call.
06-6702-5322
Jack
James
Jane
Page 32
© SAMSUNG Electronics Co., Ltd.
Page 51

Searching/Calling a Phone Number Using a Speed Dial Number
This function allows you to make a call to the desired party by simply pressing a speed dial
number for longer than 2 seconds. For example, if the number ‘12 3456’ is saved to the [1] button,
you can simply press the [1] button until a cal l is connecte d to ‘1234 56’. This function works only
on the initial screen.
1. Press the speed dial number that has the desired phone numb er for a long time.
z If there is no saved phone number, the ‘Search Result is Nothing’ message appears on
the screen momentarily and then returns to the initial screen.
z If the speed dial number is more than two digits, press the last number of the two digits
for a long time.
2. The phone number saved for tha t numbe r th en appea rs
on the screen and directly makes a call.
3. Press the [ ] button after a call i s finished.
2204
User Guide
© SAMSUNG Electronics Co., Ltd.
Page 33
Page 52

APPLICATION MENUS
Registering a Phone Number
Press the [MENU] button of the WIP-5000M phone, then select the [1. Phone book] i co n and
register the necessary phone number to be used later.
Entering a phone number directly
Directly enter the phone number on the initial screen and save that number.
Phone number registration(initial scree n) → [MENU] → Name, Speed dial
→
number Input
[OK]
1. On the initial screen, directly enter the phone number
that you want to save and press the [MENU] button.
Name
06-6702-5322
[_ _]
[_ _]
Page 34
© SAMSUNG Electronics Co., Ltd.
Page 53

User Guide
2. Enter the name that you want to save by using the dial buttons(up to 12 characters can
be used). Refer to the ‘Annex ’ for how to enter the ch aracters.
3. Assig n the sp eed dial nu mber for tha t na me and en ter it.
4. Press the [OK] button to save the associated phon e number.
© SAMSUNG Electronics Co., Ltd.
Page 35
Page 54

APPLICATION MENUS
Using the menu to save
This function allows you to save the phone number by using the menu function.
[MENU] → [1] → [4] → Name, Phone Number, Speed dial number Input → [OK]
1. Press the [MENU] button, then select the [1. Phone book] icon and press the [OK] button.
2. Select [4. New Entry] and press the [OK] button.
3. Enter the name, phone number and it s abb revia ted
number by using dial buttons and then press the [OK]
button.
Jack
[_ _]
[_ _]
[_ _]
Page 36
© SAMSUNG Electronics Co., Ltd.
Page 55

Modifying the Saved Phone Number
This is the method to modify the saved phone number.
[MENU] → [1] → [3] → [1] or [2] → Name/Address Input → [OK]
1. Press the [MENU] button, then select the [1. Phon e book] icon and [3 . Sear ch], and then
press the [OK] button.
2. Select [1. Search Name] or [2. Search Number] and then press the [OK] button.
3. If [1. Search Name] is selected, the name input field appears on th e screen a nd if
[2. Search Number] is selected, the address input field appears on the screen.
User Guide
© SAMSUNG Electronics Co., Ltd.
Page 37
Page 56

APPLICATION MENUS
4. Enter the name or address o f the phone number to be modified and press the [OK] button.
z If the [OK] button is directly pressed without entering any name/address, then all
the phone numbers saved in the phone will be displayed. Select the phone number that
you want to modify by using the [
z If any name/address was not entered, the ‘Search Result is Nothing’ message
will appear on the screen.
5. When the information of the phone nu mber that you wan t to modi fy appears on the screen ,
press the [MENU] button.
]/[ ] buttons and press the [OK] button.
Page 38
© SAMSUNG Electronics Co., Ltd.
Page 57

6. The following popu p window for modifying and deleting
will appear on the screen. Select the [Modify] button
using the [
]/[ ] buttons and press the [OK]
button.
z To delete the retrieved information, select the
[Delete] button on the popup window and press
the [OK] button.
7. Using the [C/MUTE] button and dial buttons, modify the phone number and press
the [OK] button to save it.
User Guide
© SAMSUNG Electronics Co., Ltd.
Page 39
Page 58

APPLICATION MENUS
Utilities
Press the [MENU] button and select the [2. Utilities] icon.
2. Utilities
Page 40
© SAMSUNG Electronics Co., Ltd.
Page 59

Setting/Disabling the Alarm Time
This function allows you to set and disable the alarm function. You can select a preferred alarm
melody from the following procedure.
[MENU] → [2] → [1] → [1] → [1] → Enter time → [OK]
: Alarm setup /Ring one time
[MENU] → [2] → [1] → [1] → [2] → Enter time → [OK]
: Alarm setup /Ring always
[MENU] → [2] → [1] → [2] : Disable the alarm
[MENU] → [2] → [1] → [3] → Select melody → [OK]
: Select any alarm melody
User Guide
© SAMSUNG Electronics Co., Ltd.
Page 41
Page 60

APPLICATION MENUS
1. Press the [MENU] button and select [2. Utilities], then use [ ]/[ ] buttons to select
[1. Alarm Alert], and press the [OK] button.
2. Select [1. Set Alarm] and press the [OK] button.
3. The alarm interval(rin g one time, ring always) appears on
the screen. Use the [
alarm interval and press the [OK] button. Then, the alarm
setting screen will show up.
4. Enter the alarm time and press the [OK] button to save it.
z As soon as the alarm is set, the alarm set icon( ) will appear on the top of the screen.
This icon will be displayed until the alarm is disabled and shows that an alarm is set up.
5. Select [3. Alarm Melody] to select the alarm melody then, 10 alarm melodies will be displayed.
]/[ ] buttons to select the
Page 42
© SAMSUNG Electronics Co., Ltd.
Page 61

Schedule Management
This function allows you to enter important t a sks or appoin tme nt s and th en set the phone ala rms
on those dates. So, you can easily use this function to manage a pe rsonal schedule . If the alarm
is set up as mute, you can directly check what the schedule is on the scre en.
[MENU] → [2] → [2] → Select dates → [OK] → Time/Task Input → [OK] →
Select an alarm
→
[OK]
User Guide
© SAMSUNG Electronics Co., Ltd.
Page 43
Page 62

APPLICATION MENUS
1. Press the [MENU] button, then select the [2. Utilities] icon.
Then, use the [
2. This will re sult in the calendar appearing on the screen. You can select any date to
set a schedule and press the [OK] button.
3. When the schedule input field appears you can enter the
time and contents of task. After the [OK] button is pressed,
the schedule alarm appears on the screen. Here, you can
select one alarm with a bell sound, melody selections and
press the [OK] button.
]/[ ] buttons to select [2. Schedule] and press the [OK] button.
Page 44
© SAMSUNG Electronics Co., Ltd.
Page 63

Using the Electronic Calculator
This function allows you to do four arithmetical o pe rations(e .g., ad di tion , subt racti on,
multiplication and division ) in a simple way.
z When entering negative numbers, press the [#/ ] button.
z When entering decimal points, press the [*/ ] button.
z When incorrect numbers are entered, press the [C/MUTE] button.
[MENU] → [2] → [3] → Enter Numbers → [ ]/[ ]/[ ]/[ ] → Enter
→
Numbers
[OK]
1. Press the [MENU] button and select the [2. Utilities], then use the [ ]/[ ] buttons
to select the [3. Calculator], and press the [OK] button.
User Guide
© SAMSUNG Electronics Co., Ltd.
Page 45
Page 64

APPLICATION MENUS
2. This will re sult in the electronic calcula t or a ppearing on
the screen.
3. Enter the numbers to be calculated and choose the right arithmetic operation button
on the screen using the [
4. Enter any second set of numbers and press the [OK] button. Then, the re sul t will appea r
on the screen.
]/[ ] buttons.
Page 46
© SAMSUNG Electronics Co., Ltd.
Page 65

Checking World Time
This function allows you to check current date and ti me in each re gion o f the w orld.
[MENU] → [2] → [4]
1. Press the [MENU] button and select [2. Electronic Diary].
Use the [
]/[ ] buttons to select the [4. W o rl d Clock] and press the [OK] button.
2. When pressing either [ ]/[ ] buttons, the meridian line
moves along the countries on the screen. Then , the
corresponding time of each capit al name w ill be show n.
07/12[Sa] 4:05 PM
Seoul, Tokyo
User Guide
© SAMSUNG Electronics Co., Ltd.
Page 47
Page 66

APPLICATION MENUS
Soft Menu
Press the [MENU] button and select the [3. Soft Menu] Icon.
Soft Menus are used to set system features. The soft menu
List is decided by system.
You can set the various system menus such as DND(Do
Not Disturb), Conference, Transfer.
3. Soft Menu
Page 48
© SAMSUNG Electronics Co., Ltd.
Page 67

Volume Adjustment
Press the [MENU] button and select the [4. Vol/Effect] icon.
User Guide
4. Vol/Effect
© SAMSUNG Electronics Co., Ltd.
Page 49
Page 68

APPLICATION MENUS
Selecting the Bell and Vibration
You can select the modes of call sound such as the bell, vibration, bell after vibrating, or
increasingly higher bell.
[MENU] → [4] → [1] → Select a Mode → [OK]
Page 50
© SAMSUNG Electronics Co., Ltd.
Page 69

User Guide
1. Press the [MENU] button and select [4. Vol/Effect], then press the [OK] button.
2. Select [1. Ring/Vibra te] and press the [OK] bu tton.
3. Press the [ ]/[ ] button and select a desired mode(bell/ vibration/ bell after vibrating/
increasingly higher bell), then press the [OK] button.
Otherwise, press the
etiquette mode(Vibrates) automatically.
For information about how to set the etiquette mode, refer to the description of
NOTE
[*/ ] button for more than 3 seconds to change fro m th e b ell mo de to
‘Setting the Etiquette Mode’ section in ‘Basic Features’ of this guide.
© SAMSUNG Electronics Co., Ltd.
Page 51
Page 70

APPLICATION MENUS
Selecting the Bell Sound
This function enables you to select one bell sound out of a selection of 10 so und s.
[MENU] → [4] → [2] → Select a Bell Sound → [OK]
1. Press the [MENU] button and select the [4. Vol/Effect], then press the [OK] button.
2. Press the [ ]/[ ] button and select the [2. Ring
Type], then press the [OK] button. This will result
following screen appearing.
3. Press the [ ]/[ ] button and select a desired bell sound.
Press the [OK] button to save the bell sound.
Ring Type
01 : Melody 1
02 : Melody 2
03 : Melody 3
Page 52
© SAMSUNG Electronics Co., Ltd.
Page 71

Adjusting the Bell Volume
This function enables you to adjust the bell volume .
[MENU] → [4] → [3] → Set Bell Volume → [OK]
1. Press the [MENU] button and select [4. Vol/Effect], then press the [OK] button.
2. Press the [ ]/[ ] button and select [3. Ring
Volume], then press the [OK] button. This will result in the
following screen appearing.
Bell Volume
3. Press the [ ]/[ ] button and s elect th e des ir ed be ll vo lum e, then pr ess t he [O K] butt o n.
User Guide
© SAMSUNG Electronics Co., Ltd.
Page 53
Page 72

APPLICATION MENUS
y
Adjustung the Volume of the Key Buttons
This function enables you to adjust the volume of the key butto ns when the key butto ns of the
phone are pressed.
[MENU] → [4] → [4] → Set Key Volume → [OK]
1. Press the [MENU] button and select [4. Vol/Effect], then press the [OK] button.
2. Press the [ ]/[ ] button and select [4. Key Tone].
Use the [ ]/[ ] buttons to set the key volume and then
press the [OK] button.
Ke
Tone Volume
Page 54
© SAMSUNG Electronics Co., Ltd.
Page 73

Setting My Phone
Press the [MENU] button and select [5. Settings] icon
to see a screen which prompts you to enter
a password. The submenus are not displayed until
a password is entered in the [5.Settings] screen.
5. Settings
User Guide
© SAMSUNG Electronics Co., Ltd.
Page 55
Page 74

APPLICATION MENUS
Viewing My Extension Number
This feature enables you to view your extension phone number on the LCD screen of the phone.
[MENU] → [5] → Enter a Password → [0]
1. Press the [MENU] button and select [5. Settings], then press the [OK] button.
2. Enter a password on the screen when prompted.
Page 56
© SAMSUNG Electronics Co., Ltd.
Page 75

User Guide
3. Press the [ ]/[ ] buttons and select [0. Internal
No], then press the [OK] button.
Entering the Users’ Names
This function enables you to enter random characters on the screen displayed on the initial
screen of a handset.
[MENU] → [5] → Enter a Password → [1] → Enter a Name → [OK]
1. Press the [MENU] button and select [5. Settings], then press the [OK] button.
2. Enter a password on the screen when prompted.
© SAMSUNG Electronics Co., Ltd.
Page 57
Internal NO.
1234
Page 76

APPLICATION MENUS
3. Select [1: Name Edit].
4. A screen prompting you to enter a user’s name then
appears. Enter the desired characters and press the [OK]
button.
For information about how to enter the characters, refer to ‘Annex’ section.
NOTE
Page 58
© SAMSUNG Electronics Co., Ltd.
Page 77

Selecting the Background Screen
This function enables you to select the backgrou nd of the in itial scre en tha t appea rs
when power on.
[MENU] → [5] → Enter a Password → [2] → Select Background Screen → [OK]
1. Press the [MENU] button and select [5. Settings], then press the [OK] button.
2. Enter a password on the screen that prompts you to enter a password.
3. Press the [ ]/[ ] buttons and select [2: Display], then press the [OK] button.
User Guide
© SAMSUNG Electronics Co., Ltd.
Page 59
Page 78

APPLICATION MENUS
play
4. The following three screens can be selected and displayed. Select one of them and press
the [OK] button.
DND FWD 1234 DND FWD 1234
07/12[Sa] 4:05 PM 07/12[Sa] 4:05 PM
Samsung Logo
z The above screens are all initial screens in which the DND and call forwarding are set.
Changing a Password
This function enables you to prevent others fro m using you r phone by cha nging the ini tial facto ry
set password of the phone. The ini tial password is set to 0000.
Page 60
DND FWD 1234
Jack
12 : 34 am
07/12[Sa]
Name Display
Time Dis
© SAMSUNG Electronics Co., Ltd.
Page 79

User Guide
[MENU] → [5] → Enter a Password → [3] → Enter a Password → [OK]
1. Press the [MENU] button and select [5. Settings], then press the [OK] button.
2. Enter a password on the screen that prompts you to enter a password.
3. Press the [ ]/[ ] buttons and select the [3: PIN change], then press the [OK] button.
4. If the following screen prompts y ou to en te r a p a ssw ord ,
enter a new password and press the [OK] button.
© SAMSUNG Electronics Co., Ltd.
Page 61
Page 80

APPLICATION MENUS
Setting the Language
This feature enables you to set the language display ed on the LCD screen of the pho ne.
[MENU] → [5] → Enter a Password → [4] → [2]
1. Press the [MENU] button and select [5. Setting], then press the [OK] button.
2. Enter a password on the screen when prompted.
3. Press the [ ]/[ ] buttons and select [4: Language],
then press the [OK] button.
4. Press the [ ]/[ ] buttons and select [2: English], then press the [OK] button.
Language
1 : Korean
2 : English
3 : Italian
Page 62
© SAMSUNG Electronics Co., Ltd.
Page 81

Deleting a Phone Number
This function enables you to clear phone numbers reg istered withi n the phone book or calling
numbers and called numbers.
Deleting a saved number
This function enables you to clear all the phone numbers saved within the phone book.
[MENU] → [5] → Enter a Password → [5] → [1] → Enter a Password →
Select Yes/No
→
[OK]
1. Press the [MENU] button and select the [5. Settings], then press the [OK] button.
2. Enter a password on the screen that prompts you to enter a password.
3. Press the [ ]/[ ] button and select the [5: Delete Entry], then press the [OK] button.
User Guide
© SAMSUNG Electronics Co., Ltd.
Page 63
Page 82

APPLICATION MENUS
4. Press the [ ]/[ ] button and select [1: Del Phone Book], then press the [OK] button.
5. Enter a password on the screen that prompts you to enter
a password. If a screen prompts you to clear a called
number, select Yes or No with the [
and press the [OK] button.
Deleting a calling number
This function enables you to clear the list of calling numbers saved within the phone book.
[MENU] → [5] → Enter a Password → [5] → [2] → Enter a Password →
Select Yes/No
→
[OK]
]/[ ] buttons
Confirm ?
1 : Yes
2 : No
Page 64
© SAMSUNG Electronics Co., Ltd.
Page 83

User Guide
1. Press the [MENU] button and select the [5. Setting], then press the [OK] button.
2. Enter a password on the screen that prompts you to enter a password.
3. Press the [ ]/[ ] button and select the [5: Delete Entry], then press the [OK] button.
4. Press the [ ]/[ ] button and select the [2. Del Dialed call], then press the [OK] button.
5. Enter a password on the screen that prompts you to enter
a password. Then, a screen appears as shown and
prompts you to clear a called number. Select Yes or No
using the [
button.
Deleting a called Number
This function enables you to clear the list of called numbers saved within the phone book.
]/[ ] buttons and press the [OK]
Confirm ?
1 : Yes
2 : No
© SAMSUNG Electronics Co., Ltd.
Page 65
Page 84

APPLICATION MENUS
[MENU] → [5] → Enter a Password → [5] → [3] → Enter a Password
→
Select Yes/No → [OK]
1. Press the [MENU] button and select the [5. Setting], then press the [OK] button.
2. Enter a password on the screen that prompts you to enter a password.
3. Press the [ ]/[ ] button and select the [5: Delete Entry], then press the [OK] button.
4. Press the [ ]/[ ] button and select the [3: del Recent call], then press the [OK] button.
5. Enter a password on the screen that prompts you to enter
a password. Then, a screen appears as shown and
prompts you to clear a called number. Select Yes or No
using the [
button.
]/[ ] buttons and press the [OK]
Confirm ?
1 : Yes
2 : No
Page 66
© SAMSUNG Electronics Co., Ltd.
Page 85

Selecting the Screen Lighting
This function enables you to set the inten sity of th e ligh ti ng on th e phone scre en.
Setting lighting time
This function enables you to set the time for background lighting, which lights automatically when
the keys are pressed or a messages appears.
[MENU] → [5] → Enter a Password → [6] → [1] → Select Lighting Time
→
[OK]
1. Press the [MENU] button and select the [5. Settings], then press the [OK] button.
2. Enter a password on the screen that prompts you to enter a password.
3. Press the [ ]/[ ] button and select [6: Back Light], then press the [OK] button.
User Guide
© SAMSUNG Electronics Co., Ltd.
Page 67
Page 86

APPLICATION MENUS
y
4. Press the [ ]/[ ] button and select the [1: Light Time], then press the [OK] button.
5. Select one of the three options by using the [ ]/[ ]
buttons as shown and press the [OK] b utton.
z The lighting of the LCD screen turns off automatically
Setting power saving lighting
You can set the mode of the energy-saving lighting.
[MENU] → [5] → Enter a Password → [6] → [2] → Set/Disable Energy Saving
Lighting
unless a button is pressed within 8 seconds. You
can also set the lighting duration to 20 seconds or turn
off the lighting altogether.
→
[OK]
Light Time
1 : 8 sec On
2 : 20 sec On
3 : Alwa
s Disable
Page 68
© SAMSUNG Electronics Co., Ltd.
Page 87

User Guide
1. Press the [MENU] button and select the [5. Settings], then press the [OK] button.
2. Enter a password on the screen that prompts you to enter a password.
3. Press the [ ]/[ ] button and select the [6: Back Light], then press the [OK] button.
4. Press the [ ]/[ ] button and select [2: Power Saving], and then press the [OK] button.
5. A screen prompt appears and enables you to set or
disable the energy saving lighting . Select Set or Disable
using the [
]/[ ] button and press the [OK] button.
Power Saving
1 : On
2 : Off
© SAMSUNG Electronics Co., Ltd.
Page 69
Page 88

APPLICATION MENUS
Setting the Forward T ype
This feature enables you to forward your incoming calls to a specific extension, group of
extensions or external number when you are unable to receive an incoming call. You may also
set the forwarding type(Forward All, Forward Busy, Forward No Answer or Do Not Disturb).
If this feature is set up, the ‘FWD’ me ssage w ill be display ed on the ini tial screen .
[MENU] → [5] → Enter a Password → [7] → [2] → Dial the number to which
calls should be forwarded
1. Press the [MENU] button and select [5. Setting], then press the [OK] button.
2. Enter a password on the screen when prompted.
3. Press the [ ]/[ ] buttons and select [7: Forward Type], then press the [OK] button.
→
[OK]
Page 70
© SAMSUNG Electronics Co., Ltd.
Page 89

User Guide
y
4. Press the [ ]/[ ] buttons and select the forward
type you want, then press the [OK] button.
5. Press the number to which calls should be forwarded, th en pre ss the [OK] bu tton.
The forwarding types are as follows.
- Off : You can disable the forward feature.
NOTE
- All : You can forward all incoming calls to another number.
- Busy : You can forward incoming calls to another number when you are using the phone.
- No Answer : Your incoming calls can be forwarded to another number if you cannot answer
the call within the specified time.
- Do Not Disturb : Busy : You can forward incoming calls to another number when the DND
feature is set up.
© SAMSUNG Electronics Co., Ltd.
Setting
1 : Off
2 : All
3 : Bus
Page 71
Page 90

APPLICATION MENUS
Setting the Programmed Message
When you will be away from you desk, you can leave an absence message to advise interna l
callers of your status. Internal callers will receive the message on their LCD screen when they
call you.
[MENU] → [5] → Enter a Password → [8] → [1] → [1]
1. Press the [MENU] button and select [5. Setting], then press the [OK] button.
2. Enter a password on the screen when prompted.
3. Press the [ ]/[ ] buttons and select [8: Program Msg], then press the [OK] button.
4. Press the [ ]/[ ] buttons and select [1: On], then
press the [OK] button.
Program Msg.
1 : On
2 : Off
Page 72
© SAMSUNG Electronics Co., Ltd.
Page 91

5. Press the [ ]/[ ] buttons and select [1. Give Me The Call], then press the [OK] button.
Locking the Phone
When you will be away fro m you desk, you can lock any outg oing trunk calls or
incoming/outgoing calls to prevent others from usi ng you r phon e withou t permission .
[MENU] → [5] → Enter a Password → [9] → [1]
1. Press the [MENU] button and select [5. Setting], then press the [OK] button.
2. Enter a password on the screen when prompted.
3. Press the [ ]/[ ] buttons and select [9: Station Lock], then press the [OK] button.
User Guide
© SAMSUNG Electronics Co., Ltd.
Page 73
Page 92

APPLICATION MENUS
4. Press the [ ]/[ ] buttons and select [1: On], then
Initialization
This function enables you to initialize all the functions and status of a phone.
Initializing all
This function enables you to initialize the status of a phone. All the saved records as well as the
phone options are deleted.
Page 74
press the [OK] button.
[MENU] → [5] → Enter a Password →
→
Select Yes/No
[OK]
Station Lock
1 : On
2 : Off
[*/ ]
→ [1] → Enter a Password →
© SAMSUNG Electronics Co., Ltd.
Page 93

1. Press the [MENU] button and select the [5. Settings], then press the [OK] button.
2. Enter a password on the screen that prompts you to enter a password.
3. Press the [ ]/[ ] button and select the [*, Reset], then press the [OK] button.
4. Press the [ ]/[ ] button and select [1: Reset All], then a screen appears and
prompts you to enter a password.
5. If you enter a password, the following dialog box appears.
Select Yes or No using the [
press the [OK] button.
Initializing featares only
This function enables you to initialize the options for the phone functions only.
]/[ ] buttons and
Reset All
1 : Yes
2 : No
User Guide
© SAMSUNG Electronics Co., Ltd.
Page 75
Page 94

APPLICATION MENUS
[MENU] → [5] → Enter a Password → [*/ ] → [2] → Enter a Password →
Select Yes/No
1. Press the [MENU] button and select the [5. Settings], then press the [OK] button.
2. Enter a password on the screen that prompts you to enter a password.
3. Press the [ ]/[ ] button and select the [*.Reset], then press the [OK] button.
4. Press the [ ]/[ ] button and select the [2. Reset Func.] to display the screen that
prompts you to enter a password.
5. If you enter a password, the following dialog box appears.
Select Yes or No using the [
press the [OK] button.
→
[OK]
]/[ ] buttons and
Reset Func.
1 : Yes
2 : No
Page 76
© SAMSUNG Electronics Co., Ltd.
Page 95

Setting Auto Lock
If you set the auto lock for privacy, to prevent other people from seeing personal information.
Once the auto lock is se t, the keys will not operate and functions other than answering a call
cannot be used until a password is entered.
[MENU] → [5] → Enter a Password → [#/ ] → Keypad Lock → [OK]
1. Press the [#/ ] button so that the auto lock can be set.
z If this function is set, the auto lock icon( ) appears
on the upper part of the screen.
z If you want to cancel this function, enter a password.
User Guide
© SAMSUNG Electronics Co., Ltd.
Page 77
Page 96

APPLICATION MENUS
Setting the System
Press the [MENU] button to see the main menu
on the screen.
Select [6. System] and use the desired functions.
6. System
Page 78
© SAMSUNG Electronics Co., Ltd.
Page 97

Registering a Phone
This function enables you to register a phone via the sy tem.
[MENU] → [6] → [1] → Select System → [OK] → Enter a System ID → [OK] →
→
Enter a User ID
[OK] → Enter a Password → [OK]
User Guide
© SAMSUNG Electronics Co., Ltd.
Page 79
Page 98

APPLICATION MENUS
1. Press the [MENU] button and select [6. System], then press the [OK] button.
2. Press the [ ]/[ ] button and select the [1: Registration], then press the [OK] button.
3. Determine whether the phone will be re giste red with Sy stem 1 or Syste m 2 and
press the [OK] button.
4. If the screen as shown prompts you to enter a system ID,
enter the system ID and press the [OK] button.
5. If the screen as shown prompts you to enter a user ID,
enter the user ID and press the [OK] button.
Input Sys. ID
Input User ID
Page 80
© SAMSUNG Electronics Co., Ltd.
Page 99

User Guide
6. If the [Encryption Key] screen prompts, you enter the encryption key 13 digits which was
set up in the system. If the encryption key is not set up in the system, you can press the [OK]
button without entering the encryption key.
7. If the screen as shown prompts you to enter a password
and press the [OK] button to start the registration.
Input Password
© SAMSUNG Electronics Co., Ltd.
Page 81
Page 100

APPLICATION MENUS
Selecting a System
This function easily enables you to register the two systems being used .
[MENU] → [6] → [2] → Select a System → [OK]
1. Press the [MENU] button and select [6. System], then press the [OK] button.
2. Press the [ ]/[ ] button and select the [2: System Setting], then press the [OK] button.
3. System 1 and System 2 appear and are entere d in the [1.
Registeration] from the [6.System]. Select one of the two
systems using the [
button to register the selected one.
4. You can set the encryption key(WEP key) in the system which should be entered when
you register the phone.
]/[ ] buttons. Press the [OK]
System Setting
1 : System1
2 : System2
3 : Encryption Key
Page 82
© SAMSUNG Electronics Co., Ltd.
 Loading...