

Samsung WF-J1254, WF-J1054, WF-J854, WF-B1254, WF-B1054 User Manual
...
WF-J1254(V/S/C/R)
WF-J1054(V/S/C/R)
WF-B1254(V/S/C/R)
WF-B1054(V/S/C/R)
WF-B854(V/S/C/R)
Washing Machine
user manual
WF-J854(V/S/C/R)
imagine the possibilities
Thank you for purchasing this Samsung product.
To receive more complete service,
please register your product at
www.samsung.com/global/register

2_ Features
features
1. Child Lock
The Child Lock function keeps curious little hands out of the washer. This safety feature
ensures, that children do not toy with the operation of the washer. A beep will alert you when
the Child Lock is activated.
2. Handwash
Clothes susceptible to damage, such as those made of linen or silk, can be washed just as if
they were being washed by hand.
3. Delay Start
This function enables users to delay the washing machine’s starting time for up to 24 hours.
4. Calm Wash
We have a wash cycle that is so quiet you can do laundry while you sleep. The spin cycle is
whisper quiet as it drains away water.
5. Easy Iron
Less ironing is needed as Samsung’s Carefreewash safely cleans your soft, delicate
cloths and easy-care fabrics. Developed by Samsung’s globally recognized digital process
technology, the Easy Iron function is a specialized laundry program that will help to reduce
wrinkles on your delicate garments, freeing up the time you would have spent on ironing.
Safety information _3
safety information
Congratulations on the purchase of your new washing machine. This Owner’s
Manual contains valuable information on the installation, use, and care of this
appliance. Please take the time to read this manual so that you can take full
advantage of the washing machine’s features and enjoy this appliance for many
years to come.
IMPORTANT SAFETY SYMBOLS AND PRECAUTIONS
What the icons and signs in this user manual means:
Hazards or unsafe practices that may result in severe personal injury or
WARNING
CAUTION
CAUTION
BEFORE USING THE APPLIANCE
Packing materials can be dangerous to children; keep all packing material (plastic bags,
polystyrene, etc.) well out of the reach of children.
CAUTION
death.
Hazards or unsafe practices that may result in minor personal injury or
property damage.
To reduce the risk of fire, explosion, electric shock, or personal injury when
using your washer, follow these basic safety precautions:
This appliance is designed for home use only.
Make sure that water and electrical connections are made by qualified technicians,
observing the manufacturer’s instructions (see, “Installation Instructions,” page 4) and local
safety regulations.
All packing and transit brackets must be removed before the appliance is used. Serious
damage may occur if they are not removed. See “Removing the transit bolts” on page 5.
Perform the first wash cycle without any laundry (See page 9).
WARNING
Always observe Safety Precautions when using your washer. See “Important Safety
Instructions” on the next page.
WARNING
Never try to repair the washer on your own. There is dangerous voltage inside this washer.
If the washer needs to be repaired, call an authorized service center near you.
SAVE THESE INSTRUCTIONS

4_ Safety information
safety information
Please record the serial number from the back of your washer and the date
of purchase in the space provided below.
We recommend that you keep your purchase receipt with this manual for warranty service.
Model Number
Serial Number
Date Purchased
Dealer
IMPORTANT SAFETY INSTRUCTIONS
WARNING
To reduce the risk of fire, explosion, electric shock, property damage or injury to persons
when using your appliance, follow basic precautions, including the following
WARNING
1. Read all safety instructions before using the appliance.
2. As with any equipment using electricity and having moving parts, there are potential
hazards. To use this appliance safely, the operator should become familiar with the
instructions for the operation of this appliance and always exercise care when using it.
3. Do not install or store this appliance where it will be exposed to bad weather.
4. Install and level the washing machine on a floor that can support the weight.
5. This appliance must be properly grounded. Never plug the appliance cord into a
receptacle which is not grounded adequately and in accordance with local and national
codes. See installation instructions for grounding this appliance.
6. To avoid the possibility of fire or explosion:
a. Do not wash or dry items that have been previously cleaned in, washed in, soaked
in or spotted with gasoline, dry-cleaning solvents or other flammable or explosive
substances as they give off vapors that could ignite or explode. Hand wash and line
dry any items containing these substances. Any material on which you have used a
cleaning solvent, or which is saturated with flammable liquids or solids, should not
be placed in the clothes washer until all traces of these liquids or solids and their
fumes have been removed.
These items include acetone, denatured alcohol, gasoline, kerosene, some liquid
household cleaners, some spot removers, turpentine, waxes and wax removers.
b. Do not add gasoline, dry-cleaning solvents, or other flammable or explosive
substances to the wash water. These substances give off vapors that could ignite or
explode.
c. Under certain conditions, hydrogen gas may be produced in a hot water system that
has not been used for 2 weeks or more.
HYDROGEN GAS IS EXPLOSIVE. If the hot water system has not been used for
such a period, before using a washing machine or combination washer-dryer, turn
on all hot water faucets and let the water flow from each for several minutes. This
will release any accumulated hydrogen gas. As the gas is flammable, do not smoke
or use an open flame during this time.
SAVE THESE INSTRUCTIONS

Safety information _5
7. Do not reach into the appliance if the tub is moving.
8. Do not allow children to play on or in the appliance. Close supervision of children is
necessary when the appliance is used near children.
9. Do not tamper with the controls.
10. Do not repair or replace any part of the appliance or attempt any servicing unless
specifically recommended in published user- repair instructions that you understand and
have the skills to carry out.
11. Unplug the power supply cord before attempting to service your washing machine.
12. Store laundry aids and other material in a cool, dry place where children cannot reach
them.
13. Do not wash or dry items that are soiled with vegetable or cooking oil. These items may
contain some oil after laundering. Due to the remaining oil, the fabric may smoke or
catch fire by itself.
14. Do not use chlorine bleach and ammonia or acids (such as vinegar or rust remover) in
the same wash.
Hazardous fumes can form.
15. Do not wash fiberglass materials. Small particles can stick to fabrics washed in
subsequent loads and cause skin irritation.
16. Before the appliance is removed from service or discarded, remove the door to the
washing compartment.
17. Do not sit on top of the clothes washer.
18. Do not use heat to dry articles containing foam rubber or similarly textured rubber-like
materials.
19. Do not use fabric softeners or products to eliminate static unless recommended by the
manufacturer of the fabric softener.
GROUNDING INSTRUCTIONS
This appliance must be grounded. In the event of malfunction or breakdown, grounding will
reduce the risk of electric shock by providing a path of least resistance for electric current. This
appliance is equipped with a cord having an equipment-grounding conductor and a grounding
plug. The plug must be plugged into an appropriate outlet that is properly installed and grounded
in accordance with all local codes and ordinances.
WARNING
Improper connection of the equipment-grounding conductor can result in a risk of electric
shock. Check with a qualified electrician or serviceman if you are in doubt as to whether the
WARNING
appliance is properly grounded. Do not modify the plug provided with the appliance - if it
will not fit the outlet, have a proper outlet installed by a qualified electrician.
SAVE THESE INSTRUCTIONS

6_ Safety information
safety information
USE OF EXTENSION CORDS
A short power-supply cord is provided to reduce the risks resulting from becoming entangled in
or tripping over a longer cord.
Longer cord sets or extension cords are available and may be used if care is exercised in their
use.
If a long cord or extension cord is used,
1. The marked electrical rating of the cord set or extension cord should be at least as great as
the electrical rating of the appliance.
2. The extension cord must be a groundingtype 3-wire cord and it must be plugged into a 3-
slot outlet.
3. The longer cord should be arranged so that it will not be pulled on by children or tripped over
unintentionally.
WARNING
Do not cut or remove the third (ground) prong from the power cord under any
circumstances.
WARNING
PREFERRED METHOD OF GROUNDING
Plug the three-prong power cord into a properly grounded outlet of standard 120 VAC, 60 Hz.
Your washer should be the only appliance on this circuit.
SAVE THESE INSTRUCTIONS

Contents _7
contents
INSTALLING THE WASHING
MACHINE
8
WASHING A LOAD OF LAUNDRY
11
MAINTAINING THE WASHING
MACHINE
16
TROUBLESHOOTING
8 Unpacking the Washing Machine
8 Overview of the washing machine
9 Selecting a location
9 Adjusting the leveling feet
9 Removing the shipping bolts
10 Connecting the water supply hose
10 Positioning the drain hose
11 Overview of the control panel
13 Putting detergent in the washing machine
13 Washing clothes using Fuzzy Logic
14 Washing clothes manually
14 Using delay start
15 Washing tips and hints
16 Draining the washing machine in an
emergenc
16 Repairing a frozen washing machine
16 Cleaning the exterior
17 Cleaning the detergent drawer and recess
17 Cleaning the debris filter
18 Cleaning the water hose mesh filter
19 Symptoms and solutions
19 Understanding error messages
y
19
PROGRAM CHART
20
APPENDIX
21
20 program chart
21 Wash/Rinse Temperature
21 Fabric care chart
21 Electrical warnings
22 Protecting the environment
22 Specification
23 Warranty information

8_ Installing the washing machine
installing the washing machine
UNPACKING THE WASHING MACHINE
Unpack your washing machine and inspect it for transit damage. Also make sure that you have received all
of the items shown below. If the washing machine was damaged during transport or you do not have all of
the items, contact your Samsung dealer immediately.
OVERVIEW OF THE WASHING MACHINE
Worktop
Detergent drawer
Control panel
Door
Base cover
Adjustable feet
Wrench Hose guide Bolt hole covers
Debris filter
Emergency drain tube
Filter-cover
Drain hose
Plug

Installing the washing machine _9
SELECTING A LOCATION
01 INSTALLING THE WASHING MACHINE
o
C
rp
m
Mi
n
Fuzzy control
Temp Spin Delay Start Function
Door open
Powe
r
Spin
Check
Remaining Ti
me
Delay Star
t
Rins
e
Wa
sh
Pre-wash
Eco
Speedy
Wo
ol
Delicate
Synthetic
Co
tton
START
PAUS
E
12:00
Before you install the washing machine, select a location with the following characteristics:
• A hard, level surface (if the surface is uneven, see “Adjusting the leveling feet,” below)
• Away from direct sunlight.
• Adequate ventilation
• Room temperature that will not fall below 32 ˚F
• Away from sources of heat such as coal or gas
Make sure that the washing machine does not rest on its power cord.
Ventilation openings must not be obstructed by carpeting when the washing machine is installed
on a carpeted floor.
THE MINIMUM CLEARANCES FOR CLOSET AND ALCOVE INSTALLATIONS - SIDES 0 IN.,
REAR 1 IN. TOP 2 IN., CLOSET FRONT 0 IN.
Closet Front Must Have Two Unobstructed Air Openings Combined Total Area 72 Sq. In. Min.
Located 3 in. From Top and Bottom. Louvered Door With Equivalent Air Opening Is Acceptable.
ADJUSTING THE LEVELING FEET
If the floor is uneven, adjust the feet (do not insert pieces of wood or any other objects under the
feet):
1. Loosen the leg bolt by turning it with your hand
until it is at the desired height.
2. Tighten the locking nut by turning it with the
supplied wrench.
• Place the washer on a sturdy, flat surface.
If the washer is placed on an uneven or weak
surface, noise or vibration occurs.
(Only a l degree angle is allowed.)
REMOVING THE SHIPPING BOLTS
Before using the washing machine, you must remove all of the shipping bolts from the back of
the unit.
To remove the bolts:
1. Loosen all bolts with the supplied wrench before
removing them.
2. Take each bolt head and plastic together, pull it
through the wide part of the hole.
Repeat for each bolt.
3. Fill the holes with the supplied plastic covers.
4. Keep the transit bolts for future use.

10_ Installing the washing machine
installing the washing machine
CONNECTING THE WATER SUPPLY HOSE
The water supply hose must be connected to the washing machine at one end and to the water faucet at
the other. Do not stretch the water supply hose. If the hose is too short and you do not wish to move the
washer, replace the hose with a longer, high pressure one.
To connect the water supply hose:
1. Take the L-shaped arm fitting for the water supply
hoses and connect to the water supply intake on the
back of the washer.
Tighten by hand.
2. Connect the other end of the cold water supply hose
to your sink’s cold water faucet and tighten it by hand.
If necessary, you can reposition the water supply hose
at the washing machine end by loosening the fitting,
rotating the hose, and retightening the fitting.
Optional:
1. Take the red L-shaped arm fitting for the hot water supply hose and connect to the red hot
water supply intake on the back of the machine. Tighten by hand.
2.
Connect the other end of the hot water supply hose to your sink’s hot water faucet and tighten it by hand.
3. Use a Y-piece if you only want to use cold water.
The washer should be connected to the water faucets using new hose-sets.
Old hose-sets should not be used.
POSITIONING THE DRAIN HOSE
The end of the drain hose may be positioned in three ways:
Over the edge of a sink
The drain hose must be placed at a height between 24
and 35 inches. To keep the drain hose spout bent, use the
supplied plastic hose guide. Secure the hose guide to a
wall with a hook or to the faucet with a piece of string to
prevent the drain hose from moving.
ln a sink drain pipe branch
The drain pipe branch must be above the sink siphon so that the end of the hose is at least 24 inches
above the ground.
ln a drain pipe
Samsung recommends that you use a 26 inch high vertical pipe; it must be no shorter than 24 inches
and no longer than 35 inches.
Washing a load of laundry _11
washing a load of laundry
1
2
3
4
8
5
6
7
9
10
11
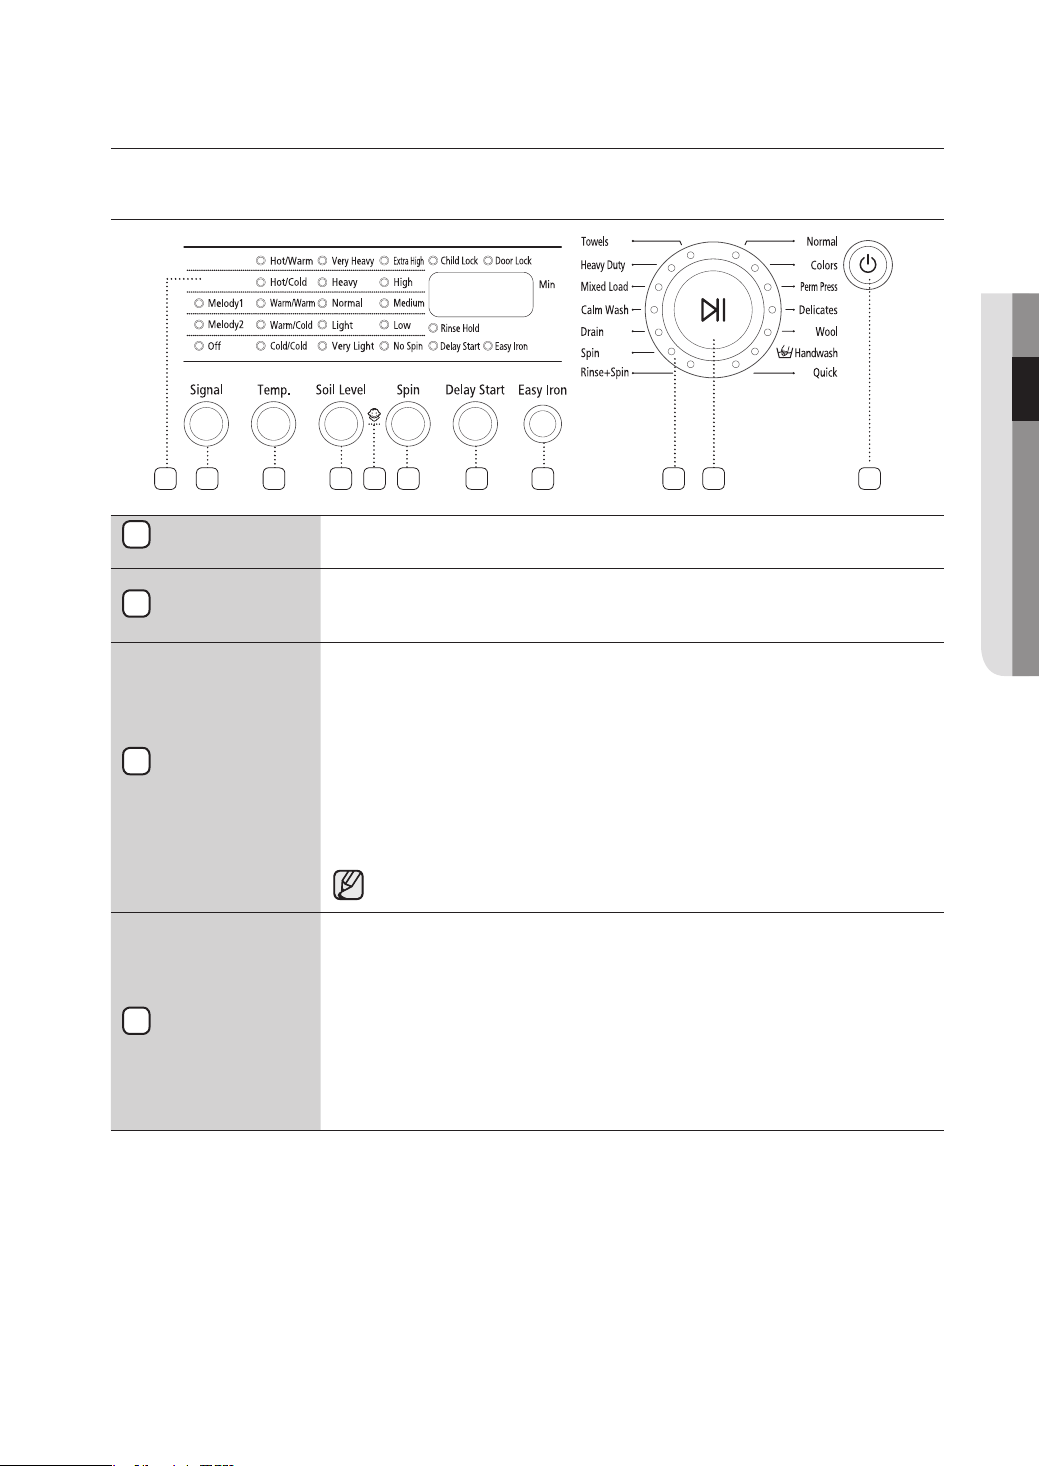
OVERVIEW OF THE CONTROL PANEL
02 WASHING A LOAD OF LAUNDRY
Digital graphic
1
display
2
Signal key
Select
3
Wash/Rinse
Temperature
Select Soil Level
4
Displays the remaining wash cycle time, all washing information and error
messages.
When the selected wash cycle is finished, a melody will sound.
Press the button repeatedly to cycle through the available melody options.
(Melody1 . Melody2 . OFF . Melody1 . ... )
Press the Temp. button to select the wash and rinse temperatures. The light
next to the temperature will illuminate. Press the button repeatedly to scroll
through the temperature settings.
Hot/Warm - Heavily soiled color-fast items.
Hot/Cold - Whites and heavily soiled color-fast items.
Warm/Warm - Color-fast items. When warm rinse is selected, only the final
rinse will be warm. The other rinses will be cold to conserve energy.
Warm/Cold – Moderately soiled, color-fast items; most wrinkle free items.
Cold/Cold – Brightly colored, lightly soiled items.
In wash water temperatures below 60° F, detergents do not dissolve or
clean well.
Press the
Soil Level button to select the appropriate soil level for the load.
The light next to the Soil Level button will illuminate. Press the button
repeatedly to scroll through the soil level settings.
Very Heavy - Use for cleaning extremely heavily soiled loads.
Heavy – Use for cleaning heavily soiled loads.
Normal – Use for cleaning moderately soiled loads. This setting will be
appropriate for most loads.
Light – Use for cleaning lightly soiled loads.
Very Light
- Use for cleaning very lightly soiled loads.

12_ Washing a load of laundry
washing a load of laundry
Press the Spin button to select the appropriate spin speed for the load. The
light next to the spin speed will illuminate. Press the button repeatedly to scroll
through the spin speed settings.
Extra High - Use for underwear and sturdy cottons.
Select Spin
5
Speed
High – Use for underwear, t-shirts and sturdy cottons.
Medium – Use for jeans, wrinkle free or “wash-and-wear” items and
synthetics.
Low – Use for delicate items needing a slow spin speed because of fabric and
construction and for hang-dry items.
No Spin – Drains the washer without spinning. Use for extremely delicate
items that cannot tolerate any spin.
Delay Start
6
selection button
Easy Iron
7
selection button
Child Lock
8
selection button
Fuzzy Control
9
dial
Start/Pause
10
selection button
POWER button
11
Press the button repeatedly to cycle through the available delayed start
options (from 2 to 24 hours in one hour increments).
The displayed hours indicate when the washing cycle will finish.
Press this button to to reduce wrinkles on your delicate garments, freeing up
the time you would have spent on ironing. It is best to use this feature with
Normal, Colors, Quick, Towels, Heavy Duty, and Mixed load cycles.
Using this feature will prevent children from manipulating the washing
machine.
To turn the “
washing machine. Press and hold down the
2-3 seconds. The “Child Lock” can only be activated when the washer is
on. Once you set the Child Lock function, no button will be active except the
POWER button. The Child Lock indicator will blink on and off when it is set.
To turn the “
button for 2-3 seconds. The Child Lock indicator will turn off and the “Child
Lock” will be deactivated.
Turn the dial to select one of the 14 available wash programs:
Normal, Colors, Perm Press, Delicates, Wool, Hand wash, Quick,
Rinse+Spin, Spin, Drain, Calm Wash, Mixed Load, Heavy Duty, Towels
Press to pause and restart programs.
Press the Start/Pause button before adding the laundry.
Press once to turn the washing machine on, press again to turn the washing
machine off.
If the washing machine power is left on for longer than 10 minutes without
any buttons being touched, the power automatically turns off.
Child Lock” on: Press the Start/Pause button to turn on the
Soil Level + Spin button for
Child Lock” off: Press and hold down the Soil Level + Spin
When the buttons on the washer are not working please check that the
child lock is not active.

Washing a load of laundry _13
PUTTING DETERGENT IN THE WASHING MACHINE
02 WASHING A LOAD OF LAUNDRY
Softener
Detergent
Bleach
Before washing clothes for the first time, you must run a complete cycle without clothes.
To do this:
1. Press the POWER button.
2. Pour a little detergent into compartment in the detergent
drawer.
3. Turn on the water supply to the washing machine.
4. Press the Start/Pause button.
• This will remove any water from the manufacturer’s test run
remaining in the washer.
WASHING CLOTHES USING FUZZY LOGIC
Your new washing machine makes washing clothes easy, using Samsung’s “Fuzzy Logic” automatic
control system. When you select a wash program, the machine will set the correct temperature, washing
time, and washing speed.
To wash clothes using the Fuzzy Logic programs:
1. Turn on your sink’s water faucet.
2. Press the POWER button.
3. Open the door.
4. Load the articles one at a time loosely into the drum, without overfilling.
5. Close the door.
6. Add the detergent, softener, and bleach(if necessary) into the appropriate compartment.
7. Turn the Fuzzy Control dial to select
the appropriate program for the type of
clothes. Normal, Colors, Perm Press,
Delicates, Wool, Handwash, Quick,
Rinse+Spin, Spin, Drain, Calm Wash,
Mixed Load, Heavy Duty, Towels.
You will see the indicators light up on
the control panel.
8. At this time, you can control the wash temperature, rinsing times, spin speed, delay time by
pressing the appropriate option button.
9. Press the Start/Pause button on the Fuzzy Control dial and the wash cycle will begin.
The process indicator will light up and the remaining time for the cycle will appear in the
display.
When the cycle is finished:
After all the cycles have finished, the power will turn off automatically.
1. Open the door.
The door will not open until 3 minutes after the machine stops or the power turns off.
2. Remove laundry.

14_ Washing a load of laundry
washing a load of laundry
WASHING CLOTHES MANUALLY
You can wash clothes manually without using the “Fuzzy Logic” feature.
To do so:
1. Turn on your sink’s water faucet.
2. Press the POWER button on the washing machine.
3. Open the door.
4. Load the articles one at a time loosely into the drum, without overfilling.
5. Close the door.
6. Put the detergent and, if necessary, softener or chlorine bleach, in the appropriate
compartments.
7. Press the Temp. button to select the water temperature.
(Hot/Warm
8. Press the Soil Level button to select the soil level for the load.
(Very Heavy Heavy Normal Light Very Light)
9. Press the Spin button to select the spin speed, [Extra high High Medium Low No
Spin Rinse Hold].
The rinse hold program allows you to take clothes that are dripping wet out of the washing
machine.
no : No Spin, rh : Rinse Hold.
10. Press the button repeatedly to cycle through the available delayed start options (from 2 to
24 hours in one hour increments).The displayed hours indicate when the washing cycle will
finish.
11. Press the Start/Pause button and the machine will begin the cycle.
When the cycle is finished:
1. Open the door.
The door will not open until 3 minutes after the machine stops or the power turns off.
2. Remove laundry.
Hot/Cold Warm/Warm Warm/Cold Cold/Cold )
USING DELAY START
You can set the washing machine to finish your wash automatically at a later time, choosing from 2 to 24
hour delay (in 1 hour increments). The displayed hours indicate when the washing cycle will finish.
To do so:
1. Manually or automatically set your washing machine for the type of clothes you are washing.
2. Press the Delay Start button repeatedly until the delay time is set.
3. Press the Start/Pause button. The Delay Start indicator will light, and the clock will begin
counting down until the washing cycle finished.
4. To cancel “Delay Start”, press the POWER button, then turn the washing machine on again.

Washing a load of laundry _15
WASHING TIPS AND HINTS
02 WASHING A LOAD OF LAUNDRY
Sorting your laundry: Sort your laundry according to the following characteristics:
• Type of fabric care label symbol: Sort laundry into cottons, mixed fibers, synthetics, silks,
wools and rayon.
• Color: Divide whites and colors. Wash new, colored items separately.
• Size: Placing items of different sizes in the same load will improve the washing action.
• Sensitivity: Wash delicate items separately, using the Delicate wash program for pure new
wool, curtains and silk articles. Check the labels on the items you are washing or refer to the
fabric care chart in the appendix.
Emptying pockets: Coins, safety pins and similar items can damage linen, the washing
machine drum, and the water tank.
Securing fasteners: Close zippers and fasten buttons or hooks; loose belts or ribbons should
be tied together.
Detergent tips: The type of detergent you should use is based on the type of fabric (cotton,
perm press, delicate items, knit/wool), color, wash temperature, degree and type of soiling.
Always use “low suds” laundry soap, which is designed for automatic washing machines.
Follow the detergent manufacturer’s recommendations based upon the weight of the laundry, the
degree of soiling, and the hardness of the water in your area. If you do not know how hard your
water is, contact your water utility company.
Keep detergents and additives in a safe, dry place out of the reach of children.
 Loading...