


Washing Machine
user manual
imagine the possibilities
Thank you for purchasing a Samsung product.
To receive a more complete service,
please register your product at
www.samsung.com/global/register
WF7522S8(W/V/S/C/R)
WF7520S8(W/V/S/C/R)
WF7528S8(W/V/S/C/R)
WF7452S8(W/V/S/C/R)
WF7450S8(W/V/S/C/R)
WF7458S8(W/V/S/C/R)
WF7350S8(W/V/S/C/R)
WF7358S8(W/V/S/C/R)
WF7704S8(W/V/S/C/R)
WF7702S8(W/V/S/C/R)
WF7700S8(W/V/S/C/R)
WF7708S8(W/V/S/C/R)
WF7604S8(W/V/S/C/R)
WF7602S8(W/V/S/C/R)
WF7600S8(W/V/S/C/R)
WF7608S8(W/V/S/C/R)

2_ Features
features
• Child Lock
The Child Lock function keeps curious little hands out of the washer. This safety feature
ensures, that children do not toy with the operation of the washer. It also alerts you when it is
activated.
• Delay Start
This function enables uses to delay the washing machine’s starting time for up to 24 hours.
• Calm Wash
We have a wash cycle that is so quiet you can do laundry while you sleep. The spin cycle is
whisper quiet as it drains away water.
• Less Iron (Option)
Less ironing is needed as Samsung’s Carefreewash safely cleans your soft, delicate
cloths and easy-care fabrics. Developed by Samsung’s globally recognized digital process
technology, the Less Iron function is a specialized laundry program that will help to reduce
wrinkles on your delicate garments, freeing up the time you would have spent on ironing.
• Quick
No time to loose! Less than 30minutes wash will give you time to run out before it’s too late.
Our 28minute Quick Wash program can be the solution to your busy life. Now you can wash
your favorite clothes in only 28minutes, guaranteed!
• Delicates & SILK Program
Special care can be determined by the appropriate temperature, the gentle wash action and
the appropriate amount of water.
• Silver Wash - Silver Nano Health System
Samsung’s silver Nano feature uses silver nano particles to sanitize and disinfect your laundry
and your machine’s drum. Delicates as well as smelly socks will get odor-free from human
sweat at temperature as low as 30˚C. That saves energy and protects color and shape of
your clothes
• Handwash
Clothes susceptible to damage, such as those made of linen or silk, can be washed just as if
they were being washed by hand.
Safety information _3
safety information
Throughout this manual, you’ll see Warning and Caution notes.
These warnings, cautions, and the important safety instructions that follow do
not cover all possible conditions and situations that may occur.
It’s your resposibility to use common sense, caution, and care when installing,
maintaining, and operation your washer. Samsung is not liable for damages
resulting from improper use.
IMPORTANT SAFETY SYMBOLS AND PRECAUTIONS
What the icons and signs in this user manual means:
WARNING
Hazards or unsafe practices that may result in severe personal injury or
death.
CAUTION
Hazards or unsafe practices that may result in minor personal injury or
property damage.
CAUTION
To reduce the risk of fire, explosion, electric shock, or personal injury when
using your washer, follow these basic safety precautions:
BEFORE USING THE APPLIANCE
Packing materials can be dangerous to children; keep all packing material (plastic bags,
polystyrene, etc.) well out of the reach of children.
The appliance is designed for home use only.
Make sure that water and electrical connections are made by qualified technicians,
observing the manufacturer’s instructions (see “Installing the Washing Machine”) and local
safety regulations.
All packaging and shipping bolts must be removed before the appliance is used. Serious
damage may occur if they are not removed. See “Removing the shipping bolts”.
Before washing clothes for the first time, you must run a complete cycle without clothes.
See “Washing for the first time”.
SAFETY INSTRUCTIONS
Before cleaning or carrying out maintenance, unplug the appliance from the electrical outlet
or set the (On/Off ) button to Off.
Make sure that the pockets of all clothing to be washed are empty.
Hard, sharp objects, such as coins, safety pins, nails, screws, or stones can cause
extensive damage to the appliance.
Always unplug the appliance and turn off the water after use.
Before you open the door of the appliance, check that the water has drained. Do not open
the door if you can still see water.
Pets and small children may climb into the appliance. Check the appliance before each use.
CAUTION
WARNING

4_ Safety information
The glass door becomes very hot during the washing cycle. Keep children away from the
appliance while it is in use.
Do not attempt to repair the appliance yourself. Repairs made by inexperienced or
unqualified persons may cause injury and/or make more serious repairs to the appliance
necessary.
If the plug (power supply cord) is damaged, it must be replaced by the manufacturer or its
service agent or a similar qualified person in order to avoid a hazard.
This appliance should only be serviced by an authorized service center, and only genuine
spare parts should be used.
This appliance is not intended for use by young children or infirm persons unless they
have been adequately supervised by a responsible person to ensure that they can use the
appliance safely. Young children should be supervised to ensure that they do not play with
the appliance.
This appliance has to be connected to the plug endurable to proper power consumption.
This appliance has to be positioned so that the plug is accessible after installation.
Do not use processed water containing oil, cream or lotion, which is usually found in skincare shops or massage clinics.
• Otherwise this will cause the packing to be deformed, which causes a malfunction or
water leak.
A stainless washing tube does not usually rust. However if some metal such as a hair pin is
left in the tube for an extended time, the tube could rust.
• Do not leave water or bleach containing chlorine in the tube for an extended period of
time.
• Do not regularly use or leave water containing iron in the tube for an extended period of
time.
• If rust starts appearing on the surface of the tube, apply a cleansing agent (neutral) to
the surface and use a sponge or soft cloth to clean it. (Under no circumstances use a
metal brush)
For washing machines with ventilation openings in the base, that a carpet must not
obstruct the openings.
Use the new hose-sets and old hose-sets should not be reused.
This marking shown on the product or its literature, indicates that it should not be disposed
with other household wastes at the end of its working life. To prevent possible harm to
the environment or human health from uncontrolled waste disposal, please separate this
from other types of wastes and recycle it responsibly to promote the sustainable reuse of
material resources.
Household users should contact either the retailer where they purchased this product,
or their local government office, for details of where and how they can take this item for
environmentally safe recycling.
Business users should contact their supplier and check the terms and conditions of the
purchase contract. This product should not be mixed with other commercial wastes for
disposal.
safety information

Contents _5
contents
INSTALLING THE WASHING
MACHINE
6
6 Unpacking the Washing Machine
6 Overview of the washing machine
7 Selecting a location
7 Adjusting the leveling feet
7 Removing the shipping bolts
8 Connecting the water supply hose
9 Connecting the water supply hose (Option)
9 Positioning the drain hose
WASHING A LOAD OF LAUNDRY
10
10 Washing for the first time
10 Putting detergent in the washing machine
11 Overview of the control panel
12 Washing clothes using Fuzzy Logic
13 Washing clothes manually
14 Using delay start
14 Washing tips and hints
MAINTAINING THE WASHING
MACHINE
15
15 Draining the washing machine in an
emergenc
y
15 Repairing a frozen washing machine
15 Cleaning the exterior
16 Cleaning the detergent drawer and recess
16 Cleaning the debris filter
17 Cleaning the water hose mesh filter
TROUBLESHOOTING
18
18 Problems and solutions
18 Understanding error messages
PROGRAMME CHART
19
19 Programme chart
APPENDIX
21
21 Fabric care chart
21 Electrical warnings
21 Protecting the environment
22 Declaration of conformity
22 Specification

6_ Installing the washing machine
installing the washing machine
UNPACKING THE WASHING MACHINE
Unpack your washing machine and inspect it for shipping damage. Also make sure that you have received
all of the items shown below. If the washing machine was damaged during shipping or you do not have all
of the items, contact your Samsung dealer immediately.
OVERVIEW OF THE WASHING MACHINE
Wrench Water supply hose Hose guide Bolt hole covers
Cover top
Drain Hose
Plug
Debris filter
Emergency drain tube
Control panel
Base cover
Door release
Filter Cover
Installing the washing machine _7
SELECTING A LOCATION
Before you install the washing machine, select a location with the following characteristics:
• A hard, level surface (if the surface is uneven, see “Adjusting the leveling feet,” below)
• Away from direct sunlight.
• Adequate ventilation
• Room temperature that will not fall below 0 ˚C
• Away from sources of heat such as coal or gas
Make sure that the washing machine does not stand on its power cord.
Ventilation openings must not be obstructed by carpeting when the washing machine is installed
on a carpeted floor.
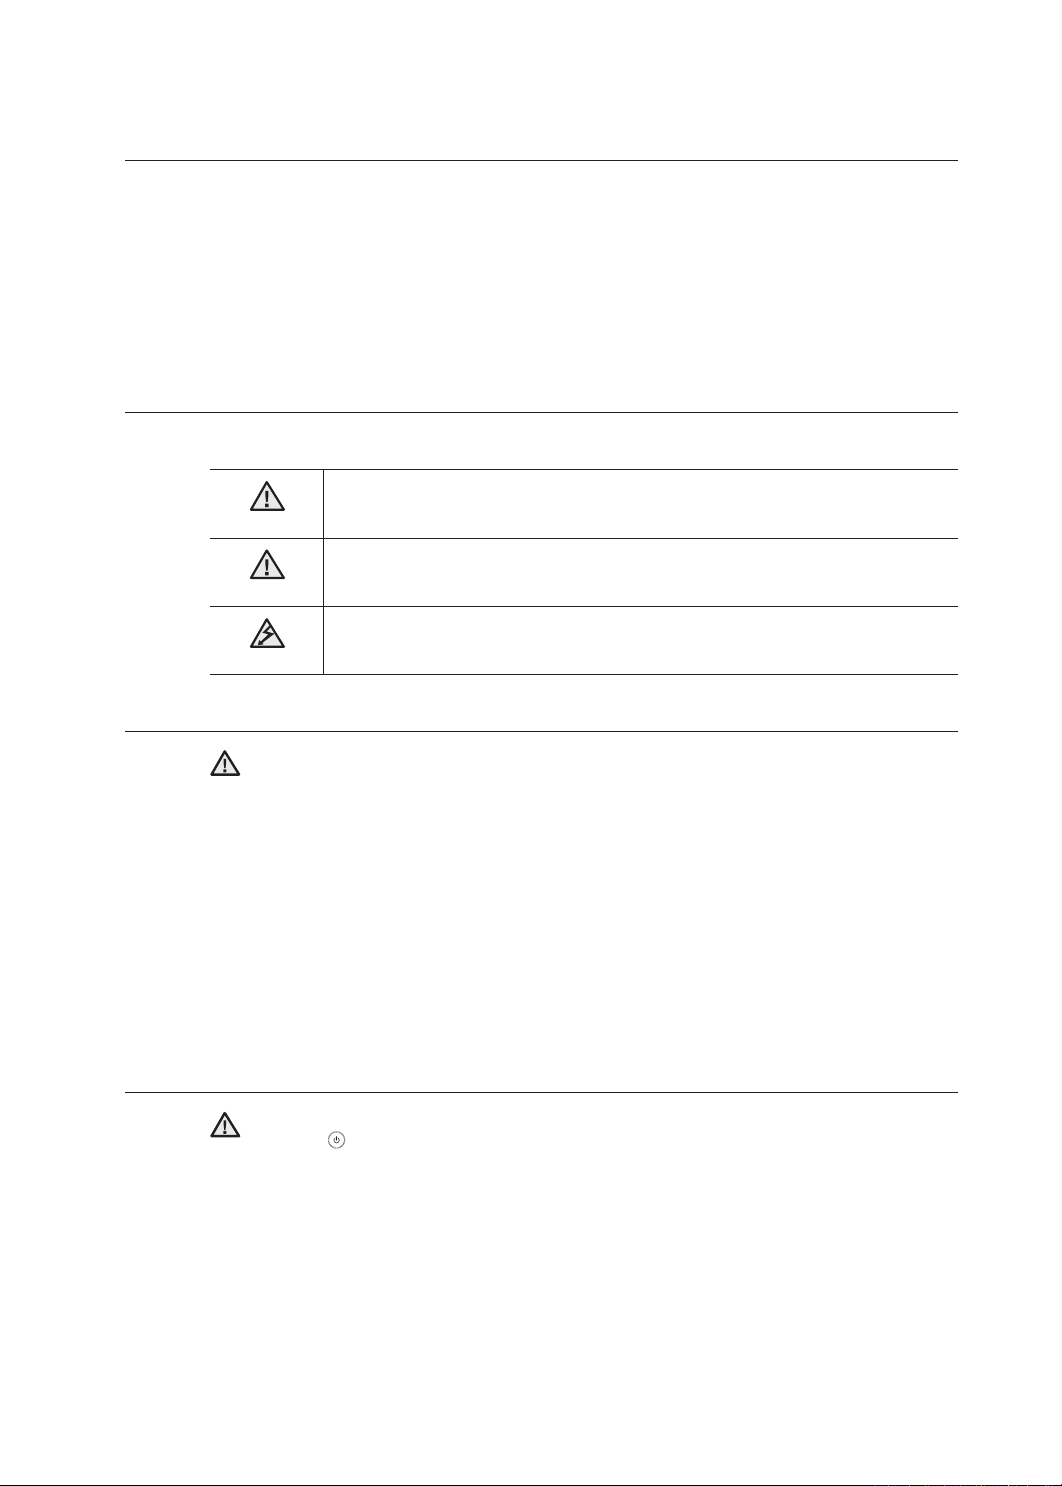
ADJUSTING THE LEVELING FEET
If the floor is uneven, adjust the feet (do not insert pieces of
wood or any other objects under the feet):
1. Loosen the leg bolt by turning it with your hand until it is at
the desired height.
2. Tighten the locking nut by turning it with the wrench.
If the washer is placed on an uneven or weak surface, noise or
vibration occurs. (Only a 1 degrees angle is allowed.)
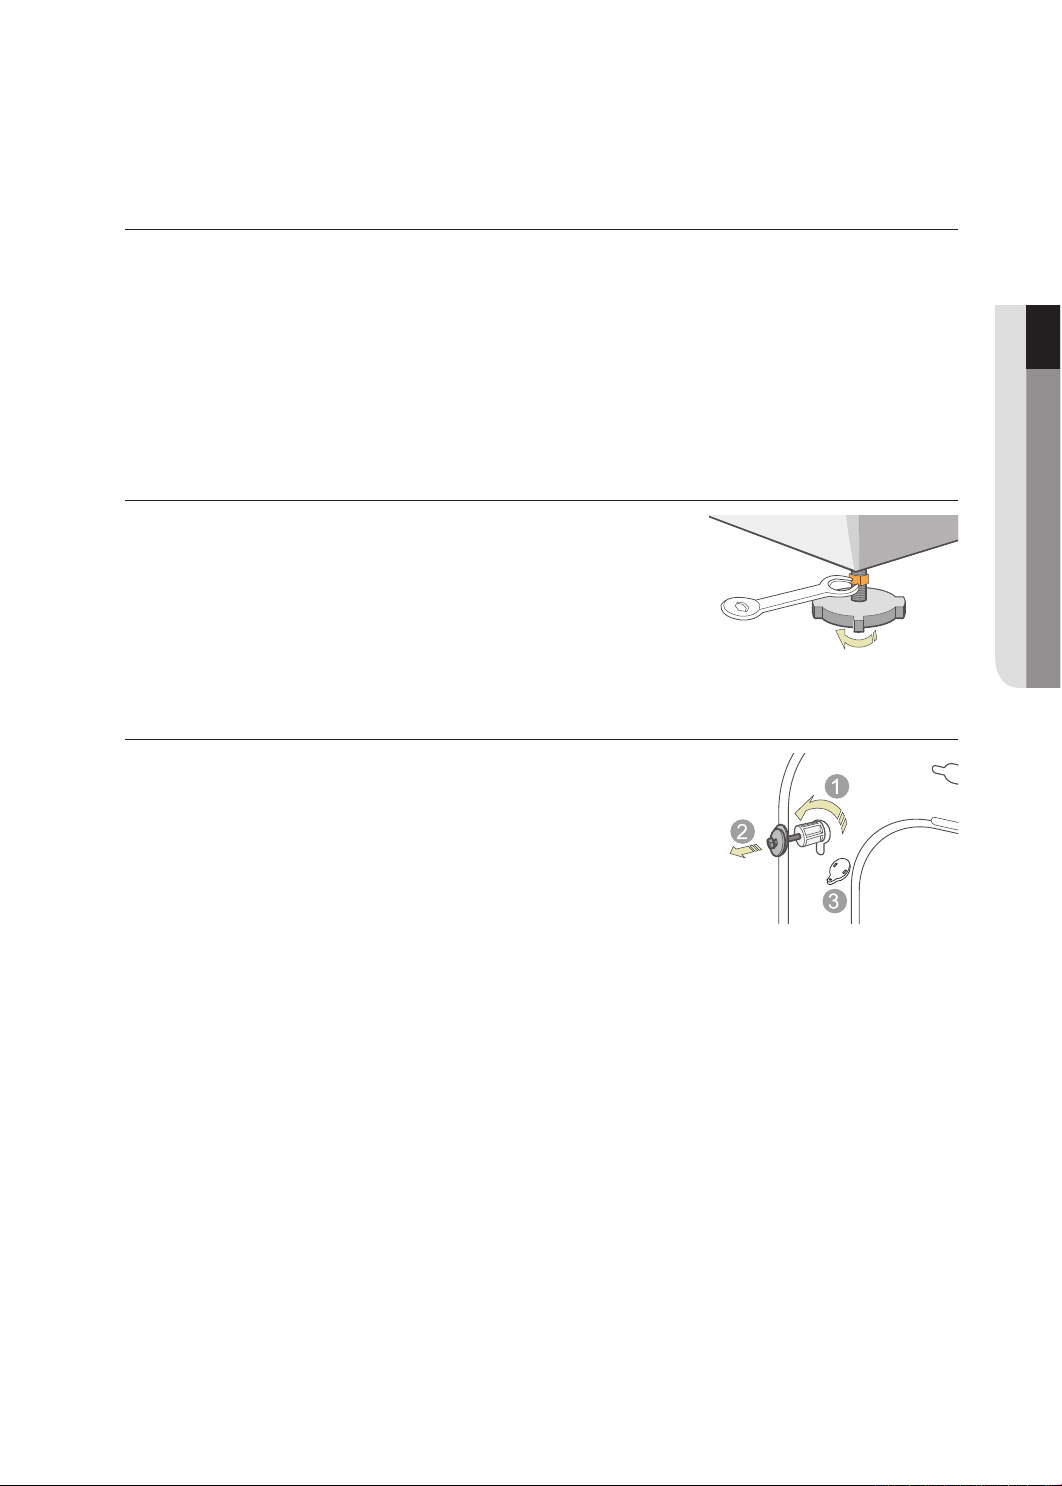
REMOVING THE SHIPPING BOLTS
Before using the washing machine, you must remove all of the
shipping bolts from the back of the unit. To remove the bolts:
1. Loosen all bolts with the wrench before removing them.
2. Take each bolt head and pull it through the wide part of the
hole.
Repeat for each bolt.
3. Fill the holes with the supplied plastic covers.
4. Keep the shipping bolts for future use.
01 Installing the washing machine
loose
8_ Installing the washing machine
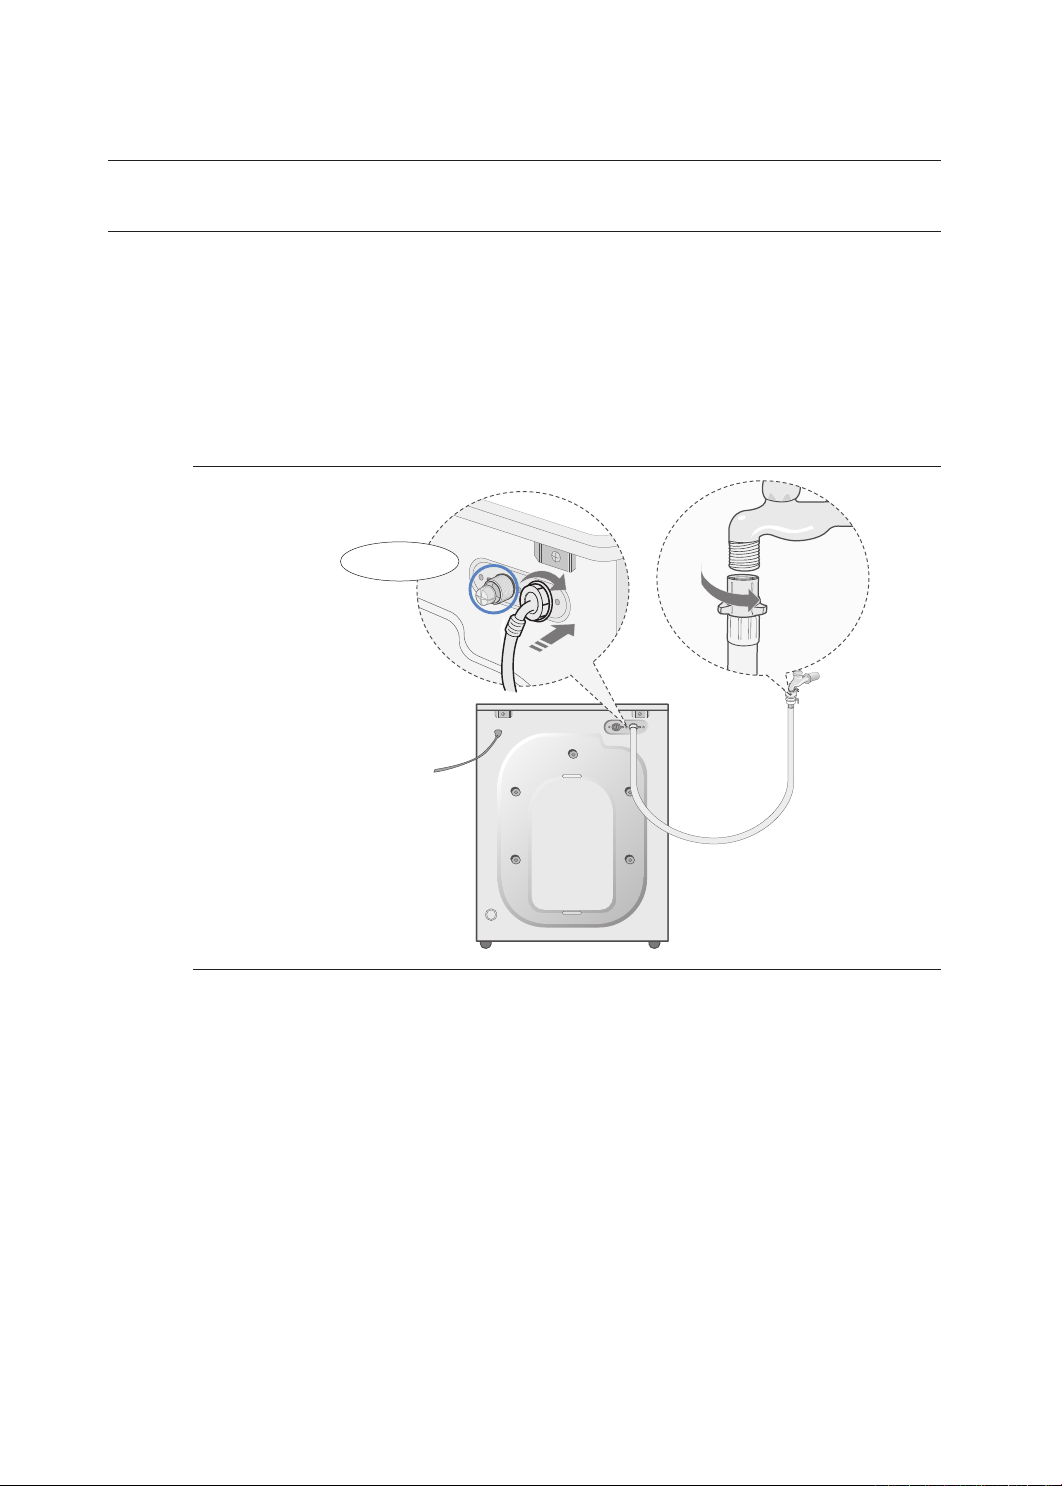
CONNECTING THE WATER SUPPLY HOSE
The water supply hose must be connected to the washing machine at one end and to the water faucet at
the other. Do not stretch the water supply hose. If the hose is too short replace the hose with a longer, high
pressure hose.
To connect the water supply hose:
1. Take the L-shaped arm fitting for the cold water supply hose and connect to the cold water
supply intake on the back of the machine. Tighten by hand.
2. Connect the other end of the cold water supply hose to your sink’s cold water faucet and
tighten it by hand. If necessary, you can reposition the water supply hose at the washing
machine end by loosening the fitting, rotating the hose, and retightening the fitting.
Option:
1. Take the red L-shaped arm fitting for the hot water supply hose and connect to the red hot
water supply intake on the back of the machine. Tighten by hand.
2. Connect the other end of the hot water supply hose to your sink’s hot water faucet and
tighten it by hand.
3. Use a Y-piece if you only want to use cold water.
installing the washing machine
Hot water supply valve
Option
Installing the washing machine _9
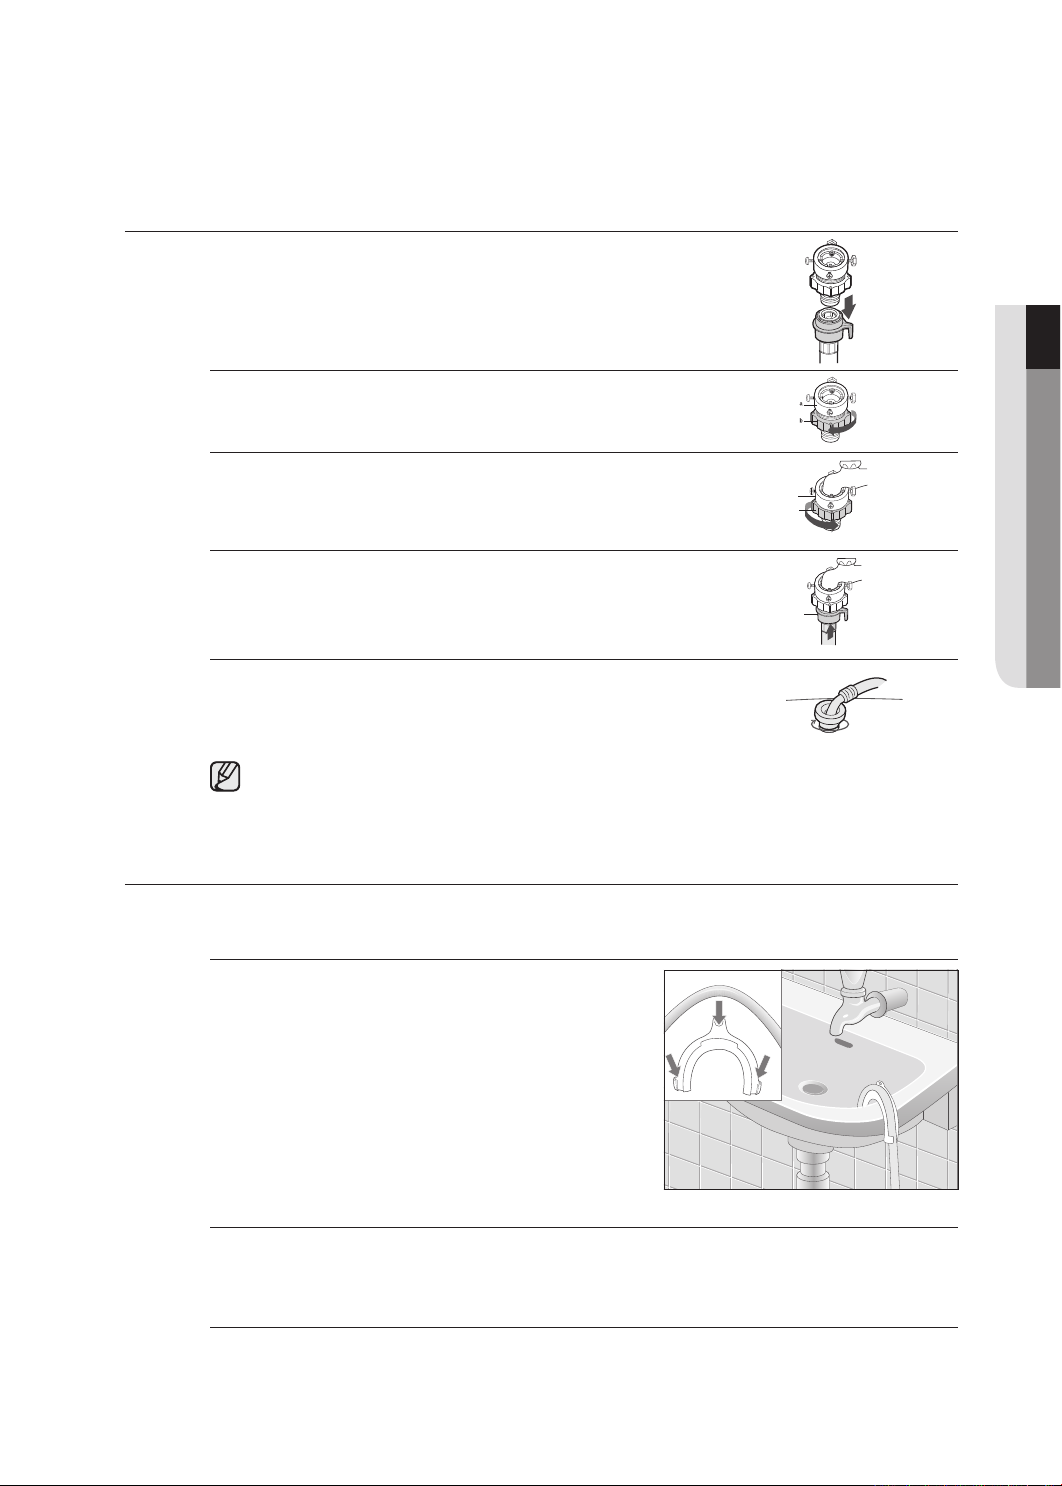
CONNECTING THE WATER SUPPLY HOSE (OPTION)
1. Remove the adaptor from the water supply hose.
2. First, using a ‘+’ type screw driver, loosen the four screws on
the adaptor. Next, take the adaptor and turn part(b) following
the arrow until there is a 5mm gap.
3. Connect adaptor to the water tap by tightening the screws
firmly.
Then, turn part (b) following the arrow and put(a) and (b)
together.
4. Connect the water supply hose to the adaptor. Pull down
part (c) of the water supply hose.
When you release part (c) the hose automatically connects
to the adaptor making a ‘click’ sound.
5. Connect the other end of the water supply hose to the
inlet water valve at the rear of the washer. Screw the hose
clockwise all the way in.
After completing connection, if water leaks from the hose, then repeat the same steps. Use
the most conventional type of faucet for water supply. In case the faucet is square or too
big, remove the spacing ring before inserting the faucet into the adaptor.
POSITIONING THE DRAIN HOSE
The end of the drain hose may be positioned in three ways:
Over the edge of a sink
The drain hose must be placed at a height of between
60 and 90 cm. To keep the drain hose spout bent, use
the supplied plastic hose guide. Secure the guide to the
wall with a hook or to the faucet with a piece of string to
prevent the drain hose from moving.
ln a sink drain pipe branch
The drain pipe branch must be above the sink siphon so that the end of the hose is at least 60
cm above the ground.
ln a drain pipe
Samsung recommends that you use a 65 cm high vertical pipe; it must be no shorter than 60
cm and no longer than 90 cm.
01 Installing the washing machine
a
b
c
10_ Installing the washing machine
washing a load of laundry
WASHING FOR THE FIRST TIME
Before washing clothes for the first time, you must run a complete cycle without clothes.
To do this:
1. Press the (On/Off) button.
2. Pour a little detergent into compartment ( ) in the
detergent drawer.
3. Turn on the water supply to the washing machine.
4. Press the Temperature button repeatedly until 40 ˚C is
displayed.
5. Press the Start/Pause button.
• This will remove any water from the manufacturer’s test run
remaining in the machine.
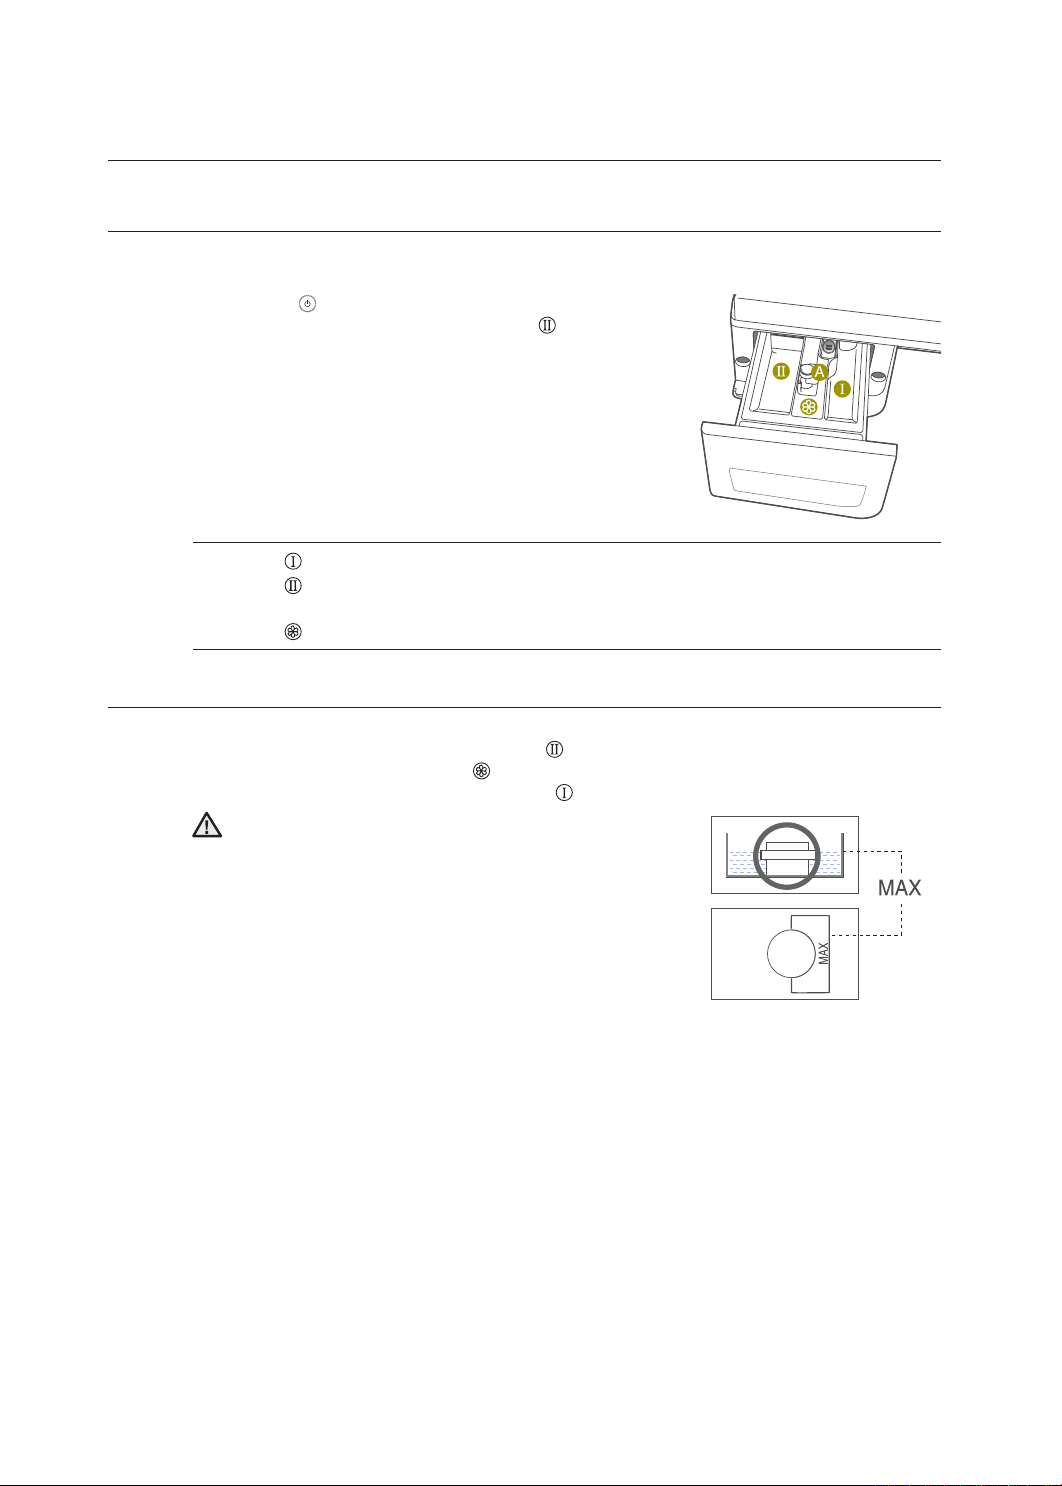
Dispenser : Detergent for prewash or starch.
Dispenser : Detergent for main wash, water softener, pre-soaking agent, bleach and stain
removal product.
Dispenser : Additives,e.g.fabric softener or former (fill no higher than lower edge of insert “ A”)
PUTTING DETERGENT IN THE WASHING MACHINE
1. Pull out the detergent drawer.
2. Add laundry detergent into compartment ( ).
3. Add softener into compartment ( ) (if you desire).
4. Add prewash detergent into compartment ( ) (if you desire).
Concentrated or thick fabric softener and conditioner must
be diluted with a little water before being poured into the
dispenser (prevents the overflow from becoming blocked.
CAUTION
Washing a load of laundry _11
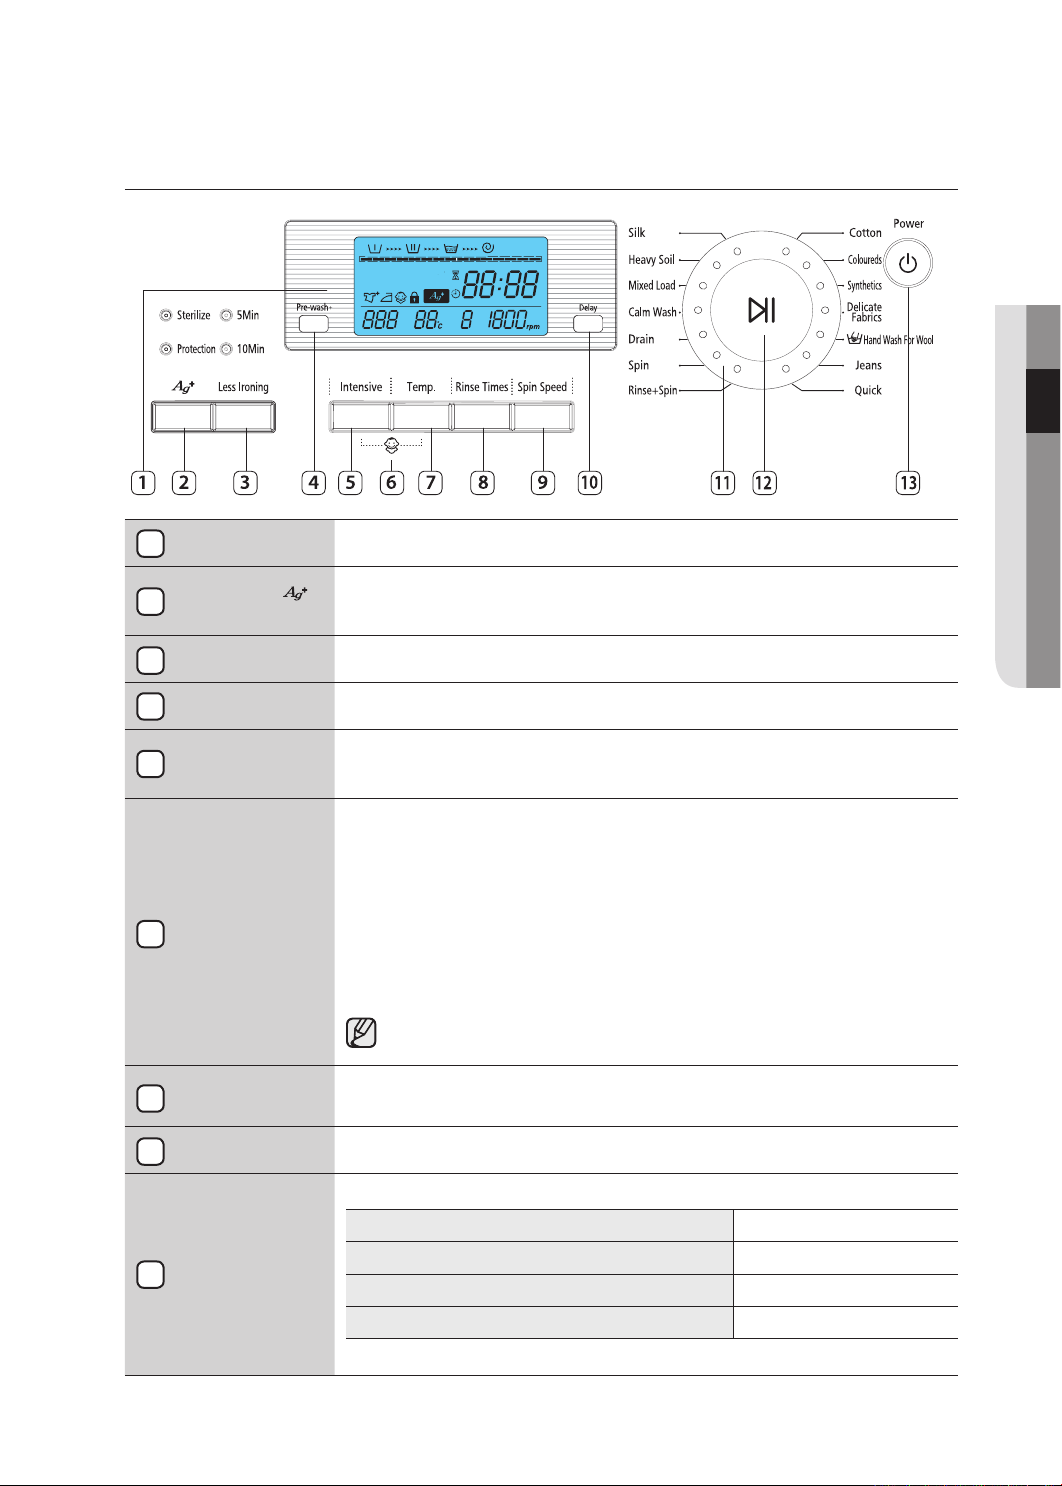
OVERVIEW OF THE CONTROL PANEL
Digital graphic
display
Displays the remaining wash cycle time, all of washing information and error
messages.
Silver Wash(
)
selection button
Silver Nano water is supplied in washing as well as the last rinse, featuring
sterilization and antibacterial coating. (You can select ‘Sterilization’ or
‘Protection’, ‘Sterilization’ + ‘Protection’.)
Less Ironing
selection button
Less Ironing will reduce wrinkles and ironing time. (available course: Cotton,
Coloureds, Quick, Heavy Soil, Mixed Load, Rinse + Spin, Spin)
Pre-Wash
selection button
Press the button to select pre-wash. Pre-wash is available only with Cotton,
Coloureds, Synthetics, Jean, Heavy Soil, Mixed Load, Calm Wash.
Intensive
selection button
When selected, the washing power increases. This function can be selected
for the Cotton, Coloreds, Synthetics, Jeans, Heavy Soil, Mixed Load, and
Calm Wash courses. Pressing this button toggles between On and Off.
Child Lock
selection button
This is a button for preventing children from manipulating the washing machine.
On/Off - To set the program on: Press the Start/Pause button to turn on the
washing machine.
Press and hold down the “Intensive” + “Temp” button for 2-3 seconds. It can only
be activated when the machine is turned on. Once you set the Child Lock on while
in washing, no button is activated until you set if off. Only the POWER button can
activate. The Child Lock lamp lights on. To set the program off: Press and hold
down the
“Intensive” + “Temp” button again for 2-3 seconds, then the lamp lights
off and is set off.
Check out the Child Lock button first when no button is activated while
the washing machine is working.
Temperature
selection button
Press the button repeatedly to cycle through the available water temperature
options. (cold(0˚C), 30˚C, 40˚C, 60˚C and 95˚C)
Rinse Times
selection button
Press the rinse button to add rinse cycles. Maximum number of rinse cycles
is five.
Spin selection
button
Press the button repeatedly to cycle through the available spin speed options.
WF7704S8/WF7604S8 0, 400, 800, 1400 rpm
WF7702S8/WF7602S8/WF7522S8/WF7452S8 0, 400, 800, 1200 rpm
WF7700S8/WF7600S8/WF7520S8/WF7450S8/WF7350S8
0, 400, 800, 1000 rpm
WF7708S8/WF7608S8/WF7528S8/WF7458S8/WF7358S8
0, 400, 600, 800 rpm
0 : no spin Non display : Rinse hold
02 Washing a load of laundry
6
5
4
3
2
1
7
8
9
12_ Washing a load of laundry
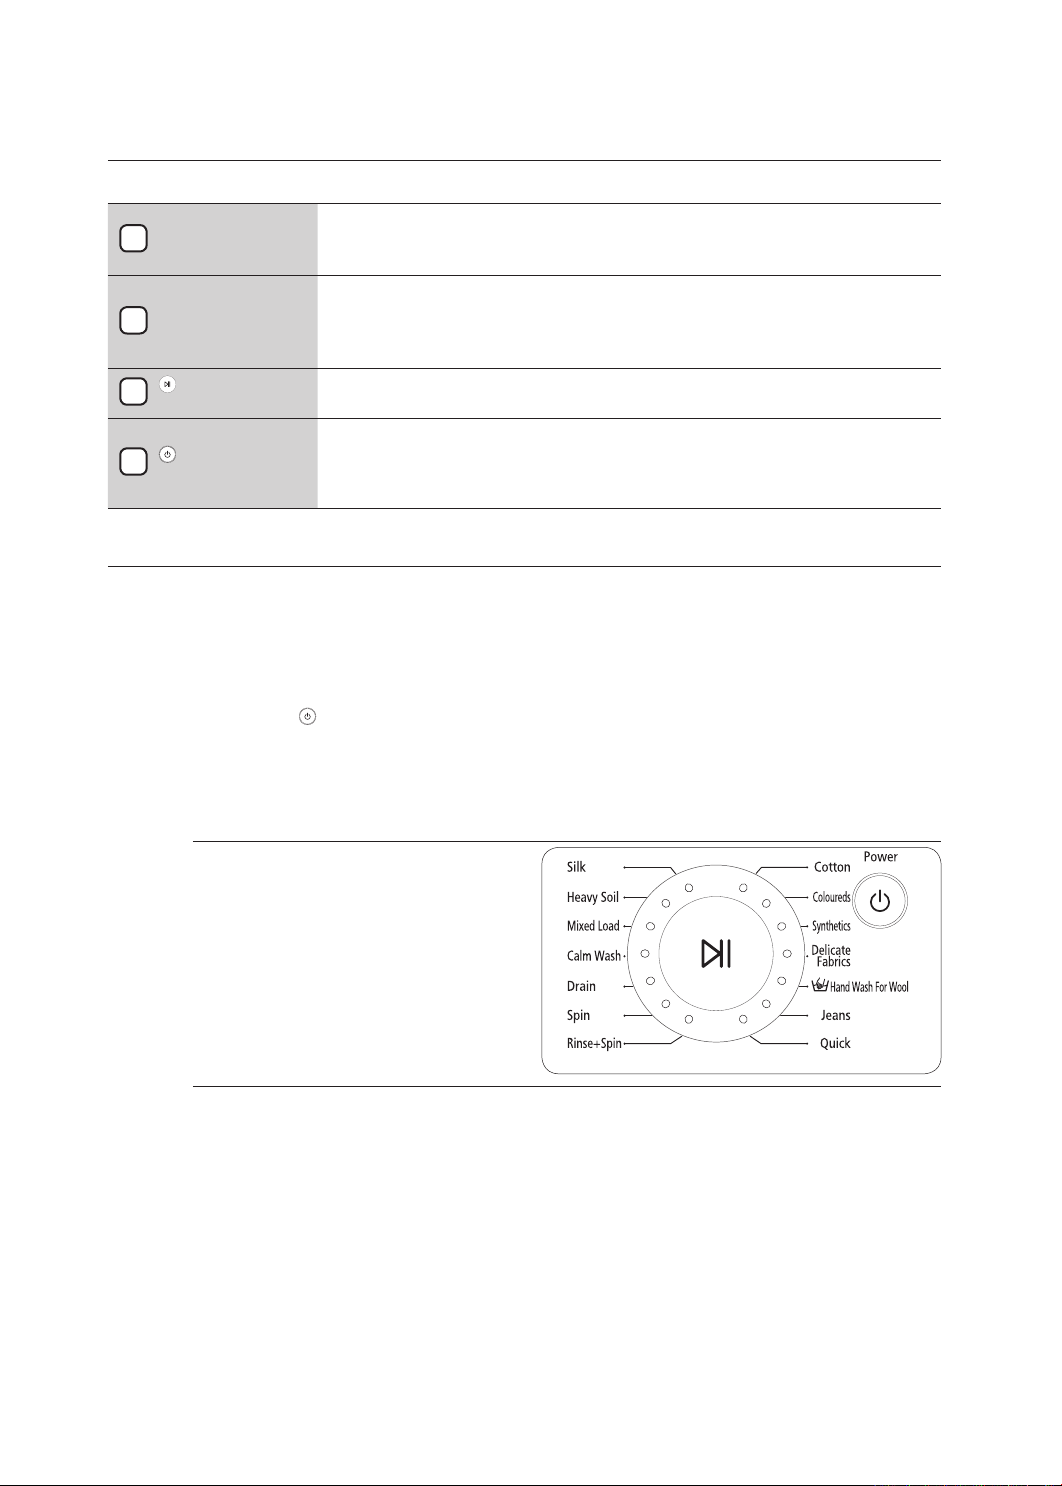
Delay Start
selection button
Press the button repeatedly to cycle through the available delayed start
options (from 3 hour to 24 hours in one hour increments).
Displayed hours means the time of finished washing-cycle.
Fuzzy Control
dial
Turn the dial to select one of the 14 available wash programs:
Cotton, Coloureds, Synthetics, Delicate Fabrics, Hand Wash For Wool,
Jeans, Quick, Rinse+Spin, Spin, Drain, Silk, Heavy Soil, Mixed Load, Calm
Wash.
Start/Pause
selection button
Press to pause and restart programs.
(On/Off)
selection button
Press once to turn the washing machine on, press again to turn the washing
machine off. If the washing machine power is left on for longer than 10
minutes without any buttons being touched, the power automatically turns
off.
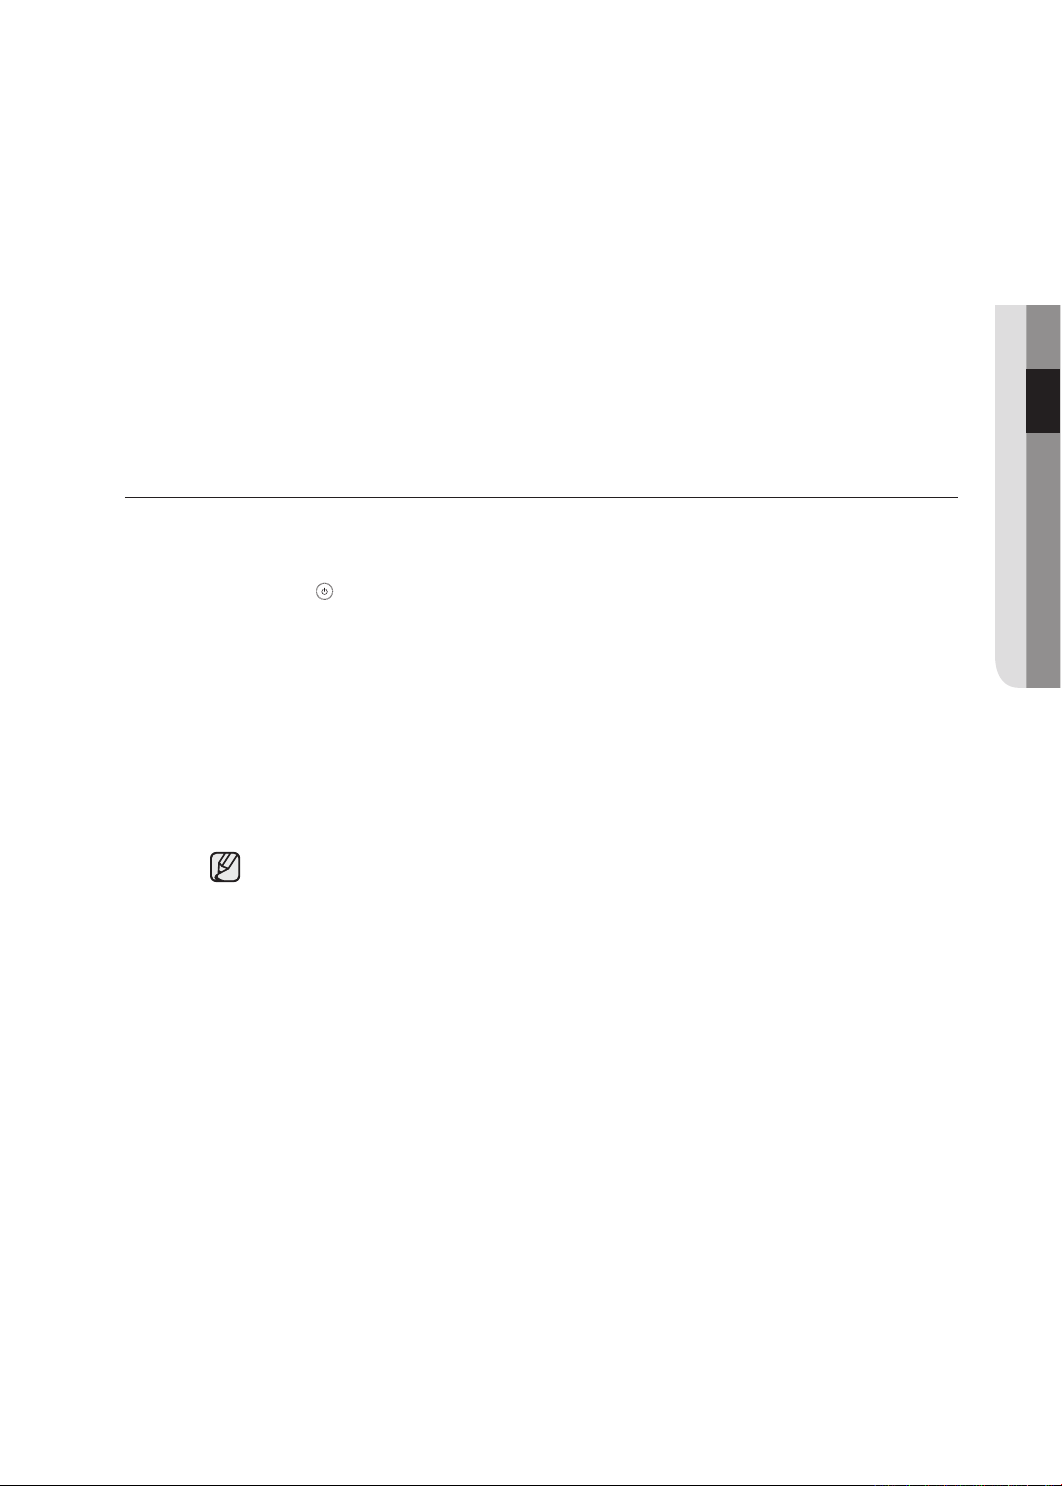
WASHING CLOTHES USING FUZZY LOGIC
Your new washing machine makes washing clothes easy, using Samsung’s “Fuzzy Logic” automatic control
system. When you select a wash programme, the machine will set the correct temperature, washing time,
and washing speed.
To wash clothes using the Fuzzy Logic programs:
1. Turn on your sink’s water faucet.
2. Press the (On/Off) button.
3. Open the door.
4. Load the articles one at a time loosely into the drum, without overfilling.
5. Close the door.
6. Add the detergent, softener, and prewash detergent (if necessary) into the appropriate
compartment.
7. Turn the Fuzzy Control dial to select
the appropriate program for the type of
clothes Cotton, Coloureds, Synthetics,
Delicate Fabrics, Hand Wash For Wool,
Jeans, Quick, Rinse+Spin, Spin, Drain,
Silk, Heavy Soil, Mixed Load, Calm
Wash.
You will see the indicators light up on the
control panel.
8. At this time, you can control the wash temperature, rinsing times, spin speed, delay time by
pressing the appropriate option button.
9. Press the Start/Pause button on the Fuzzy Control dial and the wash cycle will begin. The
process indicator will light up and the remaining time for the cycle will appear in the display.
washing a load of laundry
12
13
10
11
Washing a load of laundry _13
Pause Option (Stop & Adding laundry Function)
When pushing the Start/Pause button, the door is unlocked after two or three minutes.
In case of too hot or too much water in washer, the door can not be opened.
After closed the door, one more push Start/Pause button to make washing process going on
continuously.
When the cycle is finished:
After the total cycle has finished, the power will turn off automatically.
1. Open the door.
2. Remove laundry.
WASHING CLOTHES MANUALLY
You can wash clothes manually without using the Fuzzy Logic feature.
To do so:
1. Turn the water supply on.
2. Press the (On/Off) button on the washing machine.
3. Open the door.
4. Load the articles one at a time loosely into the drum, without overfilling.
5. Close the door.
6. Put the detergent and, if necessary, softener or prewash detergent, in the appropriate
compartments.
7. Press the Temperature button to select the temperature. (cold(0˚C), 30˚C, 40˚C, 60˚C, 95˚C)
8. Press to Rinse button to select the required number of rinse cycles.
Maximum number of rinse cycles is five.
The washing duration will be prolonged accordingly.
9.
Press the Spin button to select the spin speed. [ 0, 400, 600, 800, 1000, 1200 or 1400 revolutions
per minute(rpm)]
The rinse hold program allows you to take clothes that are dripping wet out of the washing
machine.
0 : No spin , Non display : Rinse hold
10. Press the button repeatedly to cycle through the available delayed start options (from 3 hour
to 24 hours in one hour increments). Displayed hours means the time of finished washingcycle.
11. Press the Start/Pause button and the machine will begin the cycle.
02 Washing a load of laundry
14_ Washing a load of laundry
washing a load of laundry
USING DELAY START
You can set the washing machine to finish your wash automatically at a later time, choosing from 3 to 24
hour delay (in 1 hour increments). Displayed hours means the time of finished washing-cycle.
To do this:
1. Manually or automatically set your washing machine for the type of clothes you are washing.
2. Press the Delay Start button repeatedly until the delay time is set.
3. Press the Start/Pause button. The Delay Start indicator will light, and the clock will begin
counting down until it reaches your finish time.
4. To cancel “Delay Start”, press the (On/Off) button, then turn the washing machine on
again.
WASHING TIPS AND HINTS
Sorting your laundry: Sort your laundry according to the following characteristics:
• Type of fabric care label symbol: Sort laundry into cottons, mixed fibres, synthetics, silks,
wools and rayon.
• Colour: Divide whites and colours. Wash new, coloured items separately.
• Size: Placing items of different sizes in the same load will improve the washing action.
• Sensitivity: Wash delicate items separately, using the Delicate wash programme for pure
new wool, curtains and silk articles. Check the labels on the items you are washing or refer to
the fabric care chart in the appendix.
Emptying pockets: Coins, safety pins and similar items can damage linen, the washing
machine drum, and the water tank.
Securing fasteners: Close zippers and fasten buttons or hooks; loose belts or ribbons should
be tied together.
Prewashing cotton: Your new washing machine, combined with modern detergents, will give
perfect washing results, thus saving energy, time, water and detergent. However, if your cotton is
particularly dirty, use a prewash with a protein-based detergent.
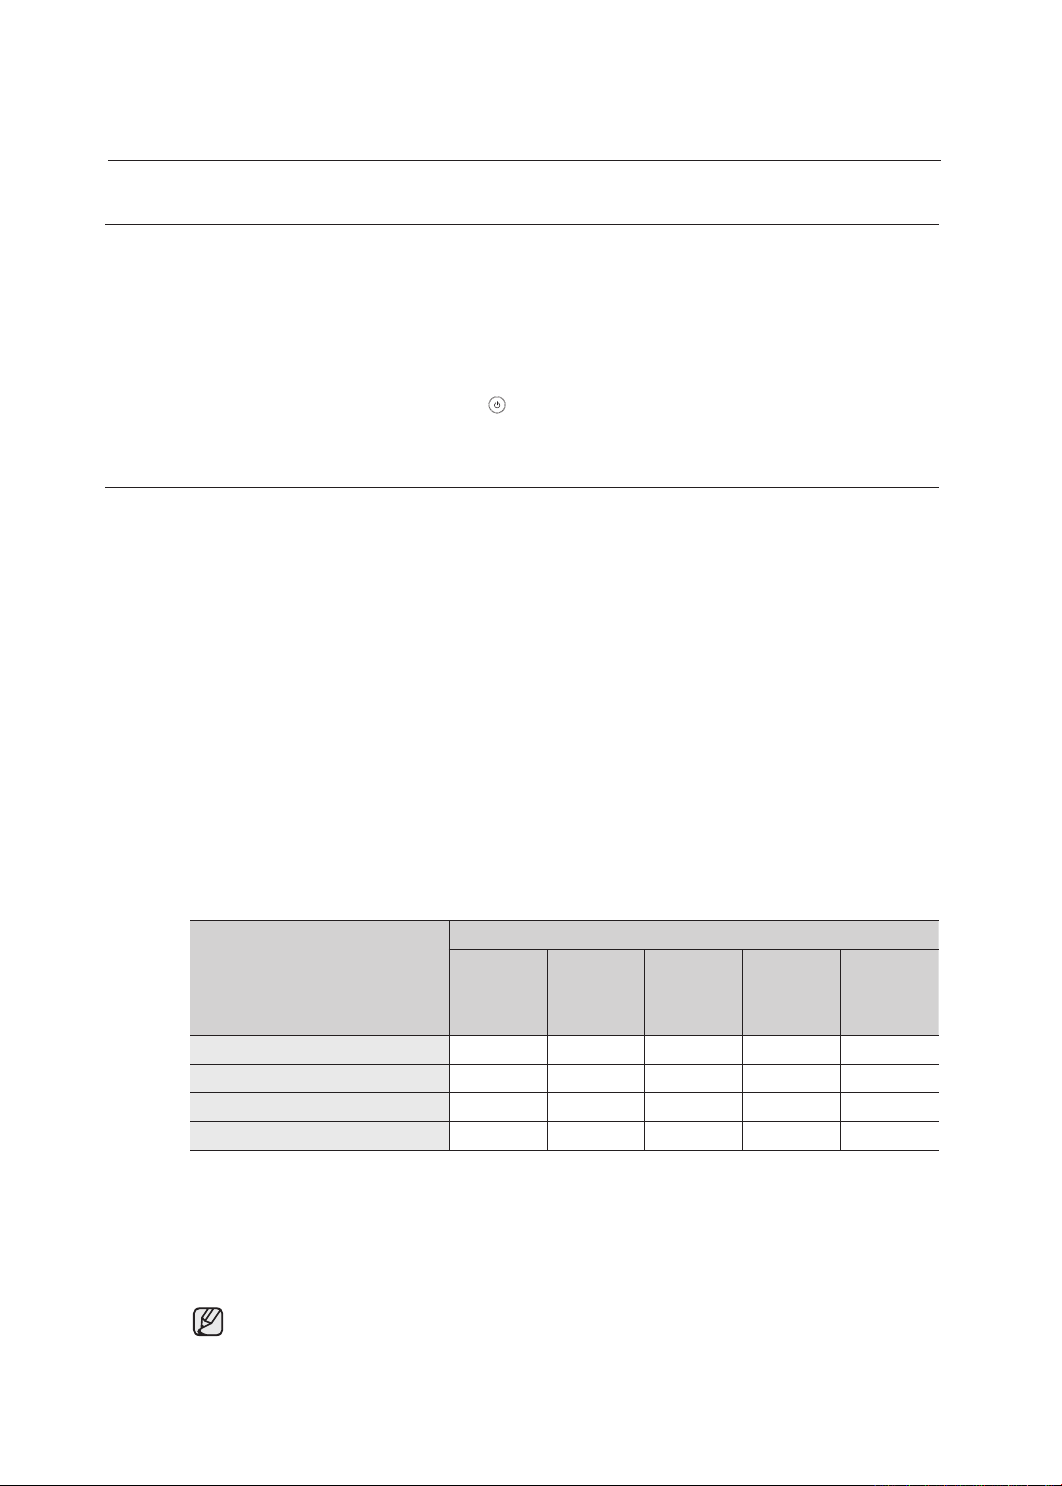
Determining load capacity: Do not overload the washing machine or your laundry may not
wash properly. Use the chart below to determine the load capacity for the type of laundry you are
washing.
Fabric Type
Load Capacity
WF7704S8
WF7702S8
WF7700S8
WF7708S8
WF7604S8
WF7602S8
WF7600S8
WF7608S8
WF7522S8
WF7520S8
WF7528S8
WF7452S8
WF7450S8
WF7458S8
WF7350S8
WF7358S8
Cotton/Coloureds
7.0 kg 6.0 kg 5.2 kg 4.5 kg 3.5 kg
Quick
3.0 kg 3.0 kg 2.5 kg 2.5 kg 2.0 kg
Delicate Fabrics
2.5 kg 2.5 kg 2.0 kg 2.0 kg 1.5 kg
Silk
2.0 kg 2.0 kg 1.5 kg 1.5 kg 1.5 kg
Detergent tips: The type of detergent you should use is based on the type of fabric (cotton,
delicate items, silk), colour, wash temperature, degree and type of soiling.
Always use “low suds” laundry soap, which is designed for automatic washing machines.
Follow the detergent manufacturer’s recommendations based upon the weight of the laundry, the
degree of soiling, and the hardness of the water in your area. If you do not know how hard your
water is, ask your water authority.
Keep detergents and additives in a safe, dry place out of the reach of children.
Maintaining the washing machine _15
maintaining the washing
machine
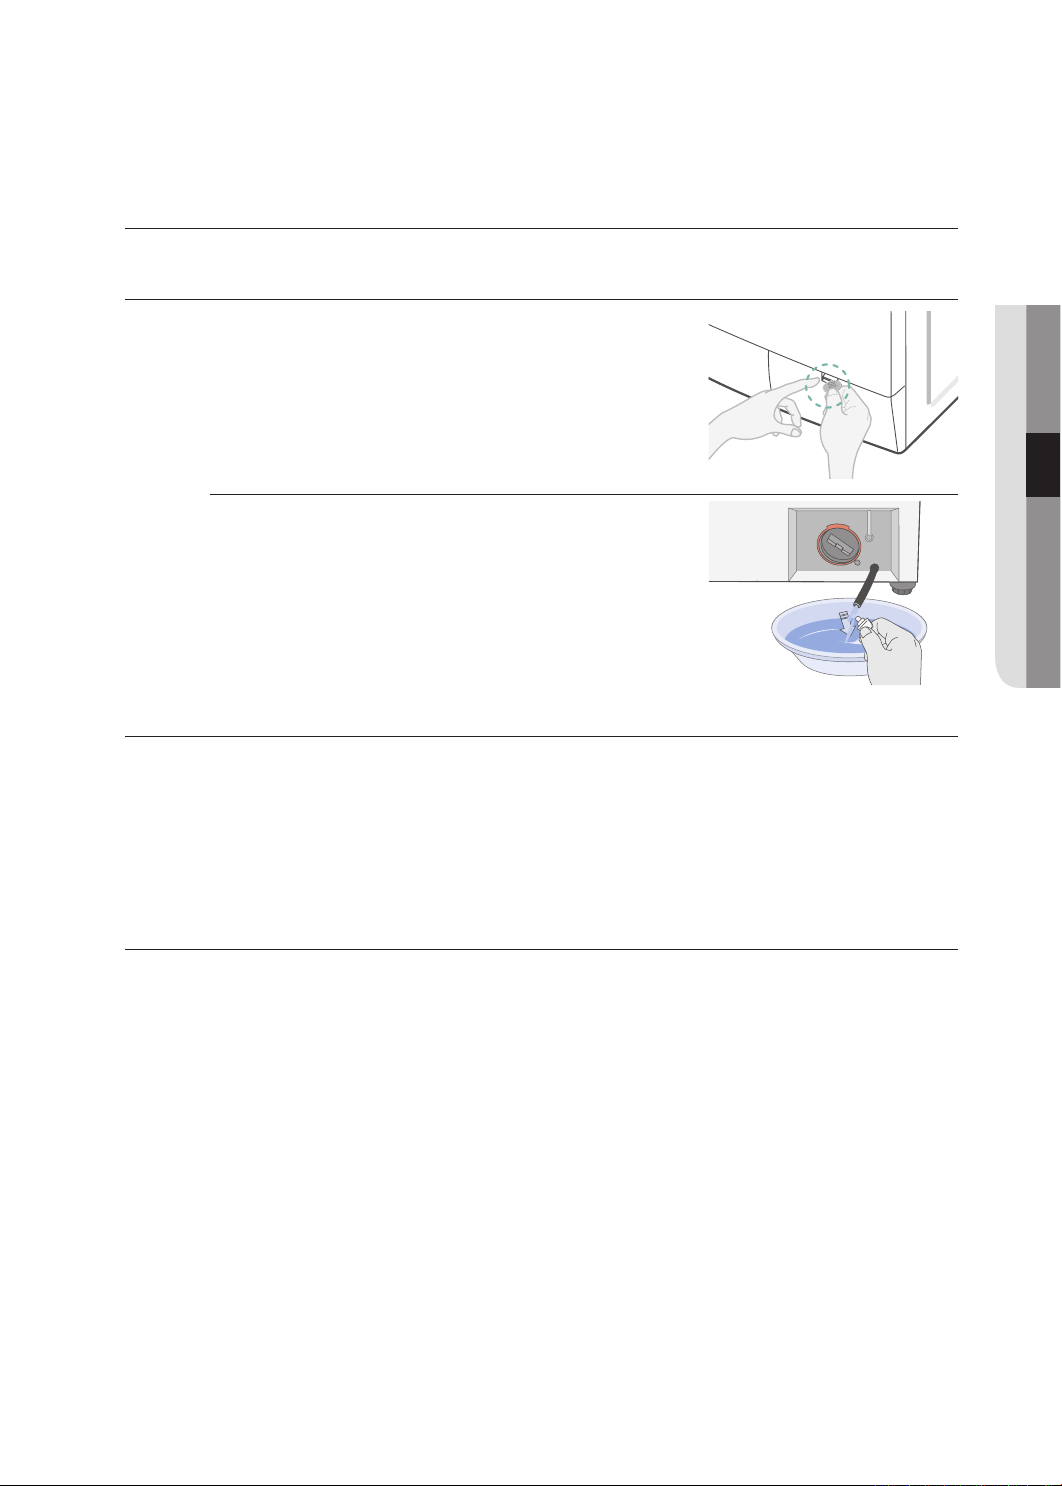
DRAINING THE WASHING MACHINE IN AN EMERGENCY
1. Unplug the washing machine from the power supply.
2. Open the filter-cover by using a coin or a key.
3. Unscrew the emergency drain cap by turning left. Grip the
cap on the end of the emergency drain tube and slowly pull
it out about 15 cm.
4. Allow all the water to flow into a bowl.
5. Reinsert the drain tube and screw the cap back on.
6. Replace the filter-cover.
REPAIRING A FROZEN WASHING MACHINE
If the temperature drops below freezing and your washing machine is frozen:
1. Unplug the washing machine.
2. Pour warm water on the source faucet to loosen the water supply hose.
3. Remove the water supply hose and soak it in warm water.
4. Pour warm water into the washing machine drum and let it sit for 10 minutes.
5. Reconnect the water supply hose to the water faucet and check if the water supply and drain
operations are normal.
CLEANING THE EXTERIOR
1. Wipe the washing machine surfaces, including the control panel, with a soft cloth and nonabrasive
household detergents.
2. Use a soft cloth to dry the surfaces.
3. Do not pour water on the washing machine.
03 Maintaining the washing machine
16_ Maintaining the washing machine
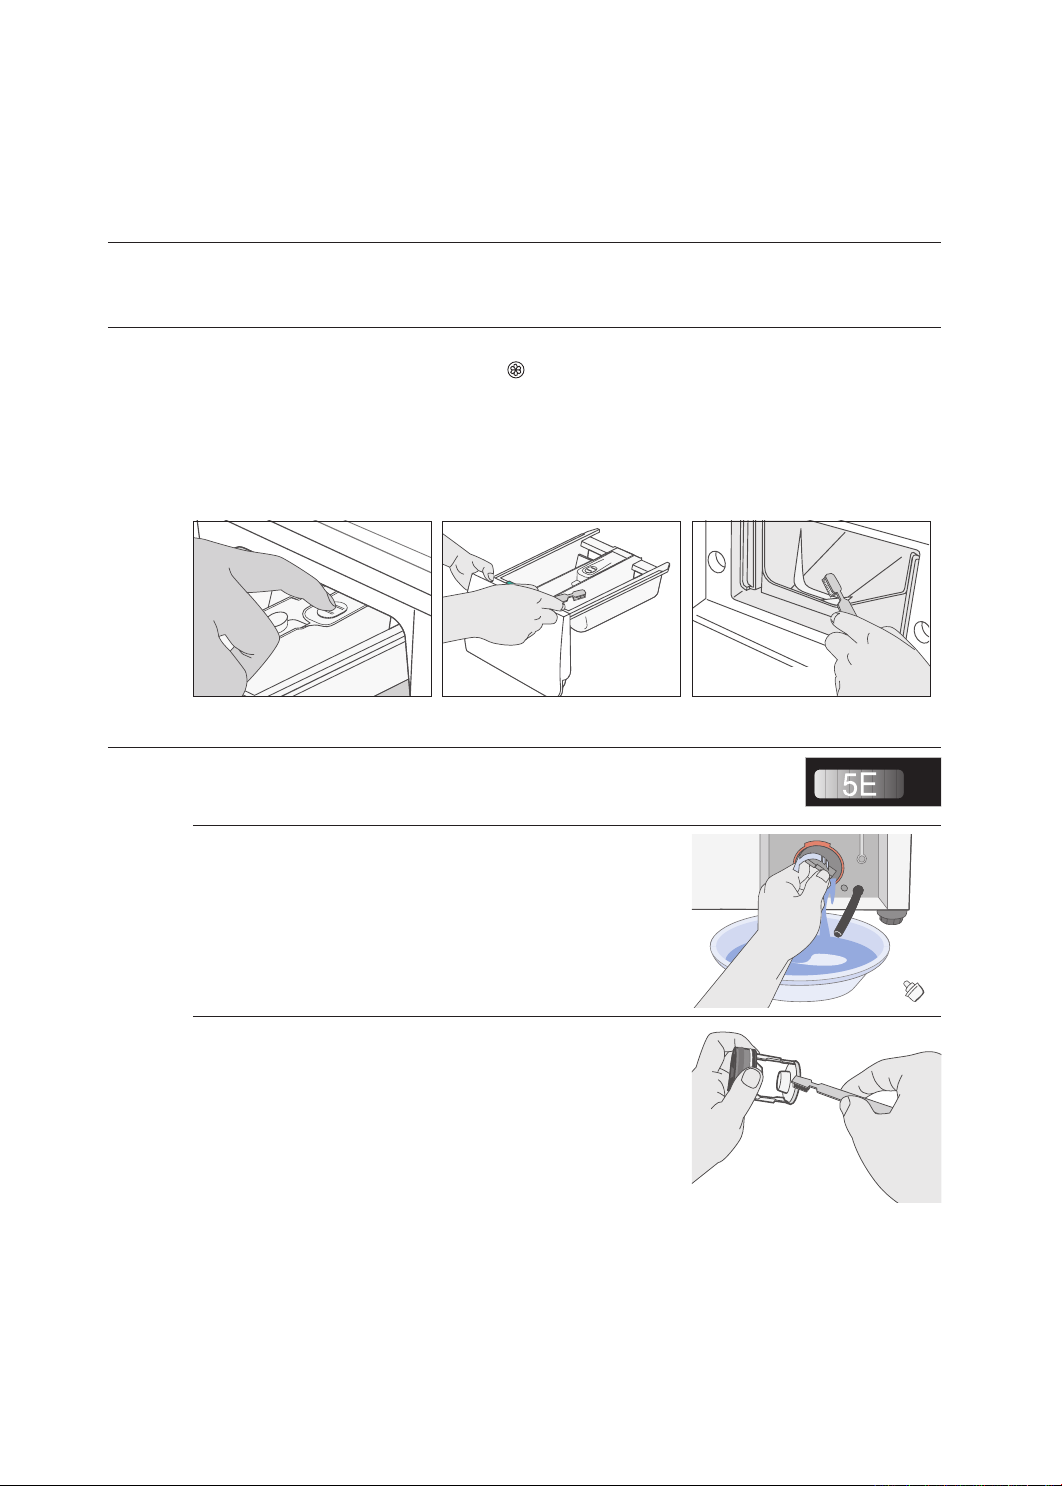
CLEANING THE DETERGENT DRAWER AND RECESS
1. Press the release lever on the inside of the detergent drawer and pull it out.
2. Remove the cap from compartment ( ).
3. Wash all of the parts under running water.
4. Clean the drawer recess with an old toothbrush.
5. Reinsert the cap (Pushing it firmly into place) and replace the liquid detergent divider into the
drawer.
6. Push the drawer back into place.
7. Run a rinse programme without any laundry in the drum.
CLEANING THE DEBRIS FILTER
Clean the debris filter 5 or 6 times a year, or when you see the following
error message on the display:
1. Open the filter-cover, See “Draining the washing machine in
an emergency” on page 15.
2. Unscrew emergency drain cap by turning left and drain off
all the water.
See “Draining the washing machine in an emergency” on
page 15.
3. Unscrew the filter cap and take it out.
4. Wash any dirt or other material from the filter. Make sure
the drain pump propeller behind the filter is not blocked.
Replace the filter cap.
5. Replace the filter-cover.
maintaining the washing
machine

Maintaining the washing machine _17
CLEANING THE WATER HOSE MESH FILTER
You should clean the water hose mesh filter at least one time per year, or
when you see the following error message on the display:
To do this:
1. Turn off the water source to the washing machine.
2. Unscrew the hose from the back of the washing machine.
3. With a pair of pliers, gently pull out the mesh filter from the
end of the hose and rinse it under water until clean. Also
clean the inside and outside of the threaded connector.
4. Push the filter back into place.
5. Screw the hose back onto the washing machine.
6. Turn on the faucet and make sure the connections are
watertight.
03 Maintaining the washing machine
Option
Option
18_ Troubleshooting
troubleshooting
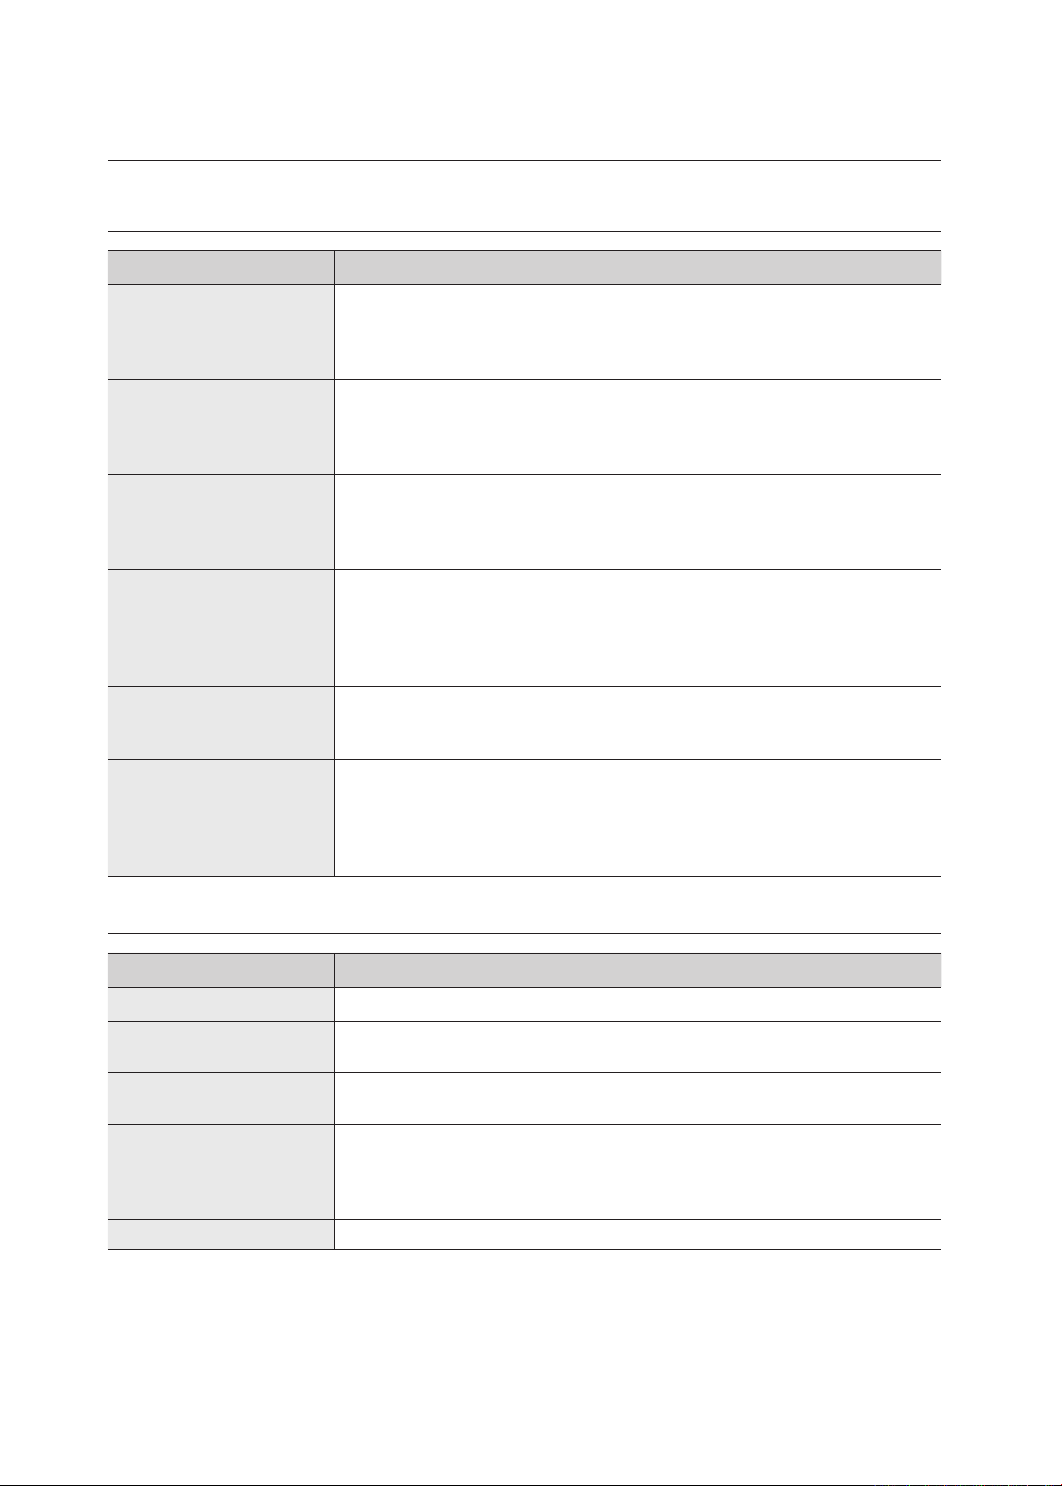
PROBLEMS AND SOLUTIONS
PROBLEM SOLUTION
The washing machine
will not start
• Make sure the door is firmly closed.
• Make sure the washing machine is plugged in.
• Make sure the water source faucet is turned on.
• Make sure to press the Start/Pause button.
No water or insufficient
water supply
• Make sure the water source faucet is turned on.
• Make sure the water source hose is not frozen.
• Make sure the water intake hose is not bent.
• Make sure the filter on the water intake hose is not clogged.
Detergent remains in the
detergent drawer after
the wash program is
complete
• Make sure the washing machine is running with sufficient water
pressure.
• Put the detergents in the inner parts of the detergent drawer(away from
the outside edges).
Washing machine
vibrates or is too noisy
• Make sure the washing machine is set on a level surface. If the surface is
not level, adjust the washing machine feet to level the appliance.
• Make sure that the shipping bolts are removed.
• Make sure the washing machine is not touching any other object.
• Make sure the laundry load is balanced.
The washing machine
does not drain and/or
spin
• Make sure the drain hose is not squashed or bent.
• Make sure the water hose mesh filter is not clogged.
The Door does not open
• Disconnect the power plug from the power supply.
• Remove the water from the washing machine.
• Open the filter cover using a coin.
• Locate the orange plastic tab and pull forward to
open the door.
UNDERSTANDING ERROR MESSAGES
ERROR CODE SOLUTION
door
• Close the door.
4E
• Make sure the source water faucet is turned on.
• Check the water pressure.
5E
• Clean the debris filter.
• Make sure the drainage hose is installed correctly.
UE
• Laundry load is unbalanced; loosen any tangled laundry.
If only one item of clothing needs washing, such as a bathrobe or jeans,
the final spin result might be unsatisfactory and an “UE” error message
will be shown in the display window.
cE/3E
• Call after-sales service.
Before contacting After-Sales service:
1. Try to remedy the problem (See “Troubleshooting” on this page).
2. Restart the programme to see if the fault is repeated.
3. If the malfunction persists, call after-sales service and describe the problem.
Programme chart _19
programme chart
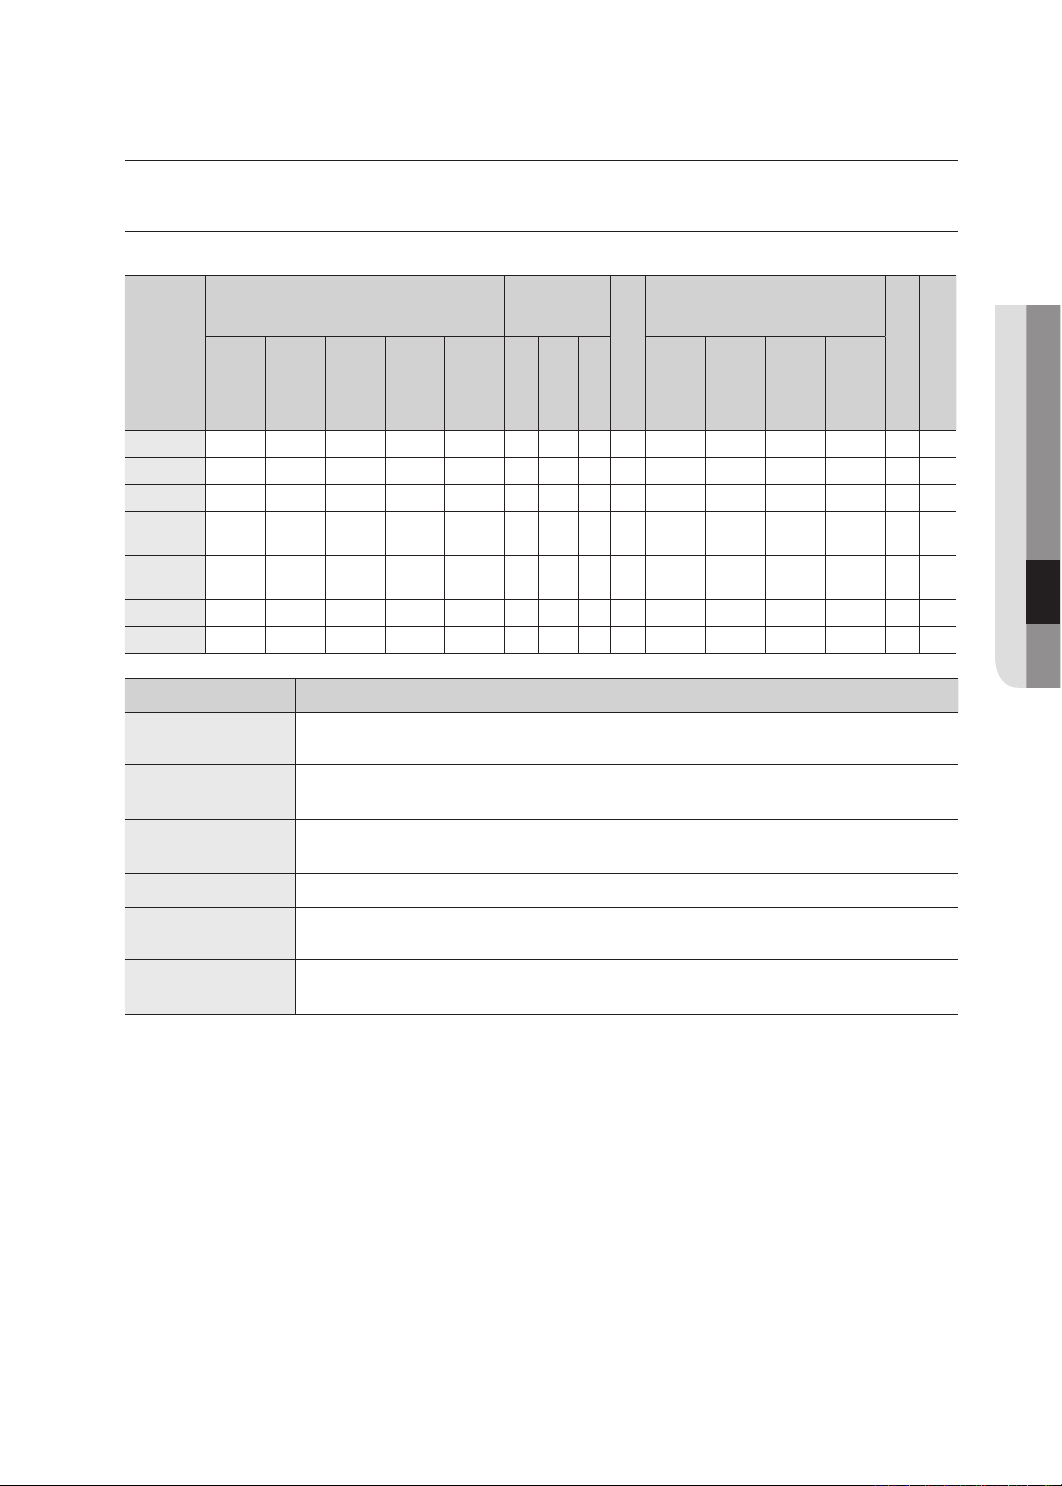
PROGRAMME CHART
( user option)
Pro-
gramme
Max load (kg)
Detergent and
Additives
Temp
(˚C)
Spin Speed(Max) rpm
Delay
start
Cycle
Time
(min)
WF7704S8
WF7702S8
WF7700S8
WF7708S8
WF7604S8
WF7602S8
WF7600S8
WF7608S8
WF7522S8
WF7520S8
WF7528S8
WF7452S8
WF7450S8
WF7458S8
WF7350S8
WF7358S8
Pre
wash
Wash
Softener
WF7704S8
WF7604S8
WF7702S8
WF7602S8
WF7522S8
WF7452S8
WF7700S8
WF7600S8
WF7520S8
WF7450S8
WF7350S8
WF7708S8
WF7608S8
WF7528S8
WF7458S8
WF7358S8
Cotton
7.0 6.0
5.2
4.5 3.5
yes
95 1400 1200 1000 800
90
Coloureds
7.0 6.0 5.2 4.5 3.5
yes
60 1400 1200 1000 800
98
Synthetics
3.0 3.0 2.5 2.5 2.0
yes
60 1400 1200 1000 600
71
Delicate
Fabrics
2.5 2.5 2.0 2.0 1.5 - yes
40 800 800 800 600
53
Handwash
for Wool
2.0 2.0 1.5 1.5 1.0 - yes
40 800 800 800 400
39
Jeans
2.0 2.0
1.5
1.5 1.0
yes
40 800 800 800 400
60
Quick
3.0 3.0 2.0 2.0 1.5 - yes
60 1400 1200 1000 800
28
Program Type of wash
Cotton
Averagely or lightly soiled cottons, bed linen, table linen, underwear, towels,
shirts,etc.
Coloureds
Averagely or lightly soiled cottons, bed linen, table linen, underwear, towels, shirts,
etc.
Synthetics
Averagely or lightly soiled blouses, shirts, etc. Made of polyester (Diolen, Trevira),
polyamide (perlon, Nylon) or other similar blends.
Delicate Fabrics
Delicate curtains, dresses, skirts, shirts and blouses.
Handwash for
Wool
Only machine washable woolens with pure new wool label.
Quick
Lightly soiled cottons or linen blouses, shirts, dark coloured terry cloth, coloured
linen articles, jeans, etc.
1. The programme duration data has been measured under the conditions specified in Standard IEC 456.
2. Consumption in individual homes may differ from the values given in the table due to variations in the
pressure and temperature of the water supply, the load and the type of laundry.
05 Programme chart
20_ Programme chart
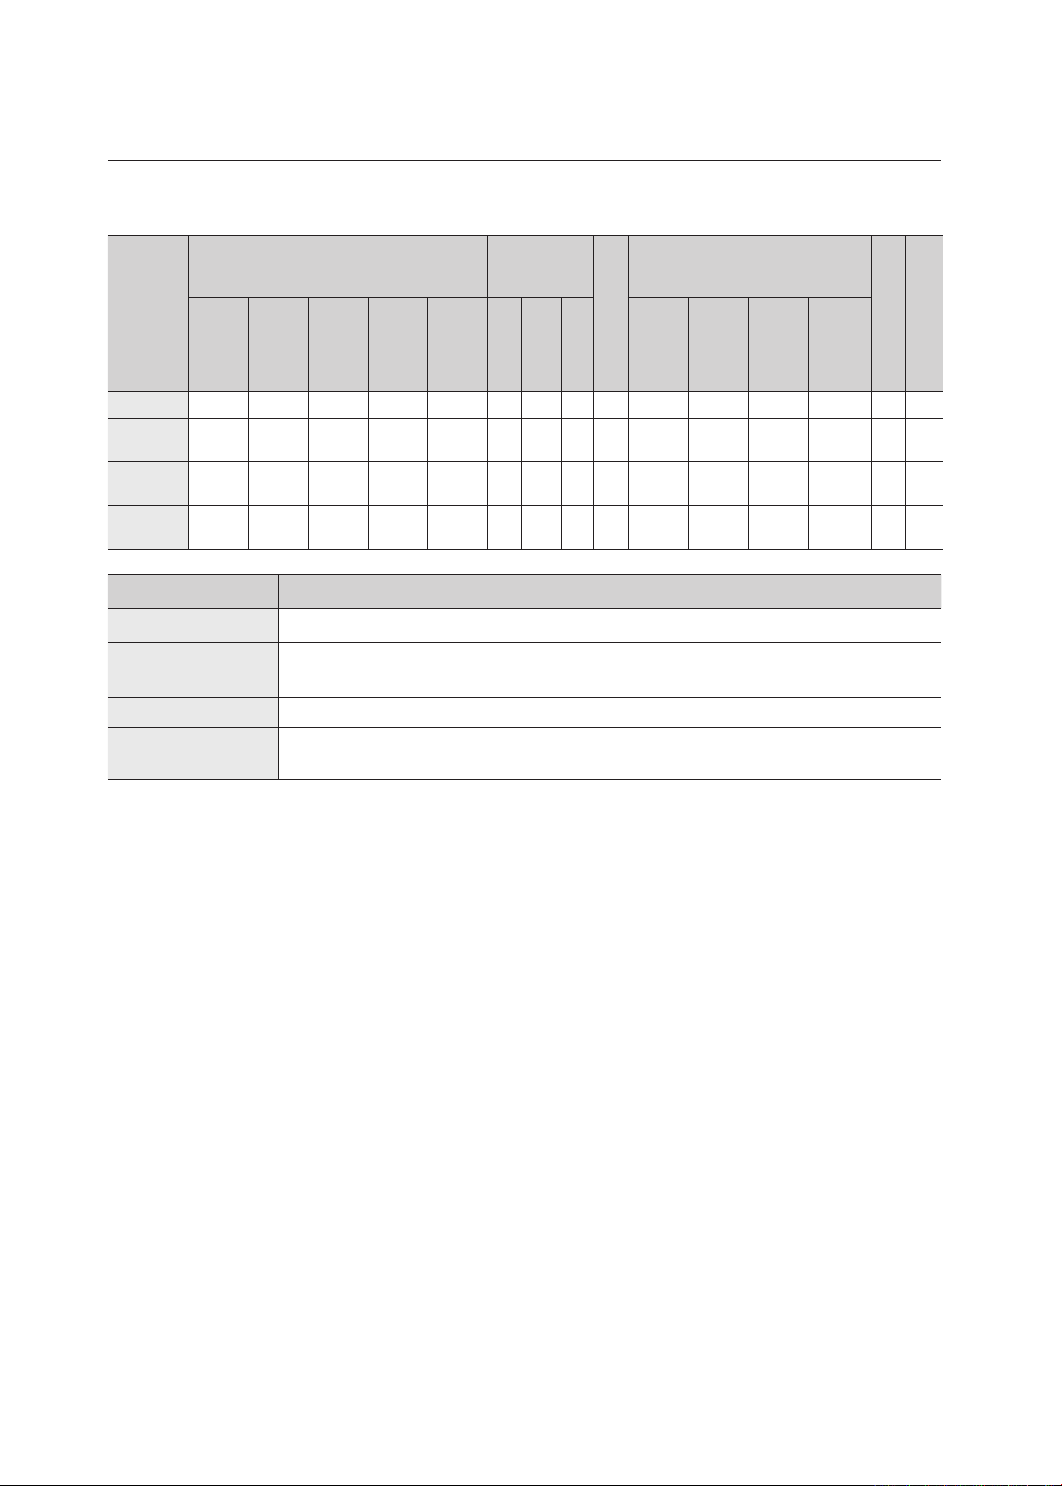
( user option)
Pro-
gramme
Max load (kg)
Detergent and
Additives
Temp
(˚C)
Spin Speed(Max) rpm
Delay
start
Cycle
Time
(min)
WF7704S8
WF7702S8
WF7700S8
WF7708S8
WF7604S8
WF7602S8
WF7600S8
WF7608S8
WF7522S8
WF7520S8
WF7528S8
WF7452S8
WF7450S8
WF7458S8
WF7350S8
WF7358S8
Pre
wash
Wash
Softener
WF7704S8
WF7604S8
WF7702S8
WF7602S8
WF7522S8
WF7452S8
WF7700S8
WF7600S8
WF7520S8
WF7450S8
WF7350S8
WF7708S8
WF7608S8
WF7528S8
WF7458S8
WF7358S8
Silk
7.0 6.0
5.2
4.5 3.5 - yes
30 400 400 400 400
35
Heavy
Soil
7.0 6.0 5.2 4.5 3.5
yes
60 1400 1200 1000 800
109
Mixed
Load
2.5 2.5 2.0 2.0 1.5
yes
60 800 800 800 800
76
Calm
Wash
3.0 3.0 2.0 2.0 1.5
yes
40
96
Program Type of wash
Silk
Silk shirts, blouses, dresses etc.
Heavy Soil
Stained or heavily soiled cottons, bed linen, table linen, underwear, towels, shirts,
jeans, etc.
Mixed Load
A mix of lightly soiled cottons and synthetic fabrics.
Calm Wash
Extremely low noise level during the entire cycle and finish rinse hold. Cottons, bed
linen, table linen, underwear, towels, shirts.
programme chart

Appendix _21
appendix
FABRIC CARE CHART
Resistant material Can be ironed at 100˚C max
Delicate fabric Do not iron
Item may be washed at 95˚C
Can be dry cleaned using any
solvent
Item may be washed at 60˚C
Dry clean with perchloride, lighter
fuel, pure alcohol or R113 only
Item may be washed at 40°C
Dry clean with aviation fuel, pure
alcohol or R113 only
Item may be washed at 30°C Do not dry clean
Item may be hand washed Dry flat
Dry clean only Can be hung to dry
Can be bleached in cold water Dry on clothes hanger
Do not bleach Tumble dry, normal heat
Can be ironed at 200˚C max Tumble dry, reduced heat
Can be ironed at 150˚C max Do not tumble dry
ELECTRICAL WARNINGS
To reduce the risk of fire, electrical shock, and other injuries, keep these safety precautions in mind:
• Operate the appliance only from the type of power source indicated on the marking label. If you are not
sure of the type of power supplied to your home, consult your appliance dealer or local power company.
• Use only a grounded or polarized outlet. This plug will fit into the power outlet only one way. If you are
unable to insert the plug fully into the outlet, try reversing the plug. If the plug still doesn’t fit, contact
your electrician to replace your outlet.
• Protect the power cord. Power supply cords should be routed so that they are unlikely to be walked on
or pinched by items placed on or against them. Pay particular attention to cords at plugs, convenience
receptacles, and the point where they exit from the unit.
• Do not overload the wall outlet or extension cords. Overloading can result in fire or electric shock.
PROTECTING THE ENVIRONMENT
• This appliance is manufactured from recyclable materials. If you decide to dispose of this appliance,
please observe local waste disposal regulations. Cut off the power cord so that the appliance cannot be
connected to a power source. Remove the door so that animals and small children cannot get trapped
inside the appliance.
• Do not exceed the detergent quantities recommended in the detergent manu-facturers’ instructions.
• Use stain removal products and bleaches before the wash cycle only when strictly necessary.
• Save water and electricity by only washing full loads (the exact amount depends upon the program
used).
06 Appendix
22_ Appendix
DECLARATION OF CONFORMITY
This appliance complies with European safety standards, EC directive 93/68 and EN Standard 60335.
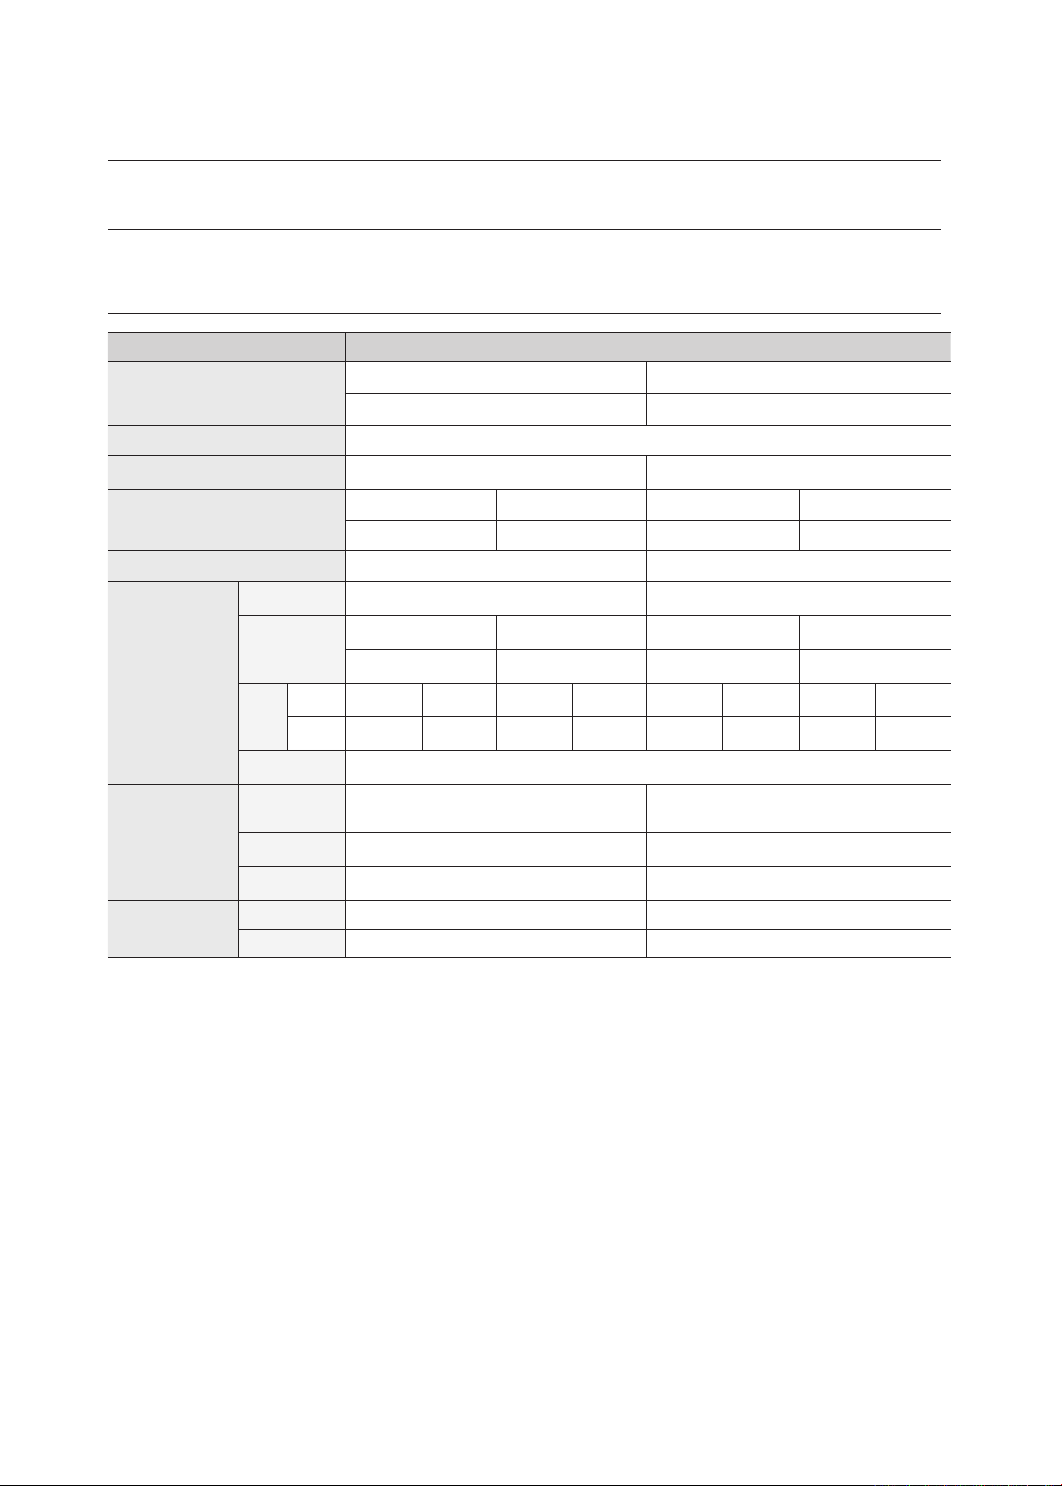
SPECIFICATION
TYPE FRONT LOADING WASHER
DIMENSION
WF7704S8/WF7702S8/WF7700S8/WF7708S8 WF7604S8/WF7602S8/WF7600S8/WF7608S8
W598mm X D600mm X H844mm W598mm X D550mm X H844mm
WATER PRESSURE
50 kPa ~ 800 kPa
WATER VOLUME
60 ℓ 54 ℓ
NET WEIGHT
WF7704S8/WF7702S8 WF7700S8/WF7708S8 WF7604S8/WF7602S8/ WF7600S8/WF7608S8
74kg 73kg 72kg 70kg
WASH AND SPIN CAPACITY
7.0 kg (DRY LAUNDRY) 6.0 kg (DRY LAUNDRY)
POWER
CONSUMPTION
MODEL
WF7704S8/WF7702S8/ WF7700S8/WF7708S8 WF7604S8/WF7602S8/WF7600S8/WF7608S8
WASHING AND
HEATING
220 V 2000 W 220 V 2000 W
240 V 2400 W 240 V 2400 W
SPIN
MODEL WF7704S8 WF7702S8 WF7700S8 WF7708S8 WF7604S8 WF7602S8 WF7600S8 WF7608S8
230 V 700 W 360 W 320 W 270 W 580 W 530 W 500 W 430 W
PUMPING 34 W
PACKAGE Wt
MODEL
WF7704S8/WF7702S8/WF7700S8/WF7708S8
WF7604S8/WF7602S8/WF7600S8/
WF7608S8
PAPER
2.5 kg 2.5 kg
PLASTIC 1.0 kg 1.0 kg
SPIN
REVOLUTION
MODEL WF7704S8/WF7604S8
WF7702S8/WF7602S8/WF7522S8/WF7452S8
rpm 1400 1200
appendix

Appendix _23
TYPE FRONT LOADING WASHER
DIMENSION
WF7522S8/WF7520S8/WF7528S8 WF7452S8/WF7450S8/WF7458S8 WF7350S8/WF7358S8
W598mm X D450mm X
H844mm
W598mm X D404mm X
H844mm
W598mm X D340mm
X H844mm
WATER PRESSURE
50 kPa ~ 800 kPa
WATER VOLUME
49 ℓ 48 ℓ 43 ℓ
NET WEIGHT
WF7522S8/7520S8 WF7528S8 WF7452S8/7450S8 WF7350S8/7358S8
66kg 65kg 61kg 51kg
WASH AND SPIN CAPACITY
5.2 kg (DRY LAUNDRY) 4.5 kg (DRY LAUNDRY)
3.5 kg (DRY
LAUNDRY)
POWER
CONSUMPTION
MODEL
WF7522S8/WF7520S8/WF7528S8 WF7452S8/WF7450S8/WF7458S8 WF7350S8/WF7358S8
WASHING AND
HEATING
220 V 1900 W 220 V 1800 W 220 V 1800 W
240 V 2200 W 240 V 2100 W 240 V 2100 W
SPIN
MODEL WF7522S8 WF7520S8 WF7528S8 WF7452S8 WF7450S8 WF7458S8 WF7350S8 WF7358S8
230 V 550 W 500 W 430 W 270 W 230 W 180 W 230 W 180 W
PUMPING 34 W
PACKAGE Wt
MODEL
WF7522S8/WF7520S8/WF7528S8
WF7452S8/WF7450S8/
WF7458S8/
WF7350S8/
WF7358S8
PAPER 2.1 kg 1.9 kg 1.8 kg
PLASTIC 0.9 kg 0.8 kg 0.8 kg
SPIN
REVOLUTION
MODEL
WF7700S8/WF7600S8/WF7520S8/
WF7450S8/WF7350S8
WF7708S8/WF7608S8/WF7528S8/WF7458S8/
WF7358S8
rpm 100 800
06 Appendix
Contact SAMSUNG WORLD WIDE
If you have any questions or comments relating to Samsung products, please
contact the SAMSUNG customer care center.
Country CALL OR VISIT US ONLINE AT
LITHUANIA 8-800-77777 www.samsung.lt
LATVIA
800-7267 www.samsung.lv
ESTONIA 800-7267 www.samsung.ee
Code No. DC68-02410H_EN
Pesumasina
kasutusjuhend
kujutle võimalusi
Täname Teid, et ostsite Samsungi pesumasina.
Põhjalikuma teeninduse saamiseks
registreerige oma toode aadressil
www.samsung.com/global/register
WF7522S8(W/V/S/C/R)
WF7520S8(W/V/S/C/R)
WF7528S8(W/V/S/C/R)
WF7452S8(W/V/S/C/R)
WF7450S8(W/V/S/C/R)
WF7458S8(W/V/S/C/R)
WF7350S8(W/V/S/C/R)
WF7358S8(W/V/S/C/R)
WF7704S8(W/V/S/C/R)
WF7702S8(W/V/S/C/R)
WF7700S8(W/V/S/C/R)
WF7708S8(W/V/S/C/R)
WF7604S8(W/V/S/C/R)
WF7602S8(W/V/S/C/R)
WF7600S8(W/V/S/C/R)
WF7608S8(W/V/S/C/R)

2_ Omadused
omadused
• Child Lock (Lapselukk)
Lapselukufunktsioon kaitseb kõige väiksemaid ega luba lastel pesumasinat avada.
Tänu sellele turvafunktsioonile ei saa lapsed pesumasinaga mängida ega seda rikkuda.
Sisselülitamisel annab see endast märku.
• Delay Start (Ajastatud käivitus)
See funktsioon võimaldab pesumasina tööaega nihutada kuni 24 tunni võrra.
• Calm Wash (Vaikne pesu)
Seda pesutsüklit te peaaegu ei kuulegi, võimaldades pesupesemist ka siis, kui te magate.
Väänamistsükkel on vaikne nagu sosin, kuna vesi valgub seejuures masinast välja.
• Hőlbus triikimine (valikuline)
Kui kasutate Samsungi pesusüsteemi Carefreewash, ei tule teil pehmeid ja õrnu kangaid
ega vähe hooldust vajavaid riideid eriti triikida. Samsungi tunnustatud digitaalse tehnoloogia
raames välja töötatud hőlpsa triikimise funktsioon (Easy Iron) on pesuprogramm, mis aitab
vähendada őrnematel kangastel tekkivaid kortse ja säästab seega ka teie aega, mis muidu
kuluks triikimisele.
• Quick (Kiirpesu)
Kui on kiire! Vähem kui 30 minuti pikkune pesutsükkel on teile abiks, kui tõesti on väga kiire.
28-minutiline kiirpesuprogramm võib teid kriitlistes olukordades välja aidata. Garanteerime, et
nüüd saate oma lemmikriided puhtaks ka 28 minutiga!
• Programm Delicates & SILK (Õrnpesu ja SIID)
Erihooldus tagatakse sobiva temperatuuri, õrnatoimelise pesutsükli ja õige veekoguse
valikuga.
• Silver Wash -Silver Nano Health System (Hőbepesu – Silver Nano
tervisesüsteem)
Samsungi Silver Nano funktsioon kasutab teie pesu ja pesumasina trumli bakteritest
vabastamiseks ja desinfitseerimiseks hõbeda nanoioone. Ebameeldivad lõhnad kaovad nii
õrnpesult kui ka mustadelt sokkidelt isegi 30 kraadises vees. See hoiab kokku energiat ja
kaitseb rõivaste värvi ja vormi.
• Käsitsipesu (Handwash)
Riideid, mida tavaline masinpesu võib kahjustada, saab pesta just täpselt nii, nagu teeksite
seda käsitsi.
Ohutusteave _3
ohutusteave
Terves kasutusjuhendis leiate te hoiatussilte ja -märkusi.
Järgnevate hoiatusted ning oluliste ohutusjuhiste hulgas ei ole kõiki võimalikke
olukordi, mis võivad ette tulla.
Pesumasina paigaldamisel, hooldamisel ning kasutamisel olge mõistlikud ning
ettevaatlikud. Samsung ei vastuta seadme ebaõigel kasutamisel tekkinud
kahjustuste eest.
OLULISED OHUTUSMÄRGID NING HOIATUSED
Mida märgid selles kasutusjuhendis tähendavad:
HOIATUS
Ohtlik ja ebakindel kasutamine võib kaasa tuua tõsiseid vigastusi või surma.
ETTEVAATUST
Ohtlik ja turvamata kasutamine võib kaasa tuua kergemaid vigastusi või
varakahjustusi.
ETTEVAATUST
Pesumasina kasutamisel tulekahju, plahvatuse, elektrilöögi või vigastusteohu
vältimiseks jälgige järgmisi põhilisiohutusnõudeid:
ENNE SEADME KASUTAMIST
Pakendid võivad olla lastele ohtlikud; hoidke kogu pakkematerjal (plastikkotid, polüstüreen
jne) lastele kättesaamatus kohas.
Toode on mõeldud kasutamiseks ainult koduses majapidamises.
Veenduge, et vee- ja elektriühendused on paigaldatud spetsialisti poolt tootja juhiste
kohaselt (vt jaotist “Pesumasina paigaldamine”) ja kohalikke ohutusnõudeid silmas pidades.
Pakke- ja transportimispoldid peavad olema eemaldatud enne toote kasutamist. Poltide
eemaldamata jätmine võib põhjustada tõsiseid kahjustusi. Vt peatükki “Transportimispoltide
eemaldamine”.
Enne esimest pesukorda peate te teostama täieliku pesutsükli ilma masinasse pesu
panemata. Vt peatükki “Esimene pesukord”.
OHUTUSJUHISED
Enne puhastamist või hooldustöid tuleb seade vooluvõrgust eemaldada või seada nupp
(Sisse/Välja) olekusse “Välja”.
Veenduge, et kõigi pestavate riietusesemete taskud oleksid tühjad.
Kõvad ning tervad esemed nagu mündid, haaknõelad, naelad, kruvid vi kivid võivad
seadmele põhjustada ulatuslikke kahjustusi.
Pärast kasutamist tuleb seade alati vooluvõrgust eemaldada ja vesi kinni keerata.
Enne seadme luugi avamist kontrollige, kas vesi on välja nõrgunud. Kui näete seadmes vett,
siis ärge luuki avage.
Lemmikloomad ja lapsed võivad seadmesse ronida. Enne kasutamist vaadake alati seadme
sisse.
ETTEVAATUST
HOIATUS
4_ Ohutusteave
Klaasist luuk võib pesutsükli ajal väga kuumaks muutuda. Seadme töötamise ajal hoidke
lapsed sellest eemal.
Ärge püüdke seadet ise parandada. Kogenematute või oskamatute inimeste poolt tehtud
parandustööd võivad seadet rikkuda ja/või nõuda juba tõsisemaid parandustöid.
Kui pistik (toitejuhe) on katki, tuleb see ohutuse tagamiseks asendada tootja esindaja,
teenindustöötaja või vastavat kvalifikatsiooni omava spetsialisti poolt.
Seda seadet tohib parandada ainult volitatud teeninduskeskuses ning kasutada tohib ainult
originaalvaruosi.
Lapsed ja oskamatud inimesed ei tohiks seda seadet kasutada enne, kui neid on vastutava
isiku poolt piisavalt juhendatud ja kui ollakse veendunud, et nad oskavad seda turvaliselt
kasutada. Väikestele lastele tuleks õpetada, et nad seadmega ei mängiks.
Seade tuleb ühendada sobiva toitepingega seinakontakti.
Seade tuleb paigutada nii, et pärast kohaleasetamist oleks seinakontakt juurdepääsetav.
Ärge kasutage nahahoolduses või masseerimisel kasutatavat töödeldud vett, millele on
lisatud õli, kreemi või puhastusvedelikku.
• Vastasel korral võib ümbris deformeeruda, mis omakorda põhjustab rikkeid või lekkimist.
Roostevabas pesupaagis tavaliselt roostet ei teki. Kui mõni metallese (nt juukseklamber)
ununeb pikemaks ajaks paaki, võib see siiski tekitada roostet.
• Ärge jätke paaki pikemaks ajaks kloori sisaldavat pleegitusainet või vett.
• Ärge kasutage pidevalt ega jätke pikemaks ajaks paaki rauasisaldusega vett.
• Kui märkate paagi pinnale tekkinud roostet, siis kasutage selle eemaldamiseks
neutraalset pesuvahendit ja käsna või pehmet lappi. (Mitte mingil juhul ärge kasutage
metallharja)
Ventileerimisavadega pesumasinate puhul tuleb jälgida, et põrandakate avasid kinni ei
kataks.
Kasutage uusi voolikukomplekte, vanu ei tohiks taaskasutada.
Selline tähistus tootel või selle dokumentidel näitab, et toodet ei tohi kasutusaja lõppemisel
kõrvaldada koos muude olmejäätmetega. Selleks, et vältida jäätmete kontrollimatu
kõrvaldamisega seotud võimaliku kahju tekitamist keskkonnale või inimeste tervisele
ning edendada materiaalsete vahendite säästvat taaskasutust, eraldage toode muudest
jäätmetest ja suunake taasringlusse.
Kodukasutajad saavad teavet keskkonnaohutu ringlussevõtu kohta kas toote müüjalt või
keskkonnaametist. Firmad peaksid võtma ühendust tarnijaga ning kontrollima ostulepingu
tingimusi ja sätteid. Toodet ei tohi panna muude hävitamiseks mõeldud kaubandusjäätmete
hulka.
ohutusteave

Sisu _5
sisu
PESUMASINA PAIGALDAMINE
6
6 Pesumasina lahtipakkimine
6 Pesumasina ülevaade
7 Sobiva paiga leidmine
7 Jalgade reguleerimine
7 Transportimispoltide eemaldamine
8 Veevoolikuga ühendamine
9 Veevoolikuga ühendamine (valikuline)
9 Vee väljalaskevooliku paigaldamine
PESU PESEMINE
10
10 Pesemine esimest korda
10 Pesuvahendi panemine pesumasinasse
11 Juhtpaneeli ülevaade
12 Pesupesemine funktsiooni Fuzzy Logic abil
13 Käsitsipesu
14 Ajastatud käivituse kasutamine
14 Nipid ja soovitused pesemiseks
PESUMASINA HOOLDAMINE
15
15 Vee väljavoolu juhtimine hädaolukorras
15 Külmunud pesumasina parandamine
15 Pesumasina välispinna puhastamine
16 Pesuvahendi sahtli ja vaheosade
puhastamine
16 Prahifiltri puhastamine
17 Veevooliku võrkfiltri puhastamine
VEAOTSING
18
18 Probleemid ja lahendused
18 Veateadete mõistmine
PROGRAMMITABEL
19
19 programmitabel
LISA
21
21 Riiete hooldusmärgiste tabel
21 Elektrialased hoiatused
21 Keskkonnakaitse
22 Sobivusdeklaratsioon
22 Tehnilised andmed

6_ Pesumasina paigaldamine
pesumasina paigaldamine
PESUMASINA LAHTIPAKKIMINE
Pakkige pesumasin lahti ja kontrollige, et sellel ei oleks transpordil tekkinud kahjustusi. Tehke kindlaks, et
kõik allpool kujutatud osad oleksid olemas. Kui pesumasin on transpordil kahjustada saanud või kui mõni
osa on puudu, võtke viivitamatult ühendust oma Samsungi edasimüüjaga.
PESUMASINA ÜLEVAADE
Mutrivõti Veevoolik Voolikujuhik Poldiaukude katted
Pealmine osa
Äravooluvoolik
Pistik
Prahifilter
Hädaolukorra äravooluvoolik
Esipaneel
Põhja kate
Luugi vabastusnupp
Filtri kate

Pesumasina paigaldamine _7
SOBIVA PAIGA LEIDMINE
Enne pesumasina paigaldamist valige koht, mis vastaks järgmistele tingimustele:
• Kõva, tasane pind (kui pind on ebatasane, vaadake allpool peatükki “Jalgade kõrguse
reguleerimine”)
• Eemal otsesest päikesevalgusest.
• Piisav ventilatsioon
• Temperatuur ruumis ei lange alla 0 ˚C
• Eemal söe või gaasiga köetavatest soojusallikatest
Jälgige, et pesumasin ei seisaks toitejuhtme peal.
Ventilatsiooniavad ei tohi olla tõkestatud vaibaga (kui pesumasin on paigaldatud vaibale).
JALGADE REGULEERIMINE
Kui põrand ei ole tasane, siis reguleerige pesumasina jalgade
kõrgust (ärge pange jalgade alla puutükke või teisi esemeid):
1. Keerake käega jalal olevat polti, kuni saavutate soovitud
kõrguse.
2. Pingutage kinnitusmutrit mutrivõtmega.
Kui pesumasin on paigaldatud ebatasasele või nõrgale
pinnale, võib tekkida müra ja vibratsioon. (Lubatud on ainult
ühekraadine nurk.)
TRANSPORTIMISPOLTIDE EEMALDAMINE
Enne pesumasina kasutamist tuleb seadme tagant eemaldada
kõik transportimispoldid. Poltide eemaldamiseks:
1. Enne eemaldamist keerake kõik poldid mutrivõtmega lahti.
2. Haarake poldi peast ning tõmmake see läbi augu laiema
osa välja.
Korrake sama toimingut iga poldiga.
3. Täitke augud komplekti kuuluvate plastkatetega.
4. Säilitage transportimispoldid tulevaseks kasutamiseks.
01 Pesumasina paigaldamine
lahti

8_ Pesumasina paigaldamine
VEEVOOLIKUGA ÜHENDAMINE
Sissevõtuvooliku üks ots peab olema ühendatud pesumasinaga ja teine ots veekraaniga. Ärge
sissevõtuvoolikut venitage. Kui voolik on liiga lühike, siis asendage see pikema, suuremat survet tekitava
voolikuga.
Vee sissevõtuvooliku ühendamine:
1. Ühendage külma vee sissevõtuvooliku L-liitmik seadme tagaküljel paikneva külma vee
sisselaskeavaga. Keerake käega kinni.
2. Ühendage teine voolikuots külmaveekraaniga ja keerake käega kinni. Kui vaja, võite muuta
veevooliku pesumasina-poolse otsa asendit seda lahti ühendades, voolikut pöörates ning
uuesti kinni keerates.
Valikuline :
1. Ühendage punast värvi kuuma vee sissevõtuvooliku L-liitmik seadme tagaküljel paikneva
punast värvi kuuma vee sisselaskeavaga. Keerake käega kinni.
2. Ühendage kuumaveevooliku teine ots oma kuumaveekraaniga ja keerake käega kinni.
3. Kasutage Y-voolikut juhul, kui soovite kasutada ainult külma vett.
pesumasina paigaldamine
Kuuma vee sisselaskeava
Valikuline

Pesumasina paigaldamine _9
VEEVOOLIKUGA ÜHENDAMINE (VALIKULINE)
1. Eemaldage adapter veevooliku küljest.
2. Kõigepealt lõdvendage ristpeakruvikeerajaga adapteri
nelja kruvi kinnitust. Edasi võtke adapter ja keerake (b) osa
noolega näidatud suunas, kuni tekib 5 mm laiune vahe.
3. Ühendage adapter veekraani külge ja keerake kruvid
tugevasti kinni.
Seejärel keerake (b) osa nooles suunas ja seadke (a) ja (b)
kohakuti.
4. Ühendage veevoolik adapteri külge. Tõmmake veevooliku (c)
osa alla.
Kui lasete (c) osa lahti, ühendab voolik end automaatselt
adapteriga, andes sellest klõpsatusega märku.
5. Ühendage veevooliku teine ots pesumasina tagaosas
paikneva vee sisselaskeavaga. Keerake voolik päripäeva
täielikult sisse.
Kui voolik pärast ühendamist siiski lekib, korrake uuesti kirjeldatud toiminguid. Kasutatav
veekraan peaks olema kõige levinumat tüüpi. Kui veekraan on kandilise suuga või liiga suur,
siis tuleks selle otsikurõngas enne adapteri paigaldamist eemaldada.
VEE VÄLJALASKEVOOLIKU PAIGALDAMINE
Väljalaskevooliku otsa võib paigaldada kolmel viisil:
Üle valamu serva
Väljalaskevoolik peab olema asetatud kõrgusele 60
kuni 90 cm. Väljalaskevooliku ninamiku painutamiseks
kasutage komplektis olevat plastklambrit. Kinnitage
klamber seinale konksuga või kraani külge nööriga, et
hoida väljalaskevoolikut liikumast.
Valamu äravoolutoru küljes
Äravoolukoht peab asetsema valamu äravoolutoru põlvest kõrgemal ning vooliku ots olgu
põrandast vähemalt 60 cm kõrgusel.
Äravoolutorus
Samsung soovitab kasutada 65 cm pikkust vertikaalset toru; see ei tohi olla lühem kui 60 cm ega
pikem kui 90 cm.
01 Pesumasina paigaldamine
a
b
c

10_ Pesu pesemine
pesu pesemine
PESEMINE ESIMEST KORDA
Enne esimest pesukorda peate te teostama täieliku pesutsükli ilma masinasse pesu panemata.
Selleks:
1. Vajutage nuppu
(On/Off) (Sisse/Välja).
2. Valage natuke pesuainet pesuainesahtli lahtrisse ( ).
3. Lülitage sisse pesumasina veevarustus.
4. Vajutage mitu korda nuppu Temperature (Temperatuur), kuni
näidikul kuvatakse 40 ˚C.
5. Vajutage nuppu Start/Stopp.
• See eemaldab võimaliku tootjapoolsest testist masinasse
jäänud vee.
Sahtel : Eelpesuvahend või tärgeldaja.
Sahtel : Pesuvahend põhipesu jaoks, veepehmendi, eelpesuvahend, pleegitusvahend ja
plekieemaldusvahend.
Sahtel : Lisandid, nt pesupehmendi või töötlusvahend (ärge täitke üle tähistuse “A” madalaima
serva )
PESUVAHENDI PANEMINE PESUMASINASSE
1. Tõmmake välja pesuainesahtel.
2. Lisage pesuvahend sahtlisse ( ).
3. Lisage pehmendaja sahtlisse ( ) (soovi korral).
4. Lisage eelpesuvahendi sahtlisse ( ) (soovi korral).
Kontsentreeritud või paksema kanga jaoks ette
nähtud pesupehmendit tuleb enne pesuainesahtlisse
kallamist vähese veega lahjendada (hoiab ära võimaliku
ummistumise).
ETTEVAATUST

Pesu pesemine _11
JUHTPANEELI ÜLEVAADE
Digitaalne näidik Kuvab järelejäänud pesutsükli aja, info pesemise kohta ning veateated.
Nupp Silver Nano
( )
Silver Nano vett kasutatakse nii pesemisel kui ka viimasel loputuskorral,
mis mõjub steriliseerivalt ja bakterivastaselt. (Võite valida kas võimaluse
“Sterilization” (Sterliseerimine), “Protection” (Kaitse) või “Sterilization”
(Sterliseerimine) + “Protection” (Kaitse)).
Nupp Less
Ironing (Hõlbus
triikimine)
Programm Less Ironing (Hõlbus triikimine) vähendab kortse ja hoiab kokku
triikimise aega.
(saadaval programmidega: Cotton (Puuvillane), Coloureds (Värvilised),
Quick (Kiirpesu), Heavy Soil (Tugev määrdumine), Mixed Load (Segapesu),
Rinse+Spin (Loputus+Tsentrifuugimine), Spin (Tsentrifuugimine)
Nupp Pre-Wash
(Eelpesu)
Eelpesu valimiseks vajutage seda nuppu. Eelpesu on saadaval ainult
programmidega Cotton (Puuvillane), Coloureds (Värvilised), Synthetics
(Sünteetika), Jean (Teksased), Heavy Soil (Tugev määrdumine), Mixed Load
(Segapesu).
Nupp Intensive
(Intensiivpesu)
See valik suurendab pesemisvõimsust. Seda funktsiooni saab kasutada
programmidega Cotton (Puuvill), Coloreds (Värviline), Synthetics (Sünteetika),
Jeans (Teksad), Heavy Soil (Tugev määrdumine), Mixed Load (Segapesu) ja Calm
Wash (Vaikne pesu). Nupule vajutamine lülitab funktsiooni kas sisse või välja.
Nupp Child Lock
(Lapselukk)
See nupp takistab lastel pesumasinat käsitsemast.
Nupp On/Off (Sees/väljas) - programmi sisselülitamiseks: Pesumasina
sisselülitamiseks vajutage nuppu Start/Pause (Start/Stopp).
Vajutage ja hoidke all nuppu “Intensive” (Intensiivpesu) + “Temp” (Temp.) 2-3
sekundit. Seda saab kasutada ainult siis, kui pesumasin on sisse lülitatud.
Kui aktiveerite lapseluku funktsiooni pesemise ajal, ei aktiveerita ühtki nuppu
enne, kui pesumasina välja lülitate. Aktiveerida saab ainult nuppu POWER
(Toide). Lapseluku tuli põleb. Programmi väljalülitamiseks: Vajutage ja hoidke
uuesti 2-3 sekundit all nuppu “Intensive” (Intensiivpesu) + “Temp” (Temp.);
lamp kustub ja lülitub välja.
Kontrollige kõigepealt nupu
Child Lock (Lapselukk) toimimist, mille
kinnituseks pesumasina töötamise ajal ei saa ühtegi nuppu aktiveerida.
Nupp Temperature
(Temperatuur)
Vajutades korduvalt seda nuppu, saate valida saadaolevate
veetemperatuuride vahel. (külm (0 ˚C), 30 ˚C, 40 ˚C, 60 ˚C ja 95 ˚C)
Nupp Rinse Times
(Loputuskorrad)
Vajutage loputusnuppu, et lisada loputustsükleid. Maksimaalne loputustsüklite
arv on viis.
02 Pesu pesemine
6
5
4
3
2
1
7
8

12_ Pesu pesemine
Nupp Spin
(Tsentrifuugimine)
Vajutades korduvalt seda nuppu, saate valida saadaolevate pöörlemiskiiruste vahel.
WF7704S8/WF7604S8 0, 400, 800, 1400 pööret minutis
WF7702S8/WF7602S8/WF7522S8/WF7452S8
0, 400, 800, 1200 pööret minutis
WF7700S8/WF7600S8/WF7520S8/WF7450S8/
WF7350S8
0, 400, 800, 1000 pööret minutis
WF7708S8/WF7608S8/WF7528S8/WF7458S8/
WF7358S8
0, 400, 600, 800 pööret minutis
0 : tsentrifuugimiseta Näidikukuva puudub: loputuse seiskamine
Nupp Delay Start
(Ajastatud käivitus)
Vajutades korduvalt seda nuppu, saate liikuda olemasolevate ajastuse valikute
vahel (alates 3 tunnist kuni 24 tunnini, tunniajalise täpsusega).
Kuvatud aeg näitab pesutsükli lõpuaega.
Valikunupp
Fuzzy Control
Selle nupu keeramisel saate valida ühe 14 saadaolevast pesuprogrammist.
Cotton (Puuvill), Coloureds (Värvilised) Synthetics (Sünteetika), Delicate
Fabrics (Õrnpesu), Hand Wash For Wool (Käsitsipesu villasele), Jeans
(Teksased), Quick (Kiirpesu), Rinse+Spin (Loputus + Tsentrifuugimine),
Spin (Tsentrifuugimine), Drain (Nőrgumine), Silk (Siid), Heavy Soil (Tugev
määrdumine), Mixed Load (Segapesu), Calm Wash (Vaikne pesu)
Nupp Start/
Pause (Start/Stopp)
Vajutades seda nuppu, saate programme peatada ja uuesti alustada.
Nupp On/Off
(Sisse/Välja)
Vajutage seda nuppu üks kord, et pesumasin sisse lülitada; veelkordne
vajutamine lülitab pesumasina välja. Kui pesumasina toide on jäänud sisse
rohkem kui kümneks minutiks, nii et selle aja jooksul pole ühtegi nuppu
puudutatud, lülitatakse toide automaatselt välja.
PESUPESEMINE FUNKTSIOONI FUZZY LOGIC ABIL
Teie uus pesumasin muudab Samsungi automaatse juhtimissüsteemi “Fuzzy Logic” abil pesupesemise
lihtsaks. Pesuprogrammi valimisel määrab masin õige temperatuuri, pesutsükli aja ja pesemiskiiruse.
Fuzzy Logic-programmide abil pesemiseks toimige järgmiselt:
1. Keerake veekraan lahti.
2. Vajutage nuppu
(On/Off) (Sisse/Välja).
3. Avage luuk.
4. Asetage esemed ükshaaval trumlisse, ilma seda üle täitmata.
5. Sulgege luuk.
6. Lisage pesuvahend, pehmendi ja eelpesuvahend (vajadusel) sobivatesse lahtritesse.
7.
Keerake programmivalijat Fuzzy Control, et
valida pestava pesu jaoks sobiv programm:
Cotton (Puuvill), Coloureds (Värvilised)
Synthetics (Sünteetika), Delicate Fabrics
(Õrnpesu), Hand Wash For Wool (Käsitsipesu
villasele), Jeans (Teksased), Quick (Kiirpesu),
Rinse+Spin (Loputus + Tsentrifuugimine), Spin
(Tsentrifuugimine), Drain (Nőrgumine), Silk
(Siid), Heavy Soil (Tugev määrdumine), Mixed
Load (Segapesu), Calm Wash (Vaikne pesu).
Esipaneelil süttib vastav indikaatortuli.
8.
Nüüd saate sobiva valikunupu abil määrata pesutemperatuuri, loputuskorrad, tsentrifuugimiskiiruse ja ajastuse.
9. Vajutage programmivalija Fuzzy Control nuppu Start/Pause (Start/Stopp) ja pesutsükkel
käivitub. Süttib toimingule vastav indikaatortuli ja näidikul kuvatakse järelejäänud tsükli kestus.
pesu pesemine
12
13
10
11
9

Pesu pesemine _13
Peatamisvõimalus (peatamise ja pesu juurdelisamise funktsioon)
Kui vajutate nuppu Start/Pause (Start/Stopp), läheb luuk kohe lukust lahti.
Kui pesumasinas on liiga kuum vesi või kui vett on liiga palju, siis luuki avada ei saa.
Pärast luugi sulgemist ja nupu Start/Pause (Start/Stopp) veelkordset vajutamist läheb
pesutsükkel edasi.
Kui tsükkel on lõppenud:
Pärast tsükli lõppemist lülitub toide automaatselt välja.
1. Avage luuk.
2. Võtke pesu välja.
KÄSITSIPESU
Pesu saab käsitsi pesta ka funktsiooni Fuzzy Logic kasutamata.
Selleks toimige järgmiselt:
1. Keerake vaavarustus sisse.
2. Vajutage pesumasina nuppu (Sisse/Välja).
3. Avage luuk.
4. Asetage esemed ükshaaval trumlisse, ilma seda üle täitmata.
5. Sulgege luuk.
6. Täitke pesuvahendi sahtli sobivad lahtrid pesuvahendiga ning vajadusel pehmendi ja
eelpesuvahendiga.
7. Temperatuuri valimiseks vajutage nuppu Temperature (Temperatuur). (külm (0 ˚C), 30 ˚C, 40
˚C, 60 ˚C, 95 ˚C)
8. Soovitud arvu loputustsüklite valimiseks vajutage nuppuRinse.
Maksimaalne loputustsüklite arv on viis.
Mida rohkem tsükleid, seda pikemaks kujuneb kogu pesemisaeg.
9. Vajutage nuppu Spin (Tsentrifuugimine), et valida pöörete kiirus. [ 0, 400, 600, 800, 1000,
1200 või 1400 pööret minutis (rpm) ]
Loputuse seiskamise funktsiooni kasutades saate masinast välja võtta läbimärja pesu.
0 Tsentrifuugimiseta, Näidikukuva puudub: loputuse seiskamine
10. Vajutades korduvalt seda nuppu, saate liikuda olemasolevate ajastuse valikute vahel (alates 3
tunnist kuni 24 tunnini, tunniajalise täpsusega). Kuvatud aeg näitab pesutsükli lõpuaega.
11. Vajutage nuppu Start/Pause (Start/Stopp) ning masin alustab tsüklit.
02 Pesu pesemine

14_ Pesu pesemine
AJASTATUD KÄIVITUSE KASUTAMINE
Võide seada pesumasina tsükli lõpu automaatselt hilisemale ajale, valides 3 kuni 24 tundi hilisema käivitusaja
(1-tunniste vahemikena). Kuvatud aeg näitab pesutsükli lõpuaega.
Selleks:
1. Valige vastavalt pestavale pesutüübile käsitsi või automaatselt sobiv pesuprogramm.
2. Soovitud käivitusaja valimiseks vajutage mitu korda nuppu Delay Start (Ajastatud käivitus).
3. Vajutage nuppu Start/Pause (Start/Stopp). Programmi Delay Start (Ajastatud käivitus)
indikaatortuli süttib ja kell hakkab lugema aega valitud lõpuajani.
4. Funktsiooni “Delay Start” (Ajastatud käivitus) tühistamiseks vajutage nuppu (Sisse/Välja) ja
lülitage seejärel pesumasin uuesti sisse.
NIPID JA SOOVITUSED PESEMISEKS
Pesu sorteerimine:Sorteerige pesu järgnevate omaduste põhjal:
• Riide hooldussildi sümbol:Sorteerige pesu puuvillaseks, segakiuliseks, sünteetiliseks,
siidist, villasest ja kunstsiidist pesuks.
• Värv: Eraldage valge ja värviline pesu. Peske uusi värvilisi esemeid eraldi.
• Suurus: Erineva suurusega esemete koos pesemine parandab pesemistegevust.
• Tundlikkus:Peske õrnu esemeid eraldi, kasutades pesuprogrammi Delicate (Õrnpesu), eriti
uute täisvillaste, kardinate ja siidriiete puhul. Kontrollige silte esemetel, mida te pesete või
vaadake riidehooldustabelit lisas.
Taskute tühjendamine: Mündid, haaknõelad jms võivad kahjustada linast riiet, trumlit ja
veepaaki.
Lukkude, nööpide ja teiste kinniste kinnitamine: Tõmmake kinni lukud ja kinnitage nööbid
või haagid; lahtised vööd või lindid tuleks kokku siduda.
Puuvillase pesu eelpesemine:Teie uus pesumasin koos tänapäevaste pesuvahenditega
annavad ideaalse pesutulemuse sealjuures energiat, aega, vett ja pesuvahendit säästes. Kui
teie puuvillane pesu on eriti määrdunud, võite siiski kasutada eelpesuprogrammi ja valgupõhist
pesuvahendit.
Pesukoguse määramine:Ärge pange pesumasinat liiga täis, sest teie pesu ei pruugi korralikult
puhtaks minna. Kasutage allolevat tabelit, et määrata pestavate riiete tüübile sobiv pesukogus.
Kanga tüüp
Pesukogus
WF7704S8
WF7702S8
WF7700S8
WF7708S8
WF7604S8
WF7602S8
WF7600S8
WF7608S8
WF7522S8
WF7520S8
WF7528S8
WF7452S8
WF7450S8
WF7458S8
WF7350S8
WF7358S8
Puuvillane/värviline 7.0 kg 6.0 kg 5.2 kg 4.5 kg 3.5 kg
Quick (Kiirpesu) 3.0 kg 3.0 kg 2.5 kg 2.5 kg 2.0 kg
Õrn materjal
2.5 kg 2.5 kg 2.0 kg 2.0 kg 1.5 kg
Siid 2.0 kg 2.0 kg 1.5 kg 1.5 kg 1.5 kg
Soovitused pesuaine valimisel:Kasutatava pesuvahendi valik oleneb pestava kanga tüübist
(puuvillane, õrnad esemed, siid), värvist, veetemperatuurist ning määrdumisastmest ja -tüübist.
Kasutage alati vähese vahutavusega pesuvahendeid, mis on mõeldud kasutamiseks
automaatsetes pesumasinates.
Jälgige pesuvahendi tootjapoolseid soovitusi, mis põhinevad pesu kaalul, mustusastmel ja teie
piirkonna vee karedusel. Kui te ei tea, kui kare teie vesi on, küsige oma veevärgist järgi.
Hoidke pesuvahendeid ja lisandeid ohutus, kuivas ja lastele kättesaamatus kohas.
pesu pesemine

Pesumasina hooldamine _15
pesumasina hooldamine
VEE VÄLJAVOOLU JUHTIMINE HÄDAOLUKORRAS
1. Eemaldage pesumasin vooluvõrgust.
2. Avage filtri luuk mündi või võtme abil.
3. Keerake hädaolukorra äravoolukork lahti, keerates seda
vasakule. Võtke kinni korgist hädaolukorra äravooluvooliku
otsas ja tõmmake see aeglaselt umbes 15 cm ulatuses
välja.
4. Laske kogu veel kaussi voolata.
5. Paigaldage äravooluvoolik ja keerake kork tagasi.
6. Paigaldage filtri kate.
KÜLMUNUD PESUMASINA PARANDAMINE
Kui temperatuur langeb alla nulli ja teie pesumasin jäätub, siis:
1. Lülitage pesumasin vooluvõrgust välja.
2. Vooliku sulatamiseks kallake sooja vett veevarustuskraanist lähtuva vooliku otsikule.
3. Eemaldage veevarustusvoolik ja hoidke seda soojas vees.
4. Valage pesumasina trumlisse sooja vett ja hoidke seda seal umbes 10 minutit.
5.
Ühendage veevarustusvoolik pesumasinaga ja kontrollige, kas veevarustus ja äravool toimivad normaalselt.
PESUMASINA VÄLISPINNA PUHASTAMINE
1. Puhastage pesumasina välispinda, ka juhtpaneeli, pehme riide ja mitteabrasiivse puhastusvahendiga.
2. Pindade kuivatamiseks kasutage pehmet riiet.
3. Ärge kallake vett pesumasinale.
03 Pesumasina hooldamine

16_ Pesumasina hooldamine
PESUVAHENDI SAHTLI JA VAHEOSADE PUHASTAMINE
1. Vajutage pesuvahendi sahtli sees paiknevat vabastusseadme kangi ja tõmmake sahtel välja.
2. Eemaldage kork vaheosalt ( ).
3. Peske kõiki osi jooksva vee all.
4. Puhastage vanad pulbrijäägid vana hambaharaja abil.
5. Pange kork tagasi (surudes selle tugevalt paika) ja pange vedelpesuvahendi vaheosa jaotaja
tagasi sahtlisse.
6. Lükake sahtel tagasi oma kohale.
7. Käivitage loputusprogramm ilma pesuta trumlis.
PRAHIFILTRI PUHASTAMINE
Puhastage prahifiltrit 5 või 6 korda aastas või kui näed paneeli ekraanil
järgmisi veateateid:
1. Avage filtri kate, vt “Vee väljavoolu juhtimine hädaolukorras’’
leheküljel 15.
2. Korkige hädaolukorra väljavoolukork lahti, keerates seda
vasakule ja juhtige kogu vesi välja.
Vt ‘’Vee väljavoolu juhtimine hädaolukorras’’ leheküljel 15.
3. Keerake filtri kork lahti ja võtke see välja.
4. Peske filter mustusest ja muust prahist puhtaks. Tehke
kindlaks, et äravoolupumba propellerkruvi filtri taga pole
blokeeritud. Pange filtri kork tagasi.
5. Paigaldage filtri kate.
pesumasina hooldamine

Pesumasina hooldamine _17
VEEVOOLIKU VÕRKFILTRI PUHASTAMINE
Veevooliku võrkfiltrit tuleks puhastada vähemalt kord aastas, või siis, kui
näed ekraanil järgmist veateadet:
Selleks:
1. Keerake pesumasina veevarustus kinni.
2. Keerake voolik pesumasina tagaküljelt lahti.
3. Tõmmake näpitsatega ettevaatlikult võrkfilter vooliku otsast
välja ja loputage see veega puhtaks. Puhastage ka mähitud
ühendajat seest ja väljast.
4. Pange filter tagasi.
5. Keerake voolik pesumasina külge tagasi.
6. Keerake otsik kinni ja veenduge ühenduse veekindluses.
03 Pesumasina hooldamine
Valikuline
Valikuline

18_ Veaotsing
veaotsing
PROBLEEMID JA LAHENDUSED
PROBLEEM LAHENDUS
Pesumasin ei käivitu • Kontrollige, kas luuk on korralikult kinni.
• Kontrollige, kas pesumasin on ühendatud vooluvõrku.
• Veenduge, et veekraan on lahti.
• Kontrollige, kas vajutasite nupule Start/Pause (Start/stopp).
Vett ei ole või
veevarustus pole piisav
• Veenduge, et veekraan on lahti.
• Veenduge, et veevoolik poleks külmunud.
• Veenduge, et voolik poleks sõlmes või painutatud.
• Veenduge, et voolikufilter poleks ummistunud.
Pesuaine jääb sahtlisse
kui pesutsükkel on läbi
• Veenduge, et pesumasin töötab piisava veesurvega.
• Asetage pesuaine pesuainesahtli keskele (eemale servadest).
Pesumasin vibreerib või
teeb liiga kõva müra
• Veenduge, et pesumasin asub tasasel pinnal. Kui pind pole tasane, siis
reguleerige seadme tasakaalu seadmiseks selle jalgu.
• Veenduge, et transportimispoldid on eemaldatud.
• Veenduge, et pesumasin ei ole mõne teise esemega kokkupuutes.
• Veenduge, et pesuhulk masinas on tasakaalus.
Pesumasin ei nõruta vett
välja ega/või tsentrifuugi
• Veenduge, et väljalaskevoolik poleks muljutud ega sõlmes.
• Veenduge, et prahifilter pole ummistunud.
Luuk ei avane • Eemaldage toitejuhe pistikust.
• Tühjendage pesumasin veest.
• Avage mündi abil filtri kate.
• Leidke üles oranž plastist sakk ja tõmmake seda
luugi avamiseks enda poole.
VEATEADETE MÕISTMINE
VEA KOOD LAHENDUS
luuk
• Sulgege luuk.
4E
• Veenduge, et veekraan on lahti.
• Kontrollige survet.
5E
• Puhastage prahifilter.
• Veenduge, et äravoolutoru on korralikult paigaldatud.
UE
• Kui vaid üks riideese vajab pesemist, näiteks hommikumantel või püksid,
võib viimase tsentrifuugimise tulemus olla mitterahuldav ning näidikule
ilmub teade “UE”.
cE / 3E
• Helistage müügijärgsesse teenindusse.
Enne müügijärgse teenindusega kontakteerumist:
1. Proovige lahendada probleem (vt “Veaotsing” sellel leheküljel).
2. Taaskäivitage pesuprogramm, et näha, kas viga kordub.
3. Kui probleem säilib, helistage müügijärgsesse teenindusse ja kirjeldage probleemi.

Programmitabel _19
programmitabel
PROGRAMMITABEL
( kasutaja valik)
Programm
Maksimaalne kogus (kg)
Pesuvahend ja
lisandid
Temper-
atuur
(MAX)
(˚C)
Pöörlemiskiirus
(MAX) rpm (pöördeid minutis)
Aja-
statud
-
käivitus
Tsük-
liaeg
(min)
WF7704S8
WF7702S8
WF7700S8
WF7708S8
WF7604S8
WF7602S8
WF7600S8
WF7608S8
WF7522S8
WF7520S8
WF7528S8
WF7452S8
WF7450S8
WF7458S8
WF7350S8
WF7358S8
Eelp-
esu
Pesu
Pehmendaja
WF7704S8
WF7604S8
WF7702S8
WF7602S8
WF7522S8
WF7452S8
WF7700S8
WF7600S8
WF7520S8
WF7450S8
WF7350S8
WF7708S8
WF7608S8
WF7528S8
WF7458S8
WF7358S8
Cotton
(Puuvillane)
7.0 6.0
5.2
4.5 3.5
jah
95 1400 1200 1000 800
90
Coloureds
(Värvilised)
7.0 6.0 5.2 4.5 3.5
jah
60 1400 1200 1000 800
98
Synthetics
(Sünteeti-
line)
3.0 3.0 2.5 2.5 2.0
jah
60 1400 1200 1000 600
71
Delicate
Fabrics
(Õrnpesu)
2.5 2.5 2.0 2.0 1.5 - jah
40 800 800 800 600
53
Handwash
for Wool
(Käsitsipesu
villasele)
2.0 2.0 1.5 1.5 1.0 - jah
40 800 800 800 400
39
Jeans
(Teksased)
2.0 2.0
1.5
1.5 1.0
jah
40 800 800 800 400
60
Quick
(Kiirpesu)
3.0 3.0 2.0 2.0 1.5 - jah
60 1400 1200 1000 800
28
Programm Pesu tüüp
Cotton
(Puuvillane)
Keskmiselt või kergelt määrdunud puuvillane pesu, voodilinad, laualinad, aluspesu,
rätikud, särgid jne.
Coloureds
(Värvilised)
Keskmiselt või kergelt määrdunud puuvillane pesu, voodilinad, laualinad, aluspesu,
rätikud, särgid, jne.
Synthetics
(Sünteetiline)
Kergelt või keskmiselt määrdunud pluusid, särgid jne. Polüestrist (Diolen, Trevira),
polüamiidist (perlon, nailon) vm segud.
Delicate Fabrics
(Õrnpesu)
Õrnad kardinad, kleidid, seelikud, särgid ja pluusid.
Handwash for
Wool
(Käsitsipesu
villasele)
Ainult masinaga pestavad villased riided puhta uusvillase tähistusega.
Quick
(Kiirpesu)
Kergelt määrdunud puuvillased või linased pluusid, särgid, tumedad tugevad
riided, värvilised linased riided, teksad jne.
1. Programmi kestus on mõõdetud tingimustes, mis on määratud standardiga IEC 456.
2. Reaalsed kasutusajad majapidamises võivad erineda tabelis antud arvudest sõltuvalt veesurvest ja
temperatuurist, pesukogusest ja -tüübist.
05 Programmitabel

20_ Programmitabel
( kasutaja valik)
Programm
Maksimaalne kogus (kg)
Pesuvahend ja
lisandid
Temper-
atuur
(MAX)
(˚C)
Pöörlemiskiirus
(MAX) rpm (pöördeid minutis)
Aja-
statud
-
käivitus
Tsük-
liaeg
(min)
WF7704S8
WF7702S8
WF7700S8
WF7708S8
WF7604S8
WF7602S8
WF7600S8
WF7608S8
WF7522S8
WF7520S8
WF7528S8
WF7452S8
WF7450S8
WF7458S8
WF7350S8
WF7358S8
Eelp-
esu
Pesu
Pehmendaja
WF7704S8
WF7604S8
WF7702S8
WF7602S8
WF7522S8
WF7452S8
WF7700S8
WF7600S8
WF7520S8
WF7450S8
WF7350S8
WF7708S8
WF7608S8
WF7528S8
WF7458S8
WF7358S8
Silk (Siid) 7.0 6.0
5.2
4.5 3.5 - jah
30 400 400 400 400
35
Heavy
Soil
(Tugev
määrdu-
mine)
7.0 6.0 5.2 4.5 3.5
jah
60 1400 1200 1000 800
109
Mixed
Load
(Segape-
su)
2.5 2.5 2.0 2.0 1.5
jah
60 800 800 800 800
76
Calm
Wash
(Vaikne
pesu)
3.0 3.0 2.0 2.0 1.5
jah
40
96
Programm Pesu tüüp
Silk (Siid) Siidist särgid, pluusid, kleidid jne.
Heavy Soil (Tugev
määrdumine)
Plekilised või tugevasti määrdunud puuvillane pesu, voodilinad, laualinad, aluspesu,
rätikud, särgid, teksad jne.
Mixed Load
(Segapesu)
Segapesu kergelt määrdunud puuvillaste ja sünteetiliste riietega.
Calm Wash
(Vaikne pesu)
Äärmiselt vaikne müratase kogu tsükli vältel ning viimase loputuse ärajätmine enne
vee äravoolu. Puuvillased esemed, voodipesu, laudlinad, aluspesu, käterätikud,
särgid.
programmitabel

Lisa _21
lisa
RIIETE HOOLDUSMÄRGISTE TABEL
Vastupidav materjal
Võib triikida temperatuuril 100 ˚C
max
Õrn materjal Mitte triikida
Eset võib pesta temperatuuril 95 ˚C.
Võib keemiliselt puhastada ükskõik
millise lahusega.
Eset võib pesta temperatuuril 60 ˚C.
Keemiline puhastus ainult
perkloraadi, kergkütuse, puhta
alkoholi või R113-ga.
Eset võib pesta temperatuuril 40 ˚C
Keemiline puhastus ainult
aviobensiini, puhta alkoholi või
R113-ga.
Eset võib pesta temperatuuril 30 ˚C Mitte keemiliselt puhastada
Eset võib pesta käsitsi Kuivatada tasapinnal
Ainult keemiline puhastus Võib riputada kuivama
Võib pleegitada külmas vees Kuivatada riidepuul
Mitte pleegitada
Trummelkuivatus,
normaaltemperatuuril
Võib triikida temperatuuril 200 ˚C
max
Trummelkuivatus, madalamal
temperatuuril
Võib triikida temperatuuril 150 ˚C
max
Mitte trummelkuivatust
ELEKTRIALASED HOIATUSED
Tuleohu, elektrilöögi ja teiste vigastuste vähendamiseks pidage meeles järgmisi ohutusnõudeid:
• Ühendage toode vaid tähistusel määratud vooluvõrku. Kui te pole kindel, millist tüüpi kodune vooluvõrk
teil on, konsulteerige oma seadme turustajaga või kohaliku elektrifirmaga.
• Kasutage ainult maandatud või polariseeritud kontakte. Seda pistikut saab toitekontakti sisestada ainult
ühtepidi. Kui teil ei õnnestu pistikut täielikult kontakti sisestada, keerake see ringi ja proovige uuesti. Kui
pistik ikkagi kontakti ei lähe, võtke ühendust oma elektrikuga, et kontakt ära vahetada.
• Kaitske toitejuhet. Toitejuhe peaks olema paigaldatud nii, et sellele ei astuta ning et selle peale või vastu
ei panda teisi esemeid. Pöörake erilist tähelepanu kontaktidele, ümbristele ja kohale, kus juhe väljub
masinast.
• Ärge koormake kontakti või pikendusjuhtme pingetaluvust üle. Ülekoormamine võib tekitada tulekahju
või elektrilööke.
KESKKONNAKAITSE
• Antud toode on valmistatud ümbertöödeldavatest materjalidest. Kui otsustate antud tootest vabaneda,
siis palun uurige kohalikke jäätmekäitlusnõudeid. Lõigake ära toitejuhe, et seadet ei saaks enam
vooluvõrku ühendada. Eemaldage luuk nii, et loomad ja väikesed lapsed ei saaks seadmesse kinni
jääda.
• Ärge pange pesumasinasse rohkem pesuvahendit, kui on aine tootja poolt soovitatud.
• Kasutage plekieemaldajaid ja pleegitajaid enne pesutsükli käivitamist ainult siis, kui see on hädavajalik.
• Säästke vett ja elektrit, laadides iga kord masina täis (täpne kogus sõltub kasutatavast programmist).
06 Lisa

22_ Lisa
lisa
SOBIVUSDEKLARATSIOON
Toode vastab Euroopa ohutusnõuetele, EÜ direktiivile 93/68 ja EN-i standardile 60335.
TEHNILISED ANDMED
TÜÜP EESTLAETAV PESUMASIN
MÕÕTMED
WF7704S8/WF7702S8/WF7700S8/WF7708S8 WF7604S8/WF7602S8/WF7600S8/WF7608S8
W598mm X D600mm X H844mm W598mm X D550mm X H844mm
VEESURVE
50 kPa ~ 800 kPa
VEEKOGUS
60 ℓ 54 ℓ
NETOKAAL
WF7704S8/WF7702S8 WF7700S8/WF7708S8 WF7604S8/WF7602S8/ WF7600S8/WF7608S8
74kg 73kg 72kg 70kg
PESU JAVÄÄNAMISULATUS
7.0 kg (KUIV PESU) 6.0 kg (KUIV PESU)
ENERGIATARVE
MUDEL
WF7704S8/WF7702S8/ WF7700S8/WF7708S8 WF7604S8/WF7602S8/WF7600S8/WF7608S8
PESEMINE JA
SOOJENDAMINE
220 V 2000 W 220 V 2000 W
240 V 2400 W 240 V 2400 W
VÄÄNA-
MINE
MUDEL
WF7704S8 WF7702S8 WF7700S8 WF7708S8 WF7604S8 WF7602S8 WF7600S8 WF7608S8
230 V 700 W 360 W 320 W 270 W 580 W 530 W 500 W 430 W
PUMPAMINE
34 W
PAKKEMATERJALI KAAL
MUDEL
WF7704S8/WF7702S8/WF7700S8/WF7708S8
WF7604S8/WF7602S8/WF7600S8/
WF7608S8
PABER
2.5 kg 2.5 kg
PLASTIK 1.0 kg 1.0 kg
PÖÖRLEMINE
MUDEL WF7704S8/WF7604S8
WF7702S8/WF7602S8/WF7522S8/WF7452S8
rpm 1400 1200

Lisa _23
TÜÜP EESTLAETAV PESUMASIN
MÕÕTMED
WF7522S8/WF7520S8/WF7528S8 WF7452S8/WF7450S8/WF7458S8 WF7350S8/WF7358S8
W598mm X D450mm X
H844mm
W598mm X D404mm X
H844mm
W598mm X D340mm
X H844mm
VEESURVE
50 kPa ~ 800 kPa
VEEKOGUS
49 ℓ 48 ℓ 43 ℓ
NETOKAAL
WF7522S8/7520S8 WF7528S8 WF7452S8/7450S8 WF7350S8/7358S8
66kg 65kg 61kg 51kg
PESU JAVÄÄNAMISULATUS
5.2 kg (KUIV PESU) 4.5 kg (KUIV PESU) 3.5 kg (KUIV PESU)
ENERGIATARVE
MUDEL
WF7522S8/WF7520S8/WF7528S8 WF7452S8/WF7450S8/WF7458S8 WF7350S8/WF7358S8
PESEMINE JA
SOOJENDAMINE
220 V 1900 W 220 V 1800 W 220 V 1800 W
240 V 2200 W 240 V 2100 W 240 V 2100 W
VÄÄNA-
MINE
MUDEL
WF7522S8 WF7520S8 WF7528S8 WF7452S8 WF7450S8 WF7458S8 WF7350S8 WF7358S8
230 V 550 W 500 W 430 W 270 W 230 W 180 W 230 W 180 W
PUMPAMINE
34 W
PAKKEMATERJALI KAAL
MUDEL
WF7522S8/WF7520S8/WF7528S8
WF7452S8/WF7450S8/
WF7458S8/
WF7350S8/
WF7358S8
PABER 2.1 kg 1.9 kg 1.8 kg
PLASTIK 0.9 kg 0.8 kg 0.8 kg
PÖÖRLEMINE
MUDEL
WF7700S8/WF7600S8/WF7520S8/
WF7450S8/WF7350S8
WF7708S8/WF7608S8/WF7528S8/WF7458S8/
WF7358S8
rpm 100 800
06 Lisa

Võtke ühendust SAMSUNGIGA KOGU MAAILMAS
Kui Teil on küsimusi või soovitusi seoses Samsungi toodetega, võtke ühendust
SAMSUNGI teeninduskeskusega.
Riik HELISTAGE VÕI KÜLASTAGE MEID AADRESSIL
LITHUANIA 8-800-77777 www.samsung.lt
LATVIA
800-7267 www.samsung.lv
ESTONIA 800-7267 www.samsung.ee
Kood:DC68-02410H_ET

Skalbimo mašinos
vartotojo vadovas
Įsivaizduokite galimybes
Dėkojame, kad įsigijote „Samsung“ gaminį.
Norėdami gauti daugiau paslaugų,
savo gaminį užregistruokite
www.samsung.com/global/register
WF7522S8(W/V/S/C/R)
WF7520S8(W/V/S/C/R)
WF7528S8(W/V/S/C/R)
WF7452S8(W/V/S/C/R)
WF7450S8(W/V/S/C/R)
WF7458S8(W/V/S/C/R)
WF7350S8(W/V/S/C/R)
WF7358S8(W/V/S/C/R)
WF7704S8(W/V/S/C/R)
WF7702S8(W/V/S/C/R)
WF7700S8(W/V/S/C/R)
WF7708S8(W/V/S/C/R)
WF7604S8(W/V/S/C/R)
WF7602S8(W/V/S/C/R)
WF7600S8(W/V/S/C/R)
WF7608S8(W/V/S/C/R)

2_ Funkcijos
funkcijos
• Užraktas nuo vaikų
Užrakto nuo vaikų funkcija saugo skalbimo mašiną nuo vaikų. Ši apsauginė funkcija neleidžia
vaikams žaisti su skalbimo mašina. Funkcija taip pat praneša apie tai, kad yra suaktyvinta.
• Uždelstas paleidimas
Šia funkcija galite nustatyti uždelstą skalbimo mašinos įjungimą per artimiausias 24 valandas.
• Ramus skalbimas
Šis skalbimo ciklas atliekamas labai tyliai, todėl jį galima naudoti miegant. Gręžimo ciklas
atliekamas šlamančiai tyliai, nes tuo metu išleidžiamas vanduo.
• Mažiau lyginimo (pasirinktinai)
Naudojant „Samsung“ „Carefreewash“, jums reikės mažiau lyginti, nes ši programa atsargiai
valo minkštus, švelnius ir lengvai prižiūrimus audinius. Išvystyta pagal visame pasaulyje
pripažintą „Samsung“ skaitmeninę technologiją, mažesnio lyginimo funkcija yra specializuota
skalbimo programa, mažinanti švelnių drabužių raukšlėjimąsi skalbimo metu ir sutaupo jūsų
laiką, kurį būtumėte praleidę lygindami.
• Greitasis skalbimas
Nepraraskite laiko! Mažiau nei 30 minučių trunkantis skalbimas suteiks jums laiko išeiti
anksčiau ir nepavėluoti. 28 minutes trunkanti greitojo skalbimo programa gali būti jūsų užimto
gyvenimo problemos sprendimas. Garantuojame, kad dabar galėsite mėgstamus drabužius
išskalbti tik per 28 minutes!
• Švelnių audinių ir šilko skalbimo programa
Galima nustatyti specialią priežiūrą, pasirenkant atitinkamą temperatūrą, atsargaus skalbimo
funkciją ir atitinkamą vandens kiekį.
• Sveikatą sauganti skalbimo sistema, naudojant sidabro
nanodaleles
„Samsung“ skalbimo funkcija, naudojant sidabro nanodaleles, gerina sanitarinę būklė,
dezinfekuoja ir jūsų skalbinius, ir jūsų skalbimo mašinos būgną. Švelnių audinių skalbiniai, taip
pat nemalonų kvapą skleidžiančios kojinės, net 30 °C temperatūroje taps bekvapiais. Taip
taupoma energija ir apsaugoma drabužių spalva ir forma.
• Skalbimas rankomis
Lininiai ar šilkiniai drabužiai skalbiant įprastu režimu gali būti pažeisti, todėl galima nustatyti
skalbimo rankomis režimą.

Saugos informacija _3
saugos informacija
Šiame vadove rasite įspėjimų ir perspėjimų.
Šie įspėjimai, perspėjimai ir svarbios saugos instrukcijos neaprėpia visų galimų
sąlygų ir situacijų, su kuriomis galite susidurti.
Skalbyklės montavimo, priežiūros ir valdymo metu vadovaukitės logika ir būkite
atsargūs. „Samsung“ neatsako už žalą, susijusią su netinkamu naudojimu.
SVARBŪS SAUGOS SIMBOLIAI IR ATSARGOS PRIEMONĖS
Ką reiškia šiame vadove pateikiamos piktogramos ir ženklai:
ĮSPĖJIMAS
Pavojingai arba nesaugiai naudojant, galima sunkiai ar net mirtinai susižeisti.
DĖMESIO
Pavojingai arba nesaugiai naudojant, galima lengvai susižeisti arba padaryti
žalos nuosavybei.
DĖMESIO
Norėdami sumažinti gaisro, sprogimo, elektros smūgio ar asmens sužeidimo
pavojų, paisykite pagrindinių atsargumopriemonių:
PRIEŠ NAUDODAMI SKALBYKLĘ
Pakavimo medžiagos gali būti pavojingos vaikams; visas pakavimo medžiagas (plastikinius
maišus, polistirolą ir t. t.) laikykite vaikams nepasiekiamoje vietoje.
Ši skalbyklė skirta naudoti tik buityje.
Pasirūpinkite, kad vandenį ir elektrą prijungtų kvalifikuoti specialistai, vadovaudamiesi
gamintojo nurodymais (žr. „Skalbimo mašinos montavimas“) ir vietinėmis saugos
taisyklėmis.
Prieš naudojant skalbyklę, reikia išimti visus pakavimo ir transportavimo varžtus. Jų
neišėmus, galimi dideli gedimai. Žr. „Transportavimo varžtų pašalinimas“.
Prieš pirmąjį skalbimą būtina atlikti visą skalbimo ciklą be skalbinių. Žr. „Pirmasis skalbimas“.
SAUGOS INSTRUKCIJOS
Prieš valydami ar atlikdami techninės priežiūros darbus, ištraukite prietaiso kištuką iš
elektros tinklo lizdo arba išjunkite paspausdami On/Off (įjungimo/išjungimo) mygtuką.
Įsitikinkite, kad visų skalbiamų drabužių kišenės yra tuščios.
Sunkūs ar aštrūs daiktai, pavyzdžiui, monetos, segtukai, vinys, varžtai ar akmenys, gali
padaryti skalbyklei daug žalos.
Baigę darbą, visada išjunkite skalbyklę ir vandens tiekimą.
Prieš atidarydami skalbyklės dureles patikrinkite, ar išleistas vanduo. Neatidarykite durelių,
jei skalbyklėje dar yra vandens.
Į skalbyklę gali patekti naminiai gyvūnai ir maži vaikai. Prieš kiekvieną naudojimą patikrinkite
skalbyklę.
DĖMESIO
ĮSPĖJIMAS

4_ Saugos informacija
Stiklo durelės skalbiant labai įkaista. Neleiskite vaikų prie veikiančios skalbyklės.
Nebandykite remontuoti skalbyklės patys. Nepatyrusio ar nekvalifikuoto asmens atliktas
remontas gali būti susižeidimų priežastis ir / arba padaryti skalbyklei dar didesnės žalos.
Jei kištukas (elektros energijos tiekimo laidas) sugadintas, jį turi pakeisti gamintojas,
įgaliotasis atstovas arba kvalifikuotas asmuo, kad būtų išvengta pavojų.
Šios skalbyklės techninės priežiūros darbus turi atlikti tik įgaliotojo techninės priežiūros
centro darbuotojai, o taip pat turi būti naudojamos tik originalios atsarginės dalys.
Šios skalbyklės neturi naudoti maži vaikai ar ligoti asmenys neprižiūrint atsakingam
asmeniui, kuris užtikrintų, kad skalbykle būtų naudojamasi saugiai. Maži vaikai turi būti
prižiūrimi, kad nežaistų su skalbykle.
Ši skalbyklė turi būti įjungta į lizdą, atitinkantį suvartojamą elektros energiją.
Ši skalbyklė turi būti įrengta taip, kad ją pastačius būtų pasiekiamas kištukas.
Nenaudokite apdoroto vandens, kuriame yra aliejaus, kremo ar losjono ir kurio paprastai
galima įsigyti odos priežiūrai skirtų reikmenų parduotuvėse ar masažo klinikose.
• Jis gali pakeisti pakuotės formą ir taip sugadinti prietaisą arba sukelti vandens protėkį.
Iš nerūdijančio plieno gaminamas plovimo vamzdelis paprastai nerūdija. Bet jei vamzdelyje
ilgesnį laiką paliekamas metalinis objektas, pvz., plaukų smeigtukas, jis gali pradėti rūdyti.
• Nepalikite vamzdelyje vandens, kurio sudėtyje yra chloro, ar baliklio ilgesniam laikui.
• Negalima reguliariai naudoti arba ilgesnį laiką palikti vamzdelyje vandens, kurio sudėtyje
yra geležies.
• Jei vamzdelio paviršiuje atsiranda rūdžių, patepkite jo paviršių valymo priemone
(neutralia) ir nuvalykite ją kempine ar minkštu audeklu. (Jokiu būdu nenaudokite
metalinio šepečio.)
Jei skalbimo mašinos pagrinde yra ventiliacinės angos, kilimas neturi uždengti angų.
Vietoje senų žarnų rinkinių naudokite naujus žarnų rinkinius.
Šis ženklas, pateikiamas ant produkto ar jo dokumentacijoje, nurodo, kad pasibaigus
produkto tarnavimo laikui, jo negalima išmesti kartu su kitomis buitinėmis atliekomis.
Kad būtų išvengta galimos nekontroliuojamo atliekų išmetimo žalos aplinkai arba žmonių
sveikatai, ir siekiant skatinti aplinką tausojantį antrinių žaliavų panaudojimą, pašom atskirti
jį nuo kitų rūšių atliekų ir atiduoti perdirbti. Informacijos, kur ir kaip pristatyti šį produktą
saugiai perdirbti, privatūs vartotojai turėtų kreiptis arba į parduotuvę, kurioje šį produktą
pirko, arba į vietines valdžios institucijas.
Verslo vartotojai turėtų kreiptis į savo tiekėją ir peržiūrėti pirkimo sutarties sąlygas.
Šisproduktas tvarkant atliekas negali būti sumaišytas su kitomis atliekomis.
saugos informacija

Turinys _5
turinys
SKALBIMO MAŠINOS MONTAVIMAS
6
6 Skalbimo mašinos išpakavimas
6 Skalbimo mašinos vaizdas
7 Vietos išrinkimas
7 Išlyginimo kojelių reguliavimas
7 Transportavimo varžtų šalinimas
8 Vandens tiekimo žarnos prijungimas
9 Vandens tiekimo žarnos prijungimas
(pasirinktinai)
9 Vandens išleidimo žarnos padėties
nustatymas
SKALBIMAS
10
10 Pirmasis skalbimas
10 Skalbimo priemonės įpylimas į skalbimo
mašiną
11 VALDYMO SKYDO APŽVALGA
12 Drabužių skalbimas naudojant sistemą
„Fuzzy Logic“
13 Rankinis drabužių skalbimas
14 Uždelsto paleidimo naudojimas
14 Skalbimo patarimai
SKALBIMO MAŠINOS PRIEŽIŪRA
15
15 Avarinis skalbimo mašinos išleidimas
15 Užšalusios skalbimo mašinos taisymas
15 Išorės valymas
16 Skalbimo priemonės stalčiaus ir nišos
valymas
16 Nešvarumų filtro valymas
17 Vandens žarnos tinklinio filtro valymas
TRIKČIŲ DIAGNOSTIKA IR
ŠALINIMAS
18
18 Problemos ir sprendimai
18 Pranešimų apie klaidas skaitymas
PROGRAMŲ LENTELĖ
19
19 Programų lentelė
PRIEDAS
21
21 Audinių priežiūros lentelė
21 Su elektros įranga susiję įspėjimai
21 Aplinkos apsauga
22 Atitikties deklaracija
22 Specifikacija

6_ Skalbimo mašinos montavimas
skalbimo mašinos montavimas
SKALBIMO MAŠINOS IŠPAKAVIMAS
Išpakuokite savo skalbimo mašiną ir patikrinkite, ar transportavimo metu ji nebuvo pažeista. Įsitikinkite, kad
kartu su ja gavote visus toliau nurodytus komponentus. Jei skalbimo mašinai padaryta žala transportavimo
metu arba, jei radote ne visus komponentus, nedelsdami kreipkitės į „Samsung“ atstovą.
SKALBIMO MAŠINOS VAIZDAS
Raktas Vandens tiekimo žarna Žarnos kreiptuvas Varžtų angų dangteliai
Viršutinis dangtis
Vandens išleidimo
žarna
Kištukas
Nešvarumų filtras
Avarinio išleidimo vamzdelis
Valdymo skydas
Apatinis dangtis
Durelių fiksatorius
Filtro dangtelis

Skalbimo mašinos montavimas _7
VIETOS IŠRINKIMAS
Prieš montuodami skalbimo mašiną, išrinkite jai vietą, atitinkančią tokius reikalavimus:
• Kietas ir lygus paviršius (jei paviršius nelygus, žr. „Išlyginimo kojelių reguliavimas“ toliau)
• Apsaugota nuo tiesioginės saulės šviesos
• Pakankama ventiliacija
• Temperatūra patalpoje negali nukristi žemiau 0 ˚C
• Laikykite atokiau nuo šilumos šaltinių, pvz., naudojančių anglis arba dujas
Įsitikinkite, kad skalbimo mašina nestovi ant savo maitinimo laido.
Jei skalbimo mašina montuojama ant kilimais išklotų grindų, kilimas negali uždengti ventiliacijos
angų.
IŠLYGINIMO KOJELIŲ REGULIAVIMAS
Jei grindys nelygios, sureguliuokite kojeles (draudžiama po
kojelėmis kišti medinius ar kitokius daiktus):
1. Ranka sukite kojelės varžtą, kol ji bus norimo aukščio.
2. Veržliarakčiu priveržkite fiksavimo veržlę.
Pastačius skalbyklę ant nelygaus ar netvirto paviršiaus, galimas
triukšmas ar vibracija. (Leidžiamas tik 1 laipsnio kampas.)
TRANSPORTAVIMO VARŽTŲ ŠALINIMAS
Prieš naudodami skalbimo mašiną, iš galinės jos dalies išimkite
visus transportavimo varžtus. Norėdami išimti varžtus:
1. Iš pradžių veržliarakčiu atsukite visus varžtus.
2. Suimkite kiekvieną varžtą už galvutės ir ištraukite per
plačiąją angos dalį.
Tai padarykite su kiekvienu varžtu.
3. Uždenkite angas su tam skirtais plastikiniais dangteliais.
4. Transportavimo varžtų neišmeskite, nes jų gali prireikti
ateityje.
01 Skalbimo mašinos montavimas
atlaisvinti
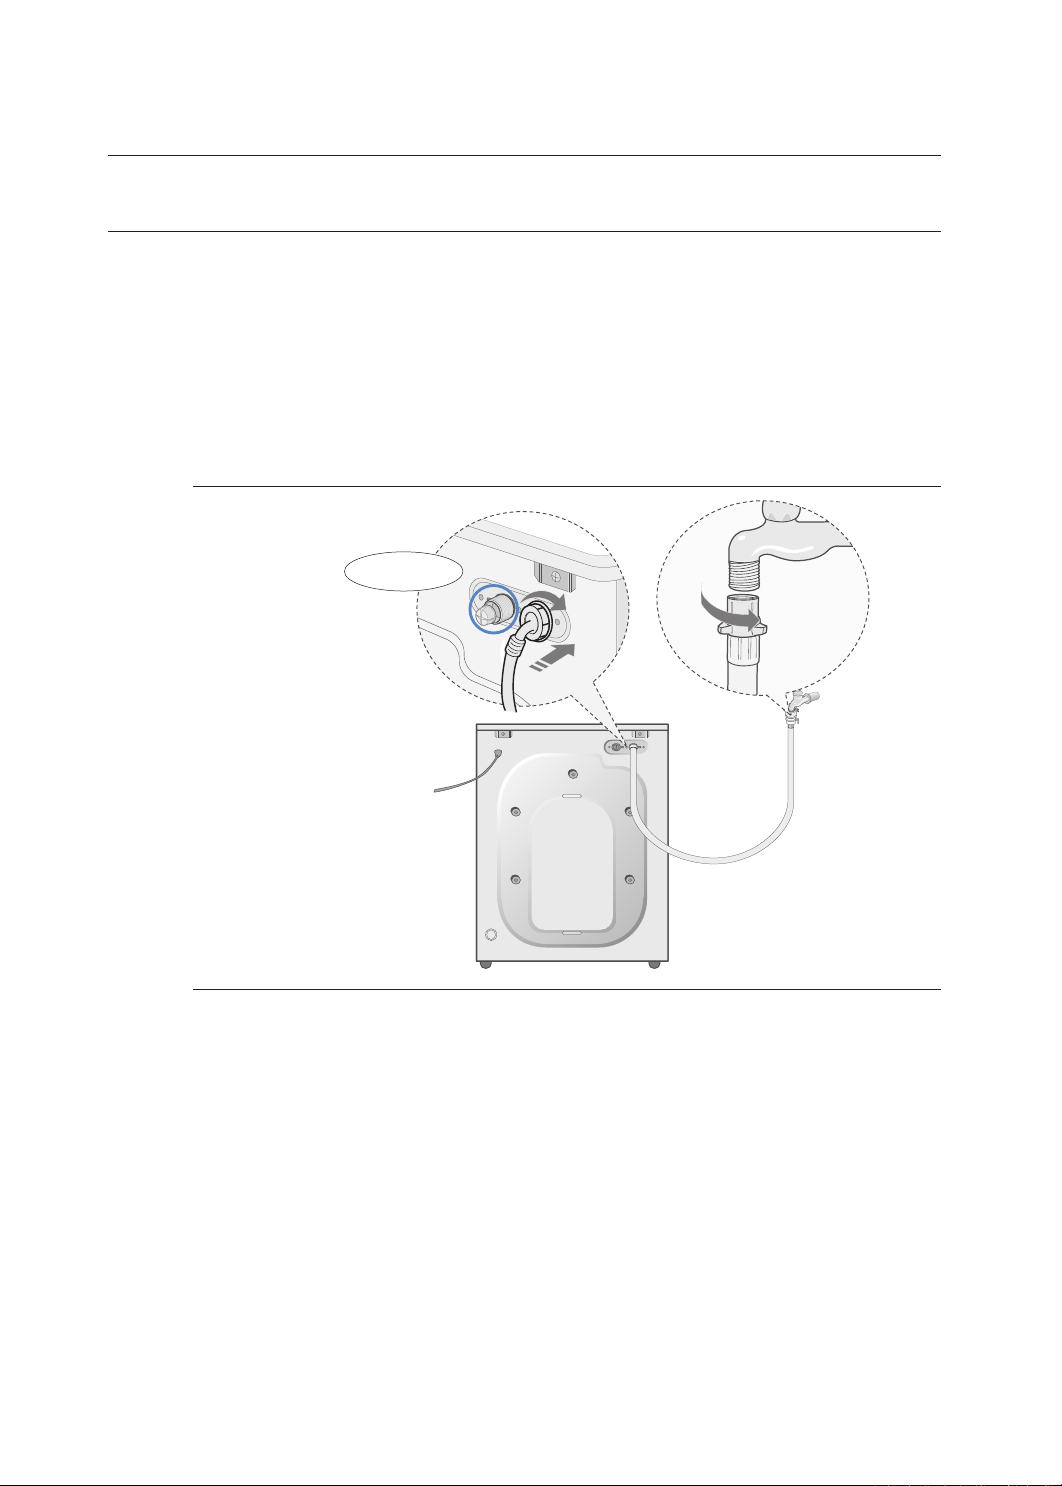
8_ Skalbimo mašinos montavimas
VANDENS TIEKIMO ŽARNOS PRIJUNGIMAS
Vieną vandens tiekimo žarnos galą reikia prijungti prie skalbimo mašinos, o kitą – prie vandens čiaupo.
Neįtempkite vandens tiekimo žarnos. Jei žarna per trumpa, ją pakeiskite ilgesne, aukštam slėgiui tinkama
žarna.
Norėdami prijungti vandens tiekimo žarną:
1. Paimkite L formos alkūninę jungiamąją detalę, skirtą šalto vandens tiekimo žarnai, ir prijunkite
ją prie šalto vandens įleidimo įrenginio galinėje skalbyklės dalyje. Priveržkite rankiniu būdu.
2. Kitą šalto vandens tiekimo žarnos galą prijunkite prie prausyklės šalto vandens tiekimo
čiaupo ir priveržkite rankiniu būdu. Prireikus galite pakeisti vandens tiekimo žarnos padėtį
užpakalinėje skalbimo mašinos dalyje atlaisvindami jungiamąją detalę, sukdami žarną ir iš
naujo priverždami jungiamąją detalę.
Pasirinktinai:
1. Paimkite raudoną L formos alkūninę jungiamąją detalę, skirtą karšto vandens tiekimo žarnai,
ir ją prijunkite prie raudono, karšto vandens įleidimo įrenginio, esančio galinėje skalbyklės
dalyje. Priveržkite rankiniu būdu.
2. Kitą karšto vandens tiekimo žarnos galą prijunkite prie prausyklės karšto vandens tiekimo
čiaupo ir priveržkite rankiniu būdu.
3. Naudokite „Y“ formos dalį, jei norėsite naudoti šaltą vandenį.
skalbimo mašinos montavimas
Karšto vandens tiekimo
vožtuvas
Pasirinktinai

Skalbimo mašinos montavimas _9
VANDENS TIEKIMO ŽARNOS PRIJUNGIMAS (PASIRINKTINAI)
1. Nuo vandens tiekimo žarnos nuimkite adapterį.
2. Pirmiausia kryžminiu atsuktuvu atlaisvinkite keturis adapterio
varžtus. Po to laikydami adapterį, rodyklės kryptimi sukite (b)
dalį tol, kol atsiras 5 mm tarpelis.
3. Adapterį prijunkite prie vandens čiaupo, tvirtai priverždami
varžtus.
Tada rodyklės kryptimi sukite (b) dalį tol, kol (a) ir (b) dalys
susilies.
4. Prie adapterio prijunkite vandens tiekimo žarną. Žemyn
patraukite vandens tiekimo žarnos (c) dalį.
Kai (c) dalį atleisite, žarna spragtelėdama automatiškai
prisijungs prie adapterio.
5. Kitą vandens tiekimo žarnos galą prijunkite prie vandens
įleidimo vožtuvo, esančio skalbyklės gale. Sukdami pagal
laikrodžio rodyklę, visiškai prisukite žarną.
Jei prijungus vanduo prateka iš žarnos, tai pakartokite tuos pačius veiksmus. Kaip vandens
šaltinį naudokite įprasto tipo čiaupą. Jei čiaupas yra kvadratinis arba per didelis, prieš
kišdami čiaupą į adapterį, išimkite tarpinę.
VANDENS IŠLEIDIMO ŽARNOS PADĖTIES NUSTATYMAS
Vandens išleidimo žarnos galą galima nustatyti trimis būdais:
Uždėti ant prausyklės krašto
Vandens išleidimo žarna turi būti 60–90 cm aukštyje.
Norėdami, kad jos galas būtų sulenktas, naudokite tam
skirtą plastikinį žarnos laikiklį. Kad žarna negalėtų judėti,
pritvirtinkite laikiklį prie sienos kabliu arba prie čiaupo
virve.
Pritvirtinti prie prausyklės vandens išleidimo vamzdžio atšakos
Išleidimo vamzdžio atšaka turi būti virš prausyklės sifono, o žarnos galas – ne mažesniame kaip
60 cm aukštyje virš grindų.
Pritvirtinti prie prausyklės vandens išleidimo vamzdžio
„Samsung“ rekomenduoja naudoti 65 cm aukščio vertikalų vamzdį; jis turi būti ne trumpesnis
kaip 60 cm ir ne ilgesnis kaip 90 cm.
01 Skalbimo mašinos montavimas
a
b
c

10_ Skalbimas
skalbimas
PIRMASIS SKALBIMAS
Prieš pirmąjį skalbimą būtina atlikti visą skalbimo ciklą be skalbinių.
Norėdami tai padaryti:
1. Paspauskite (On/Off (įjungimo/išjungimo)) mygtuką.
2. Į skalbimo priemonių stalčiaus skyrių ( ) įpilkite šiek tiek
skalbimo priemonės.
3. Įjunkite vandens į skalbimo mašiną tiekimą.
4. Spauskite mygtuką „Temp“ (Temperatūra) tol, kol bus
rodoma 40 ˚C temperatūra.
5. Paspauskite mygtuką „Start/Pause“ (Įjungimas/Pauzė).
• Taip pašalinsite vandenį, likusį skalbyklėje po gamintojo
atlikto bandomojo ciklo.
Dalytuvas : Pirminio skalbimo priemonės arba krakmolas.
Dalytuvas : Pagrindinio skalbimo priemonė, vandens minkštiklis, išankstinio mirkymo
priemonė, baliklis ir dėmių išėmiklis.
Dalytuvas : Priedai, pvz., audinių minkštiklis arba formavimo priemonė (pilkite ne daugiau nei
apatinis įdėklo „A“ kraštas)
SKALBIMO PRIEMONĖS ĮPYLIMAS Į SKALBIMO MAŠINĄ
1. Ištraukite skalbimo priemonių stalčių.
2. Į skyrių ( ) įpilkite skalbimo priemonės.
3. Į skyrių ( ) įpilkite minkštiklio (jei norite).
4. Į skyrių ( ) įpilkite pirminio skalbimo priemonės (jei pageidaujate).
Prieš pilant į dalytuvą, koncentruotą arba tirštą audinių
minkštiklį ir minkštinimo priemonę reikia atskiesti trupučiu
vandens (taip neleidžiama užsikimšti nutekamajam vamzdžiui).
DĖMESIO

Skalbimas _11
VALDYMO SKYDO APŽVALGA
Skaitmeninis
grafinis ekranas
Parodo likusį skalbimo ciklo laiką, visą skalbimo informaciją ir pranešimus apie
klaidas.
Skalbimo
sistemos,
naudojančios
sidabrą,
pasirinkimo
mygtukas ( )
Sidabro nanodalelėmis paveiktas vanduo tiekiamas skalbimo metu, taip
pat paskutinio skalavimo metu, atlikdamas sterlizavimą ir suteikdamas
antibakterinę dangą. (Galite pasirinkti „Sterilization“ (Sterilizavimas) arba
„Protection“ (Apsauga), „Sterilization“ (Sterilizavimas) + „Protection“
(Apsauga).)
Pasirinkimo
mygtukas „Less
Ironing“ (Mažiau
Lyginti)
Funkcija „Less Ironing“ (Mažiau Lyginti) mažina raukšlėjimąsi ir lyginimo laiką.
(galimi ciklai: „Cotton“ (Medvilnė), „Coloureds“ (Spalvoti audiniai), „Quick“
(Greitasis skalbimas), „Heavy Soil“ (Labai Sutepti), „Mixed Load“ (Įvairūs
Audiniai), „Rinse+Spin“ (Skalavimas ir Gręžimas), „Spin“ (Gręžimas))
Funkcijos
pasirinkimo
mygtukas „PreWash“ (Pirminis
Skalbimas)
Paspauskite mygtuką, kad pasirinktumėte pirminio skalbimo funkciją.
„Prewash“ (Pirminis Skalbimas) funkciją galima naudoti tik „Cotton“
(Medvilnė), „Coloureds“ (Spalvoti audiniai), „Synthetics“ (Sintetiniai audiniai),
„Jean“ (Džinsai), „Heavy Soil“ (Labai Sutepti), „Mixed Load“ (Įvairūs Audiniai)
ciklams.
„Intensive“
(intensyvus
skalbimas)
pasirinkimo
mygtukas
Pasirinkę, padidinsite skalbimo galingumą. Šią funkciją galite rinktis tik su
„Cotton“ (medvilnė), „Coloreds“ (spalvoti), „Synthetics“ (sintetika), „Jeans“
(džinsai), „Heavy Soil“ (labai sutepti), „Mixed Load“ (įvairūs audiniai) ir „Calm
Wash“ (ramus skalbimas) skalbimo ciklais. Paspausdami šį mygtuką, rinksitės
iš „On“ (įjungta) ir „Off“ (išjungta).
Funkcijos
pasirinkimo
mygtukas (Child
Lock) „Užraktas
nuo vaikų“
Šismygtukas skirtas neleisti vaikams naudotis skalbimo mašina.
On/Off (Įjungimas / išjungimas) – norėdami įjungti programą: Paspauskite
mygtuką Start/Pause (Įjungimas/Pauzė), norėdami įjungti skalbimo mašiną.
Paspauskite ir laikykite nuspaudę „Intensive“ (Intensyvus skalbimas) +
„Temp“ (Temperatūra) mygtuką 2–3 sekundes. Ją galima suaktyvinti įjungus
mašiną. Kai skalbimo metu įjungsite funkciją „Užraktas nuo vaikų“, negalėsite
suaktyvinti jokio mygtuko tol, kol jos neišjungsite. Galite suaktyvinti tik
mygtuką POWER (maitinimas). Užsidega „Užrakto nuo vaikų“ lemputė.
Norėdami programą išjungti: Dar kartą paspauskite ir laikykite nuspaudę
“Mygtukus „Intensive“ (Intensyvus skalbimas) + „Temp“ (Temperatūra) 2–3
sekundes, tada lemputė užges ir funkcija išsijungs.
Pirmiausia patikrinkite mygtuką Child Lock (Užraktas nuo vaikų), kai
dirbant skambimo mašinai nesuaktyvintas joks mygtukas.
02 Skalbimas
6
5
4
3
2
1

12_ Skalbimas
Temperatūros
pasirinkimo
mygtukas
Pakartotinai spausdami šį mygtuką, pasirinkite vieną iš galimų vandens
temperatūros parinkčių. (šaltas (0 ˚C), 30 ˚C, 40 ˚C, 60 ˚C ir 95 ˚C)
Paspauskite
mygtuką „Rinse
Times“ (Skalavimo
Laikai)
Paspauskite mygtuką „rinse“ (skalavimas), norėdami pridėti skalavimo ciklų.
Maksimalus skalavimo ciklų skaičius yra penki.
Pasirinkimo
mygtukas „Spin“
(Gręžimas)
Pakartotinai spausdami šį mygtuką pasirinkite vieną iš galimų gręžimo variantų.
WF7704S8/WF7604S8 0, 400, 800, 1400 aps./min.
WF7702S8/WF7602S8/WF7522S8/WF7452S8 0, 400, 800, 1200 aps./min.
WF7700S8/WF7600S8/WF7520S8/WF7450S8/WF7350S8
0, 400, 800, 1000 aps./min.
WF7708S8/WF7608S8/WF7528S8/WF7458S8/WF7358S8
0, 400, 600, 800 aps./min.
0 : negręžti Jokio rodinio: Skalavimas Sulaikytas
Pasirinkimo
mygtukas „Delay
Start“ (Uždelstas
Paleidimas)
Pakartotinai paspauskite mygtuką, kad įjungtumėte galimas uždelsto
paleidimo parinktis (nuo 3 iki 24 valandų, vienos valandos žingsniu).
Rodomos valandos reiškia skalbimo ciklo pabaigos laiką.
„Fuzzy“ valdymo
ratukas
Sukdami šį ratuką, pasirinkite vieną iš 14 galimų skalbimo programų:
„Cotton“ (Medvilnė), „Coloureds“ (Spalvoti audiniai), „Synthetics“ (Sintetiniai
audiniai), „Delicate Fabrics“ (Jautrūs Audiniai), „Hand Wash For Wool“
(Rankomis Skalbiami Vilnoniai Audiniai), „Jeans“ (Džinsai), „Quick“ (Greitasis
skalbimas), „Rinse+Spin“ (Skalavimas ir Gręžimas), „Spin“ (Gręžimas), „Drain“
(Vandens išleidimas), „Silk“ (Šilkas), „Heavy Soil“ (Labai Sutepti), „Mixed Load“
(Įvairūs Audiniai), „Calm Wash“ (Ramus Skalbimas).
Funkcijos
pasirinkimo
mygtukas „Start/
Pause“ (Įjungimas/
Pauzė)
Spauskite, jei norite laikinai sustabdyti ir vėl įjungti skalbimo programą.
Funkcijos
pasirinkimo
mygtukas („On/
Off“ (Įjungimas/
išjungimas))
Vieną kartąpaspauskite, kad įjungtumėte skalbimo mašiną, dar kartą
paspauskite, kad skalbimo mašiną išjungtumėte. Jei įjungus elektros tiekimą
į skalbimo mašiną ilgiau nei 10 minučių nepaspaudžiamas joks mygtukas,
mašinos maitinimas automatiškai atjungiamas.
DRABUŽIŲ SKALBIMAS NAUDOJANT SISTEMĄ „FUZZY LOGIC“
Naujoji skalbimo mašina palengvina drabužių skalbimą, naudodama „Samsung“ „Fuzzy Logic“ automatinę
valdymo sistemą. Kai pasirinksite skalbimo programą, mašina nustatys tinkamą temperatūrą, skalbimo laiką
ir skalbimo greitį.
Norėdami skalbti drabužius, naudodami „Fuzzy Logic“ programas:
1. Atsukite prausyklės vandens čiaupą.
2. Paspauskite (On/Off (Įjungimas/išjungimas)) mygtuką.
3. Atidarykite dureles.
4. Po vieną laisvai sudėkite skalbinius į būgną, nepridėkite per daug.
5. Uždarykite dureles.
6.
Į atitinkamą skyrių įpilkite skalbimo priemonės, minkštiklio ir pirminio skalbimo priemonių (jei reikia).
skalbimas
12
13
10
11
8
9
7

Skalbimas _13
7
. Pasukite „Fuzzy“ valdymo ratuką, kad
pasirinktumėte atitinkamą programą skalbti
drabužiams, kurių tipas yra „Cotton“
(Medvilnė), „Coloureds“ (Spalvoti audiniai),
„Synthetics“ (Sintetiniai audiniai), „Delicate
Fabrics“ (Jautrūs Audiniai), „Hand Wash
For Wool“ (Rankomis Skalbiami Vilnoniai
Audiniai), „Jeans“ (Džinsai), „Quick“ (Greitasis
skalbimas), „Rinse+Spin“ (Skalavimas
ir Gręžimas), „Spin“ (Gręžimas), „Drain“
(Vandens išleidimas), „Silk“ (Šilkas), „Heavy
Soil“ (Labai Sutepti), „Mixed Load“ (Įvairūs
Audiniai), „Calm Wash“ (Ramus Skalbimas).
Valdymo skyde matysite užsidegančius
indikatorius.
8. Šiuo metu paspaudę atitinkamą parinkties mygtuką, galėsite valdyti skalbimo temperatūrą,
skalavimo laikus, gręžimo greitį, uždelsto paleidimo laiką.
9. Paspauskite „Fuzzy“ valdymo ratuko mygtuką Start/Pause (Įjungimas/Pauzė) ir prasidės
skalbimo ciklas. Užsidegs proceso indikatorius ir ekrane bus rodomas likęs ciklo laikas.
Pauzės parinktis (skalbinių skalbimo ir sustabdymo funkcija)
Jei paspausite mygtuką „Start/Pause“ (Įjungimas/Pauzė), durelės bus iš karto atrakinamos.
Jei skalbyklėje per karštas vanduo arba jo yra per daug, durelių atidaryti negalima.
Uždarę dureles, dar vieną kartą paspauskite mygtuką „Start/Pause“ (Įjungimas/Pauzė), norėdami
tęsti skalbimo procesą be pertraukos.
Kai ciklas baigiamas:
Visam ciklui pasibaigus, maitinimas išsijungs automatiškai.
1. Atidarykite dureles.
2. Išimkite skalbinius.
RANKINIS DRABUŽIŲ SKALBIMAS
Drabužius galite skalbti rankiniu būdu, nenaudodami intelektualaus valdymo funkcijos „Fuzzy Logic“.
Norėdami tai padaryti:
1. Įjunkite vandens tiekimą.
2. Paspauskite skalbyklės
(On/Off (įjungimo/išjungimo)) mygtuką.
3. Atidarykite dureles.
4. Po vieną laisvai sudėkite skalbinius į būgną, nepridėkite per daug.
5. Uždarykite dureles.
6.
Į atitinkamus skyrius įpilkite skalbimo priemonės, jei reikia, minkštiklio arba pirminio skalbimo priemonių.
7. Paspauskite mygtuką „Temperature“ (Temperatūra), kad pasirinktumėte temperatūrą.
(šaltas (0 ˚C), 30 ˚C, 40 ˚C, 60 ˚C, 95 ˚C)
8.
Paspauskite mygtuką „Rinse“ (Skalavimas), kad pasirinktumėte reikiamą skalavimo ciklų skaičių.
Maksimalus skalavimo ciklų skaičius yra penki.
Atitinkamai pailgės skalbimo trukmė.
9. Paspauskite mygtuką „Spin“ (Gręžimas), kad pasirinktumėte gręžimo greitį. [0, 400, 600,
800, 1000, 1200 arba 1400 apsisukimų per minutę (aps./min.)]
Skalavimo sulaikymo programa leidžia išimti iš skalbimo mašinos drabužius, nuo kurių varva vanduo.
0 : Jokio gręžimo, jokio rodinio: Skalavimo Sulaikymas)
10. Pakartotinai paspauskite mygtuką, kad įjungtumėte galimus uždelsto paleidimo variantus
(nuo 3 iki 24 valandų, vienos valandos žingsniu). Rodomos valandos reiškia skalbimo ciklo
pabaigos laiką.
11. Paspauskite Start/Pause (Įjungimas/Pauzė) mygtuką ir skalbyklė pradės vykdyti ciklą.
02 Skalbimas

14_ Skalbimas
UŽDELSTO PALEIDIMO NAUDOJIMAS
Galite nustatyti skalbimo mašiną, kad automatiškai pabaigtų skalbimą vėliau, pasirinkdami nuo 3 iki 24
valandų delsą (1 valandos žingsniais). Rodomos valandos reiškia skalbimo ciklo pabaigos laiką.
Norėdami tai padaryti:
1. Rankiniu arba automatiniu būdu nustatykite savo skalbimo mašiną, atsižvelgdami į skalbiamų
drabužių tipą.
2. Pakartotinai spauskite mygtuką „Delay Start“ (Uždelstas Paleidimas) tol, kol nustatysite
delsos laiką.
3. Paspauskite Start/Pause (Įjungimas / pauzė) mygtuką. Užsidegs uždelsto paleidimo
indikatorius ir laikrodis vykdys atskaitą atgal tol, kol bus pasiektas pabaigos laikas.
4. Norėdami atšaukti „Delay Start“ (Uždelstas Paleidimas), paspauskite (On/Off (Įjungimas/
išjungimas)) mygtuką, tada dar kartą įjunkite skalbimo mašiną.
SKALBIMO PATARIMAI
Surūšiuokite skalbinius: Surūšiuokite skalbinius pagal toliau nurodytas savybes:
• Etiketėje nurodytą audinio tipo simbolį: Skalbinius rūšiuokite į medvilninius, mišraus
pluošto, sintetinius, šilkinius, vilnonius ir dirbtinio šilko.
• Spalvą: Atskirkite baltus ir spalvotus skalbinius. Naujus spalvotus skalbinius skalbkite atskirai.
• Dydį: Skalbimas pagerės, jei kartu skalbsite įvairių dydžių gaminius.
• Jautrumą: Jautrius gaminius skalbkite atskirai, o naujiems gaminiams iš grynos vilnos,
užuolaidoms ir šilkiniams gaminiams skalbti naudokite programą „Wool“ (vilna). Žr. skalbiamų
gaminių etiketes arba šios instrukcijos priede pateiktą audinių priežiūros schemą.
Ištuštinkite kišenes: Monetos, segtukai ir kiti panašūs daiktai gali sugadinti skalbinius, skalbimo
mašinos būgną ir vandens rezervuarą.
Užsekite susegimus: Užtraukite užtrauktukus ir susekite sagas ar kabliukus; palaidus dirželius
ar kaspinus suriškite.
Medvilnės pirminio skalbimo funkcija: Naudodami naująją skalbimo mašiną kartu su
moderniomis skalbimo priemonėmis, pasieksite geriausių skalbimo rezultatų, taip pat sutaupysite
energijos, laiko, vandens ir skalbimo priemonės. Tačiau jei medvilnė ypač nešvari, naudokite
pirminį skalbimą su fermentų pagrindu pagaminta skalbimo priemone.
Nustatykite skalbinių partijos dydį: Neperkraukite skalbimo mašinos, antraip skalbiniai gali
būti nevisiškai išskalbti. Naudodamiesi toliau pateikta lentele, nustatykite skalbinių partijos dydį
atsižvelgdami į skalbinių tipą.
Audinio tipas
Skalbinių partijos svoris
WF7704S8
WF7702S8
WF7700S8
WF7708S8
WF7604S8
WF7602S8
WF7600S8
WF7608S8
WF7522S8
WF7520S8
WF7528S8
WF7452S8
WF7450S8
WF7458S8
WF7350S8
WF7358S8
„Cotton“ (Medvilnė) /
„Coloureds“ (Spalvoti audiniai)
7.0 kg 6.0 kg 5.2 kg 4.5 kg 3.5 kg
Greitasis skalbimas
3.0 kg 3.0 kg 2.5 kg 2.5 kg 2.0 kg
Delicate Fabrics (Jautrūs Audiniai)
2.5 kg 2.5 kg 2.0 kg 2.0 kg 1.5 kg
Silk (Šilkas) 2.0 kg 2.0 kg 1.5 kg 1.5 kg 1.5 kg
Patarimai dėl skalbimo priemonių: Skalbimo priemonę rinkitės atsižvelgdami į audinio tipą
(medvilniniai, švelnūs, šilkas), spalvą, skalbimo temperatūrą, užteršimo laipsnį ir pobūdį.
Visada rinkitės „mažai putojantį“ skalbimo muilą, skirtą automatinėms skalbimo mašinoms.
Vadovaukitės skalbimo priemonės gamintojo rekomendacijomis, atsižvelgdami į skalbinių svorį,
užteršimo laipsnį ir jūsų regiono vandens kietumą. Jei nežinote, koks yra vandens kietumas,
kreipkitės į vandens t
iekimo įstaigą.
Skalbimo priemones ir priedus laikykite saugioje, sausoje ir vaikams nepasiekiamoje vietoje.
skalbimas

Skalbimo mašinos priežiūra _15
skalbimo mašinos priežiūra
AVARINIS SKALBIMO MAŠINOS IŠLEIDIMAS
1. Atjunkite skalbimo mašiną nuo el. maitinimo lizdo.
2. Moneta arba raktu atidarykite filtro dangtelį.
3. Sukdami į kairę, atsukite vandens avarinio išleidimo dangtelį.
Paimkite už dangtelio, esančio avarinio išleidimo vamzdelio
gale, ir lėtai jį ištraukite iki apytiksliai 15 cm ilgio.
4. Leiskite visam vandeniui ištekėti į dubenį.
5. Įkiškite išleidimo vamzdį atgal ir užsukite dantelį.
6. Uždėkite atgal filtro dangtelį.
UŽŠALUSIOS SKALBIMO MAŠINOS TAISYMAS
Jei temperatūra nukrito iki mažesnės nei nulinė, ir jūsų skalbimo mašina užšalo:
1. Atjunkite skalbimo mašiną nuo elektros tinklo.
2. Pilkite šiltą vandenį ant tiekiamo vandens čiaupo, kad atšiltų vandens tiekimo žarna.
3. Nuimkite vandens tiekimo žarną ir mirkykite ją šiltame vandenyje.
4. Įpilkite šilto vandens į skalbimo mašinos būgną ir palikite 10 minučių.
5. Vėl prijunkite vandens tiekimo žarną prie vandens čiaupo ir patikrinkite, ar vanduo normaliai tiekiamas ir
išleidžiamas.
IŠORĖS VALYMAS
1. Išorinius skalbimo mašinos paviršius, įskaitant valdymo skydą, nušluostykite minkšta šluoste ir
neabrazyviniu buitiniu valikliu.
2. Nusausinkite paviršius sausa šluoste.
3. Nepilkite ant skalbimo mašinos vandens.
03 Skalbimo mašinos priežiūra

16_ Skalbimo mašinos priežiūra
SKALBIMO PRIEMONĖS STALČIAUS IR NIŠOS VALYMAS
1. Skalbimo priemonės stalčiaus viduje paspauskite fiksatoriaus svirtį ir ištraukite stalčių.
2. Iš skyriaus išimkite dangtelį ( ).
3. Visas dalis nuplaukite tekančiu vandeniu.
4. Stalčiaus nišas valykite senu dantų šepetėliu.
5. Uždėkite dangtelį (tvirtai spausdami įstatykite į vietą) ir į stalčių įdėkite skystos skalbimo
priemonės skyriklį.
6. Įstatykite stalčių atgal į vietą.
7. Vykdykite skalavimo programą, kai būgne nėra skalbinių.
NEŠVARUMŲ FILTRO VALYMAS
Nešvarumų filtrą valykite 5 arba 6 kartus per metus, arba kai ekrane
pamatysite tokį pranešimą apie klaidą:
1. Atidarykite filtro dangtelį, žr. „Avarinis vandens išleidimas iš
skalbimo mašinos“, 15 psl.
2. Sukdami į kairę, atsukite avarinio išleidimo dangtelį ir
išleiskite visą vandenį.
Žr. „Avarinis skalbimo mašinos išleidimas“, 15 psl.
3. Atsukite ir nuimkite filtro dangtelį.
4. Išplaukite iš filtro visą purvą ir kitas medžiagas. Patikrinkite,
ar neužblokuotas už filtro esantis išleidimo siurblio sraigtas.
Uždėkite atgal filtro dangtelį.
5. Uždėkite atgal filtro dangtelį.
skalbimo mašinos priežiūra

Skalbimo mašinos priežiūra _17
VANDENS ŽARNOS TINKLINIO FILTRO VALYMAS
Vandens žarnos tinklinį filtrą reikia valyti bent kartą per metus arba kai
ekrane matysite tokį pranešimą apie klaidą:
Norėdami tai padaryti:
1. Atjunkite vandens tiekimą į skalbimo mašiną.
2. Atsukite žarną nuo skalbimo mašinos galinės dalies.
3. Replėmis atsargiai ištraukite tinklinį filtrą iš žarnos galo ir
skalaukite jį vandeniu, kol išvalysite. Taip pat nuvalykite
jungiamosios dalies su sriegiu vidų ir išorę.
4. Įstatykite filtrą atgal į vietą.
5. Prisukite žarną atgal ant skalbimo mašinos galinės dalies.
6. Atsukite čiaupą ir patikrinkite, ar jungtys sandarios.
03 Skalbimo mašinos priežiūra
Pasirinktinai
Pasirinktinai

18_ Trikčių diagnostika ir šalinimas
trikčių diagnostika ir šalinimas
PROBLEMOS IR SPRENDIMAI
PROBLEMA SPRENDIMAS
Skalbimo mašina
neįsijungia
• Įsitikinkite, kad durelės gerai uždarytos.
• Įsitikinkite, kad skalbimo mašina prijungta prie elektros tinklo.
• Įsitikinkite, kad atsuktas vandens tiekimo čiaupas.
• Paspauskite mygtuką „Start/Pause“ (Įjungimas/Pauzė).
Vandens nėra arba
vandens tiekimas
nepakankamas
• Įsitikinkite, kad atsuktas vandens tiekimo čiaupas.
• Įsitikinkite, kad vandens tiekimo žarna neužšalusi.
• Įsitikinkite, kad vandens tiekimo žarna nesulenkta.
• Įsitikinkite, kad filtras vandens tiekimo žarnoje neužsikimšo.
Baigus skalbimo
programą, skalbimo
priemonių stalčiuje liko
skalbimo priemonės
• Įsitikinkite, kad skalbimo mašina veikia esant pakankamam vandens
slėgiui.
• Skalbimo priemonę pilkite vidinėje skalbimo priemonių stalčiaus dalyje
(toliau nuo išorinių kraštų).
Skalbimo mašina
vibruoja arba veikia per
daug triukšmingai
• Įsitikinkite, kad skalbimo mašina pastatyta ant lygaus paviršiaus. Jei
grindų paviršius nelygus, sureguliuokite skalbimo mašinos kojeles, kad ji
stovėtų lygiai.
• Įsitikinkite, kad išimti transportavimo varžtai.
• Įsitikinkite, kad skalbimo mašina nesiliečia su šalia esančiais daiktais.
• Įsitikinkite, kad skalbinių kiekis subalansuotas.
Skalbimo mašina
neišleidžia vandens
ir/arba negręžia
• Įsitikinkite, kad išleidimo žarna nesuspausta ir nesulenkta.
• Įsitikinkite, kad vandens žarnos filtras neužsikimšęs.
Jei durelės neatsidaro:
• Ištraukite maitinimo kabelio kištuką iš el. maitinimo
lizdo.
• Iš skalbimo mašinos išleiskite vandenį.
• Moneta atidarykite filtro dangtelį.
• Suraskite oranžinę plastmasinę atidarymo kilpelę ir
patraukite ją į priekį, kad durelės atsidarytų.
PRANEŠIMŲ APIE KLAIDAS SKAITYMAS
KLAIDOS KODAS SPRENDIMAS
door
• Uždarykite dureles.
4E
• Įsitikinkite, kad atsuktas vandens tiekimo čiaupas.
• Patikrinkite vandens slėgį.
5E
• Išvalykite nešvarumų filtrą.
• Įsitikinkite, kad tinkamai prijungta vandens išleidimo žarna.
UE
• Skalbinių kiekis nesubalansuotas; atlaisvinkite susinarpliojusius
skalbinius.
Jei reikia skalbti tik vieną drabužį, pvz., chalatą ar džinsus, baigiamojo
gręžimo rezultatai gali būti nepatenkinami, o ekrane matysite pranešimą
apie klaidą „UE“.
cE/3E
• Paskambinkite garantinės priežiūros skyriui.
Prieš kreipdamiesi į garantinės priežiūros skyrių:
1. Pabandykite patys pašalinti problemą (žr. „Trikčių diagnostika ir šalinimas“ šiame puslapyje).
2. Įjunkite programą iš naujo ir pažiūrėkite, ar triktis pasikartos.
3. Jei gedimas neišnyko, paskambinkite garantinės priežiūros skyriui ir apibūdinkite kilusią problemą.

Programų lentelė _19
programų lentelė
PROGRAMŲ LENTELĖ
( vartotojo pasirinkimas)
Programa
Maksimalus kiekis (kg)
Skalbimo priemonės
ir priedai
Temper-
atūra
(MAKS.)
(˚C)
Gręžimo greitis (MAKS.) aps./min.
Atidėtas
įjungimas
Ciklo
trukmė
(min.)
WF7704S8
WF7702S8
WF7700S8
WF7708S8
WF7604S8
WF7602S8
WF7600S8
WF7608S8
WF7522S8
WF7520S8
WF7528S8
WF7452S8
WF7450S8
WF7458S8
WF7350S8
WF7358S8
Pirminis
skalbi
-
mas
Skal
-
bimas
Minkštiklis
WF7704S8
WF7604S8
WF7702S8
WF7602S8
WF7522S8
WF7452S8
WF7700S8
WF7600S8
WF7520S8
WF7450S8
WF7350S8
WF7708S8
WF7608S8
WF7528S8
WF7458S8
WF7358S8
Cotton
(Medvilnė)
7.0 6.0
5.2
4.5 3.5
taip
95 1400 1200 1000 800
90
Coloureds
(Spalvoti)
7.0 6.0 5.2 4.5 3.5
taip
60 1400 1200 1000 800
98
Synthetics
(Sintetiniai
audiniai)
3.0 3.0 2.5 2.5 2.0
taip
60 1400 1200 1000 600
71
Delicate
Fabrics
(Jautrūs
Audiniai)
2.5 2.5 2.0 2.0 1.5 - taip
40 800 800 800 600
53
Handwash
for Wool
(Rankomis
Skalbiami
Vilnoniai
Audiniai)
2.0 2.0 1.5 1.5 1.0 - taip
40 800 800 800 400
39
Jeans
(Džinsai)
2.0 2.0
1.5
1.5 1.0
taip
40 800 800 800 400
60
Quick
(Greitasis
skalbimas)
3.0 3.0 2.0 2.0 1.5 - taip
60 1400 1200 1000 800
28
Program
(programa)
Skalbimo tipas
Cotton (Medvilnė) Vidutiniškai ar silpnai užteršti medvilniniai audiniai, paklodės ir užvalkalai, staltiesės,
apatiniai drabužiai, rankšluosčiai, marškiniai ir pan.
Coloureds
(Spalvoti)
Vidutiniškai ar silpnai užteršti medvilniniai audiniai, paklodės ir užvalkalai, staltiesės,
apatiniai drabužiai, rankšluosčiai, marškiniai ir pan.
Synthetics
(Sintetiniai audiniai)
Lengvai ar vidutiniškai užterštos palaidinės, marškiniai ir pan. Pagaminti ir
poliesterio („Diolen“, „Trevira“), poliamido (perlono, nailono) ar panašių mišinių.
Delicate Fabrics
(Jautrūs Audiniai)
Švelnaus audinio užuolaidos, suknelės, sijonai, marškiniai ir palaidinės.
Handwash for
Wool (Rankomis
Skalbiami
Vilnoniai Audiniai)
Tik tinkami skalbti mašinomis vilnoniai audiniai su grynos naujos vilnos etikete.
Quick (Greitasis
skalbimas)
Lengvai užterštos medvilninės ar lininės palaidinės, marškiniai, tamsūs frotiniai
audiniai, spalvoti gaminiai iš lino, džinsai ir pan.
1. Programų trukmių duomenys buvo išmatuoti sąlygomis, nurodytomis standarte IEC 456.
2. Sąnaudos atskirose naudojimo vietose gali skirtis nuo lentelėje nurodytų verčių dėl tiekiamo vandens
slėgio ir temperatūros skirtumų, dėl skalbinių kiekio ir tipo.
05 Programų lentelė

20_ Programų lentelė
( vartotojo pasirinkimas)
Programa
Maksimalus kiekis (kg)
Skalbimo
priemonės ir priedai
Temper-
atūra
(MAKS.)
(˚C)
Gręžimo greitis (MAKS.) aps./min.
Atidėtas
įjungimas
Ciklo
trukmė
(min.)
WF7704S8
WF7702S8
WF7700S8
WF7708S8
WF7604S8
WF7602S8
WF7600S8
WF7608S8
WF7522S8
WF7520S8
WF7528S8
WF7452S8
WF7450S8
WF7458S8
WF7350S8
WF7358S8
Pirmin
-
is
skalbi
-
mas
Skal
-
bimas
Minkštiklis
WF7704S8
WF7604S8
WF7702S8
WF7602S8
WF7522S8
WF7452S8
WF7700S8
WF7600S8
WF7520S8
WF7450S8
WF7350S8
WF7708S8
WF7608S8
WF7528S8
WF7458S8
WF7358S8
Silk (Šilkas)
7.0 6.0
5.2
4.5 3.5 - taip
30 400 400 400 400
35
Heavy Soil
(Dideli
Nešvarumai)
7.0 6.0 5.2 4.5 3.5
taip
60 1400 1200 1000 800
109
Mixed Load
(Įvairūs
Audiniai)
2.5 2.5 2.0 2.0 1.5
taip
60 800 800 800 800
76
Calm Wash
(Ramus
Skalbimas)
3.0 3.0 2.0 2.0 1.5
taip
40
96
Programa Skalbimo tipas
Silk (Šilkas) Šilkiniai marškiniai, palaidinės, suknelės ir pan.
Heavy Soil (Dideli
Nešvarumai)
Dėmėti arba stipriai užteršti medvilniniai audiniai, paklodės ir užvalkalai, staltiesės,
apatiniai drabužiai, rankšluosčiai, marškiniai džinsai ir pan.
Mixed Load
(Įvairūs Audiniai)
Lengvai užterštų medvilninių ir sintetinių audinių mišinys.
Calm Wash
(Ramus
Skalbimas)
Labai žemas triukšmo lygis viso skalbimo ciklo metu ir pabaigiama skalavimo
sulaikymo programa. Medvilniniai audiniai, paklodės ir užvalkalai, staltiesės,
apatiniai drabužiai, rankšluosčiai, marškiniai.
programų lentelė

Priedas _21
priedas
AUDINIŲ PRIEŽIŪROS LENTELĖ
Atspari medžiaga
Galima lyginti esant ne aukštesnei
kaip 100 ˚C temperatūrai
Jautrus audinys Nelyginti
Galima skalbti 95 ˚C temperatūroje
Galima valyti sausai naudojant bet
kokį valiklį
Galima skalbti 60 ˚C temperatūroje
Galima valyti sausai, tik perchloridu,
švelnesniais degalais, grynu
alkoholiu ar R113
Galima skalbti 40°C temperatūroje
Galima valyti sausai, tik aviaciniu
kuru, grynu alkoholiu ar R113
Galima skalbti 30 °C temperatūroje Sausas valymas draudžiamas
Galima skalbti rankomis Džiovinti ištiesus
Tik sausas valymas Džiovinti galima pakabinus
Galima balinti šaltame vandenyje Džiovinti ant pakabos
Nebalinti
Galima džiovinti skalbyklėje,
įprastinis karštis
Galima lyginti esant ne aukštesnei
kaip 200 ˚C temperatūrai
Galima džiovinti skalbyklėje,
mažesnis karštis
Galima lyginti esant ne aukštesnei
kaip 150 ˚C temperatūrai
Džiovinti skalbyklėje draudžiama
SU ELEKTROS ĮRANGA SUSIJĘ ĮSPĖJIMAI
Siekdami sumažinti gaisro, elektros smūgio ir įvairių sužeidimų pavojų, nepamirškite šių atsargumo
priemonių:
• Skalbyklę prijunkite tik prie tokio maitinimo šaltinio, koks nurodytas gaminio skydelyje. Jei nesate tikri,
kokio tipo maitinimas tiekiamas jūsų namuose, pasitarkite su skalbyklės pardavėju arba vietiniu elektros
tiekėju.
• Naudokite tik įžemintą arba polinį lizdą. Šį kištuką galima įkišti į maitinimo lizdą tik vienu būdu. Jei
nepavyksta įkišti kištuko į lizdą iki galo, pabandykite kištuką apversti. Jei kištukas vis tiek nelenda,
kreipkitės į savo elektriką, kad pakeistų lizdą.
• Saugokite maitinimo kabelį. Maitinimo kabelį reikia nutiesti taip, kad būtų kuo mažesnė galimybė ant jo
užminti arba jį prispausti uždedamais ar šalia esančiais daiktais. Ypač dėmesį kreipkite į kabelio vietas
ties kištuku ir kištukiniu lizdu bei vietą, kurioje jis išvestas iš skalbyklės.
• Neperkraukite sieninio lizdo arba ilgintuvų. Perkrova gali sukelti gaisrą arba elektros smūgį.
APLINKOS APSAUGA
• Ši skalbyklė pagaminta iš perdirbamų medžiagų. Nusprendę išmesti skalbyklę, laikykitės vietinių taisyklių
dėl atliekų išmetimo. Nupjaukite maitinimo laidą, kad skalbyklės nebūtų galima prijungti prie maitinimo
šaltinio. Išimkite dureles, kad gyvūnai ir maži vaikai negalėtų užsitrenkti skalbyklės viduje.
• Nenaudokite daugiau skalbimo priemonių nei rekomenduojama jų gamintojo instrukcijose.
• Dėmių išėmiklius ir baliklius naudokite prieš skalbimo ciklą, tik jei to tikrai reikia.
• Taupykite vandenį ir elektrą skalbdami tik pilnas skalbinių partijas (tikslus skalbinių kiekis priklauso nuo
naudojamos programos).
06 Priedas

22_ Priedas
ATITIKTIES DEKLARACIJA
Ši skalbyklė atitinka Europos saugumo standartus, EB Direktyvą Nr. 93/68 ir EN standartą Nr. 60335.
SPECIFIKACIJA
TIPAS SKALBYKLĖ SU DURELĖMIS PRIEKYJE
MATMENYS
WF7704S8/WF7702S8/WF7700S8/WF7708S8 WF7604S8/WF7602S8/WF7600S8/WF7608S8
W598mm X D600mm X H844mm W598mm X D550mm X H844mm
VANDENS SLĖGIS
50 kPa ~ 800 kPa
VANDENS KIEKIS
60 ℓ 54 ℓ
NETO SVORIS
WF7704S8/WF7702S8 WF7700S8/WF7708S8 WF7604S8/WF7602S8/ WF7600S8/WF7608S8
74kg 73kg 72kg 70kg
SKALBIMO IR GRĘŽIMO
GALIA
7.0 kg (SAUSŲ SKALBINIŲ) 6.0 kg (SAUSŲ SKALBINIŲ)
ENERGIJOS
SĄNAUDOS
MODELIS WF7704S8/WF7702S8/ WF7700S8/WF7708S8 WF7604S8/WF7602S8/WF7600S8/WF7608S8
SKALBIMAS IR
KAITINIMAS
220 V 2000 W 220 V 2000 W
240 V 2400 W 240 V 2400 W
GRĘŽI-
MAS
MODELIS WF7704S8 WF7702S8 WF7700S8 WF7708S8 WF7604S8 WF7602S8 WF7600S8 WF7608S8
230 V 700 W 360 W 320 W 270 W 580 W 530 W 500 W 430 W
SIURBIMAS
34 W
PAKUOTĖS
svoris
MODELIS WF7704S8/WF7702S8/WF7700S8/WF7708S8
WF7604S8/WF7602S8/WF7600S8/
WF7608S8
POPIERIUS
2.5 kg 2.5 kg
PLASTMASĖ
1.0 kg 1.0 kg
GRĘŽIMO
APSUKOS
MODELIS
WF7704S8/WF7604S8
WF7702S8/WF7602S8/WF7522S8/WF7452S8
aps./min.
1400 1200
priedas

Priedas _23
TIPAS SKALBYKLĖ SU DURELĖMIS PRIEKYJE
MATMENYS
WF7522S8/WF7520S8/WF7528S8 WF7452S8/WF7450S8/WF7458S8 WF7350S8/WF7358S8
W598mm X D450mm X
H844mm
W598mm X D404mm X
H844mm
W598mm X D340mm
X H844mm
VANDENS SLĖGIS
50 kPa ~ 800 kPa
VANDENS KIEKIS
49 ℓ 48 ℓ 43 ℓ
NETO SVORIS
WF7522S8/7520S8 WF7528S8 WF7452S8/7450S8 WF7350S8/7358S8
66kg 65kg 61kg 51kg
SKALBIMO IR GRĘŽIMO
GALIA
5.2 kg (SAUSŲ SKALBINIŲ) 4.5 kg (SAUSŲ SKALBINIŲ)
3.5 kg (SAUSŲ
SKALBINIŲ)
ENERGIJOS
SĄNAUDOS
MODELIS WF7522S8/WF7520S8/WF7528S8 WF7452S8/WF7450S8/WF7458S8 WF7350S8/WF7358S8
SKALBIMAS IR
KAITINIMAS
220 V 1900 W 220 V 1800 W 220 V 1800 W
240 V 2200 W 240 V 2100 W 240 V 2100 W
GRĘŽI-
MAS
MODELIS WF7522S8 WF7520S8 WF7528S8 WF7452S8 WF7450S8 WF7458S8 WF7350S8 WF7358S8
230 V 550 W 500 W 430 W 270 W 230 W 180 W 230 W 180 W
SIURBIMAS
34 W
PAKUOTĖS
svoris
MODELIS WF7522S8/WF7520S8/WF7528S8
WF7452S8/WF7450S8/
WF7458S8/
WF7350S8/
WF7358S8
POPIERIUS
2.1 kg 1.9 kg 1.8 kg
PLASTMASĖ
0.9 kg 0.8 kg 0.8 kg
GRĘŽIMO
APSUKOS
MODELIS
WF7700S8/WF7600S8/WF7520S8/
WF7450S8/WF7350S8
WF7708S8/WF7608S8/WF7528S8/WF7458S8/
WF7358S8
aps./min.
100 800
06 Priedas

Kreipkitės į „SAMSUNG“ VISAME PASAULYJE
Jei turite klausimų ar pastabų dėl „Samsung“ gaminių, kreipkitės į „SAMSUNG“
klientų aptarnavimo centrą.
Šalis SKAMBINKITE
ARBA APSILANKYKITE MŪSŲ
TINKLALAPYJE
LITHUANIA 8-800-77777 www.samsung.lt
LATVIA
800-7267 www.samsung.lv
ESTONIA 800-7267 www.samsung.ee
Kodo Nr. DC68-02410H_LT

Veļas mazgājamā mašīna
Lietošanas rokasgrāmata
iepazīstieties ar iespējām
Paldies, ka esat iegādājies Samsung
ražojumu.
Lai saņemtu pilnu tehnisko apkalpošanu,
lūdzu, reģistrējiet veļas mazgājamo mašīnu
www.samsung.com/global/register
WF7522S8(W/V/S/C/R)
WF7520S8(W/V/S/C/R)
WF7528S8(W/V/S/C/R)
WF7452S8(W/V/S/C/R)
WF7450S8(W/V/S/C/R)
WF7458S8(W/V/S/C/R)
WF7350S8(W/V/S/C/R)
WF7358S8(W/V/S/C/R)
WF7704S8(W/V/S/C/R)
WF7702S8(W/V/S/C/R)
WF7700S8(W/V/S/C/R)
WF7708S8(W/V/S/C/R)
WF7604S8(W/V/S/C/R)
WF7602S8(W/V/S/C/R)
WF7600S8(W/V/S/C/R)
WF7608S8(W/V/S/C/R)

2_ Funkcijas
funkcijas
• Child Lock (Bērnu droša slēdzene)
Child Lock (Bērnu drošā slēdzenes) funkcija neļaus ziņkārīgiem bērniem ieslēgt veļas
mazgājamo mašīnu. Šī drošības funkcija neļauj bērniem spēlēties ar ierīces paneli. Tā arī
brīdina jūs, ja ir aktivizēta.
• Delay Start (Atliktais sākums)
Šī funkcija ļauj aizturēt veļas mazgājamās mašīnas ieslēgšanos par līdz pat 24 stundām.
• Calm Wash (Klusā mazgāšana)
Lai jūs varētu mazgāt veļu arī naktīs, mēs piedāvājam īpaši klusu mazgāšanas ciklu Tā kā
izgriešanas cikla laikā tiek atsūkts ūdens, tas notiek ļoti klusu.
• Less Iron (Bez gludināšanas (opcija))
Ar Samsung Carefreewash mazgāšanas programmu saudzīgi izmazgā mīksta un smalka
auduma apģērbus, tāpēc gludināšana ir nepieciešama retāk. Visā pasaulē atzītā Samsung
izstrādātā digitālās apstrādes tehnoloģijas funkcija Less Iron ir specializēta veļas mazgāšanas
programma, kas mazina smalku audumu burzīšanos, tādējādi ļaujot netērēt laiku
gludināšanai.
• Quick (Ātrā mazgāšana)
Nezaudējiet laiku! Mazāk nekā 30 minūtes ilga mazgāšana ietaupīs jūsu laiku. 28 minūšu
ātrās mazgāšanas programma ir ietaupīs laiku jūsu aizņemtajā dzīvē. Tagad jūs varat
izmazgāt savu iemīļotāko apģērbu tikai 28 minūšu laikā - tas ir garantēts!
• Delicates (Neizturīgs audums) un SILK (Zīda) programma
Īpašas rūpes nosaka attiecīgā temperatūra, maigā mazgāšana un attiecīgais ūdens
daudzums.
• Silver Wash -Silver Nano sistēma
Jūsu veļas un veļas mazgājamās mašīnas cilindra mazgāšanai un dezinficēšanai Samsung
Silver Nano sistēma izmanto sudraba nano daļiņas. 30 grādu temperatūrā tā atbrīvo
neizturīgus apģērbus, kā arī netīras zeķes no sviedru aromāta. Šī funkcija taupa enerģiju un
aizsargā jūsu drēbju krāsu un formu.
• Handwash (Mazgāšana ar rokām)
Viegli sabojājamus apģērbus, piemēram, no lina vai zīda, var mazgāt gluži tāpat, kā mazgājot
ar rokām.

Drošības informācija _3
drošības informācija
Rokasgrāmatā redzēsiet norādes “Brīdinājums!” un “Uzmanību!”.
Šie brīdinājumi un būtiskā drošības informācija, kas sniegta pēc šādām norādēm,
var neietvert visus iespējamos apstākļus un situācijas.
Jūs pats esat atbildīgs par saprātīgu rīcību, piesardzību un rūpību iekārtas
uzstādīšanas, tehniskās apkopes un izmantošanas laikā. Samsung neuzņemas
atbildību par zaudējumiem, ko izraisa neatbilstīga izmantošana.
BŪTISKĀKĀS DROŠĪBAS NORĀDES UN DROŠĪBAS PASĀKUMI
Šo ikonu vai norāžu nozīme šajā rokasgrāmatā:
BRĪDINĀJUMS
!
Apdraudējumi vai nedrošas darbības, kas var izraisīt nopietnas traumas vai
nāvi.
UZMANĪBU
!
Apdraudējumi vai nedrošas darbības, kas var izraisīt mazāk bīstamas
traumas vai īpašuma bojājumus.
UZMANĪBU
!
Ievērojiet drošību, lai mazgājamās mašīnas izmantošanas laikā mazinātu
ugunsgrēka, sprādziena, elektrošoka vai traumu riskuDrošības pasākumi:
PIRMS IERĪCES IZMANTOŠANAS
Iepakojuma materiāli var būt bīstami bērna dzīvībai; turiet tos (plastikāta maisiņi, polistirols,
u.c.) bērniem nepieejamās vietās.
Ierīce ir paredzēta lietošanai tikai mājas apstākļos.
Pārliecinieties, vai ūdens un elektrības savienojumus ir pārbaudījis kvalificēts tehniķis,
ievērojot ražotāja instrukcijas (skatīt “Veļas mazgājamās mašīnas uzstādīšana”) un vietējos
drošības noteikumus.
Pirms ierīces izmantošanas visām pakotnēm un transportēšanas aizslēgiem jābūt
noņemtiem. Ja tie nav noņemti, varat gūt nopietnus ievainojumus. Skatiet “Transportēšanas
aizslēgu noņemšana”.
Pirmo reizi mazgājot veļu, palaidiet pilnu mazgāšanas ciklu bez apģērba. Skatiet
“Mazgāšana pirmo reizi”.
DROŠĪBAS NORĀDĪJUMI
Pirms mašinas tīrīšanas vai apkopes atvienojiet ierīci no elektrības vai pārslēdziet (On/Off)
(Ieslēgšana/Izslēgšana) pogu uz Off (Izslēgt).
Pārliecinieties, vai visu mazgājamo apģērbu kabatas ir iztukšotas.
Smagi un asi objekti, piemēram, monētas, drošības adatas, naglas, skrūves vai akmeņi var
radīt nopietnus ierīces bojājumus.
Pēc lietošanas vienmēr atvienojiet ierīcei elektrību un aizgrieziet ūdens padevi.
Pirms atverat ierīces durtiņas, pārliecinieties, vai ūdens ir novadīts. Ja tvertnē ir redzams
ūdens, durtiņas nedrīkst atvērt.
Ierīcē var iekāpt mājdzīvnieki vai mazi bērni. Pārbaudiet ierīci pirms katras lietošanas.
UZMANĪBU
!
BRĪDINĀJUMS!

4_ Drošības informācija
Mazgāšanas laikā stikla durtiņas sakarst. Raugieties, lai ierīces izmantošanas laikā tai
netuvotos bērni.
Nemēģiniet pats remontēt ierīci. Nepieredzējušu vai nekvalificētu personu veikti remontdarbi
var izraisīt savainojumus, to rezultātā var rasties nepieciešamība veikt nopietnu ierīces
remontu.
Ja spraudnis (strāvas padeves vads) ir bojāts, tas jānomaina ražotājam, apkopes aģentam
vai līdzvērtīgi kvalificētai personai, lai novērstu iespējamās briesmas.
Šo ierīci drīkst apkopt tikai autorizēts apkopes centrs, izmantojot tikai oriģinālās rezerves
daļas.
Šī ierīce nav paredzēta, lai to izmantotu bērni vai nevarīgas personas, izņemot gadījumus,
kad viņus pienācīgi uzrauga atbildīga persona, tādējādi nodrošinot drošu ierīces
izmantošanu. Jāraugās, lai ar ierīci nerotaļātos bērni.
Šī ierīce jāpievieno kontaktam, kas paredzēts attiecīgam strāvas patēriņam.
Ierīce ir jānovieto tā, lai kontaktam varētu piekļūt arī pēc tās uzstādīšanas.
Neizmantojiet jau lietotu ūdeni, kas satur eļļas, krēmus vai losjonus, kurus parasti izmanto
ādas kopšanas līdzekļu veikalos vai klīnikās, kurās veic masāžu.
• Pretējā gadījumā tas var izraisīt iepakojuma deformēšanos, kas secīgi izraisa bojājumus
vai sūci.
No nerūsējošā tērauda izgatavotā mazgāšanas tvertne parasti nerūsē. Tomēr, ja tvertnē
ilgstoši atstāj metāla priekšmetus, piemēram, matu saspraudes, tvertne var sāk rūsēt.
• Neatstājiet ilgstoši tvertnē hloru saturošu ūdeni vai balinātāju.
• Neizmantojiet regulāri un neatstājiet ilgstoši tvertnē dzelzi saturošu ūdeni.
• Ja uz tvertnes virsmas parādās rūsa, apstrādājiet virsmu ar tīrīšanas līdzekli (neitrālu) un
pēc tam noslaukiet to ar sūkli vai mīkstu lupatu. (Nekādā gadījumā neizmantojiet metāla
suku.)
Atsevišķām veļas mazgājamām mašīnām pie pamatnes ir ventilācijas atveres, kuras nedrīkst
nosprostot paklājs.
Izmantojiet tikai jaunos cauruļu komplektus, veco atkārtota izmantošana ir aizliegta.
Uz izstrādājuma vai tam pievienotajās instrukcijās dotais marķējums norāda, ka to nedrīkst
likvidēt kopā ar citiem sadzīves atkritumiem pēc tā ekspluatācijas laika. Lai novērstu
videi un cilvēku veselībai iespējamo kaitējumu, kas ir saistīts ar nekontrolējamu atkritumu
likvidēšanu, tas jānošķir no citiem atkritumiem un jāpārstrādā, lai sekmētu materiālo resursu
atbildīgu atkārtotu lietošanu.
Mājsaimniecības lietotājiem jāsazinās vai nu ar veikalu, kurā šis izstrādājums ir pirkts, vai ar
pašvaldību, lai iegūtu informāciju par to, kā un kur var nodot šo izstrādājumu, lai garantētu
ekoloģiski drošu reciklēšanu.
Rūpnieciskajiem lietotājiem jāsazinās ar piegādātāju un jāpārbauda pirkuma līguma
nosacījumi. Šo izstrādājumu nedrīkst sajaukt ar citiem likvidējamiem rūpnieciskajiem
atkritumiem.
drošības informācija

Saturs _5
saturs
MAZGĀJAMĀS MAŠĪNAS
INSTALĀCIJA
6
6 Mazgājamās mašīnas komplektācija
6 Informācija par mazgājamo mašīnu
7 Atrašanās vietas izvēle
7 Nolīdzināšanas kājiņu pielāgošana
7 Transportēšanas aizslēgu noņemšana
8 Ūdens padeves caurules pievienošana
9 Ūdens padeves caurules (papildiespēja)
pievienošana
9 Novadcaurules novietošana
VEĻAS MAZGĀŠANA
10
10 Mazgāšana pirmreiz
10 Mazgāšanas līdzekļa ievietošana veļas
mazgājamā mašīnā
11 Vadības paneļa kopskats
12 Drēbju mazgāšana, izmantojot Fuzzy Logic
13 Drēbju manuāla mazgāšana
14 Atliktās iedarbināšanas izmantošana
14 Padomi mazgāšanai
VEĻAS MAZGĀJAMĀS MAŠĪNAS
APKOPE
15
15 Ūdens novadīšana no veļas mazgājamās
mašīnas avārijas gadījumā
15 Sasalušas veļas mazgājamās mašīnas
remontēšana
15 Ārpuses tīrīšana
16 Mazgāšanas līdzekļu atvilktnes un tās
padziļinājuma tīrīšana
16 Netīrumu filtra tīrīšana
17 Ūdens caurules sieta filtra tīrīšana
TRAUCĒJUMMEKLĒŠANA
18
18 Problēmas un risinājumi
18 Kļūdu paziņojumu skaidrojums
PROGRAMMU TABULA
19
19 Programmu tabula
PIELIKUMS
21
21 Audumu kopšanas tabula
21 Elektriskie brīdinājumi
21 Vides aizsardzība
22 Paziņojums par atbilstību
22 Specifikācijas

6_ Mazgājamās mašīnas instalācija
mazgājamās mašīnas
instalācija
MAZGĀJAMĀS MAŠĪNAS KOMPLEKTĀCIJA
Izsaiņojiet mazgājamo mašīnu un pārbaudiet, vai transportēšanas laikā nav radušies bojājumi. Pārliecinieties
arī, vai esat saņēmis visus tālāk norādītos priekšmetus. Ja mazgājamā mašīna transportēšanas laikā ir
bojāta vai jums trūkst kāda priekšmeta, nekavējoties sazinieties ar Samsung pārstāvi.
INFORMĀCIJA PAR MAZGĀJAMO MAŠĪNU
Uzgriežņu atslēga Ūdens padeves šļūtene Šļūtenes turētājs Aizslēga atveres vāki
Augšējais pārsegs
Novadcaurule
Kontaktdakša
Netīrumu filtrs
Avārijas novadcaurulīte
Vadības panelis
Pamatnes pārsegs
Durvju atlaišana
Filtra vāks

Mazgājamās mašīnas instalācija _7
ATRAŠANĀS VIETAS IZVĒLE
Pirms mazgājamās mašīnas uzstādīšanas izvēlieties atrašanās vietu, ievērojot šādus
nosacījumus:
• cieta, līdzena virsma (ja virsma nav līdzena, skatiet zemāk “Nolīdzināšanas kājiņu
pielāgošana”);
• netieša saules gaisma;
• pietiekama ventilācija;
• istabas temperatūra, kas nepazeminās līdz 0 ˚C;
• nenovietojiet tādu karstuma avotu tuvumā kā ogles vai gāze;
Pārliecinieties, vai mazgājamā mašīna nav novietota uz strāvas vada.
Ja mazgājamā mašīna ir uzstādīta uz paklāja, paklājs nedrīkst nosprostot ventilācijas atveres.
NOLĪDZINĀŠANAS KĀJIŅU PIELĀGOŠANA
Ja grīda ir nelīdzena, pielāgojiet kājiņas (nelieciet zem kājiņām
koka gabalus vai citus priekšmetus):
1. Atlaidiet vaļīgāk kājas aizslēgu, pagriežot to ar roku, līdz
vēlamajam augstumam.
2. Cieši nostipriniet slēdzi, pagriežot to ar uzgriežņa atslēgu.
Ja mazgājamā mašīna ir novietota uz nelīdzenas vai trauslas
virsmas, radīsies troksni un vibrācija. (Atļauts novietot tikai 1
grāda slīpumā.)
TRANSPORTĒŠANAS AIZSLĒGU NOŅEMŠANA
Pirms mazgājamā mašīnas izmantošanas vispirms noņemiet
visus ierīces aizmugurē esošos transportēšanas aizslēgus. Lai
noņemtu aizslēgus:
1. Pirms aizslēgu noņemšanas atskrūvējiet tos ar uzgriežņu
atslēgu.
2. Paņemiet katra aizslēga galu un izvelciet to cauri atveres
platajai daļai.
Dariet tā ar katru aizslēgu.
3. Aizveriet atveres ar komplektācijā iekļautajiem plastmasas
vāciņiem.
4. Saglabājiet transportēšanas aizslēgus turpmākai
izmantošanai.
01 Mazgājamās mašīnas instalācija
brīvi

8_ Mazgājamās mašīnas instalācija
ŪDENS PADEVES CAURULES PIEVIENOŠANA
Ūdens padeves caurule jāpievieno ar vienu galu veļas mazgājamajai mašīnai un ar otru ūdens krānam.
Nenostiepiet ūdens padeves cauruli. Ja caurule ir par īsu, aizvietojiet cauruli ar garāku augstspiediena
cauruli.
Lai pievienotu ūdens padeves cauruli:
1. Paņemiet aukstā ūdens padeves caurules “L” veida savienojumu un pievienojiet to aukstā
ūdens pievadam mašīnas aizmugurē. Pievelciet ar roku.
2. Pievienojiet aukstā ūdens padeves caurules otru galu izlietnes aukstā ūdens krānam un
pievelciet ar roku. Ja nepieciešams, ūdens padeves caurules galu, kas pievienots veļas
mazgājamai mašīnai, var pagriezt citā stāvoklī, atbrīvojot savienojumu, pagriežot cauruli un
pievelkot savienojumu vēlreiz.
Papildiespēja:
1. Paņemiet karstā ūdens padeves caurules “L” veida savienojumu un pievienojiet to
sarkanajam karstā ūdens pievadam mašīnas aizmugurē. Pievelciet ar roku.
2. Pievienojiet karstā ūdens padeves caurules otru galu izlietnes karstā ūdens krānam un
pievelciet ar roku.
3. Ja vēlaties izmantot tikai auksto ūdeni, izmantojiet “Y” veida savienojumu.
mazgājamās mašīnas
instalācija
Karstā ūdens ieplūdes
vārsts
Papildiespēja

Mazgājamās mašīnas instalācija _9
ŪDENS PADEVES CAURULES (PAPILDIESPĒJA) PIEVIENOŠANA
1. Noņemiet adapteri no ūdens padeves caurules.
2. Vispirms, izmantojot krustveida skrūvgriezi, atbrīvojiet visas
četras adaptera skrūves. Pēc tam paņemiet adapteri un
pagrieziet tā detaļu (b) bultiņas virzienā, līdz ir izveidojusies 5
mm atstarpe.
3. Pievienojiet adapteri ūdens krānam, stingri pievelkot skrūves.
Pēc tam pagrieziet detaļu (b) bultiņas virzienā un salieciet
detaļu (a) un (b) kopā.
4. Pievienojiet ūdens padeves cauruli adapterim. Pavelciet
ūdens padeves caurules daļu (c) lejup.
Kad atlaidīsit šo detdaļu (c), atskanēs klikšķis, un caurule
automātiski pievienosies adapterim.
5. Pievienojiet ūdens padeves caurules otru galu ūdens
ieplūdes vārstam, kas atrodas veļas mazgājamās mašīnas
aizmugurē. Ieskrūvējiet cauruli pulksteņrādītāja kustības
virzienā līdz galam.
Ja pēc savienojuma izveidošanas caurulei ir sūces, atkārtojiet šos pašus soļus vēlreiz.
Izmantojiet visparastāko ūdens krāna veidu. Ja krānam ir kvadrātveida forma vai ja tas ir
pārāk liels, pirms krāna ievietošanas adapterī noņemiet atstarpes gredzenu.
NOVADCAURULES NOVIETOŠANA
Novadcaurules galu var novietot trīs veidos:
Pāri izlietnes malai
Novadcaurule jānovieto 60 līdz 90 cm augstumā. Lai
saglabātu novadcaurules uzgaļa liekumu, izmantojiet
komplektā iekļauto izliekto plastmasas ieliktni. Piestipriniet
ieliktni pie sienas ar āķi vai pie krāna ar sloksnīti, lai
nepieļautu novadcaurules pārvietošanos.
Izlietnes novadcaurules atzarojumā
Novadcaurules atzarojumam jāatrodas augstāk par izlietnes sifonu, lai caurules gals būtu vismaz
60 cm virs grīdas.
Novadcaurulē
Samsung iesaka izmantot 65 cm augstu vertikālu cauruli; tai jābūt vismaz 60 cm garai, un tā
nedrīkst būt garāka par 90 cm.
01 Mazgājamās mašīnas instalācija
a
b
c

10_ Veļas mazgāšana
veļas mazgāšana
MAZGĀŠANA PIRMREIZ
Pirmoreiz mazgājot veļu, palaidiet pilnu mazgāšanas ciklu bez apģērba.
Lai to izdarītu:
1. Nospiediet (On/Off) (Ieslēgšanas/Izslēgšanas) pogu.
2. Ielejiet nelielu daudzumu mazgāšanas līdzekļa ( )
nodalījumā mazgāšanas līdzekļa atverē.
3. Atgrieziet veļas mašīnas ūdens padevi.
4. Spiediet temperatūras pogu, līdz parādās 40 ˚C.
5. Nospiediet pogu Start/Pause (Iedarbināšanas/Pauzes)
• Šādi jūs atbrīvosieties no liekā ūdens, kas palicis pēc
ražotāja pārbaudēm.
Veļas mazgāšanas līdzeklis : Priekšmazgāšanas līdzeklis vai cietinātājs.
Veļas mazgāšanas līdzeklis
: Mazgāšanas līdzeklis veļai, ūdens mīkstinātājs,
priekšmazgāšanas līdzeklis, balinātājs un līdzeklis traipu
tīrīšanai.
Veļas mazgāšanas līdzeklis
: Kopšanas līdzeklis, piemēram, auduma mīkstinātājs vai
iepriekšminētais līdzeklis (piepildiet ne vairāk kā līdz starplikas
apakšējai malai “A”)
MAZGĀŠANAS LĪDZEKĻA IEVIETOŠANA VEĻAS MAZGĀJAMĀ
MAŠĪNĀ
1. Izvelciet mazgāšanas līdzekļu atvilktni.
2. Iepildiet nodalījumā mazgāšanas līdzekli ( ).
3. Iepildiet nodalījumā veļas mīkstinātāju ( ) (ja vēlaties).
4. Iepildiet nodalījumā priekšmazgāšanas līdzekli( ) (ja vēlaties).
Koncentrēts vai biezs auduma mīkstinātājs vai
kondicionētājs, pirms to ielej attiecīgajā nodalījumā
(novērš pārplūdes aizsprostošanos), jāatšķaida ar nelielu
daudzumu ūdens.
UZMANĪBU
!

Veļas mazgāšana _11
VADĪBAS PANEĻA KOPSKATS
Digitāls grafiskais
displejs
Rāda atlikušo mazgāšanas cikla laiku, visu mazgāšanas informāciju un
brīdinājuma paziņojumus.
Silver Wash
( Sudraba
mazgāšanas)
atlases poga
Silver Nano ūdens tiek padots mazgāšanas, kā arī pēdējā skalošanas
cikla laikā, nodrošinot sterilizēšanas funkciju un antibakteriālo pārklājumu.
(Jūs varat atlasīt “Sterilization” (Sterilizēšanas) funkcija vai “Protection”
(Aizsardzība), “Sterilization” (Sterilizēšana) + “Protection” (Aizsardzība).)
Less ironing (Bez
gludināšnas (izvēle))
atlases poga
Bezgludināšanas funkcija samazinās veļas burzīšanos un gludināšanas laiku.
(pieejamās programmas: “Cotton” (Kokvilna), “Coloureds” (Krāsaina veļa),
“Quick” (Ātrā mazgāšana), “Heavy Soil” (Grūti izmazgājami traipi), “Mixed Load”
(Jaukta veida), “Rinse+Spin” (Skalošana+Centrifūgas), “Spin” (Centrifūgas))
Pre-Wash (Priekšmazgāšanas)
atlases poga
Nospiediet šo pogu, lai atlasītu priekšmazgāšanas režīmu. Šī iespēja ir pieejama
tikai “Cotton” (Kokvilna), “Coloureds” (Krāsaina veļa), “Synthetics” (Sintētika),
“Jeans” (Džinsi), “Heavy Soil” (Grūti izmazgājami traipi), “Mixed Load” (Jaukta
veida) audumiem, kā arī apģērbam ar grūti izmazgājamiem traipiem.
Izvēles poga Intensive
(Intensīvs režīms)
Izvēloties šo režīmu, palielinās mazgāšanas jauda. Šo funkciju var izvēlēties
Cotton (kokvilnas), Coloreds (krāsainās veļas), Synthetics (sintētikas),
Jeans (džinsu), Heavy Soil (ļoti netīru drēbju), Mixed Load (jaukta veida) un
Calm Wash (klusās mazgāšanas) programmām. Nospiežot šo pogu, varat
pārslēgties starp stāvokļiem On (Ieslēgts) un Off (Izslēgts).
Child Lock (Bērnu
aizsardzības)
izvēles poga
TŠī poga paredzēta, lai neļautu bērniem darboties ar veļas mazgājamo mašīnu.
On/Off (Ieslēgšana/Izslēgšana) – lai ieslēgtu šo programmu: nospiediet
Start/Pause (Iedarbināšanas/Pauzes) pogu, lai ieslēgtu veļas mazgājamo mašīnu.
Nospiediet un turiet nospiestu pogu “Intensive” (Intensīvā) + “Turiet nospiestu
pogu “Temp” (Temperatūra) 2-3 sekundes. To var aktivizēt tikai tad, kad mašīna
ir ieslēgta. Kad mazgāšanas laikā esat iestatījis bērnu aizsardzības funkciju,
nevarēs izmantot nevienu pogu, kamēr tā nebūs atslēgta. Tikai POWER
(Ieslēgšana/Izslēgšana) Var aktivizēt pogu (Kļūda). Iedegsies bērnu aizsardzības
lampiņa. Lai šo programmu izslēgtu: Nospiediet un turiet nospiestu pogu
“Intensive” (Intensīvā) + “Temp” (Temperatūra) vēlreiz 2-3 sekundes, pēc tam
lampiņa nodzisīs un programma tiks atslēgta.
Kamēr veļas mazgājamā mašīna darbojas, vispirms pārbaudiet Child
Lock (Bērnu aizsardzības) izvēles pogu, kad neviena poga nav aktivizēta.
Temperature
(Temperatūras)
atlases poga
Atkārtoti nospiediet šo pogu, lai izvēlētos vienu no pieejamajām ūdens
temperatūras opcijām. (auksts 0 ˚C), 30 ˚C, 40 ˚C, 60 ˚C un 95 ˚C)
Rinse Times
(Skalošanas ciklu)
atlases poga
Nospiediet skalošanas ciklu izvēles pogu, lai palielinātu skalošanas ciklu
skaitu. Maksimāli var iestatīt piecus skalošanas ciklus.
02 Veļas mazgāšana
6
5
4
3
2
1
7
8

12_ Veļas mazgāšana
Spin (Centrifūgas)
ātruma izvēles poga
Atkārtoti nospiediet šo pogu, lai izvēlētos vienu no pieejamajām centrifūgas
ātruma opcijām.
WF7704S8/WF7604S8 0, 400, 800, 1400 apgriez./min.
WF7702S8/WF7602S8/WF7522S8/WF7452S8
0, 400, 800, 1200 apgriez./min.
WF7700S8/WF7600S8/WF7520S8/WF7450S8/
WF7350S8
0, 400, 800, 1000 apgriez./min.
WF7708S8/WF7608S8/WF7528S8/WF7458S8/
WF7358S8
0, 400, 600, 800 apgriez./min.
0 : bez centrifūgas Bez displeja: Skalošanas pārtraukums
Delay Start
(Atliktās
iedarbināšanas)
izvēles poga
Atkārtoti nospiediet šo pogu, lai izvēlētos vienu no pieejamajām atliktās
iedarbināšanas opcijām (no 3 līdz 24 stundām ar vienas stundas iedaļām).
Displejā redzamās stundas nozīmē mazgāšanas cikla pabeigšanas laiku.
Fuzzy vadības ripa
Pagrieziet ripu, lai izvēlētos vienu no 14 pieejamajām mazgāšanas
programmām:
“Cotton” (Kokvilna), “Coloureds” (Krāsaina veļa), “Synthetics” (Sintētika),
“Delicate Fabrics” (Smalki audumi), “Handwash for Wool” (Vilnas
mazgāšana ar rokām), “Jeans” (Džinsi), “Quick” (Ātrā mazgāšana),
“Rinse+Spin” (Skalošana+Centrifūgas), “Spin” (Centrifūgas), “Drain”
(Noliešana), “Silk” (Zīds), “Heavy Soil” (Grūti izmazgājami traipi), “Mixed
Load” (Jaukta veida), “Calm Wash” (Klusā mazgāšana).
Start/Pause
(Iedarbināšanas/
Pauzes) poga
Nospiediet, lai apturētu un atsāktu programmas.
On/Off
(Ieslēgšanas/
Izslēgšanas)
atlases poga
Nospiediet vienreiz, lai ieslēgtu mašīnu, nospiediet vēlreiz, lai mašīnu
izslēgtu. Ja veļas mazgājamā mašīna ir atstāta ieslēgta ilgāk par desmit
minūtēm bez pogu nospiešanas, strāvas padevi automātiski atslēdz.
DRĒBJU MAZGĀŠANA, IZMANTOJOT FUZZY LOGIC
Jūsu jaunā veļas mazgājamā mašīna atvieglo drēbju mazgāšanu, izmantojot Samsung “Fuzzy Logic”
automātisko vadības sistēmu. Kad izvēlēsities mazgāšanas programmu, mašīna iestatīs pareizo
temperatūru, mazgāšanas laiku un mazgāšanas ātrumu.
Lai mazgātu drēbes, izmantojot Fuzzy Logic programmas:
1. Atgrieziet izlietnes ūdens krānu.
2. Nospiediet (On/Off) (Ieslēgšanas/Izslēgšanas) pogu.
3. Atveriet durtiņas.
4. Pa vienam brīvi ievietojiet tvertnē apģērba gabalus, nepārpildiet tvertni.
5. Aizveriet durtiņas.
6. Iepildiet mazgāšanas līdzekli, mīkstinātāju un priekšmazgāšanas līdzekli (ja nepieciešams)
attiecīgajā nodalījumā.
veļas mazgāšana
12
13
10
11
9

Veļas mazgāšana _13
7.
Pagrieziet Fuzzy vadības ripu, lai izvēlētos
drēbēm piemērotāko programmu:
“Cotton” (Kokvilna), “Coloureds” (Krāsaina
veļa), “Synthetics” (Sintētika), “Delicate
Fabrics” (Smalki audumi), “Handwash
for Wool” (Vilnas mazgāšana ar rokām),
“Jeans” (Džinsi), “Quick” (Ātrā mazgāšana),
“Rinse+Spin” (Skalošana+Centrifūgas),
“Spin” (Centrifūgas), “Drain” (Noliešana),
“Silk” (Zīds), “Heavy Soil” (Grūti
izmazgājami traipi), “Mixed Load” (Jaukta
veida), “Calm Wash” (Klusā mazgāšana).
Vadības panelī iedegsies attiecīgie
indikatori.
8. Tagad varat kontrolēt mazgāšanas temperatūru, skalošanas reižu skaitu, centrifūgas ātrumu,
atlikšanas laiku, nospiežot attiecīgās opcijas pogu.
9. Nospiediet Start/Pause (Iedarbināšanas/Pauzes) pogu, kas atrodas uz Fuzzy vadības ripas, un
mazgāšanas cikls sāksies. Iedegsies procesa indikators, un displejā būs redzams atlikušais cikla laiks.
Pauzes opcija (apturēšanas un veļas pievienošanas funkcija)
Ja nospiedīsiet Iedarbināšanas/Pauzes pogu, durvis tiks nekavējoties atbloķētas.
Ja veļas mazgājamā mašīnā ir pārāk karsts ūdens vai ja tajā ūdens ir pārāk daudz, durvis nevar atvērt.
Kad durvis ir aizvērtas, nospiežot Iedarbināšanas/Pauzes pogu vēlreiz, mazgāšanas process turpināsies
bez pārtraukumiem.
Kad cikls ir pabeigts:
Pēc cikla pabeigšanas strāvas padeve tiks atslēgta automātiski.
1. Atveriet durtiņas.
2. Izņemiet veļu.
DRĒBJU MANUĀLA MAZGĀŠANA
Drēbes var mazgāt arī manuāli, neizmantojot Fuzzy Logic funkciju.
Lai to darītu:
1. Ieslēdziet ūdens padevi.
2. Nospiediet (On/Off) (Ieslēgšanas/Izslēgšanas) pogu uz veļas mazgājamās mašīnas;.
3. Atveriet durtiņas.
4. Pa vienam brīvi ievietojiet tvertnē apģērba gabalus, nepārpildiet tvertni.
5. Aizveriet durtiņas.
6. Iepildiet atbilstošajos nodalījumos mazgāšanas līdzekli un, ja nepieciešams, mīkstinātāju vai
priekšmazgāšanas līdzekli.
7.
Nospiediet Temperature (Temperatūras) pogu, lai izvēlētos temperatūru. (auksts (0 ˚C), 30 ˚C,
40 ˚C, 60 ˚C, 95 ˚C)
8. Nospiediet Rinse (Skalošana) pogu, lai izvēlētos nepieciešamo skalošanas ciklu skaitu.
Maksimāli var iestatīt piecus skalošanas ciklus.
Mazgāšanas periods būs attiecīgi ilgāks.
9.
Nospiediet Spin (Centrifūgas) pogu, lai izvēlētos centrifūgas ātrumu. [ 0, 400, 600, 800, 1000,
1200 vai 1400 apgriezieni minūtē (rpm)]
Skalošanas pārtraukuma programma ļauj no veļas mazgājamās mašīnas izņemt pilnīgi slapjas drēbes.
0 : Bez centrifūgas, Bez displeja: Skalošanas pārtraukums
10.
Atkārtoti nospiediet šo pogu, lai izvēlētos vienu no pieejamajām atliktās iedarbināšanas opcijām
(no 3 līdz 24 stundām ar vienas stundas iedaļām). Displejā redzamās stundas nozīmē mazgāšanas
cikla pabeigšanas laiku.
11. Nospiediet Start/Pause (Iedarbināšanas/Pauzes) pogu, un mašīna sāks mazgāšanas ciklu.
02 Veļas mazgāšana

14_ Veļas mazgāšana
ATLIKTĀS IEDARBINĀŠANAS IZMANTOŠANA
Veļas mazgājamo mašīnu var iestatīt, lai tā automātiski pabeigtu mazgāšanu vēlāk, izvēloties atlikšanu par 3 līdz
24 stundām (ar 1 stundas iedaļām). Displejā redzamās stundas nozīmē mazgāšanas cikla pabeigšanas laiku.
Lai to izdarītu:
1.
Manuāli vai automātiski iestatiet savu veļas mazgājamo mašīnu atbilstoši mazgājamo drēbju veidam.
2. Atkārtoti nospiediet Delay Start (Atliktās iedarbināšanas) pogu, līdz ir iestatīts nepieciešamais
atlikšanas laiks.
3. Nospiediet Start/Pause (Iedarbināšanas/Pauzes) pogu. Iedegsies Delay Start (Atliktās
iedarbināšanas) indikators, un pulkstenis sāks laika skaitīšanu, līdz tiks sasniegts beigu laiks.
4. Lai atceltu “Delay Start” (Atliktās iedarbināšanas), nospiediet (On/Off) (Ieslēgšanas/
Izslēgšanas) pogu un pēc tam atkal ieslēdziet mašīnu.
PADOMI MAZGĀŠANAI
Veļas šķirošana: šķirojiet veļu pēc šādām īpašībām:
• simboli ražotāja piedāvātajos darbības aprakstos: šķirojiet atsevišķi kokvilnas, dažādu
šķiedru, sintētikas, zīda, vilnas un viskozes veļu.
• Krāsa: atdaliet balto un krāsaino. Jaunu, krāsainu veļu mazgājiet atsevišķi.
• Lielums: ievietojot vienā mazgāšanas reizē dažāda lieluma gabalus, uzlabosies mazgāšanas
process.
• Jutīgums: smalkus audumus mazgājiet atsevišķi un jauniem tīras vilnas apģērbiem, aizkariem
un zīda izstrādājumiem izmantojiet Delicate (smalka auduma) mazgāšanas programmu.
Izlasiet mazgājamā apģērba etiķetes vai skatiet pielikumā audumu kopšanas tabulu.
Kabatu iztukšošana: monētas, drošības adatas un līdzīgi priekšmeti var sabojāt veļu, veļas
mazgājamās mašīnas cilindru un ūdens tvertni.
Rāvējslēdzēju aizvēršana: aizvelciet rāvējslēdzējus, aizpogājiet pogas un aizāķējiet āķīšus;
jostas un lentes ir jāsasien.
Kokvilnas priekšmazgāšana: jūsu jaunā veļas mazgājamā mašīna un modernie mazgājamā
līdzekļi nodrošinās ideālus mazgāšanas rezultātus un ļaus taupīt enerģiju, laiku, ūdeni un
mazgājamos līdzekļus. Tomēr, ja kokvilnas veļa ir ļoti netīra, veiciet priekšmazgāšanu ar proteīnus
saturošu mazgājamo līdzekli.
Uzpildīšanas apjoma noteikšana: nepārslogojiet veļas mašīnu, tas traucē veļas mazgāšanu.
Izmantojiet šo tabulu, lai noteiktu ievietojamo daudzumu dažādiem mazgājamās veļas veidiem:
Auduma veids
Ievietojamais svars
WF7704S8
WF7702S8
WF7700S8
WF7708S8
WF7604S8
WF7602S8
WF7600S8
WF7608S8
WF7522S8
WF7520S8
WF7528S8
WF7452S8
WF7450S8
WF7458S8
WF7350S8
WF7358S8
Cotton (Kokvilna)/
Coloureds (Krāsaina veļa)
7.0 kg 6.0 kg 5.2 kg 4.5 kg 3.5 kg
Quick (Ātrā mazgāšana) 3.0 kg 3.0 kg 2.5 kg 2.5 kg 2.0 kg
Delicate Fabrics (Smalki audumi) 2.5 kg 2.5 kg 2.0 kg 2.0 kg 1.5 kg
Silk (Zīds) 2.0 kg 2.0 kg 1.5 kg 1.5 kg 1.5 kg
Mazgājamā līdzekļa veids: izmantojamo mazgājamo līdzekli izvēlas, ņemot vērā auduma tipu
(kokvilnas, vilnas izstrādājumi, zīds), krāsu, mazgājamā temperatūru, netīruma pakāpi un veidu.
Vienmēr izmantojiet mazputojošu veļas mazgājamo līdzekli, kas ir paredzēts automātiskām veļas
mazgājamām mašīnām.
Pildiet mazgājamā līdzekļa ražotāja ieteikumus un ņemiet vērā veļas svaru, netīrības pakāpi un
ūdens cietības pakāpi jūsu reģionā. Ja nezināt, kāda ir ūdens cietības pakāpe, noskaidrojiet to
ūdensapgādes iestādē.
Uzglabājiet mazgājamos līdzekļus drošā, sausā un bērniem nepieejamā vietā.
veļas mazgāšana

Veļas mazgājamās mašīnas apkope _15
veļas mazgājamās mašīnas
apkope
ŪDENS NOVADĪŠANA NO VEĻAS MAZGĀJAMĀS MAŠĪNAS
AVĀRIJAS GADĪJUMĀ
1. Atvienojiet veļas mazgājamās mašīnu no elektropadeves.
2. Atveriet filtra vāciņu, izmantojot monētu vai atslēgu.
3. Noskrūvējiet avārijas novadīšanas vāciņu, pagriežot to pa
kreisi. Satveriet vāciņu aiz avārijas novadcaurulītes gala un
lēnām izvelciet aptuveni 15 cm uz āru.
4. Ļaujiet ūdenim izplūst kādā traukā.
5. Ievietojiet novadcaurulīti atpakaļ un atkal uzskrūvējiet vāciņu.
6. Uzlieciet filtra vāciņu atpakaļ.
SASALUŠAS VEĻAS MAZGĀJAMĀS MAŠĪNAS REMONTĒŠANA
Ja temperatūra nokrīt zem sasalšanas punkta un jūsu veļas mazgājamā mašīna ir sasalusi:
1. Atvienojiet veļas mazgājamo mašīnu no elektropadeves.
2. Uzlejiet siltu ūdeni uz padeves krāna, lai atbrīvotu ūdens padeves cauruli.
3. Noņemiet ūdens padeves cauruli un iegremdējiet to siltā ūdenī.
4. Ielejiet veļas mazgājamās mašīnas cilindrā siltu ūdeni un pagaidiet 10 minūtes.
5. No jauna pievienojiet ūdens padeves cauruli ūdens krānam un pārbaudiet, vai ūdens padeve un
novadcaurule darbojas normāli.
ĀRPUSES TĪRĪŠANA
1. Noslaukiet veļas mazgājamās mašīnas virsmas, tajā skaitā vadības paneli ar mīkstu drāniņu un tīriet ar
neabrazīvu mazgāšanas līdzekli.
2. Virsmas nosusināšanai lietojiet mīkstu drāniņu.
3. Nelejiet ūdeni uz veļas mazgājamās mašīnas.
03 Veļas mazgājamās mašīnas apkope

16_ Veļas mazgājamās mašīnas apkope
MAZGĀŠANAS LĪDZEKĻU ATVILKTNES UN TĀS PADZIĻINĀJUMA
TĪRĪŠANA
1. Nospiediet atbrīvošanas sviru, kas atrodas mazgāšanas līdzekļu atvilktnes iekšpusē, un
izvelciet to ārā.
2. Noņemiet vāciņu no nodalījuma ( ).
3. Nomazgājiet visas detaļas zem tekoša ūdens.
4. Iztīriet atvilktnes padziļinājumu ar vecu zobu birsti.
5. Ielieciet vāciņu atpakaļ (stingri iespiežot to vietā) un ievietojiet šķidro mazgāšanas līdzekļu
atdalītāju atpakaļ atvilktnē.
6. Iebīdiet atvilktni atpakaļ.
7. Palaidiet skalošanas programmu, neievietojot cilindrā veļu.
NETĪRUMU FILTRA TĪRĪŠANA
Netīrumu filtrs jātīra 5 vai 6 reizes gadā vai arī tad, kad displejā ir redzams
šāds kļūdas paziņojums:
1. Atveriet filtra vāciņu, skatiet “Ūdens noliešana no
mazgājamās mašīnas ārkārtas situācijā” 15. lappusē.
2. Atskrūvējiet noliešanas vāciņu avārijas gadījumiem,
pagriežot to uz kreiso pusi, un nolejiet visu ūdeni.
Skatiet “Ūdens noliešana no mazgājamās mašīnas ārkārtas
situācijā” 15.lappusē.
3. Atskrūvējiet filtra vāciņu un noņemiet to.
4. Nomazgājiet no filtra visus netīrumus un citus piesārņojošus
materiālus. Pārliecinieties, vai nav bloķēts ūdens
novadīšanas sūkņa rats, kas atrodas aiz filtra. Uzlieciet
atpakaļ filtra vāciņu.
5. Uzlieciet filtra vāciņu atpakaļ.
veļas mazgājamās mašīnas
apkope

Veļas mazgājamās mašīnas apkope _17
ŪDENS CAURULES SIETA FILTRA TĪRĪŠANA
Ūdens caurules sieta filtrs jātīra vismaz vienu reizi gadā vai arī tad, kad
displejā ir redzams šāds kļūdas paziņojums:
Lai to izdarītu:
1. Aizveriet veļas mazgājamās mašīnas ūdens padevi.
2. Noskrūvējiet cauruli veļas mazgājamās mašīnas aizmugurē.
3. Ar knaiblēm uzmanīgi izvelciet sieta filtru no caurules
gala un skalojiet to ūdenī, līdz tas ir tīrs. Iztīriet arī vītņotā
savienotāja iekšpusi un ārpusi.
4. Iebīdiet filtru atpakaļ.
5. Pieskrūvējiet cauruli atpakaļ pie veļas mazgājamās
mašīnas.
6. Atgrieziet krānu un pārliecinieties, vai savienojumi ir
ūdensnecaurlaidīgi.
03 Veļas mazgājamās mašīnas apkope
Papildiespēja
Papildiespēja

18_ Traucējummeklēšana
traucējummeklēšana
PROBLĒMAS UN RISINĀJUMI
PROBLĒMA RISINĀJUMS
Veļas mazgājamā mašīna
neiedarbojas
• Pārliecinieties, ka durtiņas ir cieši aizvērtas.
• Pārliecinieties, ka veļas mazgājamā mašīna ir pieslēgta elektrotīklam.
• Pārliecinieties, ka ūdens krāns ir atgriezts.
•
Pārliecinieties, vai ir nospiesta Start/Pause (Iedarbināšanas/Pauzes) poga.
Nav ūdens vai
nepietiekama ūdens
padeve
• Pārliecinieties, ka ūdens krāns ir atgriezts.
• Pārliecinieties, ka ūdens padeves caurule nav aizsalusi.
• Pārliecinieties, ka ūdens ieplūdes caurule nav saliekta.
• Pārliecinieties, ka ūdens ieplūdes caurule nav aizsprostota.
Mazgāšanas līdzeklis
paliek mazgāšanas
līdzekļa atvilktnē
pēc mazgāšanas
programmas izpildes.
• Pārliecinieties, ka ūdens spiediens ir pietiekams veļas mazgājamās
mašīnas darbībai.
• Iepildiet mazgāšanas līdzekļus atvilktnes iekšējā zonā (atstatu no
ārmalām).
Veļas mazgājamā mašīna
vibrē vai darbojas pārāk
skaļi
• Pārliecinieties, ka veļas mazgājamā mašīna ir novietota uz līdzenas
virsmas. Ja virsma nav līdzena, noregulējiet veļas mazgājamās mašīnas
balstus, lai nolīmeņotu ierīci.
• Pārliecinieties, ka ir noņemtas transportēšanas skrūves.
•
Pārliecinieties, ka veļas mazgājamā mašīna nesaskaras ar kādu citu objektu.
• Pārliecinieties, ka ievietotā veļa ir līdzsvarā.
No veļas mazgājamās
mašīnas neaiztek ūdens
un/vai nedarbojas
centrifūga
• Pārliecinieties, ka novadcaurule nav saspiesta vai saliekta.
• Pārliecinieties, ka ūdens sieta filtrs nav aizsprostojies.
Ja nevarat atvērt
durtiņas
• Izņemiet strāvas spraudni no strāvas avota.
• Izlaidiet no veļas mašīnas ūdeni.
• Atveriet filtra vāciņu, izmantojot monētu.
• Lai atvērtu durvis, pavelciet uz priekšu oranžo plastmasas izvadu.
KĻŪDU PAZIŅOJUMU SKAIDROJUMS
KĻŪDAS KODS RISINĀJUMS
durtiņas
• Aizveriet durtiņas.
4E
• Pārliecinieties, ka ūdens krāns ir atgriezts.
• Pārbaudiet ūdens spiedienu.
5E
• Iztīriet netīrumu filtru.
• Pārliecinieties, ka novadcaurule ir uzstādīta pareizi.
UE
• Veļa nav līdzsvarā, izcilājiet kamolā savēlušos veļu.
Ja ir jāmazgā tikai viens veļas gabals, piemēram, peldmētelis vai džinsi,
galīgais centrifūgas darbības rezultāts var būt neapmierinošs un displeja
ekrānā var parādīties “UE” kļūdas paziņojums.
cE / 3E
• Zvaniet klientu apkalpošanas dienestam.
Pirms zvanāt klientu apkalpošanas dienestam:
1. Mēģiniet novērst problēmu (skatiet “Traucējumu novēršana” šajā lapā).
2. Restartējiet programmu, lai redzētu, vai kļūme atkārtojas.
3. Ja kļūme atkārtojas, zvaniet klientu apkalpošanas dienestam un aprakstiet problēmu.

Programmu tabula _19
programmu tabula
PROGRAMMU TABULA
( lietotāja izvēle)
Pro-
gramme
Maks. uzlāde (kg)
Mazgāšanas
līdzekļi un papildus
piedevas
Tempe-
ratūra
(MAKS)
˚C
Centrifūgas apgriezieni
(MAKS) apgr/min.
Palaišanasaizture
Cikla-
laiks
(min)
WF7704S8
WF7702S8
WF7700S8
WF7708S8
WF7604S8
WF7602S8
WF7600S8
WF7608S8
WF7522S8
WF7520S8
WF7528S8
WF7452S8
WF7450S8
WF7458S8
WF7350S8
WF7358S8
Priekšma-
zgāšana
Mazgā-
šana
Mīksti-
nātājs
WF7704S8
WF7604S8
WF7702S8
WF7602S8
WF7522S8
WF7452S8
WF7700S8
WF7600S8
WF7520S8
WF7450S8
WF7350S8
WF7708S8
WF7608S8
WF7528S8
WF7458S8
WF7358S8
Cotton
(Kokvilna)
7.0 6.0
5.2
4.5 3.5
jā
95 1400 1200 1000 800
90
Coloureds
(Krāsaina
veļa)
7.0 6.0 5.2 4.5 3.5
jā
60 1400 1200 1000 800
98
Synthetics
(Sintētika)
3.0 3.0 2.5 2.5 2.0
jā
60 1400 1200 1000 600
71
Delicate
Fabrics
(Smalki
audumi)
2.5 2.5 2.0 2.0 1.5 - jā
40 800 800 800 600
53
Handwash
for Wool
(Vilnas
mazgāšana
ar rokām)
2.0 2.0 1.5 1.5 1.0 - jā
40 800 800 800 400
39
Jeans
(Džinsi)
2.0 2.0
1.5
1.5 1.0
jā
40 800 800 800 400
60
Quick (Ātrā
mazgāšana)
3.0 3.0 2.0 2.0 1.5 - jā
60 1400 1200 1000 800
28
Programma Mazgāšanas veids
Cotton
(Kokvilna)
Vidēji vai viegli notraipīti kokvilnas izstrādājumi, gultas veļa, galdauti, apakšveļa,
dvieļi, krekli u.c.
Coloureds
(Krāsaina veļa)
Vidēji vai viegli netīri kokvilnas izstrādājumi, gultas veļa, galdauti, apakšveļa, dvieļi,
krekli utt.
Synthetics
(Sintētika)
Mazliet vai vidēji netīras blūzes, krekli utt. Poliesteru (diolena, trevira), poliamīdu
(perlona, neilona) vai citu līdzīgu materiālu izstrādājumi.
Delicate Fabrics
(Smalki audumi)
Smalki aizkaru, kleitu, svārku, kreklu un blūzīšu audumi.
Handwash for
Wool (Vilnas
mazgāšana ar
rokām)
Tikai mašīnā mazgājama vilna ar pilnīgi tīras vilnas uzlīmi.
Quick
(Ātrā mazgāšana)
Mazliet netīras kokvilnas vai linu blūzes, krekli, tumšas krāsas frotē audumi, krāsaini
linu izstrādājumi, džinsi utt.
1. Programmas ilguma datus nosaka atbilstoši IEC 456 standarta nosacījumiem.
2. Ūdens padeves spiediena un temperatūras svārstību dēļ, kā arī ievietotās veļas svara un veļas veida
atšķirību dēļ patēriņš atsevišķās mājās var atšķirties no tabulā norādītajām vērtībām.
05 Programmu tabula

20_ Programmu tabula
( lietotāja izvēle)
Pro-
gramme
Maks. uzlāde (kg)
Mazgāšanas
līdzekļi un papildus
piedevas
Tempe-
ratūra
(MAKS)
˚C
Centrifūgas apgriezieni
(MAKS) apgr/min.
Palaišan-
asaizture
Cikla-
laiks
(min)
WF7704S8
WF7702S8
WF7700S8
WF7708S8
WF7604S8
WF7602S8
WF7600S8
WF7608S8
WF7522S8
WF7520S8
WF7528S8
WF7452S8
WF7450S8
WF7458S8
WF7350S8
WF7358S8
Priekšma-
zgāšana
Mazgā-
šana
Mīkstinātājs
WF7704S8
WF7604S8
WF7702S8
WF7602S8
WF7522S8
WF7452S8
WF7700S8
WF7600S8
WF7520S8
WF7450S8
WF7350S8
WF7708S8
WF7608S8
WF7528S8
WF7458S8
WF7358S8
Silk (Zīds)
7.0 6.0
5.2
4.5 3.5 - jā
30 400 400 400 400
35
Heavy Soil
(Domāti
netīrām
drēbēm)
7.0 6.0 5.2 4.5 3.5
jā
60 1400 1200 1000 800
109
Mixed
Load
(Jaukta
veida)
2.5 2.5 2.0 2.0 1.5
jā
60 800 800 800 800
76
Calm Wash
(Klusā
mazgāšana)
3.0 3.0 2.0 2.0 1.5
jā
40
96
Programma Mazgāšanas veids
Silk (Zīds) Zīda krekli, blūzes, kleitas u.c.
Heavy Soil
(Domāti netīrām
drēbēm)
Notraipīti vai ļoti netīri kokvilnas izstrādājumi, gultas veļa, galdauti, apakšveļa, dvieļi,
krekli, džinsi utt.
Mixed Load
(Jaukta veida)
Mazliet netīru kokvilnas un sintētikas drēbju mazgāšana.
Calm Wash
(Klusā
mazgāšana)
Īpaši zems trokšņu līmenis visa cikla laikā, un cikls beidzas ar skalošanas
pārtraukumu. Kokvilna, gultas veļa, galdauti, apakšveļa, dvieļi, krekli.
programmu tabula

Pielikums _21
pielikums
AUDUMU KOPŠANAS TABULA
Izturīgs materiāls
Var gludināt maks.100 °C
temperatūrā
Smalks audums Negludināt
Izstrādājumu drīkst mazgāt 95 °C
temperatūrā.
Var tīrīt ķīmiski, izmantojot jebkuru
šķīdinātāju
Izstrādājumu drīkst mazgāt 60 °C
temperatūrā.
Var tīrīt sausā veidā tikai ar
perhlorīdu, benzīnu, tīru spirtu vai
šķīdinātāju R113
Izstrādājumu drīkst mazgāt 40 °C
Tīriet ķīmiski tikai ar aviācijas
degvielu, tīru spirtu vai R113.
Izstrādājumu drīkst mazgāt 30 °C Netīriet ķīmiski.
Izstrādājumu drīkst mazgāt ar
rokām.
Žāvējiet novietotu plakaniski.
Tīriet tikai ķīmiskajā tīrītavā. Var žāvēt izkarinātu.
Var balināt aukstā ūdenī. Žāvējiet uz drēbju pakaramā.
Nebaliniet. Viegli mitrs, normāla siltuma režīms.
Var gludināt maks. 200 °C
temperatūrā.
Viegli mitrs, samazināta siltuma
režīms.
Var gludināt maks.150 °C
temperatūrā
Nežāvējiet neizlīdzinātu.
ELEKTRISKIE BRĪDINĀJUMI
Lai samazinātu ugunsgrēka, elektrošoka un citu traumu risku, ievērojiet šos drošības norādījumus:
• Iekārtas darbināšanai izmantojiet strāvas avotu, kas atbilst marķējuma plāksnītē norādītajam.
Konsultējieties ar ierīces izplatītāju vai vietējo elektrotīklu uzņēmumu, ja neesat pārliecināts par mājā
pienākošās strāvas veidu.
• Izmantojiet tikai iezemētas vai īpaši polarizētas kontaktligzdas. Šo kontaktdakšu var ievietot
kontaktligzdā tikai vienā veidā. Ja nevarat ievietot kontaktdakšu kontaktligzdā līdz galam, pamēģiniet
pagriezt to otrādi. Ja kontaktdakšu tomēr nevar ievietot, sazinieties ar elektriķi, lai nomainītu
kontaktligzdu.
• Aizsargājiet strāvas padeves kabeli. Strāvas padeves kabelis jāizvelk tā, lai nevarētu tam uzkāpt virsū vai
to saspiest ar priekšmetiem, kas novietoti uz tā vai tam iepretim. Pievērsiet īpašu uzmanību kabelim pie
kontaktdakšas, sienas kontaktligzdām un vietas, kurā tas izvadīts no ierīces.
• Nepārslogojiet sienas kontaktligzdu vai pagarinātāju vadus. Pārslogošana var izraisīt ugunsgrēku vai
elektrošoku.
VIDES AIZSARDZĪBA
• Šī ierīce izgatavota no atkārtoti pārstrādājamiem materiāliem. Ja ierīce jāutilizē, lūdzu, ievērojiet vietējos
atkritumu savākšanas noteikumus. Nogrieziet strāvas padeves kabeli tā, lai ierīci nevarētu pievienot
strāvas avotam. Noņemiet durtiņas, lai dzīvnieki un mazi bērni nevarētu tikt ieslēgti ierīcē.
• Nepārsniedziet mazgāšanas līdzekļa ražotāja norādījumos ieteikto mazgāšanas līdzekļa daudzumu.
• Traipu tīrīšanas līdzekļus un balinātājus lietojiet tikai pirms mazgāšanas cikla un tikai tad, ja noteikti
nepieciešams.
• Taupiet ūdeni un elektroenerģiju, mazgājot vienīgi ar pilnu ielādi (precīzs daudzums ir atkarīgs no
izmantotās programmas).
06 Pielikums

22_ Pielikums
PAZIŅOJUMS PAR ATBILSTĪBU
Šī ierīce atbilst Eiropas drošības standartiem, EK direktīvai 93/68 un EN standartam 60335.
SPECIFIKĀCIJAS
TIPS VEĻAS MAZGĀŠANAS MAŠĪNA AR IEVIETOŠANAS LŪKU PRIEKŠPUSĒ
IZMĒRI
WF7704S8/WF7702S8/WF7700S8/WF7708S8 WF7604S8/WF7602S8/WF7600S8/WF7608S8
W598mm X D600mm X H844mm W598mm X D550mm X H844mm
ŪDENS SPIEDIENS
50 kPa ~ 800 kPa
ŪDENS IETILPĪBA
60 ℓ 54 ℓ
TĪRAIS SVARS
WF7704S8/WF7702S8
WF7700S8/WF7708S8 WF7604S8/WF7602S8/ WF7600S8/WF7608S8
74kg 73kg 72kg 70kg
MAZGĀŠANAS UN
CENTRIFUGĒŠANAS
EFEKTIVITĀTE
7.0 kg (SAUSA VEĻA) 6.0 kg (SAUSA VEĻA)
PATĒRĒTĀ
JAUDA
MODELIS
WF7704S8/WF7702S8/ WF7700S8/WF7708S8 WF7604S8/WF7602S8/WF7600S8/WF7608S8
MAZGĀŠANA
UN
UZSILDĪŠANA
220 V 2000 W 220 V 2000 W
240 V 2400 W 240 V 2400 W
CENTRI-
FŪGA
MODELIS
WF7704S8 WF7702S8
WF7700S8 WF7708S8 WF7604S8 WF7602S8 WF7600S8 WF7608S8
230 V 700 W 360 W 320 W 270 W 580 W 530 W 500 W 430 W
SŪKNĒŠANA 34 W
IEPAKOJUMS
Wt
MODELIS
WF7704S8/WF7702S8/WF7700S8/WF7708S8
WF7604S8/WF7602S8/WF7600S8/
WF7608S8
PAPĪRS
2.5 kg 2.5 kg
PLASTMASA 1.0 kg 1.0 kg
CENTRIFŪGAS
APGRIEZIENI
MODELIS WF7704S8/WF7604S8
WF7702S8/WF7602S8/WF7522S8/WF7452S8
apgr/min 1400 1200
pielikums

Pielikums _23
TIPS VEĻAS MAZGĀŠANAS MAŠĪNA AR IEVIETOŠANAS LŪKU PRIEKŠPUSĒ
IZMĒRI
WF7522S8/WF7520S8/WF7528S8
WF7452S8/WF7450S8/WF7458S8 WF7350S8/WF7358S8
W598mm X D450mm X
H844mm
W598mm X D404mm X
H844mm
W598mm X D340mm
X H844mm
ŪDENS SPIEDIENS
50 kPa ~ 800 kPa
ŪDENS IETILPĪBA
49 ℓ 48 ℓ 43 ℓ
TĪRAIS SVARS
WF7522S8/7520S8 WF7528S8 WF7452S8/7450S8 WF7350S8/7358S8
66kg 65kg 61kg 51kg
MAZGĀŠANAS UN
CENTRIFUGĒŠANAS
EFEKTIVITĀTE
5.2 kg (SAUSA VEĻA) 4.5 kg (SAUSA VEĻA)
3.5 kg (SAUSA VEĻA)
PATĒRĒTĀ
JAUDA
MODELIS
WF7522S8/WF7520S8/WF7528S8
WF7452S8/WF7450S8/WF7458S8
WF7350S8/WF7358S8
MAZGĀŠANA
UN
UZSILDĪŠANA
220 V 1900 W 220 V 1800 W 220 V 1800 W
240 V 2200 W 240 V 2100 W 240 V 2100 W
CENTRI-
FŪGA
MODELIS
WF7522S8 WF7520S8 WF7528S8
WF7452S8 WF7450S8 WF7458S8 WF7350S8 WF7358S8
230 V 550 W 500 W 430 W 270 W 230 W 180 W 230 W 180 W
SŪKNĒŠANA 34 W
IEPAKOJUMS
Wt
MODELIS
WF7522S8/WF7520S8/WF7528S8
WF7452S8/WF7450S8/
WF7458S8/
WF7350S8/
WF7358S8
PAPĪRS 2.1 kg 1.9 kg 1.8 kg
PLASTMASA 0.9 kg 0.8 kg 0.8 kg
CENTRIFŪGAS
APGRIEZIENI
MODELIS
WF7700S8/WF7600S8/WF7520S8/
WF7450S8/WF7350S8
WF7708S8/WF7608S8/WF7528S8/
WF7458S8/WF7358S8
apgr/min 100 800
06 Pielikums

Sazinieties ar SAMSUNG WORLD WIDE
Ja jums radušies jautājumi vai komentāri par Samsung produkciju, lūdzu,
sazinieties ar SAMSUNG klientu apkalpošanas centru.
Valsts ZVANIET,
VAI APMEKLĒJIET MŪS
TIEŠSAISTĒ
LITHUANIA 8-800-77777 www.samsung.lt
LATVIA
800-7267 www.samsung.lv
ESTONIA 800-7267 www.samsung.ee
Kods Nr. DC68-02410H_LV
 Loading...