

Page 1
Washing Machine
user manual
WF455ARG*
This manual is made with 100% recycled paper.
imagine the possibilities
Thank you for purchasing this Samsung product.
To receive more complete service or accessory
parts, please register your product at or contact
www.samsung.com/register
1-800-SAMSUNG (726-7864)
WF455AG-03159A-04_EN.indd 1WF455AG-03159A-04_EN.indd 1 2012-11-28 2:07:202012-11-28 2:07:20
Page 2

key features of your new
Smart PowerFoam™ washer
1. VRT PLUS™ (Vibration Reduction Technology)
This Samsung washer minimizies noise and vibration with dual 3D vibration sensors and
smart control technology, ensuring quiet operation.
2. The Largest Capacity
Samsung’s extra-large capacity laundry machine can wash a full set of your bedding, a
kingsize comforter, or up to 32 bath towels in a single load. Since you don’t have to do as
many loads, you save time, money, water, and energy.
3. PowerFoam™
Samsung’s effective PowerForm delivers improved cleanliness with advanced fabric care.
PowerFoam allows detergent to distribute evenly and penetrate fabrics faster and deeper.
4. PureCycle™(Tub Cleaning cycle)
Clean your drum with one button! This Pure Cycle is specially designed to remove
detergent residue & dirt bulidup in the tub, diaphragm and door glass without the need for
special chemical detergents.
5. SpeedSpray™
Samsung’s new Speed Spray technology saves you up to 25%* more time when doing
laundry by shortening wash times while still keeping all segments of the washing process
and getting your clothes clean.
*Based on 8 pounds loads, Normal cycle (under Normal Soil level without any options),
on previous and existing 4.3 cu.ft. Samsung front loading washers released until 2011
without Speed Spray.
**Speed Spray performs in Normal, Bedding PLUS, Deep Steam, Stain Away and
Eco Cold cycle and the saving time may vary by cycles and various load and option
compositions.
6. Deep steam
The Deep Steam feature boosts cleaning performance and loosens grime and dirt, thus
providing superior cleaning results.
7. Smart Control
Samsung’s innovative Smart Control technology enables you to control your washer
through personal technologies such as smart phones. You don’t have to be on standby
until the cycle ends. Smart Control allows you to monitor the washing process and let you
know when the cycle is complete.
8. Smart Care
Samsung’s Smart Care, an automatic error-monitoring system, detects and diagnoses
problems at an early stage and provides a quick and easy solution. With the innovative
Smart Control technology, you can also be alerted when the problem occurs via your smart
phones.
9. Stylish design
The stylish design of this washer blends well with your environment.
10. Digital Display & Center jog dial
The Jog dial enables you to select cycles in both directions with ease, and the display is
easy to use and understand.
2_ key features of your new Smart PowerFoam™ washer
WF455AG-03159A-04_EN.indd Sec9:2WF455AG-03159A-04_EN.indd Sec9:2 2012-11-28 2:07:252012-11-28 2:07:25
Page 3
11. DD Motor
The power to handle anything! Our direct-drive inverter motor delivers power right to the
washer tub from a variable speed, reversible motor. A beltless direct-drive motor generates
a higher spin speed of 1,300rpm for more effective, quiter operation. The washer also has
fewer moving parts, meaning fewer repairs.
12. Sanitize
When selecting this cycle, the water heats to an extra high temperature to remove 99.9%
of certain bacteria typically found on clothing, bedding, or towels. This certification is
conducted by NSF International, an independent third-party testing and certification
organization.
Please check the garment care label to avoid garment damage. Only sanitizing cycles have
been designed to meet the requirements of this protocol for sanitization efficacy.
NSF Protocol P172
Sanitization Performance of Residential and
Commercial, Family-Sized Clothes Washers
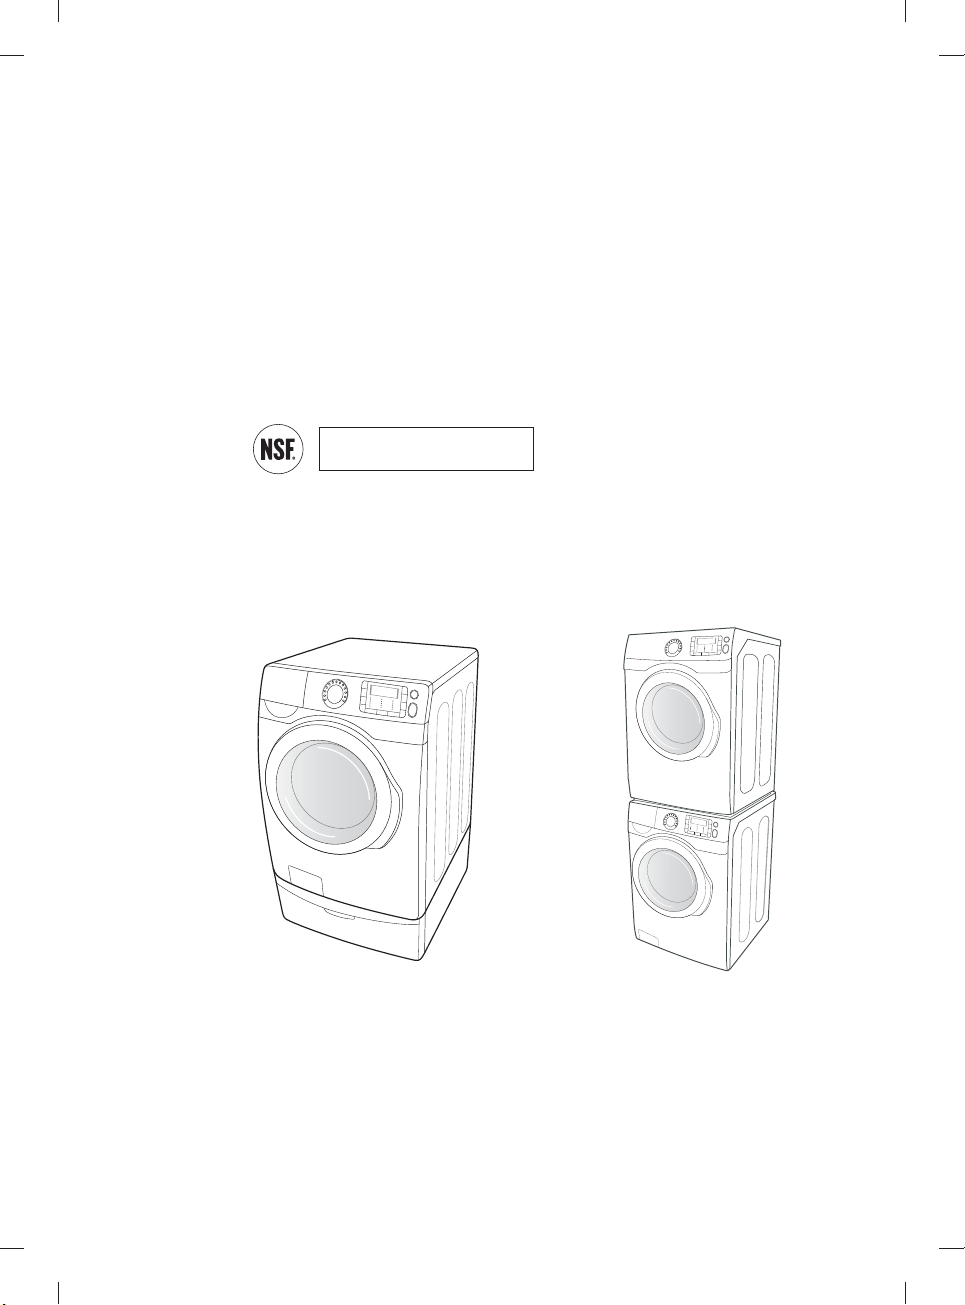
13. Pedestal with Storage Drawers (Model No :
An optional 15” pedestal is available to raise the washer for easier loading and unloading.
It also offers a built-in storage drawer that can hold a 100 oz. bottle of detergent
WE357*
)
14. Stacking (Model No : SK-5A/XAA)
Samsung washers and dryers can be stacked to maximize usable space. An optional
stacking kit is available for purchase from your Samsung retailer.
<Pedestal with Storage Drawers> <Stacking>
key features of your new Smart PowerFoam™ washer _3
WF455AG-03159A-04_EN.indd Sec9:3WF455AG-03159A-04_EN.indd Sec9:3 2012-11-28 2:07:262012-11-28 2:07:26
Page 4
safety information
Congratulations on your new Samsung washer. This manual contains important
information on the installation, use and care of your appliance. Please take time to
read this manual to take full advantage of your washer’s many benefi ts and features.
WHAT YOU NEED TO KNOW ABOUT SAFETY INSTRUCTIONS
The Warnings and Important Safety Instructions in this manual do not cover all possible conditions and
situations that may occur. It is your responsibility to use common sense, caution, and care when installing,
maintaining and operating your washer.
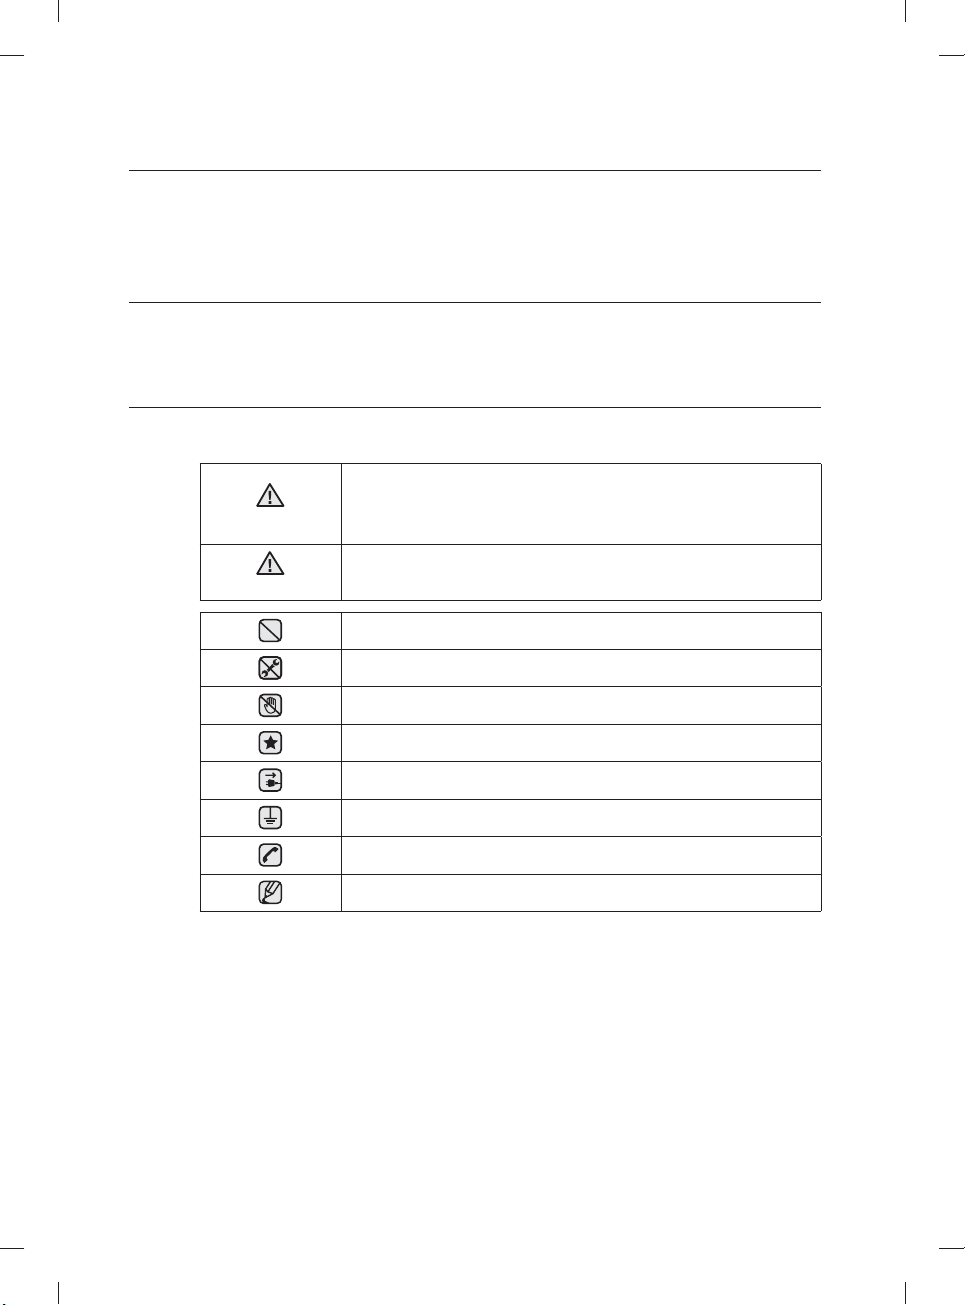
IMPORTANT SAFETY SYMBOLS AND PRECAUTIONS
What the icons and signs in this user manual mean:
Hazards or unsafe practices that may result in severe personal injury
or death.
WARNING
CAUTION
To reduce the risk of fi re, explosion, electric shock, or personal injury
when using your washer, follow these basic safety precautions:
Hazards or unsafe practices that may result in minor personal injury
or property damage.
Do NOT attempt.
Do NOT disassemble.
Do NOT touch.
Follow directions explicitly.
Unplug the power plug from the wall socket.
Make sure the machine is grounded to prevent electric shock.
Call the service center for help.
Note
These warning signs are here to prevent injury to you and others.
Please follow them explicitly.
After reading this section, keep it in a safe place for future reference.
SAVE THESE INSTRUCTIONS
4_ safety information
WF455AG-03159A-04_EN.indd Sec1:4WF455AG-03159A-04_EN.indd Sec1:4 2012-11-28 2:07:262012-11-28 2:07:26
Page 5

WARNING
WARNING
To reduce the risk of fi re, electric shock, or injury to persons when using your appliance, follow
basic precautions, including the following:
1. Read all instructions before using the appliance.
2. Do not wash or dry articles that have been previously cleaned in, washed in, soaked in, or
spotted with gasoline, dry-cleaning solvents, other fl ammable or explosive substances as
they give o vapors that could ignite or explode.
3. Do not allow children to play on or in the appliance. Close supervision of children is
necessary when the appliance is used near children.
4. Before the appliance is removed from service or discarded, remove the door to the washing
or drying compartment.
5. Do not reach into the appliance if the drum is moving.
6. Do not install or store this appliance where it will be exposed to the weather.
7. Do not tamper with controls.
8. Do not repair or replace any part of the appliance or attempt any servicing unless specifi cally
recommended in the user-maintenance instructions or in published user-repair instructions
that you understand and have the skills to carry out.
9. Do not add gasoline, dry-cleaning solvents, or other fl ammable or explosive substances to
the wash water. These substances give o vapors that could ignite or explode.
10. Under certain conditions, hydrogen gas may be produced in a hot water system that has not
been used for 2 weeks or more. HYDROGEN GAS IS EXPLOSIVE. If the hot water system
has not been used for such a period, before using a washer or combination washer-dryer,
turn on all hot water faucets and let the water fl ow from each for several minutes. This will
release any accumulated hydrogen gas. As the gas is fl ammable, do not smoke or use an
open fl ame during this time.
SAVE THESE INSTRUCTIONS
safety information _5
WF455AG-03159A-04_EN.indd Sec1:5WF455AG-03159A-04_EN.indd Sec1:5 2012-11-28 2:07:262012-11-28 2:07:26
Page 6
safety information
CRITICAL INSTALLATION WARNINGS
WARNING
Plug the power cord into an AC 120 V / 60 Hz / 15 A wall socket or higher and use the
socket for this appliance only. In addition, do not use an extension cord.
- Sharing a wall socket with other appliances, using a power strip, or using an extension
cord may result in electric shock or fi re.
- Do not use an electric transformer. It may result in electric shock or fi re.
- Ensure that the voltage, frequency, and amperage provided at the wall socket match the
power specifi cations of the product.
The installation of this appliance must be performed by a qualifi ed technician or service
company.
- Failing to do so may result in electric shock, fi re, an explosion, problems with the
product, or injury.
Remove all foreign substances such as dust or water from the power plug terminals and
contact points using a dry cloth on a regular basis.
- Unplug the power plug and clean it with a dry cloth.
- Failing to do so may result in electric shock or fi re.
Plug the power plug into the wall socket in the right direction so that the cord runs towards
the fl oor.
- If you plug the power plug into the socket in the opposite direction, the electric wires
within the cable may be damaged and this may result in electric shock or fi re.
This appliance must be properly grounded.
Do not ground the appliance to a gas pipe, plastic water pipe, or telephone line.
- Improper grounding may result in electric shock, fi re, an explosion, or problems with the
product.
- Never plug the power cord into a socket that is not grounded correctly and make sure
that it is in accordance with local and national codes.
Do not install this appliance near a heater or infl ammable material.
Do not install this appliance in a humid, oily or dusty location, or in a location exposed to
direct sunlight and water (rain drops).
Do not install this appliance in a location where gas may leak.
- This may result in electric shock or fi re.
Plug the power plug into the wall socket fi rmly. Do not use a damaged power plug,
damaged power cord, or loose wall socket.
- This may result in electric shock or fi re.
Do not pull or excessively bend the power cord.
Do not twist or tie the power cord.
Do not hook the power cord over a metal object, place a heavy object on the power cord,
insert the power cord between objects, or push the power cord into the space behind the
appliance.
- This may result in electric shock or fi re.
SAVE THESE INSTRUCTIONS
6_ safety information
WF455AG-03159A-04_EN.indd Sec1:6WF455AG-03159A-04_EN.indd Sec1:6 2012-11-28 2:07:262012-11-28 2:07:26
Page 7
Do not pull the power cord when unplugging the power plug.
- Unplug the power plug by holding the plug.
- Failing to do so may result in electric shock or fi re.
If the power plug or power cord is damaged, contact your nearest service center.
INSTALLATION CAUTIONS
CAUTION
Position the appliance so that the power plug is easily accessible.
- Failing to do so may result in electric shock or fi re due to electric leakage.
Install your appliance on a level and hard fl oor that can support its weight.
- Failing to do so may result in abnormal vibrations, noise, or problems with the product.
Unplug the power plug when the appliance is not being used for long periods of time or
during a thunder/lightning storm.
- Failing to do so may result in electric shock or fi re.
CRITICAL USAGE WARNINGS
WARNING
If the appliance is fl ooded, cut the power immediately and contact your nearest service
center.
If the appliance emits a strange noise, a burning smell, or smoke,, unplug the power plug
immediately and contact your nearest service center.
- Failing to do so may result in electric shock or fi re.
In the event of a gas leak (such as propane gas, LP gas, etc.), ventilate immediately without
touching the power plug. Do not touch the appliance or power cord.
- Do not use a ventilating fan.
- A spark may result in an explosion or fi re.
Do not wash items contaminated with gasoline, kerosene, benzene, paint thinner, alcohol or
other fl ammable or explosive substances.
- This may result in electric shock, fi re or an explosion.
Do not open the washer door by force while the washer is operating (high-temperature
washing/drying/spinning).
- Water fl owing out of the washer may result in burns or cause the fl oor to be slippery.
This may result in injury.
- Opening the door by force may result in damage to the product or personal injury.
Make sure to remove the packaging (sponge, styrofoam) attached to the bottom of the
washer before using it.
Do not insert your hand under the washer.
- This may result in injury.
SAVE THESE INSTRUCTIONS
safety information _7
WF455AG-03159A-04_EN.indd Sec1:7WF455AG-03159A-04_EN.indd Sec1:7 2012-11-28 2:07:262012-11-28 2:07:26
Page 8
safety information
Do not touch the power plug with wet hands.
- This may result in electric shock.
Do not turn the appliance o by unplugging the power plug while an operation is in
progress.
- Plugging the power plug into the wall socket again may cause a spark and result in
electric shock or fi re.
Keep all packaging materials well out of the reach of children, as packaging materials can
be dangerous to children.
- If a child places a bag over its head, it may result in su ocation.
Do not let children or infi rm persons use this washer unsupervised.
- Failing to do so may result in electric shock, burns or injury.
Do not insert your hand or a metal object under the washer while it is operating.
- This may result in injury.
Make sure the detergent drawer is closed before you put laundry into the washer or remove
laundry from the washer.
- If the detergent drawer is open, you could strike the drawer with your head and injure
yourself.
Do not attempt to repair, disassemble, or modify the appliance yourself.
- Do not use any fuse (such as cooper, steel wire, etc.) other than the standard fuse.
- If you need to repair or reinstall the appliance, contact your nearest service center.
- Failing to do so may result in electric shock, fi re, problems with the product, or injury.
If water has enters the appliance anywhere but the drum, unplug the power plug and
contact your nearest service center.
- Failing to do so may result in electric shock or fi re.
When the water supply hose comes loose from the faucet and fl oods the appliance, unplug
the power plug.
- Failing to do so may result in electric shock or fi re.
If any foreign substance enters the appliance, unplug the power plug and contact you
nearest service center.
- Failing to do so my result in electric shock or fi re.
USAGE CAUTIONS
CAUTION
If the the washer is contaminated by a foreign substance such as detergent, dirt, food
waste, etc., unplug the power plug and clean the washer using a damp, soft cloth.
- Failing to do so may result in discoloration, deformation, damage or rust.
If struck hard, the front glass can break. Take care when using the washer.
- If the glass is broken, it may result in injury.
SAVE THESE INSTRUCTIONS
8_ safety information
WF455AG-03159A-04_EN.indd Sec1:8WF455AG-03159A-04_EN.indd Sec1:8 2012-11-28 2:07:262012-11-28 2:07:26
Page 9

After a water supply failure or when reconnecting the water supply hose, open the faucet
slowly.
Open the faucet slowly after a long period of non-use.
- The air pressure in the water supply hose or the water pipe may result in damage to a
part or in water leakage.
If a drain error occurs during an operation, check if there is a drainage problem.
- If the washer is used when it is fl ooded because of a drainage problem,, it may result in
electric shock or fi re due to electric leakage.
Insert the laundry into the washer completely so that laundry does not get caught in the
door.
- If laundry gets caught in the door, it may result in damage to the laundry or the washer,
or result in water leakage.
Ensure that the faucet is turned o when the washer is not being used.
- Ensure that the screw on the water supply hose connector is fi rmly connected to the
faucet and properly tightened.
- Failing to do so may result in property damage or injury.
Take care that the Rubber Seal and the Front Door Glass are not contaminated by a foreign
substance (e.g. waste, thread, hair, etc.)
- If a foreign substance is caught in the door or the door is not completely closed, it may
cause water leakage.
Open the faucet and check if the water supply hose connector is fi rmly tightened and that
there is no water leaking before using the product.
- If the water supply hose connectors are loose, it may result in water leakage.
The product you have purchased is designed for domestic use only.
The use for business purposes qualifi es as product misuse. In this case, the product will
not be covered by the standard warranty provided by Samsung and no responsibility can
be attributed to Samsung for malfunctions or damages resulting from such misuse.
If the wash is not performed and the laundry is left for a period of time after adding
detergent or applying stain remover or pre-treatment onto the laundry, the laundry may be
discolored.
Select the recommended cycle and temperature on the basis of the laundry items, sort the
laundry by color on the basis of its colorfastness and select the appropriate cycle.
Make sure that foreign objects such as pins, buttons and coins are removed from clothing
items when adding laundry into the washer. Wash dirty laundry separately from relatively
clean items and wash fragile items separately from tougher textiles.
If an item is stained, wash it as fast as possible. Use stain remover or detergent only after
testing the colorfastness of the item by applying a small quantity to an inside seam.
SAVE THESE INSTRUCTIONS
safety information _9
WF455AG-03159A-04_EN.indd Sec1:9WF455AG-03159A-04_EN.indd Sec1:9 2012-11-28 2:07:262012-11-28 2:07:26
Page 10

safety information
Do not stand on top of the appliance or place objects (such as laundry, lighted candles,
lighted cigarettes, dishes, chemicals, metal objects, etc.) on the appliance.
- This may result in electric shock, fi re, problems with the product, or injury.
Do not operate the appliance with wet hands.
- This may result in electric shock.
Do not spray volatile material such as insecticide onto the surface of the appliance.
- As well as being harmful to humans, it may also result in electric shock, fi re or problems
with the product.
Do not place an object that generates a electromagnetic fi eld near the washer.
- This may result in injury due to a malfunction.
Since the water drained during a high-temperature wash or drying cycle is hot, do not touch
the water.
- This may result in burns or injury.
Do not wash, spin or dry water-proof seats, mats or clothing (*).
- Do not wash thick, hard mats even if the washer mark is on the care label.
- This may result in injury or damage to the washer, walls, fl oor or clothing due to
abnormal vibrations.
* Woolen bedding, rain covers, fi shing vests, ski pants, sleeping bags, diaper covers,
sweat suits, and bicycle, motor cycle, car covers, etc.
Do not operate the washer when the detergent box is removed.
- This may result in electric shock or injury due to water leakage.
Do not touch the inside of the tub during or just after drying as it is hot.
- This may result in burns.
Do not insert your hand into the detergent dispenser after opening it.
- This may result in injury as your hand may be caught.
Do not place any non-laundry objects, such as shoes, food waste, or animals into the
washer.
- This can cause abnormal vibrations that can damage the washer, and, in the case of
pets, cause severe injury or death.
Do not press the buttons using sharp objects such as pins, knifes, fi ngernails, etc.
- This may result in electric shock or injury.
Do not wash laundry contaminated by oils, creams or lotions usually found in skincare
shops or massage clinics.
- This may result in the rubber seal becoming deformed and water leakage.
Do not leave metal objects (safety pins, hair pins, etc.) or bleach in the tub for long periods
of time.
- This may cause the tub to rust.
- If rust appears on the surface of the tub, apply a neutral cleansing agent to the surface
and use a sponge to clean it. Never use a metal brush.
SAVE THESE INSTRUCTIONS
10_ safety information
WF455AG-03159A-04_EN.indd Sec1:10WF455AG-03159A-04_EN.indd Sec1:10 2012-11-28 2:07:262012-11-28 2:07:26
Page 11
Do not use dry cleaning detergent directly and do not wash, rinse, or spin laundry
contaminated by dry cleaning detergent.
- This may result in spontaneous combustion or ignition due to the heat from the oxidation
of the oil.
Do not use hot water from water cooling/heating devices.
- This may result in problems with the washer.
Do not use natural hand-washing soap in the washer.
- If it hardens and accumulates inside the washer, it may result in problems with the
product, discoloration, rust or bad odors.
Do not wash large laundry items such as bedding in the washing net.
- Failing to do so may result in injury due to abnormal vibrations.
- Place smaller items, such as lace socks and lingerie in the washing net.
Do not use hardened detergent.
- If it accumulates inside the washer, it may cause water leakage.
Do not wash throw rugs or doormats.
- If you wash throw rugs or doormats, sand will accumulate inside the washer. It may
result in errors such as no draining.
Take care that children’s fi ngers are not caught in the door when closing it.
- This may result in injury.
CRITICAL CLEANING INSTRUCTIONS
WARNING
Do not clean the appliance by spraying water directly onto it.
Do not use benzene, thinner or alcohol to clean the appliance.
- This may result in discoloration, deformation, damage, electric shock or fi re.
Before cleaning or performing maintenance, unplug the appliance from the wall socket.
- Failing to do so may result in electric shock or fi re.
SAVE THESE INSTRUCTIONS
safety information _11
WF455AG-03159A-04_EN.indd Sec1:11WF455AG-03159A-04_EN.indd Sec1:11 2012-11-28 2:07:262012-11-28 2:07:26
Page 12

safety information
REGULATORY NOTICE
1. FCC Notice
FCC CAUTION:
CAUTION
Any changes or modifi cations not expressly approved by the party responsible for compliance
could void the user’s authority to operate the equipment.
This device complies with Part 15 of FCC Rules. Operation is Subject to following two
conditions:
1. This device may not cause harmful interference, and
2. This device must accept any interference received including interference that cause
undesired operation.
For product available in the USA/Canada market, only channel 1~11 can be operated. Selection
of other channels is not possible.
FCC STATEMENT:
This equipment has been tested and found to comply within the limits for a Class B digital
device, pursuant to part 15 of the FCC Rules. These limits are designed to provide reasonable
protection against harmful interference in a residential installation.
This equipment generates, uses, and can radiate radio frequency energy and, if not installed
and used in accordance with the instructions, may cause harmful interference to radio
communications. However, there is no guarantee that interference will not occur in a particular
installation. If this equipment does cause harmful interference to radio or television reception,
which can be determined by turning the equipment o and on, the user is encouraged to try to
correct the interference by one or more of the following measures:
• Reorient or relocate the receiving antenna
• Increase the separation between the equipment and receiver
• Connect the equipment into an outlet on a di erent circuit from that to which the receiver is
connected
• Consult the dealer or an experienced radio/TV technician for help.
FCC RADIATION EXPOSURE STATEMENT:
This equipment complies with FCC radiation exposure limits set forth for an uncontrolled
environment. This equipment should be installed and operated with a minimum distance of 20cm
between the radiator and your body. This device and its antenna(s) must not be co-located or
operation in conjunction with any other antenna or transmitter.
SAVE THESE INSTRUCTIONS
12_ safety information
WF455AG-03159A-04_EN.indd Sec1:12WF455AG-03159A-04_EN.indd Sec1:12 2012-11-28 2:07:262012-11-28 2:07:26
Page 13

2. IC Notice
The term “IC” before the radio certifi cation number only signifi es that Industry Canada technical
specifi cations were met. Operation is subject to the following two conditions: (1) this device may
not cause interference, and (2) this device must accept any interference, including interference
that may cause undesired operation of the device.
This Class B digital apparatus complies with Canadian ICES-003.
Cet appareil numérique de la classe B est conforme á la norme NMB-003 du Canada.
For product available in the USA/Canada market, only channel 1~11 can be operated. Selection
of other channels is not possible.
IC RADIATION EXPOSURE STATEMENT:
This equipment complies with IC RSS-102 radiation exposure limits set forth for an uncontrolled
environment. This equipment should be installed and operated with minimum distance 20cm
between the radiator & your body. This device and its antenna(s) must not be co-located or
operation in conjunction with any other antenna or transmitter.
SAVE THESE INSTRUCTIONS
safety information _13
WF455AG-03159A-04_EN.indd Sec1:13WF455AG-03159A-04_EN.indd Sec1:13 2012-11-28 2:07:262012-11-28 2:07:26
Page 14

contents
INSTALLING YOUR WASHER
16
OPERATING INSTRUCTIONS
23
WASHING A LOAD OF LAUNDRY
24
16 Unpacking your washer
16 Overview of your washer
17 Electrical
17 Grounding
17 Water
17 Drain facility
18 Flooring
18 Location considerations
18 Alcove or closet installation
18 Undercounter installation(washer only)
19 With optional pedestal base or stacking kit
20 Important note to installer
20 Installation flow chart
23 Loading your washer
23 Getting started
24 Overview of the control panel
26 Delay Start
27 Child Lock
28 Spin Only
28 Drum Light
28 Garment+
28 My cycle
29 Steam
29 Smart Care
30 Washing clothes using the cycle selector
31 Setting the Smart Control
31 Configuring the wired/wireless router
31 Check before installation
32 Connecting to the network using the WPS
setting
33 Connecting to the network using the AP
setting
34 Using the mobile app (Android)
34 Downloading the phone application
40 Device certification
44 Using the mobile app
46 Using the mobile app (iOS)
46 Downloading the phone application
50 Device certification
54 Using the mobile app
56 Registering your washer
58 Detergent use
58 Features
14_ contents
WF455AG-03159A-04_EN.indd Sec6:14WF455AG-03159A-04_EN.indd Sec6:14 2012-11-28 2:07:262012-11-28 2:07:26
Page 15

MAINTAINING YOUR WASHER
60
60 Cleaning the exterior
60 Cleaning the interior
61 Cleaning the dispensers
61 Storing your washer
62 Cleaning the debris filter
63 Cleaning the door seal/bellow
63 Preserving the top cover and the front frame
64 Pure Cycle
TM
01 contents
TROUBLESHOOTING
65
APPENDIX
71
65 Check these points if your washer…
67 Information codes
69 Network Setup Q&A
71 Fabric care chart
72 Cycle chart
74 Helping the environment
74 Declaration of conformity
74 Specification
75 Open Source Announcement
87 OpenSSL
contents _15
WF455AG-03159A-04_EN.indd Sec6:15WF455AG-03159A-04_EN.indd Sec6:15 2012-11-28 2:07:272012-11-28 2:07:27
Page 16
installing your washer
UNPACKING YOUR WASHER
Unpack your Washer and inspect it for shipping damage. Make sure you have received all of the items
shown below. If your Washer was damaged during shipping, or you do not have all of the items, contact
1-800-SAMSUNG(726-7864).
To prevent personal injury or strain, wear protective gloves whenever lifting or carrying the unit.
Packing materials can be dangerous to children; keep all packing material (plastic bags, polystyrene,
etc.) well out of the reach of children.
WARNING
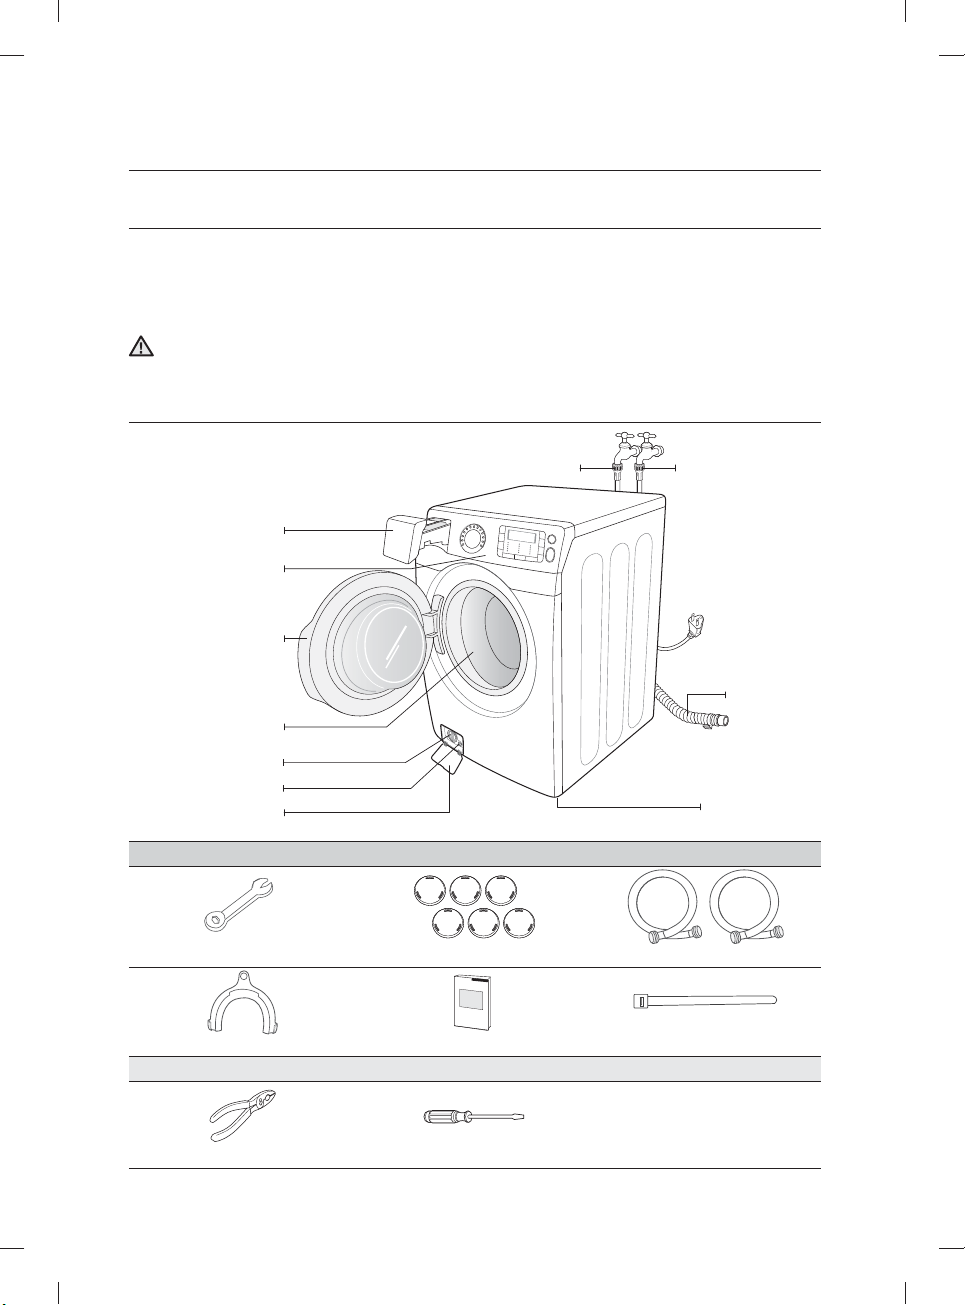
OVERVIEW OF YOUR WASHER
Detergent drawer
Control panel
Debris filter
Drain tube
Filter cover
Parts supplied
Wrench Bolt hole covers Water supply hoses
Door
Tub
Hot water supply
hose
Cold water supply
hose
Drain Hose
Adjustable legs
Hose guide User manual book Plastic zip hose tie
Tools needed
Pliers Flat screwdriver
16_ installing your washer
WF455AG-03159A-04_EN.indd Sec3:16WF455AG-03159A-04_EN.indd Sec3:16 2012-11-28 2:07:272012-11-28 2:07:27
Page 17

BASIC LOCATION REQUIREMENTS
Electrical
• 120 Volt 60 Hz 15 AMP fuse or circuit breaker
• Individual branch circuit serving only your Washer is recommended.
• Your Washer is equipped with a power cord.
NEVER USE AN EXTENSION CORD.
CAUTION
Grounding
ELECTRICAL GROUNDING IS REQUIRED ON THIS APPLIANCE.
This appliance must be grounded. In the event of malfunction or breakdown, grounding will
reduce the risk of electric shock by providing a path of least resistance for electric current.
This appliance is equipped with a power cord having a three-prong grounding plug for use in a
properly installed and grounded outlet.
The plug must be plugged into an appropriate outlet that is properly installed and grounded in
accordance with all local codes and ordinances.
Improper connection of the equipment-grounding conductor can result in a risk of electrical
shock. Check with a qualified electrician or serviceman if you are in doubt as to whether the
WARNING
appliance is properly grounded. Do not modify the plug provided with the appliance – if it
does not fit the outlet, have a proper outlet installed by a qualified electrician.
IMPORTANT SAFETY PRECAUTIONS
• To prevent unnecessary risk of fire, electrical shock or personal injury, all wiring and
grounding must be done in accordance with the National Electrical Code ANSI/FNPA, No.
70 Latest Revision and local codes and ordinances. It is the personal responsibility of the
appliance owner to provide adequate electrical service for this appliance.
NEVER CONNECT GROUND WIRE TO PLASTIC PLUMBING LINES, GAS LINES, OR HOT
CAUTION
WATER PIPES.
01 installing your washer
Water
To correctly fill your Washer in the proper amount of time, water pressure of 20-116 psi (137800kPa) is required.
Water pressure less than 20 psi may cause water valve failure, or may not allow the water valve
to shut off completely. Or, it may extend the fill time beyond what your Washer controls allow,
resulting in your Washer turning off. A time limit is built into the controls in the event of an internal
hose becoming loose and flooding your home.
The water faucets must be within 4 feet/122 cm of the back of your Washer for the inlet hoses
provided with your Washer.
Accessory inlet hoses are available in various lengths up to 10 feet/305cm for faucets that
are further away from the back of your Washer.
To avoid the possibility of water damage:
• Have water faucets easily accessible
• Turn off faucets when the washer is not in use.
• Periodically check that there is no leakage from the water inlet hose fittings.
CHECK ALL CONNECTIONS AT THE WATER VALVE AND FAUCET FOR LEAKS.
WARNING
Using hard water or bad quality water may cause the water supply valve to operate
abnormally.
CAUTION
Drain facility
The recommended height of the standpipe is 18 in/46 cm. The drain hose must be routed
through the drain hose clip to the standpipe. The standpipe must be large enough to accept the
outside diameter of the drain hose. The drain hose is attached at the factory.
installing your washer _17
WF455AG-03159A-04_EN.indd Sec3:17WF455AG-03159A-04_EN.indd Sec3:17 2012-11-28 2:07:272012-11-28 2:07:27
Page 18
installing your washer
Flooring
For best performance, your Washer must be installed on a solidly constructed floor. Wood floors
may need to be reinforced to minimize vibration and/or unbalanced load situations. Carpeting
and soft tile surfaces are contributing factors in vibration may cause your washer to move slightly
during the spin cycle.
Never install your washer on a platform or weakly supported structure.
Location considerations
Do not install your washer in areas where water may freeze, since your washer will always
maintain some water in its water valve, pump, and hose areas. This can cause damage to the
pump, hoses and other components.
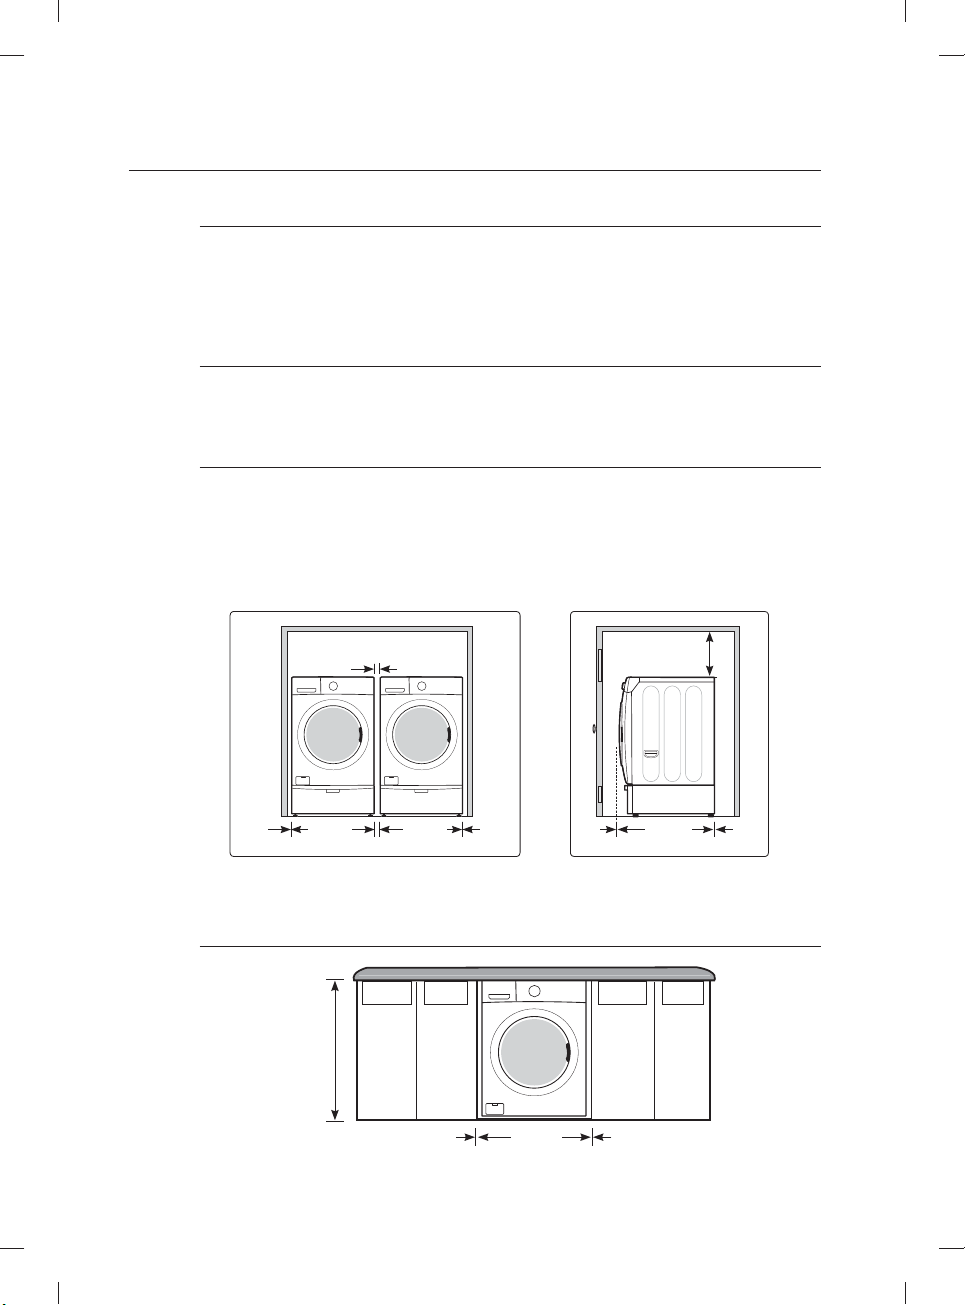
Alcove or closet installation
MINIMUM CLEARANCES FOR CLOSET AND ALCOVE INSTALLATIONS:
Sides – 1 in / 25 mm
Rear – 5.9 in / 150 mm
If the washer and dryer are installed together, the closet front must have at least a 72 in² (465
cm²) unobstructed air opening. Your washer alone does not require a specific air opening.
Top – 17 in / 432 mm
Closet Front – 2 in / 51 mm
A
1 in.
(2.5 cm)
(68.6 cm)
27 in.
1 in.
(2.5 cm)
27 in.
(68.6 cm)
1 in.
(2.5 cm)
A. Recessed area
B. Side view - closet or confined area
Undercounter installation(washer only)
39.6 in.
(100.6 cm)
1 in.
(2.5 cm)
(68.6 cm)
27 in.
B
2 in.
(5 cm)
1 in.
(2.5 cm)
17 in.
(43.2 cm)
34.1 in.
(86.5 cm)
5.9 in.
(15 cm)
18_ installing your washer
WF455AG-03159A-04_EN.indd Sec3:18WF455AG-03159A-04_EN.indd Sec3:18 2012-11-28 2:07:272012-11-28 2:07:27
Page 19
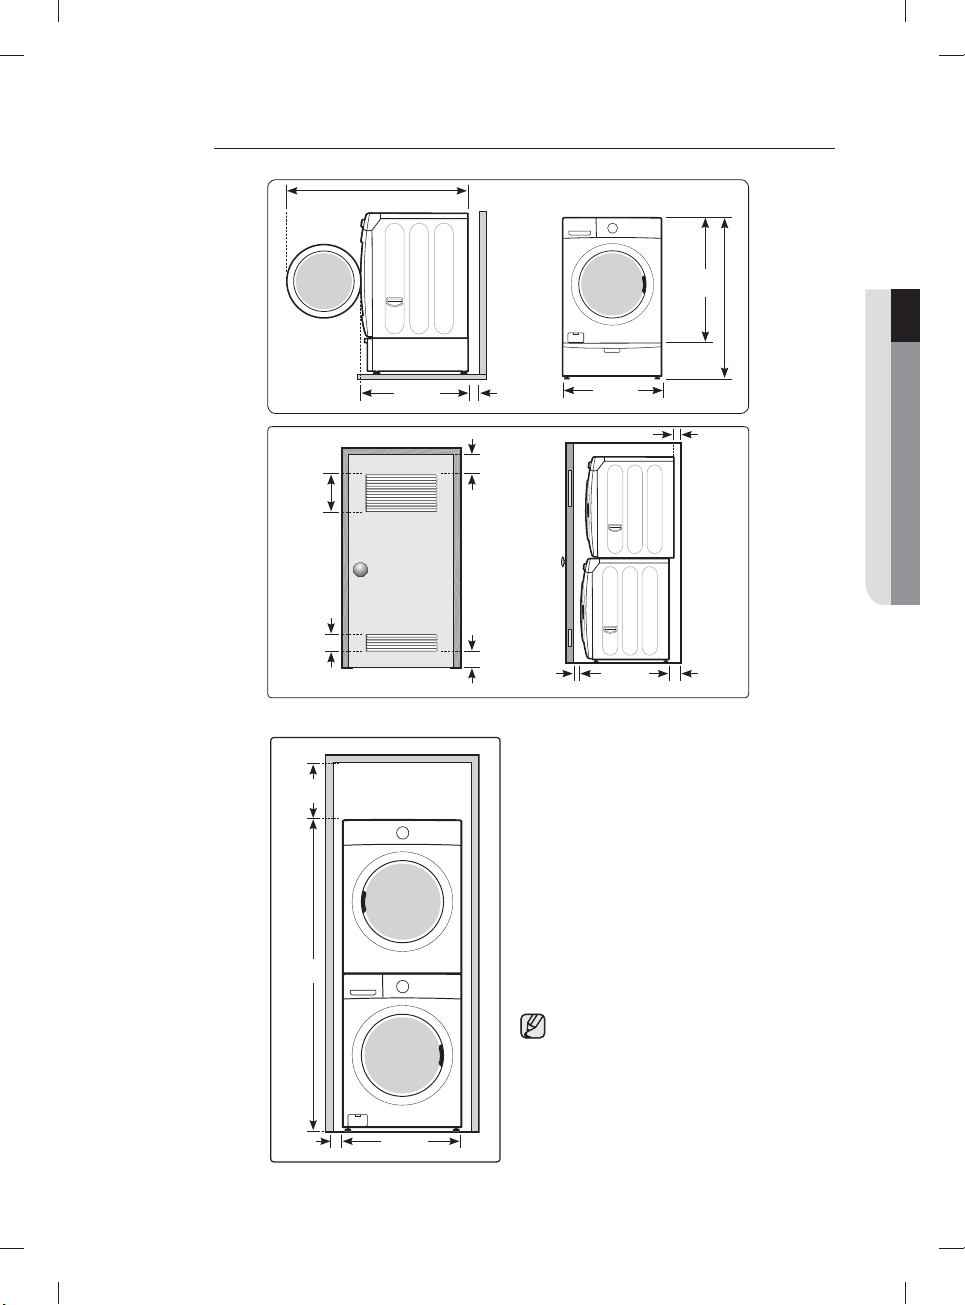
With optional pedestal base or stacking kit
Required Dimensions for Installation With Pedestal
51.2 in. (130 cm) to clear open door
5.9 in.
(15 cm)
3 in.
(7.6 cm)
3 in.
(7.6 cm)
1 in.
(2.5 cm)
48 in.² *
(310 cm²)
24 in.² *
(155 cm²)
34.1 in.
(86.5 cm)
Closet or Door
27 in.
(68.6 cm)
34.1 in.
(86.5 cm)
39.0 in.
(99 cm)
53.6 in.
(136.2 cm)
(12.7 cm)
5.9 in.**
(15 cm)
01 installing your washer
5 in.
Required Dimensions for Installation With Stacking Kit
6 in. *
(15.2 cm)
78 in.
(198 cm)
It is not recommended to stack DV457* on
your washer.
(it might be hard to control dryer LCD
because of the viewing angle.)
* Required spacing
1 in.
(2.5 cm)
27 in.
(68.6 cm)
** External exhaust elbow requires additional space.
installing your washer _19
WF455AG-03159A-04_EN.indd Sec3:19WF455AG-03159A-04_EN.indd Sec3:19 2012-11-28 2:07:272012-11-28 2:07:27
Page 20
installing your washer
IMPORTANT NOTE TO INSTALLER
Please read the following instructions carefully before installing your Washer.
These instructions should be retained for future reference.
We recommend you hire a professional for installation of this washer.
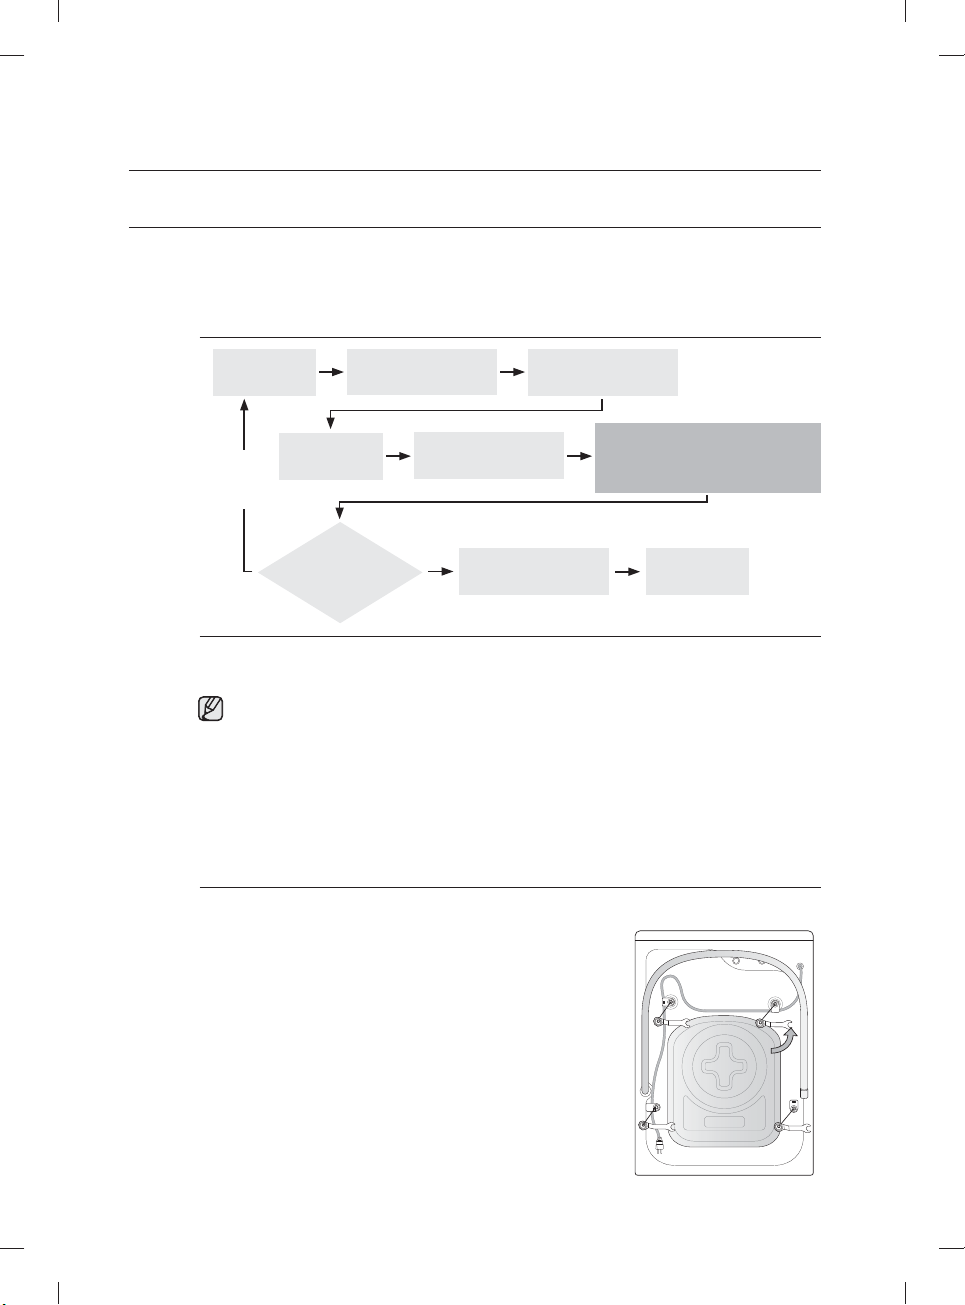
Installation flow chart
Selecting a
location
Please
check again
before
steps.
Yes
Adjusting the
levelling feet
have excess vibration
Removing the shipping
bolts (*Drum only)
Does
your washer
or noise?
Connecting the water
Powering your washing
machine
Running a Calibration mode
(Refer to the following
No
description)
and the drain
[Running a test cycle]
Run a test cycle (Rinse+Spin) with
small amount of laundary (about 4~5
Towels)
Finish the
installation
STEP 1
Selecting a Location
Before you install your washer, make sure the location:
• Has a hard, level surface without carpeting or flooring that may obstruct ventilation.
• Has no dust, oil and detergent etc.
• Is away from direct sunlight
• Has adequate ventilation
• Will not freeze (below 32°F or 0°C)
• Is away from heat sources such as oil or gas
• Has enough slack for the power cord.
• Doesn’t have any carpeting that will obstruct ventilation openings.
STEP 2
Removing the Shipping Bolts
Before using your Washer, you must remove the four shipping
bolts from the back of the unit.
1. Loosen all the bolts with the supplied wrench.
2. Slide the bolt and spacer up and remove the bolt with the
spacer through the hole in the rear wall of your washer.
Repeat for each bolt.
Fill the holes with the supplied Bolt Hole Covers (See page 16).
3.
4. Keep the shipping bolts and spacers for future use.
20_ installing your washer
WF455AG-03159A-04_EN.indd Sec3:20WF455AG-03159A-04_EN.indd Sec3:20 2012-11-28 2:07:282012-11-28 2:07:28
Page 21

STEP 3
Installing your Washer
1. Place the drain hose in the drain facility. Be
sure an airtight connection is NOT made
between the drain hose and the standpipe.
The standpipe must be at least 18 in or 46
cm high.
Caution must always be exercised to
avoid collapsing or damaging the drain
hose. For best results, the drain hose
should not be restricted in any way – by
elbows, couplings, or excessive lengths.
For situations where the drain hose
cannot be conveniently elevated to at
least 18 in or 46 cm, the drain hose must
be supported.
Laundry tub Stand pipe
96” Max
18” Min
Hose
retainer
Tie strap
96” Max
18” Min
01 installing your washer
2. Check the inlet hose to ensure a washer is inside each fill
hose.
Thread the inlet hoses to the HOT and COLD faucet
connections.
On the other end of the hose, check for one rubber washer
per hose and install each fill hose to the water valve. Make
sure the hose with the Hot printed line is attached to the
HOT faucet. Tighten by hand until snug, then two-thirds of a
turn with pliers.
3. Connect the other end of the Hot and Cold water supply
hose to the inlet water valve at the rear of the washing
machine.Tighten by hand until snug, then two-thirds of a
turn with pliers.
For correct water use, connect both HOT and COLD water
valves. If either or both are not connected, an “nF” (no fill)
error can occur.
4. Turn on the “HOT” and “COLD “water supply and check all
connections at the water valve and the faucet for leaks.
Cold Hot
Rubber
Washer
Cold printed Hot printed
installing your washer _21
WF455AG-03159A-04_EN.indd Sec3:21WF455AG-03159A-04_EN.indd Sec3:21 2012-11-28 2:07:282012-11-28 2:07:28
Page 22
installing your washer
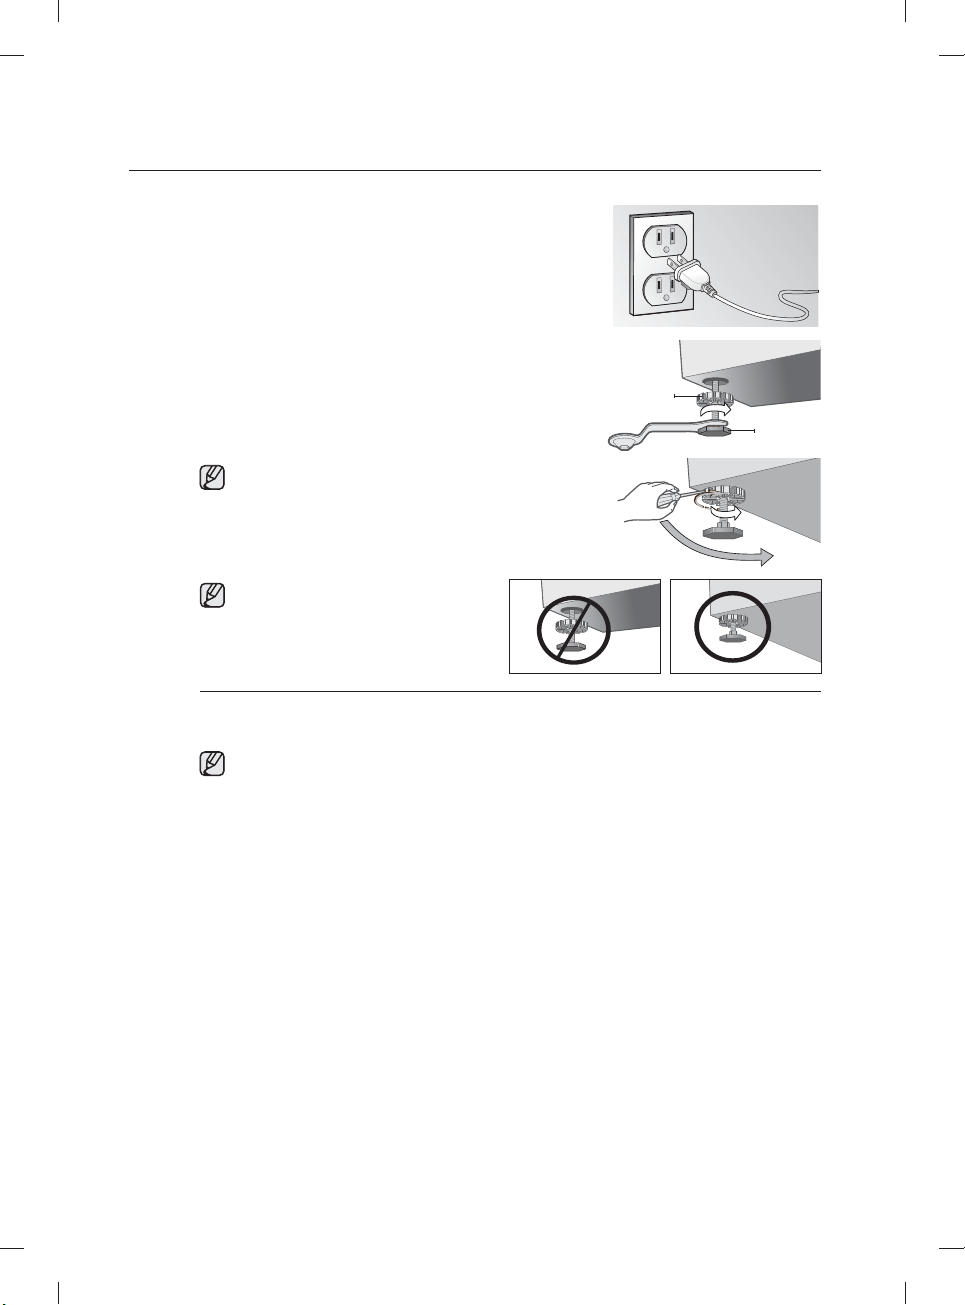
5. Slide your washer into position.
6. Level your washer by turning the leveling legs in or out as
necessary by hand or by using the wrench included with
your washer.
When your washer is level, tighten the locking nuts using
the wrench or (-) flathead screwdriver.
7. Plug the power cord into a 3-Prong, well grounded
120 volt 60 Hz approved electrical outlet protected by a
15-amp fuse or comparable circuit breaker.
Your washer is grounded through the third prong of the
power cord when plugged into a three-prong grounded
receptacle.
Your Washer must be leveled on all four sides. A
carpenter’s level should be used on all four corners
of your Washer. It’s a good idea after the first dozen
washes to recheck your washer’s levelness.
Avoid damage to the legs. Do not move
the Washer unless the Locking-nuts are
fastened to the bottom of the Washer.
STEP 4
Calibration mode
Before using Calibration mode, be sure to take out all items from the drum.
Your Samsung washer automatically detects the weight of the laundry.
For more accurate weight detection, please run Calibration Mode after the installation.
Calibration mode is performed by following the steps below.
1. Turn on the washer.
2. Press the Temp button and Delay Start button simultaneously at least 3 seconds.
3. Remove any contents in the tub and close the door.
4. Press the Start/Pause button to run Calibration Mode.
5. The drum rotates clockwise and counterclockwise approximately for for approximately 3
minutes.
6. When Calibration Mode is finished, the “En/End” appears on the display and the washing
machine turns off automatically. The washing machine is now ready for use.
Locking
Nut
Levelling
Leg
22_ installing your washer
WF455AG-03159A-04_EN.indd Sec3:22WF455AG-03159A-04_EN.indd Sec3:22 2012-11-28 2:07:282012-11-28 2:07:28
Page 23
operating instructions
LOADING YOUR WASHER
• You can fill the tub with dry, unfolded clothes; but DO NOT OVERLOAD the tub.
• Overloading may reduce washing efficiency, cause excess wear, and possibly cause creasing or
wrinkling of the load.
• Wash delicate items such as bras, hosiery, and other lingerie in the Delicates cycle with similar
lightweight items.
• When washing big bulky items or a few smaller items that don’t fill the tub completely – a rug, a pillow,
stuffed toys, or one or two sweaters, for example – add a few towels to improve tumbling and spin
performance.
During the spin cycle, the washer may add additional water to redistribute the excessive imbalance
inside the drum.
• When washing heavily soiled loads, do not overload your Washer in order to assure good cleaning
results.
• To add a forgotten item:
1. Press the Start/Pause Button.
2. Wait for the Door Lock light to go out (5 seconds)
3. Add the item, close the door, and press the Start/Pause Button.
After a 10-second pause, the cycle will resume.
GETTING STARTED
1. Load your Washer.
2. Close the door.
Push the laundry into the drum completely to prevent the laundry from being caught in the door or
from falling out of the drum.
CAUTION
3. Add detergent and additives to the dispenser (see page 58).
4. Select the appropriate cycle and options for the load (see page 24).
5. Press the Start/Pause Button.
The drum automatically rotates and measures the weight of the laundry without supplying water in
order to adjust the wash time. (The rotating display on the display panel indicates that the weight of the
laundry is being measured.)
6. The Wash Indicator light will illuminate.
7. The estimated cycle time will appear in the display.
The time may fluctuate to better indicate the time remaining in the cycle.
The actual time required for a cycle may differ from the estimated time in the display depending on the
water pressure, water temperature, detergent, and laundry.
8. Before your washer starts to fill, it will make a series of clicking noises to check the door lock and do a
quick drain.
• When the cycle is complete, the Door Lock light will go out and “End” will appear in the display.
• DO NOT attempt to open the door until the Door Lock light is off. To add a forgotten item, see
“Loading your Washer” section. (page 23)
• When your Washer is restarted after a pause, expect a delay of up to 15 seconds before the cycle
continues.
• Pressing the Power button cancels the cycle and stops your washer.
The Pre Wash, Wash, Rinse and Spin indicator lights will illuminate during those portions of the cycle.
•
Do not place anything on top of your washer while it is running.
WARNING
02 operating instructions
operating instructions _23
WF455AG-03159A-04_EN.indd Sec2:23WF455AG-03159A-04_EN.indd Sec2:23 2012-11-28 2:07:292012-11-28 2:07:29
Page 24
washing a load of laundry
WARNING: To reduce the risk of fire, electric shock, or injury to persons, read the IMPORTANT
SAFETY INSTRUCTIONS before operating this appliance.
WARNING
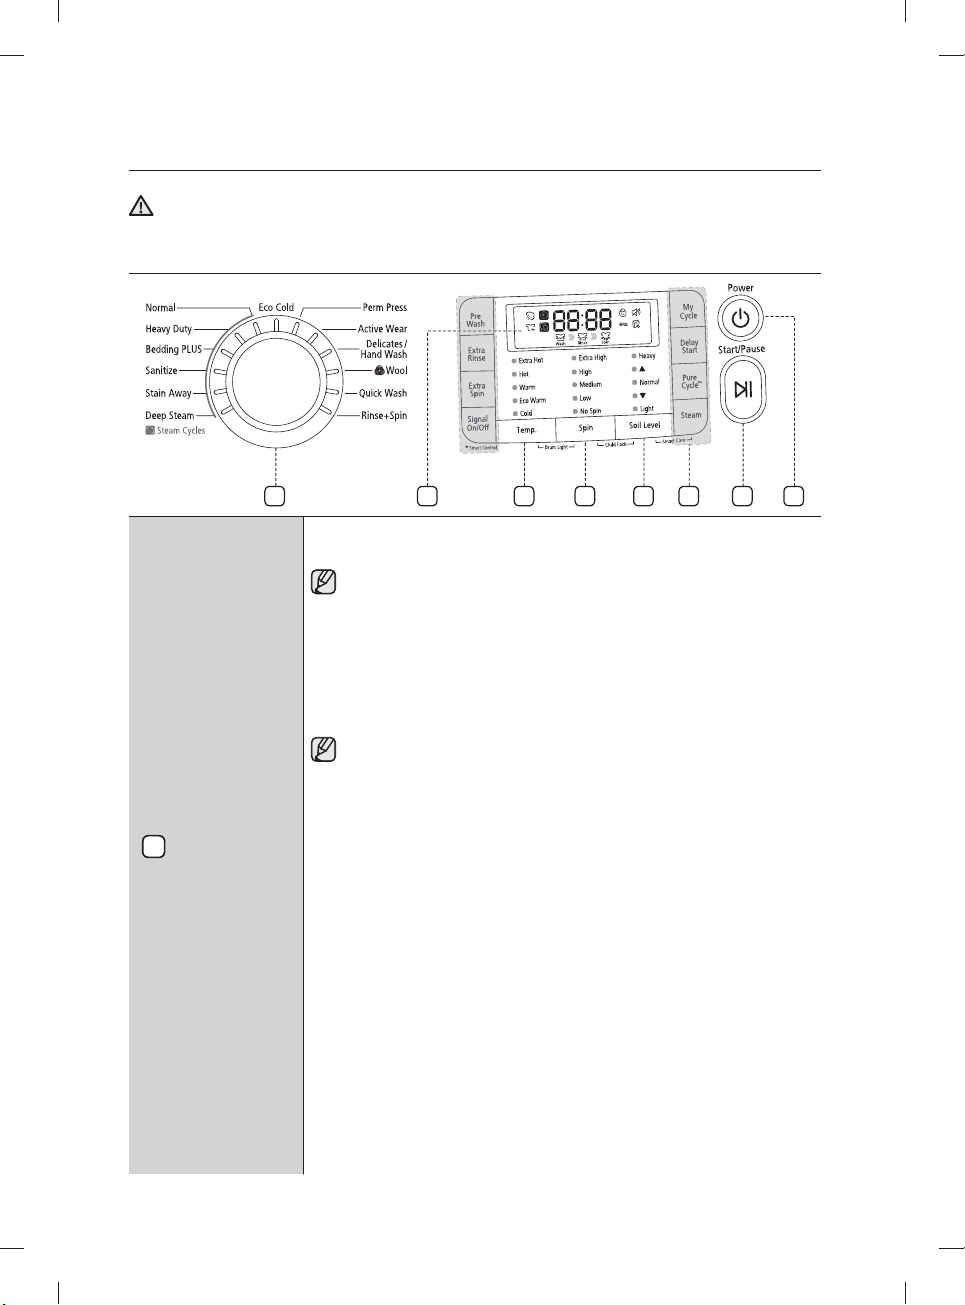
OVERVIEW OF THE CONTROL PANEL
Cycle Selector
1
1
Select the appropriate cycle for the type of load.
This will determine the tumble pattern and spin speed for the cycle.
To minimize wrinkling of laundry, select the Perm Press cycle.
Normal - For most fabrics including cottons, linens, and normally soiled garments.
Heavy Duty - For sturdy, colorfast fabrics and heavily soiled garments.
Bedding PLUS - For bulky items such as blankets and sheets. When you are
washing comforters, use liquid detergent.
Sanitize - For heavily soiled, colorfast garments. This cycle heats the water to
150°F to eliminate bacteria.
If Pause is selected during the heating portion of the Sanitize Cycle, your
Washer door will remain locked for your safety.
Stain Away - For stained clothes. Stain Away cycle provides outstanding stain removal
performance, with the utmost gentle care, avoiding the need for pre-treatment of stains.
For Best stain removal performance , it is recommended to use hot
temperature option in this cycle, in which the wash temperature is increased
using the internal heater, for overall cleaning of the different stains.
Deep Steam - For heavily soiled, colorfast garments, this cycle provides high
washing temperature and steam and is efficient in cleaning stains.
Eco Cold - It provides useful daily care for normally and lightly soiled laundry
by using only cold water, saving energy and caring fabric.
It cleans as effectively as the warm wash setting on *conventional Normal
cycle under Normal and Light Soil level options. (Cleaning performance of Eco
Cold cycle may not be equal to conventional Normal cycle under heavy soil
level option) For best result, it is recommended to use less than 8 pounds.
* conventional Normal cycle - Normal cycle on previous and existing Samsung
front loading washers released until 2009 without PowerFoam
Perm Press - For wash-and-wear, synthetic fabrics, and lightly to normally
soiled garments.
Active Wear - Use this cycle to wash exercise wear such as sports jersey,
training pants, shirts/tops and other performance clothing. This cycle
provides effective soil removal with gentle action for special fabric care.
2
3 4 5 6
7
8
24_ washing a load of laundry
WF455AG-03159A-04_EN.indd Sec5:24WF455AG-03159A-04_EN.indd Sec5:24 2012-11-28 2:07:292012-11-28 2:07:29
Page 25
Delicates/Hand Wash - For sheer fabrics, bras, lingerie silk, and other
handwash-only fabrics. For best results, use liquid detergent.
Wool - For machine-washable wool. Loads should be under 8 pounds. For
best results, we recommend a load of 4.4 pounds or less.
• The Wool cycle washes laundry by moving the wash drum horizontally
to maintain the characteristics of the wool fibers and to prevent damage
to the cloth. It then stops for a while to allow the laundry to soak in the
water. This pause in the operation of the Wool cycle is normal.
• We recommend you use a neutral detergent to prevent damage to the
cloth and to improve the washing results.
03 washing a load of laundry
Digital Display
2
Temperature
3
selection button
Spin selection
4
button
Soil Level
5
selection button
The wool wash cycle of this machine has been approved by
Woolmark for the washing of machine washable Woolmark
products, provided that the products are washed according
to the instructions on the garment label and those issued by
the manufacturer of this washing machine, M1207.
Quick Wash - For lightly soiled garments needed quickly.
Rinse + Spin - Use for loads that need rinsing only or to add rinse-added
fabric softener to a load.
The large Digital Display is easy to use. It provides instructions and
diagnostics while keeping you updated on the cycle status and time
remaining.
Press the button repeatedly to cycle through the different water temperature
options.
Extra Hot - Heavily soiled, colorfast items. Only available with the Sanitize
cycle.
Hot - Whites and heavily soiled, colorfast items.
Warm - Colorfast items. When warm rinse is selected, only the final rinse will
be warm.
The other rinses will be cold to conserve energy.
Eco Warm - Moderately soiled, colorfast items; most wrinkle-free items.
Cold - Brightly colored, very lightly soiled items.
Press the button repeatedly to cycle through the different spin speed options.
Extra High - Removes more water from loads during spin.
To minimize wrinkling of wrinkle-free and no-iron fabrics, DO NOT use
the Extra High spin option for these loads, nor overload your Washer.
High - Use for underwear, t-shirts, jeans and sturdy cottons.
Medium - Use for jeans, wrinkle-free or wash-and-wear items and synthetics.
Low - Use for delicate items needing a slow spin speed.
No Spin - Drains your Washer without spinning. Use for extremely delicate
items that cannot tolerate any spin.
Press the button to select the soil level/washing time.
(Heavy Normal Light)
Heavy - For heavily soiled loads.
Normal - For moderately soiled loads. This setting is best for most loads.
Light - For lightly soiled loads.
washing a load of laundry _25
WF455AG-03159A-04_EN.indd Sec5:25WF455AG-03159A-04_EN.indd Sec5:25 2012-11-28 2:07:292012-11-28 2:07:29
Page 26
washing a load of laundry
Press these buttons to select different cycle options.
Pre Wash - To use this feature, add detergent to the pre wash section of the
detergent compartment. When turned on, the washer fills with cold water and
detergent, tumbles, then drains and advances to the selected wash cycle.
Some cycles cannot be selected with with this option.
You cannot select the prewash option in the Wool, Quick Wash,
Delicates/Handwash and Rinse+Spin cycles.
Extra Rinse - Add an additional rinse at the end of the cycle to more
thoroughly remove laundry additives and perfumes.
Select Cycle
6
Option
Start/Pause
7
selection button
Power button
8
Extra Spin - Add additional time to remove more water from loads.
Signal On/Off - When you activate Signal off function, the “Signal off [
lamp illuminate.
My Cycle - Choose your favorite cycle including temperature, spin, soil level,
option, etc.
Delay Start -
increments. Displayed hour indicates the time at which the wash will be started.
Pure CycleTM - Use to clean dirt and bacteria from the drum. Regular use
(after every 40 washes) is recommended. No detergent or bleach is needed
(see page 64).
Steam - Press this button to use the Steam Wash function. Steam Wash is
available with Normal, Heavy Duty, Bedding PLUS, Sanitize,
For heavily soiled, colorfast garments, Steam Wash improves stain treatment
and uses less water (See page 29).
Press to pause and restart programs.
Press once to turn your washer on, press again to turn your washer off. If
the washer is left on for more than 10 minutes without any buttons being
touched, the power automatically turns off.
Any cycle can be delayed for up to 24 hours in one-hour
Stain Away
]”
cycles.
Delay Start
You can set the washing machine to finish your wash automatically at a later time, choosing a
delay of between 1 to 24 hours (in 1 hour increments). The hour displayed indicates the time at
which the wash will be finished.
1. Manually or automatically set your washing machine according to the type of laundry you are
washing.
2. Press the Delay Start button repeatedly until the delay time is set.
3. Press the Start/Pause button. The “Delay Start [
begin counting down until it reaches the set time.
4. To cancel a Delay End function, press the Power button and then turn the washing machine
on again.
26_ washing a load of laundry
WF455AG-03159A-04_EN.indd Sec5:26WF455AG-03159A-04_EN.indd Sec5:26 2012-11-28 2:07:292012-11-28 2:07:29
]” indicator will be lit, and the clock will
Page 27
Child Lock
This function prevents children from playing with your washer.
Although the Child Lock function is activated, you must keep an eye on children so that
they do not operate your washer.
CAUTION
Activating the Child Lock function
Press and hold both the Spin and Soil Level buttons simultaneously for approximately 3 seconds.
• When you activate the Child Lock function, the door locks and the “Child Lock [
illuminates.
• If you press the Start/Pause button after you have activated the Child Lock function , none
of the buttons will work except for the Power button.
• If you press a button when the buttons are locked, the “Child Lock [
]” lamp blinks.
Pausing the Child Lock function
When the door is locked or the buttons are locked by the Child Lock function, you can pause the
Child Lock operation for 1 minute by pressing and holding both the Spin and Soil Level buttons
simultaneously for approximately 3 seconds.
• If you pause the Child Lock mode temporarily, the door lock is released for 1 minute for user
convenience. During this period, the “Child Lock [
]” lamp blinks.
• If you open the door after the minute is over, an alarm sounds for up to 2 minutes.
• If you close the door within the 2 minutes, the door is locked and the Child Lock function is
reactivated. If you close the door after the 2 minutes, the door is not locked automatically
and no alarm sounds.
Deactivating the Child Lock function
Press and hold both the Spin and Soil Level buttons simultaneously for approximately 6
seconds.
• When you deactivate the Child Lock function, the door is unlocked and the “Child Lock [
is turned off.
• The Child Lock function prevents children or the infirm from accidently operating the
washer and injuring themselves.
WARNING
• If a child enters the washing machine, the child may become trapped and suffocate.
• Once you have activated the Child Lock function, it continues working even if the power
is turned off.
CAUTION
• Opening the door by force can result in injury due to damage to the product.
To add laundry after you have activated the Child Lock function, you must first pause or
deactivate the Child Lock function.
If you want to open the door of the washing machine when the Child Lock function is
activated:
• Pause or deactivate the Child Lock function.
• Turn the washing machine off and then on again.
]” lamp
03 washing a load of laundry
]”
washing a load of laundry _27
WF455AG-03159A-04_EN.indd Sec5:27WF455AG-03159A-04_EN.indd Sec5:27 2012-11-28 2:07:292012-11-28 2:07:29
Page 28
washing a load of laundry
Spin Only
If you press the Power button and then press and hold the Spin button for 2 seconds, the spin
time will be displayed on the display panel.
Then, press the Spin button repeatedly until the required spin level is selected, and then press
the Start/Pause button.
Before pressing the Spin Only button, you can select a cycle with the Cycle Selector. If you
have selected a cycle, you can only select the corresponding spin level.
Drum Light
1. If the door is opened when the power is on, the Drum Light is automatically turned on.
2. If the door is closed when the power is on, the Drum Light is automatically turned off.
3. Press the Temp. and the Spin buttons simultaneously to turn the Drum Light on or off.
4. If 4 minutes have passed after the Drum Light is turned on, the Drum Light is automatically
turned off.
Garment+
You can add or take out laundry items even after the wash has started, as long as the
“Garment+” light is on. Pushing the Start/Pause button unlocks the door, unless the water is
too hot or if there is too much water in your Washer. If you are able to unlock the door and wish
to continue the wash cycle, close the door and press the Start/Pause button.
My cycle
Allows you to activate your custom wash (temperature, spin, soil level, etc.) with one–button
convenience.
By pushing the My Cycle button, you activate the settings used during the My Cycle mode.
The “My Cycle” light will indicate activation.
You can select all options as follows in “My Cycle” mode.
1. Select cycle using the Cycle Selector dial.
2. After cycle selection, set each option.
See page 72 for available option settings with each cycle.
3. Then, you can start “My Cycle” by pushing the Start/Pause button in “My Cycle” mode.
The cycle and options you select will be displayed the next time you choose “My Cycle”.
You can change the “My Cycle” settings by repeating the same process above.
The last used setting will be displayed the next time you choose “My Cycle”.
28_ washing a load of laundry
WF455AG-03159A-04_EN.indd Sec5:28WF455AG-03159A-04_EN.indd Sec5:28 2012-11-28 2:07:302012-11-28 2:07:30
Page 29
Steam
The Steam Wash function injects steam directly into the laundry in the wash tub to increase the
wash temperature and enhance the soak effect, thus improving the wash performance.
1. Load the washer.
2. Press the Power button.
3. Turn the Cycle Selector and select a steam cycle. (The Deep Steam cycle automatically
selects the Steam Wash function.)
4. Press the Steam button.
5. Add detergent into the dispenser tray for a wash, and add fabric softener up to the marked
line.
6. Press the Start/Pause button.
: The washer automatically selects the optimal wash conditions by sensing the weight of the
laundry.
Steam may not necessarily be visible during the steam cycles.
Steam may not be present during entire steam wash cycle.
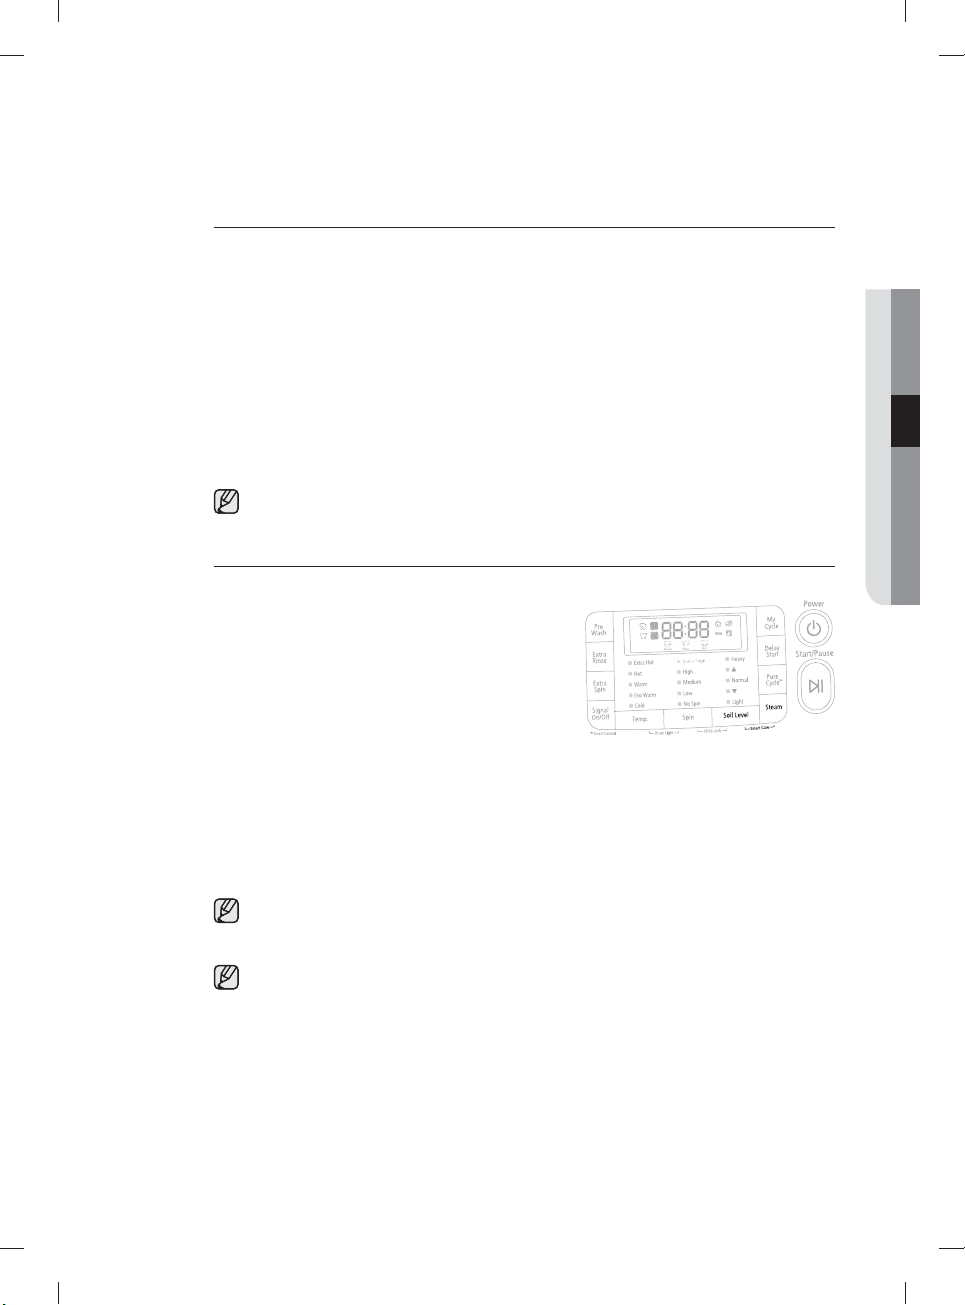
Smart Care
This function enables you to check the status of the washing machine using a smartphone.
1. To enable the Smart Care function, press and hold
the Soil Level and Steam button for 3 seconds
within 10 seconds after turning the power on by
pressing the Power button.
2. If the Smart Care function is activated, the led on
window display rotates for 2 or 3 seconds and then
the Smart Care indicator is lit on the display.
3. Run the Smart Care app on your smart phone.
4. The Smart Care function is optimized with Galaxy S, Galaxy S2, iPhone 4 and iPhone 4S.
5. Focus your smart phone’s camera on the display panel of the washing machine.
6. If the smart phone’s camera is focused on the display panel of the washing machine, the
result is automatically recognized and the error type and countermeasures are displayed on
the smart phone.
7. If an error occurs more than twice, please manually enter the error code displayed on the
display panel of the washing machine into the Smart Care app.
Downloading the Smart Care app
• Download the Samsung Smart Washer/Dryer App into your mobile phone from the
Android market or Apple App store. (Search word : Samsung Smart Washer/Dryer)
Precautions when using Smart Care
• If a lighting device (e.g. fluorescent or lamp) is reflected on the display panel of the
washing machine, the result on the display panel may not be recognized easily.
• If an error occurs more than twice, please manually enter the error code displayed on the
display panel of the washing machine into the Smart Care app.
• If the angle of the smartphone camera and the display panel of the washing machine is
incorrect, the error may not be recognized properly.
Please try to hold the smart phone at an angle to the display panel as shown by the
figure.
03 washing a load of laundry
washing a load of laundry _29
WF455AG-03159A-04_EN.indd Sec5:29WF455AG-03159A-04_EN.indd Sec5:29 2012-11-28 2:07:302012-11-28 2:07:30
Page 30

washing a load of laundry
Washing clothes using the cycle selector
Your new washing machine makes washing clothes easy, using Samsung’s “Fuzzy Control”
automatic control system. When you select a wash program, the machine will set the correct
temperature, washing time, and washing speed.
1. Press the Power button.
2. Open the door.
3. Load the articles of clothing one at a time loosely into the drum, without overfilling it.
4. Close the door.
5. Add detergent, softener, and pre-wash detergent (if necessary) into the appropriate
compartments.
Pre-wash is only available when selecting the Normal, Perm Press, Sanitize, Bedding Plus,
Deep Steam and Heavy Duty cycles. It is only necessary if your clothing is heavily soiled.
6. Use the Cycle Selector to select the appropriate cycle according to the type of material:
Normal, Heavy Duty, Perm Press, Sanitize, Bedding Plus, Deep Steam, Eco Cold, Stain
Away, Active Wear, Delicates/Hand Wash, Wool, Quick Wash, Rinse + Spin and Spin Only.
The relevant indicators will illuminate on the control panel.
7. At this time, you can control the wash temperature, the number of rinse cycles, the spinning
speed, and the delay time by pressing the appropriate option button.
8. Press the Start/Pause button on the Cycle Selector and the wash will begin. The process
indicator will light up and the remaining time for the cycle will appear in the display.
Pause Option
1. Within 5 minutes of starting a wash, it is possible to add/remove laundry items to/from the
wash.
2. Press the Start/Pause button to unlock the door.
3. The door cannot be opened when the water is too HOT or the water level is too HIGH.
4. After closing the door, press the Start/Pause button to restart the wash.
When the cycle is finished:
After the total cycle has finished, the power will turn off automatically.
1. Open the door.
2. Remove laundry.
30_ washing a load of laundry
WF455AG-03159A-04_EN.indd Sec5:30WF455AG-03159A-04_EN.indd Sec5:30 2012-11-28 2:07:302012-11-28 2:07:30
Page 31

SETTING THE SMART CONTROL
Connect a wired/wireless router and the washer through a wireless connection, connect to www.
samsungsmartappliance.com and register the washer to the Smart Control service.
This product does not contain a wireless router.
Configuring the wired/wireless router
• This product supports DHCP (Dynamic Host Configuration Protocol). Therefore, if a user
wants to use an existing wired/wireless router, the router’s DHCP server function must be
enabled.
• Set the channel for the connection with the wired/wireless router to a channel that is not
being used.
• This washer/dryer only supports OPEN, WPA/TKIP and WPA2/AES modes. If the wireless
router is set to a mode other than these three modes, the washer/dryer may not connect to
it. We recommend that you use WPA2/AES for 802.11n.
• The quality of the wireless network may be affected by the surrounding environment.
• If your Internet service provider has registered and fixed the MAC address (unique
identification number of a device) of the user’s PC or modem, you may not be able to
connect the washer to the Internet. Please ask your Internet service provider about the
procedures to connect a device (e.g. washer) other than a computer to the Internet. If your
Internet service provider requires an ID and password to connect to the Internet, you may
not be able to connect the washer to the Internet. In this case, you have to enter the ID and
password to connect to the Internet.
You may not be able to connect to the Internet due to a firewall. In this case, ask your
Internet service provider for assistance.If you cannot connect the washer to the Internet even
after contacting your Internet service provider, please contact a Samsung Electronics dealer
or service center.
Check before installation
• For the procedures to install a normal wired/wireless router,
refer to the user manual of the corresponding wired/
wireless router.
• Samsung washers only support Wi-Fi 2.4Ghz.
• The Samsung washer/dryer supports the wireless
communication standard IEEE802.11 b/g/n (2.4 GHz).
• A certified wireless router has the Wi-Fi CERTIFIED logo on
its packaging or user manual.
03 washing a load of laundry
washing a load of laundry _31
WF455AG-03159A-04_EN.indd Sec5:31WF455AG-03159A-04_EN.indd Sec5:31 2012-11-28 2:07:302012-11-28 2:07:30
Page 32

washing a load of laundry
Connecting to the network using the WPS setting
• Samsung washers use PBC as the WPS type. Check if the current wired/wireless router
supports Wi-Fi Protected Setup™(WPS).
• Check if the wired/wireless share has a WPS button.
1. Press and hold both the Temp. and Start/Pause buttons
for 5 seconds.
2. Turn the Cycle Selector until “UP” is displayed on the
display panel and press the Start/Pause button.
If the connection is not established within 5 minutes,
“FUP” is displayed on the display panel.
3. Press and hold the WPS button of the wired/wireless
router that will be connected with the washer for 120
seconds or less to run the WPS function of the wired/
wireless router. If the WPS function runs, the wired/wireless
router automatically fetches the necessary information from
the washer and the washer is automatically connected to
the Internet through the wired/wireless router.
• How to use the WPS function of the wired/wireless router may differ depending on
the manufacturer. Refer to the user manual of the corresponding wired/wireless
router.
• Even after the WPS setup is complete, it may take some time until the actual
connection is established to allocate an IP address through DHCP (up to 5 minutes).
• Note that if you use a wired/wireless router that is not WPS-certified, the washer
may not be connected through Wi-Fi or a device that was connected to the wired/
CAUTION
wireless router may be disconnected.
• Please note that for some wired/wireless routers, if you press and hold the WPS
button for some time, the settings of the router may be reset.
4. If the washer and the wired/wireless router are properly
connected, the
30 seconds.
5. Press the Smart Control button to finish the Smart
Control connection setup. When the setup is completed
normally, the
beeping sound.
If you press the Smart Control button when the washer and the wired/wireless router
are not properly connected, the invalid button sound is heard and the Smart Control
connection setup is not completed.
indicator blinks on the display panel for
indicator blinks on the display panel with a
32_ washing a load of laundry
WF455AG-03159A-04_EN.indd Sec5:32WF455AG-03159A-04_EN.indd Sec5:32 2012-11-28 2:07:302012-11-28 2:07:30
Page 33

Connecting to the network using the AP setting
1. Press and hold the Temp. and Start/Pause buttons for 5 seconds.
2. The AP menu appears on the LED screen.
3. If the Start/Pause button is pressed after approximately 1 minute, the AP blinks.
If the “AP” display does not blink.
Since the Wi-Fi module is not ready, try again after a moment.
(Approximately 1 minute is needed for the Wi-Fi module to get ready.)
4. Check if the SMARTWASHER is displayed in the list displayed in the mobile Wi-Fi setup
screen. If it is in the list, perform step 5.
5. Launch the app, enter Connection setup and press the Setting Start button.
6. The app attempts to connect to the washing machine that has changed to AP mode.
7. When the connection is established, the AP list is displayed.
8. Select the AP and enter the password.
9. When the setting is completed.
When the setting is successfully completed, “oAP” is displayed on the LED.
When the setting is unsuccessfully completed, “FAP” is displayed on the LED.
03 washing a load of laundry
washing a load of laundry _33
WF455AG-03159A-04_EN.indd Sec5:33WF455AG-03159A-04_EN.indd Sec5:33 2012-11-28 2:07:312012-11-28 2:07:31
Page 34

washing a load of laundry
USING THE MOBILE APP (ANDROID)
Downloading the phone application
1. Touch and bring up the applications menu on your phone. Then fi nd
and open the “Play Store” icon.
2. Once the “Play Store” has been open, do a search.
3. Once the search box appears type in
“Samsung Smart Washer”.
34_ washing a load of laundry
WF455AG-03159A-04_EN.indd Sec5:34WF455AG-03159A-04_EN.indd Sec5:34 2012-11-28 2:07:312012-11-28 2:07:31
Page 35

4. Once the search is complete the App
“SAMSUNG Smart Washer/Dryer” will be
displayed. You need to download this App to
your phone.
Make sure the app changes from “Free” to
“Installed”
5. Once the phone app has been downloaded to your phone, you are
now ready to set up the washer Wi-Fi control.
STEP 1
Figure 1 Figure 2
03 washing a load of laundry
You need to fi rst press the
power button to activate
the your machine. You can
activate the machine to any
wash cycle. (See fi gures
1~2)
STEP 2
Figure 3 Figure 4
WF455AG-03159A-04_EN.indd Sec5:35WF455AG-03159A-04_EN.indd Sec5:35 2012-11-28 2:07:312012-11-28 2:07:31
After you activate the
machine, press the Temp
& Start/Pause buttons
simultaneously for 3
seconds. After 3 seconds
the “AP” menu appears on
the LED screen. (See fi gures
3 ~4)
washing a load of laundry _35
Page 36

washing a load of laundry
STEP 3
Figure 5
STEP 4
Figure 6 Figure 7
STEP 5
Figure 8 Figure 9
After the AP menu appears on the LED screen, wait approximately
1 minute and press the Start/Pause button. Once the Start/Pause
button is pressed the “AP” displayed on the LED screen should
start to blink.
It will take a minute or so for the Wi-Fi module to get ready. So if
the you press the Start/Pause and the “AP” doesn’t blink try again
after a moment. (See fi gure 5)
Once the “AP” is blinking go to your mobile
phone and press the “Settings” icon. Once the
settings menu appears press the wireless and
network section. (See fi gures 5 ~ 7)
After selecting the wireless and network select
Wi-Fi setting. Then turn on the Wi-Fi. (See
fi gures 8~ 9)
36_ washing a load of laundry
WF455AG-03159A-04_EN.indd Sec5:36WF455AG-03159A-04_EN.indd Sec5:36 2012-11-28 2:07:322012-11-28 2:07:32
Page 37

STEP 6
STEP 7
STEP 8
The latest App version is 1.1.5
Once the list of available networks appears,
select the network to be used and enter the
password if necessary.
Once you are connected to the selected
network go back to the applications screen on
your mobile phone. Once you are in the phones
application screen touch the Samsung icon
“SAMSUNG Smart Washer/Dryer” that was
downloaded at the beginning of this process.
After opening the Samsung app, select “Front
Load” and then “Connection Setup”.
03 washing a load of laundry
washing a load of laundry _37
WF455AG-03159A-04_EN.indd Sec5:37WF455AG-03159A-04_EN.indd Sec5:37 2012-11-28 2:07:322012-11-28 2:07:32
Page 38

washing a load of laundry
STEP 9
Once the mobile app is open select the “Setting
Start” key.
The Wi-Fi indicator will blink on &
o on the phone several times.
STEP 10
Once the unit starts connecting the phone will
load the AP list. When the AP list is loaded you
need to select the network.
Please make sure the app and smart
phone are connected to the same
network/wireless AP.
STEP 11
After selecting the network you need to enter
your password. Once you enter your password
select “Connect”. The unit start setting up the
network. This process delivers the connection
information of the “AP” that is connected to the
mobile phone to the product.
38_ washing a load of laundry
WF455AG-03159A-04_EN.indd Sec5:38WF455AG-03159A-04_EN.indd Sec5:38 2012-11-28 2:07:332012-11-28 2:07:33
Page 39

STEP 12
STEP 13
STEP 14
When the network is setup the unit will display
“Transfer complete”. After the transfer is
completed select “Confi rm”. The unit will then
display “oAP”. The phone is now connected to
the machine through the network.
After the phone is connected
to the machine, press
the Temp & Start/Pause
buttons simultaneously for
3 seconds. After 3 seconds
the original wash cycle will
be displayed on the LED
screen.
After the wash cycle
has been displayed wait
approximately 1 minute. You
will then see the Wi-Fi icon
start to blink.
03 washing a load of laundry
STEP 15
Once the Wi-Fi icon is
displayed press and hold the
“Signal” for 3 seconds. The
Wi-Fi icon will stop blinking.
The machine is now ready to
run the device certifi cation.
washing a load of laundry _39
WF455AG-03159A-04_EN.indd Sec5:39WF455AG-03159A-04_EN.indd Sec5:39 2012-11-28 2:07:332012-11-28 2:07:33
Page 40

washing a load of laundry
Device certification
1. The “Device Certifi cation” only needs to be
run with the initial setup. Touch the “Indoor
Control” tab to search for the washer’s name.
Once the washer ‘s name is displayed touch
tab.
2. Verify the that the Wi-Fi icon is not blinking. Press the Temp & Start/
Pause buttons simultaneously for 3 seconds. “AP” will now be
displayed.
3. After you touch the washer name tab you need to touch the confi rm
tab to proceed with the certifi cation.
Figure 1 Figure 2
Figure 3
Figure 4
40_ washing a load of laundry
WF455AG-03159A-04_EN.indd Sec5:40WF455AG-03159A-04_EN.indd Sec5:40 2012-11-28 2:07:342012-11-28 2:07:34
Page 41

4. After you touch the confi rm tab you will now start preparing the
certifi cation.
Figure 5
03 washing a load of laundry
5. Follow the instructions displayed on the phone to start the washer
setup.
6. Once the “AP” is displayed you need to turn the knob counter
clockwise until “PS” is displayed. After the “PS” is displayed press the
Start/Pause button.
Figure 6
Figure 7
washing a load of laundry _41
WF455AG-03159A-04_EN.indd Sec5:41WF455AG-03159A-04_EN.indd Sec5:41 2012-11-28 2:07:342012-11-28 2:07:34
Page 42

washing a load of laundry
7. Once the Start/Pause button is pressed the “PS” will start to blink.
Once it starts blinking the phone will automatically start to connect.
8. After the “PS” is displayed, press the Temp & Start/Pause buttons
simultaneously for 3 seconds. Please wait until the Smart Control
Enabled icon [
starts blinking, press and hold the Signal on/o button for 3 seconds
to activate the Smart Control. If the Smart Control is enabled, the
Smart Control enabled icon [
9. Press the washer name tab to connect to the washer.
] starts blinking. If the Smart Control enabled icon
] is turned on.
Figure 8
Figure 9
Figure 10
42_ washing a load of laundry
WF455AG-03159A-04_EN.indd Sec5:42WF455AG-03159A-04_EN.indd Sec5:42 2012-11-28 2:07:342012-11-28 2:07:34
Page 43

10. The washer is now connected. Touch the “Start New Wash” tab and
you can now control the washer from your phone.
Figure 11
03 washing a load of laundry
11. The Device Certifi cation is now completed and the washer is
connected to your Smartphone.
Figure 12
washing a load of laundry _43
WF455AG-03159A-04_EN.indd Sec5:43WF455AG-03159A-04_EN.indd Sec5:43 2012-11-28 2:07:352012-11-28 2:07:35
Page 44

washing a load of laundry
Using the mobile app
STEP 1
Check to make sure the Wi-Fi icon is not blinking. If the icon
is blinking press and hold the Signal button until the icon
stops blinking. Once the door lock icon is activated the unit
is ready. Now press the “SAMSUNG Smart Washer/Dryer”
icon.
STEP 2
After you touch the “SAMSUNG
Smart Washer/Dryer” icon the will
search for the washer. Once the
phone connects the washer, the
washer ‘s name, or “MAC” will
appear. Now touch the washer
name.
STEP 3
Once the connection is established , touch the “Start New
Wash” tab. The unit should display the “Choose Cycle”
screen. Once Choose Cycle screen is displayed touch the
“Start” tab at the bottom left.
44_ washing a load of laundry
WF455AG-03159A-04_EN.indd Sec5:44WF455AG-03159A-04_EN.indd Sec5:44 2012-11-28 2:07:352012-11-28 2:07:35
Page 45

STEP 4
Now touch the “Start” button and
activate the wash cycle. You can
monitor the wash cycle to check the
status of the cycle. Once the cycle is
fi nished the phone will display “Cycle
Complete”.
03 washing a load of laundry
washing a load of laundry _45
WF455AG-03159A-04_EN.indd Sec5:45WF455AG-03159A-04_EN.indd Sec5:45 2012-11-28 2:07:352012-11-28 2:07:35
Page 46

washing a load of laundry
USING THE MOBILE APP (IOS)
Downloading the phone application
1. Find and open the “App Store” icon.
2. Once the “App Store” has been open, do a search.
3. Once the search box appears type in
“Samsung Smart Washer”.
46_ washing a load of laundry
WF455AG-03159A-04_EN.indd Sec5:46WF455AG-03159A-04_EN.indd Sec5:46 2012-11-28 2:07:352012-11-28 2:07:35
Page 47

4. Once the search is complete the App
“SAMSUNG Smart Washer/Dryer” will be
displayed. You need to download this App to
your phone.
Make sure the app changes from “Free” to
“Installed”
5. Once the phone app has been downloaded to your phone, you
are now ready to set up the washer Wi-Fi control.
STEP 1
Figure 1 Figure 2
03 washing a load of laundry
You need to fi rst press the
power button to activate
the your machine. You can
activate the machine to any
wash cycle. (See fi gures
1~2)
STEP 2
Figure 3 Figure 4
WF455AG-03159A-04_EN.indd Sec5:47WF455AG-03159A-04_EN.indd Sec5:47 2012-11-28 2:07:352012-11-28 2:07:35
After you activate the
machine, press the Temp
& Start/Pause buttons
simultaneously for 3
seconds. After 3 seconds
the “AP” menu appears on
the LED screen. (See fi gures
3~4)
washing a load of laundry _47
Page 48

washing a load of laundry
STEP 3
Figure 5
STEP 4
Figure 6 Figure 7
STEP 5
Figure 8 Figure 9
After the AP menu appears on the LED screen, wait approximately
1 minute and press the Start/Pause button. Once the Start/Pause
button is pressed the “AP” displayed on the LED screen should
start to blink.
It will take a minute or so for the Wi-Fi module to get ready. So if
the you press the Start/Pause and the “AP” doesn’t blink try again
after a moment. (See fi gure 5)
Once the “AP” is blinking go to your mobile phone
and press the “Settings” icon. Once the settings menu
appears press the Wi-Fi icon. (See fi gures 5~7)
You can see “SMARTWASHER” in the Wi-Fi
list. Select the SMARTWASHER and input the
password(WASHER2012).
You have to input as Capital.
After typing the password, select the join button. (See
fi gures 8~9)
STEP 6
Once you are connected to the selected network go
back to the applications screen on your mobile phone.
Once you are in the phones application screen touch
the Samsung icon “SAMSUNG Smart Washer/Dryer”
that was downloaded at the beginning of this process.
48_ washing a load of laundry
WF455AG-03159A-04_EN.indd Sec5:48WF455AG-03159A-04_EN.indd Sec5:48 2012-11-28 2:07:362012-11-28 2:07:36
Page 49

STEP 7
STEP 8
STEP 9
After opening the Samsung app, select “Front Load”
and then “Connection Setup”.
03 washing a load of laundry
Tap the “Setting Start” and input
your SSID, Authentication Type,
Encryption Type, password of AP.
This process delivers the
connection information of the “AP”
that is connected to the mobile
phone to the product.
Check the security option of
the router and then set the
wireless network confi guration
again as below.
- select the Security mode :
WPA and Encryption:TKIP
- select the Security
mode : WPA2 and
Encryption:AES
- refer to wireless router
manual for the security
option of the wireless
router.
When the network
is setup the unit will
display “Transfer
complete”. After the
transfer is completed
select “Confi rm”. The
unit will then display
“oAP”. The phone is
now connected to
the machine through
the network.
washing a load of laundry _49
WF455AG-03159A-04_EN.indd Sec5:49WF455AG-03159A-04_EN.indd Sec5:49 2012-11-28 2:07:372012-11-28 2:07:37
Page 50

washing a load of laundry
STEP 10
After the phone is connected
to the machine, press
the Temp & Start/Pause
buttons simultaneously for
3 seconds. After 3 seconds
the original wash cycle will
be displayed on the LED
screen.
STEP 11
After the wash cycle
has been displayed wait
approximately 1 minute. You
will then see the Wi-Fi icon
start to blink.
STEP 12
Once the Wi-Fi icon is
displayed press and hold the
“Signal” for 3 seconds. The
Wi-Fi icon will stop blinking.
The machine is now ready to
run the device certifi cation.
Device certification
1. The “Device Certifi cation” only needs to be
run with the initial setup. Touch the “Indoor
Control” tab to search for the washer’s name.
Once the washer ‘s name is displayed touch
tab.
50_ washing a load of laundry
WF455AG-03159A-04_EN.indd Sec5:50WF455AG-03159A-04_EN.indd Sec5:50 2012-11-28 2:07:372012-11-28 2:07:37
Figure 1 Figure 2
Page 51

2. Verify the that the Wi-Fi icon is not blinking. Press the Temp & Start/
Pause buttons simultaneously for 3 seconds. “AP” will now be
displayed.
Figure 3
03 washing a load of laundry
3. After you touch washer name tab you need to touch the confi rm tab
to proceed with the certifi cation.
4. After you touch confi rm tab you will now start preparing the
certifi cation.
5. Follow the instructions displayed on the phone to start the washer
setup.
Figure 4
Figure 5
Figure 6
washing a load of laundry _51
WF455AG-03159A-04_EN.indd Sec5:51WF455AG-03159A-04_EN.indd Sec5:51 2012-11-28 2:07:382012-11-28 2:07:38
Page 52

washing a load of laundry
6. Once the “AP” is displayed you need to turn the knob counter
clockwise until “PS” is displayed. After the “PS” is displayed press the
Start/Pause button.
7. Once the Start/Pause button is pressed the “PS” will start to blink.
Once it starts blinking the phone will automatically start to connect.
8. After the “PS” is displayed, press the Temp & Start/Pause buttons
simultaneously for 3 seconds. Please wait until the Smart Control
Enabled icon [
starts blinking, press and hold the Signal on/o button for 3 seconds
to activate the Smart Control. If the Smart Control is enabled, the
Smart Control enabled icon [ ] is turned on.
] starts blinking. If the Smart Control enabled icon
Figure 7
Figure 8
Figure 9
9. Press the washer name tab to connect to the washer.
Figure 10
52_ washing a load of laundry
WF455AG-03159A-04_EN.indd Sec5:52WF455AG-03159A-04_EN.indd Sec5:52 2012-11-28 2:07:392012-11-28 2:07:39
Page 53

10. The washer is now connected. Touch the “Start New Wash” tab and
you can now control the washer from your phone.
Figure 11
03 washing a load of laundry
11. The Device Certifi cation is now completed and the washer is
connected to your Smartphone.
Figure 12
washing a load of laundry _53
WF455AG-03159A-04_EN.indd Sec5:53WF455AG-03159A-04_EN.indd Sec5:53 2012-11-28 2:07:392012-11-28 2:07:39
Page 54

washing a load of laundry
Using the mobile app
STEP 1
Check to make sure the Wi-Fi icon is not blinking. If the icon
is blinking press and hold the Signal button until the icon
stops blinking. Once the door lock icon is activated the unit
is ready. Now press the “SAMSUNG Smart Washer/Dryer”
icon.
STEP 2
After you touch the “SAMSUNG
Smart Washer/Dryer” icon the will
search for the washer. Once the
phone connects the washer, the
washer ‘s name, or “MAC” will
appear. Now touch the washer
name.
STEP 3
Once the connection is established , touch the “Start New
Wash” tab. The unit should display the “Choose Cycle”
screen. Once Choose Cycle screen is displayed touch the
“Start” tab.
54_ washing a load of laundry
WF455AG-03159A-04_EN.indd Sec5:54WF455AG-03159A-04_EN.indd Sec5:54 2012-11-28 2:07:402012-11-28 2:07:40
Page 55

STEP 4
Now touch the “Start” button and
activate the wash cycle. You can
monitor the wash cycle to check the
status of the cycle. Once the cycle is
fi nished the phone will display “Cycle
Complete”.
03 washing a load of laundry
washing a load of laundry _55
WF455AG-03159A-04_EN.indd Sec5:55WF455AG-03159A-04_EN.indd Sec5:55 2012-11-28 2:07:402012-11-28 2:07:40
Page 56

washing a load of laundry
REGISTERING YOUR WASHER
1. Access Samsung Smart appliance
website.
(http://www.samsungsmartappliance.com)
2. Enter the User ID and Password to log in.
If you don’t have an account, press
“Create a Samsung account” and fill in
the form to become a member.
3. Select “My page” “My page”.
4. Select “Add device”.
5. After entering the MAC written from
following instruction.
1) Press and hold both the Temp., and
Start/Pause buttons for 3 seconds.
2) Turn the Cycle Selector until “Ad” is
displayed on the display panel and
press the Start/Pause button.
3) Find out 12 Hexadecimal Address,
pressing Start/Pause buttons for 2
digit & text.
6. Click the “Certify device”.
7. Press and hold both the Temp., and
Start/Pause buttons for 3 seconds.
8. Turn the Cycle Selector until PS is displayed on the display panel and press the Start/Pause
button.
9. When certify device checking window comes on, click the “Ok”.
• If the washer you are registering is already registered by other users, a window will come
on asking whether you want to delete the usage authority of the existing users, or not.
56_ washing a load of laundry
WF455AG-03159A-04_EN.indd Sec5:56WF455AG-03159A-04_EN.indd Sec5:56 2012-11-28 2:07:402012-11-28 2:07:40
Page 57

10. After the registration of the washer is
completed, you can check the registered
washer on the device information list.
Mac Address : Mapping Table of 7-Segment
0123456789
ABCDEF
03 washing a load of laundry
Mac Label
Mac Address Example
7-Segment
90A4DE89B2D3
washing a load of laundry _57
WF455AG-03159A-04_EN.indd Sec5:57WF455AG-03159A-04_EN.indd Sec5:57 2012-11-28 2:07:412012-11-28 2:07:41
Page 58

washing a load of laundry
DETERGENT USE
Your Washer is designed to use high efficiency (HE) detergents.
• For best cleaning results, use a high efficiency detergents such as Tide
HE, Wisk HE, Cheer HE or Gain HE*. High efficiency detergents contain
suds suppressors that reduce or eliminate suds. When fewer suds are
produced, the load tumbles more efficiently and cleaning is maximized.
Regular detergent is not recommended. Please use HE detergents
only.
WARNING
Reducing the amount of detergent may reduce the quality of cleaning. It is important to pre–treat
stains, sort carefully by color and soil level, and avoid overloading.
* Brand names are trademarks of their respective manufacturers.
FEATURES
Automatic dispenser
Your Washer has separate compartments for dispensing
detergent and color-safe bleach, chlorine bleach, and
fabric softener. Add all laundry additives to their respective
compartments before starting your Washer.
The automatic dispenser MUST ALWAYS be in place before
starting your Washer.
DO NOT open the automatic dispenser when your washer is running.
To use:
• Never exceed the manufacturer’s recommendations when
adding detergent.
• This compartment holds liquid detergent for the main wash
cycle, which is added to the load at the beginning of the
cycle.
When using powdered detergent, remove the liquid
detergent compartment from the detergent drawer. The
washer will not dispense powdered detergent from the
liquid detergent compartment.
Liquid detergent
compartment
Detergent compartment
1. Pour the recommended amount of laundry detergent directly into the detergent compartment
before starting your Washer.
2. If you are using color-safe bleach, add it with the detergent to the detergent compartment.
When adding color-safe bleach with detergent, it is best if both laundry products are in the
same form – granular or liquid.
58_ washing a load of laundry
WF455AG-03159A-04_EN.indd Sec5:58WF455AG-03159A-04_EN.indd Sec5:58 2012-11-28 2:07:422012-11-28 2:07:42
Page 59

Pre wash compartment
When using the Pre Wash option, detergent should be added to both the Pre Wash
compartment and the detergent compartment. The detergent will automatically be dispensed
during Pre Wash.
• If high efficiency (HE) detergent is used, add 1/3 of the recommended amount to the Pre
Wash compartment and 2/3 of the recommended amount to the detergent compartment.
Bleach compartment
(Liquid chlorine bleach only)
1. Add chlorine bleach to the bleach compartment.
DO NOT exceed the MAX FILL line.
2. Avoid splashing or over–filling the compartment.
3. Your Washer automatically dispenses bleach into the tub
at the appropriate time.
4. The dispenser automatically dilutes liquid chlorine bleach
before it reaches the wash load.
• Never pour undiluted liquid chlorine bleach directly
onto the load or into the tub. It is a powerful chemical
and can cause fabric damage, such as weakening of
the fibers or color loss, if not used properly.
• If you prefer to use color–safe, non–chlorine bleach,
add it to the appropriate detergent compartment.
DO NOT pour color–safe bleach into the Bleach
compartment.
• Oxi-type boosters or color-safe bleach can be added
to the drum prior to adding laundry.
• Put the laundry into the drum only after confirming
that the oxi-type boosters or color-safe bleach has
completely entered the hole of the drum.
• However, to use powdered detergent and powder oxi-type boosters or powdered color-
safe bleach at the same time, it is more effective putting them in together and removing
the liquid detergent holder from the detergent compartment.
Fabric Softener
compartment
Bleach
compartment
03 washing a load of laundry
Fabric softener compartment
1. Pour the recommended amount of liquid fabric softener into the softener compartment.
For smaller loads, use less than one capful.
2. Dilute the fabric softener with water until it reaches MAX FILL in the compartment.
3. The dispenser automatically releases liquid fabric softener at the proper time during the rinse
cycle.
• Use the softener compartment ONLY for liquid fabric softeners.
• DO NOT use the Downy Ball* in the fabric softener compartment with this Washer. It will
not add fabric softener at the appropriate time.
Use the detergent Compartment.
• It is not recommended using liquid fabric softener that is too sticky as it may not mix
with the water sufficiently.
* Brand names are trademarks of their respective manufacturers.
washing a load of laundry _59
WF455AG-03159A-04_EN.indd Sec5:59WF455AG-03159A-04_EN.indd Sec5:59 2012-11-28 2:07:422012-11-28 2:07:42
Page 60

maintaining your washer
CLEANING THE EXTERIOR
Turn off the water faucets after finishing the day’s washing.
This will shut off the water supply to your Washer and prevent the unlikely possibility of damage from
escaping water. Leave the door open to allow the inside of your Washer to dry out.
Use a soft cloth to wipe up all detergent, bleach or other spills as they occur.
Clean the following as recommended:
Control Panel – Clean with a soft, damp cloth. Do not use abrasive powders or cleaning pads. Do not spray
cleaners directly on the panel.
Cabinet – Clean with soap and water.
CLEANING THE INTERIOR
Clean the interior of your Washer periodically to remove any dirt, soil, odor, mold, mildew, or bacterial
residue that may remain in your Washer as a result of washing clothes.
Failure to follow these instructions may result in unpleasant conditions, including odors and/or permanent
stains on your Washer or laundry.
Hard water deposits may be removed, if needed. Use a cleaner labeled “Washer safe”.
60_ maintaining your washer
WF455AG-03159A-04_EN.indd Sec4:60WF455AG-03159A-04_EN.indd Sec4:60 2012-11-28 2:07:422012-11-28 2:07:42
Page 61

CLEANING THE DISPENSERS
The automatic dispenser may need to be cleaned periodically due to laundry additive buildup.
1. Pull the detergent liquid holder out of the detergent compartment.
2. Remove the siphon cap from the fabric softener and bleach
compartments.
3. Wash all of the parts under running water.
4. Clean the dispenser recess with a soft brush.
5. Reinsert the siphon cap and push it firmly into place.
6. Push the dispenser back into place.
7. Run a Rinse+Spin c ycle without any load in your washer.
1
2
Siphon cap
STORING YOUR WASHER
Washers can be damaged if water is not removed from hoses and internal components before storage.
Prepare your Washer for storage as follows:
• Select the Quick Wash cycle and add bleach to the automatic dispenser. Run your Washer through the
cycle without a load.
• Turn the water faucets off and disconnect the inlet hoses.
• Unplug your Washer from the electrical outlet and leave your Washer door open to let air circulate inside
the tumbler.
• If your Washer has been stored in below–freezing temperatures, allow time for any leftover water in your
Washer to thaw out before use.
04 maintaining your washer
maintaining your washer _61
WF455AG-03159A-04_EN.indd Sec4:61WF455AG-03159A-04_EN.indd Sec4:61 2012-11-28 2:07:422012-11-28 2:07:42
Page 62

maintaining your washer
CLEANING THE DEBRIS FILTER
We recommend cleaning the debris filter when water does not drain well or the “nd” error message is displayed.
1. Open the filter cover by pressing and pulling the handle
of the filter cover with your finger.
Filter cover
2. Holding the drain cap, pull the drain tube that
is hooked on the guide hook to the front.Do
not pull the drain tube with excessive force.
3. Place a bowl under the washing machine
to catch any remaining water. Then, hold
the drain tube with one hand, and turn the
emergency drain cap counter clockwise with
the other hand to separate it from the drain
tube.
4. Drain the remaining water completely.
5. Pull out the debris cap and debris filter assembly.
Debris filter cap
6. Wash any dirt or other material from the
debris filter. Make sure the drain pump
propeller behind the debris filter is not
blocked.
7. When you have finished cleaning the filter, insert the debris
cap and filter assembly back into the washer. Turn the
debris filter cap clockwise until the indicator on the debris
filter cap is in the 12 o’clock position, pointing to the
indicator on the washer.
8. Re-attach the emergency drain cap to the drain tube, and
then hook the tube to the hook guide.
9. Re-install the filter cover the filter cover.
Drain cap
Debris filter
cap
Step 2Step 1
Debris filter
62_ maintaining your washer
WF455AG-03159A-04_EN.indd Sec4:62WF455AG-03159A-04_EN.indd Sec4:62 2012-11-28 2:07:422012-11-28 2:07:42
Page 63

CLEANING THE DOOR SEAL/BELLOW
1. Open the washer door and remove any clothing or items from the washer.
2. Inspect the gray colored seal/bellow between the door
opening and the basket for stained areas. Pull back the
seal/bellow to inspect all areas under the seal/bellow and to
check for foreign objects.
seal/bellow
3. If stained areas are found, wipe down these areas of the seal/bellow, using the procedure
that follows.
a) Mix a dilute solution, using ¾ cup (177 mL) of liquid chlorine bleach, and 1 gal. (3.8 L) of
warm tap water.
b) Wipe the seal/bellow area with the dilute solution, using a damp cloth.
c) Let stand 5 minutes.
d) Wipe down area thoroughly with a dry cloth and let the washer interior air dry with door
open.
IMPORTANT:
• Wear rubber gloves when cleaning for prolonged periods.
• Refer to the bleach manufacturer’s instructions for proper use.
PRESERVING THE TOP COVER AND THE FRONT FRAME
Do not place any heavy or sharp objects or a detergent box on the washing machine. Keep them on the
purchased pedestal or in a separate storage box. This may scratch or damage the top cover of the washing
machine.
Since the entire washing machine has a high-gloss finish, the surface can be scratched or damaged.
Therefore, avoid scratching or damaging the surface when using the washing machine.
04 maintaining your washer
maintaining your washer _63
WF455AG-03159A-04_EN.indd Sec4:63WF455AG-03159A-04_EN.indd Sec4:63 2012-11-28 2:07:432012-11-28 2:07:43
Page 64

maintaining your washer
PURE CYCLE
Pure Cycle is a self-cleaning cycle that removes mold that may occur inside the washing machine.
1. Press the Power button.
2. Press the Pure Cycle
3. Press the Start/Pause button.
• Using Pure Cycle, you can clean the drum without using a cleansing agent.
CAUTION
• Never use Pure Cycle when laundry is in the washing machine. This may cause damage to
• If you want to use drum cleansing agent, use only 1/10 of the amount of the drum
The Pure Cycle Auto Indicator Function
• If the “Pure Cycle” button is lit after a wash, it indicates
• If you do not run Pure Cycle, the “Pure Cycle” indicator
• Although the Pure Cycle Auto Indicator appears once a
TM
TM
button.
• Once the Pure Cycle button is pressed, the only
function that can be set is Delay Start.
• If you press the Start/Pause button, Pure Cycle
begins.
the laundry or a problem with the washing machine.
cleansing agent recommended by the cleansing agent manufacturer. (When using a
powder-type cleansing agent , remove the liquid detergent compartment.)
that tub (drum) cleaning is required. In this case, remove
the laundry from the washing machine, turn the power on,
and clean the drum by running Pure Cycle.
turns off. However, the “Pure Cycle” indicator will light
again after two washes. Not running Pure Cycle at this
point will not cause a problem with the washing machine.
month or so, the frequency may differ depending on the
number of times the washing machine is used.
64_ maintaining your washer
WF455AG-03159A-04_EN.indd Sec4:64WF455AG-03159A-04_EN.indd Sec4:64 2012-11-28 2:07:432012-11-28 2:07:43
Page 65

troubleshooting
CHECK THESE POINTS IF YOUR WASHER…
PROBLEM SOLUTION
Will not start..
Has no water or not enough
water..
Has detergent remaining
in the automatic dispenser
after the wash cycle is
complete.
Vibrates or is too noisy.
Stops
• Make sure the door is firmly closed.
• Make sure your Washer is plugged in.
• Make sure the water source faucets are open.
• Make sure to press the Start/Pause Button to start your Washer.
• Make sure Child Lock is not activated; see page 27.
• Before your Washer starts to fill, it will make a series of clicking noises to
check the door lock and do a quick drain.
• Check the fuse or reset the circuit breaker
• Turn both faucets on fully.
• Make sure the door is tightly closed.
• Straighten the water inlet hoses.
• Disconnect hoses and clean screens. Hose filter screens may be
clogged.
• Open and close the door, then press the Start/Pause Button.
• Make sure your Washer is running with sufficient water pressure.
• Make sure the Detergent Selector dial is in the upper position when using
granular detergent.
• Make sure your Washer is set on a level surface. If the surface is not level,
adjust your Washer feet to level the appliance.
• Make sure that the shipping bolts are removed.
• Make sure your Washer is not touching any other object.
• Make sure the laundry load is balanced.
• Plug the power cord into a live electrical outlet.
• Check the fuse or reset the circuit breaker.
• Close the door and press the Start/Pause Button to start your Washer.
For your safety, your Washer will not tumble or spin unless the door is
closed.
• Before your Washer starts to fill, it will make a series of clicking noises to
check the door lock and do a quick drain.
• There may be a pause or soak period in the cycle. Wait briefly and it may
start.
• Check the screens on the inlet hoses at the faucets for obstructions.
Clean the screens periodically.
05 troubleshooting
troubleshooting _65
WF455AG-03159A-04_EN.indd Sec7:65WF455AG-03159A-04_EN.indd Sec7:65 2012-11-28 2:07:432012-11-28 2:07:43
Page 66

troubleshooting
PROBLEM SOLUTION
Fills with the wrong
temperature water.
Door locked or will not
open.
Does not drain and/or spin.
Load is too wet at the end
of the cycle.
Leaks water.
Has excessive suds.
Has an odor.
• Turn both faucets on fully.
• Make sure the temperature selection is correct.
• Make sure the hoses are connected to the correct faucets.
Flush water lines.
• Check the water heater. It should be set to deliver a minimum 120° F
(49° C) hot water at the tap. Also check the water heater capacity and
recovery rate.
• Disconnect the hoses and clean the screens. The hose filter screens may
be plugged.
• As your Washer is filling, the water temperature may change as
the automatic temperature control feature checks incoming water
temperature. This is normal.
• While your Washer is filling, you may notice just hot and/or just cold water
going through the dispenser when cold or warm wash temperatures are
selected. This is a normal function of the automatic temperature control
feature as your Washer determines the temperature of the water.
• Press the Start/Pause Button to stop your Washer.
• Your Washer door will remain locked during the heating portion of the
Sanitize Cycle
• It may take a few moments for the door lock mechanism to disengage.
• Check the fuse or reset the circuit breaker.
• Straighten the drain hoses. Eliminate kinked hoses. If there is a drain
restriction, call for service.
• Close the door and press the Start/Pause Button. For your safety, your
Washer will not tumble or spin unless the door is closed.
• Make sure the debris filter is not clogged.
• Use the High or Extra High spin speed.
• Use high efficiency detergent to reduce over–sudsing.
• Load is too small. Very small loads (one or two items) may become
unbalanced and not spin out completely.
• Make sure the door is firmly closed.
• Make sure all hose connections are tight.
• Make sure the end of the drain hose is correctly inserted and secured to
the drainage system.
• Avoid overloading.
• Use high efficiency detergent to prevent over–sudsing.
• Use high efficiency detergent to prevent over-sudsing.
• Reduce the detergent amount for soft water, small or lightly soiled loads.
• Non-HE detergent is NOT recommended.
• Excessive suds collect in nooks and crannies and can cause foul odors.
• Run cleansing cycles to sanitize the machine periodically. (Silver Care or
Sanitize Cycle or Pure Cycle)
• Clean the door seal (Diaphragm).
• Dry the interior of your washer after the total cycle has finished.
66_ troubleshooting
WF455AG-03159A-04_EN.indd Sec7:66WF455AG-03159A-04_EN.indd Sec7:66 2012-11-28 2:07:432012-11-28 2:07:43
Page 67

INFORMATION CODES
Information codes may be displayed to help you better understand what is occurring with your washer.
ERROR CODE MEANING & SOLUTION
dc
dS
FL
Hr
LE
LO
nd
nF
nF1
OE
1E
E2
An unbalanced load that prevents your washer from spinning.
Redistribute the load, press the Start/Pause button.
The door is open when the washer is running.
Close the door tightly and restart the cycle. If the code reappears, call customer
service.
Your washer failed to lock the door.
Close the door tightly and restart the cycle. If the code reappears, call customer
service.
A water temperature control problem. (Heater control problem)
Call customer service.
Your washer has tried to fi ll, but has not reached the proper water level.
Call customer service.
The door will not unlock.
Make sure the door is fi rmly closed. Press the Power button to turn o your washer,
then turn it on again. If the code reappears, call customer service.
Your washer is not draining. This can also mean that the unit senses a small clog
while draining.
1. Turn o the unit for 10 seconds and then turn it on again.
2. Select the Spin Only cycle.
3. Press the Start/Pause to drain the water.
If it still does not drain, call for service.
Your washer has tried to fi ll but was unsuccessful.
Make sure the water faucets are open all the way. Check for bent hoses. Check the
inlet screens on the hoses. If you are using a Flood Safety Device, please remove
the device and connect the water hoses directly to the unit.
Check if the hot water supply hose is connected.
You must connect the hot water supply hose because hot water is supplied by the
Auto Temperature Control (A.T.C.) function if the temperature of the cold water is
lower than 59°F.
When washer displays “nF”, washer do draining for 3 minutes. At this time,
Power button is invalid
The hot/cold water hose connection is not correct.
Please connect the hot/cold water hose connection correctly.
A fault is detected in the water level sensor.
Call customer service.
The Water Level sensor is not working properly.
Call customer service.
A jammed key.
Call customer service.
05 troubleshooting
troubleshooting _67
WF455AG-03159A-04_EN.indd Sec7:67WF455AG-03159A-04_EN.indd Sec7:67 2012-11-28 2:07:442012-11-28 2:07:44
Page 68

troubleshooting
ERROR CODE MEANING & SOLUTION
tE
3E
2E
AE
AE4
AE3
AE5
8E
SF1
SF2
SF3
SUdS
For any codes not listed above, call 1–800–726–7864 (1–800–SAMSUNG)
A temperature sensor problem.
Restart the cycle. If the code reappears, call customer service.
A motor problem.
Restart the cycle. If the code reappears, call customer service.
High/Low voltage detected.
Restart the cycle. If the code reappears, call customer service.
A Communication error between the SUB(Sensor) PBA and the MAIN PBA
Call customer service.
A Communication error between the WIFI PBA and the MAIN PBA
Call customer service.
A Communication error between the DR Module and the MAIN PBA
Call customer service.
A Communication error between the LCD PBA and the MAIN PBA
Call customer service.
A MEMS sensor problem.
Call customer service.
A system error
Call customer service.
Too many suds are detected during the wash session. The unit is put on hold until
the amount of suds have been reduced. The unit will then go back to operating.
When it fi nishes washing, the “End” and “SUdS” codes will blink in turn.
68_ troubleshooting
WF455AG-03159A-04_EN.indd Sec7:68WF455AG-03159A-04_EN.indd Sec7:68 2012-11-28 2:07:442012-11-28 2:07:44
Page 69

NETWORK SETUP Q&A
QUESTION ANSWER
The washer or dryer is not
found in the smartphone app.
The AP is not found on the
washer or dryer.
There are more than one
washer or dryer in the house.
Do I have to install an AP for
each of them?
Which AP is better? • Since the washer or dryer is controlled through the router from
How can I check if the AP is
out of order?
The customer does not have
a PC. Can the customer can
use the indoor and outdoor
control feature?
How many users can control
a washer or dryer?
• Check the power connection of the router.
• Check if the smartphone is connected with Wi-Fi.
• Check if the Wi-Fi function of the washer or dryer is turned on.
• To refresh the screen, press “Confi gure” again.
• If the router is installed too far away from the washer or dryer, the
strength of the Wi-Fi signal may weak. In this case, move the router
closer to the washer or dryer.
• Check the power connection of the router.
• Check if the Wi-Fi function of the washer or dryer is turned on.
• To refresh the screen, press “Confi gure” again.
• If the router is installed too far away from the washer or dryer,
the strength of the Wi-Fi signal may weak. In this case, move the
router closer to the washer or dryer. Ensure that the number of the
displayed antenna bars are at least 3.
• If the strength of the wireless signal of the router is weak, the washer
or dryer may not appear in the device list of the APP. Make sure to
use a high performance router to use a stable wireless network.
• You can install only one router.
• I you want to one router for each of the washer and dryer, select the
corresponding router for each of the products in the “Smart Washer”
app.
• When both washer and dryer are installed, they can be controlled
through one router.
the inside or outside of the house, high performance router is
recommended.
• Make sure to use a router that has the WiFi certifi cate logo.
• Since an router with 2 or more antennas provides better performance,
purchse and use the router.
• Connect to the router on a smartphone and check if you can connect
to the Internet. If you can connect to the Internet, the router is normal.
• Check if the LED of the router is blinking. If all the LEDs are turned o ,
it indicates that the power is turned o .
• If the router doesn’t seem to be working properly, request after-sales
service.
• If the Internet can be accessed inside of the house, the feature is
available. However, you have to sign up the web site and resgister the
product.
• Only if the “Smart Washer” app is authenticated, multiple users can
control the washer or dryer.
05 troubleshooting
troubleshooting _69
WF455AG-03159A-04_EN.indd Sec7:69WF455AG-03159A-04_EN.indd Sec7:69 2012-11-28 2:07:442012-11-28 2:07:44
Page 70

troubleshooting
QUESTION ANSWER
Where are the proper place to
install a washer or dryer?
How can I connect the
washer or dryer with a
smartphone stably?
What should I have to
do when the number of
the antenna bars that are
displayed on the LCD of the
washer or dryer is 1?
• Since a washer or dryer is heavy and connected with water, it should
be installed in the proper place. Installing the AP near the washer or
dryer is recommended. You can check the signal strength through
the setup screen of the washer or dryer or a smartphone.
• Since the performance is seriously a ected by a door or steel wall,
install the product in an open place. If there is door in front of the
installed product, open the door when using the product.
• Do not place an object maden with steel or glass in front of the front
LCD of the washer since it blocks the radio signal.
• Note that the radio signal may be weaken or interfered and the
communication with the smartphone may fail when a microwave oven
is used in the house.
• Install the washer or dryer so that the front of the product faces the
AP if available.
• When the signal strenth that is displayed on the LCE of the washer
or dryer is weak, the control may fail. Check the mark as follows or
measure the signal strength.
• At least 3 antenna bars should be displayed on the LCD of the
washer or dryer.
• At least 3 antenna bars for the Wi-Fi connection should be
displayed on the smartphone.
• When the signal strenth is measured with a smartphone app that
shows the Wi-Fi signal strength, the signal strength should be
stronger than -65 dBm. (E.g. -60 dBm and -50 dBm are stronger
than -65 dBm.)
• When the signal strenth that is displayed on the LCE of the washer
or dryer is weak, the control may fail. In this case, take the following
measures for normal operation.
• Move the AP closer to the washer or dryer.
(At least 3 antenna bars should be dislayed in the network setup
of the washer for proper operation.)
• Since old AP may provide lower performance, use new one if
available.
• Stand the antenna of the AP if available so that the radio signal is
more easily propagated.
70_ troubleshooting
WF455AG-03159A-04_EN.indd Sec7:70WF455AG-03159A-04_EN.indd Sec7:70 2012-11-28 2:07:442012-11-28 2:07:44
Page 71

appendix
FABRIC CARE CHART
The following symbols provide garment care direction. The Clothing care labels include symbols for
washing, bleaching, drying and ironing, or dry cleaning when necessary. The use of symbols ensures
consistency among garment manufacturers of domestic and imported items. Follow care label directions to
maximize garment life and reduce laundering problems.
06 appendix
Wash Cycle Special Instructions
Normal Line Dry/ Hang to Dry Do Not Wash
Permanent Press /
Wrinkle Resistant /
Wrinkle Control
Gentle/Delicates Dry Flat Do Not Bleach
Hand Wash
Water Temperature**
Hot Medium Do Not Iron
Warm Low
Cold Any Heat Dry Clean
Bleach
Any Bleach (when
needed)
Only Non-Chlorine
(color-safe)
Bleach (when needed)
Tumble Dry Cycle Medium Dry Flat
Normal
Permanent Press/
Wrinkle Resistant/
Wrinkle Control
Gentle/ Delicates
Drip Dry Do Not Wring
Heat Setting
High
No Heat/Air Do Not Dry Clean
Iron-Dry or Steam
Temperatures
High Drip Dry
Low
Warning Symbols for
Laundering
Dryclean
Do Not Tumble Dry
No Steam (added to
iron)
Line Dry/ Hang to Dry
For machine-washable
wool. Loads should be
under 8 pounds.
** The dot symbols represent appropriate wash water temperatures for various items. The temperature
range for Hot is 105° - 125° F/ 41° - 52°C, for Warm 85° - 105° F/29° - 41° C and for Cold 60° - 85° F/16°
- 29° C. (Wash water temperature must be a minimum of 60° F/16°C for detergent activation and effective
cleaning.) The clothes Washer may not ensure these temperatures because the actual water temperatures
entering your Washer are dependent on water heater settings and regional water supply temperatures. For
example, cold water entering the home in the northern states during winter may be 40° F/4° C which is
too cold for effective cleaning. The water temperature in this situation will need to be adjusted by selecting
a warm setting, adding some hot water to the MAX FILL line or using your Washer’s heating option, if
available.
appendix _71
WF455AG-03159A-04_EN.indd Sec8:71WF455AG-03159A-04_EN.indd Sec8:71 2012-11-28 2:07:442012-11-28 2:07:44
Page 72

appendix
CYCLE CHART
Use this chart to set the best cycle and option for you laundry.
(: Factory setting, : Selectable, x: Not available)
Course
Normal
Heavyduty
Perm Press
Sanitize
Bedding Plus
Deep Steam
Rinse + Spin
Quick Wash
Wool
Delicates/Hand wash
Stain Away
Active Wear
eco Cold
Pure Cycle
Extra
Hot
X
X
XX
XX
X
XXXX
X
XX
XX
X
XX
XXXX
Temp. Spin
Hot Warm
XXXX
XXXXXXX
Eco
Warm
XXX
Cold
Functions
Extra
High Medium Low No Spin
High
X
XX
XXX
XXX
XX
X
72_ appendix
WF455AG-03159A-04_EN.indd Sec8:72WF455AG-03159A-04_EN.indd Sec8:72 2012-11-28 2:07:442012-11-28 2:07:44
Page 73

CYCLE CHART
Use this chart to set the best cycle and option for you laundry.
(: Factory setting, : Selectable, x: Not available)
Functions Options
Course
Normal
Heavyduty
Perm Press
Sanitize
Bedding Plus
Deep Steam
Rinse + Spin
Quick Wash
Wool
Delicates/Hand wash
Stain Away
Active Wear
eco Cold
Pure Cycle
Extra
Heavy
(Heavy)
XX
XX
Soil Level
Heavy
Normal
()
XXXX
Extra
Light
Light
()
(Light)
XXXX
Extra
Extra
My
Pre
Delay
Rinse
Spin
Cycle
Wash
X
X
XX
X
X
X
X
X
Start
Steam
X
X
X
X
X
X
X
X
06 appendix
appendix _73
WF455AG-03159A-04_EN.indd Sec8:73WF455AG-03159A-04_EN.indd Sec8:73 2012-11-28 2:07:442012-11-28 2:07:44
Page 74

appendix
HELPING THE ENVIRONMENT
• Your Washer is manufactured from recyclable materials. If you decide to dispose of it, please observe
local waste disposal regulations. Cut off the power cord so that the appliance cannot be connected
to a power source. Remove the door so that animals and small children cannot get trapped inside the
appliance.
• Do not exceed the detergent quantities recommended in the detergent manufacturers’ instructions.
• Use stain removal products and bleaches before the wash cycle only when necessary.
• Save water and electricity by only washing full loads (the exact amount depends upon the program used).
DECLARATION OF CONFORMITY
This appliance complies with UL2157.
SPECIFICATION
TYPE FRONT LOADING WASHER
DIMENSIONS
Height-Overall
A.
B. Width
C. Depth with door open 90°
D. Depth
Div Inches (mm)
38.7” (984)
27” ( 686)
51.2”(1300)
34.1”( 865)
C
D
A
B
WATER PRESSURE
WEIGHT
HEATER RATING
POWER
CONSUMPTION
SPIN REVOLUTION
WASHING
WASHING AND HEATING
SPIN
DRAIN
WF455ARG***
20-116psi(137-800kPa)
105kg (231.5lb)
900 W
120 V 200 W
120 V 1150 W
120 V 550 W
120 V 80 W
1300 rpm
74_ appendix
WF455AG-03159A-04_EN.indd Sec8:74WF455AG-03159A-04_EN.indd Sec8:74 2012-11-28 2:07:442012-11-28 2:07:44
Page 75

OPEN SOURCE ANNOUNCEMENT
The software included in this product contains copyrighted software that is licensed under the GPL/LGPL.
You may obtain the complete Corresponding Source code from us for a period of three years after our last
shipment of this product by sending email to:
oss.request@samsung.com
If you want to obtain the complete Corresponding Source code in the physical medium such as CD-ROM,
the cost of physically performing source distribution may be charged.
This o er is valid to anyone in receipt of this information.
GPL Software:
Bridge-Utils, BusyBox, DNRD, dosfstools, iproute2, IPTables, Linux Kernel, ntpclient, Open1x, RSDK
toolchain, rtl819x - Bootloader, samba, squashfs, udhcp Server-Client Package, USB-ModeSwitch,
wireless-tools
LGPL Software:
libnl-Netlink Library, Mini-XML
GNU GENERAL PUBLIC LICENSE
Version 2, June 1991
Copyright (C) 1989, 1991 Free Software Foundation, Inc.
51 Franklin Street, Fifth Floor, Boston, MA 02110-1301, USA
Everyone is permitted to copy and distribute verbatim copies of this license document, but changing it is not
allowed.
Preamble
The licenses for most software are designed to take away your freedom to share and change
it. By contrast, the GNU General Public License is intended to guarantee your freedom to share
and change free software--to make sure the software is free for all its users. This General Public
License applies to most of the Free Software Foundation’s software and to any other program
whose authors commit to using it. (Some other Free Software Foundation software is covered by
the GNU Lesser General Public License instead.)
You can apply it to your programs, too.
When we speak of free software, we are referring to freedom, not price. Our General Public
Licenses are designed to make sure that you have the freedom to distribute copies of free
software (and charge for this service if you wish), that you receive source code or can get it if you
want it, that you can change the software or use pieces of it in new free programs; and that you
know you can do these things.
To protect your rights, we need to make restrictions that forbid anyone to deny you these rights
or to ask you to surrender the rights. These restrictions translate to certain responsibilities for you
if you distribute copies of the software, or if you modify it.
For example, if you distribute copies of such a program, whether gratis or for a fee, you must
give the recipients all the rights that you have. You must make sure that they, too, receive or can
get the source code. And you must show them these terms so they know their rights.
We protect your rights with two steps: (1) copyright the software, and (2) o er you this license
which gives you legal permission to copy, distribute and/or modify the software.
Also, for each author’s protection and ours, we want to make certain that everyone understands
that there is no warranty for this free software. If the software is modifi ed by someone else and
passed on, we want its recipients to know that what they have is not the original, so that any
06 appendix
appendix _75
WF455AG-03159A-04_EN.indd Sec8:75WF455AG-03159A-04_EN.indd Sec8:75 2012-11-28 2:07:442012-11-28 2:07:44
Page 76

appendix
problems introduced by others will not refl ect on the original authors’ reputations.
Finally, any free program is threatened constantly by software patents. We wish to avoid the
danger that redistributors of a free program will individually obtain patent licenses, in e ect
making the program proprietary. To prevent this, we have made it clear that any patent must be
licensed for everyone’s free use or not licensed at all.
The precise terms and conditions for copying, distribution and modifi cation follow.
TERMS AND CONDITIONS FOR COPYING, DISTRIBUTION AND
MODIFICATION
1. This License applies to any program or other work which contains a notice placed by the
copyright holder saying it may be distributed under the terms of this General Public License.
The “Program”, below, refers to any such program or work, and a “work based on the
Program” means either the Program or any derivative work under copyright law: that is to
say, a work containing the Program or a portion of it, either verbatim or with modifi cations
and/or translated into another language. (Hereinafter, translation is included without limitation
in the term “modifi cation”.) Each licensee is addressed as “you”.
Activities other than copying, distribution and modifi cation are not covered by this License;
they are outside its scope. The act of running the Program is not restricted, and the output
from the Program is covered only if its contents constitute a work based on the Program
(independent of having been made by running the Program). Whether that is true depends on
what the Program does.
2. You may copy and distribute verbatim copies of the Program’s source code as you receive
it, in any medium, provided that you conspicuously and appropriately publish on each copy
an appropriate copyright notice and disclaimer of warranty; keep intact all the notices that
refer to this License and to the absence of any warranty; and give any other recipients of the
Program a copy of this License along with the Program.
You may charge a fee for the physical act of transferring a copy, and you may at your option
o er warranty protection in exchange for a fee.
3. You may modify your copy or copies of the Program or any portion of it, thus forming a work
based on the Program, and copy and distribute such modifi cations or work under the terms
of Section 1 above, provided that you also meet all of these conditions:
1) You must cause the modifi ed fi les to carry prominent notices stating that you changed
the fi les and the date of any change.
2) You must cause any work that you distribute or publish, that in whole or in part contains
or is derived from the Program or any part thereof, to be licensed as a whole at no charge
to all third parties under the terms of this License.
3) If the modifi ed program normally reads commands interactively when run, you must
cause it, when started running for such interactive use in the most ordinary way, to print
or display an announcement including an appropriate copyright notice and a notice that
there is no warranty (or else, saying that you provide a warranty) and that users may
redistribute the program under these conditions, and telling the user how to view a copy
of this License. (Exception: if the Program itself is interactive but does not normally print
such an announcement, your work based on the Program is not required to print an
announcement.)
These requirements apply to the modifi ed work as a whole. If identifi able sections of that
work are not derived from the Program, and can be reasonably considered independent
and separate works in themselves, then this License, and its terms, do not apply to those
sections when you distribute them as separate works. But when you distribute the same
sections as part of a whole which is a work based on the Program, the distribution of the
whole must be on the terms of this License, whose permissions for other licensees extend to
the entire whole, and thus to each and every part regardless of who wrote it.
Thus, it is not the intent of this section to claim rights or contest your rights to work written
76_ appendix
WF455AG-03159A-04_EN.indd Sec8:76WF455AG-03159A-04_EN.indd Sec8:76 2012-11-28 2:07:452012-11-28 2:07:45
Page 77

entirely by you; rather, the intent is to exercise the right to control the distribution of derivative
or collective works based on the Program.
In addition, mere aggregation of another work not based on the Program with the Program
(or with a work based on the Program) on a volume of a storage or distribution medium does
not bring the other work under the scope of this License.
4. 3. You may copy and distribute the Program (or a work based on it, under Section 2) in
object code or executable form under the terms of Sections 1 and 2 above provided that you
also do one of the following:
1) Accompany it with the complete corresponding machinereadable source code, which
must be distributed under the terms of Sections 1 and 2 above on a medium customarily
used for software interchange; or,
2) Accompany it with a written o er, valid for at least three years, to give any third party,
for a charge no more than your cost of physically performing source distribution, a
complete machine-readable copy of the corresponding source code, to be distributed
under the terms of Sections 1 and 2 above on a medium customarily used for software
interchange; or, c) Accompany it with the information you received as to the o er to
distribute corresponding source code. (This alternative is allowed only for noncommercial
distribution and only if you received the program in object code or executable form with
such an o er, in accord with Subsection b above.)
The source code for a work means the preferred form of the work for making modifi cations
to it. For an executable work, complete source code means all the source code for all
modules it contains, plus any associated interface defi nition fi les, plus the scripts used to
control compilation and installation of the executable. However, as a special exception,
the source code distributed need not include anything that is normally distributed (in either
source or binary form) with the major components (compiler, kernel, and so on) of the
operating system on which the executable runs, unless that component itself accompanies
the executable.
If distribution of executable or object code is made by o ering access to copy from a
designated place, then o ering equivalent access to copy the source code from the same
place counts as distribution of the source code, even though third parties are not compelled
to copy the source
along with the object code.
5. You may not copy, modify, sublicense, or distribute the Program except as expressly
provided under this License. Any attempt otherwise to copy, modify, sublicense or distribute
the Program is void, and will automatically terminate your rights under this License. However,
parties who have received copies, or rights, from you under this License will not have their
licenses terminated so long as such parties remain in full compliance.
6. You are not required to accept this License, since you have not signed it. However, nothing
else grants you permission to modify or distribute the Program or its derivative works. These
actions are prohibited by law if you do not accept this License. Therefore, by modifying or
distributing the Program (or any work based on the Program), you indicate your acceptance
of this License to do so, and all its terms and conditions for copying, distributing or modifying
the Program or works based on it.
7. Each time you redistribute the Program (or any work based on the Program), the recipient
automatically receives a license from the original licensor to copy, distribute or modify the
Program subject to these terms and conditions. You may not impose any further restrictions
on the recipients’ exercise of the rights granted herein. You are not responsible for enforcing
compliance by third parties to this License.
8. If, as a consequence of a court judgment or allegation of patent infringement or for any
other reason (not limited to patent issues), conditions are imposed on you (whether by
court order, agreement or otherwise) that contradict the conditions of this License, they do
not excuse you from the conditions of this License. If you cannot distribute so as to satisfy
simultaneously your obligations under this License and any other pertinent obligations, then
06 appendix
appendix _77
WF455AG-03159A-04_EN.indd Sec8:77WF455AG-03159A-04_EN.indd Sec8:77 2012-11-28 2:07:452012-11-28 2:07:45
Page 78

appendix
as a consequence you may not distribute the Program at all. For example, if a patent license
would not permit royalty-free redistribution of the Program by all those who receive copies
directly or indirectly through you, then the only way you could satisfy both it and this License
would be to refrain entirely from distribution of the Program.
If any portion of this section is held invalid or unenforceable under any particular
circumstance, the balance of the section is intended to apply and the section as a whole is
intended to apply in other circumstances.
It is not the purpose of this section to induce you to infringe any patents or other property
right claims or to contest validity of any such claims; this section has the sole purpose of
protecting the integrity of the free software distribution system, which is implemented by
public license practices. Many people have made generous contributions to the wide range
of software distributed through that system in reliance on consistent application of that
system; it is up to the author/donor to decide if he or she is willing to distribute software
through any other system and a licensee cannot impose that choice.
This section is intended to make thoroughly clear what is believed to be a consequence of
the rest of this License.
9. If the distribution and/or use of the Program is restricted in certain countries either by patents
or by copyrighted interfaces, the original copyright holder who places the Program under this
License may add an explicit geographical distribution limitation excluding those countries, so
that distribution is permitted only in or among countries not thus excluded. In such case, this
License incorporates the limitation as if written in the body of this License.
10. The Free Software Foundation may publish revised and/or new versions of the General Public
License from time to time. Such new versions will be similar in spirit to the present version,
but may di er in detail to address new problems or concerns.
Each version is given a distinguishing version number. If the Program specifi es a version
number of this License which applies to it and “any later version”, you have the option of
following the terms and conditions either of that version or of any later version published
by the Free Software Foundation. If the Program does not specify a version number of this
License, you may choose any version ever published by the Free Software Foundation.
11. If you wish to incorporate parts of the Program into other free programs whose distribution
conditions are di erent, write to the author to ask for permission. For software which is
copyrighted by the Free Software Foundation, write to the Free Software Foundation;
we sometimes make exceptions for this. Our decision will be guided by the two goals of
preserving the free status of all derivatives of our free software and of promoting the sharing
and reuse of software generally.
NO WARRANTY
12. BECAUSE THE PROGRAM IS LICENSED FREE OF CHARGE, THERE IS NO WARRANTY
FOR THE PROGRAM, TO THE EXTENT PERMITTED BY APPLICABLE LAW. EXCEPT
WHEN OTHERWISE STATED IN WRITING THE COPYRIGHT HOLDERS AND/OR OTHER
PARTIES PROVIDE THE PROGRAM “AS IS” WITHOUT WARRANTY OF ANY KIND, EITHER
EXPRESSED OR IMPLIED, INCLUDING, BUT NOT LIMITED TO, THE IMPLIED WARRANTIES
OF MERCHANTABILITY AND FITNESS FOR A PARTICULAR PURPOSE. THE ENTIRE RISK
AS TO THE QUALITY AND PERFORMANCE OF THE PROGRAM IS WITH YOU. SHOULD
THE PROGRAM PROVE DEFECTIVE, YOU ASSUME THE COST OF ALL NECESSARY
SERVICING, REPAIR OR CORRECTION.
13. IN NO EVENT UNLESS REQUIRED BY APPLICABLE LAW OR AGREED TO IN WRITING
WILL ANY COPYRIGHT HOLDER, OR ANY OTHER PARTY WHO MAY MODIFY AND/OR
REDISTRIBUTE THE PROGRAM AS PERMITTED ABOV E , BE L I ABL E TO YOU FOR
DAMAGES, INCLUDING ANY GENERAL, SPECIAL, INCIDENTAL OR CONSEQUENTIAL
DAMAGES ARISING OUT OF THE USE OR INABILITY TO USE THE PROGRAM (INCLUDING
BUT NOT LIMITED TO LOSS OF DATA OR DATA BEING RENDERED INACCURATE OR
LOSSES SUSTAINED BY YOU OR THIRD PARTIES OR A FAILURE OF THE PROGRAM TO
78_ appendix
WF455AG-03159A-04_EN.indd Sec8:78WF455AG-03159A-04_EN.indd Sec8:78 2012-11-28 2:07:452012-11-28 2:07:45
Page 79

OPERATE WITH ANY OTHER PROGRAMS), EVEN IF SUCH HOLDER OR OTHER PARTY
HAS BEEN ADVISED OF THE POSSIBILITY OF SUCH DAMAGES.
END OF TERMS AND CONDITIONS
How to Apply These Terms to Your New Programs
If you develop a new program, and you want it to be of the greatest possible use to the public,
the best way to achieve this is to make it free software which everyone can redistribute and
change under these terms.
To do so, attach the following notices to the program. It is safest to attach them to the start of
each source fi le to most e ectively convey the exclusion of warranty; and each fi le should have at
least the “copyright” line and a pointer to where the full notice is found.
one line to give the program’s name and an idea of what it does.
Copyright (C) yyyy name of author
This program is free software; you can redistribute it and/or modify it under the terms of the GNU
General Public License as published by the Free Software Foundation; either version 2 of the
License, or (at your option) any later version.
This program is distributed in the hope that it will be useful, but WITHOUT ANY WARRANTY;
without even the implied warranty of MERCHANTABILITY or FITNESS FOR A PARTICULAR
PURPOSE. See the GNU General Public License for more details.
You should have received a copy of the GNU General Public License along with this program;
if not, write to the Free Software Foundation, Inc., 51 Franklin Street, Fifth Floor, Boston, MA
02110-1301, USA.
Also add information on how to contact you by electronic and paper mail.
If the program is interactive, make it output a short notice like this when it starts in an interactive
mode:
Gnomovision version 69, Copyright (C) year name of author Gnomovision comes with
ABSOLUTELY NO WARRANTY; for details type `show w’. This is free software, and you are
welcome to redistribute it under certain conditions; type `show c’ for details.
The hypothetical commands `show w’ and `show c’ should show the appropriate parts of the
General Public License. Of course, the commands you use may be called something other than
`show w’ and `show c’; they could even be mouse-clicks or menu items--whatever suits your
program. You should also get your employer (if you work as a programmer) or your school, if any,
to sign a “copyright disclaimer” for the program, if necessary. Here is a sample; alter the names:
Yoyodyne, Inc., hereby disclaims all copyright interest in the program `Gnomovision’ (which
makes passes at compilers) written by James Hacker.
signature of Ty Coon, 1 April 1989
Ty Coon, President of Vice
This General Public License does not permit incorporating your program into proprietary
programs. If your program is a subroutine library, you may consider it more useful to permit
linking proprietary applications with the library. If this is what you want to do, use the GNU Lesser
General Public License instead of this License.
06 appendix
GNU LESSER GENERAL PUBLIC LICENSE
Version 2.1, February 1999
Copyright (C) 1991, 1999 Free Software Foundation, Inc.
51 Franklin Street, Fifth Floor, Boston, MA 02110-1301 USA
Everyone is permitted to copy and distribute verbatim copies of this license document, but changing it is
appendix _79
WF455AG-03159A-04_EN.indd Sec8:79WF455AG-03159A-04_EN.indd Sec8:79 2012-11-28 2:07:452012-11-28 2:07:45
Page 80

appendix
not allowed.
[This is the fi rst released version of the Lesser GPL. It also counts as the successor of the GNU Library
Public License, version 2, hence the version number 2.1.]
Preamble
The licenses for most software are designed to take away your freedom to share and change it.
By contrast, the GNU General Public Licenses are intended to guarantee your freedom to share
and change free software--to make sure the software is free for all its users.
This license, the Lesser General Public License, applies to some specially designated software
packages--typically libraries--of the Free Software Foundation and other authors who decide to
use it. You can use it too, but we suggest you fi rst think carefully about whether this license or
the ordinary General Public License is the better strategy to use in any particular case, based on
the explanations below.
When we speak of free software, we are referring to freedom of use, not price. Our General
Public Licenses are designed to make sure that you have the freedom to distribute copies of free
software (and charge for this service if you wish); that you receive source code or can get it if you
want it; that you can change the software and use pieces of it in new free programs; and that
you are informed that you can do these things.
To protect your rights, we need to make restrictions that forbid distributors to deny you
these rights or to ask you to surrender these rights. These restrictions translate to certain
responsibilities for you if you distribute copies of the library or if you modify it.
For example, if you distribute copies of the library, whether gratis or for a fee, you must give the
recipients all the rights that we gave you. You must make sure that they, too, receive or can get
the source code. If you link other code with the library, you must provide complete object fi les
to the recipients, so that they can relink them with the library after making changes to the library
and recompiling it. And you must show them these terms so they know their rights.
We protect your rights with a two-step method: (1) we copyright the library, and (2) we o er you
this license, which gives you legal permission to copy, distribute and/or modify the library.
To protect each distributor, we want to make it very clear that there is no warranty for the free
library. Also, if the library is modifi ed by someone else and passed on, the recipients should
know that what they have is not the original version, so that the original author’s reputation will
not be a ected by problems that might be introduced by others.
Finally, software patents pose a constant threat to the existence of any free program. We wish to
make sure that a company cannot e ectively restrict the users of a free program by obtaining a
restrictive license from a patent holder. Therefore, we insist that any patent license obtained for a
version of the library must be consistent with the full freedom of use specifi ed in this license.
Most GNU software, including some libraries, is covered by the ordinary GNU General Public
License. This license, the GNU Lesser General Public License, applies to certain designated
libraries, and is quite di erent from the ordinary General Public License. We use this license for
certain libraries in order to permit linking those libraries into nonfree programs.
When a program is linked with a library, whether statically or using a shared library, the
combination of the two is legally speaking a combined work, a derivative of the original library.
The ordinary General Public License therefore permits such linking only if the entire combination
fi ts its criteria of freedom. The Lesser General Public License permits more lax criteria for linking
other code with the library.
We call this license the “Lesser” General Public License because it does Less to protect the
user’s freedom than the ordinary General Public License. It also provides other free software
developers Less of an advantage over competing non-free programs. These disadvantages are
the reason we use the ordinary General Public License for many libraries.
However, the Lesser license provides advantages in certain special circumstances.
For example, on rare occasions, there may be a special need to encourage the widest possible
use of a certain library, so that it becomes a de-facto standard. To achieve this, non-free
80_ appendix
WF455AG-03159A-04_EN.indd Sec8:80WF455AG-03159A-04_EN.indd Sec8:80 2012-11-28 2:07:452012-11-28 2:07:45
Page 81

programs must be allowed to use the library.
A more frequent case is that a free library does the same job as widely used non-free libraries.
In this case, there is little to gain by limiting the free library to free software only, so we use the
Lesser General Public License.
In other cases, permission to use a particular library in nonfree programs enables a greater
number of people to use a large body of free software. For example, permission to use the GNU
C Library in non-free programs enables many more people to use the whole GNU operating
system, as well as its variant, the GNU/Linux operating system.
Although the Lesser General Public License is Less protective of the users’ freedom, it does
ensure that the user of a program that is linked with the Library has the freedom and the
wherewithal to run that program using a modifi ed version of the Library.
The precise terms and conditions for copying, distribution and modifi cation follow. Pay close
attention to the di erence between a “work based on the library” and a “work that uses the
library”. The former contains code derived from the library, whereas the latter must be combined
with the library in order to run.
TERMS AND CONDITIONS FOR COPYING, DISTRIBUTION AND
MODIFICATION
1. This License Agreement applies to any software library or other program which contains a
notice placed by the copyright holder or other authorized party saying it may be distributed
under the terms of this Lesser General Public License (also called “this License”). Each
licensee is addressed as “you”.
A “library” means a collection of software functions and/or data prepared so as to be
conveniently linked with application programs (which use some of those functions and data)
to form executables.
The “Library”, below, refers to any such software library or work which has been distributed
under these terms. A “work based on the Library” means either the Library or any derivative
work under copyright law: that is to say, a work containing the Library or a portion of it, either
verbatim or with modifi cations and/or translated straightforwardly into another language.
(Hereinafter, translation is included without limitation in the term “modifi cation”.)
“Source code” for a work means the preferred form of the work for making modifi cations to
it. For a library, complete source code means all the source code for all modules it contains,
plus any associated interface defi nition fi les, plus the scripts used to control compilation and
installation of the library.
Activities other than copying, distribution and modifi cation are not covered by this License;
they are outside its scope. The act of running a program using the Library is not restricted,
and output from such a program is covered only if its contents constitute a work based on
the Library (independent of the use of the Library in a tool for writing it).
Whether that is true depends on what the Library does and what the program that uses the
Library does.
2. You may copy and distribute verbatim copies of the Library’s complete source code as you
receive it, in any medium, provided that you conspicuously and appropriately publish on each
copy an appropriate copyright notice and disclaimer of warranty; keep intact all the notices
that refer to this License and to the absence of any warranty; and distribute a copy of this
License along with the Library.
You may charge a fee for the physical act of transferring a copy, and you may at your option
o er warranty protection in exchange for a fee.
3. You may modify your copy or copies of the Library or any portion of it, thus forming a work
based on the Library, and copy and distribute such modifi cations or work under the terms of
Section 1 above, provided that you also meet all of these conditions:
1) The modifi ed work must itself be a software library.
2) You must cause the fi les modifi ed to carry prominent notices stating that you changed
06 appendix
appendix _81
WF455AG-03159A-04_EN.indd Sec8:81WF455AG-03159A-04_EN.indd Sec8:81 2012-11-28 2:07:452012-11-28 2:07:45
Page 82

appendix
the fi les and the date of any change.
3) You must cause the whole of the work to be licensed at no charge to all third parties
under the terms of this License.
4) If a facility in the modifi ed Library refers to a function or a table of data to be supplied by
an application program that uses the facility, other than as an argument passed when the
facility is invoked, then you must make a good faith e ort to ensure that, in the event an
application does not supply such function or table, the facility still operates, and performs
whatever part of its purpose remains meaningful.
(For example, a function in a library to compute square roots has a purpose that is entirely
well-defi ned independent of the application. Therefore, Subsection 2d requires that
any application-supplied function or table used by this function must be optional: if the
application does not supply it, the square root function must still compute square roots.)
These requirements apply to the modifi ed work as a whole. If identifi able sections of that
work are not derived from the Library, and can be reasonably considered independent
and separate works in themselves, then this License, and its terms, do not apply to those
sections when you distribute them as separate works. But when you distribute the same
sections as part of a whole which is a work based on the Library, the distribution of the
whole must be on the terms of this License, whose permissions for other licensees extend to
the entire whole, and thus to each and every part regardless of who wrote it. Thus, it is not
the intent of this section to claim rights or contest your rights to work written entirely by you;
rather, the intent is to exercise the right to control the distribution of derivative or collective
works based on the Library. In addition, mere aggregation of another work not based on
the Library with the Library (or with a work based on the Library) on a volume of a storage or
distribution medium does not bring the other work under the scope of this License.
4. You may opt to apply the terms of the ordinary GNU General Public License instead of this
License to a given copy of the Library. To do this, you must alter all the notices that refer to
this License, so that they refer to the ordinary GNU General Public License, version 2, instead
of to this License. (If a newer version than version 2 of the ordinary GNU General Public
License has appeared, then you can specify that version instead if you wish.) Do not make
any other change in these notices.
Once this change is made in a given copy, it is irreversible for that copy, so the ordinary GNU
General Public License applies to all subsequent copies and derivative works made from that
copy.
This option is useful when you wish to copy part of the code of the Library into a program
that is not a library.
5. You may copy and distribute the Library (or a portion or derivative of it, under Section 2) in
object code or executable form under the terms of Sections 1 and 2 above provided that you
accompany it with the complete corresponding machine-readable source code, which must
be distributed under the terms of Sections 1 and 2 above on a medium customarily used for
software interchange.
If distribution of object code is made by o ering access to copy from a designated place,
then o ering equivalent access to copy the source code from the same place satisfi es the
requirement to distribute the source code, even though third parties are not compelled to
copy the source along with the object code.
6. A program that contains no derivative of any portion of the Library, but is designed to work
with the Library by being compiled or linked with it, is called a “work that uses the Library”.
Such a work, in isolation, is not a derivative work of the Library, and therefore falls outside the
scope of this License.
However, linking a “work that uses the Library” with the Library creates an executable that
is a derivative of the Library (because it contains portions of the Library), rather than a “work
that uses the library”. The executable is therefore covered by this License. Section 6 states
terms for distribution of such executables.
When a “work that uses the Library” uses material from a header fi le that is part of the
82_ appendix
WF455AG-03159A-04_EN.indd Sec8:82WF455AG-03159A-04_EN.indd Sec8:82 2012-11-28 2:07:452012-11-28 2:07:45
Page 83

Library, the object code for the work may be a derivative work of the Library even though
the source code is not. Whether this is true is especially signifi cant if the work can be linked
without the Library, or if the work is itself a library. The threshold for this to be true is not
precisely defi ned by law.
If such an object fi le uses only numerical parameters, data structure layouts and accessors,
and small macros and small inline functions (ten lines or less in length), then the use of the
object fi le is unrestricted, regardless of whether it is legally a derivative work. (Executables
containing this object code plus portions of the Library will still fall under Section 6.)
Otherwise, if the work is a derivative of the Library, you may distribute the object code for
the work under the terms of Section 6. Any executables containing that work also fall under
Section 6, whether or not they are linked directly with the Library itself.
7. As an exception to the Sections above, you may also combine or link a “work that uses the
Library” with the Library to produce a work containing portions of the Library, and distribute
that work under terms of your choice, provided that the terms permit modifi cation of the work
for the customer’s own use and reverse engineering for debugging such modifi cations.
You must give prominent notice with each copy of the work that the Library is used in it
and that the Library and its use are covered by this License. You must supply a copy of
this License. If the work during execution displays copyright notices, you must include the
copyright notice for the Library among them, as well as a reference directing the user to the
copy of this License. Also, you must do one of these things:
1) Accompany the work wi th the complet e corresponding machine-readable source
code for the Library including whatever changes were used in the work (which must be
distributed under Sections 1 and 2 above); and, if the work is an executable linked with
the Library, with the complete machine-readable “work that uses the Library”, as object
code and/or source code, so that the user can modify the Library and then relink to
produce a modifi ed executable containing the modifi ed Library. (It is understood that the
user who changes the contents of defi nitions fi les in the Library will not necessarily be
able to recompile the application to use the modifi ed defi nitions.)
2) Use a suitable shared library mechanism for linking with the Library. A suitable
mechanism is one that (1) uses at run time a copy of the library already present on the
user’s computer system, rather than copying library functions into the executable, and (2)
will operate properly with a modifi ed version of the library, if the user installs one, as long
as the modifi ed version is interfacecompatible with the version that the work was made
with.
3) Accompany the work with a written o er, valid for at least three years, to give the same
user the materials specifi ed in Subsection 6a, above, for a charge no more than the cost
of performing this distribution.
4) If distribution of the work is made by o ering access to copy from a designated place,
o er equivalent access to copy the above specifi ed materials from the same place.
5) Verify that the user has already received a copy of these materials or that you have
already sent this user a copy.
For an executable, the required form of the “work that uses the Library” must include any
data and utility programs needed for reproducing the executable from it. However, as a
special exception, the materials to be distributed need not include anything that is normally
distributed (in either source or binary form) with the major components (compiler, kernel, and
so on) of the operating system on which the executable runs, unless that component itself
accompanies the executable.
It may happen that this requirement contradicts the license restrictions of other proprietary
libraries that do not normally accompany the operating system. Such a contradiction means
you cannot use both them and the Library together in an executable that you distribute.
8. You may place library facilities that are a work based on the Library side-by-side in a single
library together with other library facilities not covered by this License, and distribute such
a combined library, provided that the separate distribution of the work based on the Library
06 appendix
appendix _83
WF455AG-03159A-04_EN.indd Sec8:83WF455AG-03159A-04_EN.indd Sec8:83 2012-11-28 2:07:452012-11-28 2:07:45
Page 84

appendix
and of the other library facilities is otherwise permitted, and provided that you do these two
things:
1) Accompany the combined library with a copy of the same work based on the Library,
uncombined with any other library facilities. This must be distributed under the terms of
the Sections above.
2) Give prominent notice with the combined library of the fact that part of it is a work based
on the Library, and explaining where to fi nd the accompanying uncombined form of the
same work.
9. You may not copy, modify, sublicense, link with, or distribute the Library except as expressly
provided under this License. Any attempt otherwise to copy, modify, sublicense, link with, or
distribute the Library is void, and will automatically terminate your rights under this License.
However, parties who have received copies, or rights, from you under this License will not
have their licenses terminated so long as such parties remain in full compliance.
10. You are not required to accept this License, since you have not signed it. However, nothing
else grants you permission to modify or distribute the Library or its derivative works. These
actions are prohibited by law if you do not accept this License. Therefore, by modifying or
distributing the Library (or any work based on the Library), you indicate your acceptance of
this License to do so, and all its terms and conditions for copying, distributing or modifying
the Library or works based on it.
11. Each time you redistribute the Library (or any work based on the Library), the recipient
automatically receives a license from the original licensor to copy, distribute, link with or
modify the Library subject to these terms and conditions. You may not impose any further
restrictions on the recipients’ exercise of the rights granted herein. You are not responsible for
enforcing compliance by third parties with this License.
12. If, as a consequence of a court judgment or allegation of patent infringement or for any
other reason (not limited to patent issues), conditions are imposed on you (whether by
court order, agreement or otherwise) that contradict the conditions of this License, they do
not excuse you from the conditions of this License. If you cannot distribute so as to satisfy
simultaneously your obligations under this License and any other pertinent obligations, then
as a consequence you may not distribute the Library at all. For example, if a patent license
would not permit royalty-free redistribution of the Library by all those who receive copies
directly or indirectly through you, then the only way you could satisfy both it and this License
would be to refrain entirely from distribution of the Library.
If any portion of this section is held invalid or unenforceable under any particular
circumstance, the balance of the section is intended to apply, and the section as a whole is
intended to apply in other circumstances.
It is not the purpose of this section to induce you to infringe any patents or other property
right claims or to contest validity of any such claims; this section has the sole purpose of
protecting the integrity of the free software distribution system which is implemented by
public license practices.
Many people have made generous contributions to the wide range of software distributed
through that system in reliance on consistent application of that system; it is up to the author/
donor to decide if he or she is willing to distribute software through any other system and a
licensee cannot impose that choice.
This section is intended to make thoroughly clear what is believed to be a consequence of
the rest of this License.
13. If the distribution and/or use of the Library is restricted in certain countries either by patents
or by copyrighted interfaces, the original copyright holder who places the Library under this
License may add an explicit geographical distribution limitation excluding those countries, so
that distribution is permitted only in or among countries not thus excluded. In such case, this
License incorporates the limitation as if written in the body of this License.
14. The Free Software Foundation may publish revised and/or new versions of the Lesser
General Public License from time to time. Such new versions will be similar in spirit to the
84_ appendix
WF455AG-03159A-04_EN.indd Sec8:84WF455AG-03159A-04_EN.indd Sec8:84 2012-11-28 2:07:452012-11-28 2:07:45
Page 85

present version, but may di er in detail to address new problems or concerns.
Each version is given a distinguishing version number.
If the Library specifi es a version number of this License which applies to it and “any later
version”, you have the option of following the terms and conditions either of that version or of
any later version published by the Free Software Foundation. If the Library does not specify
a license version number, you may choose any version ever published by the Free Software
Foundation.
15. If you wish to incorporate parts of the Library into other free programs whose distribution
conditions are incompatible with these, write to the author to ask for permission. For software
which is copyrighted by the Free Software Foundation, write to the Free Software Foundation;
we sometimes make exceptions for this. Our decision will be guided by the two goals of
preserving the free status of all derivatives of our free software and of promoting the sharing
and reuse of software generally.
NO WARRANTY
16. BECAUSE THE LIBRARY IS LICENSED FREE OF CHARGE, THERE IS NO WARRANTY
FOR THE LIBRARY, TO THE EXTENT PERMITTED BY APPLICABLE LAW. EXCEPT
WHEN OTHERWISE STATED IN WRITING THE COPYRIGHT HOLDERS AND/OR OTHER
PARTIES PROVIDE THE LIBRARY “AS IS” WITHOUT WARRANTY OF ANY KIND, EITHER
EXPRESSED OR IMPLIED, INCLUDING, BUT NOT LIMITED TO, THE IMPLIED WARRANTIES
OF MERCHANTABILITY AND FITNESS FOR A PARTICULAR PURPOSE. THE ENTIRE RISK
AS TO THE QUALITY AND PERFORMANCE OF THE LIBRARY IS WITH YOU. SHOULD THE
LIBRARY PROVE DEFECTIVE, YOU ASSUME THE COST OF ALL NECESSARY SERVICING,
REPAIR OR CORRECTION.
17. IN NO EVENT UNLESS REQUIRED BY APPLICABLE LAW OR AGREED TO IN WRI T ING
WI L L ANY COPYRIGHT HOLDER, OR ANY OTHER PARTY WHO MAY MODIFY AND/
OR REDISTRIBUTE THE LIBRARY AS PERMITTED ABOVE, BE LIABLE TO YOU FOR
DAMAGES, INCLUDING ANY GENERAL, SPECIAL, INCIDENTAL OR CONSEQUENTIAL
DAMAGES ARISING OUT OF THE USE OR INABILITY TO USE THE LIBRARY (INCLUDING
BUT NOT LIMITED TO LOSS OF DATA OR DATA BEING RENDERED INACCURATE OR
LOSSES SUSTAINED BY YOU OR THIRD PARTIES OR A FAILURE OF THE LIBRARY TO
OPERATE WITH ANY OTHER SOFTWARE), EVEN IF SUCH HOLDER OR OTHER PARTY
HAS BEEN ADVISED OF THE POSSIBILITY OF SUCH DAMAGES.
06 appendix
END OF TERMS AND CONDITIONS
How to Apply These Terms to Your New Libraries If you develop a new library, and you want
it to be of the greatest possible use to the public, we recommend making it free software that
everyone can redistribute and change. You can do so by permitting redistribution under these
terms (or, alternatively, under the terms of the ordinary General Public License).
To apply these terms, attach the following notices to the library. It is safest to attach them to the
start of each source fi le to most e ectively convey the exclusion of warranty; and each fi le should
have at least the “copyright” line and a pointer to where the full notice is found.
one line to give the library’s name and an idea of what it does.
Copyright (C) year name of author
This library is free software; you can redistribute it and/or modify it under the terms of the GNU
Lesser General Public License as published by the Free Software Foundation; either version 2.1
of the License, or (at your option) any later version.
This library is distributed in the hope that it will be useful, but WITHOUT ANY WARRANTY;
without even the implied warranty of MERCHANTABILITY or FITNESS FOR A PARTICULAR
PURPOSE. See the GNU
appendix _85
WF455AG-03159A-04_EN.indd Sec8:85WF455AG-03159A-04_EN.indd Sec8:85 2012-11-28 2:07:452012-11-28 2:07:45
Page 86

appendix
Lesser General Public License for more details.
You should have received a copy of the GNU Lesser General Public License along with this
library; if not, write to the Free Software Foundation, Inc., 51 Franklin Street, Fifth Floor, Boston,
MA 02110-1301 USA Also add information on how to contact you by electronic and paper mail.
You should also get your employer (if you work as a programmer) or your school, if any, to sign a
“copyright disclaimer” for the library, if necessary. Here is a sample; alter the names: Yoyodyne,
Inc., hereby disclaims all copyright interest in the library `Frob’ (a library for tweaking knobs)
written by James Random Hacker.
signature of Ty Coon, 1 April 1990
Ty Coon, President of Vice
That’s all there is to it!
BSD LICENSE
fl ex: the fast lexical analyser
Copyright (c) 2001, 2002, 2003, 2004, 2005, 2006, 2007
The Flex Project.
Copyright (c) 1990, 1997 The Regents of the University of California. All rights reserved.
LibNet License
Copyright (c) 1998 - 2001 Mike D. Schi man <mike@infonexus.com>
PPP/ Debian
Copyright (c) 1989 Regents of the University of California. All rights reserved.
Redistribution and use in source and binary forms, with or without modifi cation, are permitted provided that
the following conditions are met:
1. Redistributions of source code must retain the above copyright notice, this list of conditions and the
following disclaimer.
2. Redistributions in binary form must reproduce the above copyright notice, this list of conditions and the
following disclaimer in the documentation and/or other materials provided with the distribution.
3. Neither the name of the <organization> nor the names of its contributors may be used to endorse or
promote products derived from this software without specifi c prior written permission.
THIS SOFTWARE IS PROVIDED BY THE COPYRIGHT HOLDERS AND CONTRIBUTORS “AS IS” AND ANY
EXPRESS OR IMPLIED WARRANTIES, INCLUDING, BUT NOT LIMITED TO, THE IMPLIED WARRANTIES
OF MERCHANTABILITY AND FITNESS FOR A PARTICULAR PURPOSE ARE DISCLAIMED. IN NO EVENT
SHALL <COPYRIGHT HOLDER> BE LIABLE FOR ANY DIRECT, INDIRECT, INCIDENTAL, SPECIAL,
EXEMPLARY, OR CONSEQUENTIAL DAMAGES ( INCLUDING, BUT NOT LIMITED TO, PROCUREMENT
OF SUBSTITUTE GOODS OR SERVICES; LOSS OF USE, DATA, OR PROFITS; OR BUSINESS
INTERRUPTION) HOWEVER CAUSED AND ON ANY THEORY OF LIABILITY, WHETHER IN CONTRACT,
STRICT LIABILITY, OR TORT (INCLUDING NEGLIGENCE OR OTHERWISE) ARISING IN ANY WAY OUT OF
THE USE OF THIS SOFTWARE, EVEN IF ADVISED OF THE POSSIBILITY OF SUCH DAMAGE.
86_ appendix
WF455AG-03159A-04_EN.indd Sec8:86WF455AG-03159A-04_EN.indd Sec8:86 2012-11-28 2:07:452012-11-28 2:07:45
Page 87

OPENSSL
This product includes software developed by the OpenSSL Project for use in the OpenSSL Toolkit. (http://
www.openssl.org/)
This product includes cryptographic software written by Eric Young (eay@cryptsoft.com)
LICENSE ISSUES
=====================================================================
The OpenSSL toolkit stays under a dual license, i.e. both the conditions of the OpenSSL License
and the original SSLeay license apply to the toolkit. See below for the actual license texts.
Actually both licenses are BSD-style Open Source licenses. In case of any license issues related
to OpenSSL please contact openssl-core@openssl.org.
OpenSSL License
=====================================================================
Copyright (c) 1998-2008 The OpenSSL Project. All rights reserved.
Redistribution and use in source and binary forms, with or without modifi cation, are permitted
provided that the following conditions are met:
1. Redistributions of source code must retain the above copyright notice, this list of conditions
and the following disclaimer.
2. Redistributions in binary form must reproduce the above copyright notice, this list of
conditions and the following disclaimer in the documentation and/or other materials provided
with the distribution.
3. All advertising materials mentioning features or use of this software must display the following
acknowledgment: “This product includes software developed by the OpenSSL Project for
use in the OpenSSL Toolkit. (http://www.openssl.org/)”
4. The names “OpenSSL Toolkit” and “OpenSSL Project” must not be used to endorse or
promote products derived from this software without prior written permission. For written
permission, please contact openssl-core@openssl.org.
5. Products derived from this software may not be called “OpenSSL” nor may “OpenSSL”
appear in their names without prior written permission of the OpenSSL Project.
6. Redistributions of any form whatsoever must retain the following acknowledgment:
“This product includes software developed by the OpenSSL Project for use in the OpenSSL
Toolkit (http://www.openssl.org/)”
THIS SOFTWARE IS PROVIDED BY THE OpenSSL PROJECT “AS IS” AND ANY EXPRESSED
OR IMPLIED WARRANTIES, INCLUDING, BUT NOT LIMITED TO, THE IMPLIED WARRANTIES
OF MERCHANTABILITY AND FITNESS FOR A PARTICULAR PURPOSE ARE DISCLAIMED.
IN NO EVENT SHALL THE OpenSSL PROJECT OR ITS CONTRIBUTORS BE LIABLE FOR
ANY DIRECT, INDIRECT, INCIDENTAL, SPECIAL, EXEMPLARY, OR CONSEQUENTIAL
DAMAGES (INCLUDING, BUT NOT LIMITED TO, PROCUREMENT OF SUBSTITUTE GOODS OR
SERVICES; LOSS OF USE, DATA, OR PROFITS; OR BUSINESS INTERRUPTION) HOWEVER
CAUSED AND ON ANY THEORY OF LIABILITY, WHETHER IN CONTRACT, STRICT LIABILITY,
OR TORT (INCLUDING NEGLIGENCE OR OTHERWISE) ARISING IN ANY WAY OUT OF THE
USE OF THIS SOFTWARE, EVEN IF ADVISED OF THE POSSIBILITY OF SUCH DAMAGE.
=====================================================================
This product includes cryptographic software written by Eric Young (eay@cryptsoft.com). This
product includes software written by Tim Hudson (tjh@cryptsoft.com).
06 appendix
appendix _87
WF455AG-03159A-04_EN.indd Sec8:87WF455AG-03159A-04_EN.indd Sec8:87 2012-11-28 2:07:452012-11-28 2:07:45
Page 88

warranty (U.S.A)
WARRANTY
SAMSUNG WASHER
LIMITED WARRANTY TO ORIGINAL PURCHASER
This SAMSUNG brand product, as supplied and distributed by SAMSUNG ELECTRONICS AMERICA, INC.
(SAMSUNG) and delivered new, in the original carton to the original consumer purchaser, is warranted by
SAMSUNG against manufacturing defects in materials and workmanship for a limited warranty period of:
One (1) year part and labor, Two (2) years Control Board Parts, Three (3) years stainless tub part, Ten (10)
years washing motor part
This limited warranty begins on the original date of purchase, and is valid only on products purchased and
used in the United States. To receive warranty service, the purchaser must contact SAMSUNG for problem
determination and service procedures. Warranty service can only be performed by a SAMSUNG authorized
service center. The original dated bill of sale must be presented upon request as proof of purchase to
SAMSUNG or SAMSUNG’s authorized service center. SAMSUNG will provide in-home service during the
warranty period at no charge, subject to availability within the contiguous United States. In-home service is
not available in all areas.
To receive in-home service, product must be unobstructed and accessible to the service agent. If service
is not available, SAMSUNG may elect to provide transportation of the product to and from an authorized
service center.
SAMSUNG will repair, replace, or refund this product at our option and at no charge as stipulated herein,
with new or reconditioned parts or products if found to be defective during the limited warranty period
specified above. All replaced parts and products become the property of SAMSUNG and must be returned
to SAMSUNG. Replacement parts and products assume the remaining original warranty, or ninety (90)
days, whichever is longer.This limited warranty covers manufacturing defects in materials and workmanship
encountered in normal, noncommercial use of this product and shall not apply to the following: damage
that occurs in shipment; delivery and installation; applications and uses for which this product was not
intended; altered product or serial numbers; cosmetic damage or exterior finish; accidents, abuse, neglect,
fire, water, lightning, or other acts of nature or God; use of products, equipment, systems, utilities, services,
parts, supplies, accessories, applications, installations, repairs, external wiring or connectors not supplied
or authorized by SAMSUNG that damage this product or result in service problems; incorrect electrical
line voltage, fluctuations and surges; customer adjustments and failure to follow operating instructions,
maintenance and environmental instructions that are covered and prescribed in the instruction book;
product removal and reinstallation; problems caused by pest infestations. This limited warranty does not
cover problems resulting from incorrect electric current, voltage or supply, light bulbs, house fuses, house
wiring, cost of a service call for instructions, or fixing installation errors. SAMSUNG does not warrant
uninterrupted or error-free operation of the product.
88_ warranty
WF455AG-03159A-04_EN.indd Sec10:88WF455AG-03159A-04_EN.indd Sec10:88 2012-11-28 2:07:452012-11-28 2:07:45
Page 89

EXCEPT AS SET FORTH HEREIN, THERE ARE NO WARRANTIES ON THIS PRODUCT EITHER EXPRESS
OR IMPLIED, AND SAMSUNG DISCLAIMS ALL WARRANTIES INCLUDING, BUT NOT LIMITED TO, ANY
IMPLIED WARRANTIES OF MERCHANTABILITY, INFRINGEMENT OR FITNESS FOR A PARTICULAR
PURPOSE.
NO WARRANTY OR GUARANTEE GIVEN BY ANY PERSON, FIRM, OR CORPORATION WITH RESPECT
TO THIS PRODUCT SHALL BE BINDING ON SAMSUNG. SAMSUNG SHALL NOT BE LIABLE FOR LOSS
OF REVENUE OR PROFITS, FAILURE TO REALIZE SAVINGS OR OTHER BENEFITS, OR ANY OTHER
SPECIAL, INCIDENTAL OR CONSEQUENTIAL DAMAGES CAUSED BY THE USE, MISUSE, OR INABILITY
TO USE THIS PRODUCT, REGARDLESS OF THE LEGAL THEORY ON WHICH THE CLAIM IS BASED,
AND EVEN IF SAMSUNG HAS BEEN ADVISED OF THE POSSIBILITY OF SUCH DAMAGES.
NOR SHALL RECOVERY OF ANY KIND AGAINST SAMSUNG BE GREATER IN AMOUNT THAN THE
PURCHASE PRICE OF THE PRODUCT SOLD BY SAMSUNG AND CAUSING THE ALLEGED DAMAGE.
WITHOUT LIMITING THE FOREGOING, PURCHASER ASSUMES ALL RISK AND LIABILITY FOR LOSS,
DAMAGE, OR INJURY TO PURCHASER AND PURCHASER’S PROPERTY AND TO OTHERS AND THEIR
PROPERTY ARISING OUT OF THE USE, MISUSE, OR INABILITY TO USE THIS PRODUCT. THIS LIMITED
WARRANTY SHALL NOT EXTEND TO ANYONE OTHER THAN THE ORIGINAL PURCHASER OF THIS
PRODUCT, IS NONTRANSFERABLE AND STATES YOUR EXCLUSIVE REMEDY.
Some states do not allow limitations on how long an implied warranty lasts, or the exclusion or limitation
of incidental or consequential damages, so the above limitations or exclusions may not apply to you. This
warranty gives you specific rights, and you may also have other rights, which vary from state to state.
To obtain warranty service, please contact SAMSUNG at:
SAMSUNG ELECTRONICS AMERICA, INC.
85 CHALLENGER ROAD RIDGEFIELD PARK, NJ 07660
1-800-SAMSUNG(726-7864)
www.samsung.com
Visits by a Service Engineer to explain functions, maintenance or installation is not covered by warranty.
Please contact your Samsung call agent for help with any of these issues.
warranty _89
WF455AG-03159A-04_EN.indd Sec10:89WF455AG-03159A-04_EN.indd Sec10:89 2012-11-28 2:07:452012-11-28 2:07:45
Page 90

warranty(CANADA)
SAMSUNG WASHER
LIMITED WARRANTY TO ORIGINAL PURCHASER
This SAMSUNG brand product, as supplied and distributed by SAMSUNG ELECTRONICS CANADA, INC.
(SAMSUNG) and delivered new, in the original carton to the original consumer purchaser, is warranted by
SAMSUNG against manufacturing defects in materials and workmanship for a limited warranty period of:
One (1) year part and labor, Ten (10) years washing motor part
This limited warranty begins on the original date of purchase, and is valid only on products purchased
and used in the Canada. To receive warranty service, the purchaser must contact SAMSUNG for problem
determination and service procedures. Warranty service can only be performed by a SAMSUNG authorized
service center. The original dated bill of sale must be presented upon request as proof of purchase to
SAMSUNG or SAMSUNG’s authorized service center. SAMSUNG will provide in-home service during the
warranty period at no charge, subject to availability within the Canada. In-home service is not available in all
areas.
To receive in-home service, product must be unobstructed and accessible to the service agent. If service
is not available, SAMSUNG may elect to provide transportation of the product to and from an authorized
service center.
SAMSUNG will repair, replace, or refund this product at our option and at no charge as stipulated herein,
with new or reconditioned parts or products if found to be defective during the limited warranty period
specified above. All replaced parts and products become the property of SAMSUNG and must be returned
to SAMSUNG. Replacement parts and products assume the remaining original warranty, or ninety (90)
days, whichever is longer.This limited warranty covers manufacturing defects in materials and workmanship
encountered in normal, noncommercial use of this product and shall not apply to the following: damage
that occurs in shipment; delivery and installation; applications and uses for which this product was not
intended; altered product or serial numbers; cosmetic damage or exterior finish; accidents, abuse, neglect,
fire, water, lightning, or other acts of nature or God; use of products, equipment, systems, utilities, services,
parts, supplies, accessories, applications, installations, repairs, external wiring or connectors not supplied
or authorized by SAMSUNG that damage this product or result in service problems; incorrect electrical
line voltage, fluctuations and surges; customer adjustments and failure to follow operating instructions,
maintenance and environmental instructions that are covered and prescribed in the instruction book;
product removal and reinstallation; problems caused by pest infestations. This limited warranty does not
cover problems resulting from incorrect electric current, voltage or supply, light bulbs, house fuses, house
wiring, cost of a service call for instructions, or fixing installation errors. SAMSUNG does not warrant
uninterrupted or error-free operation of the product.
90_ warranty
WF455AG-03159A-04_EN.indd Sec10:90WF455AG-03159A-04_EN.indd Sec10:90 2012-11-28 2:07:462012-11-28 2:07:46
Page 91

EXCEPT AS SET FORTH HEREIN, THERE ARE NO WARRANTIES ON THIS PRODUCT EITHER EXPRESS
OR IMPLIED, AND SAMSUNG DISCLAIMS ALL WARRANTIES INCLUDING, BUT NOT LIMITED TO, ANY
IMPLIED WARRANTIES OF MERCHANTABILITY, INFRINGEMENT OR FITNESS FOR A PARTICULAR
PURPOSE.
NO WARRANTY OR GUARANTEE GIVEN BY ANY PERSON, FIRM, OR CORPORATION WITH RESPECT
TO THIS PRODUCT SHALL BE BINDING ON SAMSUNG. SAMSUNG SHALL NOT BE LIABLE FOR LOSS
OF REVENUE OR PROFITS, FAILURE TO REALIZE SAVINGS OR OTHER BENEFITS, OR ANY OTHER
SPECIAL, INCIDENTAL OR CONSEQUENTIAL DAMAGES CAUSED BY THE USE, MISUSE, OR INABILITY
TO USE THIS PRODUCT, REGARDLESS OF THE LEGAL THEORY ON WHICH THE CLAIM IS BASED,
AND EVEN IF SAMSUNG HAS BEEN ADVISED OF THE POSSIBILITY OF SUCH DAMAGES.
NOR SHALL RECOVERY OF ANY KIND AGAINST SAMSUNG BE GREATER IN AMOUNT THAN THE
PURCHASE PRICE OF THE PRODUCT SOLD BY SAMSUNG AND CAUSING THE ALLEGED DAMAGE.
WITHOUT LIMITING THE FOREGOING, PURCHASER ASSUMES ALL RISK AND LIABILITY FOR LOSS,
DAMAGE, OR INJURY TO PURCHASER AND PURCHASER’S PROPERTY AND TO OTHERS AND THEIR
PROPERTY ARISING OUT OF THE USE, MISUSE, OR INABILITY TO USE THIS PRODUCT. THIS LIMITED
WARRANTY SHALL NOT EXTEND TO ANYONE OTHER THAN THE ORIGINAL PURCHASER OF THIS
PRODUCT, IS NONTRANSFERABLE AND STATES YOUR EXCLUSIVE REMEDY.
Some provinces do not allow limitations on how long an implied warranty lasts, or the exclusion or limitation
of incidental or consequential damages, so the above limitations or exclusions may not apply to you.
This warranty gives you specific rights, and you may also have other rights, which vary from province to
province.
To obtain warranty service, please contact SAMSUNG at:
Samsung Electronics Canada Inc.,
Customer Service 55 Standish Court Mississauga, Ontario L5R 4B2 Canada
1-800-SAMSUNG (726-7864)
www.samsung.com/ca (English)
www.samsung.com/ca_fr (French)
Visits by a Service Engineer to explain functions, maintenance or installation is not covered by warranty.
Please contact your Samsung call agent for help with any of these issues.
warranty _91
WF455AG-03159A-04_EN.indd Sec10:91WF455AG-03159A-04_EN.indd Sec10:91 2012-11-28 2:07:462012-11-28 2:07:46
Page 92

QUESTIONS OR COMMENTS?
COUNTRY CALL OR VISIT US ONLINE AT
U.S.A 1-800-SAMSUNG(726-7864) www.samsung.com
MEXICO 01-800-SAMSUNG(726-7864) www.samsung.com
CANADA 1-800-SAMSUNG(726-7864)
Visits by a Service Engineer to explain functions, maintenance or installation is not covered by warranty.
Please contact your Samsung call agent for help with any of these issues.
WF455AG-03159A-04_EN.indd Sec10:92WF455AG-03159A-04_EN.indd Sec10:92 2012-11-28 2:07:462012-11-28 2:07:46
www.samsung.com/ca (English)
www.samsung.com/ca_fr (French)
Code No. DC68-03159A-04_EN
Page 93

Lave-linge
manuel d'utilisation
WF455ARG*
Ce manuel a été imprimé sur du papier 100% recyclé.
Un monde de possibilités
Nous vous remercions d'avoir choisi ce produit
Samsung.
Si vous souhaitez recevoir un service plus complet
ou des accessoires, enregistrez votre produit à
l'adresse ci-dessous ou contactez
www.samsung.com/register
1-800-SAMSUNG (726-7864)
WF455AG-03159A-04_CFR.indd 1WF455AG-03159A-04_CFR.indd 1 2012-11-28 2:08:102012-11-28 2:08:10
Page 94

caractéristiques principales de
votre nouveau lave-linge Smart
PowerFoam™
1. VRT PLUS™ (Vibration Reduction Technology - Système de
réduction des vibrations)
Ce lave-linge Samsung permet de réduire le bruit et les vibrations grâce à ses capteurs de
vibrations 3D et sa technologie de commande intelligente, son fonctionnement est donc
plus silencieux.
2. Tambour grande capacité
Le lave-linge Samsung très grande capacité permet de laver un jeu de draps complet,
une couette « King Size » (grande taille) ou 32 serviettes de bain en un seul chargement.
Résultat : vous économisez du temps, de l'argent, de l'eau et de l'électricité.
3. PowerFoam™
Le système PowerFoam de Samsung permet d'obtenir encore plus de propreté tout en
protégeant vos tissus les plus fragiles. PowerFoam permet de distribuer de façon équitable
la lessive et de pénétrer les tissus en profondeur et plus rapidement.
4. PureCycle™ (programme de nettoyage du tambour)
Nettoyez le tambour avec un seul bouton ! Le programme Pure Cycle a été conçu
spécialement pour éliminer les résidus de lessive et la saleté accumulés dans le tambour, le
diaphragme et le hublot en verre sans ajouter de nettoyant chimique spécial.
5. SpeedSpray™
La nouvelle technologie Speed Spray de Samsung vous économise jusqu'à 25% du temps
lorsque vous effectuez une lessive en raccourcissant les temps de lavage tout en conservant
tous les cycles du procédé de lavage et en garantissant la propreté de votre linge.
*Basé sur des charges de 8 livres (4 kg), cycle Normal (Niveau de salissure Normal sans
aucune option), sur les lave-linge à chargement frontal Samsung 4.3 cu.ft (120 litres)
précédents et existants livrés jusqu'en 2011 sans la fonction Speed Spray.
**Speed Spray effectue les cycles Normal, Literie Plus, VAPEURS PROF., Anti-tache et
Éco-Froid et le temps économisé peut varier selon les cycles, les diverses charges et les
compositions d'options.
6. Vapeurs intensives
La fonction Deep Steam (Vapeurs intensives) renforce les performances de lavage et
élimine efficacement les taches ; les résultats sont spectaculaires.
7. Smart Control
La technologie innovante Smart Control de Samsung vous permet de commander votre
lave-linge à l'aide de technologies personnelles telles que des smartphones. Vous n'avez
pas besoin d'attendre jusqu'à ce que le programme se termine. Le Smart Control vous
permet de surveiller la progression du lavage et vous informe lorsque le programme est
terminé.
8. Smart Care (Entretien intelligent).
La fonction Samsung Smart Care, un système de surveillance des erreurs automatique,
détecte et diagnostique les problèmes dès qu'ils surviennent et offre une solution simple et
rapide. Avec la technologie innovante Smart Control, vous pouvez également être alerté via
votre smartphone lorsqu'un problème survient.
2_ caractéristiques principales de votre nouveau lave-linge Smart PowerFoam™
WF455AG-03159A-04_CFR.indd Sec9:2WF455AG-03159A-04_CFR.indd Sec9:2 2012-11-28 2:08:152012-11-28 2:08:15
Page 95

9. Design élégant
Le design élégant de ce lave-linge se fond à merveille dans votre environnement.
10. Affichage numérique et molette centrale
La molette centrale permet de sélectionner facilement des programmes dans les deux
sens et l’affichage est simple à utiliser et à comprendre.
11. Moteur à entraînement direct
La puissance absolue ! Notre moteur inverseur à entraînement direct génère la puissance
directement dans le tambour à partir d'un moteur réversible à vitesse variable. Un moteur
à entraînement direct sans courroie génère une vitesse d'essorage plus élevée de 1 300 tr/
min afin d'offrir un fonctionnement plus silencieux et efficace. Le lave-linge dispose
également de moins de pièces mobiles, ce qui signifie moins de réparations.
12. Stérilisation
Lorsque vous sélectionnez ce programme, l'eau chauffe jusqu'à atteindre une
température extrêmement élevée, de manière à éliminer 99,9% des bactéries que l'on
trouve typiquement dans les vêtements, la literie ou le linge de toilette. Cette procédure
de certification est dirigée par NSF International, un organisme indépendant d'essais et
d'homologation.
Veuillez consulter l’étiquette d’entretien de vos vêtements afin d’éviter tout dommage.
Seuls les programmes de stérilisation ont été conçus de manière à répondre aux
exigences imposées par le protocole d'efficacité de la stérilisation.
Protocole NSF P172
Performance de stérilisation de lave-linge
domestiques et industriels de taille familiale
13. Socle avec tiroirs de stockage (N° de modèle :
Un socle de 15" (38 cm) est disponible en option (lave-linge) pour un remplissage et un
retrait plus faciles.
Il offre également un tiroir de rangement pouvant contenir un baril de lessive de 3 litres.
WE357*
)
14. Superposition (N° de modèle : SK-5A/XAA)
Les lave-linge et sèche-linge Samsung peuvent être superposés afin d'optimiser l'espace
utilisable. Un kit de superposition est disponible en option auprès de votre revendeur
Samsung.
<Support avec tiroirs de stockage> <Superposition>
caractéristiques principales de votre nouveau lave-linge Smart PowerFoam™ _3
WF455AG-03159A-04_CFR.indd Sec9:3WF455AG-03159A-04_CFR.indd Sec9:3 2012-11-28 2:08:152012-11-28 2:08:15
Page 96

consignes de sécurité
Félicitations pour l'achat de votre nouveau lave-linge Samsung. Ce manuel contient
de précieuses informations concernant l'installation, l'utilisation et l'entretien de
votre appareil. Prenez le temps de le lire afi n de tirer pleinement profi t de toutes les
fonctionnalités qu'o re votre lave-linge.
CE QUE VOUS DEVEZ CONNAÎTRE CONCERNANT LES
INSTRUCTIONS DE SÉCURITÉ
Les consignes de sécurité et les avertissements décrits dans ce manuel ne sont pas exhaustifs. Il est de
votre responsabilité de faire preuve de bon sens, de prudence et de discernement lors de l'installation, de
l'entretien ou de l'utilisation de votre lave-linge.
SYMBOLES ET PRÉCAUTIONS DE SÉCURITÉ IMPORTANTS
Signifi cation des icônes et signes repris dans ce manuel d'utilisation:
Risques ou pratiques inadaptées susceptibles de causer des blessures
graves voire mortelles.
AVERTISSEMENT
ATTENTION
Pour réduire le risque d'incendie, d'explosion, d'électrocution ou de
blessure lors de l'utilisation de votre lave-linge, observez les consignes
élémentaires de sécurité suivantes:
Risques ou pratiques inadaptées susceptibles de causer des blessures
moins importantes ou des dommages matériels.
NE PAS faire.
NE PAS démonter.
NE PAS toucher.
Suivre attentivement les instructions.
Débrancher la prise murale.
S'assurer que l'appareil est relié à la terre afi n d'éviter tout choc
électrique.
Contacter le service d'assistance technique pour obtenir de l'aide.
Remarque
Ces symboles d'avertissement ont pour but d'éviter tout risque de blessure corporelle.
Respectez-les en toutes circonstances.
Lisez attentivement la section Consignes de sécurité de ce manuel et conservez ce
dernier en lieu sûr afi n de pouvoir le consulter ultérieurement.
CONSERVEZ SOIGNEUSEMENT CES CONSIGNES
4_ consignes de sécurité
WF455AG-03159A-04_CFR.indd Sec1:4WF455AG-03159A-04_CFR.indd Sec1:4 2012-11-28 2:08:162012-11-28 2:08:16
Page 97

AVERTISSEMENT
AVERTISSEMENT
Afi n de réduire les risques d'incendie, d'électrocution ou de blessures physiques lors de
l'utilisation de l'appareil, des précautions de base doivent être prises:
1. Lisez attentivement toutes les consignes avant d'utiliser l'appareil.
2. Ne lavez et ne faites sécher aucun article ayant été en contact de quelque manière que ce
soit (nettoyage, lavage, immersion ou tache) avec de l'essence, des solvants de nettoyage à
sec ou toute autre substance infl ammable ou explosive. Ces substances dégagent en e et
des vapeurs qui risquent de s'enfl ammer ou d'exploser.
3. Ne laissez pas les enfants jouer sur ou dans l'appareil. Une surveillance attentive s'impose
lorsque l'appareil est utilisé à proximité d'enfants.
4. Avant la mise hors service ou au rebut de l'appareil, retirez le hublot du compartiment de
lavage ou de séchage.
5. Ne tentez pas d'ouvrir l'appareil lorsque le tambour est en mouvement.
6. N'installez et n'entreposez jamais cet appareil dans un endroit exposé aux intempéries.
7. Ne jouez pas avec les commandes internes de l'appareil.
8. Ne procédez pas à la réparation ou au remplacement des pièces de l'appareil et ne tentez
pas non plus de le réparer vous-même, sauf si le manuel d'entretien ou de réparation
contient des recommandations spécifi ques en la matière que vous comprenez et êtes en
mesure d'exécuter.
9. N'ajoutez jamais d'essence, de solvant de nettoyage à sec ou d'autres substances
infl ammables ou explosives dans l'eau du lave-linge. Ces substances dégagent en e et des
vapeurs qui risquent de s'enfl ammer ou d'exploser.
10. Dans certaines conditions, de l'hydrogène peut s'accumuler dans les systèmes de
production d'eau chaude qui n'ont pas été utilisés depuis au moins deux semaines.
L'HYDROGÈNE EST UN GAZ EXPLOSIF. Si votre réseau d'eau chaude n'a pas été utilisé
pendant au moins deux semaines, ouvrez tous les robinets d'eau chaude de votre maison
et laissez l'eau couler plusieurs minutes avant d'utiliser votre lave-linge ou votre lave-linge/
sèche linge combiné. Cela permettra d'éliminer l'éventuelle accumulation d'hydrogène.
L'hydrogène étant un gaz infl ammable, ne fumez pas et ne créez aucune fl amme ni étincelle
pendant cette opération.
CONSERVEZ SOIGNEUSEMENT CES CONSIGNES
consignes de sécurité _5
WF455AG-03159A-04_CFR.indd Sec1:5WF455AG-03159A-04_CFR.indd Sec1:5 2012-11-28 2:08:162012-11-28 2:08:16
Page 98

consignes de sécurité
AVERTISSEMENTS IMPORTANTS CONCERNANT
AVERTISSEMENT
L'INSTALLATION
Branchez le cordon d'alimentation sur une prise murale 120VCA / 60Hz / 15A ou
supérieure et utilisez cette prise uniquement pour cet appareil. N'utilisez pas de rallonge.
- Le fait de partager une prise murale avec d'autres appareils à l'aide d'une multiprise ou
d'utiliser une rallonge peut entraîner des chocs électriques ou des incendies.
- N'utilisez pas de transformateur électrique. Il pourrait entraîner un incendie ou un choc
électrique.
- Vérifi ez que la tension, la fréquence et l'intensité fournies par la prise murale
correspondent aux spécifi cations d'alimentation de l'appareil.
L'installation de cet appareil doit être e ectuée par un technicien ou un centre de réparation
qualifi é.
- Le non-respect de cette consigne peut entraîner des chocs électriques, des incendies,
une explosion, des problèmes avec le produit ou des blessures.
Éliminez régulièrement toute eau, poussière ou corps étranger des prises murales et zones
de contact à l'aide d'un chi on sec.
- Débranchez le cordon d'alimentation et nettoyez-le à l'aide d'un chi on sec.
-
Le non-respect de cette consigne peut entraîner des chocs électriques ou des incendies.
Branchez le cordon d'alimentation dans la prise murale dans le bon sens, de sorte que le
cordon soit dirigé vers le sol.
- Si vous branchez le cordon d'alimentation dans l'autre sens, les fi ls électriques à
l'intérieur du câble pourront être endommagés, entraînant un risque de choc électrique
ou d'incendie.
Cet appareil doit être correctement mis à la terre.
Ne reliez pas le conducteur de terre de l'appareil à un tuyau de gaz, un tuyau de
canalisation en plastique ou une ligne téléphonique.
- Une mise à la terre incorrecte pourrait causer des chocs électriques, des incendies, une
explosion ou des problèmes avec l'appareil.
-
Ne branchez jamais le cordon d'alimentation sur une prise qui n'est pas correctement reliée
à la terre et qui n'est pas conforme aux réglementations locales et nationales en vigueur.
N'installez jamais cet appareil près d'un radiateur ou de matériaux infl ammables.
N'installez pas cet appareil dans un endroit humide, huileux ou poussiéreux, dans un
endroit exposé à la lumière directe du soleil ou à l'eau (de pluie).
N'installez pas cet appareil dans un endroit présentant un risque de fuites de gaz.
- Cela pourrait entraîner un choc électrique ou un incendie.
Branchez correctement le cordon d'alimentation dans la prise murale. N'utilisez pas de
prise ou de cordon d'alimentation endommagé(e) ou de prise murale mal fi xée.
- Cela pourrait entraîner un choc électrique ou un incendie.
Ne tirez pas et ne pliez pas excessivement le cordon d'alimentation.
Ne vrillez pas et n'attachez pas le cordon d'alimentation.
N'accrochez pas le cordon d'alimentation sur un objet métallique, ne posez pas d'objet
lourd sur le cordon d'alimentation, ne l'insérez pas entre des objets et ne le coincez pas
dans l'espace situé derrière l'appareil.
- Cela pourrait entraîner un choc électrique ou un incendie.
CONSERVEZ SOIGNEUSEMENT CES CONSIGNES
6_ consignes de sécurité
WF455AG-03159A-04_CFR.indd Sec1:6WF455AG-03159A-04_CFR.indd Sec1:6 2012-11-28 2:08:162012-11-28 2:08:16
Page 99

Ne tirez pas sur le cordon d'alimentation pour le débrancher.
- Débranchez le cordon en tenant la prise.
- Le non-respect de cette consigne peut entraîner des chocs électriques ou des
incendies.
Si la prise ou le cordon d'alimentation est endommagé(e), contactez le centre de réparation
le plus proche.
MISES EN GARDE POUR L'INSTALLATION
ATTENTION
Positionnez l'appareil de telle sorte que la prise reste facilement accessible.
- Le non-respect de cette consigne peut entraîner un choc électrique en cas de fuites de
courant.
Installez l'appareil sur un sol plan et dur, capable de supporter son poids.
- Le non-respect de cette consigne peut entraîner des vibrations et des bruits anormaux
ou des problèmes avec l'appareil.
Débranchez la prise d'alimentation lorsque l'appareil n'est pas utilisé pendant des périodes
prolongées ou lors d'orages violents.
- Le non-respect de cette consigne peut entraîner des chocs électriques ou des
incendies.
AVERTISSEMENTS IMPORTANTS CONCERNANT L'UTILISATION
AVERTISSEMENT
En cas d'inondation, coupez immédiatement l'alimentation électrique et contactez le centre
de réparation le plus proche.
Si l'appareil émet des bruits anormaux ou dégage une odeur de brûlé ou de la fumée,
débranchez immédiatement la prise d'alimentation et contactez le centre de réparation le
plus proche.
- Le non-respect de cette consigne peut entraîner des chocs électriques ou des
incendies.
En cas de fuite de gaz (propane, gaz LP, etc.) ventilez immédiatement sans toucher à la
prise d'alimentation. Ne touchez pas l'appareil ou le cordon d'alimentation.
- N'utilisez pas de ventilateur.
- Une étincelle peut entraîner une explosion ou un incendie.
Ne lavez jamais de linge ayant été en contact avec de l'essence, du kérosène, du benzène,
des diluants de peinture ou toute autre substance infl ammable ou explosive.
- Cela pourrait entraîner un choc électrique, un incendie ou une explosion.
Ne forcez pas l'ouverture du hublot pendant le fonctionnement du lave-linge (lavage à haute
température/séchage/essorage).
- Un écoulement d'eau hors du lave-linge peut entraîner des brûlures ou rendre le sol
glissant,
ce qui risque de provoquer des blessures.
- L'ouverture forcée du hublot peut entraîner des dommages sur l'appareil et des
blessures.
CONSERVEZ SOIGNEUSEMENT CES CONSIGNES
consignes de sécurité _7
WF455AG-03159A-04_CFR.indd Sec1:7WF455AG-03159A-04_CFR.indd Sec1:7 2012-11-28 2:08:162012-11-28 2:08:16
Page 100

consignes de sécurité
Assurez-vous de retirer l'emballage (mousse, polystyrène) fi xé au bas du lave-linge avant
d'utiliser celui-ci.
N'insérez pas votre main sous le lave-linge.
- Cela pourrait entraîner des blessures.
Ne touchez pas la prise d'alimentation avec les mains mouillées.
- Cela pourrait entraîner un choc électrique.
Ne débranchez pas l'appareil si celui-ci est en cours de fonctionnement.
- Le fait de rebrancher la prise d'alimentation dans la prise murale peut provoquer une
étincelle et entraîner un choc électrique ou un incendie.
Conservez tous les matériaux d'emballage hors de portée des enfants; les matériaux
d'emballage présentent des dangers pour les enfants.
- Si un enfant met un sac en plastique sur sa tête, il risque de s'asphyxier.
Ne laissez pas les enfants ou des personnes handicapées utiliser ce lave-linge sans
surveillance.
- Risque de choc électrique, de brûlure ou d'incendie.
N'insérez pas votre main ou un objet métallique sous le lave-linge pendant son
fonctionnement.
- Cela pourrait entraîner des blessures.
Assurez-vous que le tiroir à lessive est fermé avant de charger du linge dans le lave-linge ou
de retirer du linge du lave-linge.
- Si le tiroir à lessive est ouvert, vous risquez de le cogner avec votre tête et de vous
blesser.
Ne tentez pas de réparer, de démonter ou de modifi er l'appareil vous-même.
- N'utilisez pas de fusible (cuivre, fi l d'acier, etc.) autres que le fusible standard.
- Si l'appareil a besoin d'être réparé ou réinstallé, contactez le centre de réparation le plus
proche.
- Le non-respect de cette consigne peut entraîner des chocs électriques, des incendies,
des problèmes avec le produit ou des blessures.
Si de l'eau est entrée dans l'appareil ailleurs que dans le tambour, débranchez la prise de
courant et contactez le centre de réparation le plus proche.
- Le non-respect de cette consigne peut entraîner des chocs électriques ou des
incendies.
Si le tuyau d'arrivée d'eau se déconnecte du robinet et inonde l'appareil, débranchez la
prise d'alimentation.
- Le non-respect de cette consigne peut entraîner des chocs électriques ou des
incendies.
Si une substance étrangère pénètre dans l'appareil, débranchez-le et contactez le centre
de réparation le plus proche.
- Le non-respect de cette consigne peut entraîner des chocs électriques ou des
incendies.
CONSERVEZ SOIGNEUSEMENT CES CONSIGNES
8_ consignes de sécurité
WF455AG-03159A-04_CFR.indd Sec1:8WF455AG-03159A-04_CFR.indd Sec1:8 2012-11-28 2:08:162012-11-28 2:08:16
 Loading...