

Page 1

Chapter 1
Chapter 1
Computer Basics
This section allows you to have an over
all look at your new computer.
It shows you how to turn
the computer On/Off and
how to use the basic devices
such as keyboard,
mouse, etc.
Page 2
SAMSUNG Computer WF10
SAMSUNG Computer WF10
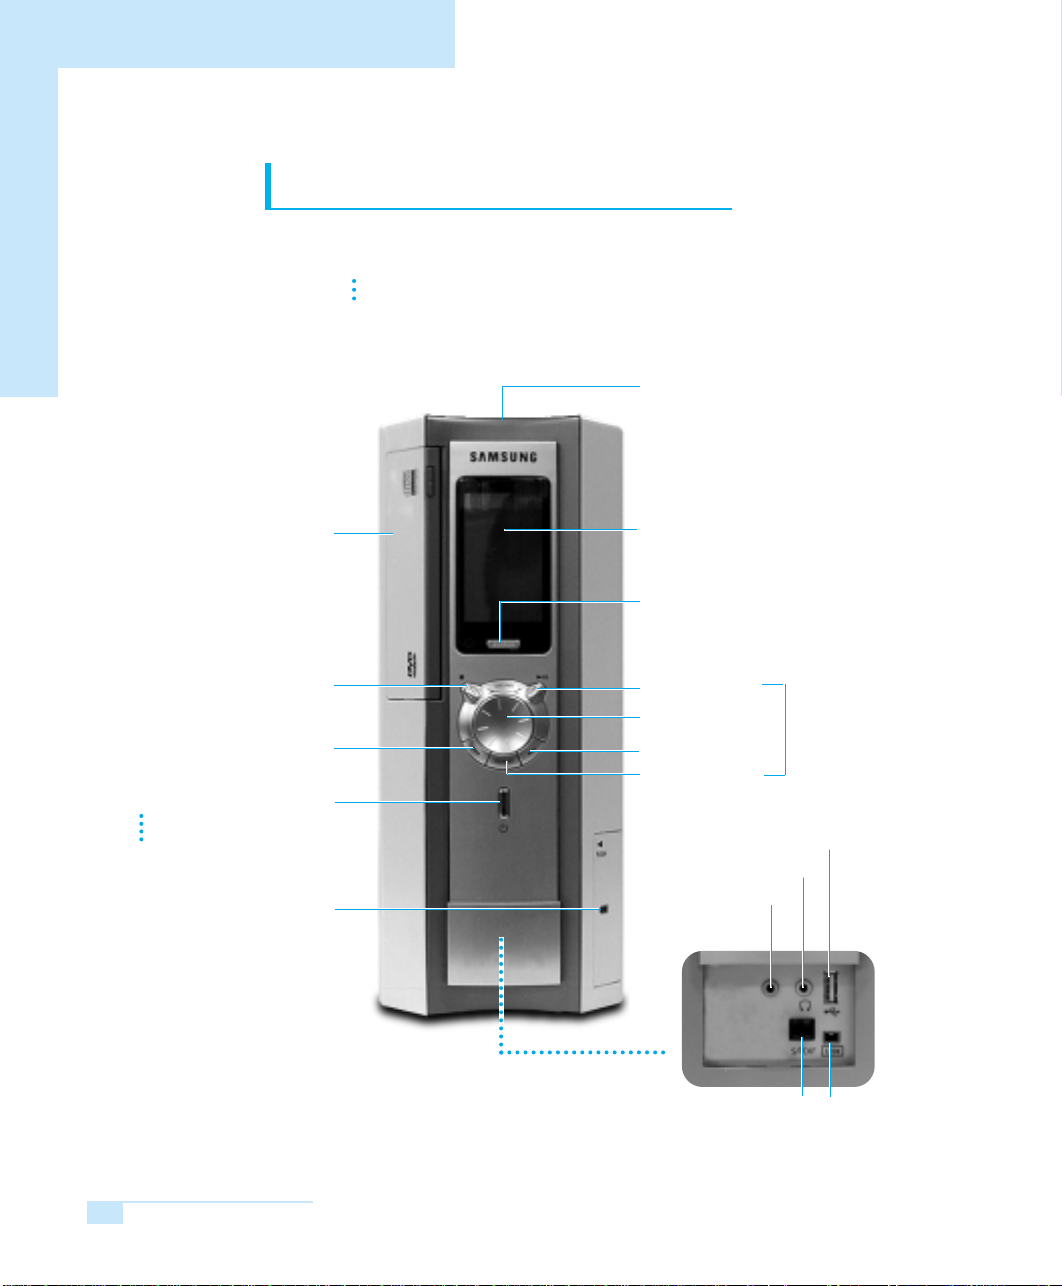
Looking at your computer
Front View
The ◆ indicates an optional item.
NNNNooootttteeee
The particular item may not be included with your model or
may be different from what is actually provided.
CD Storage space
You may store
your recovery/software CDs.
CD (or DVD, DVD Combo) Drive ◆
Stop
Skip/Search
Power Button / Power Display Light
Green : Computer ON
Orange: Standby Mode
PC Card slot
You may use PC (PCMCIA) cards.
Push upward
On Display (Refer to page 12)
Audio Button
You may play an audio CD without having to
start Windows (Refer to page 27)
Play/Pause
Volume Control Dial
Skip/Search
Repeat
USB device port
Headphone jack
Microphone jack
Digital (S/PDIF-Optical) sound port
Connet to MD Player, 5.1 Channel
speaker, etc. (Refer to page 30)
NNNNooootttteeee
Used when listening to a
CD by using the Audio Button.
IEEE 1394 device
port (4PIN)
SAMSUNG Computer WF10
6
Page 3
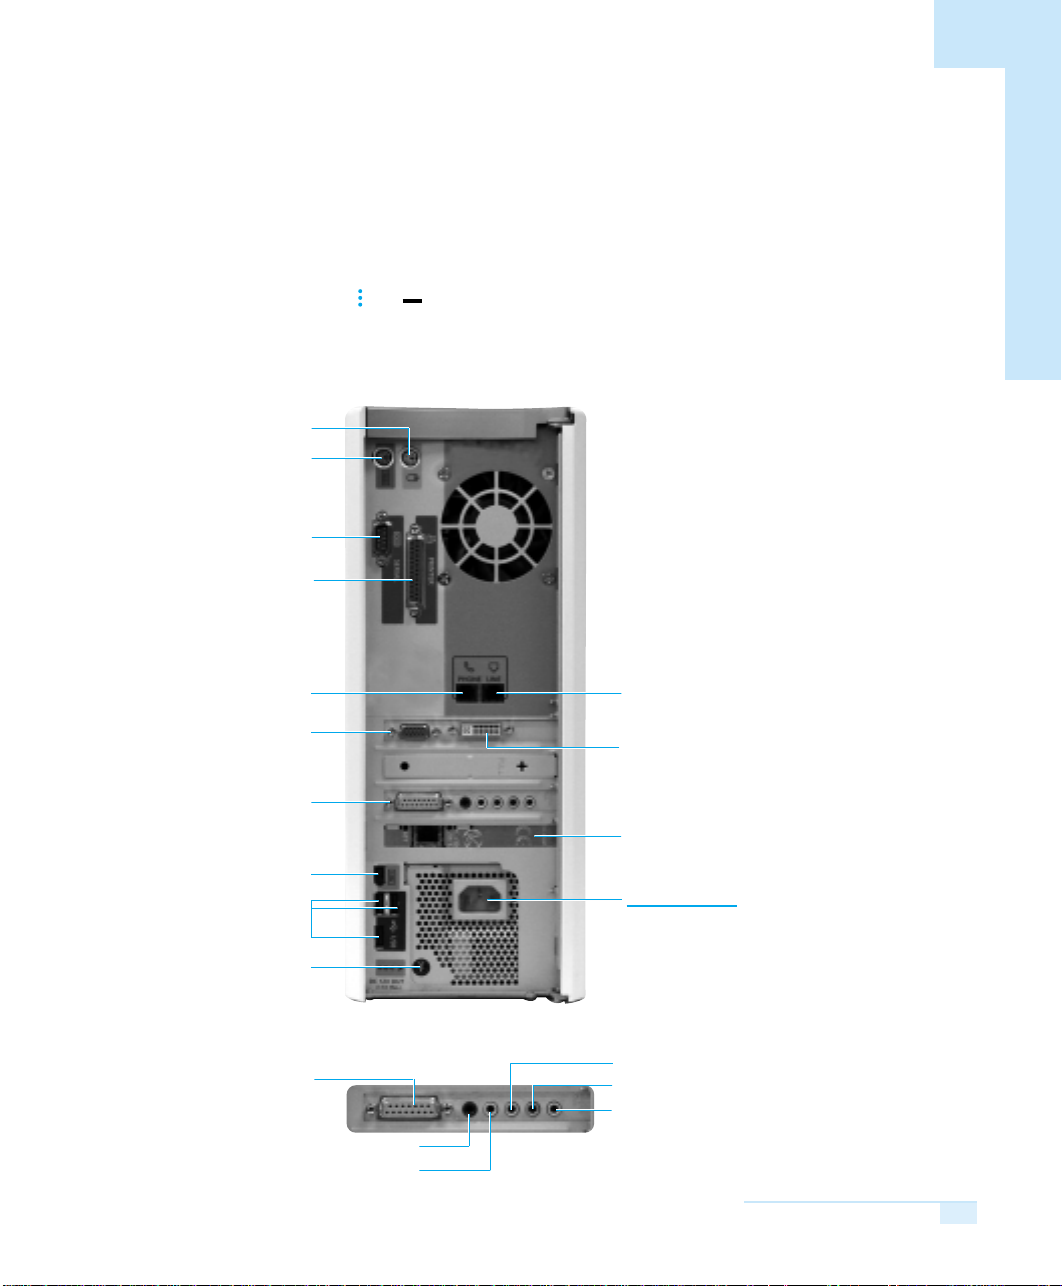
Back View
NNNNooootttteeee
Mouse port (PS/2)
Keyboard port (PS/2)
Serial device port
Printer (LPT) port
The mark indicates mandatory devices that must be connected.
(for connection when needed)
IEEE 1394 device port (6PIN)
Monitor (MCX15A) power, etc.
Telephone port
Analog monitor port
Sound card
USB device port
(USB keyboard, mouse)
12V power output port
Sound card
■
Game joystick, etc port
Rear speaker jack (Line out)
Front speaker jack (Line out)
Telephone line port
(for communications via a modem)
Digital (DVI) monitor port
The default setup for the graphics card output is set on
analog. You may change the setting to digital when using
an LCD monitor. (Refer to page 85)
LAN card
Power cable port
Microphone jack
Sound input device jack (Line in)
Digital(S/PDIF-Coaxial)/Analog(5.1 Speakers)
sound output jack
The default setting is set on digital sound.
The setting must be changed to use analog sound.
(Refer to page 30)
Chapter 1. Computer Basics
7
Page 4
SAMSUNG Computer WF10
SAMSUNG Computer WF10
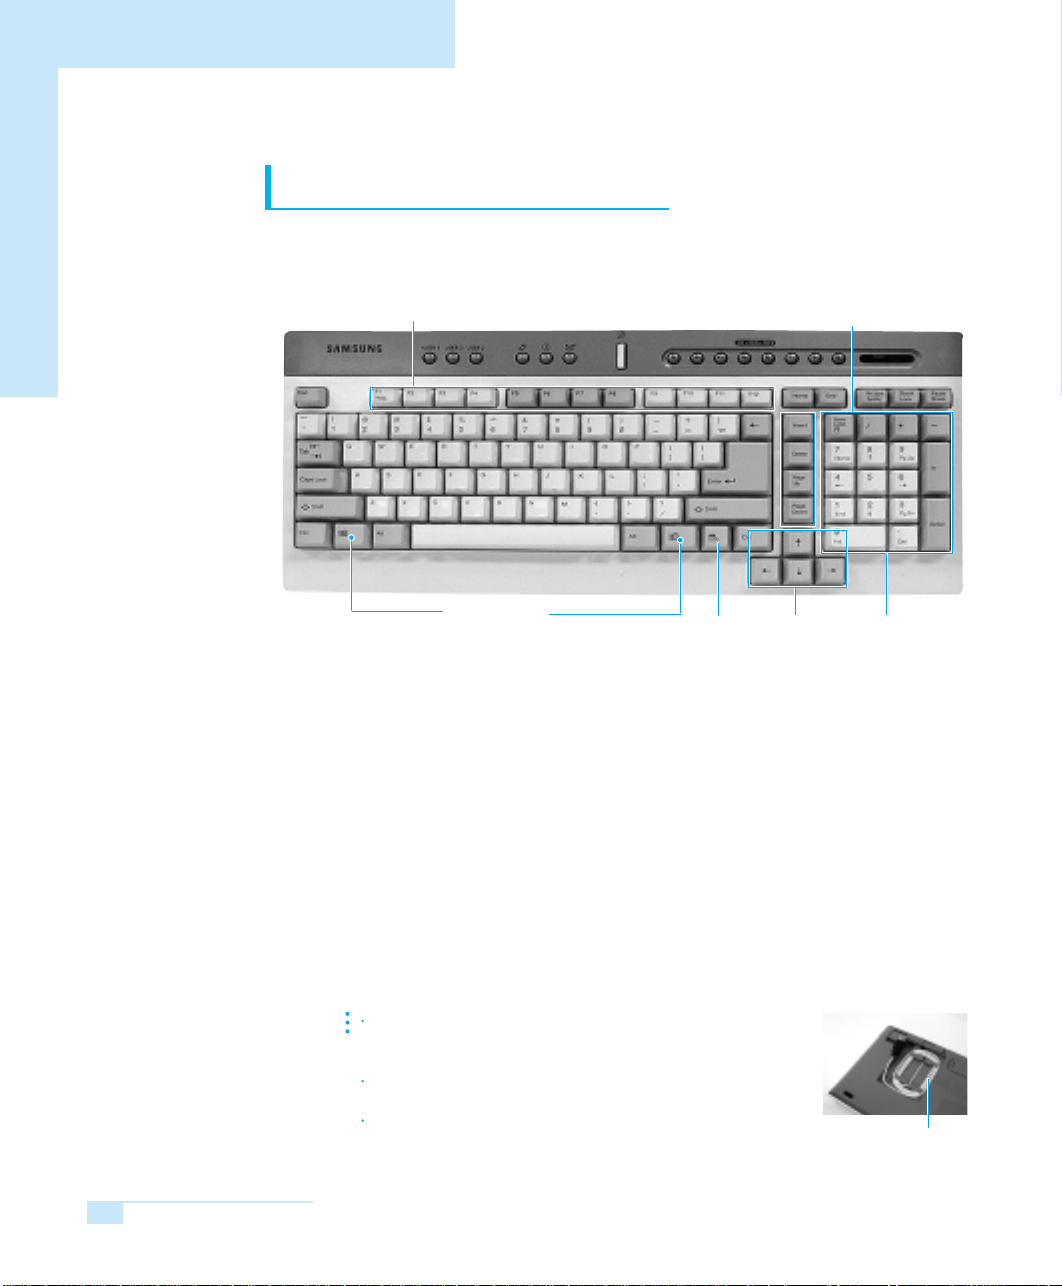
Keyboard components
The keyboard is a device which is used to input data.
You have the option to choose between standard or wireless keyboards.
Function keys
Windows keys
Function keys Executes the various program functions.
■
Their use varies according to the program
Additional keys Moves the cursor up/down or to the front
■
or back of a line.
Windows keys Displays the Windows start menu.
■
Application key Displays the program menu for the program
■
currently in operation.
Application key
Additional keys
Directional keys
Numeric keys
SAMSUNG Computer WF10
8
Directional keys Moves the cursor up/down and right/left.
■
Numeric keys The keys are used to input numbers when
■
Num Lock is ON.
ee
NNNNoooottttee
The wireless keyboard operates only on the WF10 model computer.
The operational status is displayed on the front operation display
window.
Refer to Chapter 3 Changing the wireless switch to use more
than three keyboards at one time.
If the batteries die on your wireless keyboard, you may use
the power cable located inside of the keyboard, to connect to
your computer’s USB port for use.
Power cable
Page 5

Special keys
Special keys are located at the top of your keyboard.
You can use these keys to make use of your computer more conveniently.
Connect to the Internet
Program keys
USER 1 key: Run Explorer
USER 2 key: Run Calculator
USER 3 key: Run Note Pad
Power save key
■
Mail Receipt
display
Power Save key
Skip/Search
Open CD Drive
Play/Pause
Skip/SearchStopRun Norton AntiVirus
Volume control
Mute
Executes the Power save standby mode.
The power display lights turns orange when the sandby mode is executed.
Push any key on your keyboard or mouse to restart your computer.
However, because the wireless mouse will not operate, please use your wireless
keyboard.
Program keys
■
You can assign frequently used programs to each key for more
convenient use.
- To change the key setup
Ex) Setting up Microsoft Paint for the USER 1 key
1. Double-click on the Magic Keyboard icon( ) on the Taskbar.
2. Select USER 1 in Key setup of Magic Keyboard Properties and click Browse...
3. Select the program of your choice in Browse... and click Open.
Ex) Program location: C:\ WINDOWS\ System32\ mspaint.exe
4 Click OK and the change is saved.
Chapter 1. Computer Basics
9
Page 6
SAMSUNG Computer WF10
SAMSUNG Computer WF10
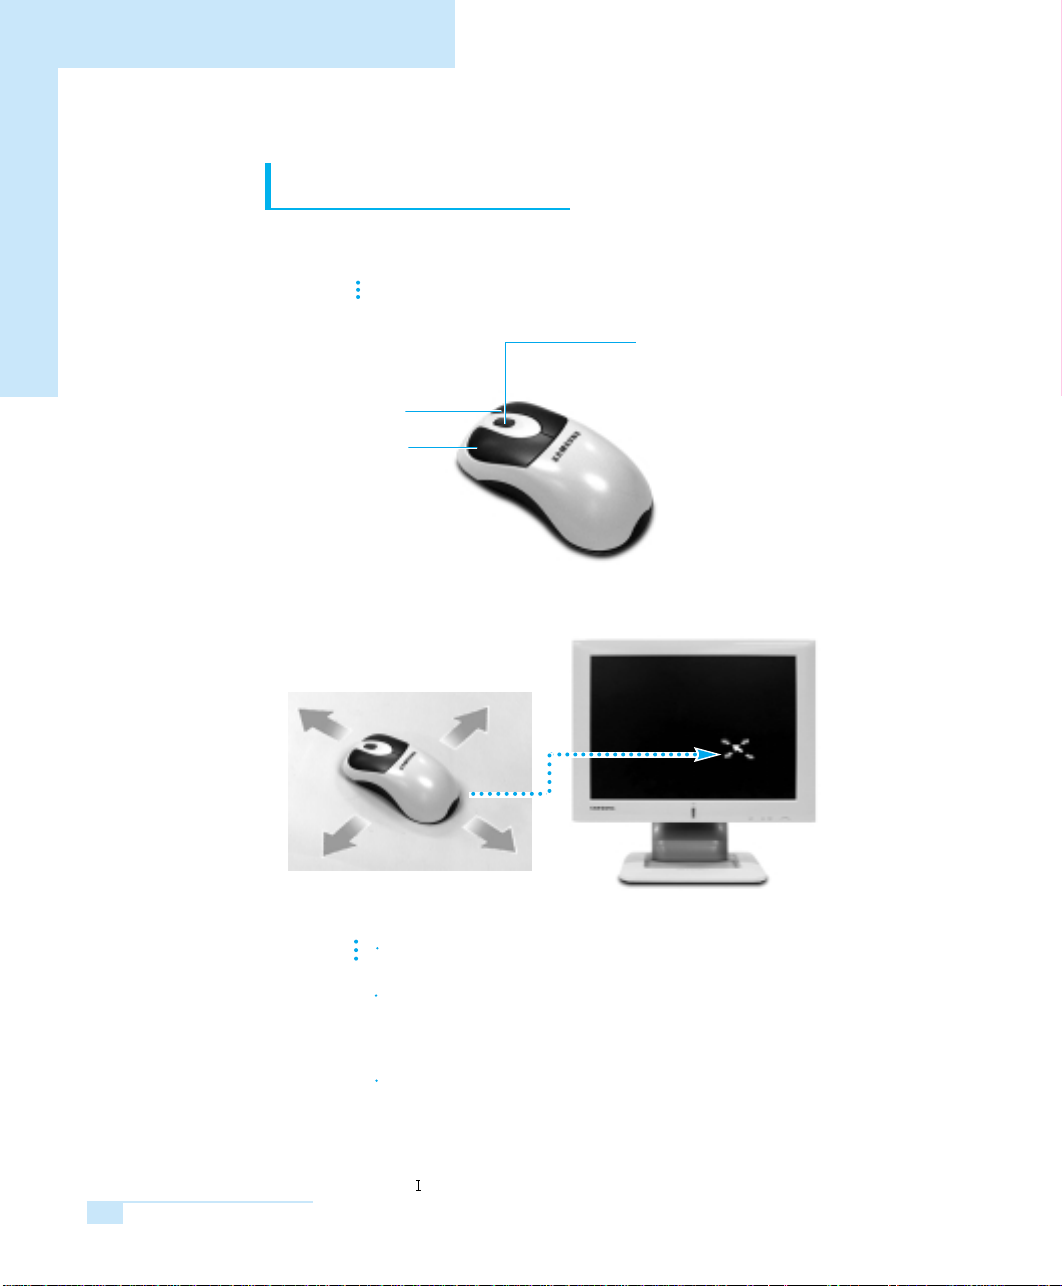
Using the mouse
The mouse is a device used to move and/or control the cursor or
pointer on the display.
You have the option of choosing a standard or wireless mouse with your computer.
ee
NNNNoooottttee
The pointer on your computer’s display moves in the direction in which you move
the mouse.
Therefore, your mouse may be different from what is described here.
Right button
Left button
Wheel dial
SAMSUNG Computer WF10
10
NNNNooootttteeee
The wireless mouse operates only on the WF10 model computer.
The operational status is displayed on the front operation display window.
The wireless mouse must be used near the front of the computer.
An obstacle between the mouse and the computer may prevent the mouse from
operating properly. Additionally, if you are pointing in the wrong direction or too
far away from the computer, the mouse will not operate properly.
Refer to Chapter 3 Changing the wireless switch to use more than one keyboard
at one time.
What is a cursor or pointer?
It is a mark that indicates the location of the mouse.
The arrow-shaped symbol, used to move objects is called a pointer and
the -shaped symbol used to indicate the location of text input is called a cursor.
Page 7
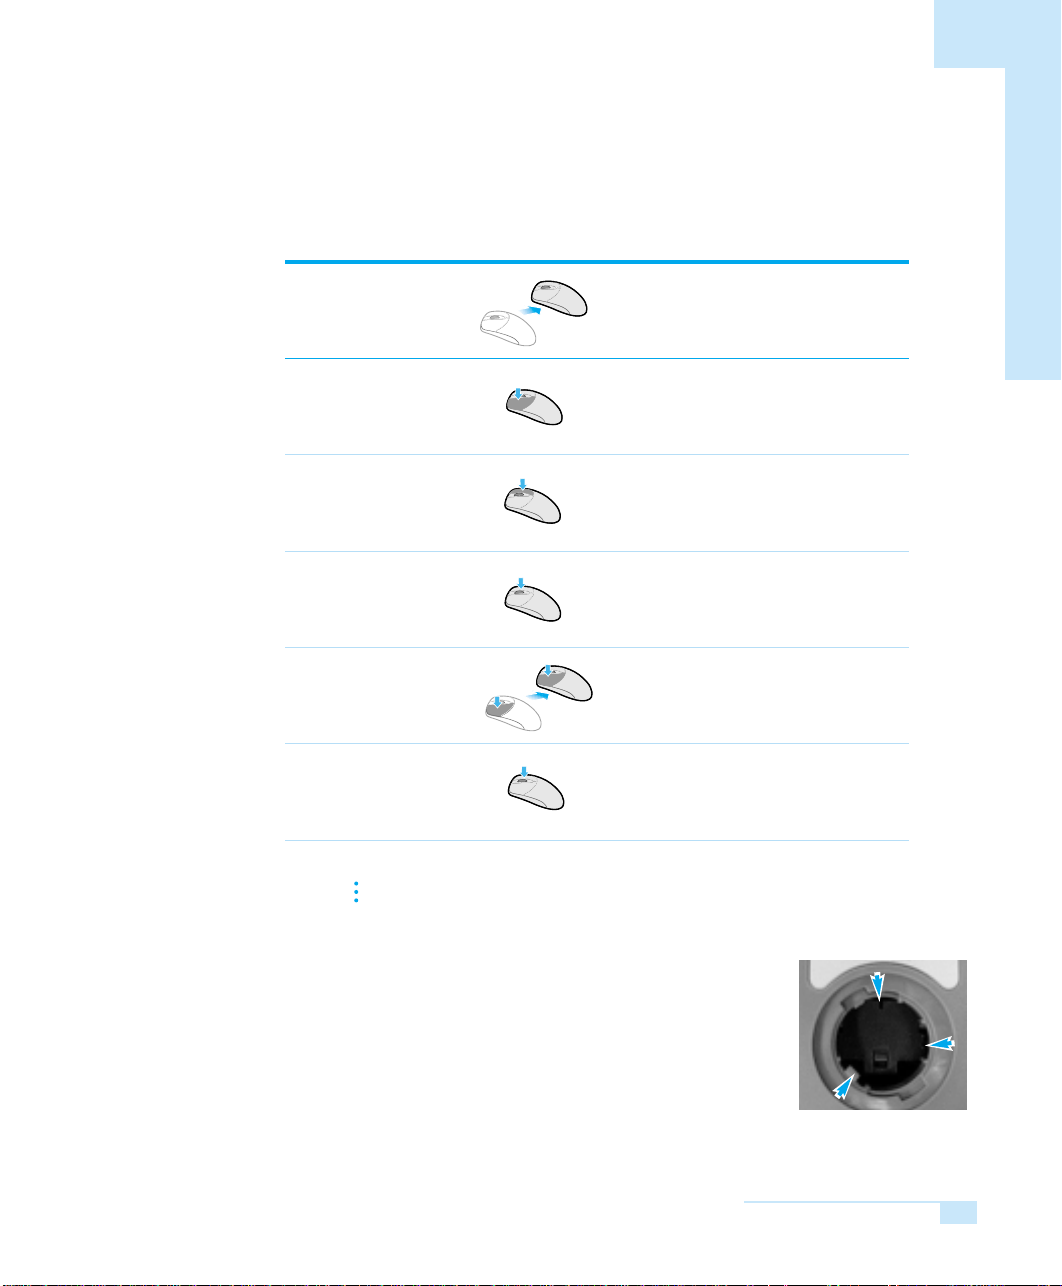
The functions of the mouse
■
Execution methodFunction
To move the
pointer
To select an item
To run a program or
open a file or folder
To open the
shortcut menu
To move a
selected item
To view the top/bottom of your
monitor display
Move
Click
Doubleclick
Click on
right mouse
button
Click/drag
Scroll
Move your mouse to the
direction of your choice,
the pointer will move
accordingly.
Place your mouse on the
item and click once on your
left mouse button
Swiftly click twice on your
left mouse button.
Click on the item with the
right mouse button.
Select the item to move
and drag to the location of
your choice while pressing
on the left mouse button.
Scroll your wheel dial
up and down.
NNNNooootttteeee
If your mouse is not working properly
Dust, etc. on the desk may collect inside of the mouse, causing it to malfution.
You must clean the mouse periodically to prevent such occurrences.
1. Turn counter clockwise, the ball cover located on the bottom
of your mouse and open it take out the ball from
the mouse.
2. Use a soft cloth to remove dirt from the ball.
3. Remove dirt, etc. from the roller (3 sections).
Use of excessive force or sharp objects may damage
the roller. Please pay attention.
4. Replace the ball in the mouse and turn cover clockwise
to fix it in place.
Roller location
Chapter 1. Computer Basics
11
Page 8
SAMSUNG
Computer WF10
Turning computer On/Off
To turn computer On
1. Connect all the peripheral devices according to instructions in
the Installation Guide.
2. Turn the Monitor and other peripheral equipment ON.
3. Press the Power button to turn your computer ON.
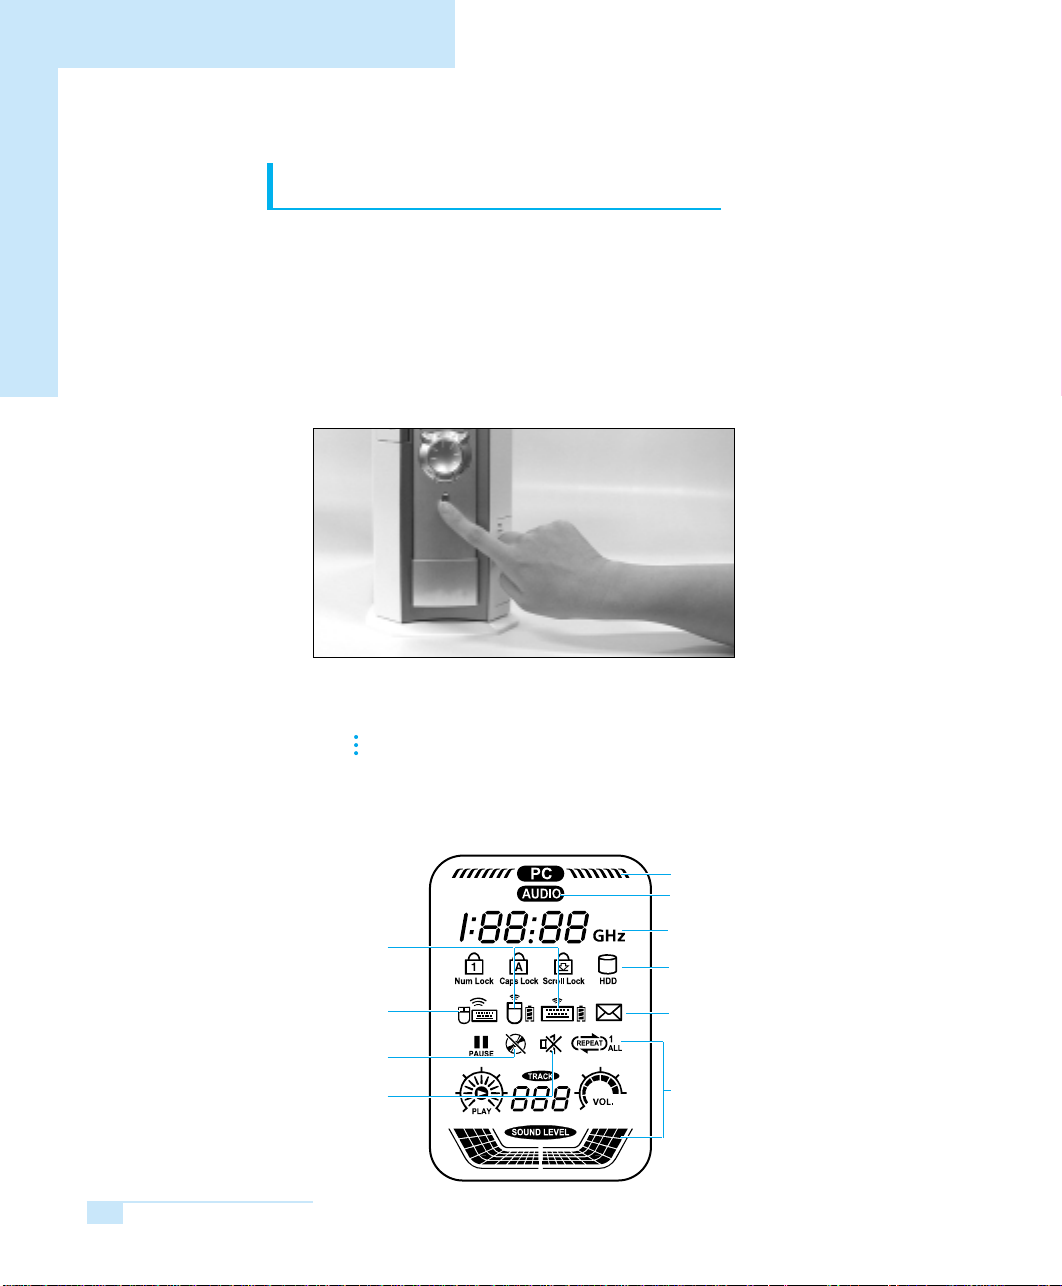
mouse battery charge level
(appears when charged 50% or less)
mouse movement display
SAMSUNG Computer WF10
12
If you have multiple users registered, click on User Name in the Start Menu.
When you turn your computer On for the first time, you will see
NNNNooootttteeee
Looking at On Display
■
Wireless keyboard/
Wireless keyboard/
NO Audio CD display
the Windows registration window appear on the monitor display.
Computer operation display
Audio Button operation display
CPU operation speed/
audio CD play time display
Wireless keyboard Lock key and
Hard Drive operation display
Mail inbox display
Mute
Audio Button operation display
(may not operate in certain
multimedia programs)
Page 9
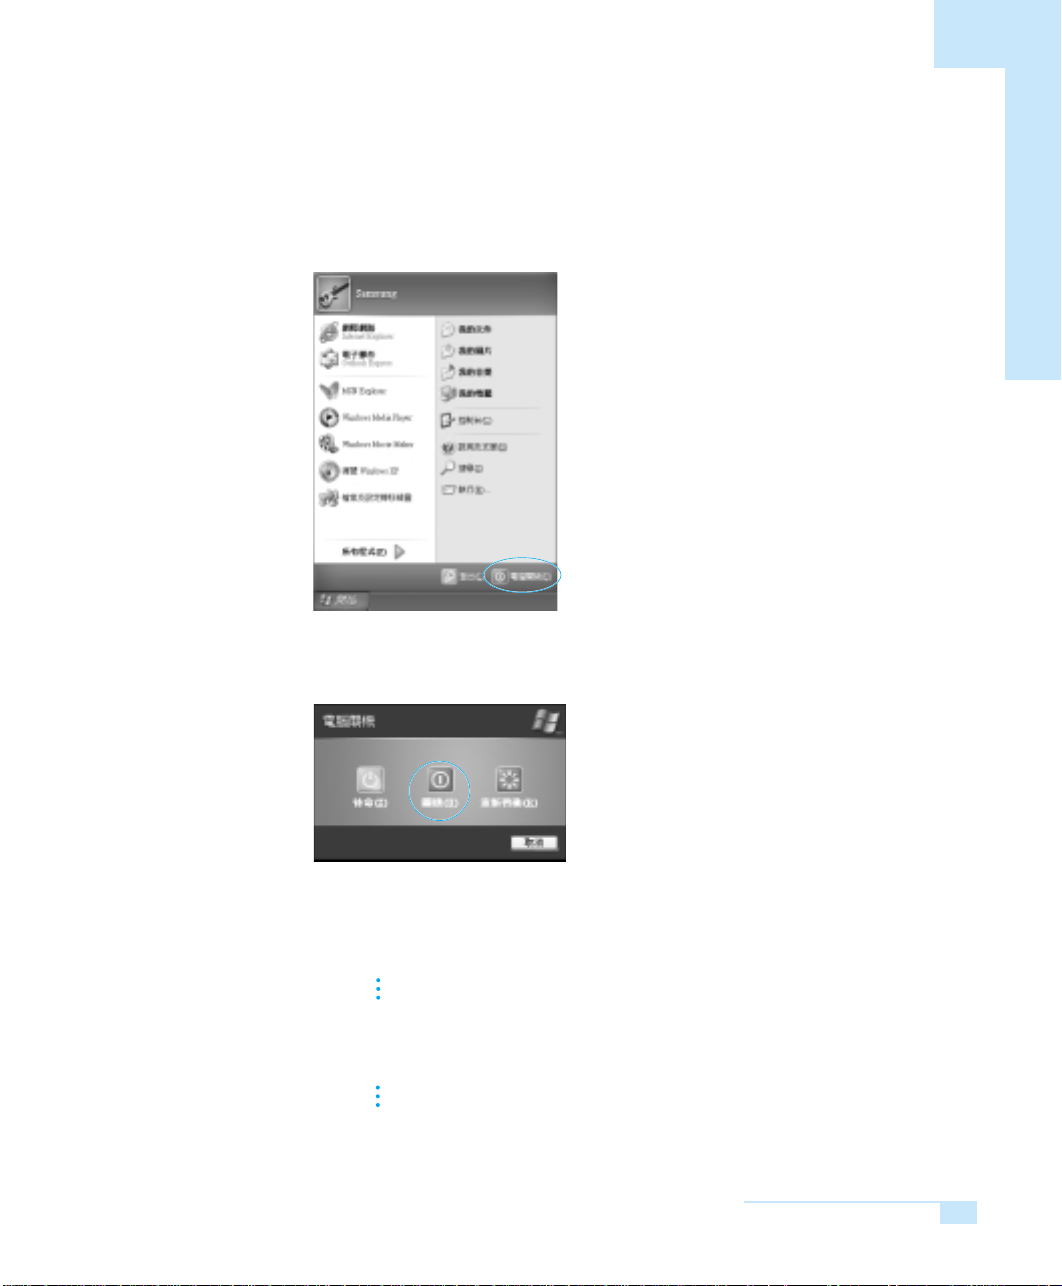
To turn computer Off
1. Click on start on the Taskbar and click on Turn Off Computer.
2. Click Turn Off from the [Turn Off Computer] window.
If your computer does not turn Off, press on the power button for five seconds
to turn it off manually.
When you turn your computer Off manually.
CCCCaaaauuuuttttiiiioooonn
nn
The Hard Drive may be exposed to damage due to electric waves flowing
within the computer.
Additionally, your computer may conduct Disk Check upon restarting your
computer after manual Turn Off.
Unplugging the power cable, telephone cable, etc while your computer is in
use may cause computer electric shock to damage your computer.
Please take caution to avoid such damage.
Chapter 1. Computer Basics
13
Page 10

SAMSUNG Computer WF10
SAMSUNG Computer WF10
When using a circuit breaker
WWWWaaaarrrriiiinnnngggg
If you use a circuit breaker (rated 30A/30mA ELB), you can use up to twelve
computer systems (including the monitors) simultaneously.
However, if excessive electricity flow causes the circuit breaker to suspend
power, you may run the risk of losing data in your computer.
For a safe usage environment, we recommend the acquisition of about
30% margin. Therefore, the use of about eight computers per each circuit
breaker is recommended.
User account registration and revision
You may register several users on one computer and
create individual user environments for use.
Let’s look at ways in which users may be added or switched.
To add a user
■
1. Click start Control Panel.
2. Click User Accounts then click on Create a New Account.
▼
SAMSUNG Computer WF10
14
3. Click Type a name for the new account and Next.
4. Select the Account Type and click Create Account.
A new user account is created.
To switch a user
■
1. Click start Log Off.
2. Click Switch User.
3. In the [Windows Log On] window, select the desired User Name.
▼
Page 11
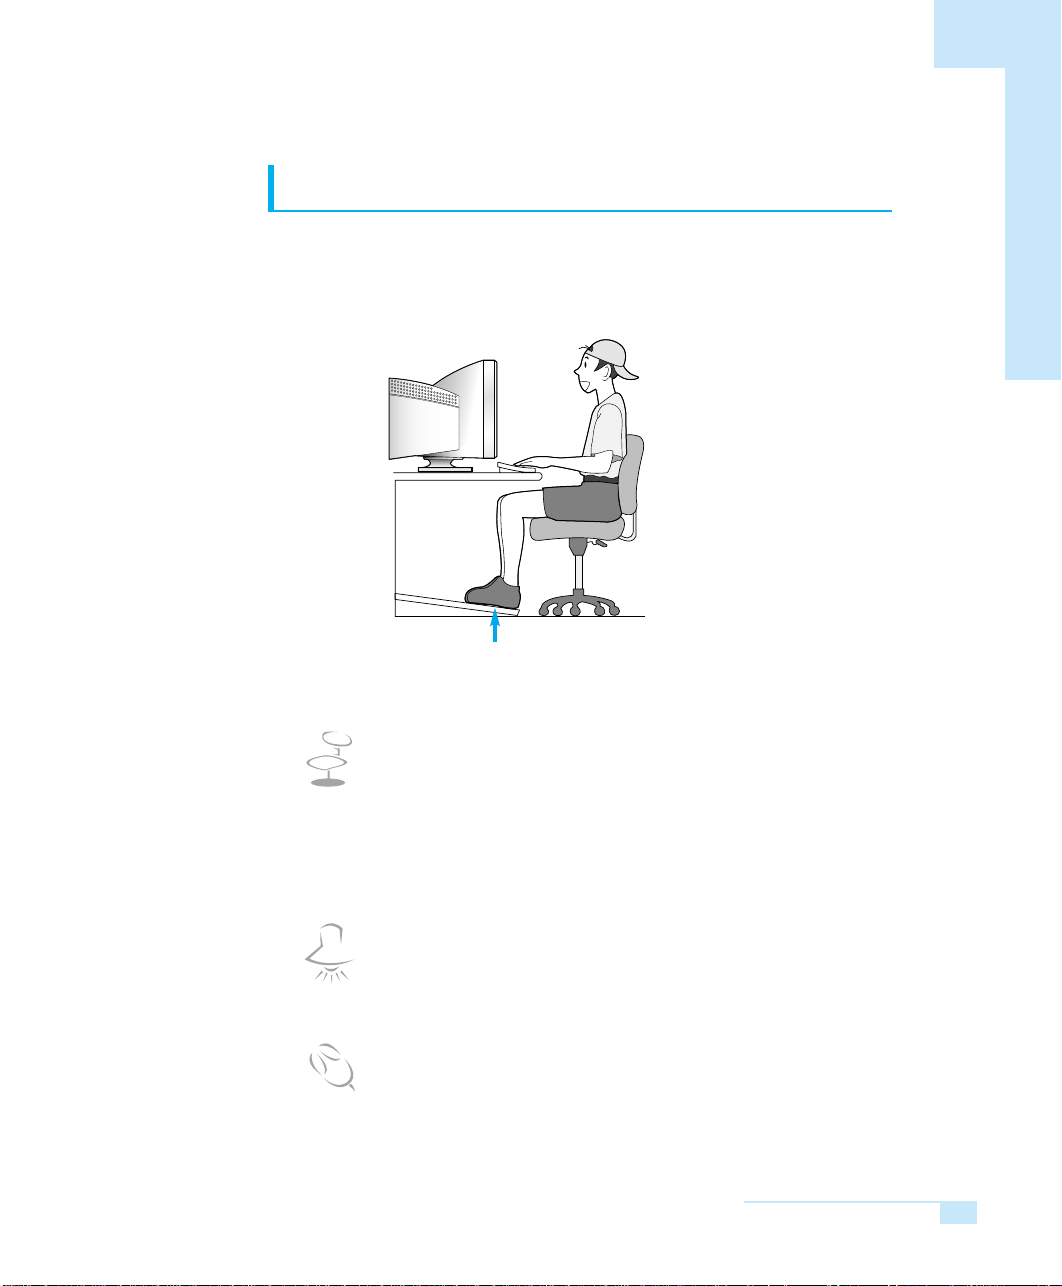
Proper Seating Posture During Computer Use
The proper seating posture during computer use is provided here.
Maintaining proper posture during computer use enhances performance and
prevents physical bodily harm.
If necessary, use a footrest to raise the level of your knees
and ease the pressure on the thighs.
Seating Posture
- Position the chair so that the eyes are slightly higher than the
display panel.
- Straighten the neck and back.
- Place the legs naturally.
- If necessary, use a cushion to provide extra back support.
- Avoid working postures that require twisting the body or neck.
Lighting
- Soft, indirect lighting is recommended.
- Position the display panel so that external light does not reflect off
the screen. Use curtains, if necessary.
Work Habits
- Take periodic breaks and stretch out stiff muscles regularly.
- Look outside the window or at distant objects frequently to relieve
strain on the eyes.
Chapter 1. Computer Basics
15
Page 12

SAMSUNG Computer WF10
SAMSUNG Computer WF10
16
Page 13

Chapter 2
Chapter 2
Using your computer
This section shows your how to use
the Windows OS and CD Drive, as
well as how to use the application
programs that use these
devices.
Page 14
SAMSUNG Computer WF10
Windows XP Basics
Windows is the computer’s main operating system, which needs to be familiarized with in order for efficiently computer use.
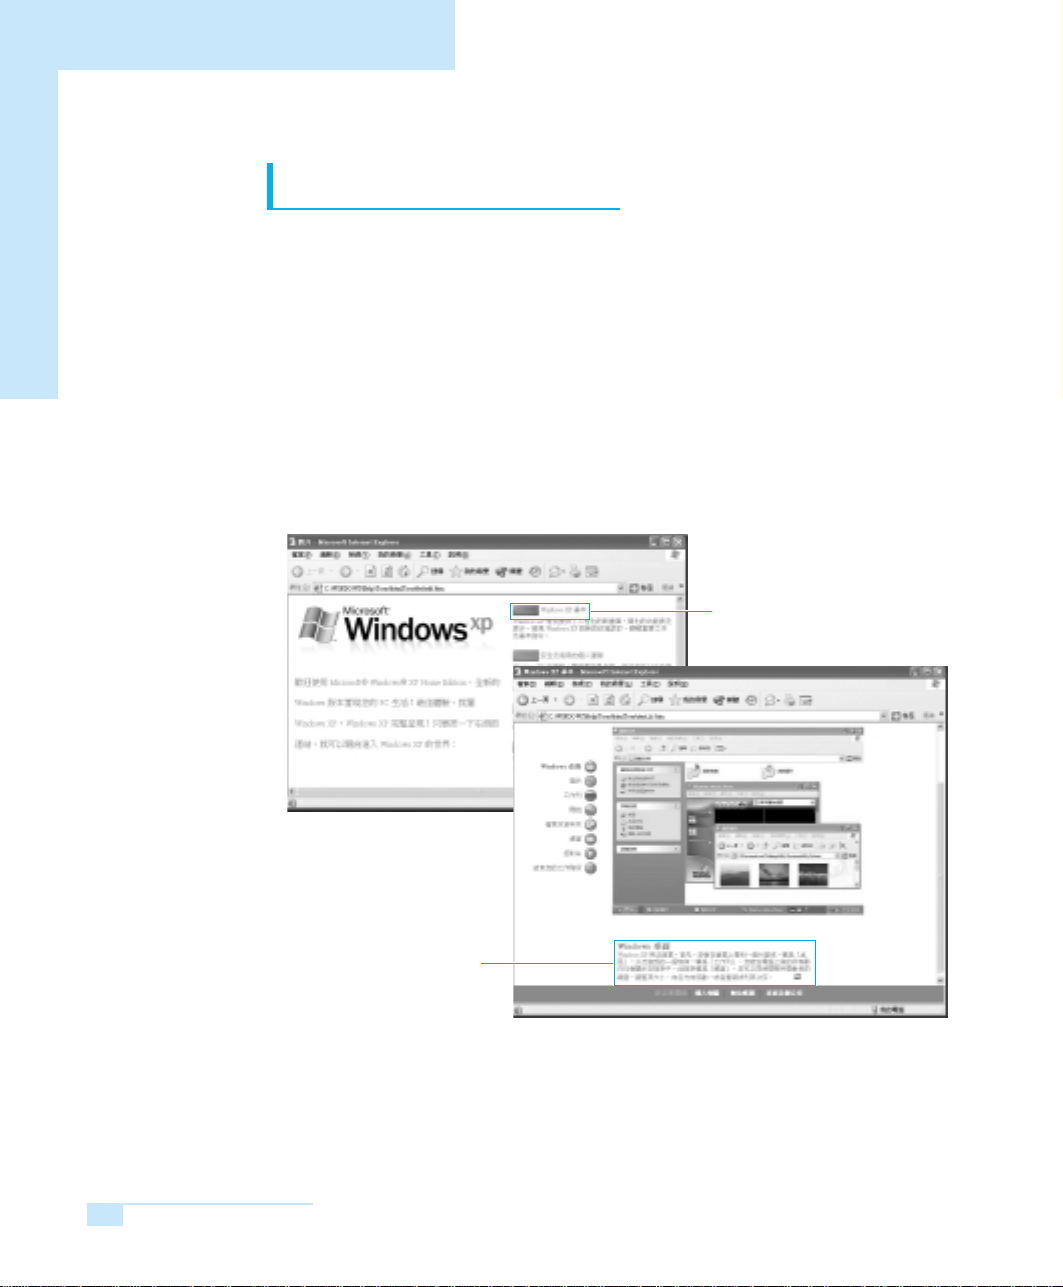
Windows XP Tour
A tour of the elementary functions provided by Windows XP.
Click Start Tour Windows XP.
Or click Start All Programs Accessories Tour Windows XP.
Click on the topics to find out about important functions of Windows XP.
An explanation will appear
on the lower part of the screen.
▼
▼
▼
▼
Click the Title.
SAMSUNG Computer WF10
18
Page 15
Start Menu
Start Button
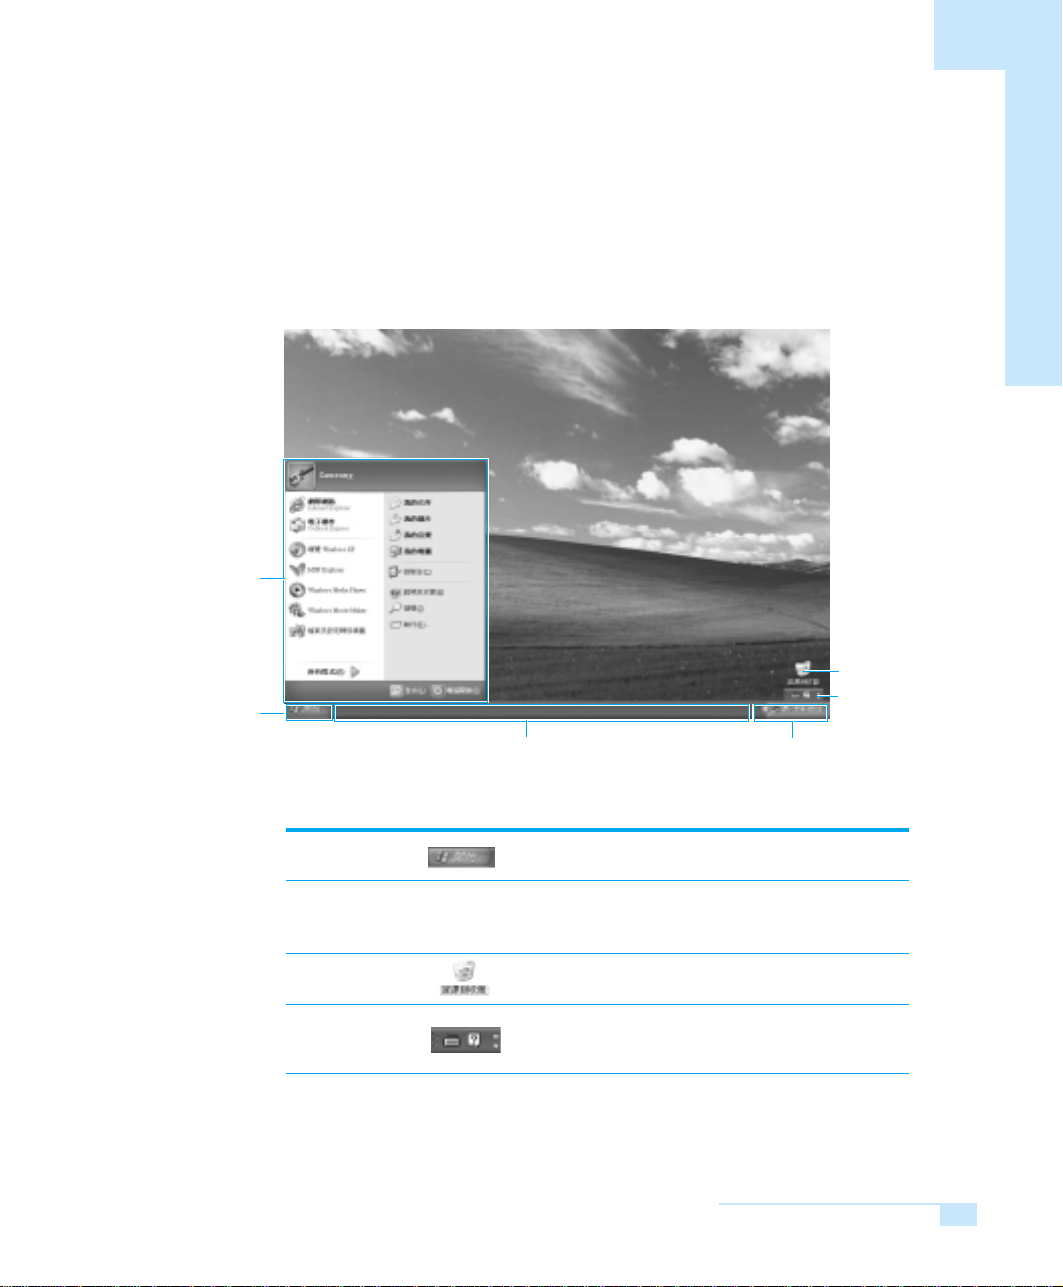
Understanding the Desktop
The Desktop is the working area on the computer. It consists of the large
workspace, which is more or less the entire the screen and a Taskbar at the
bottom.
Recycle Bin
Language Bar
Start Button
Taskbar
Taskbar
Opens the Start Menu.
Displays programs that are currently running.
Frequently used icons can be placed here.
System Tray with Clock
Recycle Bin Deleted files or folders end up here.
Language Bar
Enables switching between English/other languages
text inputs and provides other text input services.
Chapter 2. Using your computer
19
Page 16
SAMSUNG Computer WF10
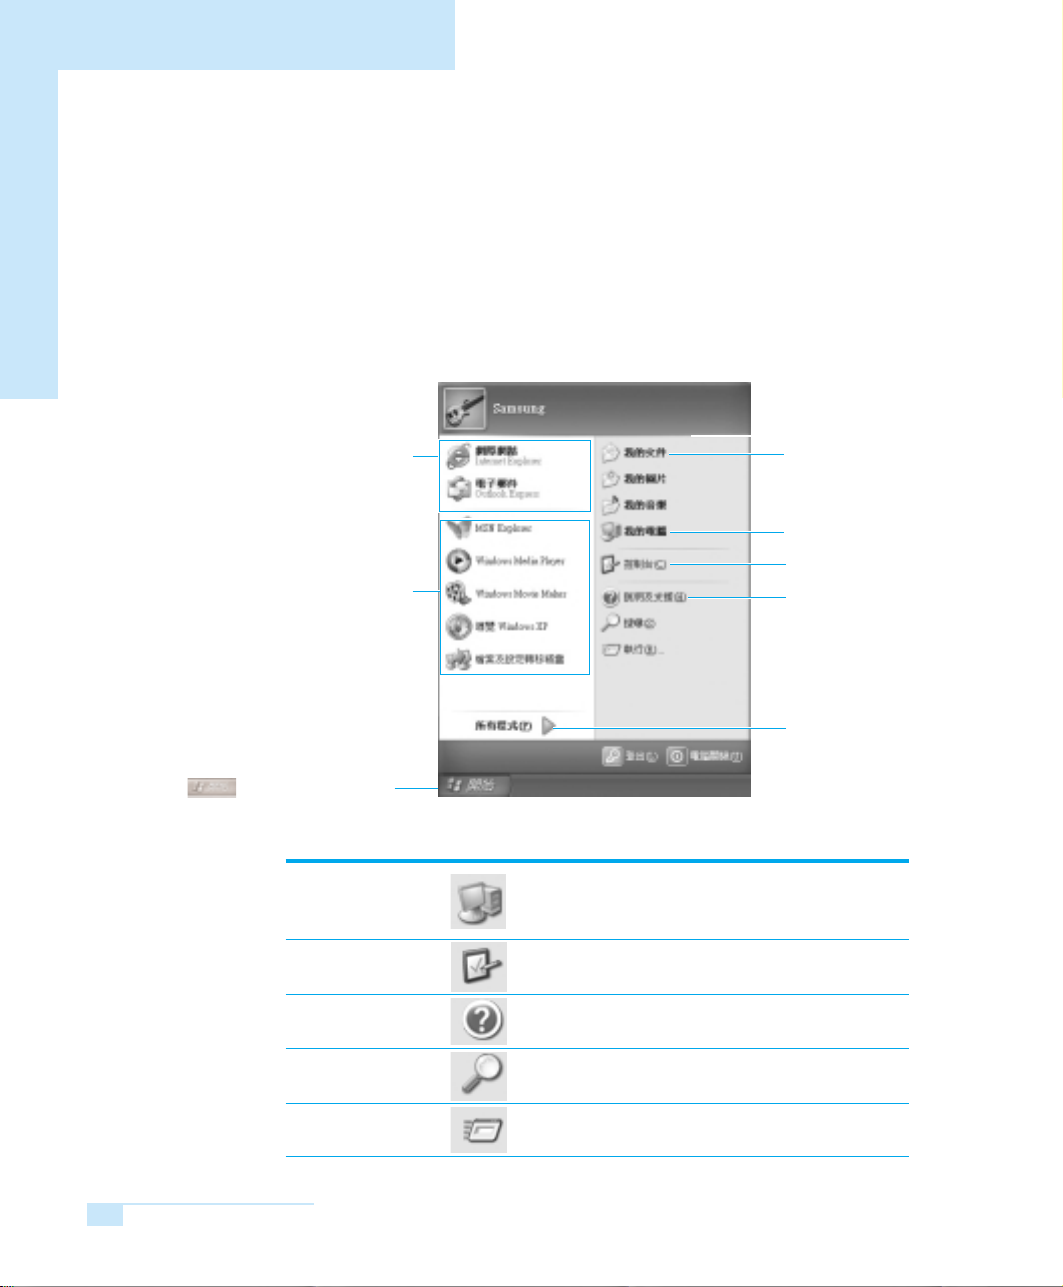
Understanding the Start Menu
The Start Menu includes everything that is required to start Windows.
From the Start Menu it is possible to run a program, open a file, assign sys-
tem users with the Control Panel, receive support by clicking Help and
Support, and search desired items from computer or Internet by clicking
Search.
Fixed Items
Internet Browser
E-Mail Program
List of Programs Last Used
Click This Button
to View the Start Menu
My Computer
Control Panel
Help and Support
This Folder Stores
Personal Documents
My Computer
Control Panel
Help and Support
Includes All Programs
Displays the contents of the hard disk, the
CD-ROM drive, the network drive, and floppy disks.
It can also be used to search and open files and folders.
Enables users to configure settings on the
computer.
Provides on-line help, information on Windows
and troubleshooting.
SAMSUNG Computer WF10
20
Search
Run
Enables users to search for information in files
or the Internet.
Run programs or documents.
Page 17
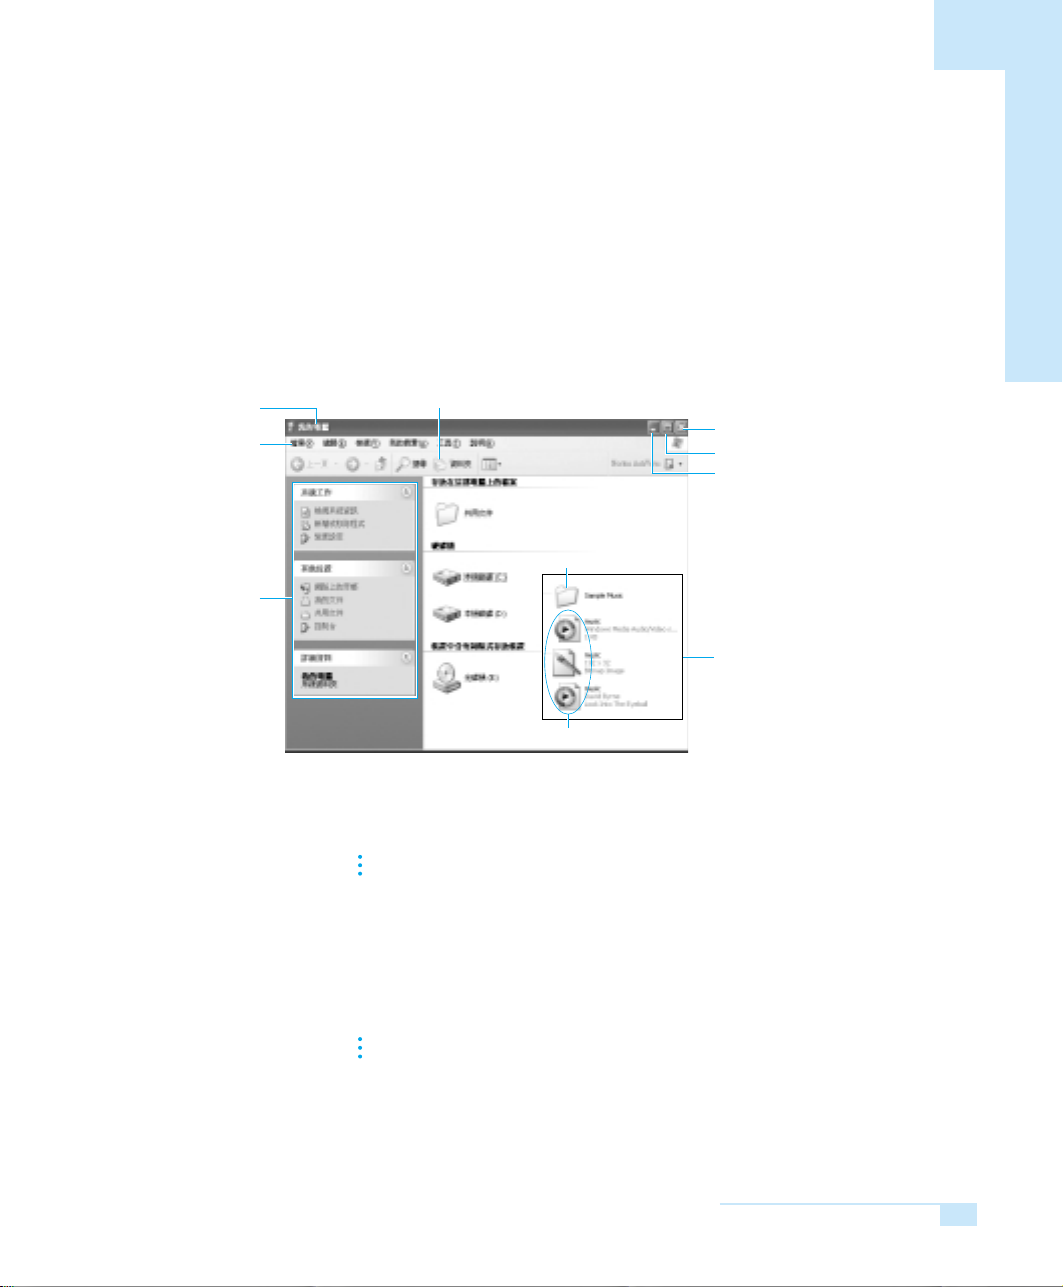
Understanding a Window
A window is the basic component in working with the computer. The My Computer
window, which is a window for the computer’s hard drive, will be used as an
example here to show the basic composition of a window.
Title Bar
Menu Bar
Quick Task Window
Click Start My Computer.
▼
Folder Icon
Close Window Button
Maximize Button
Minimize Button
Folders
Click Shared Files or the
Local Disk to view the folders
and files in it.
Files
Double-click the hard drive (local disk) to view internal folders and files stored in it.
If the contents do not appear, click Show Contents.
What is a Drive? A storage device which files and folders are saved in,
▼
NNNNooootttteeee
What is a Folder? A folder is used to group and manage files
▼▼
What is a File? A file is a document or various kinds of material that is
To view the entire structure of the drive
Click the Folder Icon in the Toolbar to view the entire structure. Click again to
return to the Quick Task Window.
and read from.
systematically, and may include files in sub-folders.
It is similar to a bookshelf.
generated as a result of program operation. It is also
called data.
Chapter 2. Using your computer
21
Page 18
SAMSUNG Computer WF10
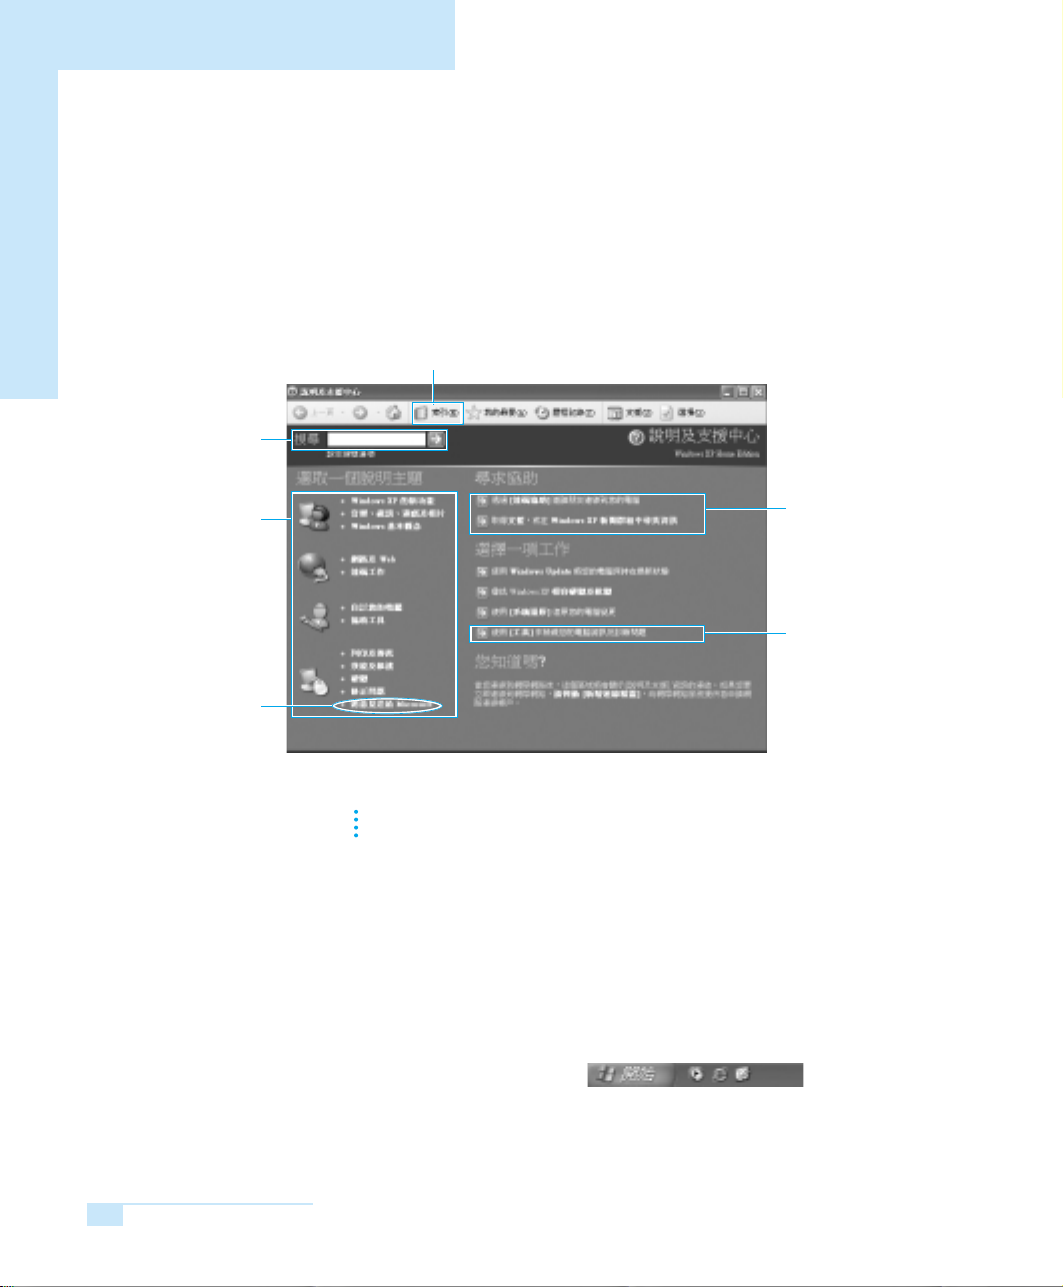
Help and Support Center
Help and Support Center provides references and troubleshooting information
regarding computer use.
Related help information
Search
appears when a search
keyword is entered.
Help Topics
Troubleshooting
Information
Click Start Help and Support.
ee
NNNNoooottttee
▼
Displays Help Index
When you click on New Functions of Windows XP > Windows XP: Using
your PC > Exercise: PC User, you will see the following HELP topics.
Display Setup
▼▼
Change Desktop Display, Activate Screen Saver, Change Display
Resolution, etc.
Connect to Support Center.
The computer has to be
connected to the Internet
Computer information can
be viewed and the problem
can be diagnosed.
SAMSUNG Computer WF10
22
Change Mouse setup.
Quick Start
▼
Start Menu Setup, Taskbar Shortcuts, Shortcuts, etc.
What is the shortcut icon? It places an icon of frequently used programs
on the taskbar for faster access.
Page 19
Document Operations
To create documents, WordPad or NotePad, which is included in Windows, or a
separate specialized word processor program can be used, such as MS Word.
Instructions for creating documents using WordPad is provided here.
Creating a New Document
■
1. Click Start All Programs Accessories WordPad.
2. Create and edit your document. For more information about WordPad, refer
to on-line Help.
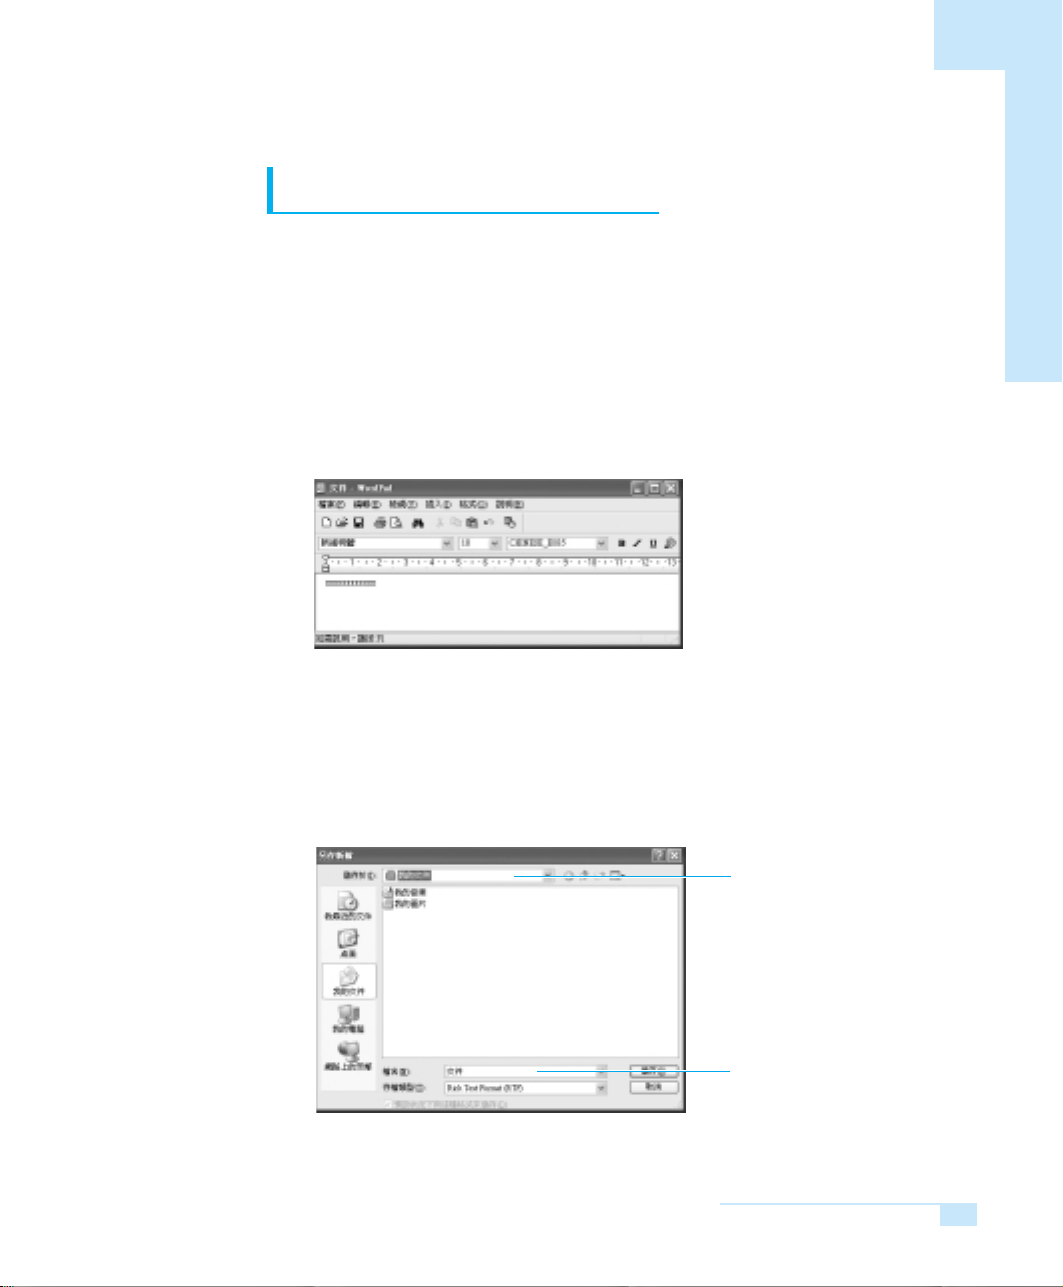
Saving a Document
■
1. Select File from the Menu, and click Save.
2. Click on the Save in field to specify a folder to save the file in, enter the
name of the file in the File Name field, and click Save.
▼
▼
▼
Save Location
Enter File Name
Chapter 2. Using your computer
23
Page 20

SAMSUNG Computer WF10
Opening a Document
■
1. Click Start All programs Accessories WordPad.
2. Select File From the Menu, and click Open.
3. Click on the Look in field and specify the folder in which the file is saved.
4. Select the file to open and click Open.
Printing a Document
■
To print a document, connect a printer to the computer.
For more information about connecting and configuring a printer,
please refer to the printer manual.
To print a WordPad document
1. Turn on the printer, and insert paper.
2. Open the WordPad file to print.
3. Select File from the Menu and select Print.
4. Click Properties, adjust the printer options accordingly, and click OK.
5. In Print window, click OK to print the document.
▼
▼
▼
SAMSUNG Computer WF10
24
Page 21
Using your CD Drive
You may enjoy various multimedia functions on your computer with use of music,
movie, game, etc. CDs.
The CD Drive is an optional item.
ee
NNNNoooottttee
CCCCaaaauuuuttttiiiioooonn
How to insert a CD
■
1. Press on the Open button on your CD Drive to eject the CD Tray.
Or press on the CD Drive Open button on your keyboard.
Your computer comes with CD Drive, DVD Drive, or DVD Combo Drive.
What is a DVD Combo?
It is a device that allows the use of both the CD-RW (read & write) and DVD
functions. The user must install the necessary programs in order to use the
DVD Combo. Please refer to the separate instruction manual for installation
and usage methods.
You must lay the computer down to use the small disks like MDs, etc.
nn
Please use the rubber platform provided when laying your computer down for
use.
Open Button
2. Hold your CD so the label shows on top and place your CD in the CD Tray.
Use the Pin on the side to fix the CD in place when using a DVD Combo.
Pin
Chapter 2. Using your computer
25
Page 22
SAMSUNG Computer WF10
Do not touch the data storage side (side opposite the label) of the CD.
nn
CCCCaaaauuuuttttiiiioooonn
3. Slightly press the CD Tray back in. Or, press the Open button again.
NNNNoooottttee
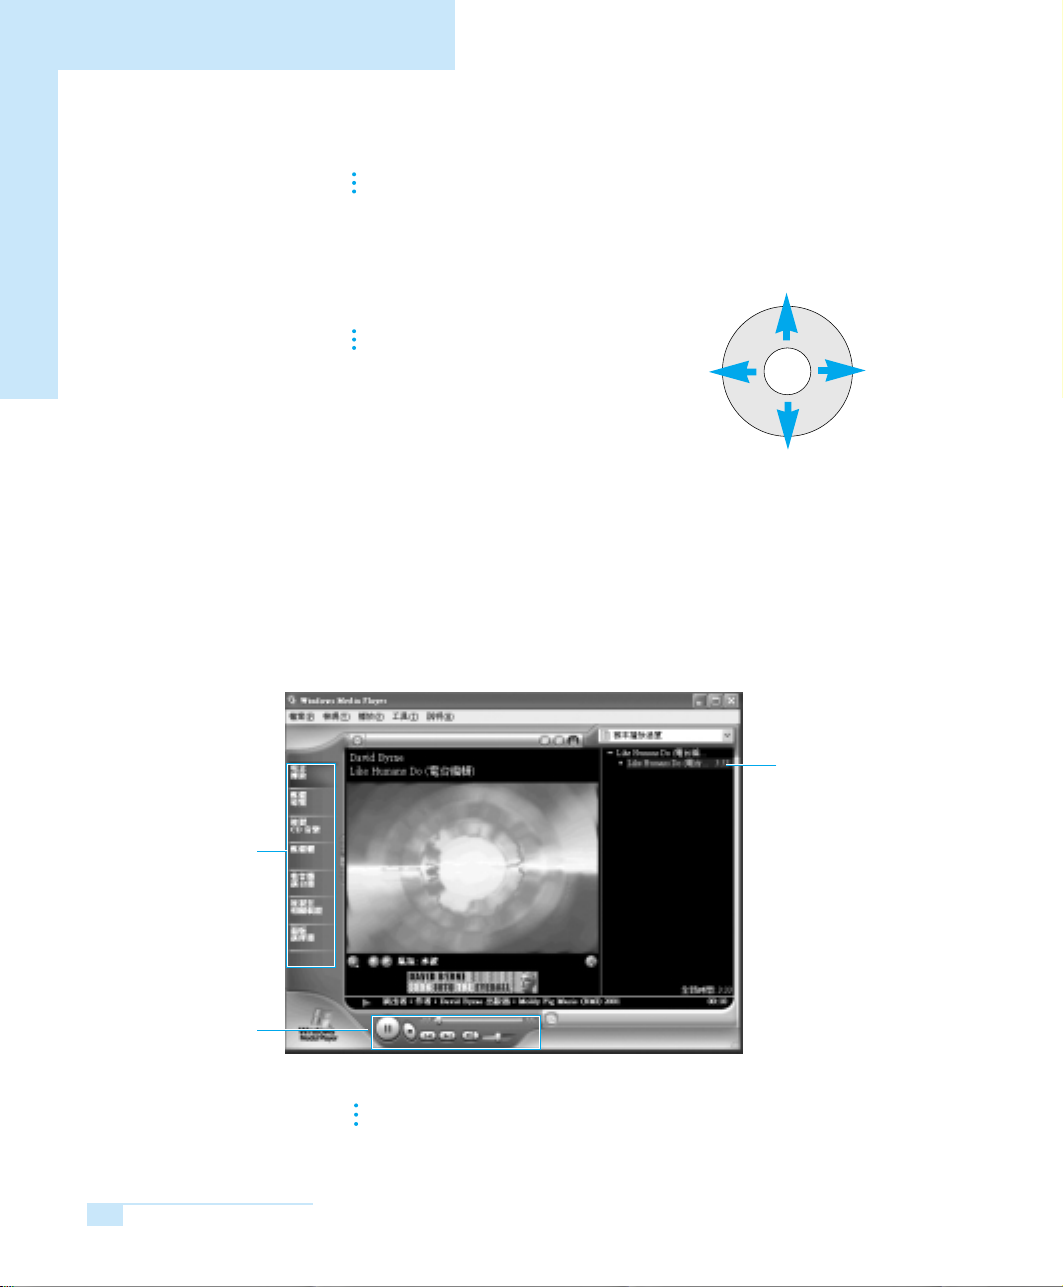
Using the Windows Media Player
The Windows Media Player enables the user to configure and play video and
audio files from the computer or the Internet.
Foreign particles on this side may prevent the CD from playing properly.
Hold the CD by its hole in the center and edge.
The CD Tray will close.
If the CD does not play properly,
ee
use a clean cloth to clean the CD.
Clean the CD from the center hole, outward.
Do not follow the circular grooves
when cleaning your CD.
Features
Playback Controls area
Click Start Windows Media Player.
Or click Start All Programs Accessories Entertainment Windows
▼
▼
▼
▼
▼
Media Player.
Playlist pane
Windows Media Player tour
ee
NNNNoooottttee
For more information about using the Windows Media Player, run the Windows
Media Player and click Help and Support > Help Topics > Windows Media
Player tour.
SAMSUNG Computer WF10
26
Page 23

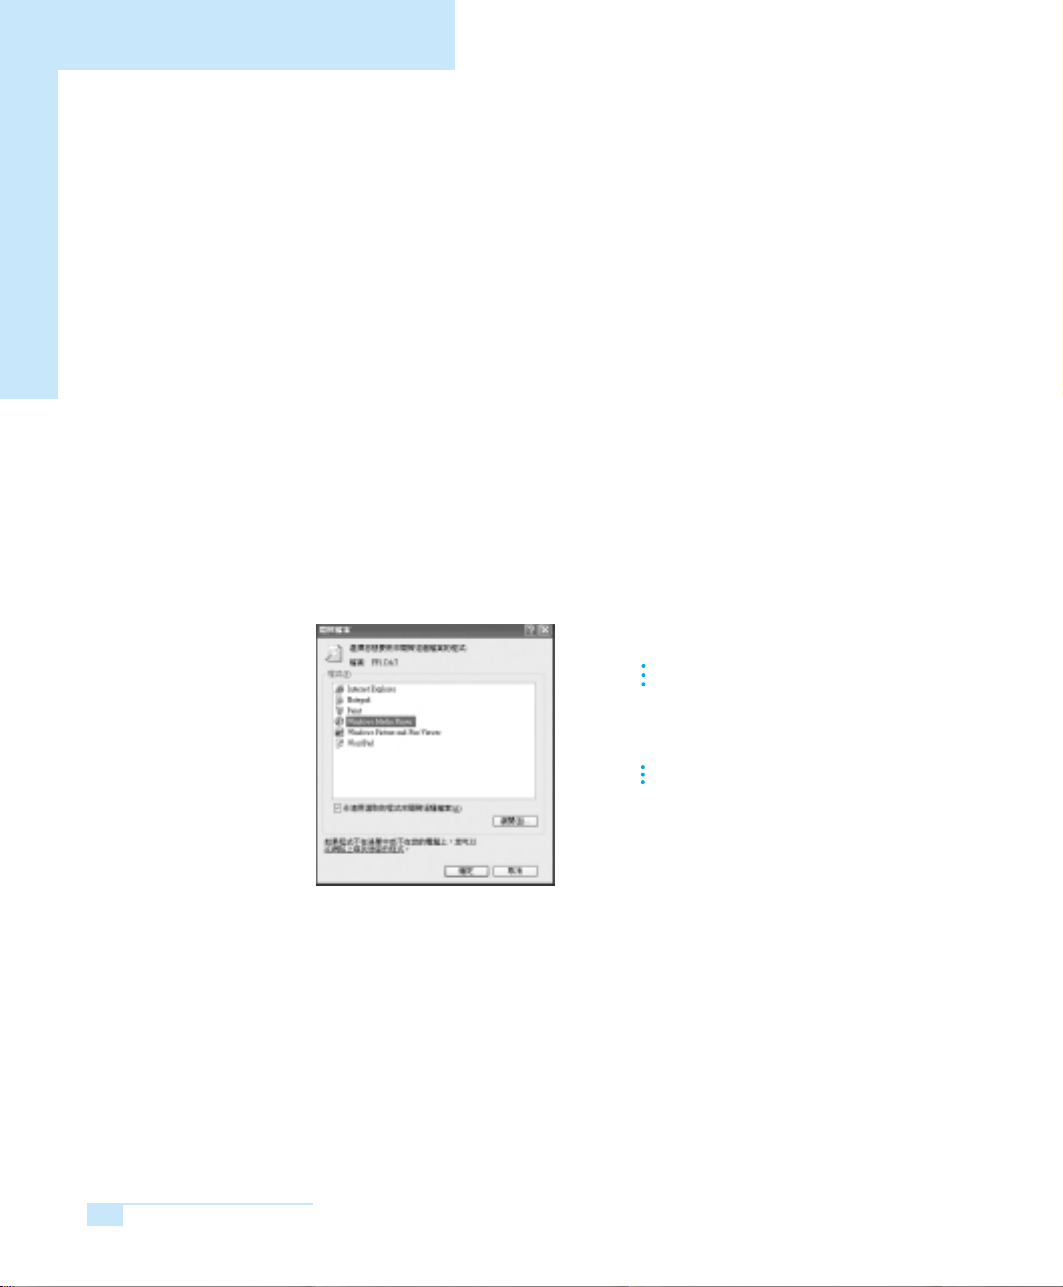
To Play an Audio CD
1. Insert an audio CD into the CD drive, and a list of all available players is
displayed automatically.
2. Select Windows Media Player and click OK to play the audio CD.
If the Always do the selected action
NNNNooootttteeee
box is checked, the selected program
automatically launches whenever an
audio CD is inserted.
How to use your PC as an Audio Player
(Using the AUDIO Button)
This computer comes with an Audio Button that allows you to listen to music on
your PC without having to execute Windows.
When you press the Audio Button with your computer turned Off;
the No Boot Audio function begins operating allowing you to use your PC
like an Audio Player.
CCCCaaaauuuuttttiiiioooonn
1. Press the AUDIO Button with your computer turned Off.
Additionally, the digital sound output port (S/PDIF- Optical) in the front will not
operate. Use the headphone jack for output.
Press the AUDIO Button.
AUDIO control buttons
Chapter 2. Using your computer
The Power Button will not function while using the AUDIO Button.
nn
27
Page 24
SAMSUNG Computer WF10
2. Press the CD Drive Open button and insert an audio CD.
3. Press the CD Tray slightly to close. The CD will begin Play.
4. Press the AUDIO Button again to exit function.
To Play a Video CD
1. Insert a video CD into the CD drive.
2. When a video window appears, double-click the MPEGAV folder.
3. Double-click the DAT file.
4. When a warning window appears, click the Open with button.
5. In the new window, click Select Program List and click OK.
6. Select the Windows Media Player, and click OK.
The video will start playing.
SAMSUNG Computer WF10
28
NNNNoooottttee
These instructions are applicable
ee
only when using a DAT file.
Instructions may vary according
to the Video CD.
If the “Always use the selected pro
gram and to open this kind of file”
box is checked, the Windows Media
Player will automatically launch
whenever a video CD is inserted.
Page 25
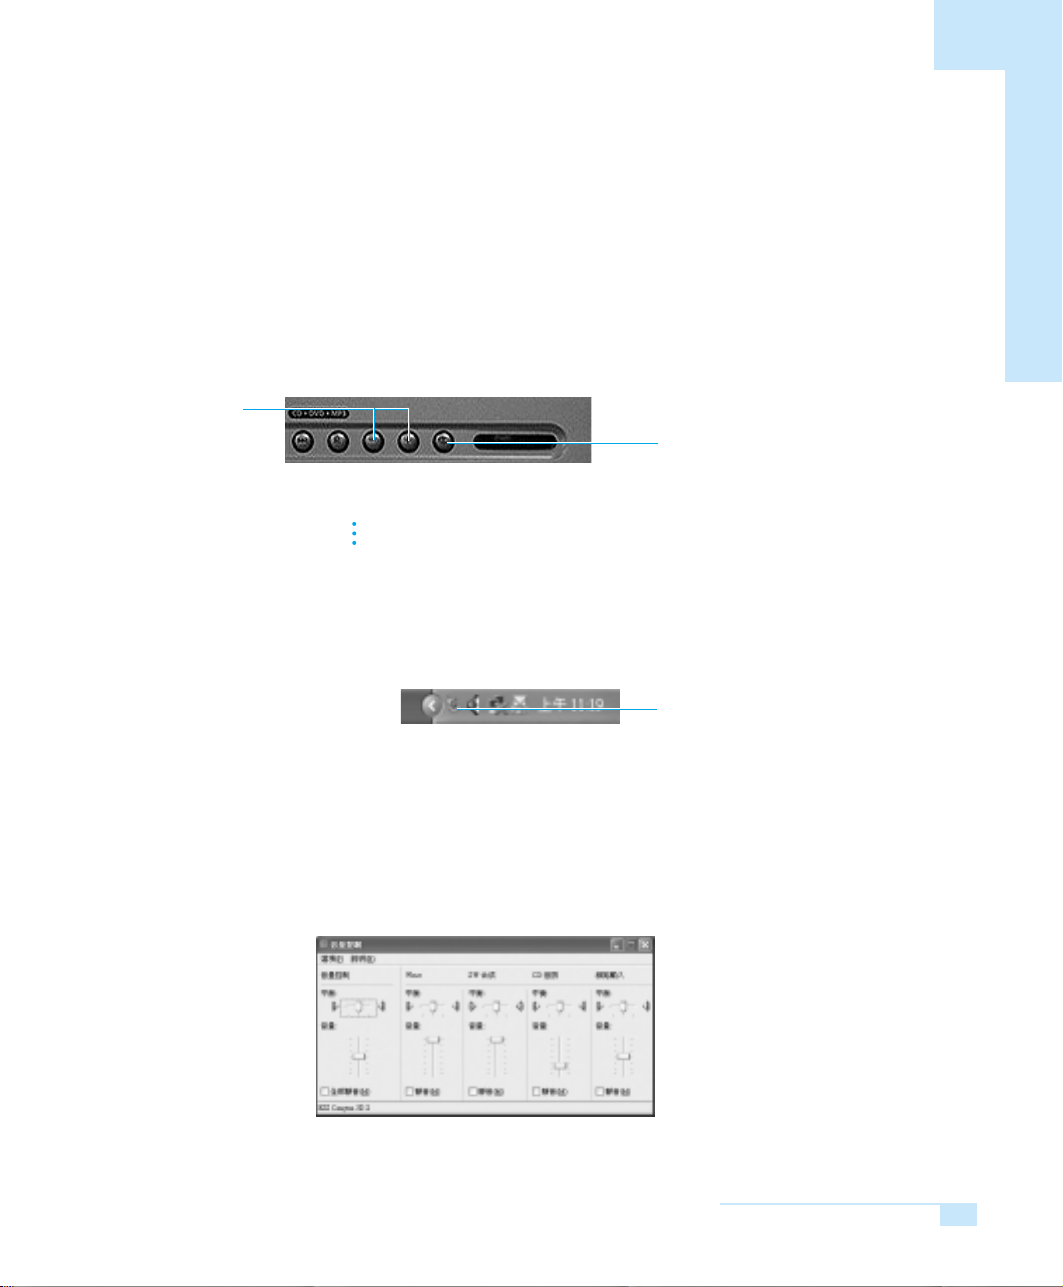
Adjust Volume
Adjusting volume
You may adjust overall volume or the volume of a particular input/output device.
Adjusting overall volume
■
Use the Volume Adjust key on your keyboard or the volume adjusts
dial on the front of the computer.
Mute
Adjusting volume in the Control Panel
NNNNooootttteeee
1. After clicking on start Control Panel, click on the Sounds, Speech,
and Audio Devices Icons.
2. Click on the Sounds and Audio Devices icon.
3. Use the Device volume adjustment bar in the Volume Tab to adjust volume.
You can create a [Volume] icon on the Taskbar by selecting
[Place volume icon in the taskbar] for more convenient use.
▼
Volume icon
To adjust volume of a particular input/output device
■
(CD Audio, Microphone, etc.)
1. Click on the Advanced button in the Device volume,
described in step3 above.
2. Adjust the volume of the device of your choice.
Chapter 2. Using your computer
29
Page 26
SAMSUNG Computer WF10
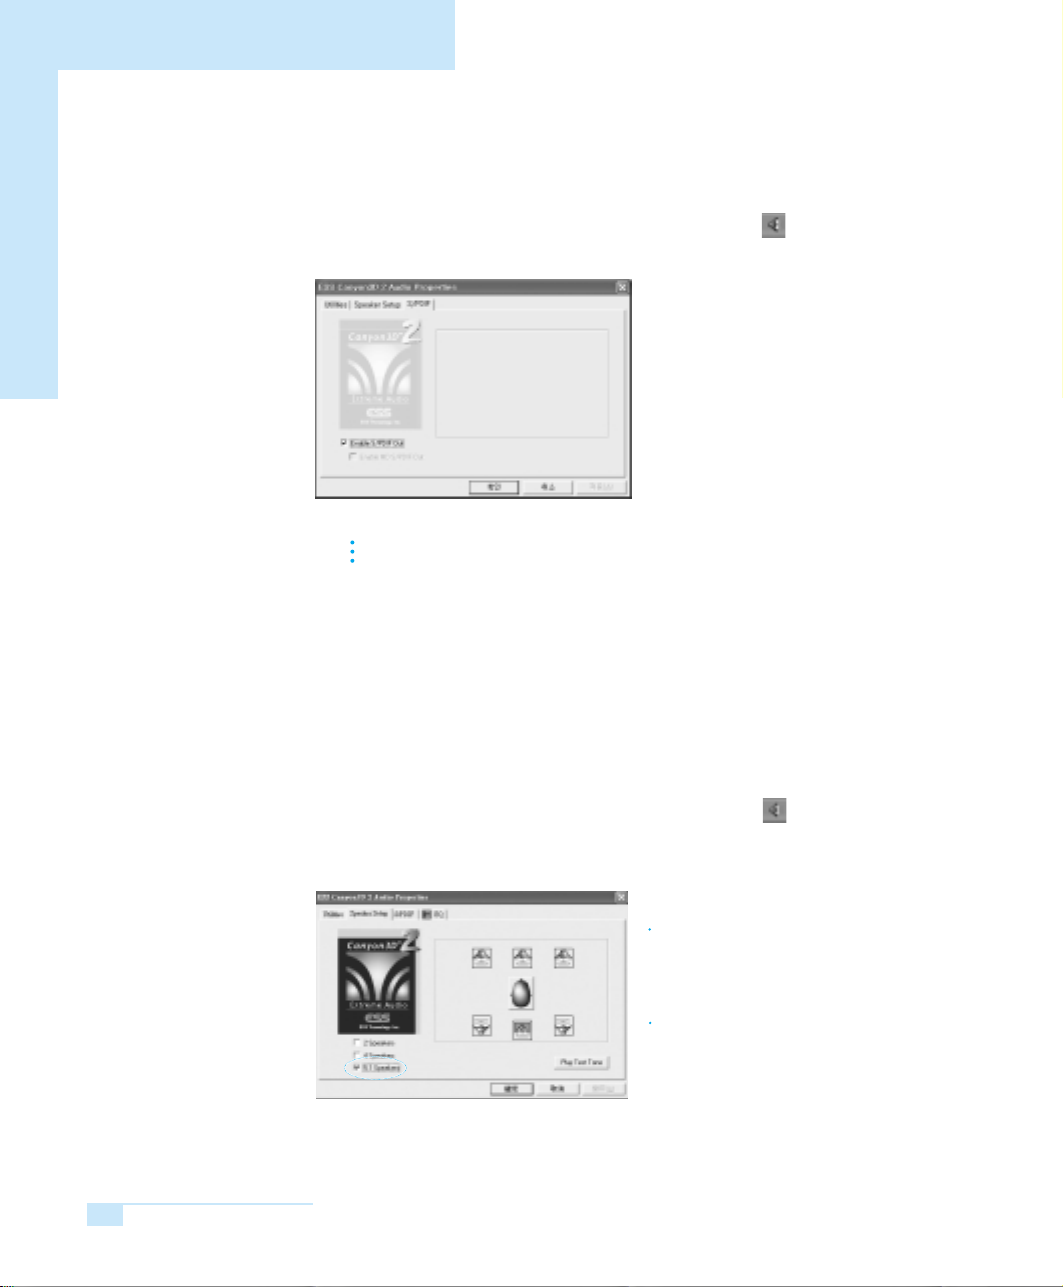
Using the front digital sound output jack(S/PDIF-Optical)
■
1. Double-click on the ESS Canyon3D 2 Audio Properties ( ) icon on the Taskbar.
2. Select the S/PDIF tab and make check the Enable S/PDIF Out item.
When using the 5.1 channel speakers, use the volume control on the speakers
ee
NNNNoooottttee
to adjust the volume.
Setting up the rear digital sound output jack
■
(S/PDIF-Coaxial)/Analog(5.1 Speakers)
The digital output jack on the rear soundcard (S/PDIF-Coaxial)/Analog
(Center/Sub Woofer Speaker) may be setup to output digital or analog sounds.
The default setting is setup on digital sound (4 Speaker).
Follow the instructions below to change to analog setting.
1. Double-click on the ESS Canyon3D 2 Audio Properties ( ) on the
Taskbar.
2. Select the Speaker Setup tab, Select 5.1 Speakers to setup for analog sound.
ee
NNNNoooottttee
The Enable S/PDIF Out on the
S/PDIF tab must be enabled to out
put digital sound.
ee
NNNNoooottttee
When using digital S/PDIF speakers,
you may use the S/PDIF-Optical port
in the front or S/PDIF-Coaxial in the
rear as they both serve the same
purpose.
SAMSUNG Computer WF10
30
Page 27
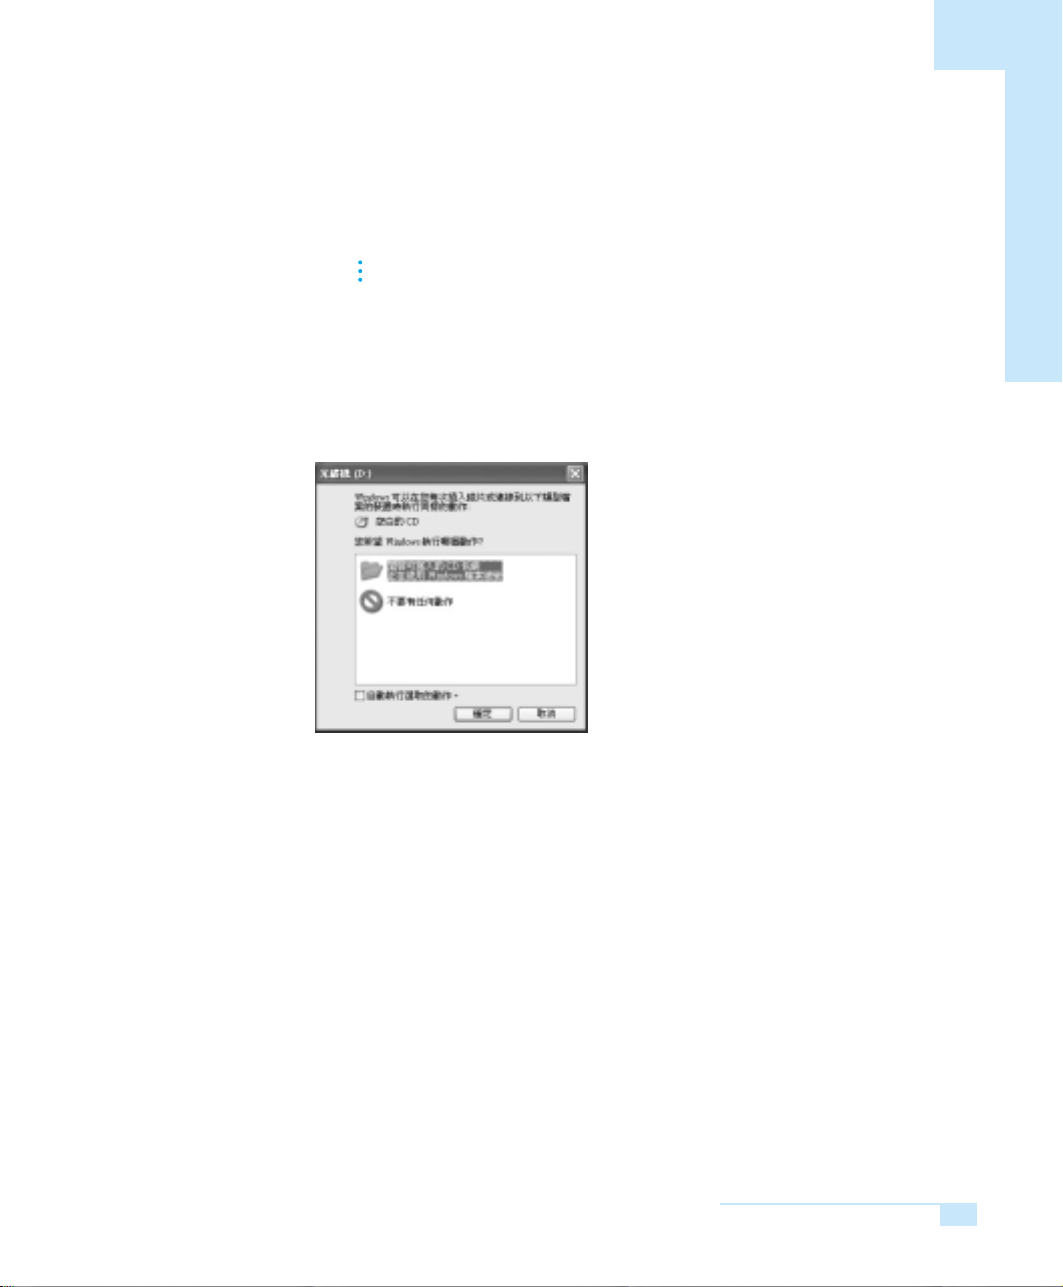
To Write Data in CD
The CD-RW drive can copy data onto a blank CD, or create an audio CD.
nn
CCCCaaaauuuuttttiiiioooonn
Writing Data
■
1. Insert a blank CD into the CD-RW drive.
2. Click Open Writable CD folder and click OK.
Writing onto blank CDs can only be done in CD-RW drives.
The CD drive window will appear automatically.
ee
NNNNoooottttee
If the “Always do the selected action”
box is checked, the selected program
automatically launches whenever a
blank CD is inserted.
3. Click Start My Computer.
▼
Chapter 2. Using your computer
31
Page 28

SAMSUNG Computer WF10
4. Select, drag and drop folders or files to copy onto the CD-ROM drive window.
Click Write Files to CD in the CD-ROM drive window.
CD-ROM drive window
2. Click Write Files to CD
1. Drag and drop folders or files to copy
My Computer window
5. When the CD Write Wizard appears, enter the CD label, and click Next.
The data will begin copying.
6. When copying is completed, a message ‘completed’ will appear and the
CD-ROM drive will open automatically.
NNNNooootttteeee
For more information on copying CDs
Click Start > Help and Support. Enter [CD copy] in the search field, and click
the Search button.
To create an audio CD
Run the Windows Media Player, click the Help menu, and select [Using
Windows Media Player > Using CDs > Creating your own CDs > To create
your own CD].
SAMSUNG Computer WF10
32
Page 29

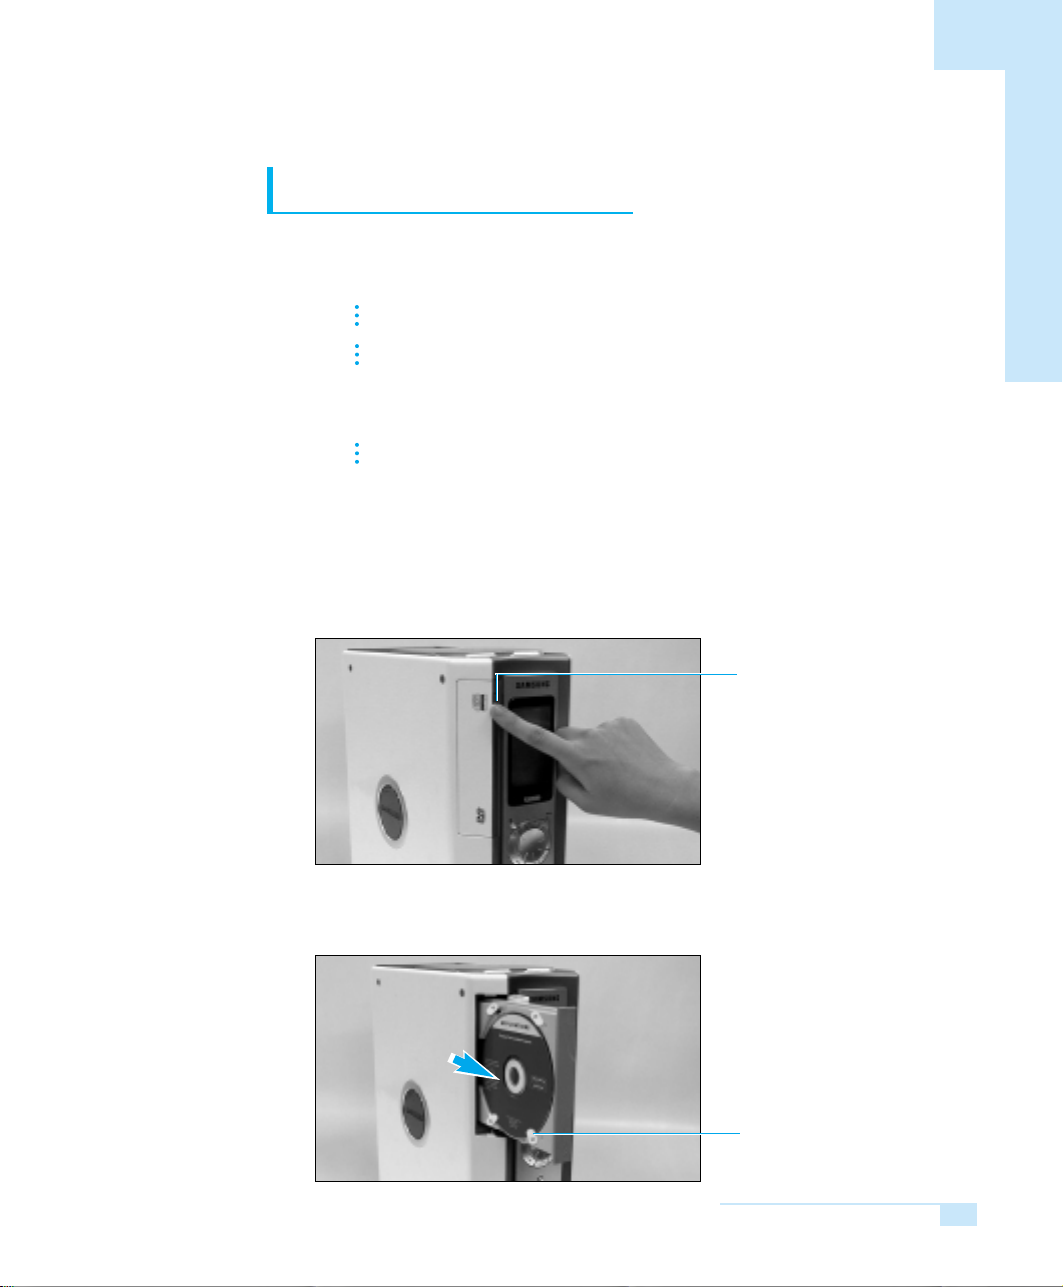
Using a PC (PCMCIA) Card
1. Press the marked section of the PC cover.
Press here.
2. Hold the Insert Display part of the PC Card outward and push inward.
The Insert Display part
faces outward
3. To remove the PC Card press the eject button on top.
Press firmly on the eject button to remove the PC Card.
Chapter 2. Using your computer
33
Page 30

SAMSUNG Computer WF10
How to play a DVD title
You must install a separate program found in the SAMSUNG DVD installation CD
in order to play a DVD title.
A DVD title may only be played in the DVD or DVD Combo drives.
ee
NNNNoooottttee
CCCCaaaauuuuttttiiiioooonn
After completing the installation, insert a DVD title in the drive and the SAMSUNG
DVD program will launch automatically to play your DVD title.
If the program doesn’t start automatically
1. Click Start All Programs SAMSUNG DVD SAMSUNG DVD.
2. A Program Control Panel and DVD Window will appear. Press the Play
The DVD or DVD Combo Drives are optional items.
nn
To play a DVD title, we recommend that you use the SAMSUNG DVD program.
▼
button.
▼
▼
Exit program
Configuration
HELP
Volume control
To enjoy digital sound from DVD program
■
Samsung DVD program default setting is setup on Analog sound.
To enjoy digital sound, system sound setting and DVD program setting must be
changed to use digital sound. (For more information about system sound setting,
refer to page 30)
Follow the instructions below to change to digital sound on DVD program.
1. When playing a DVD title, please stop it.
2. Click the configuration button on the DVD program control panel.
3. Select the Audio tab and make check “Use SPDIF Output” item instead
of “Use WaveOut” item.
4. Click OK
Show/Hide
Play
SAMSUNG Computer WF10
34
Page 31

Using the Internet
The Internet refers to a network that connects many computers worldwide like a
wide area network (WAN).
When you connect to the Internet, you will have access to endless useful information and you will be able to send/receive e-mail.
My Computer Internet Service
To connect to the Internet
■
First, you will need a network card installed.
▼▼▼
Network cards consist of a modem card that uses the telephone line and a LAN
card that uses high-speed Internet connection networks.
Second, you must register for services with an Internet Service Provider (ISP).
When using a modem card, you may register with a PC communication service
provider or ISP to receive services.
When using a LAN card in the home, you may register with high-speed ISPs to
receive Internet connection service.
Third, you must have an Internet connection program installed (browser).
Your computer comes preinstalled with Internet Explorer.
ee
NNNNoooottttee
Provider (ISP)
Worldwide Network
Chapter 2. Using your computer
35
Page 32

SAMSUNG Computer WF10
Network configuration
You need to setup the network to meet the needs of your usage environment.
You will need to have a Nework Card and Network Driver installed on your
ee
NNNNoooottttee
computer to configure the network environment.
When using high-speed Internet connections, please obtain network configu
ration instructions and necessary drivers from the service provider.
1. Start Control Panel Network and internet Connections Network
2. Select Internet Protocol (TCP/IP) and click on Properties.
Install button
To add Network
configuration items
NNNNoooottttee
▼
Connections double-click on Local Area Connection.
ee
To add Network configuration items, click on the Install button, shown in
the above illustration.
▼
▼
Internet Protocol(TCP/IP)
Properties button
▼
SAMSUNG Computer WF10
36
Page 33

3. To setup IP, select ‘Use the following IP address’, click the IP address and
DNS server address, then click OK.
However, when using the DHCP (automatic Setup), select ‘Obtain an IP
address autonmatically.
4. Restart your computer when Network setup is complete.
Chapter 2. Using your computer
37
Page 34

SAMSUNG Computer WF10
SAMSUNG Computer WF10
38
Page 35

Chapter 3
Chapter 3
Maintaining your
computer
In this section you will learn how to
manage your Hard Drive,
use the environment setup utility
“BIOS Setup” and customizing a
number of system functions
to fit your needs.
Page 36

SAMSUNG Computer WF10
Managing Hard Drive
Windows offers a utility that maintains the data stored in the Hard Disk in their
optimal status.
Inspecting a Hard Disk error
■
You can inspect external file, folder, and Hard Disk errors and make repairs to
damaged items.
1. Click on start My computer.
2. Place your mouse on the Hard Drive and click on the right mouse button and
click on Properties.
3. Select the Tools tab and click on the Check Now… button.
4. Select Check disk options and click on Start. Your computer will begin
inspecting your Hard Disk.
▼
Click on Check Now
SAMSUNG Computer WF10
40
NNNNooootttteeee
We recommend a weekly Hard Disk inspection for daily computer users
and a monthly inspection for less frequent users.
Page 37

Disk Defragmenter
■
Reorganizes the Hard Disk’s file and unused space to allow
faster program execution.
1. Click on Start All Programs Accessories System Tools Disk
▼
▼
▼
▼
Defragmenter.
2. Select the Drive that you wish to defragment and click on Defragment.
Your computer will begin defragmenting.
Select the Drive to be
defragmented.
If you are connected to a network, please log off before you execute Defrag.
CCCCaaaauuuuttttiiiioooonnnn
■
Obtaining maximum Hard Disk space
You can obtain Hard Disk space by executing Disk Cleanup.
Disk Cleanup inspects the Hard Drive and displays a list of files that may be
safely deleted such as temporary files, temporary Internet files, and unnecessary
program files.
1. Click on Start All Programs Accessories System Tools Disk
▼
▼
▼
▼
Cleanup.
Chapter 3. Maintaining your computer
41
Page 38

SAMSUNG Computer WF10
2. Select those files to be deleted and click on OK.
2. Click on “Yes” in the Disk Cleanup window. Your computer will begin Disk
Cleanup.
System Restore
■
Select files to be deleted.
SAMSUNG Computer WF10
42
This function allows you to cancel changes that may cause system
errors and revert to previous setup.
Click on Start All Programs Accessories System Tools System
Restore, select the task to be executed, then click on Next.
NNNNooootttteeee
▼
Refers to the Help and Support section for more detail about
the System Restore function.
▼
▼
▼
Select the task to
be executed.
Page 39

Checking for Viruses
A Virus is a program designed to damage the computer files and/or data.
Infections occur via the Internet or from other computers. You may use the
Norton AntiVirus Virus vaccination program.
Inspecting for Viruses
■
1. Click on Start All Programs Norton AntiVirus Norton
▼
▼
▼
AntiVirus 2002.
NNNNooootttteeee
The Norton AntiVirus Information Wizard will be displayed,
read the instruction carefully and proceed with each step.
You may update your program with the latest data via the Live
Update if you are Online after completing setup.
The Virus inspection will launch automatically once update is complete.
Click on Stop Scan to terminate inspection.
When Norton Antivirus is launched for the first time,
2. Click on Scan for Viruses on the left menu.
3. Double-click on the item to be inspected.
Double-Click to be inspected
4. If a Virus is detected, follow the Recover Wizard’s instructions to eliminate
the Virus and make repairs.
In order to inspect the lalest Viruses,
NNNNooootttteeee
You must receive the latest updates from the Norton AntiVirus Website.
Click on LiveUpdate after connecting to the Internet and you will be
automatically connected to the Norton AntiVirus Homepage for
the latest version updates.
Chapter 3. Maintaining your computer
43
Page 40

SAMSUNG Computer WF10
Managing power
You can conserve energy by using the Power Options to setup for power save
mode that will turn the components off after a set period of time, etc.
Setting up power Saving time
■
You may setup for Turn Off Monitor and Hard Disk, System standby Mode,
System hibernates Mode.
1. Click on Start Control Panel.
2. Click on Performance and Maintenance Power Options.
3. Setup the time interval under the categories of your choice, and then click on
OK.
NNNNooootttteeee
▼
▼
Setup the time interval
of your choice.
What are the System standby and System hibernates modes?
System hibernates mode allows you to conserve more power than the
System standby mode but requires more time for use.
When you restart your computer, the document and the program in use
when the System hibernates mode were executed are recorved.
The System hibernates mode may not execute properly when you are
connceted to the LAN or other high-speed Internet networks.
SAMSUNG Computer WF10
44
Once to launch the Standby Mode,
Press the Power Save button on your keyboard once to launch the
Standby Mode. The Power button display lights changes to an orange color in
the Standby Mode.
Page 41

To restart when you’re in System standby or
■
System hibernates mode
You may restart your computer by pressing on any key on your keyboard or
mouse when you are in the System standby mode.
However, because the wireless mouse will not operate, please use your wireless
keyboard.
In the System hibernates mode, press on the power button to restart your computer.
Chapter 3. Maintaining your computer
45
Page 42

SAMSUNG Computer WF10
Using the BIOS Setup Utility
Setup is an environment setup utility that sets up the computer’s environment to
be recognizable by the computer system.
To execute BIOS Setup Utility
1. Turn your computer On.
2. When the booting display appears (SAMSUNG, etc.), press the F2 key.
The setup window will be displayed.
NNNNooootttteeee
If you do not see the setup window and
your computer goes directly to Windows
Desktop, restart your computer and
repeat the above step.
BIOS Setup Utility Menu
BIOS Setup Item
Sub-Menu Display
SAMSUNG Computer WF10
46
Knowing the BIOS Setup Utility display
■
Item Specific Help
Change Key
Page 43

What can I setup in the BIOS Setup Utility?
■
You are offered 5 different menu items in Setup.
Main menu
Advanced menu
Security menu
Boot menu
Exit menu
Changing Setup
■
You may see the computer’s basic specifications or
change their setup.
You may setup peripheral devices, etc.
as well as the main chipset.
You may setup your password as well as other security
related items.
You many change booting sequence (CD, HDD, FDD)
or setup other items relative to booting.
You may setup options to exit the Setup menu.
Setup items may be changed by using your keyboard.
Execution methodFunction
To see the Help Menu
To move between
menus
,
Press F1F1
Use the left and right arrow keys
To move between
items
To change the setup
value of an item
To move from the submenu to the main menu
To return to default
settings
To Exit after saving
changes
,
+ , -
Esc
F9
Use the up and down arrow keys
Use the + and - keys
+, - Refer to the Help guide on the
right for information about each item.
Press on the Esc key
Press F9
Press F10F10
Chapter 3. Maintaining your computer
47
Page 44

SAMSUNG Computer WF10
Setting up Password
If you assign a Password, the computer will verify that password upon turning on
your computer or executing BIOS setup.
The Password can protect data and/or files in your computer by restricting use
by other users.
Setting up Password
■
1. Execute BIOS Setup Utility by referring to instructions on entering setup in the
previous section.
2. Press on the key to move to the Security menu once Setup is executed.
3. Select Set Supervisor Password and press Enter.
4. Input your password in the Enter New Password box and press Enter.
Set Supervisor Password
Enter New Passord [ ]
Confirm New Passord [ ]
NNNNooootttteeee
You may use up to 8 characters or numbers for
your password.
You may not use any special characters.
SAMSUNG Computer WF10
48
5. Reenter your password in the Confirm New Password box and press Enter.
6. Press Enter in the Setup Notice window.
7. Press F10, and hit Enter.
You must now provide your Password whenever you turn your computer on or
enter BIOS Setup Utility.
If you fail to provide the correct Password, three consecutive times,
NNNNooootttteeee
Canceling Password
■
1. Repeat step 1 to 3 in the above instructions on setting up your Password.
2. Input the Current Password and press Enter.
you must restart your computer and reenter the correct Password.
Leave both the Enter New Password box and Confirm New Password box
empty and press Enter.
Page 45

3. Press Enter in the Setup Notice window.
4. Press F10 and then hit Enter.
When you forget Password
■
You must change the Password jumper on your computer motherboard
and delete the Password.
1. Turn your computer off and open the computer case.
(Refer to Chapter 4 disassembling computer)
2. Change the Motherboard jumper no. 1 (JP1) jumper to 2-3.
Jumper no. 1 (JP1)
1-2 to
NNNNooootttteeee
2-3
▼
The displays number 1.
3. Turn your computer on.
You will see the message, The system Password has been deleted.
Press <F1> to continue and <F2> to enter BIOS Setup Utility.
4. Shut down your computer and get the jumper back to its original place(1-2).
The system password has been deleted.
5. Assemble your computer.
Chapter 3. Maintaining your computer
49
Page 46

SAMSUNG Computer WF10
Editing the booting sequence
The computer’s booting sequence are setup in the order of CD –ROM Drive,
Removable Devices, and Hard Drive.
This sequence may be changed according to the user’s needs.
For example, below shows you how you can setup your computer to boot up with
the Hard Drive first.
1. Refer to Setup execution instruction in the previous section to enter BIOS
Setup Utility.
2. Once you enter Setup, press on the key to move to the Boot menu.
3. Use the key to move to Set Boot Order and press Enter.
4. Use the key to move to Hard Drive.
5. Use the + key to move Hard Drive to the top.
SAMSUNG Computer WF10
50
CD/DVD-ROM Drive
Removable Devices
Hard Drive
Netwook Boot
MBA UNDI(BUS2 Slot2)
6. Press F10 and hit Enter. Now your computer will boot up with the Hard Drive.
Use the + key to move item to
the top.
Page 47

Changing the wireless switch
The computer, wireless mouse and wireless keyboard have a switch that can
send and receive input/output signals.
If you are using more than one computer and the switch setup is identical; the
signals will get mixed, causing a computer error. In such circumstances, the computer, keyboard, and mouse switch must be changed to different numbers.
These instructions regarding the wireless switch are only applicable to
NNNNooootttteeee
Changing the wireless switch number
■
models that come with a wireless mouse/keyboard.
Location of the computer wireless switch
Location of the keyboard wireless switch
Location of the keyboard
wireless switch
Location of the mouse wireless switch
Location of the mouse
wireless switch
1. Open the computer cover by referring to Chapter 4 disassembling computer.
2. Change the switch numbers for your Computer, Keyboard, and Mouse.
The switch setup for the components (Computer, Keyboard, Mouse) of a
CCCCaaaauuuuttttiiiioooonn
nn
single computer must be identical.
You may not use Wireless Keyboard/Mouse and standard Keyboard/Mouse
at the same time.
Please refer to Chapter 5 Mouse/Keyboard, to use these wired/wireless
devices simultaneously.
Chapter 3. Maintaining your computer
51
Page 48

SAMSUNG Computer WF10
Using two monitors
You may use 2 monitors on your computer by using the TwinView function.
The TwinView function may be used only with models that come with
NNNNooootttteeee
1. Click on the right button of your mouse on the Desktop and click on
2. Select the Settings tab and click on Advanced.
3. Select the mode of your choice in the TwinView tab and click on Apply.
Select the mode of
your choice
graphics cards that support this function.
Properties.
The TwinView function consists of
three different modes.
■
Standard Mode
Displays through one monitor only.
The current setting.
■
Copy Mode
Identical displays are output on
two monitors.
■
Horizontal/Vertical Span
One display is divided into two and
displayed on 2 different monitors.
SAMSUNG Computer WF10
52
Example
■
Copy Mode Horizontal Span Vertical Span
Page 49

Chapter4
Chapter4
Upgrading your
computer
This section shows you how to disassemble
your PC for system upgrades.
Page 50

SAMSUNG Computer WF10
Disassembling computer
You will need to open the computer cover to replace your parts or upgrade your
PC. The components and/or internal architecture may vary depending on optional specifications.
gg
WWWWaaaarrrrnnnniiiinnnngg
First, turn your computer off and unplug all the cables that are connected
to the power cord.
There is a danger for serious potential damage when your computer is
exposed to electric shock. Please unplug the power cord before your begin
disassembling. Additionally, parts may be damaged by small amounts of static
electricity flowing in your body. Please take special care when handling.
(Electric discharge on the metal parts)
Your computer consists of many sharp components. Please handle carefully.
If you don't feel confident about upgrading procedures, please contact the
customer service support center for assistance.
Disassembling the pedestal
■
1. Lay your computer on its back.
2. Pull the pedestal upward while pulling
the pedestal’s latch forward. Separate
the pedestal and your computer.
Pedestal Latch
Opening the cover
■
1. Lay your computer on its right side.
2. After lift the Open Cover Latch(Lid
Latch Ring) and pull it about 1cm
towards your body with your right hand
while holding the computer down with
your left hand.
Open Cover Latch
(Lid Latch Ring)
SAMSUNG Computer WF10
54
Page 51

3. Pull the cover open while holding the
part with arrows.
The Cover Stopper (Lid safety Latch)
will pop out when you open the cover.
Cover Stopper (Lid safety Latch)
4. To reassemble the cover, pull the Cover
Stopper(Lid safety Latch) into the
inward and close the cover.
And push the marked “PUSH”.
Disassembling the power supply unit
■
1. Unplug the power cords that is connected to the Motherboard as well as
various drives.
2. Unscrew the 2 screws, which are on the
power supply unit to take out the unit.
3. Pull the power supply unit upward and
bend it slightly backward.
4. After pushing it about 1cm, then pull to
remove it from the cover.
gg
WWWWaaaarrrrnnnniiiinnnngg
Please maintain this interval when assem
bling.
Chapter 4. Upgrading your computer
55
Page 52

Samsung Computer WF10
SAMSUNG Computer WF10
Computer’s internal components
The internal architecture and/or components of your computer may vary
NNNNooootttteeee
according to optional specifications.
CD Drive Ventilation fan Motherboard
Wireless RF
module
(optional)
SAMSUNG Computer WF10
56
Expansion card slot
Power supply unit Hard Drive
Page 53

Motherboard components
Cooling fan/Heat sink/
CPU(Central Processing Unit)
Secondary power connector
AMR card slot
AGP card slot
PCI card slot
Front I/O board connector
(IEEE 1394)
Ventilation fan power
connector
Cooling fan power connector
Memory socket
Main power connector
Primary drive connector
(PRI IDE)
Secondary drive connector
(SEC IDE)
Password delete jumper (JP1)
Front I/O board connector (USB)
Wake Up LAN connector
Wireless RF module connector Front power/LCD connector
Chapter 4. Upgrading your computer
Front PCMCIA connector
57
Page 54

SAMSUNG Computer WF10
Adding various cards
Check for available expansion slots on your computer and verify whether
the particular card is compatible with your computer.
1. Remove the fixed Bracket on the expansion slot you wish to use.
Place a cross-shaped screwdriver in the groove and flip slightly towards
the front.
SAMSUNG Computer WF10
58
ee
NNNNoooottttee
2. Open the Computer Cover.
3. Remove the Screws to release the bracket.
Your computer’s back view may vary according to optional specifications
(Refer to instructions on disassembling computer)
Page 55

4. Place your card in the slot and push until it is completely inserted.
The computer may not function properly, or the motherboard may be dam-
gg
WWWWaaaarrrrnnnniiiinnnngg
WWWWaaaarrrrnnnniiiinnnngg
aged if the card is not inserted properly. Please take special care to insert
the card properly.
gg
If it is difficult to insert the card because the connectors are too long
You can insert the card more easily if you rest the cover on the Cover
Stopper(Lid safety Latch).
Tilt the cover to lay it on the Cover
Stopper(Lid Safety Latch).
5. Use the screws removed from the brackets to fix the card in place.
6. Read the user’s manual that came with the particular card to Connect the
Internal Cables.
7. Close the cover and Connect the External Cables such as power cord, etc.
8. Turn your computer On. Refer to the card’s user’s manual to install necessary
drivers and/or programs.
Chapter 4. Upgrading your computer
59
Page 56

SAMSUNG Computer WF10
Upgrading memory
Check for available memory expansion slots on your motherboard. Prepare
memory chips that are compatible with your computer.
1. Open the Computer Cover.
(Refer to instructions on disassembling computer)
2. Push the clips on each side of the memory socket.
Clips
SAMSUNG Computer WF10
60
3. Place the memory chip in the socket and push inward until it is inserted
properly.
Your computer will not operate properly if the memory chip is not inserted
properly.
Place the memory chip in the
correct position and push.
4. Pull the clips up to fix the memory in place.
To remove the memory chip, push the clips on each side down and then
remove the chip from the socket.
Page 57

Replacing/adding drives
Replacing the Hard Drive
1. Open the Computer Cover.
(Refer to instructions on disassembling computer)
2. Unplug the Hard Drive cable and then unscrew the 2 screws to remove
the Hard Drive Case.
3. Pull the Hard Drive case about 1cm upward and remove it by pushing it
inward.
Chapter 4. Upgrading your computer
61
Page 58

SAMSUNG Computer WF10
4. Remove the 2 screws on each side of the Hard Drive case and remove the Old
Hard Drive. Insert the New Hard Drive and mount it in place with 4 screws.
5. Select the new Hard Drive Jumper as the Master and install the Hard Drive
bracket with 2 screws.
(Please refer to the Hard Drive user’s manual or instructional label)
6. Connect the Signal Ribbon Cable and Power Cable.
SAMSUNG Computer WF10
62
7. Assemble the Computer Cover and Pedestal.
8. Refer to the new Hard Drive user’s manual to conduct necessary setup
procedures.
Page 59

Adding additional Hard Drive
This computer comes with 1 Hard Drive. You may add 1 additional Hard Drive to
your computer.
1. Open the Computer Cover.
(Refer to instructions on disassembling computer)
2. Install the Additional Hard Drive bracket on the right side of the exiting
Hard Drive using 2 screws.
3. Assign the new Hard Drive jumper to Slave.
(Please refer to the Hard Drive user’s manual or instructional label)
4. Unplug the Signal and Power Cables from the existing Hard Drive, and
arrange the signal cables to be shown the slave connector.
5. After connecting the Signal Ribbon Cable (the Master end) and Power
cable to the existing Hard Drive, connecting the Signal Ribbon Cable
(the Slave end) and Power Cable on the new Hard Drive.
Slave connector
Chapter 4. Upgrading your computer
63
Page 60

SAMSUNG Computer WF10
6. Insert the new Hard Drive in the Hard Drive expansion slot.
7. Push the 2 spots on the bottom, which is hooked on and remove by pulling
the front cover towards the front.
Mount it properly according
to the additional Hard Drive
bracket suspension ledge
and hook it on.
The spots which are
SAMSUNG Computer WF10
64
hooked on
marked“PUSH”
The section that
hooks on bottom
8. Press the spots marked “PUSH” on the cover and place the 2 screws in the
grooves to mount the Hard Drive in place.
ee
NNNNoooottttee
To place the front cover on,
hook the bottorn section in
place first then push the top
section to snap on.
gg
WWWWaaaarrrrnnnniiiinnnngg
The cover will not hook in
place if the cables are left
on top of the additional Hard
The section that
hooks on top
Drive. Organize the cables
to prevent them from getting
in the way.
Page 61

Replacing the CD Drive
This section will show you how to replace your existing CD Drive with another CD
Drive, CD-RW, or DVD-Combo.
When replacing the CD Drive, a certain CD Drive door may not function
nn
CCCCaaaauuuuttttiiiioooonn
1. Open the Computer Cover. (Refer to instructions on disassembling computer)
2. Unplug the Power Cable/Signal Ribbon Cable/Sound Output Cable.
3. Remove the CD Drive bracket by unscrewing the 4 screws that holds
the bracket in place.
properly according to CD Drive type. Please take care to buy a new CD Drive.
Chapter 4. Upgrading your computer
65
Page 62

SAMSUNG Computer WF10
4. Assign the new CD Drive Jumper as the Master and insert it in the bracket.
5. Mount CD bracket in place as below illustration, the right side cover of the
bracket to be shown in outward.
And fix CD Drive right side by screwing the 2 screws and then fix the opposite
side with 2 screws.
SAMSUNG Computer WF10
66
Cover of the bracket to be
shown in outward.
6. Connect the Power Cable/Signal Ribbon Cable/Sound Output Cable.
Page 63

Setting up your Drive sequence
You must setup the priority sequencing of the newly installed Drives so that your
computer can recognize them.
What is the Drive priority sequencing?
■
The Drive Connector(Ribbon Cable) and Jumper Setup determine the priority
sequencing for Drive recognition.
You may connect 2 Hard Drives to the primary connector. The CD drive is
ee
NNNNoooottttee
First, units that are connected to the
Primary Drive connector are recognized
before those that are connected to the
secondary drive connector.
connected to the secondary connector.
The units are recognized in the primary Drive’s as MASTER Drive, SLAVE
Drive, and the secondary Drive’s as MASTER drive sequence.
However, the CD Drive is recognized as the second, after the Master Drive is
connected to the primary Drive connector.
Secondary Drive
Connector
(SEC IDE)
Primary Drive Connector
(PRI IDE)
Second, among the 2 drives connected to the drive cable, the drive setup as
the Master is recognized before the drive setup as the Slave.
You may setup the recognition sequence by referring to the Hard Drive user’s
manual or instructional label.
Chapter 4. Upgrading your computer
67
Page 64

SAMSUNG Computer WF10
Example of a drive sequence setup
■
Sequence 1 2 3
Cable type Primary Hard Drive cable Secondary Hard Drive cable
Jumper setup Master Slave Master
Current status Hard Drive CD Drive
Drive text (C:\ ) (D:\ )
With 1 additional Drive Hard Drive Added Hard Drive CD Drive
text Hard Drive (C:\ ) (E:\ ) (D:\ )
Hard Drive over 60GB may be divided into 2 different partition drives
gg
WWWWaaaarrrrnnnniiiinnnngg
Signal cable guide
■
You may be equipped with an 80PIN or 40PIN signal ribbon cable.
The 80PIN cable is a yellow cable that is used as the Primary Hard Drive cable
and has preassigned Master and Slave positions.
The 40PIN cable assigns drive sequence according to the drive’s jumper rather
than the cable itself (cable select).
(C:\ and D:\). In such as the case, the next drive text will fall into the next
alphabet sequence (e.g. E, F).
SAMSUNG Computer WF10
68
Example) 80PIN cable
SYSTEM (Blue)
Connects to the Primary Hard Drive
connector on the Motherboard
SLAVE (Grey)
Connects to the
Slave drive
MASTER (Black)
Connects to the
Master drive
Page 65

Cooling fan
Cooling fan power
connector
Replacing the CPU
When you disassemble the CPU
gg
WWWWaaaarrrrnnnniiiinnnngg
1. Open the Computer Cover. (Refer to instructions on disassembling computer)
2. Unplug the Cooling Fan Power Cable.
3. Flip the Cooling Fan Outward while pushing on the clips to remove the unit.
The heat sink and CPU have been plastered together with heat transfer
material. Using excessive force to disassemble these parts may result in
damage to the CPU.
Operate the computer for a sufficient period of time so that the heat created
softens the adhesive material, before disassembling the units.
Flip to the right and pull out while
pushing on the clip handle.
Heat sink
Pull the socket lever up
4. Detach the Cooling Fan and Heat Sink. (Refer to above illustration)
5. Pull the socket lever on the side of the socket straight up(90 ), while pushing it
slightly left, to remove the CPU.
CPU
Chapter 4. Upgrading your computer
69
Page 66

SAMSUNG Computer WF10
6. Replace with a new CPU.
You must line up the PIN on the socket with the PIN on the CPU when
inserting the CPU in place.
7. Lock the CPU socket lever in place and attach the Heat Sink and Cooling Fan.
8. Hook one of the Cooling Fan’s Clips then push on the handle to fix in place.
Fix the remaining clip in place using the same procedure.
Line up the section of the socket
without PIN holes with the section of
the CPU marked with a , to insert.
▼
SAMSUNG Computer WF10
70
9. Connect the Cooling Fan Power Cable. CPU replacement is complete.
Page 67

Chapter 5
Chapter 5
Troubleshooting
This section describes how to troubleshoot
problems on your computer and recover
regular operations.
Page 68

SAMSUNG Computer WF10
Are you having problems with your PC?
When your computer is not functioning properly, follow the procedures below.
1. Check connections.
Check to confirm those peripheral devices such as the monitor, printer,
speaker, power cable, etc. are properly connected to your computer.
2. Check for Viruses.
Start All Programs Norton AntiVirus Norton AntiVirus 2002.
▼
▼
▼
SAMSUNG Computer WF10
72
3. Using Windows Help.
Click Start Help and Support.
▼
Page 69

4. Program reinstallation
Use the System Software CD to reinstall the programs and/or drivers for
which you are experiencing errors.
If the problem persists, use the System Recovery CD to reinstall Windows.
SYSTEM SOFTWARE CD display
SYSTEM RECOVERY CD display
To prevent errors on your computer
NNNNooootttteeee
Use the computer management programs frequently to maintain your system at its
peak. (Refer to Chapter 3 Maintaining your computer)
Chapter 5. Troubleshooting
73
Page 70

SAMSUNG Computer WF10
Reinstalling your Software
If you are experiencing problems with certain software, you may use the System
Software CD to reinstall that particular software(s). If the problem persists, try
reinstalling the proper device driver.
Running the System Software CD
■
Insert the System Software CD in your CD drive and the install window will
appear automatically.
You may install
device Drivers.
SAMSUNG Computer WF10
74
You may install programs.
Installing programs
■
1. Click Install Program in the Start Menu.
2. Click Standard or User Installation.
Standard Installation automatically installs software.
User Installation may be used to change install location and various
setup values.
You may not install some of the programs with Standard install.
NNNNooootttteeee
Use User installation for these particular programs.
Page 71

Installing drivers
■
1. Click Install Driver in the Start Menu.
2. Click the driver of your choice and click Install.
Program installation display
NNNNooootttteeee
For drivers that do not appear on the installation window and drivers for in other
operating systems except Windows XP?
Refer to the instructions on the System Software CD jacket to install.
Chapter 5. Troubleshooting
75
Page 72

SAMSUNG Computer WF10
Reinstalling Windows XP
If Windows do not operate properly, you may use your System Recovery CD to
reinstall the Operating System(Windows).
If you reinstalled Windows, the colors on your computer display will not be
nn
CCCCaaaauuuuttttiiiioooonn
■
1. Place the System Recovery in the CD Drive.
expressed properly. Please reinstall the video drivers and/or application from your
software CD to correct this problem.
Installing Windows
The main installation screen will appear automatically.
SAMSUNG Computer WF10
76
2. Click on either the “Standard” or “User” install option. Windows will now be
installed.
Standard Installation is setup to reinstall Windows while preserving existing
data,
User Installation enables the user to format or partition the hard disk as
desired when reinstalling Windows.
Page 73

WWWWaaaarrrrnnnniiiinnnngg
Installing Windows
■
You may boot up with the System Recovery CD to reinstall Windows.
WWWWaaaarrrrnnnniiiinnnngg
1. Place the System Recovery CD in the CD Drive.
2. When you see the message “Press any key to boot from CD”, press any
3. The Windows installation display will appear. You can now install Windows.
data. Please backup all important data before you reinstall Windows.
When you use the System Recovery CD to boot up your computer.
gg
You will only be able to use the User Installation option and the installation process
and windows display may be different from those used in the standard Windows
environment. Please refer to instructions on Windows installation.
key on your keyboard.
If the Windows installation display does not appear, restart your computer and
repeat the above steps.
When you choose User Installation you pose the risk of deleting existing
gg
Chapter 5. Troubleshooting
77
Page 74

SAMSUNG Computer WF10
Q&A
The following is frequently asked questions regarding the use of your computer,
and their answers.
When turning your computer ON
Q I’m getting the ‘Invalid system disk, Replace the disk, and then press
any key’ message.
A You have a general diskette in the floppy drive. Take the general diskette
out or replace with a booting diskette and press any key on the keyboard to
resume.
Q I’m getting the ‘Operating system not found’ message.
This message appears when there is an error in the Hard Drive connection
or BIOS Setup Utility. Please check these items.
A1 Check if the Hard Drive signal cable and power cable are connected
properly.
A2 Check if the BIOS Setup Utility recognizes the Hard Drive properly.
The primary menu’s primary IDE master category is setup for automatic
recognition.
Drive instruction booklet and setup the primary IDE master category.
A3 Check if the Hard Drive jumper setup is correct.
(Refer to Chapter 4 Setting up your drive sequence)
A4 The Hard Drive operating system is damaged. Please reinstall Windows.
SAMSUNG Computer WF10
78
Q I’m getting the ‘Press <F1> to continue and <F2> to return to install’
message.
A4 The BIOS Setup Utility setup and system environment are not compatible.
Reset to meet system environment.
1. Refer to Chapter 4 to run BIOS Setup Utility.
2. Press <F9> to enter Setup Confirmation.
Select <Yes> and press <Enter>.
If devices have been added, reset items relative to that driver.
3. Press <F10> to enter Setup Confirmation.
Select <Yes> and press <Enter> to restart.
Page 75

Q I’m getting the ‘CMOS Checksum error’ message.
A This message may appear when the CMOS backup battery on the mother
board is dead. Refer to disassembling computer and replace the battery.
Then setup the BIOS Setup Utility accordingly.
Q My computer is booting up in Safe Mode
This message appears when there is an error in the Hard Drive connection
or BIOS Setup Utility. Please check these items.
What is the Safe Mode?
NNNNooootttteeee
A1 This may occur if Windows was not shut down properly.
A2 This may occur if system environment has not been recognized properly.
A3 Check for device errors.
When your computer detects a problem while booting, it boots up with Windows
default settings. You may not be able to use certain functions in this mode.
You should use the start > Turn Off Computer menu to shut down your
computer.
1. Boot up in the Safe Mode.
2. Run Check Disk as described in Chapter 3 Maintaining your computer.
3. Windows will run properly when you reboot your computer.
1. Click start > Control Panel > Performance and Maintenance > System.
2. Click on Device Manger in the Hardware tab and reinstall the driver for
the device experiencing the error.
When turning your computer Off
Q My computer will not shut down.
A You may use the power button to shut your computer Off if it will not shut
down in Windows. However, you must press on the power button for more
than 4 seconds if the power button is setup for power save. Check Disk will
run automatically when you restart your computer after shutting down in this
manner.
Chapter 5. Troubleshooting
79
Page 76

SAMSUNG Computer WF10
Windows and Windows Displays
Q My computer has frozen while using an application program.
A1 There is an error in the application program.
Press <Ctrl>,<Alt>, <Del> simultaneously and click End Task in the
[Windows Task Manager] window.
A2 You must Restart your computer when you run into a Windows error.
Press the power button to Restart your computer.
Q My monitor is blink.
A1 Check if the monitor power is On.
A2 Check if the monitor signal cable is properly connected to the port in the
back of the computer.
A3 Try adjusting the display brightness on your monitor.
A4 For LCD monitors, check whether the setup is on digital or analog and try
resetting the value.
For WF10 monitors (MCX15A), refer to the Online monitor user’s manual.
Click start > All Programs > Online Manual.
SAMSUNG Computer WF10
80
Mouse and keyboard
Q My mouse will not work.
A1 Check to see if the mouse cable is connected properly to the mouse port
in the back of the computer.
A mouse with USB ports may be connected to any USB port. However
a PS/2 mouse must be connected to the PS/2 mouse port.
You must restart the computer after connection to use PS/2 type mice.
A2 Delete the mouse driver in the Device Manager and reboot your computer
1. Click start > Control Panel > Performance and Maintenance > System.
2. Click Device Manger > Mice and other pointing devices in the
Hardware tab and delete the mouse driver.
3. Restart your computer and check if the cursor is moving properly.
A3 For wireless mice, check if the battery has power. Then check whether the
computer and wireless mouse switch numbers are identical.
Page 77

Q I can’t input anything on my keyboard
A1 Check if the keyboard cable is connected properly to the keyboard port in
the back of your computer.
A keyboard with USB ports may be connected to any USB port. However,
a PS/2 keyboard must be connected to the PS/2 keyboard port.
A2 Press the <Num Lock> key several times to check whether the Num Lock
LED lights.
If this does not function properly, it means that your computer is down.
You must reboot your computer.
A3 For wireless keyboard, check if the battery has power. Then check whether
the computer and wireless keyboard switch numbers are identical.
Q What do I do to use wireless keyboard/mouse along with the standard
keyboard/mouse.
You must change the BIOS Setup Utility setup values as follows in order to
use a wireless keyboard/mouse with USB keyboard/mouse, or USB
keyboard/mouse with PS/2 keyboard/mouse.
A You can use the devices after changing the BIOS Setup Utility Advanced
menu > Peripheral Configuration > RF-KBD/Mouse to Enabled. (Refer to
Chapter 3 Using the BIOS setup utility)
However, you cannot use the wireless keyboard/mouse with The PS/2
keyboard/mouse, even if your change Using the BIOS setup utility values.
Chapter 5. Troubleshooting
81
Page 78

SAMSUNG Computer WF10
Power save mode
Q Can I connect an USB device while in the power save mode.
A When you connect an USB device in the power save mode, you may not
receive a normal display. An USB device must be connected while you are
in standard operation mode.
Q My USB device won’t operate properly after leaving the power save
mode
A Unplug and then plug in the USB device again.
Q My display is not normal after entering power save mode while in the
DOS window.
A Press on the <Alt> and <Tab> keys simultaneously.
Q I can’t run the ACPI (power management control) power save mode
after adding an expansion card or driver
A Check whether the added card or driver support the ACPI function.
If the function is not supported, run start > Control Panel > Performance and
Maintenance > Power Options, and set the system standby mode on
‘Never’ in Power Schemes.
SAMSUNG Computer WF10
82
Q I cannot run the ACPI (power management control) power save mode
while using application programs or games
A Check whether the application or game support the ACPI function.
If the function is not supported, run start > Control Panel > Performance
and Maintenance > Power Options, and set the system standby mode on
‘Never’ in Power Schemes.
Communication
Q I use an inter-office telephone, but I can’t get a dial-tone.
A If you are on a private switchboard (including key phone) system that
requires dialing “9” to get an outside connection, you must setup the
following command before use.
(Or add in the modem initialization command)
-Setup the ATX3 command before use.
-Additionally, if you need to dial “9” before making calls, you insert “9” after
the ATDT. (e.g.: ATDT9,3679-1433)
Page 79

Others
Q I don’t get clear sound when I play a MIDI file in my Karaoke program.
A Run Start > Control Panel > Sounds, Speech, and Audio Devices >
Sounds and Audio Devices then select the Audio tab. Select
‘Microsoft GS
Wavetable SW Synth in MIDI music playback’ and click OK.
Q My computer cannot recognize the CD drive.
A1 Check to see if the CD drive and motherboard signal and/or power cables
is connected properly.
A2 Check whether the Master / Slave / CS jumper behind the CD-ROM drive
are setup properly.
Q My display will not recover properly when the screensaver is activated
and deactivated while using Windows Media Player.
A1 As a particular characteristic of Windows, you must turn Windows Media
Player Off and then On again to recover your display functions.
Q When I replace my Hard Drive.
A If the new Hard Drive has not been formatted, you must boot up by using
the System Recovery CD and partition the Drive before formatting.
Continue installing Windows once format is complete.
Once Windows installation is complete, use the Software CD to install
necessary programs and drivers. (Refer to reinstalling your software,
Reinstalling Windows)
Q When installing a Samsung monitor/printer.
A If the new monitor and printer drivers are not preinstalled in Windows XP,
the PreInstall program will run automatically upon connection to install
necessary drivers. However, if you’ve reinstalled Windows, the PreInstall
program will not run. To reinstall the drivers, use the installation CDs
provided with your printer and monitor.
Chapter 5. Troubleshooting
83
Page 80

SAMSUNG Computer WF10
Q I cannot run games and I’m getting noise in the sound/music.
A1 If you’ve reinstalled Windows, change the CD Drive driver setup to DMA.
The following is the procedure to use when the CD driver is setup as the
Master for the secondary IDE controller (default).
1. Click start > Control Panel > Performance and Maintenance >
System.
2. Select the Hardware tab and click on Device Manager.
3. Double-click on IDE ATA/ATAPI controllers and again on Secondary
IDE Channel.
4. Change the Device 0 Transfer Mode in the Advanced Settings tab to
DMA if available.
A2 Try adjusting the Hardware Acceleration
1. Click start > Control Panel > Sounds, Speech, and Audio Devices>
Sounds and Audio Devices.
2. Click Advanced in the Speaker settings on the Volume tab.
3. After clicking on the Performance tab, adjust Hardware acceleration.
SAMSUNG Computer WF10
84
Q When installing the Windows XP sound driver for the first time.
A When you install the sound driver for the first time after installing Windows
XP, the gameport/MPU401 is automatically installed in the final step.
Therefore, when the message “New Hardware has been installed and is
ready for use” appears indicating that the gameport/MPU401 has been
installed, select “Yes, restart my computer now” in the Setup window and
press [Finished] to complete driver installation.
Page 81

Q How do I setup the graphics output on digital when using a LCD
monitor.
A When you are using an LCD monitor connected to the DVI monitor port,
setup the soundcard output on digital. By doing so, both your graphics
card and monitor will offer digital output for better picture quality.
Please setup as follows according to the type of graphics card used.
For models with the GeForce2MX graphics card
■
1. In the Desktop, click on the right mouse button. Click on Properties in the
display menu.
2. Select the Settings tab and click on Advanced.
3. In the TwinView tab, click on Output Device. Click on Output Device in the
menu.
4. Select Flat Digital Panel in the Output Device tab and click OK.
Chapter 5. Troubleshooting
85
Page 82

SAMSUNG Computer WF10
SAMSUNG Computer WF10
86
Page 83

Appendix
Appendix
Appendix
The Appendix contains the System Spec,
Other Useful Information, and Cautionary
Measures.
Page 84

SAMSUNG Computer WF10
Specifications
Let us look at the computer’s basic specification. The product specifications may
vary according to the product model.
Item Specifications Remarks
CPU
Cache Memory
Main Memory
System Chipset
Hard Drive (HDD)
DVD/DVD-Combo
Intel Pentium 4 PGA-478 1.4GHz-2.0GHz
Internal 256KB CPU
PC133 SDRAM 256/512MB
Intel i82845 (MCH) + Intel i82801BA (ICH2)
ATA 100 40/60/80 GB
DVD: 16X, DVD-Combo: 8X
Optional
Optional
Optional
Optional
Graphics Card
Sound Card
Modem Card
Network Card
IEEE 1394
PCMCIA
Expansion Slot
Ports
Size
Weight
Recommended Usage
Environment
Power
Frequency
Power Input
Input Current
Power Output
To find out detailed computer specifications.
NNNNooootttteeee
Refer to the catalog that came with your computer at the time of purchase.
In start > Help and Support > Pick a task > Tools > My Computer Information.
Click on the categories on the right side of the display to view My Computer Information.
SVB-8634S-DVI, Memory: 32MB, Chipset: GeForce2MX
SAB-5200E (ESS ES1992S 5.1Ch)
SFM-4400LW 56Kbps Data / 14.4Kbps Fax
10/100M 3Com (3C905CX-TXM)
TSB43AB22 2 Connector (Front: 4pin / Back: 6pin)
PCI1410PGE 1 Slot
1 AGP / 3 PCI / 1 Modem / 1 PCMCIA
Back: 1 Serial / 1 Parallel / 3 USB / 2 PS/2 / 1 IEEE
1394(6pin)
Front : 1 USB / 1 Line Out / 1 IEEE1394
(4pin) / 1-S/PDIF(optical)
Width 140 x Length 290 x Height 344mm
(Excluding the pedestal)
8Kg
Temperatures : 5°C ~ 35°C
Humidity : 30% ~ 80% RH
100-120 VAC / 200-240 VAC
50 / 60Hz
100-120 VAC / 200-240 VAC
5.0A / 2.5A
Optional
Internal
Internal
±12V, +5V +3.3V, +5V SB
SAMSUNG Computer WF10
88
Page 85

Other Useful Informatin
Copyrights
Samsung Co., Ltd. owns the copyright to this manual.
No part of this manual may be reproduced or transmitted in any form or by any
means, electronically, mechanically, or through audio, without the consent of
Samsung Co., Ltd..
The information in this document is subject to change without prior notice.
The manufacturer of this product does not guarantee against data loss.
Please ensure that important data is backed up and stored separately to prevent
from data loss.
Registered Trademarks
Samsung and Samsung are registered trademarks of Samsung Co., Ltd.
Samsung WF10 are registered trademarks of Samsung Electronics Co., Ltd.
Intel, Pentium/Celeron are registered trademarks of Intel Corporation.
Microsoft, MS-DOS, and Windows are registered trademarks of Microsoft
Corporation.
All other product or company names mentioned herein are registered trademarks
of their respective companies.
CB Safety
This computer was tested to comply with IEC 950 standards by manufacturer.
Laser Safety
All systems equipped with CD or DVD drives comply with the appropriate safety
standards, including IEC 825. The laser devices in these components are classified as
“Class 1 Laser Products” under a US Department of Health and Human Services
(DHHS) Radiation Performance Standard. Should the unit ever need servicing,
contact an authorized service location.
Laser Safety Note:
nn
CCCCaaaauuuuttttiiiioooonn
Use of controls or adiustments or performance of procedures other than those
specified in this manual may result in hazardous radiation exposure.
To prevent exposure to laser beams, do not try to open the enclosure of a CD or
DVD drive.
Appendix
89
Page 86

SAMSUNG Computer WF10
Safety Instructions
Instructions for Setup
● Set up the system on a stable work surface.
If the system is dropped it may be damaged or it may
inflict injuries on the user.
● Do not use loose power outlets or damaged
power cables.
There is a danger of electric shocks or fires.
● Set up the system in a clean, dry and airy place.
If the system overheats, it may be damaged or it may
cause fires.
● Use standard power voltage.
High-voltage may result in product damage or cause fires.
SAMSUNG Computer WF10
90
● Use grounded power outlets designed for
computers.
A grounded power outlet prevents electric shock from
electricity leakage.
● Set up the system away from magnetic objects.
Contents of the hard disk drive may be deleted or the color of the monitor
may be permanently distorted.
● Dispose of moisture-reducing agents and plastic packaging
properly.
Consumption of moisture-reducing agents and placing plastic packaging over
the head is fatal, especially for children.
Page 87

Instructions for careful handling
● Handle with care so as not to damage the data
in the hard disk.
- Since the hard disk is fragile and sensitive to
external conditions, it may be damaged from
temperature changes or impact during operation.
Take extra care to prevent such damages.
- Loss of data due to external conditions or carelessness
during use is the user’s sole responsibility and the
manufacturer shall not be held liable for any compensation.
In order to minimize damages from data loss, please backup data at all
times.
Cases when the hard disk and data may be damaged:
- External impacts while separating from or installing into the computer may
cause disk or data damage.
- Power failure during hard disk operation resulting in resetting the computer
may cause disk or data damage.
- Execution of delete (DEL) or format (FORMAT) commands by mistake may
cause loss of data.
- Virus infection may cause unrecoverable loss of data.
- An abrupt power cut during program operation may cause disk or data
damage.
- Moving the computer, or impacts to the computer during hard disk
operation may cause data loss or bad sectors on the hard disk
● Be sure to make backup copies of important data.
The Manufacturer is not liable for lost data.
● Turn on peripheral devices before, turning on the computer
Otherwise damages may occur.
● Turn off the computer before turning off other peripheral devices.
Otherwise damages may occur.
● Do not touch the modem, telephone lines and
exposed electrical terminals during a thunder
storm
There is a danger of electric shocks or fires.
● Before disassembling the system, turn the
power off and disconnect the power cable.
There is a danger of electric shocks.
Appendix
91
Page 88

SAMSUNG Computer WF10
SAMSUNG Computer WF10
92
 Loading...