

Page 1
Some of the contents in this manual may dier from your device depending on the software of the device or your service
provider.
www.samsung.com/mobile
S8500_UM_Open.indb 2 9/10/2010 11:47:15 AM
Page 2

GT-S8500
user manual
S8500_UM_Open.indb 3 9/10/2010 11:47:16 AM
Page 3
Using this manual
Thank you for purchasing this Samsung mobile device.
This device will provide you with high quality mobile
communication and entertainment based on Samsung’s
exceptional technology and high standards.
This user manual has been specially designed to guide you
through the functions and features of your device.
• Please read this manual carefully before using your
device to ensure safe and correct use.
• The descriptions in this manual are based on the default
settings of your device.
• Please keep this manual for future reference.
Using this manual
2
S8500_UM_Open.indb 2 9/10/2010 11:47:16 AM
Instructional icons
Before you start, familiarize yourself with the icons you will
see in this manual:
Warning—situations that could cause injury to
yourself or others
Caution—situations that could cause damage
to your device or other equipment
Note—notes, usage tips, or additional
information
Refer to—pages with related information; for
►
example:
► p.12 (represents “see page 12”)
Page 4

→
Followed by—the order of options or menus
you must select to perform a step; for example:
In Menu mode, select Messages
(represents Messages, followed by Compose)
[ ] Square brackets—device keys; for example:
[
] (represents the Power/End key)
S8500_UM_Open.indb 3 9/10/2010 11:47:16 AM
→
Compose
Intellectual Property
All Intellectual Property, as dened below, owned by
or which is otherwise the property of Samsung or its
respective suppliers relating to the SAMSUNG Phone,
including but not limited to, accessories, parts, or software
relating thereto (the “Phone System”), is proprietary to
Samsung and protected under federal laws, state laws,
and international treaty provisions. Intellectual Property
includes, but is not limited to, inventions (patentable or
unpatentable), patents, trade secrets, copyrights, software,
computer programs, and related documentation and other
works of authorship. You may not infringe or otherwise
violate the rights secured by the Intellectual Property.
Moreover, you agree that you will not (and will not attempt
to) modify, prepare derivative works of, reverse engineer,
decompile, disassemble, or otherwise attempt to create
source code from the software. No title to or ownership in
the Intellectual Property is transferred to you. All applicable
rights of the Intellectual Property shall remain with
SAMSUNG and its suppliers.
Using this manual
3
Page 5
Copyright information
©2010 Samsung Electronics Canada, Inc. SAMSUNG is a
registered trademark of Samsung Electronics Co., Ltd. and
its related entities.
Rights to all technologies and products that comprise this
device are the property of their respective owners:
• Bluetooth® is a registered trademark of the Bluetooth
SIG, Inc. worldwide. Bluetooth QD ID: B016289
• Java™ is a trademark of Sun Microsystems, Inc.
• Windows Media Player® is a registered trademark of
Microsoft Corporation.
• and are trademarks of SRS Labs, Inc. CS
Headphone and WOW HD technologies are incorporated
under licence from SRS Labs, Inc.
• Wi-Fi®, the Wi-Fi CERTIFIED logo, and the Wi-Fi logo are
registered trademarks of the Wi-Fi Alliance.
Using this manual
4
S8500_UM_Open.indb 4 9/10/2010 11:47:16 AM
• DivX® DivX Certied® and associated
logos are trademarks of DivX, Inc. and
are used under license.
ABOUT DIVX VIDEO
DivX® is a digital video format created by DivX, Inc. This is
an ocial DivX Certied® device that plays DivX video. Visit
www.divx.com for more information and software tools to
convert your les into DivX video.
ABOUT DIVX VIDEO-ON-DEMAND
This DivX Certied® device must be registered in order to
play purchased DivX Video-on-Demand (VOD) movies. To
obtain your registration code, locate the DivX VOD section
in your device setup menu. Go to vod.divx.com for more
information on how to complete your registration.
DivX Certied® to play DivX® video up to HD 720p,
including premium content.
Pat. 7,295,673; 7,460,688; 7,519,274
Page 6
Open Source Announcements
Some software components of this product incorporate
source code covered under the GNU Lesser Public License
(LPGL) and BSD License.
To obtain the source code covered under above licenses,
please visit http://www.samsung.com/mobile.
Component License
WebKit LGPL, BSD
WBXML Library LGPL
GNU LESSER GENERAL PUBLIC LICENSE
Version 2.1, February 1999
Copyright© 1991, 1999 Free Software Foundation, Inc.
51 Franklin Street, Fifth Floor, Boston, MA 02110-1301 USA
Everyone is permitted to copy and distribute verbatim
S8500_UM_Open.indb 5 9/10/2010 11:47:16 AM
copies of this license document, but changing it is not
allowed.
[This is the rst released version of the Lesser GPL. It also
counts as the successor of the GNU Library Public License,
version 2, hence the version number 2.1.]
Preamble
The licenses for most software are designed to take away
your freedom to share and change it. By contrast, the GNU
General Public Licenses are intended to guarantee your
freedom to share and change free software--to make sure
the software is free for all its users.
This license, the Lesser General Public License, applies to
some specially designated software packages--typically
libraries--of the Free Software Foundation and other
authors who decide to use it. You can use it too, but we
suggest you rst think carefully about whether this license
or the ordinary General Public License is the better strategy
to use in any particular case, based on the explanations
below.
Using this manual
5
Page 7

When we speak of free software, we are referring to
freedom of use, not price. Our General Public Licenses
are designed to make sure that you have the freedom
to distribute copies of free software (and charge for this
service if you wish); that you receive source code or can
get it if you want it; that you can change the software and
use pieces of it in new free programs; and that you are
informed that you can do these things.
To protect your rights, we need to make restrictions that
forbid distributors to deny you these rights or to ask you
to surrender these rights. These restrictions translate to
certain responsibilities for you if you distribute copies of
the library or if you modify it.
For example, if you distribute copies of the library, whether
gratis or for a fee, you must give the recipients all the rights
that we gave you. You must make sure that they, too,
receive or can get the source code. If you link other code
with the library, you must provide complete object les to
the recipients, so that they can relink them with the library
after making changes to the library and recompiling it.
Using this manual
6
S8500_UM_Open.indb 6 9/10/2010 11:47:17 AM
And you must show them these terms so they know their
rights.
We protect your rights with a two-step method: (1) we
copyright the library, and (2) we oer you this license,
which gives you legal permission to copy, distribute and/or
modify the library.
To protect each distributor, we want to make it very clear
that there is no warranty for the free library. Also, if the
library is modied by someone else and passed on, the
recipients should know that what they have is not the
original version, so that the original author's reputation
will not be aected by problems that might be introduced
by others.
Finally, software patents pose a constant threat to the
existence of any free program. We wish to make sure
that a company cannot eectively restrict the users of
a free program by obtaining a restrictive license from a
patent holder. Therefore, we insist that any patent license
obtained for a version of the library must be consistent
with the full freedom of use specied in this license.
Page 8

Most GNU software, including some libraries, is covered
by the ordinary GNU General Public License. This license,
the GNU Lesser General Public License, applies to certain
designated libraries, and is quite dierent from the
ordinary General Public License. We use this license for
certain libraries in order to permit linking those libraries
into non-free programs.
When a program is linked with a library, whether
statically or using a shared library, the combination of
the two is legally speaking a combined work, a derivative
of the original library. The ordinary General Public
License therefore permits such linking only if the entire
combination ts its criteria of freedom. The Lesser General
Public License permits more lax criteria for linking other
code with the library.
We call this license the "Lesser" General Public License
because it does Less to protect the user's freedom than the
ordinary General Public License. It also provides other free
software developers Less of an advantage over competing
non-free programs. These disadvantages are the reason we
S8500_UM_Open.indb 7 9/10/2010 11:47:17 AM
use the ordinary General Public License for many libraries.
However, the Lesser license provides advantages in certain
special circumstances.
For example, on rare occasions, there may be a special
need to encourage the widest possible use of a certain
library, so that it becomes a de-facto standard. To achieve
this, non-free programs must be allowed to use the library.
A more frequent case is that a free library does the same
job as widely used non-free libraries. In this case, there is
little to gain by limiting the free library to free software
only, so we use the Lesser General Public License.
In other cases, permission to use a particular library in nonfree programs enables a greater number of people to use
a large body of free software. For example, permission to
use the GNU C Library in non-free programs enables many
more people to use the whole GNU operating system, as
well as its variant, the GNU/Linux operating system.
Although the Lesser General Public License is Less
protective of the users' freedom, it does ensure that the
user of a program that is linked with the Library has the
Using this manual
7
Page 9

freedom and the wherewithal to run that program using a
modied version of the Library.
The precise terms and conditions for copying, distribution
and modication follow. Pay close attention to the
dierence between a "work based on the library" and
a "work that uses the library". The former contains code
derived from the library, whereas the latter must be
combined with the library in order to run.
TERMS AND CONDITIONS FOR COPYING, DISTRIBUTION
AND MODIFICATION
0. This License Agreement applies to any software library
or other program which contains a notice placed by the
copyright holder or other authorized party saying it may
be distributed under the terms of this Lesser General
Public License (also called "this License"). Each licensee is
addressed as "you".
A "library" means a collection of software functions and/
or data prepared so as to be conveniently linked with
application programs (which use some of those functions
and data) to form executables.
Using this manual
8
S8500_UM_Open.indb 8 9/10/2010 11:47:17 AM
The "Library", below, refers to any such software library
or work which has been distributed under these terms.
A "work based on the Library" means either the Library
or any derivative work under copyright law: that is to
say, a work containing the Library or a portion of it,
either verbatim or with modications and/or translated
straightforwardly into another language. (Hereinafter,
translation is included without limitation in the term
"modication".)
"Source code" for a work means the preferred form of the
work for making modications to it. For a library, complete
source code means all the source code for all modules it
contains, plus any associated interface denition les, plus
the scripts used to control compilation and installation of
the library.
Activities other than copying, distribution and
modication are not covered by this License; they are
outside its scope. The act of running a program using the
Library is not restricted, and output from such a program
is covered only if its contents constitute a work based on
Page 10

the Library (independent of the use of the Library in a tool
for writing it). Whether that is true depends on what the
Library does and what the program that uses the Library
does.
1. You may copy and distribute verbatim copies of
the Library's complete source code as you receive it,
in any medium, provided that you conspicuously and
appropriately publish on each copy an appropriate
copyright notice and disclaimer of warranty; keep intact all
the notices that refer to this License and to the absence of
any warranty; and distribute a copy of this License along
with the Library.
You may charge a fee for the physical act of transferring
a copy, and you may at your option oer warranty
protection in exchange for a fee.
2. You may modify your copy or copies of the Library or any
portion of it, thus forming a work based on the Library, and
copy and distribute such modications or work under the
terms of Section 1 above, provided that you also meet all
of these conditions:
S8500_UM_Open.indb 9 9/10/2010 11:47:17 AM
a) The modied work must itself be a software library.
b) You must cause the les modied to carry prominent
notices stating that you changed the les and the date of
any change.
c) You must cause the whole of the work to be licensed
at no charge to all third parties under the terms of this
License.
d) If a facility in the modied Library refers to a function or
a table of data to be supplied by an application program
that uses the facility, other than as an argument passed
when the facility is invoked, then you must make a good
faith eort to ensure that, in the event an application does
not supply such function or table, the facility still operates,
and performs whatever part of its purpose remains
meaningful.
(For example, a function in a library to compute square
roots has a purpose that is entirely well-dened
independent of the application. Therefore, Subsection 2d
requires that any application-supplied function or table
used by this function must be optional: if the application
Using this manual
9
Page 11

does not supply it, the square root function must still
compute square roots.)
These requirements apply to the modied work as a
whole. If identiable sections of that work are not derived
from the Library, and can be reasonably considered
independent and separate works in themselves, then this
License, and its terms, do not apply to those sections when
you distribute them as separate works. But when you
distribute the same sections as part of a whole which is a
work based on the Library, the distribution of the whole
must be on the terms of this License, whose permissions
for other licensees extend to the entire whole, and thus to
each and every part regardless of who wrote it.
Thus, it is not the intent of this section to claim rights or
contest your rights to work written entirely by you; rather,
the intent is to exercise the right to control the distribution
of derivative or collective works based on the Library.
In addition, mere aggregation of another work not based
on the Library with the Library (or with a work based
on the Library) on a volume of a storage or distribution
Using this manual
10
S8500_UM_Open.indb 10 9/10/2010 11:47:17 AM
medium does not bring the other work under the scope of
this License.
3. You may opt to apply the terms of the ordinary GNU
General Public License instead of this License to a given
copy of the Library. To do this, you must alter all the notices
that refer to this License, so that they refer to the ordinary
GNU General Public License, version 2, instead of to this
License. (If a newer version than version 2 of the ordinary
GNU General Public License has appeared, then you can
specify that version instead if you wish.) Do not make any
other change in these notices.
Once this change is made in a given copy, it is irreversible
for that copy, so the ordinary GNU General Public License
applies to all subsequent copies and derivative works
made from that copy.
This option is useful when you wish to copy part of the
code of the Library into a program that is not a library.
4. You may copy and distribute the Library (or a portion
or derivative of it, under Section 2) in object code or
executable form under the terms of Sections 1 and 2
Page 12

above provided that you accompany it with the complete
corresponding machine-readable source code, which must
be distributed under the terms of Sections 1 and 2 above
on a medium customarily used for software interchange.
If distribution of object code is made by oering access
to copy from a designated place, then oering equivalent
access to copy the source code from the same place
satises the requirement to distribute the source code,
even though third parties are not compelled to copy the
source along with the object code.
5. A program that contains no derivative of any portion
of the Library, but is designed to work with the Library by
being compiled or linked with it, is called a "work that uses
the Library". Such a work, in isolation, is not a derivative
work of the Library, and therefore falls outside the scope
of this License.
However, linking a "work that uses the Library" with the
Library creates an executable that is a derivative of the
Library (because it contains portions of the Library), rather
than a "work that uses the library". The executable is
S8500_UM_Open.indb 11 9/10/2010 11:47:17 AM
therefore covered by this License. Section 6 states terms for
distribution of such executables.
When a "work that uses the Library" uses material from a
header le that is part of the Library, the object code for
the work may be a derivative work of the Library even
though the source code is not. Whether this is true is
especially signicant if the work can be linked without the
Library, or if the work is itself a library. The threshold for this
to be true is not precisely dened by law.
If such an object le uses only numerical parameters, data
structure layouts and accessors, and small macros and
small inline functions (ten lines or less in length), then the
use of the object le is unrestricted, regardless of whether
it is legally a derivative work. (Executables containing this
object code plus portions of the Library will still fall under
Section 6.)
Otherwise, if the work is a derivative of the Library, you
may distribute the object code for the work under the
terms of Section 6. Any executables containing that work
also fall under Section 6, whether or not they are linked
Using this manual
11
Page 13

directly with the Library itself.
6. As an exception to the Sections above, you may also
combine or link a "work that uses the Library" with the
Library to produce a work containing portions of the
Library, and distribute that work under terms of your
choice, provided that the terms permit modication of the
work for the customer's own use and reverse engineering
for debugging such modications.
You must give prominent notice with each copy of the
work that the Library is used in it and that the Library
and its use are covered by this License. You must supply a
copy of this License. If the work during execution displays
copyright notices, you must include the copyright notice
for the Library among them, as well as a reference directing
the user to the copy of this License. Also, you must do one
of these things:
a) Accompany the work with the complete corresponding
machine-readable source code for the Library including
whatever changes were used in the work (which must be
distributed under Sections 1 and 2 above); and, if the work
Using this manual
12
S8500_UM_Open.indb 12 9/10/2010 11:47:17 AM
is an executable linked with the Library, with the complete
machine-readable "work that uses the Library", as object
code and/or source code, so that the user can modify the
Library and then relink to produce a modied executable
containing the modied Library. (It is understood that
the user who changes the contents of denitions les in
the Library will not necessarily be able to recompile the
application to use the modied denitions.)
b) Use a suitable shared library mechanism for linking with
the Library. A suitable mechanism is one that (1) uses at
run time a copy of the library already present on the user's
computer system, rather than copying library functions
into the executable, and (2) will operate properly with a
modied version of the library, if the user installs one, as
long as the modied version is interface-compatible with
the version that the work was made with.
c) Accompany the work with a written oer, valid for
at least three years, to give the same user the materials
specied in Subsection 6a, above, for a charge no more
than the cost of performing this distribution.
Page 14

d) If distribution of the work is made by oering access to
copy from a designated place, oer equivalent access to
copy the above specied materials from the same place.
e) Verify that the user has already received a copy of these
materials or that you have already sent this user a copy.
For an executable, the required form of the "work that uses
the Library" must include any data and utility programs
needed for reproducing the executable from it. However,
as a special exception, the materials to be distributed
need not include anything that is normally distributed (in
either source or binary form) with the major components
(compiler, kernel, and so on) of the operating system on
which the executable runs, unless that component itself
accompanies the executable.
It may happen that this requirement contradicts the
license restrictions of other proprietary libraries that do
not normally accompany the operating system. Such a
contradiction means you cannot use both them and the
Library together in an executable that you distribute.
7. You may place library facilities that are a work based
S8500_UM_Open.indb 13 9/10/2010 11:47:17 AM
on the Library side-by-side in a single library together
with other library facilities not covered by this License,
and distribute such a combined library, provided that the
separate distribution of the work based on the Library and
of the other library facilities is otherwise permitted, and
provided that you do these two things:
•a) Accompany the combined library with a copy of the
same work based on the Library, uncombined with any
other library facilities. This must be distributed under the
terms of the Sections above.
•b) Give prominent notice with the combined library of
the fact that part of it is a work based on the Library, and
explaining where to nd the accompanying uncombined
form of the same work.
8. You may not copy, modify, sublicense, link with, or
distribute the Library except as expressly provided under
this License. Any attempt otherwise to copy, modify,
sublicense, link with, or distribute the Library is void,
and will automatically terminate your rights under this
License. However, parties who have received copies, or
Using this manual
13
Page 15

rights, from you under this License will not have their
licenses terminated so long as such parties remain in full
compliance.
9. You are not required to accept this License, since you
have not signed it. However, nothing else grants you
permission to modify or distribute the Library or its
derivative works. These actions are prohibited by law if
you do not accept this License. Therefore, by modifying or
distributing the Library (or any work based on the Library),
you indicate your acceptance of this License to do so, and
all its terms and conditions for copying, distributing or
modifying the Library or works based on it.
10. Each time you redistribute the Library (or any work
based on the Library), the recipient automatically receives
a license from the original licensor to copy, distribute,
link with or modify the Library subject to these terms and
conditions. You may not impose any further restrictions on
the recipients' exercise of the rights granted herein. You are
not responsible for enforcing compliance by third parties
with this License.
Using this manual
14
S8500_UM_Open.indb 14 9/10/2010 11:47:17 AM
11. If, as a consequence of a court judgment or allegation
of patent infringement or for any other reason (not limited
to patent issues), conditions are imposed on you (whether
by court order, agreement or otherwise) that contradict
the conditions of this License, they do not excuse you from
the conditions of this License. If you cannot distribute so
as to satisfy simultaneously your obligations under this
License and any other pertinent obligations, then as a
consequence you may not distribute the Library at all. For
example, if a patent license would not permit royalty-free
redistribution of the Library by all those who receive copies
directly or indirectly through you, then the only way you
could satisfy both it and this License would be to refrain
entirely from distribution of the Library.
If any portion of this section is held invalid or
unenforceable under any particular circumstance, the
balance of the section is intended to apply, and the section
as a whole is intended to apply in other circumstances.
It is not the purpose of this section to induce you to
infringe any patents or other property right claims or
Page 16

to contest validity of any such claims; this section has
the sole purpose of protecting the integrity of the free
software distribution system which is implemented by
public license practices. Many people have made generous
contributions to the wide range of software distributed
through that system in reliance on consistent application
of that system; it is up to the author/donor to decide if he
or she is willing to distribute software through any other
system and a licensee cannot impose that choice.
This section is intended to make thoroughly clear what is
believed to be a consequence of the rest of this License.
12. If the distribution and/or use of the Library is
restricted in certain countries either by patents or by
copyrighted interfaces, the original copyright holder
who places the Library under this License may add an
explicit geographical distribution limitation excluding
those countries, so that distribution is permitted only in
or among countries not thus excluded. In such case, this
License incorporates the limitation as if written in the body
of this License.
13. The Free Software Foundation may publish revised
and/or new versions of the Lesser General Public License
from time to time. Such new versions will be similar in spirit
to the present version, but may dier in detail to address
new problems or concerns.
Each version is given a distinguishing version number.
If the Library species a version number of this License
which applies to it and "any later version", you have the
option of following the terms and conditions either of
that version or of any later version published by the Free
Software Foundation. If the Library does not specify a
license version number, you may choose any version ever
published by the Free Software Foundation.
14. If you wish to incorporate parts of the Library into
other free programs whose distribution conditions are
incompatible with these, write to the author to ask for
permission. For software which is copyrighted by the
Free Software Foundation, write to the Free Software
Foundation; we sometimes make exceptions for this. Our
decision will be guided by the two goals of preserving
Using this manual
S8500_UM_Open.indb 15 9/10/2010 11:47:17 AM
15
Page 17

the free status of all derivatives of our free software and of
promoting the sharing and reuse of software generally.
NO WARRANTY
15. BECAUSE THE LIBRARY IS LICENSED FREE OF CHARGE,
THERE IS NO WARRANTY FOR THE LIBRARY, TO THE
EXTENT PERMITTED BY APPLICABLE LAW. EXCEPT WHEN
OTHERWISE STATED IN WRITING THE COPYRIGHT HOLDERS
AND/OR OTHER PARTIES PROVIDE THE LIBRARY "AS IS"
WITHOUT WARRANTY OF ANY KIND, EITHER EXPRESSED
OR IMPLIED, INCLUDING, BUT NOT LIMITED TO, THE
IMPLIED WARRANTIES OF MERCHANTABILITY AND FITNESS
FOR A PARTICULAR PURPOSE. THE ENTIRE RISK AS TO
THE QUALITY AND PERFORMANCE OF THE LIBRARY IS
WITH YOU. SHOULD THE LIBRARY PROVE DEFECTIVE, YOU
ASSUME THE COST OF ALL NECESSARY SERVICING, REPAIR
OR CORRECTION.
16. IN NO EVENT UNLESS REQUIRED BY APPLICABLE
LAW OR AGREED TO IN WRITING WILL ANY COPYRIGHT
HOLDER, OR ANY OTHER PARTY WHO MAY MODIFY AND/
OR REDISTRIBUTE THE LIBRARY AS PERMITTED ABOVE,
Using this manual
16
S8500_UM_Open.indb 16 9/10/2010 11:47:17 AM
BE LIABLE TO YOU FOR DAMAGES, INCLUDING ANY
GENERAL, SPECIAL, INCIDENTAL OR CONSEQUENTIAL
DAMAGES ARISING OUT OF THE USE OR INABILITY TO USE
THE LIBRARY (INCLUDING BUT NOT LIMITED TO LOSS OF
DATA OR DATA BEING RENDERED INACCURATE OR LOSSES
SUSTAINED BY YOU OR THIRD PARTIES OR A FAILURE OF
THE LIBRARY TO OPERATE WITH ANY OTHER SOFTWARE),
EVEN IF SUCH HOLDER OR OTHER PARTY HAS BEEN
ADVISED OF THE POSSIBILITY OF SUCH DAMAGES.
END OF TERMS AND CONDITIONS
How to Apply These Terms to Your New Libraries
If you develop a new library, and you want it to be of
the greatest possible use to the public, we recommend
making it free software that everyone can redistribute
and change. You can do so by permitting redistribution
under these terms (or, alternatively, under the terms of the
ordinary General Public License).
To apply these terms, attach the following notices to the
library. It is safest to attach them to the start of each source
le to most eectively convey the exclusion of warranty;
Page 18

and each le should have at least the "copyright" line and a
pointer to where the full notice is found.
one line to give the library's name and an idea of what it
does.
Copyright © year name of author
This library is free software; you can redistribute it and/
or modify it under the terms of the GNU Lesser General
Public License as published by the Free Software
Foundation; either version 2.1 of the License, or (at
your option) any later version.
This library is distributed in the hope that it will be
useful, but WITHOUT ANY WARRANTY; without even
Also add information on how to contact you by electronic
and paper mail.
You should also get your employer (if you work as a
programmer) or your school, if any, to sign a "copyright
disclaimer" for the library, if necessary. Here is a sample;
alter the names:
Yoyodyne, Inc., hereby disclaims all copyright interest
in the library `Frob' (a library for tweaking knobs)
written by James Random Hacker.
signature of Ty Coon, 1 April 1990 Ty Coon, President
of Vice
That's all there is to it!
the implied warranty of MERCHANTABILITY or FITNESS
FOR A PARTICULAR PURPOSE. See the GNU Lesser
General Public License for more details.
You should have received a copy of the GNU Lesser
General Public License along with this library; if not,
write to the Free Software Foundation, Inc., 51 Franklin
Street, Fifth Floor, Boston, MA 02110-1301 USA
S8500_UM_Open.indb 17 9/10/2010 11:47:17 AM
Copyright © 2003, 2004, 2005, 2006 Apple Computer,
Inc. All rights reserved.
Redistribution and use in source and binary forms, with
or without modication, are permitted provided that the
following conditions are met:
Using this manual
17
Page 19

1. Redistributions of source code must retain the above
copyright notice, this list of conditions and the following
disclaimer.
OTHERWISE) ARISING IN ANY WAY OUT OF THE USE OF
THIS SOFTWARE, EVEN IF ADVISED OF THE POSSIBILITY OF
SUCH DAMAGE.
2. Redistributions in binary form must reproduce the above
copyright notice, this list of conditions and the following
disclaimer in the documentation and/or other materials
provided with the distribution.
THIS SOFTWARE IS PROVIDED BY APPLE COMPUTER, INC.
``AS IS’’ AND ANY EXPRESS OR IMPLIED WARRANTIES,
INCLUDING, BUT NOT LIMITED TO, THE IMPLIED
WARRANTIES OF MERCHANTABILITY AND FITNESS FOR
A PARTICULAR PURPOSE ARE DISCLAIMED. IN NO EVENT
SHALL APPLE COMPUTER, INC. OR CONTRIBUTORS BE
LIABLE FOR ANY DIRECT, INDIRECT, INCIDENTAL, SPECIAL,
EXEMPLARY, OR CONSEQUENTIAL DAMAGES (INCLUDING,
BUT NOT LIMITED TO, PROCUREMENT OF SUBSTITUTE
GOODS OR SERVICES; LOSS OF USE, DATA, OR PROFITS;
OR BUSINESS INTERRUPTION) HOWEVER CAUSED AND
ON ANY THEORY OF LIABILITY, WHETHER IN CONTRACT,
STRICT LIABILITY, OR TORT (INCLUDING NEGLIGENCE OR
Using this manual
18
S8500_UM_Open.indb 18 9/10/2010 11:47:17 AM
Copyright © 2005 Apple Computer, Inc. All rights
reserved.
Redistribution and use in source and binary forms, with
or without modication, are permitted provided that the
following conditions are met:
1. Redistributions of source code must retain the above
copyright notice, this list of conditions and the following
disclaimer.
2. Redistributions in binary form must reproduce the above
copyright notice, this list of conditions and the following
disclaimer in the documentation and/or other materials
provided with the distribution.
3. Neither the name of Apple Computer, Inc. (“Apple”) nor
the names of its contributors may be used to endorse or
promote products
Page 20

derived from this software without specic prior written
permission.
THIS SOFTWARE IS PROVIDED BY APPLE AND ITS
CONTRIBUTORS “AS IS” AND ANY EXPRESS OR IMPLIED
WARRANTIES, INCLUDING, BUT NOT LIMITED TO, THE
IMPLIED WARRANTIES OF MERCHANTABILITY AND FITNESS
FOR A PARTICULAR PURPOSE ARE DISCLAIMED. IN NO
EVENT SHALL APPLE OR ITS CONTRIBUTORS BE LIABLE FOR
ANY DIRECT, INDIRECT, INCIDENTAL, SPECIAL, EXEMPLARY,
OR CONSEQUENTIAL DAMAGES (INCLUDING, BUT NOT
LIMITED TO, PROCUREMENT OF SUBSTITUTE GOODS OR
SERVICES; LOSS OF USE, DATA, OR PROFITS; OR BUSINESS
INTERRUPTION) HOWEVER CAUSED AND ON ANY THEORY
OF LIABILITY, WHETHER IN CONTRACT, STRICT LIABILITY,
OR TORT (INCLUDING NEGLIGENCE OR OTHERWISE)
ARISING IN ANY WAY OUT OF THE USE OF THIS SOFTWARE,
EVEN IF ADVISED OF THE POSSIBILITY OF SUCH DAMAGE.
Copyright © 2005 Thomas Stromberg
<thomas@stromberg.org>
This software is provided ‘as-is’, without any express or
implied warranty.
In no event will the authors be held liable for any damages
arising from the use of this software.
Permission is granted to anyone to use this software for any
purpose, including commercial applications, and to alter it
and redistribute it freely, subject to the following restrictions:
1. The origin of this software must not be misrepresented;
you must not claim that you wrote the original software. If
you use this software in a product, an acknowledgment in
the product documentation would be appreciated but is
not required.
2. Altered source versions must be plainly marked as such,
and must not be misrepresented as being the original
software.
3. This notice may not be removed or altered from any
source distribution.
Using this manual
S8500_UM_Open.indb 19 9/10/2010 11:47:18 AM
19
Page 21

Copyright © 1997-2005 University of Cambridge. All
rights reserved.
Redistribution and use in source and binary forms, with
or without modication, are permitted provided that the
following conditions are met:
* Redistributions of source code must retain the above
copyright notice, this list of conditions and the following
disclaimer.
* Redistributions in binary form must reproduce the above
copyright notice, this list of conditions and the following
disclaimer in the documentation and/or other materials
provided with the distribution.
BUT NOT LIMITED TO, THE IMPLIED WARRANTIES OF
MERCHANTABILITY AND FITNESS FOR A PARTICULAR
PURPOSE ARE DISCLAIMED. IN NO EVENT SHALL THE
COPYRIGHT OWNER OR CONTRIBUTORS BE LIABLE FOR
ANY DIRECT, INDIRECT, INCIDENTAL, SPECIAL, EXEMPLARY,
OR CONSEQUENTIAL DAMAGES (INCLUDING, BUT NOT
LIMITED TO, PROCUREMENT OF SUBSTITUTE GOODS OR
SERVICES; LOSS OF USE, DATA, OR PROFITS; OR BUSINESS
INTERRUPTION) HOWEVER CAUSED AND ON ANY THEORY
OF LIABILITY, WHETHER IN CONTRACT, STRICT LIABILITY,
OR TORT (INCLUDING NEGLIGENCE OR OTHERWISE)
ARISING IN ANY WAY OUT OF THE USE OF THIS SOFTWARE,
EVEN IF ADVISED OF THE POSSIBILITY OF SUCH DAMAGE.
* Neither the name of the University of Cambridge nor the
name of Apple Inc. nor the names of their contributors
may be used to endorse or promote products derived from
this software without specic prior written permission.
THIS SOFTWARE IS PROVIDED BY THE COPYRIGHT
HOLDERS AND CONTRIBUTORS “AS IS” AND ANY
EXPRESS OR IMPLIED WARRANTIES, INCLUDING,
Using this manual
20
S8500_UM_Open.indb 20 9/10/2010 11:47:18 AM
Page 22
COPYRIGHT AND PERMISSION NOTICE
Copyright © 1995-2006 International Business
Machines Corporation and others
All rights reserved.
Permission is hereby granted, free of charge, to any
person obtaining a copy of this software and associated
documentation les (the “Software”), to deal in the
Software without restriction, including without limitation
the rights to use, copy, modify, merge, publish, distribute,
and/or sell copies of the Software, and to permit persons
to whom the Software is furnished to do so, provided
that the above copyright notice(s) and this permission
NO EVENT SHALL THE COPYRIGHT HOLDER OR HOLDERS
INCLUDED IN THIS NOTICE BE LIABLE FOR ANY CLAIM, OR
ANY SPECIAL INDIRECT OR CONSEQUENTIAL DAMAGES,
OR ANY DAMAGES WHATSOEVER RESULTING FROM LOSS
OF USE, DATA OR PROFITS, WHETHER IN AN ACTION OF
CONTRACT, NEGLIGENCE OR OTHER TORTIOUS ACTION,
ARISING OUT OF OR IN CONNECTION WITH THE USE OR
PERFORMANCE OF THIS SOFTWARE.
Except as contained in this notice, the name of a copyright
holder shall not be used in advertising or otherwise to
promote the sale, use or other dealings in this Software
without prior written authorization of the copyright holder.
notice appear in all copies of the Software and that both
the above copyright notice(s) and this permission notice
appear in supporting documentation.
THE SOFTWARE IS PROVIDED “AS IS”, WITHOUT
WARRANTY OF ANY KIND, EXPRESS OR IMPLIED,
INCLUDING BUT NOT LIMITED TO THE WARRANTIES OF
MERCHANTABILITY, FITNESS FOR A PARTICULAR PURPOSE
AND NONINFRINGEMENT OF THIRD PARTY RIGHTS. IN
Using this manual
S8500_UM_Open.indb 21 9/10/2010 11:47:18 AM
21
Page 23

Contents
Assembling ........................................... 26
Unpack ................................................................ 26
Install the SIM card and battery .................... 26
Charge the battery ........................................... 28
Insert a memory card (optional) ................... 30
Access menus .................................................... 39
Launch and manage applications ................ 41
Use widgets ........................................................ 41
Customize your device .................................... 42
Enter text ............................................................ 47
Access help information ................................. 49
Getting started ..................................... 33
Turn your device on and o ........................... 33
Get to know your device ................................. 34
Use the touch screen ........................................ 37
Lock or unlock the touch screen and keys .. 39
Contents
22
S8500_UM_Open.indb 22 9/10/2010 11:47:18 AM
Communication ................................... 51
Calling .................................................................. 51
Logs ...................................................................... 58
Messages ............................................................ 59
Page 24

Email .................................................................... 65
IM .......................................................................... 68
Social Hub ........................................................... 69
Entertainment ...................................... 70
Camera ................................................................ 70
Video player ....................................................... 80
Media browser ................................................... 82
Music player ....................................................... 83
FM radio .............................................................. 87
Games and more ............................................... 90
S8500_UM_Open.indb 23 9/10/2010 11:47:18 AM
Personal information .......................... 91
Contacts .............................................................. 91
Calendar .............................................................. 93
Task ...................................................................... 95
Memo ................................................................... 95
Voice recorder .................................................... 96
Web ........................................................ 98
Internet ............................................................... 98
Samsung Apps ............................................... 102
Synchronize ..................................................... 103
Daily brieng .................................................. 104
Community websites .................................... 104
Contents
23
Page 25

Connectivity ....................................... 105
Bluetooth ......................................................... 105
Wi-Fi .................................................................. 108
AllShare ............................................................ 110
Mobile AP ........................................................ 113
GPS .................................................................... 114
TV connections (TV out mode) ................... 115
PC connections ............................................... 116
Tools ..................................................... 119
Clock ................................................................. 119
Calculator ......................................................... 120
Mini diary ......................................................... 121
Contents
24
S8500_UM_Open.indb 24 9/10/2010 11:47:18 AM
My les ............................................................. 121
Smart search ................................................... 128
Settings ................................................ 130
Access the Settings menu ............................ 130
Flight mode ..................................................... 130
Connectivity .................................................... 130
Sound proles ................................................ 131
Display and light ............................................ 132
General ............................................................. 132
Date and time ................................................. 133
Menu and widgets ......................................... 134
Applications .................................................... 134
Page 26
Security ............................................................ 140
Memory ............................................................ 141
Reset ................................................................. 141
SIM applications ............................................. 142
Troubleshooting ................................ 143
Safety and usage information ......... 148
Index .................................................... 157
Contents
25
S8500_UM_Open.indb 25 9/10/2010 11:47:18 AM
Page 27
Assembling
Unpack
Check your product box for the following items:
• Mobile device
• Battery
• Travel adapter (charger)
• User manual
Use only Samsung-approved software. Pirated or
illegal software may cause damage or malfunctions
that are not covered by your manufacturer's
warranty.
Assembling
26
S8500_UM_Open.indb 26 9/10/2010 11:47:19 AM
• The items supplied with your device may vary
depending on the software and accessories
available in your region or oered by your service
provider.
• You can obtain additional accessories from your
local Samsung dealer.
• The supplied accessories perform best for your
device.
Install the SIM card and battery
When you subscribe to a cellular service, you will receive
a Subscriber Identity Module (SIM) card, with subscription
details, such as your personal identication number (PIN)
and optional services.
Page 28
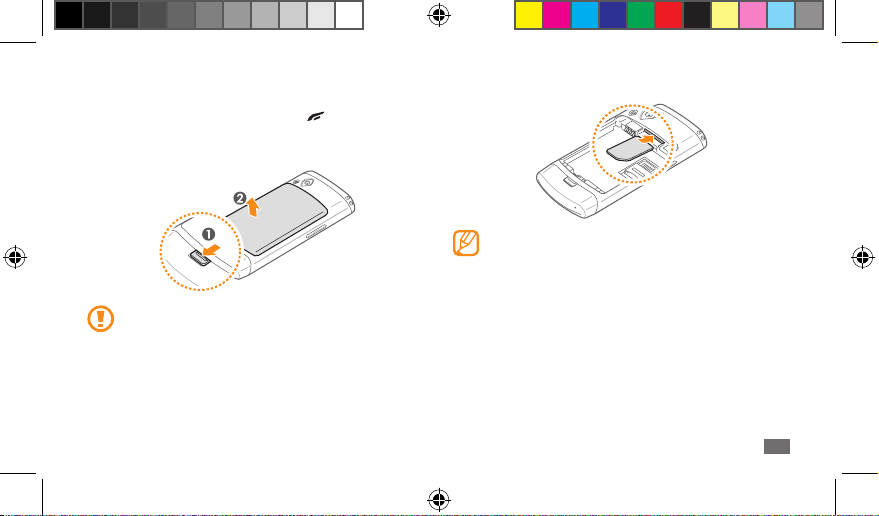
To install the SIM card and battery,
If the device is on, press and hold [ ] and select Ye s
1
to turn it o.
Remove the back cover.
2
Be careful not to damage your ngernails when you
remove the back cover.
Insert the SIM card.
3
• Place the SIM card into the device with the gold-
coloured contacts facing down.
• If you do not insert a SIM card, you can only make
an SOS (emergency) call, use your device’s
non-network services, and access some menus.
Assembling
S8500_UM_Open.indb 27 9/10/2010 11:47:19 AM
27
Page 29
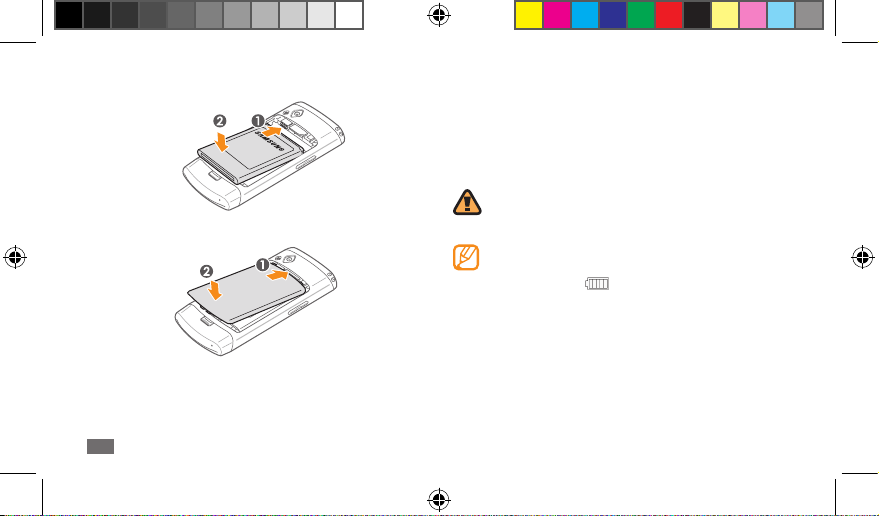
Insert the battery.
4
Replace the back cover.
5
Assembling
28
S8500_UM_Open.indb 28 9/10/2010 11:47:19 AM
Charge the battery
Before using the device for the rst time, you must charge
the battery.
You can charge the device with the provided travel adapter
or by connecting the device to a PC with a PC data cable.
Use only Samsung-approved chargers and cables.
Unauthorized chargers or cables can cause batteries
to explode or damage your device.
When your battery is low, the device will emit a
warning tone and display a low battery message.
The battery icon
blinking. If the battery level becomes too low, the
device will automatically power o. Recharge your
battery to continue using your device.
will also be empty and
Page 30
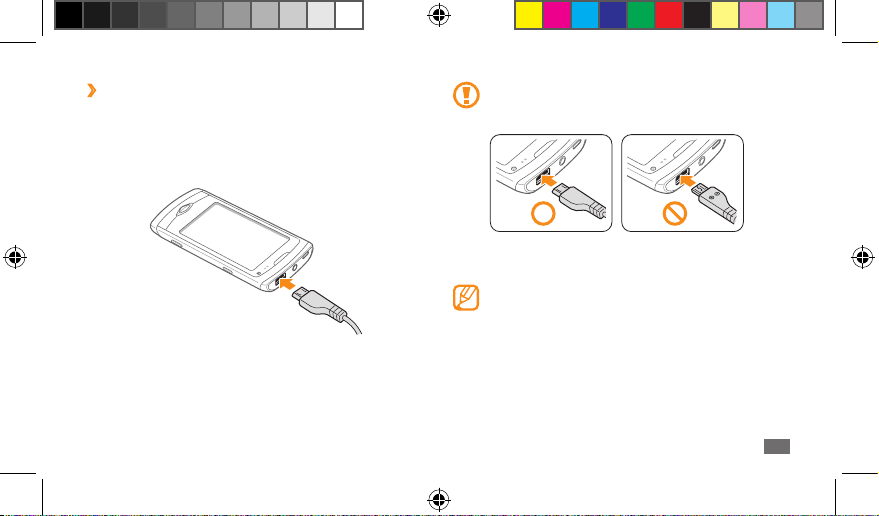
Charge with the travel adapter
›
Slide open the cover to the multifunction jack on the
1
top of the device.
Plug the small end of the travel adapter into the
2
multifunction jack.
Improperly connecting the travel adapter can cause
serious damage to the device. Any damage caused
by misuse is not covered by the warranty.
Plug the large end of the travel adapter into a power
3
outlet.
• You can use the device while it is charging, but it
may take longer to fully charge the battery.
• While charging, the device may heat up. This
is normal and should not aect your device’s
lifespan or performance.
• If your device is not charging properly, bring your
device and the charger to a Samsung Service
Centre.
Assembling
S8500_UM_Open.indb 29 9/10/2010 11:47:20 AM
29
Page 31

When the battery is fully charged (the battery icon is
4
no longer moving), unplug the travel adapter from the
device and then from the power outlet.
Do not remove the battery before removing the
travel adapter. Doing this may cause damage to the
device.
Charge with the PC data cable
›
Before charging, ensure that your PC is turned on.
Open the cover to the multifunction jack on the top of
1
the device.
Plug one end (micro USB) of the PC data cable into the
2
multifunction jack.
Plug the other end of the PC data cable into a USB port
3
on a PC.
Depending on the type of PC data cable you are
using, it may take some time before charging
begins.
Assembling
30
S8500_UM_Open.indb 30 9/10/2010 11:47:20 AM
When the battery is fully charged (the battery icon is
4
no longer moving), unplug the PC data cable from the
device and then from the PC.
Insert a memory card (optional)
To store additional multimedia les, you must insert
a memory card. Your device accepts microSD™ or
microSDHC™ memory cards with maximum capacities
of 32 GB (depending on memory card manufacturer and
type).
Samsung uses approved industry standards for
memory cards, but some brands may not be fully
compatible with your device. Using an incompatible
memory card may damage your device or the
memory card and can corrupt data stored on the
card.
Page 32

• Your device supports only the FAT le structure for
memory cards. If you insert a card formatted with
a dierent le structure, your device will ask you to
reformat the memory card.
• Frequent writing and erasing of data will shorten
the life span of memory cards.
Remove the back cover and the battery.
1
Unlock the memory card cover.
2
Lift the memory card cover and insert a memory card.
3
Be careful not to damage your ngers when you
open the memory card cover.
Close the memory card cover.
4
Assembling
S8500_UM_Open.indb 31 9/10/2010 11:47:20 AM
31
Page 33

Lock the memory card cover.
5
Replace the battery and the back cover.
6
Remove the memory card
›
Ensure that the device is not currently using the
1
memory card.
Open the memory card cover the same as you would
2
when inserting the memory card.
Assembling
32
S8500_UM_Open.indb 32 9/10/2010 11:47:20 AM
Remove the memory card and close the memory card
3
cover.
Do not remove a memory card while the device is
transferring or accessing information, as this could
result in loss of data or damage to the memory card
or device.
Format the memory card
›
Formatting your memory card on a PC may cause
incompatibilities with your device. Format the memory
card only on the device.
In Menu mode, select Settings
card details
→
Format → Yes.
Before formatting the memory card, remember to
make backup copies of all important data stored on
your device. The manufacturer’s warranty does not
cover loss of data resulting user actions.
→
Memory → Memory
Page 34

Getting started
Turn your device on and o
To turn on your device,
Press and hold [ ].
1
Enter your PIN and select Done (if necessary).
2
Select the language you want and select Next
3
Select your home zone and selectNext
4
Set the time and date and select Save
5
.
.
To turn o your device, press and hold [ ] and select Ye s.
• Follow all posted warnings and directions from
ocial personnel when in areas where the use of
wireless devices is restricted, such as airplanes and
hospitals.
• To use your device's non-network services only,
switch to the ight mode. In Menu mode, select
→
Settings
.
Flight mode.
Getting started
S8500_UM_Open.indb 33 9/10/2010 11:47:20 AM
33
Page 35

Get to know your device
Device layout
›
Earpiece
Volume key
Front camera lens
(for video calls)
Proximity sensor
Touch screen
Multifunction jack
Rear camera lens
Flash
Lock key
Speaker
Headset/
TV-out cable jack
Back cover
Menu key
Dial key
Microphone
Getting started
34
S8500_UM_Open.indb 34 9/10/2010 11:47:21 AM
Power/End key
Camera key
Back cover lock
Internal antenna
Page 36

Keys
›
Key Function
Dial
Menu
Power/
End
Volume Adjust the device’s volume.
Make or answer a call; In Idle
mode, retrieve logs of your calls
and messages.
Access Menu mode; Launch the
task manager to view all active
applications (press and hold).
Turn the device on or o (press
and hold); End a call; In Menu
mode, return to Idle mode.
Key Function
Camera
Idle screen
›
When the device is in Idle mode, you will see the idle
screen. From the idle screen, you can view your device’s
status and access applications.
The idle screen has 5 panels, and you can add new panels
to the idle screen.
In Idle mode, turn on the camera;
In Camera mode, take a photo or
record a video.
► p. 42
Lock
S8500_UM_Open.indb 35 9/10/2010 11:47:21 AM
Lock the touch screen and keys;
Unlock the touch screen and keys
(press and hold).
Getting started
35
Page 37

Indicator icons
›
Icons shown on the display may vary depending on
your region or service provider.
Icon Denition
Signal strength
GPRS network connected
EDGE network connected
UMTS network connected
HSDPA network connected
Wi-Fi activated
Bluetooth activated
Bluetooth hands-free car kit or headset
connected
Voice call in progress
Getting started
36
S8500_UM_Open.indb 36 9/10/2010 11:47:22 AM
Icon Denition
Video call in progress
SOS message feature activated
Browsing the web
Connected to secured web page
Call diverting activated
Synchronizing with PC
Memory card inserted
New text or multimedia message
New email message
New voice mail message
Alarm activated
Roaming (outside of normal service area)
Page 38

Icon Denition
Normal prole activated
Silent prole activated
Current time
Battery power level
Shortcuts panel
›
In Idle mode, select in the indicator icons area to
open the shortcuts panel.
Select icons to activate or deactivate the WLAN and
Bluetooth features. You can also select Silent turn on or
o the device's sound and Notications to check new
messages and alerts.
Use the touch screen
Your device’s touch screen lets you easily select items or
perform functions. Learn basic actions to use the touch
screen.
• To avoid scratching the touch screen, do not use
sharp tools.
• Do not allow the touch screen to come into
contact with other electrical devices. Electrostatic
discharges can cause the touch screen to
malfunction.
• Do not allow the touch screen to come into
contact with water. The touch screen may
malfunction in humid conditions or when
exposed to water.
Getting started
S8500_UM_Open.indb 37 9/10/2010 11:47:22 AM
37
Page 39

• For optimal use of the touch screen, remove the
screen protection lm before using your device.
• Your touch screen has a layer that detects small
electrical charges emitted by the human body.
For best performance, tap the touch screen with
your ngertip. The touch screen will not react to
touches of sharp tools, such as a stylus or pen.
Control your touch screen with the following actions:
• Tap: Tap once with your nger to select or launch a
menu, option, or application.
• Tap and hold: Tap an item and hold it for more than 2
seconds to open a pop-up option list.
• Double-tap: Tap twice quickly with your nger to zoom
in or out while viewing photos or web pages.
• Panning: Tap and drag with your nger to select items.
• Drag and drop: Tap and hold your nger on an item, and
then drag your nger to move the item.
• Area zoom: Place two ngers on the screen and pull
them apart to zoom in or squeeze them together to
zoom out.
• Touch and spread: Place one nger on the screen and
drag with another nger to zoom in or out.
• Slide and select: Slide the screen and select an item with
two ngers.
• Your device turns o the touch screen when you
do not use the device for a specied period. To
turn on the screen, press any key.
• You can also adjust the backlight time. In Menu
mode, select Settings
Backlight time.
→
Display and light →
• Some lists have an index along the right side. Tap
a letter to jump to items starting with that letter.
Drag your nger along the index to quickly scroll
through the list.
• Flick: Flick the screen quickly to activate an application.
Getting started
38
S8500_UM_Open.indb 38 9/10/2010 11:47:22 AM
Page 40

Lock or unlock the touch screen
and keys
You can lock the touch screen and keys to prevent any
unwanted device operations.
To lock, press the Lock key. To unlock, press and hold the
Lock key. Alternatively, press the Lock key and ick the
screen with your nger.
You can also set the device to automatically lock the
touch screen and keys when you do not use the device
for a specied period. In Menu mode, select Settings
→
General
S8500_UM_Open.indb 39 9/10/2010 11:47:22 AM
Touch → Touch panel auto-lock.
→
Access menus
To access your device’s menus,
In Idle mode, press the Menu key to access Menu
1
mode.
Scroll left or right to a main menu screen.
2
Select a menu or application.
3
Press [ ] to return to Idle mode.
4
• Your device has a built-in motion sensor that
detects its orientation. If you rotate the device
while using some features, the interface will
automatically switch to landscape view. To set
the interface to keep the orientation when you
rotate the device, select Settings
Gestures
• While using the device, you can capture an image
of a screen by pressing the Menu and Lock keys
simultaneously. The image will be saved in My
les
→
Orientation → Change orientation.
→
images.
Getting started
→
General →
39
Page 41

Organize applications in Menu mode
›
You can reorganize the applications in Menu mode by
changing their order or grouping them into categories to
suit your preferences and needs.
In Idle mode, press the Menu key to access Menu
1
mode.
Select Edit at the top left of the screen.
2
Drag an application icon to the location you want.
3
You can move an application icon to another
main menu screen. You can also move most-used
applications to the bottom line to use them in Idle
mode directly.
Select Done.
4
Getting started
40
S8500_UM_Open.indb 40 9/10/2010 11:47:22 AM
Add new main menu screens
›
In Idle mode, press the Menu key to access Menu
1
mode.
Select Edit at the top left of the screen.
2
Rotate the device sideways to landscape view.
3
Select to add a new main menu screen.
4
You can add up to 10 screens.
Select to remove the screen from the main
menu.
Rotate the device to portrait view.
5
Select Done at the top left of the screen.
6
Page 42

Launch and manage applications
Launch multiple applications
›
Your device allows you to multi-task by running multiple
applications at the same time.
To launch multiple applications, press the Menu key to
return to the main menu and select an application to
launch.
Use the task manager
›
You can manage multiple applications with the task
manager. To launch the task manager,
Press and hold the Menu key. The thumbnails of active
1
applications appear.
Control active applications as follows:
2
• To switch between applications, select one from the
thumbnails of active applications.
• To close an application, select .
• To close all active applications, select End all
applications.
Use widgets
Widgets are small applications that provide convenient
functions and information on your idle screen.
• Some of your widgets connect to web services.
Using a web-based widget may incur additional
charges.
• Available widgets may vary depending on your
region or service provider.
Getting started
S8500_UM_Open.indb 41 9/10/2010 11:47:22 AM
41
Page 43

Open the widget toolbar
›
To open the widget toolbar and access widgets,
In Idle mode, select Widget at the top left of the screen
1
to open the widget toolbar.
Select Accept to acknowledge the Widget usage
2
restrictions.
Scroll left or right on the widget toolbar to nd the
3
widget you want to use.
Drag the widget to the idle screen.
4
Select Done at the top left of the screen to close the
5
widget toolbar.
Select the widget to activate it on the idle screen.
6
To move the widget back to the widget toolbar, drag it
to the position you want on the widget toolbar.
You can organize each panel of the idle screen with
your favourite widgets. Scroll left or right to a panel
and then position widgets anywhere on the screen.
Getting started
42
S8500_UM_Open.indb 42 9/10/2010 11:47:22 AM
Manage web-based widgets
›
You can select a widget prole to connect to web services
and view downloaded widgets.
In Menu mode, select Settings
Widget.
→
Menu and widgets
→
Customize your device
Get more from your device by customizing it to match your
preferences.
Add new panels to the idle screen
›
You can add new panels to the idle screen to organize
widgets according to your preferences and needs.
In Idle mode, select Widget at the top left of the
1
screen.
Rotate the device sideways to landscape view.
2
Select to add new panels to the idle screen.
3
Page 44

You can add up to 10 panels.
Select to remove the panel from the idle screen.
Rotate the device clockwise to portrait view.
4
Select Done at the top left of the screen.
5
Set the current time and date
›
In Menu mode, select Settings → Date and time.
1
Select the time zone option and a time zone.
2
Enter the current time and date, and set the time and
3
date format.
Select Back.
4
S8500_UM_Open.indb 43 9/10/2010 11:47:23 AM
Adjust the volume of the key tones
›
In Idle mode, press the Volume key up or down.
1
Adjust the key tone volume by pressing the Volume
2
key or dragging the slider.
Adjust the vibration intensity of the
›
touch screen
You can adjust the intensity of the vibration feedback that
results when you tap the device screen.
In Menu mode, select Settings →General →Touch
1
Drag the slider under Vibration feedback to adjust
2
the intensity of the vibration.
Select Set.
3
Switch to the silent prole
›
In Idle mode, select Keypad, and then tap and hold to
mute or unmute your device.
Getting started
43
.
Page 45

Set up a sound prole
›
You can change your device's sounds by customizing
the current sound prole or switching to another sound
prole. To set up a prole,
In Menu mode, select Settings → Sound proles.
1
Select the prole you are using.
2
Customize the sound options for incoming calls,
3
incoming messages, and other device sounds.
► p. 130
Available sound options vary depending on the
selected prole.
Select Set.
4
To switch to another prole, select the check box next to
the prole and then Set.
Getting started
44
S8500_UM_Open.indb 44 9/10/2010 11:47:23 AM
Select a wallpaper for the idle screen
›
In Menu mode, select Settings → Display and light
1
→
Wallpaper.
Select an image.
2
Select Set.
3
Adjust the brightness of the display
›
In Menu mode, select Settings → Display and light.
1
Drag the slider under Brightness to adjust the level of
2
brightness.
Select Set.
3
The brightness level of the display will aect how
quickly the device consumes battery power.
Page 46

Lock your device
›
You can lock your device by activating the device
password.
In Menu mode, select Settings → Security.
1
Select Phone lock.
2
Enter a new 4- to 8-digit password and select Done.
3
Enter the new password again and select Done.
4
The rst time you access a menu that requires a
password, you will be prompted to create and
conrm a password.
Once the device lock is enabled, you must enter the
password each time you turn on the device.
• If you forget your password, bring your device to a
Samsung Service Centre to unlock it.
• Samsung is not responsible for any loss of
passwords or private information or other
damages caused by illegal software.
S8500_UM_Open.indb 45 9/10/2010 11:47:23 AM
Lock your SIM card
›
You can lock your device by activating the PIN supplied
with your SIM card.
In Menu mode, select Settings → Security.
1
Select PIN lock.
2
Enter the PIN of your SIM card and select Done.
3
Once the PIN lock is enabled, you must enter the PIN each
time you turn on the device.
• If you enter an incorrect PIN too many times, your
SIM card will be blocked. You must enter a PIN
unlock key (PUK) to unblock the SIM card.
• If you block your SIM card by entering an incorrect
PUK, bring the card to your service provider to
unblock it.
Getting started
45
Page 47

Select Sender.
Activate the mobile tracker
›
When someone inserts a new SIM card in your device,
the mobile tracker feature will automatically send the
contact number to specied recipients to help you locate
and recover your device. You can also lock, delete data, or
receive the lost device’s location information.
In Menu mode, select Settings → Security.
1
Select Mobile tracker.
2
Enter your password and select Done.
3
Select Recipients to open the recipient list.
4
Enter a phone number including a country code
5
(with +).
When you are nished setting the recipients, select OK.
6
Getting started
46
S8500_UM_Open.indb 46 9/10/2010 11:47:23 AM
7
SelectSave → Accept.
8
If the lost device is equipped with the mobile tracker
feature and the feature is activated, you can control it
remotely via the Web.
From a PC or other Internet-enabled device, access
1
URL www.samsungdive.com.
Follow the onscreen instructions to lock your device
2
remotely, wipe your device remotely, or get location of
your device.
Due to legal restrictions, determination of device
location is possible only in a limited number of
countries.
To deactivate the mobile tracker feature, in Menu
mode, select Settings
→
Reset.
→
Reset → Mobile tracker
Page 48

Enter text
You can enter text by selecting characters on the virtual
keypad or by inputting handwriting on the screen.
Change the text input method
When you tap the text input eld, the input panel with the
QWERTY keyboard appears by default.
1
2
3
Number Function
1
Change case.
2
Switch to Number or Symbol mode.
3
Insert a space.
4
5
6
Number Function
4
Clear your input.
5
Start a new line.
Change the input language; Access the
6
keyboard settings (tap and hold).
To change the text input method, tap and hold
select Keyboard type
→
a text input method.
Option Function
Keypad Select characters on the keypad.
Qwerty
keyboard
Writing full
screen
Select characters on the Qwerty
keyboard.
Write anywhere on the screen.
Writing box Write in the input boxes.
and
Getting started
S8500_UM_Open.indb 47 9/10/2010 11:47:23 AM
47
Page 49

Enter text using input methods
Change the text input method.
1
Change the text input mode.
2
Select the appropriate virtual keys or write on the
3
screen to enter your text.
When entering text, rotate the device sideways to
display the Qwerty keyboard on the wider screen.
Select the virtual keys as necessary to enter your
text.
When entering text with the keypad, you can use the
following modes:
Mode Function
ABC
48
S8500_UM_Open.indb 48 9/10/2010 11:47:23 AM
Select an appropriate virtual key until the
character you want appears on the display.
Getting started
Mode Function
1. In ABC mode, tap and hold
select Predictive text or T9.
2. Select the appropriate virtual keys to
enter an entire word.
3. When the word displays correctly, select
T9
(Predictive
text)
word does not display, select
an alternative word from the list that
appears.
Adding words to the T9 dictionary
If you cannot nd a word in the alternative
word list, you can add the word to the T9
dictionary. Select Add word at the bottom
of the alternative word list.
and
to insert a space. If the correct
and
Page 50

Mode Function
Select an appropriate virtual key to enter
Number
Symbol
Copy and paste text
While you are entering text, you can use the copy and
paste feature to use text in other applications.
Tap and hold the text input eld.
1
Select Select from the option list.
2
a number.
You can enter numbers by tapping
and holding a virtual key in ABC or
T9 mode.
1. Select
1/3to scroll to a symbol set you
want.
2. Select an appropriate virtual key to
enter a symbol.
Drag your nger across the text you want to highlight.
3
Select Copy or Cut to copy and paste, or cut and paste
4
the text onto the clipboard.
In another application, tap and hold the text input
5
eld.
Select Paste to insert the text from the clipboard into
6
the text eld.
Access help information
Learn to access helpful information about key features of
your device.
In Idle mode, open the widget toolbar and select .
1
Select the help widget from the idle screen.
2
Rotate the device counter-clockwise to landscape
3
view.
Getting started
S8500_UM_Open.indb 49 9/10/2010 11:47:23 AM
49
Page 51

Select a help topic to learn about an application or
4
feature.
Scroll left or right to view more information.
5
To return to the previous level, select
Getting started
50
S8500_UM_Open.indb 50 9/10/2010 11:47:24 AM
.
Page 52

Communication
Calling
Learn to use calling functions, such as making and
answering calls, using options available during a call or
customizing and using call-related features.
Make and answer a call
›
You can use the buttons or the touch screen when you
make, accept, end or reject calls.
Make a call
In Idle mode, select Keypad and enter an area code
1
and a phone number.
Press [ ] to make a voice call.
2
For a video call, select
When you hold the device near your face, your
device automatically locks the touch screen to
prevent accidental inputs.
To end the call, press [ ].
3
• Use Contacts to save numbers you dial frequently.
► p. 92
• To quickly access the call log to redial the numbers
you dialled recently, press [
.
].
Communication
S8500_UM_Open.indb 51 9/10/2010 11:47:24 AM
51
Page 53

Answer a call
When a call comes in, press [ ].
1
When the device is ringing, press the Volume key to
adjust the volume, or press and hold the Volume key
down to mute the ringtone.
For a video call, press [ ] and select Show me to
2
allow the caller to see you.
The front camera lens is activated to show your image.
To end the call, press [ ].
3
Reject a call
When a call comes in, press [ ]. The caller will hear a
busy tone.
• You can set up a list of numbers to reject incoming
calls automatically.
• You can send a message when you reject
incoming calls.
Communication
52
S8500_UM_Open.indb 52 9/10/2010 11:47:24 AM
► p. 55
Call an international number
In Idle mode, select Keypad and tap and hold 0 to
1
insert the + character.
Enter the complete number you want to dial (country
2
code, area code and phone number), and then press
[
] to dial the number.
Use the headset
›
By plugging the supplied headset into the device, you can
make and answer calls:
• To redial the last call, press the headset button, and then
press and hold the button.
• To answer a call, press the headset button.
• To end a call, press the headset button.
Page 54

Use options during a voice call
›
You can use the following options while a voice call is in
progress:
• To adjust the voice volume, press the Volume key up or
down.
• To place a call on hold, select Hold. To retrieve a held call,
select Unhold.
• To activate the speakerphone feature, select Speaker.
You can activate the speakerphone feature with motion.
In Menu mode, select Settings
→
Putting down (Speaker call). Then, during a call,
place your device on a table or a at surface.
In noisy environments, you may have diculty
hearing some calls while using the speakerphone
feature. For better audio performance, use the
normal device mode.
→
General → Gestures
• To turn o the microphone so that the other party
cannot hear you, select Mute.
• To listen and talk to the other party via the headset,
select Headset.
• To switch the current call to a video call, select
Switch to video call.
• To remove noise from your background so that the other
party can hear you more clearly, select
reduction on.
→
→ Noise
• To dial a second call, place the rst call on hold and then
dial a new number.
• To answer a second call, select Accept when a call
waiting tone sounds. The rst call is automatically placed
on hold.
• To switch between the two calls, select Swap.
• To end the active call, select End call.
Communication
S8500_UM_Open.indb 53 9/10/2010 11:47:24 AM
53
Page 55

• To make a multiparty call (conference call), make or
answer a second call and select Join when connected
to the second party. Repeat to add more parties. You
must subscribe to the multiparty call service to use this
feature.
Use options during a video call
›
You can use the following options while a video call is in
progress:
• To hide your image from the other party, select Hide me.
• To select an alternative image to be shown to the other
party, select Outgoing image.
• To capture the other party’s image, tap and hold the
video image of other party and select Capture image.
• To record a video call, tap and hold the video image of
other party and select Record video call.
Communication
54
S8500_UM_Open.indb 54 9/10/2010 11:47:25 AM
• To listen and talk to the other party via the headset,
select
→Switch to headset.
• To switch between the front and rear camera lens, select
→ Switch camera or tap and hold your image
and select Switch camera.
• To adjust the brightness, select
tap and hold your image and select Brightness.
• To zoom in or out, select
feature is available only when you are using the rear
camera.
• To apply the blur eect to your image, select
Blur eect or tap and hold your image and select Blur
eect. The blur eect feature is available only when you
are using the front camera.
• To customize the video call settings, select
Settings →Applications →Call →Video call.
→
Brightness or
→
Zoom. The zoom
→
→
Page 56

View and dial missed calls
›
Your device will display the number of calls you have
missed on the locked display in a "puzzle piece" icon.
• To see the call log, drag the icon to the blank spot in the
puzzle grid.
• To see the details of a call, select the call from the list.
• To return a call, place a video call or send a message,
touch the corresponding icon at the top of the screen.
Use additional features
›
You can use various other call-related features, such as
auto rejection, Fixed Dialling Number (FDN) mode, or call
forwarding or barring.
Set auto rejection
Use auto rejection to reject calls from certain numbers
automatically. To activate auto rejection and set up the
reject list,
In Menu mode, select Settings → Applications →Call
1
→
All calls → Auto reject.
Select →Create.
2
Enter a number to reject and select Save.
3
To add more numbers, repeat steps 2-3.
4
Select the check boxes next to the numbers.
5
Select Save.
6
To deactivate auto rejection of a number,
In Menu mode, select Settings → Applications →Call
1
→
All calls → Auto reject.
Deselect the check box next to the number.
2
Select Save.
3
Make a fake call
You can simulate an incoming call when you want to get
out of meetings or unwanted conversations.
Communication
S8500_UM_Open.indb 55 9/10/2010 11:47:25 AM
55
Page 57

To activate the hot key to make fake calls, in Menu mode,
select Settings
Fake call hot key.
To make a fake call, press and hold the Volume key down
in Idle mode. A fake call comes in after a specied length
of time.
You can make fake calls appear more realistic by playing
back a recorded voice. To record a voice,
In Menu mode, select Settings → Applications → Call
1
→
Touch Use fake call voice to activate the function
2
(green dot appears at the right side).
SelectRecord voice
3
Select to start recording.
4
56
S8500_UM_Open.indb 56 9/10/2010 11:47:25 AM
→
Applications → Call → Fake call →
You can change the delay time before fake calls. In
Menu mode, select Settings
→
Fake call → Fake call timer.
Fake call.
.
Communication
→
Applications → Call
Speak into the microphone.
5
During recording, select
resume.
When you are nished, select Save.
6
You can also make fake calls appear more realistic by
showing a caller ID image and caller's name or number.
In Menu mode, select Settings → Applications → Call
1
→
Fake call.
Select Name or Number.
2
Enter a name or number.
3
Select Fake caller image.
4
Select the image eld.
5
To add an existing image, select Get from My les,
6
select an image and select Set. To take a new photo,
select Get from Camera and take a photo.
to pause and select to
Page 58

Use Fixed Dialling Number (FDN) mode
In FDN mode, your device will restrict outgoing calls,
except for the numbers stored in the SIM card. You must
rst set up your FDN list in the phonebook to use FDN
mode. To activate FDN mode,
In Menu mode, select Settings → Security → Fixed
1
dialing mode.
Enter the PIN2 supplied with your SIM card and select
2
Done.
Set call forwarding
Call forwarding is a network feature to send incoming
calls to another number that you specify. You can set this
feature separately for several conditions when you are not
able to answer calls, such as when you are already on the
device or when you are outside of the service area.
In Menu mode, select Settings → Applications → Call
1
→
Voice call or Video call → Call forwarding.
Select a condition.
2
Select Forward to and select To voice mail,
3
Contacts, or To another number
Your setting will be sent to the network.
.
Set call barring
Call barring is a network feature to restrict certain types of
calling or to prevent others from making calls with your
device.
In Menu mode, select Settings → Applications → Call
1
→
Voice call or Video call →Call barring.
Select a call type to restrict.
2
Communication
S8500_UM_Open.indb 57 9/10/2010 11:47:25 AM
57
Page 59

Select Activate.
3
Enter a call barring password and select Done.
4
Your setting will be sent to the network.
Set call waiting
Call waiting is a network feature to alert you of an
incoming call while you are on a previous call. This feature
is available only for voice calls.
In Menu mode, select Settings → Applications → Call
1
→
Voice call → Call waiting.
Select Activate.
2
Your setting will be sent to the network.
Communication
58
S8500_UM_Open.indb 58 9/10/2010 11:47:25 AM
Logs
Learn to view and manage logs of calls you have dialed,
received, or missed and messages you have sent or
received.
View call and message logs
›
You can view logs of your calls and messages ltered by
their types.
In Menu mode, select Logs.
1
Scroll left or right to choose a log type at the top of
2
the screen.
Select a log to view its details.
3
From the detail view, you can dial the number, send
a message to the number or add the number to the
phonebook or reject list.
Page 60

View the log manager
›
From the log manager, you can check the amount of data
or number of messages sent or received and the cost and
duration of your calls.
In Menu mode, select Logs
1
manager.
Select an option you want.
2
Option Function
Call
duration
Message
counter
Email
counter
You can reset the records in the log manager. From
each screen, select Reset.
S8500_UM_Open.indb 59 9/10/2010 11:47:25 AM
View time data for your calls, such as
the duration of the last call and the
total duration of all calls.
View the number of messages you
have sent or received.
View the number of emails you have
sent or received.
→
→ Log
Messages
Learn to create and send text (SMS), multimedia (MMS), or
email messages, and view or manage messages you have
sent or received.
You may incur additional charges for sending or
receiving messages while outside your home service
area. For details, contact your service provider.
Send a text message
›
In Menu mode, select Messages →Compose.
1
Enter a number manually or select one or more from
2
Recent, Contacts or Groups.
Select the text input eld and enter your message text.
3
Communication
59
Page 61

Select Send to send the message.
4
• If you decide not to send a message immediately,
you can save it to the draft folder for future use.
• If an error occurs while you are sending a message,
it will be saved in the outbox so you can try to
send it later.
• When a message is sent successfully, it will be
saved in the sentbox.
Set up an MMS prole
›
To send and receive multimedia messages, you must
activate a connection prole for connecting to the MMS
server. In addition to proles that are preset by your service
provider, you can add your own connection prole.
In Menu mode, select Settings → Connectivity →
1
2
60
S8500_UM_Open.indb 60 9/10/2010 11:47:25 AM
→
Network
Select Create.
Communication
Connections →Yes.
Customize the parameters for the connection prole.
3
Option Function
Set name Enter the name for the prole.
Access name Enter the access point name.
Auth type Select an authentication type.
User ID Enter your user name.
Password Enter your password.
Protocol Select a network protocol.
Home URL
Proxy
address
Linger Time
(Sec.)
Advanced
settings
Enter the web address of a website
to use as your homepage.
Enter the address of the proxy
server.
Enter how long the device will wait
for responses from the network.
Customize IP and DNS addresses
and trac class.
Page 62

When you are nished, select Save.
4
In Menu mode, select Messages → →Settings
5
→
Multimedia messages →Multimedia message
proles.
Select a connection prole → Set.
6
Send a multimedia message
›
In Menu mode, select Messages →Compose.
1
Select Contacts.
2
Enter a number or email address manually or select
one or more from Recent, Contacts or Groups.
When you enter an email address, the device will ask
if you want to send a multimedia message. Select OK
to conrm.
Select the text input eld and enter your message text.
3
Select or select →Add Multimedia and
4
attach a le.
You can select a le from the le list, take a photo or
record a sound.
Select Send to send the message.
5
View a text or multimedia message
›
Messages you have received, sent or saved are sorted
automatically into the following message folders.
• Inbox: Received messages
• Sentbox: Sent messages
• Outbox: Messages that are currently sending or waiting
to be sent
• Drafts: Messages that you have saved for future use
Communication
S8500_UM_Open.indb 61 9/10/2010 11:47:25 AM
61
Page 63

In Menu mode, select Messages and select a thread.
1
By default, your messages are grouped by contact as
a message thread. To change the view mode, select
→ Folder view.
Select a text or multimedia message.
2
From the message list, use the following options:
• To view the messages on the thread view, select
→
Conversation view.
• To delete the messages, select
• To search a message you want, select
• To move the message to a created folder, select
→
Move to My folders from the message list.
• To view message templates or access the folders you
have created, select
→ My folders.
• To view broadcast messages, select
messages.
• To move a message to the spambox, select
Spambox.
Communication
62
S8500_UM_Open.indb 62 9/10/2010 11:47:26 AM
→
Delete.
→ Search.
→ Broadcast
→
• To sort messages, select
• To adjust the message settings, select
Settings.
Listen to voice mail messages
›
If you have set missed calls to be diverted to the voice mail
server, callers may leave voice messages when you do not
answer incoming calls. To access your voice mail inbox and
listen to voice mail messages,
In Idle mode, select Keypad, and then tap and hold 1.
1
Follow the instructions from the voice mail server.
2
You must save the voice mail server number
provided by your service provider before accessing
the server. .
→ List by.
→
Page 64

Create a multimedia message, with a subject and
Use message templates
›
Learn to create and use text and multimedia templates to
quickly and easily create new messages.
Create a text template
In Menu mode, select Messages.
1
Select
2
Enter your text and select Save.
3
You can now insert a text template in the text eld while
creating a text, multimedia, or email message by using the
Add text option.
Create a multimedia template
In Menu mode, select Messages.
1
Select → My folders → MMS cards → Create.
2
S8500_UM_Open.indb 63 9/10/2010 11:47:26 AM
→ My folders → Templates → Create.
3
desired attachments, to use as your template.
Select Save.
4
You can now use a multimedia template to create a new
multimedia message. From the MMS card list, tap and hold
a template and select Send. Your template will open as a
new multimedia message.
Create a folder to manage messages
›
Learn to create folders to manage your messages
according to your preferences and needs.
In Menu mode, select Messages.
1
Select → My folders →Create.
2
Enter a new folder name and select Done.
3
You can now move your important messages from
the inbox or sentbox to a custom folder for easier
management or to protect them from accidental deletion.
Communication
►p. 61
63
Page 65

Select contacts and select Add.
Send an SOS message
›
In case of an emergency, you can ask for help by sending
an SOS message to specied recipients.
This feature may be unavailable depending on your
region or service provider.
In Menu mode, select Messages.
1
Select
2
Sending options.
Select Sending SOS to activate the SOS messaging
3
feature.
Select Recipients to open the recipient list.
4
To enter a recipient number, select the input eld,
5
enter the number, and select OK. Skip to step 9.
To select a number saved in a contact list, select
6
Recent, Contacts, or Groups and then continue with
the next step.
Communication
64
S8500_UM_Open.indb 64 9/10/2010 11:47:26 AM
→ Settings → SOS messages →
7
Select a phone number (if necessary).
8
When you are nished setting the recipients, select OK.
9
Select Repeat and select the number of times to
10
repeat the SOS message.
Select Set →Set → Yes.
11
To send an SOS message, the touch screen and keys must
be locked. Press the Volume key 4 times.
Once you send an SOS message, all device functions
will be suspended until you press and hold the Lock
key.
Page 66

Email
Set up an email account and prole
›
In addition to the email account predened by your service
provider, you can add your personal email accounts. Also,
you can add your own connection prole for using email
services.
Set up an email account
In Menu mode, select Email .
1
To set up an account for one of the listed email
services, select the service name.
To set up an account for a dierent email service, select
Others.
Customize the settings for the account by following
2
the screens. NOTE: if you select an existing service, the
only options available are Email address, User name
and Password.
Option Function
Enter a name for the account.
Account name
Email address Enter your email address.
User name
Password
SMTP server
SMTP port
This option is available only
when setting up a new email
account.
Enter your user name for the
account.
Enter your password for the
account.
Enter the address of the SMTP
server (outgoing server).
Enter the port number of the
SMTP server.
Communication
S8500_UM_Open.indb 65 9/10/2010 11:47:26 AM
65
Page 67

Option Function
Secure
connection
Incoming
server type
POP3 server/
IMAP4 server
POP3 port/
IMAP4 port
Secure
connection
Communication
66
S8500_UM_Open.indb 66 9/10/2010 11:47:26 AM
Select a security protocol for the
SMTP server.
Select the type of the incoming
server (POP3 or IMAP4).
Enter the address of the
incoming server.
Enter the port number of the
incoming server.
Select a security protocol for the
incoming server.
Select an email prole
In Menu mode, select Email
1
Email proles.
Select a prole and select Set.
2
Send an email message
›
In Menu mode, select Email →an account→
1
Compose.
You can select Account list to view other accounts.
Enter an email address manually or select Contacts
2
and choose one from the call log or groups by
selecting another option.
Select the Cc/Bcc eld to add more recipients.
3
Select the subject eld to enter a subject.
4
→
→ Settings →
Page 68

Select the text input eld to enter your email text.
5
Select → Attach items to attach a le.
6
You can select a le from the le list or take a photo,
record a video, or capture a sound clip.
Select Send to send the message.
7
Download and view email messages
›
In Menu mode, select Email → an account.
1
If necessary, select Inbox.
2
Select
3
Select an email or a header.
4
If you selected a header, select
5
view the body of the email.
→ Download.
→ Retrieve to
Synchronize emails with an Exchange
›
server
After conguring sync settings, you can synchronize your
email with an Exchange server. To congure Exchange
server,
In Menu mode, select Email
1
Email accounts
Customize the settings for the Exchange server in the
2
following areas:
Option Function
Email address
User name
Password
→
→
New → Email for Exchange.
Enter your email address for the
Exchange server.
Enter your user name for the
Exchange server.
Enter your password for the
Exchange server.
→ Settings →
Communication
S8500_UM_Open.indb 67 9/10/2010 11:47:26 AM
67
Page 69

Option Function
Domain
After customizing the server settings, select the dot
3
next to data types to synchronize.
For synchronizing emails and calendar events, you can
set the sync interval.
To synchronize your emails,
In Menu mode, select Email → the Exchange server
1
account.
Select
2
Communication
68
S8500_UM_Open.indb 68 9/10/2010 11:47:26 AM
Enter the domain of your email
address.
→ Download.
IM
Learn to chat with friends and family from universal instant
messengers such as Windows Live Messenger, Google Talk,
and Yahoo Messenger.
Set up an IM account
In Menu mode, select IM.
1
Select an IM account from the account list.
2
Enter your User name and Password and select Next to
3
automatically verify your account.
Chat with others
In Menu mode, select IM.
1
If you have created one IM account, you are
2
automatically signed in to that account. If you have
created more than one account, select the account you
want to use.
Page 70

Chat with friends and family instantly.
3
Social Hub
Learn to access Social Hub™, Samsung's integrated pushbased communication application for email, messages,
instant messages, contacts or calendar information.
Visit http://socialhub.samsungmobile.com for more details.
In Menu mode, select Social Hub.
1
Check and use contents delivered from Social Hub.
2
Communication
S8500_UM_Open.indb 69 9/10/2010 11:47:27 AM
69
Page 71

Entertainment
Camera
Learn how to capture and view photos and videos. You
can take photos at resolutions up to 2560 x 1920 pixels
(5 megapixels) and videos at resolutions up to 1280 x 720
pixels.
Capture a photo
›
In Idle mode, press the Camera key to turn on the
1
camera.
Rotate the device counter-clockwise to landscape
2
view.
Entertainment
70
S8500_UM_Open.indb 70 9/10/2010 11:47:27 AM
• The camera interface appears only in the
landscape orientation.
• Tap the screen to hide or display viewnder icons.
• The camera automatically turns o when you do
not use it for a specied period.
• The memory capacity may dier depending on
the shooting scene or shooting conditions.
If necessary, select to switch to the camera.
3
Aim the lens at the subject and make any necessary
4
adjustments.
1
2
3
4
5
6
7
8
9
Page 72

Number Function
Check the camera status and settings.
• : Resolution
• : Exposure meter type
1
• : Default storage location
• : Number of photos you can take
(according to available memory)
2
Switch between camera and camcorder.
3
Change the shooting mode.
4
Change the scene mode.
5
Change the camera settings.
Change the ash setting; You can
manually turn the ash on or o or set
6
the camera to automatically use the
ash when needed.
Number Function
Change the focus mode; You can
take macro close-up photos or set
7
the camera to focus on human faces
automatically.
Adjust the exposure compensation;
8
Select + to increase exposure or – to
decrease.
View photos and videos you have
9
captured.
Press the Volume key to zoom in or out.
5
Press the Camera key to take a photo.
6
The photo is saved automatically.
Entertainment
S8500_UM_Open.indb 71 9/10/2010 11:47:27 AM
71
Page 73

After taking photos, select
to view the captured photos.
• To view more photos, scroll left or right or tilt the device
left or right.
• To zoom in, tap the screen with two ngers and spread
them apart (move your ngers closer together to zoom
out). To exit the zoom mode, select Real size.
• To add the photo to your favorites, select .
• To view the photos and videos in a slideshow, select .
Tap the screen to stop the slideshow.
• To view the photo details, select .
• To view thumbnails of all photos and videos, select .
• To delete a photo, select Delete
→
Yes.
• To access additional options for the photo, select
and one of the following items:
- Send via: Send the photo to others via multimedia
message, email or the Bluetooth wireless feature. You
can also send the photo to a DLNA-enabled device
using AllShare.
Entertainment
72
S8500_UM_Open.indb 72 9/10/2010 11:47:27 AM
- Upload: Post the photo to a community website or
blog.
- Set as: Set the photo as wallpaper or a caller ID image
for a contact.
- Edit tag: Add or edit a tag to categorize the photo.
- Edit: Edit the photo using Image editor or video using
Video editor.
- Print via: Print the photo using USB connection or the
Bluetooth wireless feature.
- Create movie: Compile images and/or videos into
a video le with background music and transition
eects.
Capture a photo by using preset scene
›
options
Your camera provides predened settings for various
scenes. You can simply select the proper mode for your
shooting condition and subjects.
Page 74

For example, when you take photos at night, select the
night mode that uses an extended exposure. When you
take photos of people with the light source behind them,
select the against light mode.
In Idle mode, press the Camera key to turn on the
1
camera.
Rotate the device counter-clockwise to landscape view.
2
Select → a scene → .
3
Make any necessary adjustments.
4
Press the Camera key to take a photo.
5
Capture a beauty photo
›
You can hide facial imperfections using Beauty mode.
In Idle mode, press the Camera key to turn on the
1
camera.
Rotate the device counter-clockwise to landscape
2
view.
S8500_UM_Open.indb 73 9/10/2010 11:47:28 AM
Select →Beauty.
3
Make any necessary adjustments.
4
Press the Camera key to take a photo.
5
Capture a photo in Smile shot mode
›
Your camera can recognize people’s faces and help you
take photos of their smiling faces.
In Idle mode, press the Camera key to turn on the
1
camera.
Rotate the device counter-clockwise to landscape view.
2
Select →Smile shot.
3
Make any necessary adjustments.
4
Press the Camera key.
5
Aim the camera lens at your subject. Your device
recognizes people in an image and detects their
smiles. When the subject smiles, the device
automatically takes a photo.
Entertainment
73
Page 75

Capture a series of photos
›
You can easily take a series of photos of moving subjects.
This is useful when you are photographing children at play
or a sporting event.
In Idle mode, press the Camera key to turn on the
1
camera.
Rotate the device counter-clockwise to landscape
2
view.
Select → Continuous.
3
Make any necessary adjustments.
4
Press and hold the Camera key. The camera will take
5
a series of up to nine photos while the camera key is
held down.
Entertainment
74
S8500_UM_Open.indb 74 9/10/2010 11:47:28 AM
Capture a panoramic photo
›
You can take wide panoramic photos using Panorama
shooting mode. This mode is convenient for
photographing landscapes.
In Idle mode, press the Camera key to turn on the
1
camera.
Rotate the device anti-clockwise to landscape view.
2
Select →Panorama.
3
Select a direction.
4
Make any necessary adjustments.
5
Press the Camera key to take the rst photo.
6
Slowly move the device in the direction you selected
7
and align the green frame in the brackets at the centre
of the viewnder.
When you have aligned the green frame within the
brackets, the camera automatically takes the next
photo.
Page 76

Repeat step 7 to complete the panoramic photo.
8
Select to save the panoramic photo.
9
Capture a vintage photo
›
You can take photos with a vintage look and feel by
applying colour lters.
In Idle mode, press the Camera key to turn on the
1
camera.
Rotate the device anti-clockwise to landscape view.
2
Select →Vintage.
3
Select → a colour tone.
4
Make any necessary adjustments.
5
Press the Camera key.
6
Customize camera settings
›
Before taking a photo, select → to access the
following options:
Option Function
Outdoor
visibility
Timer
Resolution
White balance
Eects
Activate Outdoor visibility to
increase screen visibility in bright
lighting conditions.
Select the length of the delay before
the camera takes a photo.
Change the resolution of captured
images.
Adjust the colour balance according
to lighting conditions. The default
setting is Auto (automatic).
Apply a special eect, such as sepia
or black and white tones.
Entertainment
S8500_UM_Open.indb 75 9/10/2010 11:47:28 AM
75
Page 77

Option Function
Adjust the sensitivity of the camera
ISO
imaging sensor. The default setting
is Auto (automatic).
Exposure
metering
Anti-Shake
Select a type of exposure meter.
Reduce blur caused by the device's
vibration or movement.
Automatically adjust contrast
Auto contrast
between your subject and
background.
Blink detection
Set the camera to alert you when
people close their eyes.
Image quality Set the quality level for your photos.
Adjust
Before taking a photo, select
Adjust contrast, saturation, and
sharpness.
→ to access the
Setting Function
Guidelines
Review
Display guidelines on the preview
screen.
Set the camera to display the
captured image.
Set the camera to include location
information for your photos.
GPS connection
• To improve GPS signals,
avoid shooting in locations
where the signal may
be obstructed, such as
between buildings or in
low-lying areas, or in poor
weather conditions.
• Alternately, customize the
GPS connection settings to
improve GPS reception.
► p. 130
following settings:
Entertainment
76
S8500_UM_Open.indb 76 9/10/2010 11:47:28 AM
Page 78

Setting Function
Shutter sound
Storage
Reset settings Reset menus and shooting options.
Capture a video
›
In Idle mode, press the Camera key to turn on the
1
camera.
Rotate the device counter-clockwise to landscape
2
view.
If necessary, select to switch to the camcorder.
3
Set the sound the camera shutter
makes when capturing a photo.
Select a memory location for storing
captured photos.
Aim the lens at the subject and make any necessary
4
adjustments.
1
2
3
4
Number Function
Check the camcorder status and
settings.
• : Resolution
1
• : Default storage location
• : Length of video that can
be captured (according to available
memory)
5
6
7
Entertainment
S8500_UM_Open.indb 77 9/10/2010 11:47:28 AM
77
Page 79

Select or press the Camera key to stop recording.
Number Function
2
Switch to the camera.
Change the recording mode (Normal,
3
Limit for MMS or Slow motio).
4
Change the camcorder settings.
Change the video light setting; You can
manually turn the light on or o, or set
5
the camera to automatically use the
light when needed.
Adjust the exposure compensation;
6
Select + to increase exposure or – to
decrease.
View photos and videos you have
7
captured.
Press the Volume key to zoom in or out.
5
Press the Camera key to start recording.
6
Entertainment
78
S8500_UM_Open.indb 78 9/10/2010 11:47:28 AM
7
The video is saved automatically.
The camera may not be able to properly record
videos to a memory card with a slow transfer speed.
After capturing videos, select
• To view more videos, scroll left or right or tilt the device
left or right.
• To play the video, select at the centre of the screen.
During playback, double-tap the screen to pause or play
again.
• To add the video to your favorites, select .
• To view the photos and videos in a slideshow, select .
Tap the screen to stop the slideshow.
• To view video details, select .
• To view thumbnails of all photos and videos, select .
• To delete a video, select Delete
to view captured videos.
→
Yes.
Page 80

• To use additional features, select and one of the
following options:
- Send via: Send the video to others via multimedia
message, email, or the Bluetooth wireless feature. You
can also send the video to a DLNA-enabled device
using AllShare.
- Upload: Post the video to a community website or
blog.
- Edit tag: Add or edit a tag to categorize the video.
- Edit: Lets you compile images and/or videos into
a video le with background music and transition
eects..
Capture a video in slow motion
›
In Idle mode, press the Camera key to turn on the
1
camera.
Rotate the device counter-clockwise to landscape
2
view.
If necessary, select to switch to the camcorder.
3
S8500_UM_Open.indb 79 9/10/2010 11:47:28 AM
Select → Slow motion.
4
Press the Camera key to start recording.
5
Select or press the Camera key to stop recording.
6
Customize camcorder settings
›
Before capturing a video, select → to access the
following options:
Option Function
Outdoor
visibility
Timer
Resolution Change the video resolution.
White balance
Activate Outdoor visibility to
increase screen visibility in bright
lighting conditions.
Select the length of the delay before
the camera starts recording a video.
Adjust the colour balance according
to lighting conditions.
Entertainment
79
Page 81

Option Function
Eects
Video quality Set the quality level for your videos.
Adjust
Before capturing a video, select
following settings:
Setting Function
Guidelines
Audio recording Turn the audio on or o.
Storage
Reset settings Reset menus and shooting options.
Entertainment
80
S8500_UM_Open.indb 80 9/10/2010 11:47:29 AM
Apply a special eect, such as sepia
or black and white tones.
Adjust contrast, saturation, and
sharpness.
→ to access the
Display the guidelines on the
preview screen.
Select a memory location for storing
captured videos.
Video player
Learn to use the video player to play various kinds of
videos. The video player supports the following le
formats: mp4, 3gp, wmv, asf, avi, mkv, divx, and xvid.
To play DivX video les, you must rst register
your device with the DivX website. In Menu mode,
select Settings
→
Registerto check your registration code and
then visit http://vod.divx.com to complete the
registration.
Play a video
›
In Menu mode, select Video player.
1
Select a video to play.
2
→
About phone → DivX(R) VOD
Page 82

Control playback with the following keys:
3
1
Number Function
Pause playback; While paused, press the
5
Camera key to capture the current screen;
Select
6
Scan forward in a le.
to resume playback.
2
3
4
Number Function
Activate the 5.1 channel surround sound
1
system when a headset is connected.
Move to a point in the le by dragging the
2
bar.
3
Scan backward in a le.
4
Change the ratio of the video screen.
S8500_UM_Open.indb 81 9/10/2010 11:47:29 AM
5
6
Customize video player settings
›
During video playback, select to access the following
settings:
Option Function
Activate or deactivate subtitles
in the video. This option appears
Subtitles on
Brightness Adjust the brightness of the video.
only when a subtitle le exists.
Supported formats are srt and smi
les.
Entertainment
81
Page 83

Option Function
Mosaic search
Color tone Change the color tone.
Repeat on Repeat video playback.
Send via
Upload to web
Details View the details of the video.
Entertainment
82
S8500_UM_Open.indb 82 9/10/2010 11:47:29 AM
Divide the video into segments
to apply dierent settings to each
segment.
Send the video to others via
multimedia message, email, or
Bluetooth wireless. You can also
send the video to a DLNA-enabled
device using AllShare.
Post the video to a community
website or blog.
Media browser
Learn to view photos and play videos saved in your
device's memory and memory card.
View a photo
›
In Menu mode, select Media browser.
1
To change the view mode, select View by
Select a photo to view.
2
While viewing a photo, use the following options:
• To view more photos, scroll left or right or tilt the device
left or right.
• To zoom in, tap the screen with two ngers and spread
them apart (move your ngers closer together to zoom
out). To exit the zoom mode, select Real size.
• To add the photo to your favourites, select .
• To view a slideshow of photos and videos, select . Tap
the screen to stop the slideshow.
→
an option.
Page 84

• To view the photo details, select .
• To recognize faces in the photo and prioritize focus on
those faces, select
• To delete the photo, select Delete
• To send the photo, select
• To edit the photo, select
Play a video
›
In Menu mode, select Media browser.
1
Select a video (with a play icon) to play.
2
Select to begin playback.
3
Control playback with the virtual keys. ►p. 80
4
.
→
Yes.
→
Send via.
→
Edit. (►p. 124)
Music
Learn to listen to your favourite music while on the go with
the music player. The music player supports the following
le formats: mp3, aac, wma, 3ga, and m4a.
Add music les to your device
›
Start by transferring les to your device or memory card:
• Download from the wireless web. ► p. 98
• Download from a PC with the optional Samsung Kies
software.
• Receive via Bluetooth. ►p. 107
• Copy to your memory card. ► p. 117
• Synchronize with Windows Media Player 11. ►p. 116
► p. 116
Entertainment
S8500_UM_Open.indb 83 9/10/2010 11:47:29 AM
83
Page 85

Play music
›
After transferring music les to your device or memory
card,
In Menu mode, select Music.
1
Select a music category → a music le.
2
Control playback with the following keys:
3
84
S8500_UM_Open.indb 84 9/10/2010 11:47:29 AM
1 5
2
3
4
Entertainment
6
7
8
Number Function
1
Activate the 5.1 channel surround sound
1
system when a headset is connected.
1
2
View the details of the music le.
1
Move to a point of the le by dragging
3
the bar.
Skip backwards; Scan backward in a le
4
(tap and hold).
1
5
Activate Shue mode.
1
Change the repeat mode (o, repeating
6
a le, or repeating all les).
Pause playback; Select to resume
7
playback.
Skip forward; Scan forward in a le (tap
8
and hold).
1. These icons are shown when you tap the player screen.
Page 86

• SRS CS Headphone™ delivers a 5.1 surround sound
experience over standard headphones or earbuds
when listening to multichannel content, such as
DVD movies.
• WOW HD™ signicantly improves the playback
quality of audio, delivering a dynamic 3D
entertainment experience with deep, rich bass
and high frequency clarity for crisp detail.
Access the revolving list
›
At any time while using the music player, rotate the phone
counter-clockwise to landscape view to make selections
from a revolving list. Items on the list correspond to the
active selection on the music category screen, i.e., if the
selected category is Albums, the revolving list displays
album names.
To make a selection, drag around the circle until your
choice is displayed then touch the icon .
If the revolving list is displaying All Tracks, making a
selection plays the track. If the revolving list is displaying
S8500_UM_Open.indb 85 9/10/2010 11:47:29 AM
any of the other categories, making a selection opens a list
of songs in that category. Select a music le from the list
to play it.
Create a playlist
›
In Menu mode, select Music.
1
Select Playlists → →Create.
2
Enter a title for your new playlist and select Done.
3
Select the created playlist.
4
Select Add.
5
Select the les you want to include and select Add.
6
Entertainment
85
Page 87

Add a song to the quick list
›
During playback, select Add to quick list to store your
1
favourite songs to the quick list.
To view songs on the list, select Go to quick list.
2
Customize music player settings
›
In Menu mode, select Music.
1
Select →Settings.
2
Adjust the following settings to customize your music
3
player:
Option Function
Equalizer
Eect Select a sound eect.
Music menu
Entertainment
86
S8500_UM_Open.indb 86 9/10/2010 11:47:30 AM
Select a default equalizer for the
style of music you play most often.
Select music categories to display
on the music library screen.
Option Function
Visualisation
Find music information
›
Learn to access an online music service to get information
about a song.
• This service is not available from some service
providers.
• The database does not include information for
all songs.
In Menu mode, select Music → →Music
1
recognition.
Select to record a part of a song.
2
After 10 seconds, the recording will stop automatically.
Follow the on-screen instructions to send the
3
recording to the music information server.
Select a screen animation to
display during playback.
Page 88

Control the FM radio with the following keys:
FM radio
Learn to listen to music and news on the FM radio. To listen
to the FM radio, you must connect the supplied headset,
which serves as the radio antenna.
Listen to the FM radio
›
Plug the supplied headset into the device.
1
In Menu mode, select FM radio.
2
Select Yes to start automatic tuning.
3
The FM radio scans and saves available stations
automatically.
The rst time you turn on the FM radio, you will be
prompted to start automatic tuning.
S8500_UM_Open.indb 87 9/10/2010 11:47:30 AM
4
Number Function
1
2
3
4
6 1
2
3 3
4
5
Set the FM radio to automatically retune
frequencies for stations when the
current signal is weak.
Turn o the FM radio; Select to turn
on the FM radio.
Change the frequency by 0.1 MHz.
Search for an available radio station.
4
Entertainment
87
Page 89

When you are nished recording, select Save.
Number Function
Add the current radio station to the
5
favourites list.
Change the sound output (headset or
6
device's speaker).
Record a song from the FM radio
›
Plug the supplied headset into the device.
1
In Menu mode, select FM radio.
2
Select to turn on the FM radio.
3
Scroll to the radio station you want.
4
Select →Record to start recording.
5
Entertainment
88
S8500_UM_Open.indb 88 9/10/2010 11:47:30 AM
6
The recorded le will be saved in Sounds (in Menu
mode, select My les
To listen to a recorded le, select
→
les
a le.
Save a radio station automatically
›
Plug the supplied headset into the device.
1
In Menu mode, select FM radio.
2
Select → Scan.
3
Select Yes to conrm (if necessary).
4
The FM radio scans and saves available stations
automatically.
Add a radio station to the favourites list
›
Plug the supplied headset into the device.
1
In Menu mode, select FM radio.
2
→
Sounds).
→Go to recorded
Page 90

Select to turn on the FM radio.
3
Scroll to the radio station you want.
4
Select one of the keys to add the station to that
5
key.
Customize FM radio settings
›
In Menu mode, select FM radio.
1
Select → Settings.
2
Adjust the following settings to customize your FM
3
radio:
Option Function
Alternative
frequency
FM radio auto oSet whether or not to turn o the
Set whether or not the FM radio
attempts to retune a radio station
when the signal is weak.
FM radio automatically.
Option Function
Record
location
Default name
of recording
les
When you are nished, select Back.
4
Set a memory location for storing
recorded sound clips.
Set a default prex for recorded
sound clips.
Entertainment
S8500_UM_Open.indb 89 9/10/2010 11:47:30 AM
89
Page 91

Play games or launch applications
Games and more
Learn to use games and applications powered by awardwinning Java technology.
The download of Java games or applications may
not be supported depending on the software of
the device.
Download games and applications
›
In Menu mode, select Games and more
1
website icon preset by your service provider.
Search for a game or application and download it to
2
the device.
Entertainment
90
S8500_UM_Open.indb 90 9/10/2010 11:47:30 AM
andselectthe
›
In Menu mode, select Games and more.
1
Select a game or application from the list and follow
2
the on-screen instructions.
• Available games or applications may vary
depending on your region or service provider.
• Controls and options of games or applications
may vary.
• Select Protection to protect your games or
applications from accidental deletion.
Page 92

Personal information
Contacts
Learn to create and manage a list of your personal or
business contacts stored on the device’s memory or a SIM
card. You can save names, mobile phone numbers, home
phone numbers, email addresses, birthdays and more for
your contacts.
Create a contact
›
In Menu mode, select Contacts → Create.
1
Enter contact information.
2
Select Done to add the contact to memory.
3
S8500_UM_Open.indb 91 9/10/2010 11:47:30 AM
You can also create a contact from the dialing screen.
In Idle mode, select Keypad and enter a phone
1
number.
Select Add to Contacts → Create contact.
2
Enter contact information.
3
Select Done to add the contact to memory.
4
Find a contact
›
In Menu mode, select Contacts.
1
Select Search and enter the rst letters of the name
2
you want.
Select the contact’s name from the contact list.
3
Once you nd a contact, you can:
• Make a voice call by touching the number you wish to
dial.
• Send a text or multimedia message by selecting .
Personal information
91
Page 93

• Make a video call by selecting .
• Edit the contact information by selecting Edit.
Set a favourite number
›
In Menu mode, select Contacts →Favorites →Add.
1
Select the check box next to the contact and Add.
2
The contact is saved to the favourite number list.
To add the number to your list of favourites, select a
contact from Contacts and then select
contact name.
The favourite numbers will be assigned to the
buddy list (
Create your namecard
›
In Menu mode, select Contacts → → My
1
prole.
Enter your own personal details.
2
Personal information
92
S8500_UM_Open.indb 92 9/10/2010 11:47:31 AM
) on the widget toolbar.
next to the
Select Done.
3
You can send your namecard by attaching it to a
message or email or transferring it via the Bluetooth
wireless feature.
Retrieve contacts from your community
›
accounts
You can view the list of community website accounts and
select an account to add a contact from the website to
your device contacts.
In Menu mode, select Contacts → →Get
1
Friends.
The accounts list you added will appear.
Select an account.
2
Page 94

Create a group of contacts
›
By creating groups of contacts, you can manage multiple
contacts and send messages or email to an entire group.
Start by creating a group.
In Menu mode, select Contacts →Groups →Create.
1
Select a memory location to save the group.
2
Enter a name and select a ringtone for the group.
3
Select Save.
4
Copy contacts
›
In Menu mode, select Contacts → → Copy
1
contacts.
Select a copy option (from the phone to the SIM card,
2
or from the SIM card to the phone).
Select contacts to copy.
3
When you are nished selecting contacts, select Copy.
4
Calendar
Learn to create and manage daily, weekly or monthly
events, and set alarms to remind yourself of important
events.
Create an event
›
In Menu mode, select Calendar.
1
Select Create.
2
Enter the details of the event as required.
3
Select Save.
4
Personal information
S8500_UM_Open.indb 93 9/10/2010 11:47:31 AM
93
Page 95

View events
›
To change the calendar view,
In Menu mode, select Calendar.
1
Select a view mode from the mode list (List, Day,
2
Month or Today).
Select an event to view its details.
3
To view events of a specic date,
In Menu mode, select Calendar.
1
Select a date on the calendar.
2
In month view, days with scheduled events are
indicated by a small triangle.
To move to a specic day by entering a date manually,
select Go to, enter the date , and select Go to.
Select an event to view its details.
3
Personal information
94
S8500_UM_Open.indb 94 9/10/2010 11:47:31 AM
• You can send the event to others by selecting
→ Send via → an option.
• You can print the event via Bluetooth by selecting
→ Print via Bluetooth.
• You can synchronize your calendar with an
Exchange server after conguring sync settings.
► p. 67
Stop an event alarm
›
If you set an alarm for a calendar event, the alarm will
sound at the specied time. To stop the alarm, select Stop.
Page 96

Select a task to view its details.
Task
Learn to create a virtual task list and set alarms to remind
yourself of important tasks or set priority.
Create a task
›
In Menu mode, select Task.
1
Select Create.
2
Enter the details of the task.
3
Select Save.
4
View tasks
›
In Menu mode, select Task.
1
Select → List by and select a category to sort
2
the tasks.
S8500_UM_Open.indb 95 9/10/2010 11:47:31 AM
3
For completed tasks with an expired deadline, you
can set their status to completed by selecting a task
and the check box from the top line. You will not be
reminded of those tasks any longer.
• You can send the task to others by selecting
→ Send via → an option.
• You can print the task via Bluetooth by selecting
→ Print via Bluetooth.
• You can synchronize your tasks with an Exchange
server after conguring sync settings.
► p. 67
Memo
Learn to record important information to save and view at
a later date.
Create a memo
›
In Menu mode, select Memo.
1
Personal information
95
Page 97

Select Create.
2
Enter your memo text.
3
To change the background colour, select Cancel and
4
select a colour in the line at the bottom of the screen.
Select Save.
5
View memos
›
In Menu mode, select Memo.
1
Select a memo to view its details.
2
To view all details of memos from the memo list, select
Maximize.
You can send the memo to others by opening the
memo and selecting Send via
Personal information
96
S8500_UM_Open.indb 96 9/10/2010 11:47:31 AM
→
an option.
Voice recorder
Learn to operate your device’s voice recorder. You can set
voice memos as call or alarm ringtones.
Record a voice memo
›
In Menu mode, select Voice rec.
1
Select to start recording.
2
Speak into the microphone.
3
When you are nished, select or Save.
4
Your memo is saved automatically.
To record more voice memos, repeat steps 2-4.
5
Play a voice memo
›
In Menu mode, select Voice recorder.
1
Select a voice memo to play.
2
Page 98

Control playback with the following keys:
3
1
Number Function
Move to a point in the le by dragging
1
the bar.
Pause playback; Select to resume
2
playback.
You can send the voice memo to others by tapping
and holding a voice memo and selecting a sending
option.
S8500_UM_Open.indb 97 9/10/2010 11:47:31 AM
2
Personal information
97
Page 99

In Menu mode, select Settings →Connectivity
Web
Internet
Learn to access and bookmark your favourite web pages.
• You may incur additional charges for accessing the
web and downloading media. For details, contact
your service provider.
• The web browser menu may be labelled
dierently depending on your service provider.
• Available icons may vary depending on your
region or service provider.
Set up an internet prole
›
To access the network and connect to the internet, you
must activate a connection prole. In addition to proles
that are preset by your service provider, you can add your
own connection prole.
Web
98
S8500_UM_Open.indb 98 9/10/2010 11:47:32 AM
1
Network →Connections →Yes.
Select Create.
2
Customize the network settings. ► "Set up an MMS
3
prole" (p. 60)
In Menu mode, select Internet → → Internet
4
5
›
1
→
settings
Select a connection prole → Set.
Internet proles.
Browse web pages
In Menu mode, select Internet to launch the browser
and open the preset homepage.
To access a specic web page, select the URL input
eld, enter the web address (URL) of the web page,
and select Go.
→
Page 100

Navigate web pages with the following keys:
2
1
2
3
4
Number Function
1
Bookmark the current web page.
2
Set the brightness of the screen.
Move backward or forward to web
3
pages in history.
4
Access a list of web browser options.
S8500_UM_Open.indb 99 9/10/2010 11:47:32 AM
5
6
7
8
9
1
Number Function
5
Refresh the current web page.
6
Change the view mode.
7
End the intetnet connection.
Open a web page in a new window or
8
switch between the currently opened
1
1
windows.
Open a list of saved bookmarks,
9
frequently visited pages and RSS feeds
and recent internet history.
1
Touch the screen to view these keys
While browsing the web page, use the following options:
• To zoom in, touch the screen with two ngers and
spread them apart (move your ngers closer together to
zoom out).
• To translate a word, tap and hold the word your want to
translate and select Translate.
Web
99
 Loading...