

Samsung WAM750, WAM551, WAM351, WAM550 User manual

WAM750/WAM751
WAM550/WAM551
WAM350/WAM351
Wireless Audio - Multiroom
M7/M5/M3
User Manual
imagine the possibilities
Thank you for purchasing this Samsung product.
To receive more complete service,
please register your product at
www.samsung.com/register

Contents
GETTING STARTED
Accessories ................................................4
Top Panel ....................................................5
Rear Panel ..................................................6
Connecting the Power Cable (WAM750,
WAM751 Only) ............................................9
Connecting the Cover-Stand (WAM750,
WAM751 Only) ..........................................10
Separating the Cover-Stand (WAM750,
WAM751 Only) ..................................................11
Installing on a Wall (WAM750, WAM751
Only) .........................................................12
Attaching the toroidal ferrite core to the
power cord of the M7 (WAM750,
WAM751 Only) ..........................................13
Looping the power cable around the toroidal
ferrite core .........................................................13
Connecting to Wi-Fi ..................................17
Connecting to Wi-Fi automatically (Android/iOS)
Connecting to Wi-Fi manually (Android) ..............19
Connecting to Wi-Fi manually (iOS) .................... 21
Connecting with a HUB (Not Included) ......24
Adding a HUB ...................................................27
Adding additional speaker(s) .....................28
.. 17
CONNECT WITH BLUETOOTH
FUNCTION
Connecting to Bluetooth Devices ..............30
Connecting with NFC function (WAM750,
WAM751, WAM550, WAM551 Only) -
Android .....................................................31
Connecting to the AUX IN (WAM750,
WAM751 Only) ..........................................32
Connecting the Stand (WAM550,
WAM551, WAM350, WAM351 Only) ......... 14
Installing on a Wall (WAM550, WAM551,
WAM350, WAM351 Only) .........................14
Standby Mode ..........................................15
Reset your product ...................................15
CONNECTING TO THE WI-FI
NETWORK
Preparing connection ................................16
Installing the Samsung Multiroom App ............... 16
Accessing the Samsung Multiroom App ............16
USING THE SAMSUNG
MULTIROOM APP
App at a glance ......................................... 33
Playing Music ............................................ 34
Playing a music file stored in the smart device ...34
Listen to the music through the phone speaker
Listening to streaming music .............................36
Listening to the internet radio .................... 37
Following a station ............................................. 38
Setting Presets ..................................................39
..35
4
2

Connecting TV to the speaker ................... 40
Connecting to TV via Bluetooth
(TV SoundConnect) ...........................................40
APPENDIX
Troubleshooting ........................................65
Connecting to TV via Wi-Fi .................................42
Listening to music from other devices in
network .............................................................42
Using playback menu ................................ 43
Adjusting Equaliser and DRC ............................. 44
Managing a queue ............................................. 45
Managing a playlist ............................................47
Using the Settings menu ...........................50
Add Speaker .....................................................50
Guide.................................................................51
Services .............................................................51
Speaker Mode ................................................... 52
Device Settings .................................................. 52
Clock ................................................................. 55
Support .............................................................57
Information ........................................................57
CONNECTING MULTIPLES
PRODUCTS
Setting Groups ..........................................58
Open Source License Notice .....................67
Licences ...................................................67
Specifications ............................................ 68
Regulatory Compliance Statements ..........71
Warning ............................................................. 71
CAUTION ..........................................................71
CAUTION ..........................................................71
Wiring the Main Power Supply Plug (UK Only) .... 72
Important Safety Instructions .............................72
Safety precautions ....................................73
Power Supply Precautions ................................. 73
Installation Precautions ......................................74
Usage Precautions.............................................74
Cleaning Precautions ......................................... 75
Additional Information ...............................75
About NFC (WAM750, WAM751, WAM550,
WAM551 Only) - Android ...................................75
About the Network Connection ..........................76
Compatible devices ...........................................76
Copyright ..................................................76
Setting the Surround Sound Mode ............60
USING MISCELLANEOUS
FUNCTIONS
Playing Media Content Saved in a PC .......62
Samsung Link ....................................................62
Wireless Audio - Multiroom for Desktop .............63
4
3

Getting Started
A
Accessories
Confirm you have the supplied accessories shown below.
• WAM750, WAM751
Power cord Cover-Stand Toroidal ferrite core
User Manual Getting started
• WAM550, WAM551
Power Adapter Stand User Manual Getting started
• WAM350, WAM351
Power cord Stand User Manual
4
4
A
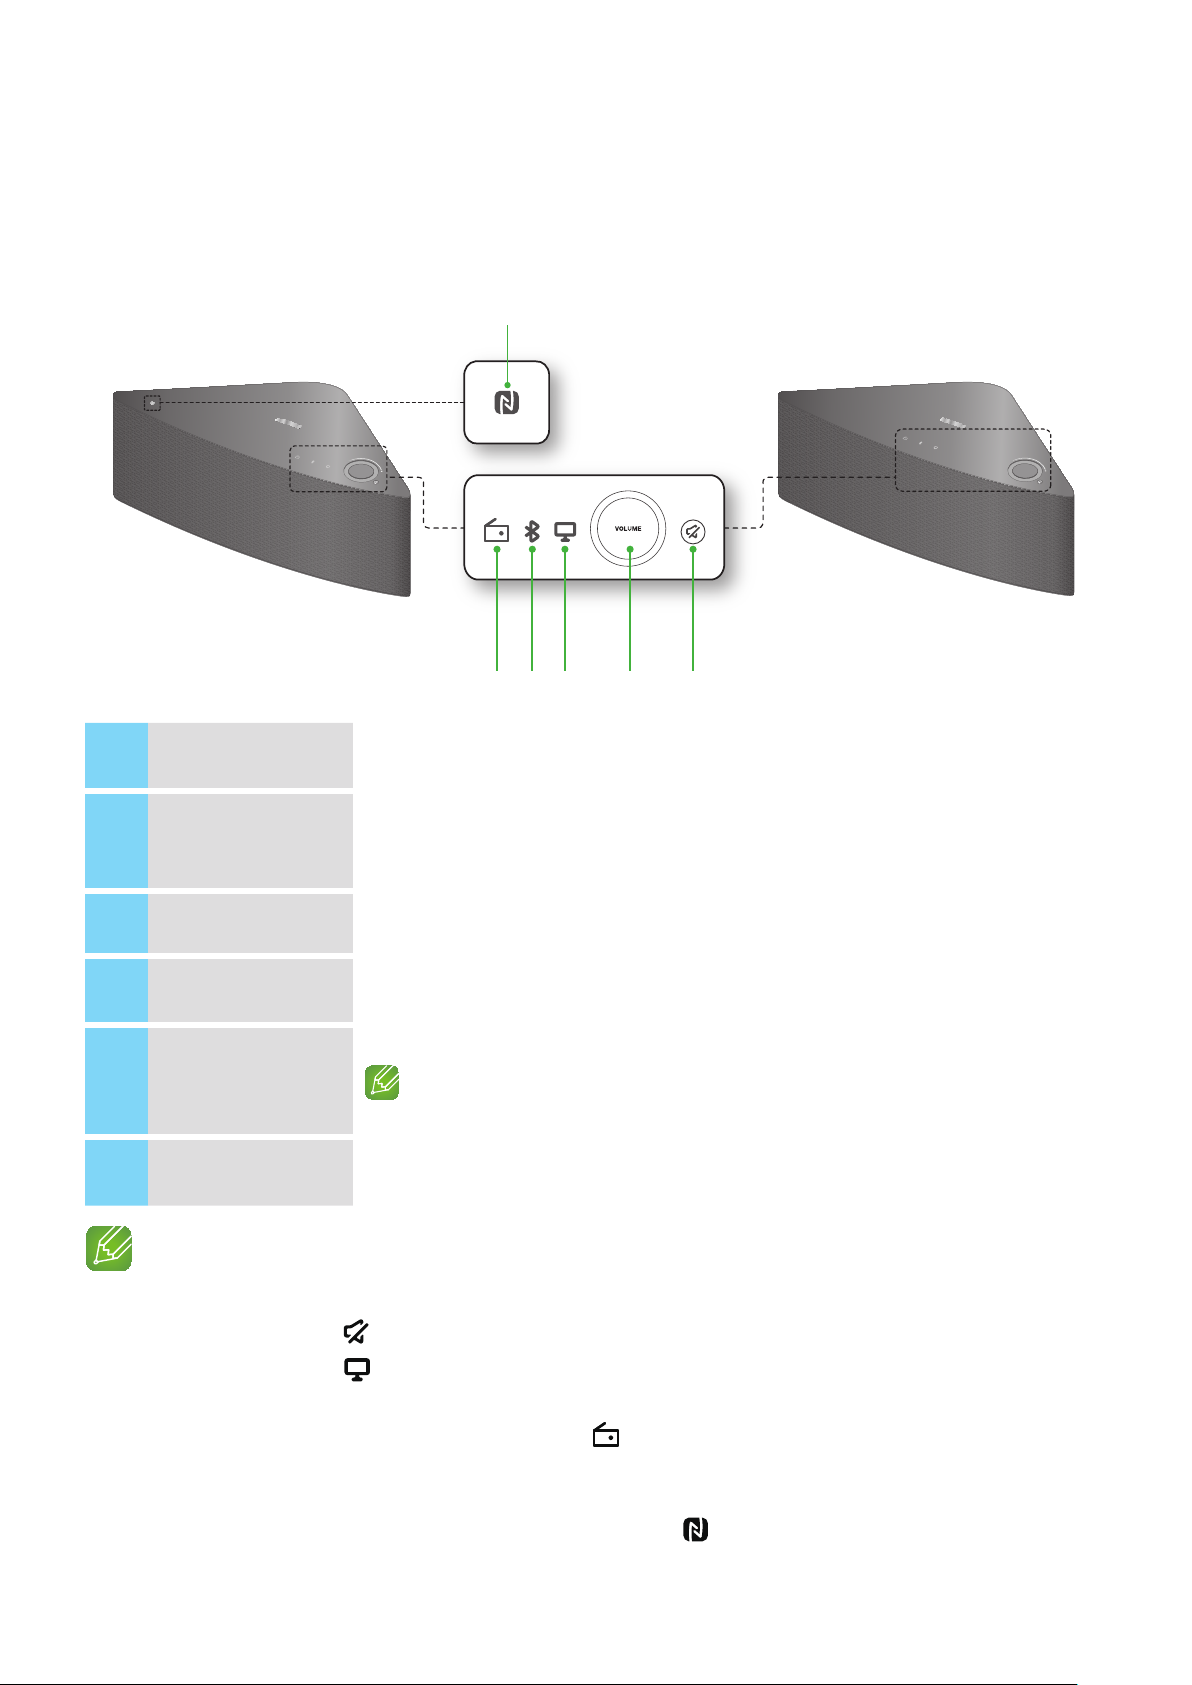
Top Panel
• WAM750, WAM751, WAM550, WAM551
q
VOLUME
wer t y
NFC Tag
1
Internet Radio
2
Preset button
Connect your NFC compatible device via Bluetooth to the product using the simple
NFC tagging procedure. (WAM750, WAM751, WAM550, WAM551 Only) - Android
Press this button to listen to an Internet radio station. Each time you press this
button, the product switches to the next default station, cycling through the 3 default
stations.
• WAM350, WAM351
VOLUME
Bluetooth button
3
TV SoundConnect
4
button
Volume Control
5
button
Mute button
6
NOTES
9When you turn on the product, touch buttons appear on its top panel.
9 Press and hold the
9 Press and hold the
and connect a new TV.
9 You can listen to a radio station by pressing the
product. Each time you press this button, the product switches to the next default station, cycling through
the 3 default stations.
Press this button to enable Bluetooth.
Press this button to enable TV SoundConnect.
Controls the volume level.
Touch and drag softly with your finger to make adjustments.
This will not work if you press with excessive force.
Mutes the sound from this product. Press again to restore the sound to the previous
volume level.
Mute button for more than 5 seconds to place the product into Standby Mode.
TV SoundConnect button for more than 5 seconds to reset the TV SoundConnect
Internet Radio Preset button on the top panel of the
9 Enable your smart device's Bluetooth by touching it to the
(WAM750, WAM751, WAM550, WAM551 Only) - Android
4
5
NFC Tag on the top panel of the product.

A
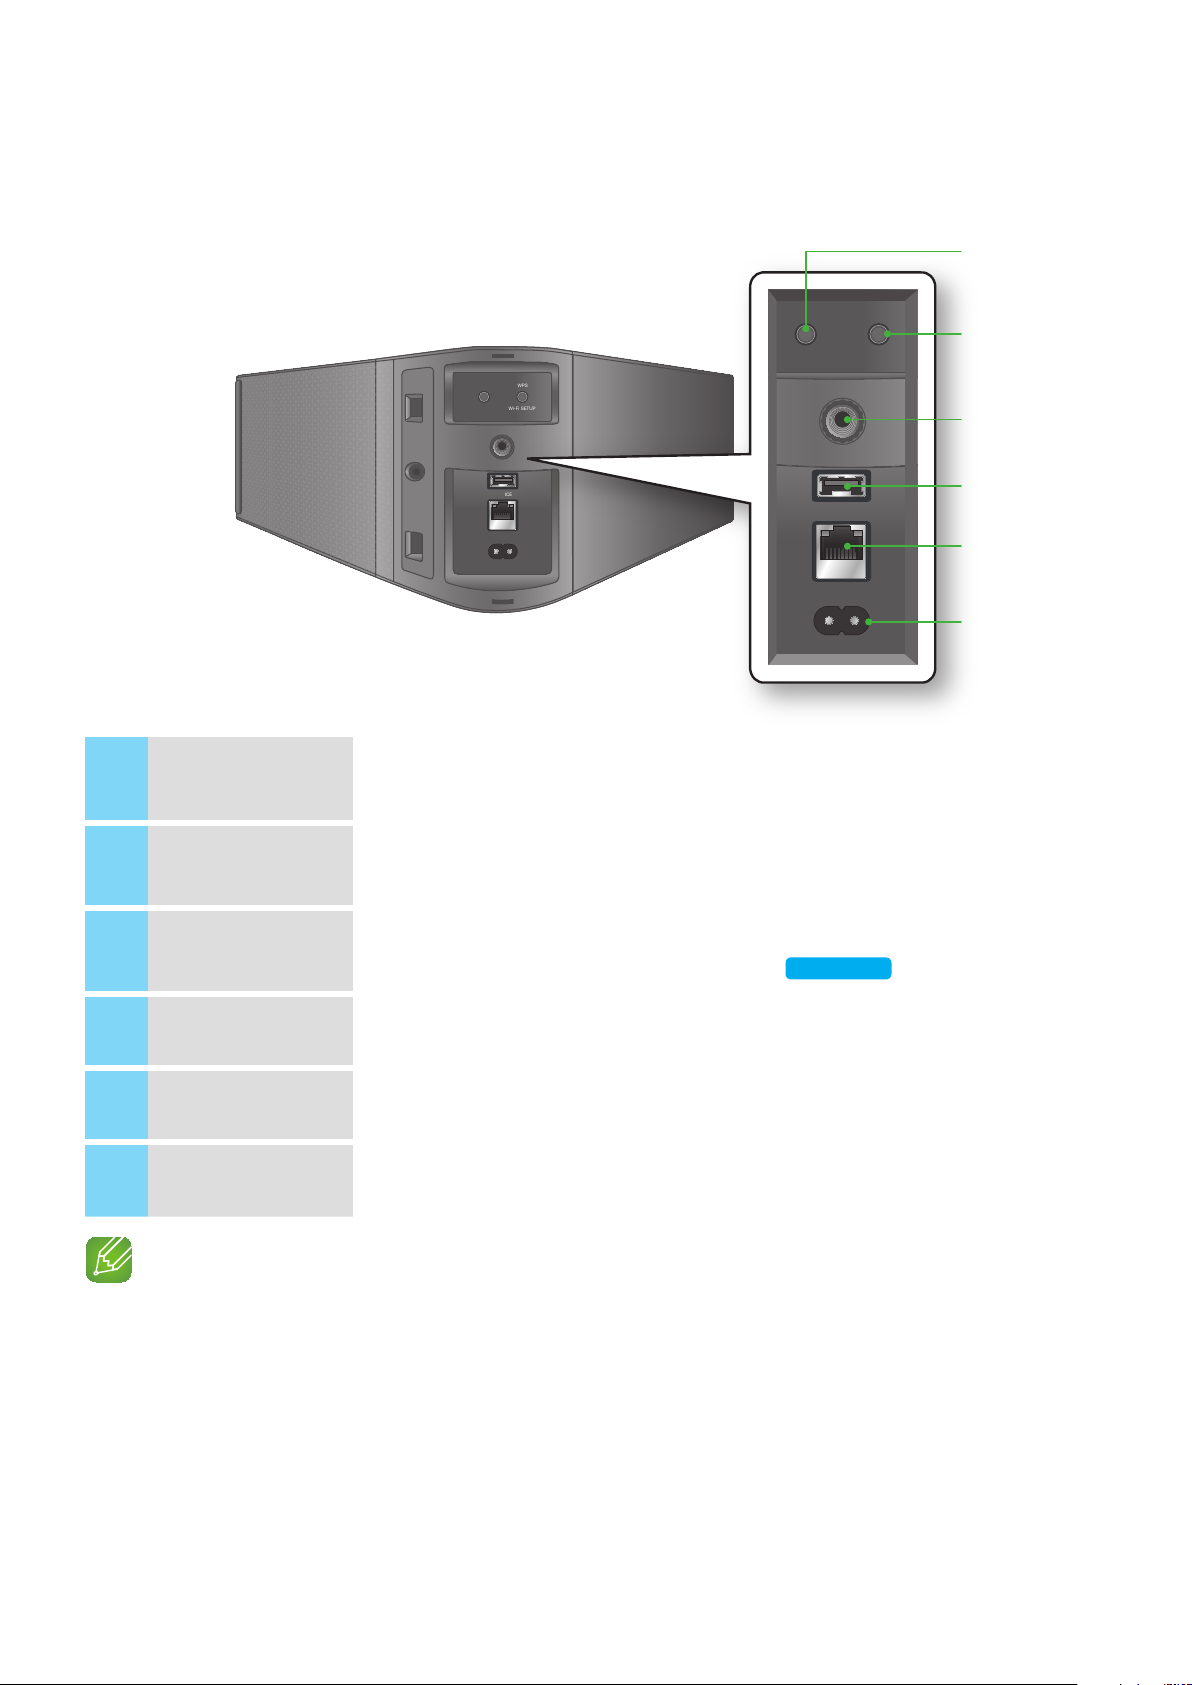
Rear Panel
• WAM750, WAM751
SPK ADD button
1
(Speaker Add)
WPS/Wi-Fi SETUP
2
button
WPS /
Wi-Fi SETUP
ETHERNET
SPK ADD
AUX IN
SERVICE
POWER
SPK ADD
WPS /
Wi-Fi SETUP
q
w
e
AUX IN
SERVICE
SPK ADD
WPS /
Wi-Fi SETUP
AUX IN
SERVICE
ETHERNET
POWER
ETHERNET
POWER
Press this button to add an M7 to your network.
Press this button to connect your M7 to your network using WPS or Wi-Fi setup.
r
t
y
3
4
5
6
AUX IN
SERVICE
ETHERNET
POWER
Lets you connect the M7 to the analog output of a smart device.
For service only. Lets service technicians update the firmware of the M7.
Lets you connect the M7 to your network using a LAN cable.
Connection for the M7's power cord.
NOTES
9SPK ADD Button: Press for 1 second to pair your M7 with a HUB.
9WPS / Wi-Fi SETUP Button:
- Press for 1 second to connect the M7 to your wireless router using WPS.
- Press and hold down for more than 5 seconds to connect the M7 to your network through your smart
device using the Wi-Fi Setup method.
4
6

• WAM550, WAM551
q
SPK ADD button
1
(Speaker Add)
WPS/Wi-Fi SETUP
2
button
SPK ADD
SPK ADD
WPS
Wi-Fi SETUP
WPS
Wi-Fi SETUP
w
e
SERVICE
ETHERNET
POWER
DC 14V 2.5A
SERVICE
ETHERNET
POWER
DC 14V 2.5A
Press this button to add an M5 to your network.
Press this button to connect your M5 to your network using WPS or Wi-Fi setup.
r
t
y
3
4
5
6
Wall Mount
SERVICE
ETHERNET
POWER
You can purchase a wall-mount to hang your product on the wall.
(For more information, please refer to page 14.)
For service only. Lets service technicians update the firmware of the M5.
Lets you connect the M5 to your network using a LAN cable.
Connection for the M5's power adapter.
NOTES
9SPK ADD Button: Press for 1 second to pair your M5 with a HUB.
9WPS / Wi-Fi SETUP Button:
- Press for 1 second to connect the M5 to your wireless router using WPS.
- Press and hold down for more than 5 seconds to connect the M5 to your network through your smart
device using the Wi-Fi Setup method.
Click here.
4
7
• WAM350, WAM351
q
SPK ADD button
1
(Speaker Add)
WPS/Wi-Fi SETUP
2
button
SPK ADD
SPK ADD
WPS
Wi-Fi SETUP
WPS
Wi-Fi SETUP
w
e
SERVICE
SERVICE
ETHERNET
POWER
ETHERNET
POWER
Press this button to add an M3 to your network.
Press this button to connect your M3 to your network using WPS or Wi-Fi setup.
r
t
y
3
4
5
6
Wall Mount
SERVICE
ETHERNET
POWER
You can purchase a wall-mount to hang your product on the wall.
(For more information, please refer to page 14.)
For service only. Lets service technicians update the firmware of the M3.
Lets you connect the M3 to your network using a LAN cable.
Connection for the M3's power cord.
NOTES
9SPK ADD Button: Press for 1 second to pair your M3 with a HUB.
9WPS / Wi-Fi SETUP Button:
- Press for 1 second to connect the M3 to your wireless router using WPS.
- Press and hold down for more than 5 seconds to connect the M3 to your network through your smart
device using the Wi-Fi Setup method.
Click here.
4
8

A
SPK ADD
WPS /
Wi-Fi SETUP
AUX IN
SERVICE
Connecting the Power Cable (WAM750, WAM751 Only)
1 Remove the rear cover.
2 Insert the power cable through the rear cover hole
into the M7 power port.
WPS /
Wi-Fi SETUP
ETHERNET
SPK ADD
AUX IN
SERVICE
POWER
ETHERNET
POWER
3 Close the rear cover.
NOTE
9When completing network setup, close the rear cover.
SPK ADD
WPS /
Wi-Fi SETUP
AUX IN
SERVICE
ETHERNET
POWER
4
9

A
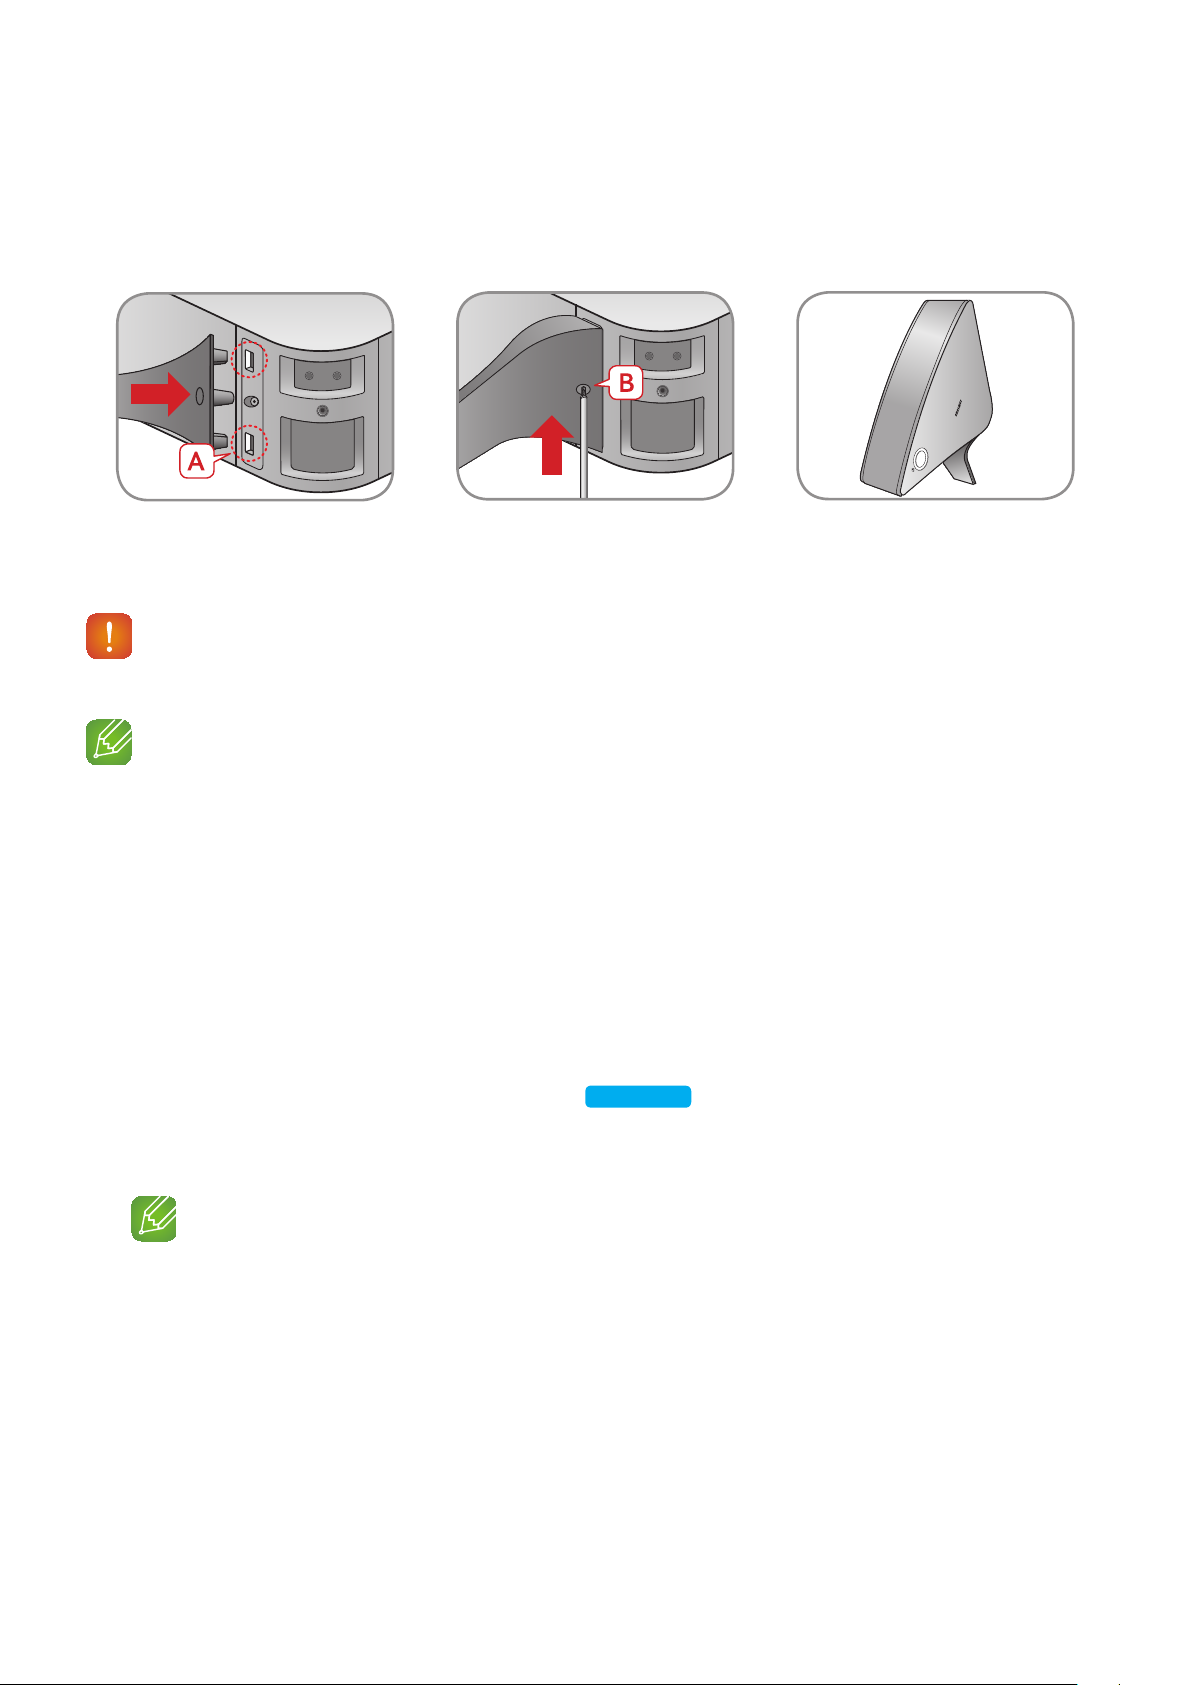
Connecting the Cover-Stand (WAM750, WAM751 Only)
1 Before attaching the Cover-Stand, remove the
rear cover.
Insert the power cable through the Cover-Stand
hole into the M7 power port.
2 The inside of the Cover-Stand has two sides.
One side (A) has four tabs - two large tabs and
two small tabs. The other side (B) has two large
tabs only. Insert the two large tabs on side A into
the two slots in the area marked A in the diagram.
3 Turn the M7 so the side marked B in the diagram
is facing you. With the thumbs of both hands,
press side B of the Cover-Stand so that the tabs
on side B snap into the slots in the area marked B
in the diagram. You may need to press side B of
the Cover-Stand with some force.
VOLUME
A
VOLUME
B
➡
4 The M7 can now be installed vertically.
Caution
9Do not place the M7 on an unstable surface.
NOTES
9Turn the speaker upright using the stand to set the
speaker to MONO mode.
9Turning the product upright or laying it down in the
middle of playing music may temporarily cause unstable
sound.
VOLUME
44
10

Separating the Cover-Stand (WAM750, WAM751 Only)
❚
1 Locate the Cover-Stand's handle. See the diagram
on the right.
2 Push the Cover-Stand's handle while applying
force to the Cover-Stand in the direction of the
arrow.
Important : Push the Cover-Stand straight ahead,
parallel to the surface of the M7. You may need to
use some force.
➡
3 The tabs release and the Cover-Stand separates
as shown in the figure.
NOTES
9Do not lift up the M7 by the stand. It may separate from the stand and cause damage or personal injury.
9When installing the M7 vertically, please make sure to use the stand.
If you do not, vibrations from the M7's speakers may cause the M7 to tip over or fall, damaging it.
44
11

A
Installing on a Wall (WAM750, WAM751 Only)
Warning
9Please have a qualified installer install the Wall Mount Bracket.
9Check the strength of the wall before you install the Wall Mount Bracket. If the strength is insufficient,
make sure to reinforce the wall before installing the Wall Mount Bracket and the M7 on the wall.
9Samsung Electronics is not liable for any damage to the product due to the product being installed
inappropriately.
9After the installation is complete, do not hang on the M7 and avoid striking it or subjecting it to severe
impact. When reinstalling the Wall Mount Bracket and M7 in another location, use the same screws
as those supplied with the Wall Mount Bracket. (You can buy the screws from your product provider.)
1 Finish pairing the M7, and then make sure the App plays music properly through the
M7.
2 Close the back cover of the M7.
3 Install the Wall Mount Bracket (sold separately). You can mount it vertically or
horizontally. Follow the directions that come with the Bracket.
or
or
4 Fit the M7 into the corresponding slots of the Wall Mount Bracket.
The installation is complete.
or
or
NOTE
9For more information, please refer to the Wall Mount's Quick Setup Guide.
44
12

A
SPK ADD
WPS /
Wi-Fi SETUP
AUX IN
SERVICE
Attaching the toroidal ferrite core to the power cord of the M7 (WAM750, WAM751 Only)
Attaching the Toroidal ferrite core to the power cord of the M7 helps prevent RF interference
from radio signals.
ETHERNET
POWER
1 Pull the fixing tab of the Toroidal ferrite core to open it.
2 Make a loop around the core with the power cable of the M7.
3 Attach the toroidal ferrite core to the M7 power cord as shown in the figure, and then
press it until it clicks.
Looping the power cable around the toroidal ferrite core
❚
•
Lift up to
release the
lock and open
➧ ➧ ➧
• Make a loop around
the core with the
power cable.
the core.
NOTE
9It is better to attach Toroidal ferrite cores at each end of the cable, one close to the wall plug and another
close to the terminal where it connects to the M7.
44
13
A
Connecting the Stand (WAM550, WAM551, WAM350, WAM351 Only)
➧ ➧
• Insert the stand into slot A of the
M5/M3.
Caution
9Do not place the M5/M3 on an unstable surface.
NOTES
9Turn the speaker upright using the stand to set the speaker to MONO mode. (WAM550, WAM551 Only)
9Turning the product upright or laying it down in the middle of playing music may temporarily cause
unstable sound.
A
Installing on a Wall
• Tighten a screw at B. • The M5/M3 can now be installed
vertically.
(WAM550, WAM551, WAM350, WAM351 Only)
You can purchase your preferred wall-mount additionally to install the product on a wall if you want.
Considerations for purchasing
`
For weight and hole size, refer to page 69.
Click here.
- Endurable load : Above 5.1 lbs (2.3kg)
- Hole size : 1/4 - 20 threaded insert
NOTES
9Since Wall-mount installation is optional, you should additionally purchase corresponding accessories
9Please have a qualified installer install the Wall Mount Bracket.
9Ask professional installation company to mount your product on the wall.
Check the strength of the wall before you install the Wall Mount Bracket. If the strength is insufficient,make
9
sure to reinforce the wall before installing the Wall Mount Bracket and the M5/M3 on the wall.
9For more information, please refer to the Wall Mount's manual.
9Samsung Electronics is not liable for any damage to the product due to the product being installed
inappropriately.
44
14

A
Standby Mode
In Wi-Fi / Bluetooth / TV SoundConnect mode
`
- The product switches to Standby mode if there is no operation (music playing, button
operation, app use) for 15 minutes.
In AUX mode (WAM750, WAM751 Only)
`
- The M7 switches to the Standby mode if there is no button operation (either from the top
panel or from the app) for 8 hours.
NOTES
9While playing music in the Wi-Fi, Bluetooth, or TV SoundConnect connection modes, the product will
not switch to the Standby mode.
9While playing music in AUX mode, it may switch to the Standby mode. (WAM750, WAM751 Only)
9To switch to the Standby mode manually, press and hold the
seconds.
A
Reset your product
1 Press and hold both the Internet Radio Preset and Mute buttons for more than
5 seconds to reset the product.
2
The Touch button on the product will blink twice.
3 Press and hold the
the product.
NOTE
9Resetting erases all information stored in the product.
Internet Radio Preset button for more than 5 seconds to reboot
Mute button for more than 5
44
15

ANDROID APP ON
Connecting to the Wi-Fi network
A
Preparing connection
Wireless RouterInternet Smart Device
1 Requirements: Wireless Router, Smart Device
2 The wireless router should be connected to the Internet.
3 The smart device should be connected to the router via a Wi-Fi connection.
Installing the Samsung Multiroom App
❚
To use the product, you must download and then install the Samsung Multiroom App by
accessing the app through Google play or App Store.
With the Samsung Multiroom App installed, you can play music stored in your smart device,
from connected devices and other content providers, and from Internet radio stations through
the product.
Android iOS
Market search : Samsung Multiroom
ANDROID APP ON
Accessing the Samsung Multiroom App
❚
Samsung
Multiroom
NOTE
Market search : Samsung Multiroom
9Please terminate the Samsung Multiroom App when speaker are not used because the battery of your
smart device can be consumed quickly if the app is working.
44
16

A
SPK ADD
Wi-Fi SETUP
WPS
ETHERNET
Connecting to Wi-Fi
Connecting to Wi-Fi automatically (Android/iOS)
❚
Wireless Router
POWER
<WAM550, WAM551><WAM750, WAM751,
WAM350, WAM351>
POWER
DC 14V 2.5A
VOLUME
1 Plug the product into an electrical outlet.
2 On your Smart device, select the Samsung Multiroom app.
3 Run the Tutorial if you want, and then press Done.
4 Press Connect Now.
• It searches for the device available for pairing.
44
17

5 Once an available device is found, it attempts to connect to the wireless network.
In case of secure network, the password prompt appears on the smart device screen.
Use the on-screen keyboard to enter the password.
• Depending on the network environments, the product(s) may not be automatically
connected. In such cases, select the Manual, and then proceed the next steps by
referring to pages 19~23.
Click here.
6 Press Done.
• Network connection is completed.
NOTES
9To connect to your wireless network safely, you must enter the valid password.
- For connecting to the home or work wireless network, consult your service provider or the network
administrator.
9If the product fails to connect to a network or the network connection does not work normally, move the
product closer to the hub or router, and then try again.
9The distance between devices or obstruction and interference from other wireless devices may
influence communication between the product and network.
9This product may be found by some other Wi-Fi devices. However, they are not allowed to connect to
this product.
9Once the Wi-Fi connection is established initially, it is maintained unless the wireless router is replaced
or its network settings are changed.
44
18

Connecting to Wi-Fi manually (Android)
❚
Depending on the network environments, the product(s) may not be automatically connected.
In that case, you can set up the product manually to connect to the network.
1 If the automatic setup fails, select the Manual.
2 Press and hold the WPS/Wi-Fi SETUP button on the back of your product for more than
5 seconds to configure the Wi-Fi Setup.
• The product can wait for 2 minutes in its standby mode until the Wi-Fi connection is
established.
VOLUME
Wireless Router
WPS/Wi-Fi SETUP button
SPK ADD
WPS /
Wi-Fi SETUP
POWER
<WAM750, WAM751>
SPK ADD
WPS
Wi-Fi SETUP
ETHERNET
POWER
DC 14V 2.5A
<WAM550, WAM551> <WAM350, WAM351>
WPS
Wi-Fi SETUP
ETHERNET
POWER
44
19

3 On your smart device, press Next.
• It searches for the device available for pairing.
4 Once an available device is found, the product tries to connect to the newly found smart
device first, then it attempts to connect to the wireless network.
In case of secure network, the password prompt appears on the smart device screen.
Use the on-screen keyboard to enter the password.
5 Press Done.
• Network connection is completed.
To connect to
another wireless
network, press
this.
44
20

Connecting to Wi-Fi manually (iOS)
❚
1 If the automatic setup fails, select the Manual.
2 Press and hold the WPS/Wi-Fi SETUP button on the back of your M7/M5/M3 for more
than 5 seconds to configure the Wi-Fi Setup.
• The M7/M5/M3 can wait for 2 minutes in its standby mode until the Wi-Fi connection is
established.
VOLUME
Wireless Router
WPS/Wi-Fi SETUP button
SPK ADD
WPS /
Wi-Fi SETUP
POWER
<WAM750, WAM751>
SPK ADD
WPS
Wi-Fi SETUP
ETHERNET
POWER
DC 14V 2.5A
<WAM550, WAM551> <WAM350, WAM351>
WPS
Wi-Fi SETUP
ETHERNET
POWER
44
21
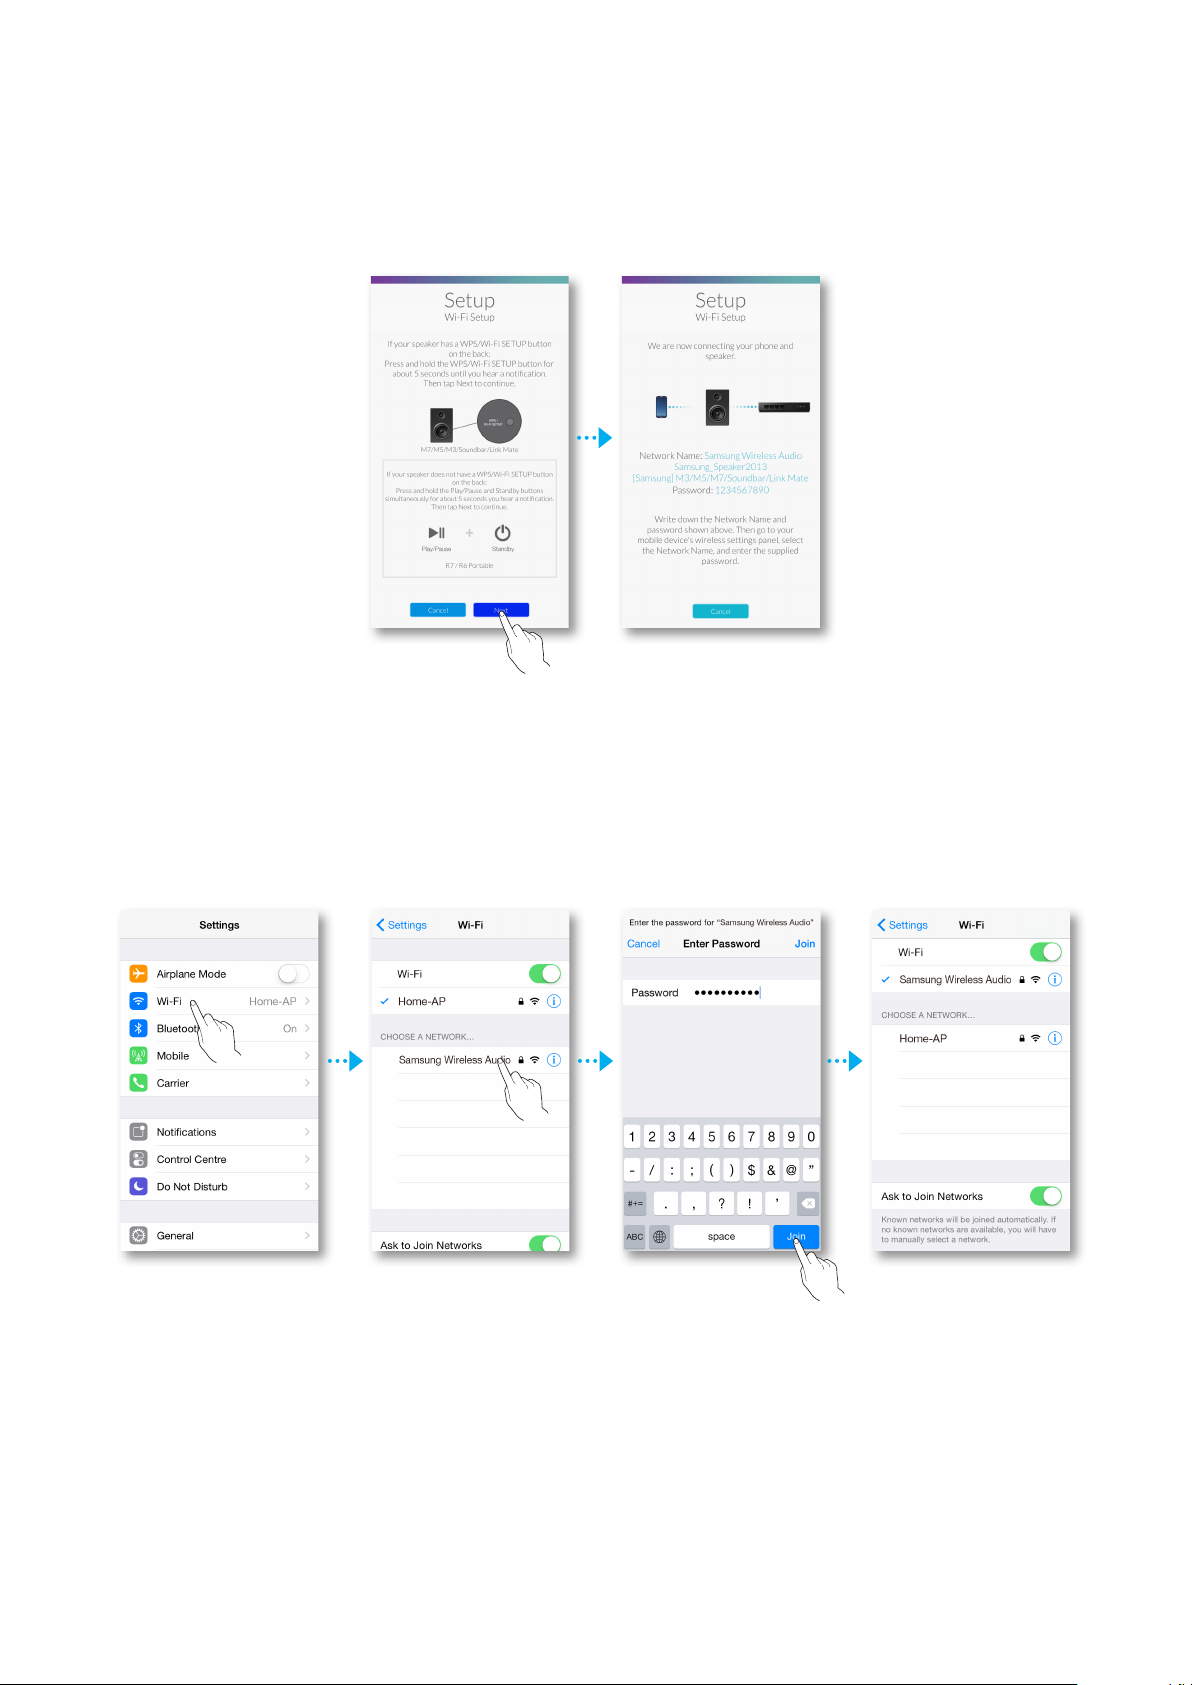
3 On your smart device, press Next.
• It searches for the device available for pairing.
4 Go to Settings ; Wi-Fi in iOS, and then select the Samsung Wireless Audio.
5 To connect your smart device to the M7/M5/M3, use the keyboard that appears to enter
your password.
• The default password is 1234567890.
• The M7/M5/M3 and the smart device are connected to each other.
44
22

6 Go back to the Samsung Multiroom app.
7 Select Next.
8 From the wireless network list, select the desired one for M7/M5/M3 connection.
9 In case of secure network, the password prompt appears on the smart device screen.
Use the on-screen keyboard to enter the password.
• Once you finish entering, the M7/M5/M3 connects to the network.
10 Go to Settings ; Wi-Fi in iOS, and then select the network which the M7/M5/M3 is
connected to.
(The M7/M5/M3 and the smart device should be connected to the same wireless router.)
• The smart device connects to the network.
11 When the M7/M5/M3 is completely connected, press Next.
12 Go back to the Samsung Multiroom app.
• All network connections are finished.
44
23

A
SPK ADD
Wi-Fi SETUP
WPS
ETHERNET
Connecting with a HUB (Not Included)
• If the product fails to connect to your network or its network connection operates
abnormally, place the product closer to the HUB or your router and try again.
• The product is a wireless network device. Its communications with your network may
be disrupted because of the distance between it and other devices on the network,
obstructions, or interference from other wireless devices.
HUB
Wireless Router
<WAM750, WAM751,
WAM350, WAM351>
LAN
POWER
<WAM550, WAM551>
POWER
DC 14V 2.5A
VOLUME
1 Connect a LAN cable to the router and the ETHERNET SWITCH on the back of the
HUB.
NOTE
9You can connect the LAN cable to any ETHERNET SWITCH Port on the HUB.
2 Attach the HUB's power cord to the power port on the rear of the HUB, and then plug
the power cord into an electrical outlet.
3 The power (
When the pairing indicator (
) and the HUB ( ) indicators on the HUB's front turn on.
) begins to flash, plug the product(s) into an outlet.
The LED indicator on the product starts to flash.
If the HUB's pairing indicator does not flash, press the SPK ADD button on the rear of
the HUB.
NOTE
9If you are adding multiple Products, connect all the Product's to electrical outlets. If you are not
connecting all the Products, refer to pages 28~29.
44
Click here.
24

4 Wait until the LED indicator on the Product stops flashing. If the Product's LED indicator
turns solid blue, pairing is complete.
NOTES
9Place each Product at least 20 inches (50 cm) from the HUB when connecting them to the HUB.
9Your smart device cannot connect to the Product or the HUB if there is no wireless router.
9To confirm you have a proper connection, check the pairing indicator on the front of the HUB.
- When you turn on the HUB for the first time, there is a 20 minute pairing period.
The pairing indicator (
) will blink for these 20 minutes or until pairing occurs. When you press
the SPK ADD button to pair additional Products, the pairing period is reduced to 10 minutes. The
pairing indicator (
) flashes for 10 minutes or until pairing occurs. Turn on the Product you want
to pair while the pairing indicator is flashing.
- If pairing mode has expired, press the SPK ADD button on the rear of the HUB to turn on pairing
mode again. Then, turn the product off and then on or press the SPK ADD button on the rear of the
product to link the product to the HUB.
9For a proper connection, connect the HUB to your router before turning on the Product.
- Connecting the Product to the HUB may take a few minutes.
- There will be a brief sound when the connection is established.
5 Connect your smart device to your Wi-Fi network. (The HUB and the smart device should
be connected to the same router.)
44
25
 Loading...