


WAM270
Wireless Audio - Multiroom
Link Mate
User Manual
imagine the possibilities
Thank you for purchasing this Samsung product.
To receive more complete service,
please register your product at
www.samsung.com/register

Safety Information
A
Regulatory Compliance Statements
CAUTION
RISK OF ELECTRIC SHOCK
DO NOT OPEN
The lighting flash and arrowhead
within the triangle is a warning sign
alerting you to dangerous voltage
inside the product.
Warning
❚
• To reduce the risk of fire or electric shock, do not expose this appliance to rain or moisture.
• Do not expose this apparatus to dripping or splashing.
Do not put objects filled with liquids, such as vases on the apparatus.
• To turn this apparatus off completely, you must pull the power plug out of the wall socket.
Consequently, the power plug must be easily and readily accessible at all times.
CAUTION
❚
TO PREVENT ELECTRIC SHOCK, MATCH WIDE BLADE OF PLUG TO WIDE SLOT, FULLY
INSERT.
• This apparatus shall always be connected to a AC outlet with a protective grounding
connection.
CAUTION:
ELECTRIC SHOCK, DO NOT REMOVE
THE COVER (OR BACK). NO USER
SERVICEABLE PARTS INSIDE. REFER
SERVICING TO QUALIFIED SERVICE
PERSONNEL.
TO REDUCE THE RISK OF
The explanation point within the
triangle is a warning sign alerting
you to important instructions
accompanying the product.
• To disconnect the apparatus from the mains, the plug must be pulled out from the mains
socket, therefore the mains plug shall be readily operable.
CAUTION
❚
• Do not expose this apparatus to dripping or splashing. Do not put an object filled with liquid,
such as a vase, on the apparatus.
• To turn this apparatus off completely, you must pull the power plug out of the wall socket.
Consequently, the power plug must be easily and readily accessible at all times.
4
2

Wiring the Main Power Supply Plug (UK Only)
❚
IMPORTANT NOTICE
The mains lead on this equipment is supplied with a moulded plug incorporating a fuse. The
value of the fuse is indicated on the pin face of the plug and if it requires replacing, a fuse
approved to BS1362 of the same rating must be used. Never use the plug with the fuse cover
removed. If the cover is detachable and a replacement is required, it must be of the same colour
as the fuse fitted in the plug. Replacement covers are available from your dealer. If the fitted
plug is not suitable for the power points in your house or the cable is not long enough to reach
a power point, you should obtain a suitable safety approved extension lead or consult your
dealer for assistance. However, if there is no alternative to cutting off the plug, remove the fuse
and then safely dispose of the plug. Do not connect the plug to a mains socket as there is a risk
of shock hazard from the bared flexible cord. Never attempt to insert bare wires directly into a
mains socket. A plug and fuse must be used at all times.
IMPORTANT NOTICE
The wires in the mains lead are coloured in accordance with the following code:– BLUE =
NEUTRAL BROWN = LIVE As these colours may not correspond to the coloured markings
identifying the terminals in your plug, proceed as follows:– The wire coloured BLUE must be
connected to the terminal marked with the letter N or coloured BLUE or BLACK. The wire
coloured BROWN must be connected to the terminal marked with the letter L or coloured
BROWN or RED.
WARNING : DO NOT CONNECT EITHER WIRE TO THE EARTH TERMINAL WHICH IS
MARKED WITH THE LETTER E OR BY THE EARTH SYMBOL
OR GREEN AND YELLOW.
Important Safety Instructions
❚
Read these operating instructions carefully before using the unit. Follow all the safety instructions
listed below.
Keep these operating instructions handy for future reference.
1 Read these instructions.
2 Keep these instructions.
3 Heed all warnings.
4 Follow all instructions.
5 Do not use this apparatus near water.
6 Clean only with a dry cloth.
7 Do not block any ventilation openings. Install in accordance with the manufacturer's
instructions.
, OR COLOURED GREEN
4
3

8 Do not install near any heat sources such as radiators, heat registers, stoves, or other
apparatus (including AV receivers) that produce heat.
9 Do not defeat the safety purpose of the polarized or grounding-type plug. A polarized plug
has two blades with one wider than the other. A grounding type plug has two blades and
a third grounding prong. The wide blade or the third prong are provided for your safety. If
the provided plug does not fit into your outlet, consult an electrician for replacement of the
obsolete outlet.
10 Protect the power cord from being walked on or pinched particularly at plugs, convenience
receptacles, and the point where it exits the apparatus.
11 Only use attachments/accessories specified by the manufacturer.
12 Use only with the cart, stand, tripod, bracket, or table specified by the
manufacturer, or sold with the apparatus. When a cart is used, use caution
when moving the cart/apparatus combination to avoid injury from tip-over.
13 Unplug this apparatus during lightning storms or when unused for long periods
of time.
14 Refer all servicing to qualified service personnel. Servicing is required when the apparatus
has been damaged in any way, such as when the power-supply cord or plug is damaged,
liquid has been spilled or objects have fallen into the apparatus, the apparatus has been
exposed to rain or moisture, does not operate normally, or has been dropped.
A
Safety precautions
Power Supply Precautions
❚
• Do not overload outlets or extension cords.
- This may result in abnormal heat or fire.
• Do not plug in or unplug the power cord with wet hands.
• Do not place the product near heating equipment.
• To clean the power plug blades, remove the plug from the wall outlet and wipe the blades with
a dry cloth only.
• Do not bend the power cord or pull it forcefully.
• Do not put heavy objects on the power cord.
• Do not plug the power cord into a loose or damaged outlet.
• Fully insert the power cord's plug into the the wall outlet so that the plug is firmly attached to
the outlet.
- If the connection is unstable, there is a risk of fire.
4
4

Installation Precautions
❚
• Do not install the product near equipment or objects that generate heat or produce fire
(candles, mosquito coils, heaters, radiators, etc.). Do not install in direct sunlight.
• When moving the product, turn off the power and disconnect all cords (include the power
cord) from the unit.
- A damaged cord may cause a fire and poses a risk of electric shock.
• Installing the product in environments with high heat or humidity, dust, or extreme cold, can
lead to quality problems or cause the product to malfunction. Before you install the product
in an environment that is outside the norm, please contact a Samsung service center for
additional information.
• When placing the product on a shelf, cabinet, or desk, make sure the top panel faces
upwards.
• Do not place the product on an unstable surface (e.g. a shaky shelf, a tilted desk, etc.).
- Dropping the product can cause it to malfunction and poses a risk of injury. Severe vibration or
impact can also cause the product to malfunction and lead to a fire hazard.
• Install your product with enough space around it for ventilation.
- Leave at least 4 inches (10cm) at the rear of the product and more than 2 inches (5cm) on
each side of the product.
• Keep the plastic packing materials out of reach of your children.
- Children playing with the plastic packing materials run the risk of suffication.
Usage Precautions
❚
• Using for an extended time at high volume may cause serious damage to your hearing.
- If you are exposed to sound louder than 85db for an extended time, you may adversely affect
your hearing. The louder the sound is, the more seriously damaged your hearing may become.
Note that an ordinary conversation is between 50 to 60 db and road noise is approximately 80
db.
• This product contains dangerous high voltage. Do not attempt to disassemble, repair, or
modify it yourself.
- Contact a Samsung service center when your product is in need of repair.
• Do not place any container that contains liquid on the product (e.g. a vase, beverages,
cosmetics, chemicals, etc.). Do do not allow any metal objects (e.g. coins, hair clips, etc.) or
flammable material (e.g. paper, matches, etc.) to enter the product (through the air vents, I/O
ports, etc.).
- If any harmful material or liquid enters the product, turn off the product immediately, unplug
the power cord, and then contact a Samsung service center.
4
5

• Do not drop the product. In case of a mechanical breakdown, disconnect the power cord and
contact a Samsung service center.
- There is a risk of fire or electric shock.
• Do not hold or pull the product by the power cord or the signal cable.
- A damaged cable can cause the product to malfunction, cause a fire, and poses a risk of
electric shock.
• Do not use or keep flammable materials near the product.
• If the product emits an abnormal sound or a burnt smell or smokes, unplug the power-cord
immediately and contact a Samsung service center.
• If you smell gas, ventilate the room immediately. Do not touch the power plug of the product.
Do not turn the product off or on.
• Do not strike or subject the product to a sudden shock. Do not pierce the product with a
sharp object.
Cleaning Precautions
❚
• Never use alcohol, solvents, waxes, benzene, thinners, air freshener, or lubricants to clean the
product, or spray insecticide on the product.
- Using any of these materials can discolor the exterior coating or cause it to split or peel off,
or remove the labelling on the product.
• To clean the product, unplug the power cord, and then wipe the product with a clean, dry,
soft cloth (Microfiber, cotton).
- Avoid leaving dust on the product. Dust can scratch its the surface.
A
Additional Information
About NFC (Android only)
❚
• NFC tagging to establish a Bluetooth connection will not work while the product is being
powered on and off.
• NFC tagging to establish a Bluetooth connection will not work while the battery indicator on
the Bluetooth device is blinking.
About the Network Connection
❚
• Depending on the wireless router used, some network operations may perform differently.
• For detailed information on networking with a wireless router or modem, refer to the router's
or modem's documentation.
• Select one wireless channel that is not used currently. If the selected channel is used by
another communication device nearby, radio interference may result in communication failure.
4
6

• In compliance with the newest Wi-Fi certification specifications, the HUB does not support
WEP, TKIP, or TKIP-AES (WPA2 Mixed) security encryption in networks running in the 802.11n
mode.
• By its nature, a wireless LAN may experience radio interference depending on the
environmental conditions (such as wireless router performance, distance, obstruction,
interference with other wireless devices, etc.)
• WEP encryption does not work with WPS (PBC) / WPS (PIN).
Compatible products
❚
• Mobile : Android 2.3.3 (Gingerbread) or above, iOS (6.0) or above
NOTE
9Some devices may not be compatible with the product.
9Note that a product of an older version may not be supported.
A
Copyright
© 2014 Samsung Electronics Co.,Ltd.
All rights reserved; No part or whole of this user's manual may be reproduced or copied without
the prior written permission of Samsung Electronics Co.,Ltd.
• An administration fee may be charged if either
a. an engineer is called out at your request and there is no defect in the product (i.e. where
you have failed to read this user manual)
b. you bring the unit to a repair centre and there is no defect in the product (i.e. where you
have failed to read this user manual).
• The amount of such administration charge will be advised to you before any work or home
visit is carried out.
4
7

Contents
SAFETY INFORMATION
Regulatory Compliance Statements ............................................................. 2
Warning .....................................................................................................................2
CAUTION ...................................................................................................................2
CAUTION ...................................................................................................................2
Wiring the Main Power Supply Plug (UK Only) ............................................................3
Important Safety Instructions ......................................................................................3
Safety precautions ....................................................................................... 4
Power Supply Precautions .........................................................................................4
Installation Precautions ...............................................................................................5
Usage Precautions .....................................................................................................5
Cleaning Precautions .................................................................................................6
Additional Information .................................................................................. 6
About NFC (Android only) ...........................................................................................6
About the Network Connection ..................................................................................6
Compatible products ..................................................................................................7
Copyright .................................................................................................... 7
UNDERSTANDING YOUR LINK MATE
Before you begin ....................................................................................... 12
Communication Basics ............................................................................................12
Connecting to external Devices - Wired ....................................................................12
How you can enjoy your Link Mate ...........................................................................13
4
8

GETTING STARTED
Top Panel .................................................................................................. 14
Rear Panel ................................................................................................. 15
Accessories ............................................................................................... 16
Available Accessories (Not Included) .......................................................... 16
Sleep Mode ............................................................................................... 17
CONNECTIONS
Connecting with a HUB (Not Included) ....................................................... 18
Connecting the Link Mate(s) to Your Network with a HUB (Not Included) ..................18
Connecting without a HUB (Not Included) .................................................. 21
Connecting the Link Mate to Your Network with a LAN Cable (For a Single
Link Mate) ................................................................................................................21
Connecting the Link Mate to Your Network via the WPS Method (For a Single
Link Mate) ................................................................................................................23
Connecting the Link Mate to Your Network via the Wi-Fi Setup Method (For a
Single Link Mate) - For Android ................................................................................25
Connecting the Link Mate to Your Network via the Wi-Fi Setup Method (For a
Single Link Mate) - For iOS .......................................................................................28
Connecting with TV SoundConnect function .............................................. 32
Disconnecting TV SoundConnect .............................................................................33
Connecting the Link Mate to Bluetooth Devices ......................................... 34
Disconnecting Bluetooth ..........................................................................................35
Connecting with NFC function - For Android .............................................. 36
4
9

Connecting to External Devices ................................................................. 37
Disconnecting an External Device.............................................................................38
Adding a Link Mate .................................................................................... 39
Adding an extra Link Mate to a HUB that is connected to a Link Mate .....................39
Adding another Link Mate and Hub to a single Link Mate in use ...............................40
Adding a HUB ........................................................................................... 42
Relocating the Link Mate ........................................................................... 42
FUNCTIONS
Installing the Samsung Multiroom App ....................................................... 43
Accessing the Samsung Multiroom App .................................................... 43
Using the Samsung Multiroom App .......................................................... 44
Renaming a connected Link Mate ............................................................................44
Switching the input source .......................................................................................44
Changing the sort order of listed Link Mates
Grouping Link Mates ................................................................................................46
Playing a Song .........................................................................................................47
Sorting songs ...........................................................................................................47
Creating a Playlist .....................................................................................................48
Listening to a radio station .......................................................................................50
Setting Presets .........................................................................................................50
Setting the Default Radio Stations in Speaker Preset ................................................52
Searching for a Radio Station ...................................................................................52
................................................................ 45
44
10

Playing music from content providers ......................................................................53
Playing music from the Amazon cloud player ............................................................53
Playing music from a selected device .......................................................................53
Playing Media Content Saved in a PC ........................................................ 54
Samsung Link ..........................................................................................................54
Wireless Audio - Multiroom for Desktop ....................................................................55
Using the Settings menu ............................................................................ 57
Guide .......................................................................................................................57
Service .....................................................................................................................58
Speaker Settings ......................................................................................................59
Clock .......................................................................................................................63
Support ....................................................................................................................64
Open source licenses ...............................................................................................65
App Version..............................................................................................................65
Reset your product .................................................................................... 66
Resetting the Link Mate ............................................................................................66
Resetting the HUB (Not Included) .............................................................................66
APPENDIX
Troubleshooting ......................................................................................... 67
Open Source License Notice ..................................................................... 69
Licences .................................................................................................... 69
Specifications ............................................................................................ 70
44
11

Understanding Your Link Mate
AUDIO IN COAXIAL IN
OPTICAL IN
INPUT
AUDIO OUT COAXIAL
OUT
OPTICAL OUT
OUTPUT
A
Before you begin
Communication Basics
❚
Smart Device:
Android, iOS
(App Control)
Internet
1 Requirements: Wireless Router, Smart Device
2 The wireless router should be connected to the Internet.
3 The smart device should be connected to the router via a Wi-Fi connection.
Connecting to external Devices - Wired
❚
To produce audio through the Link Mate, you must connect it to an external device.
Use the Samsung Multiroom App to switch to a wired input.
Wireless Router
• External Devices
TV, CDP, DVDP, BDP, etc.
NOTES
9To connect an external device to the Link Mate, refer to the user manual of the external device.
44
12
• External Devices
SAT, Reciever, Legacy Audio
(HTS), etc.

How you can enjoy your Link Mate
❚
Connect your receiver, smart phone, PC, or TV to your Link Mate and play audio from these
devices on your home theater or through one or more Wireless Audio Multirooms.
IN OUT
Component
Speaker
Smart phone
PC
TV
Home theater
Wireless
Wired
44
13
Getting Started
A
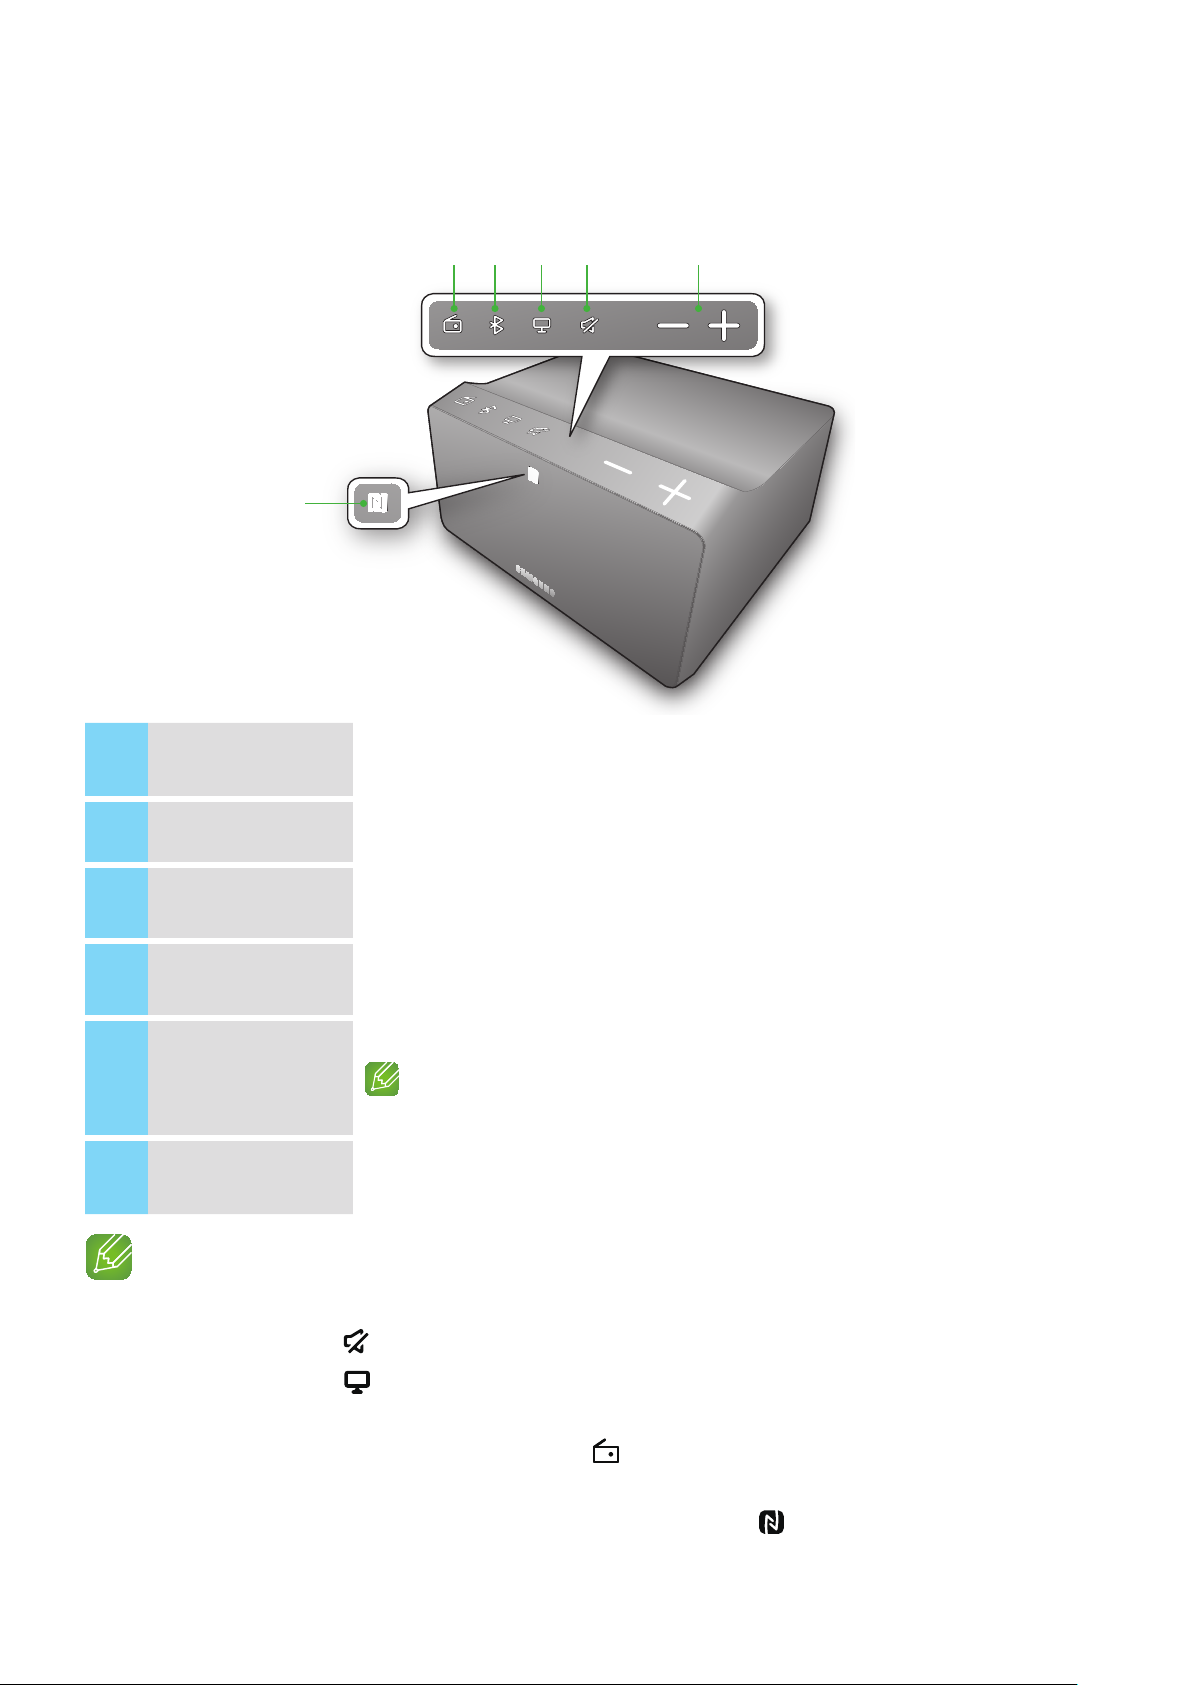
Top Panel
y
q w e r t
Internet Radio
1
Preset button
Bluetooth button
2
TV SoundConnect
3
button
Mute button
4
Volume Control
5
NFC Tag
6
NOTES
9When you turn on the Link Mate, touch buttons appear on its top panel.
Press this button to listen to an Internet radio station. Each time you press the
button, you change the radio station.
Press this button to enable Bluetooth.
Press this button to enable TV SoundConnect.
Mutes the sound from this Link Mate. Press again to restore the sound to the
previous volume level.
Controls the volume level.
Touch and drag softly with your finger to make adjustments.
The Volume Control will not work if you press with excessive force.
Connect your NFC compatible device via Bluetooth to the Link Mate using the simple
NFC tagging procedure. (Android only)
9 Press and hold the
9 Press and hold the
connect a new TV.
9 You can listen to a radio station by pressing the
Link Mate. Each time you press the button, the Link Mate changes the station.
9 Enable your smart device's Bluetooth function by touching it to the
Link Mate. (Android only)
Mute button for more than 5 seconds to place the Link Mate into Sleep Mode.
TV SoundConnect button for more than 5 seconds to reset TV SoundConnect and
Internet Radio Preset button on the top panel of the
NFC Tag on the top panel of the
44
14

A
Rear Panel
q w e r
t
y
u
i
DEVICE ADD
1
button
WPS/Wi-Fi SETUP
2
button
AUDIO IN
3
AUDIO OUT
4
ETHERNET
5
SERVICE
6
POWER SWITCH
7
POWER
8
Press this button to add a Link Mate to your network.
Press this button to connect your Link Mate to your network using WPS or Wi-Fi
setup.
Jacks that let you connect the Link Mate to the audio output connections of external
devices.
Jacks that let you connect the Link Mate to the audio input connections of external
devices.
Lets you connect the Link Mate to your network using a LAN cable.
For service only. Lets service technicians update the firmware of the Link Mate.
Press this switch to turn the Link Mate on and off.
Connection for the Link Mate's power cord.
NOTES
9WPS / Wi-Fi SETUP Button:
- Press for 1 second to connect the Link Mate to your wireless router using WPS.
- Press and hold down for more than 5 seconds - until you hear a fast, 3 note beep - to connect the Link
Mate to your network through your smart device using the Wi-Fi Setup method.
44
15

A
Accessories
Confirm you have the supplied accessories shown below.
Wireless Audio -
Multiroom Link Mate
User Manual Getting started
A
Available Accessories (Not Included)
Power cord LAN cable
HUB: WAM250
NOTES
9Information on available accessories and their release dates can be found on the Samsung website.
9When purchasing an accessory, check whether it is compatible with the Link Mate.
9Use authentic Samsung accessories. Damage and problems caused by unauthorized accessories can void
your warranty.
44
16

A
Sleep Mode
In Wi-Fi / Bluetooth / TV SoundConnect / OPTICAL / COAXIAL mode
`
- The Link Mate switches to the sleep mode if there is no music playback or no button
operation (either from the top panel or from the app) for 15 minutes.
In AUX mode
`
- The Link Mate switches to the sleep mode if there is no button operation (either from the
top panel or from the app) for 8 hours.
NOTES
9While playing music in the Wi-Fi, Bluetooth, TV SoundConnect, Optical or Coaxial connection modes,
the Link Mate will not switch to the Sleep mode.
9While playing music in the AUX mode, the Link Mate may switch to the Sleep mode.
9To switch to the Sleep mode manually, press and hold the
Mute button for more than 5 seconds.
44
17

Connections
A
Connecting with a HUB (Not Included)
• If the Link Mate fails to connect to your network or its network connection operates
abnormally, place the Link Mate closer to the HUB or your router and try again.
• The Link Mate is a wireless network device. Its communications with your network may
be disrupted because of the distance between it and other devices on the network,
obstructions, or interference from other wireless devices.
Connecting the Link Mate(s) to Your Network with a HUB (Not
❚
Included)
Plug In
HUB
Plug In
LAN
Wireless Router
NOTE
9To produce audio through the Link Mate, you must connect it to an external device. (See page 12)
Press here
1 Connect a LAN cable to the router and the ETHERNET SWITCH on the back of the
HUB.
NOTE
9You can connect the LAN cable to any ETHERNET SWITCH Port on the HUB.
2 Attach the HUB's power cord to the power port on the rear of the HUB, and then plug
the power cord into an electrical outlet.
3
The power ( ) and the HUB ( ) indicators on the HUB's front turn on.
When the pairing indicator (
The pairing indicator on the Link Mate starts to flash.
If the HUB's pairing indicator does not flash, press the SPK ADD button on the rear of the
HUB.
) begins to flash, plug the Link Mate(s) into an outlet.
44
18

NOTE
9If you are adding multiple Link Mates, connect all the Link Mate's to electrical outlets. If you are not
connecting all the Link Mates, refer to pages 39~41.
Press here
4 Wait until the pairing indicator on the Link Mate stops flashing. If the Link Mate's LED
indicator turns solid blue, pairing is complete. The Link Mate may also beep.
NOTES
9Place each Link Mate at least 20 inches (50 cm) from the HUB when connecting them to the HUB.
9Your smart device cannot connect to the Link Mate or the HUB if there is no wireless router.
9To confirm you have a proper connection, check the pairing indicator on the front of the HUB.
- When you turn on the HUB for the first time, there is a 20 minute pairing period.
The pairing indicator (
) will blink for these 20 minutes or until pairing occurs. When you press
the SPK ADD button to pair additional Link Mates, the pairing period is reduced to 10 minutes. The
pairing indicator (
) flashes for 10 minutes or until pairing occurs. Turn on the Link Mate you
want to pair while the pairing indicator is flashing.
- If pairing mode has expired, press the SPK ADD button on the rear of the HUB to turn on pairing
mode again. Then, turn the Link Mate off and then on or press the DEVICE ADD button on the rear of
the Link Mate to link the Link Mate to the HUB.
9For a proper connection, connect the HUB to your router before turning on the Link Mate.
- Connecting the Link Mate to the HUB may take a few minutes.
- There will be a brief sound when the connection is established.
5 Connect your smart device to your Wi-Fi network. (The HUB and the smart device should
be connected to the same router.)
6 Download the Samsung Multiroom app from Google Play or App Store.
44
19

7 On your smart device, select the Samsung Multiroom app. Setup starts.
8 If the automatic setup fails, run the App again.
NOTE
9After pairing is complete, the Link Mate naming screen appears. Edit the name or enter a name of your
own choosing.
44
20

A
Connecting without a HUB (Not Included)
• If the Link Mate fails to connect to your network or its network connection operates
abnormally, place the Link Mate closer to the HUB or your router and try again.
• The Link Mate is a wireless network device. Its communications with your network may
be disrupted because of the distance between it and other devices on the network,
obstructions, or interference from other wireless devices.
Connecting the Link Mate to Your Network with a LAN Cable (For a
❚
Single Link Mate)
LAN
Plug In
Wireless Router
NOTE
9To produce audio through the Link Mate, you must connect it to an external device. (See page 12)
Press here
1 Connect one end of the LAN cable to the Link Mate's ETHERNET port. Connect the
other end to your wireless router. (You cannot use the Link Mate without a wireless
router.)
2 Plug the Link Mate into an electrical outlet. The LED pairing indicator starts to blink.
3 Connect your smart device to your Wi-Fi network.
4 Download the Samsung Multiroom app from Google Play or App Store.
44
21

5 On your Smart device, select the Samsung Multiroom app. Setup starts.
6 In the app, select "I don't have a Hub", and then press Next. On the next screen, select
Link Mate, and then press Next. On the next screen select Wired, and then press Next.
7 Unplug the Link Mate's power cable, and then plug it in again.
44
22

NOTE
9After pairing is complete, the Link Mate naming screen appears. Edit the name or enter a name of your
own choosing.
Connecting the Link Mate to Your Network via the WPS Method (For a
❚
Single Link Mate)
WPS/Wi-Fi SETUP button
WPS button
WPS
Wireless Router
Plug In
NOTES
9To produce audio through the Link Mate, you must connect it to an external device. (See page 12)
Press here
9The Link Mate does not support Wi-Fi Direct or Wi-Fi Setup (tethering).
9Some Wi-Fi devices may search for and find the Link Mate, but do not support the connection.
9For activation of the WPS function on a relevant AP, refer to the AP's manual.
9The WPS function may not be supported on some APs.
In that case connect to the Internet using a wired network or the Link Mate's Wi-Fi Setup.
1 Plug the Link Mate into an electrical outlet. The LED pairing indicator starts to blink.
2 Connect your smart device to your Wi-Fi network.
3 Download the Samsung Multiroom app from Google Play or App Store.
4 On your smart device, select the Samsung Multiroom app. Setup starts.
44
23
 Loading...