

Page 1

คุณสมบัติ ..................................................................................1
ความปลอดภัยในการใช้งาน ....................................................2
ส่วนประกอบของเครื่องซักผ้า ..................................................3
แผงควบคุมการทำงาน ..............................................................4
ขั้นตอนการซัก ..........................................................................5
โปรแกรมซักปกติ..........................................................................5
โปรแกรมซักผ้าห่ม ......................................................................5
โปรแกรมการซักรวดเร็ว ..............................................................5
โปรแกรมผ้าขนสัตว์......................................................................5
โปรแกรมซักประหยัด
+
........................................................5
โปรแกรมตั้งเวลาการทำงาน ........................................................6
การเลือกการทำงานเฉพาะอย่าง ..............................................6
การติดตั้งและบำรุงรักษา ........................................................7
สถานที่ติดตั้ง ..............................................................................7
การปรับความสมดุล......................................................................7
การต่อท่อน้ำเข้า ..........................................................................7
วิธีประกอบแผ่นกันหนู..................................................................8
ประเภทที่มีเครื่องสูบน้ำ ..............................................................8
การต่อท่อน้ำทิ้ง ........................................................................8
การเติมน้ำยาปรับผ้านุ่ม................................................................8
การเติมผงซักฟอก ......................................................................8
เครื่องกรองช่องต่อท่อน้ำเข้า ........................................................9
การทำความสะอาดถุงกรอง ........................................................9
การทำความสะอาดเครื่องกรอง ....................................................9
การประกอบขาตั้ง ..........................................................................................9
การแก้ปัญหาเบื้องต้น..............................................................10
ข้อกำหนดรายละเอียด
กรุณาอ่านคู่มือการใช้งานเล่มนี้อย่างละเอียด
เพื่อศึกษาการใช้งานของเครื่อง และควรเก็บ
รักษาไว้เป็นอย่างดี
คู่มือการใช้งานเครื่องซักผ้า
คู่มือเล่มนี้สำหรับการใช้งานโดยทั่วไป
ควรใช้คู่มือการใช้งานตามรุ่นของเครื่องซักผ้าของท่าน
Page 2

การควบคุมด้วยระบบซักปกติ
การควบคุมด้วยระบบซักปกติทำงานโดยเลือกโปรแกรมการซักที่ดีที่สุด
โดยการตรวจจับปริมาณผ้าที่บรรจุได้ราวกับเครื่องจักรปัญญาประดิษฐ์
ฝาใส
ฝาใสนี้คือแนวคิดใหม่ในการแก้ปัญหาความต้องการดูการทำงานภายในของเครื่องซักผ้าของผู้ใช้ในขณะใช้งาน
ดังนั้น เมื่อเครื่องกำลังทำงาน ท่านจึงสามารถตรวจสอบขั้นตอนการซักภายในเครื่องได้ จากการมองผ่านฝาใสนี้
แกนซัก
แกนซักช่วยให้น้ำและผงซักฟอกละลายเพื่อซึมผ่านผ้าได้อย่างมีประสิทธิภาพ
ทั้งในขณะเพิ่มพลังซักของน้ำเพื่อทำความสะอาดผ้าปริมาณมากที่มีความสกปรกมาก
และช่วยป้องกันการฉีกขาดและการสึกหรอของผ้า
พลังน้ำแบบน้ำตก
พลังน้ำแบบน้ำตกจะฉีดน้ำจากภายใต้แกนซักเป็นคลื่นลดหลั่นด้วยแรงดันกลับเต็มกำลังจากถังซัก
ซึ่งจะดันผ้าทุกชิ้นลอยเหนือน้ำให้จมลงใต้ผิวน้ำ พลังน้ำแบบน้ำตกนี้เองที่ช่วยให้เครื่องซักผ้าสามารถ
ซักผ้าปริมาณมากที่มีความสกปรกมากได้อย่างมีประสิทธิภาพ เช่น กางเกงยีนส์ และผ้าห่ม
ถุงกรองมหัศจรรย์
ถุงกรองมหัศจรรย์ที่เป็นเอกลักษณ์เฉพาะตัวนี้ช่วยให้มั่นใจได้ว่าเศษฝุ่นผงทั้งหลายภายในถังซักจะถูกกักเก็บได้หมดจด
เพื่อให้ได้คุณภาพการกรองสูงสุด ให้ผลการซักที่สะอาดอย่างมีประสิทธิภาพตลอดไป
ช่องเติมน้ำยาปรับผ้านุ่ม
ช่องเติมน้ำยาปรับผ้านุ่มจะถ่ายน้ำยาปรับผ้านุ่มเข้าสู่เครื่อง
ตามเวลาที่เหมาะสมเมื่อถึงขั้นตอนการซักน้ำครั้งสุดท้าย
ระบบ CAS
การทำงานของตัวล็อคป้องกันเด็ก (—>หน้า 2)
ตัวเริ่มการทำงานใหม่อัตโนมัติ
ในกรณีที่ไฟดับลงชั่วครู่ เครื่องจะเริ่มขั้นตอนการซักใหม่โดยอัตโนมัติ
ประหยัดพลังงาน
Eco+course เป็นโปรแกรมการซักที่จะช่วยให้ท่านสามารถประหยัดพลังงาน โดยจะลดระยะเวลาในการซักผ้าที่ท่านสวมใส่บ่อยหรือผ้าสกปรกลง
1
คุณสมบัติ
Page 3

คำเตือน
ควรปฏิบัติตามคู่มือการใช้งานนี้อย่างเคร่งครัด มิเช่นนั้นอาจก่อให้
เกิดอุบัติเหตุร้ายแรง หรือการบาดเจ็บขั้นรุนแรงได้
ห้ามใช้สายไฟที่ชำรุดหรือเต้าเสียบที่หลวม
- อาจเป็นสาเหตุทำให้เกิดไฟฟ้าช็อตหรือไฟไหม้ได้
อย่าจับหรือดึงสายไฟขณะที่มือเปียกน้ำ
- อาจเป็นสาเหตุทำให้เกิดไฟฟ้าช็อตหรือไฟไหม้ได้
ระวังอย่าให้สายไฟบิดงอหรือของหนักทับสายไฟ
- อาจเป็นสาเหตุทำให้เกิดไฟฟ้าช็อตหรือไฟไหม้ได้
อย่าติดตั้งเครื่องซักผ้าใกล้เครื่องกำเนิดความร้อน และห้ามวางเทียน
หรือบุหรี่ที่จุดแล้วบนเครื่อง
- อาจเป็นสาเหตุทำให้เกิดไฟไหม้ได้
ห้ามถอด ซ่อมแซม หรือแก้ไขเครื่องด้วยตนเอง
- เมื่อท่านจำเป็นต้องซ่อมแซมเครื่อง โปรดติดต่อตัวแทนศูนย์บริการ
มิฉะนั้น อาจเป็นสาเหตุทำให้เกิดไฟฟ้าช็อตหรือไฟไหม้ได้
ระหว่างการใช้งาน ห้ามสอดมือหรือวางของที่เป็นโลหะใต้เครื่องซักผ้า
- ท่านอาจได้รับบาดเจ็บจากแผ่นควบคุมการปั่นที่อยู่ใต้เครื่องได้
อย่าเข้าใกล้ถังซักเมื่อน้ำท่วมถึงส่วนล่างของเครื่องซักผ้า
- อาจเป็นสาเหตุทำให้เกิดไฟฟ้าช็อตได้ โปรดรอจนเครื่องระบายน้ำ
ออกหมดแล้ว
อย่านำผ้าที่เปื้อนคราบเชื้อเพลิง เบนซิน หรือแอลกอฮอล์ ใส่ลงในเครื่อง
และวางวัตถุไวไฟเหล่านั้นให้ห่างจากเครื่องซักผ้า
- อาจเป็นสาเหตุทำให้เกิดการระเบิดหรือไฟไหม้ได้
ระหว่างการปั่น อย่ายื่นมือลงไปในถังปั่น
- มือของท่านอาจได้รับบาดเจ็บ หากท่านเปิดฝาถังซักแล้วเครื่องไม่หยุด
ทำงานภายใน 15 วินาที โปรดติดต่อตัวแทนศูนย์บริการทันที
ข้อควรระวัง
ควรปฏิบัติตามคู่มือการใช้งานนี้ มิฉะนั้นอาจเกิดความเสียหาย
หรือการบาดเจ็บเล็กน้อยได้
อย่าติดตั้งเครื่องซักผ้าในบริเวณที่เปียกชื้นหรือภายนอกอาคารที่อาจถูกฝน
สาดได้
- อาจเป็นสาเหตุทำให้เกิดไฟฟ้าช็อตหรือไฟไหม้ได้
โปรดถอดสายไฟออกทุกครั้งเมื่อเลิกใช้งาน
- อาจเป็นสาเหตุทำให้เกิดไฟฟ้าช็อตหรือไฟไหม้ได้
หากมีฝุ่นหรือน้ำติดอยู่ที่ปลั๊กไฟหรือส่วนที่เป็นโลหะของปลั๊ก ให้ปัดฝุ่นหรือ
เช็ดน้ำออกจนหมด
- อาจเป็นสาเหตุทำให้เกิดไฟฟ้าช็อตหรือไฟไหม้ได้
อย่าให้เด็กชะโงกดูในเครื่องซักผ้า
- หากเด็กตกลงไปในเครื่องซักผ้า อาจเป็นอันตรายถึงชีวิตได้
หากมีเหตุการณ์ก๊าซรั่วเกิดขึ้น ให้ระบายถ่ายเทอากาศในทันที และอย่า
จับปลั๊กไฟเด็ดขาด
- อาจเป็นสาเหตุทำให้เกิดไฟฟ้าช็อตหรือไฟไหม้ได้หากเกิดประกายไฟ
หากสังเกตเห็นว่ามีสิ่งผิดปกติเกิดขึ้นกับเครื่องซักผ้า เช่น เสียงดังผิดปกติ
มีกลิ่นไหม้หรือควัน ให้ถอดปลั๊กออกทันทีและติดต่อตัวแทนศูนย์บริการ
- อาจเป็นสาเหตุทำให้เกิดไฟฟ้าช็อตหรือไฟไหม้ได้
อย่าฉีดน้ำทำความสะอาดชิ้นส่วนต่างๆ ของเครื่องซักผ้าโดยตรง
- อายุการใช้งานของเครื่องอาจสั้นลง และยังอาจเป็นสาเหตุให้เกิดไฟฟ้า
ช็อตหรือไฟไหม้ได้
อย่าเสียบปลั๊กเครื่องใช้ไฟฟ้าหลายเครื่องในเต้าเสียบเดียว
- อาจเป็นสาเหตุทำให้เกิดไฟไหม้ได้เนื่องจากความร้อนสูงเกิน
อย่าใช้เหล็กแหลมหรือเข็มกดปุ่มเครื่อง
- อาจเป็นสาเหตุทำให้เกิดไฟฟ้าช็อตหรือไฟไหม้ได้
2
ความปลอดภัยในการใช้งาน
ข้อควรระวังเพื่อความปลอดภัยต่อไปนี้มีจุดประสงค์เพื่อป้องกันอันตรายและความเสียหายนอกเหนือความคาดหมาย
โดยการช่วยแนะนำวิธีการใช้งานที่ปลอดภัยอย่างเหมาะสม
เมื่อใช้น้ำร้อนในการซัก โปรดตรวจสอบให้แน่ใจว่าความร้อนของน้ำไม่เกิน 50 องศาเซลเซียส
ชิ้นส่วนที่เป็นพลาสติกอาจได้รับความเสียหายหรือบิดเบี้ยว
และอาจเกิดไฟฟ้าช็อตหรือการลุกไหม้ขึ้นได้
ระบบล็อคป้องกันเด็ก - เป็นระบบที่สามารถป้องกันอันตรายที่อาจเกิดขึ้นกับเด็กหากเด็กเล่นเครื่องซักผ้า
วิธีใช้ระบบล็อคป้องกันเด็ก
- กดปุ่ม พาวเวอร์ ‘Power’ เพื่อเปิดเครื่อง
- กดปุ่ม เริ่ม/พัก ‘Start/Hold’ เพื่อเริ่มการทำงาน ในกรณีที่ต้องการใช้ระบบล็อคป้องกันเด็กระหว่างการซัก
- กดปุ่ม โปรแกรม ‘Course’ และเลือกโปรแกรมการซัก
(โปรดสังเกตุ: เครื่องจะทำงานได้ต่อเมื่อได้กดปุ่ม Power แล้วเท่านั้น)
ในกรณีที่คุณต้องการเปลี่ยนแปลงระบบล็อคป้องกันเด็ก สัญญาณอักษร ‘L’ จะกระพริบทุกๆ 2
วินาทีในช่องหน้าจอแสดงผลพร้อมบอกเวลาที่เหลือ นั่นหมายถึงเครื่องจะถูกปลดล็อคทันทีที่เวลาในช่องแสดงผลสิ้นสุดลง
วิธีปลดระบบล็อคป้องกันเด็ก
- ในกรณีที่มีการตั้งโปรแกรมระบบล็อคป้องกันเด็ก ให้กดปุ่ม ‘Function’ ค้างไว้แล้วกดปุ่ม ‘Course’ ตาม เพื่อปลดระบบล็อค
Page 4
3
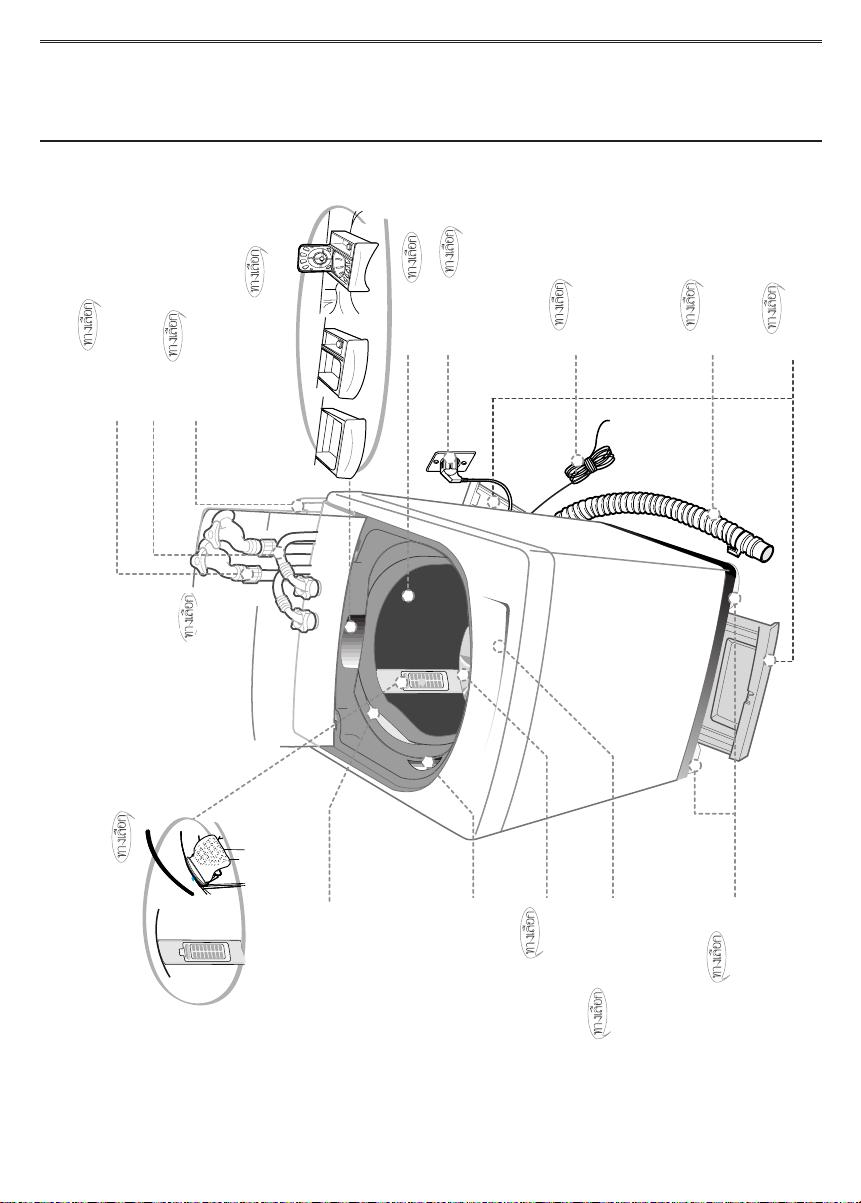
ส่วนประกอบของเครื่องซักผ้า
ท่อน้ำเข้า (น้ำเย็น)
ฝาปิด
ปิดฝาถังซักทุกครั้งระหว่างการซัก
และการปั่น
ถุงกรองจะกักเก็บเศษฝุ่นสกปรก
ไว้ ในระหว่างการซัก
ถุงกรอง
กล่องผงซักฟอก
คู่มือเล่มนี้สำหรับการใช้งานโดยทั่วไป
ควรใช้คู่มือการใช้งานตามรุ่นของเครื่องซักผ้าของท่าน
ปลั๊กไฟ
ถังปั่น
ช่องใส่น้ำยาฟอกขาว
ช่องเติมน้ำยาปรับผ้านุ่ม
ท่อน้ำทิ้ง (ปั๊ม)
ท่อน้ำเข้า(น้ำร้อน)
สายดิน
หากต่อท่อน้ำที่เป็นโลหะ
อย่าลืมหุ้มส่วนปลายของสายดิน
ท่อน้ำทิ้ง
แผ่นกันหนู
แกนซัก
แผงควบคุมด้านหน้า
ขาตั้งปรับได้
ปรับความสูงของขาตั้งเมื่อติดตั้งเครื่องซักผ้า
Page 5
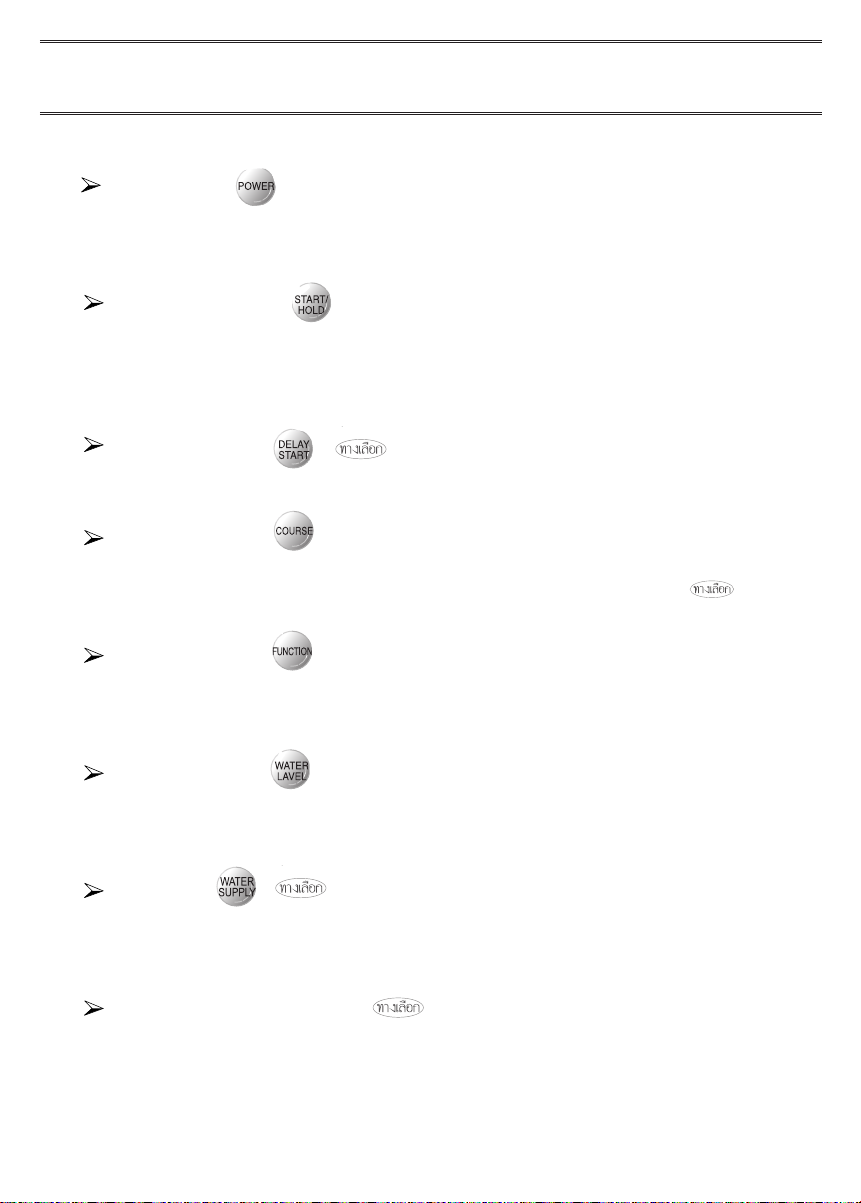
ปุ่มเปิด/ปิดเครื่อง
กดปุ่มนี้หนึ่งครั้งเพื่อเริ่มใช้งาน
กดอีกครั้งเพื่อปิดเครื่อง
ปุ่มเริ่มทำงาน/หยุดชั่วคราว
ใช้เพื่อเริ่มทำงานหรือหยุดทำงานชั่วคราว
ในการเปลี่ยนโปรแกรมการซักระหว่างการทำงาน ให้กดปุ่มนี้เพื่อหยุด
และกดอีกครั้งเพื่อเริ่มการทำงานอีกครั้งหลังจากเปลี่ยนโปรแกรมแล้ว
ปุ่มตั้งเวลาการทำงาน
กดปุ่มนี้เมื่อต้องการตั้งเวลาซักล่วงหน้า
ปุ่มเลือกระบบการซัก
ทุกครั้งที่กดปุ่มนี้ โปรแกรมการซักจะเปลี่ยนไประหว่าง
FUZZY (ปกติ)
BLANKET (ผ้าห่ม) SPEEDY (รวดเร็ว) WOOL(ผ้าขนสัตว์) Eco+ (โปรแกรมซักประหยัด) FUZZY (ปกติ)
ปุ่มเลือกการทำงาน
ทุกครั้งที่กดปุ่มนี้ การทำงานจะเปลี่ยนไประหว่าง SOAK, WASH, RINSE, SPIN (แช่ ซัก ล้างน้ำ ปั่น) WASH (ซัก) RINSE (ล้างน้ำ)
SPIN (ปั่น) WASH&RINSE (ซักและล้างน้ำ) RINSE&SPIN (ล้างน้ำและปั่น) WASH,RINSE,SPIN (ซัก ล้างน้ำ ปั่น)
ปุ่มเลือกระดับน้ำ
เลือกระดับน้ำตามปริมาณผ้าที่บรรจุ
MED (ปานกลาง)
HIGH (สูง) EXTRA LOW (ต่ำพิเศษ) LOW (ต่ำ)
ปุ่มเลือกน้ำเข้า
เมื่อกดปุ่มนี้ จะเป็นการเลือกประเภทของน้ำดังนี้
COLD (เย็น)
COLD + HOT (เย็น + ร้อน) HOT (ร้อน) COLD (เย็น)
ไฟแสดงสถานะเวลาการทำงานที่เหลืออยู่
ไฟแสดงสถานะแสดงเวลาการทำงานที่เหลืออยู่ (หน่วยเป็นนาที) ของวงจรการซักแต่ละวงจร
เมื่อสิ้นสุดวงจร ไฟจะดับลงโดยอัตโนมัติ
สำหรับรายละเอียดเพิ่มเติม โปรดดูที่แผงควบคุมการทำงานของเครื่องซักผ้าของท่าน
4
แผงควบคุมการทำงาน
Page 6

5
โปรแกรมซักปกติ
เลือกโปรแกรมการซักที่ดีที่สุดให้โดยอัตโนมัติ
1. กดปุ่มเปิด/ปิดเครื่อง เพื่อ "เปิด"
2. กดปุ่มเริ่มทำงาน/หยุดทำงานชั่วคราว
เครื่องจะเลือกระดับน้ำให้โดยอัตโนมัติ
ตามด้วยการซัก การล้างน้ำ และการปั่น
หากท่านต้องการหยุดชั่วคราว ให้กดปุ่มเริ่มทำงาน/หยุดทำงานชั่วคราว
อีกครั้ง ท่านสามารถเปลี่ยนโปรแกรมการซักได้เมื่อหยุดเครื่องไว้ชั่วคราว
3. ปิดฝาถังซัก
โปรแกรมซักผ้าห่ม
1. กดปุ่มเปิด/ปิดเครื่อง เพื่อ "เปิด"
2. กดเลือกโปรแกรมหนึ่งครั้ง
3. กดปุ่มเริ่มทำงาน/หยุดทำงานชั่วคราว
เครื่องจะเลือกระดับน้ำให้โดยอัตโนมัติ
ตามด้วยการซัก การล้างน้ำ และการปั่น
หากท่านต้องการหยุดชั่วคราว ให้กดปุ่มเริ่มทำงาน/หยุดทำงานชั่วคราว
อีกครั้ง ท่านสามารถเปลี่ยนโปรแกรมการซักได้เมื่อหยุดเครื่องไว้ชั่วคราว
4. ปิดฝาถังซัก
โปรแกรมการซักรวดเร็ว
เนื่องจากการซักกระทำอย่างรวดเร็ว
จึงเป็นการซักที่เหมาะสำหรับผ้าที่มี
คราบสกปรกน้อย
1. กดปุ่มเปิด/ปิดเครื่อง เพื่อ "เปิด"
2. กดเลือกโปรแกรมสองครั้ง
3. กดปุ่มเริ่มทำงาน/หยุดทำงานชั่วคราว
เครื่องจะเลือกระดับน้ำให้โดยอัตโนมัติ
ตามด้วยการซัก การล้างน้ำ และการปั่น
หากท่านต้องการหยุดชั่วคราว ให้กดปุ่มเริ่มทำงาน/หยุดทำงานชั่วคราว
อีกครั้ง ท่านสามารถเปลี่ยนโปรแกรมการซักได้เมื่อหยุดเครื่องไว้ชั่วคราว
4. ปิดฝาถังซัก
โปรแกรมผ้าขนสัตว์
1. กดปุ่มเปิด/ปิดเครื่อง เพื่อ "เปิด"
2. กดเลือกโปรแกรมสามครั้ง
3. กดปุ่มเริ่มทำงาน/หยุดทำงานชั่วคราว
การซัก การล้างน้ำ และการปั่นจะเริ่มต้น
หากท่านต้องการหยุดชั่วคราว ให้กดปุ่มเริ่มทำงาน/หยุดทำงานชั่วคราว
อีกครั้ง ท่านสามารถเปลี่ยนโปรแกรมการซักได้เมื่อหยุดเครื่องไว้ชั่วคราว
4. ปิดฝาถังซัก
ข้อควรระวัง . . .
-อย่าใช้น้ำที่มีความร้อนเกิน 30 องศาเซลเซียสในการซักผ้าขนสัตว์
-ดูฉลากการดูแลรักษาที่ติดอยู่บนเสื้อผ้าเพื่อศึกษาข้อมูลในการซัก
-ติดกระดุมและกลับด้านนอกเข้าด้านในก่อนทำการซัก
-ใช้ผงซักฟอกที่ระบุไว้ในการซักผ้า
-เมื่อผ้าที่จะซักมีความสกปรกมาก ให้แช่ผ้าในน้ำอุ่นประมาณ 10 นาที
ก่อนกดปุ่มเลือกโปรแกรมการซักผ้าขนสัตว์ ทั้งนี้เพื่อเพิ่มประสิทธิภาพ
ในการซัก
โปรแกรมซักประหยัด+
1. กดปุ่ม พาวเวอร์ ‘Power’ เพื่อเปิดเครื่อง
2. กดปุ่มเลือกโปรแกรม 4 ครั้ง
3. กดปุ่ม เริ่ม/พัก ‘Start/Hold’
ระบบน้ำจะถูกเลือกโดยอัตโนมัติ
เครื่องจะทำการซัก ล้าง ปั่น ตามลำดับ
ถ้าต้องการหยุดชั่วคราว กดปุ่ม เริ่ม/พัก อีกครั้งหนึ่ง
และสามารถเปลี่ยนโปรแกรมได้เมื่อเครื่องหยุดแล้ว
4. ปิดฝา
โปรแกรมตั้งเวลาการทำงาน
เลือกโปรแกรมนี้เมื่อท่านต้องออกไปทำธุระนอกบ้านหรือทำงานอื่น
1. กดปุ่มเปิด/ปิดเครื่อง เพื่อ "เปิด"
2. กดปุ่มตั้งเวลาการทำงานหนึ่งครั้ง
ท่านอาจเปลี่ยนเวลาการตั้งได้โดยใช้ปุ่มเดียวกันนี้
(จาก 3 ชั่วโมง ถึง 18 ชั่วโมง)
3. กดปุ่มเริ่มทำงาน/หยุดทำงานชั่วคราว และเติมผงซักฟอกลงในถังซักตาม
ปริมาณที่เหมาะสม
4. ปิดฝาถังซัก
การซักจะเสร็จสิ้นตามเวลาที่ท่านตั้งไว้
ขั้นตอนการซัก
การเริ่มต้นการซัก ควรตรวจสอบสิ่งต่อไปนี้
ต่อท่อน้ำเข้าเข้ากับก๊อกน้ำและเปิดก๊อก เสียบปลั๊กเครื่องซักผ้า ตรวจสอบ
ให้แน่ใจว่าวางท่อน้ำทิ้งลงแล้ว (ในกรณีไม่มีเครื่องสูบน้ำทิ้ง)
ใส่ผ้าที่ต้องการซักเข้าเครื่อง และเติมผงซักฟอก
โปรดแน่ใจว่าไม่บรรจุผ้ามากเกินไป ใช้ผงซักฟอกที่เหมาะสม
กับผ้าที่จะซัก
Page 7
6
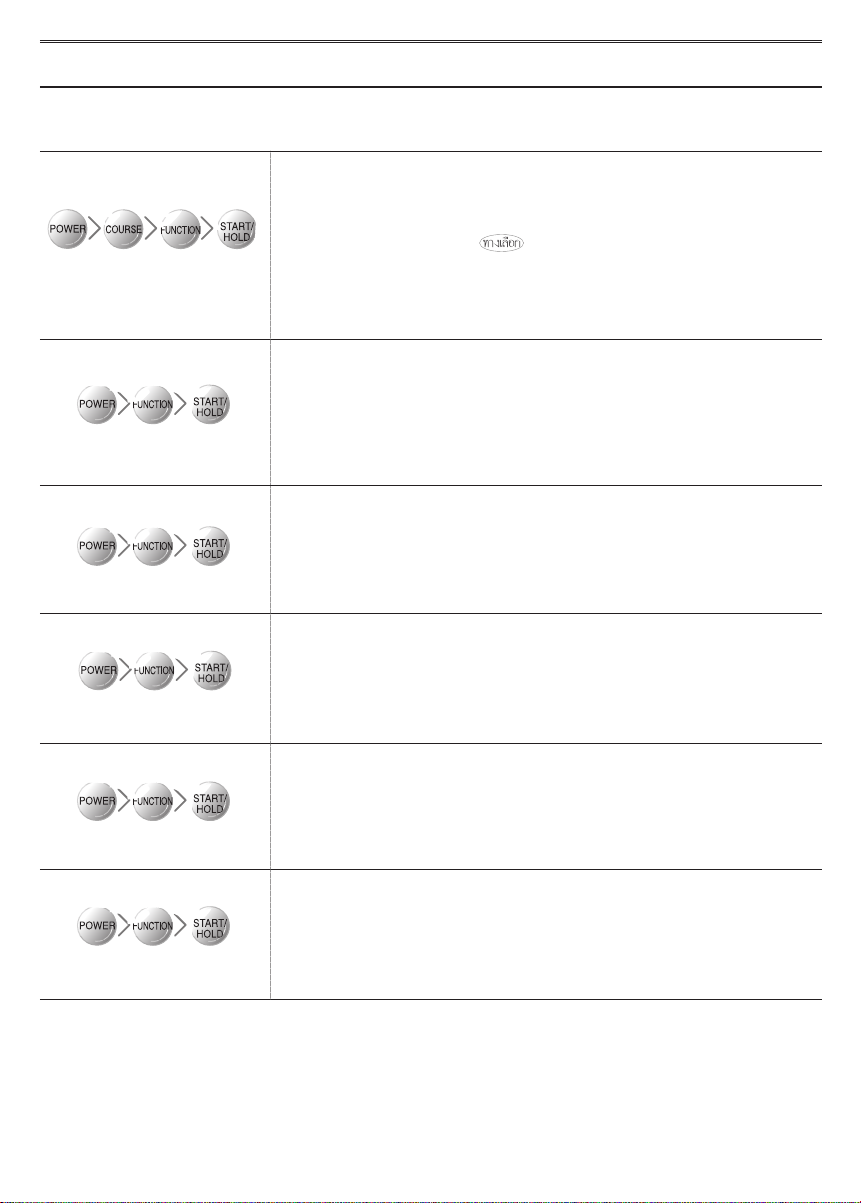
โปรแกรมการซักแต่ละโปรแกรมจะเปลี่ยนแปลงตามการเลือกของท่านเอง
ตัวอย่าง: หากท่านต้องการเลือกโปรแกรมการซักรวดเร็ว ให้กดปุ่มเปิด/ปิดเครื่อง - เลือกโปรแกรมซักเร็ว - การซัก - และกดปุ่มเริ่มทำงาน/หยุดทำงานชั่วคราว
ฟังก์ชั่นแช่ผ้า (รวมการซัก ล้างน้ำ ปั่น (WASH, RINSE, SPIN))
กดปุ่มเปิด/ปิด
เลือกโปรแกรม(กดปุ่มโปรแกรม)
FUZZY (ซักปกติ), BLANKET (ผ้าห่ม), SPEED (ซักเร็ว), WOOL (ผ้าขนสัตว์),
Eco+ (โปรแกรมซักประหยัด)
กดปุ่มเลือกการทำงานหนึ่งครั้ง
กดปุ่มเริ่มต้น/หยุดทำงานชั่วคราวหนึ่งครั้ง
เครื่องจะเลือกระดับน้ำให้โดยอัตโนมัติ
ตามด้วยการซัก ล้างน้ำ และการปั่น
ซักอย่างเดียว
กดปุ่มเปิด/ปิด
กดปุ่มเลือกการทำงานสองครั้ง
กดปุ่มเริ่มต้น/หยุดทำงานชั่วคราวหนึ่งครั้ง
การซักดำเนินไปเป็นเวลา 18 นาที
เมื่อกดปุ่มเลือกการทำงานในระหว่างการซัก เวลาการซักจะเปลี่ยนไปมาระหว่างรอบ
ละ 3 นาที ถึงรอบละ 25 นาที
ล้างน้ำอย่างเดียว
กดปุ่มเลือกการทำงานสามครั้ง
กดปุ่มเริ่มต้น/หยุดทำงานชั่วคราวหนึ่งครั้ง
การล้างน้ำจะดำเนินไปเป็นเวลา 15 นาที
เมื่อกดปุ่มเลือกการทำงานในระหว่างการล้างน้ำ เวลาการล้างน้ำจะเปลี่ยนไปมาระหว่าง
รอบละ 1 ครั้ง และรอบละ 5 ครั้ง
ปั่นอย่างเดียว
กดปุ่มเลือกการทำงานสี่ครั้ง
กดปุ่มเริ่มต้น/หยุดทำงานชั่วคราวหนึ่งครั้ง
การปั่นจะดำเนินไปเป็นเวลา 11 นาที
เมื่อกดปุ่มเลือกการทำงานในระหว่างการปั่น เวลาการปั่นจะเปลี่ยนไปมาระหว่างรอบละ
1 นาที ถึงรอบละ 7 นาที
การซักและล้างน้ำ
กดปุ่มเลือกการทำงานห้าครั้ง
กดปุ่มเริ่มต้น/หยุดทำงานชั่วคราวหนึ่งครั้ง
การซักและการล้างน้ำจะดำเนินไปเป็นเวลา 38 นาที
เมื่อกดปุ่มเลือกการทำงานในระหว่างการทำงาน เวลาการล้างน้ำจะเปลี่ยนไปมาระหว่าง
รอบละ 1 ครั้ง และรอบละ 5 ครั้ง
ล้างน้ำและปั่น
กดปุ่มเลือกการทำงานหกครั้ง
กดปุ่มเริ่มต้น/หยุดทำงานชั่วคราวหนึ่งครั้ง
การล้างน้ำและการปั่นแห้งจะเริ่มต้น
เมื่อกดปุ่มเลือกการทำงานในระหว่างการทำงาน เวลาการล้างน้ำจะเปลี่ยนไปมาระหว่าง
รอบละ 1 ครั้ง และรอบละ 5 ครั้ง
หนึ่งครั้ง
สองครั้ง
สามครั้ง
สี่ครั้ง
ห้าครั้ง
หกครั้ง
การเลือกการทำงานเฉพาะอย่าง
Page 8
คู่มือเล่มนี้สำหรับการใช้งานโดยทั่วไป
ควรใช้คู่มือการใช้งานตามรุ่นของเครื่องซักผ้าของท่าน
7
การติดตั้งและการบำรุงรักษา
หากตั้งเครื่องซักผ้าไม่ได้ระดับสมดุลกับพื้น เครื่องอาจสั่นมากหรือไม่ทำงาน
ดังนั้นโปรดตรวจสอบให้แน่ใจว่าตั้งเครื่องอย่างได้ระดับสมดุลแล้ว
สถานที่ติดตั้ง
อย่าตั้งเครื่องซักผ้าติดผนัง
ควรเว้นพื้นที่ให้เครื่องซักผ้าห่างจากผนังอย่างน้อย 10 ซม.
ตั้งเครื่องซักผ้าบนพื้นราบที่ไม่ลาดเอียง
หากวางเครื่องซักผ้าบนพื้นที่ไม่สม่ำเสมอหรือไม่แข็งแรง อาจเกิดเสียงรบกวน
หรือการสั่นสะเทือนขึ้นได้ (ความเอียงไม่เกิน 1 องศา)
ปรับขาตั้งเพื่อให้ได้การวางที่ได้ระดับ
ห้ามตั้งเครื่องซักผ้าใกล้พื้นที่เปียกชื้น
อย่าตั้งเครื่องซักผ้าในห้องที่อบหรือในบริเวณที่อาจถูกฝนสาดโดยตรง ความชื้น
อาจทำลายระดับหุ้มฉนวนไฟฟ้าอันเป็นสาเหตุให้เกิดอันตรายจากไฟฟ้าช็อตได้
หลีกเลี่ยงการตั้งเครื่องซักผ้าใกล้เครื่องกำเนิดความร้อนหรือแสงแดด
ชิ้นส่วนพลาสติกหรือไฟฟ้าของเครื่องอาจได้รับผลกระทบจากความร้อนโดยตรง
ห้ามตั้งเครื่องซักผ้าใกล้เครื่องทำความร้อง หม้อต้มน้ำ ฯลฯ และอย่าตั้งเครื่อง
ในบริเวณที่แสงแดดส่องถึง
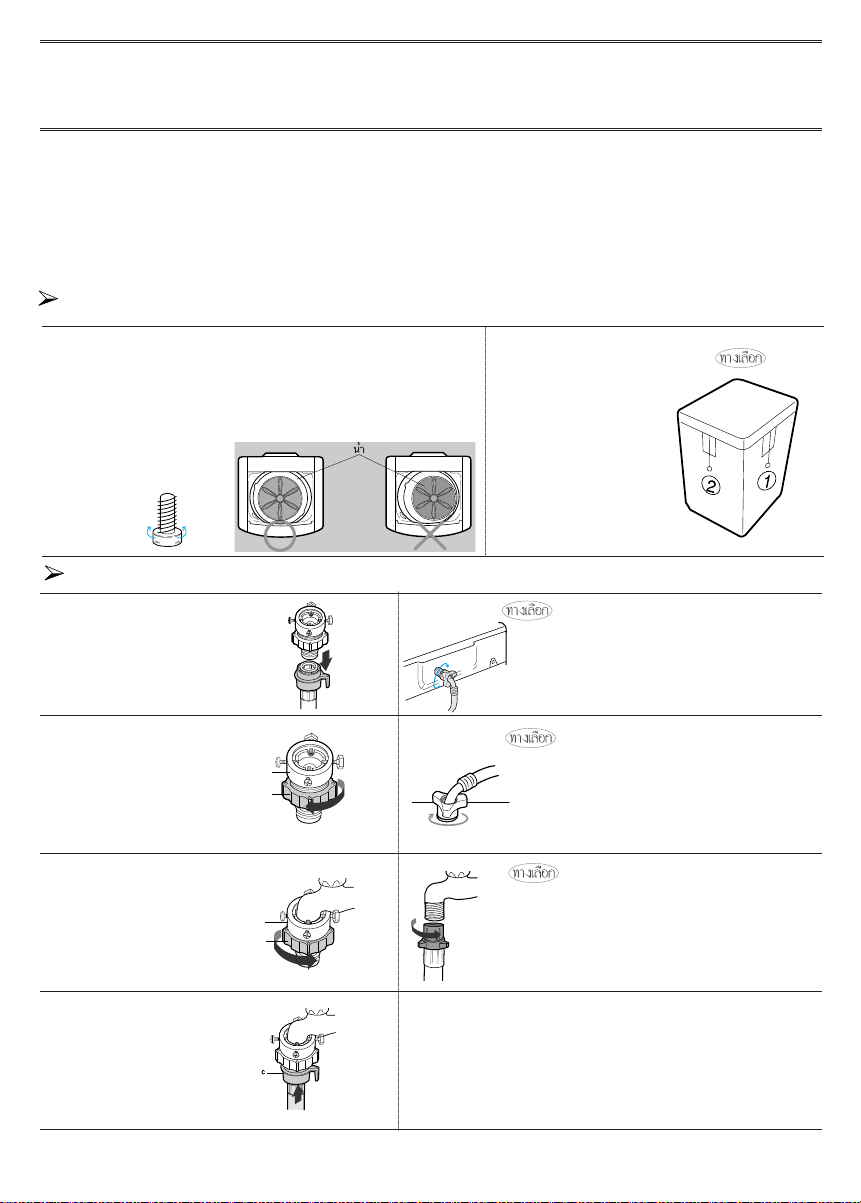
การปรับความสมดุล
ล็อค
หลวม
ตรวจสอบว่าตั้งเครื่องซักผ้าได้ระดับโดยการตรวจตำแหน่งของถังซัก
1. ปรับด้านข้างตามแนวนอนก่อน
และปรับด้านหน้า
ไปในทิศทางเดียวกัน
2. หากด้ายไม่อยู่ในระดับ
จำกัดที่ตั้งไว้ ให้ปรับความยาว
ของขาตั้ง
เปิดฝาปิดถังซัก เทน้ำลงในถังจนถึงระดับต่ำกว่าแกนซักเล็กน้อย
และปรับขาตั้งเพื่อให้แกนซักอยู่ในตำแหน่งศูนย์กลางดังแสดงในภาพ
ตั้งเครื่องห่างจากผนังอย่างน้อย
10 ซม.
ปรับขาตั้งเครื่องเพื่อให้ได้ระดับ
1. ถอดอแดปเตอร์สำหรับต่อกับท่อน้ำ
ดังรูป
2. ก่อนอื่น ใช้ไขควงหัวแฉก
คลายน็อตสี่ตัวที่อแดปเตอร์
จากนั้น ดึงอแดปเตอร์และ
ชิ้นส่วน(b) โดยหมุนตามลูกศร
เพื่อให้มีช่องว่างห่างกัน 5 มม.
3. ต่ออแดปเตอร์เข้ากับก๊อกน้ำ
โดยขันน็อตให้แน่น จากนั้น
หมุนชิ้นส่วน (b) ตามลูกศร
และวางชิ้นส่วน (a) และ (b)
ไว้ด้วยกัน
4. ต่อท่อน้ำเข้ากับอแดปเตอร์
ดึงชิ้นส่วน (c) ของท่อน้ำลง
เมื่อชิ้นส่วน (c) คลายตัว
ท่อจะต่อเข้ากับอแดปเตอร์
โดยอัตโนมัติ และมีเสียง ‘คลิก’
ดังขึ้น
a
b
a
b
การต่อท่อน้ำเข้า
5. ต่อปลายอีกด้านของท่อน้ำเข้าเข้ากับวาล์วน้ำเข้า
ที่ด้านหลังของเครื่องซักผ้า
ขันน็อตตามเข็มนาฬิกาจนสุด
5-1. ต่อปลายอีกด้านของท่อน้ำเข้ากับวาล์วน้ำเข้า
ที่ด้านบนของเครื่องซักผ้า
ขันน็อตตามเข็มนาฬิกาจนสุด
หากหัวก๊อกเป็นแบบเกลียว จะสามารถขันเกลียว
ท่อน้ำเข้ากับหัวก๊อกได้ดังภาพ
ข้อสังเกต หลังจากต่อท่อน้ำเข้าเสร็จแล้ว หากมีน้ำรั่วออกจากท่อ ให้ต่อท่อใหม่
ตามขั้นตอนเดิม
ใช้หัวท่อน้ำเข้าประเภทที่เหมาะสมกับก๊อกน้ำ
ในกรณีที่หัวท่อน้ำเข้าใหญ่เกินไป ให้ถอดแหวนประกบท่อออก แล้วจึงต่อหัวท่อ
เข้ากับอแดปเตอร์
Page 9

ตั้งท่อน้ำทิ้งให้อยู่ในต่ำแหน่งสูง
จากพื้น 90~100 ซม.
8
เมื่อเติมน้ำยาปรับผ้าในปริมาณที่เหมาะสม (ทำครั้งเดียว) ลงในช่องใส่ น้ำยาปรับผ้านุ่มแล้ว
น้ำยาจะไหลเข้าสู่การซักน้ำครั้งสุดท้ายโดยอัตโนมัติ
ห้ามเติมผงซักฟอก น้ำยาฟอกผ้าขาว หรือแป้งลงในช่องเติมน้ำยาปรับ ผ้านุ่ม
อย่าใช้น้ำยาปรับผ้านุ่มมากเกินไป เพราะอาจทำให้ได้ผลลัพธ์ที่ไม่น่าพอใจ
อย่าเปิดฝาถังระหว่างวงจรการปั่น หากใส่น้ำยาปรับผ้านุ่มเร็วเกินไป ประสิทธิภาพของน้ำยาอาจลดลง
อย่าทิ้งน้ำยาปรับผ้านุ่มไว้ในช่องใส่ น้ำยานานเกินไป เพราะน้ำยาอาจ แข็งตัวได้
การต่อท่อน้ำทิ้ง
หลังจากกดแหวนต่อ (a) ใส่หัวต่อท่อน้ำทิ้ง (b) เข้าที่ช่องต่อท่อน้ำ
อย่าลืมต่อท่อน้ำทิ้งเข้ากับที่ต่อท่อ
น้ำทิ้งที่ด้านข้างของเครื่องให้แน่น
อย่าลืมต่อท่อน้ำทิ้งเข้ากับที่ต่อท่อน้ำทิ้งที่ด้านหลังของ
เครื่องให้แน่น
ถอดฝาปิดท่อแล้วต่อกับท่อน้ำทิ้ง
ประเภทที่มีเครื่องสูบน้ำ
ฝาปิดท่อ
ท่อน้ำทิ้ง
วิธีประกอบแผ่นกันหนู
1. ใส่แผ่นกันหนู
เข้าไปในช่องใต้เครื่อง
ทางด้านหลัง
2. หากใส่ยาก ให้ยกเครื่อง
ตะแคงเล็กน้อย แล้วจึง
ใส่เข้าไป
ดันตัวเครื่องเอียงเล็กน้อยแล้วยกถาดเก็บเสียงขึ้นจนได้ยินเสียงดังคลิก
สุดท้ายขันน็อตยึดติดกับฐาน ดังภาพ
การเติมน้ำยาปรับผ้านุ่ม
1. เปิดกล่องใส่ผงซักฟอก โดนดึงออกจากทิศทางลูกศรดังภาพ จากนั้นใส่ผงซักฟอกลงในกล่อง
2. ใส่ผงซักฟอกในปริมาณที่เหมาะสมเพียงครั้งเดียว และเกลี่ยให้ทั่วเพื่อป้องกันผงซักฟอกหกล้นจากกล่อง
การเติมผงซักฟอก
ช่องใส่ผงซักฟอก
เติมผงซักฟอกให้
เหมาะสมกับระดับน้ำ
ช่องเติมน้ำยาปรับผ้านุ่ม
แนวน้ำยา
ปรับผ้านุ่ม
ข้อควรระวัง : หากเติมน้ำยาปรับผ้านุ่มสูงเกินกว่าแนว น้ำยาอาจล้นได้ทุกเมื่อ
70~80cm
90~100ซม.
(a)
(b)
Page 10

9
1.
ดึงเครื่องกรองออกแล้วล้างให้สะอาด
2.
ดันเครื่องกรองเข้าและต่อท่อเข้ากับ
วาล์วของช่องต่อท่อน้ำเข้าให้แน่น
วาล์วช่องต่อน้ำเข้า
3.
ตรวจสอบการรั่วซึม และขันช่องต่อท่อ
น้ำให้แน่นขึ้น
การทำความสะอาดถุงกรอง
ควรทำความสะอาดถุงกรองบ่อยๆ เพื่อรักษาความสะอาดของแหวนปะเก็น
1. ผลักส่วนบนของถุงแล้วดึงออก 2. เปิดฝาครอบดังภาพ 3. ทำความสะอาดถุงกรอง 4. ปิดฝาครอบและใส่ส่วนล่างของถุงกรอง
ไว้ในถังก่อน จากนั้นจึงถุงกรอง
เข้าไปจนได้ยินเสียงดัง "คลิก"
การทำความสะอาดเครื่องกรอง
1. รองเศษผ้าใต้เครื่องกรองเพื่อกันพื้นเปียก
2. หมุนเครื่องกรองทวน
เข็มนาฬิกาและดึงเครื่อง
กรองออก
3. ขจัดคราบสกปรก และใส่
เครื่องกรองกลับคืน หมุน
ตามเข็มนาฬิกาจนล็อคเข้าที่
(ประเภทที่มีเครื่องสูบ)
1. รองเศษผ้าใต้เครื่อง
กรองเพื่อกันพื้นเปียก
2. หมุนฝาปิดเครื่องกรอง
ไปทางซ้าย
3. ดึงเครื่องกรองออก
และขจัดสิ่งสกปรก
4. ประกอบกลับตาม
ลำดับตรงข้าม
เครื่องกรองช่องต่อท่อน้ำเข้า
1. ดึงขึ้นและดึงถุงกรองออก 2. ขจัดเศษสกปรกออกจากถุงกรอง
3. ทำความสะอาดถุงกรอง 4. สวมถุงกรองกลับ
1. ตรวจสอบขาตั้งทั้ง 4 ขา (หน้า-ขวา หน้า-ซ้าย หลัง-ขวา หลัง-ซ้าย)
2. เอนเครื่องซักผ้าไปด้านหน้า
3. ใส่ขอเกี่ยวของขาตั้งเข้ากับช่องสี่เหลี่ยมที่ฐานเครื่อง
4. ดันขาตั้งเข้าไปตามทิศทางลูกศร จนเสียงดัง “คลิก”
5. ท้ายสุดจึงใส่ขาทั้งหมดเข้าที่ฐานด้วยยึดด้วยน็อต ดังภาพ
การประกอบขาตั้ง
ฐาน
รู
ขอเกี่ยว
น็อต
Page 11

เครื่องซักผ้าไม่ทำงาน
เปิดก๊อกน้ำหรือยัง?
เสียบปลั๊กเครื่องซักผ้าหรือยัง?
ไฟดับหรือไม่?
น้ำประปาแรงพอหรือไม่?
น้ำไม่ไหลเข้าถัง
เปิดก๊อกน้ำหรือยัง?
น้ำประปาไหลหรือไม่?
ท่อน้ำเข้าหรือท่อต่อก๊อกน้ำอุดตันหรือไม่?
น้ำในก๊อกเป็นน้ำแข็งหรือไม่?
หากน้ำไม่ไหลเข้าเครื่องภายใน 1 ชั่วโมง
เสียงเตือนจะดังขึ้น และไฟแสดงเวลาที่เหลืออยู่
จะปรากฎข้อความ "4E"
น้ำไม่ระบายออกจากถังซัก
วางท่อน้ำทิ้งบนพื้นแล้วหรือไม่?(กรณีไม่มีปั๊ม)
ท่อน้ำทิ้งจับตัวเป็นน้ำแข็งหรือไม่?
ท่อน้ำทิ้งอุดตันหรือไม่?
หากน้ำไม่ระบายออกภายใน 6 นาที
เสียงเตือนจะดังขึ้น และไฟแสดงเวลา
ที่เหลืออยู่จะปรากฎข้อความ "5E"
การปั่นไม่ทำงาน
เสื้อผ้าในเครื่องกระจายตัวอย่างทั่วถึง
หรือไม่?
ตั้งเครื่องซักผ้าบนพื้นราบได้ระดับหรือไม่?
น้ำล้น
เครื่องเติมน้ำอีกครั้งหลังจากปั่นแห้ง
หากสัญญาณแสดงข้อผิดพลาดยังคง
ปรากฏอยู่ โปรดติดต่อศูนย์บริการ
10
การแก้ปัญหาเบื้องต้น
Page 12

หากจำเป็นต้องติดต่อศูนย์บริการ
หากมีปัญหาใดๆ กับผลิตภัณฑ์ของท่าน โปรดติดต่อศูนย์บริการใกล้บ้านได้ทุกเวลา
โปรดแจ้งชื่อ ที่อยู่ และหมายเลขโทรศัพท์ของท่าน
อัตราการใช้ไฟ
ขนาด (มม.)
น้ำหนัก
240W
กว้าง 540 x ลึก 560 x สูง 850(LOW BASE)
กว้าง 540 x ลึก 560 x สูง 910(HIGH BASE)
31 กก.
0.05~0.78 MPa
(0.5 ~ 8.0 kg. f/cm2)
ระดับน้ำมาตรฐาน
แรงดันน้ำ
ปริมาณการใช้น้ำ
164 ลิตร
113 รอบต่อนาที
ประเภทการซัก
ประเภทหมุน
ความเร็วการหมุนของแกนซัก
ข้อกำหนดรายละเอียด
การปั่น
การซัก
สูง
กลาง
ต่ำ
ต่ำสุด
56 ลิตร
330W
49 ลิตร
41 ลิตร
34 ลิตร
Page 13

WASHING MACHINE
User’s Manual
FEATURES 1
SAFETY INSTRUCTIONS 2
DESCRIPTION OF PARTS 3
CONTROL PANEL 4
WASHING PROCEDURE 5
Fuzzy course 5
Blanket course 5
Speedy course 5
Wool course 5
Eco course 5
Delay start course 5
MANUAL FUNCTIONS 6
INSTALLATION & MAINTENANCE 7
Environment 7
Levelling 7
Connecting the water supply hose 7
Assembling the rat protection panel 8
In case of pump-drained washer 8
Connecting the drain hose 8
How to add the fabric softener 8
Please read this manual before using and note
how to use in the proper manner.
Please be careful of keeping the manual.
Otherwise, it should be bought separately.
How to put the detergent in 8
Water supply connector filter 9
Cleaning the filter net. 9
How to clean the filter 9
How to assemble the legs 9
TROUBLESHOOTING 10
SPECIFICATIONS
The User’s Manual is for common use.
Make use of the User’s Manual depending upon your washing machine model.
Page 14

FEATURES
FUZZY CONTROL
• Fuzzy control operates with best washing course
by sensing the washload like artificial intelligence.
TRANSPARENT WINDOW
• This Transparent Window is the new concept to solve the curiosity
of users to see inside of washing machine while operation.
While operation, the laundry progress inside of washing machine can be checked by
looking through the transparent window.
PULSATOR
• The Pulsator helps water and detergent to go through fabrics efficiently
while providing both the powerful water action to clean larger and heavier clothes and
the gentle water action to clean all delicates with less wear and tear on clothes.
WATERFALL FLOW
• The Waterfall Flow injected from under the pulsator cascades with full force back into the tub,
pushing down any clothes that float right under the water surface. It is this Waterfall Flow that
enables this washing machine to effectively wash large and heavy items, such as bluejeans
and blankets.
MAGIC FILTER
• This unique magic Filter ensures that all the lint inside the tub is captured for top quality filtering
results to deliver consistently effective cleaning results.
SOFTENER DISPENSER
• The Softener Dispenser releases the fabric
softener at the appropriate time when the last
rinsing proceeds.
CAS SYSTEM
• Child Lock Function ( page2)
• Auto Restart
The power is turned on automatically after power failure.
• Saving Energy
The Eco+ course, it is a wash course to saving the energy
reduces laundry time for frequent and soiled clothes.
1
Page 15

SAFETY INSTRUCTIONS
Please note that the following precautions for safety intend to prevent unpredictable danger and damage
by helping the proper use in safety.
When using hot water in washing, please make sure that the water should not exceed 50˚C.
• Plastic parts may be deformed or damaged, and an electric shock or a fire may take place.
WARNING
There might be serious injury or fatal accident when
you violate this instruction.
If the power supply cord or plug is damaged or
loosened, do not use.
• An electric shock or a fire may take place.
Do not pull the cord off or touch it with moist hands.
• An electric shock or a fire may take place.
Do not bend the power supply cord by force or
press it with heavy things.
• An electric shock or a fire may take place.
Do not install the washer nearby electric implement or
don’t put a candle light or cigarette light on the washer.
• A fire may take place.
Do not disassemble, repair or remodel it recklessly.
• When you need to repair it, please call service
agent. An electric shock or a fire may take place.
During operation, do not put your hands or metal
materials under the washer.
• You may be hurt by spinning board beneath
the washer.
Stay away from the washer when the bottom of the
washer sinks into the water.
• There might be an electric shock. Please
wait until the water drains out completely.
Do not put laundry stained with gasoline, benzene,
or alcohol in the washer, and keep the materials
away from the washer.
• An explosion or a fire may take place.
During spinning, don’t put your hand in the spinning tub.
• It may hurt your hands. If it does not stop within
15 seconds after you open the lid, call
service agent immediately.
CAUTIONS
There might be a slight injury or damage when you
violate this instruction.
Don’t’ install it in the area with moisture or outdoor
where it has rain or snow
• An electric shock or a fire may take place.
Please unplug the power supply cord when you do
not use it.
• An electric shock or a fire may take place.
If there is dust or water on the power supply plug
and its connected part, please remove it completely.
• An electric shock or a fire may take place.
Do not make your kids look into the inside of the
washer.
• If your kid falls into the washer, his life could be
in danger.
Ventilate immediately without touching the power
plug if gas is leaking.
• An electric shock or a fire may take place if it
catches flame.
If the washer makes strange noise, smell or smoke,
unplug it promptly and call service agent.
• An electric shock or a fire may take place.
When cleaning, don’t spray water to the parts of the
washer directly.
• It may make it’s life span shorten.
Also an electric shock or fire may take place
Don’t use several appliances together with an outlet.
• A fire may take place due to unusual heat.
Don’t press the button with an awl or pin.
• An electric shock or a fire may take place.
Child-Lock function: This is a device to protect children from being accidentally hurt while
How to start the Child-Lock function:
- Press the "Power" button to go to an initial washing mode.
-
By pressing "Start/Hold" button, you start washing and in case Child Lock function is needed during the laundry
- Push the "Course" button and get the function started.
(Note: You cannot perform the function without the "Power" button on.)
In the event that you would like to modify the Child-Lock function, "L" signal flashes in the "signal window
showing the rest of the set time" every two seconds, which means it is locked and indicates how much
time is left until the function is released.
To release the function of Child-Lock:
- In case the "Child-Lock" is programmed, press both the "Function" and "Course" buttons in sequence.
playing with the washer.
2
Page 16

DESCRIPTION OF PARTS
Make use of the User’s Manual depending upon your washing machine model.
The User’s Manual is for common use.
SPIN BASKET
POWER CORD
GROUND LEAD
When the water pipe is
metal, make sure to cover
the end of the ground wire.
WATER DRAIN HOSE
SOUND ABSORPTION
PAN EL
WATER SUPPLY HOSE(HOT)
DRAIN-HOSE (PUMP)
WATER SUPPLY HOSE (COLD)
LID
and spinning.
closed during washing
Be sure to keep the lid
FILTER
DETERGENT BOX
washing.
the filter during
Lint will be collected in
DISPENSER
FABRIC SOFTENER
PULSATOR
BLEACH INLET
PANEL
FRONT CONTROL
ADJUSTABLE LEGS
of the legs when
Adjust the length
installing the washer.
3
Page 17

For more details, see control panel of your washing machine.
CONTROL PANEL
POWER BUTTON
Press this button once to operate.
POWER
Press once again to turn the power off.
START/HOLD BUTTON
Use to pause and restart the operation.
START/
HOLD
To change the washing procedure during operation, press this button to stop,
and once again to restart after changing the procedure.
DELAY START BUTTON
Press this button when delay start washing is needed.
COURSE SELECT BUTTON
DELAY
START
COURSE
With every press of this button, the washing course changes;
➔
FUZZY
BLANKET➔ SPEEDY➔ WOOL➔ECO
FUNCTION
➔
FUZZY
FUNCTION SELECT BUTTON
With every press of this button, the function changes; SOAK,WASH,RI NSE,SPI N
WASH ➔ RINSE ➔ SPIN ➔ WASH&RINSE ➔ RINSE&SPIN ➔ WASH,RINSE,SPIN
WATER LEVEL SELECT BUTTON
According to the washload,select the water level ;
WATER
LEVEL
MED ➔ HIGH ➔ EXTRA LOW ➔ LOW
➔
WATER
WATER SUPPLY SELECT BUTTON
SUPPLY
As you press this button, the type of water is selected as follows.
➔
COLD
COLD + HOT➔ HOT➔ COLD
REMAINING TIME INDICATOR LIGHT
The indicator light shows the remaining time (in minutes) of each wash cycle.
At the end of the cycle,the power automatically switches off.
4
Page 18

WASHING PROCEDURE
Before starting washing, check the following;
Connect the water supply hose to the water tap. Leave a tap
open. Plug the power cord in. Make sure to lay down the
drain hose. (In case no drain pump)
FUZZY COURSE
Selects the best washing course
automatically.
POWER
START/
HOLD
1. Press the POWER Button to"ON".
2. Press the START/HOLD button.
Water level is selected automatically.
Washing,rinsing, and spinning follow.
If you want to pause, press the START/HOLD
button again.You can change the course when paused.
3. Close the lid.
BLANKET COURSE
POWER
COURSE
START/
HOLD
1. Press the power button to "ON".
2. Press the course select button once.
3. Press the START/HOLD button
Water level is selected automatically.
Washing, rinsing, and spinning follow.
If you want to pause, press the START/HOLD
button again.You can change the course when paused.
4. Close the lid.
SPEEDY COURSE
POWER
COURSE
START/
HOLD
Because washing is speedy, it is
good for light or less stained laundry.
1. Press the power button to "ON".
2. Press the course select button twice.
3. Press the START/HOLD button
Water level is selected automatically.
Washing, rinsing, and spinning follow.
If you want to pause, press the START/HOLD
button again.You can change the course when paused.
4. Close the lid.
Put the laundry into the washer and add detergent, too.
Be careful not to overload. Use right detergent
for the fabrics you are washing.
WOOL COURSE
POWER
COURSE
START/
HOLD
1.Press the power button to "ON".
2.Press the course select three times.
3.Press the START/HOLD button.
Washing,rinsing, and spinning follow.
If you want to pause, press the START/HOLD
button again.You can change the course when paused.
4. Close the lid.
CAUTION . . .
-Do not use water above 30˚C for WOOL washing.
-Refer to the tag attached on the clothes for washing
information.
-Fasten buttons and turn inside out before washing.
-Use the detergent indicated in the laundry.
-When the degree of dirt is extreme, soak the laundry in warm
water for about 10 minutes before pressing the WOOL course
button in order to enhance washing efficiency.
COURSE
ECO
POWER
COURSE
START/
HOLD
1. Press the power button to "ON".
2. Press the course select button four times.
3. Press the START/HOLD button
Water level is selected automatically.
Washing, rinsing, and spinning follow.
If you want to pause, press the START/HOLD
button again.You can change the course when paused.
4. Close the lid.
DELAY START COURSE
POWER
COURSE
DELAY
START
START/
HOLD
Select this course when you have to go out or do
something else.
1. Press the power button to "ON".
2. Press the DELAY START button once.
You may change the delay start time with
use the DEALY START button. (from 3 hours to 18 hours)
3. Press the START/HOLD button and put
the proper amount of detergent into tub.
4. Close the lid.
The washing finishes by the time you reserved.
5
Page 19

MANUAL FUNCTIONS
Each washing course changes manually.
Ex) If you want to wash in the speedy course : Power - Select speedy course - Wash - Start/Hold button
SOAK FUNCTION (Including WASH, RINSE, SPIN)
Press the POWER button.
POWER COURSE
POWER
FUNCTION
twice
POWER
FUNCTION
three times
FUNCTION
once
START/
HOLD
START/
HOLD
START/
HOLD
Select the course(Press the course button).
➔ FUZZY, BLANKET, SPEED, WOOL,
Press the FUNCTION SELECT button once.
Press the START/HOLD button once.
Water level is selected automatically.
Washing,rinsing, and spinning follow.
WASH ONLY
Press the POWER button.
Press the FUNCTION SELECT button twice.
Press the START/HOLD button once.
Washing goes on for 18 minutes.
When the FUNCTION button is pressed during washing, the wash
time can be changed to between 3 and 25 minutes in duration.
RINSE ONLY
Press the FUNCTION button three times.
Press the START/HOLD button once.
Rinsing goes on for 15 minutes.
When the FUNCTION button is pressed during rinsing, the rinse
times can be changed to between 1 to 5 times in duration.
ECO
POWER
POWER
POWER
FUNCTION
four times
FUNCTION
five times
FUNCTION
six times
START/
HOLD
START/
HOLD
START/
HOLD
SPIN ONLY
Press the FUNCTION button four times.
Press the START/HOLD button once.
Spin drying goes on for 11 minutes.
When the FUNCTION button is pressed during spinning,
the spin time can be changed to from 1 to 7 minutes.
WASH AND RINSE
Press the FUNCTION button five times.
Press the START/HOLD button once.
Washing and rinsing go on for 38 minutes.
When the FUNCTION button is pressed during working, the rinse
times can be changed to between 1 to 5 times in duration.
RINSE AND SPIN
Press the FUNCTION button six times.
Press the START/HOLD button once.
Rinsing and spin drying follow.
When the FUNCTION button is pressed during working, the rinse
times can be changed to between 1 and 5 times in duration.
6
Page 20

INSTALLATION & MAINTENANCE
a
b
a
b
c
Make use of the User’s Manual depending upon your washing machine model.
ENVIRONMENT
Leave some space
Maintain at least 10cm between the washer and the wall.
Place the washer on a sturdy flat surface.
If the washer is placed on an uneven or weak surface,
noise or vibration occurs. (Allowable is 1˚)
Adjust the legs for even placement.
•
LEVELLING
If the washer is not leveled with the ground, it makes the machine tremble more or be out of order.
So, make sure that the washer is leveled properly.
SEE IF THE MACHINE IS PLACED LEVEL BY CHECKING
THE POSITION OF THE WASHING TUB.
•
Open the lid of the machine, pour water into the tub up to the level
just below the pulsator, and adjust the legs so that the pulsator is
positioned at the center of the water as shown in the figure.
•
Place the machine more than
10cm away from the wall.
•
Adjust the legs on feet
for levelling .
LockLoosen
CONNECTING THE WATER SUPPLY HOSE
1. Remove the adaptor
from the water
supply hose.
The User’s Manual is for common use.
Never install the washer near water.
Do not place the washer in steamy rooms or where the
washer is directly exposed to rain.Moisture may destroy the
electrical insulation causing an electrical shock hazard.
Avoid direct sunlight or heaters.
As plastic and electrical components are affected by direct
heat,never place the washer near furnaces, boilers, etc.
Do not place under direct sunlight.
1. Adjust the side horizontally
first and the front
in same direction ❷ next.
2. If the thread is not
within the limit, adjust
the height of
the legs.
5. Connect the other end of the water
supply hose to the inlet water valve
at the back of the washer.
Screw the hose clockwise all the
way in.
2. First,using a "+" type
screw driver, loosen the
four screws on the adaptor.
Next,take the adaptor and
turn part(b) following the
arrow for gap about 5mm
between them.
3. Connect adaptor to the
water tap by tightening
the screws firmly.
Then, turn part (b)
following the arrow and
put (a) and (b)together.
4. Connect the water supply
hose to the adaptor. Pull down
the part (c) of the water supply
hose .When the part (c)is released,
the hose is automatically
connected to the adaptor
making a 'click' sound.
5-1.Connect the other end of the water
supply hose to the inlet water valve
at the top of the washer.
Screw the hose clockwise all the way in.
If the water tap is a screw type,assemble
a water supply hose that fits to the
tap as shown.
NOTICE After completing connection, if water leaks from the hose,
then repeat the same steps.
Use the most conventional type of faucet for water supply.
In case the faucet is square or too big,remove the spacing
ring before inserting the faucet into the adaptor.
7
Page 21

Rear-side
70~80cm
ASSEMBLING THE RAT PROTECTION PANEL
Tilt the washer a little and lift up the panel until it clicks,
finally fix the panel with screw to the base as shown
in the figure.
IN CASE OF PUMP-DRAINED WASHER
Take out the cap-hose and
connect the outlet-hose.
Be sure to join tightly the drain hose into
the drain-outlet on the back of the
machine.
1.Insert the sound
absorbing panel
to the assembling
hole on back side
to the end.
2.If you have difficulty
inserting the panel
lift up the washer a
little and insert it
Be sure to join tightly the drain
hose into the drain-outlet
on the side of the machine.
Install the drain hose in the
position of about 90~100cm
above the ground.
cap-hose
outlet-hose
CONNECTING THE DRAIN HOSE
(a)
After pressing the joint ring(a), insert the drain hose(b)
to drain direction.
(b)
HOW TO ADD THE FABRIC SOFTENER
•
When a proper amount (one time does) of fabric
softener is stored in the softener inlet,it is
automatically put in at the last rinsing cycle.
•
Do not use detergent, bleach or starch into
the Softener Inlet.
•
Using too much softener may produce
unsatisfactory results.
•
Do not open the lid during the Spin Dry cycle.
If added too early, its effectiveness will decrease.
•
Do not leave the softener
into the Softener
Dispenser for a long time.
Because softner
became stiff.
HOW TO PUT THE DETERGENT IN
1.Open the detergent box by pulling in the direction of the arrow as shown in the
figure and then put the powder detergent in the detergent box.
2. Put in one-time amount of detergent evenly so the detergent may not brim over the box.
Detergent Device
Put the detergent
in proportion to
water level
90~100cm
Softener Device
Softener
baseline
CAUTION : If softener is stored over the above base line, it may flow down at any time.
8
Page 22

WATER SUPPLY CONNECTOR FILTER
1
2
1.
Pull out the filter and wash well.
inlet water
valve
2.
Pull in the filter and connect
the hose to the inlet water
valve tightly.
3.
Check if there is a leakage.
Note to tighten up the
connector.
CLEANING THE FILTER NET
1. Push the upper part
of the filter and pull in.
1. Push up and
pull out the filter net.
Clean the filter net often to keep the washer clean.
2. Open the cover as
shown in the figure.
2.
Remove the collected
lint from the filter net.
HOW TO CLEAN THE FILTER
1. Place a rag under the washer filter not to wet the floor.
2. Rotate the filter counterclockwise
and pull out the filter.
3. Remove dirts and rotate
the filter clockwise
until it locks in position.
3. Clean the filter. 4. Close the cover and insert the
lower part of the filter in the
basket first and then push the
filter with "click" sound .
3. Clean the filter. 4.
Pull down the filter net.
(pump drained washer)
1.Place a rag under washer filter not to wet the floor.
2.Turn the filter-cap to the left.
3.Take the filter out and
remove dirts.
4. Reassemble in
reverse order.
HOW TO ASSEMBLE THE LEGS
1. Check the 4 Legs.(Front-right. Front-left.
Rear-right. Rear-left)
Hook
Hole
2. Lay down the Washing Machine to the front.
3. Insert the hook of leg in to the square hole
of base.
4. Push the leg to the arrow direction to “Click”.
5. Finaly fix the legs on the base
Base
Screw
with screw like a figure.
9
Page 23

TROUBLESHOOTING
Washing machine won't work
Is the water tap opened?
Is the washer plugged in?
Is the power cut off?
Is there enough water?
Water is not supplied
Is the water tap opened?
Is the water cut off?
Is the water supply hose or hose
connection clogged?
Is the water tap frozen?
If water is not supplied in 1 hour,a
buzzer will sound, and the remaining
time indicator will show "4E".
Water dose not drain
Is the drain hose down?(No pump)
Is the drain hose frozen?
Is the drain hose clogged?
If the water dose not drain in 15
minutes, a buzzer will sound,and the
remaining time indicator will show "5E".
Spinning does not work
Is the laundry spread out evenly
in the washer?
Is the washer set on a sturdy
flat surface?
Water is overflowed
Restart after spinning.
If the error sign still indicates,
call agency.
10
Page 24

IN CASE THE NEED FOR SERVICING ARISES.
If any problem occurs with your products,do not hestitate to call any nearby.
Name, address, telephone number is required.
SPECIFICATIONS
POWER
CONSUMPTION
DIMENSIONS(mm)
WEIGHT
WATER PRESSURE
WASHING TYPE
WASH
330W
SPIN
W540xD560xH850(LOW BASE)
W540xD560xH910(HIGH BASE)
240W
31 kg
0.05~0.78 MPa
(0.5 ~ 8.0 kg. f/cm2)
Stirring Type
STANDARD
WATER LEVEL
WATER USAGE
PULSATOR
ROTATING SPEED
HIGH
MED
LOW
MIN
56 l
49 l
41 l
34 l
164
l
113 rpm
 Loading...