

Samsung WA5451ANW User Manual

Washing Machine
user manual
WA5471AB*
WA5451AN*
imagine the possibilities
Thank you for purchasing this Samsung product.
To receive more complete service or accessory
parts, please register your product at or contact
www.samsung.com/register
1-800-SAMSUNG (726-7864)
WA5471ABP-03050A_EN.indd 1WA5471ABP-03050A_EN.indd 1 2011-03-04 1:51:142011-03-04 1:51:14

Key features of your new
washer
1. VRT® (Vibration Reduction Technology)
This Samsung washer performs smoothly at top spin speeds, minimizing noise and vibration.
2. The Largest Capacity
Even bulky garments and blankets get super clean. The large capacity leaves enough room
for a more thorough, cleaner wash.
3. PowerFoam™(WA5471*)
Samsung’s effective PowerForm delivers improved cleanliness with advanced fabric care.
PowerFoam allows detergent to distribute evenly and penetrate fabrics faster and deeper.
4. PureCycle™(Tub Cleaning cycle)
Clean your drum with one button! Pure Cycle is specially designed to remove detergent
residue and dirt bulidup in the tub, without the need for special chemical detergents.
5. Stylish design
The stylish design of this washer blends well with your environment.
6. Center jog dial
The Jog dial enables you to select cycles in both directions with ease.
7. DD Motor
The power to handle anything! Our direct-drive inverter motor delivers power right to the
washer tub from a variable speed, reversible motor. A beltless direct-drive motor generates a
higher spin speed of 1,100rpm for more effective, quiet operation. The washer also has fewer
moving parts, meaning fewer repairs.
8. Tempered Glass Lid
The tempered glass lid is durable and makes it easy to see the inside of washer.
9. Sanitize
When you select the NSF certifi ed Sanitize cycle, the water heats to an extra high
temperature and removes 99.9% of certain bacteria typically found on clothing, bedding, or
towels. This certifi cation is awarded by NSF International, an independent third-party testing
and certifi cation organization.
Please check the garment care label to avoid garment damage. Only sanitizing cycles have
been designed to meet the requirements of this protocol for sanitization effi cacy.
NSF Protocol P172
Sanitization Performance of Residential and
Commercial, Family-Sized Clothes Washers
10. Lid Lock Switch
The washer lid is locked during operation. The lid can be unlocked by pressing the Start/
Pause button to stop the washer.
2_ key features of your new washer
WA5471ABP-03050A_EN.indd Sec9:2WA5471ABP-03050A_EN.indd Sec9:2 2011-03-04 1:51:262011-03-04 1:51:26
safety information
Congratulations on your new Samsung Washer. This manual contains important
information on the installation, use, and care of your appliance. Please take time
to read this manual to take full advantage of your washer’s many benefi ts and
features.
WHAT YOU NEED TO KNOW ABOUT SAFETY INSTRUCTIONS
Warnings and Important Safety Instructions in this manual do not cover all possible conditions and
situations that may occur. It is your responsibility to use common sense, caution, and care when installing,
maintaining, and operating your washer.
IMPORTANT SAFETY SYMBOLS AND PRECAUTIONS
What the icons and signs in this user manual mean:
Hazards or unsafe practices that may result in severe personal injury
WARNING
CAUTION
CAUTION
These warning icons are here to prevent injury to you and others.
Please heed them explicitly.
After reading this section, keep it in a safe place for future reference.
Read all instructions before using the appliance.
or death.
Hazards or unsafe practices that may result in minor personal injury or
property damage.
To reduce the risk of fi re, explosion, electric shock, or personal injury
when using your washer, follow these basic safety precautions:
Do NOT attempt.
Do NOT disassemble.
Do NOT touch.
Follow directions explicitly.
Unplug the power plug from the wall socket.
Make sure the machine is grounded to prevent electric shock.
Call the service center for help.
Note
SAVE THESE INSTRUCTIONS
safety information _3
WA5471ABP-03050A_EN.indd Sec1:3WA5471ABP-03050A_EN.indd Sec1:3 2011-03-04 1:51:272011-03-04 1:51:27

safety information
WARNING: To reduce the risk of fi re, electric shock, or injury to persons when using your
appliance, follow basic precautions, including the following:
WARNING
1. Read all instructions before using the appliance.
2. Do not wash or dry articles that have been previously cleaned in, washed in, soaked in,
or spotted with gasoline, dry-cleaning solvents, other fl ammable or explosive substances
as they give off vapors that could ignite or explode.
3. Do not allow children to play on or in the appliance. Close supervision of children is
necessary when the appliance is used near children.
4. Before the appliance is removed from service or discarded, remove the door to the
washing or drying compartment.
5. Do not reach into the appliance if the drum is moving.
6. Do not install or store this appliance where it will be exposed to the weather.
7. Do not tamper with the controls.
8. Do not repair or replace any part of the appliance or attempt any servicing unless it is
specifi cally recommended in the user-maintenance instructions or in published userrepair instructions that you understand and have the skills to carry out.
9. Do not add gasoline, dry-cleaning solvents, or other fl ammable or explosive substances
to the wash water. These substances give off vapors that could ignite or explode.
10.Under certain conditions, hydrogen gas may be produced in a hot water system
that has not been used for 2 weeks or more. HYDROGEN GAS IS EXPLOSIVE. If the
hot water system has not been used for 2 weeks or more, before using a washer or
combination washer-dryer, turn on all hot water faucets and let the water fl ow from
each for several minutes. This will release any accumulated hydrogen gas. As the gas is
fl ammable, do not smoke or use an open fl ame during this time.
SAVE THESE INSTRUCTIONS
4_ safety information
WA5471ABP-03050A_EN.indd Sec1:4WA5471ABP-03050A_EN.indd Sec1:4 2011-03-04 1:51:272011-03-04 1:51:27

CRITICAL INSTALLATION WARNINGS
WARNING
Plug the power cord into an AC 120V/60Hz/wall socket rated at 15 amps or higher. Use the
socket for this appliance only. In addition, do not use an extension cord.
- Sharing a wall socket with other appliances, using a power strip, or extending the power
cord may result in electric shock or fi re.
- Do not use an electric transformer. It may result in electric shock or fi re.
- Ensure that the power voltage, frequency, and current match the product’s
specifi cations. Failing to do so may result in electric shock or fi re.
Have this appliance installed by a qualifi ed technician or service company.
- Failing to do so may result in electric shock, fi re, an explosion, problems with the
product, or injury.
Remove all foreign substances such as dust or water from the power plug terminals and
contact points using a dry cloth on a regular basis.
- Unplug the power plug and clean it with a dry cloth.
- Failing to do so may result in electric shock or fi re.
Plug the power plug into the wall socket in the right direction so that the cord runs towards
the fl oor.
- If you plug the power plug into the socket in the opposite direction, the electric wires
within the cable may be damaged and this may result in electric shock or fi re.
This appliance must be properly grounded.
Do not ground the appliance to a gas pipe, plastic water pipe, or telephone line.
- Improper grounding may result in electric shock, fi re, an explosion, or problems with the
product
- Never plug the power cord into a socket that is not grounded correctly. Make sure the
socket you use is grounded in accordance with local and national codes.
Do not install this appliance near a heater or infl ammable material.
Do not install this appliance in a humid, oily, or dusty location, or in a location exposed to
direct sunlight or water (rain drops).
Do not install this appliance in a location where gas may leak.
- This may result in electric shock or fi re.
Plug the power plug into the wall socket fi rmly. Do not use a damaged power plug,
damaged power cord, or loose wall socket.
- This may result in electric shock or fi re.
Do not pull or excessively bend the power cord.
Do not twist or tie the power cord.
Do not hook the power cord over a metal object, place a heavy object on the power cord,
insert the power cord between objects, or push the power cord into the space behind the
appliance.
- This may result in electric shock or fi re.
Do not pull the power cord when unplugging the power plug.
- Unplug the power plug by holding the plug.
- Failing to do so may result in electric shock or fi re.
If the power plug or power cord are damaged, contact your nearest service center.
safety information _5
WA5471ABP-03050A_EN.indd Sec1:5WA5471ABP-03050A_EN.indd Sec1:5 2011-03-04 1:51:272011-03-04 1:51:27

safety information
INSTALLATION CAUTIONS
CAUTION
Position the appliance so that the power plug is easily accessible.
- Failing to do so may result in electric shock or fi re due to electric leakage.
Install your appliance on a level and hard fl oor that can support its weight.
- Failing to do so may result in abnormal vibrations, noise, or problems with the product.
Unplug the power plug when the appliance is not being used for long periods of time or
during a thunder/lightning storm.
- Failing to do so may result in electric shock or fi re.
WARNING
CRITICAL USAGE WARNINGS
If the appliance is fl ooded, cut the power immediately and contact your nearest service
center.
If the appliance generates a strange noise, a burning smell, or smoke, unplug the power
plug immediately and contact your nearest service center.
- Failing to do so may result in electric shock or fi re.
In the event of a gas leak (such as propane gas, LP gas, etc.), ventilate the area
immediately. Do not turn any appliance or light on or off.
- Do not use a ventilating fan.
- A spark may result in an explosion or fi re.
Do not wash items contaminated with gasoline, kerosene, benzene, paint thinner, alcohol or
other fl ammable or explosive substances.
- This may result in electric shock, fi re, or an explosion.
Do not open the washer door by force while it is operating (high-temperature washing/
drying/spinning).
- Water fl owing out of the washer may cause burns or cause the fl oor to be slippery.
This may result in injury.
- Opening the door by force may cause damage to the product or injury.
Make sure to remove the packaging (sponge, styrofoam) attached to the bottom of the
washer before using it.
Do not insert your hand under the washer.
- This may result in injury.
6_ safety information
WA5471ABP-03050A_EN.indd Sec1:6WA5471ABP-03050A_EN.indd Sec1:6 2011-03-04 1:51:272011-03-04 1:51:27
Do not touch the power plug with wet hands.
- This may result in electric shock.
Do not turn the appliance off by unplugging the power plug while the washer is in operation.
- Plugging the power plug into the wall socket again may cause a spark and result in
electric shock or fi re.
Keep all packaging materials well out of the reach of children, as packaging materials can
be dangerous to children.
- If a child places a bag over its head, it may suffocate.
Do not let children or infi rm persons use this washer unsupervised.
- Failing to do so may result in electric shock, burns or injury.
Do not insert your hand or a metal object under the washer while it is operating.
- This may result in injury.
Do not attempt to repair, disassemble, or modify the appliance yourself.
- Do not use any fuse (such as cooper, steel wire, etc.) other than the standard fuse.
- If you need to repair or reinstall the appliance, contact your nearest service center.
- Failing to do so may result in electric shock, fi re, problems with the product, or injury.
If any foreign substance such as water enters the appliance in any area other than the tub,
unplug the power plug and contact your nearest service center.
- Failing to do so may result in electric shock or fi re.
If the water supply hose comes loose from the faucet and fl oods the appliance, unplug the
power plug.
- Failing to do so may result in electric shock or fi re.
CAUTION
USAGE CAUTIONS
If the washer is contaminated by a foreign substance such as detergent, dirt, food waste,
etc., unplug the power plug and clean the washer using a damp and soft cloth.
- Failing to do so may result in discoloration, deformation, damage or rust.
The front glass may be broken by a strong impact. Take care when using the washer.
- If the glass is broken, it may result in injury.
After a water supply failure or when reconnecting the water supply hose, open the faucet
slowly.
Open the faucet slowly after a long period of non-use.
- The air pressure in the water supply hose or the water pipe may result in damage to a
part or in water leakage.
If a drain error occurs during an operation, check if there is a draining problem.
- If the washer is used when it is fl ooded because of a draining problem, it may result in
electric shock or fi re due to electric leakage.
safety information _7
WA5471ABP-03050A_EN.indd Sec1:7WA5471ABP-03050A_EN.indd Sec1:7 2011-03-04 1:51:272011-03-04 1:51:27

safety information
Insert the laundry into the washer completely so that laundry does not get caught in the
door.
- If laundry gets caught in the door, it may result in damage to the laundry or the washer,
or result in water leakage.
Ensure that the faucet is turned off when the washer is not being used.
- Ensure that the water supply hose connectors are properly tightened.
- Failing to do so may result in property damage or injury.
Open the faucet and check if the water supply hose connector is fi rmly tightened and that
there is no water leaking before using the product.
- If the water supply hose connectors are loose, it may result in water leakage.
Do not stand on top of the appliance or place objects (such as laundry, lighted candles,
lighted cigarettes, dishes, chemicals, metal objects, etc.) on the appliance.
- This may result in electric shock, fi re, problems with the product, or injury.
Do not operate the appliance with wet hands.
- This may result in electric shock.
Do not spray volatile material such as insecticide onto the surface of the appliance.
- As well as being harmful to humans, it may also result in electric shock, fi re,or problems
with the product.
Do not place an object that generates a electromagnetic fi eld near the washer.
- This may result in injury due to a malfunction.
Since the water drained during a high-temperature wash or drying cycle is hot, do not
touch the water.
- This may result in burns or injury.
Do not wash, spin, or dry water-proof seats, mats or, clothing*.
- Do not wash thick, hard mats even if the washer mark is on the care label.
This may result in injury or damage to the washer, walls, fl oor,or clothing due to abnormal
vibrations.
* Items not to wash: Woolen bedding, rain covers, fi shing vests, ski pants, sleeping bags,
diaper covers, sweat suits, and bicycle, motor cycle, car covers, etc.
Do not operate the washer when the detergent box is removed.
- This may result in electric shock or injury due to water leakage.
Do not insert your hand into the detergent dispenser after opening it.
- This may result in injury as your hand may be caught.
8_ safety information
WA5471ABP-03050A_EN.indd Sec1:8WA5471ABP-03050A_EN.indd Sec1:8 2011-03-04 1:51:272011-03-04 1:51:27

Do not place any non-laundry objects, such as shoes, food waste, or animals into the
washer.
- This can cause abnormal vibrations that can damage the washer, and, in the case of
pets, cause severe injury or death.
Do not press the buttons using sharp objects such as pins, knifes, fi ngernails, etc.
- This may result in electric shock or injury.
Do not wash laundry contaminated by oils, creams, or lotions usually found in skincare
shops or massage clinics.
- This may result in the rubber seal becoming deformed and water leakage.
Do not leave metal objects (safety pins, hair pins, etc.) or bleach in the tub for long periods
of time.
- This may cause the tub to rust.
- If rust appears on the surface of the tub, apply a neutral cleansing agent to the surface
and use a sponge to clean it. Never use a metal brush.
Do not use dry cleaning detergent directly and do not wash, rinse, or spin laundry
contaminated by dry cleaning detergent.
- This may result in spontaneous combustion or ignition due to heat from the oxidation of
the oil.
Do not use hot water from water cooling/heating devices.
- This may result in problems with the washer.
Do not use natural hand-washing soap for the washer.
- If it hardens and accumulates inside the washer, it may cause problems with the
product, discoloration, rust, or bad odors.
Do not wash large laundry items such as bedding in the washing net.
- Failing to do so may result in injury due to abnormal vibrations.
- Place smaller items, such as lace socks and lingerie in the washing net.
Do not use hardened detergent.
- If it accumulates inside the washer, it may result in water leakage.
Do not wash throw rugs or doormats.
- If you wash throw rugs or doormats, the sand will accumulate inside the washer. It may
result in error such as no draining.
CRITICAL CLEANING INSTRUCTIONS
WARNING
Do not clean the appliance by spraying water directly onto it.
Do not use benzene, thinner, or alcohol to clean the appliance.
- This may result in discoloration, deformation, damage, electric shock, or fi re.
Before cleaning or performing maintenance, unplug the appliance from the wall socket.
- Failing to do so may result in electric shock or fi re.
safety information _9
WA5471ABP-03050A_EN.indd Sec1:9WA5471ABP-03050A_EN.indd Sec1:9 2011-03-04 1:51:272011-03-04 1:51:27

contents
INSTALLING YOUR WASHER
11
OPERATING INSTRUCTIONS
17
WASHING A LOAD OF LAUNDRY
18
11 Unpacking your washer
11 Overview of your washer
12 Electrical
12 Grounding
12 Water
13 Drain facility
13 Flooring
13 Location considerations
13 Alcove or closet installation
14 Required Dimensions for Installation
15 Important note to installer
17 Loading your washer
17 Getting started
18 Overview of the control panel
21 Child Lock
22 Spin Only Adjustment
22 Garment+
22 My cycle
23 Washing clothes using the cycle selector
24 Detergent use
24 Features
MAINTAINING YOUR WASHER
26
TROUBLESHOOTING
26 Cleaning the exterior
26 Cleaning the interior
26 Storing your washer
26 Preserving the top cover and the front frame
27 Cleaning the dispensers
28 Pure Cycle
29 Check these solutions if your washer…
31 Information codes
29
APPENDIX
33
10_ contents
WA5471ABP-03050A_EN.indd Sec6:10WA5471ABP-03050A_EN.indd Sec6:10 2011-03-04 1:51:282011-03-04 1:51:28
33 Fabric care chart
34 Cycle chart
36 Helping the environment
36 Declaration of conformity
36 Specifi cation

installing your washer
UNPACKING YOUR WASHER
Unpack your Washer and inspect it for shipping damage. Make sure you have received all the items shown
below. If your Washer was damaged during shipping, or you do not have all of the items, contact 1-800SAMSUNG (1-800-726-7864).
To prevent personal injury or strain, wear protective gloves whenever lifting or carrying the unit.
Packing materials can be dangerous to children; Keep all packing material (plastic bags, polystyrene,
etc.) well out of childrens’ reach.
WARNING
OVERVIEW OF YOUR WASHER
01 installing your washer
Drain Hose
Door
Power Cord
Adjustable legs
Parts supplied
Hose guide User manual book Water supply hoses Plastic zip hose tie
Tools needed
Control panel
Pliers Flat screwdriver
installing your washer _11
WA5471ABP-03050A_EN.indd Sec3:11WA5471ABP-03050A_EN.indd Sec3:11 2011-03-04 1:51:282011-03-04 1:51:28

installing your washer
BASIC LOCATION REQUIREMENTS
Electrical
• 120 Volt 60 Hz 15 AMP fuse or circuit breaker
• Individual branch circuit serving only your Washer is recommended.
• Your Washer is equipped with a power cord.
NEVER USE AN EXTENSION CORD.
CAUTION
Grounding
ELECTRICAL GROUNDING IS REQUIRED FOR THIS APPLIANCE.
This appliance must be grounded. In the event of malfunction or breakdown, grounding will
reduce the risk of electric shock by providing a path of least resistance for electric current.
This appliance is equipped with a power cord having a three-prong grounding plug for use in a
properly installed and grounded outlet.
An improperly connected equipment-grounding conductor can increase the risk of electrical
shock. Check with a qualifi ed electrician or serviceman if you are not sure whether the
WARNING
appliance is properly grounded. Do not modify the plug provided with the appliance – if it
does not fi t the outlet, have a proper outlet installed by a qualifi ed electrician.
IMPORTANT SAFETY PRECAUTIONS
• To prevent unnecessary risk of fi re, electrical shock or personal injury, all wiring and
grounding must be done in accordance with the National Electrical Code ANSI/FNPA, No.
70 Latest Revision and local codes and ordinances. It is the personal responsibility of the
appliance owner to provide adequate electrical service for this appliance.
NEVER CONNECT THE GROUND WIRE TO PLASTIC PLUMBING LINES, GAS LINES, OR
CAUTION
HOT WATER PIPES.
Water
To correctly fi ll your Washer in the proper amount of time, water pressure of 20 to 116psi (137 to
800kPa) is required.
Water pressure less than 20 psi may cause water valve failure, or may not allow the water valve
to shut off completely, or may extend the fi ll time beyond what your Washer controls allow,
causing your Washer to turn off. A time limit is built into the controls to prevent fl ooding in your
home if a hose becomes loose.
The water faucets must be within 4 feet/122cm of the back of your Washer to match the inlet
hoses provided with your Washer.
Accessory inlet hoses are available in various lengths up to 10 feet/305cm for faucets that
are further away from the back of your Washer.
To avoid the possibility of water damage:
• Have water faucets easily accessible
• Turn off faucets when the washer is not in use.
• Periodically check that there is no leakage from the water inlet hose fi ttings.
CHECK ALL CONNECTIONS AT THE WATER VALVE AND FAUCET FOR LEAKS.
WARNING
12_ installing your washer
WA5471ABP-03050A_EN.indd Sec3:12WA5471ABP-03050A_EN.indd Sec3:12 2011-03-04 1:51:292011-03-04 1:51:29

Drain facility
The recommended height of the standpipe is 39 in/ 99 cm. The drain hose must be routed
through the drain hose clip to the standpipe. The standpipe must be large enough to accept the
outside diameter of the drain hose. The drain hose is attached to the washer at the factory.
Flooring
For best performance, you must install your washer on a solidly constructed fl oor. Wood fl oors
may need to be reinforced to minimize vibration and/or unbalanced load situations. Carpeting
and soft tile surfaces are contributing factors to vibration which can cause your washer to move
slightly during the spin cycle.
Never install your washer on a platform or weakly supported structure.
Location considerations
Do not install your washer in areas where water may freeze, since your washer will always retain
some water in its water valve, pump, and hose areas. Frozen water can damage the belts, the
pump, hoses, and other components.
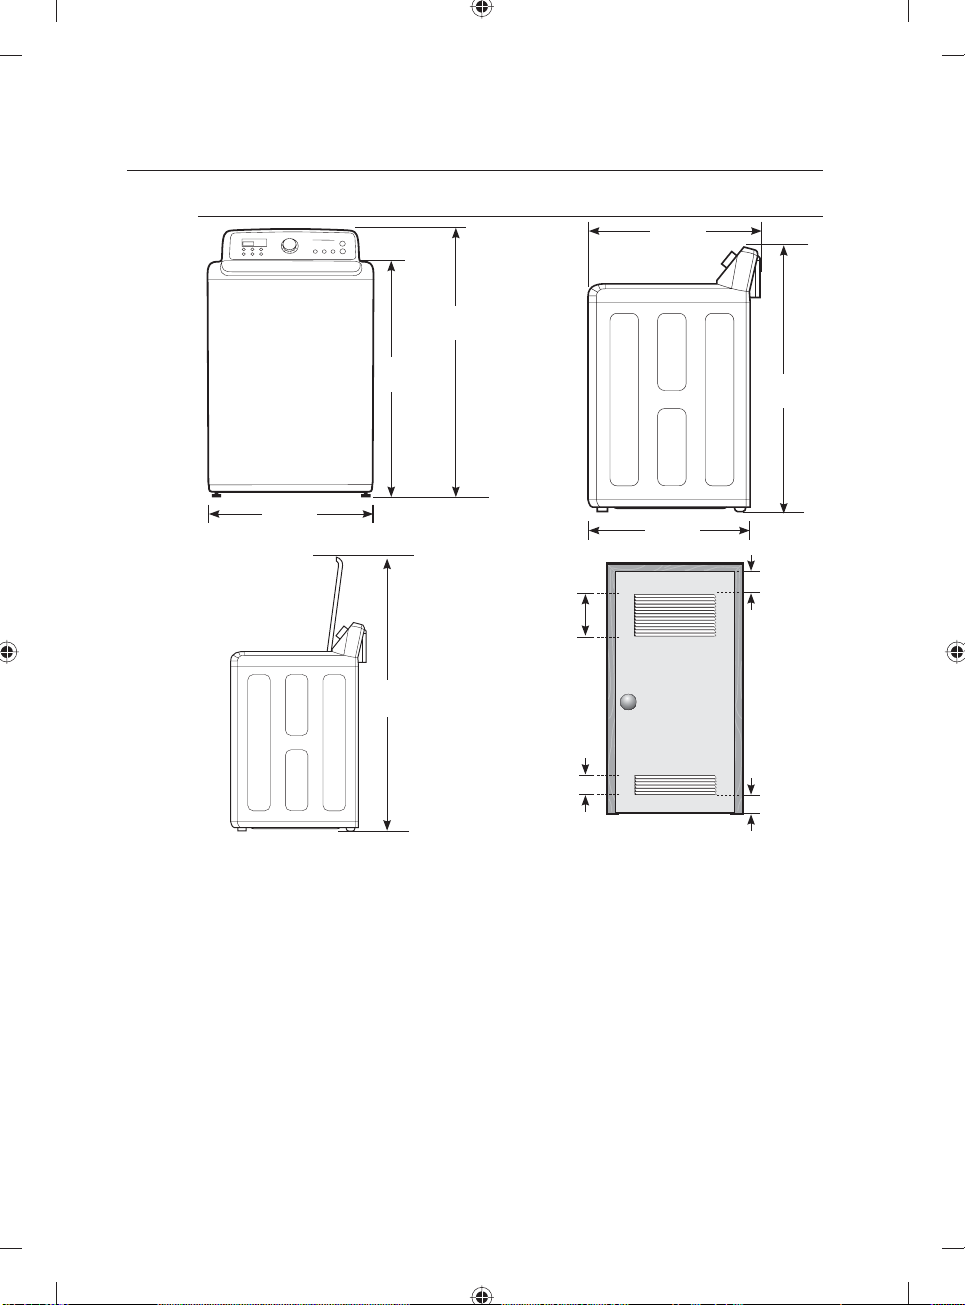
Alcove or closet installation
MINIMUM CLEARANCES FOR CLOSET AND ALCOVE INSTALLATIONS:
Sides – 1 in / 25 mm
Rear – 6 in / 152 mm
If the washer and dryer are installed together, the closet front must have at least a 72 in² (465 cm²)
unobstructed air opening. Your washer alone does not require a specifi c air opening.
A
Closet Front – 2 in / 51 mm
TOP - 21 in / 533 mm
B
21in.
(53.3 cm)
01 installing your washer
1 in.
(2.5 cm)
A. Recessed area
B. Side view - closet or confi ned area
27in.
(68.6 cm)
1 in.
(2.5 cm)
2 in.
(5 cm)
27.1in.
(69 cm)
6 in
(15.2 cm)
installing your washer _13
WA5471ABP-03050A_EN.indd Sec3:13WA5471ABP-03050A_EN.indd Sec3:13 2011-03-04 1:51:302011-03-04 1:51:30
installing your washer
Required Dimensions for Installation
44.6in.
(113.5 cm)
38.4in.
(97.6 cm)
28.6in.
(72.8 cm)
44.6in.
(113.5 cm)
27in.
(68.6 cm)
48in.² *
(310 cm²)
57.5in.
(146.2 cm)
24in.² *
(155 cm²)
* Required spacing ** External exhaust elbow requires additional space.
27.1in.
(69.0 cm)
Closet or Door
3in.
(7.6 cm)
3in.
(7.6 cm)
14_ installing your washer
WA5471ABP-03050A_EN.indd Sec3:14WA5471ABP-03050A_EN.indd Sec3:14 2011-03-04 1:51:302011-03-04 1:51:30

IMPORTANT NOTE TO INSTALLER
Please read the following instructions carefully before installing your Washer.
These instructions should be retained for future reference.
We recommend you hire a professional to install this washer.
STEP 1
Selecting a Location
Before you install your washer, make sure the location:
• Has a hard, level surface without carpeting or fl ooring that may obstruct ventilation.
• Has no dust, oil and detergent etc.
• Is away from direct sunlight
• Has adequate ventilation
• Will not freeze (temperatures are never below 32°F or 0°C)
• Is away from heat sources such as oil or gas
• Provides enough slack for the power cord.
• Doesn’t have any carpeting that will obstruct ventilation openings.
STEP 2
Installing your Washer
1. If you use a stand pipe, make sure the connection between the drain hose and the standpipe
is NOT airtight.
The standpipe must be at least 39 in or 99 cm high.
You must always exercise caution to
avoid collapsing or damaging the drain
hose. For best results, the drain hose
should not be restricted in any way – by
elbows, couplings, or excessive length.
For situations where the drain hose
cannot be conveniently elevated to at
least 39 in or 99 cm, the drain hose must
be supported.
Do not insert the drain hose too far into
the stand pipe: 6 - 8 inches, and no
more.
96” Max
Hose
retainer
Tie strap
01 installing your washer
39”
installing your washer _15
WA5471ABP-03050A_EN.indd Sec3:15WA5471ABP-03050A_EN.indd Sec3:15 2011-03-04 1:51:302011-03-04 1:51:30
installing your washer
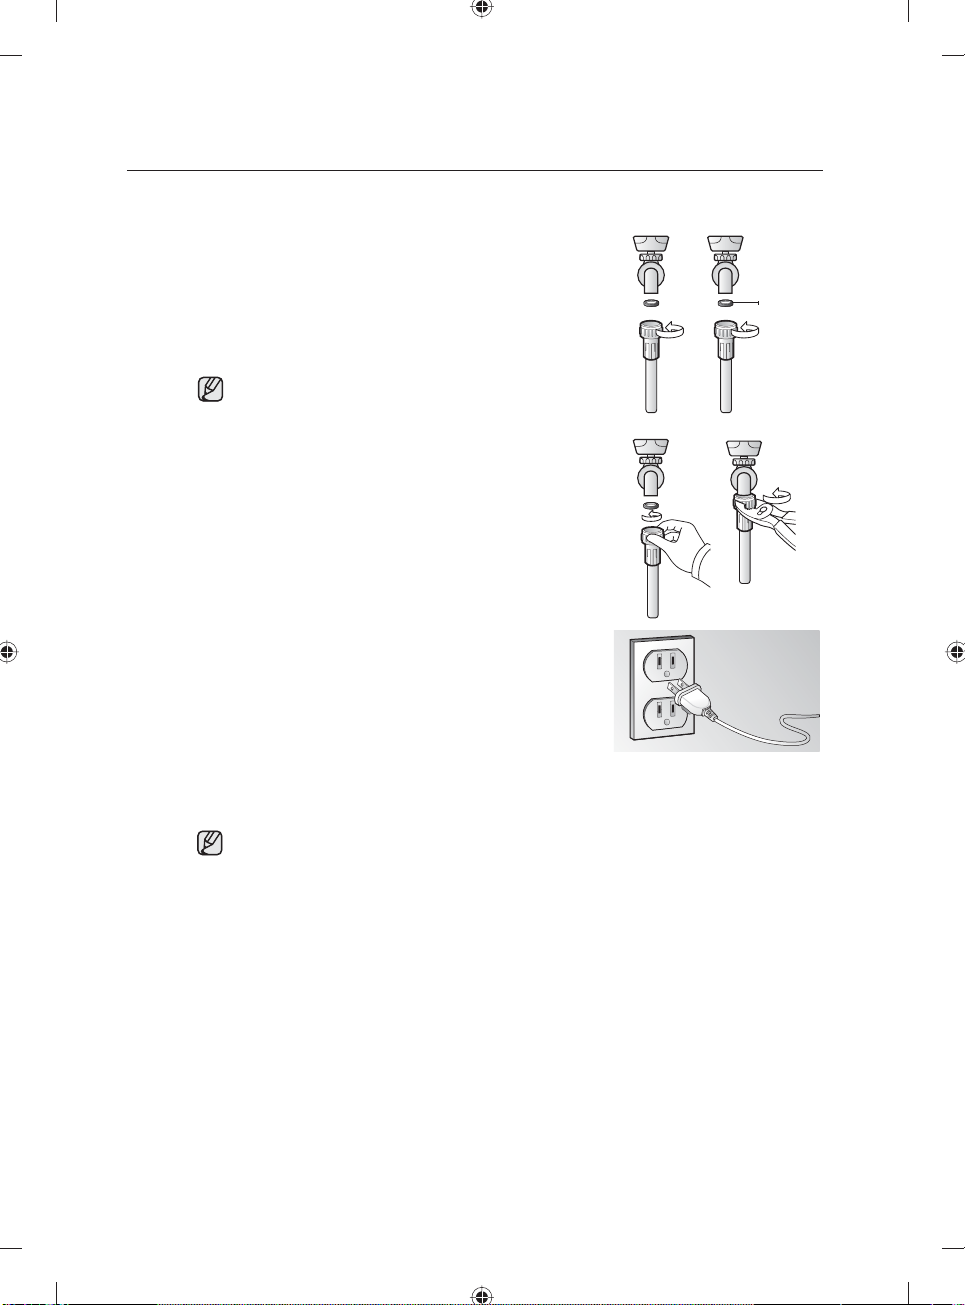
2. Check the inlet hoses to ensure a washer is inside the
coupling of each fi ll hose.
Thread the inlet hoses onto the HOT and COLD faucet
connections.
On the other end of the hose, check for one rubber washer
per hose and attach each fi ll hose to the water valve. Make
sure the hose with Hot printed on it is attached to the HOT
faucet. Tighten by hand until snug, then add two-thirds of a
turn with pliers.
For correct water use, connect both HOT and COLD water
valves. If either or both are not connected, an “nF” (no fi ll)
error can occur.
3. Turn on the “HOT” and “COLD” water supplies and check all
the water valve and the faucet connections for leaks.
4. Plug the power cord into a 3-Prong, well grounded 120 volt
60 Hz approved electrical outlet protected by a 15-amp fuse
or comparable circuit breaker.
Your washer is grounded through the third prong of the
power cord when plugged into a three-prong grounded
receptacle.
5. Slide your washer into position.
6. Level your washer by turning the leveling legs in or out as
necessary by hand.
Cold Hot
Rubber Washer
Cold printed Hot printed
Your Washer must be level back to front and side to side. Use a carpenter’s level on all four
corners of your Washer to level it. It’s a good idea after the fi rst dozen washes to recheck
your washer to ensure it is still level.
16_ installing your washer
WA5471ABP-03050A_EN.indd Sec3:16WA5471ABP-03050A_EN.indd Sec3:16 2011-03-04 1:51:312011-03-04 1:51:31

operating instructions
LOADING YOUR WASHER
• You can fi ll the tub with dry, unfolded clothes, but DO NOT OVERLOAD the tub, No more than 3/4 full.
• Overloading may reduce washing effi ciency, cause excess wear, and possibly cause creasing or
wrinkling of the load.
• Wash delicate items such as bras, hosiery, and other lingerie in the Delicates cycle with similar
lightweight items.
• When washing big bulky items or a few smaller items that don’t fi ll the tub completely – a rug, a pillow,
stuffed toys, or one or two sweaters, for example – add a few towels to improve spin performance.
During the spin cycle, the washer may add additional water to redistribute the clothes and correct an
unbalance inside the drum.
• When washing heavily soiled loads, do not overload your Washer to ensure good cleaning results.
• To add a forgotten item:
1. Press the Start/Pause button to pause the washer.
2. Wait for the door to unlock automatically, and then open the door.
3. Add the item, close the door, and then press the Start/Pause Button. The cycle will resume
GETTING STARTED
1. Load your Washer.
2. Add liquid detergent only and additives to the dispenser (see pages 24~25).
3. Select the appropriate cycle and options for the load (see pages 18~20).
4. Close the door.
5. Press the Start/Pause Button.
6. The Wash Indicator light illuminates.
7. The estimated cycle time will appear in the display.
The time may fl uctuate to indicate the time remaining in the cycle better.
The actual time required for a cycle may differ from the estimated time in the display depending on the
water pressure, water temperature, detergent, and laundry.
8. Before your washer starts to fi ll, it will make a series of clicking noises to check the door lock and do a
quick drain.
• When the cycle is complete, the Door Lock light will go out and “End” will appear in the display.
• Pressing the Power button cancels the cycle and stops your washer.
The Wash, Rinse ,and Spin indicator lights will illuminate during those portions of the cycle.
•
02 operating instructions
operating instructions _17
WA5471ABP-03050A_EN.indd Sec2:17WA5471ABP-03050A_EN.indd Sec2:17 2011-03-04 1:51:312011-03-04 1:51:31

washing a load of laundry
OVERVIEW OF THE CONTROL PANEL
1
1
Display
Select Cycle
2
Option
2 8
Provides instructions and diagnostics while keeping you updated on the cycle
status and time remaining.
Press these buttons to select different cycle options.
Pure Cycle - Use to clean dirt and bacteria from the drum. Regular use (after
every 21 washes) is recommended. No detergent or bleach is needed (see
page 28).
Delay Start - Delay the start of any cycle for up to 24 hours in one-hour
increments. Displayed hour indicates the time the wash will be started.
Extra Spin (WA5471) - Add additional spin time to remove more water from
loads.
Extra Rinse - Add an additional rinse at the end of the cycle to more
thoroughly remove laundry additives and perfumes.
Signal - Press to turn the signal (chime) on or off.
My Cycle (WA5471) - Create and/or use a cycle you create with customized
temperature, spin, soil level, option, etc.
43 5 6
7
18_ washing a load of laundry
WA5471ABP-03050A_EN.indd Sec5:18WA5471ABP-03050A_EN.indd Sec5:18 2011-03-04 1:51:322011-03-04 1:51:32

3
Cycle Selector
Select the appropriate cycle for the type of load.
The cycle you select determines the tumble pattern and spin speed for the cycle.
To minimize wrinkling of laundry, select the Perm Press cycle.
Normal - For most fabrics including cottons, linens, and normally soiled garments.
Heavy Duty - For sturdy, colorfast fabrics and heavily soiled garments.
Perm Press - For wash-and-wear, synthetic fabrics, and lightly to normally soiled
garments.
Sanitize - For heavily soiled, colorfast garments.
If you select Pause during the heating portion of the Sanitize Cycle, your
Washer door will remain locked for your safety in case the water is too hot .
Towels - For bath towels, washcloths, and mats.
Bedding - For bulky items such as blankets and sheets. When you are washing
comforters, use liquid detergent.
Eco Cold (WA5471) - Provides useful, gentle, and energy saving daily care
for normally and lightly soiled laundry by using only cold water.
Eco Cold cleans as effectively as the warm wash setting on the
*conventional Normal cycle under Normal and Light Soil level options. (The
Cleaning performance of Eco Cold may not be equal to the conventional
Normal cycle under the heavy soil level option.) For best result, we
recommend using Eco Cold for loads of 8 pounds or less.
* conventional Normal cycle - The Normal cycle on previous and existing Samsung
front loading washers released until 2009 without PowerFoam.
Stain Away (WA5471) - For stained clothes. The stain Away cycle provides
outstanding stain removal performance with the gentlest care and frees you
from the need to pre-treat stains.
Active Wear - Use this cycle to wash exercise wear such as sports jerseys,
training pants, shirts/tops and other performance clothing. This cycle
provides effective soil removal with gentle action for special fabric care.
Delicates/Hand Wash - For sheer fabrics, bras, lingerie, silks, and other
handwash-only fabrics. For best results, use liquid detergent.
Wool - For machine-washable wool. Loads should be under 8 pounds. For
best results, we recommend a load of 4.4 pounds or less.
• The Wool cycle washes laundry by moving the wash drum horizontally
to maintain the characteristics of the wool fi bers and to prevent damage
to the cloth. It then stops for a while to allow the laundry to soak in the
water. This pause in the operation of the Wool cycle is normal.
• We recommend you use a neutral detergent to prevent damage to the
cloth and to improve the washing results.
The wool wash cycle of this machine has been approved by
Woolmark for the washing of machine washable Woolmark
products, provided that the products are washed according
to the instructions on the garment label and those issued by
the manufacturer of this washing machine, M1104.
Quick Wash - For lightly soiled garments needed quickly.
Rinse + Spin - Use for loads that need rinsing only or to add rinse-added
fabric softener to a load.
03 washing a load of laundry
washing a load of laundry _19
WA5471ABP-03050A_EN.indd Sec5:19WA5471ABP-03050A_EN.indd Sec5:19 2011-03-04 1:51:322011-03-04 1:51:32

washing a load of laundry
Press the button repeatedly to cycle through the different water temperature
options.
Extra Hot - Heavily soiled, colorfast items. Only available with the Sanitize
Temperature
4
selection button
Spin selection
5
button
Soil Level
6
selection button
cycle.
Hot - Whites and heavily soiled, colorfast items.
Warm - Colorfast items.
Eco Warm - Moderately soiled, colorfast items; most wrinkle-free items.
Cold - Brightly colored, very lightly soiled items.
Press the button repeatedly to cycle through the different spin speed options.
Extra High (WA5471) - Removes more water from loads during spin.
To minimize wrinkling of wrinkle-free and no-iron fabrics, DO NOT use
the Extra High spin option for these loads, nor overload your Washer.
High - Use for underwear, t-shirts, jeans, and sturdy cottons.
Medium - Use for jeans, wrinkle-free or wash-and-wear items, and synthetics.
Low - Use for delicate items needing a slow spin speed.
No Spin - Drains your Washer without spinning. Use for extremely delicate
items that cannot tolerate any spin.
Press the button to select the soil level/washing time.
* WA5471: (NomalÆ S Æ Heavy Æ Light Æ S)
* WA5451: (NomalÆ Heavy Æ Light)
Heavy - For heavily soiled loads.
S
Normal - For moderately soiled loads. This setting is best for most loads.
S
Light - For lightly soiled loads.
Start/Pause
7
selection button
8
Power button
Press to pause and restart cycles.
Press once to turn your washer on. Press again to turn your washer off. If
the washer is left on for more than 10 minutes without any buttons being
touched, the power automatically turns off.
20_ washing a load of laundry
WA5471ABP-03050A_EN.indd Sec5:20WA5471ABP-03050A_EN.indd Sec5:20 2011-03-04 1:51:332011-03-04 1:51:33
Child Lock
Child Lock prevents children from playing with your washer.
Activating the Child Lock function
Press and hold the Spin and Soil Level buttons simultaneously for approximately 3 seconds.
• When you activate the Child Lock function, the “Child Lock [
]” lamp illuminates.
• If you press the Start/Pause button after you have activated the Child Lock function , none
of the buttons will work except for the Power button.
• If you press a button when the buttons are locked, the “Child Lock [
]” lamp blinks.
Using the Child Lock function
If the door is opened when the Child Lock function is on, “ds” is displayed and an alarm sounds.
• If the door is closed while “ds” is displayed, the alarm sound stops and the information code
turns from ”ds” to “CL”.
• 30 seconds after the contol panel displays “ds”, the washer performs a compulsory drain.
• Even if the power is off, if Child Lock is on and the door is opened for 30 seconds, the
washer displays the “CL” code and performs a a compulsory drain.
• After the compulsory drain, the “CL” code display blinks at 1 second intervals and the
product enters the “CL” mode. (When the product is in the “CL” mode, only the Power
button works.)
• To cancel the “CL” mode, you need to turn the power off and then on again.
• To cancel the “ds” mode, deactivate the Child Lock function. To deactivate the Child Lock
function, press and hold the Spin and the Soil Level buttons simultaneously for at least 3
seconds.
Adding laundry when Child Lock is on
• To add laundry, deactivate the Child Lock function. To deactivate the Child Lock function,
press and hold the Spin and the Soil Level buttons simultaneously for at least 3 seconds.
See “Pause Option” on page 23 for additional details.
Deactivating the Child Lock function
Press and hold both the Spin and Soil Level buttons simultaneously for approximately 3
seconds.
• When you deactivate the Child Lock function, the “Child Lock [
• The Child Lock function prevents children or the infi rm from accidently operating the washer
and injuring themselves.
WARNING
• If a child enters the washing machine, the child may become trapped and suffocate.
• Once you have activated the Child Lock function, it continues working even if the power
is turned off.
CAUTION
• Opening the door by force can result in injury or damage to the product.
To add laundry after you have activated the Child Lock function, you must fi rst pause or
deactivate the Child Lock function.
]” is turned off.
03 washing a load of laundry
washing a load of laundry _21
WA5471ABP-03050A_EN.indd Sec5:21WA5471ABP-03050A_EN.indd Sec5:21 2011-03-04 1:51:332011-03-04 1:51:33

washing a load of laundry
Spin Only Adjustment
If you press the Power button, and then press and hold the Spin button for 2 seconds, the spin
time is displayed on the display panel.
You can then change the spin level independently of any other setting by pressing the Spin
button repeatedly until the spin level you want (High, Medium, etc.) is selected on the control
panel. Then, press the Start/Pause button.
Make a Spin Only adjustment before you select a cycle. If you have selected a cycle, you
can only select the corresponding spin level.
Garment+
You can add or take out laundry items even after the wash has started, as long as the
“Garment+” light is on. Pushing the Start/Pause button unlocks the door, unless the water is
too hot or there is too much water in your Washer. If you open the door and want to continue the
wash cycle, close the door, and then press the Start/Pause button.
If you have Child Lock on, you must deactivate it fi rst. See page 21
My cycle
My Cycle lets you create a custom wash cycle (with custom temperature, spin, soil level, etc.)
and activate your custom wash cycle with one–button convenience.
Creating a custom wash cycle
To create a custom wash cycle, follow these steps:
1. Press the Power button, and then open the door
2. Load the washer with clothes.
3. Add detergent (and softener and/or bleach if needed) to the appropriate compartments, and
then close the door.
4. Press the My Cycle button. The My Cycle indicator light illuminates.
5. Select the cycle you want on the Cycle Selector dial.
6. Set the options available for the cycle you selected.
see pages 34~35 for the options available with each cycle.
7. Push the Start/Pause button to start the cycle. The next time you press My Cycle, the
washer will return to these settings automatically.
To program in “My Cycle” settings, the washer needs to complete an entire wash cycle. If
for any reason the wash cycle is interrupted and the washer does not fi nish the cycle, it will
not program in the settings for later use.
You can change the “My Cycle” settings by repeating the process above. The washer uses
the latest programmed settings whenever you choose “My Cycle”.
Running your custom cycle using My Cycle
To run your custom cycle, follow these steps:
1. Press the Power button, and then open the door.
2. Load the washer with clothes.
3. Add detergent (and softener and/or bleach if needed) to the appropriate compartments, and
then close the door.
4. Press the My Cycle button. The My Cycle indicator light illuminates and the cycle begins.
22_ washing a load of laundry
WA5471ABP-03050A_EN.indd Sec5:22WA5471ABP-03050A_EN.indd Sec5:22 2011-03-04 1:51:332011-03-04 1:51:33

Washing clothes using the cycle selector
Your new washing machine makes washing clothes easy, using Samsung’s “Fuzzy Control”
automatic control system. When you select a wash program, the machine will set the correct
temperature, washing time, and washing speed.
1. Press the Power button.
2. Open the door.
3. Load the articles of clothing one at a time loosely into the drum, without overfi lling it.
4. Add liquid detergent only, softener, and/or bleach (if necessary) to the appropriate
compartments. See pages 24~25.
5. Close the door.
6. Use the Cycle Selector to select the appropriate cycle according to the type of material:
Normal, Heavy Duty, Perm Press, Sanitize, Towels, Bedding, Eco Cold, Stain Away, Active
Wear, Delicates/Hand Wash, Wool, Quick Wash, Rinse + Spin and Spin Only. The relevant
indicators will illuminate on the control panel.
7. At this time, you can control the wash temperature, the number of rinse cycles, the spinning
speed, and the delay time by pressing the appropriate option button.
8. Press the Start/Pause button on the Cycle Selector and the wash will begin. The process
indicator will light up and the remaining time for the cycle will appear in the display.
Pause Option
When the Garment + LED is on, you can add laundry items to or remove laundry items from the
wash.
To remove or add laundry items when the Garment + LED is on, follow these steps:
1. Press the Start/Pause button to unlock the door.
The door cannot be opened when the water is too HOT.
2. Remove or add laundry items.
3. Close the door, and then press the Start/Pause button to restart the wash.
If you have Child Lock on, you must deactivate it fi rst. See page 21.
03 washing a load of laundry
When the cycle is fi nished:
After the total cycle has fi nished, the power will turn off automatically.
1. Open the door.
2. Remove laundry.
washing a load of laundry _23
WA5471ABP-03050A_EN.indd Sec5:23WA5471ABP-03050A_EN.indd Sec5:23 2011-03-04 1:51:332011-03-04 1:51:33

washing a load of laundry
DETERGENT USE
Your Washer is designed to use high effi ciency (HE) detergents.
• For best cleaning results, use a high effi ciency detergents such as Tide
HE, Wisk HE, Cheer HE or Gain HE*. High effi ciency detergents contain
suds suppressors that reduce or eliminate suds. When fewer suds are
produced, the load tumbles more effi ciently and cleaning is maximized.
Regular detergent is not recommended. Use HE detergents only.
WARNING
Reducing the amount of detergent may reduce the quality of cleaning. It is important to pre–treat
stains, sort carefully by color and soil level, and avoid overloading.
* Brand names are trademarks of their respective manufacturers.
FEATURES
Automatic dispenser
Your Washer has separate compartments for dispensing detergent and color-safe bleach and
fabric softener. Add all laundry additives to their respective compartments before starting your
Washer.
The automatic dispenser MUST ALWAYS be in place before you start your Washer.
DO NOT open the automatic dispenser when your washer is running.
• Never exceed the manufacturer’s recommendations when adding detergent.
• This compartment holds liquid detergent for the main wash cycle, which is added to the
load at the beginning of the cycle.
To add detergent to the automatic dispenser:
1. Open the dispenser drawer.
2. Load the recommended amount of liquid detergent into the detergent compartment before
you start your wash.
3. Close the drawer slowly and smoothly to avoid spilling, splashing, or premature dispensing
of the contents.
It is normal for a small amount of water to remain in the dispenser compartments at the end
of the cycle.
Do not put chlorine bleach in the dispenser drawer.
Liquid detergent
compartment
24_ washing a load of laundry
WA5471ABP-03050A_EN.indd Sec5:24WA5471ABP-03050A_EN.indd Sec5:24 2011-03-04 1:51:342011-03-04 1:51:34
 Loading...