

Page 1

DRAFT
FOR INTERNAL USE ONLY
W700
This document is watermarked because certain important information in the document has not yet been verified.
This document has been sent to you as a draft and for informational purposes only.
The document should only be used for internal purposes and may not be distributed outside of the company.
Distributing the document outside of the company could result in legal exposure to the company if the preliminary,
unverified information in the draft turns out to be inaccurate.
TABLET
User Manual
Please read this manual before operating your device
and keep it for future reference.
Page 2

DRAFT
FOR INTERNAL USE ONLY
Legal Notices
Legal Notices
Warning: This product contains chemicals known
to the Stateof California to cause cancer and
reproductivetoxicity. For more information, please call
1-800-SAMSUNG (726-7864).
Intellectual Property
All Intellectual Property, as defined below,
owned by or which is otherwise the property of
Samsung or its respective suppliers relating to the
SAMSUNG mobile device, including but not limited
to, accessories, parts, or software relating thereto
(the “mobile device”), is proprietary to Samsung
and protected under federal laws, state laws, and
international treaty provisions. Intellectual Property
includes, but is not limited to, inventions (patentable
or unpatentable), patents, trade secrets, copyrights,
software, computer programs, and related
documentation and other works of authorship. You
may not infringe or otherwise violate the rights
secured by the Intellectual Property. Moreover,
you agree that you will not (and will not attempt
to) modify, prepare derivative works of, reverse
engineer, decompile, disassemble, or otherwise
attempt to create source code from the software.
No title to or ownership in the Intellectual Property
is transferred to you. All applicable rights of the
Intellectual Property shall remain with SAMSUNG
and its suppliers.
Disclaimer of Warranties;
Exclusion of Liability
EXCEPT AS SET FORTH IN THE EXPRESS
WARRANTY CONTAINED ON THE WARRANTY
PAGE ENCLOSED WITH THE PRODUCT, THE
PURCHASER TAKES THE PRODUCT “AS IS”, AND
SAMSUNG MAKES NO EXPRESS OR IMPLIED
WARRANTY OF ANY KIND WHATSOEVER WITH
RESPECT TO THE PRODUCT, INCLUDING BUT
NOT LIMITED TO THE MERCHANTABILITY OF THE
PRODUCT OR ITS FITNESS FOR ANY PARTICULAR
PURPOSE OR USE; THE DESIGN, CONDITION OR
QUALITY OF THE PRODUCT; THE PERFORMANCE
OF THE PRODUCT; THE WORKMANSHIP OF THE
PRODUCT OR THE COMPONENTS CONTAINED
THEREIN; OR COMPLIANCE OF THE PRODUCT
WITH THE REQUIREMENTS OF ANY LAW, RULE,
SPECIFICATION OR CONTRACT PERTAINING
THERETO. NOTHING CONTAINED IN THE
INSTRUCTION MANUAL SHALL BE CONSTRUED
TO CREATE AN EXPRESS OR IMPLIED WARRANTY
OF ANY KIND WHATSOEVER WITH RESPECT TO
THE PRODUCT. IN ADDITION, SAMSUNG SHALL
NOT BE LIABLE FOR ANY DAMAGES OF ANY KIND
RESULTING FROM THE PURCHASE OR USE OF
THE PRODUCT OR ARISING FROM THE BREACH
OF THE EXPRESS WARRANTY, INCLUDING
INCIDENTAL, SPECIAL OR CONSEQUENTIAL
DAMAGES, OR LOSS OF ANTICIPATED PROFITS
OR BENEFITS.
Open Source Software
Some software components of this product
incorporate source code covered under GNU
General Public License (GPL), GNU Lesser
GeneralPublic License (LGPL), OpenSSL
License, BSD License and other open source
licenses. Toobtain the source code covered
under the opensource licenses, please visit:
opensource.samsung.com.
Modification of Software
SAMSUNG IS NOT LIABLE FOR PERFORMANCE
ISSUES OR INCOMPATIBILITIES CAUSED BY
YOUR EDITING OF REGISTRY SETTINGS, OR
YOUR MODIFICATION OF OPERATING SYSTEM
SOFTWARE.
USING CUSTOM OPERATING SYSTEM SOFTWARE
MAY CAUSE YOUR DEVICE AND APPLICATIONS
TO WORK IMPROPERLY. YOUR CARRIER MAY
NOT PERMIT USERS TO DOWNLOAD CERTAIN
SOFTWARE, SUCH AS CUSTOM OS.
i
WIN_W700_EN_UM_TN_XXX_120815_R0
Page 3

DRAFT
FOR INTERNAL USE ONLY
Legal Notices
Samsung Knox
Samsung Knox is Samsung’s security platform and
is a mark for a Samsung device tested for security
with enterprise use in mind. Additional licensing fee
may be required. For more information about Knox,
please refer to: samsung.com/us/knox. [030115]
™
microSD™ and the microSD logo are Trademarks of
the SD Card Association.
Wi-Fi is a registered trademark of the Wireless
Fidelity Alliance, Inc.
Microsoft is a registered trademark of the Microsoft
Corporation.
Samsung Electronics America
(SEA), Inc
Address:
85 Challenger Road
Ridgefield Park,
New Jersey 07660
Phone:
1-800-SAMSUNG (726-7864)
Internet Address:
samsung.com
©2015 Samsung Electronics America, Inc. Samsung
and Galaxy Tab are registered trademarks of
SamsungElectronics Co., Ltd.
Screen images are simulated. Appearances of the
device may vary.
Do you have questions about your
Samsung Mobile Device?
Legal Information
Important legal information can be accessed in
writing on the mobile device or at samsung.com.
Read this information before using your mobile
device.
Samsung Limited Warranty - This product is
covered under the applicable Samsung Limited
Warranty. Full written terms and detailed information
about the warranty and obtaining service are
available on the device at: Settings > About
device > LegalInformation > Samsung legal or at
samsung.com.
The online version of the Health/Safety and
Warranty guide for your device can be found at:
English
samsung.com/us/Legal/Tablet-HSGuide
Spanish
samsung.com/us/Legal/Tablet-HSGuide-SP
Location of Legal Information on the device:
For 24 hour information and assistance, we offer
a new FAQ/ARS System (Automated Response
System) at: samsung.com/us/support.
The actual available capacity of the internal memory
is less than the specified capacity because the
operating system and default applications occupy
part of the memory. The available capacity may
change when you upgrade the device.
Nuance
logo are trademarks or registered trademarks of
Nuance Communications, Inc., or its affiliates in the
United States and/or other countries.
The Bluetooth
“BDesign”) , and combination mark (Bluetooth word
mark and “B Design”) are registered trademarks and
are wholly owned by the Bluetooth SIG.
®
, VSuite™, T9® Text Input, and the Nuance
®
word mark, figure mark (stylized
Health and Safety Information
•
Settings > About device > Legal information >
Samsung legal > Health and Safety
Warranty
•
Settings > About device > Legal information >
Samsung legal > Warranty
EULA
•
Settings > About device > Legal information >
Samsung legal > End User License Agreement
ii
Page 4

DRAFT
FOR INTERNAL USE ONLY
Table of Contents
Table of Contents
Getting Started ............................................................. 1
Front View ........................................................................... 2
Back View ........................................................................... 3
Assemble Your Device ............................................... 4
Set Up Your Device ......................................................6
Set Up Accounts on Your Device ........................ 7
Know Your Device ..................................................... 8
Home Screen....................................................................9
Status Bar .........................................................................12
Navigation, Motions, and Gestures ..................13
Notification Panel .........................................................14
Multi Window ..................................................................16
Enter Text ..........................................................................18
Applications ...................................................................20
Apps List ...........................................................................21
Microsoft Applications ..............................................23
Other Applications ......................................................24
Calculator ..........................................................................25
Calendar ............................................................................26
Camera ...............................................................................28
Clock ....................................................................................31
Contacts .............................................................................33
Email ....................................................................................36
Galaxy Apps ...................................................................37
Gallery ................................................................................. 38
Video Player ....................................................................48
Settings ..............................................................................50
How to Use Settings ..................................................51
Wi-Fi Settings ..................................................................52
Bluetooth ...........................................................................54
Airplane Mode ...............................................................56
Data Usage ......................................................................57
More Connection Settings ......................................58
Sounds and Notifications ........................................59
Display Settings ............................................................62
Motions and Gestures...............................................64
Applications Settings .................................................65
Users ....................................................................................68
Wallpaper Settings ......................................................69
Lock Screen and Security ......................................70
Privacy ................................................................................74
Accessibility .....................................................................76
Accounts ............................................................................78
Backup and Reset.......................................................79
Language and Input Settings ...............................80
Battery ................................................................................. 82
Storage ...............................................................................83
Accessories .....................................................................85
Date and Time Settings ...........................................86
About Your Device ......................................................87
Internet ................................................................................40
Memo ..................................................................................42
Music Player ....................................................................43
My Files ..............................................................................45
Smart Manager .............................................................47
iii
Page 5

DRAFT
FOR INTERNAL USE ONLY
Getting Started
Learn about your mobile
device hardware, assembly
procedures, and how to
get started using your new
device.
Page 6

DRAFT
FOR INTERNAL USE ONLY
Getting Started
Front View
Back: Tap to return to the previous screen, or to
•
close a dialog box, menu, or keyboard.
Front camera: Take pictures and record videos of
•
yourself.
Home key and Finger scanner: Press to return to
•
the Home screen. Activate the Fingerprint security
feature.
Light sensor: Use the ambient light level to adjust
•
the screen brightness and contrast.
Memory card slot: Install an optional memory
•
card (not included) for storage of files.
Microphone: Records audio and detects voice
•
commands.
Power key: Press and hold to turn the device on
•
or off. Press to lock or wake up the screen. Press
and hold to turn the device off or restart it, or for
quick access to Airplane Mode.
Recent: Tap to display recent apps or touch and
•
hold for Home screen options.
Volume key: Press to adjust the volume of your
•
device’s sounds.
2
Front View
Page 7

DRAFT
FOR INTERNAL USE ONLY
Getting Started
Back View
Headset jack: Connect an optional headset
•
(notincluded).
Rear camera: Take pictures and record videos.
•
Simple clicker: These retractable circles
•
securely attach optional covers (not included) to
yourdevice.
Speaker: Plays music and other sounds.
•
USB charger/Accessory port: Connect the
•
Charger/USB cable (included), and other optional
accessories (not included) .
3
Back View
Page 8

DRAFT
FOR INTERNAL USE ONLY
Getting Started
Assemble Your Device
This section helps you to
assemble your device.
Install an Optional Memory Card
You can install an optional microSD or microSDHC
memory card (not included) to expand available
memory space.
Note: A memory card can be installed at any time; it
is not necessary to install it prior to using the device.
For more information on installing a memory card,
see Install a Memory Card.
Charge the Battery
Your device is powered by a rechargeable, standard
Li-Ion battery. A Wall/USB Charger (charging head
and USB cable) is included with the device for
charging the battery.
1. Insert the USB cable into the port.
2. Connect the USB cable to the charging head,
then plug the charging head into a standard
ACpower outlet.
3. When charging is complete, unplug the charging
head from the power outlet and remove the USB
cable from the device.
Caution: Failure to unplug the wall charger before you
remove the battery can cause damage to the device.
The battery comes partially charged. A fully
discharged battery requires up to four hours of
charge time. You can use the device while charging.
Caution: Use only Samsung-approved charging
devices and batteries. Samsung accessories are
designed to maximize battery life. Using other
accessories may invalidate your warranty and may
cause damage.
4
Assemble Your Device
Page 9

DRAFT
FOR INTERNAL USE ONLY
Getting Started
When to Charge the Battery
When the battery is weak and only a few minutes of
operation remain, the device sounds a warning tone
at regular intervals.
In this condition, your device conserves its
remaining battery power by dimming the screen.
When the battery level becomes too low, the device
automatically turns off.
► For a quick check of your battery level, view
the battery charge indicator located in the
upper-right corner of your device’s display. A
solid color (
You can also choose to display a percentage
value. Viewing a percentage value can provide
a better idea of the remaining charge on the
battery. For more information, see Battery.
) indicates a full charge.
5
Assemble Your Device
Page 10

DRAFT
FOR INTERNAL USE ONLY
Getting Started
Set Up Your Device
Turn Your Device On or Off
Turn the Device On
► Press and hold the Power key until the device
starts up.
Turn the Device Off
1. Press and hold the Power key until the device
options menu displays.
2. Tap Power off.
3. On the window that appears, tap POWER OFF.
Secure Your Device
Use your device’s screen lock features to secure
your device.
Lock the Device
By default, the device locks automatically when the
screen times out.
To lock the device:
► Press the Power key.
Unlock the Device
The default screen lock on your device is Swipe.
To unlock your device:
► Press the Power key or Home key, and then
touch and drag your finger across the screen.
Set Up a Secure Screen Lock
The default Screen lock is Swipe, which offers no
security. To choose a more secure screen lock,
see Set a Screen Lock.
6
Set Up Your Device
Page 11

DRAFT
FOR INTERNAL USE ONLY
Getting Started
Set Up Accounts on Your Device
Google Account
Your new device uses your Google Account to fully
utilize its Android features, including Gmail, Google
Hangouts, and the Google Play store.
When you turn on your device for the first time, set
up your existing Google Account or create a new
Google Account.
– or –
To create a new Google Account or set up your
Google Account on your device at any time,
use Accounts settings. Formore information,
seeAccounts.
► From a Home screen, tap
> Accounts > Add account > Google.
Apps > Settings
Samsung Account
Create a Samsung account, for access to Samsung
content and apps on your device.
When you turn on your device for the first time, set
up your existing Samsung account or create a new
Samsung account.
– or –
To create a new Samsung account or set up your
Samsung account on your device at any time,
use Accounts settings. Formore information,
seeAccounts.
► From a Home screen, tap
> Accounts > Add account > Samsungaccount.
Apps > Settings
7
Set Up Accounts on Your Device
Page 12

DRAFT
FOR INTERNAL USE ONLY
Know Your Device
Learn some of the key
features of your mobile
device, including the screens
and icons, as well as how to
navigate the device and enter
text using the keyboard.
Warning: Please note that a touch screen
responds best to a light touch from the pad
of your finger or a capacitive stylus. Using
excessive force or a metallic object when
pressing on the touch screen may damage the
tempered glass surface and void the warranty.
Page 13

DRAFT
FOR INTERNAL USE ONLY
Know Your Device
Home Screen
The Home screen is the starting point for using your device.
App folder: For your convenience, applications
•
can be grouped into folders on the Home screens.
App shortcuts: Shortcuts to your favorite
•
applications.
Appslist: Allows quick access to all of your
•
applications.
Home screen indicator: Indicates which Home
•
screen is presently displayed.
Notification icons: Displays new messages and
•
emails, notifications, available software updates,
and so on.
Status bar: Displays device status icons (right)
•
and notification icons (left).
Status icons: Display information about the
•
device, such as the network signal strength,
battery level, the time, and so on.
Widget: Self-contained application (not a shortcut)
•
that runs on a Home screen.
9
Home Screen
Page 14

DRAFT
FOR INTERNAL USE ONLY
Know Your Device
Customize your Home screen
Change the Wallpaper
by adding application shortcuts,
widgets, folders, andusing
wallpapers.
Manage Home Screens
Your device comes with multiple Home screens to
hold apps and widgets. You can rearrange the Home
screens in a different order.
1. From a Home screen, pinch the screen.
– or –
Touch and hold an empty space on the screen.
2. Use these options to manage screens:
Add a screen: Swipe to the end of the
•
screens, and then tap Add.
Remove a screen: Touch and hold a screen,
•
and then drag it to
Set a screen as the main Home screen: Tap
•
Main Home screen at the top of a screen.
This screen displays when you press the
Home key.
Remove.
Change the look of the Home and Lock screens
with wallpaper. You can display a favorite picture or
choose from preloaded wallpapers.
1. From a Home screen, pinch the screen.
– or –
Touch and hold an empty space on the screen.
2. Tap Wallpapers, and then choose HOME
SCREEN, LOCK SCREEN, or HOME AND
LOCKSCREENS.
3. Tap a wallpaper to see a sample, and then tap
SET AS WALLPAPER.
For more information, see Wallpaper Settings.
Widgets
Widgets are self-contained apps that run on a Home
screen. There are all kinds of widgets, including
links to a specific contact, Internet bookmarks,
Gmail and email accounts, and many others.
Add a Widget to a Home Screen
1. From a Home screen, pinch the screen.
Change the order of screens: Touch and
•
hold on a screen, and then drag to a new
position.
Flipboard Briefing: Scroll to the left of the
•
screens to find the Flipboard Briefing screen.
To activate this feature, tap the checkbox at
the top center of the screen.
– or –
Touch and hold an empty space on the screen.
2. Tap Widgets.
3. Touch and hold a widget, drag it to a Home
screen, and release it.
Remove a Widget
1. From a Home screen, touch and hold a widget to
releaseit.
2. Drag the widget to
Note: Removing a widget does not delete the widget,
it just removes the widget from the Home screen.
Remove and releaseit.
10
Home Screen
Page 15

DRAFT
FOR INTERNAL USE ONLY
Know Your Device
App Shortcuts
You can use app shortcuts to launch an app from
any Home screen.
Add a Shortcut to a Home Screen
1. From a Home screen, tap Apps.
2. Touch and hold an app shortcut, drag it to a
Home screen, and release it.
Remove a Shortcut
1. Touch and hold a shortcut to releaseit.
2. Drag the icon to
Note: Removing a shortcut does not delete the app, it
just removes the shortcut from the Home screen.
Remove and release it.
Folders
Place folders on a Home screen to organize items.
Add a Folder to a Home Screen
1. Touch and hold an app icon and drag it on top of
another app until a highlighted box appears.
2. Release the app icon to create the folder.
Use Folders
Tap the folder to view the apps inside.
•
Tap Enter folder name to enter a name for the
•
folder.
Tap Palette to change the color.
•
Tap anywhere outside of the folder to close it.
•
To add more apps, touch and hold an app icon
•
and drag it to the folder.
To delete a folder, touch and hold the folder until
•
it detaches, and then drag it to
release it.
Remove and
11
Home Screen
Page 16
DRAFT
FOR INTERNAL USE ONLY
Know Your Device
Status Bar
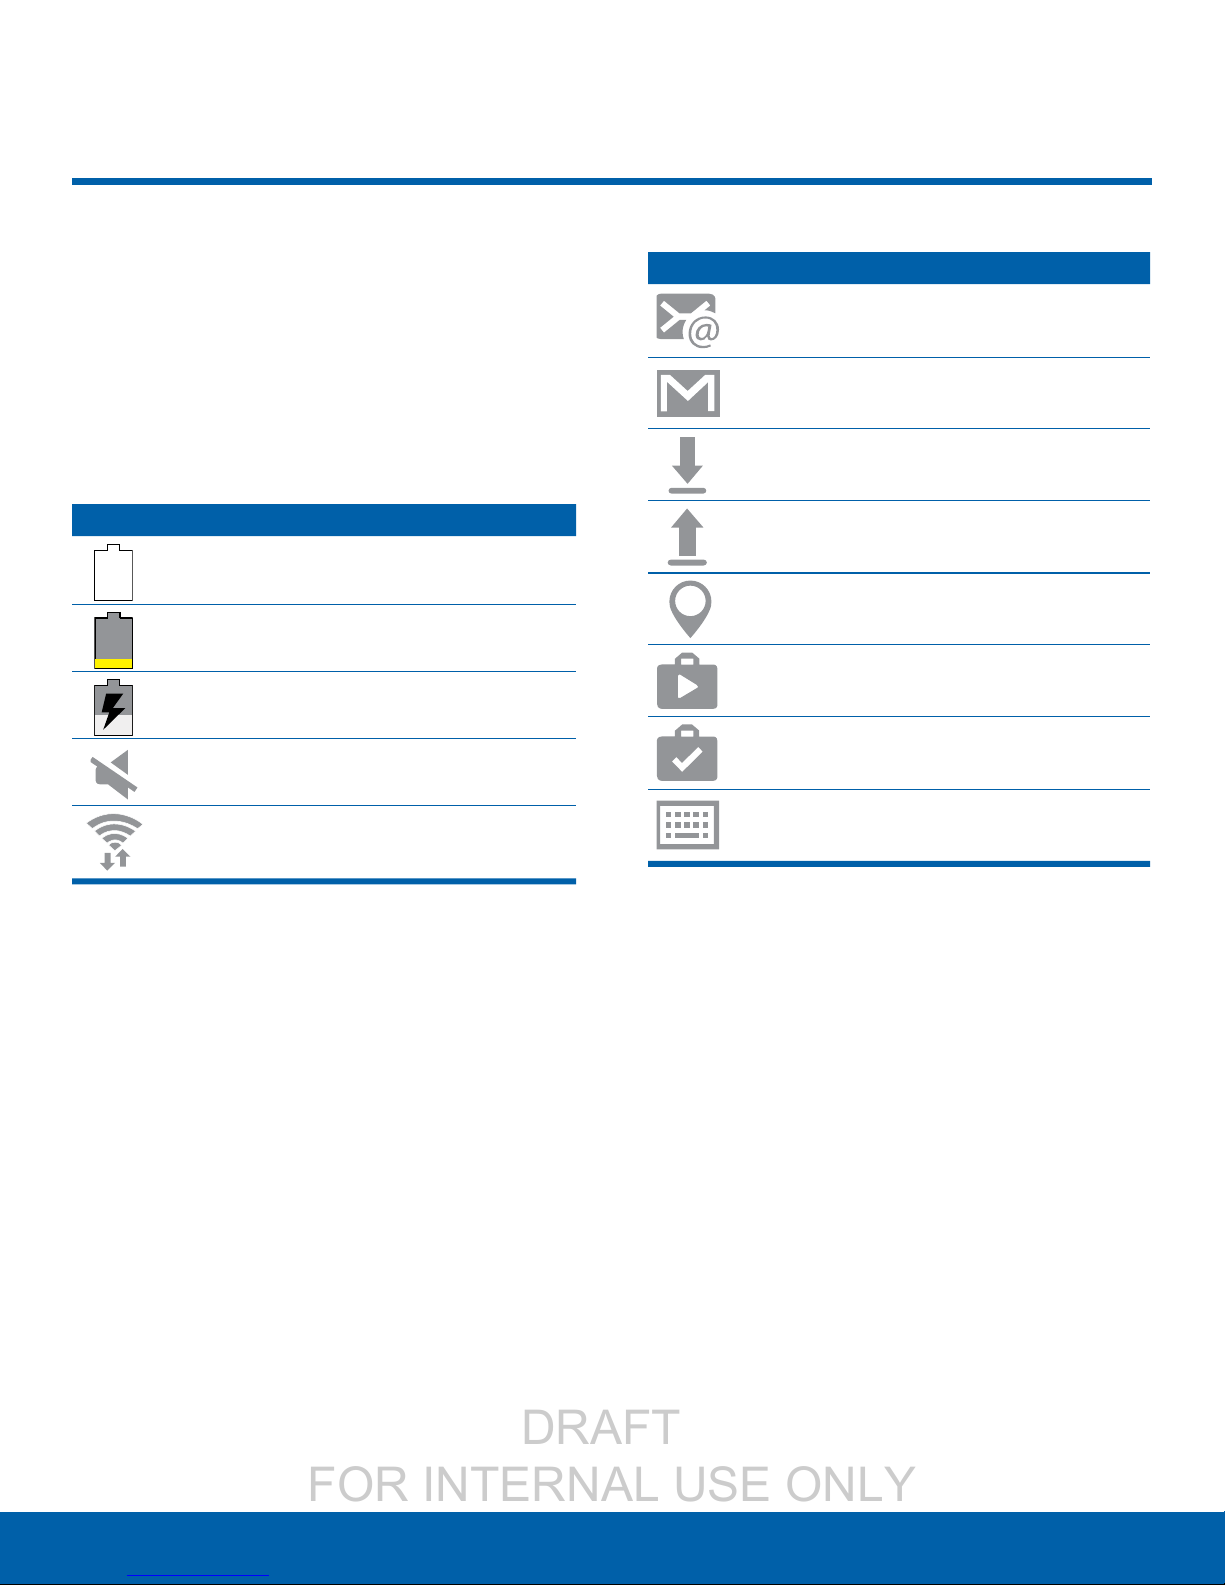
The Statusbar at the top of the
Home screen provides device
information (such as network
status, battery charge, and time)
on the right side and notification
alerts on the left.
Status Icons
Battery is fully charged.
Battery is low.
Battery is charging.
Mute mode is enabled.
Wi-Fi is active.
Notification Icons
New email has arrived.
New Gmail has arrived.
Download of a file or app is in progress.
File is being uploaded or sent.
Location service (GPS) is active.
App updates are available from the
Google Play store.
App installation or updates are complete.
Keyboard is in use.
12
Status Bar
Page 17

DRAFT
FOR INTERNAL USE ONLY
Know Your Device
Navigation, Motions, and Gestures
Touchscreen Navigation
Tap
Lightly tap items to select or launch them.
Tap the onscreen keyboard to enter characters
•
ortext.
Tap an item to select it.
•
Tap an app icon to launch the application.
•
Touch and Hold
Activate onscreen items by a touch and hold
gesture.
Touch and hold a widget on a Home screen to
•
move it.
Touch and hold a field to display a pop-up menu
•
of options.
Pinch and Spread
Pinch the screen using your thumb and forefinger or
spread by moving your fingers apart.
Zoom in or out while viewing a picture or a
•
Webpage.
Zoom in or out while taking a picture.
•
Motions
Control your device by making specific motions with
your hand on the device’s screen.
Enable Motions
1. From a Home screen, tap Apps >
Settings > Motions and gestures.
2. Tap ON/OFF to enable each feature.
For details, see Motions and Gestures.
Swipe or Slide
To swipe, lightly drag your finger vertically or
horizontally across the screen.
Unlock the screen.
•
Scroll through the Home screens or menu options.
•
Drag
To drag, touch and hold on an item, and then move
it to a new location.
Add a shortcut to a Home screen.
•
Move a widget on a Home screen.
•
13
Navigation, Motions, and Gestures
Page 18

DRAFT
FOR INTERNAL USE ONLY
Know Your Device
Notification Panel
Notification icons on the Statusbar display calendar events, device
status, and more. For details, open the Notificationpanel.
Clear notifications: Tap to clear all notifications.
•
Edit Quick settings: Tap to change which
•
Quicksettings buttons are visible.
Manage users: Tap to manage user accounts.
•
Notification card: Tap to see details about a
•
notification. Swipe a notification card to the right
to dismiss it.
Quick settings: Tap to quickly enable or disable a
•
feature. Swipe to the left to see more settings.
Screen brightness: Drag the slider to adjust
•
screen brightness. Tap Auto to have the tablet set
the screen brightness using its light sensor.
Settings: Tap to open the Settings screen.
•
View the Notification Panel
1. Swipe down on the Status bar to display the
Notification panel.
2. Scroll down the list to see notification details.
Tap an item to open it.
•
To clear a single notification, drag the
•
notification left or right. Tap Clear to clear
allnotifications.
3. To close the Notification panel, swipe upward
from the bottom of the screen or tap
Back.
14
Notification Panel
Page 19

DRAFT
FOR INTERNAL USE ONLY
Know Your Device
Quick Settings
Connect to a Device
In addition to notifications, the Notification panel
also provides quick access to device functions such
as Wi-Fi, allowing you to quickly turn them on or off.
To view additional Quick settings:
► Swipe left or right across the visible icons.
To customize Quick settings:
► On the Notificationpanel, tap EDIT.
S Finder
Search for a wide variety of content with a keyword.
1. Swipe down on the Statusbar to display the
Notificationpanel.
2. Tap S Finder.
3. Enter a keyword in the Search device field, or
tap
Google voice typing and say a keyword.
1. Swipe down on the Statusbar to display the
Notificationpanel.
2. Tap Quick Connect.
If you are using this feature for the first time,
•
select a visibility option and tap TURN ON
QUICK CONNECT.
When the Notificationpanel opens, Wi-Fi is
activated automatically and the tablet searches
for nearby devices.
3. Tap a device and follow the instructions.
To change your device’s visibility setting, tap
•
SETTINGS > Device visibility, and then select
an option.
If the desired device does not appear in the
•
list, tap REFRESH.
Share Content
Share content with a connected device.
Tap a location or category to filter your search.
•
Use Search Location
You can search for content in specific locations.
► Tap MORE > Select search locations and select
categories.
Quick Connect
Automatically search for nearby devices and quickly
connect to them.
If the device you want to connect does not
•
support the Quick connect feature, activate
its Wi-Fi Direct feature before launching Quick
Connect on your device.
Connection methods may vary depending on the
•
type of connected devices or the content being
shared.
1. Swipe down on the Statusbar to display the
Notificationpanel.
2. Tap a device from the list of detected devices.
3. Tap Share content and select a media category.
4. Follow the instructions to send content to the
connected device.
15
Notification Panel
Page 20

DRAFT
FOR INTERNAL USE ONLY
Know Your Device
Multi Window
Multitask by using multiple applications at the same time.
Activate Multi Window
Apps that support Multi window display together on
a split screen. You can switch between the apps,
adjust the size of their display on the screen, and
copy information from one app to the other.
Note: Multi window is not available for all apps.
1. From any screen, touch and hold
2. If you are currently using an app that supports
Multi window, tap an app to add in split screen,
or tap two new apps to open in split view.
Recent.
You can also launch recently used apps directly into
Multiwindow view:
1. Tap Recent.
2. Recently used apps that support Multiwindow
have a
the Multiwindow icon in the title bar to launch
the application in Multiwindow view.
3. Other recently used apps that support
Multiwindow appear below the launched app.
Tap the app icon to add it to the Multiwindow
view.
Note: Only applications that support Multi window
have the Multi window icon.
Multiwindow icon in the title bar. Tap
16
Multi Window
Page 21
DRAFT
FOR INTERNAL USE ONLY
Know Your Device
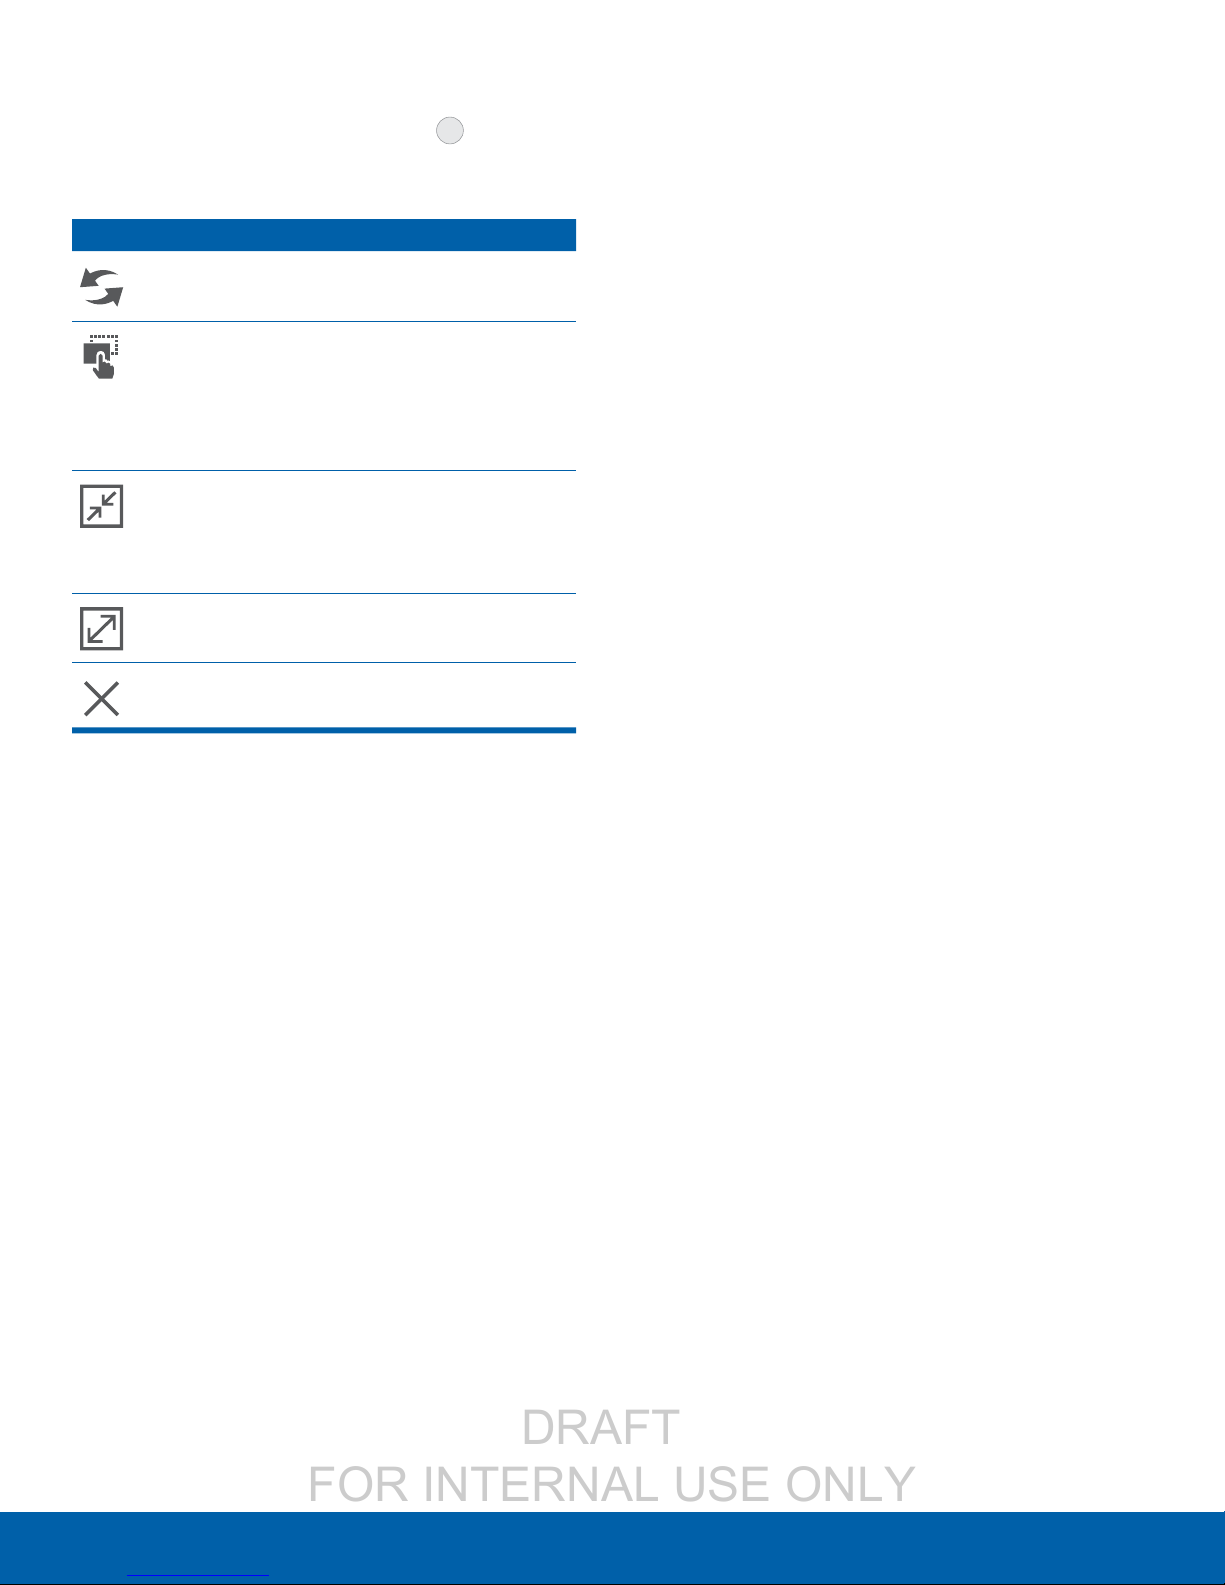
Window Controls
Select an application window and tap Control
in the middle of the window to display the window
controls.
Control Buttons
Switch windows: Switch the positions of
two Multi Window applications.
Drag and drop content: Move items
between the application windows. Drag an
item to share from one window to another.
Some applications may not support this
feature.
Minimize window: Minimize the selected
app window. This turns the app into a
circular, movable icon that can be opened
by tapping on it.
Maximize window: Open the selected
window in full screen view.
Close app: Close the selected application.
17
Multi Window
Page 22
DRAFT
FOR INTERNAL USE ONLY
Know Your Device
Enter Tex t
Use the SamsungKeyboard
Type your text input using a QWERTY keyboard.
Predicted text suggests words based on your typing.
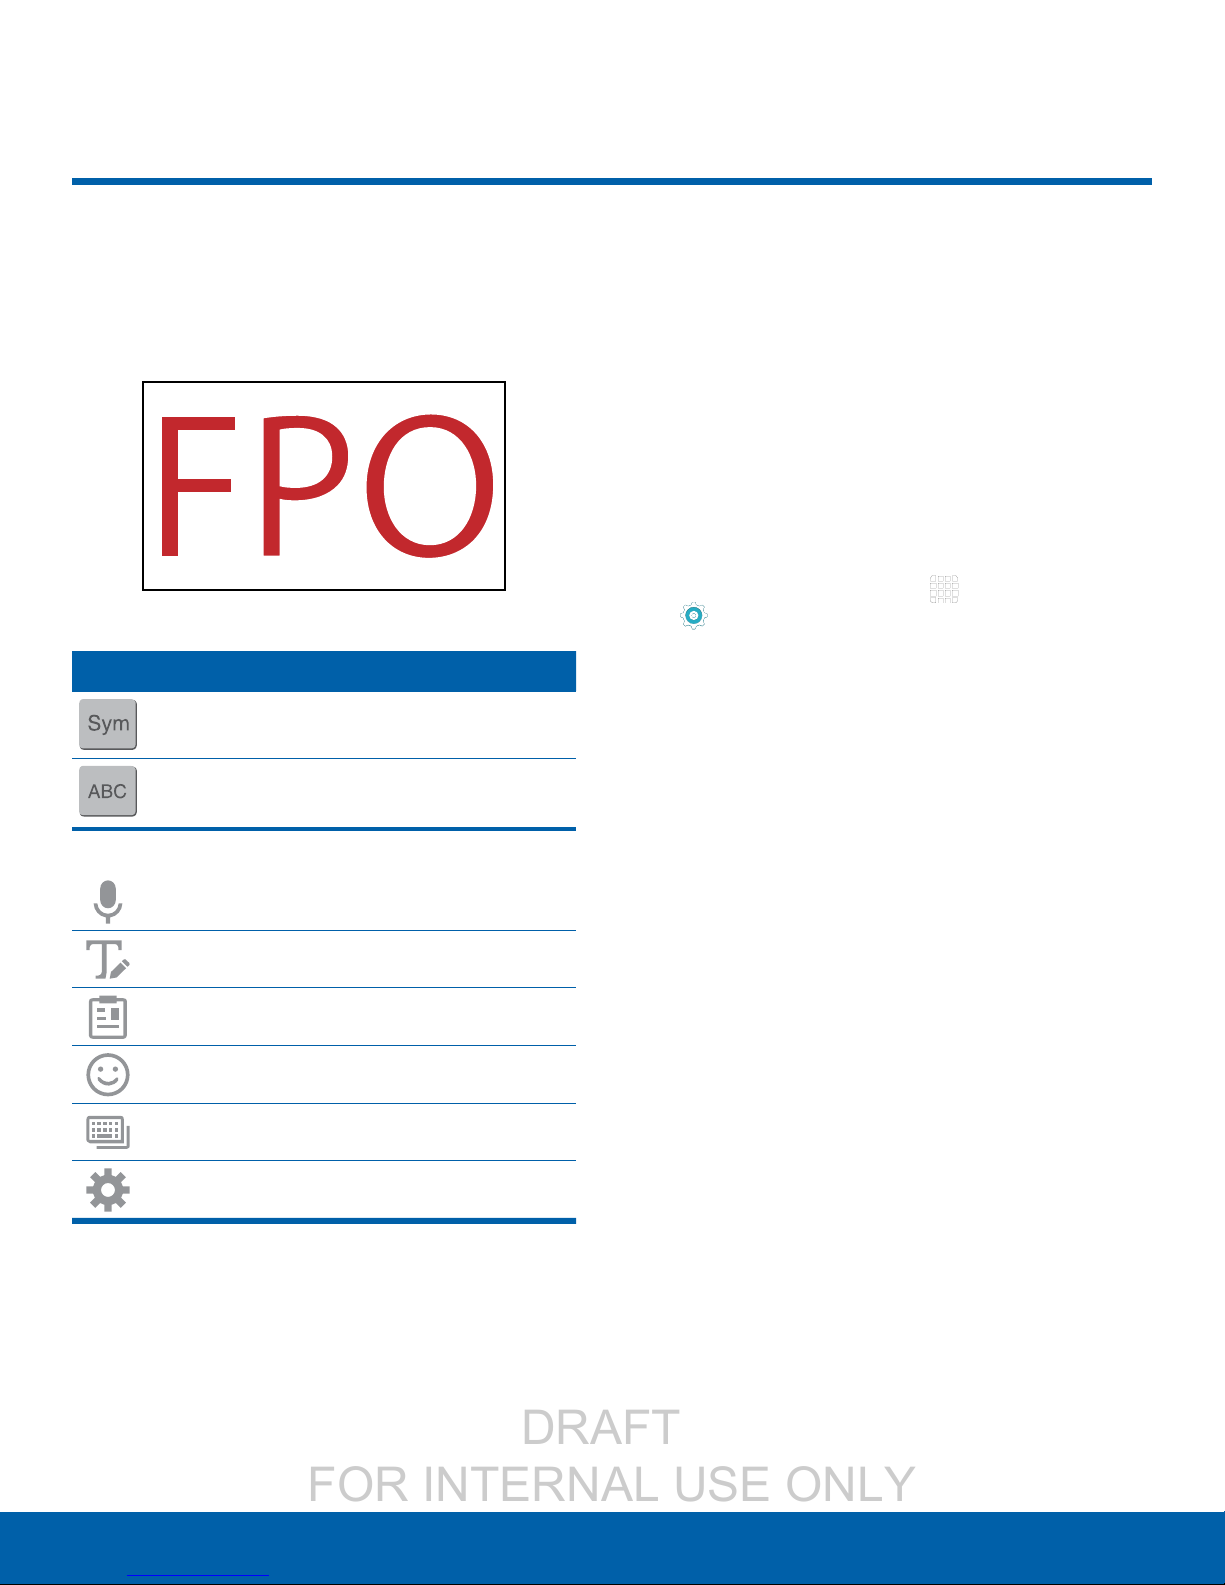
Special Keys
Tap to insert numbers and symbols.
Tap to insert letters.
Predictive Text
Predictive text suggest words matching your text
entries, and, optionally, completes common words
automatically. Predictive text can learn your personal
writing style from your contacts, messages, email,
and social networking sites — improving its accuracy
of predicting your text entries.
Configure the Samsung Keyboard
To customize the Samsung Keyboard:
1. From a Home screen, tap
Settings > Language and input.
2. Tap Samsung keyboard for options.
Apps >
Touch and hold the Options key to:
Use Google Voice Typing.
Use your handwriting to enter text.
Access the clipboard.
Insert emojis.
Change the layout of the keyboard.
Access keyboard settings.
Note: The available Options keys depend on the
application in use. Not all options are available for
allapps.
18
Enter Text
Page 23
DRAFT
FOR INTERNAL USE ONLY
Know Your Device
Use Google Voice Typing
Instead of typing, speak your text input.
To enable Google voice typing:
1. On the Samsung Keyboard, tap
Typing. You may need to touch and hold the
Options key (left of the Space key) to find it.
2. Speak your text.
Google Voice
Configure Google Voice Typing
To customize Google voice typing:
1. From a Home screen, tap
Settings > Language and input.
2. Tap Google voice typing for options.
Apps >
19
Enter Text
Page 24

DRAFT
FOR INTERNAL USE ONLY
Applications
The Appslist displays all
applications installed on your
device, both preloaded apps
and apps you download and
install yourself.
Learn how to change the way
apps appear, organize apps
into folders, and uninstall or
disable apps.
Page 25

DRAFT
FOR INTERNAL USE ONLY
Applications
Apps List
The Apps list shows all
preloaded apps and apps that
you downloaded. You can
uninstall, disable, or hide apps
from view.
Shortcuts to apps can be placed on any of
the Home screens. For more information, see
Add a Shortcut to a Home Screen.
Access Applications
1. From a Home screen, tap Apps.
2. Tap an application’s icon to launch it.
3. To return to the main Home screen, press the
Home key.
Uninstall or Disable Apps
You can uninstall or disable apps you download and
install.
Preloaded apps cannot be uninstalled.
•
Apps that are disabled are turned off and hidden
•
from view.
1. From a Home screen, tap
2. Tap EDIT. Apps that can be uninstalled show
Remove on their icon.
3. Tap
uninstall or disable the app.
4. When you are finished, tap DONE.
Remove and follow the prompts to either
View Disabled Apps
You can place disabled apps back on the Appslist,
where they become active once again.
Apps.
Download and Install NewApps
Find new apps to download and install on your
device.
Play Store: Download new apps
•
from the Google Play store. Visit
play.google.com/store/apps to learn more.
Galaxy Apps: View and download
•
Samsung apps that are optimized
for use with Galaxy devices. Visit
samsung.com/levant/apps/mobile/galaxyapps
tolearn more.
1. From a Home screen, tap
> Applications > Application manager.
2. Swipe to the DISABLED screen. (This screen
only appears if you have disabled apps.)
3. Tap the app you want to enable, and
tapENABLE.
Apps > Settings
21
Apps List
Page 26

DRAFT
FOR INTERNAL USE ONLY
Applications
Organize Your Apps
The Apps icons can be organized in folders and
listed alphabetically or in your own custom order.
Change the Order Apps Are Listed
1. From a Home screen, tap Apps.
2. Tap EDIT.
3. Touch and hold an app icon to drag it to the
location you want.
4. Tap DONE when finished.
Use Folders to Organize Apps
1. From a Home screen, tap Apps > EDIT.
2. Touch and hold an app icon and drag it on top of
another app until a highlighted box appears.
3. Release the app icon to create the folder.
Tap Enter folder name to name the folder.
•
Tap Palette to change the folder color.
•
4. Tap anywhere outside of the folder to close it.
To add more apps, touch an hold an app icon
•
and drag it to the folder.
5. Tap DONE when you are finished.
22
Apps List
Page 27
DRAFT
FOR INTERNAL USE ONLY
Applications
Microsoft Applications
These Microsoft applications are
also preloaded on your device.
Excel
The Excel app provides a core
experience for viewing, creating and
editing documents on tablets with a
screen size of 10.1 inches or smaller. You
can unlock the full Excel experience with
an Office 365 subscription.
OneDrive
OneDrive gives you free online storage
for all your personal files so you can
get to them from your Android device,
computer, and any other devices you use.
OneNote
Word
The Microsoft Word app provides a core
experience for viewing, creating and
editing docs on tablets with a screen size
of 10.1 inches or smaller. You can unlock
the full Word experience with an Office
365 subscription.
You can stay organized using text,
pictures, or audio notes. Create Quick
Notes or review and edit shared OneNote
notebooks using OneDrive.
PowerPoint
The PowerPoint app provides a core
experience for viewing, creating and
editing documents on tablets with a
screen size of 10.1 inches or smaller. You
can unlock the full PowerPoint experience
with an Office 365 subscription.
Skype
Use free Skype to hold video and voice
calls, as well as send instant messages to
anyone around the world. Just open the
app and start using it.
23
Microsoft Applications
Page 28
DRAFT
FOR INTERNAL USE ONLY
Applications
Other Applications
There are also other apps,
including several Samsung apps,
preloaded on your device.
Milk
Exclusive to Galaxy owners, Milk Music is
a radio service that gives you more of the
music you love, curated by top DJs and
industry pros and all for free.
Samsung+
Gain all the benefits of owning a
Samsung Galaxy device and to get any
guidance and support you need along
theway.
Screen Saver
When your tablet screen automatically
times out, instead of a blank screen,
enable the Galaxy Tab S2 Screen Saver,
an action-packed video tour of all the
fantastic features that you will find on
your Galaxy Tab S2.
SideSync 3.0
SideSync is a PC-Mobile solution that
enables the screens, windows, and data
to be shared easily between a PC and
Samsung Android Device.
24
Other Applications
Page 29

DRAFT
FOR INTERNAL USE ONLY
Applications
Calculator
The Calculator provides basic
and advanced arithmetic
functions.
Basic Operation
1. From a Home screen, tap Apps >
Calculator.
2. Enter the first number using the numeric keys.
3. Tap the appropriate arithmetic function key.
4. Enter the next number.
5. To view the result, tap the
Equals key.
Additional Functions
To clear the results:
► Tap
To clear the calculator history:
► Tap CLEAR HISTORY.
To copy all or part of the calculation to the
clipboard:
► Touch and hold an entry in the display field.
Clear.
25
Calculator
Page 30
DRAFT
FOR INTERNAL USE ONLY
Applications
Calendar
Manage your calendar events
and tasks.
Create an Event
1. From a Home screen, tap Apps >
Calendar.
2. Tap
3. Enter details for the event, and then tapSAVE.
Add to add an event.
Delete an Event
1. From a Home screen, tap Apps >
Calendar.
2. Tap an event to view it, and then tap DELETE,
and then confirm by tapping DELETE.
Create a Task
Tasks are items you add to the calendar to be
accomplished on a certain day. A task appears as
a checklist item and is removed once you mark the
task as complete.
1. From a Home screen, tap
Calendar.
2. Tap TAS KS.
3. Tap the Enter new task field and type a name
for the task.
4. You can choose to set the task for TODAY,
TOMORROW, or tap the
and set the following options:
Due date: Tap the ON/OFF switch to select a
•
date on the calendar for the task.
Reminder: Tap to set a reminder alert.
•
Notes: Tap to save a note with your task.
•
Apps >
Expand icon to view
Share an Event
1. From a Home screen, tap Apps >
Calendar.
2. Tap an event to view it.
3. Tap SHARE and tap a sharing format.
4. In the Share as window, tap a sharing method
and follow the prompts.
Priority: Tap to assign a priority to the task.
•
5. Tap SAVE to save the task.
Delete a Task
1. From a Home screen, tap Apps >
Calendar.
2. Tap TAS KS.
3. Tap the checkbox by the task to mark it as
complete and remove it from the calendar.
4. To delete the task permanently, tap the task to
open it, and then tap DELETE.
26
Calendar
Page 31

DRAFT
FOR INTERNAL USE ONLY
Applications
Calendar Settings
These settings allow you to modify settings
associated with using the Calendar.
1. From a Home screen, tap
Calendar.
2. Tap MORE > Settings.
3. Tap an option and follow the prompts.
Apps >
27
Calendar
Page 32

DRAFT
FOR INTERNAL USE ONLY
Applications
Camera
Take pictures and videos with the Camera app.
Camera settings: Tap to change camera settings.
•
Effect: Tap to add an effect before taking a photo
•
or video.
Gallery: Tap to open the Gallery to view photos
•
and videos.
Record video: Tap to record a video.
•
Shooting mode: Tap to change the
•
shootingmode.
Switch cameras: Tap to switch between the rear
•
and front cameras.
Take a picture: Tap to take a picture.
•
Timer: Tap to set the camera timer.
•
28
Camera
Page 33

DRAFT
FOR INTERNAL USE ONLY
Applications
Note: Prior to using the camera, remove the plastic
protective covering from the camera lens.
Shooting Mode
Several visual effects are available. Modes differ by
which camera is active (front or rear facing).
Take Pictures
Take pictures with your device’s front or back
camera, or combine shots with Dual mode.
1. From a Home screen, tap
2. Using the display screen as a viewfinder,
compose your shot by aiming the camera at the
subject. While composing your picture, use the
onscreen options or these gestures:
Touch the screen with two fingers and pinch
•
or spread them on the screen to zoom in and
out.
Tap the screen to focus on the area you
•
touched.
3. If desired, before taking the photo, you can
touch onscreen icons to access various camera
options and settings. You can also touch the
screen to move the focus field to the area you
touch.
4. Tap
to take the picture.
Apps > Camera.
1. From a Home screen, tap
2. Tap MODE to view the following options. Each
section indicates which camera (front or rear) the
modes are available for.
Both cameras
Virtual shot: Create multi-directional views of
•
objects.
Download: Download additional shooting
•
modes from the Galaxy Apps store.
Rear camera
Auto: Allow the camera to evaluate the
•
surroundings and determine the ideal mode
for the picture.
Pro: Manually adjust the ISO sensitivity,
•
exposure value, white balance, and color tone
while taking pictures.
Panorama: Create a linear image by taking
•
pictures in either a horizontal or vertical
direction.
Apps > Camera.
Note: You can also press the Volume key up or
down to take a picture. This is the default action of the
Volume key. You can also set the Volume key to act as
the video record key or as a zoom key.
HDR (rich tone): Save the picture in HDR
•
(rich tone) only.
Shot & more: Use various functions with your
•
burst shots after you take them, such as best
photo, best face, drama, eraser, and panning
shot.
Dual camera: Take pictures and record videos
•
in a variety of styles using the front and rear
cameras at the same time.
Front camera
Selfie: Take selfie shots and apply various
•
effects, such as an airbrushed effect.
Interval shot: Select the best pictures from
•
a series of continuous shots taken at set
intervals.
29
Camera
Page 34

DRAFT
FOR INTERNAL USE ONLY
Applications
Camera Settings
1. From a Home screen, tap Apps > Camera.
2. Quick settings are listed across one side of
the camera view finder. Available options vary
depending on the camera or recording mode
used. Default settings include:
Beauty: Take a picture with lightened faces for
•
gentler images (front camera only).
Timer: Take time-delayed pictures or videos.
•
EFFECT: Add special graphical effects.
•
Front camera
Gesture control: Detect palm and
•
automatically take a picture two seconds later.
Save pictures as previewed: Save the
•
self-portrait or self-recording as seen on the
preview screen.
3. Tap
Camera. Available options vary depending on the
camera/recording mode used.
Both cameras
•
•
•
•
•
•
Settings to configure settings for
Picture size: Select a resolution. Use higher
resolution for higher quality. Higher resolution
pictures take up more memory.
Video size: Select a resolution. Use higher
resolution for higher quality. Higher resolution
videos take up more memory.
View mode: Choose between standard and
full screen view mode.
Grid lines: Display viewfinder grid lines to help
composition when selecting subjects.
Location tags: Attach a GPS location tag to
the picture.
Review pictures: Set to show pictures after
taking them.
Storage location: Choose to store your
•
photos to your device, or optional memory
card.
Volume keys function: Use the Volume key as
•
the camera key, the record key, or as a zoom
key.
Reset settings: Reset the camera settings.
•
Rear camera
Video stabilization: Activate anti-shake.
•
Anti-shake helps to keep the focus steady
when the camera is moving.
30
Camera
Page 35

DRAFT
FOR INTERNAL USE ONLY
Applications
Clock
The Clock app offers features for
keeping track of time and setting
alarms.
1. From a Home screen, tap Apps > Clock.
2. Tap a tab to use a feature:
ALARM: Set an alarm to ring at a specific time.
•
WORLD CLOCK: View the time of day or
•
night in other parts of the world. World Clock
displays time in hundreds of different cities,
within all 24 time zones around the world.
STOPWATCH: Measure intervals of time.
•
TIMER: Use a timer to count down to an event
•
based on a preset time length (hours, minutes,
and seconds).
OPTIONS: Tap to view and set the following
•
options:
Volume: If you have chosen an alarm type
-
that includes sound, drag the slider to set
the volume of the alarm.
Alarm tone: If you have chosen an alarm
-
type that includes sound, choose a sound
to play for the alarm.
Snooze: Allow snoozing, and set interval
-
and repeat values for the alarm while
snoozing.
Increasing volume: When on, the alarm will
-
start playing a tone at a low volume at an
interval before the alarm time, and slowly
increase in volume. Available when you have
chosen an alarm type that includes sound.
Alarm name: Enter a name for the alarm.
-
Alarm
Set alarms by using the ALARM tab.
Create an Alarm
Create an alarm event. You can set one-time or
recurring alarms, and choose options for how to be
notified.
1. From a Home screen, tap
2. Tap the following items to configure an alarm:
Date: Choose the day for this alarm.
•
Time: Set a time for the alarm.
•
Repeat weekly: Choose when to repeat the
•
alarm, if so desired.
KEYPAD: Tap to use a keypad to enter the
•
alarm time.
Apps > Clock.
3. Tap SAVE to save the alarm.
Delete an Alarm
1. From a Home screen, tap Apps > Clock.
2. Find the alarm in the alarm list (under the Alarm
tab), and then tap
corner of the alarm entry.
Delete in the upper right
World Clock
The world clock lets you keep track of the current
time in multiple cities around the globe.
1. From a Home screen, tap
2. Tap WORLD CLOCK.
3. Select a city and tap
Repeat to add multiple cities.
•
Apps > Clock.
Add City.
31
Clock
Page 36

DRAFT
FOR INTERNAL USE ONLY
Applications
Stopwatch
The stopwatch lets you time events down to the
hundredth of a second.
1. From a Home screen, tap
2. Tap STOPWATCH.
3. Tap START to begin timing.
4. Tap STOP to stop timing.
Additional options include LAP to keep track
•
of laps, RESUME to continue timing, and
RESET to reset the stopwatch to zero.
Apps > Clock.
Timer
The timer provides a countdown timer for up to
99hours, 59 minutes, and 59 seconds.
1. From a Home screen, tap
2. Tap TIMER.
3. To set the length of the timer, either tap the digits
or tap KEYPAD to use a numeric keypad.
Apps > Clock.
4. Tap START to begin the timer.
5. Tap either PAUSE or CANCEL to stop the timer.
32
Clock
Page 37
DRAFT
FOR INTERNAL USE ONLY
Applications
Contacts
Store and manage your contacts
with the Contacts app, which
can be synchronized with a
variety of your existing personal
accounts, including Google,
Email, Facebook, and your
Samsung account.
For more information on connecting with and
managing your accounts through your device,
see Accounts.
Manage Contacts
Access your list of contacts by using the Contacts
app. To access your Contacts list:
► From a Home screen, tap
Contacts.
Apps >
Add a Contact
Use the following procedure to add a new contact.
1. From a Home screen, tap
Contacts.
2. Tap
information.
•
•
•
Add, and then tap contact fields to enter
Choose a storage account for the contact. You
can store the contact on the device, or sync it
with an account.
Tap Contact photo to assign a picture to
the new contact.
Enter a name, phone number, email address,
and assign the contact to a group. Tap
ADDANOTHER FIELD to add additional
contact information.
Tap Add to enter additional entries.
-
Tap Remove to remove an entry.
-
Tap Expand for additional fields.
-
Apps >
Find a Contact
You can search for a contact, or scroll the list to find
one by name.
1. From a Home screen, tap
Contacts.
2. Tap the Search field, and then enter characters
to find contacts that match.
– or –
Tap a letter on the side of the list to jump directly
to that letter in the alphabetical list. You can also
press and slide across the alphabetical list to
select a letter with better precision.
Apps >
Tap the label to the right of an entry to
-
choose a label for the field (for example,
Home or Work).
3. Tap SAVE.
Edit a Contact
When editing a contact, you can tap a field and
change or delete the information, or you can add
additional fields to the contact’s list of information.
1. From a Home screen, tap
Contacts.
2. Tap the contact to display it, and then tapEDIT.
3. Tap any of the fields to add, change, or delete
information.
4. Tap SAVE.
Apps >
33
Contacts
 Loading...