

Page 1
Samsung Electronics
2-1
2. Alignment and Adjustment
2-1 Reference
1) X-Point (Tracking center) adjustment, “Head switching adjustment” and “NVRAM option setting” can be adjusted with remote control.
2) When replacing the Micom (IC601) and NVRAM (IC603 ; EEPROM) be sure to adjust the “Head switching adjustment” and
“NVRAM option setting”.
3) When replacing the cylinder ass’y, be sure to adjust the “X-Point” and “Head switching adjustment”.
4) Among Samsung VCR remote control used for adjustment as a accessory, only the remote control that has figures buttons (0 ~ 9) is
available for all adjustment regardless of chassis.
5) How to adjustment.
- Intermittently short-circuit the test point on Main PCB with pincets to set the adjustment mode.
- If the corresponding adjustment button is pressed, the adjustment is preformed automatically.
- If the adjustment is completed, be sure to turn the power off.
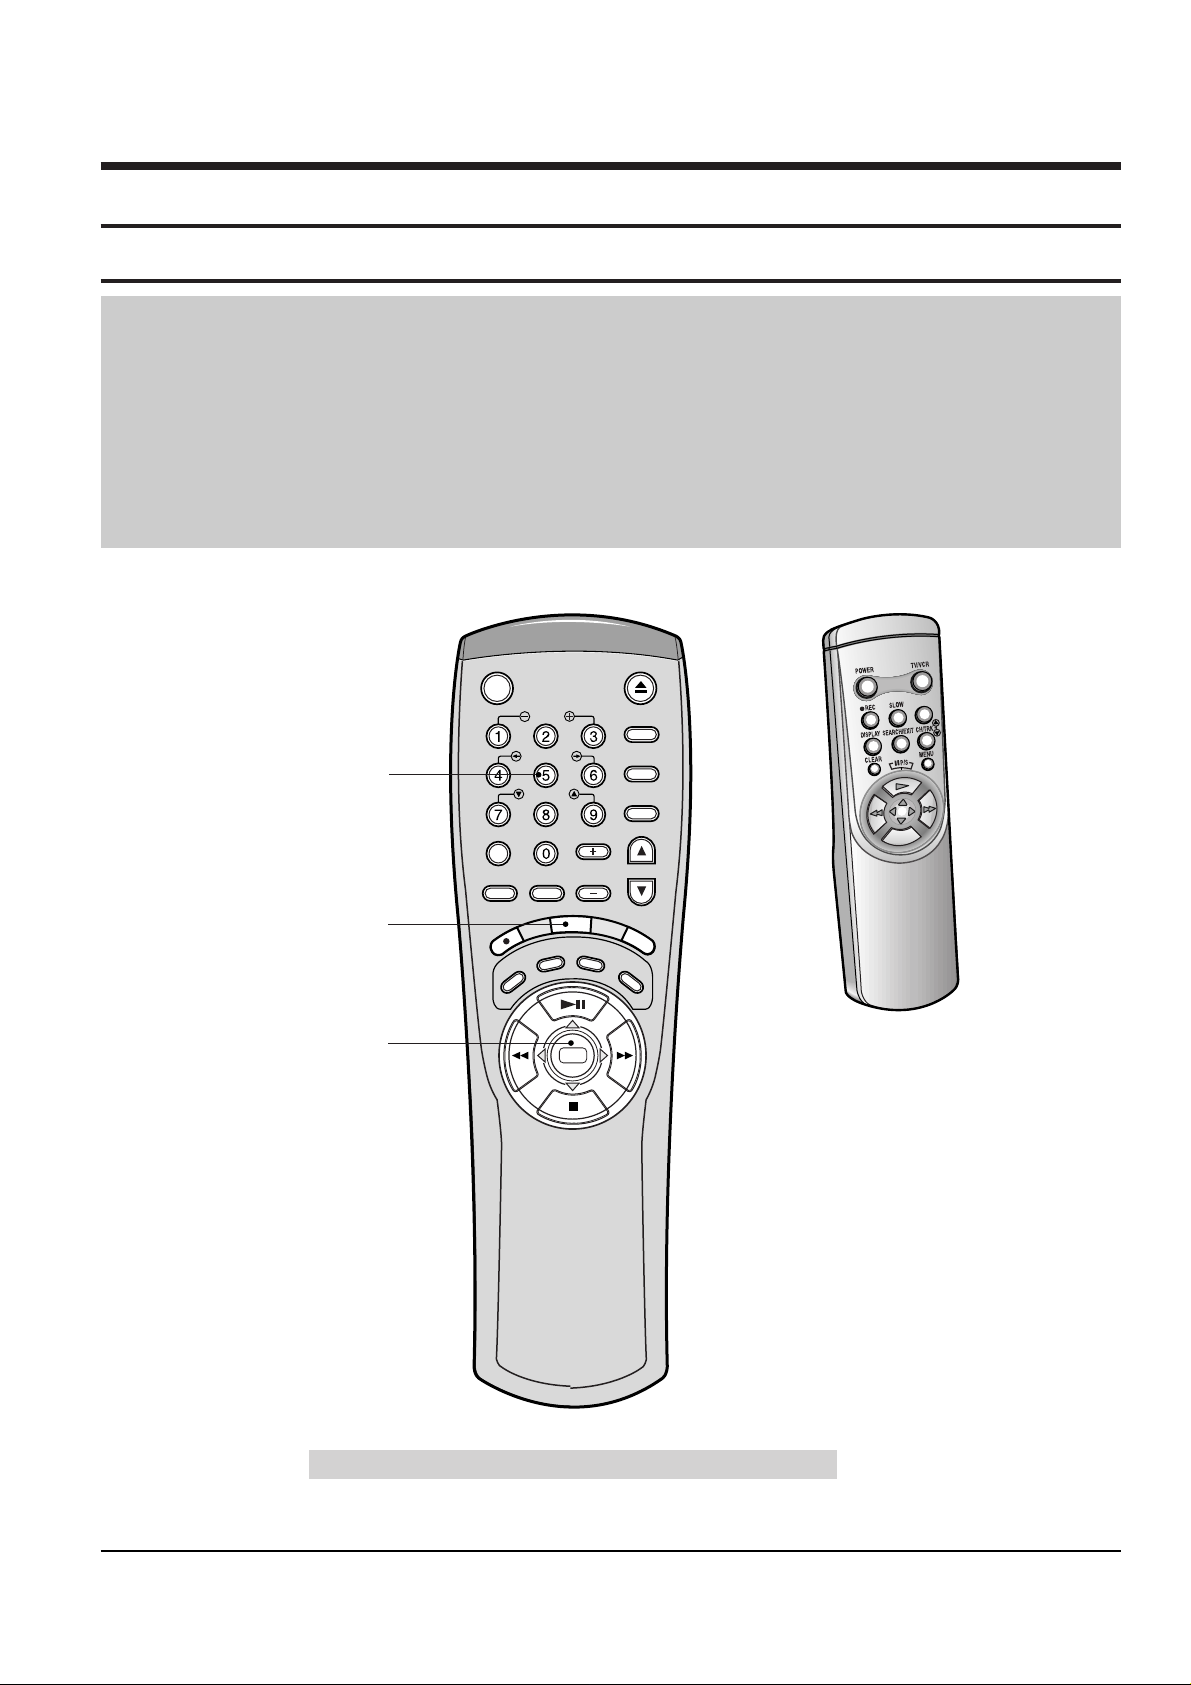
2-1-1 Location of adjustment button of remote control
Fig. 2-1
SHUTTLE
V-LOCK
REPLAY F.ADV/SKIP
TV/VCR PREV.CH
R
E
C
R
E
C
.
S
P
E
E
D
L
I
N
E
I
N
A
U
D
I
O
S
E
A
R
C
H
/
E
X
I
T
C
L
E
A
R
D
I
S
P
L
A
Y
POWER EJECT
CH/TRK
VCR
TV
CABLE/DSS
ENTER
MENU
SLOW
VOL
100
X-Point (Tracking Center)
Adjustment
Head Switching Adjustment
NVRAM Option Setting
<This type of remote control can adjust.>
<This type of remote control can not adjust.>
Remote Control for adjustment is not supplied as a Service Jig.
Page 2
2-2
Samsung Electronics
Alignment and Adjustment
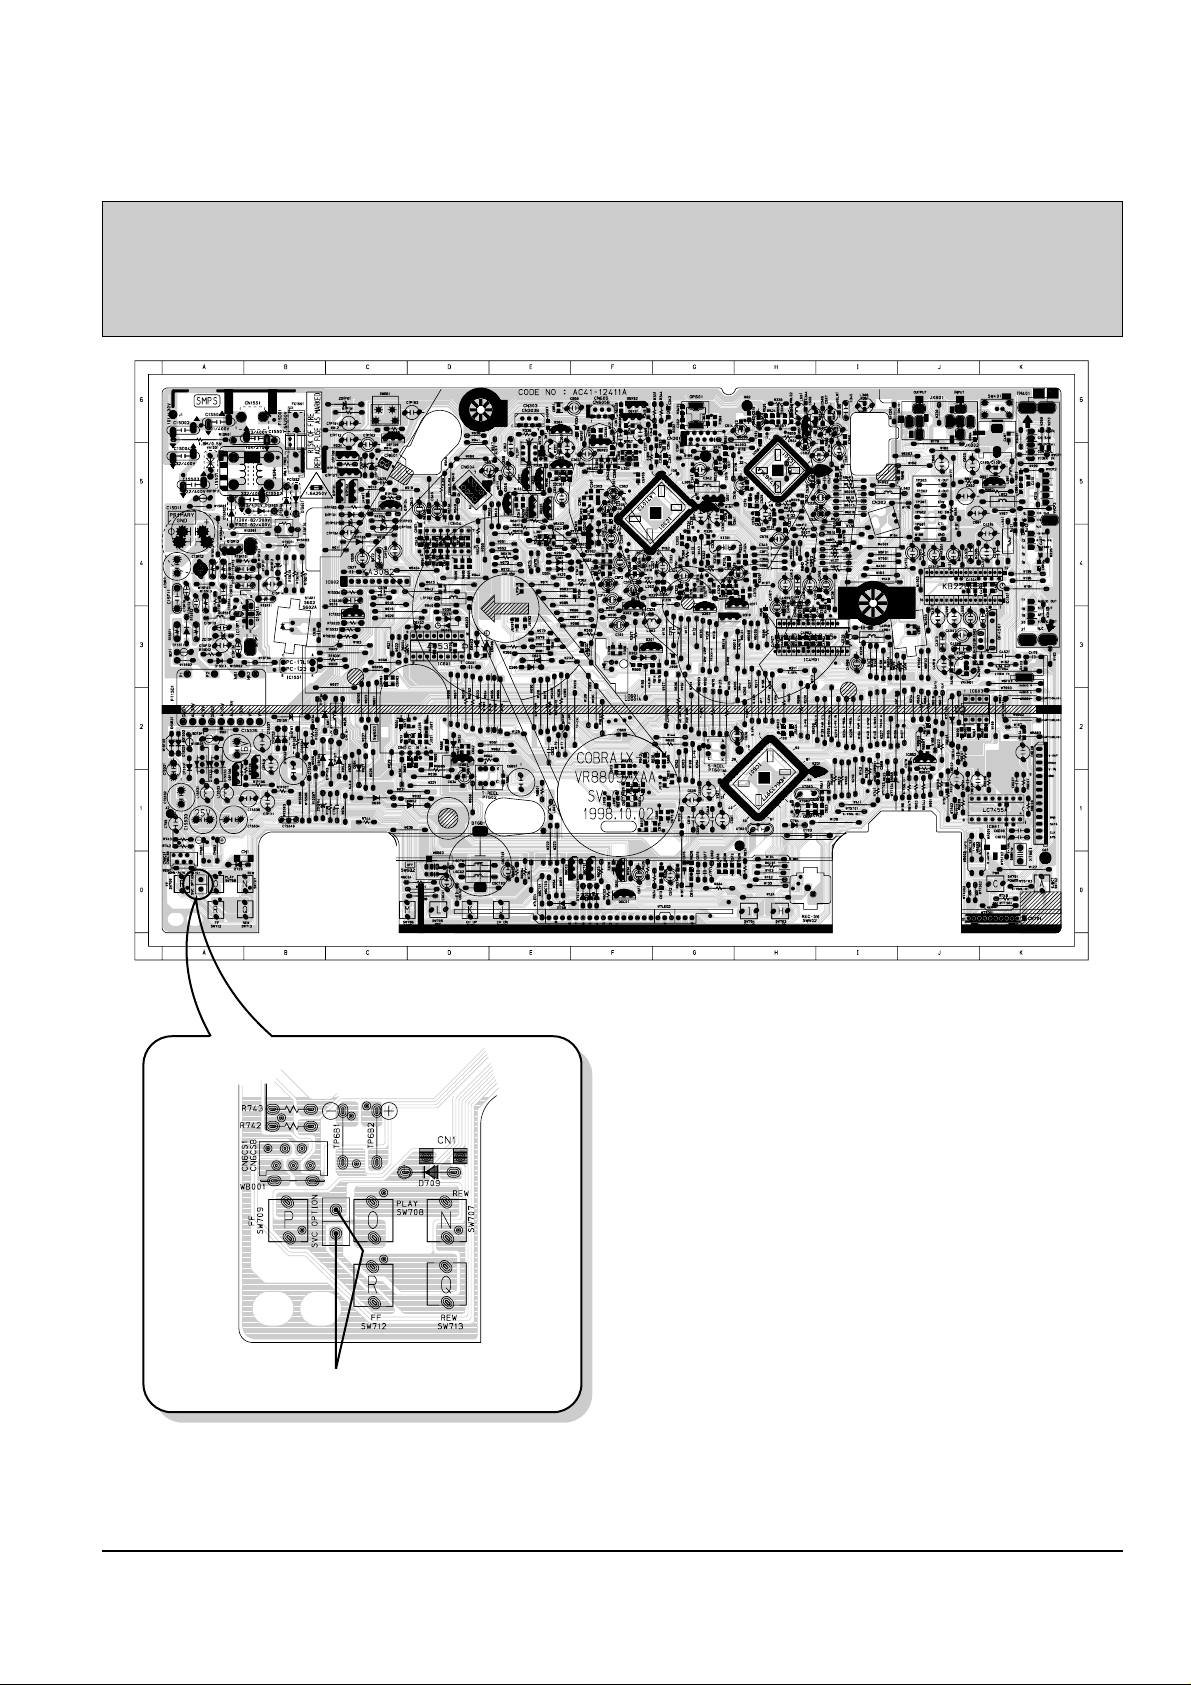
2-1-2 Test point location for adjustment mode setting
Fig. 2-2 Main PCB (Bottom View)
Short-Circuit
Application Models ;
VR8809/8709/8609/8509/5709/5609/5509/3609
VR8809C/8769C/8719C/8609C/8509C/5809C/5709C/5609C/5509C/3609C
SV-C120UM/C70UM/C60UM/C100UP/C60P/C50UP
SV-C141P/C61P/C106P/C56P/C151P/C123P/C63P/C142P/C122P/C52P/C22P/C105P/C55P/C25P
Page 3

Alignment and Adjustment
Samsung Electronics
2-3
Fig. 2-3 Main PCB (Bottom View)
Short-Circuit
Application Models ;
VR8459/8409/5459/5409/3409
VR8459C/8409C/5459C/5409C/3409C
SV-C95UM/C45UM/C90P/C45P/C40P/C15P/SP-C15P
Page 4

2-4
Samsung Electronics
Alignment and Adjustment
2-2 Mechanical Adjustment
Note : Refer to the Mechanical Manual ÒDX-9R (AC68-00001A)Ó for the adjustment and confirmation of
assÕy full deck.
2-2-1 The number and position of test point
Test point : TP601 (Control Pulse)
TP602 (H’D S/W -Trigger)
TP301 (Envelope)
TP302 (Audio output)
TP303 (Video output)
Fig. 2-4 Location of Test point (Main PCB-Top View)
AUDIO OUTPUT
HEAD SWITCHING
ENVELOPE
2-2-1 ACE Head Position (X-Point) Adjustment
(See the 2-2-1(d) ACE Head Position (X-Point) Adjustment
on page 2-2 of the Mechanical Manual)
1) Playback the alignment tape (Color bar).
2) Intermittently short-circuit the two test points on
Main PCB to set the adjustment mode.
(See Fig. 2-2 and 2-3)
3) Press the Ò5Ó button of remote control then adjustment is operated automatically. (See Fig. 2-1)
4) Connect the CH-1 probe to TP301 (Envelope) the
CH-2 probe to TP602 (HÕD switching pulse) and
then trigger to CH-1.
5) Insert the (-) driver into the X-Point adjustment
hole and adjust it so that envelope waveform is
maximum.
6) Turn the Power off.
Page 5

Alignment and Adjustment
Samsung Electronics
2-5
2-3 Head Switching Point Adjustment
1) Playback the alignment tape.
2) Intermittently short-circuit the two test points on Main PCB to set the adjustment mode. (See Fig. 2-2 and 2-3)
3) Press the ÒREC.SPEEDÓ button of remote control then adjustment is operated automatically. (See Fig. 2-1)
4) Turn the Power off.
2-4 NVRAM Option Setting
1) Intermittently short-circuit the two test points on Main PCB to set the adjustment mode. (See Fig. 2-2 and 2-3)
2) Press the ÒMENUÓ button on the remote control about 5 seconds then option setting display is appeared.
(See Fig. 2-5)
3) Select the option number (See Table 2-1 ; Page 2-6) of corresponding model with ÒFFÓ and ÒREWÓ button on
the remote control.
4) If selecting the option number is completed, press the ÒSTOPÓ button of remote control.
(If ÒSTOPÓ button is pressed, the selected number is changes reversed color. ; See Fig. 2-5)
5) Press the ÒMENUÓ button of remote control again to store the option number.
(ÒsaveÓ is displayed for a second as shown Fig. 2-6 and this setting is completed.)
6) Turn the Power off.
1) NVRAM Option is adjusted at production line basically.
2) In case Micom (IC601) and NVRAM (IC603 ; EEPROM) is replaced, be sure to set the corresponding option number of the repaired
model. (If the option is not set, the unit is not operated.)
MOVE :
SAVE
: MENU
01 02 03 04 05 06 07 08
09 10 11 12 13 14 15 16
17 18 19 20 21 22 23 24
25 26 27 28 29 30 31 32
33 34 35 36 37 38 39 40
Fig. 2-5
MOVE : save
SAVE
: MENU
01 02 03 04 05 06 07 08
09 10 11 12 13 14 15 16
17 18 19 20 21 22 23 24
25 26 27 28 29 30 31 32
33 34 35 36 37 38 39 40
Fig. 2-6
Page 6

2-6
Samsung Electronics
Alignment and Adjustment
COUNTRY MODELS OPTION NUMBER
U.S.A. VR8809 2, 4, 5, 6, 7, 9, 18, 27, 33, 34, 35, 36
VR8709 2, 5, 6, 7, 9, 18, 29, 34, 36
VR8609 2, 6, 7, 18, 28, 34, 36
VR8509 2, 6, 7, 18, 28, 34, 36
VR8459 2, 7, 12, 20, 30, 36
VR8409 2, 7, 12, 20, 30, 36
VR5709 5, 6, 7, 9, 18, 29, 34, 36
VR5609 6, 7, 18, 28, 34, 36
VR5509 6, 7, 18, 28, 34, 36
VR5459 7, 12, 20, 30, 36
VR5409 7, 12 ,20, 30, 36
VR3609 1, 6, 7, 18, 28, 34, 36
VR3409 1, 7, 12, 20, 30, 36
CANADA VR8809C 2, 4, 5, 6, 7, 9, 18, 27, 33, 34, 35, 36
VR8769C 2, 4, 5, 6, 7, 9, 18, 26, 33, 34, 36
VR8719C 2, 5, 6, 7, 9, 18, 29, 33, 34, 36
VR8609C 2, 6, 7, 18, 28, 34, 36
VR8509C 2, 6, 7, 18, 28, 34, 36
VR8459C 2, 7, 12, 20, 30, 36
VR8409C 2, 7,12, 20, 30, 36
VR5809C 4, 5, 6, 7, 9, 18, 27, 33, 34, 35, 36
VR5709C 5, 6, 7, 9, 18, 29, 34, 36
VR5609C 6, 7, 18, 28, 34, 36
VR5509C 6, 7, 18, 28, 34, 36
VR5459C 7, 12, 20, 30, 36
VR5409C 7, 12, 20, 30, 36
VR3609C 1, 6, 7, 18, 28, 34, 36
VR3409C 1, 7, 12, 20, 30, 36
MEXICO SV-C120UM 2, 5 ,6, 7, 18, 29, 36, 37
SV-C95UM 2, 7, 12, 20, 30, 36, 37
SV-C70UM 5, 6, 7, 18, 26, 36, 37
SV-C60UM 6, 7, 18, 29, 36, 37
SV-C45UM 7, 12, 20, 30, 36, 37
PANAMA SV-C100UP 2, 6, 7, 18, 29, 36, 37
SV-C60P 5, 6, 7, 18, 26, 36, 37
SV-C50UP 6, 7, 18, 29, 36, 37
CHILE SV-C141P 2, 4, 5, 6, 7, 18, 29, 36, 37
SV-C61P 5, 6, 7, 18, 29, 36, 37
SV-C106P 2, 6, 7, 18, 28, 36, 37
SV-C56P 6, 7, 18, 28, 36, 37
PERU SV-C151P 2, 4, 5, 6, 7, 18, 26, 36, 37
SV-C45P 7, 12, 20, 30, 36, 37
BOLIVIA SV-C123P 2, 5, 6, 7, 18, 29, 36, 37
SV-C63P 5, 6, 7, 18, 29, 36, 37
PHILIPPINESS SV-C105P 2, 6, 7, 18, 26, 36
SV-C55P 6, 7, 18, 28, 36
SV-C25P 1, 6, 7, 18, 28, 36
SV-C15P 1, 3, 6, 12, 22, 30, 36
SP-C15P 1, 3, 12, 21, 30, 36
AAFES SV-C142P 2, 4, 5, 6, 7, 18, 27, 34, 35, 36
SV-C122P 2, 5, 6, 7, 18, 28, 34, 36
SV-C90P 2, 7, 12, 20, 30, 36
SV-C52P 6, 7, 18, 28, 34, 36
SV-C40P 7, 12, 20, 30, 36
SV-C22P 1, 6, 7, 18, 28, 34, 36
<Table 2-1>
 Loading...