

Page 1
Precautions for safety are the contents to
secure the safety of user and to prevent
damage of property etc. Please read carefully
to have proper use of the product.
※ This product has been made to be used in
Korea, and the quality will not be guaranteed in
overseas countries.
(FOR KOREA UNIT STANDARD ONLY)
Robotic vacuum cleaner
Operation manual of the product
VC-RA52V
VC-RA50V* SERIES
VC-RL52V* SERIES
VC-RL50V* SERIES
Page 2
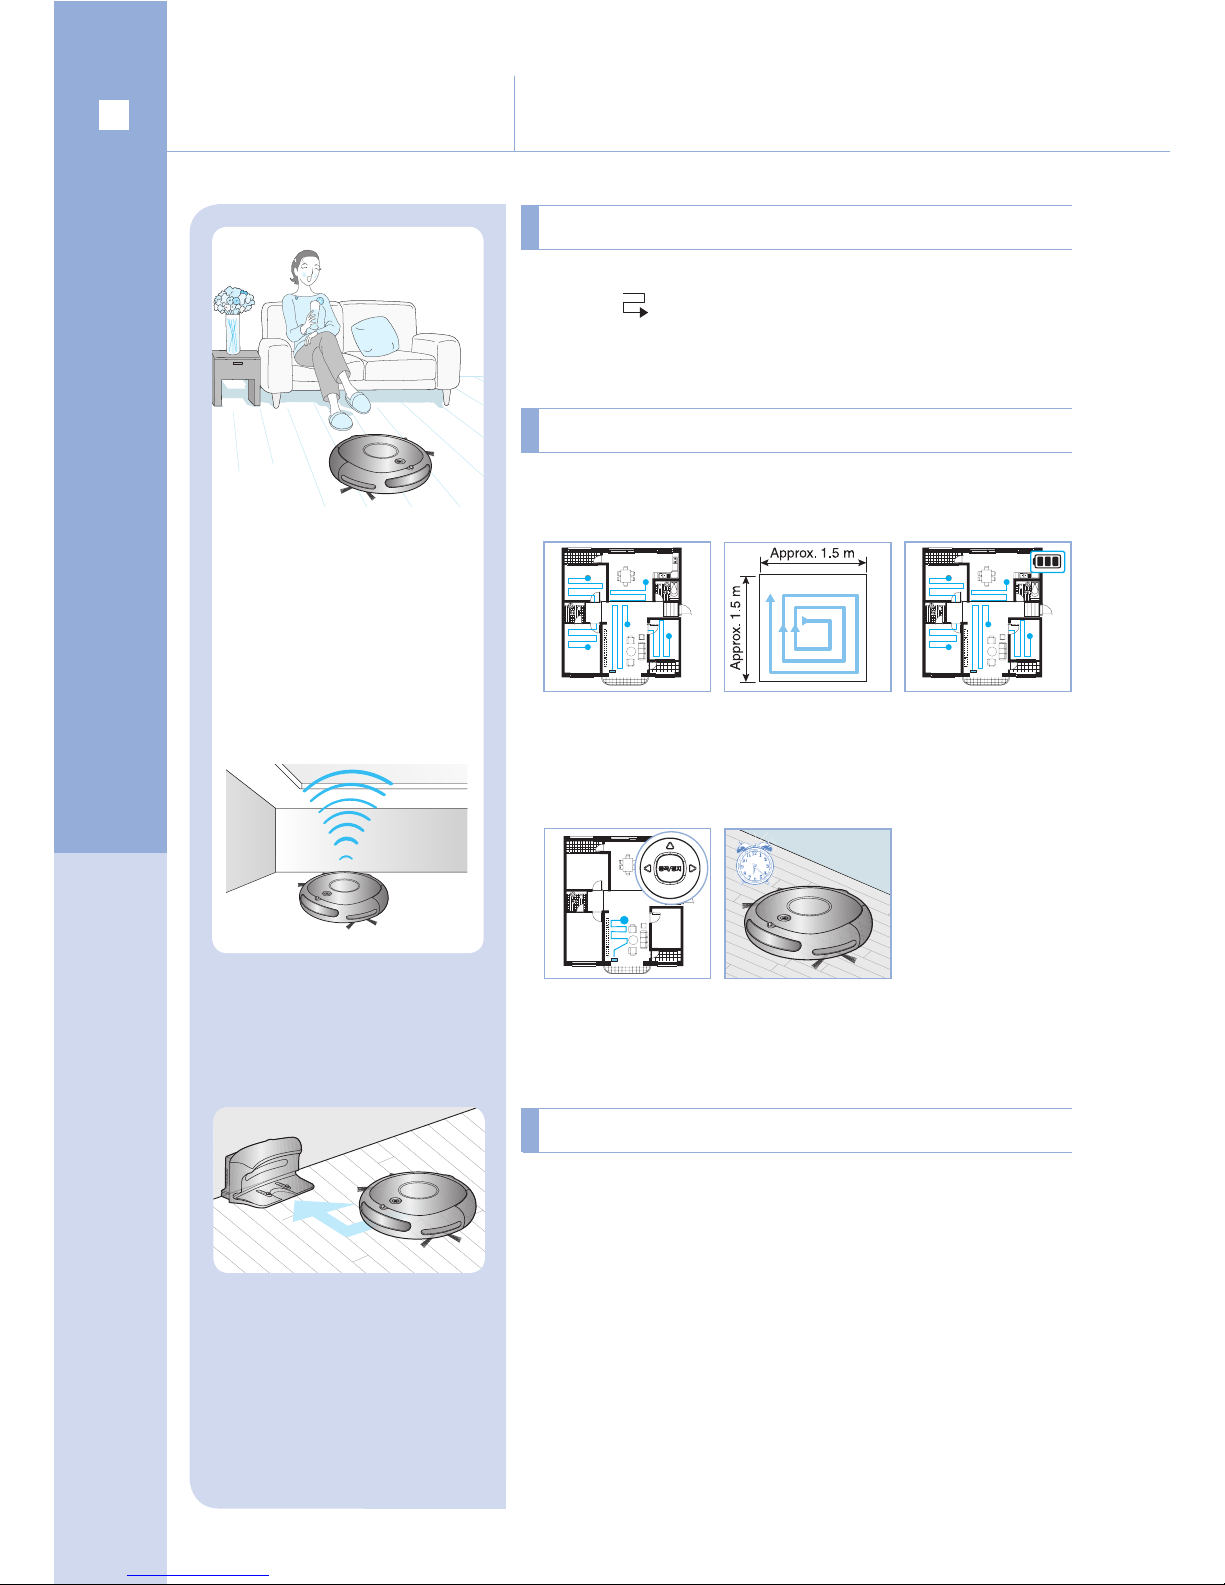
As the cleaning is conducted by following the lattice
pattern (
) with the ceiling image recognition method,
cleaning can be performed for every part of the room.
Realizing fine and uniform cleaning for every part of the room
Manual cleaning mode
Perform the cleaning
by directly moving the
cleaner with remote
controller.
Reserved cleaning mode
Reserve the cleaning
at desired time when
going out
Partial cleaning mode
Perform the cleaning of
partial area or when
being scattered of small
fragments of cookies etc.
Automatic
cleaning mode
Perform uniform and
convenient cleaning for
every room.
Repeated
cleaning mode
Perform repeated
cleaning until battery is
exhausted.
Various cleaning modes are provided in accordance
with the cleaning circumstances.
Diverse cleaning mode
2
Features and advantages
of product
When remaining amount of battery is not sufficient, the
charger induces the robotic vacuum cleaner, therefore,
accurate automatic charging can be accomplished.
Automatic charging
What is the ceiling image
recognition (Visionary
Mapping TM) method?
As the product moves with its
own judgment on the place
to clean after recognizing the
image of ceiling with the
camera located at the upper
section, every part of the
room can be cleaned.
Page 3
Features and advantages
of product
3
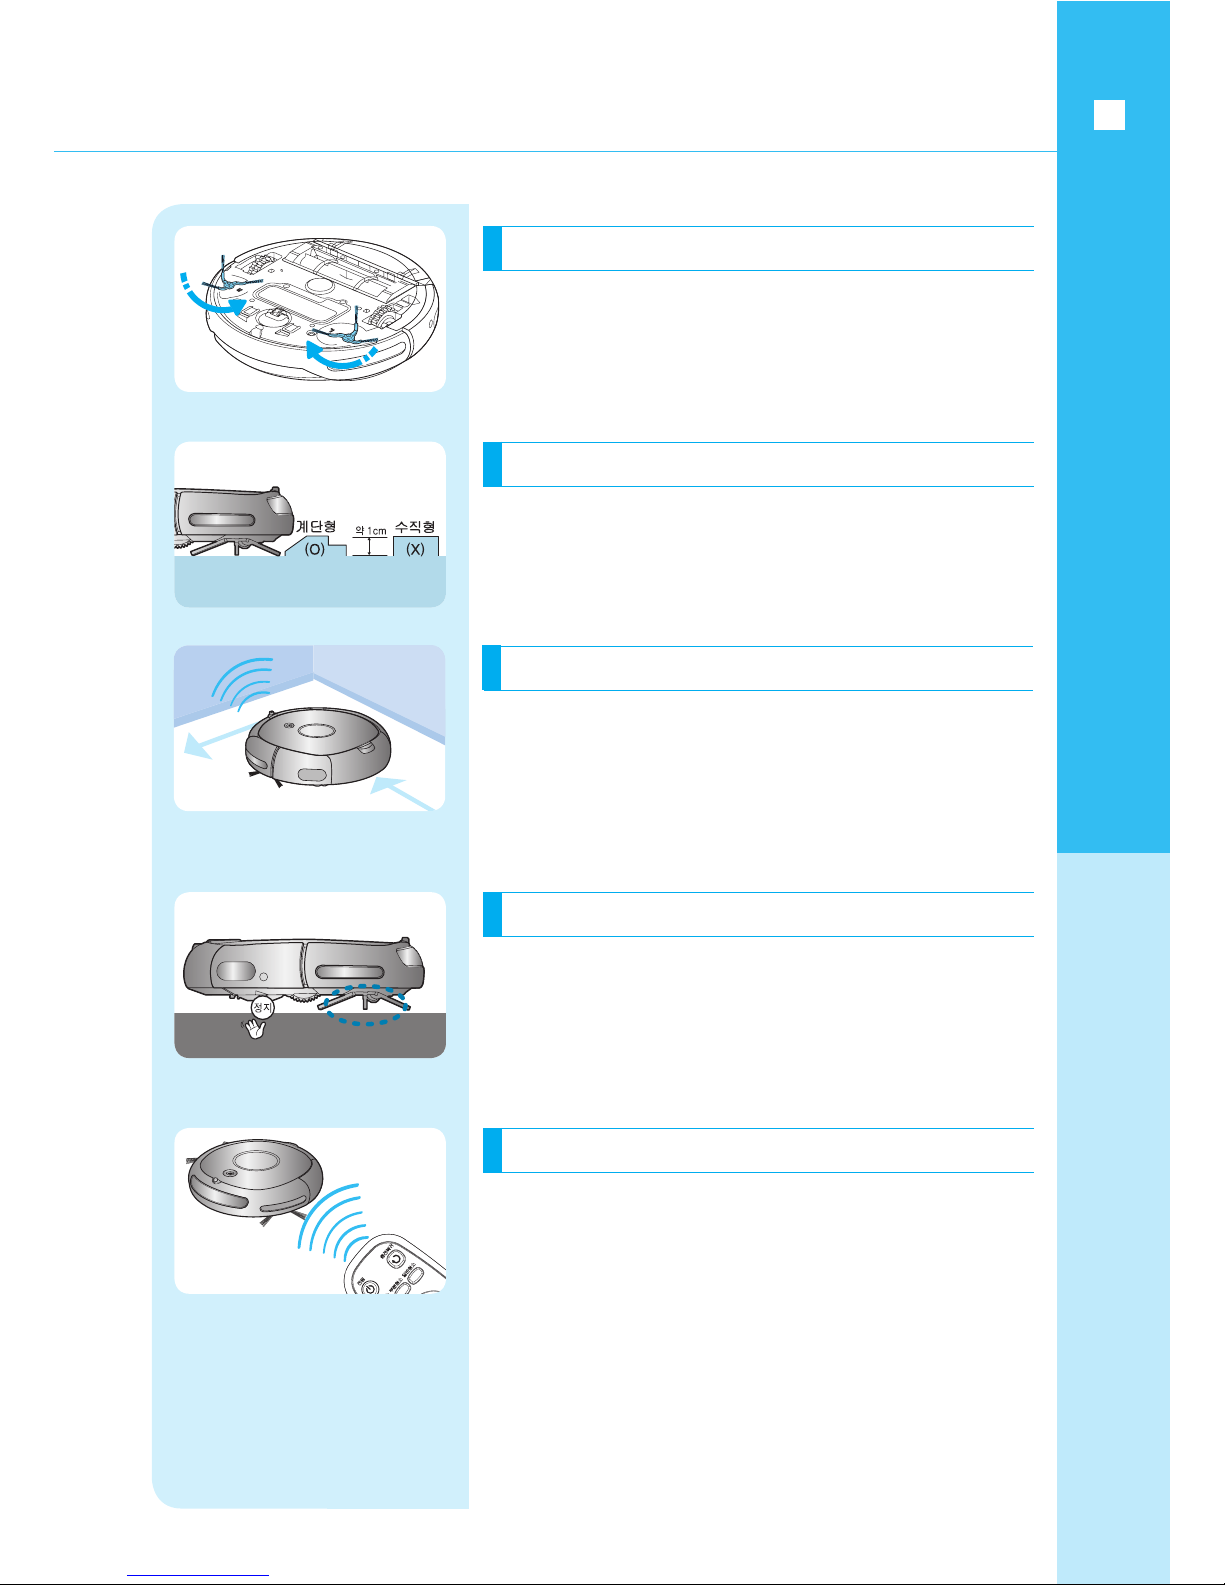
Approx. 1 cm of threshold can be traveled with special
driving system, therefore, all the rooms can evenly be
cleaned. However, for the sake of safety, the threshold of
more than 1 cm can not be crossed.
Threshold traveling
If lifting the robotic vacuum cleaner while it is in operation,
the motions of driving wheel, power brush, suction motor,
and side rotating brush will be stopped due to the
detection of the sensor.
Safety device
The robotic vacuum cleaner can easily be operated with
the remote controller.
Remote controller
Dust is removed by the rotation of dual side brushes.
Dual side rotating brush
Dust of every corner can be neatly cleaned by approaching to the
corner as much as possible through the minimizing of colliding
impact as the velocity is reduced by 7 obstacle sensors when
encountering with obstacle and through the relieving of the
colliding impact by 2 bumper sensors during the cleaning. (The
obstacle sensor displays higher sensitivity against bright obstacle.)
Soft bumping
Page 4

Preparation
Installation
Operation
Features and advantages of product .........................
Precautions for safety ........................................................
Items related with the power supply .................................
Before the use ........................................................................
During the use ........................................................................
Handling after the use ..........................................................
Components ...........................................................................
Name of each section .......................................................
Main frame ...............................................................................
Charger .....................................................................................
Remote controller ...................................................................
State indicating screen ..........................................................
Emergency switch ON/OFF ................................................
Installation of the charger .....................................................
Electric charging .....................................................................
Important items for battery ....................................................
Installation of entry prevention tape ....................................
Cleaning start/stop .................................................................
Returning to electric charging ...........................................
Automatic cleaning .................................................................
Partial cleaning ........................................................................
Repeated cleaning .................................................................
Manual cleaning .....................................................................
Reserved cleaning .................................................................
Additional functions ................................................................
Precautions before the handling ........................................
Handling of sensor window and camera ........................
Handling of dust bin and HEPA-filter .................................
Handling of power brush .....................................................
Handling of side rotating brush ..........................................
Handling of driving wheel ....................................................
Confirming items before reporting the failure ..........
Corrective measures for each inspection code .............
Specification of product ....................................................
Disposal guidance of waster electronic product ............
2
5
5
6
9
10
11
12
12
13
14
15
16
17
18
19
20
21
22
23
24
25
26
27
28
29
29
30
31
32
33
34
36
37
39
Contents
4
Handling
Others
Page 5
Precautions for safety
preparation
5
These are the contents to secure the safety of user and to prevent damage of property.
Please have safe operation by reading carefully of the following items.
Always observe followings for
safety
If caution items are not being observed, wound or
property damage can be occurred to the user.
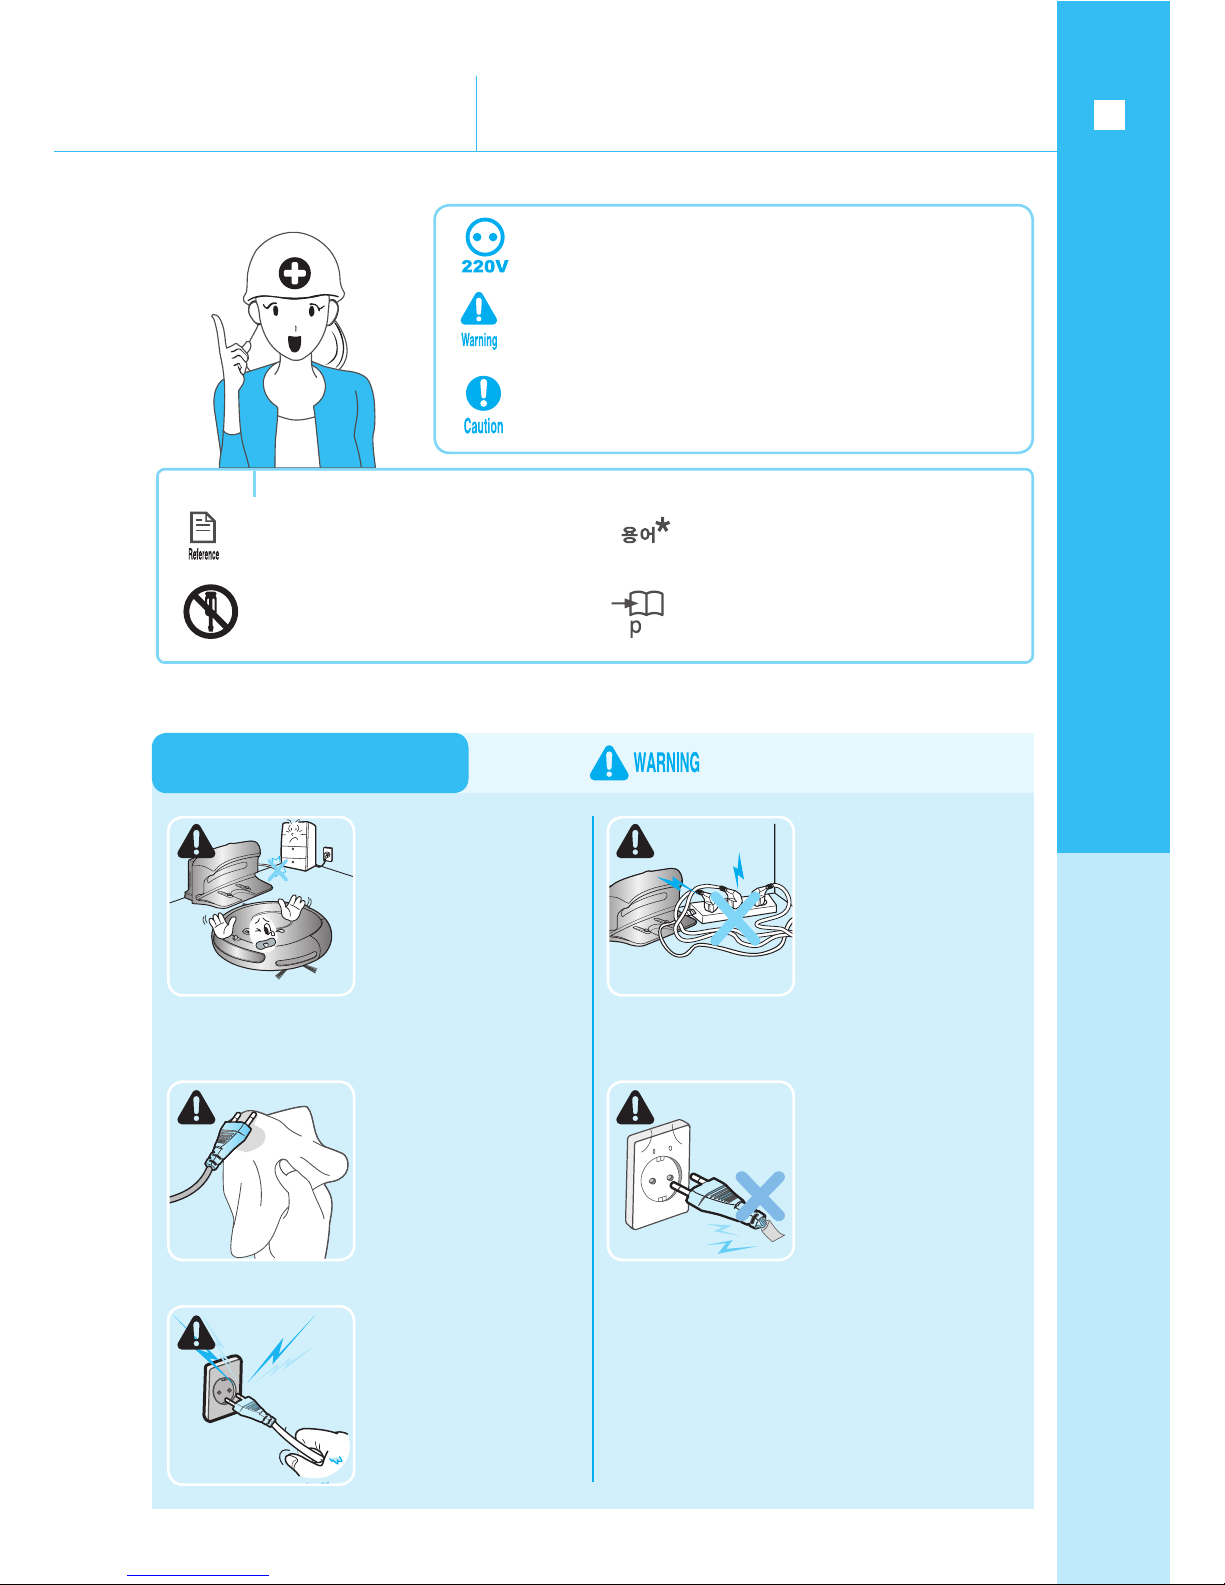
This product is used 220V as the rated voltage.
If warning items are not being observed, death or serious
wound can be occurred to the user.
Corresponding terminology will be
explained to improve the understanding for
the product operation.
This is the disassembly prohibited
indication.
Refer to the corresponding page.
Contents with which more efficient
use of the product can be realized
will be explained.
Do not impair the power
supply cord by excessively
bending it or pressing it
down with heavy object.
▶ There is the danger of
electric shock or fire.
Items related with the power supply
Do not use the power
source other than 220V or
do not connect several
electric products
simultaneously to one
outlet. (Do not expose the
cord line on the floor.)
▶ There is the danger of electric shock or fire.
If dust, water etc. are
adhered to the pin and
contact section of the power
supply plug, thoroughly
clean them.
▶ There is the danger of
abnormal operation and
electric shock.
Do not use damaged
power supply plug,
power supply cord, or
loosened outlet.
▶ There is the danger of
electric shock or fire.
Do not pull the power
supply cord section or
touch the power supply
plug with wet hand.
▶ There is the danger of
electric shock or fire.
Page 6
Before the use
Confirm whether dust
bin is assembled before
operating the robotic
vacuum cleaner.
▶ If dust bin is not
assembled, the robotic
vacuum cleaner will not
be operated.
In order to have cleaning of all of the
rooms, open the doors of rooms before
the cleaning.
▶ If the door of room is closed, the robotic
vacuum cleaner can not enter the room.
▶ However, always close the doors of entrance,
veranda, and rest room etc., through which
the robotic vacuum cleaner can be dropped.
Precautions for safety
preparation
6
These are the contents to secure the safety of user and to prevent damage of property.
Please have safe operation by reading carefully of the following items.
Always observe followings for
safety
Never use the robotic vacuum cleaner at the
following locations as it is a household
appliance.
▶ Critical damage (malfunction, breakage) can be
occurred to the product if it is used at the attic,
basement, warehouse, industrial building, separate
space away from indoors, locations where water is
always existed such as bathroom, laundry room etc.,
and narrow and elevated locations such as table,
shelves etc.
▶ At the location where candle or light stand
for desk are placed on the floor.
▶ At the location without people where light is
existed or fireplace is lighted.
▶ At the location where inflammables such as
gasoline, distilled alcohol, thinner, and
ashtray with lighted cigarette etc. are placed.
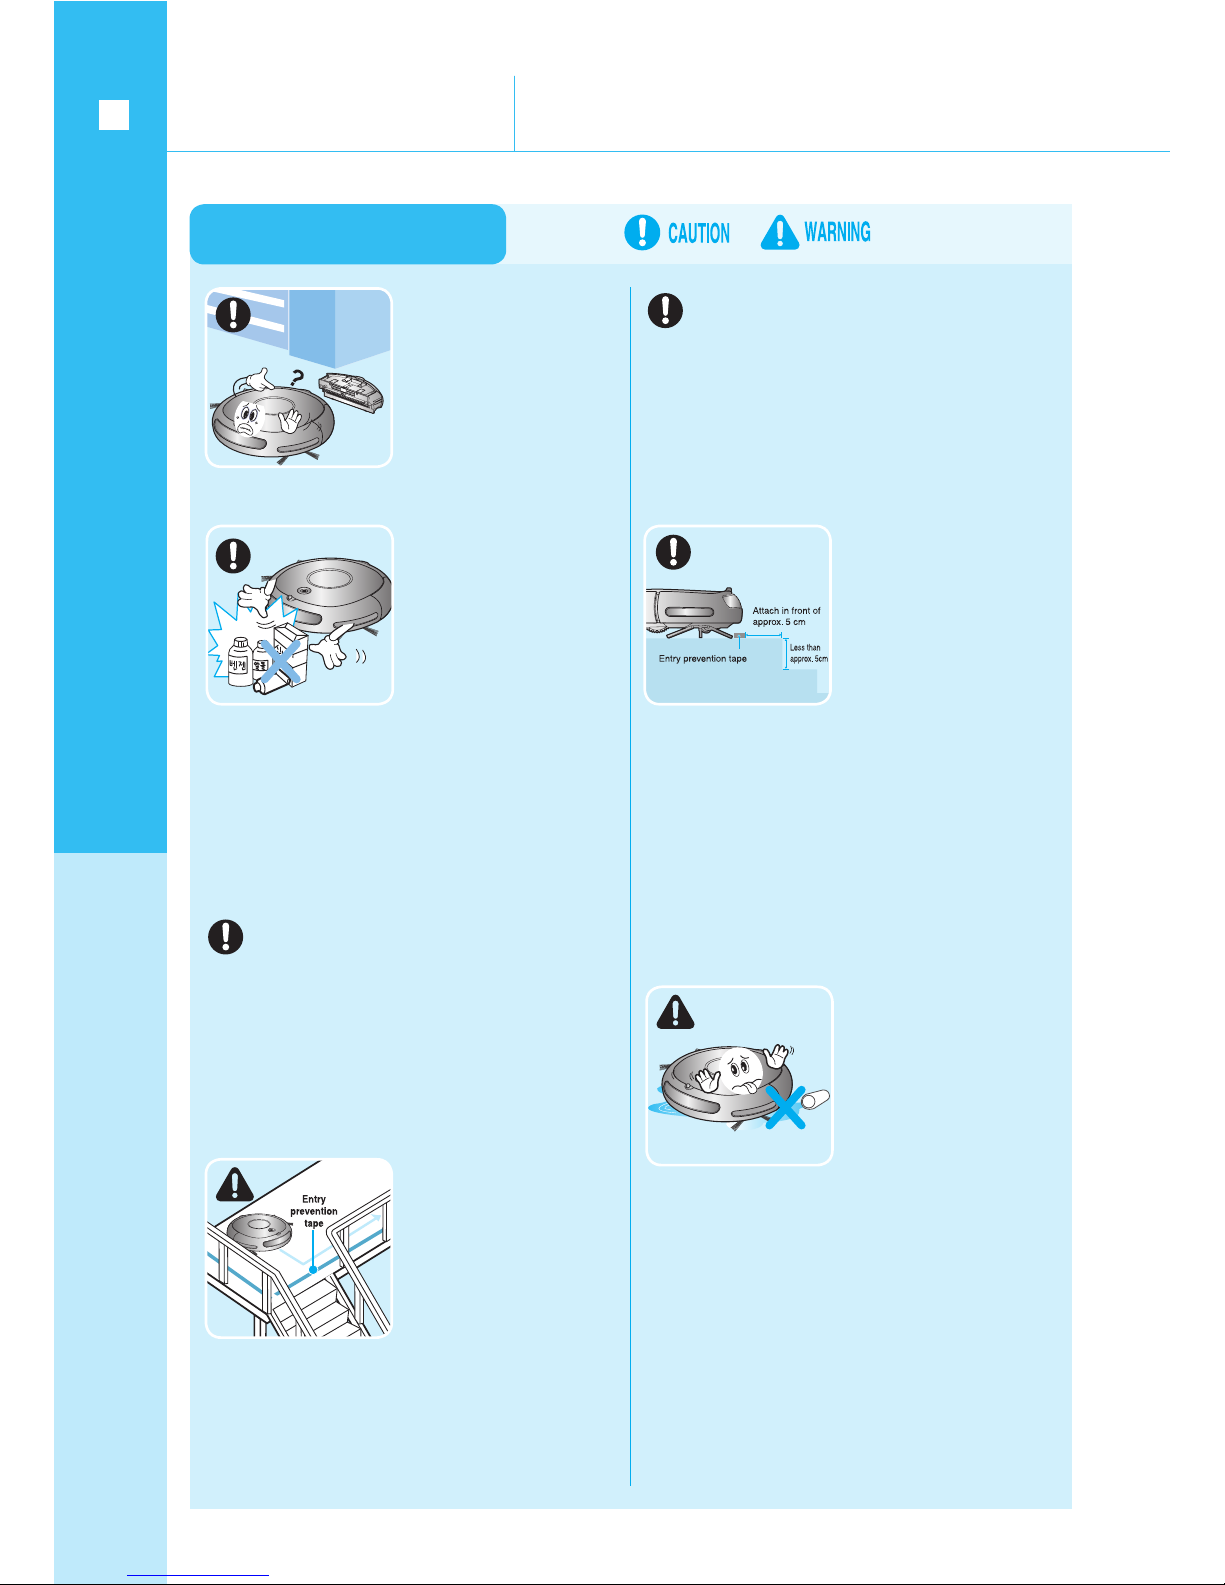
Never operate the
cleaner at the
location where
inflammable is
placed.
▶ Attach to the zone with the difference of height
of less than 5 cm from the floor.
Example) Entrances of veranda, rest room, low
staircase, and porch etc.
▶ Attach to the fire zone (fireplace, heater, and
candle etc.) or danger zone with moisture.
▶ As entering may be happened in accordance
with the condition of floor surface, close the
doors of rest room, veranda, and porch etc.,
during the cleaning.
Always attach entry
prevention tape to the
zone into which the
robotic vacuum cleaner
can not be entered.
▶ Other place can be contaminated through
the liquid adhered to the wheel.
Be careful not to make
the robotic vacuum
cleaner to be passing
through or sucking in
water, oil, and liquid of
excrement of pet etc.
▶ Fatal damage can be
inflicted on the product.
▶ If dust is accumulated at the falling prevention
sensor window, falling may be happened as
the falling danger zone can not be identified by
the robotic vacuum cleaner.
▶ If falling, injury or damage to the product can
be happened.
Attach entry prevention
tape to railing or
stairway entrance etc.
where falling danger is
existed.
Page 7
Precautions for safety
preparation
7
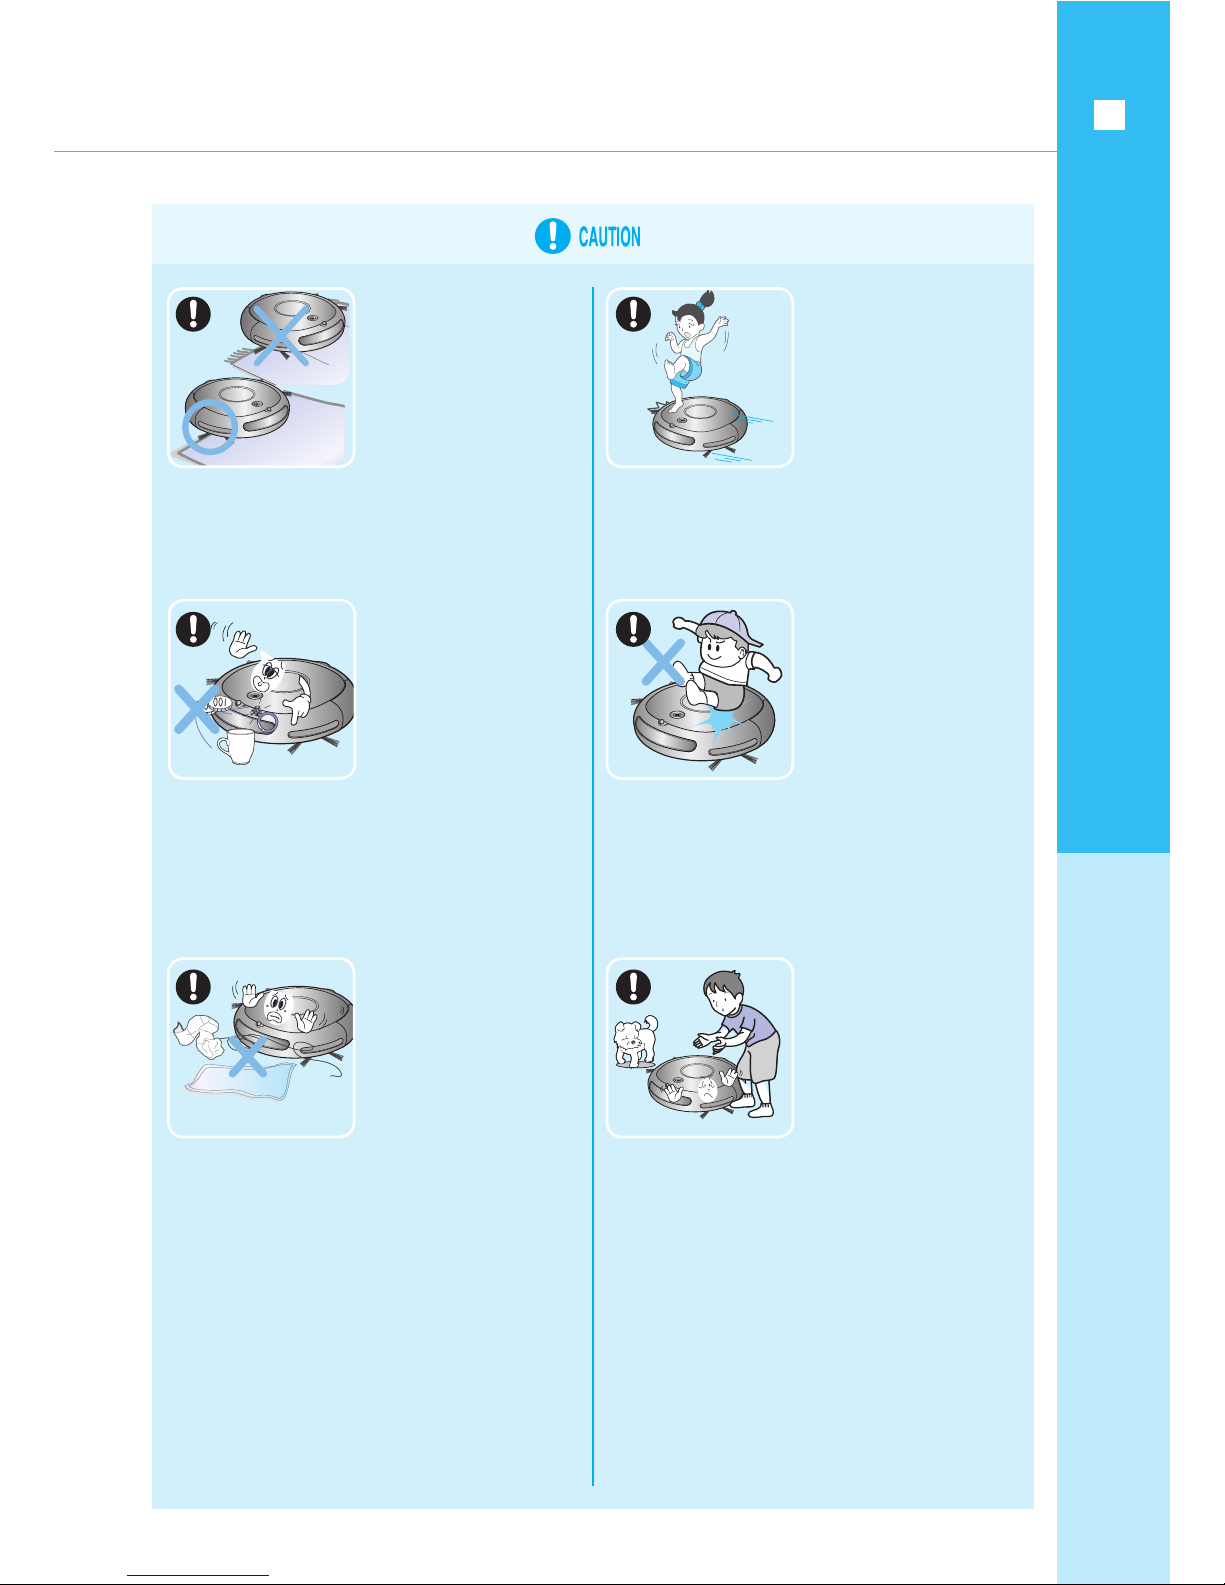
In the case of the carpet
with long tassel at the
end, fold the end section
to the inside.
▶ Fatal damage can be
inflicted on carpet and
robotic vacuum cleaner
by being wound to
driving wheel and
power brush.
▶ By all means, remove those products of
breakable ceramic ware or glass, and light
flowerpot etc.
▶ The robotic vacuum cleaner does not identify
coin, ring, or expensive jewelry etc.
Remove in advance
small or breakable
object at the location of
cleaning.
▶ Always remove these
prior to the cleaning.
Never let children
standing or sitting on the
product while it is in
operation.
▶ Through the falling by
mistake, injury can be
inflicted or fatal damage
can be occurred to the
product.
Before the cleaning or
after establishing the
reserved cleaning
function, let all the
persons in the house to
be careful about these
by informing them.
▶ Children can be caught
and fallen by mistake
while they are running.
▶ The robotic vacuum cleaner is supposed
to detect obstacles separated with the
distance of approx. 5 cm.
▶ Thin towel, pad, power supply cord, table
cloth, and belt etc., in front of the
bathroom, sink stand, entrance door, and
multipurpose room etc. can be tangled
with driving wheel or power brush, or can
be the cause of dropping objects on the
table or dinner table.
Put away those
objects scattered on
the floor.
▶ The robotic vacuum cleaner can be the object
of curiosity of child or pet.
▶ Injury can be inflicted if hand, feet, end of
clothes, and hair etc. are caught in the driving
wheel, side rotating brush, and power brush
during the cleaning.
▶ If the robotic vacuum cleaner is interrupted
while being followed along the path, the
particular section may not be cleaned as it is
being recognized as obstacle.
▶ In the case when emergency switch is turned
off, all functions and power supply will be
intercepted.
If child or pet is left
alone, turn off the
emergency switch of
the robotic vacuum
cleaner.
Page 8
Precautions for safety
preparation
8
These are the contents to secure the safety of user and to prevent damage of property.
Please have safe operation by reading carefully of the following items.
Always observe followings for
safety
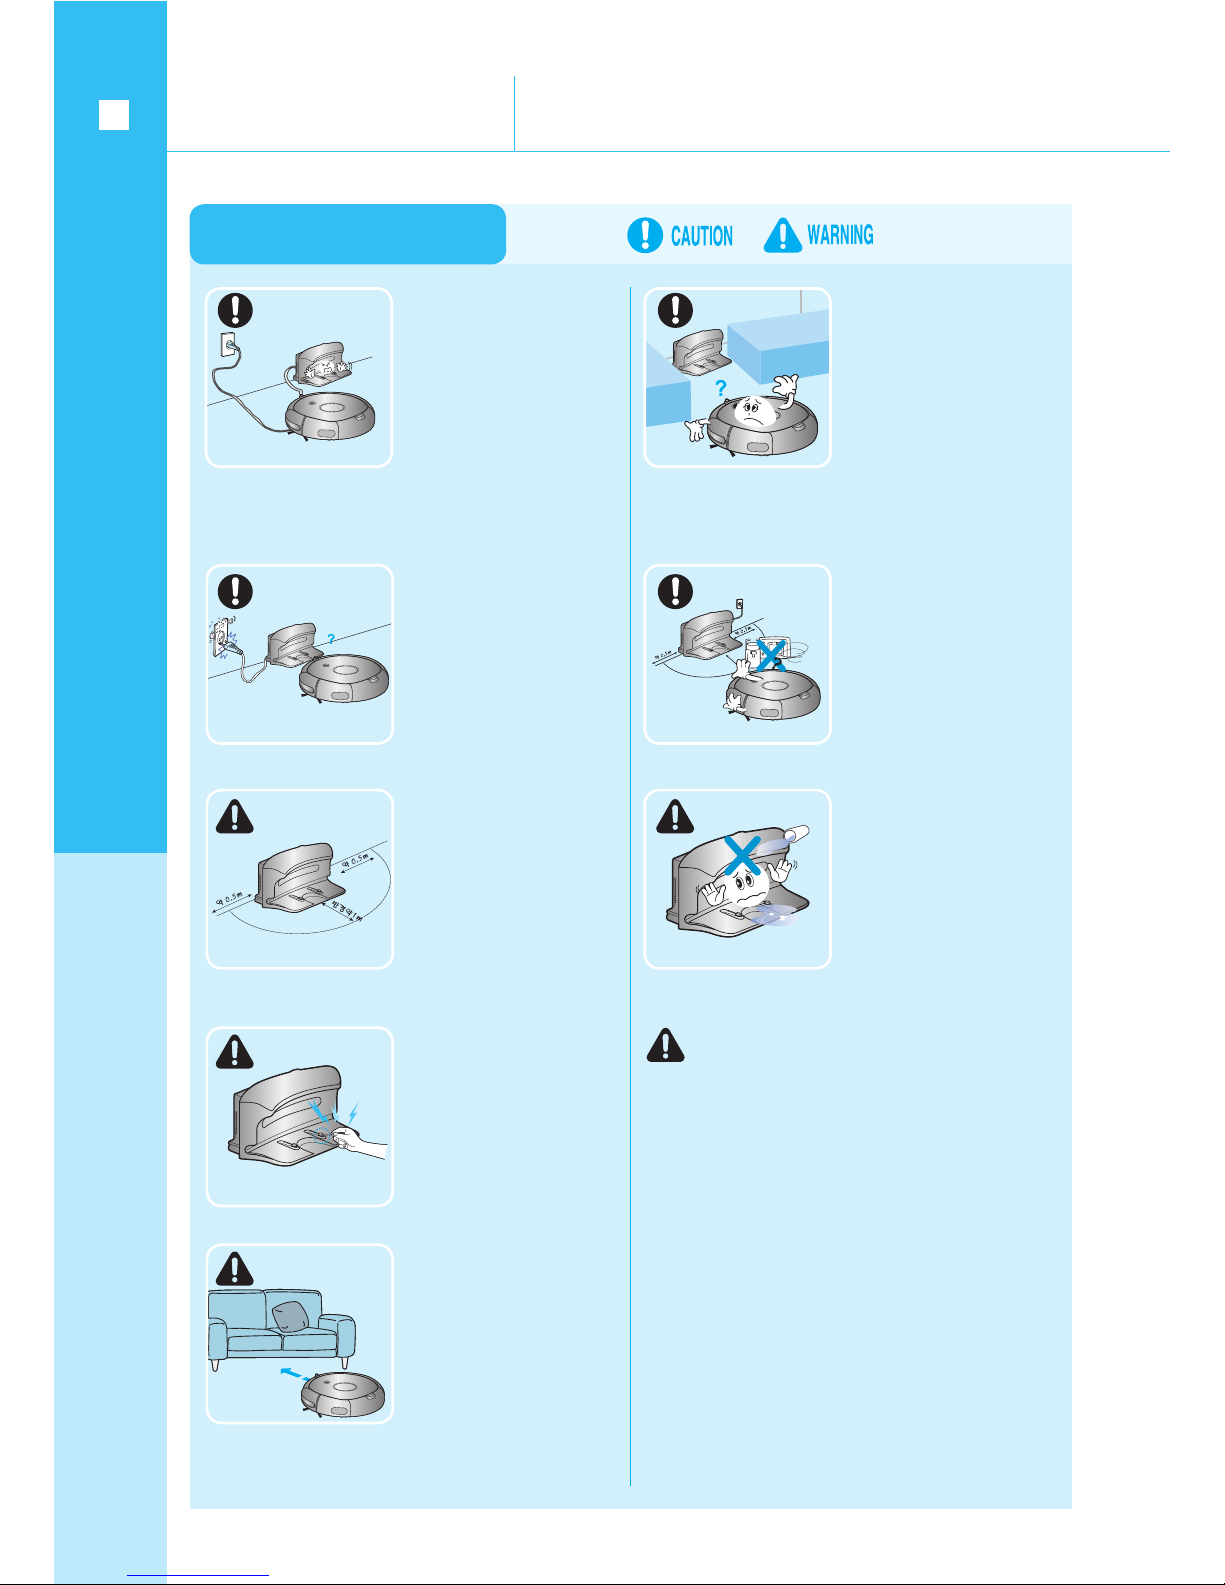
Before the use
When installing the charger,
do not expose the power
supply cord on the floor.
▶ During the automatic
electric charging or the
passing in front of the
charger, the robotic
vacuum cleaner can be
moved while drawing the
power supply cord.
Install the charger at the
location where it can be
discovered easily.
▶ If installing it at
recessed area,
automatic electric
charging will be difficult
due to the excessive
unnecessary motions.
If an object is placed in
front of the charger,
automatic electric
charging can not be
performed by the robotic
vacuum cleaner.
▶ Take away the object.
Always insert the power
supply plug of the
charger.
▶ If power is not
supplied, automatic
electric charging can
not be performed.
Remove the obstacles
located in the vicinity
of approx. 1m in front
of and approx. 0.5m
at left and right side
of the charger.
Be careful not to have
the inflow of liquids
such as water, juice
etc. on the charger.
▶ There will be the
danger of electric
shock or fire.
Do not make short the
terminal of charger
with metals such as
chopsticks, driver etc.
▶ Fatal damage can
be inflicted on the
charger.
For the space with the
height less than that of
the robotic vacuum
cleaner (low sofa,
underneath of low bed
etc.), entry may
attempted or jamming
can be occurred,
therefore, attach the
entry prevention tape.
Do not use the charger for another
application.
▶ There will be the danger of fire or
fatal damage to the charger.
Page 9
Precautions for safety
preparation
9
During the use
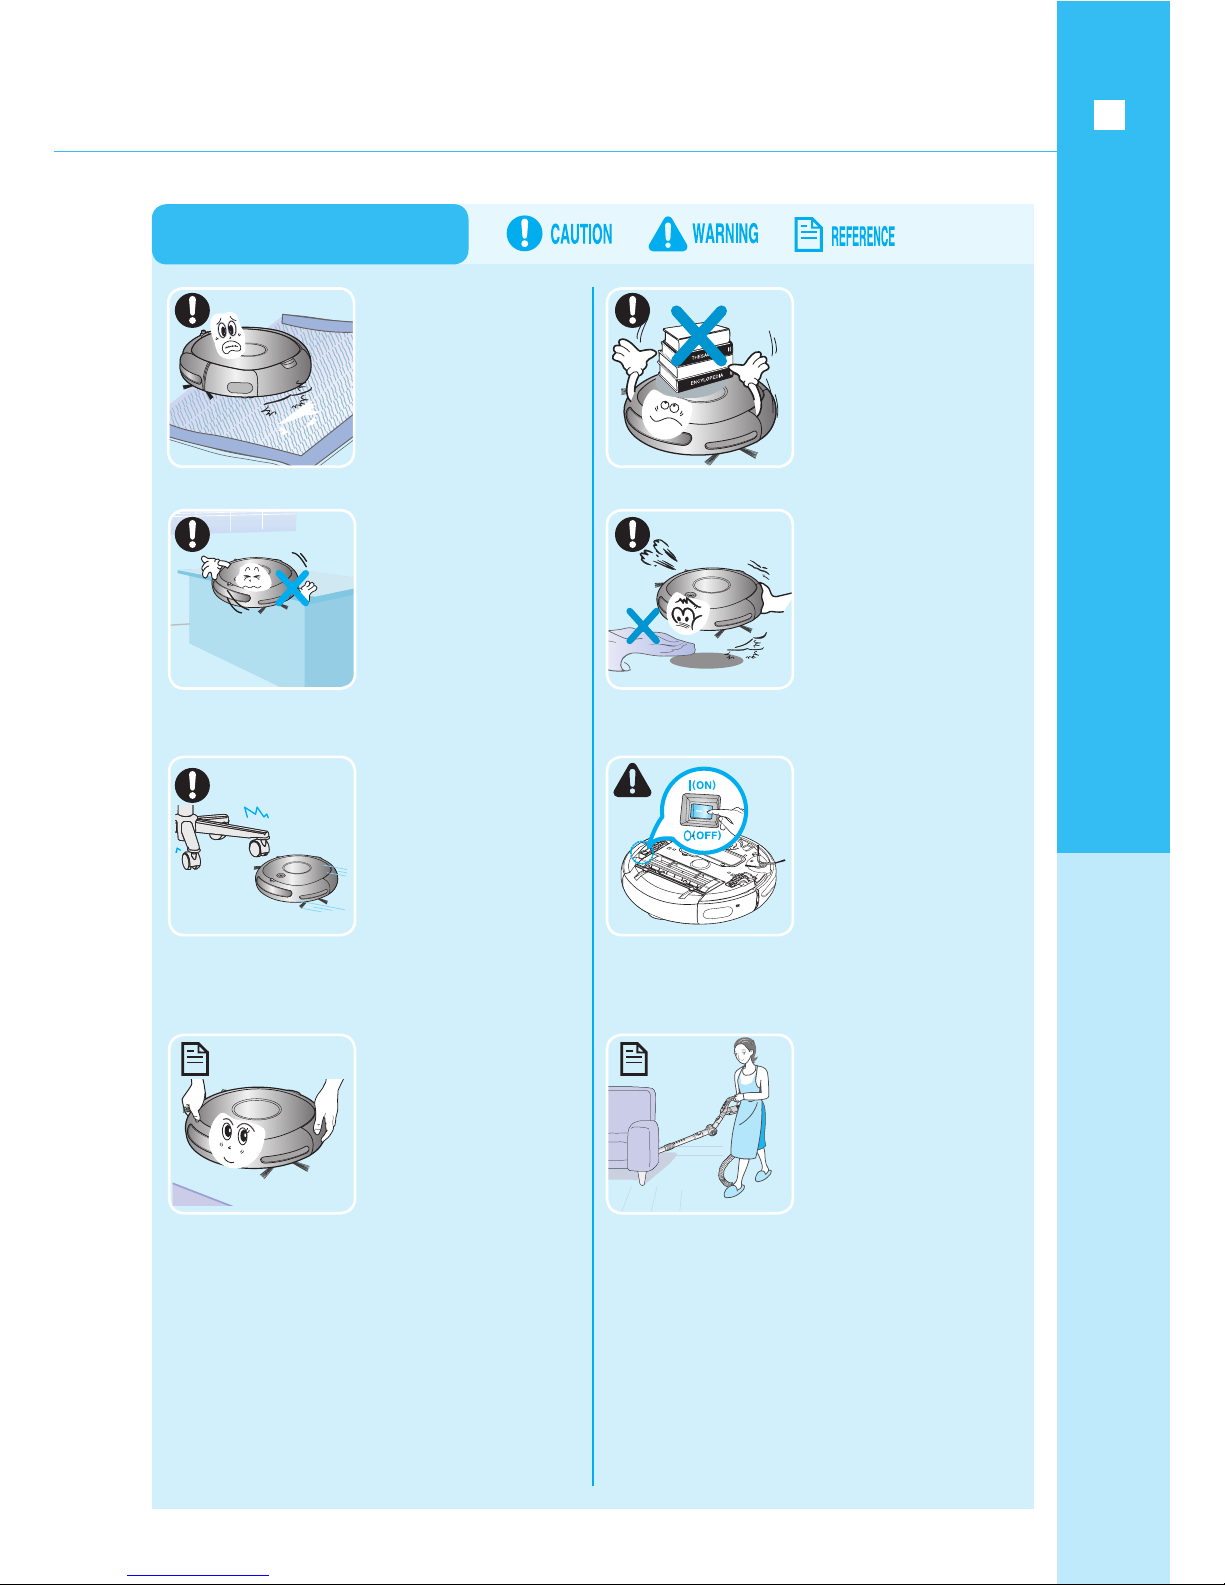
The robotic vacuum
cleaner shall not be
used on thick carpet.
▶ This can be the cause
of failure of the robotic
vacuum cleaner.
▶ The carpet may be
damaged by this.
Do not put objects on
the robotic vacuum
cleaner.
▶ Malfunction can be
generated.
Do not use the robotic
vacuum cleaner on
the table or on
elevated place.
▶ If it is fallen, there
will be the danger
of damage.
If sucking in wide paper
or vinyl bag during the
cleaning, remove them
immediately.
▶ If using the appliance
for long time with the
blocked state of the
inlet, fatal damage can
be inflicted on the
product.
If abnormal noise, odor,
or smoke is generated
from the robotic vacuum
cleaner, turn off the
emergency switch
immediately and call the
customer care center.
During the movements
of the robotic vacuum
cleaner, it can be
collided with leg of
chair, leg of desk, table
chair, or thin and long
furniture etc.
▶ For the sake of fast and tidy cleaning,
put the table chair etc. on the table.
During the cleaning of
the robotic vacuum
cleaner, its traveling can
be interrupted by being
caught to the threshold
of entrance door and of
veranda etc.
▶ If the driving wheel of the robotic vacuum
cleaner is not rotated for more than 5 minutes,
all the functions will be suspended and the
movement will be stopped.
▶ In order to have the movement again, after
turning off the emergency switch and moving
the robotic vacuum cleaner to the movable
location by lifting it, turn on the power supply,
and then, perform the cleaning.
Perfect cleaning can not be
realized for the recessed
corner or the space
between sofa and wall etc.
which can not be accessed
by the robotic vacuum
cleaner.
▶ Clean them separately from
time to time.
During the cleaning by the robotic
vacuum cleaner, the phenomenon of
having a lump of dust remained on the
floor may be happened due to the failure
of inhaling it.
▶ Sweep it with another cleaning device.
Page 10
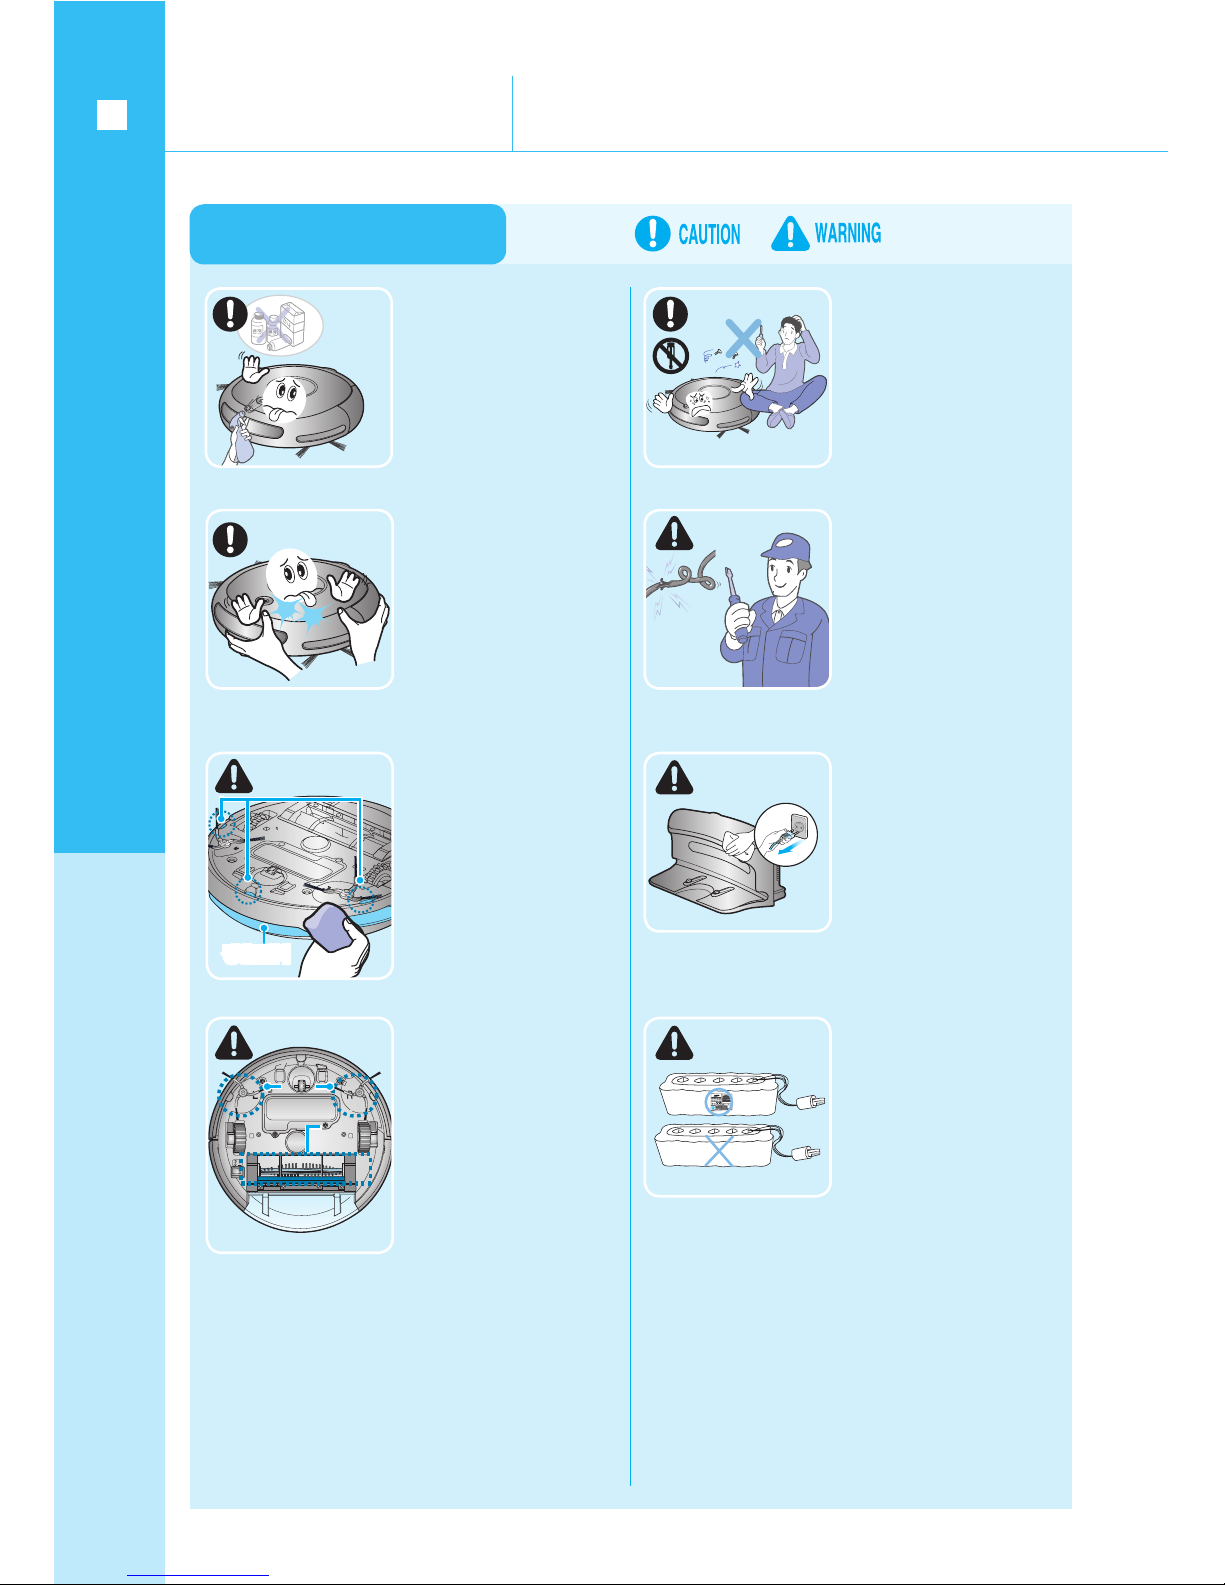
Handling after the use
During the handling, do
not directly spray water
or polish the outside with
volatile substances such
as benzene, thinner,
and alcohol etc.
▶ Fatal damage can be
inflicted on the product.
Never disassemble or
modify the robotic
vacuum cleaner except
qualified repair
technician.
▶ Fatal damage to the
product can be
happened.
Precautions for safety
preparation
10
These are the contents to secure the safety of user and to prevent damage of property.
Please have safe operation by reading carefully of the following items.
Always observe followings for
safety
Regularly wipe off foreign
material accumulated on
the obstacle sensor and
falling prevention sensor.
▶ The sensors may have
malfunction due to the
covering with foreign
material.
In the case of damaging
power supply cord,
exchange it through the
qualified repair
technician of customer
care center.
▶ There is the danger of
electric shock or fire.
When removing foreign
material, always turn off
the emergency switch in
the first place, and then,
use the brush for
cleaning.
▶ If suddenly activated,
injury or fatal damage
to the product can be
brought.
Do not handle the
charger before
separating the power
supply plug.
When exchanging
battery, call up the
customer care center of
Samsung Electronics.
▶ If using battery which is
not a legitimate
product, it will be the
cause of failure.
Do not squeeze with
force or strongly press
the bumper
▶ If bumper sensor
becomes abnormal,
collision with the
surface of wall or
fixture and so forth
can be happened.
측면
회전솔
측면
회전솔
측면
회전솔
측면
회전솔
측면
회전솔
측면
회전솔
측면
회전솔
측면
회전솔
측면
회전솔
측면
회전솔
측면
회전솔
측면
회전솔
파워브러시
파워브러시
파워브러시
파워브러시
파워브러시
파워브러시
파워브러시
파워브러시
파워브러시
파워브러시
파워브러시
파워브러시
파워브러시
파워브러시
파워브러시
파워브러시
파워브러시
파워브러시
파워브러시
파워브러시
파워브러시
파워브러시
추락방지 센서
추락방지 센서
추락방지 센서
추락방지 센서
추락방지 센서
추락방지 센서
추락방지 센서
추락방지 센서
추락방지 센서
추락방지 센서
추락방지 센서
추락방지 센서
추락방지 센서
추락방지 센서
추락방지 센서
추락방지 센서
추락방지 센서
추락방지 센서
추락방지 센서
추락방지 센서
추락방지 센서
추락방지 센서
추락방지 센서
추락방지 센서
추락방지 센서
추락방지 센서
추락방지 센서
추락방지 센서
추락방지 센서
추락방지 센서
추락방지 센서
추락방지 센서
추락방지 센서
추락방지 센서
장애물 센서
Page 11
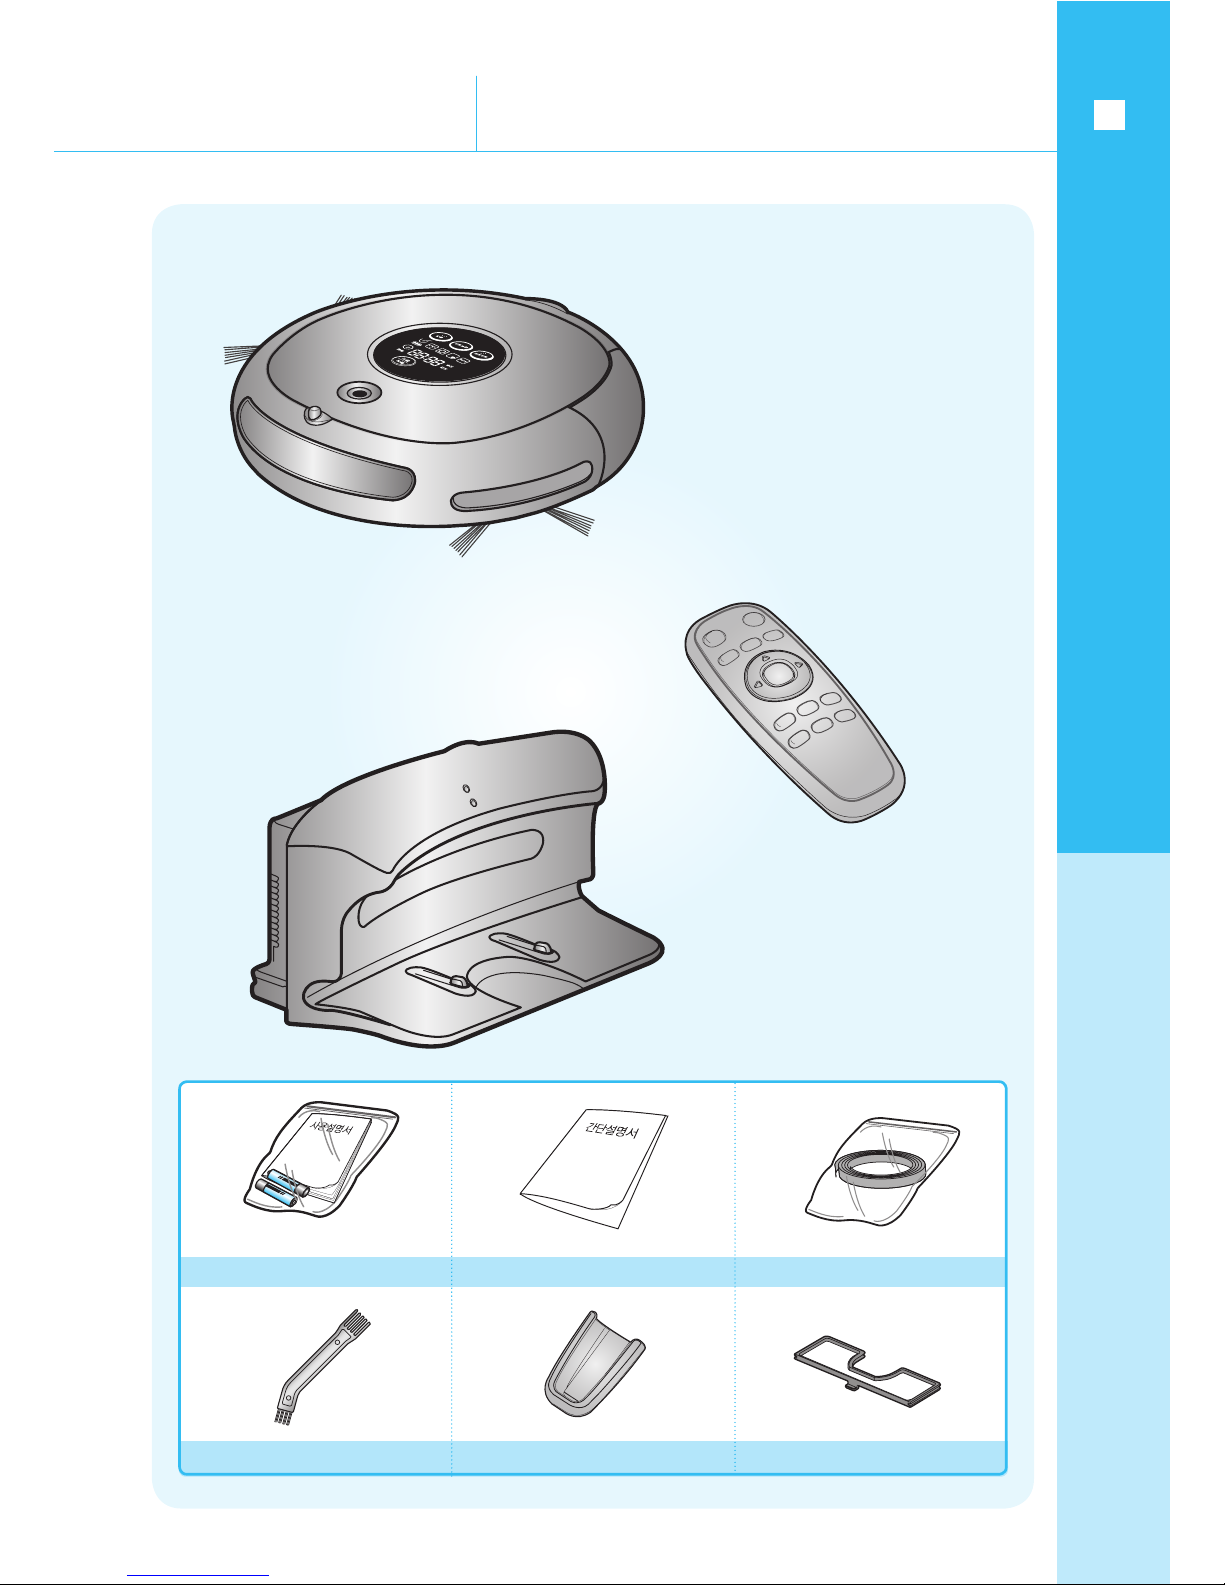
Components
preparation
11
Carefully confirm the
components.
■ Remote
controller
■
Main frame
■
Charger
Brush for cleaning Remote controller stand Spare HEPA filter
(AAA type dry cell)
Operating instruction/dry cell Simple instruction Entry prevention tape (1 set)
Page 12
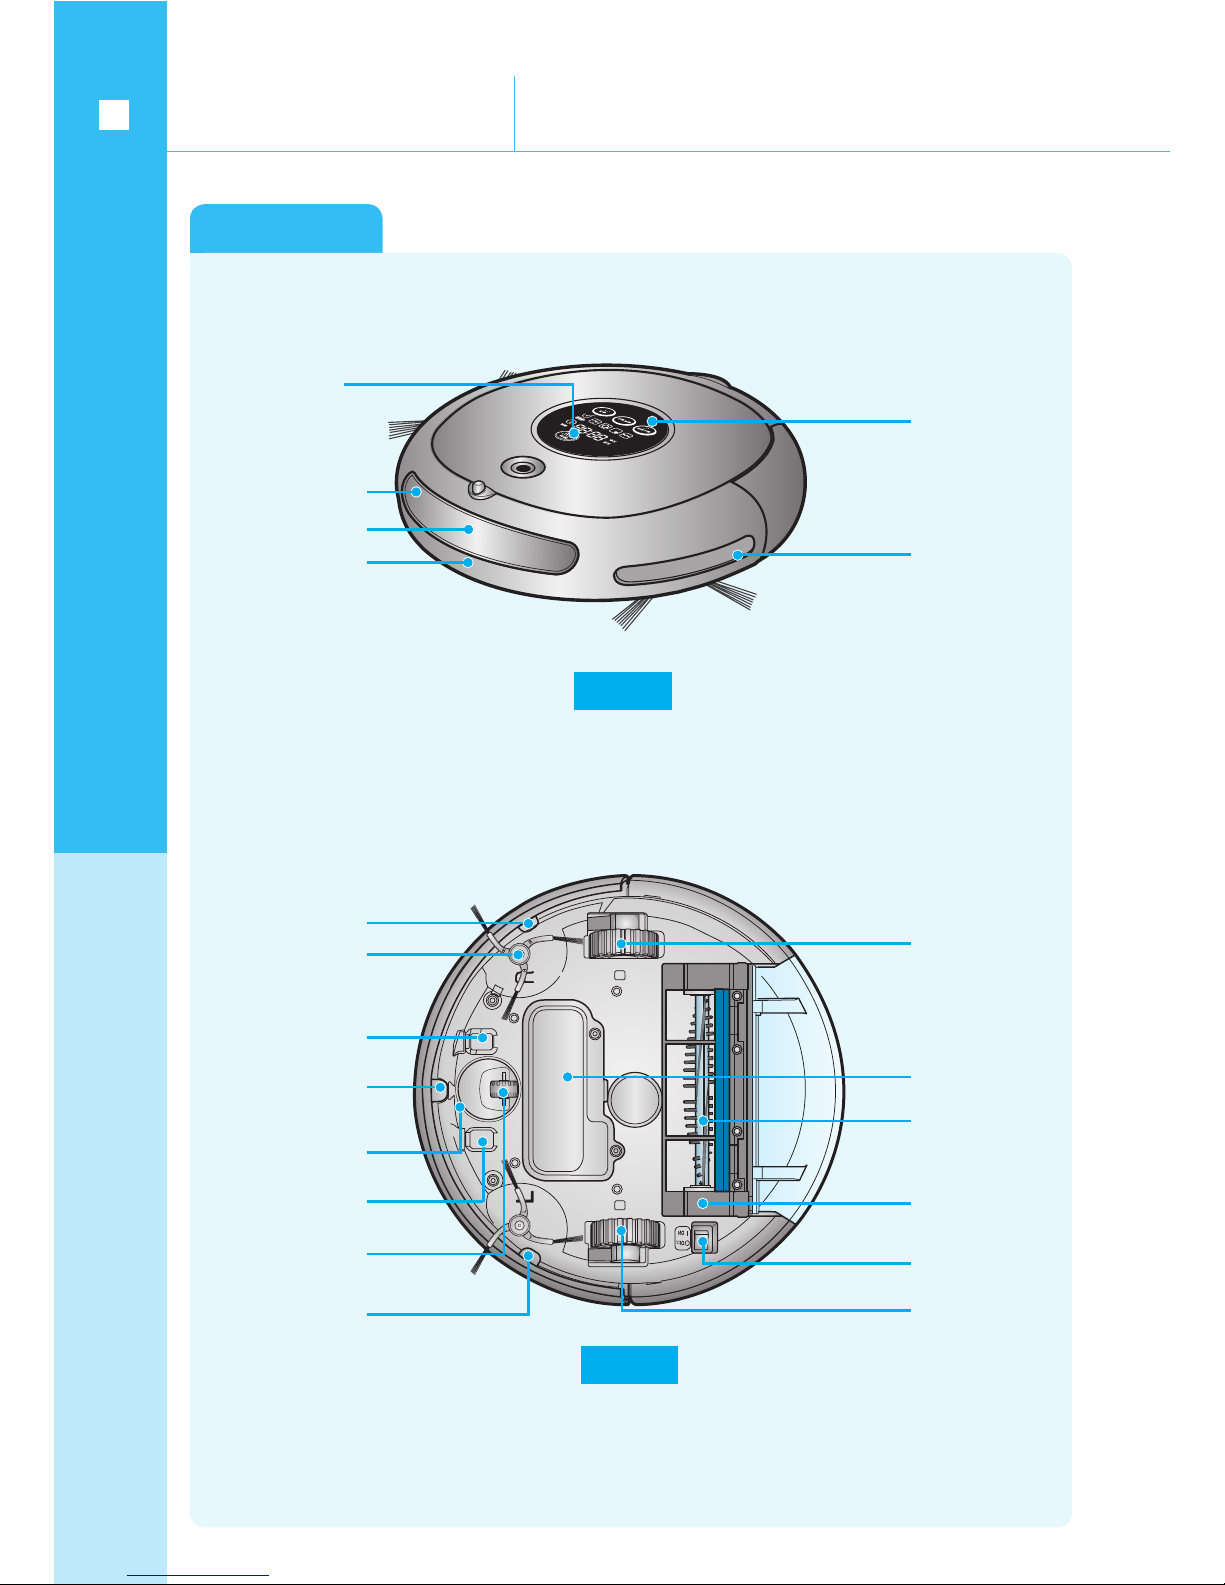
■ Main frame
Name of each section
preparation
12
Remember the names of
each section.
Front side
Driving wheel
Battery cover
Power brush
Bottom side
Falling prevention
sensor
Falling prevention
sensor
Side rotating brush
Charging pin
Falling prevention
sensor
Roller
Charging pin
Entry prevention
tape sensor
Power
brush cover
Driving wheel
Emergency switch
Manipulation
button
Obstacle sensor
Obstacle sensor
Bumper sensor
Receiving section of
remote controller
State indicating
window
Page 13
Remember the names of
each section.
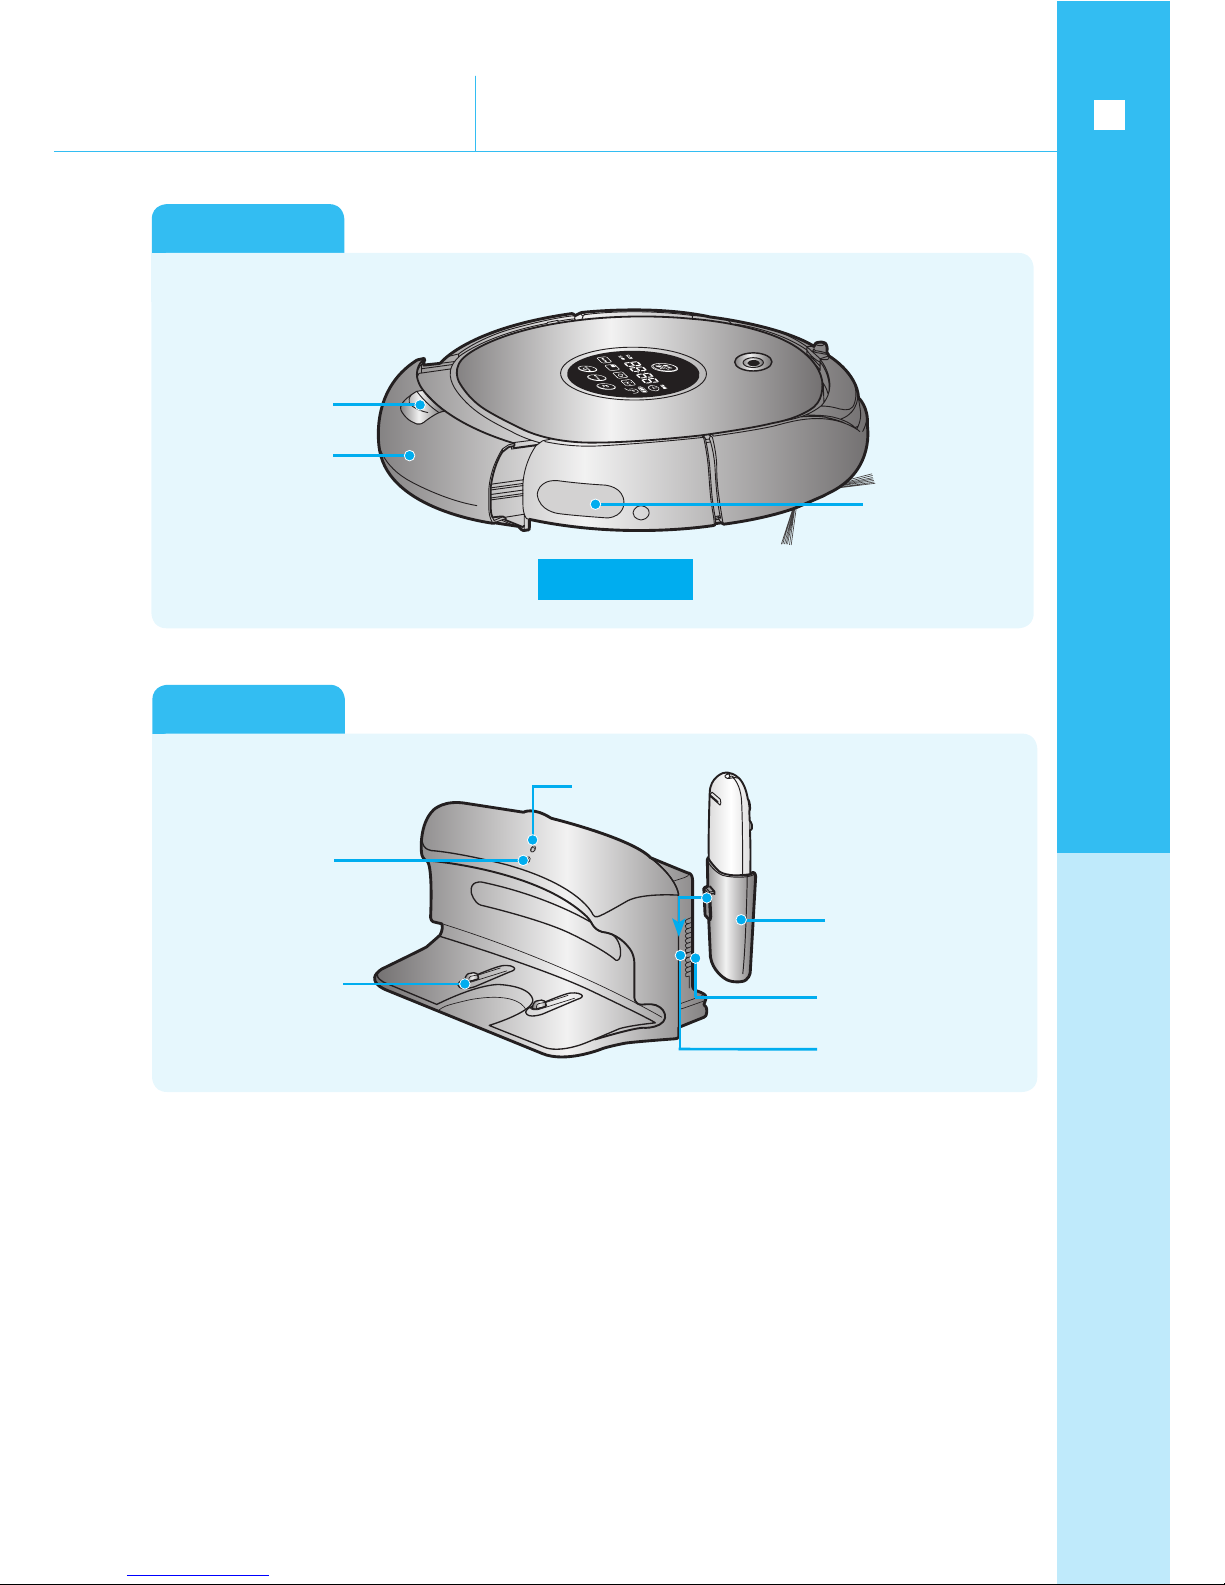
Name of each section
preparation
13
■ Main frame
Side section
Receiving section
of remote
controller
Dust bin
discharging button
Dust bin
■ Charger
Charging terminal
Remote controller
stand
Ventilation port
Catching sill
Charging
lamp
(green)
Power
lamp (red)
Page 14
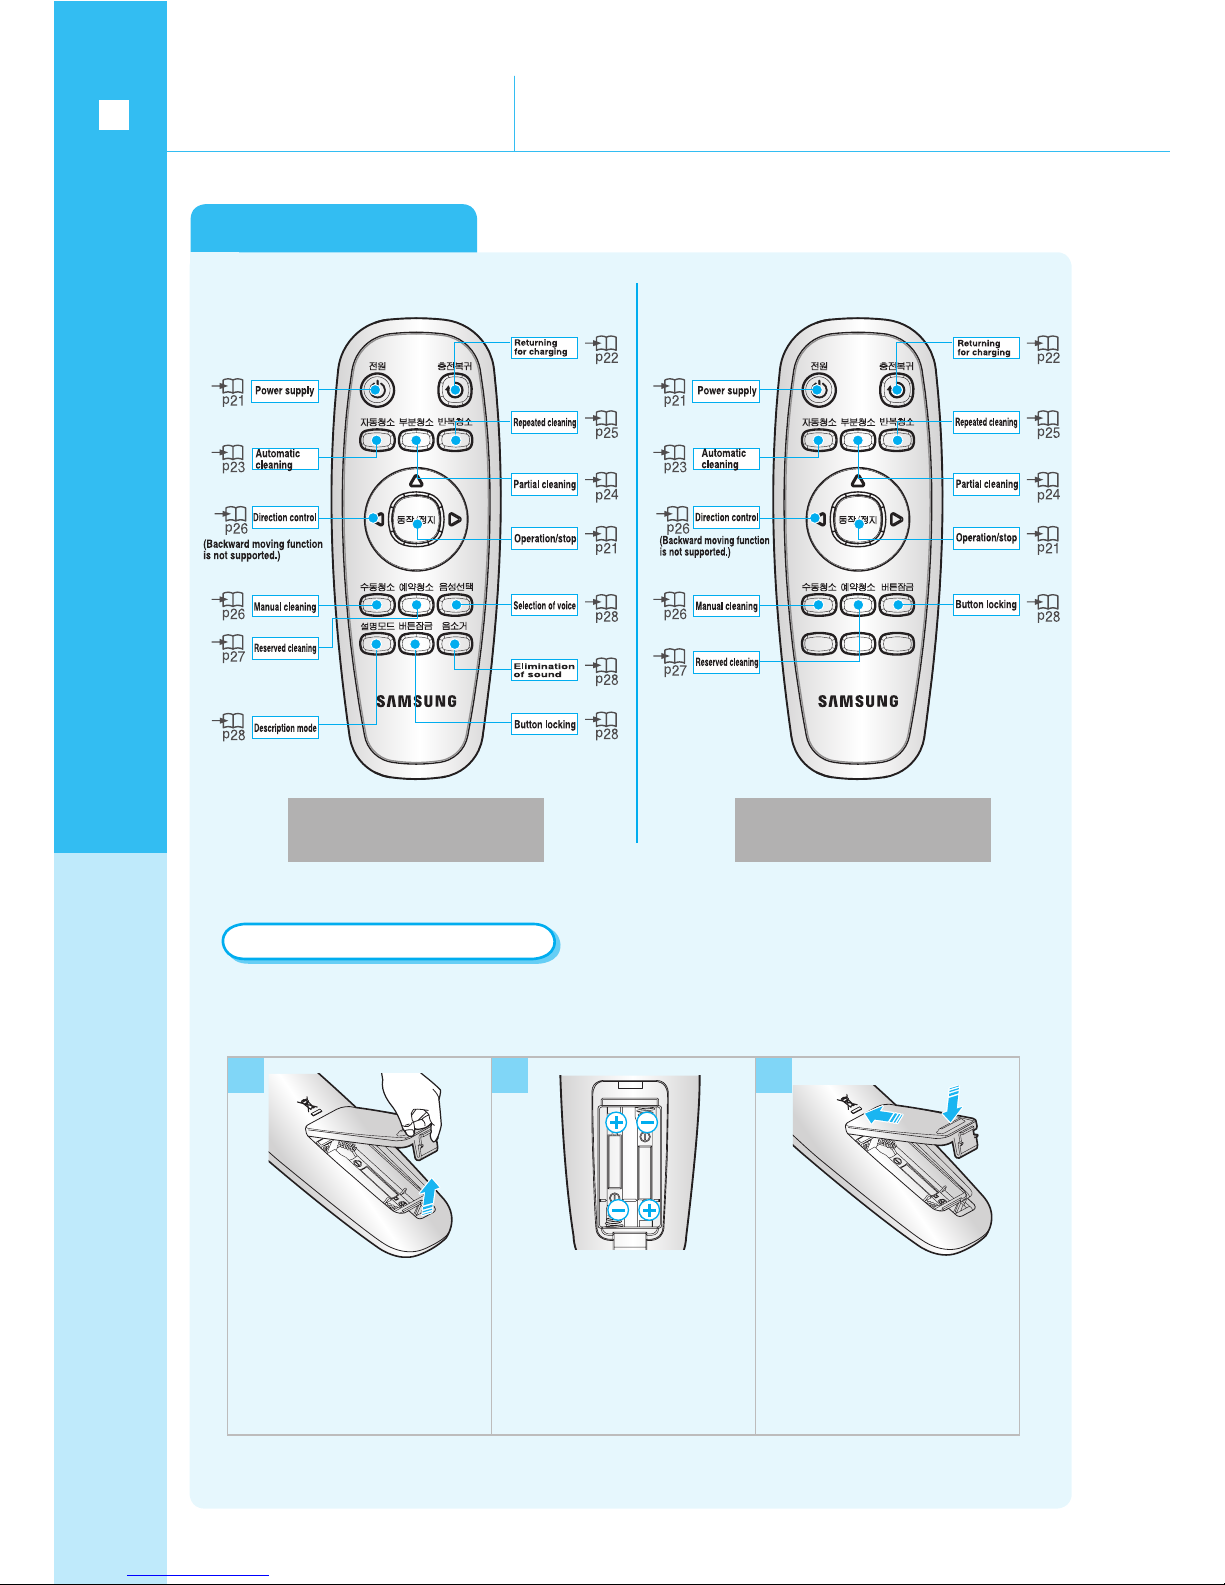
■ Remote controller
When purchasing the product, the dry cell is not existed at the remote controller inside.
Assemble the dry cell (AAA type) and use the product.
The method to put in dry cell
Press the cover of rear
side of remote controller
and pull up it to upward
Assemble the dry cell as shown
the picture in the remote
controller. (If the assembly of ⊕
and ⊖ is erroneously performed,
the remote controller will not be
activated.)
After matching the cover
of remote controller to the
groove, close it until the
“click” sound is
generated.
1 2
※ Dimension: Dry cell of AAA size
3
Name of each section
preparation
14
Remember the names of
each section.
VC-RA52V
VC-RL52V* SERIES
VC-RA50V* SERIES
VC-RL50V* SERIES
Page 15

Name of each section
preparation
15
Remember the names of
each section.
■ State indicating window
1
2
5
9 108
4
7
3
6
ⓐ ⓑ ⓒ ⓓ
1. Numeral indicating section
- Expressing reserved time indication,
progress status, and checking guide with
numeral, English letter, and graphic etc.
2. Battery
- Under charging: The progressing state of charging is
indicated with 3 stages and it will be
increased by one column at each stage.
- Under using: Remaining amount of battery is reduced by
one column at each stage from the full state.
(When being discharged completely, “LO” is
indicated while one column is flickering.)
3. Reserved cleaning
- Reserved cleaning icon is turned on
when setting up the reserved cleaning.
4. Button locking
- When the button locking button of
remote controller is pressed, the button of
main frame will be locked.
5. Returning to charging
- When the robotic vacuum cleaner is
returned to the charger for charging, the
icon will be turned on.
Indicating section
6. Cleaning mode indicating section
- Whenever pressing the cleaning mode button,
the cleaning mode will be appeared in
sequence.
ⓐ Automatic cleaning mode: The icon will be
turned on during the automatic cleaning.
ⓑ Partial cleaning mode: The icon will be turned
on during the partial cleaning.
ⓒ Repeated cleaning mode: The icon will be
turned on during the repeated cleaning.
ⓓ Manual cleaning mode: The icon will be turned
on during the manual cleaning.
7. Activation/stop
- Cleaning will be started or canceled.
8. Cleaning mode
- Start the cleaning by pressing the
button
after selecting the cleaning mode.
9. Reserved cleaning
- Use this when selecting the reserved cleaning.
(Establishment can be realized up to the
maximum of 23 hours.)
10. Returning to charging
- The cleaner will be returned for charging as the
icon of returning to charging is turned on.
Button section
Page 16

Turn on emergency switch by turning the main
frame upside down.
▶
If the icon is not turned on, the battery is in the state of
no storage, therefore, turn on emergency switch, and
perform charging to the charger.
Emergency switch ON/OFF
In order to use the robot vacuum cleaner, the emergency switch
located underneath of the main frame shall be turned on.
Installation of robotic vacuum
cleaner
installation
16
Perform the installation in accordance with the following
sequence.
Confirm at the time of
installation.
Installing the charger
In order to have charging, install the charger in the first place. When
purchasing the product, the battery is in the discharged state,
therefore, use the charger after completely charging the battery.
17
2
Charging
In order to use robot vacuum cleaner, the battery shall be
charged in advance.
3
Installing the entry prevention tape
Always attach entry prevention tape to no entry
area of robot vacuum cleaner.
20
4
■ Installation sequence
1
■ Emergency switch ON/OFF
When emergency switch is turned off, charging will not
taken place even if robotic vacuum cleaner is being
attached to the charger.
1
If robotic vacuum cleaner is to be activated, emergency
switch shall be turned on. If the emergency switch is
turned off, all the settings will be initialized.
16
18
Page 17

■ Installation of charger
2
Install the charger at the location which can easily
detected by the robot vacuum cleaner.
Evenly arrange the power supply cord along the wall
surface.
In the case when the floor material is comprised of
lumber material, it is desirable to make the charger facing
in the grain direction of wood.
3
4
5
Install the charger at the location where the floor and wall
are even.
1
Install the charger at the location where there are no
obstacles around approx. 1m in front of and 0.5 m to the
left and right side of the charger.
For charger, always maintain the inserted state
of its power supply plug.
Power supply
lamp
Charging lamp
●
If power is not supplied to the
charger, automatic charging can not
be accomplished because robotic
vacuum cleaner can not detect the
charger.
●
In the case when robotic vacuum cleaner is being separated from
the charger, natural discharging will be taken place.
Installation of robotic vacuum
cleaner
installation
17
Page 18

전원램프
충전램프
Under charging Completion of charging
Installation of robotic vacuum
cleaner
installation
18
Observe the following sequence before inserting the power
supply plug of charger.
Remember the installation
method.
● Roughly 120 minutes will be required to have complete charging after the purchasing and around 90 minutes can be operated.
● If charging is performed under the overheated state of battery, charging time can be delayed.
● Measures to be taken when charging in not conducted smoothly.
When automatic charging is impossible, perform the checking of following items.
- Turn on the emergency switch located at the bottom section of main frame after turned it off. (Reset)
- Insert again the power supply plug of the charger. (Reset)
- Confirm whether foreign material is adhered to the terminal section of the charger and wipe the main frame and charging terminal of the
charger with dried dust cloth.
- Confirm whether there aren’t any obstacles such as the object with excellent property of reflection, chair and so forth near to the charger.
● In the case when the robotic vacuum cleaner is being separated from the charger, natural discharge will be started.
- Make the robotic vacuum cleaner to be in the charged state at the charger as much as possible.
(If the house becomes empty for a long period of time due to the business trip, journey and so forth, store the robotic vacuum cleaner after
turned off the emergency switch and pulled off the power supply plug of the charger.)
■ Perform the charging
When purchasing the product, the
battery is in the discharged state,
therefore, it shall manually be charged
at the initial stage.
Turn on the emergency switch located
underneath of the main frame.
1
2
After accurately matching the charging pin of main frame
to the charging terminal of charger, push the main frame
until “piririk” sound is generated from the charger.
▶ Green light will be turned on at the charging lamp.
Confirm the charging state of robot vacuum cleaner.
- When charging is started, “remaining amount of battery”
and “
”are lighted in sequence on the state indication
window.
- When charging is completed, “remaining amount of
battery” and “FULL” are lighted on the state indication
window.
■ When the battery remaining amount indicator
is flickered during the cleaning, suction will
be stopped and automatic charging will be
performed by being moved to the charger.
■ During the automatic cleaning, if “LO” is indicated while the battery remaining
amount indicator is flickering, the cleaner will not be moved even with the
remote controller and main frame button, always perform the charging by
directly carrying the cleaner to the charger. (Remaining amount of battery is
almost in the state of nil.)
<Indication of charging>
Completion
of charging
Under
charging
Charging
is required
Power supply
lamp
Charging
lamp
Power
supply
lamp
Charging
lamp
Page 19

Get to know about the
battery.
Installation of robotic vacuum
cleaner
installation
19
■ Get to know about battery
■ Nickel-hydrogen battery which is not harmful to
environment is used, and as it has over-charging
protecting function, the battery can be used for a long
period of time.
■ Warranty period of the battery is 6 months from the
sales date.
■ When purchasing the battery, call to the customer care
center and confirm the legitimate product mark (
)
and model name before the purchasing.
▶ As this battery is exclusively used by the robotic
vacuum cleaner of Samsung Electronics, do not use it to
other electric home appliance or application.
▶ Do not conduct disassembly or modification.
▶ Perform the charging at the location with good
ventilation.
▶ Do not throw the battery to fire or heat it.
▶ Do not connect metallic material to (+) or (-) terminal.
▶ Store the battery at indoors (0℃~40℃).
※ When abnormality is happened to the battery, call to
near customer care center without disassembling it.
※ When charging and using time of battery become
shortened as the using amount (frequency of operation)
is increased, this is the case that the battery has been
arrived at the end of its life, therefore, call to the
customer care center for exchange.
This is the product to use 220V as the rated voltage.
Page 20

Get to know about installation
method.
Installation of robotic vacuum
cleaner
installation
20
■ Installation of entry prevention tape
Always attach entry prevention tape at no-entry area of
the robot vacuum cleaner.
■ Remove the vinyl tape before attaching it.
1
Attach the entry prevention tape at the area which has
less than 5 cm of height difference with the floor.
Examples) Veranda, rest room, low stairway, entrance
door of porch etc.
2
3
Attach the entry prevention tape at 5 cm in front of the
places such as the fireplace, heater, heat of fire,
hazardous area, and the area with moisture etc.
Attach the entry prevention tape in front of the room with
the threshold of more than 1 cm. (attached to the living
room)
▶ Only the threshold of less than 1 cm can be crossed,
and if it is exceeding 1 cm, the robotic vacuum cleaner
can be caught at the threshold.
Attach the entry prevention tape as it is without cutting.
Entry can be happened as the robotic vacuum cleaner may not
recognize it otherwise.
● Detour can be conducted through detecting by the falling
prevention sensor as falling danger area of the zone with more than
5 cm difference with the floor, however, for the area with less than
that height difference, entry will be conducted as it is not to be
recognized as the falling danger area.
● The entry prevention tape can be purchased from the customer
care center
4
Attach the entry prevention tape at the handrail or
entrance of stairway et cetera with falling danger.
▶ If dust is accumulated on the falling prevention sensor
window, falling can be happened as the robotic
vacuum cleaner does not recognize the falling danger
area.
▶ If being fallen, injury or damage to the product can be
happened.
Page 21

Using of robotic vacuum
cleaner
use
21
Get to know about operation
method.
■ Cleaning START/STOP
All functions of the robotic vacuum cleaner can be started
or stopped.
■ All functions of the robotic vacuum cleaner can be
activated when the emergency switch is turned on.
■
When the robotic vacuum cleaner is in operation, select
the desired function after canceling the operation by
pressing the
button.
When using
remote controller
When using
buttons of main
frame
Power supply ON/OFF
Remote controller: Press the power supply button.
Main frame: Press the
button.
▶ Buttons of main frame and battery remaining
amount indication, and cleaning mode icon will
be turned on.
ON
Remote controller: Press the power supply button.
Main frame: Press the
button for more than 3
seconds.
▶ Icons except for the battery remaining amount
indication will be turned off.
OFF
Cleaning START/STOP
Press the
button of remote controller or
main frame.
▶ When stopping the cleaning, the robotic
vacuum cleaner will be stopped.
STOP
Remote controller: Press automatic cleaning,
partial cleaning, repeated
cleaning, and manual
cleaning buttons.
Main frame: Select
automatic cleaning/partial
cleaning/repeated cleaning/manual
cleaning
with
button and press
button.
▶ Automatic cleaning will be performed when
pressing
button without selecting the
cleaning mode.
▶ When starting the cleaning, the robotic vacuum
cleaner will be moved.
START
Page 22

22
Using of robotic vacuum
cleaner
use
Get to know about operation
method.
When using buttons of main frame
When using remote controller
■ Returning for charging
The robotic vacuum cleaner can be returned to charger
for charging by the charging return button.
■ When the charging return button is in operation,
select the charging return button after cancel the
operation by pressing the
button.
1
2
If being wanted to stop in the middle of the charging
return, select the
button.
3
During the automatic charging test, press the charging
return button at 1.5 m in front of the charger.
▶ Confirm the installation state of charger.
- In the case when the charger is located at the place
from which the robotic vacuum cleaner can not be
induced.
- In the case when the distance between the charger
and robotic vacuum cleaner is more than 5 m: Long
time can be required for the charging return.
▶ Perform the manual charging for the following cases.
- In the case when installing the charger at recessed area
- In the case when the battery is completely discharged
- In the case when the robotic vacuum cleaner is being
locked due to obstacles (arrangement of furniture etc.)
- In the case when the threshold of charger installation place
can not be crossed (Height of threshold which can be
traveled: about less than 1 cm)
- In the case when “LO” is indicated while the remaining
amount indication of battery is flickering.
Select the charging return button
▶ Charging return will be performed as the main frame
icon
is turned on.
Returning for charging
Corrective measures when the charging return is not performed.
Page 23

Automatic cleaning
Using of robotic vacuum
cleaner
use
23
Get to know about operation
method.
■ Using of automatic cleaning
Automatic cleaning will be conducted while moving by itself until 1
cycle of the cleaning is completed.
■ When starting the cleaning from the attached state to the
charger, the movement is performed while the starting point is
being remembered, therefore, the charging return time will be
shortened.
■ When the battery is not sufficient during the cleaning, the
cleaning will be started again by moving to the remaining area
after the charging. (the number of re-cleaning times: 1 time)
Under cleaning
Completion of cleaning
Canceling of
setup
2
1
Setting of mode
Main frame button
Remote controller Sequence of setting
1회 3회 4회2회
▶
Get to know about re-cleaning function
●
When being recognized that the cleaning is completed,
re-cleaning will not be performed.
● If arbitrarily moving the robotic vacuum cleaner or
manipulating the button while it is under automatic charging,
re-cleaning will not be performed since these are being
recognized as the completion of the cleaning.
Do not conduct arbitrary moving or manipulating the button of the
robotic vacuum cleaner which is in the cleaning operation. Since
these are being recognized as the completion of the cleaning, the
cleaning operation will be started from the beginning.
Page 24

Using of robotic vacuum
cleaner
use
24
Get to know about operation
method.
Partial cleaning
■ Using of partial cleaning
When small fragments of cake et cetera are being fallen,
these can be cleaned easily.
■ Move the robotic vacuum cleaner to the place where
partial cleaning is required.
▶ The area with roughly 1.5m of width x roughly 1.5m
of length is supposed to be cleaned.
▶ When the cleaning is completed, the cleaner will be
standby for next operation at the original place after
indicating the END mark.
Under cleaning
Completion of
cleaning
1
Setting of mode
Canceling of
setup
2
Main frame button
Remote controller Sequence of setting
▶
Under the attached state to the charger, the partial
cleaning will not be performed.
Page 25

Using of robotic vacuum
cleaner
use
25
Get to know about operation
method.
▶
■ Using of repeated cleaning
Even under the state of completion of cleaning, repeated cleaning will be
performed until one column of battery is started to be flickering.
■ When starting the cleaning from the attached state to the charger, the
movement is performed while the starting point is being remembered,
therefore, the charging return time will be shortened.
■ When the battery is not sufficient during the cleaning, the cleaning will
be started again by moving to the remaining area after the charging.
(the number of re-cleaning times: 1 time)
Under cleaning
1
Setting of mode
Canceling of
setup
2
Main frame button
Remote controller Sequence of setting
Get to know about re-cleaning function
● If arbitrarily moving the robotic vacuum cleaner or manipulating the
button while it is under automatic charging, re-cleaning will not be
performed since these are being recognized as the completion of the
cleaning.
Do not conduct arbitrary moving or manipulating the button of the
robotic vacuum cleaner which is in the cleaning operation. Since
these are being recognized as the completion of the cleaning, the
cleaning operation will be started from the beginning.
Repeated cleaning
Page 26

Using of robotic vacuum
cleaner
use
26
Get to know about operation
method.
Manual cleaning
▶
■ Using of manual cleaning
Cleaning can be performed while directly moving the
robotic vacuum cleaner with the remote controller.
■ Move the robotic vacuum cleaner to the place where
manual cleaning is required.
■ Manual cleaning can be performed with the remote
controller only.
Under cleaning
1
Setting of mode
Main frame button
Remote controller Sequence of setting
Under the attached state to the charger, the manual
cleaning will not be performed.
Even at the entry prevention tape attached area, falling danger area
and so forth, the entry may be performed when attempting forced
entry with remote controller.
Directional
control
(forward,
left, right)
Backward
function will
not be
supported
Canceling of
setup
2
Page 27

Canceling of setup
Get to know about operation
method.
Using of robotic vacuum
cleaner
use
27
Reserved cleaning
■ Setting of reserved cleaning
Even in absentia, automatic cleaning will be performed at
desired time. (available time of reservation: 23 hours to the
maximum)
■ The reserved cleaning will be performed only when the
cleaner is attached to the charger.
Adjust the desired “time”
Whenever pressing the
button, one hour by one
hour will be increased.
2
1
Enter to the reserved
cleaning mode
Completion of setting
3
Icon is turned off.
Icon is turned on.
Main frame button
Remote controller Sequence of setting
Ex) When assuming that the cleaning
will be started after 5 hours from
the present time
▶
At the completion of the setting, if button instead of reserved cleaning button is pressed,
the product will be coming out from the reserved cleaning mode.
Page 28

Select desired voice guide by pressing the
voice selecting
button.
▶ Whenever pressing, it will be setup in the sequence of the
sound deletion → voice guide.
Selection of voice (exclusive use for VC-RA52V,VC-RL52V* SERIES)
Voice guide : Voice guide will be provided.
Sound effect : Melody will be provided.
Sound deletion : Sound will not be produced.
Using of robotic vacuum
cleaner
use
28
Get to know about operation
method.
■ Using additional functions
More simple and convenient use of the robotic vacuum
cleaner will be accomplished by utilizing various additional
functions.
■ Additional functions can only be setup with the
remote controller.
안녕하세요.
When pressing the button locking button, the main frame
buttons will be locked.
▶ Whenever pressing, it will be setup in the sequence of
the button locking → releasing of button locking.
Button locking function
Press the description mode button.
※ When pressing the button, voice guide will be performed in
sequence.
Description mode function (exclusive use for VC-RA52V,VC-RL52V* SERIES)
Introducing each function of the robot vacuum cleaner
Description of the cleaning mode and simple embodiment
When pressing the
sound deleting
button, the sound will not
be produced.
▶ Whenever pressing, it will be setup in the sequence of the
sound deletion → voice guide.
Sound deleting function (exclusive use for VC-RA52V,VC-RL52V* SERIES)
VC-RA52V
VC-RL52V* SERIES
VC-RA50V* SERIES
VC-RL50V* SERIES
The description mode will not be conducted under the attached state to
the charger, therefore, perform this function after moving it to wide area.
※ The mail reservation function will be applied to VC-RA8*
model only.
Page 29

Handling of robotic vacuum
cleaner
installation
29
Perform regular cleaning.
Always observe the following items.
Get to know about cleaning and
handling method.
■ Handling method of sensor window and camera
■ Precautions before the handling
Perform the handling only
after turned off the
emergency switch at the
bottom of the main frame.
▶ Never spray water, thinner, and
benzene et cetera to the main
frame of robotic vacuum cleaner
for the purpose of cleaning.
▶ When wiping all of the sensor windows or camera, sweep
them down lightly with smooth cloth.
▶ In the case when the emergency switch is damaged, call to the
customer care center so as not to have danger.
▶ Do not arbitrarily modify the robotic vacuum cleaner or use any
means or mechanical device to accelerate the deformation of its
shape.
▶ Before the handling, always
turn off the emergency
switch at the bottom of the
main frame. Wound can be
resulted due to sudden
action of the robotic vacuum
cleaner.
Front sensor windows
State
indicating
window
Front sensor windows
and camera
Falling prevention
sensor windows
Rear sensor windows
Camera
Page 30

Handling of robotic vacuum
cleaner
installation
30
Regularly empty dust bin and take care of the HEPA filter.
Always observe the following items.
Get to know about cleaning and
handling method.
■ Handling method of dust bin and HEPA filter
Separate the dust bin by pulling it after pressing the dust
bin discharging (PUSH) button.
1
Separate the dust bin cover in the arrow direction.
2
Separate the HEPA filter from the dust bin.
1. Dust bin: Wipe the moisture completely.
2. HEPA filter: Assemble this after completely dried.
3
HEPA filter
Dust bin
cover
Shake the dust off from the HEPA filter and dust bin.
※ Water washing is possible.
When water washing has been performed..
1. Dust bin: Wipe the moisture completely.
2. HEPA filter: Assemble this after completely dried.
4
Re-assemble the HEPA filter into the dust bin.
▶ Assemble in such a way that the lattice pattern of the
HEPA filter goes to the bottom side.
If the direction is reversed, it will not be assembled.
5
After closing the dust bin cover, re-assemble it to the
main frame.
6
When starting the cleaning, empty the dust bin in
the first place.
▶ When separating the dust bin, be careful not to be
spilt of the dust accumulated in the dust bin.
▶ Empty the dust bin under the following cases.
1. When dust is existed in the dust bin.
2. When the sectional force becomes suddenly
weakened.
3. When the noise becomes abruptly increased.
If the dust bin is assembled to the robotic vacuum cleaner under
the state of not attaching the HEPA filter, the inspection code
C08 is generated, therefore, always insert the HEPA filter.
Page 31

6
When suction force of the robotic vacuum cleaner is weakened or trembling
noise is generated, the cleaner may have been blocked by foreign material.
When being blocked by foreign material,
remove it as follows.
Handling of robotic vacuum
cleaner
installation
31
After confirming whether foreign material is existed or not,
separate it by pressing the cover fixing hook.
Separate the dust bin by pressing the dust bin
discharging (PUSH) button.
Lift the power brush up from the main frame.
Remove foreign materials such as hair or thread clung to
the power brush with the cleaning brush or vacuum
cleaner.
■ Handling method of power brush
Always turn off the emergency switch at the bottom
of main frame before handling.
2
3
4
●
In order to prevent the blocking by foreign material, be careful not to let the cleaner
inhale toothpick, cotton-swabstick and so forth during the cleaning.
●
If removing of foreign material is difficult, call to the customer care center
●
As the power brush performs the cleaning by sweeping up the dust of the floor,
foreign materials such as thin and long thread, hair and so forth can be wound on it,
therefore, perform the cleaning through regular confirmation.
As the dust on the dust bin can be spilt, separate the
dust bin before handling the power brush.
After insert the upper section of the cover into the groove (3
points), perform the assembling by lowering it downward until
“click” sound is generated.
1
When the handling is over, accurately fix the power
brush in the emergency switch direction, and then,
secure the opposite side with the same method.
5
Page 32

L
Handling of robotic vacuum
cleaner
installation
32
When the bottom surface to be cleaned is rough or frequent wall surface
cleaning is conducted, the side rotating brush can be bent or scattered.
If side rotating brush becomes bent or dirty,
take the following measures.
Always turn off the emergency switch at the bottom
of main frame before handling.
■ Handling method of side rotating brush
1
2
4
3
Confirm whether the side rotating brush becomes bent or
foreign materials are adhered.
Wear rubber glove, and after wrapping the side rotating
brush with steam towel etc. for about 10 seconds, wipe
them away.
When large amount of hair, thread, etc. are clung to the
gap between the main frame and side rotating brush,
remove them by separating the side rotating brush with (+)
driver. When re-assembling, conduct the assembling after
confirming the “L” mark inscribed at the side rotating brush
and the “L” mark of the main frame bottom.
(R mark has been inscribed for the right side of the brush.)
Perform the wiping with the same method as that of the
No. 2 above while rotating the side rotating brush.
As foreign material like hair can easily be adhered to the
side rotating brush, remove them frequently. If large
amount of foreign materials are being caught there, there
is the worry of damaging the side rotating brush.
Page 33

Handling of robotic vacuum
cleaner
installation
33
If the inspection code of 002, 003 are appeared on the main frame
state indicating screen, take actions as follows.
If foreign material is caught in the driving wheel, take
the following measures.
■ Handling method of driving wheel
Always turn off the emergency switch at the bottom
of main frame before handling.
▶ If the robotic vacuum cleaner goes forward along a
curved path suddenly, foreign material may have been
caught in the driving wheel.
2
After confirming whether there is any foreign material at
the driving wheel, remove it with stick or tweezers etc.
whose end are not sharp.
1
Spread smooth cloth on the floor and gently put down the
main frame after turning it upside down.
Page 34

Confirming items before
reporting the failure
others
34
If service is requested when it is not a case of failure, the service charge
will be requested, therefore, read the operation manual carefully.
Always confirm these before
reporting the failure.
Symptom Confirmation Corrective measures
The robotic vacuum
cleaner doesn’t
move at all before
the cleaning.
▶ Has the dust bin been assembled?
▶ Has the emergency switch been
turned on?
▶ Has the cleaning mode
of state
indicating window been turned on?
▶ At the state indicating window, is the
“LO” indicated at the one column while
flickering at the battery remaining
amount?
▶ If the dry cell of the remote controller
has been discharged, the operation will
not be conducted.
▶ Assemble the dust bin.
▶ Turn on the emergency
switch.
▶ Press the
button. (When
turning it off, press the
button for more than 3
seconds.)
▶ Move the robotic vacuum
cleaner to the charger and
conduct the charging.
▶ Exchange the dry cell. (AAA
type)
The robotic vacuum
cleaner doesn’t
move during the
cleaning.
▶ At the state indicating window, is
the “LO” indicated at the one
column while flickering at the
battery remaining amount?
▶ Is the robotic vacuum cleaner
being caught to the cable on the
floor?
▶ Is the robotic vacuum cleaner
being caught to the floor with
difference of height?
- Driving wheel is being lifted.
▶ Is thin towel (cloth) being wrapped
in the driving wheel?
▶ Is the robotic vacuum cleaner
being caught to the threshold?
▶ Move the robotic vacuum cleaner
to the charger and conduct the
charging.
▶ After turning off the emergency
switch, remove the cable on the
floor.
▶ After turning off the emergency
switch, move the robotic vacuum
cleaner to other place.
▶ After turning off the emergency
switch, remove the thin towel.
▶ After turning off the emergency
switch, move the robotic vacuum
cleaner to other place.
Suction force
becomes weakened
during the cleaning.
▶ Confirm whether there is
some dust at the dust bin
inside.
▶ Confirm whether suction port
has been blocked by foreign
material.
▶ Confirm whether the HEPA
filter has been blocked
▶ Stop the robotic vacuum cleaner
and empty the dust bin.
▶ After turning off the emergency
switch, remove the foreign
material from the suction port.
▶ Neatly clean the HEPA filter.
Page 35

Confirming items before
reporting the failure
others
35
If service is requested when it is not a case of
failure, the service charge will be requested,
therefore, read the operation manual carefully.
Always confirm these before
reporting the failure.
Symptom Confirmation Corrective measures
▶ Confirm whether the power
supply plug of the charger has
been inserted to the outlet.
▶ Take away obstacles within
approx. 1 m in the front of and
approx. 0.5 m to the left and right
side of the charger.
▶ When foreign material is existed at
the terminal of the charger, wipe
it off with dry towel.
The robotic vacuum
cleaner can’t find the
charger.
▶ Confirm whether the entry
prevention tape has been
installed approx. 5 cm in front
of the no entry area.
Entry is being conducted
even if the entry prevention
tape has been installed.
▶ Attach the entry prevention
tape approx. 5 cm in front of
the no entry area.
▶ Cleaning in the diagonal
direction can be happened in
the following cases.
- When the cleaner has
been partially charged
from the charger.
- When moving to another
area through the shortest
distance after the cleaning.
- When the contact angle
with obstacle is not the
right angle (90°)
- In the case when the floor
material is tile or wooden
floor.
The cleaning is being
done suddenly in the
diagonal direction.
▶ The cleaning direction will be
decided in accordance with
the initial position, and as the
cleaning is being performed
by drawing the map, there will
not be any deleted place.
(This is the normal
movement.) Install the charger
in the grain direction of the
wood and start the cleaning
from the attached state to the
charger.
Page 36

Confirming items before
reporting the failure
others
36
If service is requested when it is not a case of failure, the service charge
will be requested, therefore, read the operation manual carefully.
Get to know about corrective measures for
each inspection code.
Corrective measures
inspection code
Cause
▶ Problem such as jamming, catching, locking and
so forth are occurred during the traveling of the
robotic vacuum cleaner.
▶ After turned off the emergency switch at the
bottom side, move the robotic vacuum cleaner
to other place.
▶ Foreign materials (thread,
paper, toy, etc.) are caught to
the power brush.
▶ After turned off the emergency switch
at the bottom side, remove foreign
material caught in the power brush.
▶ Foreign materials (thread,
paper, toy, etc.) are caught to
the left side driving wheel.
▶ After turned off the emergency switch at
the bottom side, remove foreign material
caught in the left side driving wheel.
▶ Foreign materials (thread,
paper, toy, etc.) are caught to
the right side driving wheel.
▶ After turned off the emergency switch at
the bottom side, remove foreign material
caught in the right side driving wheel.
▶
Inspection of bumper
sensor is required.
▶ Gently pull the pressed bumper to the outside.
▶ Foreign materials (dust, stain,
etc.) are accumulated on the
obstacle sensor window.
▶ After turned off the emergency switch at the
bottom side, wipe the foreign materials
accumulated on the front and rear sensor
windows with smooth cloth.
▶ Foreign materials (dust, stain, etc.)
are accumulated on the falling
prevention sensor window.
▶ After turned off the emergency switch at the
bottom side, wipe the foreign materials
accumulated on the falling prevention sensor
window with smooth cloth.
▶
Insertion of dust bin is
impossible.
▶ Insert the dust bin assembled with filter
until “click” sound is generated.
▶
Foreign materials (thread,
cloth, etc.) are caught to
the side rotating brush.
▶ After turned off the emergency switch at the
bottom side, remove foreign material from the
side rotating brush.
31
33
33
29
29
30
32
※ When pressing activation/stop button or turning off the emergency switch, the inspection
code will be released.
※ When inspection code is generated, voice guide will be presented (exclusive use for
VC-RA52V,VC-RL52V* SERIES)
Page 37

Product specification
others
37
93 mm(Height)
355 mm(Length)
355 mm(Width)
275 mm(Width)
161 mm(Length)
122 mm(Height)
Main frame
Charger
Page 38

Product specification
others
38
■ Product specification
Item
Classification
Mechanical
specification
Electrical
specification
Cleaning
section
VC-RA52V
VC-RL52V* SERIES
VC-RA50V* SERIES
VC-RL50V* SERIES
※ Charging and cleaning time may have differences in accordance with
the use condition.
355mm
93mm
4.0kg
Single phase AC220V/60Hz
50W
25W
14.4V/2,000mA
Approx. 0.6 ℓ
Automatic charging/manual charging
Automatic, partial, repeated, manual, and reserved
Approx. 120 minutes
Approx. 90 minutes
O
Recognition of ceiling image
Button type
355mm
93mm
4.0kg
Single phase AC220V/60Hz
50W
25W
14.4V/2,000mA
Approx. 0.6 ℓ
Automatic charging/manual charging
Automatic, partial, repeated, manual, and reserved
Approx. 120 minutes
Approx. 90 minutes
X
Recognition of ceiling image
Button type
Diameter
Height
Weight
Power supply voltage
Power consumption for charging
Power consumption for main frame
Battery specification
Dust collecting capacity
Charging method
Cleaning mode
Charging time
Charging time
Voice guide function
Cleaning method
Button type of main frame
(based on wooden floor)
Page 39

Disposal guide of waste
electronic product
others
39
For the sake of environmental protection and recycling of resources, waste electronic
product shall be disposed as follows in accordance with the meter rate system.
Dispose the waste electronic product
as follows.
Disposal without
charge
Disposal with
charge
What is the recycling mark? What is the material indication mark?
This is the mark to indicate the articles which
can be recycled among the waste generated
after use of the product so that it can be
distinguished by the user. (examples: papers,
scrap irons, glass bottles, and synthetic resins)
This is the mark to be indicated so that the
waste which can be recycled can easily be
distinguished by the recycling enterprise etc.
through the indication of the material of
synthetic resin component.
In the case of discarding the used product without purchasing a new one,
it can be disposed by inquiring to the corresponding village office.
In the case of purchasing new product from an agency of Samsung
Electronics and discarding the used one, it will be disposed without
charge when delivering the new product.
[Green management] of Samsung Electronics
Samsung Electronics prevented environmental contamination accident through the
establishment of environmental management system in June, 1992, and after
announcing ‘environmental policy’ for continuous improvement, they declared the
[green management] in May, 1996. The green management of Samsung Electronics is the expression of the will to
participate for the embodiment of affluent living of human and global environmental preservation by recognizing the
environment, safety, and health as the core elements of enterprise management activity and through the active
promotion of this.
Page 40

Memo
Page 41

Memo
Page 42

Memo
Page 43

This warranty is only to be used in Korea, and as this will
not be published again, please keep this safely with the
operation manual.
Service without charge
Service with charge
Customer’s pattern of damage
Contents of compensation
When an important repair is required within 10 days after the purchasing date.
When an important repair is required within 1 month after the purchasing date.
The damage occurred during the transport process and product installation when purchasing the product
The failure, for which important repair is required, occurred to the exchanged product within 1 month.
When the exchange is impossible
When up to the 2nd time of failures are generated with the same defect.
When the 3rd failure is generated with the same defect.
When the 5th failure is generated with different defect.
In the case when the servicing enterprise loses the product for which the repair has been requested by customer
In the case when the repair becomes impossible as the component for repair is not being possessed within the component possession period.
When the repair is impossible even though the components is available.
In the case when the repair is impossible.
In the case when the repair is possible.
Repair is
possible
When failures
on the
performance,
function are
occurred
under normal
use state
within the
component
possession
period
In the case of failure due to
intention, mistake of customer
Exchange of product or reimbursement of purchasing price
Exchange of product or repair without charge
Exchange of product
Reimbursement of purchasing price
Repair without charge
Exchange of product or reimbursement of purchasing price
Exchange of product after collecting the amount corresponded to the repair with charge
Repair with charge
Not applicable
Repair with charge
Repair with charge
Repair with charge
Reimbursement by adding 10% to the amount for which
fixed amount depreciation has been conducted.
Reimbursement after conducting the fixed amount depreciation
Exchange of product by applying depreciation after collecting the amount corresponded to the repair with charge
Repair with charge
Within the warranty period
After the warranty period
2. In the case of the failure due to the mistake of customer
When failure is occurred due to the negligent handling of customer or erroneous repair
- When failure is occurred through erroneous use of electric capacity
- When failure or damage is occurred due to the external impact or dropping etc.
- When failure is occurred through the use of consumables, optional items which have not been
designated by this company.
- When failure is occurred through the repair by the person who is not the technician of Samsung
Electronics Service Inc. which is the entrusted service company of Samsung Electronics Inc. and
of the cooperation company.
- When failure is occurred because of not following the “precautionary items” in the operation
manual.
3. Other cases
When failure is occurred due to the natural disasters (lightening, fire, sea water damage, flood
damage, etc.)
In the case when the life of consumables is exhausted (battery, oscillator, lamps, drum, filters, etc.)
1. In the case when it is not the failure of product such
as washing of the device, adjustment, operational
instruction, or installation etc.
- Simple adjustment without operational instruction and disassembly
- Problems from external environment such as internet, antenna,
and wire signal etc.
- Initial installation of the delivered product
※ When installed by service after the purchasing, the service
charge will be requested.
- Deterioration of installation due to the movement of product,
removal etc.
- Handling of filters and removing of foreign material from
accessories (hose, brush, and pipe etc.)
- Description of failure due to other company’s product (including
software)
※In the case of use by converting to business purpose with general product, half of the warranty period will be applied.
※In the case of no-failure, if service is requested, corresponding charges will be requested, therefore, always read the operation manual carefully.
Page 44

Customer consultation office
02-541-3000, 080-022-3000
Representative telephone number of the customer care center:
Anywhere in this country
1588-3366
When accurately informed the model name of product, state of failure, and contact address, any
anxieties of customer will always be kindly consulted and rapid service will be provided.
Home page of the customer care center:
www.samsungsvc.co.kr
The cyber service center, in which reception of service and real time cyber consultation at the date
and time exactly desired by customer can be realized, is operated.
Internet home page
http://www.sec.co.kr
■
Address: 271 Oseon dong, Gwangsan gu, Gwangju metropolitan city
■
Manufacturer: Samsung Gwangju Electronics Inc.
Manufacturer: 271 Oseon dong, Gwangsan gu, Gwangju metropolitan city
Operation manual
DJ68-00517B REV(0.6)
 Loading...