

Samsung VAU-5863 User Manual [en, en]

DJ68-00075J REV(0.0
)

Vacuum Cleaner
Commercial Products
Operating
Instructions
VAU-5863
Read these instructions before operating the vacuum cleaner

Fill in and retain
Index
Safety lnstructions
Warning:
The model and serial number are located on the bottom of the cleaner.
For your personal records, please enter the COMPLETE model and serial number
in the spaces provided and retain this information.
Your cleaner is model
and has serial number
It is suggested that you attach your sales receipt to this owner’s manual.
Verification of date of purchase may be required for warranty service of your
SAMSUNG product.
Thank you for purchasing a Samsung vacuum cleaner. When using an electrical
appliance, basic precautions should always be followed, including the following:
To reduce the risk of fire, electric shock, or injury:
··
Do not leave appliance unattended when plugged in. Unplug the vacuum from the
outlet when it is not in use, or when it is being cleaned.
··
Do not use outdoors or on wet surfaces.
··
Do not allow to be used as a toy. Close attention is necessary when used by or
near children.
··
Use only as described in this manual. Use only manufacturer’s recommended
attachments.
··
Do not use with damaged cord or plug. If appliance is not working as it should, or
has been dropped, damaged, left outdoors or dropped in water, take it to a
service center.
··
Do not pull or carry the vacuum by the cord, or use the cord as a handle. Do not
close a door on cord, or pull the cord around sharp edges or corners. Do not run
the appliance over its cord. Keep the cord away from heated surfaces.
··
Do not unplug the vacuum by pulling on the cord. To unplug, grasp the plug, not
the cord.
··
Do not handle plug or appliance with wet hands.
··
Do not put any object into vacuum openings. Do not operate with any opening
blocked:Keep free of dust, lint, hair and anything that may reduce air flow.
··
Keep hair, loose clothing, fingers and all parts of body away from openings and
moving parts.
··
Do not use to pick up anything that is burning or smoking, such as cigarettes,
matches or hot ashes.
··
Do not use without dust bag and filters in place.
··
Turn off all controls before unplugging.
··
Use extra care when cleaning on stairs.
··
Do not use to clean up flammable or combustible liquids such as gasoline. Do not
use the vacuum in areas where such liquids may be present.
··
Store your cleaner indoors in a cool, dry area.
··
Do not use extension cords or plug into an electrical outlet with inadequate
current carrying capacity.
··
Avoid vacuuming up sharp objects.
··
Always turn this appliance off before connecting or disconnecting the hose,
replacing bags, or removing the bottom plate for maintenance.
··
Unplug electrical appliances before vacuuming them.
PLEASE READ ALL WARNINGS AND INSTRUCTIONS BEFORE USING THIS APPLIANCE
A
A
ssembling Parts
Checking Parts
Attaching the Handle
Attaching the Hose and Tools
Assembled Vacuum Cleaner Parts
O
peration
ON-OFF switch
Handle positions
Transporting Cleaner
Carrying Handle
Cleaning Lightweight Flexible rugs
Cleaning Tool Attachments
Motor Protector Feature
M
aintenance
Replacing the Dust Bag
Cleaning the Filters
Replacing the Headlight
Replacing the Belt
Clearing Clogs
T
hermal Protector
T
roubleshooting
W
arranty
Save these instructions!
To reduce the risk of electrical shock, this appliance has a polarized plug with one
blade wider than the other. This plug will fit in a polarized outlet only one way. If the
plug does not fit in the outlet, reverse the plug. If it still does not fit, contact a
qualified electrician to replace the outlet. Do not change the plug in any way.
2~3
3~4
4~7
7
8
8
1
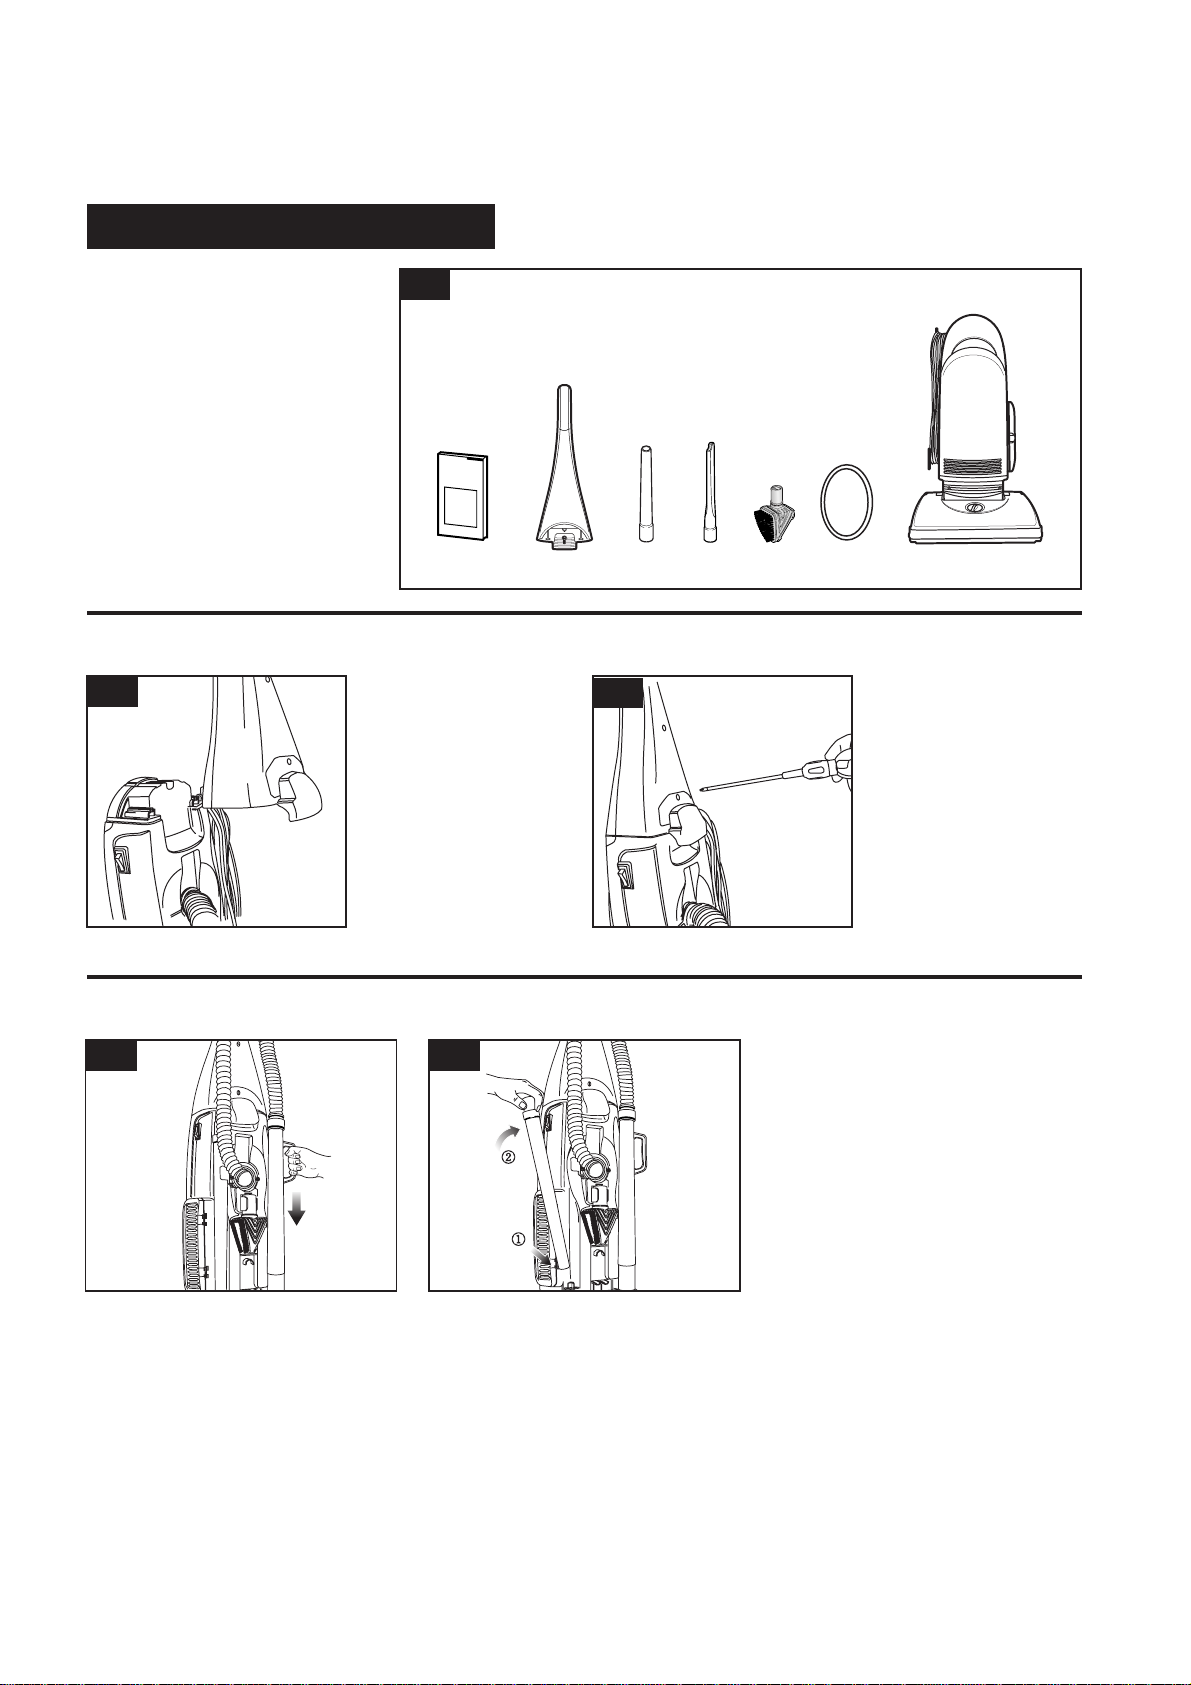
1. Assembling Parts
Checking Parts
Step 1. Attaching the Handle
You should have the following
items when you unpack your
vacuum cleaner.
A. Owner’s manual
B. Handle
C. Extension wand
D. Crevice tool
E. Combination tool
F. Belt
G. Vacuum body
Stand the vacuum upright
and slide the base of the
handle firmly into the
grooves at the top of the
vacuum body.
1-1
1-2
Insert the screw provided
into the existing hole.
Tighten the screw securely
with a screwdriver.
Before securing the handle,
please check that the
handle is fitted to the
vacuum body and make
sure there’s no gap.
1-3
Step 2. Attaching the Hose and Tools
Slide the end of the hose wand with
tabs into the suction intake valve.
Slide the extension wand and the
crevice tool together into the storage
clip.
1-4 1-5
ABCDEF G
2
 Loading...