

Page 1

Contact SAMSUNG WORLD WIDE
If you have any questions or comments relating to Samsung products, please contact the SAMSUNG customer care center.
Comment contacter Samsung dans le monde
Si vous avez des suggestions ou des questions concernant les produits Samsung, veuillez contacter le Service Consommateurs Samsung.
Country
CANADA 1-800-SAMSUNG (726-7864) www.samsung.com/ca (English)
U.S.A 1-800-SAMSUNG (726-7864) www.samsung.com/us Samsung Electronics America, Inc. 85 Challenger Road
Customer Care Center
Web Site Address
Samsung Electronics Canada Inc., Customer Service 55
www.samsung.com/ca_fr (French)
Standish Court Mississauga, Ontario L5R 4B2 Canada
Ridgeeld Park, NJ 07660
© 2013 Samsung Electronics Co., Ltd. All rights reserved.
BN68-05182C-03
Thank you for purchasing this Samsung product.
To receive more complete service, please register your product at
www.samsung.com/register
Model _____________Serial No. _____________
✎If you have any questions, please call us at 1-800-SAMSUNG (1-800-726-7864) for assistance.
Page 2

Important Safety Instructions
Warning! Important Safety Instructions
CAUTION
RISK OF ELECTRIC SHOCK DO NOT OPEN
CAUTION: TO REDUCE THE RISK OF ELECTRIC
SHOCK, DO NOT REMOVE COVER (OR BACK).
THERE ARE NO USER SERVICEABLE PARTS
INSIDE. REFER ALL SERVICING TO QUALIFIED
PERSONNEL.
• The slots and openings in the cabinet and in the back or bottom are provided for necessary ventilation. To
ensure reliable operation of this apparatus, and to protect it from overheating, these slots and openings
must never be blocked or covered.
− Do not place this apparatus in a confined space, such as a bookcase, or built-in cabinet, unless proper
ventilation is provided.
− Do not place this apparatus near or over a radiator or heat register, or where it is exposed to direct sunlight.
− Do not place vessels (vases etc.) containing water on this apparatus, as this can result in a fire or electric
shock.
• Do not expose this apparatus to rain or place it near water (near a bathtub, washbowl, kitchen sink, or
laundry tub, in a wet basement, or near a swimming pool etc.). If this apparatus accidentally gets wet,
unplug it and contact an authorized dealer immediately.
• This apparatus uses batteries. In your community, there might be environmental regulations that require
you to dispose of these batteries properly. Please contact your local authorities for disposal or recycling
information.
• Do not overload wall outlets, extension cords or adaptors beyond their capacity, since this can result in fire
or electric shock.
• Power-supply cords should be placed so that they are not likely to be walked on or pinched by items placed
upon or against them. Pay particular attention to cords at the plug end, at wall outlets, and the point where
they exit from the appliance.
• To protect this apparatus from a lightning storm, or when it is left unattended and unused for long periods of
time, unplug it from the wall outlet and disconnect the antenna or cable system. This will prevent damage to
the set due to lightning and power line surges.
This symbol indicates that high
voltage is present inside. It is
dangerous to make any kind of
contact with any internal part of this
product.
This symbol indicates that important
literature concerning operation and
maintenance has been included
with this product.
• Before connecting the AC power cord to the DC adaptor outlet, make sure the voltage designation of the
DC adaptor corresponds to the local electrical supply.
• Never insert anything metallic into the open parts of this apparatus. Doing so may create a danger of electric
shock.
• To avoid electric shock, never touch the inside of this apparatus. Only a qualified technician should open this
apparatus.
• Make sure to plug the power cord in until it is firmly seated. When unplugging the power cord from a wall
outlet, always pull on the power cord's plug. Never unplug by pulling on the power cord. Do not touch the
power cord with wet hands.
• If this apparatus does not operate normally - in particular, if there are any unusual sounds or smells coming
from it - unplug it immediately and contact an authorized dealer or service center.
• Be sure to pull the power plug out of the outlet if the TV is to remain unused or if you are to leave the house
for an extended period of time (especially when children, elderly or disabled people will be left alone in the
house).
− Accumulated dust can cause an electric shock, an electric leakage or a fire by causing the power cord to
generate sparks and heat or the insulation to deteriorate.
• Be sure to contact an authorized service center for information if you intend to install your TV in a location
with heavy dust, high or low temperatures, high humidity, chemical substances, or where it will operate 24
hours a day such in an airport, a train station, etc. Failing to do so may lead to serious damage of your TV.
• Use only a properly grounded plug and wall outlet.
− An improper ground may cause electric shock or equipment damage. (Class l Equipment only.)
• To turn this apparatus off completely, you must disconnect it from the wall outlet. Consequently, the wall
outlet and power plug must be readily accessible at all times.
• Do not allow children to hang onto the product.
• Store the accessories (battery, etc.) in a location safely out of the reach of children.
• Do not install the product in an unstable location such as a shaky self, a slanted floor or a location exposed
to vibration.
• Do not drop or apply any shock to the product. If the product is damaged, disconnect the power cord and
contact a service center.
• To clean this apparatus, unplug the power cord from the wall outlet and wipe the product using a soft,
dry cloth. Do not use any chemicals such as wax, benzene, alcohol, thinners, insecticide, air fresheners,
lubricants, or detergent. These chemicals can damage the appearance of the TV or erase the printing on the
product.
• Do not expose this apparatus to dripping or splashing.
• Do not dispose of batteries in fire.
• Do not short-circuit, disassemble or overheat the batteries.
• There is danger of an explosion if you replace the batteries used in the remote with the
wrong type of battery. Replace only with the same or equivalent type.
• WARNING - TO PREVENT THE SPREAD OF FIRE, KEEP CANDLES OR OTHER OPEN
FLAMES AWAY FROM THIS PRODUCT AT ALL TIMES.
English - 2 English - 3
Page 3

Contents
Basic Features
5 Using the Smart Touch Control
6 Connecting to the TV
6 Inserting the Batteries
(AAA X 2)
7 Low Battery Power Warning
7 Using the touch pad
8 Changing Channels by
Entering Numbers
8 Show Status and
Notification Banner
8 Recommended
8 History
9 Searching
9 Using the Virtual
Remote Control
10 Installation Height &
Angle Adjustment
10 Turning on the TV
12 Built-in TV Camera
12 Extending the TV Camera
12 Retracting the Camera
12 Camera angle adjustment
13 Connecting the TV
to One Connect
13 External Device Connections
13 TV - Side
14 One Connect - Front
15 Switching Between
Video Sources
16 Universal Remote Setup
16 Add the External Device
Viewing the e-Manual
17 Viewing the e-Manual
17 Scrolling a Page
17 Using the Top Icons
17 Returning to the Home Page
17 Searching the Index
17 Searching Pages
Network
Configuration
18 Connecting to a Network
18 Network Connection
- Wireless
18 Wireless Network
Precautions
18 Closing the e-Manual
18 Jumping to a Menu Item
18 Updating the e-Manual
19 Network Security Protocols
19 Network Connection - Wired
3D Basics
20 3D Active Glasses
20 Features
21 Pairing 3D Active Glasses
22 Pairing for the first time
Troubleshooting and
Other Information
23 What is Remote Support?
24 Troubleshooting
25 Eco Sensor and
Screen Brightness
26 Maintenance
26 TV Upgrade using One
Connect
(sold separately)
Specifications
27 Specifications
27 Licenses
Guides
28 Warranty Information
30 Regulatory Compliance
Statements
(For 3D Active Glasses)
Page 4

Figures and illustrations in this User Manual are provided f or reference only
and may differ from the actual product appearance. Product design and
specifications may change without notice.
Features of your new TV
• 3D: This new feature enables you to view 3D content.
• SMART HUB:
This TV features Smart Hub, a multi-purpose entertainment and family center. With
Smart Hub, you can surf the web, download applications, and stay in touch with
family and friends through social networking services. In addition, you can view or
play photo, video, and music files stored on external storage devices.
Press the ™ button to launch Smart Hub. Choose a service using the icons
displayed in the top part of the screen.
Smart Hub services and functionality include:
Social: Watch the latest YouTube videos and your and your friends' video posts on
Facebook and Twitter. You can also make video calls to friends by the TV camera.
Apps: Samsung Apps offers an extensive collection of free and paid news, sports,
weather, and gaming content you can directly download to and enjoy on your TV.
On TV: Check a listing of programs that are currently airing or are scheduled to air.
Photos, Videos & Music: Play back photo, video, and music files from an external
storage device.
• Anynet+ (HDMI-CEC): This allows you to control all connected Samsung devices
that support Anynet+ with your Samsung TV’s remote.
• e-Manual: Provides a detailed, on-screen user's manual built into your TV.
• SMART Interaction: Using this function, you can access and control menu options
and functions using motions.
• Device Manager: Use the TV features with a USB or Bluetooth keyboard and
mouse.
• MHL & Screen Mirroring: Displays mobile device screens on your TV using a
wired or wireless connection.
Accessories
Included in this box
①
One Connect Accessories: One connect, one connect cable
②
• Smart Touch Control &
Batteries (AAA x 2)
• Also included: User manual, quick setup guide, antenna cable,
IR extender, component adapter, RCA adapter x 2, power cord
③
3D Glasses Accessories: 3D Active glasses, USB charge cable
④
Stand
• DELPHINUS • Screw
x 8
English - 4 English - 5
Page 5

Using the Smart Touch Control
MUTE
MUTE
Use Voice Recognition function with the
microphone embedded in remote control.
The Voice Recognition function can be
✎
affected by unclear pronunciation, voice
Displays and selects the available video sources.
level, or surrounding noise.
Turns the TV on and off.
Turn on and off the satellite or cable set-top box
connected to the TV.
For this, the Smart Touch Control must be
configured as a universal remote control. See the
TV
MIC
SOURCE
STB
e-Manual chapter, Controlling the TV > Universal
Remote Setup.
VOICE: Take your voice command and enter a text
using your voice.
MUTE: Cuts off the
sound temporarily.
Adjusts the volume.
LIGHT: Turn on the backlight for the buttons.
The backlight lasts for only a few seconds. Turns
the remote control light on or off. When on, the
buttons become illuminated for a moment when
pressed. (Using the remote control with this button
set to On will reduce the battery usage time.)
DVR: This button is only available when the Smart
Touch Control is configured to function as a
universal remote control to control a set-top box.
Run DVR (Digital Video Recording) in set-top box.
MENU: Opens the OSD.
3D: Turns the 3D function on or off.
See e-Manual chapter,
TV Viewing > 3D TV.
Returns to the previous menu.
VOL
LIGHT DVR MENU 3D
EXIT
VOICE
MORE
SMART HUB
CH
GUIDERETURN
Changes channels.
Displays a virtual remote panel on the screen. See
the e-Manual chapter, Controlling the TV > Using
the Virtual Remote Control.
Touch Pad
• Drag on the touch pad to move the focus on
the screen.
• Press the touch pad to run, activate, or select
the highlighted item.
• Press and hold the touch pad to display the
Channel List.
Displays the EPG
(Electronic Program Guide).
Brings up Smart Hub applications.
See the e-Manual chapter, SMART TV Features
> Smart Hub.
To exit an application that is running easily,
✎
™
press the
button.
Page 6

Connecting to the TV
Inserting the Batteries (AAA X 2)
In order to operate the TV using a Smart Touch Control, you must first pair it
to the TV via Bluetooth. However, the Smart Touch Control is only available for
the paired Samsung TV.
We recommend to use the Smart Touch Control in less than 20ft(6m).
✎
A usable distance may differ depending on the wireless environmental
conditions.
1. To turn on the TV, point the Smart Touch Control at the remote control
receiver of the TV and press the P button. The remote control receiver's
location may vary depending on the model.
2. A Bluetooth icon will appear at the bottom left of the screen as shown
below. The TV will then attempt to connect to the Smart Touch Control
automatically.
<Attempting to connect and completion icons>
1 2 3
1. Slightly lift the battery cover using a plastic card. Next, pull on the cover’s
notch with a fingernail to remove the cover completely.
Check the location of the battery cover groove. The groove's location
✎
may vary depending on the type of Smart Touch Control is provided
with the product.
2. Insert 2 AAA batteries, making sure to align the positive and negative ends
correctly.
3. Align the battery cover with the back of the remote control, and then press
down along the edges until it is completely attached to the remote control.
English - 6 English - 7
Page 7

Reconnecting the Smart Touch Control
If the Smart Touch Control stops operating or works abnormally, replace the
battery as this may be caused by insufficient battery power. If the problem
persists, press the PAIRING button on the Smart Touch Control to restore
pairing with the TV. The PAIRING button cannot be accessed without removing
the Smart Touch Control's battery cover. Within a distance between 1ft to
13.1ft(30cm to 4m), point the Smart Touch Control to the TV receiver and
press the PAIRING button. When pairing is complete, the pairing image
displays at the bottom left of the TV screen.
Using the touch pad
Use the touch pad to implement various commands. Navigate to Tutorial
(System > Device Manager > Smart Touch Control Settings > Tutorial) to
view an on-screen guide to using the Smart Touch Control.
Dragging Pressing
<The Smart Touch Control's pairing button>
Low Battery Power Warning
If the battery becomes low while using the Smart Touch Control, the following
alarm window appears at the bottom of the left screen. If the alarm window
pops up, replace the batteries of the Smart Touch Control. Use alkaline
batteries for longer usage.
<Low battery alarm window>
Drag on the touch pad to move the focus, pointer, or
highlight in the direction the finger is dragging.
Press the touch pad to select the item highlighted or in
focus. When watching TV, press and hold the touch pad
for 2 seconds displays the channel list. On some apps,
press and hold the touch pad for 2 seconds displays a
list of functions available for the app.
Page 8

Changing Channels by Entering Numbers
Show Status and Notification Banner
While watching TV, tap on the protruding line
on the left or right edge of the touchpad to
bring up the numerical input window on the
screen. Use your finger to enter the number
for the channel you want to watch. The
recognized number is displayed on the screen
and the TV switches to the corresponding
channel. However, the number you have
entered may not be recognized properly by
the TV. Refer to the guide below to ensure
that your numerical entries are recognized
accurately.
Numerical Input Guide
Refer to the diagrams below when entering numerical values. The TV may not
recognize your entries if you do not follow the sequences shown below.
Press the MORE button on the Smart Touch Control and then select STATUS
on the virtual remote panel that appears on the screen. The status and
notification banner appears at the top of the screen. For more information
about using the status and notification banner, refer to e-Manual > SMART
TV Features > Status and Notification.
Recommended
Press the RECOMM. / SEARCH button and then select the Recommended
from the list on bottom of the screen. This shows the current/scheduled
program and application recommendations.
Select a program that is currently airing to jump to the corresponding channel
or a program that is scheduled to air to set up a Schedule Viewing setting.
Refer to e-Manual > SMART TV Features > On TV for more information.
Select an application to launch. Samsung Apps will launch if the selected
application is not installed on the TV. Refer to e-Manual > SMART TV
Features > Apps > Samsung Apps for more information.
History
Press the RECOMM. / SEARCH button and then select History from the
list displayed at the bottom of the screen. This displays an interactive list of
recently accessed channels, media content and applications.
English - 8 English - 9
Page 9
Searching
Change a position of the Virtual Remote Panel
Press the RECOMM. / SEARCH button on the Smart Touch Control. The list
appears at the bottom of the screen. Press the RECOMM. / SEARCH button
again. The keypad will appear on the screen. Enter search criteria to search
not only many apps and their contents on the TV but also the Web.
Refer to e-Manual > SMART TV Features > Searching for more information.
Using the Virtual Remote Control
Press the MORE button to display the virtual remote panel on the TV screen.
The virtual remote panel consists of the number panel, a playback control
panel, and the quick access panel. Use the touch pad to highlight and select
icons, numbers, and buttons on the panels.
The displayed virtual remote panel on the TV screen may differ depending
✎
on the country.
Changing the Virtual Remote Panel
You can change which virtual remote panel is displayed on the TV screen. To
shift between panels, move the focus highlight beyond the left or right edge of
the displayed panel.
Use left/right scroll function on the touch pad to change the panel easily.
Press the MORE button on the Smart Touch Control. The virtual remote panel
appears on the screen. Press and hold the touch pad for one second. Users
can change a position of the virtual remote panel of the screen.
Using the Number Panel
Use the number panel to enter numbers on a keypad screen or webpage or
to change the channel while watching TV. Changing the channel using the
number pad leaves a record, allowing you to easily return to previous channels.
Using the Playback Control Panel
Use the playback control panel to pause, rewind, fast forward, skip to the next
file, select a function with the a, b, {, } buttons, and much more while
enjoying media content.
Using the Quick Access Panel
Use the buttons on the quick access panel to bring up the TV's INFO, TOOLS
or e-Manual screens. Note that the buttons that appear may vary depending
on the operating mode of the Smart Touch Control (with the TV only, as a
universal remote, etc.).
Page 10

Turning on the TV
Turn on the TV using the P button on the Smart Touch Control or TV panel.
The first time you turn on your TV, it will immediately start the initial setup.
✎
The product color and shape may vary depending on the model.
✎
Remote
control sensor
Camera
Installation Height & Angle Adjustment
1. Using the provided Delphinus, unlock the frame lock on either side of the
product's rear middle as shown.
Speakers
Speakers
Power button
<TV Screen Lock> <TV Screen Unlock>
English - 10 English - 11
Page 11

2. Refer to the diagram and adjust the height of the TV.
<Diagram 1> Pull the product up slowly while holding it
at the bottom center.
<Diagram 2> Push the product down slowly while
holding it at the top center.
[When moving the product, make sure there are no small children
nearby. In addition, the improper handling of the product may result in
injury.
3. When adjusting the height of the TV, make sure the frame ends up in the
designated position.
4. Use the DELPHINUS (included) to tighten the locking devices attached to
the frame on both sides and secure the TV in place.
5. Grab the middle part of the top or bottom edge of the product and push or
pull to adjust the TV angle.
Adjustable angles
✎
Front angle:
• When installing the TV, the maximum height is: 2.7 ± 1.0°
• When installing the TV to the minimum height: 7.7 ± 1.0°
Rear angle: 9.5 ± 1.0°
[When adjusting the TV angle, make sure there are no small children
nearby. In addition, the improper handling of the product may result in
injury.
Page 12

Built-in TV Camera
주의
This TV features a built-in TV camera that can be used for the Motion Control,
Voice Control (built-in microphone), and Face Recognition features.
Retracting the Camera
If you are not using the TV camera, keep it retracted inside the TV. The Motion
Control and Face Recognition features cannot be used while the TV camera is
in the retracted state, but Voice Control will still be available.
Push in a corner of the camera until you hear a click and then release it.
Microphone
Lens
Do not touch the lens while
operating the TV camera. You can
leave fingerprints that may affect the
image quality. If the lens gets dirty,
clean it using a soft piece of cloth.
Extending the TV Camera
In order to use the TV camera, you must first extend it.
Gently press and release the top portion of
.
Microphone
Camera angle adjustment
Pull out the TV camera, hold the camera on its sides using two fingers, and
move the camera up or down to adjust its angle. When the camera angle is
slightly lowered, you will hear a clicking sound. To return the camera angle to
its original position, hold either side of the camera and move it up a little. When
the camera angle is returned to its original position, you will hear a clicking
sound.
English - 12 English - 13
Page 13
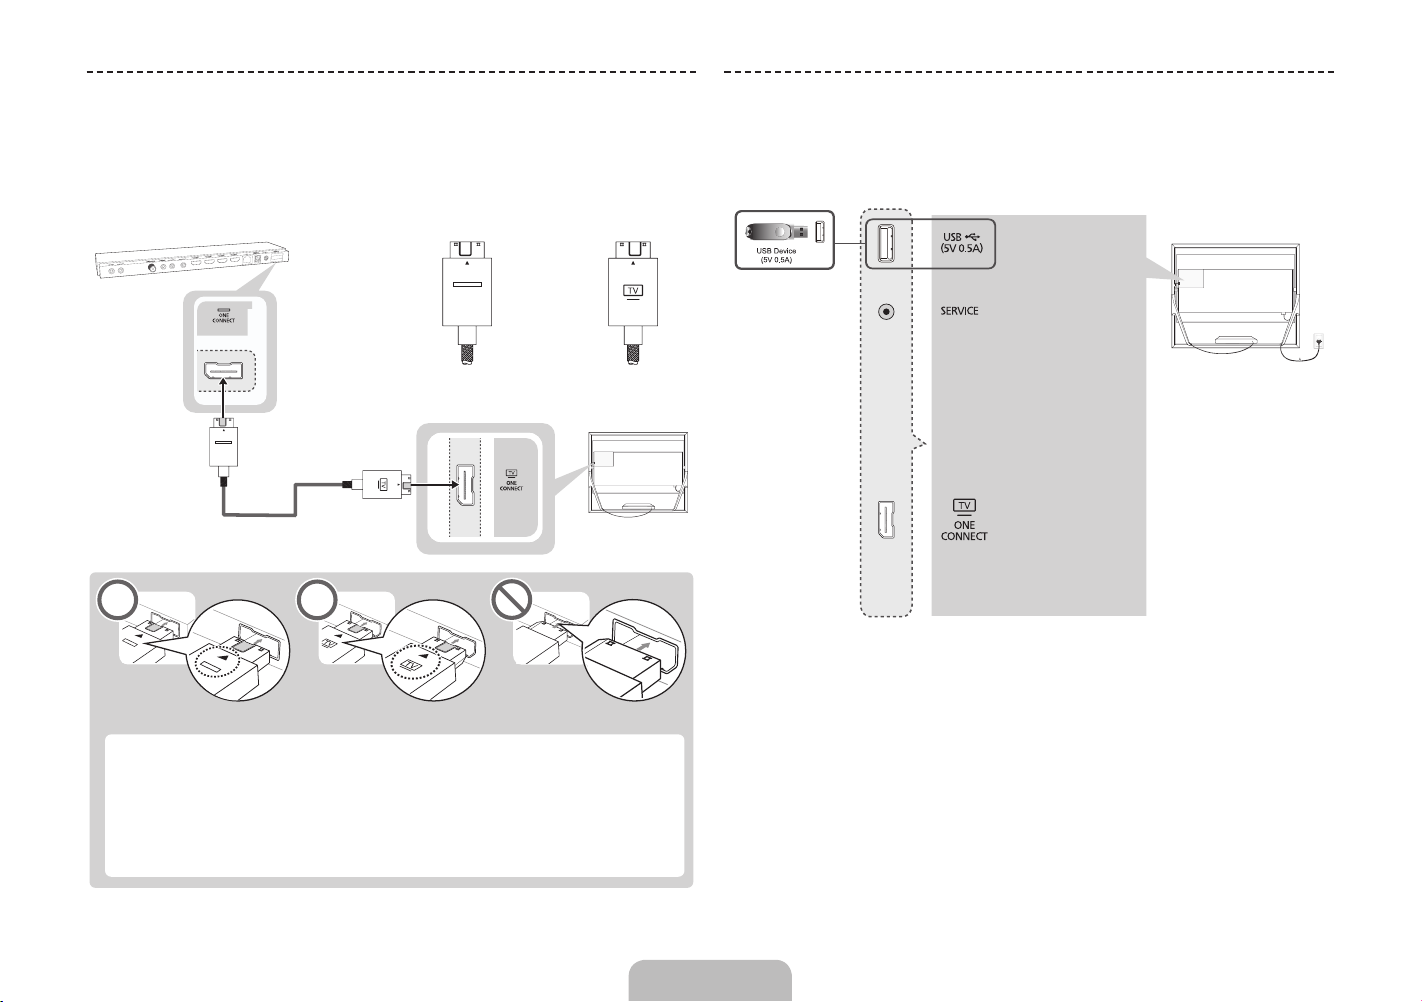
Connecting the TV to One Connect
External Device Connections
One Connect must be connected to the TV via the One Connect cable before
connecting an external device. The One Connect cable has two different ends,
Connect the TV to One Connect referring to the diagram.
One Connect
<TV-end Connector><One Connect-end Connector>
TV
<One Connect-end Connector> <TV-end Connector>
TV - Side
[The connectors at both ends of the One Connect cable are
different from each other in shape. When connecting the One
Connect cable to the TV, make sure that the right connector is
plugged into the TV. Otherwise, it may cause product failure.
Page 14

One Connect - Front
English - 14 English - 15
Page 15
Switching Between Video Sources
Press the SOURCE button to switch between devices connected to the TV.
For example, to switch to a game console connected to the second HDMI
connector, press the SOURCE button. From the Source list, select HDMI2.
The connector names may vary depending on the product.
Select Tools at the upper-right corner of the source screen to access the
following functions.
• Edit Name: Lets you associate a device name to an input source.
You can select the following device names in the Edit Name option:
VCR / DVD / Cable STB / Satellite STB / PVR STB / AV Receiver /
Game / Camcorder / PC / DVI PC / DVI Devices / TV / IPTV / Blu-ray /
HD DVD / DMA
To associate a device name to an input source, follow these steps:
1. Select Tools in the upper right corner of the source screen.
2. Select Edit Name.
3. Find the input source you want in the Source list (HDMI1, HDMI2,
Component, etc.).
4. Select the blank field next to the input.
5. In the device name list that appears, select the name of the device
attached to the input.
When you view the Source list, the device name and the input jack will be
displayed together.
− If you have connected a PC to the HDMI IN 2 (DVI) port with an HDMI
cable, select PC from the device name list.
− If you have connected a PC to the HDMI IN 2 (DVI) port with an HDMI
to DVI cable, select DVI PC from the device name list.
− If you connected an AV device to the HDMI IN 2 (DVI) port with an
HDMI to DVI cable, select DVI Devices from the device name list.
• Information: View detailed information about the connected devices.
• Refresh: Select if a connected device does not appear in the list. If the list
does not show the device after selecting Refresh, check the status of the
TV-to-device connection.
• Remove USB: Remove the USB device from the list safely. This function is
only available when the USB device selected.
Universal Remote Setup: Use to configure universal remote control settings.
Using the universal remote control, users can control external devices
connected to the TV, such as a set-top box, Blu-ray player, and AV receiver.
Page 16

Universal Remote Setup
This TV has a universal remote control feature that lets you control cable
boxes, Blu-ray players, home theaters, and other third-party external devices
connected to the TV using the TV's remote control.
2 inches
Keep a distance of 2 inches at least between the IR Extender and the external
device, as the illustration shows. Face the IR Extender toward the external
device’s remote control signal receiver. Note that it should be no obstacle
between IR Extender and external device. The presence of an obstacle will
interfere with the transmission of the remote control signal.
Add the External Device
1. Turn on the external device you wish to set up universal remote function for
and then press the SOURCE to bring up the Source screen.
2. Select Universal Remote Setup from the top of the screen. This initiates
the universal remote setup process.
3. Follow the on-screen instruction and set up the universal remote control. If
it does not work, set up the remote control by entering the model number
manually.
English - 16 English - 17
Page 17

Viewing the e-Manual
This TV has a built-in e-Manual that contains information about your TV's key
features and instructions for using them. To view the e-Manual, use one of the
following methods:
• Open the Support menu and choose e-Manual (Troubleshooting).
Using the Top Icons
Use the Back, Forward, and Opened pages icons on the top left of the
screen to navigate through pages. These icons are available after you have
viewed two or more pages.
Returning to the Home Page
• Press the MORE button on the Smart Touch Control to display the virtual
remote panel on the TV screen. Flick the touch pad until the quick access
panel appears, select the e-Manual icon, and then press the touch pad.
In the e-Manual, words in blue refer to screen menu options and words in
✎
light blue refer to remote control buttons.
A printable version of this guide is also available at www.samsung.com/
✎
support.
Scrolling a Page
To scroll a page, use of one of the following methods:
• Place the focus on the
and then press the touch pad.
• Drag or flick up or down the line on either the left or right edge of the touch
pad.
• Place the focus on the
drag or flick up or down on the touch pad.
or button at the right edge of the screen,
or button at the right edge of the screen,
To return to the home page, select the a button or select on the top right
of the screen.
To select a letter button (a, b, {, }), press the MORE button on the
✎
Smart Touch Control to display to display the virtual remote panel on the
TV screen. Flick the touch pad until the playback control panel appears,
select the a button, and then press the touch pad.
Searching the Index
Select the b button or select on the top right of the screen to display the
index. Select a term to display the page containing the term.
Searching Pages
Select the { button or select on the top right of the screen, and enter
search criteria. Select a page from the list of search results to display it.
Page 18

Closing the e-Manual
To close the e-Manual, press and hold the RETURN button or select at the
upper-right corner of the screen.
Jumping to a Menu Item
Connecting to a Network
Connecting the TV to a network gives you access to online services such
as Smart Hub and lets you update the TV's software online directly from
Samsung.com.
To jump directly to the menu item that is described in the current section,
select . It is possible to jump from a menu item directly to the related
section in the e-Manual. On a menu screen, press the MORE button on the
Smart Touch Control and then select e-Manual on the virtual remote panel
that appears on the screen.
This feature may not be available, depending on the menu.
✎
Picture
Picture Mode
• Backlight
• Contrast
• Brightness
• Sharpness
• Color
• Tint (G/R)
Standard
e-Manual
14
100
45
50
G50
50
R50
Try Now
Updating the e-Manual
Press the ™ button and select Apps, and then select More Apps. The
e-Manual can be updated in the same way with an application update.
On the More Apps screen, select Update Apps, and then select e-Manual
from the list. The e-Manual starts updating to the latest version. However,
Update Apps appears on the screen only when the update is required.
Network Connection - Wireless
Connect the TV to the Internet using a standard wireless router or modem.
Wireless IP Router or Modem
that has a DHCP Server
The LAN Port on the Wall
LAN Cable (Not Supplied)
Wireless Network Precautions
• This TV supports the IEEE 802.11a/b/g /n communication protocols.
Samsung recommends using IEEE 802.11n. Otherwise, when you play
video over a network connection, the video may not play smoothly.
English - 18 English - 19
Page 19

• To use a wireless network, the TV must be connected to a wireless router
or modem. If the wireless router supports DHCP, the TV can use a DHCP
or static IP address to connect to the wireless network.
• Select a channel that is not currently in use for the wireless router. If the
channel set for the wireless router is currently being used by another
device, the result is usually interference and/or a communications failure.
• Most wireless networks have an optional security system. To enable a
wireless network's security system, you need to create a security key using
characters and numbers, and then enter that key into the router through
its menu. You then must enter this security key into any other devices you
want to connect to the wireless network.
Network Security Protocols
The TV only supports the following wireless network security protocols:
• Authentication Modes: WEP, WPAPSK, WPA2PSK
• Encryption Types: WEP, TKIP, AES
In compliance with the newest Wi-Fi certification specifications, Samsung TVs
do not support WEP or TKIP security encryption in networks running in the
802.11n mode.
If the wireless router supports WPS (Wi-Fi Protected Setup), you can connect
the TV to your network using PBC (Push Button Configuration) or a PIN
(Personal Identification Number). WPS automatically configures the SSID and
WPA key settings.
Your Smart TV cannot connect to uncertified wireless routers.
Network Connection - Wired
There are three main ways to connect your TV to your network using cable,
depending on your network setup. They are illustrated below:
The Modem
Port on the Wall
The Modem
Port on the Wall
The LAN Port
on the Wall
External Modem
(ADSL / VDSL / Cable TV)
Modem Cable (Not Supplied) LAN Cable (Not Supplied)
External Modem
(ADSL / VDSL / Cable TV)
Modem Cable
(Not Supplied)
LAN Cable
(Not Supplied)
IP Router that has
a DHCP Server
LAN Cable
(Not Supplied)
One Connect
One Connect
One Connect
LAN Cable (Not Supplied)
The TV does not support network speeds less than or equal to 10Mbps.
✎
Use Cat 7 cable for the connection.
✎
Page 20

3D Active Glasses
Features
Samsung's SSG-3570CR 3D glasses enable you to view 3D images on your
3D TV. The Samsung 3D glasses communicate with Samsung 3D TVs via the
2.4GHz RF band.
This product can be used only with Samsung D, E, and F series 3D TVs
✎
released in 2011 to 2013 or with 3D TVs that have any of the logos below.
Other wireless devices are not compatible with this product.
Parts
Charging the Battery
If the red LED blinks every 2 seconds, charge the battery as shown below.
The orange LED will blink every second when battery charging is in progress.
The green LED will blink every 2 seconds when the charging is finished. (It
takes about 30 minutes to fully charge the battery that is dead; however, the
time required to charge it to full capacity may vary depending on the battery
level and the voltage of the supplied power.)
SAMSUNG TV
PC
Nose pad
Liquid-crystal
shutter
pairing button
To wear the 3D glasses over eyeglasses, detach the nose pad from the
✎
The nose pads are adjustable.
3D glasses.
For details on how to attach or detach the glasses' Nose pad, refer to the
✎
separate 3D glasses manual.
USB PORT
Micro USB Cable
Note Book
English - 20 English - 21
Page 21

Pairing 3D Active Glasses
What is Pairing? Pairing is a process that prepares devices to exchange
✎
data so that, in operation, the devices can transmit and exchange data
instantly.
• Pairing
Press the pairing button on the 3D glasses
for more than 1 seconds. Pairing will start.
• Turning the glasses on and off
Put on the 3D glasses. The glasses will
automatically power on and the green
LED will be lit for 3 seconds. To power off
the glasses, take off the glasses. Several
minutes later, the glasses will automatically
power off and the red LED will be lit for 3
seconds.
(Make sure that 3D is activated on the TV
before using the 3D glasses.)
• Operating range
Recommended pairing distance
2~6m
Recommended viewing distance
Recommended viewing distance Recommended pairing distance
2~6m (6.5 to 19.5 ft) 50 cm or less (19.5 in)
The working distance depends on obstacles (a person, metal, walls, etc.)
✎
50cm
or electromagnetic waves.
Note that if you take off the 3D glasses while viewing 3D video and the
✎
3D mode remains enabled on your TV, it will take 5 minutes for the 3D
glasses to power off.
If the glasses do not operate immediately when you put them on while the
✎
TV is in 3D mode, put the glasses on again.
This product is rechargeable. It may not operate due to the dead battery
✎
when you attempt to use it for the first time. In this case, charge the
batter y.
Page 22

Pairing for the first time
1. Turn on the TV and wait until the TV is fully on.
2. Press the pairing button on the 3D glasses shortly. The 3D glasses will
power on and pairing will start.
3. The message “3D glasses are connected to TV.” will be displayed on the
TV screen when the pairing is successfully completed.
4. Enjoy 3D video after configuring the 3D function settings on the TV.
• After the first pairing, putting on the 3D glasses will automatically power
on the glasses. To power off, take off the glasses.
• If the pairing fails, the 3D glasses will power off.
• If the first attempt to pair fails, turn the TV off and on again, and then go
to Step 2.
• The LED will blink green and red alternately for 1 seconds if pairing is in
progress.
How to pair again: Press the pairing button on the 3D glasses for more than
1 seconds.
Pairing is needed again in the following occasions:
− Pairing may be needed again after you have had your 3D TV repaired.
− If you want to play 3D content on another Samsung 3D TV model that
belongs to the D, E, or F series released in 2011 through 2013.
Watching 3D Video
Some 3D modes may not be available depending on the format of the image
source.
To watch in 3D, you must wear 3D Active Glasses and turn the glasses on by
pressing the power button.
1. Go to the 3D screen. (Picture > 3D)
2. Select the 3D Mode. The 3D Mode screen appears.
3. Set the 3D Mode of the image you want to view.
English - 22 English - 23
Page 23

Troubleshooting
If you encounter... Try this...
The 3D glasses should be close to the TV. Move the 3D glasses to within 6m
(19.5 ft) of the TV.
My 3D glasses do not work.
The LED keeps blinking The battery is low. Charge the battery.
Try the paring again in order to check if it is completed.
Check the 3D function settings on the TV.
Take off the glasses and put them on again. The glasses may not be turned
on if not properly worn.
What is Remote Support?
Samsung Remote Support service offers you one-on-one support with a
Samsung Technician who can remotely:
• Diagnose your TV
• Adjust the TV settings for you
• Perform a factory reset on your TV
Specifications (Model Number: SSG-3550CR/SSG-3570CR)
Shutters Liquid crystal Transmittance 37±2%
Optics
Weight Glasses 29g (0.99 oz)
Power Glasses Built-in 3.7V Lithium-polymer battery
Power
consumption
Operating
conditions
Product specifications may be changed without notice in order to
✎
enhance product performance.
The continuous operating time may differ depending on the wireless
✎
communication environment and usage conditions.
Recommended
operating
distance
Glasses 1.12mA
Battery
Operating
temperature
Custody
temperature
2~6m (6 to 19.5 ft) Field Rate 120 fields/second
Type 65mAh, 3.7V
Operating time 40Hr
50 °F ~ 104 °F (10°C ~ 40°C)
-4 °F ~ 113 °F (-20°C ~ 45°C)
• Install recommended firmware updates
How Does it Work?
Having a Samsung Tech remotely service your TV is easy.
1. Call the Samsung Contact
Center and ask for remote
support.
3. Select Remote Management and
Provide the Pin# to the agent.
2. Open the menu on your TV and
go to the Support section.
4. The agent will then access your
TV. That's it!
Page 24

Troubleshooting
If the TV seems to have a problem, first review this list of possible problems
and solutions. Also, review the Troubleshooting Section in the e-Manual. If
none of the troubleshooting tips apply, visit www.samsung.com/support or call
Samsung Customer Service at 1-800-SAMSUNG (1-800-726-7864).
Issues Solutions and Explanations
Flickering and Dimming If your Samsung Television is flickering or dimming sporadically, you may
Component Connections /
Screen Color
Screen Brightness If you find that the colors on your Samsung TV are correct but just a little too
Auto Motion Plus/Blur If you find that there is a blur or “ghost” shadow to the images on your
Unwanted Powering Off If your Samsung TV appears to turn off by itself, try disabling some of
need to disable some of the energy efficiency features.
Disable Energy Saving (System > Eco Solution > Eco Sensor) and/
or Energy Saving (System > Eco Solution > Energy Saving) and check
again.
If you find that the color on your Samsung television screen is not correct or
the black and white colors are off, run a Self Diagnosis Picture Test (Support
> Self Diagnosis > Picture Test).
If the picture problem is caused by the TV, the problem should be visible in
the Picture Test. If the problem is not visible, next confirm that the TV's video
input jacks are connected to the correct external video device output jacks
and that none of the connections are loose. Finally, if possible, test your
external video devices by connecting them to another TV.
dark or bright, try adjusting the following settings first.
Navigate to Picture and adjust Backlight, Contrast, Brightness,
Sharpness, Color, Tint (G/R) and other picture quality adjustment settings.
television screen, you might be able to correct the issue using Auto Motion
Plus (Picture > Picture Options > Auto Motion Plus).
the TV's energy efficiency and automatic off features. Check if Sleep
Timer (System > Time > Sleep Timer) has been enabled. Sleep Timer
automatically turns off the TV after an amount of time that you select. If the
Sleep Timer has not been enabled, see if No Signal Power Off (System >
Eco Solution > No Signal Power Off) or Auto Power Off (System > Eco
Solution > Auto Power Off) has been enabled. No Signal Power Off turns
off the TV if no signal has been received by the TV for a specified period time.
Auto Power Off turns off the TV if there has been no user input in four hours.
Issues Solutions and Explanations
Trouble Powering On When the TV is turned on, the remote control receiver flashes 5 times
Stand Assembly If you have any trouble assembling the stand, review the stand assembly
The stand is wobbly or
crooked
Cannot Find a Channel Re-run Setup (Go to Menu > System > Setup) or run Auto Program. (Go
For detailed troubleshooting information, watch the troubleshooting
✎
before the screen turns on.
If you find that you are having problems powering on your Samsung
television, there are a number of things to check before calling the service
department.
If the power cord is connected properly and the remote control is operating
normally, the problem might be with the antenna cable connection or the
cable/satellite box not being turned on. Check the antenna connection or
turn on the cable/satellite box.
instruction in the Quick Start Guide.
Make sure the arrows on the stand are properly aligned.
to Menu > Broadcasting > Auto Program).
videos at www.samsung.com/spsn.
Make sure you have the correct cable before plugging it in. Illustrations of
common plugs and jacks are shown below.
Cable Plugs Ports / Jacks
HDMI
USB
Do not plug cables in
upside down.
Optical
Warning
Be sure to check the
orientation of the plug
before plugging it in.
English - 24 English - 25
Page 25

Issues Solutions and Explanations
The TV won’t turn on. • Make sure the AC power cord is securely plugged in to the wall outlet
There is no picture/video. • Check the cable connections. Remove and reconnect all cables
The remote control does not
work.
The cable/set top box remote
control doesn’t turn the TV on
or off or adjust the volume.
I have extra parts • The TV includes some optional parts to help with wall mounting and
This TFT LED panel uses a panel consisting of sub pixels which require
✎
and the TV.
• Make sure the wall outlet is working.
• Try pressing the
the remote. If the TV turns on, refer to “Remote control does not work”
below.
connected to the TV and external devices.
• Set the video outputs of your external devices (Cable/Sat Box, DVD,
Blu-ray etc) to match the TV's input connections. For example, if an
external device’s output is HDMI, it should be connected to an HDMI
input on the TV.
• Make sure your connected devices are powered on.
• Be sure to select the correct input source.
• Reboot the connected device by unplugging it, and then reconnecting
the device’s power cable.
• Replace the remote control batteries. Make sure the batteries are
installed with their poles (+/–) in the correct direction.
• Clean the sensor’s transmission window on the remote.
• Try pointing the remote directly at the TV from 5~6 feet away.
• Program the Cable/Set remote control to operate the TV. Refer to the
Cable/Set-Top-Box user manual for the SAMSUNG TV code.
cable routing.
P
button on the TV to make sure the problem is not
sophisticated technology to produce. There may be, however, a few bright
or dark pixels on the screen. These pixels will have no impact on the
performance of the product.
To keep your TV in optimum condition, upgrade to the latest software.
✎
Use the Update Now or Auto Update functions on the TV's menu (Screen
Menu > Support > Software Update > Update now or Screen Menu >
Support > Software Update > Auto Update).
Eco Sensor and Screen Brightness
Eco Sensor measures the light in your room and optimizes the brightness
of the TV automatically to reduce power consumption. This causes the TV
to brighten and dim automatically. If you want to turn this function off, go to
Menu > System > Eco Solution > Eco Sensor
Eco Sensor
[Do not block the sensor with
any material. It can decrease
picture brightness.
Page 26

Maintenance
TV Upgrade using One Connect
If a sticker was attached to the TV screen, some debris can remain after
✎
you remove the sticker. Please clean the debris off before watching TV.
The exterior and screen of the product can get scratched during cleaning.
✎
Be sure to wipe the exterior and screen carefully using a soft cloth to
prevent scratches.
Do not spray water directly onto the
product. Any liquid that goes into the
product may cause a failure, fire, or
electric shock.
Clean the product with a soft cloth
dampened with a small amount of
water. Do not use a flammable liquid
(e.g. benzene, thinners) or a cleaning
agent.
(sold separately)
One Connect
(sold separately)
TV
Connecting a more current version of One Connect (sold separately) to your
Samsung TV will allow you to enjoy the latest features and content without
having to purchase a new TV. Experience the latest features and services
offered by Samsung Electronics via One Connect.
One Connect is sold separately. Purchasing One Connect will allow you
✎
to upgrade the software to the version from the year in which your One
Connect was released. Not supported on all models.
English - 26 English - 27
Page 27

Specifications
Display Resolution
Environmental Considerations
Operating Temperature
Operating Humidity
Storage Temperature
Storage Humidity
Stand Swivel (Left / Right)
Model Name
Screen Size
(Diagonal)
Sound
(Output)
Dimensions (W x H x D)
Body
With stand
Weight
With Stand
3840 x 2160
50°F to 104°F (10°C to 40°C)
10% to 80%, non-condensing
-4°F to 113°F (-20°C to 45°C)
5% to 95%, non-condensing
0˚
UN85S9AF
85˝ Class
(84.5 measured diagonally)
120W
(front top 20 x 2, front bottom 20 x 2, woofer 20 x 2)
78.9 x 64.4 x 2.8 inches
(2004.3 x 1635.9 x 71.6 mm)
78.9 x 63.9 x 22.8 inches
(2004.3 x 1624.4 x 581.5 mm)
189.1 lbs (85.8 kg)
Design and specifications are subject to change without prior notice.
✎
The actual appearance of the TV may differ from the images in this
✎
manual, depending on the model.
Typical power consumption is measured according to Energy Star
✎
Program requirements for Televisions.
Standby mode
To decrease power consumption, unplug the power cord when you don't
intend to use the TV for a long time.
Licenses
Page 28

Warranty Information
Federal Communication Commission Interference Statement
FCC Radiation Exposure Statement:
This equipment complies with FCC radiation exposure limits set forth for an
uncontrolled environment. This equipment should be installed and operated
with minimum distance 20cm between the radiator & your body.
This equipment has been tested and found to comply with the limits for a
Class B digital device, pursuant to Part 15 of the FCC Rules. These limits
are designed to provide reasonable protection against harmful interference
in a residential installation. This equipment generates, uses and can radiate
radio frequency energy and, if not installed and used in accordance with
the instructions, may cause harmful interference to radio communications.
However, there is no guarantee that interference will not occur in a particular
installation. If this equipment does cause harmful interference to radio or
television reception, which can be determined by turning the equipment off
and on, the user is encouraged to try to correct the interference by one of the
following measures:
• Reorient or relocate the receiving antenna.
• Increase the separation between the equipment and receiver.
• Connect the equipment into an outlet on a circuit different from that to
which the receiver is connected.
• Consult the dealer or an experienced radio/TV technician for help.
FCC Caution: Any changes or modifications not expressly approved by the
party responsible for compliance could void the user’s authority to operate this
equipment.
This device complies with Part 15 of the FCC Rules. Operation is subject
to the following two conditions: (1) This device may not cause harmful
interference, and (2) this device must accept any interference received,
including interference that may cause undesired operation.
For product available in the USA/Canada market, only channel 1~11 can be
operated. Selection of other channels is not possible.
This device and its antenna(s) must not be co-located or operation in
conjunction with any other antenna or transmitter.
This Class B digital apparatus complies with Canadian ICES-003.
Cet appareil numérique de la classe B conforme á la norme NMB-003 du
Canada.
This device complies with Industry Canada license-exempt RSS standard(s).
Operation is subject to the following two conditions: (1) this device may not
cause interference, and (2) this device must accept any interference, including
interference that may cause undesired operation of the device.
Le présent appareil est conforme aux CNR d'Industrie Canada applicables
aux appareils radio exempts de licence. L'exploitation est autorisée aux deux
conditions suivantes: (1) l'appareil ne doit pas produire de brouillage, et (2)
l'utilisateur de l'appareil doit accepter tout brouillage radioélectrique subi,
même si le brouillage est susceptible d'en compromettre le fonctionnement.
For product available in the USA/Canada market, only channel 1~11 can be
operated. Selection of other channels is not possible.
This device and its antenna(s) must not be co-located or operation in
conjunction with any other antenna or transmitter.
Under Industry Canada regulations, this radio transmitter may only operate
using an antenna of a type and maximum (or lesser) gain approved for the
transmitter by Industry Canada. To reduce potential radio interference to other
users, the antenna type and its gain should be so chosen that the equivalent
isotropically radiated power (e.i.r.p.) is not more than that necessary for
successful communication.
IC Radiation Exposure Statement:
This equipment complies with IC RSS-102 radiation exposure limits set forth
for an uncontrolled environment. This equipment should be installed and
operated with minimum distance 20cm between the radiator & your body.
English - 28 English - 29
Page 29

IMPORTANT WARRANTY INFORMATION REGARDING
TELEVISION FORMAT VIEWING
See the warranty card for more information on warranty terms.
✎
Wide screen format LED Displays (with 16:9 aspect ratios, the ratio of the
screen width to height) are primarily designed to view wide screen format
full-motion video. The images displayed on them should primarily be in the
wide screen, 16:9 ratio format, or expanded to fill the screen, if your model
offers this feature, with the images constantly in motion. Displaying stationary
graphics and images on the screen, such as the dark sidebars on nonexpanded standard format television video and programming, should be
limited to no more than 5% of the total television viewing time per week.
Additionally, viewing other stationary images and text such as stock market
crawls, video game displays, station logos, web sites or computer graphics
and patterns, should be limited as described above for all televisions.
Displaying stationary images that exceed the above guidelines can cause
uneven aging of LED Displays that leave subtle, but permanent burned-in
ghost images in the LED picture. To avoid this, vary the programming and
images, and primarily display full screen moving images, not stationary
patterns or dark bars. On LED models that offer picture sizing features, use
these controls to view different formats as a full screen picture.
Be careful about the television formats you select and the length of time you
view them. Uneven LED aging as a result of format selection and use, as well
as burned in images, are not covered by your Samsung limited warranty.
• SAMSUNG ELECTRONICS NORTH AMERICAN LIMITED WARRANTY
STATEMENT
Subject to the requirements, conditions, exclusions and limitations of the
original Limited Warranty supplied with Samsung Electronics (SAMSUNG)
products, and the requirements, conditions, exclusions and limitations
contained herein, SAMSUNG will additionally provide Warranty Repair
Service in the United States on SAMSUNG products purchased in Canada,
and in Canada on SAMSUNG products purchased in the United States, for
the warranty period originally specified, and to the Original Purchaser only.
The above described warranty repairs must be performed by a SAMSUNG
Authorized Service Center. Along with this Statement, the Original Limited
Warranty Statement and a dated Bill of Sale as Proof of Purchase must be
presented to the Service Center. Transportation to and from the Service
Center is the responsibility of the purchaser. Conditions covered are limited
only to manufacturing defects in material or workmanship, and only those
encountered in normal use of the product.
Excluded, but not limited to, are any originally specified provisions for, inhome or on-site services, minimum or maximum repair times, exchanges
or replacements, accessories, options, upgrades, or consumables.
For the location of a SAMSUNG Authorized Service Center, please call
toll-free:
− In the United States: 1-800-SAMSUNG (1-800-726-7864)
− In Canada: 1-800-SAMSUNG
Still image warning
Avoid displaying still images (such as jpeg picture files), still image elements
(such as TV channel logos, stock or news bars at the screen bottom etc.),
or programs in panorama or 4:3 image format on the screen. Constantly
displaying still pictures can cause image burn-in on the LED screen, which
will affect image quality. To reduce risk of this effect, please follow the
recommendations below:
• Avoid displaying the same TV channel for long periods.
• Always try to display any image in full screen. Use the TV set’s picture
format menu for the best possible match.
• Reduce brightness and contrast to avoid the appearance of after-images.
• Use all TV features designed to reduce image retention and screen burn.
Refer to the e-Manual for details.
Page 30

Regulatory Compliance Statements
(For 3D Active Glasses)
FCC COMPLIANCE
Federal Communication Commission Interference Statement
1. Changes or modifications not expressly approved by the party responsible
for compliance could void the user’s authority to operate the equipment.
2. NOTE: This equipment has been tested and found to comply with the
limits for a Class B digital device, pursuant to Part 15 of the FCC Rules.
These limits are designed to provide reasonable protection against harmful
interference in a residential installation. This equipment generates, uses
and can radiate radio frequency energy and, if not installed and used in
accordance with the instructions, may cause harmful interference to radio
communications. However, there is no guarantee that interference will
not occur in a particular installation. If this equipment does cause harmful
interference to radio or television reception, which can be determined by
turning the equipment off and on, the user is encouraged to try to correct
the interference by one or more of the following measures:
• Reorient or relocate the receiving antenna.
• Increase the separation between the equipment and receiver.
• Connect the equipment to an outlet on a circuit different from that to which
the receiver is connected.
• Consult the dealer or an experienced radio/TV technician for help.
FCC Caution: Any changes or modifications not expressly approved by the
party responsible for compliance could void the user’s authority to operate this
equipment.
This device complies with Part 15 of the FCC Rules. Operation is subject
to the following two conditions: (1) This device may not cause harmful
interference, and (2) this device must accept any interference received,
including interference that may cause undesired operation.
CALIFORNIA USA ONLY
This perchlorate warning applies only to primary CR
(Manganese Dioxide)
Lithium coin cells in the product sold or distributed ONLY in California
USA
" Perchlorate Material - special handling may apply,
See www.dtsc.ca.gov/hazardouswaste/perchlorate."
English - 30
Page 31

Merci d’avoir acheté ce produit Samsung.
Pour obtenir un service complet, veuillez enregistrer votre produit à:
Modèle ___________N° de série _____________
✎ Si vous avez des questions, composez le numéro 1-800-SAMSUNG (1-800-726-7864) pour obtenir de l’aide.
www.samsung.com/register
Page 32

Consignes de sécurité importantes
Avertissement! Consignes
de sécurité importantes
ATTENTION
RISQUE DE CHOC ÉLECTRIQUE, NE PAS OUVRIR
MISE EN GARDE: POUR PRÉVENIR TOUT RISQUE
DE CHOC ÉLECTRIQUE, NE RETIREZ PAR LE
COUVERCLE OU LE PANNEAU ARRIÈRE DU
TÉLÉVISEUR. CET APPAREIL NE CONTIENT
AUCUNE PIÈCE POUVANT ÊTRE RÉPARÉE.
POUR TOUT ENTRETIEN, ADRESSEZ-VOUS À UN
TECHNICIEN QUALIFIÉ.
• Les fentes et les ouvertures ménagées dans le boîtier ainsi qu'à l’arrière et au-dessous de l'appareil servent
pour la ventilation. Afin de garantir le bon fonctionnement de l'appareil et d'éviter les risques de surchauffe,
ces fentes et ouvertures ne doivent être ni obstruées ni couvertes.
− L’appareil ne doit pas être placé dans un environnement clos tel qu’une bibliothèque ou une armoire
encastrée, sauf si une ventilation adéquate est prévue.
− L’appareil ne doit pas être placé à proximité ou au-dessus d’un radiateur ou d’une grille d'air de chauffage, ni
dans un endroit exposé à la lumière directe du soleil.
− Aucun récipient contenant de l’eau (vases, etc.) ne doit être placé sur l’appareil, car cela présente un risque
d’incendie ou de décharge électrique.
• L’appareil ne doit pas être exposé à la pluie ni placé à proximité d'une source d'eau, par exemple une
baignoire, un lavabo, un évier, un bac de lavage, un sous-sol humide, une piscine, etc. Si l’appareil est
mouillé par accident, débranchez-le et appelez immédiatement un revendeur agréé.
• Cet appareil fonctionne avec des piles. Dans un souci de préservation de l’environnement, la réglementation
locale prévoit peut-être des mesures particulières pour la mise au rebut des piles. Veuillez communiquer
avec les autorités compétentes pour vous renseigner sur la mise au rebut ou le recyclage des piles.
• Evitez de surcharger les prises murales, les rallonges et les adaptateurs, car cela présente un risque
d'incendie ou d'électrocution.
• Les cordons d'alimentation doivent être disposés de telle sorte afin d'éviter que l'on ne marche dessus ou
qu'un objet s'y accroche. Portez une attention particulière aux cordons près de l'extrémité de la fiche, à
proximité des prises de sortie murales et à leur point de sortie sur l'appareil.
• En cas d'orage, ou bien lorsque vous vous absentez ou n'utilisez pas votre appareil pendant une longue
période, débranchez celui-ci de la prise murale et débranchez également l’antenne ou le connecteur
au réseau câblé. Ces précautions éviteront que l’appareil ne soit endommagé par la foudre ou par des
surtensions.
Ce symbole indique la présence
d'une tension élevée à l'intérieur
de l'appareil. Tout contact avec
les pièces à l'intérieur présente un
danger.
Ce symbole vous informe qu'une
documentation importante relative
au fonctionnement et à l'entretien
est fournie avec le produit.
• Avant de raccorder le cordon d’alimentation CA à la prise de l’adaptateur CC, vérifiez que la tension
indiquée sur ce dernier correspond bien à la tension délivrée par le réseau électrique local.
• N'insérez jamais d'objet métallique dans les parties ouvertes de cet appareil, car vous pourriez recevoir une
décharge électrique.
• Pour éviter tout risque d'électrocution, ne mettez jamais les doigts à l’intérieur de l’appareil. Seul un
technicien qualifié est habilité à ouvrir cet appareil.
• Veillez à brancher le cordon d'alimentation de sorte qu'il soit correctement inséré dans la prise. Pour
débrancher le cordon d'alimentation d'une prise murale, tenez la fiche. Ne débranchez jamais le cordon en
tirant sur ce dernier. Évitez de toucher le cordon avec les mains mouillées.
• Si l’appareil ne fonctionne pas normalement, surtout s’il émet des odeurs ou des sons anormaux,
débranchez-le immédiatement et appelez un revendeur ou un centre de dépannage agréé.
• Si vous envisagez de ne pas utiliser le téléviseur ou de vous absenter de chez vous pendant une période
prolongée, veillez à retirer la fiche d'alimentation de la prise (en particulier si des enfants, des personnes
âgées ou des personnes handicapées restent seuls à la maison).
− L'accumulation de poussière peut provoquer une électrocution, une perte d'énergie, ou un incendie induit par
le cordon d'alimentation dû à des variations, une surchauffe ou une détérioration de l'isolation.
• Communiquez avec un centre de service homologué lorsque vous installez l'appareil dans un endroit
exposé à la poussière, à des températures faibles ou élevées, à des produits chimiques et si l’appareil doit
fonctionner continuellement 24heures sur 24, comme dans un aéroport, une gare, etc. Le non-respect de
ces consignes peut causer de sérieux dommages au téléviseur.
• N'utilisez que des prises de sortie murale et des fiches correctement mises à la terre.
− Une mise à la terre risque incorrecte peut entraîner des électrocutions ou endommager l'appareil (appareil de
classe 1 uniquement).
• Pour mettre cet appareil totalement hors tension, il doit être débrancher de la prise murale. Par conséquent,
la prise murale et la fiche doivent être accessibles en tout temps.
• Ne laissez pas les enfants se suspendre à l'appareil.
• Gardez les petits accessoires (piles, etc.) dans un endroit hors de portée des enfants.
• Évitez d'installer l'appareil dans un endroit instable, comme sur une étagère branlante, sur une surface
inclinée ou à un endroit exposé à des vibrations.
• Évitez de laisser tomber l'appareil ou de lui faire subir des chocs. Si le produit est endommagé, débranchez
le cordon d'alimentation et communiquez avec un centre de service.
• Pour nettoyer l'appareil, débranchez le cordon d'alimentation de la prise murale et nettoyez l'appareil à
l'aide d'un chiffon doux et sec. N'utilisez pas de produits chimiques tels que la cire, le benzène, l'alcool,
des solvants, des insecticides, des désodorisants, des lubrifiants ou des détergents. Ces produits peuvent
endommager la surface du téléviseur ou effacer les parties imprimées.
• L’appareil ne doit pas être exposé à des éclaboussures ou gouttes d'eau ou de liquide.
• Ne vous débarrassez pas des piles en les faisant brûler.
• Les piles ne doivent pas être court-circuitées, démontées ou subir de surchauffe.
• Il y a un risque d'explosion si vous n'utilisez pas la bonne sorte de piles pour remplacer
les piles de la télécommande. Remplacez-les uniquement par des produits similaires ou
équivalents.
• ATTENTION - POUR ÉVITER TOUT RISQUE D'INCENDIE, TENEZ TOUJOURS CE
PRODUIT À DISTANCE DES BOUGIES OU DES FLAMMES NUES.
Français - 2 Français - 3
Page 33

Table des matières
Fonctions de base
5 Utilisation de la télécommande
Smart Control
6 Connexion au téléviseur
6 Insertion des piles (AAA x 2)
7 Avertissement indiquant
que le niveau de puissance
des piles est faible.
7 Utilisation du pavé tactile
8 Changer de chaîne en
entrant des chiffres
8 Affichage de la bannière
État et notification
8 Recommandé
8 Historique
9 Recherche
9 Utilisation de la
télécommande virtuelle
10 Ajustement de la hauteur et
de l'angle d'installation
10 Mise sous tension du téléviseur
12 Télécaméra intégrée
12 Déployer la télécaméra
12 Rétracter la caméra
12 Réglage de l'angle de la caméra
13 Brancher le téléviseur à One Connect
13 Branchement d'appareils externes
13 Côté du téléviseur
14 Côté de One Connect
15 Basculer d'une source
vidéo à une autre
16 Réglage de la télécommande
universelle
16 Ajout d'un appareil externe
Affichage du guide
électronique
17 Affichage du guide électronique
17 Défilement sur une page
17 Utilisation des icônes du haut
17 Revenir à la page d'accueil
17 Recherche dans l'index
17 Recherche de pages
Configuration du
réseau
18 Connexion à un réseau
18 Connexion au réseau - sans fil
18 Réseau sans fil – précautions
18 Fermeture du guide électronique
18 Atteindre un élément de menu
18 Mise à jour du guide électronique
19 Protocoles de sécurité du réseau
19 Connexion au réseau - câblé
Fonctions de base 3D
20 Lunettes 3D Active
20 Caractéristiques
21 Exécution du pairage des
lunettes 3D Active
22 Pairage initial
Dépannage et autres
informations
23 Que signifie le soutien
technique à distance?
24 Dépannage
25 Capteur Eco et luminosité de l'écran
26 Entretien
26 Mise à niveau du téléviseur avec One
Connect
(vendu séparément)
Spécifications
27 Spécifications
27 Licences
Guides
28 Garantie
30 Avis de conformité aux
règlements (lunettes 3D Active)
Page 34

Les figures et les illustrations de ce guide d'utilisation ne sont fournies qu’à titre de
référence. L’apparence réelle du produit pourrait être différente. La conception et les
spécifications du produit peuvent changer sans avis préalable.
Fonctions de votre nouveau téléviseur
• 3D: cette nouvelle fonction vous permet de regarder un contenu 3D.
• SMART HUB:
Ce téléviseur offre le service Smart Hub, un centre de divertissement à usage multiple
et familial. Grâce à Smart Hub, vous pouvez naviguer sur le Web, télécharger des
applications et rester en contact avec la famille et les amis par l'intermédiaire des
services des réseaux sociaux. De plus, vous pouvez visualiser ou lire des fichiers vidéo,
photo et de musique enregistrés sur des appareils externes.
Appuyez sur la touche ™ pour lancer Smart Hub. Choisissez un service au moyen des
icônes affichées dans la partie supérieure de l'écran.
La fonction et les services Smart Hub comprennent les caractéristiques suivantes:
Social: vous pouvez regarder les vidéos YouTube les plus récentes ainsi que les
contenus vidéo affichés par vous et vos amis, sur Facebook et Twitter. Vous pouvez
également entrer en communication avec des amis par appel vidéo à l'aide de la
caméra intégrée au téléviseur.
Applications: Samsung Apps vous offre un large éventail de contenus gratuits et
payants (nouvelles, sports, météo et jeux) que vous pouvez télécharger et utiliser sur
votre téléviseur.
Sur le téléviseur: permet de consulter la liste des émissions qui sont diffusées ou qui
sont prévues pour la diffusion.
Photos, vidéos et musique: permet de visualiser des photos, regarder des vidéos et
écouter de la musique depuis un appareil externe.
• Anynet+ (HDMI-CEC): permet de commander tous les appareils Samsung branchés
qui prennent en charge Anynet+ à l’aide de la télécommande Samsung.
• e-Manual: un manuel d'utilisation détaillé est intégré au téléviseur.
• Interaction INTELLIGENTE: Cette fonction permet d'accéder aux options et aux
fonctions du menu et de les commander vocalement et par les gestes.
• Gest. périph.: permet d'utiliser les fonctions du téléviseur avec un clavier USB ou
Bluetooth et une souris.
• MHL & Screen Mirroring: Permet d'afficher sur l'écran du téléviseur les écrans
d'appareils mobiles à l'aide d'une connexion avec ou sans fil.
Accessoires
A ccessoires fournis dans cette boîte
①
Accessoires One Connect: Dispositif One Connect et câble One Connect
②
• Smart Touch Control
& Piles (AAA x 2)
• Également fourni: Guide de l'utilisateur, guide d'installation rapide, câble de
l'antenne, relais IR, adaptateur composante, adaptateur RCA x2 et câble
d'alimentation
③
Accessoires pour lunettes 3D: Lunettes 3D Active et câble de recharge USB
④
Pied
• DELPHINUS • Vis
x 8
Français - 4 Français - 5
Page 35

Utilisation de la télécommande Smart Control
MUTE
MUTE
Pour utiliser la fonction de reconnaissance vocale
avec le microphone intégré dans la télécommande.
La fonction Reconnaissance vocale peut
✎
être altérée en raison d'une prononciation
pas claire, du niveau de la voix ou du bruit
Permet de mettre le téléviseur sous tension et hors
Permet d’afficher et de sélectionner les sources
environnant.
tension.
vidéo disponibles.
TV
MIC
SOURCE
STB
Permet d'activer et de désactiver le câblosélecteur
ou le récepteur satellite branché au téléviseur.
Pour que cela soit possible, la télécommande
Smart Touch Control doit être configurée en
tant que télécommande universelle. Dans le
guide électronique, reportez-vous au chapitre,
Commande du téléviseur > Réglage de la
télécommande universelle.
VOICE: Enregistrement de la commande vocale;
saisie vocale du texte.
MUTE: permet de couper
le son temporairement.
Permet de régler le volume.
LIGHT: permet d'activer le rétroéclairage pour les
touches. Le rétroéclairage ne dure que quelques
secondes. Active ou désactive l'éclairage de la
télécommande. Lorsque l'éclairage est activé,
les touches enfoncées restent allumées pendant
quelques instants. (Utiliser la télécommande avec
cette fonction activée réduit le temps d’utilisation
des piles.)
DVR: Cette touche est disponible uniquement
lorsque la télécommande Smart Touch Control
est configurée pour fonctionner comme une
télécommande universelle pour commander le
décodeur. Activez le mode DVR (Digital Video
Recording) dans le décodeur.
MENU: permet d'ouvrir la fenêtre d’affichage.
3D: permet d'activer ou de désactiver la fonction
3D. Reportez-vous au chapitre,Utilisation de la
fonction > 3D du téléviseur.
Permet de retourner au menu précédent.
VOL
LIGHT DVR MENU 3D
EXIT
VOICE
MORE
SMART HUB
CH
GUIDERETURN
Permet de changer de chaîne.
Permet d'afficher le panneau de la télécommande
virtuelle à l'écran. Dans le guide électronique,
reportez-vous au chapitre, Commande du
téléviseur > Utilisation de la télécommande
virtuelle.
Pavé tactile
• Faites glisser votre doigt sur le pavé tactile
pour déplacer l’objectif sur l’écran.
• Appuyez sur le pavé tactile pour exécuter,
lancer ou sélectionner l'option mise en
surbrillance.
• Appuyez sur le pavé tactile et maintenezle enfoncé pour afficher l'option Liste des
chaînes.
Affiche Guide électronique de programme (GEP)
(Guide électronique des programmes).
Permet d’afficher les applications Smart Hub.
Dans le guide électronique, consultez le chapitre
Fonctions de SMART TV > Smart Hub.
Pour quitter facilement une application en
✎
cours d'exécution, appuyez sur la touche
™
.
Page 36

Connexion au téléviseur
Insertion des piles (AAA x 2)
Pour faire fonctionner le téléviseur à l'aide de la télécommande Smart Touch Control, vous
devez d'abord effectuer le pairage de la télécommande avec le téléviseur par l'intermédiaire
d'une connexion Bluetooth. La télécommande Smart Touch Control peut seulement être
utilisée lorsque le pairage avec le téléviseur Samsung a été effectué.
Nous recommandons d'utiliser la télécommande Smart Touch Control dans un
✎
périmètre inférieur à 6 m (20 pi). La distance d'utilisation appropriée peut varier en
fonction des conditions de l'environnement sans fil.
1. Pour mettre le téléviseur sous tension, pointez la télécommande Smart Touch Control
P
vers le capteur de la télécommande du téléviseur et appuyez sur la touche
position du récepteur de la télécommande peut varier selon le modèle.
2. Une icône Bluetooth s'affiche au bas gauche de l'écran tel qu'illustré ci-dessous. Le
téléviseur tentera de se connecter automatiquement à la télécommande Smart Touch.
<Icônes de la progression de la connexion>
. La
1 2 3
1. Soulevez légèrement le couvercle des piles à l'aide d'une carte de plastique. Ensuite,
tirez sur la languette du couvercle avec un ongle pour retirer complètement le couvercle.
Repérez l'emplacement de rainure du couvercle de la pile. Son emplacement
✎
dépend du type de télécommande Smart Touch Control fournie avec l'appareil.
2. Insérez 2 piles AAA en respectant les pôles négatif et positif.
3. Alignez le couvercle du compartiment des piles avec l'arrière de la télécommande, puis
appuyez sur les bords pour qu'il soit enclenché correctement.
Français - 6 Français - 7
Page 37

Connecter de nouveau la télécommande Smart Touch
Si la télécommande Smart Touch Control arrête de fonctionner ou fonctionne de manière
anormale, remplacez la pile, la cause peut être un manque de puissance. Si le problème
persiste, appuyez sur la touche de PAIRING sur la télécommande afin de rétablir le pairage
avec le téléviseur. Pour accéder à la touche de PAIRING, il suffit de retirer le couvercle du
logement des piles de la télécommande Smart Touch Control. En respectant une distance
entre 1ft et 13.1ft(30cm et 4m), pointez la télécommande Smart Touch Control vers le
récepteur du téléviseur et appuyez sur la touche de PAIRING. Lorsque le paraige est
terminé, l'image de pairage s'affiche dans la partie inférieure gauche de l'écran.
Utilisation du pavé tactile
Le pavé tactile vous permet d'effectuer diverses commandes. Accédez au menu Didacticiel
(Système > Gest. périph. > Paramètres Smart Touch Control > Didacticiel) pour
visualiser le guide à l'écran au moyen de la télécommande Smart Touch Control.
Faire glisser Appuyer
<Touche de pairage de la télécommande Smart Touch Control>
Avertissement indiquant que le niveau de puissance des
piles est faible.
Si les piles de votre télécommande Smart Touch deviennent faibles lorsque vous utilisez
la télécommande, la fenêtre d'alarme ci-dessous s'affiche dans la partie inférieure gauche
de l'écran. Si la fenêtre d'avertissement apparaît, remplacez les piles de la télécommande
Smart Touch Control. Pour une durée d'utilisation accrue, utilisez des piles alcalines.
<Fenêtre d’alarme de piles faibles.>
Faites glisser vos doigts sur le pavé tactile pour
déplacer le pointeur ou mettre en surbrillance une
option dans le sens de déplacement.
Appuyez sur le pavé tactile pour sélectionner l'élément
en surbrillance ou ciblé par le pointeur. Quand vous
regardez une émission, appuyez sur le pavé tactile et
maintenez votre doigt pendant 2 secondes pour afficher
la liste de chaînes. Sur certaines applications, le fait
d'appuyer sur le pavé tactile et de maintenir le doigt
pendant plus de 2 secondes permet d'afficher la liste
des fonctions disponibles pour l'application.
Page 38

Changer de chaîne en entrant des chiffres
Affichage de la bannière État et notification
Lorsque vous regardez le téléviseur, tapez sur la ligne
qui dépasse du côté gauche ou droit de l'écran afin
de faire afficher la fenêtre de saisie numérique. Entrez
le numéro de la chaîne que vous désirez regarder à
l'aide de votre doigt. Le chiffre saisi s'affiche à l'écran
et le téléviseur passe à la chaîne correspondante. Il est
toutefois probable que le téléviseur ne reconnaisse pas
le chiffre que vous avez entré. Consultez le guide cidessous pour vous assurer que votre saisie numérique
a bien été reconnue.
Guide de saisie numérique
Lorsque vous entrez des valeurs numériques, suivez les diagrammes ci-dessous. Si vous
ne suivez pas les séquences indiquées ci-dessous, il est possible que le téléviseur ne
reconnaisse pas vos saisies.
Appuyez sur la touche MORE de la télécommande Smart Touch, puis sélectionnez STATUS
sur le panneau de configuration virtuel qui s’affiche à l’écran. La bannière État et notification
apparaît dans la partie supérieure de l'écran. Pour plus d'information sur la bannière
d'avertissement et de statut , reportez-vous à e-Manual > Fonctions de SMART TV > État
et notification.
Recommandé
Appuyez sur la touche RECOMM. / SEARCH et sélectionnez l'option Recommandé dans
la liste apparaissant au bas de l'écran. Les recommandations d'applications et d'émissions
actuelles et prévues s'afficheront.
Sélectionnez une émission en cours de diffusion pour passer à la chaîne correspondante,
ou à une émission dont la diffusion est prévue pour Planifier un visionnement. Reportezvous à la section « e-Manual > Fonctions de SMART TV > Sur le téléviseur» pour plus
d'information.
Sélectionnez une application que vous désirez exécuter. Samsung Apps sera lancé si
l'application sélectionnée n'est pas installée sur votre téléviseur. Reportez-vous à la section
« e-Manual > Fonctions de SMART TV > Applications > Samsung Apps pour plus
d'information.
Historique
Appuyez sur la touche RECOMM. / SEARCH et sélectionnez l'option Historique dans la
liste qui s'affiche au bas de l'écran. Cela vous permet d'obtenir une liste interactive des
chaînes, des contenus média et des applications que vous avez consultés récemment.
Français - 8 Français - 9
Page 39

Recherche
Changer la position du panneau de la télécommande virtuelle
Appuyez sur la touche RECOMM. / SEARCH de la télécommande Smart Touch Control.
La liste s'affiche au bas de l'écran. Appuyez de nouveau sur la touche RECOMM. /
SEARCH. Le clavier apparaît à l’écran. Saisissez des critères de recherche pour effectuer
une recherche non seulement parmi plusieurs applications et leur contenu dans le téléviseur,
mais également sur le Web.
Reportez-vous à la section e-Manual > Fonctions de SMART TV > Recherche pour plus
d'information.
Utilisation de la télécommande virtuelle
Appuyez sur la touche MORE pour afficher la télécommande virtuelle à l'écran. Le panneau
de la télécommande virtuelle comprend un panneau numérique, un panneau de commande
de la lecture et un panneau d'accès rapide. Utilisez le pavé tactile pour mettre en surbrillance
et sélectionner les icônes, les chiffres et les touches des panneaux.
La télécommande virtuelle affichée à l'écran du téléviseur peut être différente selon le
✎
pays.
Changing the Virtual Remote Panel
Vous pouvez changer le panneau de télécommande virtuelle affiché à l'écran. Pour passer
d'un panneau à l'autre, placez le pointeur à côté du bord droit ou gauche du panneau
affiché.
Utilisez la fonction de défilement vers la gauche ou la droite pour changer facilement de
panneau.
Appuyez sur la touche MORE de la télécommande Smart Touch Control. Le panneau
de la télécommande virtuelle s'affiche à l'écran. Appuyez sur le pavé tactile et maintenez
la pression pendant une seconde. Vous pouvez changer la position du panneau de la
télécommande virtuelle à l'écran.
Utilisation du panneau numérique
Le panneau numérique vous permet d'entrer des chiffres sur l'écran de clavier ou une page
Web ou de changer de chaîne tout en regardant la télévision. Les chaînes que vous changez
à l'aide du pavé numérique sont enregistrées. Ainsi, vous pouvez revenir facilement aux
chaînes que vous avez consultées précédemment.
Utilisation du panneau de commande de la lecture
Utilisez le panneau de commande de la lecture pour arrêter la lecture, revenir en arrière,
effectuer la lecture en avance rapide, passer au fichier suivant, sélectionner une fonction
avec les touches a, b, {, }, et bien plus tout en regardant un contenu média.
Utilisation du panneau d'accès rapide
Utilisez les touches du panneau d'accès rapide pour afficher les options INFOS, TOOLS, ou
les écrans e-Manual. Veuillez noter que l'affichage des touches peut varier selon le mode
de fonctionnement de la télécommande Smart Touch Control (avec le téléviseur seulement,
comme une télécommande universelle, etc.).
Page 40

Mise sous tension du téléviseur
Mettez le téléviseur sous tension à l'aide de la touche
Control ou du panneau.
La première fois que vous mettez le téléviseur sous tension, il lance immédiatement la
✎
configuration initiale.
La couleur et la forme du produit peuvent varier en fonction du modèle.
✎
P
de la télécommande Smart Touch
Capteur pour la
télécommande
Caméra
Ajustement de la hauteur et de l'angle d'installation
1. Grâce à l'outil Delphinus inclus, déverrouiller le cadre des deux côtés du produit, au
milieu de la partie inférieure, tel qu'illustré.
Haut-
parleurs
Haut-parleurs
<Verrouillage de l'écran du téléviseur> <Déverrouillage de l'écran du téléviseur>
Touche de mise sous tension
Français - 10 Français - 11
Page 41

2. Pour régler la hauteur du téléviseur, reportez-vous au diagramme.
<Diagramme 1> Tirer lentement le produit vers le haut
en le tenant au centre de la partie inférieure.
<Diagramme 2> Pousser lentement le produit vers le
bas en le tenant au centre de la partie supérieure.
[Assurez-vous qu'aucun jeune enfant ne se trouve dans les environs
si vous devez déplacer le téléviseur. De plus, une manipulation
inadéquate du produit pourrait entraîner des blessures.
3. Lorsque vous réglez la hauteur du téléviseur, veillez à ce que que le cadre se trouve à la
position désignée.
4. Utilisez le DELPHINUS (inclus) afin de serrer les verrous fixés au cadre des deux côtés
du téléviseur et de fixer le téléviseur en place.
5. Saisissez le milieu de la partie inférieure ou supérieure du produit, puis poussez ou tirez
pour régler l'angle du téléviseur.
Angles ajustables
✎
Angle à l'avant:
• La hauteur maximale pour installer le téléviseur est: 2.7 ± 1.0°
• La hauteur minimale pour installer le téléviseur est: 7.7 ± 1.0°
Angle à l'arrière: 9.5 ± 1.0°
[Assurez-vous qu'aucun jeune enfant ne se trouve dans les environs
lorsque vous réglez l'angle du téléviseur. De plus, une manipulation
inadéquate du produit pourrait entraîner des blessures.
Page 42

Télécaméra intégrée
주의
Ce téléviseur est doté d'une caméra intégrée qui peut être utilisée pour les fonctions
Commande gestuelle, Commande vocale (microphone intégré) et Reconnaissance faciale.
Rétracter la caméra
En cas de non-utilisation, la télécamara doit être rétractée. Vous ne pouvez pas utiliser les
fonctions Commande gestuelle et Reconnaissance faciale si la caméra est rétractée, mais
vous pouvez toujours utiliser la Commande vocale.
Poussez un coin de la caméra jusqu'à ce que vous entendiez un clic, puis relâchez la
pression.
Microphone
Lentille
Évitez de toucher la télécaméra
pendant son utilisation, car vous
risquez de laisser des empreintes
susceptibles de compromettre la
qualité de l'image. Si la lentille est
sale, nettoyez-la avec un chiffon doux.
Déployer la télécaméra
Pour pouvoir utiliser la télécaméra, vous devez d'abord la déployer.
Appuyez doucement et relâchez la pression sur la partie supérieure du
Microphone
Réglage de l'angle de la caméra
Déployez la télécaméra, mettez-la sur le côté à l'aide de deux de vos doigts, puis faites-la
pivoter vers le haut ou le bas pour ajuster l'angle. Si vous réduisez légèrement l'angle de la
caméra, vous entendrez un clic. Pour ramener la caméra à son angle original, tenez l'un des
côtés de la caméra et déplacez la caméra légèrement vers le haut. Quand la caméra sera
revenue à son angle original, vous entendrez un clic.
.
Français - 12 Français - 13
Page 43

Brancher le téléviseur à One Connect
Branchement d'appareils externes
Avant de brancher un appareil externe, vous devez brancher One Connect au téléviseur
grâce au câble One Connect. Les deux bouts du câble One Connect sont différents.
Branchez le téléviseur au dispositif One Connect conformément au diagramme.
One Connect
<Connecteur du
côté du téléviseur>
TV
<Connecteur du côté du
dispositif One Connect>
<Connecteur du côté du
dispositif One Connect>
<Connecteur du côté du téléviseur>
Côté du téléviseur
[Les connecteurs aux extrémités du câble One Connect ont chacun
une forme différente. Lorsque vous branchez le câble One Connect
au téléviseur, assurez-vous de brancher le bon connecteur. Sinon,
cela peut entraîner une défaillance du téléviseur.
Page 44

Côté de One Connect
Français - 14 Français - 15
Page 45

Basculer d'une source vidéo à une autre
Appuyez sur la touche SOURCE pour basculer d'un appareil branché au téléviseur à un
autre.
Par exemple, pour basculer vers une console de jeux branchée au deuxième connecteur
HDMI, appuyez sur la touche SOURCE. Dans la liste Source, sélectionnez HDMI2. Les
noms des connecteurs peuvent varier selon le modèle.
Sélectionnez Outils dans le coin supérieur droit de l'écran Source pour accéder aux
fonctions suivantes.
• Entrer le nom: Vous permet d’associer un nom d’appareil à une source d’entrée.
Vous pouvez sélectionner les noms d'appareils suivants sous l'option
Entrer le nom:
Magnétoscope / DVD / Décodeur câble / Décodeur satellite /
Décodeur PVR / Récepteur AV / Jeu / Caméscope / PC / DVI PC /
AppareilsDVI / TV / TV IP / Blu-ray / HD DVD / DMA
Pour associer un nom d’appareil à une source d’entrée, suivez la
procédure ci-après:
1. Sélectionnez Outils dans le coin droit supérieur de l'écran Source.
2. Sélectionnez Entrer le nom.
3. Recherchez la source d'entrée désirée dans la liste Source (HDMI1, HDMI2,
Composante, etc.).
4. Sélectionnez l'espace vide à côté du champ de saisie.
5. Dans la liste qui s'affiche, sélectionnez le nom de l'appareil associé à la source
d'entrée.
Lorsque vous affichez la liste Source, le nom de l'appareil et la prise
d'entrée s'affichent ensemble.
• Information: permet d'afficher de l'information détaillée sur les appareils branchés.
• Rafraîchir: sélectionnez cette fonction si un appareil branché ne s'affiche pas dans
la liste. Si l'appareil ne s'affiche toujours pas dans la liste après avoir sélectionné
Rafraîchir, vérifiez l'état du branchement du téléviseur à l'appareil.
• Retirer USB: permet de retirer en toute sécurité le dispositif USB de la liste. Cette
fonction est disponible uniquement lorsque le dispositif USB a été sélectionné.
Conf. téléc. universelle: cette fonction permet de configurer les paramètres de la
télécommande universelle. Grâce à la télécommande universelle, les utilisateurs peuvent
contrôler les appareils externes branchés au téléviseur, comme un boîtier décodeur, un
lecteur Blu-ray et un récepteur audiovisuel.
− Si vous avez connecté un ordinateur à une prise HDMI IN 2 (DVI) à l'aide d'un
câble HDMI, sélectionnez PC dans la liste des appareils.
− Si vous avez connecté un ordinateur à une prise HDMI IN 2 (DVI) à l'aide d'un
câble HDMI-DVI, sélectionnez DVI PC dans la liste des appareils.
− Si vous avez connecté un appareil audiovisuel à une prise HDMI IN 2 (DVI) à l'aide
d'un câble HDMI-DVI, sélectionnez AppareilsDVI dans la liste des appareils.
Page 46

Réglage de la télécommande universelle
Vous pouvez transformer la télécommande du téléviseur en télécommande universelle
pour contrôler le câblosélecteur, le lecteur Blu-ray, la chaîne de cinéma maison et d'autres
appareils externes branchés au téléviseur.
Gardez une distance d’au moins 2 pouce entre l’allonge de câble IR et l’appareil externe,
tel qu’illustré ci-après. Dirigez l’allonge de câble IR vers le récepteur de signaux de la
télécommande. Notez qu’aucun obstacle ne devrait se trouver entre l’allonge de câble IR et
l’appareil externe. La présence d'un obstacle crée des interférences avec la transmission du
signal de la télécommande.
Ajout d'un appareil externe
1. Mettez sous tension l'appareil externe pour lequel vous voulez configurer la
2. Sélectionnez Conf. téléc. universelle au haut de l'écran. Le processus de configuration
3. Suivez les instructions affichées à l'écran pour configurer la télécommande universelle.
2 pouce
télécommande universelle, puis appuyez sur SOURCE pour afficher l'écran Source.
de la télécommande universelle s'amorce.
Si cela ne fonctionne pas, entrez le numéro du modèle manuellement pour configurer la
télécommande.
Français - 16 Français - 17
Page 47

Affichage du guide électronique
Ce téléviseur comprend un guide électronique intégré qui contient des informations au sujet
des principales fonctions du téléviseur et des instructions pour leur utilisation. Appliquez
l'une des méthodes suivantes pour afficher le guide électronique:
• allez au menu Support technique, puis choisissez e-Manual (dépannage).
Utilisation des icônes du haut
Utilisez les icônes Retour, Suivante et Page ouverte dans le haut à gauche de l'écran pour
défiler d'une page à l'autre. Ces icônes sont disponibles après avoir affiché deux pages ou
plus.
Revenir à la page d'accueil
• Appuyez sur la touche MORE de la télécommande Smart Touch pour afficher la
télécommande à l'écran. Tapotez sur le pavé tactile jusqu'à ce que le panneau d'accès
rapide apparaisse, sélectionnez l'icône e-Manual, puis appuyez sur le pavé tactile.
Dans le guide électronique, les mots en bleu désignent les options du menu à l'écran;
✎
les mots en bleu clair se rapportent aux touches de la télécommande.
Une version imprimable du guide est aussi disponibe à l'adresse www.samsung.com/
✎
support.
Défilement sur une page
Appliquez l'une des méthodes suivantes pour défiler sur une page:
• Placez le pointeur sur la touche
appuyez sur le pavé tactile.
• Faites glisser ou tapotez du doigt vers le haut ou le bas d'un côté ou de l'autre du pavé
tactile.
• Placez le pointeur sur la touche
faites basculer la ligne vers le haut ou le bas sur le pavé tactile.
ou dans le coin droit de l'écran et ensuite
ou dans le coin droit de l'écran, déplacez ou
Pour revenir à la page d'accueil, sélectionnez la touche
supérieur de l'écran.
Pour sélectionner la touche touche de la lettre (a, b, {, }), appuyez sur la
✎
touche MORE de la télécommande Smart Touch pour afficher la télécommande à
l'écran. Tapotez sur le pavé tactile jusqu'à ce que l'écran de lecture du panneau de
télécommande virtuelle apparaisse, sélectionnez la touche à lettre
pavé tactile.
a
ou dans le coin droit
a
et appuyez sur le
Recherche dans l'index
Sélectionnez la touche b ou sélectionnez dans le haut à droite de l'écran pour afficher
l'index. Sélectionnez un terme pour afficher la page contenant ce terme.
Recherche de pages
Sélectionnez la touche { ou sélectionnez dans le haut à droite de l'écran et saisissez
les critères de recherche. Pour afficher une page, sélectionnez-la à partir de la liste des
résultats de la recherche.
Page 48

Fermeture du guide électronique
Pour fermer le guide électronique, maintenez enfoncée la touche RETURN ou sélectionnez
dans le coin supérieur droit de l'écran.
Atteindre un élément de menu
Connexion à un réseau
Lorsque vous connectez le téléviseur TV à un réseau, vous pouvez accéder à des services
en ligne notamment Smart Hub et les mises à jour des logiciels directement de Samsung.
com.
Pour passer directement à l'élément de menu décrit dans la section courante, sélectionnez
Connexion au réseau - sans fil
. Il est possible de passer directement d'un menu vers la section correspondante du
guide électronique. Au menu à l'écran, appuyez sur la touche MORE de la télécommande
Smart Touch Control et ensuite sélectionnez e-Manual sur le panneau de configuration
Connectez le téléviseur à Internet par l'intermédiaire d'un routeur ou d'un modem standard
sans fil.
virtuel qui s'affiche à l'écran.
Selon le menu, cette fonction pourrait ne pas être prise en charge.
✎
Image
Image Mode
• Contre-jour
• Contraste
• Luminosité
• Netteté
• Couleur
• Teinte (V/R)
Standard
e-Manual
14
100
45
50
G50
50
R50
Ess. maint.
Mise à jour du guide électronique
Prise LAN murale
Réseau sans fil – précautions
Appuyez sur la touche ™ et sélectionnez l'option Applications, puis l'option Autres Apps.
La mise à jour du guide électronique peut se faire de la même manière que la mise à jour
d'une application.
À l'écran Autres Apps, sélectionnez l'option Met. app. à j., puis le guide électronique dans
la liste. La dernière version du guide électronique est alors téléchargée. Cependant, l'option
• Ce téléviseur prend en charge les protocoles de communication IEEE 802.11a/b/g/n.
Samsung recommande l'utilisation du protocole IEEE 802.11n. Sinon, lorsque vous
effectuez la lecture d'un fichier vidéo par une connexion réseau, la lecture du fichier peut
ne pas être optimale.
Met. app. à j. s'affiche à l'écran uniquement lorsqu'il faut procéder à la mise à jour.
Routeur IP sans fil ou modem pourvu
d'un serveur utilisant le protocole DHCP
Câble LAN (non fourni)
Français - 18 Français - 19
Page 49

• Pour utiliser un réseau sans fil, le téléviseur doit être connecté à un routeur ou un
modem sans fil. Si le routeur sans fil est compatible avec le protocole DHCP, le
téléviseur peut utiliser une adresse IP statique ou DHCP pour établir la connexion au
réseau sans fil.
Connexion au réseau - câblé
Il existe trois manières de connecter votre téléviseur par le câble, selon la configuration de
votre réseau. Ces trois méthodes sont illustrées ci-dessous:
• Sélectionnez une chaîne actuellement inutilisée pour le routeur sans fil. Si la chaîne
choisie pour le routeur est actuellement utilisée par un autre appareil, il y aura des
interférences et la communication échouera.
• La plupart des systèmes de réseau sans fil sont équipés d’un système de sécurité
optionnel. Pour utiliser un système de sécurité du réseau sans fil, vous devez créer un
code de sécurité composé de caractères et de chiffres; vous devez ensuite entrer ce
code dans le routeur par l'intermédiaire du menu. Vous devez ensuite entrer ce code de
sécurité dans tout autre appareil que vous souhaitez connecter au réseau sans fil.
Protocoles de sécurité du réseau
Votre téléviseur prend seulement en charge les protocoles de sécurité du réseau sans fil qui
suivent:
• Mode d'authentification: WEP, WPAPSK, WPA2PSK
• Type de chiffrement: WEP, TKIP, AES
Les téléviseurs Samsung ne prend pas en charge le type de chiffrement WEP ou TKIP
conformément aux nouvelles spécifications de certification de produits sans fil lorsque le
mode (Greenfield) 802.11n est sélectionné.
Si le routeur sans fil prend en charge la configuration WPS (Configuration Wi-Fi protégée),
vous pouvez vous connecter au réseau à l’aide de la configuration par touches (PBC) ou
d’un NIP (numéro d’identification personnel). WPS configurera automatiquement les clés
SSID et WPA.
Votre téléviseur ne peut pas être connecté à des routeurs sans fil non certifiés.
Prise de
modem murale
Câble de modem (non fourni) Câble LAN (non fourni)
Prise de
modem murale
Câble de modem
Prise LAN
murale
Modem externe
(ADSL / VDSL / câblodistribution)
Modem externe
(ADSL / VDSL / câblodistribution)
(non fourni)
Câble LAN (non fourni)
One Connect
One Connect
Routeur IP pourvu d'un serveur
utilisant le protocole DHCP
Câble LAN (non fourni)Câble LAN (non fourni)
One Connect
Le téléviseur ne prend pas en charge les vitesses du réseau qui sont inférieures ou
✎
égales à 10Mbps.
Utilisez un câble réseau de catégorie 7 pour cette connexion.
✎
Page 50

Lunettes 3D Active
Recharge de la pile
Si la DEL rouge clignote toutes les 2 secondes, chargez la pile tel qu’indiqué ci-dessous.
Caractéristiques
Les lunettes 3D SSG-3570CR vous permettent de voir des images 3D. Les lunettes 3D
Samsung se connectent au téléviseur 3D Samsung par l'intermédiaire de la bande RF de 2,4
GHz.
Ce produit a été conçu pour être apparié avec les modèles de téléviseurs 3D, séries D,
✎
E, et F mis sur le marché en 2011 et jusqu’en 2013, ainsi que les téléviseurs 3D ayant
l’un des logos ci-dessous. Les autres appareils sans fil ne sont pas compatibles avec
ce produit.
Pièces
La DEL orange clignote toutes les secondes pendant que la pile se recharge. La DEL
verte clignote toutes les 2 secondes lorsque la recharge est terminée. (Il faut 30 minutes
environ pour recharger complètement la batterie à plat; cependant, le temps nécessaire
pour une recharge complète dépend du niveau de la batterie et de la tension d’alimentation
électrique.)
SAMSUNG TV
PC
Plaquettes
Obturateur à cristaux
liquides
Touche de
pairage
Pour mettre les lunettes 3D sur les lunettes de vue, retirez les plaquettes des lunettes
✎
Les plaquettes des lunettes sont réglables.
3D.
Pour plus d'informations sur la manière d'attacher ou de détacher les plaquettes,
✎
reportez-vous au manuel des lunettes 3D distinct.
Port USB
Microcâble USB
Ordinateur portatif
Français - 20 Français - 21
Page 51

Exécution du pairage des lunettes 3D Active
En quoi consiste le pairage? Le processus de pairage consiste à établir la connexion
✎
entre les lunettes 3D et le téléviseur 3D et assurer l'échange de données entre les
deux.
• Pairage
Appuyez sur la touche d’alimentation des
lunettes 3D durant plus d’une seconde.
• Mettre les lunettes 3D sous tension ou hors
tension
Mettez les lunettes 3D. Celles-ci sont
mises sous tension automatiquement et
la DEL devient verte pendant 3 secondes.
Pour les désactiver, il suffit de les retirer.
Après plusieurs minutes, les lunettes sont
mises hors tension automatiquement et la
DEL devient rouge pendant 3 secondes.
(Avant d’utiliser les lunettes 3D, assurezvous que le mode 3D est activé sur le
téléviseur.)
• Portée
Distance de pairage
recommandée
2~6m
Distance de visionnement recommandée
Distance de visionnement recommandée Distance de pairage recommandée
La distance de visionnement est variable en fonction des obstacles (une personne, des
✎
50cm
2 à 6 m 50 cm
objets en métal, des murs, etc.) ou des ondes électromagnétiques.
Notez que même si vous retirez les lunettes 3D pendant que vous regardez la vidéo
✎
3D, alors que le mode 3D est activé sur le téléviseur, les lunettes ne se mettent hors
tension qu’après 5 minutes.
Si les lunettes ne fonctionnent pas immédiatement lorsque vous les utilisez alors que le
✎
téléviseur est en mode 3D, mettez-les de nouveau.
Ce produit est rechargeable. Comme la pile est déchargée, il est possible que les
✎
lunettes ne fonctionnent pas au moment de l’utilisation initiale. Le cas échéant, chargez
la pile.
Page 52

Pairage initial
1. Mettez le téléviseur sous tension.
2. Appuyez brièvement sur la touche Pairage des lunettes 3D. Ces dernières se mettent
sous tension et le processus de pairage se déclenche.
3. Lorsque le pairage s'effectue avec succès, le message « Lunettes 3D connectées au
téléviseur.» (Lunettes 3D connectées) s'affiche à l'écran du téléviseur.
4. Regardez des films 3D après avoir configuré les paramètres de la fonction 3D sur le
téléviseur.
• Après le pairage, les lunettes 3D se mettent automatiquement sous tension lorsque
l’utilisateur les met. Pour les désactiver, il suffit de les retirer.
• Si le pairage échoue, les lunettes 3D se mettent hors tension.
• Si la première tentative échoue, mettez l’écran hors tension et remettez-le sous
tension, puis exécutez l’étape 2.
• Lorsque le processus de pairage est en cours d’exécution, les DEL verte et rouge
clignotent pendant une seconde.
Comment répéter le pairage: Appuyez sur la touche d’alimentation des lunettes 3D durant
plus d’une seconde.
Le pairage est nécessaire à nouveau dans les cas suivants:
Regarder une vidéo 3D
Certains modes 3D peuvent ne pas être disponibles selon le format de la source d'image.
Pour visionner une image 3D, vous devez mettre les lunettes 3D Active et les activer en
appuyant sur la touche de mise sous tension.
− Il se peut qu’il faille exécuter de nouveau le processus de pairage lorsque le téléviseur a
fait l’objet d’une réparation.
− Si vous désirez lire un contenu 3D sur un modèle de téléviseur 3D Samsung, série D, E
ou F mis sur le marché en 2011 jusqu’en 2013.
1. Allez à l'écran 3D. (Image > 3D)
2. Sélectionnez le mode 3D. L'écran du mode 3D s'affiche.
3. Réglez le mode 3D de l’image que vous désirez afficher.
Français - 22 Français - 23
Page 53

Dépannage
Problème Conseil
Les lunettes 3D doivent être à une distance rapprochée du téléviseur.
Assurez-vous que la distance entre le téléviseur et les lunettes 3D est
Mes lunettes 3D ne
fonctionnent pas.
La DEL continue de clignoter La pile est faible. Rechargez la pile.
inférieure à 6 m (19,68 pi) en ligne droite.
Essayez le pairage à nouveau pour vérifier si la recharge est terminée.
Vérifiez les paramètres de la fonction 3D de votre téléviseur.
Enlevez les lunettes et remettez-les. Les lunettes peuvent ne pas s’allumer.
Que signifie le soutien technique à distance?
Samsung vous offre un service de soutien technique à distance et personnalisé. Un
technicien de Samsung pourra à distance:
• diagnostiquer votre téléviseur;
• ajuster les réglages du téléviseur;
• rétablir les paramètres par défaut sur votre téléviseur;
Spécifications (Numéro de modèle: SSG-3550CR/SSG-3570CR)
Obturateurs Cristaux liquides Transmittance 37±2%
Optique
Poids Lunettes 29g (28,07 g)
Mise sous
tension
Consommation
énergétique
Conditions de
fonctionnement
Le design et les caractéristiques du produit peuvent être modifiés sans préavis afin
✎
d’en améliorer les performances.
La durée d'utilisation continue peut différer selon l'environnement de communication
✎
sans fil et des conditions d'utilisation.
Distance de
fonctionnement
recommandée
Lunettes Pile au lithium-polymère intégrée de 3,7 V
Lunettes 1.12mA
Pile
Température de
fonctionnement
Température de
conservation
2 à 6m (6 à 19,5pi)
Type 65mAh, 3.7V
Durée de
fonctionnement
sous tension
50 °F ~ 104 °F (10°C ~ 40°C)
-4 °F ~ 113 °F (-20°C ~ 45°C)
Fréquence de
trame
40 h
120 trames/seconde
• installer les dernières versions du micrologiciel recommandées.
Comment cela fonctionne-t-il?
Grâce au service de soutien technique à distance de Samsung, vous pouvez effectuer les
mesures de dépannage en toute facilité.
1. Il vous suffit d'appeler un centre
d'appels Samsung et de demander
un soutien technique à distance.
3. Sélectionnez Gestion à distance et
communiquez le NIP à l'agent.
2. Ouvrez le menu de votre téléviseur
et accédez à la section Support
technique.
4. Ce dernier accédera à votre
téléviseur. Et c'est tout!
Page 54

Dépannage
Problèmes Solutions et explications
Problème de mise sous
tension
Si le téléviseur semble présenter un problème, essayez d'abord de le corriger à l'aide de
la présente liste des problèmes et solutions possibles. Consultez également la section
«Dépannage» dans le guide électronique. Si aucun de ces conseils de dépannage ne
fonctionne, rendez-vous à l’adresse www.samsung.com/support ou communiquez avec le
service à la clientèle de Samsung en composant le 1-800-SAMSUNG (1-800-726-7864).
Problèmes Solutions et explications
Scintillement et diminution de
la luminosité
Branchement de composants/
Couleur de l’écran
Luminosité de l’écran Si vous constatez que les couleurs du téléviseur Samsung sont bonnes, mais
Auto Motion Plus/Flou Si vous constatez que l’image est floue ou qu’il y a une rémanence à l’écran,
Mise hors tension inopportune Si le téléviseur Samsung s'éteint tout seul, essayez de désactiver certaines
En cas de scintillement ou de diminution de la luminosité de manière
sporadique de votre téléviseur Samsung, vous devrez peut-être désactiver
certaines fonctions d’économie d’énergie.
Désactivez Écon. Énergie (Système > Solution Eco > Capteur Eco) ou
Écon. Énergie (Système > Solution Eco > Écon. Énergie), puis vérifiez de
nouveau.
Si vous constatez que la couleur de l’écran de votre téléviseur Samsung n’est
pas bonne ou qu’elle est en noir et blanc, exécutez un Autodiagnostic Essai
d'image (Support technique > Autodiagnostic > Essai d'image).
Si le téléviseur est la cause du problème concernant l'image, le problème est
détecté dans l'essai d'image. Si le problème ne peut être détecté, assurezvous que les prises d'entrée vidéo du téléviseur sont branchées aux bonnes
prises de sortie de l'appareil vidéo externe et que toutes les connexions sont
bien en place. Pour finir, si possible, testez votre appareil vidéo externe en le
branchant à un autre téléviseur.
légèrement sombres ou brillantes, réglez d’abord les paramètres ci-après.
Allez à Image, puis réglez Contre-jour, Contraste, Luminosité, Netteté,
Couleur, Teinte (V/R), ainsi que les autres réglages de l’image.
vous pouvez remédier à ce problème au moyen de la fonction Auto Motion
Plus (Image > Options d'image > Auto Motion Plus).
fonctions d'économie d'énergie automatiques. Vérifiez si la fonction Mise en
veille (Système > Heure > Mise en veille) a été activée. La fonction Mise
en veille met automatiquement le téléviseur hors tension après une période
d'inactivité pour économiser l'énergie. Si la fonction Mise en veille n'a pas
été activée, vérifiez si la fonction Veille abs. sign. (Système > Solution
Eco > Veille abs. sign.) ou Arrêt autom. (Système > Solution Eco > Arrêt
autom.) a été activée. La fonction Veille abs. sign. met le téléviseur hors
tension si aucun signal n'a été reçu pendant une certaine période de temps.
La fonction Arrêt autom. met le téléviseur hors tension s'il n'a pas été utilisé
pendant quatre heures.
Assemblage du support Si vous éprouvez des difficultés à assembler le support, reportez-vous aux
Pied bancal ou tordu Assurez-vous que les flèches sur le pied sont correctement alignées.
Impossible de trouver une
chaîne
Pour de plus amples renseignements sur le dépannage, visionnez les vidéos sur le site
✎
www.samsung.com/spsn.
Assurez-vous que vous avez le bon câble avant de le brancher. Les fiches et prises
courantes sont illustrées ci-dessous.
HDMI
USB
Optique
À la mise sous tension du téléviseur, le récepteur de la télécommande
clignote 5 fois avant que l’écran ne s’allume.
Si vous avez des difficultés à mettre votre téléviseur Samsung sous tension,
procédez à certaines vérifications avant d’appeler le service de dépannage.
Si le cordon d’alimentation est branché correctement et si la télécommande
fonctionne normalement, il se peut que le problème soit dû au branchement
du câble de l’antenne; il se peut aussi que le câblosélecteur ou le boîtier
décodeur ne soit pas allumé. Vérifiez le branchement de l’antenne ou mettez
sous tension le câblosélecteur ou le boîtier décodeur.
instructions d'assemblage dans le guide de démarrage rapide.
Exécutez de nouveau Configuration (Allez à Menu > Système >
Configuration) ou exécutez Prog. auto. (Allez à Menu > Diffusion > Prog.
auto).
Fiches de câble Ports et prises
Avertissement
Ne branchez pas le câble en
sens inverse.
Assurez-vous que l’orientation
de la fiche est adéquate avant
de la brancher.
Français - 24 Français - 25
Page 55

Problèmes Solutions et explications
Le téléviseur ne s’allume pas. • Assurez-vous que le cordon d’alimentation c.a. est bien branché à la
Il n’y a pas d’image. • Vérifiez le branchement des câbles. Débranchez et branchez à nouveau
La télécommande ne
fonctionne pas.
La télécommande du
câblosélecteur ou du boîtier
numérique ne commande pas
la mise sous tension ou la
mise hors tension du téléviseur
ni le volume.
J’ai des pièces en surplus • Des pièces supplémentaires sont fournies avec le téléviseur pour
Cet écran TFT DEL utilise un affichage constitué de pixels secondaires dont la
✎
prise de courant murale et au téléviseur.
• Assurez-vous que la prise de courant murale est sous tension.
• Appuyez sur la touche
télécommande fonctionne correctement. Si le téléviseur s’allume,
reportez-vous à la section «La télécommande ne fonctionne pas»
ci-dessous.
tous les câbles du téléviseur et des appareils externes.
• Réglez la sortie vidéo de votre appareil externe (câblosélecteur, récepteur
satellite, lecteur DVD, lecteur Blu-ray, etc.) afin qu'elle corresponde à
l'entrée vidéo du téléviseur. Par exemple, si un appareil externe a une
sortie HDMI, il faut le brancher à une entrée HDMI du téléviseur.
• Assurez-vous que les appareils branchés sont sous tension.
• Veillez à sélectionner la source d’entrée appropriée.
• Réinitialisez l'appareil connecté en débranchant puis en rebranchant son
cordon d'alimentation.
• Remplacez les piles de la télécommande. Lorsque vous insérez les piles,
assurez-vous de respecter les polarités appropriées (+/– ).
• Nettoyez la fenêtre de transmission de la télécommande.
• Essayez de pointer la télécommande directement vers le téléviseur à une
distance de 1,5 à 1,8m (5 à 6pi).
• Programmez la télécommande du câblosélecteur ou récepteur satellite
pour faire fonctionner le téléviseur. Consultez le guide d’utilisation du
câblosélecteur ou du récepteur satellite pour obtenir le code de téléviseur
SAMSUNG.
l’installation murale et l’acheminement des câbles.
P
du téléviseur pour vous assurer que la
production exige une technologie perfectionnée. Il se peut toutefois que certains pixels
deviennent sombres ou plus lumineux à l’écran. Ce phénomène n’a aucune incidence
sur la performance de l’appareil.
Pour optimiser les performances de votre téléviseur, utilisez la dernière version
✎
de logiciels. Utilisez les fonctions Mettre à jour maintenant ou Mettre à jour
automatiquement dans le menu du téléviseur (Menu à l'écran > Support technique
> Mise à jour du logiciel > Mettre à jour ou Menu à l'écran > Support technique >
Mise à jour du logiciel > Mise à jour auto).
Capteur Eco et luminosité de l'écran
Le Capteur Eco mesure la lumière de votre chambre et optimise automatiquement la
luminosité du téléviseur pour réduire la consommation d’énergie. Cela augmente ou diminue
automatiquement la luminosité du téléviseur. Pour désactiver cette fonction, allez à Menu >
Système > Solution Eco > Capteur Eco
Capteur Eco
[Évitez d’obstruer le capteur
par un objet. Car cela
diminuerait la luminosité de
l’image.
Page 56

Entretien
Mise à niveau du téléviseur avec One Connect
Si vous retirez l'autocollant apposé sur l'écran du téléviseur, il se peut que des débris
✎
restent encore collés. Éliminez les débris avant de regarder la télévision.
La partie extérieure et l’écran du produit peuvent être rayés durant le nettoyage. Pour
✎
éviter qu'il n'y ait des rayures, essuyez avec précaution la partie extérieure et l'écran à
l'aide d'un chiffon doux.
Ne vaporisez pas de l’eau ni de produit
nettoyant directement sur l’appareil. Tout
liquide qui s’infiltre dans l’appareil risque de
provoquer une défaillance, un incendie ou
une décharge électrique.
Nettoyez l’appareil à l’aide d’un chiffon doux
légèrement humidifié à l’eau. N’utilisez pas
de liquide inflammable (comme le benzène
ou des diluants) ni de produits de nettoyage.
(vendu séparément)
One Connect
(vendu séparément)
TV
Le branchement d'un panneau One Connect d'une version plus récente (vendu séparément)
à un téléviseur Samsung vous permet de profiter des toutes dernières fonctionnalités et du
tout dernier contenu sans avoir à acheter un nouveau modèle de téléviseur. Découvrez les
tout derniers services et fonctionnalités offerts par Samsung Electronics par l'intermédiaire
de One Connect.
One Connect est vendu séparément. En achetant One Connect, vous pouvez mettre
✎
à jour le logiciel à la version One Connect de l'année de mise sur le marché. N'est pas
pris en charge par tous les modèles.
Français - 26 Français - 27
Page 57

Spécifications
Résolution d'affichage
Facteurs environnementaux
Température de fonctionnement
Niveau d'humidité en fonctionnement
Température d'entreposage
Niveau d’humidité en entreposage
Pivotement du support (Gauche/Droite)
Nom du modèle
Taille de l'écran
(diagonale)
Son
(sortie)
Dimensions (L x H x P)
Boîtier
Avec support
Poids
Avec support
3840 x 2160
50°F à 104°F (10°C à 40°C)
10% à 80%, sans condensation
-4°F à 113°F (-20°C à 45°C)
5% à 95%, sans condensation
0˚
UN85S9AF
Categorie de 85 pouces
(84.5 pouces en diagonale)
120W
(avant haut 20x2, avant bas 20x2, caisson de basses 20x2)
78.9 x 64.4 x 2.8 pouces
(2004.3 x 1635.9 x 71.6 mm)
78.9 x 63.9 x 22.8 pouces
(2004.3 x 1624.4 x 581.5 mm)
189.1 lb (85.8 kg)
La conception et les spécifications peuvent faire l'objet de modifications sans préavis.
✎
L’aspect réel du téléviseur peut différer des illustrations du présent guide selon le
✎
modèle choisi.
La consommation d’énergie typique est mesurée conformément aux exigences du
✎
programme Energy Star relatives aux téléviseurs.
Mode veille
Pour réduire la consommation d'énergie, débranchez le cordon d'alimentation lorsque le
téléviseur n'est pas utilisé pendant une longue période.
Licences
Page 58

Garantie
Déclaration de la Federal Communications Commission relative au brouillage
Ce matériel a été testé et déclaré conforme aux limites imposées à un appareil numérique
de classe B, conformément à l’alinéa 15 des règlements de la FCC. Ces restrictions sont
conçues pour assurer une protection raisonnable contre un brouillage préjudiciable lorsque
l'appareil est utilisé dans un milieu résidentiel. Ce matériel génère, utilise et peut diffuser
de l’énergie sur les fréquences radio et, s’il n’est pas installé et utilisé conformément au
mode d'emploi, il peut brouiller les communications radio. Toutefois, il n’y a aucune garantie
qu'un brouillage ne se produira pas dans un milieu particulier. Si cet appareil brouille les
communications radio ou télévision, comme cela peut être confirmé en éteignant puis en
allumant l'appareil, l'utilisateur peut tenter de corriger toute interférence en essayant une ou
plusieurs des méthodes suivantes:
• Réorienter l’antenne réceptrice ou la placer à un autre endroit.
• Éloigner davantage l'appareil du récepteur.
• Brancher le matériel sur une prise ou un circuit différent de celui du récepteur.
• Pour toute aide, consulter le distributeur ou s'adresser à un technicien expérimenté en
radio-télévision.
Mise en garde de la FCC: Toute modification n’ayant pas été expressément approuvée par la
partie responsable de la conformité peut entraîner la révocation du droit à utiliser ce matériel.
Cet appareil est conforme à la partie 15 des règlements de la FCC. L'exploitation est
autorisée aux deux conditions suivantes: (1) l'appareil ne doit pas produire de brouillage
nuisible et (2) l'utilisateur de l'appareil doit accepter tout brouillage radioélectrique subi,
même si le brouillage est susceptible d'en compromettre le fonctionnement.
Pour les produits disponibles sur les marchés américain et canadien, seules les chaînes de 1
à 11 peuvent fonctionner. Il n'est pas possible de sélectionner d'autres chaînes.
Cet appareil et son ou ses antennes ne doivent pas être installés à proximité ou être utilisés
conjointement avec une autre antenne ou un autre émetteur.
Déclaration concernant l'exposition aux radiations de la FCC:
Cet équipement est conforme aux limites de la FCC concernant l'exposition aux radiations
applicables dans un environnement non contrôlé. Cet équipement doit être installé
et fonctionner en respectant une distance de 20cm au minimum entre la source de
rayonnement et votre corps.
Cet appareil numérique de la classe B est conforme à la norme NMB-003 du
Canada.
This Class B digital apparatus complies with Canadian ICES-003.
Cet appareil est en conformité avec les normes RSS exemptes de licence d'Industrie
Canada. L'exploitation est autorisée aux deux conditions suivantes: (1) l'appareil ne
doit pas produire de brouillage nuisible et (2) l'utilisateur de l'appareil doit accepter tout
brouillage radioélectrique subi, même si le brouillage est susceptible d'en compromettre le
fonctionnement.
Le présent appareil est conforme aux CNR d'Industrie Canada applicables aux appareils
radio exempts de licence. L'exploitation est autorisée aux deux conditions suivantes: (1)
l'appareil ne doit pas produire de brouillage, et (2) l'utilisateur de l'appareil doit accepter tout
brouillage radioélectrique subi, même si le brouillage est susceptible d'en compromettre le
fonctionnement.
Pour les produits disponibles sur les marchés américain et canadien, seules les chaînes de 1
à 11 peuvent fonctionner. Il n'est pas possible de sélectionner d'autres chaînes.
Cet appareil et son ou ses antennes ne doivent pas être installés à proximité ou être utilisés
conjointement avec une autre antenne ou un autre émetteur.
En vertu de la réglementation d'Industrie Canada, le présent émetteur radio ne peut
fonctionner qu'à l'aide d'une antenne dont le type et le gain maximal (ou minimal) pour
cet émetteur sont approuvés par Industrie Canada. Dans le but de réduire les risques de
brouillage radio électrique pour les autres utilisateurs, le type et le gain de l'antenne doivent
être choisis de manière à ce que la puissance isotrope rayonnée équivalente (p.i.r.e.) ne
dépasse pas l'intensité nécessaire à l'établissement d'une communication satisfaisante.
Déclaration concernant l'exposition aux radiations d'IC:
Cet équipement est conforme à la norme RSS-102 IC concernant l'exposition aux
radiations applicables dans un environnement non contrôlé. Cet équipement doit être
installé et fonctionner en respectant une distance de 20cm au minimum entre la source de
rayonnement et votre corps.
Français - 28 Français - 29
Page 59

INFORMATION IMPORTANTE SUR LA GARANTIE RELATIVE AU FORMAT DE
L'IMAGE DU TÉLÉVISEUR
Consultez la carte de garantie afin d'obtenir de plus amples renseignements sur les
✎
conditions de la garantie.
Les téléviseurs à DEL à format d’affichage grand écran (16:9, soit le rapport hauteur/largeur
de l'image) sont principalement conçus pour afficher les animations vidéo grand écran.
Les images affichées sur ces écrans devraient être principalement en format grand écran
16:9, ou agrandies pour remplir l’écran si votre modèle offre cette fonction, et animées
continuellement. L'affichage de graphiques et d'images fixes, comme les barres noires
des vidéos et émissions de télévision en format standard non agrandi, doit être limité au
maximum à 5% du temps d'écoute hebdomadaire.
De plus, il faut limiter l’affichage des autres images et textes fixes, comme les rapports
boursiers, les affichages de jeux vidéo, les logos des stations, les sites Web ou les images
graphiques et les schémas des ordinateurs, tel qu'indiqué ci-dessus, et ce pour tous les
téléviseurs. L'affichage d'images fixes qui ne respecte pas les directives ci-dessus peut
causer un vieillissement inégal des écrans DEL en y créant des images fantômes subtiles
mais permanentes. Pour éviter ce problème, faites varier les émissions et les images et
regarder principalement des images plein écran en mouvement et non pas des images ou
des barres foncées fixes. Dans les modèles d'écran à DEL qui offrent des caractéristiques
de format d'image, utilisez ces commandes pour obtenir différents formats en plein écran.
Prenez garde au choix des formats que vous utilisez pour regarder la télévision et à leur
durée d’utilisation. Le vieillissement inégal de l’affichage à DEL résultant du choix et de
l’utilisation d’un format n’est pas couvert par la garantie limitée de Samsung; les images
rémanentes en sont également exclues.
• ÉNONCÉ DE GARANTIE LIMITÉE DE SAMSUNG ELECTRONICS POUR L'AMÉRIQUE
DU NORD
Assujettie aux exigences, conditions, exclusions et limitations de la
garantie limitée originale fournie avec les produits de Samsung Electronics
(SAMSUNG) et les exigences, conditions, exclusions et limitations de la
présente garantie, SAMSUNG offrira en plus un service de réparation
sous garantie aux États-Unis pour les produits achetés au Canada et un
service de réparation sous garantie au Canada pour les produits achetés
aux États-Unis pendant la période de garantie précisée à l'origine et pour
l'acheteur initial seulement.
Les réparations sous garantie décrites ci-dessus doivent être effectuées
dans un centre de réparation agréé SAMSUNG. En plus de la présente
garantie, la garantie limitée originale et une facture datée en tant que
preuve d'achat doivent être présentées au centre de réparation. Le
transport de l'appareil à destination et en provenance du centre de
réparation incombe à l'acheteur. Les conditions couvertes ne sont
limitées qu'aux vices de matériaux et de fabrication dans des conditions
d'utilisation normale.
Exclues, mais sans s'y limiter, sont les dispositions précisées à l'origine
pour le service à domicile ou sur place, durées de réparation minimales et
maximales, échanges ou remplacements, accessoires, options, mises à
niveau ou produits non durables.
Pour obtenir le nom d'un centre de réparation agréé Samsung, composez
les numéros sans frais suivants:
Avertissement relatif aux images fixes
Évitez l'affichage d'images fixes (telles que des fichiers photo en jpeg) ou d'éléments
d'image fixes (logos de chaînes, barres de défilement affichant les nouvelles ou la bourse
au bas de l'écran, etc.) ou les émissions au format d’image panorama ou 4:3. L'affichage
constant d'images fixes peut entraîner une brûlure de l’écran à DEL et réduire ainsi la qualité
de l’image. Pour éviter ce genre d'incident, veuillez suivre les recommandations ci-dessous:
• Évitez d'afficher la même chaîne pendant de longues périodes.
• Essayez de toujours afficher une image au format plein écran. Utilisez le menu de
réglage du format de l'image pour obtenir les meilleurs résultats.
• Réduisez la luminosité et le contraste afin d'éviter l'apparition d'images rémanentes.
• Utilisez toutes les fonctions du téléviseur conçues pour réduire les images rémanentes et
la brûlure d'écran. Consultez le guide électronique pour obtenir plus de détails.
− Aux États-Unis: 1-800-SAMSUNG (1-800-726-7864)
− Au Canada: 1-800-SAMSUNG
Page 60

Avis de conformité aux règlements (lunettes
3D Active)
• Réorienter l’antenne réceptrice ou la placer à un autre endroit.
• Éloigner davantage l'appareil du récepteur.
• Brancher le matériel sur une prise ou un circuit différent de celui du récepteur.
CONFORMITÉ À LA FCC
Déclaration de la Federal Communications Commission relative au brouillage
1. Toute modification n’ayant pas été expressément approuvée par la partie responsable
de la conformité peut entraîner la révocation du droit à utiliser ce matériel.
2. REMARQUE: Ce matériel a été testé et déclaré conforme aux limites imposées à un
appareil numérique de classe B, conformément à l’alinéa 15 des règlements de la
FCC. Ces restrictions sont conçues pour assurer une protection raisonnable contre un
brouillage préjudiciable lorsque l'appareil est utilisé dans un milieu résidentiel. Ce matériel
génère, utilise et peut diffuser de l’énergie sur les fréquences radio et, s’il n’est pas
installé et utilisé conformément au mode d'emploi, il peut brouiller les communications
radio. Toutefois, il n’y a aucune garantie qu'un brouillage ne se produira pas dans un
milieu particulier. Si cet appareil brouille les communications radio ou télévision, comme
cela peut être confirmé en éteignant puis en allumant l'appareil, l'utilisateur peut tenter
de corriger toute interférence en essayant une ou plusieurs des méthodes suivantes:
• Pour toute aide, consulter le distributeur ou s'adresser à un technicien expérimenté en
radio-télévision.
Mise en garde de la FCC: Toute modification n’ayant pas été expressément approuvée
par la partie responsable de la conformité peut entraîner la révocation du droit à utiliser ce
matériel.
Cet appareil est conforme à la partie 15 des règlements de la FCC. L'exploitation est
autorisée aux deux conditions suivantes: (1) l'appareil ne doit pas produire de brouillage
nuisible et (2) l'utilisateur de l'appareil doit accepter tout brouillage radioélectrique subi,
même si le brouillage est susceptible d'en compromettre le fonctionnement.
CALIFORNIE (É.-U.) SEULEMENT
Cet avertissement relatif au perchlorate ne s’applique qu’aux piles
boutons CR (dioxyde de manganèse).
au lithium primaire dans le produit vendu ou distribué SEULEMENT en
Californie (É.-U.)
«Produit contenant du perchlorate – une manipulation particulière
pourrait s'appliquer, consulter le site www.dtsc.ca.gov/hazardouswaste/
perchlorate».
Français - 30
Page 61

This page is intentionally left blank.
Page 62

This page is intentionally left blank.
 Loading...