

Samsung UN65H7150AFXZA-TH01, UN60H7150AFXZA-HH01, UN60H6300AFXZA-HS01, UN55H7150AFXZA-TS01, UN55H6350AFXZA-TH01 Owner’s Manual
...
E-MANUAL
;_,_° _,_-,_ ;-4_ _ _,,,,_ _,,
Thank you for purchasing this Samsung product.
To receive more complete service, please register
your product at
www.samsung.com/register
Model Serial No.
Quick Guide
Using Smart Hub
Using the Remote Control and
Peripherals
Using Voice Control
Using Motion Control
Using the Samsung Smart Control
Using Multi-Link Screen
Connecting Antenna and
External
devices
Antenna Connection
Video Device Connections
9 HDMI Connection
10 Component Connection
11 Composite (A/V) Connection
Audio Input and Output Connections
12 HDMI (ARC) Connection
13 Digital Audio (Optical) Connection
14 Audio Output Connection
Connecting to a Computer
15 Connecting Through the HDMI Port
16 Connecting With a DVI to HDMI Cable
17 Connecting Through Samsung Link
17 Connecting Through DLNA Using Your Home Network
Installing Batteries into the Samsung Smart Control
24 The Low Battery Alarm Window
Pairing the Samsung Smart Control
25 Reconnecting the Samsung Smart Control
Using the Samsung Smart Control
26 Button Functions
29 Operating the TV by Moving the Samsung Smart Control
30 Using the Touch Pad and the Directional Buttons
32 Displaying and Using the On-Screen Remote
Controlling External Devices with the TV Remote -
Using the Universal Remote
34 Connecting the IR Extender Cable
35 Setting Up the Universal Remote Control
36 Universal Remote Features
Controlling the TV with a Keyboard
37 Connecting a Keyboard
38 Using the Keyboard
Controlling the TV with a Mouse
39 Connecting a Mouse
40 Using the Mouse
Entering Text Using the On-Screen QWERTY Keypad
41 Using Additional Functions
Connecting To a Mobile Device
19 Screen Mirroring
21 Connecting Mobile Devices without a Wireless Router
(Wi-Fi Direct)
21 Connecting Through Samsung Link
22 Connecting Through DLNA Using Your Home Network
22 Specifying the Name of the TV on a Network
Switching Between Video Sources
23 Other Functions Available When You Display the Source
List
23 The Universal Remote Function
internet Connection
Establishing a Wired Internet Connection
42 Using Cat 7 LAN Cables
43 Connecting to a Wired Internet Network Automatically
44 Connecting to a Wired Internet Network Manually
Establishing a Wireless Internet Connection
46 Connecting to a Wireless Internet Network Automatically
47 Connecting to a Wireless Internet Network Manually
48 Connecting to a Wireless Internet Network with WPS
TroubleshootingInternetConnectivityIssues
49 TroubleshootingWiredInternetConnectivityIssues
50 TroubleshootingWirelessInternetConnectivityIssues
Checking the Internet Connection Status
Smart Features
Using Multiple Functions on a Single Screen (Multi-Link
Screen)
52 Launching Multi-Link Screen
52 Using Multi-Link Screen
Smart Hub
53 Testing Smart Hub connections
54 Opening the First Screen
55 Moving to the Panel Screen
56 Using the Smart Hub Tutorial
56 Resetting Smart Hub
Using the On TV Panel
74 Using Supported Features via the Pop-Up Menu
74 Viewing Detailed Program Information
75 Configuring On TV Settings
Using the MOVIES & TV SHOWS Panel
77 Using Supported Features via the Pop-Up Menu
78 Watching a Movie/TV Program
78 Preventing Children from Watching Adult Content
79 Rating and Sharing a Purchased Content
Using the Multimedia Panel (Playing Photos, Videos,
and Music)
81 Playing Media Content Saved on a USB Device
82 Playing Multimedia Content Saved on a Computer/
Mobile Device
85 Buttons and Functions Available While Viewing Photos
86 Buttons and Functions Available While Viewing Videos
88 Buttons and Functions Available While Playing Music
89 Functions on the Media Content List Screen
Using Smart Hub with a Samsung Account
57 Creating a Samsung Account
59 Signing in to a Samsung Account
60 Linking Your Samsung Account to External Service
Accounts
61 Changing and Adding Information to a Samsung Account
61 Deleting a Samsung Account from the TV
Using the Games Panel
62 Using Supported Features via the Pop-Up Menu
63 Installing and Running a Game
64 Managing Downloaded or Purchased Games
Using the SAMSUNG APPS Panel
66 Using Supported Features via the Pop-Up Menu -
Downloaded Apps
67 Using Supported Features via the Pop-Up Menu -
Recommended Apps
67 installing an App
69 Default Apps
70 Relocating an App on the Apps Screen.
70 Deleting an App from the TV
71 Rating/Reviewing an App
Using the NewsON Panel
90 News
90 Weather
Using the SOCCER Panel
92 Setting Your Favorite Team
Controlling the TV with Your Voice (Voice Control)
93 Using Imperative Voice Control
95 Using Interactive Voice Control
Controlling the TV using Motions (Motion Control)
97 Testing Ambient Illumination Using the TV Camera
98 Activating Motion Control
100 Motion Control Screen Layout
Using Face Recognition
103 Registering Your Face to Your Samsung Account
104 Changing Your Login Method to Face Recognition
104 Signing in to a Samsung Account Using Face Recognition
71 Updating Apps
72 Using Other App Features and Functions
"iV Viewing
Making Sports Programs More Realistic with Soccer
Mode
Digital Broadcast Information at a Glance
105 Using the Guide
106 Viewing Detailed Information
107 Checking Current Program Info
107 Changing the broadcast signal
107 Digital Channel Signal Info and Strength
Recording Programs
108 Formatting a USB Recording Device
110 Recording Programs
111 Buttons and Functions Available While Recording a
Program
112 Managing the Schedule Recording List
113 Viewing Recorded Programs
116 Managing Recorded Files
Setting Up a Schedule Viewing
117 Digital Channel Schedule Viewing
118 Analog Channel Schedule Viewing
119 Canceling a Schedule Viewing
119 Editing a Schedule Viewing
132 Enabling Soccer Mode
132 Extracting Highlights Automatically
133 Functions Available While Watching Sports in Soccer
Mode
134 Viewing a game recorded in Soccer Mode
TV-Viewing Support Features
135 Showing Captions
137 Enabling the Audio Guide for the Video Description
137 PIP Broadcast Viewing
138 Scanning for Available Channels
138 Selecting the Broadcast Audio Language
139 Fine-Tuning the Screen
139 Remove Scrambled Channels
Picture and Sound Settings
Changing the Picture Mode and Adjusting the Picture
Quality
140 Choosing the Right Picture Mode for the Viewing
Environment
Using Timeshift
Using the Channel List
Registering, Removing, and Editing Channels
122 Registering and Removing Channels
123 Editing Registered Channels
124 Program Rating Lock
Creating a Personal Favorites List
127 Registering Channels as a Favorites
128 Selecting from Favorite List Channels Only
Editing a Favorites List
129 Edit Favorites Screen Menu Items
141 Adjusting the Picture Quality for Each Picture Mode
142 Fine-Tuning Each Picture Mode (Advanced Settings)
144 Adjusting the Picture for Easier Viewing (Picture Options)
Viewing in 3D
146 Starting 3D
147 Changing the 3D Mode
148 Adjusting the 3D Effect
Picture Support Functions
149 PIP Broadcast Viewing
150 Changing the Picture Size and Position
151 Listening to Audio Only with the Screen Turned Off
(Picture Off)
151 Resetting the Picture Mode Settings

ChangingtheSoundModeandUsingSoundEffects
152ChoosingtheRightSoundModefortheEnvironment
152UsingSoundEffects
Sound Support Functions
153 Selecting Speakers
153 Designating the TV's Installation Type
154 Listening to TV Sound through Samsung Bluetooth Audio
155 Enabling Digital Audio Output
Updating the TV's Software
165 Update now
165 Online
166 Manually, Using a USB Flash Drive
167 Enabling Automatic Software Updates
Protecting the TV from Hacking and malicious code
167 Checking the TV and Connected Storage Media
168 Automatically Scanning when the TV is Powered On
155 Listening to 3D Audio in 3D Mode
155 Resetting All Sound Settings
General
Setting the Time and Using the Timer
156 Setting the Current Time
158 Using the Timers
Using the Screen Burn Protection and Energy Saving
Features
160 Preventing Screen Burn
160 Using Energy Saving Features
Using Anynet+ (HDMI-CEC)
161 Setting Up Anynet+ (HDMI-CEC)
162 Using Anynet+ (HDMI-CEC)
Using the e-Manual
163 Launching the e-Manual
163 Additional e-Manual Features
164 Accessing the Menu from the e-Manual
164 Loading Reference Pages
164 Updating the e-Manual to the Latest Version
168 Automatically Adding malicious code to the Blocked List
Using Other Functions
169 Setting Up a Password
169 Changing the Menu Language
169 Checking Notifications
170 Enabling Voice Guides for the Visually Impaired
171 Adjusting the Menu Transparency
171 White Text on Black Background (High Contrast)
172 Expanding the Smart Hub's Focus Area
172 Enabling/Disabling Sound Feedback
172 Locking/Unlocking the Panel Keys
172 Showing/Hiding the Samsung Logo while Booting
172 Enabling the TV to Boot Faster
173 Enabling Game Mode
173 Enjoying Rich Colors and Superior Picture Quality (BD
Wise)
174 Registering the TV as a DivX-Certified Device (Watching
For Pay DivX Movies)
175 Restoring the TV to the Factory Settings
175 Using the TV as a Display Model (exclusively for retail
stores)
Troubleshooting
Supported Resolutions for 3D Modes
192 HDMI
Getting Support
176 Support through Remote Management
177 Finding the Information You Need for Service
There is a problem with the picture
178 Testing the Picture
I can't hear the sound clearly
180 Testing the Sound
I can't see 3D images clearly.
181 Testing 3D Picture Quality
There is a problem with the broadcast.
My computer won't connect.
I can't connect to the Internet.
The Schedule Recording/Timeshift function isn't
working.
Anynet+ (HDMI-CEC) isn't working.
I am having trouble launching/using apps.
192 Component
192 Digital Channel
192 Videos/Photos
192 Computer via HDMI Cable.
Read Before Using Voice, Motion, or Face Recognition
193 Voice, Motion, and Face Recognition Precautions
195 Requirements for Using Voice, Motion, or Face
Recognition
Read Before Using Apps
Read Before Using the Web Browser
Read Before Playing Photo, Video, or Music Files
200 Photo, Video, and Music File Use Limitations
200 Compatible Storage Devices for File Transfers
201 Supported External Subtitles
201 Supported Internal Subtitles
202 Supported Image Formats and Resolutions
202 Supported Music Formats and Codecs
203 Supported Video Codecs
My file won't play.
I want to reset the TV.
Other Issues
Appendix
Read Before Using 3D Viewing Mode
188 3D Precautions
S-Recommendation Disclaimer
191 S Recommendation with Voice Interaction
191 S Recommendation
Read After Installing the TV
205 Picture Sizes and Input Signals
205 Installing an Anti-Theft Lock
206 Read Before Setting Up a Wireless Internet Connection
Read Before Connecting a Computer (Supported
Resolutions)
2O7 IBM
2O7 MAC
2O8 VESA DMT
Supported Resolutions for Video Signals
2O9 CEA-861
License
Glossary
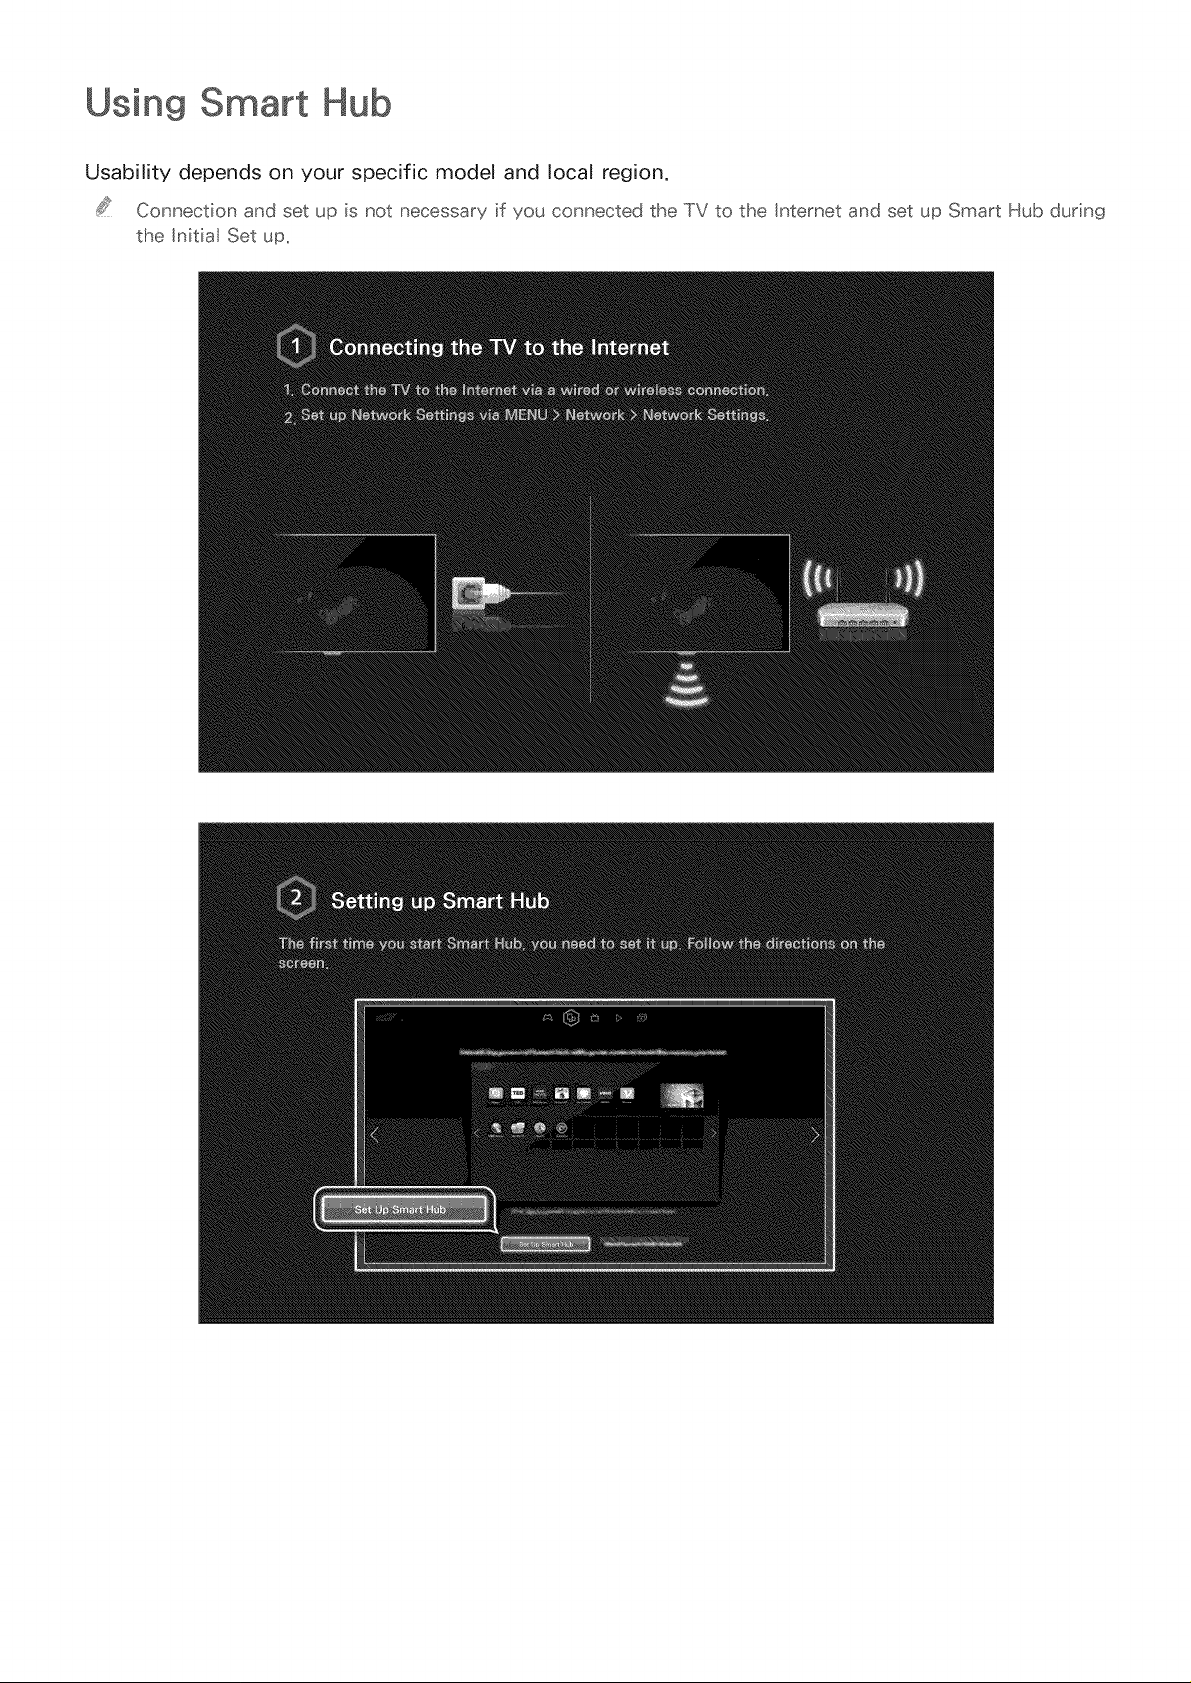
Using Smart Hub
Usability depends on your specific model and local region.
Connection and set up is not necessary if you connected the TV to the Internet and set up Smart Hub during
the Initial Set up_
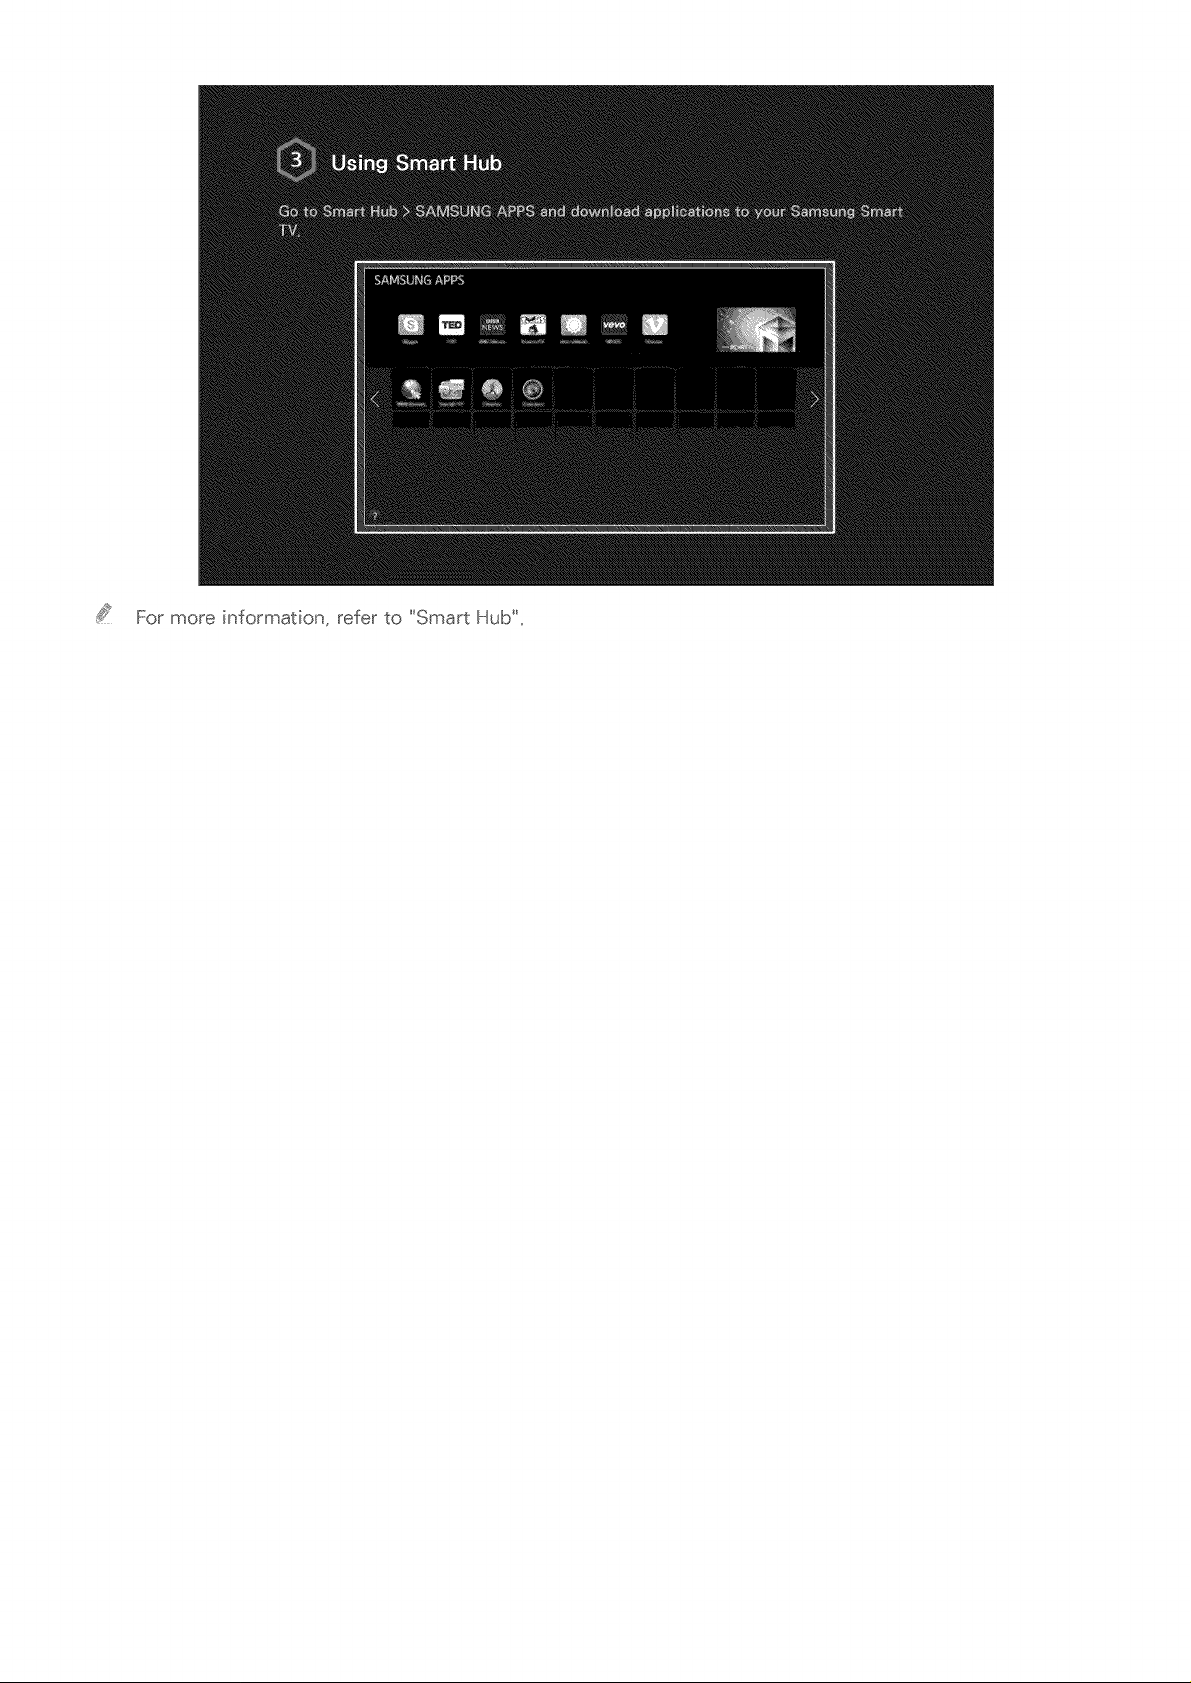
Formoreinformation,referto"SmartHub",
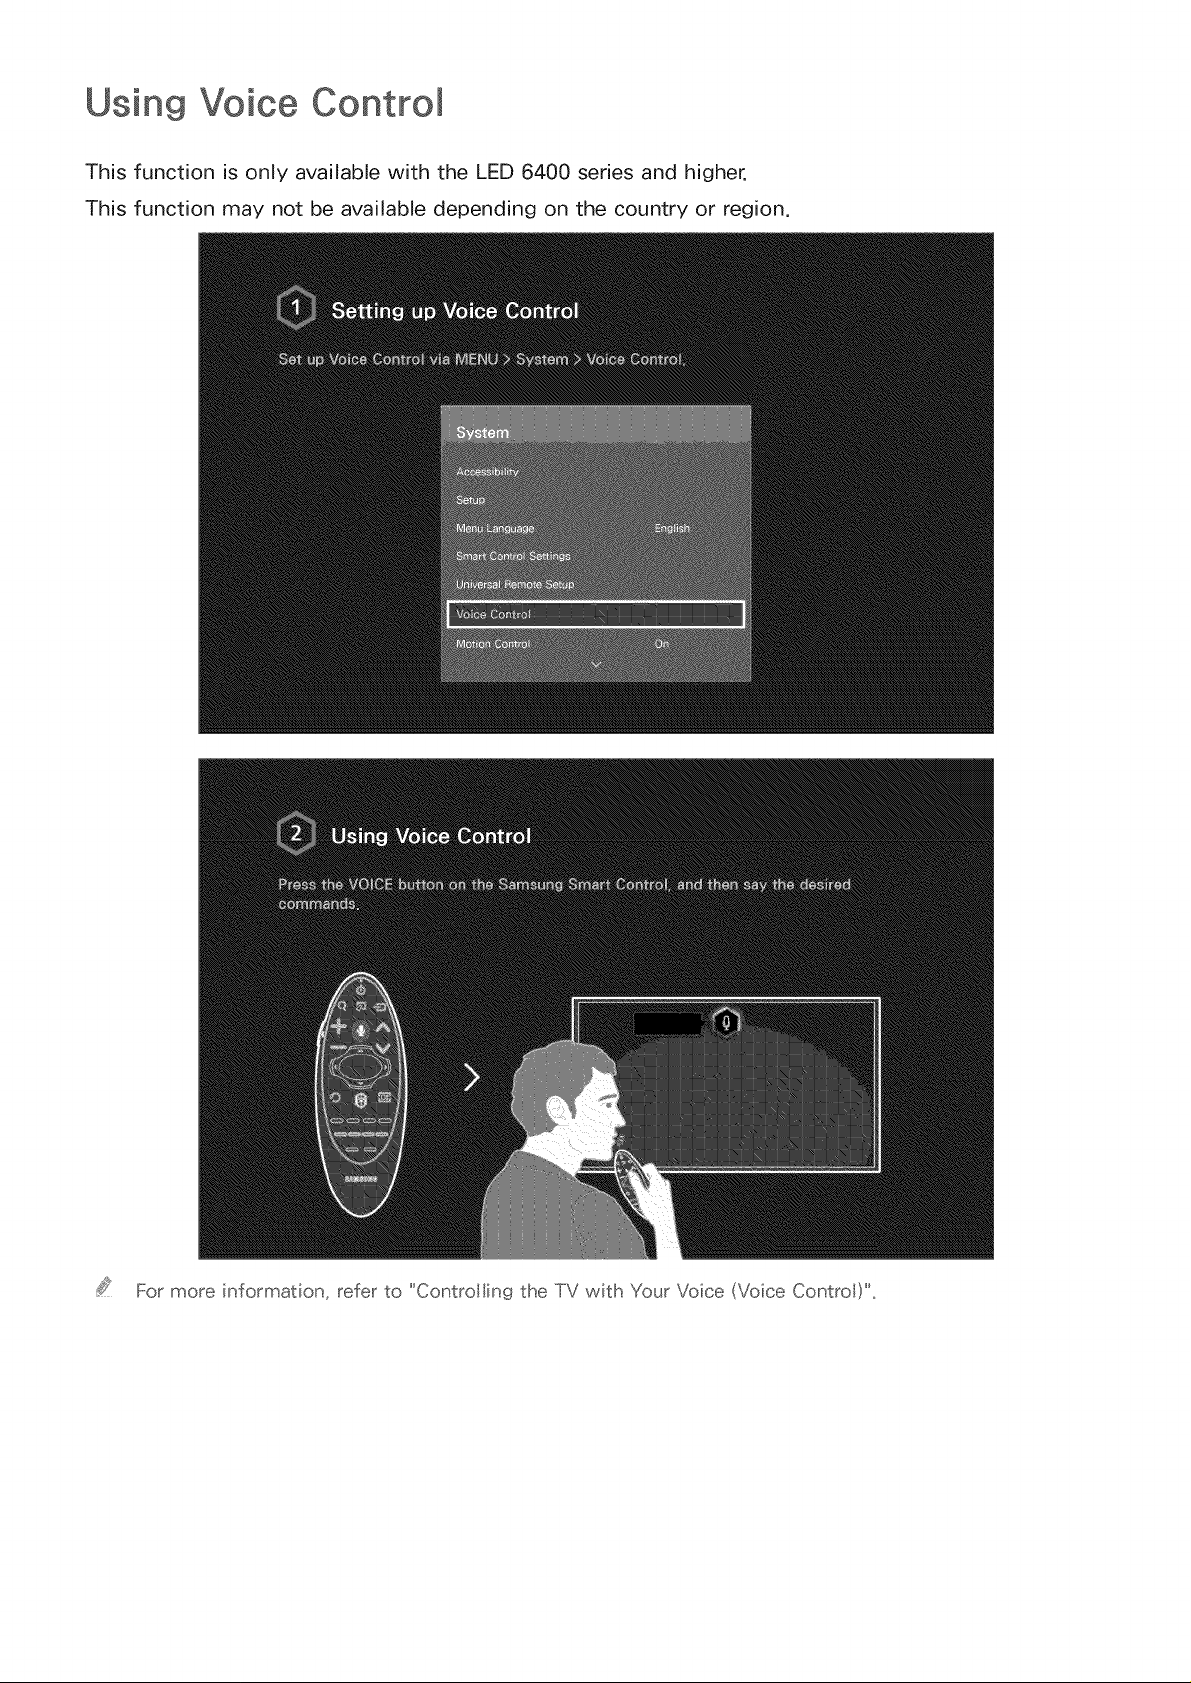
Using Voice Control
This function is only available with the LED 6400 series and higher.
This function may not be available depending on the country or region.
For more information, refer to "Controlling the TV with Your Voice (Voice Control)',
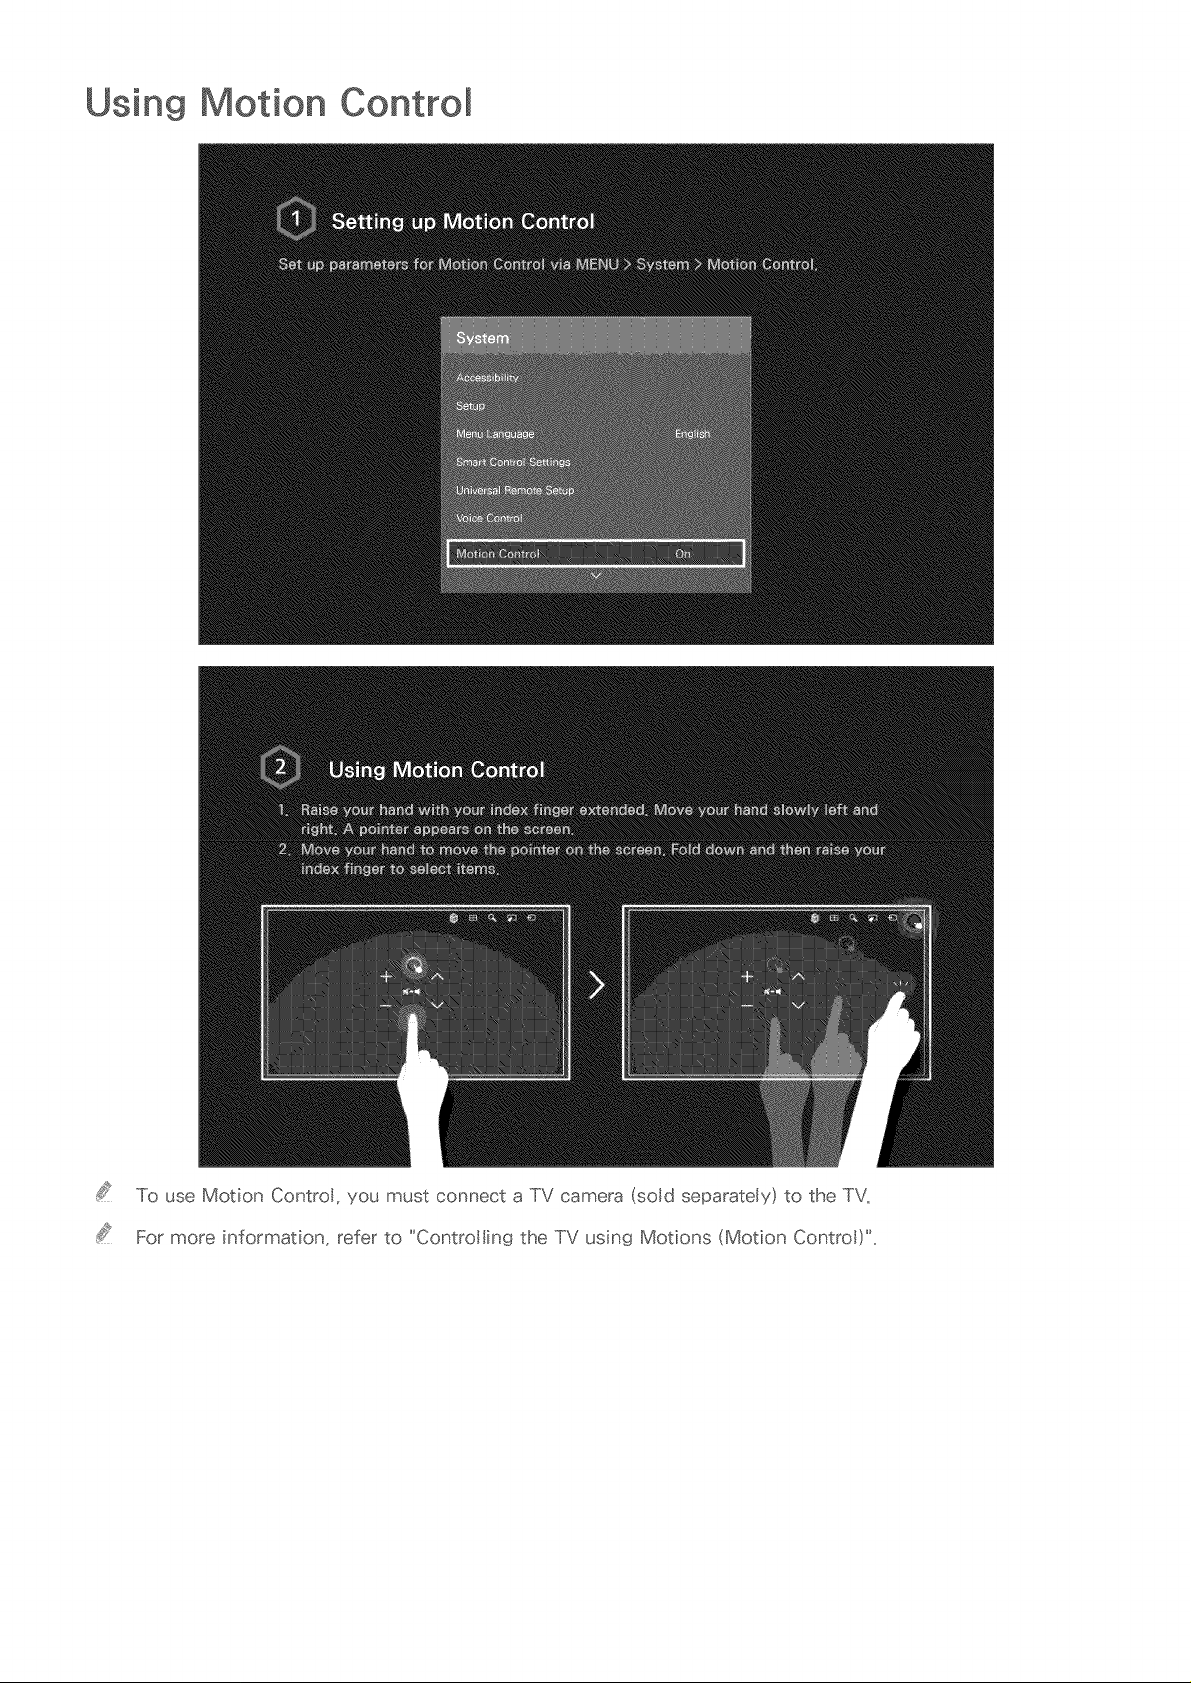
Using Motion Control
To use Motion Contro, you must connect a TV camera (sold separately) to the TV.
For more information, refer to "Contro Iing the TV using Motions (Motion Contro )"_

Using the Samsun9
This function is only available with the LED 6400 series and higher.
It may not be supported Samsung Smart Control depends on the country.
Pair the Samsung Smart Control to the TV the first time by pressing the Power button on the Samsung
Smart Control. To pair again - if necessary - press the RETURN and GUIDE buttons simultaneously for
3 seconds or more.
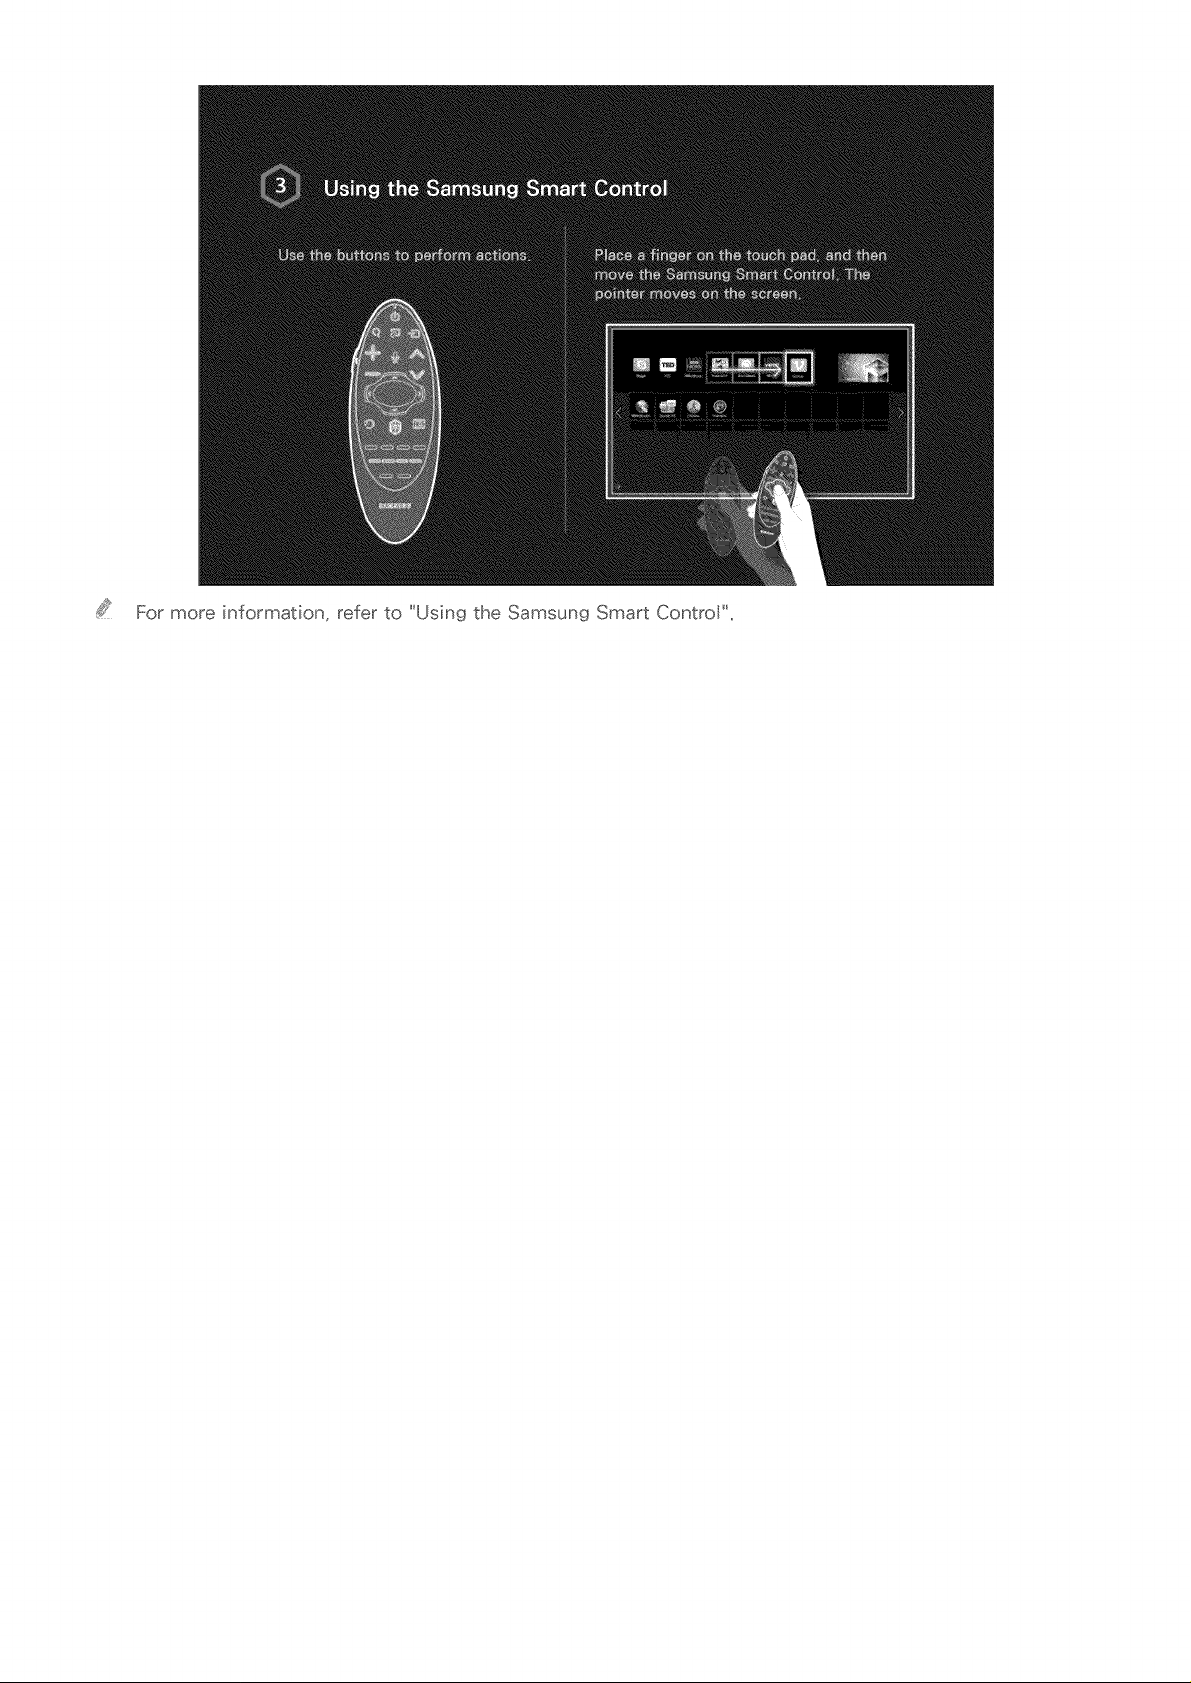
For more information, refer to "Using the Samsung Smart Contro ' _
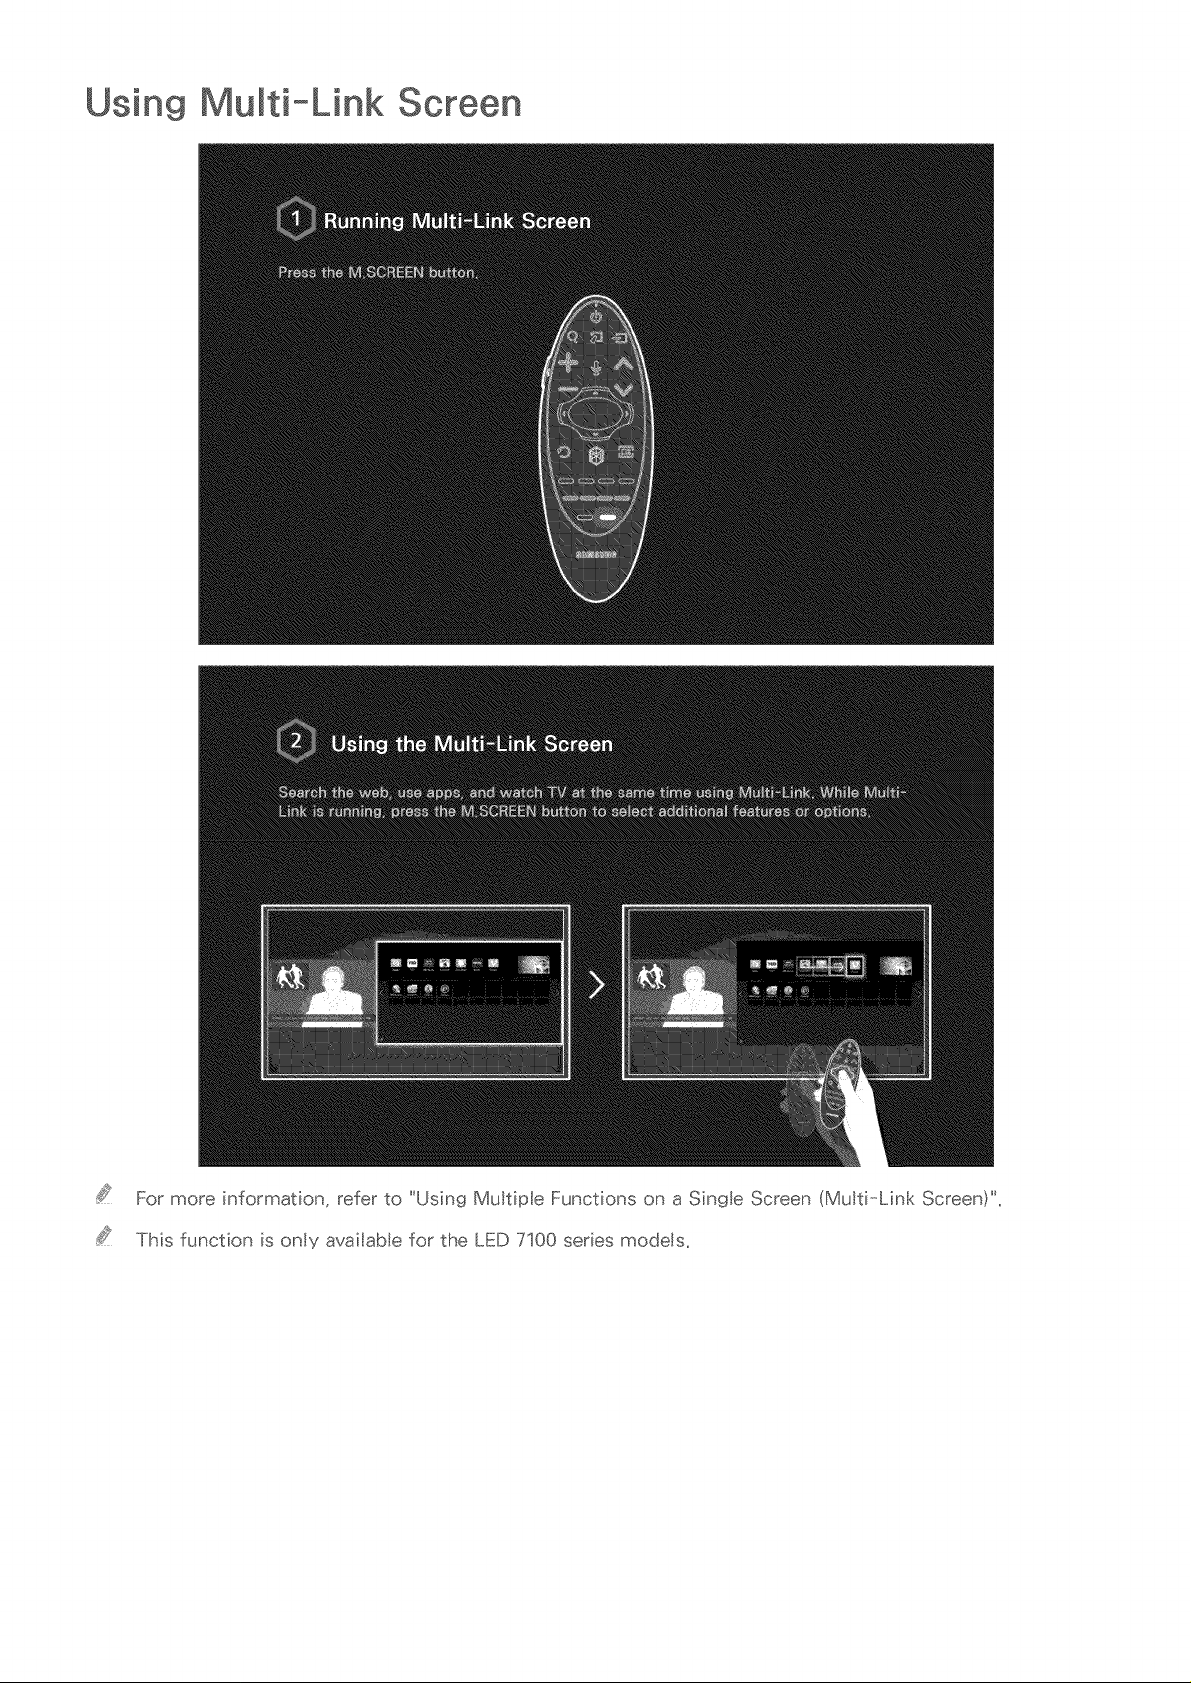
Using Multi-Link Screen
For more information, refer to "Using Multiple Functions on a Single Screen (Multi-Link Screen)' _
This function is only availab e for the LED 7100 series modets,
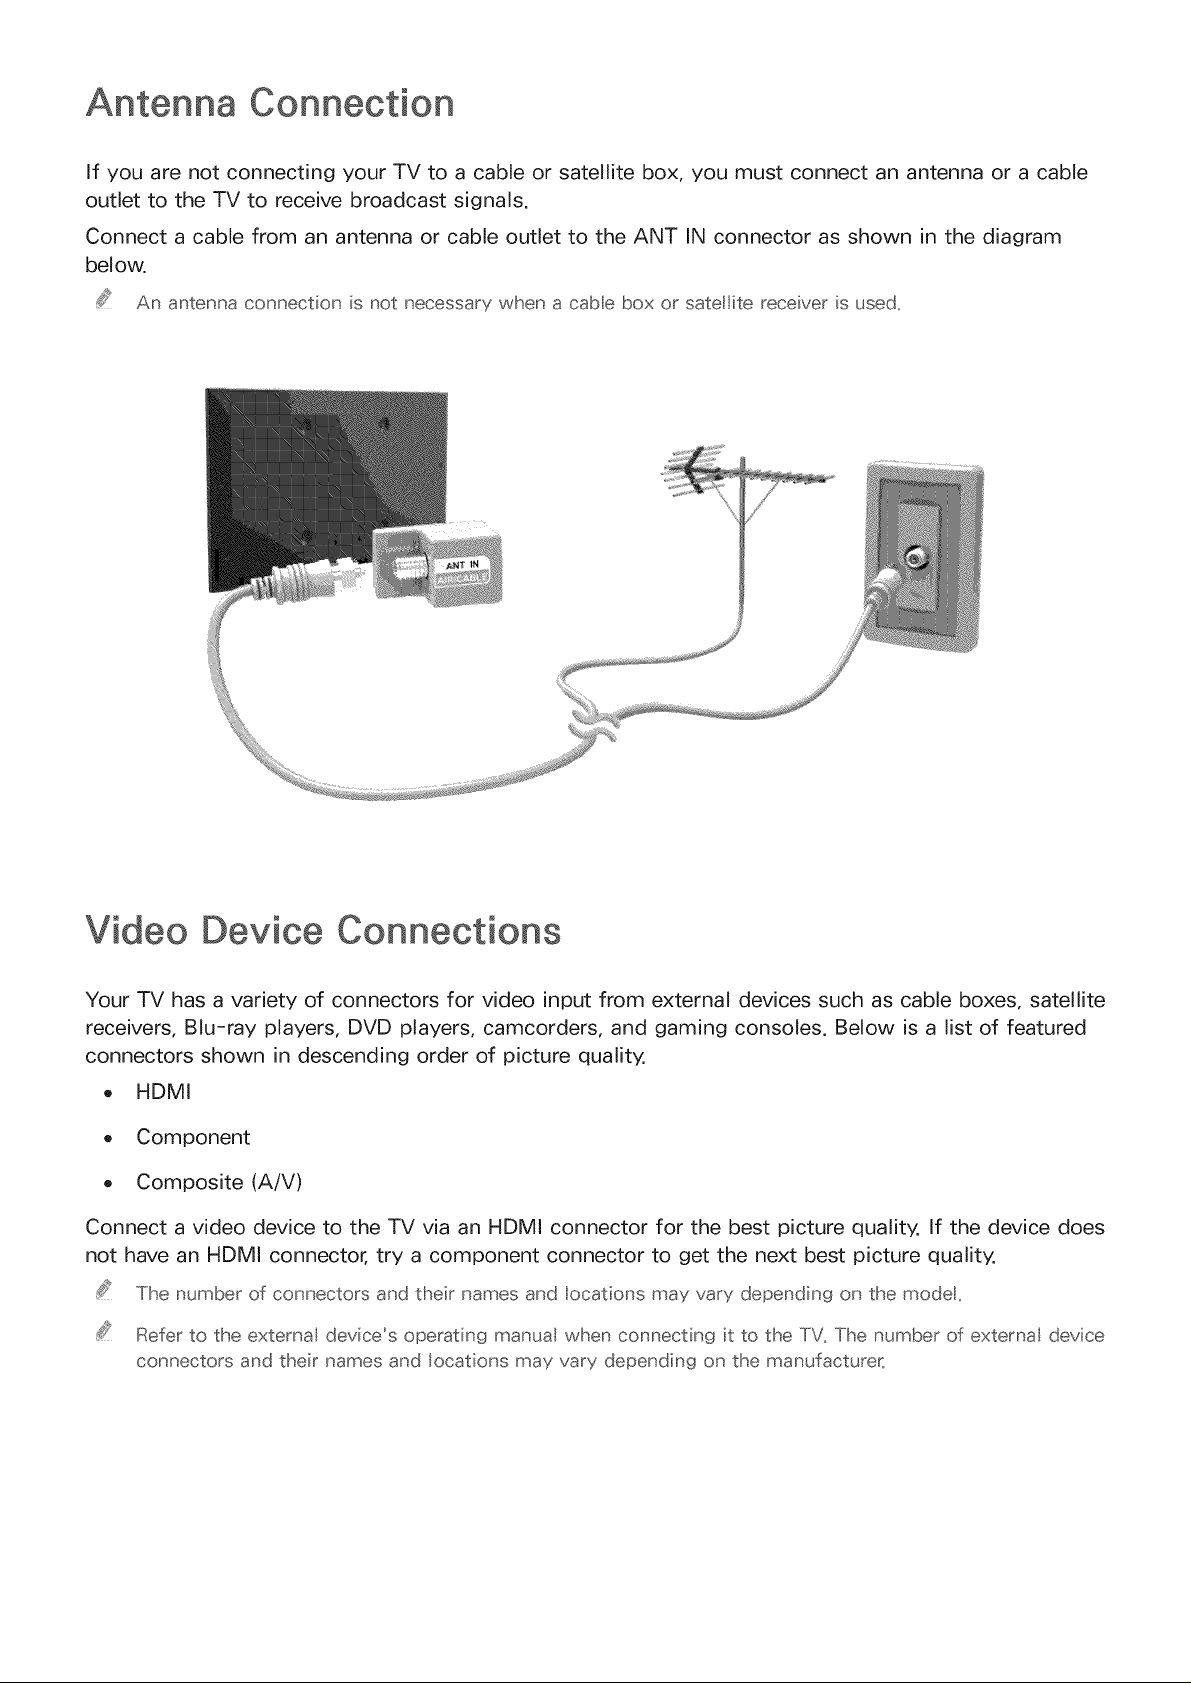
Antenna Connection
If you are not connecting your TV to a cable or satellite box, you must connect an antenna or a cable
outlet to the TV to receive broadcast signals.
Connect a cable from an antenna or cable outlet to the ANT IN connector as shown in the diagram
below.
An antenna connection is not necessary when a cabe box or satellite receiver is used,
Video Device Connections
Your TV has a variety of connectors for video input from external devices such as cable boxes, satellite
receivers, Blu-ray players, DVD players, camcorders, and gaming consoles. Below is a list of featured
connectors shown in descending order of picture quality.
o HDMI
o Component
Composite (A/V)
Connect a video device to the TV via an HDMI connector for the best picture quality. If the device does
not have an HDMI connector, try a component connector to get the next best picture quality.
The number of connectors and their names and locations may vary depending on the modet,
Refer to the external device's operating manual when connecting it to the TV. The number of external device
connectors and their names and locations may vary depending on the manufacturer_
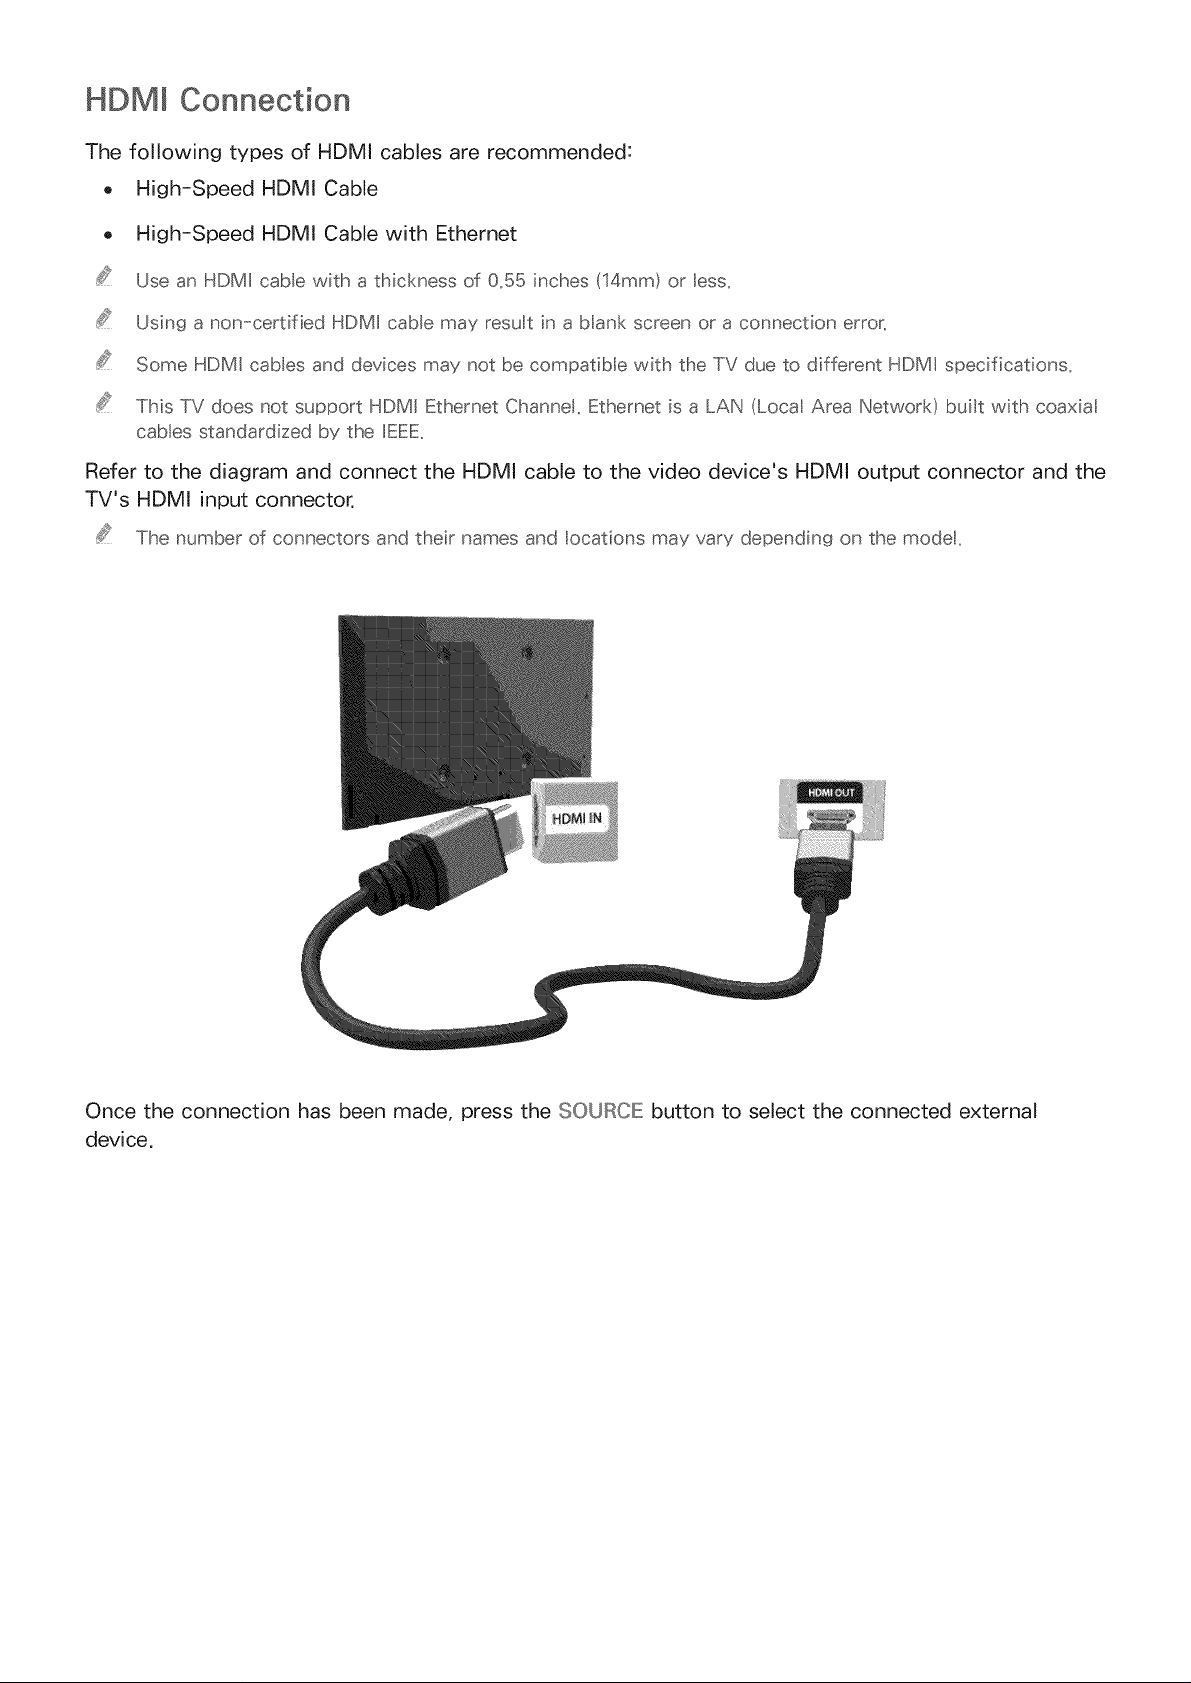
HDMI Connection
The following types of HDMI cables are recommended:
o High-Speed HDMI Cable
o High-Speed HDMI Cable with Ethernet
Use an HDMI cable with a thickness of 0,55 inches (14mm) or less,
Using a non-certified HDMI cable may result in a blank screen or a connection error_
Some HDMI cables and devices may not be compatible with the TV due to different HDMI specifications_
This TV does not support HDMI Ethernet Channe, Ethernet is a LAN (Loca Area Network) buit with coaxial
cables standardized by the IEEE_
Refer to the diagram and connect the HDMI cable to the video device's HDMI output connector and the
TV's HDMI input connector.
The number of connectors and their names and locations may vary depending on the modet_
Once the connection has been made, press the SOURCE button to select the connected external
device.
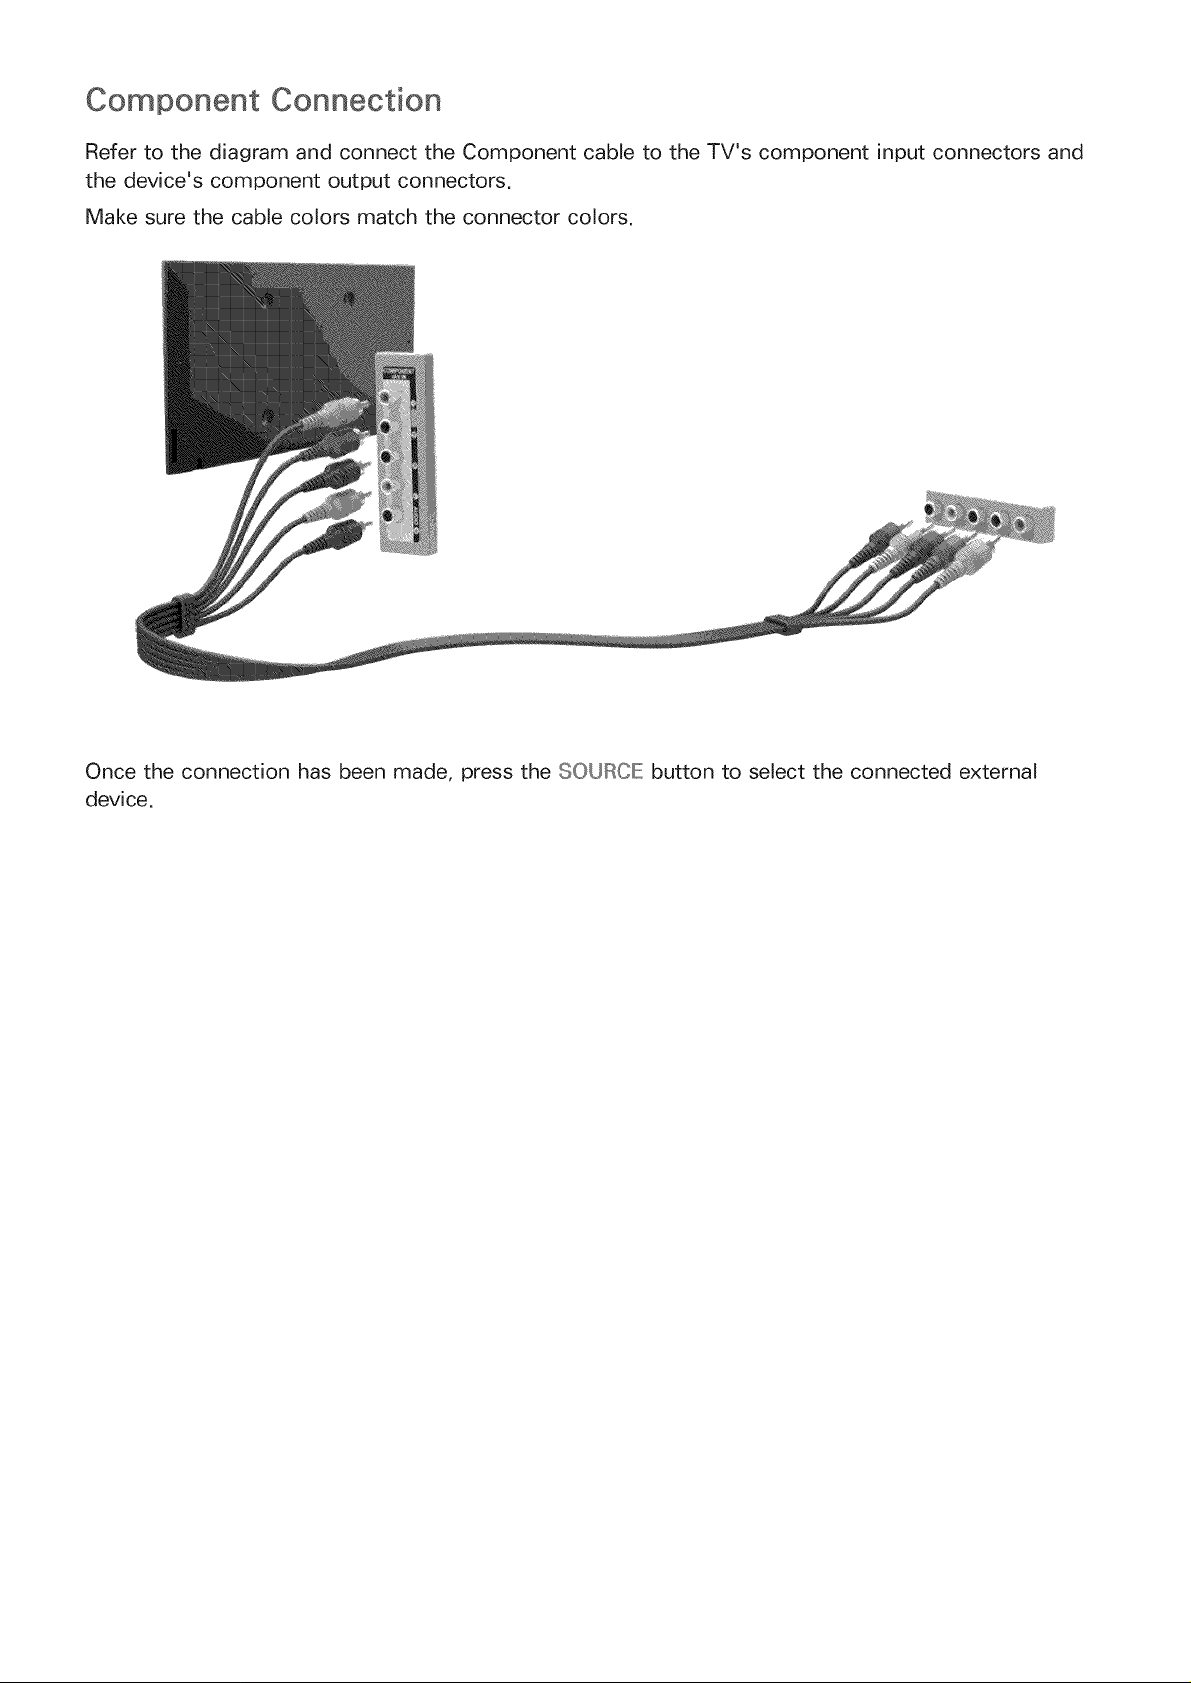
Component Connection
Refer to the diagram and connect the Component cable to the TV's component input connectors and
the device's component output connectors.
Make sure the cable colors match the connector colors.
Once the connection has been made, press the SOURCE: button to select the connected external
device.
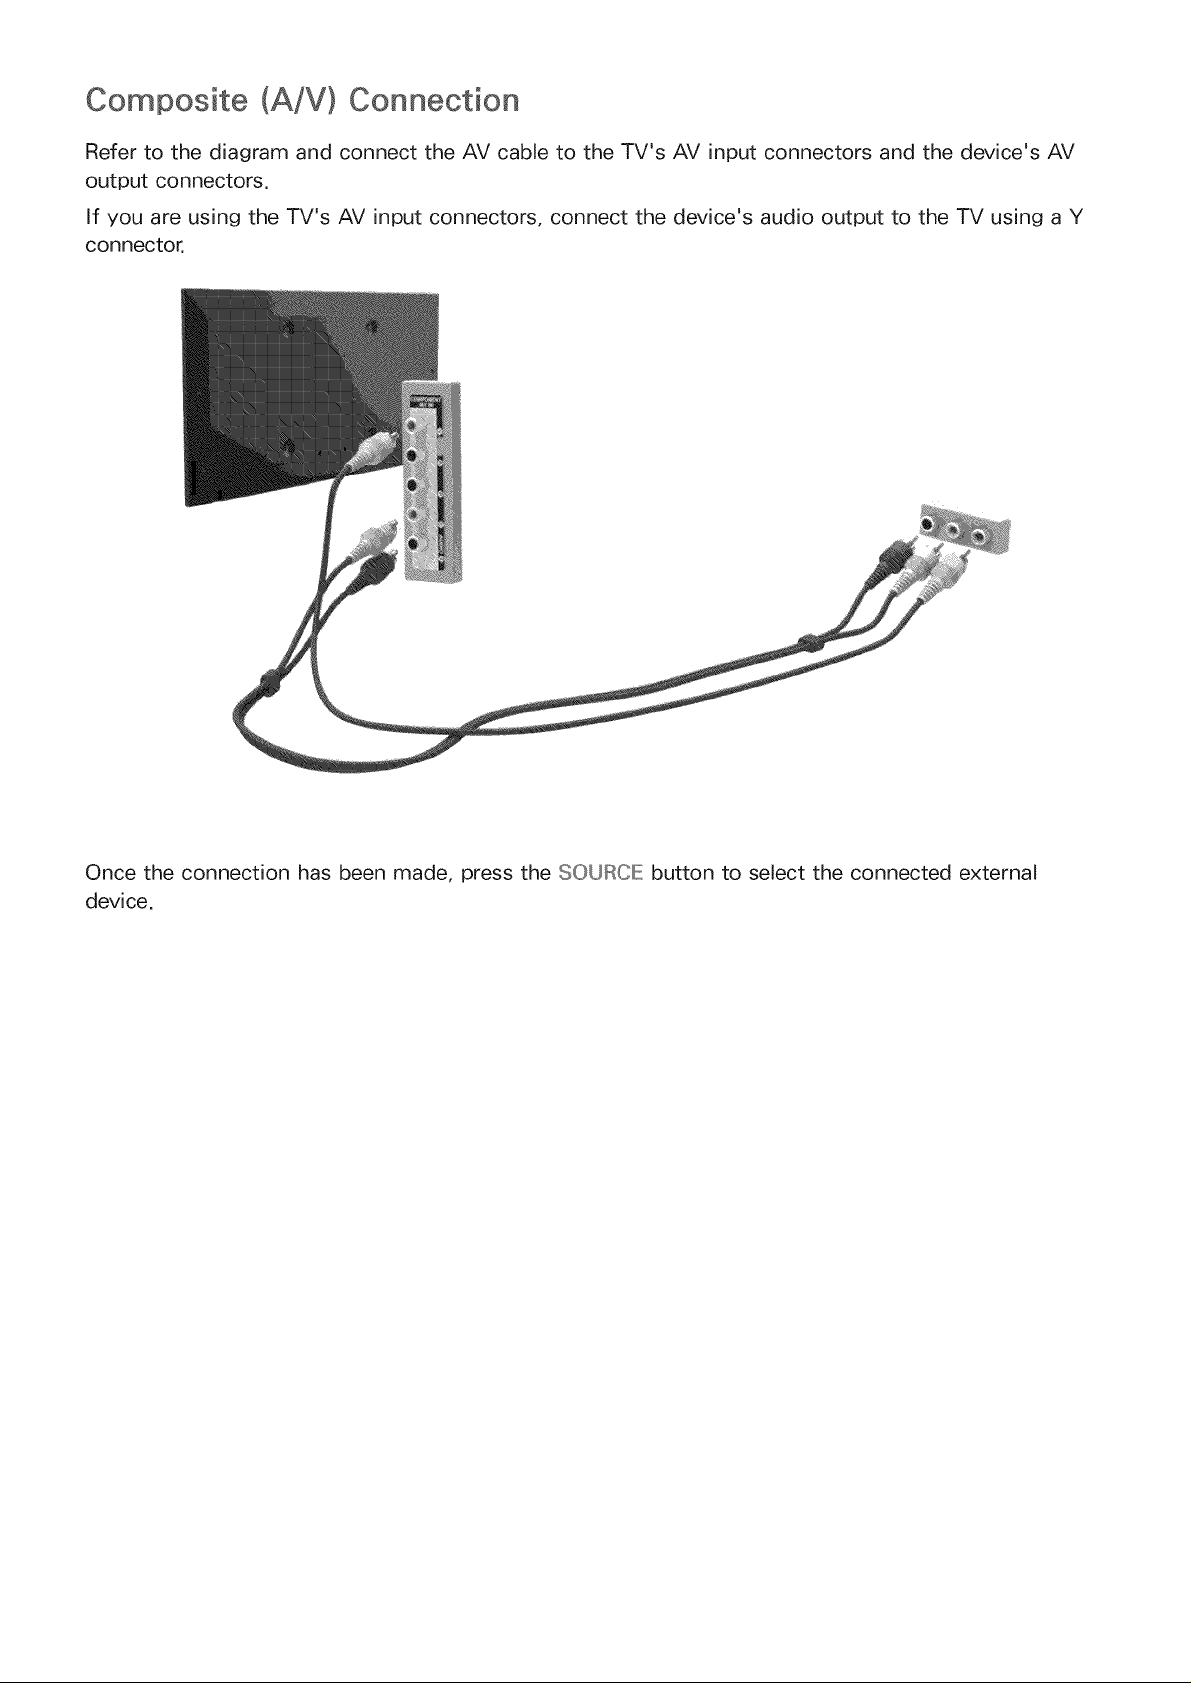
Composite (A/V) Connection
Refer to the diagram and connect the AV cable to the TV's AV input connectors and the device's AV
output connectors.
If you are using the TV's AV input connectors, connect the device's audio output to the TV using a Y
connector.
Once the connection has been made, press the SOURCE button to select the connected external
device.
Input and Output Connections
Your TV has a variety of connections for audio input from devices such as Blu-ray players and DVD
players and for audio output to such devices as amplifiers. The connections are listed below.
o HDMI/ARC (Audio Return Channel)
Digital Audio (Optical)
Audio (Analog)
For better audio qualit'y; it is a good idea to use an _V receiver_
The number of connectors and their names and locations may vary depending on the modet,
Refer to the external device's operating manuat when connecting it to the TV. The number of external device
connectors and their names and locations may vary depending on the manufacturer_
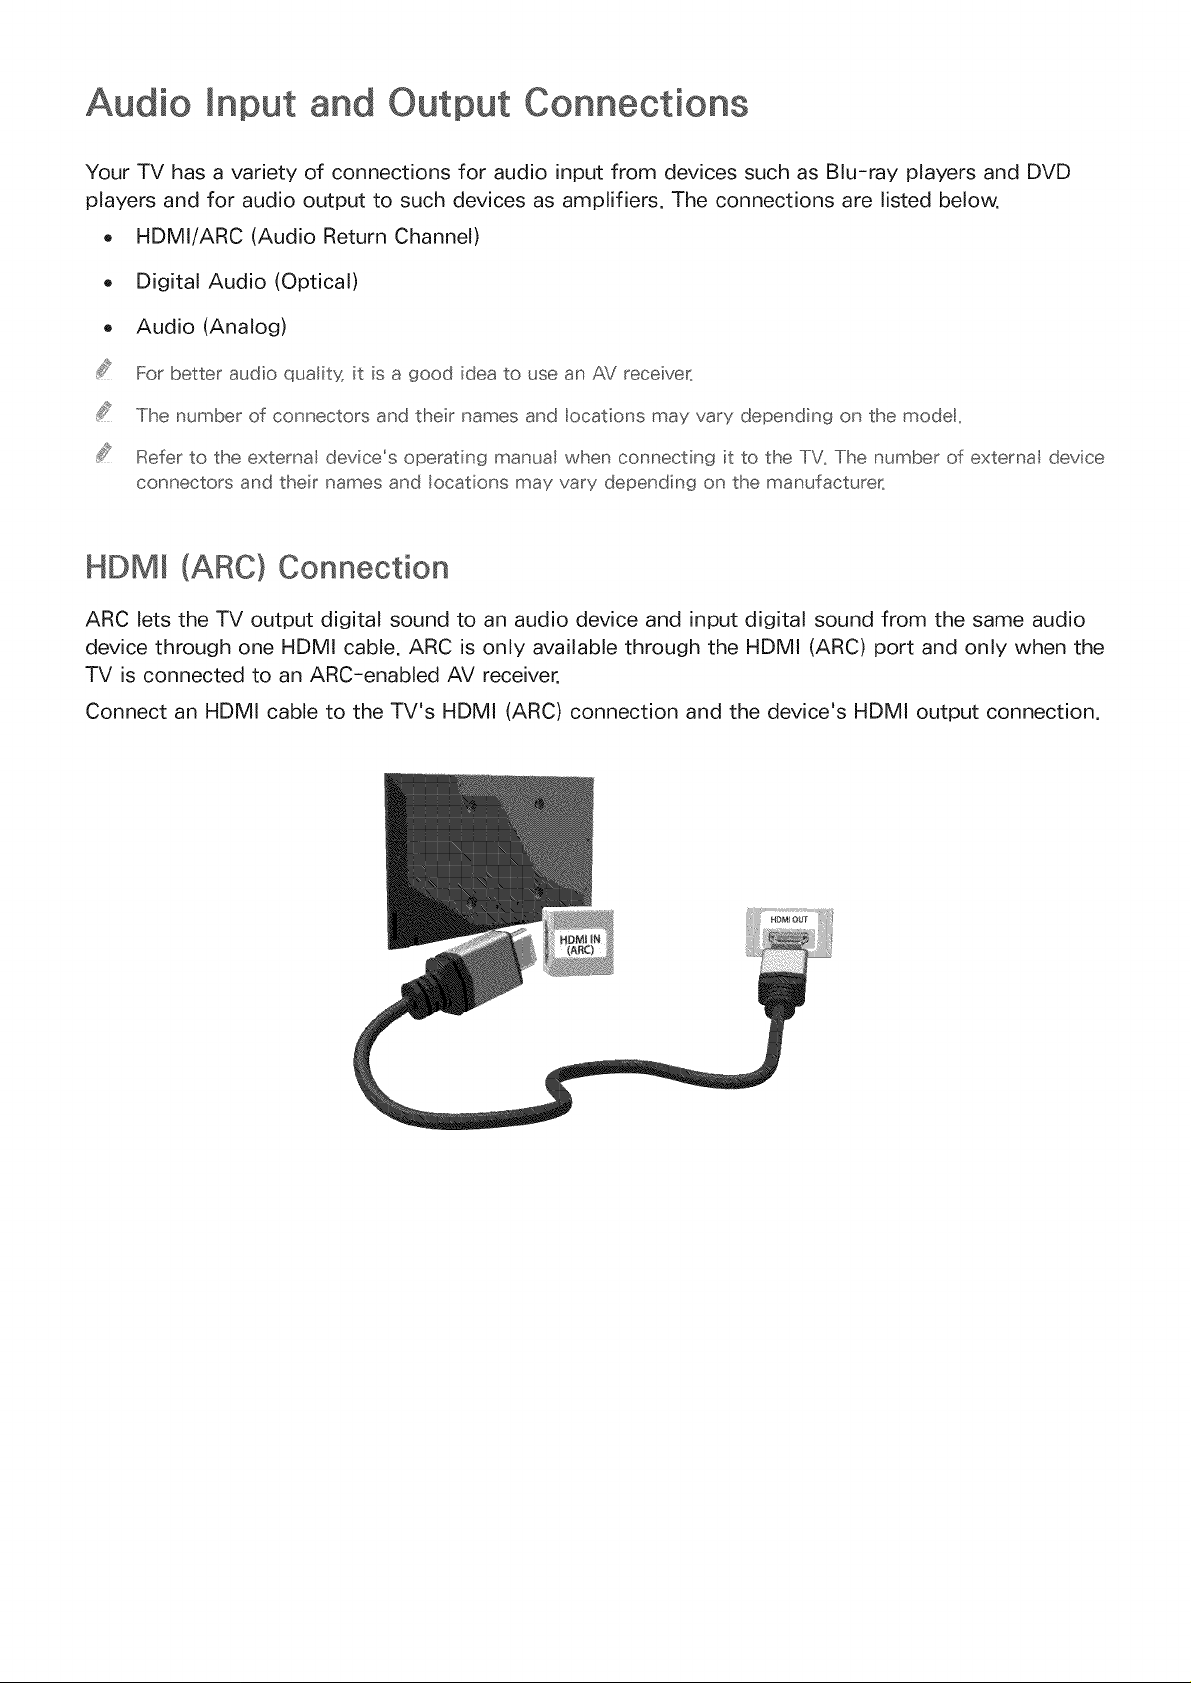
HDM (ARC) Connection
ARC lets the TV output digital sound to an audio device and input digital sound from the same audio
device through one HDMI cable. ARC is only available through the HDMI (ARC) port and only when the
TV is connected to an ARC-enabled AV receiver.
Connect an HDMI cable to the TV's HDMI (ARC) connection and the device's HDMI output connection.
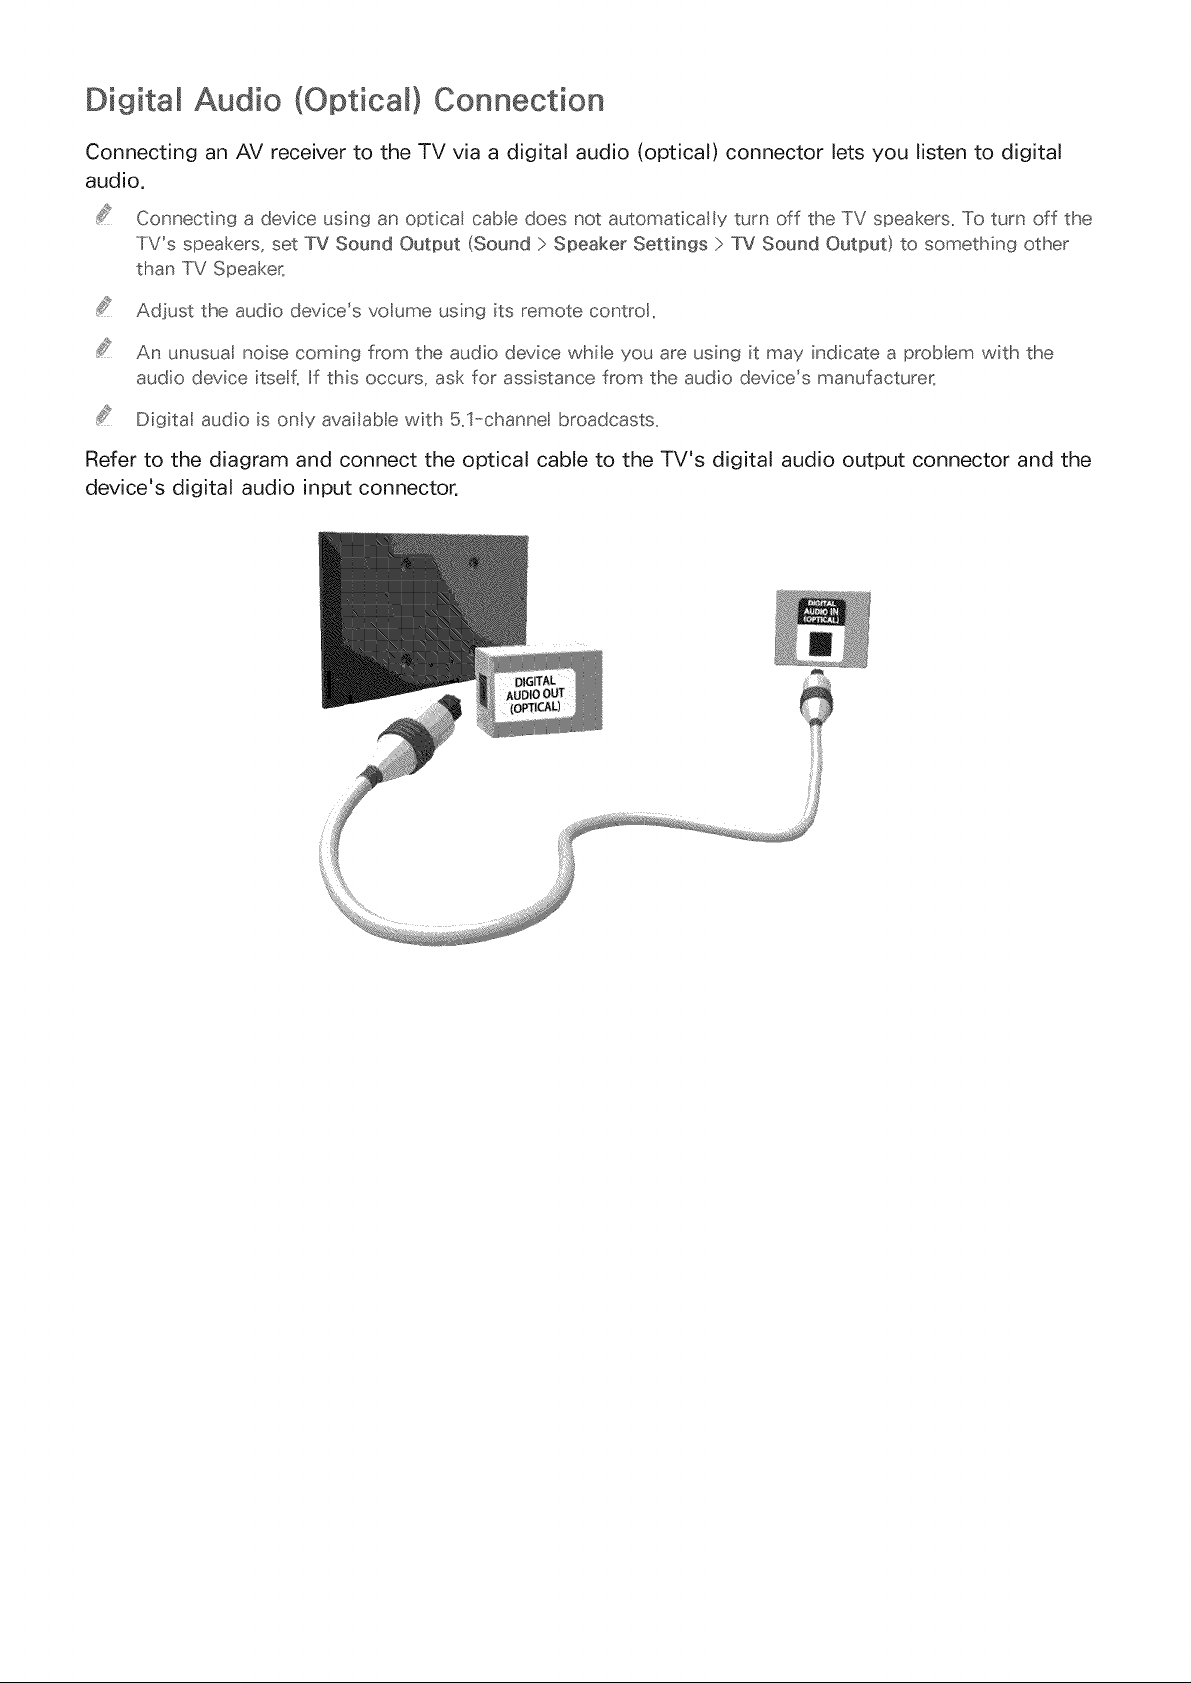
Digital Audio (Optical} Connection
Connecting an AV receiver to the TV via a digital audio (optical) connector lets you listen to digital
audio.
Connecting a device using an optical cable does not automatically turn off the TV speakers. To turn off the
TV's speakers, set TV Sound Output (Sound :> Speaker Settings :>TV Sound Output) to something other
than TV Speaker_
Adjust the audio device's voume using its remote control,
An unusual noise coming from the audio device whie you are using it may indicate a prob em with the
audio device itse{ if this occurs, ask for assistance from the audio device's manufacturer_
Digital audio is ony available with 5,1-channe broadcasts,
Refer to the diagram and connect the optical cable to the TV's digital audio output connector and the
device's digital audio input connector.

Audio Output Connection
Refer to the diagram and connect an audio cable to the TV's audio output connector and the device's
audio input connector.
Once the connection has been made, press the SOURCE button to select the connected external
device.
Connecting to a Computer
You can connect a computer directly to the TV using an HDMI or DVI to HDMI cable and use the TV as
a monitor. You can also connect the TV to a computer via your home network and access media files
saved on the computer on the TV screen. The kinds of connections you can make are listed below.
To use the TV as a Computer Monitor
o Connect through the HDMI Port using an HDMI cable.
You can connect the computer to the TV using an HDMI cable and display the computer screen
on the TV.
Connect though the HDMI (DVI) port using a DVI to HDMI cable.
You can connect a computer to the TV by connecting the computer's DVl port to the TV's HDMI
(DVl) port with a DVl to HDMI cable and display the computer screen on the TV.
To Access Media Files on a Computer and View or Play Them on the TV
o Connect Through Samsung Link.
Quickly access photo, video, and music files saved on a computer on which Samsung Link
software is installed, even if you do not connect the TV directly to the computer.
Connect Through DLNA Using Your Home Network.
Quickly access photo, video, and music files saved on a computer by connecting the TV and the
computer to the same router or AP.
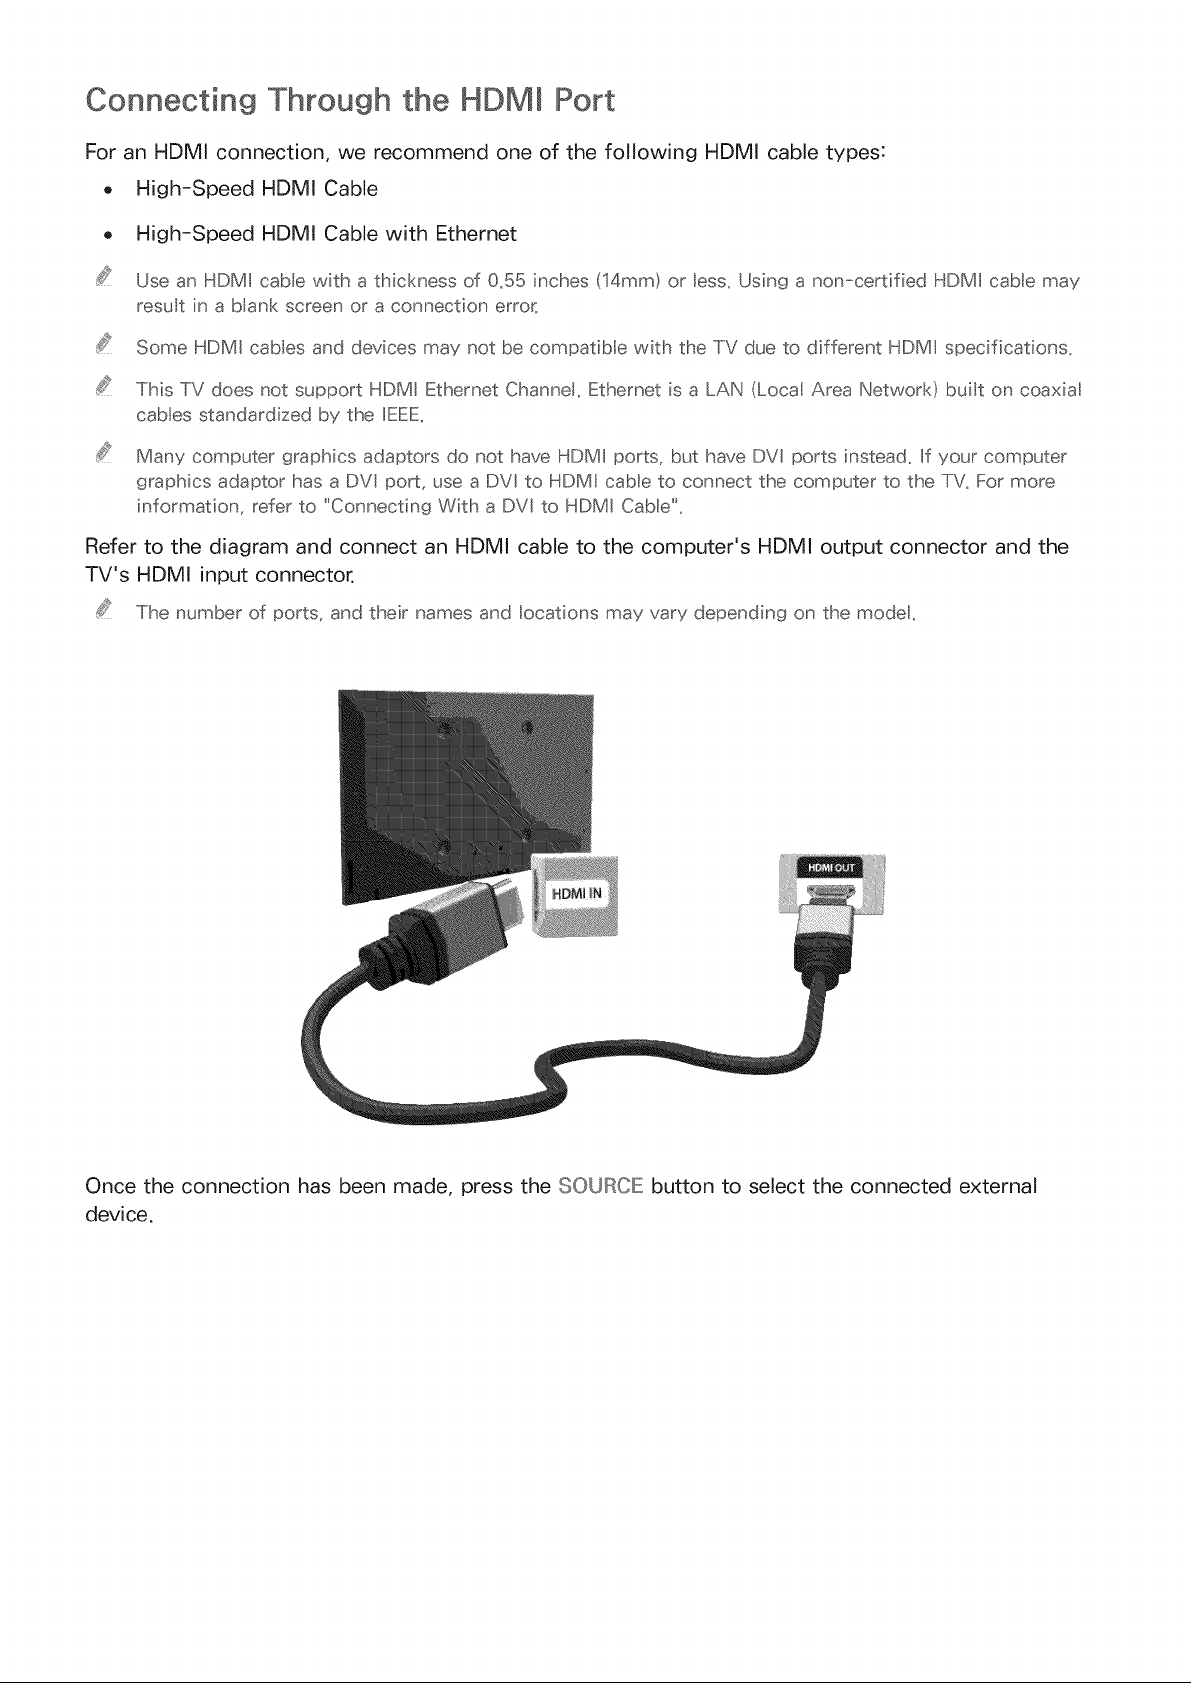
Connecting Through the HDMI Port
For an HDMI connection, we recommend one of the following HDMI cable types:
o High-Speed HDMI Cable
o High-Speed HDMI Cable with Ethernet
Use an HDMI cable with a thickness of 0_55 inches (14ram) or less_ Using a non-certified HDMI cable may
result in a blank screen or a connection error,
Some HDMI cables and devices may not be compatible with the TV due to different HDMI specifications_
This TV does not support HDMI Ethernet ChanneI_ Ethernet is a LAN (Local Area Network) buit on coaxia
cables standardized by the IEEE,
Many computer graphics adaptors do not have HDMI ports, but have DVI ports instead_ if your computer
graphics adaptor has a DVI port, use a DVI to HDMI cable to connect the computer to the TV_ For more
information, refer to "Connecting With a DVI to HDMI Cable"_
Refer to the diagram and connect an HDMI cable to the computer's HDMI output connector and the
TV's HDMI input connector.
The number of ports, and their names and locations may vary depending on the modet,
Once the connection has been made, press the SOURCE button to select the connected external
device.
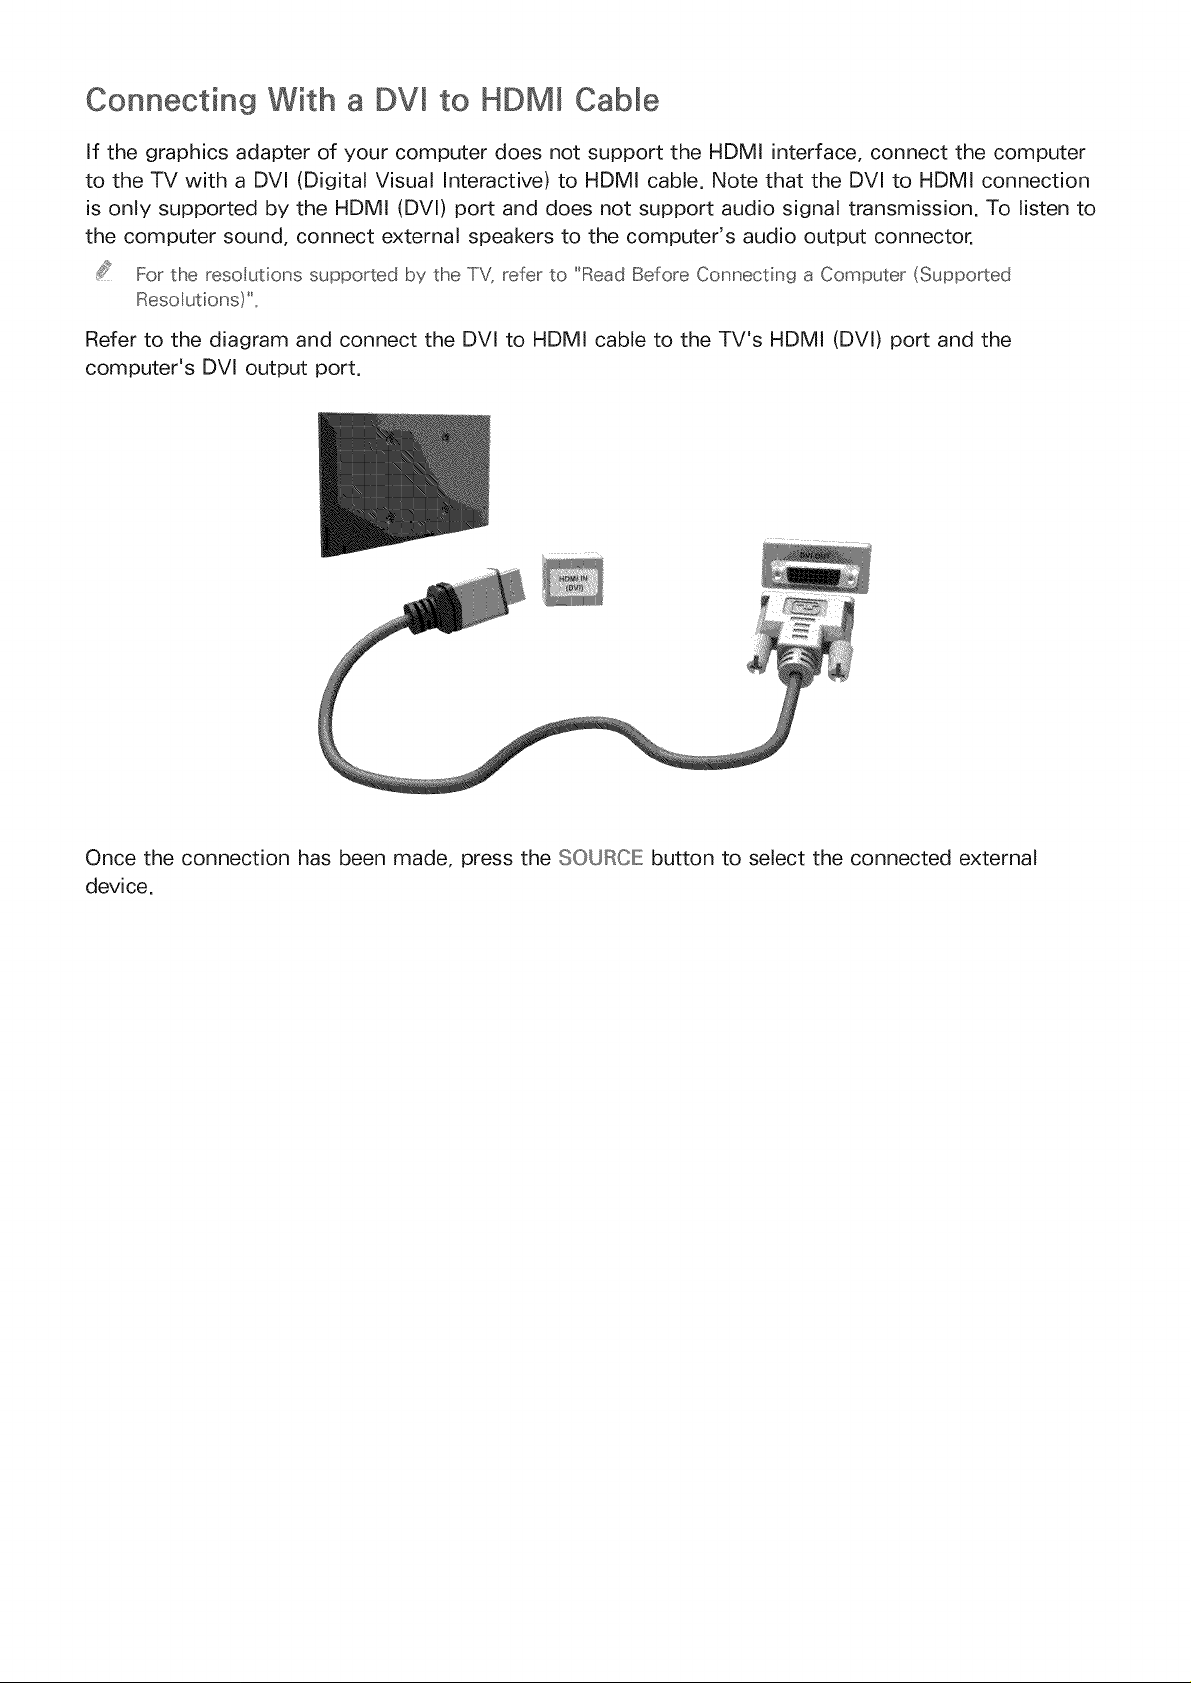
Connecting With a DV[ to HDM[ Cable
If the graphics adapter of your computer does not support the HDMI interface, connect the computer
to the TV with a DVl (Digital Visual Interactive) to HDMI cable. Note that the DVl to HDMI connection
is only supported by the HDMI (DVl) port and does not support audio signal transmission. To listen to
the computer sound, connect external speakers to the computer's audio output connector.
For the reso utions supported by the TV, refer to "Read Before Connecting a Computer (Supported
Reso utions)"_
Refer to the diagram and connect the DVI to HDMI cable to the TV's HDMI (DVI) port and the
computer's DVl output port.
Once the connection has been made, press the SOURCE button to select the connected external
device.
Connecting Through Samsung Link
Quickly access photo, video, and music files saved on a computer on which Samsung Link software
is installed. In addition, using Samsung Link, you can view or play the content of a computer which is
registered with Samsung Link through your Samsung account, even if the computer and the TV are not
connected to the same router or AP.
On a computer, navigate to the Samsung content and service portal (http://link.samsung.com),
and then sign into your Samsung account.
.....Iio nstal tlhe Sams_.ng Lnk desktop software yotJ _eed to sign nto yotJ Sar_ss_ng account,, Iif yo_;
dont have a Sams_ ng acco_ nt c_eate one f _st,,
2,
Install the Samsung Link desktop software. When the installation _scomplete, the computer will
be registered with Samsung Link.
3,
Specify a folder on the computer to connect to the TV. You can view or play the photo, video,
and music files in the specified folder on the TV. For more information about playing or viewing
multimedia content, refer to the "Playing Multimedia Content Saved on a Computer/Mobile
Device" section.
For more nfomsation abo_£ _;sing the Sams_ ng link desktop software, refe_ to the Hep sect[o_ of the
Sams_ ng Ink software,,
Connecting Through DLNA Using Your Home Network
Quickly access and play photo, video, and music files stored on a computer on the TV.
Connect the TV and the computer to the same router or AP. Once you connect them to the same
router or AP, a home network is configured.
D NA s the techno ogy tlhat ets IiVs, computers, and moble devices co_nected to o_e wred or
w _eess ro_£e_ share content,,
2,
On the computer, select [Control Panel] ) [Network and Internet] ) [Network and Sharing Center]
) [Change advanced sharing settings], and then select [Choose media streaming options...] to
activate media streaming.
3,
From the list, set the TV to [Allowed].
4,
Launch Windows Media Player on a computer. Select [Settings] ) [Library Management], and then
add the location where photo, video, and music files are saved to play them on the TV. For more
information about playing content, refer to "Playing Multimedia Content Saved on a Computer/
Mobile Device" section.
A te__ative y, you cars move tlhe fles to the defa_ It foder specif ed lay W []dows Media Ii:::>ayec and then
pay or view them on tlhe IIV
As ong as Fie Sha_ ng s activated, _na_ tl"_o_zed access may occtc When you do _ot _eed to access
data, disab e Fie Shar ng,,

Connecting To a Mobile Device
You can connect a mobile device such as a smartphone or tablet directly to the TV, or connect it to the
network and display the mobile device's screen or play its content on the TV. The kinds of connections
you can make are listed below.
o Connect by Mirroring the Mobile Device's Screen on the TV (Screen Mirroring)
Wirelessly connect the TV and the mobile device with the mirroring function. You can view the
mobile device's screen on the TV screen.
.....Iihis optio _ s ava abe O_y 0_ 8 moble device that s_ppo_ts the mi__o_ng fi_nctio _,,
Connect Mobile Devices without a Wireless Router (Wi-Fi Direct)
Wi-Fi Direct enables you to connect the TV and the mobile device without a router or AP. Quickly
access and play photo, video, and music files in the connected mobile device on the TV.
.....Iihis optio _ s ava labe Ony On 8 moble device that s_ppo_ts the W F Direct fi_nctio _,,
Connect Through Samsung Link
Samsung Link enables you to play photo, video, and music files saved on a Samsung Link-
enabled mobile device easily, without the need for a connection to the TV.
Connect Through DLNA Using Your Home Network
You can conveniently play photo, video, and music files saved on a mobile device by connecting
the mobile device and the TV to the same router or AP.
Screen Mirroring
MIE:INU) Network ) Screen Mirroring
Wirelessly connect a mirroring-enabled mobile device to the TV and play the video and audio files
stored on the device on the TV. Mirroring refers to the function that plays the video and audio files
located on a mobile device on a TV and on the mobile device simultaneously.
To use the Screen Mirroring funct on, the mobile devce must support a mirroring funct on such as A tShare
Cast or Screen Mirror ng. To check whether your mobte device supports the m rroring funct on, please vist
the moble device manufacturer's webs te.
The video oraudomay ntermttenttystopdependngonnetworkcondtons_
Connecting via a mobile device
On the mobile device, run Screen Mirroring. The mobile device searches for available devices to
connect to.
2, In the search result list, select the TV. The TV displays a pop-up at the top of the screen.
3, In the pop-up, select Allow to connect the mobile device.
A previo_sly al owed moble dev ces wl a_tomatica y connect w tlno_£ needing approval,,
Iif yo_. select Deny, the device cannot connect,, Iinaddit[o_, yo[ are setting the devices connection
stat_,s to Deny and it wl not be abe to connect n the f_ture _;nless you change its connection status,,
.....Iio change tlhe connection status of a denied device, Navigate to Network > Screen Mirroring > Device
Manager, seect the device, and then seect Allow,,
Connecting by Automatically A_owing the Connection
Navigate to Network > Screen Mirroring, and then select Screen Mirroring. The Screen Mirroring
function starts. You can also start screen mirroring by pressing the SOURCE button on your
remote, and then selecting Screen Mirroring from the list at the top of the screen.
2_ Launch Screen Mirroring on your mobile device. The device searches for available devices.
3_ Select the TV from the list. The TV automatically allows the connection and the device connects.
Iif the moble device cannot co _nect, tr_yt_ ruing the IiV off and o_,,
Managing the Connection Status of P_"_eviously Connected Mobile Devices
This funct on is only ava labte f dev ces have previously connected to the TV or have pr°eviously attempted
to connect and been denied.
Navigate to Network > Screen Mirroring > Device Manager. The TV displays a list of devices that
have previously connected to the TV or have tried to connect to the TV and been denied. The
status of the connection (Allow/Deny) is also displayed.
2_
Select a device. A pop-up appears.
3_
In the pop-up, you can select Allow connection, Deny connection, or Delete the device from the
list.
Connecting Mobile Devices without a Wireless Router (Wi-Fi
Navigate to MIE:INU) Network ) Wi-Fi Direct
You can connect a mobile device with the Wi-Fi Direct feature directly to the TV without using a
wireless router or AP. By connecting a mobile device to the TV through Wi-Fi Direct, you can play
photo, video, and music files saved on the mobile device on the TV.
This option is ava Iab[e ony on a mob[e device that supports the W-F Direct funct on, Pease check f your
mobte device supports Wi-F DrecL
The video or audo may nterm ttently stop depend ng on network cond t}ons.
Enable Wi-Fi Direct on the mobile device, and then navigate to Network and select Wi-Fi Direct
on the TV. The TV automatically scans for and displays a list of available devices. The TV's name
also appears on the mobile device.
2_
Select the device from the list to initiate a connection. If a connection request is made by the TV,
a permission message appears on the mobile device and vice versa.
3_
Allow the connection. The TV and mobile device connect. For more information on the
multimedia content, refer to the "Playing Multimedia Content Saved on a Computer/Mobile
Device" section.
Connecting Through Samsung Link
Samsung Link lets you play the photo, video, and music files saved on a Samsung Link-enabled
mobile device. In addition, using Samsung Link, you can play the content of a mobile device, which is
registered to Samsung Link through your Samsung account, even if the mobile device and the TV are
not connected to the same router or AP.
Run the Samsung Link app on the mobile device, and then sign in to your Samsung account.
.....Ilo Lse SamsL ng [.nk, yoL have to sign n to yo_r Sams_ ng acco_nt,, Iif yo_ do_t have a Sams_ ng
acco_ nt, create o_e f rst,,
2_
Access and play photo, video, and music files saved on the mobile device. For more information
about playing multimedia content, refer to the "Playing Multimedia Content Saved on a Computer/
Mobile Device" section.
For more nforrnatio_ abo_£ _sing the Sams_ng I nk moble software, refer to the Hep sectio_ of the
software.
Connecting Through DLNA Using Your Home Network
Quickly access and play photo, video, and music files stored on a mobile device on the TV.
Connect both the TV and the mobile device to the same router or AP. Once you connect them to
a single router or AP, a home network is configured.
D NA s the techno ogy that ets IiVs, comp_£ers, and moble devices co snected to ose w_ed or
w reess _o_te_ sha_e content
2, Enable File Sharing on the mobile device. You can play the content shared on the mobile
device on the TV. For more information about playing multimedia content, refer to the "Playing
Multimedia Content Saved on a Computer/Mobile Device" section.
As ong as Fie Shadng s active, _na_tho_ zed access can occ_ When yo_ do sot seed to access data,
disab e Fie Sha_ ng
Specifying the Name of the TV on a Network
MEINU>n_two_k>D_vio_n_m__:_
Choose or specify a name for the TV that will appear on mobile devices and laptop computers,
Select Device Name from the Network menu, and then choose a name from the list that appears,
Alternatively, select User input to enter a name manually,
2, Check the name from a mobile device or laptop computer,
Switching Between Video
Press the SOURCE button to switch between external devices connected to the TV. For example, to
switch to a game console connected to the second HDMI connector, press the SOURCE: button. The
Source List appears across the top of the screen. From the Source List, select HDMm2.
The connector names may vary depend ng on the product_
Other Functions Available When You Display the Source List
A number of functions are available in the pop-up Options menu when the TV displays the Source
List. The functions that appear in the Options menu vary, depending on the source you selected in the
Source List and the external device connected to the source.
To view the Options menu, press the TOOLS button or press and hold the {i@ button on the standard
remote. On the Samsung Smart Control, press and hold the touch pad or press the KIE:YIPADbutton,
and then select TOOLS on the On-Screen Remote.
The functions that appear in the Options menu can include any of the following:
o Edit Name: Lets you assign a device name to an input source, for example, Blu-ray to HDMI1. To
assign a device name to an input source, follow these steps:
Open the Source List. The list appears in a horizontal line across the top of the TV. Using your
remote, highlight the source you want to assign a device name to.
2_
Select Edit Name in the Options menu. The on-screen keyboard appears.
Using the keyboard, enter a new name. You can enter up to 15 characters.
When finished, select DOINIE on the keyboard, and then press the touch pad or the {7_ button.
information: View information about the connected devices.
Anynet+ (HDM_-CEC}: Displays a list of Anynet+ (HDMl-CEC)-compliant devices that are
connected to the TV.
.....Ilhis option sony ava labe when Anynet+ (HDM_-CEC) s set to On,,
Remove USB: Use to safely remove a USB device connected to the TV. This option is only
available when a USB device has been selected.
Delete: Use to delete an external device from a source. When you delete an external device
from a source, you erase the information the TV has stored about the device and you delete the
association the device has with the source.
The Universal Remote Function
This function may not be available depending on the country or model.
When you display the Source List, the Universa_ Remote Setup button is displayed in the upper right
corner of the screen. Select this button to start the Universal Remote function. The Universal Remote
function lets you control cable boxes, Blu-ray players, home theaters, and other external devices using
your TV remote control. Refer to the "Controlling External Devices with the TV Remote - Using the
Universal Remote" section for more information on using the Universal Remote function.
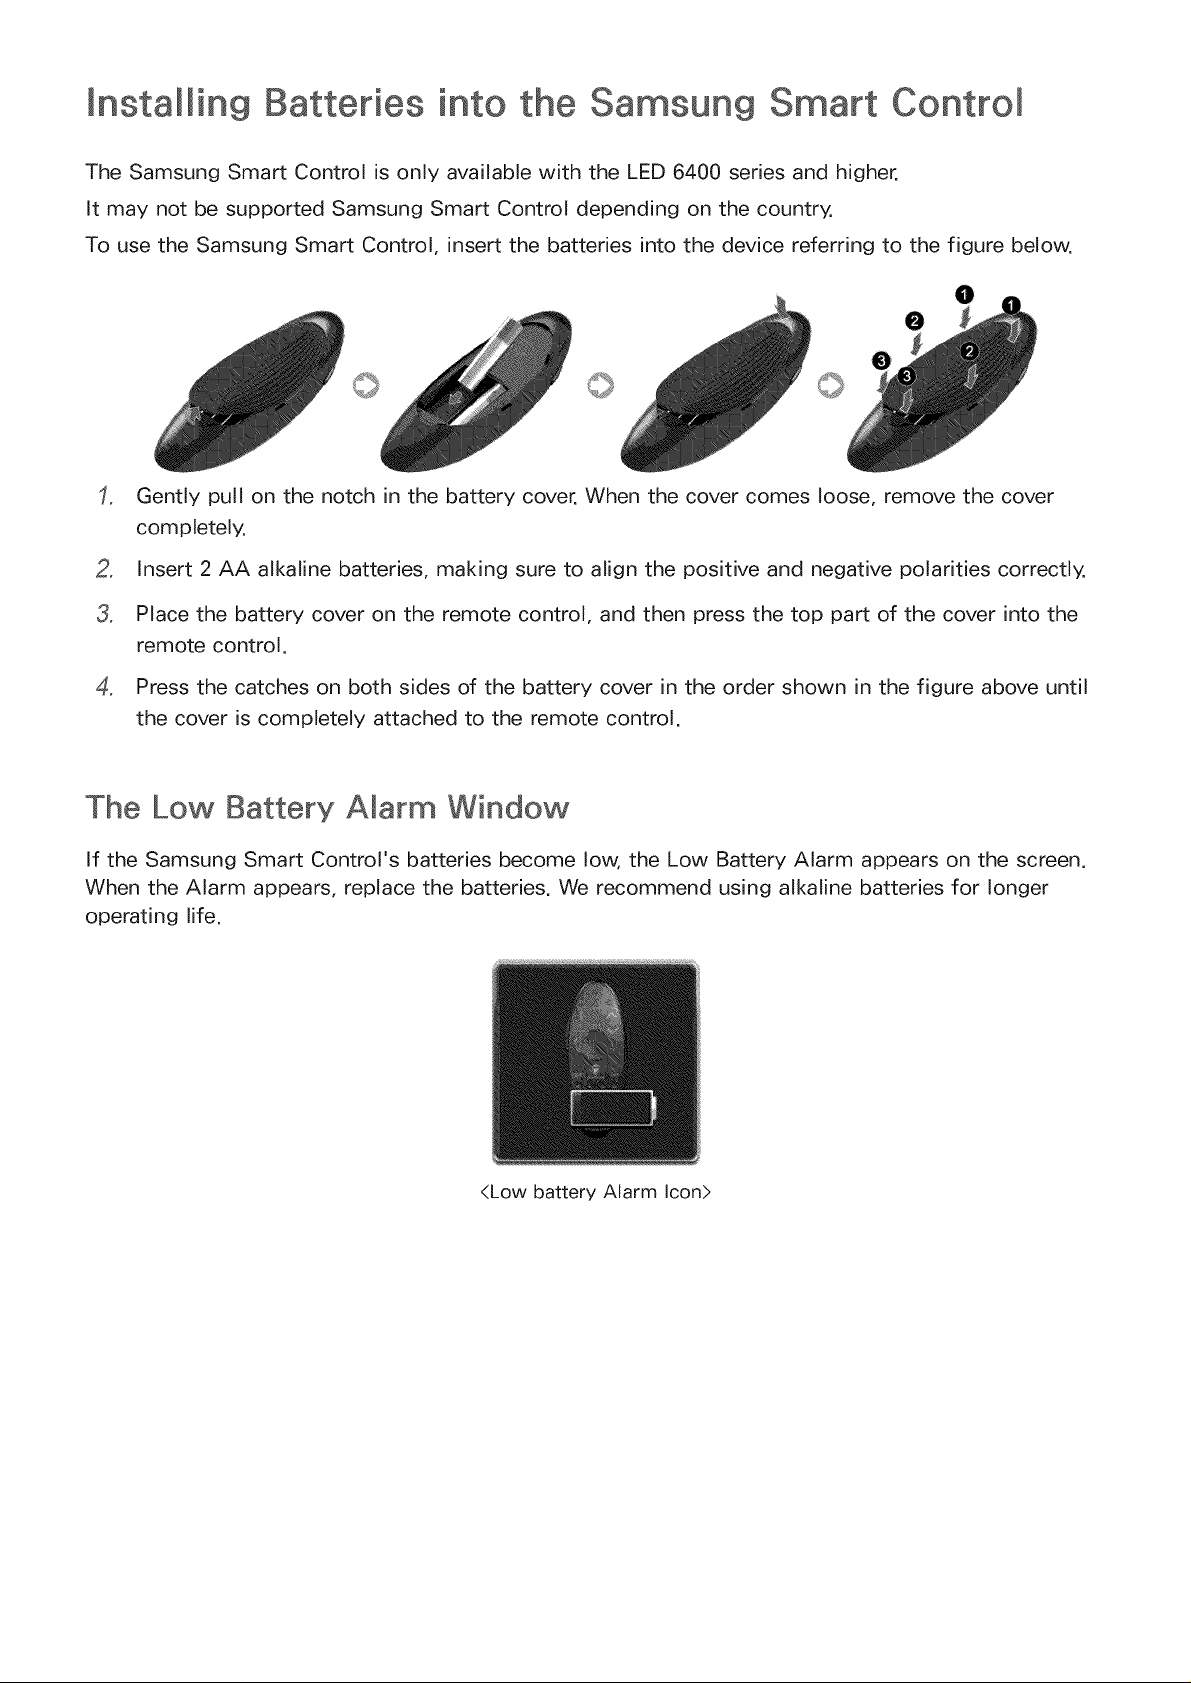
Installing Batteries into the Samsung Smart Control
The Samsung Smart Control is only available with the LED 6400 series and higher.
It may not be supported Samsung Smart Control depending on the country.
To use the Samsung Smart Control, insert the batteries into the device referring to the figure below.
Gently pull on the notch in the battery cover. When the cover comes loose, remove the cover
completely.
o
Insert 2 AA alkaline batteries, making sure to align the positive and negative polarities correctly.
&
Place the battery cover on the remote control, and then press the top part of the cover into the
remote control.
o
Press the catches on both sides of the battery cover in the order shown in the figure above until
the cover is completely attached to the remote control.
The Low Battery Amarm Window
If the Samsung Smart Control's batteries become low; the Low Battery Alarm appears on the screen.
When the Alarm appears, replace the batteries. We recommend using alkaline batteries for longer
operating life.
<Low battery Alarm Icon>
 Loading...