

Samsung UN55ES7100, UN46ES7100, UN60ES7100 User Manual
LEO TV
SERIES
7100
LZ
user
manual
SUPPORT
Th
To
your
www.samsung.com/register
M
If you have any question
~
you
ank
eceive
r
product
_____
el
od
please call us at
s,
purchasing
for
comp
e
mor
at
u
Sams
this
please
ce,
rvi
se
ete
l
____
No.
ial
Ser
1-800-SAMSUNG
product.
ng
er
ist
reg
_
(1-800-726-786
for assistance.
4)
A d
et
Fi
gure
sp
ecrf
~
See
Wi
de
motion
thrs
fe
st
anda
Ad
di
ti
and
patt
ag
i
ng
prima
vi
ew
dr
Be
ca
well
as
•
SAMSUN
Subje
pr
in
wa
The a
Wa
Cen
enc
E
r
ep
For
-
-
ai
led
Use
s
and
i
ca
tions
t
he
sc
r
een
v
id
eo
at
ur
e,
rd format
onall
y,
e
rn
of
LED
ril
y
di
s
fferent
re
ful
ab
burned
ct
oduc
th
e
Un
rr
an
ty
bo
rr
anty St
ter
ou
ntered in
xcl
u
de
l
aceme
th
e l
In
the
In Can
r's
il
l
us
ma
w
arra
for
ma
. The
with the
vi
ewing ot
s,
shou
Di
spl
pl
ay
fo
rma
out the te
in im
G EL
to
the
t
s,
an
it
ed
period
ve
d
at
is
the r
d, but
nt
oca
ti
Un
it
ed
ada
te
fu
d
esc
s,
on
:
Ma
nua
l rs
bu
t
rations
in
thi
y be changed wi
nty
ca
rd
f
or
t
LE
D
Disp
images
vision
her
be lim
tha
scr
een mo
as
a
levisi
ag
es,
TR
ONICS
ir
eme
e
req
es
on
or
i
gi
nal
ribed
nt
and
t limit
cess
of a
S
es
00-
S
di
sp
video
statio
it
t l
ea
fu
on f
are
u
ire
SA
ly
wa
i
bil
it
l
use
ed
orie
AM
: 1-8
AM
l
co
ed
ve
ll
not
n
ts.
me
sp
rr
a dat
y of
to,
s,
S
S
images
le
ld
ays
ll
ts
EC
requ
th
St
at
e
me
espons
norma
no
ac
Stat
1-8
il
t
in
to
yo
ur
TV
s U
. For more information
se
r
Ma
nu
al
are
noti
ce
.
provided
th
o
ut
abo
ut
how
to vi
ew
this e-
Man
f
or
r
efere
nc
e
on
ly
and
ma
y
diffe
r from
Important Warranty Information Regarding
more
i
nf
o
rm
a
tion
on
warra
nt
y t
er
ms
.
ays
(
with
16
:9 asp
ec
t
ra
ti
os,
the
r
at
io of
th
e
screen
w
id
th
to
he
l
aye
d
on
nst
ant
an
d
pro
na
ry
i
as
descr
subt
vin
g im
screen pi
orma
ts
cov
NO
RT
c
on
dit
nt
s,
cond
MS
UN
ec
ifi
ed, and
a
nty
r
epa
ed
the
of t
he
a
re
any
option
UN
G Au
00-S
AMSUNG
UN
G
t
hem
ly in
mo
gr
am
mages
ibed
le, b
ut
ages
cture
yo
u
e
red
H AME
io
ns,
iti
G
prod
ir
s m
B
ill
of
pu
rch
pr
oduct.
ori
s,
upgr
tho
shoul
d
tion.
D
rsp
m
ing
,
s
and
text
ab
ov
e
fo
pe
r
man
en
, not station
.
se
l
ec
t
a
nd
by
your
Sam
RICA
N
excl
us
i
on
on
s,
ex
clusions
u
cts
pu
rch
to
the
O
us
t be pe
Sale
as
Pr
aser
.
Cond
gi
nally
specif
ade
s.
or
rized
Se
rvi
(1-
800-726
pr
i
mar
l
aying
ho
u
ld
such as
r a
ll
t
bu
ary
t
he
s
ung
LI
M
ITE
s a
nd
ase
ri
g
in
al P
rf
or
oo
f
i
ti
ons
ie
co
n
ce
C
i
ly
be
te
l
rned
pa
lengt
D
li
and
d
me
of P
co
d
provisi
suma
ent
-
78
be in
st
at
ion
lim
sto
evis
i
ons
-in g
tt
erns
h
of
limited
W
AR
mitat
li
in
Cana
urc
ha
d
by
ur
ch
vered
ble
er,
pl
64
)
th
e wi
ary
graphics
ited to no
ck
mar
ket
. D
ispla
ho
st imag
or
da
rk
t
im
e
you
wa
rranty.
RA
N
TY
ion
s
of
mit
at
ion
da
,
and
se
r onl
a
SA
MSUNG
ase
m
us
ar
e
l
o
ns
f
or
s.
eas
e
ca
de
sc
r
ee
n, 16:9 ratio
and
mo
re than
repo
rts
ying
st
ationa
es
in
the L
ba
rs.
On
view
th
ST
ATEMEN
the
origin
s
co
nt
ai
ned
rn
Ca
nada
y.
Au
th
t
be
pr
esent
imi
t
ed
on
ly
, in-home or
ll
tol
l-
f
ree
:
al
i
mage
5%
,
vid
L
ED
em. U
Li
here
ori
to
on
eo
ED
T
mi
on
ze
ed
ma
s on t
of t
ga
ry
i
mages
pi
mo
ne
ted
in,
SAMS
d
Serv
to the
nufactu
-site
ight) are
he
me
ctu
dels
ven L
Warr
SA
serv
for
re
MSU
i
ce
Serv
ual
ac
he
t
d
t
UN
ma
ota
ha
ED
ant
rrn
ice
see
t
ua
t, or
screen
l
is
pl
that
. To a
t o
y s
NG
G
Ce
i
g
s,
page
l
pro
p
rr
ma
expanded
tele
vis
ay
s,
exceed
vo
ffer
ag
in
upp
wi
pro
nt
er.
ce
Cen
defec
mi
ni
33
du
ct
ril
y
d
,
suc
i
on
sta
tio
id
th
is,
picture si
g
as
a
lied with
ll
add
d
uc
ts
A
lo
ng
t
er
ts
in
mu
m
.
appearan
es
i
gned
to
fi
h as the da
viewing
n
l
ogos
the ab
ove
vary
t
he
zi
ng
result
of
Samsu
ition
ally
pu
r
chased
with
th
. T
ra
ns
portat
mate
rial
or
ma
x
pe
,
to
ll
we
f
pr
is
imu
c
the
r
gui
pro
eat
for
St
or
es
vi
rk
week
b sit
ov
m
.
Pr
oduc
ew
wr
sc
r
ee
si
de
es
d
eli
n
grammin
ur
es, u
ma
t sel
ng
Ele
i
de
Wa
in
the
ate
me
i
on
to
wo
rkmansh
re
pa
b
.
es
Uni
and
de
n,
ars
or
se
ec
ct
nt
ir tim
if
com
ca
ti
ro
rr
an
te
, the
t
de
s
ig
n and
s
creen
f
orma
your
model
on
non-e
pu
te
r gr
n
cause
g a
nd
im
ag
th
es
e
con
on and use,
nics
(S
AM
ty Re
pa
d
Sta
t
es,
Original
fro
m the
ip,
an
d
on
es
,
excha
t
f
offe
xpand
aphic
un
even
es
, a
t
rols
as
SUNG)
ir
Serv
for
th
Li
mi
Se
rv
ice
ly
tho
n
ges
ul
l-
rs
ed
s
nd
to
rce
e
ted
se
or
Avoid
or pro
a
ff
ect
•
• Al
•
•
di
gr
im
Avo
wa
Redu
U
se
sp
l
ams
age
id
disp
ys
ce
a
ll
ay
i
ng
in
qua
layi
try
brightne
TV
st
i
ll
p
ano
lity. To re
ng
to di
fea
t
ur
r
sp
es
ima
ama
the
lay a
ss
ges
or
du
sa
ny
and c
de
sig
(such
4:
3 i
ce
r
me
TV
image in
ontra
ne
ma
is
k of
d to
as
ge
cha
st to
red
jp
th
nn
eg
forma
is
el
full
avo
u
ce
pic
effec
for
sc
re
id t
image
tur
t
long
en.
on
t,
he
e
fil
es
th
e
sc
pl
ease
periods
Use
appearan
ret
enti
),
the
s
ti
ll
r
ee
f
ollow
on
Still
image warning
im
age
el
eme
n
e re
a
sc
stan
pic
ft
er-im
re
tl
co
mmend
tu
en b
y
nt
displaying
re f
ag
ur
n.
.
TV
ce
Co
th
set's
of
and
s (
es.
suc
h
as
TV
ch
an
nel
l
ogos,
st
oc
k or
ne
ws
bars
at
th
e
sc
re
en b
ottom
et
sti
ll
pi
ct
ures
ca
n
ca
u
se
im
age
b
urn
-in
on
th
e
LED
sc
r
a
ti
ons
bel
ow
:
or
m
at
m
enu
fo
r t
he
best
possi
bl
e
ma
t
ch
.
n
Re
fer
to
the
e-
Man
ual for de
ta
i
ls.
ee
n,
wh
c.),
i
ch
w
ill
List of Features
• 3D: This exciting new feature enables you
•
SMART
HUB: Your gateway to
all
your content, integrated
to
view 3D content.
in
one place.
- Provides diverse entertainment choices.
- Lets you control your entertainment life with
to
- Gives you easy access
- Lets you customize your
diverse apps, with more being added every day.
TV
by grouping and sorting apps to your taste.
an
easy-to-use, user friendly user interface.
• AIIShare Play: Lets you access, view, or play photos, videos, or music located on USB devices,
digital cameras, cell phones, and PCs. PCs and cell phones can be accessed wirelessly, through your
wireless network.
• Anynet+ (HDMI-CEC): Allows you to control
all
connected Samsung devices that support Anynet+
with your Samsung TV's remote.
• e-Manual: Provides a detailed, on-screen user's manual that's built into your
TV.
(page 33)
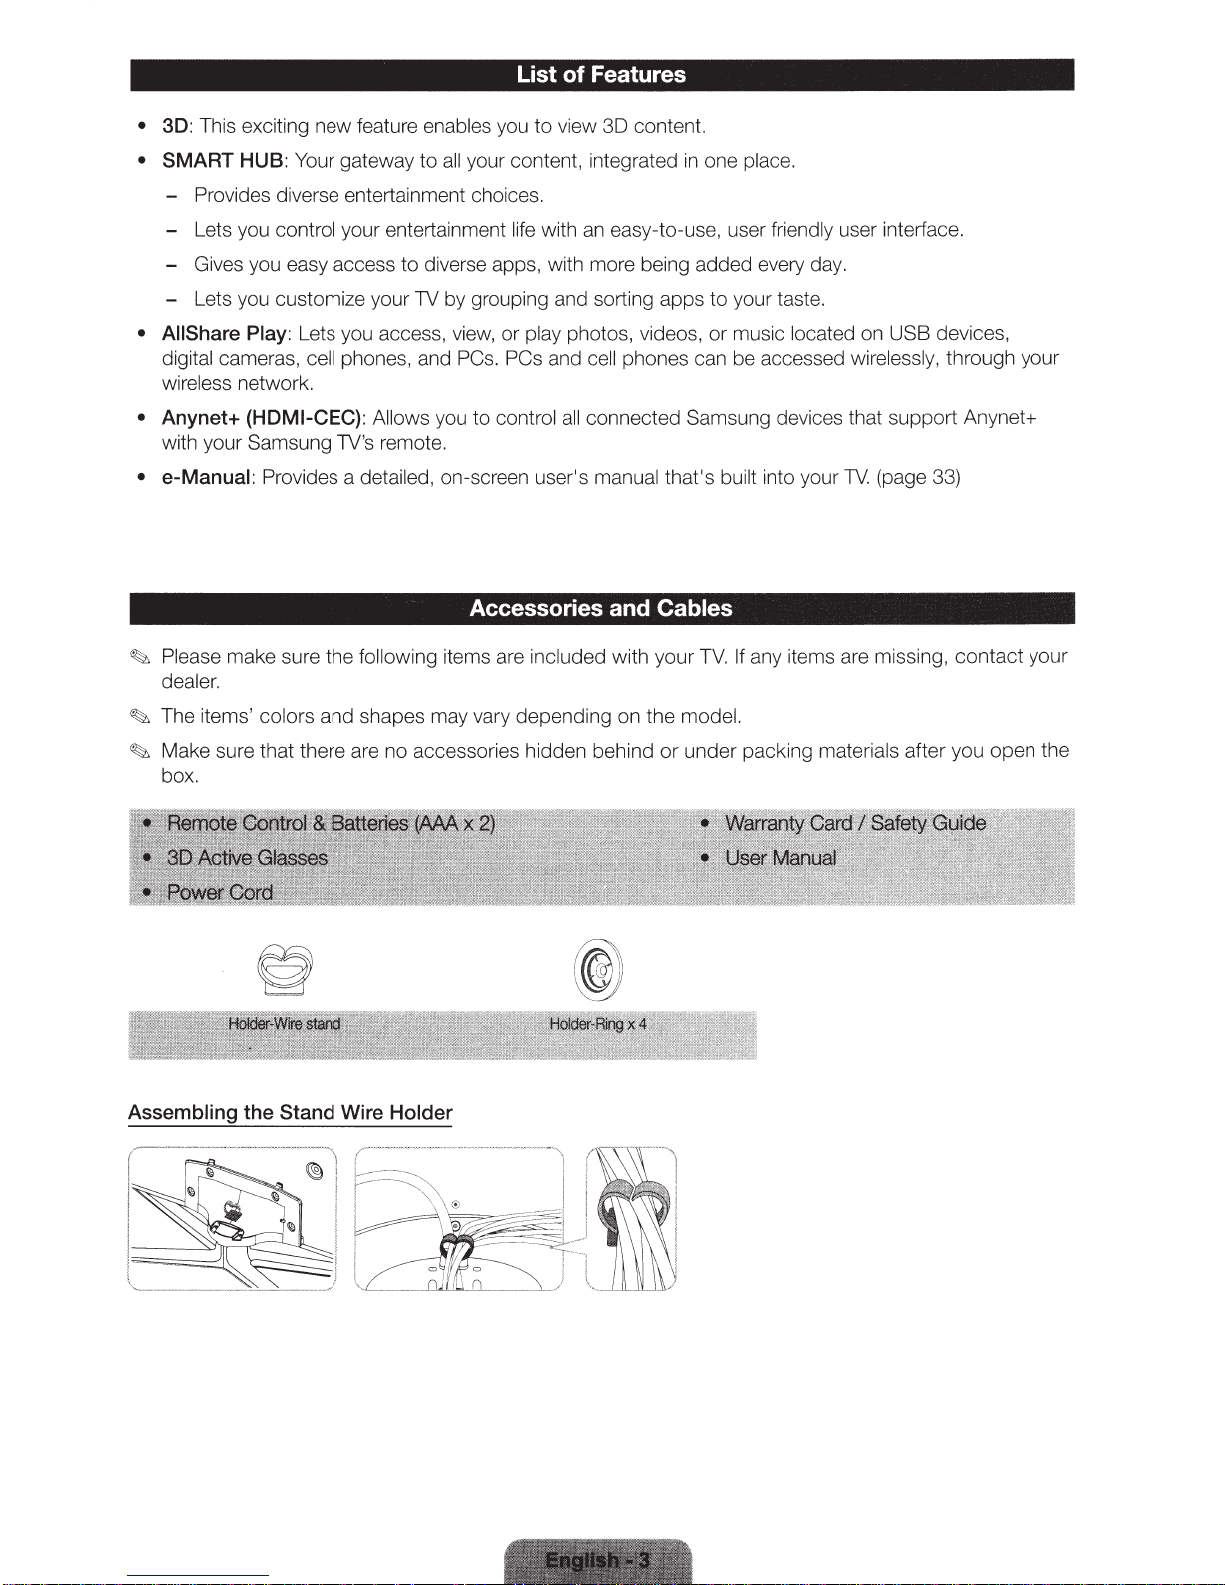
Accessories and Cables
~
Please make sure the following items are incl uded with your
aler.
de
TV.
If
any items are missing, contact your
~
The items' colors and shapes may vary depending on the model.
~
Make sure that there are no accessories hidden behind
or
box.
Assembling the Stand Wire Holder
.,r-
-·--·0••••·-·~··-•
{
•w••••••
•
under packing materials after you open the
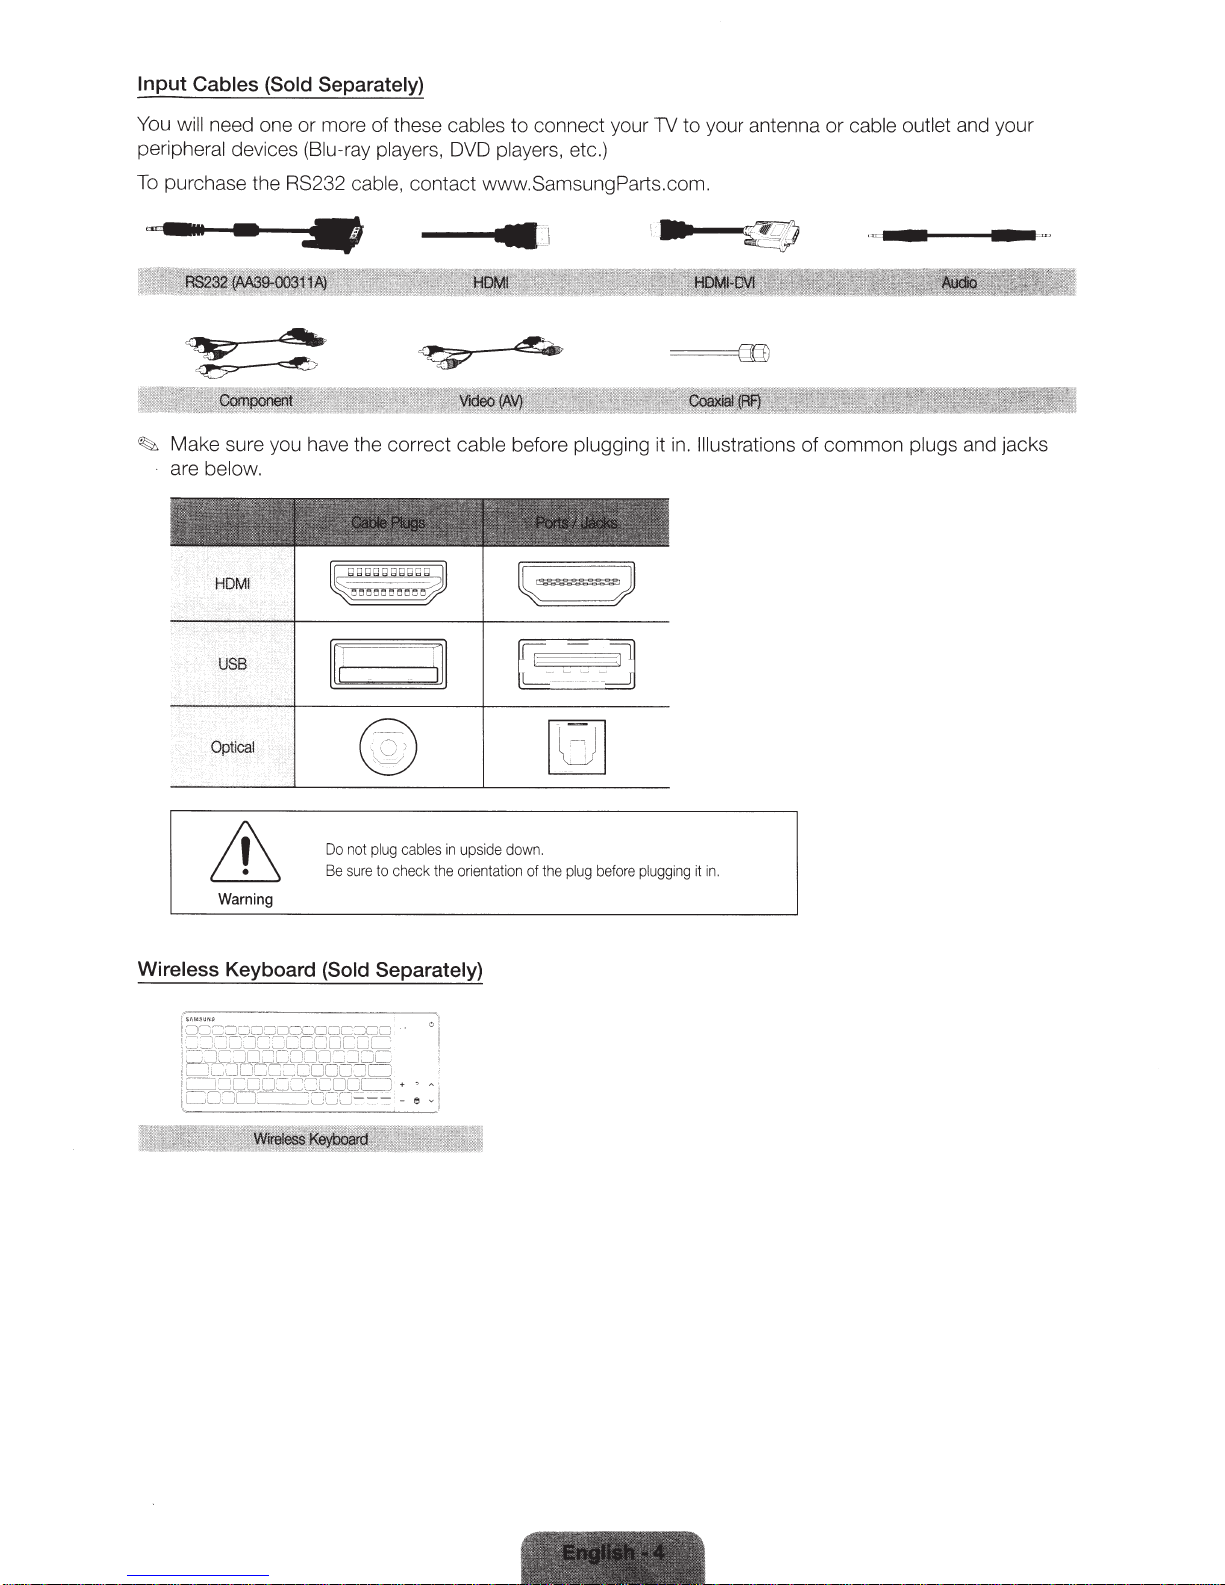
Input Cables (Sold Separately)
You
will
need one or more
peripheral devices (Biu-ray players, DVD players, etc.)
To
purchase the RS232 cable, contact www.SamsungParts.com.
of
these cables
to
connect your
1V
to
your antenna
or
cable outlet and your
---11
""'"'
"--····-
~
..
------·
Make sure you have the correct cable before plugging it
are below.
~
v
:1
~
~
in.
Illustrations
of
common plugs and jacks
Do
not plug
cables
in
upsi
Be sure
to c
heck
the orientation
Warning
Wireless Keyboard (Sold Separately)
de
down.
of the
plug
before plugging
it
in.
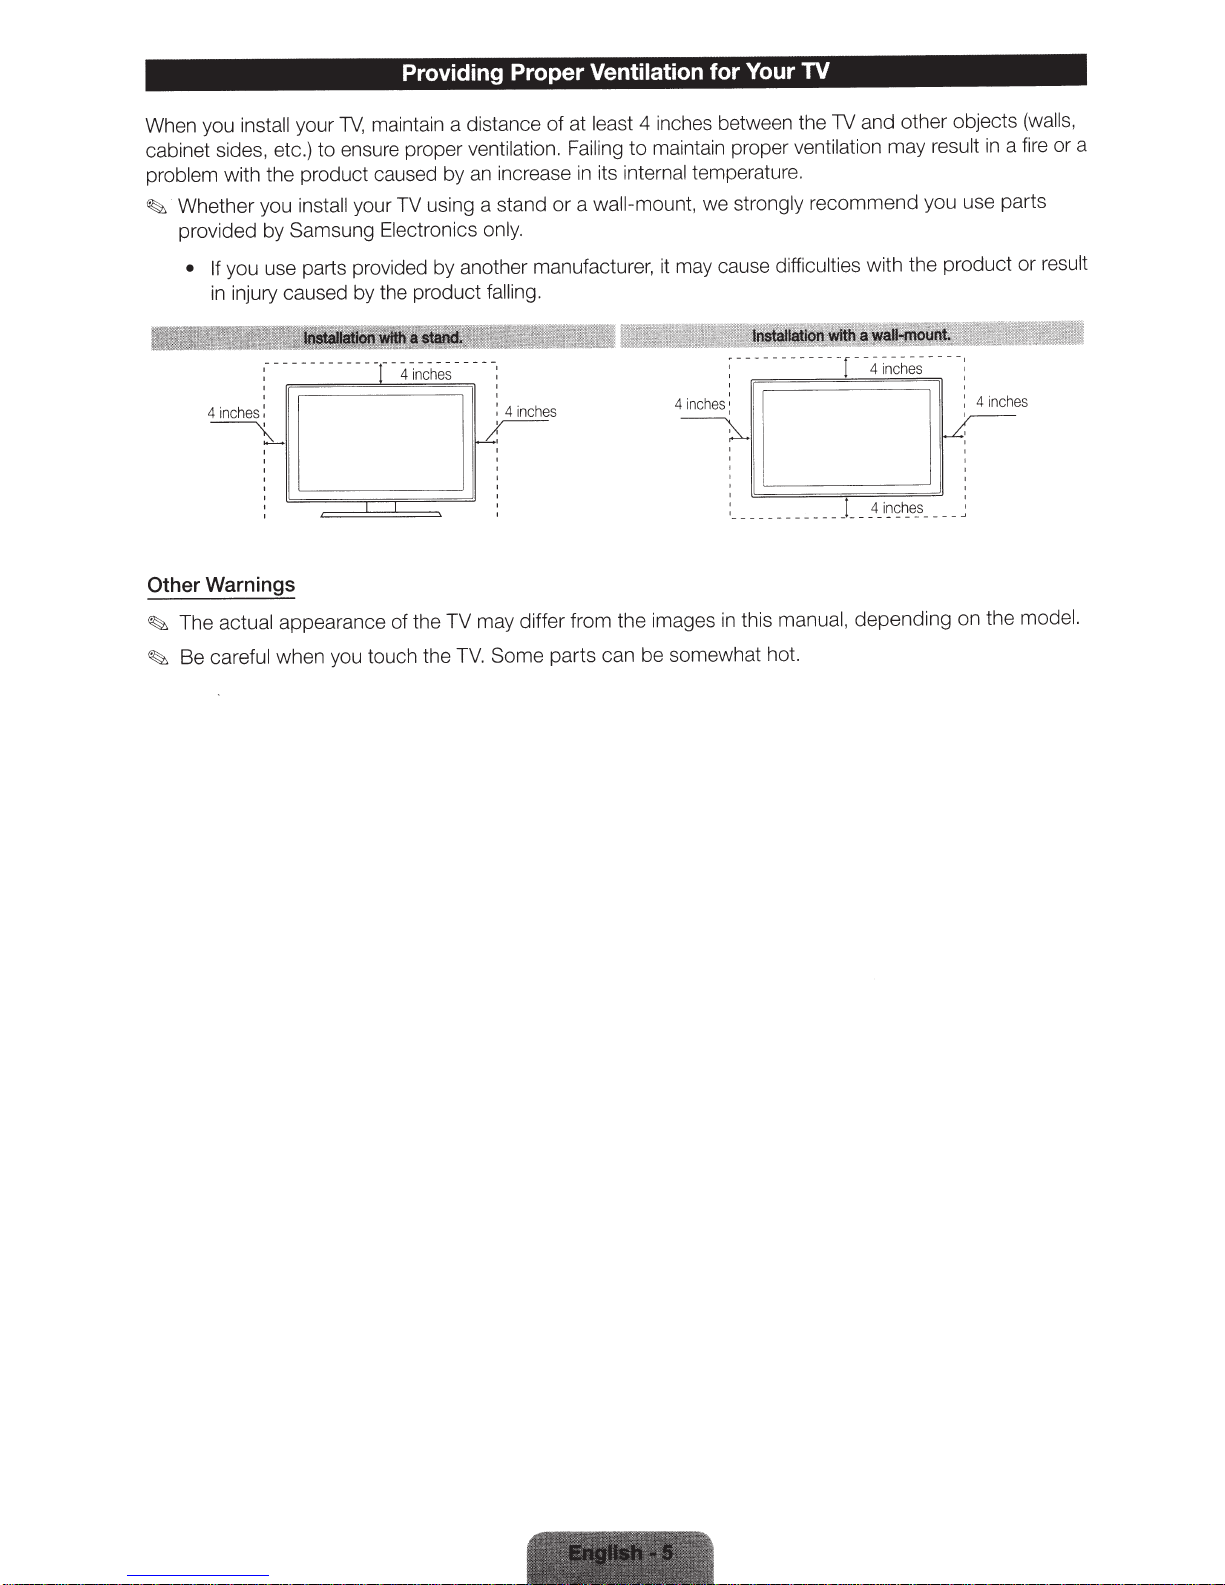
Providing Proper Ventilation for Your
maintain a distance of at
When you
cabinet sides, etc.)
problem
Whether you
~
provided by Samsung Electronics only.
Other
The
~
Be
~
install your
with the product caused by
you use parts provided by another manufacturer, it may cause
• If
injury caused by the product
in
- - -
-
: 4
'
'
s:
he
c
4in
~
'
Warnings
actual
careful when you touch the
TV,
ensure proper
to
install your TV using a stand or a
-
-
-
-
- - -
-~-
-
-
- - -
-
-
-
appearance of the TV may differ from the images in this
es
ch
in
4 inches between the
least
maintain proper
ventilation. Failing
increase in its internal
an
falling.
- - -
-
-
:
'
'
es
h
nc
: 4 i
~
Some parts can be somewhat hot.
TV.
to
wall-mount,
4 in
~
temperature.
we
che
TV
,
a
in
hes
nc
the m
re
fi
alls
or a
result
el.
od
and other objects (w
TV
result
ventilation
difficulties
-
-
-
---
recomme
----r-
strongly
: --
:
:
s
lb;;;;;;;;;;;;;;:;;;;;;;;;~
____
; __
__
___
_
manual,
may
you use parts
nd
with the product or
----:
es
h
~
in
-4
;;;;;:;;;;;;;;;dl
~
~
~
i
_
4
__
_!_
depending
I
-r
1
i
__
__
s
_
e
on
'
4 i
!
:
~

· Installing
the
Stand ·
Stand
Follow
stand installation guide.
Parts: 46 inches
~
the steps
below
0
~px4
(M4XL
..
~--
00
Lm:J
-
- -
Rear
~
model only
to
connect the
.
1
2
)
!
-
<'~
,
,
'
','
I
'
::<
®@~
oo=~
• C'
' '
..
..
TopView
~::r
\:_____;/
ATIENTION
oo
tEM!
CII.LS
G
..
..
,
...
.................................
TV
to
the stand. For more detailed
'
1
~
~
:~~
:
·--
:
~
~'
oo
~
RE
ASE
'
USC
OI
L
~
:
t
~
'
~~
instructions, see the separate
~
.
~
--~~--
Pl
ace
a
so
place
t
he
In
se
rt
the
ft
TV
Sta
-
--- -··
cl
oth
over
a
ta
ble
on
nd
the
cloth
Guide
screen
i
nto
to protect
the
slot
si
de
on
the
down.
the
(M4XL12)
TV,
a
nd
TV's
bott
om
0
th
en
.
E)
0
Si
deV
,-
ie
--
w
-------------
--
·r
-----.,
(Correct
assembly)
........
..
....
... ...
_
~~
(I
nco
rrect
assembly)
-
--
-
~~
'
.
--
x4(
M
4X
L
1
2)
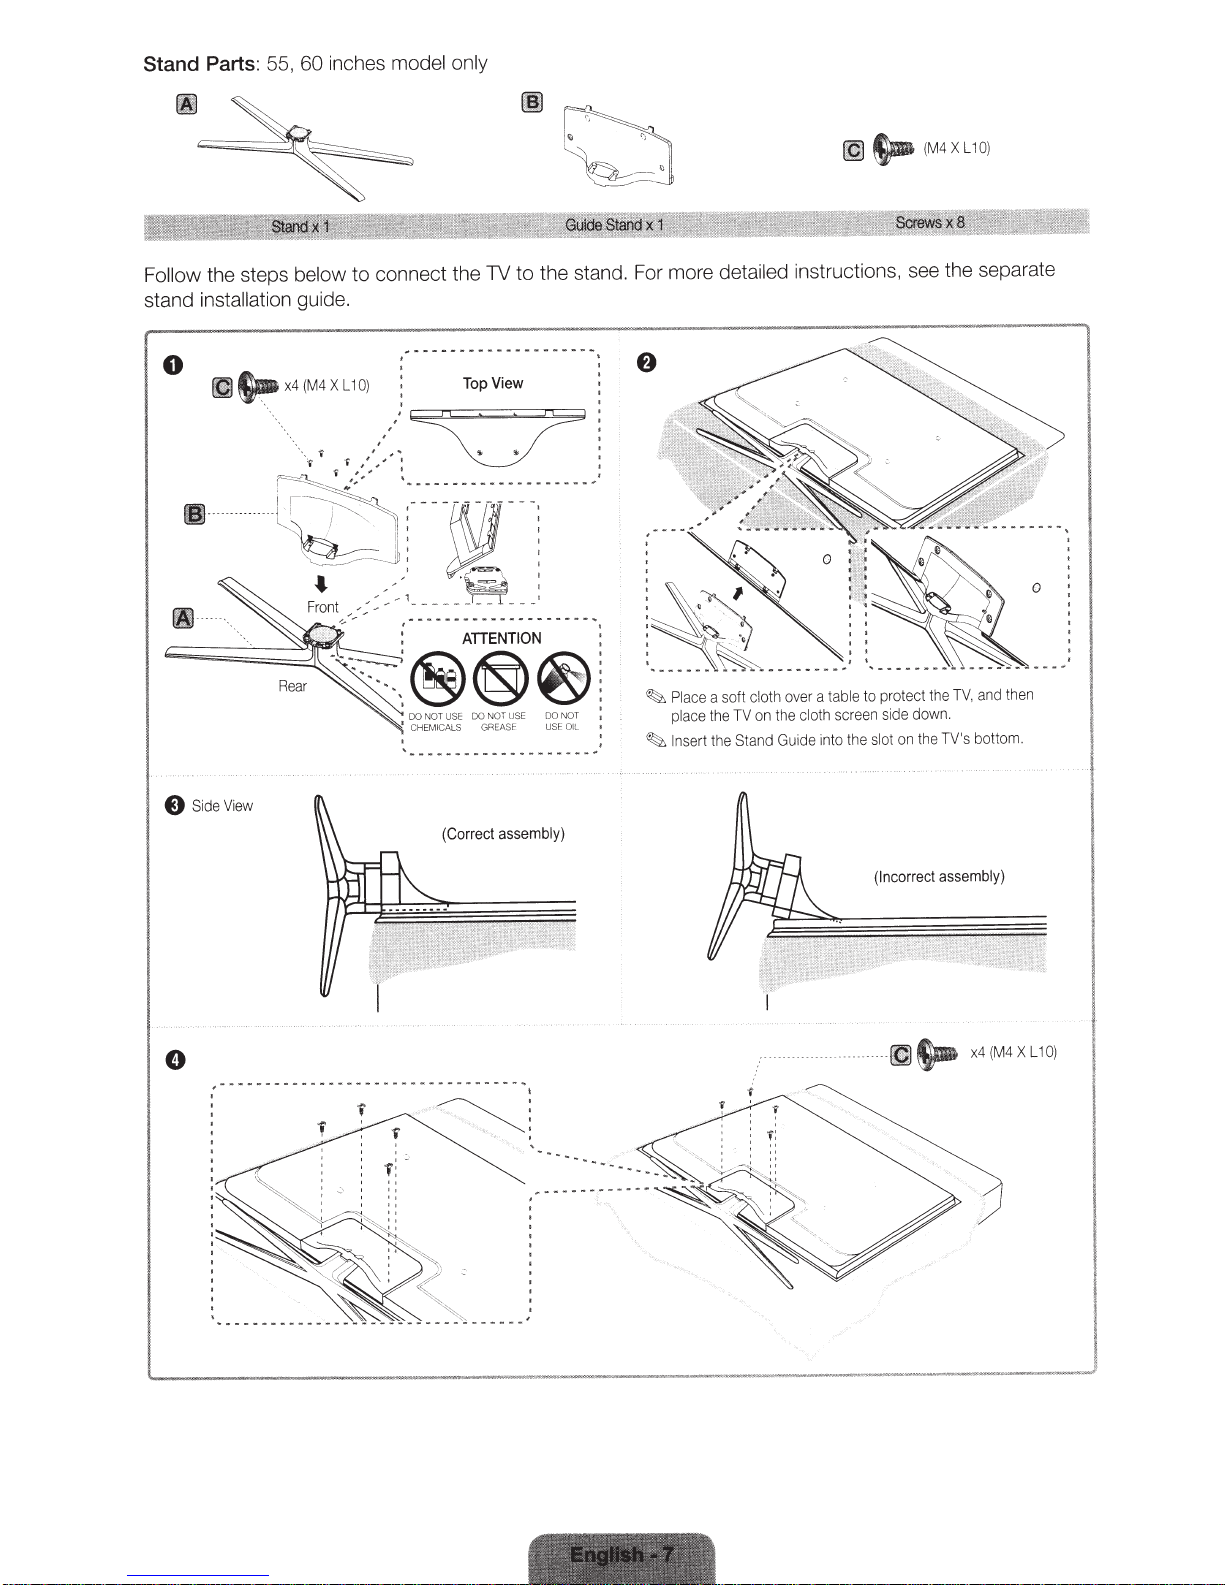
Stand Parts:
55,
inches model only
60
~
~
(M4XL10)
connect the TV
to
~
below
guide.
(M4
x4
'
0)
L1
X
Top
Follow
stand installation
the steps
0
tl)
·~·~~·
.~:
..
"i
~
~
-=-
(
~-
~
~
~
I
l
''"
''"'
""
~~~Rea~r
View
de
Si
E)
<'
:
,,,
'
,'
..
' '
,,
..
~,
J
;~,.,.
...
_,
~,
~
~--~;
~
.....................
....
...
~---M·
_,'
.-.
·~
_______
i
--------------------,._
ATIENTION
@@@
1
'
CHEMIC
'
..............
..
"""
'"
""''
S
AL
.......
...
(Correct assembly)
the stand. For more
to
View
...............
.....
··
-
:
---~
N•
"~
'
""
GREASF USF OIL
.........
.....
...........
..
:
..
'
!
~
:
1
'
~
/
.
Place a
place
Insert
detailed
cloth
ft
so
the
on
TV
the
Stand Guide into t
the
instructions, see the separate
then
and
V,
on
the
T
TV's
botto
m.
table
a
over
screen side down.
th
o
cl
protect the
to
sl
he
ot
~~
assembly)
x4(M
4X
L10)
(Incorrect
___
.
..
. . .
--
·
_
~
NOTE
•
Make sure to distinguish between the front and back of each component when
•
Make sure that at
•
Stand the product
down,
&
Do not insert your fingers into the stand base
it
may
lean
least
two
people lift
up
before you tighten the screws.
to
one side when you stand it up.
and move the
slot
assembling
TV.
If
you tighten the screws with the TV lying
of
the
TV
when
installing
the stand base.
them.
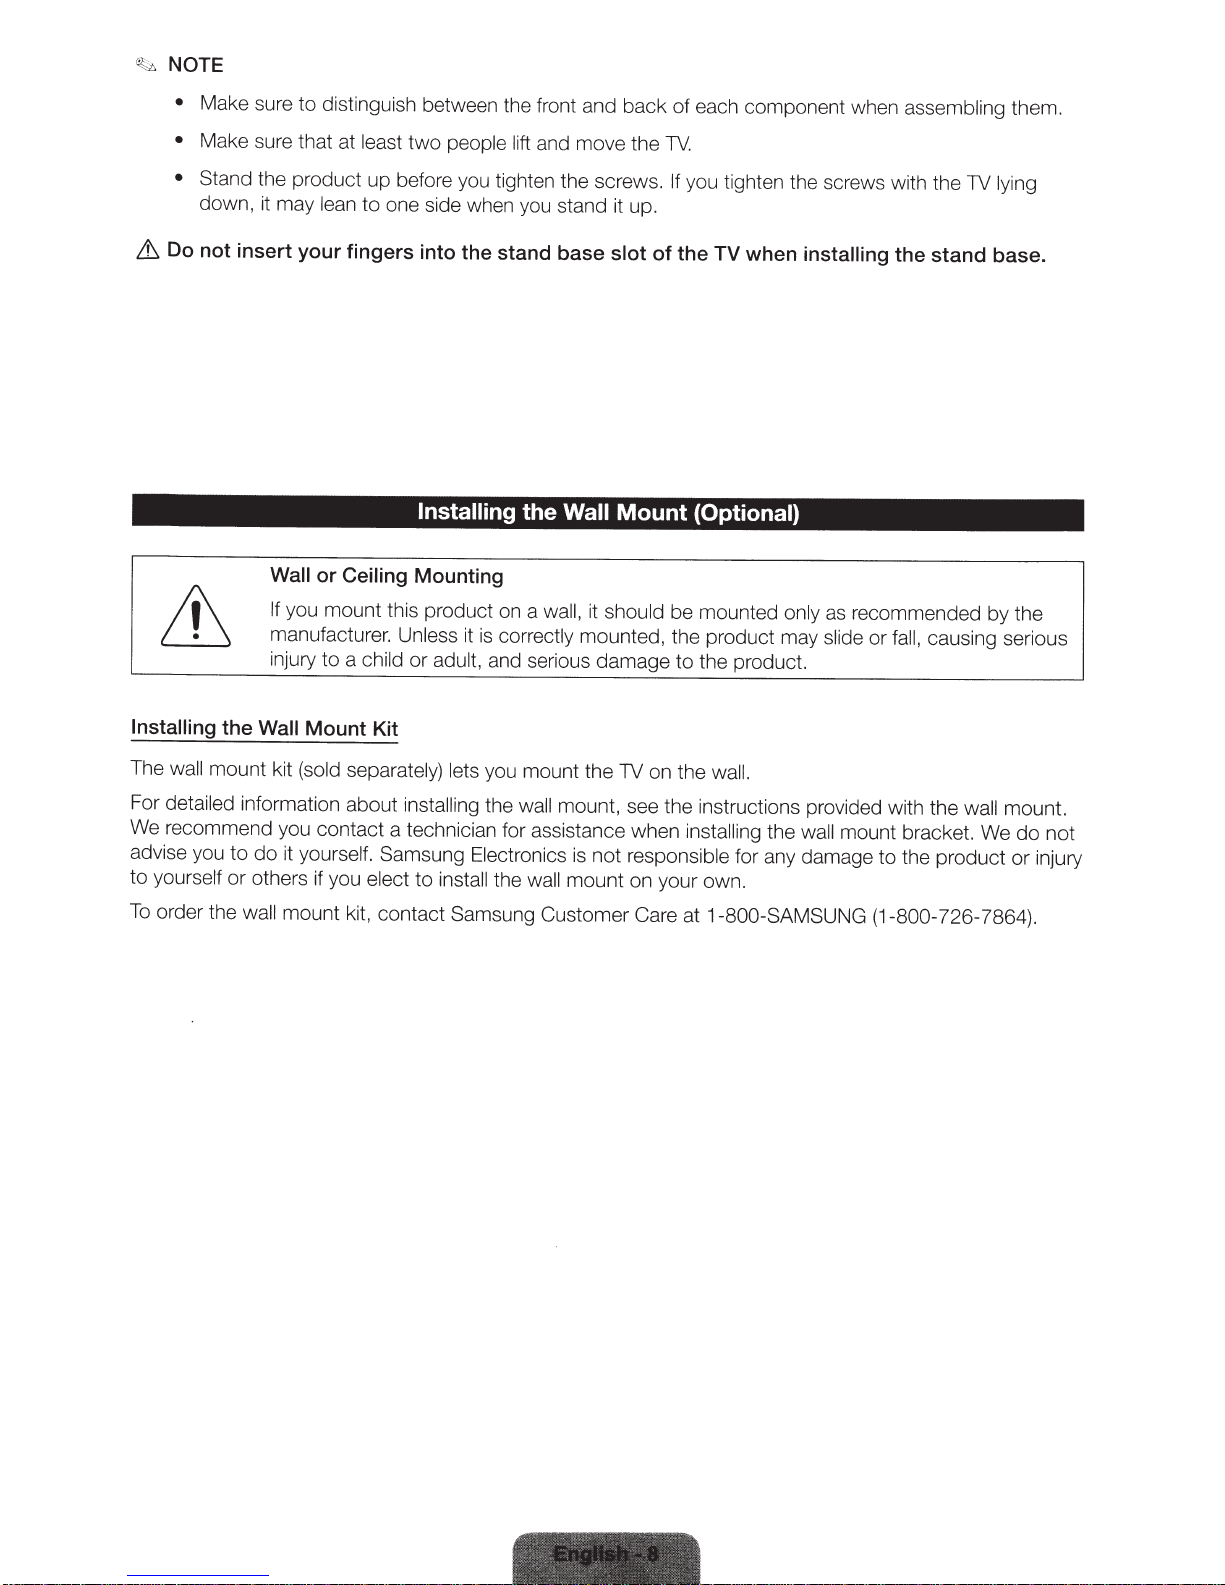
Installing
Wall or Ceiling
If
you mount this product on a
manufacturer. Unless
injury to a
Installing
The
For
We
advise you to do it
to
yourself
To
order the
the
Wall
Mount Kit
wall mount kit
detailed
recommend you contact a technician for assistance when
or
(sold separately) lets
information about
yours
elf.
others if you
wall
mount kit, contact Samsung Customer Care at
Mounting
child
or
installing
Samsung
elect to
adult,
inst
the
Wall
wall,
it
it
is
correctly mounted, the p
and serious damage to the product.
you mount the
the
wall
mount, see the instructions provided with the
Electronics
al
l
the
is
not
wall
mount on your own.
Mount
should
be mounted
TV
on the
responsible
(Optional)
only
as
re
commended by the
ro
duct may slide
wall.
installing
the
wall
for any damage to the product
1-800-SAMSUNG (1-800-726-7864).
or fall,
causing serious
wall
mount bracket. We
mount.
do
not
or
injury
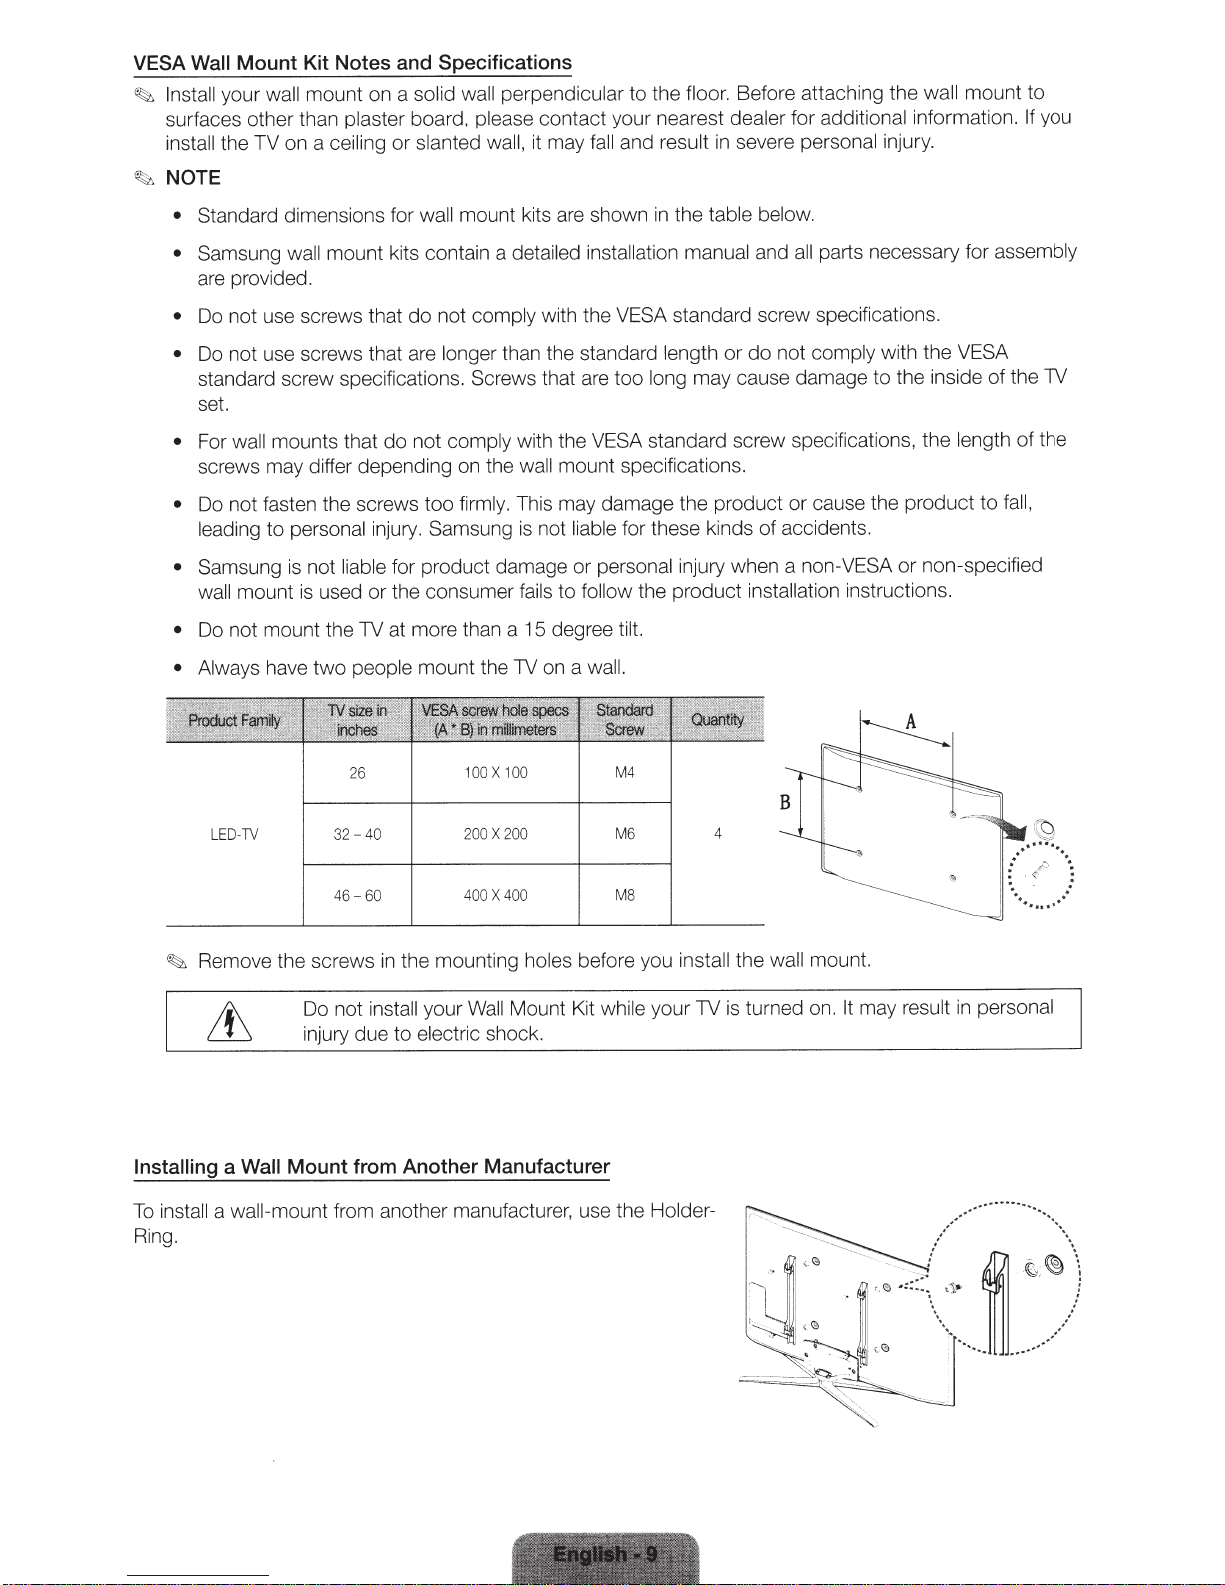
VESA Wall
Install your
~
Mount Kit Notes and Specifications
surfaces other than
install the
~NOTE
•
TV
Standard dimensions for
mount on a
wall
on a
plaster
ceiling
solid wall perpendicular
to the
board, please contact your nearest
result
and
slanted wall, it may
or
mount kits are shown
wall
fall
in
the
Before attaching the wall
floor.
additional
for
dealer
severe personal
in
table below.
information.
injury.
mount to
If
you
• Samsung wall
mount kits contain a
detailed installation manual
are provided.
Do not use screws that
•
Do not use screws that are
•
standard screw specifications.
comply
not
do
longer than the standard
Screws
with the
that are
set.
comply with the
not
mounts that
wall
For
•
screws may differ depending on the
Do not fasten the screws too
•
personal
mount
ED-TV
L
to
not
is
used or the consumer
is
two
leading
• Samsung
wall
Do not mount the TV at more than a 15 degree
•
• Always have
do
firmly. This may damage the product
Samsung
injury.
for product damage or
liable
people
26
- 40
32
mount the TV on a
100
200
X
X
wall
is not
fails
0
10
200
standard screw specifications.
VESA
or
length
may cause damage
long
too
standard screw specifications, the
VESA
mount specifications.
for these kinds
liable
injury when a
the product
to
follow
personal
tilt.
wall.
M4
M6
4
parts necessary for
all
and
not
do
or
accidents.
of
comply
cause the product
non-VESA
with the VESA
the inside of the TV
to
non-specified
or
installation instructions.
assembly
length
to
of
fall,
the
Remove the screws
~
Installing a
a
ll
sta
in
To
Ring.
60
-
46
the mounting
in
stall
Do not
injury due
Mount from Another Manufacturer
Wall
wall-mount
in
to
from another ma
400
Wa
your
electric
shock.
nu
400
X
holes
Mount Kit
ll
facture
MS
before you install
your TV is turned on. It
while
use th e
r,
Holder-
the wall
mount.
may
result
personal
in

Connecting the
VHF
~
Plug
the power cord into a wall outlet only
~
{;1:.
If
you are connecting your TV to a
co
nnections, you
'
fl:~
Use cautio n when you move or
break the antenna jack
do
not need to
i
UHF
of
f the T
Power
Ant
en
na
cable
co
sw
i
vel
V.
Cord and the Antenna
after you ha
or satellite box using
nnect the ANT
the TV if the
IN
an
ve
made
jack
tenna
to
cable
or
Cable Connection
all
other
co
nne
HDMI, Componen
an antenna
is tightly
or
a
co
ct
io
ns.
t,
or Video
cab
le
connec
nnected.
You
ti
co
o
n.
uld
Connecting
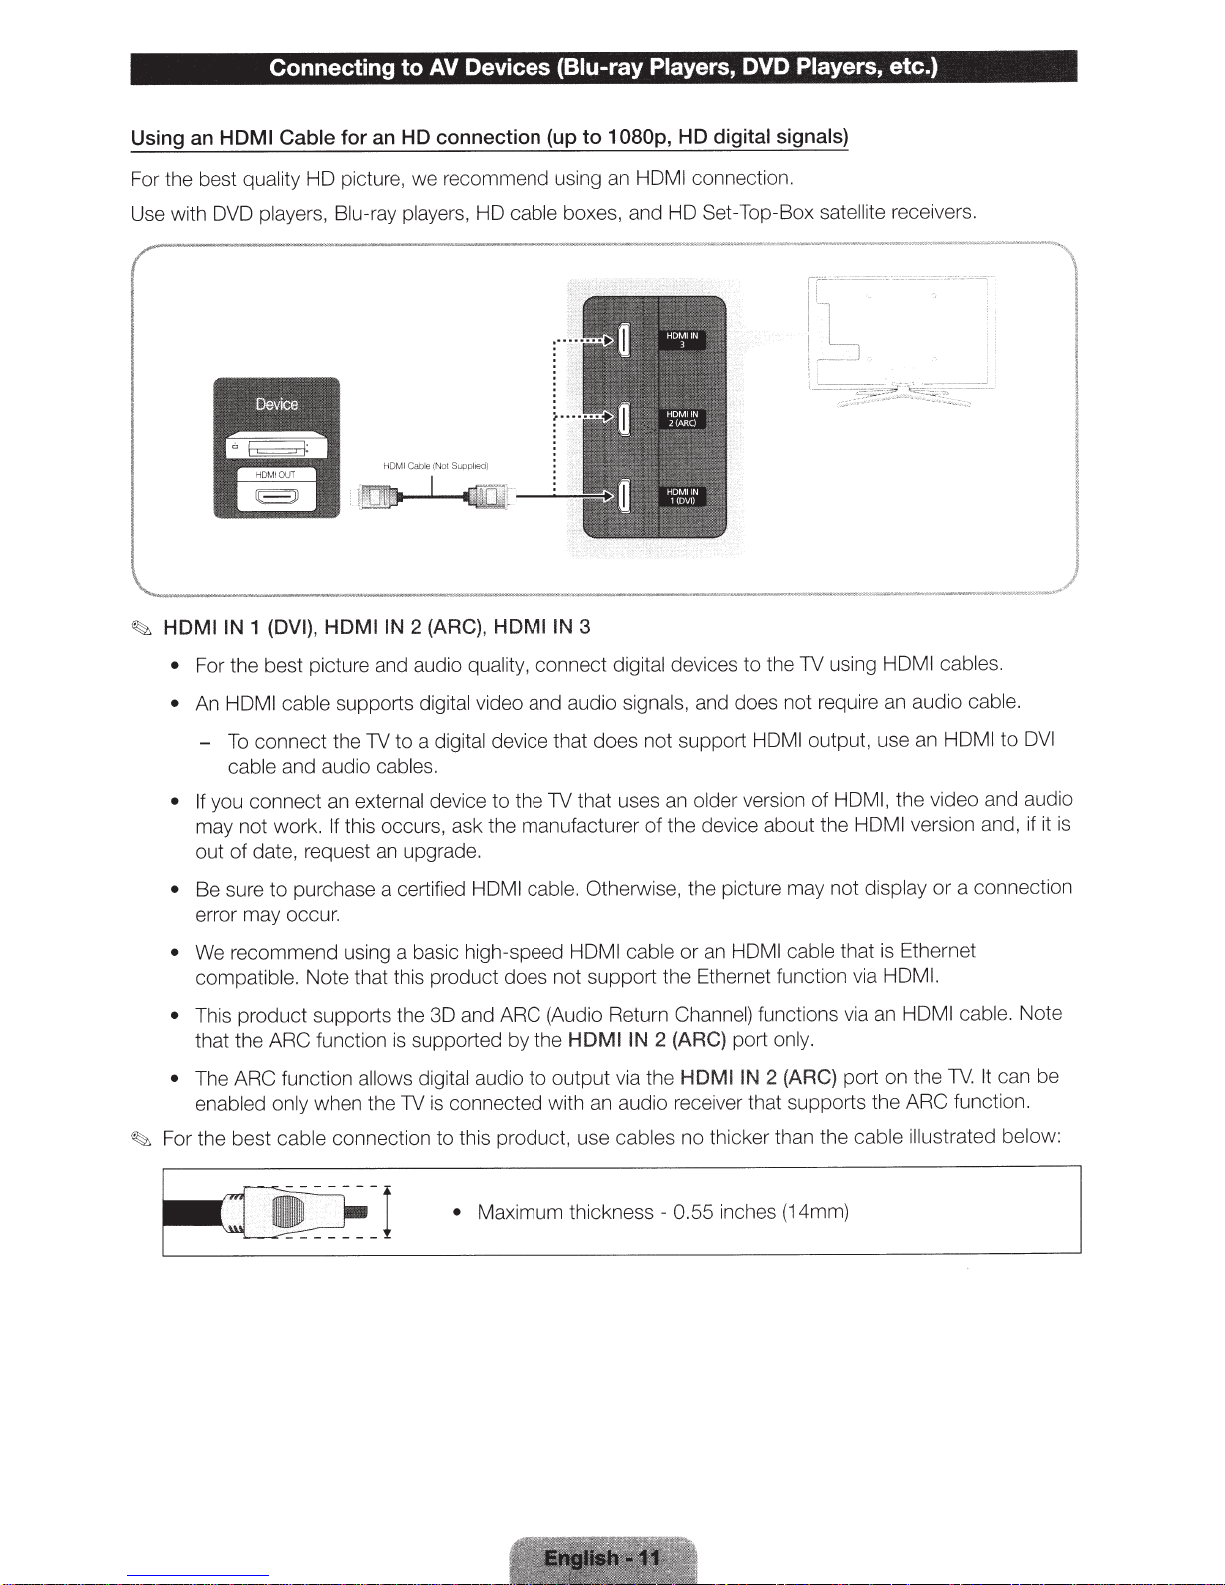
Cable for an HD connection (up to 1
I
Using an
For
Use with DVD players,
~
HOM
the best quality HD picture, we recommend using
Blu
HDMI
(DVI),
1
IN
HDMI
to
-ray players, HD cable boxes, and
Suppl.ea)
Not
(
Cable
HDMI
IN
(ARC),
2
HDMI
Devices (Biu-ray
AV
IN
Players,
080p,
HDMI connection.
an
3
DVD Players,
digital signals)
HD
Set-Top-Box
HD
satellite
etc.)
receivers.
• For the best picture and audio quality, connect digital devices
cable supports digital video and audio
HDMI
An
•
connect the TV to a digital device that does not support
To
-
signals, and does not requi
cable and audio cables.
that uses an older version
you connect an external device to the
• If
TV
may not work. If this occurs, ask the manufacturer of the device about the
upgrade.
date, request
of
out
• Be sure
purchase a certified
to
an
cable. Otherwise, the picture may not di
HDMI
error may occur.
cable
We recommend using a basic high-speed
•
compatible. Note that this product does
This product supports the 3D and ARC (Audio Return Channe
•
that the ARC function is supported
e ARC function allows digital audio
Th
•
when the TV is connected with an audio receiver that supports th e ARC function.
enabled
For the best cable connection to this product, use cables
~
only
--I •
by
Maximum thi
HDMI
not support the
IN
I
HOM
the
output via the
to
ness
ck
the TV using
to
HDMI
HDMI
an
or
ernet function via
Eth
func
l)
2 (ARC)
- 0.55
port only.
HDMIIN
no
2 (ARC)
thicker than the cab le
inches (14mm)
cab
HDMI
an audio cable.
re
output, use an
HDMI, the video and audio
of
HDMI
sp
HDMI
version and, if it
a
or
lay
cable that is Ethernet
I.
HDM
cable. Note
HDMI
ons via
ti
an
port on the
ustrated below:
ill
TV.
s.
le
DVI
to
ct
nne
co
It can be
is
ion
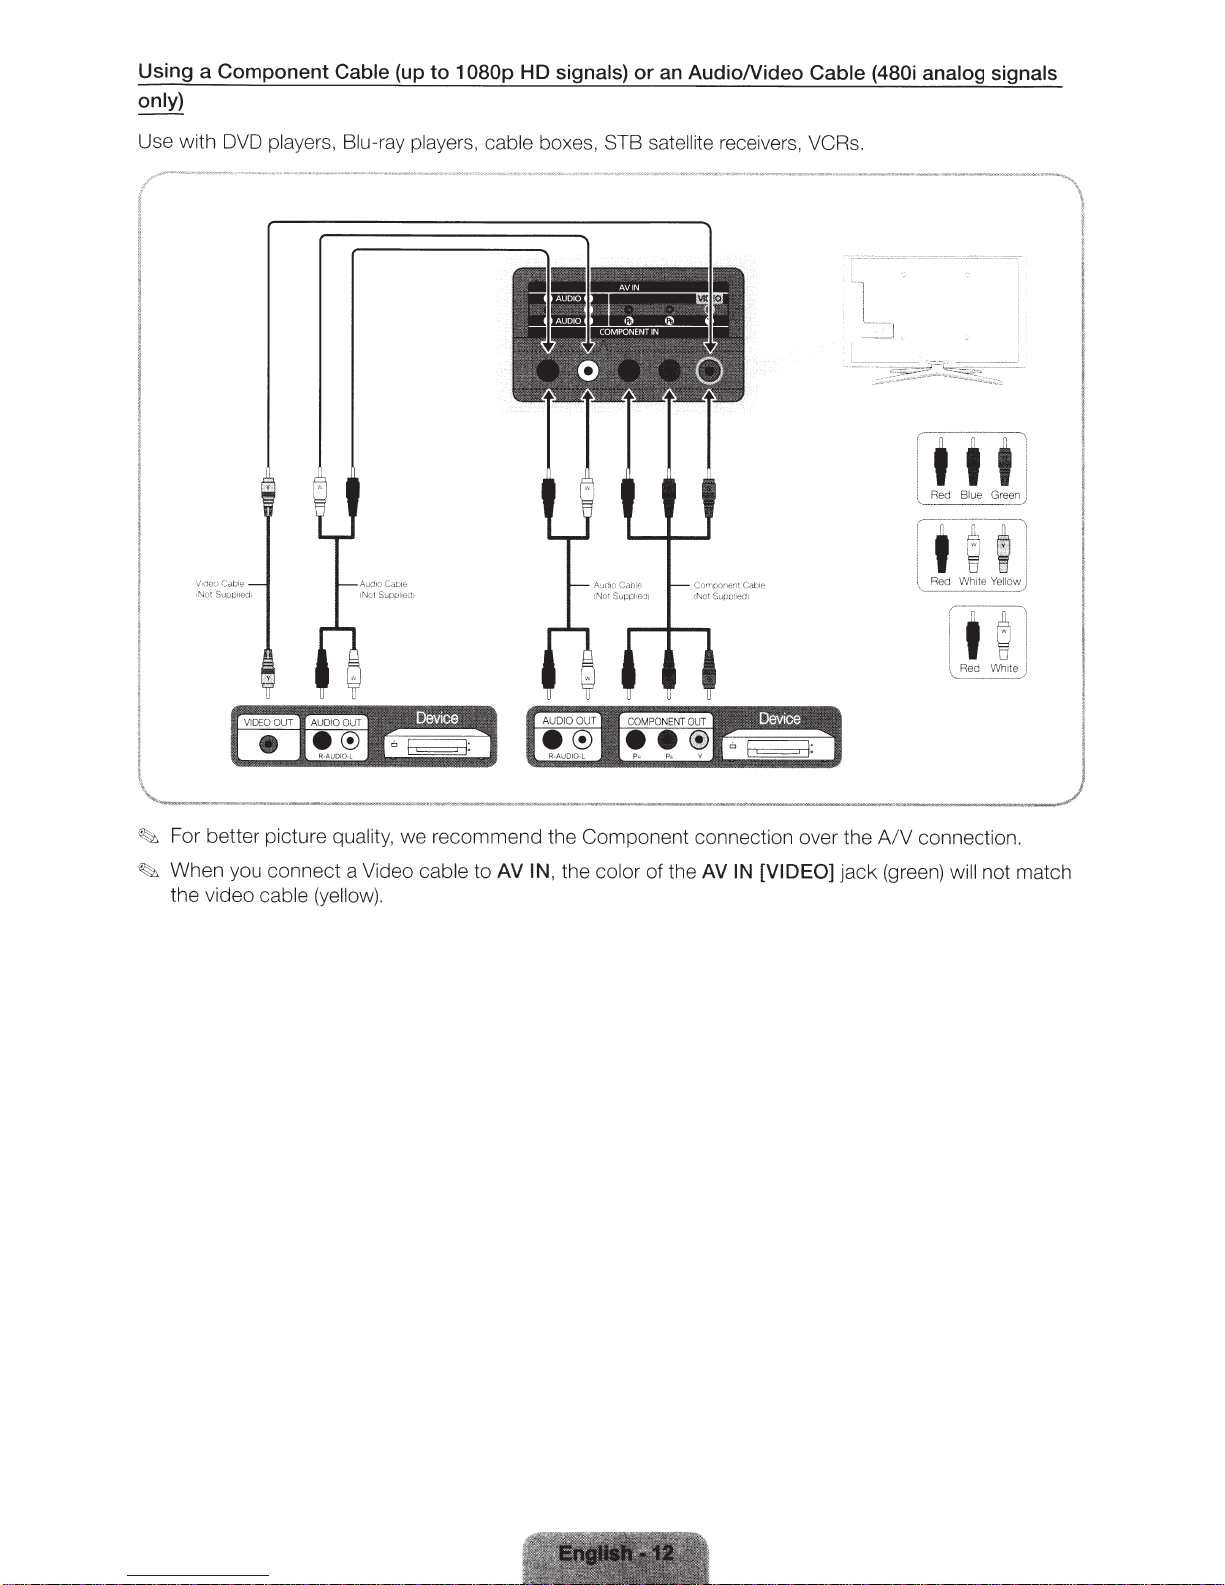
Using a Component Cable (up to 1
only)
080p
HD
signals)
or
an AudioNideo Cable
(480i
analog signals
Use with DVD players, Blu-ray players, cable box
es,
STB satellite receivers, VCR
s.
in
<
·.ii
.
:
l
.
'
Red
Wh1te Y
I
I
,
Re
'--
-
n
S\
..
W
L1
t
ci
--
Wh
~
·
I
"'
.
.
'
ii
~.
.
--
:
ello
w !
_/
~
l
0
i
1te
)
-
~
For be
tt
er picture quality, we reco mm e
~
When you connect a Video cable to
the video ca
bl
e (ye
ll
ow).
AV
nd
IN ,
the Co
the
mp
onent connection over the
co
lor of the
AV
IN [VIDEO]
jack
A/V
(g
reen)
co
nn
ec
ti
on.
will not match

Using an Optical
(Digital)
Cable Connection and a Standard Stereo
Use with Digital Audio Systems,
--·--
fier
U
tll.eater
-
I
.,...
-----·--
DVD
Arnp
home
-~-
~
l
DIGITAL AUDIO OUT (OPTICAL)
~
Connecting to Audio Devices
.
Amplifiers,
,_
_ _
""'
·
,
and Home Theate
-""
'
.,,"""""
,
__
.
......
rs
-----,.-
·- ..
____
,
~
·
"'-
"
·
Cable
____
'""
Connection
__
,,.,
,
~._
.
...
• 8
I
Red White
,.,..,_..__"_
n
"1
,
~
..
__)
I
Audio System
When you connect a
•
the
• 5.1
volume
CH (channel)
of both the
Digital
audio
and the system.
TV
able
il
ava
is
when you connect the TV
CH .
When the receiver (or home theater) is set to on, you can hear sound output from the TV's
•
signal,
component such as a DVD
Blu-ray
io
player
input jacks on your
~
jack. When the TV is receiving a DTV
a
receiver. When the source
STB (Set-Top-Box)
I
CH audio from the home theater receiver.
2
audio out jack from your DVD
amplifier
AUDIO
or home theat
Connects to the aud
OUT:
is
satellite
er.
receiver and you connected it to the TV via
I
digital
• When connecting, use the appropriate connector.
When you connect an audio amplifier
•
adjust the
volume level
with the
to the
amplifier's volume con t
DIGITAL AUDIO
the
to
the TV w
il
If you want to
cable
I
AUDIO OUT
OUT
external
an
to
CH
5.1
send
l
player
CH
.1
ar 5
he
satellite
STB
I
box
amplifieri
DVD
jacks, decrease the
rol.
(OPTICAL)
device supporting 5.1
the home theater
sound
to
Blu-ray player
I
HDMI,
audi
you will
connect the
o,
receiver
home theater.
volume
jack, decrease
optical
cable
I
only
digital
an
directly
to
of the TV and
box
hear
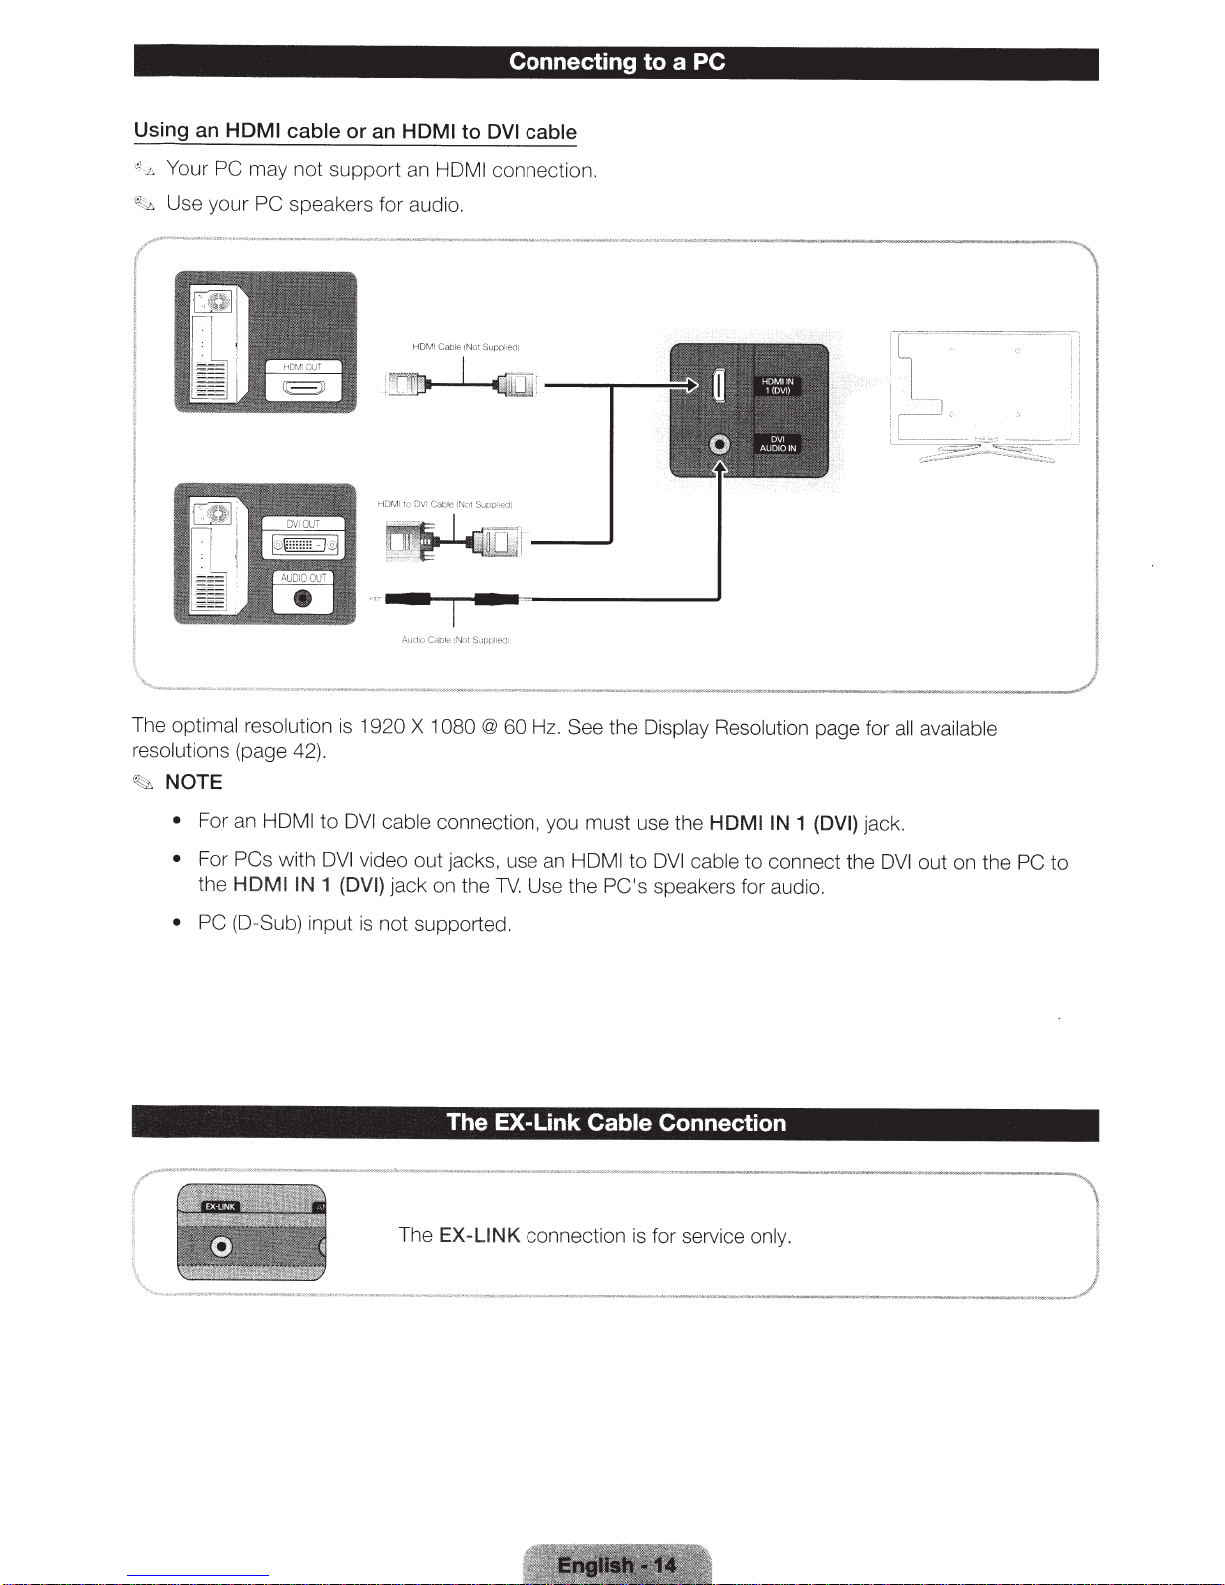
Connecting
to
a PC
Using an
-:;,;.
Your
~
·
;;..
Use your
HDMI
PC may
PC
cable or an
no
t s
upp
HOM I to
ort an
HDMI
speakers for audio.
DVI
cable
connection.
The
op
timal resolution
resolutions
"i..:;z,
NOTE
•
For an HDMI
• For
the
• PC
(page 42).
PCs with
HDMI IN
(D
-Sub) input
is
1920
X 1
080
to
DVI
cable
connection, you must use the HDMI IN
DVI
video out jacks, use an
1
(DVI) jack on the
is
not supported.
The EX-Link
The
EX-LINK
@
60
Hz.
See
the Display Resolution
HDMI
to
DVI
cable
TV.
Use the PC's speakers for audi
Cable Connection
connection is for service
page for
1
(DVI)
jack.
to connect the
o.
onl
y.
a
ll
ava
DVI
out on th e
il
able
PC
to
can set up your
You
using a wired or
(LAN)
yo
After
~2:.
connection to
process
so that
1V
wireless
u have "physically" connected your TV to your
complete
page 23)
(see
it
connection.
the process.
after the
or
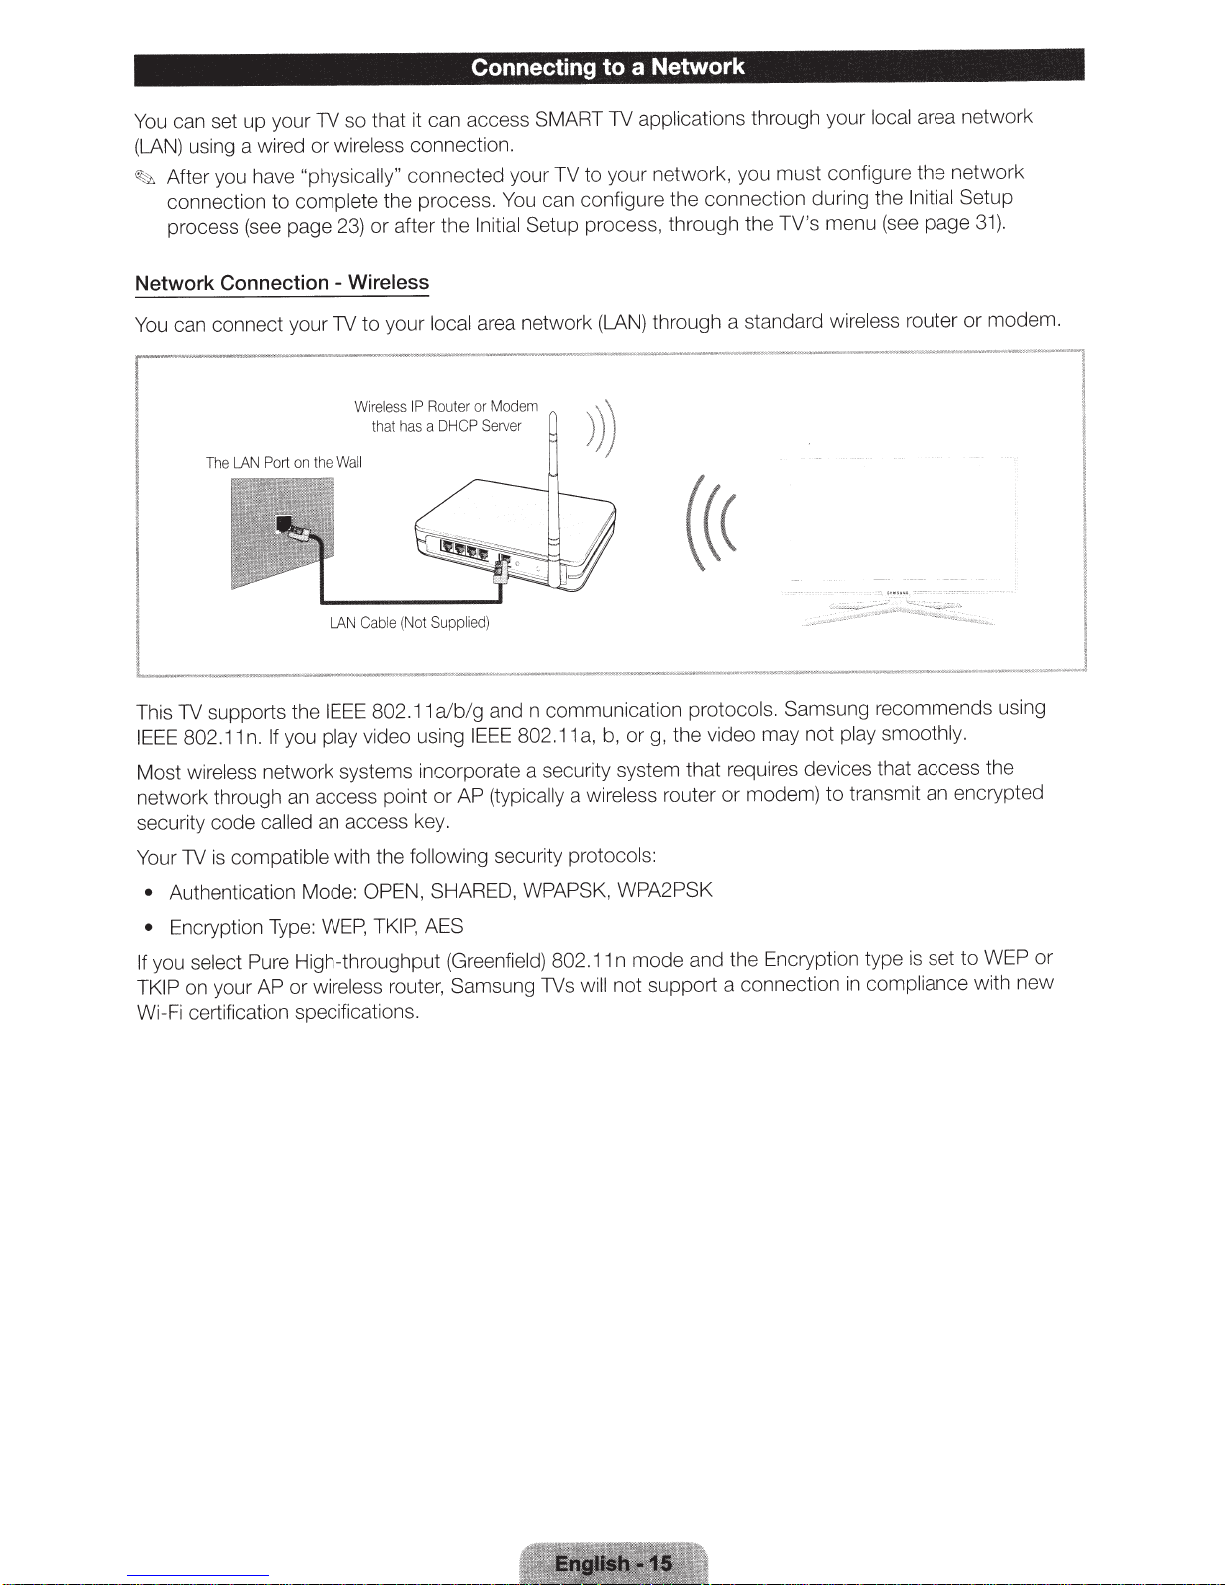
Network Connection - Wireless
your
to
on
the
1V
Wa
LAN
re
Wi
that
ll
Cable
ess
l
has
Not
(
IP
can connect your
You
LAN
The
Port
Connecting
can access SMART
can configure the connection during the
You
Setup process, through the TV's
Initial
area network
local
m
Mode
or
Router
Server
DHCP
a
Supplied)
a Network
to
applications
1V
ork, you must configure the network
netw
through a standard
(LAN)
((<
through your
me
ir
w
area network
local
Setup
Initial
nu (see page
eless router
31).
modem.
or
supports the
1V
This
IEEE
Most
802.11
wireless
n.
network systems incorporate a security system that
network through
security code
1V
Your
Authentication Mode: OPEN,
•
Encryption
•
select
you
If
on your AP or
TKIP
Wi-Fi certifica
called
compatible
is
Pure High-throughput
ti
IEEE
play video using
If you
access point or AP
an
an
with the
WEP,
Type:
wireless router, Samsung 1Vs will
on spec
ifi
802.11
a/b/g
access key.
following
SHARED, WPAPSK, WPA2PSK
AES
TKIP,
cations.
and n communication
802.11
IEEE
(typically
security
(Greenfield)
a,
a
protocols:
802.
protocols.
or g, the video may not
b,
wireless router or modem)
n mode and the Encryption type
11
support a connection
not
Samsung recommends using
quires devices that access the
re
to
play smoothly.
smit an encrypted
ran
t
set to WEP
is
mpliance with
co
in
or
new
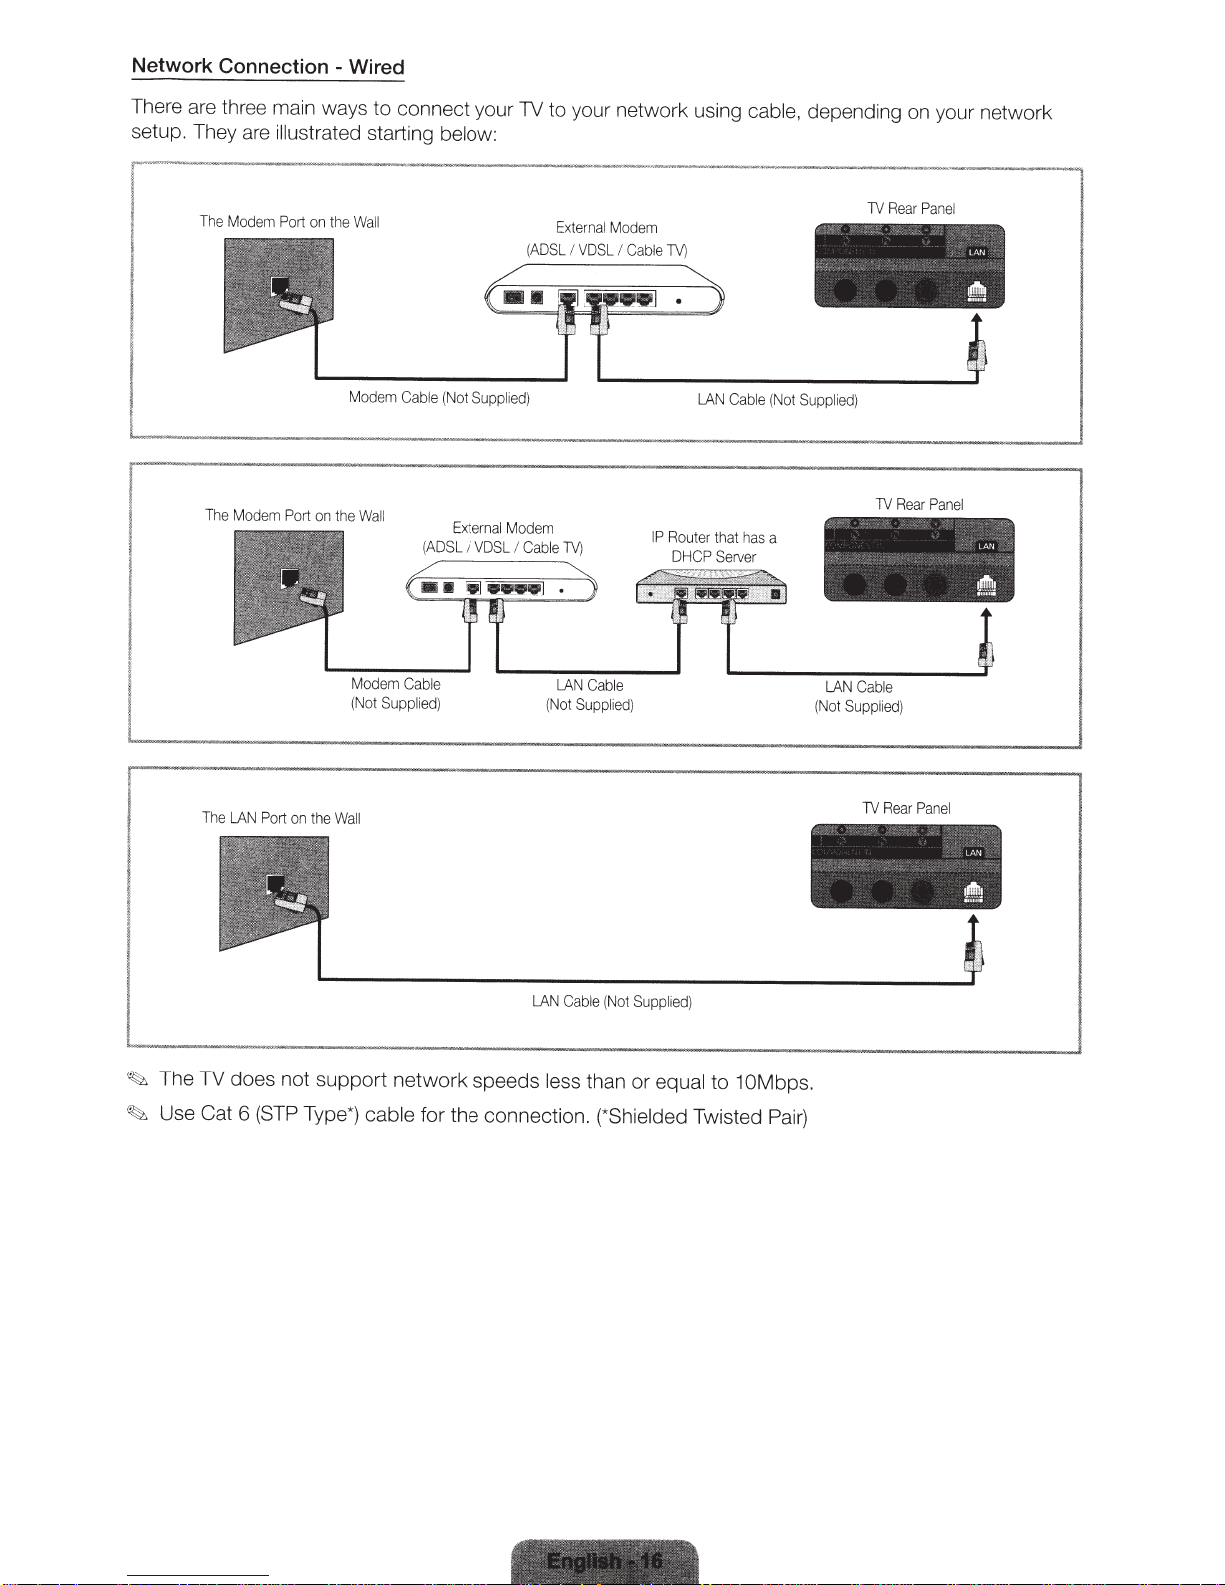
Network Connection - Wired
There are three main ways
setup. They are
Th
I
Th
e
Modem
e
Mo
il
lustrated
Port
dem
Port
on
on
the
the
I
I
I
I
··----------------
------------------------------------------------------------------2
to
co
nnect your
starting below:
Wall
Mod
em
C
able
(No
Wall
M
od
(Not
em
Suppl
Cab
(A
ied)
Exte
DSL I
le
t
Supp
rna
VDSL
TV
to your network using
External
Modem
(ADSL
I
VDSL
I
Cab
li
ed
)
l
Mo
dem
I
Cable
TV)
LAN
Cable
(Not
Suppl
ie
d)
le
IP
TV)
Ro
ut
DHCP
LA
er
N
Ca
that
Serve
cable,
ble
(Not
ha
s a
r
depend
""'
Suppl
i
ed
' •
~
LAN
(Not
in
g on your net
TV
Re
'
)
TV
Rear
~
"'
Ca
b
le
Su
ppl
i
ed
)
ar
Panel
'
Panel
\.
< -
~
-co)
"b.
AA
work
IAN
••
'
LAN
~
The
LA
~
The TV does not
~
Use Cat 6
N
Port
(S
on
TP
th
e
Wall
support
Type*)
network speeds
cable
for the connectio
LA
N
Cable
(Not
Su
pp
less
than or
n.
(*Shielded Twisted
li
ed)
equal to 10Mbps.
Pair)
TV
Rear
P
an
el
~
LAN
.
"
~"
•
~
~
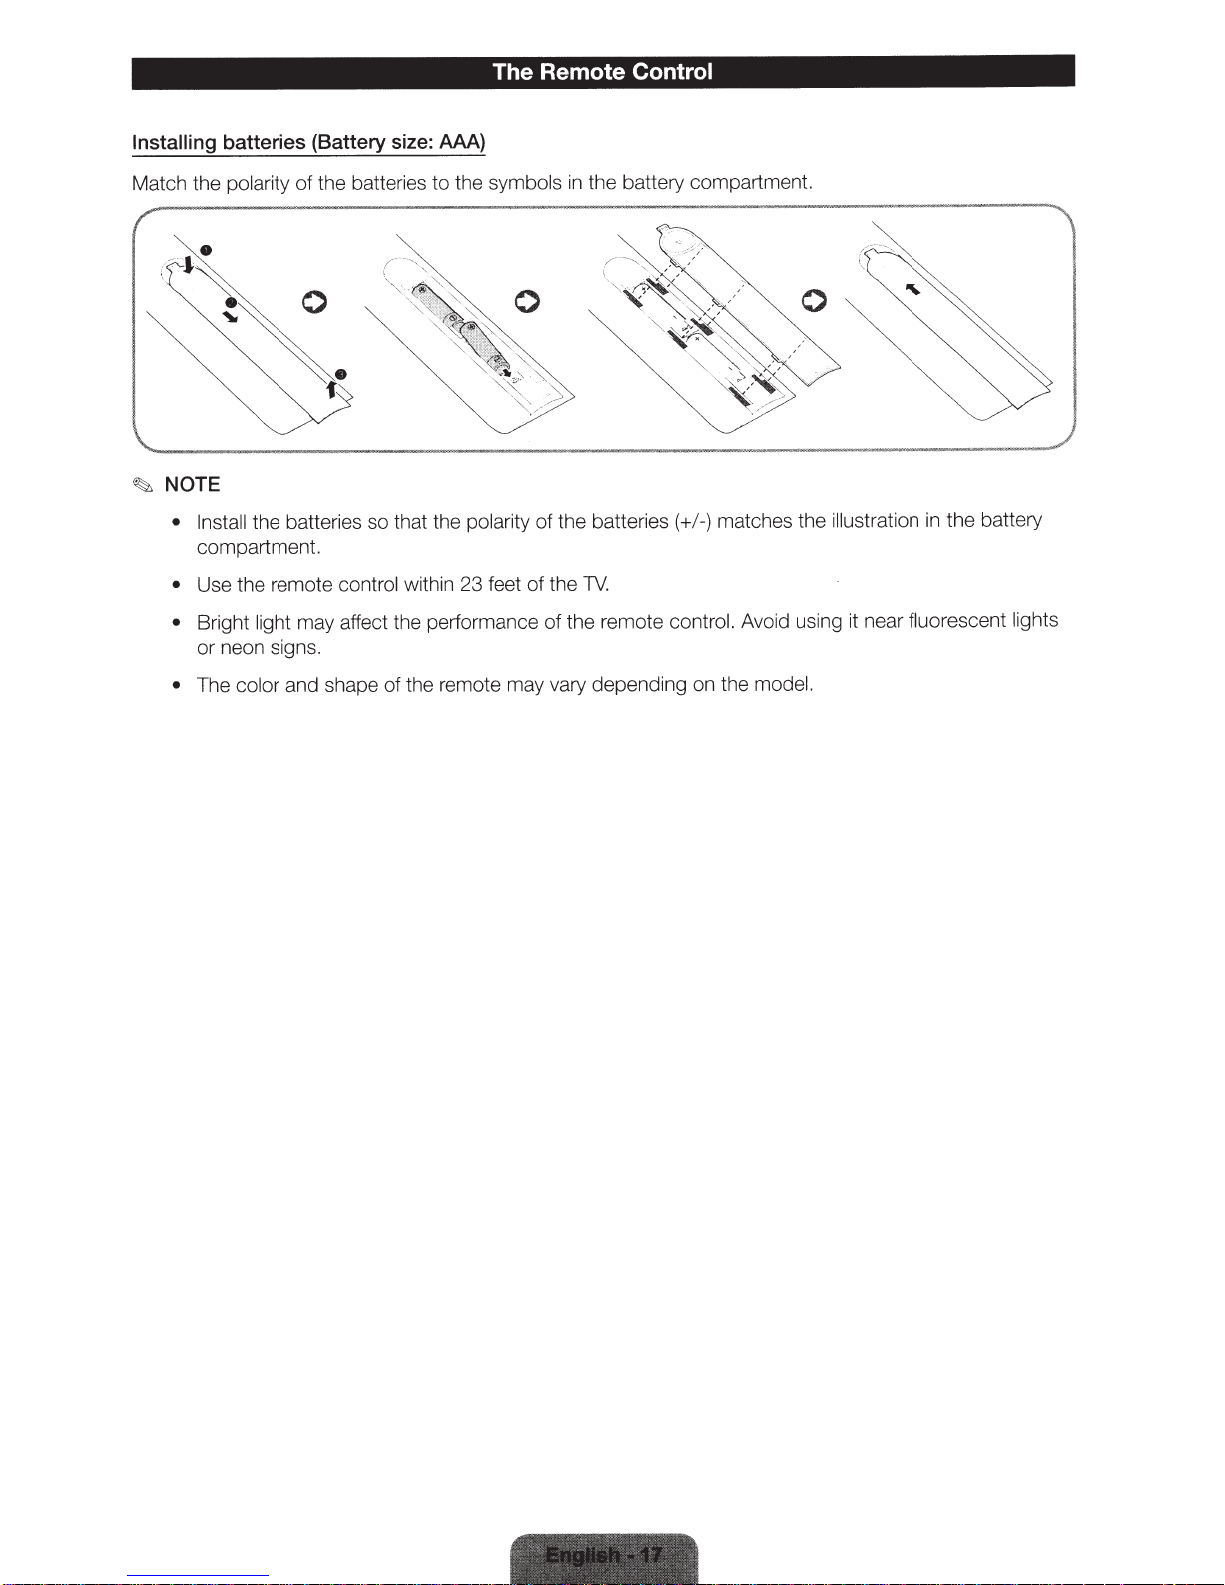
The Remote Control
Installing
Match the
~
batteries (Battery size: AAA)
polarity
NOTE
• Install
compartment.
• Use the remote
Bright
•
or neon signs.
color
The
•
the battery compartment.
the batteries
of
to
the batteries so that the
control
may affect the performance
light
within 23 feet
symbols
the
polarity
in
of the batteries
1V.
the
of
the remote control. Avoid using it near
of
and shape of the remote may vary depending on the
matches the illustration in the battery
-)
/
(+
fluorescent lights
model.
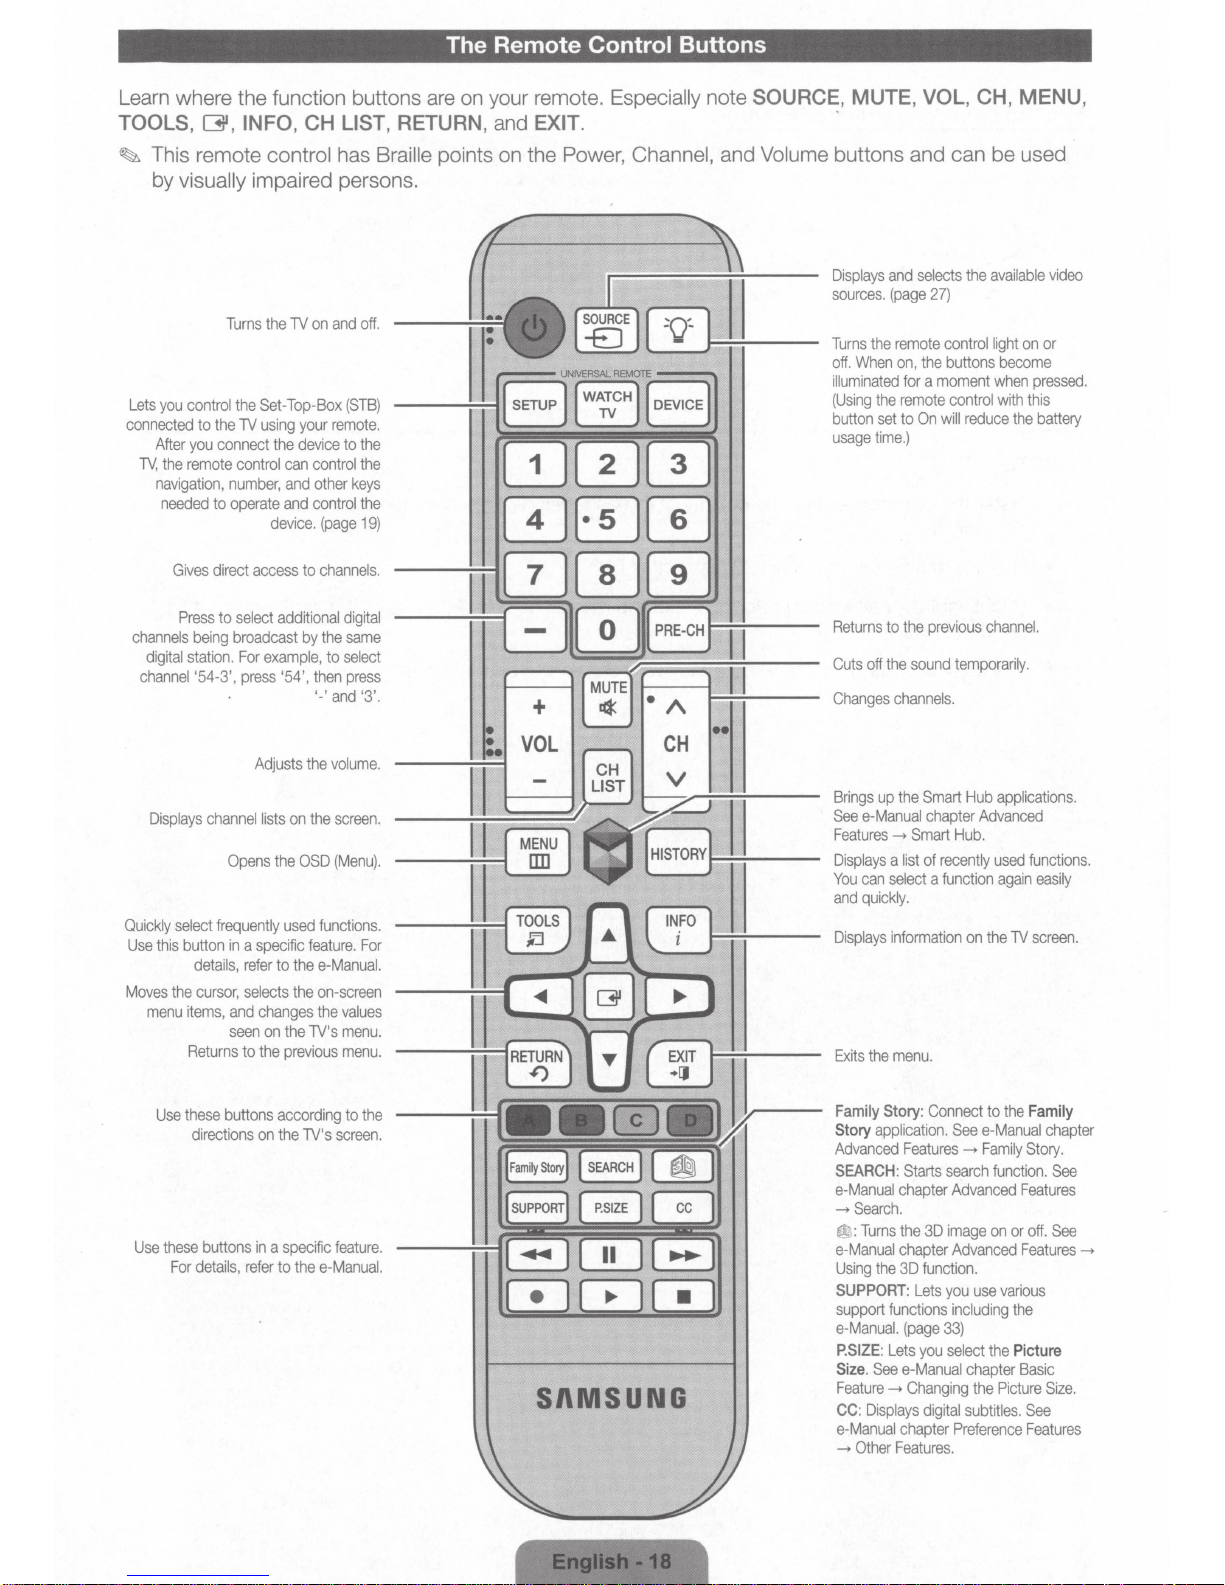
The Remote Control Buttons
Learn where the function buttons are on your remote. Especially note SOURCE, MUTE, VOL, CH, MENU,
TOOLS,
~
Lets
connected
TV,
channels
channel
[31, INFO, CH LIST, RETURN, and EXIT. .
This remote control has Braille points
on
the Power, Channel, and Volume buttons and can be used
by visually impaired persons.
Turns
the
TV
on
and
off.
you
control
After
you
the
remote
navigation,
needed
Gives
Press
being
digital
station.
'54-3',
to
the
connect
to
direct
the
TV
control
number,
operate
access
to
select
broadcast
For
press
Set-Top-Box
using
your
remote.
the
device
can
control
and
other
and
control
device.
(page
to
channels.
additional
by
the
example,
'54',
to
then
'-'and '3'.
---UNIVERSAL
(STB)
---...;,.;~BffiB
to
the
the
keys
the
19)
digital
same
select
press
REMOTE
---
Displays
and
sources.
(page
Turns
the
off.
When
illuminated
(Using
the
button
set
usage
time.)
Returns
to
Cuts
off
the
Changes
selects
27)
remote
control
on,
the
buttons
for a moment
remote
control
to
On
will
the
previous
sound
temporarily.
channels.
the
available
light
become
when
with
reduce
channel.
on
pressed.
this
the
battery
video
or
Displays
Quickly
Use
this
Moves
menu
Use
Use
select
button
the
items,
Returns
these
these
For
channel
Opens
frequently
in a specific
details,
cursor,
and
seen
to
buttons
directions
buttons
details,
Adjusts
lists
on
the
used
refer
to
the
selects
the
changes
on
the TV's
the
previous
according
on
the
in a specific
refer
to
thee-Manual.
the
volume.
the
screen.
OSD
(Menu).
functions.
feature.
e-Manual.
on-screen
the
TV's
For
values
menu.
menu.
to
the
screen.
feature.
[ 1
ll
SI\MSUNG
Brings
up
See
Features
Displays a list
You
and
Displays
Exits
Family
Story
Advanced
SEARCH:
e-Manual
->Search.
@
e-Manual
Using
SUPPORT:
support
e-Manual.
P.SIZE:
Size. See
Feature--.
CC:
e-Manual
->
the
e-Manual
->
can
select a function
quickly.
information
the
menu.
Story:
application.
Features->
Starts
chapter
:Turns
the
chapter
the
3D
functions
(page
Lets
e-Manual
Changing
Displays
chapter
Other
Features.
Smart
chapter
Smart
of
recently
Connect
3D
function.
Lets
33)
you
digital
Hub
applications.
Advanced
Hub.
used
on
the
to
See
e-Manual
Family
search
function.
Advanced
image
on
Advanced
you
use
including
select
the
chapter
the
Picture
subtitles.
Preference
functions.
again
easily
TV
screen.
the
Family
Story.
Features
or
off.
Features--.
various
the
Picture
Basic
See
Features
chapter
See
See
Size.
Setting up
your remote
If
~
DEVICE
set up
To
1.
identify your remote, press and hold
To
2.
Universal
button.
Universal Remote, press the
Remote with The Universal Remote
controller
the first time, the END USER
button
Press the
3.
[31
Remote.
to
select
buttons
LICENSE
AGREE.
please
work,
not
does
SETUP
the
button on your
SETUP
button for 8 seconds.
AGREEMENT screen appears .
is required to agree with the terms prior
It
Setup Application
set your remote
mote.
re
to
using the
by
mode
TV
you use this functi
If
using
to
for
on
Universal
Select
4.
Select
5.
Select
6.
Select
7.
please
To
8.
appears.
the search
Select
9.
way as Step
model, select
selected. If
list,
The Test screen appears. Press and
10.
a remote control
Add a device to
external
an
a port that the
check your
search a brand name,
a brand name using
Input
completed
is
Search Model.
and then
8,
Recommended
se
you
Step 13.
to
go
you have. The remote option menu screen appears.
control.
The
device you want
external device
external
device connection, and then try again by selecting
Search brands/TV service providers.
select
and then
The QWERTY keypad screen appears. Input
select a
model.
Recommended
ct
le
screen.
Enter the
11.
Press the
12.
following
v
the next step.
different code set..
numbers using your remot
button to test your remote.
/\.
CH
to register the device.
select
you
If
data, and then the Test screen reappears.
not work,
~
the code data
If all
do
external device again.
Select
connect. The
to
nected
con
is
a device
screen appears.
Input Source
If
TV.
the
to
screen appears.
your TV cannot find
The QWERTY keypad screen
When done,
e QWERTY keypad scree
th
a brand name
t
ec
sel
model
number you have in the search
progresses a test using the code set
TV
The
to
model,
ld
ho
you
If
go
SETUP
the
The button test screen appears.
e.
your
If
external
device is not work,
in
Step
button for 3 seconds. Numbers appears on the
external
n.
the search
you
If
.
11
device working,
result.
model
a
result list. If
ct
le
se
select
a
No, try the test with a different code set.,
12.
to
10
search a
or
please
again Steps
Try
check
the brand name
external device,
an
Refresh.
unt
ect
sel
number
Done.
in
Wait
the same
you can't find the
the brand you
of
the search
in
l
mode
Yes, go to
select
No, try the test with a
the code
name of
l
es
your
the TV chang
mode
il
result
external
Your
13.
When you use the BD home theater
~
this case, we recommend to use
In
device has been setup successfully.
using
by
Anynet+
Universal
Remote, some buttons may not
(HDMI-CEC)
fun
ct
ion.
be
su
ppor
ted.
Setting up Universal
If
your remote controller buttons does not work, please set your remote to
Remote
with Universal
Remote
Code
Set
1V
button.
1.
To
set up Universal Remote, press the
the
top
of
your remote blink twice simulaneously.
2.
Press the
1
button on your remote to select a
SETUP
button on your remote for 3 second
Set-
top
bo
x.
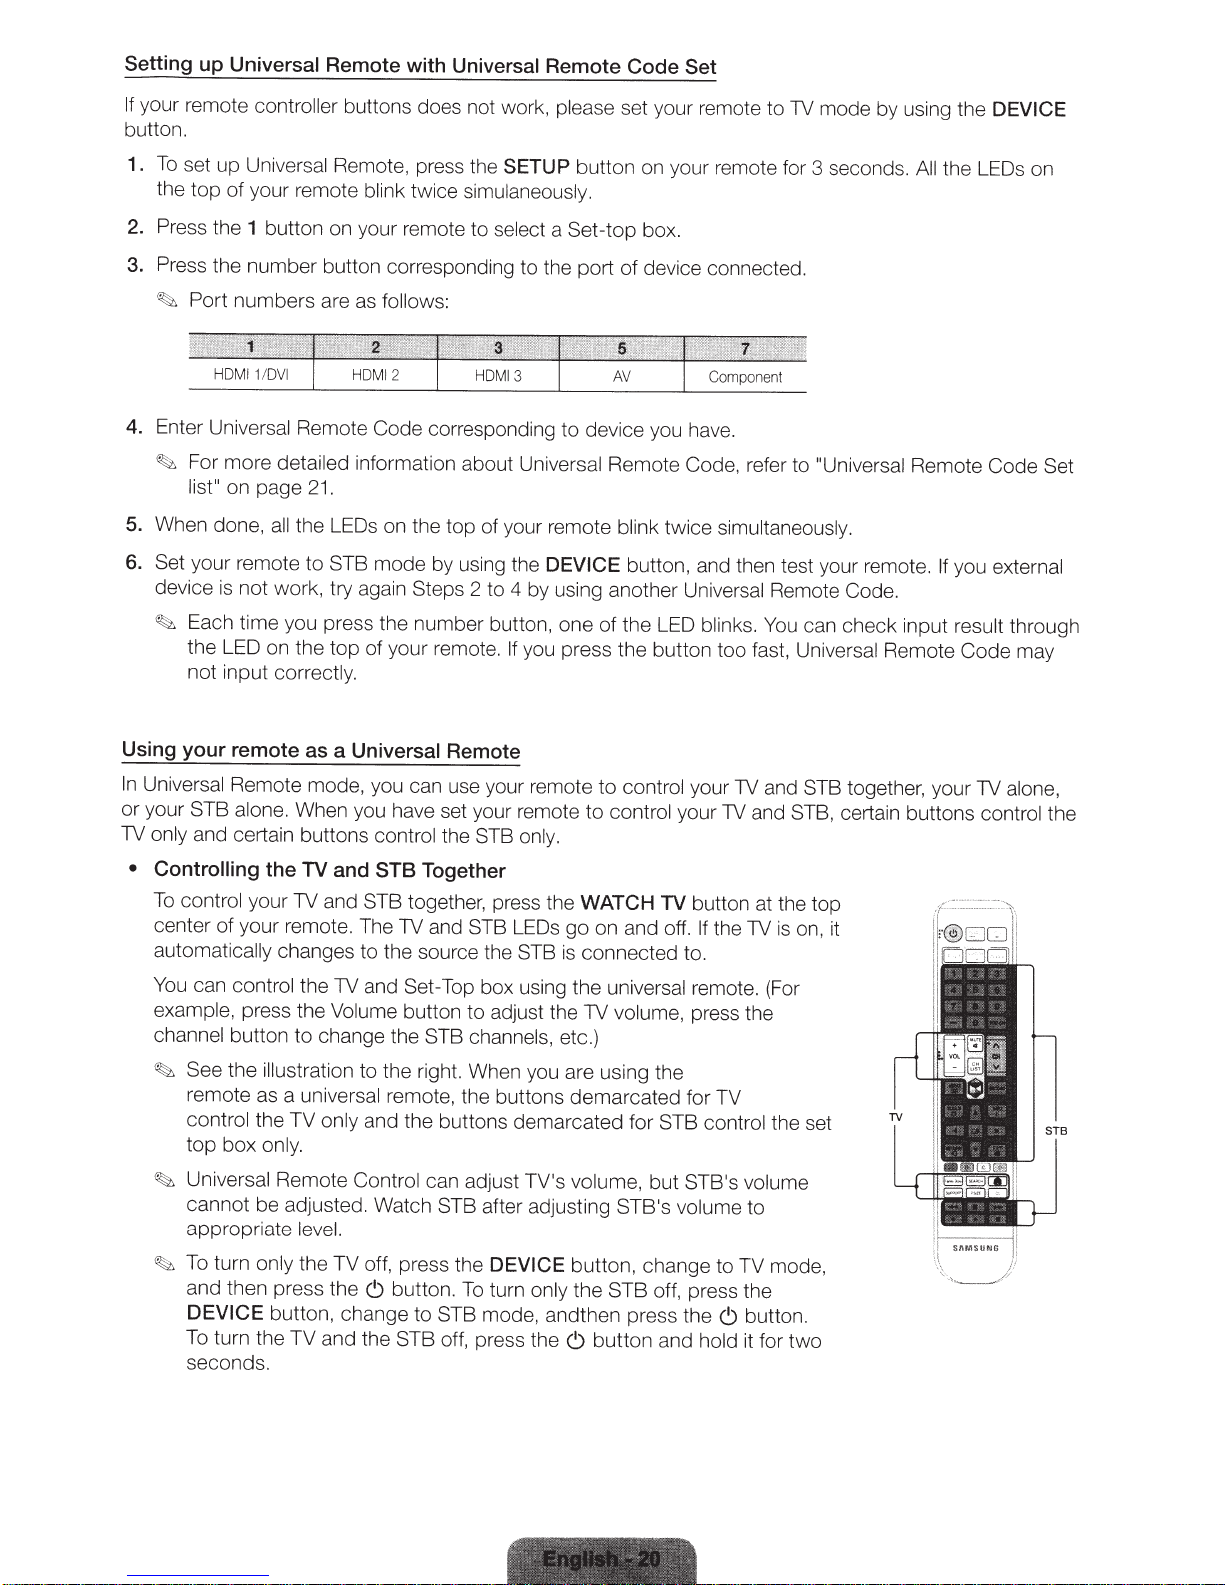
3. Press the number button corresponding to the port of device connected.
~
Port numbers are
4.
Enter Universal Remote
~
For more detailed information about Universal Remote
list"
on page
5.
When done,
6.
Set
your remote
device
~
Each time you press the number button, one of the
a
ll
is
not work, try again
the LED on the top of your remote.
the
21.
to
as
follows:
Code
corresponding to device you have.
Cod
e,
LEOs
on the top of your remote blink twice simultaneously.
STB
mode
by using the
Steps
2 to 4 by using another
DEVICE
If
you press the button too fast, Universal Remote
button,
LED
an
d then test your remote.
Uni
versal Remote
bli
n
ks.
refer to
You
not input correctly.
mode by using the
s.
All
"Universal
Remote Code Set
If
Code.
can che
ck
input result through
DEVICE
the
LEOs
on
you external
Code
may
Using your remote
In
Univer
sal
Remote mode, you c
or your
1V
•
STB
alone. When you have set your remote
only and certa
Controlling the
To
control your
center
automati
You
exampl
of
your remote. The
ca
can
co
e,
press the Volume button to adjust the TV volume, p
as
a Universal Remote
in
buttons control the STB
TV
and
STB
1V
and
STB together, press the
lly
changes to the source the
ntrol the
1V
and
channel button to change th e STB
~
See the illustration
to the right. When y
remote as a universal remote, the buttons demarcated for TV
control the TV o
nl
y and the button s demar
top box only.
~
Univers
ca
appr
~
To turn only the TV off, press the
and then press the
DEVICE
al
Remote
nn
ot
be adjusted. Watch STB a
opria
te
butto
level.
n,
Control
(!)
change to
To turn the TV and the
se
co
nds.
an
Together
1V
and
Set-Top
can ad
butto
STB
STB
use your
STB
box us
cha
ju
ft
DEVICE
n.
To turn o
mode,
o
ff,
press the
re
mote
to
control your
to control your
on
ly
.
LEOs
go on and
STB
is
in
g the universal r
nn
el
s,
etc
WATCH
connected to.
.)
TV
off
ou are using the
ca
ted for
STB
st TV' s volume, but
er adjusting
STB's
button, change to TV mod
nl
y the
S
TB
off, pr
andth en press the
(!)
b
utt
on and hold
1V
and
1V
and
STB, certain buttons
button at the top
.
If
the
TV
is
on, it
em
ote. (For
ress
the
control the
STB's
volume
volume
es
(!)
to
s the
butt
it
for
o
n.
tw
STB
se
t
e,
o
together, y
our
1V
control the
alone,

• Controlling
DEVICE
the
Press
the TV using the
• Controlling
DEVICE
the
Press
control
the Set-Top
only.
TV
the
button and change
universal
only
STB
the
button and change
box
remote.
ng
usi
the
TV mode. The TV LED goes on and off.
to
to
universal
STB mode. The STB
remote.
You
LED goes on and off.
can
You
ca
only control
n only
initializing
To
erases the current code set from the
ing
iz
Initial
the
Press
1.
simultaneously.
sequence: 9, 8,
in
Press
2.
3. The TV and
Remote
Setup
Control initializes.
Codes
(reset) the
SETUP
STB LEOs on the
For
Universal
button for 3 seconds.
Cable
Remote
1.
your remote
of
top
Universal Remote
Top
Set
Control
mote
re
the TV and
All
Box
control's
STB LEOs on the t
blink once
simultaneously,
Code
memory.
list
Set
of your remote
op
and then the
blink twice
Universal
~
·
Sam
Sc
ie
SM
Sudden
Su
S
uw
.
Brand
'
.
RCN
Rogers
Ru
nco
sung
Sask
t
nt
ific
At
Sea
woo
Sej
in
Shaw
Signal
SKBtv
SL
Ma
t
ronics
St
argate
r
eWest
on
Cab
el
rx
link
,
lant
31i;_;,,
a
le
.
;:
· ' ':
0000, 0040,01
0008,
0858,
;~f:
p'dde
0476,
1877
0000
44,0702
3319
1998
0877.
1877, 1
0073
1602
1376
0040
2681
0040
3319
0040
1376, 1877
148
1,
3319
.
Set
1376
, 0840,
1998
·
.·
982,23
>f.;!J·t
1877,29
4
5,3028
79,
,,··
~lf
TaeKwang
Taepyu
Ta
Te
Te
Thoms
Ti
me
Ti
me
Tong
Topf
T
oshiba
Veri
Video
WideOpenWes
Zen
ng
i
ha
n
lev1ew
l
us
on
Warne
l
es
TiVo
Kook
ield
U
BS
zon
t
ro
i
th
't
s
n
l
.
~~i;
~i;
r
t
,;;•''''t:~gf!~:t,1;r:!l•
'
r.MA
,
..•
,,
.
0068
1410
0778
0040
2345
1982
1376, 1877
0040
2576
0840
2981
0000
0073
2378
1877
1877
0000.0525
•
,21
:::.~·,~L:::
87
Setup
Hugh
System
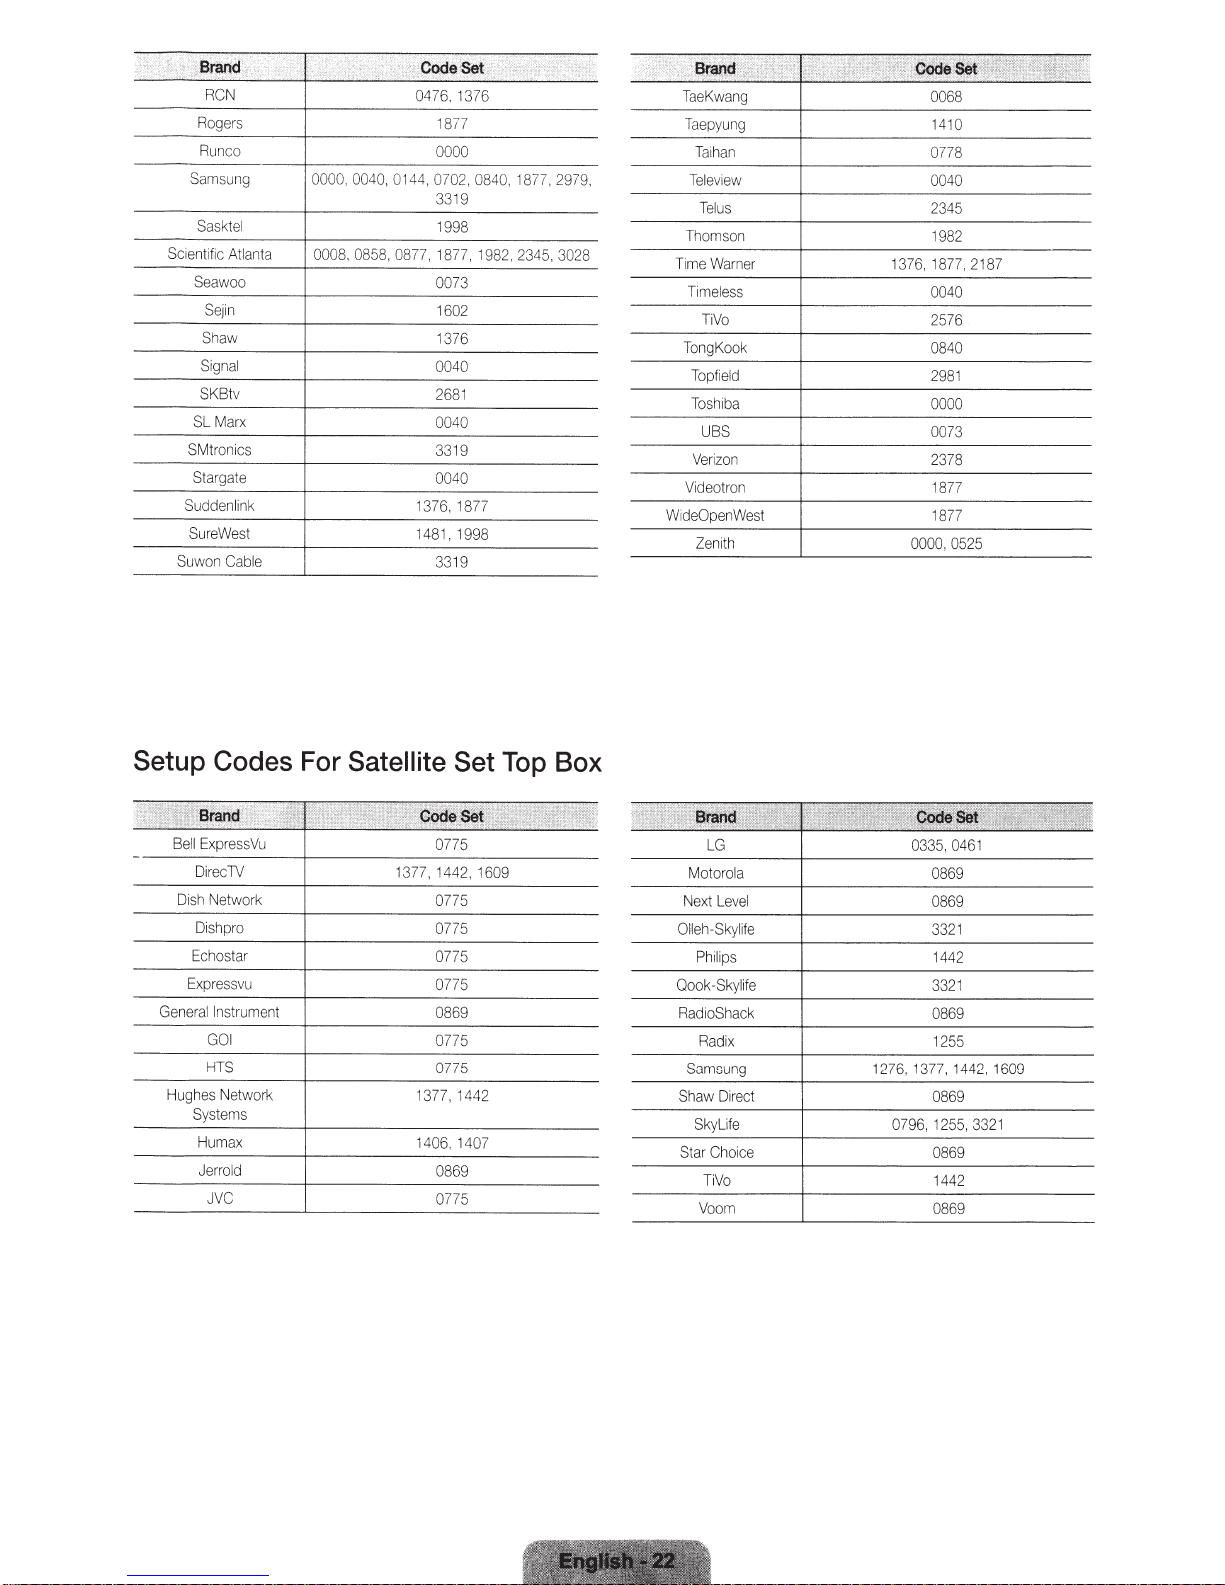
Codes For Satellite Set Top Box
0775
0775
es
Network
s
1377, 1442
Configuring
Basic Settings
the
in
Initial
Setup
When you turn the TV on for the first time, a sequence of screens and on-screen prompts
the power cord into a wall outlet, and then press the
configuring the TV's basic settings.
Plug
turn on the TV
put Source"
In
available only
Setup
~
To
~
Be sure to
~
If
~
or
If
~
a LAN
is
return to the previous step
complete
you are not using a
connection before you turn on the
cable
you want to configure a wired network connection during
cable to your
connection during
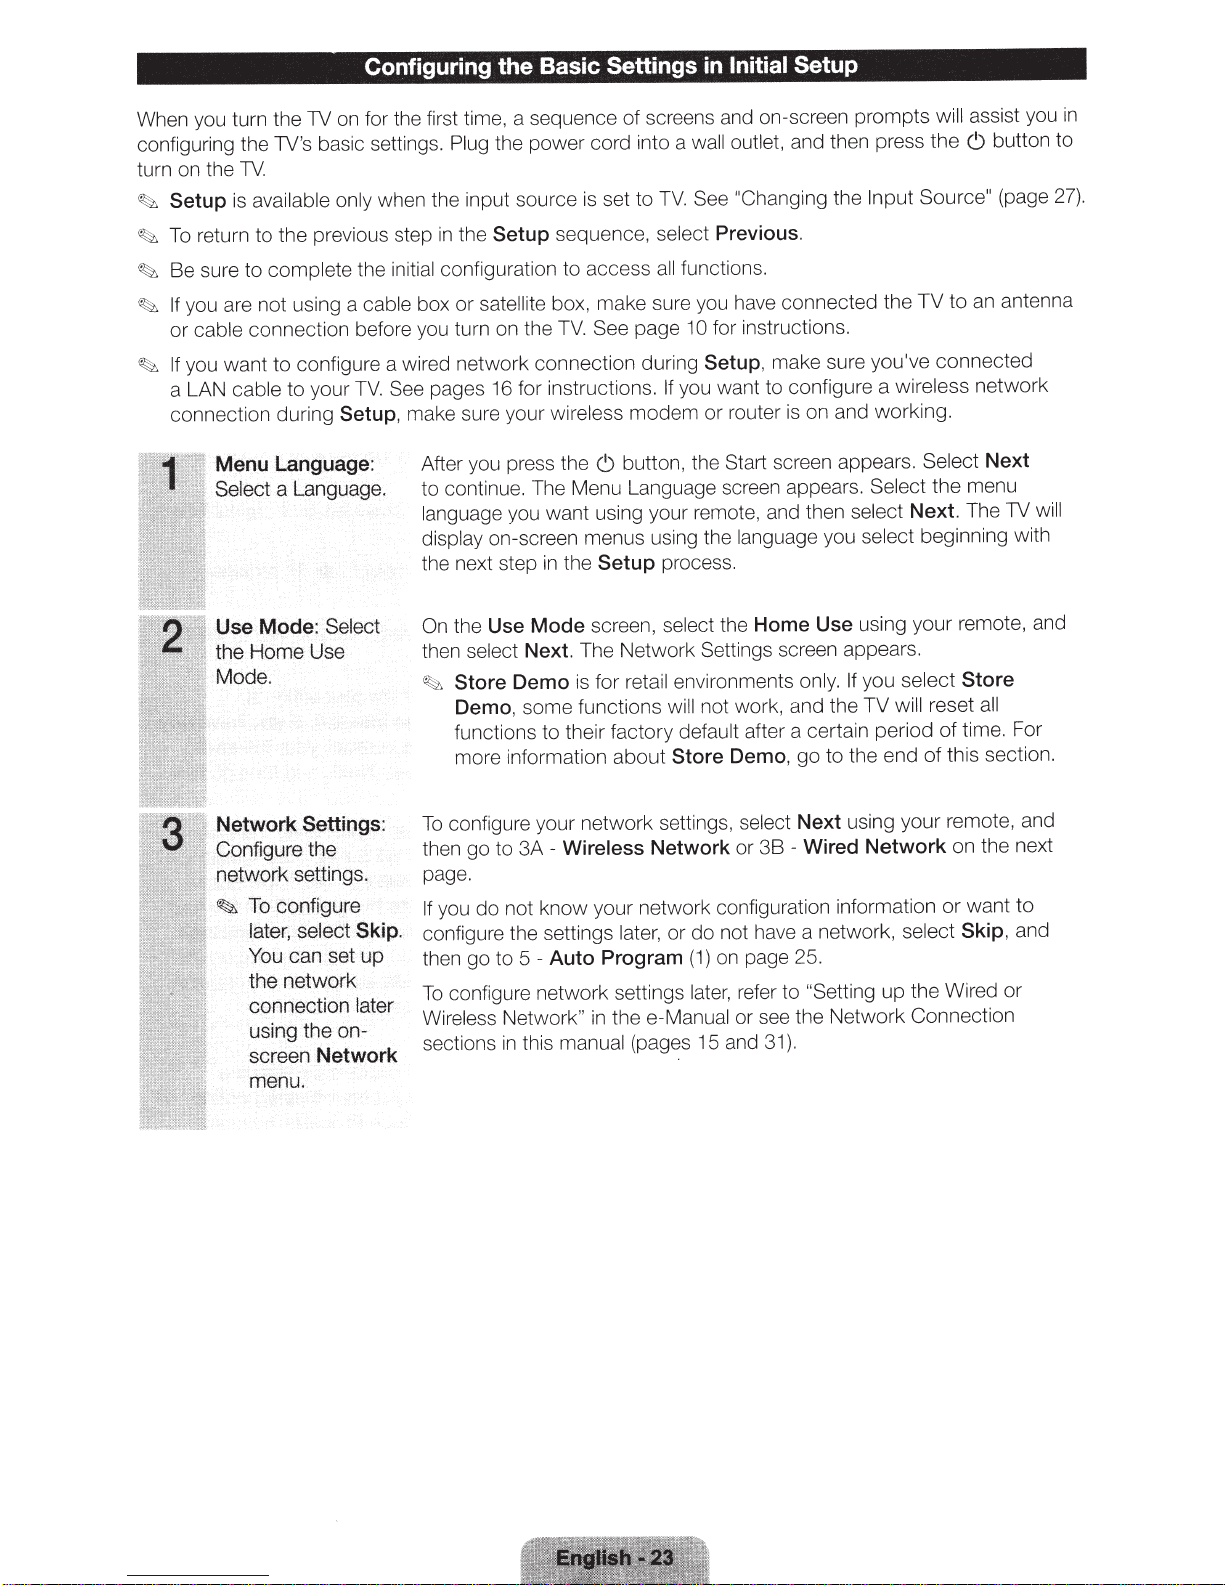
Menu Language:
Select
a Language.
when the input source
the
in
the initial
cable
TV.
Setup,
configuration to access
box or
See
satellite
pages
make sure your wireless
After you press the
to continue.
guage
lan
display
on-screen menus using the
Setup
for instructions.
16
you want using your remote, and then select
is
sequence,
box, make sure you have connected the
TV.
e Menu Language sc
Th
the next step in the
Use Mode:
Select
the Home Use
Mode.
On
th
~
en
select
Store
Demo,
The Network Settings screen appears.
Next.
Demo
is
some functions
Mode
Use
the
functions to their factory
more information about
See "Changing
TV.
set to
lect
se
nctions.
fu
all
10
page
See
Setup,
you want to con figure a
If
modem or router
button, the
C)
Setup
process.
screen, select
environments
retail
for
not work, and the TV
will
default
Store
Previous.
for instructions.
make sure you've connected
screen appears.
Start
reen
language
Home Use
the
after a certa
Demo,
the
TV
wireless
rking.
on and
is
wo
appears. Select the menu
Next.
select beginning with
you
using your remote, and
only. If
you select
will
iod
per
in
to the end
go
assist you
will
button to
C)
(page
to an antenna
network
Select
Next
The TV
Store
ll
a
reset
time. For
of
this section.
of
wi
in
27).
ll
Networl<
Settings:
Configure the
network settings ..
configLJre
To
·
~
later, select
can set
You
the. net
connection
Skip.
up
work
later
using the on-
scr~en
Network
menu.
configure your network settings,
To
then go to 3A -
Wireless
Network
se
or
Wired Network
-
36
using your remote, and
Next
ct
le
page.
you do not know your network configuration information
If
not have a network,
do
or
th
in
manual
later,
on page 25.
1)
(
refer to
ater,
l
gs
in
-Manual or see the Network Connection
ee
ages 15 and
(p
"Setting
31).
up the Wired
configure the settings
Auto Program
5-
go to
en
th
configure network sett
To
Wireless Network"
this
sections
in
or
select
on the next
want to
and
Skip,
or
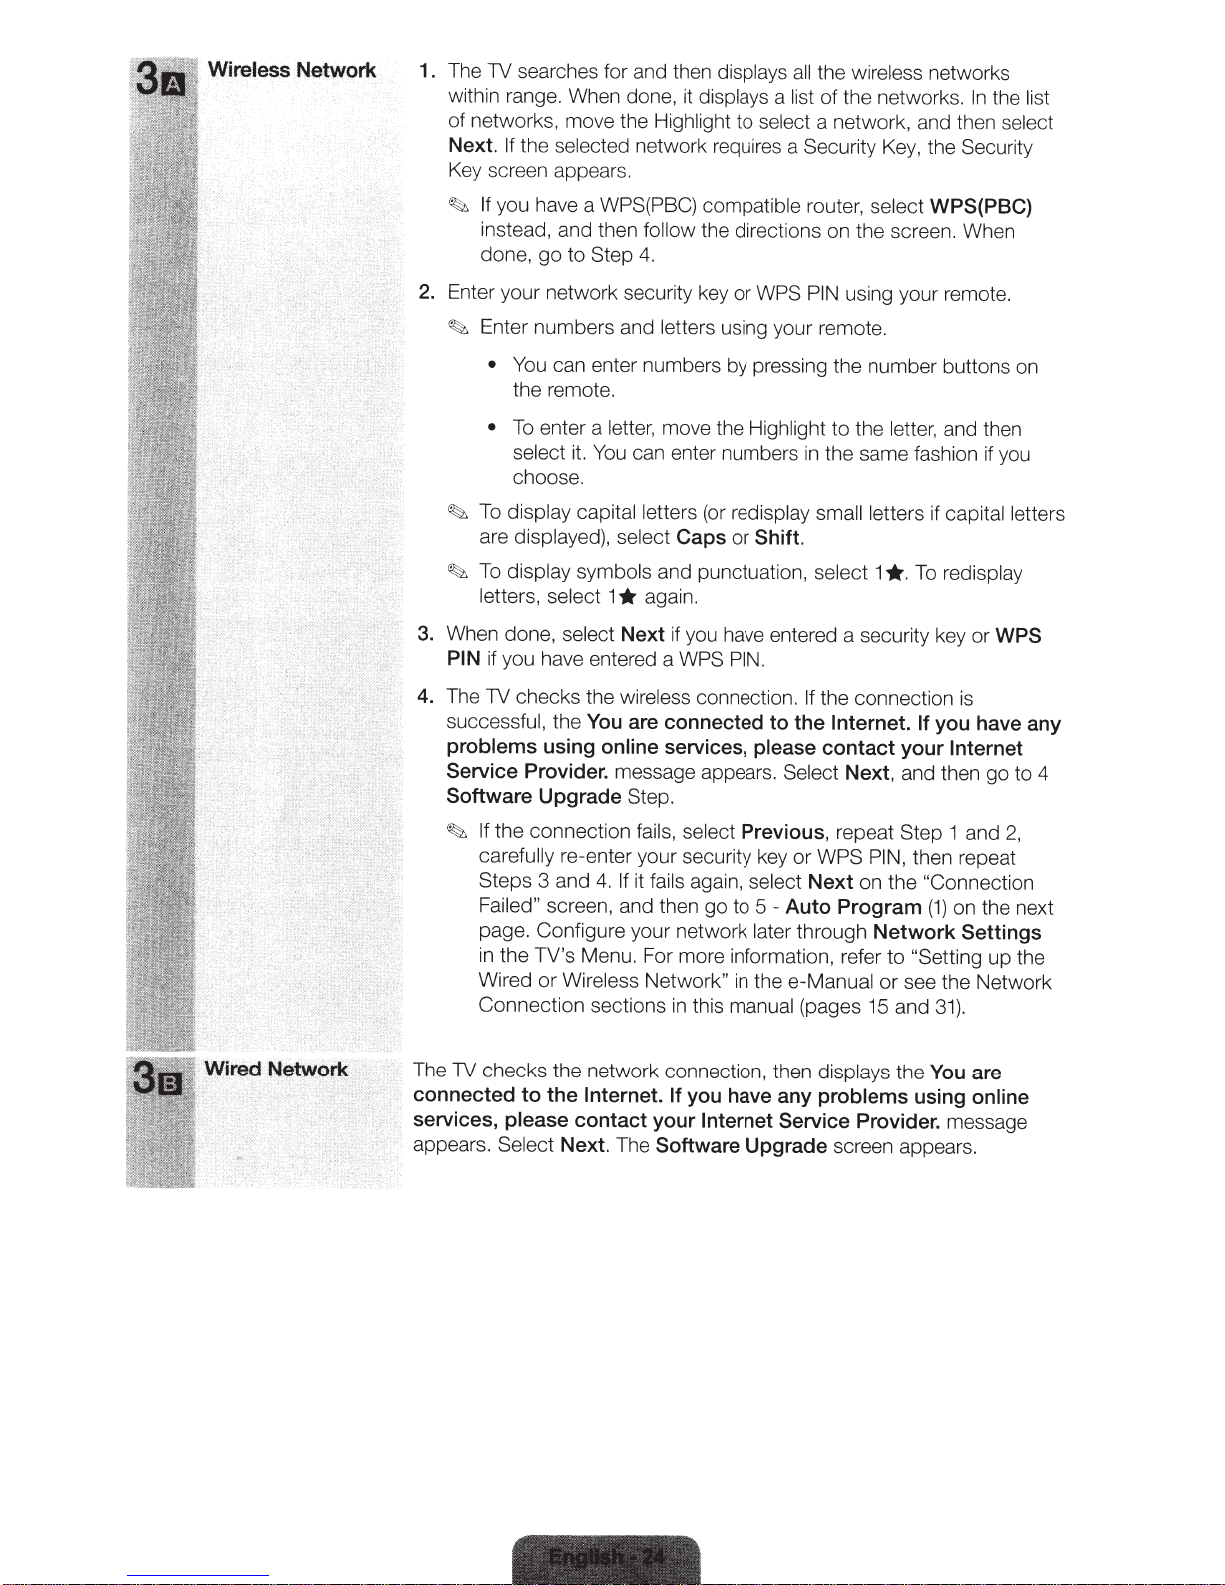
1 .
The
1V
searches for and then
within range. When done, it
of networks, move the
Next.
If
the
selected
Key screen appears.
~
If
you have a
instead, and then
done,
2.
Enter your network security key or
~
Enter numbers and
~
To
are
~
To
letters, select 1
3.
When done,
PIN
go
to Step
•
You
can enter numbers by pressing the
the remote.
•
To
enter a letter,
select
choose.
display capital letters
display symbols
if you have entered a
it.
You
displayed), select
select
Highlight
network requires a
WPS(PBC) compatible
follow
4.
letters
move the
can enter numbers
Caps
and punctuation,
*
again .
Next
if you have entered a security key or
WPS
displays
displays
the directions on the screen. When
using your
(o
r
redisplay small letters
or Shift.
PIN
all
the
wireless networks
a
list
of
the networks .
to
select a network, and then
Security
router,
WPS PIN
remote.
Highlight
in
select
.
Key,
the Security
select
WPS(PBC)
using your remote.
nu
mber buttons on
to
the letter, and then
the same fashion if you
if
1
*·
To
In
the
capital letters
redisplay
WPS
l
is
t
select
4.
Th
e
1V
checks the
successful,
problems
Service Provider.
Software
~
If
the connection fails, select
carefully
Steps 3 and
Failed"
page. Configure your network
in the TV
Wired
Connect
The
1V
checks the network connection, then
connected
services,
appears.
to
please
Sele
wireless connection.
the
You are connected to
using
online
Upgrade
re-enter your security key or
4.
screen, and then
's
Menu. For more information, refer to
or
Wireless Ne
ion sections
the
Internet. If
contact your
ct
Next.
services,
message appears.
Step.
Previous,
If
it fails
again, select
go
to
two
rk"
in
in
th
is
manual
you have any
Internet
The
Software
If
the
please
Select
5-
Auto
later through
the
e-Manual
(pages 15 and 3
Service Provider.
Upgrade
the connection
Internet. If you have any
contact
repeat
WPS
Next
Program
displays
problems
screen appears.
your
Next
,
Step
PIN,
on the "Connection
Network
or
the
is
Internet
and then go to 4
1 and 2,
then repeat
(1)
on the next
Settings
"Setting up the
see the Network
1}.
You
are
using online
message
Software
UpdatE!
to
the
latest
·
~
>
to
up(ja:te
'
''
:
~~~
.
~q~
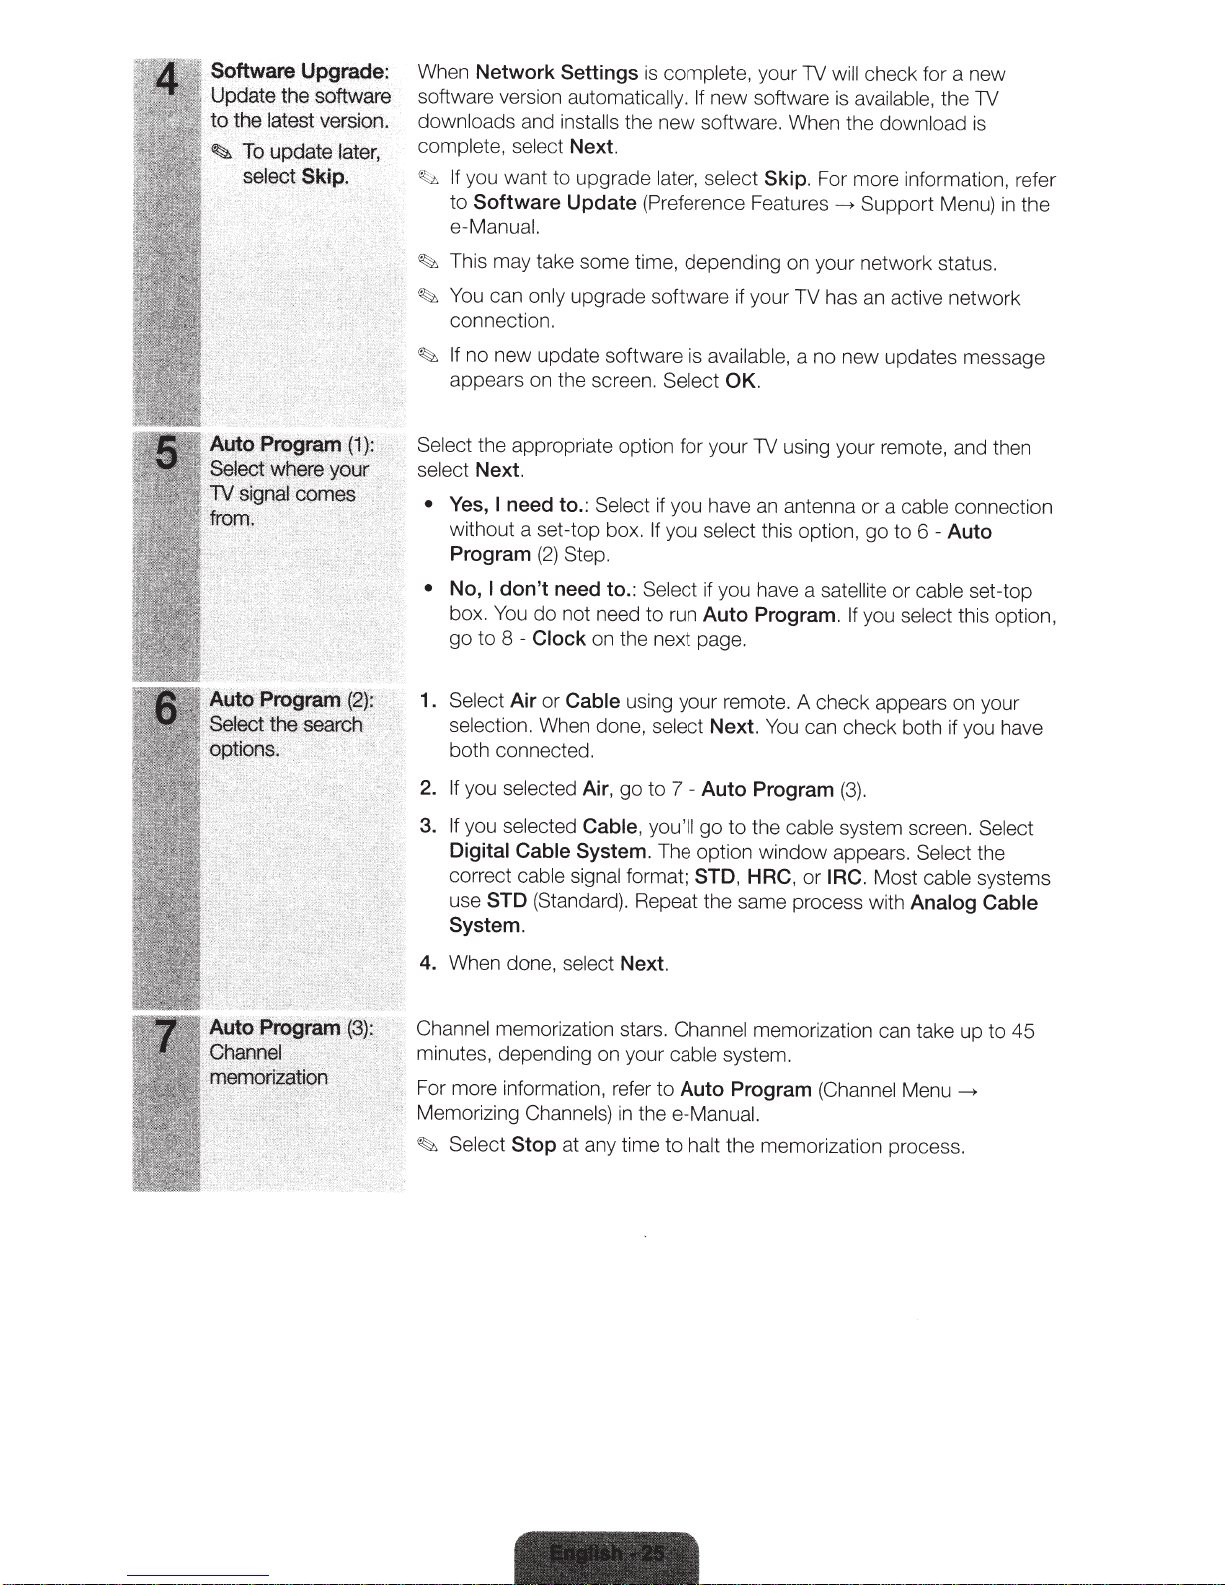
Upgrade:
the
software·
version.
later,
~~~P,·
..
When
software version
downloads
complete, select
~b
.
,.,_
.
~
~
~
Network Settings
automatically. If
and
installs
Next.
If
you want to upgrade
to
Software
Update
is
complete,
your
1V
will
new software is
check for a new
available, the
the new software. When the
later, select
(Preference Features
Skip.
For more information , refer
~
Support Menu)
download
1V
is
e-Manual.
This may take some time, depending on your network status.
You
can
only
upgrade software if your TV has
an
active network
connection.
If
no new update software
appears on the screen .
is
available, a no
Select
OK.
ne
w updates message
in
the
Select the appropriate option for your
select
Next.
•
Yes, I
need to.:
without a set-top box.
Program
•
No,
I
don't need to.:
box.
You
do
go
to
8-
Clock
1.
Select
Air
selection.
Select if you have
(2)
Step.
not need to run
on the next page.
or
Cable
using yo ur remote. A check appears on your
When done,
If
you
select this
Select if you have a satellite
Auto Program.
select
Next.
both connected.
2.
If
you
3.
If
you
Digital
correct
use
STD
System.
4.
When done ,
selected
selected
Cable
cable signal
Air,
go to 7 -
Cable,
System.
format;
Auto Program
you'll
go
to
The option window appear
STD
,
(Standard). Repeat the same process with
se
lect
Next.
1V
using your remote, and then
an
antenna or a
op
tion, go to 6
You
can check both if you have
If
you
cable
or
cable
select
-Auto
(3).
the
cable
system screen. Select
s.
Select
HRC
,
or
IRC .
Most
cable
Analog
connection
set-top
this option,
the
systems
Cable
:
~~?~~~1
rn•:>r..n:al
..
.J~;J
;J;
j,;.
2
Channel memorization stars.
Channel
minutes, depending on your cab le
For more information, refer
Memorizing
~
Select
Channels)
Stop
at
any time
to
Auto Program
in
thee-Manual.
to
halt the memorization process.
memorization can take up to
system .
(Channel
Menu~
45
 Loading...