

Page 1
Contact SAMSUNG WORLDWIDE
SUPPORT
If you have any questions or comments about your Samsung TV, please contact the SAMSUNG customer care center.
Comment contacter Samsung dans le monde
Si vous avez des suggestions ou des questions concernant les produits Samsung, veuillez contacter le Service Consommateurs
Samsung.
Country
CANADA 1-800-SAMSUNG (726-7864) www.samsung.com Samsung Electronics Canada Inc., Customer Service 55
U.S.A 1-800-SAMSUNG (726-7864) www.samsung.com Samsung Electronics America, Inc. 85 Challenger Road
Customer Care Center
Web Site Address
Standish Court Mississauga, Ontario L5R 4B2 Canada
Ridgefi eld Park, NJ 07660
LED TV
user manual
© 2012 Samsung Electronics Co., Ltd. All rights reserved.
Thank you for purchasing this Samsung product.
To receive more complete service, please register
your product at
www.samsung.com/register
Model _____________Serial No. _____________
✎ If you have any questions, please call us at 1-800-SAMSUNG (1-800-726-7864) for assistance.
BN68-04033B-04
Page 2

A detailed User’s Manual is built into your TV. For more information about how to view this e-Manual see page 47.
Figures and illustrations in this User Manual are provided for reference only and may differ from actual product appearances. Product design and
specifications may be changed without notice.
Important Warranty Information Regarding
See the warranty card for more information on warranty terms.
✎
Wide screen format LED Displays (with 16:9 aspect ratios, the ratio of the screen width to height) are primarily designed to view wide screen format fullmotion video. The images displayed on them should primarily be in the wide screen, 16:9 ratio format, or expanded to fill the screen, if your model offers
this feature, with the images constantly in motion. Displaying stationary graphics and images on the screen, such as the dark sidebars on non-expanded
standard format television video and programming, should be limited to no more than 5% of the total television viewing per week.
Additionally, viewing other stationary images and text such as stock market reports, video game displays, station logos, web sites or computer graphics
and patterns, should be limited as described above for all televisions. Displaying stationary images that exceed the above guidelines can cause uneven
aging of LED Displays that leave subtle, but permanent burned-in ghost images in the LED picture. To avoid this, vary the programming and images, and
primarily display full screen moving images, not stationary patterns or dark bars. On LED models that offer picture sizing features, use these controls to
view different formats as a full screen picture.
Be careful about the television formats you select and the length of time you view them. Uneven LED aging as a result of format selection and use, as
well as burned in images, are not covered by your Samsung limited warranty.
• SAMSUNG ELECTRONICS NORTH AMERICAN LIMITED WARRANTY STATEMENT
Subject to the requirements, conditions, exclusions and limitations of the original Limited Warranty supplied with Samsung Electronics (SAMSUNG)
products, and the requirements, conditions, exclusions and limitations contained herein, SAMSUNG will additionally provide Warranty Repair Service
in the United States on SAMSUNG products purchased in Canada, and in Canada on SAMSUNG products purchased in the United States, for the
warranty period originally specified, and to the Original Purchaser only.
The above described warranty repairs must be performed by a SAMSUNG Authorized Service Center. Along with this Statement, the Original Limited
Warranty Statement and a dated Bill of Sale as Proof of Purchase must be presented to the Service Center. Transportation to and from the Service
Center is the responsibility of the purchaser. Conditions covered are limited only to manufacturing defects in material or workmanship, and only those
encountered in normal use of the product.
Excluded, but not limited to, are any originally specified provisions for, in-home or on-site services, minimum or maximum repair times, exchanges or
replacements, accessories, options, upgrades, or consumables.
For the location of a SAMSUNG Authorized Service Center, please call toll-free:
– In the United States : 1-800-SAMSUNG (1-800-726-7864)
– In Canada : 1-800-SAMSUNG
Still image warning
Avoid displaying still images (such as jpeg picture files), still image elements (such as TV channel logos, stock or news bars at the screen bottom etc.),
or programs in panorama or 4:3 image format on the screen. Constantly displaying still pictures can cause image burn-in on the LED screen, which will
affect image quality. To reduce risk of this effect, please follow the recommendations below:
• Avoid displaying the same TV channel for long periods.
• Always try to display any image in full screen. Use the TV set’s picture format menu for the best possible match.
• Reduce brightness and contrast to avoid the appearance of after-images.
• Use all TV features designed to reduce image retention and screen burn. Refer to the e-Manual for details.
English - 2
Page 3

Contents
• Important Warranty Information Regarding .... 2
• Still image warning .......................................... 2
• Contents ......................................................... 3
• List of Features ............................................... 4
• Accessories and Cables .................................. 5
• Installing the Stand ......................................... 7
• Installing the Wall Mount (Optional) .................. 8
• Providing Proper Ventilation for Your TV ........ 10
• Using the TV's Controller (Panel Key) ............ 11
• Connecting the Power Cord
and the Antenna or Cable Connection .......... 12
• The Standard Remote Control ......................13
• How to Navigate Menus ................................ 15
• Configuring
the Basic Settings in Initial Setup .................. 16
• Connecting to AV Devices
(Blu-ray Players, DVD Players, etc.) ............... 20
• Connecting to Audio Devices ........................ 22
• Connecting to a PC ...................................... 23
• The EX-Link Cable Connection .................... 23
• Changing the Input Source ...........................24
• Using Smart Hub .......................................... 25
• SMART Interaction ........................................ 26
− Voice Control ...........................................26
− Motion Control ........................................ 29
− Face recognition ...................................... 31
• The Evolution Kit Slot (Kit Sold Separately) .... 33
• Connecting to a Network .............................. 34
• Configuring Network Connections ................. 36
• The Smart Touch Control .............................. 38
• The IR Blaster ............................................... 42
• Setting up the Universal Remote Control .......44
• Using the Search
for Recommended Model Code .................... 46
• How to view the e-Manual ............................ 47
• Troubleshooting ............................................ 49
• Licenses ....................................................... 52
• Storage and Maintenance ............................. 52
• Specifications - Smart Touch Control ............ 55
• Specifications - IR Blaster ............................. 55
• Specifications ............................................... 56
• Display Resolution ........................................ 57
• Video Codec ................................................. 58
• Dimensions ................................................... 59
• Index ............................................................ 60
English - 3
Page 4

List of Features
• 3D: This exciting new feature enables you to view 3D content.
• SMART HUB: Your gateway to all your content, integrated in one place.
− Provides diverse entertainment choices.
− Lets you control your entertainment life with an easy-to-use, user friendly user interface.
− Gives you easy access to diverse apps, with more being added every day.
− Lets you customize your TV by grouping and sorting apps to your taste.
• AllShare Play: Lets you access, view, or play photos, videos, or music located on USB devices,
digital cameras, cell phones, and PCs. PCs and cell phones can be accessed wirelessly, through your
wireless network.
• Anynet+ (HDMI-CEC): Allows you to control all connected Samsung devices that support Anynet+
with your Samsung TV’s remote.
• e-Manual: Provides a detailed, on-screen user's manual that's built into your TV. (page 47)
• SMART Interaction: Using this function, you can access and control menu options and functions
using speech or motions. (page 26)
English - 4
Page 5
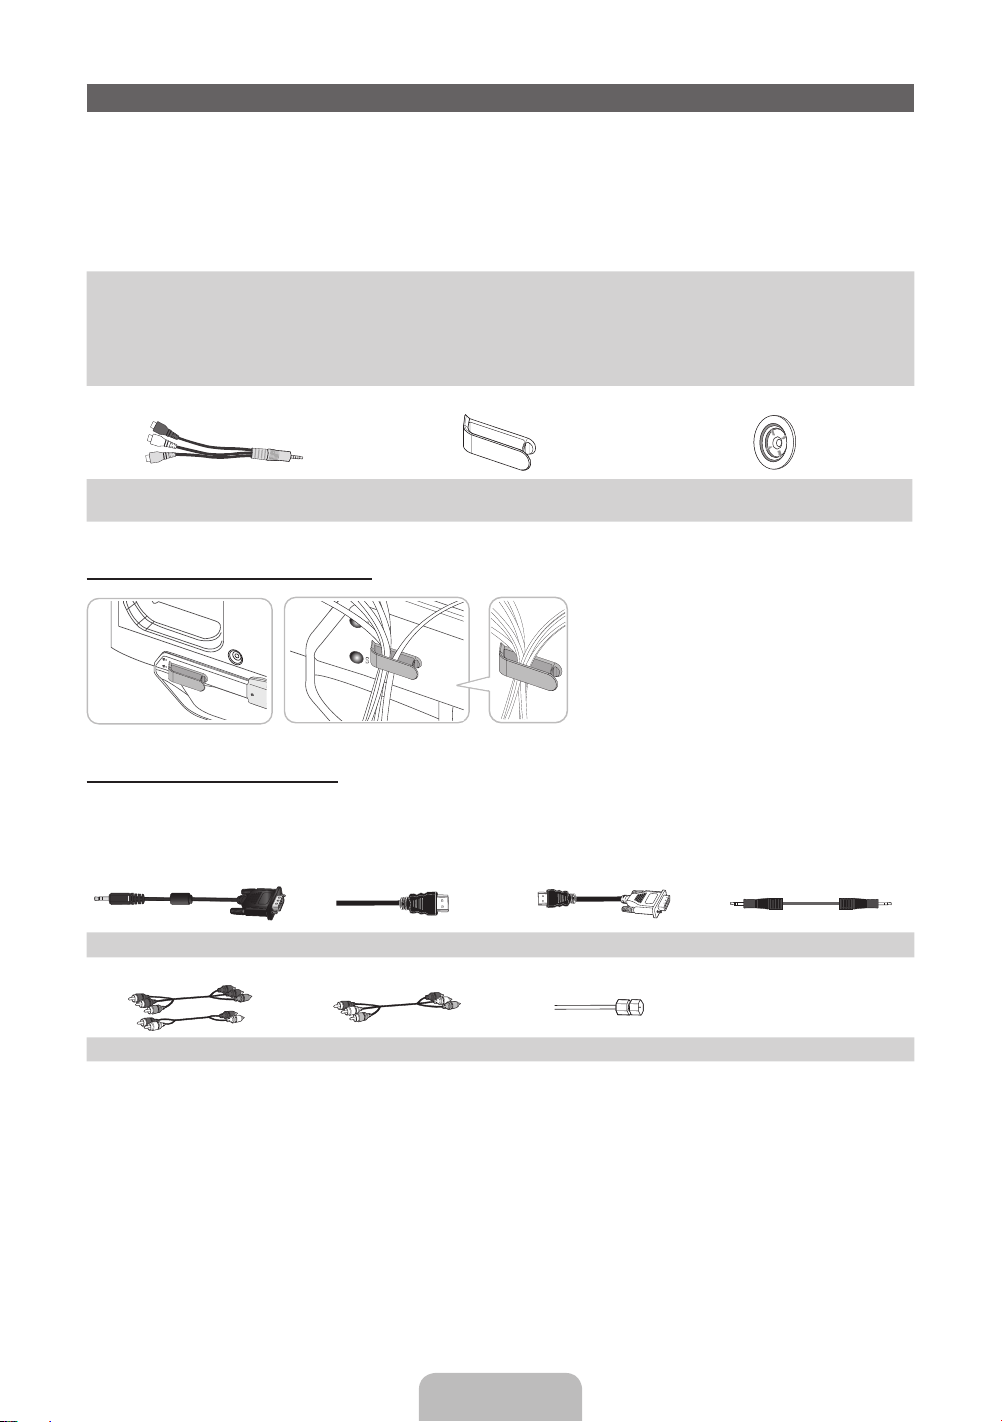
Accessories and Cables
Please make sure the following items are included with your TV. If any items are missing, contact your
✎
dealer.
The items’ colors and shapes may vary depending on the model.
✎
Make sure that there are no accessories hidden behind or under packing materials after you open the
✎
box.
• Smart Touch Control (AA59-00626A) & Batteries (AA x 2)
• IR Blaster (BN96-22897A) & Batteries (AA x 4)
• Remote Control (AA59-00637A) & Batteries (AAA x 2)
• User Manual
AV Adapter Holder-Wire stand Holder-Ring x 4
(BN39-01154H) (BN61-08391A) (BN96-18153A)
• Cleaning Cloth (BN63-01798B)
• Warranty Card / Safety Guide
• 3D Active Glasses
• Power Cord
Assembling the Stand Wire Holder
Input Cables (Sold Separately)
You will need one or more of these cables to connect your TV to your antenna or cable outlet and your
peripheral devices (Blu-ray players, DVD players, etc.)
To purchase the RS232 cable, contact www.SamsungParts.com.
RS232 (AA39-00311A) HDMI HDMI-DVI Audio
Component Composite (AV) Coaxial (RF)
English - 5
Page 6
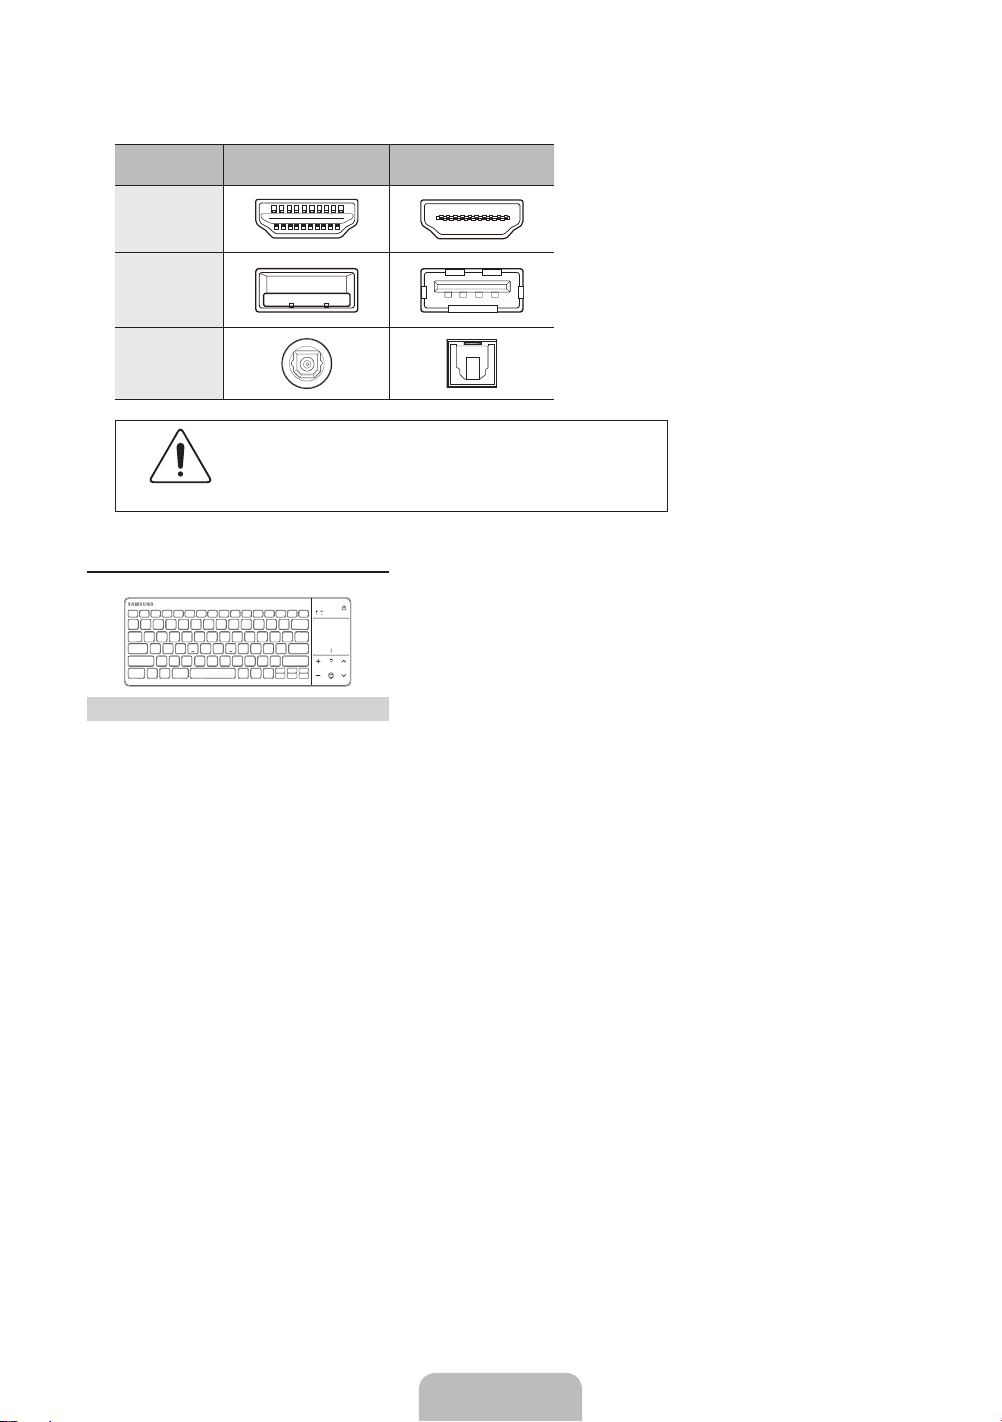
Make sure you have the correct cable before plugging it in. Illustrations of common plugs and jacks
✎
are below.
Cable Plugs Ports / Jacks
HDMI
USB
Optical
Do not plug cables in upside down.
Be sure to check the orientation of the plug before plugging it in.
Warning
Wireless Keyboard (Sold Separately)
Wireless Keyboard
English - 6
Page 7
Stand Parts:
2
1
A
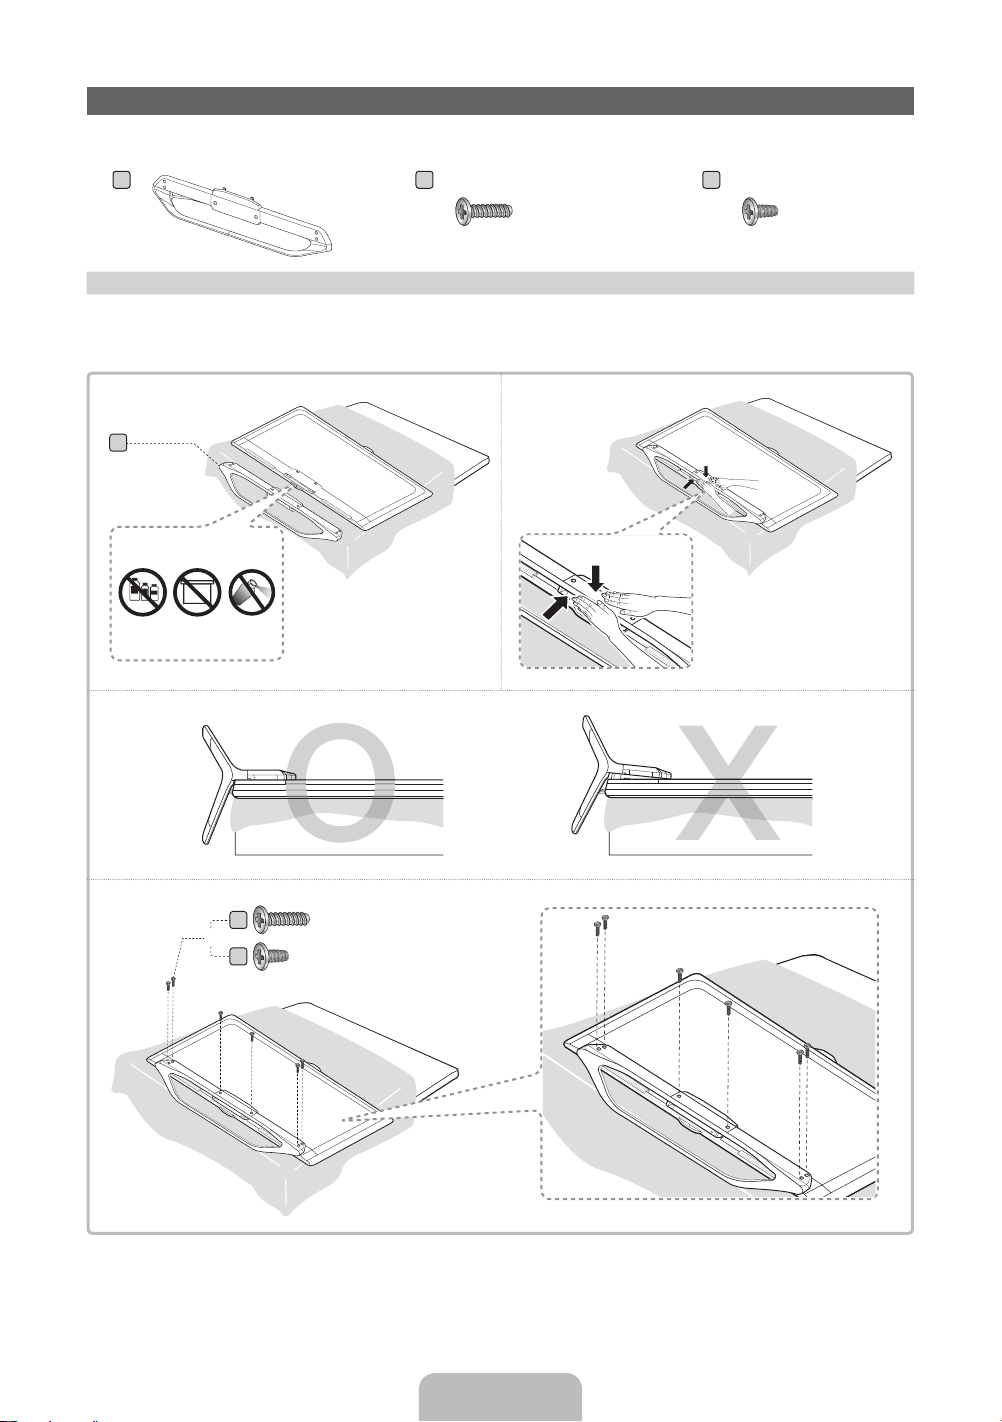
Installing the Stand
B
(M4 X L12)
C
(M4 X L10)
Stand x 1
Screws x 6 (46 inches only) Screws x 6 (55 and 60 inches only)
Follow the steps below to connect the TV to the stand. For more detailed instructions, see the separate
stand installation guide.
1
2
A
1
2
ATTENTION
Place a soft cloth over a table
✎
DO NOT USE
CHEMICALS
DO NOT USE
GREASE
DO NOT
USE OIL
to protect the T V, and then
place the TV on the cloth
screen side down.
3
4
B
or
C
x6 (M4 X L12) 46 inches only
x6 (M4 X L10) 55 and 60 inches only
English - 7
Page 8
NOTE
✎
• Make sure to distinguish between the front and back of each component when assembling them.
• Make sure that at least two people lift and move the TV.
• Stand the product up before you tighten the screws. If you tighten the screws with the TV lying
down, it may lean to one side when you stand it up.
Do not insert your fingers into the stand base slot of the TV when installing the stand base.
[
Installing the Wall Mount (Optional)
Wall or Ceiling Mounting
If you mount this product on a wall, it should be mounted only as recommended by the
manufacturer. Unless it is correctly mounted, the product may slide or fall, causing serious
injury to a child or adult, and serious damage to the product.
Installing the Wall Mount Kit
The wall mount kit (sold separately) lets you mount the TV on the wall.
For detailed information about installing the wall mount, see the instructions provided with the wall mount.
We recommend you contact a technician for assistance when installing the wall mount bracket. We do not
advise you to do it yourself. Samsung Electronics is not responsible for any damage to the product or injury
to yourself or others if you elect to install the wall mount on your own.
To order the wall mount kit, contact Samsung Customer Care at 1-800-SAMSUNG (1-800-726-7864).
VESA Wall Mount Kit Notes and Specifications
Install your wall mount on a solid wall perpendicular to the floor. Before attaching the wall mount to
✎
surfaces other than plaster board, please contact your nearest dealer for additional information. If you
install the TV on a ceiling or slanted wall, it may fall and result in severe personal injury.
NOTE
✎
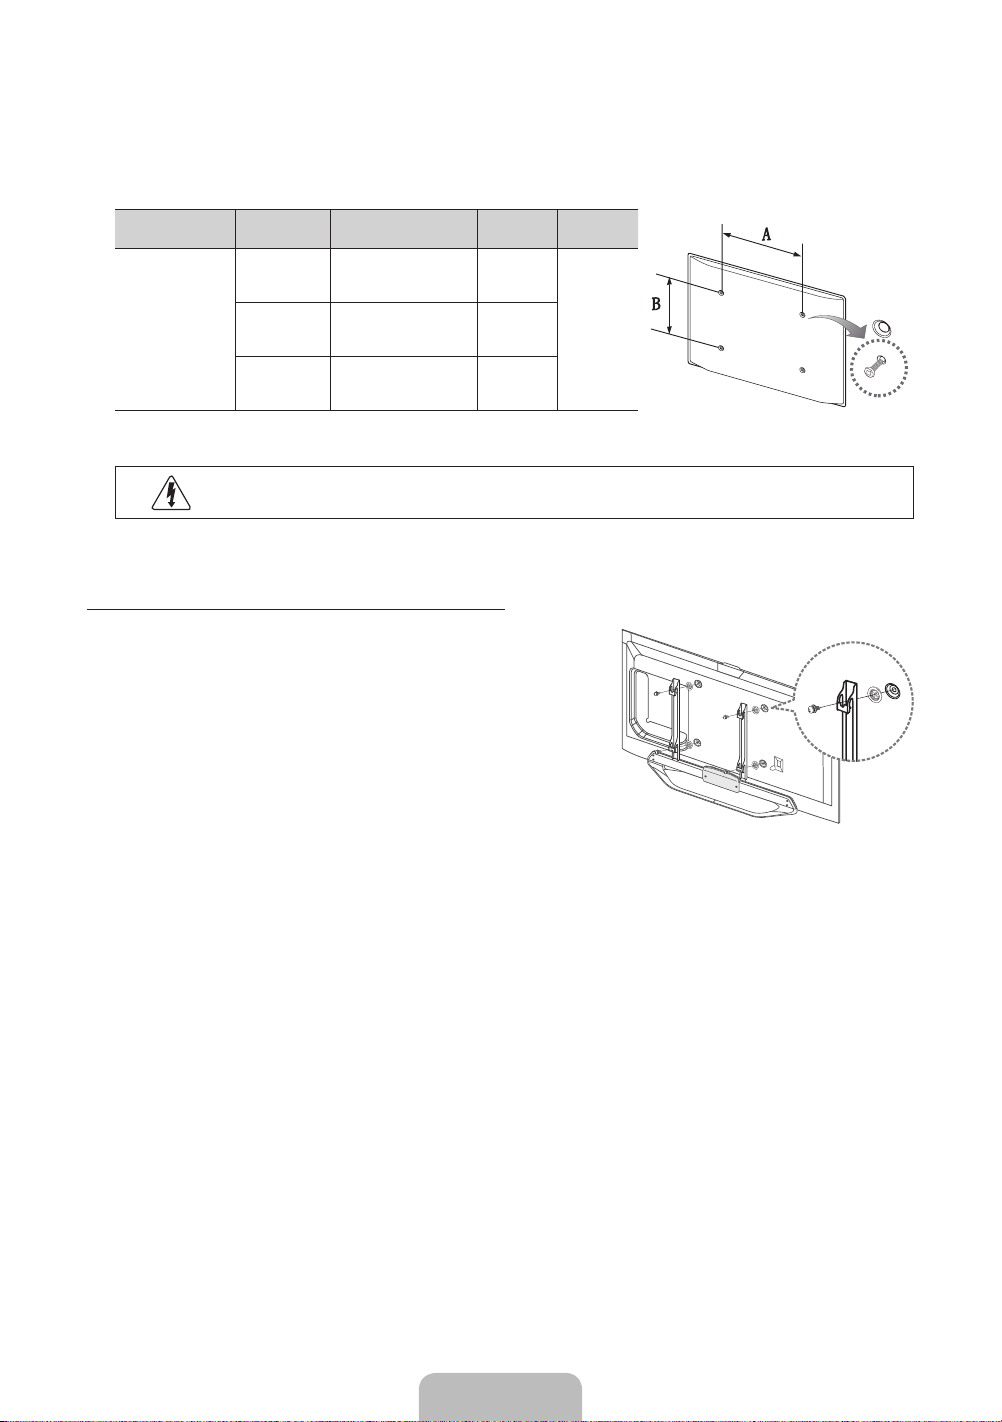
• Standard dimensions for wall mount kits are shown in the table below.
• Samsung wall mount kits contain a detailed installation manual and all parts necessary for assembly
are provided.
• Do not use screws that do not comply with the VESA standard screw specifications.
• Do not use screws that are longer than the standard length or do not comply with the VESA
standard screw specifications. Screws that are too long may cause damage to the inside of the TV
set.
• For wall mounts that do not comply with the VESA standard screw specifications, the length of the
screws may differ depending on the wall mount specifications.
• Do not fasten the screws too firmly. This may damage the product or cause the product to fall,
leading to personal injury. Samsung is not liable for these kinds of accidents.
English - 8
Page 9
• Samsung is not liable for product damage or personal injury when a non-VESA or non-specified
wall mount is used or the consumer fails to follow the product installation instructions.
• Do not mount the TV at more than a 15 degree tilt.
• Always have two people mount the TV on a wall.
Product Family
LED-TV
Remove the screws in the mounting holes before you install the wall mount.
✎
TV size in
inches
26 100 X 100 M4
46 – 60 400 X 400 M8
VESA screw hole specs
(A * B) in millimeters
Standard
Screw
Quantity
432 – 40 200 X 200 M6
Do not install your Wall Mount Kit while your TV is turned on. It may result in personal
injury due to electric shock.
Installing a Wall Mount from Another Manufacturer
To install a wall-mount from another manufacturer, use the HolderRing.
English - 9
Page 10

Providing Proper Ventilation for Your TV
When you install your TV, maintain a distance of at least 4 inches between the TV and other objects (walls,
cabinet sides, etc.) to ensure proper ventilation. Failing to maintain proper ventilation may result in a fire or a
problem with the product caused by an increase in its internal temperature.
Whether you install your TV using a stand or a wall-mount, we strongly recommend you use parts
✎
provided by Samsung Electronics only.
• If you use parts provided by another manufacturer, it may cause difficulties with the product or result
in injury caused by the product falling.
Installation with a stand. Installation with a wall-mount.
4 inches
4 inches
4 inches
4 inches
Other Warnings
The actual appearance of the TV may differ from the images in this manual, depending on the model.
✎
Be careful when you touch the TV. Some parts can be somewhat hot.
✎
4 inches
4 inches
4 inches
English - 10
Page 11
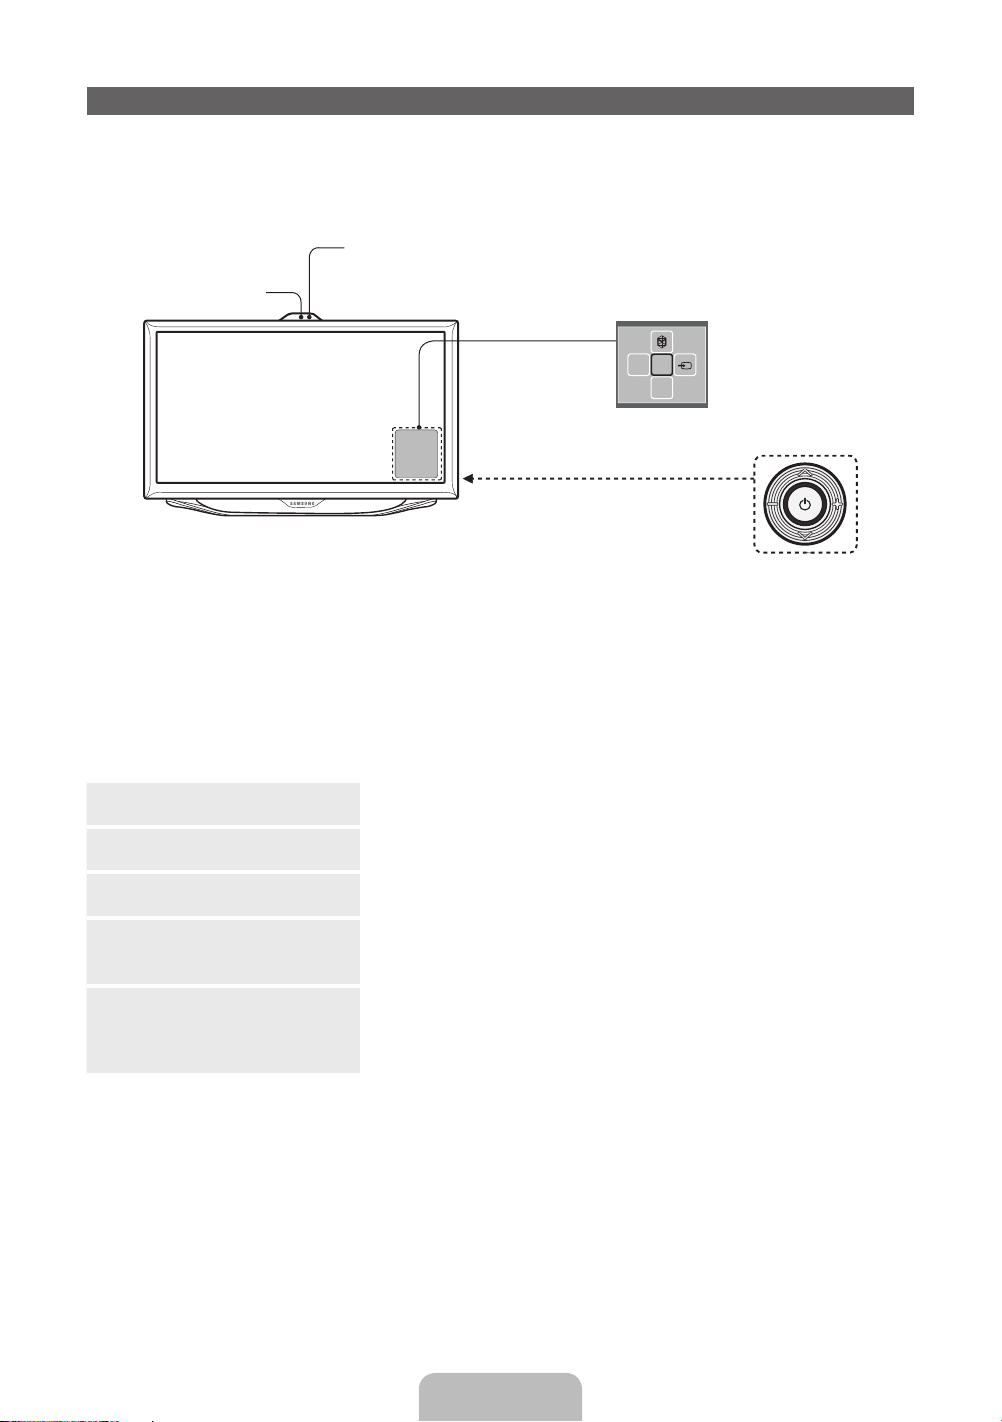
Using the TV's Controller (Panel Key)
The TV's Controller, a small joy stick like button on the rear right side of the TV, lets you control the TV
without the remote control.
The product color and shape may vary depending on the model.
✎
Remote control sensor
When you use the Smart Touch Control, a standby
Camera
Follow these instructions facing the front of your TV.
✎
When selecting the function by moving the controller to the up/down/left/right directions, be sure
✎
not to press the controller. If you press it first, you cannot operate it to move the up/down/left/right
directions.
When you use a TV camera, you should check whether a tape attached or not in rear of the TV
✎
camera, and then you can use a TV camera after adjust a camera angle. When you don't want to
use a TV camera, we recommend to use after a camera lens fixes to upwards. In this case, Face
recognition and Motion Control are not available.
Power on Turn the TV on by pressing the Controller when the TV is in standby
Adjusting the volume Adjust the volume by moving the Controller from side to side when
Selecting a channel Select a channel by moving the Controller upwards and downwards
Using the Function menu To view and use the Function menu, press and release the Controller
Selecting the SMART HUB (™) With the Function menu visible, select SMART HUB (™) by moving
LED does not work (except P button).
Function menu
mR
P
TV Controller
The image is drawn by facing
the front side of the TV.
mode.
the power is on.
when the power is on.
when the power is on. To close the Function menu, press and release
the Controller again.
the Controller upwards. The SMART HUB main screen appears.
Select an application by moving the Controller, and then pressing the
Controller.
English - 11
Page 12
Selecting the MENU (m) With the Function menu visible, select the MENU (m) by moving the
Controller to the left. The OSD (On Screen Display) Menu appears.
Select an option by moving the Controller to the right. Move the
Controller to the right or left, or upwards and downwards to make
additional selections. To change a parameter, select it, and then press
the Controller.
Selecting a Source (s) With the Function menu visible, open the Source (s) list by moving
the Controller to the right. The Source list screen appears. To select
a source, move the Controller upwards and downwards. When the
source you want is highlighted, press the Controller.
Power Off (P) With the Function menu visible, select Power Off (P) by moving the
Controller downwards, and then press the Controller.
To close the Menu, Smart Hub, or Source, press the Controller for more than 1 second.
✎
Standby mode
Your TV enters Standby mode when you turn it off and continues to consume a small amount of electric
power. To be safe and to decrease power consumption, do not leave your TV in standby mode for long
periods of time (when you are away on vacation, for example). It is best to unplug the power cord.
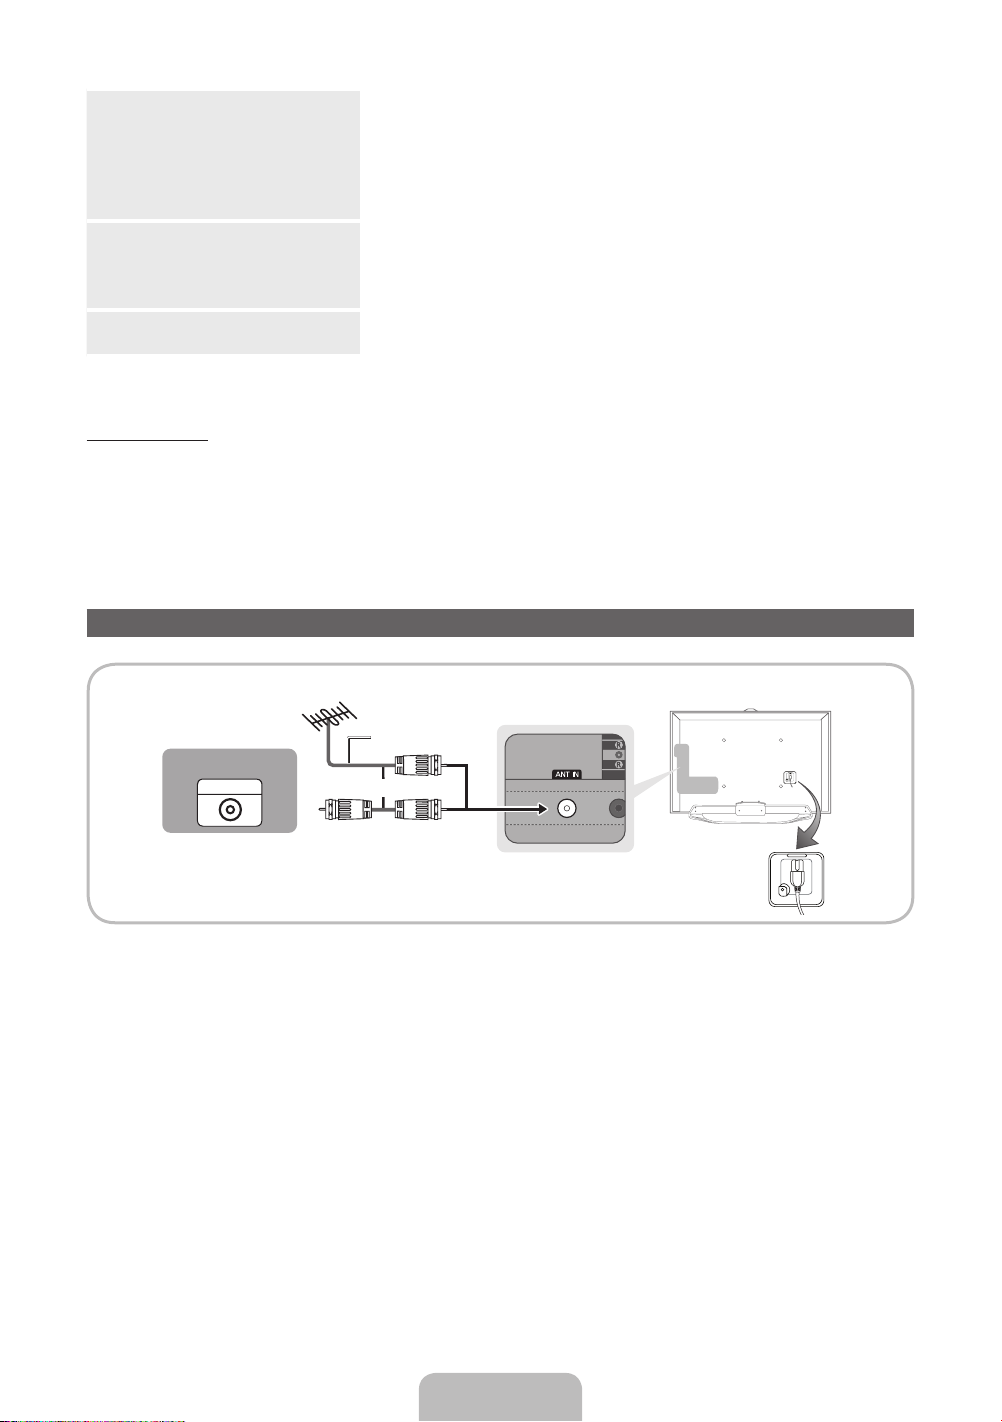
Connecting the Power Cord and the Antenna or Cable Connection
VHF/UHF Antenna
Antenna Cable (Not Supplied)
Cable
ANT OUT
Plug the power cord into a wall outlet only after you have made all other connections.
✎
If you are connecting your TV to a cable or satellite box using HDMI, Component, or Composite
✎
or
Power Input
connections, you do not need to connect the ANT IN jack to an antenna or a cable connection.
Use caution when you move or swivel the TV if the antenna cable is tightly connected. You could
✎
break the antenna jack off the TV.
English - 12
Page 13
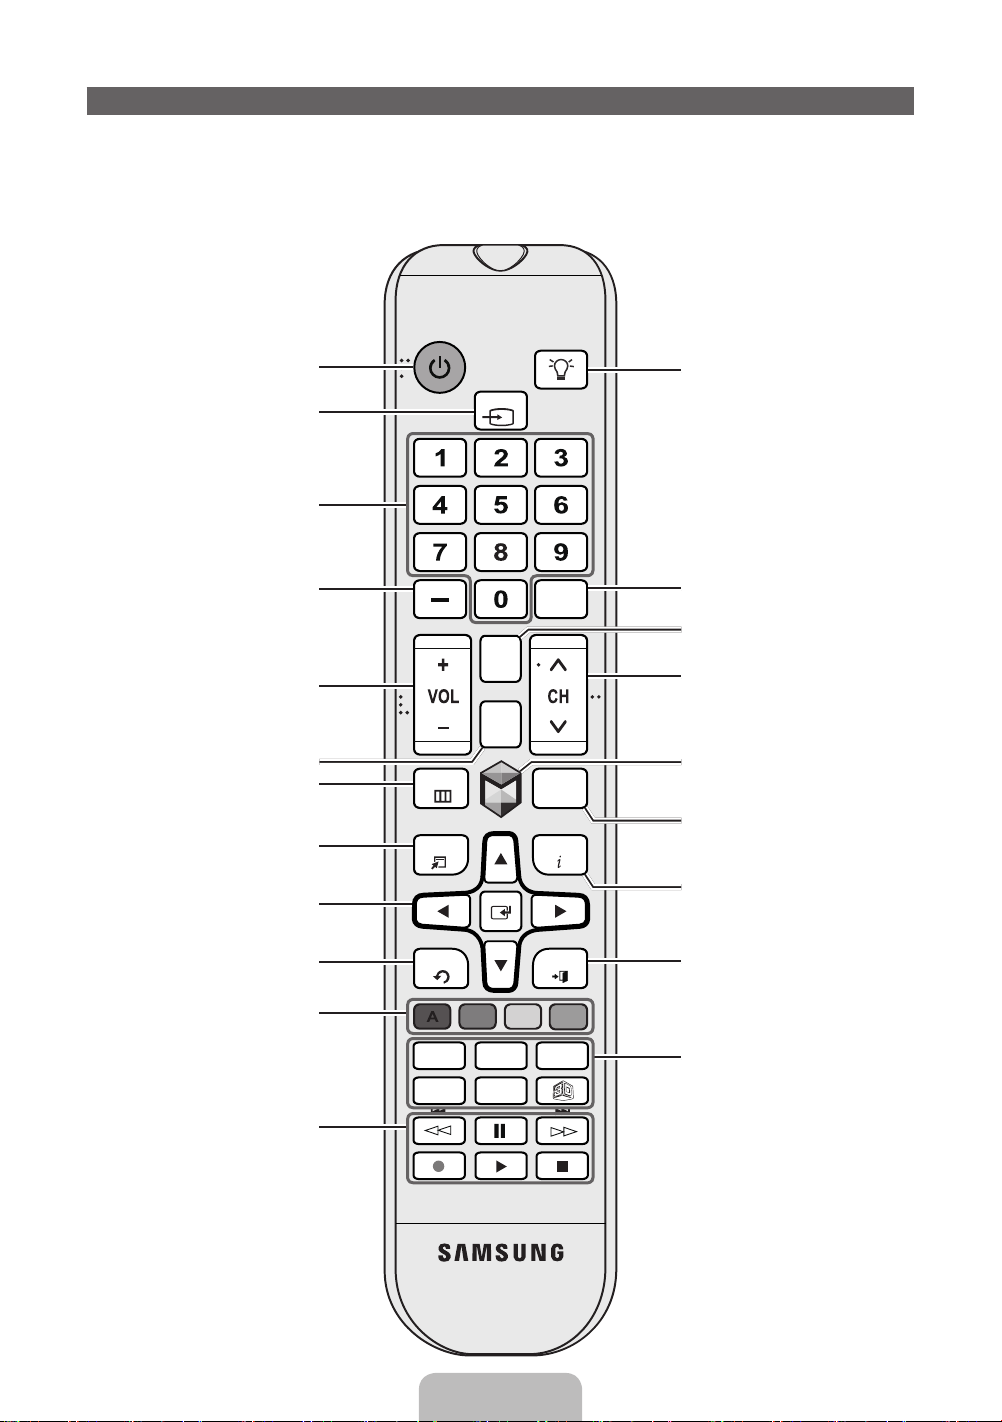
The Standard Remote Control
Learn where the function buttons are on your remote. Especially note SOURCE, MUTE, VOL, CH, MENU,
TOOLS, E, INFO, CH LIST, RETURN, and EXIT.
This remote control has Braille points on the Power, Channel, and Volume buttons and can be used
✎
by visually impaired persons.
Turns the TV on and off.
Displays and selects the available video
sources. (page 24)
Gives direct access to channels.
Press to select additional digital
channels being broadcast by the same
digital station. For example, to select
channel ‘54-3’, press ‘54’, then press
‘-’ and ‘3’.
Adjusts the volume.
Displays channel lists on the screen.
Opens the OSD (Menu).
Quickly select frequently used functions.
Use this button in a specific feature. For
details, refer to the e-Manual.
Moves the cursor, selects the on-screen
menu items, and changes the values
seen on the TV's menu.
Returns to the previous menu.
MENU
RETURN
SOURCE
MUTE
M
CH
LIST
PRE-CH
HISTORY
INFOTOOLS
EXIT
Turns the remote control light on or
off. When on, the buttons become
illuminated for a moment when pressed.
(Using the remote control with this
button set to On will reduce the battery
usage time.)
Returns to the previous channel.
Cuts off the sound temporarily.
Changes channels.
Brings up the Smart Hub applications.
See e-Manual chapter Advanced
Features → Smart Hub.
Displays a list of recently used functions.
You can select a function again easily
and quickly.
Displays information on the TV screen.
Exits the menu.
Use these buttons according to the
directions on the TV's screen.
Use these buttons in a specific feature.
For details, refer to the e-Manual.
BCD
Family Story
SUPPORTP.SIZE
l
l
SEARCH CAMERA
English - 13
Family Story: Connect to the Family
Story application. See e-Manual chapter
Advanced Features → Family Story.
l
l
SEARCH: Starts search function. See
e-Manual chapter Advanced Features
→ Search.
CAMERA: Connect to camera
application.
SUPPORT: Lets you use various
support functions including the
e-Manual. (page 47)
P.SIZE: Lets you select the Picture
Size. See e-Manual chapter Basic
Feature → Changing the Picture Size.
X
: Turns the 3D image on or off. See
e-Manual chapter Advanced Features →
Using the 3D function.
Page 14
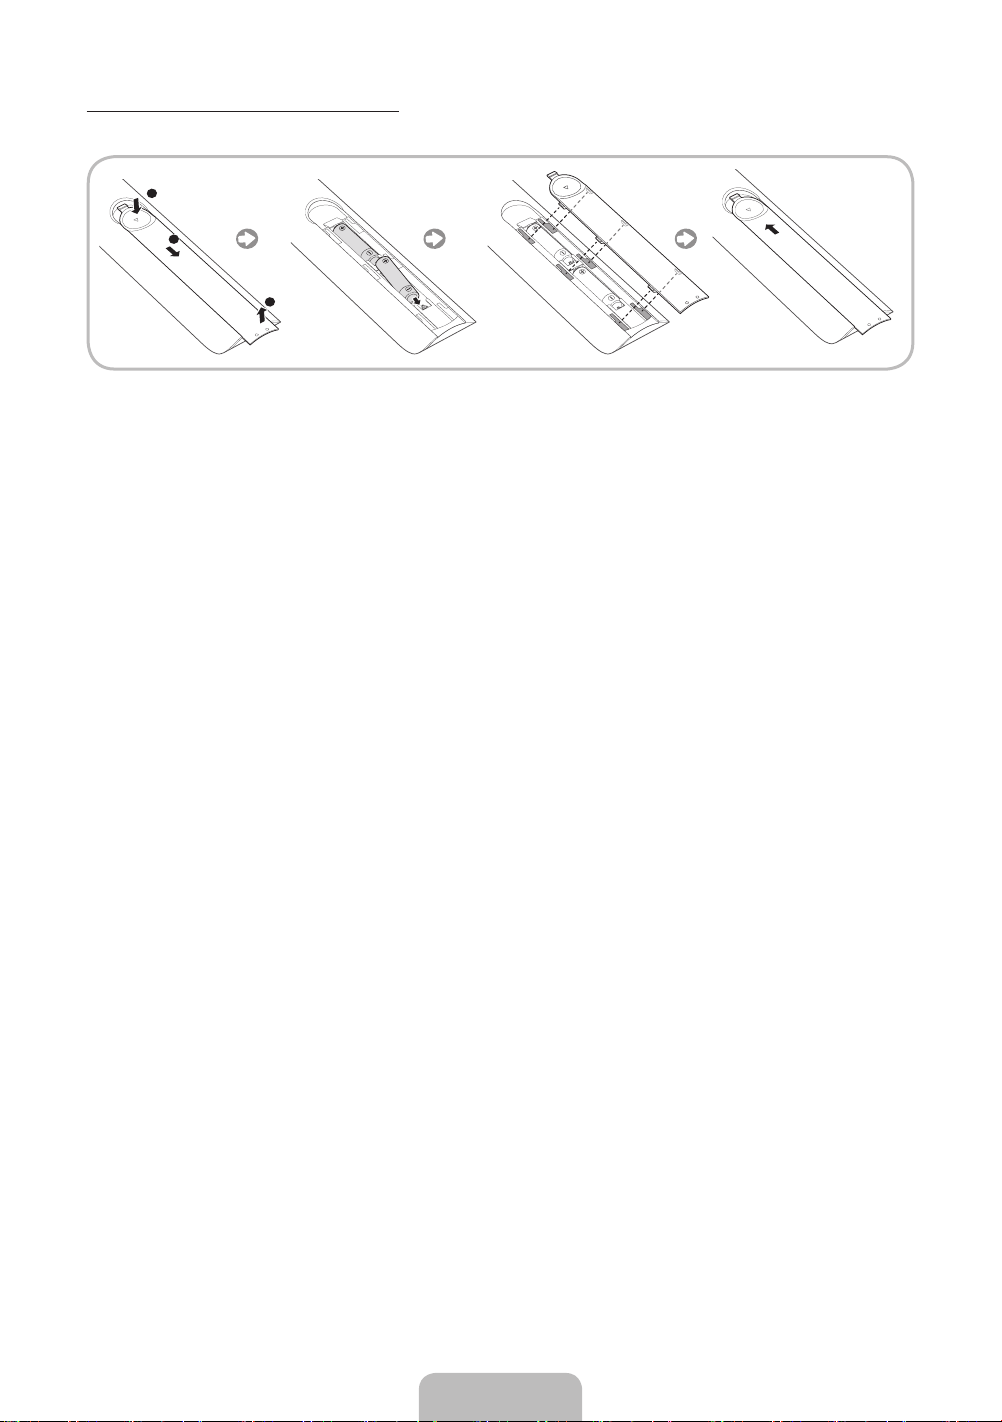
Installing batteries (Battery size: AAA)
Match the polarity of the batteries to the symbols in the battery compartment.
Your TV also comes with a Smart Touch Control. For information about the Smart Touch Control, see
✎
page 38.
NOTE
✎
• Install the batteries so that the polarity of the batteries (+/-) matches the illustration in the battery
compartment.
• Use the remote control within 23 feet of the TV.
• Bright light may affect the performance of the remote control. Avoid using it near fluorescent lights
or neon signs.
• The color and shape of the remote may vary depending on the model.
English - 14
Page 15
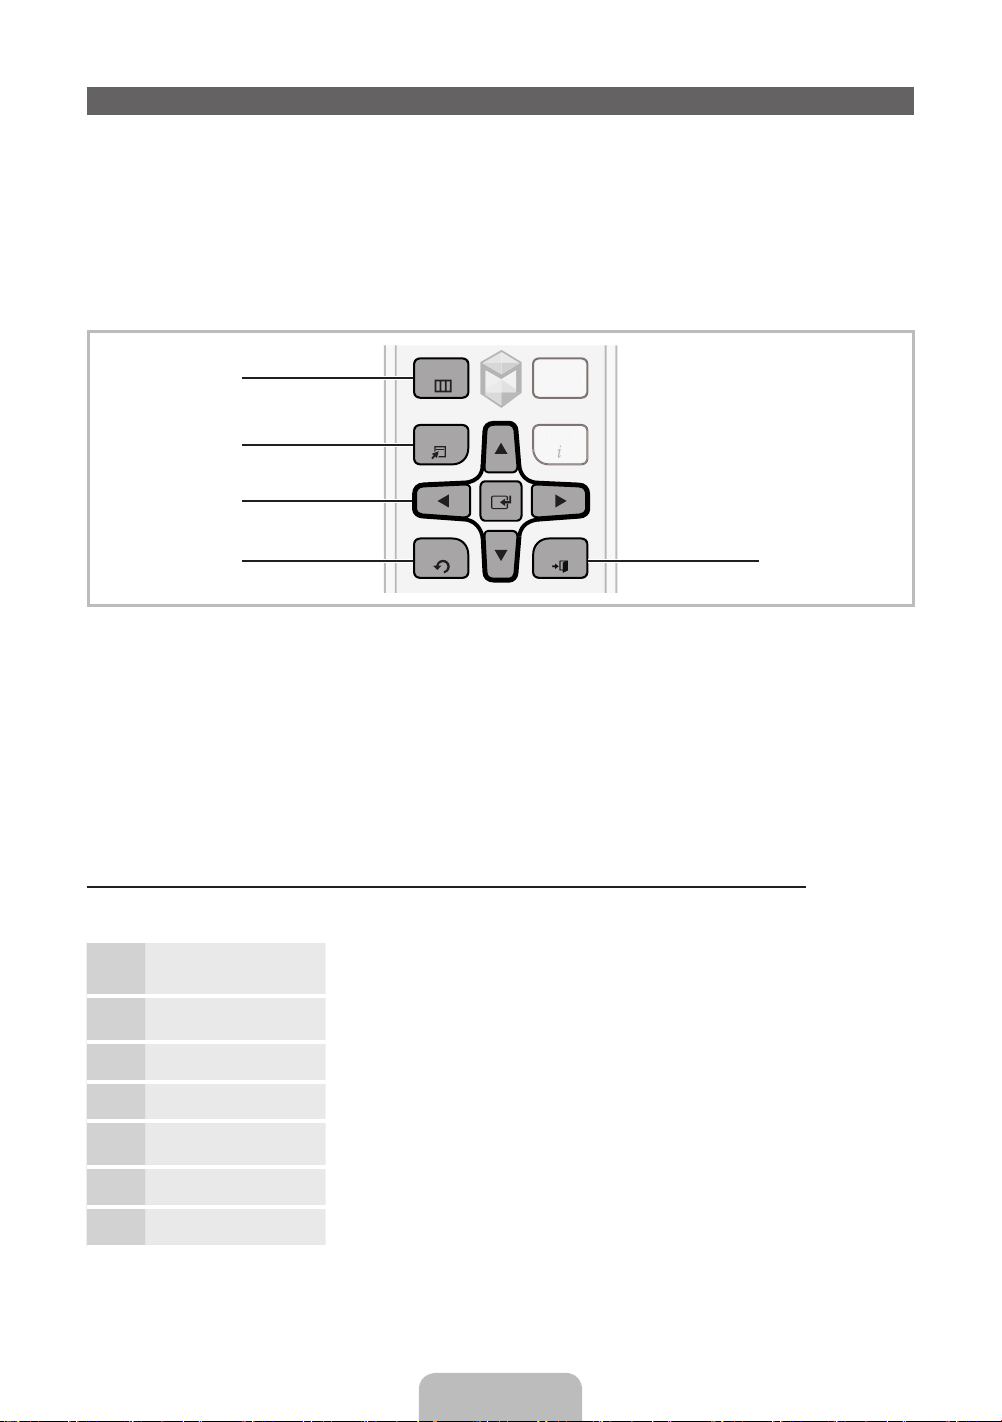
How to Navigate Menus
O
HISTO
Your TV’s Main and Tools menus contains functions that let you control the TV’s features. For example, in
the Main menu you can change the size and configuration of the picture, its brightness, its contrast and so
on. There are also functions that let you control the TV’s sound, channel configuration, energy use, and a
host of other features. To access the main, on-screen menu, press the MENUm button on your remote.
To access Tools menus, press the TOOLST button. Tools menus are available when the TOOLST menu
Icon is displayed on the bottom right of the screen.
The illustration below displays the buttons on the standard remote you use to navigate the menus and
select and adjust different functions. For information about using the Smart Touch Control, see page 38.
1
2
3
4
1 MENUm button: Displays the main on-screen menu.
2 TOOLST button: Displays the Tools menus when available.
3 E and Direction buttons: Use the Direction buttons to move the cursor and highight an item. Use the
Enter button to select an item or confirm the setting.
4 RETURNR button: Returns to the previous menu.
5 EXITe button: Exits the on-screen menu.
How to Operate the Main Menu (OSD - On Screen Display) Using the Standard Remote
The access steps may differ depending on the menu option you select.
MENU
TOOLS
RETURN
INF
EXIT
RY
5
MENUm
1
u / d Select a main menu option on the left side of the screen with the u or d
2
E Press E to access the sub-menus.
3
u / d Select the desired submenu with the u or d button.
4
u / d / l / r Adjust the value of an item with the l, r, u, or d button. The
5
E Press E to confirm the selection.
6
EXITe Press EXITe.
7
The main menu options appear on the screen:
Picture, Sound, Channel, Network, System, Support.
button.
adjustment in the OSD may differ depending on the selected menu.
English - 15
Page 16
Configuring the Basic Settings in Initial Setup
When you turn the TV on for the first time, a sequence of screens and on-screen prompts will assist you in
configuring the TV’s basic settings. Plug the power cord into a wall outlet, and then press the P button to
turn on the TV.
Use the standard remote to run the Initial Setup.
✎
Setup is available only when the input source is set to TV. See "Changing the Input Source" (page 24).
✎
To return to the previous step in the Setup sequence, select Previous.
✎
If you are not using a cable box or satellite box, make sure you have connected the TV to an antenna
✎
or cable connection before you turn on the TV. See page 12 for instructions.
If you want to configure a wired network connection during Setup, make sure you've connected a
✎
LAN cable to your TV. See pages 35 for instructions. If you want to configure a wireless network
connection during Setup, make sure your wireless modem or router is on and working.
Menu Language:
1
Select a Language.
Use Mode: Select
2
the Home Use
Mode.
Network Settings:
3
Configure the
network settings
To configure
✎
later, select Skip.
You can set up
the network
connection later
using the onscreen Network
menu.
After you press the P button, the Start screen appears. Select Next
to continue. The Menu Language screen appears. Select the menu
language you want using your remote, and then select Next. The TV will
display on-screen menus using the language you select beginning with
the next step in the Setup process.
On the Use Mode screen, select the Home Use using your remote, and
then select Next. The Network Settings screen appears.
Store Demo is for retail environments only. If you select Store
✎
Demo, some functions will not work, and the TV will reset all
functions to their factory default after a certain period of time. For
more information about Store Demo, go to the end of this section.
To configure your network settings, select Start using your remote, and
then go to 3A - Wireless Network or 3B - Wired Network on the next
page.
If you do not know your network configuration information or want to
configure the settings later, or do not have a network, select Skip, and
then go to 5 - Auto Program (1) on page 18.
To configure network settings later, refer to “Setting up the Wired or
Wireless Network” in the e-Manual or see the Network Connection
sections in this manual (pages 34 and 36).
English - 16
Page 17

3
Wireless Network 1. The TV searches for and then displays all the wireless networks
a
within range. When done, it displays a list of the networks. In the list
of networks, move the Highlight to select a network, and then select
Next. If the selected network requires a Security Key, the Security
Key screen appears.
If you have a WPS(PBC) compatible router, select WPS(PBC)
✎
instead, and then follow the directions on the screen. When
done, go to Step 4.
2. Enter your network security key or WPS PIN using your remote.
Enter numbers and letters using your remote.
✎
• If you are using the standard remote, you can enter numbers
by pressing the number buttons on the remote.
• To enter a letter, move the Highlight to the letter, and then
select it. You can enter numbers in the same fashion if you
choose.
To display capital letters (or redisplay small letters if capital letters
✎
are displayed), select Caps or Shift.
To display symbols and punctuation, select F. To redisplay
✎
letters, select F again.
3. When done, select Next if you have entered a security key or WPS
PIN if you have entered a WPS PIN.
4. The TV checks the wireless connection. If the connection is
successful, the You are connected to the Internet. If you have any
problems using online services, please contact your Internet
Service Provider. message appears. Select Next, and then go to 4
Software Upgrade Step.
If the connection fails, select Previous, repeat Step 1 and 2,
✎
carefully re-enter your security key or WPS PIN, then repeat
Steps 3 and 4. If it fails again, select Next on the “Connection
Failed” screen, and then go to 5 - Auto Program (1) on the next
page. Configure your network later through Network Settings
in the TV’s Menu. For more information, refer to “Setting up the
Wired or Wireless Network” in the e-Manual or see the Network
Connection sections in this manual (pages 34 and 36).
3
Wired Network The TV checks the network connection, then displays the You are
b
connected to the Internet. If you have any problems using online
services, please contact your Internet Service Provider. message
appears. Select Next. The Software Upgrade screen appears.
English - 17
Page 18

Software Upgrade:
4
Update the software
to the latest version
To update later,
✎
select Skip.
When Network Settings is complete, your TV will check for a new
software version automatically. If new software is available, the TV
downloads and installs the new software. When the download is
complete, select Next.
If you want to upgrade later, select Skip. For more information, refer
✎
to Software Update (Preference Features → Support Menu) in the
e-Manual.
This may take some time, depending on your network status.
✎
You can only upgrade software if your TV has an active network
✎
connection.
If no new update software is available, a no new updates message
✎
appears on the screen. Select OK.
Auto Program (1):
5
Select where your
TV signal comes
from.
Auto Program (2):
6
Select the search
options.
Auto Program (3):
7
Channel
memorization
Select the appropriate option for your TV using your remote, and then
select Next.
• I use an antenna cable connection to the TV.: Select if you have an
antenna or a cable connection without a set-top box. If you select this
option, go to 6 - Auto Program (2) Step.
• I use a set-top box.: Select if you have a satellite or cable set-top
box. You do not need to run Auto Program. If you select this option,
go to 8 - Clock on the next page.
1. Select Air or Cable using your remote. A check appears on your
selection. When done, select Next. You can check both if you have
both connected.
2. If you selected Air, go to 7 - Auto Program (3).
3. If you selected Cable, you’ll go to the cable system screen. Select
Digital Cable System. The option window appears. Select the
correct cable signal format; STD, HRC, or IRC. Most cable systems
use STD (Standard). Repeat the same process with Analog Cable
System.
4. When done, select Next.
Channel memorization stars. Channel memorization can take up to 45
minutes, depending on your cable system.
For more information, refer to Auto Program (Channel Menu →
Memorizing Channels) in the e-Manual.
Select Stop at any time to halt the memorization process.
✎
English - 18
Page 19
Clock: Set the Clock Select Auto or Manual, and then select Next.
8
If you selected I use a set-top box. in 5 - Auto Program (1), you can
✎
only set the current time and date manually, using your remote.
Auto
If you selected Auto, the TV will automatically download the correct time
from a digital channel. The Time Zone screen will appear. Select your
Time Zone, and then select Next. The DST (Daylight Savings Time)
screen will appear. The DST function sets the time ahead one hour to
adjust the clock for Daylight Savings Time. Select On if you want to turn
the DST adjustment on. Select Off to turn off the DST adjustment. You
can also turn the DST function on through the TV's on screen menu
(Menu → System → Time → Clock → DST).
Manual
If you selected Manual, you’ll go to the Clock screen. Select Date or
Time. You can set the current date and time using your remote. When
done setting the Date and Time, select Next.
Voice and Motion
9
Control: Setting the
Voice and Motion
Control function.
Setup Complete Review the Setup data, and then select Close to finish.
10
If You Want to Rerun Setup...
Menu → System → Setup
If You Want to Turn the Store Demo Mode On or Off.
To set or unset Store Demo mode outside of Setup, press and release the Controller when the power is
on. The Function menu screen appears. Push the Controller to the left (to MENU (m)) and hold for more
than 5 seconds. The Store Demo mode is set. To cancel Store Demo, bring up the Function menu using
the Controller, push the Controller to the right (to Source (s)) and hold for more than 5 seconds. See
page 11 for information about the Controller.
You can turn the Voice and Motion Control function on or off. Select Off
or On, and then select Next.
The completed settings are displayed.
✎
English - 19
Page 20
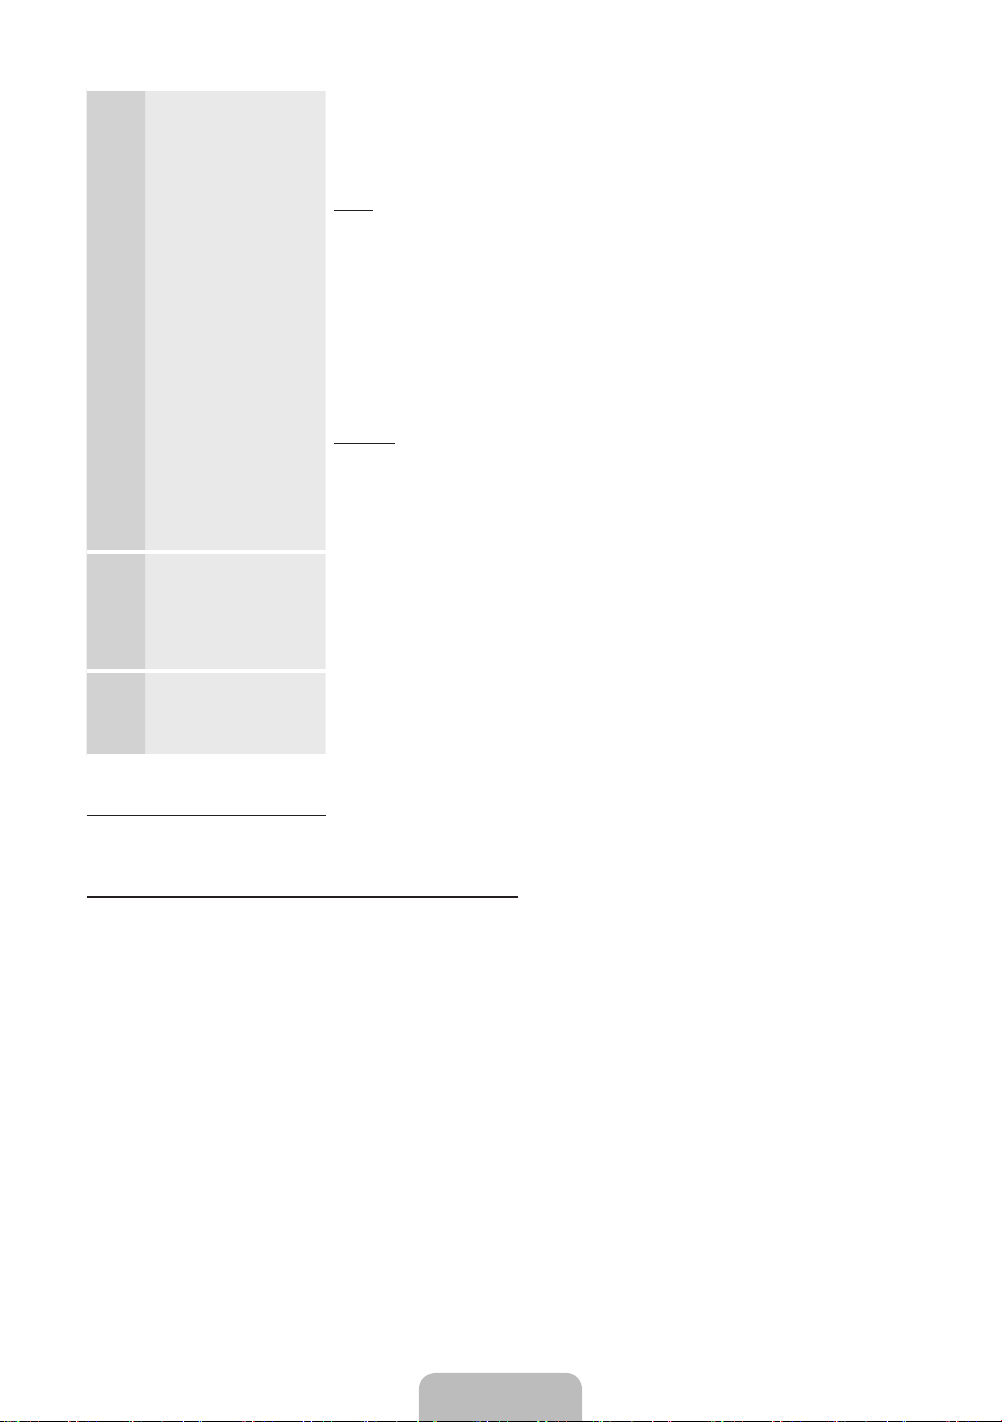
Connecting to AV Devices (Blu-ray Players, DVD Players, etc.)
Using an HDMI Cable for an HD connection (up to 1080p, HD digital signals)
For the best quality HD picture, we recommend using an HDMI connection.
Use with DVD players, Blu-ray players, HD cable boxes, and HD Set-Top-Box satellite receivers.
Device
HDMI OUT
HDMI IN 1 (DVI), HDMI IN 2 (ARC), HDMI IN 3 (MHL)
✎
HDMI Cable (Not Supplied)
• For the best picture and audio quality, connect digital devices to the TV using HDMI cables.
• An HDMI cable supports digital video and audio signals, and does not require an audio cable.
− To connect the TV to a digital device that does not support HDMI output, use an HDMI to DVI
cable and audio cables.
• If you connect an external device to the TV that uses an older version of HDMI, the video and audio
may not work. If this occurs, ask the manufacturer of the device about the HDMI version and, if it is
out of date, request an upgrade.
• Be sure to purchase a certified HDMI cable. Otherwise, the picture may not display or a connection
error may occur.
• We recommend using a basic high-speed HDMI cable or an HDMI cable that is Ethernet
compatible. Note that this product does not support the Ethernet function via HDMI.
• This product supports the 3D and ARC (Audio Return Channel) functions via an HDMI cable. Note
that the ARC function is supported by the HDMI IN 2 (ARC) port only.
− If 3D Auto View is set to On, some functions such as SMART HUB may be disabled. In this
case, set 3D Auto View or 3D Mode to Off.
• The ARC function allows digital audio to output via the HDMI IN 2 (ARC) port on the TV. It can be
enabled only when the TV is connected with an audio receiver that supports the ARC function.
• This product supports the Mobile High-Definition Link (MHL) function via an HDMI-MHL cable. Note
that the MHL function is supported by the HDMI IN 3 (MHL) port only.
• The MHL function lets you display a mobile device's screen via the HDMI IN 3 (MHL) port on the
TV. It can be enabled only when the TV is connected with a mobile device that supports the MHL
function. For more detailed information, see "Using the MHL function" in e-Manual.
English - 20
Page 21
• When you use MHL devices via a MHL cable, Picture Size is set to Screen Fit automatically. But
if you use MHL devices via an HDMI cable, Picture Size is not set to Screen Fit automatically.
To view an original size, select Screen Fit in the Picture Size menu (Menu → Picture → Picture
Size).
• If you use MHL devices via an HDMI cable, The TV will be recognized as the HDMI input. In this
case, the TV may work differently than when you use MHL devices via a MHL cable.
For the best cable connection to this product, use cables no thicker than the cable illustrated below:
✎
• Maximum thickness - 0.55 inches (14mm)
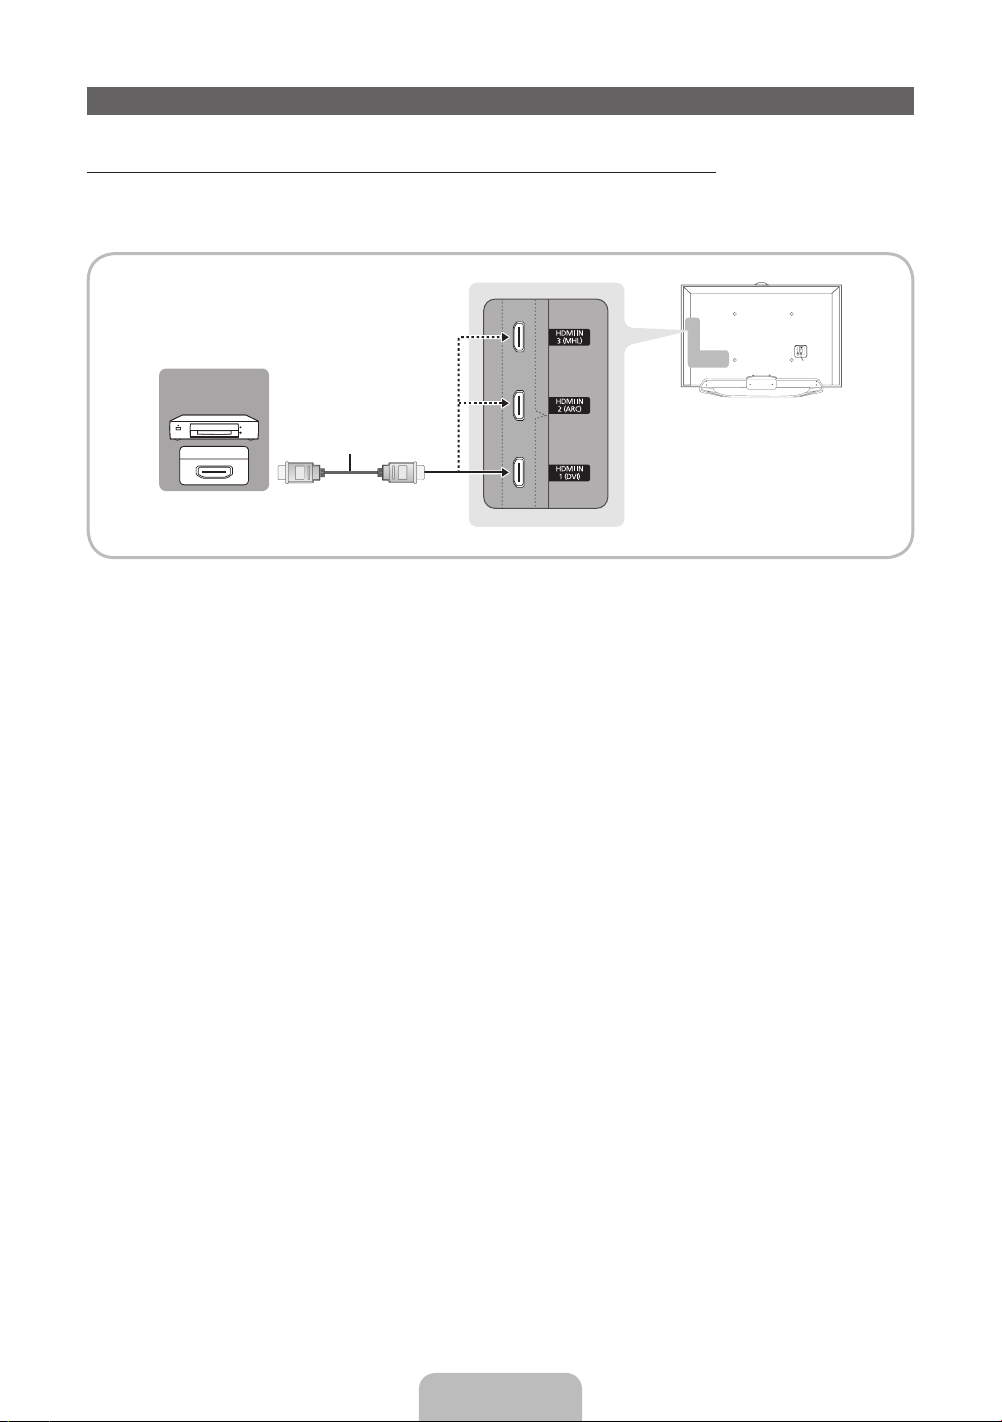
Using a Component Cable (up to 1080p HD signals) or an Audio/Video Cable (480i analog signals
only)
Use with DVD players, Blu-ray players, cable boxes, STB satellite receivers, VCRs.
Red
Blue
Green
Red
White
AV Adapter (Supplied)
Audio Cable
(Not Supplied)
Video Cable (Not Supplied)
Audio Cable (Not Supplied) Audio Cable (Not Supplied)
Component Cable
(Not Supplied)
Video Cable
(Not Supplied)
Red White
Device Device Device
For better picture quality, we recommend the Component connection over the A/V connection.
✎
When you connect a Video cable to AV IN 1, the color of the AV IN 1 [VIDEO] jack (green) will not
✎
match the video cable (yellow).
Yellow
English - 21
Page 22
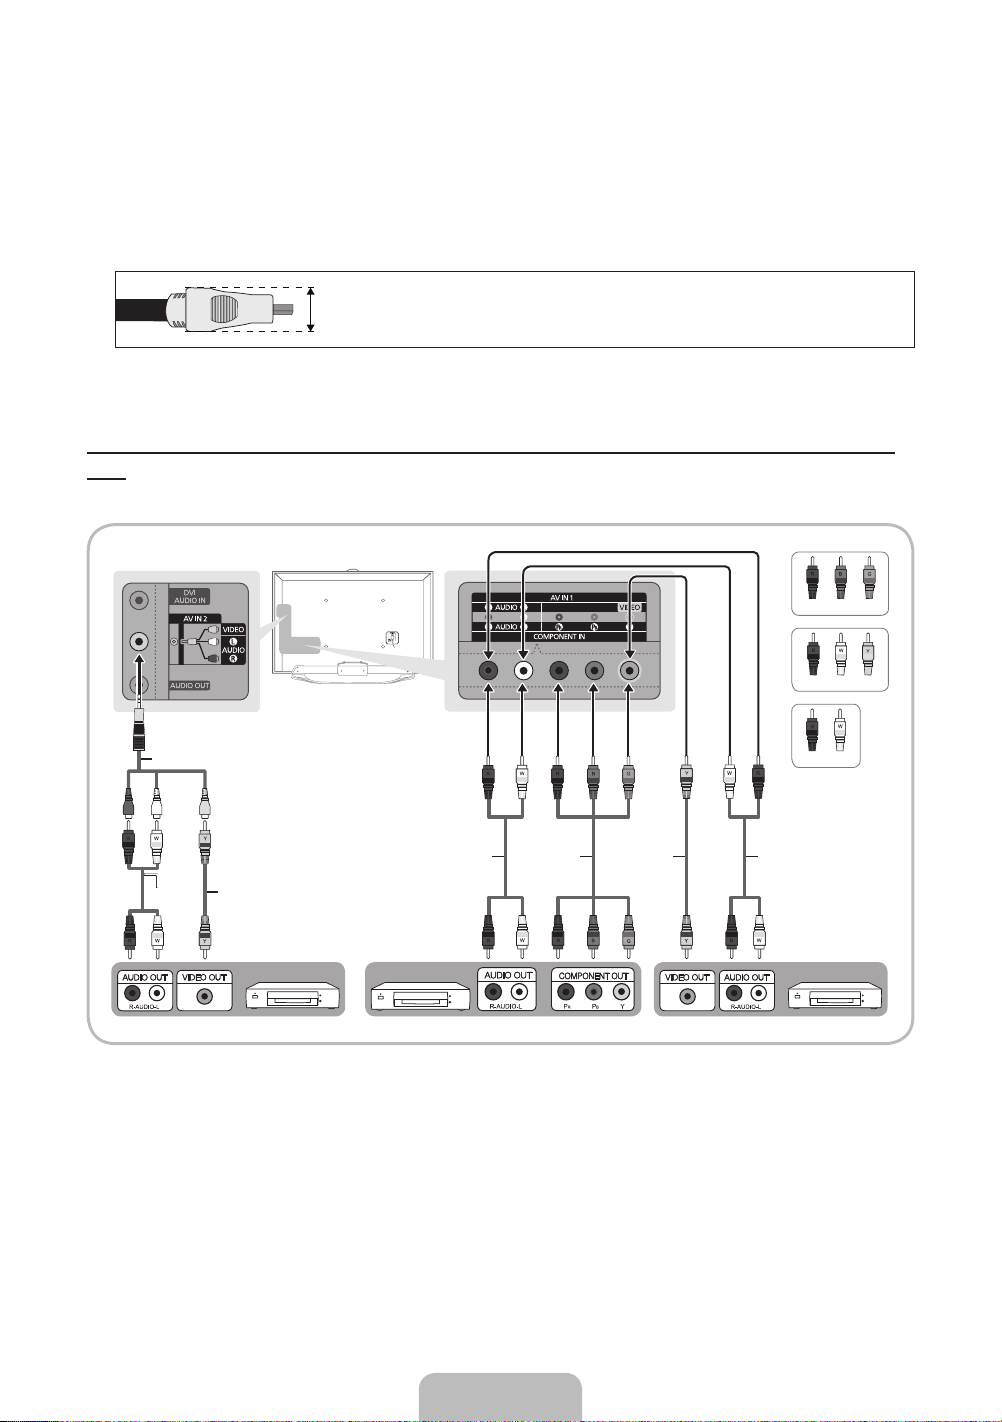
Connecting to Audio Devices
R-AUDIO-L
Using an Optical (Digital) Cable Connection and a Standard Stereo Cable Connection
Use with Digital Audio Systems, Amplifiers, and Home Theaters.
Digital Audio System
OPTICAL
Amplifier /
DVD home theater
DIGITAL AUDIO OUT (OPTICAL)
✎
AUDIO IN
Optical Cable (Not Supplied)
Audio Cable (Not Supplied)
WR
Red White
• When you connect a Digital Audio System to the DIGITAL AUDIO OUT (OPTICAL) jack, decrease
the volume of both the TV and the system.
• 5.1 CH (channel) audio is available when you connect the TV to an external device supporting 5.1
CH.
• When the receiver (or home theater) is set to on, you can hear sound output from the TV’s optical
jack. When the TV is receiving a DTV signal, the TV will send 5.1 CH sound to the home theater
receiver. When the source is a digital component such as a DVD player / Blu-ray player / cable box
/ STB (Set-Top-Box) satellite receiver and you connected it to the TV via HDMI, you will only hear
2 CH audio from the home theater receiver. If you want to hear 5.1 CH audio, connect the digital
audio out jack from your DVD / Blu-ray player / cable box / STB satellite receiver directly to an
amplifier or home theater.
AUDIO OUT: Connects to the audio input jacks on your amplifier/DVD home theater.
✎
• When connecting, use the appropriate connector.
• When you connect an audio amplifier to the AUDIO OUT jacks, decrease the volume of the TV and
adjust the volume level with the amplifier’s volume control.
English - 22
Page 23

Connecting to a PC
AUDIO OUT
DVI OUT
HDMI OUT
Using an HDMI cable or an HDMI to DVI cable
Your PC may not support an HDMI connection.
✎
Use your PC speakers for audio.
✎
HDMI Cable (Not Supplied)
HDMI to DVI Cable (Not Supplied)
Audio Cable (Not Supplied)
The optimal resolution is 1920 X 1080 @ 60 Hz. See the Display Resolution page for all available
resolutions (page 57).
NOTE
✎
• For an HDMI to DVI cable connection, you must use the HDMI IN 1 (DVI) jack.
• For PCs with DVI video out jacks, use an HDMI to DVI cable to connect the DVI out on the PC to
the HDMI IN 1 (DVI) jack on the TV. Use the PC's speakers for audio.
• PC (D-Sub) input is not supported.
The EX-Link Cable Connection
The EX-LINK connection is for service only.
English - 23
Page 24

Changing the Input Source
Source
™ → Source
When you are watching TV and you want to watch a movie on your DVD player or Blu-ray player or switch
to your cable box or STB satellite receiver, you need to change the Source.
■ TV / HDMI1/DVI / HDMI2 / HDMI3 / AV1 / AV2 / Component
1. Press the ™ button on your remote. The Smart Hub screen appears.
2. Select Source. The Source screen appears.
3. Select a desired external input source.
Alternatively, you can access the Source screen by selecting the SOURCEs button on your
✎
standard remote or selecting Source with the Smart Touch Control (see page 38).
You can only choose external devices that are connected to the TV. In the displayed Source list,
✎
connected inputs are highlighted.
How to Use Edit Name
Edit Name lets you associate a device name to an input source. To access Edit Name, open the Tools
menu when the Source list is displayed. The following selections appear under Edit Name:
■ VCR / DVD / Cable STB / Satellite STB / PVR STB / AV Receiver / Game / Camcorder / PC / DVI
PC / DVI Devices / TV / IPTV / Blu-ray / HD DVD / DMA: Select an input jack, and then select the
name of the device connected to that jack from the list that appears. For example, if you have your Bluray player attached to HDMI IN 2 (ARC), select Blu-ray for that input.
If you connect a PC to the HDMI IN 1 (DVI) port with an HDMI cable, assign PC to HDMI1/DVI in
✎
Edit Name.
If you connect a PC to the HDMI IN 1 (DVI) port with an HDMI to DVI cable, assign DVI PC to
✎
HDMI1/DVI in Edit Name.
If you connect an AV device to the HDMI IN 1 (DVI) port with an HDMI to DVI cable, assign DVI
✎
Devices to HDMI1/DVI in Edit Name.
Information
You can see detailed information about the selected external device.
Refresh
If the external devices are not displayed in the Source list, open the Tools menu, select Refresh, and then
search for the connected devices.
Alternatively, you can refresh the Source list by selecting a using your remote.
✎
English - 24
Page 25

Using Smart Hub
Smart Hub provides easy, on-screen access to five functions that let you manage and access channels,
set favorite channels, access photos, videos, or music on USB devices, cameras, and PCs, select video
sources, and set the TV to turn on automatically when a show you want to watch is on. The five functions
are listed below:
• Channel: Lets you manage channels, select favorite channels, add channels to and delete channels
from the Added Ch. list (the channels that appear when you press the z button.)
• Web Browser: Lets you browse the Internet.
• Schedule Manager: Lets you schedule shows and channels for viewing.
• Source: Lets you select a connected external video source to view.
• AllShare Play: Lets you access, view, or play photos, videos, or music located on USB devices,
digital cameras, cell phones, and PCs. PCs and cell phones can be accessed wirelessly, through your
wireless network.
Smart Hub also provides an easy-to-use gateway to a host of on-line media and entertainment including
apps from the Samsung Apps store, streaming videos and movies, kids sites, and more.
To access Smart Hub, press the ™ button on your remote.
✎
For more information about Smart Hub, see the e-Manual.
✎
English - 25
Page 26
SMART Interaction
Using this function, you can access and control menu options and functions using speech, motions or face
recognition.
INFORMATION BOOKLET DISCLAIMER
• Face recognition Log-in
In order for Face recognition to function, a thumbnail image of your face will be stored in your TV for
logging-in purposes.
Logging into the Smart Hub using Face recognition may be less secure than using an ID and
password.
• TV Camera Usage
Before using the TV Camera, you should be aware that under some circumstances and under certain
legal conditions your misuse of the TV Camera can result in legal liability for you. By using the TV
Camera, you agree that you will not use the camera (i) in locations where cameras are generally
prohibited (such as bathrooms, locker rooms or changing rooms), (ii) in any manner that will result in an
invasion of a person’s privacy or (iii) in violation of any applicable laws, regulations or statutes.
When you use a TV camera, you should check whether a tape attached or not in rear of the TV
camera, and then you can use a TV camera after adjust a camera angle. When you don't want to use a
TV camera, we recommend to use after a camera lens fixes to upwards. In this case, Face recognition
and Voice and Motion Control are not available.
Voice Control
Menu → System → Voice and Motion Control → Voice Control
Enable or disable the voice recognition function. Lets you access and control menu options and functions
by speaking letters or words.
For accurate voice recognition, refer to the Standard Voice Command list at the Samsung web site
✎
(www.samsung.com → support → Manuals & Downloads).
Voice Control function can be affected recognition by unclear pronunciation, voice level, or
✎
surrounding noise.
To use Voice Control, you must pronounce words and phrases clearly and correctly in the language
✎
you selected in Language.
Ambient noise may cause Voice Control to malfunction. (Appropriate surrounding noise: Below
✎
40dB)
Your TV can "hear" your voice commands in two ways:
− Using the TV’s microphone. (Distant Recognition)
We are recommended using Voice Control function within about 13 ft with your TV. You can
✎
check the usable distance by using Voice Control Environment Test (System → Voice and
Motion Control → Voice Control → Voice Control Environment Test).
English - 26
Page 27

− Using the VOICE˜ button on your remote. (Close Proximity Recognition)
When you use the TV's microphone, the words may not be recognized because of ambient noise.
✎
If this occurs, try using the VOICE˜ button on your remote. The TV will be able to recognize a
voice command more easily.
The VOICE˜ button on your remote is always activated. If you want to use the TV's microphone,
✎
turn on Voice Control (System → Voice and Motion Control → Voice Control).
Say a voice command to proper volume into the microphone of your remote within 0.3 – 0.9 ft. If
✎
voice level is too small or large, voice command may not be recognized.
If a menu option or function is not supported by the Voice Control function, we suggest trying the
✎
Motion Control function. To use the Motion Control, raise your hand while opening it toward the
screen, hold it for a moment and then wave it 3 – 4 time to the left and right. Motion Control starts. If
the Motion Control starts, the cursor is displayed at the center of the screen and the Motion Guide
Bar Size is at the bottom of the screen.
■ Voice Control
Turns the Voice Control function on or off.
The VOICE˜ button on your remote is always activated.
✎
■ Language
Select the recognition language you want to use.
■ Trigger Words
You can select the Trigger Words that start the Voice Control function.
Alternatively you can turn on your TV using the Trigger Words if Voice Control function is set to On.
− If the Trigger Words is set to Hi TV, say Hi TV Power On.
− If the Trigger Words is set to Smart TV, say Smart TV Power On.
■ Voice Command Bar Size
Set the Voice Command Bar Size mode to Minimum or Full. Minimum displays the least number of
words and phrases you can use. Full displays all the words and phrases.
■ Voice Sensitivity
You can configure the sensitivity of Voice recognition.
− Howling: Select howling levels.
− Recognition responsiveness: Select the responsiveness level of Voice recognition.
English - 27
Page 28

■ Voice Control Environment Test
You can test the amount of ambient noise level detected by the TV microphone.
− Noise Test: This test checks the amount of ambient noise detected by the TV microphone. Too
much ambient noise will prevent Voice Command from functioning. To run, select Next using your
remote. The test starts and takes a few seconds. Please keep as quiet as possible during the test.
− Mic & Speaker Test: Determines if the sound from the TV speakers picked up by the TV
microphone will disrupt Voice Command. To run, select Start using your remote. The test starts and
takes a few seconds. Please keep as quiet as possible during the test.
Available only when Speaker Select is set to TV Speaker.
✎
− Voice Control Test: This test checks the volume level and clarity of your voice for use with Voice
Control. Select Start using your remote. After the test starts, say the test words listed in the
instructions as loudly and clearly as you can.
If the test is not successful, select Retest, and then say the words loudly and clearly again.
✎
To use the Voice Control function, follow these steps:
If Voice Control function is set to On, the TV may be turned on automatically by effect of the ambient
✎
environment.
1. Speak the Trigger Words that you selected into the microphone embedded in the TV or press the
VOICE˜ button on your remote. The TV displays the Voice Command Bar Size.
When you use the Voice Control, the volume is set to 5 automatically.
✎
2. Say a word or phrase listed in the Voice Command Bar Size.
Pronounce the word or phrase clearly and correctly in the language you selected in Language.
✎
3. Wait until recognition is complete, and then say the next command in the same fashion
To exit the Voice Control mode, speak the Trigger Words or "Cancel" using the TV's
✎
microphone, or press the RETURNR button.
Using the Voice Text Input Mode
1. Say "Search All" while in the Voice Control mode.
When you use a QWERTY keypad screen, you can use the Voice Text Input Mode. Say the
✎
Trigger Words that you selected into the microphone embedded in the TV or press the VOICE˜
button on your remote. You cannot use it for some UIs such as URL input boxes.
2. Say the word or phrase you wish to search for.
3. The TV executes the spoken function.
Voice Control performance levels will vary based on the language spoken.
✎
English - 28
Page 29

Motion Control
Menu → System → Voice and Motion Control → Motion Control
Enable or disable the Motion Control function. Lets you control your TV by moving the TV cursor using
specific motions.
Motion Control function can be affected recognition by motion posture, or ambient brightness
✎
conditions.
Some applications may not support Motion Control.
✎
You may experience physical fatigue when you use the Motion Control for a long time.
✎
To use the Motion Control, please avoid direct sunlight.
✎
We are recommended using Motion Control function within about 5 – 13 ft with your TV. TV
✎
Camera's recognition range may differ depending on the angle of camera or other conditions. You
can check the recognition range of TV camera by using Motion Control Environment Test (System
→ Voice and Motion Control → Motion Control → Motion Control Environment Test).
■ Motion Control
Turns the Motion Control function on or off.
■ Motion Guide Bar Size
Set the Motion Guide Bar Size mode between Minimum or Full.
■ Motion Control Environment Test
You can test the brightness of room and the camera angle.
− Brightness Test: This test checks to see if your room is bright enough for Motion Control to work
properly. Select Start using your remote. The test will starts and should take only a few seconds.
(Appropriate ambient brightness: 50 – 500 Lux)
Do not illuminating a sunlight or lights directly into the camera lens.
✎
Make sure that the camera lens is cloaked by an object.
✎
− Camera Angle Test: On the Camera Angle Test screen, select Start using your remote. A
rectangle appears on the screen. Move yourself into the rectangle by adjusting the camera or
moving yourself in front of the camera. If you are not within the rectangle position, the test may not
work properly. After aligning your body with the TV, raise your hand while opening it toward the
screen, hold it for a moment and then wave it 3 – 4 times to the left and right.
To use the Motion Control function, follow these steps:
1. To use the Motion Control, raise your hand while opening it toward the screen, hold it for a moment
and then wave it 3 – 4 time to the left and right. Motion Control starts. If the Motion Control starts,
the cursor is displayed at the center of the screen and the Motion Guide Bar Size is at the bottom of
the screen.
2. Control the TV using your hands.
Note that the Motion Control function closes if your hands go out of the camera range.
✎
While using the Motion Control, if you use the other devices (i.e. remote control, keyboard, etc.),
✎
Motion Control closes.
English - 29
Page 30
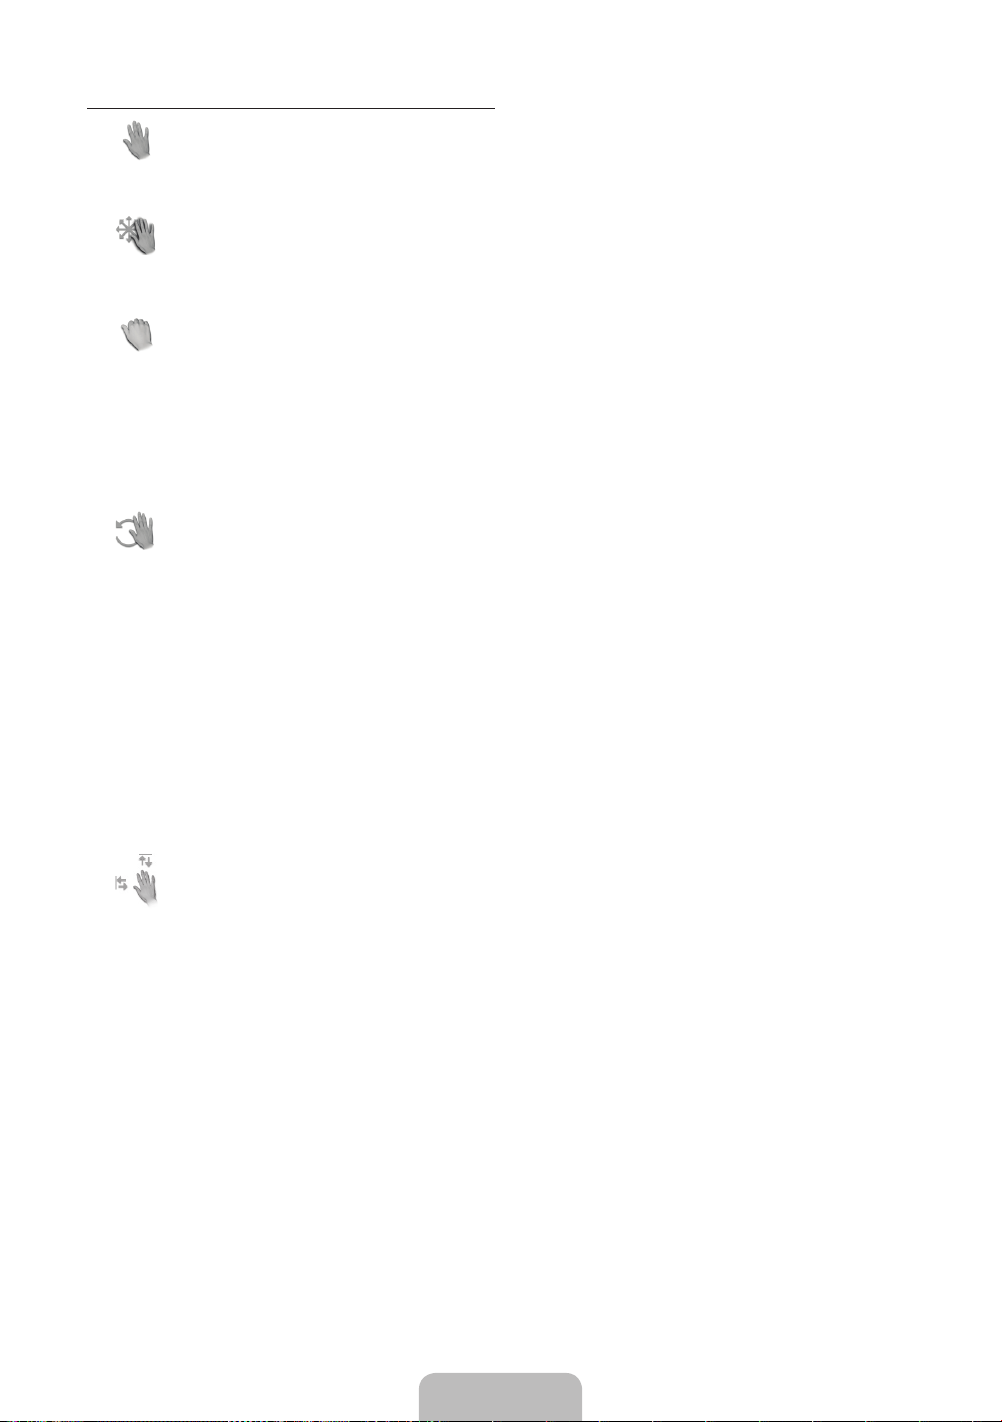
Controlling the TV with your hands using motions
■
Access Motion Control
− Action: Spread your hand in the direction of the camera, and shake it three or four times from a
side to side.
■
Pointing Navigation
Moves the cursor to the position you want.
− Action: Spread your hand and guide the cursor to position you want.
■
Run
Selects an item or executes a command that is indicated by the cursor or is highlighted.
− Action: Clench your fi st.
When you watch some page or some image, you can move the page or image to direction you
✎
want if it can be moved. In this case, use and keep the Run motion, and then move it to direction
you want. To move a page, clench your fist, keep it clenched, and then move it in the direction you
want the page to move. Note that not all pages can be moved.
Return
■
Return to the previous menu.
− Action: Spread your hand and rotate it counterclockwise.
■ Channel / Volume Control
Changes the channel or adjust the volume.
If you use the Motion Control function while watching a channel, the channel / volume control
✎
screen appears.
− Action: Use the Pointing Navigation motion to move the cursor to the channel or volume
controller, and then uses the Run motion to adjust the channel or volume.
If you use the Run motion once, it has the same effect as pressing a button on your remote.
✎
If you hold the Run motion, it has the same effect as pressing and holding a button on your
remote.
■
Scroll
Scroll the page in the direction you want. For example, suppose that you want to scroll down.
Some applications may not support this function.
✎
1. Move the cursor to the bottom of the screen (page scroll zone) using the Pointing Navigation
motion.
2. Move the cursor to the center of the screen using the Pointing Navigation motion.
3. The page will move down.
English - 30
Page 31

Face recognition
™ → Tools → Settings → Account Manager → Face recognition
Enable or disable the Face recognition function. Face recognition lets you register your face with your
Samsung account. Also, you can log in to the Samsung account using the Face recognition function
without inputting your account ID or your account password.
You can register your face in only one account.
✎
To register your face in your Samsung account, follow these steps:
To use this function, you must log into Smart Hub. If you don't have a Samsung Account, you
✎
should create one before using this function. To create your Samsung Account, refer to “Creating an
Account” (Advanced Features → Smart Hub) in the e-Manual.
1. On the Smart Hub screen, open the Tools menu using your remote, and then select Settings.
2. Select Account Manager. The Account Manager screen appears.
3. Select Face recognition. The Face recognition screen appears.
4. Move your face into the square in the center of the screen, and then wait until the square changes from
red to green.
If Face recognition fails, select Retry and then try again.
✎
5. When done, your face is now registered in your Samsung account. The Continue to Register Service
window appears.
To close the window, select OK. You can register services later using Link to other accounts in
✎
the Smart Hub menu (Settings → Account Manager → Link to other accounts).
English - 31
Page 32

To log in to your Samsung account using Face recognition, follow these steps:
If you use Face recognition to log into Smart Hub, it may be less secure than logging in with a
✎
password.
1. With the Smart Hub screen displayed, select a using your
remote. The Samsung Account screen appears.
2. Select Face Recognition Mode. The Face recognition screen
appears.
To return to the Samsung Account screen, select
✎
What is Samsung Account? A Samsung Account is an integrated
membership account that lets you access all the services
provided by Samsung through a single registered account.
Samsung Account Press [Enter]
Password Press [Enter]
Face Recognition Mode
You can log in using facial recognition. Turn your face
towards the TV with your face level with the camera.
Log In
Remember my password
Sign me in automatically
Log In
Create Account
Log In
Cancel
Password mode.
Password mode Pause
3. The TV starts Face recognition. Face the front of the TV screen. The TV will recognize your face
automatically.
A Green square indicates a registered face. A red-square indicates an unregistered face.
✎
If the TV fails to recognize your face, try again.
✎
4. The TV logs you into your Samsung account automatically.
If the TV recognizes two or more registered faces, the Samsung account list appears. Select your
✎
account to log in.
If your face is unregistered, you can register your face in your Samsung account. Follow steps 4
✎
through 5 in the “To register your face to your Samsung account:” procedure above.
If you have no account, you can create one. For more detailed information, refer to “Creating an
✎
Account” (Advanced Features → Smart Hub) in the e-Manual.
RReturn
RReturn
English - 32
Page 33

The Evolution Kit Slot (Kit Sold Separately)
This socket is designed to accept an extension device called the Evolution Kit. The Evolution Kit enables
the TV to run a variety of the latest applications for a better user experience.
The Evolution Kit, which may not be available depending on the product, will be sold separately in 2013 or
later.
English - 33
Page 34

Connecting to a Network
You can set up your TV so that it can access SMART TV applications through your local area network
(LAN) using a wired or wireless connection.
After you have “physically” connected your TV to your network, you must configure the network
✎
connection to complete the process. You can configure the connection during the Initial Setup
process (see page 16) or after the Initial Setup process, through the TV’s menu (see page 36).
Network Connection - Wireless
You can connect your TV to your local area network (LAN) through a standard wireless router or modem.
Wireless IP Router or Modem
The LAN Port on the Wall
This TV supports the IEEE 802.11a/b/g and n communication protocols. Samsung recommends using
IEEE 802.11n. If you play video using IEEE 802.11a, b, or g, the video may not play smoothly.
Most wireless network systems incorporate a security system that requires devices that access the
network through an access point or AP (typically a wireless router or modem) to transmit an encrypted
security code called an access key.
Your TV is compatible with the following security protocols:
• Authentication Mode: OPEN, SHARED, WPAPSK, WPA2PSK
• Encryption Type: WEP, TKIP, AES
If you select Pure High-throughput (Greenfield) 802.11n mode and the Encryption type is set to WEP or
TKIP on your AP or wireless router, Samsung TVs will not support a connection in compliance with new
Wi-Fi certification specifications.
that has a DHCP Server
LAN Cable (Not Supplied)
English - 34
Page 35

Network Connection - Wired
There are three main ways to connect your TV to your network using cable, depending on your network
setup. They are illustrated starting below:
The Modem Port on the Wall
The Modem Port on the Wall
Modem Cable
(Not Supplied)
The LAN Port on the Wall
External Modem
(ADSL / VDSL / Cable TV)
External Modem
(ADSL / VDSL / Cable TV)
LAN Cable
(Not Supplied)
TV Rear Panel
LAN Cable (Not Supplied)Modem Cable (Not Supplied)
TV Rear Panel
IP Router that has a
DHCP Server
LAN Cable
(Not Supplied)
TV Rear Panel
LAN Cable (Not Supplied)
The TV does not support network speeds less than or equal to 10Mbps.
✎
Use Cat 5 or 6 (STP Type*) cable for the connection. (*Shielded Twisted Pair)
✎
English - 35
Page 36

Configuring Network Connections
After you have run the initial setup, you can configure or reconfigure the network connections through the
TV's menu.
Configuring a Wireless Network Connection
The instructions below are for networks that use the Dynamic Host Configuration Protocol (DHCP) to
configure network connections automatically. Most wireless networks use DHCP. If you have a Static IP
network, see the e-Manual for configuration instructions.
To configure the network connection for a network that uses DHCP, follow these steps:
1. Connect your TV to your network as shown in the illustration on page 34.
2. Turn on your TV, and then go to the Network Settings screen. (Menu → Network → Network
Settings)
3. Select Start. The Network function searches for available wireless networks. When done, it displays a
list of the available networks.
4. In the list of networks, move the highlight to select a network, and then select Next.
If you have a WPS(PBC) compatible router, select WPS(PBC) instead, and then follow the
✎
directions on the screen.
5. Enter your network security key or WPS PIN using your remote.
Enter numbers and letters using your remote.
✎
• If you are using the standard remote, you can enter numbers by pressing the number buttons
on your remote.
• To enter a letter, move the Highlight to the letter, and then select it. You can enter numbers in
the same fashion if you choose.
To display capital letters (or redisplay small letters if capital letters are displayed), select Caps or
✎
Shift.
To display symbols and punctuation, select F. To redisplay letters, select F again.
✎
6. When done, select Next if you have entered a security key or WPS PIN if you have entered a WPS PIN.
7. The TV checks the wireless connection. If the connection is successful, the “You are connected to the
Internet. If you have any problems using online services, please contact your Internet Service
Provider.” message appears. Select Next using your remote.
For more detailed information, see “Setting up the Wireless Network” in the e-Manual.
✎
If you want to configure the connection manually, select IP Settings on the Network Connection
✎
screen. Set IP Mode to Manual, and then enter the IP Address, Subnet Mask, Gateway, and
DNS Server manually.
English - 36
Page 37

Configuring a Wired Network Connection
Most home networks use the Dynamic Host Configuration Protocol (DHCP) to configure network
connections. Home networks that support DHCP automatically provide the IP address, subnet mask,
gateway, and DNS values your TV needs to access the Internet so you don’t have to enter them manually.
If you have a Static IP network, see your user’s manual for configuration instructions.
To configure the network connection for a wired network that uses DHCP, follow these steps:
1. Connect your TV to your network as shown in one of the illustrations on page 35.
2. Turn on your TV, and then go to the Network Settings screen. (Menu → Network → Network
Settings)
3. Select Start.
4. The Network Connection screen appears, and verifies the network connection. When the connection
has been verified, the “You are connected to the Internet. If you have any problems using online
services, please contact your Internet Service Provider.” message appears. Network set up is
completed.
If your TV cannot acquire network the connection values automatically or if you want to set the
✎
connection manually, select IP Settings on the network connection screen. Set IP Mode to Manual,
and then enter the IP Address, Subnet Mask, Gateway, and DNS Server manually.
For more detailed information, refer to “Setting up the Wired Network” in the e-Manual.
✎
English - 37
Page 38

The Smart Touch Control
For more detailed information about Smart Touch Control, see "Using the Smart Touch Control" in
✎
e-Manual.
Smart Touch Control
You can speak a voice command that
displayed to the TV using MIC. To use
MIC, press the VOICE
remote.
Voice Control function can be
✎
affected recognition by unclear
pronunciation, voice level, or
surrounding noise.
LED to show the active device.
Displays color and playing control
functions. You can select a function
using the Touch Pad.
T
: Quickly select frequently used
functions. Use this button in a specific
feature. For details, refer to e-Manual.
z
: Changes channels.
Turns the TV on and off.
Š
: Displays a list of recently used
functions. You can select a function
again using the Touch Pad easily and
y
: Adjusts the Volume.
quickly.
.*$
TV STB BD
˜
button on your
Displays the shortcut functions list. You
can select a function using the Touch
RETURNR: Returns to the previous
VOICE
˜
: Lets you access the Voice
Control function. When you press
the button, the TV displays the
command list. You can speak using the
microphone embedded in your remote.
For more detailed information
✎
about the Voice Control function,
see "SMART Interaction" in the
e-manual or see page 26.
š
NUMBER
button screen. You can select a number
: Displays the Number
using the Touch Pad.
Pad.
menu.
RETURN VOICE NUMBER
Touch Pad
• Drag on the Touch Pad to move the
focus on the screen.
• Click on the Touch Pad to run the
focused item.
• If you don't press any button within
30 seconds, the Smart Touch
Control is set to Sleep mode
automatically. To wake up the Smart
Touch Control, press the Touch Pad.
• If you press and hold the Touch Pad,
it has the same effect as pressing
M
the MUTE
remote. However, this action scrolls
the page on a Web Browser.
• Tap on the Touch Pad or press the
RETURN
normal state.
Brings up the Smart Hub applications.
See the e-Manual chapter Advanced
Features → Smart Hub.
To exit an application that is
✎
running easily, press the
button on your
R
button to return to the
™
button.
English - 38
Page 39

Installing batteries (Battery size: AA)
2
11
1. Press the back of the remote at the very bottom with both thumbs, and then slide the battery cover up
in the direction of the arrow.
2. Install two batteries so that the polarity of the batteries (+/-) matches the illustration in the battery
compartment.
3. Slide the cover down in the direction of the arrow to close the battery cover.
Initial Pairing for Smart Touch Control
After you have run the Initial Setup on your TV, you should connect your Smart Touch Control to your TV.
1. Point the Smart Touch Control toward the TV's IR Blaster and press any key on the Smart Touch
Control.
2. The connection icon appears at the bottom left of the screen and the Smart Touch Control is
automatically connected to the TV.
If you want to perform the pairing process again, press the reset button in the center of the back
✎
cover using a pin or the tip of an unbent paper clip. The Smart Touch Control will be initialized.
• Smart Touch Control PAIRING Reset button.
Calibrating the Touch Pad
To calibrate the Touch Pad on the Smart Touch Control, follow these steps:
1. Press the NUMBERš button for 3 seconds. The calibration starts.
2. When done, all the LEDs on the top of the Smart Touch Control blink twice simultaneously.
While calibrating, don't touch the Touch Pad.
✎
If the Touch Pad looses accuracy, re-calibrate the Touch Pad by repeating Steps 1 and 2.
✎
English - 39
Page 40

Using the Touch Pad
To display the shortcut functions list on the bottom of the screen, press the ‹ button at the bottom of the
Touch Pad. This list includes Menu, Source, Ch List, 3D, Support, and a number of other functions.
To display the color and playing control functions on the top of the screen, press the
button on the
top of the Touch Pad.
To Move the Highlight: Rest your finger on the Touch Pad, and then slide it
from one side to the other, from top to bottom, or bottom to top.
To move the Highlight continuously, flick your finger across the Touch Pad
✎
from right to left, left to right, top to bottom, or bottom to top.
Menu
RETURN VOICE NUMBER
Source
To Select an item: Press the Touch Pad.
RETURN VOICE NUMBER
Open the History screen.: Press the Š button in the left of the Touch Pad.
Displays a list of recently used functions. You can select a function again using
the Touch Pad easily and quickly.
Open the Tools menu.: Press the T button in the right of the Touch Pad.
Quickly select frequently used functions.
English - 40
Page 41

Open the color, playing control and exit buttons.: To display the color, exit
and play control buttons at the top of the screen, press the button at the
top of the Touch Pad.
e: Close all menus shown on the screen.
Open the shortcut functions screen.: Press the ‹ button in the bottom
center of the Touch Pad.
Quickly select frequently used functions:
RETURN VOICE NUMBER
Using the Scroll mode
If you press and hold the Touch Pad when using Web Browser, the Touch Pad switches to the Scroll
mode.
In the Scroll mode, slide your finger in the Touch Pad from one side to the other, the highlight moves page
units.
To return to the general mode of the Touch Pad, press the Touch Pad or RETURNR button on your
✎
Smart Touch Control.
To Enter a channel number through Smart Touch Control
1. While watching a broadcast, press the NUMBERš button on the Smart Touch Control. The TV
displays the number button screen.
2. Using the Touch Pad, highlight a number, and then press the Touch Pad. The TV displays a list of
channels that start with the number you selected.
3. Using the Touch Pad, highlight the channel in the list you want, and then press the Touch Pad.
You can also change the channel by touching the up or down channel icon on the Touch Pad. If
✎
you touch the Touch Pad immediately after, the TV displays the list of memorized channels. Select a
channel by moving or flicking your finger up or down, and then pressing the Touch Pad.
If you change a channel by entering the channel number, that channel number is memorized and
✎
added to the Added Ch. list automatically. You can change channels using the memorized channel
list easily and quickly.
English - 41
Page 42

The IR Blaster
1
2
1
2
1
1
2
1
1
2
1
When you connect an IR Blaster with your TV, you can control connected external devices with your TV
using the Smart Touch Control.
Install the IR Blaster within 50 cm and 45 degrees of the up, down, left and right directions of the IR
✎
sensor of the external device.
IR Blaster
Pairing Button
Power Switch
OPEN
ON
OFF
PAIRING
OPEN
Device Indicator LED
IR Blaster shows the pairing state.
Installing batteries (Battery size : AA)
X
1
2
1
OPEN
OPEN
OPEN
OPEN
1. Hold the both sides of the battery holder and pull it out.
2. Install four batteries so that the polarity of the batteries (+/-) matches the illustration in the battery
compartment.
3. Push it back.
English - 42
Page 43

IR Blaster Pairing
O
O
O
O
1. Turn the IR Blaster on, and if the LED blinks, connect the IR Blaster to the TV.
2. Briefly point the IR Blaster toward the IR sensor of the TV and press the PAIRING button at the bottom.
3. The connection icons appear on the bottom left of the screen, and the TV connects to IR Blaster
automatically.
If the connection process failed, please turn off and on the IR Blaster, try again from step 2.
✎
PEN
N
FF
PAIRING
PEN
• IR Blaster PAIRING Reset button.
Precautions for Using an IR Blaster
To use an IR Blaster, the IR Blaster must be located nearby with external devices connected to the TV.
Note that it should be no obstacle between the external device's IR receiver and an IR Blaster.
English - 43
Page 44

Setting up the Universal Remote Control
Lets you control a Set-Top-Box (STB) or a BD player or both connected to the TV using your Smart Touch
Control. After you connect the device to the TV, the Smart Touch Control can control the navigation,
number, and other keys needed to operate and control the device.
To connect the external device to your Smart Touch Control, follow these steps:
1. When you connect IR Blaster for the fi rst time, a
pop-up appears. Select Yes to set IR Blaster and
Smart Touch Control, and then press the Touch
Pad.
2. To reset IR Blaster and Smart Touch Control,
Set Up Universal Remote
To use IR Blaster, universal remote control
setup needs to be complete. Do you want to
continue with setup?
Yes No
press the ‹ button on Smart Touch Control,
and then select Set Up Universal Remote
.
3. Select Set up a device to control, and then
press the Touch Pad.
What do you want to do?
Set up a device to control
View remote control settings
Previous
4. Select an external device from the connected
devices, and then press the Touch Pad.
5. Select the port used to connect the external
device, and then press the Touch Pad.
Make sure that the selected device is on. If
✎
it is turned off, turn the power on and press
Refresh.
Which device do you want to control?
Set-top box
Blu-ray player
Which Input Source does Set-top Box use?
HDMI2
HDMI3
HDMI4
Video
Component
Select a device to
control. The device
you select must be
connected to your TV.
Select the input source
that the Set-top Box is
conneted to.
If the port you want to
select is deactivated,
please power on Set-top
Box you want to connect
and press the refresh
button.
Previous
Next
Refresh
Previous
Next
English - 44
Page 45

6. Select Search Brands, and then press the
Touch Pad. A keyboard and an entry field appear.
Enter the first few letters of the brand name of
your device using the Smart Touch Control, and
then select Done at the bottom of the keyboard.
In the list that appears below the entry field,
select the brand name of your device, and then
press the Touch Pad.
If you want to search the brand of STB (Set-
✎
Top box), you can search the STB by using
the brand name or a cable provider.
What is the brand of Set-top Box?
Search Brands
Check the brand
name of your Set-top
Box and select it from
the list. If you want
to search manually,
select ‘search brands’.
Previous
Next
7. Select Search Model, and then press the Touch
Pad. A keyboard and an entry field appear. Enter
the first few letters and numbers of the model
name of your device using the Touch Control,
and then select Done at the bottom of the
keyboard. In the list that appears below the entry
field, select the model name of your device, and
then press the Touch Pad.
If the search for model name does not work
✎
properly, search with a part of the model
name or use the search for recommended
model code.
For more information on the search for
✎
recommended model code function, refer to
page 46.
8. Select Download, and then press the Touch
Pad. Download the configuration data for the IR
Blaster in the same way.
9. When all the settings are complete, select the
Complete button and press the Touch Pad.
What is the model number of your Set-top Box?
Search Model
Recommended
Check the model
number of your
Set-top Box. Then
select ‘search model’
and enter the correct
model number for your
Set-top Box.
Universal remote setup data will now be downloaded to your Smart
Touch control.
Press Download on the TV screen using your Smart Touch Control.
Universal remote setup complete.
Congratulations! Your
Set-top Box-Samsung
connected on Component
is now ready to use.
Previous
Next
Previous
Download
Previous
Set up another
Complete
English - 45
Page 46

Using the Search for Recommended Model Code
1. In the Search for model name step in the
integrated remote control setup, select the
Recommended and press the Touch Pad.
2. Select Download to download the
recommended model code.
3. Point the Smart Touch Control forward to the
TV's IR sensor and press the Touch Pad to test if
the device works.
What is the model number of your Set-top Box?
Search Model
Recommended
Check the model
number of your
Set-top Box. Then
select ‘search model’
and enter the correct
model number for your
Set-top Box.
Universal remote setup data will now be downloaded to your Smart
Touch control.
Press Download on the TV screen using your Smart Touch Control.
Press the button below until the power is turned on and off on your
Set-top Box.
Test
Is it working?
Yes, go to the next step.
No, try the test with a different code set.
Previous
Next
Previous
Download
Previous
Next
4. If the downloaded recommended model code
does not work, repeat the steps from step 3.
When you use the BD home theater by using Universal Remote, some buttons may not be supported.
✎
Press the button below until the power is turned on and off on your
Set-top Box.
Test
Is it working?
Yes, go to the next step.
No, try the test with a different code set.
In this case, we recommend to use Anynet+ (HDMI-CEC) function.
Previous
Next
English - 46
Page 47

How to view the e-Manual
You can fi nd instructions for your TV’s features in the e-Manual. To open the e-Manual, press the
SUPPORT button on your standard remote or select Support using the Smart Touch Control.
You can also access it through the menu:
Menu → Support → e-Manual
Access the e-Manual
To use the e-Manual, follow these steps:
1. When you need help, select Support using your remote. The Support screen appears.
2. Select e-Manual using your remote. The e-Manual screen appears.
3. Select a desired category.
4. Select a desired topic. The e-Manual displays the page you want to see.
Blue words in e-Manual signify menu options or selections on TV screen.
✎
Green icons in the e-Manual signify a button on your remote.
✎
Arrow steps (e.g. Menu → Support → e-Manual) in the e-Manual signify the sequence of steps
✎
required to access an option or activate a function.
How to toggle between an e-Manual topic and the corresponding OSD menu(s).
Changing the Preset Picture Mode
Picture
Picture Mode
Backlight
Contrast
Brightness
Sharpness
Color
Tint (G/R) G50
This function is not enabled in some menus.
✎
You can’t use the Try N ow function if the menu is not available.
✎
Picture Mode
Menu → Picture → Picture Mode
Picture modes apply preset adjustments to the picture.
N When your TV is connected to a PC via the HDMI to DVI cable,
you can only select Entertain and Standard.
• Dynamic
Brightens the screen. Suitable for a bright room.
• Standard
Suitable for a normal environment.
• Natural
for LED TV / Relax for PDP TV
Suitable for reducing eye strain.
• Movie
Darkens the screen, making it less glary. Suitable for watching
movies in a darkened room.
Picture
Picture Mode
Backlight
Contrast
Brightness
Sharpness
Color
Tint (G/R) G50
1. To go to the topic's corresponding menu option, select a using your remote.
2. To return to the e-Manual screen, select Support using your remote.
Changing the Preset Picture Mode
Picture Mode
Menu → Picture → Picture Mode
Picture modes apply preset adjustments to the picture.
N When your TV is connected to a PC via the HDMI to DVI cable,
you can only select Entertain and Standard.
• Dynamic
Brightens the screen. Suitable for a bright room.
• Standard
Suitable for a normal environment.
• Natural
for LED TV / Relax for PDP TV
Suitable for reducing eye strain.
• Movie
Darkens the screen, making it less glary. Suitable for watching
movies in a darkened room.
‘ Back to e-Manual
English - 47
Page 48

Using the colored and function buttons with the e-Manual
• Scroll bar: Scroll the e-Manual screen up or down.
• l / r: Moves to the previous or next chapter.
• a Try Now: Move to the OSD menu that corresponds to the topic. To return to the e-Manual screen,
select Support using your remote.
• b Home: Moves to the e-Manual home screen.
• { Position: Each time you select {, you change the position of the e-Manual screen.
• } Index: Displays the Index screen.
• R Return: Return to the previous screen.
How to search for a topic on the index page
1. Select } using your remote. The Index screen appears.
2. To search for a topic, select a letter. The Index displays a list of topics and keywords that begin with the
letter you selected.
3. Select a topic or keyword you want.
4. The e-Manual page with the topic appears.
To close the Index screen, press the RETURNR button.
✎
To Change the screen position of the e-Manual
If the e-Manual screen is not invisible well because the OSD Menus screen, you can change the e-Manual
screen's position.
1. Move the Highlight to the e-Manual screen by pressing the SUPPORT button on your standard remote
or select Support using the Smart Touch Control.
2. Press the { button on your standard remote, or select { using the Smart Touch Control. Each time
you select {, the position of the e-Manual will change.
English - 48
Page 49

Troubleshooting
If the TV seems to have a problem, first review this list of possible problems and solution. Also review the
Troubleshooting Section in the e-Manual. If none of the troubleshooting tips apply, visit www.samsung.
com/support or call Samsung Customer Service at 1-800-SAMSUNG (1-800-726-7864).
Issues Solutions and Explanations
Flickering and Dimming If your Samsung Television is flickering or dimming sporadically, you may
need to disable some of its energy efficient features such as the Eco
Sensor or the Energy Saving feature. Follow the steps below with your
remote to turn these features off or on.
• Energy Saving: User Menu → System → Eco Solution → Energy
Saving
• Eco Sensor: User Menu → System → Eco Solution → Eco Sensor
Component Connections /
Screen Color
Screen Brightness If you find that the colors on your Samsung TV are correct but just a little
Blur If you find that there is a blur or “ghostlike” appearance to the images on
If you find that the color on your Samsung television’s screen is not
correct or black and white, first run a Self Diagnosis on the TV to make
sure there are no device issues.
• Self Diagnosis: User Menu → Support → Self Diagnosis →
Picture Test
If the problem does not appear in the Picture test, make sure:
• Your connections are all consistent. For example, if you’ve used the
AV In jack on your TV, make sure you have used the AV Out jack on
your video source.
• You have connected your devices to the correct jacks. For example, if
you use the Component jacks, labeled Pb, Pr, and Y, to connect your
TV and video source, make sure you have connected the blue Pb jack
on the video source to the blue Pb jack on the TV, and the yellow Y
jack on the source to the yellow Y jack on the TV.
too dark or bright, try adjusting the following settings in the Picture menu
option of the Main menu:
• Backlight, Contrast, Brightness, Sharpness, Color, Tint (G/R) and
so on.
your television’s screen, you might be able to correct the blurring using
Auto Motion Plus.
• Auto Motion Plus: User Menu → Picture → Picture Options →
Auto Motion Plus
English - 49
Page 50

Issues Solutions and Explanations
Unwanted Powering Off If your Samsung TV appears to turn off by itself, there may be an issue
with either your Timer settings or your Eco friendly No Signal Power Off
feature.
First make sure Sleep Timer is not accidentally set. The Sleep Timer
turns off the TV automatically after a certain period of time has passed.
• Sleep Timer: User Menu → System → Time → Sleep Timer
If the Sleep Timer is not activated, you may have engaged the No Signal
Power Off or Auto Power Off feature.
• No Signal Power Off: User Menu → System → Eco Solution → No
Signal Power Off
• Auto Power Off: User Menu → System → Eco Solution → Auto
Power Off
Trouble Powering On Press the Power on button on the TV or remote. The light should
blink about 5 times before the TV turns on.
If you find that you are having trouble powering on your Samsung
television, there are a number of things to check before making a call to
the service department.
If you’re sure your power cord, remote control, and PC are functioning
properly, you may be having a cable issue. If you have a cable or satellite
box, your TV may appear to be off because the cable or satellite box is
not outputting a signal. To test the signal output of your cable or satellite
box, press the guide or info button on the cable or satellite box remote
control. If the screen displays the guide or info data, the problem is
caused by the box.
Stand Assembly If you have any trouble assembling the stand first, review "Install the
Stand" in the paper manual.
Cannot Find a Channel
Re-run Setup (Go to User Menu → System → Setup) or run Auto
Program. (Go to User Menu → Channel → Auto Program).
For detailed troubleshooting information, watch the troubleshooting videos at www.samsung.com/
✎
spsn.
English - 50
Page 51

Issues Solutions and Explanations
The TV won’t turn on. • Make sure the AC power cord is securely plugged in to the wall outlet
and the TV.
• Make sure the wall outlet is working.
• Try pressing the P button on the TV to make sure the problem is not
the remote. If the TV turns on, refer to “Remote control does not work”
below.
There is no picture/video. • Check the cable connections. Remove and reconnect all cables
connected to the TV and external devices.
• Set the video outputs of your external devices (Cable/Sat Box, DVD,
Blu-ray etc) to match the TV's input connections. For example, if an
external device’s output is HDMI, it should be connected to an HDMI
input on the TV.
• Make sure your connected devices are powered on.
• Be sure to select the correct input source
• Reboot the connected device by unplugging it, and then reconnecting
the device’s power cable.
The remote control does not
work.
The cable/set top box remote
control doesn’t turn the TV on
or off, or adjust the volume.
• Replace the remote control batteries. Make sure the batteries are
installed with their poles (+/–) in the correct direction.
• Clean the sensor’s transmission window on the remote.
• Try pointing the remote directly at the TV from 5~6 feet away.
• Program the Cable/Set remote control to operate the TV. Refer to the
Cable/Set-Top-Box user manual for the SAMSUNG TV code.
This TFT LED panel uses a panel consisting of sub pixels which require sophisticated technology to
✎
produce. There may be, however, a few bright or dark pixels on the screen. These pixels will have no
impact on the performance of the product.
To keep your TV in optimum condition, upgrade to the latest firmware on the Samsung web site by
✎
USB (samsung.com → Support → Downloads).
English - 51
Page 52

Licenses
Storage and Maintenance
If a sticker was attached to the TV screen, some debris can remain after you remove the sticker.
✎
Please clean the debris off before watching TV.
The exterior and screen of the product can get scratched during cleaning. Be sure to wipe the exterior
✎
and screen carefully using the cloth provided or a soft cloth to prevent scratches.
Do not spray water directly onto the product. Any
liquid that goes into the product may cause a
failure, fire, or electric shock.
English - 52
Clean the product with a soft cloth dampened with
a small amount of water. Do not use a flammable
liquid (e.g. benzene, thinners) or a cleaning agent.
Page 53

Securing the TV to the Wall
Caution: Pulling, pushing, or climbing
on the TV may cause the TV to fall. In
particular, ensure your children do not
hang over or destabilize the TV. Doing
so may cause the TV to tip over, causing
serious injuries or death. Follow all safety
precautions provided in the Safety Flyer
included with your TV. For added stability
and safety, you can purchase and install
the anti-fall device as described below.
The TV-Holder Kit (Sold Separately):
The parts below are included in the TV Holder kit. In addition, you need to provide a wood screw, screw
and molly, or other screw appropriate for the wall or cabinet you intend to secure the TV-Holder string to.
We recommend a size M4xL20 wood screw.
TV-Holder (BN96-15753A) Screw (M8 X L19)
Installing the TV-Holder
1. Remove the screw attached to the back of your TV, and then connect the TV-Holder to the TV with the
screw included in the TV-Holder Kit that is designated for your TV.
Make sure to use only the appropriate supplied screw. If you use a different screw, you can
✎
damage your TV.
2. Firmly fasten the screw you provided (size M4xL20 or similar) to the wall or cabinet where the TV is to
be installed.
If you fasten the screw to the wall, we recommend you drive the screw into a stud. If that is not
✎
possible, use a molly to anchor the screw.
English - 53
Page 54

3. Tie the TV-Holder cord to the screw fastened to the wall or cabinet so that the TV is fixed. See the
illustrations below.
Install the TV close to the wall so that it does not fall.
✎
When attaching the TV-Holder cord to the wall, tie the cord level with the ground or slanted
✎
downwards for safety purposes.
Check the cord occasionally to make sure it is secure.
✎
Before moving the TV, separate the connected cord first.
✎
4. Verify all connections are properly secured. Periodically check the connections for any sign of fatigue or
failure. If you have any doubt about the security of your connections, contact a professional installer.
To purchase the TV-Holder Kit, contact Samsung Customer Care
• In the United States: 1-800-SAMSUNG (1-800-726-7864)
• In Canada: 1-800-SAMSUNG (1-800-726-7864)
English - 54
Page 55

Specifications - Smart Touch Control
Model Name RMCTPE1
Power Source Battery (AA x 2)
To extend the battery life, use of alkaline battery is recommended
Compatibility LED TV Above LED E7500
PDP TV E8000
Dimension
(W x H x D)
Weight Without Batteries
Including Batteries
2.0 x 6.1 x 0.7 inches
(52.0 x 154.0 x 19.5 mm)
0.1 lbs (84.0 g)
0.2 lbs (130.0 g)
Specifications - IR Blaster
Model Name VG-IRB2000
Power Source Battery (AA x 4)
To extend the battery life, use of alkaline battery is recommended
Compatibility LED TV Above LED E7500
PDP TV E8000
Dimension
(W x H x D)
Weight Without Batteries
Including Batteries
3.7 x 2.6 x 3.1 inches
(95.0 x 65.0 x 79.0 mm)
0.1 lbs (86.5 g)
0.3 lbs (178.5 g)
English - 55
Page 56

Specifications
Display Resolution 1920 x 1080
Environmental Considerations
Operating Temperature
Operating Humidity
Storage Temperature
Storage Humidity
Stand Swivel (Left / Right) 0˚
Model Name UN46ES8000 UN55ES8000
Screen Size
(Diagonal)
Sound
(Output) 10 W X 2
Dimensions (W x H x D)
Body
With stand
Weight
Without Stand
With Stand
Model Name UN60ES8000
Screen Size
(Diagonal)
Sound
(Output) 10 W X 2
Dimensions (W x H x D)
Body
With stand
Weight
Without Stand
With Stand
46˝ Class
(45.9˝ measured diagonally)
40.8 x 24.2 x 1.2 inches
(1038.7 x 614.7 x 30.8 mm)
40.8 x 25.7 x 8.2 inches
(1038.7 x 653.7 x 210.0mm)
26.4 lbs (11.9 kg)
32.1 lbs (14.6 kg)
50°F to 104°F (10°C to 40°C)
10% to 80%, non-condensing
-4°F to 113°F (-20°C to 45°C)
5% to 95%, non-condensing
55˝ Class
(54.6˝ measured diagonally)
48.4 x 28.4 x 1.2 inches
(1230.3 x 722.3 x 30.8 mm)
48.4 x 29.9 x 8.2 inches
(1230.3 x 761.6 x 210.0 mm)
36.5 lbs (16.6 kg)
42.5 lbs (19.3 kg)
60˝ Class
(60.0˝ measured diagonally)
53.8 x 31.8 x 1.2 inches
(1368.5 x 808.8 x 31.5 mm)
53.8 x 33.3 x 8.2 inches
(1368.5 x 847.9 x 210.0 mm)
45.3 lbs (20.5 kg)
51.8 lbs (23.5 kg)
Design and specifications are subject to change without prior notice.
✎
The actual appearance of the TV may differ from the images in this manual, depending on the model.
✎
This device is a Class B digital apparatus.
✎
For information about the power supply, and more about power consumption, refer to the label
✎
attached to the product.
Typical power consumption is measured according to Energy Star Program requirements for
✎
Televisions.
English - 56
Page 57

Display Resolution
If you have attached the TV to your PC, you can select one of the standard resolutions listed in the
Resolution column. The TV will automatically adjust to the resolution you choose.
Mode Resolution
IBM
MAC
VESA DMT
NOTE
✎
640 x 350
720 x 400
640 x 480
832 x 624
1152 x 870
640 x 480
640 x 480
640 x 480
800 x 600
800 x 600
800 x 600
1024 x 768
1024 x 768
1024 x 768
1152 x 864
1280 x 720
1280 x 800
1280 x 1024
1280 x 1024
1366 x 768
1440 x 900
1600 x 900RB
1680 x 1050
1920 x 1080
Horizontal Frequency
(KHz)
31.469
31.469
35.000
49.726
68.681
31.469
37.861
37.500
37.879
48.077
46.875
48.363
56.476
60.023
67.500
45.000
49.702
63.981
79.976
47.712
55.935
60.000
65.290
67.500
Vertical Frequency
(Hz)
70.086
70.087
66.667
74.551
75.062
59.940
72.809
75.000
60.317
72.188
75.000
60.004
70.069
75.029
75.000
60.000
59.810
60.020
75.025
59.790
59.887
60.000
59.954
60.000
Pixel Clock Frequency
• The interlaced mode is not supported.
• The set might operate abnormally if you select a non-standard video format.
(MHz)
25.175
28.322
30.240
57.284
100.000
25.175
31.500
31.500
40.000
50.000
49.500
65.000
75.000
78.750
108.000
74.250
83.500
108.000
135.000
85.500
106.500
108.000
146.250
148.500
Sync Polarity
(H / V)
+/-
-/+
-/-
-/-
-/-
-/-
-/-
-/+/+
+/+
+/+
-/-
-/+/+
+/+
+/+
-/+
+/+
+/+
+/+
-/+
+/+
-/+
+/+
English - 57
Page 58

Video Codec
File Extension Container Video Codec Resolution Frame rate (fps) Bit rate (Mbps) Audio Codec
*.avi
*.mkv
*.asf
*.wmv
*.mp4
*.mov
*.3gp
*.vro
*.mpg
*.mpeg
*.ts
*.tp
*.trp
*.m2ts
*.mts
*.divx
*.webm WebM VP8 6 – 30 8 Vorbis
AVI
MKV
ASF
MP4
3GP
VRO
VOB
PS
TS
DIVX 3.11/4.x/5.x/6.1
MPEG4 SP/ASP
H.264 BP/MP/HP
Motion JPEG
Window Media Video v9
MPEG2
MPEG1
VP6 640 x 480 4
SVAF
MVC 24 / 25 / 30 40
1920 x 1080
6 – 30
1920 x 1080
AC3
30
30
LPCM
ADMPCM(IMA,
MS)
AAC
HE-AAC
WMA
DD+
MPEG(MP3)
DTS Core
DRA
Other Restriction
Video content will not play, or not play correctly, if there is an error in the content or the container.
✎
Sound or video may not work if the contents have a standard bit rate/frame rate above the compatible
✎
Frame/sec listed in the table above.
If the Index Table is damaged, the Seek (Jump) function is not supported.
✎
When you play video over a network connection, the video may not be played smoothly.
✎
The menu may take longer to appear if the video’s bit rate exceeds 10Mbps.
✎
Some USB/digital camera devices may not be compatible with the player.
✎
Video decoder
• Supports up to H.264, Level 4.1
• H.264 FMO / ASO / RS, VC1 SP / MP / AP L4 and AVCHD are not supported.
• For all Video codecs except MVC, VP8, VP6:
− Below 1280 x 720: 60 frame max
− Above 1280 x 720: 30 frame max
− GMC 2 over is not supported.
• Supports only SVAF Top/Bottom and Side by Side.
• Supports only BD MVC Spec.
Audio decoder
• WMA 10 Pro supports up to 5.1 channel. WMA lossless audio is not supported.
• RealAudio 10 lossless is not supported.
• QCELP, AMR NB/WB are not supported.
• If Vorbis is only in Webm container, supports up to 2 channel.
English - 58
Page 59

■ Jack panel detail / Rear view
Dimensions
6
1
4
5
Model name
UN46ES8000 15.7 15.7 27.7 4.9 4.7 3.8
UN55ES8000 15.7 15.7 33.1 6.2 4.6 7.3
UN60ES8000 15.7 15.7 35.8 8.9 6.0 9.3
1 2 3 4 5 6
2
3
(Unit: inches)
NOTE: All drawings are not necessarily to scale. Some dimensions are subject to change without prior
notice. Refer to the dimensions prior to performing installation of your TV. Not responsible for typographical
or printed errors.
© 2012 Samsung Electronics America, Inc
English - 59
Page 60

Index
A
Assembling the Stand Wire Holder ....................... 5
Auto Program ..................................................... 18
C
Calibrating the Touch Pad ................................... 39
Changing the Input Source ................................. 24
Clock .................................................................. 19
Configuring the Basic Settings in Initial Setup ..... 16
Connecting the Power Cord
and the Antenna or Cable Connection ................ 12
Connecting to a Network .................................... 34
Connecting to a PC ............................................ 23
Connecting to Audio Devices .............................. 22
Connecting to AV Devices ..................................20
Controlling the TV
with your hands using motions ........................... 30
D
Display Resolution .............................................. 57
F
Face recognition ................................................. 31
H
Howling .............................................................. 27
How to Use Edit Name ....................................... 24
How to view the e-Manual .................................. 47
I
Initial Pairing for Smart Touch Control .................39
Installing the Wall Mount (Optional) .......................8
IR Blaster Pairing ................................................ 43
L
Language ........................................................... 27
Licenses ............................................................. 52
M
Menu Language ................................................. 16
Motion Control ....................................................29
Motion Control Environment Test ........................ 29
Motion Guide Bar Size ........................................ 29
S
Securing the TV to the Wall .................................53
Setting up the Universal Remote Control ............44
SMART Interaction ............................................. 26
Software Upgrade ..............................................18
Specifications ..................................................... 56
Store Demo ........................................................ 16
T
The Evolution Kit Slot (Kit Sold Separately)..........33
The IR Blaster ..................................................... 42
The Smart Touch Control .................................... 38
To Change
the screen position of the e-Manual .................... 48
To register your face
in your Samsung account ................................... 31
Trigger Words ..................................................... 27
Troubleshooting .................................................. 49
U
Use Mode ........................................................... 16
Using Smart Hub ................................................ 25
Using the Touch Pad .......................................... 40
Using the TV's Controller (Panel Key) .................. 11
Using the Voice Text Input Mode ......................... 28
V
Video Codec ...................................................... 58
Voice Command Bar Size ................................... 27
Voice Control ...................................................... 26
Voice Control Environment Test .......................... 28
Voice Sensitivity .................................................. 27
English - 60
Page 61

Federal Communication Commission Interference Statement
This equipment has been tested and found to comply with the limits for a Class B digital device, pursuant
to Part 15 of the FCC Rules. These limits are designed to provide reasonable protection against harmful
interference in a residential installation. This equipment generates, uses and can radiate radio frequency
energy and, if not installed and used in accordance with the instructions, may cause harmful interference
to radio communications. However, there is no guarantee that interference will not occur in a particular
installation. If this equipment does cause harmful interference to radio or television reception, which can be
determined by turning the equipment off and on, the user is encouraged to try to correct the interference
by one of the following measures:
• Reorient or relocate the receiving antenna.
• Increase the separation between the equipment and receiver.
• Connect the equipment into an outlet on a circuit different from that to which the receiver is connected.
• Consult the dealer or an experienced radio/TV technician for help.
FCC Caution: Any changes or modifications not expressly approved by the party responsible for
compliance could void the user’s authority to operate this equipment.
This device complies with Part 15 of the FCC Rules. Operation is subject to the following two conditions:
(1) This device may not cause harmful interference, and (2) this device must accept any interference
received, including interference that may cause undesired operation.
For product available in the USA/Canada market, only channel 1~11 can be operated. Selection of other
channels is not possible.
This device and its antenna(s) must not be co-located or operation in conjunction with any other antenna or
transmitter.
FCC Radiation Exposure Statement:
This equipment complies with FCC radiation exposure limits set forth for an uncontrolled environment. This
equipment should be installed and operated with minimum distance 20cm between the radiator & your
body.
English - 61
Page 62

This Class B digital apparatus complies with Canadian ICES-003.
Cet appareil numérique de la classe B conforme á la norme NMB-003 du Canada.
This device complies with Industry Canada license-exempt RSS standard(s). Operation is subject to the
following two conditions: (1) this device may not cause interference, and (2) this device must accept any
interference, including interference that may cause undesired operation of the device.
Le présent appareil est conforme aux CNR d'Industrie Canada applicables aux appareils radio exempts
de licence. L'exploitation est autorisée aux deux conditions suivantes : (1) l'appareil ne doit pas produire
de brouillage, et (2) l'utilisateur de l'appareil doit accepter tout brouillage radioélectrique subi, même si le
brouillage est susceptible d'en compromettre le fonctionnement.
For product available in the USA/Canada market, only channel 1~11 can be operated. Selection of other
channels is not possible.
This device and its antenna(s) must not be co-located or operation in conjunction with any other antenna or
transmitter.
Under Industry Canada regulations, this radio transmitter may only operate using an antenna of a type
and maximum (or lesser) gain approved for the transmitter by Industry Canada. To reduce potential
radio interference to other users, the antenna type and its gain should be so chosen that the equivalent
isotropically radiated power (e.i.r.p.) is not more than that necessary for successful communication.
IC Radiation Exposure Statement:
This equipment complies with IC RSS-102 radiation exposure limits set forth for an uncontrolled
environment. This equipment should be installed and operated with minimum distance 20cm between the
radiator & your body.
English - 62
Page 63

TÉLÉVISEUR DEL
SUPPORT
Guide de l’utilisateur
Merci d’avoir acheté un produit Samsung. Pour
obtenir un service complet, veuillez enregistrer
votre produit à:
www.samsung.com/register
✎ Si vous avez des questions, composez le numéro 1-800-SAMSUNG (1-800-726-7864) pour obtenir de l’aide.
Modèle ___________N° de série _____________
Page 64

Un guide électronique détaillé est intégré au téléviseur. Pour obtenir de plus amples renseignements sur l'utilisation du guide électronique, consultez la
page 47.
Les figures et les illustrations de ce mode d’emploi ne sont fournies qu’à titre de référence. Elles peuvent différer du produit réel. Le design et les
caractéristiques techniques du produit peuvent être modifiés sans préavis.
Remarques importantes sur la garantie relative au format de l’image du téléviseur
Consultez la carte de garantie afin d’obtenir de plus amples renseignements sur les conditions de la garantie.
✎
Le format écran large des écrans à DEL (16:9, soit le rapport hauteur/largeur de l’image) est conçu principalement pour les vidéos plein écran à écran
large. Les images affichées devraient être au format écran large 16:9 ou agrandi afin de remplir l’écran si votre modèle offre cette caractéristique et
que les images sont constamment en mouvement. L’affichage de graphiques et d’images fixes, comme les barres noires des vidéos et émissions de
télévision en format standard non agrandi, doit être limité au maximum à 5% du temps d’écoute hebdomadaire.
De plus, il faut limiter l’affichage d’images et de textes fixes, comme les rapports boursiers, les affichages de jeux vidéo, les logos des stations, les sites
Web ou les images graphiques et les schémas des ordinateurs, comme on l’indique ci-dessus, et ce pour tous les téléviseurs. L’affichage d’images fixes
qui ne respecte pas les directives ci-dessus peut causer un vieillissement inégal des écrans à plasma en y créant des images rémanentes subtiles mais
permanentes. Pour éviter ce problème, faites varier les émissions et les images et regarder principalement des images plein écran en mouvement et non
pas des images ou des barres foncées fixes. Sur les modèles d’écran à plasma dotés de fonctions de redimensionnement de l’image, ces commandes
permettent d’afficher différents formats en plein écran.
Prenez garde au choix des formats que vous utilisez pour regarder la télévision et à leur durée d’utilisation. Un vieillissement inégal résultant du choix et
de l’utilisation d’un format, tout comme les images rémanentes, n’est pas couvert par la garantie limitée de Samsung.
• ÉNONCÉ DE GARANTIE LIMITÉE DE SAMSUNG ELECTRONICS POUR L’AMÉRIQUE DU NORD
Assujettie aux exigences, conditions, exclusions et limitations de la garantie limitée originale fournie avec les produits de Samsung Electronics
(SAMSUNG) et les exigences, conditions, exclusions et limitations de la présente garantie, SAMSUNG offre également plus un service d’entretien
sous garantie aux États-Unis pour les produits achetés au Canada et un service de réparation sous garantie au Canada pour les produits achetés
aux États-Unis pendant la période de garantie précisée à l’origine et pour l’acheteur initial seulement.
Les réparations sous garantie décrites ci-dessus doivent être effectuées dans un centre de réparation agréé SAMSUNG. En plus de la présente
garantie, la garantie limitée originale et une facture datée en tant que preuve d’achat doivent être présentées au centre de réparation. Le transport
de l’appareil à destination et en provenance du centre de réparation incombe à l’acheteur. Les conditions couvertes se limitent qu’aux vices de
matériaux et de fabrication dans des conditions d’utilisation normale.
Sont notamment exclues toute disposition précisée à l’origine pour le service à domicile ou sur place, durées de réparation minimales et maximales,
échanges ou remplacements, accessoires, options, mises à niveau ou produits non durables.
Pour connaître l’emplacement d’un centre de réparation agréé Samsung, composez les numéros sans frais suivants:
– Aux États-Unis: 1-800-SAMSUNG (1-800-726-7864)
– Au Canada: 1-800-SAMSUNG
Avertissement relatif aux images fixes
Évitez l'affichage d'images fixes (telles que des fichiers photo en jpeg) ou d'éléments d'image fixes (logos de chaînes, barres de défilement affichant les
nouvelles ou la bourse au bas de l'écran, etc.) ou les émissions au format d’image panorama ou 4:3. L'affichage constant d'images fixes peut entraîner
une brûlure de l’écran à DEL et réduire ainsi la qualité de l’image. Pour éviter ce genre d'incident, veuillez suivre les recommandations ci-dessous :
• Évitez d'afficher la même chaîne pendant de longues périodes.
• Essayez de toujours afficher une image au format plein écran. Utilisez le menu de réglage du format de l'image pour obtenir les meilleurs résultats.
• Réduisez la luminosité et le contraste pour éviter l'apparition d'images rémanentes.
• Utilisez toutes les fonctions du téléviseur conçues pour réduire les images rémanentes et la brûlure d'écran. Consultez le guide électronique pour
obtenir plus de détails.
Français - 2
Page 65

Contenu
• Remarques importantes sur la garantie
relative au format de l’image du téléviseur ....... 2
• Avertissement relatif aux images fixes .............2
• Contenu .......................................................... 3
• Caractéristiques .............................................. 4
• Accessoires et câbles ..................................... 5
• Installation du support ..................................... 7
• Installation de la fixation murale (facultatif) ....... 8
• Assurer une bonne
ventilation de votre téléviseur ........................10
• Utilisation du dispositif de commande
du téléviseur (panneau principal) ................... 11
• Branchement du cordon d'alimentation
et de l'antenne ou du câble ........................... 12
• La télécommande standard ..........................13
• Navigation dans les menus ........................... 15
• Configuration des réglages
de base lors de la configuration initiale. ......... 16
• Branchement à des appareils AV
(lecteur Blu-ray, lecteur DVD, etc.) ................ 20
• Branchement d'appareils audio .....................22
• Branchement à un PC .................................. 23
• Connexion avec câble EX-Link ..................... 23
• Modification de la source d’entrée ................24
• Utilisation de Smart Hub ............................... 25
• Interaction SMART ........................................ 26
− Commande vocale .................................. 26
− Commande gestuelle .............................. 29
− Reconnaissance faciale ........................... 31
• Fente pour le dispositif «Evolution Kit»
(vendue séparément) ....................................33
• Connexion à un réseau ................................. 34
• Configuration des connexions réseau ............36
• La télécommande Smart Touch Control ........ 38
• Le diffuseur IR ............................................... 42
• Réglage de la télécommande universelle ....... 44
• Utilisation de la fonction Recherche
du code du modèle recommandé ................. 46
• Comment afficher le guide électronique ........47
• Dépannage ................................................... 49
• Licences ....................................................... 52
• Entreposage et entretien ............................... 52
• Spécifications
– télécommande Smart Touch Control .......... 55
• Spécifications
– diffuseur IR ................................................. 55
• Spécifications ............................................... 56
• Résolution d’affichage ...................................57
• Codec vidéo ................................................. 58
• Dimensions ................................................... 59
• Index ............................................................ 60
Français - 3
Page 66

Caractéristiques
• 3D: c'est une nouvelle fonction passionnante qui vous permet de regarder un contenu 3D.
• SMART HUB: la passerelle pour tout le contenu intégré dans un seul emplacement.
− Offre divers choix de divertissement.
− Vous permet de commander votre mode de divertissement grâce à une interface utilisateur
conviviale.
− Vous permet d’accéder facilement aux diverses applications dont le nombre s’ajoute chaque jour.
− Vous permet de personnaliser votre téléviseur en regroupant et en triant les applications selon votre
choix.
• AllShare Play: vous permet d'ouvrir des photos, visionner des vidéos ou faire jouer de la musique qui
se trouvent dans des dispositifs USB, des appareils photo numériques, des téléphones cellulaires et
des PC. Vous pouvez accéder à des PC et des téléphones cellulaires grâce à votre réseau sans fil.
• Anynet+ (HDMI-CEC): permet de commander tous les appareils Samsung branchés qui prennent en
charge Anynet+ à l’aide de la télécommande Samsung.
• e-Manual: un manuel d'utilisation détaillé est intégré au téléviseur. (page 47)
• Interaction SMART: cette fonction permet d'utiliser et de contrôler les options et les fonctions du
menu par la parole et les gestes. (page 26)
Français - 4
Page 67

Accessoires et câbles
Veillez à ce que les articles suivants soient inclus avec votre téléviseur. Si des éléments sont
✎
manquants, communiquez avec le détaillant.
La forme et la couleur des éléments peuvent varier selon le modèle.
✎
Assurez-vous qu'aucun accessoire n'est dissimulé derrière ou sous les matières d'emballage après
✎
avoir ouvert la boîte.
• Télécommande Smart Control (AA59-00626A)
et piles (AA x 2)
• Diffuseur IR (BN96-22897A) & piles (AA x 4)
• Télécommande (AA59-00637A) et piles (AAA x 2)
• Chiffon de nettoyage (BN63-01798B)
• Carte de garantie / Guide de sécurité
• Lunettes 3D Active
• Cordon d’alimentation
• Guide de l’utilisateur
Adaptateur AV Support porte-fil Anneau de support x 4
(BN39-01154H) (BN61-08391A) (BN96-18153A)
Assemblage du support porte-fil
Câbles d’entrée (vendus séparément)
Vous aurez besoin d'un ou de plusieurs de ces câbles pour brancher votre téléviseur à votre antenne ou
prise de câble et vos appareils (lecteurs Blu-ray, lecteurs DVD, etc.).
Pour l'achat du câble RS232, consultez www.SamsungParts.com.
RS232 (AA39-00311A) HDMI HDMI-DVI Audio
Composante Composite (AV) Coaxial (RF)
Français - 5
Page 68

Assurez-vous que vous avez le bon câble avant de le brancher. Les fiches et prises courantes sont
✎
illustrées ci-dessous.
Fiches de câble Ports/Prises
HDMI
USB,
Optique
Ne branchez pas le câble en sens inverse.
Assurez-vous que l'orientation de la fiche est adéquate avant de la brancher.
Avertissement
Clavier sans fil (vendu séparément)
Clavier sans fil
Français - 6
Page 69

Installation du support
2
1
Pièces du support:
A
Base x 1 Vis x 6 (modèle de 46 pouces seulement) Vis x 6 (modèle de 55 et 60 pouces seulement)
Suivez les étapes ci-dessous pour fixer le téléviseur à la base. Pour plus de détails sur l'installation du
support, consultez le guide d’installation séparé.
B
(M4 X L12)
C
(M4 X L10)
1
A
UTILISER DE
3
4
NE PAS
PRODUITS
CHIMIQUES
ATTENTION
NE PAS
UTILISER DE
GRAISSE
ou
NE PAS
UTILISER
D’HUILE
B
C
2
Pour protéger le téléviseur,
✎
posez un tissu doux sur la table
et placez le téléviseur écran
vers le bas sur ce dernier.
x6 (M4 X L12) modèle de 46 pouces seulement
x6 (M4 X L10) modèle de 55 et 60 pouces seulement
1
2
Français - 7
Page 70

REMARQUE
✎
• Assurez-vous de bien distinguer le devant et l’endos de chaque élément au moment de l’assemblage.
• Assurez-vous qu’au moins deux personnes soulèvent et déplacent le téléviseur.
• Avant de visser les vis, maintenez le téléviseur à la verticale. Si vous vissez les vis alors que le
téléviseur est en position horizontale, il pourrait pencher vers un côté au moment où vous le
replacez à la verticale.
Ne mettez pas vos doigts dans la fente du support du téléviseur au moment de l’installation.
[
Installation de la fixation murale (facultatif)
Installation sur un mur ou au plafond
Pour l'installation du support sur un mur, vous devez suivre les instructions du fabricant.
Si l’appareil est mal installé, il risque de glisser ou de tomber et d’être endommagé
sérieusement. Il risque aussi de blesser grièvement un enfant ou un adulte.
Installation de l’ensemble de fixation murale
L'ensemble de fixation murale (vendu séparément) permet de fixer le téléviseur au mur.
Pour obtenir des instructions détaillées sur l'installation du support mural, reportez-vous aux instructions
fournies avec l'ensemble. Nous recommandons de demander l’aide d’un technicien pour l’installation.
Nous vous déconseillons de le faire vous-même. Samsung Electronics n’est pas responsable des
dommages causés à l’appareil ni des blessures possibles occasionnées si vous tentez d’installer le support
vous-même.
Pour commander le support mural, téléphonez au Centre de service à la clientèle au 1-800-SAMSUNG
(1-800-726-7864).
Spécifications de l’ensemble de fixation murale (VESA)
Installez le support mural sur un mur solide perpendiculaire au plancher. Avant de fixer le support à
✎
un matériau autre que le placoplâtre, veuillez communiquer avec votre détaillant local. Si vous installez
le téléviseur à la hauteur du plafond ou sur un mur incliné, il risque de tomber et de causer des
blessures.
REMARQUE
✎
• Les dimensions standard pour les ensembles de fixation murale figurent dans le tableau ci-dessous.
• Les ensembles de fixation murale de Samsung sont fournis avec un guide d’installation détaillé et
toutes les pièces nécessaires à l’assemblage.
• N’utilisez pas de vis non conformes aux spécifications de vis standard VESA.
• N’utilisez pas de vis plus longues que les longueurs standard ou non conformes aux spécifications
VESA de vis standard. Des vis trop longues pourraient endommager l’intérieur du téléviseur.
• En ce qui a trait aux supports muraux non conformes aux spécifications de vis de la norme VESA,
la longueur des vis peut différer selon les spécifications du support mural.
• Ne serrez pas trop les vis; cela pourrait endommager le produit ou provoquer sa chute et
causer des blessures. Samsung décline toute responsabilité dans le cas où de tels accidents se
produisent.
Français - 8
Page 71

• Samsung ne saurait être tenu responsable des dommages au produit ou des blessures
occasionnés par l’utilisation d’un support mural non conforme aux spécifications VESA ou non
recommandé, ou si le consommateur ne suit pas les instructions d’installation du produit.
• N’installez pas le téléviseur à un angle d’inclinaison de plus de 15degrés.
• Deuxpersonnes sont nécessaires pour fixer le téléviseur au mur.
Type de produit
TV à DEL
Avant d’installer le support mural, retirez les vis des trous de fixation.
✎
Taille du
téléviseur en
pouces
26 100 X 100 M4
46 – 60 400 X 400 M8
Spécifications VESA de
l’orifice de passage des vis
(A * B) en millimètres
Vis standard Quantité
N’installez pas le support mural lorsque le téléviseur est sous tension. Il pourrait
survenir des blessures causées par une décharge électrique.
Installation d'un support mural provenant d’un autre fabricant
Utilisez l’anneau de support pour installer un support mural
provenant d’un autre fabricant.
432 – 40 200 X 200 M6
Français - 9
Page 72

Assurer une bonne ventilation de votre téléviseur
Au moment de l'installation du téléviseur, vous devez laisser une distance d'au moins 4 pouces entre le
téléviseur et les autres objets (murs, côtés de l'armoire, etc.) afin d'assurer une ventilation adéquate. Le
non-respect de cette consigne pourrait faire augmenter la température interne du produit et causer un
incendie ou endommager celui-ci.
Lorsque vous utilisez une base ou un support mural, nous vous recommandons fortement d'utiliser
✎
seulement les pièces fournies par Samsung Electronics.
• Si vous utilisez des pièces fournies par un autre fabricant, cela pourrait endommager le produit ou
causer des blessures engendrées par la chute de celui-ci.
Installation sur une base. Installation sur un support mural.
4 pouces
4 pouces
4 pouces
4 pouces
Autres mises en garde
L’aspect réel du téléviseur peut différer des illustrations du présent guide et en fonction du modèle
✎
choisi.
Faites attention lorsque vous touchez le téléviseur, car certaines parties peuvent être chaudes.
✎
4 pouces
4 pouces
4 pouces
Français - 10
Page 73

Utilisation du dispositif de commande du téléviseur (panneau principal)
Le dispositif de commande du téléviseur, un petit bouton similaire à une manette de jeu situé dans la partie
arrière droite de ce dernier, permet de commander le téléviseur sans télécommande.
La couleur et la forme du produit peuvent varier en fonction du modèle.
✎
Capteur pour la télécommande
Lorsque vous utilisez la télécommande Smart Touch Control,
Caméra
Suivez ces instructions en vous mettant en face de l'écran du téléviseur.
✎
Al seleccionar la función moviendo el controlador hacia arriba/abajo/izquierda/derecha, asegúrese
✎
de no presionar el controlador. Si lo presiona en primer lugar no podrá moverlo hacia arriba/abajo/
izquierda/derecha.
Lorsque vous utilisez une télécaméra, vous devez vérifier si un ruban est attaché à l'arrière de la
✎
télécaméra et ajuster l'angle de celle-ci. Si vous ne voulez pas utiliser une télécaméra, nous vous
recommandons de placer l'objectif vers le haut. Dans ce cas, les fonctions Reconnaissance faciale
et Commande gestuelle ne sont pas disponibles.
Sous tension Permet de mettre le téléviseur sous tension en appuyant sur le
Réglage du volume Permet de régler le volume en déplaçant le dispositif d'un côté à
Choix d’une chaîne Permet de sélectionner une chaîne en déplaçant le dispositif vers
Utilisation du menu des
fonctions
Sélection de SMART HUB (™) Le menu des fonctions étant affiché, sélectionnez SMART HUB (™)
la DEL du mode veille ne fonctionne pas (sauf la touche P).
Menu Fonction
mR
P
Commande du téléviseur
L'image se dessine lorsque vous
vous mettez en face du téléviseur.
dispositif de commande lorsque le téléviseur est en mode veille.
l'autre lorsque l'appareil est sous tension.
l'avant et vers l'arrière lorsque l'appareil est sous tension.
Pour visualiser et utiliser le menu des fonctions, appuyez sur le
dispositif puis relâchez-le lorsque l'appareil est sous tension. Pour
fermer le menu des fonctions, appuyez sur le dispositif de nouveau,
puis relâchez-le.
en déplaçant le dispositif vers l'avant. L'écran principal SMART HUB
s'affiche. Pour sélectionner une application, déplacez le dispositif,
puis appuyez sur ce dernier.
Français - 11
Page 74

Sélection du MENU (m) Le menu des fonctions étant affiché, sélectionnez MENU (m) en
déplaçant le dispositif vers la gauche. Le menu s'affiche à l'écran (On
Screen Display): Sélectionnez une option en déplaçant le dispositif
vers la droite. Pour faire d'autres sélections, déplacez le dispositif
vers la droite/gauche, ou avant/arrière. Pour modifier un paramètre,
sélectionnez-le, puis appuyez sur le dispositif.
Sélection d'une Source (s) Le menu des fonctions étant affiché, ouvrez la liste Source (s)
en poussant le dispositif vers la droite. L’écran de la liste Source
s’affiche. Pour sélectionner une source, déplacez le dispositif
de l'avant vers l'arrière. Lorsque la source désirée est mise en
surbrillance, appuyez sur le dispositif.
Éteindre (P) Le menu des fonctions étant affiché, sélectionnez Éteindre (P) en
tirant le dispositif vers le bas, puis appuyez sur ce dernier.
Pour fermer le Menu, Smart Hub ou Source, appuyez sur le dispositif pendant plus d'une seconde.
✎
Mode veille
Le téléviseur passe en mode veille lorsque vous l’éteignez et continue de consommer une petite quantité
d’électricité. Par mesure de sécurité et pour réduire votre consommation électrique, ne laissez pas votre
téléviseur en mode veille durant de longues périodes (par exemple lorsque vous partez en vacances). Il est
conseillé de débrancher le cordon d’alimentation.
Branchement du cordon d'alimentation et de l'antenne ou du câble
Antenne VHF/UHF
Câble d’antenne (non fourni)
Câble
ANT OUT
Avant de brancher le cordon d'alimentation à la prise murale, assurez-vous que tous les autres
✎
ou
Puissance consommée
branchements sont faits.
Si vous branchez votre téléviseur à un câblosélecteur ou un récepteur satellite au moyen des prises
✎
HDMI, composante ou composite, il n'est pas nécessaire de brancher la prise ANT IN à une antenne
ou une prise de câble.
Faites attention lorsque vous déplacez ou faites pivoter le téléviseur alors que le câble de l'antenne est
✎
trop court, la prise de l'antenne du téléviseur risque de se briser.
Français - 12
Page 75

La télécommande standard
Voyez où se trouvent les touches de fonction sur votre télécommande. Notez particulièrement l'emplacement
des touches SOURCE, MUTE, VOL, CH, MENU, TOOLS, E, INFO, CH LIST, RETURN et EXIT.
Cette télécommande dispose de points de braille sur les touches Power, Channel et Volume,
✎
permettant ainsi aux personnes aveugles de l'utiliser.
Permet de mettre le téléviseur sous
tension et hors tension.
Permet d’afficher et de sélectionner les
sources vidéo disponibles. (page 24)
Permet l’accès direct aux chaînes.
Appuyez sur cette touche pour
choisir des chaînes numériques
supplémentaires diffusées par la même
station numérique. Par exemple, pour
sélectionner la chaîne «54-3», appuyez
sur «54», puis sur «3».
Permet de régler le volume.
Affiche la liste des chaînes à l’écran.
Ouvre le menu d’affichage.
Les fonctions fréquemment utilisées sont
sélectionnées rapidement. Utilisez cette
touche pour une option particulière.
Pour en savoir davantage, reportez-vous
au guide électronique.
Permet de déplacer le curseur, de
sélectionner les options de menu
à l’écran et de modifier les valeurs
affichées.
permet de retourner au menu précédent.
Appuyez sur ces touches selon les
instructions à l'écran.
Utilisez ces touches pour une option
particulière. Pour en savoir davantage,
reportez-vous au guide électronique.
SOURCE
MUTE
M
CH
LIST
MENU
RETURN
BCD
Family Story
SUPPORTP.SIZE
l
l
SEARCH CAMERA
PRE-CH
HISTORY
INFOTOOLS
EXIT
l
Permet d’allumer ou d’éteindre
l’éclairage de la télécommande.
Lorsque cette touche est activée,
les touches s’illuminent pendant un
moment lorsqu’on appuie sur celles-ci.
(L’utilisation de la télécommande lorsque
cette touche est activée réduit le temps
d’utilisation des piles.)
Permet de revenir à la chaîne
précédente.
Permet de couper le son
temporairement.
Permet de changer de chaîne.
Permet d’afficher les applications
SMART HUB. Reportez-vous au
chapitre Fonctions avancées → SMART
HUB du guide électronique.
La liste des fonctions utilisées
récemment s'affiche. Vous pouvez
resélectionner rapidement et facilement
une fonction.
Affiche l’information à l’écran du
téléviseur.
Permet de quitter le menu.
Family Story: permet d’établir la
connexion avec l’application Family
Story. Reportez-vous au chapitre
Fonctions avancées → Family Story du
guide électronique.
SEARCH: permet d'exécuter les
fonctions de recherche recommandées
(critère de recherche par exemple).
l
Reportez-vous au chapitre Fonctions
avancées → Recherche du guide
électronique.
CAMERA: permet d'établir la connexion
avec l'application appareil photo.
SUPPORT: permet d'utiliser diverses
fonctions de soutien, y compris le guide
électronique. (page 47)
P.SIZE: Vous permet de sélectionner
la fonction Image Format. Reportezvous au chapitre Fonction de base →
Modification de la taille de l’image du
guide électronique.
X
: Permet d’activer ou de désactiver
les images 3D. Reportez-vous au
chapitre Fonctions avancées →
Utilisation de la fonction 3D.
Français - 13
Page 76

Insertion des piles (piles AAA)
Faites correspondre la polarité des piles avec les symboles figurant dans le compartiment des piles.
La télécommande Smart Touch Control est fournie avec le téléviseur. Pour en savoir davantage sur la
✎
télécommande Smart Touch Control, reportez-vous à la page 38.
REMARQUE
✎
• Lorsque vous installez les piles, veillez à respecter les bornes + et - conformément à l'illustration qui
se trouve à l'intérieur du compartiment.
• Utilisez la télécommande à une distance maximale de 7m (23pi) du téléviseur.
• Une lumière vive peut entraver le bon fonctionnement de la télécommande. Évitez de l'utiliser près
d'une source lumineuse fluorescente ou d'une enseigne au néon.
• La couleur et la forme de la télécommande peuvent varier en fonction du modèle.
Français - 14
Page 77

Navigation dans les menus
O
HISTO
Il vous est possible de contrôler les fonctions du téléviseur à l'aide des fonctions du menu principal et
du menu Outils. Par exemple, au menu principal, vous pouvez modifier le format, la configuration, la
luminosité , le contraste de l'image, etc. Il existe également des fonctions qui vous permettent de contrôle
le son du téléviseur, la configuration des chaînes, la consommation d'énergie et un éventail de fonctions.
Pour accéder au menu à l'écran principal, appuyez sur la touche MENUm de la télécommande. Pour
accéder au menu des outils, appuyez la touche TOOLST. Les menus des outils sont disponibles lorsque
l'icône du menu TOOLST s'affiche au bas à droite de l'écran.
L'illustration ci-après montre les touches de la télécommande standard que vous utilisez pour parcourir les
menus et sélectionner ou ajuster les différentes fonctions. Pour en savoir davantage sur la télécommande
Smart Touch Control, reportez-vous à la page 38.
1
2
3
4
1 MENUm: permet d'afficher le menu principal à l'écran.
2 TOOLST: permet d'afficher les menus des outils lorsqu'ils sont disponibles.
3 E et touches de direction: les touches de direction vous permettent de déplacer le curseur et
sélectionner un élément. La touche Enter vous permet de sélectionner un élément ou de confirmer le
réglage.
4 RETURNR: permet de retourner au menu précédent.
5 EXITe: permet de quitter le menu à l’écran.
Utilisation du menu principal (OSD – affichage à l'écran) à l'aide de la télécommande standard
La méthode d'accès peut différer selon le menu sélectionné.
MENU
TOOLS
RETURN
INF
EXIT
RY
5
MENUm
1
u / d
2
E Appuyez sur E pour accéder aux sous-menus.
3
u / d Sélectionnez le sous-menu voulu à l'aide de la touche u ou d.
4
u / d / l / r Appuyez sur la touche l, r, u, ou d pour réglez la valeur d'une option.
5
E Appuyez sur la touche E pour confirmer la sélection.
6
EXITe Appuyez sur EXITe.
7
Les options du menu principal s'affichent à l'écran:
Image, Son, Chaîne, Réseau, Système, Support technique.
Sélectionnez une option du menu principal sur le côté gauche de l'écran
à l'aide de la touche u ou d.
Le réglage de l'affichage peut varier en fonction du menu sélectionné.
Français - 15
Page 78

Configuration des réglages de base lors de la configuration initiale.
La première fois que vous mettez le téléviseur sous tension, une série de messages s'affiche pour faciliter
la configuration des réglages de base du téléviseur. Branchez le cordon d'alimentation à la prise murale,
puis appuyez sur la touche P pour mettre le téléviseur sous tension.
Utilisez la télécommande standard pour lancer la configuration initiale.
✎
Configuration n'est disponible que lorsque la source d'entrée est réglée à TV. Consultez la rubrique
✎
«Modification de la source d'entrée» (page 24).
Pour revenir à l'étape précédente dans la séquence Configuration, sélectionnez Précédent.
✎
Si vous n'utilisez pas un câbloselecteur ou un récepteur satellite, assurez-vous que le téléviseur est
✎
branché à une antenne ou une prise de câble avant de le mettre sous tension. Pour connaître les
instructions, reportez-vous à la page 12.
Si vous voulez configurer une connexion au réseau câblé durant la Configuration, assurez-vous que
✎
le téléviseur est branché à un câble LAN. Pour connaître les instructions, reportez-vous à la page 35.
Si vous voulez configurer une connexion au réseau câblé durant la Configuration, assurez-vous que
le modem ou le routeur sans fil sont sous tension et qu'ils fonctionnent normalement.
Langue menu :
1
sélectionnez une
langue.
Mode utilisation:
2
sélectionnez le
mode d'utilisation à
domicile.
Paramètres
3
réseau:
configuration des
paramètres réseau.
Pour effectuer
✎
la configuration
ultérieurement,
sélectionnez
Passer.
Vous pouvez
configurer la
connexion
réseau
ultérieurement
au moyen du
menu à l'écran
Réseau.
Après avoir appuyé sur la touche P, l'écran de démarrage s'affiche.
Sélectionnez Suivant pour continuer. L'écran Langue de menu s'affiche.
Sélectionnez la langue de menu désirée à l’aide de votre télécommande
et sélectionnez Suivant. Le téléviseur affichera les menus à l'écran à
l'aide de la langue choisie en commençant par la prochaine étape du
processus de Configuration
À l'écran Mode utilisation, sélectionnez le Util. à domicile au moyen
de votre télécommande, puis sélectionnez Suivant. L'écran Paramètres
réseau s'affiche.
Le Démo magasin est réservé à l’utilisation en magasin. Si vous
✎
sélectionnez Démo magasin, certaines fonctions ne seront pas
actives; le téléviseur réinitialise les fonctions par défaut après un
certain temps. Pour en savoir davantage sur Démo magasin,
consultez la fin de cette section.
Pour définir les paramètres du réseau, sélectionnez Démarrer au moyen
de la télécommande, puis passez à 3A - Réseau sans fil ou 3B Réseau câblé à la page suivante.
Si vous ne savez pas comment configurer votre réseau ou que voulez
définir les paramètres ultérieurement, ou encore si vous n'avez pas de
réseau, sélectionnez Passer, puis passez à 5 - Prog. auto (1) à la page
18.
Pour définir les paramètres réseau ultérieurement, reportez-vous à
«Configuration du réseau câblé ou sans fil» dans le guide électronique
ou consultez les sections «Connexion réseau» du présent manuel
(pages 34 et 36).
Français - 16
Page 79

3
Réseau sans fil 1. Le téléviseur recherche et affiche tous les réseaux sans fil à portée.
a
Une fois terminé, une liste des réseaux s'affiche. Dans la liste des
réseaux, déplacez la surbrillance pour en sélectionner un, puis
appuyez sur Suivant. Si le réseau sélectionné exige un code de
sécurité, l'écran Code de sécurité s'affiche.
Si vous avez un routeur compatible WPS(PBC), sélectionnez
✎
plutôt WPS(PBC), puis suivez les instructions à l'écran. Une fois
terminé, passez à l'étape 4.
2. Entrez le code de sécurité du réseau ou WPS(NIP) à l'aide de la
télécommande.
Entrez des chiffres et des lettres à l'aide de votre télécommande.
✎
• Si vous avez une télécommande standard, vous pouvez entrer
les chiffres à l'aide des touches numériques.
• Pour saisir une lettre, déplacez la surbrillance sur la lettre en
question, puis sélectionnez-la. Vous pouvez aussi entrer des
chiffres de la même façon.
Pour afficher les majuscules (ou afficher de nouveau les
✎
minuscules si les majuscules sont affichées), sélectionnez Caps
ou Maj..
Pour afficher les symboles et la ponctuation, sélectionnez F.
✎
Pour afficher de nouveau les lettres, sélectionnez F.
3. Lorsque vous avez terminé, sélectionnez Suivant si vous avez entré
un code de sécurité ou WPS(NIP) si vous avez entré un WPS(NIP).
4. Le téléviseur vérifie la connexion sans fil. Si la connexion est effectuée
avec succès, le message «Vous êtes connecté à Internet. Si
vous avez de la difficulté à utiliser un service en ligne, veuillez
contacter votre fournisseur de service Internet.» s'affiche.
Sélectionnez Suivant, puis passez à l'étape 4 Mise à niveau du
logiciel.
Si la connexion échoue, sélectionnez Précédent, répétez les
✎
étapes 1 et 2, entrez de nouveau avec précaution votre code
de sécurité ou WPS (NIP), puis répétez les étapes 3 et 4. Si la
connexion échoue de nouveau, sélectionnez Suivant à l'écran
«Échec de connexion», puis passez à 5 - Prog. auto (1) à la
page suivante. Configurez votre réseau ultérieurement à l'aide de
Paramètres réseau dans le menu du téléviseur. Pour en savoir
davantage, reportez-vous à «Configuration du réseau câblé ou
sans fil» dans le guide électronique ou consultez les sections
«Connexion réseau» du présent manuel (pages 34 et 36).
3
Réseau câblé Le téléviseur vérifie la connexion réseau, puis affiche le message Vous
b
êtes connecté à Internet. Si vous avez de la difficulté à utiliser un
service en ligne, veuillez contacter votre fournisseur de service
Internet.. Sélectionnez Suivant. L’écran Mise à niveau du logiciel
s’affiche.
Français - 17
Page 80

installation de la
4
dernière version
du logiciel.Mise à
niveau du logiciel
Pour vous
✎
effectuer la
mise à niveau
ultérieurement,
sélectionnez
Passer.
Une fois le réglage des Paramètres réseau terminé, le téléviseur
recherchera automatiquement une version du logiciel. Si une nouvelle
version du logiciel est disponible, le téléviseur la télécharge et l'installe.
Une fois le téléchargement terminé, sélectionnez Suivant.
Si vous désirez effectuer la mise à niveau plus tard, sélectionnez
✎
Passer. Pour de plus amples renseignements, consultez la rubrique
Mise à jour du logiciel (Fonctions de préférence → Menu Soutien
technique) dans le guide électronique.
L’opération peut durer un certain temps, selon l’état du réseau.
✎
Pour pouvoir faire une mise à jour, vous devez activer la connexion
✎
réseau du téléviseur.
Si aucune version récente n'est disponible, un message s'affiche à
✎
l'écran vous indiquant qu'il n'ya aucune version récente du logiciel.
Sélectionnez OK.
Prog. auto (1):
5
sélectionnez la
source du signal de
votre téléviseur.
Prog. auto (2):
6
sélectionnez
les options de
recherche.
Sélectionnez une option appropriée pour votre télévision au moyen de
votre télécommande, puis sélectionnez Suivant.
• Connexion par câble d'antenne au téléviseur.: sélectionnez cette
option si vous avez une connexion antenne ou câble sans boîtier
décodeur. Si vous sélectionnez cette option, passez à l'étape 6 Prog.
auto (2).
• J'utilise un boîtier décodeur.: sélectionnez cette option si
vous avez un récepteur satellite ou un câblosélecteur. Il n'est pas
nécessaire d'exécuter Prog. auto. Si vous sélectionnez cette option,
passez à 8 Horloge à la page suivante.
1. Sélectionnez Hertzien ou Câble à l'aide de la télécommande. Un
crochet apparaît sur votre sélection. Lorsque c’est fait, sélectionnez
Suivant. Vous pouvez cocher les deux si vous disposez de ces deux
types de connexion.
2. Si vous avez sélectionné Hertzien, allez à l'étape 7 - Prog. auto (3).
3. Si vous avez sélectionné Câble, l’écran de sélection du système de
câblodistribution apparaît. Sélectionnez Système num. par câble.
La fenêtre des options s’affiche. Sélectionnez le bon format de câble
du signal, soit STD, HRC, ou IRC. La plupart des systèmes de
câblodistribution utilisent STD (standard). Répétez cette étape pour
Syst. analog. par câble.
4. Lorsque c’est fait, sélectionnez Suivant.
Prog. auto (3):
7
mémorisation des
chaînes
La mémorisation des chaînes commence. Celle-ci peut durer jusqu'à 45
minutes selon votre système par câble.
Pour de plus amples renseignements, consultez la rubrique Prog.
auto (Menu des chaînes → Mémorisation des chaînes) dans le guide
électronique.
Sélectionnez Arrêter à tout moment pour interrompre le processus
✎
de mémorisation.
Français - 18
Page 81

Horloge: réglage de
8
l’horloge
Sélectionnez Auto ou Manuel, puis sélectionnezSuivant.
Si vous avez choisi J'utilise un boîtier décodeur. dans 5 -
✎
Prog. auto (1), vous pouvez seulement régler l'heure et la date
manuellement à l'aide de la télécommande.
Auto
Si vous sélectionnez Auto, le téléviseur téléchargera automatiquement
l'heure exacte à partir d'une chaîne numérique. L'écran Fuseau hor.
s’affiche. Sélectionnez votre Fuseau hor., puis sélectionnez Suivant.
L'écran H. d'été (Heure d'été) s'affiche. La fonction H. d'été fait
avancer l'horloge d'une heure pour qu'elle soit ajustée à l'heure d'été.
Sélectionnez Activer si vous voulez activer le réglage de l'heure d'été.
Sélectionnez Désactiver pour désactiver l'heure d'été. Vous pouvez
aussi activer la fonction de l'heure d'été dans le menu à l'écran du
téléviseur (Menu → Système → Heure → Horloge → H. d'été).
Manuel
Si vous avez sélectionné Manuel, l’écran de Horloge. Sélectionnez
Date ou Heure. Vous pouvez régler l’heure et la date à l’aide de votre
télécommande. Lorsque vous avez terminé le réglage de Date et Heure,
sélectionnez Suivant.
Commande vocale
9
et gestuelle:
sélection des
fonctions
Commande vocale
et gestuelle.
Configuration
10
terminée
Si vous souhaitez exécuter Configuration de nouveau...
Menu → Système → Configuration
Si vous voulez regler le mode Démo magasin sur Activer ou Désactiver
Pour activer ou désactiver le mode Démo magasin à l'extérieur de Configuration, appuyez sur le
dispositif de commande lorsque le téléviseur est sous tension. L'écran du menu des fonctions s'affiche.
Poussez le dispositif de commande vers la gauche (jusqu'à MENU (m)) et maintenez-le en position
pendant plus de 5 secondes. Le mode Démo magasin est activé. Pour annuler Démo magasin, affichez
le menu des fonctions à l'aide du dispositif, poussez ce dernier vers la droite (jusqu'à Source (s)) et
maintenez-le en position pendant plus de 5 secondes. Pour en savoir davantage sur le dispositif, reportezvous à la page 11.
Permet d’activer ou de désactiver la fonction Commande vocale et
gestuelle. Sélectionnez Désactiver ou Activer, puis sélectionnez
Suivant.
Passez en revue les données de configuration, puis sélectionnez Fermer
pour terminer.
Les réglages effectués s’affichent.
✎
Français - 19
Page 82

Branchement à des appareils AV (lecteur Blu-ray, lecteur DVD, etc.)
Branchement haute définition à l'aide d'un câble HDMI (jusqu'à 1080p, signaux numériques HD)
Nous recommandons l’utilisation de la connexion HDMI pour obtenir une image HD de grande qualité.
Utilisation de lecteurs DVD, lecteurs Blu-ray, câblosélecteursHD ou récepteurs satelliteHD (boîtier décodeur).
Appareil
HDMI OUT
HDMI IN 1 (DVI), HDMI IN 2 (ARC), HDMI IN 3 (MHL)
✎
Câble HDMI (non fourni)
• Pour une image et un son de meilleure qualité, branchez le téléviseur à un appareil numérique à
l'aide d'un câble HDMI.
• Un câble HDMI prend en charge les signaux vidéo et audio numériques; un câble audio n’est pas nécessaire.
− Pour brancher le téléviseur à un appareil numérique qui ne prend pas en charge une sortie
HDMI, utilisez des câbles HDMI/DVI et audio.
• Si vous branchez au téléviseur un appareil externe utilisant une ancienne version du mode HDMI, la vidéo
et le son risquent de ne pas fonctionner. Si un tel problème survient, renseignez-vous sur la version HDMI
auprès du fabricant de l'appareil externe et, si elle trop ancienne, demandez une mise à niveau.
• Vérifiez que vous achetez un câble HDMI certifié. Sinon, l’image risque de ne pas s’afficher ou une
erreur de connexion peut survenir.
• Il est recommandé d’utiliser un câble HDMI haute vitesse de base ou un câble Ethernet compatible. Veuillez
noter que ce produit ne prend pas en charge la fonction Ethernet par l’intermédiaire d’un câble HDMI.
• Ce produit ne prend pas en charge les fonctions 3D et ARC (Audio Return Channel) par l’intermédiaire
d’un câble HDMI. Notez que la fonction ARC n’est prise en charge qu’à la prise HDMI IN 2 (ARC).
− If Affichage 3D auto is set to Activer, some functions such as SMART HUB may be disabled.
In this case, set Affichage 3D auto or Mode 3D to Désactiver.
• La fonction ARC permet au son numérique de sortir par le port HDMI IN 2 (ARC) du téléviseur. Elle ne peut
être activée que lorsque le téléviseur est branché à un récepteur audio compatible avec la fonction ARC.
• Ce produit prend en charge la fonction Mobile High-Definition Link (MHL) au moyen d’un câble
HDMI-MHL. Notez que la fonction MHL n’est prise en charge qu’à la prise HDMI IN 3 (MHL).
• La fonction MHL permet d’afficher l’écran d’appareils mobiles au moyen du port HDMI IN 3 (MHL)
du téléviseur. Elle ne peut être activée que lorsque le téléviseur est branché à un appareil mobile
compatible avec la fonction MHL. Pour plus d’informations, reportez-vous à «Utilisation de la
fonction MHL» dans le guide électronique.
Français - 20
Page 83

• Lorsque
vous utilisez des appareils MHL à l'aide d'un câble MHL, Image Format se règle
automatiquement à Plein écran. Cependant, si vous utilisez des appareils MHL à l'aide d'un câble HDMI,
Image Format ne se règle pas automatiquement à Plein écran. Pour voir un format original, sélectionnez
Plein écran dans le menu Image Format (Menu → Image → Image Format).
• Si vous utilisez des appareils MHL à l'aide d'un câble HDMI, le téléviseur sera reconnu comme une
entrée HDMI. Dans ce cas, le téléviseur pourrait fonctionner de façon différente de celle où vous
utilisez des appareils MHL avec un câble MHL.
Afin d'assurer une connexion optimale des câbles à ce produit, assurez-vous d'utiliser le câble tel
✎
qu'indiqué ci-dessous:
• Largeur maximale - 14 mm (0,55 pouce)
Utilisation d'un câble composante (jusqu'à 1080p, signaux haute définition) ou audio/vidéo (480i,
signaux analogiques seulement)
Utilisation de lecteurs DVD, lecteurs Blu-ray, câblosélecteursHD ou récepteurs satelliteHD (boîtier
décodeur) et magnétoscopes.
Rouge
Bleu
Vert
Rouge
Blanc
Câble audio
(non fourni)
Rouge Blanc
Adaptateur AV (fourni)
Câble audio
(non fourni)
Câble vidéo
(non fourni)
Câble audio
(non fourni)
Câble composante
(non fourni)
Câble vidéo
(non fourni)
Appareil Appareil Appareil
Le branchement par composante est conseillé plutôt que le branchement A/V pour obtenir la
✎
meilleure qualité d’image.
Lorsque vous branchez un câble vidéo AV IN 1, la couleur de la prise AV IN 1 [VIDEO] (verte) ne
✎
correspondra pas à la couleur du câble vidéo (jaune).
Jaune
Français - 21
Page 84

Branchement d'appareils audio
R-AUDIO-L
Uso de una conexión de cable óptico (digital) o de un cable estéreo estándar
Utilisez des systèmes audio numériques, des amplificateurs et des chaînes de cinéma maison.
Système audionumérique
OPTICAL
Amplificateur /
Chaîne de cinéma
maison à DVD
DIGITAL AUDIO OUT (OPTICAL)
✎
AUDIO IN
Câble optique (non fourni)
Câble audio (non fourni)
WR
Rouge Blanc
• Lorsque vous connectez une chaîne audio numérique à la prise DIGITAL AUDIO OUT (OPTICAL),
réduisez le volume du téléviseur et de la chaîne.
• Vous pouvez utiliser un son en 5.1canaux lorsque votre téléviseur est raccordé à un appareil
externe offrant cette fonction audio.
• Lorsque le récepteur (ou cinéma maison) est activé, il est possible d’entendre le son provenant de
la prise optique du téléviseur. Lorsque le téléviseur reçoit des signaux numériques, il transmet le son
en 5.1canaux au récepteur de la chaîne de cinéma maison. Lorsque la source est un composant
numérique, comme un lecteur DVD, un lecteur Blu-ray, un câblosélecteur ou un récepteur satellite,
et que cet appareil est branché au téléviseur par câble HDMI, le récepteur de la chaîne de cinéma
maison ne fera entendre qu’un son en 2canaux. Pour entendre le son en 5.1canaux, branchez
directement la prise Digital Audio Out du lecteur DVD/Blu-ray, câblosélecteur ou récepteur satellite
à un amplificateur ou une chaîne de cinéma maison.
AUDIO OUT : Se branche aux prises d’entrée audio de votre amplificateur/chaîne de cinéma maison
✎
à DVD.
• Utilisez le connecteur approprié pour le branchement.
• Lorsque vous branchez un amplificateur audio aux prises AUDIO OUT du téléviseur, baissez le
volume de cet appareil et réglez ce volume à l’aide de la commande de volume de l’amplificateur.
Français - 22
Page 85

Branchement à un PC
AUDIO OUT
DVI OUT
HDMI OUT
Utilisation d’un câble HDMI ou HDMI/DVI
Votre ordinateur peut ne pas prendre en charge une connexion HDMI.
✎
Utilisez les haut-parleurs de votre PC pour la sortie audio.
✎
Câble HDMI (non fourni)
Câble HDMI vers DVI (non fourni)
Câble audio (non fourni)
La résolution optimale est 1920 x 1080 à 60Hz. Reportez-vous à la page de résolution de l’affichage pour
toutes les résolutions possibles (page 57).
REMARQUE
✎
• Dans le cas d’un branchement au câble HDMI/DVI, il faut utiliser la prise d’entrée HDMI IN 1 (DVI).
• Pour les ordinateurs dotés de prises de sortie vidéo DVI, utilisez un câble HDMI/DVI pour relier la
prise de sortie DVI de l'ordinateur à la prise HDMI IN 1 (DVI) du téléviseur. Pour le son, utilisez les
haut-parleurs de l'ordinateur.
• L’entrée PC (D-Sub) n’est pas prise en charge.
Connexion avec câble EX-Link
Le connecteur EX-LINK est utilisé à des fins de réparation seulement.
Français - 23
Page 86

Modification de la source d’entrée
Source
™ → Source
Si vous regardez la télévision et vous voulez visionner un film sur votre lecteur DVD ou Blu-ray, ou passer
au câblosélecteur ou au récepteur satellite (boîtier décodeur), vous n'aurez pas besoin de modifier la
source.
■ TV / HDMI1/DVI / HDMI2 / HDMI3 / AV1 / AV2 / Composantes
1. Appuyez sur la touche ™ de la télécommande. L’écran Smart Hub s’affiche.
2. Sélectionnez Source. L’écran Source s’affiche.
3. Permet de sélectionner la source externe de signal d’entrée désirée.
Il est également possible d'accéder à l'écran Source en appuyant sur la touche SOURCEs de
✎
la télécommande standard ou en sélectionnant Source à l'aide de la télécommande Smart Touch
Control (voir page 38).
Seuls les appareils externes branchés au téléviseur peuvent être sélectionnés. Dans la liste Source
✎
qui s'affiche, les entrées branchées sont en surbrillance.
Utilisation de la fonction Entrer le nom
Entrer le nom vous permet d’associer un nom d’appareil à une source d’entrée. Pour accéder à Entrer le
nom, ouvrez le menu Outils lorsque la liste Source s'affiche. Les sélections ci-dessous apparaissent sous
Entrer le nom:
■ Magnétoscope / DVD / Décodeur câble / Décodeur satellite / Décodeur PVR / Récepteur
AV / Jeu / Caméscope / PC / DVI PC / AppareilsDVI / TV / TV IP / Blu-ray / HD DVD / DMA:
sélectionnez une prise d'entrée, puis choisissez le nom de l’appareil branché à cette prise à partir de
la liste qui s'affiche. Par exemple, si vous avez un lecteur Blu-ray branché à prise HDMI IN 2 (ARC),
sélectionnez Blu-ray en conséquence.
Si vous branchez un ordinateur à la prise HDMI IN 1 (DVI) avec un câble HDMI, assignez PC à
✎
HDMI1/DVI dans Entrer le nom.
Si vous branchez un ordinateur à la prise HDMI IN 1 (DVI) avec un câble HDMI / DVI, assignez DVI
✎
PC à HDMI1/DVI dans Entrer le nom.
Si vous branchez un appareil audiovisuel à la prise HDMI IN 1 (DVI) avec un câble HDMI/DVI,
✎
assignez AppareilsDVI à HDMI1/DVI dans Entrer le nom.
Information
Permet d’obtenir des informations détaillées sur l’appareil externe choisi.
Rafraîchir
Si les appareils externes ne s'affichent pas dans la liste Source, ouvrez le menu Outils, sélectionnez
Rafraîchir, et cherchez les appareils branchés.
Vous pouvez aussi rafraîchir la liste Source en sélectionnant a à l’aide de votre télécommande.
✎
Français - 24
Page 87

Utilisation de Smart Hub
Smart Hub vous permet d'accéder facilement à cinq fonctions pour gérer les chaînes et y accéder; définir
les chaînes favorites; consulter des photos, visionner des vidéos ou écouter de la musique stockées dans
un dispositif USB, un appareil photo ou un PC; sélectionner des sources vidéo; et régler le téléviseur pour
qu'il se mette automatiquement sous tension au moment de la diffusion d'un spectacle que vous voulez
voir. Les cinq fonctions sont énumérées ci-après:
• Chaîne: permet de gérer les chaînes, sélectionner des chaînes favorites, ajouter des chaînes et
supprimer des chaînes de la liste des Chaînes aj. (les chaînes qui s'affichent lorsque vous appuyez sur
la touche z.)
• Navigateur Web: permet de faire des recherches sur Internet.
• Gest. d'horaire: permet de programmer les spectacles et les chaînes que vous voulez regarder.
• Source: permet de sélectionner la source vidéo externe branchée que vous voulez voir.
• AllShare Play: vous permet d'ouvrir des photos, visionner des vidéos ou faire jouer de la musique qui
se trouvent dans des dispositifs USB, des appareils photo numériques, des téléphones cellulaires et
des PC. Vous pouvez accéder à des PC et des téléphones cellulaires grâce à votre réseau sans fil.
Smart Hub offre également une passerelle conviviale vers des sites de médias et de divertissement
notamment la boutique en ligne Samsung Apps, des vidéos et des films en continu, des sites pour enfants
et plus encore.
Pour accéder à Smart Hub, appuyez sur la touche ™ de la télécommande.
✎
Pour obtenir de plus amples renseignements sur Smart Hub, reportez-vous au guide électronique.
✎
Français - 25
Page 88

Interaction SMART
Cette fonction permet d'accéder aux options et aux fonctions du menu et de les commander vocalement,
par les gestes ou à l'aide de la reconnaissance faciale.
BROCHURED'INFORMATION – DÉNÉGATION DE RESPONSABILITÉ
• Ouverture de session à l'aide de la Reconnaissance faciale
Pour que la Reconnaissance faciale fonctionne, une image miniature de votre visage sera mémorisée
dans votre téléviseur; cette image vous permettra d'ouvrir une session.
L'ouverture d'une session dans Smart Hub à l'aide de Reconnaissance faciale pourrait être moins
sécuritaire que l'utilisation d'un code d'utilisateur ou d'un mot de passe.
• Utilisation d'une télécaméra
Avant d'utiliser la télécaméra, vous devez savoir que vous pourrez être tenu responsable devant la loi
en cas d'utilisation ou d'usage abusif de la télécaméra dans certains cas et sous certaines conditions
légales. Vous acceptez de ne pas utiliser la télécaméra i) dans des endroits où il est généralement
interdit de filmer (par exemple, salles de bains, vestiaires, cabines de déshabillage), ii) d'une manière
susceptible de violer la vie privée d'une personne ou iii) dans toute situation où il y a violation des lois
ou règlements en vigueur.
Lorsque vous utilisez une télécaméra, vous devez vérifier si un ruban est attaché à l'arrière de la
télécaméra et ajuster l'angle de celle-ci. Si vous ne voulez pas utiliser une télécaméra, nous vous
recommandons de placer l'objectif vers le haut. Dans ce cas, les fonctions Reconnaissance faciale et
Commande vocale et gestuelle ne sont pas disponibles.
Commande vocale
Menu → Système → Commande vocale et gestuelle → Commande vocale
Permet d’activer ou de désactiver la fonction de reconnaissance vocale. Permet d’accéder et de
commander les options et fonctions du menu en énonçant (en dictant) des lettres et des mots à voix haute.
Pour connaître la reconnaissance vocale exacte, reportez-vous à la liste Commande vocale standard
✎
sur le site Web (www.samsung.com → support → Manuals & Downloads).
Fonction Commande vocale - la reconnaissance vocale peut être altérée en raison d'une
✎
prononciation pas claire, du niveau de la voix ou du bruit environnant.
Pour utiliser Commande vocale, vous devez prononcer les mots et les phrases clairement et en
✎
articulant bien dans la langue sélectionnée sous l'option Langue.
Le bruit ambiant peut causer un mauvais fonctionnement de la Commande vocale. (Bruit ambiant
✎
approprié: au-dessous de 40 dB)
Votre téléviseur peut «entendre» vos commandes vocales de deux façons:
− Dans le microphone du téléviseur. (Reconnaissance à distance)
Il est recommandé d'utiliser la fonction Commande vocale à moins de 13pi du téléviseur. Vous
✎
pouvez vérifier la distance à l'aide de Test environnement de la commande vocale (Système
→ Commande vocale et gestuelle → Commande vocale → Test environnement de la
commande vocale).
Français - 26
Page 89

− Si vous utilisez la touche VOICE˜ de la télécommande. (Reconnaissance à proximité immédiate)
Lorsque vous utilisez le microphone du téléviseur, il se peut que les mots ne soient pas
✎
reconnus en raison du bruit ambiant. Si c'est le cas, essayez d'utiliser la touche VOICE˜ de la
télécommande. Le téléviseur reconnaîtra sans difficulté la commande vocale.
La touche VOICE˜ de la télécommande est toujours activée. Si vous voulez utiliser le microphone
✎
du téléviseur, activez Commande vocale (Système → Commande vocale et gestuelle →
Commande vocale).
Dites une commande a un niveau sonore approprie et a une distance de 0,3 a 0,9 pi (9,14 cm
✎
a 27,43 cm) du microphone de la telecommande. Si votre voix est trop faible ou trop forte, la
commande vocale risque de ne pas être reconnue.
Si une option ou une fonction du menu n'est pas prise en charge par la fonction Commande vocale,
✎
nous vous suggérons d'essayer la fonction Commande gestuelle. Vous utilisez la Commande
gestuelle, levez la main et tendez-la vers l’écran, ne la faites pas bouger pendant un instant puis
remuez-la 3 à 4 fois, de gauche à droite. Lancement de la Commande gestuelle. Si la Commande
gestuelle est exécutée, le curseur s’affiche au centre de l’écran et Taille de barre du guide gestuel
apparait au bas de l’écran.
■ Commande vocale
Permet d’activer ou de désactiver la fonction Commande vocale.
La touche VOICE˜ de la télécommande est toujours activée.
✎
■ Langue
Sélectionnez la langue de reconnaissance que vous désirez utiliser.
■ Mot de déclenchement
Vous pouvez choisir les mots déclencheurs pour exécuter la fonction Commande vocale. Vous pouvez
également mettre sous tension votre téléviseur en utilisant les Mot de déclenchement si vous réglez la
fonction Mot de déclenchement.
− Si Mot de déclenchement est réglé à Bonjour TV, dites Bonjour TV, allumer.
■ Taille barre commande vocale
Réglez le mode Taille barre commande vocale à Minimum ou Plein écran. Minimum affiche le
nombre minimum de mots ou de phrases que vous pouvez utiliser. Plein écran affiche tous les mots et
toutes les phrases.
■ Sensibilité voix
Vous pouvez configurer la sensibilité de la reconnaissance vocale.
− Écho: Sélec. niveaux de rétroaction.
− Sensibilité reconnaissance: Sélectionner le niveau de sensibilité de la reconnaissance vocale.
Français - 27
Page 90

■ Test environnement de la commande vocale
Vous pouvez vérifier le niveau de bruit ambiant détecté par le microphone du téléviseur.
− Test de bruit: cet essai permet de vérifier le niveau du bruit ambiant détecté par le microphone
du téléviseur. Trop de bruit ambiant empêche le fonctionnement de la commande vocale. Pour
exécuter la fonction, sélectionnez Suivant à l’aide de votre télécommande. L'essai démarrera; il
durera quelques secondes. Veuillez rester aussi silencieux que possible pendant le test.
− Test micro et haut-parleurs: permet de déterminer si la commande vocale sera perturbée par
le son provenant des haut-parleurs et transmis au microphone du téléviseur. Pour exécuter la
fonction, sélectionnez Démarrer à l’aide de votre télécommande. L'essai démarrera; il durera
quelques secondes. Veuillez rester aussi silencieux que possible pendant le test.
Disponible seulement lorsque l'option Sélect. le haut-parleur est réglée à Haut-parleur TV.
✎
− Test de la commande vocale: Ce test vérifie le niveau du volume et la clarté de votre voix pour une
utilisation avec Commande vocale. Sélectionnez Démarrer à l’aide de votre télécommande. Une
fois le test commencé, énoncez les mots test des instructions, aussi haut et fort que vous le pouvez.
Si le test se conclut par un échec, sélectionnez Tester de nouveau, et répétez les mots, haut
✎
et fort encore une fois.
Pour utiliser la fonction Commande vocale, suivez ces étapes:
Si la fonction Commande vocale est réglée à Activer, le téléviseur peut se mettre sous tension
✎
automatiquement à cause de l'environnement ambiant.
1. Prononcez les mots déclencheurs Mot de déclenchement que vous avez choisis à l'aide du
microphone intégré au téléviseur, ou maintenez enfoncée la touche VOICE˜ de votre télécommande.
Le téléviseur affiche Taille barre commande vocale.
Si vous utilisez la fonction Commande vocale, le volume se réglera automatiquement sur le
✎
niveau 5.
2. Prononcez un mot ou une phrase figurant dans la Taille barre commande vocale. Si vous avez
appuyé sur la toucheVOICE˜ de la télécommande, relâchez-la.
Prononcez le mot ou la phrase clairement et en articulant bien dans la langue sélectionnée sous
✎
l'option Langue.
3. Attendez jusqu’à la reconnaissance complète avant de dicter la prochaine commande, selon le même
procédé.
Pour quitter le mode Commande vocale, prononcez les Mot de déclenchement ou « annulez
✎
» à l'aide du microphone du téléviseur, ou encore appuyez sur la touche RETURNR de votre
télécommande.
Utilisation du mode vocal de saisie de texte
1. Prononcez «Rechercher tout» lorsque vous utilisez le mode Commande vocale.
Il vous est possible d'utiliser le mode vocal de saisie de texte à l'aide de l'écran de clavier
✎
QWERTY. Prononcez les Mot de déclenchement que vous avez choisis à l'aide du microphone
intégré au téléviseur, ou maintenez enfoncée la touche VOICE˜ de votre télécommande. Vous ne
pouvez pas l’utiliser pour certaines URL comme la fenêtre de saisie d’URL.
2. Dites le mot ou la phrase à rechercher.
3. Le téléviseur exécute la fonction prononcée.
Les fonctions Recherche de mot et Reconnaissance textuelle sont prises en charge par la version
✎
Beta.
Français - 28
Page 91

Commande gestuelle
Menu → Système → Commande vocale et gestuelle → Commande gestuelle
Permet d’activer ou de désactiver la fonction Commande gestuelle. Vous permet de commander votre
téléviseur en déplaçant le curseur de ce dernier avec des gestes précis.
La fonction Commande gestuelle peut être altérée par l'exécution des mouvements ou la luminosité
✎
ambiante.
Il se peut que certaines applications ne prennent pas en charge la fonction Commande gestuelle.
✎
Il se peut que vous éprouviez de la fatigue physique lorsque vous utilisez Commande gestuelle
✎
pendant de longues périodes.
Pour utiliser la Commande gestuelle, l'appareil ne doit pas être exposé à la lumière du soleil.
✎
Il est recommandé d'utiliser la fonction Commande gestuelle à moins de 5 à 13pi du téléviseur. La
✎
portée de reconnaissance de la caméra peut différer selon l'angle de celle-ci et d'autres conditions.
Vous pouvez vérifier la portée de reconnaissance de la télécaméra à l'aide de Test environnement
de commande gestuelle (Système → Commande vocale et gestuelle → Commande gestuelle
→ Test environnement de commande gestuelle).
■ Commande gestuelle
Permet d’activer ou de désactiver la fonction Commande gestuelle.
■ Taille de barre du guide gestuel
Permet de régler le mode Taille de barre du guide gestuel entre Minimum ou Plein écran.
■ Test environnement de commande gestuelle
Vous pouvez vérifier la luminosité de la pièce ou l'angle de la caméra.
− Test de luminosité: cet essai permet de vérifier si votre pièce a assez de luminosité pour que
l'option Commande gestuelle puisse fonctionner normalement. Sélectionnez Démarrer à l'aide
de la télécommande. L'essai démarrera; il ne durera que quelques secondes. (Luminosité ambiante
appropriée: 50 ~ 500 Lux)
N'exposez pas l'objectif de la caméra directement aux rayons solaires ou à la lumière.
✎
Assurez-vous que l'objectif de la caméra est protégé par un objet.
✎
− Test de l'angle de la caméra: À l’écran Test de l'angle de la caméra, appuyez sur la touche
Démarrer de votre télécommande. Un rectangle s’affiche à l’écran. Déplacez-vous dans le
rectangle en réglant la caméra ou en vous déplaçant devant. Si vous n’êtes pas dans le rectangle,
le test pourrait ne pas fonctionner. Après avoir aligné le corps, levez la main et tendezla vers l’écran,
ne la faites pas bouger pendant un instant puis remuez-la 3 à 4 fois, de gauche à droite.
Pour utiliser la fonction Commande gestuelle , suivez ces étapes:
1. Vous utilisez la Commande gestuelle, levez la main et tendez-la vers l’écran, ne la faites pas bouger
pendant un instant puis remuez-la 3 à 4 fois, de gauche à droite. Lancement de la Commande
gestuelle. Si la Commande gestuelle est exécutée, le curseur s’affiche au centre de l’écran et Taille
de barre du guide gestuel apparait au bas de l’écran.
2. Commande du téléviseur avec les mains.
Remarque: La fonction Commande gestuelle s’interrompt si vos mains quittent la zone de portée de
✎
la caméra.
Fonction Commande gestuelle - si vous utilisez un autre appareil (c.-à-d. la télécommande, le clavier,
✎
etc.) en même temps, la fonction Commande gestuelle se désactive.
Français - 29
Page 92

Commande du téléviseur par des gestes
■
Accès à la Commande gestuelle
− Geste: tendez la main vers la caméra, puis agitez-la trois ou quatre fois d'un côté à l'autre.
■
Navig. par pointage
Permet de déplacer le curseur vers la position désirée.
− Geste: tendez la main et déplacez le curseur vers la position désirée.
■
Exécuter
Permet de sélectionner un élément ou d'exécuter une commande indiquée par le curseur ou l'élément
en surbrillance.
− Geste: Serrez le poing.
Lorsque vous regardez une page ou une image, vous pouvez, si c'est possible, déplacer l'une
✎
ou l'autre vers la direction voulue. Dans ce cas, utilisez le geste Exécuter sans interruption, puis
déplacez-le vers la direction voulue. Pour changer de page, serrez le poing, gardez-le fermé et
déplacez-le dans la direction de la page désirée. Remarque: on ne peut pas toujours changer de
page.
Retour
■
Permet de revenir au menu précédent.
− Geste: tendez la main et faites-la tourner dans le sens antihoraire.
■ Contrôle des chaînes et du volume
Change de chaîne ou règle le volume.
Si vous utilisez la fonction Commande gestuelle pendant le visionnement d’une chaîne, l’écran
✎
de commande des chaînes et du volume s’affiche.
− Geste: Utilisez le geste Navig. par pointage pour déplacer le curseur vers la commande de
chaîne ou de volume, et utilisez le geste Exécuter pour changer de chaîne ou régler le volume.
Si vous utilisez le geste Exécuter une fois, cela correspond au fait d’appuyer sur la touche de
✎
votre télécommande. Si vous maintenez le geste Exécuter, c'est comme si vous maintenez
enfoncée une touche de la télécommande.
■
Défi ler
Permet de faire défi ler la page dans la direction voulue. Par exemple, supposons que vous vouliez faire
défi ler la page vers le bas.
Il se peut que certaines applications ne prennent pas en charge cette fonction.
✎
1. Déplacez le curseur vers le bas de l'écran (zone de défi lement de la page) à l'aide du geste Navig.
par pointage.
2. Déplacez le curseur vers le milieu de l'écran à l'aide du geste Navig. par pointage.
3. Cette action permet le défi lement d'une page vers le bas.
Français - 30
Page 93

Reconnaissance faciale
™ → Outils → Paramètres → Gestionnaire comptes → Reconnaissance faciale
Permet d'activer ou de désactiver la fonction de reconnaissance faciale. Cette fonction vous permet
d’enregistrer votre visage dans votre compte Samsung. Vous pouvez aussi ouvrir une session dans votre
compte Samsung au moyen de la fonction Reconnaissance faciale, sans saisir votre identifiant du
compte et votre mot de passe.
Vous pouvez enregistrer votre visage dans un compte seulement.
✎
Pour enregistrer votre visage dans votre compte Samsung, suivez ces étapes:
Pour utiliser cette fonction, vous devez ouvrir une session Smart Hub. Si vous n'avez pas de Compte
✎
Samsung, vous devez en créer un avant d'utiliser cette fonction. Pour créer votre Compte Samsung,
reportez-vous à la rubrique «Créer un compte» dans (Fonctions avancées → Smart Hub) dans le
guide électronique.
1. À l'écran Smart Hub, ouvrez le menu Outils à l’aide de votre télécommande et sélectionnez
Paramètres.
2. Sélectionnez Gestionnaire comptes. L’écran Gestionnaire comptes s’affiche.
3. Sélectionnez Reconnaissance faciale. L’écran Reconnaissance faciale s’affiche.
4. Mettez votre visage dans le carré au centre de l’écran et attendez qu’il passe du rouge au vert.
Si la Reconnaissance faciale échoue, sélectionnez Réessayer, puis essayez de nouveau.
✎
5. Une fois terminé, votre visage est enregistré dans le compte Samsung. La fenêtre «Continuer
d’enregistrer le service» s’affiche.
Pour fermer la fenêtre, sélectionnez OK. Vous pouvez enregistrer le service au moyen de Lier aux
✎
autres comptes dans le menu Smart Hub (Paramètres → Gestionnaire comptes → Lier aux
autres comptes).
Français - 31
Page 94

Pour ouvrir une session dans votre compte Samsung à l'aide de la Reconnaissance faciale, suivez
les étapes ci-après :
Si vous utilisez la Reconnaissance faciale pour ouvrir une sessions dans Smart Hub, cela pourrait
✎
être moins sécuritaire que l'utilisation d'un mot de passe.
1. Lorsque l'écran Smart Hub s'affiche, sélectionnez a à l'aide de
la télécommande. L’écran Compte Samsung s’affiche.
2. Sélectionnez Mode reconnaissance faciale. L’écran
Reconnaissance faciale s’affiche.
Pour retourner à l’écran Compte Samsung, sélectionnez
✎
Qu’est-ce qu’un compte Samsung? Un compte Samsung est un
compte de membre vous permettant d’accéder à tous les services
fournis par Samsung au moyen d’un seul compte enregistré.
Compte Samsung Appuy. [Entrée]
Mot de passe Appuy. [Entrée]
Mode reconnaissance faciale
Vous pouvez vous connecter par reconnaissance faciale.
Tournez le visage vers le téléviseur, au niveau la caméra.
Connec.
Retenir mot de passe
Connecter automatiquement
Connec.
Annuler
Créer compte
Connec.
RRetour
Mode mot de passe.
Mode mot de passe
Pause
3. Le téléviseur amorce la Reconnaissance faciale. Faites face à l'écran du téléviseur. Le téléviseur
reconnaît automatiquement votre visage.
Un carré vert indique un visage enregistré. Un carré rouge indique un visage non enregistré.
✎
Si le téléviseur ne parvient pas à faire la reconnaissance faciale, essayez de nouveau.
✎
4. Le téléviseur ouvre automatiquement une session dans le compte Samsung.
Si le téléviseur reconnaît deux visages ou plus, la liste des comptes Samsung s’affiche.
✎
Sélectionnez votre compte pour ouvrir une session.
Si votre visage n'est pas enregistré, vous pouvez l'enregistrer dans votre
✎
compte Samsung. Suivez les étapes 4 à 5 de la procédure « Pour enregistrer votre visage dans un
✎
compte Samsung » ci-dessus.
Si vous n’avez pas de compte, vous pouvez en créer un. Pour plus de renseignements, reportez-
✎
vous à la «Création d’un compte» (Fonctions avancées → Smart Hub) du guide électronique.
RRetour
Français - 32
Page 95

Fente pour le dispositif «Evolution Kit» (vendue séparément)
Cette fente est conçue pour recevoir un dispositif appelé «EvolutionKit». Ce dernier permet au téléviseur
d'exécuter une variété d'applications récentes et améliorer ainsi l'expérience de l'utilisateur.
Le dispositif «Evolution Kit» peut ne pas être disponible en fonction du produit; il sera vendu séparément
en 2013 ou ultérieurement.
Français - 33
Page 96

Connexion à un réseau
Vous pouvez configurer le téléviseur pour qu’il puisse accéder aux applications SMART TV par l’entremise
de votre réseau (LAN) à l’aide d’une connexion sans fil ou câblée.
Après avoir connecté votre téléviseur au réseau local, vous devez configurer la connexion réseau pour
✎
terminer le processus. Vous pouvez configurer la connexion durant le processus de configuration
initiale (voir la page 16) ou après à l'aide du menu du téléviseur (voir la page 36).
Connexion au réseau - sans fil
Vous pouvez connecter votre téléviseur à votre réseau (LAN) par l'intermédiaire d'un routeur sans fil ou
d'un modem standard.
Routeur IP sans fil ou
modem pourvu d'un serveur
Prise LAN murale
Ce téléviseur prend en charge les protocoles de communication IEEE 802.11a/b/g et n. Samsung
recommande l’utilisation du protocole IEEE 802.11n. Lorsque vous regardez une vidéo à partir de la
connexion IEEE 802.11a, b, ou g, la lecture pourrait être altérée.
La plupart des systèmes de réseau sans fil comportent un système de sécurité intégré qui exige que les
appareils accédant au réseau par un point d'accès (en règle générale, un routeur IP sans fil) transmettent
un code de sécurité crypté appelé clé d'accès.
Votre téléviseur est compatible avec les protocoles de sécurité suivants:
• Mode d’authentification: OPEN, SHARED, WPAPSK, WPA2PSK
• Type de cryptage: WEP, TKIP, AES
Si le mode 802.11n à débit élevé pur (Greenfield) est sélectionné et que le type de chiffrement est réglé
à WEP ou TKIP pour votre routeur sans fil, les téléviseurs Samsung ne reconnaîtront pas la connexion
conformément aux nouvelles spécifications de certification de produits sans fil.
utilisant le protocole DHCP
Câble LAN (non fourni)
Français - 34
Page 97

Connexion au réseau - câblé
Il existe trois façons de connecter votre téléviseur par le câble, selon la configuration de votre réseau. Ces
trois méthodes sont illustrées ci-dessous:
Port de modem mural Panneau arrière du téléviseur
Port de modem mural
Câble de modem
(non fourni)
Prise LAN murale Panneau arrière du téléviseur
Modem externe
(ADSL/VDSL/câblodistribution)
Modem externe
(ADSL/VDSL/câblodistribution)
Routeur IP pourvu d'un serveur
utilisant le protocole DHCP
Câble LAN
(non fourni)
Câble LAN (non fourni)Câble de modem (non fourni)
Panneau arrière du téléviseur
Câble LAN
(non fourni)
Câble LAN (non fourni)
Le téléviseur ne prend pas en charge les vitesses du réseau qui sont inférieures ou égales à 10Mbps.
✎
Utilisez un câble Cat 5 ou 6 (de type *STP) pour la connexion. (*paire torsadée blindée)
✎
Français - 35
Page 98

Configuration des connexions réseau
Après avoir lancé la configuration initiale, vous pouvez configurer ou reconfigurer les connexions réseau à
partir du menu du téléviseur.
Configuration d'une connexion au réseau sans fil
Les instructions ci-dessous concernent les réseaux qui utilisent le protocole DHCP (Dynamic Host
Configuration Protocol) pour configurer automatiquement les connexions au réseau. La plupart des réseaux
sans fil utilisent le protocole DHCP. Si vous avez un réseau à adresse IP statique, reportez-vous au guide
électronique pour les instructions de configuration.
Pour configurer la connexion réseau utilisant un protocole DHCP, procédez de la manière suivante:
1. Connectez votre téléviseur au réseau conformément aux illustrations à la page 34.
2. Mettez votre téléviseur sous tension et allez à l’écran Paramètres réseau. (Menu → Réseau →
Paramètres réseau)
3. Sélectionnez Démarrer. La fonction Réseau cherche les réseaux sans fil disponibles. Une fois
l’opération de recherche terminée, la liste des réseaux accessibles s’affiche.
4. Dans la liste des réseaux, déplacez la surbrillance pour sélectionner un réseau et sélectionnez Suivant.
Si vous avez un routeur compatible WPS(PBC), sélectionnez plutôt WPS(PBC), puis suivez les
✎
instructions à l'écran.
5. Entrez le code de sécurité du réseau ou WPS(NIP) à l'aide de la télécommande.
Entrez des chiffres et des lettres à l'aide de votre télécommande.
✎
• Si vous avez une télécommande standard, vous pouvez entrer les chiffres à l'aide des touches
numériques.
• Pour saisir une lettre, déplacez la surbrillance sur la lettre en question, puis sélectionnez-la. Vous
pouvez aussi entrer des chiffres de la même façon.
Pour afficher les majuscules (ou afficher de nouveau les minuscules si les majuscules sont
✎
affichées), sélectionnez Caps ou Maj..
Pour afficher les symboles et la ponctuation, sélectionnez F. Pour afficher de nouveau les lettres,
✎
sélectionnez F.
6. Lorsque vous avez terminé, sélectionnez Suivant si vous avez entré un code de sécurité ou WPS(NIP)
si vous avez entré un WPS(NIP).
7. Le téléviseur vérifie la connexion sans fil. Si la connexion est effectuée avec succès, le message «Vous
êtes connecté à Internet. Si vous avez de la difficulté à utiliser un service en ligne, veuillez
contacter votre fournisseur de service Internet.» s'affiche. Sélectionnez Suivant à l'aide de la
télécommande.
Pour de plus amples renseignements, reportez-vous à la section «Configuration du réseau sans
✎
fil» du le guide électronique.
Si vous voulez configurer la connexion manuellement, sélectionnez Param. IP à l'écran de
✎
connexion au réseau. Réglez le mode Mode IP à Manuel, puis entrez Adresse IP, Masque s.-
réseau, Passerelle, et Serveur DNS manuellement.
Français - 36
Page 99

Configuration d'une connexion au réseau câblé
La plupart des réseaux domestiques utilisent un protocole DHCP (Dynamic Host Configuration Protocol)
pour configurer les connexions au réseau. Les réseaux domestiques qui prennent en charge le protocole
DHCP fournissent automatiquement l’adresse IP, le masque de sous-réseau, la passerelle et les valeurs
DNS dont votre téléviseur a besoin pour accéder à Internet, de sorte que vous n’avez pas à les entrer
manuellement. Si vous avez un réseau à adresse IP statique, reportez-vous au guide de l'utilisateur pour
les instructions de configuration.
Pour configurer la connexion réseau pour un réseau câblé utilisant un protocole DHCP, procédez de la
manière suivante:
1. Connectez votre téléviseur au réseau conformément aux illustrations à la page 35.
2. Mettez votre téléviseur sous tension et allez à l’écran Paramètres réseau. (Menu → Réseau →
Paramètres réseau)
3. Sélectionnez Démarrer.
4. L’écran Connexion au réseau apparaît et vérifie cette connexion. Lorsque la connexion est confirmée,
le message Vous êtes connecté à Internet. Si vous avez de la difficulté à utiliser un service en
ligne, veuillez contacter votre fournisseur de service Internet. s’affiche. La configuration réseau est
terminée.
Si votre téléviseur ne peut acquérir automatiquement les valeurs de connexion au réseau ou si vous
✎
souhaitez configurer manuellement cette connexion, sélectionnez Param. IP à l’écran de connexion
réseau. Réglez le mode Mode IP à Manuel, puis entrez Adresse IP, Masque s.-réseau, Passerelle,
et Serveur DNS manuellement.
Pour en savoir plus sur les options de configuration, consultez la section «Connexion au réseau
✎
câblé» du guide électronique.
Français - 37
Page 100

La télécommande Smart Touch Control
Pour de plus amples renseignements au sujet de la télécommande Smart Touch Control, consultez la
✎
rubrique «Utilisation de la télécommande Smart Touch Control » dans le guide électronique.
Télécommande Smart Touch Control
À l'aide de la fonction MIC, vous pouvez
prononcer une commande vocale qui
est transmise au téléviseur. Pour utiliser
la fonction MIC, appuyez sur la touche
˜
de la télécommande.
VOICE
Fonction Commande vocale - la
✎
reconnaissance vocale peut
être altérée en raison d'une
prononciation pas claire, du niveau
de la voix ou du bruit environnant.
DEL pour afficher l’appareil actif.
Affiche les fonctions de contrôle de la
couleur et de la lecture. Vous pouvez
sélectionner une fonction à l’aide du
pavé tactile.
T
: Les fonctions fréquemment
utilisées sont sélectionnées rapidement.
Utilisez cette touche pour une option
particulière. Pour en savoir davantage,
reportez-vous au guide électronique.
z
chaîne.
Pavé tactile
Permet d’afficher les applications
Smart Hub. Reportez-vous au chapitre
Fonctions avancées → Smart Hub du
guide électronique.
: Permet de changer de
• Touchez le pavé tactile pour
déplacer l’objectif sur l’écran.
• Touchez le pavé tactile pour
déplacer l’objectif sur l’écran.
vous n'appuyez pas sur une
• Si
touche durant 30 secondes, la
télécommande Smart Touch
Control se règle en mode veille
automatiquement. Pour l'activer à
nouveau, appuyez sur le pavé tactile.
• Si vous appuyez et maintenez
enfoncée le pavé tactile, c'est le
même effet que si vous appuyez
sur la touche MUTE
télécommande. Cependant, cette
action fait défiler la page sur le
Navigateur Web.
• Tapez sur le pavé tactile ou appuyez
sur la touche RETURN
revenir à la situation normale.
Pour quitter facilement une
✎
application en cous d'exécution,
appuyez sur la touche
M
permet de mettre le téléviseur sous
Š
facilement et rapidement, à l'aide du
y
raccourci. Vous pouvez sélectionner une
RETURNR : Permet de retourner au
vous maintenez la touche enfoncée,
commandes. Vous pouvez parler à
l’aide du microphone intégré à votre
Pour de plus amples informations à
✎
propos de la fonction Commande
vocale, reportez-vous à la section
NUMBER
des touches numériques. Vous pouvez
sélectionner un numéro à l’aide du pavé
tension et hors tension.
: Une liste des fonctions utilisées
récemment s'affiche. Vous pouvez
choisir une fonction de nouveau,
: permet de régler le volume..
Affiche la liste des fonctions de
fonction à l’aide du pavé tactile.
VOICE
˜
: Permet d'accéder à la
fonction Commande vocale. Si
le téléviseur affiche la liste des
«Reconnaissance» du guide
électronique ou à la page 26.
š
: permet d'afficher l'écran
pavé tactile.
menu précédent.
télécommande.
tactile.
.*$
TV STB BD
RETURN VOICE NUMBER
de votre
R
pour
™
.
Français - 38
 Loading...