

Samsung UN65J6200AFXZA-IH02, UN65J6200AFXZA-AH01, UN60J6200AFXZA-NS02, UN60J6200AFXZA-MH01, UN60J6200AFXZA-EA03 Owner’s Manual
...
E-MANUAL
Thank you for purchasing this Samsung product.
To receive more complete service, please register
your product at
www.samsung.com/register
Model
Serial No.
Connecting Antenna and External
devices
Using the Remote Control and
Peripherals
Antenna Connection
Video Device Connections
2 HDMI Connection
3 Component Connection
4 Composite (A/V) Connection
Audio Input and Output Connections
5 Digital Audio (Optical) Connection
6 Audio Output Connection
Connecting to a Computer
7 Connecting Through the HDMI Port
8 Connecting With a DVI to HDMI Cable
9 Connecting Through Home Network
Connecting To a Mobile Device
11 Screen Mirroring
13 Connecting Mobile Devices without a Wireless Router
(Wi-Fi Direct)
14 Connecting Through Home Network
14 Specifying the Name of the TV on a Network
Switching Between Video Sources
15 Other Functions Available When You Display the Source
List
Controlling the TV with a Keyboard
16 Connecting a Keyboard
16 Using the Keyboard
Controlling the TV with a Mouse
17 Connecting a Mouse
18 Using the Mouse
Entering Text Using the On-Screen QWERTY Keypad
19 Using Additional Functions
internet Connection
Establishing a Wired Internet Connection
20 Using Cat 7 LAN Cables
21 Connecting to a Wired Internet Network Automatically
22 Connecting to a Wired Internet Network Manually
Establishing a Wireless Internet Connection
24 Connecting to a Wireless Internet Network Automatically
25 Connecting to a Wireless Internet Network Manually
26 Connecting to a Wireless Internet Network with WPS
Troubleshooting Internet Connectivity Issues
27 Troubleshooting Wired Internet Connectivity Issues
28 Troubleshooting Wireless Internet Connectivity Issues
Checking the Internet Connection Status
Smart Features TV Viewing
Smart Hub
30 Testing Smart Hub connections
31 Opening the First Screen
31 Moving to the Panel Screen
31 Resetting Smart Hub's First Screen
Using Smart Hub with a Samsung Account
32 Creating a Samsung Account
34 Signing in to a Samsung Account
35 Linking Your Samsung Account to External Service
Accounts
36 Changing and Adding Information to a Samsung Account
36 Deleting a Samsung Account from the TV
Using the SAMSUNG APPS Panel
38 Using Supported Features via the Pop-Up Menu -
Downloaded Apps
39 Using Supported Features via the Pop-Up Menu -
Recommended Apps
39 installing an App
Using the e-Manual
41 Launching the e-Manual
41 Additional e-Manual Features
42 Accessing the Menu from the e-Manual
42 Loading Reference Pages
42 Updating the e-Manual to the Latest Version
43 Using Web Browser
47 Relocating an App on the Apps Screen.
47 Deleting an App from the TV
48 Rating/Reviewing an App
48 Updating Apps
49 Using Other App Features and Functions
Using the Multimedia (Playing Photos, Videos, and
Music)
50 Playing Media Content Saved on a USB Device
51 Playing Multimedia Content Saved on a Computer/
Mobile Device
Digital Broadcast Information at a Glance
57 Using the Guide
58 Viewing Detailed Information
58 Checking Current Program Info
58 Changing the broadcast signal
58 Digital Channel Signal Info and Strength
Setting Up a Schedule Viewing
59 Digital Channel Schedule Viewing
60 Analog Channel Schedule Viewing
61 Canceling a Schedule Viewing
61 Editing a Schedule Viewing
Using the Channel List
Registering, Removing, and Editing Channels
63 Registering and Removing Channels
64 Editing Registered Channels
65 Program Rating Lock
Creating a Personal Favorites List
68 Registering Channels as a Favorites
69 Selecting from Favorite List Channels Only
Editing a Favorites List
70 Edit Favorites Screen Menu Items
Making Sports Programs More Realistic with Soccer
Mode
73 Enabling Soccer Mode
TV-Viewing Support Features
74 Showing Captions
76 Enabling the Audio Guide for the Video Description
76 PIP Broadcast Viewing
77 Scanning for Available Channels
77 Selecting the Broadcast Audio Language
78 Fine-Tuning the Screen
78 Remove Scrambled Channels
52 Playing Photos
53 Playing Videos
55 Playing Music
56 Functions on the Media Content List Screen
Picture and Sound Settings
Changing the Picture Mode and Adjusting the Picture
Quality
79 Choosing the Right Picture Mode for the Viewing
Environment
80 Adjusting the Picture Quality for Each Picture Mode
81 Fine-Tuning Each Picture Mode (Advanced Settings)
83 Adjusting the Picture for Easier Viewing (Picture Options)
Using Anynet+ (HDMI-CEC)
95 Setting Up Anynet+ (HDMI-CEC
96 Using Anynet+ (HDMI-CEC)
Updating the TV's Software
97 Update now
97 Online
98 Manually, Using a USB Flash Drive
99 Enabling Automatic Software Updates
Picture Support Functions
84 PIP Broadcast Viewing
85 Changing the Picture Size and Position
86 Listening to Audio Only with the Screen Turned Off
(Picture Off)
86 Resetting the Picture Mode Settings
Changing the Sound Mode and Using Sound Effects
87 Choosing the Right Sound Mode for the Environment
88 Using Sound Effects
Sound Support Functions
88 Selecting Speakers
89 Designating the TV's Installation Type
89 Enabling Digital Audio Output
89 Resetting All Sound Settings
General
Setting the Time and Using the Timer
90 Setting the Current Time
91 Using the Timers
Protecting the TV from Hacking and malicious code
99 Checking the TV and Connected Storage Media
100 Automatically Scanning when the TV is Powered On
100 Automatically Adding malicious code to the Blocked List
Using Other Functions
101 Setting Up a Password
101 Changing the Menu Language
101 Checking Notifications
101 Adjusting the Menu Transparency
102 White Text on Black Background (High Contrast)
102 Expanding the Smart Hub's Focus Area
102 Enjoying Rich Colors and Superior Picture Quality (BD
Wise)
102 Locking/Unlocking the Panel Keys
102 Showing/Hiding the Samsung Logo while Booting
102 Enabling Game Mode
103 Registering the TV as a DivX-Certified Device (To Watch
For Pay DivX Movies)
104 Restoring the TV to the Factory Settings
104 Using the TV as a Display Model (exclusively for retail
stores)
Using the Screen Burn Protection and Energy Saving
Features
94 Preventing Screen Burn
94 Using Energy Saving Features
Troubleshooting
Getting Support
105 Support through Remote Management
106 Finding the Information You Need for Service
Requesting support
There is a problem with the picture
107 Testing the Picture
I can't hear the sound clearly
109 Testing the Sound
Read Before Playing Photo, Video, or Music Files
117 Photo, Video, and Music File Use Limitations
117 Compatible Storage Devices for File Transfers
118 Supported External Subtitles
118 Supported Internal Subtitles
119 Supported Image Formats and Resolutions
119 Supported Music Formats and Codecs
120 Supported Video Codecs
Read After Installing the TV
122 Picture Sizes and Input Signals
122 Installing an Anti-Theft Lock
There is a problem with the broadcast.
My computer won't connect.
I can't connect to the Internet.
I am having trouble launching/using apps.
My file won't play.
I want to reset the TV.
Other Issues
Appendix
Read Before Using Apps
Read Before Using the Web Browser
123 Read Before Setting Up a Wireless Internet Connection
Read Before Connecting a Computer (Supported
Resolutions)
124 LED 5, 6 series
124 IBM
124 MAC
125 VESA DMT
126 LED 4 series
126 IBM
126 MAC
126 VESA DMT
Supported Resolutions for Video Signals
License
Glossary
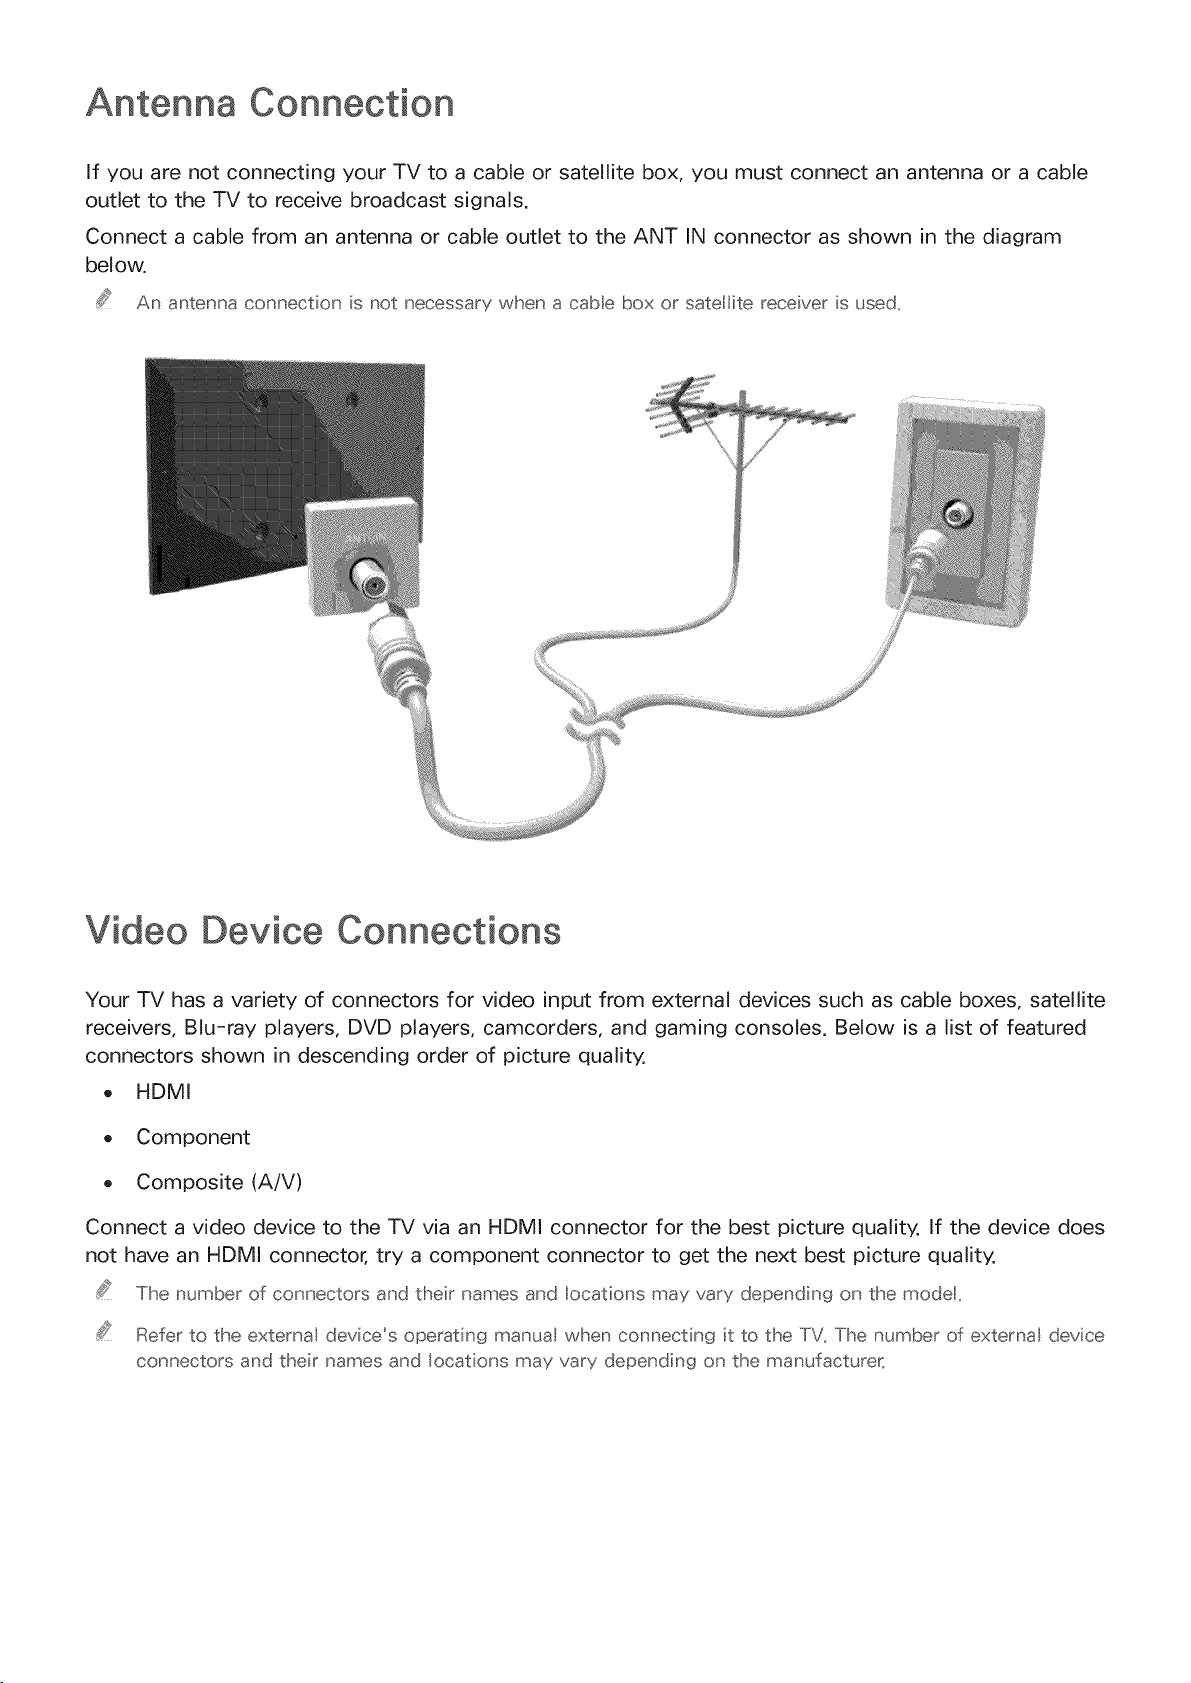
Antenna Connection
If you are not connecting your TV to a cable or satellite box, you must connect an antenna or a cable
outlet to the TV to receive broadcast signals.
Connect a cable from an antenna or cable outlet to the ANT IN connector as shown in the diagram
below.
An antenna connection is not necessary when a cabe box or satellite receiver is used,
Video Device Connections
Your TV has a variety of connectors for video input from external devices such as cable boxes, satellite
receivers, Blu-ray players, DVD players, camcorders, and gaming consoles. Below is a list of featured
connectors shown in descending order of picture quality.
o HDMI
o Component
Composite (A/V)
Connect a video device to the TV via an HDMI connector for the best picture quality. If the device does
not have an HDMI connector, try a component connector to get the next best picture quality.
The number of connectors and their names and locations may vary depending on the modet,
Refer to the external device's operating manual when connecting it to the TV. The number of external device
connectors and their names and locations may vary depending on the manufacturer_
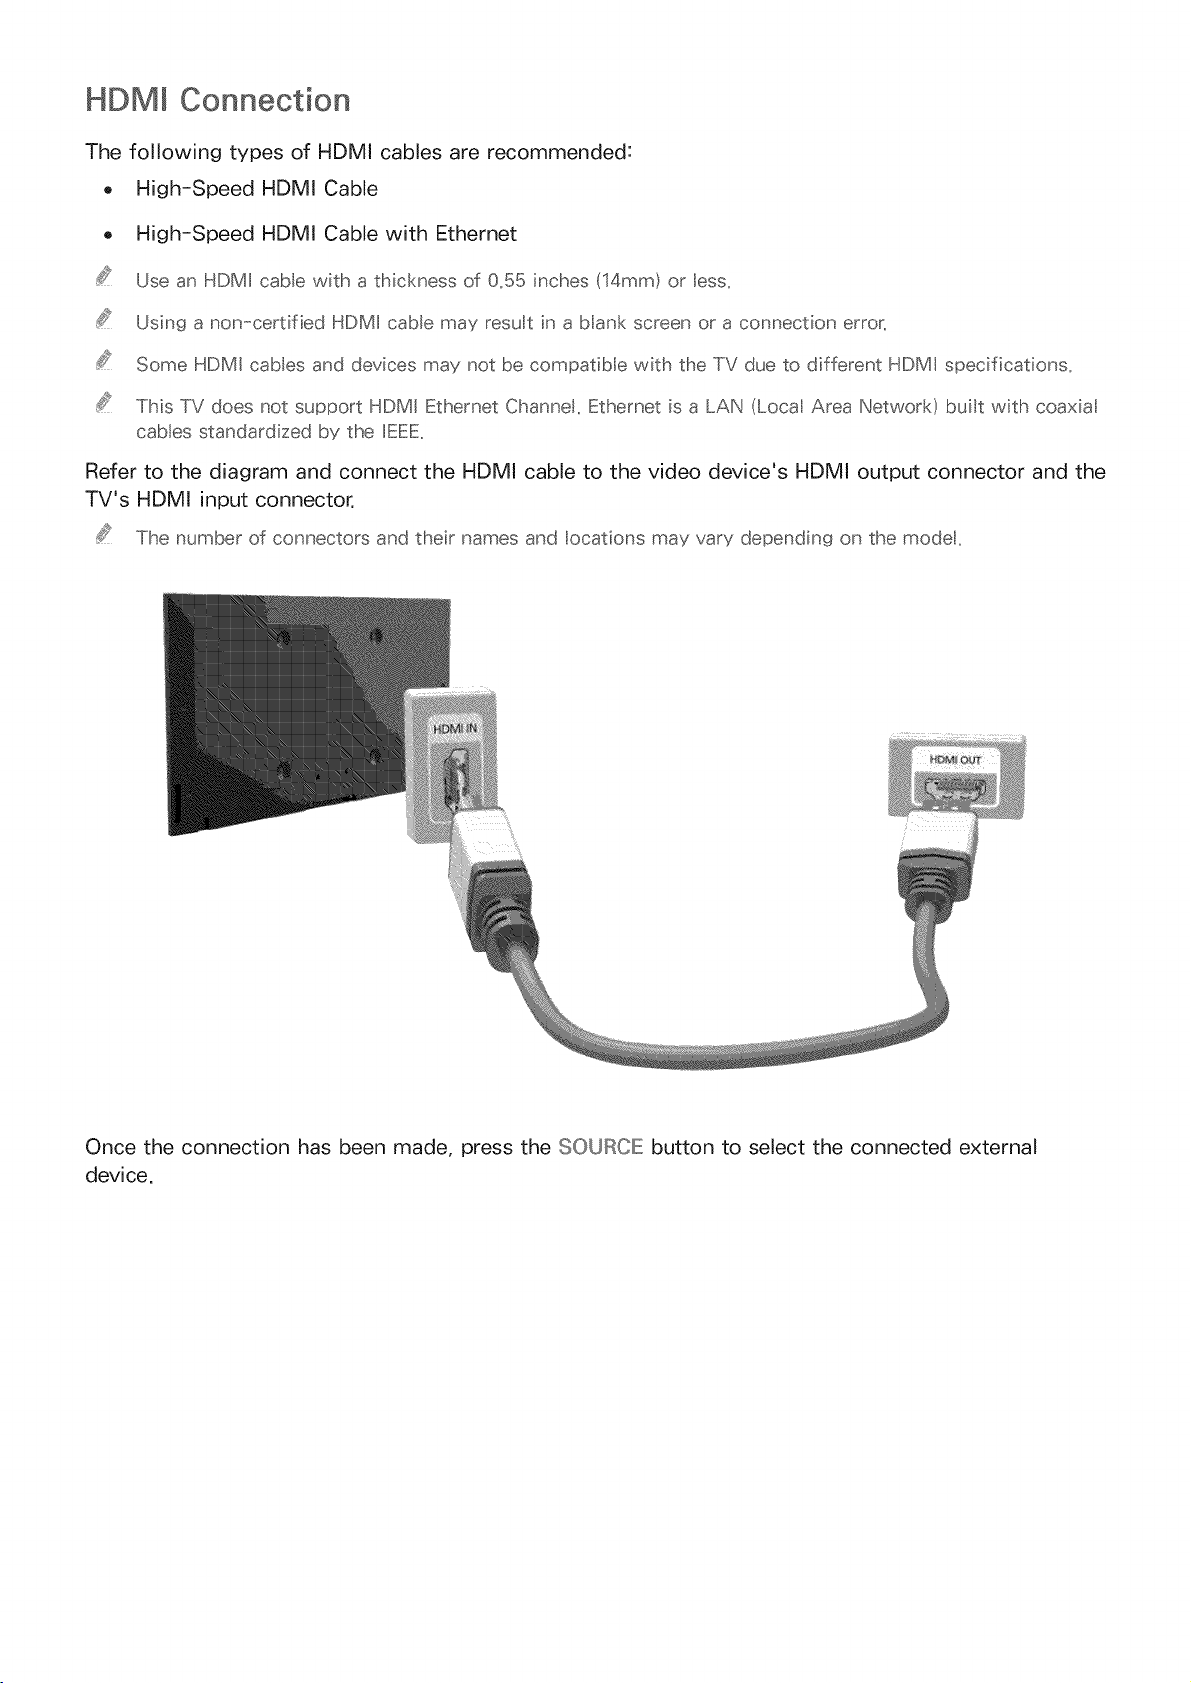
HDMI Connection
The following types of HDMI cables are recommended:
o High-Speed HDMI Cable
o High-Speed HDMI Cable with Ethernet
Use an HDMI cable with a thickness of 0,55 inches (14mm) or less,
Using a non-certified HDMI cable may result in a blank screen or a connection error_
Some HDMI cables and devices may not be compatible with the TV due to different HDMI specifications_
This TV does not support HDMI Ethernet Channe, Ethernet is a LAN (Loca Area Network) buit with coaxial
cables standardized by the IEEE_
Refer to the diagram and connect the HDMI cable to the video device's HDMI output connector and the
TV's HDMI input connector.
The number of connectors and their names and locations may vary depending on the modet_
Once the connection has been made, press the SOURCE: button to select the connected external
device.
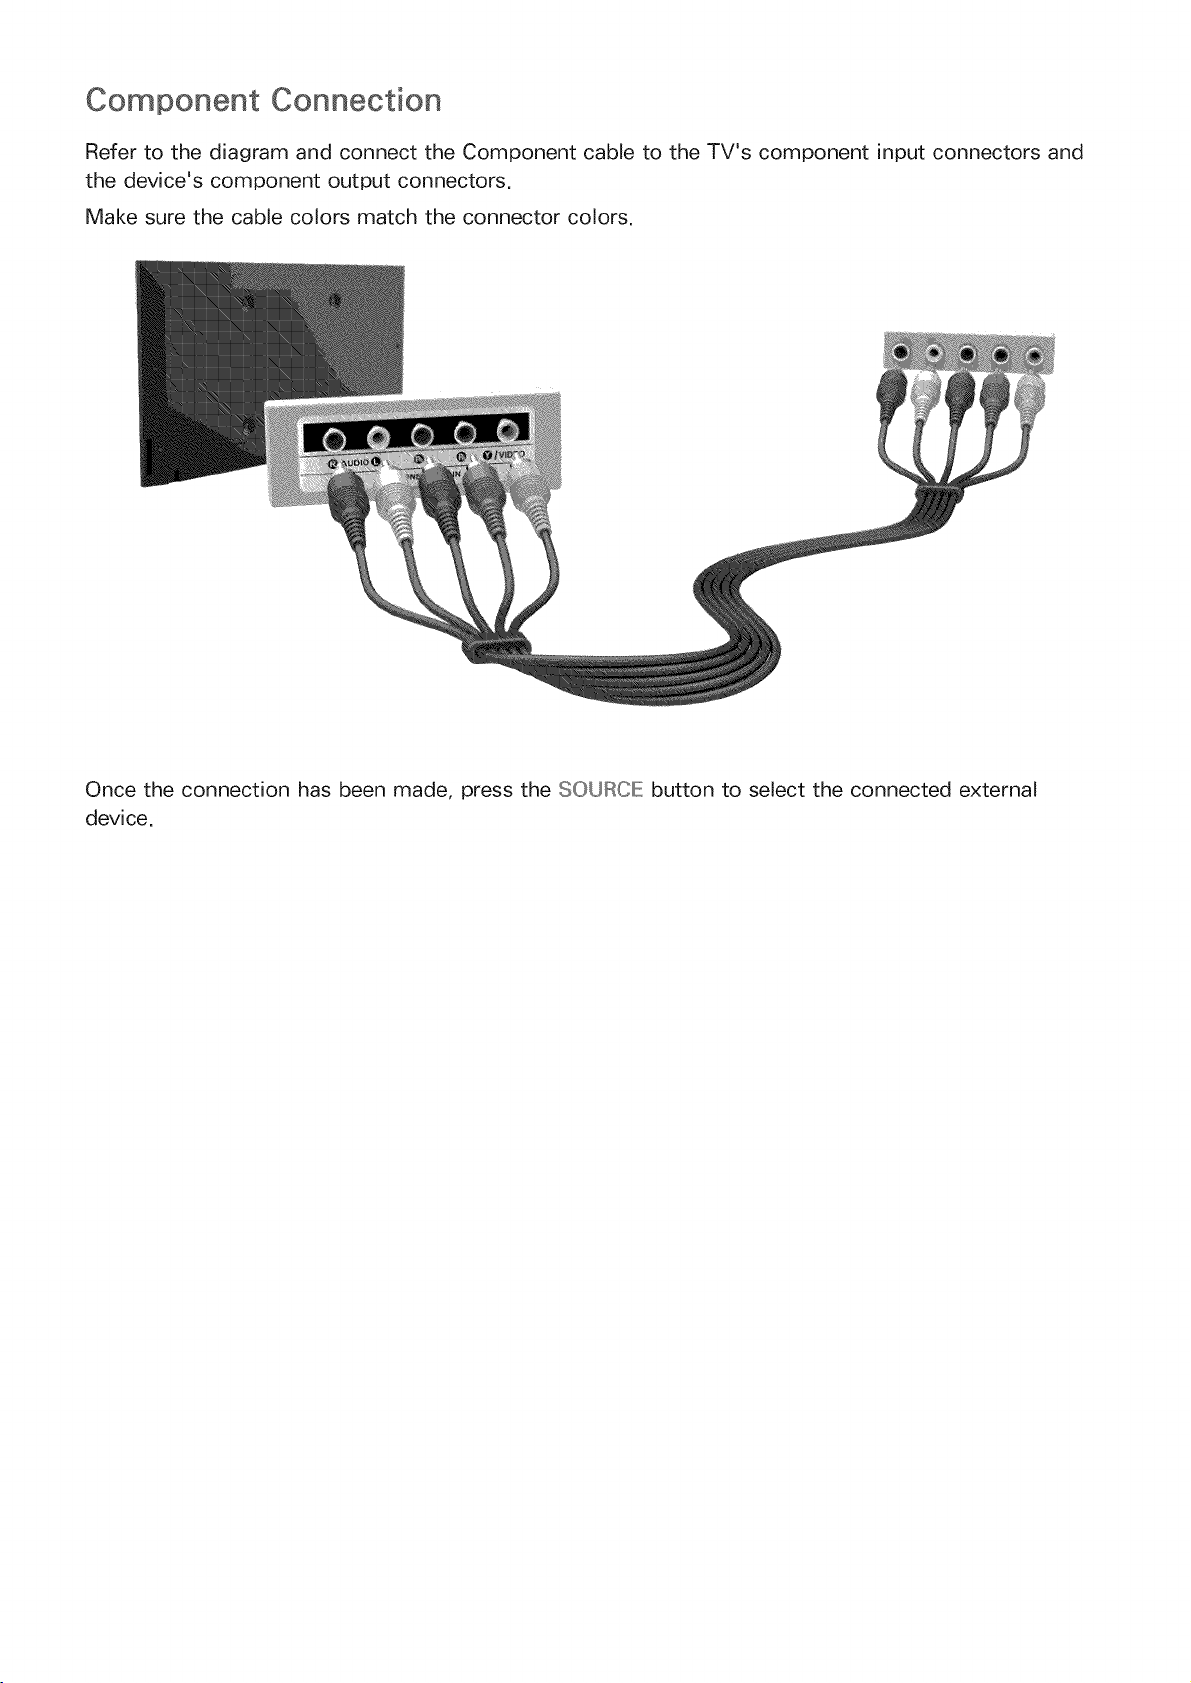
Component Connection
Refer to the diagram and connect the Component cable to the TV's component input connectors and
the device's component output connectors.
Make sure the cable colors match the connector colors.
Once the connection has been made, press the SOURCE: button to select the connected external
device.
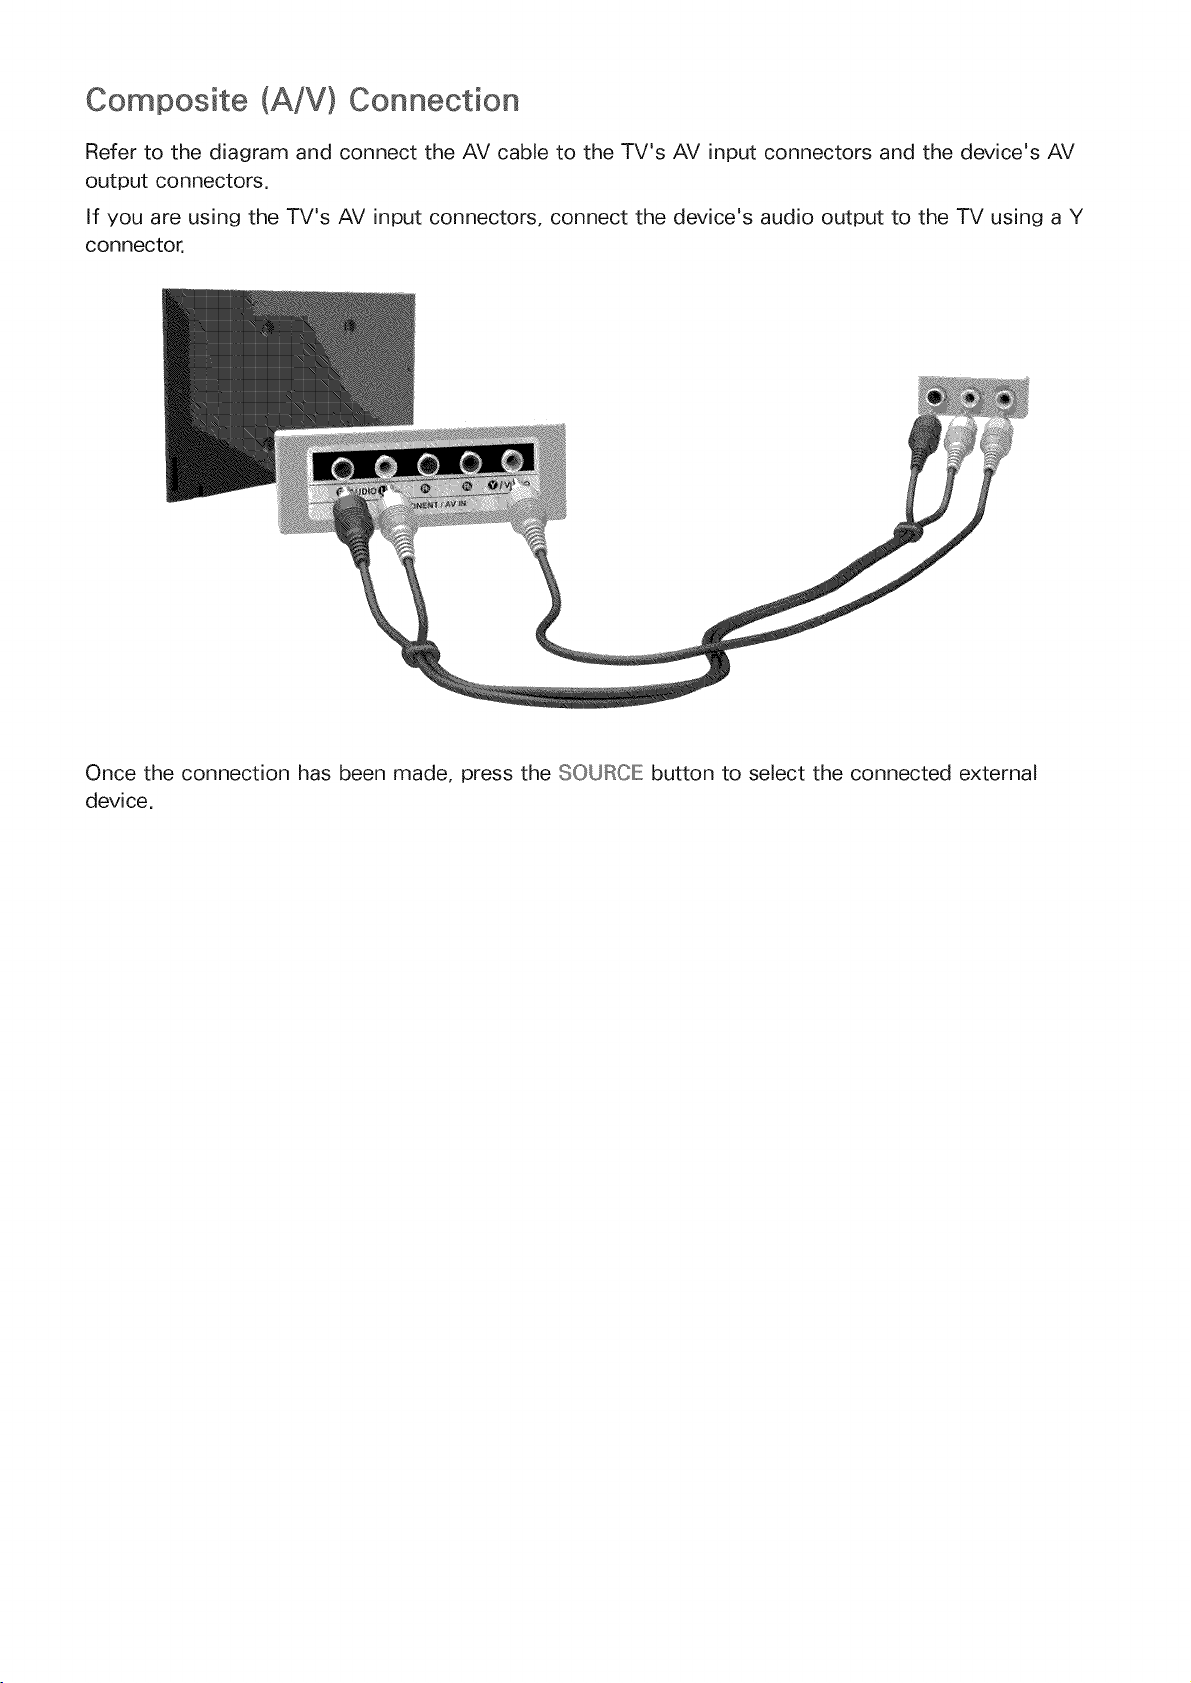
Composite (A/V) Connection
Refer to the diagram and connect the AV cable to the TV's AV input connectors and the device's AV
output connectors.
If you are using the TV's AV input connectors, connect the device's audio output to the TV using a Y
connector.
Once the connection has been made, press the SOURCE button to select the connected external
device.
Input and Output Connections
Your TV has a variety of connections for audio input from devices such as Blu-ray players and DVD
players and for audio output to such devices as amplifiers. The connections are listed below.
o Digital Audio (Optical)
Audio (Analog)
For better audio quality it is a good idea to use an AV receiver:
The number of connectors and their names and locations may vary depending on the modet.
Refer to the external device's operating manua when connecting it to the TV. The number of external device
connectors and their names and locations may vary depending on the manufacturer.
When connecting the external device to the external speake_i be sure to connect the external speaker to
the TV first, and then connect the extema device. Sync problems may develop if the connection order is
reversed_
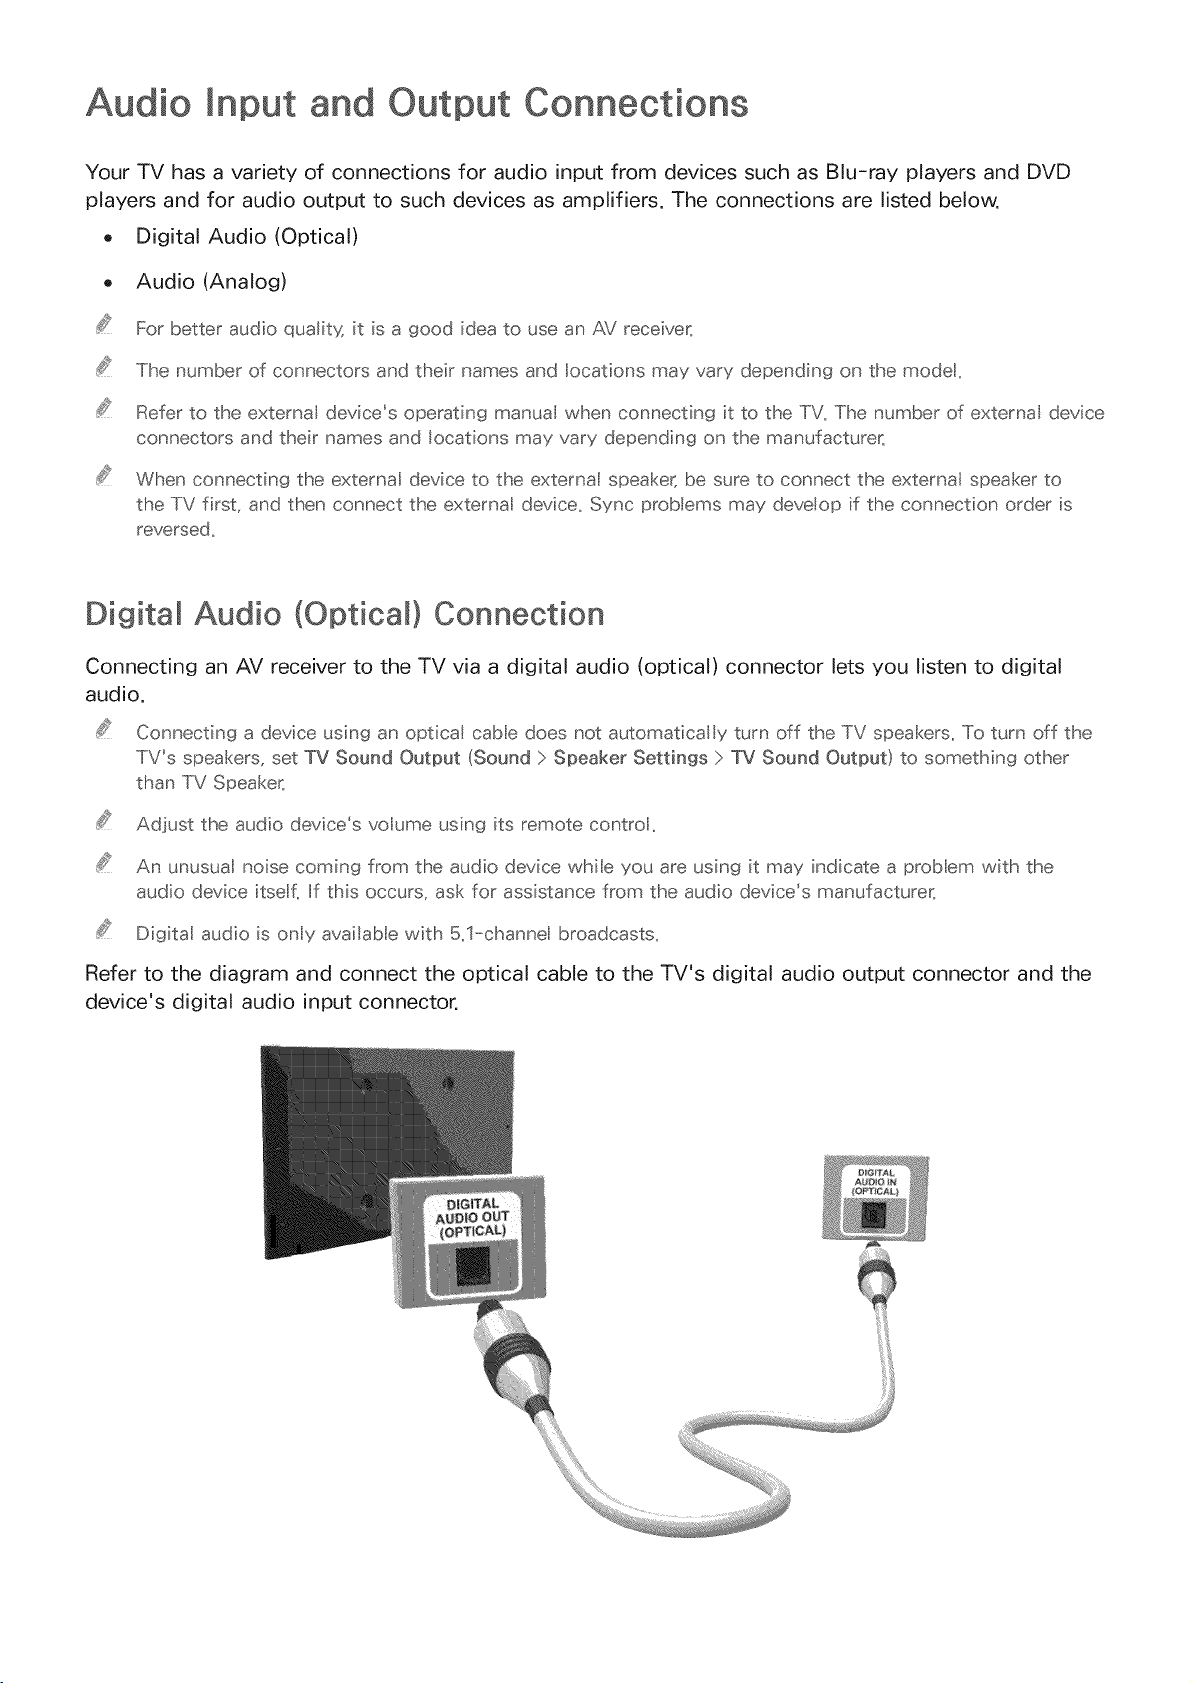
Digital Audio (Optical} Connection
Connecting an AV receiver to the TV via a digital audio (optical) connector lets you listen to digital
audio.
Connecting a device using an optical cable does not automatical y turn off the TV speakers. To turn off the
TV's speakers, set TV Sound Output (Sound :>Speaker Settings :>TV Sound Output) to something other
than TV Speaker_
Adjust the audio device's volume using its remote control,
An unusual noise coming from the audio device while you are using it may indicate a problem with the
audio device itse{ If this occurs, ask for assistance from the audio device's manufacturer_
Digital audio is ony available with 5,1-channe broadcasts,
Refer to the diagram and connect the optical cable to the TV's digital audio output connector and the
device's digital audio input connector.
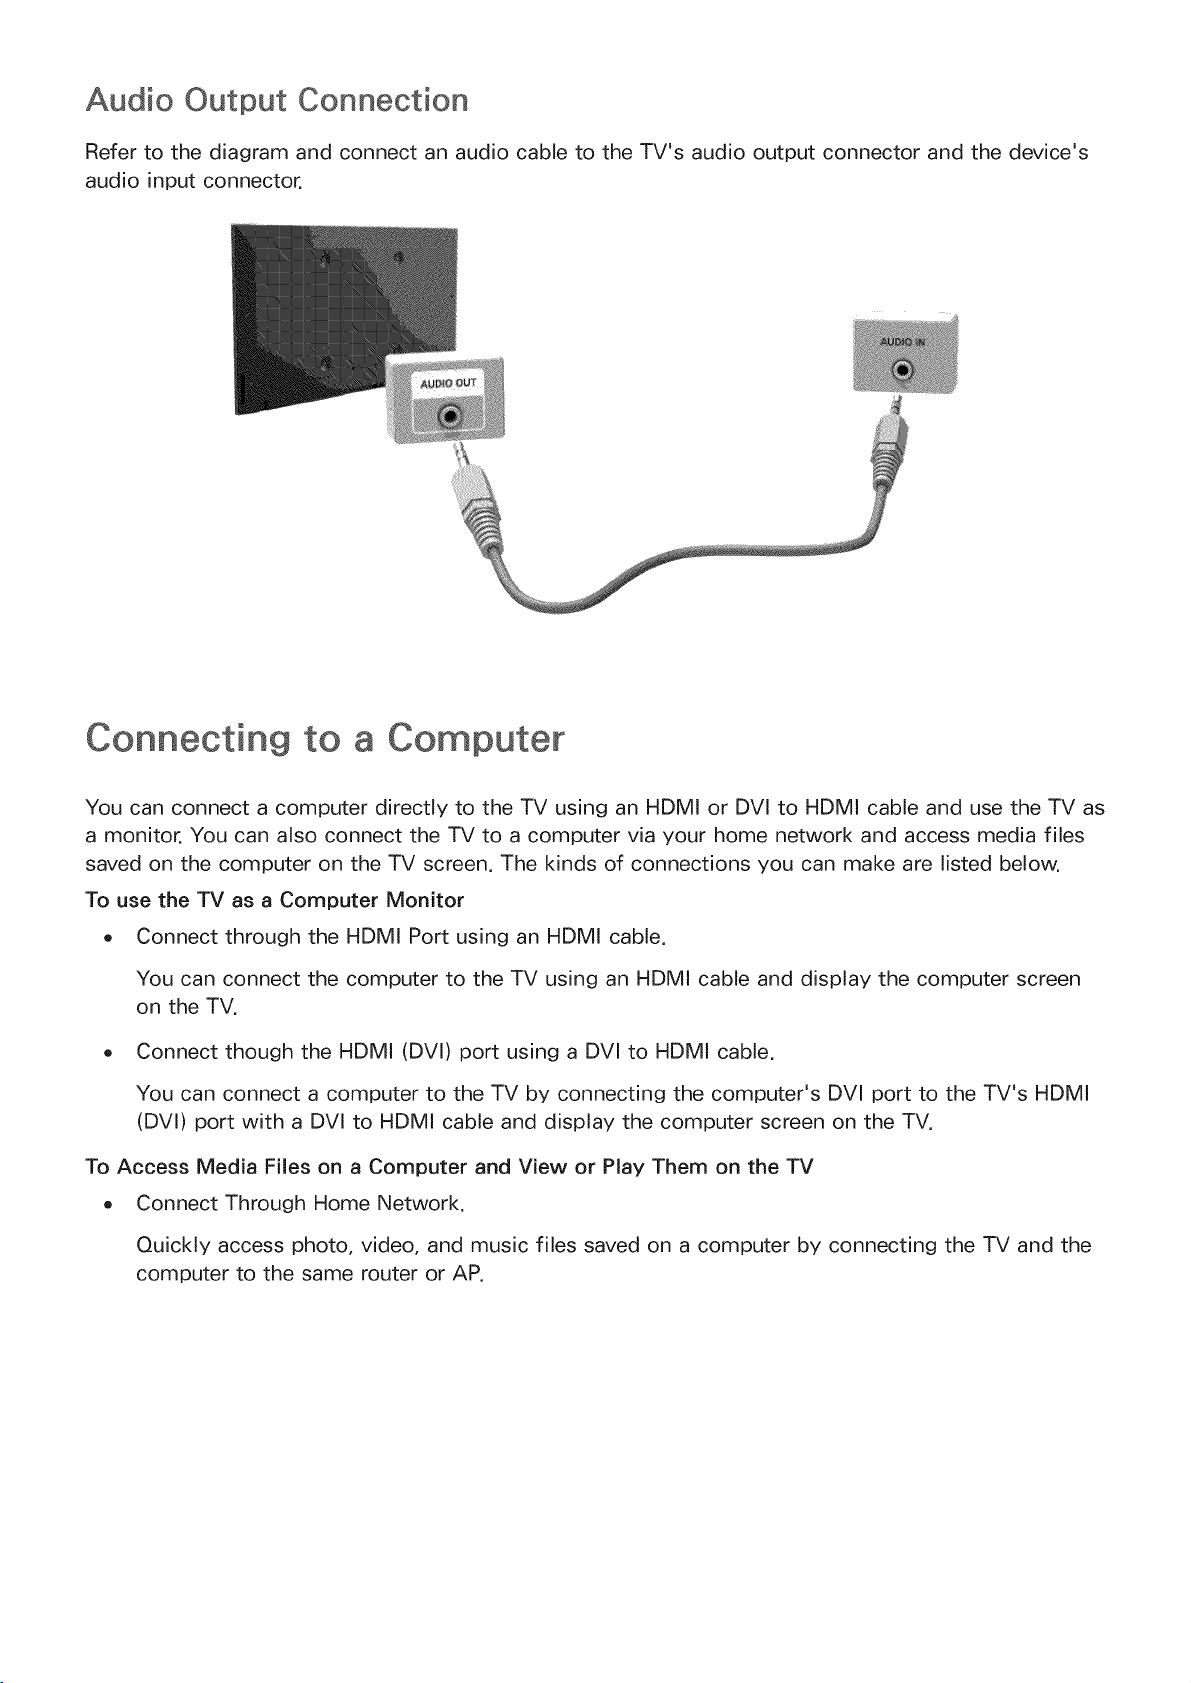
Audio Output Connection
Refer to the diagram and connect an audio cable to the TV's audio output connector and the device's
audio input connector.
Connecting to a Computer
You can connect a computer directly to the TV using an HDMI or DVI to HDMI cable and use the TV as
a monitor. You can also connect the TV to a computer via your home network and access media files
saved on the computer on the TV screen. The kinds of connections you can make are listed below.
To use the TV as a Computer Monitor
o Connect through the HDMI Port using an HDMI cable.
You can connect the computer to the TV using an HDMI cable and display the computer screen
on the TV.
Connect though the HDMI (DVI) port using a DVI to HDMI cable.
You can connect a computer to the TV by connecting the computer's DVl port to the TV's HDMI
(DVl) port with a DVl to HDMI cable and display the computer screen on the TV.
To Access Media Files on a Computer and View or Play Them on the TV
o Connect Through Home Network.
Quickly access photo, video, and music files saved on a computer by connecting the TV and the
computer to the same router or AP.

Connecting Through the HDMI Port
For an HDMI connection, we recommend one of the following HDMI cable types:
o High-Speed HDMI Cable
o High-Speed HDMI Cable with Ethernet
Use an HDMI cable with a thickness of 0_55 inches (14mm) or less_ Using a non-certified HDMI cable may
result in a blank screen or a connection error,
Some HDMI cables and devices may not be compatible with the TV due to different HDMI specifications_
This TV does not support HDMI Ethernet Channe _Ethernet is a LAN (Loca Area Network) buit on coaxia
cables standardized by the IEEE
Many computer graphics adaptors do not have HDMI ports, but have DVI ports instead_ If your computer
graphics adaptor has a DVI port_ use a DVI to HDMI cable to connect the computer to the TV_ For more
informatior_, refer to
Refer to the diagram and connect an HDMI cable to the computer's HDMI output connector and the
TV's HDMI input connector.
The number of ports, and their names and locations may vary depending on the modet_
Once the connection has been made, press the SOURCE: button to select the connected external
device.
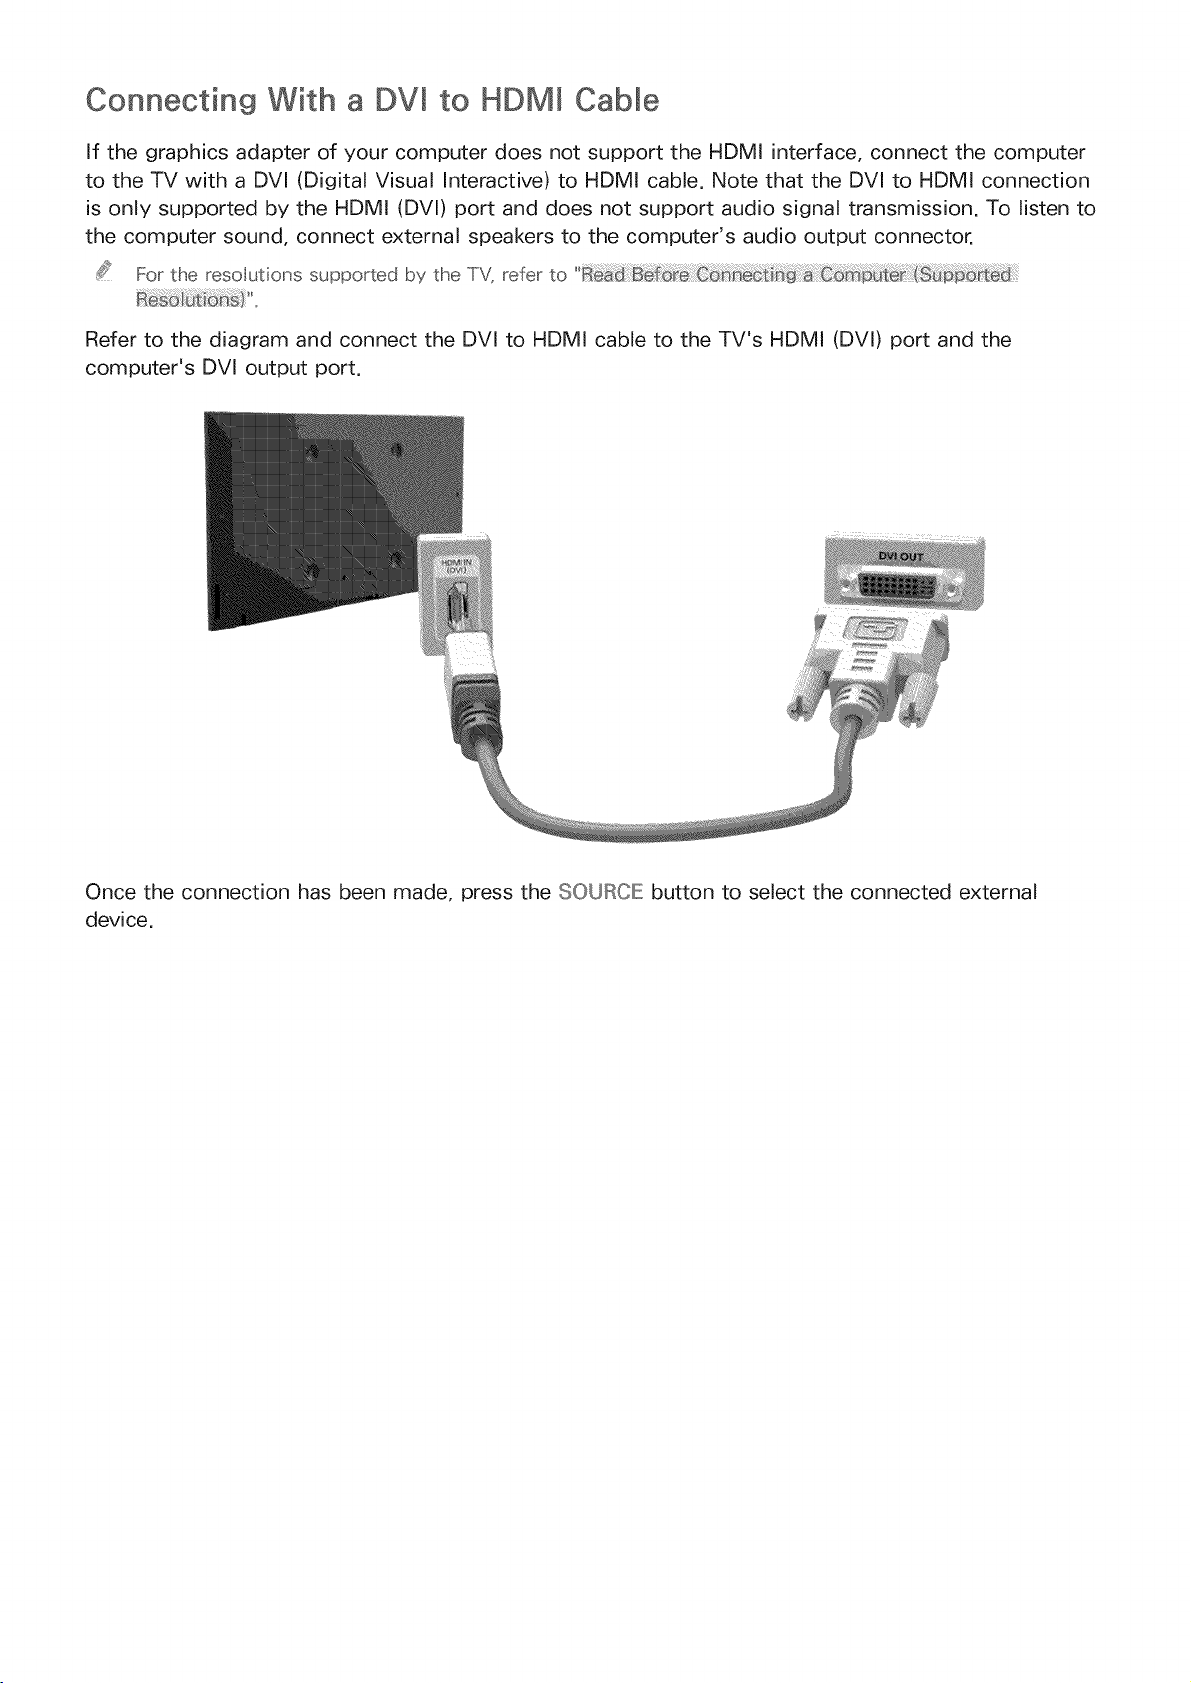
Connecting With a DVmto HDMI Cable
If the graphics adapter of your computer does not support the HDMI interface, connect the computer
to the TV with a DVl (Digital Visual Interactive) to HDMI cable. Note that the DVl to HDMI connection
is only supported by the HDMI (DVl) port and does not support audio signal transmission. To listen to
the computer sound, connect external speakers to the computer's audio output connector.
For the resolutions supported by the TV, refer to
Refer to the diagram and connect the DVI to HDMI cable to the TV's HDMI (DVI) port and the
computer's DVl output port.
Once the connection has been made, press the SOURCE button to select the connected external
device.
Connecting Through Home Network
Quickly access and play photo, video, and music files stored on a computer on the TV.
Connect the TV and the computer to the same router or AP. Once you connect them to the same
router or AP, a home network is configured.
2, On the computer, select [Control Panel] > [Network and Internet] > [Network and Sharing Center]
> [Change advanced sharing settings], and then select [Choose media streaming options...] to
activate media streaming.
3, From the list, set the TV to [Allowed].
4, Launch Windows Media Player on a computer. Select [Settings] > [Library Management], and then
add the location where photo, video, and music files are saved to play them on the TV.
A te_ _ative y, you ca[] move tlhe fles to the defa_ It foder specif ed HayW []dows Media Ii:::>ayec and then
pay or view them on tlhe IIV
As ong as Fie Sha_ ng s activated, {_na_tl"_o_zed access may occtc When yot_ do _ot _eed to access
data, disab e Fie Sha_ n9,,
Connecting To a Mobile Device
You can connect a mobile device such as a smartphone or tablet directly to the TV, or connect it to the
network and display the mobile device's screen or play its content on the TV. The kinds of connections
you can make are listed below.
o Connect by Mirroring the Mobile Device's Screen on the TV (Screen Mirroring)
Wirelessly connect the TV and the mobile device with the mirroring function. You can view the
mobile device's screen on the TV screen.
.....lihis ol_tion s ava abe O_y 0_ 8 moble device ha s_ pl/_o_s he rni__o_n_:_f_nctio_,,
.....lihis optio _ may dil_e_ flom he mobiles so_ wa_e,,
Connect Mobile Devices without a Wireless Router (Wi-Fi Direct)
Wi-Fi Direct enables you to connect the TV and the mobile device without a router or AP. Quickly
access and play photo, video, and music files in the connected mobile device on the TV.
.....lihis ol_tio_ sava abe O_y 0_ 8 moble device ha s_ pl;_o_s he W F Direct fi_nctio_,,
Connect Through Home Network
You can conveniently play photo, video, and music files saved on a mobile device by connecting
the mobile device and the TV to the same router or AP.
Screen Mirroring
This option may differ from the mobile's software.
Wirelessly connect a mirroring-enabled mobile device to the TV and play the video and audio files
stored on the device on the TV. Mirroring refers to the function that plays the video and audio files
located on a mobile device on a TV and on the mobile device simultaneously,
To use the Screen Mirroring funct on, the mobile devce must support a mirroring funct on such as A tShare
Cast or Screen Mirror ng. To check whether your mobb device supports the m rroring funct on, please vist
the moble device manufacturer's webs te.
The video oraudomay ntermttenttystopdependngonnetworkcondtons_
Connecting via a mobile device
On the mobile device, run Screen Mirroring. The mobile device searches for available devices to
connect to.
2, In the search result list, select the TV. The TV displays a pop-up at the top of the screen.
3, In the pop-up, select Allow to connect the mobile device.
A previously al owed moble dev ces wl a_tomatica y connect wtho_ t needing approval,,
Iif yo_. select Deny, the device cannot connect,, Iinadditio _,yo_ are setting the devices connection
stat_,s to Deny and it wl not Be abe to connect n the f_ture unless you change its connection status,,
.....Iio clilange the connection status of a denied device, Navigate to Network > Screen Mirroring > Device
Manager, seect the device, and then seect Allow,,
Connecting by Automatically A_owin9 the Connection
Navigate to Network > Screen Mirroring, and then select Screen Mirroring. The Screen Mirroring
function starts. You can also start screen mirroring by pressing the SOURCE button on your
remote, and then selecting Screen Mirroring from the list at the top of the screen.
2_ Launch Screen Mirroring on your mobile device. The device searches for available devices.
3_ Select the TV from the list. The TV automatically allows the connection and the device connects.
Iif the moble device cannot co _nect, tr_yt_ruing the IiV off and o_,,
Managing the Connection Status of P_"_eviously Connected Mobile Devices
This funct on is only ava labte f dev ces have previously connected to the TV or have pr°eviously attempted
to connect and been denied.
Navigate to Network > Screen Mirroring > Device Manager. The TV displays a list of devices that
have previously connected to the TV or have tried to connect to the TV and been denied. The
status of the connection (Allow/Deny) is also displayed.
2_
Select a device. A pop-up appears.
3_
In the pop-up, you can select Allow connection, Deny connection, or Delete the device from the
list.
Connecting Mobime Devices without a Wireless Router (Wi-Fi
Navigate to MIE:INU> Network > Wi-Fi Direct
You can connect a mobile device with the Wi-Fi Direct feature directly to the TV without using a
wireless router or AP. By connecting a mobile device to the TV through Wi-Fi Direct, you can play
photo, video, and music files saved on the mobile device on the TV.
This option is ava Iab[e ony on a mob[e device that supports the W-F Direct funct on, Pease chec< f your
mobte device supports Wi-F DrecL
The video or audo may nterm ttently stop depend ng on network cond t}ons.
Enable Wi-Fi Direct on the mobile device, and then navigate to Network and select Wi-Fi Direct
on the TV. The TV automatically scans for and displays a list of available devices. The TV's name
also appears on the mobile device.
2_
Select the device from the list to initiate a connection. If a connection request is made by the TV,
a permission message appears on the mobile device and vice versa.
3_ Allow the connection. The TV and mobile device connect.
Connecting Through Home Network
Quickly access and play photo, video, and music files stored on a mobile device on the TV.
Connect both the TV and the mobile device to the same router or AP. Once you connect them to
a single router or AP, a home network is configured.
2, Enable File Sharing on the mobile device. You can play the content shared on the mobile device
on the TV.
As ong as Fie Shadng s " _act_,e, _na_tho_ zed access can occ_ {. When yo_ do _ot _eed to access data,
d_sabe Fie Sha_ng.
Specifying the Name of the TV on a Network
MEW_U>network>Dev_oen_me_:_
Choose or specify a name for the TV that will appear on mobile devices and laptop computers.
Select Device Name from the Network menu, and then choose a name from the list that appears.
Alternatively, select User input to enter a name manually.
2, Check the name from a mobile device or laptop computer.
Switching Between Video
Press the SOURCE button to switch between external devices connected to the TV. For example, to
switch to a game console connected to the second HDMI connector, press the SOURCE: button. The
Source List appears across the top of the screen. From the Source List, select HDMm2.
The connector names may vary depend ng on the product_
Other Functions Available When You Display the Source List
A number of functions are available in the pop-up Options menu when the TV displays the Source
List. The functions that appear in the Options menu vary, depending on the source you selected in the
Source List and the external device connected to the source.
To view the Options menu, press the TOOLS button or press and hold the {ii@button.
The functions that appear in the Options menu can include any of the following:
o Edit Name: Lets you assign a device name to an input source, for example, Blu-ray to HDMI1. To
assign a device name to an input source, follow these steps:
Open the Source List. The list appears in a horizontal line across the top of the TV. Using your
remote, highlight the source you want to assign a device name to.
2, Select Edit Name in the Options menu. The on-screen keyboard appears.
3, Using the keyboard, enter a new name. You can enter up to 15 characters.
4, When finished, select DOINIEon the keyboard, and then press the {7_ button.
_nformation: View information about the connected devices.
Remove USB: Use to safely remove a USB device connected to the TV. This option is only
available when a USB device has been selected.
Anynet+ (HDM_-CEC}: Displays a list of Anynet+ (HDMl-CEC)-compliant devices that are
connected to the TV.
.....Iihis f_nction s _ot ava labe o_ certain models in specific geographical areas,,
.....Iihis optio _ s o_y ava labe when Anynet+ (HDM_-CEC) s set to On,,
Contromming the TV with a Keyboard
MEINU > System > Device Manager > Keyboard Settings
Connecting a keyboard makes it easy to control most of the functions on the TV.
Certa n modes do not support USB HID cass keyboards.
Connecting a Keyboard
Connectin9 a USB Keyboa_'d
Plug the keyboard cable into the TV's USB port. A connection message appears on the screen.
Using the Keyboard
Use the following remote features with the USB keyboard connected to the TV.
o Arrow Keys (moving the focus), Windows Key (MIEINU Button), Menu List Key (TOOLS Button),
Enter Key (Select/run item), ESC (RIETURIN Button), Number Keys (Number Buttons
F1 ([]), F2 (@), F3 (_), F4 (El), F5 (SIMART HUB), F6 (SOURCIE Button), F7 (OH List), F8 (_Z Button),
F9/F10 (Volume Buttons), Fll / F12 (Channel Buttons)
Page Up/Page Down: Scroll web browser pages up/down.
Press and hold the Enter key: On the Smart Hub screen, navigate to an item and press and hold
the Enter key to display the Options menu.
Chan_Si,,ngKeyboards
Select System > Device Manager > Keyboard Settings > Select Keyboard. Designate which keyboard
to use.
Only one keyboard can be used at a tree.
_nput Lang_,,,_ages, Keyboard "_ype_ and Switch Language Key
Select System > Device Manager > Keyboard Settings > Keyboard Options. The following options are
available:
- Keyboard Language
If the keyboard supports multiple languages, choose the language you want to use from the
displayed list.
. Keyboard Type
Match the Keyboard Type to the language selected in Keyboard Language.
.....Ilhe Keyboard Type list vares depending os which ang_ age was se ected _nder Keyboard Language,,
- Switch input Language
if the keyboard supports multiple languages, choose the key you want to use to switch between
languages.
Contromling the TV with a
MEINU > System > Device Manager > Mouse Settings
Connecting a mouse makes it easy to control most of the functions on the TV.
Certa n modes do not support USB HID cass race,
Connecting a Mouse
Connecting a USB Mouse
Plug the mouse cable into the TV's USB port. A connection message appears on the screen.
Using the Mouse
Once a USB mouse is connected to the TV, a pointer appears on the TV's screen. You can use this
pointer to control the TV in the same way you use a pointer on a computer.
o Selecting and Running an Item
Left-click using the mouse.
Showing Tools Buttons
Right-clicking displays the Tools buttons on the screen so that you can easily use the TV's
functions.
.....Iihe Iioos b_£to_s may va[y depending o_ the fi;nct[o_ yo_J a_e _;sin((_,,
Scrolling the TV Menu or Screen
Move the mouse wheel up or down. This scrolls the TV menu or screen up/down.
Exiting the TV Menu or Feature
Click the X button. This closes the menu.
.....Iihe X b_tton appears on the IIV men_ when a mouse [s being _sed,, eft clicking o_ce while _sing a
feat_ re disp ays the X b_tton on rise c_trent screen..
Chan singMice
Select System > Device Manager > Mouse Settings > Select Mouse, Designate which mouse to use.
Only one mouse can be used at a tree,
Changing Mouse Buttons and Pointer Speed
Select System > Device Manager > Mouse Settings > Mouse Options. The following options are
available:
Primary Button
Choose which button (left or right) to use to select and run items.
Pointer Speed
Adjust the movement speed of the pointer that appears on the screen.

Entering Text Using the On-Screen QWERTY Keypad
A QWERTY keypad appears when you need to enter text (entering the network password, logging into
your Samsung account, etc.), allowing you to enter text using your remote control.
Using Additional Functions
Select 0 on the QWERTY keyboard screen. The following options are available:
o Recommended text
Enable/disable the Recommended Text feature Enabling the Recommended text feature allows
you to quickly enter text starting with the characters you typed in by displaying recommended
words. To enter the word "lnternet," for example, all you have to do is enter "In" and select the
word "lnternet" from the list of recommended words. The word is memorized so that you can
enter the same text again more easily.
o Reset recommended text data
Delete both the recommended words and the memorized words to clear the list.
Predict Next Letter
Enable/disable the Text Prediction feature. Enabling the Text Prediction feature eliminates the
need to find and select individual character keys. To enter the word "lnternet," for example, select
"1". A predicted word will then appear next to the I key. Simply select the predicted word to enter
"Inter net".
.....Ibis feature is imited to words that have previous y beeu' added to the diction' ary,
Estabmishin9 a Wired Internet Connection
Connecting the TV to the Internet gives you access to online services and SMART features, and lets
you update the TV's software quickly and easily through the Internet.
Using Cat 7 LAN Cables
We recommend using Cat 7 LAN cables to link your TV to the Internet Access Points.
The TV wi not be abe to connect to the Intemet if the network speed is below 10Mbps,
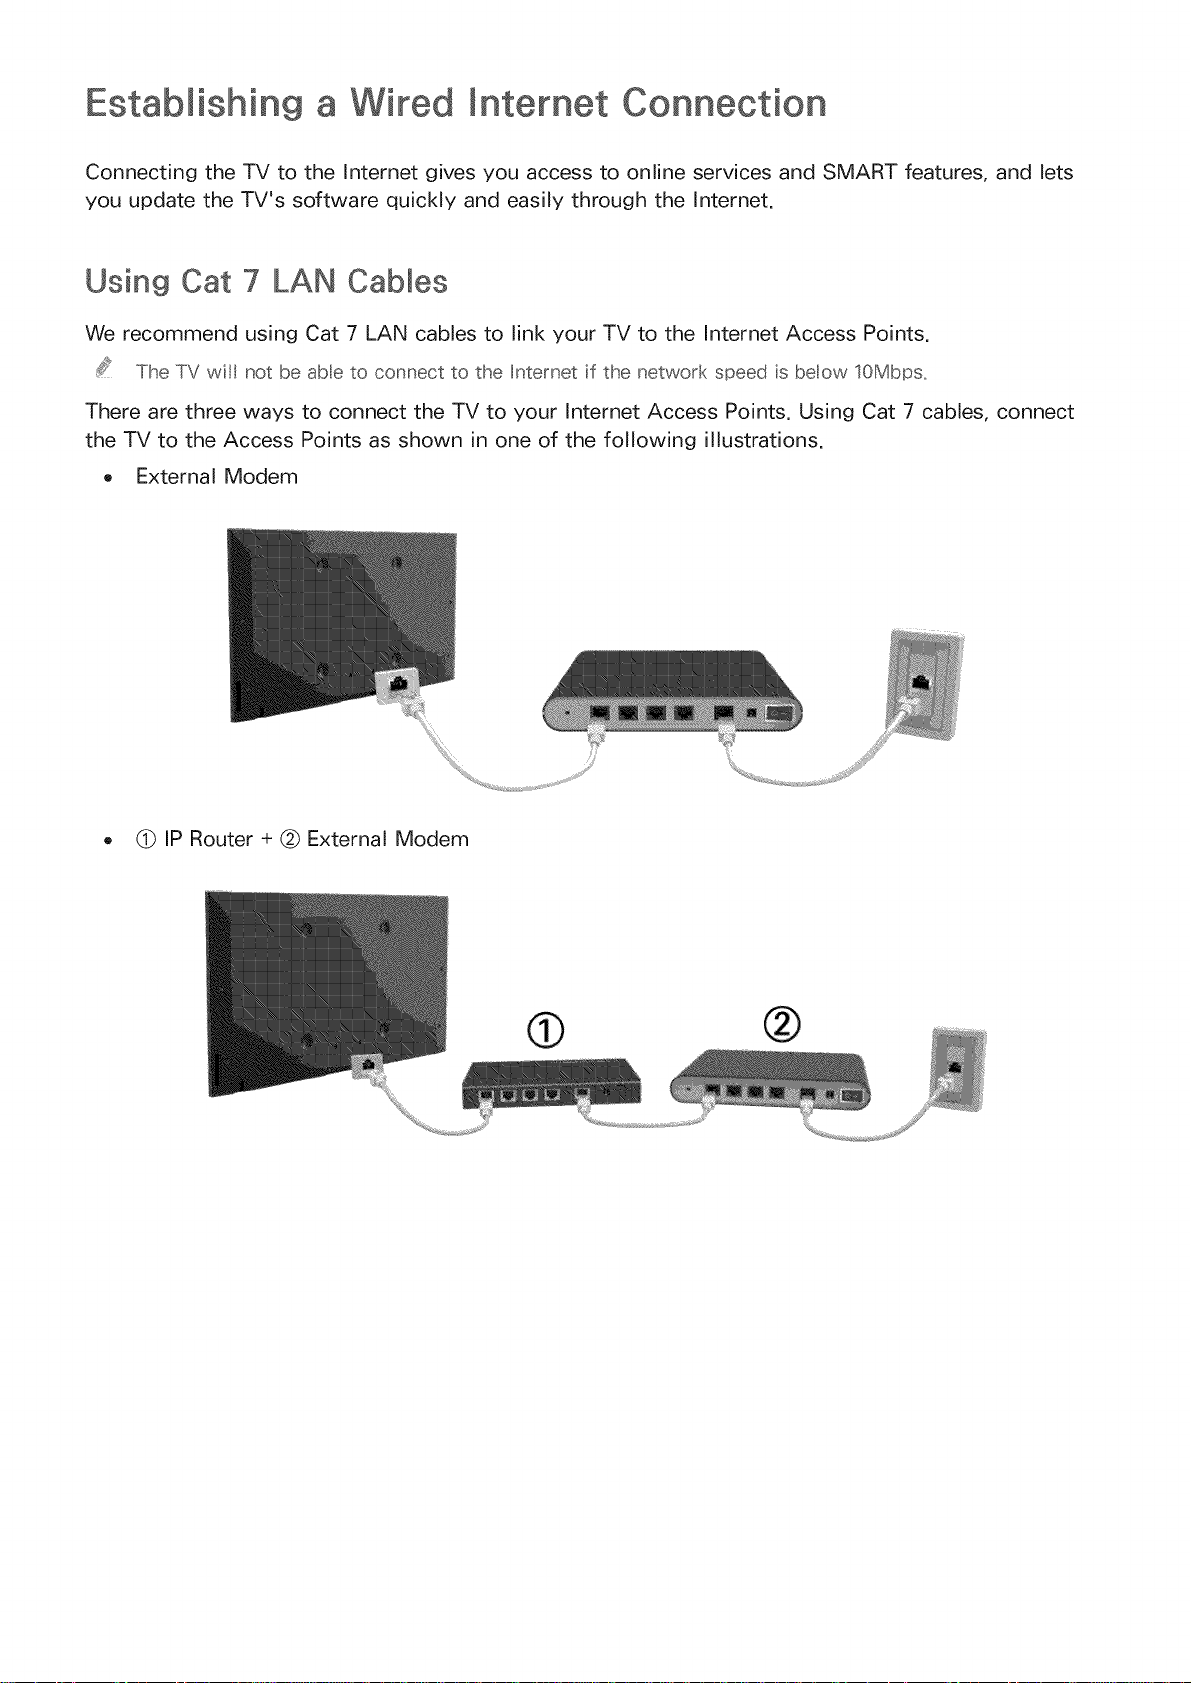
There are three ways to connect the TV to your Internet Access Points. Using Cat 7 cables, connect
the TV to the Access Points as shown in one of the following illustrations.
o External Modem
o (_ IP Router + @ External Modem
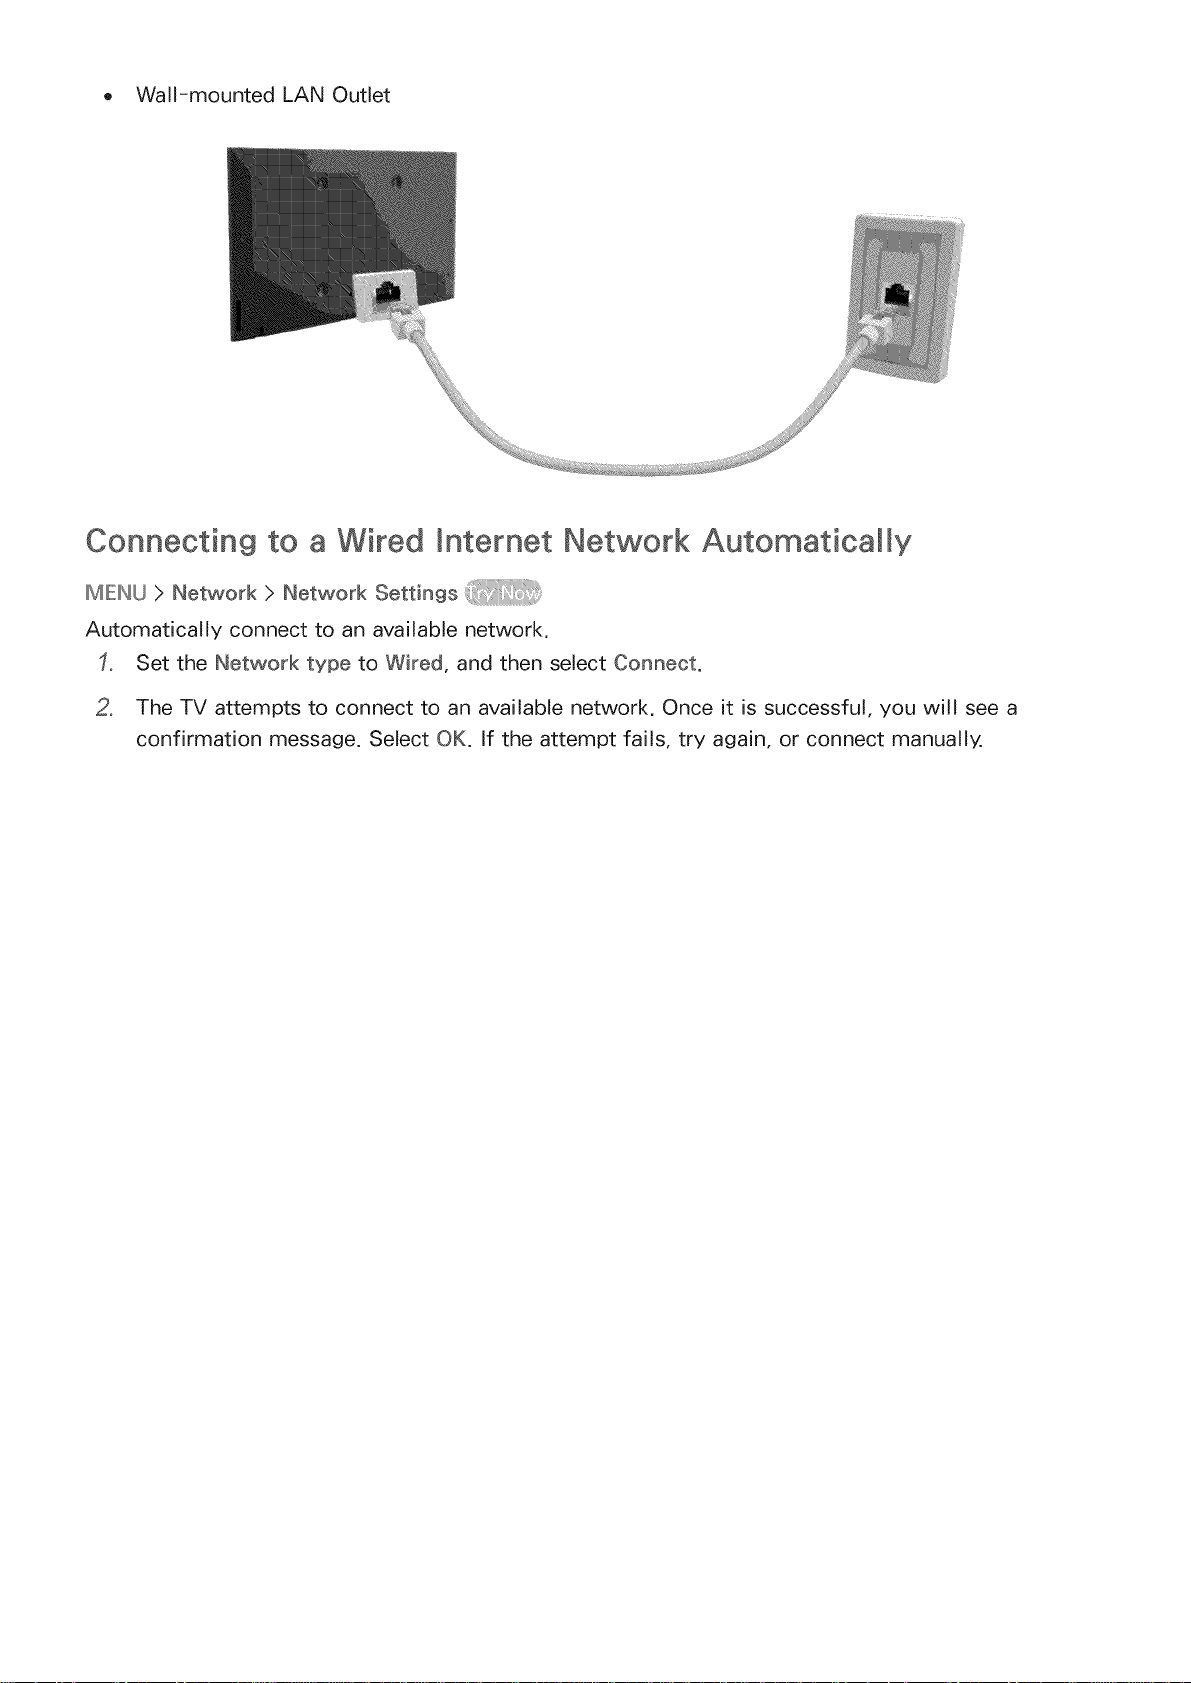
o Wall-mounted LAN Outlet
Connecting to a Wired _nternet Network Automatically
IMIEINU> Network > Network Settings
Automatically connect to an available network.
Set the Network type to Wired, and then select Connect.
2. The TV attempts to connect to an available network. Once it is successful, you will see a
confirmation message. Select OK. If the attempt fails, try again, or connect manually,
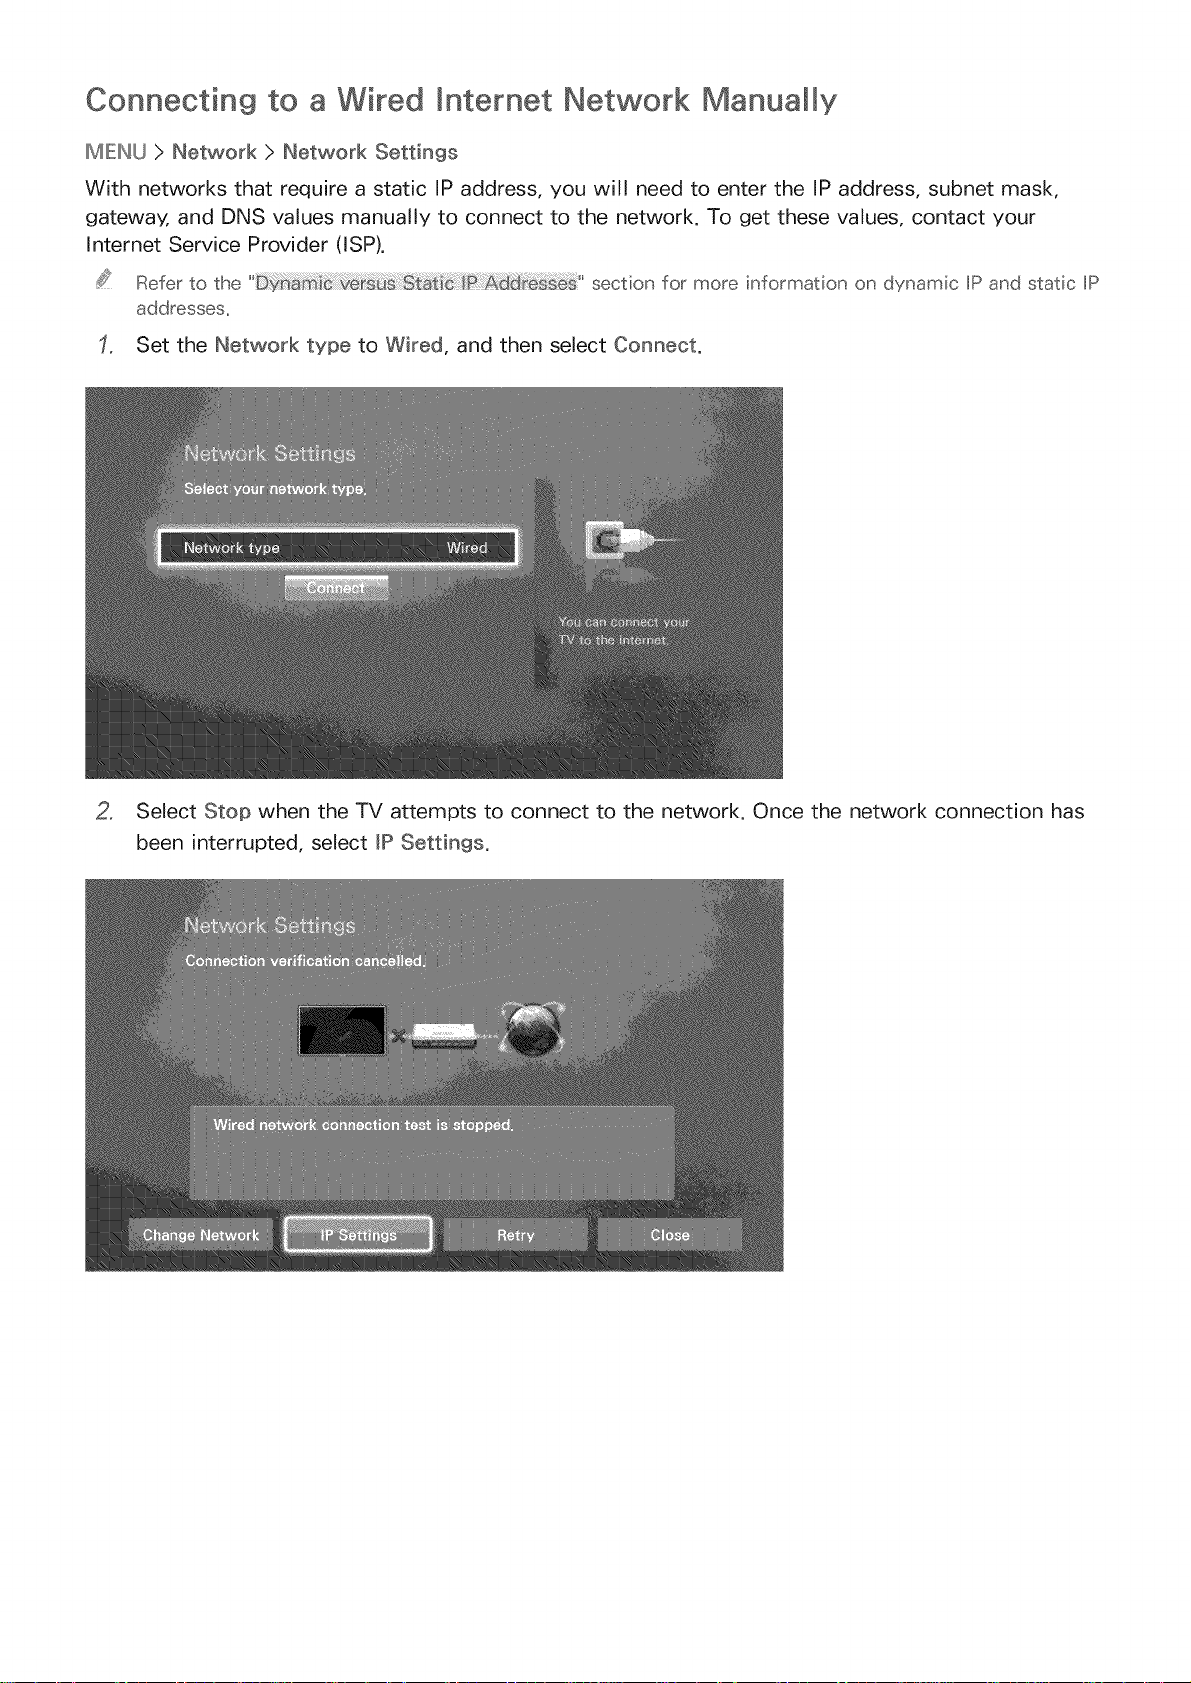
Connecting to a Wired Intemet Network Manually
IMIENU > Network > Network Settings
With networks that require a static IP address, you will need to enter the IP address, subnet mask,
gateway, and DNS values manually to connect to the network. To get these values, contact your
Internet Service Provider (ISP).
Refe_"to the section for more information on dynamic IP and static IP
addresses_
Set the Network type to Wired, and then select Connect.
2, Select Stop when the TV attempts to connect to the network. Once the network connection has
been interrupted, select _PSettings.
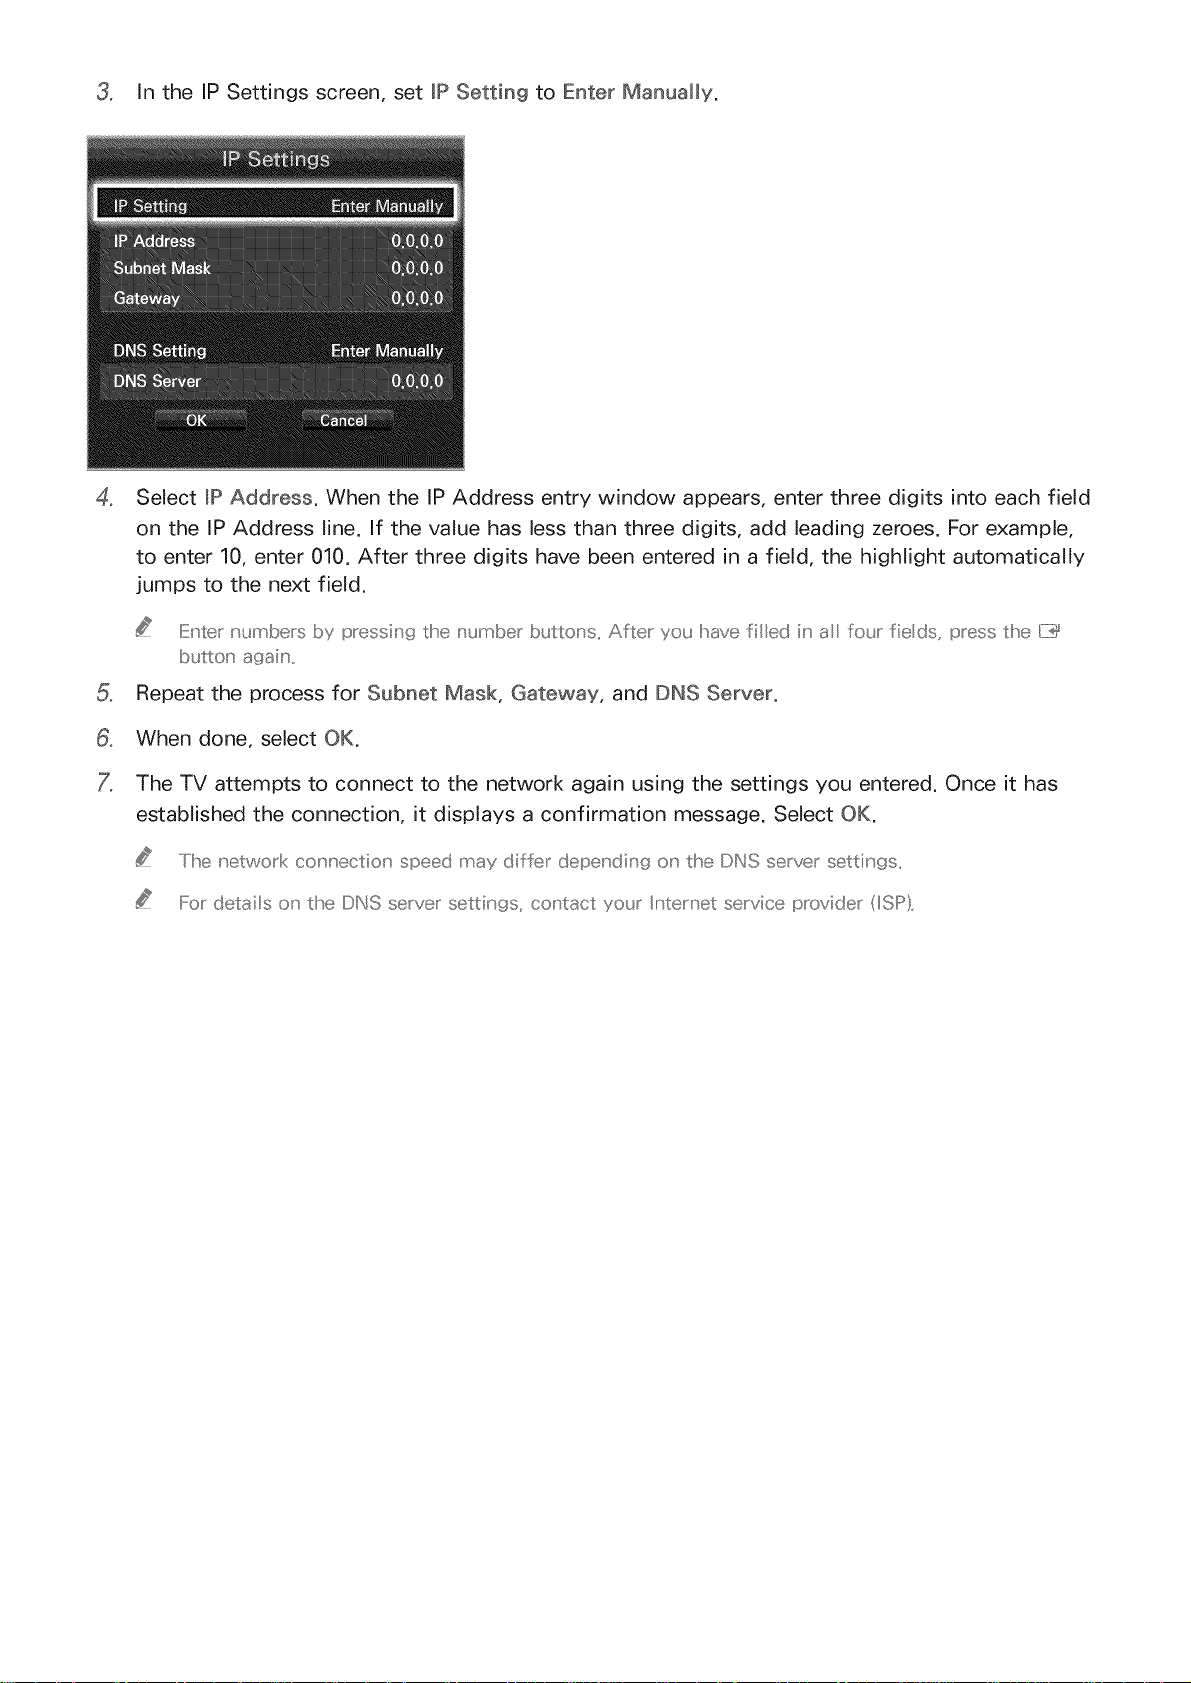
3. In the IP Settings screen, set IP Setting to Enter Manually.
o
Select IP Address. When the IP Address entry window appears, enter three digits into each field
on the IP Address line. If the value has less than three digits, add leading zeroes. For example,
to enter 10, enter 010. After three digits have been entered in a field, the highlight automatically
jumps to the next field.
IiiE_'ter numbers I)y pressing the number buttons. Mfter you have filed h' _ fo_.Jrfie ds, press the [TY
Repeat the process for Subnet Mask, Gateway, and DNS Server.
When done, select OK.
The TV attempts to connect to the network again using the settings you entered. Once it has
established the connection, it displays a confirmation message. Select OK.
..../he network co_','ectio_' speed may differ depe,' din9 o_' the DNS server settings..
For details o_' the DNS server settings, co_'tact yo_J Intemet service provider (ISP)..
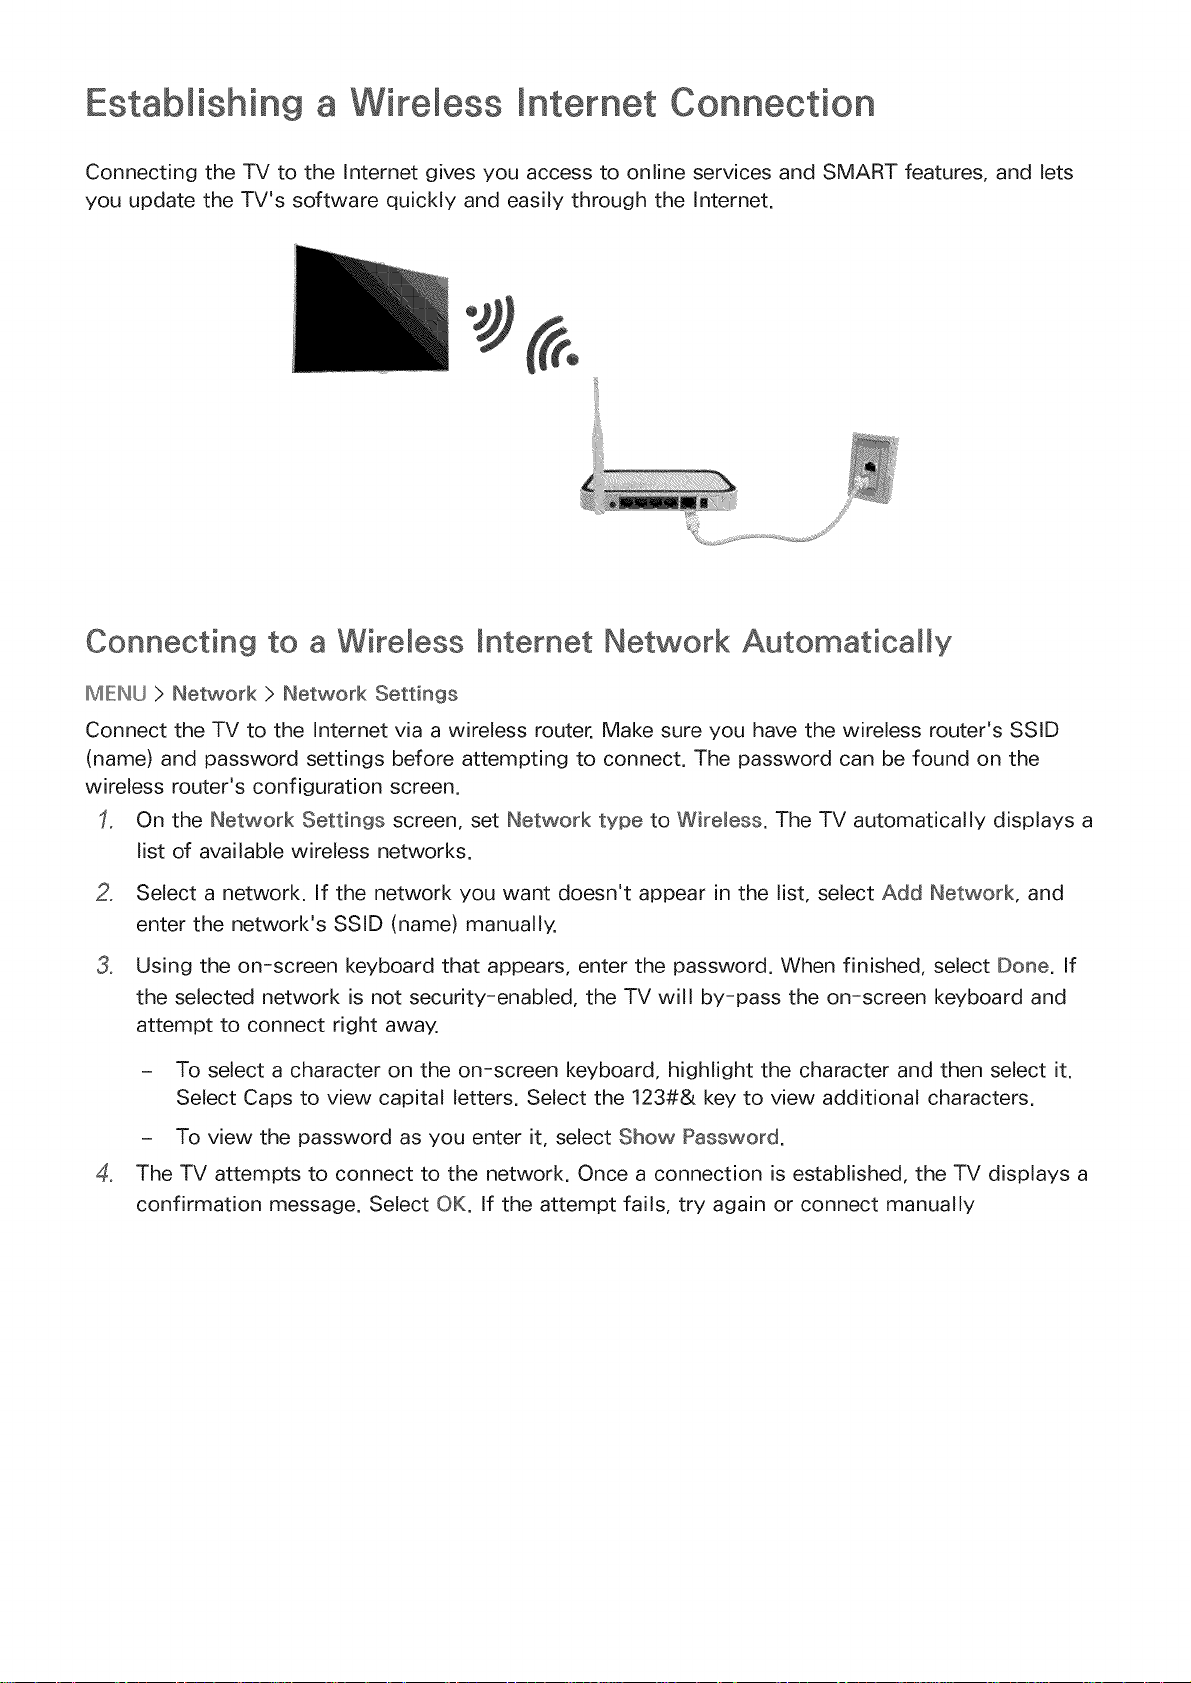
Estabmishing a Wireless Internet Connection
Connecting the TV to the Internet gives you access to online services and SMART features, and lets
you update the TV's software quickly and easily through the Internet.
Connecting to a Wireless mnternet Network Automatically
IMIENU > Network > Network Settings
Connect the TV to the Internet via a wireless router. Make sure you have the wireless router's SSID
(name) and password settings before attempting to connect. The password can be found on the
wireless router's configuration screen.
On the Network Settings screen, set Network type to Wireless. The TV automatically displays a
list of available wireless networks.
o
Select a network. If the network you want doesn't appear in the list, select Add Network, and
enter the network's SSID (name) manually.
o
Using the on-screen keyboard that appears, enter the password. When finished, select Done. If
the selected network is not security-enabled, the TV will by-pass the on-screen keyboard and
attempt to connect right away.
- To select a character on the on-screen keyboard, highlight the character and then select it.
Select Caps to view capital letters. Select the 123#& key to view additional characters.
- To view the password as you enter it, select Show Password.
o
The TV attempts to connect to the network. Once a connection is established, the TV displays a
confirmation message. Select OK. If the attempt fails, try again or connect manually
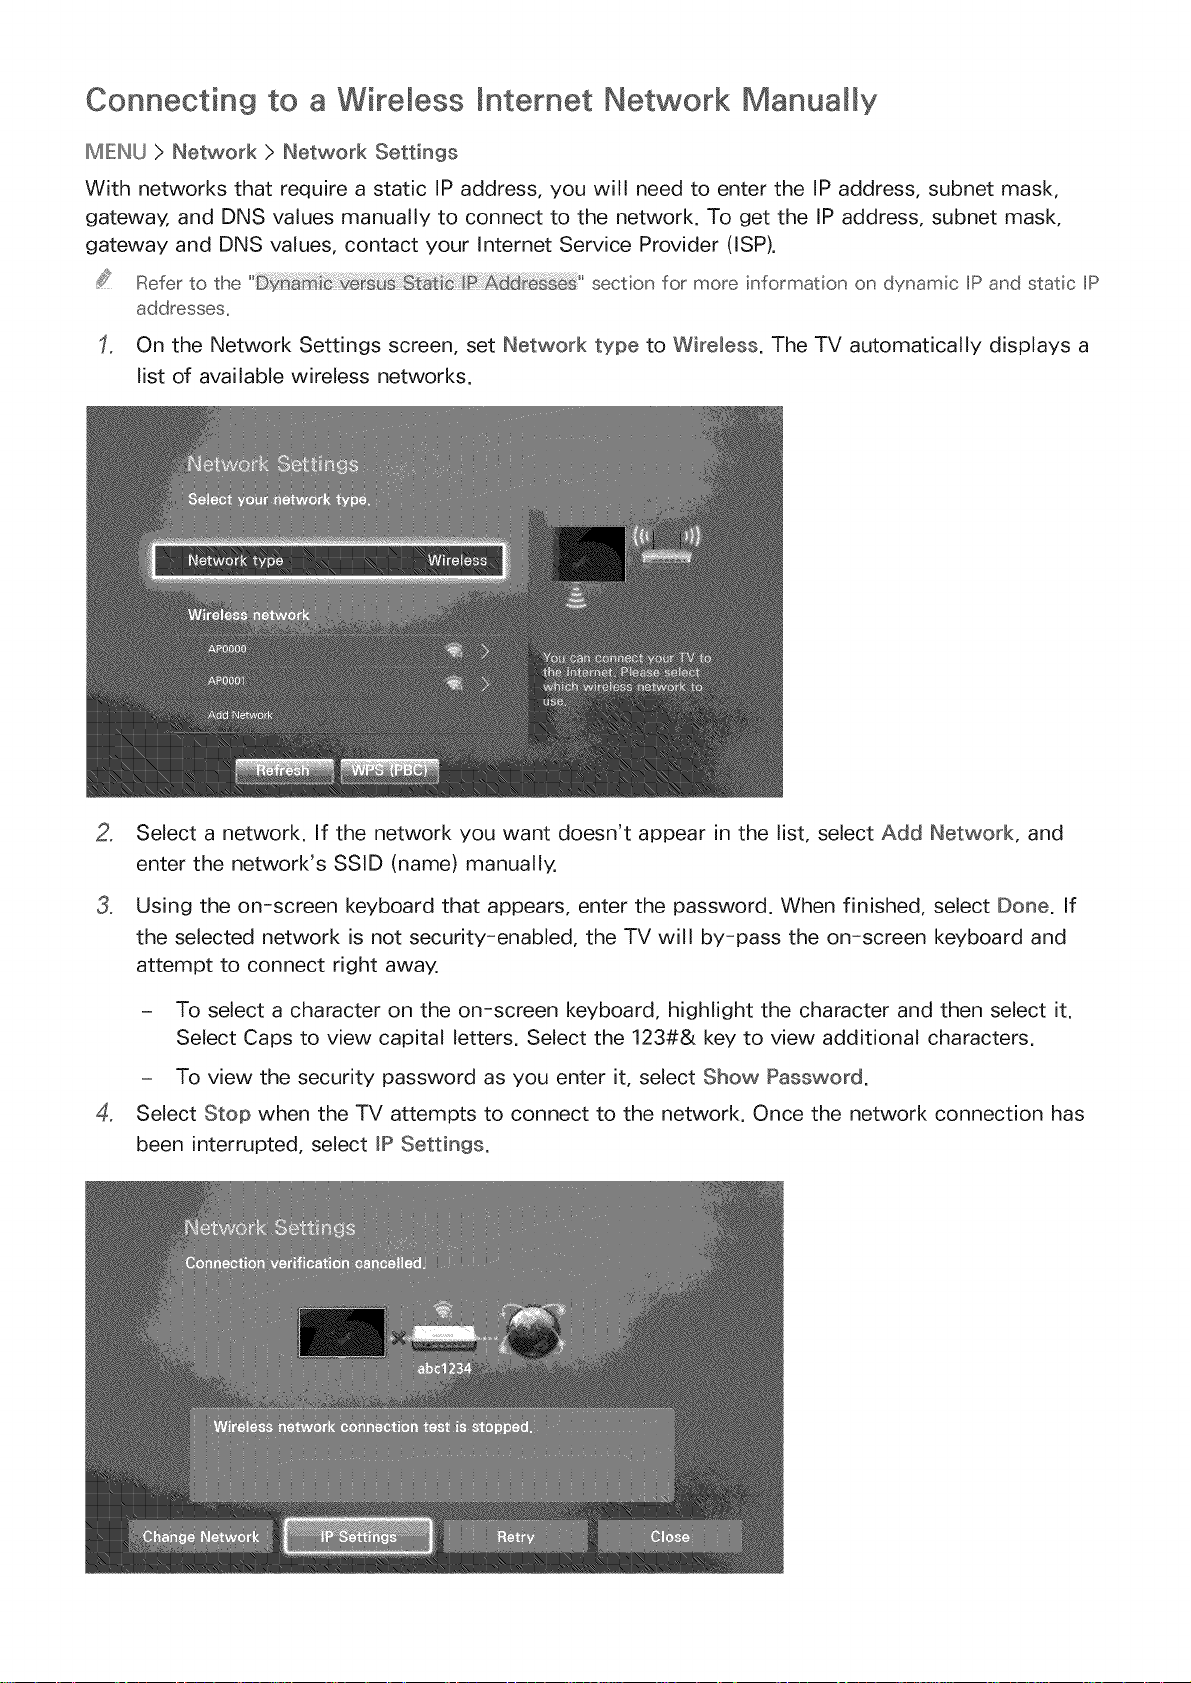
Connecting to a Wireless mnternet Network Manually
IMIENU > Network > Network Settings
With networks that require a static IP address, you will need to enter the IP address, subnet mask,
gateway, and DNS values manually to connect to the network. To get the IP address, subnet mask,
gateway and DNS values, contact your Internet Service Provider (ISP).
Refer to the section for more information on dynamic IP and static IP
addresses.
On the Network Settings screen, set Network type to Wireless. The TV automatically displays a
list of available wireless networks.
o
Select a network. If the network you want doesn't appear in the list, select Add Network, and
enter the network's SSID (name) manually,
o
Using the on-screen keyboard that appears, enter the password. When finished, select Done. If
the selected network is not security-enabled, the TV will by-pass the on-screen keyboard and
attempt to connect right away.
- To select a character on the on-screen keyboard, highlight the character and then select it.
Select Caps to view capital letters. Select the 123#& key to view additional characters.
- To view the security password as you enter it, select Show Password.
o
Select Stop when the TV attempts to connect to the network. Once the network connection has
been interrupted, select JPSettings.
 Loading...