

Page 1

For LED TV UF5500 Series
UN32F5500AGXZD
UN40F5500AGXZD
UN46F5500AGXZD
UN50F5500AGXZD
Page 2

Ⅰ. Concept
Ⅱ. Specification
Ⅲ. Design
Ⅳ. Inner Feature
Ⅴ. Disassemble
Ⅵ. Troubleshooting
Ⅶ. Feature
Page 3

Ⅰ. Product Concept
Picture Quality : Direct LED backlighting Panel
Design : Narrow Bezel
Experience : USB 2.0 Movie
Energy Saving : Low power consumption up to 40% of LCD TV
Page 4

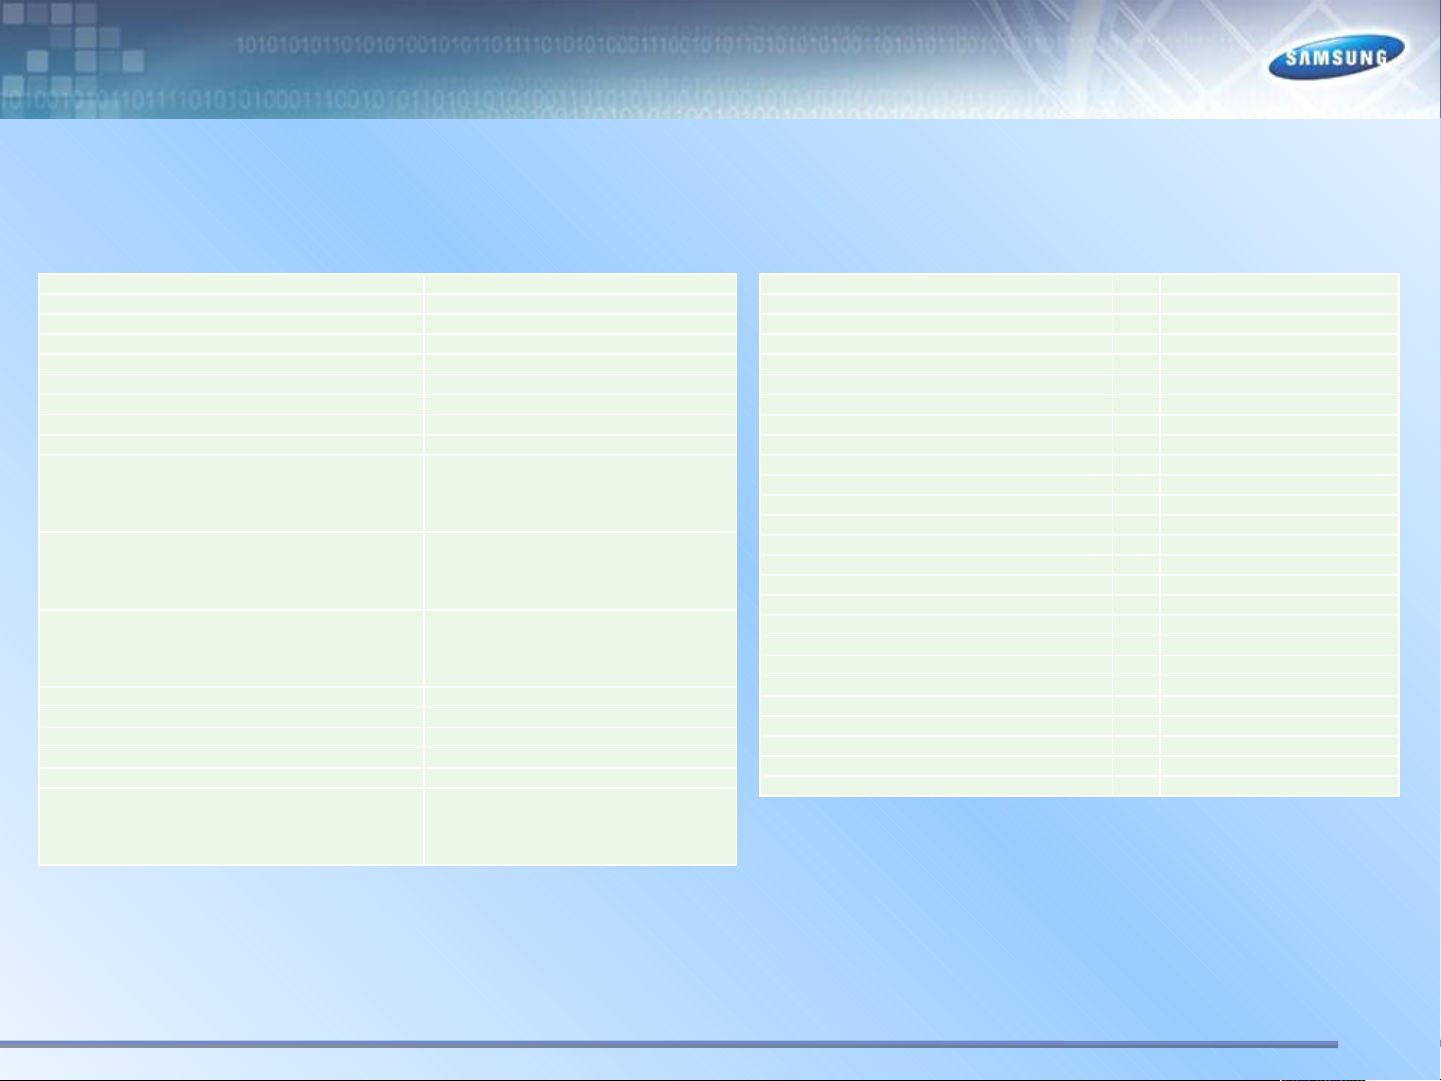
Ⅱ. Specification
Item
General Information
Product LED
Cabinet Basic Code FK
Series 5
Series Name LED F5500
Country BRAZIL
Tools Support N/A
Platform(TV) Mstar | X12
Display
Inch 32/40/46/50
Resolution 1,920 x 1,080
Ultra Clear Panel No
Cell Light Series N/A
Real Black Pro Panel N/A
Clear Image Panel N/A
Lvds Format JEIDA
HV Flip ON
Video
Picture Engine HyperReal Engine
OLED Motion Rate N/A
Clear Motion Rate 120
600Hz Subfield Motion N/A
Dynamic Contrast Ratio Mega Contrast
New Picture Differentiation N/A
Micro Dimming No
Cinema Smooth N/A
Precision Black (Local Dimming) No
Wide Color Enhancer (Plus) Yes
Auto Motion Plus 120/240Hz No
Motion Judder Canceller N/A
Film Mode Yes
Brightness 300nits
Contrast Ratio 5000:1
Picture Film Mode,HDMI Black Level
Detail Resolution 60Hz
Response Time 8ms
Viewing Angle (H/V) 178/178
Natural Mode Support Yes
Relax Mode Support N/A
UN**F5500AGXZD
Audio
Dolby Dolby Digital Plus / Dolby Pulse
SRS / DNSe+
dts 2.0+Digital Out / DTS Premium Audio
3D Sound No
Sound Customizer No
Speaker Type Down Firing + Full Range
Sound Output (RMS) 10W X 2
Woofer No
Sound Mono,Stereo,Auto volume
Sound Amp IC TI | TAS5745
Speaker 용량 10W x 2
Woofer Speaker 용량 No
Analog 2Ch
Digital Optical
SMART TV Functionality
Samsung SMART TV N/A
Smart Guide Yes
Family Story Yes
Movie & TV Shows Yes (US)
Fitness Yes
Apps Yes
Kids Yes
Social Yes
Automated Content Recognition (ACR) N/A
Music, Photos & Clip Yes
Samsung SMART View Yes (Clone View only)
Smart Hub Yes
Search All N/A
Your Video No
Social TV N/A
Samsung Sports Experience (SSE) N/A
Samsung Apps N/A
Smart Scene No
Skype™ on Samsung TV N/A
Web Browser Yes
AllShare Control No
Recommendation Bar Yes
VESA Standard
Screw Size M8
DTS Studio Sound
DTS Premium Audio 5.1
-3/23-
Page 5

Ⅱ. Specification
Smart Interaction
Camera Built-in No
Face Recognition Ready
Hand Gesture Recognition Ready
Voice Recognition (Embedded) No
Voice Recognition (Server) No
VM App N/A
NLU (Natural Language Understanding) No
Camera App No
HM App N/A
Samsung TV Apps supported Yes
Feature
Samsung 3D No
3D Converter No
Dual View N/A
Samsung One Line N/A
History Yes
MultiTasking N/A
Smart Phone Remote support Yes
Smart Evolution Support No
Extended PVR No
Time Shift No
Allshare Play Yes
AllShare Cloud Storage N/A
ConnectShare™ (USB2.0) Movie
AllShare Cast Yes
RUI No
RVU Yes ( DirecTV ready )
WiFi Direct Yes
Wireless LAN Built-in Yes
Wireless LAN Adaptor Support No
ISP Bound Service No
BT HID Built-in Yes
USB HID Support Yes
OSD Language Local Languages
Samsung IR Blaster Support Yes
User Interface Golden Bridge
Digital Noise Filter Yes
Analog Signal Booster N/A
Network Speaker Support N/A
MHL No
Sound Share Yes
WiDi N/A
Regional EQ N/A
InstaPort S (HDMI quick switch) No
HDMI 1.4 3D Auto Setting No
HDMI 1.4 A/Return Ch. Support No
Teletext (TTX) No
Triple Protector N/A
Miracast No
Anynet+ (HDMI-CEC) Yes
BD Wise Plus No
Auto Channel Search Yes
Auto Power Off Yes
Auto Volume Leveler Yes
Caption (Subtitle) Yes
2 Tuner No
Clock&On/Off Timer Yes
Game Mode Yes
Battery Ready N/A
Picture-In-Picture Yes
Sleep Timer Yes
Screen Burn Protection N/A
Channel List USB-Clone N/A
V-Chip Yes
Embeded POP Yes
Calibration Mode N/A
Channel Auto Store,Signal Level,Fine Tune
Plug&Play Yes
Child Lock Yes
Sports Mode No
Paratal Lock Yes
Kids Lock N/A
Media Play(USB & DLNA) Yes
Bluetooth Yes
Home Network Centre N/A
Zero Stand-By Power N/A
USB Copy N/A
ACS No
IP Video Closed Caption No
Additional Feature
Self Diagnosis Yes
Software Upgrade Yes
HD Connection Guide Yes
Contact Samsung Yes
Page 6

Ⅱ. Specification
S/W
MCU 명 X12
OS Linux
기타 N/A
System
DTV Tuner ISDB-T
Analog Tuner Yes
CI/CI+ N/A
MHP / MHEG (version) / ACAP N/A
NTSC 3.58 Yes
NTSC 4.43, VIT N/A
PAL-B/G, D/K, I, I/I' N/A
Scan Type N/A
SECAM-B/G, D/K N/A
SECAM-B/G, D/K, L/L` N/A
Trinorma (PAL M,N) N/A
Broadcast System ISDB-T
ATV Sound System M
DTV Video System ISDB-T
DTV Sound System Dolby
Tuner Vendor & Model SEM
Core Component
DDR SDRAM Samsung
Nand Flash Memory Samsung
OneNand Flash Memory N/A
FlexOneNand Flash Memory N/A
Serial Flash Memory N/A
HDMI Switch N/A
Display Device Vender SDC
Input & Output
HDMI 3
Resolution 1920 x 1080
DVI 지원 Port Port1 Type
PC 최대지원 해상도 1920 x 1080 | 60 Hz
MHL 지원 Port N/A
HDMI/DVI SEL N/A
USB 2
Port 1 Type Host
Port 2 Type Host
Port 3 Type Host
Port 4 Type N/A
Port 5 Type N/A
OS Linux
Component In (Y/Pb/Pr) 1
Composite In (AV) 1 (Common Use for Component Y)
Ethernet (LAN) 1
Headphone No
Digital Audio Out (Optical) 1
Audio Out (Mini Jack / LR) 1
PC In (D-sub) No
PC Audio In (Mini Jack) No
DVI Audio In (Mini Jack) 0
RF In (Terrestrial/Cable Input) 1
RF In (Satelite Input) No
RS232C (AV CONTROL) 1
CI Slot N/A
Scart N/A
Port 1 Type N/A
Port 2 Type N/A
Port 3 Type N/A
Port 4 Type N/A
Port 5 Type N/A
Coaxial No
EX-Link Yes
Monitor Output No
DVI
Resolution 1920 x 1080i 60
DVI 지원 Port Port1 Type
PC 최대지원 해상도 1920 x 1080 | 60 Hz
D-Sub Resolution N/A | N/A
Design
Design Logo Deco
Bezel Type NNB
Slim Type Slim 1
Front Color Black
Light Effect (Deco) No
Stand Type Quad
Swivel (Left/Right) Yes
Push & Pull Camera N/A
Design Name N/A
사출 방식 Steam Mold
Front Resin PC+ABS+GF15%
Stand Packing Type Bundle
Eco
Energy Efficiency Class PR 단계 규격팀 측정 예정
Eco Mark Planet First
Eco Label N/A
Eco Sensor Yes
Page 7
Ⅱ. Specification
Power
Power Supply (V) AC100-240V 50/60Hz
Power Consumption (Max) PR 단계 규격팀 측정 예정
Power Consumption (Energy Saving Mode) PR 단계 규격팀 측정 예정
Power Consumption (Stand-by) 0.3W
전원 조건 (Hz) 60Hz
Security
Kensington Lock Yes
Dimension (WxHxD)
Set Size without Stand (mm)
Set Size with Stand (mm)
Package Size (mm)
Weight
Set Weight without Stand (kg)
Set Weight with Stand (kg)
Package Weight (kg)
Loading Quantity
20/40Ft
32(738.2*445.4*49.0)
40(928.2*552.3*49.4)
46(1059.6*626.2*49.4)
50(1135.4*668.0*49.8)
32(738*509.6*265)
40(928.2*615.5*265.0)
46(1059.6*700.0*307.3)
50(1135.4*741.8*307.3)
32(985*596*143)
40(1190*616*147)
46(1343*718*158)
50(1427*771*163)
32(5.0) / 40(8.0) / 46(10.8) / 50(13)
32(5.7) / 40(8.9) / 46(11.5) / 50(14.7)
32(8.1) / 40(12.0) / 46(15.5) / 50(18.7)
32(240/504)
40(198/396)
46(165/345)
50(96/192)
Accessory
3D Active Glasses (Included) No
IR Blaster (Included) Yes
Wireless LAN Adaptor (Included) 0
Network Speaker (Included) No
MOIP Camera (Included) 0
Wireless Keyboard (Included) 0
Battery Pack (for Battery Ready TV) N/A
Remote Controller Model TM1250A
Battery (for Remote Control) Yes
Mini Wall Mount Support Yes
Ultra Slim Wall Mount Support No
VESA Wall Mount Support Yes
Electric Wall Mount Support No
Electric Stand Support N/A
Slim Gender Cable 0
ANT-Cable 0
Power Cable Yes
User Manual Yes
E-Manual Yes
Floor Stand Support No
License
Oracle JAVA NO
Universial Remote Control YES
MS DRM NO
Moving Picture’s Codec DivX
-3/23-
Page 8

Ⅱ. Specification
Spec. Comparison
Model UE5L(UN**EH5000GXZD) UF5F(UN32F5500AGXZD)
Design
Set Size(without stand)
Size Diagonal 32” Diagonal 32”
Panel
Color System NTSC NTSC
Function
Back light unit Direct LED S-FLED
Additional Function JOG FUNTION JOG FUNTION
Power Consumption 70W 70W
Resolution 1920 x 1080 1920 x 1080
Hz 60 60
Viewing angle H : 176 V : 176 H : 178 V : 178
Tuner 1 1
Contrast (cd/m2) 370 300
CR ( Dynamic ) MEGA Mega Contrast
Enhancer HyperReal Engine (X9N) HyperReal Engine (X12)
29.1 x 17.2 x 1.9 (32”) 29.1 x 17.5 x 1.9 (32”)
12.57 lbs(32”) 12.8 lbs(32”)
-3/23-
Page 9
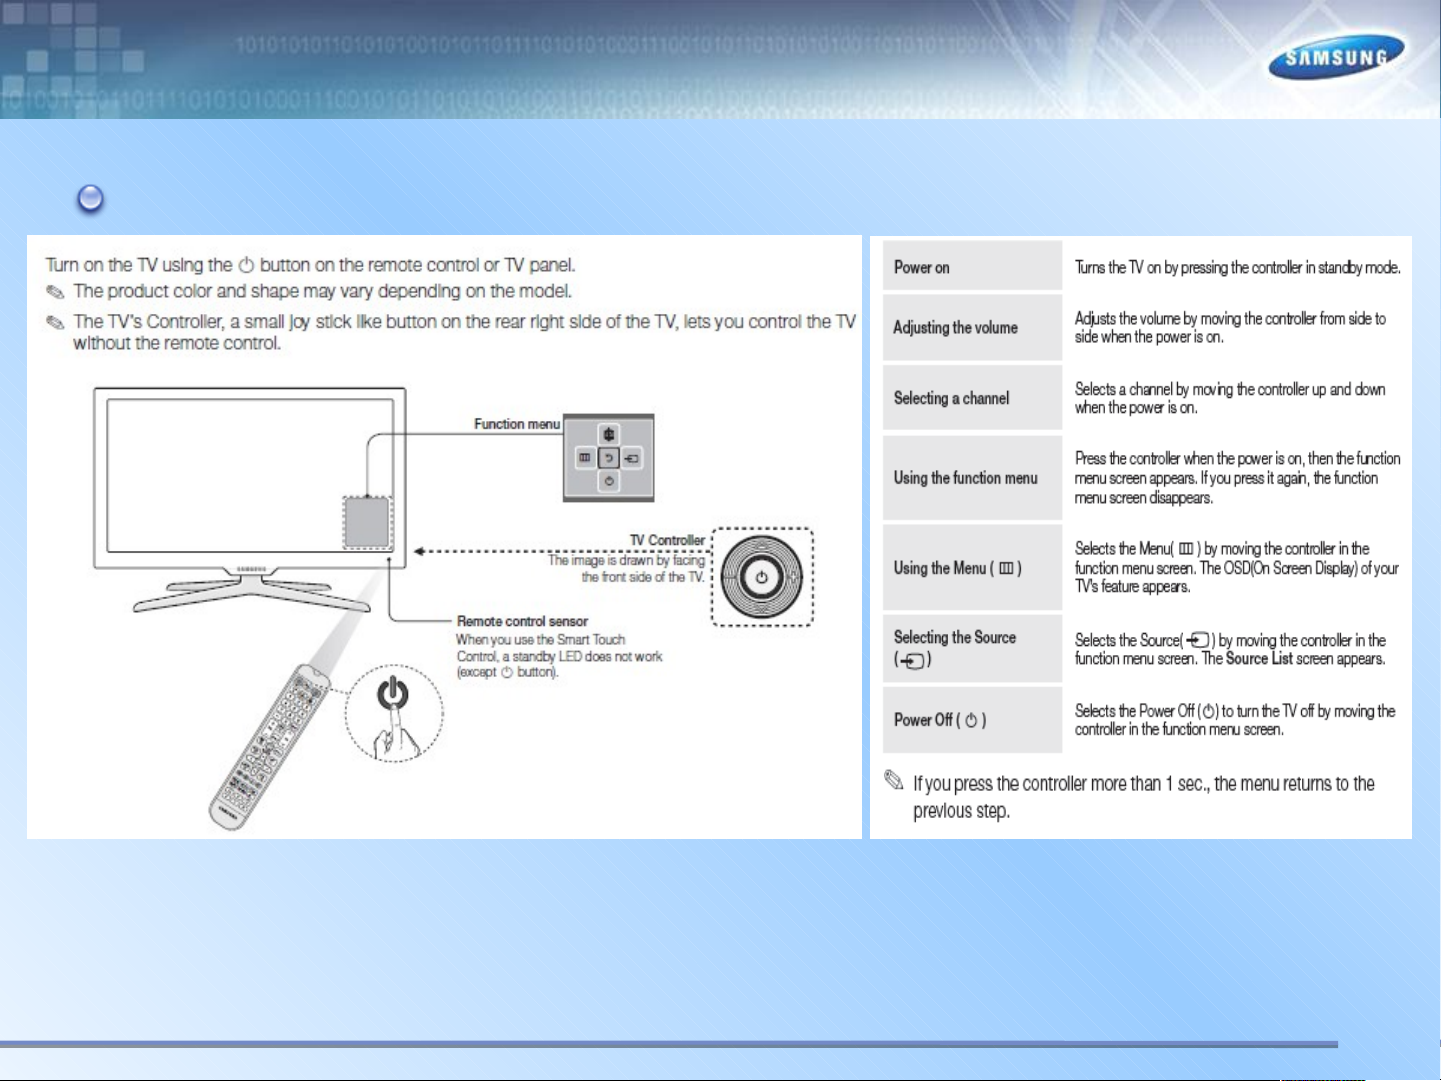
Ⅲ. Design
TV Controller
Page 10

Ⅲ. Design
Plug & Play
Page 11

Ⅲ. Design
Connectios
Page 12

Ⅲ. Design
Changing the Input Source
Page 13

Ⅲ. Design
Display Modes(HDMI/DVI)
Page 14

Ⅲ. Design
Remote Control
Page 15

Ⅲ. Design
Viewing Front – UN**F5500AGXZD
-Speakers
- Remote Control Sensor
- Power Indicator
- Jog function
Page 16

Ⅲ. Design
Viewing Rear – UN**F5500AGXZD
Page 17

Ⅲ. Design
Rear Cover Demension
– UN**F5500AG
UF5500 32" 40" 46" 50"
WALL MOUNT
(AXB)
C 269 mm 364.1 mm 329.8 mm 367.7 mm
D 116.2 mm 170.4 mm 78.1 mm 120 mm
200*200 mm 200*200 mm 400*400 mm 400*400 mm
Page 18

Ⅳ. Inner Feature
LAY OUT
Main Board
SMPS Board
Speaker
(R)
Speaker
(L)
Page 19

Ⅳ. Inner Feature
Wiring Diagram
Page 20

Ⅳ. Inner Feature
Block Diagram
Page 21

Ⅳ. Inner Feature
RESET TREE
Page 22

Ⅳ. Inner Feature
I2C (X12)
Page 23

Ⅳ. Inner Feature
POWER TREE
Page 24

Ⅳ. Inner Feature
Main Board Layout
CN1502_U2
CN1501_U1
CN603_H3
CN602_H2
MAIN
EEPROM
CN304_NIRB
CN303_IBR
DDR3 SDRAM
IC901
CN601_H1
IC1101
IC1001
X12
IC-DECODER
CN1402
CN502
OP301
CN1203_RS
CN201
CN1401
TU702
CN1201 CN302
Page 25

Ⅳ. Inner Feature
Main Board Conn. Pin map
Page 26

Ⅳ. Inner Feature
Main Board Conn. Pin map
1. CN1401_FHD
1 NC 27 EVEN_TX02 GND 28 GND
3 FRC_SDA 29 ODD_TX4+
4 FRC_PWM1 30 ODD_TX45 FRC_SCL 31 ODD_TX3+
6 FRC_PWM3 32 ODD_TX37 FRC_PWM2 33 GND
8 TCON_SDA 34 ODD_TXCLK+
9 PANEL_I2C_EN 35 ODD_TXCLK-
10 BT_SYNC 36 GND
11 UPDATE_CHK 37 ODD_TX2+
12 TCON_SCL 38 ODD_TX213 GND 39 ODD_TX1+
14 EVEN_TX4+ 40 ODD_TX115 EVEN_TX4- 41 ODD_TX0+
16 EVEN_TX3+ 42 ODD_TX017 EVEN_TX3- 43 GND
18 GND 44 GND
19 EVEN_TXCLK- 45 GND
20 EVEN_TXCLK+ 46 FRC_PWM4
21 GND 47 PANEL_13V_PW
22 EVEN_TX2+ 48 PANEL_13V_PW
23 EVEN_TX2- 49 PANEL_13V_PW
24 EVEN_TX1+ 50 PANEL_13V_PW
25 EVEN_TX1- 51 PANEL_13V_PW
26 EVEN_TX0+
2.CN201 (to Powr board)
1 B5V 11 B13V
2 SW_POWER 12 B13V
3 B5V 13 B13V
4 A5V 14 PWM_DIMM
5 GND 15 NC
6 GND 16 NC
7 B13VS 17 NC
8 GND 18 NC
9 B13VS 19 NC
10 SW_INVERTER 20 NC
3.CN1201 (FUNCTION)
1 IR 14 A5.3V
2 GND 15 LED_STB
3 GND 16 BT_WAKE
4 FRAME_SYNC_IN 17 IR_GND
5 A3.3V 18 POWER_DET
6 BT_SYNC 19 NC
7 MSCL 20 BT_RESET
8 GND 21 NC
9 MSDA 22 NC
10 USB_BT_DP 23 GND
11 KEY_INPUT1 24 WIFI_DP
12 USB_BT_DM 25 WIFI_DM
13 KEY_INPUT2 26 B5V_DC_PW
Page 27

Ⅳ. Inner Feature
Main Board Conn. Pin map
4. CN302 (SPEAKER)
1 R+ 3 L+
2 R- 4 L-
5. CN502(COMPONETN)
1 GND 9 TEST_PR
2 COMP2_Y_CVBS 10 GND
3 IDENT_VIDEO2 11
4 GND 12 TEST_SL
5 COMP2_PB 13 GND
6 IDENT_COMP2 14
7 GND 15 TEST_SR
8 COMP2_PR
6. CN601 (HDMI3)
1 HDMI1_RX2+ 11 GND
2 GND 12 HDMI1_RXCLK3 HDMI1_RX2- 13 CEC
4 HDMI1_RX1+ 14 NC
5 GND 15
6 HDMI1_RX1- 16
7 HDMI1_RX0+ 17 GND
8 GND 18 HDMI1_5V
9 HDMI1_RX0- 19
10 HDMI1_RXCLK+
COMP2_AV2_SR_IN
COMP2_AV2_SR_IN
HDMI1_SCL_DDC
HDMI1_SDA_DDC
HDMI1_HOT_PLUG
7. CN602 (HDMI1)
1 HDMI2_RX2+ 11 GND
2 GND 12 HDMI2_RXCLK3 HDMI2_RX2- 13 CEC
4 HDMI2_RX1+ 14 ARC2_SIGLE
5 GND 15
6 HDMI2_RX1- 16
7 HDMI2_RX0+ 17 GND
8 GND 18 HDMI2_5V
9 HDMI2_RX0- 19
10 HDMI2_RXCLK+
8. CN603 (HDMI2)
1 HDMI3_RX2+ 11 GND
2 GND 12 HDMI3_RXCLK3 HDMI3_RX2- 13 CEC
4 HDMI3_RX1+ 14 NC
5 GND 15
6 HDMI3_RX1- 16
7 HDMI3_RX0+ 17 GND
8 GND 18 HDMI3_5V
9 HDMI3_RX0- 19
10 HDMI3_RXCLK+
HDMI2_SCL_DDC
HDMI2_SDA_DDC
HDMI2_HOT_PLUG
HDMI3_SCL_DDC
HDMI3_SDA_DDC
HDMI3_HOT_PLUG
Page 28

Ⅳ. Inner Feature
Main Board Conn. Pin map
9. CN1501 (USB1)
1 B5V_USB1_PW 3 USB1_DP
2 USB2_DM 4 GND
10. CN1502 (USB2)
1 B5V_USB2_PW 3 USB2_DP
2 USB2_DM 4 GND
11. OP301 (OPTICAL)
1 SPDIF_OUT 3 GND
2 B5V_DC_PW
12. CN1402 (LAN)
1 LAN_TXD+ 5 B2.5V
2 B2.5V 6 LAN_RXD3 LAN_TXD- 7 NC
4 LAN_RXD+ 8 GND
13. CN304_NIRB
CN303_IBR
1 GND 5 TEST_SR
2
3
4 TEST_SL 8 GND
9 IRB 12 NC
10 IRB 13 IPR_JACK_ID
11 NC 14 GND
HP_LINE_SL_OUT
HP_LINE_SR_OUT
6 IDENT_HP
7 GND
Page 29

Ⅴ. Disassembly
(40”)
1. Place monitor face down on cushioned table.
2. Remove 4 screws from the stand and Remove stand.
3. 32" : Remove 15 screws of rear cover.
4. Remove the cover jack.
Page 30

Ⅴ. Disassembly
5. Lift up rear cover slightly from the bottom.
7. Remove the rear cover.
6. Disconnect the function assy cable.
8. Remove 9 screws of main board and power board.
Page 31

Ⅴ. Disassembly
9. Remove the speakers and power cables. 10. Remove the LVDS cable and Panel drive cable.
11. Completed disassembly.
Page 32

Ⅴ.
Disassembly(PTC)
1. Place monitor face up on cushioned table.
2. Products at the top of the central TOP-CHASSIS is rotated by 45 degrees outward and pulls.
Page 33

Ⅴ.
Disassembly(PTC)
3. Pull in the same way from the center of the top.
4. Pull the left part of the product as shown while holding the raised portion on figure 3.
Page 34

Ⅴ.
Disassembly(PTC)
5. Pull the bottom part of the product as figure 2 while holding the raised portion on figure 4.
6. As shown in the picture, Lift the bottom of the TOP-CHASSIS.
Page 35

Ⅴ.
Disassembly(PTC)
7. Pull the products at the bottom of the right side of the chassis.
8. Lift the bottom of the chassis with one hand and holding the bottom of the product after you pull
the right side of the product chassis.
Page 36

Ⅴ.
Disassembly(PTC)
9. Disassembly is complete.
※ To use JIG : Does not lift the chassis by hand, JIG using the lift.
Page 37

Ⅵ. Trouble Shooting
Main Ass'y
20p cable
Power Ass'y
Speake
r
Speaker
LVDS cable
Check List for Initial operation
Main Board Assy (CN201)
1 B5V 11 B13V
2 SW_POWER 12 B13V
3 B5V 13 B13V
4 A5V 14 PWM_DIMM
5 GND 15 NC
6 GND 16 NC
7 B13VS 17 NC
8 GND 18 NC
9 B13VS 19 NC
10 SW_INVERTER 20 NC
Main Ass'y
20p cable
LVDS cable
Speake
Speaker
r
Power Board Assy (CNM803)
1 B13V 8 GND
2 PWM_DIM 9 GND
3 B13V 10 GND
4 ECO_ON/OFF 11 B5V
5 Vamp 12 A5V
6 BLU_ON/OFF 13 B5V
7 Vamp 14 PS ON/OFF
Power Ass'y
Power Board Assy (CNL802)
1 NC 9 22 NC 10 2+
3 4- 11 14 4+ 12 1+
5 3- 13 NC
6 3+ 14 NC
7 NC 15 IF2
8 NC 16 IF1
Page 38

Ⅵ. Trouble Shooting
No power
Page 39

Ⅵ. Trouble Shooting
CN602_H2 :
HDMI1
CN603_H3 :
HDMI2
CN601_H1 :
HDMI3
No Video (HDMI 1, 2, 3 - Digital Signal)
CN603_H3 :
HDMI2
CN602_H2 :
HDMI1
CN601_H1 :
HDMI3
Page 40

Ⅵ. Trouble Shooting
Calibration
Page 41

Ⅵ. Trouble Shooting
Calibration
Page 42

Ⅵ. Trouble Shooting
White Balance
Page 43

Ⅵ. Trouble Shooting
White Balance
Page 44

Ⅵ. Trouble Shooting
How to check the SW version
Page 45

Ⅵ. Trouble Shooting
How to check the SW version
Page 46

Ⅵ. Trouble Shooting
USB Download
● How to Upgrade SW and Micom
Insert a USB drive containing the firmware upgrade downloaded
from samsung.com into the TV. Please be careful to not
disconnect the power or remove the USB drive while upgrades
are being applied. The TV will turn off and turn on automatically
after completing the firmware upgrade. Please check the firmware
version after the upgrades are complete (the new version will
have a higher number than the older version).
When software is upgraded, video and audio settings you have
made will return to their default (factory) settings. We recommend
you write down your settings so that you can easily reset them
after the upgrade.
Page 47

Ⅵ. Trouble Shooting
USB Download
(1) Main SW upgrade
● store the sw program named "T-MST12UABC" in USB memory stick
● connect the USB
Page 48

Ⅵ. Trouble Shooting
USB Download
● click the "menu" key in remote controller
● select Support menu
● locate the menu cursor "Software Update" menu
Page 49

Ⅵ. Trouble Shooting
USB Download
● click the "enter" key
● click the "enter" key
● wait for upgrade complete
● Check the SW version
 Loading...