

Page 1
E-MANUAL
Thank you for purchasing this Samsung product.
To receive more complete service, please register
your product at
www.samsung.com/register
Model______________ Serial No.______________
Page 2

Contents
Channel Menu
• Connecting the TV 1
• Using the INFO button
(Now & Next guide) 20
• Managing Channels
and Channel Functions 22
• Memorizing Channels 66
• Other Features 80
Basic Feature
• Changing the Preset Picture Mode 96
• Adjusting Picture Settings 99
• Changing the Picture Size 105
• Changing the Picture Options 116
• Using the TV with Your PC 134
• Changing the Preset Sound Mode 138
• Adjusting Sound Settings 140
Preference Features
• Connecting to the Network 156
• Setting up a Wired Network 167
• Setting up the Wireless Network 180
• Managing the Network Devices 206
• Setting the Time 218
• Blocking Programmes 231
• Economical Solutions 236
• Picture In Picture (PIP) 240
• Using the TV with
a Keyboard and a Mouse 245
• Other Features 253
• Support Menu 276
Page 3

Advanced Features
• Using the 3D function 301
• Smart Hub 319
• Customizing the Home Screen 343
• Using Samsung Apps 375
• Search 385
• Your Video 393
• Family Story 410
• Fitness 465
• Kids 477
• Web Browser 493
• Skype 522
• SMART Interaction 525
• Specification for SMART Interaction 566
• AllShare Play 577
• Using the AllShare Play 602
• My list (In AllShare Play) 606
• Videos (In AllShare Play) 619
• Photos (In AllShare Play) 638
• Music (In AllShare Play) 655
• Recorded TV (In AllShare Play) 669
• Timeshift 684
• Using the DLNA Function 694
• Using the MHL function 705
• Anynet+ (HDMI-CEC) 711
Page 4

Other Information
• Troubleshooting 728
• Picture Quality (Troubleshooting) 732
• Sound Quality (Troubleshooting) 740
• No Picture, No Video (Troubleshooting) 744
• RF (Cable / Aerial) Connection
(Troubleshooting) 748
• PC Connection (Troubleshooting) 750
• Network Connection (Troubleshooting) 751
• Recording / Timeshift (Troubleshooting) 752
• Others (Troubleshooting) 761
• Anynet+ (HDMI-CEC) (Troubleshooting) 775
• AllShare Play (Troubleshooting) 783
• Smart Hub (Troubleshooting) 784
• Web Browser (Troubleshooting) 786
• Using the Smart Touch Control 794
• Supported Subtitle
and AllShare Play file formats 822
• Data Service 831
• HbbTV 839
• Connecting to a TV Viewing Card slot 843
• Teletext Feature 849
• Anti-theft Kensington Lock 856
• Licence 861
Page 5

Connecting the TV
Connecting to an Aerial and / or Satellite
The displayed image may differ depending on the model.
or
TV rear panel
Connecting to an AV Device
Channel Menu
Page 6

Using a HDMI (up to 1080p)
TV side panel
The displayed image may differ depending on the model.
Using an HDMI cable (up to 1080p)
N
HDMI IN 1(DVI), HDMI IN 2(ARC),
HDMI IN 3(MHL)
●
For better picture and audio quality,
Page 7

connect to a digital device using an
HDMI cable.
●
An HDMI cable supports digital video
and audio signals, and does not require
an audio cable.
–To connect the TV to a digital device
that does not support HDMI output,
use an HDMI/DVI and audio cables.
●
The picture may not display normally
(if at all) or the audio may not work if
an external device that uses an older
Page 8

version of HDMI mode is connected to
the TV. If such a problem occurs, ask
the manufacturer of the external device
about the HDMI version and, if out of
date, request an upgrade.
●
Be sure to use an HDMI cable with a
thickness of 14 mm or less.
●
Be sure to purchase a certified HDMI
cable. Otherwise, the picture may not
display or a connection error may
occur.
Page 9

●
A basic high-speed HDMI cable or one
with Ethernet is recommended. This
product does not support the Ethernet
function via HDMI.
●
This product supports the 3D and ARC
(Audio Return Channel) functions via an
HDMI cable. Note that the ARC function
is supported by the HDMI IN 2(ARC)
port only.
–If 3D Auto View is set to On, some
functions such as SMART HUB may
Page 10

be disabled. In this case, set 3D Auto
View or 3D Mode to Off.
●
The ARC function allows digital audio
to output via the HDMI IN 2(ARC) port.
It can be enabled only when the TV is
connected with an audio receiver that
supports the ARC function.
●
This product supports the Mobile High-
Definition Link (MHL) function via an
HDMI-MHL cable. Note that the MHL
function is supported by the HDMI IN
Page 11

3(MHL) port only.
●
The MHL function allows to display
mobile device's screen via the HDMI
IN 3(MHL) port. It can be enabled
only when the TV is connected with a
mobile device that supports the MHL
function. For more detailed information,
see "Using the MHL function" in
e-Manual.
Page 12
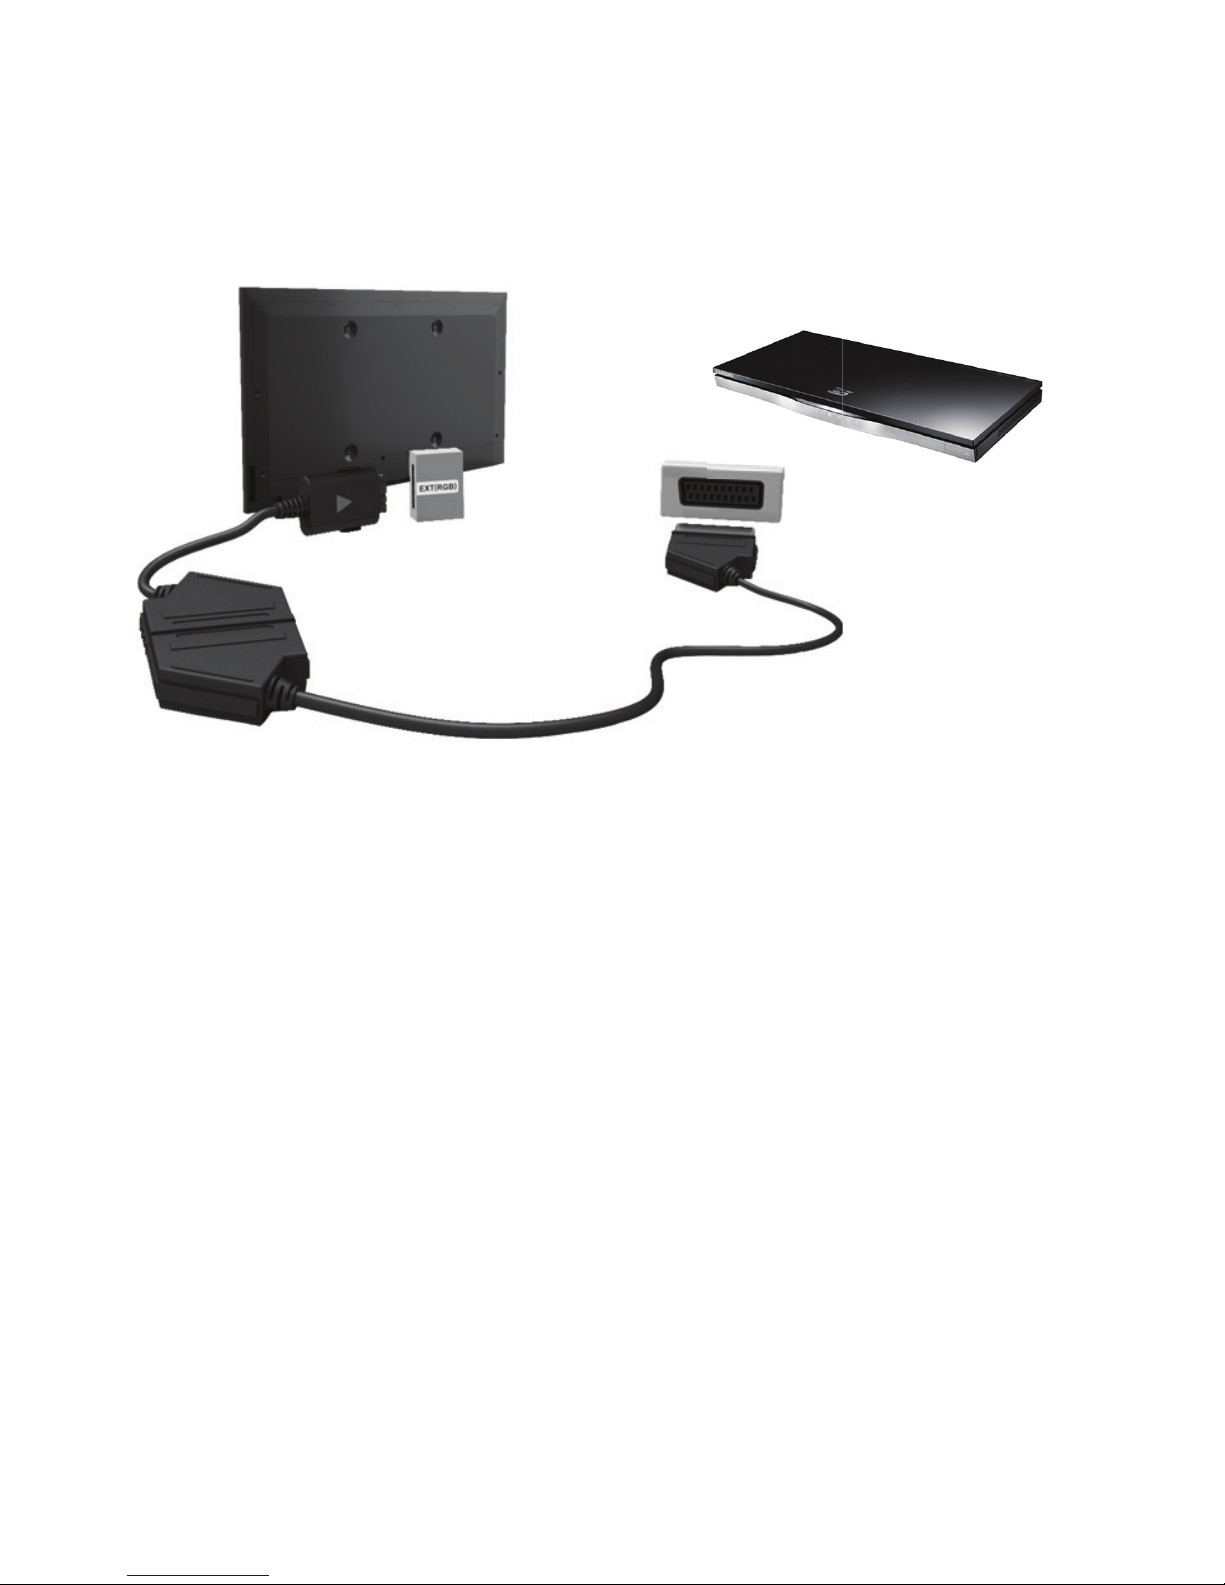
Using a Scart Cable
TV side panel
The displayed image may differ depending on the model.
Page 13

Using a Component (up to 1080i)
TV rear panel
The displayed image may differ depending on the model.
Using a Component (up to 1080i) or an
Audio/Video (480i only) and a Scart Cable
N
In Ext. mode, DTV Out supports
Page 14

MPEG SD Video and Audio only.
N
When connecting to AV IN, connect
the AV connector (yellow) to the TV
jack (Green).
N
To obtain the better picture quality,
the Component connection or Scart
connection are recommended over
the A/V connection.
Page 15
Connecting to an Audio device
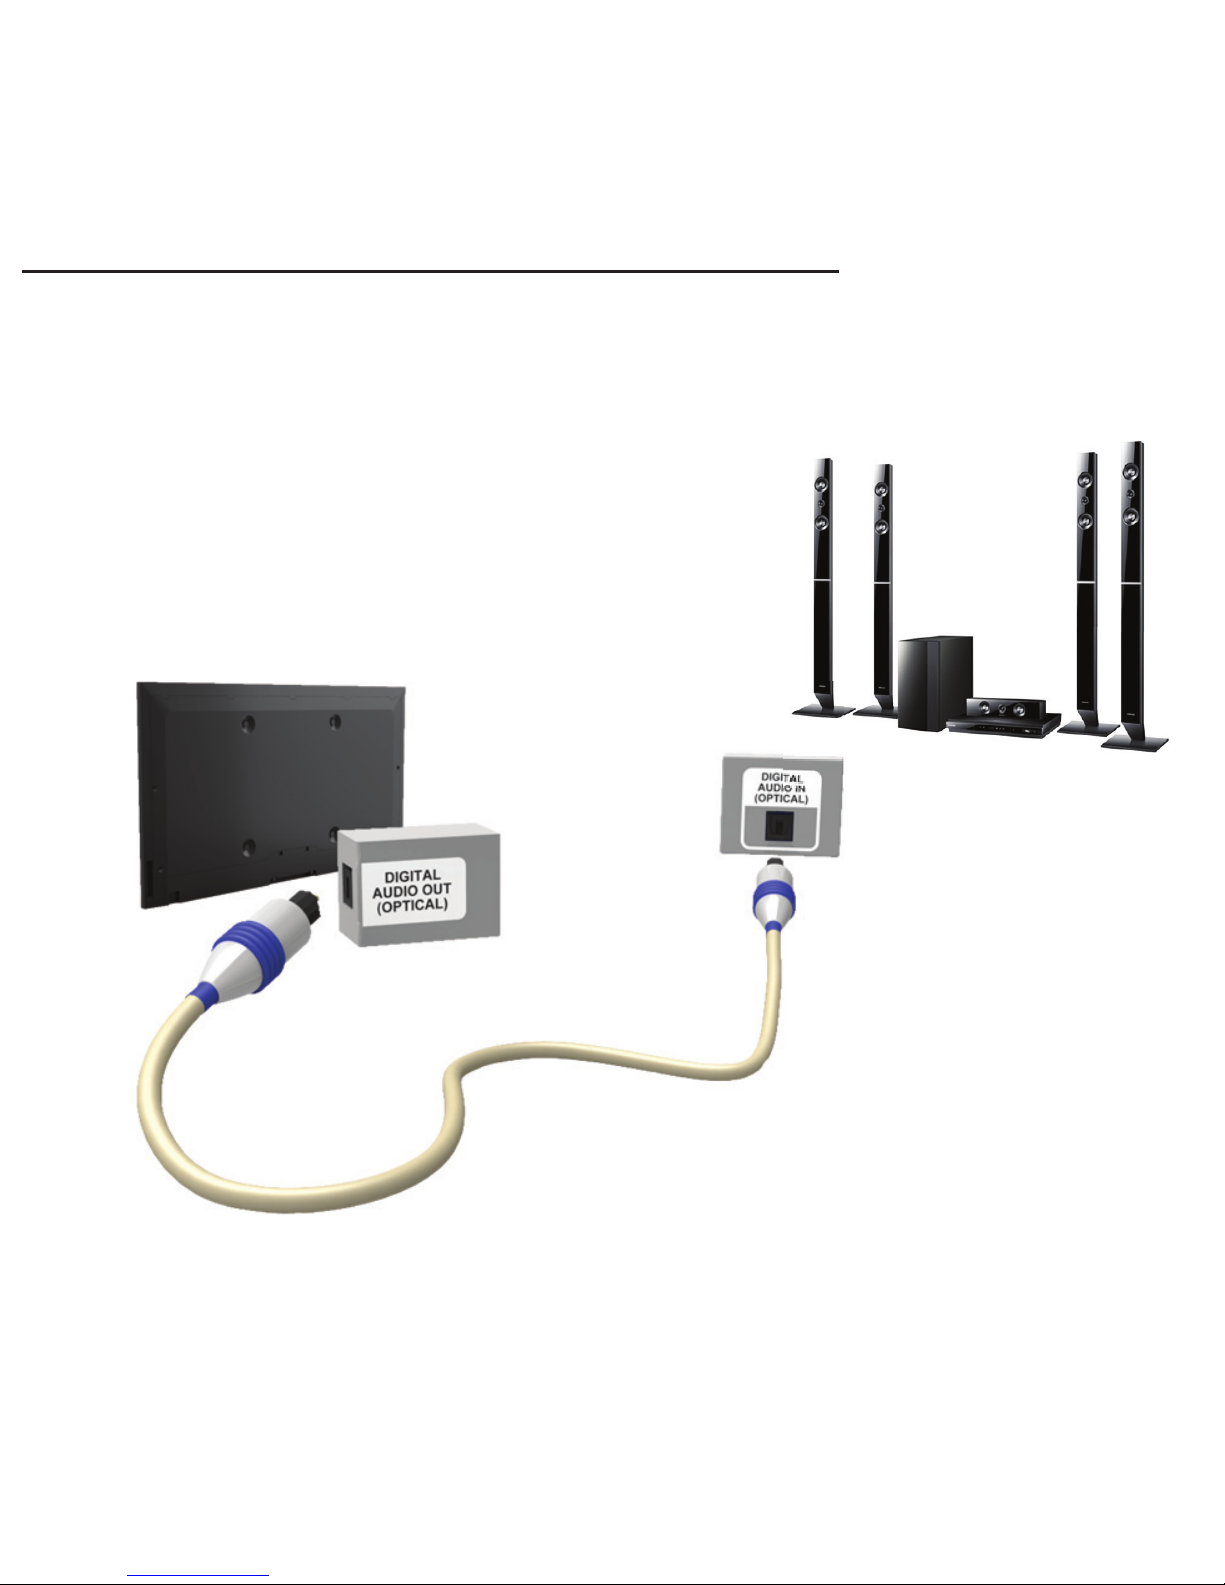
Using an Optical (Digital) Connection
TV side panel
The displayed image may differ depending on the model.
Page 16

DIGITAL AUDIO OUT (OPTICAL)
●
When you connect a Digital Audio
System to the DIGITAL AUDIO OUT
(OPTICAL) jack, decrease the volume
of both the TV and the system.
●
Use the System speakers for audio.
●
5.1 CH (channel) audio is available when
the TV is connected to an external
device supporting 5.1 CH.
●
When the receiver (home theatre) is set
to on, you can hear sound output from
Page 17

the TV’s optical jack. When the TV
is receiving a DTV signal, the TV will
send 5.1 CH sound to the home theatre
receiver. When the source is a digital
component such as a DVD / Blu-ray
player / cable box / STB (Set-Top-Box)
satellite receiver and is connected to the
TV via HDMI, only 2 CH audio will be
heard from the home theatre receiver. If
you want to hear 5.1 CH audio, connect
the digital audio out jack from your
Page 18
DVD / Blu-ray player / cable box / STB
satellite receiver directly to an amplifier
or home theatre.
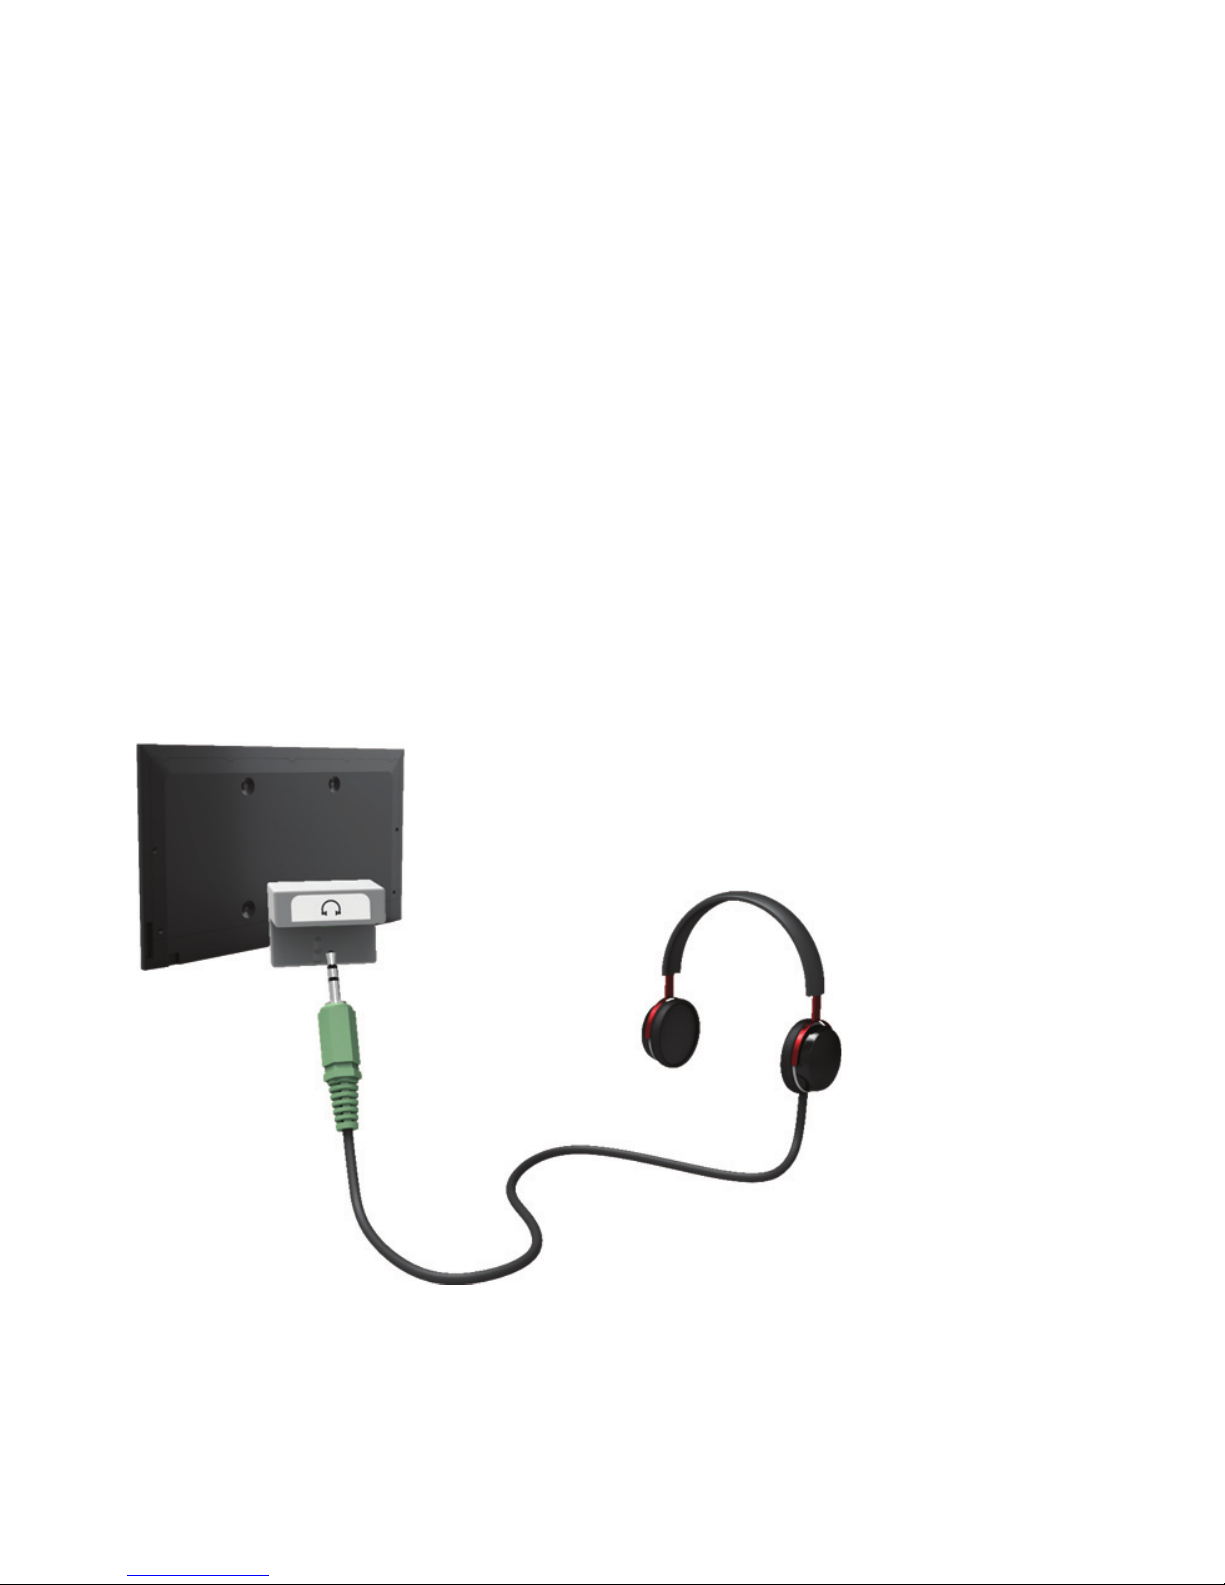
Headphones
H
TV rear panel
The displayed image may differ depending on the model.
Page 19

You can connect your headphones to
the headphones output on your set.
While the headphones are connected,
the sound from the built-in speakers
will be disabled.
●
Sound function may be restricted
when connecting headphones to the
TV.
●
Headphone volume and TV volume
are adjusted separately.
●
The headphones jack supports only
Page 20

the 3 conductor tip-ring-sleeve (TRS)
type.
Page 21

Connecting to a PC
Using an HDMI cable or an HDMI to DVI
cable
TV side panel
The displayed image may differ depending on the model.
Page 22

N
Connecting through the HDMI cable
may not be supported depending on
the PC.
Optimal resolution is 1920 X 1080 @ 60
Hz.
N
For HDMI/DVI cable connection, you
must use the HDMI IN 1(DVI) jack.
●
The interlace mode is not supported.
●
The set might operate abnormally
if a non-standard video format is
Page 23

selected.
●
Separate and Composite modes are
supported. SOG (Sync On Green) is
not supported.
●
PC (D-Sub) input is not supported.
Page 24

Using the INFO button (Now & Next guide)
The display identifies the current
channel and the status of certain audio-
video settings.
The Now & Next guide shows daily
TV programme information for each
channel according to the broadcasting
time.
●
Scroll l, r to view information for a
desired programme while watching the
current channel.
Page 25

●
Scroll
u, d
to view information for
other channels. If you want to move to
the currently selected channel, select
E
using your remote.
Page 26

Managing Channels and Channel Functions
Press the
™
button to select the menu
you want to use. Each screen will be
displayed.
Guide
™
→
Guide
The EPG (Electronic Programme Guide)
information is provided by broadcasters.
Using programme schedules provided
by broadcasters, you can specify
Page 27

programmes you want to watch
in advance so that the channel
automatically changes to the selected
programme channel at the specified
time. Programme entries may appear
blank or out of date depending on a
channel status.
Using Channel View
●
a
(Sche. Mgr): Displays the Schedule
Manager.
Page 28

●
b
(-24 Hours): Viewing the list of
programmes to be broadcasted before
24 hours.
●
{
(+24 Hours): Viewing the list of
programmes to be broadcasted after 24
hours.
●
}
(Ch. Mode): Select the type of
channels you want to display on the
Channel View window.
●
`
Information: Displays details of the
selected programme.
Page 29

●
k
Page: Move to next or previous page.
●
E
Watch / Schedule: When selecting
the current programme, you can watch
the selected programme. / When
selecting the future programme, you
can reserve to watch the selected
programme.
Channel
™
→
Channel
Using this function, you can delete
Page 30

channels from the different Category
channel lists on the Channel screen,
set favourite channels, view and access
recently viewed and most viewed
channels, and edit the channel names
of analogue channels.
N
The available items may differ
depending on the selected aerial
source.
Category Options (on the left side of the
Page 31

Channel screen)
●
All
Shows all channels.
●
TV
Shows TV channels.
●
Radio
Shows radio channels.
●
Data/Other
Shows data channels and other
channels.
●
Analogue
Page 32

Shows analogue channels.
●
Favourites 1 – Favourites 5
Lets you arrange and display favourite
channels in up to five groups. Each
group is independent of the other
groups and can contain the same
channels as other groups, different
channels, or a combination of both.
N
The TV displays favourites only if
you have added favourites using Edit
Favourites in the Tools menu.
Page 33

N
If the highlight located in the
Favourites 1 – Favourites 5 category,
you can change the name of
category by selecting
b
using your
remote.
●
Recently Viewed
Shows the most recently viewed
channels.
●
Most Viewed
Shows the most frequently viewed
channels.
Page 34

Using the coloured and function buttons
with Channel
●
a
Air / Cable / Satellite
Select the desired aerial source.
The option may differ depending on
country.
●
b
Delete
Deletes the selected channel(s) from a
category list.
●
`
Information
Page 35

Displays details of the selected channel.
●
k
Page
Scrolls the channel list to the next or
previous page.
N
These correspond to the CH buttons
on the remote.
●
E
Select / Deselect
Selects or deselects a channel.
●
T
Tools
Displays the option menu.
●
R
Return
Page 36

Return to the previous menu.
Using the Tools menu with the Channel
●
Edit Favourites
Lets you assign channels you watch
frequently to a favourites group and
remove channels from a favourites
group. You access Edit Favourites on
the Tools menu.
1.
Select Edit Favourites. The Edit
Favourites screen appears.
Page 37

2.
Select
a
using your remote. The
selected channel will be added to the
favourite group.
N
Also, you can select a channel in
the Edit Favourites screen.
N
You can add a favourite channel
to any one of the groups. To
change favourites group, select
}
using your remote. Each time you
select
}
, a favourites group will
be changed.
Page 38

3.
When done, select OK on the right
side. The channel is made a favourite
and is assigned to the favourites
group you selected.
4.
Edit completed. appears on the
screen. Select OK.
N
On the Channel screen, the TV
displays the “
” symbol next
to the channel, indicating it is a
favourite.
●
Lock / Unlock
Page 39

Lock a channel so that the channel
cannot be selected and viewed.
N
This function is available only when
the Channel Lock is set to On.
●
Rename channels
(Appears only if you have selected an
analogue channel.)
Lets you assign a name of up to five
characters to an analogue channel. For
example, Food, Golf, etc. This makes it
easier to find and select the channel.
Page 40

●
Edit Channel Number
Edit the channel number by select the
numbers.
N
This function may not be supported
depending on the region.
●
Sorting (digital channels only)
Change the list ordered by name or
number.
●
Channel Info
Displays information of channel signal.
The item may differ depending on
Page 41

channel.
●
Search (when the Aerial was set to
Satellite)
Channel scan is started.
●
Delete
Delete a channel to display the
channels you want.
●
Select All / Deselect All
Select all channels in the list. / Deselect
all channels you selected.
Page 42

To delete a channel from a Category
list on the Channel screen, follow these
steps:
1.
If you want to delete a channel,
select a category of the channel.
2.
Select a channel in the category list.
A
c
mark appears to the left of the
channel.
N
You can select more than one
channel.
N
If you re-select a channel you
Page 43

selected, the
c
mark disappears.
3.
Open the Tools menu using your
remote.
4.
Select Delete. The message Delete
the selected channels? appears.
Select OK.
N
You can delete the selected channel
immediately by selecting
b
using
your remote.
N
When you delete a channel in the
Recently Viewed or Most Viewed
Page 44

category, the channel will disappear
from that category list. But, the
channel is not deleted.
To set channels as favourites, follow
these steps:
1.
Select the All category.
2.
Select a channel in the category. A
c
mark appears to the left of the
channel.
N
You can select more than one
Page 45

channel.
N
If you re-select a channel you
selected, the
c
mark disappears.
3.
Open the Tools menu using your
remote.
4.
Select the Edit Favourites. The Edit
Favourites screen appears.
5.
Select
a
using your remote. The
selected channel will be moved to
the favourite group.
N
Also, you can select a channel in
Page 46

the Edit Favourites screen.
N
You can add a favourite channel
to any one of the groups. To
change favourites group, select
}
using your remote. Each time you
select
}
, a favourites group will
be changed.
6.
When done, select OK. The channel is
made as a favourite and is assigned
to the favourite group you selected.
N
The TV displays the “ ” symbol
Page 47

next to the channel, indicating it
is a favourite.
Using the coloured and function
buttons with Edit Favourites
●
When the highlight located in the All,
you can use these options:
–
a
Add
Add selected channels to the
favourites group.
–
}
Change Fav.
Page 48

Change the favourites group.
Each time you select
}
using
your remote, the favourites group
changes.
–
Ÿ
Go To
You can enter a channel number
immediately using your remote.
–
R
Return
Return to the previous menu.
●
When you highlight a favourite
channel in a favourites group on the
Page 49

Edit Favourites screen, you can use
these options:
–
a
Delete
Delete the selected channel.
–
b
Change order
Change the favourite group list
order.
–
{
Copy
Copy a selected channel to other
favourites groups.
–
}
Change Fav.
Page 50

Change the favourites group.
Each time you select
}
using
your remote, the favourites group
changes.
–
E
Done
Finish the Change order function.
–
Ÿ
Go To
You can enter a channel number
immediately using your remote.
–
R
Return
Return to the previous menu.
Page 51

To remove a channel from a favourites
group, follow these steps:
1.
Select the favourite’s group category.
2.
Select a channel in the selected
favourites group. A
c
mark appears
to the left of the channel.
N
You can select more than one
channel.
N
If you re-select a selected channel,
the
c
mark disappears.
Page 52

3.
Open the Tools menu using your
remote.
4.
Select the Delete. The message
Do you want to delete the selected
item(s)? appears.
5.
Select OK. The message Deleted the
selected item(s). appears.
Display Icons Used in the Channel screens
: An analogue channel.
c
: A channel selected.
Page 53

: A favourite channel.
: A locked channel.
Schedule Manager
™
→
Schedule Manager
Using this function, you can set
the TV to display a desired channel
automatically on a day and at a time of
your choice.
N
You must set the current time first
using the Time
→
Clock function
Page 54

in the System menu to use this
function.
To use Schedule Viewing, follow these
steps:
1.
On the Schedule Manager screen,
select
a
using your remote.
2.
A pop up screen will appear. Select
Schedule Viewing.
3.
Set Aerial, Channel, Repeat, and
Start Time.
Page 55

●
Aerial
Select the desired aerial source.
●
Channel
Select Channel to view the channel
numbers. Select the desired channel.
N
You can only select memorised
channels.
●
Repeat
Select Once, Manual, Sat~Sun,
Mon~Fri or Everyday. If you select
Manual, you can set the day you
Page 56

want.
N
The
c
mark indicates a day you’
ve selected.
Date: You can set a desired date.
N
The Date is available only when
you select Once in Repeat.
●
Start Time
You can set the start time you want.
4.
When done, select OK, The selected
channel is scheduled for viewing.
N
On the Schedule Manager screen,
Page 57

you can view a list of Schedule
Viewing.
N
If you select Information
function using your remote
after highlighting an item, the
Information screen appears. On
the Information screen, you can
change or cancel the Schedule
Viewing.
Cancel schedule: Cancel the Schedule
Viewing.
Page 58

Edit Schedule: Change the Schedule
Viewing.
Return: Return to the previous
screen.
To delete an item in a list of scheduled,
follow these steps:
1.
On the Schedule Manager screen,
highlight an item you want to delete.
2.
Open the Tools menu using your
remote.
Page 59

3.
Select the Cancel schedule. The
Cancel selected list(s)? message
appears.
4.
Select Yes. The selected schedule is
cancelled.
To use Schedule Recording, follow these
steps (Digital channels only):
Allows you to make a reservation to
record a programme scheduled for
broadcast.
Page 60

Set the current time first to use this
function.
1.
Select Schedule Manager. The
Schedule Manager screen will be
displayed.
2.
Select
a
using your remote. A pop
up screen will appear.
3.
Select the Schedule Recording.
N
We recommend using a USB
HDD with at least 5,400 rpm, but
a USB HDD of RAID type is not
Page 61

supported.
N
More than 3TB USB HDD is not
supported.
N
A USB storage device cannot
record until it completes the
Device Performance Test.
N
USB memory stick is not
compatible.
4.
Set the Aerial, Channel, Repeat, Date,
Start / End Time.
N
If you want to play a recorded
Page 62

programme, refer to Recorded TV
in the e-Manual.
Channel List
Using this function, you can view the
channel list, programme information,
and favourite channels, select channels
to watch, and use Schedule Viewing on
digital channels.
1.
Press the CH LIST button
for Standard
Remote Control
or select CH List
for
Page 63

Smart Touch Control
. The Channel List
screen is displayed immediately.
2.
Change a channel or channel list
mode.
Using the coloured and function buttons
with the Channel List
N
If you select Info using your remote,
the TV displays details of the
selected programme.
●
a
Aerial
Page 64

Select the desired aerial source.
The option may differ depending on
country.
●
{
Programme View / Channel View
For digital channels, switches the
display between Programme View and
Channel View.
When you select a digital channel in
Channel List, select
{
once to display
a list of programmes on that channel.
Select again to re-display the Channel
Page 65

View.
●
lr
Ch. Mode / Channel
Move to the type of channels you want
to display on the Channel List screen.
/ On the Programme View screen,
displays the programmes for the next
or previous channel.
●
E
Watch / Information
Watches the channel you select. /
Displays details of the selected channel.
Page 66

●
k
Page
Scrolls the Channel List to the next or
previous page.
Using the Schedule Viewing in Channel List
(Digital channels only)
You can use Schedule Viewing in
Channel List to schedule a digital
channel programme for viewing.
The TV will turn on and display the
digital channel programme when the
Page 67

programme begins.
1.
Select CH LIST function using your
remote. The Channel List screen
appears.
2.
Select a desired digital channel.
3.
Select
{
using your remote. The TV
displays the programme list of the
selected channel.
4.
Select a desired programme in the
programme view, and then select
Information using your remote.
Page 68

5.
On the Information screen, select
Schedule Viewing. The selected
programme is scheduled.
N
If you want to cancel the Schedule
Viewing, follow Steps 1 through 4,
and then select Cancel schedule.
Channel Status Display Icons
: An analogue channel.
: A reserved programme.
: A reserved recording programme.
Page 69

: A locked channel.
Page 70

Memorizing Channels
Aerial
Menu
→
Channel
→
Aerial
Before your television can begin
memorizing the available channels, you
must specify the type of signal source
that is connected to the TV.
N
The option may differ depending on
country.
Page 71

Country
Menu
→
Channel
→
Country
Select your country so that the TV can
correctly auto-tune the broadcasting
channels.
N
The PIN input screen appears. Enter
your 4 digit PIN number.
●
Digital Channel: Change the country
for digital channels.
●
Analogue Channel: Change the
country for analogue channels.
Page 72

Auto Tuning
Menu
→
Channel
→
Auto Tuning
Scans for a channel automatically and
stores in the TV.
N
Automatically allocated programme
numbers may not correspond
to actual or desired programme
numbers. If a channel is locked using
the Channel Lock function, the PIN
input window appears.
Page 73

●
Auto Tuning: Scans for channels
automatically and stores them in the
TV’s memory.
●
Cable Search Option
(Depending on the country)
N
When the Aerial was set to Cable.
Sets additional search options such
as the frequency and symbol rate for
a cable network search.
When Aerial Source is set to Air or Cable
Page 74

●
Digital & Analogue / Digital / Analogue:
Select the channel source to memorise.
When selecting Cable
→
Digital &
Analogue or Digital: Provide a value to
scan for cable channels.
●
Operator Selection (Depending on the
country): Selects a provider of cable
services.
●
Search Mode: If you selected the Cable,
the Search Mode screen appears.
Scans for all channels with active
Page 75

broadcast stations and stores them in
the TV.
N
If you select Quick, you can set up
the Network, Network ID, Frequency,
Modulation, and Symbol Rate
manually by the remote control.
Network: Selects the Network ID setting
mode among Auto or Manual.
Network ID: When Network is Manual,
you can set up Network ID.
Frequency: Displays the frequency for
Page 76

the channel. (Differs in each country)
Modulation: Displays available
modulation values.
Symbol Rate: Displays available symbol
rates.
When Aerial Source is set to Satellite
(Depending on the country)
●
Channel Type: Select the Channel Type
to memorise.
●
Satellite: Selects the satellite to scan.
Page 77

The option may differ depending on
country.
●
Scan Mode: Selects the scanning mode
of the selected satellite.
●
Re-initialise: Selects the scanning
mode of the selected satellite.
●
Search Mode: Sets search mode using
up/down functions.
Manual Tuning
Menu
→
Channel
→
Manual Tuning
Page 78

Scans for a channel manually and
stores in the TV.
N
If a channel is locked using the
Channel Lock function, the PIN input
window appears.
N
This function may not be supported
depending on the region.
When Aerial Source is set to Air or Cable
●
Digital Channel Tuning: Scans for a
digital channel.
Page 79

1.
Select the New.
N
When selecting Aerial
→
Air:
Channel, Frequency, Bandwidth
N
When selecting Aerial
→
Cable:
Frequency, Modulation, Symbol
Rate
2.
Select the Search. When scanning
has finished, a channel is updated in
the channel list.
●
Analogue Channel Tuning: Scans for a
analogue channel.
Page 80

1.
Select the New.
2.
Set the Programme, Colour System,
Sound System, Channel and Search.
3.
Select the Store. When scanning has
finished, a channel is updated in the
channel list.
Channel mode
●
P (programme mode): When tuning is
complete, the broadcasting stations
in your area have been assigned to
Page 81

position numbers from P0 to P99.
You can select a channel by entering
the position number in this mode.
●
C (aerial channel mode) / S (cable
channel mode): These two modes
allow you to select a channel by
entering the assigned number for
each aerial broadcasting station or
cable channel.
When Aerial Source is set to Satellite
Page 82

●
Transponder: Selects the transponder.
●
Scan Mode: Selects either free or all
channels to store.
●
Network Search: Enable / Disable
network search.
●
Signal Quality: Display the current
status of broadcasting signal.
N
Information on a satellite and its
transponder is subject to change
depending on the broadcasting
conditions.
Page 83

N
When setting is completed, move to
Search. Channel scan is started.
Page 84

Other Features
Guide Type
Menu
→
Channel
→
Guide Type
(Depending on the country)
You can select a different type of
Guide.
●
Samsung: Uses the guide programme
by provided Samsung.
●
Rovi On Screen: Uses the guide
programme provided by Rovi
Page 85

International Solutions.
N
ROVI EPG initial setting time can
take a while depending on the region
or broadcast environment.
Genre Selection
for U.K
Menu
→
Channel
→
Genre Selection
Genre Selection is available when Aerial
is set to Freesat.
●
Genre Selection: Turn the channel-
genre selection feature on or off
Page 86

when using the guide.
Transfer Channel List
Menu
→
Channel
→
Transfer Channel List
Imports or exports the channel map.
You should connect USB storage to use
this function.
N
The PIN input screen appears. Enter
the PIN using your remote.
●
Import from USB: Import channel list
from USB.
Page 87

●
Export to USB: Export channel list to
USB. This function is available when
USB is connected.
Fine Tune
Menu
→
Channel
→
Fine Tune
(Analogue channels only)
If the reception is clear, you do not
have to fine tune the channel, as this is
done automatically during the search
and store operation. If the signal is
Page 88

weak or distorted, fine tune the channel
manually. Scroll to the left or right until
the image is clear.
N
Settings are applied to the channel
you’re currently watching.
N
Fine tuned channels that have been
saved are marked with an asterisk “*”
on the right-hand side of the channel
number in the channel banner.
N
To reset the fine-tuning, select the
Reset.
Page 89

Crosstalk noise reduction
Menu
→
Channel
→
Crosstalk noise
reduction
(Analogue channels only)
This function reduces diagonal noise in
the picture caused by signal crosstalk
(interference). If your TV picture
displays diagonal noise or distortion
when you watch, turn on this function.
(Depending on the country)
Page 90

Satellite System
Satellite System is available when
Aerial is set to Satellite. Before running
Auto Store, set Satellite System. Then
channel scan is run normally.
N
The PIN input screen appears. Enter
your 4 digit PIN number.
●
Satellite Selection: You can choose the
satellites for this TV.
●
LNB Power: Enables or disables the
Page 91

power supply for the LNB.
●
LNB Settings: Configures the outdoor
equipment.
Satellite: Selects the satellite for
receiving digital broadcasts.
Transponder: Selects a transponder
from the list or adds a new transponder.
DiSEqC Mode: Selects DiSEqC mode
for the selected LNB.
Lower LNB Oscillators: Sets the LNB
oscillators to a lower frequency.
Page 92

Upper LNB Oscillators: Sets the LNB
oscillators to a higher frequency.
Tone 22 kHz: Selects the Tone 22 kHz
depending on the LNB type. For a
universal LNB it should be Auto.
Signal Quality: Display the current
status of broadcasting signal.
●
SatCR/Unicable Settings: Configure
single cable installation.
N
This function may not support
depending on the region.
Page 93

–SatCR/Unicable: Enables or disable
single cable installation support.
–Slot Number: Select the SatCR user
slot number for this receiver.
–Slot Frequency: Enter the appropriate
frequency to receive the signal from
SatCR.
–Detect Slot Frequency: Auto-detect
the signal frequency for the selected
slot number.
–Verify Slot Frequency: Verify that the
Page 94

frequency entered corresponds to the
selected slot.
●
Positioner Settings: Configures the
aerial positioner.
Positioner: Enables or disables the
positioned control.
Positioner Type: Sets the positioned
type between DiSEqC 1.2 and USALS
(Universal Satellite Automatic Location
System).
–My Longitude: Sets the longitude for
Page 95

my location.
–My Latitude: Sets the latitude for my
location.
–Satellite Longitude Settings: Sets the
longitude of user defined satellites.
User Mode: Sets the position of satellite
aerial according to each satellite.
If you store the current position of
satellite aerial according to a certain
satellite, when the signal of that
satellite is needed, the satellite aerial
Page 96

can be moved to pre-populated
position.
–Satellite: Selects the satellite to set
the position for.
–Transponder: Selects a transponder
from the list for signal reception.
–Moving Mode: Selects the movement
mode between discrete and
continuous movement.
–Step Size: Adjusts the step size
degrees for the aerial rotation. Step
Page 97

Size is available when Moving Mode
is set to Step.
–Go To Stored Position: Rotates the
aerial to the stored satellite position.
–Aerial Position: Adjusts and stores
the aerial position for the selected
satellite.
–Store Current Position: Stores current
position as the selected positioner
limit.
–Signal Quality: Display the current
Page 98

status of broadcasting signal.
Installer Mode: Sets limits to the scope
of movement of satellite aerial or reset
the position. Generally, installation
guide uses this function.
–Limit Position: Selects the direction
of the positioner Limit.
–Aerial Position: Adjusts and stores
the aerial position for the selected
satellite.
–Store Current Position: Stores the
Page 99

current position as the selected
positioner Limit.
–Go To Zero: Moves the aerial to the
reference position.
–Reset Positioner Limit: Allows the
aerial to rotate over the full arc.
●
Reset All Settings: All satellite settings
will be reset to the initial values.
Page 100

Changing the Preset Picture Mode
Picture Mode
Menu
→
Picture
→
Picture Mode
Picture modes apply preset adjustments
to the picture.
N
When your TV is connected to a PC
via an HDMI to DVI cable, you can
only select Entertain and Standard.
●
Dynamic
Suitable for a bright room.
Basic Feature
 Loading...