

Page 1

SUPPORT
Связывайтесь с SAMSUNG по всему миру
Если у вас есть предложения или вопросы по продуктам Samsung, связывайтесь с информационным центром Samsung.
Страна
RUSSIA 8-800-555-55-55 www.samsung.com
GEORGIA 8-800-555-555 -
ARMENIA 0-800-05-555 -
AZERBAIJAN 088-55-55-555 -
KAZAKHSTAN 8-10-800-500-55-500(GSM: 7799) www.samsung.com
UZBEKISTAN 8-10-800-500-55-500 www.samsung.com
KYRGYZSTAN 00-800-500-55-500 www.samsung.com
TADJIKISTAN 8-10-800-500-55-500 www.samsung.com
MONGOLIA www.samsung.com
UKRAINE 0-800-502-000 www.samsung.ua
BELARUS 810-800-500-55-500 -
MOLDOVA 00-800-500-55-500 -
Производитель:
ООО «Самсунг Электроникс Рус Калуга»,
249002, Калужская обл., Боровский р-н, д. Коряково, Первый Северный проезд, владение 1
Центр поддержки покупателей
Веб-узел
www.samsung.com/ua_ru
UE40ES8000S UE46ES8000S UE55ES8000S
LED-ТЕЛЕВИЗОР
руководство пользователя
© 2012 Samsung Electronics Co., Ltd. All rights reserved.
Благодарим за приобретение продукта компании.
Для получения более полного обслуживания
зарегистрируйте свое устройство по адресу
www.samsung.com/register
Модель____ Серийный номер. _____________
BN68-04061K-04
Page 2

A detailed User’s Manual is built into your TV.
For more information about how to view this e-Manual see page 19.
Figures and illustrations in this User Manual are provided for reference only and may differ from actual product appearance. Product design and
specifications may be changed without notice.
Digital TV notice
1. Functionalities related to Digital TV (DVB) are only available in countries/areas where DVB-T (MPEG2 and MPEG4 AVC) digital terrestrial signals are
broadcasted or where you are able to access to a compatible DVB-C (MPEG2 and MPEG4 AAC) cable-TV service. Please check with your local
dealer the possibility to receive DVB-T or DVB-C signal.
2. DVB-T is the DVB European consortium standard for the broadcast transmission of digital terrestrial television and DVB-C is that for the broadcast
transmission of digital TV over cable. However, some differentiated features like EPG (Electric Programme Guide), VOD (Video On Demand) and so
on, are not included in this specification. So, they cannot be workable at this moment.
3. Although this TV set meets the latest DVB-T and DVB-C standards, as of [August, 2008], the compatibility with future DVB-T digital terrestrial and
DVB-C digital cable broadcasts cannot be guaranteed.
4. Depending on the countries/areas where this TV set is used some cable-TV providers may charge an additional fee for such a service and you may
be required to agree to terms and conditions of their business.
5. Some Digital TV functions might be unavailable in some countries or regions and DVB-C might not work correctly with some cable service providers.
6. For more information, please contact your local Samsung customer care centre.
The reception quality of TV may be affected due to differences in broadcasting method between the countries. Please check the TV
✎
performance in the local SAMSUNG Authorized Dealer, or the Samsung Call Centre whether it can be improved by reconfiguring TV setting
or not.
Still image warning
Avoid displaying still images (like jpeg picture files) or still image element (like TV programme logo, panorama or 4:3 image format, stock or news bar at
screen bottom etc.) on the screen. Constant displaying of still picture can cause ghosting of LED screen, which will affect image quality. To reduce risk
of this effect, please follow below recommendations:
• Avoid displaying the same TV channel for long periods.
• Always try do display any image on full screen, use TV set picture format menu for best possible match.
• Reduce brightness and contrast values to minimum required to achieve desired picture quality, exceeded values may speed up the burnout process.
• Frequently use all TV features designed to reduce image retention and screen burnout, refer to e-Manual for details.
English - 2
Page 3

Providing Proper Ventilation for Your TV
When you install your TV, maintain a distance of at least 4 inches between the TV and other objects (walls, cabinet sides, etc.) to ensure proper
ventilation. Failing to maintain proper ventilation may result in a fire or a problem with the product caused by an increase in its internal temperature.
Whether you install your TV using a stand or a wall-mount, we strongly recommend you use parts provided by Samsung Electronics only.
✎
• If you use parts provided by another manufacturer, it may cause difficulties with the product or result in injury caused by the product falling.
Installation with a stand. Installation with a wall-mount.
10 cm
10 cm10 cm
Other Warnings
[
The actual appearance of the TV may differ from the images in this manual, depending on the model.
✎
Be careful when you touch the TV. Some parts can be somewhat hot.
✎
Correct Disposal of This Product (Waste Electrical & Electronic Equipment)
(Applicable in the European Union and other European countries with separate collection systems)
This marking on the product, accessories or literature indicates that the product and its electronic accessories (e.g. charger, headset,
USB cable) should not be disposed of with other household waste at the end of their working life. To prevent possible harm to
the environment or human health from uncontrolled waste disposal, please separate these items from other types of waste and
recycle them responsibly to promote the sustainable reuse of material resources. Household users should contact either the retailer
where they purchased this product, or their local government office, for details of where and how they can take these items for
environmentally safe recycling. Business users should contact their supplier and check the terms and conditions of the purchase
contract. This product and its electronic accessories should not be mixed with other commercial wastes for disposal.
Correct disposal of batteries in this product
(Applicable in the European Union and other European countries with separate battery return systems)
This marking on the battery, manual or packaging indicates that the batteries in this product should not be disposed of with other
household waste at the end of their working life. Where marked, the chemical symbols Hg, Cd or Pb indicate that the battery contains
mercury, cadmium or lead above the reference levels in EC Directive 2006/66. If batteries are not properly disposed of, these
substances can cause harm to human health or the environment. To protect natural resources and to promote material reuse, please
separate batteries from other types of waste and recycle them through your local, free battery return system.
10 cm
10 cm
10 cm
10 cm
• An administration fee may be charged if either
− (a) an engineer is called out at your request and there is no defect in the product
(i.e. where you have failed to read this user manual)
− (b) you bring the unit to a repair centre and there is no defect in the product
(i.e. where you have failed to read this user manual).
• The amount of such administration charge will be advised to you before any work or home visit is carried out.
English - 3
Page 4

List of Features
• 3D: This exciting new feature enables you to view 3D content from some broadcasting or 3D BD players.
• SMART HUB: The Gateway to all content integrated in one place
− It’s all integrated to guide you to easier and diverse entertainment choices
− Control your entertainment life with easy and simple user friendly UI
− Access to diverse Apps that are adding up every day
− Customize your TV, by App grouping & sorting to your taste
• AllShare Play: AllShare Play lets you access, view, or play photos, videos, or music located on USB devices, digital cameras, cell phones, and
PCs. PCs, cell phones, and other compatible devices can be accessed wirelessly, through your wireless network.
• Anynet+ (HDMI-CEC): Allows you to control all connected Samsung devices that support Anynet+ with your Samsung TV’s remote.
• e-Manual: Allows you to read on screen full manual. (p. 19)
Accessories
Please make sure the following items are included with your TV. If any items are missing, contact your dealer.
✎
The items’ colours and shapes may vary depending on the models.
✎
Cables not included in the package contents can be purchased separately.
✎
Check that there is no accessory hidden behind packing materials when you open the box.
✎
CAUTION: INSERT SECURELY LEST SHOULD BE DETACHED IN SET
[
• Smart Touch Control & Batteries (AA x 2)
• IR Blaster & Batteries (AA x 4)
• Remote Control & Batteries (AAA x 2)
• Warranty Card (Not available in some locations) / Safety Guide
• Power Cord
• Cleaning-Cloth
• Samsung 3D Active Glasses
• User Manual
Scart Adapter Holder-Wire stand Holder Ring x 4 CI Card Adapter
Assembling the Stand Wire Holder
Wireless Keyboard (Sold Separately)
Wireless Keyboard
English - 4
Page 5
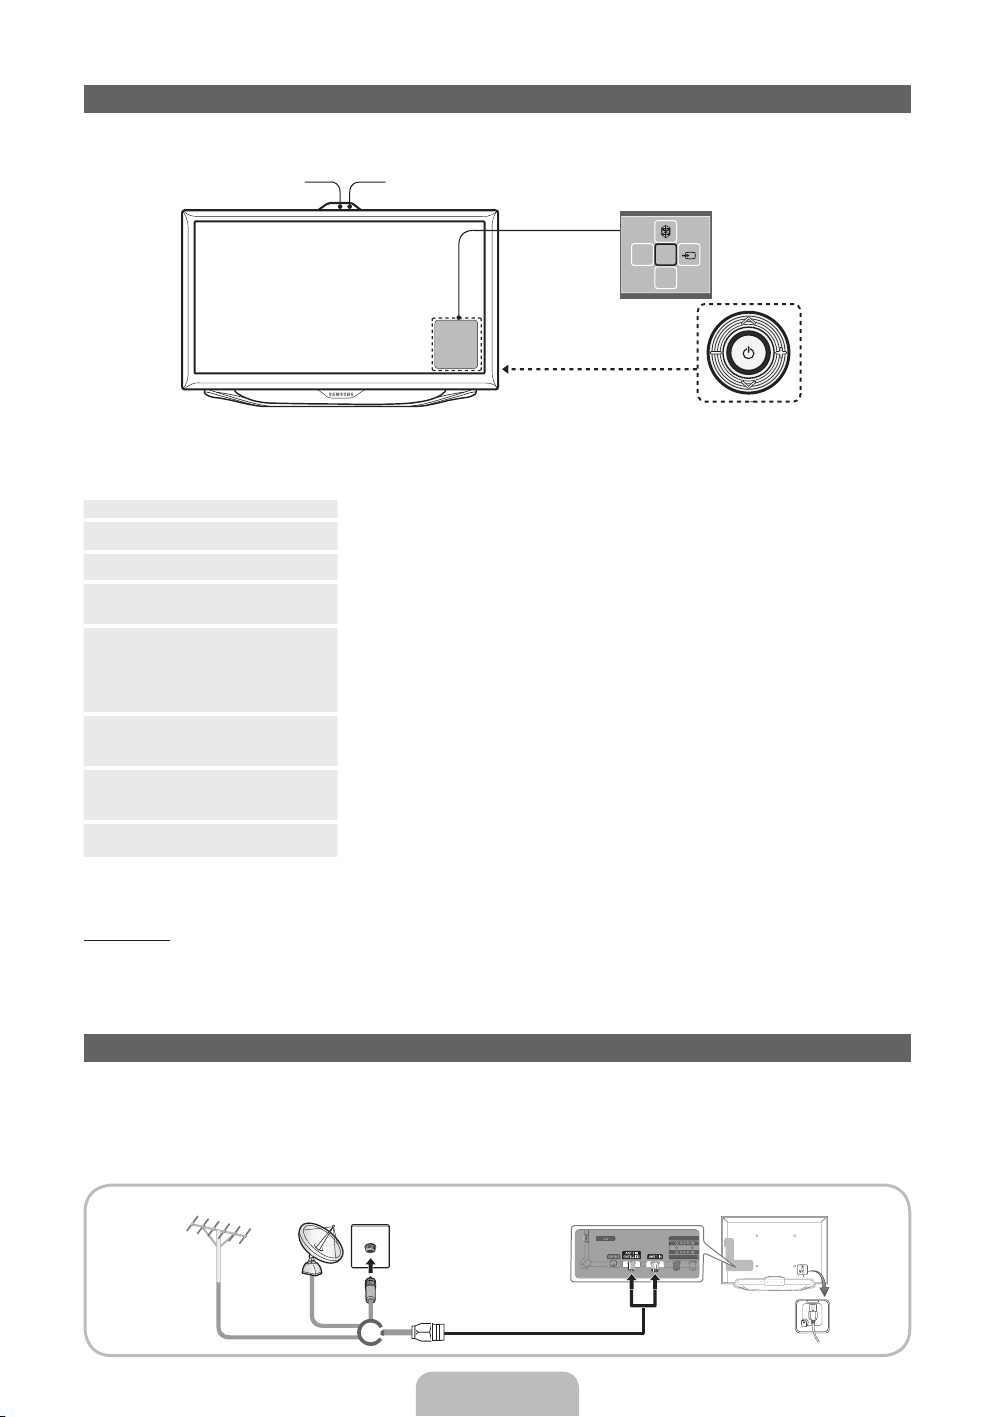
Using the TV's Controller (Panel Key)
The TV's Controller, a small joy stick like button on the rear right side of the TV, lets you control the TV without the remote control.
The product colour and shape may vary depending on the model.
✎
Camera
Follow these instructions facing the front of your TV.
✎
When you use a TV camera, you should check whether a tape attached or not in rear of the TV camera, and then you can use a TV camera
✎
after adjust a camera angle. If you do not intend to use the TV camera, move the camera lens upwards so that the lens is not revealed. In this
case, Face recognition and Motion control are not available.
Power on Turn the TV on by pressing the Controller when the TV is in standby mode.
Adjusting the volume Adjust the volume by moving the Controller from side to side when the power is on.
Selecting a channel Select a channel by moving the Controller upwards and downwards when the power is on.
Using the Function menu To view and use the Function menu, press and release the Controller when the power is on. To close
m
Selecting the MENU (
Selecting the SMART HUB (
Selecting a Source (
P
Power off (
) With the Function menu visible, select Power off (P) by moving the Controller downwards, and then
) With the Function menu visible, select the MENU (m) by moving the Controller to the left. The OSD
™
) With the Function menu visible, select SMART HUB (™) by moving the Controller upwards. The
s
) With the Function menu visible, open the Source (s) by moving the Controller to the right. The
Remote control sensor
Function menu
mR
P
TV Controller
the Function menu, press and release the Controller again.
(On Screen Display) Menu appears. Select an option by moving the Controller to the right. Move the
Controller to the right or left, or backwards and forwards to make additional selections. To change a
parameter, select the it, and then press the Controller.
additional selections. To change a parameter, select the it, and then press the Controller.
SMART HUB main screen appears. Select an application by moving the Controller, and then pressing
the Controller.
Source screen appears. To select a Source, move the Controller back and forth. When the source you
want is highlighted, press the Controller.
press the Controller.
To close the Menu, Smart Hub, or Source, press the Controller for more than 1 second.
✎
Standby mode
Your TV enters Standby mode when you turn it off and continues to consume a small amount of electric power. To be safe and to decrease power
consumption, do not leave your TV in standby mode for long periods of time (when you are away on vacation, for example). It is best to unplug the
power cord.
Connecting to an Aerial
Plug the power cord into a wall outlet only after you have made all other connections.
✎
If you are connecting your TV to a cable or satellite box using HDMI, Component, or Composite connections, you do not need to connect the
✎
ANT IN jack to an aerial or a cable connection.
Using two-way radio mobile and portable units or amateur radio or AM radio near your TV may cause the TV to malfunction.
✎
Use caution when you move or swivel the TV if the aerial cable is tightly connected. You could break the aerial jack off the T V.
✎
VHF/UHF Aerial CableSatellite
or
English - 5
Page 6

The Smart Touch Control / IR Blaster Guide
For more detailed information about Smart Touch Control, see "Using the Smart Touch Control" in e-Manual.
✎
Smart Touch Control
Turns the TV on and off.
Š
: Displays a list of recently used
functions. You can select a function again
using the Touch Pad easily and quickly.
Y
: Adjusts the Volume.
Displays the shortcut functions list. You can
select a function using the Touch Pad.
RETURNR: Returns to the previous menu.
VOICE
˜
: Lets you access the Voice
Control function. When you press the
button, the TV displays the command
list. You can speak using the microphone
embedded in your remote.For more
detailed information about the Voice
Control function, see "SMART Interaction"
in the e-manual or see page 14.
NUMBER
š
screen. You can select a number using the
: Displays the Number button
Touch Pad.
Installing batteries (Battery size : AA)
RETURN VOICE NUMBER
TV STB BD
You can speak a voice command that
displayed to the TV using MIC. To use
MIC, press the VOICE
remote.
Voice Control function can be
✎
affected recognition by unclear
pronunciation, voice level, or
surrounding noise.
LED to show the active device.
Displays Colour and playing control
functions. You can select a function using
the Touch Pad.
: Use these buttons according to
the directions on screen.
playing control buttons: Use these buttons
in a specific feature. For details, refer to
the e-Manual.
T
: Quickly select frequently used
functions. Use this button in a specific
feature. For details, refer to e-Manual.
< P >
: Changes channels.
Touch Pad
˜
button on your
• Drag on the Touch Pad to move the
focus on the screen.
• Click on the touch pad to run the
focused item.
• If you don't press any button within
30 seconds, the Smart Touch
Control is set to Sleep mode
automatically. To wake up the Smart
Touch Control, press the Touch Pad.
• If you press and hold the Touch Pad,
it has the same effect as pressing
the MUTE
M
button on your
remote. However, this action scrolls
the page on a Web Browser.
• Press the Touch Pad or RETURN
R
button to return to the general
mode.
Brings up the Smart Hub applications. See
the e-Manual chapter Advanced Features
→ Smart Hub.
To exit an application that is running
✎
easily, press the
™
button.
2
11
1. Press the back of the remote at the very bottom with both thumbs, and then slide the battery cover up in the direction of the arrow.
2. Install two batteries so that the polarity of the batteries (+/-) matches the illustration in the battery compartment.
3. Slide the cover down in the direction of the arrow to close the battery cover.
English - 6
Page 7
IR Blaster
1
O
O
To control to external devices connected to your TV, setting up the Universal Remote.
If you control Smart Touch Control to adjust to the external device, the IR Blaster will send the IR signal to an external device.
Pairing Button
Power Switch
OPEN
PAIRING
ON
OFF
1
OPEN
Device Indicator LED
IR Blaster shows the pairing
state.
Installing batteries (Battery size : AA)
1. Hold the both sides of the battery holder
1
1
2
1
OPEN
OPEN
OPEN
OPEN
and pull it out.
2. Install four batteries so that the polarity of
the batteries (+/-) matches the illustration
in the battery compartment.
3. Push it back.
Initial Pairing
When you connect an IR Blaster with your TV, you can control connected external devices with your TV using the Smart Touch Control.
30cm ~ 4m
TVSTB BD
RETURN VOICE NUMBER
IR receiver
<Connecting>
TVSTBBD
RETURN VOICE NUMBER
• Smart Touch Control
• IR Blaster
<Pairing complete>
Smart Touch Control
After you have run the Initial Setup on your TV, you should connect your Smart Touch Control to your TV.
1. Point the Smart Touch Control toward the IR Sensor of the TV and press any key on the Smart Touch Control.
2. The connection icons appear on the bottom left of the screen, and the TV connects to your Smart Touch Control automatically.
If you want to perform the pairing process again, press the reset button in the centre of the back cover using a pin or the tip of an unbent
✎
paper clip. The Smart Touch Control will be initialized.
• Smart Touch Control PAIRING Reset button
IR Blaster
1. Turn on the IR Blaster. When Indicator LED blinks, you should connect IR Blaster to TV.
2. Move the IR Blaster to the direction of your TV's IR receiver, and then press the PAIRING button once
PEN
ON
OFF
PAIRING
PEN
shortly on the bottom of the IR Blaster.
3. The connection icons appear on the bottom left of the screen, and the TV connects to IR Blaster
automatically.
If the connection process failed, please turn off and on the IR Blaster, try again from step2.
✎
English - 7
Page 8

Calibrating the Touch Pad
To calibrate the touch pad on the Smart Touch Control, follow these steps:
š
1. Press the NUMBER
2. When done, all the LEDs on the top of the Smart Touch Control blink twice simultaneously.
While calibrating, don't touch the touch pad.
✎
If the touch pad looses accuracy, re-calibrate the touch pad by repeating Steps 1 and 2.
✎
button for 3 seconds. The calibration starts.
Using the Touch Pad
To display the shortcut functions list on the bottom of the screen, press the ‹ button at the bottom of the touch pad. This list include Menu, Source,
CH List, 3D and other functions.
To display the colour and playing control functions on the top of the screen, press the
To Move the Highlight: Rest your finger on the touch pad, and then slide it from one side to the other, from top
to bottom, or bottom to top.
To move the Highlight continuously, flick your finger across the touch pad from right to left, left to right,
✎
top to bottom, or bottom to top.
RETURN VOICE NUMBER
To Select an item: Press the Touch Pad.
button on the top of the touch pad.
RETURN VOICE NUMBER
Using the Scroll mode
If you press the Touch Pad when using Smart Hub, Web Browser, and AllShare Play, the Touch Pad switches to the Scroll mode.
In the Scroll mode, slide your finger in the Touch Pad from one side to the other, the highlight moves page units.
To return to the general mode of the Touch Pad, press the Touch Pad or RETURNR button on your Smart Touch Control.
✎
To Enter a channel number through Smart Touch Control
1. While watching a broadcast, press the NUMBER
2. Using the touch pad, highlight a number, and then press the touch pad. The TV displays a list of channels that start with the number you
selected.
3. Using the touch pad, highlight the channel in the list you want, and then press the touch pad.
You can also change the channel by touching the up or down channel icon on the touch pad. If you touch the touch pad immediately after, the
✎
TV displays the list of memorized channels. Select a channel by moving or flicking your finger up or down, and then pressing the touch pad.
To Display the Tools Menu
Press the
T
button on the right side of the touch pad.
To Display a History of the Channels You Watched
Š
Press the
button on the left side of the touch pad.
š
button on the Smart Touch Control. The TV displays the number button screen.
English - 8
Page 9

Setting up Smart touch control to use as a Universal Remote Control
Lets you control a Set-Top-Box (STB) or a BD player or both connected to the TV using your Smart Touch Control. After you connect the device to the
TV, the Smart Touch Control can control the navigation, number, and other keys needed to operate and control the device.
The Universal Remote Control can adjust TV's volume, but STB's volume cannot be adjusted. Watch STB af ter adjusting STB's volume to
✎
appropriate level.
Depending on the version of an application, the Universal remote setup instructions may differ. In this case, please follow the instructions on
✎
the screen.
To connect the external device to your Smart Touch Control, follow these steps:
1. Select Set up a device to control, and then press the Touch Pad.
2. Select an external device from the connected devices, and then press the Touch Pad.
3. Select the port used to connect the external device, and then press the Touch Pad.
Make sure that the selected device is on. If it is turned off, turn the power on and press Refresh.
✎
4. Select Search brands/TV service providers, and then press the Touch Pad. A keyboard and an entry fi eld appear. Enter the fi rst few letters of
the brand name of your device using the Smart Touch Control, and then select Done at the bottom of the keyboard. In the list that appears below
the entry fi eld, select the brand name of your device, and then press the Touch Pad.
If you want to search the brand of STB (Set-Top box), you can search the STB by using the brand name or a cable provider.
5. Select Search model, and then press the Touch Pad. A keyboard and an entry fi eld appear. Enter the fi rst few letters and numbers of the model
name of your device using the Touch Control, and then select Done at the bottom of the keyboard. In the list that appears below the entry fi eld,
select the model name of your device, and then press the Touch Pad.
If the search for model name does not work properly, search with a part of the model name or use the search for recommended model
✎
code.
6. Select Download, and then press the Touch Pad. Download the confi guration data for the IR Blaster in the same way.
7. When all the settings are complete, select the Complete button and press the Touch Pad.
To reset IR Blaster and Smart Touch Control, press the ‹ button on Smart Touch Control, and then select Universal remote setup.
✎
Using the Search for recommended model code.
1. In the Search model name step in the integrated remote control setup, select the Recommended model and press the Touch Pad.
2. Select Download to download the recommended model code.
3. Point the Smart Touch Control forward to the IR sensor of the external device and press the Touch Pad to test if the device works.
4. If the downloaded recommended model code does not work, repeat the steps from step 3.
When you use the BD home theater by using Universal Remote, some buttons may not be supported. In this case, we recommend to use
✎
Anynet+ (HDMI-CEC) function.
English - 9
Page 10

Viewing the Remote Control
This is a special remote control for the visually impaired persons and has Braille points on the Power, Channel and Volume buttons.
✎
Turns the TV on and off.
Displays and selects the available video
sources. (p. 14)
Have direct access to channels.
Alternately select Teletext ON, Double, Mix
or OFF.
Adjusts the volume.
Brings up the Smart Hub applications. See
e-Manual chapter Advanced Features →
Smart Hub.
Opens the OSD.
Quickly select frequently used functions.
Use this button in a specific feature.
Turns the remote control light on or off.
When on, the buttons become illuminated
for a moment when pressed. (Using the
remote control with this button set to On
will reduce the battery usage time.)
Returns to the previous channel.
Cuts off the sound temporarily.
Changes channels.
Displays channel lists on the screen.
Displays the EPG (Electronic Programme
Guide).
Displays information on the TV screen.
Returns to the previous menu.
Use these buttons according to the
direction on screen.
Use these buttons in a specific feature. For
details, refer to e-Manual.
HISTORY CAMERA
S
AD/SUBT.
English - 10
u/d/l/r
menu item.
E
corresponding item value.
Exits the menu.
HISTORY: Displays a list of recently used
functions.
Family Story: Connect to Family Story
application. See e-Manual chapter
Advanced Features → Family Story.
CAMERA: Connect to Camera application.
SUPPORT: Lets you use various support
functions including e-Manual. (p. 19)
AD/SUBT.: Turns the audio description on
and off (not available in some locations).
/ Displays digital subtitles. See e-Manual
chapter Other Features → Subtitle.
W
e-Manual chapter Advanced Features →
Using the 3D function.
: Move the cursor on-screen
: Selects the menu and changes the
: Turns the 3D image on or off. See
Page 11
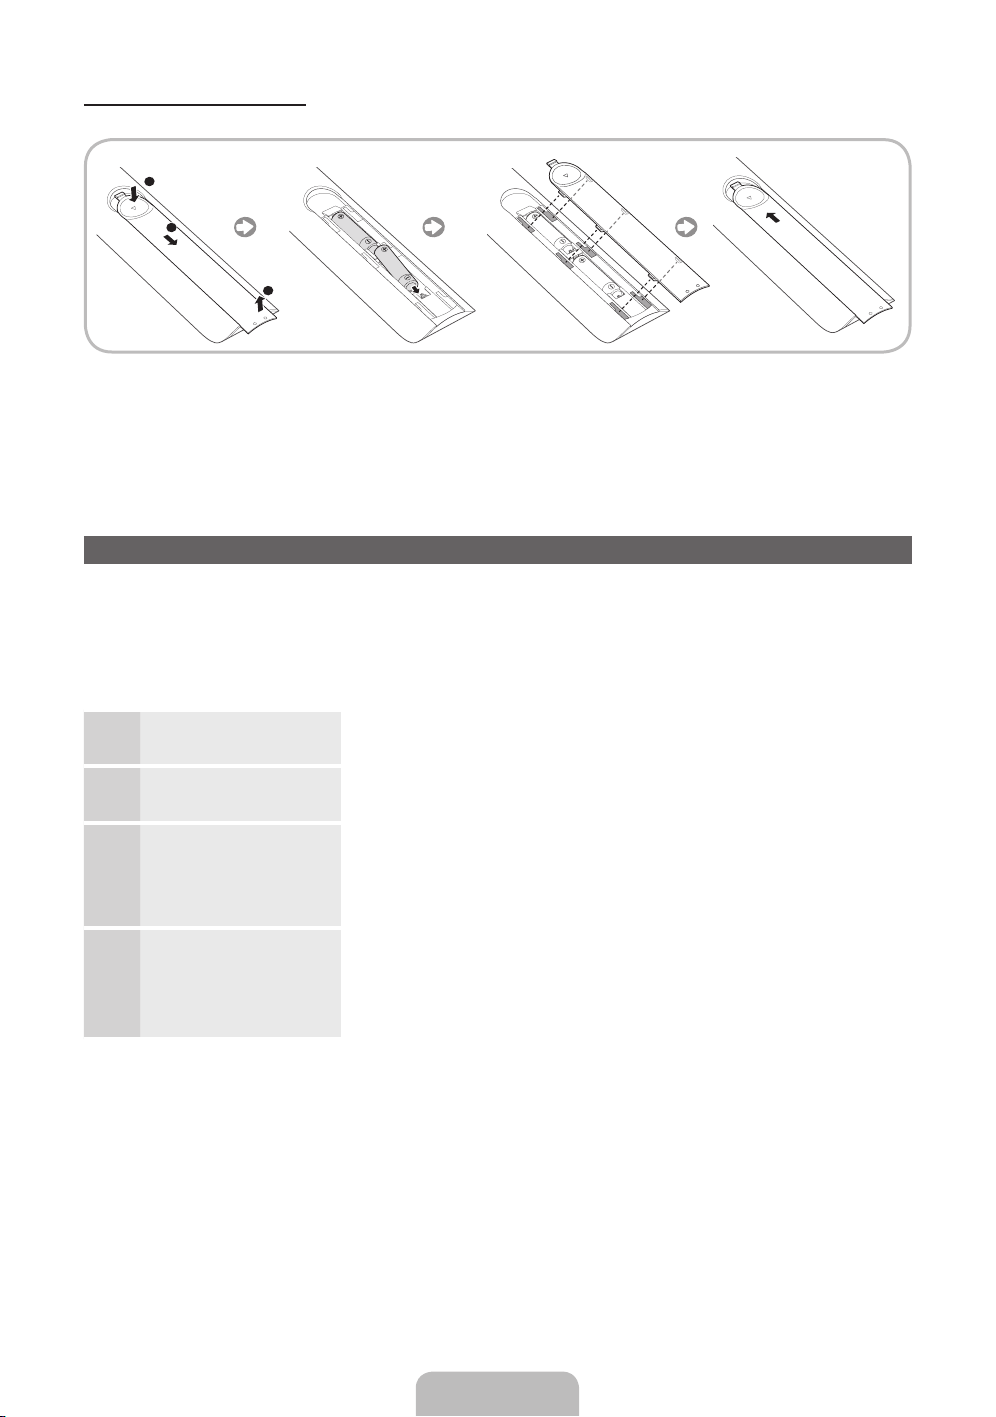
Installing batteries (Battery size: AAA)
Match the polarity of the batteries to the symbols in the battery compartment.
1
2
3
NOTE
✎
• Install the batteries so that the polarity of the batteries (+/-) matches the illustration in the battery compartment.
• Use the remote control within 23 feet of the TV.
• Bright light may affect the performance of the remote control. Avoid using when near special fluorescent lights or neon signs.
• The colour and shape may vary depending on the model.
Setup (Initial Setup)
When you turn the TV on for the first time, a sequence of prompts and screens will assist you in configuring basic settings. To begin Setup, press the
P
button on your remote.
Setup is available only when the input source is set to TV. See "Changing the Input Source" (p. 14).
✎
To return to the previous step in the Setup sequence, Select Previous.
✎
Before you begin, make sure you have connected the T V to an aerial or a cable connection and that the TV is plugged in. (p. 5).
✎
To start the Setup select Start.
✎
Menu Language:
1
Select a Language.
Use Mode: Select the Home
2
Use Mode.
Network Settings: Configure
3
network settings
To connect later, select
✎
Skip.
Software Upgrade: Upgrading
4
the software to latest version
To upgrade later, select
✎
Skip.
Select a menu language you want using your remote, and then select Next. The TV will be
displayed a menu using the selected language since next step.
Select Home Use using your remote, and then select Next.
Store Demo mode is for retail environments.
To set up your network connection, select Next using your remote. If you do not know your
network set up information or want to set to it later, select Skip. For more detailed information,
refer to “Setting up the Wired or Wireless Network” in the e-Manual for set up requirements and
instructions, and the Network Connection section of this manual (p. 18). You can set up the
network connection later using the Network menu.
Select Next to upgrade TV software. Your TV will automatically upgrade, if your TV need a software
upgrade. If you want to upgrade later, select the Skip. For more information, refer to Software
Upgrade (Preference Features → Support Menu) in the e-Manual.
This may take some time, depending on network status.
✎
English - 11
Page 12

Select Country.
5
(Depending on the country)
Select the appropriate country.
After selecting the country in the Country menu, some models may proceed with an
✎
additional option to setup the pin number.
Auto Tuning (1): Selecting how
6
you watch your TV
Auto Tuning (2):
7
Selecting a search options and
Region Selection (Depending
on the country)
Clock: Setting the Clock Mode • Auto: Set the current time automatically.
8
Time Zone
9
(Depending on the country):
Setting the your Time Zone
Voice and motion control:
10
Setting the Voice and Motion
Control function.
Setup Complete Select Close to finish.
11
Let’s find and store channels on your TV. Do you need to search for channels?
• Yes, I need to.: All the channels available will be found and stored on your TV.
• No, I don’t need to.: My set-top box provides all the channels that are available, so I don't
need to search for channels.
Select the channel source to memorise. When setting the aerial source to Cable, a step appears
allowing you to assign numerical values (channel frequencies) to the channels. For more information,
refer to Auto Tuning (Channel Menu → Memorizing Channels) in the e-Manual.
When Air or Cable is selected first: After all Air or Cable channels are stored, the step for
✎
storing Satellite channels is displayed.
When Satellite is selected first: After all Satellite channels are stored, the step for storing
✎
Air or Cable channels is displayed.
Select Stop at any time to interrupt the memorization process.
✎
• Manual: Allows you to manually set the current date and time.
This step is only available when the clock mode is set to Auto.
• Auto: Set the time zone automatically.
• Manual: Set the time zone manually.
If you selected Manual, you can select whether to turn DST (Daylight Savings Time) On or
✎
Off. (Depending on the country)
You can turn the Voice and motion control function On or Off. Select Off or On, and then
✎
select Next. For more detailed information, refer to “SMART Interaction” (p.14)
The completed settings are displayed.
✎
If You Want to Reset This Feature...
Menu → System →Setup
Select System - Setup (Initial Setup). Enter your 4 digit PIN number. The default PIN number is “0-0-0-0”. If you want to change the PIN number, use
the Change PIN function.
You should do Setup (Menu → System) again at home although you did in shop.
If you forget the PIN code, press the remote control buttons in the following sequence in Standby mode, which resets the PIN to “0-0-0-0”:
✎
MUTE → 8 → 2 → 4 → POWER (on).
English - 12
Page 13

Connections
For more information, refer to Connecting the TV in the e-Manual.
✎
DVD home theatre connection
OPTICAL
HDMI Cable
(Not Supplied)
PC connection
HDMI OUT
HDMI connection
BD Player
HDMI OUT
HDMI to DVI connection
BD Player
DVI OUT
AUDIO OUT
R-AUDIO-L
Headphones connection
Not Supplied
HDMI Cable
(Not Supplied)
HDMI Cable
(Not Supplied)
AUDIO Cable
(Not Supplied)
Optical Cable
(Not Supplied)
Scart Adapter
(Supplied)
Scart Cable
(Not Supplied)
SERVICE: Connector for service only.
Component Cable
(Not Supplied)
Audio Cable
(Not Supplied)
HDMI to DVI Cable
(Not Supplied)
Audio Cable
(Not Supplied)
R
Audio Cable
(Not Supplied)
W
TV Rear
R
B
DVI OUT
AUDIO OUT
Y
Video Cable
(Not Supplied)
Power Input
R
B
COMPONENT OUT
EXT
VCR or DVD
SCART connection
For best cable connection to this product, be sure to use cables with a maximum thickness as below:
✎
PRPBY
Component connection
Y
BD Player
R
AUDIO OUT
R-AUDIO-L
W
R
AUDIO OUT
R-AUDIO-L
• Maximum thickness - 0.55 inches (14mm)
English - 13
W
VIDEO OUT
BD Player
AV connection
Y
Page 14

Changing the Input Source
Using this function, you can access and control menu options and
Source
™
→ Source
When you are watching TV and you want to watch a movie on your
DVD player or Blu-ray player or switch to your cable box or STB satellite
receiver, you need to change the Source.
■ TV / Ext. / HDMI1/DVI / HDMI2 / HDMI3 / AV / Component
1. Press the
2. Select Source. The Source screen appears.
3. Select a desired external input source.
✎
✎
How to Use Edit Name
Edit Name lets you associate a device name to an input source. To
access Edit Name, open the Tools menu when the Source list is
displayed. The following selections appear under Edit Name:
■ VCR / DVD / Cable STB / Satellite STB / PVR STB / AV
✎
✎
✎
Information
You can see detailed information about the selected external device.
Refresh
If the external devices are not displayed in the Source list, open the
Tools menu, and then select Refresh. The list will display all connected
devices.
✎
✎
™
appears.
Alternatively, you can access the Source screen by selecting the
Source s button on your standard remote or selecting Source
with the Smart Touch Control (see page 6).
You can only choose external devices that are connected to the
TV. In the displayed Source list, connected inputs are highlighted.
Receiver / Game / Camcorder / PC / DVI PC / DVI Devices /
TV / IPTV / Blu-ray / HD DVD / DMA: Select an input jack, and
then select the name of the device connected to that jack from
the list that appears. For example, if you have your Blu-ray player
attached to HDMI IN 2, select Blu-ray for that input.
If you connect a PC to the HDMI IN 1 (DVI) port with an HDMI
cable, assign PC to HDMI1/DVI in Edit Name.
If you connect a PC to the HDMI IN 1 (DVI) port with an HDMI to
DVI cable, assign DVI PC to HDMI1/DVI in Edit Name.
If you connect an AV device to the HDMI IN 1 (DVI) port with an
HDMI to DVI cable, assign DVI Devices to HDMI1/DVI in Edit
Name.
Alternatively, you can refresh the Source list screen by selecting
a
Refresh button/function only available if Anynet+ (HDMI-CEC)
function is set to On.
button on your remote. The Smart Hub screen
using your remote.
functions using speech, gestures or face recognition.
INFORMATION BOOKLET DISCLAIMER
• Face Recognition Log-in
In order for Face recognition to function, a thumbnail image of your
face will be stored in your TV for logging-in purposes.
Logging into the Smart Hub using Face recognition may be less
secure than using an ID and password.
• TV Camera Usage
Before using the TV Camera, you should be aware that under some
circumstances and under certain legal conditions your misuse of
the TV Camera can result in legal liability for you. By using the TV
Camera, you agree that you will not use the camera (i) in locations
where cameras are generally prohibited (such as bathrooms, locker
rooms or changing rooms), (ii) in any manner that will result in an
invasion of a person’s privacy or (iii) in violation of any applicable
laws, regulations or statutes.
Voice Control
Menu → System → Voice and motion control → Voice Control
Enable or disable the voice recognition function. Lets you access and
control menu options and functions using speech.
Voice Control function can be affected recognition by unclear
✎
pronunciation, voice level, or surrounding noise.
To use Voice Control, you must pronounce words and phrases
✎
clearly and correctly in the language you selected in Language.
Ambient noise may cause Voice Control to malfunction.
✎
Your TV can "hear" your voice commands in two ways:
− Using the TV’s microphone. (Distant Recognition)
We are recommended using Voice Control function within about
✎
13 ft with your TV. You can check the usable distance by using
Voice Control Environment Test (System → Voice and motion
control → Voice Control → Voice Control Environment Test).
− Using the VOICE
Recognition)
When you use the TV's microphone, the words may not be
✎
recognized because of ambient noise. If this occurs, try using the
VOICE˜ button on your remote. The T V will be able to recognize
a voice command more easily.
The VOICE˜ button on your remote is always activated. If you
✎
want to use the TV's microphone, turn on Voice Control (System
→ Voice and motion control → Voice Control).
If a menu option or function is not supported by the Voice
✎
Control function, we suggest trying the Motion control function.
To use gestures, spread your hand in the direction of the camera,
and shake it three or four times from a side to side.
■ Voice Control
Turns the Voice Control function on or off.
✎
■ Language
Select the recognition language you want to use.
SMART Interaction
˜
button on your remote. (Close Proximity
The VOICE˜ button on your remote is always activated.
English - 14
Page 15

■ Trigger words
You can select the Trigger words that start the Voice Control
function. Alternatively you can turn on your TV using the Trigger
words if Voice Control function is set to On.
If the Trigger words is set to Hi TV, say Hi TV Power On.
■ Voice command bar size
Set the Voice command bar size mode to Minimum or Full.
Minimum displays the least number of words and phrases you
can use.
Full displays all the words and phrases.
■ Voice Sensitivity
Set the sensitivity of Voice recognition.
− Howling: Set echo level.
− Recognition responsiveness: Set the responsiveness level
of Voice recognition.
■ Voice Control Environment Test
You can test the noise level on the TV microphone.
− Noise Test: This test checks the noise level of the TV
microphone. Select Next using your remote. The test will start
and should only take a few seconds. Please keep as quiet as
possible during the test.
− Mic & Speaker Test: This test checks the noise level of the
TV microphone and speaker. Select Start using your remote.
The test will start and should only take a few seconds. Please
keep as quiet as possible during the test.
Available only when Speaker Select is set to TV
✎
Speaker.
− Voice Control Test: This test checks the volume level and
clarity of your voice when using Voice Control. Select Start
using your remote. The test will start. Please say a guide
message as loud and clearly as you can to complete this test.
If the test is not completed, select Retest, and then say
✎
a guide message loudly and clearly again.
To use the Voice Control function, follow these steps:
If Voice Control function is set to On, the TV may be turned on
✎
automatically by effect of the ambient environment.
1. Speak the Trigger words that you selected using the microphone
embedded in the TV or press and hold the VOICE
your remote. The TV displays the Voice Control Environment
Test.
If you use the Voice Control, the volume will be set to 5
✎
automatically.
2. Speak a word or phrase listed in the Voice Control Environment
Test. If you use the VOICE
button.
Pronounce the word or phrase clearly and correctly in the
✎
language you selected in Language.
3. Wait until recognition is complete, and then speak the next
command.
To exit the Voice Control mode, speak a Trigger words or
✎
"Cancel" using the TV's microphone, or press the VOICE
button on your remote again.
Using the Voice Text Input Mode
1. Speak "Search All" while in the Voice Control mode.
When you use a QWERTY keypad screen, you can use the
✎
Voice Text Input Mode. Speak the Trigger words that you
selected using the microphone embedded in the TV or press
and hold the VOICE˜ button on your remote.
2. Say the word or phrase you wish to search for.
˜
button on your remote, release the
˜
button on
˜
3. The TV executes the spoken function.
Voice Control performance levels will vary based on the
✎
language spoken.
Motion control
Menu → System → Voice and motion control → Motion control
Enable or disable the Motion control function. Lets you control your TV
by moving the TV cursor using specific gestures.
Some applications may not support Motion control.
✎
We are recommended using Motion control function within
✎
about 5 - 13 ft with your TV. TV Camera's recognition range may
differ depending on the angle of camera or other conditions. You
can check the recognition range of TV camera by using Motion
control environment test (System → Voice and motion control
→ Motion control → Motion control environment test).
■ Motion control
Turns the Motion control function on or off.
■ Motion guide bar size
Set the Motion guide bar size mode between Minimum or Full.
■ Motion control environment test
You can test the brightness of room and the camera angle.
− Brightness Test: This test checks to see if your room is bright
enough for Motion control to work properly. Select Start
using your remote. The test will start and should take only a
few seconds.
− Camera Angle Test: Start Camera Angle Test Select Start
using your remote. Please put yourself in the rectangle on
the screen by adjusting the camera or moving around. If you
are not located in the correct position, the test may not work
properly. When done, please spread your hand in the direction
of the camera, and shake it three or four times from a side
to side.
To use the Motion control function, follow these steps:
1. To use the Motion control, raise your hand while opening it toward
the screen, hold it for a moment and then wave it 3 – 4 time to the
left and right. Motion control starts. If the Motion control starts,
the cursor is displayed at the center of the screen and the Motion
guide bar size is at the bottom of the screen.
2. Control the TV using your hands.
Note that the Motion control function closes if your hands go out
✎
of the camera range.
While using the Motion control, if you use the other device (i.e.
✎
remote control, keyboard, etc.), Motion control closes.
Controlling the TV with your hands using gestures
■ Access Gesture Control
− Action: Spread your hand in the direction of the camera, and
shake it three or four times from a side to side.
■ Pointing Navigation
Moves the cursor to the position you want.
− Action: Spread your hand and guide the cursor to position
you want.
■ Run
Selects an item or executes a command that is indicated by the
cursor or is highlighted.
− Action: Clench your fist.
English - 15
Page 16

■ Back
Return to the previous menu.
− Action: Spread your hand and rotate it counter clockwise.
■ Channel / Volume Control
Changes the channel or adjust the volume.
If you use the Motion control function while watching a
✎
channel, the channel / volume control screen appears.
− Action: Use the Pointing Navigation gesture to move the
cursor to the channel or volume controller, and then uses the
Run gesture to adjust the channel or volume.
If you use the Run gesture once, it has the same effect
✎
as pressing a button on your remote. If you hold the
Run gesture, it has the same effect as pressing and
holding a button on your remote.
■ Scroll
Scroll the page in the direction you want. For example, suppose
that you want to scroll down.
Some applications may not support this function.
✎
1. Move the cursor to the bottom of the screen (page scroll zone)
using the Pointing Navigation gesture.
2. Move the cursor to the centre of the screen using the
Pointing Navigation gesture.
3. The page will move down.
To log in to your Samsung account using Face recognition, follow
these steps:
If you use Face recognition to log into Smart Hub, it may be less
secure than logging in with a password.
1. With the Smart Hub screen displayed, select
2. Select Face Recognition Mode. The Face recognition screen
3. The TV starts Face recognition. Face the front of the TV screen.
4. The TV logs you into your Samsung account automatically.
Face recognition
™
→ Tools → Settings → Account Manager → Change account
information → Register face
Enable or disable the Face recognition function. Lets you register your
face in your Samsung account. Also, you can log in to the Samsung
account using the Face recognition function without inputting your
account ID or your account password.
You can register your face in only one account.
✎
a
remote. The ID/password screen appears.
appears.
To return to the ID/password screen, select Password
✎
mode.
The TV will recognize your face automatically.
If the TV fails to recognize your face, try again.
✎
If the TV recognizes two or more registered faces, the
✎
Samsung account list appears. Select your account to log in.
If your face is unregistered, you can register your face in
✎
your Samsung account. Follow steps 4 through 5 in the “To
register your face to your Samsung account” procedure
above.
If you have no account, you can create one. For more
✎
detailed information, refer to “Creating an Account”
(Advanced Features → Smart Hub) in the e-Manual.
using your
To register your face in your Samsung account, follow these steps:
To use this function, you must log into Smart Hub. If you don't
✎
have a Samsung Account, you should create one before using
this function. To create your Samsung Account, refer to “Creating
an Account” (Advanced Features → Smart Hub) in the e-Manual.
1. On the Smart Hub screen, open the Tools menu using your
remote, and then select Settings.
2. Select Account Manager. The Account Manager screen appears.
3. Select Change account information. The Change account
information screen appears.
4. Select Register face. If you agree to use facial recognition, select
OK.
5. Enter your account password.
6. Move your face into the facial lines at the centre of the screen, and
then wait until the facial lines changes from red to green.
If Face recognition fails, select Retry and try again.
✎
7. When finished, your face is now registered in your Samsung
account.
English - 16
Page 17

Connecting to a COMMON INTERFACE slot (Your TV viewing Card Slot)
Attaching the CI Card Adapter
Attach the adapter as shown below.
To connect the CI CARD Adapter, follow these steps.
We recommend attaching the adapter before installing the wall mount, or
✎
inserting the “CI or CI+ CARD”.
To install the CI card adapter, please remove the sticker attached to the TV.
✎
1. Insert the CI CARD Adapter into the two holes on the product 1.
Please find a two holes on the rear of the TV. A two holes is beside
✎
the COMMON INTERFACE port.
2. Connect the CI CARD Adapter into the COMMON INTERFACE port on the
product 2.
3. Insert the “CI or CI+ CARD”.
We recommend that you insert the CI card before you mount the TV on a wall. It may be difficult to insert after the mounting. Insert
the card after attaching the CI Card Adapter on TV. It is difficult to attach the module if you insert the card before attaching.
Using the “CI or CI+ CARD”
To watch paid channels, the “CI or CI+ CARD” must be inserted.
• If you don’t insert the “CI or CI+ CARD”, some channels will display the message
“Scrambled Signal”.
• The pairing information containing a telephone number, the “CI or CI+ CARD” ID the Host
ID and other information will be displayed in about 2~3 minutes. If an error message is
displayed, please contact your service provider.
• When the configuration of channel information has finished, the message “Updating
Completed” is displayed, indicating the channel list is updated.
NOTE
✎
• You must obtain a “CI or CI+ CARD” from a local cable service provider.
• When removing the “CI or CI+ CARD”, carefully pull it out with your hands since
dropping the “CI or CI+ CARD” may cause damage to it.
• Insert the “CI or CI+ CARD” in the direction marked on the card.
• The location of the COMMON INTERFACE slot may be different depending on the model.
• “CI or CI+ CARD” is not supported in some countries and regions; check with your authorized dealer.
• If you have any problems, please contact a service provider.
• Insert the “CI or CI+ CARD” that supports the current aerial settings. The screen will be distorted or will not be seen.
To install the CI card adapter, please
remove the sticker attached to the TV.
TV Rear
The Evolution Kit Slot (Kit Sold Separately)
TV Rear
This socket is designed to accept an extension device called Evolution Kit. The Evolution Kit enables the TV to run a variety of the latest applications
for a better user experience.
The Evolution Kit, which may not be available depending on the product, will be sold separately in 2013 or later.
English - 17
Page 18
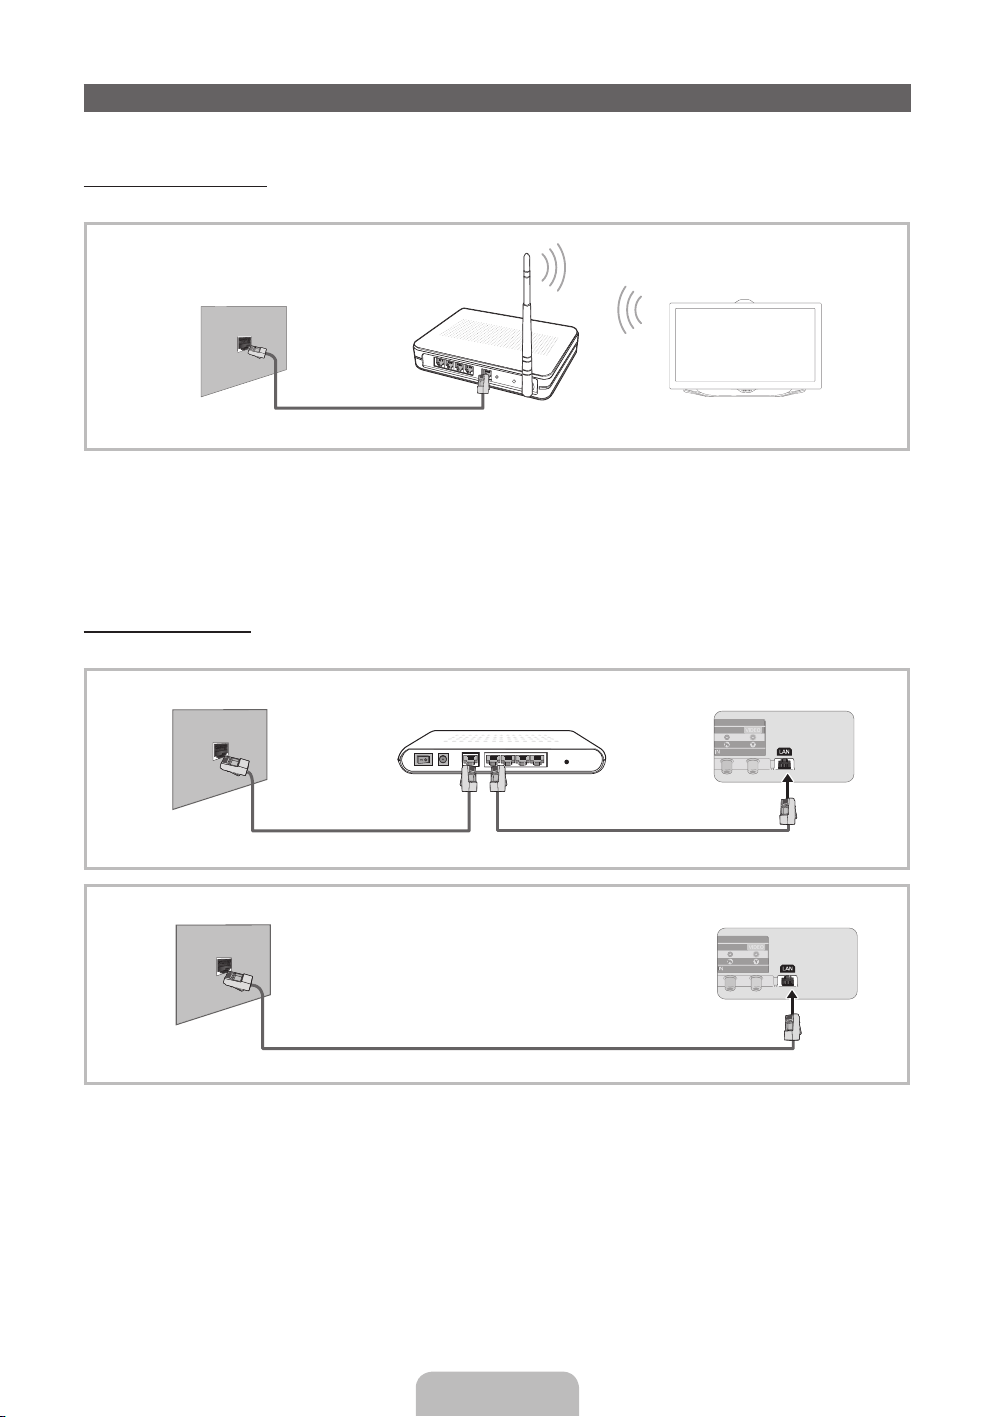
Network Connection
You can set up your TV so that it can access the SMART TV applications. through your local area network (LAN) using a wired or wireless connection.
Network Connection - Wireless
You can connect your TV to your LAN through a standard wireless router or modem.
The LAN Port on
the Wall
Wireless IP sharer
(Router having DHCP server)
LAN Cable
TV
Samsung’s Wireless LAN adapter supports the IEEE 802.11a/b/g and n communication protocols. Samsung recommends using IEEE 802.11n. When
you play the video over a IEEE 802.11b/g connection, the video may not play smoothly.
Most wireless network systems incorporate a security system that requires devices that access the network through an access point or wireless router
(typically a wireless IP Sharer) to transmit an encrypted security code called an access key.
If Pure High-throughput (Greenfield) 802.11n mode is selected and the Encryption type is set to WEP, TKIP or TKIP AES (WPS2Mixed) for your wireless
router, Samsung TVs will not support a connection in compliance with new Wi-Fi certification specifications.
Network Connection - Wired
There are two main ways to connect your TV to your network using cable, depending on your network setup. They are illustrated below:
The Modem Port on the Wall
External Modem
(ADSL / VDSL / Cable TV)
TV Rear Panel
The LAN Port on the Wall
LAN Cable
The TV does not support network speeds less than or equal to 10Mbps.
✎
Use Cat 5 or 6 (STP Type*) cable for the connection. (*Shielded Twisted Pair)
✎
English - 18
LAN CableModem Cable
TV Rear Panel
Page 19

How to view the e-Manual
You can fi nd instructions for your TV’s features in the e-Manual. To open the e-Manual, press the SUPPORT button on your standard remote or
select Support using the Smart Touch Control.
You can also access it through the menu:
Menu → Support → e-Manual
Access the e-Manual
To use the e-Manual, follow these steps:
1. When you need help, select Support using your remote. The Support screen appears.
2. Select e-Manual using your remote. The e-Manual screen appears.
3. Select a desired category.
4. Select a desired topic. The e-Manual displays the page you want to see.
Blue words in e-Manual refer to menu options or selections in the TV's on screen menu.
✎
Green icons in the e-Manual refers to a button on your remote.
✎
Arrow steps (e.g. Menu → Support → e-Manual) in the e-Manual signify the sequence of steps required to access an option or activate a
✎
function.
How to toggle between an e-Manual topic and the corresponding OSD menu(s).
Changing the Preset Picture Mode
Picture
Picture Mode
Back Light
Contrast
Brightness
Sharpness
Colour
Tint (G/R) G50
This function is not enabled in some menus.
✎
You can’t use the Try n o w function if the menu is not available.
✎
1. To go to the topic's corresponding menu option, select
Changing the Preset Picture Mode
Picture Mode
Menu → Picture → Picture Mode
Picture modes apply preset adjustments to the picture.
N When connecting a PC using the HDMI-DVI cable, you can only
select Entertain and Standard.
• Dynamic
Suitable for a bright room.
• Standard
Suitable for a normal environment.
a
using your remote.
2. To return to the e-Manual screen, select Support using your remote.
Picture
Picture Mode
Back Light
Contrast
Brightness
Sharpness
Colour
Tint (G/R)
Changing the Preset Picture Mode
Changing the Preset Picture Mode
Picture Mode
Menu → Picture → Picture Mode
Picture modes apply preset adjustments to the picture.
N When connecting a PC using the HDMI-DVI cable, you can only
select Entertain and Standard.
• Dynamic
Suitable for a bright room.
• Standard
Suitable for a normal environment.
Using the coloured and function buttons with the e-Manual
• Scroll bar: Scroll the e-Manual screen up or down.
l / r
: Moves to the previous or next chapter.
•
•
a
Try now: Move the OSD menu that corresponds to the topic. To return to the e-Manual screen, select Support using your remote.
•
b
Home: Moves to the e-Manual home screen.
•
{
Position: Each time you select {, using your remote, you change the position of the e-Manual screen.
•
}
Index: Displays the Index screen.
•
R
Return: Return to the previous screen.
How to search for a topic on the index page
1. Select
}
using your remote. The Index screen appears.
2. To search for a topic, select a letter. The Index displays a list of topics and keywords that begin with the letter you selected.
3. Select a topic or keyword you want.
4. The e-Manual page with the topic appears.
To close the Index screen, press the RETURNR button.
✎
English - 19
Page 20

To Change the screen position of the e-Manual
If the e-Manual screen is not invisible well because the OSD Menus screen, you can change the e-Manual screen's position.
1. Move the Highlight to the e-Manual screen by pressing the SUPPORT button on your standard remote or select Support using the Smart Touch
Control.
{
2. Press the
button on your standard remote, or select { using the Smart Touch Control. Each time you select { using your remote, the
position of the e-Manual will change.
Installing the Wall Mount
Installing the Wall Mount Kit
The wall mount kit (sold separately) allows you to mount the TV on the wall.
For detailed information on installing the wall mount, see the instructions provided with the wall mount. Contact a technician for assistance when
installing the wall mount bracket. We do not advice you to do it yourself.
Samsung Electronics is not responsible for any damage to the product or injury to yourself or others if you elect to install the TV on your own.
Preparing before installing Wall-Mount
Case A. Installing the SAMSUNG Wall-Mount Case B. Installing another company’s Wall-Mount
1
To install a wall-mount, use the Holder-Ring 1.
1
Wall Mount Kit Specifi cations (VESA)
The wall mount kit is not supplied, but sold separately.
✎
Install your wall mount on a solid wall perpendicular to the floor. When attaching to other building materials, please contact your nearest dealer.
✎
If installed on a ceiling or slanted wall, it may fall and result in severe personal injury.
NOTE
✎
• Standard dimensions for wall mount kits are shown in the table below.
• When purchasing our wall mount kit, a detailed installation manual and all parts necessary for assembly are provided.
• Do not use screws that do not comply with the VESA standard screw specifi cations.
• Do not use screws that are longer than the standard dimension or do not comply with the VESA standard screw specifi cations. Screws that
are too long may cause damage to the inside of the TV set.
• For wall mounts that do not comply with the VESA standard screw specifi cations, the length of the screws may differ depending on the wall
mount specifi cations.
• Do not fasten the screws that are too strongly; this may damage the product or cause the product to fall, leading to personal injury.
Samsung is not liable for these kinds of accidents.
• Samsung is not liable for product damage or personal injury when a non-VESA or non-specifi ed wall mount is used or the consumer fails to
follow the product installation instructions.
• Do not mount the TV at more than a 15 degree tilt.
• Always have two people mount the TV on a wall.
Product Family inches VESA Spec. (A * B) Standard Screw Quantity
40 200 X 200
LED-TV
46~60 400 X 400
Unscrew the hole around before installing Wall-Mount on the wall.
✎
Do not install your Wall Mount Kit while your TV is turned on. It may result in personal injury due to electric shock.
English - 20
M8 4
Page 21

Storage and Maintenance
If you attached some stickers on the TV screen, it remains some debris after removing the sticker. Please clean it to watch TV.
✎
Do not spray water directly onto the product. Any liquid that goes into
the product may cause a failure, fi re, or electric shock.
Clean the product with a soft cloth dapped in a small amount of water.
Do not use a fl ammable liquid (e.g. benzene, thinners) or a cleaning
agent.
Securing the TV to the Wall
Caution: Pulling, pushing, or climbing on the TV may cause the TV to fall. In particular, ensure your
children do not hang over or destabilize the TV. Doing so may cause the TV to tip over, causing
serious injuries or death. Follow all safety precautions provided in the included Safety Flyer with
your TV. For added stability and safety, you can purchase and install the anti fall device as described
below.
To Avoid the TV from Falling
1. Put the screws into the clamps and fi rmly fasten them onto the wall. Confi rm that the screws have
been fi rmly installed onto the wall.
You may need additional material such as an anchor depending on the type of wall.
✎
Since the necessary clamps, screws, and string are not supplied, please purchase these
✎
additionally.
2. Remove the screws from the back centre of the TV, put the screws into the clamps, and then
fasten the screws onto the TV again.
Screws may not be supplied with the product. In this case, please purchase the screws of
✎
the following specifications.
Screw Specifications
✎
• For a 19 ~ 27 inch: M4
• For a 32 ~ 75 inch: M8
3. Connect the clamps fi xed onto the TV and the clamps fi xed onto the wall with a strong cable and
then tie the string tightly.
NOTE
✎
• Install the TV near to the wall so that it does not fall backwards.
• It is safe to connect the string so that the clamps fi xed on the wall are equal to or lower
than the clamps fi xed on the TV.
• Untie the string before moving the TV.
4. Verify all connections are properly secured. Periodically check connections for any sign of fatigue for failure. If you have any doubt about the
security of your connections, contact a professional installer.
English - 21
Page 22
Troubleshooting
If you have any questions about the TV, first refer to this list. If none of these troubleshooting tips apply, please visit “www.samsung.com,” then click on
Support, or contact the call centre listed on the back-cover of this manual.
Issues Solutions and Explanations
The TV won’t turn on. • Make sure the AC power cord is securely plugged in to the wall outlet and the TV.
There is no picture/video. • Check cable connections (remove and reconnect all cables connected to the TV and external
The remote control does not work. • Replace the remote control batteries with the poles (+/–) in the right direction.
The cable/set top box remote control
doesn’t turn the TV on or off, or adjust the
volume.
Some of above pictures and functions are available at specific models only.
✎
You can keep your TV as optimum condition to upgrade the latest firmware on web site (samsung.com → Support → Downloads) by USB.
✎
• Make sure the wall outlet is working.
• Try pressing the POWER button on the TV to make sure the problem is not the remote. If the TV turns
on, refer to “Remote control does not work” below.
devices).
• Set your external device’s (Cable/Sat Box, DVD, Blu-ray etc) video outputs to match the connections
to the TV input. For example, if an external device’s output is HDMI, it should be connected to an
HDMI input on the TV.
• Make sure your connected devices are powered on.
• Reboot the connected device by reconnecting the device’s power cable.
• Clean the sensor’s transmission window on the remote.
• Try pointing the remote directly at the TV from 5~6 feet away.
• Programme the Cable/Set remote control to operate the TV. Refer to the Cable/Set user manual for
the SAMSUNG TV code.
Display Resolution
Mode Resolution
IBM
MAC
VESA DMT
NOTE
✎
640 x 350
720 x 400
640 x 480
832 x 624
1152 x 870
640 x 480
640 x 480
640 x 480
800 x 600
800 x 600
800 x 600
1024 x 768
1024 x 768
1024 x 768
1152 x 864
1280 x 720
1280 x 800
1280 x 1024
1280 x 1024
1366 x 768
1440 x 900
1600 x900RB
1680 x 1050
1920 x 1080
Horizontal Frequency
(KHz)
31.469
31.469
35.000
49.726
68.681
31.469
37.861
37.500
37.879
48.077
46.875
48.363
56.476
60.023
67.500
45.000
49.702
63.981
79.976
47.712
55.935
60.000
65.290
67.500
Vertical Frequency
(Hz)
70.086
70.087
66.667
74.551
75.062
59.940
72.809
75.000
60.317
72.188
75.000
60.004
70.069
75.029
75.000
60.000
59.810
60.020
75.025
59.790
59.887
60.000
59.954
60.000
• The interlace mode is not supported.
• The set might operate abnormally if a non-standard video format is selected.
Pixel Clock Frequency
(MHz)
25.175
28.322
30.240
57.284
100.000
25.175
31.500
31.500
40.000
50.000
49.500
65.000
75.000
78.750
108.000
74.250
83.500
108.000
135.000
85.500
106.500
108.000
146.250
148.500
Sync Polarity
(H / V)
+/-
-/+
-/-
-/-
-/-
-/-
-/-
-/+/+
+/+
+/+
-/-
-/+/+
+/+
+/+
-/+
+/+
+/+
+/+
-/+
+/+
-/+
+/+
English - 22
Page 23

Specifications
Display Resolution 1920 x 1080
Environmental Considerations
Operating Temperature
Operating Humidity
Storage Temperature
Storage Humidity
TV System Analogue: B/G, D/K, L, I (Depending on your country selection)
Colour/Video System Analogue: PAL, SECAM, NTSC-4.43, NTSC-3.58, PAL60
Sound System BG, DK, L, NICAM, MPEG1, DD, DD+, HEAAC.
HDMI IN Video: 1080 24p, 1080p, 1080i, 720p, 576p, 480p
Stand Swivel (Left / Right) 0˚
Model Name UE40ES8000S UE46ES8000S UE55ES8000S
Screen Size 40 inches 46 inches 55 inches
Sound
(Output) 10 W X 2
Dimensions (WxHxD)
Body
With stand
Weight
Without Stand
With Stand
906.3 x 540.1 x 30.8 mm
906.3 x 571.3 x 176 mm
Digital: MPEG-2 MP@ML, MPEG-4, H.264/AVC MP@L3, MP@L4.0, HP@L4.0
Audio: 2Ch Linear PCM 32/44.1/48kHz, 16/20/24bits.
9.55 kg
11.8 kg
10°C to 40°C (50°F to 104°F)
10% to 80%, non-condensing
-20°C to 45°C (-4°F to 113°F)
5% to 95%, non-condensing
Digital: DVB-T/DVB-C/DVB-S2
1038.7 x 614.7 x 30.8 mm
1038.7 x 653.7 x 210 mm
11.98 kg
14.6 kg
1230.3 x 722.3 x 30.8 mm
1230.3 x 761.6 x 210 mm
16.6 kg
19.3 kg
Smart Touch Control
Model Name RMCTPE1
Power Source
Input
Output
Features
MBR
Voice
Bluetooth
Setup
Operating
Compatibility
Dimension Set (mm) 154x52x19.5
Weight
Button 14 Keys
Touch Pad Capacitive Touch Sensor (45mmx55mm)
Indicator Device Indicator LED x 3
IR Infrared Emitting Diode x 1
Touch Control Absolute Coordinate
MBR Universal Control
Voice Voice Transfer via Bluetooth
Bluetooth Bluetooth 2.1 Supported
MBR Database Coverage Global
Supported Device Mode 3 Mode (TV, STB, BD)
Maximum Working Distance 12m
Voice Transfer Bluetooth HID protocol
Supported Audio Data Rate 16KHz, 16bit
Suggested Sound Level -15.5dB (from 0dB Full-scale)
RF 2.4GHz, CSM Band
Pairing Method IR Triggered Standard Pairing
Maximum Pairing Distance 4m (Line of Sight, Targeting IR Receiver on TV)
Maximum Working Distance 10m (Line of Sight)
Pairing with TV Yes
Programming MBR TV Widget needed
Operating Temperature 32°F to 104°F (0°C to 40°C)
Working Distance IR : Normal 10m, Max 12m / BT : 10m
Working Hours 3 month (200 times button pressed / day)
LED TV Above LED E7500
PDP TV E8000
Set (without Batteries)(g) 119
Set (Including Batteries)(g) 165
Accessory Batteries (AAx2)
Battery (AA x 2)
To extend the battery life, use of alkaline battery is recommended
English - 23
Page 24
IR Blaster
Model Name VG-IRB2000
Power Source
Input Button 2 Keys (Pairing, Power on/off)
Output
Features
MBR
Bluetooth
Setup
Operating
Compatibility
Dimension Set (mm) W95×D79×H65
(WxDxH) Package (mm) W88×D71×H102
Weight
Design and specifications are subject to change without prior notice.
✎
For information about power supply, and more about power consumption, refer to the label attached to the product.
✎
Indicator Indicator LED x 1
IR Infrared Emitting Diode x 5
MBR Universal Control
Bluetooth Bluetooth 2.1 Supported
MBR Database Coverage Global
Supported Device Mode 3 Mode (TV, STB, BD)
Maximum Working Distance 8m
RF 2.4GHz, CSM Band
Pairing Method IR Triggered Standard Pairing
Maximum Pairing Distance 4m (Line of Sight, Targeting IR Receiver on TV)
Maximum Working Distance 10m (Line of Sight)
Pairing with TV Yes
Programming MBR TV Widget needed
Operating Temperature 32°F to 104°F (0°C to 40°C)
Working Distance IR : Normal 10m, Max 12m / BT : 10m
Working Angle 360 degree
Working Hours 3 month (200 times button pressed / day)
LED TV Above LED E7500
PDP TV E8000
Set (without Batteries)(g) 86.5
Set (Including Batteries)(g) 178.5
Package(g) 30.6
Accessory Batteries (AAx4)
Battery (AA x 4)
To extend the battery life, use of alkaline battery is recommended
Recommendation - EU Only
• Hereby, Samsung Electronics, declares that this LED TV is in compliance with the essential requirements and other relevant provisions of Directive
1999/5/EC.
• The official Declaration of Conformity may be found at http://www.samsung.com, go to Support > Search Product Support and enter the model
name.
• This equipment may only be used indoors.
• This equipment may be operated in all EU countries.
Licence
English - 24
Page 25

Подробное руководство пользователя встроено в телевизор.
Для получения дополнительной информации о способе просмотра данного руководства e-Manual см. стр. 19.
Рисунки и иллюстрации в данном руководстве пользователя представлены только для справки. Они могут отличаться от реального
внешнего вида устройства. Конструкция и характеристики устройства могут быть изменены без предварительного уведомления.
Примечание относительно цифрового телевещания
1. Функции цифрового телевидения (DVB) доступны только в тех странах и регионах, где передаются цифровые наземные сигналы DVB-T
(MPEG2 и MPEG4 AVC) или где имеется доступ к совместимой услуге кабельного телевидения DVB-C (MPEG2 и MPEG4 AAC). Узнайте у
местного дилера о возможности приема сигнала DVB-T или DVB-C.
2. DVB-T – это стандарт цифрового наземного телевещания, принятый консорциумом европейских организаций DVB, а DVB-C – это
стандарт цифрового кабельного телевидения. Однако некоторые дифференцированные функции, такие как EPG (Electric Programme
Guide), VOD (Video on Demand) и другие, не входят в эту спецификацию. Поэтому в настоящее время они не работают.
3. Несмотря на то, что данный телевизор поддерживает последние стандарты DVB-T и DVB-C [с августа 2008 года], компания не гарантирует
совместимость с последующими стандартами цифрового наземного телевещания DVB-T и цифрового кабельного вещания DVB-C.
4. В зависимости от того, в какой стране или регионе используется телевизор, некоторые поставщики услуг кабельного телевидения могут
взимать отдельную плату за данную услугу. При этом пользователю необходимо будет принять условия предоставления услуги.
5. Некоторые функции цифрового ТВ могут быть недоступны в отдельных странах или регионах, кроме того, не все поставщики услуг
кабельного телевидения могут обеспечить правильную работу DVB-C.
6. Для получения более подробной информации обратитесь в местный центр по обслуживанию клиентов Samsung.
Качество приема телепрограмм может варьироваться в разных странах в зависимости от способа телевещания. Чтобы узнать,
✎
можно ли повысить качество приема с помощью настроек телевизора, обратитесь к местному официальному дилеру SAMSUNG
или в Центр обслуживания к лиентов Samsung.
Предупреждение относительно неподвижных изображений
Старайтесь избегать длительного воспроизведения на экране неподвижных изображений, например файлов jpeg, или неподвижных объектов,
например логотипов телепрограмм, полей при панорамном воспроизведении или воспроизведении в формате 4:3, биржевой или новостной
ленты внизу. Это может привести к раздвоению изображения на светодиодном экране и, соответственно, к снижению качества изображения.
Чтобы избежать преждевременного износа, выполняйте следующие рекомендации.
• Старайтесь не смотреть очень долго один и тот же телевизионный канал.
• Отдавайте предпочтение полноэкранному режиму. Используйте меню настройки формата изображения на телевизоре для выбора
оптимального соответствия размеру экрана.
• Установите минимальные приемлемые значения яркости и контрастности. Чем выше значения этих параметров, тем быстрее идет
процесс выгорания экрана.
• Постоянно используйте функции, призванные сократить эффект остаточного изображения и выгорания экрана. Подробнее см.
соответствующий раздел электронного руководства.
Русский - 2
Page 26

Обеспечение соответствующей вентиляции для телевизора
При установке телевизора соблюдайте требуемое расстояние между телевизором и другими объектами (например, стенами, стенками
шкафов и т. д.) для обеспечения достаточной вентиляции. Оно должно составлять не менее 10 см. Несоблюдение правила обеспечения
надлежащей вентиляции может привести к возгоранию или поломке устройства из-за перегрева.
При установке телевизора на подставку или настенное крепление используйте только те детали, которые поставляются Samsung
✎
Electronics.
• При использовании деталей других производителей устройство может упасть и сломаться или нанести травму.
Установка на подставку Установка на настенное крепление
10 см
10 см10 см
Другие предупреждения
[
Реальный внешний вид телевизора может отличаться от его изображений в руководстве, поскольку зависит от модели.
✎
Соблюдайте осторожность, когда прикасаетесь к телевизору. Некоторые части могут нагреваться.
✎
Правильная утилизация данного изделия (утилизация электрического и электронного оборудования)
(действует во всех странах Европейского союза и других странах Европы, принявших систему разделения отходов)
Подобная маркировка на устройстве, принадлежностях или в руководстве предупреждает, что по истечении срока
службы устройство или электронные принадлежности (например, зарядное устройство, наушники, кабель USB) не следует
выбрасывать вместе с другим бытовым мусором. Чтобы избежать вредного воздействия на окружающую среду или
на здоровье человека от неконтролируемой утилизации отходов, следует отделять маркированные подобным образом
устройства от другого мусора для соответствующей переработки и повторного использования в качестве сырья. За
подробной информацией о месте и способе экологически безопасной утилизации бытовым потребителям следует
обращаться к продавцу данного устройства или в органы местного самоуправления. Промышленным потребителям
необходимо обратиться к поставщику, чтобы проверить сроки и условия договора купли-продажи. Подобные устройства и
электронные принадлежности не следует утилизировать вместе с другими производственными отходами.
Правильная утилизация батарей данного устройства
(действует во всех странах Европейского союза и других странах Европы, принявших систему отдельного возврата
батарей)
Подобная маркировка на батарее, руководстве или упаковке свидетельствует о том, что батареи данного устройства в
конце срока его использования нельзя утилизировать с другими бытовыми отходами. Символы химических элементов
Hg, Cd или Pb в маркировке указывают на то, что в батарее содержится ртуть, кадмий или свинец в концентрации,
превышающей уровни, установленные директивой EC 2006/66. В случае нарушения требований по утилизации эти вещества
могут нанести вред здоровью людей или окружающей среде. Для защиты природных ресурсов и в целях повторного
использования материалов не выбрасывайте батареи с другими бытовыми отходами, а утилизируйте их в соответствии с
правилами местной системы возврата батарей.
10 см
• Плата за обслуживание может взиматься в следующих случаях.
− а. Если вы вызовете специалиста, и он не обнаружит неисправности устройства
(это возможно, если вы не знакомы с настоящим руководством).
− б. Если вы передадите устройство в ремонтный центр, и его специалисты не обнаружат неисправности устройства
(это возможно, если вы не знакомы с настоящим руководством).
• Размер этой платы будет сообщен вам перед тем, как сотрудник компании выедет на место.
10 см
10 см
10 см
Русский - 3
Page 27
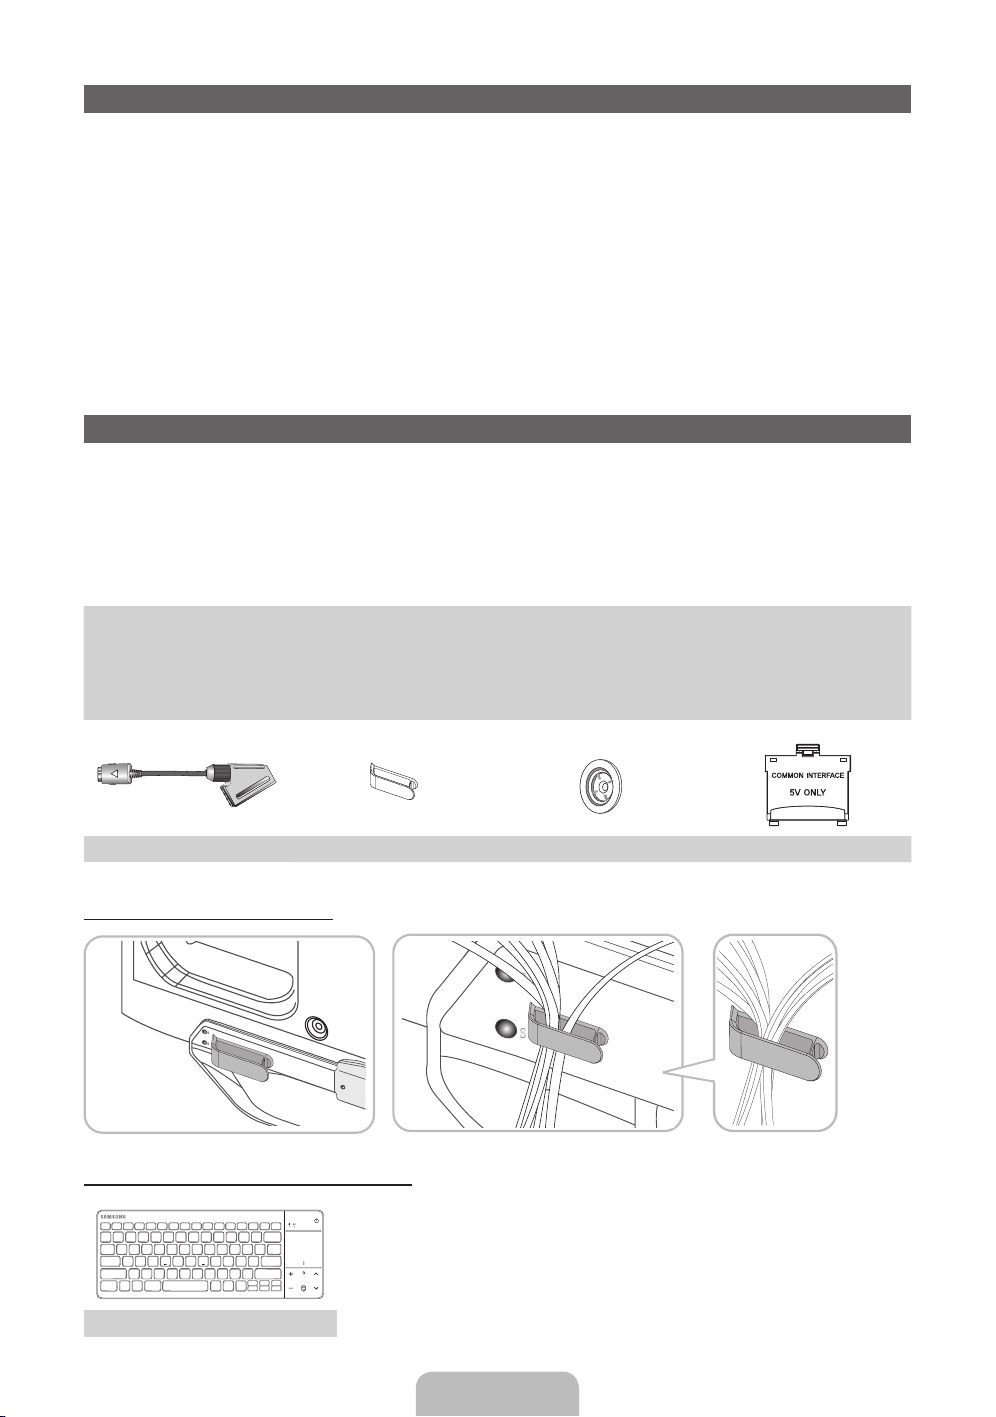
Список функций
• 3D: Благодаря этой удивительной функции можно просматривать трехмерное содержимое с помощью 3D-проигрывателей BD, 3D
контента или телепередачи в формате 3D.
• SMART HUB: Обеспечивает доступ ко всему содержимому, которое хранится в одном месте
− Эта функция помогает при выборе различного содержимого развлекательного характера
− Обеспечивает управление средой развлекательных программ с помощью простого и понятного интерфейса пользователя
− Предоставляет доступ к различным приложениям, состав которых каждый день расширяется
− Позволяет настроить систему ТВ путем группировки и сортировки приложений по своему усмотрению
• AllShare Play: С помощью функции AllShare Play можно получить доступ, просмотреть или воспроизвести фотографии, видео или
музыку с устройств USB, цифровых камер, сотовых телефонов и компьютеров. Беспроводной доступ к компьютерам, сотовым
телефонам и другим совместимым устройствам можно получить с помощью беспроводной сети.
• Anynet+ (HDMI-CEC): позволяет с помощью пульта дистанционного управления для телевизора управлять всеми подключенными
устройствами Samsung, поддерживающими функцию Anynet+.
• e-Manual: возможность чтения полного руководства на экране. (стр. 19)
Принадлежности
Убедитесь, что следующие принадлежности входят в комплект поставки телевизора. Если какой-либо элемент комплекта
✎
отсутствует, обратитесь к своему дилеру.
Цвет и форма устройств могут различаться в зависимости от модели.
✎
Кабели, не входящие в комплект поставки, можно приобрести дополнительно.
✎
Открывая коробку, убедитесь, что все принадлежности на месте (некоторые из них могут быть скрыты под упаковочным
✎
материалом).
ВНИМАНИЕ! ВСТАВЬТЕ НАДЕЖНО, ЧТОБЫ ИСКЛЮЧИТЬ ВЕРОЯТНОСТЬ ОТСОЕДИНЕНИЯ
[
• Smart Touch Control и батареи (AA x 2)
• ИК-бластер и батареи (AA x 4)
• Пульт дистанционного управления и батареи (AAA x 2)
• Гарантийный талон (прилагается не во всех странах)/Инструкция по технике
безопасности
• Кабель питания
• Чистящая салфетка
• Трехмерные очки Samsung 3D Active Glasses
• Руководство пользователя
Адаптер Scart Подставка-держатель проводов Держатель в форме кольца x 4 Адаптер карты CI
Сборка подставки-держателя проводов
Беспроводная клавиатура (приобретается отдельно)
Беспроводная клавиатура
Русский - 4
Page 28
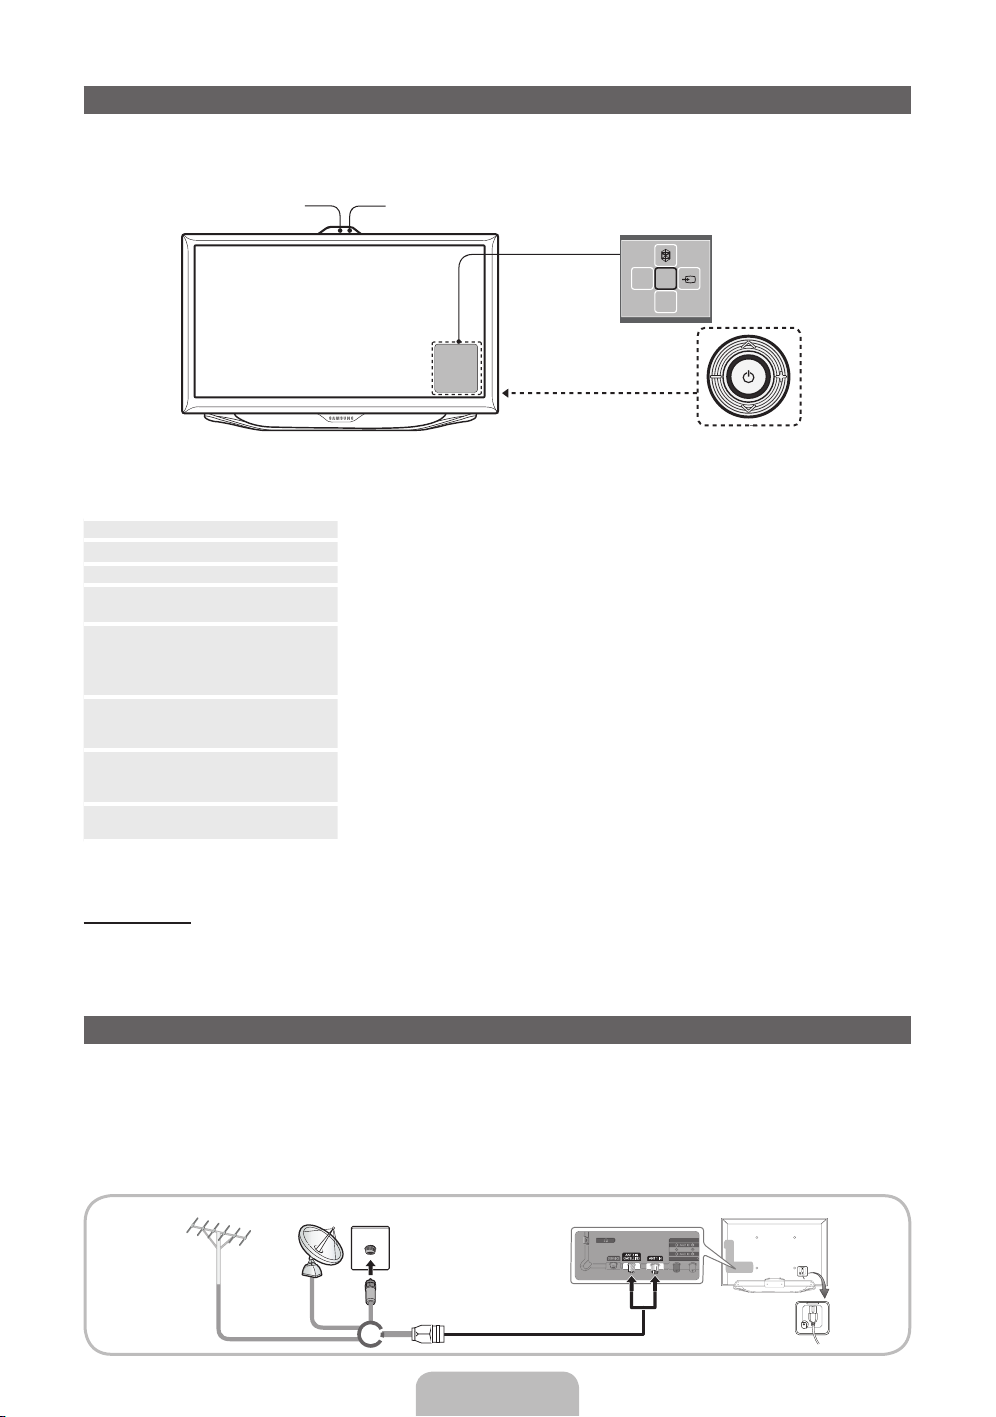
Использование контроллера телевизора (клавиши панели)
С помощью контроллера ТВ на задней стенке телевизора справа, представляющего собой небольшой джойстик, похожий на кнопку,
можно управлять функциями телевизора без пульта дистанционного управления.
Цвет и форма устройства могут различаться в зависимости от модели.
✎
Камера
Выполните эти инструкции, расположившись напротив экрана телевизора.
✎
Перед использованием камеры телевизора проверьте прикреплена ли пленка к ее задней стороне. После настройки угла камеры
✎
телевизора ее можно использовать. Если в использовании камеры телевизора нет необходимости, рекомендуется повернуть
объектив камеры вверх. В этом случае функции, Распознавание лиц и Управл. движениями недоступны.
Включить питание
Настройка громкости
Выбор канала Выбор канала путем перемещения контроллера вверх-вниз при включенном питании.
Использование меню функций Для просмотра и использования меню функций нажмите и отпустите контроллер при
m
Выбор МЕНЮ (
Выбор SMART HUB (
Выбор Источник (
Выключить питание (
) При отображении на экране меню функций выберите МЕНЮ (m), переместив контроллер
™
) При отображении на экране меню функций выберите SMART HUB (™), переместив контроллер
s
) При отображении на экране меню функций откройте список Источник (s), сместив
P
) При отображении на экране меню функций выберите Выключить питание (P), переместив
Датчик пульта дистанционного управления
Меню функций
mR
P
Контроллер ТВ
Включение телевизора нажатием кнопки контроллера, если телевизор находится в режиме ожидания.
Настройка громкости путем перемещения контроллера из стороны в сторону при включенном питании.
включенном питании. Чтобы закрыть меню функций, еще раз нажмите и отпустите контроллер.
влево. Появится экранное меню телевизора. Выберите параметр, переместив контроллер
вправо. Чтобы выбрать дополнительные параметры, перемещайте контроллер вправо-влево
или вверх-вниз. Чтобы изменить настройку параметра, выберите его и нажмите контроллер.
вверх. Отобразится основной экран SMART HUB. Перемещая контроллер, выберите
приложение и нажмите контроллер.
контроллер вправо. Появится экран “Источник”. Чтобы выбрать Источник, перемещайте
контроллер вверх-вниз. Выделив нужный источник, нажмите контроллер.
контроллер вниз, затем нажмите его.
Чтобы закрыть экран Меню, Smart Hub или Источник, нажмите и удерживайте контроллер более 1 секунды.
✎
Режим ожидания
Телевизор переходит в режим ожидания при выключении и продолжает потреблять небольшое количество электроэнергии. Для
безопасности и снижения потребления электроэнергии не оставляйте телевизор в режиме ожидания надолго (например, уезжая в отпуск).
Рекомендуется отключать кабель питания от сети.
Подключение к антенне
Подключать кабель питания к сетевой розетке следует только тогда, когда будут выполнены все остальные подключения.
✎
При подключении телевизора к приставке кабельного или спутникового ТВ через HDMI, компонентный или композитный выходы, не
✎
нужно подключать разъем ANT IN к антенне или кабельному соединению.
Работа мобильных и портативных радиоустройств или любительских радиостанций и радиоприемников, работающих в диапазоне
✎
AM в непосредственной близости от телевизора, может привести к неисправности телевизора.
Соблюдайте осторожность, перестанавливая или поворачивая телевизор с подсоединенным к нему антенным кабелем. В
✎
противном случае можно отломить антенный разъем.
Антенна ОВЧ/У КабельСпутник
или
Русский - 5
Page 29

Руководство Smart Touch Control /ИК-бластер
Для получения дополнительной информации об интеллектуальном пульте дистанционного управления см. раздел “Использование
✎
интеллектуального пульта дистанционного управления” руководства e-Manual.
Smart Touch Control
Голосовую команду, отображаемую
на телевизоре, можно произнести
с использованием микрофона. Для
использования микрофона нажмите кнопку
VOICE˜ на пульте дистанционного управления.
Функция Голосовое управление может
✎
неверно выполнить распознавание из-за
нечеткого произношения, тихого голоса
или окружающего шума.
Индикатор, указывающий на активное
устройство.
Отображение следующих функций управления
цветом и воспроизведением. Можно выбрать
функцию с помощью сенсорной панели.
: используйте эти кнопки
в соответствии с указаниями,
отображающимися на экране.
Кнопки управления воспроизведением:
используйте эти кнопки в зависимости от
выбора функции. Подробную информацию
см. в руководстве e-Manual.
T: быстрый выбор часто используемых
функций. Используйте эту кнопку в
зависимости от выбора функции. Для
получения подробной информации см.
руководство e-Manual.
< P:>
переключение каналов.
Сенсорная панель: сенсорную панель
можно использовать так же, как и сенсорную
панель ноутбука. Если не нажимать кнопки в
течение 30 секунд, интеллектуальный пульт
дистанционного управления автоматически
перейдет в режим ожидания. Для включения
интеллектуального пульта дистанционного
управления нажмите на сенсорную панель.
Отображение приложений Smart Hub.
См. главу “Дополнительные функции”
> раздел Smart Hub руководства
e-Manual.
Приложение отличается
✎
простотой работы. Чтобы закрыть
его, нажмите кнопку
™
Включение и выключение телевизора.
Š
: отображение списка недавно
используемых функций. С помощью
сенсорной панели можно повторно
выбрать функцию легко и быстро.
Y
: настройка громкости.
Отображение экрана быстрого доступа
к функциям. Можно выбрать функцию с
раздел “SMART Interaction” в руководстве
помощью сенсорной панели.
RETURNR: возврат к предыдущему
VOICE˜: Доступ к функции Голосовое
управление. При нажатии данной
кнопки на экране телевизора
отобразится список команд. Можно
говорить в микрофон, встроенный в
пульт дистанционного управления. Для
получения дополнительной информации
о функции Голосовое управление см.
e-Manual или стр. 14 руководства
Для отключения функции
✎
меню.
пользователя.
Голосовое управление
нажмите кнопку еще раз.
NUMBERš: отображение экрана с
номерными кнопками. Можно выбрать
номер с помощью сенсорной панели.
Установка батарей
TV STB BD
RETURN VOICE NUMBER
.
2
11
1. Двумя большими пальцами нажмите на нижнюю часть задней стенки пульта дистанционного управления и потяните крышку
батарейного отсека в направлении, указанном стрелкой.
2. Вставьте 2 батареи размера AA в отсек для батарей.
3. Чтобы закрыть крышку батарейного отсека, задвиньте ее в направлении стрелки.
Русский - 6
Page 30

ИК-бластер
2
1
Для управления внешними устройствами, подключенными к телевизору, настройте параметры универсального пульта дистанционного управления.
При регулировке внешнего устройства с помощью пульта Smart Touch Control ИК-бластер посылает инфракрасный сигнал на внешнее устройство.
Кнопка сопряжения
Переключатель питания
OPEN
PAIRING
ON
OFF
1
OPEN
Индикатор устройства
ИК-бластер находится в
состоянии сопряжения.
Установка батарей
1. Удерживая держатель батареи с двух
1
1
2
OPEN
OPEN
сторон, потяните его.
2 . Вставьте 4 батареи размера AA в
отсек для батарей.
3 . Установите его на место.
1
OPEN
OPEN
Первоначальное сопряжение
При подключении ИК-бластера к телевизору можно управлять подключенными к телевизору внешними устройствами с помощью
интеллектуального пульта дистанционного управления.
TVSTB BD
RETURN VOICE NUMBER
ИК приемник
30 см ~ 4 м
<Подключение>
TVSTBBD
RETURN VOICE NUMBER
• Smart Touch Control
• ИК-бластер
<Сопряжение выполнено>
Smart Touch Control
После запуска функции исходной настройки на телевизоре следует подключить интеллектуальный пульт дистанционного управления к телевизору.
1. Включите телевизор, нажав кнопку P на пульте дистанционного управления.
2. В левой нижней части экрана телевизора появятся значки подключения, и телевизор автоматически подключится к пульту Smart Touch Control.
Для повторного процесса сопряжения нажмите кнопку сброса в центре крышки задней панели, используя для этого шпильку или кончик
✎
канцелярской скрепки. Smart Touch Control активируется.
• Кнопка сброса сопряжения PAIRING на пульте Smart Touch Control
ИК-бластер
1. Включите питание ИК-бластера. Когда индикатор замигает, необходимо подключить ИК-бластер к
телевизору.
OPEN
ON
OFF
PAIRING
OPEN
2. Направьте ИК-бластер на ИК-приемник телевизора и кратковременно нажмите один раз кнопку
PAIRING в нижней части ИК-бластера.
3. В левой верхней части экрана телевизора появятся значки подключения, и телевизор
автоматически подключится к ИК-бластеру.
В случае сбоя соединения выключите и снова включите ИК-бластер, повторите процедуру,
✎
начиная с шага 2.
Русский - 7
Page 31

Калибровка сенсорной панели
Для калибровки сенсорной панели на интеллектуальном пульте дистанционного управления выполните следующие действия.
1. Нажмите и удерживайте кнопку NUMBER
2. По окончании калибровки все индикаторы в верхней части интеллектуального пульта дистанционного управления дважды
одновременно мигнут.
Во время калибровки не касайтесь сенсорной панели.
✎
При снижении точности сенсорной панели выполните повторную калибровку, повторив шаги 1 и 2.
✎
š
в течение 3 секунд. Начнется калибровка.
Использование сенсорной панели
Для отображения экрана быстрого доступа к функциям в нижней части экрана телевизора, нажмите кнопку ‹ в нижней части сенсорной
панели. Список содержит параметры Меню, Источник, Спис.КАН, 3D и другие функции.
Чтобы отобразить в верхней части экрана меню с функциями управления цветом и воспроизведением, нажмите кнопку
части сенсорной панели.
Перемещение выделения: поместите палец на сенсорную панель и проведите им от одного края
панели к противоположному краю сверху вниз или снизу вверх.
Для непрерывного перемещения выделения проводите пальцем по сенсорной панели справа
✎
налево, слева направо, сверху вниз или снизу вверх.
RETURN VOICE NUMBER
Выбор элемента: нажмите на сенсорную панель.
в верхней
RETURN VOICE NUMBER
Использование режима прокрутки
Если во время использования функций Smart Hub, Web Browser и AllShare Play нажать сенсорную панель, она переключится в режим
прокрутки.
В режиме прокрутки проведите пальцем по сенсорной панели от одного ее края к другому, при этом элементы на странице окажутся
выделенными.
Для возврата в обычный режим снова нажмите сенсорную панель или нажмите кнопку RETURNR на пульте Smart Touch Control.
✎
Ввод номера канала с помощью интеллектуального пульта дистанционного управления
š
1. Во время просмотра телепередачи нажмите кнопку NUMBER
телевизора отобразится экран с номерными кнопками.
2. С помощью сенсорной панели выделите число и нажмите на сенсорной панели. На экране телевизора отобразится список каналов,
номера которых начинаются с выбранного числа.
3. С помощью сенсорной панели выделите нужный канал в списке и нажмите на сенсорной панели.
Изменить канал также можно, коснувшись верхнего или нижнего значка канала на сенсорной панели. Если коснуться сенсорной
✎
панели сразу после этого, на экране телевизора отобразится список сохраненных в памяти каналов. Выберите канал, проведя
пальцем вверх или вниз и нажав на сенсорную панель.
Отображение меню “Сервис”
T
Нажмите кнопку
Отображение журнала просматриваемых ранее каналов
Нажмите кнопку
в правой части сенсорной панели.
Š
в левой части сенсорной панели.
на интеллектуальном пульте дистанционного управления. На экране
Русский - 8
Page 32

Настройка пульта Smart touch control для использования в качестве универсального пульта дистанционного управления
Позволяет■управлять■приставкой,■проигрывателем■BD■или■одновременно■обоими■устройствами,■подключенными■к■телевизору,■с■помощью■
пульта■Smart■Touch■Control.■После■подключения■устройства■к■телевизору■на■пульте■Smart■Touch■Control■можно■использовать■кнопки■
навигации,■числовые■и■другие■кнопки,■необходимые■для■управления■устройством.
С■помощью■универсального■пульта■дистанционного■управления■можно■регулировать■громкость■телевизора,■но■не■громкость■
■✎
видеоприставки.■Установите■необходимый■уровень■громкости■на■телеприставке.
В■зависимости■от■версии■программы■инструкции■Настр. унив. пульта ДУ■могут■отличаться.■В■этом■случае■следует■выполнять■
■✎
инструкции,■отображаемые■на■экране.■
■Для■подключения■внешнего■устройства■с■помощью■интеллектуального■пульта■дистанционного■управления■выполните■следующие■действия.
1. Выберите■Настройка устр. для управления,■и■нажмите■на■сенсорной■панели.
2. Выберите■внешнее■устройство■из■подключенных■устройств■и■нажмите■на■сенсорной■панели.
3. Выберите■порт■для■подключения■внешнего■устройства■и■нажмите■на■сенсорной■панели.
■Убедитесь,■что■выбранное■устройство■включено.■Если■устройство■выключено,■включите■его■и■нажмите■Обновить.
■✎
4. Выберите■Поиск марок/поставщиков услуг ТВ,■и■нажмите■на■сенсорной■панели.■Появится■клавиатура■и■поле■ввода.■Введите■
несколько■первых■букв■названия■марки■своего■устройства,■используя■Smart■Touch■Control,■затем■в■нижней■части■клавиатуры■выберите■
Готово.■В■списке,■который■отобразится■ниже■поля■ввода,■выберите■название■марки■своего■устройства,■затем■нажмите■на■сенсорной■
панели.
Если■требуется■найти■торговую■марку■приставки,■поиск■можно■выполнить■по■названию■торговой■марки■или■по■имени■поставщика■услуг■
кабельного■телевидения.
5. Выберите■ПОИСК МОДЕЛИ,■и■нажмите■на■сенсорной■панели.■Появится■клавиатура■и■поле■ввода.■Введите■несколько■первых■букв■
и■цифр■названия■модели■устройства,■используя■Smart■Touch■Control,■затем■в■нижней■части■клавиатуры■выберите■Готово.■В■списке,■
который■отобразится■ниже■поля■ввода,■выберите■название■модели■своего■устройства,■затем■нажмите■на■сенсорной■панели.
Если■поиск■названия■модели■не■выполняется■соответствующим■образом,■выполните■поиск■по■части■названия■модели■или■
■✎
воспользуйтесь■функцией■поиска■рекомендованного■кода■модели.
6. Выберите■Загрузка,■и■нажмите■на■сенсорной■панели.■Загрузите■данные■конфигурации■ИК-бластера■таким■же■способом.
7. По■завершении■настроек■выберите■кнопку■Завершена■и■нажмите■на■сенсорной■панели.
Если■снова■потребуется■настроить■пульт■Smart■Touch■Control■и■устройство■IR■Blaster,■нажмите■‹■на■пульте■Smart■Touch■
■✎
Control.■Выберите■Настр. унив. пульта ДУ.■
Поиск рекомендуемого кода модели.
1. В■шаге■ПОИСК МОДЕЛИ■настройки■дистанционного■управления■выберите■Рекомендуемая модель■и■нажмите■на■сенсорной■панели.
2. Выберите■Загрузка■для■загрузки■рекомендуемого■кода■модели.
3. Направьте■пульт■Smart■Touch■Control■в■направлении■ИК-датчика■внешнего■устройства■и■нажмите■сенсорную■панель■для■проверки■
работы■устройства.
4. Если■загруженный■рекомендованный■код■модели■не■работает,■повторите■шаги,■начиная■с■шага■3.
При■управлении■домашним■кинотеатром■BD■с■помощью■универсального■пульта■дистанционного■управления■некоторые■кнопки■
■✎
могут■не■работать.■В■этом■случае■рекомендуется■использовать■функцию■■Anynet+ (HDMI-CEC).
Русский - 9
Page 33

Обзор пульта дистанционного управления
Это специальный пульт дистанционного управления для людей с плохим зрением. На кнопках питания, переключения каналов и
✎
настройки громкости имеются точки Брайля.
Включение и выключение телевизора.
Просмотр и выбор доступных
источников видеосигнала (стр. 14)
Прямой доступ к каналам.
Альтернативный выбор значений
телетекста: включен, двойной,
смешанный или выключен.
Настройка громкости.
Отображение приложений Smart Hub.
См. главу “Дополнительные функции” →
раздел Smart Hub руководства e-Manual.
Открытие экранного меню.
Быстрый выбор часто используемых
функций.
Используйте эту кнопку в зависимости
от выбора функции.
Возврат к предыдущему меню.
Используйте эти кнопки в соответствии
с указаниями, отображающимися на
экране.
Используйте эти кнопки для
определенных функций. Для получения
подробной информации см. руководство
e-Manual.
HISTORY CAMERA
S
AD/SUBT.
Включение или выключение подсветки
пульта дистанционного управления.
Когда функция подсветки включена
с помощью этой кнопки, остальные
кнопки подсвечиваются при нажатии на
них. (Использование функции подсветки
на пульте дистанционного управления
сокращает срок службы батарей.)
Возвращение к предыдущему каналу.
Временное отключение звука.
Переключение каналов.
Отображение на экране списка каналов.
Отображение электронного телегида.
Отображение информации на экране
телевизора.
u/d/l/r
элементам экранного меню.
E
соответствующего значения элемента.
Выход из меню.
HISTORY: отображение списка недавно
используемых функций.
Family Story: подключение к
приложению Family Story. См. главу
“Дополнительные функции” → раздел
“Family Story” руководства e-Manual.
CAMERA: подключение к приложению
Камера.
SUPPORT: возможность использования
различных функций поддержки, включая
e-Manual. (стр. 19)
AD/SUBT.: включение и выключение
описания аудио (доступно не во всех
странах). /отображение цифровых
субтитров. См. главу “Другие функции”
→ раздел “Субтитры” руководства
e-Manual.
W
главу “Дополнительные функции” →
Использование функции 3D.
: перемещение курсора по
: выбор меню и изменение
: включение или отключение 3D. См.
Русский - 10
Page 34

Установка батарей (размер батарей: AAA)
Убедитесь, что полюса батарей соответствуют полюсам на рисунке внутри отделения.
1
2
3
ПРИМЕЧАНИЕ
✎
• При установке батарей убедитесь, что полюса батарей (+/-) соответствуют полюсам на рисунке внутри отделения.
• Используйте пульт дистанционного управления на расстоянии не более 7 метров от телевизора.
• На работу пульта дистанционного управления может влиять яркий свет. Старайтесь не включать рядом с телевизором
люминесцентные или неоновые лампы.
• Цвет и форма могут различаться в зависимости от модели.
Настройка (начальная настройка)
При первом включении телевизора на экране последовательно отображаются инструкции и экраны с настройками основных параметров.
Для запуска функции Настройка нажмите кнопку P на пульте дистанционного управления.
Настройка доступна, если в качестве источника входных сигналов выбран телевизор. См. раздел “Смена источника входных
✎
сигналов” (стр. 14).
Чтобы вернуться к предыдущему шагу функции Настройка, выберите Предыдущ..
✎
Перед началом убедитесь в том, что телевизор подключен к антенне или кабелю, а также в том, что телевизор подключен к сети
✎
(стр. 5).
Для запуска функции Настройка выберите Пуск.
✎
Язык меню:
1
Выберите язык.
Режим использов.: выбор
2
режима “Домашний”.
Настройки сети: настройка
3
параметров сети.
Чтобы выполнить
✎
подключение позднее,
выберите Пропуск.
Обновление ПО: обновление
4
программного обеспечения
до последней версии.
Чтобы выполнить
✎
обновление позднее,
выберите Пропуск.
С помощью пульта дистанционного управления выберите язык меню, затем выберите
Далее. Со следующего шага на экране телевизора меню будут отображаться на выбранном
языке.
С помощью пульта дистанционного управления выберите Домашний, затем выберите
Далее. Демонстрация предназначен только для точек розничной торговли.
Чтобы настроить подключение к сети, выберите Пуск, используя кнопки пульта
дистанционного управления. Если данные о настройке сети неизвестны или если вы
хотите выполнить настройку позднее, выберите Пропуск. Для получения более подробной
информации см. требования и инструкции раздела “Настройка проводной или беспроводной
сети” руководства e-Manual, а также раздел “Подключение к сети” данного руководства (стр.
19). Настроить сетевое подключение можно позднее с помощью меню Сеть.
Чтобы обновить программное обеспечение телевизора, выберите Далее. Если потребуется
обновление программного обеспечения телевизора, оно будет выполнено автоматически.
Если обновление требуется выполнить позднее, выберите Пропуск. Для получения
дополнительной информации см. раздел Обновление ПО (функции “Предпочтение” → меню
“Поддержка”) в руководстве e-Manual.
Для этого может потребоваться некоторое время, продолжительность которого
✎
зависит от состояния сети.
Русский - 11
Page 35

Выбор страны.
5
(зависит от страны)
Выберите подходящую страну.
После выбора страны в меню “Страна” на некоторых моделях может отобразиться
✎
дополнительный параметр для настройки PIN-кода.
6
7
8
9
10
11
Автонастройка (1): выбор
способа просмотра телевизора.
Автонастройка (2): выбор
параметров поиска и Выбор
региона (в зависимости от
страны)
Часы: настройка параметра
“Режим часов”.
Часовой пояс
(зависит от страны): установка
часового пояса.
Голос. упр. и упр. движениями:
настройка функции “Управление
голосом и жестами”.
Настройка завершена Выберите Закрыть для завершения.
Давайте найдём и сохраним каналы на Вашем телевизоре. Вы нуждаетесь в поиске
каналов?
• Да, я нуждаюсь.: Все доступные каналы будут найдены и сохранены в Вашем
телевизоре.
• Нет, я не нуждаюсь.: Мой внешний приёмник обеспечивает приём всех доступных
каналов, поэтому я не нуждаюсь в поиске каналов.
Выберите источник канала для сохранения в памяти. Если в качестве источника антенны
выбрать Кабель, появится возможность присвоения каналам номеров (частот). Для
получения дополнительной информации см. раздел Автонастройка (меню “Канал” →
“Сохранение каналов в памяти”) в руководстве e-Manual.
Если сначала выбран параметр Антенна или Кабель: после сохранения всех
✎
каналов Антенна или Кабель отобразится экран сохранения каналов Спутник.
Если сначала выбран параметр Спутник: после сохранения всех каналов Спутник
✎
отобразится экран сохранения каналов Антенна или Кабель.
Чтобы прервать процесс сохранения в памяти, можно в любой момент выбрать
✎
Стоп.
• Авто: автоматическая установка текущего времени.
• Ручной: установка текущей даты и времени вручную.
Этот шаг доступен, если для режима часов установлено значение Авто.
• Авто: автоматическая установка часового пояса.
• Ручной: установка часового пояса вручную.
Если был выбран параметр Ручной, можно установить для параметра “Летнее
✎
время” значение Вкл. или Выкл.. (зависит от страны)
Ф у н к ц и ю Голос. упр. и упр. движениями можно Вкл. или Выкл.. Выберите Вкл.
✎
или Выкл., затем нажмите Далее. Для получения более подробной информации
см. раздел “SMART Interaction” (стр.14).
Отобразятся настроенные параметры.
✎
Сброс настроек данной функции
Меню → Система →Настройка
Выберите Система – Настройка (исходная настройка). Введите 4-значный PIN-код. По умолчанию используется PIN-код “0-0-0-0”. Если
потребуется изменить PIN-код, используйте функцию Изменение PIN.
Установку параметра Настройка (Меню → Система) придется повторить дома, даже если она уже была выполнена в магазине.
Если вы забыли PIN-код, в режиме ожидания нажмите кнопки пульта дистанционного управления в следующей последовательности,
✎
чтобы восстановить значение по умолчанию “0-0-0-0”: MUTE → 8 → 2 → 4 → POWER (включение питания).
Русский - 12
Page 36

Подключение
Дополнительную информацию см. в разделе Подключение телевизора руководства e-Manual.
✎
Подключение домашнего кинотеатра с
проигрывателем DVD
OPTICAL
Кабель HDMI
(не входит в комплект)
Подключение компьютера
HDMI OUT
Подключение по HDMI
Проигрыватель BD
HDMI OUT
Подключение HDMI-DVI
Проигрыватель BD
DVI OUT
AUDIO OUT
R-AUDIO-L
Подключение наушников
Не входит в
комплект
Оптический кабель
(не входит в комплект)
Кабель HDMI
(не входит в комплект)
Кабель HDMI
(не входит в комплект)
Аудиокабель
(не входит в комплект)
Кабель Scart
(не входит в
комплект)
Адаптер Scart
(входит в комплект)
SERVICE: разъем используется
только для техобслуживания.
Компонентный кабель
(не входит в комплект)
R
B
Y
Аудиокабель
(не входит в комплект)
R
W
Кабель HDMI-DVI
(не входит в комплект)
Аудиокабель
(не входит в
комплект)
Задняя панель
телевизора
R
W
Аудиокабель
(не входит в
комплект)
W
R
R
DVI OUT
AUDIO OUT
B
Y
Видеокабель
(не входит в комплект)
Y
Разъем для
кабеля питания
COMPONENT OUT
EXT
Видеомагнитофон или DVD-проигрыватель
Подключение SCART
Для обеспечения высококачественного кабельного соединения с данным устройством следует использовать кабели, максимальная
✎
PRPBY
Подключение
компонентного кабеля
AUDIO OUT
R-AUDIO-L
Проигрыватель BD
AUDIO OUT
R-AUDIO-L
Проигрыватель BD
VIDEO OUT
Подключение AV-
устройств
толщина которых не превышает указанные ниже значения.
• Максимальная толщина – 14 мм (0,55 дюйма)
Русский - 13
Page 37

Смена источника входных сигналов
Благодаря этой функции можно получить доступ к параметрам и
Источник
™
→ Источник
Когда во время просмотра телевизора вы захотите посмотреть
фильм с проигрывателя дисков DVD или Blu-ray или захотите
переключиться на приемник кабельного или спутникового
телевидения, вам потребуется изменить источник сигналов.
■ ТВ / Внешний / HDMI 1/DVI / HDMI 2 / HDMI 3 / AV /
Компонент
1. Нажмите кнопку
Появится экран Smart Hub.
2. Выберите Источник. Появится экран Источник.
3. Выберите требуемый внешний источник входного сигнала.
Экран Источник можно также открыть, нажав кнопку
✎
Источникs на стандартном пульте дистанционного
управления или выбрав Источник с помощью
интеллектуального пульта дистанционного управления (см.
стр. 6).
Можно выбрать только внешние устройства, подключенные
✎
к телевизору. В отображающемся списке Источник
подключенные источники входных сигналов будут выделены.
™
на пульте дистанционного управления.
функциям меню и управлять ими с помощью голоса, жестов или
распознавания лица пользователя.
ЗАЯВЛЕНИЕ ОБ ОГРАНИЧЕНИИ ОТВЕТСТВЕННОСТИ В
ИНФОРМАЦИОННОЙ БРОШЮРЕ
• Вход с помощью функции “Распознавание лиц”
• Использование ТВ-камеры
SMART Interaction
Чтобы использовать функцию “Распознавание лиц”, в
телевизоре будет сохранен эскиз изображения лица для
выполнения входа.
Вход в службу Smart Hub с помощью функции “Распознавание
лиц” может оказаться менее безопасным, чем при входе с
помощью идентификатора или пароля.
Перед использованием ТВ-камеры необходимо понять, что
при некоторых обстоятельствах и определенных условиях
неправильное использование ТВ-камеры может привести
к юридической ответственности. При использовании ТВкамеры вы даете согласие не использовать ее (i) в местах,
где использование камеры запрещено (например, ванная
комната, раздевалка), (ii) если это приведет к нарушению
конфиденциальности или (iii) нарушению любого применяемого
закона, нормативного требования или соглашения.
Правила использования параметра Редактир. назв.
Редактир. назв. позволяет соотнести название устройства с
источником входных сигналов. Чтобы получить доступ к параметру
Редактир. назв., откройте меню Сервис, когда отобразится
список Источник. Следующие варианты выбора отображаются в
разделе Редактир. назв.:
■ VCR / DVD / Кабельн. прист. / Спутн. прист. / PVR / АV
ресивер / Игра / Камера / ПК / DVI PC / Устройства DVI / ТВ
/ IP TB / Blu-ray / HD DVD / DMA: выберите входное гнездо,
затем в отображенном списке выберите имя устройства,
подключенного к этому гнезду. Например, если проигрыватель
Blu-ray подключен к гнезду HDMI IN 2, выберите в качестве
входного сигнала Blu-ray.
Если подключение компьютера к порту HDMI IN 1 (DVI)
✎
выполняется с помощью кабеля HDMI, установите для входа
HDMI 1 /DVI имя ПК в разделе Редактир. назв..
Если подключение компьютера к порту HDMI IN 1 (DVI)
✎
выполняется с помощью кабеля HDMI-DVI, установите для
входа HDMI 1/DVI имя DVI PC в разделе Редактир. назв..
Если подключение устройства AV к порту HDMI IN 1 (DVI)
✎
выполняется с помощью кабеля HDMI-DVI, установите для
входа HDMI 1/DVI имя Устройства DVI в разделе Редактир.
назв..
Сведения
Просмотр подробной информации о выбранном внешнем
устройстве.
Обновить
Если внешние устройства не отображаются в списке Источник,
откройте меню Сервис, затем выберите Обновить. В списке
отобразятся все подключенные устройства.
Можно также обновить список Источник, выбрав a с
✎
помощью пульта дистанционного управления.
Голосовое управление
Меню → Система → Голос. упр. и упр. движениями →
Голосовое управление
Включение или отключение функции распознавания голоса.
Благодаря этой функции можно получить доступ к параметрам и
функциям меню и управлять ими с помощью голоса.
Для использования функции Голосовое управление
✎
необходимо произносить слова и фразы четко и правильно
на языке, выбранном в разделе Язык.
Окружающий шум может нарушить работу функции
✎
Голосовое управление.
Телевизор может воспринимать голосовые команды двумя
способами.
− Использование микрофона телевизора. (распознавание на
расстоянии)
− Использование кнопки VOICE
управления. (распознавание в непосредственной близости)
При использовании микрофона телевизора слова могут
✎
не распознаваться из-за окружающего шума. В этом
случае нажмите кнопку VOICE˜ на пульте дистанционного
управления. Телевизор лучше выполнит распознавание
голосовой команды.
Кнопка VOICE˜ на пульте дистанционного управления
✎
всегда включена. Если необходимо использовать микрофон
телевизора, включите Голосовое управление (Система →
Голос. упр. и упр. движениями → Голосовое управление).
Если параметр или функция меню не поддерживается
✎
функцией Голосовое управление, используйте функцию
Управл. движениями. Для использования функции жестов
протяните руку в направлении камеры и помашите ею тричетыре раза из стороны в сторону.
■ Голосовое управление
Включение или отключение функции Голосовое управление.
✎
■ Язык
Выбор языка распознавания, который необходимо
использовать.
˜
на пульте дистанционного
Кнопка VOICE˜ на пульте дистанционного управления
всегда включена.
Русский - 14
Page 38

■■ Слова вызова
■Можно■выбрать■Слова вызова■для■выполнения■функции■
Голосовое управление.■Кроме■того,■можно■включить■
телевизор■с■использованием■параметра■Слова вызова■если■
для■функции■Голосовое управление■установить■значение■
Вкл..
Если■для■функции■Слова вызова■установлено■значение■Hi■TV■
(Привет, ТВ),■произнесите■Привет ТВ. Включись.■
■■ Размер панели голос. команд
Задайте■для■режима■Размер панели голос. команд■значение■
Минимальная■или■Полная.■Функция■Минимальная■отображает■
минимальное■количество■слов■и■фраз,■которые■можно■
использовать.■Функция■Полная■отображает■все■слова■и■фразы.
■■ Чувствит. голоса
Настройка■чувствительности■распознавания■голоса.
■− Подвывания:■настройка■уровня■эха.
■− Отзывчивость распознавания:■настройка■уровня■
отзывчивости■распознавания■голоса.
■■ Проверка среды управления голосом
Можно■проверить■уровень■шума■в■микрофоне■телевизора.
■− Проверка шума:■во■время■этого■теста■проверяется■
уровень■шума■в■микрофоне■телевизора.■Выберите■Далее■
с■помощью■пульта■дистанционного■управления.■Начнется■
тест,■выполнение■которого■займет■несколько■секунд.■Не■
следует■шуметь■во■время■теста.
■− Проверка микрофона и динамика:■во■время■этого■
теста■проверяется■уровень■шума■в■микрофоне■телевизора■
и■громкоговорителе.■Выберите■Пуск■с■помощью■пульта■
дистанционного■управления.■Начнется■тест,■выполнение■
которого■займет■несколько■секунд.■Не■следует■шуметь■во■
время■теста.
Доступно,■только■если■для■параметра■Выбрать
■✎
громкогов.■установлено■значение■Громкогов. ТВ.
■− Проверка управления голосом:■во■время■этого■теста■
проверяется■уровень■громкости■и■качество■звучания■
голоса■при■использовании■Голосовое управление.■
Выберите■Пуск■с■помощью■пульта■дистанционного■
управления.■Тест■будет■запущен.■Для■выполнения■этого■
теста■произнесите■фразу■как■можно■громче■и■четче.
Если■тест■не■завершен,■выберите■Повторная
■✎
проверка,■а■затем■снова■произнесите■фразу■как■
можно■громче■и■четче.
Для использования функции Голосовое управление выполните
следующие действия.
Если■для■функции■Голосовое управление■установлено■
■✎
значение■Вкл.,■телевизор■может■быть■включен■под■влиянием■
окружающей■среды.
1.
Произнесите■Слово вызова,■которое■было■выбрано,■в■микрофон,■
встроенный■в■телевизор,■или■нажмите■и■удерживайте■кнопку■
VOICE˜■на■пульте■дистанционного■управления.■На■экране■
телевизора■отобразится■Проверка среды управления голосом.
При■использовании■функции■Голосовое управление■для■
■✎
параметра■“Громкость”■будет■автоматически■установлено■
значение■“5”.
2. Произнесите■слово■или■фразу,■указанную■в■Проверка среды
управления голосом.■При■использовании■кнопки■VOICE
пульте■дистанционного■управления■отпустите■кнопку.
Произнесите■слово■или■фразу■четко■и■правильно■на■
■✎
языке,■выбранном■в■разделе■Язык.
3. Подождите,■пока■распознавание■не■будет■завершено,■затем■
произнесите■следующую■команду.
Чтобы■выйти■из■режима■Голосовое управление,■
■✎
произнесите■Слово вызова■или■“Отмена”■в■микрофон■
телевизора■или■нажмите■кнопку■VOICE˜■на■пульте■
дистанционного■управления.
Режим ввода текста с помощью голоса
1. Произнесите■“Найти■все”■в■режиме■Голосовое управление.
При■использовании■экранной■клавиатуры■QWERTY■
■✎
можно■использовать■режим■ввода■текста■с■помощью■
голоса.■Произнесите■слово■Слово вызова,■которое■
˜
2. Произнесите■слово■или■фразу,■которую■необходимо■найти.
3. Будет■выполнена■указанная■функция.
■✎
Управл. движениями
Меню■→■Система■→■Унив. пульт ДУ■→■Управл. движениями
Включение■или■отключение■функции■Управл. движениями.■
Позволяет■управлять■телевизором,■перемещая■курсор■по■экрану■с■
помощью■определенных■жестов.
Некоторые■приложения■могут■не■поддерживать■функцию■
■✎
Управл. движениями.
■■ Управл. движениями
Включение■или■отключение■функции■Управл. движениями.
■■ Размер панели упр. движениями
Задайте■для■режима■Размер панели упр. движениями■
значение■Минимальная■или■Полная.
■■ Проверка среды управления движениями
Можно■проверить■яркость■освещения■комнаты■и■угол■обзора■
камеры.
■− Проверка яркости:■во■время■данного■теста■
■− Проверка угла поворота камеры:■запуск■Проверка угла
Для использования функции Управл. движениями выполните
следующие действия.
1. Для■использования■функции■Управл. движениями■следует■
поднести■руку■к■экрану,■задержать■ее■на■мгновение,■а■
затем■3-4■раза■помахать■из■стороны■в■сторону.■Выполнится■
запуск■Управл. движениями.■При■запуске■функции■Управл.
движениями■■по■центру■экрана■отображается■курсор,■
а■в■нижней■части■отображается■Размер панели упр.
движениями.
2.
Управляйте■телевизором■с■помощью■движений■рук.
Обратите■внимание,■что■функция■Управл. движениями■
■✎
отключится,■если■движения■рук■находятся■вне■диапазона■
видимости■камеры.
При■использовании■Управл. движениями,■если■применяется■
■✎
другое■устройство■(например,■пульт■дистанционного■
управления,■клавиатура■и■т.д.),■функция■Управл.
движениями■отключится.
■на■
Управление телевизором с помощью движений рук
■■ Доступ к функции “Управление жестами”
■− Действие:■протяните■руку■в■направлении■камеры■и■
■■ Направление
Перемещение■курсора■в■необходимое■положение.
■− Действие:■протяните■руку■и■переместите■курсор■в■
■■ Захват
Выбор■элемента■или■выполнение■команды,■выбранной■с■
помощью■курсора■или■выделенной.
■− Действие:■сожмите■кулак.
было■выбрано,■в■микрофон,■встроенный■в■телевизор,■
или■нажмите■и■удерживайте■кнопку■VOICE˜■на■пульте■
дистанционного■управления.
Работа■функции Голосовое управление■зависит■от■
используемого■языка.
проверяется,■достаточно■ли■ярко■освещена■комната■для■
соответствующей■работы■функции■Управл. движениями.■
Выберите■Пуск■с■помощью■пульта■дистанционного■
управления.■Начнется■тест,■выполнение■которого■займет■
несколько■секунд.
поворота камеры.■Выберите■Пуск■с■помощью■пульта■
дистанционного■управления.■Настройте■прямоугольник■
на■экране■камеры■так,■чтобы■объект■находился■в■центре,■с■
помощью■изменения■угла■обзора■камеры■или■перемещения■
камеры.■Если■объект■расположен■неверно,■тест■может■
выполняться■неправильно.■По■завершении■настройки■
протяните■руку■в■направлении■камеры■и■помашите■ею■тричетыре■раза■из■стороны■в■сторону.
помашите■ею■три-четыре■раза■из■стороны■в■сторону.
необходимое■положение.
Русский - 15
Page 39

■■ Поворот против часовой стрелки
Возврат■к■предыдущему■меню.
■− Действие:■протяните■руку■и■покрутите■против■часовой■
стрелки.
■■ Управление каналами/регулировка громкости
Изменение■канала■или■регулировка■громкости.
Если■при■просмотре■канала■используется■функция■
■✎
Управл. движениями,■появится■экран■управления■
каналами/регулировки■громкости.
■− Действие:■используйте■действие■Наведение■для■
перемещения■курсора■на■контроллер■каналов■или■
громкости,■затем■используйте■действие■Захват■для■
настройки■канала■или■громкости.
Однократное■использование■действия■Захват■
■✎
означает■нажатие■кнопки■на■пульте■дистанционного■
управления.■Длительное■использование■действия■
Захват■означает■нажатие■и■удерживание■кнопки■на■
пульте■дистанционного■управления.
■■ Прокрутка страниц
Прокрутка■страниц■в■необходимом■направлении.■
Предположим,■что■нужно■выполнить■прокрутку■вниз.
Некоторые■приложения■могут■не■поддерживать■данную■
■✎
функцию.
1. Переместите■курсор■в■нижнюю■часть■экрана■(область■
прокрутки■страниц)■с■помощью■действия■Наведение.
2. Переместите■курсор■в■центр■экрана■с■помощью■действия■
Наведение.
3. Будет■выполнен■переход■на■1■страницу.
Распознавание лиц
™
■→■Сервис■→■Настройки■→■Дисп. уч. записей■→■Изменить
информацию уч. записи →■Зарегистр. лицо
Включение■или■отключение■функции■распознавания■лица.■
Позволяет■выполнить■регистрацию■лица■для■учетной■записи■
Samsung.■Можно■также■войти■в■учетную■запись■Samsung■с■
помощью■функции■Распознавание лиц■без■ввода■идентификатора■
или■пароля■учетной■записи.
Лицо■можно■зарегистрировать■только■для■одной■учетной■записи.
■✎
Чтобы войти в учетную запись Samsung с помощью функции
Распознавание лиц, выполните следующие действия.
Если■используется■функция■Распознавание лиц■для■входа■
в■учетную■запись■Smart Hub,■это■может■оказаться■менее■
безопасным,■чем■при■входе■путем■ввода■пароля.
a
1. На■экране■Smart Hub■выберите■
дистанционного■управления.■Появится■экран■ИД/пароль.
2. Выберите■Режим распознавания лиц.■Появится■экран■
Распознавание лиц.
Для■возврата■к■экрану■ИД/пароль■выберите■Режим
■✎
пароля.
3. Телевизор■выполнит■Распознавание лиц.■Сядьте■напротив■
экрана■телевизора.■Телевизор■выполнит■распознавание■лица■
автоматически.
Если■не■удается■выполнить■распознавание■лица,■
■✎
повторите■попытку.
4. Будет■выполнен■автоматический■вход■в■учетную■запись■
Samsung.
При■распознавании■двух■или■более■зарегистрированных■
■✎
лиц■отобразится■список■учетных■записей■Samsung.■
Выберите■учетную■запись■для■входа.
Если■лицо■не■зарегистрировано,■можно■
■✎
зарегистрировать■его■для■учетной■записи■
Samsung.■Выполните■шаги■4■и■5■процедуры■“Чтобы■
зарегистрировать■лицо■для■учетной■записи■Samsung,■
выполните■следующие■действия”,■указанные■выше.
При■отсутствии■учетной■записи■можно■создать■ее.■
■✎
Более■подробную■информацию■см.■в■разделе■“Создание■
учетной■записи”■(“Дополнительные■функции”■>■Smart■
Hub)■в■руководстве■e-Manual.
■с■помощью■пульта■
Чтобы зарегистрировать лицо для учетной записи Samsung,
выполните следующие действия.
Чтобы■использовать■эту■функцию,■следует■выполнить■вход■в■
■✎
Smart Hub.■При■отсутствии■учетной■записи■Уч. зап. Samsung■
необходимо■создать■ее■перед■использованием■этой■функции.■
Информацию■о■создании■учетной■записи■Уч. зап. Samsung■
см.■в■разделе■“Создание■учетной■записи”■(“Дополнительные■
функции”■>■Smart■Hub)■в■руководстве■e-Manual.
1. На■экране■Smart Hub■откройте■меню■Сервис■с■помощью■пульта■
дистанционного■управления,■а■затем■выберите■Настройки.
2.
Выберите■
Дисп. уч. записей
3.
Выберите■Изменить информацию уч. записи.■Появится■экран■
Изменить информацию уч. записи.
4. Выберите■Зарегистр. лицо.■Если■вы■согласны■использовать■
функцию■распознавания■лиц,■нажмите■ОК.
5. Введите■ваш■пароль■учетной■записи.
6. Сядьте■так,■чтобы■лицо■попадало■в■линии■лица,■
расположенные■в■центре■экрана,■и■подождите,■пока■цветлиний■
лица■не■изменится■с■красного■на■зеленый.
Если■Распознавание лиц■не■удастся■выполнить,■
■✎
выберите■Повторить■и■повторите■попытку.
7. После■выполнения■этих■действий■лицо■будет■
зарегистрировано■в■учетной■записи■Samsung.
.■Появится■экран■
Дисп. уч. записей
.
Русский - 16
Page 40

Подключение к разъему COMMON INTERFACE (разъем для карты ТВ)
Подсоединение адаптера карты CI Card
Подсоедините адаптер, как показано на рисунке ниже.
Для подключения адаптера карты CI CARD выполните следующие
действия.
Рекомендуется подсоединять адаптер до установки настенного
✎
крепления или карты CI или CI+ CARD.
1. Вставьте адаптер карты CI CARD в два отверстия на устройстве 1.
Найдите два отверстия на задней панели телевизора. Эти два
✎
отверстия находятся рядом с портом COMMON INTERFACE.
• 2. Подключите адаптер карты CI CARD к порту COMMON INTERFACE
на устройстве 2.
• 3. Вставьте карту CI или CI+ CARD.
Рекомендуется вставить карту CI Card до того, как телевизор будет установлен на настенное крепление. После установки
вставить карту будет трудно. Вставьте карту после подключения адаптера карты CI Card к телевизору. Если карта
вставлена до подключения модуля, подключить его будет трудно.
Использование карты CI CARD или CI+ CARD
Для просмотра платных каналов необходимо установить карту CI CARD или CI+ CARD.
• Если этого не сделать, отобразится сообщение “Недопустимый сигнал”.
• Через 2-3 минуты после установки на экране отобразится информация о
согласовании, содержащая номер телефона, идентификатор карты CI CARD или
CI+ CARD, идентификатор хоста и другие сведения. Если появится сообщение об
ошибке, обратитесь к поставщику услуги.
• После того, как настройка сведений о каналах будет закончена, на экране
отобразится сообщение “Обновление завершено”, означающее, что список каналов
обновлен.
ПРИМЕЧАНИЕ
✎
• Карту CI или CI+ CARD можно приобрести у местного поставщика услуг
кабельного телевидения.
• Извлекайте карту CI или CI+ CARD, аккуратно придерживая ее, поскольку падение карты может привести к ее повреждению.
• Вставляйте карту CI или CI+ CARD в направлении, указанном на ней.
• Расположение гнезда COMMON INTERFACE может отличаться в зависимости от модели устройства.
• В некоторых странах и регионах карты CI или CI+ CARD не поддерживаются. Уточните это у официального дилера.
• При возникновении проблем обратитесь к поставщику услуги.
• Вставьте карту CI или CI+ CARD, поддерживающую текущие настройки антенны. В противном случае изображение на экране
будет отсутствовать или будет искажено.
Для установки адаптера карты CI Card
удалите защитную наклейку с телевизора.
Задняя
панель
телевизора
Разъем для комплекта Evolution Kit (приобретается отдельно)
Задняя панель
телевизора
Данный разъем предназначен для подключения устройства расширения, которое называется Evolution Kit. Он позволяет запускать в
системе телевизора самые разные новейшие приложения, расширяющие возможности пользователя.
Для некоторых устройств комплект Evolution Kit недоступен, и его можно будет приобрести отдельно только в 2013 году или позднее.
Русский - 17
Page 41

Сетевое подключение
Можно настроить телевизор таким образом, чтобы он имел доступ к приложениям SMART TV по сети Интернет с использованием
проводного или беспроводного соединения.
Беспроводное сетевое подключение
Подключить телевизор к локальной сети можно с помощью стандартного беспроводного маршрутизатора или модема.
Беспроводное IP-устройство
Порт локальной сети
на стене
Адаптер беспроводной локальной сети Samsung поддерживает протоколы связи IEEE 802.11A/B/G и N. Samsung рекомендует использовать
протокол IEEE 802.11N. При воспроизведении видео через соединение IEEE 802.11B/G возможны перерывы.
Большинство систем беспроводной связи оснащены системой безопасности, требующей от устройств, подключаемых через точку доступа
или беспроводной маршрутизатор (обычно IP-устройство совместного доступа), предоставления зашифрованного кода безопасности,
который называется кодом доступа.
Если выбран режим High-throughput (Greenfield) 802.11n в чистом виде и в качестве типа шифрования для беспроводного маршрутизатора
выбран WEP, TKIP или TKIP AES (WPS2Mixed), телевизоры Samsung не будут поддерживать подключение в соответствии с новыми
спецификациями сертификата Wi-Fi.
совместного доступа
(маршрутизатор с сервером
DHCP)
Кабель локальной сети
ТВ
Кабельное сетевое подключение
В зависимости от настроек сети существует два основных способа подключения телевизора к сети с помощью кабеля. Оба способа
показаны ниже.
Порт модема на стене
Порт сети Интернет на стене
Телевизор не поддерживает работу сети, если скорость соединения равна или менее 10 Мбит/с.
✎
Используйте для подключения кабель Cat 5 или 6 (STP*) (*экранированная витая пара).
✎
Внешний модем
(ADSL/VDSL/кабельное ТВ)
Кабель локальной сетиКабель модема
Кабель сети Интернет
Задняя панель телевизора
Задняя панель телевизора
Русский - 18
Page 42

Просмотр руководства e-Manual
Инструкции по функциям телевизора можно найти в руководстве e-Manual. Чтобы открыть руководство e-Manual, нажмите кнопку
SUPPORT
на стандартном пульте дистанционного управления или выберите Поддержка с помощью интеллектуального пульта
дистанционного управления.
Категорию также можно выбрать с помощью меню:
Меню → Поддержка → e-Manual
Получение доступа к e-Manual
Для использования функции e-Manual выполните следующие действия.
1. Если необходима помощь, выберите Поддержка с помощью пульта дистанционного управления. Появится экран Поддержка.
2. Выберите e-Manual с помощью пульта дистанционного управления. Появится экран e-Manual.
3. Выберите нужную категорию.
4. Выберите нужную тему. В руководстве e-Manual отобразится необходимая страница.
Синие слова в руководстве e-Manual относятся к параметрам или элементам выбора экранного меню телевизора.
✎
Зеленые значки в руководстве e-Manual относятся к кнопкам пульта дистанционного управления.
✎
Стрелки (например, Меню → Поддержка → e-Manual) в руководстве e-Manual означают последовательность шагов, необходимых
✎
для доступа к параметру или включения функции.
Переход между разделами руководства e-Manual и соответствующими экранными меню.
Изменение предварительно настроенного
режима изображения
Изображение
Реж. изображения
Подсветка
Контраст
Яркость
Четкость
Цвет
Тон(З/К) G50
Эта функция недоступна в некоторых меню.
✎
Ф у н к ц и ю Попроб. использовать нельзя, если меню недоступно.
✎
1. Чтобы перейти к соответствующему меню раздела, выберите
Изменение предварительно настроенного
режима изображения
Реж. изображения
Меню → Изображение → Реж. изображения
С помощью режимов изображения к изображению
применяются предварительно заданные настройки.
N При подключении компьютера с помощью кабеля
HDMI-DVI можно выбрать только значения Развлекат.
и Стандартный
• Динамический
Для просмотра в комнате с ярким освещением.
• Стандартный
Для просмотра в комнате с нормальным освещением.
Изображение
Реж. изображения
Подсветка
Контраст
Яркость
a
с помощью пульта дистанционного управления.
Четкость
Цвет
Тон(З/К)
2. Для возврата к экрану e-Manual выберите Поддержка с помощью пульта дистанционного управления.
Изменение предварительно настроенного
режима изображения
Изменение предварительно настроенного
режима изображения
Реж. изображения
Меню → Изображение → Реж. изображения
С помощью режимов изображения к изображению
применяются предварительно заданные настройки.
N При подключении компьютера с помощью кабеля
HDMI-DVI можно выбрать только значения Развлекат.
и Стандартный
• Динамический
Для просмотра в комнате с ярким освещением.
• Стандартный
для просмотра в комнате с нормальным освещением.
Использование цветных и функциональных кнопок для e-Manual
• Полоса прокрутки: прокрутка экрана руководства e-Manual вверх или вниз.
l/r
: переход к предыдущей или следующей главе.
•
•
a
:Попроб. переход к экранному меню, соответствующему данному разделу. для возврата к экрану руководства e-Manual выберите
Поддержка с помощью пульта дистанционного управления.
•
b
:Главная переход к начальному экрану руководства e-Manual.
•
{
Позиция: При каждом выборе { с помощью пульта дистанционного управления положение экрана e-Manual будет изменяться.
•
}
Указатель: отображение экрана указателя.
•
R
Возврат: возврат к предыдущему экрану.
Поиск раздела на странице указателя
1. Выберите
}
с помощью пульта дистанционного управления. Появится экран указателя.
2. Чтобы найти необходимый раздел, выберите соответствующую букву. В разделе указателя отобразится список разделов и ключевых
слов, которые начинаются с выбранной буквы.
3. Выберите нужный раздел или ключевое слово.
4. Появится страница руководства e-Manual с нужным разделом.
Чтобы закрыть экран Указатель, нажмите кнопку RETURNR.
✎
Русский - 19
Page 43

Изменение положения экрана e-Manual
Если экран руководства e-Manual не отображается надлежащим образом из-за экранных меню, можно изменить положение экрана e-Manual.
1. Переместите выделение на экран e-Manual, нажав кнопку SUPPORT на стандартном пульте дистанционного управления или выберите
Поддержка с помощью интеллектуального пульта дистанционного управления.
2. Нажмите кнопку
дистанционного управления. При каждом выборе
{
на стандартном пульте дистанционного управления или выберите
{
с помощью пульта дистанционного управления положение экрана e-Manual будет
{
с помощью интеллектуального пульта
изменяться.
Установка настенного крепления
Установка с помощью набора для настенного монтажа
Набор для настенного монтажа (продается отдельно) позволяет установить телевизор на стене.
Для получения более подробной информации о настенной установке см. инструкции, прилагаемые к деталям настенного монтажа. Для
получения помощи при установке настенного кронштейна обратитесь к специалисту по технической поддержке. Не рекомендуется
выполнять установку самостоятельно.
Samsung Electronics не несет ответственности за любые повреждения устройства или травмы, возникшие в случае самостоятельной
установки телевизора покупателем.
Подготовительные действия перед установкой настенного крепления
Вариант А. Установка настенного крепления SAMSUNG
Вариант Б. Установка настенных креплений других производителей
1
Для установки настенного крепления используйте держатель в
форме кольца 1.
1
Характеристики набора для настенного монтажа (VESA)
Набор для настенного монтажа не входит в комплект, а продается отдельно.
✎
Устанавливайте настенное крепление на прочную стену, перпендикулярную полу. В случае крепления к другим строительным
✎
материалам обратитесь за советом к ближайшему дилеру. При установке на потолке или наклонной стене устройство может упасть
и стать причиной травмы.
ПРИМЕЧАНИЕ.
✎
• В приведенной ниже таблице представлены стандартные размеры наборов для настенного монтажа.
• В комплект поставки набора для настенного монтажа входит подробное руководство по установке и все необходимые для сборки детали.
• Не используйте винты, не соответствующие стандарту VESA.
• Не используйте слишком длинные винты или винты, не соответствующие стандарту VESA. Использование винтов
длиннее стандартного размера может привести к повреждению внутренних элементов телевизора.
• Для настенных креплений с винтами, не соответствующими требованиям стандарта VESA, длина винтов может быть различной и
будет определяться техническими характеристиками настенных креплений.
• Не затягивайте винты слишком сильно, поскольку это может привести к повреждению устройства или быть причиной
его падения, что может повлечь за собой травму. Samsung не несет ответственности за подобные несчастные случаи.
• Samsung не несет ответственности за повреждение устройства или получение травм при использовании настенного крепления,
не соответствующего стандартам VESA или не предназначенного для этих целей, а также в случае несоблюдения инструкций по
установке устройства.
• Не устанавливайте телевизор под наклоном более 15 градусов.
• Установку телевизора на стене всегда следует выполнять вдвоем.
Семейство
продуктов
Дюймы
Характеристики VESA
(A * B)
Стандартный винт Количество
4 0 200 х 200
LED-телевизоры
46~60 400 х 400
Перед установкой настенного крепления извлеките винты из отверстий.
✎
M 8 4
Не выполняйте установку набора для настенного монтажа, когда телевизор включен. Это может привести к
поражению электрическим током.
Русский - 20
Page 44

Хранение и обслуживание
Если на экране телевизора имеются какие-либо наклейки, после их удаления остается небольшое загрязнение. Для нормального
✎
просмотра телевизора удалите это загрязнение.
Не распыляйте воду непосредственно на устройство. Попавшая
внутрь устройства жидкость может стать причиной повреждения,
возгорания или поражения электрическим током.
Для очистки следует использовать только мягкую ткань,
смоченную в небольшом количестве воды. Не используйте
легковоспламеняющиеся жидкости (например, бензин,
разбавители) или моющие средства.
Крепление телевизора на стене
Внимание! Нельзя тянуть, толкать телевизор или забираться на него, поскольку телевизор
может упасть. Следите за тем, чтобы дети не облокачивались на телевизор и не раскачивали
его. Телевизор может опрокинуться и нанести серьезные и даже смертельные травмы.
Соблюдайте все меры предосторожности, описанные в прилагаемой к телевизору брошюре
по безопасности. Для дополнительной устойчивости и безопасности приобретите и установите
приспособление против скольжения, как описано ниже.
Предотвращение падения телевизора
1. Вставьте винты в зажимы и надежно закрепите их в стене. Убедитесь, что винты надежно
закреплены в стене.
В зависимости от типа стены могут потребоваться дополнительные приспособления,
✎
например дюбели.
Поскольку необходимые зажимы, винты и трос не входят в комплект поставки, их
✎
необходимо приобретать отдельно.
2. Извлеките винты из центральной части задней панели телевизора, вставьте их в зажимы,
затем снова заверните винты на телевизоре.
Винты не всегда входят в комплект поставки телевизора. В этом случае необходимо
✎
приобрести винты со следующими характеристиками.
Характеристики винтов
✎
• Для телевизоров с диагональю 19-27 дюймов: M4
• Для телевизоров с диагональю 32-75 дюймов: M8
3. Соедините зажимы, прикрепленные к телевизору, и зажимы, прикрепленные к стене, с
помощью крепкого троса, а затем надежно завяжите его.
ПРИМЕЧАНИЕ
✎
• Установите телевизор рядом со стеной, чтобы он не упал назад.
• Прикрепление троса будет безопасным, если зажимы на стене находятся на одном уровне или ниже зажимов на телевизоре.
• Перед тем как перемещать телевизор, развяжите трос.
4. Убедитесь, что все соединения надежно зафиксированы. Периодически проверяйте, не ослабли или не нарушены ли соединения. Если
у вас возникают сомнения по поводу безопасности соединений, обратитесь к квалифицированному специалисту по установке.
Русский - 21
Page 45

Поиск и устранение неисправностей
При возникновении вопросов, связанных с работой телевизора, сначала просмотрите следующий список. Если ни один
из перечисленных советов не поможет устранить неисправность, посетите веб-сайт www.samsung.com и выберите пункт
“Поддержка” или обратитесь в операторский центр, адрес которого указан на задней обложке данного руководства.
Проблемы Способы устранения и пояснения
Телевизор не включается. • Проверьте надежность подключения кабеля питания к сетевой розетке и телевизору.
Отсутствует изображение/видео. • Проверьте подключения кабелей (отсоедините и подсоедините все кабели, ведущие к
Пульт дистанционного управления не
работает.
Невозможно включить или выключить
телевизор или отрегулировать
громкость с помощью пульта
дистанционного управления приставки
кабельного ТВ/видеоприставки.
Некоторые из приведенных изображений и функций соответствуют только определенным моделям.
✎
Оптимальные условия использования телевизора достигаются путем обновления микропрограммы с веб-сайта (samsung.com →
✎
“Поддержка” → “Загрузки”) через USB.
• Проверьте исправность сетевой розетки.
• Попробуйте нажать кнопку POWER на телевизоре, чтобы исключить вероятность
неисправности пульта дистанционного управления. Если телевизор включится, обратитесь к
пункту “Пульт дистанционного управления не работает” ниже.
телевизору и внешним устройствам).
• Установите выходной видеосигнал внешнего устройства (приставка кабельной сети/
спутникового телевидения, проигрыватель DVD или Blu-ray и т.д.) так, чтобы он
соответствовал входному разъему телевизора. Например, если на внешнем устройстве
используется выход HDMI, его следует подключить к входу HDMI на телевизоре.
• Убедитесь, что подсоединенные устройства включены.
Перезагрузите подключенное устройство, отсоединив и снова подсоединив его кабель питания.
•
• Замените батареи в пульте дистанционного управления и проверьте их полярность (+/-).
• Почистите окно передачи сигнала датчика, расположенное на пульте дистанционного управления.
• Попробуйте направить пульт дистанционного управления непосредственно на телевизор с
расстояния 1,5-2 м.
• Запрограммируйте пульт дистанционного управления кабельного ТВ/видеоприставки,
чтобы использовать его для управления телевизором. Код телевизора SAMSUNG указан в
руководстве для приставки кабельного ТВ/видеоприставки.
Разрешение экрана
Режим Разрешение
IBM
MAC
VESA DMT
ПРИМЕЧАНИЕ
✎
640 x 350
720 x 400
640 х 480
832 x 624
1152 x 870
640 х 480
640 х 480
640 х 480
800 x 600
800 x 600
800 x 600
1024 х 768
1024 х 768
1024 х 768
1152 x 864
1280 x 720
1280 x 800
1280 x 1024
1280 x 1024
1366 x 768
1440 x 900
1600 x 900
1680 x 1050
1920 х 1080
Частота горизонтальной
развертки (кГц)
31,469
31,469
35,000
49,726
68,681
31,469
37,861
37,500
37,879
48,077
46,875
48,363
56,476
60,023
67,500
45,000
49,702
63,981
79,976
47,712
55,935
60,000
65,290
67,500
• Режим чересстрочной развертки не поддерживается.
• При выборе нестандартного видеоформата устройство может работать неправильно.
Частота
вертикальной
развертки (Гц)
70,086
70,087
66,667
74,551
75,062
59,940
72,809
75,000
60,317
72,188
75,000
60,004
70,069
75,029
75,000
60,000
59,810
60,020
75,025
59,790
59,887
60,000
59,954
60,000
Частота синхронизации
пикселей (МГц)
25,175
28,322
30,240
57,284
100,000
25,175
31,500
31,500
40,000
50,000
49,500
65,000
75,000
78,750
108,000
74,250
83,500
108,000
135,000
85,500
106,500
108,000
146,250
148,500
Полярность
синхронизации
(Г/В)
+/-
-/+
-/-
-/-
-/-
-/-
-/-
-/+/+
+/+
+/+
-/-
-/+/+
+/+
+/+
-/+
+/+
+/+
+/+
-/+
+/+
-/+
+/+
Русский - 22
Page 46

Технические характеристики
Разрешение экрана 1920 х 1080
Условия окружающей среды
Рабочая температура
Рабочая влажность
Температура хранения
Влажность при хранении
Система телевидения Аналоговое: B/G, D/K, L, I (зависит от выбранной страны)
Видеосистема цветности Аналоговое: PAL, SECAM, NTSC-4.43, NTSC-3.58, PAL60
Система звука BG, DK, L, NICAM, MPEG1, DD, DD+, HEAAC.
HDMI IN Видео: 1080p 24Гц, 1080p, 1080i, 720p, 576p, 480p
Шарнирная подставка (влево/вправо) 0°
Название модели UE40ES8000S UE46ES8000S UE55ES8000S
Размер экрана 40 дюймов 46 дюймов 55 дюймов
Звук
(Выход) 10 Вт X 2
Размеры (Ш x В x Г)
Корпус
С подставкой
Вес
Без подставки
С подставкой
Цифровое: MPEG-2 MP@ML, MPEG-4, H.264/AVC MP@L3, MP@L4.0, HP@L4.0
Аудио: 2-канальная линейная ИКМ 32/44,1/48 кГц, 16/20/24 бит.
906,3 х 540,1 х 30,8 мм
906,3 х 571,3 х 176 мм
9,55 кг
11,8 кг
От 10°C до 40°C
От 10% до 80%, без конденсации
От -20°C до 45°C
От 5% до 95%, без конденсации
Цифровое: DVB-T/DVB-C/DVB-S2
1038,7 х 614,7 х 30,8 мм
1038,7 х 653,7 х 210 мм
11,98 кг
14,6 кг
1230,3 х 722,3 х 30,8 мм
1230,3 х 761,6 х 210 мм
16,6 кг
19,3 кг
Smart Touch Control
Название модели RMCTPE1
Питание Источник
Вход
Выход
Возможности
MBR
Голос
Bluetooth
Настройка
Эксплуатация
Совместимость
Размеры Установка (мм) 154 x 52 x 19,5
Вес
Кнопка 14 клавиш
Сенсорная панель Емкостная сенсорная панель (45 мм x55 мм)
Индикатор Индикатор устройства x 3
ИК Инфракрасный светоизлучающий диод x 1
Пульт дистанционного управления Абсолютная координата
MBR Универсальный пульт дистанционного управления
Голос Передача голоса через Bluetooth
Bluetooth Поддержка Bluetooth 2.1
Зона охвата базы данных MBR Глобальная
Режим поддерживаемых устройств 3 режима (TV, STB, BD)
Максимальный рабочий диапазон 12 м
Передача голоса Протокол Bluetooth HID
Поддерживаемая скорость передачи
аудиоданных
Предлагаемый уровень звука -15,5 дБ (от 0 дБ, полномасштабный)
ВЧ 2,4 ГГц, диапазон CSM
Метод сопряжения Стандартное сопряжение с помощью ИК-порта
Максимальное расстояние сопряжения 4 м (линия визирования, целевой инфракрасный приемник на ТВ)
Максимальный рабочий диапазон 10 м (линия визирования)
Сопряжение с ТВ Да
Программирование MBR Требуется Виджет ТВ
Рабочая температура От 32°F до 104°F (от 0°C до 40°C)
Рабочий диапазон ИК: норм. 10 м, макс. 12 м/BT: 10 м
Время работы 3 месяца (200 нажатий кнопок/день)
LED-телевизоры Выше LED E7500
Плазменные телевизоры E8000
Установка (без батарей) (г) 119
Установка (с батареями) (г) 165
Принадлежность Батареи (AA x 2)
Батарея (AA x 2)
Для продления срока службы батарей рекомендуется использовать
щелочные батареи.
16 кГц, 16 бит
Русский - 23
Page 47

ИК-бластер
Название модели VG-IRB2000
Питание Источник
Вход Кнопка 2 клавиши (сопряжение, включение/выключение питания)
Выход
Возможности
MBR
Bluetooth
Настройка
Эксплуатация
Совместимость
Размеры Установка (мм) 95 (Ш ) х 79 (Г) х 65 (В)
(Ш x Г x В) Упаковка (мм) 88 (Ш) х 71 (Г) Х 102 (В)
Вес
Номер сертификата POCC KR. AB57. B00438
Срок действия сертификата с 20.01.2010 по 19.01.2013
Орган сертификации
IP(степень защиты от попадания
твердых частиц и влаги)
Класс защиты прибора от
поражения электрическим током
Напряжение питания переменного тока Переменный ток: 100-240 В
Конструкция и характеристики устройства могут быть изменены без предварительного уведомления.
✎
Характеристики электропитания и потребления электроэнергии указаны на наклейке на корпусе устройства.
✎
Индикатор Индикатор x 1
ИК Инфракрасный светоизлучающий диод x 5
MBR Универсальный пульт дистанционного управления
Bluetooth Поддержка Bluetooth 2.1
Зона охвата базы данных MBR Глобальная
Режим поддерживаемых устройств 3 режима (TV, STB, BD)
Максимальный рабочий диапазон 8 м
ВЧ 2,4 ГГц, диапазон CSM
Метод сопряжения Стандартное сопряжение с помощью ИК-порта
Максимальное расстояние сопряжения 4 м (линия визирования, целевой инфракрасный приемник на ТВ)
Максимальный рабочий диапазон 10 м (линия визирования)
Сопряжение с ТВ Да
Программирование MBR Требуется виджет ТВ
Рабочая температура 32От
Рабочий диапазон ИК: норм. 10 м, макс. 12 м/BT: 10 м
Рабочий угол 360 градусов
Время работы 3 месяца (200 нажатий кнопок/день)
LED-телевизоры Выше LED E7500
Плазменные телевизоры E8000
Установка (без батарей) (г) 86,5
Установка (с батареями) (г) 178,5
Упаковка (г) 30,6
Принадлежность
Рекомендация – только для стран ЕС
• Настоящим компания Samsung Electronics заявляет, что данный LED-телевизор удовлетворяет основным требованиям и другим
положениям директивы 1999/5/EC.
• Официальное заявление о соответствии можно найти по адресу: http://www.samsung.com, выбрав “Поддержка” > “Найти”, “Поддержка
продукции” и введя название модели.
• Данное оборудование можно использовать только в помещении.
• Данное оборудование можно использовать во всех странах ЕС.
Батарея (AA x 4)
Для продления срока службы батарей рекомендуется использовать щелочные батареи.
°F до 104°F (от 0°C до 40°C)
Батареи (AA x 4)
OOO “АЛЬТТЕСТ”
117418, Москва, ул. Цюрупы, д.14
IP 20
оборудование класса II
AB57
Лицензия
Символ «не для пищевой продукции» применяется в соответствие с техническим регламентом Таможенного союза «О безопасности
упаковки» 005/2011 и указывает на то, что упаковка данного продукта не предназначена для повторного использования и подлежит
утилизации. Упаковку данного продукта запрещается использовать для хранения пищевой продукции.
Символ «петля Мебиуса» указывает на возможность утилизации упаковки. Символ может быть дополнен обозначением
материала упаковки в виде цифрового и/или буквенного обозначения.
Русский - 24
Page 48

Докладний посібник користувача вбудовано у телевізор.
Докладніше про перегляд цього електронного посібника читайте на сторінці 19.
Ілюстрації у цьому посібнику користувача подані лише для довідки і можуть відрізнятися від дійсного вигляду виробу. Вигляд і технічні
характеристики виробу можуть бути змінені без попередження.
Примітка про цифрове телебачення
1. Функції, пов’язані з цифровим телебаченням (DVB), доступні лише в тих країнах/регіонах, де транслюються наземні цифрові канали DVB-T
(MPEG2 і MPEG4 AVC) або де наявний доступ до послуг кабельного телебачення, сумісних зі стандартом DVB-C (MPEG2 і MPEG4 AAC).
Дізнайтеся у місцевого торгового представника про можливість отримання сигналу DVB-T або DVB-C.
2. DVB-T – це стандарт європейського консорціуму DVB для передачі цифрового наземного телевізійного сигналу; DVB-C – це стандарт для
передачі цифрового телевізійного сигналу через кабель. Однак підтримку окремих функції, як-от EPG (електронний довідник програм),
VOD (відео за запитом) тощо, не передбачено технічними характеристиками цієї моделі. Тому вони поки що недоступні для використання.
3. Хоча цей телевізор відповідає останнім вимогам стандартів DVB-T і DVB-C (станом на [серпень 2008 р.]), ми не можемо гарантувати його
сумісність із майбутніми функціями цифрового наземного сигналу DVB-T і цифрового кабельного сигналу DVB-C.
4. Залежно від країни чи регіону, де встановлено телевізор, деякі постачальники послуг кабельного телебачення можуть впроваджувати
додаткову плату за такі послуги, згоду з якою користувач надаватиме, приймаючи умови і положення щодо постачання цих послуг.
5. Окремі функції цифрового телебачення можуть бути недоступними в деяких країнах або регіонах; не всі постачальники послуг кабельного
телебачення можуть забезпечувати належну якість мовлення DVB-C.
6. Докладніші відомості можна отримати, звернувшись до місцевого центру обслуговування Samsung.
На якість прийому телевізійного сигналу можуть впливати відмінності типів мовлення в різних країнах. Дізнайтеся у місцевого
✎
уповноваженого торгового представника SAMSUNG або в центрі обслуговування Samsung, чи можна налаштувати телевізор так,
щоб покращити його роботу.
Попередження щодо нерухомого зображення
Уникайте відображення на екрані нерухомих зображень (наприклад, фотографій у форматі jpeg) або нерухомих елементів (наприклад,
логотипу телеканалу, зображення в панорамному форматі або у форматі 4:3, рядка біржових котувань або новин внизу екрана тощо).
Тривале відображення нерухомого зображення може спричинити появу на світлодіодному екрані фантомних зображень, що впливатиме на
якість зображення. Щоб зменшити ризик виникнення такого ефекту, дотримуйтеся викладених нижче рекомендацій.
• Уникайте перегляду того самого телевізійного каналу протягом тривалого часу.
• Завжди намагайтесь відображати будь-яке зображення на весь екран; для оптимального відображення використовуйте меню формату
зображення телевізора.
• Для досягнення потрібної якості зображення зменште значення яскравості і контрастності до мінімального рівня; збільшення таких значень
може прискорити процес вигоряння.
• Часто використовуйте спеціальні функції телевізора, які розроблені для зменшення ефекту залишкового зображення і вигоряння екрана;
детальнішу інформацію читайте в електронному посібнику.
Українська - 2
Page 49

Забезпечення належної вентиляції для телевізора
Встановлюючи телевізор, залиште відстань принаймні 10 см між телевізором та іншими предметами (стінами, стінками шафок тощо) для
забезпечення належної вентиляції. Недотримання цієї вимоги може призвести до пожежі чи проблем із виробом внаслідок підвищення
внутрішньої температури виробу.
Встановлюючи телевізор на підставці чи настінному кріпленні, використовуйте лише деталі, які надаються компанією Samsung
✎
Electronics.
• Використання деталей, наданих іншим виробником, може призвести до проблем із виробом чи травмування користувача через падіння
виробу.
Встановлення на підставці. Встановлення з настінним кріпленням.
10 см
10 см10 см
Інші попередження
[
Залежно від моделі дійсний вигляд виробу може бути дещо іншим, аніж зображено на малюнку.
✎
Будьте уважні, торкаючись телевізора. Деякі частини можуть бути гарячими.
✎
Правила утилізації виробу (відходи електронного та електричного обладнання)
(чинні у країнах ЄС та інших країнах Європи, які використовують систему роздільного збору відходів)
Це позначення на виробі, приладді або документації вказує на те, що після закінчення терміну експлуатації виріб і його
електронне приладдя (наприклад, зарядний пристрій, навушники, кабель USB) не можна утилізувати разом з іншими
побутовими відходами. Щоб уникнути потенційного негативного впливу на навколишнє середовище або здоров’я людей
внаслідок неправильної утилізації, а також для раціональнішого використання матеріальних ресурсів, відокремте цей виріб
від інших відходів та здайте його на утилізацію у встановленому порядку. Для отримання детальної інформації про місце
та спосіб здачі виробів для екологічно безпечної переробки індивідуальним користувачам слід звернутись до торгового
представника, у якого вони придбали виріб, або у місцеві органи влади. Компаніям слід звертатися до постачальників
для уточнення умов договору придбання. Цей виріб і його електронне приладдя не можна утилізувати разом з іншими
комерційними відходами.
Правила утилізації батарей виробу
(чинні у країнах ЄС та інших країнах Європи, які використовують систему збору використаних батарей)
Це позначення на батареї, посібнику або упаковці вказує на те, що після закінчення терміну експлуатації батареї її не можна
утилізувати разом з іншими побутовими відходами. Позначення хімічних символів Hg, Cd або Pb вказує на те, що батарея
містить ртуть, кадмій або свинець у кількості понад рівень, визначений Директивою ЄС 2006/66. Якщо батареї належним
чином не утилізувати, ці речовини можуть завдати шкоди здоров’ю людей або навколишньому середовищу. Для захисту
природних ресурсів і для повторного використання матеріалів відділіть батареї від інших відходів і утилізуйте їх через
місцевий пункт безкоштовного прийому використаних батарей.
10 см
10 см
10 см
10 см
• У перелічених далі випадках може стягуватися плата за обслуговування:
− (а) якщо викликаний на прохання користувача спеціаліст не виявить дефекту виробу
(тобто, якщо користувач не ознайомився з цим посібником);
− (б) якщо у зданому до центру обслуговування виробі не буде виявлено жодного дефекту
(тобто, якщо користувач не ознайомився з цим посібником).
• Про розмір цієї плати користувача буде повідомлено перед виконанням будь-яких робіт чи виїздом спеціаліста.
Українська - 3
Page 50

Перелік функцій
• 3D: за допомогою цієї нової дивовижної функції можна переглядати тривимірний вміст через канали мовлення чи BD-програвачі із
підтримкою формату 3D.
• SMART HUB: єдине меню для доступу до всього вмісту.
− Весь мультимедійний вміст зібрано в одному місці, щоб спростити та урізноманітнити вам проведення вільного часу.
− Простий інтерфейс користувача полегшує керування різноманітними розважальними функціями.
− Багатий вибір різноманітних програм, кількість яких зростає щодня.
− Меню можна персоналізувати шляхом групування та сортування програм відповідно до власних уподобань.
• AllShare Play: AllShare Play надає можливість доступу, перегляду або відтворення фотографій, відеофайлів чи музичних файлів, які
знаходяться на пристроях USB, цифрових камерах, стільникових телефонах та інших сумісних пристроях, доступ до яких можна
отримати через бездротову мережу.
• Anynet+ (HDMI-CEC): дозволяє керувати усіма підключеними пристроями Samsung, які підтримують функцію Anynet+, за допомогою
пульта дистанційного керування телевізора Samsung.
• e-Manual: дає змогу переглянути екранний посібник повністю (стор. 19).
Приладдя
Перевірте наявність усіх перелічених елементів, які постачаються з телевізором. Якщо якогось елемента бракує, зверніться за
✎
місцем придбання виробу.
Форма і колір елементів можуть бути дещо іншими залежно від моделі.
✎
Кабелі, які не входять у комплект, можна придбати окремо.
✎
Відкривши коробку, перевірте, чи окремі елементи не застрягли за матеріалами упаковки.
✎
УВАГА: ВСТАВЛЯЙТЕ КАБЕЛЬ НАДІЙНО, ЩОБ ВИКЛЮЧИТИ САМОВІЛЬНЕ ВІД’ЄДНАННЯ
[
• Пульт керування Smart Touch і батареї (AA x 2)
• IR Blaster & батареї (AA, 4 шт.)
• Пульт дистанційного керування (ДК) і батареї (ААА, 2 шт.)
• Гарантійний талон (додається не у всіх країнах) / інструкція з техніки безпеки
• Кабель живлення
• Ганчірка для протирання
• Окуляри Samsung 3D Active
• Посібник користувача
Перехідник для роз’єму Scart Тримач для кабелів на підставці Проставка під гвинт (4 шт.)
Встановлення тримача для кабелів
Бездротова клавіатура (продається окремо)
Бездротова клавіатура
Українська - 4
Адаптер для картки стандартного
інтерфейсу
Page 51

Використання контролера (клавіша на панелі)
Контролер – це невеликий джойстик, на кшталт кнопки, ззаду праворуч на телевізорі, що дає змогу управляти телевізором без пульта
дистанційного керування.
Форма і колір виробу можуть різнитися залежно від моделі.
✎
Камера
Виконайте описані нижче дії, стоячи перед телевізором.
✎
Якщо ви маєте намір користуватися камерою, слід перевірити, чи до задньої панелі камери прикріплено стрічку; тоді, перш ніж
✎
користуватися камерою, відрегулюйте кут нахилу камери. Якщо ви не маєте наміру користуватися камерою, рекомендовано
встановити об’єктив камери догори. У такому разі пункти Розпізнавання обличчя і Керування рухами недоступні.
Увімкнення живлення Увімкнення телевізора натисненням контролера, коли телевізор перебуває в режимі очікування.
Регулювання гучності Регулювання гучності переміщенням контролера зі сторони в сторону, коли живлення увімкнено.
Вибір каналу Вибір каналу переміщенням контролера вгору і вниз, коли живлення увімкнено.
Використання меню функцій Щоб переглянути і використовувати меню функцій, натисніть і відпустіть контролер, коли
m
Вибір пункту МЕНЮ (
Вибір пункту SMART HUB(
Вибір пункту Джерело (
Вимкнути (P) Коли меню функцій відкрито, виберіть пункт Вимкнути (P) переміщенням контролера назад,
) Відкривши меню функцій, виберіть пункт МЕНЮ (m) переміщенням контролера ліворуч.
™
) Коли відкрито меню функцій, виберіть пункт SMART HUB (™) переміщенням контролера вгору.
s
)
Сенсор пульта дистанційного керування
Меню функцій
mR
P
Телеконтролер
живлення увімкнено. Щоб закрити меню функцій, знову натисніть і відпустіть контролер.
З’явиться екранне меню. Виберіть пункт переміщенням контролера праворуч. Виконуйте
додаткові дії переміщенням контролера праворуч або ліворуч чи назад або вперед. Щоб змінити
параметр, виберіть його і натисніть контролер.
щоб виконати додаткові дії. Щоб змінити параметр, виберіть його і натисніть контролер.
З’явиться головний екран SMART HUB. Виберіть програму за допомогою контролера, тоді
натисніть контролер.
Коли вибрано меню функцій, відкрийте список Джерело (s) переміщенням контролера
праворуч. З’явиться екран джерела. Щоб вибрати потрібне налаштування у пункті Джерело,
переміщайте контролер назад і вперед. Виділивши потрібне джерело сигналу, натисніть контролер.
тоді натисніть контролер.
Щоб закрити пункт Меню, Smart Hub або Джерело, натисніть і утримуйте контролер понад 1 секунду.
✎
Режим очікування
Після вимкнення телевізор переходить у режим очікування і продовжує споживати електроенергію, хоч і в незначному обсязі. Задля безпеки
і з метою зменшення споживання електроенергії не залишайте телевізор у режимі очікування на тривалий час (наприклад, їдучи у відпустку).
Найкраще від’єднати кабель живлення від розетки.
Під’єднання антени
Під’єднуйте кабель живлення до настінної розетки лише попередньо виконавши усі з’єднання.
✎
Під’єднуючи телевізор до декодера кабельних чи супутникових каналів за допомогою кабелю HDMI, компонентного чи композитного
✎
кабелю, немає потреби під’єднувати антену чи кабель до вхідного роз’єму для антени.
Рації та інші портативні пристрої, аматорське чи АМ-радіообладнання, які використовуються поблизу телевізора, можуть негативно
✎
вплинути на роботу телевізора.
Пересуваючи чи повертаючи телевізор із під’єднаним кабелем антени, будьте обережні. Інакше можна відламати роз’єм для антени.
✎
ДВЧ/УВЧ-антена КабельСупутник
або
Українська - 5
Page 52

Довідник пульта керування Smart Touch / ІЧ-прийомопередавача
Докладніше про пульт керування Smart Touch читайте у розділі «Користування пультом керування Smart Touch» електронного посібника.
✎
Smart Touch Control
Промовте голосову команду, яка
відображається на екрані телевізора,
у мікрофон. Щоб використовувати
мікрофон, натисніть кнопку VOICE
на пульті дистанційного керування.
На робот у функції Керування
✎
голосом можуть впливати такі
чинники: нечітка вимова, рівень
Увімкнення і вимкнення телевізора.
Š
: відображення списку нещодавно
використовуваних функцій. За
допомогою сенсорної панелі можна
легко і швидко вибрати потрібну
Y
: регулювання гучності.
Відображення списку функцій.
Виберіть функцію за допомогою
RETURNR: повернення до
VOICE˜: доступ до функції Керування
голосом. Після натиснення кнопки на
екрані телевізора відобразиться список
команд. Промовляйте текст у мікрофон,
вбудований у телевізор. Детальніше
про функцію Керування голосом
читайте у розділі «Розумна взаємодія»
електронного посібника чи на стор. 14.
Щоб вимкнути функцію
✎
функцію.
сенсорної панелі.
попереднього меню.
Керування голосом,
натисніть цю кнопку ще раз.
NUMBERš: відображення екрана з
кнопками з цифрами. Число можна
вибрати за допомогою сенсорної панелі.
TV STB BD
RETURN VOICE NUMBER
голосу і оточуючі шуми.
Світлодіодний індикатор на
позначення ввімкненого пристрою.
Відображення кольорових кнопок і
функцій управління відтворенням. Функцію
можна вибрати за допомогою сенсорної
панелі.
: користуйтеся цими кнопками
відповідно до вказівок на екрані.
Кнопки управління відтворенням:
Використовуйте ці кнопки в разі виконання
певної функції. Детальну інформацію
читайте в електронному посібнику.
T: швидкий вибір часто застосовуваних
функцій. Використовуйте цю кнопку
для виконання певної функції. Детальну
інформацію читайте в електронному
посібнику.
< P >
: зміна каналів.
Сенсорна панель: Сенсорна панель: цю
сенсорну панель можна використовувати
так само, як і сенсорну панель ноутбука.
Якщо упродовж 30 секунд не натиснути
жодної кнопки, пульт керування Smart
Touch автоматично перейде у режим сну.
Щоб увімкнути пульт керування Smart
Touch, торкніться сенсорної панелі.
Відображення програм Smart
Hub. Дивіться розділ «Додаткові
функції → Smart Hub» електронного
посібника.
Щоб вийти з програми, яка
✎
виконується, натисніть кнопку
™
.
˜
Встановлення батареї
2
11
1. Натисніть на задню панель пульта дистанційного керування внизу обома великими пальцями, тоді посуньте кришку відсіку для батарей
у напрямку стрілки.
2. Вставте дві батареї AA у відсік для батарей.
3. Посуньте кришку вниз у напрямку стрілки, щоб закрити відсік для батарей.
Українська - 6
Page 53

IR Blaster
2
1
Для управління зовнішніми пристроями, підключеними до телевізора, налаштуйте універсальний пульт дистанційного керування.
Якщо для налаштування зовнішнього пристрою використовується пульт керування Smart Touch, ІЧ прийомопередавач надсилатиме ІЧ
сигнали на зовнішній пристрій.
Кнопка спарення
Перемикач живлення
OPEN
PAIRING
ON
OFF
1
OPEN
Світлодіодний індикатор
пристрою
ІЧ-прийомопередавач
показує стан спарення.
Встановлення батареї
1. Візьміться за відсік для батарей обома
1
1
2
OPEN
OPEN
руками і витягніть його.
2 . Вставте чотири батареї AA у відсік для
батарей.
3 . Потисніть його на місце.
1
OPEN
OPEN
Початкове спарення
Під’єднавши ІЧ-прийомопередавач до телевізора, ви зможете управляти під’єднаними зовнішніми пристроями із телевізора за допомогою
пульта керування Smart Touch.
ІЧ приймач
30 см - 4 м
TVSTB BD
TVSTBBD
RETURN VOICE NUMBER
• Smart Touch Control
• IR Blaster
RETURN VOICE NUMBER
<Під’єднання>
<Спарення виконано>
Smart Touch Control
Виконавши початкове налаштування телевізора, під’єднайте пульт керування Smart Touch до телевізора.
1. Увімкніть телевізор, натиснувши кнопку
P
.
2. Внизу ліворуч на екрані з’являться піктограми з’єднання, і телевізор автоматично з’єднається з пультом керування Smart Touch.
Щоб ще раз виконати процес спарення, шпилькою або кінчиком скріпки натисніть кнопку скидання налаштувань посередині на
✎
задній кришці пульта. Пульт керування Smart Touch буде ініціалізовано.
• Кнопка скидання налаштувань спарення PAIRING на пульті Smart Touch
IR Blaster
1. Увімкніть ІЧ прийомопередавач. Коли світлодіодний індикатор миготить, ІЧ
прийомопередавач слід під’єднати до телевізора.
OPEN
ON
OFF
PAIRING
OPEN
2. Перемістіть ІЧ прийомопередавач у напрямку ІЧ приймача телевізора, тоді коротко
натисніть кнопку PAIRING внизу ІЧ прийомопередавача.
3. Внизу ліворуч на екрані з’являться піктограми з’єднання, і телевізор автоматично
з’єднається з ІЧ прийомопередавачем.
Якщо під’єднатися не вдасться, вимкніть і знову увімкніть ІЧ прийомопередавач та
✎
спробуйте виконати дії з кроку 2.
Українська - 7
Page 54

Калібрування сенсорної панелі
Щоб відкалібрувати сенсорну панель на пульті керування Smart Touch, виконайте описані нижче дії.
š
1. Натисніть та утримуйте кнопку NUMBER
2. Після завершення усі світлодіодні індикатори вгорі пульта керування Smart Touch одночасно блимнуть два рази.
Користування сенсорною панеллю
✎
Якщо сенсорна панель не працюватиме належним чином, відкалібруйте ї ї, повторивши дії кроків 1 і 2.
✎
протягом 3 секунд. Розпочнеться калібрування.
Користування сенсорною панеллю
Щоб відобразити список із ярликами функцій внизу на екрані, натисніть кнопку ‹ внизу сенсорної панелі. Цей список включає параметри
Меню, Джерело, Сп. кан., 3D та інші функції.
Щоб відобразити вгорі екрана кольорові кнопки та функції управління відтворенням, натисніть кнопку
Переміщення виділеного пункту: торкніться пальцем сенсорної панелі і проведіть ним з одної сторони в
іншу, згори донизу або знизу вгору.
Для безперервного переміщення виділеного пункту швидко проведіть пальцем справа наліво,
✎
зліва направо, згори донизу чи знизу вгору.
RETURN VOICE NUMBER
Виберіть пункт: Торкніться сенсорної панелі.
вгорі сенсорної панелі.
RETURN VOICE NUMBER
Використання режиму прокручування
Якщо у режимі Smart Hub, Web Browser і AllShare Play торкнутися сенсорної панелі, увімкнеться режим прокручування.
У режимі прокручування проведіть пальцем по сенсорній панелі з одного боку в інший – сторінка прокрутиться.
Щоб повернутися до загального режиму сенсорної панелі, торкніться сенсорної панелі або натисніть кнопку RETURNR на пульті
✎
керування Smart Touch.
Введення номера каналу за допомогою пульта керування Smart Touch
1. Переглядаючи телевізійні канали, натисніть кнопку NUMBER
із кнопками з цифрами.
2. За допомогою сенсорної панелі виділіть число, тоді торкніться сенсорної панелі. На екрані телевізора відобразиться список каналів, що
розпочинається з вибраного вами номера.
3. За допомогою сенсорної панелі виділіть канал у списку, тоді торкніться сенсорної панелі.
Канал можна також змінити, торкнувшись піктограми вгору чи вниз на сенсорній панелі. Якщо відразу після цього торкнутись
✎
сенсорної панелі, на екрані телевізора відобразиться список збережених каналів. Виберіть канал, провівши пальцем вгору або вниз,
тоді торкніться сенсорної панелі.
Відображення меню інструментів
T
натисніть кнопку
Відображення журналу каналів, які ви переглядали
Натисніть кнопку
праворуч на сенсорній панелі.
Š
ліворуч на сенсорній панелі.
š
на пульті керування Smart Touch. На екрані телевізора з’явиться екран
Українська - 8
Page 55

Налаштування пульта керування Smart touch control для використання як універсального пульта дистанційного керування
Дає■змогу■управляти■декодером■або■BD-програвачем■чи■обома■під’єднаними■до■телевізора■пристроями■за■допомогою■пульта■керування■
Smart■Touch■Control.■Після■того,■як■ви■під’єднаєте■пристрій■до■телевізора,■за■допомогою■пульта■керування■Smart■Touch■Control■ви■зможете■
здійснювати■навігацію,■вводити■цифри■і■виконувати■інші■команди,■необхідні■для■роботи■та■управління■пристроєм.
За■допомогою■універсального■пульта■дистанційного■керування■можна■налаштувати■гучність■телевізора,■проте■неможливо■
■✎
налаштувати■гучність■декодера.■Перш■ніж■переглядати■зображення■через■декодер,■налаштуйте■рівень■гучності■декодера.
Залежно■від■версії■програми■вказівки■для■режиму■Налашт. станд. пульта ДК■можуть■бути■дещо■іншими.■У■такому■разі■дотримуйтесь■
■✎
вказівок■на■екрані.■
Щоб■підключити■зовнішній■пристрій■до■пульта■керування■Smart■Touch,■виконайте■описані■нижче■дії.
1. Виберіть■пункт■Настройте пристрій для керув.,■і■торкніться■сенсорної■панелі.
2. Виберіть■зовнішній■пристрій■зі■списку■підключених■пристроїв■і■торкніться■сенсорної■панелі.
3. Виберіть■порт,■до■якого■підключений■зовнішній■пристрій,■і■торкніться■сенсорної■панелі.
■Упевніться,■що■вибраний■пристрій■увімкнено.■Якщо■пристрій■вимкнено,■увімкніть■живлення■і■натисніть■кнопку■Оновити.
■✎
4. Виберіть■пункт■Пошук торгових марок/постач. послуг ТБ,■і■торкніться■сенсорної■панелі.■З’явиться■клавіатура■і■поле■для■введення■
тексту.■Введіть■перші■кілька■літер■назви■марки■вашого■пристрою■за■допомогою■пульта■керування■Smart■Touch■Control,■тоді■виберіть■
пункт■Гот.■внизу■клавіатури.■У■списку,■що■з’явиться■під■полем■введення,■виберіть■марку■пристрою,■тоді■торкніться■сенсорної■панелі.
Марку■декодера■можна■шукати■за■назвою■марки■або■назвою■постачальника■послуг■кабельного■телебачення.
5. Виберіть■пункт■ПОШУК МОДЕЛЕЙ,■і■торкніться■сенсорної■панелі.■З’явиться■клавіатура■і■поле■для■введення■тексту.■Введіть■перші■
кілька■літер■і■чисел■назви■моделі■вашого■пристрою■за■допомогою■пульта■керування■Smart■Touch■Control,■тоді■виберіть■пункт■Гот.■внизу■
клавіатури.■У■списку,■що■з’явиться■під■полем■введення,■виберіть■модель■пристрою,■тоді■торкніться■сенсорної■панелі.
■Якщо■функція■пошуку■за■назвою■моделі■не■працює■належним■чином,■виконайте■пошук■за■частиною■назви■моделі■або■
■✎
використовуйте■функцію■пошуку■за■рекомендованим■кодом■моделі.
6. Виберіть■пункт■Завантаж.,■і■торкніться■сенсорної■панелі.■Завантажте■дані■конфігурації■для■прийомопередавача■IR■Blaster■у■той■самий■
спосіб.
7. Завершивши■усі■налаштування,■натисніть■кнопку■Завершено■■і■торкніться■сенсорної■панелі.
TЩоб■скинути■налаштування■прийомопередавача■IR■Blaster■і■пульта■керування■Smart■Touch■Control,■натисніть■кнопку■‹■■на■
■✎
пульті■керування■Smart■Touch■Control,■тоді■виберіть■пункт■Налашт. станд. пульта ДК.■
Використання функції пошуку за рекомендованим кодом моделі
1. У■пункті■ПОШУК МОДЕЛЕЙ■у■режимі■налаштування■вбудованого■пульта■керування,■виберіть■пункт■Рекомендована модель■і■
торкніться■сенсорної■панелі.
2. Виберіть■пункт■Завантаж.■,■щоб■завантажити■рекомендований■код■моделі.
3. Спрямуйте■пульт■керування■Smart■Touch■Control■у■напрямку■ІЧ■сенсора■зовнішнього■пристрою,■тоді■торкніться■сенсорної■панелі,■щоб■
перевірити,■чи■працює■пристрій.
4. Якщо■завантажений■рекомендований■код■моделі■не■працює,■повторіть■дії,■починаючи■з■кроку■3.
У■разі■управління■домашнім■кінотеатром■BD■за■допомогою■універсального■пульта■дистанційного■керування■окремі■кнопки■можуть■не■
■✎
підтримуватися.■У■такому■разі■рекомендовано■використовувати■функцію■Anynet+ (HDMI-CEC).
Українська - 9
Page 56

Огляд пульта дистанційного керування
Цей пульт дистанційного керування спеціально пристосовано для людей із вадами зору; він має крапкові знаки Брайля на кнопках
✎
живлення, перемикання каналів і регулювання гучності.
Увімкнення і вимкнення телевізора.
Відображення та вибір доступного
джерела відеосигналу (стор. 14).
Прямий доступ до каналів.
Почергове увімкнення телетексту, вибір
режиму двох вікон, змішаного режиму і
вимкнення телетексту.
Регулювання гучності.
Відображення програм Smart Hub.
Дивіться розділ «Додаткові функції»
електронного посібника → Smart Hub.
Виклик екранного меню.
Швидкий вибір часто застосовуваних
функцій.
Використовуйте цю кнопку для
виконання певної функції.
Повернення до попереднього меню.
Користуйтеся цими кнопками відповідно
до вказівок на екрані.
Використовуйте ці кнопки в разі
виконання певної функції. Детальну
інформацію читайте в електронному
посібнику.
HISTORY CAMERA
S
AD/SUBT.
Увімкнення та вимкнення підсвітки
пульта дистанційного керування.
Коли підсвітку ввімкнено, кнопки
підсвітлюються на короткий час
після кожного натиснення. (Якщо
користуватись пультом дистанційного
керування, коли ця кнопка увімкнена,
термін роботи батареї буде зменшено).
Повернення до попереднього каналу.
Тимчасове вимкнення звуку.
Зміна каналів.
Виклик списку наявних каналів.
Відображення електронного довідника
програм.
Відображення інформації на екрані
телевізора.
u/d/l/r
елементами екранного меню.
E
їх значень.
Вихід із меню.
HISTORY: відобразиться список
нещодавно використовуваних функцій.
Family Story: підключення до програми
Family Story. Дивіться розділ «Додаткові
функції» електронного посібника →
Family Story.
CAMERA: підключення до камери.
SUPPORT: дає змогу користуватися
різними функціями підтримки, у тому
числі e-Manual (стор. 19).
AD/SUBT.: увімкнення та вимкнення
аудіоопису (функція недоступна у деяких
регіонах) / відображення субтитрів у
цифровому режимі. Дивіться розділ
«Інші функції» електронного посібника →
Субтитри.
W
3D. Дивіться розділ Додаткові функції
електронного посібника → Використання
3D функцій.
: переміщення курсору між
: вибір пунктів меню і налаштування
: вмикання або вимикання режиму
Українська - 10
Page 57

Встановлення батарей (батареї типу: AAA)
Упевніться, що дотримано правильної полярності батарей відповідно до позначень у відсіку.
1
2
3
ПРИМІТКА
✎
• Встановіть батареї так, щоб їхня полярність (+/-) відповідала позначкам усередині відсіку для батарей.
• Пультом дистанційного керування можна користуватися на віддалі до 7 м від телевізора.
• На роботу пульта дистанційного керування може впливати яскраве освітлення. Не використовуйте його поблизу флуоресцентної
лампи або неонової вивіски.
• Форма і колір можуть різнитися залежно від моделі.
Налаштування (Попереднє налаштування)
Коли телевізор буде ввімкнено вперше, низка підказок та екранних вказівок допоможуть вам виконати основні налаштування. Щоб почати
Настр., натисніть кнопку P на пульті дистанційного керування.
Пункт Настр. недоступний, коли джерелом вхідного сигналу вибрано телевізор. Дивіться розділ «Зміна джерела вхідного сигналу»
✎
(стор. 14).
Щоб повернутися до попереднього року в послідовності Настр., виберіть пункт Поперед..
✎
Перш ніж почати, слід перевірити, чи підключено телевізор до антени або кабельної мережі та чи ввімкнено його в розетку (стор. 5).
✎
Щоб запустити функцію Настр., виберіть пункт Пуск.
✎
Мова меню:
1
Вибір мови.
Режим викор.: вибір режиму
2
«Для дому».
Настройки мережі:
3
налаштування параметрів
мережі
Щоб встановити
✎
підключення пізніше,
виберіть пункт Проп..
Оновлення пр. забезп.:
4
оновлення програмного
забезпечення до найновішої
версії
Щоб оновити пізніше,
✎
виберіть пункт Проп..
Виберіть мову меню для використання пульта дистанційного керування, після чого виберіть
пункт Наст.. Починаючи з наступної дії, телевізор відображатиме меню вибраною мовою.
Виберіть за допомогою пульта дистанційного керування пункт Для дому , після чого виберіть
Наст.. Режим
Демо збереж. призначений для використання в магазинах.
Щоб налаштувати мережеве підключення, виберіть за допомогою пульта дистанційного
керування пункт Пуск. Якщо вам невідомі дані налаштування мережі або щоб налаштувати
її пізніше, виберіть пункт Проп.. Докладніше читайте у розділі електронного посібника
«Налаштування дротової або бездротової мережі», де описані вказівки та вимоги до
налаштування, а також у розділі «Під’єднання до мережі» (стор. 18). З’єднання з мережею
можна встановити згодом за допомогою меню Мережа.
Щоб оновити програмне забезпечення телевізора, виберіть пункт Наст.. За потреби
програмне забезпечення телевізора буде оновлено автоматично. Щоб оновити програмне
забезпечення пізніше, виберіть пункт Проп.. Детальнішу інформацію читайте у розділі
Оновлення пр. забезп. («Уподобання → Меню підтримки») електронного посібника.
Тривалість оновлення залежить від стану мережі.
✎
Українська - 11
Page 58

Виберіть країну.
5
(залежно від країни)
Виберіть потрібну країну.
Після вибору країни в деяких моделях може з’явитися додаткове вікно для
✎
встановлення PIN-коду.
Автоматична настройка
6
(1): вибір способу перегляду
телевізора
Автоматична настройка (2):
7
вибір параметрів пошуку і
налаштування пункту Вибір
регіону (залежно від країни).
Годинн.: налаштування
8
режиму годинника
Часовий пояс
9
(залежно від країни):
налаштування часового
поясу.
Керування голосом і
10
рухами: налаштування
функції керування голосом і
жестами.
Настр. завершено Щоб завершити, виберіть Закрити.
11
Пошук та зберігання телевізійних каналів. Розпочати?
• Так.: Всі доступні телевізійні канали будуть знайдені та збережені в пам'яті Вашого
телевізора.
• Ні.: Мені не потрібний пошук. Моя телевізійна приставка забезпечує прийом всіх
доступних телевізійних каналів.
Виберіть джерело каналів, яке потрібно запам’ятати. Якщо вибрати джерело сигналу
Кабель, відобразиться новий екран, в якому можна присвоїти каналам цифрові значення
(частоти). Детальніше читайте у розділі Автоматична настройка («Меню каналу →
Програмування каналів») в електронному посібнику.
Коли спершу вибрано пункт Ант. або Кабель: після того, як будуть збережені всі
✎
ефірні (А нт.) або кабельні (Кабель) канали, можна буде зберегти супутникові канали
(Супутник).
Коли спершу вибрано пункт Супутник: після того, як будуть збережені всі супутникові
✎
(Супутник) канали, можна буде зберегти всі ефірні (А нт.) або кабельні (Кабель)
кана ли.
Перервати процес збереження можна в будь-який момент натисненням кнопки
✎
Зупин.
• Авто: автоматичне встановлення поточного часу.
• Вручну: встановлення поточних дати й часу вручну.
Ця дія доступна лише, коли для режиму годинника встановлено значення Авто.
• Авто: автоматичне встановлення часового поясу.
• Вручну: встановлення часового поясу вручну.
Якщо вибрано пункт Вручну, можна обрати для ЛЧ (перехід на літній/зимовий час)
✎
значення Вмк або Вимк. (залежно від країни)
Функцію Керування голосом і рухами можна увімкнути (Вмк) або вимкнути (Вимк).
✎
Виберіть пункт «Вимк» або «Вмк» і натисніть Наст.. Детальніше читайте у розділі
«Розумна взаємодія» (стор.14).
Внаслідок цього відобразяться виконані налаштування.
✎
Як скинути параметри цієї функції...
Меню → Система →Налаштування
Виберіть пункт Система - Настр. (початкове налаштування). Введіть чотиризначний PIN-код. PIN-код за замовчуванням – «0-0-0-0». Щоб
змінити PIN-код, скористайтеся функцією Змінити PIN.
Навіть якщо ви частково виконали ці налаштування в магазині, вдома потрібно ще раз виконати налаштування меню Настр. (Меню →
Система).
Якщо ви забудете PIN-код, натисніть кнопки на пульті дистанційного керування у режимі очікування у такій послідовності, щоб
✎
скинути PIN-код до «0-0-0-0»: MUTE → 8 → 2 → 4 → POWER (увімк.).
Українська - 12
Page 59

З’єднання
Докладніше читайте у розділі Під’єднання телевізора у e-Manual.
✎
Підключення домашнього кінотеатру DVD
OPTICAL
Кабель HDMI
(не додається в
комплекті)
Під’єднання до комп’ютера
HDMI OUT
З’єднання HDMI
BD-програвач
HDMI OUT
З’єднання HDMI-DVI
BD-програвач
DVI OUT
AUDIO OUT
R-AUDIO-L
Під’єднання навушників
Не
додаються в
комплекті
Оптичний кабель
(не додається в
комплекті)
Кабель HDMI
(не додається в
комплекті)
Кабель HDMI
(не додається в
комплекті)
Аудіокабель
(не додається в
комплекті)
Перехідник для
роз’єму Scart
(додається)
Кабель Scart
(не додається в
комплекті)
SERVICE: роз’єм, призначений лише
для обслуговування.
Компонентний кабель
(не додається в
комплекті)
R
B
R
Y
Кабель HDMI-DVI
(не додається в
комплекті)
Аудіокабель
(не додається в
комплекті)
R
Аудіокабель
(не додається в комплекті)
W
R
Задня панель
телевізора
W
R
Аудіокабель
(не додається в
комплекті)
W
AUDIO OUT
B
Відеокабель
(не додається в
комплекті)
Y
DVI OUT
Вхід для кабелю
живлення
Y
COMPONENT OUT
EXT
Відеомагнітофон або DVD-програвач
З’єднання SCART
Для оптимального кабельного з’єднання використовуйте кабелі товщиною, що не перевищує вказане нижче значення.
✎
PRPBY
Компонентне з’єднання
AUDIO OUT
R-AUDIO-L
BD-програвач
AUDIO OUT
R-AUDIO-L
VIDEO OUT
BD-програвач
Аудіовідеоз’єднання
• Максимальна товщина – 14 мм.
Українська - 13
Page 60

Зміна джерела вхідного сигналу
Ця функція дає змогу вибрати параметри меню та функції
Джерело
™
→ Джерело
Якщо під час перегляду телепрограми ви бажаєте подивитися
фільм на програвачі дисків DVD або Blu-ray, переключитися на
декодер або приймач каналів супутникового телебачення, слід
змінити джерело вхідного сигналу.
■ ТВ / Зовн. / HDMI1/DVI / HDMI2 / HDMI3 / AV / Компонентний
1. Натисніть кнопку
З’явиться екран Smart Hub.
2. Виберіть Джерело. З’явиться екран Джерело.
3. Виберіть потрібне зовнішнє джерело вхідного сигналу.
Або ж відкрити екран Джерело можна, натиснувши кнопку
✎
Джерело
керування чи кнопку Джерело на пульті керування Smart
Touch (дивіться стор. 6).
Вибрати можна лише ті зовнішні пристрої, які під’єднано до
✎
телевізора. У списку Джерело під’єднані джерела вхідного
сигналу буде виділено.
Правила користування Змін. назву
Функція Змін. назву дає змогу присвоїти джерелу вхідного сигналу
назву. Щоб отримати доступ до пункту Змін. назву, відкрийте меню
Сервіс, коли відображається список Джерело . Під пунктом Змін.
назву з’являться описані нижче параметри:
■ VCR / DVD / Дек. каб ТБ / Дек. суп ТБ / PVR дек. / AV-
ресивер / Гра / Відеокамера / ПК / DVI PC / Пристрої DVI /
ТВ / IPTV / Blu-ray / HD DVD / DMA: виберіть вхідний роз’єм,
тоді виберіть назву пристрою, підключеного до роз’єму, зі
списку, що з’явиться. Наприклад, якщо програвач Blu-ray
під’єднано до роз’єму HDMI IN 2, виберіть для цього вхідного
роз’єму сигнал Blu-ray.
Якщо підключити комп’ютер до роз’єму HDMI IN 1 (DVI) за
✎
допомогою кабелю HDMI, ПК слід призначити HDMI1/DVI у
пункті Змін. назву.
Якщо підключити комп’ютер до роз’єму HDMI IN 1 (DVI)
✎
за допомогою кабелю HDMI-DVI, слід призначити DVI PC
HDMI1/DVI у пункті Змін. назву.
Якщо підключити аудіовідеопристрій до роз’єму HDMI IN
✎
1 (DVI) за допомогою кабелю HDMI-DVI, слід призначити
Пристрої DVI HDMI1/DVI у пункті Змін. назву.
Інформація
Перегляд докладних відомостей про вибраний зовнішній пристрій.
Оновити
Якщо зовнішні пристрої у списку Джерело не відображаються,
відкрийте меню Сервіс і виберіть пункт Оновити. У списку
відобразяться всі під’єднані пристрої.
Екран Джерело зі списком джерел сигналу також
✎
можна оновити, вибравши пункт a за допомогою пульта
дистанційного керування.
™
на пульті дистанційного керування.
s
на стандартному пульті дистанційного
шляхом промовляння літер і слів, за допомогою рухів або шляхом
розпізнавання обличчя.
ІНФОРМАЦІЙНИЙ БУКЛЕТ: ВІДМОВА ВІД ЗОБОВ’ЯЗАНЬ
• Вхід у систему за допомогою функції розпізнавання обличчя
Для роботи функції розпізнавання обличчя у пам’ять
телевізора буде збережено ескіз зображення вашого обличчя,
який використовуватиметься для входу в систему.
Використання для входу в систему Smart Hub функції
розпізнавання обличчя може бути менш безпечним, аніж вхід
за допомогою ідентифікатора користувача і пароля.
• Користування камерою для телевізора
Перш ніж використовувати камеру, зверніть увагу на те, що за
певних обставин і за певних юридичних умов користування/
неправильне користування камерою для телевізора може
призвести до правової відповідальності. Користуючись
камерою, ви погоджуєтеся, що не використовуватимете
її (i) у місцях, де камери загалом заборонені (наприклад, у
ванній кімнаті, вбиральні чи роздягальні), (ii) у спосіб, що
розглядатиметься як посягання на приватність особи, або (iii) із
порушенням відповідних законів, норм і статутів.
Керування голосом
Меню → Система → Керування голосом і рухами → Керування
голосом
Увімкнення або вимкнення функції розпізнавання голосу. Дає
змогу отримати доступ до меню і вибирати параметри і функції
промовлянням команд.
Щоб використовувати функцію Керування голосом, слід
✎
чітко і правильно промовити слова і фрази мовою, вибраною
у пункті Мова.
Навколишні шуми можуть призвести до неналежної роботи
✎
функції Керування голосом.
Телевізор розпізнає голосові команди у два способи:
− за допомогою мікрофона телевізора (дистанційне
розпізнавання);
− за допомогою кнопки VOICE
керування (розпізнавання зблизька).
Якщо використовується мікрофон телевізора, слова можуть
✎
не бути правильно розпізнані через навколишні шуми. У
такому випадку скористайтеся кнопкою VOICE˜ на пульті
дистанційного керування. Телевізору буде легше розпізнати
голосову команду.
Кнопка VOICE˜ на пульті дистанційного керування завжди
✎
активна. Щоб використовувати мікрофон телевізора,
увімкніть пункт Керування голосом (Система → Керування
голосом і рухами → Керування голосом).
Якщо параметр меню чи режим не підтримується функцією
✎
Керування голосом, спробуйте функцію Керування
рухами. Щоб користуватися режимом управління жестами,
простягніть руку в напрямку камери і проведіть нею три або
чотири рази зі сторони у сторону.
■ Керування голосом
Увімкнення та вимкнення функції Керування голосом.
■ Мова
Вибір мови, яка використовуватиметься.
Розумне управління
˜
на пульті дистанційного
Кнопка VOICE˜ на пульті дистанційного керування
✎
завжди активна.
Українська - 14
Page 61

■■ Слова-тригери
■Можна■вибрати■параметр■Слова-тригери■,■що■дає■змогу■
використовувати■функцію■Керування голосом.■Або■ж■
телевізор■можна■увімкнути■за■допомогою■налаштування■
Слова-тригери■,■якщо■для■функції■Керування голосом■■
встановлено■значення■Вмк.
Якщо■для■пункту■Слова-тригери■встановлено■значення■«Hi■
TV»,■промовте■Hi TV Power On.
Якщо■для■пункту■Слова-тригери■встановлено■налаштування■
«Smart■TV»,■промовте■Smart TV Power On.
■■ Розмір панелі голос. команди
Встановіть■для■пункту■Розмір панелі голос. команди■
значення■Мінімальний■або■Повний.■Значення■
Мінімальний■■позначає■найменшу■кількість■слів■і■фраз,■які■
можна■використовувати.■Значення■
Повний■позначає■усі■слова■і■фрази.
■■ Чутл-сть (голос)
Встановіть■чутливість■функції■розпізнавання■голосу.
■− Виття:■налаштування■рівня■луни.
■− Чутливість розпізнавання:■налаштування■порогу■
чутливості■функції■розпізнавання■голосу.
■■ Перевірка середовища керування голосом
Можна■перевірити■рівень■шумів■мікрофона■телевізора.
■− Перевірка шуму:■перевірка■рівня■шумів■мікрофона■телевізора.■
Виберіть■Наст.■за■допомогою■пульта■дистанційного■керування.■
Розпочнеться■перевірка,■яка■триватиме■кілька■секунд.■Під■час■
перевірки■слід■зберігати■тишу.
■− Перевірка мікроф. і динаміків:■перевірка■рівня■
шумів■мікрофона■і■гучномовця■телевізора.■Виберіть■
Пуск■за■допомогою■пульта■дистанційного■керування.■
Розпочнеться■перевірка,■яка■триватиме■кілька■секунд.■Під■
час■перевірки■слід■зберігати■тишу.
Функція■доступна■лише,■коли■для■пункту■Вибір
■✎
динаміків■встановлено■значення■Динамік ТВ.
■− Перевірка керування голосом:■перевірка■рівня■гучності■
і■чіткості■голосу■у■режимі■Керування голосом.■Виберіть■
Пуск■за■допомогою■пульта■дистанційного■керування.■
Розпочнеться■перевірка.■Промовте■повідомлення■якомога■
голосніше■і■чіткіше,■щоб■завершити■перевірку.
Якщо■перевірку■не■завершено,■виберіть■пункт■
■✎
Повторна перевірка■і■ще■раз■чітко■і■голосно■
промовте■повідомлення.
Щоб використовувати функцію Керування голосом, виконайте
описані нижче дії.
Якщо■для■функції■Увімкнути телевізор■встановлено■
■✎
значення■Вмк,■телевізор■може■увімкнутися■автоматично■від■
оточуючого■шуму.
1. Промовте■слово,■визначене■у■пункті■Слова-тригери,■у■
мікрофон,■вбудований■у■телевізор,■або■натисніть■і■утримуйте■
кнопку■VOICE
телевізора■відобразиться■індикація■Перевірка середовища
керування голосом.
■✎
2.
Промовте■слово■або■фразу,■вказану■у■пункті■Перевірка
середовища керування голосом.■Якщо■використовується■кнопка■
VOICE˜■на■пульті■дистанційного■керування,■відпустіть■кнопку.
■✎
3. Зачекайте,■поки■текст■буде■розпізнано,■а■тоді■промовте■
наступну■команду.
■✎
Використання режиму введення тексту голосом
1.
Промовте■«Search■All»■(Шукати■всі)■у■режимі■Керування голосом.
■✎
˜
■на■пульті■дистанційного■керування.■На■екрані■
Якщо■використовується■функція■Керування голосом,■для■
рівня■гучності■буде■автоматично■встановлено■значення■5.
Чітко■і■правильно■промовте■слово■або■фразу■мовою,■
вибраною■у■пункті■Мова.
Щоб■вийти■з■режиму■Керування голосом,■промовте■
слово■Слова-тригери■або■«Скасувати»■у■мікрофон■
телевізора■або■ще■раз■натисніть■кнопку■VOICE˜■на■
пульті■дистанційного■керування.
Функцію■введення■тексту■голосом■можна■використовувати■
у■режимі■екранної■клавіатури■QWERTY.■Промовте■слово,■
2. Промовте■слово■або■фразу,■пошук■яких■слід■виконати.
3. Телевізор■виконає■команду.
■✎
Керування рухами
Меню■→■Система■→■Керування голосом і рухами■→■Керування
рухами
Увімкнення■або■вимкнення■функції■Керування рухами.■Дає■змогу■
здійснювати■управління■телевізором■переміщенням■курсору■за■
допомогою■певних■жестів.
Окремі■програми■можуть■не■підтримувати■режим■Керування
■✎
рухами.
■■ Керування рухами
Увімкнення■та■вимкнення■функції■Керування рухами.
■■ Розмір панелі керування рухами
Встановлення■для■режиму■Розмір панелі керування рухами■
значення■Мінімальний■або■Повний.
■■ Перевірка середовища керування рухами
Можна■перевірити■рівень■яскравості■у■приміщенні■і■кут■нахилу■
камери.
■− Перевірка яскравості:■за■допомогою■цієї■перевірки■
■− Перевірка кута камери:■увімкніть■режим■Перевірка
Щоб використовувати функцію Керування рухами, виконайте
описані нижче дії.
1. Щоб■використовувати■режим■Керування рухами,■,■підніміть■
руку■долонею■до■екрана,■затримайте■руку■на■мить■і■помахайте■
нею■3-4■рази■вліво-вправо.■Увімкнеться■режим.■Керування
рухами.■Якщо■режим■Керування рухами■■увімкнено,■
посередині■екрана■з’явиться■курсор,■а■внизу■екрана■з’явиться■
пункт■■Розмір панелі керування рухами.
2. Здійснюйте■управління■телевізором■за■допомогою■рухів.
Зауважте,■що■функція■Керування рухами■закриється,■якщо■
■✎
рухи■виконувати■поза■межами■діапазону■камери.
Якщо■у■режимі■Керування рухами■використовується■
■✎
інший■пристрій■(наприклад,■пульт■дистанційного■керування,■
клавіатура■тощо),■режим■Керування рухами■закриється.
Управління телевізором за допомогою рухів
■■ Вибір режиму управління рухами
■− ДіяДія:■простягніть■руку■в■напрямку■камери■і■проведіть■
■■ Управління курсором
Переміщення■курсору■у■потрібне■положення.
■− ДіяДія:■простягніть■руку■і■перемістіть■курсор■у■потрібне■
■■ Виконання
Вибір■пункту■або■виконання■команди,■позначеної■курсором,■чи■
виділеного■пункту.
■− ДіяДія:■стисніть■кулак.
визначене■у■пункті■Слова-тригери,■у■мікрофон,■вбудований■
у■телевізор,■або■натисніть■і■утримуйте■кнопку■VOICE˜■на■
пульті■дистанційного■керування.
Керування голосом■рівень■ефективності■роботи■функції■
залежатиме■від■мови.
ви■дізнаєтеся,■чи■достатньо■освітлене■приміщення■для■
належного■використання■функції■Керування рухами.■
Виберіть■Пуск■за■допомогою■пульта■дистанційного■
керування.■Розпочнеться■перевірка,■яка■триватиме■лише■
кілька■секунд.
кута камери.■Виберіть■пункт■Пуск■за■допомогою■пульта■
дистанційного■керування.■Розташуйтеся■так,■щоб■ваше■
відображення■було■у■прямокутнику■на■екрані■–■для■
цього■відрегулюйте■камеру■чи■перемістіться■у■потрібне■
положення.■Якщо■положення■вибрано■неправильно,■
функція■може■не■працювати■належним■чином.■Після■цього■
простягніть■руку■в■напрямку■камери■і■проведіть■нею■три■
або■чотири■рази■зі■сторони■у■сторону.
нею■три■або■чотири■рази■зі■сторони■у■сторону.
положення.
Українська - 15
Page 62

■■ Назад
Повернення■до■попереднього■меню.
■− Дія:■простягніть■руку■і■поверніть■нею■проти■годинникової■
стрілки.
■■ Регулювання гучності/вибір каналу
Зміна■каналу■або■налаштування■рівня■гучності.
Якщо■функція■Керування рухами■використовується■
■✎
під■час■перегляду■каналу,■з’явиться■екран■перемикання■
каналу■/■регулювання■гучності.
■− ДіяДія:■за■допомогою■функції■управління курсором■
перемістіть■курсор■до■вікна■регулювання■гучності■
чи■перемикання■каналів,■тоді■за■допомогою■функції■
виконання■налаштуйте■канал■або■гучність.
Якщо■використати■функцію■виконання■один■раз,■
■✎
буде■виконано■ту■саму■дію,■що■й■натисненням■
кнопки■на■пульті■дистанційного■керування.■Якщо■
використати■і■утримувати■функцію■виконання,■
буде■виконано■ту■саму■дію,■що■й■натисненням■та■
утримуванням■кнопки■на■пульті■дистанційного■
■■ Прокручування
керування.
Прокручування■сторінки■у■потрібному■напрямку.■Наприклад,■
потрібно■прокрутити■сторінку■донизу.
Окремі■програми■можуть■не■підтримувати■цю■функцію.
■✎
1. Перемістіть■курсор■донизу■екрана■(зона■прокручування■
сторінки)■за■допомогою■функції■управління курсором.
2. Перемістіть■курсор■до■центру■екрана■за■допомогою■
функції■управління курсором.
3. Сторінка■зміститься■донизу.
Розпізнавання обличчя
™
■→■Сервіс■→■Параметри■→■Дисп. обл. записів■→■Змінити дані
облікового запису →■Зареєстр. обличчя
Увімкнення■або■вимкнення■функції■розпізнавання■обличчя.■Дає■
змогу■зареєструвати■обличчя■в■обліковому■записі■Samsung.■
Увійти■в■обліковий■запис■Samsung■можна■також■за■допомогою■
функції■Розпізнавання обличчя;■для■цього■не■потрібно■вводити■
реєстраційні■дані■і■пароль.
Обличчя■можна■зареєструвати■лише■для■одного■облікового■
■✎
запису.
Щоб увійти в обліковий запис Samsung за допомогою функції
Розпізнавання обличчя, виконайте описані нижче дії.
Використання■для■входу■в■систему■Розпізнавання обличчя■функції■
Smart Hub■може■бути■менш■безпечним,■аніж■вхід■за■допомогою■
пароля.
a
1. Коли■відобразиться■екран■Smart Hub,■виберіть■
допомогою■пульта■дистанційного■керування.■З’явиться■екран■
ID/Пароль.
2. Виберіть■Режим розпізнавання обличчя.■З’явиться■екран■
Розпізнавання обличчя.
Щоб■повернутися■до■екрана■ID/Пароль,■виберіть■пункт■
■✎
Режим пароля.
3. Телевізор■запустить■функцію■Розпізнавання обличчя.■
Розташуйтеся■перед■екраном■телевізора.■Телевізор■
автоматично■розпізнає■обличчя.
Якщо■телевізор■не■розпізнає■обличчя,■повторіть■спробу.
■✎
4. Телевізор■виконає■вхід■в■обліковий■запис■Samsung■
автоматично.
Якщо■розпізнано■два■чи■більше■зареєстрованих■облич,■
■✎
з’явиться■список■облікових■записів■Samsung.■Виберіть■
обліковий■запис■для■входу■в■систему.
Якщо■ваше■обличчя■не■зареєстровано,■зареєструйте■
■✎
його■в■обліковому■записі■Samsung.■Виконайте■дії■кроків■
4■і■5■розділу■«Щоб■зареєструвати■обличчя■в■обліковому■
записі■Samsung,■виконайте■описані■нижче■дії.».
Якщо■у■вас■немає■облікового■запису,■створіть■його.■
■✎
Докладніше■читайте■у■розділі■«Створення■облікового■
запису»■(Додаткові■функції■→■Smart■Hub)■в■електронному■
посібнику.
■за■
Щоб зареєструвати обличчя в обліковому записі Samsung,
виконайте описані нижче дії.
Щоб■використовувати■цю■функцію,■слід■увійти■в■обліковий■
■✎
запис■Smart Hub.■Якщо■у■вас■немає■облікового■запису■Обл.
запис Samsung,■перш■ніж■використовувати■цю■функцію,■
створіть■обліковий■запис.■Відомості■щодо■того,■як■створити■
запис■Обл.запис Samsung,■читайте■у■розділі■«Створення■
облікового■запису»■(Додаткові■функції■→■Smart■Hub)■
електронного■посібника.
1. На■екрані■Smart Hub■за■допомогою■пульта■дистанційного■
керування■відкрийте■меню■Сервіс■і■виберіть■пункт■Параметри.
2. Виберіть■Дисп. обл. записів.■З’явиться■екран■Дисп. обл.
записів.
3. Виберіть■Змінити дані облікового запису.■З’явиться■екран■
Змінити дані облікового запису.
4. Виберіть■пункт■Зареєстр. обличчя.■Щоб■увімкнути■функцію■
розпізнавання■обличчя,■виберіть■пункт■ОК.
5. Введіть■пароль■облікового■запису.
6. Розмістіться■так,■щоб■обличчя■відображалося■урамці■в■центрі■
екрана,■тоді■зачекайте,■поки■рамказмінить■колір■із■червоного■
на■зелений.
Якщо■функцію■Розпізнавання обличчя■виконати■не■
■✎
вдасться,■виберіть■пункт■Повтор.■і■повторіть■спробу.
7. Після■цього■обличчя■буде■зареєстровано■в■обліковому■записі■
Samsung.
Українська - 16
Page 63

Під’єднання до гнізда COMMON INTERFACE (гніздо для перегляду телепрограм)
Під’єднання адаптера для картки стандартного інтерфейсу
Під’єднайте адаптер, як показано нижче.
Щоб під’єднати адаптер для картки стандартного інтерфейсу, виконайте
описані нижче дії.
Перш ніж встановлювати настінний кронштейн чи встановлювати
✎
картку СІ або СІ+, радимо під’єднати адаптер.
Щоб встановити адаптер для картки стандартного інтерфейсу (CI),
✎
зніміть наклейку з телевізора.
1. Вставте адаптер для картки стандартного інтерфейсу у два отвори на
пристрої 1.
Знайдіть два отвори на задній панелі телевізора. Вони
✎
знаходяться поруч із гніздом COMMON INTERFACE.
2. Підключіть адаптер для картки стандартного інтерфейсу до гнізда
COMMON INTERFACE на пристрої 2.
3. Вставте картку CI або СI+.
Картку стандартного інтерфейсу краще вставляти перед монтуванням телевізора на стіну. Після монтування вставити
її може бути важко. Вставляйте картку після під’єднання адаптера для картки CI до телевізора. Якщо спершу вставити
картку, під’єднати модуль буде важко.
Використання картки CI або СI+
Щоб переглядати платні канали, слід вставити картку CI або CI+.
• Якщо картку CI або CI+ не вставити, для деяких каналів на екрані з’являтиметься
повідомлення «Кодований сигнал».
• На екрані протягом 2-3 хвилин відображатиметься така інформація: номер телефону,
ідентифікатор картки CI або CI+, ідентифікатор головного вузла тощо. Якщо з’явиться
повідомлення про помилку, зверніться до постачальника послуг.
• Після завершення конфігурації інформації каналу з’явиться повідомлення про те, що
оновлення завершено. Це означає, що список каналів оновлено.
ПРИМІТКА
✎
• Картку CI або CI+ можна придбати в місцевого постачальника послуг кабельного
телебачення.
• Виймаючи картку CI або CI+, будьте обережні, оскільки від падіння картка може
вийти з ладу.
• Вставляйте картку CI або CI+ відповідно до позначок на ній.
• Розташування гнізда COMMON INTERFACE може різнитися залежно від моделі.
• Картка CI або CI+ не підтримується у деяких країнах і регіонах. Докладніші відомості можна отримати в місцевого уповноваженого
дилера.
• У разі виникнення проблем звертайтеся до постачальника послуг.
• Вставте картку CI чи CI+, що відповідає поточному налаштуванню джерела сигналу з антени. Інакше зображення на екрані може
бути спотворене чи не відображатися.
Щоб встановити адаптер для картки стандартного
інтерфейсу (CI), зніміть наклейку з телевізора.
Задня
панель
телевізора
Роз’єм для комплекту Evolution Kit (продається окремо)
Задня панель
телевізора
Цей роз’єм призначено для підключення комплекту під назвою Evolution Kit. Він дає змогу використовувати на телевізорі безліч найновіших
програм для отримання найкращих вражень від перегляду.
Пристрій Evolution Kit, наявність якого залежить від виробу, надійде у продаж у 2013 році чи пізніше.
Українська - 17
Page 64

Під’єднання до мережі
Телевізор можна налаштувати на з’єднання з програмами SMART TV через локальну мережу за допомогою дротового або бездротового
зв’язку.
Під’єднання до мережі – бездротове з’єднання
З’єднання між телевізором і локальною мережею можна встановити через звичайний маршрутизатор чи модем.
Роз’єм локальної мережі
на стіні
Бездротовий маршрутизатор
(Маршрутизатор із сервером
DHCP)
Кабель локальної мережі
ТВ
Адаптер бездротової локальної мережі Samsung підтримує протоколи зв’язку IEEE 802.11a/b/g та n. Компанія Samsung радить
використовувати протокол IEEE 802.11n. Відео може не відтворюватися належним чином через з’єднання IEEE 802.11b/g.
Більшість систем бездротових мереж мають систему безпеки, яка передбачає застосування зашифрованого коду захисту, так званого
ключа доступу, під час під’єднання пристроїв до мережі через точку доступу або бездротовий маршрутизатор (бездротовий розподілювач
ІР-адрес).
Якщо вибрано режим високої пропускної здатності стандарту 802.11n (Greenfield), а для бездротового маршрутизатора вибрано тип
шифрування WEP, TKIP або TKIP AES (WPS2Mixed), телевізор Samsung не підтримуватиме можливість з’єднання відповідно до нових
технічних характеристик сертифікації Wi-Fi.
Під’єднання до мережі – дротове з’єднання
Існує два основні способи підключення телевізора до мережі за допомогою кабелю, які залежать від способу організації мережі. Їх ілюстрації
наведено нижче.
Роз’єм для модема на стіні
Зовнішній модем
(ADSL/VDSL/кабельне телебачення)
Задня панель телевізора
Кабель локальної мережіКабель модема
Роз’єм локальної мережі на стіні
Кабель локальної мережі
Телевізор не підтримує швидкості мережі, яка є нижчою або дорівнює 10 Мбіт/с.
✎
Для такого з’єднання слід використовувати кабель Cat 5 або 6 (*тип STP). (*Shielded Twist Pair – екранована вита пара)
✎
Задня панель телевізора
Українська - 18
Page 65

Правила перегляду e-Manual
Правила перегляду
В електронному посібнику описані вказівки з роботи функцій телевізора. Щоб відкрити електронний посібник, натисніть кнопку
SUPPORT на стандартному пульті дистанційного керування або виберіть Підтримка за допомогою пульта керування Smart Touch.
Доступ до посібника можна також отримати через меню:
Меню → Підтримка → e-Manual
Доступ до e-Manual
Щоб використовувати режим e-Manual, виконайте описані нижче дії.
1. Якщо вам потрібна допомога, виберіть пункт Підтримка за допомогою пульта дистанційного керування. З’явиться екран Підтримка.
2. Виберіть e-Manual за допомогою пульта дистанційного керування. З’явиться екран e-Manual.
3. Виберіть потрібну категорію.
4. Виберіть потрібну тему. На екрані з’явиться вибрана сторінка посібника e-Manual.
Сині слова у посібнику e-Manual позначають параметри меню чи вибрані пункти меню телевізора.
✎
Зелені піктограми в електронному посібнику позначають кнопки на пульті дистанційного керування.
✎
Стрілки (наприклад, Меню → Підтримка → e-Manual) в електронному посібнику позначають послідовність дій для доступу до
✎
певного параметра чи увімкнення функції.
Перехід від теми в e-Manual до відповідних екранних меню і навпаки.
Зміна попередньо встановленого режиму зображення
Зображ.
Режим зображення
Підсвітка
Контраст.
Яскравість
Різкість
Колір
Тон (з/ч) G50
Ця функція не підтримується деякими меню.
✎
Якщо меню недоступне, функцію Спробувати використовувати неможливо.
✎
1. Щоб перейти до відповідного пункту меню певної теми, виберіть
Зміна попередньо встановленого режиму
зображення
Режим зображення
Меню → Зображення → Режим зображення
До зображення буде застосовано попередньо встановлені
налаштування режимів зображення.
N У разі під’єднання комп’ютера за допомогою кабелю HDMI-
DVI можна вибрати лише пункти Розважити та Стандарт..
• Динамічний режим
Підходить для яскраво освітленого приміщення.
• Стандарт.
Підходить для звичайного освітлення.
a
за допомогою пульта дистанційного керування.
Зображ.
Режим зображення
Підсвітка
Контраст.
Яскравість
Різкість
Колір
Тон (з/ч)
2. Щоб повернутися до екрана e-Manual, виберіть за допомогою пульта дистанційного керування пункт Підтримка.
Зміна попередньо встановленого режиму зображення
Зміна попередньо встановленого режиму
зображення
Режим зображення
Меню → Зображення → Режим зображення
До зображення буде застосовано попередньо встановлені
налаштування режимів зображення.
N У разі під’єднання комп’ютера за допомогою кабелю HDMI-
DVI можна вибрати лише пункти Розважити та Стандарт..
• Динамічний режим
Підходить для яскраво освітленого приміщення.
• Стандарт.
Підходить для звичайного освітлення.
Використання кольорових і функціональних кнопок у меню e-Manual
• Смуга прокручування: перетягування екрана e-Manual вгору чи вниз.
l / r
: перехід до попереднього або наступного розділу.
•
•
a
Спробувати: перехід до екранного меню, що відповідає темі. Щоб повернутися до екрана електронного посібника, виберіть за
допомогою пульта дистанційного керування кнопку Підтримка.
•
b
Вдома: перехід до головного екрана e-Manual.
•
{
Положення: щоразу внаслідок натиснення кнопки
електронного посібника.
•
}
Показник: відображення екрана покажчика.
•
R
Поверн.: повернення до попереднього екрана.
Пошук теми на сторінці покажчика
1. Виберіть
}
за допомогою пульта дистанційного керування. З’явиться екран покажчика.
2. Щоб знайти тему, виберіть літеру. На сторінці покажчика відображається список тем і ключових слів, що починаються з вибраної вами
літери.
3. Виберіть потрібну тему або ключове слово.
4. З’явиться сторінка e-Manual із вибраною темою.
Щоб закрити екран Показник, натисніть кнопку RETURNR.
✎
{
на пульті дистанційного керування змінюється положення екрана
Українська - 19
Page 66

Зміна розташування посібника e-Manual на екрані
Якщо посібник e-Manual погано видно через екранні меню, посібник e-Manual можна перемістити.
1. Перемістіть курсор до екрана e-Manual натисненням кнопки SUPPORT на стандартному пульті дистанційного керування або вибравши
пункт Підтримка за допомогою пульта керування Smart Touch.
2. Натисніть кнопку
на стандартному пульті дистанційного керування або виберіть
{
за допомогою пульта керування Smart Touch.
{
Щоразу внаслідок натиснення { на пульті дистанційного керування змінюється положення екрана e-Manual.
Встановлення на стіні
Монтаж комплекту настінного кріплення
Комплект настінного кріплення (продається окремо) дає змогу встановити телевізор на стіні.
Щоб отримати детальну інформацію про монтаж настінного кріплення, дивіться посібник, який додається до настінного кріплення. З
питаннями щодо монтажу настінного кронштейна звертайтеся до спеціаліста технічної служби. Ми не радимо робити це самостійно.
Компанія Samsung Electronics не несе відповідальності за ушкодження виробу або травми, отримані користувачами у разі самостійного
встановлення телевізора.
Підготовка перед встановленням настінного кріплення
Спосіб A. Встановлення настінного кріплення SAMSUNG Спосіб Б. Встановлення настінного кріплення іншого виробникa
1
Щоб встановити настінне кріплення, використовуйте проставку під гвинти 1.
1
Технічні характеристики комплекту настінного кріплення (VESA)
Комплект настінного кріплення не додається до пристрою, а продається окремо.
✎
Встановлюйте настінне кріплення на твердій стіні, перпендикулярній до підлоги. Якщо потрібно встановити кріплення на інший
✎
матеріал, проконсультуйтеся з місцевим торговим представником. У разі встановлення на стелі або похилій стіні телевізор може
впасти і завдати серйозних травм.
ПРИМІТКА
✎
• У таблиці нижче наведено стандартні розміри комплектів настінного кріплення.
• До комплекту настінного кріплення входить детальний посібник зі встановлення і всі необхідні складові.
• Не використовуйте гвинти, які не відповідають стандартним технічним характеристикам гвинтів VESA.
• Не використовуйте гвинти, довші за стандартні розміри або які не відповідають технічним характеристикам VESA. Надто довгі
гвинти можуть завдати пошкоджень внутрішнім деталям виробу.
• Для настінних кріплень, які не відповідають стандартним технічним характеристикам VESA, розмір гвинтів може відрізнятися
залежно від характеристик настінного кріплення.
• Не закручуйте гвинти надто сильно, оскільки це може пошкодити пристрій або спричинити його падіння, яке може призвести до
травмування користувача. Компанія Samsung не несе відповідальності за такі випадки.
• Компанія Samsung не несе відповідальності за пошкодження виробу або отримання травм користувачем у разі використання
кріплення, іншого аніж VESA, або будь-якого невідповідного кріплення, а також у випадку недотримання користувачем вказівок
щодо встановлення виробу.
• Не монтуйте телевізор із нахилом понад 15 градусів.
• Для встановлення телевізора на стіні потрібно двоє людей.
Тип пристрою
Розмір
діагоналі,
дюйми
Технічні характеристики
VESA (A х B)
Стандартний
гвинт
Кількість
Телевізор зі
світлодіодною
підсвіткою
екрана
Перш ніж встановлювати настінне кріплення, викрутіть гвинти.
✎
4 0 200 X 200
46~60 400 X 400
Не встановлюйте комплект настінного кріплення, коли телевізор увімкнено. Це може призвести до травмування
користувача внаслідок ураження електричним струмом.
Українська - 20
M 8 4
Page 67

Зберігання та обслуговування
Якщо на екрані телевізора є наліпки і якщо їх видалити, екран буде брудним. Почистьте екран для перегляду.
✎
Не розпилюйте воду безпосередньо на виріб. Будь-яка рідина,
потрапивши всередину виробу, може спричинити несправність,
пожежу або ураження електричним струмом.
Витирайте виріб м’якою ганчіркою, змоченою невеликою кількістю
води. Не використовуйте займисту рідину (наприклад, бензин,
розчинники) чи засіб для чищення.
Кріплення телевізора на настінному кронштейні
Увага: Не тягніть, не штовхайте і не залазьте на телевізор, інакше він може впасти. Особливо
зверніть увагу на те, щоб діти не виснули на телевізорі і не розхитували його. В іншому разі
телевізор може перевернутись і призвести до серйозної травми чи смерті. Дотримуйтесь усіх
заходів безпеки, зазначених на вкладеній листівці з правилами техніки безпеки. З міркувань
безпеки для додаткової стабільності пристрою скористайтесь засобом проти падіння, як
Вказівки щодо запобігання падінню телевізора
1. Вставте гвинти у затискачі і надійно зафіксуйте їх на стіні. Перевірте, чи гвинти надійно
зафіксовані на стіні.
Залежно від типу стіни можуть знадобитися додаткові засоби, наприклад анкери.
✎
Оскільки скоби, гвинти і шнурок не додаються, придбайте їх додатково.
✎
2. Викрутіть гвинти посередині на задній панелі телевізора, вставте гвинти у затискачі і знову
вкрутіть гвинти.
Гвинти можуть не постачатися разом із виробом. У такому разі придбайте гвинти, які
✎
відповідають поданим далі технічним характеристикам.
Технічні характеристики гвинтів
✎
• Для моделей з екраном 19-27 дюймів: M4
• Для моделей з екраном 32-75 дюймів: M8
3. З’єднайте затискачі на телевізорі із затискачами на стіні за допомогою міцного шнурка,
після чого надійно зав’яжіть шнурок.
ПРИМІТКА
✎
• Встановлюйте телевізор близько до стіни, щоб він не перевернувся назад.
• Задля безпеки протягніть шнурок так, щоб скоби на стіні були на рівні або нижче
скоб на телевізорі.
• Перш ніж пересувати телевізор, розв’яжіть шнурок.
4. Перевірте, чи усі з’єднання виконано належним чином. Час від часу перевіряйте з’єднання на наявність пошкодження чи послаблення.
Якщо у вас виникли сумніви щодо надійності з’єднань, зверніться до професійного монтажника.
вказано нижче.
Українська - 21
Page 68

Усунення несправностей
Якщо ви маєте будь-які запитання щодо роботи телевізора, спершу перегляньте цей список. Якщо жодна з поданих порад не допоможе
вирішити вашу проблему, перегляньте на веб-сайті www.samsung.com розділ підтримки або зателефонуйте у центр телефонного
обслуговування, перелік яких подається на останній сторінці цього посібника.
Неполадка Вирішення і пояснення
Телевізор не вмикається.
Зображення/відео відсутнє.
Пульт дистанційного керування не
працює.
Пульт дистанційного керування
декодера кабельних чи супутникових
каналів не спрацьовує для увімкнення
або вимкнення телевізора та
регулювання гучності.
Деякі з наведених вище зображень і функцій доступні тільки у певних режимах.
✎
Ви маєте змогу завантажувати найновіше програмне забезпечення з веб-сайту (samsung.com → Support (Підтримка) → Downloads
✎
•
Упевніться, що кабель живлення змінного струму надійно під’єднано до настінної розетки і телевізора.
• Перевірте, чи працює настінна розетка.
• Щоб перевірити, чи проблема не в самому пульті дистанційного керування, скористайтеся
кнопкою POWER на телевізорі. Якщо телевізор увімкнеться, дивіться нижче пункт «Пульт
дистанційного керування не працює».
• Перевірте з’єднання кабелів (від’єднайте і знову під’єднайте всі кабелі телевізора і зовнішніх пристроїв).
• Встановіть вихідний відеосигнал зовнішнього пристрою (декодера каналів кабельного чи
супутникового телебачення, DVD-програвача, Blu-ray-програвача та ін.) відповідно до вхідного
сигналу телевізора. Наприклад, якщо зовнішній пристрій передає вихідний сигнал HDMI, його
слід під’єднати до входу HDMI на телевізорі.
• Перевірте, чи під’єднані пристрої увімкнено.
• Перезавантажте під’єднаний пристрій шляхом повторного під’єднання його кабелю живлення.
Замініть батареї пульта дистанційного керування, розташувавши їх з урахуванням полярності (+/–).
•
• Почистьте вікно передачі сигналу пульта дистанційного керування.
• Спробуйте спрямувати пульт безпосередньо на телевізор на відстані 1,5-1,8 м від нього.
• Запрограмуйте пульт дистанційного керування декодера каналів кабельного/супутникового
телебачення для роботи з телевізором. Код для телевізора SAMSUNG дивіться в посібнику
користувача декодера кабельного чи супутникового телебачення.
(Центр завантажень)) через з’єднання USB.
Роздільна здатність екрана
Режим
IBM
MAC
VESA DMT
ПРИМІТКА
✎
Роздільна
здатність
640 Х 350
720 Х 400
640 Х 480
832 Х 624
1152 Х 870
640 Х 480
640 Х 480
640 Х 480
800 Х 600
800 Х 600
800 Х 600
1024 Х 768
1024 Х 768
1024 Х 768
1152 Х 864
1280 Х 720
1280 Х 800
1280 Х 1024
1280 Х 1024
1366 Х 768
1440 Х 900
1600 x900RB
1680 Х 1050
1920 Х 1080
Горизонтальна частота
(кГц)
31,469
31,469
35,000
49,726
68,681
31,469
37,861
37,500
37,879
48,077
46,875
48,363
56,476
60,023
67,500
45,000
49,702
63,981
79,976
47,712
55,935
60,000
65,290
67,500
Вертикальна частота
(Гц)
70,086
70,087
66,667
74,551
75,062
59,940
72,809
75,000
60,317
72,188
75,000
60,004
70,069
75,029
75,000
60,000
59,810
60,020
75,025
59,790
59,887
60,000
59,954
60,000
Частота піксельної
синхронізації (МГц)
25,175
28,322
30,240
57,284
100,000
25,175
31,500
31,500
40,000
50,000
49,500
65,000
75,000
78,750
108,000
74,250
83,500
108,000
135,000
85,500
106,500
108,000
146,250
148,500
• Режим черезрядкової розгортки не підтримується.
• У разі вибору нестандартного відеоформату зображення може не відображатися належним чином.
Полярність
синхронізації
(Г / В)
+/-
-/+
-/-
-/-
-/-
-/-
-/-
-/+/+
+/+
+/+
-/-
-/+/+
+/+
+/+
-/+
+/+
+/+
+/+
-/+
+/+
-/+
+/+
Українська - 22
Page 69

Технічні характеристики
Роздільна здатність екрана 1920 Х 1080
Вимоги щодо навколишнього середовища
Робоча температура
Робоча вологість
Температура зберігання
Вологість зберігання
Телевізійна система Аналоговий режим: B/G, D/K, L, I (залежно від регіону)
Система кольору/відео Аналоговий режим: PAL, SECAM, NTSC-4.43, NTSC-3.58, PAL60
Система звуку BG, DK, L, NICAM, MPEG1, DD, DD+, HEAAC.
HDMI IN Відео: 1080 24p, 1080p, 1080i, 720p, 576p, 480p
Поворот підставки (вліво/вправо) 0°
Модель UE40ES8000S UE46ES8000S UE55ES8000S
Розмір екрана 40 дюймів 46 дюймів 55 дюймів
Звук
(вихідний) 2 х 10 Вт
Розміри (ШxВxГ)
Корпус
З підставкою
Вага
Без підставки
З підставкою
Цифрове мовлення: MPEG-2 MP@ML, MPEG-4, H.264/AVC MP@L3, MP@L4.0, HP@L4.0
Аудіо: 2-канальний звук Linear PCM 32/44,1/48 кГц, 16/20/24 біт.
906,3 x 540,1 x 30,8 мм
906,3 x 571,3 x 176 мм
9,55 кг
11,8 кг
Цифрове мовлення: DVB-T/DVB-C/DVB-S2
від 10 °C до 40 °C
від 10% до 80% без конденсації
від -20 °C до 45 °C
від 5% до 95% без конденсації
1038,7 x 614,1 x 30,8 мм
1038,7 x 653,7 x 210 мм
11,98 кг
14,6 кг
1230,3 x 722,3 x 30,8 мм
1230,3 x 761,6 x 210 мм
16,6 кг
19,3 кг
Smart Touch Control
Модель RMCTPE1
Живлення Джерело
Введення
Виведення
Характеристики
Універсальний
пульт керування
Голосовий
режим
Bluetooth
Налаштування
Експлуатація
Сумісність
Розміри Виріб (мм) 154x52x19,5
Вага
Кнопка 14 кнопок
Сенсорна панель Сенсор дотику (45 ммx55 мм)
Індикатор Світлодіодні індикатори x 3
ІЧ Інфрачервоний діод x 1
Сенсорне управління Абсолютна координата
Універсальний пульт керування Універсальна система керування
Голосовий режим Передача голосу через Bluetooth
Bluetooth Підтримується Bluetooth 2.1
Покриття бази даних універсального
пульта керування
Підтримувані режими 3 режими (телевізор, декодер, BD-програвач)
Максимальна робоча відстань 12 м
Передача голосу Протокол Bluetooth HID
Підтримувана швидкість передачі звуку 16 кГц, 16 біт
Рекомендований рівень звуку -15,5 дБ (від 0 дБ повного масштабу)
РЧ 2,4 ГГц, діапазон CSM
Спосіб спарення Стандартне спарення ІЧ-способом
Максимальна відстань для спарення 4 м (на лінії видимості, спрямовуючи ІЧ-приймач на телевізор)
Максимальна робоча відстань 10 м (на лінії видимості)
Спарення з телевізором Так
Програмування універсального пульта
керування
Робоча температура від 0°C до 40°C
Робоча відстань ІЧ : нормальна – 10 м, максимальна – 12 м / BT : 10 см
Робочий час 3 місяці (200 натиснень кнопки / день)
Телевізор зі світлодіодною підсвіткою
екрана
Телевізор із плазмовим екраном E8000
Виріб (без батарей)(г) 119
Виріб (із батареями)(г) 165
Приладдя Батареї (AAx2)
Батареї (AA x 2)
Рекомендовано використовувати лужні батареї.
Глобальне
Потрібен телевіджет
Телевізор зі світлодіодною підсвіткою екрана моделі E7500 і пізніших
Українська - 23
Page 70

ІЧ прийомопередавач
Модель VG-IRB2000
Живлення Джерело
Введення Кнопка 2 кнопки (спарення, увімкнення/вимкнення живлення)
Виведення
Характеристики
Універсальний
пульт керування
Bluetooth
Налаштування
Експлуатація
Сумісність
Розміри Виріб (мм) Ш95×Г79×В65
(ШxГxВ) Пакування (мм) Ш88×Г71×В102
Вага
Конструкцію та технічні характеристики може бути змінено без попередження.
✎
Номінальні параметри живлення та відомості про енергоспоживання для цього виробу вказано на наліпці.
✎
Індикатор Світлодіодний індикатор x 1
ІЧ Інфрачервоний діод x 5
Універсальний пульт керування Універсальна система керування
Bluetooth Підтримується Bluetooth 2.1
Покриття бази даних універсального
пульта керування
Підтримувані режими 3 режими (телевізор, декодер, BD-програвач)
Максимальна робоча відстань 8 м
РЧ 2,4 ГГц, діапазон CSM
Спосіб спарення Стандартне спарення ІЧ-способом
Максимальна відстань для спарення 4 м (на лінії видимості, спрямовуючи ІЧ-приймач на телевізор)
Максимальна робоча відстань 10 м (на лінії видимості)
Спарення з телевізором Так
Програмування універсального пульта
керування
Робоча температура від 0°C до 40°C
Робоча відстань ІЧ : нормальна – 10 м, максимальна – 12 м / BT : 10 см
Робочий кут 360 градусів
Робочий час 3 місяці (200 натиснень кнопки / день)
Телевізор зі світлодіодною підсвіткою
екрана
Телевізор із плазмовим екраном E8000
Виріб (без батарей)(г) 86.5
Виріб (із батареями)(г) 178.5
Пакування (г) 30.6
Приладдя Батареї (AAx4)
Батареї (AA x 4)
Рекомендовано використовувати лужні батареї.
Глобальне
Потрібен телевіджет
Телевізор зі світлодіодною підсвіткою екрана моделі E7500 і пізніших
WY\
Рекомендації – лише для ЄС
• Цим компанія Samsung Electronics стверджує, що цей телевізор зі світлодіодною підсвіткою екрана відповідає усім важливим вимогам
та іншим відповідним положенням Директиви 1999/5/EC.
• Офіційну Декларацію сумісності шукайте за адресою http://www.samsung.com, перейдіть до розділу «Support (Підтримка) > Search
Product Support (Пошук з підтримки продукту)» і введіть номер моделі.
• Цей виріб можна використовувати лише у приміщенні.
• Цей виріб можна використовувати в усіх країнах ЄС.
Ліцензія
Українська - 24
Page 71

Пайдаланушы нұсқаулығының толық нұсқасы осы ТД-ға орнатылған.
Эл. нұсқаулықты қарауға қатысты толық ақпаратты 19-шы беттен қараңыз.
Аталмыш пайдаланушыға арналған нұсқаулықтағы суреттер мен сызбалар тек жалпылама ақпарат ретінде ғана берілген және олар
құрылғының нақты көрінісінен өзгеше болуы мүмкін. Өнімнің дизайны мен техникалық сипаттамасы алдын ала ескертусіз өзгертілуі
мүмкін.
Сандық теледидарға қатысты құлақтандыру
1. Сандық теледидар (DVB) функциялары тек DVB-T (MPEG2 және MPEG4 AVC) сандық жерүсті сигналдары таратылатын немесе DVB-C
(MPEG2 және MPEG4 AAC) сигналдарымен сыйысымды кабельдік телевизия қызметі көрсетілетін елдер/аймақтарда ғана бар. DVB-T
немесе DVB-C сигналдарын қабылдау мүмкіндігінің бар-жоғын білу үшін жергілікті дилерге хабарласыңыз.
2. DVB-T дегеніміз, сандық жерүсті сигналдарын таратуға қатысты, ал DVB-C дегеніміз, сандық сигналдарды кабельдік теледидар арқылы
қабылдау бойынша DVB Еуропалық консорциум стандарты болып табылады. Дегенмен, EPG (Бағдарламалардың Электрондық
Нұсқаулығы), VOD (Сұраныс бойынша Видео) тағы сол сияқты ерекше функциялардың түрі бұл нұсқаулықта қамтылмаған. Сондықтан
оларға осы сәтте қолдау көрсетілмейді.
3. Бұл ТД, DVB-T және DVB-C соңғы стандарттарына [Тамыз, 2008] сай жасалса да, аталмыш теледидарға бұдан кейін шығатын DVB-T
сандық жерүсті және DVB-C кабельдік теледидар таратылым сигналдарын қолдайды деген кепілдік берілмейді.
4. ТД қолданылатын ел/аймақ түрлеріне қарай, кейбір кабельдік теледидар қызметінің провайдерлері көрсеткен қызметтері үшін қосымша
төлемақы алуы және олардың көрсететін қызмет шарттарына келісім беру қажет болуы мүмкін.
5. Кейбір елдерде немесе аймақтарда сандық ТД-дың кей функциялары жұмыс істемеуі және кабельдік теледидар провайдерлерінің
кейбірі DVB-C қызметін дұрыс көрсете алмауы мүмкін.
6. Қосымша ақпаратты жергілікті Samsung тұтынушыларға қызмет көрсету орталығына хабарласып алыңыз.
Теледид ардың сиг нал дарды қабылдау сапасына елдер арасындағы сиг нал тарат у тәсілдерінің әр т үрлі болуы әсер етуі
✎
мүмк ін. ТД-д ың қа лай ж ұмы с жасайтынын жергілікті SAMSUNG уә кіл етті дилеріне немесе Samsung байланыс орталы ғына
хабарласып, оны ТД-ды қайта теңшеу арқылы рет теуге болатын-бо лмайтынын тексері ңіз.
Қимылсыз бейнеге қатысты ескерту
Бейнебетте қимылсыз бейнені (мысалы, jpeg суреттерінен тұратын файлдар) немесе қимылсыз бейне элементін (мысалы, ТД
бағдарламасының логотипі, панорама немесе 4:3 пішіміндегі сурет, экранның төменгі жағынан биржа жаңалықтары не жаңалықтар
т.с.с.) көрсетпеуге тырысыңыз. Қимылсыз бейнені үздіксіз көрсеткенде, LED жарықтамалы бейнебетте қосарлы сурет пайда болады, бұл
суреттің сапасына әсер етеді. Осы әсердің салдарын азайту үшін төмендегі ұсыныстарды орындаңыз:
• Теледидардан бір арнаны ұзақ уақыт көрмеңіз.
• Кез келген суретті ТД экранына толық ашып көріңіз, ол үшін теледидардың бейне пішімі параметрлері мәзірін қолданыңыз.
• Суреттің сапасын қалаған деңгейге қою үшін жарықтылық және контраст мәндерін ең аз мәнге қойыңыз, бұл мәннен асырсаңыз
"бейнебеттің жануы" үрдісі тездетуі мүмкін.
• Теледидардың "бейненің қалып қоюы" және "бейнебеттің жануы" тәрізді ақаулықтарды азайтуға арналған функцияларының барлығын
жиі қолданыңыз, толығырақ ақпаратты эл. нұсқаулықтан қараңыз.
Казақ - 2
Page 72

ТД-ды дұрыс желдету
ТД-дың жақсы желдетілуін қамтамасыз ету үшін оны орнатқан кезде ТД мен басқа заттардың (қабырғалар, жиһаздың қабырғалары
т.с.с.) кем дегенде 4 дюйм орын қалуын қамтамасыз етіңіз. Дұрыс желдетпеген кезде, құрылғының ішкі температурасы артып, өрт шығуы
немесе оған зақым келуі мүмкін.
ТД-ды тұрғыға қою немесе қабырғалық аспа жинаққа орнату үшін Samsung Electronics бөлшектерін ғана қолдануды ұсынамыз.
✎
• Егер басқа өндіруші шығарған бөлшектерді қолдансаңыз, өнімге зақым келуі немесе ол құлап, адам жарақат алуы мүмкін.
Тұрғыға орнату. Қабырғалық аспа жинаққа орнату.
10 см
10 см10 см
Басқа ескертулер
[
ТД-дың нақты сыртқы көрінісі, үлгі түріне байланысты осы нұсқаулықтағы суреттерден өзгеше болуы мүмкін.
✎
ТД-ды ұстаған кезде абай болыңыз. Кей бөліктері ыстық болуы мүмкін.
✎
Осы өнімді дұрыс тастау (Қолданыстан шыққан электр & және электроника бөлшектері)
(Еуропалық одақ елдері мен басқа қоқыс тастау жүйесін қолданатын Еуропа елдеріне қатысты)
Өнімдегі, оның керек-жарақтары немесе ілеспе кітапшасындағы белгі, осы өнім мен оның электроникалық керекжарақтарын (мысалы, зарядтағыш құралы, құлақаспабы, USB сымы), қолданыс мерзімі аяқталғаннан кейін басқа
тұрмыстық қалдықтармен бірге тастамау керек дегенді білдіреді. Қалдық дұрыс тасталмаған жағдайда қоршаған ортаға
немесе адамдардың денсаулығына келетін зиянның алдын алуға және материалдық ресурстарды қайтадан қажетке
жаратуға өз үлесіңізді қосу үшін бұндай заттарды басқа қоқыс түрлерінен бөлектеп, қалдық өнімдерді қайта өңдеуден
өткізетін жерге апарып тапсырыңыз. Тұрмыстық құрылғыны қолданушылар, осы заттарды қоршаған ортаға залалсыз түрде
қайта өңдеуден өткізу үшін осы құрылғыны қайда апарып тапсыру, қалай тапсыру туралы егжей-тегжейлі ақпаратты, осы
өнімді сатып алған бөлшек сауда орталығына немесе жергілікті мекемеге хабарласып алуына болады. Коммерциялық
мақсатта қолданушылар, өз жабдықтаушыларына хабарласып, сатып алу келісім-шартының талаптарымен танысуы керек.
Осы өнім мен оның электроникалық керек-жарақтарын басқа да коммерциялық өнімдердің қалдықтарымен араластырып
тастауға болмайды.
Осы өнімнің батареяларын дұрыс тастау
(Еуропалық одақ елдері мен батареяны басқаша тастау жүйесін қолданатын Еуропа елдеріне қатысты)
Батареядағы, нұсқаулық немесе орамдағы мына белгі, осы өнімнің батареяларын, қолданыстан шыққаннан кейін басқа
да тұрмыстық қалдықтармен бірге тастауға болмайды дегенді көрсетеді. Егер батареяда Hg, Cd немесе Pb тәрізді
химиялық элементтердің белгілері көрсетілсе, онда аталмыш батареядағы сынап, кадмий немесе қорғасынның мөлшері,
Еуропалық Одақтың 2006/66 ережесінде ұсынылған деңгейден артық екендігін білдіреді. Батареяларды дұрыс тастамаған
жағдайда, бұл элементтер адам денсаулығына немесе қоршаған ортаға зиян келтіруі мүмкін. Табиғи ресурстарды
қорғап, материалдарды қайта қолдануға өз үлесіңізді тигізу үшін, батареяларды басқа қоқыстардан бөліп, таусылған
батареяларды қабылдайтын жергілікті мекемеге тапсырыңыз.
10 см
10 см
10 см
10 см
• Келесі жағдайларда әкімшілік төлемақы төлеу қажет болуы мүмкін:
− (a) техникті үйге шақырсаңыз, бірақ құрылғыдан ешбір ақау табылмаса,
(яғни, осы пайдаланушы нұсқаулығының тиісті тұстарын оқымасаңыз)
− (ә) құрылғыны жөндеу орталығына әкелсеңіз, бірақ құрылғыда
ешбір ақау болмаса (яғни, осы пайдаланушы нұсқаулығының тиісті тұстарын оқымасаңыз).
• Бұндай әкімшілік төлемақының мөлшері, қандай да бір жұмысты орындау немесе үйіңізге барар алдында алдын ала хабарланады.
Казақ - 3
Page 73

Функциялар тізімі
• 3D: Бұл тамаша жаңа функция кейбір таратылым станцияларынан немесе 3D BD ойнатқыштарынан 3D мазмұнды көруге мүмкіндік
береді.
• SMART HUB: Барлық мазмұн жиналған жерге бару мүмкіндігі
− Әр түрлі ойын-сауық бағдарламаларына оңай баруға көмектесетін, топтастырылған нұсқаулық
− Оңай әрі қарапайым пайдаланушы интерфейсі (UI) арқылы ойын-сауық бағдарламаларын басқарыңыз
− Күн сайын қосылып отыратын, түрлі бағдарламаларға қол жеткізіңіз.
− Бағдарламаларды өз қалауыңызға сай топтау & сұрыптау арқылы ТД-ды өзіңізге бейімдеңіз
• AllShare Play: AllShare Play бағдарламасы USB құралдарына, сандық камераларда, ұялы телефондарда және ДК-де сақталған
фотосуреттерге, бейнежазбаларға немесе саз файлдарына баруға, қарауға немесе ойнатуға мүмкіндік береді. ДК, ұялы телефондар
және басқа сыйысымды құралдарға сымсыз желі арқылы сымсыз қосылуға болады.
• Anynet+ (HDMI-CEC): Anynet+ функциясын қолдайтын, барлық жалғаулы тұрған Samsung құрылғыларын Samsung теледидарының
қашықтан басқару пульті арқылы басқаруға мүмкіндік береді.
• e-Manual: Нұсқаулықты бейнебеттен толық оқуға мүмкіндік береді. (б. 19)
Керек-жарақтар
Төмендегі бөлшектердің ТД-мен бірге жеткізілгенін тексеріңіз. Керек-жарақтардың бірі жетіспесе, дилерге хабарласыңыз.
✎
Элементтердің түсі мен пішімі ТД үлгісіне байланысты әр түрлі болуы мүмкін.
✎
Жинақтың ішіне кірмеген сымдарды жеке сатып алуға болады.
✎
Қорапты ашқанда орам материалдарының арт жағында ешбір керек-жарақтың қалып қоймағанына көз жеткізіңіз.
✎
АБАЙ БОЛЫҢЫЗ: ЖИНАҚТАН ШЫҒЫП КЕТПЕС ҮШІН МЫҚТАП СҰҒЫҢЫЗ
[
• Smart Touch Control & батареялары (AA x 2)
• IR Blaster & батареялары (AA x 4)
• Қашықтан басқару пультінің & батареялары (AAA x 2)
• Кепілдік түбіртегі (Кей жерлерде берілмейді) / Қауіпсіздік нұсқаулары
• Қорек сымы
• Тазалағыш шүберек
• Samsung 3D Active көзілдірігі
• Пайдаланушы нұсқаулығы
Scart адаптері
Ұстағыш-Сымның тұрғысын құрастыру
Сымсыз пернетақта (жеке сатылады)
Сымсыз пернетақта
Ұстағыш-Сымдарға арналған
тұрғы
Ұстағыш-Шығырық x 4 CI Card адаптері
Казақ - 4
Page 74

ТД басқарушысын қолдану (Панельдегі перне)
ТД басқарушысы дегеніміз ТД-дың артқы оң жағында орналасқан, ТД-ды қашықтан басқару пультін пайдаланбай басқаруға мүмкіндік
беретін кішкене джойстик-түймешік.
Құрылғының түсі мен пішімі үлгі түріне қарай әр түрлі болуы мүмкін.
✎
Камера
ТД-дың алдыңғы жағындағы мына нұсқауларды орындаңыз.
✎
ТД камерасын пайдаланған кезде ТД камерасының артына таспа тағылғанына көз жеткізгеннен кейін, камера бұрышын
✎
түзетіңіз. ТД камерасын пайдаланғыңыз келмесе, камера линзасын жоғары қаратып қоюды ұсынамыз. Бұндай жағдайда Бет
тану және Қимылмен басқару функциялары жұмыс істемейді.
Қуат қосулы ТД күту режимінде тұрғанда басқарушыны басып, ТД-ды іске қосыңыз.
Үнділікті реттеу Тоққа қосылып тұрғанда басқару құралын бір жағынан екінші жағына қарай қозғау арқылы
Арнаны таңдау Тоққа қосылып тұрғанда басқару құралын жоғары және төмен қозғау арқылы арнаны таңдаңыз.
Функция мәзірін пайдалану Функция мәзірін қарау және пайдалану үшін, тоққа қосылып тұрған кезде басқару құралын
m
таңдау МӘЗІР (
таңдау SMART HUB (™) Функция мәзірі көрініп тұрғанда басқару құралын жоғары жылжытып, SMART HUB (™)
режимін таңдау Сигнал көзі (
Қуатты өшіру (P) Функция мәзірі көрініп тұрғанда басқару құралын төмен жылжытып Қуатты өшіру (P)
)
s
)
Қашықтан басқару пультінің сенсоры
Функция мәзірі
mR
P
ТД басқару құралы
үнділікті реттеңіз.
басып босатыңыз. Функция мәзірін жабу үшін басқару құралын басып қайта босатыңыз.
Функция мәзірі көрініп тұрғанда басқару құралын солға жылжытып, МӘЗІР (m) қойындысын
таңдаңыз. БМ (Бейнебет мәзірі) көрсетіледі. Басқару құралын оңға қарай жылжытып параметрді
таңдаңыз. Қосымша параметрлерді таңдау үшін басқару құралын оңға немесе солға, артқа немесе
алға жылжытыңыз. Параметрді өзгерту үшін, оны таңдаңыз да, содан кейін басқару құралын
басыңыз.
жылжытыңыз. Параметрді өзгерту үшін, оны таңдаңыз да, содан кейін басқару құралын басыңыз.
функциясын таңдаңыз. SMART HUB негізгі бейнебеті көрсетіледі. Бағдарламаны басқару
құралын жылжытып таңдаңыз да, содан кейін басқару құралын басыңыз.
Функция мәзірі көрініп тұрғанда басқару құралын оңға жылжытып, Сигнал көзі (s) тізімін ашыңыз.
Сигнал көзі бейнебеті көрсетіледі. Сигнал көзі режимін таңдау үшін басқару құралын артқа және
алға жылжытыңыз. Қажетті сигнал көзі бөлектелген кезде басқару құралын басыңыз.
параметрін таңдаңыз да, содан кейін басқару құралын басыңыз.
Мәзір, Smart Hub немесе Сигнал көзі режимін жабу үшін басқару құралын 1 секундтан астам басыңыз.
✎
Күту режимі
ТД-ды сөндірген кезде күту режиміне кіреді де, сәл де болса электр қуатын тартып тұрады. Қауіпсіздікті қамтамасыз ету үшін және электр
қуатын үнемдеу үшін ТД-ды ұзақ уақыт (мысалы, демалысқа кеткенде) күту режимінде қалдырмаңыз. Қорек сымын ағытып қойған дұрыс.
Әуе желісіне қосу
Қорек сымын басқа барлық қосылымдарды қосып болғаннан кейін ғана қабырғадағы розеткаға жалғаңыз.
✎
Егер ТД-ды HDMI, Құралас элемент немесе Құралас қосылымдарды қолданып кабельге немесе жерсерік ресиверіне қоссаңыз,
✎
ANT IN ұяшығын антенна немесе кабель қосылымына қосудың қа жеті жоқ.
ТД қасында екі-толқынды ұялы радио мен жылжымалы құралдарды немесе кәсіпқой радио не AM радиосын қолданғанда, ТД
✎
дұрыс жұмыс істемеуі мүмкін.
Егер антенна сымы мықтап қосылып тұрса, ТД-ды жылжытқанда немесе айналдыр ғанда абай болыңыз. ТД-дың антенна
✎
ұяшығын сындырып алуыңыз мүмкін.
VHF/UHF әуе желісі сымы
Жерсерік
Кабель
немесе
Казақ - 5
Page 75

Smart Touch Control / IR Blaster нұсқаулығы
Smart Touch Control туралы толық ақпаратты эл. нұсқаулықтың "Smart Touch Control функциясын қолдану" тарауынан қараңыз.
✎
Smart Touch Control
Микрофонды пайдаланып ТД-да көрсетіліп
тұрған дауысты нұсқауды айтуға болады.
Микрофонды пайдалану үшін қашықтан
басқару пультінің VOICE˜ түймешігін
басыңыз.
Дауыспен басқару функциясын да
✎
нұсқ аудың н ақты айтылмау ы, үнділік
деңгейі немес е қоршаған ортаның
шуылы тану ға әс ер ет уі мүмкін.
Белсенді құралды LED көрсетеді.
Түрлі-түсті және ойнатуды басқару
функцияларын көрсетеді. Функцияны
Сенсорлық тақтаны пайдаланып таңдауға
болады.
: Осы түймешіктерді бейнебетте
көрсетілген нұсқауларға сай қолданыңыз.
ойнату режимін басқаратын түймешіктер:
Бұл түймешіктерді арнайы функцияда
қолданыңыз. Қосымша ақпаратты
электронды нұсқаулықтан қараңыз.
T: Жиі қолданылған функцияларды
жылдам таңдауға арналған. Бұл түймешікті
арнайы функцияда қолданыңыз. Қосымша
ақпаратты эл. нұсқаулықтан қараңыз.
< P >
: Арналарды ауыстырады.
Сенсорлық тақта Сенсорлық
тақтаны ноутбуктің сенсорлық
тақтасы тәрізді қолдануға болады.
Егер 30 секунд ішінде ешбір
түймешікті баспасаңыз, Smart Touch
Control функциясы Күту режиміне
автоматты түрде қойылады. Smart
Touch Control функциясын іске қосу
үшін Сенсорлық тақтаны басыңыз.
Smart Hub бағдарламаларын
көрсетеді. Эл. нұсқаулықтың
Кеңейтілген функциялар → Smart
Hub тарауын қараңыз.
Орындалып тұ рған
✎
бағдарламадан тез шығу үшін
™
түймешігін басың ыз.
Теледидарды қосуға және сөндіруге
Š
: Жақында қолданылған
функциялардың тізімі көрсетіледі.
Функцияны қайтадан Сенсорлық
тақтаны пайдаланып оңай және
жылдам таңдауға болады.
Y
: Үнділікті реттеуге арналған.
Ентаңба функцияларының тізімін
көрсетеді. Функцияны Сенсорлық
тақтаны пайдаланып таңдауға болады.
RETURNR: Алдыңғы мәзірге қайтуға
VOICE˜: Дауыспен басқару
функциясына баруға мүмкіндік
береді. Түймешікті басқан кезде
ТД-да пәрмендер тізімі көрсетіледі.
Қашықтан басқару пультіне
кіріктірілген микрофонға сөйлеуге
болады. Дауыспен басқару
функциясына қатысты толық
ақпаратты эл. нұсқаулықтың "SMART
қатынасу" тарауынан немесе 14-ші
Дауыспен басқару
✎
функциясынан шығу үшін
түймешікті қ айта басыңыз.
NUMBERš: Number түймешігінің
бейнебетін көрсетуге арналған.
Санды Сенсорлық тақтаны
пайдаланып таңдауға болады.
арналған.
арналған.
беттен қараңыз.
TV STB BD
RETURN VOICE NUMBER
Батареяны салу
2
11
1. Қашықтан басқару пультінің артқы астыңғы жағын қос бармағыңызбен басып, содан кейін батарея бөлімінің қақпағын көрсеткінің
бағытымен сырғытыңыз.
2. Батарея бөліміне 2 AA батареясын салыңыз.
3. Батареяның қақпағын жабу үшін қақпақты көрсеткінің бағытымен төмен қарай сырғытыңыз.
Казақ - 6
Page 76

IR Blaster
ТД-ға қосылған сыртқы құрылғыларды басқару үшін Әмбебап басқару құралын баптау керек.
Сыртқы құрылғыны реттеу үшін Smart Touch Control құралын пайдалансаңыз, IR Blaster құралы сыртқы құрылғыға IR сигналын жібереді.
Жұптастыру түймешігі
Қуат тетігі
OPEN
PAIRING
ON
OFF
1
OPEN
Құрылғының LED
индикаторы
IR Blaster құралы
жұптастыру үрдісінің
қалып-күйін көрсетеді.
Батареяны салу
1. Батарея ұстағыштың екі жағынан
1
1
2
OPEN
OPEN
ұстап тұрып тартыңыз.
2 . Батарея бөліміне 4 AA батареясын
салыңыз.
3 . Кері итеріңіз.
1
OPEN
OPEN
Бастапқы жұптастыру
ТД-ғ
а IR Blaster құралын жалғаған кезде қосылған сыртқы құрылғыларды Smart Touch Control функциясын қолданып ТД арқылы басқара аласыз.
RETURN VOICE NUMBER
IR қабылдағыш
30см ~ 4м
TVSTB BD
<Жалғанып жатыр >
TVSTBBD
RETURN VOICE NUMBER
• Smart Touch Control
• IR Blaster
<Жұптастыру аяқталды >
Smart Touch Control
ТД-дың параметрін алғаш баптағаннан кейін Smart Touch Control құралын ТД-ға жалғау керек.
1. ТД-ды P түймешігін басып қосыңыз.
2. Бейнебеттің астыңғы сол жағында қосылым белгішелері көрсетіледі де ТД автоматты түрде Smart Touch Control құралына қосылады.
Егер жұптастыру әрекетін қайта орындағыңыз келсе, артқы қақпақтың ортасындағы қайта бастапқы қалпына қою түймешігін инемен
✎
немесе майыспаған қағаз қапсырмасының ұшымен басыңыз. Smart Touch Control функциясы бастапқы қалпына қойылады.
• Smart Touch Control PAIRING Reset түймешігі
IR Blaster
1. IR Blaster құралын қосыңыз. LED индикаторы жыпылықтаған кезде IR Blaster құралын ТД-ға
жалғау керек.
OPEN
ON
OFF
PAIRING
OPEN
2. IR Blaster құралын ТД IR ресиверіне қарай жылжытып, содан кейін IR Blaster құралының астыңғы
жағындағы PAIRING түймешігін бір рет қысқа басыңыз.
3. Бейнебеттің астыңғы сол жағында қосылым белгішелері көрсетіледі де, ТД автоматты түрде IR
Blaster құралына қосылады.
Егер жұптастыру үрдісі сәтсіз аяқталса, IR Blaster құралын сөндіріп қайта қосыңыз да, 2-ші
✎
қадамнан бастап қайталаңыз.
Казақ - 7
Page 77

Сенсорлық тақтаны баптау
Smart Touch Control құралының сенсорлық тақтасын баптау үшін келесі қадамдарды орындаңыз:
š
1. NUMBER
2. Болған кезде Smart Touch Control құралының үстіңгі жағындағы барлық LED индикаторлары екі рет қатар жыпылықтайды.
Баптау барысында сенсорлық тақтаға қол тигізбеңіз.
✎
Егер сенсорлық тақта дәлдігін жоғалтса, 1-2-ші қадамдарды қайталап сенсорлық тақтаны қайта баптаңыз.
✎
түймешігін 3 секунд басыңыз. Баптау үрдісі басталады.
Сенсорлық тақтаны пайдалану
Бейнебеттің астыңғы жағына жылдам функциялардың тізімін шығару үшін сенсорлық тақтаның астыңғы жағындағы ‹ түймешігін
басыңыз. Бұл тізімде Мәзір, Сигнал көзі, Арн. тіз, 3D және басқа функциялар бар.
Бейнебеттің үстіңгі жағына түрлі-түсті және ойнатуды басқару функцияларын шығару үшін сенсорлық тақтаның үстіңгі жағындағы
түймешігін басыңыз.
Бөлектелген элементті жылжыту: Саусағыңызды сенсорлық тақтаға қойып, содан кейін оңнан солға,
жоғарыдан төменге немесе төменнен жоғарыға жылжытыңыз.
Бөлектелген элементті үздіксіз жылжыту үшін, саусағыңызды сенсорлық тақта бойымен оңнан
✎
солға, солдан оңға, жоғарыдан төменге немесе төменнен жоғарыға жылдам жылжытыңыз.
RETURN VOICE NUMBER
Элементті таңдау үшін: Сенсорлық тақтаны басыңыз.
RETURN VOICE NUMBER
Шарлау режимін қолдану
Сенсорлық тақтаны Smart Hub, Web Browser және AllShare Play қолданылып тұрған кезде бассаңыз, Сенсорлық алаң Шарлау режиміне ауысады.
Шарлау режимінде тұрған кезде саусағыңызды Сенсорлық тақтаның бір жағынан екінші жағына қарай сырғытыңыз, бөлектелген элемент
бір беттен екінші бетке ауысады.
Сенсорлық тақтаның жалпы режиміне оралу үшін Сенсорлық тақ таны немесе Smart Touch Control құралыныңRETURNR
✎
түймешігін басыңыз.
Smart Touch Control көмегімен арна нөмірін енгізу
1. Таратылым бағдарламасын қарап отырып Smart Touch Control құралының NUMBER
түймешігінің бейнебеті көрсетіледі.
2. Сенсорлық тақтаны пайдаланып нөмірді бөлектеп, содан кейін сенсорлық тақтаны басыңыз. ТД-да сіз таңдаған нөмірден басталатын
арналардың тізімі көрсетіледі.
3. Сенсорлық тақтаны пайдаланып, тізімнен қалаған арнаны бөлектеңіз де, содан кейін сенсорлық тақтаны басыңыз.
Сонымен қатар арнаны сенсорлық тақ таның арнаны жоғары немесе төмен ауыстыру түймешігін басып өзгертуге болады. Егер
✎
сенсорлық тақ таны дереу т үртсеңіз, ТД-да жадыға сақталған арналар тізімі көрсетіледі. Арнаны саусағыңызды жоғары немесе
төмен қозғалтып немесе кенет жылжытып, содан кейін сенсорлық тақтаны басып таң даңыз.
Құралдар мәзірін бейнебетке шығару
Сенсорлық тақтаның оң жағындағы
Қараған арналар жұрналын көрсету
Сенсорлық тақтаның сол жағындағы
T
пернесін басыңыз.
Š
түймешігін басыңыз.
š
түймешігін басыңыз. ТД-да сандар
Казақ - 8
Page 78

Smart touch control құралын Әмбебап қашықтан басқару құралы ретінде пайдалану үшін баптау
Жерсерік■ресиверін■(STB)■немесе■BD■ойнатқышын■немесе■осы■екеуі■де■ТД-ға■қосылып■тұрған■кезде■Smart■Touch■Control■құралымен■
басқаруға■мүмкіндік■береді.■Құралды■ТД-ға■жалғағаннан■кейін■Smart■Touch■Control■құралы,■құралды■іске■қосуға■және■басқаруға■қажет■
шарлау,■сандар■және■басқа■пернелерді■басқара■алады.■
Əмбебап■қашықтан■басқару■құралы■ТД-дың■үнділігін■реттей■алады,■бірақ■Жерсерік■ресиверінің■үнділігі■рет телмейді.■Жерсерік■
■✎
ресиверін■Жерсерік■ресиверінің■үнділігін■реттегеннен■кейін■қараңыз.■
Бағдарламаның■үлгісіне■қарай■■Әмбебап қашық-тан басқ. жиынтығы■нұсқаулары■әр■түрлі■болуы■мүмкін.■Бұндай■жағдайда■
■✎
бейнебеттегі■нұсқ ауларды■орындаңыз.■
Сыртқы■құралды■Smart■Touch■Control■құралына■қосу■үшін■мына■қадамдарды■орындаңыз:
1. Басқар. құрылғы парам-н орнату■параметрін■таңдаңыз■да,■содан■кейін■сенсорлық■тақтаны■басыңыз.
2. Қосылған■құралдардың■ішінен■сыртқы■құралды■таңдаңыз■да,■содан■кейін■сенсорлық■тақтаны■басыңыз.■
3. Сыртқы■құрылғыны■қосуға■арналған■ұяшықты■таңдаңыз■да,■содан■кейін■сенсорлық■тақтаны■басыңыз.■
■Таңдалған■құралдың■қосулы■екеніне■көз■жеткізіңіз.■Егер■сөндірулі■тұрса,■тоққа■қосып■Жаңарту пернесін■басыңыз..
■✎
4. Брендтерді/теледидар қыз-н жетк-ді іздеу■параметрін■таңдаңыз■да,■содан■кейін■сенсорлық■тақтаны■басыңыз.■Пернетақта■мен■
мәтін■енгізу■жолағы■пайда■болады.■Smart■Touch■Control■құралын■пайдаланып■үлгі■атауының■алғашқы■бірнеше■әріптерін■енгізіңіз■де,■
содан■кейін■пернетақтаның■астыңғы■жағындағы■Дайын■параметрін■таңдаңыз.■Жолақтың■астыңғы■жағында■пайда■болған■тізімнен■
құрылғы■үлгісінің■атауын■таңдаңыз■да,■содан■кейін■сенсорлық■тақтаны■басыңыз.■
Жерсерік■ресиверінің■брендін■таңдау■үшін■жерсерік■ресиверін■бренд■атауы■бойынша■немесе■кабельдік■телевизия■провайдері■
бойынша■іздеуге■болады.■
5. МОДЕЛЬДІ ІЗДЕУ параметрін■таңдаңыз■да,■содан■кейін■сенсорлық■тақтаны■басыңыз.■AПернетақта■мен■мәтін■енгізу■жолағы■пайда■
болады.■Smart■Touch■Control■құралын■пайдаланып■үлгі■атауының■алғашқы■бірнеше■әріптері■мен■сандарын■енгізіңіз■де,■пернетақтаның■
астыңғы■жағындағы■Дайын■параметрін■таңдаңыз.■Жолақтың■астыңғы■жағында■пайда■болған■тізімнен■құрылғы■үлгісінің■атауын■
таңдап,■содан■кейін■сенсорлық■тақтаны■басыңыз.■
Егер■үлгі■атауын■іздеу■дұрыс■нәтиже■бермесе,■үлгі■атауының■жартысын■немесе■Ұсынылған■үлгі■кодын■іздеу■функциясын■
■✎
пайдаланып■іздеңіз.■
6. Жүктеу■параметрін■таңдаңыз■да,■содан■кейін■сенсорлық■тақтаны■басыңыз.■IR■Blaster■құралына■арналған■теңшеу■дерегін■де■осы■
жолмен■қотарып■алыңыз.
7. Барлық■параметрлерді■орнатып■болғаннан■кейін■Аяқталды■түймешігін■басыңыз■да,■сенсорлық■тақтаны■басыңыз.■
IR■Blaster■және■Smart■Touch■Control■құралын■бастапқы■қалпына■келтіру■үшін■Smart■Touch■Control■құралының■‹■пернесін■
■✎
басып,■содан■кейін■Әмбебап қашық-тан басқ. жиынтығы параметрін■таңдаңыз.■
Ұсынылған үлгі кодын Іздеу функциясы пайдаланып іздеу
1. МОДЕЛЬДІ ІЗДЕУ■қадамында,■біріктірілген■қашықтан■басқару■құралын■баптау■кезінде■Ұсынылған модель■қадамын■таңдаңыз■да,■
сенсорлық■тақтаны■басыңыз.■
2. Ұсынылған■үлгі■кодын■қотарып■алу■үшін■Жүктеу■параметрін■таңдаңыз.
3. Smart■Touch■Control■құралын■сыртқы■құрылғының■IR■сенсорына■бағыттап,■оның■жұмыс■істейтін-істемейтінін■Сенсорлық■тақтаны■
басып■тексеріңіз.■
4. Егер■қотарылып■алынған,■ұсынылған■үлгі■коды■жұмыс■істемесе,■әрекеттерді■3-ші■қадамнан■бастап■қайталаңыз.■
BD■үй■театрын■әмбебап■басқару■пультімен■пайдаланған■кез де■кейібір■т үймешіктер■жұмыс■істемеуі■мүмкін.■Бұндай■жағдайда■
■✎
Anynet+ (HDMI-CEC)■функциясын■қолдануды■ұсынамыз.
Казақ - 9
Page 79

Қашықтан басқару пульті
Бұл көзі нашар көретін адамдарға арналған, сондай-ақ, Power, Channel және Volume түймешіктерінің үстінде Брайль нүктелері
✎
бар арнайы қашық тан басқару құралы.
Теледидарды қосуға және сөндіруге
арналған.
Қолданыстағы видео сигнал көздерін
көрсетуге және таңдауға арналған. (б.
14)
Арналарға тура кіруге арналған.
Сондай-ақ, Телемәтінді қосу, қосарлау,
араластыру немесе ажырату режимін
тиісінше таңдаңыз.
Үнділікті реттейді.
Smart Hub бағдарламаларын көрсетеді.
Эл. нұсқаулықтың Кеңейтілген
функциялар → Smart Hub тарауын
қараңыз.
Бейнебет мәзірін ашады.
Жиі қолданылған функцияларды
жылдам таңдауға арналған.
Бұл түймешікті арнайы функцияда
қолданыңыз.
Алдыңғы мәзірге қайтуға арналған.
Осы түймешіктерді бейнебетте
көрсетілген нұсқауларға сай
қолданыңыз.
Бұл түймешіктерді арнайы функцияда
қолданыңыз. Қосымша ақпаратты эл.
нұсқаулықтан қараңыз.
HISTORY CAMERA
S
AD/SUBT.
Қашықтан басқару құралының шамын
қосады немесе сөндіреді. Шам қосулы
тұрғанда, түймешікті бассаңыз, ол
біраз уақыт жанып тұрады. (Қашықтан
басқару пультінің осы түймешігін
On қалпына қойып пайдаланғанда,
батареяның жарамдылық мерзімі
қысқарады.)
Алдыңғы арнаға оралуға арналған.
Үнділікті уақытша өшіре тұрады.
Арналарды ауыстырады.
Арна тізімдерін бейнебетке шығарады.
EPG (Бағдарламалардың электрондық
нұсқаулығы) көрсетеді.
Теледидар экранына ақпаратты
шығарады.
u/d/l/r
элементінде жылжытуға арналған.
E
элементтің мәнін өзгертеді.
Мәзірден шығу.
HISTORY: Жақында қолданылған
функциялардың тізімі көрсетіледі.
Family Story: Family Story
бағдарламасына қосылуға арналған. Эл.
нұсқаулықтың Кеңейтілген функциялар
→ Жанұя әңгімесі тарауын қараңыз.
CAMERA: Камера бағдарламасына
қосылуға арналған.
SUPPORT: Әр түрлі қолдау көрсету
бағдарламасын, соның ішінде e-Manual
бағдарламасын қолдану мүмкіндігін
береді. (б. 19)
AD/SUBT.: Аудио сипаттаманы қосады
және сөндіреді (кей жерлерде жұмыс
істемейді). / Сандық субтитрлерді
көрсетеді. Эл. нұсқаулықтың Басқа
функциялар → Субтитр тарауын
қараңыз.
W
арналған. Эл. нұсқаулықтың Кеңейтілген
функциялар → 3D функциясын қолдану.
: Көрсеткіні бейнебет мәзірі
: Мәзірді таңдайды және тиісті
: 3D суретін қосуға немесе сөндіруге
Казақ - 10
Page 80

Батареяларды орнату (Батарея өлшемі: AAA)
Батареяның полюстерін батарея салынатын бөліктегі белгілерге келтіріп салыңыз.
1
2
3
ЕСКЕРІМ
✎
• Батареяны салған кезде оның полюстерін (+/-) батарея бөлігіндегі суретке келтіріп салуды ұсынамыз.
• Қашықтан басқару пультін теледидардан 23 фут қашықтықта тұрып қолданыңыз.
• Өткір жарық қашықтан басқару пультінің жұмыс жасауына әсер етуі мүмкін. Оны люминесцентті немесе неон белгілерінің
қасында тұрып қолданбауға тырысыңыз.
• Түсі мен пішімі үлгі түріне қарай әр түрлі болуы мүмкін.
Орнату (параметрлерді бастапқы орнату)
ТД-ды бірінші рет қосқан кезде негізгі параметрлерді бірінен соң бірі көрсетілетін нұсқаулар мен бейнебеттердің көмегімен баптауға
болады. Орнату үрдісін бастау үшін қашықтан басқару пультінің P түймешігін басыңыз.
Орнату сигнал көзі ретінде ТД таңдалса ғана жұмыс істейді. "Сигнал көзін өзгерту" тарауын қараңыз (б. 14).
✎
Параметрді орнатудың алдыңғы қадамына Орнату қа дамы кезінде өту үшін Алдыңғы параметрін таңдаңыз.
✎
ТД-ды қоспай т ұрып, ТД-дың антеннаға немесе кабельге және тоқ көзіне қосылып т ұрғанын тексеріңіз. (б. 5).
✎
Орнату үрдісін бастар алдында Бастау параметрін таң даңыз.
✎
Мәзір тілі:
1
Тілді таңдаңыз.
Пайдалану режимі: Үйде
2
пайд. режимін таңдаңыз.
Желі параметрлері: Желі
3
параметрлерін теңшеңіз
Кейін қосылу үшін Өтк-у
✎
параметрін таңдаңыз.
Бағд-қ құрал жаңарту:
4
Бағдарламаны ең соңғы
нұсқасына дейін жаңарту
Кейін жаңарту үшін
✎
Өтк-у параметрін
таңдаңыз.
Қажетті мәзір тілін қашықтан басқару пультімен таңдап, содан кейін Бұдан әрі параметрін
таңдаңыз. Келесі қадамда ТД мәзірді таңдалған тілде көрсетеді.
Қашықтан басқару пультімен Үйде пайд. функциясын таңдаңыз да, содан кейін Бұдан әрі.
параметрін таңдаңыз.
Көрсету режимі бөлшек сауда орталықтарында қолдануға арналған.
Желі қосылымын орнату үшін қашықтан басқару пультімен Бастау параметрін таңдаңыз.
Егер желі параметрлерін орнату деректерін білмесеңіз немесе кейін орнатқыңыз келсе,
Өтк-у параметрін таңдаңыз. Параметрлерді орнатуға қойылатын талаптар мен нұсқауларға
қатысты толық ақпаратты эл. нұсқаулықтың "Желіге сым арқылы немесе сымсыз қосылу
параметрлерін баптау" тарауынан және осы пайдаланушы нұсқаулығының Желіге қосылу
тарауынан қараңыз (б. 18). Кейін Желі мәзірін қолданып желіге қосылуға болады.
ТД-дың бағдарламалық жасақтамасын жаңарту үшін Бұдан әрі пәрменін таңдаңыз. Егер
ТД-дың бағдарламалық жасақтамасын жаңарту қажет болса, ТД автоматты жаңарту үрдісін
орындайды. Егер кейінірек жаңартқыңыз келсе, Өтк-у параметрін таңдаңыз. Толығырақ
ақпаратты эл. нұсқаулықтың Бағд-қ құрал жаңарту (Таңдаулы функциялар → Қолдау
көрсету мәзірі) тарауынан қараңыз.
Желінің қалып-күйіне байланысты бұған біраз уақыт қажет болуы мүмкін.
✎
Казақ - 11
Page 81

Елді таңдаңыз.
5
(Елге байланысты)
Тиісті елді таңдаңыз.
Елді Country мәзірінде таң дағаннан кейін, теледидардың кей үлгілерінде пин кодты
✎
орнату үшін қосымша параметр іске қосылуы мүмкін.
Автоматты баптау (1): ТД
6
қарау жолын таңдау
Автоматты баптау (2):
7
Іздеу және Аймақ таңдау
параметрлерін таңдау (Елге
байланысты)
Сағат: Сағат режимін орнату • Авт-ы: Ағымдық уақытты автоматты түрде орнатады.
8
Уақыт белд.
9
(Елге байланысты): Уақыт
белдеуін орнату
Дауыспен және қимылмен
10
басқару: Дауыс және Motion
Control функцияларын
орнату.
Орнату Аяқтау Аяқтау үшін Жабу параметрін таңдаңыз.
11
Телеарнаны тауып, сіздің теледидарыңызға сақатайық. Телеарналарды іздеу керек пе?
• Ия, керек: Қол жетерлік телеарналардың бәрі табылды, және сіздің теледидарыңызға
сақталды
• Жоқ, керек жоқ: Кол жетерлік телеарналадың бәрі бар, іздеуге керегі жоқ
Жадыға енгізгіңіз келген арна көзін таңдаңыз. Әуе желісі көзін Кабель режиміне қойған
кезде, арналарға белгілі бір нөмір (арна жиіліктері) тағайындауға мүмкіндік беретін қадам
пайда болады. Қосымша ақпаратты эл. нұсқаулықтың Автоматты баптау (Арна мәзірі →
Арналарды жадыға сақтау) тарауынан қараңыз.
Ауа немесе Кабель параметрі бірінші таң далса: Барлық Ауа немесе Кабель
✎
арналары сақталғаннан кейін Жерсерік арналары көрсетіледі.
Жерсерік бірінші таңдалса: Барлық Жерсерік арналары сақталғаннан кейін Ауа
✎
немесе Кабель немесе арна ларын сақтауға арналған қадам көрс етіледі.
Жадыға сақтау үрдісін кідірту үшін Тоқтату параметрін кез келген уақытта
✎
таңдаңыз.
• Қолмен: Ағымдық ай-күн мен уақытты қолдан орнатуға мүмкіндік береді.
Бұл қадам сағат режимі Авт-ы қалпында тұрғанда ғана жұмыс істейді.
• Авт-ы: Уақыт белдеуін автоматты түрде орнатуға арналған.
• Қолмен: Уақыт белдеуін қолмен орнатуға арналған.
Қолмен параметрін таң дасаңыз, КЖ Ү (Күндізгі жарықты үнемдеу) параметрін Қосу
✎
немесе Сөндіру қалпына қоя аласыз. (Елге байланысты)
Дауыспен және қимылмен басқару функциясын Қосу немесе Сөндіру қалпына
✎
қоюға болады. Сөндіру немесе Қосу параметрін таңдаңыз да, содан кейін Бұдан
әрі параметрін таңдаңыз. Қосымша ақпарат алу үшін "SMART байланыс" тарауын
қараңыз (б.14).
Орнатылған параметр көрсетіледі.
✎
Егер бұл функцияны қайта орнатқыңыз келсе...
Мәзір → Жүйе →Орнату
Жүйе - Орнату параметрін таңдаңыз (Параметрлерді бастапқы орнату). 4 орынды PIN кодты енгізіңіз. PIN кодтың әдепкі мәні: "0-0-0-0".
PIN кодты өзгерткіңіз келсе, PIN кодын өзг функциясын қолданыңыз.
Орнату (Мәзір → Жүйе) функциясын дүкенде орнатсаңыз да, үйде қайта орнатыңыз.
Егер PIN кодты ұмытып қалсаңыз, қашықтан басқару пультінің түймешіктерін Күту режимінде төмендегі рет бойынша басыңыз,
✎
сонда PIN код “0-0-0 -0” болып орнайды: MUTE → 8 → 2 → 4 → POWER (қосу).
Казақ - 12
Page 82

Жалғау
Қосымша ақпаратты ТД-ды қосу тарауын e-Manual көмегімен қараңыз.
✎
DVD үй театры қосылымы
OPTICAL
Оптикалық сым
HDMI қосылымы
BD ойнатқыш
HDMI OUT
HDMI - DVI қосылымы
BD ойнатқыш
(жинаққа кірмейді)
HDMI сымы
(жинаққа кірмейді)
HDMI сымы
(жинаққа кірмейді)
HDMI сымы
(жинаққа кірмейді)
HDMI - DVI сымы
(жинаққа кірмейді)
Аудио сым
(жинаққа кірмейді)
ТД-дың артқы панелі
ДК қосылымы
HDMI OUT
DVI OUT
AUDIO OUT
Қуат кірісі
DVI OUT
AUDIO OUT
R-AUDIO-L
Құлақаспап қосылымы
Жинаққа кірмейді
AUDIO сым
(жинаққа кірмейді)
Scart адаптері
(жинаққа кіреді)
Scart сымы
(жинаққа кірмейді)
EXT
VCR немесе DVD
SCART қосылымы
SERVICE: Тек қызметке арналған
жалғастырғыш.
Құралас элемент
сымы
(жинаққа кірмейді)
R
B
COMPONENT OUT
PRPBY
BD ойнатқыш
Y
Аудио сым
(жинаққа кірмейді)
R
AUDIO OUT
R-AUDIO-L
W
Құралас элемент қосылымы
R
W
R
Аудио сым
(жинаққа кірмейді)
W
R
AUDIO OUT
R-AUDIO-L
BD ойнатқыш
АВ қосылымы
B
Y
VIDEO OUT
Y
Видео сым
(жинаққа кірмейді)
Осы өнімге сымдарды дұрыс жалғау үшін, міндетті түрде жуандықтары төменде көрсетілгендей сымдарды қолданыңыз:
✎
• Макс. жуандығы - 0.55 дюйм (14мм)
Казақ - 13
Page 83

Сигнал көзін өзгерту
Сигнал көзі
™
→ Сигнал көзі
ТД-ды қарап отырып, DVD немесе Blu-ray ойнатқышынан
бейнефильм қарағыңыз келсе немесе кабель қорапшасына не
жерсерік декодеріне қосылсаңыз, сигнал көзін ауыстыру қажет.
■ ТД / Сыртқы / HDMI1/DVI / HDMI2 / HDMI3 / AV / Құраушы
1. Қашықтан басқару пультінің
Hub бейнебеті көрсетіледі.
2. таңдаңыз ct Сигнал көзі. Сигнал көзі бейнебеті көрсетіледі.
3. Қажетті сыртқы сигнал көзін таңдаңыз.
Сонымен қатар Сигнал көзі бейнебетіне стандартты
✎
қашықтан басқару пультінің Сигнал көзі
басып немесе Smart Touch Control көмегімен Сигнал көзі
режимін таңдау (6-шы бетке қараңыз) арқылы бара аласыз.
Тек ТД-ға жалғанған сыртқы құрылғыларды ғана таңдауға
✎
болады. Көрсетілген Сигнал көзі тізімінде жалғанған кіріс
көздері бөлектеліп көрсетіледі.
Атын өзгерту параметрін қолдану
Атын өзгерту құрылғының атауын сигнал көзімен
байланыстыруға мүмкіндік береді. Атын өзгерту параметріне
кіру үшін Құралдар мәзірін Сигнал көзі тізімі көрсетілген
кезде ашыңыз. Атын өзгерту параметрінен келесі таңдаулар
көрсетіледі:
■ Бейм / DVD / Кабельді ТД / Жерсерік құрылғы. / PVR STB
/ AV қабылдағыш / Ойын / Бейнекамера / ДК / DVI PC /
DVI құрылғы-ры / ТД / IPTV / Blu-ray / HD DVD / DMA: Кіріс
ұяшығын таңдаңыз, содан кейін сол ұяшыққа жалғанған
құрылғының атауын көрсетілген тізімнен таңдаңыз. Мысалы,
Blu-ray ойнатқышы HDMI IN 2 ұяшығына жалғанып тұрса, сол
ұяшыққа Блю-рейді таңдаңыз.
Егер ДК HDMI IN 1 (DVI) ұяшығына HDMI сымымен
✎
жалғанса, ДК атауын HDMI1/DVI ұяшығына Атын өзгерту
параметрі көмегімен тағайындаңыз.
Егер ДК HDMI IN 1 (DVI) ұяшығына HDMI-DVI сымымен
✎
жалғанса, DVI PC атауын HDMI1/DVI ұяшығына Атын
өзгерту параметрі көмегімен тағайындаңыз.
Егер AV құралы HDMI IN 1 (DVI) ұяшығына HDMI-DVI
✎
сымымен жалғанса DVI құрылғы-ры ұяшығына HDMI1/DVI
атауын Атын өзгерту параметрі көмегімен тағайындаңыз.
Ақпарат
Таңдалған сыртқы құрылғыға қатысты толық ақпаратты қарай
аласыз.
Жаңарту
Егер сыртқы құрылғылар Сигнал көзі тізімінде жоқ болса,
Құралдар мәзірін ашып, содан кейін Жаңарту параметрін
таңдаңыз. Тізімде барлық қосылған құрылғылар көрсетіледі.
Сондай-ақ, Сигнал көзі тізімін қ ашықтан басқару пультімен
✎
a
түймешігін таңдап жаңартуға болады.
™
түймешігін басыңыз. Smart
s
түймешігін
SMART функциясын қолдану
Осы функцияны қолданып, мәзір параметрлері мен
функцияларына, сөйлеу, ишарат немесе бетті тану
функцияларының көмегімен баруға және басқаруға болады.
АҚПАРАТ КІТАПШАСЫНЫҢ ҚҰЛАҚТАНДЫРУЫ
• Бетті тану функциясымен кіру
Бетті тану функциясын жұмыс істету үшін, бетіңіздің
таңба суреті ТД-ға кірген кезде қолдану үшін теледидарда
сақталады.
Smart Hub қызметіне Бетті тану функциясының көмегімен кіру,
ID мен құпиясөзді пайдаланғанға қарағанда сонша қауіпсіз
болмауы мүмкін.
• ТД камерасын пайдалану
ТД камерасын пайдаланар алдында, кейбір белгілі
жағдайларда және кей заңды жағдайларда ТД камерасын
дұрыс пайдаланбау сізге заңды жауапкершілік артатынын
ескеріңіз. ТД камерасын пайдалану арқылы камераны
қолдануға тиым салынатын жерлерде (i) (мысалы, ванна
бөлмесі, шешінетін және киім ауыстыратын бөлмелерде),
(ii) жеке адамның құпиялылығына қол сұғатын (iii) немесе
қолданыстағы заңдарға, ережелер мен заңнамаларға
қайшылық туғызатын жағдайларда қолданбауға келісім
бересіз.
Дауыспен басқару
Мәзір → Жүйе → Дауыспен және қимылмен басқару →
Дауыспен басқару
Дауысты тану функциясын қосуға немесе сөндіруге арналған.
Сөйлеу функциясын пайдаланып, мәзір параметрлері мен
функцияларына баруға және оларды басқаруға мүмкіндік береді.
Дауыспен басқару функциясын қолдану үшін сөздер мен
✎
сөз тіркестерін Тіл параметрінде таңдалған тілде анық
және дұрыс айту керек.
Қоршаған ортаның шуылы Дауыспен басқару
✎
функциясының дұрыс жұмыс істемеуіне әкелуі мүмкін.
Сіздің ТД-ңыз сіз берген нұсқауларды екі тәсілмен "ести" алады:
− ТД микрофонын қолдану. (Қашықтықты анықтау)
− Қашықтан басқару пультінің VOICE
(Жақын қашықтықты анықтау)
ТД микрофонын пайдаланған кезде сөздер қоршаған
✎
ортаның шуылына байланысты анық естілмеуі мүмкін.
Бұндай жағдай орын алса қашықтан басқару пультінің
VOICE˜ түймешігін қолданып көріңіз. ТД дауысты нұсқауды
барынша оңай тани алады.
Қашықтан басқару пультінің VOICE˜ түймешігі үнемі
✎
белсенді күйде тұрады. Егер ТД микрофонын қолданғыңыз
келсе Дауыспен басқару (Жүйе → Дауыспен және
қимылмен басқару → Дауыспен басқару) функциясын
қосыңыз.
Егер мәзір параметріне немесе функциясына Дауыспен
✎
басқару функциясы қолдау көрсетпесе, Қимылмен
басқару функциясын қолдануды ұсынамыз. Ишарат
функциясын қолдану үшін қолыңызды камераға қарай
созыңыз да, үш немесе төрт рет бұлғаңыз.
■ Дауыспен басқару
Дауыспен басқару функциясын қосады немесе сөндіреді.
Қашықтан басқару пультінің VOICE˜ түймешігі үнемі
✎
белсенді күйде тұрады.
■ Тіл
Пайдаланғыңыз келген тану тілін таңдауға арналған.
˜
түймешігін қолдану.
Казақ - 14
Page 84

■■ Іске қосу сөздері
Дауыспен басқару функциясын■іске■қосу■үшін■Іске қосу
сөздері -н■таңдауға■болады.■Сондай-ақ,■ТД-ды■Іске қосу
сөздері■-н■пайдаланып,■егер■Дауыспен басқару■функциясы■■
Қосу қалпына■қойылып■тұрса■іске■қоса■аласыз.
■Егер■Іске қосу сөздері■Hi■TV■режимінде■тұрса,■Hi TV Power
On (Hi■TV■іске■қос)■деп■айтыңыз.■
Егер■Іске қосу сөздері■Smart■TV■режимінде■тұрса,■Smart TV
Power On (Smart TV-ды іске қос) деп айтыңыз..
■■ Дауыстық пәрмен жолағының өлшемі
Дауыстық пәрмен жолағының өлшемі■режимін■Минимум■
немесе■Толық қалпына■қойыңыз.■
Минимум■параметрі■қолдануға■болатын■сөздер■мен■сөз■
тіркестерінің■ең■аз■санын■көрсетеді.■
Толық■параметрі■барлық■сөздер■мен■сөз■тіркестерін■көрсетеді.
■■ Дыбыс сезімтал-ғы
Дауысты■тану■функциясының■сезімталдық■деңгейін■орнатыңыз.■
■− Ысқыру:■Жаңғырық■деңгейін■орнатыңыз.■
■− Тану жауаптылығы:■Дауысты■тану■функциясының■
жауап■беру■деңгейін■орнатыңыз.
■■ Дауыспен басқару ортасын тексеру
ТД■микрофонының■шуылының■деңгейін■тексеруге■болады.■
■− Шу деңгейін тексеру:■ТД■микрофонының■шуылының■
деңгейін■тексеруге■арналған.■Қашықтан■басқару■
пультімен■Бұдан әрі■параметрін■таңдаңыз.■Сынақ■
басталады■да,■бірнеше■секундқа■жалғасады.■Сынақ■
кезінде■мүмкіндігінше■тыныштық■сақтаңыз.■
■− Микрофон мен динамикті тексеру:■Бұл■сынақ■ТД■
микрофонының■және■үндеткішінің■шуылының■деңгейін■
тексереді.■Қашықтан■басқару■пультімен■Бастау■
параметрін■таңдаңыз.■Сынақ■басталады■да,■бірнеше■
секундқа■жалғасады.■Сынақ■кезінде■мүмкіндігінше■
тыныштық■сақтаңыз.■
Динамик таңдау■параметрі■Тлд динамигі■
■✎
режиміне■қойылғанда■ғана■жұмыс■істейді.
■− Дауыспен басқаруды тексеру:■Бұл■сынақ■Дауыспен
басқару■функциясын■қолданған■кезде■дауысыңыздың■
деңгейі■мен■анықтығын■тексереді.■Қашықтан■басқару■
пультімен■Бастау■параметрін■таңдаңыз.■Сынақ■
басталады.■Осы■сынақты■аяқтау■үшін■нұсқау■хабарын■
барынша■қатты■және■анық■айтыңыз.■
Егер■сынақ■аяқталмаса■Қайта тексеру■параметрін■
■✎
таңдаңыз■да,■содан■кейін■нұсқауды■қайтадан■
қатты■және■анық■айтыңыз.
Дауыспен басқару функциясын қолдану үшін мына
қадамдарды орындаңыз:
Егер■Дауыспен басқару■функциясы■Қосу■қалпына■
■✎
қойылса,■ТД■қоршаған■ортаның■әсерінен■автоматты■түрде■
іске■қосылуы■мүмкін.■
1. ТД-ға■кіріктірілген■микрофонды■қолданып■таңдаған■Іске
қосу сөздері■айту■керек■немесе■қашықтан■басқару■пультінің■
VOICE
˜
■түймешігін■басып■ұстап■тұрыңыз.■ТД-да■Дауыспен
басқару ортасын тексеру■көрсетіледі.■
Егер■Дауыспен басқару■функциясын■қолдансаңыз,■
■✎
үнділік■автоматты■т үрде■5-ші■деңгейге■қойылады.■
2. тізімінен■қалаған■сөзді■немесе■сөз■тіркесін■айтыңызДауыспен
басқару ортасын тексеру.■Егер■қашықтан■басқару■пультінің■
VOICE
˜
■түймешігін■пайдалансаңыз,■түймешікті■босатыңыз.■
Сөзді■немесе■с өз■тіркесін■Тіл■параметрінен■таң далған■
■✎
тілде■барынша■анық■және■дұрыс■айтыңыз.
3. Тану■үрдісі■аяқталғанша■күте■тұрыңыз■да,■содан■кейін■келесі■
нұсқауды■айтыңыз.■
Дауыспен басқару■режимінен■шығу■үшін■ТД■
■✎
микрофонын■қолданып■Іске қосу сөздері■немесе■
"Болдырмау"■сөзін■айтыңыз■немесе■қашықтан■басқару■
пультінің■VOICE˜■түймешігін■қайта■басыңыз.
Дыбысты мәтінді енгізу режимін пайдалану
1. режимі■қосылып■тұрған■кезде■"Барлығын■іздеу"■деп■айтыңыз.■
Дауыспен басқару.
QWERTY■пернетақта■бейнебетін■қолданған■кезде■
■✎
Дыбысты■мәтінді■енгізу■режимін■қолдана■аласыз.■ТД-ға■
кіріктірілген■микрофонды■қолданып■таңдаған■Іске қосу
сөздері■айту■керек■немесе■қашықтан■басқару■пультінің■
VOICE˜■түймешігін■басып■ұстап■тұрыңыз.■
2. Іздегіңіз■келген■сөзді■немесе■сөз■тіркесін■айтыңыз.
3. ТД■айтылған■функцияны■орындайды.
Дауыспен басқару■функциясының■ж ұмыс■жасау■
■✎
деңгейі■сөйлеп■тұрған■тілге■байланысты■әр■түрлі■
болуы■мүмкін.
Қимылмен басқару
Мәзір■→■Жүйе■→■Дауыспен және қимылмен басқару■→■
Қимылмен басқару
Қимылмен басқару■функциясын■қосуға■немесе■сөндіруге■болады.■■
ТД■меңзерін■арнайы■ишараттарды■қолданып■қозғай■отырып,■ТДды■басқаруға■мүмкіндік■береді.■
Кейбір■бағдарламалар■Қимылмен басқару■функциясына■
■✎
қолдау■көрсетпеуі■мүмкін.
■■ Қимылмен басқару
Қимылмен басқару■функциясын■қосады■немесе■сөндіреді.■
■■ Қимыл нұсқаулығы жолағының өлшемі
Қимыл нұсқаулығы жолағының өлшемі■режимін■Минимум■
немесе■Толық■параметрінің■біреуіне■қояды.■
■■ Қимылмен басқару ортасын тексеру
Бөлменің■жарықтылығын,■камераның■бұрышын■тексеруге■
болады.■
■− Жарықтықты тексеру:■Бұл■сынақ■бөлме■жарығының■
Қимылмен басқару■функциясының■дұрыс■жұмыс■
жасауына■жеткілікті■немесе■жеткіліксіз■екен■анықтауға■
арналған.■Қашықтан■басқару■пультімен■Бастау■
параметрін■таңдаңыз.■Сынақ■басталады■да,■бірнеше■
секунд■ғана■жалғасуға■тиіс.
■− Камера бұрышын тексеру:■Камера бұрышын тексеру■
функциясын■бастаңыз.■Қашықтан■басқару■пультімен■
Бастау■параметрін■таңдаңыз.■Камераны■реттеу■
немесе■орныңыздан■жылжу■арқылы■бейнебеттегі■тік■
төртбұрышқа■дәл■келіп■тұрыңыз.■Егер■дұрыс■орында■
тұрмасаңыз,■бұл■сынақ■дұрыс■жұмыс■істемеуі■мүмкін.■
Болған■кезде■қолыңызды■камераға■қарай■созыңыз■да,■үш■
немесе■төрт■рет■бұлғаңыз.■
Қимылмен басқару функциясын қолдану үшін мына
қадамдарды орындаңыз:
1. Қимылмен басқару,■функциясын■пайдалану■үшін■
қолыңызды■экранға■қарай■жая■созған■қалпы■сәл■ғана■ұстап■
тұрыңыз■да,■содан■кейін■солға■және■оңға■қарай■3■-■4■рет■
бұлғаңыз.■Қимылмен басқару■басталады.■Егер■Қимылмен
басқару■функциясы■басталса,■бейнебеттің■ортасында■меңзер■
пайда■болады■да,■бейнебеттің■астыңғы■жағынан■Қимыл
нұсқаулығы жолағының өлшемі■is■at■the■bottom■of■the■
screen.
2. ТД-ды■қолыңызбен■басқарыңыз.
Егер■қолыңыз■камераның■аумағынан■тыс■кетсе,■Қимылмен
■✎
басқару■функциясының■жабылып■қалатынын■есте■ұстаңыз.
Қимылмен басқару■функциясын■қолдану■барысында■
■✎
басқа■құралды■қолдансаңыз■(мысалы,■қашық тан■басқару■
құралы),■Қимылмен басқару■функциясы■жабылады.■
Ишарат функциясын қолданып ТД-ды қолмен басқару
■■ Ишаратпен басқару функциясына кіру
■− Әрекет:■Қолыңызды■камераға■қарай■созыңыз■да,■үш■
немесе■төрт■рет■бұлғаңыз.■
■■ Меңзеп шарлау
Меңзерді■қалаған■орынға■жылжытады.■
■− Әрекет:■Қолыңызды■қалаған■жерге■апарады■және■
меңзерді■қалаған■орынға■жылжытады.■
■■ Іске қосу
Элементті■таңдайды■немесе■меңзер■арқылы■көрсетілген■
немесе■бөлектелген■нұсқауды■орындайды.
■− Әрекет:■Қолыңызды■қысыңыз.■
Казақ - 15
Page 85

■ Кері
Алдыңғы мәзірге оралу.
− Әрекет: Қолыңызды жайып, сағат тілінің бағытына қарсы
айналдырыңыз.
■ Арна / Үнділікті басқару
Арнаны немесе үнділік деңгейін өзгертеді.
Егер арнаны қарап отырып Қимылмен басқару
✎
функциясын қолдансаңыз, арнаны/үнділік деңгейін
басқаратын бейнебет көрсетіледі.
− Әрекет: Меңзеп шарлау ишаратын қолданып меңзерді
арнаны немесе үнділікті басқару жолағына апарады,
содан кейін Іске қосу ишаратымен арнаны немесе
үнділікті өзгертеді.
Егер Іске қосу ишаратын бір рет бассаңыз,
✎
қашықтан басқару пультінің т үймешігі тәрізді
жұмыс істейді. Егер Іске қосу ишаратын ұстап
тұрсаңыз, қашықтан басқару пультінің түймешігін
басып ұстап тұр ған тәріз ді жұмыс істейді.
■ Айналдыру
Бетті қалаған бағытқа айналдырыңыз. Мысалы, төмен қарай
жылжытқыңыз келді делік.
Кей бағдарламалар бұл функцияға қолдау көрсетпеуі
✎
мүмкін.
1. Меңзеп шарлау функциясымен меңзерді бейнебеттің
төменгі жағына қарай (бетті шарлау алаңы)
жылжытыңыз.
2. Меңзеп шарлау функциясымен меңзерді бейнебеттің
ортасына қарай жылжытыңыз.
3. Бет төмен жылжиды.
Бет тану
™
→ Құралдар → Баптау → Ес. жазба диспетчері → Есеп.
жазба ту-ы ақпар-ы өзг-з → Тіркелу беті
Бетті тану функциясын қосуға немесе сөндіруге арналған. Бетіңізді
Samsung тіркелгісіне тіркеуге мүмкіндік береді. Сондай-ақ,
Samsung тіркелгісіне Бет тану функциясын қолданып, тіркелгі ID
мәнін немесе тіркелгі құпиясөзін қолданбай кіруге болады.
Бетіңізді тек бір ғана тіркелгіге тіркей аласыз.
✎
Samsung тіркелгісіне Бет тану функциясын қолданып кіру
үшін мына қадамдарды орындаңыз:
Егер Бет тану функциясын Smart Hub қызметіне кіру үшін
пайдалансаңыз, құпиясөзді қолданғанға қарағанда сонша қауіпсіз
болмауы мүмкін.
1. бейнебеті көрсетіліп тұрған кезде қашықтан басқару
пультімен Smart Hub
сөз бейнебеті көрсетіледі.
2. таңдаңыз.Бет тану режимі. Бет тану бейнебеті көрсетіледі.
Иден-р/құ-я сөз бейнебетіне оралу үшін Кілтсөз
✎
режимі параметрін таң даңыз.
3. ТД Бет тану функциясын бастайды. ТД бейнебетінің алдына
бетіңізді әкеліңіз. ТД бетіңізді автоматты түрде таниды.
Егер ТД бетіңізді тани алмаса, әрекетті қайта орындап
✎
көріңіз.
4. ТД сіздің Samsung тіркелгіңізге автоматты түрде кіреді.
Егер ТД екі немесе одан да көп тіркелген беттерді
✎
таныса, Samsung тіркелгісінің тізімі көрсетіледі. Кіру
үшін өз тіркелгіңізді таңдаңыз.
Егер сіздің бетіңіз тіркелмеген болса, бетіңізді
✎
Samsung тіркелгісіне тіркей аласыз. "Бетіңізді Samsung
тіркелгісіне тіркеу үшін:" жоғарыда көрсетілген 4-5-ші
қадамдарды орындаңыз.
Егер ешбір тіркелгіңіз жоқ болса, тіркелгі құрыңыз.
✎
Толық ақпаратты эл. нұсқаулықтың "Тіркелгі құру"
(Кеңейтілген функциялар → Smart Hub) тармағынан
қараңыз.
a
түймешігін таңдаңыз. Иден-р/құ-я
Бетіңізді Samsung тіркелгісіне тіркеу үшін мына қадамдарды
орындаңыз:
Бұл функцияны қолдану үшін Smart Hub қызметіне кіруіңіз
✎
керек. Егер сізде Samsung ес. жазб. жоқ болса, осы
функцияны қолданбай тұрып тіркелгі құру керек. Samsung
ес. жазб. құру үшін эл. нұсқаулықтың "Тіркелгі құру"
(Кеңейтілген функциялар → Smart Hub) тармағын қараңыз.
1. бейнебетінен қашықтан басқару пультімен Smart Hub мәзірін
басып, содан кейін Құралдар қойындысын Баптау.таңдау
керек.
2. таңдаңызЕс. жазба диспетчері. Ес. жазба диспетчері
бейнебеті көрсетіледі.
3. таңдаңыз Есеп. жазба ту-ы ақпар-ы өзг-з. Есеп. жазба ту-ы
ақпар-ы өзг-з бейнебеті көрсетіледі.
4. Тіркелу беті параметрін таңдаңыз. Егер бетті тануға келісім
бергіңіз келсе OK параметрін таңдаңыз..
5. Тіркелгіңіздің құпиясөзін енгізіңіз.
6. Бетіңізді бейнебеттің ортасындағы бет сызықтарына апарып,
бет сызықтарының түсі қызыл түстен жасыл түске ауысқанша
күте тұрыңыз.
Егер Бет тану сәтсіз аяқ талса Қайталау параметрін
✎
таңдап, қайта орындап көріңіз.
7. Болған кезде бетіңіз Samsung тіркелгісіне тіркеледі.
Казақ - 16
Page 86

ЖАЛПЫ ИНТЕРФЕЙС ұяшығына (ТД қарау картасының ұяшығы) қосылу
CI Card адаптерін жалғау
Адаптерді төменде көрсетілгендей жалғаңыз.
CI CARD адаптерін жалғау үшін мына қадамдарды орындаңыз.
Адаптерді қабырғалық жинақты орнатпай немесе “CI немес е CI+
✎
CARD" картасын салмай тұрып орнатуды ұсынамыз.
CI картасының адаптерін орнату үшін ТД- ға жапсырылған
✎
жапсырманы алыңыз.
1. CI CARD адаптерін 1-ші құрылғыдағы екі саңылауға салыңыз.
ТД-дың арт жағындағы екі саңылауды табыңыз. Екі саңылау
✎
COMMON INTERFACE ұяшығының жанында орналасқан.
2. CI CARD адаптерін құрылғының COMMON INTERFACE ұяшығына
жалғаңыз: 2.
3. "CI немесе CI+ CARD" картасын салыңыз.
CI картасын ТД-ды қабырғаға орнатпай тұрып салуды ұсынамыз. Орнатып болғаннан кейін салу қиын болуы мүмкін.
Картаны CI Card адаптерін ТД-ға орнатып болғаннан кейін салыңыз. Егер модульді орнатпай тұрып картаны салсаңыз,
модульді орнату қиынға соғады.
"CI немесе CI+ CARD" картасын қолдану
Ақылы арналарды көру үшін “CI немесе CI+ CARD” картасын салу керек.
• Егер “CI немесе CI+ CARD” картасын салмасаңыз, кей арналарда "Шифрланған
сигнал" жазуы көрсетіледі.
• 2-3 минуттан кейін бейнебетте телефон нөмірі, “CI немесе CI+ CARD” анықтағышы,
хост анықтағышы және басқа да деректерді қамтыған келісім туралы мәлімет
көрсетіледі. Егер ақаулық туралы ақпарат пайда болса, қызмет провайдеріне
хабарласыңыз.
• Арна деректерін теңшеу жұмысы аяқталған кезде, арналар тізімінің жаңартылғанын
білдіретін "Жаңарту аяқталды" хабары көрсетіледі.
ЕСКЕРІМ
✎
• “CI немесе CI+ CARD” картасын жергілікті кабельдік телевидение
провайдерінен алуыңыз керек.
• “CI немесе CI+ CARD” картасын еппен шығарып алыңыз, себебі “CI немесе CI+ CARD” жерге түсіп кетсе, оған нұқсан келуі
мүмкін.
• “CI немесе CI+ CARD” картасын онда көрсетілген бағытта орнатыңыз.
• COMMON INTERFACE орналасатын жері, үлгіге қарай әр түрлі болуы мүмкін.
• Кей елдер мен аймақтарда “CI немесе CI+ CARD” модуліне қолдау көрсетілмеуі мүмкін, уәкілетті дилерге хабарласыңыз.
• Мәселе туындаған жағдайда, қызмет провайдеріне хабарласыңыз.
• Ағымдық әуе желісі параметрлеріне қолдау көрсететін “CI немесе CI+ CARD” картасын салыңыз. Бейнебет бұрмалануы немесе
көрсетілмеуі мүмкін.
CI картасының адаптерін орнату үшін ТД-ға
жапсырылған жапсырманы алыңыз.
ТД-дың
артқы
панелі
Evolution Kit ұяшығы (жинақ жеке сатылады)
ТД-дың артқы
панелі
Бұл ұяшық Evolution Kit деп аталатын ұзартқыш құралды қосуға арналып жасақталған. Evolution Kit ТД-да әр түрлі соңғы шығарылған
бағдарламаларды қосып-тамашалауға мүмкіндік береді.
Кей үлгі жинағында болмауы мүмкін Evolution Kit 2013-ші немесе одан кейінгі жылдарда жеке сатылады.
Казақ - 17
Page 87

Желіге қосылу
ТД-ды SMART ТД бағдарламаларына, сым арқылы немесе сымсыз қосылым арқылы жергілікті желі көмегімен (LAN) интернетке қосыла
алатын етіп баптауға болады.
Желілік байланыс - Сымсыз
ТД-ды LAN желісіне стандартты сымсыз роутер немесе модем арқылы қоса аласыз.
Қабырғадағы LAN
ұяшығы
Сымсыз IP ортақтастырғышы
(DHCP сервері бар роутер)
LAN сымы
TV
Samsung сымсыз LAN адаптері IEEE 802.11a/b/g және n тілқатысу протоколдарына қолдау көрсетеді. Samsung компаниясы IEEE 802.11n
протоколын қолдануды ұсынады. Бейнефильмді IEEE 802.11b/g қосылымы арқылы көрген кезде, бейнефильм бірқалыпты көрсетілмеуі
мүмкін.
Көпшілік сымсыз желілердің, желіге кіру протоколы немесе сымсыз роутер (әдетте, сымсыз IP ортақтастырғышы) арқылы кіріп, "қауіпсіздік
коды" деп аталатын құпияланған қауіпсіздік кодын жіберетін қауіпсіздік жүйелері болады.
Егер "Pure High-throughput (Greeneld) 802.11n" режимі таңдалып, сымсыз роутер үшін "Encryption" параметрі "WEP, TKIP" немесе "TKIP
AES (WPS2Mixed)" қалпына қойылса, Samsung теледидары жаңа Wi-Fi сертификаттау стандартына сай келетін қосылымға қолдау
көрсетпейді.
Желілік байланыс - Сым арқылы
Теледидарды желіге, желінің параметрлеріне қарай, сымды қолданып екі негізгі тәсілмен қосуға болады. Бұл тәсілдер төменде
көрсетілген:
Қабырғадағы Модем ұяшығы
Сыртқы Модем
(ADSL/VDSL/Кабель ТД)
TД-дың артқы панелі
LAN сымыМодем Сымы
Қабырғадағы LAN ұяшығы
LAN сымы
ТД 10мбит/с мәнінен аз немесе осыған тең жылдамдығы бар желілерге қолдау көрсетпейді.
✎
Қосылымды орнату үшін Cat 5 немес е 6 (STP түрі*) сымын қолданыңыз. (*Оқшауланған жұптасқан сым)
✎
Казақ - 18
TД-дың артқы панелі
Page 88

e-Manual қарау жолдары
қарау жолдары
ТД функцияларына қатысты нұсқауларды эл. нұсқаулықтан таба аласыз. Эл. нұсқаулықты ашу үшін стандартты қашықтан басқару
пультінің SUPPORT түймешігін басыңыз немесе Smart Touch Control көмегімен Қолдау параметрін таңдаңыз.
Оған сонымен қатар мәзір арқылы да бара аласыз:
Мәзір → Қолдау → e-Manual
e-Manual-ге кіру
e-Manual функциясын қолдану үшін мына қадамдарды орындаңыз:
1. Анықтама алу қажет болғанда қашықтан басқару пультімен Қолдау параметрін таңдаңыз. Қолдау бейнебеті көрсетіледі.
2. Қашықтан басқару пультімен e-Manual таңдаңыз. e-Manual бейнебеті көрсетіледі.
3. Қажетті санатты таңдаңыз.
4. Қажетті тақырыпты таңдаңыз. e-Manual көргіңіз келген бетті көрсетеді.
e-Manual мәтінінде көрсетілген көк түспен бөлектелген сөз дер ТД-дың бейнебет мәзірінің параметрлерін немесе таңдауларын
✎
көрсетеді.
Эл. нұсқаулық тағы жасыл белгішелер қашықтан басқару пультінің түймешігін көрсетеді.
✎
Эл. нұсқаулық тағы көрсеткілер (мысалы, Мәзір → Қолдау → e-Manual) параметрге кіруге немесе функцияны іске қосуға қажетті
✎
қадамдардың ретін көрсетеді.
e-Manual тақырыбы мен тиісті бейнебет мәзір(лер)іне өту жолдары.
Алдын ала орнатылған сурет режимін өзгерту
Сурет
Сурет режимі
Артқы жарық
Контраст
Жарықтылық
Айқындық
Түс
Реңк (G/R) G50
Кей мәзірлерде бұл функция жұмыс істемейді.
✎
Мәзір белсенді күйде тұрмаса, Қазір көру функциясы жұмыс істемейді.
✎
Алдын ала орнатылған сурет режимін өзгерту
Сурет режимі
Menu → Сурет → Сурет режимі
Сурет режимдері суретке алдын ала орнатылған
параметрлерді қолданады.
N ДК-ді HDMI-DVI сымын қолданып қосқан кезде
Көңіл көтеру және Стандартты. параметрлерін
ғана таңдай аласыз.
• Динамика
Жарық бөлмеге сай келеді.
• Стандартты
Қалыпты ортаға сай келеді.
1. Тақырыпқа тиесілі мәзірдің параметріне бару үшін қашықтан басқару пультімен
Сурет
Сурет режимі
Артқы жарық
Контраст
Жарықтылық
Айқындық
Түс
Реңк (G/R)
a
түймешігін басыңыз.
2. бейнебетіне оралу үшін қашықтан басқару пультімен e-ManualҚолдау параметрін таңдаңыз.
Алдын ала орнатылған сурет режимін өзгерту
Алдын ала орнатылған сурет режимін өзгерту
Сурет режимі
Menu → Сурет → Сурет режимі
Сурет режимдері суретке алдын ала орнатылған
параметрлерді қолданады.
N ДК-ді HDMI-DVI сымын қолданып қосқан кезде
Көңіл көтеру және Стандартты. параметрлерін
ғана таңдай аласыз.
• Динамика
Жарық бөлмеге сай келеді.
• Стандартты
Қалыпты ортаға сай келеді.
Түрлі-түсті және функция түймешіктерін e-Manual функциясымен бірге қолдану
• Айналдыру жолағы: e-Manual бейнебетін жоғары немесе төмен шарлаңыз.
l / r
: Алдыңғы немесе келесі тарауға өтуге арналған.
•
•
a
Қазір көру: Тақырыпқа сай келетін БМ мәзіріне баруға арналған. Эл. нұсқаулықтың бейнебетіне оралу үшін қашықтан басқару
пультімен Қолдау параметрін таңдаңыз.
•
b
Басты: e-Manual негізгі бейнебетіне баруға арналған.
•
{
Позиция: Қашықтан басқару пультімен { түймешігін басқан сайын, эл. нұсқаулықтың орнын өзгертесіз.
•
}
Индекс: Индекс бейнебетін көрсетеді.
•
R
Қайту: Алдыңғы бейнебетке оралуға арналған.
Индекс бетінен тақырыпты іздеу
1. Қашықтан басқару пультімен
2. Тақырыпты іздеу үшін әріпті таңдаңыз. Индекс бетінде тақырыптар тізімі мен іздеу сөздері, сіз таңдаған қаріптен бастап көрсетіледі.
3. Қажетті тақырыпты немесе негізгі сөзді таңдаңыз.
4. Тақырыпты қамтитын e-Manual беті көрсетіледі.
Индекс бейнебетін жабу үшін RETURNR түймешігін басыңыз.
✎
}
параметрін таңдаңыз. Индекс бейнебеті көрсетіледі.
Казақ - 19
Page 89

e-Manual бейнебетінің орналасқан орнын өзгерту үшін
Егер БМ бейнебетіне байланысты e-Manual бейнебеті дұрыс көрсетілмесе, e-Manual бейнебетінің орналасқан орнын өзгерте аласыз.
1. Бөлектелген элементті e-Manual бейнебетіне стандартты қашықтан басқару пультінің SUPPORT түймешігін басып немесе Smart
Touch Control функциясының Қолдау параметрін таңдап жылжытыңыз.
2. Стандартты қашықтан басқару пультінің
{
түймешігін басыңыз немесе Smart Touch Control көмегімен { түймешігін басыңыз.
Қашықтан басқару пультімен { түймешігін басқан сайын, e-Manual орны өзгереді.
Қабырғалық аспа жинақты орнату
Қабырғалық аспа жинағын орнату
Қабырғалық аспа жинақ (бөлек сатылады) ТД-ды қабырғаға орнатуға мүмкіндік береді.
Қабырғалық аспа жинақты орнату туралы толық ақпаратты, қабырғалық аспа жинақтың нұсқаулығынан оқи аласыз. Қабырғаға
орнатылатын құрсауды орнына қондыру үшін техник маманға хабарласыңыз. Өз бетіңізбен орындау ұсынылмайды.
Samsung Electronics компаниясы құрылғыны дұрыс орнатпаудың нәтижесінде жарақат алсаңыз не басқа адамдар зардап шексе немесе
мүлікке нұқсан келсе, жауапкершілік көтермейді.
Қабырғалық аспа жинақты орнатпай тұрып дайындау
A жағдайы. SAMSUNG қабырғалық аспасын орнату
B жағдайы. Басқа компания шығарған қабырғалық аспа жинақты
орнату
1
Қабырғалық аспаны орнату үшін Ұстағыш-Шығырықты 1 қолданыңыз.
1
Қабырғалық аспа жинақ параметрлері (VESA)
Қабырғалық аспа жинақ теледидармен бірге жеткізілмейді, бірақ жеке сатылады.
✎
Қабырғалық аспа жинақты қатты қабыр ғаға, еденге перпендикуляр бағытта орнатыңыз. Басқа құрылыс материалдарына орнат у
✎
үшін, жақын жердегі дилерге хабарласыңыз. Төбеге немесе қисық қ абырғаға орнатса құлап, адам қатты жарақат алуы мүмкін.
Е С К Е Р І М
✎
• Қабырғалық аспа жинақтың стандартты өлшемдері төмендегі кестеде көрсетілген.
• Қабырғалық аспа жинақ сатып аларда, оны орнатуға қатысты толық нұсқаулық пен керек - жарақтар беріледі.
• VESA стандартты бұрандалар спецификациясына сай келмейтін бұрандаларды қолданбаңыз.
• Стандартты өлшемнен ұзын немесе VESA бұрандалар стандартына сай келмейтін бұрандаларды қолданбаңыз. Тым ұзын
бұрандалар теледидардың ішкі бөлшектеріне зиян келтіруі мүмкін.
• VESA стандартты бұрандалар спецификациясына сай келмейтін қабырғалық аспа жинақ қолданылса, бұрандаларының
ұзындықтары қабырғалық аспа жинақ спецификациясына байланысты басқаша болуы мүмкін.
• Бұрандаларды тым қатайтпаңыз; себебі өнімге нұқсан келуі немесе құлап қалып, адам жарақат алуы мүмкін. Samsung бұндай
қатерлі оқиғалар үшін жауапкершілік көтермейді.
• VESA стандартына сай емес немесе өндіруші ұсынбаған қабырғалық аспа жинақ қолданылса немесе сатып алушы өнімді
орнату туралы нұсқауларды орындамағандықтан өнімге зақым келсе немесе адам жарақат алса, Samsung компаниясы
жауапкершілік көтермейді.
• Теледидарды 15 градустан асыра қисайтпаңыз.
• ТД-ды үнемі екі адам қабырғаға орнатуға тиіс.
Өнім тобы дюйм VESA стан. (A * B)
Стандартты
бұранда
Саны
LED
жарықтамасы
бар теледидар
Қабырғалық аспа жинақты орнатардың алдында, қабырғаға тесіктерді бұрғылап жасаңыз.
✎
40 200 X 200
46~60 400 X 400
M 8 4
Қабырғалық аспа жинақты теледидар қосулы тұрғанда орнатпаңыз. Себебі электр тоғы соғып, адам жарақат
алуы мүмкін.
Казақ - 20
Page 90

Сақтау және күтім көрсету
Егер ТД бейнебетіне жапсырма жапсырсаңыз, оларды алғаннан кейін орындары шамалы кірлеп қалады. ТД-ды осыны
✎
тазалағаннан кейін қараңыз.
Құрылғыға су шашуға болмайды. Құрылғыға кірген кез келген
сұйық зат оны бүлдіруі, өртке себеп болуы немесе электр қатерін
тудыруы мүмкін.
Құрылғыны аз ғана су сіңірілген жұмсақ шүберекпен тазалаңыз.
Тұтанғыш сұйықтарды (мысалы, бензин, сұйылтқыш) немесе
тазалағыш затты қолданбаңыз.
Теледидарды қабырғаға бекіту
Абайлаңыз: Теледидарды тартса, итерсе немесе үстіне шықса, ол құлап кетуі мүмкін.
Сондай-ақ, балалардың ТД-ға артылып тұрмауына немесе оны қозғамауына көз жеткізіңіз.
Әйтпесе ТД аударылып кетіп, адам қатты жарақат алуы немесе мерт болуы мүмкін. ТД
жинағымен қоса берілген қауіпсіздік парағындағы сақтық шараларының барлығын
орындаңыз. Қосымша қауіпсіздік шарасы ретінде және өз қауіпсіздігіңізді қамтамасыз ету
үшін төменде сипатталған, аударылып қалуға қарсы құралды сатып алып орнатыңыз.
Теледидарды құлатып алуға жол бермеңіз
1. Бұрандаларды қапсырмаларға салыңыз да, қабырғаға мықтап бекітіңіз. Бұрандалардың
қабырғаға мықтап бекігеніне көз жеткізіңіз.
Қабырғаның түріне байланысты анкер шегесі тәрізді қосымша зат қ ажет болуы
✎
мүмкін.
Бұранда қапсырмасы, бұрандалар мен бау құрылғымен бірге жеткізілмейтіндіктен
✎
оларды жеке с атып алу қажет.
2. Бұрандаларды теледидардың артқы орта жағынан алыңыз да, қапсырмаға салыңыз,
содан соң бұрандаларды қайтадан теледидарға бекітіңіз.
Бұрандалар құрылғымен бірге жеткізілмеуі мүмкін. Мұндай жағдайда, келесі
✎
техникалық сипаттамаға ие бұрандаларды сатып алуды сұраймыз.
Бұранданың техникалық сипаттамасы
✎
• 19 ~ 27 дюйм үшін: M4
• 32 ~ 75 дюйм үшін: M8
3. Теледидарға бекітілген қапсырмалар мен қабырғаға бекітілген қапсырмаларды берік сым
арқылы жалғап, содан соң мықтап байлаңыз.
ЕСКЕРІМ
✎
• ТД артқа қарай құлап кетпес үшін қабырғаға таяу орнатыңыз.
• Сақтық мақсатында қабырғаға бекітілген қапсырма мен теледидарға бекітілген қапсырма бір деңгейде не одан төменірек
тұру үшін оларды сыммен қосып байлаған дұрыс.
• Сымды ТД-ды жылжытпай тұрып шешіңіз.
4. Барлық қосылымдардың мықтап жалғанғанына көз жеткізіңіз. Қосылымдардың босап қалмағанын мезгіл-мезгіл тексеріп отырыңыз.
Қосылымдардың берік екендігіне күмәндансаңыз, білікті маманға хабарласыңыз.
Казақ - 21
Page 91

Ақаулықты түзету
ТД-ға қатысты қандай да бір сұрағыңыз болса, алдымен осы тізімді қараңыз. Егер ақаулықты түзетуге қатысты кеңестердің біреуі
де көмектеспесе, “www.samsung.com” торабының қолдау көрсету бөліміне барыңыз немесе осы нұсқаулықтың артқы мұқабасында
көрсетілген тізімдегі байланыс орталығына хабарласыңыз.
Ақаулық Шешімі және түсіндірмесі
ТД іске қосылмайды. • АТ сымының қабырғадағы розеткаға және ТД-ға мықтап жалғанғанын тексеріңіз.
Ешбір сурет/видео жоқ. • Сым қосылымдарын тексеріңіз (ТД мен сыртқы құрылғылардың барлық сымдарын ағытып
Қашықтан басқару пульті жұмыс
істемейді.
Кабель/жерсерік ресиверінің қашықтан
басқару пульті, ТД-ды іске қоспайды не
сөндірмейді, үнділігін реттемейді.
Жоғарыдағы суреттер мен функциялардың кейбірі, құрылғының арнайы үлгілерінде ғана бар.
✎
ТД-ды ең оңтайлы күйде ұстау үшін бағдарламаның соңғы нұсқасын веб-сайттан (samsung.com -> Қолдау -> Қотару) USB арқылы
✎
• Қабырғадағы розетканың жұмыс істеп тұрғанына көз жеткізіңіз.
• ТД-дың POWER түймешігін басып көру арқылы, ақаулықтың қашықтан басқару пультіне
байланысты емес екеніне көз жеткізіңіз. Егер теледидар қосылса, төмендегі “Қашықтан
басқару пульті жұмыс істемейді” тармағын қараңыз.
алыңыз да, қайта жалғаңыз).
• Сыртқы құрылғыңыздың (Кабель/Жерсерік ресивері, DVD, Блю-рей т.с.с.) видео шығысын,
ТД-дың кіріс ұяшықтарына сәйкес келтіріп жалғаңыз. Егер сыртқы құрылғының шығысы HDMI
болса, оны ТД-дың HDMI кіріс ұяшығына жалғау керек.
• Жалғанған құрылғылардың электр желісіне қосулы тұрғанын тексеріңіз.
• Құрылғының қорек сымын қайта жалғау арқылы, жалғанған құрылғыны қайта іске қосыңыз.
• Қашықтан басқару пульті батареяларының (+/–) полюстарын дұрыс келтіріп салыңыз.
• Пульт сенсорының сигнал шығатын терезесін тазалаңыз.
• Қашықтан басқару пультін ТД-ға 5~6 фут қашықтықтан тура бағыттап көріңіз.
• Кабель/жерсерік ресиверінің қашықтан басқаратын пультін, теледидарды басқаратын
етіп бағдарламалаңыз. SAMSUNG ТД кодын, Кабель/жерсерік ресиверінің пайдаланушы
нұсқаулығынан қараңыз.
орната аласыз.
Бейнебеттің ажыратымдылығы
Режим Ажыратымдылық
IBM
MAC
VESA DMT
ЕСКЕРІМ
✎
640 x 350
720 x 400
640 x 480
832 x 624
1152 x 870
640 x 480
640 x 480
640 x 480
800 x 600
800 x 600
800 x 600
1024 x 768
1024 x 768
1024 x 768
1152 x 864
1280 x 720
1280 x 800
1280 x 1024
1280 x 1024
1366 x 768
1440 x 900
1600 x900RB
1680 x 1050
1920 x 1080
Көлденең жиілік
(кГц)
31,469
31,469
35,000
49,726
68,681
31,469
37,861
37,500
37,879
48,077
46,875
48,363
56,476
60,023
67,500
45,000
49,702
63,981
79,976
47,712
55,935
60,000
65,290
67,500
Тік жиілік (Гц)
70,086
70,087
66,667
74,551
75,062
59,940
72,809
75,000
60,317
72,188
75,000
60,004
70,069
75,029
75,000
60,000
59,810
60,020
75,025
59,790
59,887
60,000
59,954
60,000
Пиксел сағатының
жиілігі (МГц)
• Интерфейс режиміне қолдау көрсетілмейді.
• Стандартты емес бейне пішімін таңдаған жағдайда, теледидар дұрыс жұмыс істемеуі мүмкін.
25,175
28,322
30,240
57,284
100,000
25,175
31,500
31,500
40,000
50,000
49,500
65,000
75,000
78,750
108,000
74,250
83,500
108,000
135,000
85,500
106,500
108,000
146,250
148,500
Үндестіру
полярлығы
(H / V)
+/-
-/+
-/-
-/-
-/-
-/-
-/-
-/+/+
+/+
+/+
-/-
-/+/+
+/+
+/+
-/+
+/+
+/+
+/+
-/+
+/+
-/+
+/+
Казақ - 22
Page 92

Техникалық параметрлері
Бейнебеттің ажыратымдылығы 1920 x 1080
Жұмыс ортасының жағдайлары
Жұмыс температурасы
Орта ылғалдылығы
Сақталатын ортаның температурасы
Сақталатын ортаның ылғалдылығы
ТД жүйесі Аналогты: B/G, D/K, L, I (таңдалған елге байланысты)
Түс/видео жүйесі Аналогты: PAL, SECAM, NTSC-4.43, NTSC-3.58, PAL60
Үнділік жүйесі BG, DK, L, NICAM, MPEG1, DD, DD+, HEAAC.
HDMI IN Видео: 1080 24p, 1080p, 1080i, 720p, 576p, 480p
Айналмалы тұрғы (Сол / Оң) 0˚
Үлгі атауы UE40ES8000S UE46ES8000S UE55ES8000S
Бейнебет өлшемі 40 дюйм 46 дюйм 55 дюйм
Үнділік
(Шығыс) 10 Вт X 2
Өлшемдері (ЕxТxБ)
Корпус
Тұрғымен бірге
Салмағы
Тұрғыны қоспағанда
Тұрғыны қоса алғанда
Сандық: MPEG-2 MP@ML, MPEG-4, H.264/AVC MP@L3, MP@L4.0, HP@L4.0
906,3 x 540,1 x 30,8 мм
906,3 x 571,3 x 176 мм
9,55 кг
11,8 кг
10°C бастап 40°C дейін (50°F бастап 104°F дейін)
-20°C бастап 45°C дейін (-4°F бастап 113°F дейін)
Аудио : 2Ch Linear PCM 32/44.1/48kHz, 16/20/24bits.
10% - 80%, конденсатсыз
5% - 95%, конденсатсыз
Сандық: DVB-T/DVB-C/DVB-S2
1038,7 x 614,7 x 30,8 мм
1038,7 x 653,7 x 210 мм
11,98 кг
14,6 кг
1230,3 x 722,3 x 30,8 мм
1230,3 x 761,6 x 210 мм
16,6 кг
19,3 кг
Smart Touch Control
Үлгі атауы RMCTPE1
Қуат Сигнал көзі
Енгізу
Шығыс
Функциялары
MBR
Дыбыс
Bluetooth
Орнату
Іске қосу
Сыйысымдылығы
Өлшемі Жинақ (мм) 154x52x19.5
Салмағы
Түймешік 14 түймешік
Сенсорлық тақта Көлемді сенсорлық тақта (45ммx55мм)
Индикатор Құрылғы индикаторы LED x 3
IR Инфрақызыл сәуле шығаратын диод x 1
Touch Control Абсолютті координат
MBR Әмбебап басқару
Дыбыс Bluetooth арқылы дыбысты жіберу
Bluetooth Bluetooth 2.1 құралына қолдау көрсетіледі
MBR дерекқоры қамтылған Жаһандық
Қолдау көрсетілетін құрылғы режимі 3 режим (ТД, STB, BD)
Макс. жұмыс жасау қашықтығы 12м
Дауысты жіберу Bluetooth HID протоколы
Қолдау көрсетілетін аудио дерек жиілігі 16кГц, 16бит
Қолдау көрсетілетін дыбыс деңгейі -15.5дБ (0дБ-Толық шәкілге дейін)
RF 2.4ГГц, CSM диапазоны
Жұптастыру тәсілі IR бастаған стандартты жұптастыру
Макс. жұптастыру қашықтығы 4м (Меже сызығы, ТД-дағы IR ресиверіне бағытталған)
Макс. жұмыс жасау қашықтығы 10м (Меже сызығы)
ТД-мен жұптастыру Иә
MBR-ды бағдарламалау ТД виджеті қажет
Жұмыс температурасы 32°F бастап 104°F дейін (0°C бастап 40°C дейін)
Жұмыс жасау қашықтығы IR: Қалыпты 10м, макс. 12м / BT : 10м
Жұмыс уақыты 3 ай (түймешікті 200 рет басу / күніне)
LED ТД LED E7500 үлгісінен кейінгі
ПБП ТД E8000
Жинақ (батареяларсыз)(г) 119
Жинақ (батареяларды қосқанда)(г) 165
Керек-жарақтары Батареялар (AAx2)
Батарея (AA x 2)
Батареяның қолданыс уақытын ұзарту үшін сілті батареясын қолдануды
ұсынамыз
Казақ - 23
Page 93

IR Blaster
Үлгі атауы VG-IRB2000
Қуат Сигнал көзі
Енгізу Түймешік 2 түймешік (жұптастыру, қуатты қосу/сөндіру)
Шығыс
Функциялары
MBR
Bluetooth
Орнату
Іске қосу
Сыйысымдылығы
Өлшемі Жинақ (мм) Е95×Т79×Б65
(ЕxТxБ) Орам (мм) Е88×Т71×Б102
Салмағы
Өндіруші құрылғының дизайны мен техникалық сипаттамаларын алдын а ла ескерт усіз өзгерте алады.
✎
Қуат көзіне қосу мен тұтынылатын қуат туралы ақпаратты өнімге жапсырылған жапсырмадан қараңыз.
✎
Индикатор LED индикаторы x 1
IR Инфрақызыл сәуле шығаратын диод x 5
MBR Әмбебап басқару
Bluetooth Bluetooth 2.1 құралына қолдау көрсетіледі
MBR дерекқоры қамтылған Жаһандық
Қолдау көрсетілетін құрылғы режимі 3 режим (ТД, STB, BD)
Макс. жұмыс жасау қашықтығы 8м
RF 2.4ГГц, CSM диапазоны
Жұптастыру тәсілі IR бастаған стандартты жұптастыру
Макс. жұптастыру қашықтығы 4м (Меже сызығы, ТД-дағы IR ресиверіне бағытталған)
Макс. жұмыс жасау қашықтығы 10м (Меже сызығы)
ТД-мен жұптастыру Иә
MBR-ды бағдарламалау ТД виджеті қажет
Жұмыс температурасы 32°F бастап 104°F дейін (0°C бастап 40°C дейін)
Жұмыс жасау қашықтығы IR: Қалыпты 10м, макс. 12м / BT : 10м
Жұмыс жасау бұрышы 360 градус
Жұмыс уақыты 3 ай (түймешікті 200 рет басу / күніне)
LED ТД LED E7500 үлгісінен кейінгі
ПБП ТД E8000
Жинақ (батареяларсыз)(г) 86.5
Жинақ (батареяларды қосқанда)(г) 178.5
Орам (г) 30.6
Керек-жарақтары Батареялар (AAx4)
Батарея (AA x 4)
Батареяның қолданыс уақытын ұзарту үшін сілті батареясын қолдануды
ұсынамыз
Ұсыныс - тек ЕО ғана
• Samsung Electronics осы мәлімдеме арқылы, осы LED ТД-ның 1999/5/EC ережесінің маңызды талаптары мен басқа да тиісті
шарттарына сай келетінін мәлімдейді.
• Ресми Сәйкестік декларациясына http://www.samsung.com, Қолдау > Өнімге қолдау көрсету қойындысына барып, үлгінің атауын
енгізу арқылы қол жеткізуге болады.
• Бұл құрылғы тек үй ішінде ғана қолдануға болады.
• Бұл құрылғыны барлық ЕО елдерінде қолдануға болады.
Лицензия
Символ Кедендік одақтың 005/2011 техникалық регламентіне сәйкес қолданылады және осы өнімнің қаптамасын екінші рет
пайдалануға арналмағанын және жоюға жататынын көрсетеді. Осы өнімнің қаптамасын азық-түлік өнімдерін сақтау үшін пайдалануға
тыйым салынады.
Символ қаптаманы жою мүмкіндігін көрсетеді. Символ сандық код және/немесе әріп белгілері түріндегі қаптама
материалының белгісімен толықтырылуы мүмкін.
Казақ - 24
 Loading...