

Page 1
Связывайтесь с SAMSUNG по всему миру
Если у вас есть предложения или вопросы по продуктам Samsung, связывайтесь с информационным центром Samsung.
Страна Центр поддержки покупателей Веб-узел
RUSSIA 8-800-555-55-55 www.samsung.ru
Georgia 8-800-555-555 -
Armenia 0-800-05-555 -
Azerbaijan 088-55-55-555 -
KAZAKHSTAN 8-10-800-500-55-500 -
UZBEKISTAN 8-10-800-500-55-500 www.samsung.com/kz_ru
KYRGYZSTAN 00-800-500-55-500 www.samsung.com
TADJIKISTAN 8-10-800-500-55-500 www.samsung.com
UKRAINE 0-800-502-000
www.samsung.ua
www.samsung.com/ua_ru
Belarus 810-800-500-55-500 -
Moldova 00-800-500-55-500 -
Производитель:
ООО «Самсунг Электроникс Рус Калуга», 249002, Калужская обл., Боровский р-н, д. Коряково, Первый Северный проезд,
владение 1
© 2010 Samsung Electronics Co., Ltd. All rights reserved.
BN68-02820G-00
LED-ТЕЛЕВИЗОР
руководство пользователя
UE46C9000Z UE46C9000S UE55C9000Z UE55C9000S
удивительные возможности
Благодарим за приобретение продукции компании
Samsung. Для получения полного обслуживания
зарегистрируйте свое устройство по адресу
www.samsung.ru/club/registration
Модель Серийный номер
0_BN68-02820G-Cover.indd 1 2010-05-25 오후 4:47:01
Page 2
2
English
Figures and illustrations in this User Manual are provided for reference only and may differ from actual product appearance.
Product design and specifications may be changed without notice.
Digital TV notice
1. Functionalities related to Digital TV (DVB) are only available in countries/areas where DVB-T (MPEG2 and MPEG4 AVC) digital terrestrial signals are
broadcasted or where you are able to access to a compatible DVB-C (MPEG2 and MPEG4 AAC) cable-TV service. Please check with your local
dealer the possibility to receive DVB-T or DVB-C signal.
2. DVB-T is the DVB European consortium standard for the broadcast transmission of digital terrestrial television and DVB-C is that for the broadcast
transmission of digital TV over cable. However, some differentiated features like EPG (Electric Programme Guide), VOD (Video On Demand) and so
on, are not included in this specification. So, they cannot be workable at this moment.
3. Although this TV set meets the latest DVB-T and DVB-C standards, as of [August, 2008], the compatibility with future DVB-T digital terrestrial and
DVB-C digital cable broadcasts cannot be guaranteed.
4. Depending on the countries/areas where this TV set is used some cable-TV providers may charge an additional fee for such a service and you may
be required to agree to terms and conditions of their business.
5. Some Digital TV functions might be unavailable in some countries or regions and DVB-C might not work correctly with some cable service providers.
6. For more information, please contact your local Samsung customer care centre.
✎
The reception quality of TV may be affected due to differences in broadcasting method between the countries. Please check the TV
performance in the local SAMSUNG Authorized Dealer, or the Samsung Call Centre whether it can be improved by reconfiguring TV setting or
not.
Still image warning
Avoid displaying still images (like jpeg picture files) or still image element (like TV programme logo, panorama or 4:3 image format, stock or news bar at
screen bottom etc.) on the screen. Constant displaying of still picture can cause ghosting of LED screen, which will affect image quality. To reduce risk of
this effect, please follow below recommendations:
• Avoid displaying the same TV channel for long periods.
• Always try do display any image on full screen, use TV set picture format menu for best possible match.
• Reduce brightness and contrast values to minimum required to achieve desired picture quality, exceeded values may speed up the burnout process.
• Frequently use all TV features designed to reduce image retention and screen burnout, refer to proper user manual section for details.
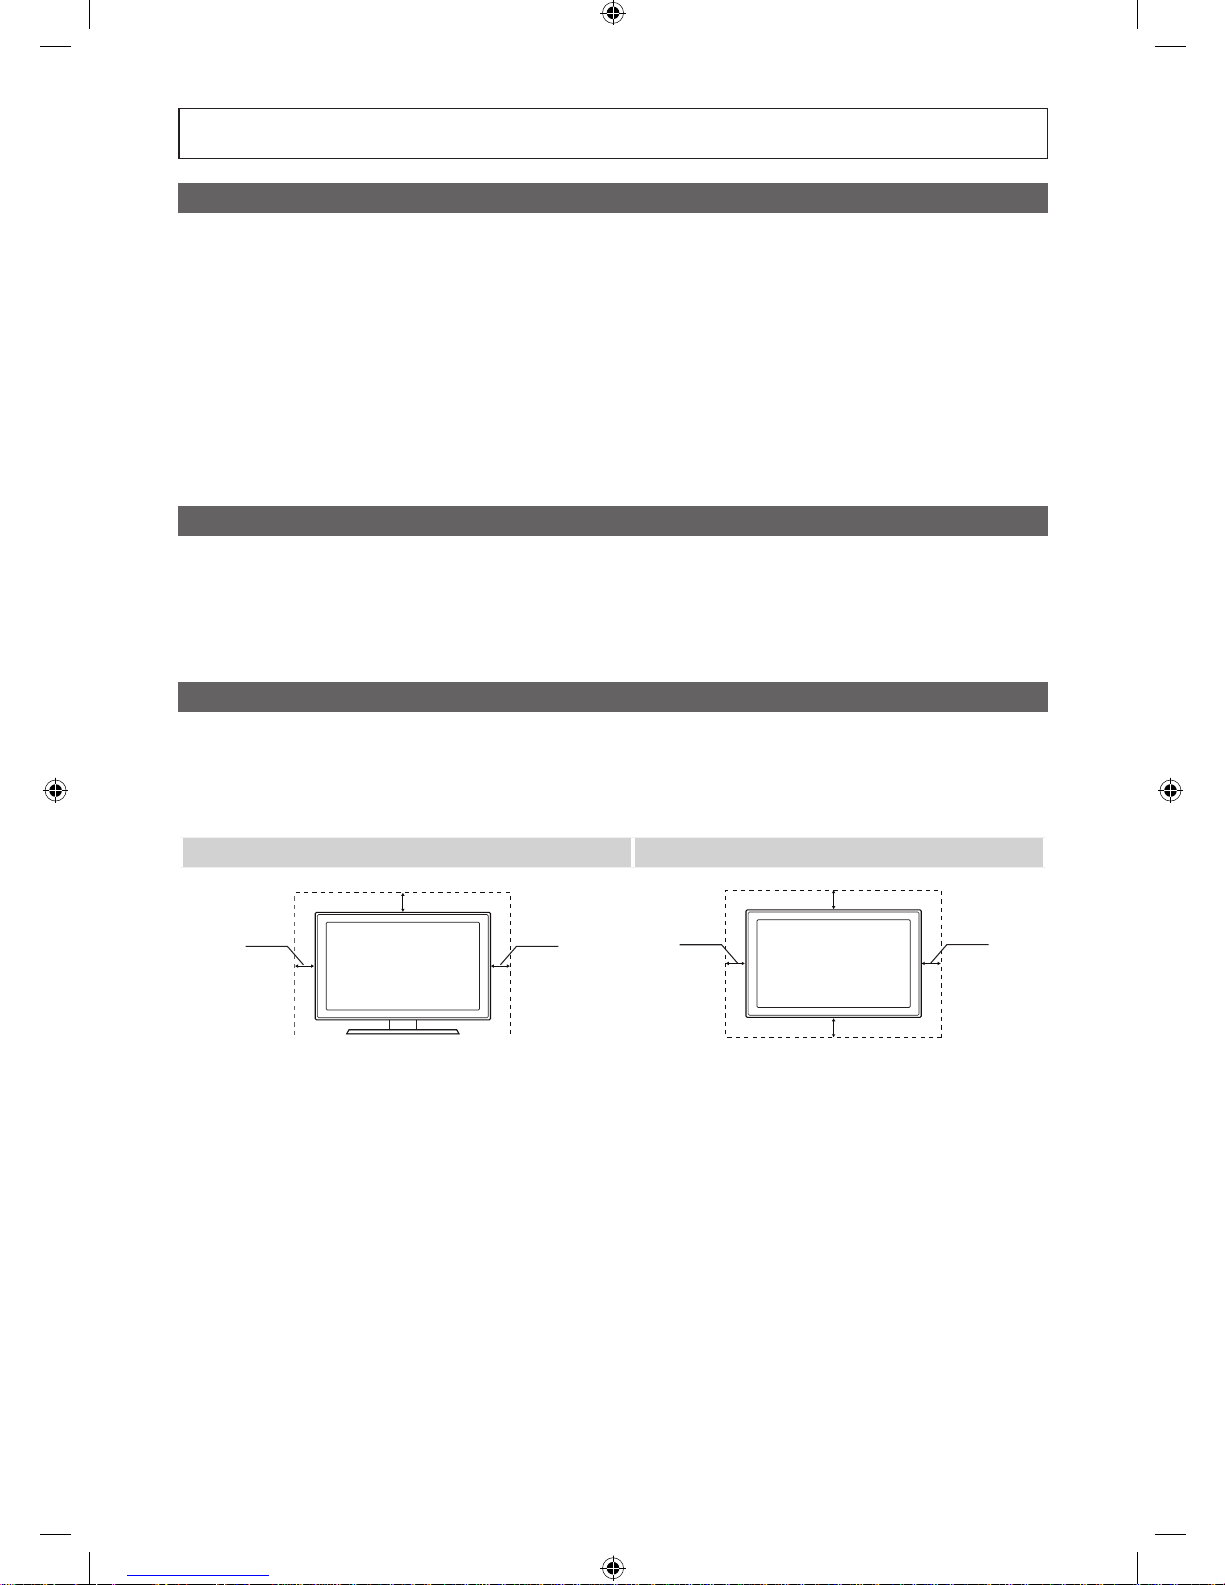
Securing the Installation Space
Keep the required distances between the product and other objects (e.g. walls) to ensure proper ventilation.
Failing to do so may result in fire or a problem with the product due to an increase in the internal temperature of the product.
✎
When using a stand or wall-mount, use parts provided by Samsung Electronics only.
x
If you use parts provided by another manufacturer, it may result in a problem with the product or an injury due to the product falling.
✎
The appearance may differ depending on the product.
Installation with a stand. Installation with a wall-mount.
10 cm
10 cm
10 cm
10 cm
10 cm
10 cm
10 cm
[UC9000]BN68-02820G-RU.indb 2 2010-05-25 오전 9:58:38
Page 3

3
ENGLISH
English
Contents
Getting Started
4
4 Accessories
5 Viewing the Control Panel
6 Viewing the Remote Control
7 Connecting to an Antenna
7 Plug & Play (Initial Setup)
Connections
8
8 Connecting to an AV Device
10 Connecting to an Audio Device
11 Changing the Input Source
Basic Features
12
12 How to Navigate Menus
12 Using the INFO button (Now & Next guide)
12 Planning Your Viewing
14 Channel Menu
16 Picture Menu
21 Sound Menu
23 Setup Menu
25 Support Menu
Advanced Features
27
27 Connecting to a PC
28 Network Connection
35 Media Play
44 Anynet+
48 Internet@TV
51 AllShare
Other Information
53
53 Analogue Channel Teletext Feature
54 Assembling the Cables
54 Securing the TV to the wall
55 Troubleshooting
59 Specifications
60 Index
Check the Symbol!
This function can be used by
pressing the TOOLS button on the
remote control.
Note One-Touch Button
TOOLS
TOOLS
[UC9000]BN68-02820G-RU.indb 3 2010-05-25 오전 9:58:38
Page 4
4
English
Getting Started
Accessories
✎✎
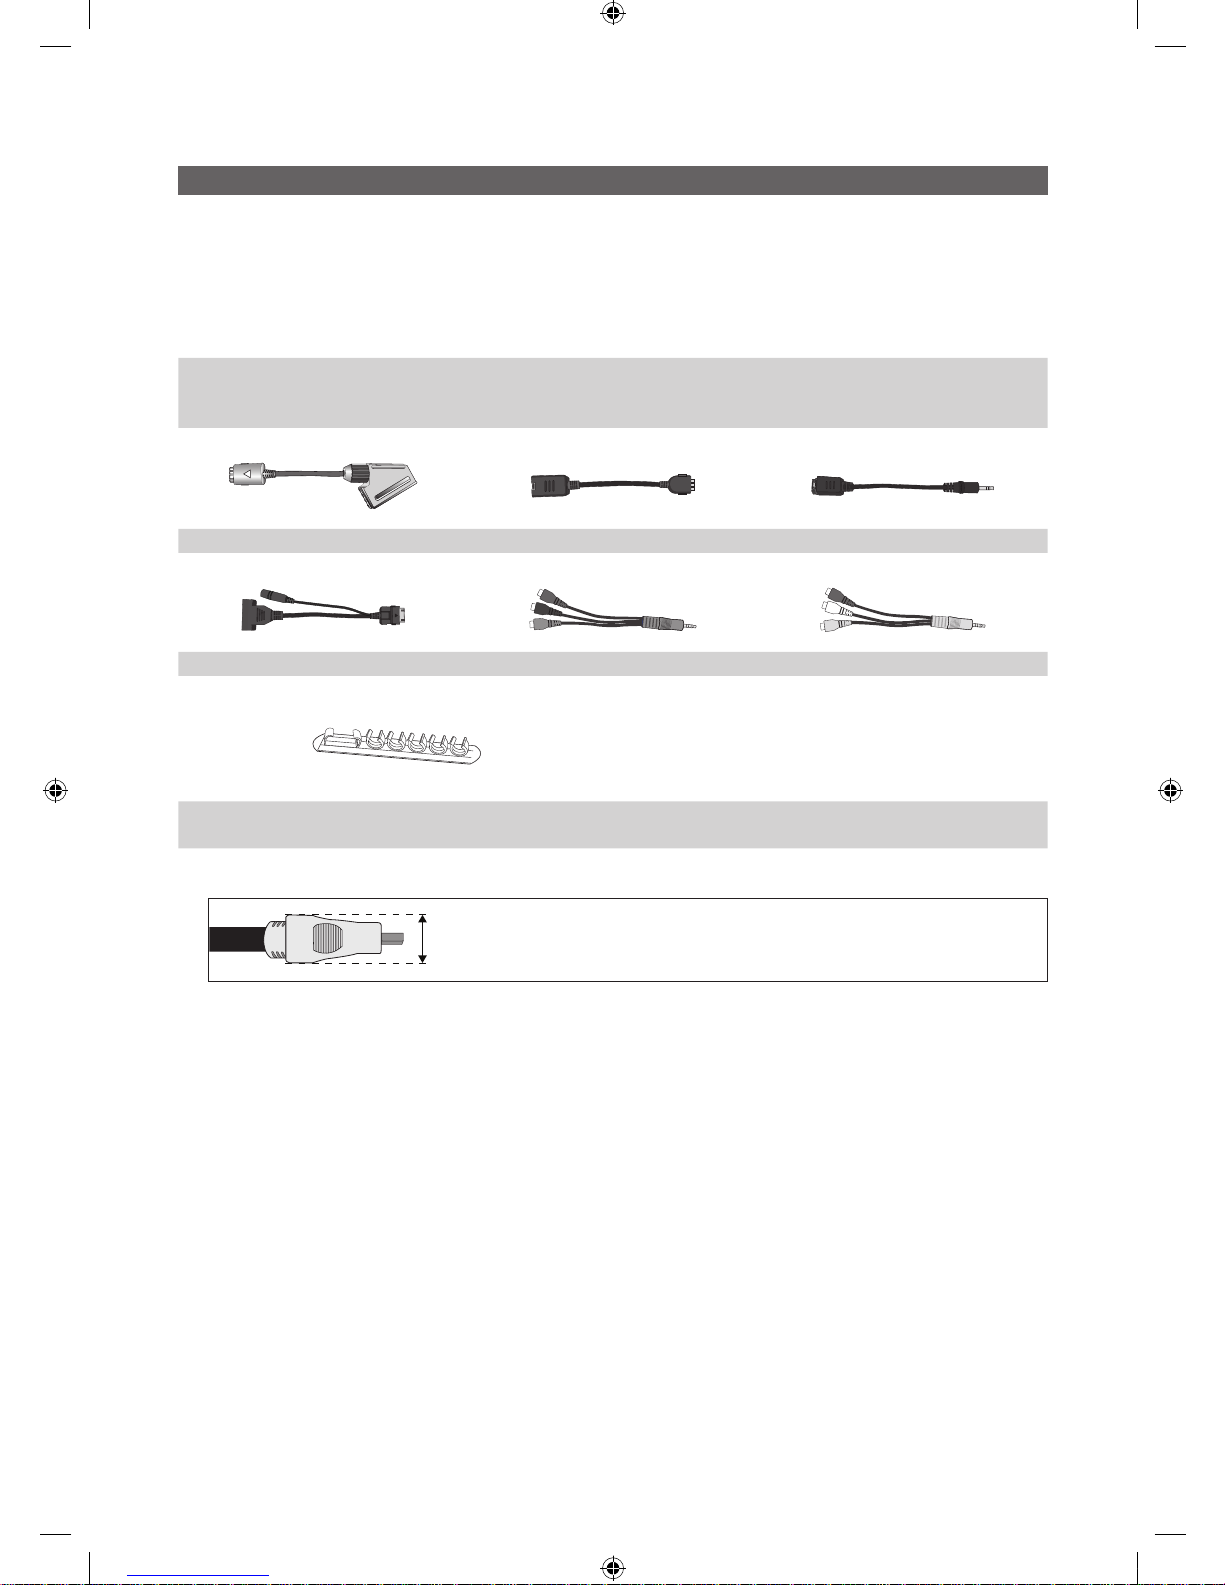
Please✎make✎sure✎the✎following✎items✎are✎included✎with✎your✎LED✎TV.✎If✎any✎items✎are✎missing,✎contact✎your✎dealer.
✎✎
The✎items’✎colours✎and✎shapes✎may✎vary✎depending✎on✎the✎models.
✎✎
Cables✎not✎included✎in✎the✎package✎contents✎can✎be✎purchased✎separately.
✎✎
Don’t✎pull✎ou t✎the✎LAN✎and✎SCART✎Adapter✎directly.
[[
CAUTION:[INSERT[SECURELY[LEST[SHOULD[BE[DETACHED[IN[SET
✎y Remote✎Control✎&✎Batteries✎(AAA✎x✎2)
✎y Owner’s✎Instructions
✎y Warranty✎Card✎/✎Safety✎Guide✎(Not✎available✎in✎some✎locations)
✎y Cleaning✎Cloth
✎y SCART✎Adapter✎ ✎y LAN✎Adapter ✎y Optical✎Adapter
✎y PC✎Adapter ✎y Component✎Adapter ✎y AV✎Adapter
✎y Holder-Wire✎(4EA)
(UE46C9000ZW,✎UE55C9000ZW)
✎✎
For✎best✎cable✎connection✎to✎this✎product,✎be✎sure✎to✎use✎cables✎with✎a✎maximum✎thickness✎as✎below:
✎y Maximum✎thickness✎-✎0.55✎inches✎(14mm)
1_BN68-02820G-Eng.indd 4 2010-05-25 오후 4:11:44
Page 5
5
01 Getting Started
English
Viewing the Control Panel
✎
The product colour and shape may vary depending on the model.
✎
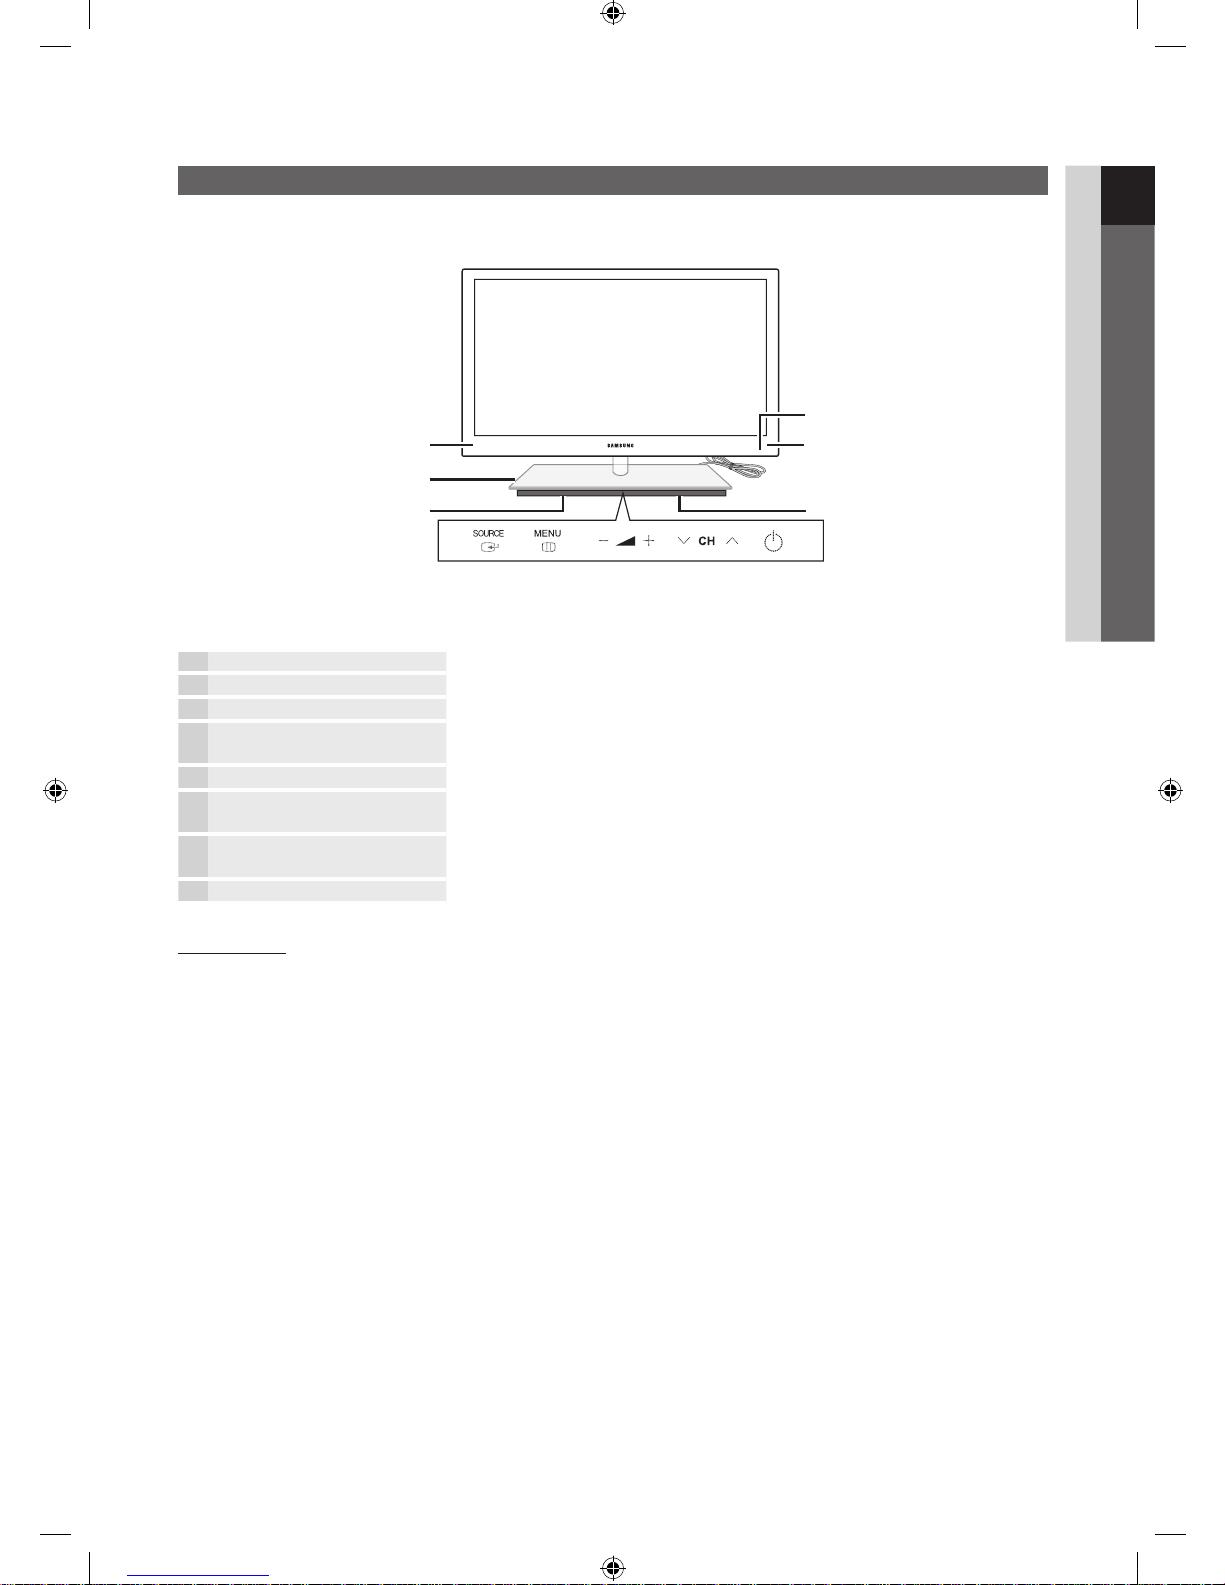
To control the TV using the LED touch pad, tap the LED touch pad centered underneath the stand. The touch pad will
slide out by itself. The LED touch pad will slide back in if unused for a specified period of time.
3D Emitter The LED on the 3D emitter blinks only when sending a 3D signal.
Power Indicator Blinks and turns off when the power is on and lights up in standby mode.
Remote control sensor Aim the remote control towards this spot on the TV.
SOURCE
Toggles between all the available input sources. In the on-screen menu, use this
button as you would use the ENTER button on the remote control.
MENU
Displays an on-screen menu, the OSD (on screen display) of your TV’s features.
Adjusts the volume. In the OSD, use the
buttons as you would use the
◄ and ► buttons on the remote control.
Changes the channels. In the OSD, use the
buttons as you would use the
▼ and ▲ buttons on the remote control.
(Power)
Turns the TV on or off.
Standby mode
Do not leave your TV in standby mode for long periods of time (when you are away on a holiday, for example). A small amount
of electric power is still consumed even when the power button is turned off. It is best to unplug the power cord.
Power Indicator
Remote control sensor
Speakers Speakers
Woofer
3D Emitter
[UC9000]BN68-02820G-RU.indb 5 2010-05-25 오전 9:58:41
Page 6
6
Getting Started
English
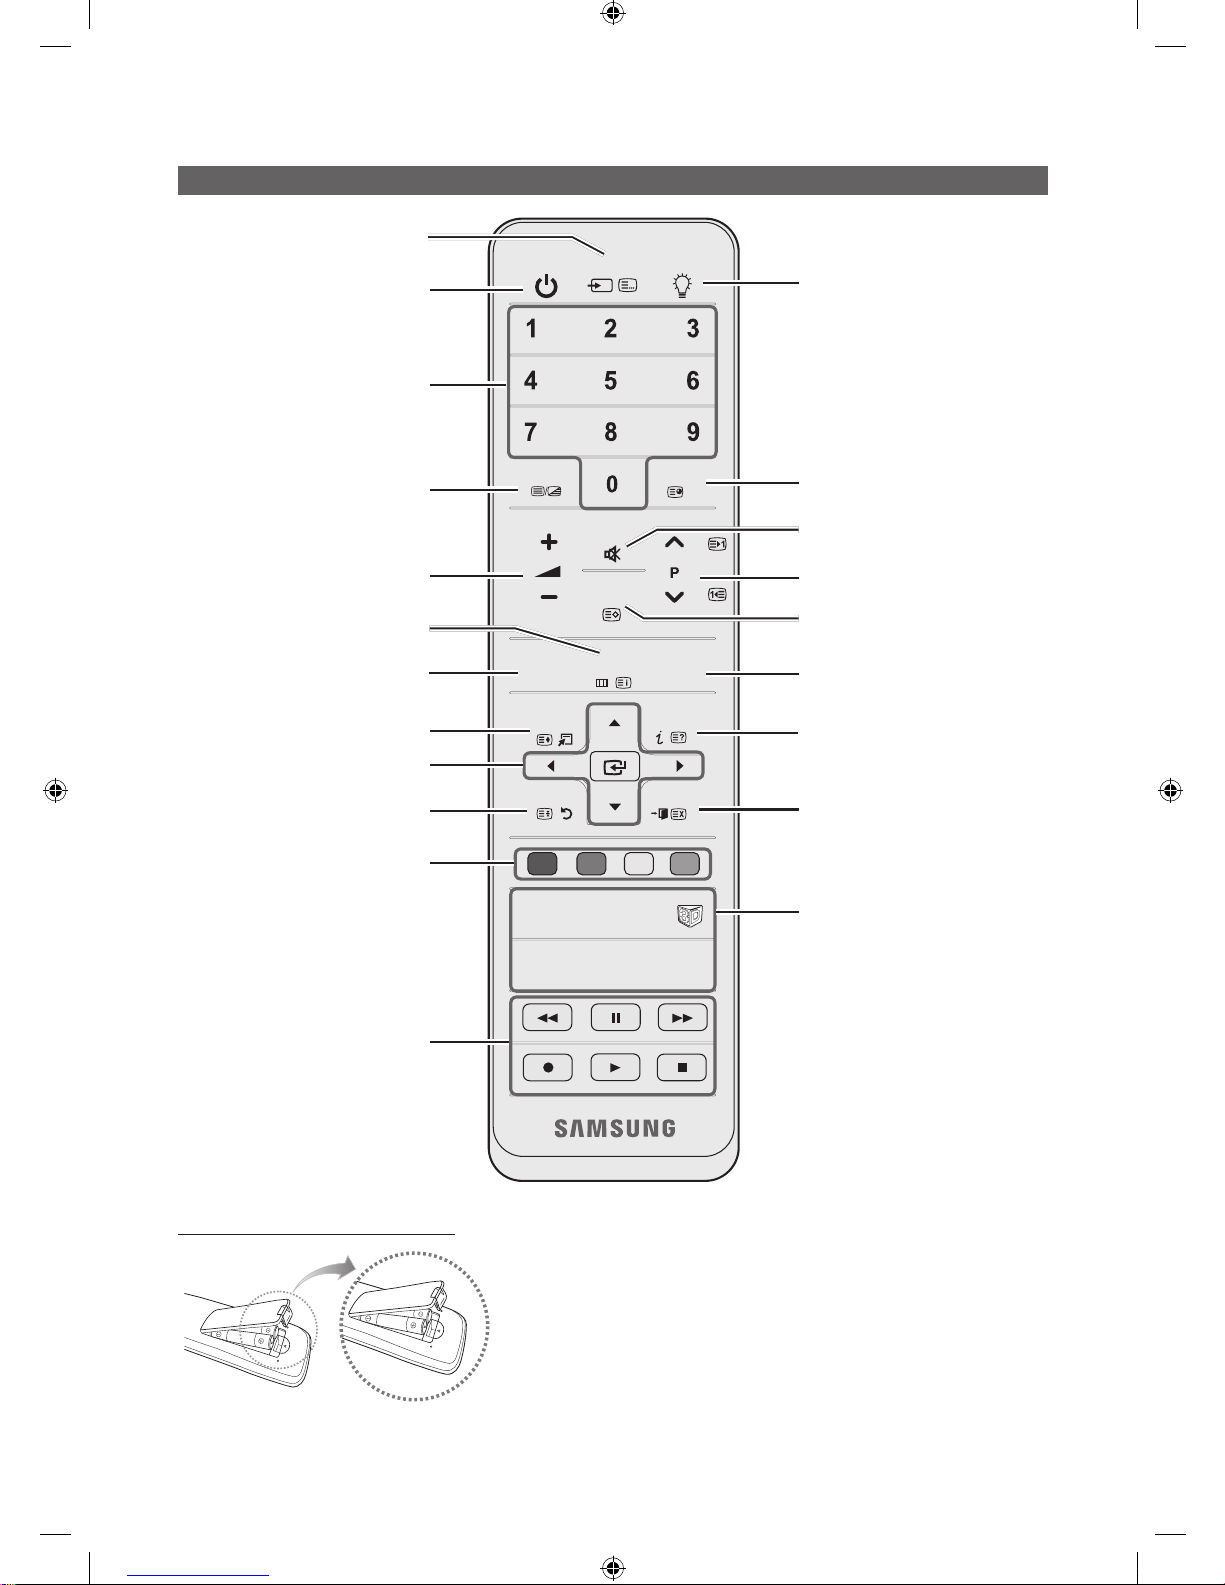
Viewing the Remote Control
Installing batteries (Battery size: AAA)
✎
NOTE
x
Use the remote control within 23 feet from the TV.
x
Bright light may affect the performance of the remote control.
Avoid using nearby special fluorescent light or neon signs.
x
The colour and shape may vary depending on the model.
POWER SOURCE ON/OFF
PRE-CH
INTERNET
@TV
CONTENT
MEDIA.P
P.SIZEAD
SUBT.
A B C D
TTX/MIX
GUIDE
CH LIST
MUTE
TOOLS
RETURN
EXIT
INFO
MENU
Turns the TV on and off.
Displays and selects the available video
sources (p. 11).
Turns the remote control light on or
off. When on, the buttons become
illuminated for a moment when pressed.
(Using the remote control with this button
set to on will reduce the battery usage
time.)
Returns to the previous channel.
Cuts off the sound temporarily.
Changes channels.
Displays channel lists on the screen
(p. 14).
Displays the EPG (Electronic Programme
Guide) (p.12).
Displays information on the
TV screen.
Exits the menu.
Have direct access to channels.
Adjusts the volume.
Alternately select Teletext ON, Double,
Mix or OFF.
Opens the OSD.
Quickly select frequently used functions.
Displays the Content View, which
includes Guide, 3D, Internet@TV,
Media Play, and AllShare.
Returns to the previous menu.
Selects the on-screen menu items and
changes the values seen on the menu.
These buttons are for the Channel
Manager, Internet@TV, Media Play
menu, etc.
Use these buttons in Media Play
and Anynet+ modes (p. 35, 44).
(The button also controls recording
for Samsung recorders that support the
Anynet+, TimeShift and PVR features.)
MEDIA.P: Displays Media Play (p. 35).
INTERNET@TV: Link to various internet
services (p. 48).
3D: Sets the video, which provided with
3D signal (p. 19).
AD: Turns the audio description on and
off (p. 22). This is not available in some
locations.
P.SIZE: Selects the picture size (p. 17).
SUBT.: Displays digital subtitles (p. 24).
[UC9000]BN68-02820G-RU.indb 6 2010-05-25 오전 9:58:42
Page 7

7
01 Getting Started
English
Connecting to an Antenna
When the TV is initially powered on, basic settings proceed automatically.
✎
Preset: Connecting the mains and antenna.
Plug & Play (Initial Setup)
When the TV is initially powered on, a sequence of on-screen prompts will assist in configuring basic settings. Press the
POWER button. Plug & Play is available only when the Input source is set to TV.
✎
To return to the previous step, press the Red button.
1
Selecting a language
Press the ▲ or ▼ button, then press the ENTER
button.
Select the desired OSD (On Screen Display) language.
P
POWER
2
Selecting Store Demo
or Home Use
Press the ◄ or ► button, then press the ENTER
button.
y Select the Home Use mode. Store Demo Mode is for retail
environments.
y To return the unit’s settings from Store Demo to Home Use
(standard): Press the volume button on the TV. When you see the
volume OSD, press and hold MENU for 5 sec.
3
Selecting a country
Press the ▲ or ▼ button, then press the ENTER
button.
Select the appropriate country.
4
Selecting an antenna
Press the ▲ or ▼ button, then press the ENTER
button.
Select Air or Cable.
5
Selecting a channel
Press the ▲ or ▼ button, then press the ENTER
button.
Select the channel source to memorise. When setting the antenna source to Cable, a step
appears allowing you to assign numerical values (channel frequencies) to the channels. For
more information, refer to Channel → Auto Store (p. 14).
✎
Press the ENTER button at any time to interrupt the memorisation process.
6
Setting the Clock
Mode
Set the Clock Mode automatically or manually.
Press the ▲ or ▼ button to select Auto, then press the ENTER
button.
7
Time Zone
Press the ▲ or ▼ button to select the your time zone, then press the ENTER
button.
(depending on the country)
8
Viewing the HD
Connection Guide.
The connection method for the best HD screen quality is displayed.
9
Enjoy your TV.
Press the ENTER
button.
If You Want to Reset This Feature...
Select Setup - Plug & Play (Initial Setup). Enter your 4 digit PIN number. The default PIN number is “0-0-0-0.” If you want to
change the PIN number, use the Change PIN function.
ANT OUT
VHF/UHF Antenna
Cable
or
[UC9000]BN68-02820G-RU.indb 7 2010-05-25 오전 9:58:43
Page 8
8
English
Connections
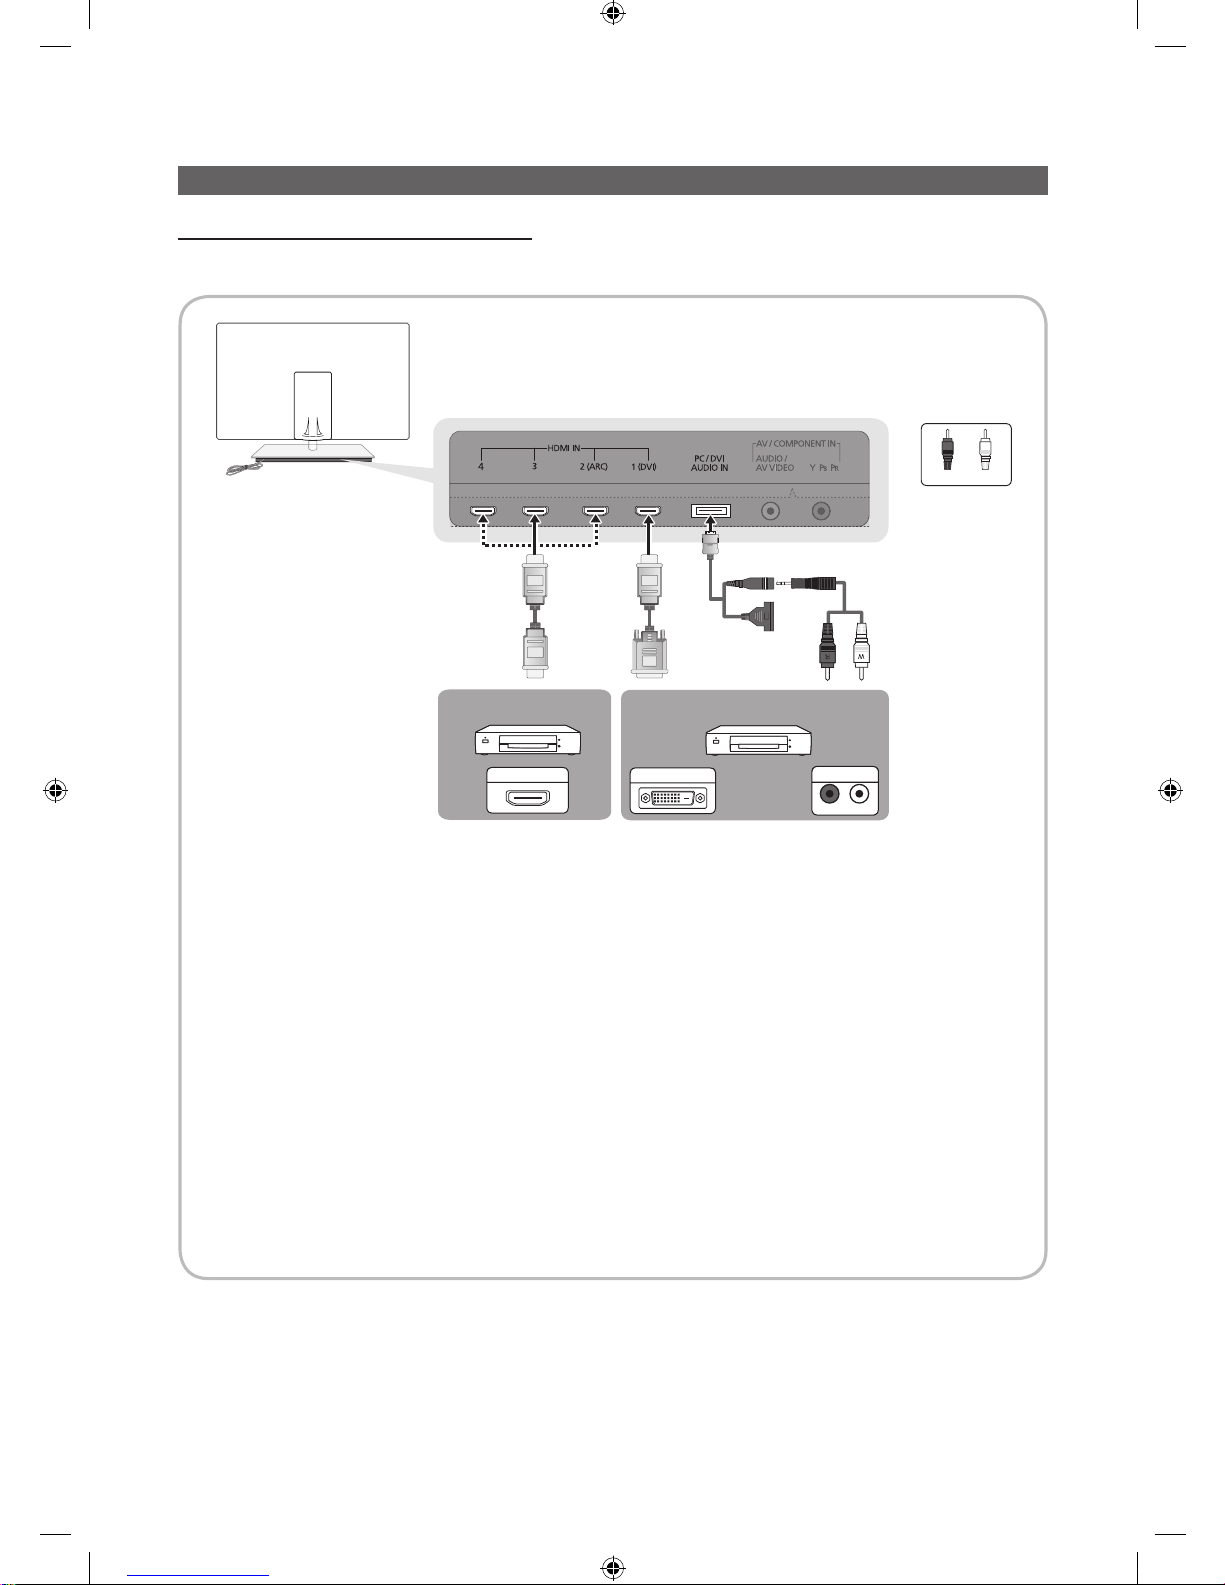
Connecting to an AV Device
Using an HDMI or HDMI/DVI cable (up to 1080p)
Available devices: DVD, Blu-ray player, HD cable box, HD STB (Set-Top-Box) satellite receiver, cable box, STB satellite receiver
✎
HDMI IN 1(DVI), 2(ARC), 3, 4, PC/DVI AUDIO IN
x
For better picture and audio quality, connect to a digital device using an HDMI cable.
x
An HDMI cable supports digital video and audio signals, and does not require an audio cable.
– To connect the TV to a digital device that does not support HDMI output, use an HDMI/DVI and audio cables.
x
The picture may not display normally (if at all) or the audio may not work if an external device that uses an older
version of HDMI mode is connected to the TV. If such a problem occurs, ask the manufacturer of the external
device about the HDMI version and, if out of date, request an upgrade.
x
Be sure to use an HDMI cable with a thickness of 14 mm or less.
x
Be sure to purchase a certified HDMI cable. Otherwise, the picture may not display or a connection error may
occur.
x
A basic high-speed HDMI cable or one with ethernet is recommended. This product does not support the
ethernet function via HDMI.
x
This product supports the 3D and ARC (Audio Return Channel) functions via an HDMI cable. Note that the
ARC function is supported by the HDMI IN 2(ARC) port only.
– If 3D Auto View is set to On, some functions such as Internet@TV may be disabled. In this case, set
3D Auto View or 3D Mode to Off.
x
The ARC function allows digital audio to output via the HDMI IN 2(ARC) port. It can be enabled only when the
TV is connected with an audio receiver that supports the ARC function.
WhiteRed
WR
DVI OUT
R-AUDIO-L
AUDIO OUT
HDMI OUT
DVD / Blu-ray player DVD / Blu-ray player
[UC9000]BN68-02820G-RU.indb 8 2010-05-25 오전 9:58:44
Page 9
9
English
02 Connections
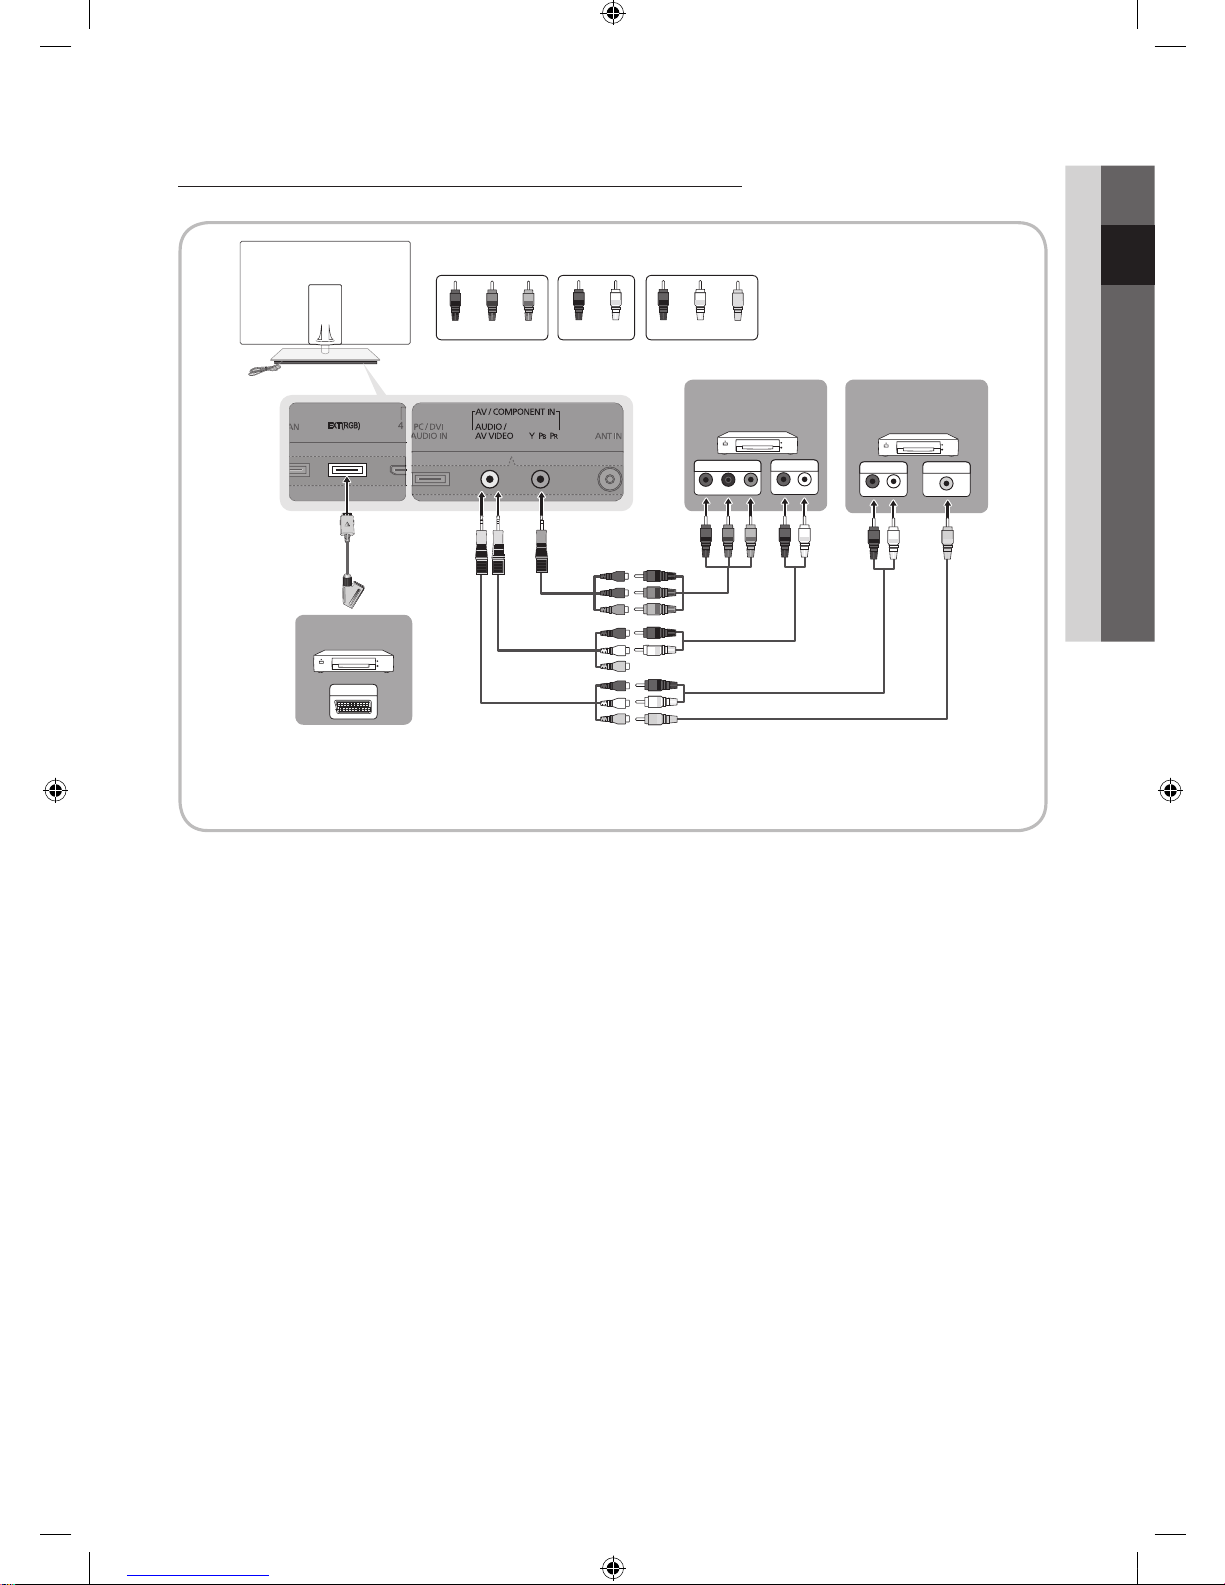
Using a Component (up to 1080p) or Audio/Video (480i only) and Scart Cable
Available devices: DVD, Blu-ray player, cable box, STB satellite receiver, VCR
✎
In Ext. mode, DTV Out supports MPEG SD Video and Audio only.
✎
To obtain the best picture quality, the Component connection is recommended over the A/V connection.
PR PB Y
COMPONENT OUT
AUDIO OUT
R-AUDIO-L
W
R
RGB
AUDIO OUT
R-AUDIO-L
VIDEO OUT
W R
R
B
G
WR
R
G
B
W R
W Y
Y
R
EXT
Y
W
R
Red RedBlue WhiteGreen
VCR
VCR
DVD / Blu-ray
player
Red White Yellow
[UC9000]BN68-02820G-RU.indb 9 2010-05-25 오전 9:58:44
Page 10
10
English
Connections
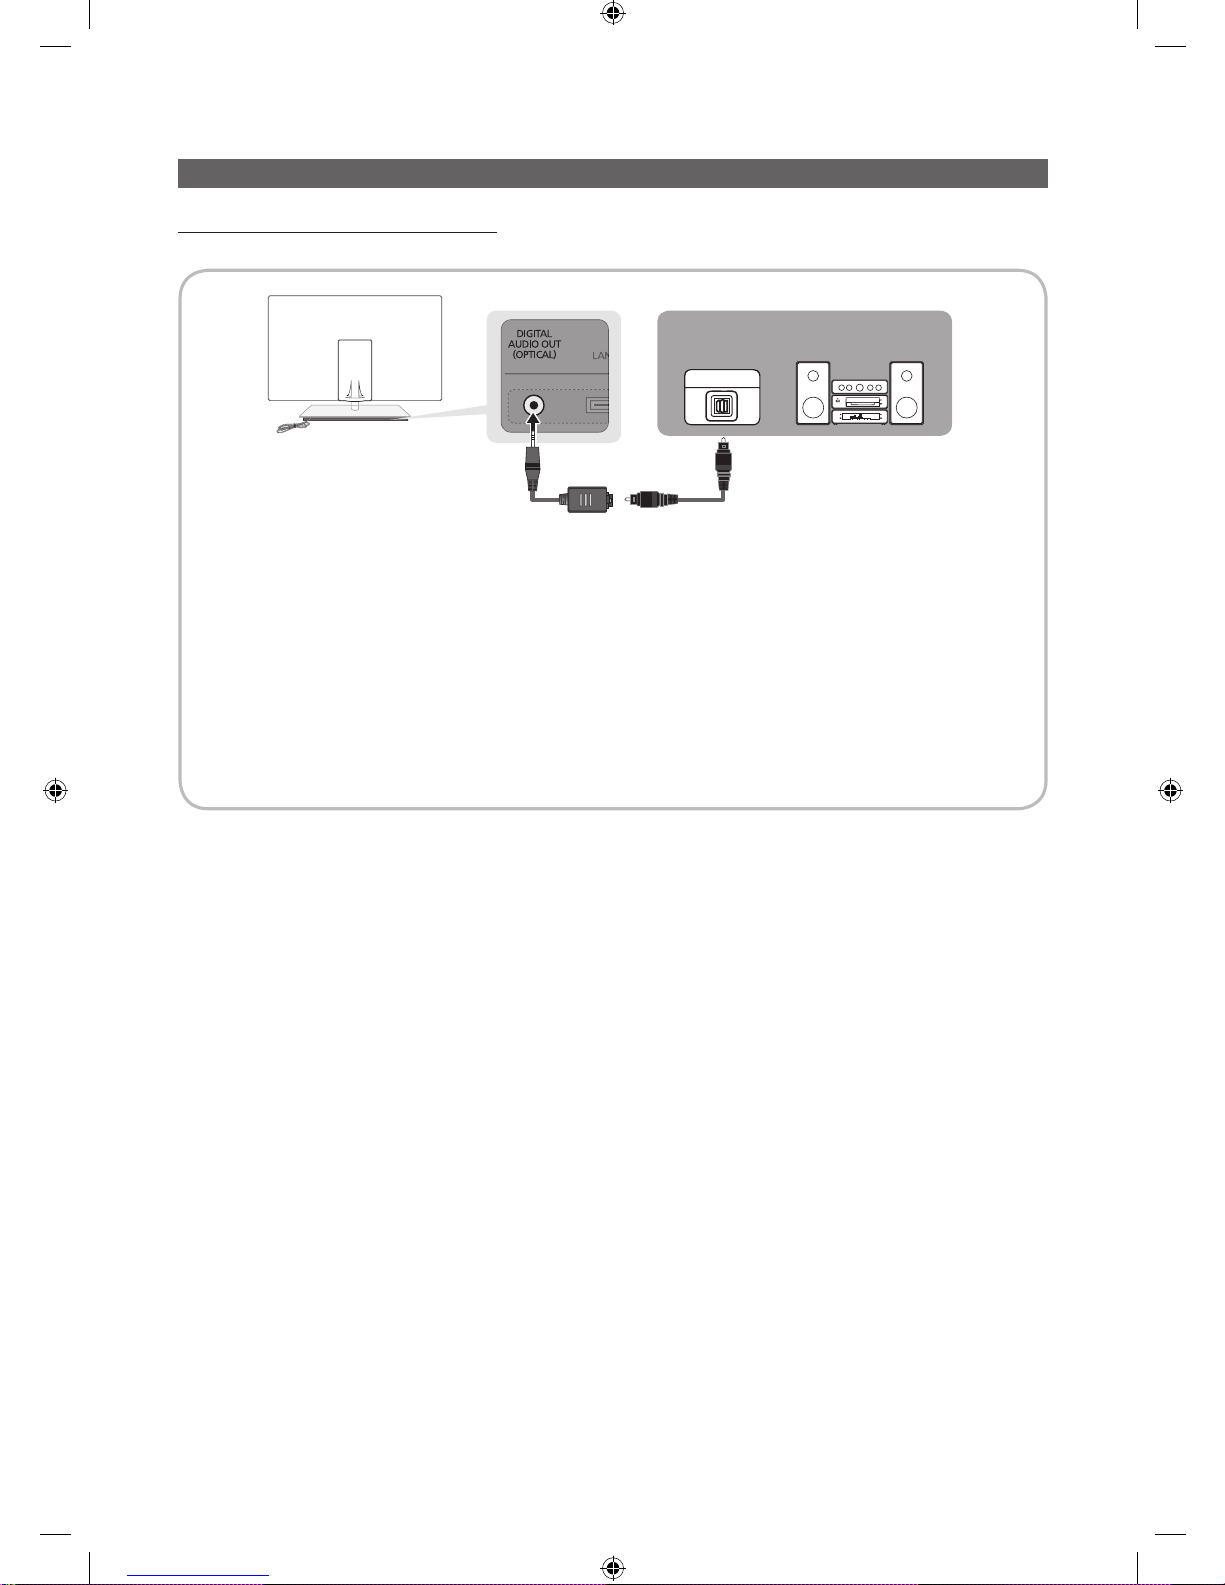
Connecting to an Audio Device
Using an Optical (Digital) Cable Connection
Available devices: digital audio system, amplifier, DVD home theatre
✎
DIGITAL AUDIO OUT (OPTICAL)
x
When a digital audio system is connected to the DIGITAL AUDIO OUT (OPTICAL) jack, decrease the volume
of both the TV and the system.
x
5.1 CH (channel) audio is available when the TV is connected to an external device supporting 5.1 CH.
x
When the receiver (home theatre) is set to on, you can hear sound output from the TV’s optical jack. When the
TV is receiving a DTV signal, the TV will send 5.1 CH sound to the home theatre receiver. When the source is
a digital component such as a DVD / Blu-ray player / cable box / STB (Set-Top-Box) satellite receiver and is
connected to the TV via HDMI, only 2 CH audio will be heard from the home theatre receiver. If you want to
hear 5.1 CH audio, connect the digital audio out jack from your DVD / Blu-ray player / cable box / STB satellite
receiver directly to an amplifier or home theatre.
OPTICAL
digital audio system
[UC9000]BN68-02820G-RU.indb 10 2010-05-25 오전 9:58:45
Page 11
11
English
02 Connections
Changing the Input Source
Source List
Use to select TV or an external input
sources such as a DVD / Blu-ray player /
cable box / STB satellite receiver.
■ TV / Ext. / PC / AV / Component
/ HDMI1/DVI / HDMI2 / HDMI3 /
HDMI4 / USB
✎
In the Source List, connected
inputs will be highlighted.
✎
Ext. PC always stay activated.
Edit Name
■ VCR / DVD / Cable STB / Satellite STB / PVR STB /
AV Receiver / Game / Camcorder / PC / DVI PC / DVI
Devices / TV / IPTV / Blu-ray / HD DVD / DMA: Name
the device connected to the input jacks to make your
input source selection easier.
✎
When a PC with a resolution of 1920 x 1080 @
60Hz is connected to the HDMI IN 1(DVI) port,
you should set to DVI PC mode under Edit Name.
✎
When connecting an HDMI/DVI cable to the HDMI
IN 1(DVI) port, you should set to DVI PC or DVI
Devices mode under Edit Name.
✎
If an HDMI cable is connected to the
HDMI IN 1(DVI) port, the audio may not work. In
this case, connect to the PC/DVI AUDIO IN port.
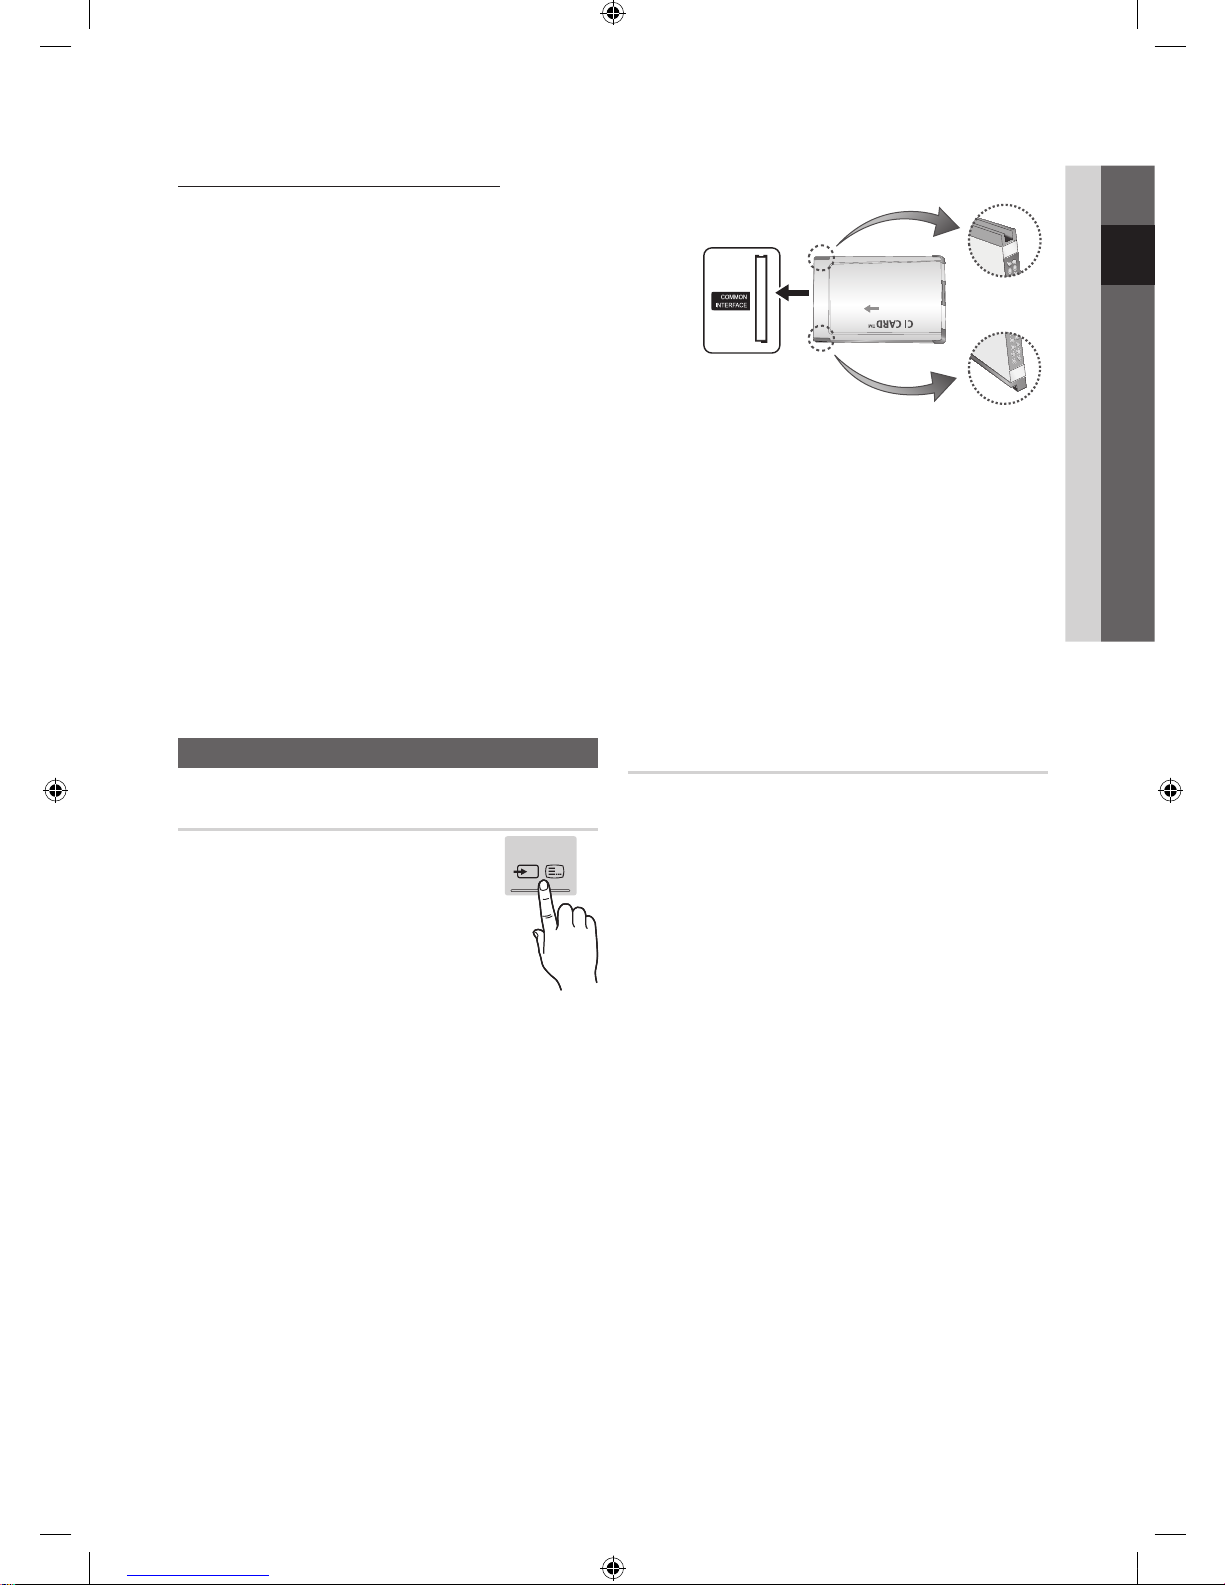
CONNECTIONS COMMON INTERFACE Slot
To watch paid channels, the “CI or CI+ CARD” must be inserted.
y If you don’t insert the “CI or CI+ CARD,” some channels will
display the message “Scrambled Signal”.
y The pairing information containing a telephone number, the “CI or
CI+ CARD” ID the Host ID and other information will be displayed
in about 2~3 minutes. If an error message is displayed, please
contact your service provider.
y When the configuration of channel information has finished, the
message “Updating Completed” is displayed, indicating the
channel list is updated.
✎
NOTE
x
You must obtain a “CI or CI+ CARD” from a local cable service provider.
x
When removing the “CI or CI+ CARD”, carefully pull it out with your hands since dropping the “CI or CI+ CARD” may
cause damage to it.
x
Insert the “CI or CI+ CARD” in the direction marked on the card.
x
The location of the COMMON INTERFACE slot may be different depending on the model.
x
“CI or CI+ CARD” is not supported in some countries and regions; check with your authorized dealer.
x
If you have any problems, please contact a service provider.
x
Insert the “CI or CI+ CARD” that supports the current antenna settings. The screen will be distorted or will not be
seen.
SOURCE
[UC9000]BN68-02820G-RU.indb 11 2010-05-25 오전 9:58:46
Page 12
12
English
Basic Features
How to Navigate Menus
Before using the TV, follow the steps below to learn how to
navigate the menu and select and adjust different functions.
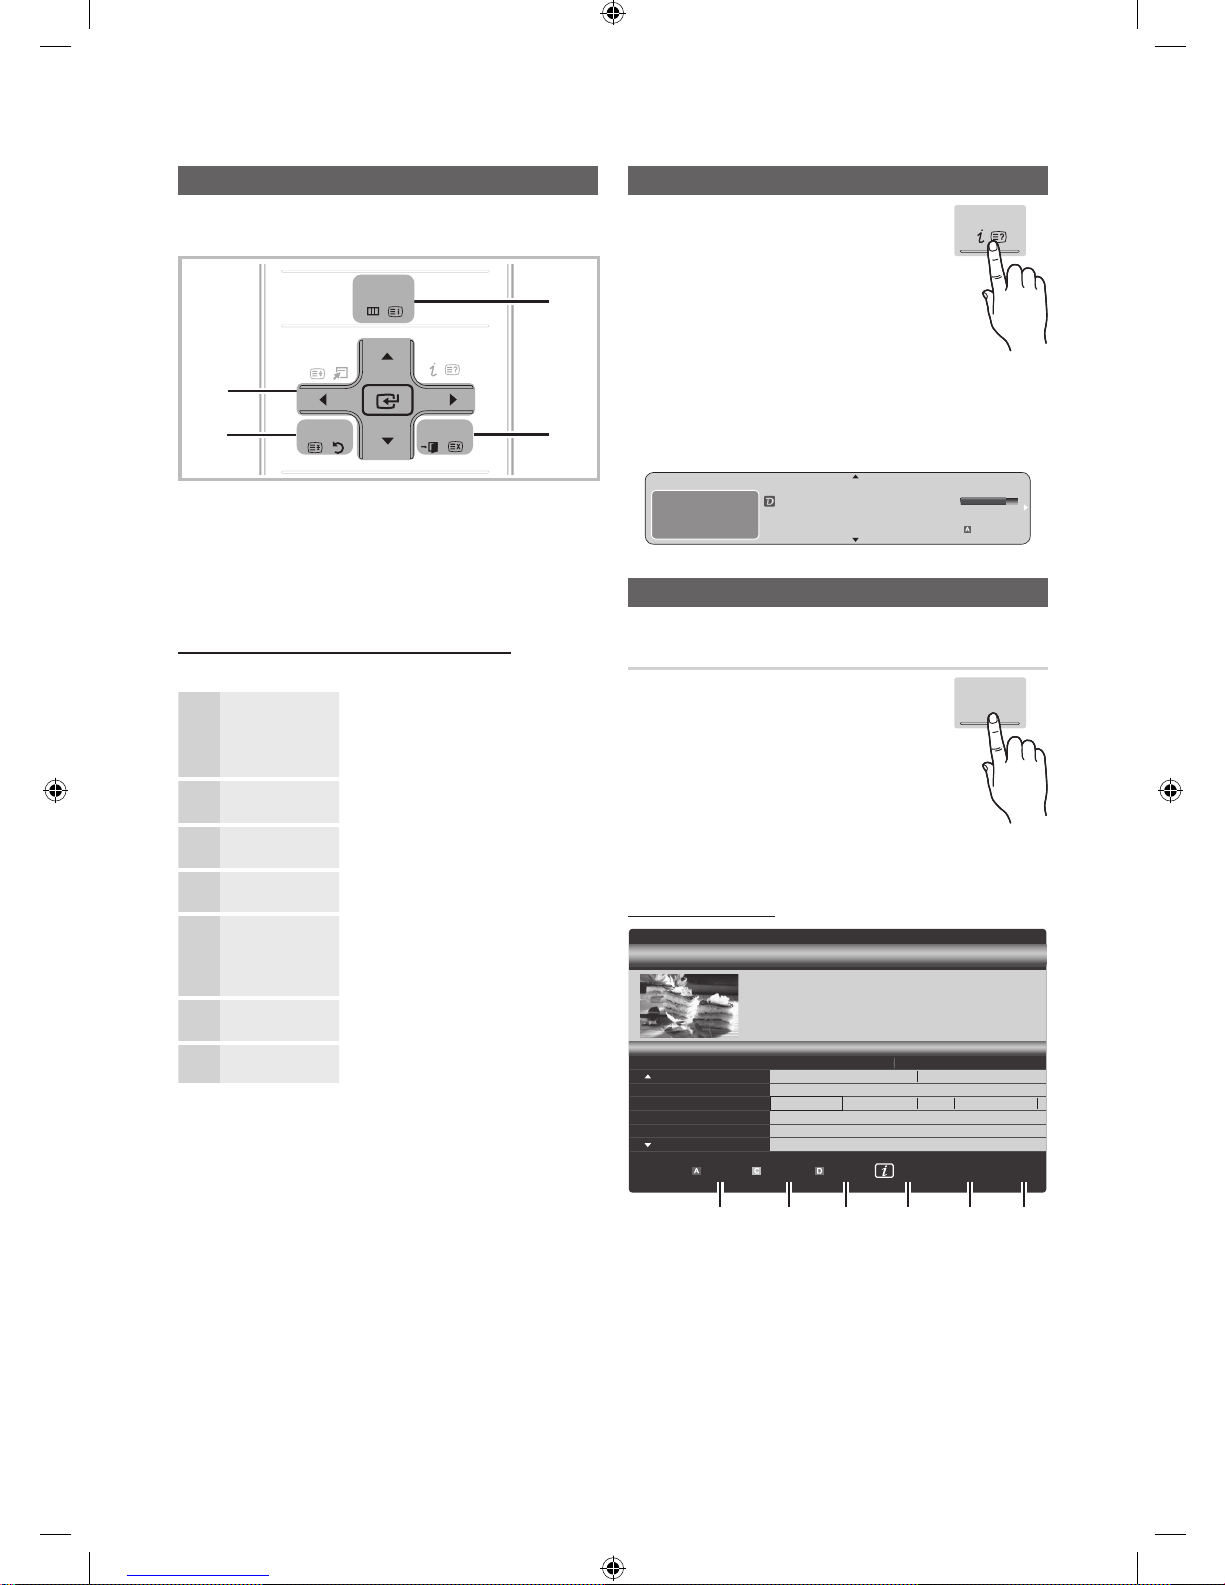
1 ENTER / Direction button: Move the cursor and
select an item. Confirm the setting.
2 RETURN button: Returns to the previous menu.
3 MENU button: Displays the main on-screen menu.
4 EXIT button: Exits the on-screen menu.
How to Operate the OSD (On Screen Display)
The access step may differ depending on the selected menu.
1
MENU
The main menu options appear on
the screen:
Picture, Sound, Channel, Setup,
Input, Application, Support.
2
▲ / ▼ Select an icon with the ▲ or ▼
button.
3
ENTER
Press ENTER to access the
sub-menu.
4
▲ / ▼
Select the desired submenu with
the ▲ or ▼ button.
5
◄ / ►
Adjust the value of an item with the
◄ or ► button. The adjustment in
the OSD may differ depending on
the selected menu.
6
ENTER
Press ENTER to complete the
configuration.
7
EXIT
Press EXIT.
Using the INFO button (Now & Next guide)
The display identifies the current channel
and the status of certain audio-video
settings.
The Now & Next guide shows daily TV
programme information for each channel
according to the broadcasting time.
y Scroll ◄, ► to view information for a
desired programme while watching the
current channel.
y Scroll ▲, ▼ to view information for other channels. If you
want to move to the currently selected channel, press
the ENTER
button.
DTV Air
15
DEF
18:00 ~ 6:00
Life On Venus Ave nue
Unclass ified
No Det aild Infor mation
E
Planning Your Viewing
Guide
The EPG (Electronic Programme Guide)
information is provided by broadcasters.
Using programme schedules provided
by broadcasters, you can specify
programmes you want to watch in
advance so that the channel automatically
changes to the selected programme
channel at the specified time. Programme
entries may appear blank or out of date depending on a
channel status.
Using Channel View
PO
WER
S
OURC
E
ON/O
FF
PRE-
CH
CO
NTENT
TTX/MI
X
G
UID
E
C
H LIST
MUTE
TOOL
S
INF
O
2
1
4
3
RETURN
EXIT
MENU
INFO
GUIDE
18:11 Thu 6 Jan
Watch
Information
DTV Air 800 five
Home and Away
18:00 - 18:30
Drama
Dani is devastated when scott makes clear his views on marriage...
27
28
800
24
16
6
Discovery
DiscoveryH&L
five
price-drop.tv
QVC
R4DTT
American Chopper
Programmes resume at 06:00
Home and...
No Information
QVC Selection
No Information
Tine Team
Fiv...
18:00 - 19:00 19:00 - 20:00
)
Family Affairs
)
Dark Angel
800 five
View Mode +24 Hours Ch. Mode Information Page
Watch
2:10 Tue 1 Jun
Guide
Channel View - TV
1 2 3 4 5 6
Today
[UC9000]BN68-02820G-RU.indb 12 2010-05-25 오전 9:58:48
Page 13
13
English
03 Basic Features
Using Scheduled View
1
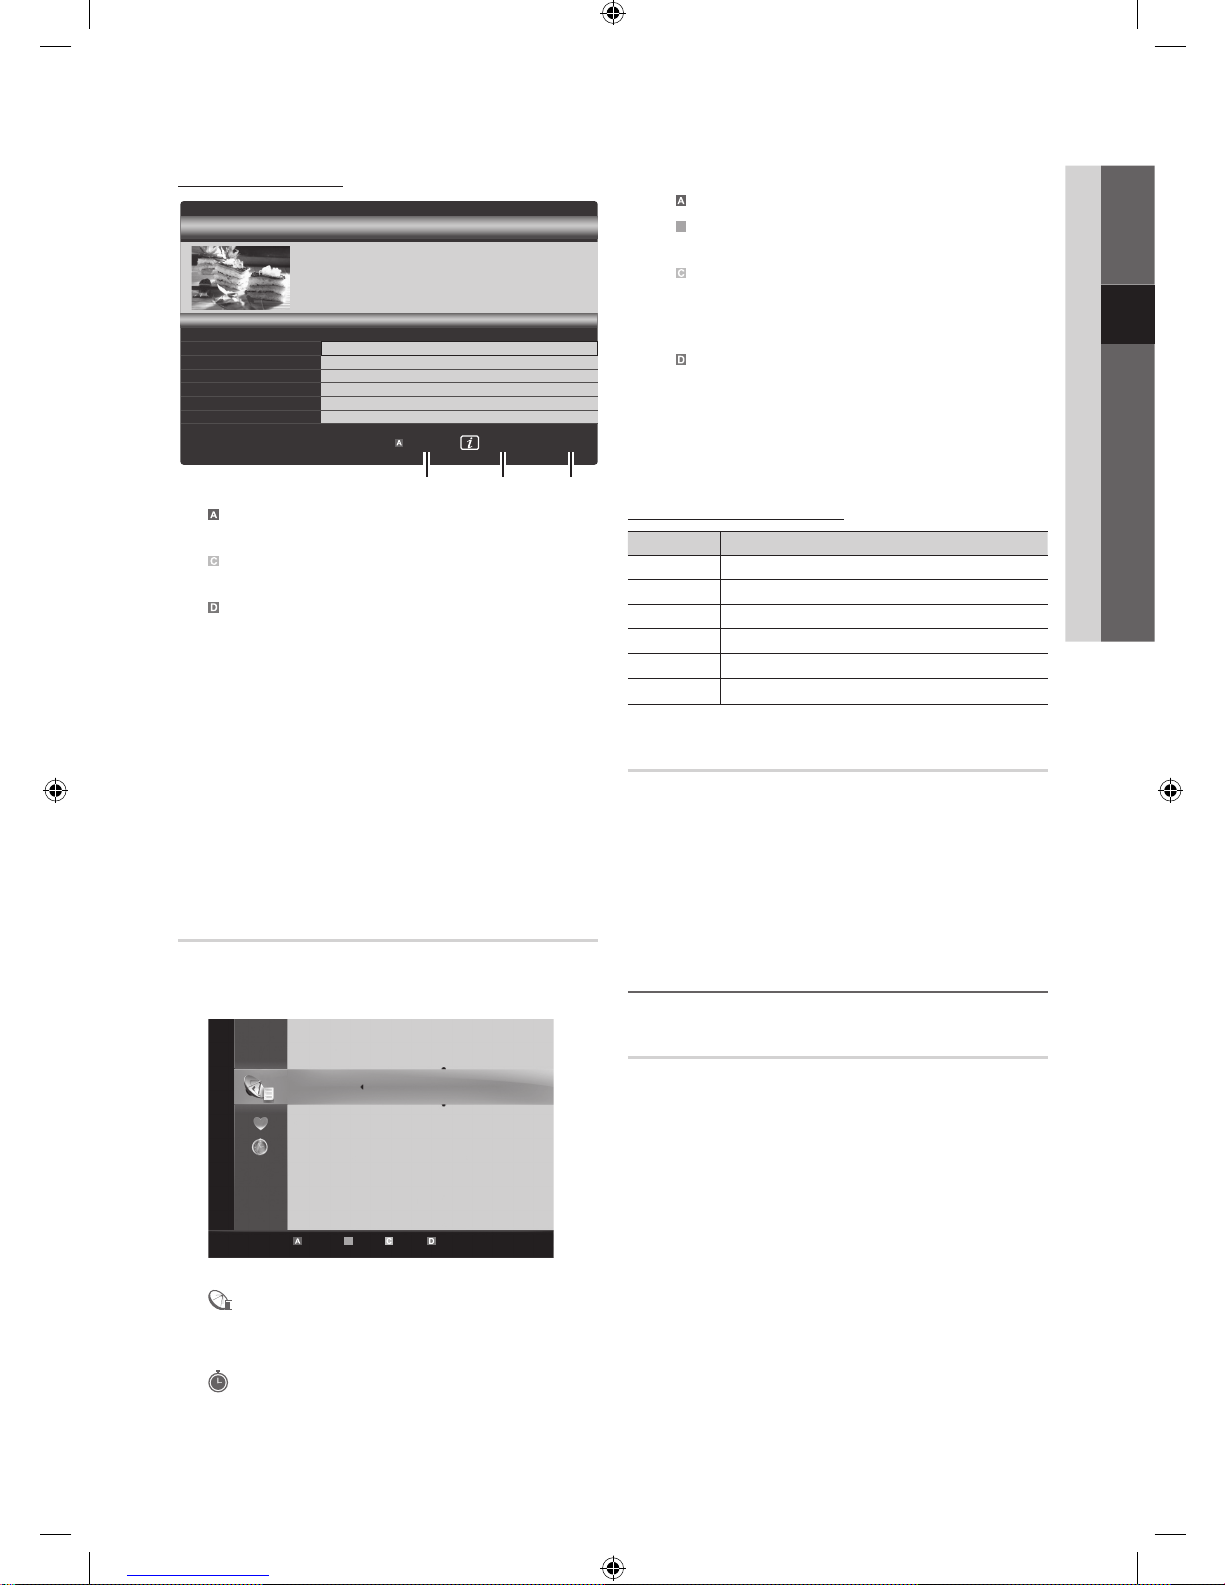
Red (View Mode): View the list of programmes that
are playing now or coming up.
2
Yellow (+24 Hours): Viewing the list of programmes to
be broadcasted after 24 hours.
3
Blue (Ch. Mode): Select the type of channels you
want to display on the Channel View window. (All, TV,
Radio, Data/Other, My Channel 1~4)
4 Information: Displays details of the selected
programme.
5
(Page): Move to next or previous page.
6 ENTER
button
– When selecting the current programme, you can
watch the selected programme.
– When selecting the future programme, you can
reserve to watch the selected programme. To cancel
the schedule, press the ENTER
button again and
select Cancel Schedules.
Channel Manager
Delete or set favourites channels and use the programme
guide for digital broadcasts. Select a channel in the
Channels, My Channels or Scheduled screen.
■
Channels: Shows the channel list according to
channel type.
■
My Channels: Shows the group of the channel.
■
Scheduled: Shows all the currently reserved
programmes.
✎
Using the colour buttons with the Channel Manager
x
Red (Antenna): Toggle among Air or Cable.
x
B
Green (Zoom): Enlarges or shrinks a channel
number.
x
Yellow (Select): Select desired channels and press
the Yellow button to set all the selected channels at
the same time. The mark appears to the left of
the selected channels.
x
Blue (Sort): Change the list ordered by channel
name or channel number.
x
(Page): Move to next or previous page.
x
(Tools): Displays the Channel Manager option
menu. (The options menus may differ depending on
the situation.)
Channel Status Display Icons
Icons Operations
An analogue channel.
A channel selected.
A channel set as a Favourite.
A programme currently being broadcast.
A locked channel.
A reserved programme.
Guide Type (Samsung / Guide Plus+)
(depending on the country)
You can select a different type of Guide.
■ Samsung: Uses the guide programme by provided
samsung.
■ Guide Plus+: Uses the guide programme provided by
Rovi International Solutions. For more information, refer
to “www.europe.guideplus.com.”
Using Favourite Channels
My Channels
(in Channel Manager)
Shows all favourite channels.
■ Edit My Channels
: You can set the selected
channels to desired my channels group.
✎
The “” symbol will be displayed and the channel will
be set as a my channel.
1. Select a channel and press the TOOLS button.
2. Add or delete a channel in the my channel groups
you want among 1, 2, 3 and 4.
x
One or more groups can be selected.
c 1 1futech
2 * 24ore.tv
15 abc1
3 BBC World
23 bid-up.tv
33 Boonerang
32 Cartoon Nwk
5 Class News
4 \ Coming Soon
27 Discovery
r
Air Antenna B Zoom Select Sort Page
Tools
Channels
DTV Air 800 five
Family Affairs
18:00 - 18:30
Drama
Tanya confesses all to a stunned Babs. Conrad is anxious to hear...
18:30
19:15
)
Family Affairs
)
Dark Angel
800
800
five
five
800 five
View Mode Information
Cancel
2:10 Tue 1 Jun
Guide
Scheduled View
1 4 6
Today
Today
All
TV
Radio
Data/Other
Analogue
[UC9000]BN68-02820G-RU.indb 13 2010-05-25 오전 9:58:50
Page 14

14
English
Basic Features
3. After you have changed the settings, the channel list
for each group can be viewed in my channels.
Channel List
You can see all the channels searched.
Channel Menu
Retuning Channels
Antenna (Air / Cable)
Before your television can begin memorising the available
channels, you must specify the type of signal source that is
connected to the TV (i.e. an Air or a Cable system).
Country
The PIN input screen appears. Enter your 4 digit PIN number.
■ Digital Channel: Change the country for digital
channels.
■ Analogue Channel: Change the country for analogue
channels.
Auto Store
Scans for a channel automatically and stores in the TV.
✎
Automatically allocated programme numbers may not
correspond to actual or desired programme numbers. If
a channel is locked using the Child Lock function, the
PIN input window appears.
■ Antenna Source (Air / Cable)
: Select the
antenna source to memorise.
■ Channel Source (Digital & Analogue / Digital /
Analogue): Select the channel source to memorise.
When selecting Cable → Digital & Analogue or Digital:
Provide a value to scan for cable channels.
Search Mode (Full / Network / Quick): Scans for all
channels with active broadcast stations and stores them
in the TV.
✎
If you select Quick, you can set up the Network,
Network ID, Frequency, Modulation and
Symbol Rate manually by pressing the button on
the remote control.
Network (Auto / Manual): Selects the Network ID
setting mode among Auto or Manual.
Network ID: When Network is Manual, you can set up
Network ID using the numeric buttons.
Frequency: Displays the frequency for the channel.
(differs in each country)
Modulation: Displays available modulation values.
Symbol Rate: Displays available symbol rates.
Manual Store
Scans for a channel manually and stores in the TV.
✎
If a channel is locked using the Child Lock function,
the PIN input window appears.
■ Digital Channel: When scanning has finished, channels
are updated in the channel list.
✎
When selecting Antenna → Air: Channel,
Frequency, Bandwidth
✎
When selecting Antenna → Cable: Frequency,
Modulation, Symbol Rate
■ Analogue Channel (Programme, Colour System,
Sound System, Channel, Search): If there is abnormal
sound or no sound, reselect the sound standard
required.
✎
Channel mode
x
P (programme mode): When tuning is complete,
the broadcasting stations in your area have been
assigned to position numbers from P0 to P99. You
can select a channel by entering the position number
in this mode.
x
C (aerial channel mode) / S (cable channel mode):
These two modes allow you to select a channel
by entering the assigned number for each aerial
broadcasting station or cable channel.
CH LIST
c 1 1futech
2 * 24ore.tv
15 abc1
3 BBC World
23 bid-up.tv
33 Boonerang
32 Cartoon Nwk
5 Class News
4 \ Coming Soon
27 Discovery
r
Air Antenna B Zoom Select Sort Page
Tools
Channels
Edit My Channels
Lock
Timer Recording
Timer Viewing
Edit Channel Number
Delete
All
TV
Radio
Data/Other
Analogue
[UC9000]BN68-02820G-RU.indb 14 2010-05-25 오전 9:58:51
Page 15

15
English
03 Basic Features
Editing Channels
Channel Manager Option Menu
(in Channel Manager)
1. Select a channel and press the TOOLS button.
2. Edit the channel name or number using the Edit
Channel Name or Edit Channel Number menu.
■ Edit Channel Name (analogue channels only): Assign
your own channel name.
■ Edit Channel Number (digital channels only): Edit the
number by pressing the number buttons desired.
Other Features
Cable Search Option
(depending on the country)
Sets additional search options such as the frequency and
symbol rate for a cable network search.
■ Freq.Start / Freq.Stop: Set the start or stop frequency
(differs in each country).
■ Symbol Rate: Displays available symbol rates.
■ Modulation: Displays available modulation values.
Channel Manager
Channel Manager Option Menu
Set each channel using the Channel Manager menu options
(Lock / Unlock, Timer Recording, Timer Viewing, Sort,
Delete, Select All / Deselect All). Option menu items may
differ depending on the channel status.
1. Select a channel and press the TOOLS button.
2. Select a function and change its settings.
■ Lock / Unlock: Lock a channel so that the channel
cannot be selected and viewed.
✎
NOTE
x
This function is available only when the Child Lock
is set to On.
x
The PIN input screen appears. Enter your 4-digit PIN,
the default of which is “0-0-0-0”. Change the PIN
using the Change PIN option.
■ Timer Recording (digital channels only): Allows you to
record a programme currently being broadcasted or
make a reservation to record a programme scheduled
for broadcast.
✎
A USB device with 4GB of memory or greater
must be connected to the TV.
✎
A USB storage device cannot record until it
completes the Device Performance Test.
✎
In case of USB-HDD, over 5400rpm
✎
In case of USB Stick, USB 2.0 and SLC Type.
(Minimum size of USB Stick is 2GB.)
✎
To record, press the (REC) button on the
remote. Press (REC) twice to set the recording
duration.
■ Timer Viewing: You can set a desired channel to be
displayed automatically at the reserved time. Set the
current time first to use this function.
✎
When a digital channel is selected, press the ►
button to view the digital Programme.
■ Sort (analogue channels only): This operation allows
you to change the programme numbers of the stored
channels. This operation may be necessary after using
the auto store.
■ Delete: You can delete a channel to display the channels
you want.
■ Select All / Deselect All: Select all the channels
or deselect all the selected channels in the channel
manager.
Channel List Transfer
The PIN input screen appears. Enter your 4 digit PIN number.
Imports or exports the channel map. You should connect a
USB storage to use this function.
■ Import from USB: Import channel list from USB.
■ Export to USB: Export channel list to USB. this function
is available when USB is connected.
Scheduled
(in Channel Manager)
You can view, modify or delete a show you have reserved to
watch.
■ Change Info: Change a show you have reserved to
watch.
■ Cancel Schedules: Cancel a show you have reserved
to watch.
■ Information: Display a show you have reserved
to watch. (You can also change the reservation
information.)
■ Select All / Deselect All: Select or deselect all reserved
programmes.
Fine Tune
(analogue channels only)
If the signal is weak or distorted, fine tune the channel
manually.
✎
Fine tuned channels are marked with an asterisk “*”.
✎
To reset the fine-tuning, select Reset.
[UC9000]BN68-02820G-RU.indb 15 2010-05-25 오전 9:58:52
Page 16
16
English
Basic Features
Picture Menu
Changing the Preset Picture Mode
Mode
Select your preferred picture type.
■ Dynamic: Suitable for a bright room.
■ Standard: Suitable for a normal environment.
■ Natural: Suitable for reducing eye strain.
✎
Natural is not available in PC mode.
■ Movie: Suitable for watching movies in a dark room.
Adjusting Picture Settings
Backlight / Contrast / Brightness /
Sharpness / Colour / Tint (G/R)
Your television has several setting options for picture quality
control.
✎
NOTE
x
In analogue TV, Ext., AV modes of the PAL system,
the Tint (G/R) function is not available.
x
In PC mode, you can only make changes to
Backlight, Contrast and Brightness.
x
Settings can be adjusted and stored for each
external device connected to the TV.
Economical Solutions
Eco Solution
■ Energy Saving (Off / Low / Medium / High / Picture
Off / Auto)
: This adjusts the brightness of the
TV in order to reduce power consumption. If you select
Picture Off, the screen is turned off, but the sound
remains on. Press any button except volume button to
turn on the screen.
■ Eco Sensor (Off / On): To enhance your power savings;
the picture settings will automatically adapt to the light
in the room.
✎
If you adjust the Backlight, the Eco Sensor will
be set to Off.
Min Backlight: When Eco sensor is On, the minimum
screen brightness can be adjusted manually.
✎
If Eco Sensor is On, the display brightness
may change (become slightly darker or brighter)
depending on the surrounding light intensity.
■ No-Signal Power Off (Off / 15 min / 30 min / 60 min):
To avoid unnecessary energy consumption, set how long
you want the TV to remain on if it’s not receiving a signal.
✎
Disabled when the PC is in power saving mode.
Changing the Picture Options
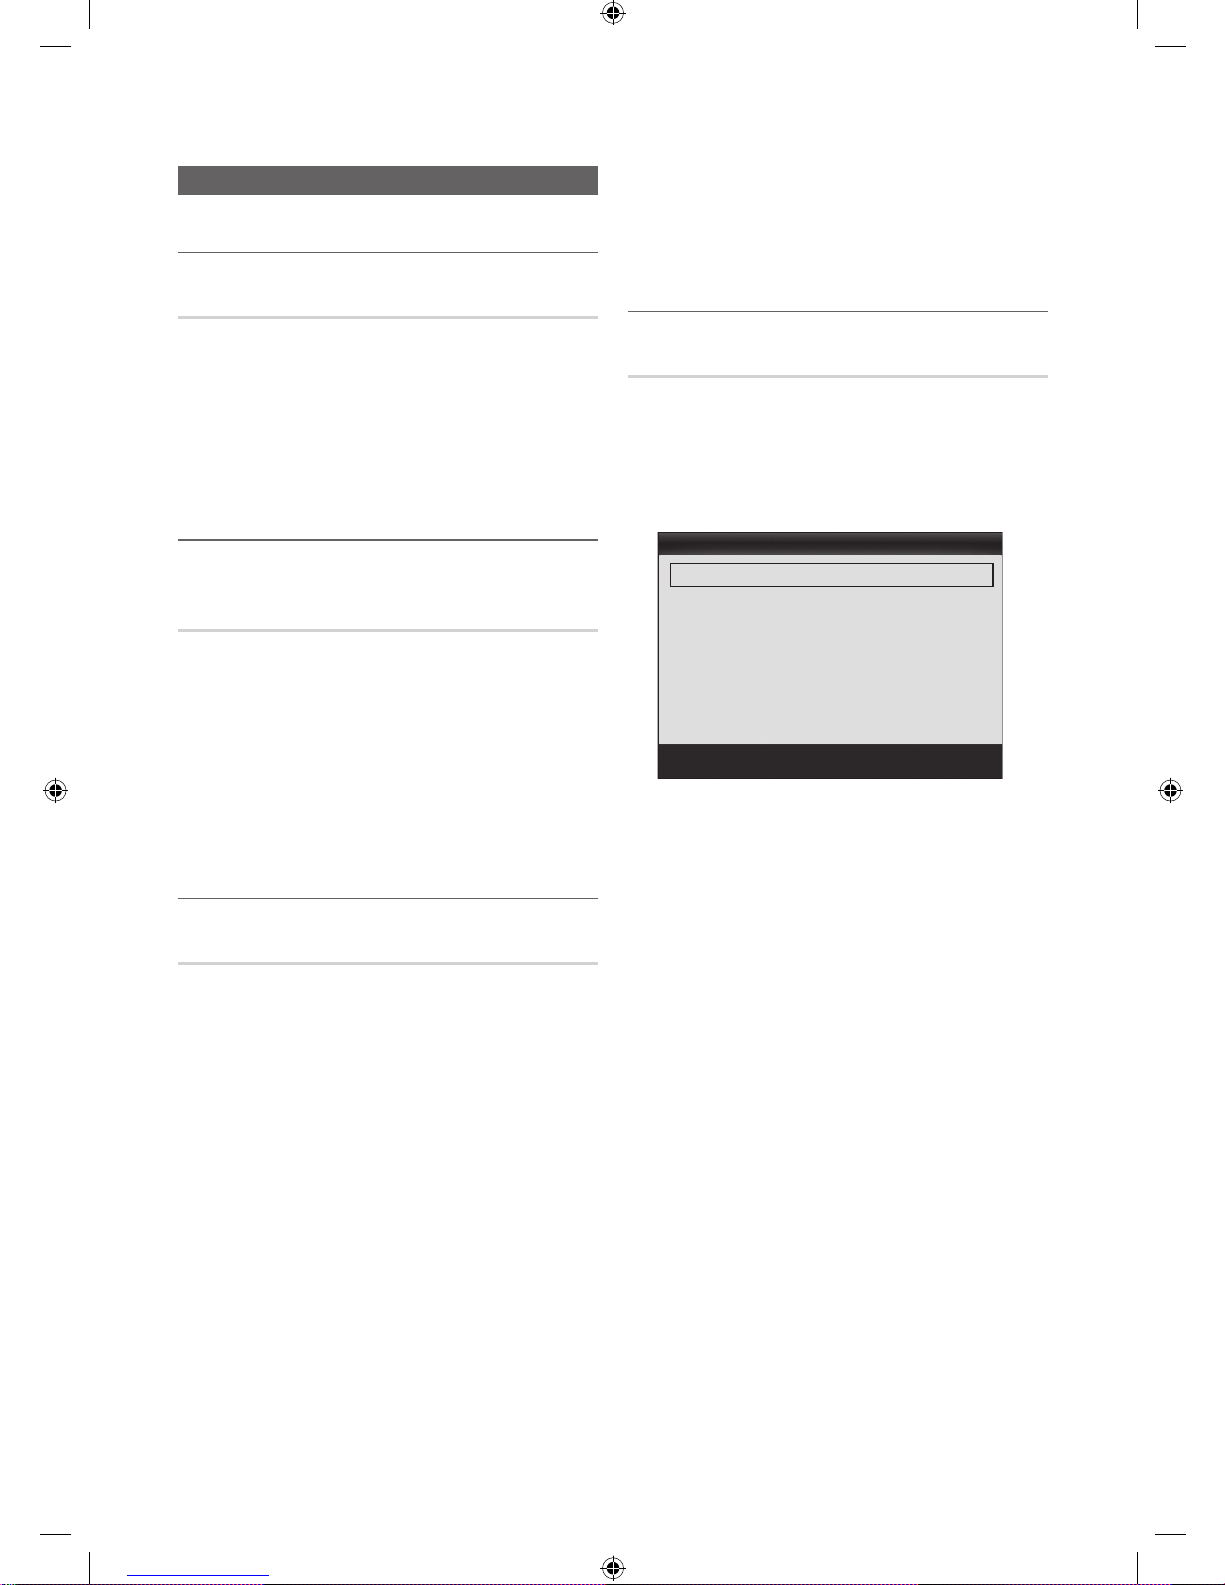
Advanced Settings
(available in Standard / Movie mode)
You can adjust the detailed setting for the screen including
colour and contrast.
✎
In PC mode, you can only make changes to Dynamic
Contrast, Gamma, White Balance and LED Motion
Plus.
■ Black Tone (Off / Dark / Darker / Darkest): Select the
black level to adjust the screen depth.
■ Dynamic Contrast (Off / Low / Medium / High): Adjust
the screen contrast.
■ Shadow Detail (-2~+2): Increase the brightness of dark
images.
■ Gamma: Adjust the primary colour intensity.
■ Expert Pattern (Off / Pattern1 / Pattern2): By running
the Expert Pattern function, the picture can be
calibrated without a generator or filter. If the OSD menu
disappears or a menu other than the Picture menu is
opened, the calibration is saved and the Expert Pattern
window disappears.
✎
While the Expert Pattern is running, sound is not
outputted.
✎
Only enabled on DTV, Component / HDMI modes.
■ RGB Only Mode (Off / Red / Green / Blue): You can
adjust Colour or Tint (G/R) of Red, Green or Blue for
the picture from an external device (DVD player, home
theatre, etc.).
■ Colour Space (Auto / Native / Custom): Adjust the
range of colours available to create the image. To adjust
Colour, Red, Green, Blue and Reset, set Colour
Space to Custom.
Advanced Settings
Black Tone : Off ►
Dynamic Contrast : Medium
Shadow Detail : -2
Gamma : 0
Expert Pattern : Off
RGB Only Mode : Off
Colour Space : Native
▼
Move
Enter
Return
[UC9000]BN68-02820G-RU.indb 16 2010-05-25 오전 9:58:53
Page 17

17
English
03 Basic Features
■ White Balance: Adjust the colour temperature for a
more natural picture.
R-Offset / G-Offset / B-Offset: Adjust each colour’s
(red, green, blue) darkness.
R-Gain / G-Gain / B-Gain: Adjust each colour’s (red,
green, blue) brightness.
Reset: Resets the White Balance to it’s default settings.
■ 10p White Balance (Off / On): Controls the white
balance in 10 point interval by adjusting the red, green,
and blue brightness.
✎
Available when the picture mode is set to Movie
and when the external input is set to HDMI or
Component.
✎
Some external devices may not support this
function.
Interval: Select interval to adjust.
Red: Adjust the red level.
Green: Adjust the green level.
Blue: Adjust the blue level.
Reset: Resets the 10p White Balance to its default
settings.
■ Flesh Tone: Emphasize pink “Flesh Tone.”
■ Edge Enhancement (Off / On): Emphasize object
boundaries.
■ xvYCC (Off / On): Setting the xvYCC mode on
increases detail and colour space when watching movies
from an external device (e.g. DVD player) connected to
the HDMI or Component IN jacks.
✎
Available when the picture mode is set to Movie
and when the external input is set to HDMI or
Component.
✎
Some external devices may not support this
function.
■ LED Motion Plus (Off / On): Removes drag from fast
scenes with a lot of movement to provide a clear picture.
Picture Options
✎
In PC mode, you can only make changes to the Colour
Tone, Size, and Auto Protection Time.
■ Colour Tone (Cool / Normal / Warm1 / Warm2)
✎
Warm1 or Warm2 will be deactivated when the
picture mode is Dynamic.
✎
Settings can be adjusted and stored for each
external device connected to an input on the TV.
■ Size: Your cable box/satellite receiver
may have its own set of screen
sizes as well. However, we highly
recommend you use 16:9 mode most
of the time.
Auto Wide: Automatically adjusts the
picture size to the 16:9 aspect ratio.
16:9: Adjusts the picture size to 16:9
for DVDs or wide broadcasting.
Wide Zoom: Magnifies the picture size more than 4:3.
✎
Adjusts the Position by using ▲, ▼ buttons.
Zoom: Magnifies the 16:9 wide pictures vertically to fit
the screen size.
✎
Adjusts the Position or Size by using ▲, ▼
button.
4:3: The default setting for a movie or normal
broadcasting.
✎
Do not watch in 4:3 format for a long time. Traces
of borders displayed on the left, right and centre
of the screen may cause image retention(screen
burn) which are not covered by the warranty.
Screen Fit: Displays the full image without any cut-off
when HDMI (720p / 1080i / 1080p) or Component
(1080i / 1080p) signals are inputted.
✎
NOTE
x
Depending on the input source, the picture size
options may vary.
x
The available items may differ depending on the
selected mode.
x
In PC mode, only 16:9 and 4:3 modes can be
adjusted.
x
Settings can be adjusted and stored for each
external device connected to an input on the TV.
x
After selecting Screen Fit in HDMI (1080i / 1080p)
or Component (1080i / 1080p) mode: Adjusts the
Position or Size by using ▲, ▼, ◄, ► button.
x
If you use the Screen Fit function with HDMI 720p
input, 1 line will be cut at the top, bottom, left and
right as in the overscan function.
■ Screen Mode (16:9 / Wide Zoom / Zoom / 4:3):
Available only when picture size is set to Auto Wide. You
can determine the desired picture size at the 4:3 WSS
(Wide Screen Service) size or the original size. Each
European country requires different picture size.
✎
Not available in PC, Component or HDMI mode.
P.SIZE
Picture Options
Colour Tone : Normal ►
Size : Auto Wide
Screen Mode : 16:9
Digital Noise Filter : Auto
MPEG Noise Filter : Auto
HDMI Black Level : Normal
Film Mode : Off
▼
Move
Enter
Return
[UC9000]BN68-02820G-RU.indb 17 2010-05-25 오전 9:58:54
Page 18
18
English
Basic Features
■ Digital Noise Filter (Off / Low / Medium / High / Auto
/ Auto Visualisation): When the broadcast signal is
weak, some static and ghosting may appear. Select one
of the options until the best picture is displayed.
Auto Visualisation: When changing analogue channels,
displays the intensity of the current signal and defines
the screen noise filter.
✎
Only available for analogue channels.
■ MPEG Noise Filter (Off / Low / Medium / High /
Auto): Reduces MPEG noise to provide improved
picture quality.
■ HDMI Black Level (Normal / Low): Selects the black
level on the screen to adjust the screen depth.
✎
Available only in HDMI mode (RGB signals).
■ Film Mode (Off / Auto1 / Auto2): Sets the TV to
automatically sense and process film signals from all
sources and adjust the picture for optimum quality.
✎
Available in AV, COMPONENT (480i / 1080i) and
HDMI (480i / 1080i).
■ Motion Plus (Off / Clear / Standard / Smooth /
Custom / Demo): Removes drag from fast scenes with
a lot of movement to provide a clearer picture.
✎
If noise occurs on the screen, please set up
the Motion Plus to Off. If 200Hz Motion Plus
is Custom, you can set up the Blur Reduction,
Judder Reduction or Reset manually.
✎
If Motion Plus is Demo, you can compare the
difference of on and off modes.
Blur Reduction: Adjusts the blur reduction level from
video sources.
Judder Reduction: Adjusts the judder reduction level
from video sources when playing films.
Reset: Reset the custom settings.
■ Auto Protection Time (2 hours / 4 hours / 8 hours
/ 10 hours / Off): If the screen remains idle with a still
image for a certain period of time defined by the user,
the screen saver is activated to prevent the formation of
ghost images on the screen
Viewing TV using the 3D function
IMPORTANT HEALTH AND SAFETY INFORMATION FOR
3D PICTURES.
Read and understand the following safety information
before using the TV’s 3D function.
WARNING
x
Some viewers may experience discomfort while
viewing 3D TV such as dizziness, nausea and
headaches. If you experience any such symptom,
stop viewing 3D TV, remove 3D Active Glasses and
rest.
x
Watching 3D images for an extended period of time
may cause eye strain. If you feel eye strain, stop
viewing 3D TV, remove your 3D Active Glasses and
rest.
x
A responsible adult should frequently check on
children who are using the 3D function. If there are
any reports of tired eyes, headaches, dizziness, or
nausea, have the child stop viewing 3D TV and rest.
x
Do not use the 3D Active Glasses for other purposes
(such as general eyeglasses, sunglasses, protective
goggles, etc.)
x
Do not use the 3D function or 3D Active Glasses
while walking or moving around. Using the 3D
function or 3D Active Glasses while moving around
may result in injuries due to running into objects,
tripping, and/or falling.
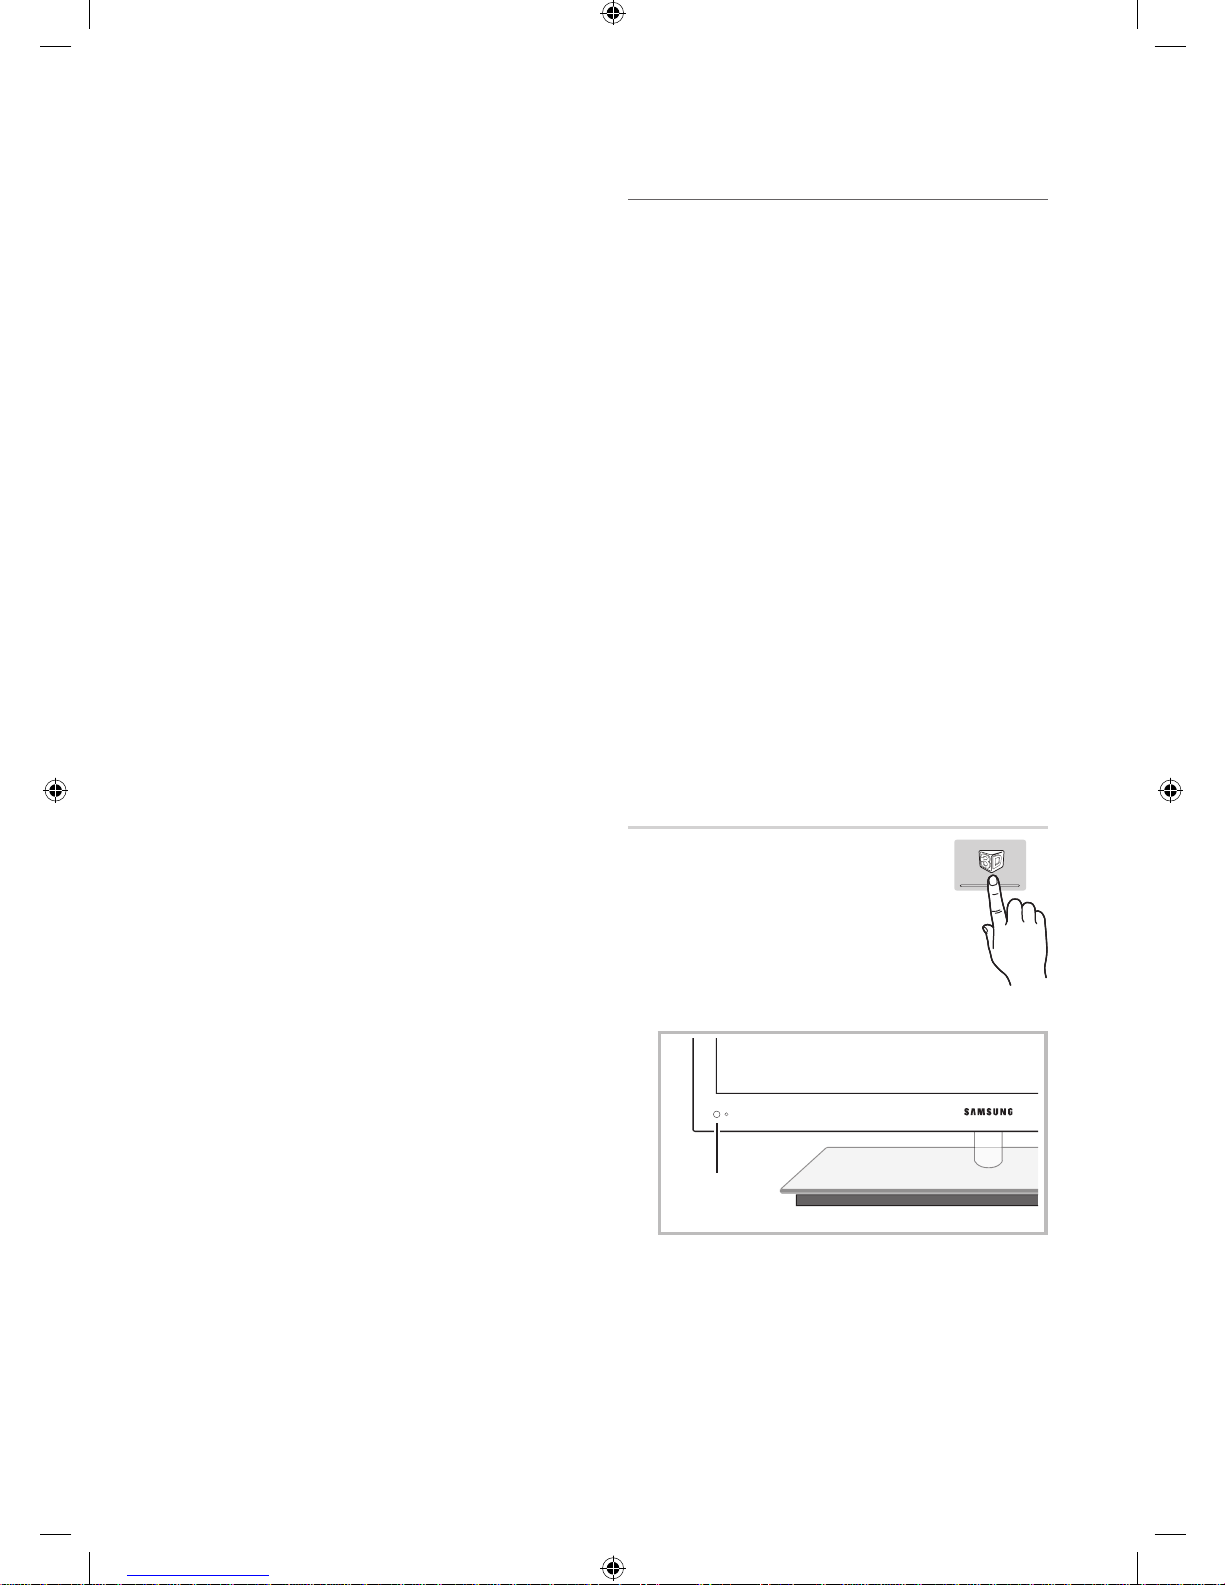
3D
This exciting new feature enables you to
view 3D content. In order to fully enjoy
this feature, you must purchase a pair
of Samsung 3D Active Glasses (SSG2100AB, SSG-2200AR, SSG- 2200KR) to
view 3D video.
Samsung 3D Active Glasses are sold
separately. For more detailed purchasing
information, contact the retailer where you purchased this TV.
✎
If there is any obstacle between the emitter and 3D
Active Glasses, the proper 3D effect may not be
obtained.
3D emitter
[UC9000]BN68-02820G-RU.indb 18 2010-05-25 오전 9:58:54
Page 19
19
English
03 Basic Features
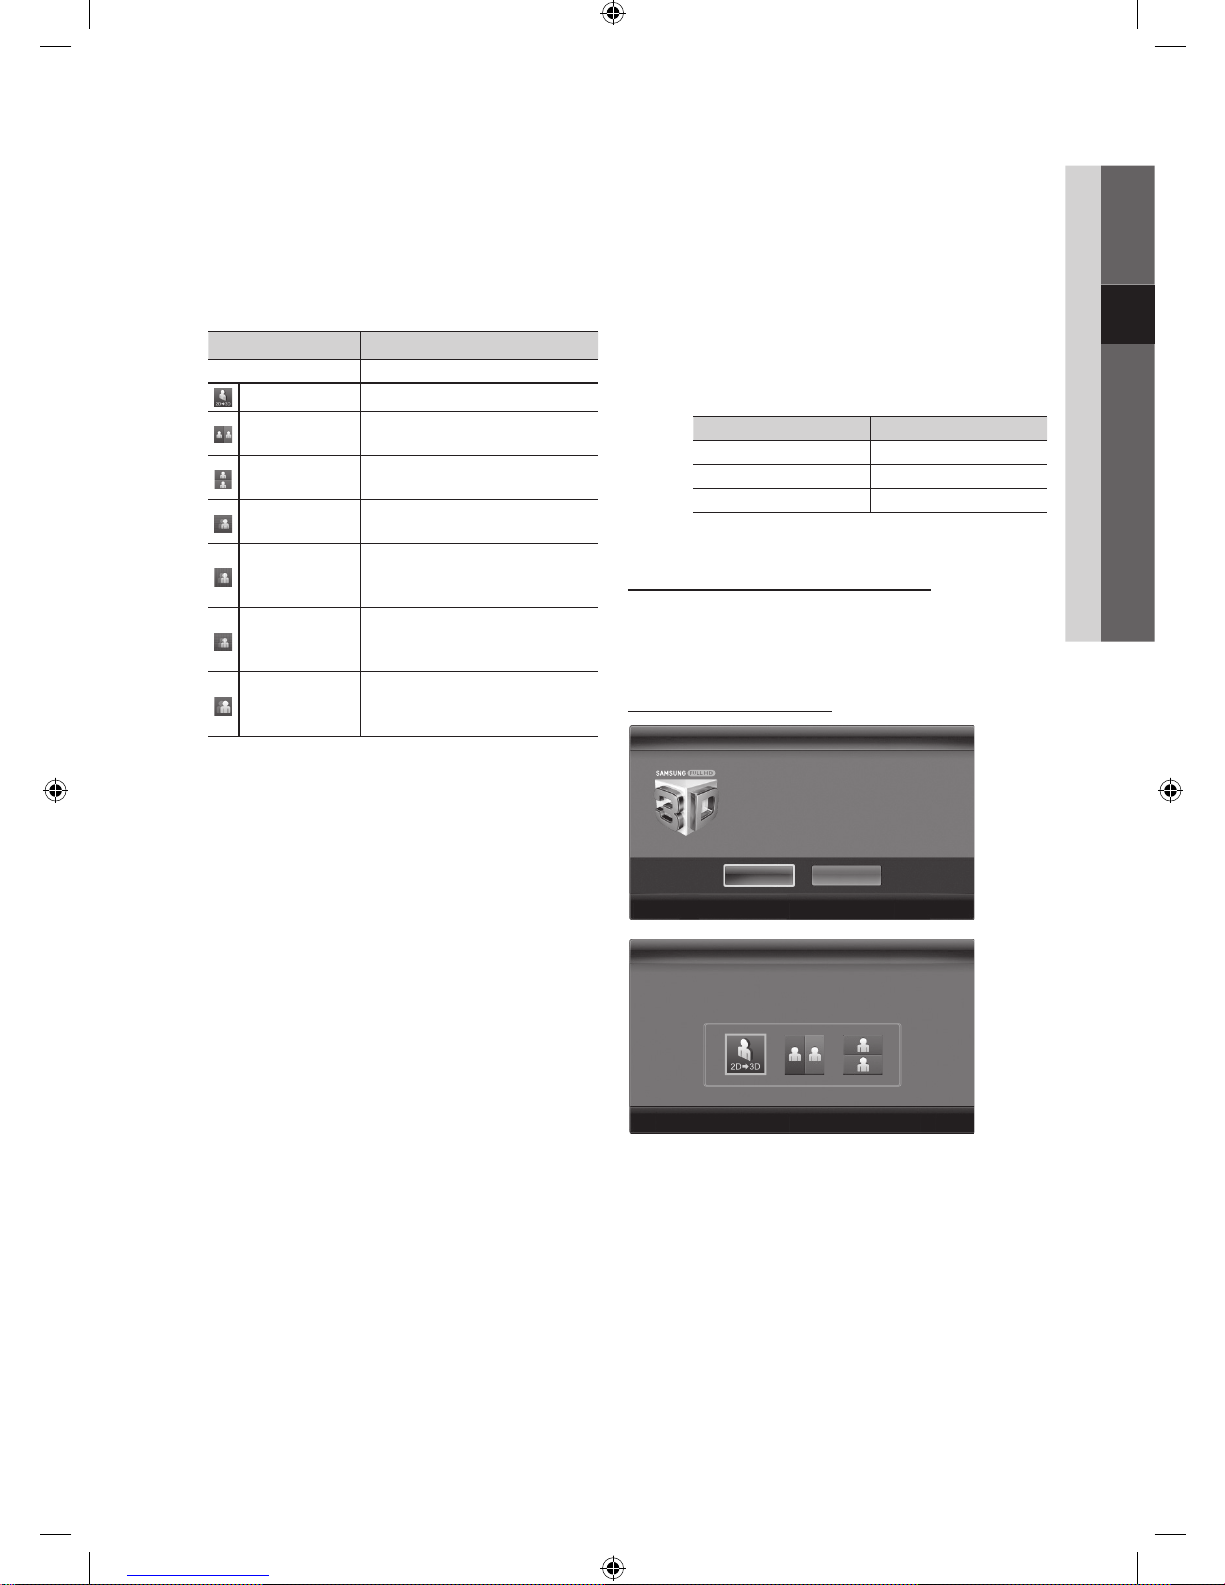
■ 3D Mode: Select the 3D input format.
✎
If you want to feel the 3D effect fully, please wear
the 3D Active Glasses first, and then select 3D
mode from the list below that provides the best
3D viewing experience.
✎
When watching 3D images, turn on 3D Active
Glasses.
3D Mode Operation
Off Turns the 3D function off.
2D → 3D
Changes a 2D image to 3D.
Side by Side
Displays two images next to
each other.
Top & Bottom
Displays one image above
another.
Line by Line
Displays the images for the left
and right eye alternately in rows.
Vertical Stripe
Displays the images for the
left and right eye alternately in
columns.
Checker
Board
Displays the images for the
left and right eye alternately in
pixels.
Frequency
Displays the images for the
left and right eye alternately in
frames.
✎
“Side by Side” and “Top & Bottom” are available
when the resolution is 720p, 1080i and 1080p
in DTV, HDMI and USB mode or set to PC
connecting through HDMI/DVI cable.
✎
“Vertical Strip”, “Line by Line” and “Checker
Board” are available when the source is set to PC
connecting through HDMI/DVI cable.
✎
“Frequency” displays the frequency (60Hz only)
when the source is set to PC.
■ 3D → 2D (Off / On): Displays the image for the left eye
only.
✎
This function is deactivated when 3D Mode set to
“2D → 3D” or Off.
■ 3D View Point: The overall adjustment of 3D
perspective.
✎
This function is deactivated when 3D Mode is set
to “2D → 3D” or Off.
■ Depth: Adjusts focus / depth in “2D → 3D” mode.
✎
This function is only activated when the 3D Mode
is “2D → 3D”.
■ Picture Correction: Adjusts the images for the left and
right eye.
■ 3D Auto View (Off / On): If 3D Auto View is set to On,
a “Side by Side” format HDMI signal with one of the
resolutions below is automatically switched to 3D. Here,
correct 3D information must be sent from the Standard
HDMI 3D Format.
✎
If a 3D failure occurs due to a 3D information error,
set 3D Auto View to Off and manually select a 3D
Mode using the 3D button or corresponding menu
.
✎
Support resolution (16:9 only)
Resolution Frequency (Hz)
1280 x 720p 50 / 60 Hz
1920 x 1080i 50 / 60 Hz
1920 x 1080p 24 / 30 / 50 / 60 Hz
■ 3D Optimisation: The overall adjustment of 3D effect.
Resolution supported for HDMI PC mode
The resolution for HDMI PC mode is optimized to
1920 x 1080 input.
An input resolution other than 1920 x 1080 may not be
displayed properly in 3D display or full screen mode.
How to watch the 3D image
3D
OK
To watch in 3D, wear 3D glasses and
press the power button on the glasses.
Viewing 3D TV motion pictures for long
periods may cause eye fatigue and/or
dizziness.
Cancel
Move
Enter
Exit
3D3D
Using the LEFT / RIGHT keys on the remote control,
select the icon suitable for the picture on screen.
Using the LEFT / RIGHT keys on the remote control,
select the icon suitable for the picture on screen.
Move
Enter
Exit
Move
Enter
Exit
[UC9000]BN68-02820G-RU.indb 19 2010-05-25 오전 9:58:56
Page 20

20
English
Basic Features
1. Press the CONTENT button, then the Content View
menu will appear.
2. Press the ◄ or ► button, then select 3D.
To watch in 3D, wear 3D Active Glasses and press the
power button on the glasses.
3. Select OK, then press the ENTER
button.
4. Using the ◄ or ► buttons on your remote control,
selects the 3D Mode of the image you want to view.
✎
Some 3D modes may not be available depending
on the format of the image source.
Supported formats and operating specifications for
Standard HDMI 3D
✎
The 3D formats indicated below are recommended by
the HDMI association and must be supported.
Source signal format Standard HDMI 1.4 3D
1920x1080p@24Hz x 2 1920x2205p@24Hz
1280x720p@60Hz x 2 1280x1470p@60Hz
1280x720p@50Hz x 2 1280x1470p@50Hz
The mode is automatically switched to 3D mode for the 3D
video input in one of the formats above.
For the HDMI 1.4@24Hz format, the TV is optimized as
follows:
– Resolution First Display Mode: If Motion Plus is set
to Off, Clear or Standard, you can watch the video
at a high resolution optimized to the resolution of the
source video.
– Judder Reduction Display Mode: When Motion
Plus is set to Smooth or Custom, you can watch a
smooth picture without judder.
Before using 3D function...
✎
NOTE
x
You may notice a small amount of screen flickering
when watching 3D images in poor light conditions
(from a strobe light, etc.), or under a fluorescent lamp
(50Hz ~ 60Hz) or 3 wavelength lamp. If so, dim the
light or turn the lamp off.
x
3D mode is automatically disabled in following cases:
when changing a channel or the input source, or
accessing Media Play or Internet@TV.
x
Some Picture functions are disabled in 3D mode.
x
The Touch Control does not support 3D pictures.
x
Data broadcasts (MHEG / MHP) are not supported
in 3D mode.
x
3D Active Glasses from other manufacturers may not
be supported.
x
When the T V is initially powered on, may take some
time until the 3D display is optimized.
x
The 3D Active Glasses may not work properly if there
is any other 3D product or electronic devices turned
on near the glasses or TV. If there is a problem, keep
other electronic devices as far away as possible from
the 3D Active Glasses.
x
When watching pictures from a 50Hz 3D source with
its Game mode On, visually-sensitive viewers may
see some flicker on bright images.
x
Photos of Media Play are shown in “2D → 3D”
mode only.
x
If you lie on your side while watching TV with 3D
active glasses, the picture may look dark or may not
be visible.
x
Be sure to stay within the viewing angle and optimum
TV viewing distance when watching 3D pictures.
– Otherwise, you may not be able to enjoy proper 3D
effects.
x
The ideal viewing distance should be three times
or more the height of the screen. We recommend
sitting with viewer’s eyes on a level with the screen.
Picture Reset (OK / Cancel)
Resets your current picture mode to its default settings.
Setting up the TV with Your PC
Set the input source to PC.
Auto Adjustment
Adjust frequency values/positions and fine tune the settings
automatically.
✎
Not available when connecting with an HDMI/DVI cable.
[UC9000]BN68-02820G-RU.indb 20 2010-05-25 오전 9:58:57
Page 21

21
English
03 Basic Features
Screen
■ Coarse / Fine: Removes or reduces picture noise. If the
noise is not removed by Fine-tuning alone, then adjust
the frequency as best as possible (Coarse) and Finetune again. After the noise has been reduced, readjust
the picture so that it is aligned to the centre of screen.
■ Position: Adjust the PC screen position with direction
button (▲ / ▼ / ◄ / ►).
■ Image Reset: Resets the image to default settings.
Using Your TV as a Computer (PC) Display
Setting Up Your PC Software (Based on Windows XP)
Depending on the version of Windows and the video card,
the actual screens on your PC may differ in which case the
same basic set-up information will almost always be applied.
(If not, contact your computer manufacturer or Samsung
Dealer.)
1. Click on “Control Panel” on the Windows start menu.
2. Click on “Appearance and Themes” in the “Control
Panel” window and a display dialog-box will appear.
3. Click on “Display” and a display dialog box will appear.
4. Navigate to the “Settings” tab on the display dialog-box.
y The correct size setting (resolution) [Optimum: 1920 X
1080 pixels]
y If a vertical-frequency option exists on your display
settings dialog box, the correct value is “60” or “60 Hz”.
Otherwise, just click “OK” and exit the dialog box.
Sound Menu
Changing the Preset Sound Mode
SRS TheaterSound
■ Standard: Selects the normal sound mode.
■ Music: Emphasizes music over voices.
■ Movie: Provides the best sound for movies.
■ Clear Voice: Emphasizes voices over other sounds.
■ Amplify: Increase the intensity of high-frequency sound
to allow a better listening experience for the hearing
impaired.
Adjusting Sound Settings
Equalizer
Adjusts the sound mode (standard sound mode only).
■ Balance L/R: Adjusts the balance between the right and
left speaker.
■ 100Hz / 300Hz / 1kHz / 3kHz / 10kHz (Bandwidth
Adjustment): Adjusts the level of specific bandwidth
frequencies.
■ Reset: Resets the equalizer to its default settings.
Sound Systems, Etc.
SRS TruSurround HD (Off / On)
(standard sound mode only)
This function provides a virtual 5.1 channel surround sound
experience through a pair of speakers using HRTF (Head
Related Transfer Function) technology.
SRS TruDialog (Off / On)
(standard sound mode only)
This function allows you to increase the intensity of a voice
over background music or sound effects so that dialog can
be heard more clearly.
Audio Language
(digital channels only)
Change the default value for audio languages.
✎
The available language may differ depending on the
broadcast.
[UC9000]BN68-02820G-RU.indb 21 2010-05-25 오전 9:58:57
Page 22

22
English
Basic Features
Audio Format
(digital channels only)
When sound is emitted from both the main speaker and the
audio receiver, a sound echo may occur due to the decoding
speed difference between the main speaker and the audio
receiver. In this case, use the TV Speaker function.
✎
Audio Format option may differ depending on the
broadcast. 5.1ch Dolby digital sound is only available
when connecting an external speaker through an
optical cable.
Audio Description
(not available in all locations) (digital
channels only)
This function handles the Audio Stream
for the AD (Audio Description) which is
sent along with the Main audio from the
broadcaster.
■ Audio Description (Off / On): Turn
the audio description function on or
off.
■ Volume: Adjust the audio description volume.
Auto Volume (Off / Normal / Night)
To equalize the volume level on each channel, set to Normal.
■ Night: This mode provides an improved sound
experience compared to Normal mode, making almost
no noise. It is useful at night.
Speaker Select (External Speaker / TV
Speaker)
A sound echo may occur due to a difference in decoding
speed between the main speaker and the audio receiver. In
this case, set the TV to External Speaker.
✎
When Speaker Select is set to External Speaker, the
volume and MUTE buttons will not operate and the
sound settings will be limited.
✎
When Speaker Select is set to External Speaker.
x
TV Speaker: Off, External Speaker: On
✎
When Speaker Select is set to TV Speaker.
x
TV Speaker: On, External Speaker: On
✎
If there is no video signal, both speakers will be mute.
Additional Setting
(digital channels only)
■ DTV Audio Level (MPEG / HE-AAC): This function
allows you to reduce the disparity of a voice signal
(which is one of the signals received during a digital TV
broadcast) to a desired level.
✎
According to the type of broadcast signal, MPEG
/ HE-AAC can be adjusted between -10dB and
0dB.
✎
To increase or decrease the volume, adjust
between the range 0 and -10 respectively.
■ SPDIF Output: SPDIF (Sony Philips Digital InterFace)
is used to provide digital sound, reducing interference
going to speakers and various digital devices such as a
DVD player.
Audio Format: During the reception of a digital TV
broadcast, you can select the Digital Audio output
(SPDIF) format from the options PCM or Dolby Digital.
Audio Delay: Correct audio-video sync problems, when
watching TV or video, and when listening to digital audio
output using an external device such as an AV receiver
(0ms ~ 250ms).
■ Dolby Digital Comp (Line / RF): This function minimizes
signal disparity between a dolby digital signal and a
voice signal (i.e. MPEG Audio, HE-AAC, ATV Sound).
✎
Select Line to obtain dynamic sound, and RF
to reduce the difference between loud and soft
sounds at night time.
Line: Set the output level for signals greater or less than
-31dB (reference) to either -20dB or -31dB.
RF: Set the output level for signals greater or less than
-20dB (reference) to either -10dB or -20dB.
Sound Reset (OK / Cancel)
Reset all sound settings to the factory defaults.
AD
[UC9000]BN68-02820G-RU.indb 22 2010-05-25 오전 9:58:58
Page 23
23
English
03 Basic Features
Selecting the Sound Mode
When you set to Dual -, the current sound mode is
displayed on the screen.
Audio
Type
Dual 1/2 Default
A2
Stereo
Mono Mono
Automatic
change
Stereo
Stereo ↔ Mono
Dual
Dual
↔ Dual
Dual
NICAM
Stereo
Mono Mono
Automatic
change
Stereo
Mono ↔ Stereo
Dual
Mono ↔ Dual
Dual
Dual
✎
If the stereo signal is weak and an automatic switching,
occurs, then switch to the mono.
✎
Only activated in stereo sound signal.
✎
Only available when the Input source is set to TV.
Setup Menu
Setting the Time
Time
■ Clock: Setting the clock is for using various timer
features of the TV.
The current time will appear every time you press
the INFO button.
✎
If you disconnect the power cord, you have to set
the clock again.
Clock Mode (Auto / Manual)
✎
Depending on the broadcast station and signal,
the auto time set up may not be correct. In this
case, set the time manually.
✎
The antenna must be connected in order to set
the time automatically.
Clock Set: Set the Day, Month, Year, Hour and Minute
manually.
✎
Available only when Clock Mode is set to
Manual.
Time Zone (depending on the country): Select your time
zone.
✎
When Country is set to Others, you can use this
function.
✎
This function is only available when the Clock
Mode is set to Auto.
Using the Sleep Timer
■ Sleep Timer
: Automatically shuts off the TV
after a preset period of time. (30, 60, 90, 120, 150 and
180 minutes).
✎
To cancel Sleep Timer, select Off.
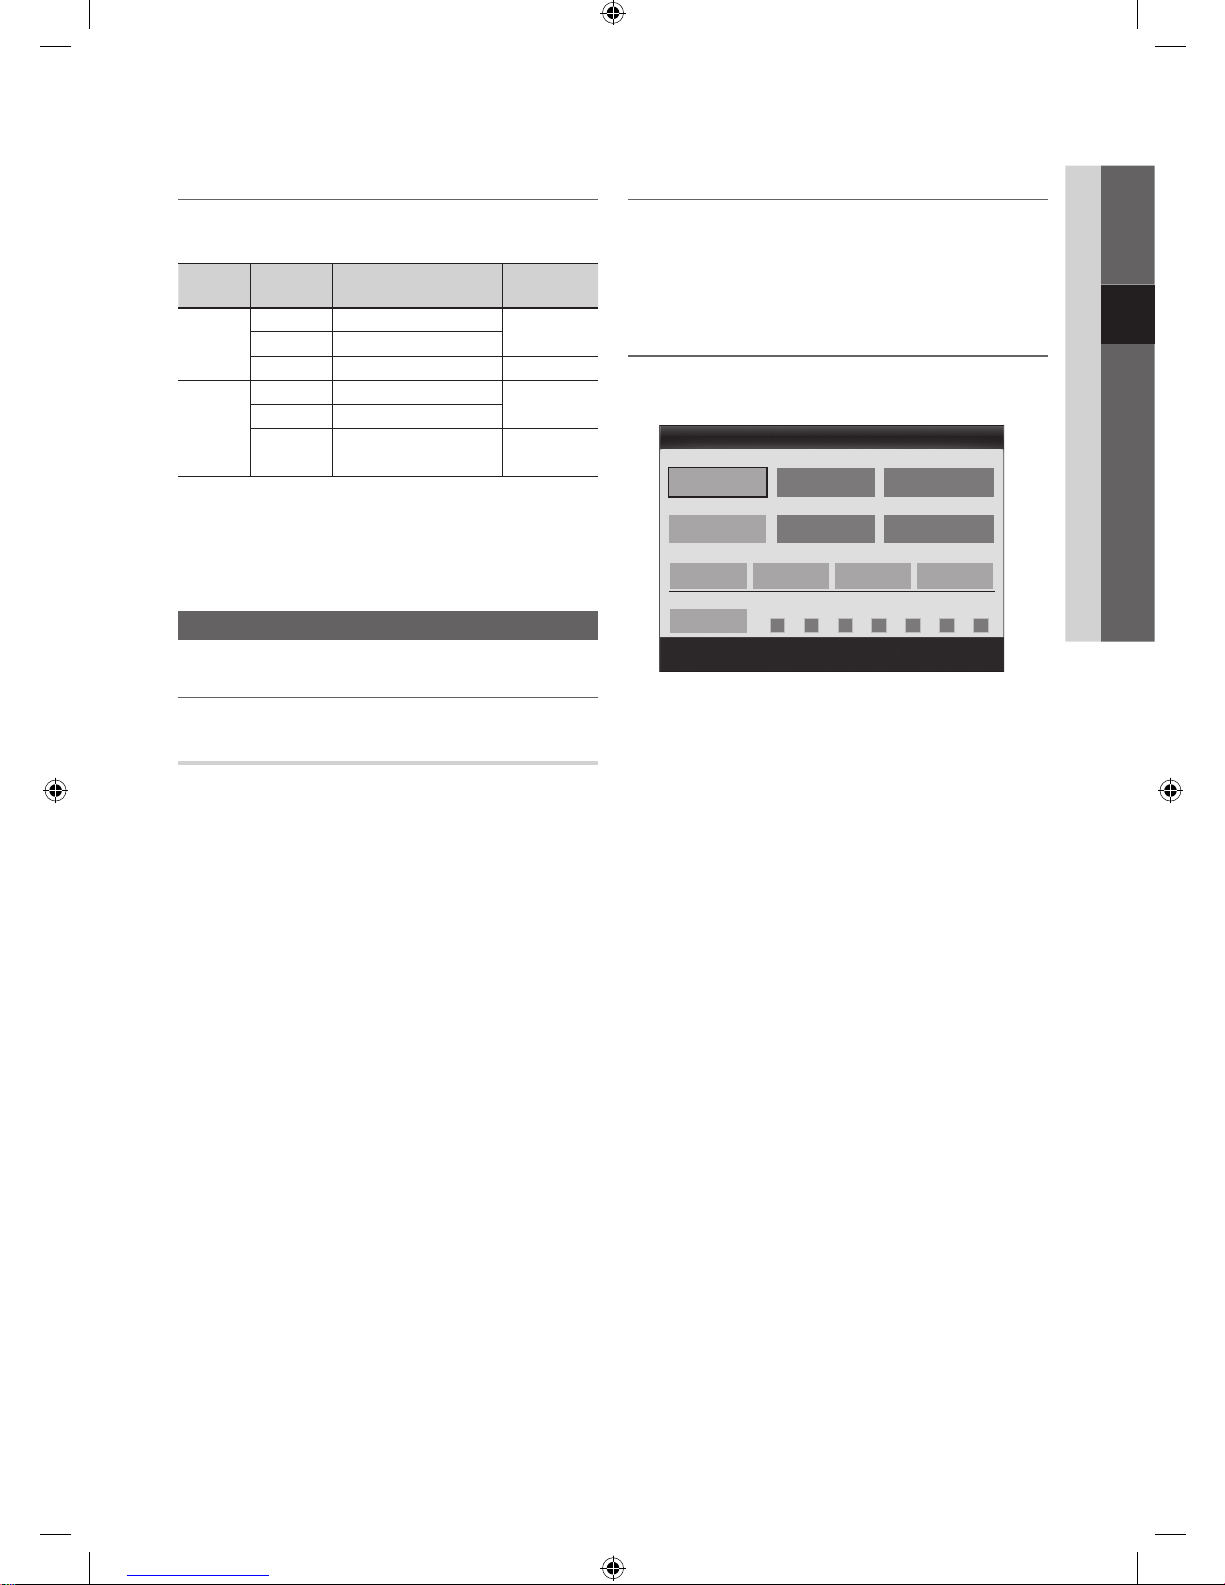
Setting the On / Off Timer
■ Timer 1 / Timer 2 / Timer 3: Three different on / off
timer settings can be made. You must set the clock first.
On Time / Off Time: Set the hour, minute, and activate
/ inactivate. (To activate timer with the setting you’ve
chosen, set to Activate.)
Volume: Set the desired volume level.
Source: Select TV or USB content to be played when
the TV is turned on automatically. (USB can be selected
only when a USB device is connected to the TV)
Antenna (when the Source is set to TV): Select ATV or
DTV.
Channel (when the Source is set to TV): Select the
desired channel.
Contents (when the Source is set to USB): Select a
folder in the USB device containing music or photo files
to be played when the TV is turned on automatically.
✎
NOTE
x
If there is no music file on the USB device or the
folder containing a music file is not selected, the
Timer function does not operate correctly.
x
When there is only one photo file in the USB
device, the Slide Show will not play.
x
If a folder name is too long, the folder cannot be
selected.
x
Each USB you use is assigned its own folder.
When using more than one of the same type of
USB, make sure the folders assigned to each
USB have different names.
10 TV ATV 1
00 00
▲
▼
00 00
Timer 1
On Time
Off Time
Volume
Inactivate
Inactivate
Sun Mon Tue Wed Thu Fri Sat
Once
Source Antenna Channel
Repeat
Move
Adjust
Enter
Return
[UC9000]BN68-02820G-RU.indb 23 2010-05-25 오전 9:58:59
Page 24

24
English
Basic Features
Repeat: Select Once, Everyday, Mon~Fri, Mon~Sat,
Sat~Sun or Manual to set at you convenience. If you
select Manual, you can set up the day you want to
activate the timer.
✎
The mark indicates the day is selected.
✎
Auto Power Off (available only when the TV is turned on
by Timer): The TV will be automatically turned off after 3
hours of being left idle to prevent overheating.
Locking Programme
Security
✎
The PIN input screen appears before the setup screen.
✎
Enter your 4-digit PIN, the default of which is “0-0-0-0”.
Change the PIN using the Change PIN option.
■ Child Lock (Off / On): Lock channels in Channel
Manager, to prevent unauthorized users, such as
children, from watching unsuitable programme.
✎
Available only when the Input source is set to TV.
■ Parental Lock (depending on the country): Prevent
unauthorized users, such as children, from watching
unsuitable programme with a user-defined 4-digit PIN
code. If the selected channel is locked, the “
” symbol
will be displayed.
Allow All: Unlock all TV ratings.
■ Change PIN: Change your personal ID number required
to set up the TV.
✎
If you forget the PIN code, press the remote
control buttons in the following sequence, which
resets the PIN to “0-0-0-0”: POWER (off) →
MUTE → 8 → 2 → 4 → POWER (on).
Other Features
Language
■ Menu Language: Set the menu language.
■ Teletext Language: Set a desired language for teletext.
✎
English is the default in cases where the selected
language is unavailable in the broadcast.
■ Preference (Primary Audio Language / Secondary
Audio Language / Primary Subtitle Language /
Secondary Subtitle Language / Primary Teletext
Language / Secondary Teletext Language): Select
a language, which will be the default language when a
channel is selected.
Subtitle
Use this menu to set the Subtitle mode.
■ Subtitle (Off / On): Switches subtitles
on or off.
■ Mode (Normal / Hearing Impaired):
Sets the subtitle mode.
■ Subtitle Language: Sets the subtitle
language.
✎
If the programme you are watching does not
support the Hearing Impaired function, Normal
automatically activates even if the Hearing
Impaired mode is selected.
✎
English is the default in cases where the selected
language is unavailable in the broadcast.
Digital Text (Disable / Enable)
(UK only)
If the programme broadcasts with digital text, this feature is
enabled.
Network (Network Type / Network Setup
/ Network Test / SWL(Samsung Wireless
Link) / SWL connect)
For details on setting up options, refer to the “Network
Connection” instructions (p. 28).
General
■ Game Mode (Off / On): When connecting to a game
console such as PlayStation™ or Xbox™, you can enjoy
a more realistic gaming experience by selecting game
mode.
SUBT.
[UC9000]BN68-02820G-RU.indb 24 2010-05-25 오전 9:59:00
Page 25

25
English
03 Basic Features
✎
NOTE
x
Precautions and limitations for game mode
– To disconnect the game console and connect
another external device, set Game Mode to Off in
the setup menu.
– If you display the TV menu in Game Mode, the
screen shakes slightly.
x
Game Mode is not available when the input source
is set to TV or PC.
x
After connecting the game console, set Game Mode
to On. Unfortunately, you may notice reduced picture
quality.
x
If Game Mode is On:
– Picture mode is set to Standard and Sound mode
is set to Movie.
– Equalizer is not available.
■ BD Wise (Off / On): Provides the optimal picture quality
for Samsung DVD, Blu-ray and Home Theatre products
which support BD Wise. When BD Wise is turned On,
the picture mode is automatically changed to the optimal
resolution.
✎
Available when connecting Samsung products
that support BD Wise through a HDMI cable.
■ Menu Transparency (Bright / Dark): Set the
Transparency of the menu.
■ Slide Key (Off / On ): You can choose to use the LED
touch pad, which is centered underneath the stand, or not.
■ Melody (Off / Low / Medium / High): Set so that a
melody plays when the TV is turned on or off.
✎
Melody is disabled when FastStart is On.
■ FastStart (Off / On): When the TV is powered on, the
screen will come on quickly with this feature.
Common Interface
■ CI Menu: This enables the user to select from the CAM-
provided menu. Select the CI Menu based on the menu
PC Card.
■ Application Info: View information on the CAM inserted
into the CI slot and on the “CI or CI+ CARD” which is
inserted into the CAM. You can install the CAM anytime
whether the TV is on or off.
1. Purchase a CI CAM module at your nearest dealer or by
phone.
2. Firmly insert the “CI or CI+ CARD” into the CAM in the
direction of the arrow.
3. Insert the CAM with the “CI or CI+ CARD” into the
common interface slot, in the direction of the arrow so
that it aligns parallel with the slot.
4. Check if you can see a picture on a scrambled signal
channel.
Wireless Remote Control
Turn wireless remote controls on or off or give permission to
wireless remote controls.
Support Menu
Self Diagnosis
✎
Self Diagnostic might take few seconds, this is part of
the normal operation of the T V.
■ Picture Test (Yes / No): Use to check for picture
problems.
■ Sound Test (Yes / No): Use the built-in melody sound to
check for sound problems.
✎
If you hear no sound from the TV’s speakers,
before performing the sound test, make sure
Speaker Select is set to TV Speaker in the
Sound menu.
✎
The melody will be heard during the test even if
Speaker Select is set to External Speaker or the
sound is muted by pressing the MUTE button.
■ Signal Information: (digital channels only) HDTV
channel’s reception quality is either perfect or the
channels are unavailable. Adjust your antenna to
increase signal strength.
■ Troubleshooting: If the TV seems to have a problem,
refer to this description.
✎
If none of these troubleshooting tips apply, contact
the Samsung customer service centre.
[UC9000]BN68-02820G-RU.indb 25 2010-05-25 오전 9:59:00
Page 26
26
English
Basic Features
Software Upgrade
Software Upgrade can be performed via a broadcasting
signal or by network connection or downloading the latest
firmware from “www.samsung.com,” to a USB memory
device.
Current Version the software already installed in the TV.
✎
Software is represented as “Year/Month/Day_Version”.
Installing the Latest Version
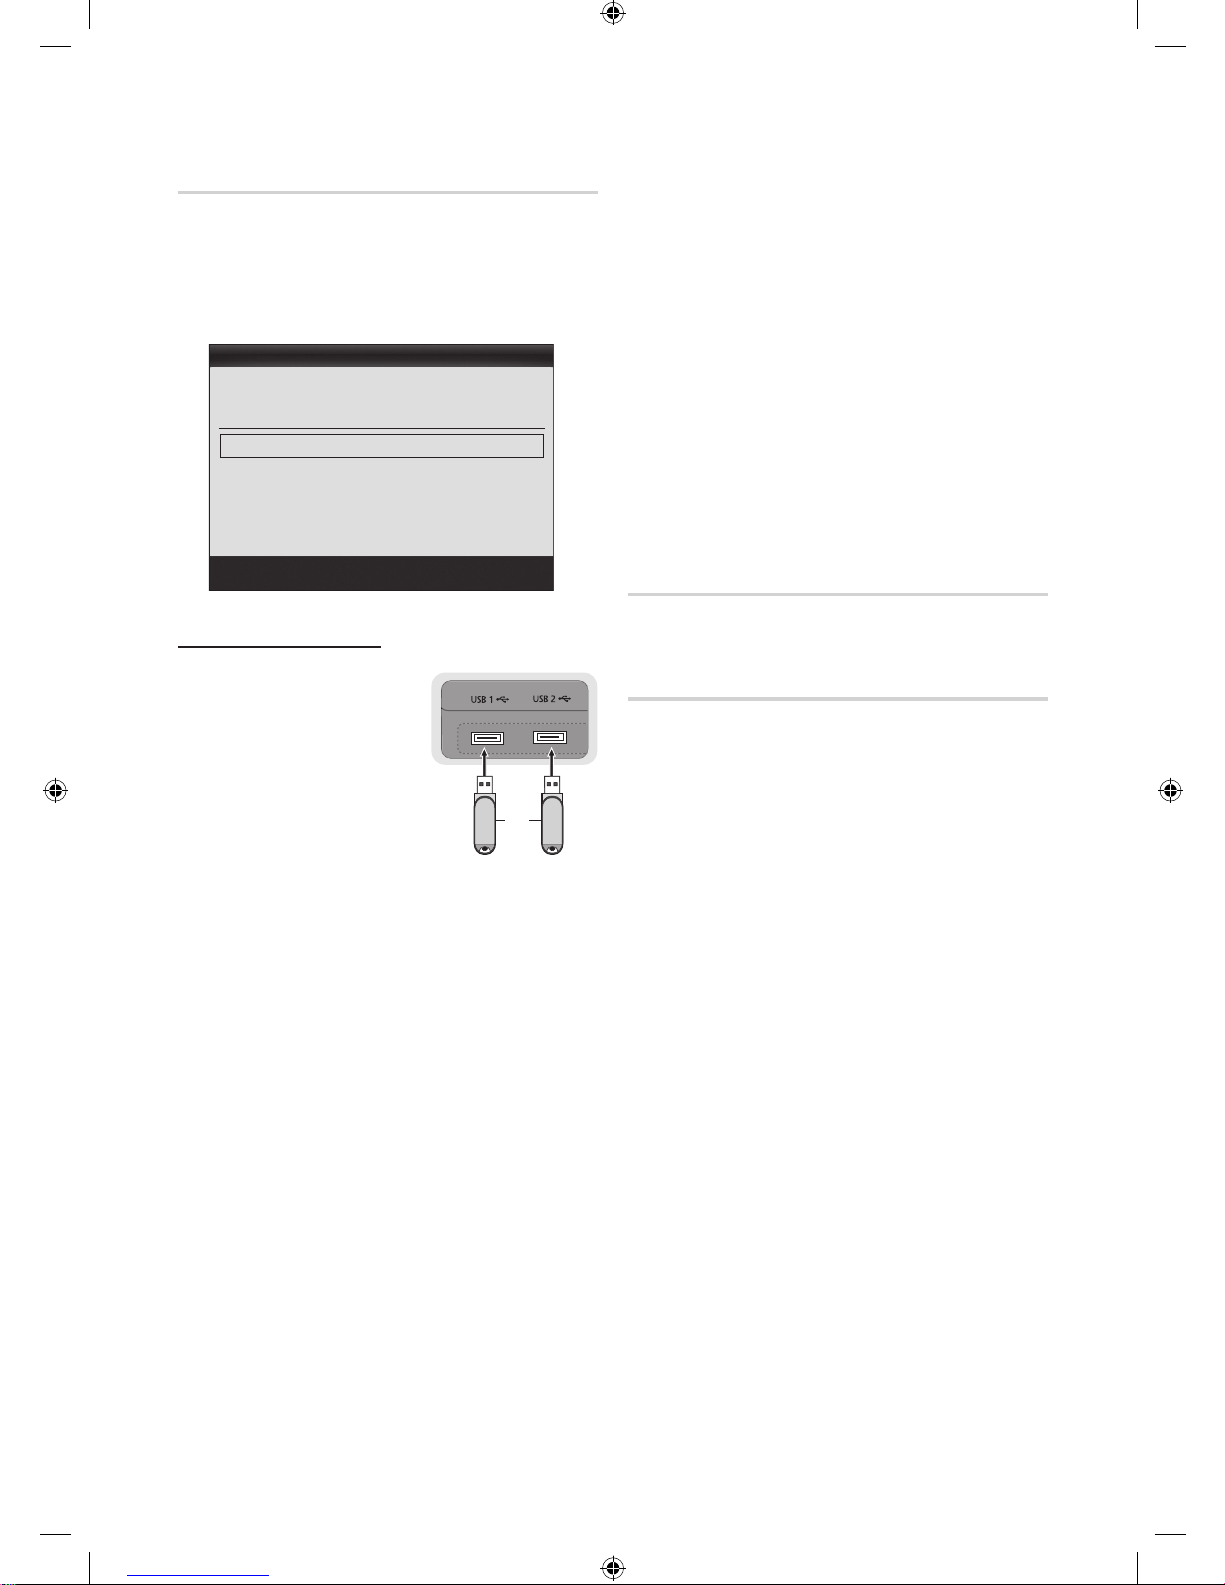
■ By USB: Insert a USB drive
containing the firmware
upgrade file, downloaded
from “www.samsung.com,”
into the TV. Please be careful
not to disconnect the power
or remove the USB drive until
upgrades are complete. The
TV will be turned off and on
automatically after completing
the firmware upgrade. When
software is upgraded, video
and audio settings you have made will return to their
default settings. We advise you to to write down your
settings so that you can easily reset them after the
upgrade.
■ By Online: Upgrade the software using the Internet.
✎
First, configure your network. For detailed
procedures on using the Network Setup, refer to
the “Network Connection” instructions.
✎
If the internet connection doesn’t operate properly,
the connection may be broken. Please retry
downloading. If the problem persists, download by
USB and upgrade.
■ By Channel: Upgrade the software using the
broadcasting signal.
✎
If the function is selected during the software
transmission period, software will be automatically
searched and downloaded.
✎
The time required to download the software is
determined by the signal status.
■ Standby Mode Upgrade: A manual upgrade will be
automatically performed at selected time. Since the
power of the unit is turned on internally, the screen
may be turned on slightly for the LED product. This
phenomenon may continue for more than 1 hour until
the software upgrade is complete.
■ Alternative Software (backup): Displays the software
version downloaded through By Online. During the
software upgrading, When the Upgrade will discontinue
from last step, this function be activated.
HD Connection Guide
Refer to this information when connecting external devices
to the TV.
Contact Samsung
View this information when your TV does not work properly
or when you want to upgrade the software. You can find
information regarding our call centres, and how to download
products and software.
USB Drive
Stand Side Panel
or
Software Upgrade
By USB ►
By Online
By Channel
Standby Mode Upgrade : Off
Alternative Software 2010/01/15_00000
Move
Enter
Return
Current Version 2010/01/18_000001
[UC9000]BN68-02820G-RU.indb 26 2010-05-25 오전 9:59:01
Page 27

27
English
04 Advanced Features
Advanced Features
Connecting to a PC
Using an HDMI/DVI Cable / a D-sub Cable
Display Modes (D-Sub and HDMI/DVI Input)
Optimal resolution is 1920 X 1080 @ 60 Hz.
Mode Resolution
Horizontal Frequency
(KHz)
Vertical Frequency
(Hz)
Pixel Clock Frequency
(MHz)
Sync Polarity
(H / V)
IBM
640 x 350
720 x 400
31.469
31.469
70.086
70.087
25.175
28.322
+/-
-/+
MAC
640 x 480
832 x 624
1152 x 870
35.000
49.726
68.681
66.667
74.551
75.062
30.240
57.284
100.000
-/-
-/-
-/-
VESA CVT
720 x 576
1152 x 864
1280 x 720
1280 x 960
35.910
53.783
56.456
75.231
59.950
59.959
74.777
74.857
32.750
81.750
95.750
130.000
-/+
-/+
-/+
-/+
VESA DMT
640 x 480
640 x 480
640 x 480
800 x 600
800 x 600
800 x 600
1024 x 768
1024 x 768
1024 x 768
1152 x 864
1280 x 1024
1280 x 1024
1280 x 720
1280 x 800
1280 x 800
1280 x 960
1360 x 768
1440 x 900
1440 x 900
1600 x 1200
1680 x 1050
31.469
37.861
37.500
37.879
48.077
46.875
48.363
56.476
60.023
67.500
63.981
79.976
45.000
49.702
62.795
60.000
47.712
55.935
70.635
75.000
65.290
59.940
72.809
75.000
60.317
72.188
75.000
60.004
70.069
75.029
75.000
60.020
75.025
60.000
59.810
74.934
60.000
60.015
59.887
74.984
60.000
59.954
25.175
31.500
31.500
40.000
50.000
49.500
65.000
75.000
78.750
108.000
108.000
135.000
74.250
83.500
106.500
108.000
85.500
106.500
136.750
162.000
146.250
-/-
-/-
-/+/+
+/+
+/+
-/-
-/+/+
+/+
+/+
+/+
+/+
-/+
-/+
+/+
+/+
-/+
-/+
+/+
-/+
VESA GTF
1280 x 720
1280 x 1024
52.500
74.620
70.000
70.000
89.040
128.943
-/+
-/-
VESA DMT / DTV CEA
1920 x 1080p 67.500 60.000 148.500 +/+
✎
NOTE
x
For HDMI/DVI cable connection, you must use the HDMI IN 1(DVI) jack.
x
The interlace mode is not supported.
x
The set might operate abnormally if a non-standard video format is selected.
x
Separate and Composite modes are supported. SOG(Sync On Green) is not supported.
AUDIO OUT
PC OUT
AUDIO OUT
DVI OUT
[UC9000]BN68-02820G-RU.indb 27 2010-05-25 오전 9:59:03
Page 28

28
English
Advanced Features
Network Connection
You can set up your TV so that it can access the Internet through your local area network (LAN) using a wired or wireless
connection.
Connecting to a Wired Network
You can attach your TV to your LAN using cable in three ways:
y You can attach your TV to your LAN by connecting the LAN port on the back of your TV to an external modem using a Cat
5 cable. See the diagram below.
y You can attach your TV to your LAN by connecting the LAN port on the back of your TV to a IP Sharer which is connected
to an external modem. Use Cat 5 cable for the connection. See the diagram below.
y Depending on how your network is configured, you may be able to attach your TV to your LAN by connecting the LAN
port on the back of your TV directly to a network wall outlet using a Cat 5 cable. See the diagram below. Note that the wall
outlet is attached to a modem or router elsewhere in your house.
If you have a Dynamic Network, you should use an ADSL modem or router that supports Dynamic Host Configuration
Protocol (DHCP). Modems and routers that support DHCP automatically provide the IP address, subnet mask, gateway,
and DNS values your TV needs to access the Internet so you don’t have to enter them manually. Most home networks are
Dynamic Networks.
Some networks require a Static IP address. If your network requires a Static IP address, you must enter the IP address,
subnet mask, gateway, and DNS values manually on your TV’s Network Setup Screen when you set up the network
connection. To get the IP address, subnet mask, gateway, and DNS values, contact your Internet Service Provider (ISP). If
you have a Windows computer, you can also get these values through your computer.
✎
You can use ADSL modems that support DHCP if your network requires a Static IP address. ADSL modems that
support DHCP also let you use Static IP addresses.
The Modem Port on the Wall
Stand Rear Panel
LAN Cable LAN AdapterModem Cable
External Modem
(ADSL / VDSL / Cable TV)
The Modem Port on the Wall Stand Rear Panel
LAN Cable
LAN CableModem Cable
External Modem
(ADSL / VDSL / Cable TV)
IP Sharer
(having DHCP server)
LAN Adapter
The LAN Port on the Wall
Stand Rear Panel
LAN Cable LAN Adapter
[UC9000]BN68-02820G-RU.indb 28 2010-05-25 오전 9:59:05
Page 29
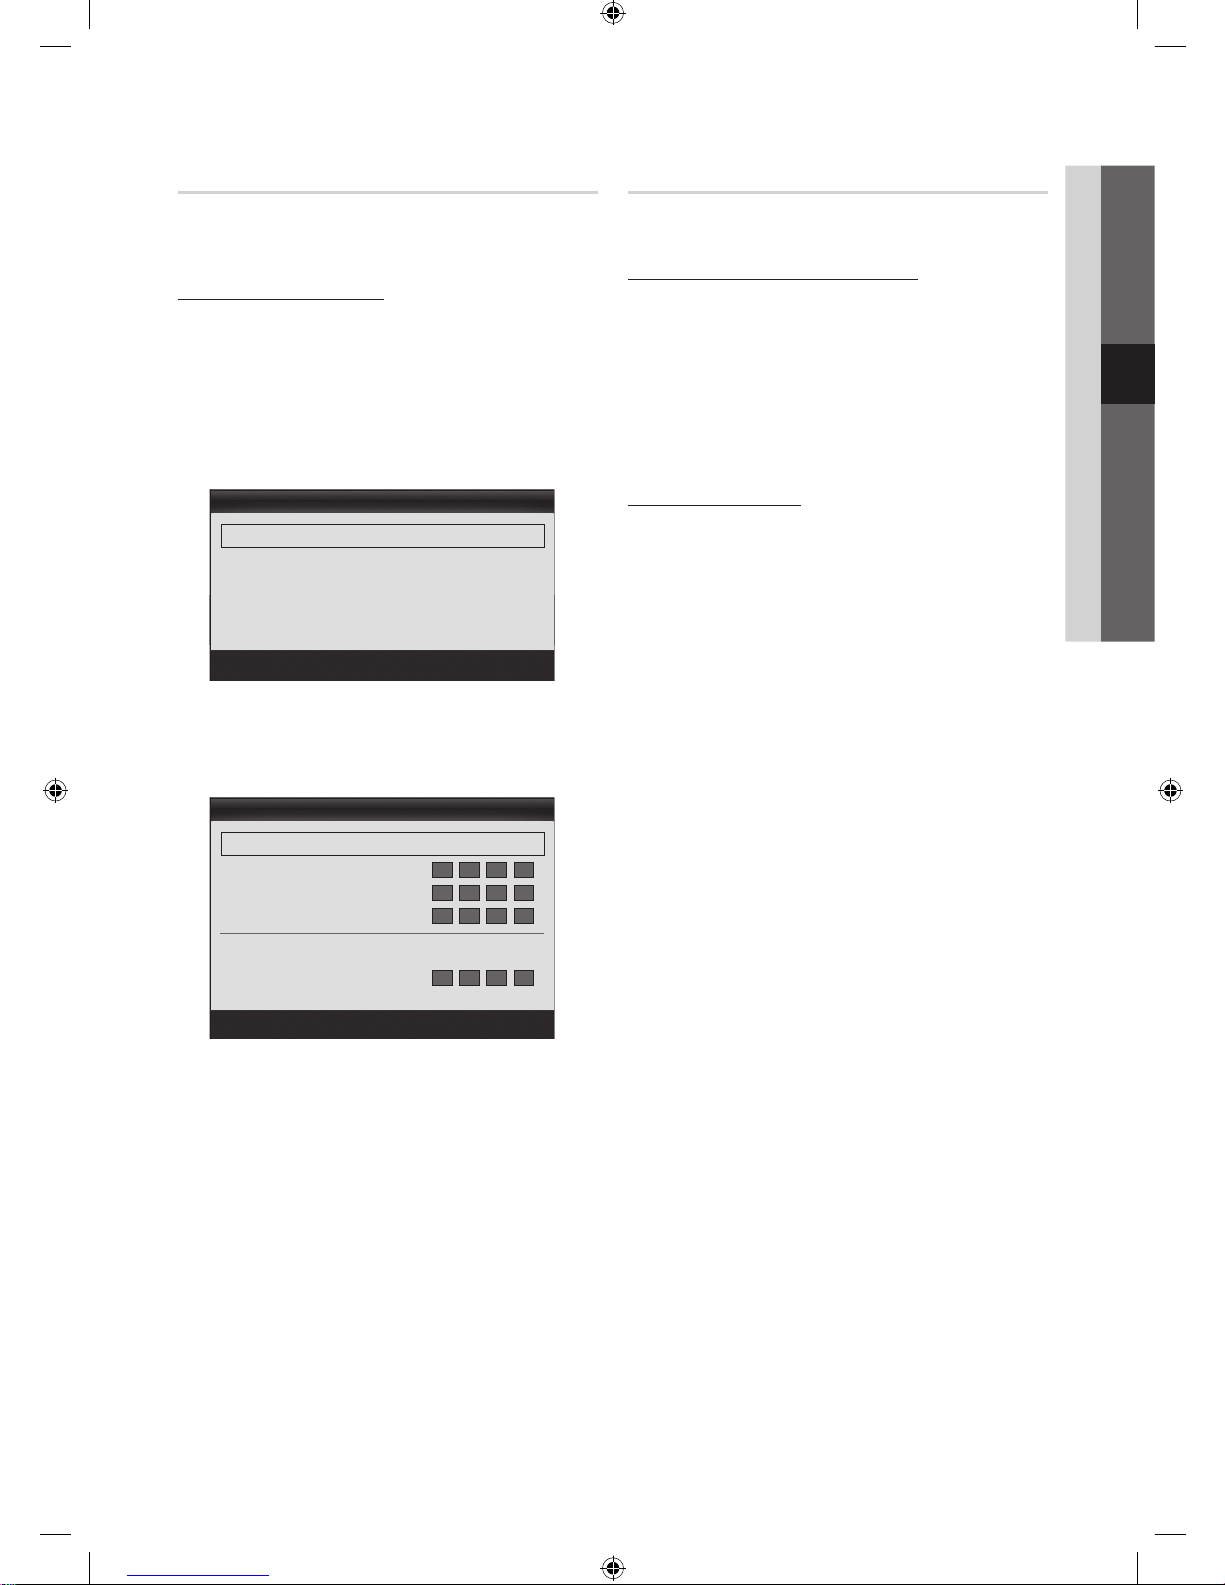
29
English
04 Advanced Features
Network Setup (Auto)
Use the Automatic Network Setup when connecting your
TV to a network that supports DHCP. To set up your TV’s
cable network connection automatically, follow these steps:
How to set up automatically
1. Connect your TV to your LAN as described in the
previous section.
2. Turn on your TV, press the MENU button on your
remote, use the ▲ or ▼ button to select Setup, and
then press the ENTER
button.
3. Use the ▲ or ▼ button to select Network in the Setup
menu, and then press the ENTER
button. The
Network screen appears.
4. On the Network screen, select Network Type.
5. Set Network Type to Wired.
6. Select Network Setup. The Network Setup screen
appears.
7. Set Internet Protocol Setup to Auto.
8. Auto acquires and enters the needed Internet values
automatically.
9. When done, press the RETURN button on your remote.
10. If the Network Function has not acquired the network
connection values, go to the directions for Manual.
Network Setup (Manual)
Use the Manual Network Setup when connecting your TV to
a network that requires a Static IP address.
Getting the Network Connection Values
To get the Network connection values on most Windows
computers, follow these steps:
1. Right click the Network icon on the bottom right of the
screen.
2. In the pop-up menu that appears, click Status.
3. On the dialog that appears, click the Support tab.
4. On the Support Tab, click the Details button. The
Network connection values are displayed.
How to set up manually
To set up your TV’s cable network connection manually,
follow these steps:
1. Follow Steps 1 through 6 in the “How to set up
automatically” procedure.
2. Set Internet Protocol Setup to Manual.
3. Press the ▼ button on your remote to go to the first
entry field.
4. Enter the IP Address, Subnet Mask, Gateway, and
DNS Server values. Use the number buttons on your
remote to enter numbers and the arrow buttons to move
from one entry field to another.
5. When done, press the RETURN button on your remote.
6. Select Network Test to check the Internet connectivity.
Network Setup
IP Address :
Subnet Mask :
Gateway :
DNS : Auto
DNS Server :
Move
Enter
Return
Internet Protocol Setup : Auto ►
Network
Move
Enter
Return
Network Type : Wired ►
Network Setup
Network Test
SWL(Samsung Wireless Link) : Off
SWL connect
[UC9000]BN68-02820G-RU.indb 29 2010-05-25 오전 9:59:06
Page 30

30
English
Advanced Features
Connecting to a Wireless Network
To connect your TV to your network wirelessly, you need a wireless router or modem and a Samsung Wireless LAN Adapter
(WIS09ABGN, WIS09ABGN2, WIS10ABGN), which you connect to your TV’s back or side panel USB jack. See the illustration below.
Samsung’s Wireless LAN adapter is sold separately and is offered by select retailers, Ecommerce sites and Samsungparts.
com. Samsung’s Wireless LAN adapter supports the IEEE 802.11A/B/G and N communication protocols. Samsung
recommends using IEEE 802.11N. When you play the video over a IEEE 802.11B/G connection, the video may not play
smoothly.
✎
NOTE
x
You must use the “Samsung Wireless LAN Adapter” (WIS09ABGN, WIS09ABGN2, WIS10ABGN) to use a wireless
network.
x
Samsung’s Wireless LAN Adapter is sold separately. The Samsung Wireless LAN Adapter is offered by select
retailers, Ecommerce sites and Samsungparts.com.
x
To use a wireless network, your TV must be connected to a wireless IP sharer. If the wireless IP sharer supports
DHCP, your TV can use a DHCP or static IP address to connect to the wireless network.
x
Select a channel for the wireless IP sharer that is not currently being used. If the channel set for the wireless IP sharer
is currently being used by another device nearby, this will result in interference and communication failure.
x
If you apply a security system other than the systems listed below, it will not work with the TV.
x
If Pure High-throughput (Greenfield) 802.11N mode is selected and the Encryption type is set to WEP, TKIP or TKIPAES (WPS2Mixed) for your AP, Samsung TVs will not support a connection in compliance with new Wi-Fi certification
specifications.
x
If your AP supports WPS (Wi-Fi Protected Setup), you can connect to the network via PBC (Push Button
Configuration) or PIN (Personal Identification Number). WPS will automatically configure the SSID and WPA key in
either mode.
x
If your router, modem, or device isn’t certified, it may not connect to the TV via the “Samsung Wireless LAN Adapter.”
x
Connection Methods: You can setup the wireless network connection six ways.
– Samsung Auto Configuration
– PBC (WPS)
– Auto Setup (Using the Auto Network Search function)
– Manual Setup
– SWL(Samsung Wireless Link)
– Ad-Hoc
x
The Samsung Wireless LAN Adapter may not be recognized or work properly when connecting via a USB hub or via
a USB extension cable other than the one available from Samsung.
Stand Side Panel
The LAN Port on
the Wall
LAN Cable
Wireless IP sharer
(AP having DHCP server)
Samsung Wireless
LAN Adapter
or
✎
When the USB 2 port is connected to a Samsung Wireless LAN Adapter,
you may not be able to use the USB 1 port. We recommend connecting a
Samsung Wireless LAN Adapter to the USB 1 port.
[UC9000]BN68-02820G-RU.indb 30 2010-05-25 오전 9:59:08
Page 31
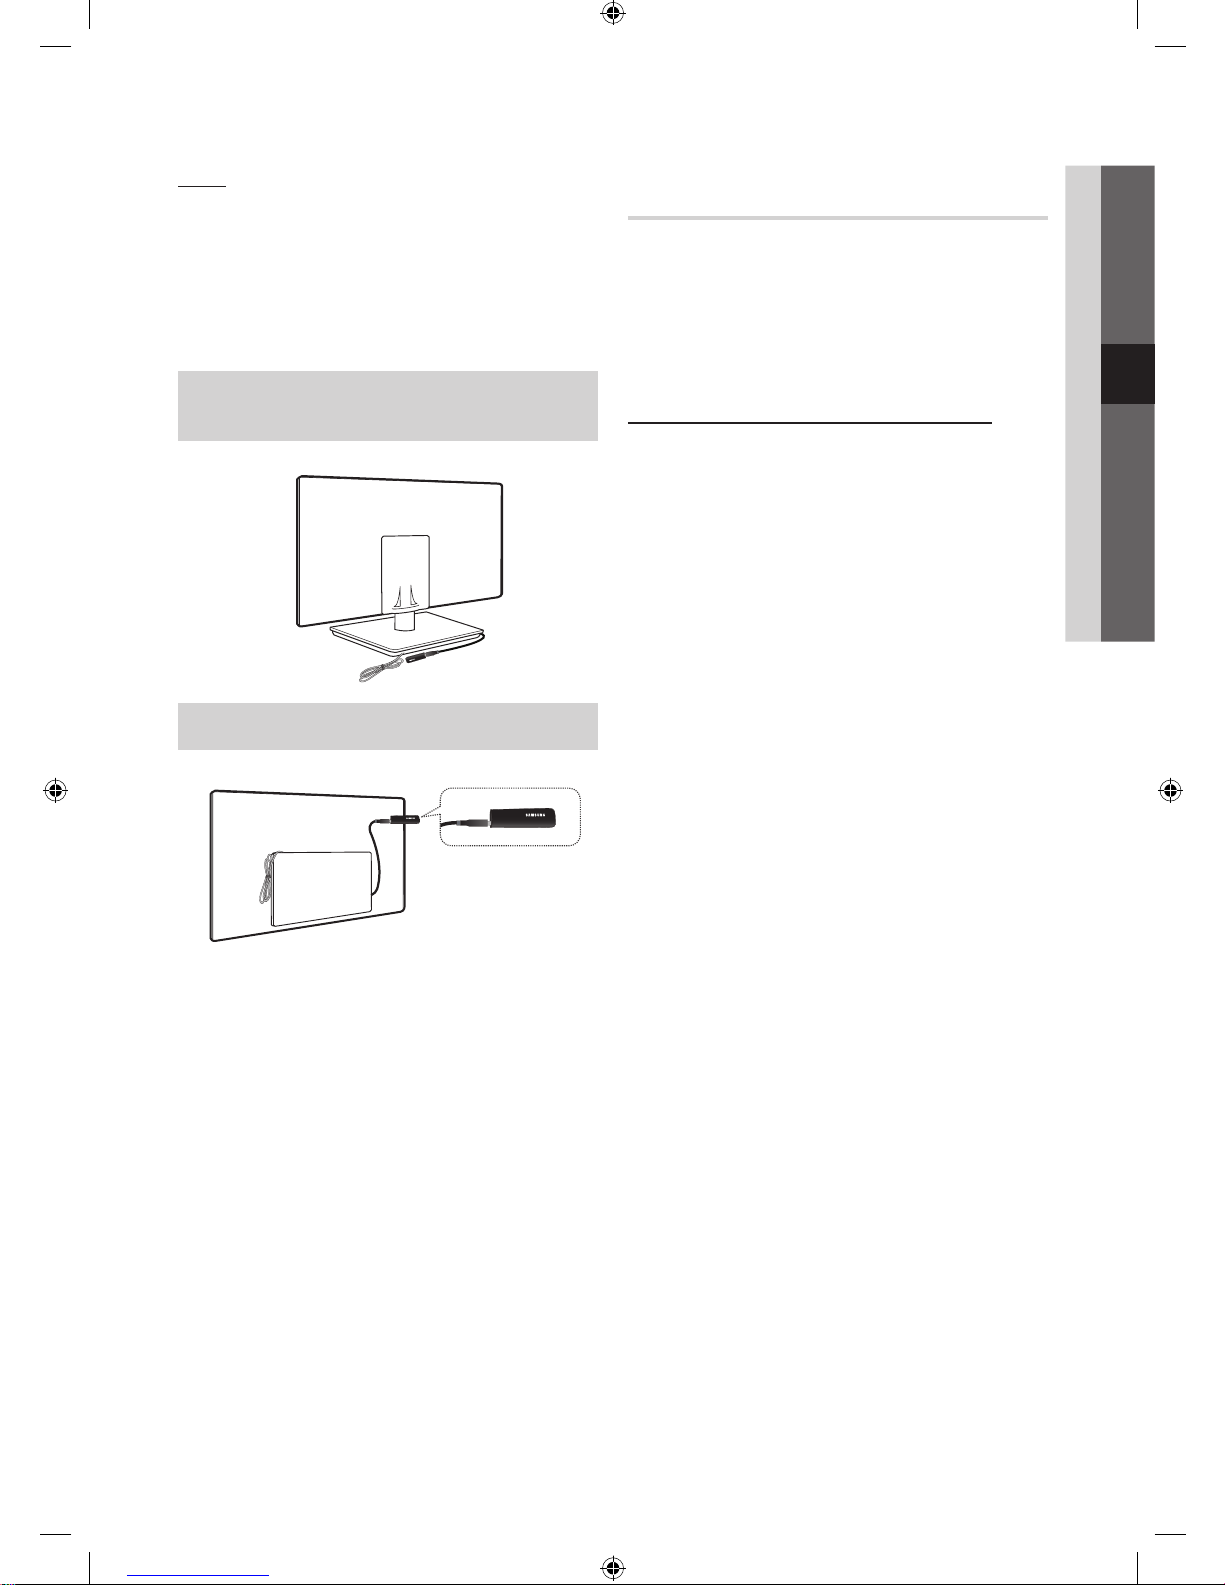
31
English
04 Advanced Features
Notice
The picture may appear corrupted or have static for some
channels when the TV is connected to the Samsung Wireless
LAN Adapter. In such a case, connect the Samsung Wireless
LAN Adapter using a USB cable in a place that is not
affected by radio interference.
✎
The Samsung Wireless LAN Adapter should be
installed in an interference-free area in order to avoid
interference between the adapter and tuner.
Method 1
UE46C9005SW, UE55C9005SW
UE46C9005ZW, UE55C9005ZW
✎
Components: Extension Cable, Velcro
Method 2
UE46C9005ZW, UE55C9005ZW
✎
Components: Extension Cable, Velcro
Network Setup (Samsung Auto
Configuration)
This function is available in APs (Access Points) that support
Samsung Auto Configuration. If your AP does not, you can
connect through PBC (WPS), auto, or manually.
✎
This function is available when SWL(Samsung
Wireless Link) is set to Off.
✎
You can check for equipment that supports Samsung
Auto Configuration on www.samsung.com.
How to set up using Samsung Auto Configuration
1. Place the AP and TV next to each other and turn them
on.
✎
Because the booting times of applications differ,
you may have to wait for approximately 2 minutes.
✎
If the LAN cable connected the WAN port of AP
during Samsung Auto Configuration, you are able
to complete until internet connection test. If you
do not connect, Samsung Auto Configuration will
check only device connecting of AP (Not check
internet).
2. After 2 minutes, connect the Samsung Wireless LAN
Adapter to the TV. When the Samsung Wireless LAN
Adapter is established, the pop-up window appears.
3. As soon as a connection is established, place the AP in
parallel with the Samsung Wireless LAN Adapter giving a
gap no larger than 25cm.
4. Wait until the connection is automatically established.
✎
If Samsung Auto Configuration does not connect
your TV to your AP, a pop-up window appears
on the screen notifying you of the failure. Reset
the AP, and then try again. If the connection fails
again, choose one of the other connection setup
methods, PBC (WPS), auto, or manual.
5. After the connection is established, locate the sharer at
the desired location.
✎
If the AP settings have been changed or it is the
first time you use the new AP after purchase, you
need to set up again beginning from Step 1.
[UC9000]BN68-02820G-RU.indb 31 2010-05-25 오전 9:59:09
Page 32
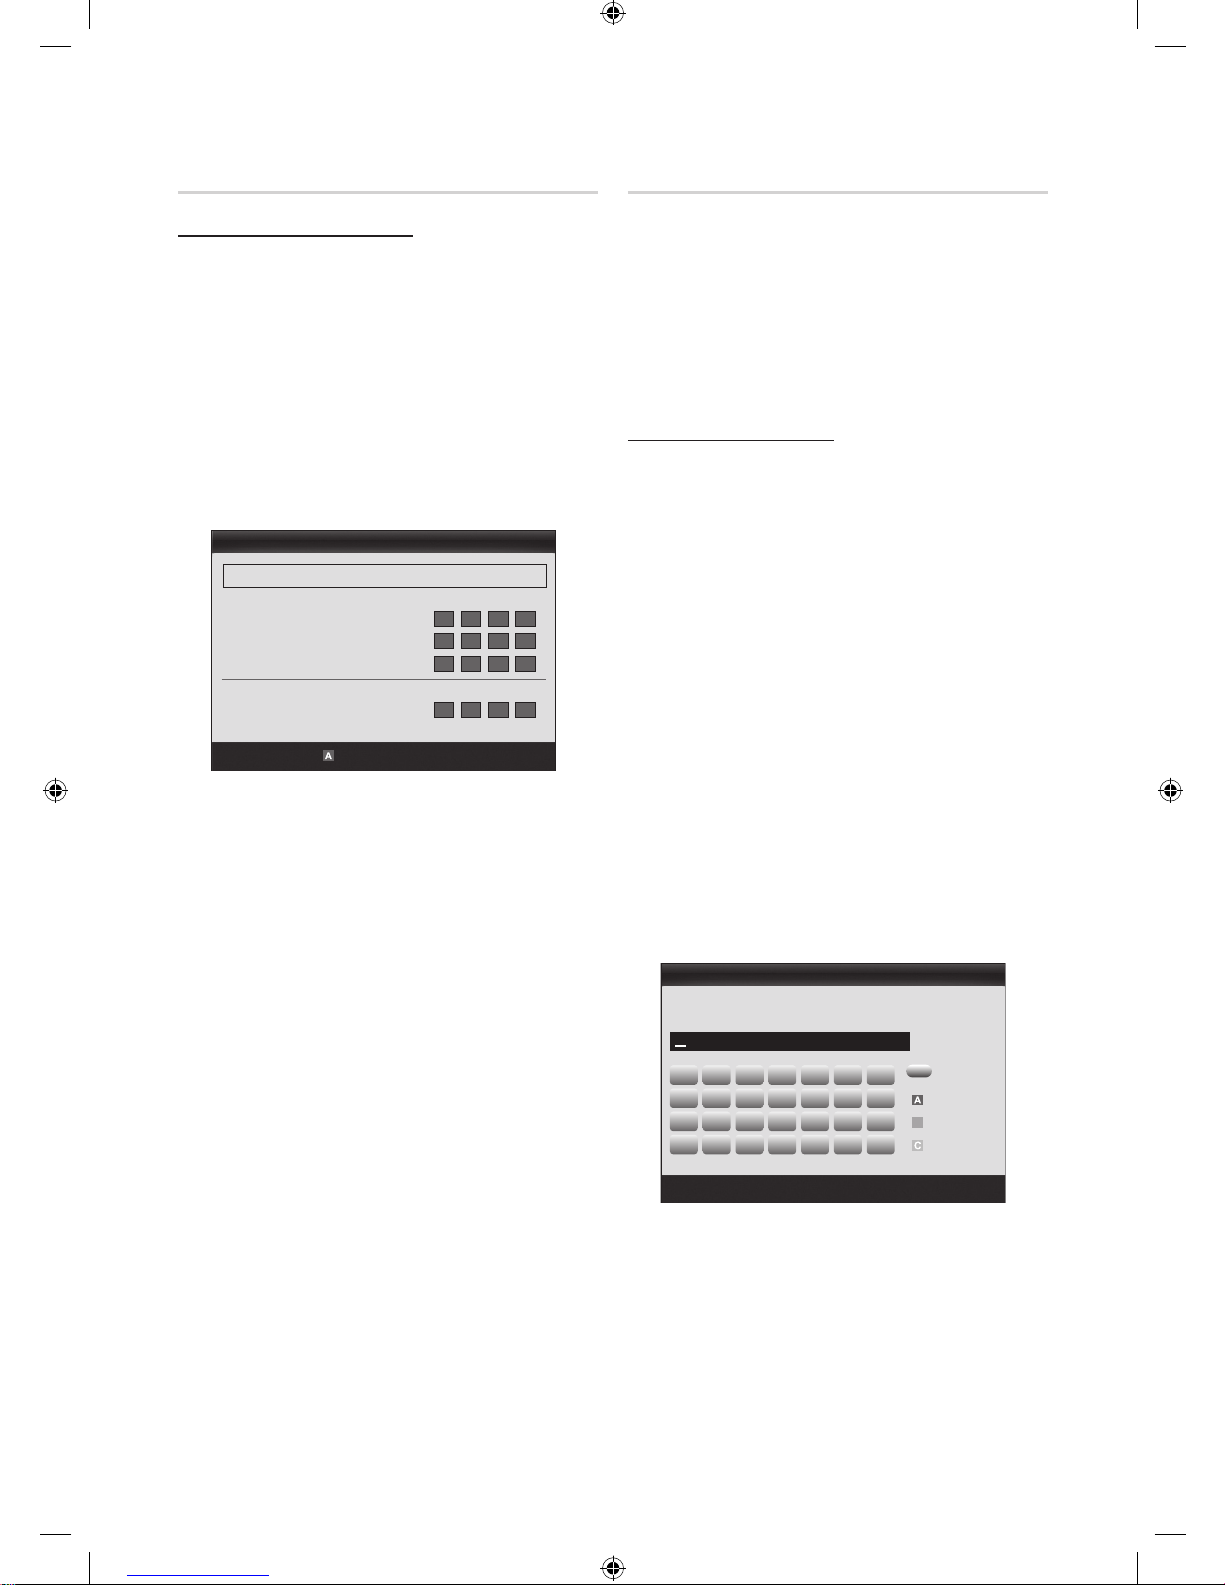
32
English
Advanced Features
Network Setup (PBC (WPS))
How to set up using PBC (WPS)
If your router has a PBC (WPS) button, follow these steps:
1. Connect your TV to Samsung Wireless LAN Adapter as
described in the previous section.
2. Turn on your TV, press the MENU button on your
remote, use the ▲ or ▼ button to select Setup, and
then press the ENTER
button.
3. Use the ▲ or ▼ button to select Network in the Setup
menu, and then press the ENTER
button.
4. On the Network screen, select Network Type.
5. Set Network Type to Wireless.
6. Select Network Setup. The Network Setup screen
appears.
7. Press the Red button on your remote.
8. Press the PBC (WPS) button on your router within 2
minutes. Your TV player automatically acquires all the
network setting values it needs and connects to your
network.
9. After the network connection is set up, press the
RETURN button to exit the Network Setup screen.
Network Setup (Auto)
Most wireless networks have an optional security system
that requires devices that access the network to transmit
an encrypted security code called an Access or Security
Key. The Security Key is based on a Pass Phrase, typically
a word or a series of letters and numbers of a specified
length you were asked to enter when you set up security for
your wireless network. If you use this method of setting up
the network connection, and have a Security Key for your
wireless network, you will have to enter the Pass Phrase
during the setup process.
How to set up automatically
To set up the wireless connection automatically, follow these
steps:
1. Follow Steps 1 through 6 in the “How to set up using
PBC (WPS)” procedure.
2. Press the ▼ button to select Internet Protocol Setup,
and then press the ENTER
button. Press the ▲ or
▼ button to select Auto, and then press the ENTER
button.
3. Press the ▲ button to go to Select a Network, and
then press the ENTER
button. The Network function
searches for available wireless networks. When done, it
displays a list of the available networks.
4. In the list of networks, press the ▲ or ▼ button to select
a network, and then press the ENTER
button.
✎
If the AP is set to Hidden (Invisible), you have
to select Add Network and enter the correct
Network Name (SSID) and Security Key to
establish the connection.
5. If the Security/PIN pop-up appears, go to Step 6. If the
Network Connecting Screen appears, go to Step 10.
6. Press the ▲ or ▼ button to select Security or PIN. For
most home networks, you would select Security (for
Security Key). The Security Screen appears.
A B C D E F G
H I J K L M N
O P Q R S T U
V W X Y Z
0~9
Network Setup
Move
Enter
Return
Security Key
0 entered
Number
Lower case
B
Delete
Space
Network Setup
PBC(WPS)
Move
Enter
Return
Select a Network : Not Selected ►
Internet Protocol Setup : Auto
IP Address :
Subnet Mask :
Gateway :
DNS : Auto
DNS Server :
[UC9000]BN68-02820G-RU.indb 32 2010-05-25 오전 9:59:09
Page 33
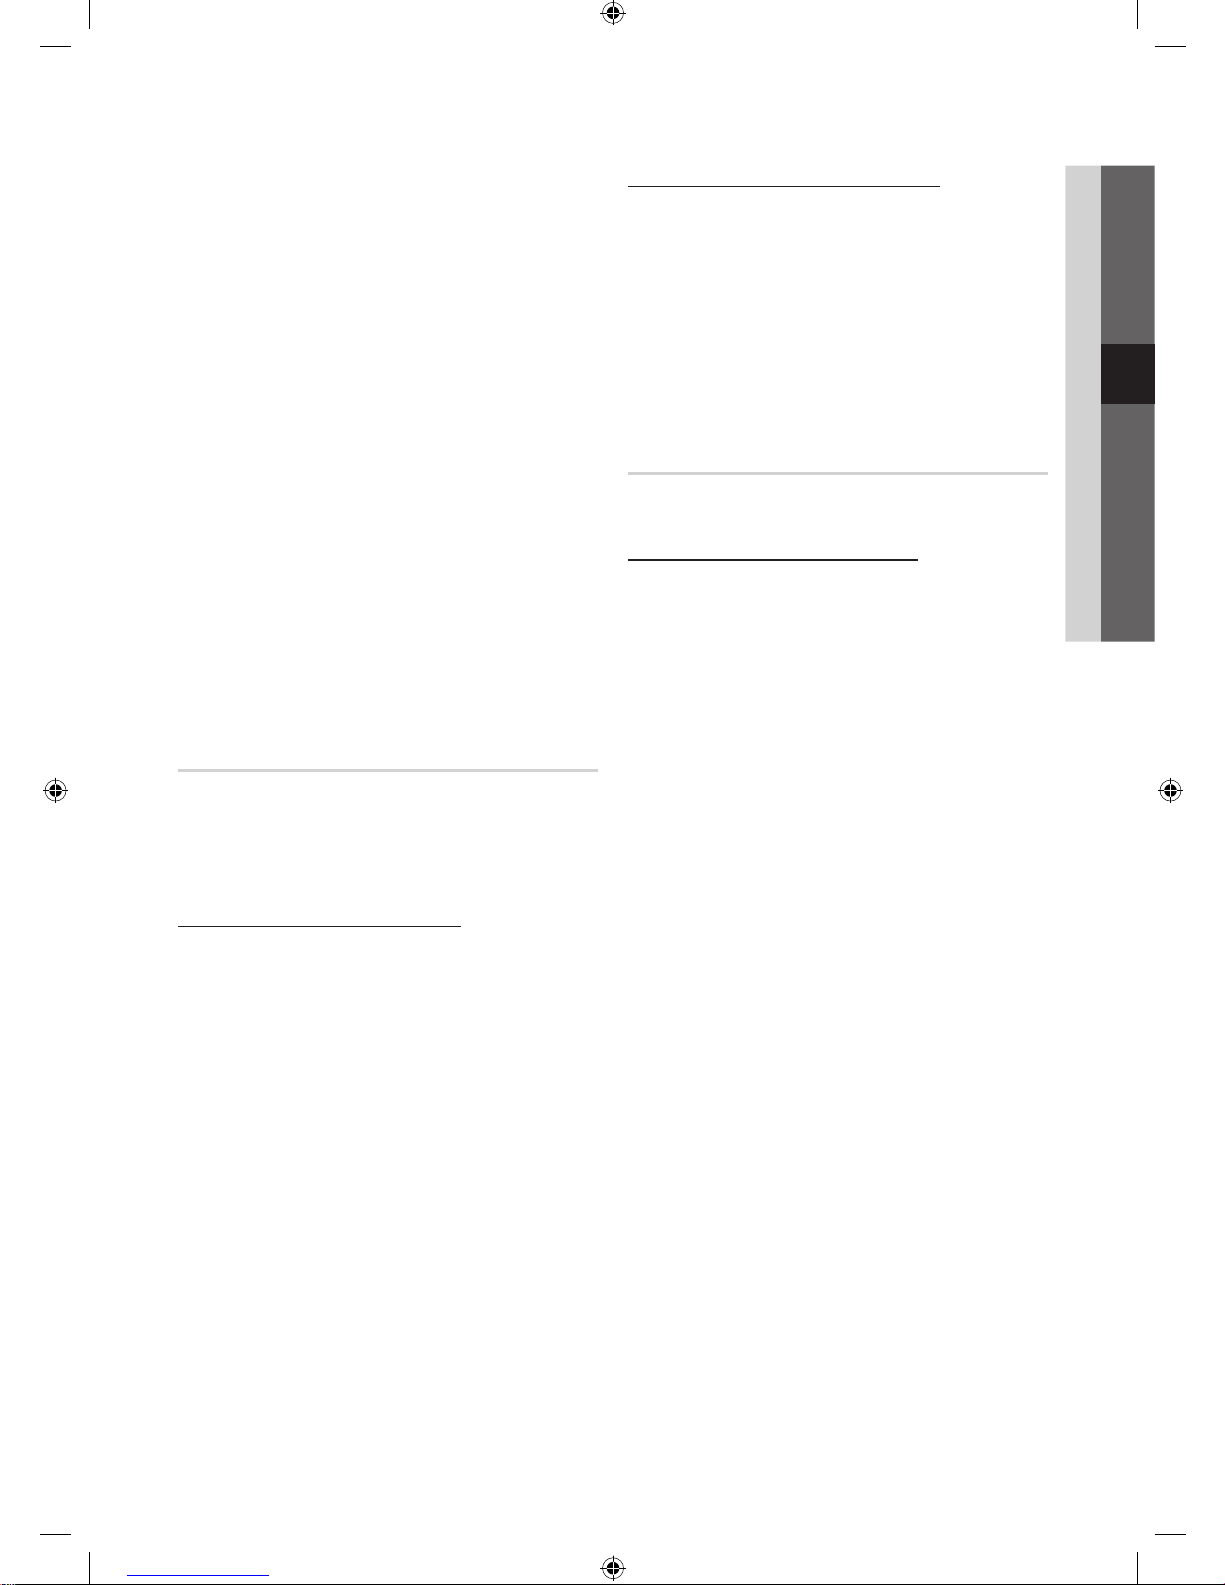
33
English
04 Advanced Features
7. On the Security screen, enter your network’s Pass
Phrase.
✎
You should be able to find the Pass Phrase on
one of the set up screens you used to set up your
router or modem.
8. To enter the Pass Phrase, follow these general
directions:
– Press the number buttons on your remote to enter
numbers.
– Use the direction buttons on your remote to move
from button to button on the Security Key screen.
– Press the Red button to change case or display
symbols/characters.
– To a enter letter or symbol, move to the letter or
symbol, and then press the ENTER
button.
– To delete the last letter or number you entered, press
the Green button on your remote.
9. When done, press the Blue button on your remote. The
Network Connecting screen appears.
10. Wait until the connection confirmation message is
displayed, and then press the ENTER
button. The
Network Setup screen re-appears.
11. To test the connection, press the RETURN button to
select Network Test, and then press the ENTER
button.
Network Setup (Ad-Hoc)
You can connect to a mobile device without an access point
through the “Samsung Wireless LAN Adapter” by using a
peer to peer network.
✎
This function is available when SWL(Samsung
Wireless Link) is set to Off.
How to connect to new Ad-hoc device
1. Follow Steps 1 through 6 in the “How to set up using
PBC (WPS)” (p. 31).
2. Choose Select a network. A list of devices/networks
appears.
3. While in the device list, press the Blue button on the
remote.
✎
The message Ad-hoc is a direct Wi-Fi
connection with cell phone or PC. Ad-hoc is a
direct Wi-Fi connection with cell phone or PC.
The existing network system may have limited
functionality. Do you want to change the
network connection? is displayed. is displayed.
4. Input the generated Network Name (SSID) and
Security Key into the device you want to connect.
How to connect an existing Ad-hoc device
1. Follow Steps 1 through 6 in the “How to set up using
PBC (WPS)” (p. 31).
2. Choose Select a network. The Device/Network list
appears.
3. Select the device you want in the Device list.
4. If security key is required, input the security key.
✎
If network doesn’t operate normally, check
the Network Name (SSID) and Security Key
again. An incorrect Security Key may cause a
malfunction.
Network Setup (Manual)
If the other methods do not work, you need to enter the
Network setting values manually.
Getting the Network Connection Values
To get the Network connection values on most Windows
computers, follow these steps:
1. Right click the Network icon on the bottom right of the
screen.
2. In the pop-up menu, click Status.
3. On the dialog that appears, click the Support tab.
4. On the Support tab, click the Details button. The
Network settings are displayed.
[UC9000]BN68-02820G-RU.indb 33 2010-05-25 오전 9:59:10
Page 34

34
English
Advanced Features
How to set up manually
To enter the Network connection values manually, follow
these steps:
1. Follow Steps 1 through 6 in the “How to set up using
PBC (WPS)” (p. 31).
2. Press the ▼ button to select Internet Protocol Setup,
and then press the ENTER
button. Press the ▲
or ▼ button to select Manual, and then press the
ENTER button.
3. Press the ▼ button to go to the first entry field (IP
Address).
4. Use the number buttons to enter numbers.
5. When done with each field, use the ► button to move
successively to the next field. You can also use the other
arrow buttons to move up, down, and back.
6. Enter the IP Address, Subnet Mask, and Gateway
values.
7. Press the ▲ or ▼ button to go to DNS.
8. Press the ▼ button to go to the first DNS entry field.
Enter the numbers as above.
9. When done, press the ▲ button to go to Select a
Network. Select your network, and then press the
ENTER
button.
10. Go to Step 4 in the “How to set up automatically” (p.
32), and follow the directions from that point on.
SWL(Samsung Wireless Link)
This function lets you connect a Samsung device that
supports the PBC (WPS) to your TV. You can connect
devices to the TV even if a sharer is not connected to the TV.
✎
To use the Internet@TV, the AP (access point) must be
connected to the wireless network.
✎
Only sharers using the 2.4 Ghz band are supported.
Sharers using the 5 Ghz band are not supported.
SWL connect
You can directly connect a device that supports the PBC
(WPS) to the TV.
✎
This function is available when SWL(Samsung
Wireless Link) is set to On.
How to connect Samsung Wireless Link
For the procedures to establish a connection, refer to the
following:
1. Follow Steps 1 through 5 in the “How to set up using
PBC (WPS)” (p. 31).
2. Select SWL(Samsung Wireless Link) by using the ▼
button and press the ENTER
button to turn it On.
3. Select SWL connect by using the ▼ button and press
the ENTER
button.
4. If the “Press the PBC button on the PBC(WPS)
supported device to connect within 120 seconds.”
message appears, press the PBC button on the device
to connect.
✎
For more information, refer to the wireless network
setup manual of the device to be connected.
5. If the device is connected properly to the TV after
starting count on message box then message box will
be disappeared automatically.
✎
If the connection fails, please retry after 2 minutes.
If Your TV Fails to Connect to the Internet
Your TV may not be able to connect to the Internet
because your ISP has permanently registered the
MAC address (a unique identifying number) of your
PC or modem, which it then authenticates each time
you connect to the Internet as a way of preventing
unauthorized access. As your TV has a different MAC
address, your ISP can not authenticate its MAC address,
and your TV can not connect.
To resolve this problem, ask your ISP about the
procedures required to connect devices other than a PC
(such as your TV) to the Internet.
If your Internet service provider requires an ID or password
to connect to the Internet, your TV may not be able to
connect to the Internet. If this is the case, you must enter
your ID or password when connecting to the Internet.
The internet connection may fail because of a firewall
problem. If this is the case, contact your Internet service
provider.
If you cannot connect to the Internet even after you have
followed the procedures of your Internet service provider,
please contact Samsung Electronics at 1-800-SAMSUNG.
[UC9000]BN68-02820G-RU.indb 34 2010-05-25 오전 9:59:10
Page 35
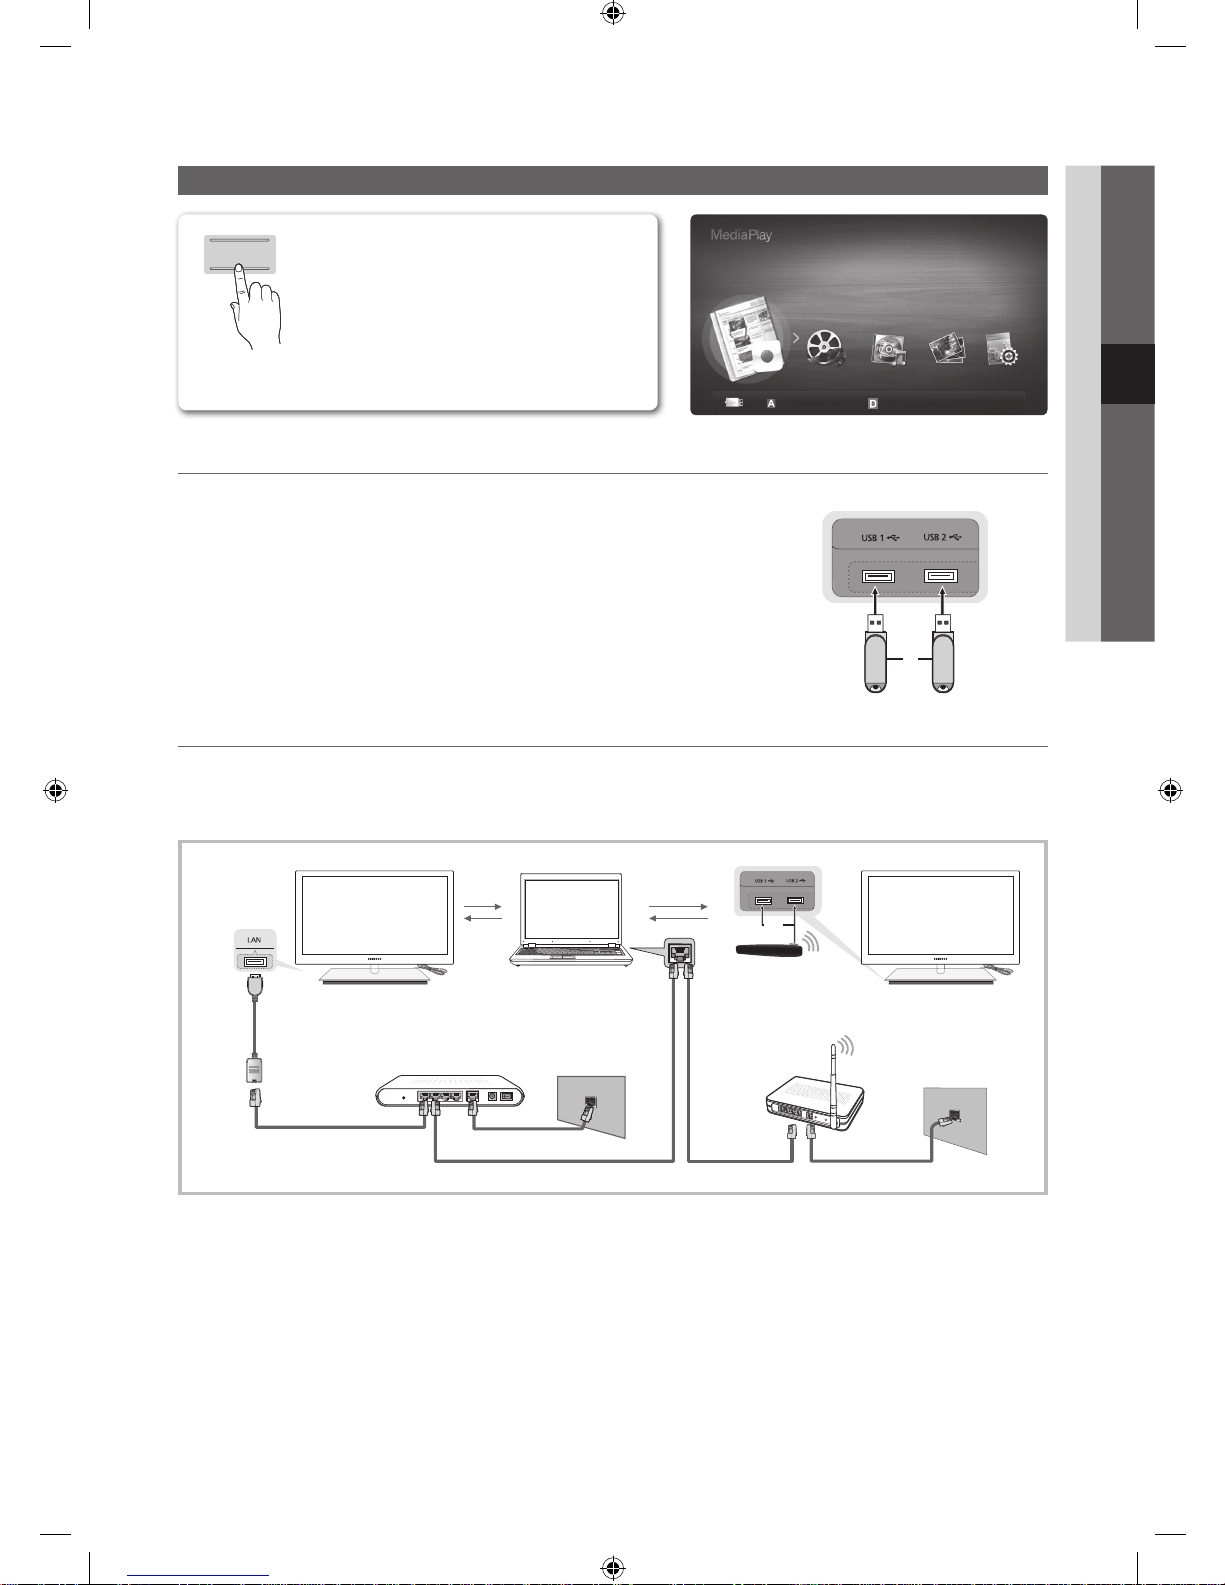
35
English
04 Advanced Features
Media Play
Connecting a USB Device
1. Turn on your TV.
2. Connect a USB device containing recorded tv, photo, music and/or movie fi les to
the USB 1 (HDD) or USB 2 port on the back or side panel of the TV.
3. When USB is connected to the TV, popup window appears. Then you can select
Media Play.
Connecting to the PC through network
You can play pictures, music and videos saved on your PC through a network connection in the Media Play mode.
✎
If you use Media Play through saved file on your PC, you should download “PC Share Manager” and users manual from
“www.samsung.com.”
1. For more information on how to confi gure your network, refer to “Network Connection” (p. 28).
– You are recommended to locate both TV and PC in same subnet. The fi rst 3 parts of the subnet address of the TV and
the PC IP addresses should be the same and only the last part (the host address) should be changed. (e.g. IP Address:
123.456.789.**)
2. Using a LAN cable, connect between the external modem and the PC onto which the Samsung PC Share Manager
programme will be installed.
– You can connect the TV to the PC directly without connecting it through a Sharer (Router).
Enjoy recorded tv, photos, music and/or movie
fi les saved on a USB Mass Storage Class (MSC)
device and/or your PC.
LAN Cable
PC
External Modem
(ADSL/VDSL/Cable TV)
LAN
Samsung Wireless
LAN Adapter
Wireless IP sharer
Stand Side Panel
or
LAN Cable
Modem Cable
LAN Cable LAN Cable
LAN
adapter
USB Drive
Stand Side Panel
or
MEDIA.P
SUM
Change Device
Device Mode
Enter
Return
Recorded TV
[UC9000]BN68-02820G-RU.indb 35 2010-05-25 오전 9:59:13
Page 36

36
English
Advanced Features
✎
No supported functions when connecting to the PC through network:
x
The Background Music and Background Music Setting functions.
x
Sorting files by preference in the Photos, Music, and Videos folders.
x
The (REW) or (FF) button while a movie is playing.
✎
The Divx DRM, Multi-audio, embedded caption does not supported.
✎
Samsung PC Share manager should be permitted by the firewall programme on your PC.
✎
When you use Media Play mode through a network connection, According to functions of the provided server:
x
The sorting method may vary.
x
The scene search function may not be supported.
x
The Play Continuously function, which resumes playing of a video, may not be supported.
– The Play Continuously function does not support multiple users. (It will have only memorised the point where the
most recent user stopped playing.)
x
The ◄ or ► button may not work depending on the content information.
x
You may experience file shuttering while playing a video in Media Play through a network connection.
✎
It might not work properly with unlicenced multimedia files.
✎
Need-to-Know List before using Media Play
x
MTP (Media Transfer Protocol) is not supported.
x
The file system supports FAT16, FAT32 and NTFS.
x
Certain types of USB Digital camera and audio devices may not be compatible with this TV.
x
Media Play only supports USB Mass Storage Class (MSC) devices. MSC is a Mass Storage Class Bulk-Only
Transport device. Examples of MSC are Thumb drives, Flash Card Readers and USB HDD (USB HUB are not
supported). Devices should be connected directly to the TV’s USB port.
x
Before connecting your device to the TV, please back up your files to prevent them from damage or loss of data.
SAMSUNG is not responsible for any data file damage or data loss.
x
Do not disconnect the USB device while it is loading.
x
The higher the resolution of the image, the longer it takes to display on the screen.
x
The maximum supported JPEG resolution is 15360X8640 pixels.
x
For unsupported or corrupted files, the “Not Supported File Format” message is displayed.
x
If the files are sorted by Basic View, up to 1000 files can be displayed in each folder.
x
MP3 files with DRM that have been downloaded from a non-free site cannot be played. Digital Rights Management
(DRM) is a technology that supports the creation of content, the distribution and management of the content in an
integrated and comprehensive way, including the protection of the rights and interests of the content providers, the
prevention of the illegal copying of contents, as well as managing billings and settlements.
x
If more than 2 PTP devices are connected, you can only use one at a time.
x
If more than two MSC devices are connected, some of them may not be recognized. A USB device that requires high
power (more than 500mA or 5V) may not be supported.
x
If an over-power warning message is displayed while you are connecting or using a USB device, the device may not
be recognized or may malfunction.
x
If the TV has been no input during time set in Auto Protection Time, the Screensaver will run.
x
The power-saving mode of some external hard disk drives may be released automatically when connected to the TV.
x
If a USB extension cable is used, the USB device may not be recognized or the files on the device may not be read.
x
If a USB device connected to the T V is not recognized, the list of files on the device is corrupted or a file in the list is
not played, connect the USB device to the PC, format the device and check the connection.
x
If a file deleted from the PC is still found when Media Play is run, use the “Empty the Recycle Bin” function on the PC
to permanently delete the file.
[UC9000]BN68-02820G-RU.indb 36 2010-05-25 오전 9:59:13
Page 37
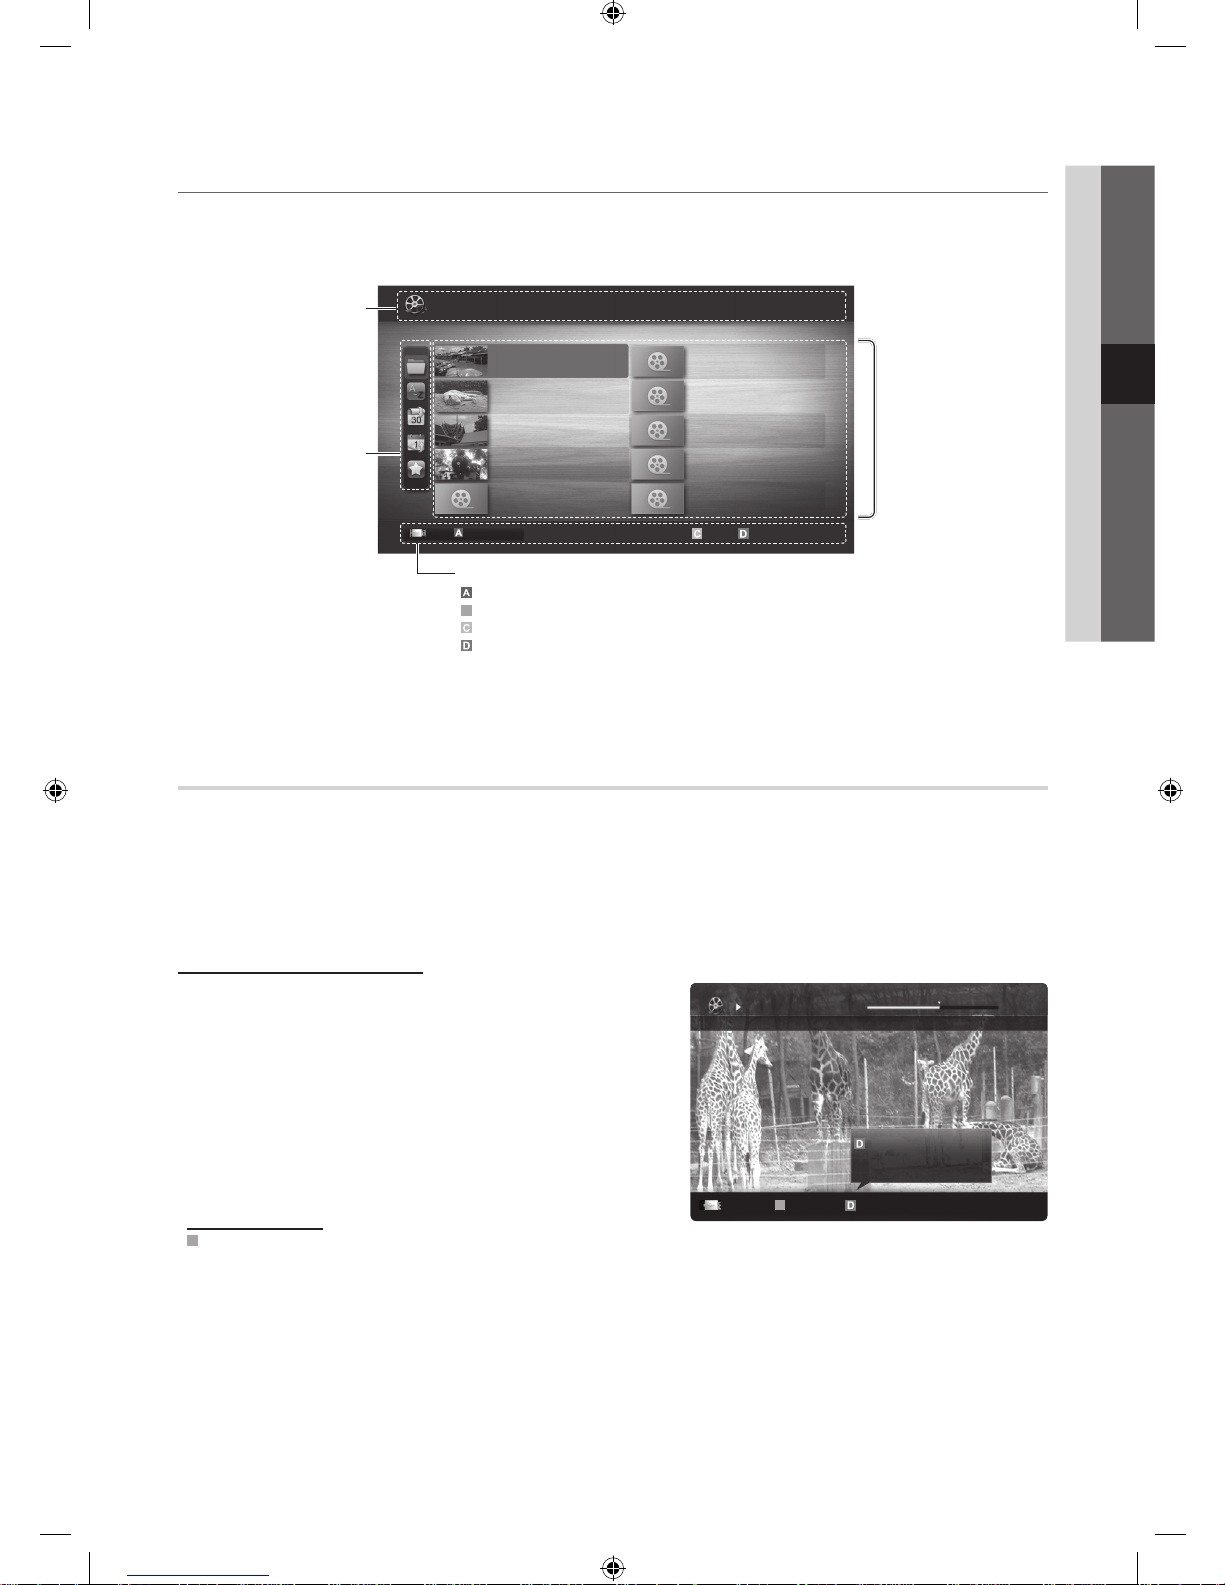
37
English
04 Advanced Features
Screen Display
Move to the file you desired using the up/down/right/left buttons and then press the ENTER or (Play) button. The file is
played.
✎
Supports the View Devices and Home in Media Play homepage.
Recorded TV
To use the recording or Timeshift Mode function, the connected USB device must be available for recording. Device format is
recommended to use USB HDD.
✎
During the Device formatting, do not disconnect the device while formatting is in progress. If you format the device, all
files will be deleted.
✎
Before formatting your device to the tv, please back up your files to prevent them from damage or loss of data.
SAMSUNG is not responsible for any data file damage or data loss.
Playing Recorded TV Programme
1. Press the ◄ or ► button to select Recorded TV, then press
the ENTER button in the Media Play menu.
2. Press the ◄/►/▲/▼ button to select the desired file in the file
list.
3. Press the ENTER
button or (Play) button.
– The selected file is displayed on the top with its playing
time.
– During playing the recorded TV programme, you can search
using the ◄ and ► button.
Operation Buttons
B
Green (Section Repeat): You can set up the function to repeat some section.
You can also watch some section you want to.
Movie 01.avi
00:04:03 / 00:07:38 1/1
SUM
B
Section Repeat Play continuously
Pause
Jump
Tools
Resumes playing from the last viewed
scene.
Play continuously
Jan.10.2010
Jan.10.2010
Jan.10.2010
Jan.10.2010
Jan.10.2010
Jan.10.2010
Jan.10.2010
Jan.10.2010
Jan.10.2010
Jan.10.2010
/Movie 01.avi 1/1
Movie 01.avi
SUM
Movie 03.avi
Movie 05.avi
Movie 07.avi
Movie 09.avi
Movie 02.avi
Movie 04.avi
Movie 06.avi
Movie 08.avi
Movie 10.avi
Select Sorting
Tools
Information:
You can ascertain the selected
file name and the number of files
and page.
Sort List Section:
Displays sorting standard.
✎
Sorting standard is
different depending on the
contents.
Operation Buttons
Red (Change Device): Selects a connected device.
B
Green (Preference): Sets the file preference. (not supported in Basic view)
Yellow (Select): Selects multiple files from file list. Selected files are marked with a symbol.
Blue (Sorting): Selects the sort list.
Tools: Displays the option menu.
✎
Using the (REW) or (FF) button, file list can move to next or previous page.
File List Section:
You can confirm the files
and groups that is sorted by
each category.
Videos
Page
Change Device
[UC9000]BN68-02820G-RU.indb 37 2010-05-25 오전 9:59:15
Page 38

38
English
Advanced Features
Using the Timeshift Mode function
If you missed a live broadcast, you can see from the recorded broadcast using this feature.
When the Timeshift Mode is set to Auto, the TV stores the channel you watch currently to record automatically.
When the Timeshift Mode is set to Manual, if you press the
(Play) button, the TV stores the channel from the point of
view you want to record.
Recorded videos are DRM (digital rights management) protected and cannot be played on a PC or other TVs.
Note that files saved on the TV cannot be used after the main board is changed.
✎
NOTE
x
Data broadcasts cannot be recorded.
x
The availability of both recording and the Timeshift Mode function may differ depending on picture quality and the
free space on the hard disk drive.
x
If you press the ▲ or ▼ button, you can see the current channel being on air, or can see the start point the recorded
broadcast.
x
The Timeshift Mode operates for a maximum of 90 minutes.
x
After the Timeshift Mode function has run for the maximum time, the time information will be fixed to “00:00:00.”
Note that if you have paused the recording the TV will automatically resume playback.
x
If the 5% free memory space limit of the USB storage device is reached, the current recording process will be closed.
x
When recording is performed by both the PVR (Personal Video Recorder) function and a device that supports the
HDMI-CEC feature, recording by the PVR function takes precedence.
x
During a playback or the Timeshift Mode, the picture will be displayed according to the display settings of the TV.
x
If you change the input source during recording, the screen will go blank until the change is completed.
x
An application which supports neither the recording nor the Timeshift Mode function will close automatically if you
try to use it during either function.
x
A message may appear in front of the application window indicating that the recording or the Timeshift Mode
function is closed.
x
Timeshift Mode function is not supported for radio channels.
x
The recording and the Timeshift Mode functions are disabled for channels locked with Child Lock.
x
If the USB device has failed the Device Performance Test, the USB device must go through the Device Format and
Device Performance Test again before you record with the Guide or Channel Manager.
x
The recording and Timeshif Modet functions can only be used with a USB storage device that completed the
Device Performance Test.
x
If you attempt the recording or Timeshift Mode function with a device that did not have the Device Performance
Test, the function will not start.
x
If you press (REC) on the remote control while the Channel Manager screen is being displayed or record with
Timer Recording, the T V may start or stop recording 1 or 2 seconds later than you intended due to the time needed
to process the command.
x
If a USB device dedicated to recording is connected, existing Timeshift Mode or recording files that were saved
abnormally will automatically be deleted.
x
If you switch to external input mode during recording, the recording will continue but the (REC) button will be
disabled.
x
If any function that turns off the TV (Sleep Timer, Off timer, etc.) is set for a time that conflicts with recording, the TV
will be turned off once the recording is complete.
[UC9000]BN68-02820G-RU.indb 38 2010-05-25 오전 9:59:16
Page 39
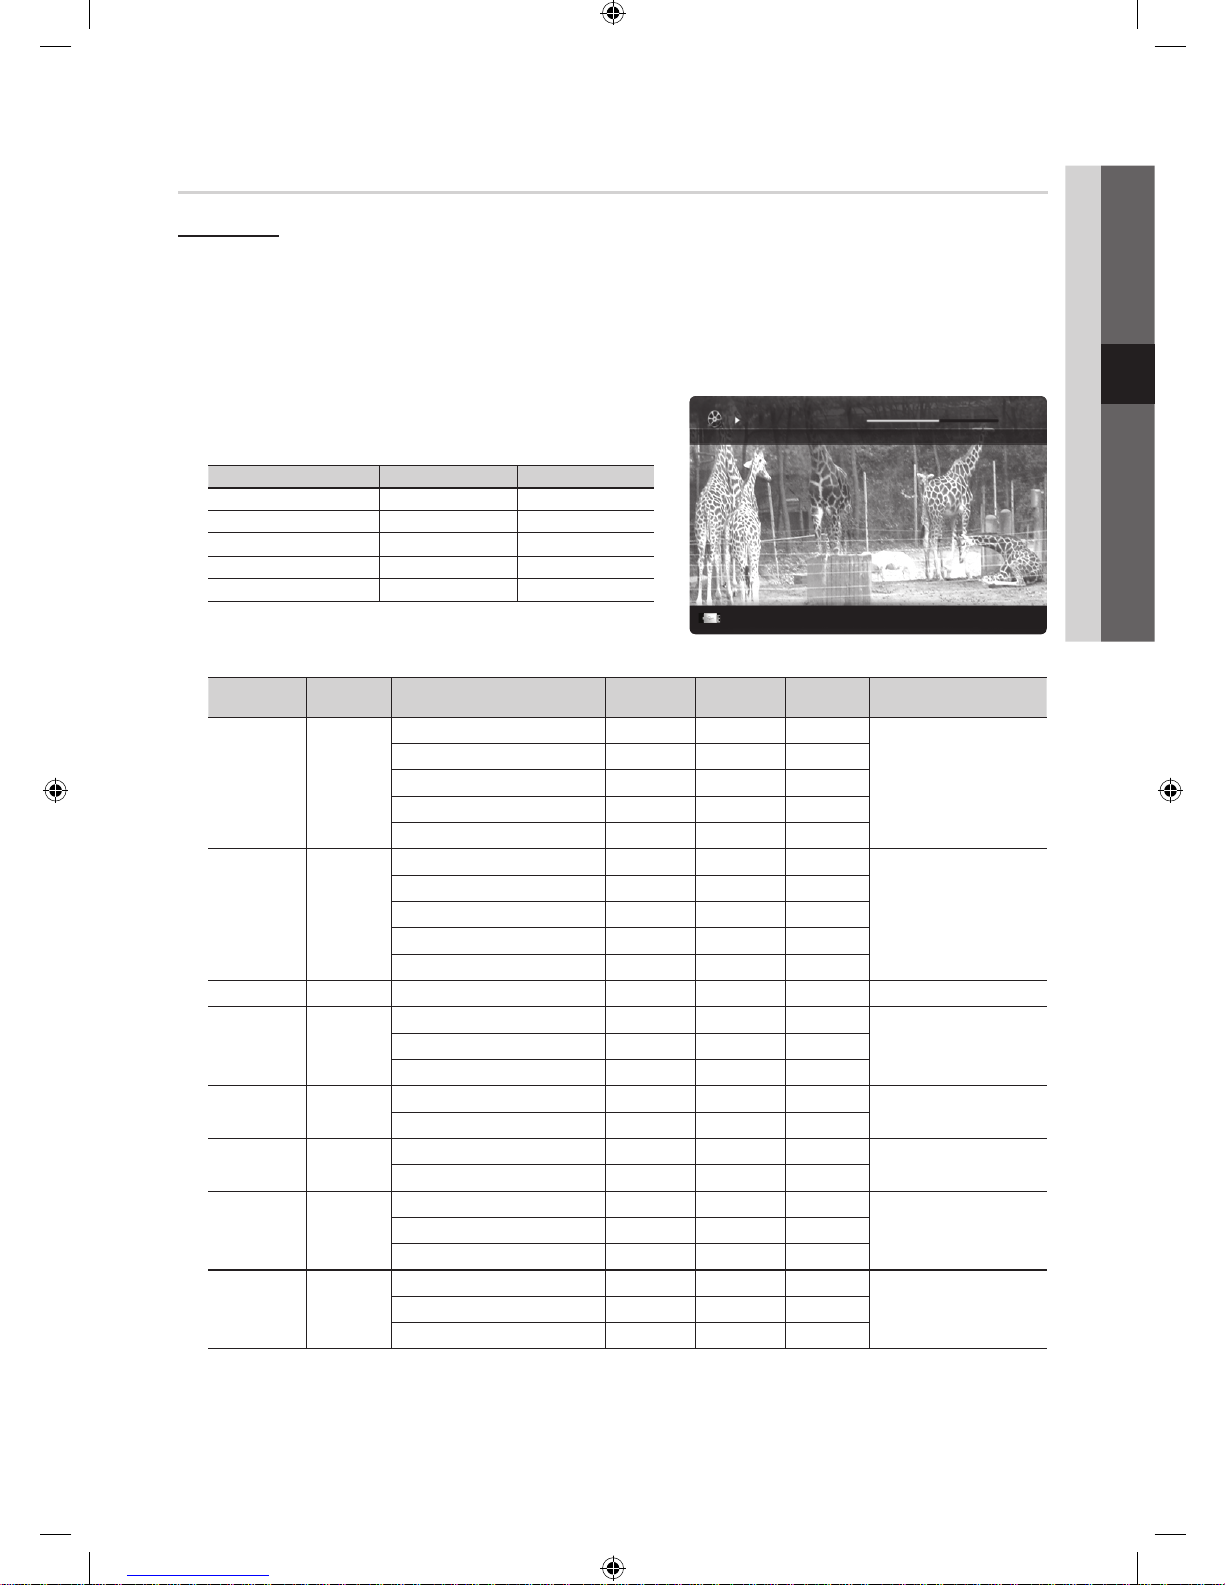
39
English
04 Advanced Features
Videos
Playing Video
1. Press the ◄ or ► button to select Videos, then press the ENTER
button in the Media Play menu.
2. Press the ◄/►/▲/▼ button to select the desired file in the file list.
3. Press the ENTER
button or (Play) button.
– The selected file is displayed on the top with its playing time.
– If video time information is unknown, play time and progress bar are not displayed.
– During playing the video, you can search using the ◄ and ► button.
✎
In this mode, you can enjoy movie clips contained on a Game,
but you cannot play the Game itself.
y Supported Subtitle Formats
Name File extension Format
MPEG-4 time-based text .ttxt XML
SAMI .smi HTML
SubRip .srt string-based
SubViewer .sub string-based
Micro DVD .sub or .txt string-based
y Supported Video Formats
File Extension Container Video Codec Resolution
Frame rate
(fps)
Bit rate
(Mbps)
Audio Codec
*.avi
*.mkv
AVI
MKV
Divx 3.11 / 4.x / 5.1 / 6.0 1920x1080 6 ~ 30 8
MP3 / AC3 / LPCM /
ADPCM / DTS Core
XviD 1920x1080 6 ~ 30 8
H.264 BP / MP / HP 1920x1080 6 ~ 30 25
MPEG4 SP / ASP 1920x1080 6 ~ 30 8
Motion JPEG 800x600 6 ~ 30 8
*.asf ASF
Divx 3.11 / 4.x / 5.1 / 6.0 1920x1080 6 ~ 30 8
MP3 / AC3 / LPCM /
ADPCM / WMA
XviD 1920x1080 6 ~ 30 8
H.264 BP / MP / HP 1920x1080 6 ~ 30 25
MPEG4 SP / ASP 1920x1080 6 ~ 30 8
Motion JPEG 800x600 6 ~ 30 8
*.wmv ASF Window Media Video v9 1920x1080 6 ~ 30 25 WMA
*.mp4 MP4
H.264 BP / MP / HP 1920x1080 6 ~ 30 25
MP3 / ADPCM / AACMPEG4 SP / ASP 1920x1080 6 ~ 30 8
XVID 1920x1080 6 ~ 30 8
*.3gp 3GPP
H.264 BP / MP / HP 1920x1080 6 ~ 30 25
ADPCM / AAC / HE-AAC
MPEG4 SP / ASP 1920x1080 6 ~ 30 8
*.vro
VRO
VOB
MPEG1 1920x1080 24 / 25 / 30 30
AC3 / MPEG / LPCM
MPEG2 1920x1080 24 / 25 / 30 30
*.mpg
*.mpeg
PS
MPEG1 1920x1080 24 / 25 / 30 30
AC3 / MPEG / LPCM / AACMPEG2 1920x1080 24 / 25 / 30 30
H.264 1920x1080 6 ~ 30 25
*.ts
*.tp
*.trp
TS
MPEG2 1920x1080 24 / 25 / 30 30
AC3 / AAC / MP3 / DD+ /
HE-AAC
H.264 1920x1080 6 ~ 30 25
VC1 1920x1080 6 ~ 30 25
Movie 01.avi
00:04:03 / 00:07:38 1/1
SUM
Chaptering
Jump
Tools
Return
[UC9000]BN68-02820G-RU.indb 39 2010-05-25 오전 9:59:18
Page 40
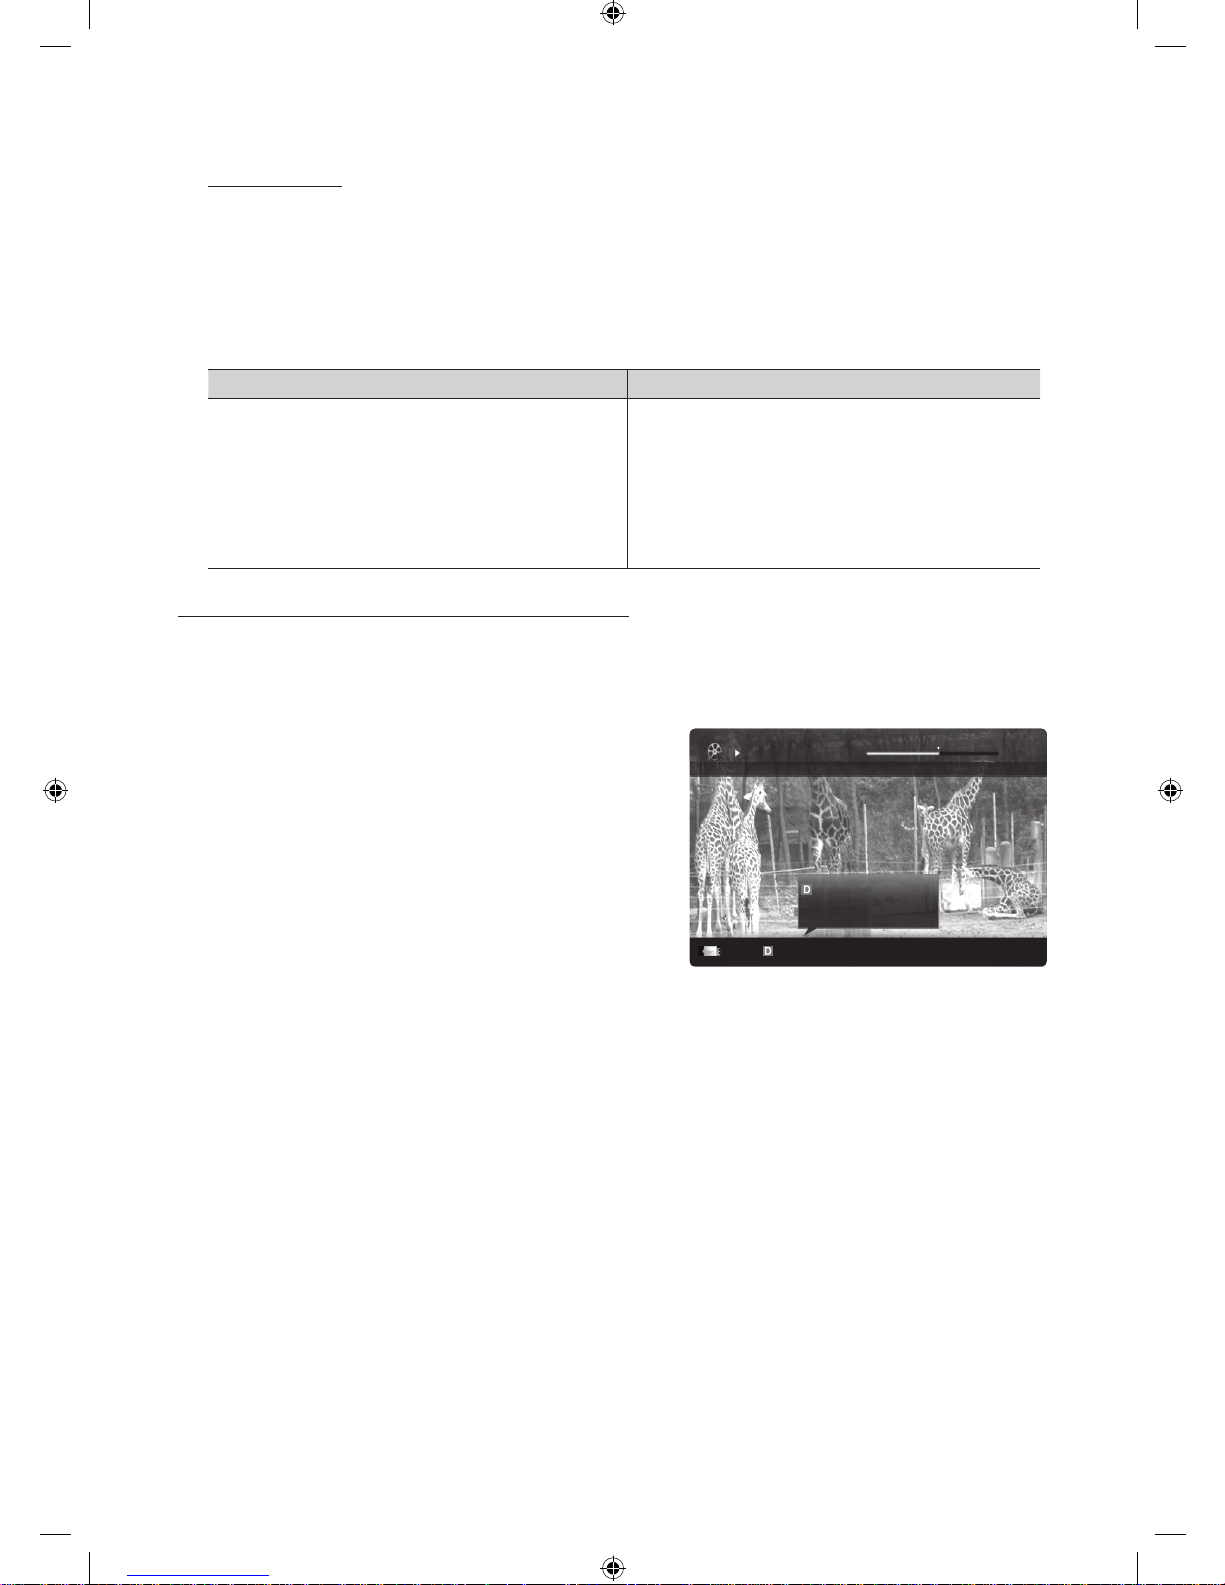
40
English
Advanced Features
Other Restrictions
✎
NOTE
x
If there are problems with the contents of a codec, the codec will not be supported.
x
If the information for a Container is incorrect and the file is in error, the Container will not be able to play
correctly.
x
Sound or video may not work if the contents have a standard bitrate/frame rate above the compatible Frame/sec
listed in the table above.
x
If the Index Table is in error, the Seek (Jump) function is not supported.
Video Decoder Audio Decoder
• Supports up to H.264, Level 4.1
• H.264 FMO / ASO / RS, VC1 SP / MP / AP L4 and AVCHD are not
supported.
• XVID, MPEG4 SP, ASP:
– Below 1280 x 720: 60 frame max
– Above 1280 x 720: 30 frame max
• GMC 2 over is not supported.
• H.263 is not supported.
• Only Samsung Techwin MJPEG is supported.
• Supports up to WMA 7, 8, 9, STD
• WMA 9 PRO does not support 2 channel excess multi channel or
lossless audio.
• WMA sampling rate 22050Hz mono is not supported.
Playing recorded TV or movie file continuously (Resume Play)
If you exit the playing Recorded TV or Videos function, it can be played later from the point where it was stopped.
✎
If you press the ENTER button (Chaptering) during playing the file, you can explore scene divided into 5 chapters
you want.
✎
If the index information is damaged or unsupported, you will not be able to use the Chaptering function.
1. Select the movie file you want to play continuously by pressing
the ◄ or ► button to select it from the file list section.
2. Press the
(Play) / ENTER button.
3. Select Play Continuously (Resume Play) by pressing the Blue
button. The Movie will begin to play from where it was stopped.
✎
The Blue button is available when resuming play.
✎
If the Cont. movie play help function is set to On in the
Settings menu, a pop-up message will appear when you
resume play a movie file.
Movie 01.avi
00:04:03 / 00:07:38 1/1
SUM
Play continuously
Chaptering
Jump
Tools
Return
Resumes playing from the last viewed
scene.
Play continuously
[UC9000]BN68-02820G-RU.indb 40 2010-05-25 오전 9:59:19
Page 41
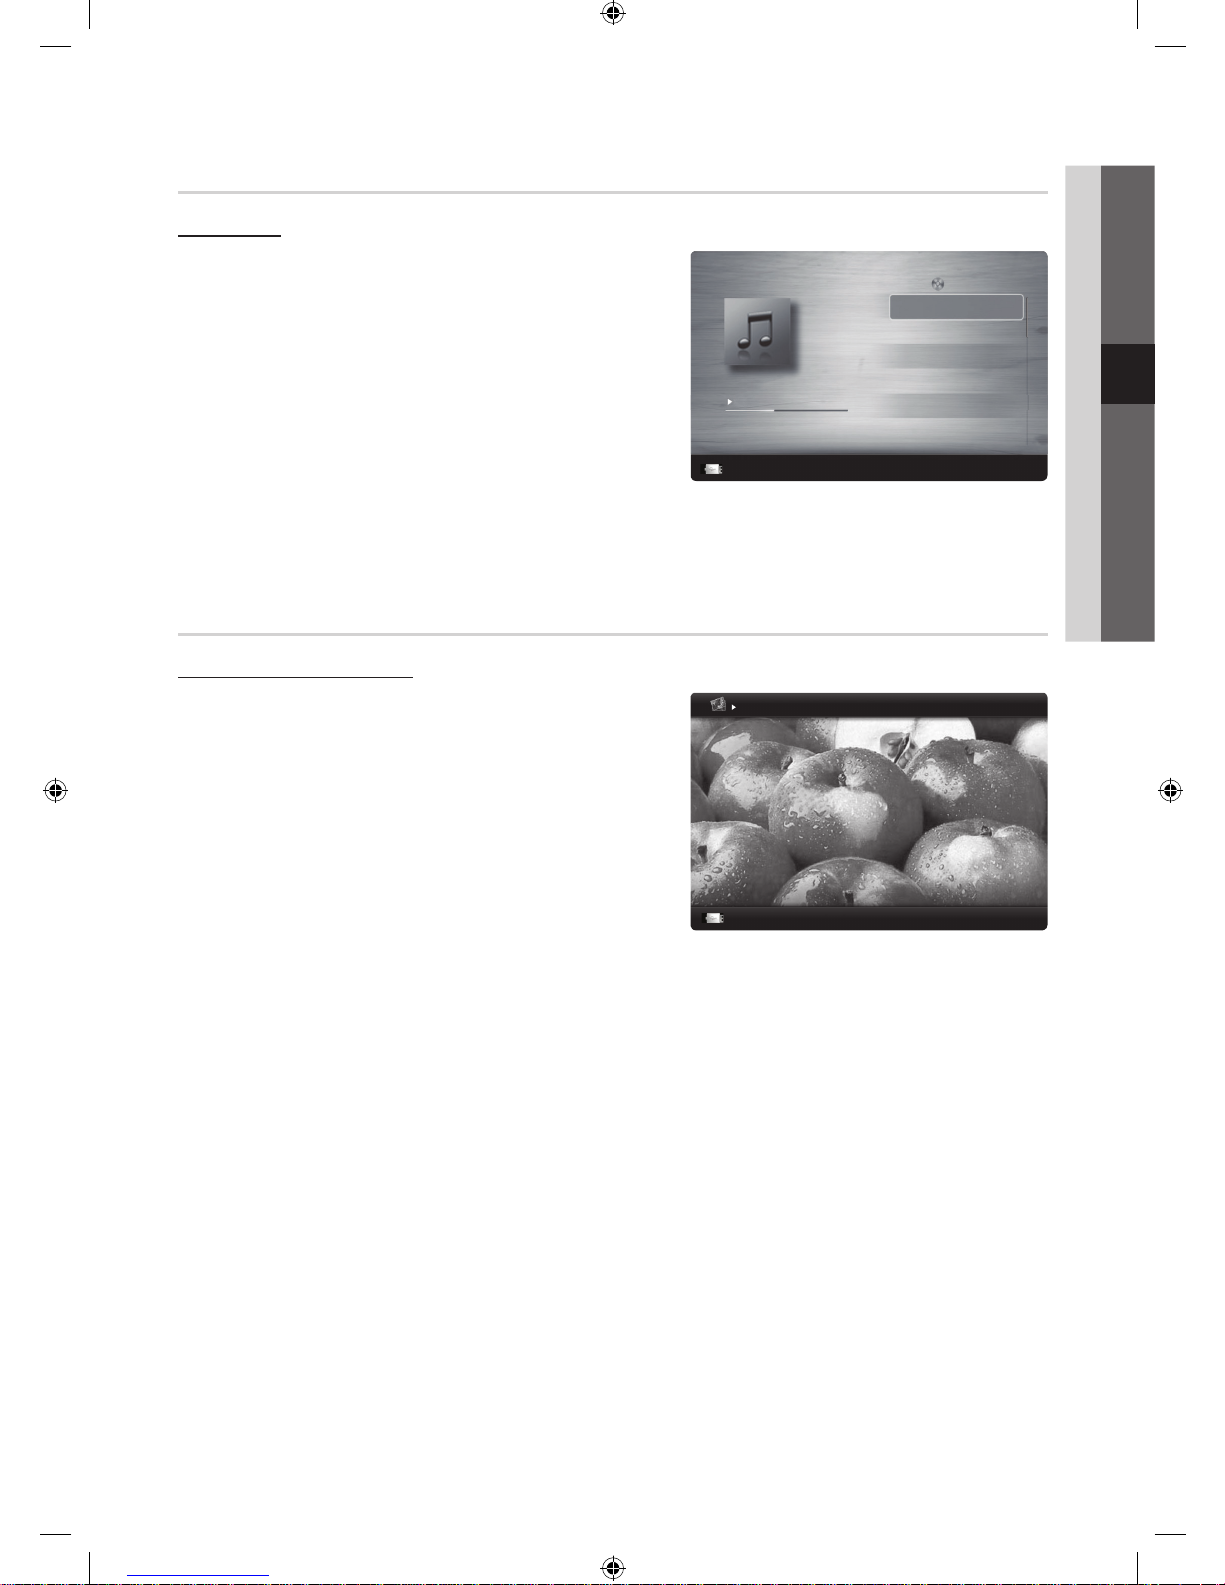
41
English
04 Advanced Features
Music
Playing Music
1. Press the ◄ or ► button to select Music, then press the
ENTER
button in the Media Play menu.
2. Press the ◄/►/▲/▼ button to select the desired file in the file
list.
3. Press the ENTER
button or (Play) button.
– During playing the music, you can search using the ◄ and ►
button.
–
(REW) and (FF) buttons do not function during play.
✎
Only displays the files with MP3 and PCM file extension. Other
file extensions are not displayed, even if they are saved on the
same USB device.
✎
If the sound is strange when playing MP3 files, adjust the Equalizer in the Sound menu. (An over-modulated MP3 file
may cause a sound problem.)
✎
You can create My Playlist selecting the desired music in the file, and can play My Playlist.
Photos
Viewing a Photo (or Slide Show)
1. Press the ◄ or ► button to select Photos, then press the
ENTER
button in the Media Play menu.
2. Press the ◄/►/▲/▼ button to select the desired file in the file
list.
3. Press the ENTER
button or (Play) button.
– While a photo list is displayed, press the
(Play) /
ENTER button on the remote control to start slide show.
– All files in the file list section will be displayed in the slide show.
– During the slide show, files are displayed in order from
currently being shown.
✎
Music files can be automatically played during the Slide Show if
the Background Music is set to On.
✎
The BGM Mode cannot be changed until the BGM has finished
loading.
Image1024.jpg 1024x768 2010/2/1 3/15
SUM
Pause
Previous/Next
Tools
Return
Normal
3/15
I Love you
Jhon
Music 1
No Singer
Music 2
No Singer
Music 3
No Singer
Music 4
No Singer
Music 5
No Singer
I Love You
Jhon
1st Album
Pop
2010
4.2MB
01:10 / 04:02
SUM
Pause
Jump
Tools
Return
Playlist
[UC9000]BN68-02820G-RU.indb 41 2010-05-25 오전 9:59:20
Page 42
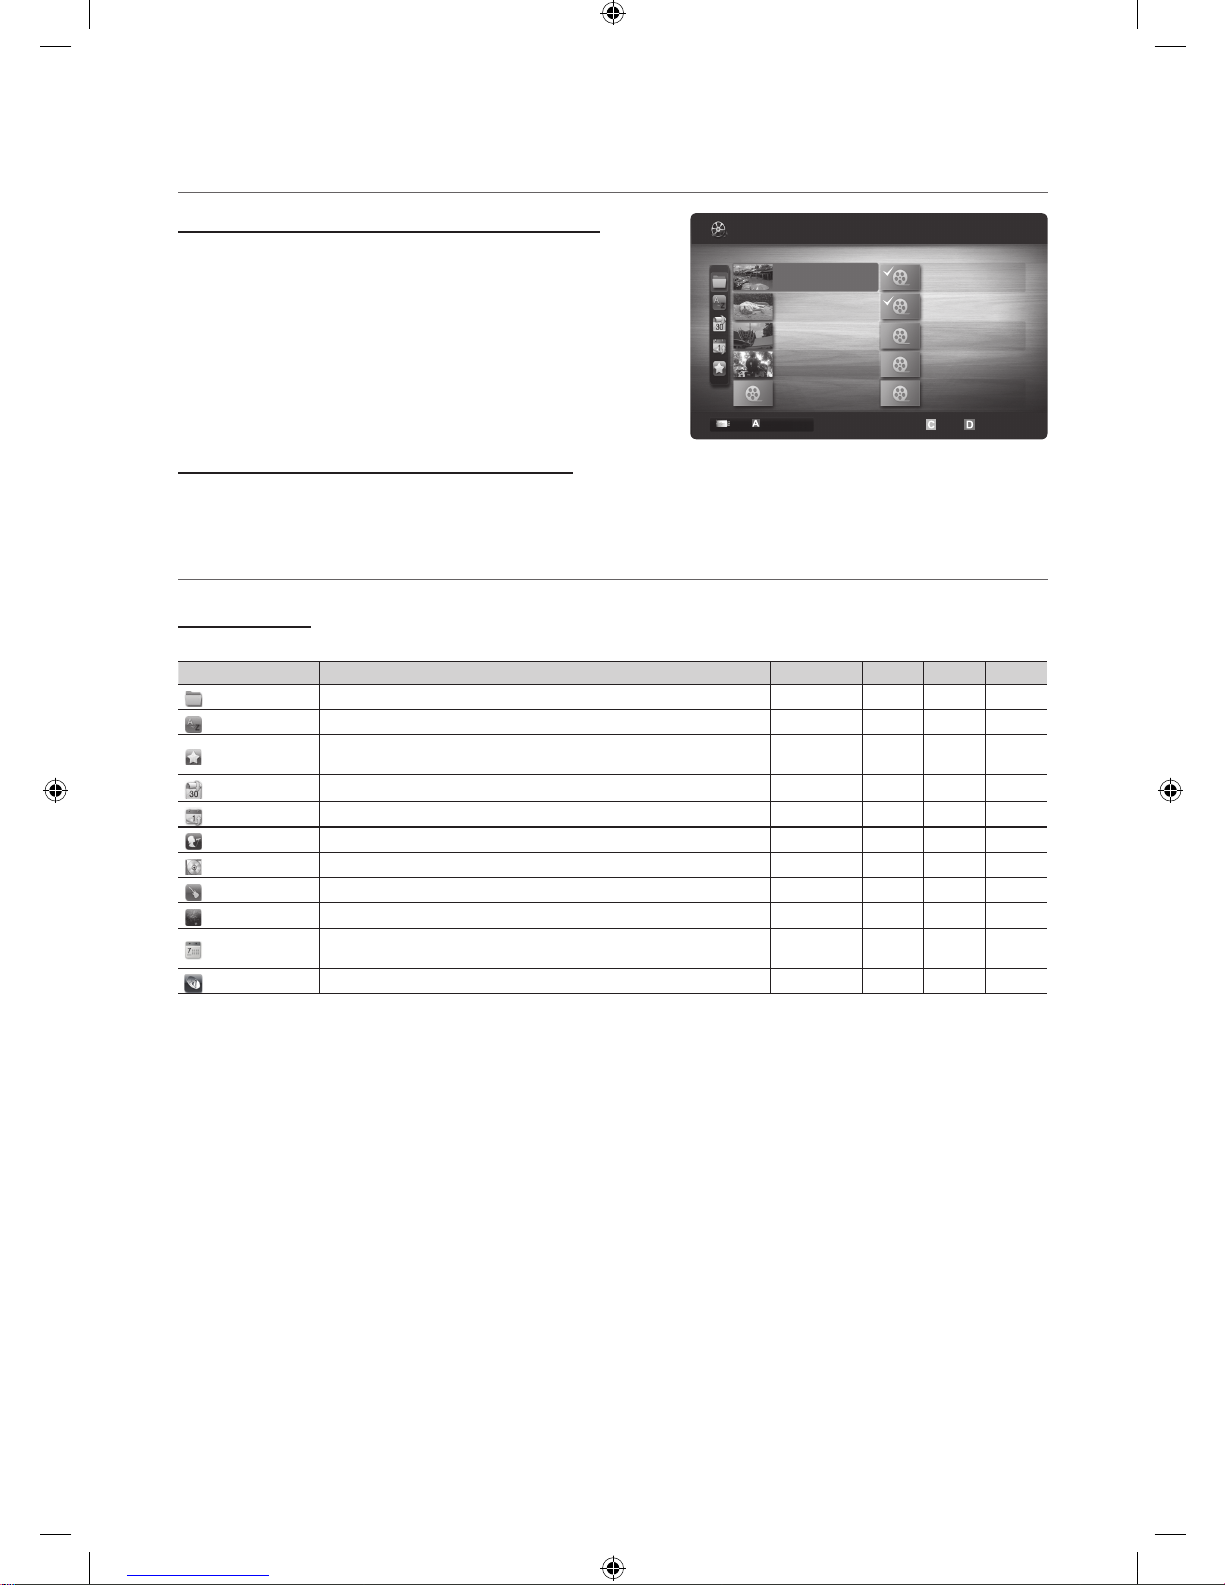
42
English
Advanced Features
Playing the Multiple Files
Playing the selected recorded TV/video/music/photo files
1. Press the Yellow button in the file list to select the desired file.
2. Repeat the above operation to select multiple files.
✎
NOTE
x
The mark appears to the left of the selected files.
x
To cancel a selection, press the Yellow button again.
x
To deselect all selected files, press the TOOLS button
and select Deselect All.
3. Press the TOOLS button and select Play Selected Contents.
Playing the recorded TV/video/music/photo file group
1. While a file list is displayed, move to the any file in desired group.
2. Press the TOOLS button and select Play Current Group.
Media Play Additional Function
Sorting the file list
Press the Blue button in the file list to sort the files.
Category Operations Recorded TV Videos Music Photos
Basic View
It shows whole folder. You can view the file list by selecting the folder.
Title
It sorts and displays the file title in Symbol/Number/Alphabet/Special order.
Preference
It sorts and displays the file by preference. You can change the file preference
in the file list section using the Green button.
Latest Date
It sorts and shows files by latest date.
Earliest Date
It sorts and shows files by earliest date.
Artist
It sorts the music file by artist in alphabetical.
Album
It sorts the music file by album in alphabetical order.
Genre
It sorts music files by the genre.
Mood
It sorts music files by the mood. You can change the music mood information.
Monthly
It sorts and shows photo files by month. It sorts only by month (from January
to December) regardless of year.
Channel
It sorts the recorded files by channel name.
1/1
/Movie 01.avi
SUM
Movie 01.avi
Jan.10.2010
Jan.10.2010
Jan.10.2010
Jan.10.2010
Jan.10.2010
Jan.10.2010
Jan.10.2010
Jan.10.2010
Jan.10.2010
Jan.10.2010
Movie 03.avi
Movie 05.avi
Movie 07.avi
Movie 09.avi
Movie 02.avi
Movie 04.avi
Movie 06.avi
Movie 08.avi
Movie 10.avi
Change Device
Select Sorting
Tools
Videos
2 les selected Page
[UC9000]BN68-02820G-RU.indb 42 2010-05-25 오전 9:59:22
Page 43
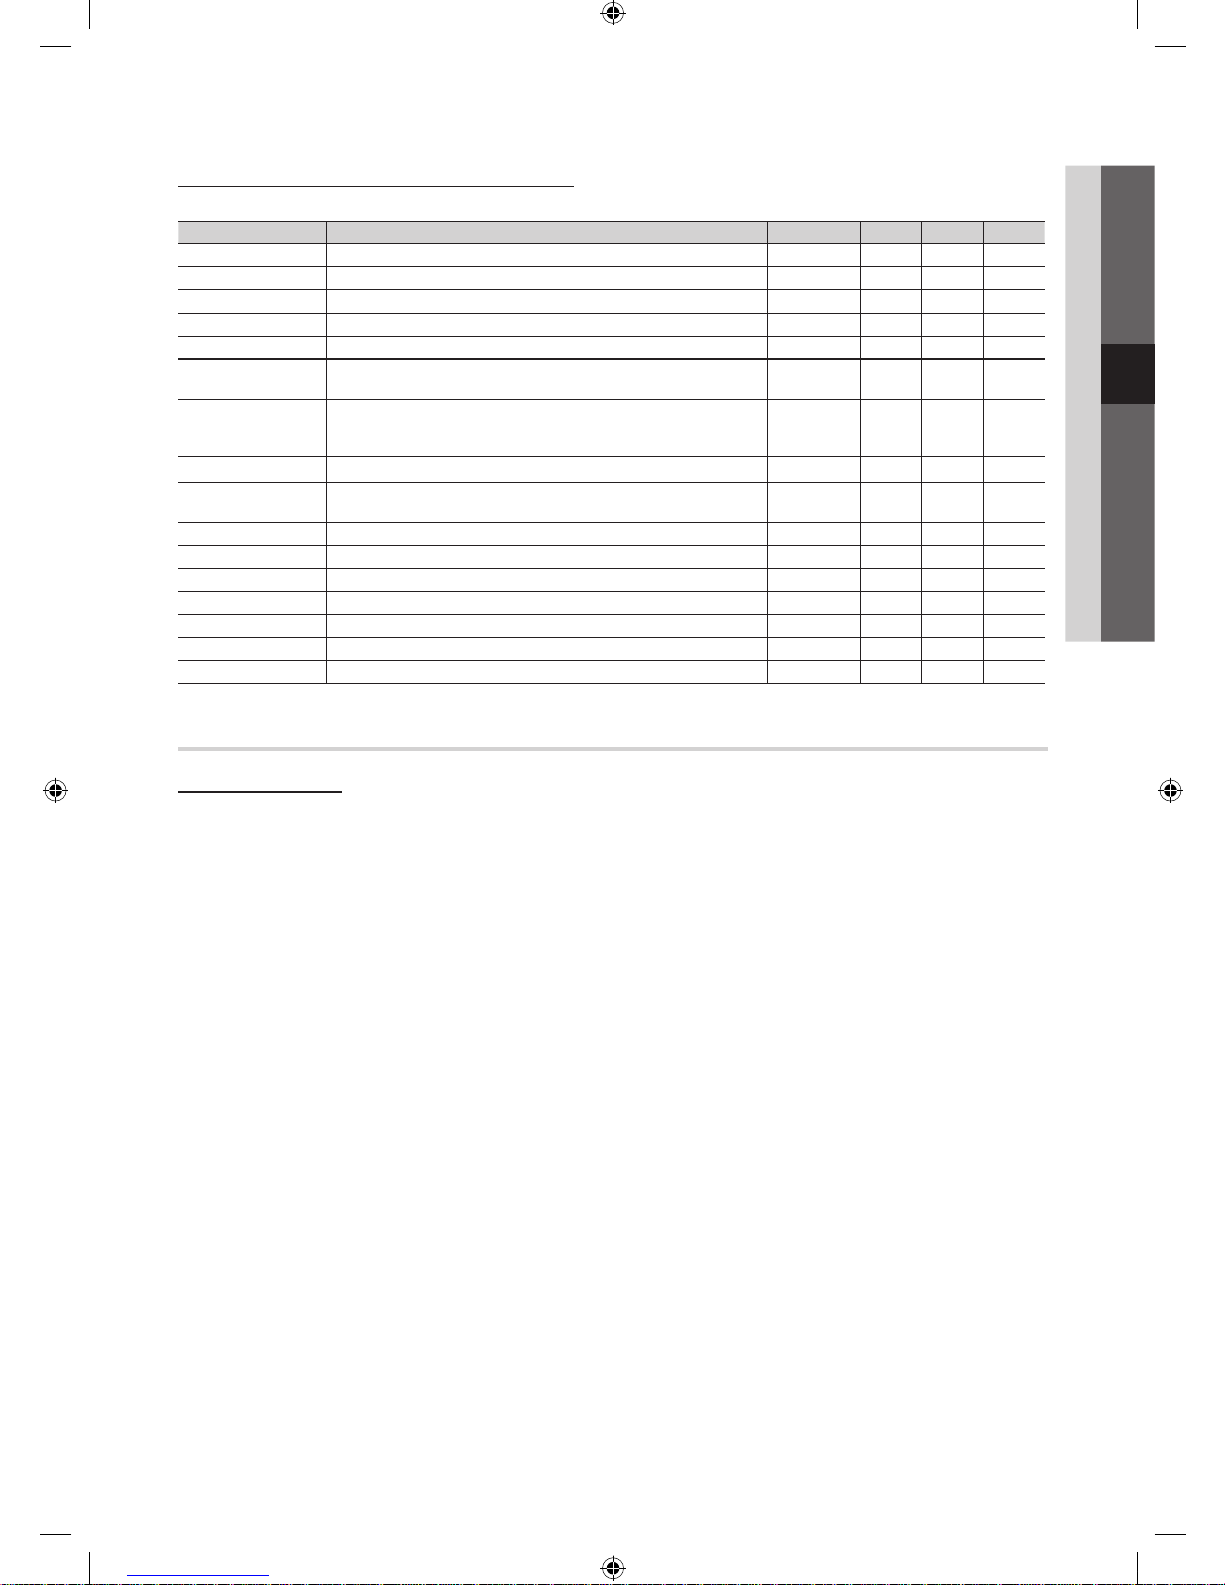
43
English
04 Advanced Features
Recorded TV/Videos/Music/Photos Play Option menu
During playing a file, press the TOOLS button.
Category Operations Recorded TV Videos Music Photos
Title You can move the other file directly.
Repeat Mode You can play recorded tv, movie and music files repeatedly.
Picture Size You can adjust the picture size for preference.
Picture Setting You can adjust the picture setting. (p. 16~21)
Sound Setting You can adjust the sound setting. (p. 21, 22)
Subtitle Setting You can play the video file with Subtitle. This function only works if the
subtitles are the same file name as the video file.
Audio You can enjoy video in one of supported languages as required. The function
is only enabled when stream-type files which support multiple audio formats
are played.
Audio Description You can adjust the audio description (p. 22).
Stop Slide Show /
Start Slide Show
You can start or stop a slide show.
Slide Show Speed You can select the slide show speed during the slide show.
Slide Show Effect You can set variously the slide show effect.
Background Music You can set and select background music when watching a slide show.
Zoom You can zoom into images in full screen mode.
Rotate You can rotate images in full screen mode.
Home Background You can move the file to the Media Play desktop.
Information You can see detailed information about the played file.
Settings
Using the Setup Menu
■ Background Setting: Select to display the background you want.
■ Cont. movie play help (Resume Play) (On / Off): Select to display the help pop-up message for continuous movie
playback.
■ Get the DivX® VOD registration code: Shows the registration code authorized for the TV. If you connect to the DivX web
site and register the registration code with a personal account, you can download VOD registration file. If you play the VOD
registration using Media Play, the registration is completed.
✎
For more information on DivX® VOD, visit “www.DivX.com.”
■ Get the DivX® VOD deactivation code: When DivX® VOD is not registered, the registration deactivation code is
displayed. If you execute this function when DivX® VOD is registered, the current DivX® VOD registration is deactivated.
■ Information: Select to view information about the connected device.
[UC9000]BN68-02820G-RU.indb 43 2010-05-25 오전 9:59:23
Page 44
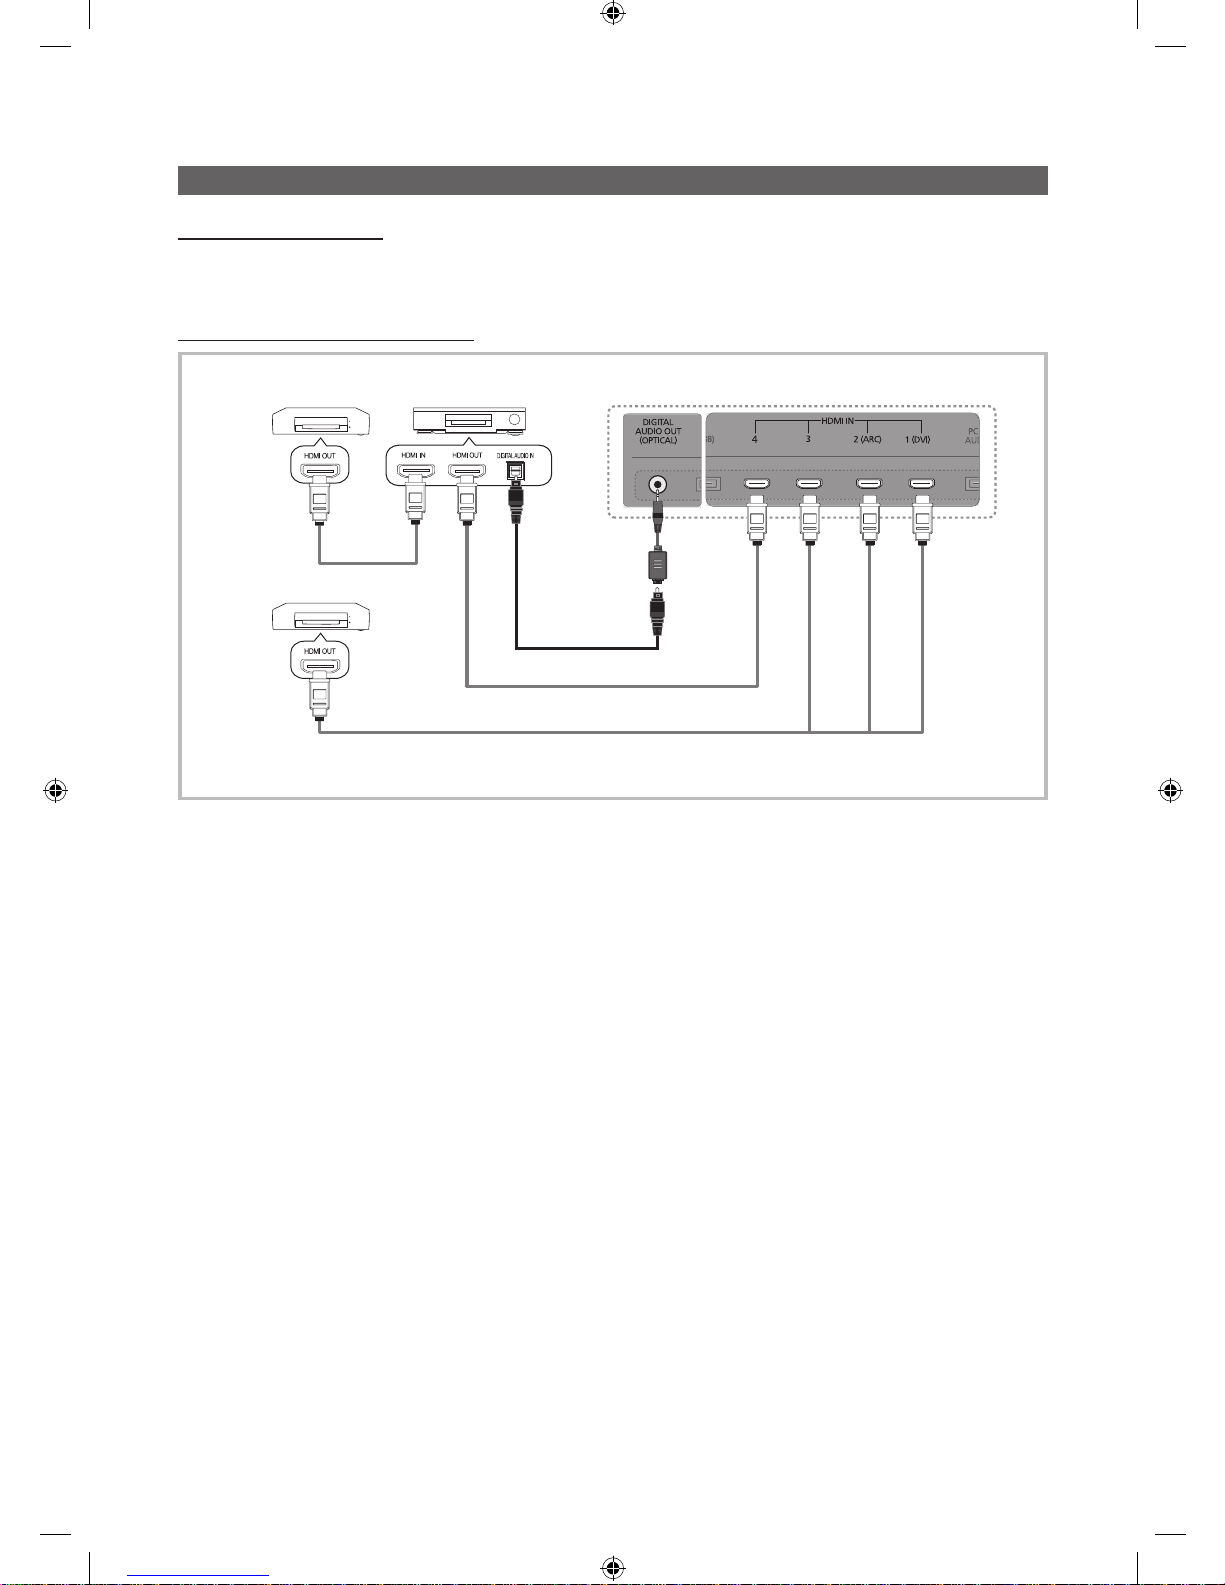
44
English
Advanced Features
Anynet+
What is Anynet+?
Anynet+ is a function that enables you to control all connected Samsung devices that support Anynet+ with your Samsung
TV’s remote. The Anynet+ system can be used only with Samsung devices that have the Anynet+ feature. To be sure your
Samsung device has this feature, check if there is an Anynet+ logo on it.
To connect to a Samsung Home Theatre
1. Connect the HDMI IN (1(DVI), 2(ARC), 3 or 4) jack on the TV and the HDMI OUT jack of the corresponding Anynet+
device using an HDMI cable.
2. Connect the HDMI IN jack of the home theatre and the HDMI OUT jack of the corresponding Anynet+ device using an
HDMI cable.
✎
NOTE
x
Connect the Optical cable between the DIGITAL AUDIO OUT (OPTICAL) jack on your TV and the Digital Audio Input
on the Home Theatre.
x
The ARC function enables digital output of sound using the HDMI IN 2(ARC) port and can only be operated when
the TV is connected to an audio receiver that supports the ARC function.
x
When following the connection above, the Optical jack only outputs 2 channel audio. You will only hear sound from
the Home Theatre’s Front, Left and Right speakers and the subwoofer. If you want to hear 5.1 channel audio, connect
the DIGITAL AUDIO OUT (OPTICAL) jack on the DVD / Satellite Box (i.e. Anynet Device 1 or 2) directly to the
Amplifier or Home Theatre, not the TV.
x
You can connect only one Home Theatre.
x
You can connect an Anynet+ device using the HDMI cable. Some HDMI cables may not support Anynet+ functions.
x
Anynet+ works when the AV device supporting Anynet+ is in the standby or on status.
x
Anynet+ supports up to 12 AV devices in total. Note that you can connect up to 3 devices of the same type.
Home TheatreAnynet+ Device 1
Anynet+ Device 2, 3, 4
Stand Rear Panel
Optical Cable
HDMI Cable
HDMI Cable
HDMI Cable
Optical
Adapter
[UC9000]BN68-02820G-RU.indb 44 2010-05-25 오전 9:59:24
Page 45
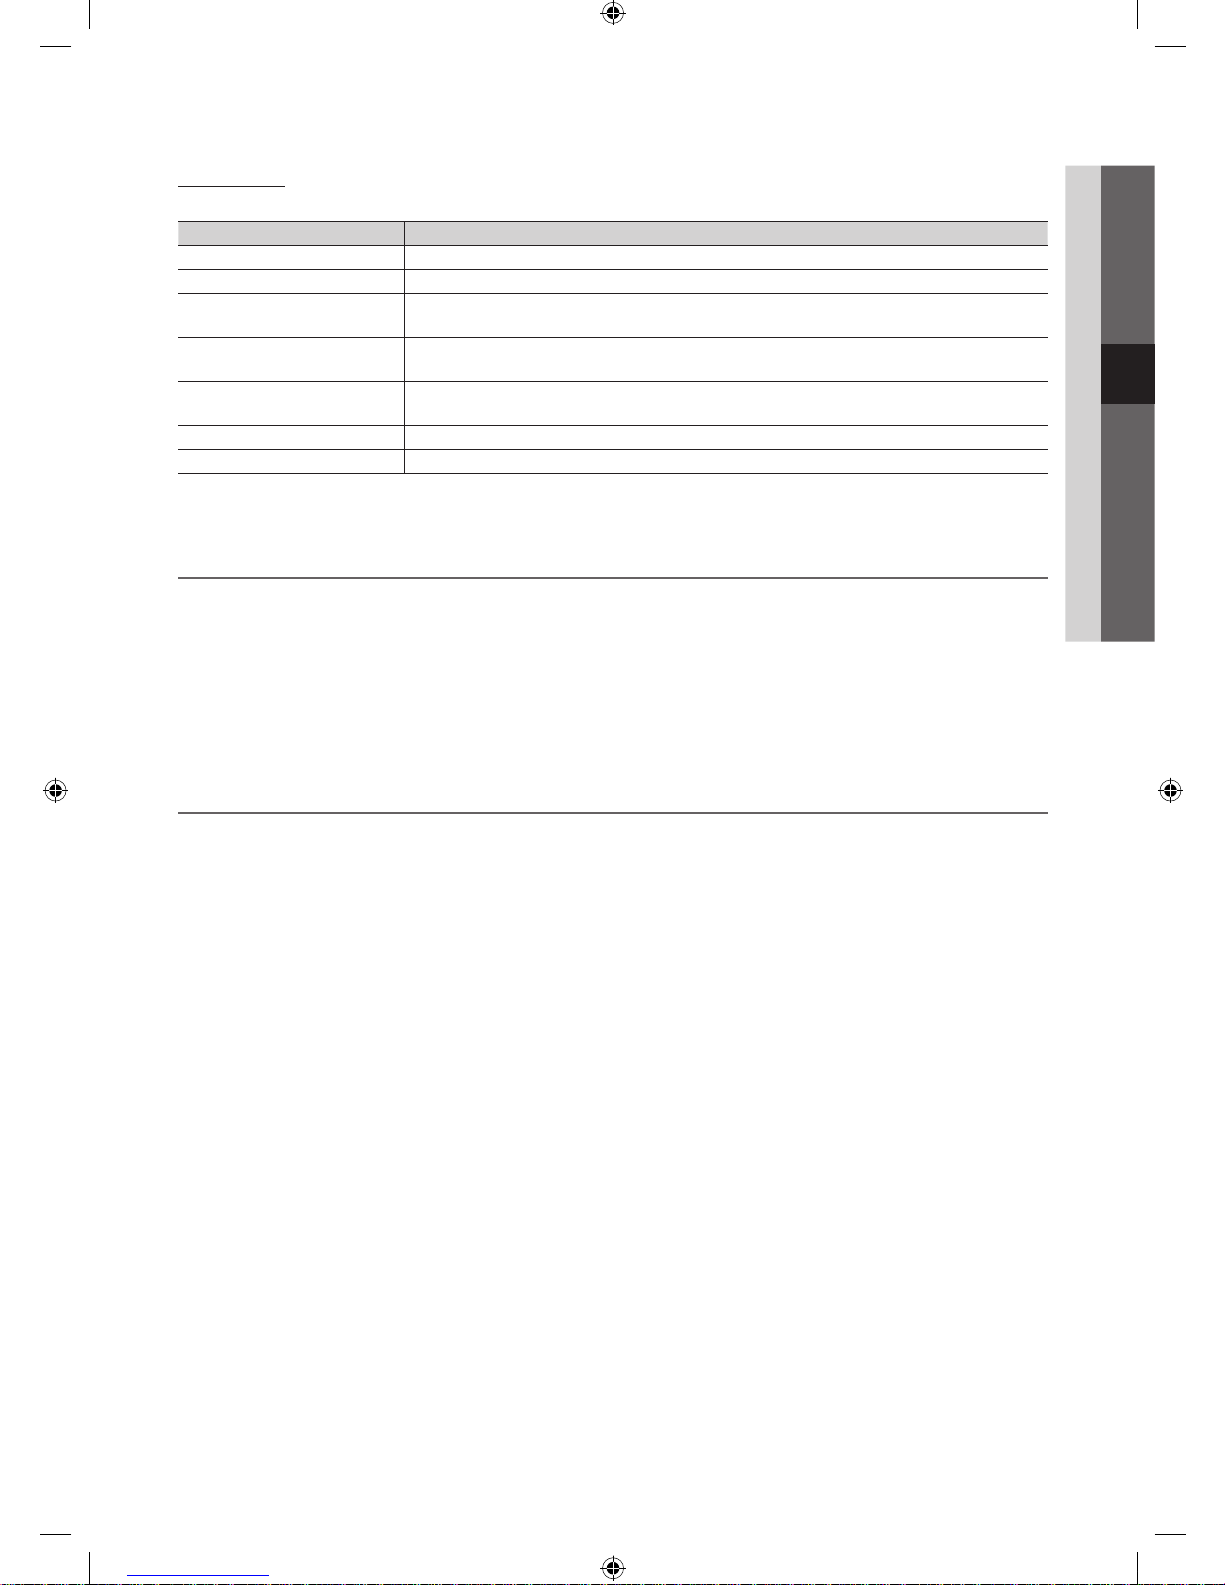
45
English
04 Advanced Features
Anynet+ Menu
The Anynet+ menu changes depending on the type and status of the Anynet+ devices connected to the TV.
Anynet+ Menu Description
View TV Changes Anynet+ mode to TV broadcast mode.
Device List Shows the Anynet+ device list.
(device_name) MENU Shows the connected device menus. E.g. If a DVD recorder is connected, the disc menu of
the DVD recorder will appear.
(device_name) INFO Shows the play menu of the connected device. E.g. If a DVD recorder is connected, the
play menu of the DVD recorder will appear.
Recording: (*recorder) Starts recording immediately using the recorder. (This is only available for devices that
support the recording function.)
Stop Recording: (*recorder) Stops recording.
Receiver Sound is played through the receiver.
If more than one recording device is connected, they are displayed as (*recorder) and if only one recording device is
connected, it will be represented as (*device_name).
Setting Up Anynet+
■ Setup
Anynet+ (HDMI-CEC) (Off / On): To use the Anynet+ Function, Anynet+ (HDMI-CEC) must be set to On.
✎
When the Anynet+ (HDMI-CEC) function is disabled, all the Anynet+ related operations are deactivated.
Auto Turn Off (No / Yes): Setting an Anynet+ Device to turn off automatically when the TV is turned off.
✎
If Auto Turn Off is set to Yes, running external devices will turn off at the same time as the TV powers off.
However, a device may not turn off if recording is in progress.
✎
May not be enabled depending on the device.
Switching between Anynet+ Devices
1. Anynet+ devices connected to the TV are listed.
✎
If you cannot find a device you want, press the Red button to refresh the list.
2. Select a device and press the ENTER
button. You can switch to the selected device.
✎
Only when you set Anynet+ (HDMI-CEC) to On in the Application menu, the Device List menu appears.
x
Switching to the selected device may take up to 2 minutes. You cannot cancel the operation during the switching
operation.
x
If you have selected external input mode by pressing the SOURCE button, you cannot use the Anynet+ function.
Make sure to switch to an Anynet+ device by using the Device List.
[UC9000]BN68-02820G-RU.indb 45 2010-05-25 오전 9:59:24
Page 46

46
English
Advanced Features
Recording
You can make a recording of a TV Programme using a Samsung recorder.
1. Select Recording.
✎
When there are more than two recording devices
x
When multiple recording devices are connected, the recording devices are listed. Select one recording device in
the Device List.
✎
When the recording device is not displayed, select Device List and press the Red button to search devices.
2. Press the EXIT button to exit.
✎
You can record the source streams by selecting Recording: (device_name).
✎
Pressing the (REC) button will record whatever you are currently watching. If you are watching video from
another device, the video from the device is recorded.
✎
Before recording, check whether the antenna jack is properly connected to the recording device. To properly
connect an antenna to a recording device, refer to the recording device’s users manual.
Listening through a Receiver
You can listen to sound through a receiver (i.e Home Theatre) instead of the TV Speaker.
1. Select Receiver and set to On.
2. Press the EXIT button to exit.
✎
If your receiver supports audio only, it may not appear in the device list.
✎
The receiver will work when you have properly connected the optical in jack of the receiver to the DIGITAL AUDIO
OUT (OPTICAL) jack of the TV.
✎
When the receiver (i.e Home Theatre) is set to On, you can hear sound output from the TV’s Optical jack. When the
TV is displaying a DTV (aerial) signal, the TV will send out 5.1 channel sound to the receiver. When the source is a
digital component such as a DVD and is connected to the TV via HDMI, only 2 channel sound will be heard from
the receiver.
✎
NOTE
x
You can only control Anynet+ devices using the TV remote control, not the buttons on the TV.
x
The TV remote control may not work under certain conditions. If this occurs, reselect the Anynet+ device.
x
The Anynet+ functions do not operate with other manufacturers’ products.
Using the ARC function
You can listen to sound through a receiver connected HDMI cable without the need for a separate optical cable.
1. Select Receiver and set to On.
2. Press the EXIT button to exit.
✎
To use the ARC function, a receiver which supports the HDMI-CEC and ARC features must be connected to the HDMI
IN 2 (ARC) port.
✎
To disable the ARC function, set the Receiver to Off. Even if the TV transmits the ARC signal continuously, the receiver
will be blocked from receiving the signal.
[UC9000]BN68-02820G-RU.indb 46 2010-05-25 오전 9:59:25
Page 47
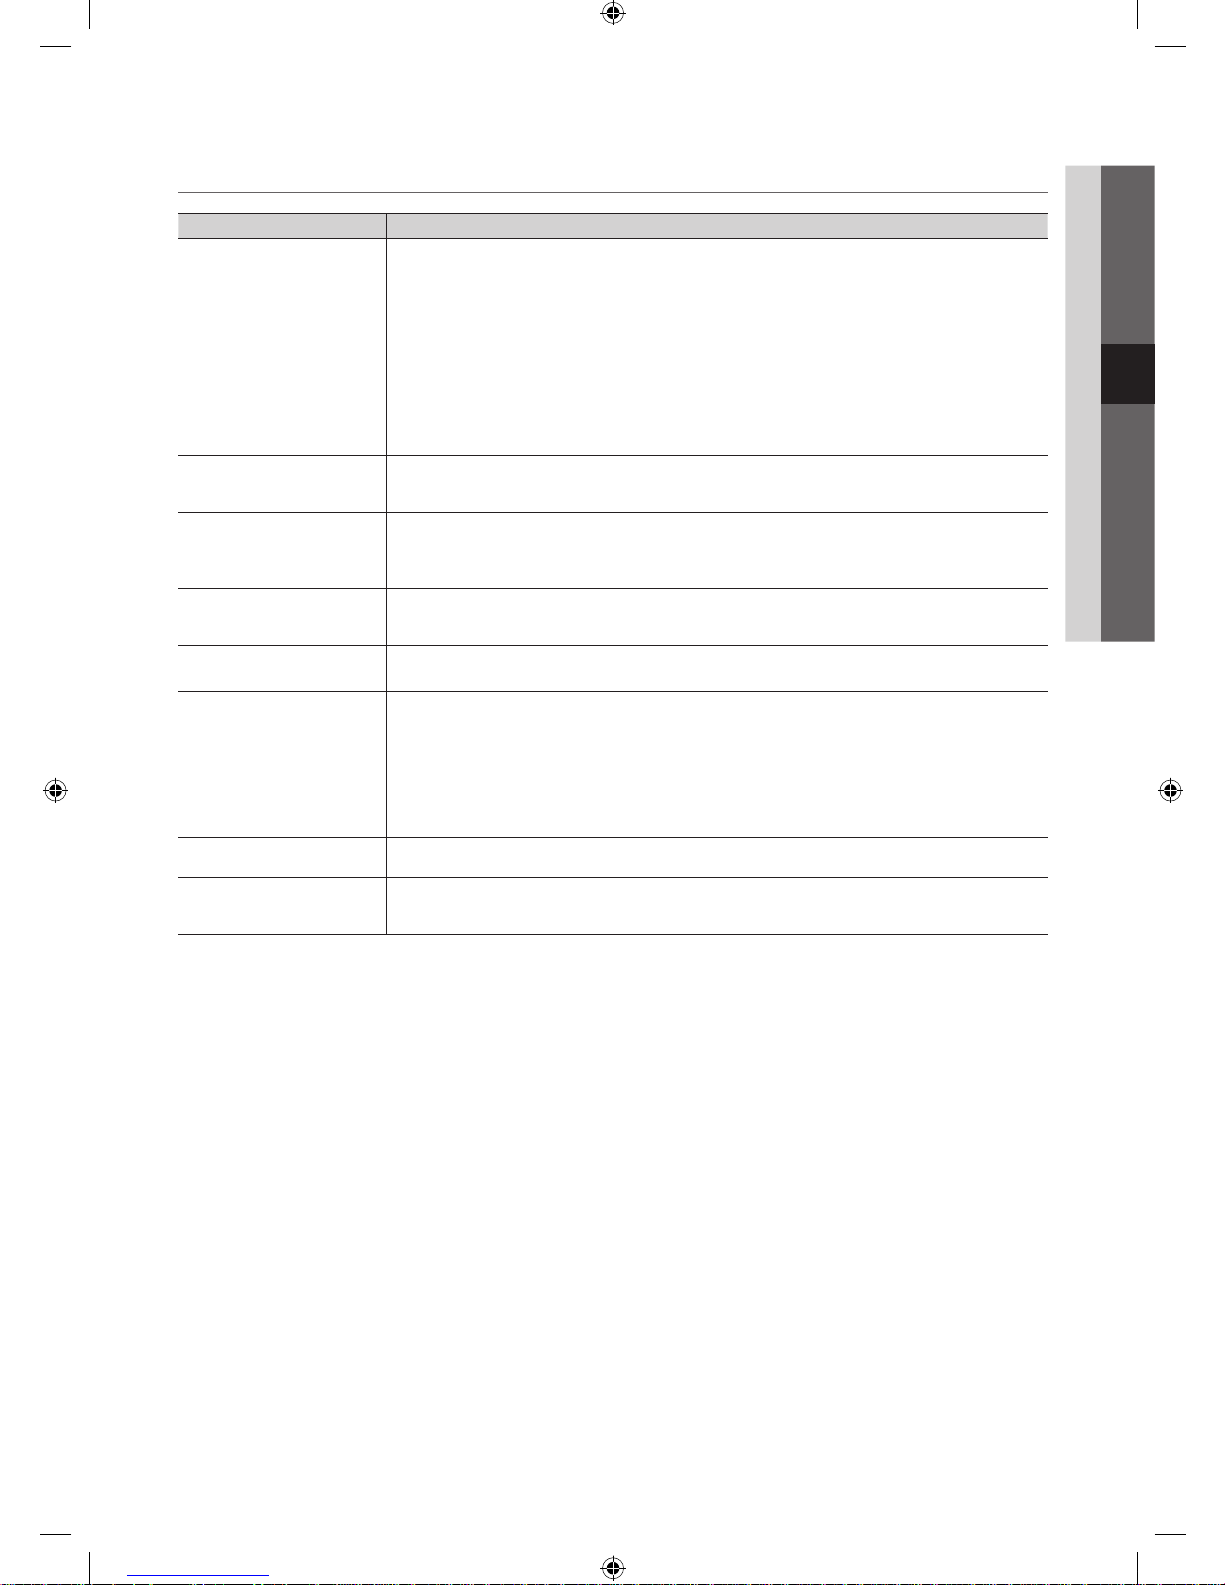
47
English
04 Advanced Features
Troubleshooting for Anynet+
Problem Possible Solution
Anynet+ does not work. • Check if the device is an Anynet+ device. The Anynet+ system supports Anynet+ devices only.
• Only one receiver (home theatre) can be connected.
• Check if the Anynet+ device power cord is properly connected.
• Check the Anynet+ device’s Video/Audio/HDMI cable connections.
• Check whether Anynet+ (HDMI-CEC) is set to On in the Anynet+ setup menu.
• Check whether the TV remote control is in TV mode.
• Check whether the remote control is Anynet+ compatible.
• Anynet+ doesn’t work in certain situations. (Searching channels, operating Media Play or Plug & Play (initial
setup), etc.)
• When connecting or removing the HDMI cable, please make sure to search devices again or turn your TV off
and on again.
• Check if the Anynet+ Function of Anynet+ device is set on.
I want to start Anynet+. • Check if the Anynet+ device is properly connected to the TV and check if the Anynet+ (HDMI-CEC) is set to
On in the Anynet+ Setup menu.
• Press the TOOLS button to display the Anynet+ menu and select a menu you want.
I want to exit Anynet+. • Select View TV in the Anynet+ menu.
• Press the SOURCE button on the TV remote control and select a non- Anynet+ device.
• Press P
/
, and PRE-CH to change the TV mode. (Note that the channel button operates only when a
tuner-embedded Anynet+ device is not connected.)
The message “Connecting to
Anynet+ device...” appears on the
screen.
• You cannot use the remote control when you are configuring Anynet+ or switching to a view mode.
• Use the remote control when the Anynet+ setting or switching to view mode is complete.
The Anynet+ device does not play. • You cannot use the play function when Plug & Play (initial setup) is in progress.
The connected device is not
displayed.
• Check whether or not the device supports Anynet+ functions.
• Check whether or not the HDMI cable is properly connected.
• Check whether Anynet+ (HDMI-CEC) is set to On in the Anynet+ setup menu.
• Search Anynet+ devices again.
• You can connect an Anynet+ device using the HDMI cable only. Some HDMI cables may not support Anynet+
functions.
• If connection is terminated because there has been a power interruption or the HDMI cable has been
disconnected, please repeat the device scan.
The TV Programme cannot be
recorded.
• Check whether the antenna jack on the recording device is properly connected.
The TV sound is not output
through the receiver.
• Connect the optical cable between TV and the receiver.
• The ARC function enables digital output of sound using the HDMI IN 2(ARC) port and can only be operated
when the TV is connected to an audio receiver that supports the ARC function.
[UC9000]BN68-02820G-RU.indb 47 2010-05-25 오전 9:59:25
Page 48
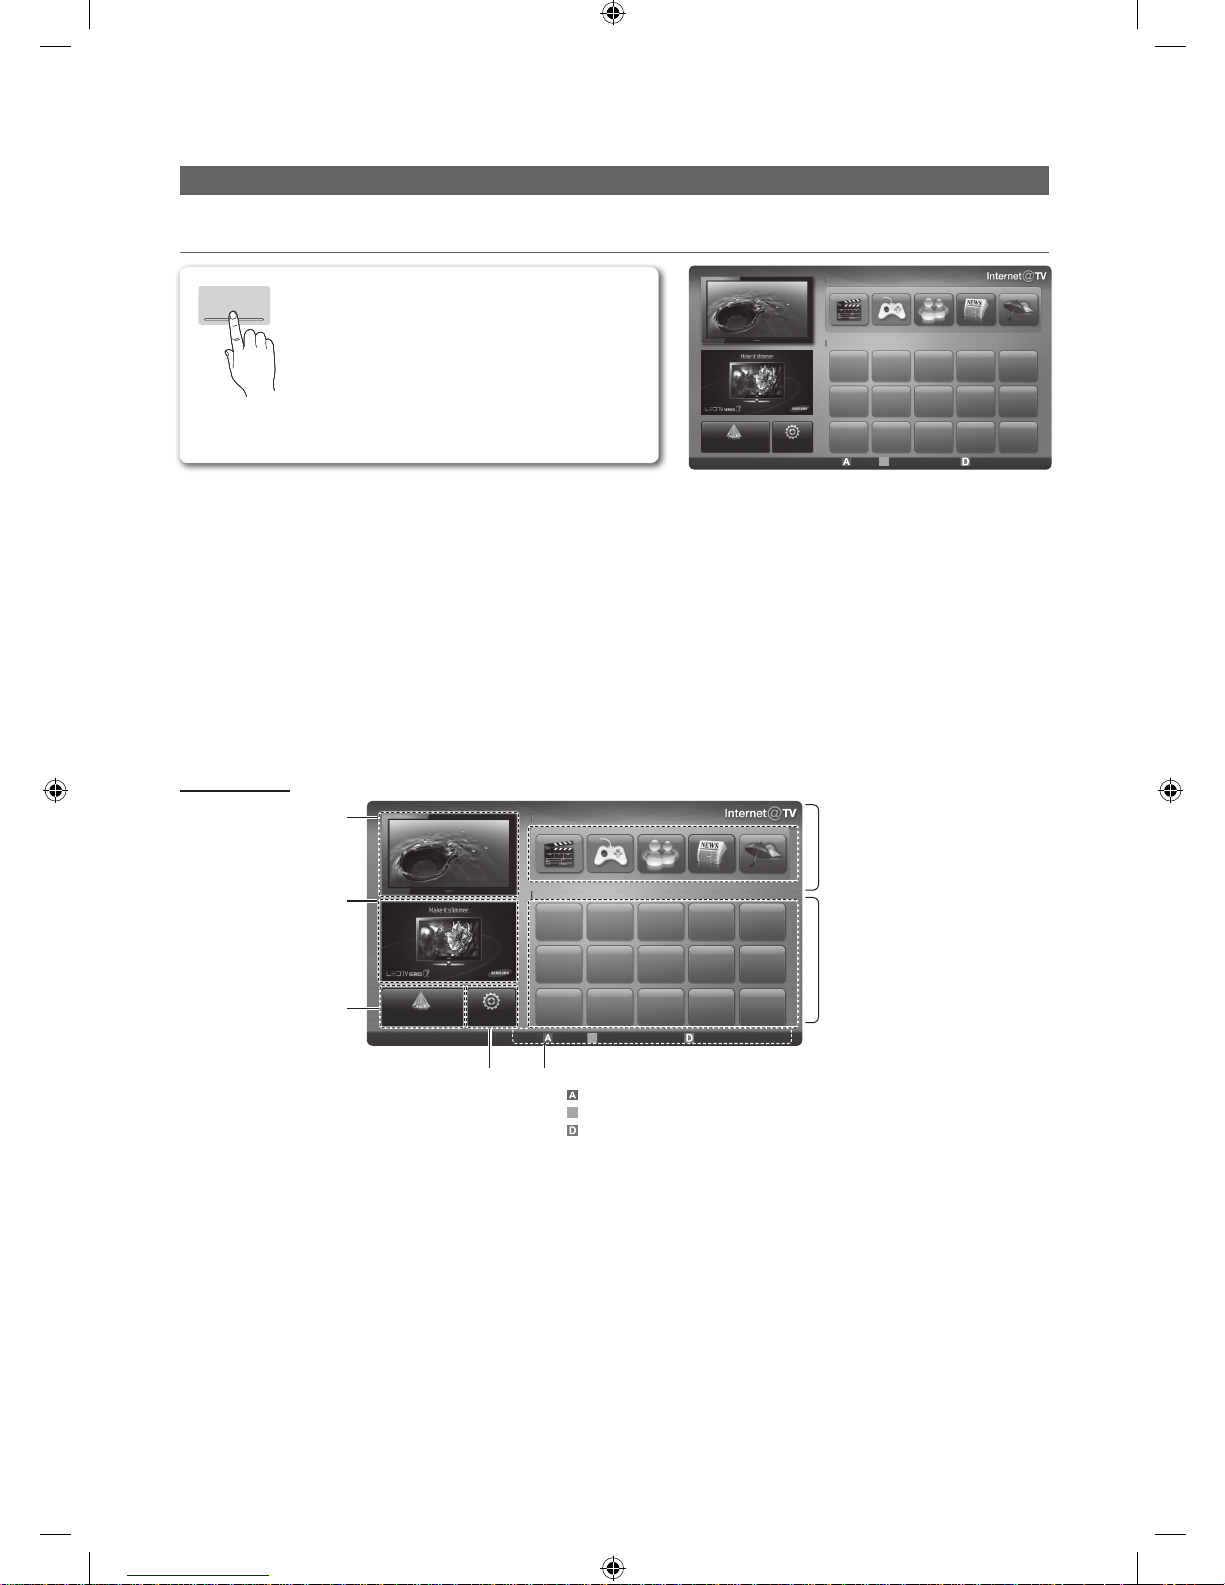
48
English
Advanced Features
Internet@TV
Getting Started with Internet@TV
✎
NOTE
x
Configure the network settings before using Internet@TV. For more information, refer to “Network Connection” (p.
28).
x
Unsupported fonts within the provider’s content will not display normally.
x
Slow responses and/or interruptions may occur, depending on your network conditions.
x
English may be only supported in application service depending on region.
x
This feature is not available in some locations.
x
If you experience a problem using a application, please contact the content provider.
x
According to circumstances of the contents provider, an application’s updates or the application itself may be
discontinued.
x
Depending on your country’s regulations, some applications may have limited service or not be supported.
Screen Display
Internet@TV brings useful and entertaining
contents and services directly from the web to
your TV.
INTERNET
@ TV
Recommended
Samsung Apps
Settings
My Applications
Login B Mark as Favourite Sort by
Return
by Date 1/1
Login B
Mark as Favourite Sort by
Return
My Applications
Recommended
by Date 1/1
Settings
Samsung Apps
Recommended Applications:
Displays the recommended service by
Samsung. You are not able to add or
delete a service in this list.
Downloaded Applications:
Displays the downloaded applications
through the Samsung Apps.
TV Screen:
Displays the current channel.
Information:
Displays notices, new
applications, and
advertisements brought to
you by Samsung product
introductions.
Application service:
You can experience
various service by provided
samsung.
Internet@TV Settings:
Edit and confi gure applications
and Internet@TV settings.
Controls:
• Red (Login): To log in to Internet@TV.
• B Green (Mark as Favourite): To mark the applications as a favourite.
• Blue (Sort by): To sort the applications.
• Return: To return to the previous menu.
✎
The colour buttons may work differently depending on the application.
[UC9000]BN68-02820G-RU.indb 48 2010-05-25 오전 9:59:27
Page 49
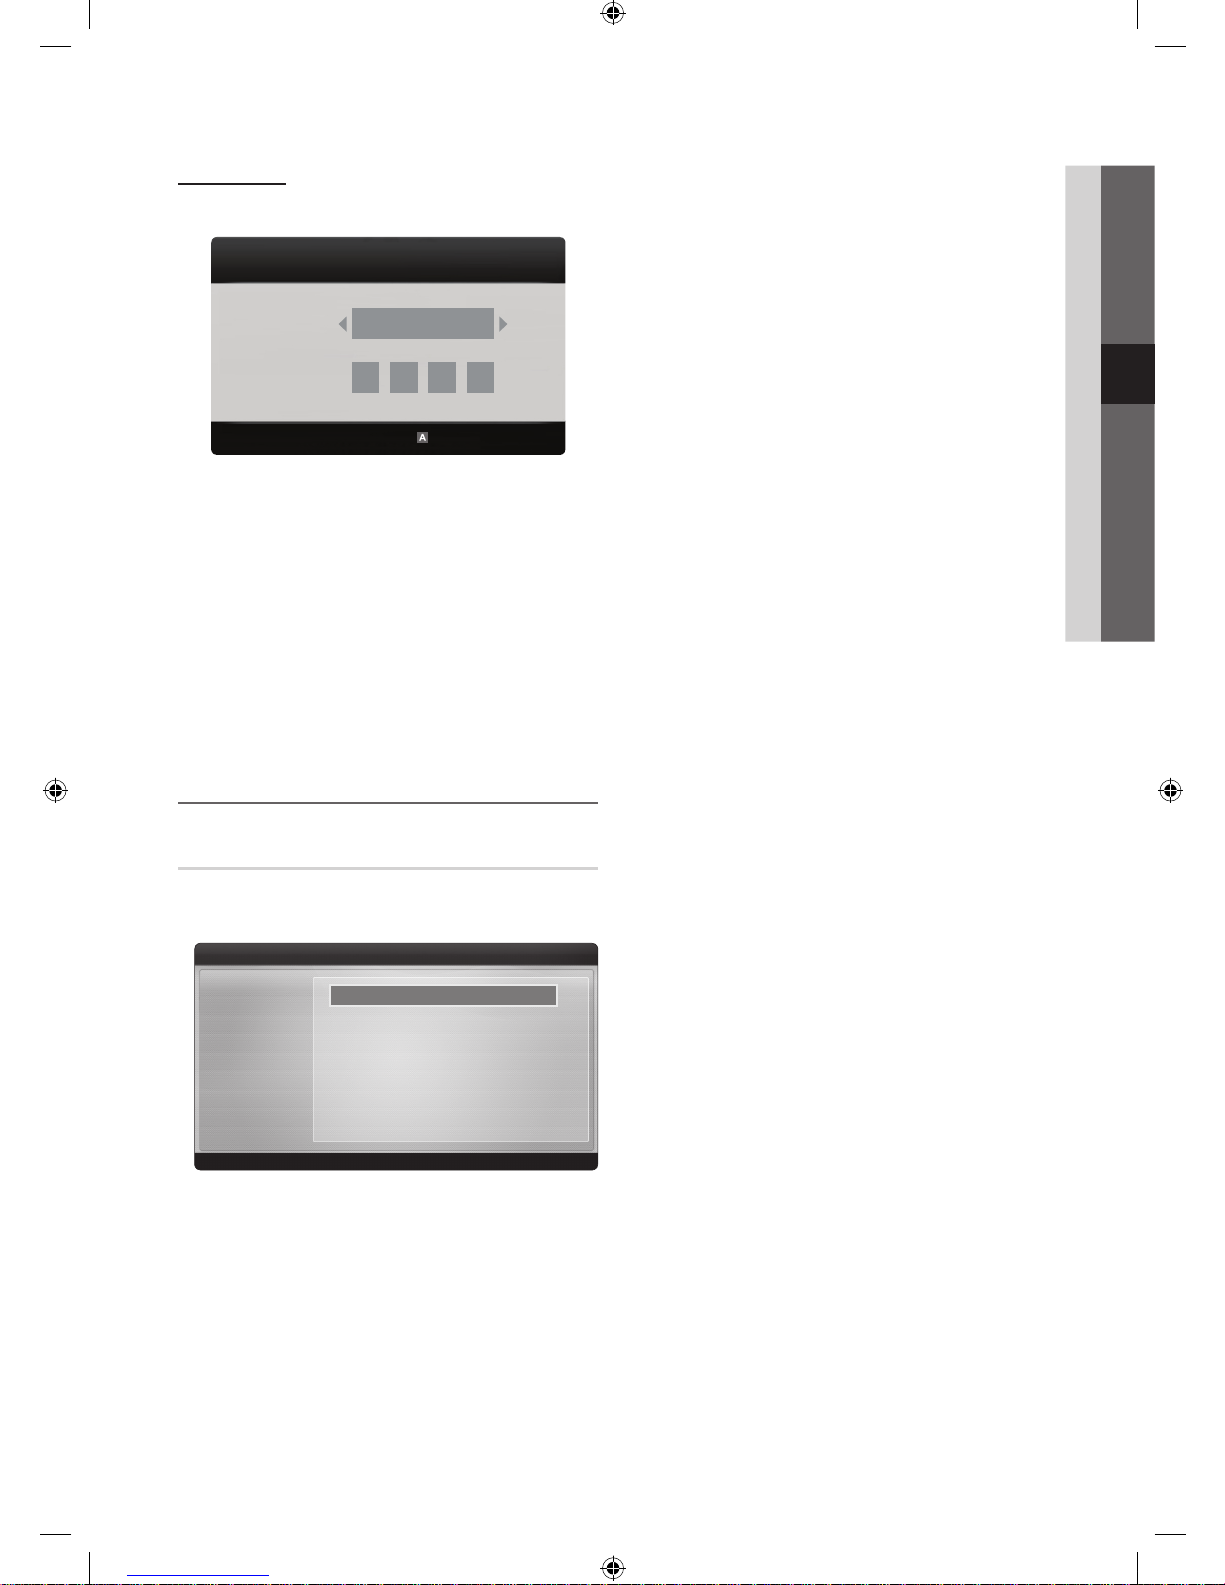
49
English
04 Advanced Features
Account Login
For a application with multiple account, use ◄ and ► to
access the different account.
✎
For a more enjoyable application experience, register
and log in to your account.
✎
For instructions on creating an account, refer to
Settings → Internet@TV ID → Create.
1. Press the Red button in Internet@TV home page.
2. Select desired User account, then press the ENTER
button.
✎
If you want create account, press Red button;
then create account OSD window appear.
3. Enter the Password.
✎
When login succeeds, User account will be
displayed on the screen.
Setting up Internet@TV
Settings
Create IDs and configure Internet@TV settings from this
screen. Highlight Settings using ▲ and ▼ buttons and press
the ENTER button.
■ System Setup
Ticker Autorun (Off / On): Enable/disable ticker autorun
upon powering on the TV.
✎
The Ticker application provides useful News,
Weather, and Stock Market information. The
Ticker application on Internet@TV must be
downloaded to use this feature.
✎
Depending on your country, Ticker application
may have different service or not be supported.
Channel Bound Service (Off / On): Some channels
support applications as an Internet data service, allowing
you to access the Internet service while watching TV.
✎
Only available if supported by the broadcaster.
Change the Service Lock password
✎
The default password set is “0-0-0-0.”
✎
If you forget the password, press the following
sequence of remote control buttons to reset the
password to “0-0-0-0”: POWER (off) → MUTE →
8 → 2 → 4 → POWER (on).
Reset: Resets Internet@TV settings to factory default
settings.
■ Internet@TV ID
You can use this menu when creating, deleting the
account. You can control your account including
contents site’s account information.
✎
Account is only for internet@TV.
Create: Create an account and link it with desired
service applications.
✎
NOTE
x
Account will be made less than 10.
x
Maximum number of characters is 8.
Manager
– Service Site: Register login information for service
sites.
– Change Password: Change account password.
– Delete: Delete the account.
■ Service Manager: Delete and lock applications installed
to Internet@TV.
Lock: Lock the application.
✎
Accessing a locked application requires the
password.
Delete: Delete the application.
■ Properties: Display information about Internet@TV. Use
the Check the speed of your internet connection
option to test your network connection.
admin
Login
User account:
Password:
Create [0~9] Enter PIN
Cancel
Return
Settings
▪ System setup
▪ Internet@TV ID
▪ Service Manager
▪ Properties
▪ Ticker Autorun : Off
▪ Channel Bound Service : Off
▪ Change the Service Lock password
▪ Reset
[UC9000]BN68-02820G-RU.indb 49 2010-05-25 오전 9:59:29
Page 50
50
English
Advanced Features
Using the Internet@TV service
Samsung Apps
Samsung Apps is a store for downloading applications to be
used on Samsung TV/AV equipment.
Users can enjoy a variety of contents like videos, music,
photos, games, useful information etc. using the downloaded
applications.
Additional applications will be available hereafter.
✎
Using the colour buttons with the Samsung Apps.
x
Red (Login): To log in to the internet service.
x
B
Green (Thumbnail View): To change the view
mode.
x
Blue (Sort by): To sort the applications by
Featured, Most downloaded, Most recent or
Name.
x
Return: Moves to previous menu.
Using the Samsung Apps by category
The following categories are available:
y What’s New?: Displays newly registered applications.
y Video: Displays various video media such as movies, TV
shows and short length videos.
y Sports: Displays various sports media such as match
information, images and short length video.
y Game: Displays various games such as sudoku and
chess.
y Lifestyle: Includes various lifestyle media services such
as music, personal photo management tools and social
networking such as Facebook and Twitter.
y Information: Includes various information services such
as news, stocks and weather.
y Other: Includes other miscellaneous services.
y My Page: My Page offers information about already
installed applications on the TV like detailed information,
download contents etc.. It can allows delete or lock the
applications.
y Help: If you have questions about Internet@TV, check
this section first.
You Tube
Login B Thumbnail View Sort by
Return
Samsung Apps
What’s New?
Video
Sports
Game
Lifestyle
Information
Other
My Page
Help
Featured Most downloaded Most recent Name
YouTube
TV store Test User002
Free
[Legal Statement]
Due to the various capabilities of products featuring the Samsung Internet@TV - Content Service, as well as limitations in
the available content, certain features, applications, and services may not be available on all devices or in all territories.
Some features on Internet@TV may also require additional peripheral devices or membership fees that are sold separately.
Please visit http://www.samsung.com for more information on specific device information and content availability. The
services and availability of content through Internet@TV are subject to change from time to time without prior notice.
[UC9000]BN68-02820G-RU.indb 50 2010-05-25 오전 9:59:30
Page 51
51
English
04 Advanced Features
AllShare
About AllShare
AllShare connects your TV, mobile phones and other
devices which are compatible through a network. On your
TV, you can view call arrivals, SMS messages and schedules
set on your mobile phones. In addition, you can play media
contents including videos, photos and music saved on your
mobile phones or the other devices (such as your PC) by
controlling them on the TV via the network. Additionally, you
can use your TV as a monitor for your mobile when browsing
a web page.
✎
For more information, visit “www.samsung.com” or
contact the Samsung call centre. Mobile devices may
need additional software installation. For details, refer to
each device’s user’s guide.
Setting Up AllShare
Setup
■ Message (On / Off): Enables or disables the message
function (for call arrivals, SMS messages and schedules
set on your mobile phones).
■ Media (On / Off): Enables or disables the media
function. When the media function is on, it plays videos,
photos and music from a mobile phone or other device
that supports AllShare.
■ ScreenShare (On / Off): Enables or disables the
ScreenShare function for using mobile phone as a
remote control.
■ TV name: Sets the TV name so you can find it easily on
a mobile device.
✎
If you select User Input, you can type on the TV
using the OSK (On Screen Keyboard).
Message / Media / ScreenShare
Shows a list of mobile phones or connected devices which
have been set up with this TV for using the Message,
Media, or ScreenShare function.
✎
The Media function is available in all mobile devices
which support AllShare.
■ Allowed / Denied: Allows/Blocks the mobile phone.
■ Delete: Deletes the mobile phone from the list.
✎
This function only deletes the name of the mobile
from the list. If the deleted mobile device is turned
on or trys to connect to the TV, it may appear on
the list again.
Using the Message Function
Using this function, you view call arrivals, SMS messages
and schedules set on the mobile phone through the alarm
window while watching TV.
✎
NOTE
x
To disable the alarm window, set Message to Off in
Setup of AllShare.
x
If OK is selected, or if OK is not selected after the
message has appeared three times, the message
will be deleted. The message is not deleted from the
mobile phone.
x
The alarm window can be displayed while using
some applications such as Media Play etc. To view
the contents of a message, switch to TV viewing
mode.
x
When a message from an unknown mobile phone is
displayed, select the mobile phone on the message
menu in AllShare and select Denied to block the
phone.
Message View
If a new SMS message arrives while you are watching
TV, the alarm window appears. If you click the OK
button, the contents of the message are displayed.
✎
You can configure the viewing settings for SMS
messages on your mobile phones. For the
procedures, refer to the mobile phone manual.
✎
Some types of characters may be displayed as
blank or broken characters.
AllShare™
3/7
Select
Return
Exit
Setup
Return
Setup
Message
Media
ScreenShare
Message : On
Media : On
ScreenShare : On
TV name : Home TV
[UC9000]BN68-02820G-RU.indb 51 2010-05-25 오전 9:59:30
Page 52
52
English
Advanced Features
Call Arrival Alarm
If a call arrives while you are watching TV, the alarm
window appears.
Schedule Alarm
While you are watching TV, the alarm window appears to
display the registered event.
✎
You can configure viewing settings for schedule
contents on your mobile phones. For the
procedures, refer to the mobile phone manual.
✎
Some special characters may be displayed as
blank or broken characters.
Using the Media Function
An alarm window appears informing the user that the media
contents (videos, photos, music) sent from a mobile phone
will be displayed on your TV. The contents are played
automatically 3 seconds after the alarm window appears.
If you press the RETURN or EXIT button when the alarm
window appears, the media contents are not played.
✎
NOTE
x
If the media function executes for the first time,
the warning popup windows appears. Press the
ENTER button to select Allow, then you can use
Media function on that device.
x
To turn off the media contents transmission from
the mobile phone, set Media to Off in the AllShare
setup.
x
Contents may not be played on your TV depending
on their resolution and format.
x
The ENTER and ◄ / ► buttons may not work
depending on the type of media content.
x
Using the mobile device, you can control the media
playing. For details, refer to each mobile’s user’s
guide.
x
When you want to play media contents from
your PC, select the PC icon on the main display
of AllShare. Then the TV’s Media Play menu
automatically changes. For more detail information,
refer to “Media Play” (p. 35).
Using ScreenShare Function
Screenshare displays the same web page as provide in
mobile. Using ScreenShare, you can open the various
contents saved in a mobile phone. For example, the image
below displays an access page for contents from a mobile.
You can read the mobile’s various files and view the phone
book and calender on the TV. Also, in phone book, you can
make a call to other person, or can send to SMS.
✎
NOTE
x
In Samsung mobile, ScreenShare must be installed
and the supporting application must be executed;
then you can use the ScreenShare function.
x
Available buttons on your remote control may vary
for each page.
x
Doc Viewer can read files in doc format, but cannot
modify them.
x
The screen display may differ depending on the
connected device.
Using your Samsung phone to control your TV Simply
Before you can use this feature, you must connect to
a Samsung mobile phone that supports ScreenShare
functions. When operating the TV with your mobile phone,
only the POWER,
, P/ and MUTE buttons are
supported.
✎
Even if you keep pressing down on a control button
(channel or volume) on the mobile phone, the value will
only go up or down by one unit.
DenyAllow
“Unknown Device 0” is requesting that the media le be allowed to play.
If you wish to allow the media le to be played at your device, please press
“Allow”, otherwise press “Deny”.
You can also change the setting (or resetting) of this feature at “AllShare
Setup”.
Warning: Please note that if your device is connected to unsecured or
unfamiliar network, unwanted or inappropriate contents might be played.
If you are not sure about the network's identity or content’s appropriateness,
we strongly recommend that you do not “Allow” the request to play.
Select Return
My Mobile
Contacts Calendar Doc Viewer
[UC9000]BN68-02820G-RU.indb 52 2010-05-25 오전 9:59:31
Page 53
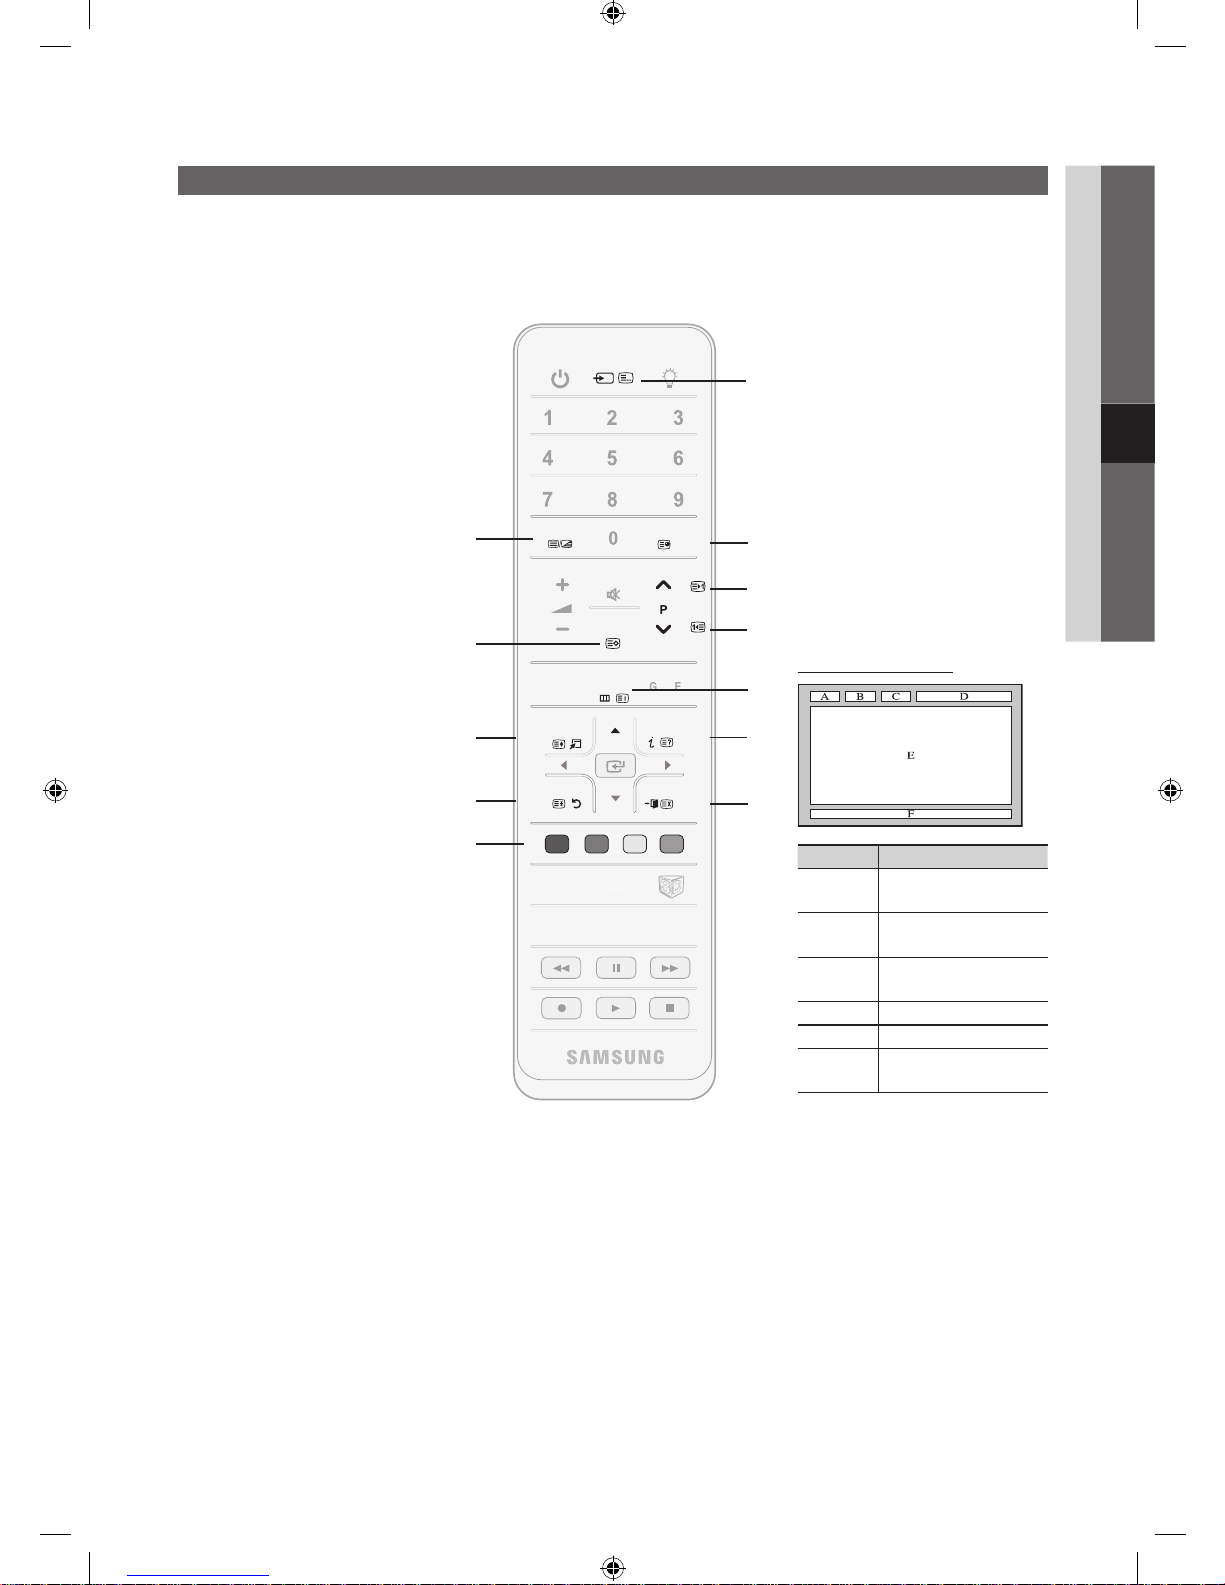
53
English
05 Other Information
Analogue Channel Teletext Feature
The index page of the Teletext service gives you information on how to use the service. For Teletext information to be displayed
correctly, channel reception must be stable. Otherwise, information may be missing or some pages may not be displayed.
✎
You can change Teletext pages by pressing the numeric buttons on the remote control.
Other Information
1
(Teletext on/mix/off):
Activates the Teletext mode for the
current channel. Press the button
twice to overlap the Teletext mode
with the current broadcasting
screen. Press it one more time to
exit teletext.
2
(store): Stores the Teletext
pages.
3
(size): Displays the teletext
on the upper half of the screen in
double-size. To move the text to
the lower half of the screen, press
it again. For normal display, press
it once again.
4
(hold): Holds the display at
the current page, in the case that
there are several secondary pages
that follow automaticially. To undo,
press it again.
5
Colour buttons (red, green, yellow,
blue): If the FASTEXT system
is used by the broadcasting
company, the different topics on
a Teletext page are colour-coded
and can be selected by pressing
the coloured buttons. Press the
colour corresponding to the topic
of your choice. A new colourcoded page is displayed. Items
can be selected in the same way.
To display the previous or next
page, press the corresponding
coloured button.
6
(mode): Selects the Teletext
mode (LIST/ FLOF).
If pressed during LIST mode,
switches the mode to List save
mode. In List save mode, you can
save a Teletext page into a list
using the
(store) button.
7
(sub-page): Displays the
available sub-page.
(page up): Displays the next
Teletext page.
8
(page down): Displays the
previous Teletext page.
9
(index): Displays the index
(contents) page at any time while
you are viewing Teletext.
0
(reveal): Displays the hidden
text (answers to quiz games, for
example). To display the normal
screen, press it again.
!
(cancel): Shrinks the Teletext
display to overlap with the current
broadcast.
@
Typical Tetetext page
Part Contents
A Selected page
number.
B Broadcasting channel
identity.
C Current page number
or search indications.
D Date and time.
E Text.
F Status information.
FASTEXT information.
PRE-CH
@TV
CO
NTEN
T
MEDIA.P
P.SIZE
SU
BT.
A B C D
TTX/MIX
G
UID
E
CH LIST
MUTE
TOOLS INFO
RETURN
EXIT
MENU
POWE
R
SOURCE
ON/OFF
6
7
8
9
!
@
0
1
3
2
4
5
[UC9000]BN68-02820G-RU.indb 53 2010-05-25 오전 9:59:32
Page 54
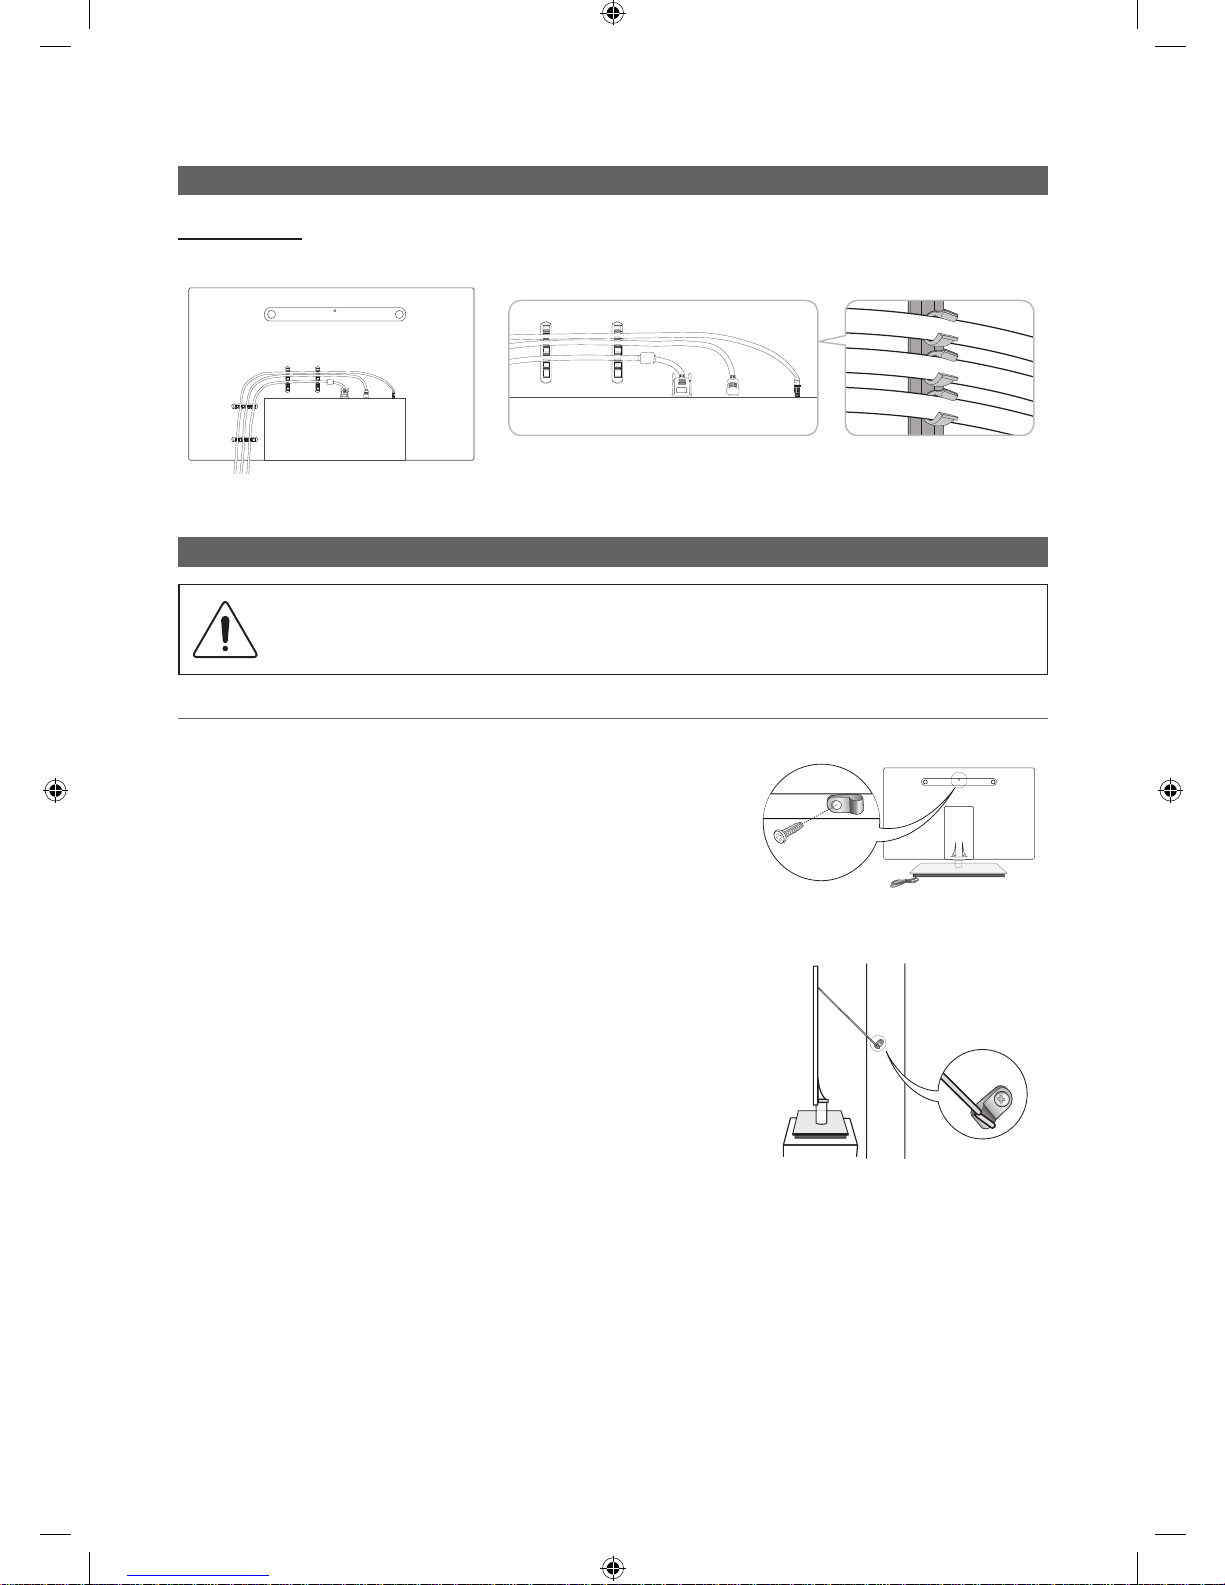
54
English
Other Information
Assembling the Cables
Wall-Mount Type
(UE46C9000ZW, UE55C9000ZW)
✎
Do not pull the cables too hard when arranging them. This may cause damage to the product’s connection terminals.
Securing the TV to the wall
Caution: Pulling, pushing, or climbing onto the TV may cause the TV to fall. In particular, ensure that your
children do not hang over or destabilize the TV; doing so may cause the TV to tip over, resulting in serious
injuries or death. Follow all safety precautions provided in the included Safety Flyer. For added stability and
safety, install the anti-fall device as follows.
To Avoid the TV from Falling
(UE46C9000ZW, UE55C9000ZW)
1. Put the screws into the clamps and firmly fasten them onto the wall.
Confirm that the screws have been firmly installed onto the wall.
✎
You may need additional material such as an anchor depending on
the type of wall.
✎
Since the necessary clamps, screws, and string are not supplied,
please purchase these additionally.
2. Remove the screws from the back centre of the TV, put the screws into
the clamps, and then fasten the screws onto the TV again.
3. Connect the clamps fixed onto the TV and the clamps fixed onto the wall
with a strong cable and then tie the string tightly.
✎
NOTE
x
Install the TV near to the wall so that it does not fall backwards.
x
It is safe to connect the string so that the clamps fixed on the
wall are equal to or lower than the clamps fixed on the TV.
x
Untie the string before moving the TV.
4. Verify all connections are properly secured. Periodically check
connections for any sign of fatigue for failure. If you have any doubt about
the security of your connections, contact a professional installer.
Wall
[UC9000]BN68-02820G-RU.indb 54 2010-05-25 오전 9:59:34
Page 55
55
English
05 Other Information
Troubleshooting
If you have any questions about the TV, first refer to this list. If none of these troubleshooting tips apply, please visit “www.
samsung.com,” then click on Support, or contact the call centre listed on the back-cover of this manual.
Issues Solutions and Explanations
Picture Quality First of all, please perform the Picture Test and confirm that your TV is properly displaying test image.
(go to MENU - Support - Self Diagnosis - Picture Test) (p. 25)
If the test image is properly displayed, the poor picture may caused by the source or signal.
The TV image does not look as good as it
did in the store.
• If you have an analogue cable/set top box, upgrade to a digital set top box. Use HDMI or Component
cables to deliver HD (high definition) picture quality.
• Cable/Satellite subscribers: Try HD stations from the channel line up.
• Antenna connection: Try HD stations after performing Auto programme.
• Many HD channels are up scaled from SD(Standard Definition) contents.
• Adjust the Cable/Set top box video output resolution to 1080i or 720p.
• Make sure you are watching the TV at the minimum recommended distance based on the size and
definition of the signal.
The picture is distorted: macro block error,
small block, dots, pixelization
• Compression of video contents may cause picture distortion especially in fast moving pictures such
as sports and action movies.
• Low signal level or bad quality can cause picture distortion. This is not a TV issue.
• Mobile phones used close to the TV (cca up to 1m) may cause noise in picture on analog and digital TV.
Colour is wrong or missing. • If you’re using a component connection, make sure the component cables are connected to the
correct jacks. Incorrect or loose connections may cause colour problems or a blank screen.
There is poor colour or brightness. • Adjust the Picture options in the TV menu. (go to Picture mode / Colour / Brightness / Sharpness)
(p. 16)
• Adjust Energy Saving option in the TV menu. (go to MENU - Picture - Eco Solution -
Energy Saving) (p. 16)
• Try resetting the picture to view the default picture settings. (go to MENU - Picture - Picture Reset)
(p. 20).
There is a dotted line on the edge of the
screen.
• If the picture size is set to Screen Fit, change it to 16:9 (p. 17).
• Change cable/set top box resolution.
The picture is black and white. • If you are using an AV composite input, connect the video cable (yellow) to the Green jack of
component input 1 on the TV.
When changing channels, the picture
freezes or is distorted or delayed.
• If connected with a cable box, please try to reset the cable box. Reconnect the AC cord and wait until
the cable box reboots. It may take up to 20 minutes.
• Set the output resolution of the cable box to 1080i or 720p.
Sound Quality First of all, please perform the Sound Test to confirm that your TV audio is properly operating.
(go to MENU - Support - Self Diagnosis - Sound Test) (p. 25)
If the audio is OK, the sound problem may caused by the source or signal.
There is no sound or the sound is too low
at maximum volume.
• Please check the volume the of external device connected to your TV.
The picture is good but there is no sound. • Set the Speaker Select option to TV Speaker in the sound menu (p. 22).
• If you are using an external device, make sure the audio cables are connected to the correct audio
input jacks on the TV.
• If you are using an external device, check the device’s audio output option (ex. you may need to
change your cable box’s audio option to HDMI when you have a HDMI connected to your TV).
• If you are using a DVI to HDMI cable, a separate audio cable is required.
• If your TV has a headphone jack, make sure there is nothing plugged into it.
The speakers are making an inappropriate
noise.
• Check the cable connections. Make sure a video cable is not connected to an audio input.
• For antenna or cable connections, check the signal strength. Low signal level may cause sound
distortion.
No Picture, No Video
The TV won’t turn on. • Make sure the AC power cord is securely plugged in to the wall outlet and the TV.
• Make sure the wall outlet is working.
• Try pressing the POWER button on the TV to make sure the problem is not the remote. If the TV turns
on, refer to “The remote control does not work” below.
The TV turns off automatically. • Ensure the Sleep Timer is set to Off in the Setup menu (p. 23).
• If your PC is connected to the TV, check your PC power settings.
• Make sure the AC power cord is plugged in securely to the wall outlet and the TV.
• When watching TV from an antenna or cable connection, the TV will turn off after 10 ~ 15 minutes if
there is no signal.
[UC9000]BN68-02820G-RU.indb 55 2010-05-25 오전 9:59:34
Page 56
56
English
Other Information
Issues Solutions and Explanations
There is no picture/Video. • Check cable connections (remove and reconnect all cables connected to the TV and external
devices).
• Set your external devices’ (Cable/Set top Box, DVD, Blu-ray etc) video outputs to match the
connections to the TV input. For example, if an external device’s output is HDMI, it should be connect
to an HDMI input on the TV.
• Make sure your connected devices are powered on.
• Be sure to select the TV’s correct source by pressing the SOURCE button on the TV remote.
RF(Cable/Antenna) Connection
The TV is not receiving all channels. • Make sure the Antenna cable is connected securely.
• Please try Plug & Play (Initial setup) to add available channels to the channel list. Go to MENU -
Setup - Plug & Play (Initial setup) and wait for all available channels to be stored (p. 7).
• Verify the Antenna is positioned correctly.
The picture is distorted: macro block error
small block, dots, pixelization
• Compression of video contents may cause picture distortion, especially with fast moving pictures
such as sports and action movies.
• A low signal can cause picture distortion. This is not a TV issue.
PC Connection
A “Mode Not Supported” message
appears.
• Set your PC’s output resolution and frequency so they match the resolutions supported by the TV (p. 27).
“PC” is always shown on the source list,
even if a PC is not connected.
• This is normal; “PC” is always shown on the source list, regardless of whether a PC is connected.
The video is OK but there is no audio. • If you are using a HDMI connection, check the audio output setting on your PC.
Network Connection (Depending on Models)
Wireless network connection failed. • Samsung Wireless USB dongle is required to use a wireless network.
• Make sure the Network Connection is set to Wireless (p. 30).
• Make sure the TV is be connected to a wireless IP sharer (router).
Recording / Timeshift
The USB device is not recognized or a
Device Format, Device Test or Device
Performance Test fails.
• See the manual for the USB device to check that the USB device supports recording.
• If the USB device has a lock, ensure it is off.
• Check that the USB device can be formatted when connected to the PC. Connect the USB to the TV
and format it. (Formatting may fail intermittently.)
• If a Device Performance Test or formatting failed, it means that there is a problem with the USB
hardware or the performance of the USB hardware is too low.
A message prompts me to format a USB
device that has been working well.
• If the USB device has a lock, ensure it is off.
• Recover the USB device using the recovery function in Checking Device.
The recording function does not work. • Check that a USB device is connected.
• Check that the channel is a recordable digital channel.
• If the signal is weak or does not exist, the recording function will automatically be closed.
• The TV will not record if the USB device has no free memory space. Check that this is not the case.
Timeshift Mode does not work. • Check that a USB device is connected.
• Radio channels and analogue broadcasts are not supported.
• Data broadcast channels are not supported.
• If the signal is weak or does not exist, the Timeshift Mode function will automatically be closed.
• Timeshift Mode cannot be performed if the USB device has no free memory space. Check that this
is not the case.
A message indicates a performance test
failure, and the recording and
Timeshift Mode functions do not work.
• These problems may occur if you use a low-capacity USB device that does not support recording.
We recommend using the USB HDD.
[UC9000]BN68-02820G-RU.indb 56 2010-05-25 오전 9:59:35
Page 57
57
English
05 Other Information
Issues Solutions and Explanations
A scheduled recording has failed. • A scheduled recording is disabled for certain operations (formatting, performance test, error checking,
deleting) that access the file system of a USB device.
• If there is no USB device connected, the TV will not record even if the scheduled time is reached.
• The TV will not record if the USB device has no free memory space. Check that this is not the case.
• If you record a channel locked with Parental lock, the PIN input window will appear when you try to
play back the recording.
Several recording devices are connected
but the TV stopped recording.
• If multiple recording devices are connected and the device set as Default Recording Device has no
free memory space, the recording function will be closed. Attempt recording again. The device with
the most free memory space will automatically be set as Default Recording Device and the TV will
start recording.
Others
The picture won’t display in full screen. • HD channels will have black bars on either side of the screen when displaying up scaled SD (4:3)
contents.
• Black bars on the top and bottom will appear during movies that have aspect ratios different from
your TV.
• Adjust the picture size options on your external device or TV to full screen.
The remote control does not work. • Replace the remote control batteries with the poles (+/–) in the right direction.
• Clean the sensor’s transmission window on the remote.
• Try pointing the remote directly at the TV from 5~6 feet away.
The cable/set top box remote control
doesn’t turn the TV on or off, or adjust the
volume.
• Programme the Cable/Set top box remote control to operate the TV. Refer to the Cable/Set user
manual for the SAMSUNG TV code.
A “Mode Not Supported” message
appears.
• Check the supported resolution of the TV, and adjust the external device’s output resolution
accordingly. Refer to the resolution settings on page 27 of this manual.
There is a plastic smell from the TV. • This smell is normal and will dissipate over time.
The TV Signal Information is unavailable
in the Self Diagnostic Test menu.
• This function is only available with digital channels from an Antenna / RF/Coax connection (p. 25).
The TV is tilted to the side. • Remove the base stand from the TV and reassemble it.
The channel menu is greyed out.
(unavailable)
• The Channel menu is only available when the TV source is selected.
Your settings are lost after 30 minutes or
every time the TV is turned off.
• If the TV is in the Store Demo mode, it will reset audio and picture settings every 30 minutes. Change
the settings from Store Demo mode to Home Use mode in the Plug & Play (Initial setup) procedure.
Press the SOURCE button to select TV mode, and go to MENU → Setup → Plug & Play (Initial
setup) → ENTER
(p. 7).
You have intermittent loss of audio or
video.
• Check the cable connections and reconnect them.
• Loss of audio or video can be caused by using overly rigid or thick cables. Make sure the cables are
flexible enough for long term use. If mounting the TV to the wall, we recommend using cables with 90
degree connectors.
You see small particles when you look
closely at the edge of the frame of the TV.
• This is part of the product’s design and is not a defect.
The message “Scramble signal” or “Weak
Signal/No Signal” appears.
• If you are using a CAM CARD (CI/CI+), check that it is installed into the common interface slot.
• If there is still a problem, pull the CAM CARD out of the TV and insert it into the slot again.
You turned the TV off 45 minutes ago, and
it turned on again.
• It is normal. The TV operates the OTA (Over The Aerial) function itself to upgrade firmware
downloaded whilst your watching TV.
There are recurrent picture/sound issues. • Check and change the signal/source.
A reaction may occur between the rubber
cushion pads on the base stand and the
top finish of some furniture.
• To prevent this, use felt pads on any surface of the TV that comes in direct contact with furniture.
✎
This TFT LED panel uses a panel consisting of sub pixels which require sophisticated technology to produce. However,
there may be a few bright or dark pixels on the screen. These pixels will have no impact on the performance of the
product.
[UC9000]BN68-02820G-RU.indb 57 2010-05-25 오전 9:59:36
Page 58
58
English
Other Information
Licence
TheaterSound, SRS and the symbol are trademarks of SRS Labs, Inc.
TheaterSound technology is incorporated under licence from SRS Labs, Inc.
Manufactured under licence from Dolby Laboratories. Dolby and the double-D symbol are
trademarks of Dolby Laboratories.
Manufactured under licence under U.S. Patent #’s: 5,451,942; 5,956,674; 5,974,380; 5,978,762;
6,487,535 & other U.S. and worldwide patents issued & pending. DTS and the Symbol are
registered trademarks. & DTS 2.0+ Digital Out and the DTS logos are trademarks of DTS, Inc.
Product Includes software. © DTS, Inc. All Rights Reserved.
DivX Certified to play DivX video up to HD 1080p, including premium content.
ABOUT DIVX VIDEO: DivX® is a digital video format created by DivX,Inc. This is an official DivX Certified device that
plays DivX video. Visit www.divx.com for more information and software tools to convert your files into DivX video.
ABOUT DIVX VIDEO-ON-DEMAND: This DivX Certified® device must be registered in order to play DivX Video-onDemand (VOD) content. To generate the registration code, locate the DivX VOD section in the device setup menu. Go
to vod.divx.com with this code to complete the registration process and learn more about DivX VOD.
Pat. 7,295,673; 7,460,688; 7,519,274
GUIDE Plus+ Trademark / Licence / Patent Notice
GUIDE Plus+ is (1) a registered trademark or trademark of, (2) manufactured under license from
and (3) subject of various international patents and patent applications owned by, or licensed to,
Gemstar-TV Guide International, Inc. and/or its related affiliates.
GUIDE Plus+ Legal Notice:
GEMSTAR-TV GUIDE INTERNATIONAL, INC. AND/OR ITS RELATED AFFILIATES ARE NOT IN ANY WAY LIABLE FOR
THE ACCURACY OF THE PROGRAM SCHEDULE INFORMATION PROVIDED BY THE GUIDE PLUS+ SYSTEM. IN NO
EVENT SHALL GEMSTAR-TV GUIDE INTERNATIONAL, INC. AND /OR ITS RELATED AFFILIATES BE LIABLE FOR ANY
AMOUNTS REPRESENTING LOSS OF PROFITS, LOSS OF BUSINESS, OR INDIRECT, SPECIAL, OR CONSEQUENTIAL
DAMAGES IN CONNECTION WITH THE PROVISION OR USE OF ANY INFORMATION, EQUIPMENT, OR SERVICES
RELATING TO THE GUIDE PLUS+ SYSTEM.
Open Source Licence Notice
In the case of using open source software, Open Source Licences are available on the product menu.
Open Source Licence Notice is written only English.
[UC9000]BN68-02820G-RU.indb 58 2010-05-25 오전 9:59:37
Page 59
59
English
05 Other Information
Specifications
Panel native 1920 x 1080
Environmental
Considerations
Operating Temperature
Operating Humidity
Storage Temperature
Storage Humidity
10°C to 40°C (50°F to 104°F)
10% to 80%, non-condensing
-20°C to 45°C (-4°F to 113°F)
5% to 95%, non-condensing
TV System Analogue: B/G, D/K, L, I (Depending on your country selection)
Digital: DVB-T/DVB-C
Colour/Video System Analogue: PAL, SECAM, NTSC-4.43, NTSC-3.58, PAL60
Digital: MPEG-2 MP@ML, MPEG-4, H.264/AVC MP@L3, [email protected], [email protected]
Sound System BG. OK NICAM. MPEGl
HDMI IN 1 ~ 4 Video: 1080 24p, 1080p, 1080i, 720p, 576p, 576i, 480p, 480i
Audio: 2Ch Linear PCM 32/44.1/48kHz, 16/20/24bits.
Analogue audio input (HDMI IN1 only)
PC input (HDMI IN1 only)
Stand Swivel
(Left / Right) -20˚ ~ 20˚
Model Name UE46C9000ZW UE46C9000SW UE55C9000ZW UE55C9000SW
Screen Size
(Diagonal) 46 inches 55 inches
Sound
(Output) 10 W X 2 15 W X 2
Dimensions (WxDxH)
Body
With stand
1104.2 X 33.9 X 674.8 mm
1104.2 X 306.1 X 819.5 mm_1104.2 X 306.1 X 819.5 mm
1295.6 x 33.9 x 784.4 mm
1295.6 x 306.1 x 873.3 mm_1295.6 x 306.1 x 873.3 mm
Weight
Without Stand
With Stand
16.7 kg
22.8 kg
_
21.8 kg
20.4 kg
26.5 kg
_
25.5 kg
✎
Design and specifications are subject to change without prior notice.
✎
For information about power supply, and more about power consumption, refer to the label attached to the product.
[UC9000]BN68-02820G-RU.indb 59 2010-05-25 오전 9:59:37
Page 60

60
English
Other Information
Index
A
AllShare 51
Amplify 21
Antenna 14
Anynet+ 44
Auto Adjustment 20
Auto Volume 22
B
Background Music 43
Balance L/R 21
Basic View 42
Batteries 6
Black Tone 16
Brightness 16
C
Cable Tie 4, 54
Change PIN 24
Channel Manager 13
Channel Menu 14
Clock 23
Colour Tone 17
Component 9
Connecting to a PC 27
Connecting to an Audio Device 10
D
DIGITAL AUDIO OUT 10, 44
DivX® VOD 43
D-sub 27
Dynamic 16
Dynamic Contrast 16
E
Eco Sensor 16
Edit Name 11
Editing Channels 15
Energy Saving 16
EPG (Electronic Programme Guide) 12
Equalizer 21
External Speaker 22
F
Fine Tune 15
Flesh Tone 17
Frequency 14
H
HDMI 8, 44
Home Theatre 10, 44
I
Installation Space 2
Internet@TV 48
L
Language 24
Licence 58
Lock 15
M
Media Play 35
Melody 25
Menu Transparency 25
Music 41
N
Navigate 12
Network Connection 28
Network Setup 29
Now & Next guide 12
O
ON/OFF button 6
Optimal resolution 27
P
Password 49
Photos 41
Picture Size 17, 43
Plug & Play 7
Power Indicator 5
R
Receiver 46
Recording 46
Remote Control 6
Repeat Mode 43
RGB Only Mode 16
Rotate 43
S
Select All 15
Self Diagnosis 25
Sharpness 16
Signal Information 25
Sleep Timer 23
Slide Show 41
Software Upgrade 26
Source List 11
Speaker Select 22
Specifications 59
Standby mode 5
Subtitle 24
Symbol 3
T
Timer 23
Title 42
Tools 3
Troubleshooting 55
TV Speaker 22
U
USB Drive 26, 35
Using Channel View 12
Using Scheduled View 13
Using the Favourite Channels 13
V
VCR 9
Video Formats 39
Videos 39
Volume 5
W
Warm 17
White Balance 17
[UC9000]BN68-02820G-RU.indb 60 2010-05-25 오전 9:59:39
Page 61

This page is intentionally
left blank.
[UC9000]BN68-02820G-RU.indb 61 2010-05-25 오전 9:59:39
Page 62
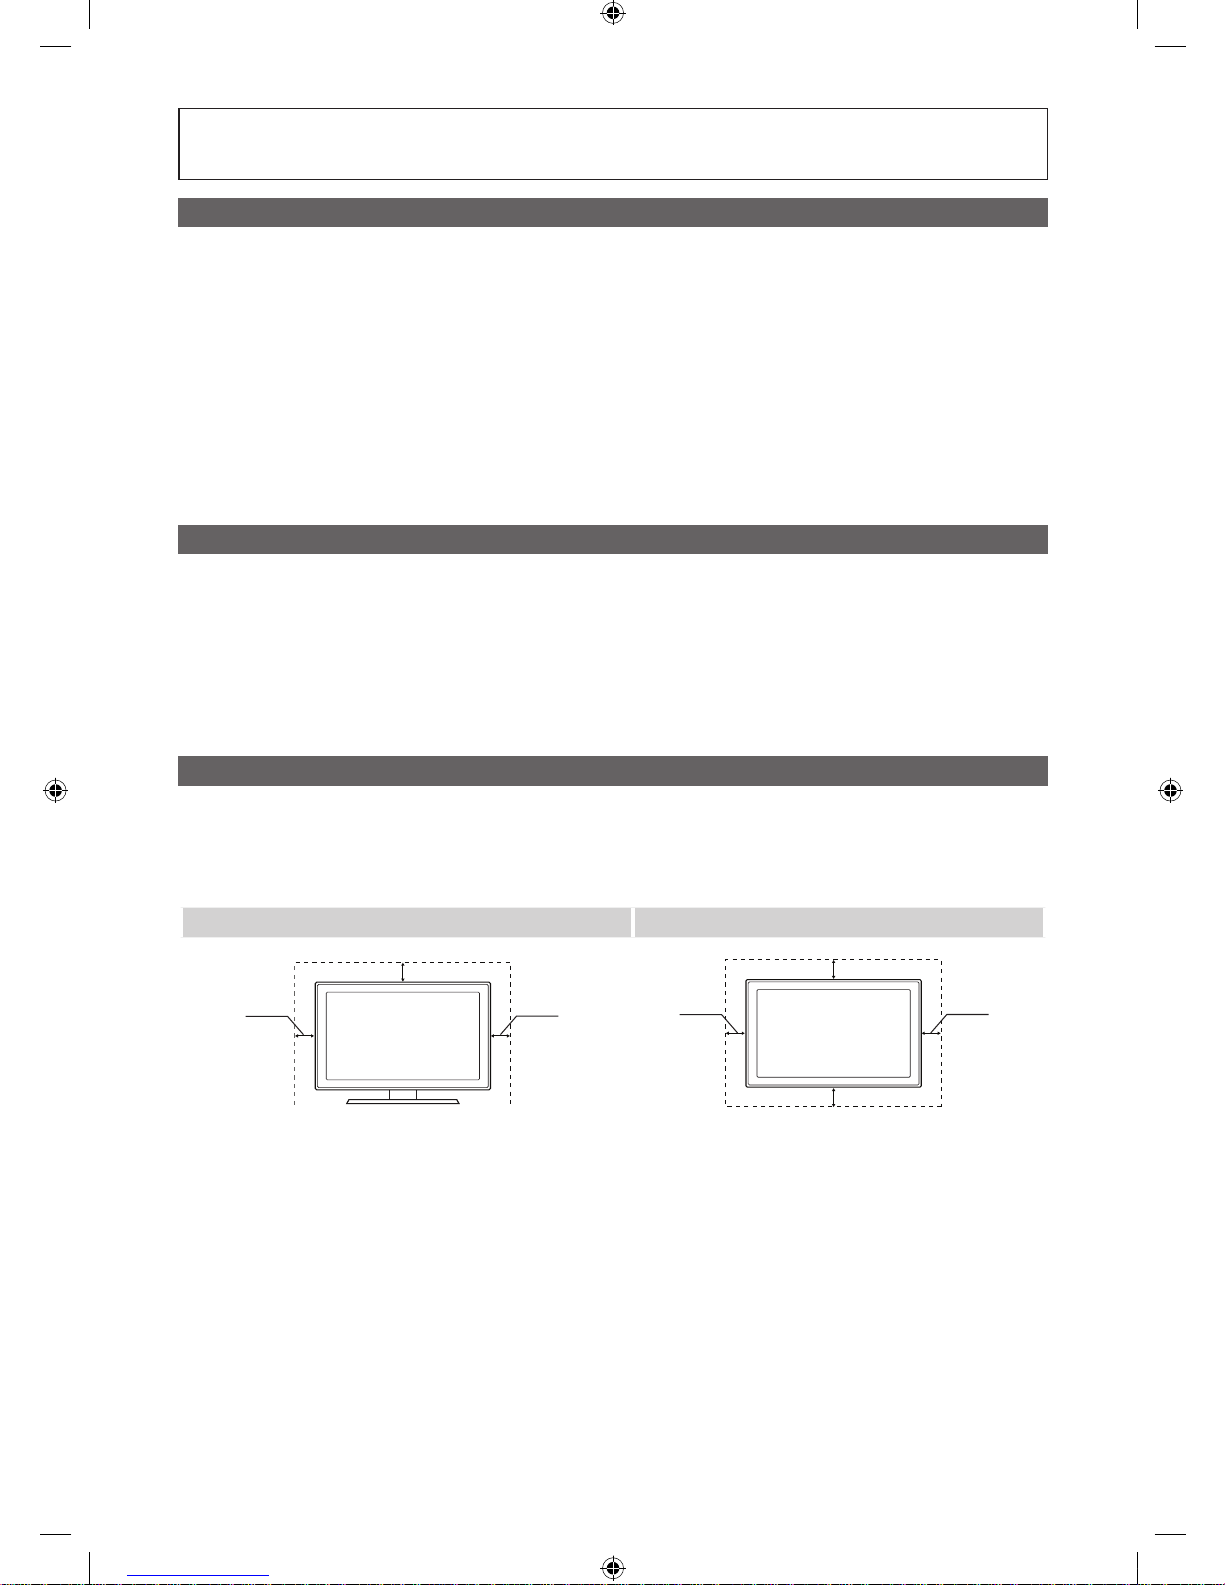
2
Русский
Рисунки и иллюстрации в данном руководстве пользователя представлены только для справки. Они могут отличаться
от реального внешнего вида устройства. Конструкция и характеристики устройства могут быть изменены без
предварительного уведомления.
Примечание относительно цифрового телевещания
1. Функции цифрового телевидения (DVB) доступны только в тех странах и регионах, где передаются цифровые наземные сигналы DVB-T
(MPEG2 и MPEG4 AVC) или где имеется доступ к совместимой услуге кабельного телевидения DVB-C (MPEG2 и MPEG4 AAC). Узнайте у
местного дилера о возможности приема сигнала DVB-T или DVB-C.
2. DVB-T – это стандарт цифрового наземного телевещания, принятый консорциумом европейских организаций DVB, а DVB-C – это стандарт
цифрового кабельного телевидения. Однако некоторые дифференцированные функции, такие как EPG (Electric Programme Guide), VOD
(Video on Demand) и другие, не входят в эту спецификацию. Поэтому в настоящее время они не работают.
3. Несмотря на то, что данный телевизор поддерживает последние стандарты DVB-T и DVB-C [с августа 2008 года], компания не гарантирует
совместимость с последующими стандартами цифрового наземного телевещания DVB-T и цифрового кабельного вещания DVB-C.
4. В зависимости от того, в какой стране или регионе используется телевизор, некоторые поставщики услуг кабельного телевидения могут
взимать отдельную плату за данную услугу. При этом пользователю необходимо будет принять условия предоставления услуги.
5. Некоторые функции цифрового ТВ могут быть недоступны в отдельных странах или регионах, кроме того, не все поставщики услуг
кабельного телевидения могут обеспечить правильную работу DVB-C.
6. Для получения более подробной информации обратитесь в местный центр по обслуживанию клиентов Samsung.
✎
Качество приема телепрограмм может варьироваться в разных странах в зависимости от способа телевещания. Чтобы узнать,
можно ли повысить качество приема с помощью настроек телевизора, обратитесь к местному официальному дилеру SAMSUNG или
в Центр обслуживания клиентов Samsung.
Предупреждение относительно неподвижных изображений
Старайтесь избегать длительного воспроизведения на экране неподвижных изображений, например файлов jpeg, или неподвижных объектов,
например логотипов телепрограмм, полей при панорамном воспроизведении или воспроизведении в формате 4:3, биржевой или новостной
ленты внизу. Это может привести к раздвоению изображения на светодиодном экране и, соответственно, к снижению качества изображения.
Чтобы избежать преждевременного износа, выполняйте следующие рекомендации.
• Старайтесь не смотреть очень долго один и тот же телевизионный канал.
• Отдавайте предпочтение полноэкранному режиму. Используйте меню настройки формата изображения на телевизоре для выбора
оптимального соответствия размеру экрана.
• Установите минимальные приемлемые значения яркости и контрастности. Чем выше значения этих параметров, тем быстрее идет процесс
выгорания экрана.
• Постоянно используйте функции, призванные сократить эффект остаточного изображения и выгорания экрана. Подробнее см.
соответствующий раздел руководства пользователя.
Выбор пространства для безопасной установки
Соблюдайте требуемое расстояние между устройством и другими объектами (например, стенами) для обеспечения достаточной вентиляции.
Несоблюдение этого правила может привести к возгоранию или поломке устройства из-за перегрева.
✎
В качестве подставки или настенного крепления используйте только те детали, которые поставляются Samsung Electronics.
x
При использовании деталей других производителей устройство может упасть и сломаться или нанести травму.
✎
Внешний вид устройства зависит от модели.
Установка на подставку Настенное крепление
10 cm
10 cm
10 cm
10 cm
10 cm
10 cm
10 cm
[UC9000]BN68-02820G-RU.indb 2 2010-05-25 오전 9:59:41
Page 63
3
РУССКИЙ
Русский
Содержание
Начало работы
4
4 Принадлежности
5 Обзор панели управления
6 Обзор пульта дистанционного управления
7 Подключение к антенне
7 Функция Plug & Play (исходная настройка)
Подключение
8
8 Подключение к устройству AV
10 Подключение к аудиоустройству
11 Смена источника входных сигналов
Основные операции
12
12 Работа с меню
12 Использование кнопки INFO – Текущая и следующая
программы
12 Планирование просмотра
14 Меню Канал
16 Меню Изображение
21 Меню Звук
23 Меню Настройка
25 Меню Поддержка
Дополнительные операции
27
27 Подключение к компьютеру
28 Сетевое подключение
35 Media Play
44 Anynet+
48 Internet@TV
51 AllShare
Прочее
53
53 Телетекст на аналоговых каналах
54 Компоновка кабелей
54 Крепление телевизора на стене
55 Поиск и устранение неисправностей
59 Технические характеристики
60 Указатель
Значение символов
Для использования этой функции
необходимо нажать кнопку
TOOLS на пульте дистанционного
управления.
Примечание Сенсорная кнопка
TOOLS
[UC9000]BN68-02820G-RU.indb 3 2010-05-25 오전 9:59:42
Page 64
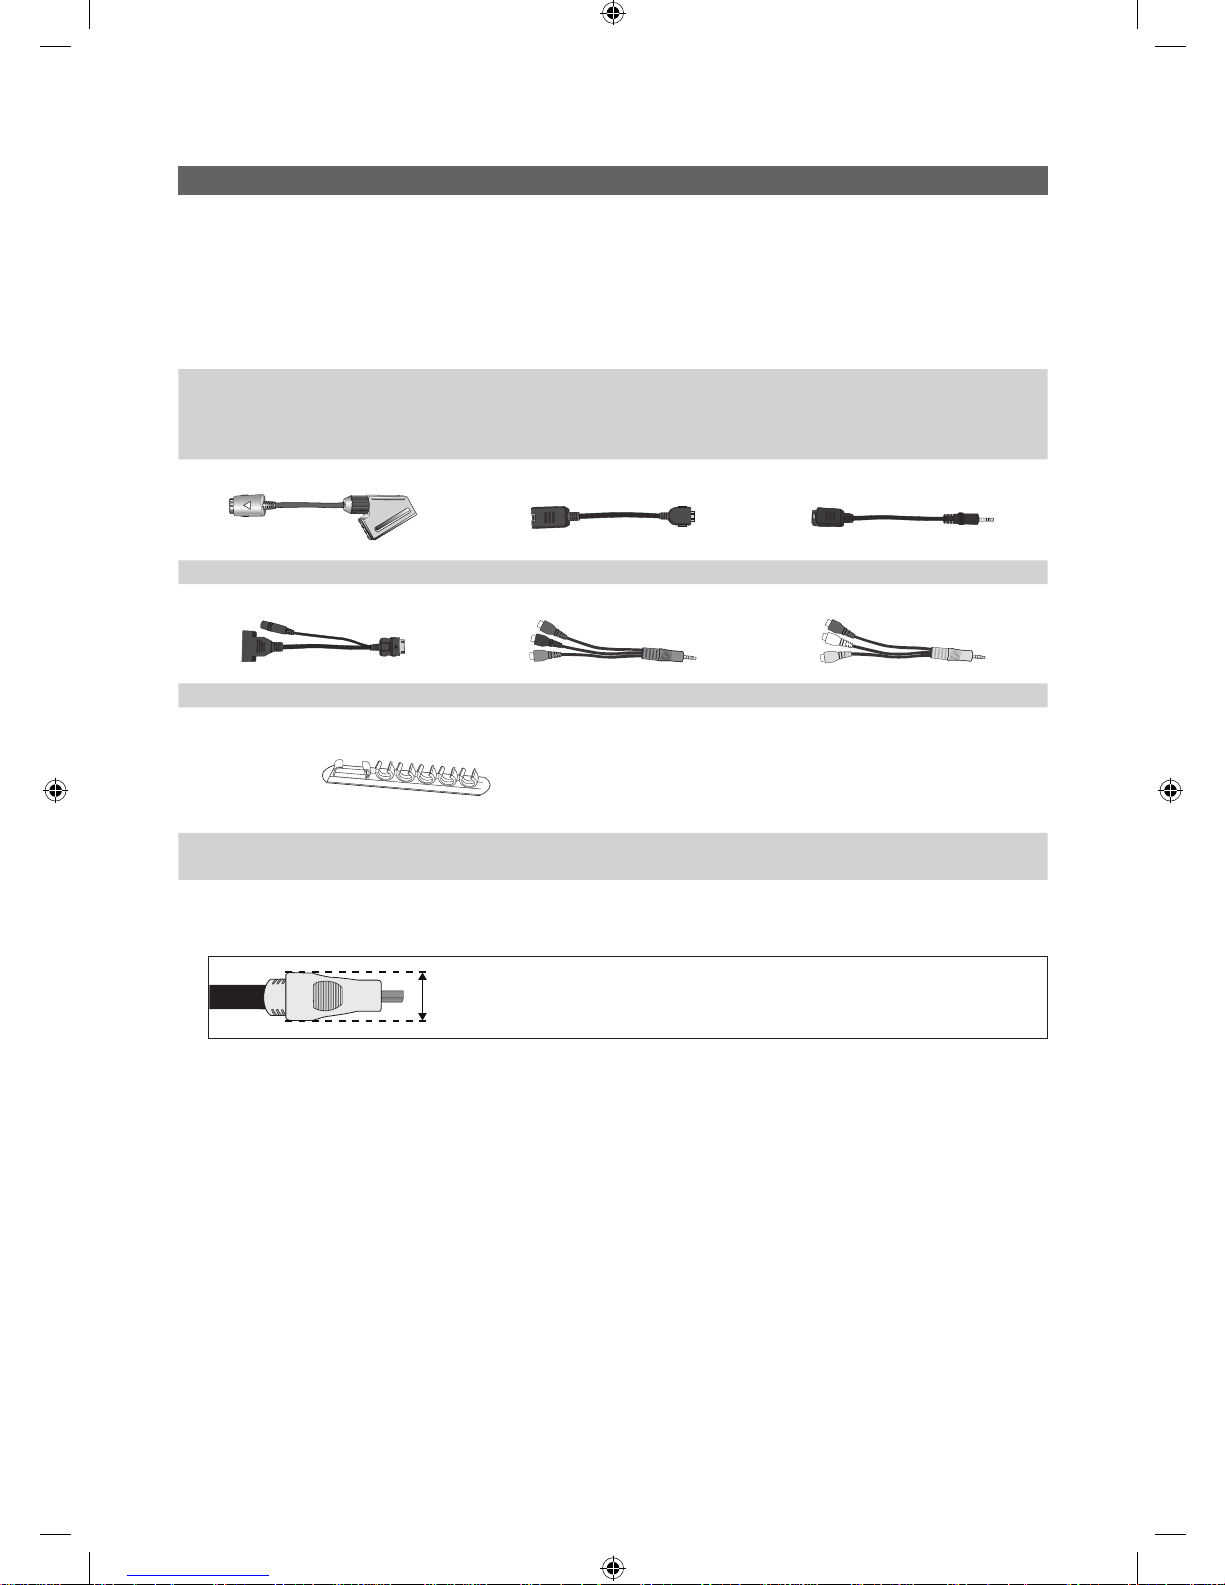
4
Русский
Начало работы
Принадлежности
✎✎
Убедитесь,✎что✎следующие✎принадлежности✎прилагаются✎к✎светодиодному✎LED-телевизору.✎Если✎какой-либо✎элемент✎комплекта✎
отсутствует,✎обратитесь✎к✎торговому✎представителю.
✎✎
Цвет✎и✎форма✎устройств✎могут✎различаться✎в✎зависимости✎от✎модели.
✎✎
Кабели,✎не✎входящие✎в✎комплект✎поставки,✎можно✎приобрести✎дополнительно.
✎✎
Не✎тяните✎непосредственно✎за✎адаптер✎локальной✎сети✎и✎адаптер✎SCART.
[[
ВНИМАНИЕ:[ВСТАВЬТЕ[НАДЕЖНО,[ЧТОБЫ[ИСКЛЮЧИТЬ[ВЕРОЯТНОСТЬ[ОТСОЕДИНЕНИЯ
✎y Пульт✎дистанционного✎управления✎и✎2✎батареи✎(AAA)
✎y Руководство✎пользователя
✎y Гарантийный✎талон,✎инструкция✎по✎технике✎безопасности✎(прилагается✎не✎
во✎всех✎странах)
✎y Чистящая✎салфетка
✎y Адаптер✎SCART✎ ✎y Адаптер✎локальной✎сети ✎y Оптический✎адаптер
✎y Адаптер✎компьютера ✎y Компонентный✎адаптер ✎y Адаптер✎AV
✎y Держатель✎проводов✎(4✎шт.)
(UE46C9000ZW,✎UE55C9000ZW)
✎✎
Для✎обеспечения✎кабельного✎соединения✎высокого✎качества✎с✎данным✎продуктом✎следует✎использовать✎кабели,✎максимальная✎
толщина✎которых✎не✎превышает✎указанные✎ниже✎значения.
✎y Максимальная✎толщина✎–✎14✎мм✎(0,55✎дюйма)
✎
2_BN68-02820G-Rus.indd 4 2010-05-25 오후 4:12:53
Page 65
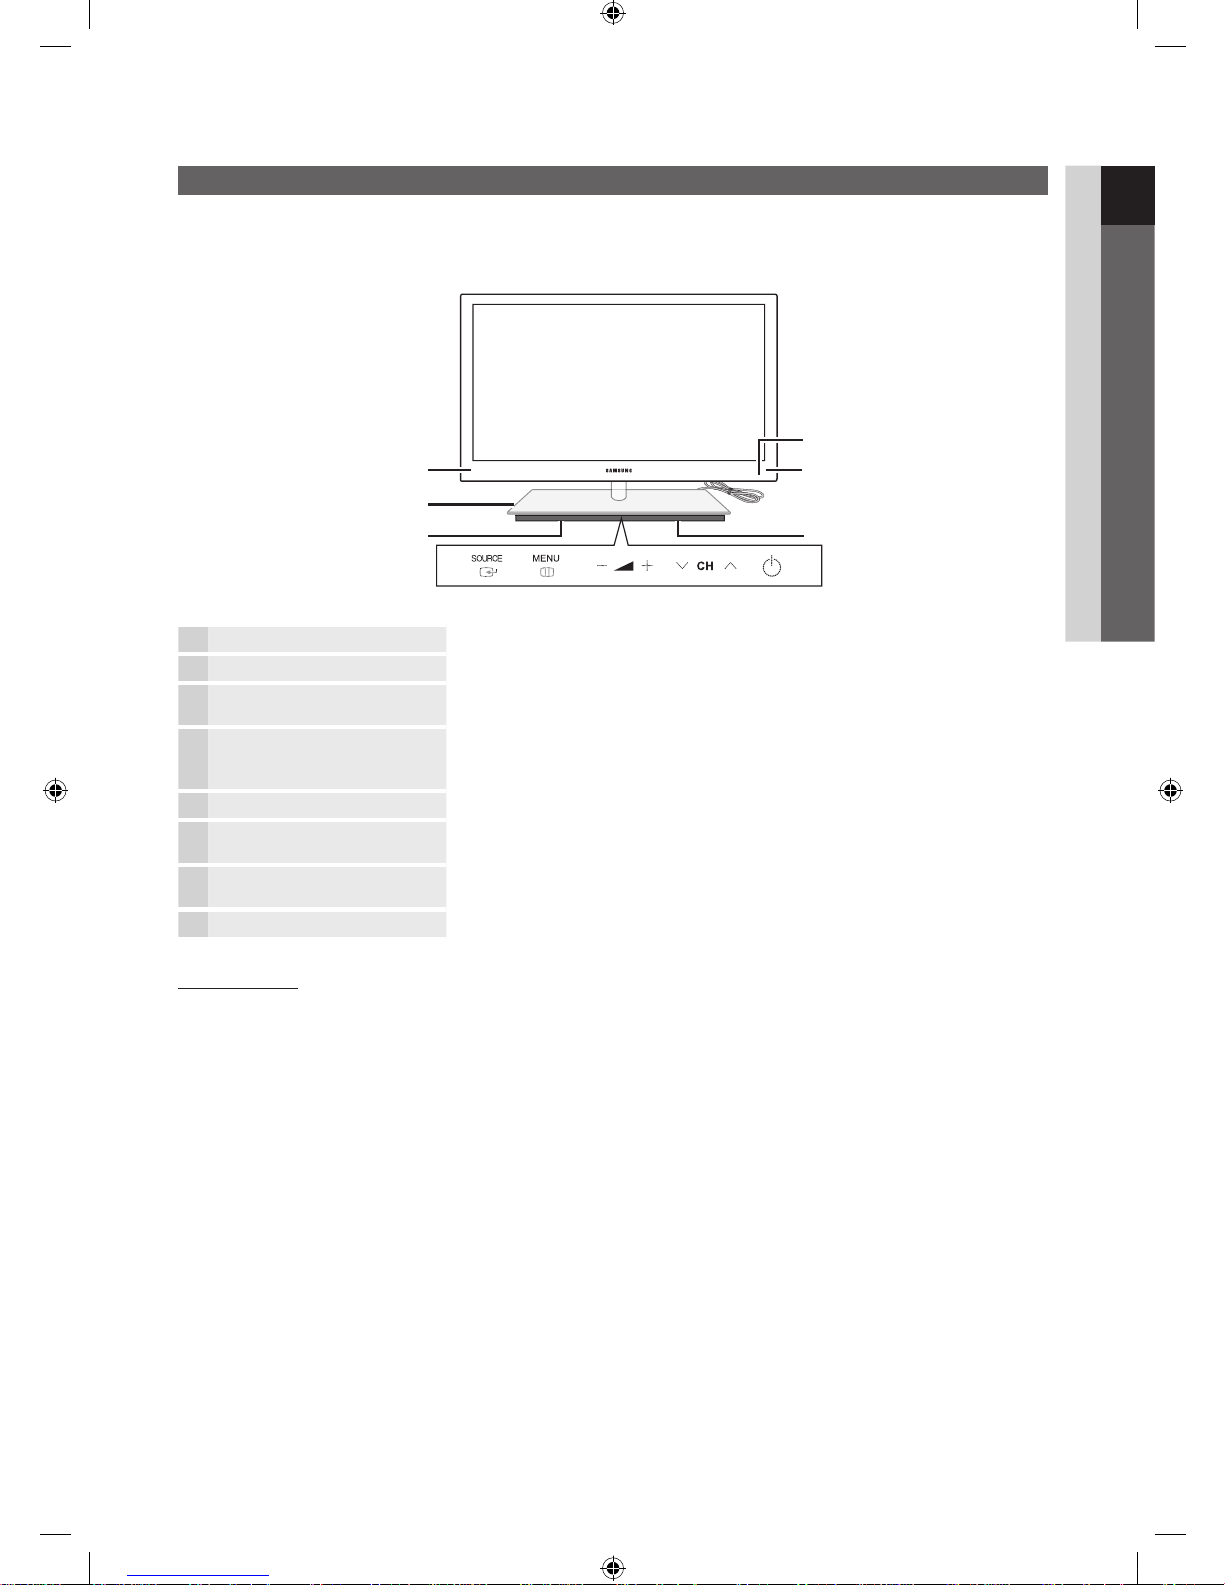
5
01 Начало работы
Русский
Обзор панели управления
✎
Цвет и форма устройства могут различаться в зависимости от модели.
Передатчик 3D-сигналов Индикатор на передатчике 3D-сигналов мигает только при передаче 3D-сигнала.
Индикатор питания Мигает и отключается при включенном питании; горит в режиме ожидания.
Датчик пульта дистанционного
управления
Направляйте пульт дистанционного управления на эту точку на панели управления
телевизора.
SOURCE
Переключение между всеми доступными источниками входящего сигнала. Эта кнопка
в экранном меню выполняет те же функции, что и кнопка ENTER на пульте
дистанционного управления.
MENU
Отображение экранного меню, в котором перечислены функции телевизора.
Настройка громкости. Кнопки
в экранном меню выполняют те же функции, что
и кнопки ◄ и ► на пульте дистанционного управления.
Переключение каналов. Кнопки
в экранном меню выполняют те же функции,
что и кнопки ▼ и ▲ на пульте дистанционного управления.
(питание)
Включение и выключение телевизора.
Режим ожидания
Не оставляйте телевизор в режиме ожидания надолго (например, уезжая в отпуск). Даже когда питание выключено, устройство
потребляет небольшое количество электроэнергии. Рекомендуется отключать кабель питания от сети.
Индикатор питания
Датчик пульта дистанционного
управления
Громкоговорители
Громкоговорители
Низкочастотный динамик
Передатчик 3D-сигналов
[UC9000]BN68-02820G-RU.indb 5 2010-05-25 오전 9:59:44
Page 66
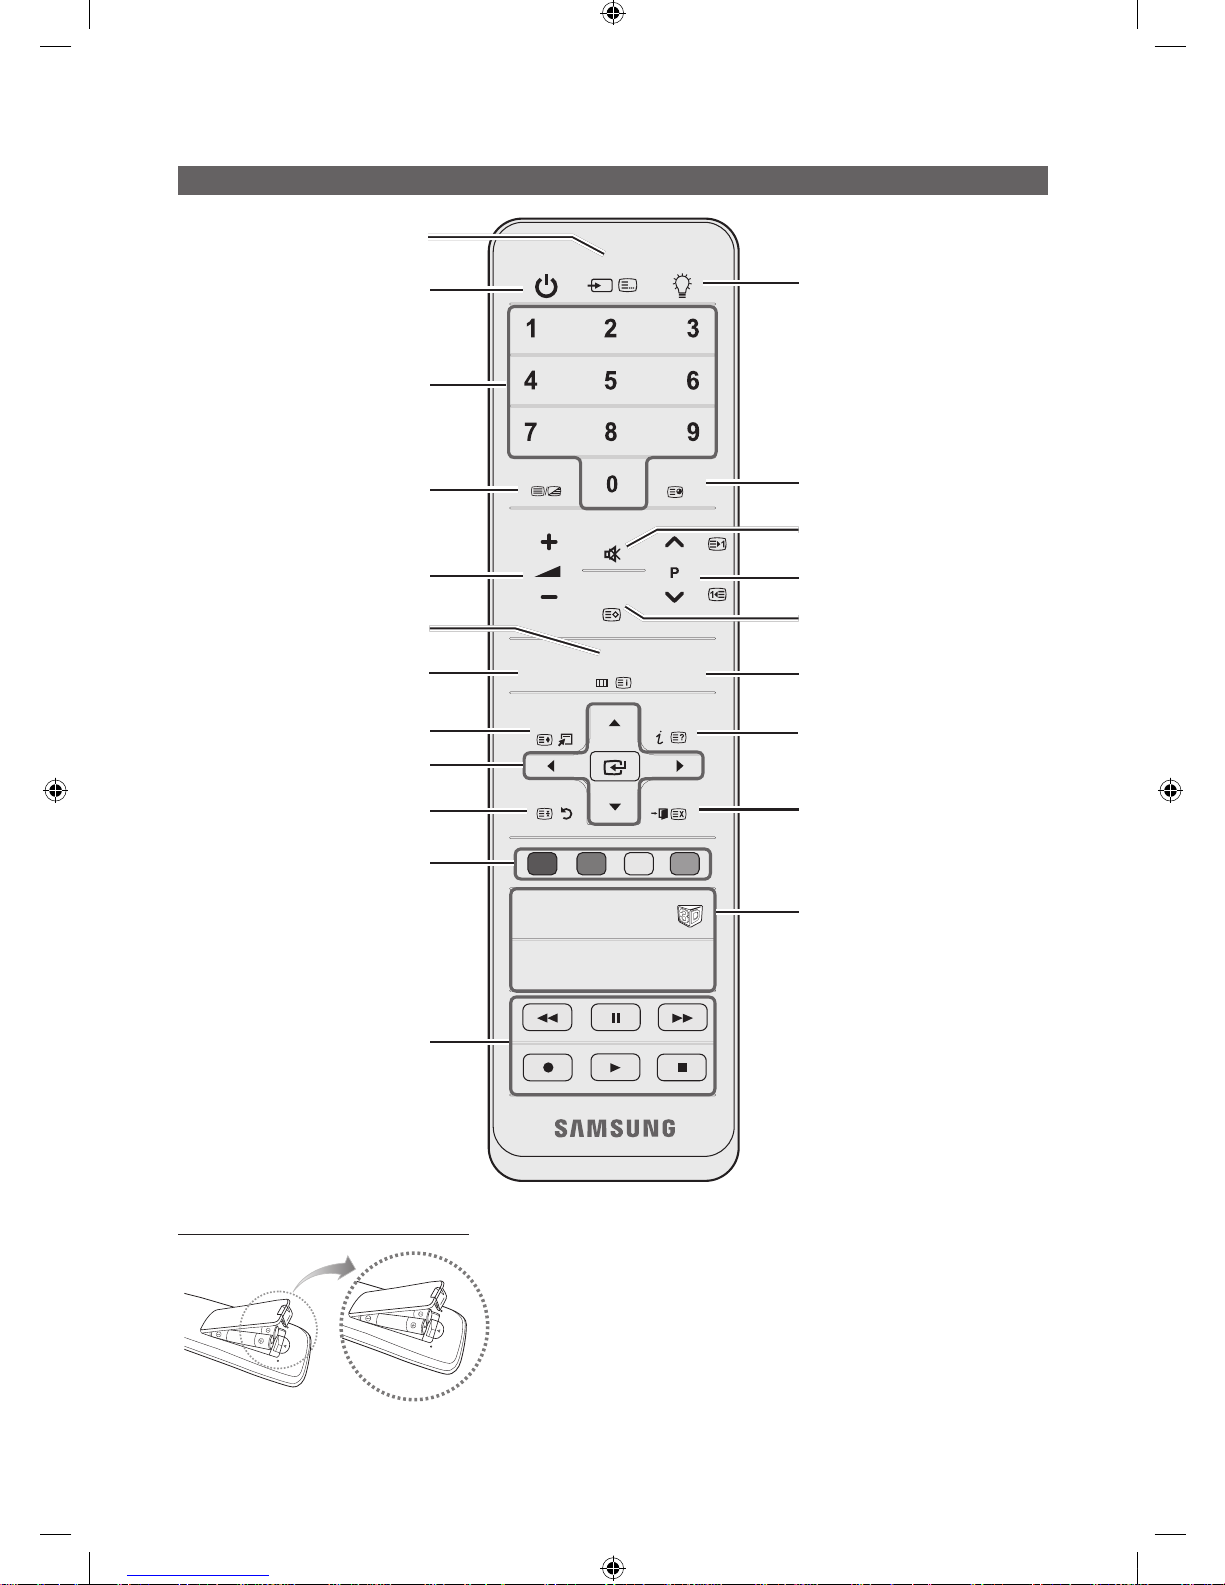
6
Начало работы
Русский
Обзор пульта дистанционного управления
Установка батарей (размер батарей: AAA)
✎
ПРИМЕЧАНИЕ
x
Используйте пульт дистанционного управления на расстоянии не более
7 метров от телевизора.
x
На работу пульта дистанционного управления может влиять яркий свет.
Старайтесь не включать рядом с телевизором люминесцентные или
неоновые лампы.
x
Цвет и форма могут различаться в зависимости от модели.
POWER SOURCE ON/OFF
PRE-CH
INTERNET
@TV
CONTENT
MEDIA.P
P.SIZEAD
SUBT.
A B C D
TTX/MIX
GUIDE
CH LIST
MUTE
TOOLS
RETURN
EXIT
INFO
MENU
Включение и выключение телевизора.
Просмотр и выбор доступных источников
видеосигнала (стр. 11).
Включение или выключение
подсветки пульта дистанционного
управления. Когда функция подсветки
включена, кнопки ненадолго
подсвечиваются при нажатии.
(Использование функции подсветки
на пульте дистанционного управления
сокращает срок службы батарей.)
Возвращение к предыдущему каналу.
Временное отключение звука.
Переключение каналов.
Отображение на экране списка
каналов (стр. 14).
Отображение электронного телегида
(стр.12).
Отображение информации на экране
телевизора.
Выход из меню.
Прямой доступ к каналам.
Настройка громкости.
Альтернативный выбор значений
телетекста: ВКЛЮЧЕН, Двойной,
Смешанный или ВЫКЛЮЧЕН.
Открытие экранного меню.
Быстрый выбор часто используемых
функций.
Отображение режима
Просм. содержимого с функциями Телегид,
Internet@TV, Media Play и AllShare.
Возврат к предыдущему меню.
Выбор элементов экранного меню и
изменение значений.
Кнопки для упраления меню Диспетчер
каналов, Internet@TV, Media Play и т.д.
Кнопки для работы в режимах Media Play
и Anynet+ (стр. 35, 44).
(Кнопку также можно использовать
для управления записью на устройствах
записи Samsung с функциями Anynet+,
TimeShift и PVR.)
MEDIA.P: отображение меню
Media Play (стр. 35).
INTERNET@TV: ссылка на различные
интернет-службы (стр. 48).
3D:
выбор видео с сигналом 3D (стр. 19).
AD: включение и выключение
описания аудио (стр. 22). Эта функция
доступна не во всех странах.
P.SIZE: выбор размера изображения
(стр. 17).
SUBT.: отображение цифровых
субтитров (стр. 24).
[UC9000]BN68-02820G-RU.indb 6 2010-05-25 오전 9:59:45
Page 67
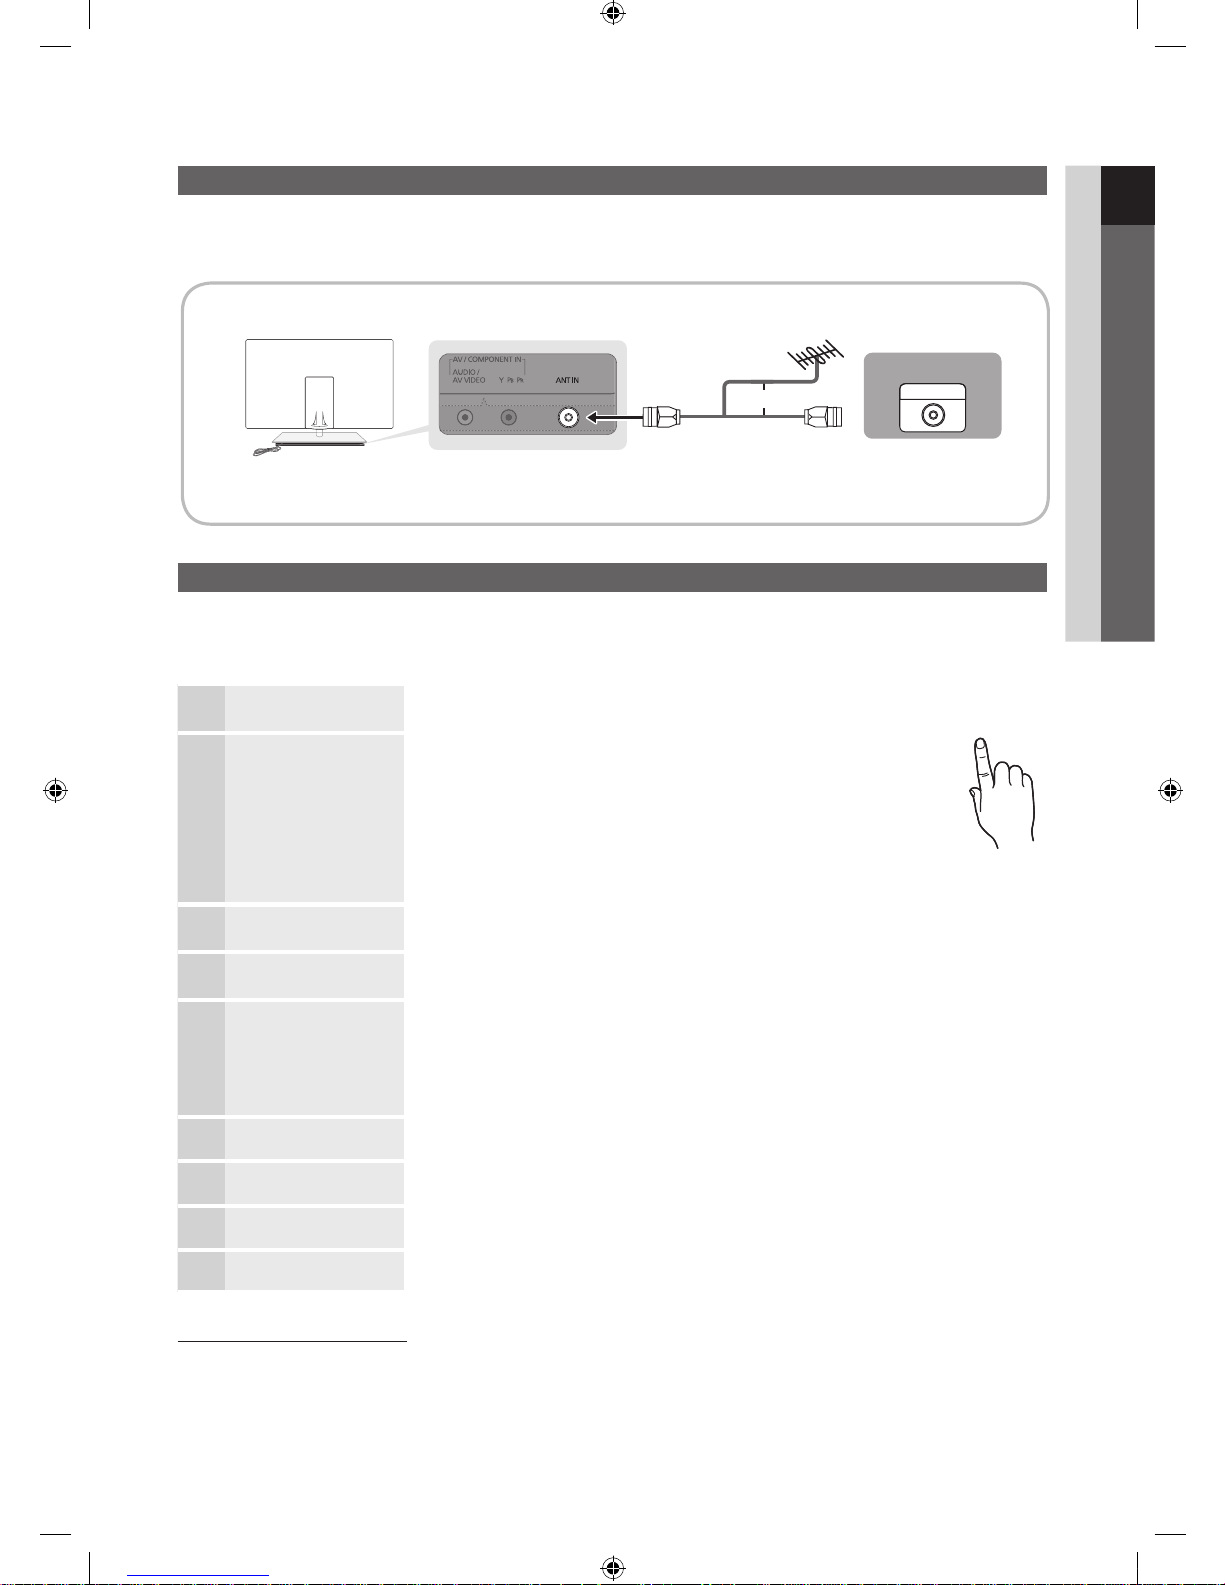
7
01 Начало работы
Русский
Подключение к антенне
При первом включении телевизора основные параметры настраиваются автоматически.
✎
Предварительная установка: подсоединение кабеля питания и антенны.
Функция Plug & Play (исходная настройка)
При первом включении телевизора на экране последовательно отображаются инструкции по настройке основных параметров.
Нажмите кнопку POWER. Функция Plug & Play доступна, если в качестве источника входного сигнала Вход выбрано значение ТВ.
✎
Чтобы вернуться к предыдущему шагу, нажмите красную кнопку.
1
Выбор языка
Выберите нужный параметр с помощью кнопки ▲ или ▼ и нажмите
ENTER
. Выберите язык экранного меню.
P
POWER
2
Выбор режима
Демонстрация или
Домашний
Выберите нужный параметр с помощью кнопки ◄ или ► и нажмите
ENTER
.
y Выберите режим Домашний. Режим Демонстрация предназначен
только для точек розничной торговли.
y Переход из режима Демонстрация в стандартный режим Домашний:
нажмите кнопку регулировки громкости на телевизоре. Когда
появится экранное меню, нажмите и удерживайте кнопку MENU в
течение 5 секунд.
3
Выбор страны
Выберите нужный параметр с помощью кнопки ▲ или ▼ и нажмите ENTER
.
Выберите подходящую страну.
4
Выбор антенны
Выберите нужный параметр с помощью кнопки ▲ или ▼ и нажмите ENTER
.
Выберите Антенна или Кабель.
5
Выбор канала
Выберите нужный параметр с помощью кнопки ▲ или ▼ и нажмите ENTER
.
выбор источника канала для сохранения. Если в качестве источника антенны выбрать Кабель,
появится возможность присвоить номера (частоты) каналам. Для получения дополнительных
сведений выберите Канал → Автонастройка (стр. 14).
✎
Если потребуется прервать процесс сохранения, нажмите кнопку ENTER в любой момент.
6
Настройка Режим часов
Режим часов можно настроить вручную или автоматически. С помощью кнопки ▲ или ▼
выберите пункт Авто, затем нажмите кнопку ENTER
.
7
Часовой пояс
С помощью кнопки ▲ или ▼ выберите часовой пояс, затем нажмите кнопку ENTER
.
(зависит от страны)
8
Просмотр Руководство
по соединению c ТВЧ.
Будет указан метод подключения, обеспечивающий лучшее качество изображения на экране
высокой четкости.
9
Приятного просмотра!
Нажмите кнопку ENTER
.
Сброс настроек данной функции
Выберите Настройка-Plug & Play (исходная настройка). Введите 4-значный PIN-код. По умолчанию используется PIN-код “0-0-0-0”.
Если потребуется изменить PIN-код, используйте функцию Изменение PIN.
ANT OUT
Антенна VHF/UHF
Cable
или
[UC9000]BN68-02820G-RU.indb 7 2010-05-25 오전 9:59:46
Page 68
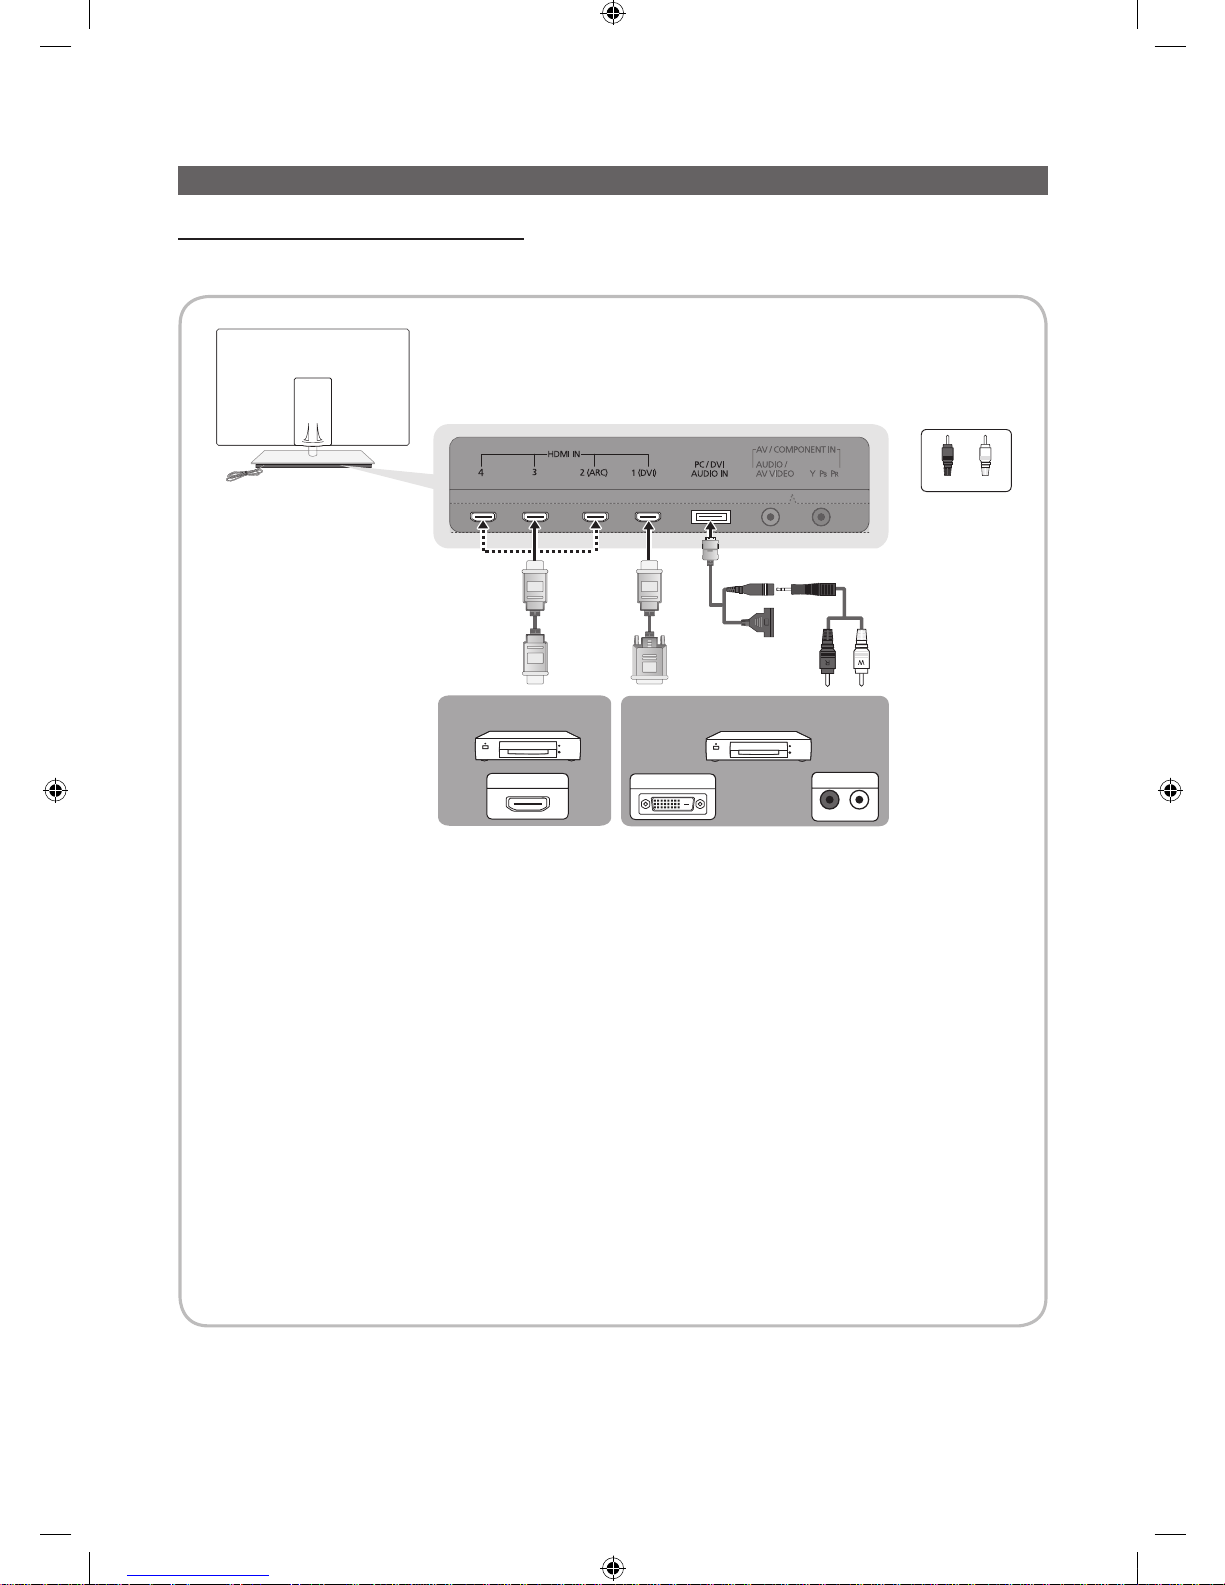
8
Русский
Подключение
Подключение к устройству AV
С помощью кабеля HDMI или HDMI/DVI (до 1080p)
Допустимые устройства: проигрыватель DVD-дисков, проигрыватель дисков Blu-ray, приемник кабельного/спутникового
телевидения (видеоприставка), приемник кабельного/спутникового телевидения высокой четкости (видеоприставка)
✎
HDMI IN 1(DVI), 2(ARC), 3, 4, PC/DVI AUDIO IN
x
Для более высокого качества изображения и звука при подключении к цифровому устройству используйте кабель HDMI.
x
Кабель HDMI поддерживает цифровые видео- и аудиосигналы, поэтому подключение аудиокабеля не требуется.
– Для подключения телевизора к цифровому устройству без разъема HDMI следует использовать кабель HDMI/DVI
и аудиокабель.
x
При подключении к телевизору внешнего устройства, на котором используется старая версия режима HDMI,
изображение может быть искажено (или отсутствовать) или может не работать звук. В случае возникновения такой
проблемы свяжитесь с производителем внешнего устройства, узнайте версию HDMI и при необходимости закажите
обновление.
x
Следует использовать кабель HDMI, толщина которого не более 14 мм.
x
При использовании других кабелей может отсутствовать изображение или произойти ошибка подключения.
x
Рекомендуется использовать высокоскоростной кабель HDMI, стандартный или с Ethernet. Данное устройство не
поддерживает функцию Ethernet через HDMI.
x
Данное устройство поддерживает работу функций 3D и ARC (Audio Return Channel) через кабель HDMI. Обратите
внимание, что работа функции ARC возможна только при подключении через порт HDMI IN 2(ARC).
– Если для параметра Автом. просмотр 3D установлено значение Вкл., то некоторые функции, например Internet@
TV, могут быть отключены. В этом случае установите для параметра Автом. просмотр 3D или Режим 3D
значение Выкл..
x
Функция ARC обеспечивает вывод цифрового аудиосигнала через порт HDMI IN 2(ARC). Использование функции ARC
возможно только в том случае, когда телевизор подключен к аудиоприемнику, поддерживающему эту функцию.
Белый
Красный
WR
DVI OUT
R-AUDIO-L
AUDIO OUT
HDMI OUT
Проигрыватель DVD-дисков/
дисков Blu-ray
Проигрыватель DVD-дисков/дисков Blu-ray
[UC9000]BN68-02820G-RU.indb 8 2010-05-25 오전 9:59:48
Page 69
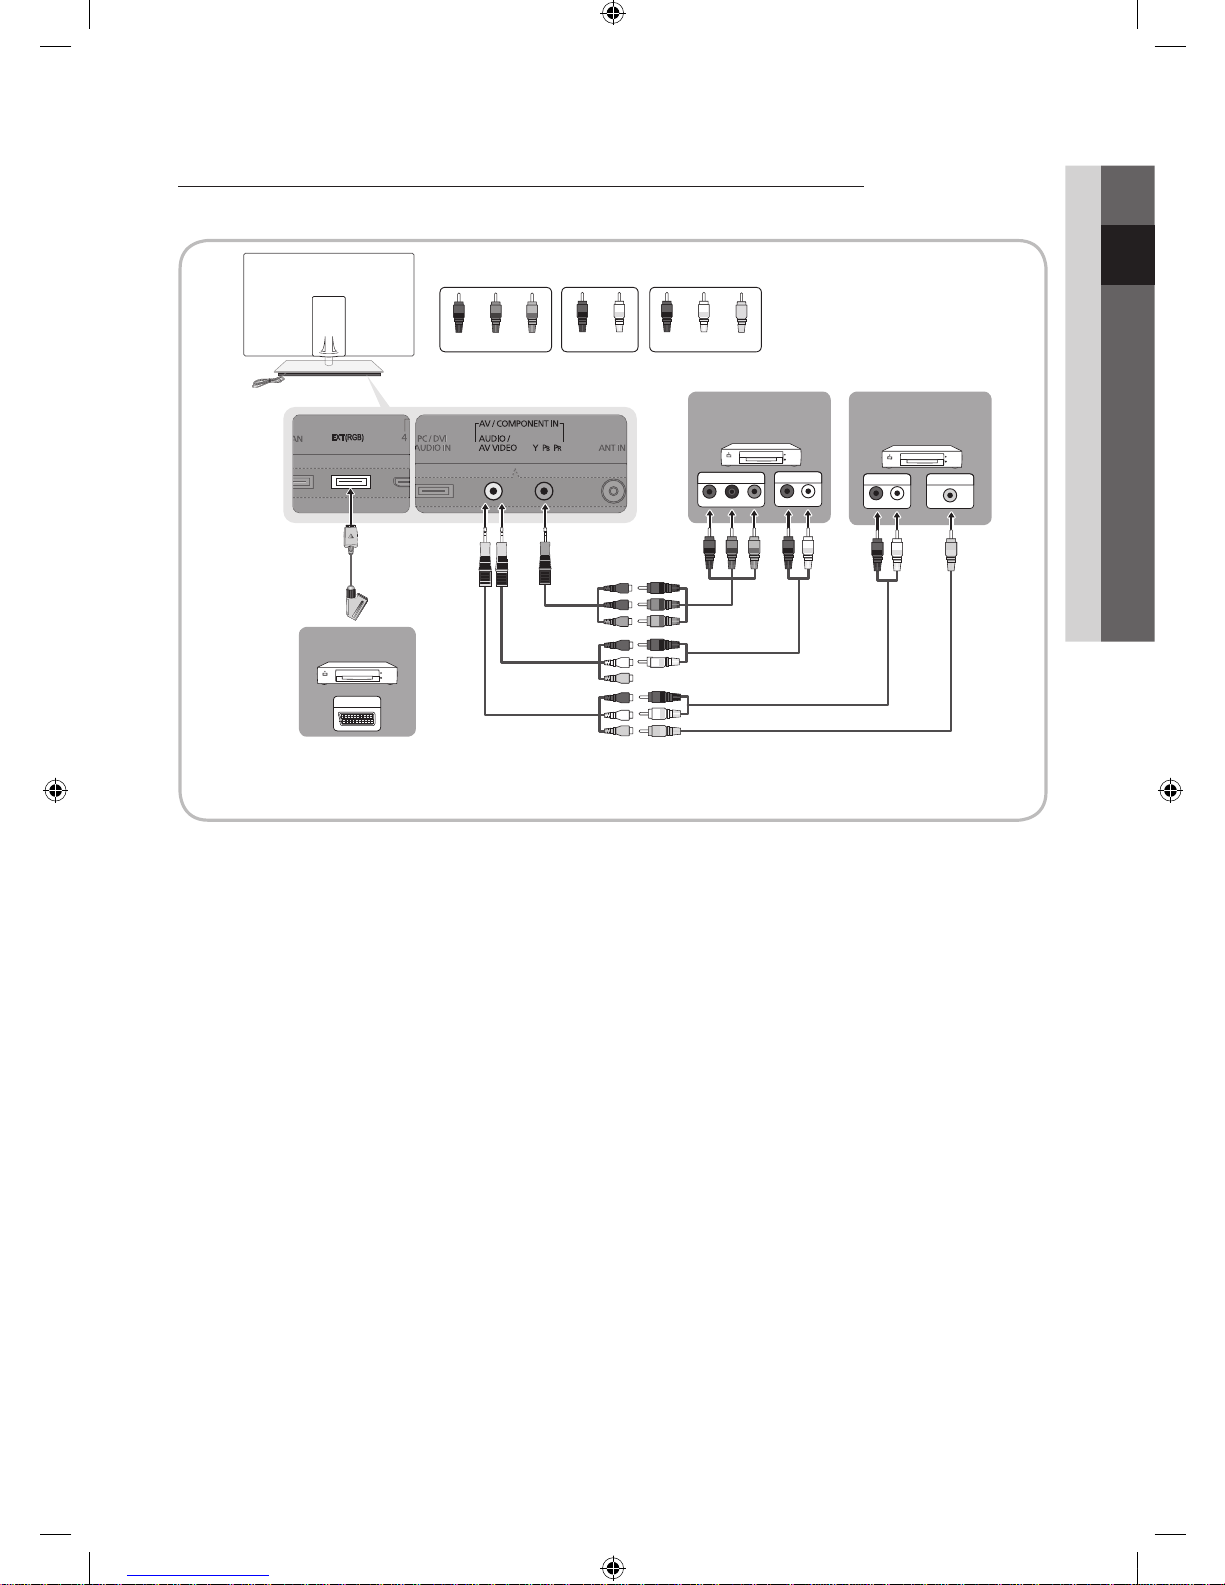
9
Русский
02 Подключение
С помощью компонентного кабеля (до 1080p) или аудио-/видео кабеля (только 480i) и кабеля Scart
Допустимые устройства: проигрыватель DVD-дисков, проигрыватель дисков Blu-Ray, приемник кабельного или спутникового
телевидения (видеоприставка), видеомагнитофон
✎
В режиме Внешний вывод цифрового ТВ поддерживает только видеосигнал в формате MPEG SD и аудиосигнал.
✎
Чтобы максимально повысить качество воспроизведения, рекомендуется подключить компонентный кабель к аудио/видео
выводам.
PR PB Y
COMPONENT OUT
AUDIO OUT
R-AUDIO-L
W
R
RGB
AUDIO OUT
R-AUDIO-L
VIDEO OUT
W R
R
B
G
WR
R
G
B
W R
W Y
Y
R
EXT
Y
W
R
Красный КрасныйСиняя БелыйЗеленый
VHS
VHS
DVD / Проигрыватель
Blu-ray
Красный Белый Желтый
[UC9000]BN68-02820G-RU.indb 9 2010-05-25 오전 9:59:49
Page 70
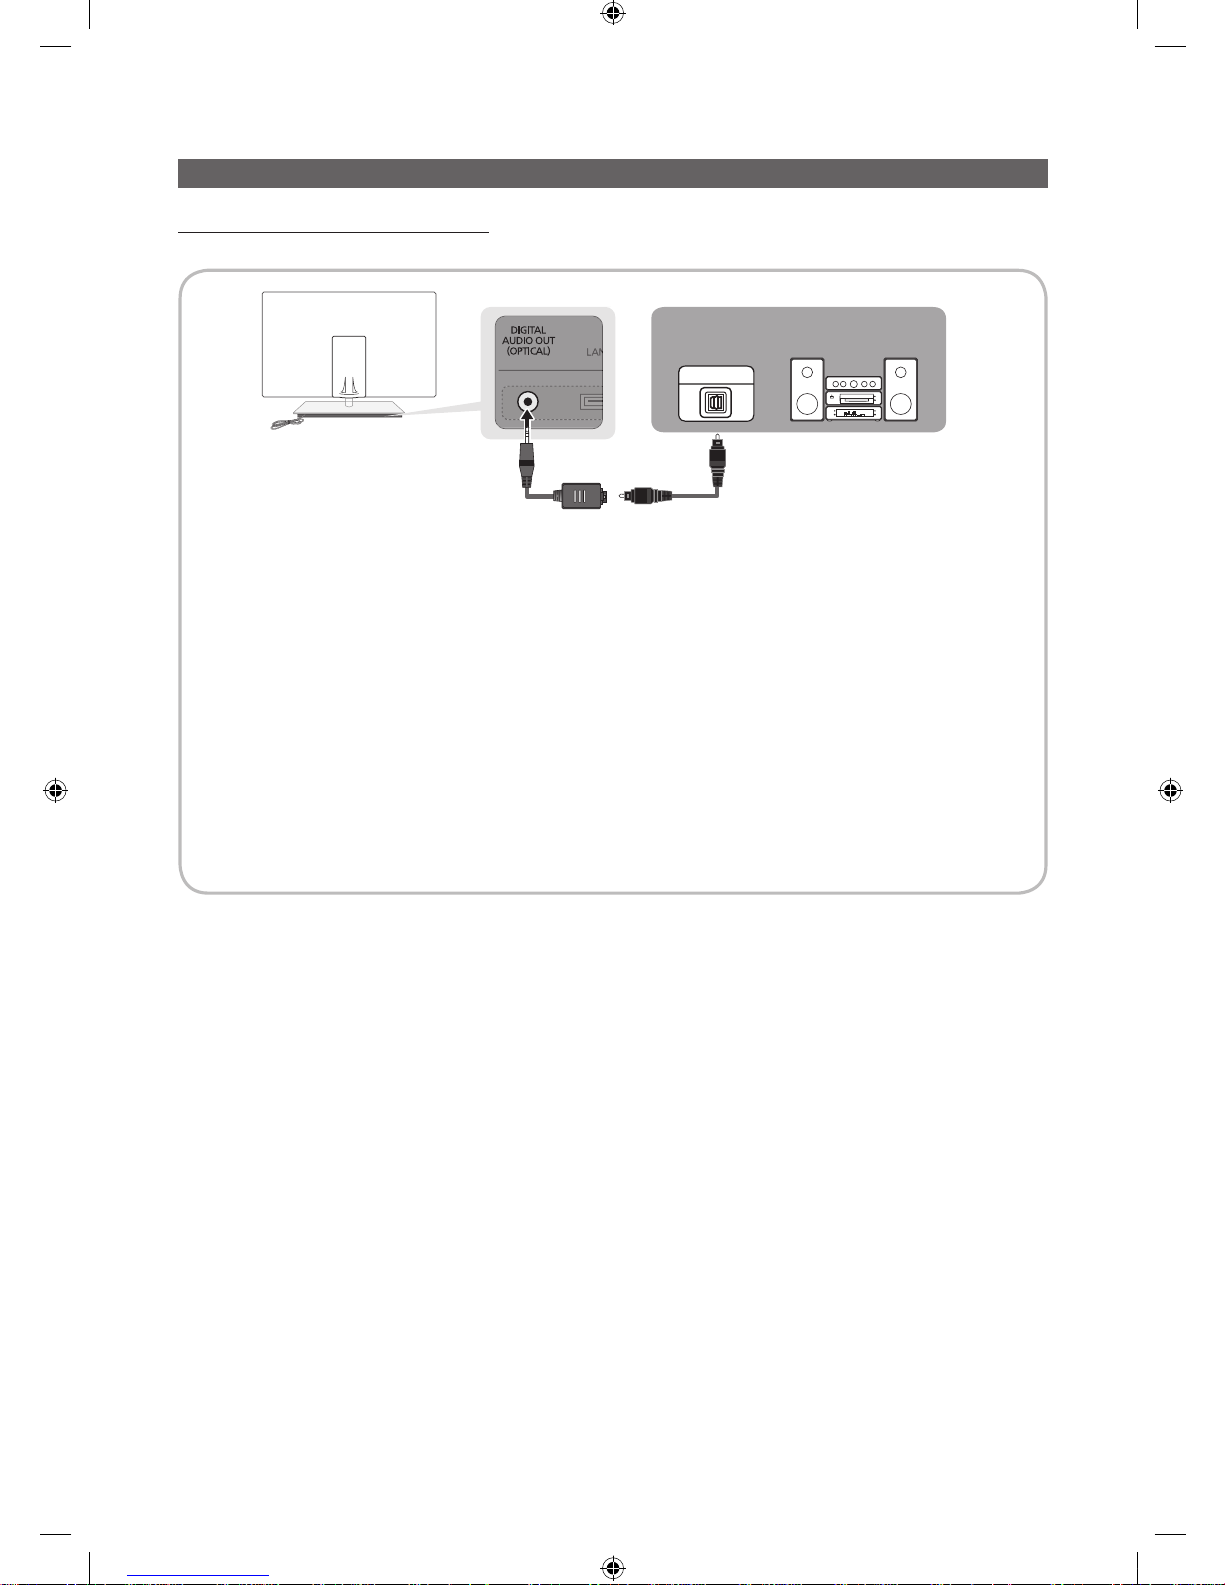
10
Русский
Подключение
Подключение к аудиоустройству
С помощью оптического (цифрового) кабеля
Допустимые устройства: цифровая аудиосистема, усилитель, домашний кинотеатр с DVD-проигрывателем
✎
DIGITAL AUDIO OUT (OPTICAL)
x
При подключении цифровой аудиосистемы к гнезду DIGITAL AUDIO OUT (OPTICAL) уменьшите громкость на телевизоре
и на аудиосистеме.
x
5.1-канальное звучание возможно в том случае, если телевизор подключен к внешнему устройству, поддерживающему
5.1-канальное звучание.
x
Если приемник (домашний кинотеатр) включен, звук будет выводиться через оптический разъем на телевизоре. Если
телевизор принимает цифровой телесигнал, то на приемник домашнего кинотеатра звук будет передаваться в формате
5.1. Если в качестве источника используется цифровое устройство, подключенное к телевизору через гнездо HDMI,
например, DVD-проигрыватель, проигрыватель дисков Blu-ray, приемник кабельного или спутникового телевидения
(видеоприставка), то приемник домашнего кинотеатра обеспечивает только 2-канальное звучание. Если требуется
5.1-канальное звучание, подключите проигрыватель DVD-дисков, проигрыватель дисков Blu-ray, приемник кабельного
или спутникового телевидения (телеприставку) напрямую через цифровой аудиовыход к усилителю или домашнему
кинотеатру.
OPTICAL
digital audio system
[UC9000]BN68-02820G-RU.indb 10 2010-05-25 오전 9:59:49
Page 71
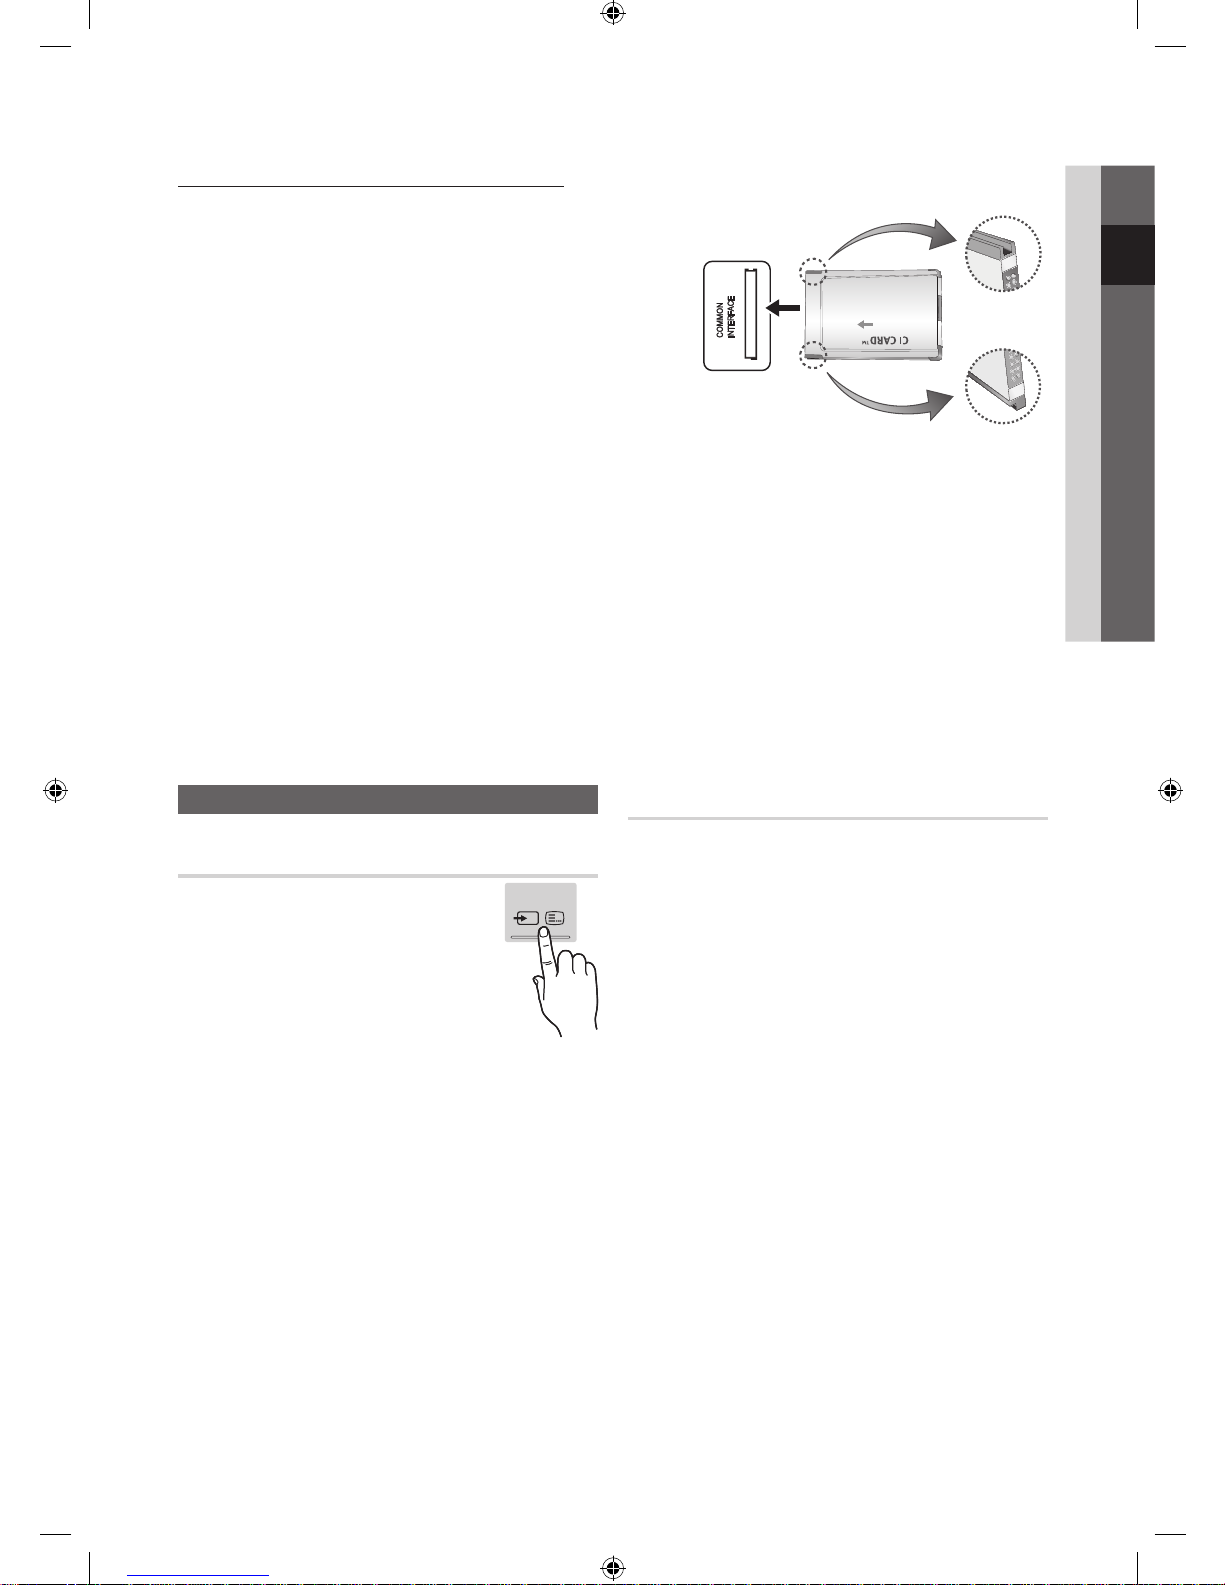
11
Русский
02 Подключение
Смена источника входных сигналов
Список источников
Используется для выбора телевизора
или других внешних источников ввода,
подключенных к телевизору, например,
DVD-проигрывателей, проигрывателей
дисков Blu-ray, приемников кабельного или
спутникового телевидения (видеоприставок).
■ ТВ / Внешний / ПК / AV / Компонент /
HDMI1/DVI / HDMI2 / HDMI3 / HDMI4
/ USB
✎
Подключенные источники входных сигналов
выделяются в меню Список источников.
✎
Источники Внешний и ПК всегда включены.
Редактир. назв.
■ VHS / DVD / Кабельное ТВ / Спутниковая прист. / PVR /
АV ресивер / Игра / Камера / ПК / DVI PC / Устройства
DVI / ТВ / IP TB / Blu-ray / HD DVD / DMA: укажите
название устройства, подключнного к входным разъемам,
для упрощения процедуры выбора источника.
✎
Если к разъему HDMI IN 1(DVI) подключен компьютер
с разрешением 1920 x 1080 и частотой 60 Гц, то
необходимо выбрать режим DVI PC в меню Редактир.
назв..
✎
Если к разъему HDMI IN 1(DVI) подключен кабель
HDMI/DVI, то необходимо установить режим DVI PC или
Устройства DVI в меню Редактир. назв..
✎
Если кабель HDMI подключен к порту HDMI IN 1 (DVI),
звук может не работать. В этом случае выполните
подключение к порту PC/DVI AUDIO IN.
ПОДКЛЮЧЕНИЕ ЧЕРЕЗ ГНЕЗДО COMMON INTERFACE
Для просмотра платных каналов необходимо установить карту CI CARD
или CI+ CARD.
y Если этого не сделать, отобразится сообщение “Сигнал
закодирован”.
y Через 2-3 минуты после установки на экране отобразится
информация о согласовании, содержащая номер телефона,
идентификатор карты CI CARD или CI+ CARD, идентификатор хоста
и другие сведения. Если появится сообщение об ошибке, обратитесь
к поставщику услуги.
y После того, как настройка сведений о каналах будет закончена,
на экране отобразится сообщение “Обновление завершено”,
сигнализирующее, что список каналов обновлен.
✎
ПРИМЕЧАНИЕ
x
Карту CI CARD или CI+ CARD можно приобрести у местного поставщика услуг кабельного телевидения.
x
Извлекайте карту CI CARD или CI+ CARD, аккуратно придерживая ее, поскольку падение карты может привести к ее
повреждению.
x
Вставляйте карту CI CARD или CI+ CARD в направлении, указанном на ней.
x
Расположение гнезда COMMON INTERFACE может отличаться в зависимости от модели устройства.
x
В некоторых странах и регионах карты CI CARD или CI+ CARD не поддерживаются. Уточните это у официального дилера.
x
При возникновении проблем обратитесь к поставщику услуги.
x
Вставьте карту CI CARD или CI+ CARD, поддерживающую текущие настройки антенны. Изображение на экране будет
отсутствовать или искажено.
SOURCE
[UC9000]BN68-02820G-RU.indb 11 2010-05-25 오전 9:59:50
Page 72
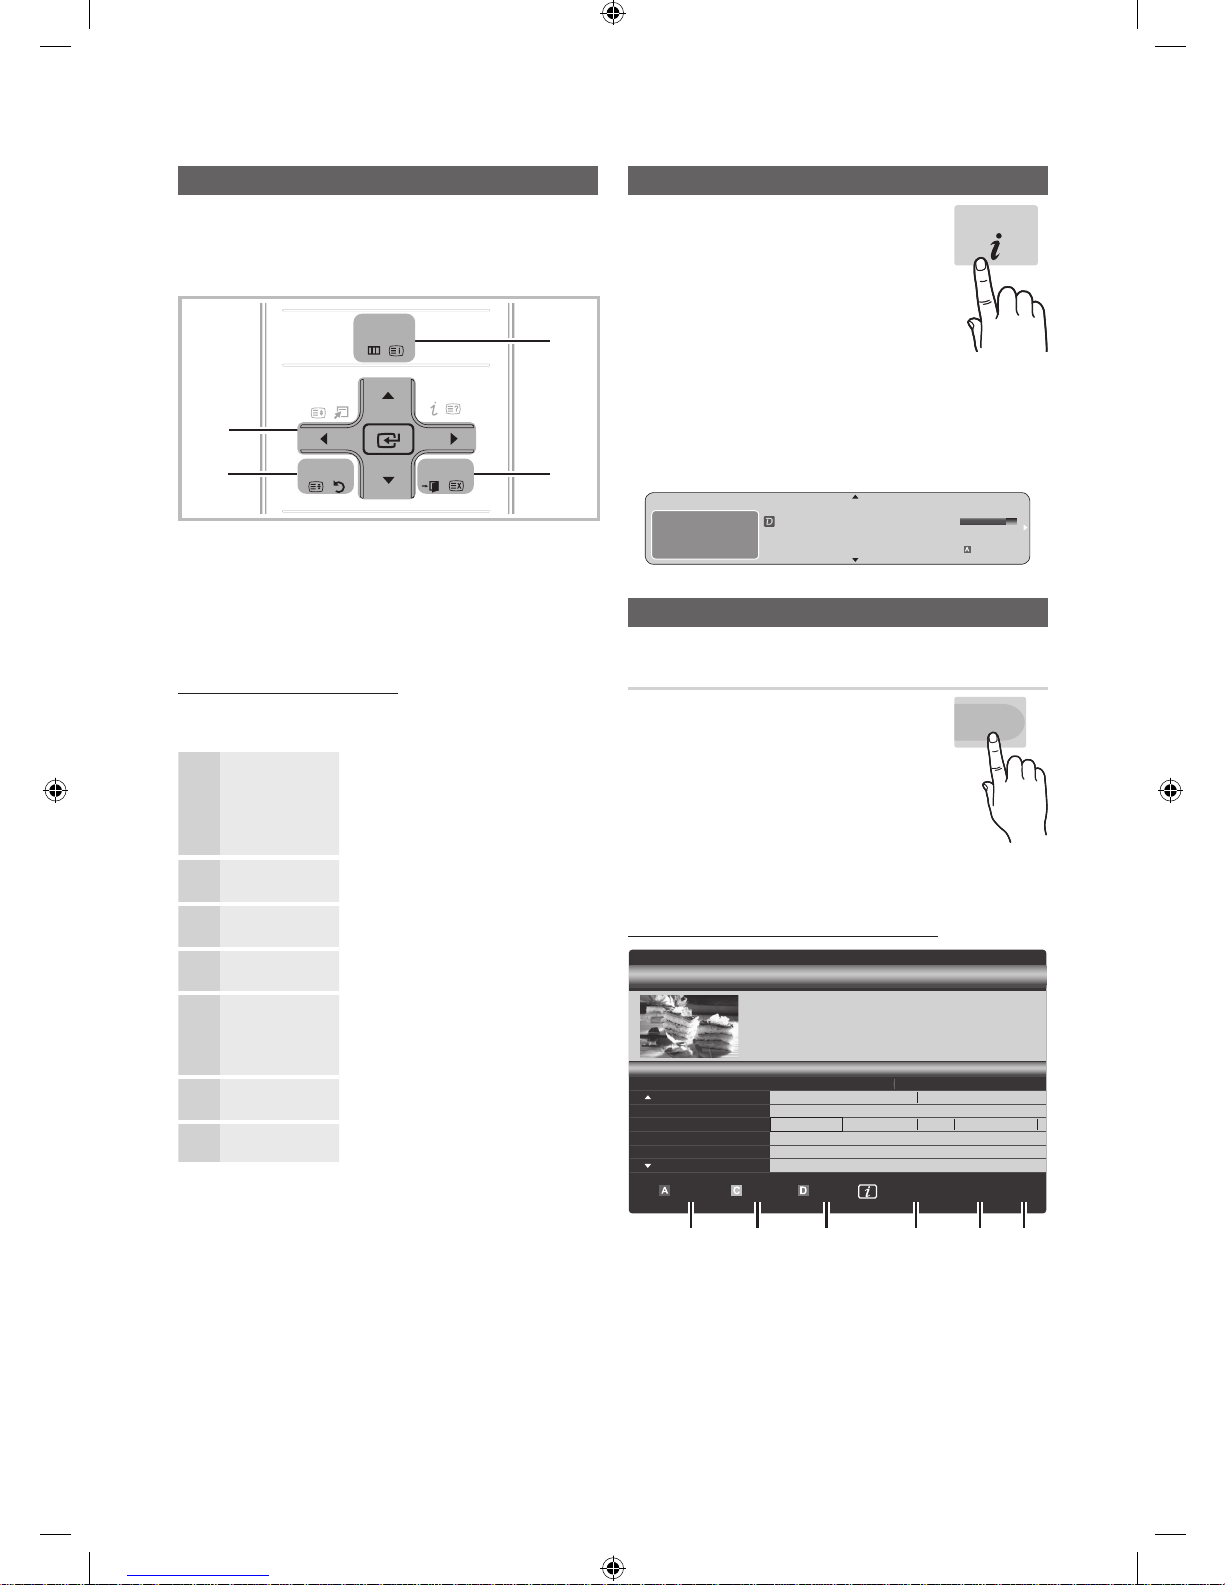
12
Русский
Основные операции
Работа с меню
Прежде чем приступать к использованию телевизора,
просмотрите следующие инструкции, чтобы знать, как
осуществляется навигация по меню для выбора и настройки
различных функций.
PO
WER
S
OURC
E
ON/O
FF
PRE-
CH
CO
NTENT
TTX/MI
X
G
UID
E
C
H LIST
MUTE
TOOL
S
INF
O
2
1
4
3
RETURN
EXIT
MENU
1 ENTER / кнопка управления: перемещение курсора для
выбора пункта меню. Подтверждение настройки.
2 Кнопка RETURN: Возврат к предыдущему меню.
3 Кнопка MENU: вызов главного экранного меню.
4 Кнопка EXIT: выход из экранного меню.
Использование экранных меню
Набор доступных параметров зависит от того, какое меню
выбрано.
1
MENU
На экране отображаются пункты
главного меню:
Изображение, Звук, Канал,
Настройка, Вход, Приложение,
Поддержка.
2
▲ / ▼
Для выбора пункта меню
используйте кнопки ▲ и ▼.
3
ENTER
Нажмите ENTER для перехода в
подменю.
4
▲ / ▼
Для выбора подменю используйте
кнопки ▲ и ▼.
5
◄ / ►
Для выбора значений используйте
кнопки ◄ и ►. Способ настройки
экранного меню может отличаться в
зависимости от его типа.
6
ENTER
Нажмите ENTER для завершения
настройки.
7
EXIT
Нажмите EXIT.
Использование кнопки INFO – Текущая и следующая программы
На дисплее отображается номер текущего
канала и состояние некоторых настроек
аудио и видео.
В окне текущей и следующей программы
отображаются ежедневно обновляемые
сведения о телепрограммах, идущих на всех
каналах в определенное время.
y Чтобы найти нужную программу на
текущем канале, воспользуйтесь кнопками ◄ и ►.
y Чтобы просмотреть программу телепередач для
других каналов, воспользуйтесь кнопками ▲ и ▼. Если
необходимо перейти на выбранный канал, нажмите кнопку
ENTER
.
DTV Air
15
DEF
18:00 ~ 6:00
Life On Venus Ave nue
Unclass ified
No Det aild Infor mation
E
Планирование просмотра
Телегид
Сведения о программах в электронном
телегиде (EPG) предоставляются
вещательными компаниями. Используя
программу телепередач, составленную
вещательной компанией, можно заранее
выбрать программы для просмотра, чтобы в
указанное время телевизор автоматически
переключился на нужный канал. В
зависимости от состояния канала сведения о программах
могут быть устаревшими или не отображаться вовсе.
Использование функции просмотра каналов
INFO
GUIDE
18:11 Чт 6 Янв
Часы
Информация
DTV Air 800 five
Home and Away
18:00 - 18:30
Drama
Dani is devastated when scott makes clear his views on marriage...
27
28
800
24
16
6
Discovery
DiscoveryH&L
five
price-drop.tv
QVC
R4DTT
American Chopper
Programmes resume at 06:00
Home and...
No Information
QVC Selection
No Information
Tine Team
Fiv...
18:00 - 19:00 19:00 - 20:00
)
Family Affairs
)
Dark Angel
800 five
Реж.просм +24 часа Реж.кан. Информация Страница
Часы
2:10 Вт 1 Июн
Телегид
Просм.канал. - ТВ
1 2 3 4 5 6
Сегодня
[UC9000]BN68-02820G-RU.indb 12 2010-05-25 오전 9:59:53
Page 73
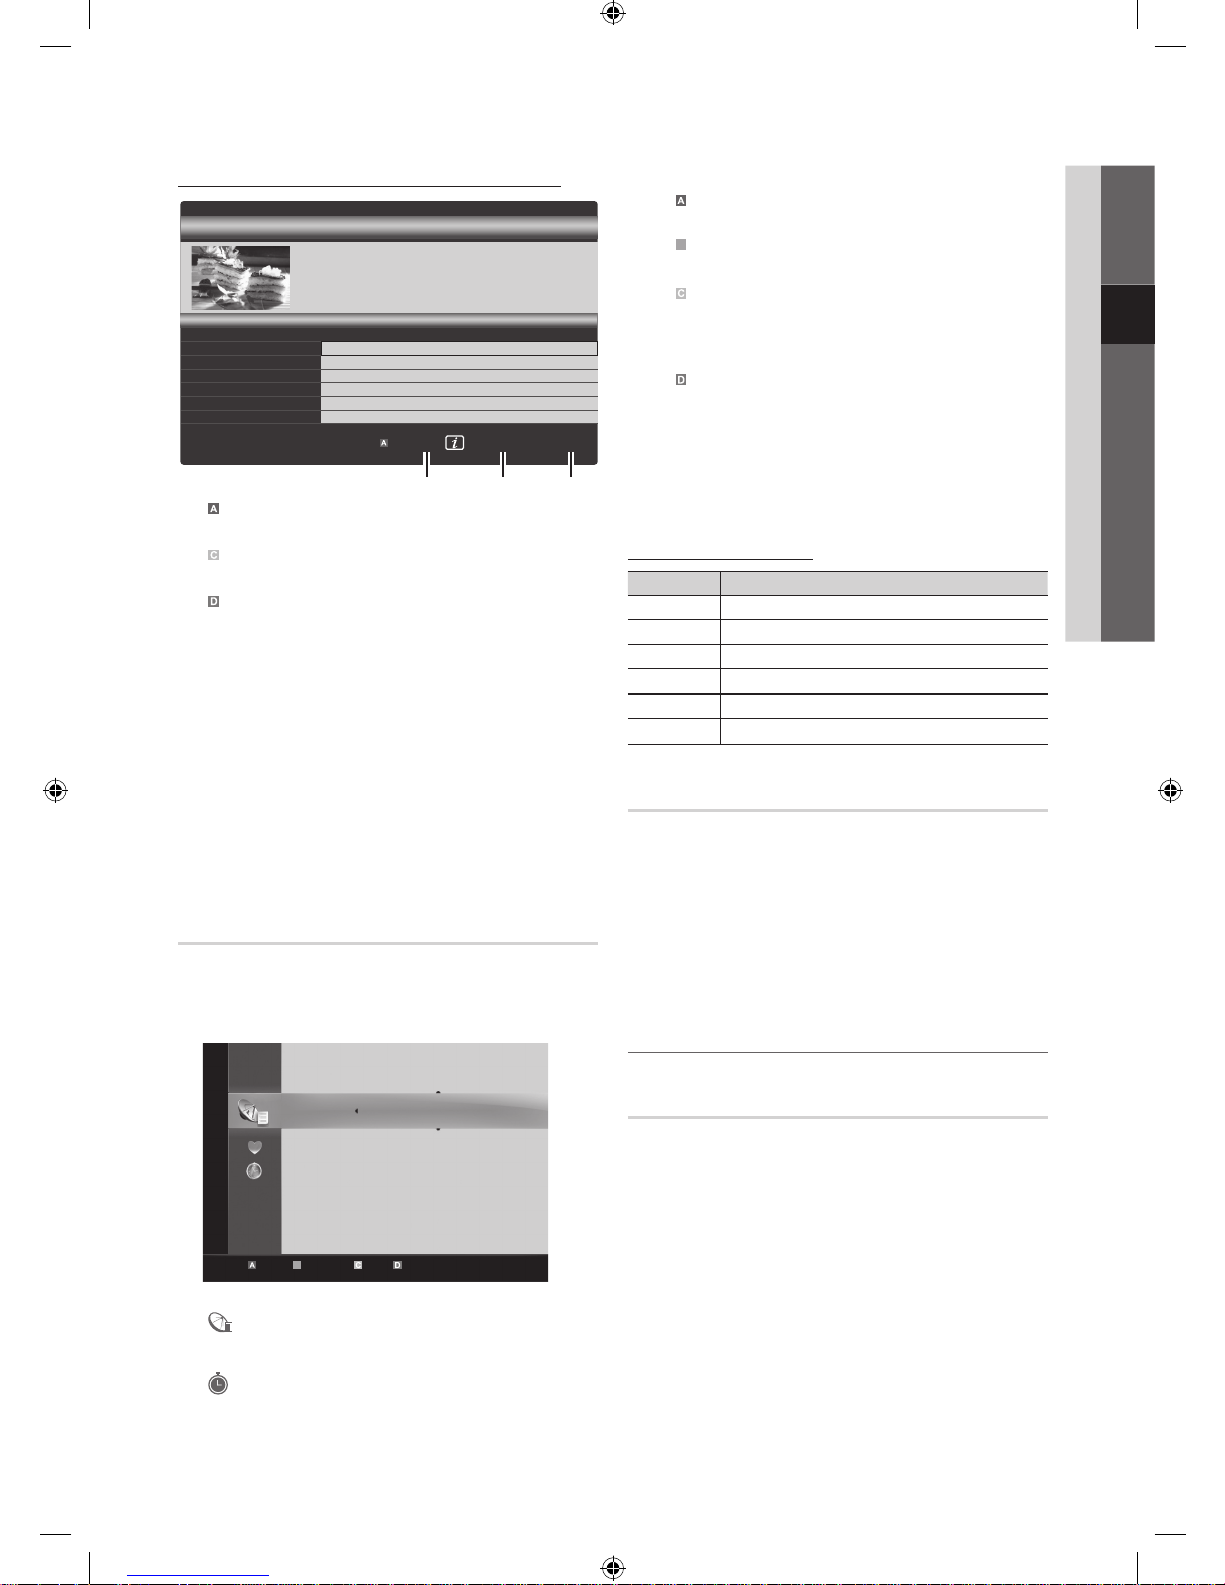
13
Русский
03 Основные операции
Использование функции запланированного просмотра
1
Красная (Реж.просм): просмотр списка программ,
которые уже воспроизводятся или скоро начнутся.
2
Желтая кнопка (+24 часа): просмотр списка программ,
которые будут транслироваться через 24 часа.
3
Синяя (Реж.кан.): выбор типа каналов, которые будут
отображаться в окне Просм.канал.. (Все, ТВ , Радио ,
Данные/др., Мой канал 1-4 )
4 Информация: просмотр сведений о выбранной
программе.
5
(Страница): переход к предыдущей или следующей
странице.
6 Кнопка ENTER
– Если выбрана текущая программа, она начинает
воспроизводиться.
– Если выбрана предстоящая программа, она
резервируется для просмотра. Чтобы отменить
запланированный просмотр, нажмите ENTER
еще
раз и выберите пункт Отмена расписаний.
Диспетчер каналов
Удаление каналов, выбор избранных каналов, а также
использование телегида по цифровому телевещанию.
Выбор каналов на экранах Каналы , Мои каналы или
Запланировано.
■
Каналы: просмотр списка каналов конкретного типа.
■
Мои каналы: отображение группы каналов.
■
Запланировано: отображение всех программ,
запланированных для просмотра.
✎
Использование цветных кнопок в окне Диспетчер каналов
x
Красная (Антенна): переключение источников Антенна
и Кабель.
x
B
Зеленая (Увеличенный): увеличение или уменьшение
номера канала.
x
Желтая (Выбор): выберите нужные каналы и нажмите
желтую кнопку, чтобы одновременно настроить
выбранные каналы. Слева от выбранных каналов
отобразится метка
.
x
Синяя (Сортировка): сортировка списка по имени или
номеру канала.
x
(Страница): переход к предыдущей или следующей
странице.
x
(Инструменты): отображение меню параметров
Диспетчер каналов. (Меню параметров может отличаться
в зависимости от ситуации.)
Значки состояния каналов
Значки Значение
Аналоговый канал.
Выбранный канал.
Канал, добавленный в список избранных.
Принимаемая в текущий момент программа.
Заблокированный канал.
Запланированная программа.
Тип руководства (Samsung / GuidePlus+)
(зависит от страны)
Можно выбрать другой тип руководства.
■ Samsung: Использование программы телепередач,
предоставляемой компанией Samsung.
■ Guide Plus+: Использование программы телепередач,
предоставляемой компанией Rovi International Solutions.
Дополнительные сведения см. на сайте «www.europe.
guideplus.com».
Работа с избранными каналами
Мои каналы
(в окне Диспетчер каналов)
Отображение всех избранных каналов.
■ Изменить мои каналы
: перемещение
выбранных каналов в нужную группу избранных каналов.
✎
Канал будет отмечен значком “” и добавлен в список
избранных.
1. Выберите канал и нажмите кнопку TOOLS.
2. Добавьте или удалите канал из группы 1, 2, 3 или 4
избранных каналов.
x
Можно выбрать несколько групп.
DTV Air 800 five
Family Affairs
18:00 - 18:30
Drama
Tanya confesses all to a stunned Babs. Conrad is anxious to hear...
18:30
19:15
)
Family Affairs
)
Dark Angel
800
800
five
five
800 five
Реж.просм Информация
Отмена
2:10 Вт 1 Июн
Телегид
Запланированный просмотр
1 4 6
Сегодня
Сегодня
c 1 1futech
2 * 24ore.tv
15 abc1
3 BBC World
23 bid-up.tv
33 Boonerang
32 Cartoon Nwk
5 Class News
4 \ Coming Soon
27 Discovery
r
Антенна Антенна B Увеличенный Выбор Сортировка Страница Инструменты
Каналы
Все
ТВ
Радио
Данные/др.
Аналоговые
[UC9000]BN68-02820G-RU.indb 13 2010-05-25 오전 9:59:55
Page 74
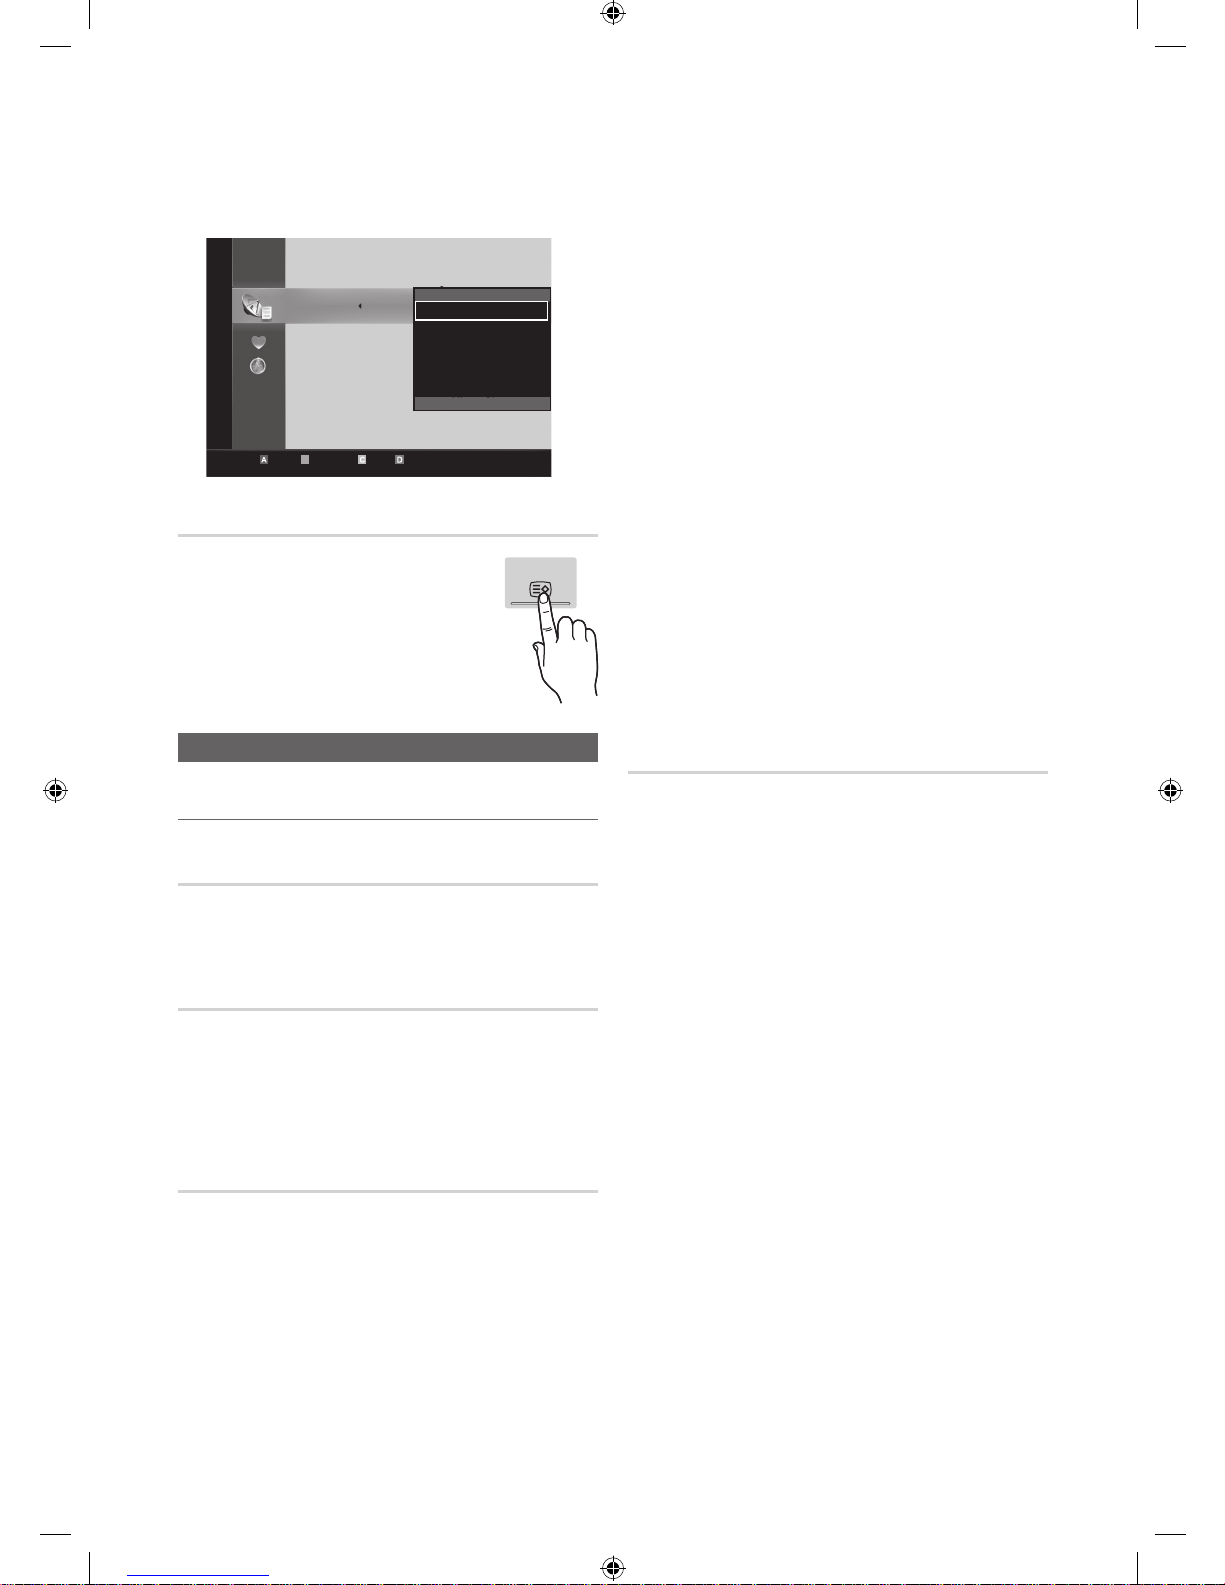
14
Русский
Основные операции
3.
Внеся необходимые изменения, можно просмотреть
список каналов для каждой группы в разделе “Мои
каналы”.
Список каналов
Просмотр всех найденных каналов.
Меню Канал
Перенастройка каналов
Антенна (Антенна / Кабель)
Для запоминания доступных каналов сначала следует указать
тип источника сигнала, подключенного к телевизору: антенна
или кабель.
Страна
Появится окно ввода PIN-кода. Введите 4-значный PIN-код.
■ Цифровой канал: изменение стрны для приема цифровых
каналов.
■ Аналоговый канал: изменение страны для приема
аналоговых каналов.
Автонастройка
Автоматическое сканирование каналов и сохранение их в
память телевизора.
✎
Автоматически присвоенные номера программ могут
не соответствовать реальным или желаемым номерам
программ. Если канал заблокирован с помощью функции
Замок, отобразится окно ввода PIN-кода.
■ Источник антенны (Антенна / Кабель)
:
выберите источник сигнала телевещания.
■ Источник канала (Цифр. и аналог. / Цифровые /
Аналоговые): выбор источника канала для сохранения.
При выборе меню Кабель → Цифр. и аналог. или
Цифровые: укажите значение для поиска кабельных
каналов.
Режим поиска (Полный / Сеть / Быстрый): сканирование
всех каналов действующих телевизионных станций и
сохранение их в память телевизора.
✎
При выборе режима Быстрый параметры Сеть,
Идентиф. cети, Частота, Модуляция, Скорость
передачи можно задать вручную с помощью
соответствующей кнопки на пульте дистанционного
управления.
Сеть (Авто / Ручной): выбор в качестве режима настройки
Идентиф. cети значения Авто или Ручной.
Идентиф. cети: если для параметра Сеть выбран режим
Ручной, то значение параметра Идентиф. cети можно
задать с помощью цифровых кнопок.
Частота: отображение частоты канала. (зависит от
страны).
Модуляция: отображение доступных значений модуляции.
Скорость передачи: отображение допустимых значений
скорости передачи.
Ручная настройка
Поиск канала вручную и его сохранение в памяти телевизора.
✎
Если канал заблокирован с помощью функции Замок,
отобразится окно ввода PIN-кода.
■ Цифровой канал: после завершения сканирования список
каналов обновляется.
✎
При выборе меню Антенна → Антенна: Канал,
Частота, Полоса пропуск.
✎
При выборе меню Антенна → Кабель: Частота,
Модуляция, Скорость передачи
■ Аналоговый канал (Программа, Система цвета,
Система звука, Канал, Поиск): если звук не слышен или
имеются сильные помехи, поменяйте стандарт звука.
✎
Режим каналов
x
P (Режим программы): после настройки всем станциям
телевещания в регионе присваиваются номера от P0
до P99. В этом режиме можно выбрать канал, введя
присвоенный ему номер.
x
C (режим канала с антенны) / S (режим кабельного
канала): в этих режимах можно выбрать канал с антенны
или кабельный канал, введя присвоенный ему номер.
CH LIST
c 1 1futech
2 * 24ore.tv
15 abc1
3 BBC World
23 bid-up.tv
33 Boonerang
32 Cartoon Nwk
5 Class News
4 \ Coming Soon
27 Discovery
r
Антенна Антенна B Увеличенный Выбор Сортировка Страница Инструменты
Каналы
Изменить мои каналы
Блокировка
Прос. по тайм.
Зап. по тайм.
Изм. номера канала
Удалить
Все
ТВ
Радио
Данные/др.
Аналоговые
[UC9000]BN68-02820G-RU.indb 14 2010-05-25 오전 9:59:56
Page 75

15
Русский
03 Основные операции
Редактирование каналов
Меню параметров диспетчера каналов
(в окне Диспетчер каналов)
1. Выберите канал и нажмите кнопку TOOLS.
2. Измените имя или номер канала с помощью меню
Изменить название канала или Изм. номера канала.
■ Изменить название канала (только для аналоговых
каналов): присвоение каналу нового имени.
■ Изм. номера канала (только для цифровых каналов): ввод
нового номера с помощью цифровых кнопок.
Другие операции
Кабельные параметры поиска
(зависит от страны)
Установка дополнительных параметров поиска, таких как частота
и скорость передачи символов для поиска кабельной сети.
■ Частота начала / Частота окончания: выбор частоты
начала и окончания (зависит от страны).
■ Скорость передачи: отображение допустимых значений
скорости передачи.
■ Модуляция: отображение доступных значений модуляции.
Диспетчер каналов
Меню параметров Диспетчер каналов
Настройте все каналы с помощью параметров меню
Диспетчер каналов (Блокировка / Разблокировка, Прос.
по тайм., Зап. по тайм., Сортировка, Удалить, Выбрать все
/ Отменить все). Набор элементов в меню параметров может
варьироваться в зависимости от состояния канала.
1. Выберите канал и нажмите кнопку TOOLS.
2. Выберите функцию и измените ее настройки.
■ Блокировка / Разблокировка: заблокированные каналы
нельзя выбирать и просматривать.
✎
ПРИМЕЧАНИЕ
x
Эта функция доступна, только если для параметра Замок
установлено значение Вкл..
x
Появится окно ввода PIN-кода. Введите 4-значный PINкод. По умолчанию используется PIN-код “0-0-0-0”. PINкод можно изменить, выбрав пункт Изменение PIN.
■ Прос. по тайм.: Можно настроить автоматическое
включение нужного канала в заданное время. Сначала
необходимо настроить текущее время.
✎
При просмотре цифрового канала нажмите кнопку ►,
чтобы на экране отобразилось название программы.
■ Зап. по тайм. (только для цифровых каналов): Позволяет
записывать транслируемую в настоящий момент
программу или запрограммировать запись программы,
которая будет транслироваться в будущем.
✎
К телевизору необходимо подключить устройство USB
с памятью объемом 4 Гбайт или более.
✎
Запись на устройство хранения USB невозможна до
завершения процедуры Тест произв-ти устройства.
✎
В случае жесткого диска USB более 5400 об/мин
✎
В случае накопителя USB, USB 2.0 или SLC.
(Минимальный размер накопителя USB – 2 ГБ.)
✎
Для записи нажмите кнопку (REC) на пульте
дистанционного управления. Нажмите кнопку (REC)
дважды, чтобы установить продолжительность записи.
■ Сортировка (только для аналоговых каналов): можно
изменять программные номера сохраненных каналов.
Эта функция может понадобиться после автоматической
настройки каналов.
■ Удалить: можно удалить канал, чтобы отобразить
необходимые каналы.
■ Выбрать все / Отменить все: в окне диспетчера каналов
можно выделить все каналы или полностью снять
выделение.
Передача списка каналов
Появится окно ввода PIN-кода. Введите 4-значный PIN-код.
Импорт или экспорт карты каналов. Для использования данной
функции необходимо подключить память USB.
■ Импорт с USB: импорт списка каналов с USB.
■ Экспорт на USB: экспорт списка каналов на USB. Эта
функция доступна, когда выполнено подключение к порту
USB.
Запланировано
(в окне Диспетчер каналов)
Можно просматривать, изменять или удалять программы,
запланированные для просмотра.
■ Изменение информации: изменение программы,
запланированной для просмотра.
■ Отмена расписаний: отмена программы,
запланированной для просмотра.
■ Информация: отображение программы, запланированной
для просмотра (а также изменение сведений о ней).
■ Выбрать все / Отменить все: выбор всех программ,
запланированных для просмотра, или полная отмена
выбора.
Точная настройка
(только для аналоговых каналов)
Если сигнал слабый или искаженный, то можно выполнить его
точную настройку вручную.
✎
Точно настроенные каналы отмечаются звездочкой “*”.
✎
Чтобы сбросить точную настройку, выберите пункт Сброс.
[UC9000]BN68-02820G-RU.indb 15 2010-05-25 오전 9:59:57
Page 76
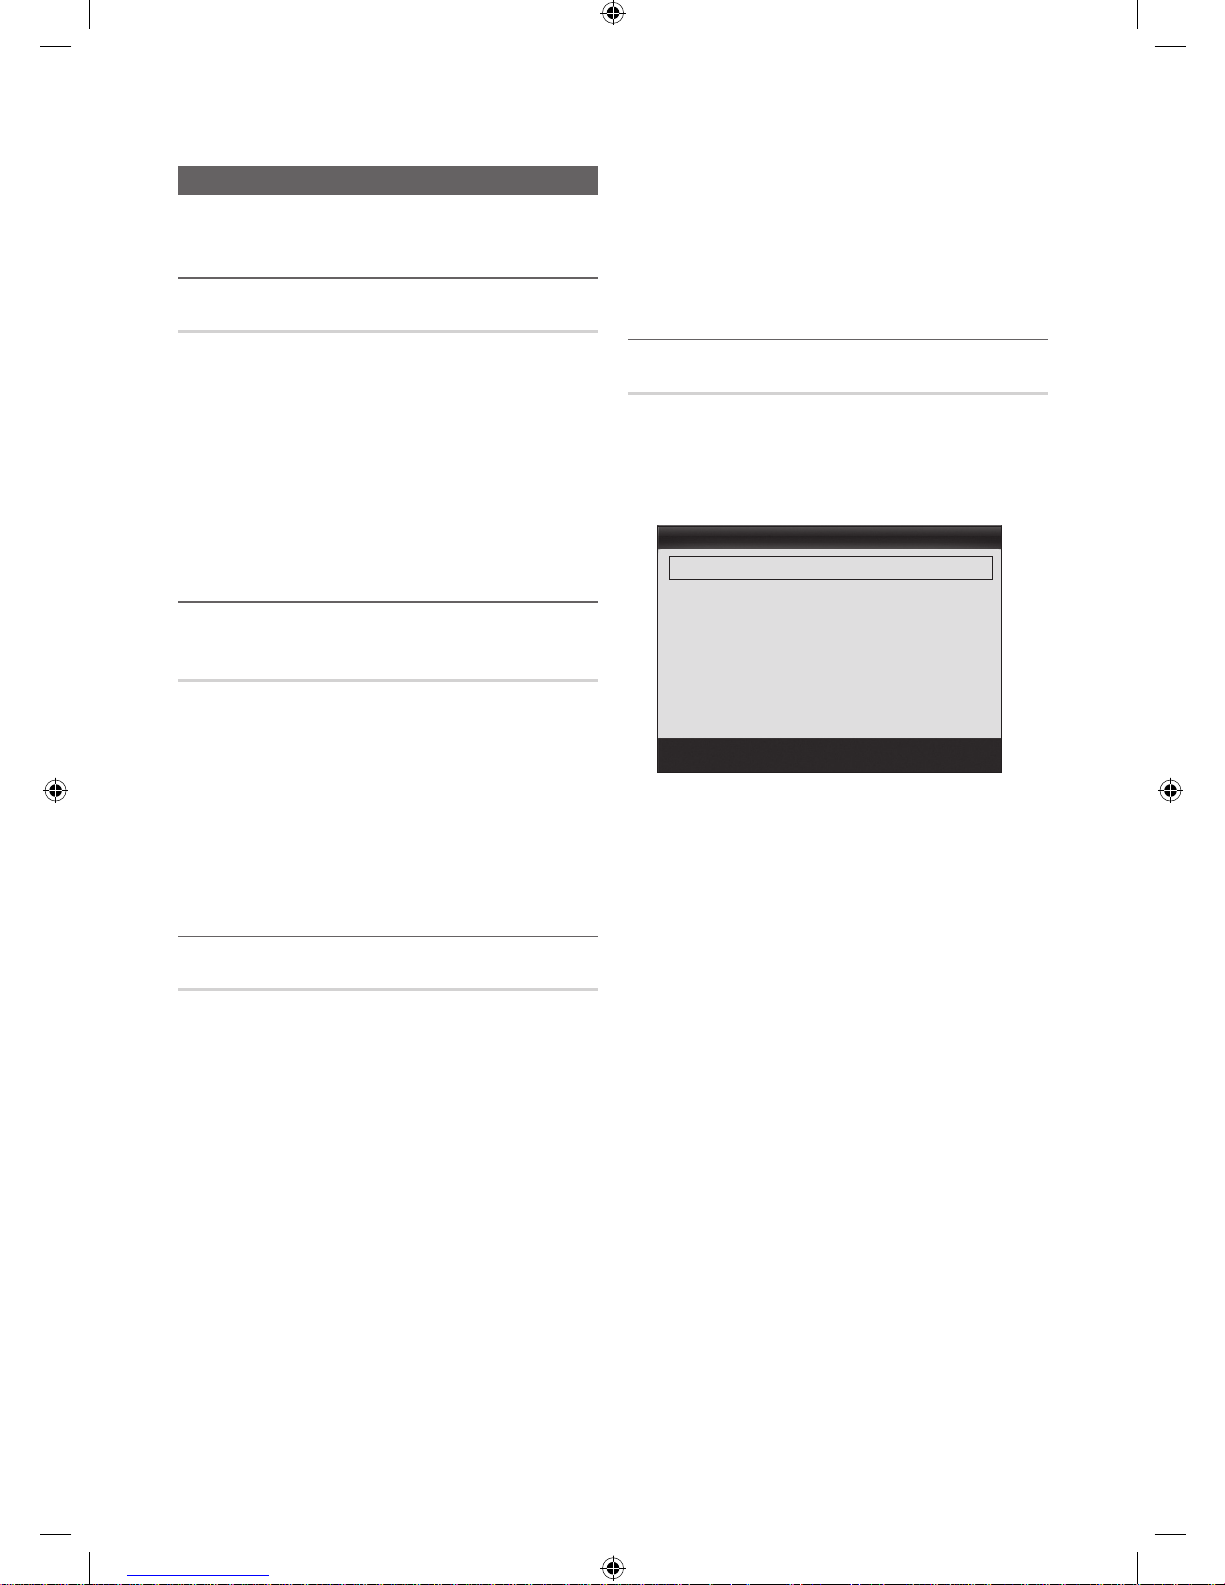
16
Русский
Основные операции
Меню Изображение
Изменение предварительно настроенного
режима изображения
Режим
Выберите тип изображения.
■ Динамический: для просмотра в комнате с ярким
освещением.
■ Стандартный: для просмотра в комнате с нормальным
освещением.
■ Обычный: для просмотра с минимальной нагрузкой на
глаза.
✎
Обычный недоступен в режиме ПК.
■ Кино: для просмотра фильмов в темной комнате.
Настройка параметров изображения
Подсветка / Контраст / Яркость / Четкость /
Цвет / Тон(З/К)
Качество изображения можно настроить с помощью
нескольких параметров.
✎
ПРИМЕЧАНИЕ
x
В режимах ТВ, Внешний, AV в системе PAL функция
Тон(З/К) недоступна.
x
В режиме ПК можно изменять только параметры
Подсветка , Контраст и Яркость .
x
Настройки можно задать и сохранить для каждого
внешнего устройства, подключенного к телевизору.
Решения для экономии электроэнергии
Экономный режим
■ Экон. энергии (Выкл. / Низкий / Средний / Высокий
/ Откл. экран / Авто)
: настройка яркости
телевизора для снижения потребления энергии. Если
выбрать значение Откл. экран, то экран погаснет и
останется только звук. Нажмите любую кнопку, кроме
кнопки регулировки громкости, чтобы включить экран.
■ Датчик экон. реж. (Выкл. / Вкл.): автоматическое
изменение настроек изображения в соответствии с
уровнем освещения для экономии электроэнергии.
✎
Если изменить режим Подсветка, то для параметра
Датчик экон. реж. автоматически установиться
значение Выкл..
Мин. подсветка: если для параметра Датчик экон. реж.
выбрано значение Вкл., то минимальную яркость экрана
можно настроить вручную.
✎
Если для Датчик экон. реж. установлено значение
Вкл., то яркость экрана будет меняться (немного
увеличиваться или уменьшаться) в зависимости от
интенсивности окружающего освещения.
■ Режим ожидания (Выкл. / 15 мин / 30 мин / 60 мин):
Для предотвращения ненужного потребления энергии
настройте, как долго телевизор должен оставаться
включенным при отсутствии принимаемого сигнала.
✎
Не работает, если компьютер находится в режиме
энергосбережения.
Изменение параметров изображения
Дополнительные параметры
(доступно в режиме Стандартный / Кино)
Можно выполнить расширенную настройку параметров экрана,
включая цвет и контрастность.
✎
В режиме ПК можно изменять только параметры
Автоконтраст, Гамма, Баланс белого и Доп. движение ЖК.
■ Черный тон (Выкл. / Темный / Темнее / Самый темный):
выбор уровня черного для настройки глубины экрана.
■ Автоконтраст (Выкл. / Низкий / Средний / Высокий):
настройка контрастности экрана.
■ Детали теней (от -2 до +2): увеличение яркости темных
изображений.
■ Гамма: настройка интенсивности главных цветов.
■ Режим эксперт (Выкл. / Образец1 / Образец2): при
запуске функции Режим эксперт можно выполнить
калибровку изображения без генератора или фильтра.
Если экранное меню исчезнет или будет открыто меню,
отличное от Изображение, настройки калибровки будут
сохранены, а окно Режим эксперт закроется.
✎
Когда запущена функция Режим эксперт, звук не
выводится.
✎
Доступна только на моделях DTV/Компонент/HDMI.
■ Режим только RGB (Выкл. / Красный / Зеленый
/ Синий): параметры Цвет или Тон(З/К) для цветов
изображения Красный, Зеленый или Синий можно
настроить на внешнем устройстве (DVD-проигрывателе,
домашнем кинотеатре и т.п.).
■ Цвет. пространство (Авто / Исходный /
Пользовательский): настройка диапазона цветов,
доступных для воспроизведения изображений. Чтобы
настроить компоненты Цвет, Красный, Зеленый, Синий
и Сброс, выберите для параметра Цвет. пространство
значение Пользовательский.
Дополнительные параметры
Черный тон : Выкл. ►
Автоконтраст : Средний
Детали теней : -2
Гамма : 0
Режим эксперт : Выкл.
Режим только RGB : Выкл.
Цвет. пространство : Исходный
▼
Переместить
Ввод
Возврат
[UC9000]BN68-02820G-RU.indb 16 2010-05-25 오전 9:59:58
Page 77
17
Русский
03 Основные операции
■ Баланс белого: настройка цветовой температуры для
более естественного изображения.
К: смещ. / З: смещ. / С: смещ.: настройка степени
темноты основных цветов (красного, зеленого, синего).
К: усил. / З: усил. / С: усил.: настройка яркости основных
цветов (красного, зеленого, синего).
Сброс: восстановление стандартных настроек Баланс
белого.
■ Бал. бел. по 10 т. (Выкл. / Вкл.): управление балансом
белого с интервалом в 10 пунктов путем настройки
яркости красного, зеленого и синего цветов.
✎
Режим доступен, когда для просмотра выбран режим
Кино, а для внешнего источника - входной сигнал.
✎
Некоторые внешние устройства могут не поддерживать
данную функцию.
Интервал: выбор интервала.
Красный: настройка уровня красного.
Зеленый: настройка уровня зеленого.
Синий: настройка уровня синего.
Сброс: восстановление стандартного значения параметра
Бал. бел. по 10 т..
■ Телесный оттенок: выделение розового оттенка.
■ Улучшение кромок (Выкл. / Вкл.): выделение границ
объекта.
■ xvYCC (Выкл. / Вкл.): если режим xvYCC включен, то
детализация и цветовое пространство увеличиваются при
просмотре фильмов из внешнего источника (например,
проигрывателя DVD), подключенного к разъемам HDMI или
COMPONENT IN.
✎
Режим xvYCC доступен, когда для просмотра выбран
режим Кино, а для внешнего источника – значение
HDMI или Компонент.
✎
Некоторые внешние устройства могут не поддерживать
данную функцию.
✎
Доп. движение ЖК (Выкл. / Вкл.): устранение эффекта
торможения в динамичных сценах с большим количеством
движений для получения более четкого изображения.
Параметры изображения
✎
В режиме ПК можно изменять только параметры Оттенок,
Размер и Время автозащиты.
■ Оттенок (Хол. / Норм. / Теплый1 / Теплый2)
✎
Теплый1 и Теплый2 недоступны в режиме
Динамический.
✎
Настройки можно задать и сохранить для каждого
внешнего устройства, подключенного к телевизору.
■ Размер: для приемника кабельного/
спутникового телевидения также
может быть предусмотрено несколько
вариантов размера экрана. Однако
настоятельно рекомендуется отдавать
предпочтение формату 16:9.
Широкий aвто: автоматическая
настройка размера изображения под
формат 16:9.
16:9: настройка размера изображения под формат 16:9
для просмотра DVD-дисков или телепередач.
Широк. увел.: увеличение размера изображения от 4:3.
✎
Параметр Позиция можно настроить с помощью
кнопок ▲ и ▼.
Увеличенный: увеличение изображения в формате 16:9 (в
вертикальном направлении) по размеру экрана.
✎
Параметры Позиция и Размер можно настроить с
помощью кнопок ▲ и ▼.
4:3: стандартная настройка для просмотра фильмов или
обычных телепрограмм.
✎
Формат 4:3 не рекомендуется использовать в течение
длительного времени. Границы изображения по
краям экрана могут вызвать эффект остаточного
изображения (выгорание экрана), который не
покрывается гарантией.
По разм. экрана: просмотр полноразмерного
изображения без обрезки при приеме сигналов HDMI
(720p/1080i/1080p) или Компонент (1080i/1080p).
✎
ПРИМЕЧАНИЕ
x
Размер изображения может варьироваться в зависимости
от источника входного сигнала.
x
Набор доступных элементов зависит от того, какой режим выбран.
x
В режиме ПК доступны только форматы 16:9 и 4:3.
x
Настройки можно задать и сохранить для каждого
внешнего устройства, подключенного к телевизору.
x
После выбора параметра По разм. экрана в режиме
HDMI (1080i/1080p) или Компонент (1080i/1080p)
настройте параметры Позиция или Размер с помощью
кнопок ▲, ▼, ◄, ► .
x
Если включить функцию По разм. экрана, когда выбран
вход HDMI 720p, то первая строка будет обрезана сверху,
снизу, слева и справа, как при использовании функции
нерабочей области.
■ Режим экрана (16:9 / Широк. увел. / Увеличенный / 4:3):
эта функция доступна, только если в качестве размера
изображения выбрано значение Широкий aвто. Можно
выбрать формат 4:3 WSS (широкий экран) или исходный
размер. В разных странах Европы требования к размерам
изображений отличаются.
✎
Эта функция недоступна в режимах ПК, Компонент и
HDMI.
P.SIZE
Параметры изображения
Оттенок : Норм. ►
Размер : Широкий aвто
Режим экрана : 16:9
Цифр. фильтр шумов : Авто
Фильтр шумов MPEG : Авто
ЧерныйHDMI : Норм.
Режим “фильм” : Выкл.
▼
Переместить
Ввод
Возврат
[UC9000]BN68-02820G-RU.indb 17 2010-05-25 오전 9:59:59
Page 78
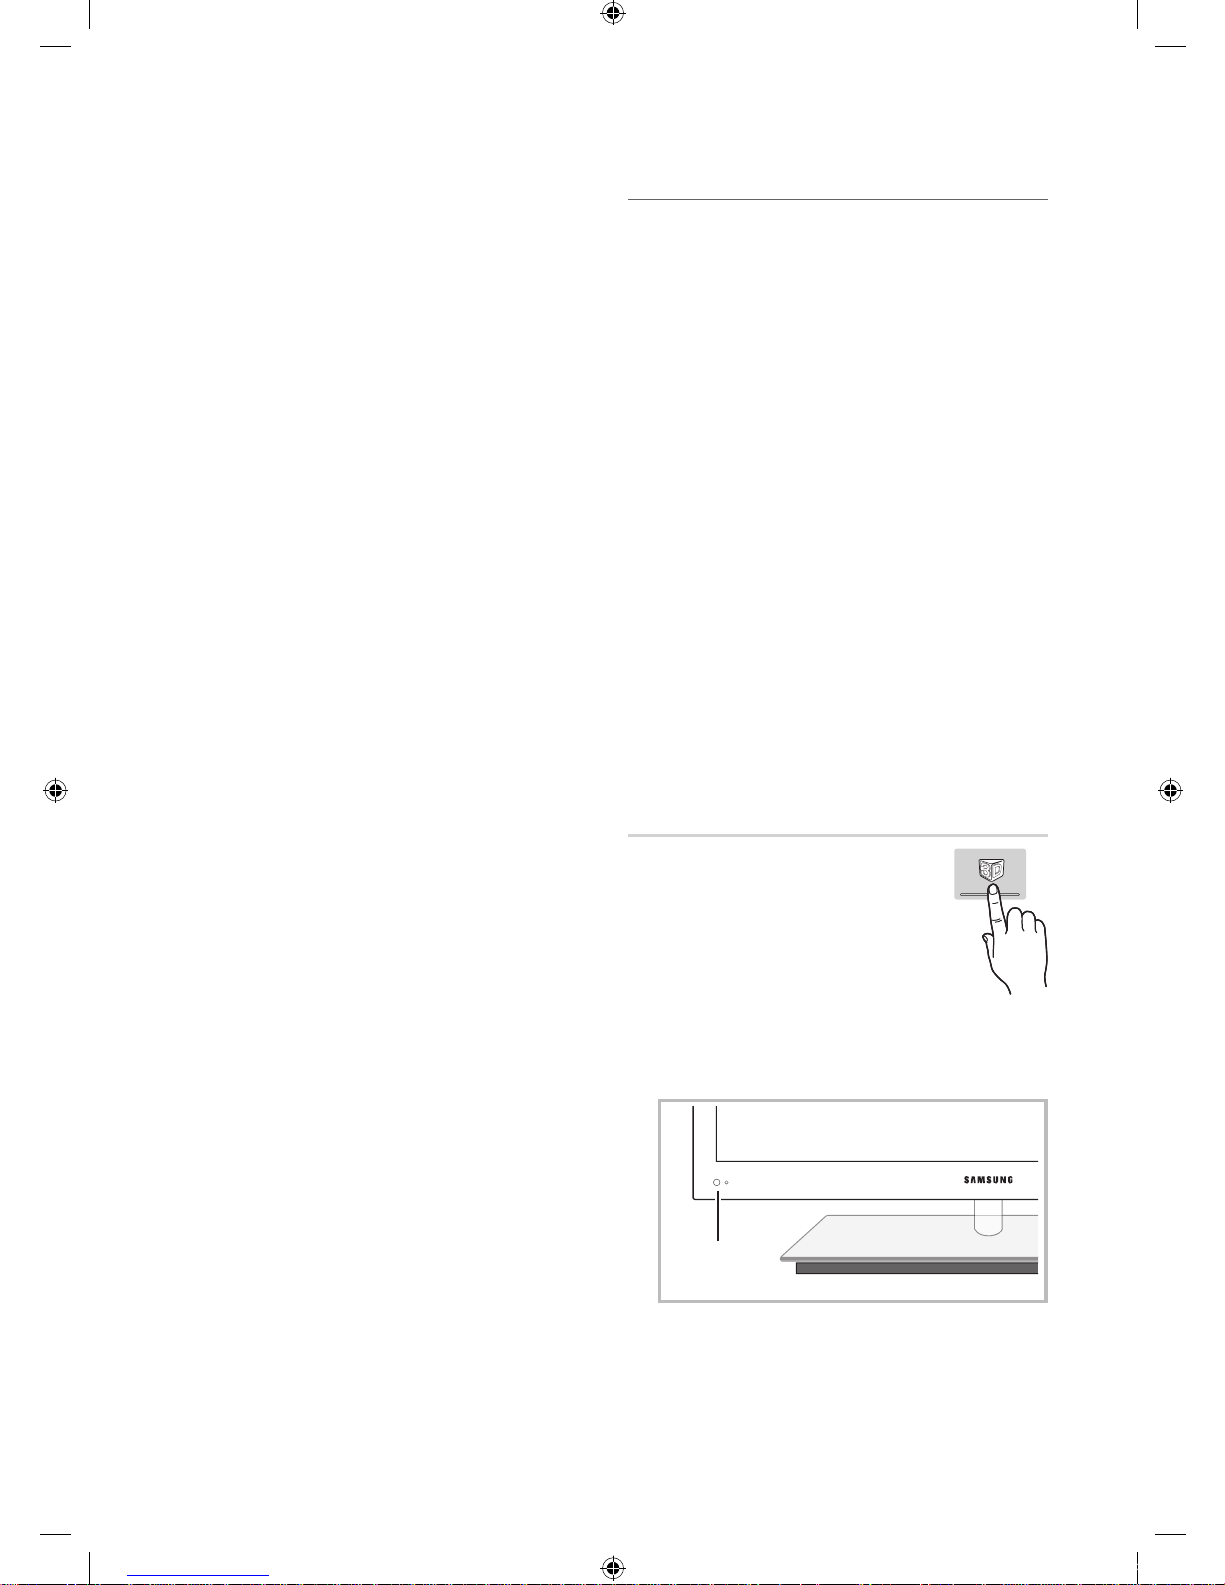
18
Русский
Основные операции
■ Цифр. фильтр шумов (Выкл. / Низкий / Средний /
Высокий / Авто / Автовизуализация): если уровень
сигнала невысок, то изображение может застывать или
раздваиваться. Чтобы улучшить изображение, выберите
один из параметров.
Автовизуализация: отображение интенсивности текущего
сигнала и уровня шумоподавления при переключении
аналоговых каналов.
✎
Только для аналоговых каналов.
■ Фильтр шумов MPEG (Выкл. / Низкий / Средний
/ Высокий / Авто): сокращение шумов MPEG для
повышения качества изображения.
■ ЧерныйHDMI (Норм. / Низкий): выбор уровня черного для
настройки глубины экрана.
✎
Только в режиме HDMI (сигналы RGB).
■ Режим “фильм” (Выкл. / Авто1 / Авто2): настройка
телевизора на автоматическое распознавание и обработку
видеосигналов со всех источников, а также на регулировку
оптимального качества изображения.
✎
Только в режимах AV, КОМПОНЕНТ (480i/1080i) и HDMI
(480i/1080i).
■ Motion Plus (Выкл. / Четкий / Стандартный /
Сглаживание / Пользовательский / Демо): устранение
эффекта торможения в динамичных сценах с большим
количеством движений для получения более четкого
изображения.
✎
При возникновении на экране помех установите
для функции Motion Plus значение Выкл.. Если
для функции Motion Plus установлено значение
Пользовательский, настройку параметров
Снижение размытия, Снижение дрож. или Сброс
можно выполнить вручную.
✎
Если для функции Motion Plus установлено значение
Демо, можно сравнить качество отображения при
включенном и выключенном режиме.
Снижение размытия: настройка уровня размытия
источника видеосигнала.
Снижение дрож.: настройка уровня снижения дрожания
при воспроизведении фильмов с источника видеосигнала.
Сброс: сброс пользовательских настроек.
■ Время автозащиты (2 часа / 4 часа / 8 часа / 10 часа
/ Выкл.): если на экране сохраняется неподвижное
изображение в течение определенного времени,
установленного пользователем, запускается экранная
заставка, чтобы предотвратить появление на экране
остаточных изображений
Просмотр телевизора с включенной 3D-функцией
ВАЖНЫЕ СВЕДЕНИЯ ПО ОХРАНЕ ЗДОРОВЬЯ И
БЕЗОПАСНОСТИ ДЛЯ ТРЕХМЕРНЫХ ИЗОБРАЖЕНИЙ.
Прочтите и уясните следующие сведения по безопасности,
прежде чем использовать функцию 3D телевизора.
ПРЕДУПРЕЖДЕНИЕ
x
Некоторые люди могут испытывать дискомфорт во время
просмотра телевизоров 3D, например головокружение,
тошноту и головные боли. Если вы почувствуете любой из
подобных симптомов, прекратите просмотр телевизора
3D, снимите очки 3D Active Glasses и отдохните.
x
Пр
осмотр трехмерных изображений в течение
продолжительного времени может приводить к усталости глаз.
Если вы почувствуете усталость глаз, прекратите просмотр
телевизора 3D, снимите очки 3D Active Glasses и отдохните.
x
Взрослые должны часто проверять состояние детей,
использующих функцию 3D. Если они пожалуются на
усталость глаз, головные боли, головокружение или
тошноту, немедленно прекратите просмотр телевизора 3D
и дайте детям отдохнуть.
x
Не используйте очки 3D Active Glasses не по назначению
(например, как очки для коррекции зрения, солнечные или
защитные очки и т.д.)
x
Не используйте функцию 3D или очки 3D Active Glasses
во время прогулок или перемещения по комнате.
Использование функции 3D или очков 3D Active Glasses
во время перемещения по комнате может привести к
травмам вследствие столкновения с другими предметами,
спотыкания и/или падения.
3D
Бл
агодаря этой удивительной функции
изображения можно просматривать в
трехмерном режиме. Чтобы в полной мере
насладиться возможностями этой функции,
необходимо приобрести трехмерные очки
Samsung 3D Active Glasses (SSG-2100AB,
SSG-2200AR, SSG-2200KR), которые следует
надевать при просмотре трехмерного видео.
Трехмерные очки Samsung 3D Active Glasses продаются отдельно.
Для получения более подробной информации о том, где лучше
всего приобрести очки, обратитесь к продавцу, у которого был
приобретен данный телевизор.
✎
Если между передатчиком и трехмерными очками 3D
Active Glasses будет находиться какое-либо препятствие,
возможно, вы не получите надлежащий эффект трехмерного
изображения.
Передатчик
3D-сигналов
[UC9000]BN68-02820G-RU.indb 18 2010-05-25 오전 10:00:00
Page 79
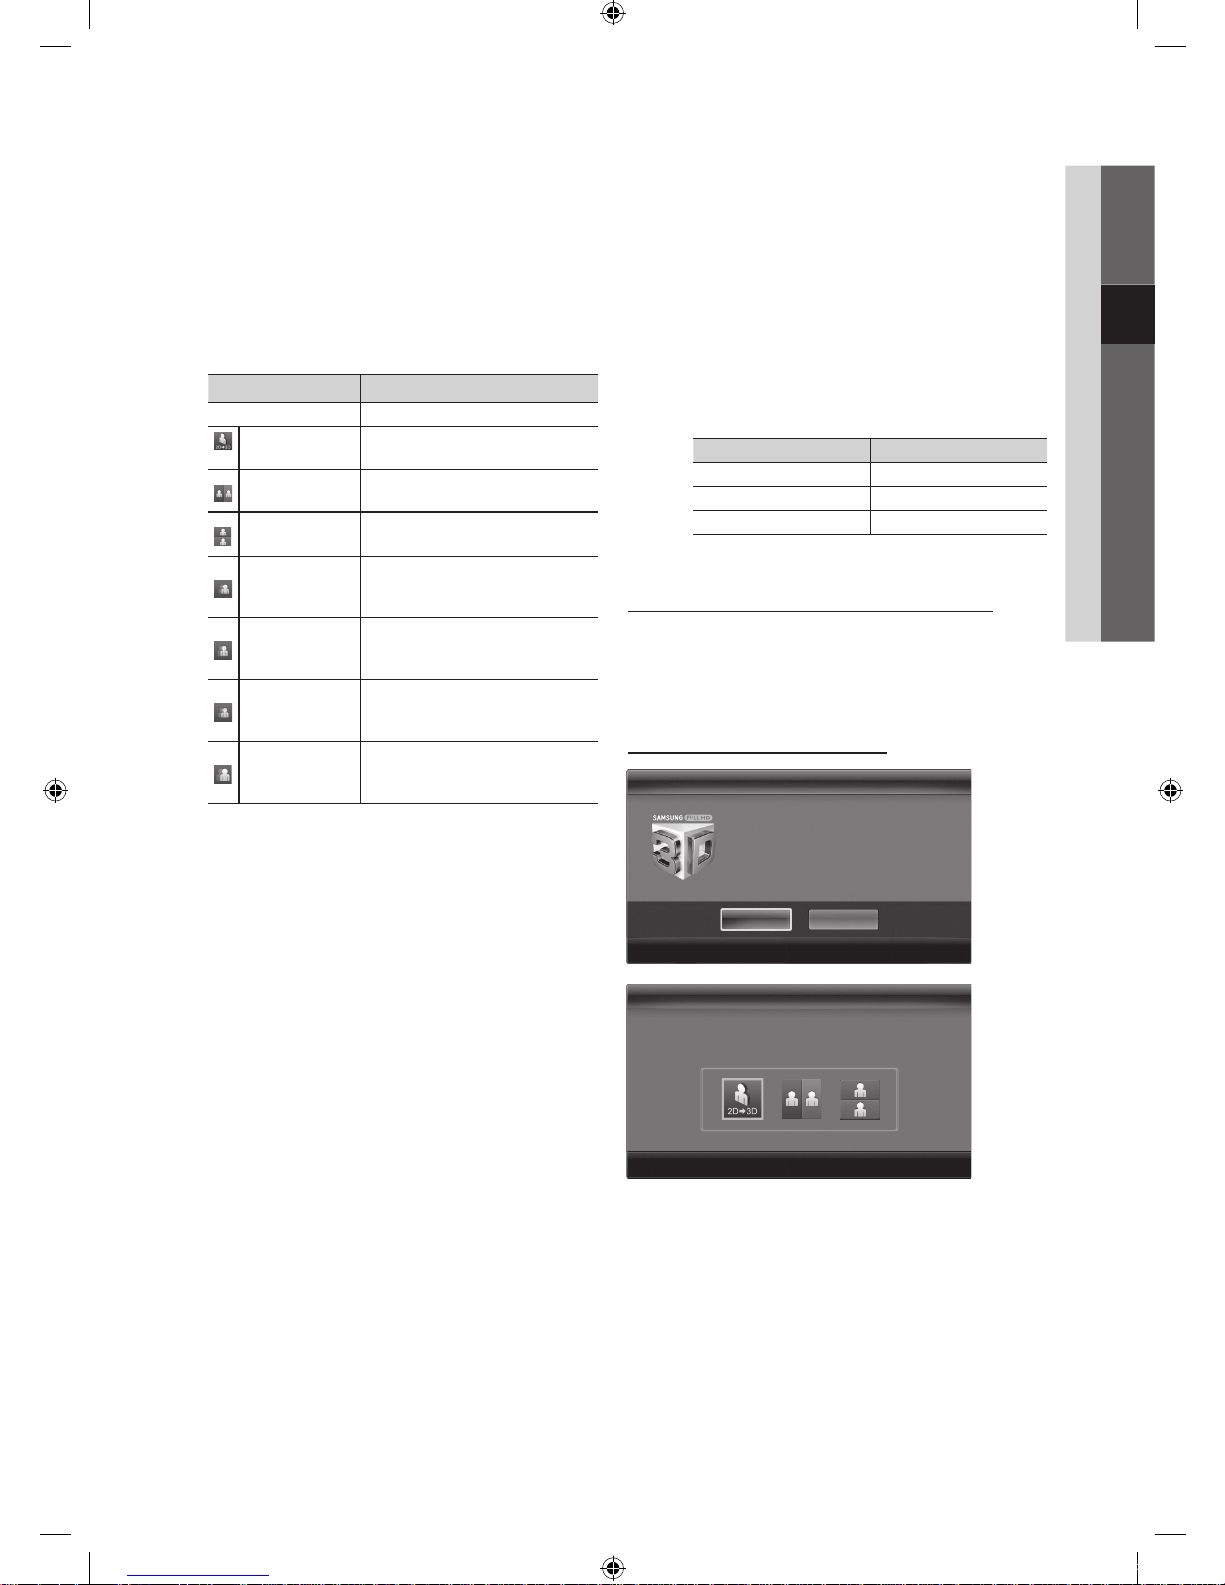
19
Русский
03 Основные операции
■ Режим 3D: выбор формата трехмерного входного сигнала.
✎
Если вы хотите насладиться эффектом трехмерного
изображения в полной мере, надевайте при просмотре
трехмерные очки и выберите соответствующее
значение режима Режим 3D в представленном ниже
списке. Это позволит вам получить оптимальное
трехмерное изображение.
✎
Во время просмотра трехмерный изображений
включите очки 3D Active Glasses.
Режим 3D Действие
Выкл. Отключение 3D-функции.
2D → 3D
Преобразование двухмерного
изображения в трехмерное.
Рядом
Отображение двух изображений
рядом друг с другом.
Одно над
другим
Отображение одного
изображения над другим.
Строками
Отображение изображений
для левого и правого глаза
попеременно строками.
Столбцами
Отображение изображений
для левого и правого глаза
попеременно столбцами.
В шахматном
порядке
Отображение изображений
для левого и правого глаза
попеременно в пикселах.
Частота
Отображение изображений
для левого и правого глаза
попеременно кадрами.
✎
Параметры Рядом и Одно над другим доступны при
разрешении 720p, 1080i и 1080p в режимах DTV,
HDMI и USB или при разрешении, установленном на
компьютере, который подключен с помощью кабеля
HDMI/DVI.
✎
Параметры Столбцами, Строками и В шахматном
порядке доступны, если в качестве источника
установлен компьютер, подключенный с помощью
кабеля HDMI/DVI.
✎
При включенном параметре Частота частота
(только 60 Гц) отображается, когда в качестве
источника установлен компьютер.
■ 3D → 2D (Выкл. / Вкл.): отображение изображения только
для левого глаза.
✎
Эта функция отключена, если в режиме Режим 3D
установлен параметр «2D → 3D» или Выкл..
■ Точка обзора 3D: общая настройка перспективы 3D.
✎
Эта функция отключена, если в режиме Режим 3D
установлен параметр «2D → 3D» или Выкл..
■ Глубина: настройка фокуса или глубины в режиме
«2D → 3D».
✎
Эта функция активируется, только когда в режиме
Режим 3D установлен параметр «2D → 3D».
■ Коррекция изображ.: настройка изображений для левого
и правого глаза.
■ Автом. просмотр 3D (Выкл. / Вкл.): если для параметра
Автом. просмотр 3D установлено значение Вкл.,
сигнал HDMI формата Рядом с одним из указанных ниже
разрешений автоматически будет переключен в режим 3D.
В этом случае правильные данные 3D должны поступать в
формате 3D-стандарта HDMI.
✎
В случае сбоя режима 3D из-за ошибки в данных
3D, установите для параметра Автом. просмотр 3D
значение Выкл. и вручную выберите режим Режим 3D
с помощью кнопки 3D или соответствующего меню.
✎
Поддерживаемое разрешение (только 16:9)
Разрешение Частота (Гц)
1280 x 720p 50/60 Гц
1920 х 1080i 50/60 Гц
1920 x 1080p 24/30/50/60 Гц
■ Оптимизация 3D: Общая настройка 3D-эффекта.
Разрешение, поддерживаемое для режима ПК HDMI
Разрешение входного сигнала в режиме ПК HDMI
оптимизировано до 1920 x 1080.
В режиме 3D или полноэкранном режиме входной сигнал с
разрешением, отличным от 1920 х 1080, может отображаться
неправильно.
Просмотр трехмерного изображения
3D
OK
Для просмотра в режиме 3D наденьте
3D-очки и нажмите кнопку включения
на очках.
Длительный просмотр ТВ-фильмов в
режиме 3D может вызвать переутомление
глаз и/или головокружение.
Отмена
Переместить
Ввод
Выход
3D3D
С помощью кнопок со стрелками ВЛЕВО и
ВПРАВО на пульте дистанционного управления
выберите значок для отображения на экране.
С помощью кнопок со стрелками ВЛЕВО и
ВПРАВО на пульте дистанционного управления
выберите значок для отображения на экране.
Переместить
Ввод
Выход
Переместить
Ввод
Выход
[UC9000]BN68-02820G-RU.indb 19 2010-05-25 오전 10:00:02
Page 80
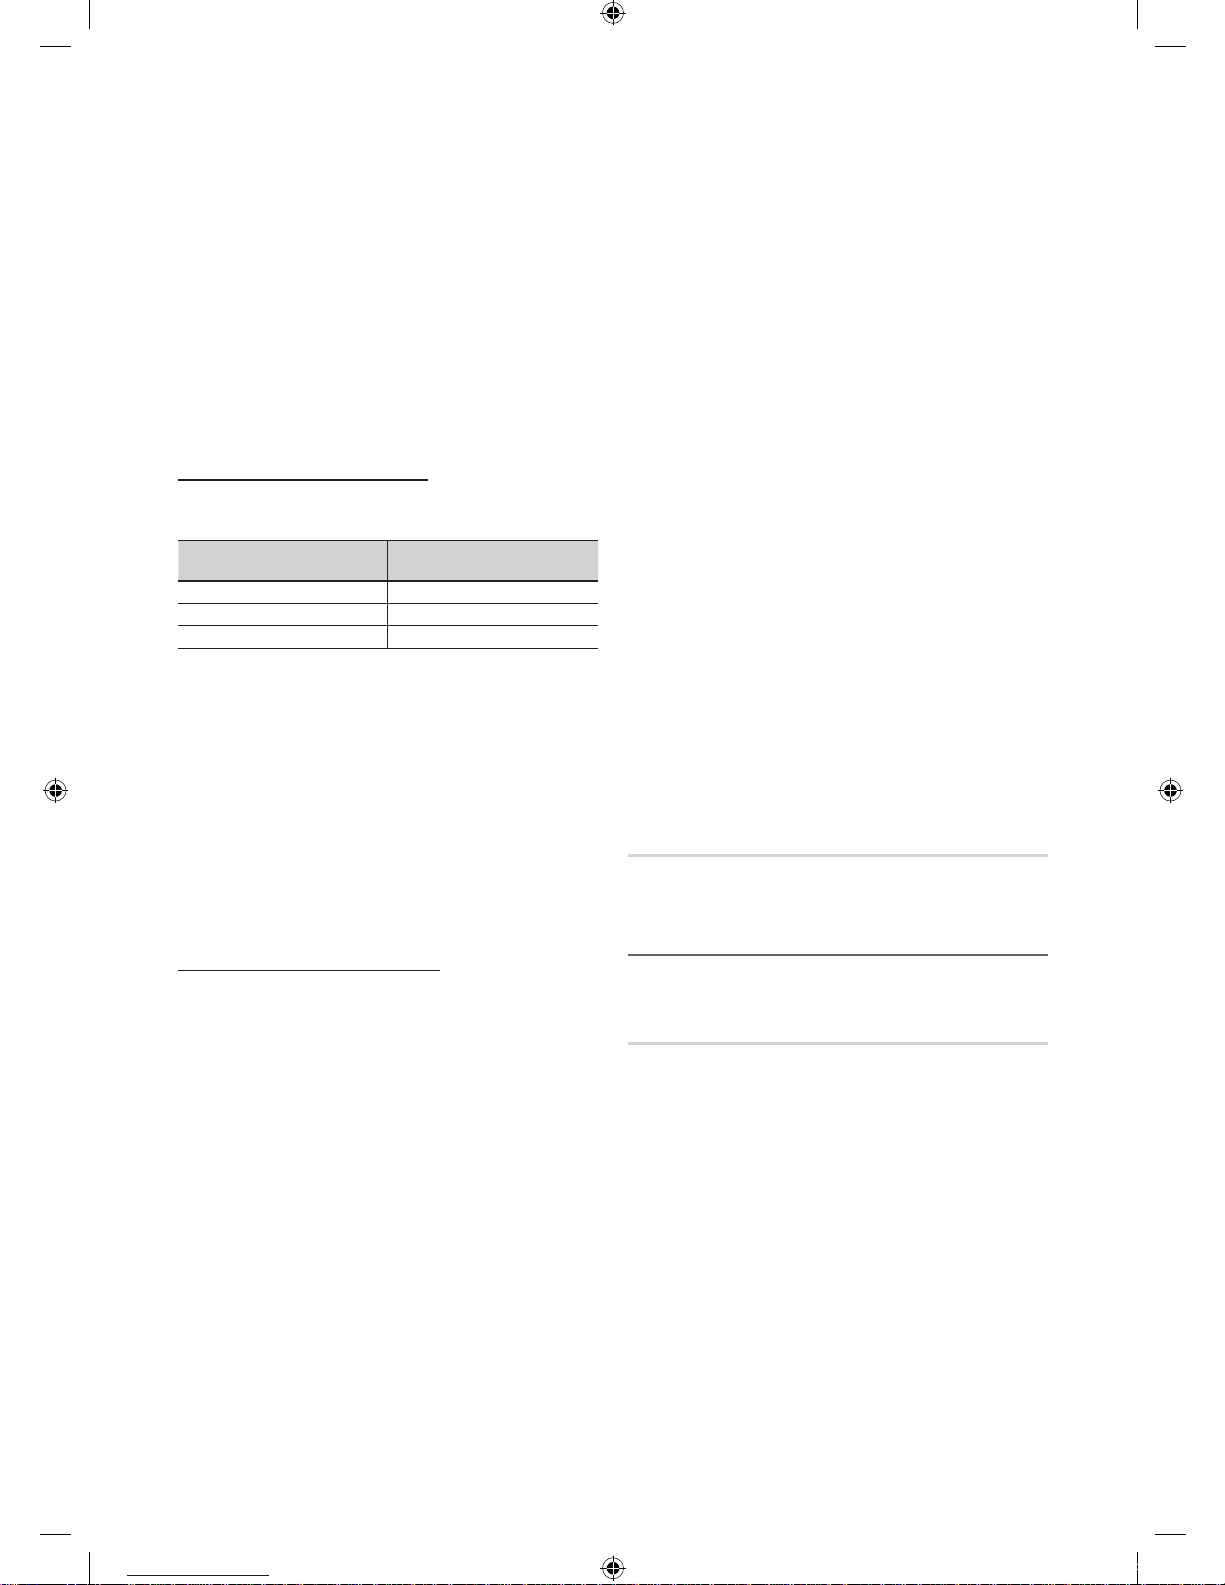
20
Русский
Основные операции
1. Нажмите кнопку CONTENT, откроется меню Просм.
содержимого.
2. Нажмите кнопку ◄ или ►, а затем выберите 3D.
Для просмотра в режиме 3D Active Glasses следует надеть
трехмерные очки и нажать на очках кнопку питания.
3. Выберите ОК, а затем нажмите кнопку ENTER
.
4. С помощью кнопки ◄ или ► на пульте дистанционного
управления выберите режим Режим 3D изображения,
которое необходимо посмотреть.
✎
Иногда режим 3D может быть недоступен. Это зависит
от формата исходного изображения.
Поддерживаемые форматы и рабочие технические
характеристики 3D-стандарта HDMI
✎
Форматы 3D-сигналов, указанные ниже, рекомендованы
ассоциацией HDMI и должны поддерживаться.
Формат сигнала источника Стандартный HDMI 1.4 с
технологией 3D
1920x1080p при 24 Гц x 2 1920x2205p при 24 Гц
1280x720p при 60 Гц x 2 1280x1470p при 60 Гц
1280x720p при 50 Гц x 2 1280x1470p при 50 Гц
Режим для входного трехмерного видеосигнала в одном из
перечисленных выше форматов автоматически переключается в 3D.
Для 3D-стандарта HDMI при 24 Гц телевизионное изображение
оптимизируется следующим образом.
– Режим отображения С исходным разрешением:
если для функции Motion Plus установлено значение
Выкл., Выкл. или Стандартный, можно просматривать
видео с высоким разрешением, оптимизированным до
разрешения источника видео.
– Режим отображения Снижение дрож.: если
для функции Motion Plus установлено значение
Сглаживание или Пользовательский, изображение не
будет дрожать.
Перед использованием 3D-функции...
✎
ПРИМЕЧАНИЕ
x
В случае просмотра трехмерных изображений при
плохом освещении (например, при свете стробоскопа),
освещении флуоресцентными лампами (50 Гц ~ 60 Гц) или
лампами с тремя длинами волн может наблюдаться легкое
мигание экрана. В этом случае уменьшите интенсивность
освещения или выключите лампы совсем.
x
В перечисленных ниже случаях режим трехмерного
видео автоматически выключается: при смене канала или
источника входного сигнала, а также при выборе функции
Media Play или Internet@TV.
x
В режиме 3D некоторые функции изображения не
работают.
x
Пульт Touch Remote не поддерживает просмотр
трехмерных изображений.
x
Службы передачи данных (MHEG/MHP) в режиме 3D не
поддерживаются.
x
Трехмерные очки 3D Active Glasses сторонних
производителей могут не подойти.
x
При первом включении телевизора требуется некоторое
время, чтобы качество изображения в режиме 3D стало
оптимальным.
x
Очки 3D Active Glasses могут неправильно работать, если
рядом с очками или телевизором включено любое другое
устройство 3D или иные электронные устройства. Если
существует подобная проблема, сделайте так, чтобы
между трехмерными очками 3D Active Glasses и другими
электронными устройствами расстояние было как можно
больше.
x
Если просмотр изображений выполняется с источника
трехмерного видео с частотой 50 Гц в режиме игр, то
некоторые зрители могут заметить, что слишком яркие
изображения мигают.
x
Содержимое меню Фотографии в Media Play
отображается только в режиме “2D → 3D”.
x
Если смотреть телевизор в очках 3D active glasses в
положении лежа на боку, изображение может быть
темным или не отображаться.
x
Соблюдайте угол обзора и оптимальное расстояние до
телевизора при просмотре изображений 3D.
– В противном случае желаемый эффект 3D может
быть не достигнут.
x
В идеале расстояние просмотра должно составлять
три высоты экрана или более. Рекомендуется смотреть
телевизор так, чтобы глаза сидящего зрителя находились
на одном уровне с экраном.
Сброс настроек изображения (ОК / Отмена)
Восстановление значений по умолчанию для текущих
параметров изображения.
Настройка подключения телевизора к компьютеру
Настройка источника входного сигнала для компьютера.
Автоподстройка
Автоматическая настройка частоты и положения, а также
точная настройка.
✎
Эта функция недоступна при использовании кабеля HDMI/DVI.
[UC9000]BN68-02820G-RU.indb 20 2010-05-25 오전 10:00:04
Page 81
21
Русский
03 Основные операции
Экран
■ Грубо / Точно: устранение или сокращение помех. Если
уровень помех не удалось снизить с помощью функции
точной настройки, настройте частоты как можно лучше
в режиме Грубо, а затем повторите точную настройку.
Снизив уровень помех, настройте изображение таким
образом, чтобы оно располагалось по центру экрана.
■ Позиция: выберите подходящее положение экрана
компьютера с помощью кнопок (▲ / ▼ / ◄ / ►).
■ Сброс настр.: восстановление значений по умолчанию
для всех параметров изображения.
Использование телевизора в качестве экрана компьютера
Настройка программного обеспечения компьютера (на основе
Windows XP)
В зависимости от установленной версии Windows и видеокарты
изображение на экране компьютера может варьироваться,
однако основные параметры почти всегда совпадают. (В
противном случае, обратитесь к производителю компьютера
или торговому представителю компании Samsung.)
1. Выберите “Панель управления” в меню Пуск Windows.
2. Выберите “Оформление и темы” в открывшемся окне
“Панель управления”, чтобы открыть диалоговое окно
экрана.
3. Выберите “Экран”, чтобы открыть диалоговое окно экрана.
4. В диалоговом окне “Экран” перейдите на вкладку
“Настройка”.
y Оптимальная настройка размера (разрешения): 1920 X
1080 пикселей.
y Если в диалоговом окне параметров экрана есть параметр
частоты вертикальной развертки, то правильным
значением будет “60” или “60 Гц”. Если нет, закройте
диалоговое окно, нажав кнопку OK.
Меню Звук
Изменение предварительно настроенного
режима звучания
SRS TheaterSound
■ Стандартный: выбор обычного режима звучания.
■ Музыка: усиление музыки по сравнению со звуком голоса.
■ Кино: обеспечение наивысшего качества звучания при
просмотре фильмов.
■ Четкий голос: усиление звука голоса по сравнению с
другими звуками.
■ Усиление: усиление высокочастотного звука в
соответствии с потребностями людей с нарушениями
слуха.
Настройка параметров звука
Эквалайзер
Настройка режима звучания (только в стандартном режиме
звучания).
■ Баланс Лев./Пр.: настройка баланса между правым и
левым громкоговорителями.
■ 100Гц / 300Гц / 1кГц / 3кГц / 10кГц (регулировка полосы
пропускания): настройка уровня звука в разных частотных
диапазонах.
■ Сброс: сброс настроек эквалайзера до значений по
умолчанию.
Аудиосистемы и т.п.
SRS TruSurround HD (Выкл. / Вкл.)
(только в стандартном режиме звучания)
Эта функция позволяет добиться эффекта объемного звучания
виртуальной 5.1-канальной системы при воспроизведении
через два громкоговорителя или наушники за счет применения
технологии HRTF (Head Related Transfer Function).
SRS TruDialog (Выкл. / Вкл.)
(только в стандартном режиме звучания)
Эта функция позволяет усилить звук голоса по сравнению с
фоновой музыкой или звуковыми эффектами, чтобы диалоги
звучали более четко.
[UC9000]BN68-02820G-RU.indb 21 2010-05-25 오전 10:00:05
Page 82
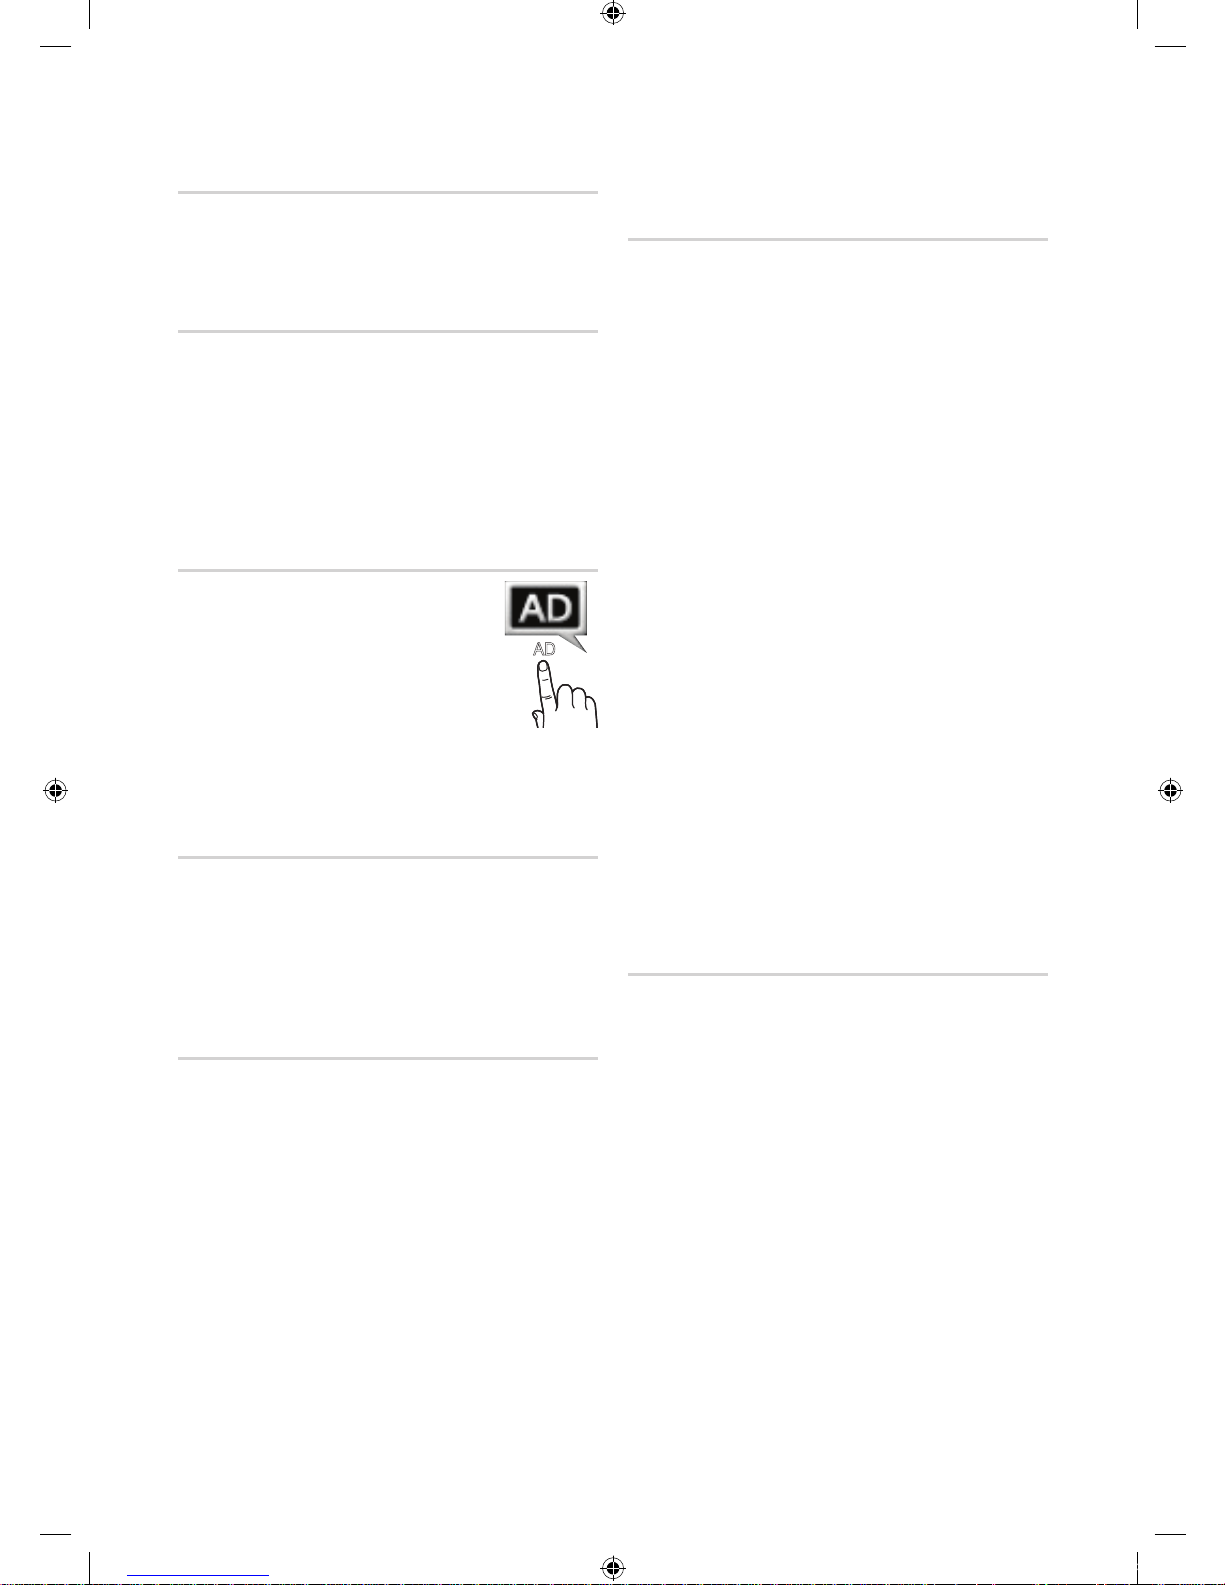
22
Русский
Основные операции
Язык аудио
(только для цифровых каналов)
Изменение языка аудио, установленного по умолчанию.
✎
Набор доступных языков может отличаться в зависимости от
типа телевещания.
Аудиоформат
(только для цифровых каналов)
При выводе звука через главный громкоговоритель и
аудиоприемник может возникать эффект эха из-за различий
в скорости декодирования этих устройств. В этом случае
используйте громкоговорители телевизора.
✎
Аудиоформат может отличаться в зависимости от типа
телевещания. 5.1-канальное звучание в формате Dolby digital
доступно только в том случае, если телевизор подключен к
внешнему громкоговорителю с помощью оптического кабеля.
Описание аудио
(доступно не во всех странах) (только для
цифровых каналов)
Эта функция обрабатывает аудиопоток для
AD (Audio Description), который передается
вещательной компанией вместе сосновным
аудио.
■ Описание аудио (Выкл. / Вкл.):
включение и выключение функции
описания аудио.
■ Громкость: настройка громкости описания аудио.
Громкость авто (Выкл. / Норм. / Ночь)
Чтобы выровнять громкость на всех каналах, установите
значение Норм..
■ Ночь: звучание в этом режиме сравнимо по качеству с
режимом Норм. и характеризуется практически полным
отсутствием шумов. Этот режим рекомендуется включать
ночью.
Выбрать громкогов. (Внеш. громк. /
Громкогов. ТВ)
При выводе звука через главный громкоговоритель и
аудиоприемник может возникать эффект эха из-за различий
в скорости декодирования этих устройств. В этом случае
переключите телевизор на Внеш. громк..
✎
Если для параметра Выбрать громкогов. установлено
значение Внеш. громк., то кнопка регулировки громкости
и кнопка MUTE не работают и, соответственно,
ограничиваются возможности настройки звука.
✎
Если для параметра Выбрать громкогов. установлено
значение Внеш. громк..
x
Громкогов. ТВ: Выкл., Внеш. громк.: Вкл.
✎
Если для параметра Выбрать громкогов. установлено
значение Громкогов. ТВ.
x
Громкогов. ТВ: Вкл., Внеш. громк.: Вкл.
✎
При отсутствии видеосигнала звук будет отсутствовать в
обоих громкоговорителях.
Доп-ная настройка
(только для цифровых каналов)
■ Уровень звука DTV (MPEG / HE-AAC): эта функция
позволяет нормализовать звуковой сигнал, получаемый
наряду с другими сигналами в рамках цифрового
телевещания.
✎
В зависимости от типа транслируемого сигнала для
параметров MPEG / HE-AAC можно задать значение от
-10 дБ до 0 дБ.
✎
Переключение в рамках диапазона от 0 до -10 дБ позволяет
соответственно увеличивать и уменьшать громкость.
■ Выход SPDIF: SPDIF – это интерфейс формата передачи
цифрового аудио, разработанный компаниями Sony
и Philips. Он позволяет снизить помехи при передаче
цифровых аудио сигналов от одного устройства к другому,
например, к громкоговорителю или DVD-проигрывателю.
Аудиоформат: помимо формата вывода цифрового аудио
(SPDIF), в ходе приема цифрового телевещания можно
выбрать следующие варианты: PCM или Dolby Digital.
Автозадержка: устранение несоответствия видео и звука
при просмотре ТВ или видео, если цифровой звуковой
сигнал выводится через внешнее устройство, например
AV-приемник (0 мс – 250 мс).
■ Комп Dolby Digital (Line / RF): выравнивание сигнала Dolby Digital
и звукового сигнала (то есть сигналов MPEG, HE-AAC, ATV).
✎
Чтобы добиться динамического звучания, выберите
Line; чтобы сгладить разницу между громкими и тихими
звуками в ночное время, используйте RF.
Line: установка уровня вывода сигналов, отличающегося в
большую или меньшую сторону от эталонного уровня -31
дБ, – либо -20 дБ, либо -31 дБ.
RF: установка уровня вывода сигналов, отличающегося в
большую или меньшую сторону от эталонного уровня -20
дБ, – либо -10 дБ, либо -20 дБ.
Сброс звука (ОК / Отмена)
Восстановление для параметров звука заводских настроек по
умолчанию.
AD
[UC9000]BN68-02820G-RU.indb 22 2010-05-25 오전 10:00:06
Page 83
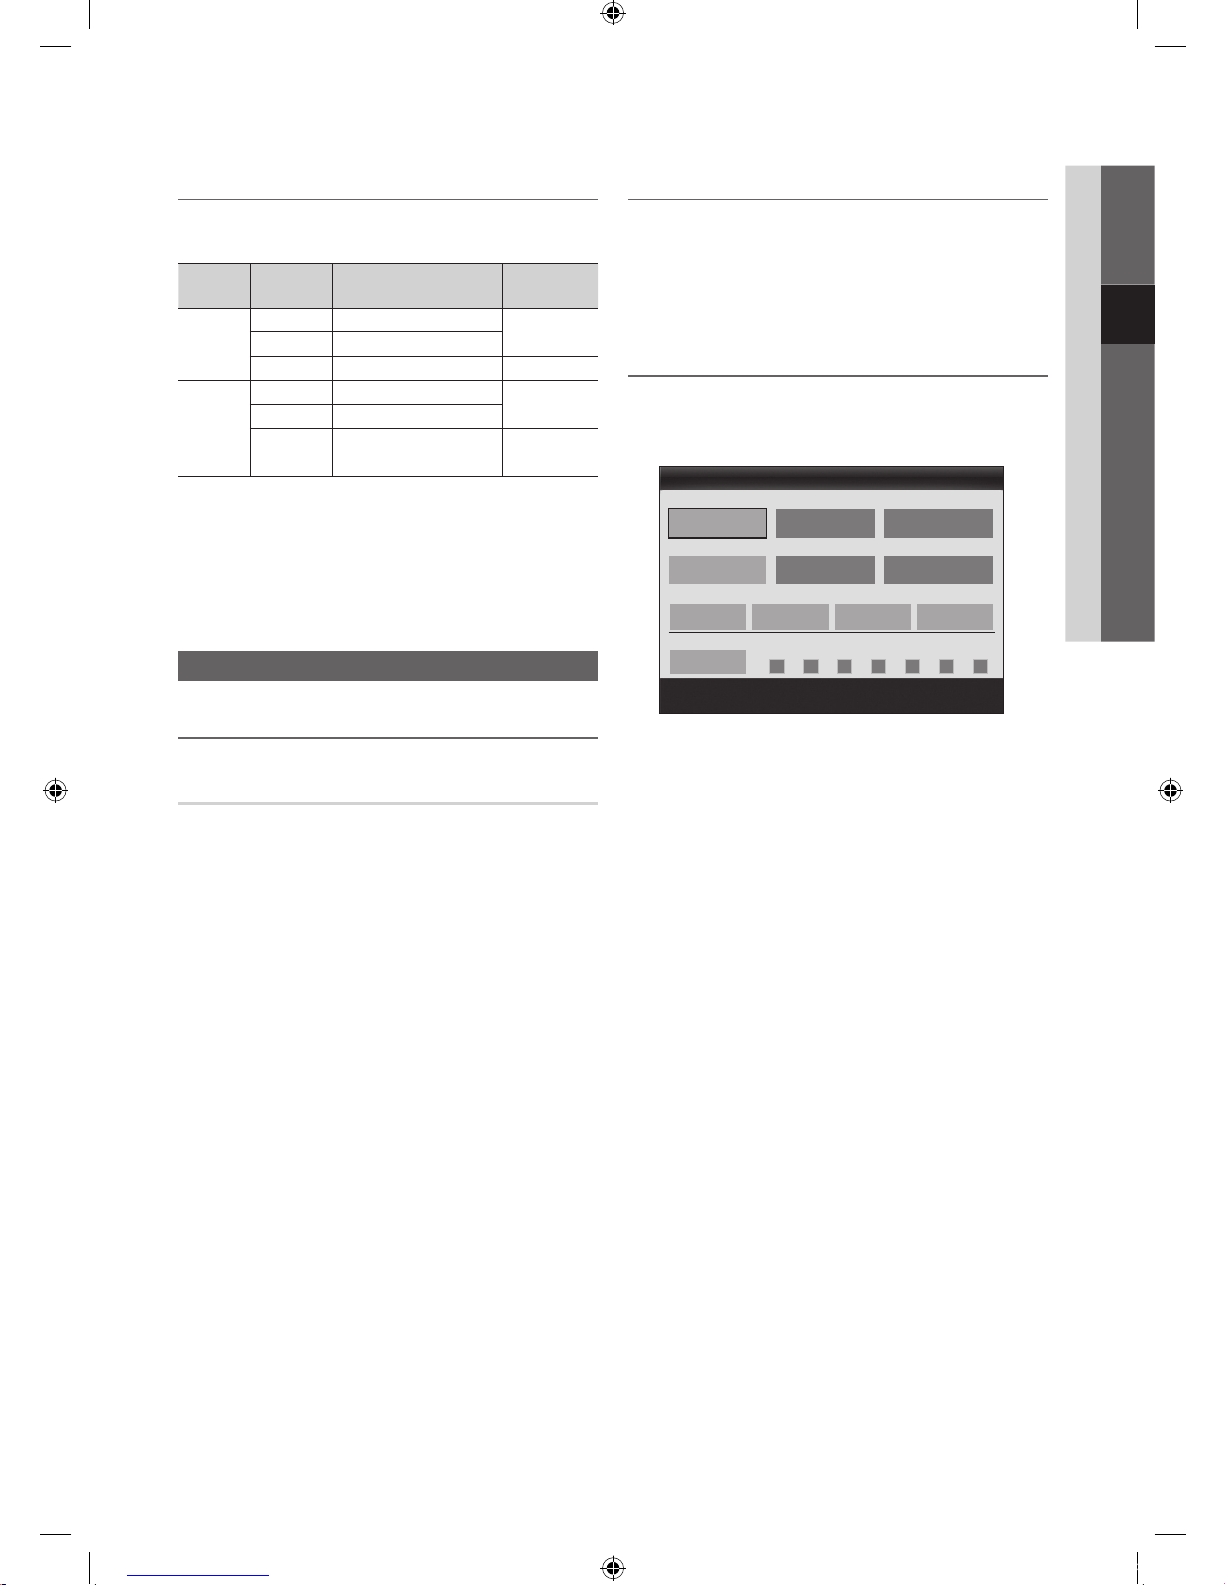
23
Русский
03 Основные операции
Выбор режима звучания
При выборе параметра Dual. - на экране отобразится
текущий режим звука.
Тип звука Dual 1/2
По
умолчанию
Стерео
A2
Моно Моно
Авто.
изменение
Стерео
Стерео ↔ Моно
Dual
Dual
↔ Dual
Dual
NICAM
стерео
Моно Моно
Авто.
изменение
Стерео
Моно ↔ Стерео
Dual
Моно ↔ Dual
Dual
Dual
✎
Если стереосигнал слишком слабый и происходит
автоматическое переключение режимов, выберите режим
“Моно”.
✎
Включается только для стереосигналов.
✎
Доступно, если в качестве источника входного сигнала
(параметр Вход) установлено значение ТВ.
Меню Настройка
Установка времени
Время
■ Часы: для использования различных функций таймера в
телевизоре необходимо настроить часы.
Текущее время будет отображаться каждый раз при
нажатии кнопки INFO.
✎
После отключения кабеля питания часы потребуется
установить заново.
Режим часов (Авто / Ручной)
✎
В зависимости от телевизионной станции и сигнала
автоматическое время может быть установлено
неверно. В этом случае установите время вручную.
✎
Для автоматической установки времени необходимо
подключить антенну.
Установка часов: вручную задайте значения параметров
День, Месяц, Год, Час. и Минут.
✎
Эта функция доступна, только если для параметра
Режим часов установлено значение Ручной.
Часовой пояс (в зависимости от страны): выберите
часовой пояс.
✎
Эту функцию можно использовать, если для параметра
Страна выбрано значение Другие.
✎
Эта функция доступна, только если для параметра
Режим часов установлено значение Авто.
Использование таймера сна
■ Таймер сна
: автоматическое отключение
телевизора по прошествии заданного времени. (30, 60, 90,
120, 150 или 180 минут).
✎
Для отмены функции Таймер сна выберите значение
Выкл..
Настройка таймера включения/выключения
■ Таймер 1 / Таймер 2 / Таймер 3 : доступны три различные
настройки включения/выключения таймера. Сначала
необходимо установить часы.
Время вкл. / Время выкл. : выбор времени (часы, минуты)
и действия (включение/выключение). (Чтобы включить
таймер с выбранными параметрами, нажмите Включить.)
Громкость: установка необходимого уровня громкости.
Источник: можно выбрать источник содержимого для
воспроизведения (ТВ или USB) при автоматическом
включении телевизора. (USB можно выбрать, только если
к телевизору подключено устройство USB.)
Антенна (когда для параметра Источник установлено
значение ТВ): выберите ATV или DTV.
Канал (когда для параметра Источник установлено
значение ТВ ): выберите нужный канал.
Содержимое (когда для параметра Источник установлено
значение USB ): выберите на устройстве USB папку с
музыкальными или фотофайлами для воспроизведения
при автоматическом включении телевизора.
✎
ПРИМЕЧАНИЕ
x
Если на устройстве USB нет музыкальных файлов
или не выбрана нужная папка, то таймер не
сработает.
x
Если на устройстве USB имеется только один
фотофайл, то слайд-шоу показано не будет.
x
Если папка имеет слишком длинное имя, то выбрать
ее не удастся.
x
Каждому устройству USB соответствует отдельная
папка. При подключении нескольких устройств
USB одного типа убедитесь, что имена папок,
соответствующих разным устройствам USB, не
совпадают.
10 TV ATV 1
00 00
▲
▼
00 00
Таймер 1
Время вкл.
Время выкл.
Громкость
Неактивный
Неактивный
Вс Пн Втр Срд Чтв Пт Сб
Один раз
Источн. Антенна Канал
Повтор
Переместить
Настройка
Ввод
Возврат
[UC9000]BN68-02820G-RU.indb 23 2010-05-25 오전 10:00:07
Page 84

24
Русский
Основные операции
Повтор: выберите Один раз, Ежедн., Пн-Пт, Пн-Сб,
Сб-Вс или Ручной, чтобы настроить таймер по своему
усмотрению. При выборе параметра Ручной можно задать
день включения таймера.
✎
Выбранный день отмечен значком .
✎
Автовыключение питания (только если телевизор включен по
таймеру): через 3 часа ожидания телевизор автоматически
выключится для предотвращения перегрева.
Блокировка программы
Защита
✎
Перед отображением экрана настройки появится экран для
ввода PIN-кода.
✎
Введите 4-значный PIN-код. По умолчанию используется
PIN-код “0-0-0-0”. PIN-код можно изменить, выбрав пункт
Изменение PIN.
■ Замок (Выкл. / Вкл.): В окне Диспетчер каналов
можно заблокировать некоторые каналы и, тем самым,
ограничить доступ определенных пользователей
(например, детей) к неподходящим программам.
✎
Доступно, если в качестве источника входного сигнала
(параметр Вход) установлено значение ТВ.
■ Родит. блокировка (зависит от страны): ограничение
доступа определенных пользователей (например, детей)
к неподходящим программам с помощью 4-значного PINкода. При выборе заблокированного канала отобразится
значок “”.
Разр. все: снятие всех блокировок.
■ Изменение PIN: изменение персонального
идентификационного номера, необходимого для настройки
телевизора.
✎
Если вы забыли PIN-код, нажмите следующие кнопки
пульта дистанционного управления для возвращения
значения по умолчанию – “0-0-0-0”: POWER (выкл.) →
MUTE → 8 → 2 → 4 → POWER (вкл.).
Другие операции
Язык
■ Язык меню: выбор языка меню.
■ Язык телетекста: выбор языка телетекста.
✎
Если выбранный язык не транслируется, по умолчанию
устанавливается английский язык.
■ Предпочтение (Основной язык аудио / Вторичный
язык аудио
/ Первичный язык субтитров / Вторичный
язык субтитров / Основной язык телетекста /
Вторичный язык телетекста): выбор языка, который
будет языком по умолчанию при выборе канала.
Субтитры
Это меню используется для настройки
режима Субтитры.
■ Субтитры (Выкл. / Вкл.): включение или
выключение субтитров.
■ Режим (Норм. / С нарушен. слуха):
выбор режима субтитров.
■ Язык субтитров: выбор языка
субтитров.
✎
Если просматриваемая программа не поддерживает
режим С нарушен. слуха, то автоматически
включается режим Норм. даже при выборе режима
С нарушен. слуха.
✎
Если выбранный язык не транслируется, по умолчанию
устанавливается английский язык.
Цифровой текст (Отключить / Включить)
(только для Великобритании)
Эта функция включается, если программа передается с
цифровым текстом.
Сеть (Тип сети / Настройка сети / Проверка
сети / SWL(Samsung Wireless Link) /
Подключение SWL)
Подробные сведения о настройке параметров см. в
инструкциях по сетевому подключению (стр. 28).
Общие
■ Игровой режим (Выкл. / Вкл.): при подключении игровой
консоли, например PlayStation™ или Xbox™, можно
выбрать меню игры для получения более реалистичных
эффектов.
SUBT.
[UC9000]BN68-02820G-RU.indb 24 2010-05-25 오전 10:00:07
Page 85

25
Русский
03 Основные операции
✎
ПРИМЕЧАНИЕ
x
Меры предосторожности и ограничения при
использовании игрового режима
– Чтобы отсоединить игровую консоль и подключить
другое внешнее устройство, сначала установите для
Игровой режим значение Выкл. в меню настройки.
– При отображении меню телевизора в Игровом
режиме изображение на экране будет слегка
дрожать.
x
Игровой режим недоступен, когда в качестве источника
входного сигнала выбран телевизор или компьютер.
x
Сразу после подключения игровой консоли установите
для параметра Игровой режим значение Вкл.. К
сожалению, может наблюдаться ухудшение качества
изображения.
x
Когда для параметра Игровой режим установлено
значение Вкл.:
– для режима Изображение устанавливается значение
Стандартный, а для режима Звук – значение Кино.
– Параметр Эквалайзер недоступен.
■ BD Wise (Выкл. / Вкл.): обеспечение оптимального
качества изображения для проигрывателей DVD-дисков,
дисков Blu-ray и домашних кинотеатров компании
SAMSUNG, поддерживающих функцию BD Wise. Если для
функции BD Wise выбрано значение Вкл., то для режима
изображения автоматически подбирается оптимальное
разрешение.
✎
Эта функция доступна при подключении устройств
Samsung, поддерживающих BD Wise, с помощью
кабеля HDMI.
■ Прозрачность меню (Яркий / Темный): выбор
прозрачности экрана меню.
■ Клавиша перех. (Выкл. / Вкл.): можно выбрать
управление с помощью ЖК-сенсорной панели,
расположенной по центру в нижней части подставки.
■ Мелодия (Выкл. / Низкий / Средний / Высокий): выбор
мелодии, которая будет воспроизводиться при включении
или выключении телевизора.
✎
Функция Мелодия отключена, если для параметра
FastStart установлено значение Вкл..
■ FastStart (Выкл. / Вкл.): Когда на телевизор подается
питание, с помощью этой функции экран быстро
включится.
Общий интерфейс
■ Меню CI: выбор параметров в меню модуля CAM.
Выберите меню CI в меню платы PC Card.
■ Инфо о приложении: просмотр сведений о модуле CAM,
вставленном в гнездо CI, и о карте CI CARD или CI+
CARD, вставленной в модуль CAM. Модуль CAM можно
установить независимо от того, включен телевизор или
нет.
1. Модуль CI CAM можно приобрести у ближайшего дилера
или по телефону.
2. Вставьте карту CI CARD или CI+ CARD в модуль CAM в
направлении, указанном стрелкой.
3. Вставьте модуль CAM с картой CI CARD или CI+ CARD в
гнездо COMMON INTERFACE в направлении, указанном
стрелкой, так, чтобы модуль был параллелен гнезду.
4. Убедитесь, что на зашифрованном канале есть
изображение.
Беспроводной пульт ДУ
Включение или выключение беспроводных пультов
дистанционного управления или предоставление разрешения
на их использование.
Меню Поддержка
Самодиагностика
✎
Для работы функции диагностики требуется несколько
секунд. Это часть нормальной работы телевизора.
■ Тест изображения (Да / Нет): устранение сбоев
изображения.
■ Звуковой тест (Да / Нет): воспроизведение встроенной
мелодии для устранения звуковых сбоев.
✎
При отсутствии звука из громкоговорителей
телевизора перед выполнением проверки звука
убедитесь, что для параметра Выбрать громкогов.
задано значение Громкогов. ТВ в меню Звук.
✎
Во время проверки будет воспроизводиться мелодия,
даже если для параметра Выбрать громкогов.
установлено значение Внеш. громк., или звук
отключен с помощью кнопки MUTE.
■ Информ. о сигнале: (только для цифровых каналов) либо
качество приема каналов ТВЧ идеальное, либо каналы
недоступны. Отрегулируйте антенну, чтобы увеличить
уровень сигнала.
■ Устранение неполадок: обращайтесь к этим советам при
возникновении проблем, связанных с работой телевизора.
✎
Если ни один из советов не поможет, обратитесь в
центр обслуживания клиентов Samsung.
[UC9000]BN68-02820G-RU.indb 25 2010-05-25 오전 10:00:08
Page 86
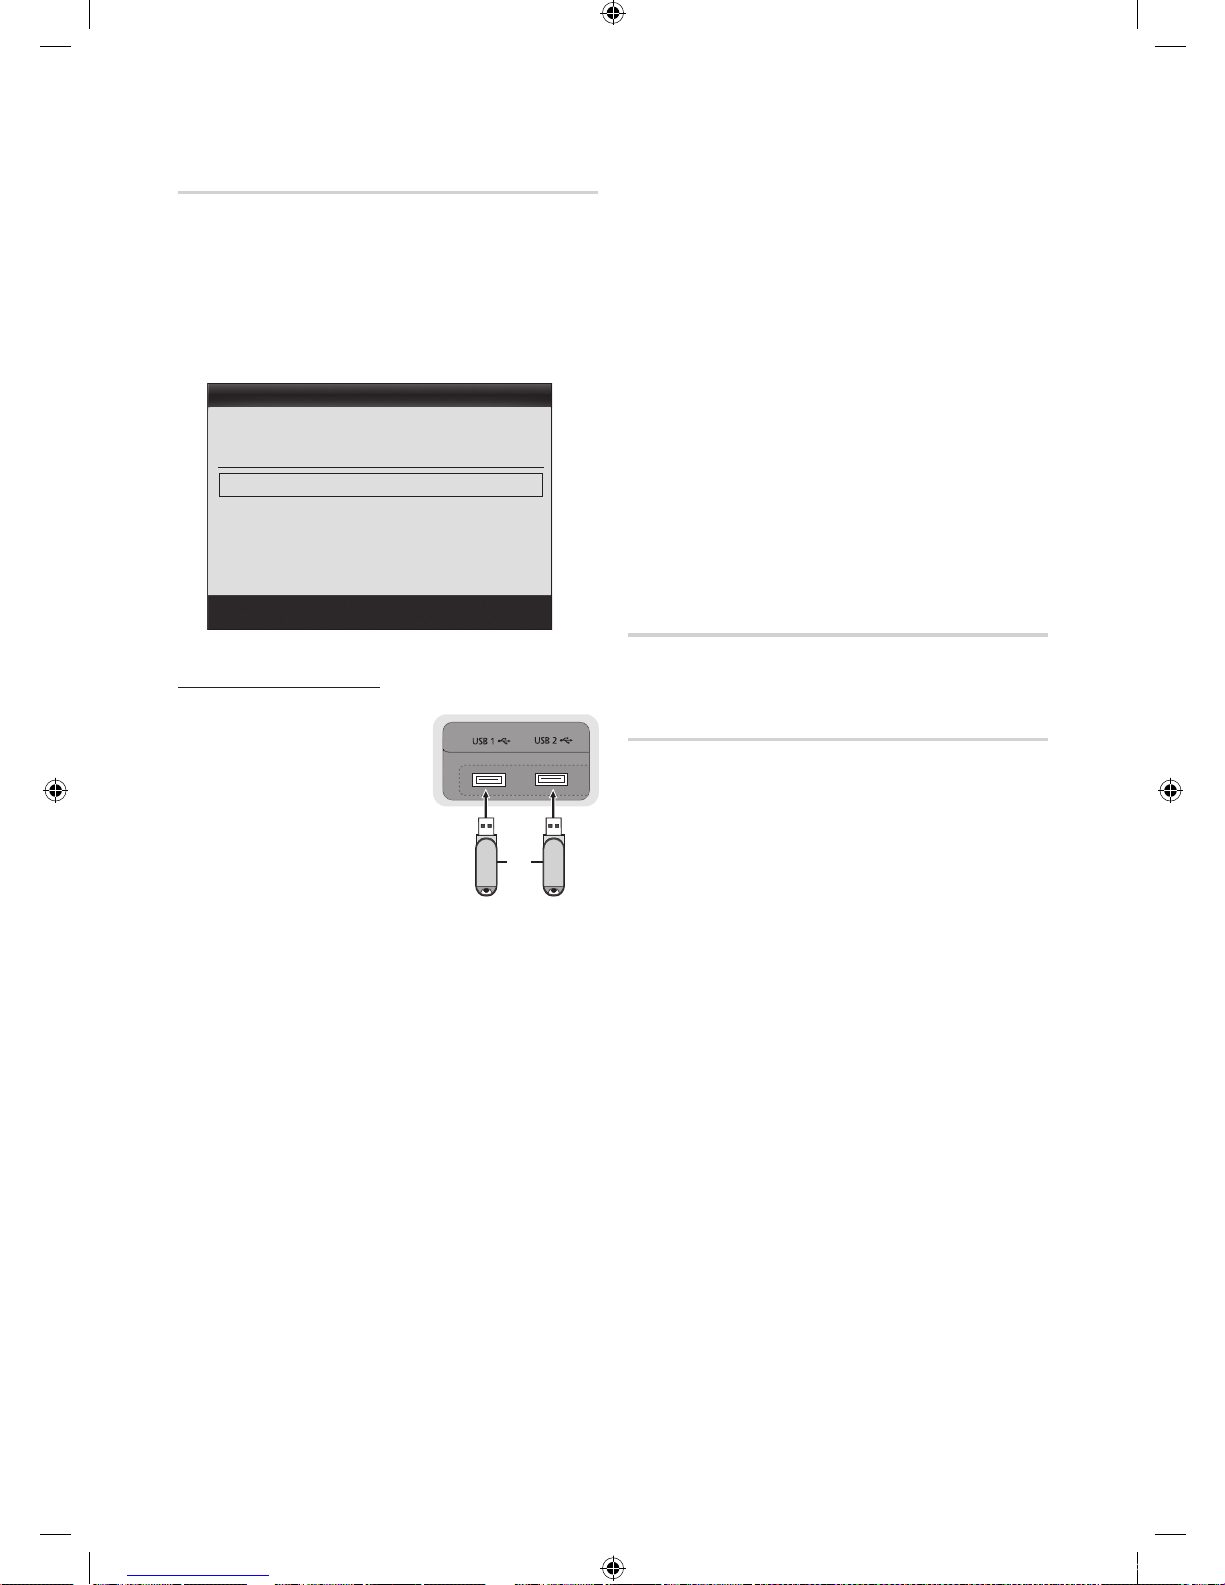
26
Русский
Основные операции
Обновление ПО
Обновление ПО можно выполнить путем приема
транслируемого сигнала или путем загрузки новой версии
микропрограммы с веб-узла samsung.com на устройство
памяти USB.
Текущая версия – это программное обеспечение, уже
установленное в телевизоре.
✎
Имя программного обеспечения имеет следующий формат:
“год/месяц/день_версия”.
Установка последней версии
■ По USB: вставьте в гнездо
на телевизоре устройство
USB с файлом обновления
микропрограммы, загруженным
с веб-узла www.samsung.com.
Не отсоединяйте питание и не
извлекайте устройство USB
во время обновления. После
обновления микропрограммы
телевизор автоматически
выключится и снова включится.
При этом для всех настроек
видео и аудио будут восстановлены заводские значения
по умолчанию. Рекомендуется записывать свои настройки,
чтобы их можно было легко восстановить после
обновления.
■ По сети: обновление программного обеспечения через
Интернет.
✎
Сначала выполните настройку сети. Подробные
инструкции см. в разделе “Настройка сети”.
✎
Если Интернет-соединение некачественное, оно может
неожиданно прерваться. Повторите попытку загрузки.
Если проблема повторяется, загрузите обновление с
устройства USB.
■ По каналу: обновление программного обеспечения через
транслируемый сигнал.
✎
Если данная функция включена во время
передачи программного обеспечения, то поиск и
загрузка программного обеспечения выполняются
автоматически.
✎
Время, необходимое для загрузки программного
обеспечения, зависит от состояния сигнала.
■ Обновление в реж. ожидан.: обновление в режиме
ожидания автоматически выполняется в заданное время.
Поскольку питание устройства включается автоматически,
экран устройства может слегка мигать. Этот эффект
может сохраняться более часа до тех пор, пока не будет
завершено обновление программного обеспечения.
■ Альтернативное ПО (резервное копирование):
отображение версии программного обеспечения,
загруженной в режиме По сети. Эта функция включается
при обновлении ПО, если оно прерывается на последнем
этапе.
Руководство по соединению c ТВЧ
Используйте данную информацию при подключении к
телевизору внешних устройств.
Обращение в Samsung
См. данный раздел, когда телевизор работает неправильно
или требуется обновить программное обеспечение. Здесь
содержатся сведения о центрах поддержки Samsung и советы
по загрузке решений и программ.
Устройство USB
Панель, обращенная к
подставке
или
Обновление ПО
По USB ►
По сети
По каналу
Обновление в реж. ожидан. : Выкл.
Альтернативное ПО 2010/01/15_00000
Переместить
Ввод
Возврат
Текущая версия 2010/01/18_000001
[UC9000]BN68-02820G-RU.indb 26 2010-05-25 오전 10:00:09
Page 87
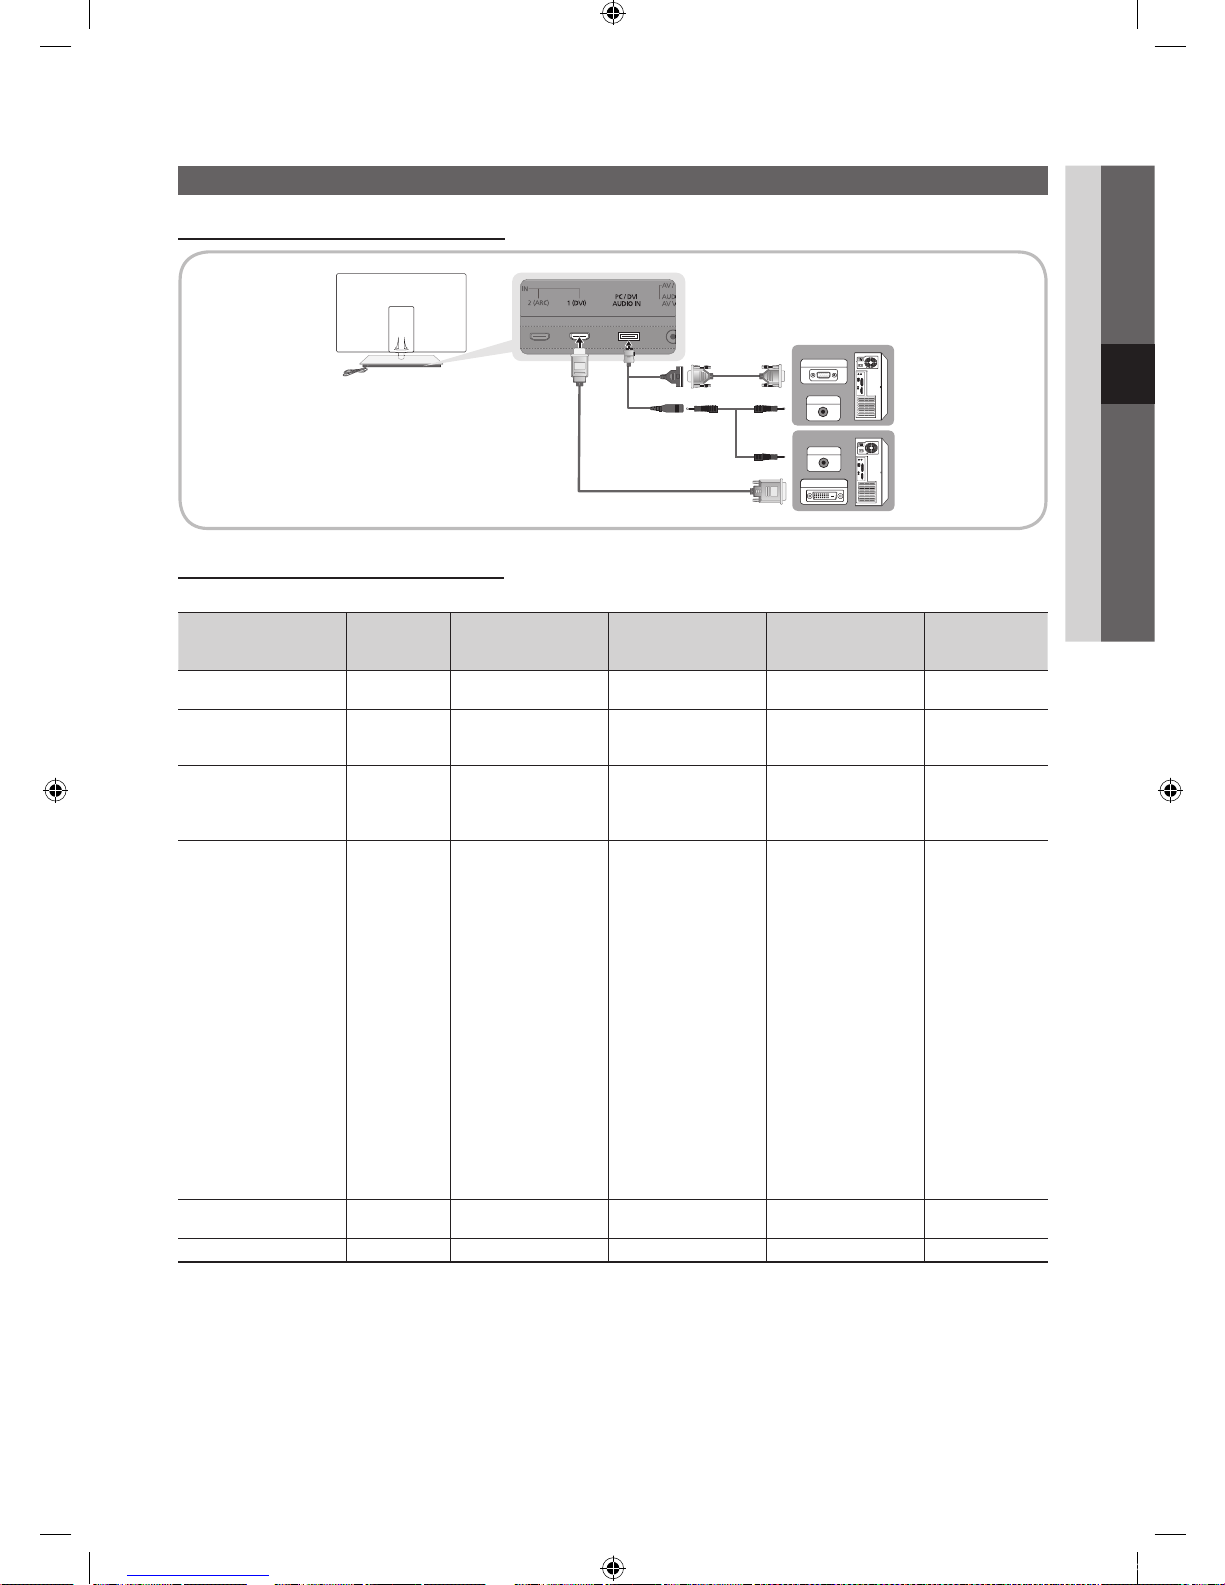
27
Русский
04 Дополнительные операции
Дополнительные операции
Подключение к компьютеру
С помощью кабеля HDMI/DVI или кабеля D-sub
Режимы отображения (вход D-Sub и HDMI/DVI)
Оптимальное разрешение: 1920 X 1080 при частоте 60 Гц.
Режим Разрешение
Частота горизонтальной
развертки
(кГц)
Частота вертикальной
развертки
(Гц)
Частота синхронизации
пикселей
(МГц)
Полярность
синхронизации
(Г / В)
IBM
640 x 350.
720 x 400
31.469
31.469
70.086
70.087
25.175
28.322
+/-
-/+
MAC
640 x 480
832 x 624
1152 x 870
35.000
49.726
68.681
66.667
74.551
75.062
30.240
57.284
100.000
-/-
-/-
-/-
VESA CVT
720 x 576
1152 x 864
1280 x 720
1280 x 960
35.910
53.783
56.456
75.231
59.950
59.959
74.777
74.857
32.750
81.750
95.750
130.000
-/+
-/+
-/+
-/+
VESA DMT
640 x 480
640 x 480
640 x 480
800 x 600
800 x 600
800 x 600
1024 x 768
1024 x 768
1024 x 768
1152 x 864
1280 x 1024
1280 x 1024
1280 x 720
1280 x 800
1280 x 800
1280 x 960
1360 x 768
1440 x 900
1440 x 900
1600 x 1200
1680 x 1050
31.469
37.861
37.500
37.879
48.077
46.875
48.363
56.476
60.023
67.500
63.981
79.976
45.000
49.702
62.795
60.000
47.712
55.935
70.635
75.000
65.290
59.940
72.809
75.000
60.317
72.188
75.000
60.004
70.069
75.029
75.000
60.020
75.025
60.000
59.810
74.934
60.000
60.015
59.887
74.984
60.000
59.954
25.175
31.500
31.500
40.000
50.000
49.500
65.000
75.000
78.750
108.000
108.000
135.000
74.250
83.500
106.500
108.000
85.500
106.500
136.750
162.000
146.250
-/-
-/-
-/+/+
+/+
+/+
-/-
-/+/+
+/+
+/+
+/+
+/+
-/+
-/+
+/+
+/+
-/+
-/+
+/+
-/+
VESA GTF
1280 x 720
1280 x 1024
52.500
74.620
70.000
70.000
89.040
128.943
-/+
-/-
VESA DMT/DTV CEA
1920 x 1080p 67.500 60.000 148.500 +/+
✎
ПРИМЕЧАНИЕ
x
При использовании кабеля HDMI/DVI следует задействовать разъем HDMI IN 1(DVI).
x
Режим чересстрочной развертки не поддерживается.
x
При выборе нестандартного видеоформата устройство может работать неправильно.
x
Поддерживаются режимы раздельной и композитной синхронизации. Режим SOG (Sync On Green) не поддерживается.
AUDIO OUT
PC OUT
AUDIO OUT
DVI OUT
[UC9000]BN68-02820G-RU.indb 27 2010-05-25 오전 10:00:13
Page 88
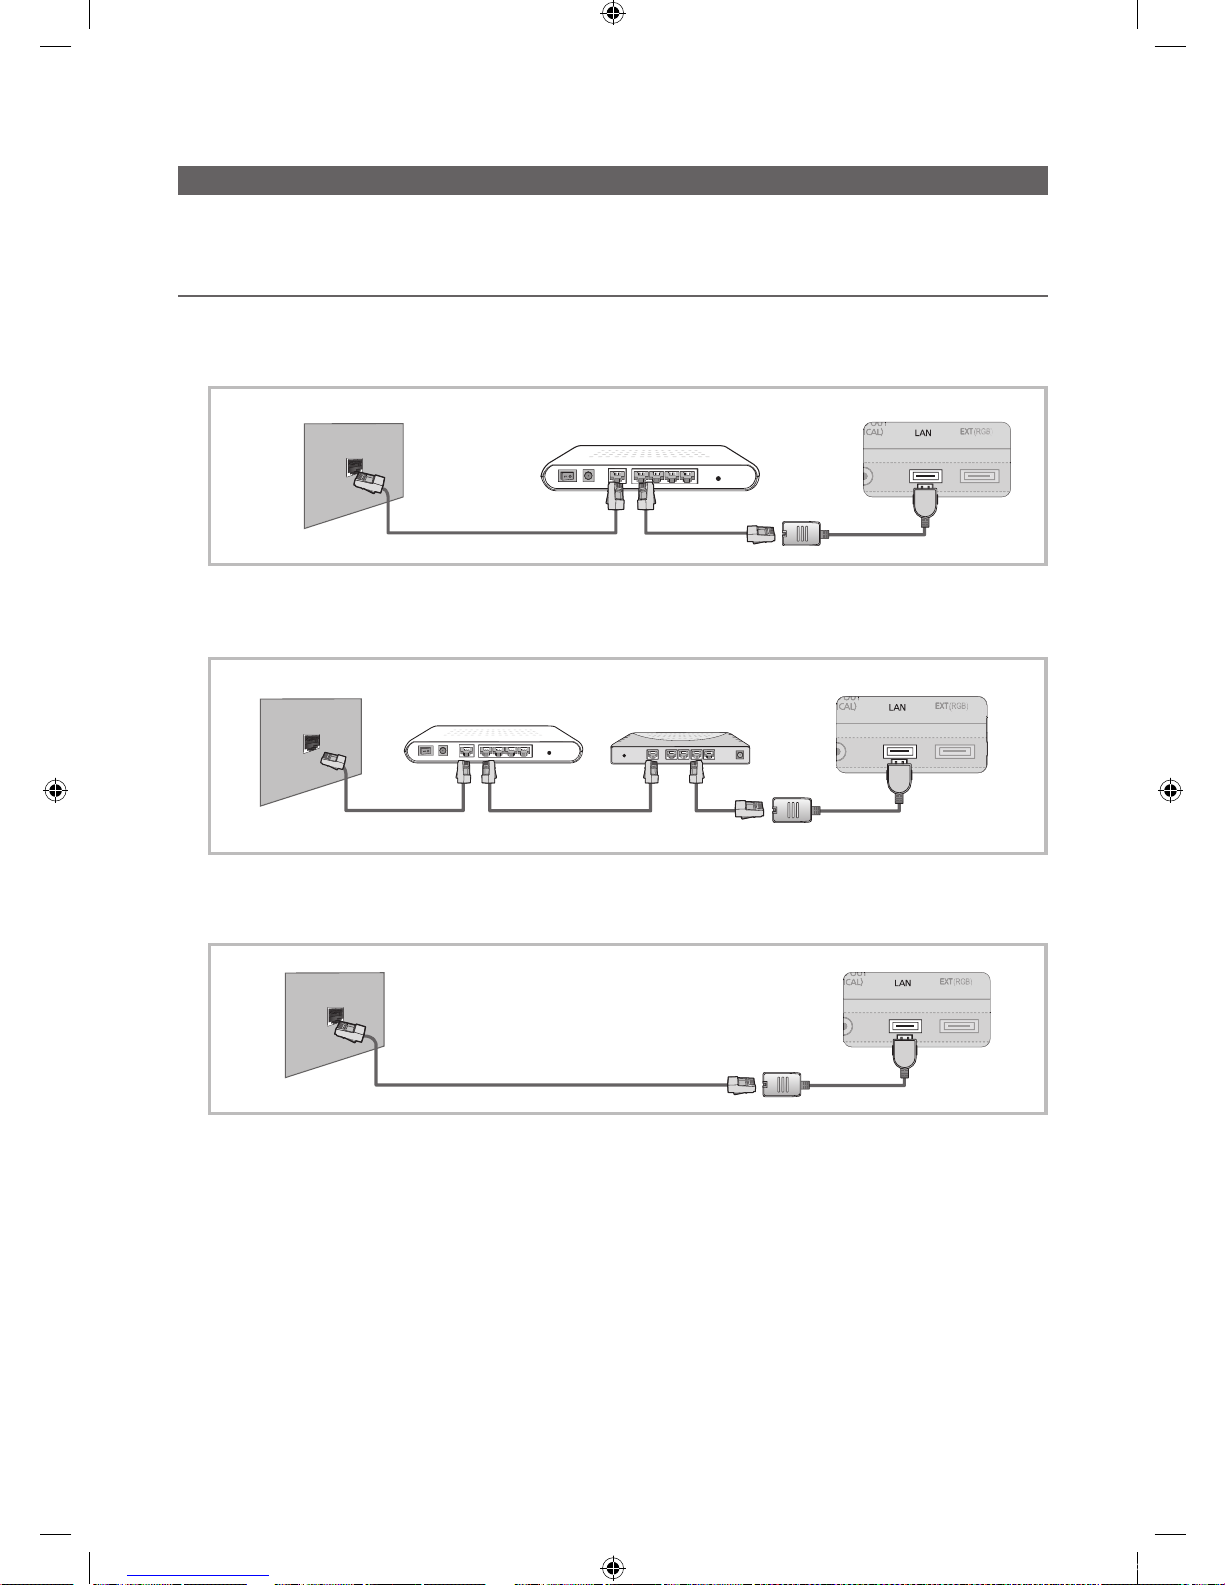
28
Русский
Дополнительные операции
Сетевое подключение
Можно настроить телевизор таким образом, чтобы он осуществлял доступ в Интернет по локальной сети с использованием
проводного или беспроводного соединения.
Подключение к проводной сети
Телевизор можно подключить к локальной сети с помощью кабеля тремя способами:
y Телевизор можно подключить к локальной сети, подсоединив порт локальной сети на задней панели телевизора к внешнему
модему с использованием кабеля Cat 5. См. диаграмму ниже.
y Телевизор можно подключить к локальной сети, подсоединив порт локальной сети на задней панели телевизора к IP-
устройству совместного доступа, которое подсоединено к внешнему модему. Используйте для подключения кабель Cat 5. См.
диаграмму ниже.
y В зависимости от настройки сети телевизор можно подключать к локальной сети путем соединения порта локальной сети на
задней панели телевизора непосредственно к стенной розетке с использованием кабеля 5. См. диаграмму ниже. Обратите
внимание, что модем или маршрутизатор подключаются в доме к стенной розетке где-нибудь в другом месте.
Если используется режим динамической сети, следует использовать модем ADSL или маршрутизатор, который поддерживает
протокол DHCP (Dynamic Host Configuration Protocol). Модемы и маршрутизаторы, поддерживающие протокол DHCP,
автоматически предоставляют значения IP-адреса, маски подсети, шлюза и DNS, которые требуются телевизору для доступа в
Интернет, поэтому их не придется вводить вручную. Большинство домашних сетей являются динамическими.
В некоторых сетях требуется указать статический IP-адрес. Если в сети требуется статический IP-адрес, при настройке
сетевого соединения необходимо вручную ввести на экране настройки сети телевизора значения IP-адреса, маски подсети,
шлюза и DNS. Чтобы получить значения IP-адреса, маски подсети, шлюза и DNS, обратитесь к своему поставщику услуг
Интернета. Если используется компьютер с системой Windows, то эти значения можно узнать на компьютере.
✎
Модемы ADSL, поддерживающие DHCP, можно использовать и в том случае, если в сети требуется статический IP-адрес.
Модемы ADSL, поддерживающие DHCP, также позволяют использовать статические IP-адреса.
Порт модема на стене
Задняя панель подставки
Сетевой кабель Адаптер локальной сетиКабель модема
Внешний модем
(ADSL/VDSL/кабельное ТВ)
Порт модема на стене Задняя панель подставки
Сетевой кабель
Сетевой кабельКабель модема
Внешний модем
(ADSL / VDSL / кабельное ТВ)
IP-устройство
совместного доступа
(с сервером DHCP)
Адаптер локальной сети
Сетевой порт на стене
Задняя панель подставки
Сетевой кабель Адаптер локальной сети
[UC9000]BN68-02820G-RU.indb 28 2010-05-25 오전 10:00:15
Page 89
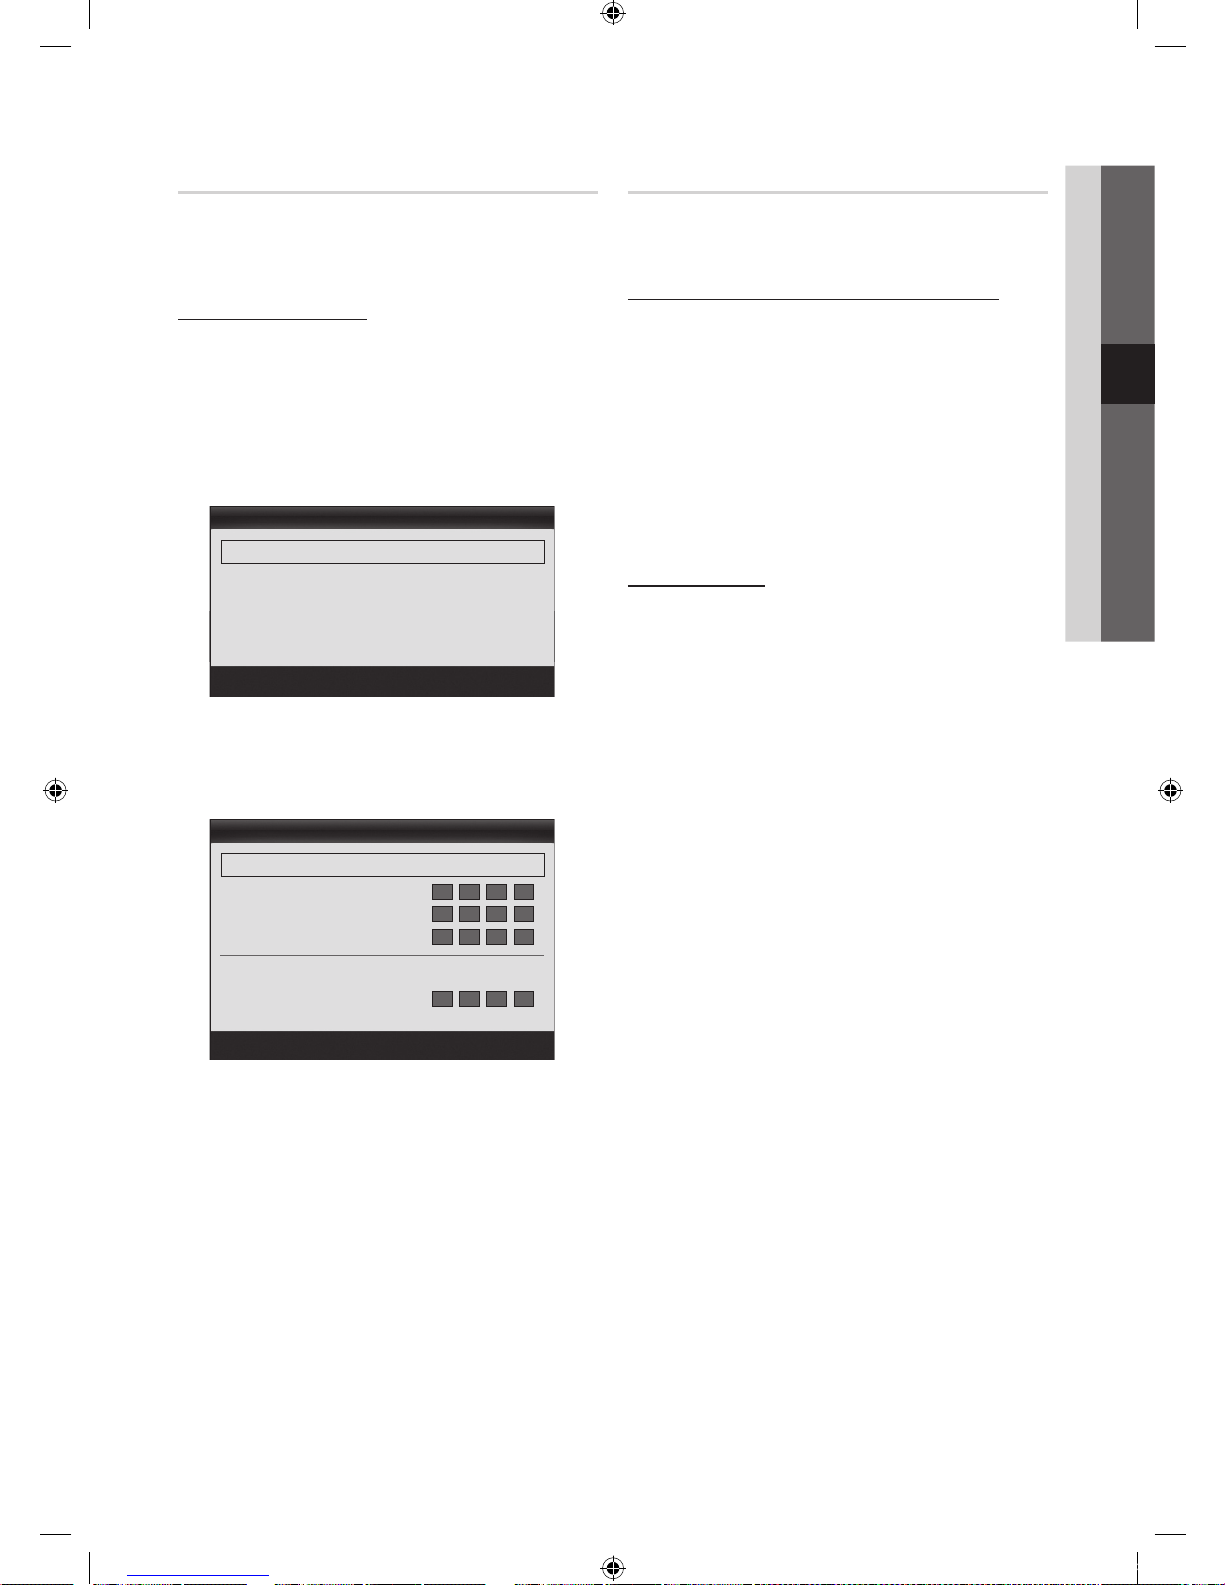
29
Русский
04 Дополнительные операции
Настройка сети (Авто)
Автоматическая Настройка сети используется при
подключении телевизора к сети, поддерживающей протокол
DHCP. Чтобы автоматически настроить подключение
телевизора к кабельной сети, выполните следующие действия:
Автоматическая настройка
1. Подсоедините телевизор к локальной сети, как описано в
предыдущем разделе.
2. Включите телевизор, нажмите кнопку MENU на пульте
дистанционного управления, с помощью кнопки ▲ или ▼
выберите пункт Настройка и нажмите кнопку ENTER
.
3. С помощью кнопки ▲ или ▼ выберите в меню Настройка
пункт Сеть, а затем нажмите кнопку ENTER
. Появится
экран Сеть.
4. На экране Сеть выберите пункт Тип сети.
5. Для параметра Тип сети установите значение Кабель.
6. Выберите параметр Настройка сети. Появится экран
Настройка сети.
7. Установите для параметра Настр.проток. Интернета
значение Авто.
8. При выборе значения Авто сбор и ввод необходимых
значений Интернета происходит автоматически.
9. После завершения нажмите кнопку RETURN на пульте
дистанционного управления.
10. Если значения для настройки сетевого подключения не
удалось получить с помощью функции Сеть, выполните
указания для Ручной настройки.
Настройка сети (режим Ручной)
Режим Ручной функции Настройка сети используется
при подключении телевизора к сети, в которой требуется
статический IP-адрес.
Получение значений настроек сетевого подключения
На большинстве компьютеров с операционной системой
Windows для получения значений параметров сетевого
подключения выполните следующие действия:
1. Щелкните правой кнопкой мыши значок сети в правой
нижней части экрана.
2. В появившемся раскрывающемся меню выберите пункт
Сост..
3. В отобразившемся диалоговом окне выберите вкладку
Поддержка.
4. На вкладке Поддержка нажмите кнопку Сведения.
Отобразятся значения настроек сетевого подключения.
Настройка вручную
Чтобы настроить подключение телевизора к кабельной сети
вручную, выполните следующие действия:
1. Выполните шаги с 1 по 6 в разделе “Автоматическая
настройка”.
2. Установите для параметра Настр.проток. Интернета
значение Ручной.
3. Нажмите кнопку ▼ на пульте дистанционного управления
для перехода к первому полю ввода.
4. Введите значения для параметров IP-адрес, Маска
подсети, Шлюз и Сервер DNS. Для ввода цифр
используйте цифровые кнопки на пульте дистанционного
управления, а для перехода из одного поля в другое
используйте кнопки со стрелками.
5. После завершения нажмите кнопку RETURN на пульте
дистанционного управления.
6. Выберите параметр Проверка сети для проверки
подключения к Интернету.
Настройка сети
IP-адрес :
Маска подсети :
Шлюз :
DNS : Авто
Сервер DNS :
Переместить
Ввод
Возврат
Настр.проток. Интернета : Авто ►
Сеть
Переместить
Ввод
Возврат
Тип сети : Кабель ►
Настройка сети
Проверка сети
SWL (Samsung Wireless Link) : Выкл.
Подключение SWL
[UC9000]BN68-02820G-RU.indb 29 2010-05-25 오전 10:00:16
Page 90
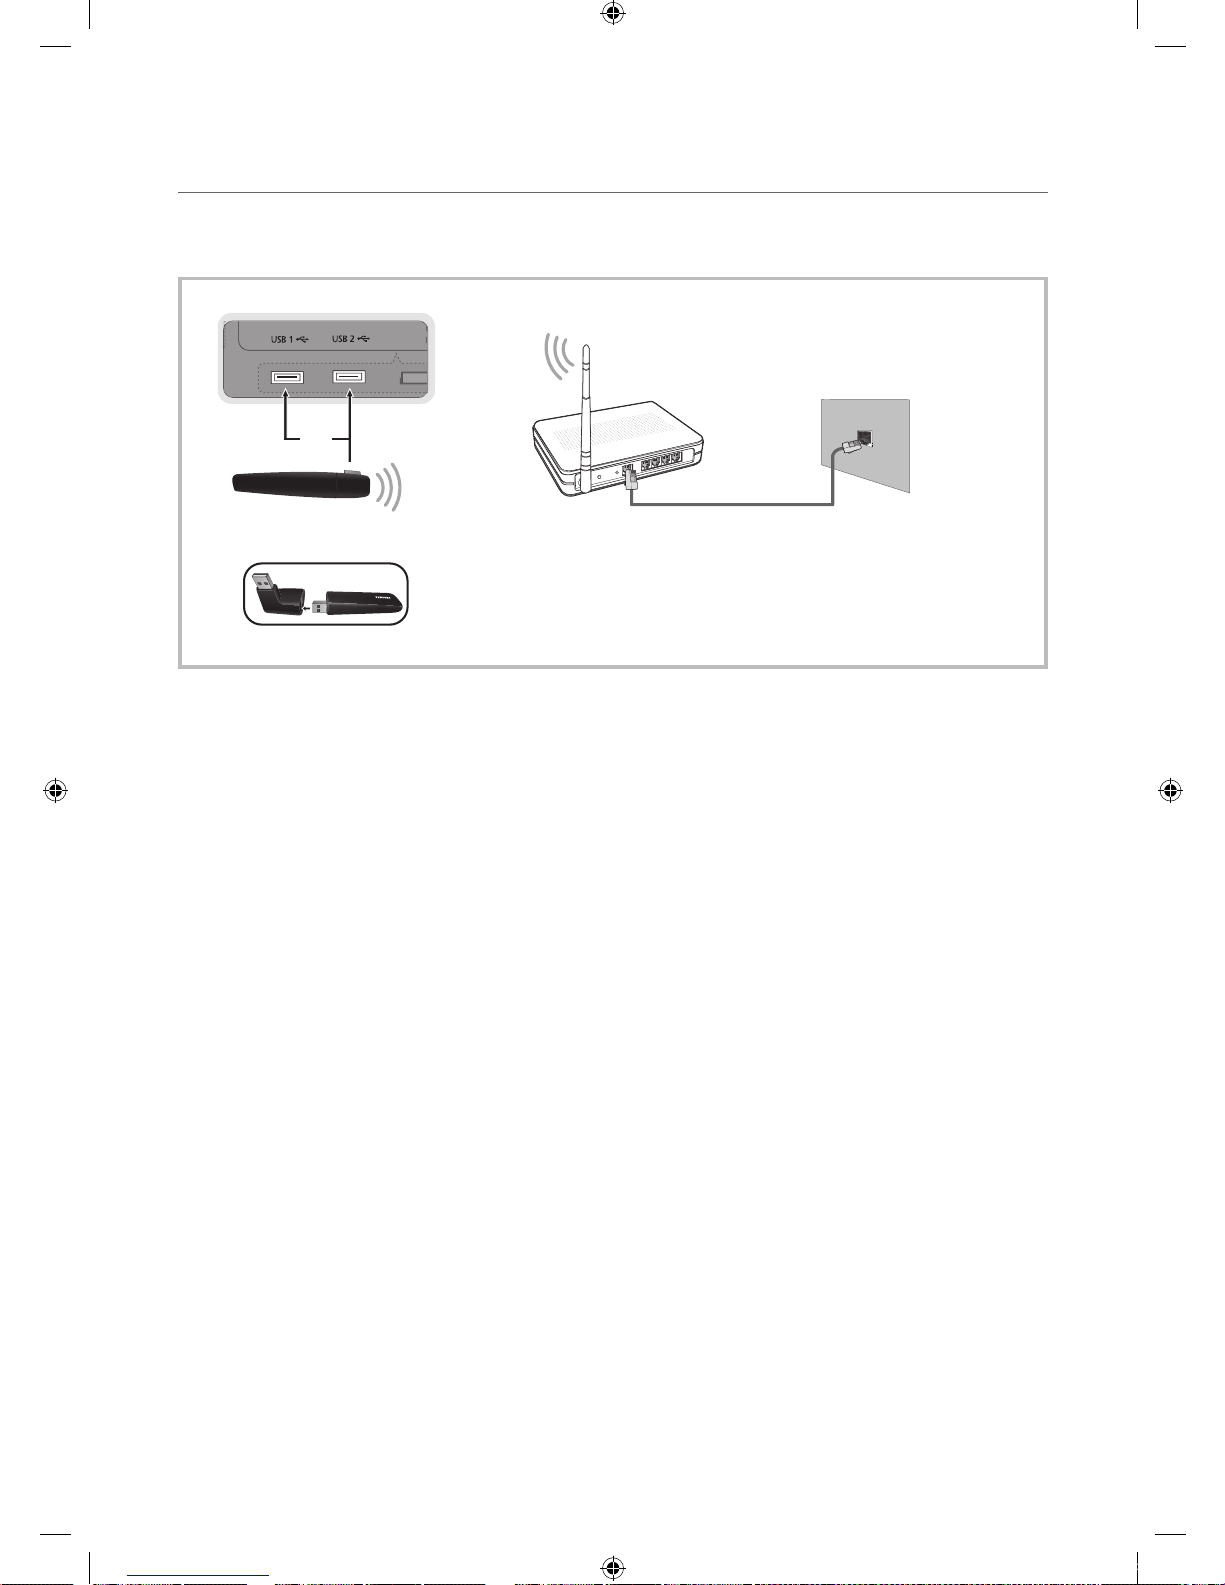
30
Русский
Дополнительные операции
Подключение к беспроводной сети
Для беспроводного подключения телевизора к сети потребуется беспроводной маршрутизатор или модем, а также адаптер
беспроводной сети Samsung (WIS09ABGN, WIS09ABGN2, WIS10ABGN), который подключается к разъему USB на задней или
боковой панели телевизора. См. рисунок ниже.
Адаптер беспроводной локальной сети Samsung можно приобретается отдельно в некоторых розничных магазинах, через
электронные магазины или на веб-узле Samsungparts.com. Адаптер беспроводной локальной сети Samsung поддерживает
протоколы связи IEEE 802.11A/B/G и N. Samsung рекомендует использовать протокол IEEE 802.11N. При воспроизведении видео
через соединение IEEE 802.11B/G воспроизведение видео может выполняться с перерывами.
✎
ПРИМЕЧАНИЕ
x
Чтобы пользоваться беспроводной сетью, необходимо установить адаптер беспроводной локальной сети Samsung
(WIS09ABGN, WIS09ABGN2, WIS10ABGN).
x
Адаптер беспроводной локальной сети Samsung продается отдельно. Адаптер беспроводной локальной сети Samsung можно
приобрести в некоторых точках розничной торговли, через электронные магазины или на веб-узле Samsungparts.com.
x
Для подключения к беспроводной сети телевизор необходимо соединить с беспроводным IP-устройством совместного доступа.
Если беспроводное IP-устройство совместного доступа поддерживает протокол DHCP, то для подсоединения телевизора к
беспроводной сети можно использовать протокол DHCP или статический IP-адрес.
x
Выберите свободный канал для беспроводного IP-устройства совместного доступа. Если выбранный канал занят другим
устройством, установленным рядом, то могут возникнуть помехи или перебои со связью.
x
Система безопасности, отличная от перечисленных ниже, не будет работать на телевизоре.
x
Если выбран режим High-throughput (Greenfield) 802.11N в чистом виде и в качестве типа шифрования для точки доступа выбран
WEP, TKIP или TKIP-AES (WPS2Mixed), телевизоры Samsung не будут поддерживать подключение в соответствии с новыми
спецификациями сертификата Wi-Fi.
x
Если точка доступа поддерживает WPS (Wi-Fi Protected Setup), то к сети можно подключиться методом нажатия одной кнопки
(PBC) или с помощью PIN-кода. WPS автоматически настроит SSID и ключ WPA для каждого режима.
x
Если используемый маршрутизатор, модем или устройство не сертифицированы, возможно, их не удастся подключить к
телевизору с использованием адаптера беспроводной локальной сети Samsung.
x
Методы подключения: Подключение к беспроводной сети можно настроить шестью способами.
– Автонастройка Samsung
– PBC (WPS)
– Автонастройка (с помощью функции автоматического поиска сети)
– Настройка вручную
– SWL (Samsung Wireless Link)
– Ad-Hoc
x
При подключении через концентратор USB или с помощью удлинительного кабеля USB, отличного от кабеля Samsung, адаптер
беспроводной локальной сети Samsung может не распознаваться или работать неправильно.
Панель, обращенная к подставке
Сетевой порт на
стене
Сетевой кабель
Беспроводное IP-устройство
совместного доступа (точка
доступа с сервером DHCP)
Адаптер беспроводной
локальной сети
Samsung
или
✎
Если адаптер беспроводной локальной сети Samsung подключен к порту USB 2, то
порты USB 1 могут не работать. Рекомендуем подключать адаптер беспроводной
локальной сети Samsung к портам USB 1.
[UC9000]BN68-02820G-RU.indb 30 2010-05-25 오전 10:00:18
Page 91
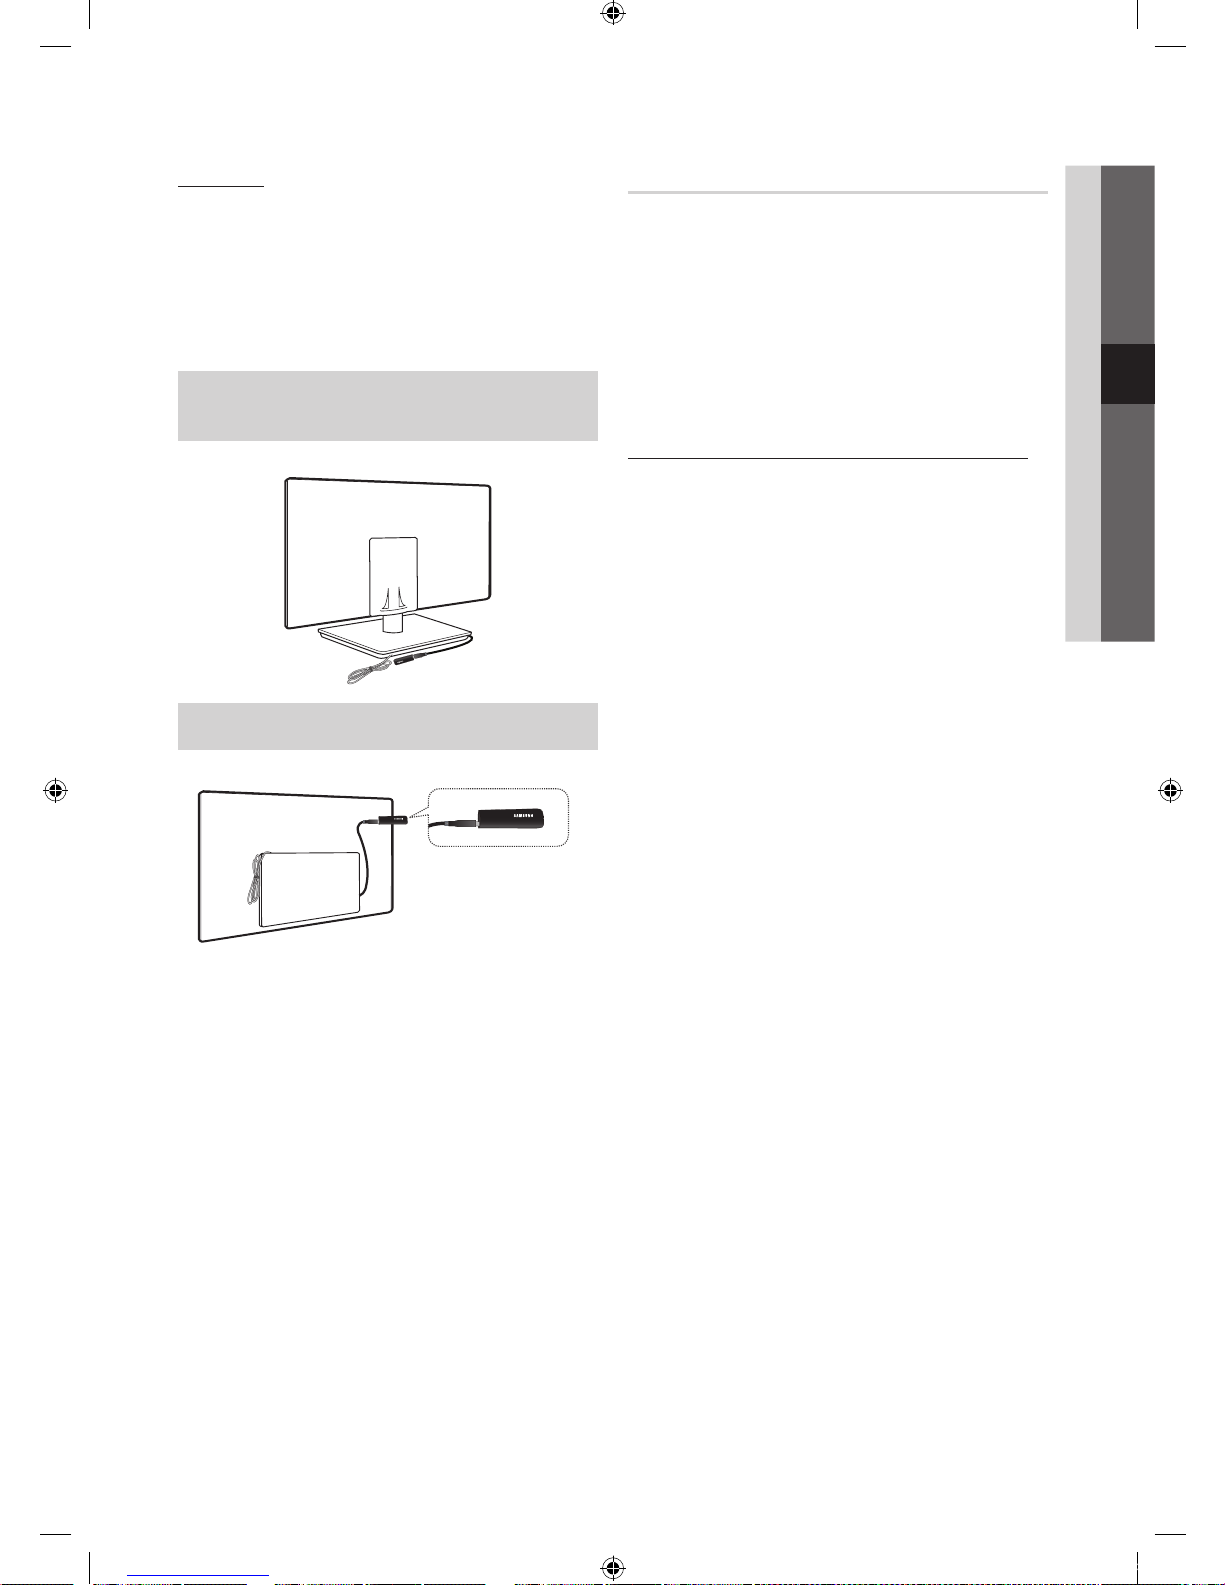
31
Русский
04 Дополнительные операции
Примечание
Изображение может искажаться на некоторых каналах, если
телевизор подключен к адаптеру беспроводной локальной сети
Samsung. В этом случае подсоедините адаптер беспроводной
локальной сети Samsung с помощью кабеля USB в месте, где
исключены радиопомехи.
✎
Адаптер беспроводной локальной сети Samsung должен
быть установлен в защищенном от радиопомех месте, чтобы
исключить влияние помех между адаптером и приемником.
Способ 1
UE46C9005SW, UE55C9005SW
UE46C9005ZW, UE55C9005ZW
✎
Компонент:
Удлинительный кабель
, лента Velcro
Method 2
UE46C9005ZW, UE55C9005ZW
✎
Компонент:
Удлинительный кабель
, лента Velcro
Настройка сети (Автонастройка Samsung)
Эта функция имеется в точках доступа, поддерживающих
автоматическую настройку Samsung. Если используемая
точка доступа это не поддерживает, можно подключиться,
используя PBC (WPS), функцию автоматического поиска сети
или вручную.
✎
Эта функция доступна, если для параметра
SWL(Samsung Wireless Link) установлено значение Выкл..
✎
Список оборудования, поддерживающего функцию
автонастройки Samsung, можно найти на веб-узле www.
samsung.com.
Настройка с использованием функции автонастройки Samsung
1. Установите точку доступа и телевизор рядом друг с другом
и включите оба устройства.
✎
Ввиду различий во времени загрузки приложений,
возможно, придется подождать примерно 2 минуты.
✎
Если кабель локальной сети был подключен к порту
WAN точки доступа во время выполнения процедуры
автоматической настройки Samsung, вы сможете
выполнить проверку подключения к Интернету
автоматически. Если кабель не был подключен,
функция автонастройки Samsung проверит только
подключение устройства к точке доступа (проверка
подключения к Интернету не выполняется).
2. Спустя 2 минуты подсоедините адаптер беспроводной
локальной сети Samsung к телевизору. После
подключения адаптера беспроводной локальной сети
Samsung появится всплывающее окно.
3. Сразу после установления подключения установите точку
доступа параллельно адаптеру беспроводной локальной
сети Samsung на расстоянии не более 25 см.
4. Дождитесь автоматического установления соединения.
✎
Если с помощью функции автонастройки Samsung
не удастся подключить телевизор к точке доступа,
появится всплывающее окно с уведомлением об этой
ошибке. Произведите сброс точки доступа и повторите
попытку. В случае повторной ошибки соединения,
выберите один из других способов настройки
подключения: PBC (WPS), Авто и Ручной.
5. После установления соединения установите в желаемом
месте устройство общего доступа.
✎
Если настройки точки доступа изменились, а также
при первом использовании новой точки доступа после
покупки, потребуется произвести настройку заново,
начиная с шага 1.
[UC9000]BN68-02820G-RU.indb 31 2010-05-25 오전 10:00:18
Page 92
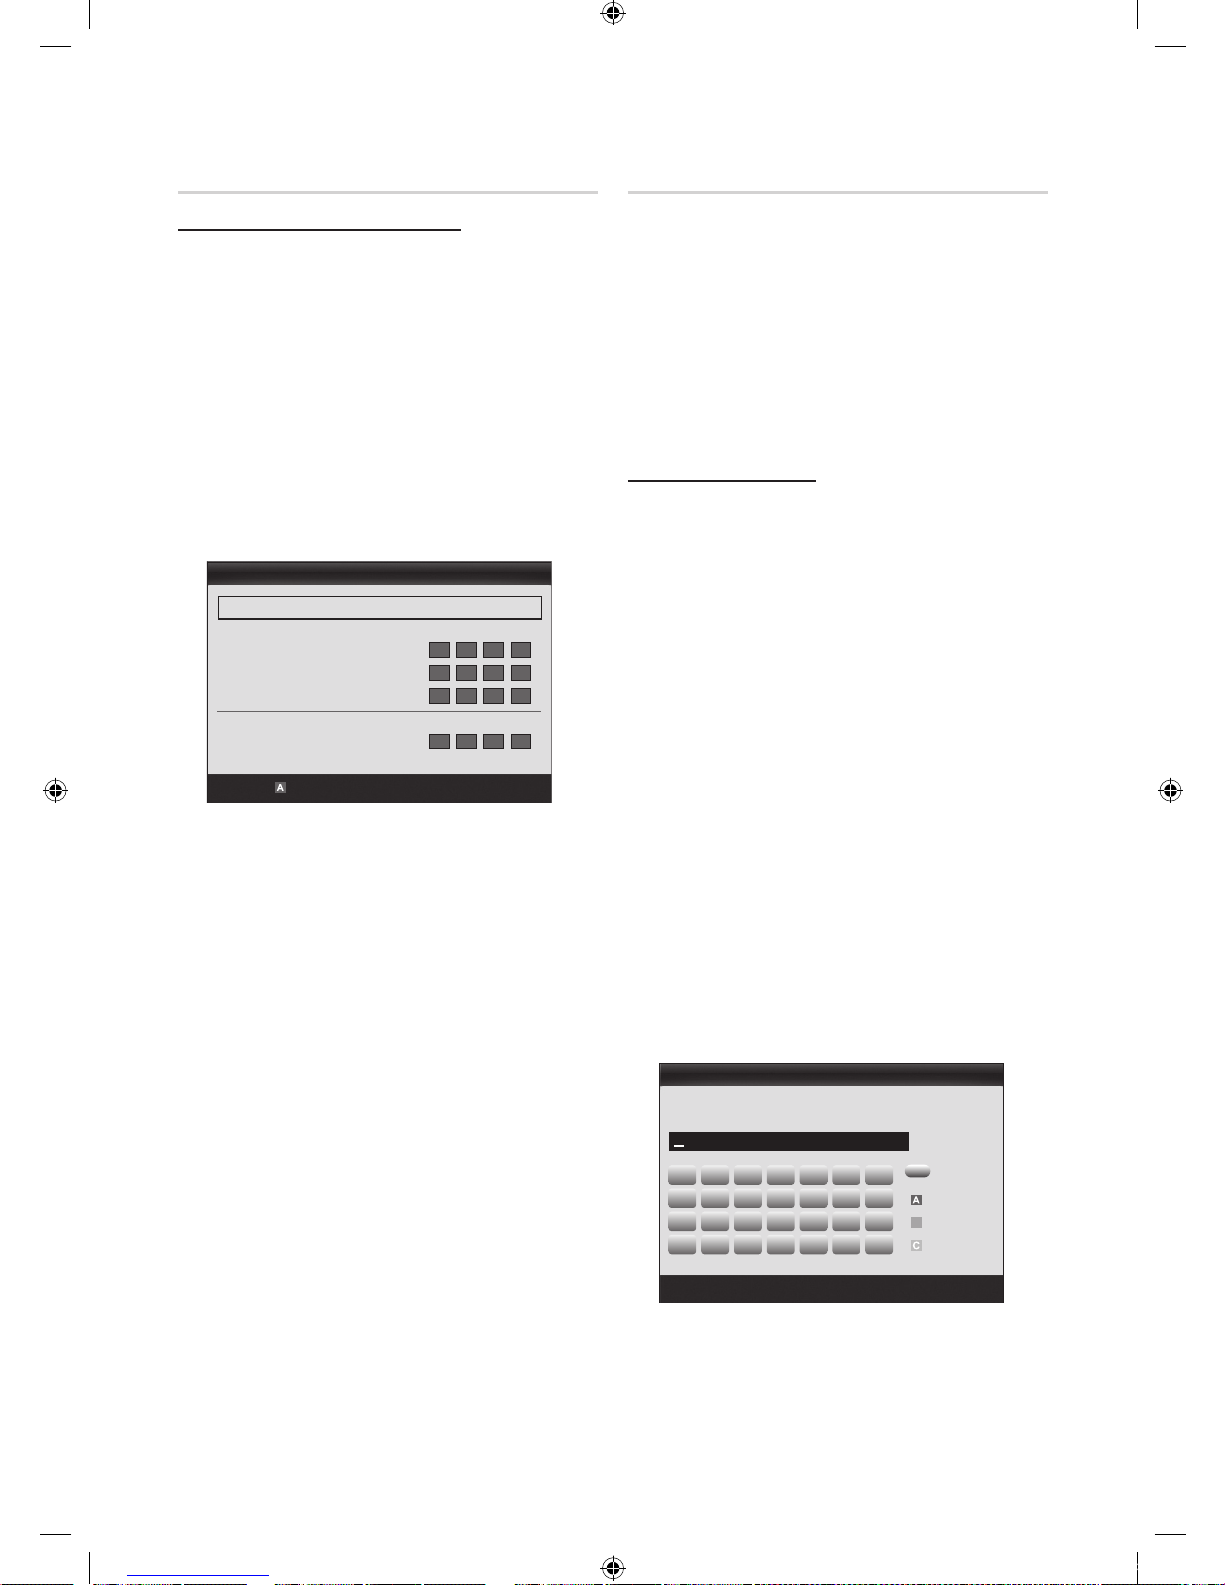
32
Русский
Дополнительные операции
Настройка сети (PBC (WPS))
Настройка с использованием PBC (WPS)
Если на маршрутизаторе имеется кнопка PBC (WPS),
выполните следующие действия.
1. Подсоедините телевизор к локальной сети, как описано в
предыдущем разделе.
2. Включите телевизор, нажмите кнопку MENU на пульте
дистанционного управления, с помощью кнопки ▲ или ▼
выберите пункт Настройка и нажмите кнопку ENTER
.
3. С помощью кнопки ▲ или ▼ выберите в меню Настройка
пункт Сеть, а затем нажмите кнопку ENTER
.
4. На экране Сеть выберите пункт Тип сети.
5. Установите для параметра Тип сети значение
Беспроводная.
6. Выберите параметр Настройка сети. Появится экран
Настройка сети.
7. Нажмите красную кнопку на пульте дистанционного
управления.
8. В течение ближайших 2 минут нажмите кнопку PBC
(WPS) на маршрутизаторе. Проигрыватель на телевизоре
автоматически получит все значения параметров, которые
требуются для подключения к сети.
9. После настройки сетевого соединения нажмите кнопку
RETURN, чтобы выйти из экрана Настройка сети.
Настройка сети (Авто)
Большинство беспроводных сетей защищены дополнительной
системой безопасности, требующей от подключаемых
устройств предоставления зашифрованного кода
безопасности, который называется “Кодом доступа” или
“Кодом безопасности”. Ключ безопасности представляет собой
парольную фразу (обычно слово или последовательность букв
и цифр определенной длины), которую пользователь должен
ввести при настройке безопасности беспроводной сети. При
выборе этого метода настройки беспроводного сетевого
соединения и при наличии ключа безопасности беспроводной
сети во время процедуры настройки пользователь должен
ввести парольную фразу.
Автоматическая настройка
Чтобы выполнить автоматическую настройку беспроводного
соединения, выполните следующие действия:
1. Выполните шаги с 1 по 6 раздела “Настройка с
использованием PBC (WPS)”.
2. С помощью кнопки ▼ выберите пункт Настр.проток.
Интернета, затем нажмите кнопку ENTER
. С помощью
кнопки ▲ или ▼ выберите пункт Авто, затем нажмите
кнопку ENTER.
3. С помощью кнопки ▲ перейдите к пункту Выбор сети,
затем нажмите кнопку ENTER
. Эта функция Сеть
сети выполняет поиск доступных беспроводных сетей. По
завершении поиска отображается список доступных сетей.
4. В списке сетей с помощью кнопки ▲ или ▼ выберите
сеть, а затем нажмите кнопку ENTER
.
✎
Если для точки доступа выбран режим невидимая,
необходимо выбрать параметр Добавить сеть и
введите соответствующие значения для параметров
Имя сети (SSID) и Ключ безопасности, чтобы
установить соединение.
5. Если появится всплывающее окно защита/PIN, перейдите
к шагу 6. Если появится экран подключения к сети,
перейдите к шагу 10.
6. С помощью кнопки ▲ или ▼ выберите пункт Защита или
PIN. Для большинства домашних сетей следует выбрать
Защита (для Ключ безопасности). Появится экран
Защита.
A B C D E F G
H I J K L M N
O P Q R S T U
V W X Y Z
0~9
Настройка сети
Переместить
Ввод
Возврат
Ключ безопасности
Ввод: 0
Номер
Строчные
B
Удалить
Пробел
Настройка сети
PBC (WPS)
Переместить
Ввод
Возврат
Выбор сети : Не выбрано ►
Настр.проток. Интернета : Авто
IP-адрес :
Маска подсети :
Шлюз :
DNS : Авто
Сервер DNS :
[UC9000]BN68-02820G-RU.indb 32 2010-05-25 오전 10:00:19
Page 93
33
Русский
04 Дополнительные операции
7. В окне Защита введите парольную фразу своей сети.
✎
Парольную фразу можно найти в одном из окон
установки, которые использовались для настройки
маршрутизатора или модема.
8. Для ввода парольной фразы выполните следующие
указания.
– Для ввода цифр используйте цифровые кнопки на
пульте дистанционного управления.
– Для перехода от одной кнопки на экране Ключ
безопасности к другой используйте кнопки со
стрелками.
– Для переключения регистра или отображения списка
символов нажмите красную кнопку.
– Чтобы ввести букву или символ, перейдите к этой букве
или символу, а затем нажмите кнопку ENTER
.
– Чтобы удалить последнюю введенную букву или цифру,
нажмите зеленую кнопку на пульте дистанционного
управления.
9. После завершения нажмите синюю кнопку на пульте
дистанционного управления. Появится экранное меню
подключения к сети.
10. Подождите, пока не отобразится окно подтверждения
соединения, а затем нажмите кнопку ENTER
. Снова
появится экран Настройка сети.
11. Чтобы проверить подключение, нажмите кнопку RETURN
и выберите пункт Проверка сети, а затем нажмите кнопку
ENTER
.
Настройка сети (Ad-Hoc)
К мобильным устройствам можно подключаться не через
точку доступа, а через адаптер беспроводной локальной сети
Samsung в одноранговой сети.
✎
Эта функция доступна, если для параметра
SWL(Samsung Wireless Link) установлено значение Выкл..
Подключение нового однорангового устройства
1. Выполните шаги с 1 по 6 раздела “Настройка с
использованием PBC (WPS)” (стр. 31).
2. Нажмите Выбор сети. Появится список устройств и сетей.
3. Во время отображения списка устройств нажмите синюю
кнопку на пульте дистанционного управления.
✎
Отобразится сообщение “Одноранг. сеть пред. собой
прямое соед. Wi-Fi с сот. телеф. или комп. Функции
существующей сетевой системы могут быть
ограничены. Изменить сетевое подключение?”.
4. Введите созданные Имя сети (SSID) и Ключ
безопасности на устройстве, которое требуется
подключить.
Подключение к существующему устройству одноранговой сети
1. Выполните шаги с 1 по 6 раздела “Настройка с
использованием PBC (WPS)” (стр. 31).
2. Нажмите Выбор сети. Появится список устройств и сетей.
3. Выберите нужное устройство в списке устройств.
4. Если требуется ключ безопасности, введите его.
✎
Если сеть работает ненадлежащим образом, проверьте,
правильно ли введены Имя сети (SSID) и Ключ
безопасности. Ошибка при вводе значения параметра
Ключ безопасности может стать причиной сбоя.
Настройка сети (Ручной)
Если другие способы не работают, необходимо ввести
значения параметров сети вручную.
Получение значений настроек сетевого подключения
На большинстве компьютеров с операционной системой
Windows для получения значений параметров сетевого
подключения выполните следующие действия:
1. Щелкните правой кнопкой мыши значок сети в правой
нижней части экрана.
2. Во всплывающем меню выберите пункт Состояние.
3. В отобразившемся диалоговом окне выберите вкладку
Поддержка.
4. На вкладке Поддержка нажмите кнопку Сведения.
Отобразятся параметры сети.
[UC9000]BN68-02820G-RU.indb 33 2010-05-25 오전 10:00:20
Page 94

34
Русский
Дополнительные операции
Настройка вручную
Чтобы ввести значения параметров подключения к сети
вручную, выполните следующие действия:
1. Выполните шаги с 1 по 6 раздела “Настройка с3
использованием PBC (WPS)” (стр. 31).
2. С помощью кнопки ▼ выберите пункт Настр.проток.
Интернета, затем нажмите кнопку ENTER
. С помощью
кнопки ▲ или ▼ выберите пункт Ручной, затем нажмите
кнопку ENTER
.
3. С помощью кнопки ▼ перейдите к первому полю ввода
(IP-адрес).
4. С помощью цифровых кнопок введите цифры.
5. По завершении ввода в каждом поле нажмите кнопку
► для перехода к следующему полю. Для перемещения
вверх, вниз и обратно можно также использовать другие
кнопки со стрелками.
6. Введите значения для параметров IP-адрес, Маска
подсети и Шлюз.
7. С помощью кнопки ▲ или ▼ выберите пункт DNS.
8. С помощью кнопки ▼ перейдите к первому полю ввода
DNS. Введите цифры, как показано выше.
9. После завершения нажмите кнопку ▲, чтобы перейти
в раздел Выбор сети. Выберите сеть, а затем нажмите
кнопку ENTER
.
10. Перейдите к шагу 4 в разделе “Автоматическая настройка”
(стр. 32) и следуйте соответствующим указаниям.
SWL (Samsung Wireless Link)
Эта функция позволяет подключить к телевизору устройство
Samsung, поддерживающее PBC (WPS). Устройства можно
подключать к телевизору, даже если к телевизору не
подключено устройство общего доступа.
✎
Для использования функции Internet@TV к беспроводной
сети должна быть подключена точка доступа.
✎
Поддерживаются только устройство общего доступа,
работающие на частоте 2,4 ГГц. Устройства общего доступа,
работающие на частоте 5 ГГц, не поддерживаются.
Подключение SWL
К телевизору можно напрямую подключать устройство,
поддерживающее PBC (WPS).
✎
Эта функция доступна, если для параметра SWL (Samsung
Wireless Link) установлено значение Вкл..
Подключение Samsung Wireless Link
Для установления соединения выполните следующие действия.
1. Выполните шаги с 1 по 5 раздела “Настройка с
использованием PBC (WPS)” (стр. 31).
2. Выберите пункт SWL(Samsung Wireless Link) с помощью
кнопки ▼ и нажмите кнопку ENTER
, чтобы включить
этот параметр.
3. Выберите пункт Подключение SWL с помощью кнопки ▼
и нажмите кнопку ENTER
.
4. Если появится сообщение “Нажмите кнопку PBC на
устройстве с поддержкой PBC(WPS) для подключения
в течение 120 секунд.”, нажмите кнопку PBC на
устройстве, чтобы установить подключение.
✎
Для получения дополнительных сведений см.
руководство по настройке беспроводной сети
подключаемого устройства.
5. Если устройство правильно подключено к телевизору
после начала отсчета в окне сообщения, то это окно
сообщения исчезнет автоматически.
✎
Если не удастся установить соединение, повторите
попытку через 2 минуты.
Если телевизору не удается подключиться к Интернету
Телевизор может не подключаться к Интернету из-за
того, что ваш поставщик услуг Интернета мог ввести
постоянный MAC-адрес (уникальный идентификационный
номеp) вашего компьютера или модема, который
используется для проверки подлинности при подключении
к Интернету в качестве средства для предотвращения
несанкционированного доступа. Поскольку у телевизора
другой MAC-адрес, поставщик услуг Интернета не может
осуществить проверку подлинности его MAC-адрес и
телевизор не подключается к Интернету.
Чтобы решить эту проблему, узнайте у своего поставщика
услуг Интернета процедуру подключения других устройств к
Интернету кроме компьютера (например, телевизора).
Если поставщик услуг Интернета запрашивает
идентификатор или пароль для подключения к Интернету,
возможно, телевизор к Интернету подключить не удастся.
В этом случае при подключении к Интернету необходимо
ввести свое имя пользователя или пароль. Ошибка
подключения к Интернету может возникать из-за ошибки
неполадок брандмауэра. В этом случае обратитесь к
поставщику услуг Интернета.
Если не удается подключиться к Интернету даже после
выполнения инструкций, полученных от поставщика услуг
Интернета, обратитесь в компанию Samsung Electronics по
телефону 8-800-555-55-55.
[UC9000]BN68-02820G-RU.indb 34 2010-05-25 오전 10:00:20
Page 95
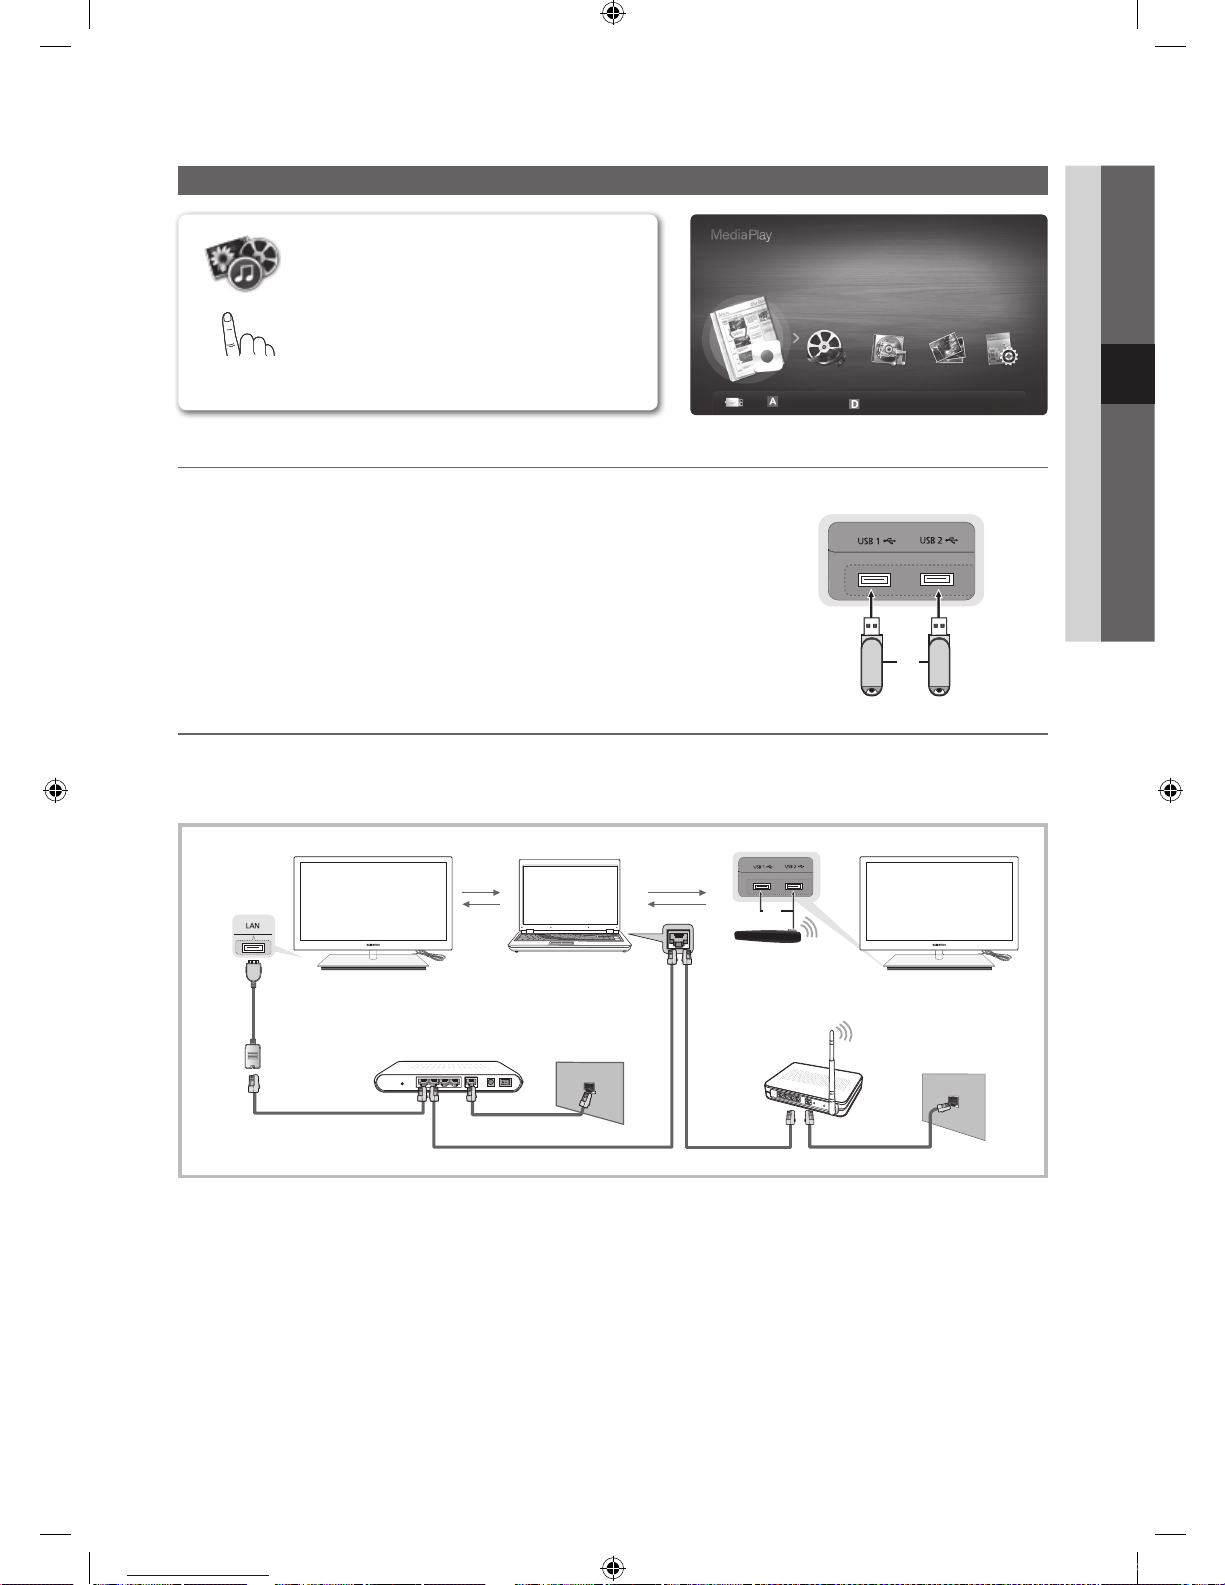
35
Русский
04 Дополнительные операции
Media Play
Подключение устройства USB
1. Включите телевизор.
2. Подключите устройство USB, содержащее записанные телепрограммы, файлы
фотографий, музыкальные файлы и/или видеофайлы, к разъему USB 1 или USB 2
на боковой панели телевизора.
3. После подключения устройства USB к телевизору появится всплыающее окно.
После этого можно выбрать функцию Media Play.
Подключение к компьютеру через сеть
Можно воспроизводить изображения, музыку и видео, сохраненные на компьютере, через сетевое соединение в режиме Media Play.
✎
Если функция Media Play используется для файла, сохраненного на компьютере, следует загрузить программу PC Share Manager и
соответствующее руководство пользователя с узла www.samsung.com.
1. Для получения дополнительной информации о настройке сети см. раздел “Сетевое подключение” (стр. 28).
– Рекомендуется размещать телевизор и компьютер в одной и той же подсети. Первые 3 части адреса подсети, IP-адресов
телевизора и компьютера должны быть одинаковыми, и только последняя часть (адрес хоста) должна быть изменена.
(например, IP-адрес: 123.456.789.**)
2. С помощью сетевого кабеля подсоедините компьютер, на который будет установлена программа Samsung PC Share Manager, к
внешнему модему.
– Можно подсоединить телевизор к компьютеру напрямую без подключения его к устройству совместного доступа
(маршрутизатору).
Возможность воспроизведения записанных
телепрограмм, фото-, видео- и/или музыкальных
файлов, хранящихся на устройстве USB MSC
(Mass Storage Class) и/или компьютере.
устройство USB
Панель, обращенная к
подставке
или
Сетевой кабель
PC
Внешний модем
(ADSL/VDSL/кабельное ТВ)
LAN
Адаптер беспроводной
локальной сети
Samsung
Беспроводное IP-устройство
совместного доступа
Панель, обращенная к подставке
или
Сетевой кабель
Кабель модема
Сетевой кабель Сетевой кабель
Адаптер
локальной
сети
MEDIA.P
SUM
Смена устр.
Реж. устройства
Ввод
Возврат
Записанная ТВ-пр.
[UC9000]BN68-02820G-RU.indb 35 2010-05-25 오전 10:00:23
Page 96

36
Русский
Дополнительные операции
✎
Ниже перечислены функции, которые не поддерживаются при подключении к компьютеру через сеть.
x
Функции Фоновая музыка и Настройка фоновой музыки.
x
Сортировка файлов по предпочтениям в папках Фотографии, Музыка и Видео.
x
Функции кнопок (REW) и (FF) во время воспроизведения видео.
✎
Технология Divx DRM, функция воспроизведения нескольких звуковых дорожек и функция встроенных субтитров не
поддерживаются.
✎
Использование программы Samsung PC Share Manager на компьютере должно быть разрешено в брандмауэре.
✎
При сетевом подключении в режиме Media Play, в зависимости от функций предоставляемого сервера, могут произойти
следующие сбои.
x
Может измениться метод сортировки.
x
Может не поддерживаться функция поиска сцены.
x
Функция возобновления воспроизведения видео Непрер. может не поддерживаться.
– Функцию Непрер. не могут применять сразу несколько пользователей. (Устройство запоминает только момент остановки
воспроизведения, выбранный самым последним пользователем.)
x
Функции кнопок ◄ или ► могут не работать в зависимости от данных содержимого.
x
При воспроизведении видео в режиме Media Play через сетевое соединение возможно прерывание файла.
✎
При использовании нелицензированных файлов мультимедиа в работе данной функции могут наблюдаться сбои.
✎
Информация, которую необходимо знать до начала использования Media Play
x
Протокол MTP (Media Transfer Protocol) не поддерживается.
x
Поддерживаются файловые системы FAT16, FAT32 и NTFS.
x
Цифровые камеры и аудиоустройства USB некоторых типов могут быть несовместимы с этим телевизором.
x
Функция Media Play поддерживает только устройства USB MSC (Mass Storage Class). MSC – это устройства Mass Storage Class
с возможностью передачи данных единым целым. Примерами устройств MSC являются флэш-накопители, устройства чтения
флэш-карт и жесткие диски USB (не поддерживаются концентраторы USB). Устройства следует подключать непосредственно к
порту USB телевизора.
x
Перед подключением к телевизору создайте резервные копии файлов, чтобы предотвратить повреждение или потерю данных.
Компания SAMSUNG не несет ответственности за любые повреждения файлов и потерю данных.
x
Не отключайте устройство USB во время загрузки.
x
Чем больше разрешение изображения, тем больше времени требуется для его отображения на экране.
x
Максимально возможное разрешение JPEG – 15360 X 8640 пикселов.
x
Если файл поврежден или имеет несовместимый формат, отображается сообщение “Формат файла не поддерж”.
x
Если в качестве критерия для сортировки файлов выбран основной вид, в каждой папке могут отображаться до 1000 файлов.
x
Файлы MP3 с технологией DRM, которые были загружены с платного узла, воспроизвести невозможно. Digital Rights Management
(DRM) – это технология, которая поддерживает создание содержимого, распространение и полное интегрированное управление
содержимым, включая защиту прав и интересов поставщиков содержимого, предотвращение незаконного копирования
содержимого, а также управление выставлением счетов и платежами.
x
Если подключено более двух устройств PTP, то можно использовать только одно устройство за раз.
x
Если подключено более двух устройств MSC, возможно, некоторые из них не будут распознаваться. Устройство USB, для работы
которого требуется большая мощность (более 500 мА или 5 В), возможно, поддерживаться не будет.
x
Если во время подключения или использования устройства USB отобразится предупреждающее сообщение о превышении
мощности, возможно, устройство не распознается или неисправно.
x
При отсутствии входного сигнала в течение времени, установленного для параметра Время автозащиты, запускается экранная заставка.
x
При подключении к телевизору некоторых моделей внешнего жесткого диска режим энергосбережения этого диска может быть
автоматически сброшен.
x
При использовании удлинительного кабеля USB устройство USB может не распознаваться или могут не читаться файлы,
хранящиеся на данном устройстве.
x
Если устройство USB не распознается при подключении к телевизору, нарушен список файлов, хранящихся на устройстве, или какой-либо файл из
списка не воспроизводится, подсоедините устройство USB к компьютеру, отформатируйте его и проверьте соединение.
x
Чтобы окончательно удалить из компьютера файл, который ранее был удален, но обнаруживается при запуске режима Media
Play, используйте на компьютере функцию “Очистить корзину”.
[UC9000]BN68-02820G-RU.indb 36 2010-05-25 오전 10:00:24
Page 97
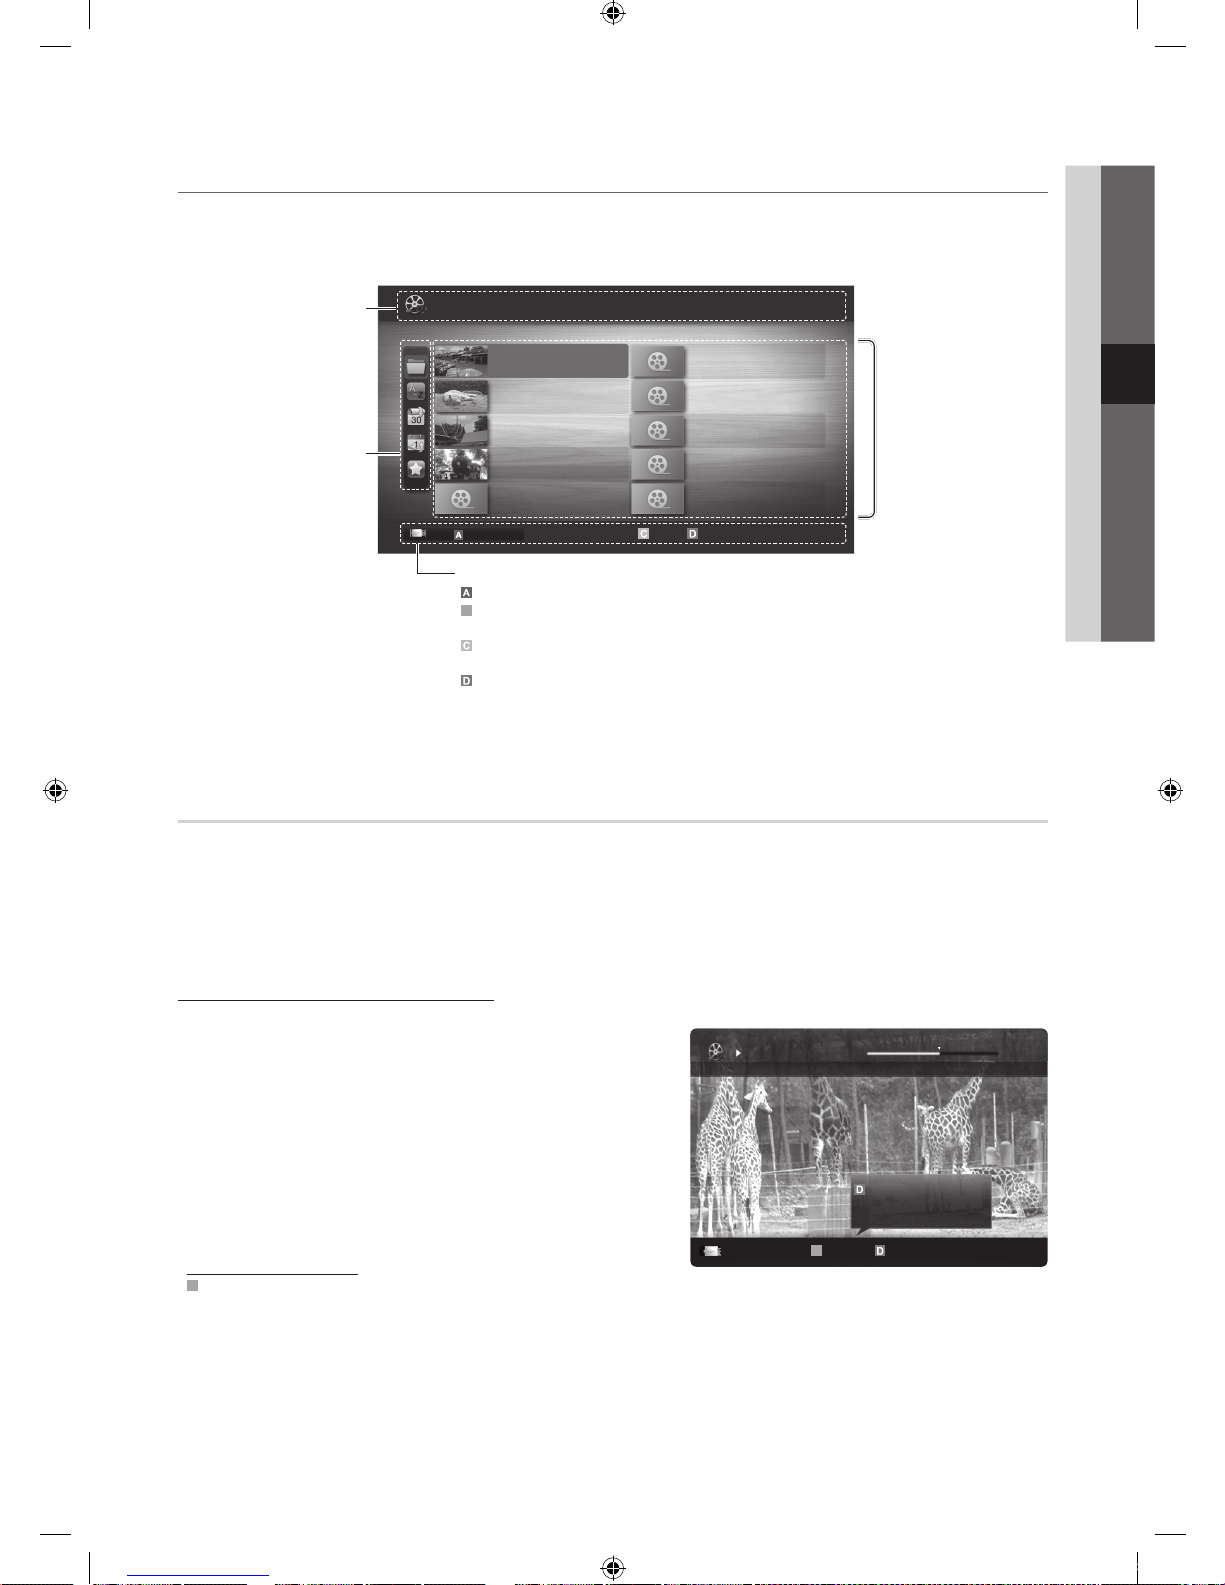
37
Русский
04 Дополнительные операции
Элементы, отображаемые на экране
С помощью кнопок вверх/вниз/вправо/влево перейдите к нужному файлу и затем нажмите кнопку ENTER или (Воспр.).
Начнется воспроизведение файла.
✎
Поддержка функций Просмотр устройств и Дом на домашней странице Media Play.
Записанная ТВ-пр.
Для записи или сдвига по времени подключенное устройство должно быть отформатировано в формате, поддерживающем запись.
Чтобы использовать жесткий диск USB, требуется отформатировать устройство, выбрав Формат устройства.
✎
Во время форматирования устройства это устройство не рекомендуется отсоединять. При форматировании устройства все файлы
будут удалены.
✎
Перед форматированием устройства на телевизоре создайте резервные копии файлов, чтобы предотвратить повреждение или
потерю данных. Компания SAMSUNG не несет ответственности за любые повреждения файлов и потерю данных.
Воспроизведение записанной ТВ-программы
1. С помощью кнопки ◄ или ► выберите пункт Записанная ТВпр., затем нажмите кнопку ENTER в меню Media Play.
2. С помощью кнопки ◄/►/▲/▼ выберите необходимый пункт в
списке файлов.
3. Нажмите кнопку ENTER
или кнопку (Восп.).
– Выбранный файл и время его воспроизведения отображаются
в верхней части экрана.
– Во время воспроизведения записанной телепрограммы с
помощью кнопок ◄ и ► можно осуществлять поиск.
Функциональные кнопки
B
Зеленая (Повтор раздела): Можно настроить функцию для повтора
раздела. Можно также просмотреть желаемый раздел.
Jan.10.2010
Jan.10.2010
Jan.10.2010
Jan.10.2010
Jan.10.2010
Jan.10.2010
Jan.10.2010
Jan.10.2010
Jan.10.2010
Jan.10.2010
/Movie 01.avi 1/1
Movie 01.avi
SUM
Movie 03.avi
Movie 05.avi
Movie 07.avi
Movie 09.avi
Movie 02.avi
Movie 04.avi
Movie 06.avi
Movie 08.avi
Movie 10.avi
Выбор Сортиров.
Инструменты
Информация:
можно узнать имя выбранного
файла, а также номер файла и
страницы.
Критерии сортировки списка:
отображаются критерии
сортировки.
✎
Критерии сортировки
зависят от содержания.
Кнопки управления
Красная (Смена устр.): выбор подсоединенного устройства.
B
Зеленая (Предпочтение ): установка предпочтения файлов. (не поддерживается при выборе
критерия Основной вид)
Желтая (Выбор): выбор нескольких файлов из списка. Выбранные файлы отмечаются
значком.
Синяя (Сортиров.): выбор списка критериев сортировки.
Инструменты: отображение меню параметров.
✎
С помощью кнопки (REW) или (FF) можно перейти на следующую или предыдущую
страницу в списке файлов.
Список файлов:
возможность
подтверждения файлов и
групп, распределяемых по
категориям.
Видео
Страница
Смена устр.
Movie 01.avi
00:04:03 / 00:07:38 1/1
SUM
B
Повтор раздела Непрер. Главы Переход Инструменты
Возобновление воспр.
Непрер.
[UC9000]BN68-02820G-RU.indb 37 2010-05-25 오전 10:00:26
Page 98

38
Русский
Дополнительные операции
Использование функции Режим Timeshift
Если вы пропустили показ какой-либо телевизионной передачи, данная функция позволит вам просмотреть ее в записи.
Когда для функции Режим Timeshift задано значение Авто, в памяти телевизора сохраняется текущий просматриваемый канал,
который затем будет записываться автоматически.
Когда для функции Режим Timeshift задано значение Ручной, то при нажатии кнопки
(Воспр.) в памяти телевизора канал
будет сохранен для записи.
Записанное видео защищено технологией DRM (Digital Rights Management) и не может быть воспроизведено на компьютере
или других телевизорах. Следует также учесть, что файлы, сохраненные в телевизоре, не могут быть использованы в
случае замены материнской платы.
✎
ПРИМЕЧАНИЕ
x
Передаваемые данные не могут быть записаны.
x
Доступность функции записи и функции Режим Timeshift зависит от качества изображения и объема свободного пространства
на жестком диске.
x
Если нажать кнопку ▲ или ▼, можно просматривать текущий канал в прямом эфире или просматривать с начала записанную
телепередачу.
x
Функция Режим Timeshift работает в течение не более чем 90 минут.
x
После работы функции Режим Timeshift в течение максимального количества времени, для параметра времени будет
установлено значение “00:00:00”. Обратите внимание, что если воспроизведение телепередачи было приостановлено, оно будет
автоматически возобновлено.
x
Если достигнут предел свободного объема памяти накопителя USB – 5%, текущий процесс записи будет завершен.
x
Если запись выполняется с использованием функции PVR (Personal Video Recorder) и устройства, поддерживающего функцию
HDMI-CEC, приоритет имеет функция PVR.
x
Во время воспроизведения или в режиме Режим Timeshift изображение будет отображаться в соответствии с настройками
экрана телевизора.
x
Если изменить источник ввода во время воспроизведения, экран будет оставаться пустым до завершения процесса внесения
изменений.
x
Приложение, которое не поддерживает ни запись, ни функцию Режим Timeshift будет автоматически закрыто при попытке его
запуска во время использования одной из этих функций.
x
Перед окном приложения может отобразиться сообщение, оповещающее о прекращении записи или работы функции Режим
Timeshift.
x
Функция Режим Timeshift не поддерживается для радиоканалов.
x
Функция записи и функция Режим Timeshift недоступны для каналов, заблокированных с помощью функции Замок.
x
Если устройство USB не прошло Тест произв-ти устройства, оно должно пройти тест Формат устройства и Тест произв-ти
устройства повторно перед выполнением записи с помощью функции Телегид или Диспетчер каналов.
x
Функции записи и Режим Timeshift можно использовать только устройством хранения USB, которое прошло процедуру Тест
произв-ти устройства.
x
При попытке записи или использования функции Режим Timeshift с устройством, которое не прошло процедуру Тест произв-ти
устройства, функция не запустится.
x
Если нажать кнопку (REC) на пульте дистанционного управления, когда отображается экран Диспетчер каналов или
выполнить запись с использованием функции Зап. по тайм., запись с телевизора может начаться позже или прекратится на 1
или 2 секунды, поскольку на обработку команды требуется некоторое время.
x
Если устройство USB, предназначенное для записи, подключено, существующие файлы функции Режим Timeshift или файлы
записи, которые были сохранены некорректно, будут автоматически удалены.
x
Если во время записи переключиться на режим внешнего входа, запись продолжится, однако кнопка (REC) будет недоступна.
x
Если какая-либо функция, которая отключает телевизор (Таймер сна, таймер отключения и т.д.) настроена на время, которое
конфликтует с записью, телевизор отключится после завершения записи.
[UC9000]BN68-02820G-RU.indb 38 2010-05-25 오전 10:00:27
Page 99
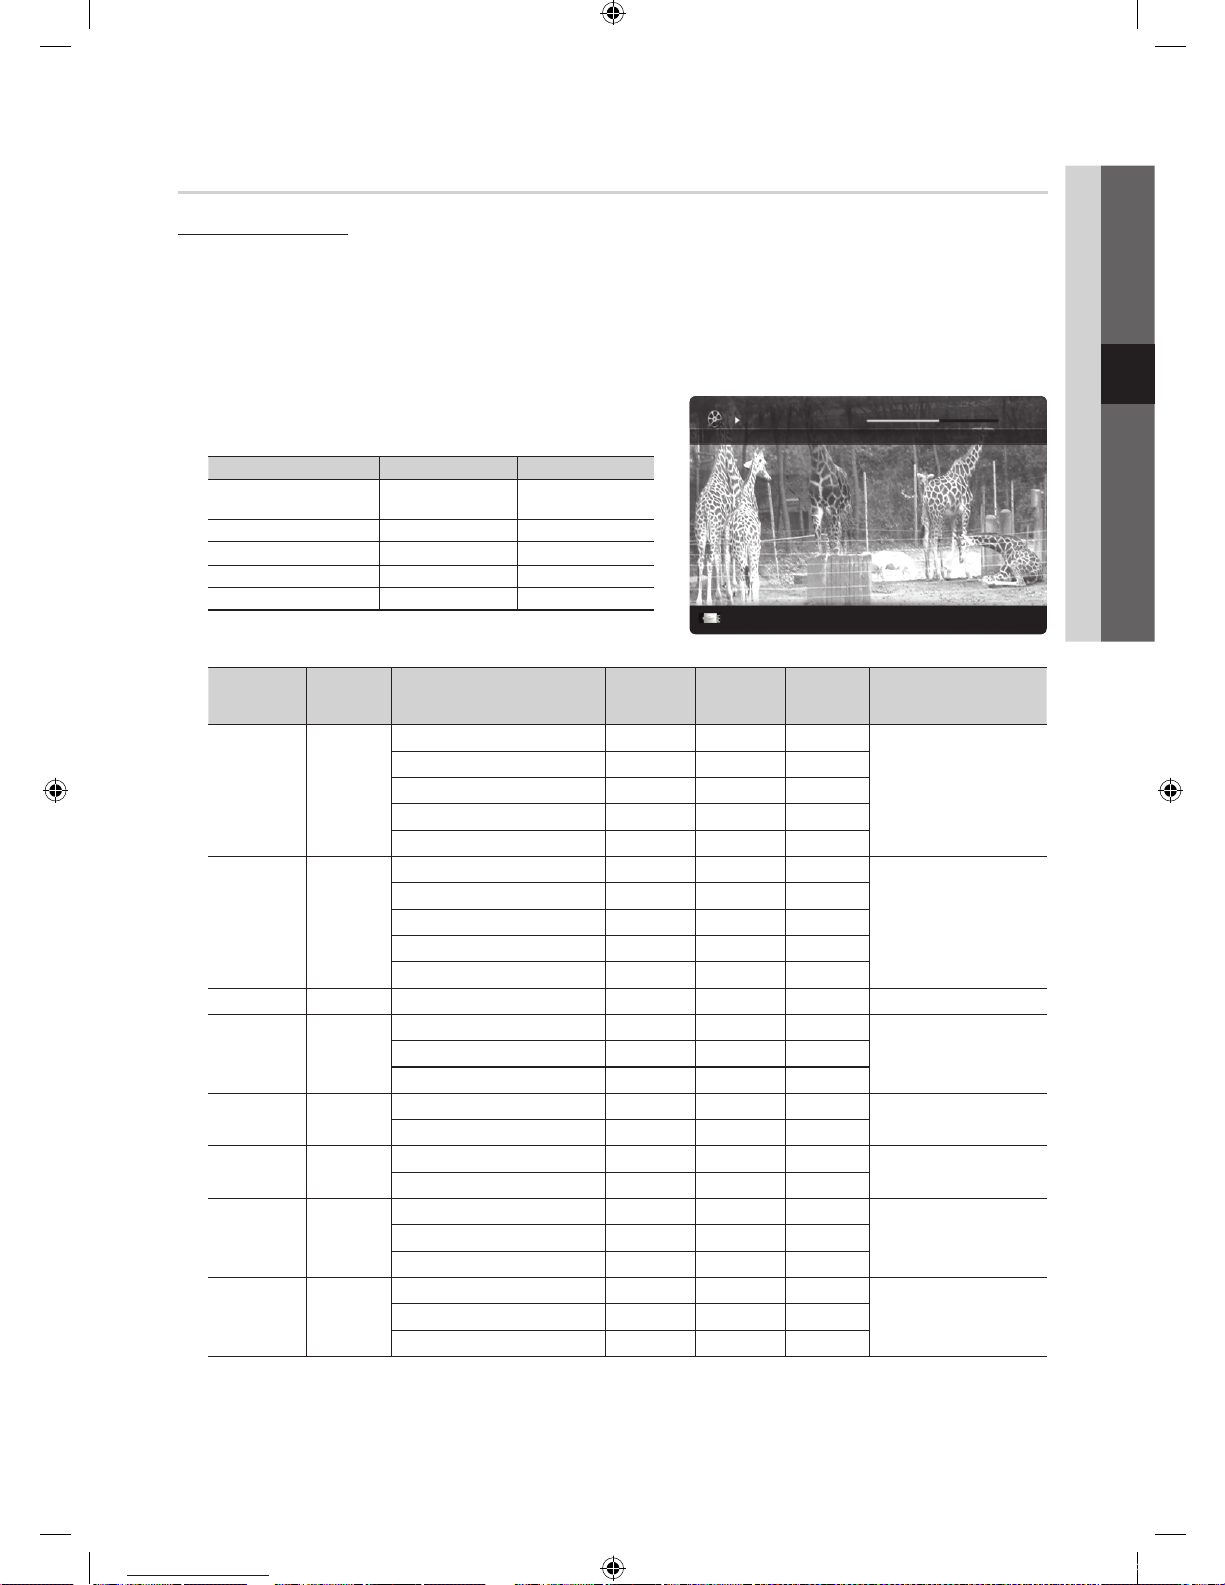
39
Русский
04 Дополнительные операции
Видео
Воспроизведение видео
1. С помощью кнопки ◄ или ► выберите пункт Видео, затем нажмите кнопку ENTER
в меню Media Play.
2. С помощью кнопки ◄/►/▲/▼ выберите необходимый пункт в списке файлов.
3. Нажмите кнопку ENTER
или кнопку (Воспр.).
– Выбранный файл и время его воспроизведения отображаются в верхней части экрана.
– При отсутствии данных о продолжительности видео время воспроизведения и строка состояния не отображаются.
– С помощью кнопок ◄ и ► можно перемещаться по видео во время его воспроизведения.
✎
В этом режиме можно просматривать видеоролики игры, но саму игру
воспроизвести невозможно.
y Поддерживаемые форматы субтитров
Название Расширение файла Формат
Текст MPEG-4, зависящий
от времени
.ttxt XML
SAMI .smi HTML
SubRip .srt строковый
SubViewer .sub строковый
Micro DVD .sub или .txt строковый
y Поддерживаемые форматы видео
Расширение
файла
Контейнер Видеокодек
Разрешение
Частота
кадров
(кадр/с)
Скорость
передачи
(Мбит/с)
Аудиокодек
*.avi
*.mkv
AVI
MKV
Divx 3.11/4.x/5.1/6.0 1920 x 1080 6 ~ 30 8
MP3/AC3/LPCM/ADPCM/
DTS Core
XviD 1920 x 1080 6 ~ 30 8
H.264 BP/MP/HP 1920 x 1080 6 ~ 30 25
MPEG4 SP/ASP 1920 x 1080 6 ~ 30 8
Motion JPEG 800 x 600 6 ~ 30 8
*.asf ASF
Divx 3.11/4.x/5.1/6.0 1920 x 1080 6 ~ 30 8
MP3/AC3/LPCM/ADPCM/
WMA
XviD 1920 x 1080 6 ~ 30 8
H.264 BP/MP/HP 1920 x 1080 6 ~ 30 25
MPEG4 SP/ASP 1920 x 1080 6 ~ 30 8
Motion JPEG 800 x 600 6 ~ 30 8
*.wmv ASF Window Media Video 9 1920 x 1080 6 ~ 30 25 WMA
*.mp4 MP4
H.264 BP/MP/HP 1920 x 1080 6 ~ 30 25
MP3/ADPCM/AACMPEG4 SP/ASP 1920 x 1080 6 ~ 30 8
XVID 1920 x 1080 6 ~ 30 8
*.3gp 3GPP
H.264 BP/MP/HP 1920 x 1080 6 ~ 30 25
ADPCM / AAC / HE-AAC
MPEG4 SP/ASP 1920 x 1080 6 ~ 30 8
*.vro
VRO
VOB
MPEG1 1920 x 1080 24 / 25 / 30 30
AC3/MPEG/LPCM
MPEG2 1920 x 1080 24 / 25 / 30 30
*.mpg
*.mpeg
PS
MPEG1 1920 x 1080 24 / 25 / 30 30
AC3/MPEG/LPCM/AACMPEG2 1920 x 1080 24 / 25 / 30 30
H.264 1920 x 1080 6 ~ 30 25
*.ts
*.tp
*.trp
TS
MPEG2 1920 x 1080 24 / 25 / 30 30
AC3/AAC/MP3/DD+/HE-
AAC
H.264 1920 x 1080 6 ~ 30 25
VC1 1920 x 1080 6 ~ 30 25
Movie 01.avi
00:04:03 / 00:07:38 1/1
SUM
Главы
Переход
Инструменты
Возврат
[UC9000]BN68-02820G-RU.indb 39 2010-05-25 오전 10:00:28
Page 100
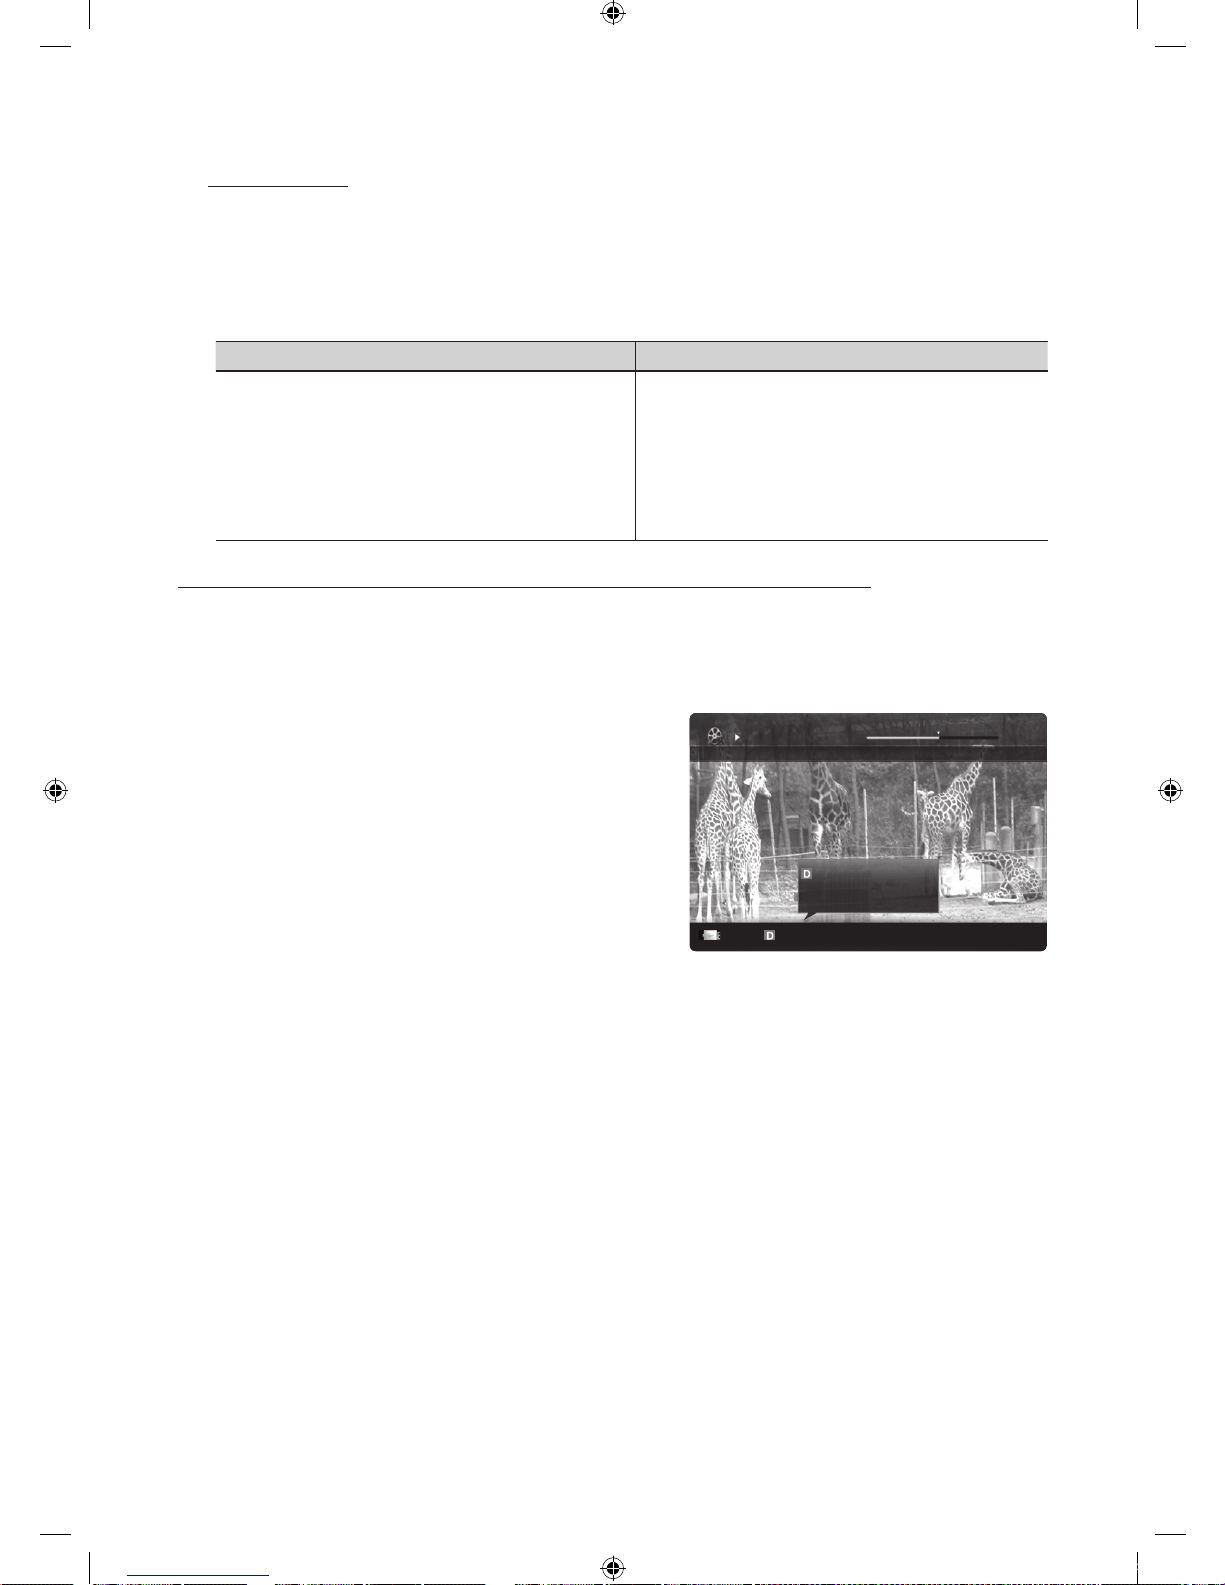
40
Русский
Дополнительные операции
Другие ограничения
✎
ПРИМЕЧАНИЕ
x
При наличии проблем с содержимым кодека данный кодек поддерживаться не будет.
x
Если данные для контейнера неверны и файл поврежден, то правильное воспроизведение контейнера невозможно.
x
Звук или видео могут отсутствовать, если обычная скорость передачи/частота кадров содержимого превышает параметры
скорости, указанные в приведенной выше таблице.
x
При наличии ошибки в таблице индексов функция поиска (перехода) не поддерживается.
Видеодекодер Аудиодекодер
• Поддерживает форматы до H.264, Level 4.1
• Форматы H.264 FMO/ASO/RS, VC1 SP/MP/AP L4 и AVCHD не
поддерживаются.
• XVID, MPEG4 SP, ASP:
– Ниже 1280 x 720: не более 60 кадров
– Выше 1280 x 720: не более 30 кадров
• Форматы свыше GMC 2 не поддерживаются.
• Формат H.263 не поддерживается.
• Поддерживается только Samsung Techwin MJPEG.
• Поддержка до WMA 7, 8, 9, STD
• WMA 9 PRO не поддерживает форматы многоканального аудио
с двумя дополнительными каналами или аудио без потерь.
• Частота дискретизации WMA 22050 Гц (моно) не
поддерживается.
Функция непрерывного воспроизведения записанного файла или видеофайла (Продолжить воспр.)
После выхода из режима воспроизведения Записанная ТВ-пр. или Видео воспроизведение можно будет возобновить позднее с
места, на котором оно было остановлено.
✎
При нажатии кнопки ENTER (Главы) во время воспроизведения файла можно разделить сцену по своему усмотрению на 5
разделов и переходить по ним.
✎
Если данные индекса повреждены или не поддерживаются, вы не сможете использовать функцию Главы.
1. В разделе списка файлов выберите видеофайл для непрерывного
воспроизведения, используя кнопку ◄ или ►.
2. Нажмите кнопку
(Воспр.) / ENTER.
3. Выберите Непрер. (Продолжить воспр.), нажав синюю кнопку.
Воспроизведение видео начнется с того момента, на котором было
остановлено.
✎
Синяя кнопка доступна при возобновлении воспроизведения.
✎
Если для параметра Справка непрер. воспр. выбрано значение
Вкл. в меню Настройки, при возобновлении воспроизведения
видеофайла отобразится всплывающее сообщение.
Movie 01.avi
00:04:03 / 00:07:38 1/1
SUM
Непрер.
Главы
Переход
Инструменты
Возврат
Возобновление воспр.
Непрер.
[UC9000]BN68-02820G-RU.indb 40 2010-05-25 오전 10:00:29
 Loading...