

Page 1
Contact SAMSUNG WORLDWIDE
If you have any questions or comments relating to Samsung products, please contact the SAMSUNG customer care centre.
Country
AUSTRIA 0810 - SAMSUNG (7267864, € 0.07/min) www.samsung.com/at
BELGIUM 02-201-24-18 www.samsung.com/be (Dutch)
CZECH 800 - SAMSUNG (800-726786) www.samsung.com/cz
DENMARK 70 70 19 70 www.samsung.com/dk
FINLAND 030 - 6227 515 www.samsung.com/
FRANCE 01 48 63 00 00 www.samsung.com/fr
GERMANY 01805 - SAMSUNG (726-7864 € 0,14/Min) www.samsung.de
HUNGARY 06-80-SAMSUNG (726-7864) www.samsung.com/hu
ITALIA 800-SAMSUNG (726-7864) www.samsung.com/it
LUXEMBURG 261 03 710 www.samsung.com/lu
NETHERLANDS 0900-SAMSUNG (0900-7267864) (€ 0,10/Min) www.samsung.com/nl
NORWAY 815-56 480 www.samsung.com/no
POLAND 0 801 1SAMSUNG (172678)
PORTUGAL 80820-SAMSUNG (726-7864) www.samsung.com/pt
SLOVAKIA 0800-SAMSUNG (726-7864) www.samsung.com/sk
SPAIN 902 - 1 - SAMSUNG (902 172 678) www.samsung.com/es
SWEDEN 0771 726 7864 (SAMSUNG) www.samsung.com/se
TURKEY 444 77 11 www.samsung.com/tr
U.K 0845 SAMSUNG (7267864) www.samsung.com/uk
EIRE 0818 717100 www.samsung.com/ie
SWITZERLAND 0848 - SAMSUNG (7267864, CHF 0.08/min) www.samsung.com/ch
LITHUANIA 8-800-77777 www.samsung.com/lt
LATVIA 8000-7267 www.samsung.com/lv
ESTONIA 800-7267 www.samsung.com/ee
Customer Care Centre
Samsung Zrt., česká organizační složka, Oasis Florenc, Sokolovská394/17, 180 00, Praha 8
022-607-93-33
Web Site
www.samsung.com/be_fr (French)
www.samsung.com/pl
www.samsung.com/ch_fr/(French)
LED TV user manual
LED TV
user manual
imagine the possibilities
Thank you for purchasing this Samsung product.
To receive more complete service, please register
your product at
www.samsung.com/register
Model _____________ Serial No. _____________
© 2010 Samsung Electronics Co., Ltd. All rights reserved.
[UC9000]BN68-02820F-ZT.indb 1 2010-05-24 오후 5:24:17
BN68-02820F-00
Page 2
Figures and illustrations in this User Manual are provided for reference only and may differ from actual product appearance.
Product design and specifications may be changed without notice.
Digital TV notice
1. Functionalities related to Digital TV (DVB) are only available in countries/areas where DVB-T (MPEG2 and MPEG4 AVC) digital terrestrial signals are
broadcasted or where you are able to access to a compatible DVB-C (MPEG2 and MPEG4 AAC) cable-TV service. Please check with your local
dealer the possibility to receive DVB-T or DVB-C signal.
2. DVB-T is the DVB European consortium standard for the broadcast transmission of digital terrestrial television and DVB-C is that for the broadcast
transmission of digital TV over cable. However, some differentiated features like EPG (Electric Programme Guide), VOD (Video On Demand) and so
on, are not included in this specification. So, they cannot be workable at this moment.
3. Although this TV set meets the latest DVB-T and DVB-C standards, as of [August, 2008], the compatibility with future DVB-T digital terrestrial and
DVB-C digital cable broadcasts cannot be guaranteed.
4. Depending on the countries/areas where this TV set is used some cable-TV providers may charge an additional fee for such a service and you may
be required to agree to terms and conditions of their business.
5. Some Digital TV functions might be unavailable in some countries or regions and DVB-C might not work correctly with some cable service providers.
6. For more information, please contact your local Samsung customer care centre.
The reception quality of TV may be affected due to differences in broadcasting method between the countries. Please check the TV
✎
performance in the local SAMSUNG Authorized Dealer, or the Samsung Call Centre whether it can be improved by reconfiguring TV setting or
not.
Still image warning
Avoid displaying still images (like jpeg picture files) or still image element (like TV programme logo, panorama or 4:3 image format, stock or news bar at
screen bottom etc.) on the screen. Constant displaying of still picture can cause ghosting of LED screen, which will affect image quality. To reduce risk of
this effect, please follow below recommendations:
• Avoid displaying the same TV channel for long periods.
• Always try do display any image on full screen, use TV set picture format menu for best possible match.
• Reduce brightness and contrast values to minimum required to achieve desired picture quality, exceeded values may speed up the burnout process.
• Frequently use all TV features designed to reduce image retention and screen burnout, refer to proper user manual section for details.
Securing the Installation Space
Keep the required distances between the product and other objects (e.g. walls) to ensure proper ventilation.
Failing to do so may result in fire or a problem with the product due to an increase in the internal temperature of the product.
When using a stand or wall-mount, use parts provided by Samsung Electronics only.
✎
If you use parts provided by another manufacturer, it may result in a problem with the product or an injury due to the product falling.
x
The appearance may differ depending on the product.
✎
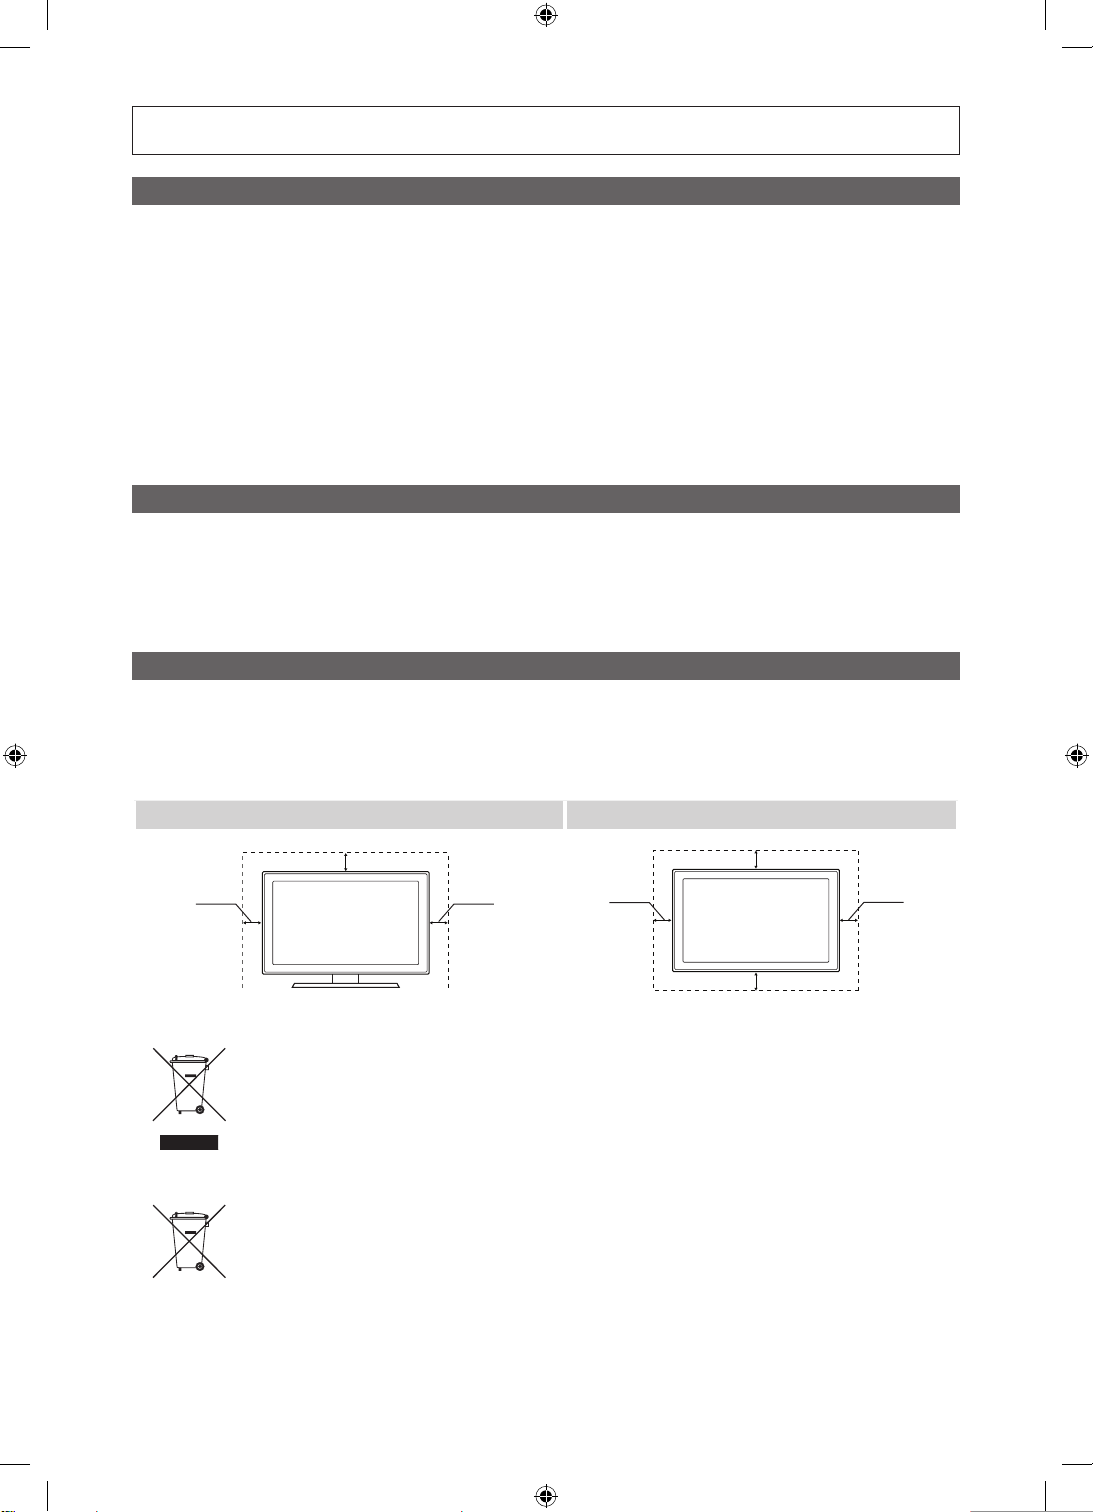
Installation with a stand. Installation with a wall-mount.
2
10 cm
English
10 cm
10 cm
Correct Disposal of This Product (Waste Electrical & Electronic Equipment)
(Applicable in the European Union and other European countries with separate collection systems)
This marking on the product, accessories or literature indicates that the product and its electronic accessories (e.g. charger,
headset, USB cable) should not be disposed of with other household waste at the end of their working life. To prevent possible
harm to the environment or human health from uncontrolled waste disposal, please separate these items from other types of waste
and recycle them responsibly to promote the sustainable reuse of material resources. Household users should contact either the
retailer where they purchased this product, or their local government office, for details of where and how they can take these items
for environmentally safe recycling. Business users should contact their supplier and check the terms and conditions of the purchase
contract. This product and its electronic accessories should not be mixed with other commercial wastes for disposal.
Correct disposal of batteries in this product
(Applicable in the European Union and other European countries with separate battery return systems)
This marking on the battery, manual or packaging indicates that the batteries in this product should not be disposed of with other
household waste at the end of their working life. Where marked, the chemical symbols Hg, Cd or Pb indicate that the battery
contains mercury, cadmium or lead above the reference levels in EC Directive 2006/66. If batteries are not properly disposed of,
these substances can cause harm to human health or the environment. To protect natural resources and to promote material
reuse, please separate batteries from other types of waste and recycle them through your local, free battery return system.
10 cm
10 cm
10 cm
10 cm
[UC9000]BN68-02820F-ZT.indb 2 2010-05-24 오후 5:24:18
Page 3
Contents
Getting Started
4
Connections
12
Basic Features
15
Advanced Features
32
4 Accessories
5 Viewing the Control Panel
6 Mini Remote Control
7 Viewing the Touch Control
10 Connecting to an Antenna
11 Plug & Play (Initial Setup)
12 Connecting to an AV Device
14 Connecting to an Audio Device
15 Changing the Input Source
15 How to Navigate Menus
16 Using the INFO button (Now & Next guide)
16 Planning Your Viewing
18 Channel Menu
19 Picture Menu
25 Sound Menu
27 Setup Menu
31 Support Menu
32 Connecting to a PC
33 Network Connection
40 Media Play
49 Anynet+
53 Internet@TV
56 AllShare
ENGLISH
Other Information
TOOLS
This function can be used by
pressing the TOOLS button on the
remote control.
58
58 Assembling the Cables
58 Securing the TV to the wall
59 Troubleshooting
62 Enclosed Wireless LAN Adapter
64 Specifications
65 Index
Check the Symbol!
Note One-Touch Button
English
3
[UC9000]BN68-02820F-ZT.indb 3 2010-05-24 오후 5:24:19
Page 4
Getting Started
Accessories
✎✎
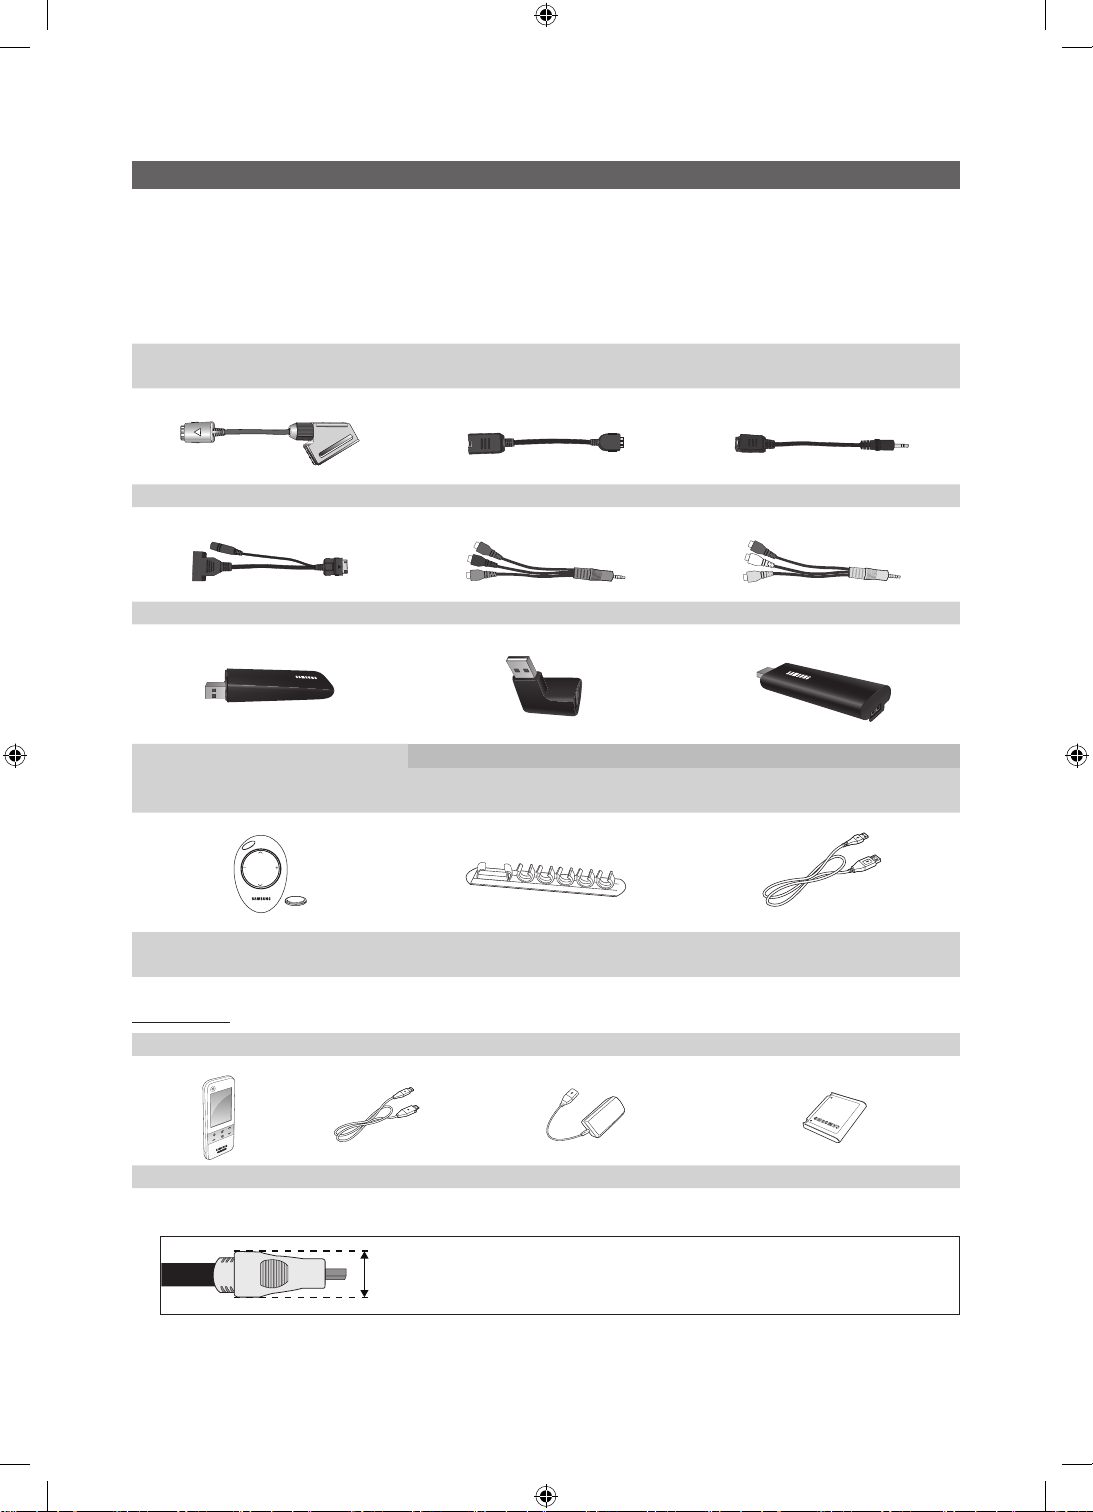
Please✎make✎sure✎the✎following✎items✎are✎included✎with✎your✎LED✎TV.✎If✎any✎items✎are✎missing,✎contact✎your✎dealer.
✎✎
The✎items’✎colours✎and✎shapes✎m ay✎vary✎depending✎on✎the✎models.
✎✎
Cables✎not✎included✎in✎the✎pack age✎contents✎can✎be✎purchased✎separately.
✎✎
Don’t✎pull✎out✎the✎LAN✎and✎SCART✎Adapter✎directly.
CAUTION:[INSERT[SECURELY[LEST[SHOULD[BE[DETACHED[IN[SET
[[
✎y Owner’s✎Instructions
✎y Warranty✎Card✎/✎Safety✎Guide✎(Not✎available✎in✎some✎locations)
✎y SCART✎Adapter✎ ✎y LAN✎Adapter ✎y Optical✎Adapter
✎y PC✎Adapter ✎y Component✎Adapter ✎y AV✎Adapter
✎y Cleaning✎Cloth
✎y Velcro
USB✎adapter
✎y Samsung✎Wireless✎Lan✎Adapter
✎y Mini✎Remote✎Control✎&✎Lithium✎battery✎
Touch[Control
✎y Owner’s✎Instructions
MUTE
CH
SOURCE
VOL
✎y Touch✎Control✎ ✎y Cable ✎y Power✎Adapter ✎y Touch✎Control✎Battery
✎✎
For✎best✎cable✎connection✎to✎thi s✎product,✎be✎sure✎to✎use✎cables✎with✎a✎maximum✎thickness✎as✎below:
✎y Maximum✎thickness✎-✎0.55✎inches✎(14mm)
✎y For✎stand✎type
✎y Holder-Wire✎(4EA)
(UE46C9000ZP,✎UE55C9000ZP)
✎y For✎wall✎mount✎type
(UE46C9000ZP,✎UE55C9000ZP)
✎y Extension✎Cable
English
4
1_BN68-02820F-Eng.indd 4 2010-05-25 오후 7:28:29
Page 5
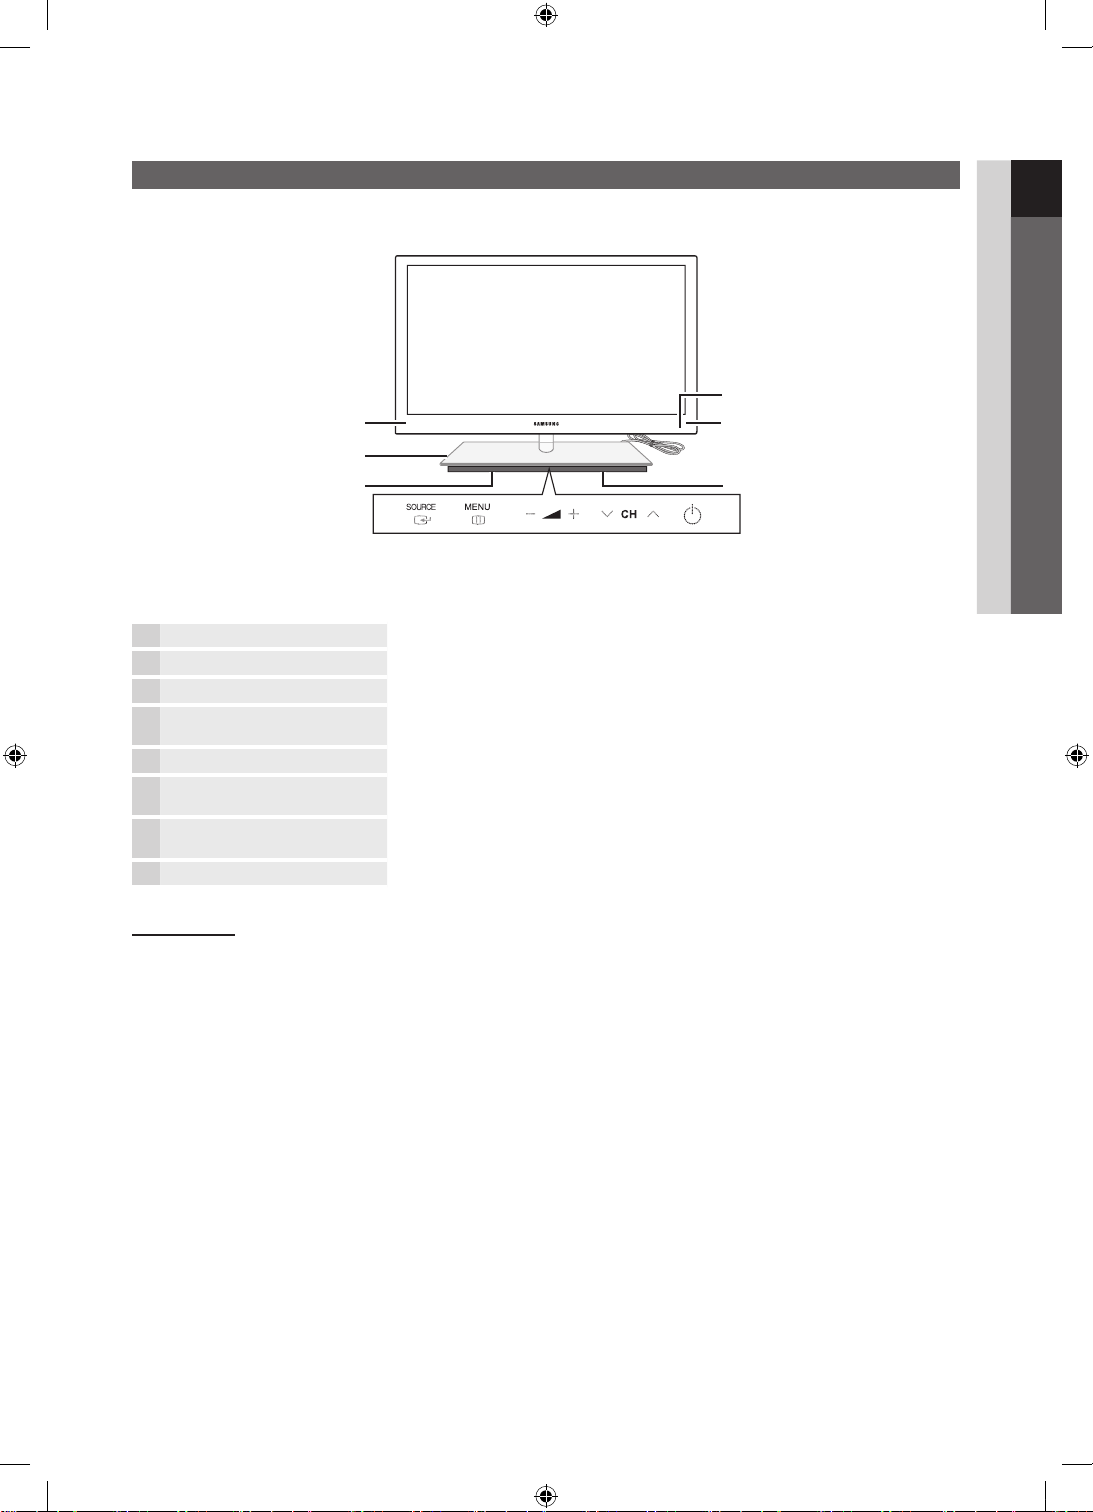
Viewing the Control Panel
✎
The product colour and shape may vary depending on the model.
Power Indicator
3D Emitter
Woofer
Speakers Speakers
✎
To control the TV using the LED touch pad, tap the LED touch pad centered underneath the stand. The touch pad will
slide out by itself. The LED touch pad will slide back in if unused for a specified period of time.
3D Emitter The LED on the 3D emitter blinks only when sending a 3D signal.
Power Indicator Blinks and turns off when the power is on and lights up in standby mode.
Remote control sensor Aim the remote control towards this spot on the TV.
SOURCE
MENU
(Power)
Toggles between all the available input sources. In the on-screen menu, use this
button as you would use the ENTER button on the remote control.
Displays an on-screen menu, the OSD (on screen display), of your TV’s features.
Adjusts the volume. In the OSD, use the
◄ and ► buttons on the remote control.
Changes the channels. In the OSD, use the
▼ and ▲ buttons on the remote control.
Turns the TV on or off.
Remote control sensor
buttons as you would use the
buttons as you would use the
01 Getting Started
Standby mode
Do not leave your TV in standby mode for long periods of time (when you are away on a holiday, for example). A small amount
of electric power is still consumed even when the power button is turned off. It is best to unplug the power cord.
English
[UC9000]BN68-02820F-ZT.indb 5 2010-05-24 오후 5:24:23
5
Page 6
Getting Started
OPEN
CLOSE
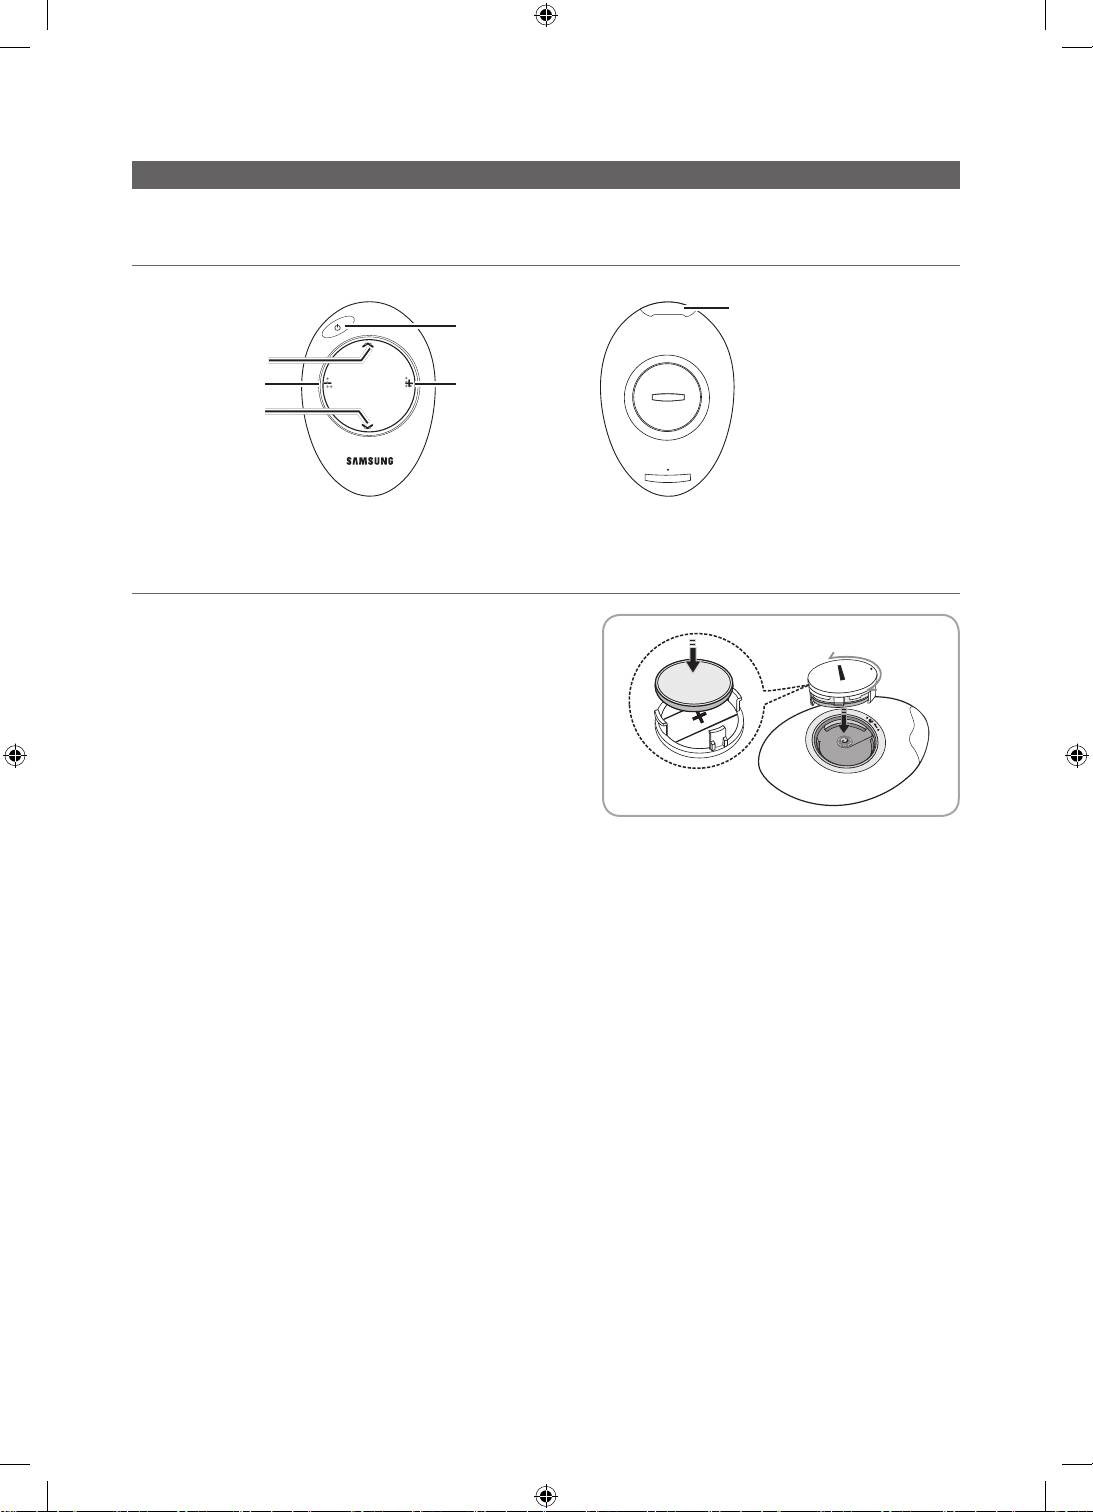
Mini Remote Control
The Mini Remote Control is a simplified remote control that consists of the power, channel and volume buttons only.
Description
Power On/Off button
Next channel
Volume decrease
Previous channel
✎
This is a special remote control for the visually impaired and has Braille points on the Channel and Volume buttons.
Volume increase
IrDA transmitter
Point the IrDA transmitter at the TV
✎
to use the mini remote.
Inserting the battery
1. Turn the battery cover counterclockwise to unlock it and then
separate the battery cover.
2. Insert a 3V Lithium battery with the + side facing down into the
battery cover.
3. Place the battery cover into the remote control aligning it with
the grooves and then turn the battery cover clockwise to lock
the cover.
✎
If the remote control doesn’t work, check the following:
Is the TV power on?
x
Are the plus and minus ends of the batteries reversed?
x
Are the batteries drained?
x
Is there a power outage or is the power cord unplugged?
x
Is there a special fluorescent light or neon sign nearby?
x
English
6
[UC9000]BN68-02820F-ZT.indb 6 2010-05-24 오후 5:24:24
Page 7
Description
P
MUTE
SOURCE
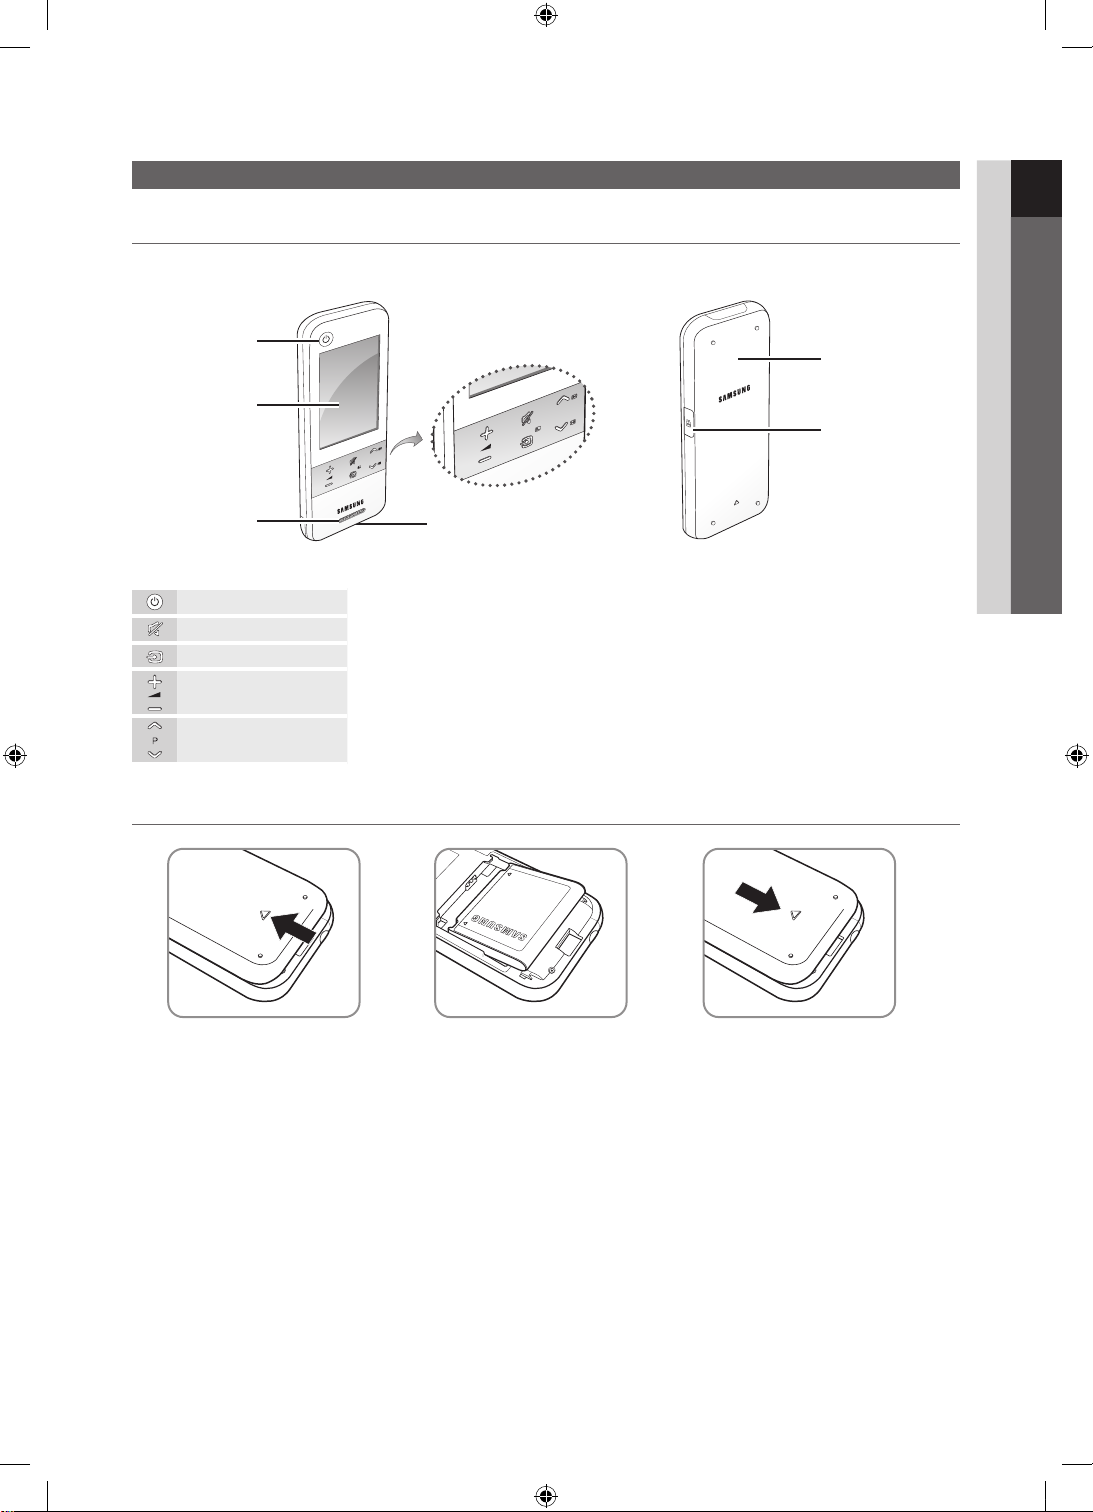
Viewing the Touch Control
01 Getting Started
Front View Rear View
TV Power button
Touch screen
MUTE
P
SOURCE
Speaker
Earphone jack
Power Turn the TV on and off.
MUTE Mute or unmute the sound.
SOURCE Display the source list (TV, PC, etc.) on the screen.
Volume Press to control the volume.
Channel Press to change channels.
Inserting the battery
Battery cover
Charge Port
1. Slide and open the battery cover
in the direction of the arrow.
2. Insert the battery with the
Samsung logo facing up.
3. Slide and close the battery
cover in the direction of the
arrow.
English
[UC9000]BN68-02820F-ZT.indb 7 2010-05-24 오후 5:24:25
7
Page 8

Getting Started
.,;@
abc def
ghi jkl mno
pqrs tuv wxyz
I-II DUAL
Remote Control Screen Display
Initial Screen
1
Keyboard
TV Control Services
Press to directly access channels.
Returns to the previous channel.
Navigation
Drag to the Left direction
2
Keyboard
TV Control Services
CONTENT MENU GUIDE
Navigation
Tap the Navigation or Menu button.
3
Keyboard
TV Control Services
Selects the on-screen menu
items and changes the values
seen on the menu.
Alternately select Teletext ON, Double, Mix or OFF.
CONTENT: Displays the Content View, which includes Guide, Internet@TV, Media Play, AllShare
and 3D.
MENU: Brings up the OSD.
GUIDE: Displays the EPG (Electronic Programme Guide).
RETURN
TOOLS: Quickly select frequently used functions.
INFO : Displays information on the TV screen.
EXIT: Exits the menu.
Use these buttons in Media Play and Anynet+ modes (p. 40, 49).
(: Controls recording for Samsung recorders that have the Anynet+ feature)
Buttons used in the Channel List, Internet@TV, Media Play menu, etc.
: Returns to the previous menu.
Tap Services.
4
TV Control Services
INTERNET@TV: Link to various internet
services (p. 53).
MEDIA.P: Displays Media Play (p. 40).
3D: Sets the 3D mode. (p. 22).
AD: Turns the audio description on and
off (p. 26). This is not available in some
locations.
CHLIST: Displays channel lists on the screen
(p. 17).
D (Data Service): Use this button when
using data broadcast service (p. 30).
P.SIZE: Selects the picture size (p. 21).
SUBT.: Displays digital subtitles (p. 28).
I-II DUAL: Sound effect selection (p. 27).
[UC9000]BN68-02820F-ZT.indb 8 2010-05-24 오후 5:24:26
8
English
Page 9
Setting Up Your Remote
You can set up your 3” LCD Touch Control to control your TV in three ways:
As a standard, IR (Infra Red) remote
As an IR remote, your LCD Touch Control works the same way as a standard push button remote, except you touch icons and
symbols on the LCD screen to control your TV instead of pushing buttons. Using your Touch Control as an IR remote requires
no more set up than a standard remote and gives you access to most of the remote’s functions and features.
As an extended distance, Wi-Fi remote
As an extended distance, Wi-Fi remote, your Touch Control offers all the functions and features of the IR mode and, because
it uses Wi-Fi radio waves instead of infra red waves to control your TV, it lets you control your TV from a much greater distance
and even from around corners. It also gives you access to the Twin Display function which lets you watch the Programme
or content that is on your TV screen on the LCD screen of the Touch Control. The long distance, Wi-Fi mode requires a few
additional setup steps; possibly including re-initialization. It also requires you to attach Samsung’s Wireless LAN Adapter
(WIS09ABGN, WIS09ABGN2, or WIS10ABGN) to one of your TV’s USB ports.
As a networked, Wi-Fi remote
As a networked, Wi-Fi remote, your Touch Control gives you all the functions and features of the IR and the extended distance
modes and also gives you access to the Multimedia function which lets you listen to or view music, movie, and picture files
from your PC on your TV screen. You can also download upgrades to your Touch Control’s software directly from the Internet.
The networked, Wi-Fi mode requires the largest number of setup steps. In addition, to use the networked, Wi-Fi mode,
you need a working local area network and a wireless router. You also need to attach Samsung’s Wireless LAN Adapter
(WIS09ABGN, WIS09ABGN2, or WIS10ABGN) to one of your TV’s USB ports. To use the Multimedia function, you need to
install Samsung’s PC Share Manager on your PC. You can download PC Share Manager from http://www.samsung.com.
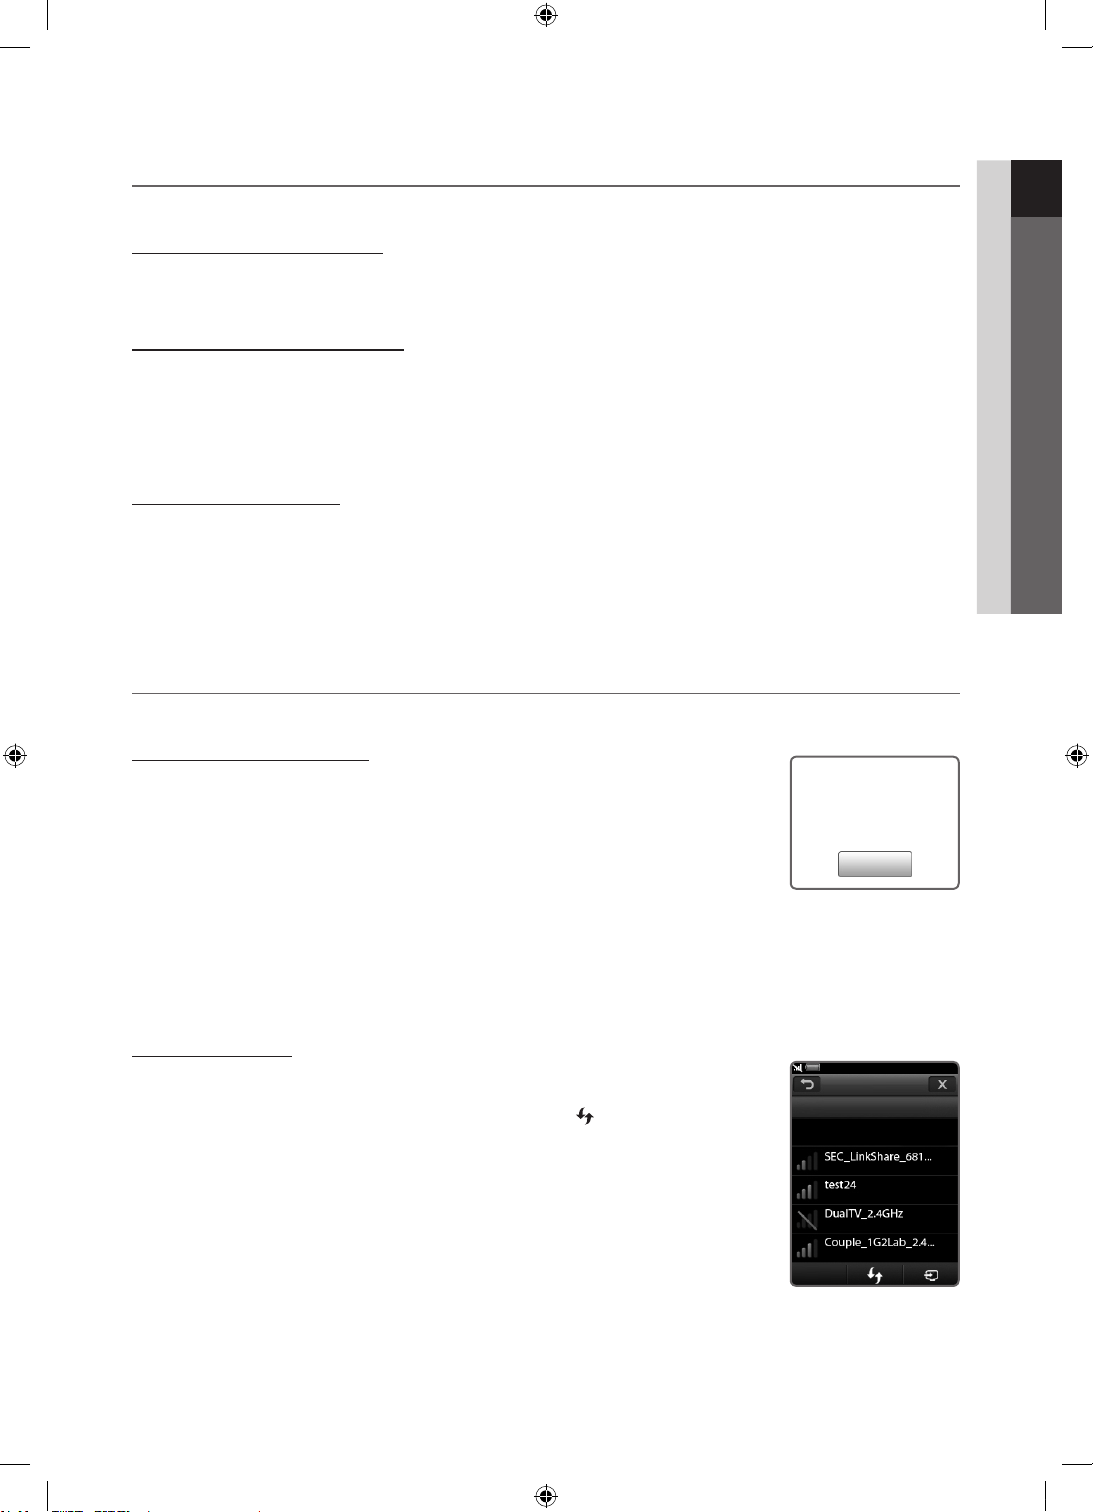
Setting up the Network
You can set up a wireless network for the 3-inch remote control.
How to connect using PBC (WPS)
If your router has a PBC (WPS) button, follow these steps:
1. Connect your TV to your LAN.
2. On the Services screen, touch Settings → Remote Settings.
3. Touch Network.
4. Touch the PBC(WPS).
5. If the Press PBC button on the access point within 120 seconds. message appears,
press the PBC button on the device to connect.
✎
For more information, refer to the wireless network setup manual of the device to be connected.
6. If the device is connected properly to the TV after starting count on message box then message box will be disappeared
automatically.
✎
If the connection fails, please retry after 2 minutes.
Press the PBC button on the
access point within 120
seconds.
Remaining Time : 112
Stop
01 Getting Started
Connecting to network
To setup the wireless connection automatically, follow these steps:
1. Follow Steps 1 through 3 in the “How to connect using PBC (WPS)” procedure.
✎
If the intended network cannot be found in the list, select to open the list of
networks again.
2. Select a network and connect to the network using the encryption method (PIN, security
key, ad-hoc, etc.) set for the network.
3. When the network connection is complete, select Test to perform a network test.
✎
For the automatic IP, the AP will automatically define the IP Address, Subnet Mask,
Gateway and DNS server.
✎
For the manual IP, you can select Edit and directly enter the IP Address, Subnet
Mask, Gateway and DNS server.
✎
For Full Touch Control instructions, please read the Touch Control's user manual.
[UC9000]BN68-02820F-ZT.indb 9 2010-05-24 오후 5:24:26
Auto Conguration
Unsecured
Secured
Unsecured
Secured
PBC(WPS)
Network
Select a network.
English
9
Page 10

Getting Started
Operating specification for dual view
Main TV
DTV ATV Scart AV Comp. PC HDMI
DTV
Touch Control
ATV X
SCART X X
AV X X X △ X X X
Comp. X X X X
PC X X X X X X X
HDMI X X X X X X
◎
: <Preview> and <Twin Display> are enabled. Note that only Free channels are available for <Preview>.
●
: <Preview> enabled. Olny Free channels are available.
○
: <Preview> enabled. Free / Scramble channels are available.
△
: <Twin Display> enabled.
X
: Disabled.
✎
Scart output: disabled when a Touch Control signal is outputted.
✎
The Touch Control screen will freeze a few seconds while the input source of the TV switches.
✎
A message appears saying “Not Supported Mode” if the network condition is poor. Check the network connection and
try again.
✎
<Twin Display> or <Preview> may be restricted on the touch control if one of the following functions or modes is
enabled on the TV:
– PVR, Media Play, Internet@TV, AllShare, or PC mode.
◎ ● O O O O O
△
X X O O O
△
X X X X
△
X X
△
Connecting to an Antenna
When the TV is initially powered on, basic settings proceed automatically.
✎
Preset: Connecting the mains and antenna.
VHF/UHF Antenna
or
Cable
ANT OUT
English
10
[UC9000]BN68-02820F-ZT.indb 10 2010-05-24 오후 5:24:27
Page 11

Plug & Play (Initial Setup)
When the TV is initially powered on, a sequence of on-screen prompts will assist in configuring basic settings. Press the
POWER button. Plug & Play is available only when the Input source is set to TV.
✎
To return to the previous step, press the Red button.
1
Turn on the TV and
Touch Control.
y Turn on the Touch Control and then tap OK on your
remote.
✎
It may take about one minute to establish a wireless
connection between the TV and Touch Control
using the Samsung Wireless LAN Adapter.
01 Getting Started
2
3
4
5
6
7
8
9
10
11
Connect the
Samsung Wireless
LAN Adapter
Selecting a
language
Selecting Store
Demo or
Home Use
Selecting a country
Selecting an
antenna
Selecting a channel
Setting the Clock
Mode
Time Zone
Viewing the HD
Connection Guide.
Enjoy your TV.
y Connect the Samsung Wireless LAN Adapter to the TV. You can connect the Samsung
Wireless LAN Adapter using one of the methods shown on page 36.
y If the connection fails, reconnect the Samsung Wireless LAN Adapter and then try again.
Press the ▲ or ▼ button, then press the ENTER button.
Select the desired OSD (On Screen Display) language.
Press the ◄ or ► button, then press the ENTER
y Select the Home Use mode. Store Demo mode is for retail environments.
y To return the unit’s settings from Store Demo to Home Use (standard): Press the volume
button on the TV. When the OSD volume is displayed, press and hold MENU for 5 sec.
Press the ▲ or ▼ button, then press the ENTER
Select the appropriate country.
Press the ▲ or ▼ button, then press the ENTER button.
Select Air or Cable.
Press the ▲ or ▼ button, then press the ENTER
Select the channel source to memorise. When setting the antenna source to Cable, a step
appears allowing you to assign numerical values (channel frequencies) to the channels. For
more information, refer to Channel → Auto Store (p. 18).
✎
Press the ENTER button at any time to interrupt the memorisation process.
Set the Clock Mode automatically or manually.
Press the ▲ or ▼ button to select Auto, then press the ENTER
Press the ▲ or ▼ button to select the your time zone, then press the ENTER button.
(depending on the country)
The connection method for the best HD screen quality is displayed.
Press the ENTER
button.
button.
button.
button.
button.
If You Want to Reset This Feature...
Select Setup - Plug & Play (Initial Setup). Enter your 4 digit PIN number. The default PIN number is “0-0-0-0.” If you want to
change the PIN number, use the Change PIN function.
English
11
[UC9000]BN68-02820F-ZT.indb 11 2010-05-24 오후 5:24:28
Page 12
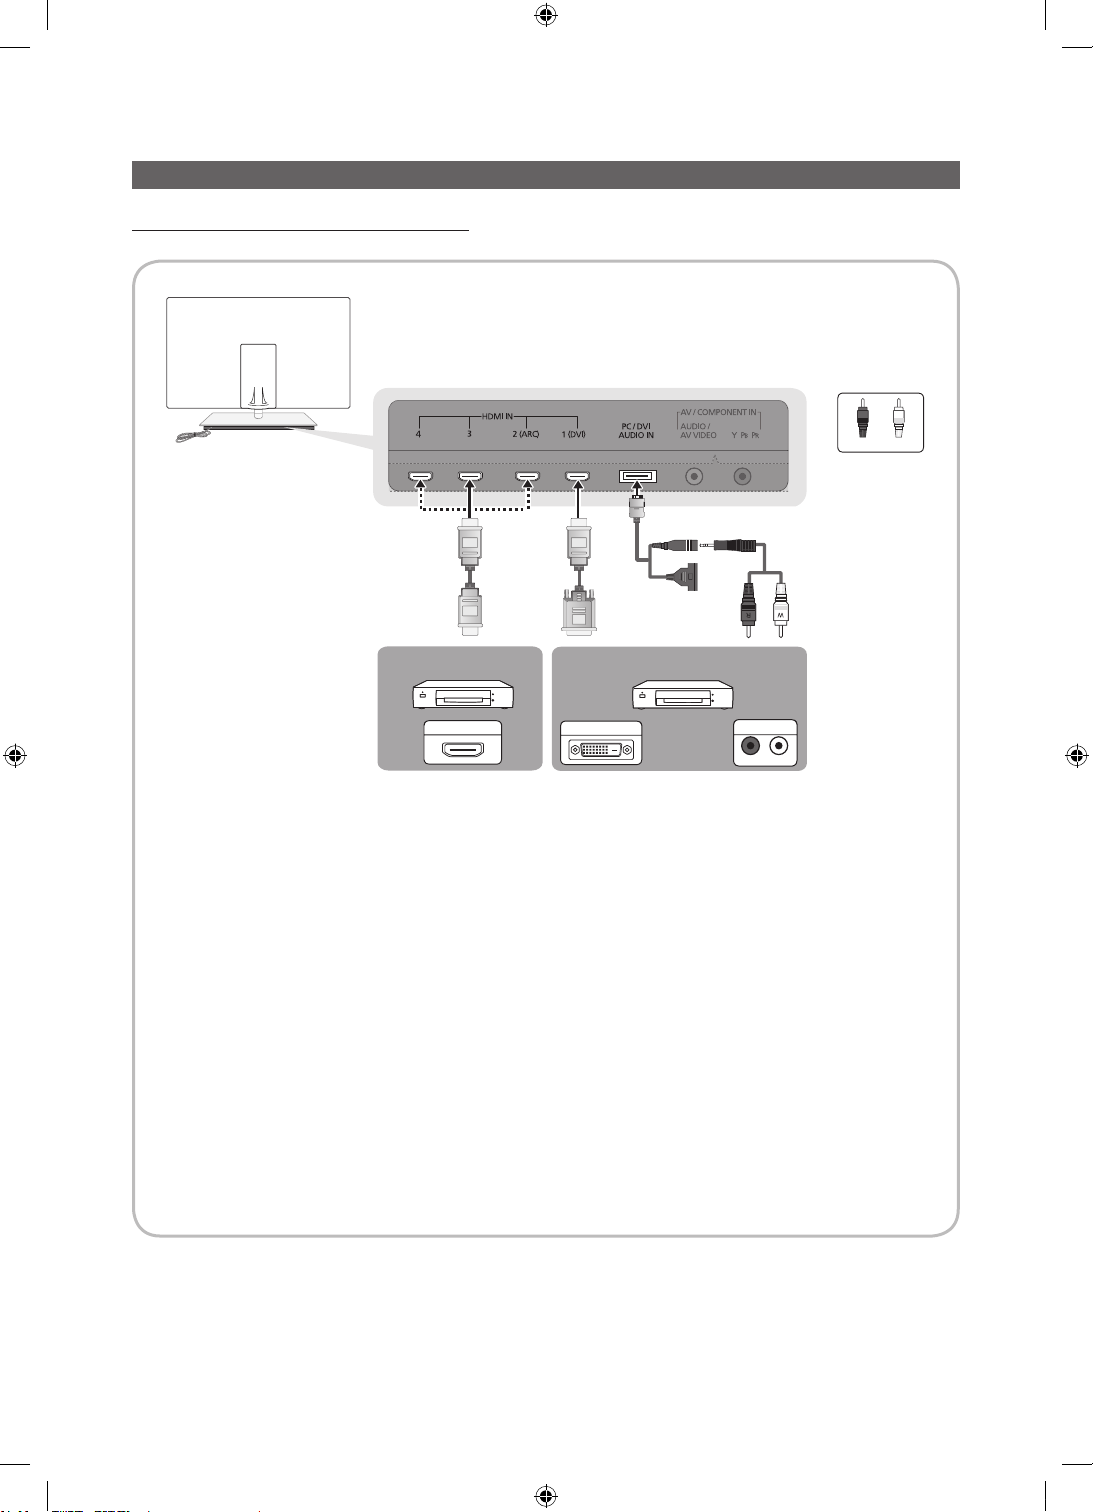
Connections
R-AUDIO-L
Connecting to an AV Device
Using an HDMI or HDMI/DVI cable (up to 1080p)
Available devices: DVD, Blu-ray player, HD cable box, HD STB (Set-Top-Box) satellite receiver, cable box, STB satellite receiver
WR
WhiteRed
DVD / Blu-ray player DVD / Blu-ray player
HDMI OUT
✎
HDMI IN 1(DVI), 2(ARC), 3, 4, PC/DVI AUDIO IN
For better picture and audio quality, connect to a digital device using an HDMI cable.
x
An HDMI cable supports digital video and audio signals, and does not require an audio cable.
x
– To connect the TV to a digital device that does not support HDMI output, use an HDMI/DVI and audio cables.
The picture may not display normally (if at all) or the audio may not work if an external device that uses an older
x
version of HDMI mode is connected to the TV. If such a problem occurs, ask the manufacturer of the external
device about the HDMI version and, if out of date, request an upgrade.
Be sure to use an HDMI cable with a thickness of 14 mm or less.
x
Be sure to purchase a certified HDMI cable. Otherwise, the picture may not display or a connection error may
x
occur.
A basic high-speed HDMI cable or one with ethernet is recommended. This product does not support the
x
ethernet function via HDMI.
This product supports the 3D and ARC (Audio Return Channel) functions via an HDMI cable. Note that the
x
ARC function is supported by the HDMI IN 2(ARC) port only.
– If 3D Auto View is set to On, some functions such as Internet@TV may be disabled. In this case, set
3D Auto View or 3D Mode to Off.
The ARC function allows digital audio to output via the HDMI IN 2(ARC) port. It can be enabled only when the
x
TV is connected with an audio receiver that supports the ARC function.
DVI OUT
AUDIO OUT
English
12
[UC9000]BN68-02820F-ZT.indb 12 2010-05-24 오후 5:24:29
Page 13
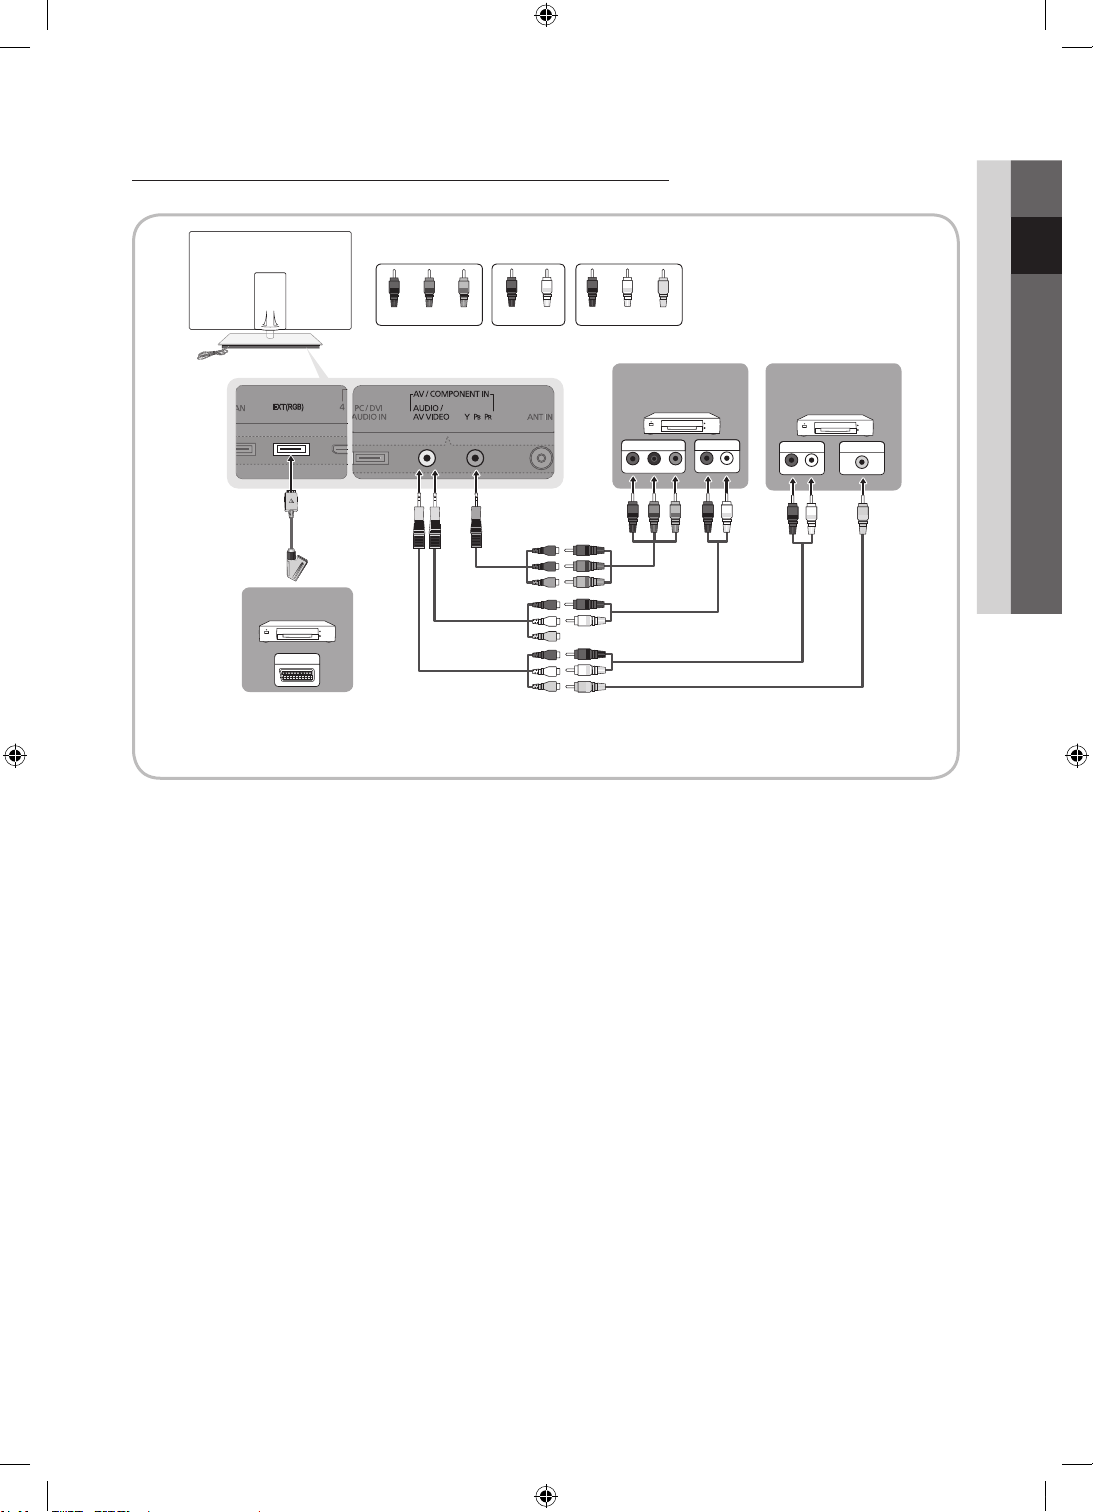
Using a Component (up to 1080p) or Audio/Video (480i only) and Scart Cable
Available devices: DVD, Blu-ray player, cable box, STB satellite receiver, VCR
W
RGB
Red RedBlue WhiteGreen
R
W
R
Red White Yellow
02 Connections
Y
DVD / Blu-ray
player
COMPONENT OUT
PR PB Y
R
R
B
VCR
EXT
✎
In Ext. mode, DTV Out supports MPEG SD Video and Audio only.
✎
To obtain the best picture quality, the Component connection is recommended over the A/V connection.
G
R
W WR
Y
AUDIO OUT
R-AUDIO-L
B
G
WR
AUDIO OUT
R-AUDIO-L
R
VCR
VIDEO OUT
W Y
English
13
[UC9000]BN68-02820F-ZT.indb 13 2010-05-24 오후 5:24:30
Page 14
Connections
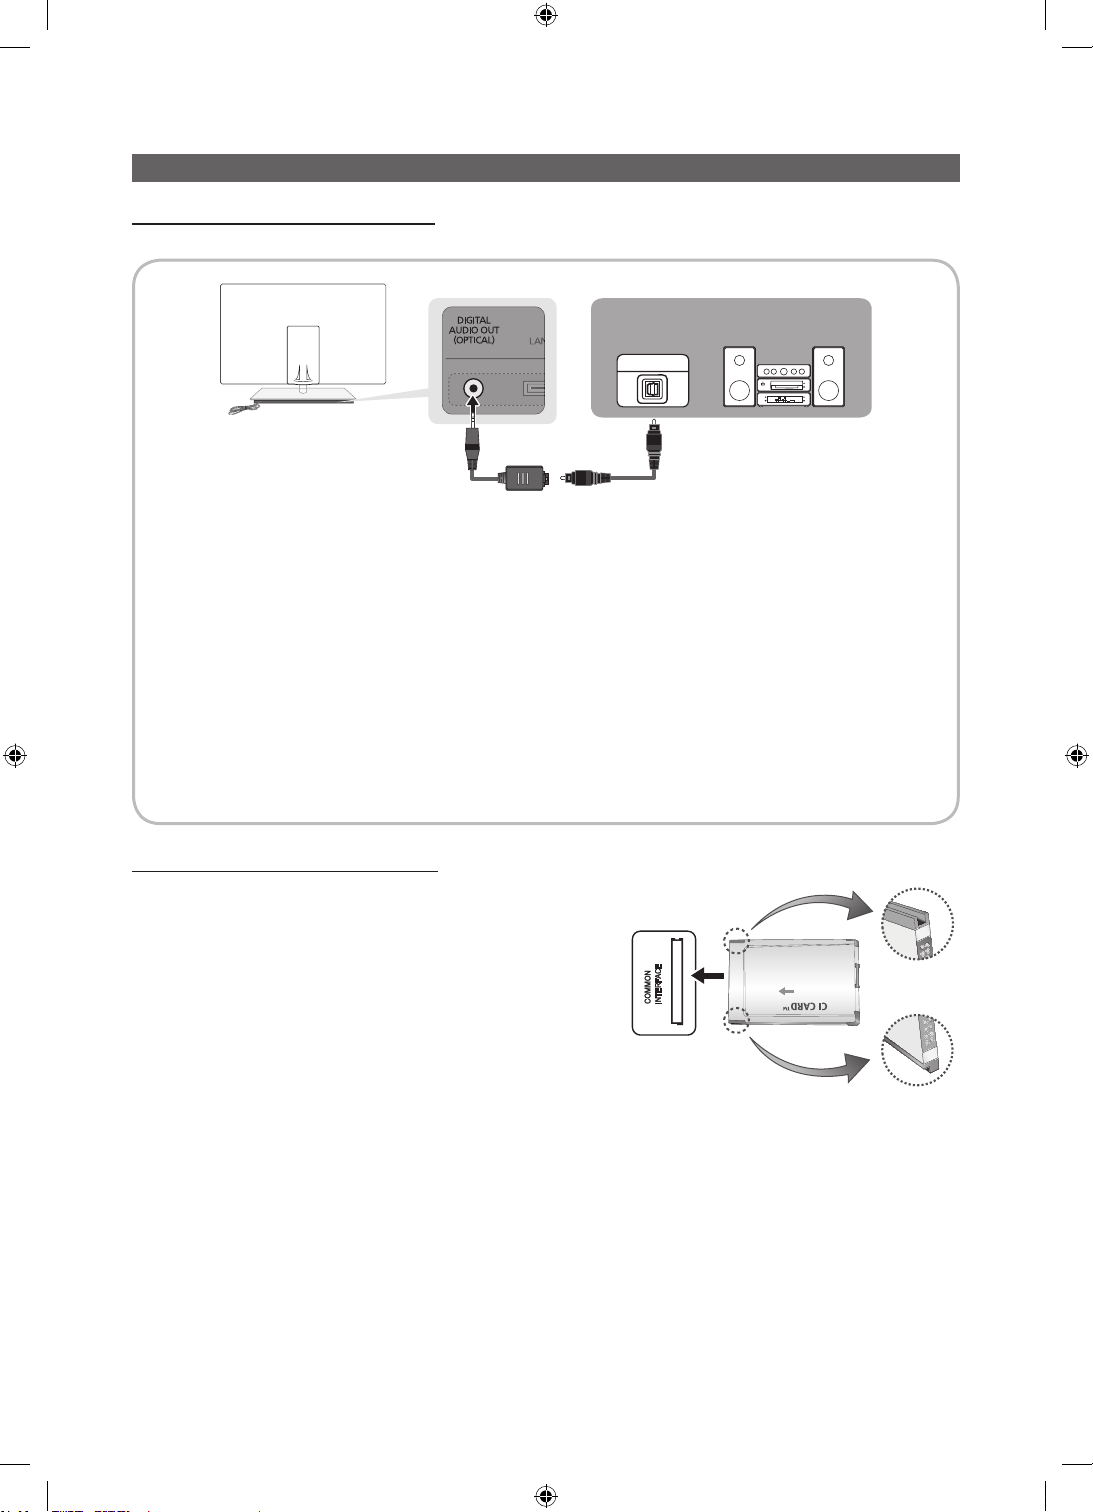
Connecting to an Audio Device
Using an Optical (Digital) Cable Connection
Available devices: digital audio system, amplifier, DVD home theatre
✎
DIGITAL AUDIO OUT (OPTICAL)
When a digital audio system is connected to the DIGITAL AUDIO OUT (OPTICAL) jack, decrease the volume
x
of both the TV and the system.
5.1 CH (channel) audio is available when the TV is connected to an external device supporting 5.1 CH.
x
When the receiver (home theatre) is set to on, you can hear sound output from the TV’s optical jack. When the
x
TV is receiving a DTV signal, the TV will send 5.1 CH sound to the home theatre receiver. When the source is
a digital component such as a DVD / Blu-ray player / cable box / STB (Set-Top-Box) satellite receiver and is
connected to the TV via HDMI, only 2 CH audio will be heard from the home theatre receiver. If you want to
hear 5.1 CH audio, connect the digital audio out jack from your DVD / Blu-ray player / cable box / STB satellite
receiver directly to an amplifier or home theatre.
digital audio system
OPTICAL
CONNECTIONS COMMON INTERFACE Slot
To watch paid channels, the “CI or CI+ CARD” must be inserted.
y If you don’t insert the “CI or CI+ CARD,” some channels will
display the message “Scrambled Signal”.
y The pairing information containing a telephone number, the “CI or
CI+ CARD” ID the Host ID and other information will be displayed
in about 2~3 minutes. If an error message is displayed, please
contact your service provider.
y When the configuration of channel information has finished, the
message “Updating Completed” is displayed, indicating the
channel list is updated.
✎
NOTE
You must obtain a “CI or CI+ CARD” from a local cable service provider.
x
When removing the “CI or CI+ CARD”, carefully pull it out with your hands since dropping the “CI or CI+ CARD” may
x
cause damage to it.
Insert the “CI or CI+ CARD” in the direction marked on the card.
x
The location of the COMMON INTERFACE slot may be different depending on the model.
x
“CI or CI+ CARD” is not supported in some countries and regions; check with your authorized dealer.
x
If you have any problems, please contact a service provider.
x
Insert the “CI or CI+ CARD” that supports the current antenna settings. The screen will be distorted or will not be
x
seen.
English
14
[UC9000]BN68-02820F-ZT.indb 14 2010-05-24 오후 5:24:31
Page 15
02 Connections
Changing the Input Source
Source List
Use to select TV or other external input sources such as
DVD / Blu-ray players / cable box / STB satellite receiver
connected to the TV.
■ TV / Ext. / PC / AV / Component / HDMI1/DVI /
HDMI2 / HDMI3 / HDMI4 / USB
✎
In the Source List, connected inputs will be
highlighted.
✎
Ext. and PC always stay activated.
Basic Features
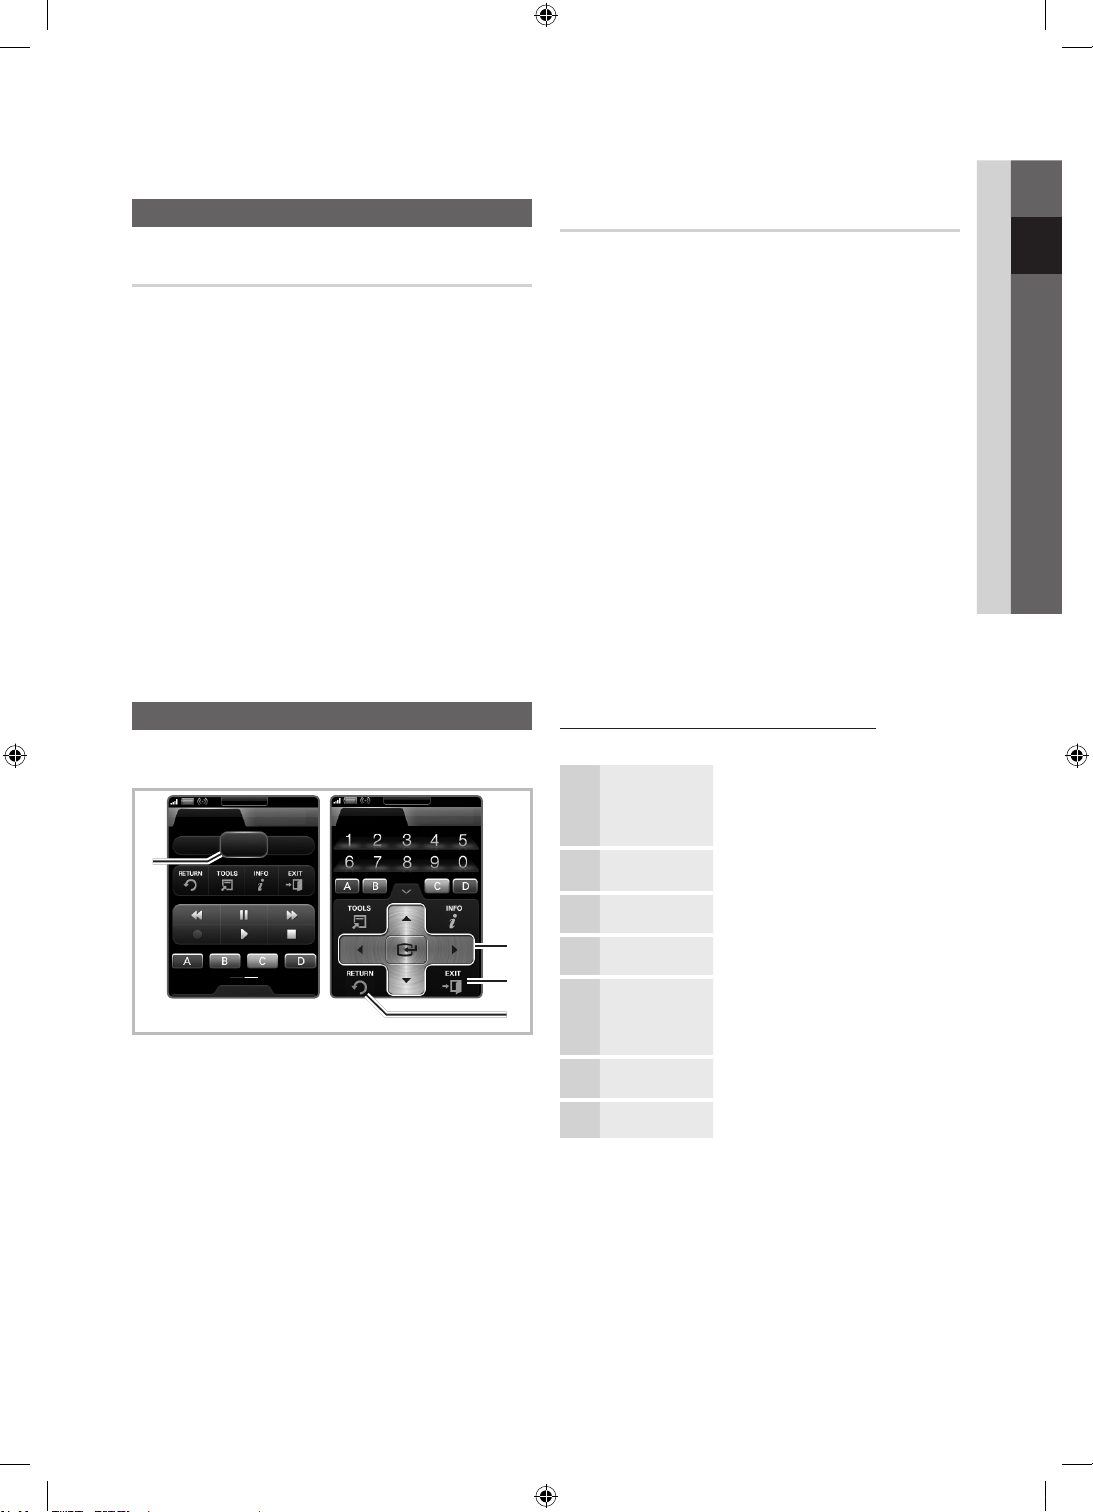
How to Navigate Menus
Before using the TV, follow the steps below to learn how to
navigate the menu and select and adjust different functions.
Keyboard
TV Control Services
CONTENT MENU GUIDE
1
Navigation
1 MENU button: Displays the main on-screen menu.
2 ENTER
3 EXIT button: Exits the on-screen menu.
4 RETURN button: Returns to the previous menu.
select an item. Confirm the setting.
/ Direction button: Move the cursor and
Keyboard
TV Control Services
2
3
4
Edit Name
■ VCR / DVD / Cable STB / Satellite STB / PVR STB /
AV Receiver / Game / Camcorder / PC / DVI PC /
DVI Devices / TV / IPTV / Blu-ray / HD DVD / DMA:
Name the device connected to the input jacks to make
your input source selection easier.
✎
When a PC with a resolution of 1920 x 1080 @
60Hz is connected to the HDMI IN 1(DVI) port,
you should set to DVI PC mode under Edit Name.
✎
When connecting an HDMI/DVI cable to the
HDMI IN 1(DVI) port, you should set to DVI PC or
DVI Devices mode under Edit Name.
✎
If an HDMI cable is connected to the
HDMI IN 1(DVI) port, the audio may not work. In
this case, connect to the PC/DVI AUDIO IN port.
How to Operate the OSD (On Screen Display)
The access step may differ depending on the selected menu.
MENU The main menu options appear on
1
▲ / ▼ Select an icon with the ▲ or ▼
2
ENTER
3
▲ / ▼
4
◄ / ►
5
ENTER
6
EXIT
the screen:
Picture, Sound, Channel, Setup,
Input, Application, Support.
button.
Press ENTER to access the
sub-menu.
Select the desired submenu with
the ▲ or ▼ button.
Adjust the value of an item with the
◄ or ► button. The adjustment in
the OSD may differ depending on
the selected menu.
Press ENTER to complete the
configuration.
Press EXIT.
7
English
15
[UC9000]BN68-02820F-ZT.indb 15 2010-05-24 오후 5:24:31
Page 16

Using the INFO button (Now & Next guide)
The display identifies the current channel and
the status of certain audio-video settings.
The Now & Next guide shows daily TV
programme information for each channel
according to the broadcasting time.
y Scroll ◄, ► to view information for a
desired programme while watching the
current channel.
y Scroll ▲, ▼ to view information for other channels. If you
want to move to the currently selected channel, press
the ENTER
DEF
DTV Air
15
button.
Unclass ified
No Det aild Inform ation
Life On Venus Avenu e
18:00 ~ 6:00
INFO
18:11 Thu 6 Jan
E
Watch
Information
Planning Your Viewing
Guide
The EPG (Electronic Programme Guide)
information is provided by broadcasters.
Using programme schedules provided
by broadcasters, you can specify
programmes you want to watch in
advance so that the channel automatically
changes to the selected programme
channel at the specified time. Programme
entries may appear blank or out of date depending on a
channel status.
Using Channel View
GUIDE
Using Scheduled View
Guide
)
Family Affairs
)
Dark Angel
800
800
View Mode Information
1 4 6
button again and
DTV Air 800 five
Family Affairs
18:00 - 18:30
Drama
800 five
Scheduled View
18:30
Today
19:15
Today
1
Red (View Mode): View the list of programmes that
Tanya confesses all to a stunned Babs. Conrad is anxious to hear...
are playing now or coming up.
2
Yellow (+24 Hours): Viewing the list of programmes to
be broadcasted after 24 hours.
3
Blue (Ch. Mode): Select the type of channels you
want to display on the Channel View window. (All, TV,
Radio, Data/Other, My Channel 1~4)
4 Information: Displays details of the selected
programme.
5
(Page): Move to next or previous page.
6 ENTER
button
– When selecting the current programme, you can
watch the selected programme.
– When selecting the future programme, you can
reserve to watch the selected programme. To cancel
the schedule, press the ENTER
select Cancel Schedules.
2:10 Tue 1 Jun
five
five
Cancel
Guide
800 five
Channel View - TV
Today
27
28
800
24
16
6
16
DTV Air 800 five
Home and Away
18:00 - 18:30
Drama
Dani is devastated when scott makes clear his views on marriage...
Discovery
DiscoveryH&L
five
price-drop.tv
QVC
R4DTT
View Mode +24 Hours Ch. Mode Information Page
18:00 - 19:00 19:00 - 20:00
American Chopper
Programmes resume at 06:00
Home and...
No Information
QVC Selection
No Information
)
Family Affairs
Tine Team
Fiv...
1 2 3 4 5 6
English
2:10 Tue 1 Jun
)
Dark Angel
Watch
Channel Manager
Delete or set favourites channels and use the programme
guide for digital broadcasts. Select a channel in the
Channels, My Channels or Scheduled screen.
Channels
All
TV
Radio
Data/Other
Analogue
Air Antenna B Zoom Select Sort Page
■
Channels: Shows the channel list according to
channel type.
c 1 1futech
2 * 24ore.tv
15 abc1
3 BBC World
23 bid-up.tv
33 Boonerang
32 Cartoon Nwk
5 Class News
4 \ Coming Soon
27 Discovery
r
Tools
[UC9000]BN68-02820F-ZT.indb 16 2010-05-24 오후 5:24:35
Page 17

■
B
My Channels: Shows the group of the channel.
■
Scheduled: Shows all the currently reserved
programmes.
✎
Using the colour buttons with the Channel Manager
Red (Antenna): Toggle among Air or Cable.
x
Green (Zoom): Enlarges or shrinks a channel
x
number.
Yellow (Select): Select desired channels and press
x
the Yellow button to set all the selected channels at
the same time. The
the selected channels.
Blue (Sort): Change the list ordered by channel
x
name or channel number.
(Page): Move to next or previous page.
x
(Tools): Displays the Channel Manager option
x
menu. (The options menus may differ depending on
the situation.)
Channel Status Display Icons
Icons Operations
An analogue channel.
A channel selected.
A channel set as a Favourite.
A programme currently being broadcast.
A locked channel.
A reserved programme.
mark appears to the left of
Using Favourite Channels
My Channels
(in Channel Manager)
Shows all favourite channels.
■ Edit My Channels
channels to desired my channels group.
✎
The “” symbol will be displayed and the channel will
be set as a my channel.
1. Select a channel and press the TOOLS button.
2. Add or delete a channel in the my channel groups
you want among 1, 2, 3 and 4.
One or more groups can be selected.
x
3. After you have changed the settings, the channel list
for each group can be viewed in my channels.
Channels
Air Antenna B Zoom Select Sort Page
All
TV
Radio
Data/Other
Analogue
: You can set the selected
c 1 1futech
2 * 24ore.tv
Edit My Channels
15 abc1
Lock
3 BBC World
Timer Viewing
23 bid-up.tv
Timer Recording
33 Boonerang
Edit Channel Number
32 Cartoon Nwk
Delete
5 Class News
4 \ Coming Soon
27 Discovery
Tools
r
03 Basic Features
Guide Type (Samsung / Guide Plus+)
(depending on the country)
You can select a different type of Guide.
■ Samsung: Uses the guide programme by provided
samsung.
■ Guide Plus+: Uses the guide programme provided by
Rovi International Solutions. For more information, refer
to “www.europe.guideplus.com.”
Channel List
You can see all the channels searched.
CHLIST
English
17
[UC9000]BN68-02820F-ZT.indb 17 2010-05-24 오후 5:24:36
Page 18

Basic Features
Channel Menu
Retuning Channels
Antenna (Air / Cable)
Selects an appropriate type of antenna for digital broadcasts.
Country
The PIN input screen appears. Enter your 4 digit PIN number.
■ Digital Channel: Change the country for digital
channels.
■ Analogue Channel: Change the country for analogue
channels.
Auto Store
Scans for a channel automatically and stores in the TV.
✎
Automatically allocated programme numbers may not
correspond to actual or desired programme numbers. If
a channel is locked using the Child Lock function, the
PIN input window appears.
■ Antenna Source (Air / Cable)
antenna source to memorise.
■ Channel Source (Digital & Analogue / Digital /
Analogue): Select the channel source to memorise.
When selecting Cable → Digital & Analogue or Digital:
Provide a value to scan for cable channels.
Search Mode (Full / Network / Quick): Scans for all
channels with active broadcast stations and stores them
in the TV.
✎
If you select Quick, you can set up the Network,
Network ID, Frequency, Modulation and
Symbol Rate manually by pressing the button on
the remote control.
Network (Auto / Manual): Selects the Network ID
setting mode among Auto or Manual.
Network ID: When Network is Manual, you can set up
Network ID using the numeric buttons.
Frequency: Displays the frequency for the channel.
(differs in each country)
Modulation: Displays available modulation values.
Symbol Rate: Displays available symbol rates.
: Select the
Manual Store
Scans for a channel manually and stores in the TV.
✎
If a channel is locked using the Child Lock function,
the PIN input window appears.
■ Digital Channel: When scanning has finished, channels
are updated in the channel list.
✎
When selecting Antenna → Air: Channel,
Frequency, Bandwidth
When selecting Antenna → Cable: Frequency,
Modulation, Symbol Rate
■ Analogue Channel (Programme, Colour System,
Sound System, Channel, Search): If there is abnormal
sound or no sound, reselect the sound standard
required.
✎
Channel mode
P (programme mode): When tuning is complete,
x
the broadcasting stations in your area have been
assigned to position numbers from P0 to P99. You
can select a channel by entering the position number
in this mode.
C (aerial channel mode) / S (cable channel mode):
x
These two modes allow you to select a channel
by entering the assigned number for each aerial
broadcasting station or cable channel.
Editing Channels
Channel Manager Option Menu
(in Channel Manager)
1. Select a channel and press the TOOLS button.
2. Edit the channel name or number using the Edit
Channel Name or Edit Channel Number menu.
■ Edit Channel Name (analogue channels only): Assign
your own channel name.
■ Edit Channel Number (digital channels only): Edit the
number by pressing the number buttons desired.
Other Features
Cable Search Option
(depending on the country)
Sets additional search options such as the frequency and
symbol rate for a cable network search.
■ Freq.Start / Freq.Stop: Set the start or stop frequency
(differs in each country).
■ Symbol Rate: Displays available symbol rates.
■ Modulation: Displays available modulation values.
English
18
[UC9000]BN68-02820F-ZT.indb 18 2010-05-24 오후 5:24:36
Page 19

Channel Manager
Channel Manager Option Menu
Set each channel using the Channel Manager menu options
(Lock / Unlock, Timer Viewing, Timer Recording, Sort,
Delete, Select All / Deselect All). Option menu items may
differ depending on the channel status.
1. Select a channel and press the TOOLS button.
2. Select a function and change its settings.
■ Lock / Unlock: Lock a channel so that the channel
cannot be selected and viewed.
✎
NOTE
This function is available only when the Child Lock
x
is set to On.
The PIN input screen appears. Enter your 4-digit PIN,
x
the default of which is “0-0-0-0”. Change the PIN
using the Change PIN option.
■ Timer Viewing: You can set a desired channel to be
displayed automatically at the reserved time. Set the
current time first to use this function.
✎
When a digital channel is selected, press the ►
button to view the digital Programme.
■ Timer Recording (digital channels only): Allows you to
record a programme currently being broadcasted or
make a reservation to record a programme scheduled
for broadcast.
✎
A USB device with 4GB of memory or greater
must be connected to the TV.
✎
A USB storage device cannot record until it
completes the Device Performance Test.
✎
In case of USB-HDD, over 5400rpm
✎
In case of USB Stick, USB 2.0 and SLC Type.
(Minimum size of USB Stick is 2GB.)
✎
To record, press the (REC) button on the
remote. Press (REC) twice to set the recording
duration.
■ Sort (analogue channels only): This operation allows
you to change the programme numbers of the stored
channels. This operation may be necessary after using
the auto store.
■ Delete: You can delete a channel to display the channels
you want.
■ Select All / Deselect All: Select all the channels
or deselect all the selected channels in the channel
manager.
Channel List Transfer
The PIN input screen appears. Enter your 4 digit PIN number.
Imports or exports the channel map. You should connect a
USB storage to use this function.
■ Import from USB: Import channel list from USB.
■ Export to USB: Export channel list to USB. this function
is available when USB is connected.
Scheduled
(in Channel Manager)
You can view, modify or delete a show you have reserved to
watch.
■ Change Info: Change a show you have reserved to
watch.
■ Cancel Schedules: Cancel a show you have reserved
to watch.
■ Information: Display a show you have reserved
to watch. (You can also change the reservation
information.)
■ Select All / Deselect All: Select or deselect all reserved
programmes.
Fine Tune
(analogue channels only)
If the signal is weak or distorted, fine tune the channel
manually.
✎
Fine tuned channels are marked with an asterisk “*”.
✎
To reset the fine-tuning, select Reset.
Picture Menu
Changing the Preset Picture Mode
Mode
Select your preferred picture type.
■ Dynamic: Suitable for a bright room.
■ Standard: Suitable for a normal environment.
■ Natural: Suitable for reducing eye strain.
✎
Natural is not available in PC mode.
■ Movie: Suitable for watching movies in a dark room.
03 Basic Features
English
19
[UC9000]BN68-02820F-ZT.indb 19 2010-05-24 오후 5:24:38
Page 20
Basic Features
Adjusting Picture Settings
Backlight / Contrast / Brightness /
Sharpness / Colour / Tint (G/R)
Your television has several setting options for picture quality
control.
✎
NOTE
In analogue TV, Ext., AV modes of the PAL system,
x
the Tint (G/R) function is not available.
In PC mode, you can only make changes to
x
Backlight, Contrast and Brightness.
Settings can be adjusted and stored for each
x
external device connected to the TV.
Economical Solutions
Eco Solution
■ Energy Saving (Off / Low / Medium / High / Picture
Off / Auto)
TV in order to reduce power consumption. If you select
Picture Off, the screen is turned off, but the sound
remains on. Press any button except volume button to
turn on the screen.
■ Eco Sensor (Off / On): To enhance your power savings;
the picture settings will automatically adapt to the light
in the room.
Min Backlight: When Eco sensor is On, the minimum
screen brightness can be adjusted manually.
■ No-Signal Power Off (Off / 15 min / 30 min / 60 min):
To avoid unnecessary energy consumption, set how long
you want the TV to remain on if it’s not receiving a signal.
✎
If you adjust the Backlight, the Eco Sensor will
be set to Off.
✎
If Eco Sensor is On, the display brightness
may change (become slightly darker or brighter)
depending on the surrounding light intensity.
✎
Disabled when the PC is in power saving mode.
: This adjusts the brightness of the
Changing the Picture Options
Advanced Settings
(available in Standard / Movie mode)
You can adjust the detailed setting for the screen including
colour and contrast.
✎
In PC mode, you can only make changes to Dynamic
Contrast, Gamma, White Balance and LED Motion
Plus.
Advanced Settings
Black Tone : Off ►
Dynamic Contrast : Medium
Shadow Detail : -2
Gamma : 0
Expert Pattern : Off
RGB Only Mode : Off
Colour Space : Native
■ Black Tone (Off / Dark / Darker / Darkest): Select the
black level to adjust the screen depth.
■ Dynamic Contrast (Off / Low / Medium / High): Adjust
the screen contrast.
■ Shadow Detail (-2~+2): Increase the brightness of dark
images.
■ Gamma: Adjust the primary colour intensity.
■ Expert Pattern (Off / Pattern1 / Pattern2): By running
the Expert Pattern function, the picture can be
calibrated without a generator or filter. If the OSD menu
disappears or a menu other than the Picture menu is
opened, the calibration is saved and the Expert Pattern
window disappears.
✎
While the Expert Pattern is running, sound is not
outputted.
✎
Only enabled in DTV (except with a data service
channel), Component and HDMI modes.
■ RGB Only Mode (Off / Red / Green / Blue): You can
adjust Colour or Tint (G/R) of Red, Green or Blue for
the picture from an external device (DVD player, home
theatre, etc.).
■ Colour Space (Auto / Native / Custom): Adjust the
range of colours available to create the image. To adjust
Colour, Red, Green, Blue and Reset, set Colour
Space to Custom.
▼
Move
Enter
Return
English
20
[UC9000]BN68-02820F-ZT.indb 20 2010-05-24 오후 5:24:38
Page 21

■ White Balance: Adjust the colour temperature for a
more natural picture.
R-Offset / G-Offset / B-Offset: Adjust each colour’s
(red, green, blue) darkness.
R-Gain / G-Gain / B-Gain: Adjust each colour’s (red,
green, blue) brightness.
Reset: Resets the White Balance to it’s default settings.
■ 10p White Balance (Off / On): Controls the white
balance in 10 point interval by adjusting the red, green,
and blue brightness.
✎
Available when the picture mode is set to Movie
and when the external input is set to all input.
✎
Some external devices may not support this
function.
Interval: Select interval to adjust.
Red: Adjust the red level.
Green: Adjust the green level.
Blue: Adjust the blue level.
Reset: Resets the 10p White Balance to its default
settings.
■ Flesh Tone: Emphasize pink “Flesh Tone.”
■ Edge Enhancement (Off / On): Emphasize object
boundaries.
■ xvYCC (Off / On): Setting the xvYCC mode on
increases detail and colour space when watching movies
from an external device (e.g. DVD player) connected to
the HDMI or Component IN jacks.
✎
Available when the picture mode is set to Movie
and when the external input is set to HDMI or
Component.
✎
Some external devices may not support this
function.
■ LED Motion Plus (Off / On): Removes drag from fast
scenes with a lot of movement to provide a clear picture.
Picture Options
✎
In PC mode, you can only make changes to the Colour
Tone, Size and Auto Protection Time.
Picture Options
Colour Tone : Normal ►
Size : Auto Wide
Screen Mode : 16:9
Digital Noise Filter : Auto
MPEG Noise Filter : Auto
HDMI Black Level : Normal
Film Mode : Off
▼
Move
Enter
Return
■ Colour Tone (Cool / Normal / Warm1 / Warm2)
✎
Warm1 or Warm2 will be deactivated when the
picture mode is Dynamic.
✎
Settings can be adjusted and stored for each
external device connected to an input on the TV.
■ Size: Your cable box/satellite receiver may
have its own set of screen sizes as well.
However, we highly recommend you use
16:9 mode most of the time.
Auto Wide: Automatically adjusts the
picture size to the 16:9 aspect ratio.
16:9: Adjusts the picture size to 16:9 for
DVDs or wide broadcasting.
Wide Zoom: Magnifies the picture size
more than 4:3.
✎
Adjusts the Position by using ▲, ▼ buttons.
Zoom: Magnifies the 16:9 wide pictures vertically to fit
the screen size.
✎
Adjusts the Position or Size by using ▲, ▼
button.
4:3: The default setting for a movie or normal
broadcasting.
✎
Do not watch in 4:3 format for a long time. Traces
of borders displayed on the left, right and centre
of the screen may cause image retention(screen
burn) which are not covered by the warranty.
Screen Fit: Displays the full image without any cut-off
when HDMI (720p / 1080i / 1080p) or Component
(1080i / 1080p) signals are inputted.
✎
NOTE
Depending on the input source, the picture size
x
options may vary.
The available items may differ depending on the
x
selected mode.
In PC mode, only 16:9 and 4:3 modes can be
x
adjusted.
Settings can be adjusted and stored for each
x
external device connected to an input on the TV.
After selecting Screen Fit in HDMI (1080i / 1080p)
x
or Component (1080i / 1080p) mode: Adjusts the
Position or Size by using ▲, ▼, ◄, ► button.
If you use the Screen Fit function with HDMI 720p
x
input, 1 line will be cut at the top, bottom, left and
right as in the overscan function.
■ Screen Mode (16:9 / Wide Zoom / Zoom / 4:3):
Available only when picture size is set to Auto Wide. You
can determine the desired picture size at the 4:3 WSS
(Wide Screen Service) size or the original size. Each
European country requires different picture size.
✎
Not available in PC, Component or HDMI mode.
P.SIZE
03 Basic Features
English
21
[UC9000]BN68-02820F-ZT.indb 21 2010-05-24 오후 5:24:39
Page 22
Basic Features
■ Digital Noise Filter (Off / Low / Medium / High / Auto
/ Auto Visualisation): When the broadcast signal is
weak, some static and ghosting may appear. Select one
of the options until the best picture is displayed.
Auto Visualisation: When changing analogue channels,
displays the intensity of the current signal and defines
the screen noise filter.
✎
Only available for analogue channels.
■ MPEG Noise Filter (Off / Low / Medium / High /
Auto): Reduces MPEG noise to provide improved
picture quality.
■ HDMI Black Level (Normal / Low): Selects the black
level on the screen to adjust the screen depth.
✎
Available only in HDMI mode (RGB signals).
■ Film Mode (Off / Auto1 / Auto2): Sets the TV to
automatically sense and process film signals from all
sources and adjust the picture for optimum quality.
✎
Available in AV, COMPONENT (480i / 1080i) and
HDMI (480i / 1080i).
■ Motion Plus (Off / Clear / Standard / Smooth /
Custom / Demo): Removes drag from fast scenes with
a lot of movement to provide a clearer picture.
✎
If noise occurs on the screen, please set up the
Motion Plus to Off. If Motion Plus is Custom,
you can set up the Blur Reduction, Judder
Reduction or Reset manually.
✎
If Motion Plus is Demo, you can compare the
difference of on and off modes.
Blur Reduction: Adjusts the blur reduction level from
video sources.
Judder Reduction: Adjusts the judder reduction level
from video sources when playing films.
Reset: Reset the custom settings.
■ Auto Protection Time (2 hours / 4 hours / 8 hours
/ 10 hours / Off): If the screen remains idle with a still
image for a certain period of time defined by the user,
the screen saver is activated to prevent the formation of
ghost images on the screen
Viewing TV using the 3D function
IMPORTANT HEALTH AND SAFETY INFORMATION FOR
3D PICTURES.
Read and understand the following safety information
before using the TV’s 3D function.
WARNING
Some viewers may experience discomfort while
x
viewing 3D TV such as dizziness, nausea and
headaches. If you experience any such symptom,
stop viewing 3D TV, remove 3D Active Glasses and
rest.
Watching 3D images for an extended period of time
x
may cause eye strain. If you feel eye strain, stop
viewing 3D TV, remove your 3D Active Glasses and
rest.
A responsible adult should frequently check on
x
children who are using the 3D function. If there are
any reports of tired eyes, headaches, dizziness, or
nausea, have the child stop viewing 3D TV and rest.
Do not use the 3D Active Glasses for other purposes
x
(such as general eyeglasses, sunglasses, protective
goggles, etc.)
Do not use the 3D function or 3D Active Glasses
x
while walking or moving around. Using the 3D
function or 3D Active Glasses while moving around
may result in injuries due to running into objects,
tripping, and/or falling.
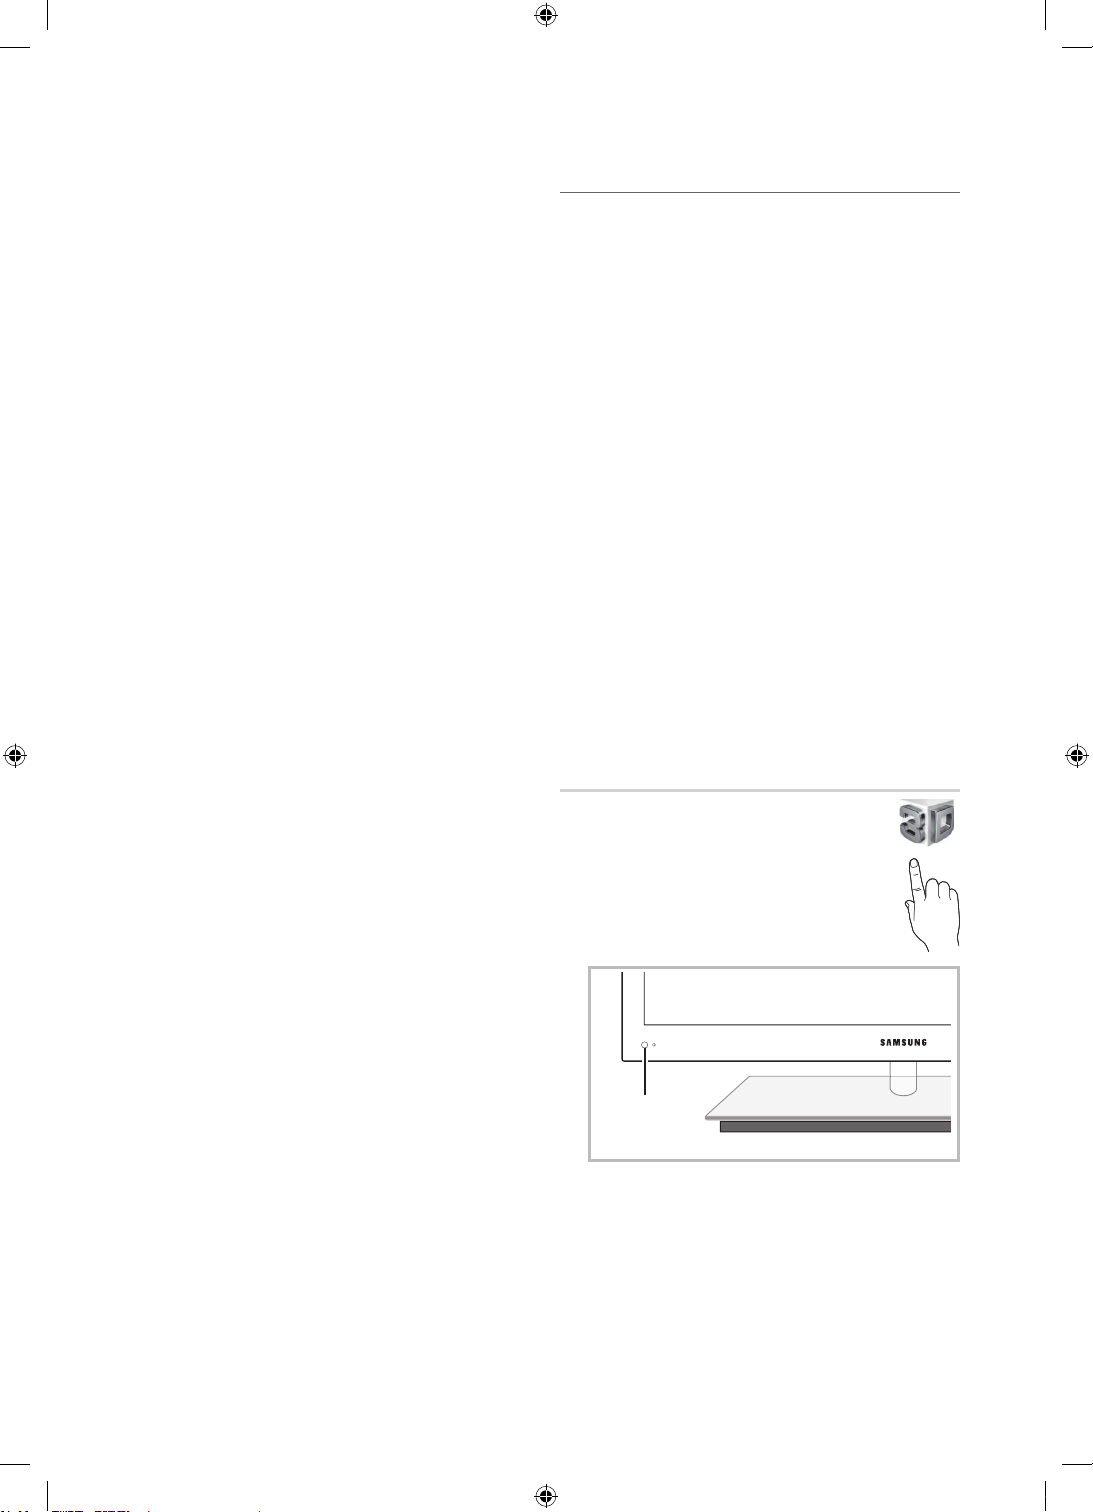
3D
This exciting new feature enables you to view
3D content. In order to fully enjoy this feature,
you must purchase a pair of Samsung 3D Active
Glasses (SSG-2100AB, SSG-2200AR, SSG2200KR) to view 3D video.
Samsung 3D Active Glasses are sold separately.
For more detailed purchasing information, contact
the retailer where you purchased this TV.
3D
3D emitter
✎
If there is any obstacle between the emitter and 3D
Active Glasses, the proper 3D effect may not be
obtained.
English
22
[UC9000]BN68-02820F-ZT.indb 22 2010-05-24 오후 5:24:40
Page 23
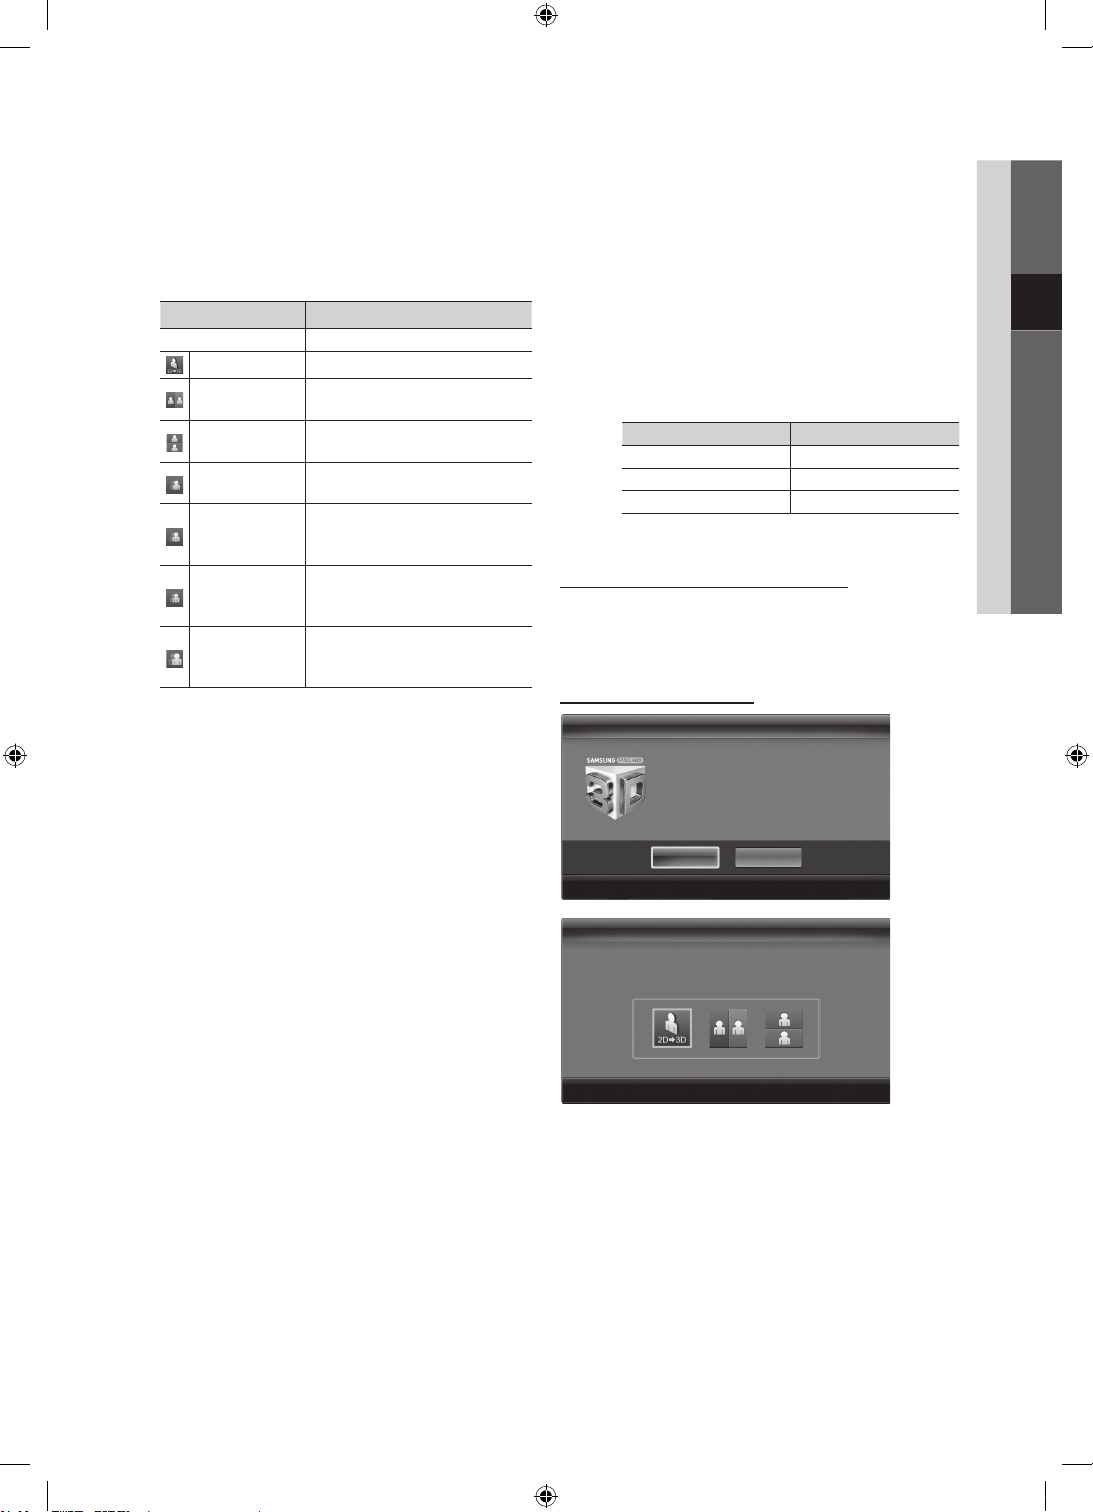
■ 3D Mode: Select the 3D input format.
✎
If you want to feel the 3D effect fully, please wear
the 3D Active Glasses first, and then select
3D Mode from the list as below.
✎
When watching 3D images, turn on 3D Active
Glasses
3D Mode Operation
Off Turns the 3D function off.
2D → 3D
Side by Side
Top & Bottom
Line by Line
Vertical Stripe
Checker
Board
Frequency
✎
“Side by Side” and “Top & Bottom” are available
when the resolution is 720p, 1080i and 1080p
in DTV, HDMI and USB mode or set to PC
connecting through HDMI/DVI cable.
✎
“Vertical Strip”, “Line by Line” and “Checker
Board” are available when the source is set to PC
connecting through HDMI/DVI cable.
✎
“Frequency” displays the frequency (60Hz only)
when the source is set to PC.
■ 3D → 2D (Off / On): Displays the image for the left eye only.
✎
This function is deactivated when 3D Mode set to
“2D → 3D” or Off.
■ 3D View Point: The overall adjustment of 3D
perspective.
✎
This function is deactivated when 3D Mode set to
“2D → 3D” or Off.
■ Depth: Adjusts focus / depth in “2D → 3D” mode.
✎
This function is only activated when the 3D Mode
is “2D → 3D”.
Changes a 2D image to 3D.
Displays two images next to
each other.
Displays one image above
another.
Displays the images for the left
and right eye alternately in rows.
Displays the images for the
left and right eye alternately in
columns.
Displays the images for the
left and right eye alternately in
pixels.
Displays the images for the
left and right eye alternately in
frames.
■ Picture Correction: Adjusts the images for the left and
right eye.
■ 3D Auto View (Off / On): If 3D Auto View is set to On,
a “Side by Side” format HDMI signal with one of the
resolutions below is automatically switched to 3D. Here,
correct 3D information must be sent from the Standard
HDMI 3D Format.
✎
If a 3D failure occurs due to a 3D information error,
set 3D Auto View to Off and manually select a
3D Mode using the 3D button or corresponding
menu.
✎
Support resolution (16:9 only)
Resolution Frequency (Hz)
1280 x 720p 50 / 60 Hz
1920 x 1080i 50 / 60 Hz
1920 x 1080p 24 / 30 / 50 / 60 Hz
■ 3D Optimisation: The overall adjustment of 3D effect.
Resolution supported for HDMI PC mode
The resolution for HDMI PC mode is optimized to
1920 x 1080 input.
An input resolution other than 1920 x 1080 may not be
displayed properly in 3D display or full screen mode.
How to watch the 3D image
3D
To watch in 3D, wear 3D glasses and
press the power button on the glasses.
Viewing 3D TV motion pictures for long
periods may cause eye fatigue and/
or dizziness.
OK
Cancel
Move
Enter
Exit
3D3D
Using the LEFT / RIGHT keys on the remote control,
Using the LEFT / RIGHT keys on the remote control,
select the icon suitable for the picture on screen.
select the icon suitable for the picture on screen.
Move
Enter
Move
Enter
Exit
Exit
03 Basic Features
English
23
[UC9000]BN68-02820F-ZT.indb 23 2010-05-24 오후 5:24:41
Page 24

Basic Features
1. Press the CONTENT button, then the Content View
menu will appear.
2. Press the ◄ or ► button, then select 3D.
To watch in 3D, wear 3D Active Glasses and press the
power button on the glasses.
3. Select OK, then press the ENTER
4. Using the ◄ or ► buttons on your remote control,
selects the 3D Mode of the image you want to view.
✎
Some 3D modes may not be available depending
on the format of the image source.
Supported formats and operating specifications for
Standard HDMI 3D
✎
The 3D formats indicated below are recommended by
the HDMI association and must be supported.
Source signal format Standard HDMI 1.4 3D
1920x1080p@24Hz x 2 1920x2205p@24Hz
1280x720p@60Hz x 2 1280x1470p@60Hz
1280x720p@50Hz x 2 1280x1470p@50Hz
The mode is automatically switched to 3D mode for the 3D
video input in one of the formats above.
For the Standard HDMI 3D format with 24Hz, the TV is
optimized as follows:
– Resolution First Display Mode: If Motion Plus is set
to Off, Clear or Standard, you can watch the video
at a high resolution optimized to the resolution of the
source video.
– Judder Reduction Display Mode: When
Motion Plus is set to Smooth or Custom, you can
watch a smooth picture without judder.
Before using 3D function...
✎
NOTE
You may notice a small amount of screen flickering
x
when watching 3D images in poor light conditions
(from a strobe light, etc.), or under a fluorescent lamp
(50Hz ~ 60Hz) or 3 wavelength lamp. If so, dim the
light or turn the lamp off.
3D mode is automatically disabled in following cases:
x
when changing a channel or the input source, or
accessing Media Play or Internet@TV.
Some Picture functions are disabled in 3D mode.
x
The Touch Control does not support 3D pictures.
x
Data broadcasts (MHEG / MHP) are not supported
x
in 3D mode.
button.
3D Active Glasses from other manufacturers may not
x
be supported.
When the TV is initially powered on, it may take some
x
time until the 3D display is optimized.
The 3D Active Glasses may not work properly if there
x
is any other 3D product or electronic devices turned
on near the glasses or TV. If there is a problem, keep
other electronic devices as far away as possible from
the 3D Active Glasses.
When watching pictures from a 50Hz 3D source with
x
its Game mode On, visually-sensitive viewers may
see some flicker on bright images.
Photos of Media Play are shown in “2D → 3D”
x
mode only.
If you lie on your side while watching TV with 3D
x
active glasses, the picture may look dark or may not
be visible.
Be sure to stay within the viewing angle and optimum
x
TV viewing distance when watching 3D pictures.
– Otherwise, you may not be able to enjoy proper 3D
effects.
The ideal viewing distance should be three times
x
or more the height of the screen. We recommend
sitting with viewer’s eyes on a level with the screen.
Picture Reset (OK / Cancel)
Resets your current picture mode to its default settings.
Setting up the TV with Your PC
Set the input source to PC.
Auto Adjustment
Adjust frequency values/positions and fine tune the settings
automatically.
✎
Not available when connecting with an HDMI/DVI cable.
English
24
[UC9000]BN68-02820F-ZT.indb 24 2010-05-24 오후 5:24:42
Page 25
Screen
■ Coarse / Fine: Removes or reduces picture noise. If the
noise is not removed by Fine-tuning alone, then adjust
the frequency as best as possible (Coarse) and Finetune again. After the noise has been reduced, readjust
the picture so that it is aligned to the centre of screen.
■ Position: Adjust the PC screen position with direction
button (▲ / ▼ / ◄ / ►).
■ Image Reset: Resets the image to default settings.
Using Your TV as a Computer (PC) Display
Setting Up Your PC Software (Based on Windows XP)
Depending on the version of Windows and the video card,
the actual screens on your PC may differ in which case the
same basic set-up information will almost always be applied.
(If not, contact your computer manufacturer or Samsung
Dealer.)
1. Click on “Control Panel” on the Windows start menu.
2. Click on “Appearance and Themes” in the “Control
Panel” window and a display dialog-box will appear.
3. Click on “Display” and a display dialog box will appear.
4. Navigate to the “Settings” tab on the display dialog-box.
y The correct size setting (resolution) [Optimum: 1920 X
1080 pixels]
y If a vertical-frequency option exists on your display
settings dialog box, the correct value is “60” or “60 Hz”.
Otherwise, just click “OK” and exit the dialog box.
Sound Menu
Changing the Preset Sound Mode
SRS TheaterSound
■ Standard: Selects the normal sound mode.
■ Music: Emphasizes music over voices.
■ Movie: Provides the best sound for movies.
■ Clear Voice: Emphasizes voices over other sounds.
■ Amplify: Increase the intensity of high-frequency sound
to allow a better listening experience for the hearing
impaired.
Adjusting Sound Settings
Equalizer
Adjusts the sound mode (standard sound mode only).
■ Balance L/R: Adjusts the balance between the right and
left speaker.
■ 100Hz / 300Hz / 1kHz / 3kHz / 10kHz (Bandwidth
Adjustment): Adjusts the level of specific bandwidth
frequencies.
■ Reset: Resets the equalizer to its default settings.
03 Basic Features
Sound Systems, Etc.
SRS TruSurround HD (Off / On)
(standard sound mode only)
This function provides a virtual 5.1 channel surround sound
experience through a pair of speakers using HRTF (Head
Related Transfer Function) technology.
SRS TruDialog (Off / On)
(standard sound mode only)
This function allows you to increase the intensity of a voice
over background music or sound effects so that dialog can
be heard more clearly.
English
25
[UC9000]BN68-02820F-ZT.indb 25 2010-05-24 오후 5:24:42
Page 26

Basic Features
Audio Language
(digital channels only)
Change the default value for audio languages.
✎
The available language may differ depending on the
broadcast.
Audio Format
(digital channels only)
When sound is emitted from both the main speaker and the
audio receiver, a sound echo may occur due to the decoding
speed difference between the main speaker and the audio
receiver. In this case, use the TV Speaker function.
✎
Audio Format option may differ depending on the
broadcast. 5.1ch Dolby digital sound is only available
when connecting an external speaker through an
optical cable.
Audio Description
(not available in all locations) (digital
channels only)
This function handles the Audio Stream
for the AD (Audio Description) which is
sent along with the Main audio from the
broadcaster.
■ Audio Description (Off / On): Turn the
audio description function on or off.
■ Volume: Adjust the audio description
volume.
AD
Auto Volume (Off / Normal / Night)
To equalize the volume level on each channel, set to Normal.
■ Night: This mode provides an improved sound
experience compared to Normal mode, making almost
no noise. It is useful at night.
Additional Setting
(digital channels only)
■ DTV Audio Level (MPEG / HE-AAC): This function
allows you to reduce the disparity of a voice signal
(which is one of the signals received during a digital TV
broadcast) to a desired level.
✎
According to the type of broadcast signal, MPEG
/ HE-AAC can be adjusted between -10dB and
0dB.
✎
To increase or decrease the volume, adjust
between the range 0 and -10 respectively.
■ SPDIF Output: SPDIF (Sony Philips Digital InterFace)
is used to provide digital sound, reducing interference
going to speakers and various digital devices such as a
DVD player.
Audio Format: During the reception of a digital TV
broadcast, you can select the Digital Audio output
(SPDIF) format from the options PCM or Dolby Digital.
Audio Delay: Correct audio-video sync problems, when
watching TV or video, and when listening to digital audio
output using an external device such as an AV receiver
(0ms ~ 250ms).
■ Dolby Digital Comp (Line / RF): This function minimizes
signal disparity between a dolby digital signal and a
voice signal (i.e. MPEG Audio, HE-AAC, ATV Sound).
✎
Select Line to obtain dynamic sound, and RF
to reduce the difference between loud and soft
sounds at night time.
Line: Set the output level for signals greater or less than
-31dB (reference) to either -20dB or -31dB.
RF: Set the output level for signals greater or less than
-20dB (reference) to either -10dB or -20dB.
Sound Reset (OK / Cancel)
Reset all sound settings to the factory defaults.
Speaker Select (External Speaker / TV
Speaker)
A sound echo may occur due to a difference in decoding
speed between the main speaker and the audio receiver. In
this case, set the TV to External Speaker.
✎
When Speaker Select is set to External Speaker, the
volume and MUTE buttons will not operate and the
sound settings will be limited.
✎
When Speaker Select is set to External Speaker.
TV Speaker: Off, External Speaker: On
x
✎
When Speaker Select is set to TV Speaker.
TV Speaker: On, External Speaker: On
x
✎
If there is no video signal, both speakers will be mute.
English
26
[UC9000]BN68-02820F-ZT.indb 26 2010-05-24 오후 5:24:43
Page 27

¦ Selecting the Sound Mode
t
¦ Using the Sleep Timer
03 Basic Features
When you set to f-g Dual, the current
sound mode is displayed on the screen.
I-II DUAL
Audio
Type
A2
Stereo
NICAM
Stereo
✎
If the stereo signal is weak and an automatic switching,
occurs, then switch to the mono.
✎
Only activated in stereo sound signal.
✎
Only available when the Input source is set to TV.
Mono Mono
Stereo
Dual
Mono Mono
Stereo
Dual
Dual 1/2 Default
Stereo ↔ Mono
Dual
f
↔ Dual
Mono ↔ Stereo
Mono ↔ Dual
Dual g
g
f
Automatic
change
Dual
Automatic
change
Dual
Setup Menu
¦ Setting the Time
Time
■ Clock: Setting the clock is for using various timer
features of the TV.
O
The current time will appear every time you press
the INFO button.
✎
If you disconnect the power cord, you have to set
the clock again.
Clock Mode (Auto / Manual)
✎
Depending on the broadcast station and signal,
the auto time set up may not be correct. In this
case, set the time manually.
✎
The antenna must be connected in order to set
the time automatically.
Clock Set: Set the Day, Month, Year, Hour and Minute
manually.
✎
Available only when Clock Mode is set to
Manual.
Time Zone (depending on the country): Select your time
zone.
✎
When Country is set to Others, you can use this
function.
✎
This function is only available when the Clock
Mode is set to Auto.
■ Sleep Timer
after a preset period of time. (30, 60, 90, 120, 150 and
180 minutes).
✎
t
To cancel Sleep Timer, select Off.
: Automatically shuts off the TV
¦ Setting the On / Off Timer
■ Timer 1 / Timer 2 / Timer 3: Three different on / off
timer settings can be made. You must set the clock first.
On Time
▲
Inactivate
▼
f
f
Off Time
Inactivate
Volume
10 TV ATV 1
Repeat
Once
On Time / Off Time: Set the hour, minute, and activate
/ inactivate. (To activate timer with the setting you’ve
chosen, set to Activate.)
Volume: Set the desired volume level.
Source: Select TV or USB content to be played when
the TV is turned on automatically. (USB can be selected
only when a USB device is connected to the TV)
Antenna (when the Source is set to TV): Select ATV or
DTV.
Channel (when the Source is set to TV): Select the
desired channel.
Contents (when the Source is set to USB): Select a
folder in the USB device containing music or photo files
to be played when the TV is turned on automatically.
✎
NOTE
If there is no music file on the USB device or the
x
folder containing a music file is not selected, the
Timer function does not operate correctly.
When there is only one photo file in the USB
x
device, the Slide Show will not play.
If a folder name is too long, the folder cannot be
x
selected.
Each USB you use is assigned its own folder.
x
When using more than one of the same type of
USB, make sure the folders assigned to each
USB have different names.
Timer 1
00 00
00 00
Source Antenna Channel
Sun Mon Tue Wed Thu Fri Sat
L
Move
U Adjust E
Enter
R
Return
English
27
1_BN68-02820F-Eng.indd 27 2010-05-25 오후 7:28:41
Page 28
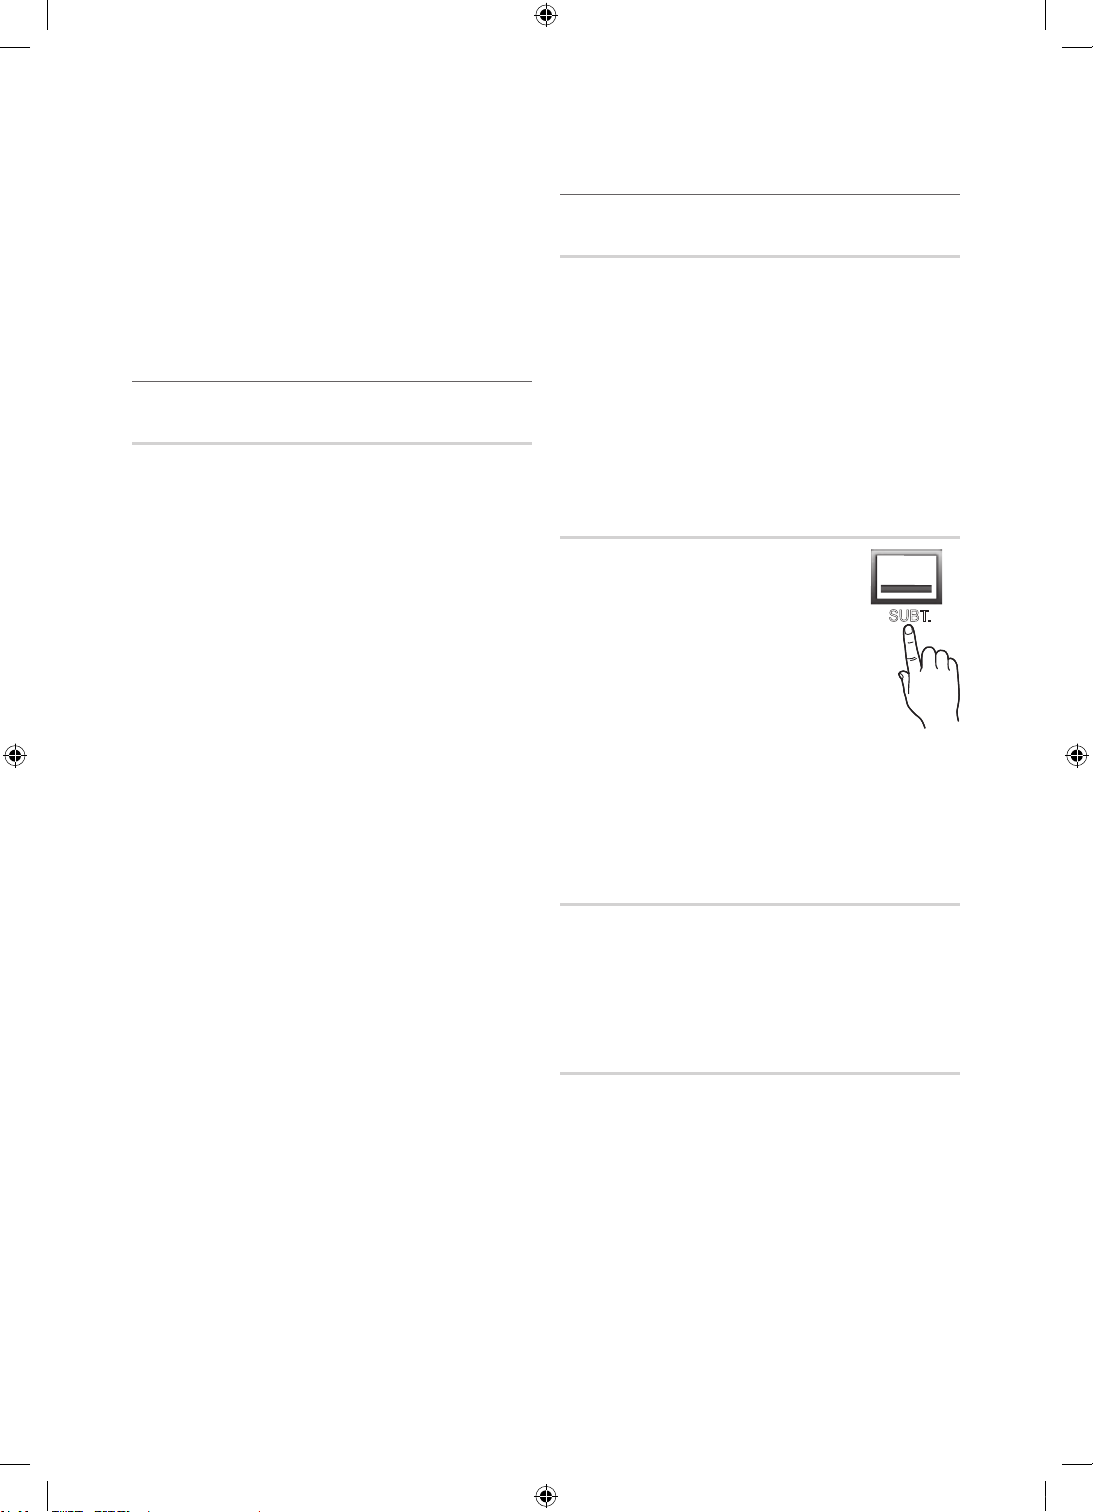
Basic Features
Repeat: Select Once, Everyday, Mon~Fri, Mon~Sat,
Sat~Sun or Manual to set at you convenience. If you
select Manual, you can set up the day you want to
activate the timer.
✎
The mark indicates the day is selected.
✎
Auto Power Off (available only when the TV is turned on
by Timer): The TV will be automatically turned off after 3
hours of being left idle to prevent overheating.
Locking Programme
Security
✎
The PIN input screen appears before the setup screen.
✎
Enter your 4-digit PIN, the default of which is “0-0-0-0”.
Change the PIN using the Change PIN option.
■ Child Lock (Off / On): Lock channels in Channel
Manager, to prevent unauthorized users, such as
children, from watching unsuitable programme.
✎
Available only when the Input source is set to TV.
■ Parental Lock (depending on the country): Prevent
unauthorized users, such as children, from watching
unsuitable programme with a user-defined 4-digit PIN
code. If the selected channel is locked, the “
will be displayed.
Allow All: Unlock all TV ratings.
■ Change PIN: Change your personal ID number required
to set up the TV.
✎
If you forget the PIN code, press the remote
control buttons in the following sequence, which
resets the PIN to “0-0-0-0”: POWER (off) →
MUTE → 8 → 2 → 4 → POWER (on).
” symbol
Other Features
Language
■ Menu Language: Set the menu language.
■ Teletext Language: Set a desired language for teletext.
✎
English is the default in cases where the selected
language is unavailable in the broadcast.
■ Preference (Primary Audio Language / Secondary
Audio Language / Primary Subtitle Language /
Secondary Subtitle Language / Primary Teletext
Language / Secondary Teletext Language): Select
a language, which will be the default language when a
channel is selected.
Subtitle
Use this menu to set the Subtitle mode.
■ Subtitle (Off / On): Switches subtitles
on or off.
■ Mode (Normal / Hearing Impaired):
Sets the subtitle mode.
■ Subtitle Language: Sets the subtitle
language.
✎
If the programme you are
watching does not support the
Hearing Impaired function, Normal automatically
activates even if the Hearing Impaired mode is
selected.
✎
English is the default in cases where the selected
language is unavailable in the broadcast.
SUBT.
Digital Text (Disable / Enable)
(UK only)
If the programme broadcasts with digital text, this feature is
enabled.
Network (Network Type / Network Setup
/ Network Test / SWL(Samsung Wireless
Link) / SWL connect)
For details on setting up options, refer to the “Network
Connection” instructions (p. 33).
English
28
[UC9000]BN68-02820F-ZT.indb 28 2010-05-24 오후 5:24:45
Page 29

General
■ Game Mode (Off / On): When connecting to a game
console such as PlayStation™ or Xbox™, you can enjoy
a more realistic gaming experience by selecting game
mode.
✎
NOTE
Precautions and limitations for game mode
x
– To disconnect the game console and connect
another external device, set Game Mode to Off in
the setup menu.
– If you display the TV menu in Game Mode, the
screen shakes slightly.
Game Mode is not available when the input source
x
is set to TV or PC.
After connecting the game console, set Game Mode
x
to On. Unfortunately, you may notice reduced picture
quality.
If Game Mode is On:
x
– Picture mode is set to Standard and Sound mode
is set to Movie.
– Equalizer is not available.
■ BD Wise (Off / On): Provides the optimal picture quality
for Samsung DVD, Blu-ray and Home Theatre products
which support BD Wise. When BD Wise is turned On,
the picture mode is automatically changed to the optimal
resolution.
✎
Available when connecting Samsung products
that support BD Wise through a HDMI cable.
■ Menu Transparency (Bright / Dark): Set the
Transparency of the menu.
■ Slide Key (Off / On ): You can choose to use the LED
touch pad, which is centered underneath the stand, or not.
■ Melody (Off / Low / Medium / High): Set so that a
melody plays when the TV is turned on or off.
✎
Melody is disabled when FastStart is On.
■ FastStart (Off / On): When the TV is powered on, the
screen will come on quickly with this feature.
Common Interface
■ CI Menu: This enables the user to select from the CAM-
provided menu. Select the CI Menu based on the menu
PC Card.
■ Application Info: View information on the CAM inserted
into the CI slot and on the “CI or CI+ CARD” which is
inserted into the CAM. You can install the CAM anytime
whether the TV is on or off.
1. Purchase a CI CAM module at your nearest dealer or by
phone.
2. Firmly insert the “CI or CI+ CARD” into the CAM in the
direction of the arrow.
3. Insert the CAM with the “CI or CI+ CARD” into the
common interface slot, in the direction of the arrow so
that it aligns parallel with the slot.
4. Check if you can see a picture on a scrambled signal
channel.
Wireless Remote Control
Turn wireless remote controls on or off or give permission to
wireless remote controls.
03 Basic Features
English
29
[UC9000]BN68-02820F-ZT.indb 29 2010-05-24 오후 5:24:45
Page 30

Basic Features
Using Data Service
(Italian only)
Allows the user to use information (text, still
images, graphics, documents, software, etc.)
transmitted via broadcast media.
✎
If you switch the channel while the
Data broadcast window is displayed,
the previous window may appear
temporarily.
D
Auto Run Data Service (On / Off)
Sets whether or not to automatically run data service. Auto
Run Data Service automatically runs data service without
user intervention.
✎
If any other secondary function is under way, Auto Run
Data Service may not work.
Using Data Service
If the channel you are currently watching provides data
service, you can enjoy a variety of data services by pressing
the D or red button.
✎
Provided Data Service information may vary
depending on broadcast.
✎
While using data service, changing the channel using the
numeric buttons may not be possible depending on the
service.
1. Press the D button. Select a desired service by pressing
the ▲/▼/◄/► and OK
✎
If Auto Run Data Service is On, the data service
will automatically run with loading banner. In this
case, the D button does not work.
2. Press the red button. The data service screen will be
displayed.
3. Move to a desired option by pressing the ▲/▼/◄/►
button on the data service screen and then press
OK
. The selected service will be started.
✎
If a Colour button of a certain function appears on
the screen, you can use the offered function by
pressing the corresponded button.
4. If you press EXIT button, data service will be closed.
buttons.
Main Data Service buttons and their functions
Button Operation
(Data
Service)
BACK
Colour Button
Symbol
TEXT
▲/▼/◄/►
OK
EXIT
Displays the Data Service list and
immediately starts Data Service.
Returns to the previous screen.
Perform functions corresponding to each
Colour button image displayed on the
screen during Data Service.
✎
Operations may differ depending on
the service provider.
Text can be inputted using the numbers
and letters printed on and above the
numeric keys on the remote control. If
you input the numeric keys on the remote
control one by one into the blank where
the cursor is located on the text input
screen, the corresponding lettering,
numbers or special characters will be
displayed.
e.g., If you press the number 3 key in
rapid succession, then the assigned
letters (D, E, and F) and the number 3 will
alternately appear in order of input.
Switches to teletext mode or Returns to
the previous screen.
✎
Operations may differ depending on
the service provider.
Moves the Data Service menu up,
down, left and right.
Runs a selected item.
Stops a running Data Service.
English
30
[UC9000]BN68-02820F-ZT.indb 30 2010-05-24 오후 5:24:47
Page 31
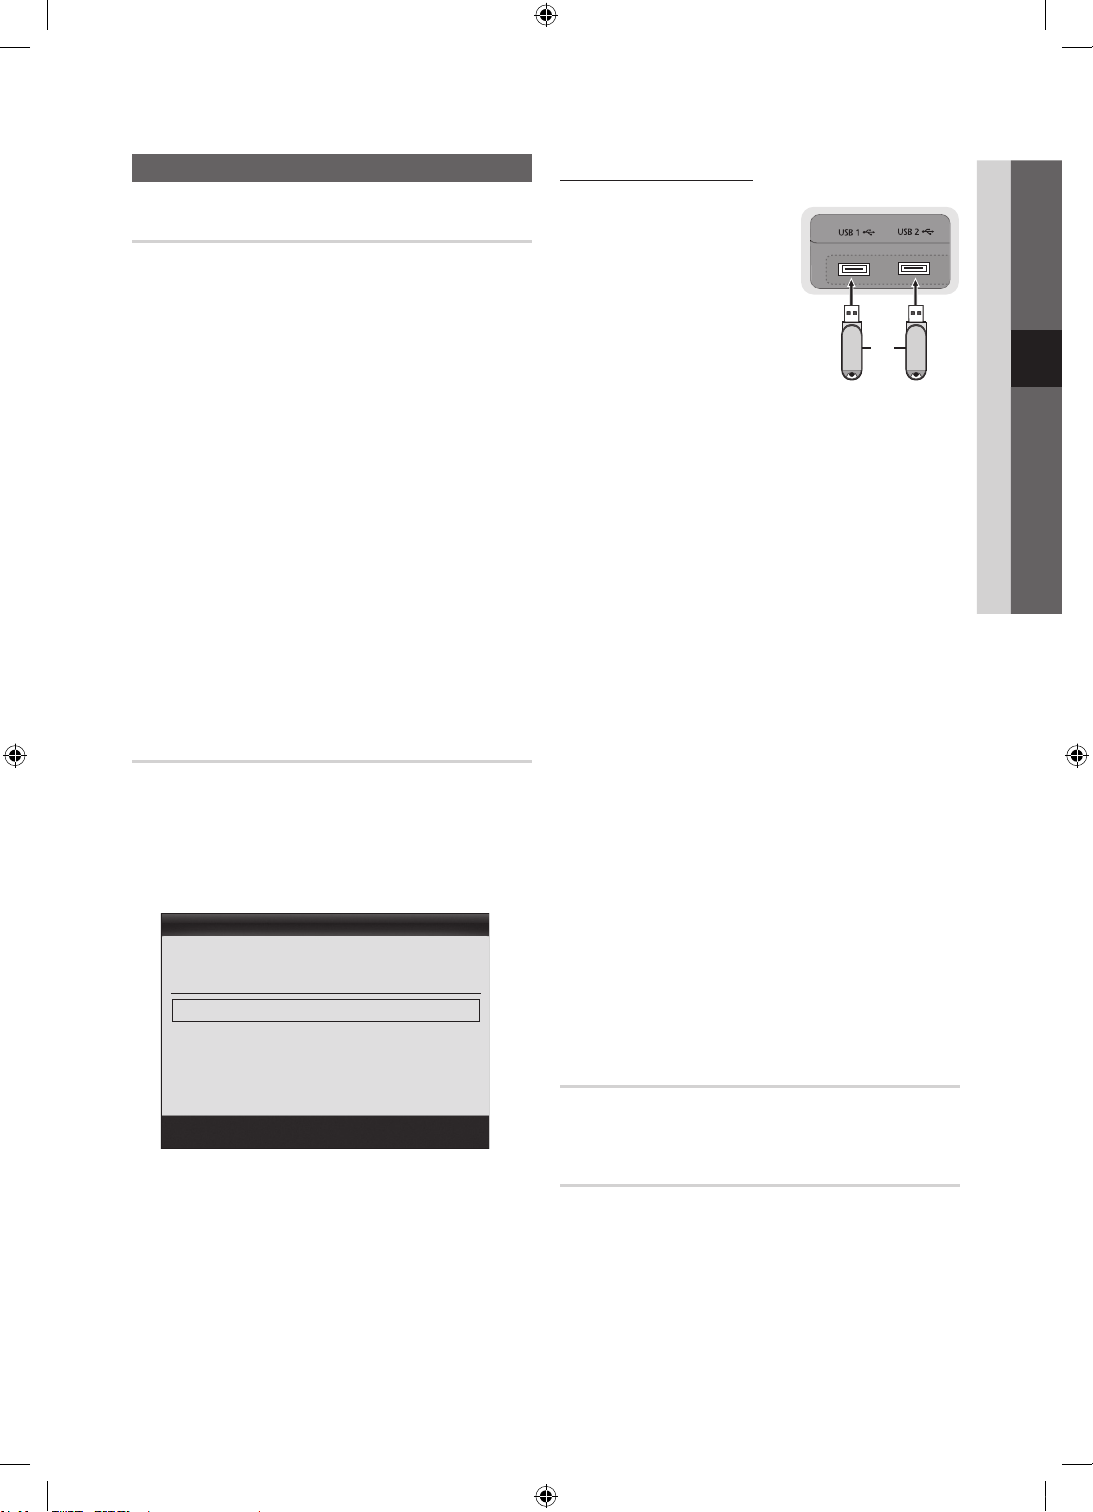
Support Menu
Self Diagnosis
✎
Self Diagnostic might take few seconds, this is part of
the normal operation of the TV.
■ Picture Test (Yes / No): Use to check for picture
problems.
■ Sound Test (Yes / No): Use the built-in melody sound to
check for sound problems.
✎
If you hear no sound from the TV’s speakers,
before performing the sound test, make sure
Speaker Select is set to TV Speaker in the
Sound menu.
✎
The melody will be heard during the test even if
Speaker Select is set to External Speaker or the
sound is muted by pressing the MUTE button.
■ Signal Information: (digital channels only) HDTV
channel’s reception quality is either perfect or the
channels are unavailable. Adjust your antenna to
increase signal strength.
■ Troubleshooting: If the TV seems to have a problem,
refer to this description.
✎
If none of these troubleshooting tips apply, contact
the Samsung customer service centre.
Software Upgrade
Software Upgrade can be performed via a broadcasting
signal or by network connection or downloading the latest
firmware from “www.samsung.com,” to a USB memory
device.
Current Version the software already installed in the TV.
✎
Software is represented as “Year/Month/Day_Version”.
Software Upgrade
Current Version 2010/01/18_000001
By USB ►
By Online
By Channel
Standby Mode Upgrade : Off
Alternative Software 2010/01/15_00000
Move
Enter
Return
Installing the Latest Version
■ By USB: Insert a USB drive
containing the firmware
upgrade file, downloaded
from “www.samsung.com,”
into the TV. Please be careful
not to disconnect the power
or remove the USB drive until
upgrades are complete. The
TV will be turned off and on
automatically after completing
the firmware upgrade. When
software is upgraded, video
and audio settings you have made will return to their
default settings. We advise you to to write down your
settings so that you can easily reset them after the
upgrade.
■ By Online: Upgrade the software using the Internet.
✎
First, configure your network. For detailed
procedures on using the Network Setup, refer to
the “Network Connection” instructions.
✎
If the internet connection doesn’t operate properly,
the connection may be broken. Please retry
downloading. If the problem persists, download by
USB and upgrade.
■ By Channel: Upgrade the software using the
broadcasting signal.
✎
If the function is selected during the software
transmission period, software will be automatically
searched and downloaded.
✎
The time required to download the software is
determined by the signal status.
■ Standby Mode Upgrade: A manual upgrade will be
automatically performed at selected time. Since the
power of the unit is turned on internally, the screen
may be turned on slightly for the LED product. This
phenomenon may continue for more than 1 hour until
the software upgrade is complete.
■ Alternative Software (backup): Displays the software
version downloaded through By Online. During the
software upgrading, When the Upgrade will discontinue
from last step, this function be activated.
Stand Side Panel
or
USB Drive
HD Connection Guide
Refer to this information when connecting external devices
to the TV.
04 Advanced Features
Contact Samsung
View this information when your TV does not work properly
or when you want to upgrade the software. You can find
information regarding our call centres, and how to download
products and software.
English
31
[UC9000]BN68-02820F-ZT.indb 31 2010-05-24 오후 5:24:48
Page 32
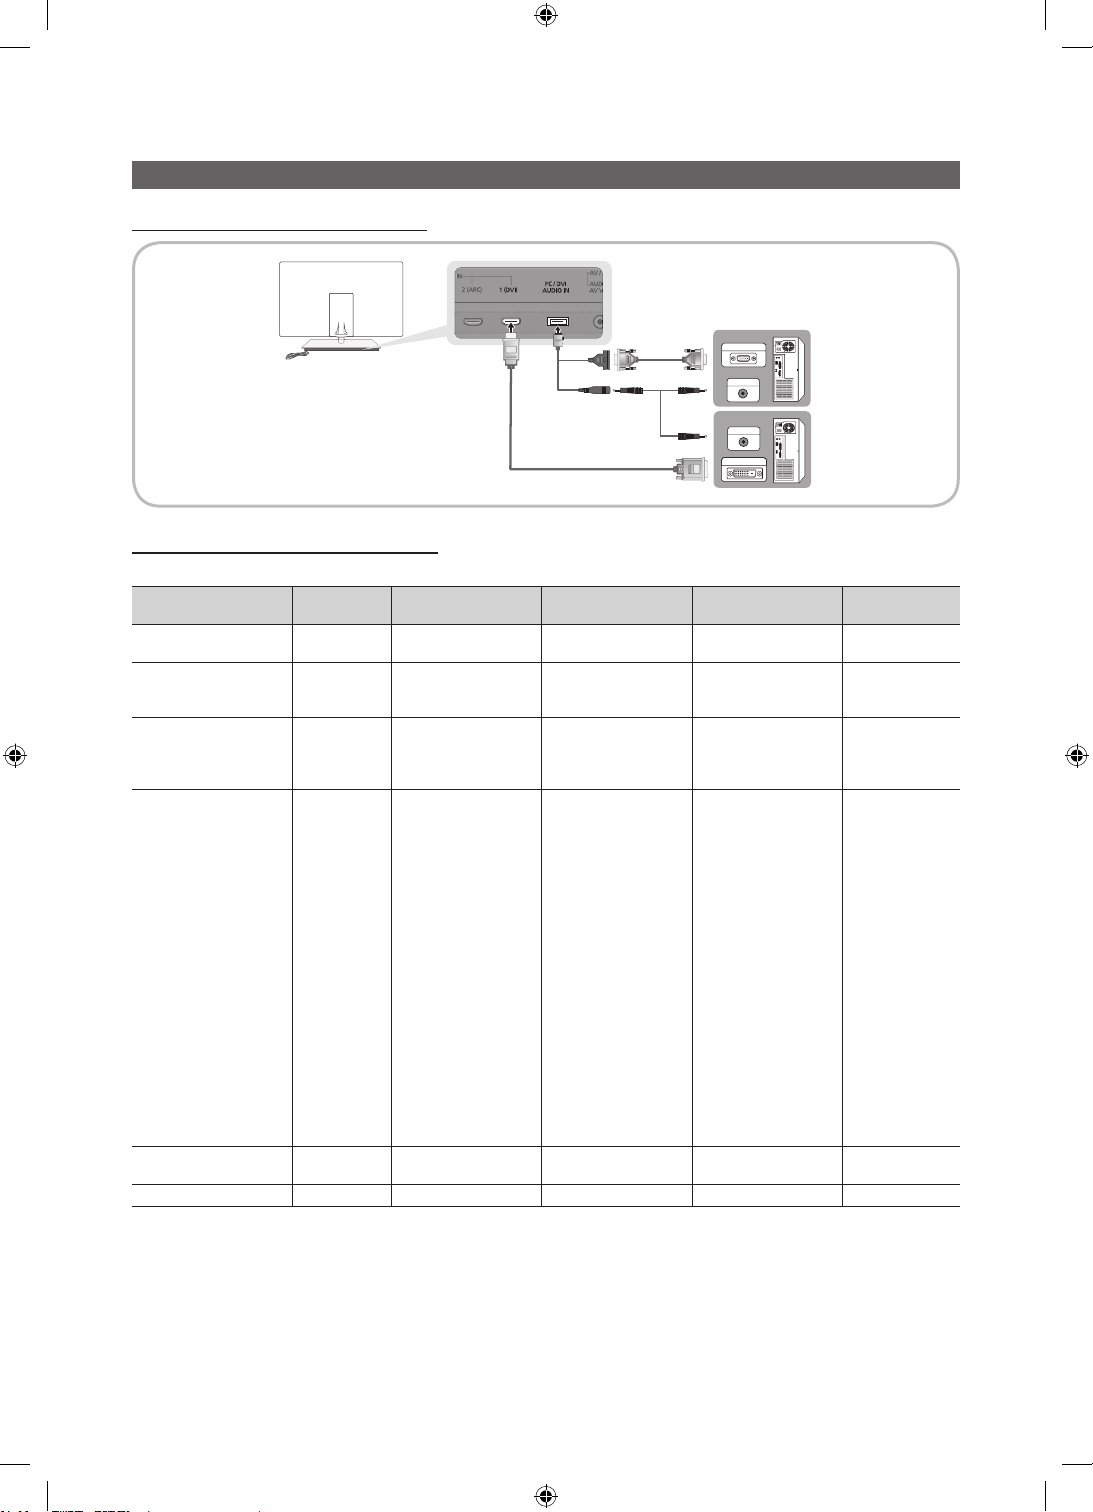
Advanced Features
Using an HDMI/DVI Cable / a D-sub Cable
Display Modes (D-Sub and HDMI/DVI Input)
Optimal resolution is 1920 X 1080 @ 60 Hz.
Mode Resolution
IBM
MAC
VESA CVT
VESA DMT
VESA GTF
VESA DMT / DTV CEA
640 x 350
720 x 400
640 x 480
832 x 624
1152 x 870
720 x 576
1152 x 864
1280 x 720
1280 x 960
640 x 480
640 x 480
640 x 480
800 x 600
800 x 600
800 x 600
1024 x 768
1024 x 768
1024 x 768
1152 x 864
1280 x 1024
1280 x 1024
1280 x 720
1280 x 800
1280 x 800
1280 x 960
1360 x 768
1440 x 900
1440 x 900
1600 x 1200
1680 x 1050
1280 x 720
1280 x 1024
1920 x 1080p 67.500 60.000 148.500 +/+
Horizontal Frequency
Connecting to a PC
Vertical Frequency
(KHz)
31.469
31.469
35.000
49.726
68.681
35.910
53.783
56.456
75.231
31.469
37.861
37.500
37.879
48.077
46.875
48.363
56.476
60.023
67.500
63.981
79.976
45.000
49.702
62.795
60.000
47.712
55.935
70.635
75.000
65.290
52.500
74.620
(Hz)
70.086
70.087
66.667
74.551
75.062
59.950
59.959
74.777
74.857
59.940
72.809
75.000
60.317
72.188
75.000
60.004
70.069
75.029
75.000
60.020
75.025
60.000
59.810
74.934
60.000
60.015
59.887
74.984
60.000
59.954
70.000
70.000
PC OUT
AUDIO OUT
AUDIO OUT
DVI OUT
Pixel Clock Frequency
(MHz)
25.175
28.322
30.240
57.284
100.000
32.750
81.750
95.750
130.000
25.175
31.500
31.500
40.000
50.000
49.500
65.000
75.000
78.750
108.000
108.000
135.000
74.250
83.500
106.500
108.000
85.500
106.500
136.750
162.000
146.250
89.040
128.943
Sync Polarity
(H / V)
+/-
-/+
-/-
-/-
-/-
-/+
-/+
-/+
-/+
-/-
-/-
-/+/+
+/+
+/+
-/-
-/+/+
+/+
+/+
+/+
+/+
-/+
-/+
+/+
+/+
-/+
-/+
+/+
-/+
-/+
-/-
✎
NOTE
For HDMI/DVI cable connection, you must use the HDMI IN 1(DVI) jack.
x
The interlace mode is not supported.
x
The set might operate abnormally if a non-standard video format is selected.
x
Separate and Composite modes are supported. SOG(Sync On Green) is not supported.
x
English
32
[UC9000]BN68-02820F-ZT.indb 32 2010-05-24 오후 5:24:51
Page 33
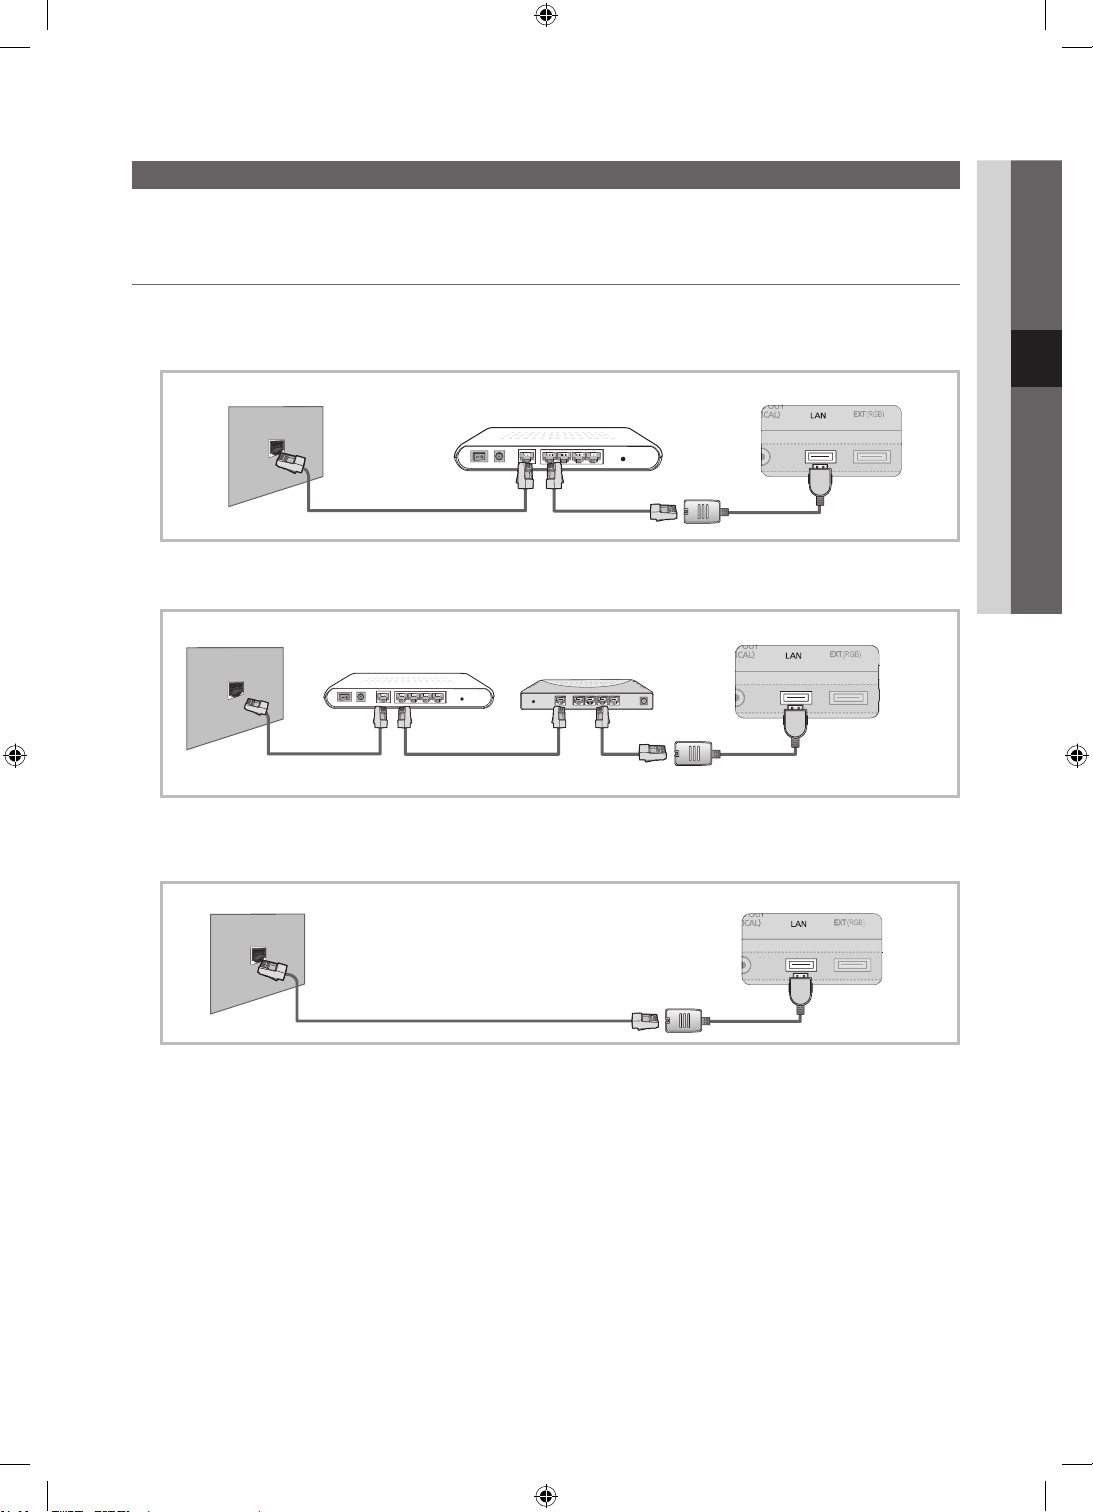
Network Connection
You can set up your TV so that it can access the Internet through your local area network (LAN) using a wired or wireless
connection.
Connecting to a Wired Network
You can attach your TV to your LAN using cable in three ways:
y You can attach your TV to your LAN by connecting the LAN port on the back of your TV to an external modem using a Cat
5 cable. See the diagram below.
04 Advanced Features
The Modem Port on the Wall
External Modem
(ADSL / VDSL / Cable TV)
LAN Cable LAN AdapterModem Cable
Stand Rear Panel
y You can attach your TV to your LAN by connecting the LAN port on the back of your TV to a IP Sharer which is connected
to an external modem. Use Cat 5 cable for the connection. See the diagram below.
The Modem Port on the Wall Stand Rear Panel
External Modem
(ADSL / VDSL / Cable TV)
LAN CableModem Cable
IP Sharer
(having DHCP server)
LAN Cable
LAN Adapter
y Depending on how your network is configured, you may be able to attach your TV to your LAN by connecting the LAN
port on the back of your TV directly to a network wall outlet using a Cat 5 cable. See the diagram below. Note that the wall
outlet is attached to a modem or router elsewhere in your house.
The LAN Port on the Wall
Stand Rear Panel
LAN Cable LAN Adapter
If you have a Dynamic Network, you should use an ADSL modem or router that supports Dynamic Host Configuration
Protocol (DHCP). Modems and routers that support DHCP automatically provide the IP address, subnet mask, gateway,
and DNS values your TV needs to access the Internet so you don’t have to enter them manually. Most home networks are
Dynamic Networks.
Some networks require a Static IP address. If your network requires a Static IP address, you must enter the IP address,
subnet mask, gateway, and DNS values manually on your TV’s Network Setup Screen when you set up the network
connection. To get the IP address, subnet mask, gateway, and DNS values, contact your Internet Service Provider (ISP). If
you have a Windows computer, you can also get these values through your computer.
✎
You can use ADSL modems that support DHCP if your network requires a Static IP address. ADSL modems that
support DHCP also let you use Static IP addresses.
English
33
[UC9000]BN68-02820F-ZT.indb 33 2010-05-24 오후 5:24:53
Page 34
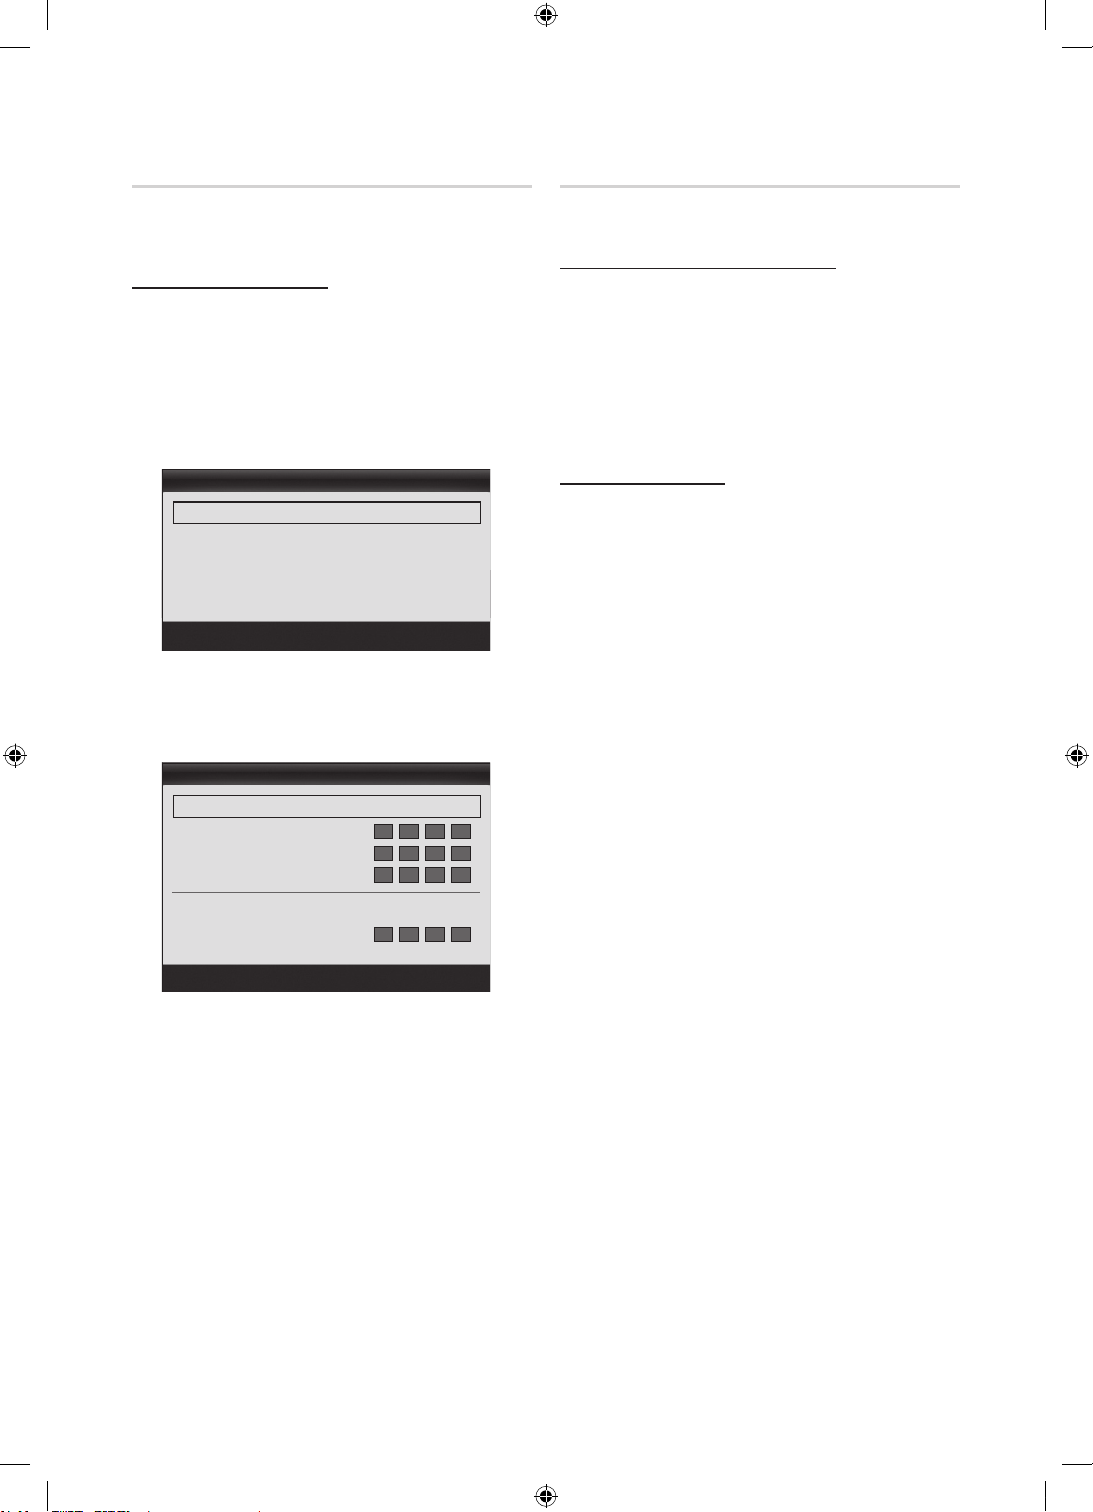
Advanced Features
Network Setup (Auto)
Use the Automatic Network Setup when connecting your
TV to a network that supports DHCP. To set up your TV’s
cable network connection automatically, follow these steps:
How to set up automatically
1. Connect your TV to your LAN as described in the
previous section.
2. Turn on your TV, press the MENU button on your
remote, use the ▲ or ▼ button to select Setup, and
then press the ENTER
3. Use the ▲ or ▼ button to select Network in the Setup
menu, and then press the ENTER
Network screen appears.
Network Type : Wired ►
Network Setup
Network Test
SWL(Samsung Wireless Link) : Off
SWL connect
4. On the Network screen, select Network Type.
5. Set Network Type to Wired.
6. Select Network Setup. The Network Setup screen
appears.
Internet Protocol Setup : Auto ►
IP Address :
Subnet Mask :
Gateway :
DNS : Auto
DNS Server :
button.
Network
Move
Network Setup
button. The
Enter
Return
Network Setup (Manual)
Use the Manual Network Setup when connecting your TV to
a network that requires a Static IP address.
Getting the Network Connection Values
To get the Network connection values on most Windows
computers, follow these steps:
1. Right click the Network icon on the bottom right of the
screen.
2. In the pop-up menu that appears, click Status.
3. On the dialog that appears, click the Support tab.
4. On the Support Tab, click the Details button. The
Network connection values are displayed.
How to set up manually
To set up your TV’s cable network connection manually,
follow these steps:
1. Follow Steps 1 through 6 in the “How to set up
automatically” procedure.
2. Set Internet Protocol Setup to Manual.
3. Press the ▼ button on your remote to go to the first
entry field.
4. Enter the IP Address, Subnet Mask, Gateway, and
DNS Server values. Use the number buttons on your
remote to enter numbers and the arrow buttons to move
from one entry field to another.
5. When done, press the RETURN button on your remote.
6. Select Network Test to check the Internet connectivity.
Move
Enter
Return
7. Set Internet Protocol Setup to Auto.
8. Auto acquires and enters the needed Internet values
automatically.
9. When done, press the RETURN button on your remote.
10. If the Network Function has not acquired the network
connection values, go to the directions for Manual.
English
34
[UC9000]BN68-02820F-ZT.indb 34 2010-05-24 오후 5:24:54
Page 35
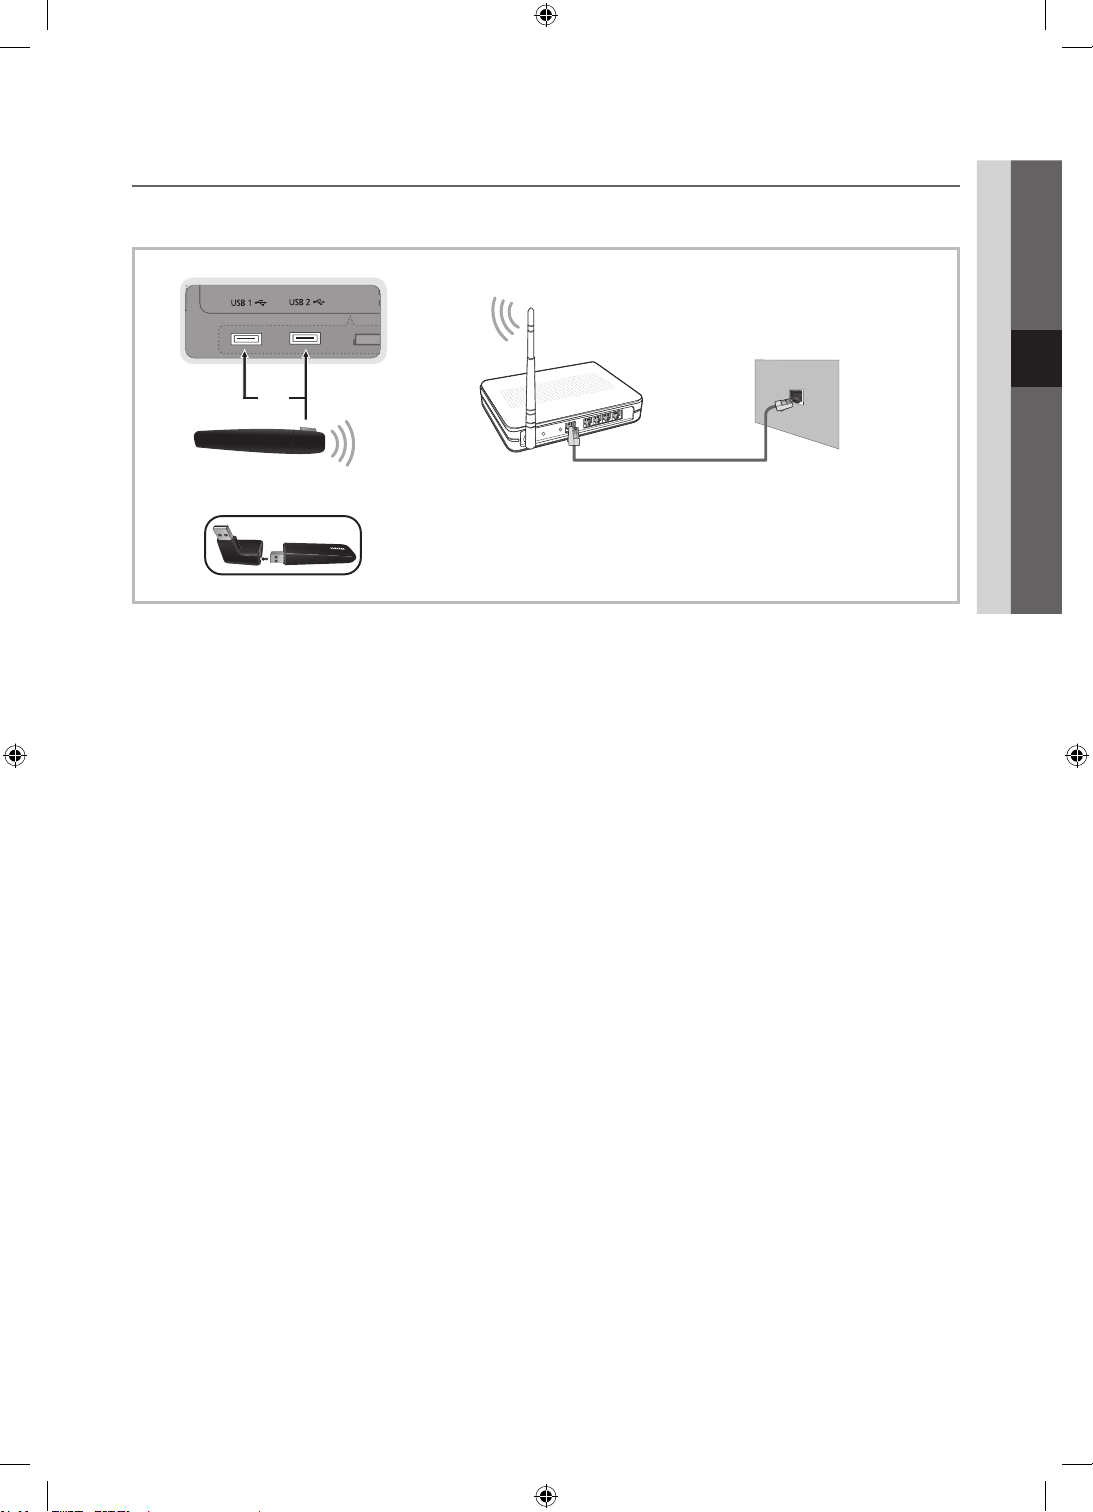
Connecting to a Wireless Network
To connect your TV to your network wirelessly, you need a wireless router or modem and a Samsung Wireless LAN Adapter
(WIS09ABGN2), which you connect to your TV’s back or side panel USB jack. See the illustration below.
Stand Side Panel
04 Advanced Features
Wireless IP sharer
(AP having DHCP server)
or
Samsung Wireless
LAN Adapter
✎
When the USB 2 port is connected to a Samsung Wireless LAN Adapter, you
may not be able to use USB 1 port. We recommend connecting a Samsung
Wireless LAN Adapter to the USB 1 port.
Samsung’s Wireless LAN adapter supports the IEEE 802.11A/B/G and N communication protocols. Samsung recommends
using IEEE 802.11N. When you play the video over a IEEE 802.11B/G connection, the video may not play smoothly.
✎
NOTE
You must use the “Samsung Wireless LAN Adapter” (WIS09ABGN2) to use a wireless network.
x
To use a wireless network, your TV must be connected to a wireless IP sharer. If the wireless IP sharer supports
x
DHCP, your TV can use a DHCP or static IP address to connect to the wireless network.
Select a channel for the wireless IP sharer that is not currently being used. If the channel set for the wireless IP sharer
x
is currently being used by another device nearby, this will result in interference and communication failure.
If you apply a security system other than the systems listed below, it will not work with the TV.
x
If Pure High-throughput (Greenfield) 802.11N mode is selected and the Encryption type is set to WEP, TKIP or TKIP-
x
AES (WPS2Mixed) for your AP, Samsung TVs will not support a connection in compliance with new Wi-Fi certification
specifications.
If your AP supports WPS (Wi-Fi Protected Setup), you can connect to the network via PBC (Push Button
x
Configuration) or PIN (Personal Identification Number). WPS will automatically configure the SSID and WPA key in
either mode.
If your router, modem, or device isn’t certified, it may not connect to the TV via the “Samsung Wireless LAN Adapter.”
x
Connection Methods: You can setup the wireless network connection six ways.
x
– Samsung Auto Configuration
– PBC (WPS)
– Auto Setup (Using the Auto Network Search function)
– Manual Setup
– SWL(Samsung Wireless Link)
– Ad-Hoc
The Samsung Wireless LAN Adapter may not be recognized or work properly when connecting via a USB hub or via
x
a USB extension cable other than the one available from Samsung.
LAN Cable
The LAN Port on
the Wall
English
35
[UC9000]BN68-02820F-ZT.indb 35 2010-05-24 오후 5:24:56
Page 36
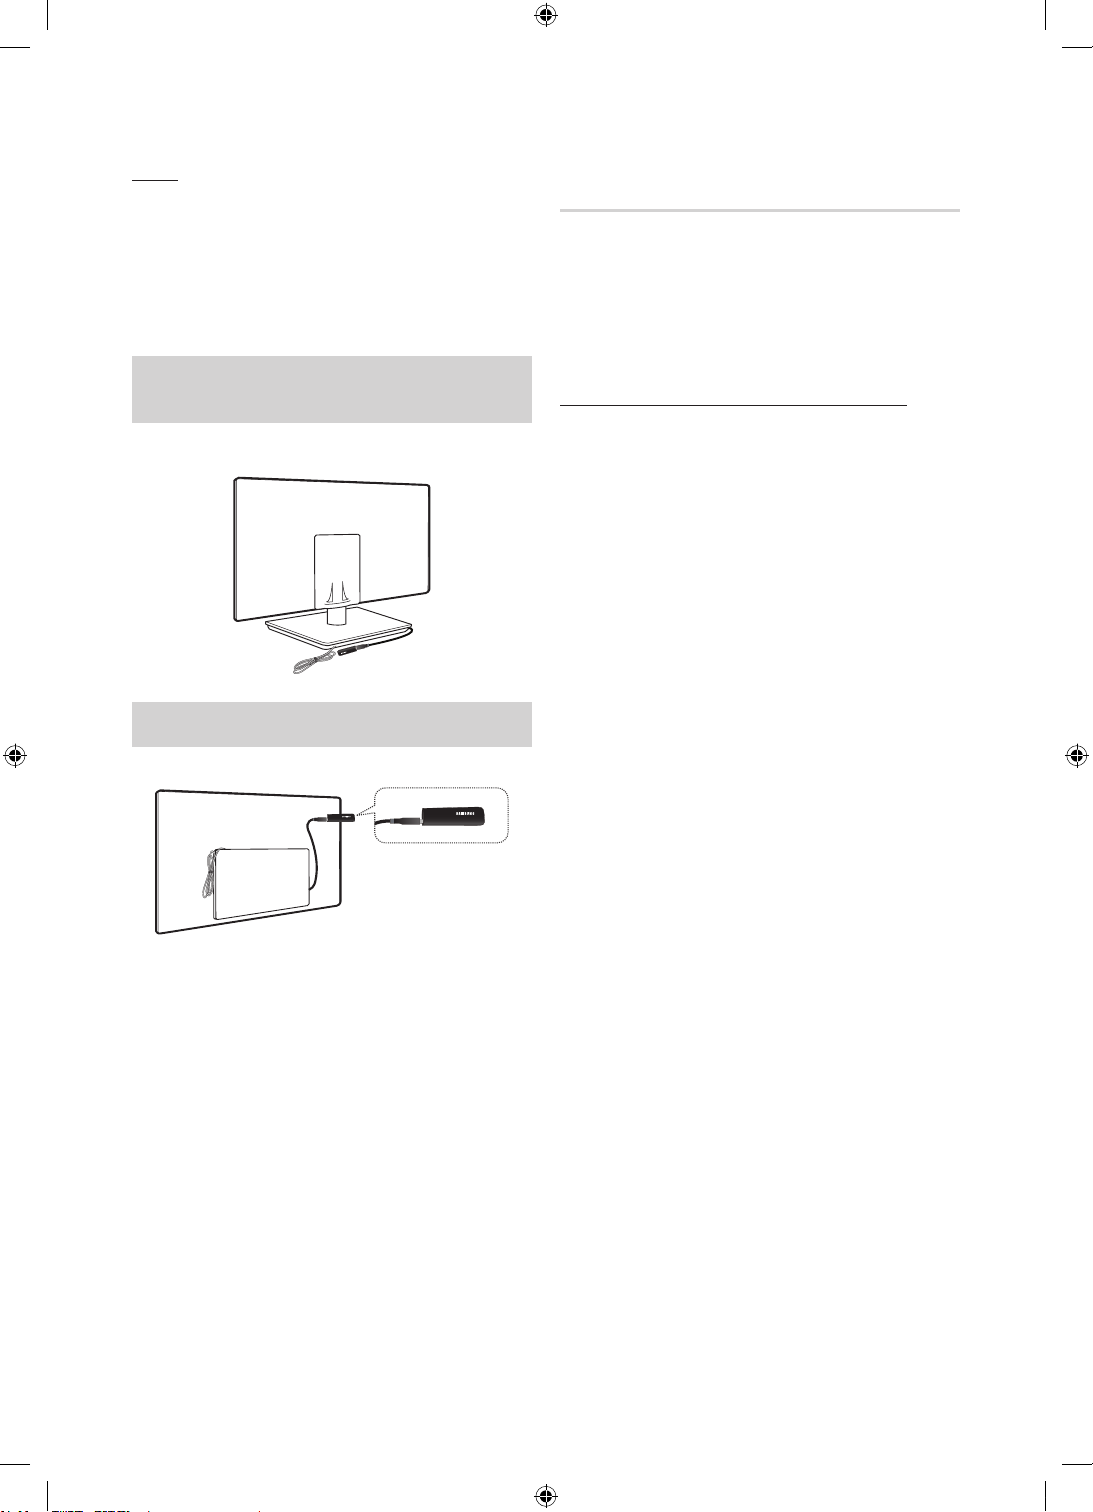
Advanced Features
Notice
The picture may appear corrupted or have static for some
channels when the TV is connected to the Samsung Wireless
LAN Adapter. In such a case, connect the Samsung Wireless
LAN Adapter using a USB cable in a place that is not
affected by radio interference.
✎
The Samsung Wireless LAN Adapter should be
installed in an interference-free area in order to avoid
interference between the adapter and tuner.
Method 1
UE46C9000SP, UE55C9000SP
UE46C9000ZP, UE55C9000ZP
✎
Components: Extension Cable, Velcro
Method 2
UE46C9000ZP, UE55C9000ZP
✎
Components: Extension Cable, Velcro
Network Setup (Samsung Auto
Configuration)
This function is available in APs (Access Points) that support
Samsung Auto Configuration. If your AP does not, you can
connect through PBC (WPS), auto, or manually.
✎
This function is available when SWL(Samsung
Wireless Link) is set to Off.
✎
You can check for equipment that supports Samsung
Auto Configuration on www.samsung.com.
How to set up using Samsung Auto Configuration
1. Place the AP and TV next to each other and turn them
on.
✎
Because the booting times of applications differ,
you may have to wait for approximately 2 minutes.
✎
If the LAN cable connected the WAN port of AP
during Samsung Auto Configuration, you are able
to complete until internet connection test. If you
do not connect, Samsung Auto Configuration will
check only device connecting of AP (Not check
internet).
2. After 2 minutes, connect the Samsung Wireless LAN
Adapter to the TV. When the Samsung Wireless LAN
Adapter is established, the pop-up window appears.
3. As soon as a connection is established, place the AP in
parallel with the Samsung Wireless LAN Adapter giving a
gap no larger than 25cm.
4. Wait until the connection is automatically established.
✎
If Samsung Auto Configuration does not connect
your TV to your AP, a pop-up window appears
on the screen notifying you of the failure. Reset
the AP, and then try again. If the connection fails
again, choose one of the other connection setup
methods, PBC (WPS), auto, or manual.
5. After the connection is established, locate the sharer at
the desired location.
✎
If the AP settings have been changed or it is the
first time you use the new AP after purchase, you
need to set up again beginning from Step 1.
English
36
[UC9000]BN68-02820F-ZT.indb 36 2010-05-24 오후 5:24:57
Page 37
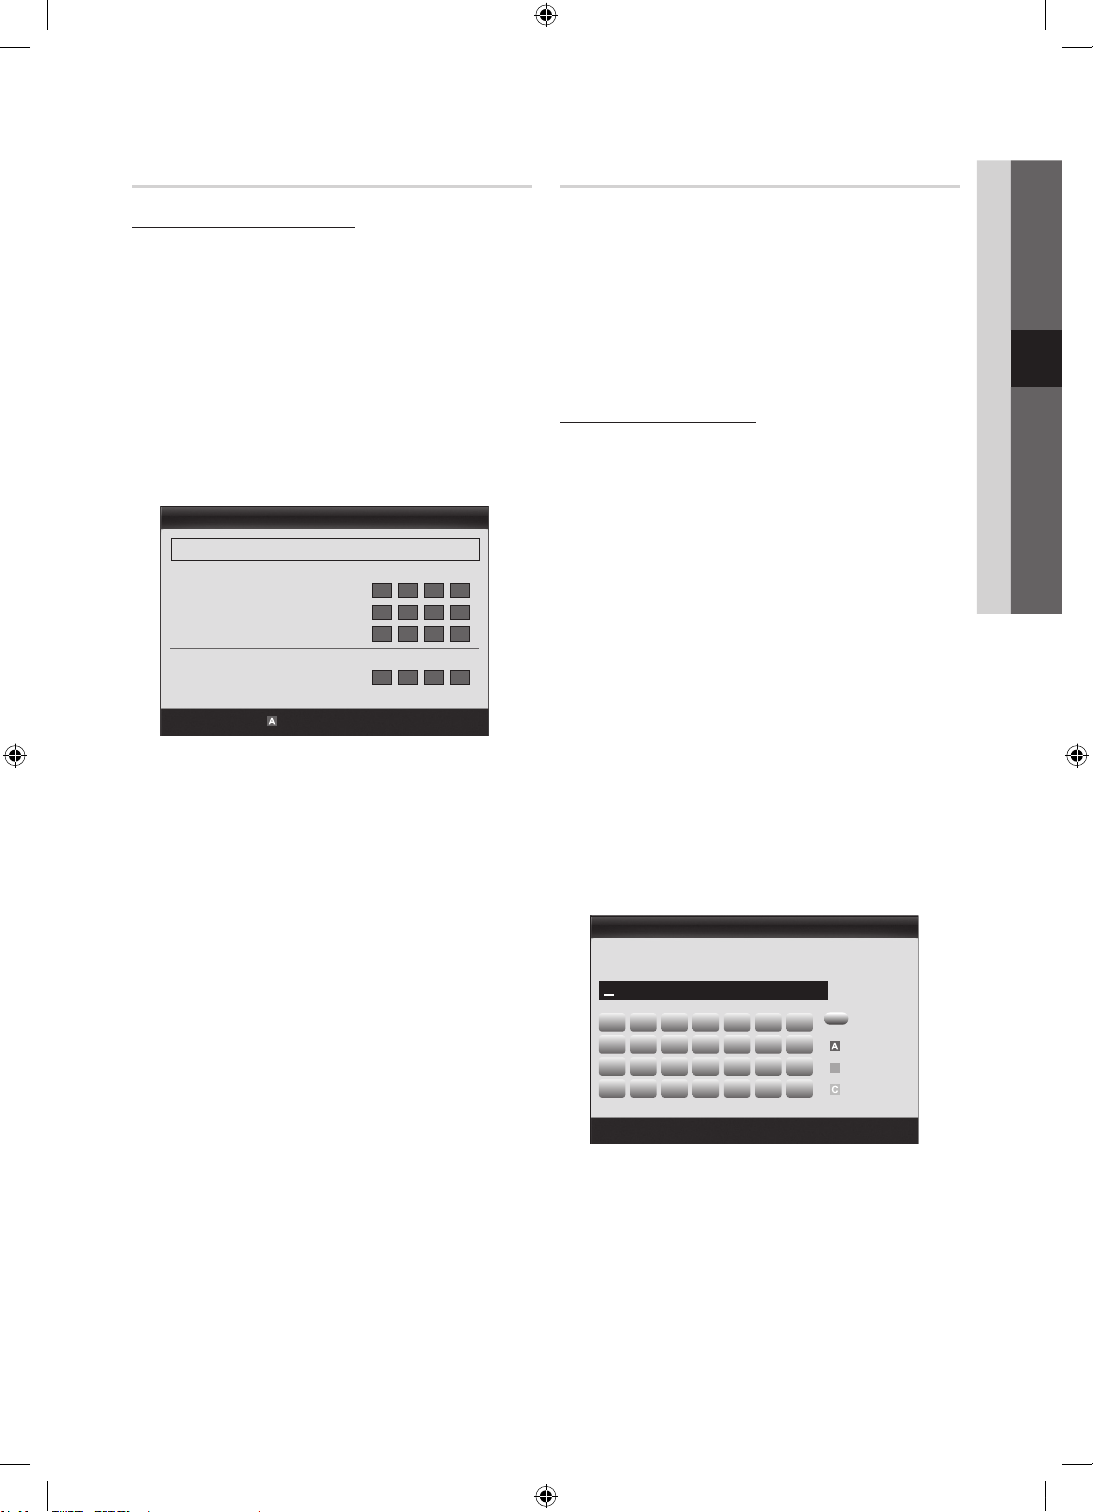
Network Setup (PBC (WPS))
B
How to set up using PBC (WPS)
If your router has a PBC (WPS) button, follow these steps:
1. Connect your TV to Samsung Wireless LAN Adapter as
described in the previous section.
2. Turn on your TV, press the MENU button on your
remote, use the ▲ or ▼ button to select Setup, and
then press the ENTER
3. Use the ▲ or ▼ button to select Network in the Setup
menu, and then press the ENTER
4. On the Network screen, select Network Type.
5. Set Network Type to Wireless.
6. Select Network Setup. The Network Setup screen
appears.
Select a Network : Not Selected ►
Internet Protocol Setup : Auto
IP Address :
Subnet Mask :
Gateway :
DNS : Auto
DNS Server :
7. Press the Red button on your remote.
8. Press the PBC (WPS) button on your router within 2
minutes. Your TV player automatically acquires all the
network setting values it needs and connects to your
network.
9. After the network connection is set up, press the
RETURN button to exit the Network Setup screen.
button.
Network Setup
PBC(WPS)
Move
button.
Enter
Return
Network Setup (Auto)
Most wireless networks have an optional security system
that requires devices that access the network to transmit
an encrypted security code called an Access or Security
Key. The Security Key is based on a Pass Phrase, typically
a word or a series of letters and numbers of a specified
length you were asked to enter when you set up security for
your wireless network. If you use this method of setting up
the network connection, and have a Security Key for your
wireless network, you will have to enter the Pass Phrase
during the setup process.
How to set up automatically
To set up the wireless connection automatically, follow these
steps:
1. Follow Steps 1 through 6 in the “How to set up using
PBC (WPS)” procedure.
2. Press the ▼ button to select Internet Protocol Setup,
and then press the ENTER
▼ button to select Auto, and then press the ENTER
button.
3. Press the ▲ button to go to Select a Network, and
then press the ENTER
searches for available wireless networks. When done, it
displays a list of the available networks.
4. In the list of networks, press the ▲ or ▼ button to select
a network, and then press the ENTER
✎
If the AP is set to Hidden (Invisible), you have
to select Add Network and enter the correct
Network Name (SSID) and Security Key to
establish the connection.
5. If the Security/PIN pop-up appears, go to Step 6. If the
Network Connecting Screen appears, go to Step 10.
6. Press the ▲ or ▼ button to select Security or PIN. For
most home networks, you would select Security (for
Security Key). The Security Screen appears.
Network Setup
Security Key
A B C D E F G
H I J K L M N
O P Q R S T U
V W X Y Z
button. Press the ▲ or
button. The Network function
button.
0 entered
0~9
Number
Lower case
Delete
Space
04 Advanced Features
Move
Enter
Return
English
37
[UC9000]BN68-02820F-ZT.indb 37 2010-05-24 오후 5:24:57
Page 38

Advanced Features
7. On the Security screen, enter your network’s Pass
Phrase.
✎
You should be able to find the Pass Phrase on
one of the set up screens you used to set up your
router or modem.
8. To enter the Pass Phrase, follow these general
directions:
– Press the number buttons on your remote to enter
numbers.
– Use the direction buttons on your remote to move
from button to button on the Security Key screen.
– Press the Red button to change case or display
symbols/characters.
– To a enter letter or symbol, move to the letter or
symbol, and then press the ENTER
– To delete the last letter or number you entered, press
the Green button on your remote.
– To input a blank space, press the Yellow button on
your remote.
9. When done, press the Blue button on your remote. The
Network Connecting screen appears.
10. Wait until the connection confirmation message is
displayed, and then press the ENTER
Network Setup screen re-appears.
11. To test the connection, press the RETURN button to
select Network Test, and then press the ENTER
button.
button.
button. The
How to connect an existing Ad-hoc device
1. Follow Steps 1 through 6 in the “How to set up using
PBC (WPS)” (p. 37).
2. Choose Select a Network. The Device/Network list
appears.
3. Select the device you want in the Device list.
4. If security key is required, input the security key.
✎
If network doesn’t operate normally, check
the Network Name (SSID) and Security Key
again. An incorrect Security Key may cause a
malfunction.
Network Setup (Manual)
If the other methods do not work, you need to enter the
Network setting values manually.
Getting the Network Connection Values
To get the Network connection values on most Windows
computers, follow these steps:
1. Right click the Network icon on the bottom right of the
screen.
2. In the pop-up menu, click Status.
3. On the dialog that appears, click the Support tab.
4. On the Support tab, click the Details button. The
Network settings are displayed.
Network Setup (Ad-Hoc)
You can connect to a mobile device without an access point
through the “Samsung Wireless LAN Adapter” by using a
peer to peer network.
✎
This function is available when SWL(Samsung
Wireless Link) is set to Off.
How to connect to new Ad-hoc device
1. Follow Steps 1 through 6 in the “How to set up using
PBC (WPS)” (p. 37).
2. Choose Select a Network. A list of devices/networks
appears.
3. While in the device list, press the Blue button on the
remote.
✎
The message Ad-hoc is a direct Wi-Fi
connection with cell phone or PC. The existing
network system may have limited functionality.
Do you want to change the network
connection? is displayed.
4. Input the generated Network Name (SSID) and
Security Key into the device you want to connect.
English
38
[UC9000]BN68-02820F-ZT.indb 38 2010-05-24 오후 5:24:58
Page 39

How to set up manually
To enter the Network connection values manually, follow
these steps:
1. Follow Steps 1 through 6 in the “How to set up using
PBC (WPS)” (p. 37).
2. Press the ▼ button to select Internet Protocol Setup,
and then press the ENTER
or ▼ button to select Manual, and then press the
ENTER button.
3. Press the ▼ button to go to the first entry field (IP
Address).
4. Use the number buttons to enter numbers.
5. When done with each field, use the ► button to move
successively to the next field. You can also use the other
arrow buttons to move up, down, and back.
6. Enter the IP Address, Subnet Mask, and Gateway
values.
7. Press the ▲ or ▼ button to go to DNS.
8. Press the ▼ button to go to the first DNS entry field.
Enter the numbers as above.
9. When done, press the ▲ button to go to Select a
Network. Select your network, and then press the
ENTER
button.
10. Go to Step 4 in the “How to set up automatically” (p.
33), and follow the directions from that point on.
button. Press the ▲
SWL connect
You can directly connect a device that supports the PBC
(WPS) to the TV.
✎
This function is available when SWL(Samsung
Wireless Link) is set to On.
How to connect Samsung Wireless Link
For the procedures to establish a connection, refer to the
following:
1. Follow Steps 1 through 5 in the “How to set up using
PBC (WPS)” (p. 37).
2. Select SWL(Samsung Wireless Link) by using the ▼
button and press the ENTER
3. Select SWL connect by using the ▼ button and press
the ENTER
4. If the “Press the PBC button on the PBC(WPS)
supported device to connect within 120 seconds.”
message appears, press the PBC button on the device
to connect.
5. If the device is connected properly to the TV after
starting count on message box then message box will
be disappeared automatically.
button.
✎
For more information, refer to the wireless network
setup manual of the device to be connected.
✎
If the connection fails, please retry after 2 minutes.
button to turn it On.
04 Advanced Features
SWL(Samsung Wireless Link)
This function lets you connect a Samsung device that
supports the PBC (WPS) to your TV. You can connect
devices to the TV even if a sharer is not connected to the TV.
✎
To use the Internet@TV, the AP (access point) must be
connected to the wireless network.
✎
Only sharers using the 2.4 Ghz band are supported.
Sharers using the 5 Ghz band are not supported.
If Your TV Fails to Connect to the Internet
Your TV may not be able to connect to the Internet
because your ISP has permanently registered the
MAC address (a unique identifying number) of your
PC or modem, which it then authenticates each time
you connect to the Internet as a way of preventing
unauthorized access. As your TV has a different MAC
address, your ISP can not authenticate its MAC address,
and your TV can not connect.
To resolve this problem, ask your ISP about the
procedures required to connect devices other than a PC
(such as your TV) to the Internet.
If your Internet service provider requires an ID or password
to connect to the Internet, your TV may not be able to
connect to the Internet. If this is the case, you must enter
your ID or password when connecting to the Internet.
The internet connection may fail because of a firewall
problem. If this is the case, contact your Internet service
provider.
If you cannot connect to the Internet even after you have
followed the procedures of your Internet service provider,
please contact Samsung Electronics at 1-800-SAMSUNG.
English
39
[UC9000]BN68-02820F-ZT.indb 39 2010-05-24 오후 5:24:58
Page 40
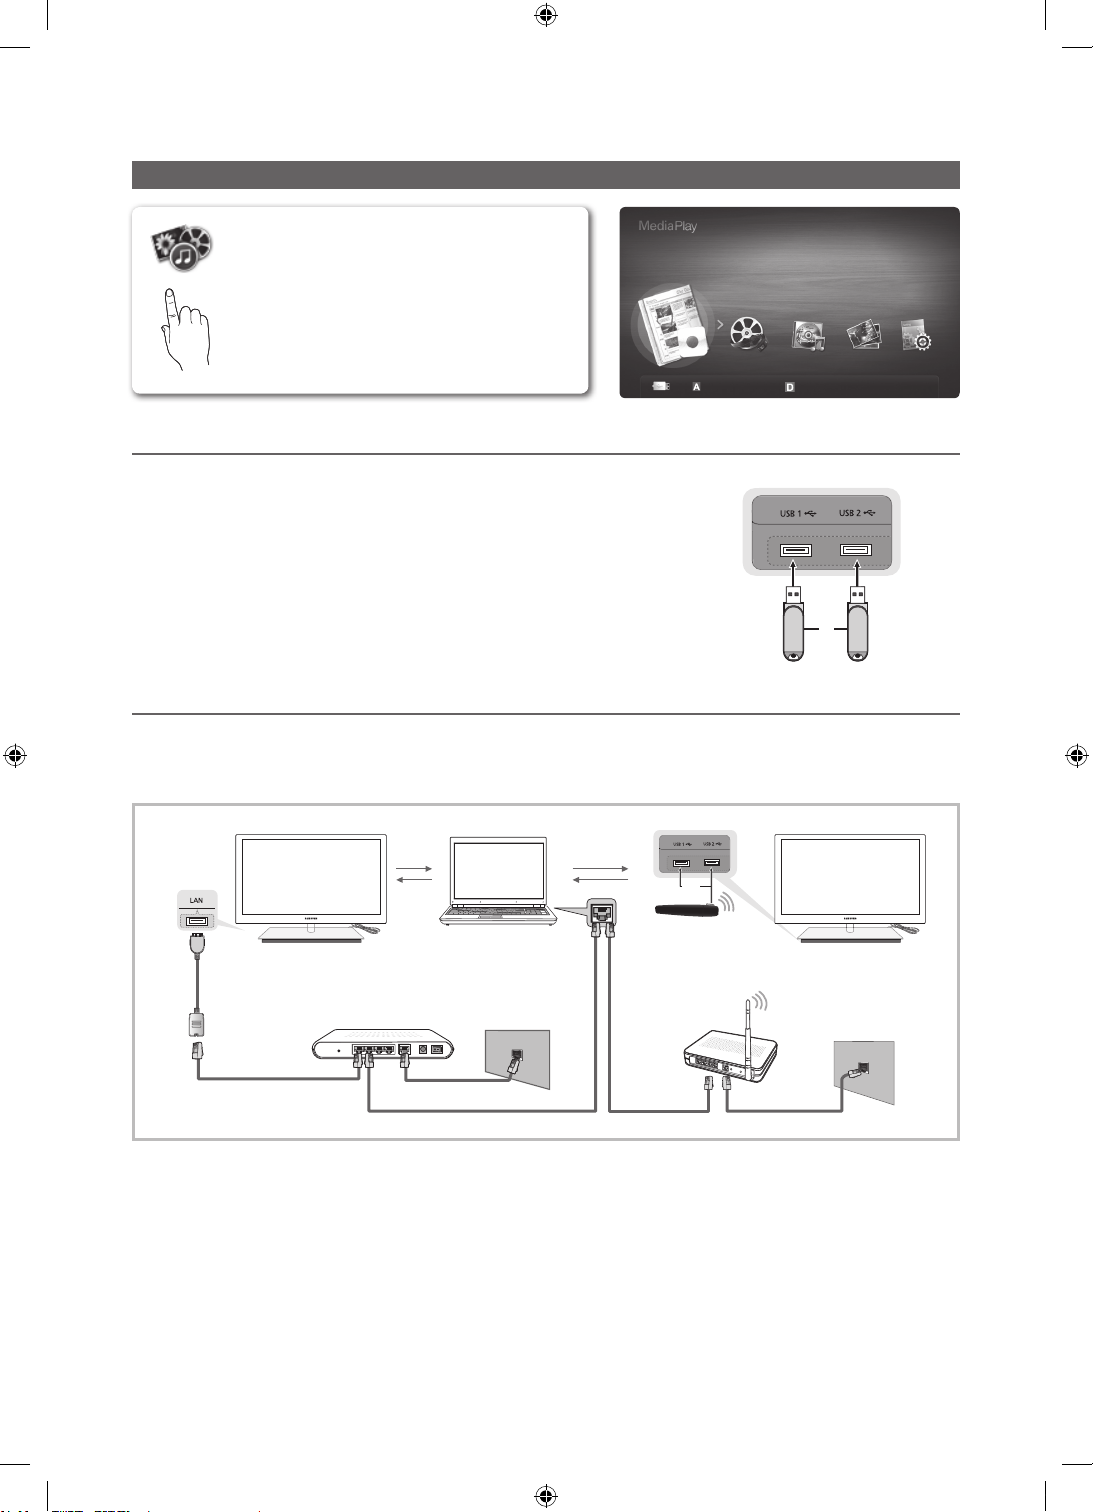
Advanced Features
SUM
Enjoy recorded tv, photos, music and/or movie fi les
saved on a USB Mass Storage Class (MSC) device
MEDIA.P
Connecting a USB Device
and/or your PC.
Media Play
Recorded TV
Change Device
View Devices
Enter
Return
1. Turn on your TV.
Stand Side Panel
2. Connect a USB device containing recorded tv, photo, music and/or movie fi les to
the USB 1 or USB 2 port on the back or side panel of the TV.
3. When USB is connected to the TV, popup window appears. Then you can select
Media Play.
or
USB Drive
Connecting to the PC through network
You can play pictures, music and videos saved on your PC through a network connection in the Media Play mode.
✎
If you use Media Play through saved file on your PC, you should download “PC Share Manager” and users manual from
“www.samsung.com.”
Stand Side Panel
or
Samsung Wireless
LAN Adapter
Wireless IP sharer
LAN
adapter
PC
LAN
External Modem
(ADSL/VDSL/Cable TV)
LAN Cable
Modem Cable
LAN Cable LAN Cable
LAN Cable
1. For more information on how to confi gure your network, refer to “Network Connection” (p. 33).
– You are recommended to locate both TV and PC in same subnet. The fi rst 3 parts of the subnet address of the TV and
the PC IP addresses should be the same and only the last part (the host address) should be changed. (e.g. IP Address:
123.456.789.**)
2. Using a LAN cable, connect between the external modem and the PC onto which the Samsung PC Share Manager
programme will be installed.
– You can connect the TV to the PC directly without connecting it through a Sharer (Router).
English
40
[UC9000]BN68-02820F-ZT.indb 40 2010-05-24 오후 5:25:01
Page 41

✎
No supported functions when connecting to the PC through network:
The Background Music and Background Music Setting functions.
x
Sorting files by preference in the Photos, Music, and Videos folders.
x
The (REW) or (FF) button while a movie is playing.
x
✎
The Divx DRM, Multi-audio, embedded caption does not supported.
✎
Samsung PC Share manager should be permitted by the firewall programme on your PC.
✎
When you use Media Play mode through a network connection, According to functions of the provided server:
The sorting method may vary.
x
The scene search function may not be supported.
x
The Play Continuously function, which resumes playing of a video, may not be supported.
x
– The Play Continuously function does not support multiple users. (It will have only memorised the point where the
most recent user stopped playing.)
The ◄ or ► button may not work depending on the content information.
x
You may experience file stuttering while playing a video in Media Play through a network connection.
x
✎
It might not work properly with unlicenced multimedia files.
✎
Need-to-Know List before using Media Play
MTP (Media Transfer Protocol) is not supported.
x
The file system supports FAT16, FAT32 and NTFS.
x
Certain types of USB Digital camera and audio devices may not be compatible with this TV.
x
Media Play only supports USB Mass Storage Class (MSC) devices. MSC is a Mass Storage Class Bulk-Only
x
Transport device. Examples of MSC are Thumb drives, Flash Card Readers and USB HDD (USB HUB are not
supported). Devices should be connected directly to the TV’s USB port.
Before connecting your device to the TV, please back up your files to prevent them from damage or loss of data.
x
SAMSUNG is not responsible for any data file damage or data loss.
Do not disconnect the USB device while it is loading.
x
The higher the resolution of the image, the longer it takes to display on the screen.
x
The maximum supported JPEG resolution is 15360X8640 pixels.
x
For unsupported or corrupted files, the “Not Supported File Format” message is displayed.
x
If the files are sorted by Basic View, up to 1000 files can be displayed in each folder.
x
MP3 files with DRM that have been downloaded from a non-free site cannot be played. Digital Rights Management
x
(DRM) is a technology that supports the creation of content, the distribution and management of the content in an
integrated and comprehensive way, including the protection of the rights and interests of the content providers, the
prevention of the illegal copying of contents, as well as managing billings and settlements.
If more than 2 PTP devices are connected, you can only use one at a time.
x
If more than two MSC devices are connected, some of them may not be recognized. A USB device that requires high
x
power (more than 500mA or 5V) may not be supported.
If an over-power warning message is displayed while you are connecting or using a USB device, the device may not
x
be recognized or may malfunction.
If the TV has been no input during time set in Auto Protection Time, the Screensaver will run.
x
The power-saving mode of some external hard disk drives may be released automatically when connected to the TV.
x
If a USB extension cable is used, the USB device may not be recognized or the files on the device may not be read.
x
If a USB device connected to the TV is not recognized, the list of files on the device is corrupted or a file in the list is
x
not played, connect the USB device to the PC, format the device and check the connection.
If a file deleted from the PC is still found when Media Play is run, use the “Empty the Recycle Bin” function on the PC
x
to permanently delete the file.
04 Advanced Features
English
41
[UC9000]BN68-02820F-ZT.indb 41 2010-05-24 오후 5:25:02
Page 42
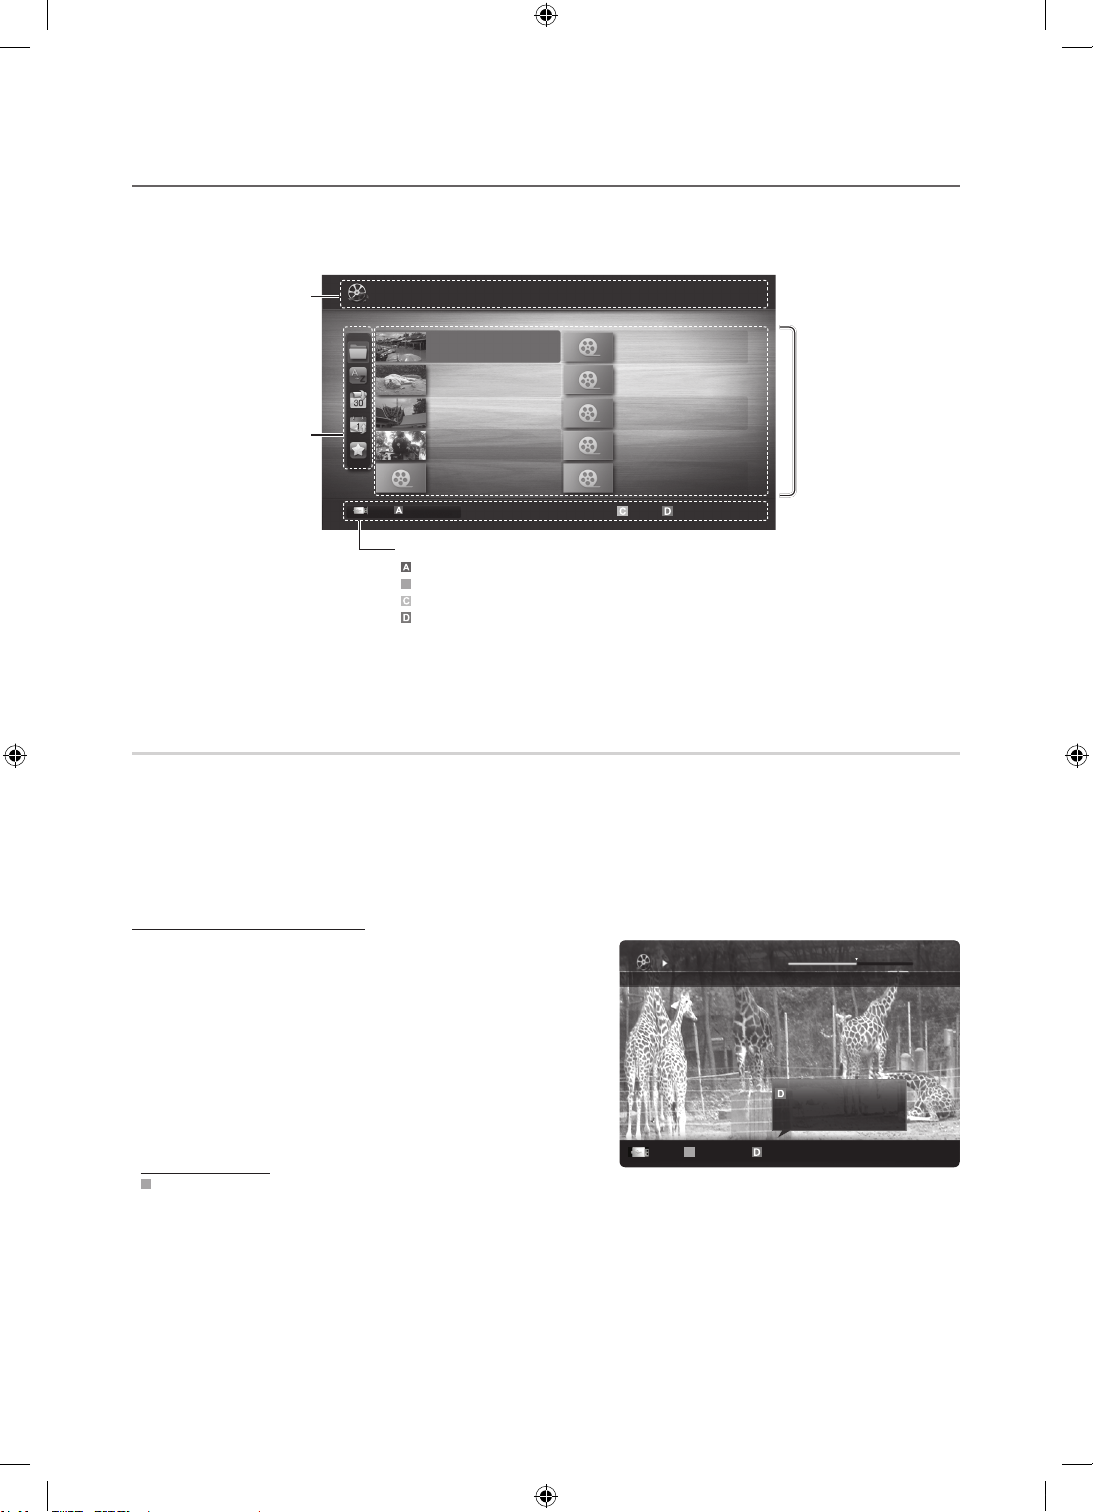
Advanced Features
B
Movie 01.avi
00:04:03 / 00:07:38 1/1
SUM
B
B
Screen Display
Move to the file you desired using the up/down/right/left buttons and then press the ENTER or (Play) button. The file is
played.
✎
Supports the View Devices and Home in Media Play homepage.
You can ascertain the selected
file name and the number of files
Displays sorting standard.
Sorting standard is
✎
different depending on the
contents.
Information:
and page.
Sort List Section:
Videos
SUM
/Movie 01.avi 1/1
Change Device
Movie 01.avi
Movie 03.avi
Movie 05.avi
Movie 07.avi
Movie 09.avi
Jan.10.2010
Jan.10.2010
Jan.10.2010
Jan.10.2010
Jan.10.2010
Movie 02.avi
Movie 04.avi
Movie 06.avi
Movie 08.avi
Movie 10.avi
Select Sorting
Jan.10.2010
Jan.10.2010
Jan.10.2010
Jan.10.2010
Jan.10.2010
Tools
Page
Operation Buttons
Red (Change Device): Selects a connected device.
Green (Preference): Sets the file preference. (not supported in Basic view)
Yellow (Select): Selects multiple files from file list. Selected files are marked with a symbol.
Blue (Sorting): Selects the sort list.
Tools: Displays the option menu.
Using the (REW) or (FF) button, file list can move to next or previous page.
✎
File List Section:
You can confirm the files
and groups that is sorted by
each category.
Recorded TV
To use the recording or Timeshift Mode function, the connected USB device must be available for recording. Device format is
recommended to use USB HDD.
✎
During the Device formatting, do not disconnect the device while formatting is in progress. If you format the device, all
files will be deleted.
✎
Before formatting your device to the tv, please back up your files to prevent them from damage or loss of data.
SAMSUNG is not responsible for any data file damage or data loss.
Playing Recorded TV Programme
1. Press the ◄ or ► button to select Recorded TV, then press
the ENTER button in the Media Play menu.
2. Press the ◄/►/▲/▼ button to select the desired file in the file
list.
3. Press the ENTER
– The selected file is displayed on the top with its playing
time.
– During playing the recorded TV programme, you can search
using the ◄ and ► button.
Operation Buttons
Green (Section Repeat): You can set up the function to repeat some section.
You can also watch some section you want to.
button or (Play) button.
Play continuously
Resumes playing from the last viewed
scene.
Section Repeat Play continuously
Chaptering
Jump
Tools
English
42
[UC9000]BN68-02820F-ZT.indb 42 2010-05-24 오후 5:25:03
Page 43

Using the Timeshift Mode function
If you missed a live broadcast, you can see from the recorded broadcast using this feature.
When the Timeshift Mode is set to Auto, the TV stores the channel you watch currently to record automatically.
When the Timeshift Mode is set to Manual, if you press the
view you want to record.
Recorded videos are DRM (digital rights management) protected and cannot be played on a PC or other TVs.
Note that files saved on the TV cannot be used after the main board is changed.
✎
NOTE
Data broadcasts cannot be recorded.
x
The availability of both recording and the Timeshift Mode function may differ depending on picture quality and the
x
free space on the hard disk drive.
If you press the ▲ or ▼ button, you can see the current channel being on air, or can see the start point the recorded
x
broadcast.
The Timeshift Mode operates for a maximum of 90 minutes.
x
After the Timeshift Mode function has run for the maximum time, the time information will be fixed to “00:00:00.”
x
Note that if you have paused the recording the TV will automatically resume playback.
If the 5% free memory space limit of the USB storage device is reached, the current recording process will be closed.
x
When recording is performed by both the PVR (Personal Video Recorder) function and a device that supports the
x
HDMI-CEC feature, recording by the PVR function takes precedence.
During a playback or the Timeshift Mode, the picture will be displayed according to the display settings of the TV.
x
If you change the input source during recording, the screen will go blank until the change is completed.
x
An application which supports neither the recording nor the Timeshift Mode function will close automatically if you
x
try to use it during either function.
A message may appear in front of the application window indicating that the recording or the Timeshift Mode
x
function is closed.
Timeshift Mode function is not supported for analogue channels.
x
The recording and the Timeshift Mode functions are disabled for channels locked with Child Lock.
x
If the USB device has failed the Device Performance Test, the USB device must go through the Device Format and
x
Device Performance Test again before you record with the Guide or Channel Manager.
The recording and Timeshift Mode functions can only be used with a USB storage device that completed the
x
Device Performance Test.
If you attempt the recording or Timeshift Mode function with a device that did not have the Device Performance
x
Test, the function will not start.
If you press (REC) on the remote control while the Channel Manager screen is being displayed or record with
x
Timer Recording, the TV may start or stop recording 1 or 2 seconds later than you intended due to the time needed
to process the command.
If a USB device dedicated to recording is connected, existing Timeshift Mode or recording files that were saved
x
abnormally will automatically be deleted.
If you switch to external input mode during recording, the recording will continue but the (REC) button will be
x
disabled.
If any function that turns off the TV (Sleep Timer, Off timer, etc.) is set for a time that conflicts with recording, the TV
x
will be turned off once the recording is complete.
(Play) button, the TV stores the channel from the point of
04 Advanced Features
English
43
[UC9000]BN68-02820F-ZT.indb 43 2010-05-24 오후 5:25:04
Page 44
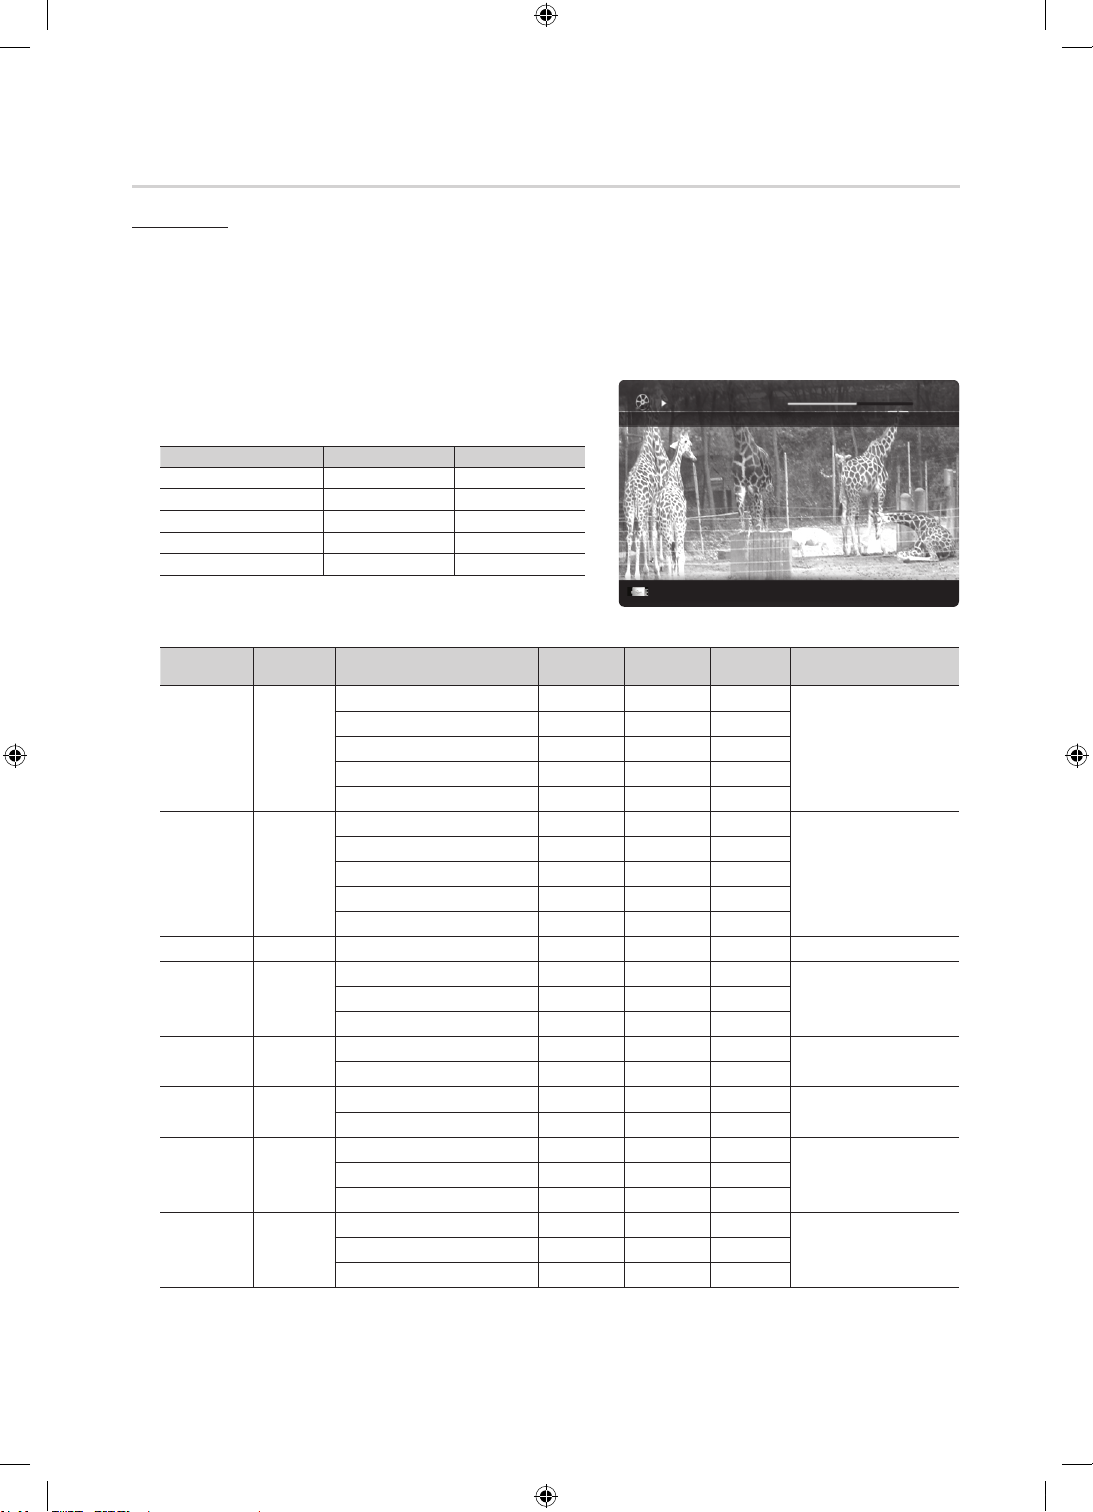
Advanced Features
Movie 01.avi
00:04:03 / 00:07:38 1/1
SUM
Videos
Playing Video
1. Press the ◄ or ► button to select Videos, then press the ENTER
2. Press the ◄/►/▲/▼ button to select the desired file in the file list.
3. Press the ENTER
– The selected file is displayed on the top with its playing time.
– If video time information is unknown, play time and progress bar are not displayed.
– During playing the video, you can search using the ◄ and ► button.
✎
In this mode, you can enjoy movie clips contained on a Game,
but you cannot play the Game itself.
y Supported Subtitle Formats
MPEG-4 time-based text .ttxt XML
y Supported Video Formats
File Extension Container Video Codec Resolution
*.mkv
*.asf ASF
*.wmv ASF Window Media Video v9 1920x1080 6 ~ 30 25 WMA
*.mp4 MP4
*.3gp 3GPP
*.vro
*.mpg
*.mpeg
*.trp
button or (Play) button.
Name File extension Format
SAMI .smi HTML
SubRip .srt string-based
SubViewer .sub string-based
Micro DVD .sub or .txt string-based
Divx 3.11 / 4.x / 5.1 / 6.0 1920x1080 6 ~ 30 8
*.avi
*.ts
*.tp
AVI
MKV
VRO
VOB
PS
TS
XviD 1920x1080 6 ~ 30 8
H.264 BP / MP / HP 1920x1080 6 ~ 30 25
MPEG4 SP / ASP 1920x1080 6 ~ 30 8
Motion JPEG 800x600 6 ~ 30 8
Divx 3.11 / 4.x / 5.1 / 6.0 1920x1080 6 ~ 30 8
XviD 1920x1080 6 ~ 30 8
H.264 BP / MP / HP 1920x1080 6 ~ 30 25
MPEG4 SP / ASP 1920x1080 6 ~ 30 8
Motion JPEG 800x600 6 ~ 30 8
H.264 BP / MP / HP 1920x1080 6 ~ 30 25
XVID 1920x1080 6 ~ 30 8
H.264 BP / MP / HP 1920x1080 6 ~ 30 25
MPEG4 SP / ASP 1920x1080 6 ~ 30 8
MPEG1 1920x1080 24 / 25 / 30 30
MPEG2 1920x1080 24 / 25 / 30 30
MPEG1 1920x1080 24 / 25 / 30 30
H.264 1920x1080 6 ~ 30 25
MPEG2 1920x1080 24 / 25 / 30 30
H.264 1920x1080 6 ~ 30 25
VC1 1920x1080 6 ~ 30 25
button in the Media Play menu.
Frame rate
(fps)
Bit rate
(Mbps)
Chaptering
Jump
Tools
Audio Codec
MP3 / AC3 / LPCM /
ADPCM / DTS Core
MP3 / AC3 / LPCM /
ADPCM / WMA
MP3 / ADPCM / AACMPEG4 SP / ASP 1920x1080 6 ~ 30 8
ADPCM / AAC / HE-AAC
AC3 / MPEG / LPCM
AC3 / MPEG / LPCM / AACMPEG2 1920x1080 24 / 25 / 30 30
AC3 / AAC / MP3 / DD+ /
HE-AAC
Return
English
44
[UC9000]BN68-02820F-ZT.indb 44 2010-05-24 오후 5:25:05
Page 45
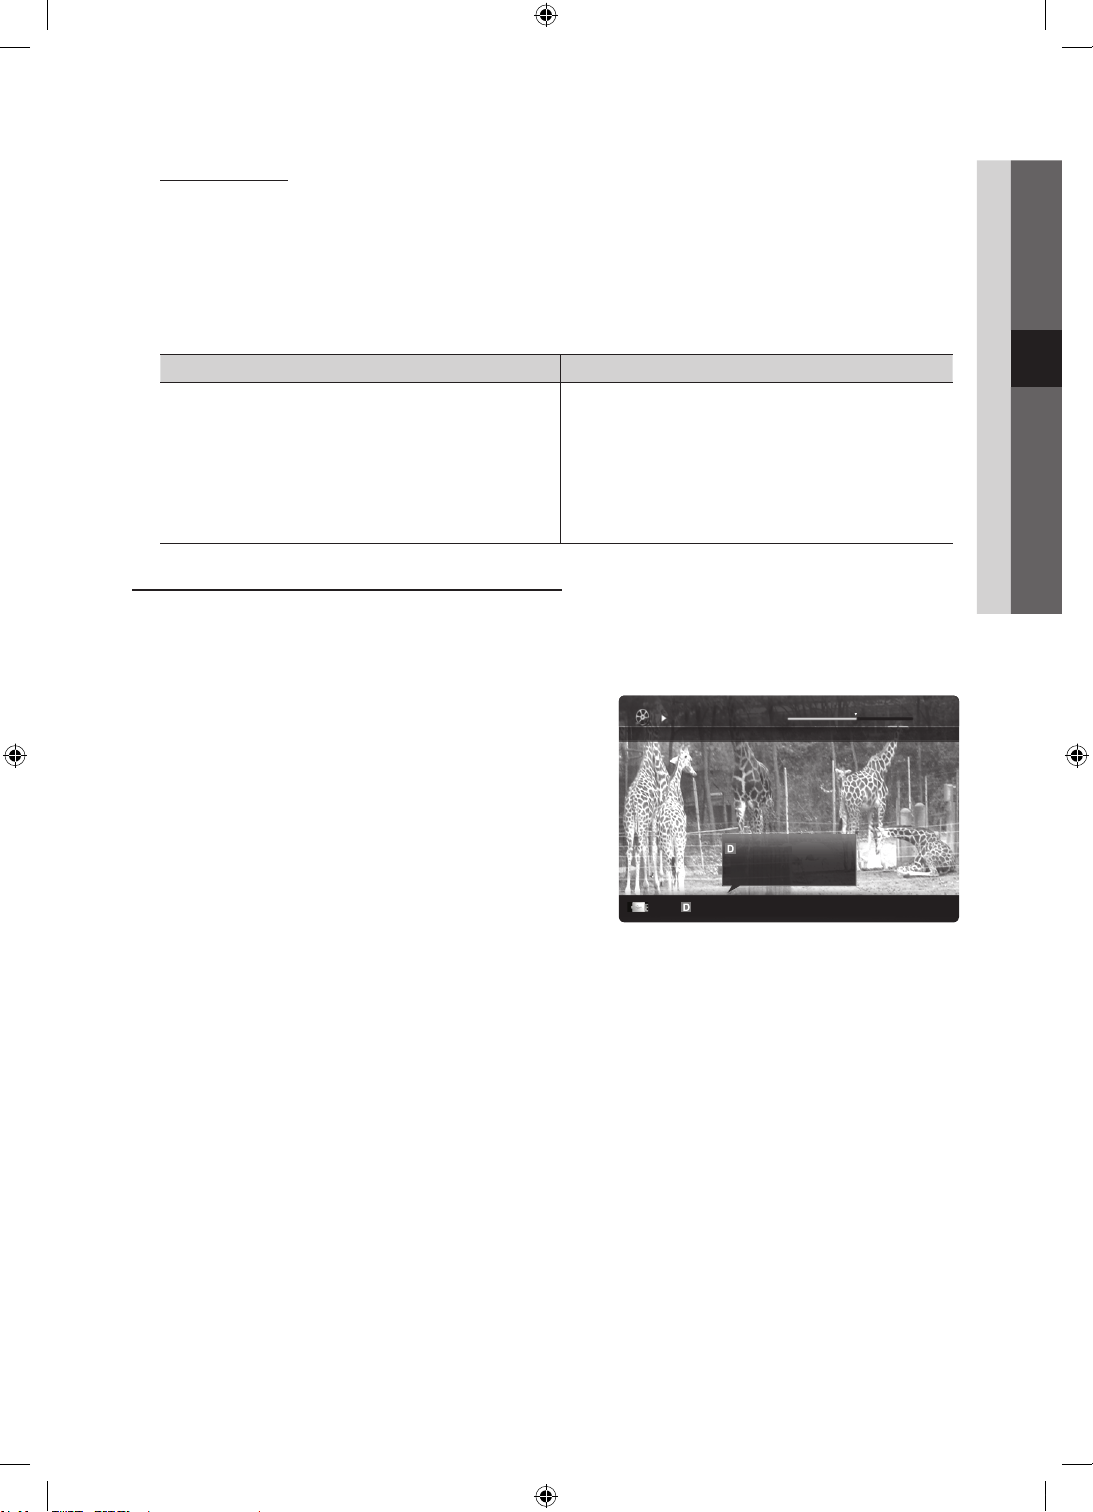
Other Restrictions
Movie 01.avi
00:04:03 / 00:07:38 1/1
SUM
✎
NOTE
If there are problems with the contents of a codec, the codec will not be supported.
x
If the information for a Container is incorrect and the file is in error, the Container will not be able to play
x
correctly.
Sound or video may not work if the contents have a standard bitrate/frame rate above the compatible Frame/sec
x
listed in the table above.
If the Index Table is in error, the Seek (Jump) function is not supported.
x
Video Decoder Audio Decoder
• Supports up to H.264, Level 4.1
• H.264 FMO / ASO / RS, VC1 SP / MP / AP L4 and AVCHD are not
supported.
• XVID, MPEG4 SP, ASP:
– Below 1280 x 720: 60 frame max
– Above 1280 x 720: 30 frame max
• GMC 2 over is not supported.
• H.263 is not supported.
• Only Samsung Techwin MJPEG is supported.
• Supports up to WMA 7, 8, 9, STD
• WMA 9 PRO does not support 2 channel excess multi channel or
lossless audio.
• WMA sampling rate 22050Hz mono is not supported.
Playing recorded TV or movie file continuously (Resume Play)
If you exit the playing Recorded TV or Videos function, it can be played later from the point where it was stopped.
✎
If you press the ENTER button (Chaptering) during playing the file, you can explore scene divided into 5 chapters
you want.
✎
If the index information is damaged or unsupported, you will not be able to use the Chaptering function.
1. Select the movie file you want to play continuously by pressing
the ◄ or ► button to select it from the file list section.
2. Press the
(Play) / ENTER button.
3. Select Play Continuously (Resume Play) by pressing the Blue
button. The Movie will begin to play from where it was stopped.
✎
The Blue button is available when resuming play.
✎
If the Cont. movie play help function is set to On in the
Settings menu, a pop-up message will appear when you
resume play a movie file.
Play continuously
Resumes playing from the last viewed
scene.
Play continuously
Chaptering
Jump
Tools
04 Advanced Features
Return
English
45
[UC9000]BN68-02820F-ZT.indb 45 2010-05-24 오후 5:25:06
Page 46
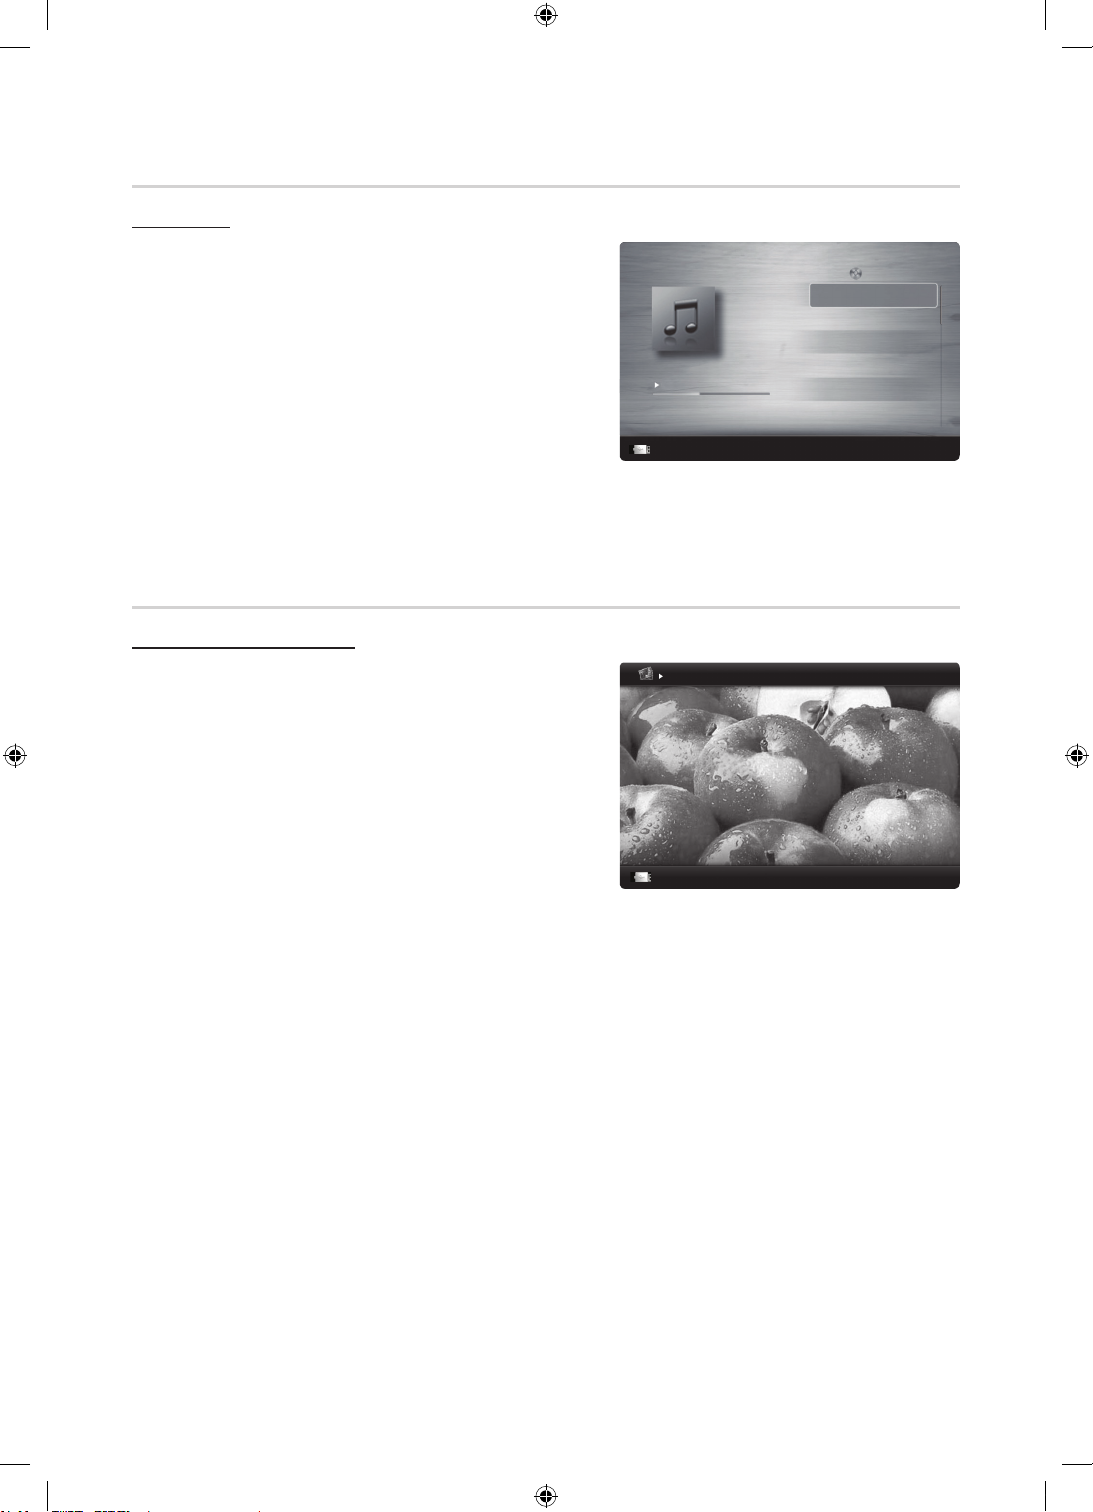
Advanced Features
Image1024.jpg 1024x768 2010/2/1 3/15
SUM
3/15
I Love you
Jhon
Music 1
No Singer
Music 2
No Singer
Music 3
No Singer
Music 4
No Singer
Music 5
No Singer
I Love You
Jhon
1st Album
Pop
2010
4.2MB
01:10 / 04:02
SUM
Music
Playing Music
1. Press the ◄ or ► button to select Music, then press the
ENTER
button in the Media Play menu.
2. Press the ◄/►/▲/▼ button to select the desired file in the file
list.
3. Press the ENTER
button or (Play) button.
– During playing the music, you can search using the ◄ and ►
button.
–
(REW) and (FF) buttons do not function during play.
✎
Only displays the files with MP3 and PCM file extension. Other
file extensions are not displayed, even if they are saved on the
same USB device.
✎
If the sound is strange when playing MP3 files, adjust the Equalizer in the Sound menu. (An over-modulated MP3 file
may cause a sound problem.)
✎
You can create My Playlist selecting the desired music in the file, and can play My Playlist.
Photos
Viewing a Photo (or Slide Show)
1. Press the ◄ or ► button to select Photos, then press the
ENTER
button in the Media Play menu.
2. Press the ◄/►/▲/▼ button to select the desired file in the file
list.
3. Press the ENTER
– While a photo list is displayed, press the
button or (Play) button.
(Play) /
ENTER button on the remote control to start slide show.
– All files in the file list section will be displayed in the slide show.
– During the slide show, files are displayed in order from
currently being shown.
✎
Music files can be automatically played during the Slide Show if
the Background Music is set to On.
✎
The BGM Mode cannot be changed until the BGM has finished
loading.
Normal
Pause
Pause
Previous/Next
Playlist
Jump
Tools
Tools
Return
Return
46
[UC9000]BN68-02820F-ZT.indb 46 2010-05-24 오후 5:25:07
English
Page 47
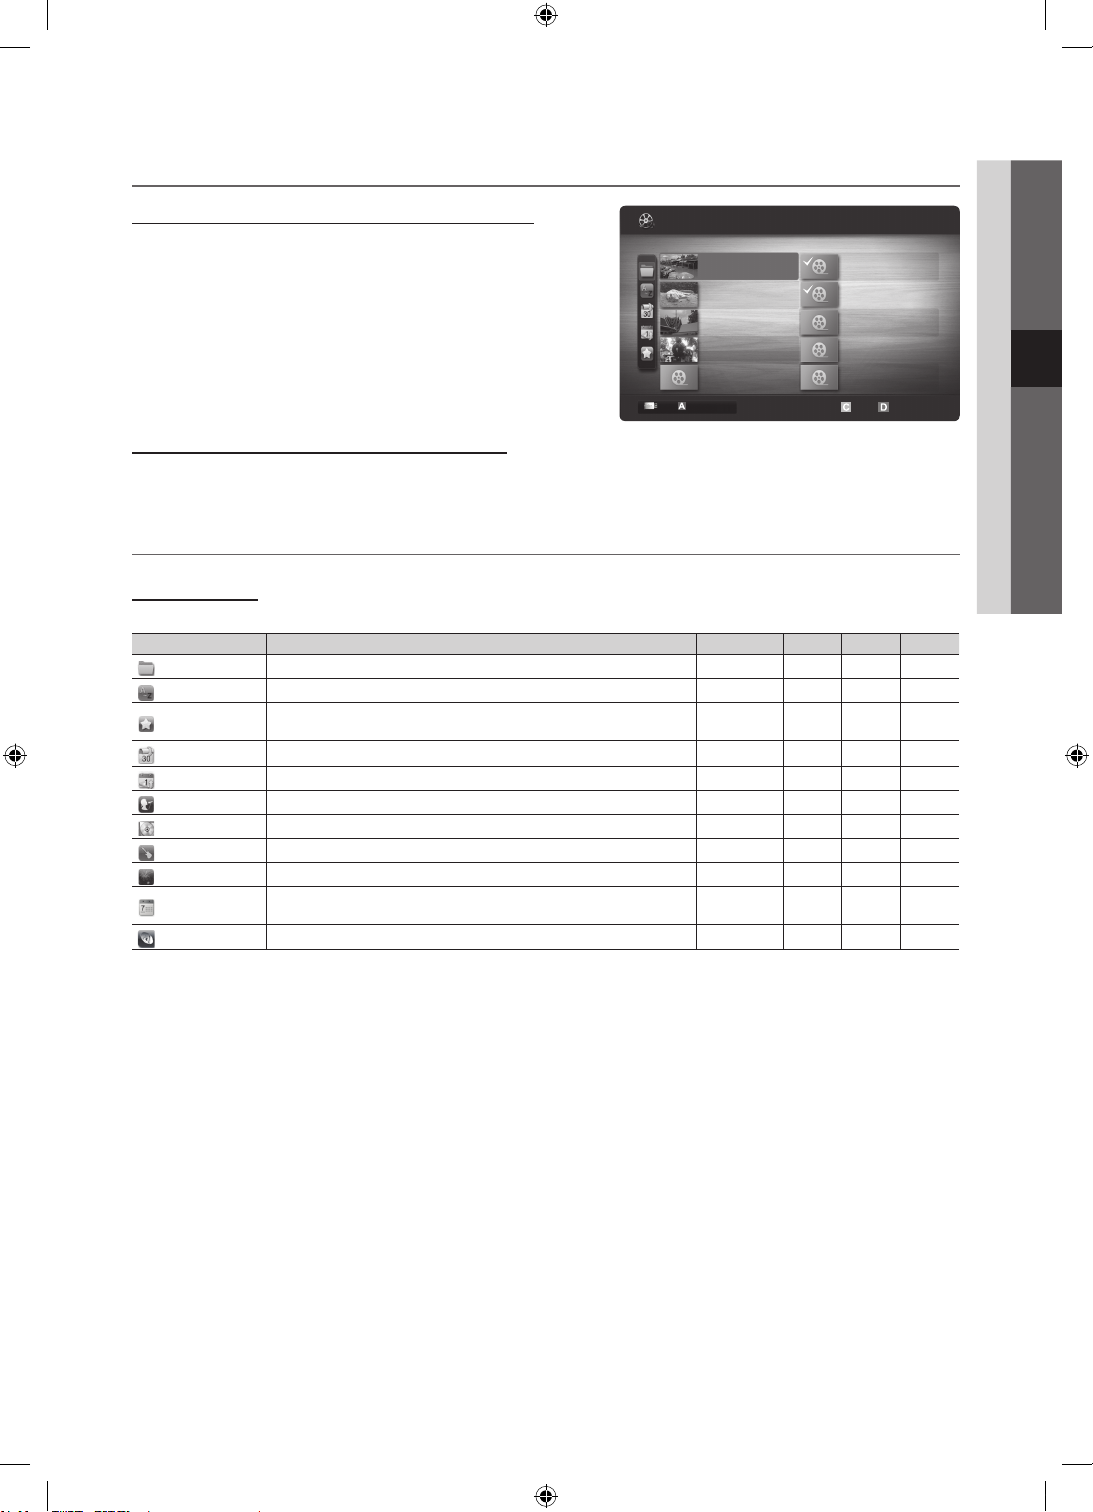
Playing the Multiple Files
1/1
/Movie 01.avi
SUM
Movie 01.avi
Jan.10.2010
Jan.10.2010
Jan.10.2010
Jan.10.2010
Jan.10.2010
Jan.10.2010
Jan.10.2010
Jan.10.2010
Jan.10.2010
Jan.10.2010
Movie 03.avi
Movie 05.avi
Movie 07.avi
Movie 09.avi
Movie 02.avi
Movie 04.avi
Movie 06.avi
Movie 08.avi
Movie 10.avi
04 Advanced Features
Playing the selected recorded TV/video/music/photo files
1. Press the Yellow button in the file list to select the desired file.
Videos
2 les selected Page
2. Repeat the above operation to select multiple files.
✎
NOTE
The mark appears to the left of the selected files.
x
To cancel a selection, press the Yellow button again.
x
To deselect all selected files, press the TOOLS button
x
and select Deselect All.
3. Press the TOOLS button and select Play Selected Contents.
Change Device
Select Sorting
Playing the recorded TV/video/music/photo file group
1. While a file list is displayed, move to the any file in desired group.
2. Press the TOOLS button and select Play Current Group.
Media Play Additional Function
Sorting the file list
Press the Blue button in the file list to sort the files.
Category Operations Recorded TV Videos Music Photos
Basic View
Title
Preference
Latest Date
Earliest Date
Artist
Album
Genre
Mood
Monthly
Channel
It shows whole folder. You can view the file list by selecting the folder.
It sorts and displays the file title in Symbol/Number/Alphabet/Special order.
It sorts and displays the file by preference. You can change the file preference
in the file list section using the Green button.
It sorts and shows files by latest date.
It sorts and shows files by earliest date.
It sorts the music file by artist in alphabetical.
It sorts the music file by album in alphabetical order.
It sorts music files by the genre.
It sorts music files by the mood. You can change the music mood information.
It sorts and shows photo files by month. It sorts only by month (from January
to December) regardless of year.
It sorts the recorded files by channel name.
Tools
English
47
[UC9000]BN68-02820F-ZT.indb 47 2010-05-24 오후 5:25:09
Page 48
Advanced Features
Recorded TV/Videos/Music/Photos Play Option menu
During playing a file, press the TOOLS button.
Category Operations Recorded TV Videos Music Photos
Title You can move the other file directly.
Repeat Mode You can play recorded tv, movie and music files repeatedly.
Picture Size You can adjust the picture size for preference.
Picture Setting You can adjust the picture setting. (p. 19~25)
Sound Setting You can adjust the sound setting. (p. 25, 26, 27)
Subtitle Setting You can play the video file with Subtitle. This function only works if the
Audio You can enjoy video in one of supported languages as required. The function
Audio Description You can adjust the audio description (p. 26).
Stop Slide Show /
Start Slide Show
Slide Show Speed You can select the slide show speed during the slide show.
Slide Show Effect You can set variously the slide show effect.
Background Music You can set and select background music when watching a slide show.
Zoom You can zoom into images in full screen mode.
Rotate You can rotate images in full screen mode.
Home Background You can move the file to the Media Play desktop.
Information You can see detailed information about the played file.
subtitles are the same file name as the video file.
is only enabled when stream-type files which support multiple audio formats
are played.
You can start or stop a slide show.
Settings
Using the Setup Menu
■ Background Setting: Select to display the background you want.
■ Cont. movie play help (Resume Play) (On / Off): Select to display the help pop-up message for continuous movie
playback.
■ Get the DivX® VOD registration code: Shows the registration code authorized for the TV. If you connect to the DivX web
site and register the registration code with a personal account, you can download VOD registration file. If you play the VOD
registration using Media Play, the registration is completed.
✎
For more information on DivX® VOD, visit “www.DivX.com.”
■ Get the DivX® VOD deactivation code: When DivX® VOD is not registered, the registration deactivation code is
displayed. If you execute this function when DivX® VOD is registered, the current DivX® VOD registration is deactivated.
■ Information: Select to view information about the connected device.
English
48
[UC9000]BN68-02820F-ZT.indb 48 2010-05-24 오후 5:25:10
Page 49
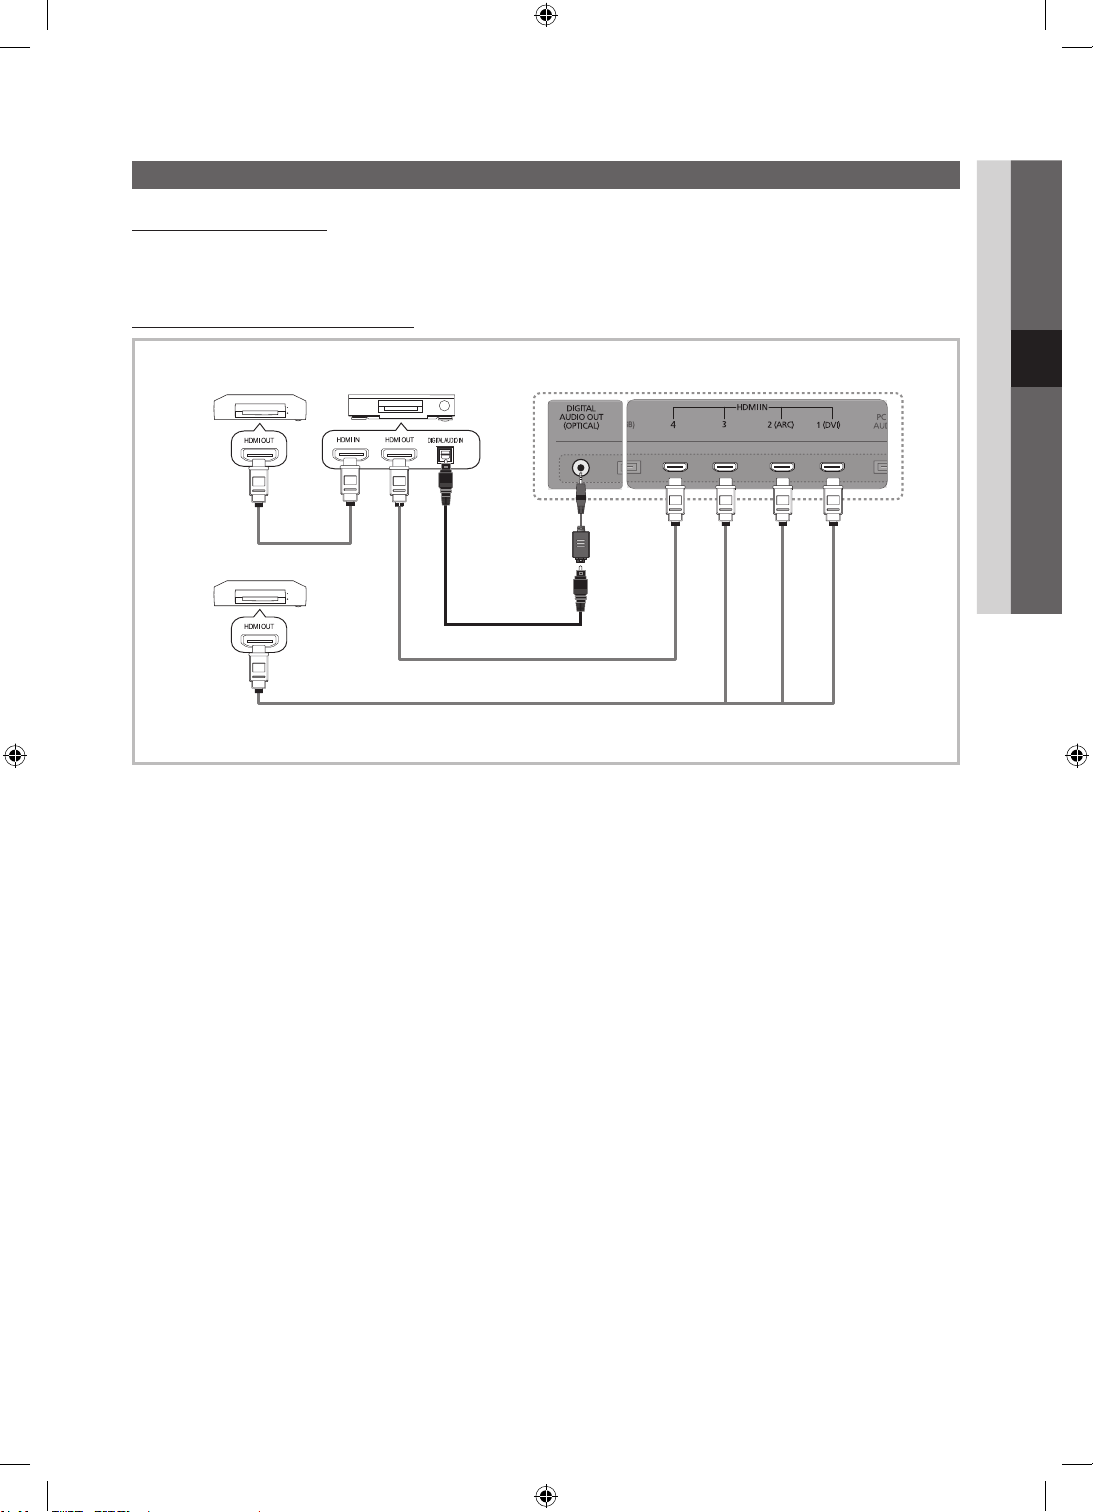
Anynet+
04 Advanced Features
What is Anynet+?
Anynet+ is a function that enables you to control all connected Samsung devices that support Anynet+ with your Samsung
TV’s remote. The Anynet+ system can be used only with Samsung devices that have the Anynet+ feature. To be sure your
Samsung device has this feature, check if there is an Anynet+ logo on it.
To connect to a Samsung Home Theatre
1. Connect the HDMI IN (1(DVI), 2(ARC), 3 or 4) jack on the TV and the HDMI OUT jack of the corresponding Anynet+
device using an HDMI cable.
2. Connect the HDMI IN jack of the home theatre and the HDMI OUT jack of the corresponding Anynet+ device using an
HDMI cable.
✎
NOTE
Connect the Optical cable between the DIGITAL AUDIO OUT (OPTICAL) jack on your TV and the Digital Audio Input
x
on the Home Theatre.
The ARC function enables digital output of sound using the HDMI IN 2(ARC) port and can only be operated when
x
the TV is connected to an audio receiver that supports the ARC function.
When following the connection above, the Optical jack only outputs 2 channel audio. You will only hear sound from
x
the Home Theatre’s Front, Left and Right speakers and the subwoofer. If you want to hear 5.1 channel audio, connect
the DIGITAL AUDIO OUT (OPTICAL) jack on the DVD / Satellite Box (i.e. Anynet Device 1 or 2) directly to the
Amplifier or Home Theatre, not the TV.
You can connect only one Home Theatre.
x
You can connect an Anynet+ device using the HDMI cable. Some HDMI cables may not support Anynet+ functions.
x
Anynet+ works when the AV device supporting Anynet+ is in the standby or on status.
x
Anynet+ supports up to 12 AV devices in total. Note that you can connect up to 3 devices of the same type.
x
HDMI Cable
Anynet+ Device 2, 3, 4
Home TheatreAnynet+ Device 1
Optical
Adapter
Optical Cable
HDMI Cable
HDMI Cable
Stand Rear Panel
English
49
[UC9000]BN68-02820F-ZT.indb 49 2010-05-24 오후 5:25:11
Page 50
Advanced Features
Anynet+ Menu
The Anynet+ menu changes depending on the type and status of the Anynet+ devices connected to the TV.
Anynet+ Menu Description
View TV Changes Anynet+ mode to TV broadcast mode.
Device List Shows the Anynet+ device list.
(device_name) MENU Shows the connected device menus. E.g. If a DVD recorder is connected, the disc menu of
(device_name) INFO Shows the play menu of the connected device. E.g. If a DVD recorder is connected, the
Recording: (*recorder) Starts recording immediately using the recorder. (This is only available for devices that
Stop Recording: (*recorder) Stops recording.
Receiver Sound is played through the receiver.
If more than one recording device is connected, they are displayed as (*recorder) and if only one recording device is
connected, it will be represented as (*device_name).
Setting Up Anynet+
■ Setup
Anynet+ (HDMI-CEC) (Off / On): To use the Anynet+ Function, Anynet+ (HDMI-CEC) must be set to On.
✎
When the Anynet+ (HDMI-CEC) function is disabled, all the Anynet+ related operations are deactivated.
Auto Turn Off (No / Yes): Setting an Anynet+ Device to turn off automatically when the TV is turned off.
✎
If Auto Turn Off is set to Yes, running external devices will turn off at the same time as the TV powers off.
However, a device may not turn off if recording is in progress.
✎
May not be enabled depending on the device.
the DVD recorder will appear.
play menu of the DVD recorder will appear.
support the recording function.)
Switching between Anynet+ Devices
1. Anynet+ devices connected to the TV are listed.
✎
If you cannot find a device you want, press the Red button to refresh the list.
2. Select a device and press the ENTER
✎
Only when you set Anynet+ (HDMI-CEC) to On in the Application menu, the Device List menu appears.
Switching to the selected device may take up to 2 minutes. You cannot cancel the operation during the switching
x
operation.
If you have selected external input mode by pressing the SOURCE button, you cannot use the Anynet+ function.
x
Make sure to switch to an Anynet+ device by using the Device List.
button. You can switch to the selected device.
English
50
[UC9000]BN68-02820F-ZT.indb 50 2010-05-24 오후 5:25:11
Page 51
Recording
You can make a recording of a TV Programme using a Samsung recorder.
1. Select Recording.
✎
When there are more than two recording devices
When multiple recording devices are connected, the recording devices are listed. Select one recording device in
x
the Device List.
✎
When the recording device is not displayed, select Device List and press the Red button to search devices.
2. Press the EXIT button to exit.
✎
You can record the source streams by selecting Recording: (device_name).
✎
Pressing the (REC) button will record whatever you are currently watching. If you are watching video from
another device, the video from the device is recorded.
✎
Before recording, check whether the antenna jack is properly connected to the recording device. To properly
connect an antenna to a recording device, refer to the recording device’s users manual.
Listening through a Receiver
You can listen to sound through a receiver (i.e Home Theatre) instead of the TV Speaker.
1. Select Receiver and set to On.
2. Press the EXIT button to exit.
✎
If your receiver supports audio only, it may not appear in the device list.
✎
The receiver will work when you have properly connected the optical in jack of the receiver to the DIGITAL AUDIO
OUT (OPTICAL) jack of the TV.
✎
When the receiver (i.e Home Theatre) is set to On, you can hear sound output from the TV’s Optical jack. When the
TV is displaying a DTV (aerial) signal, the TV will send out 5.1 channel sound to the receiver. When the source is a
digital component such as a DVD and is connected to the TV via HDMI, only 2 channel sound will be heard from
the receiver.
✎
NOTE
You can only control Anynet+ devices using the TV remote control, not the buttons on the TV.
x
The TV remote control may not work under certain conditions. If this occurs, reselect the Anynet+ device.
x
The Anynet+ functions do not operate with other manufacturers’ products.
x
Using the ARC function
You can listen to sound through a receiver connected HDMI cable without the need for a separate optical cable.
1. Select Receiver and set to On.
2. Press the EXIT button to exit.
✎
To use the ARC function, a receiver which supports the HDMI-CEC and ARC features must be connected to the HDMI
IN 2 (ARC) port.
✎
To disable the ARC function, set the Receiver to Off. Even if the TV transmits the ARC signal continuously, the receiver
will be blocked from receiving the signal.
04 Advanced Features
English
51
[UC9000]BN68-02820F-ZT.indb 51 2010-05-24 오후 5:25:12
Page 52

Advanced Features
Troubleshooting for Anynet+
Problem Possible Solution
Anynet+ does not work. • Check if the device is an Anynet+ device. The Anynet+ system supports Anynet+ devices only.
I want to start Anynet+. • Check if the Anynet+ device is properly connected to the TV and check if the Anynet+ (HDMI-CEC) is set to
I want to exit Anynet+. • Select View TV in the Anynet+ menu.
The message “Connecting to
Anynet+ device...” appears on the
screen.
The Anynet+ device does not play. • You cannot use the play function when Plug & Play (initial setup) is in progress.
• Only one receiver (home theatre) can be connected.
• Check if the Anynet+ device power cord is properly connected.
• Check the Anynet+ device’s Video/Audio/HDMI cable connections.
• Check whether Anynet+ (HDMI-CEC) is set to On in the Anynet+ setup menu.
• Check whether the TV remote control is in TV mode.
• Check whether the remote control is Anynet+ compatible.
• Anynet+ doesn’t work in certain situations. (Searching channels, operating Media Play or Plug & Play (initial
setup), etc.)
• When connecting or removing the HDMI cable, please make sure to search devices again or turn your TV off
and on again.
• Check if the Anynet+ Function of Anynet+ device is set on.
On in the Anynet+ Setup menu.
• Press the TOOLS button to display the Anynet+ menu and select a menu you want.
• Press the SOURCE button on the TV remote control and select a non- Anynet+ device.
• Press P
• You cannot use the remote control when you are configuring Anynet+ or switching to a view mode.
• Use the remote control when the Anynet+ setting or switching to view mode is complete.
/
tuner-embedded Anynet+ device is not connected.)
, and PRE-CH to change the TV mode. (Note that the channel button operates only when a
The connected device is not
displayed.
The TV Programme cannot be
recorded.
The TV sound is not output
through the receiver.
• Check whether or not the device supports Anynet+ functions.
• Check whether or not the HDMI cable is properly connected.
• Check whether Anynet+ (HDMI-CEC) is set to On in the Anynet+ setup menu.
• Search Anynet+ devices again.
• You can connect an Anynet+ device using the HDMI cable only. Some HDMI cables may not support Anynet+
functions.
• If connection is terminated because there has been a power interruption or the HDMI cable has been
disconnected, please repeat the device scan.
• Check whether the antenna jack on the recording device is properly connected.
• Connect the optical cable between TV and the receiver.
• The ARC function enables digital output of sound using the HDMI IN 2(ARC) port and can only be operated
when the TV is connected to an audio receiver that supports the ARC function.
English
52
[UC9000]BN68-02820F-ZT.indb 52 2010-05-24 오후 5:25:12
Page 53
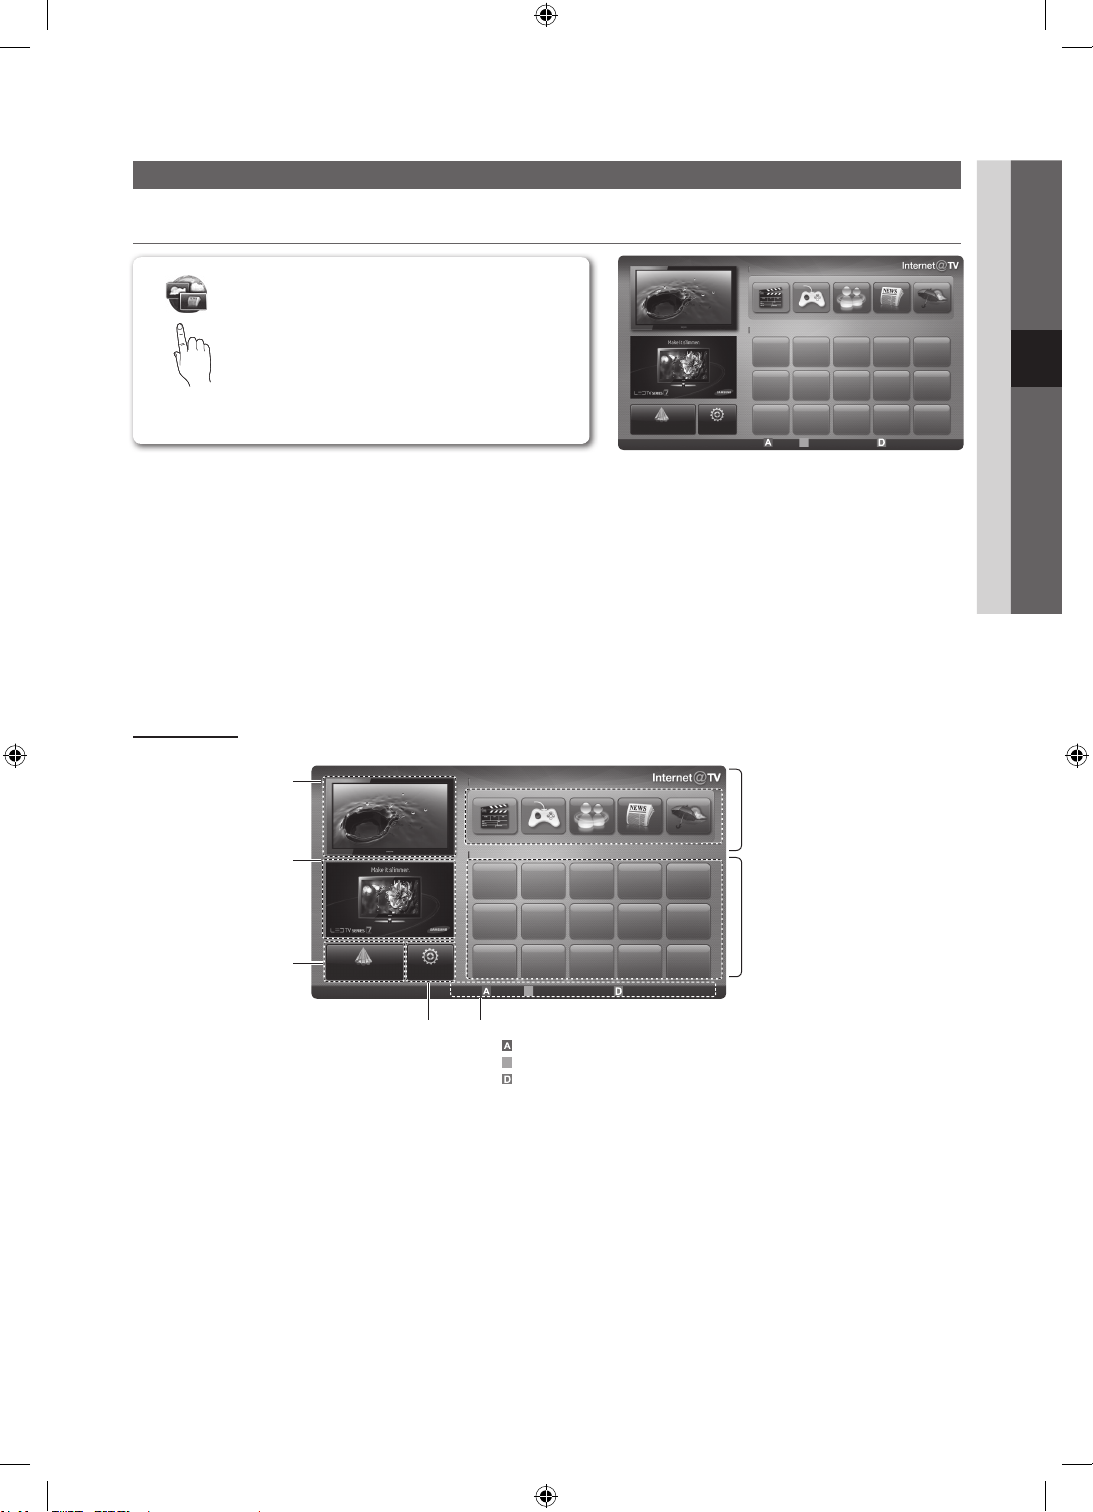
Getting Started with Internet@TV
Internet@TV
04 Advanced Features
Internet@TV brings useful and entertaining
Recommended
contents and services directly from the web to
INTERNET@TV
✎
NOTE
Configure the network settings before using Internet@TV. For more information, refer to “Network Connection” (p. 33).
x
Unsupported fonts within the provider’s content will not display normally.
x
Slow responses and/or interruptions may occur, depending on your network conditions.
x
English may be only supported in application service depending on region.
x
This feature is not available in some locations.
x
If you experience a problem using a application, please contact the content provider.
x
According to circumstances of the contents provider, an application’s updates or the application itself may be
x
your TV.
Samsung Apps
Settings
My Applications
Login B Mark as Favourite Sort by
discontinued.
Depending on your country’s regulations, some applications may have limited service or not be supported.
x
Screen Display
Settings
Recommended
My Applications
Login B
Mark as -avourite Sort by
Controls:
• Red (Login): To log in to Internet@TV.
• B Green (Mark as Favourite): To mark the applications as a favourite.
• Blue (Sort by): To sort the applications.
• Return: To return to the previous menu.
The colour buttons may work differently depending on the application.
✎
by Date 1/1
Return
Recommended Applications:
Displays the recommended service by
Samsung. You are not able to add or
delete a service in this list.
Downloaded Applications:
Displays the downloaded applications
through the Samsung Apps.
Displays the current channel.
TV Screen:
Information:
Displays notices, new
applications, and
advertisements brought to
you by Samsung product
introductions.
Application service:
You can experience
various service by provided
samsung.
Samsung Apps
Internet@TV Settings:
Edit and confi gure applications
and Internet@TV settings.
by Date 1/1
Return
English
53
[UC9000]BN68-02820F-ZT.indb 53 2010-05-24 오후 5:25:14
Page 54
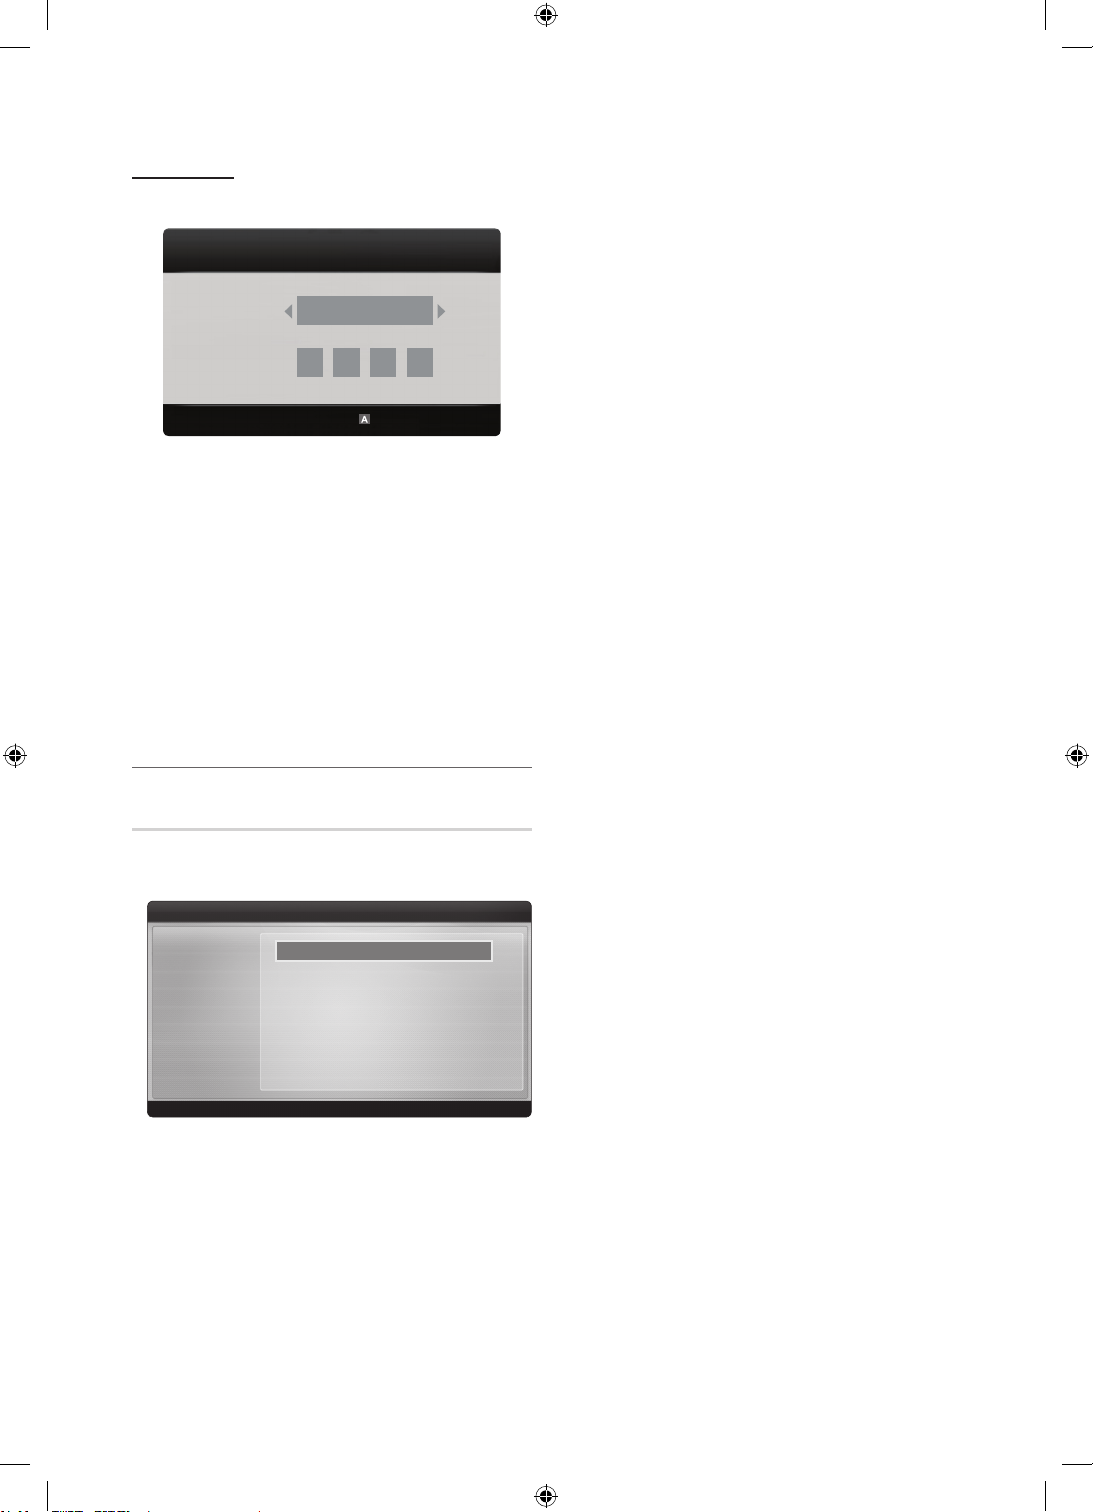
Advanced Features
admin
Account Login
For a application with multiple account, use ◄ and ► to
access the different account.
Login
User account:
Password:
Create [0~9] Enter PIN
✎
For a more enjoyable application experience, register
and log in to your account.
✎
For instructions on creating an account, refer to
Settings → Internet@TV ID → Create.
1. Press the Red button in Internet@TV home page.
2. Select desired User account, then press the ENTER
button.
✎
If you want create account, press Red button;
then create account OSD window appear.
3. Enter the Password.
✎
When login succeeds, User account will be
displayed on the screen.
Setting up Internet@TV
Settings
Create IDs and configure Internet@TV settings from this
screen. Highlight Settings using ▲ and ▼ buttons and press
the ENTER button.
Settings
▪ System setup
▪ Internet@TV ID
▪ Service Manager
▪ Properties
▪ Ticker Autorun : Off
▪ Channel Bound Service : Off
▪ Change the Service Lock password
▪ Reset
Cancel
Return
■ System Setup
Ticker Autorun (Off / On): Enable/disable ticker autorun
upon powering on the TV.
✎
The Ticker application provides useful News,
Weather, and Stock Market information. The
Ticker application on Internet@TV must be
downloaded to use this feature.
✎
Depending on your country, Ticker application
may have different service or not be supported.
Channel Bound Service (Off / On): Some channels
support applications as an Internet data service, allowing
you to access the Internet service while watching TV.
✎
Only available if supported by the broadcaster.
Change the Service Lock password
✎
The default password set is “0-0-0-0.”
✎
If you forget the password, press the following
sequence of remote control buttons to reset the
password to “0-0-0-0”: POWER (off) → MUTE →
8 → 2 → 4 → POWER (on).
Reset: Resets Internet@TV settings to factory default
settings.
■ Internet@TV ID
You can use this menu when creating, deleting the
account. You can control your account including
contents site’s account information.
✎
Account is only for internet@TV.
Create: Create an account and link it with desired
service applications.
✎
NOTE
Account will be made less than 10.
x
Maximum number of characters is 8.
x
Manager
– Service Site: Register login information for service
sites.
– Change Password: Change account password.
– Delete: Delete the account.
■ Service Manager: Delete and lock applications installed
to Internet@TV.
Lock: Lock the application.
✎
Accessing a locked application requires the
password.
Delete: Delete the application.
■ Properties: Display information about Internet@TV. Use
the Check the speed of your internet connection
option to test your network connection.
English
54
[UC9000]BN68-02820F-ZT.indb 54 2010-05-24 오후 5:25:15
Page 55
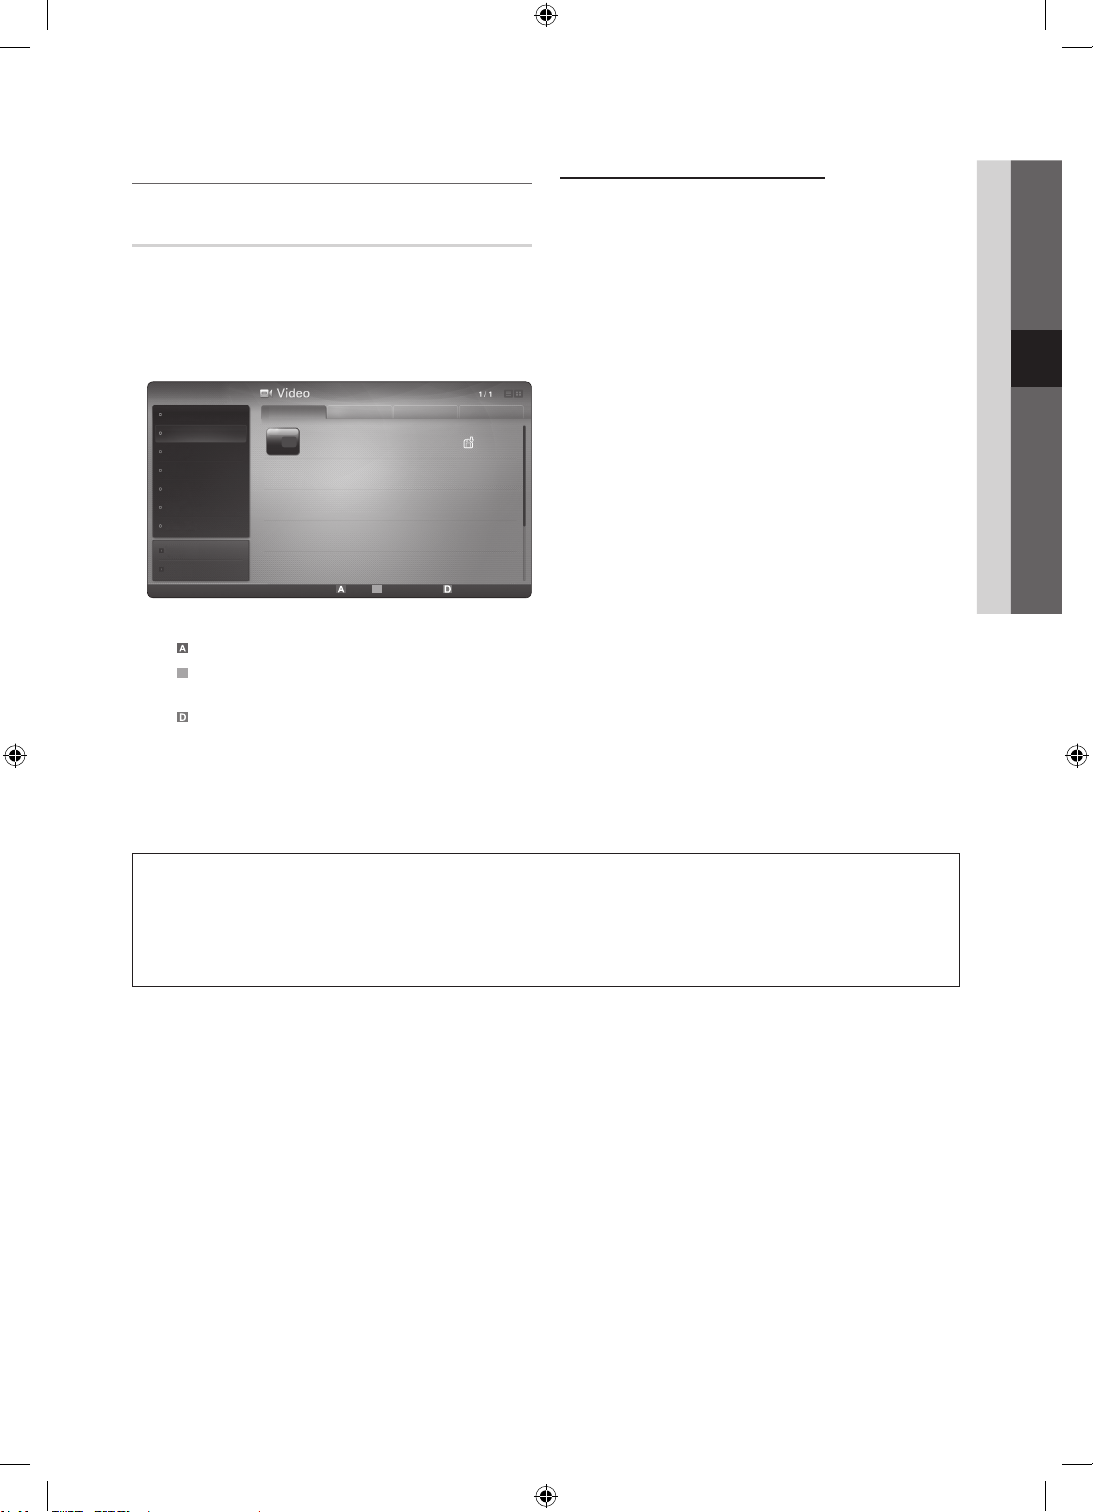
Using the Internet@TV service
B
You Tube
Samsung Apps
Samsung Apps is a store for downloading applications to be
used on Samsung TV/AV equipment.
Users can enjoy a variety of contents like videos, music,
photos, games, useful information etc. using the downloaded
applications.
Additional applications will be available hereafter.
Samsung Apps
What’s New?
Video
Sports
Game
Lifestyle
Information
Other
My Page
Help
✎
Using the colour buttons with the Samsung Apps.
Red (Login): To log in to the internet service.
x
Green (Thumbnail View): To change the view
x
mode.
Blue (Sort by): To sort the applications by
x
Featured, Most downloaded, Most recent or
Name.
Return: Moves to previous menu.
x
Featured Most downloaded Most recent Name
YouTube
TV store Test User002
Login B Thumbnail View Sort by
Free
Return
Using the Samsung Apps by category
The following categories are available:
y What’s New?: Displays newly registered applications.
y Video: Displays various video media such as movies, TV
shows and short length videos.
y Sports: Displays various sports media such as match
information, images and short length video.
y Game: Displays various games such as sudoku and
chess.
y Lifestyle: Includes various lifestyle media services such
as music, personal photo management tools and social
networking such as Facebook and Twitter.
y Information: Includes various information services such
as news, stocks and weather.
y Other: Includes other miscellaneous services.
y My Page: My Page offers information about already
installed applications on the TV like detailed information,
download contents etc.. It can allows delete or lock the
applications.
y Help: If you have questions about Internet@TV, check
this section first.
04 Advanced Features
[Legal Statement]
Due to the various capabilities of products featuring the Samsung Internet@TV - Content Service, as well as limitations in
the available content, certain features, applications, and services may not be available on all devices or in all territories.
Some features on Internet@TV may also require additional peripheral devices or membership fees that are sold separately.
Please visit http://www.samsung.com for more information on specific device information and content availability. The
services and availability of content through Internet@TV are subject to change from time to time without prior notice.
English
55
[UC9000]BN68-02820F-ZT.indb 55 2010-05-24 오후 5:25:16
Page 56
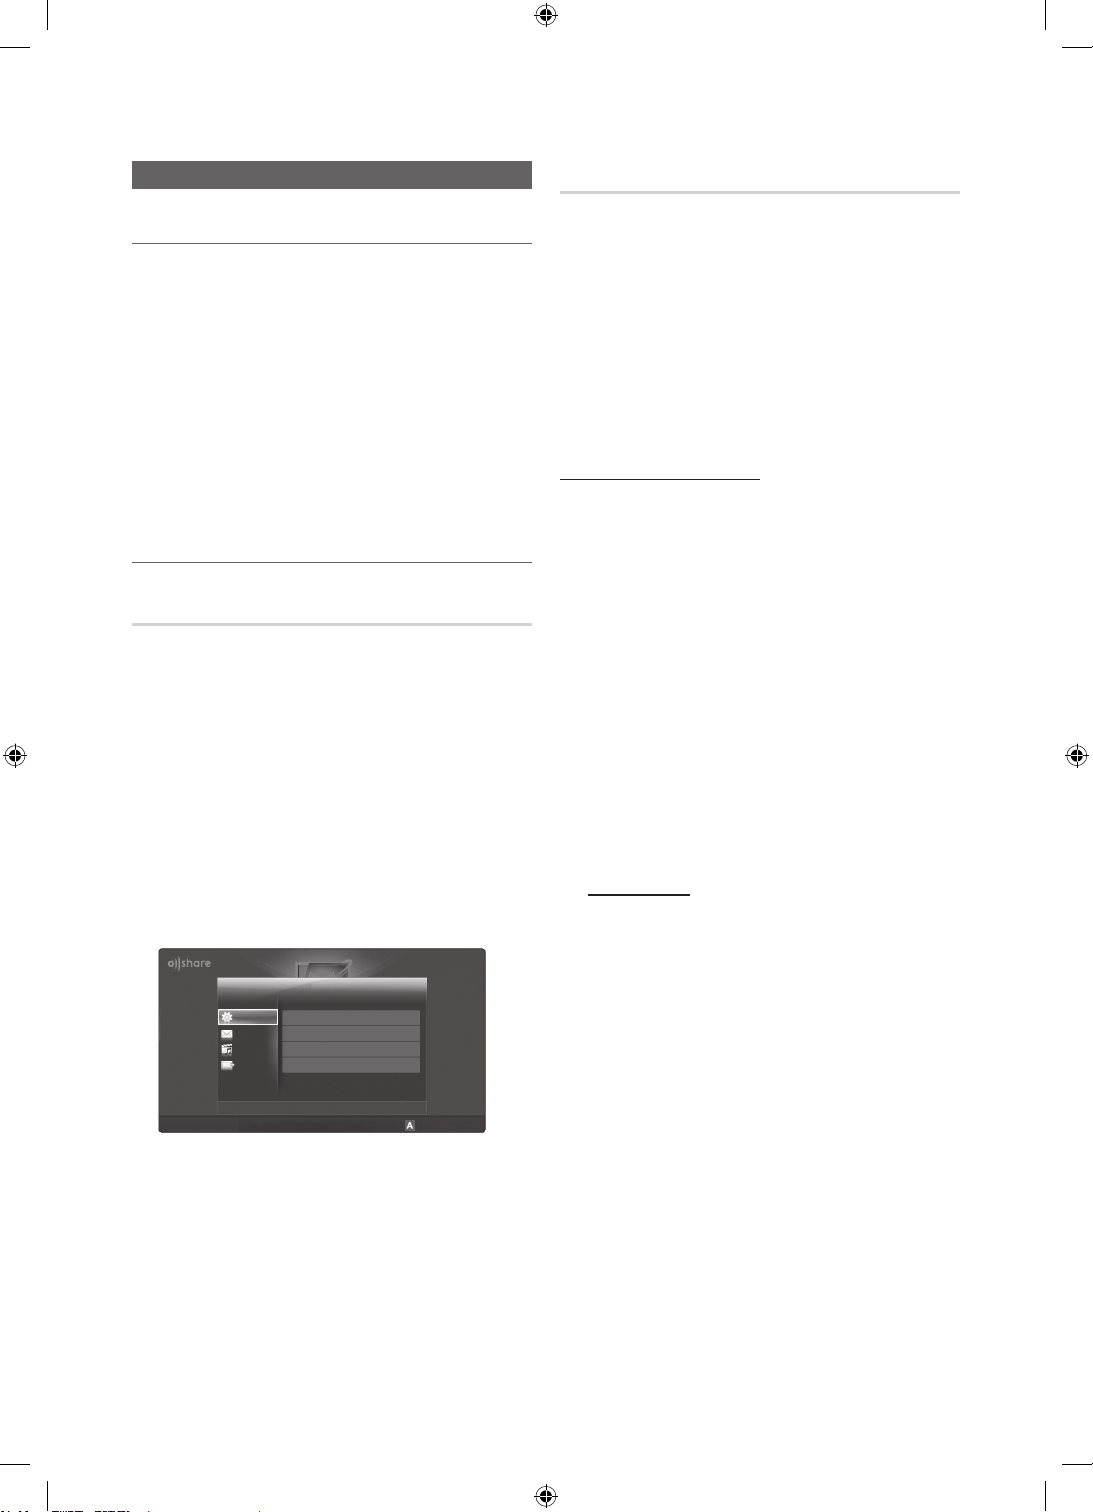
Advanced Features
AllShare™
3/7
AllShare
About AllShare
AllShare connects your TV, mobile phones and other
devices which are compatible through a network. On your
TV, you can view call arrivals, SMS messages and schedules
set on your mobile phones. In addition, you can play media
contents including videos, photos and music saved on your
mobile phones or the other devices (such as your PC) by
controlling them on the TV via the network. Additionally, you
can use your TV as a monitor for your mobile when browsing
a web page.
✎
For more information, visit “www.samsung.com” or
contact the Samsung call centre. Mobile devices may
need additional software installation. For details, refer to
each device’s user’s guide.
Setting Up AllShare
Setup
■ Message (On / Off): Enables or disables the message
function (for call arrivals, SMS messages and schedules
set on your mobile phones).
■ Media (On / Off): Enables or disables the media
function. When the media function is on, it plays videos,
photos and music from a mobile phone or other device
that supports AllShare.
■ ScreenShare (On / Off): Enables or disables the
ScreenShare function for using mobile phone as a
remote control.
■ TV name: Sets the TV name so you can find it easily on
a mobile device.
✎
If you select User Input, you can type on the TV
using the OSK (On Screen Keyboard).
Setup
Message : On
Media : On
Message
Media
ScreenShare : On
TV name : Home TV
ScreenShare
Message / Media / ScreenShare
Shows a list of mobile phones or connected devices which
have been set up with this TV for using the Message,
Media, or ScreenShare function.
✎
The Media function is available in all mobile devices
which support AllShare.
■ Allowed / Denied: Allows/Blocks the mobile phone.
■ Delete: Deletes the mobile phone from the list.
✎
This function only deletes the name of the mobile
from the list. If the deleted mobile device is turned
on or trys to connect to the TV, it may appear on
the list again.
Using the Message Function
Using this function, you view call arrivals, SMS messages
and schedules set on the mobile phone through the alarm
window while watching TV.
✎
NOTE
To disable the alarm window, set Message to Off in
x
Setup of AllShare.
If OK is selected, or if OK is not selected after the
x
message has appeared three times, the message
will be deleted. The message is not deleted from the
mobile phone.
The alarm window can be displayed while using
x
some applications such as Media Play etc. To view
the contents of a message, switch to TV viewing
mode.
When a message from an unknown mobile phone is
x
displayed, select the mobile phone on the message
menu in AllShare and select Denied to block the
phone.
Message View
If a new SMS message arrives while you are watching
TV, the alarm window appears. If you click the OK
button, the contents of the message are displayed.
✎
You can configure the viewing settings for SMS
messages on your mobile phones. For the
procedures, refer to the mobile phone manual.
✎
Some types of characters may be displayed as
blank or broken characters.
Select
Return
Exit
Setup
Return
English
56
[UC9000]BN68-02820F-ZT.indb 56 2010-05-24 오후 5:25:17
Page 57
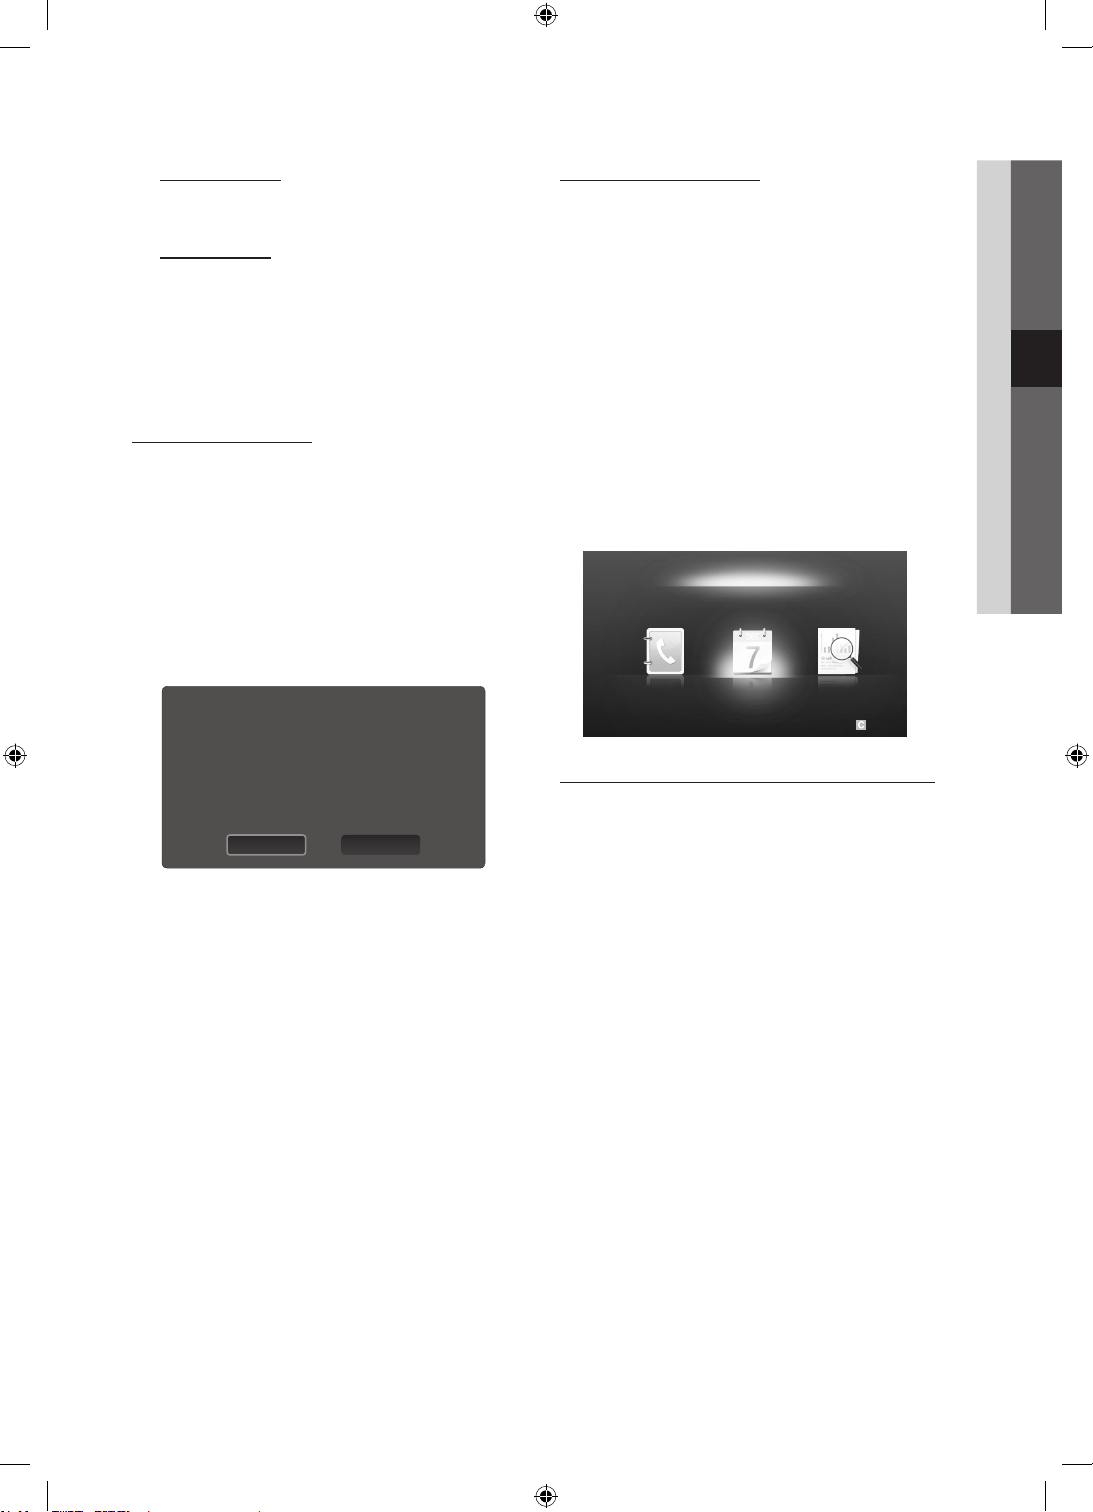
Call Arrival Alarm
If a call arrives while you are watching TV, the alarm
window appears.
Schedule Alarm
While you are watching TV, the alarm window appears to
display the registered event.
✎
You can configure viewing settings for schedule
contents on your mobile phones. For the
procedures, refer to the mobile phone manual.
✎
Some special characters may be displayed as
blank or broken characters.
Using the Media Function
An alarm window appears informing the user that the media
contents (videos, photos, music) sent from a mobile phone
will be displayed on your TV. The contents are played
automatically 3 seconds after the alarm window appears.
If you press the RETURN or EXIT button when the alarm
window appears, the media contents are not played.
✎
NOTE
If the media function executes for the first time,
x
the warning popup window appears. Press the
ENTER button to select Allow, then you can use
Media function on that device.
“Unknown Device 0” is requesting that the media le be allowed to play.
If you wish to allow the media le to be played at your device, please press
“Allow”, otherwise press “Deny”.
You can also change the setting (or resetting) of this feature at “AllShare
Setup”.
Warning: Please note that if your device is connected to unsecured or
unfamiliar network, unwanted or inappropriate contents might be played.
If you are not sure about the network's identity or content’s appropriateness,
we strongly recommend that you do not “Allow” the request to play.
DenyAllow
To turn off the media contents transmission from
x
the mobile phone, set Media to Off in the AllShare
setup.
Contents may not be played on your TV depending
x
on their resolution and format.
The ENTER and ◄ / ► buttons may not work
x
depending on the type of media content.
Using the mobile device, you can control the media
x
playing. For details, refer to each mobile’s user’s
guide.
When you want to play media contents from
x
your PC, select the PC icon on the main display
of AllShare. Then the TV’s Media Play menu
automatically changes. For more detail information,
refer to “Media Play” (p. 40).
Using ScreenShare Function
Screenshare displays the same web page as provide in
mobile. Using ScreenShare, you can open the various
contents saved in a mobile phone. For example, the image
below displays an access page for contents from a mobile.
You can read the mobile’s various files and view the phone
book and calendar on the TV. Also, in phone book, you can
make a call to other person, or can send to SMS.
✎
NOTE
In Samsung mobile, ScreenShare must be installed
x
and the supporting application must be executed;
then you can use the ScreenShare function.
Available buttons on your remote control may vary
x
for each page.
Doc Viewer can read files in doc format, but cannot
x
modify them.
The screen display may differ depending on the
x
connected device.
My Mobile
Contacts Calendar Doc Viewer
Select Return
Using your Samsung phone to control your TV Simply
Before you can use this feature, you must connect to
a Samsung mobile phone that supports ScreenShare
functions. When operating the TV with your mobile phone,
only the POWER,
supported.
✎
Even if you keep pressing down on a control button
(channel or volume) on the mobile phone, the value will
only go up or down by one unit.
, P/ and MUTE buttons are
04 Advanced Features
English
57
[UC9000]BN68-02820F-ZT.indb 57 2010-05-24 오후 5:25:18
Page 58
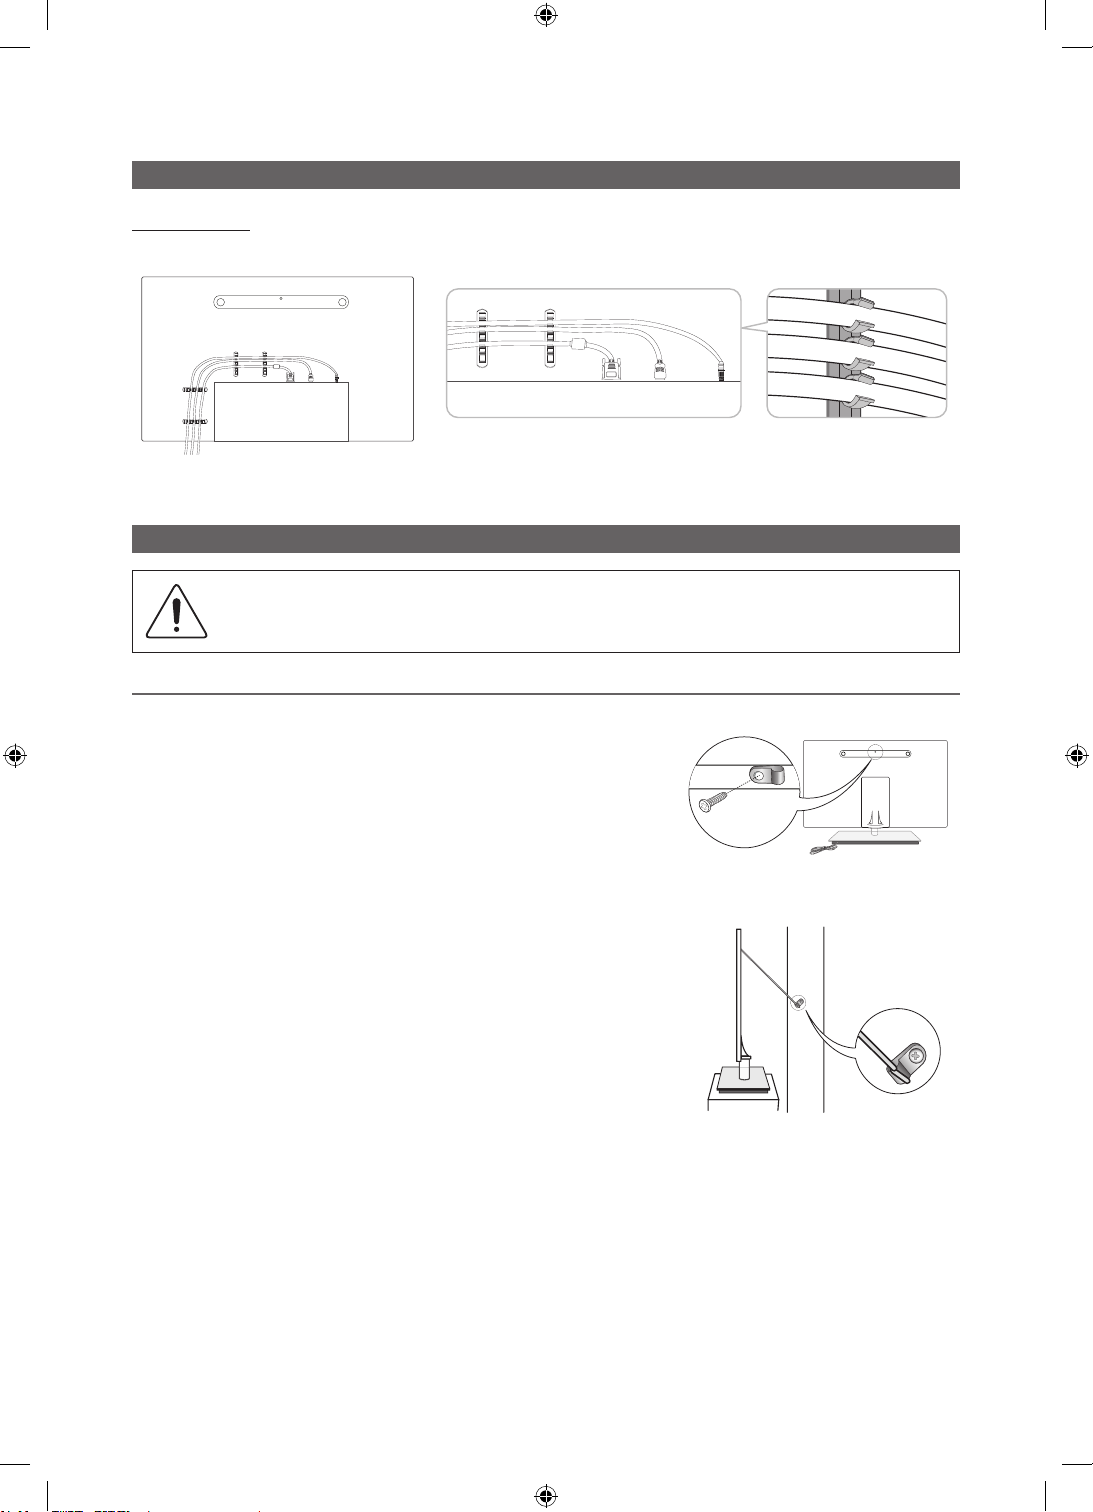
Other Information
Other Information
Assembling the Cables
Wall-Mount Type
(UE46C9000ZP, UE55C9000ZP)
✎
Do not pull the cables too hard when arranging them. This may cause damage to the product’s connection terminals.
Securing the TV to the wall
Caution: Pulling, pushing, or climbing onto the TV may cause the TV to fall. In particular, ensure that your
children do not hang over or destabilize the TV; doing so may cause the TV to tip over, resulting in serious
injuries or death. Follow all safety precautions provided in the included Safety Flyer. For added stability and
safety, install the anti-fall device as follows.
To Avoid the TV from Falling
(UE46C9000ZP, UE55C9000ZP)
1. Put the screws into the clamps and firmly fasten them onto the wall.
Confirm that the screws have been firmly installed onto the wall.
✎
You may need additional material such as an anchor depending on
the type of wall.
✎
Since the necessary clamps, screws, and string are not supplied,
please purchase these additionally.
2. Remove the screws from the back centre of the TV, put the screws into
the clamps, and then fasten the screws onto the TV again.
3. Connect the clamps fixed onto the TV and the clamps fixed onto the wall
with a strong cable and then tie the string tightly.
✎
NOTE
Install the TV near to the wall so that it does not fall backwards.
x
It is safe to connect the string so that the clamps fixed on the
x
wall are equal to or lower than the clamps fixed on the TV.
Untie the string before moving the TV.
x
4. Verify all connections are properly secured. Periodically check
connections for any sign of fatigue for failure. If you have any doubt about
the security of your connections, contact a professional installer.
Wall
English
58
[UC9000]BN68-02820F-ZT.indb 58 2010-05-24 오후 5:25:19
Page 59
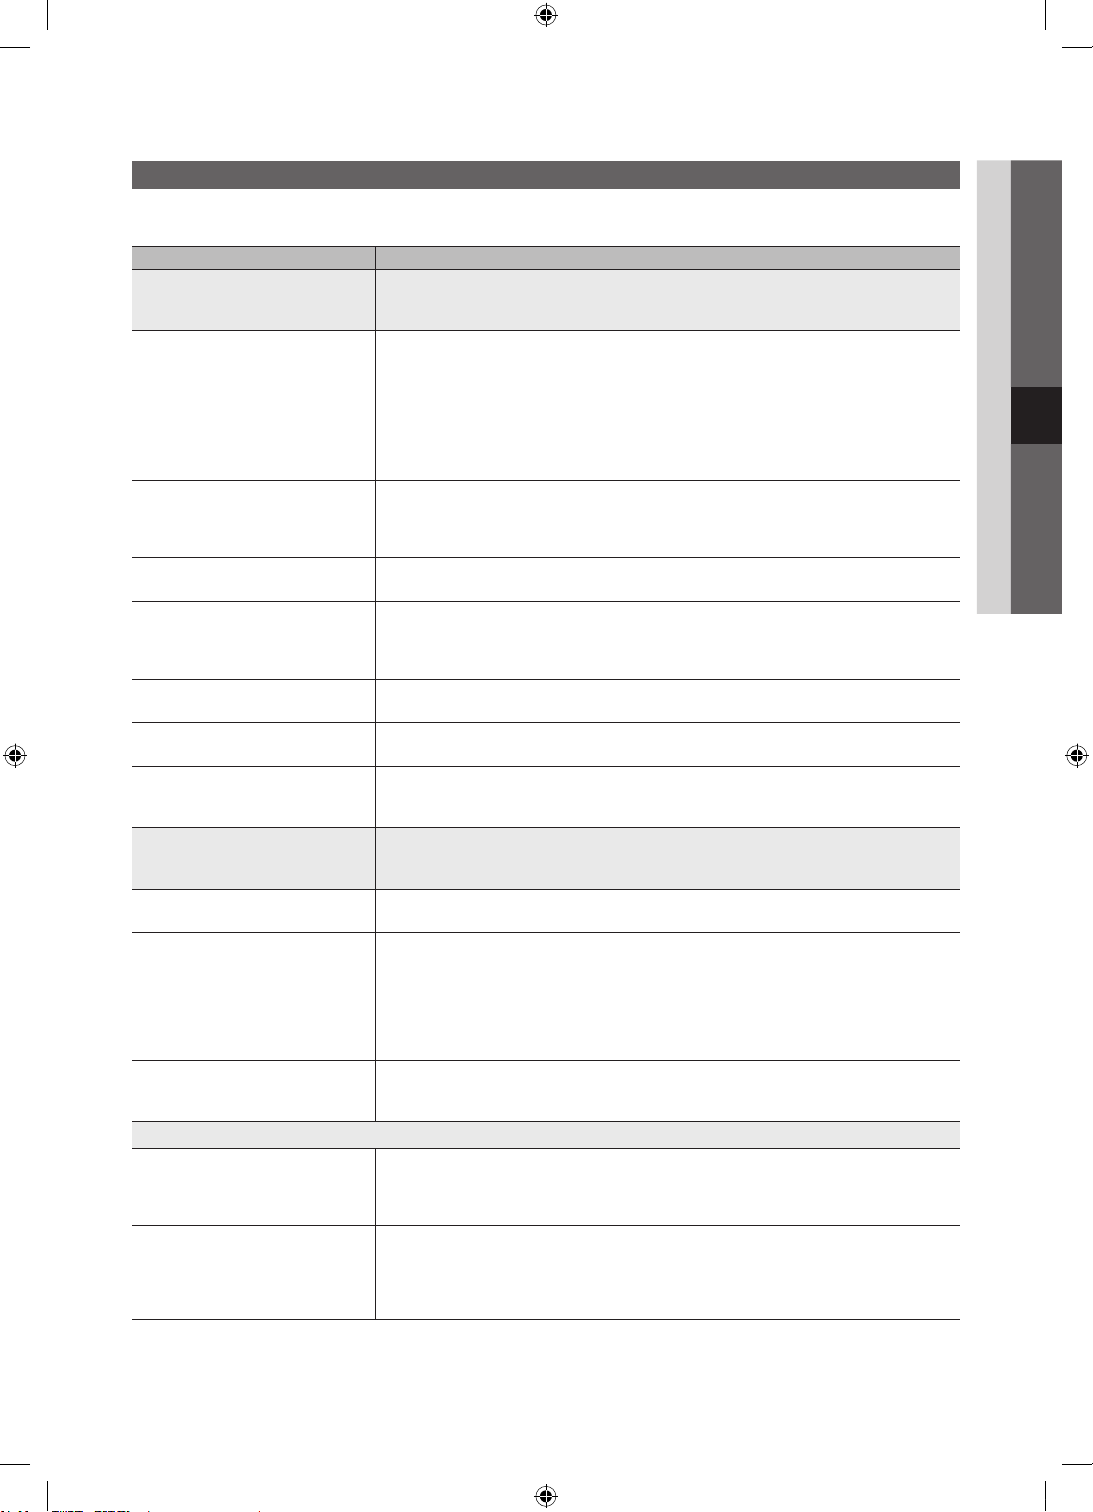
Troubleshooting
If you have any questions about the TV, first refer to this list. If none of these troubleshooting tips apply, please visit “www.
samsung.com,” then click on Support, or contact the call centre listed on the back-cover of this manual.
Issues Solutions and Explanations
Picture Quality First of all, please perform the Picture Test and confirm that your TV is properly displaying test image.
The TV image does not look as good as it
did in the store.
The picture is distorted: macro block error,
small block, dots, pixelization
Colour is wrong or missing. • If you’re using a component connection, make sure the component cables are connected to the
There is poor colour or brightness.
There is a dotted line on the edge of the
screen.
The picture is black and white. • If you are using an AV composite input, connect the video cable (yellow) to the Green jack of
When changing channels, the picture
freezes or is distorted or delayed.
Sound Quality First of all, please perform the Sound Test to confirm that your TV audio is properly operating.
There is no sound or the sound is too low
at maximum volume.
The picture is good but there is no sound. • Set the Speaker Select option to TV Speaker in the sound menu (p. 26).
The speakers are making an inappropriate
noise.
No Picture, No Video
The TV won’t turn on. • Make sure the AC power cord is securely plugged in to the wall outlet and the TV.
The TV turns off automatically. • Ensure the Sleep Timer is set to Off in the Setup menu (p. 27).
(go to MENU - Support - Self Diagnosis - Picture Test) (p. 31)
If the test image is properly displayed, the poor picture may caused by the source or signal.
• If you have an analogue cable/set top box, upgrade to a digital set top box. Use HDMI or Component
cables to deliver HD (high definition) picture quality.
• Cable/Satellite subscribers: Try HD stations from the channel line up.
• Antenna connection: Try HD stations after performing Auto programme.
Many HD channels are up scaled from SD(Standard Definition) contents.
✎
• Adjust the Cable/Set top box video output resolution to 1080i or 720p.
• Make sure you are watching the TV at the minimum recommended distance based on the size and
definition of the signal.
• Compression of video contents may cause picture distortion especially in fast moving pictures such
as sports and action movies.
• Low signal level or bad quality can cause picture distortion. This is not a TV issue.
• Mobile phones used close to the TV (cca up to 1m) may cause noise in picture on analog and digital TV.
correct jacks. Incorrect or loose connections may cause colour problems or a blank screen.
• Adjust the Picture options in the TV menu. (go to Picture mode / Colour / Brightness / Sharpness) (p. 20)
• Adjust Energy Saving option in the TV menu. (go to MENU - Picture - Eco Solution -
Energy Saving) (p. 20)
• Try resetting the picture to view the default picture settings. (go to MENU - Picture - Picture Reset) (p. 24).
• If the picture size is set to Screen Fit, change it to 16:9 (p. 21).
• Change cable/set top box resolution.
component input 1 on the TV.
• If connected with a cable box, please try to reset the cable box. Reconnect the AC cord and wait until
the cable box reboots. It may take up to 20 minutes.
• Set the output resolution of the cable box to 1080i or 720p.
(go to MENU - Support - Self Diagnosis - Sound Test) (p. 31)
If the audio is OK, the sound problem may caused by the source or signal.
• Please check the volume the of external device connected to your TV.
• If you are using an external device, make sure the audio cables are connected to the correct audio
input jacks on the TV.
• If you are using an external device, check the device’s audio output option (ex. you may need to
change your cable box’s audio option to HDMI when you have a HDMI connected to your TV).
• If you are using a DVI to HDMI cable, a separate audio cable is required.
• If your TV has a headphone jack, make sure there is nothing plugged into it.
• Check the cable connections. Make sure a video cable is not connected to an audio input.
• For antenna or cable connections, check the signal strength. Low signal level may cause sound
distortion.
• Make sure the wall outlet is working.
• Try pressing the POWER button on the TV to make sure the problem is not the remote. If the TV turns
on, refer to “The remote control does not work” below.
• If your PC is connected to the TV, check your PC power settings.
• Make sure the AC power cord is plugged in securely to the wall outlet and the TV.
• When watching TV from an antenna or cable connection, the TV will turn off after 10 ~ 15 minutes if
there is no signal.
05 Other Information
English
59
[UC9000]BN68-02820F-ZT.indb 59 2010-05-24 오후 5:25:20
Page 60
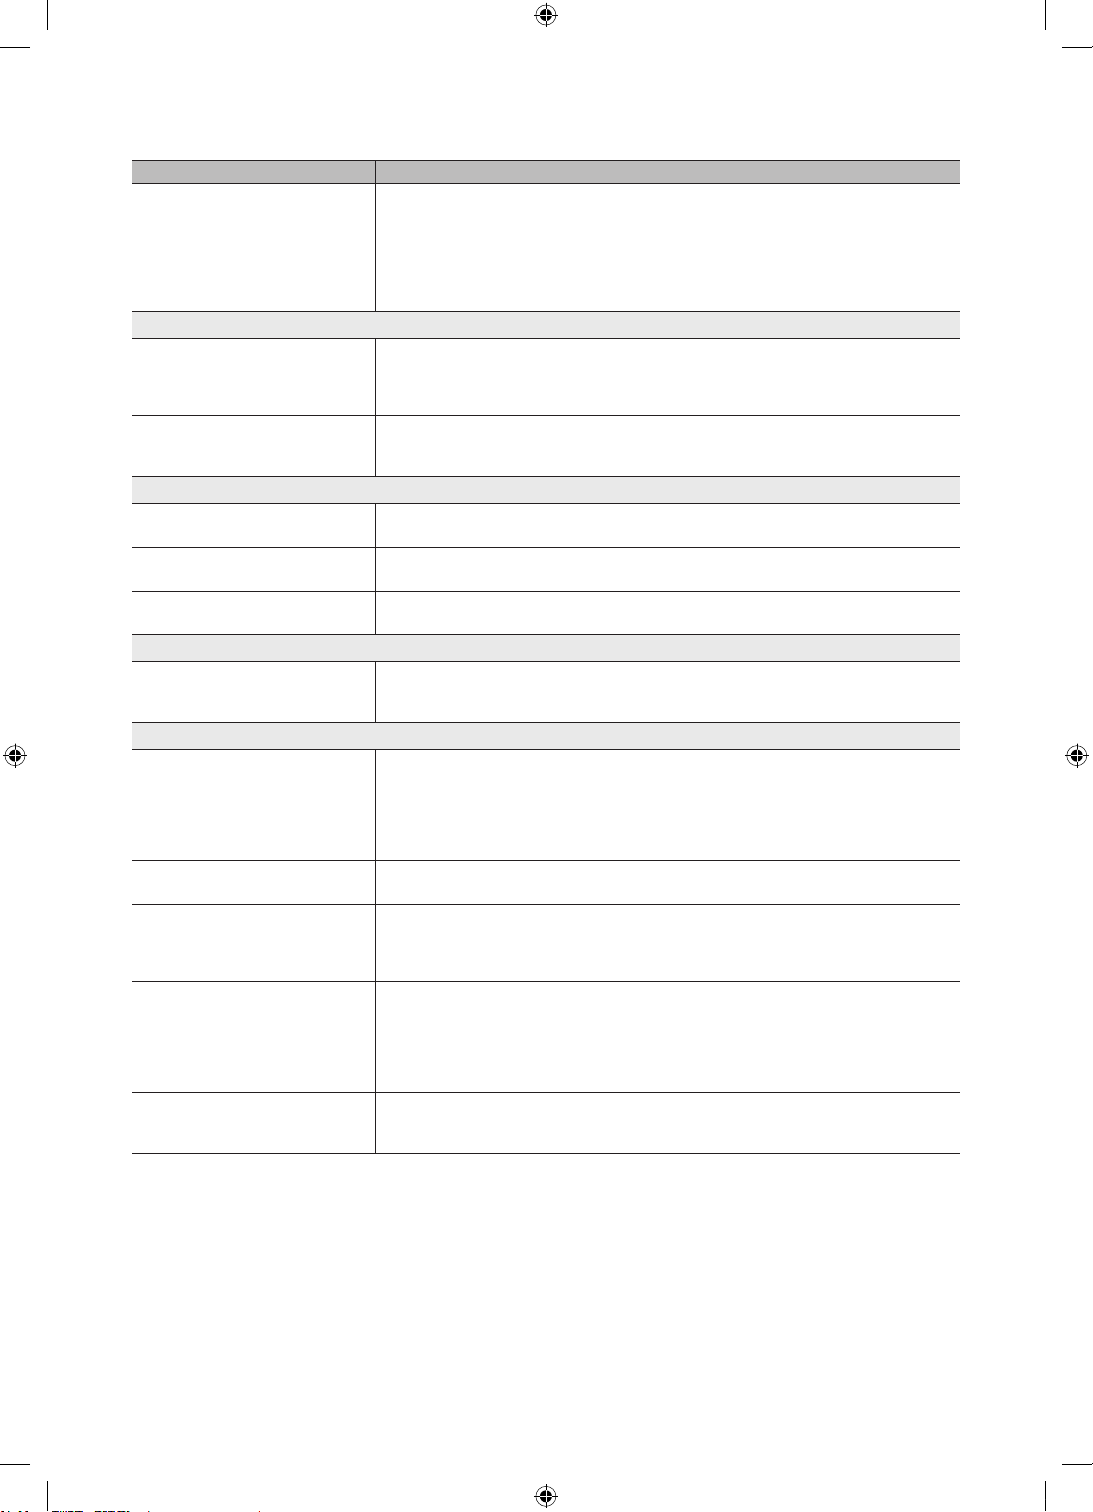
Other Information
Issues Solutions and Explanations
There is no picture/Video. • Check cable connections (remove and reconnect all cables connected to the TV and external
RF(Cable/Antenna) Connection
The TV is not receiving all channels. • Make sure the Antenna cable is connected securely.
The picture is distorted: macro block error
small block, dots, pixelization
PC Connection
A “Mode Not Supported” message
appears.
“PC” is always shown on the source list,
even if a PC is not connected.
The video is OK but there is no audio. • If you are using a HDMI connection, check the audio output setting on your PC.
Network Connection (Depending on Models)
Wireless network connection failed. • Samsung Wireless USB dongle is required to use a wireless network.
Recording / Timeshift
The USB device is not recognized or a
Device Format, Checking Device or
Device Performance Test fails.
A message prompts me to format a USB
device that has been working well.
The recording function does not work. • Check that a USB device is connected.
Timeshift Mode does not work. • Check that a USB device is connected.
A message indicates a performance test
failure, and the recording and
Timeshift Mode functions do not work.
devices).
• Set your external devices’ (Cable/Set top Box, DVD, Blu-ray etc) video outputs to match the
connections to the TV input. For example, if an external device’s output is HDMI, it should be connect
to an HDMI input on the TV.
• Make sure your connected devices are powered on.
• Be sure to select the TV’s correct source by pressing the SOURCE button on the TV remote.
• Please try Plug & Play (Initial setup) to add available channels to the channel list. Go to MENU -
Setup - Plug & Play (Initial setup) and wait for all available channels to be stored (p. 11).
• Verify the Antenna is positioned correctly.
• Compression of video contents may cause picture distortion, especially with fast moving pictures
such as sports and action movies.
• A low signal can cause picture distortion. This is not a TV issue.
• Set your PC’s output resolution and frequency so they match the resolutions supported by the TV (p. 32).
• This is normal; “PC” is always shown on the source list, regardless of whether a PC is connected.
• Make sure the Network Connection is set to Wireless (p. 35).
• Make sure the TV is be connected to a wireless IP sharer (router).
• See the manual for the USB device to check that the USB device supports recording.
• If the USB device has a lock, ensure it is off.
• Check that the USB device can be formatted when connected to the PC. Connect the USB to the TV
and format it. (Formatting may fail intermittently.)
• If a Device Performance Test or formatting failed, it means that there is a problem with the USB
hardware or the performance of the USB hardware is too low.
• If the USB device has a lock, ensure it is off.
• Recover the USB device using the recovery function in Checking Device.
• Check that the channel is a recordable digital channel.
• If the signal is weak or does not exist, the recording function will automatically be closed.
• The TV will not record if the USB device has no free memory space. Check that this is not the case.
• Radio channels and analogue broadcasts are not supported.
• Data broadcast channels are not supported.
• If the signal is weak or does not exist, the Timeshift Mode function will automatically be closed.
• Timeshift Mode cannot be performed if the USB device has no free memory space. Check that this
is not the case.
• These problems may occur if you use a low-capacity USB device that does not support recording.
We recommend using the USB HDD.
English
60
[UC9000]BN68-02820F-ZT.indb 60 2010-05-24 오후 5:25:21
Page 61
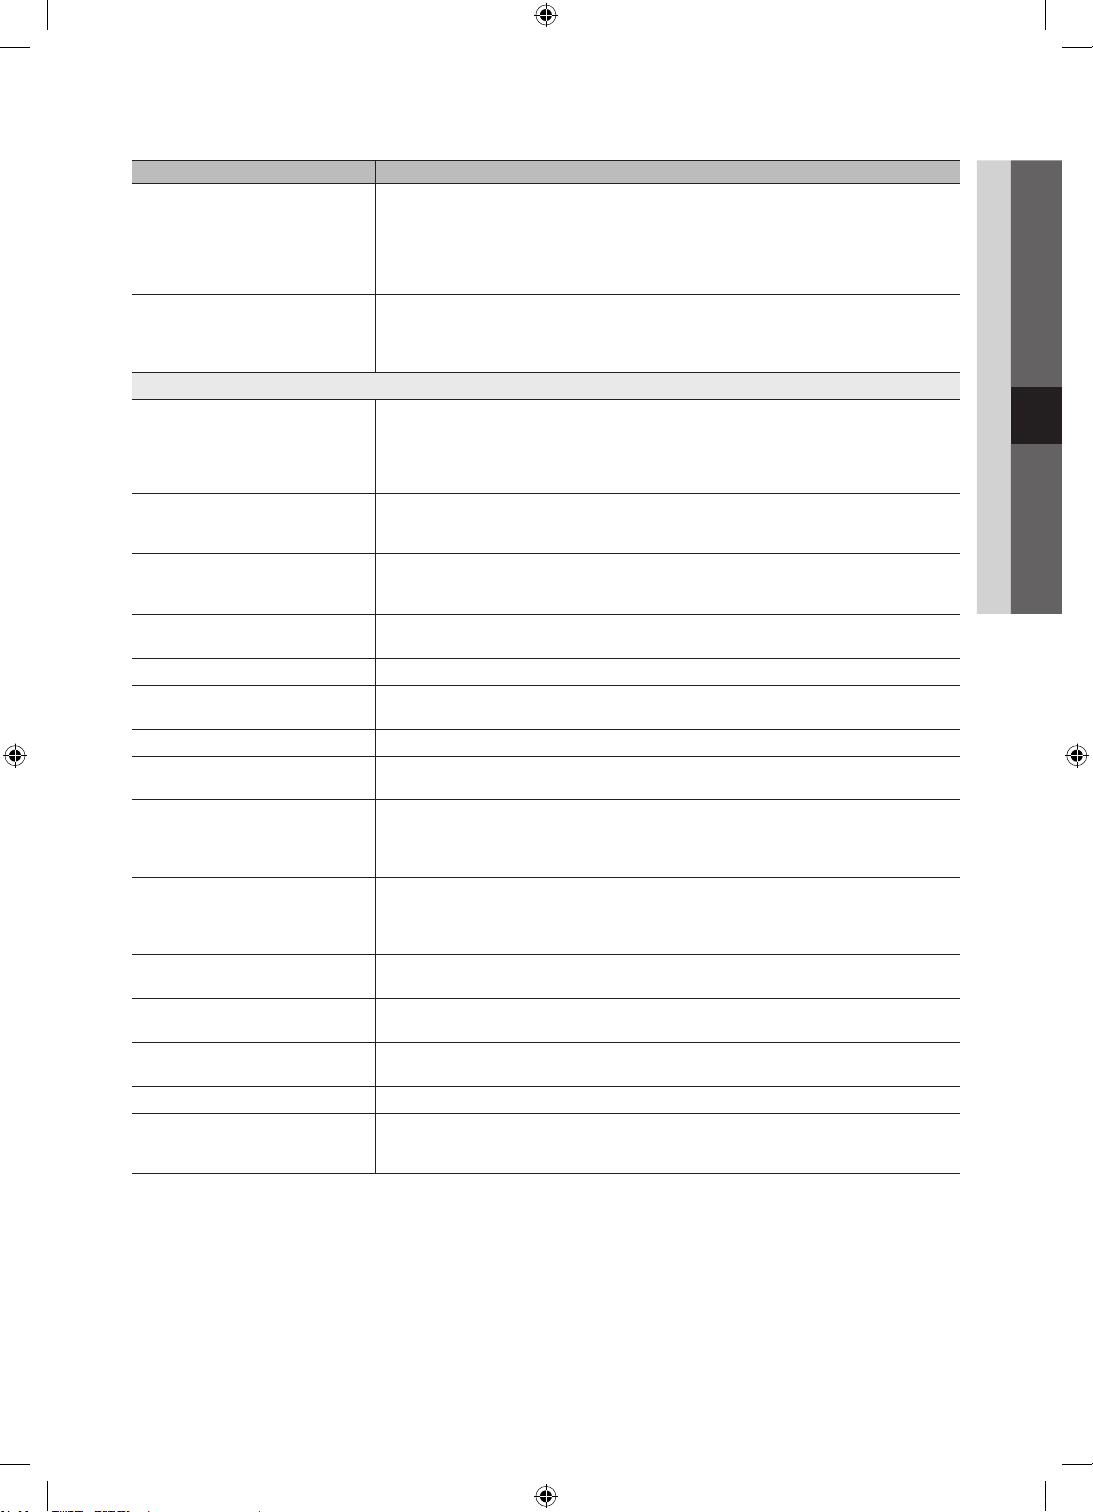
Issues Solutions and Explanations
A scheduled recording has failed. • A scheduled recording is disabled for certain operations (formatting, performance test, error checking,
Several recording devices are connected
but the TV stopped recording.
Others
The picture won’t display in full screen. • HD channels will have black bars on either side of the screen when displaying up scaled SD (4:3)
The remote control does not work. • Replace the remote control batteries with the poles (+/–) in the right direction.
The cable/set top box remote control
doesn’t turn the TV on or off, or adjust the
volume.
A “Mode Not Supported” message
appears.
There is a plastic smell from the TV. • This smell is normal and will dissipate over time.
The TV Signal Information is unavailable
in the Self Diagnostic Test menu.
The TV is tilted to the side. • Remove the base stand from the TV and reassemble it.
The channel menu is greyed out.
(unavailable)
Your settings are lost after 30 minutes or
every time the TV is turned off.
You have intermittent loss of audio or
video.
You see small particles when you look
closely at the edge of the frame of the TV.
The message “Scramble signal” or “Weak
Signal/No Signal” appears.
You turned the TV off 45 minutes ago, and
it turned on again.
There are recurrent picture/sound issues. • Check and change the signal/source.
A reaction may occur between the rubber
cushion pads on the base stand and the
top finish of some furniture.
deleting) that access the file system of a USB device.
• If there is no USB device connected, the TV will not record even if the scheduled time is reached.
• The TV will not record if the USB device has no free memory space. Check that this is not the case.
• If you record a channel locked with Parental lock, the PIN input window will appear when you try to
play back the recording.
• If multiple recording devices are connected and the device set as Default Recording Device has no
free memory space, the recording function will be closed. Attempt recording again. The device with
the most free memory space will automatically be set as Default Recording Device and the TV will
start recording.
contents.
• Black bars on the top and bottom will appear during movies that have aspect ratios different from
your TV.
• Adjust the picture size options on your external device or TV to full screen.
• Clean the sensor’s transmission window on the remote.
• Try pointing the remote directly at the TV from 5~6 feet away.
• Programme the Cable/Set top box remote control to operate the TV. Refer to the Cable/Set user
manual for the SAMSUNG TV code.
• Check the supported resolution of the TV, and adjust the external device’s output resolution
accordingly. Refer to the resolution settings on page 32 of this manual.
• This function is only available with digital channels from an Antenna / RF/Coax connection (p. 31).
• The Channel menu is only available when the TV source is selected.
• If the TV is in the Store Demo mode, it will reset audio and picture settings every 30 minutes. Change
the settings from Store Demo mode to Home Use mode in the Plug & Play (Initial setup) procedure.
Press the SOURCE button to select TV mode, and go to MENU → Setup → Plug & Play (Initial
setup) → ENTER
• Check the cable connections and reconnect them.
• Loss of audio or video can be caused by using overly rigid or thick cables. Make sure the cables are
flexible enough for long term use. If mounting the TV to the wall, we recommend using cables with 90
degree connectors.
• This is part of the product’s design and is not a defect.
• If you are using a CAM CARD (CI/CI+), check that it is installed into the common interface slot.
• If there is still a problem, pull the CAM CARD out of the TV and insert it into the slot again.
• It is normal. The TV operates the OTA (Over The Aerial) function itself to upgrade firmware
downloaded whilst your watching TV.
• To prevent this, use felt pads on any surface of the TV that comes in direct contact with furniture.
(p. 11).
05 Other Information
✎
This TFT LED panel uses a panel consisting of sub pixels which require sophisticated technology to produce. However,
there may be a few bright or dark pixels on the screen. These pixels will have no impact on the performance of the
product.
English
61
[UC9000]BN68-02820F-ZT.indb 61 2010-05-24 오후 5:25:21
Page 62
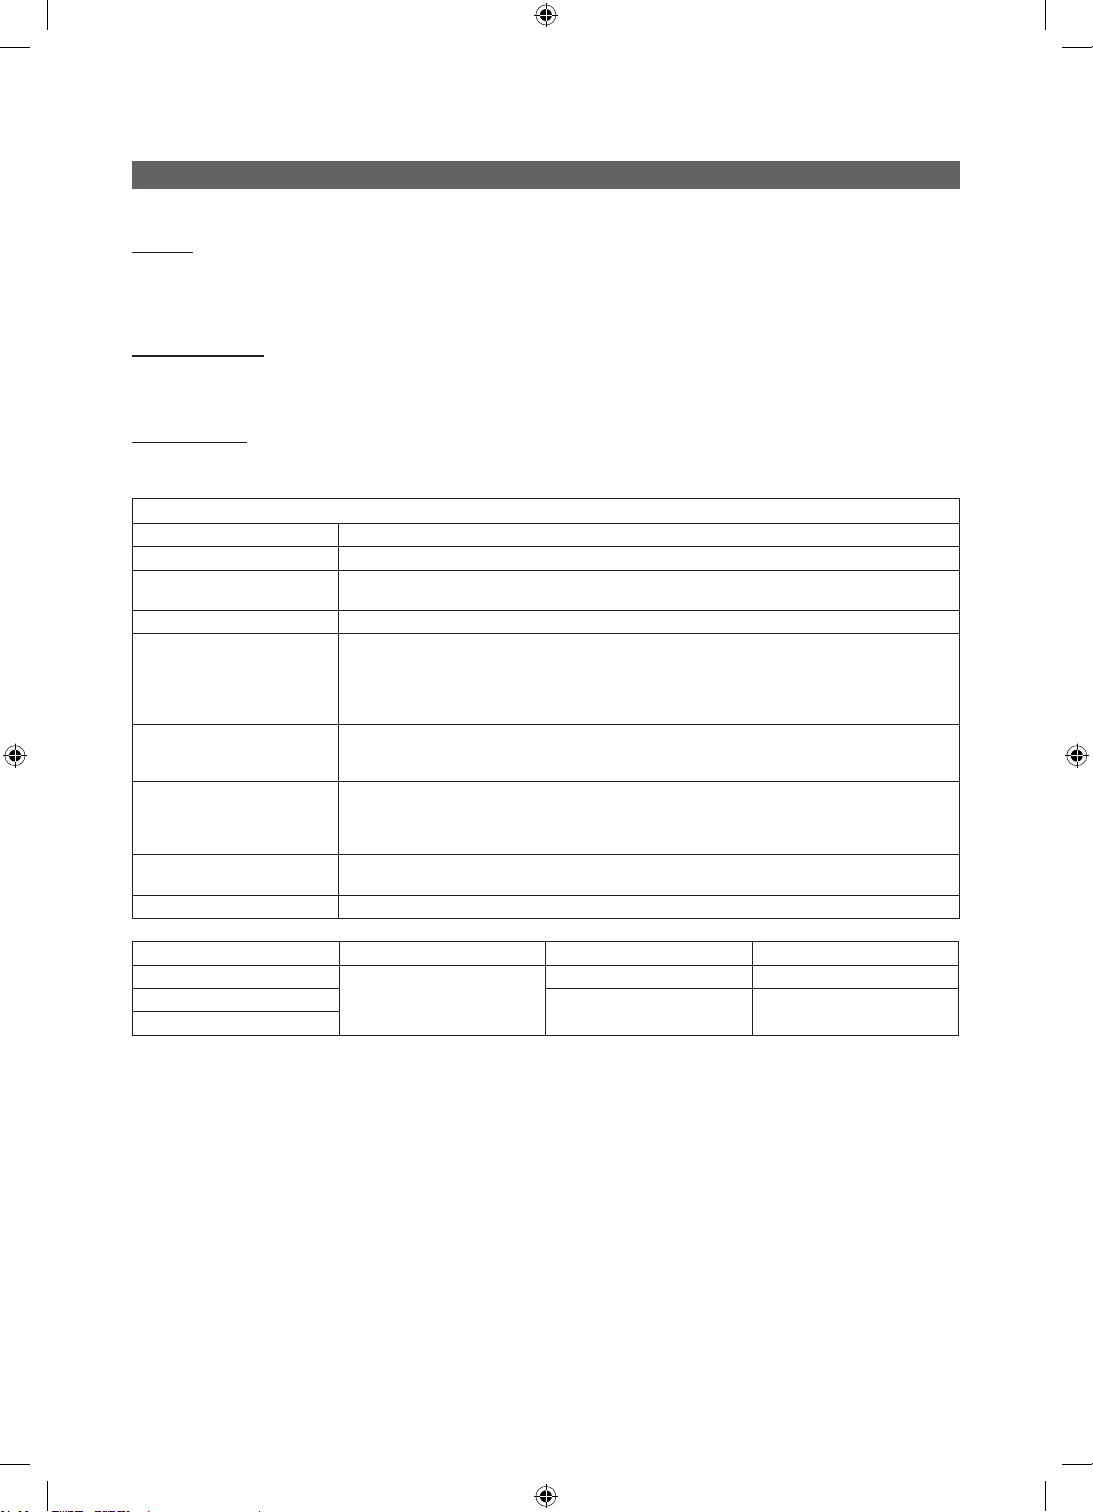
Other Information
Enclosed Wireless LAN Adapter
WIS09ABGN2
Features
• Compatible with IEEE 802.11a/b/g and 802.11n draft 2.0
• Supports USB 2.0
• Compact and Lightweight Pocket-Sized Design
• Supported Model: The Enclosed wireless LAN Adapter will only be work with the TV is was shipped with.
Safety Precautions
• Do not let children swallow the product or play with the plastic bag. Keep the product and the plastic bag out of the reach of children.
• Do not let water or other liquids come into contact with the product, as it may result in damage.
• Keep the product away from direct sunlight, fire or a heat source such as a heater. This may reduce the product lifetime or result in fire.
Warranty: 1 Year
• If the product is not working properly due to a performance defect that appears under normal circumstances within the warranty period, please visit
the retailer where you purchased it.
Specifications
Standard IEEE 802.11 a/b/g/n ( n : draft 2.0)
Host Interface USB 2.0
Frequency Range 2.412 ~ 2.4835GHz
Security 64/128bit WEP, WPA /WPA2, 802.1x, WPS
Output Power 802.11a: 11dBm at 54Mbps
Data Rate 802.11a/g: 54,48,36,24,18,12,9 and 6Mbps
Sensitivity 802.11a: –68dBm at 54Mbps
Power consumption TX: 500mA at continuous transmit mode (2 Tx chains on )
Dimensions (L X W X D) 84 X 26.6 X 16 mm
5.15 ~ 5.850GHz
802.11b: 17dBm at 11, 5.5, 2, and 1Mbps
802.11g: 14dBm at 54Mbps
802.11n(2.4GHz): 14dBm (20MHz) / 12dBm (40MHz)
802.11n(5GHz): 11dBm (20MHz) / 9dBm (40MHz)
802.11b: 11,5.5,2 and 1Mbps
802.11n: up to 300Mbps (40MHz / spatial streams: 2)
802.11b: –84dBm at 11Mbps
802.11g: –68dBm at 54Mbps
802.11n: –68dBm (20MHz) / –65dBm (40MHz)
RX: 300mA at continuous receive mode (2 Rx chains on )
Ideal For 802.11n (5GHz) 802.11n (2.4GHz) 802.11 a/b/g
streaming HD video
streaming SD video
music, photo
• Network conditions and environmental factors (including but not limited) volume of network traffic, building materials and construction, may lower
actual data throughput rate.
• Environmental conditions will affect wireless signal coverage.
• Video clips with lower than 20Mbps bit-rates are recommended for the wireless video streaming.
English
62
[UC9000]BN68-02820F-ZT.indb 62 2010-05-24 오후 5:25:22
recommended
not recommended not recommended
recommended recommended
Page 63
Licence
TheaterSound, SRS and the symbol are trademarks of SRS Labs, Inc.
TheaterSound technology is incorporated under licence from SRS Labs, Inc.
Manufactured under licence from Dolby Laboratories. Dolby and the double-D symbol are
trademarks of Dolby Laboratories.
Manufactured under licence under U.S. Patent #’s: 5,451,942; 5,956,674; 5,974,380; 5,978,762;
6,487,535 & other U.S. and worldwide patents issued & pending. DTS and the Symbol are
registered trademarks. & DTS 2.0+ Digital Out and the DTS logos are trademarks of DTS, Inc.
Product Includes software. © DTS, Inc. All Rights Reserved.
DivX Certified to play DivX video up to HD 1080p, including premium content.
ABOUT DIVX VIDEO: DivX® is a digital video format created by DivX,Inc. This is an official DivX Certified device that
plays DivX video. Visit www.divx.com for more information and software tools to convert your files into DivX video.
ABOUT DIVX VIDEO-ON-DEMAND: This DivX Certified® device must be registered in order to play DivX Video-onDemand (VOD) content. To generate the registration code, locate the DivX VOD section in the device setup menu. Go
to vod.divx.com with this code to complete the registration process and learn more about DivX VOD.
Pat. 7,295,673; 7,460,688; 7,519,274
05 Other Information
GUIDE Plus+ Trademark / Licence / Patent Notice
GUIDE Plus+ is (1) a registered trademark or trademark of, (2) manufactured under license from
and (3) subject of various international patents and patent applications owned by, or licensed to,
Gemstar-TV Guide International, Inc. and/or its related affiliates.
GUIDE Plus+ Legal Notice:
GEMSTAR-TV GUIDE INTERNATIONAL, INC. AND/OR ITS RELATED AFFILIATES ARE NOT IN ANY WAY LIABLE FOR
THE ACCURACY OF THE PROGRAM SCHEDULE INFORMATION PROVIDED BY THE GUIDE PLUS+ SYSTEM. IN NO
EVENT SHALL GEMSTAR-TV GUIDE INTERNATIONAL, INC. AND /OR ITS RELATED AFFILIATES BE LIABLE FOR ANY
AMOUNTS REPRESENTING LOSS OF PROFITS, LOSS OF BUSINESS, OR INDIRECT, SPECIAL, OR CONSEQUENTIAL
DAMAGES IN CONNECTION WITH THE PROVISION OR USE OF ANY INFORMATION, EQUIPMENT, OR SERVICES
RELATING TO THE GUIDE PLUS+ SYSTEM.
Open Source Licence Notice
In the case of using open source software, Open Source Licences are available on the product menu.
Open Source Licence Notice is written only English.
English
63
[UC9000]BN68-02820F-ZT.indb 63 2010-05-24 오후 5:25:23
Page 64
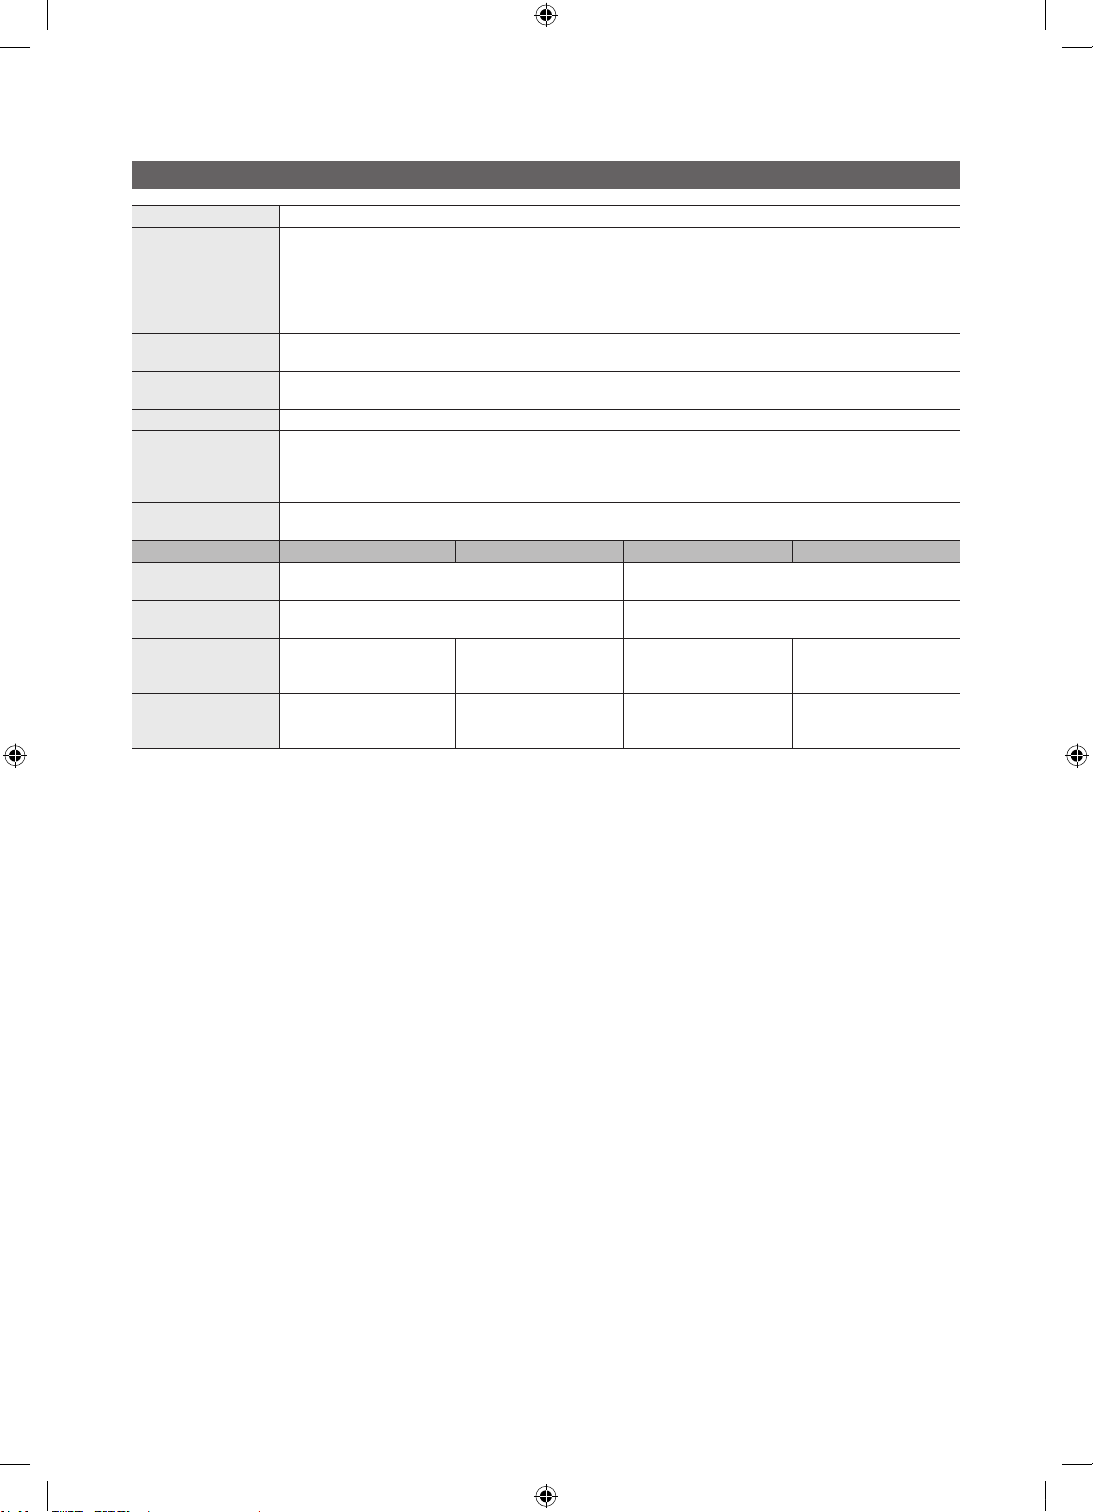
Other Information
Specifications
Panel native 1920 x 1080
Environmental
Considerations
Operating Temperature
Operating Humidity
Storage Temperature
Storage Humidity
TV System Analogue: B/G, D/K, L, I (Depending on your country selection)
Colour/Video System Analogue: PAL, SECAM, NTSC-4.43, NTSC-3.58, PAL60
Sound System BG. OK NICAM. MPEGl
HDMI IN 1 ~ 4 Video: 1080 24p, 1080p, 1080i, 720p, 576p, 576i, 480p, 480i
Stand Swivel
(Left / Right) -20˚ ~ 20˚
Model Name UE46C9000ZP UE46C9000SP UE55C9000ZP UE55C9000SP
Screen Size
(Diagonal) 46 inches 55 inches
Sound
(Output) 10 W X 2 15 W X 2
Dimensions (WxDxH)
Body
With stand
Weight
Without Stand
With Stand
1104.2 X 33.9 X 674.8 mm
1104.2 X 306.1 X 819.5 mm_1104.2 X 306.1 X 819.5 mm
16.7 kg
22.8 kg
Digital: MPEG-2 MP@ML, MPEG-4, H.264/AVC MP@L3, [email protected], [email protected]
Audio: 2Ch Linear PCM 32/44.1/48kHz, 16/20/24bits.
10°C to 40°C (50°F to 104°F)
10% to 80%, non-condensing
-20°C to 45°C (-4°F to 113°F)
5% to 95%, non-condensing
Digital: MHP-T/MHP-C
Analogue audio input (HDMI IN1 only)
PC input (HDMI IN1 only)
1295.6 x 33.9 x 784.4 mm
1295.6 x 306.1 x 873.3 mm_1295.6 x 306.1 x 873.3 mm
_
21.8 kg
20.4 kg
26.5 kg
_
25.5 kg
✎
Design and specifications are subject to change without prior notice.
✎
For information about power supply, and more about power consumption, refer to the label attached to the product.
English
64
[UC9000]BN68-02820F-ZT.indb 64 2010-05-24 오후 5:25:23
Page 65
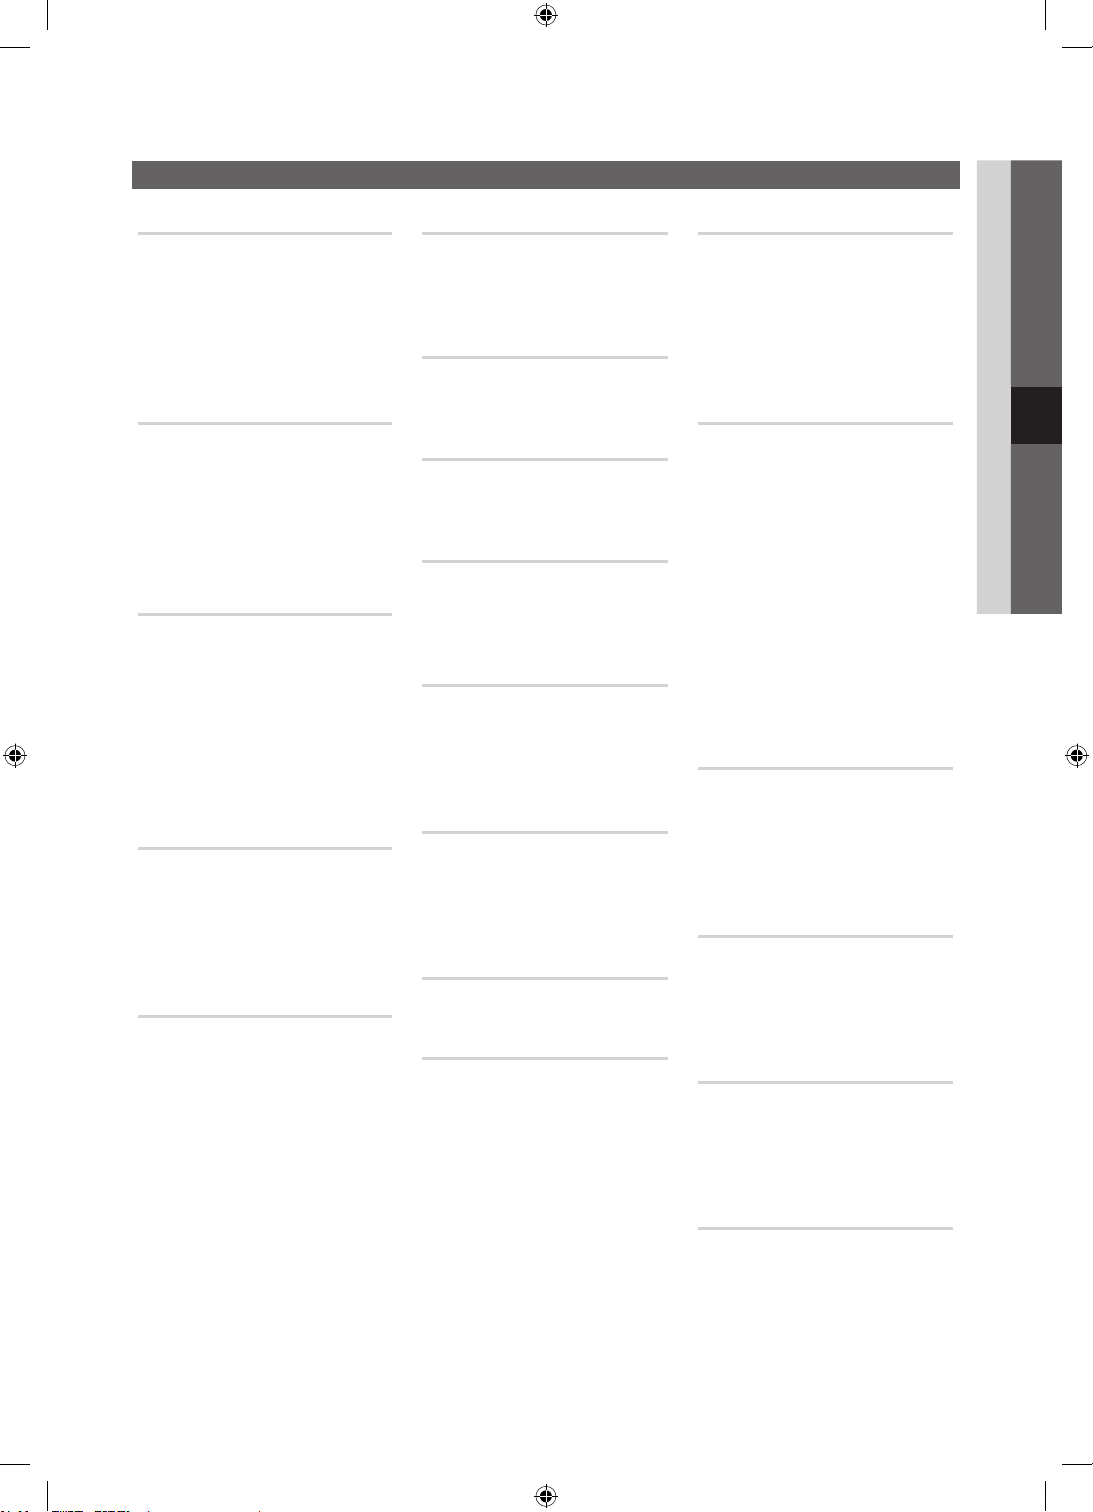
Index
05 Other Information
A
AllShare 56
Amplify 25
Antenna 18
Anynet+ 49
Auto Adjustment 24
Auto Volume 26
B
Background Music 48
Balance L/R 25
Basic View 47
Batteries 6, 7
Black Tone 20
Brightness 20
C
Change PIN 28
Channel Manager 16
Channel Menu 18
Clock 27
Colour Tone 21
Component 13
Connecting to a PC 32
Connecting to an Audio Device 14
D
DIGITAL AUDIO OUT 14, 49
DivX® VOD 48
D-sub 32
Dynamic 19
Dynamic Contrast 20
E
Eco Sensor 20
Edit Name 15
Editing Channels 18
Energy Saving 20
EPG (Electronic Programme Guide) 16
Equalizer 25
External Speaker 26
F
Fine Tune 19
Flesh Tone 21
Frequency 18
H
HDMI 12, 49
Home Theatre 14, 49
I
Installation Space 2
Internet@TV 53
L
Language 28
Licence 63
Lock 19
M
Media Play 40
Melody 29
Menu Transparency 29
Music 46
N
Navigate 15
Network Connection 33
Network Setup 34
Now & Next guide 16
O
Optimal resolution 32
P
Password 54
Photos 46
Picture Size 21, 48
Plug & Play 11
Power Indicator 5
R
Receiver 51
Recording 51
Remote Control 6, 7
Repeat Mode 48
RGB Only Mode 20
Rotate 48
S
Select All 19
Self Diagnosis 31
Sharpness 20
Signal Information 31
Sleep Timer 27
Slide Show 46
Software Upgrade 31
Source List 15
Speaker Select 26
Specifications 64
Standby mode 5
Subtitle 28
Symbol 3
T
Timer 27
Title 47
Tools 3
Troubleshooting 59
TV Speaker 26
U
USB Drive 31, 40
Using Channel View 16
Using Scheduled View 16
Using Favourite Channels 17
V
VCR 13
Video Formats 44
Videos 44
Volume 5
W
Warm 21
White Balance 21
English
65
[UC9000]BN68-02820F-ZT.indb 65 2010-05-24 오후 5:25:25
Page 66
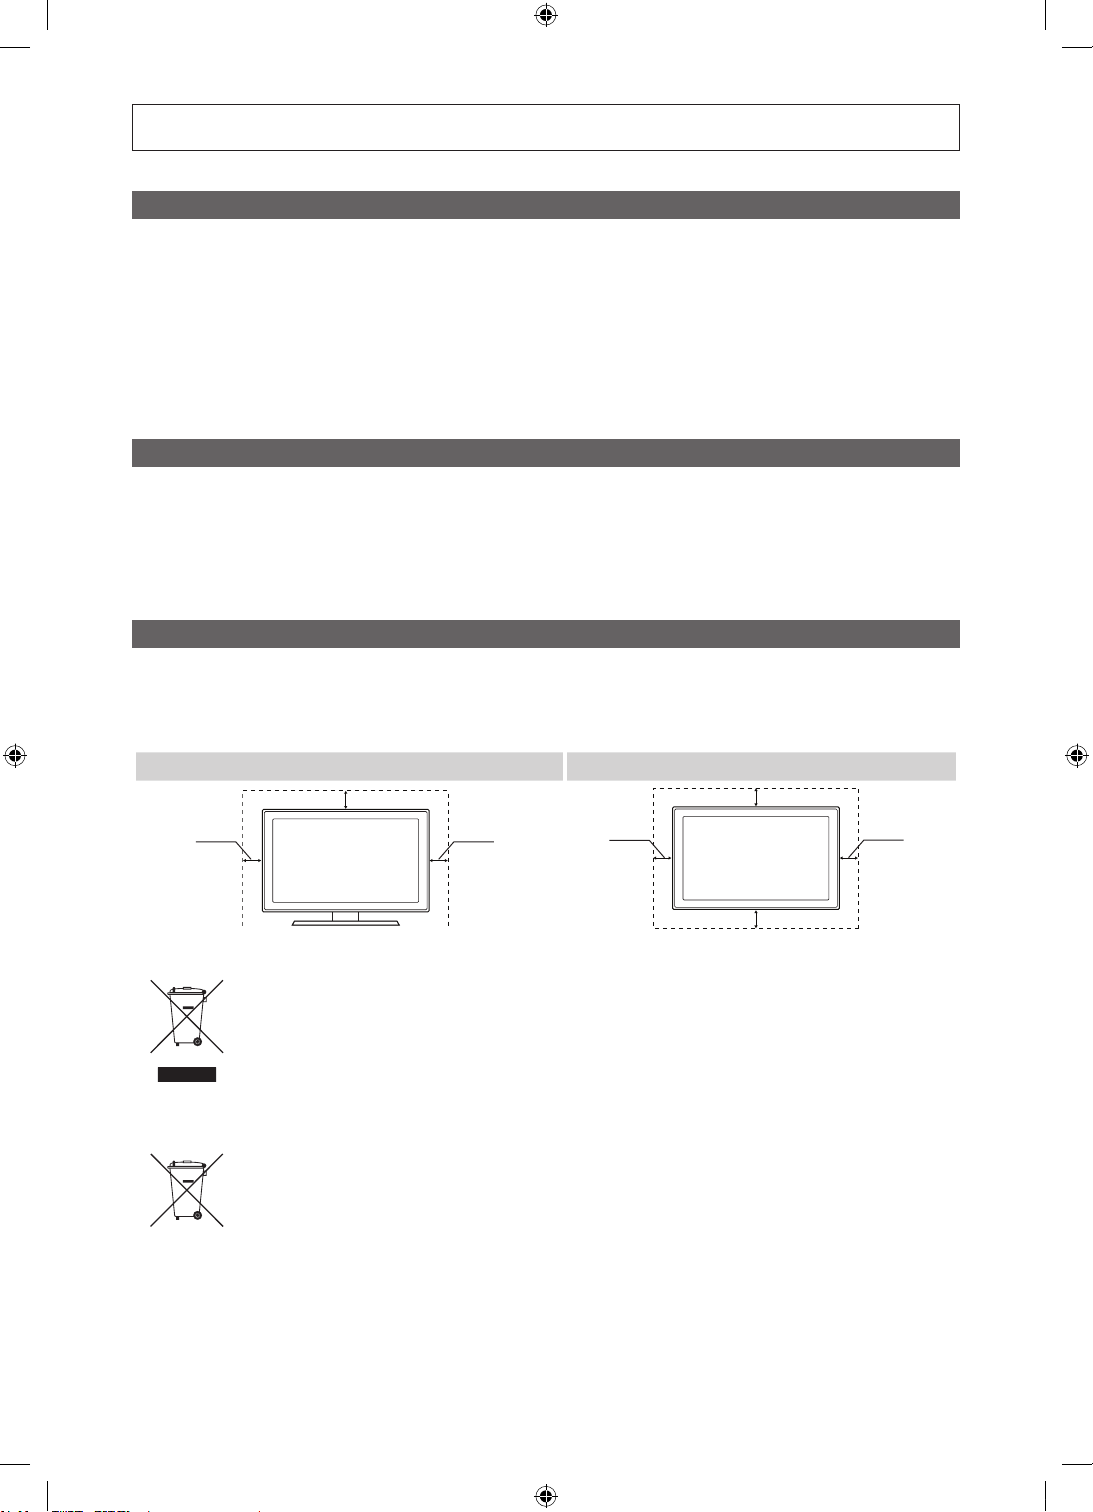
Le figure e le illustrazioni presenti in questo Manuale dell’utente sono fornite unicamente a titolo di riferimento e possono
differire da quelle del prodotto attuale. Le specifiche e il design del prodotto possono variare senza preavviso.
Avviso relativo alla trasmissione TV digitale
1. Le funzioni relative alla televisione digitale (DVB) sono disponibili solo nelle nazioni o nelle aree in cui viene trasmesso il segnale digitale terrestre DVB-T (MPEG2 e MPEG4 AVC) o laddove si
abbia accesso a un servizio TV via cavo compatibile DVB-C (MPEG2 e MPEG4 AAC). Verificare con il rivenditore locale la possibilitàdi ricevere segnali DVB-T o DVB-C.
2. DVB-T è lo standard del consorzio europeo DVB per la trasmissione della televisione digitale terrestre mentre DVB-C è lo standard per la trasmissione della televisione digitale via cavo. Tuttavia,
alcune funzioni quali EPG (Electronic Program Guide), VOD (Video on Demand) e altre non sono incluse in queste specifiche. Per questo motivo, al momento non sono disponibili.
3. Sebbene questo apparecchio TV soddisfi i più recenti standard DVB-T e DVB-C, aggiornati a [Agosto, 2008], la compatibilità con future trasmissioni digitali via cavo DVB-C e terrestri DVB-T
non può essere garantita.
4. In base al paese o all’area in cui si utilizza questo televisore, alcuni fornitori di trasmissioni TV via cavo potrebbero applicare una tariffa aggiuntiva per tali servizi e richiedere all’utente di accettare
i termini e le condizioni della loro offerta.
5. Alcune funzioni della trasmissione TV digitale potrebbero non essere disponibili in alcune nazioni o regioni e DVB-C potrebbe non funzionare correttamente con alcuni fornitori di servizi via cavo.
6. Per maggiori informazioni, contattare il locale centro assistenza clienti Samsung.
La qualità di ricezione del televisore può essere influenzata dai diversi metodi di trasmissione esistenti nei vari paesi. Verificare le prestazioni del televisore presso un Rivenditore
✎
autorizzato SAMSUNG o presso un Call Centre Samsung per sapere se la qualità di ricezione può essere migliorata o meno riconfigurando le impostazioni dell’apparecchio.
Avvertenza per la visualizzazione di immagini fisse
Evitare la visualizzazione di immagini fisse (per es. file jpeg) o di elementi grafici fissi (come ad esempio il logo di un programma TV, il formato panorama o 4:3, la barra dei titoli di borsa
o delle notizie nella parte inferiore dello schermo). La visualizzazione continua di una immagine fissa può causare immagini residue sullo schermo LED e influenzare la qualità della
riproduzione. Per ridurre il rischio di tale effetto, seguire le raccomandazioni:
• Evitare la visualizzazione dello stesso canale televisivo per lunghi periodi di tempo.
• Visualizzare sempre le immagini a schermo pieno, usando il menu del formato immagini per impostarlo al valore più appropriato.
• Ridurre la luminosità e il contrasto al minimo necessario per ottenere la qualità visiva desiderata; valori troppo elevati possono accelerare il processo di bruciatura dello schermo.
• Usare frequentemente tutte le funzioni TV progettate per ridurre la ritenzione delle immagini e la bruciatura dello schermo. Per maggiori informazioni consultare l’apposita sezione
del manuale dell’utente.
Messa in sicurezza della posizione di installazione
Mantenere le distanze indicate tra il prodotto e gli altri elementi presenti (per esempio le pareti) per garantire un’adeguata ventilazione.
Il mancato rispetto di questa precauzione può comportare un incendio o un malfunzionamento provocato dall’aumento della temperatura interna del prodotto.
Se si usa un piedistallo o un sistema di montaggio a parete, utilizzare solo componenti forniti da Samsung Electronics.
✎
L’uso di componenti di altri produttori può causare problemi di funzionamento del prodotto o lesioni provocate dalla caduta del prodotto.
x
L’aspetto del prodotto può differire in base al modello.
✎
Installazione con piedistallo. Installazione con supporto a parete.
10 cm
10 cm
10 cm
10 cm
10 cm
10 cm
10 cm
Corretto smaltimento del prodotto (rifiuti elettrici ed elettronici)
(Applicabile nell’Unione Europea e in altri paesi europei con sistema di raccolta differenziata)
Il marchio riportato sul prodotto, sugli accessori o sulla documentazione indica che il prodotto e i relativi accessori elettronici (quali
caricabatterie, cuffia e cavo USB) non devono essere smaltiti con altri rifiuti domestici al termine del ciclo di vita. Per evitare eventuali danni
all’ambiente o alla salute causati dall’inopportuno smaltimento dei rifiuti, si invita l’utente a separare il prodotto e i suddetti accessori da altri
tipi di rifiuti e di riciclarli in maniera responsabile per favorire il riutilizzo sostenibile delle risorse materiali. Gli utenti domestici sono invitati a
contattare il rivenditore presso il quale è stato acquistato il prodotto o l’ufficio locale preposto per tutte le informazioni relative alla raccolta
differenziata e al riciclaggio per questo tipo di materiali. Gli utenti aziendali sono invitati a contattare il proprio fornitore e verificare i termini e
le condizioni del contratto di acquisto. Questo prodotto e i relativi accessori elettronici non devono essere smaltiti unitamente ad altri rifiuti
commerciali.
Corretto smaltimento delle batterie del prodotto
(Applicabile nei paesi dell’Unione Europea e in altri paesi europei con sistemi di conferimento differenziato delle batterie.)
Il marchio riportato sulla batteria o sulla sua documentazione o confezione indica che le batterie di questo prodotto non devono essere
smaltite con altri rifiuti domestici al termine del ciclo di vita. Dove raffigurati, i simboli chimici Hg, Cd o Pb indicano che la batteria contiene
mercurio, cadmio o piombo in quantità superiori ai livelli di riferimento della direttiva UE 2006/66. Se le batterie non vengono smaltite
correttamente, queste sostanze possono causare danni alla salute umana o all’ambiente. Per proteggere le risorse naturali e favorire il
riutilizzo dei materiali, separare le batterie dagli altri tipi di rifiuti e riciclarle utilizzando il sistema di conferimento gratuito previsto nella propria
area di residenza.
Italiano
2
[UC9000]BN68-02820F-ZT.indb 2 2010-05-24 오후 5:25:27
Page 67
Contenuti
Per iniziare
4
Collegamenti
12
Funzioni base
15
Funzioni avanzate
32
4 Accessori
5 Vista del Pannello di controllo
6 Mini telecomando
7 Vista del telecomando Touch Control
10 Collegamento all’antenna
11 Plug & Play (Impostazione iniziale)
12 Collegare un dispositivo AV
14 Collegamento a un dispositivo audio
15 Cambiare la sorgente di ingresso
15 Come scorrere i menu
16 Uso del tasto INFO (Guida Now & Next)
16 Pianificare la visione
18 Menu Canale
19 Menu Immagine
25 Menu Suono
27 Menu Impostazione
31 Menu Supporto
32 Collegamento a un PC
33 Connessione di rete
40 Media Play
49 Anynet+
53 Internet@TV
56 AllShare
ITALIANO
TOOLS
Altre informazioni
Questa funzione è utilizzabile
premendo il tasto TOOLS sul
telecomando.
58 Assemblaggio dei cavi
58 Fissaggio del televisore alla parete
58
Controllate il simbolo!
59 Risoluzione dei problemi
62 Adattatore LAN wireless incluso
64 Specifiche
65 Indice
66 Diagrammi a blocchi
Nota Tasto One-Touch
Italiano
3
[UC9000]BN68-02820F-ZT.indb 3 2010-05-24 오후 5:25:27
Page 68
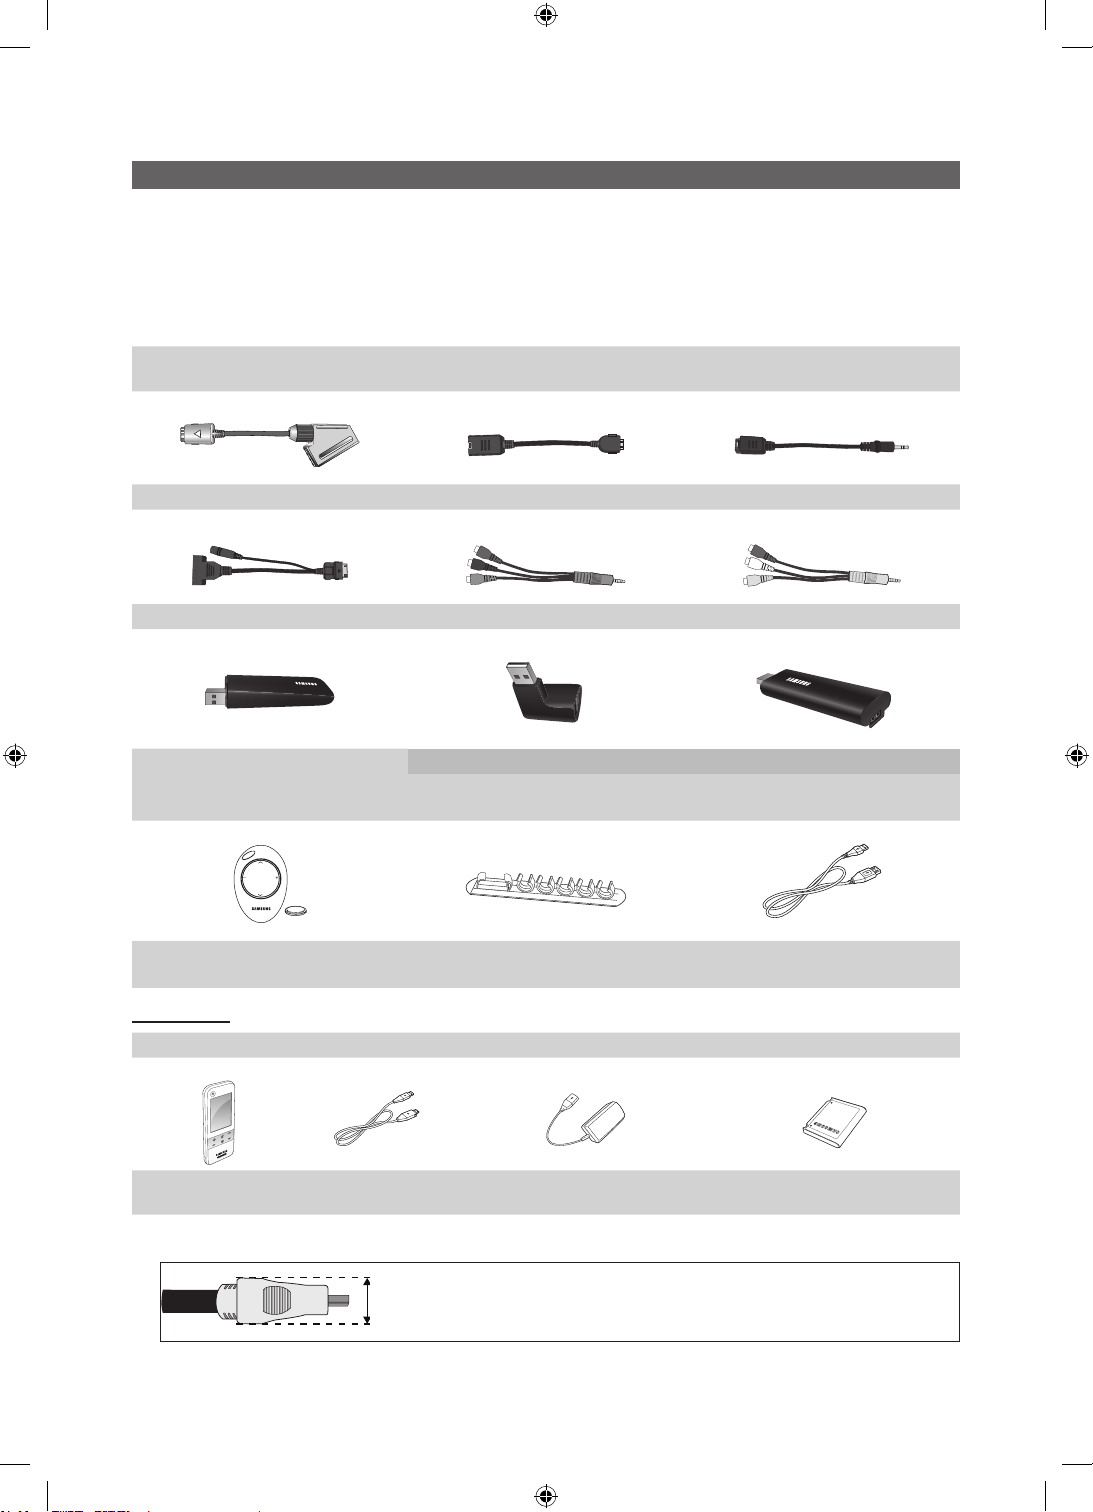
Per iniziare
Accessori
✎✎
Controllare✎che✎nella✎confezi one✎del✎TV✎LED✎siano✎contenuti✎i✎seguenti✎component i.✎Se✎eventuali✎componenti✎
risult assero✎mancanti,✎contattare✎il✎rivenditore.
✎✎
La✎forma✎e✎il✎colore✎dei✎componenti✎possono✎variare✎in✎base✎al✎modello.
✎✎
Eventuali✎cavi✎non✎forniti✎in✎dotazione✎possono✎essere✎acquistati✎separatamente.
✎✎
Non✎estrarre✎direttamente✎le✎prese✎LAN✎e✎SCART.
ATTENZIONE:[INSERIRE[SALDAMENTE[PER[EVITARE[UNO[SCOLLEGAMENTO[ACCIDENTALE[
[[
DALL’APPARECCHIO
✎y Istruzioni✎per✎l’utente
✎y Scheda✎di✎garanzia✎/✎Guida✎alla✎sicurezza✎✎(non✎disponibili✎in✎tutti✎i✎paesi)
✎y Adattatore✎SCART ✎y Adattatore✎LAN ✎y Adattatore✎ottico
✎y Adattatore✎PC ✎y Adattatore✎component✎ ✎y Adattatore✎AV
✎y Panno✎per✎la✎pulizia
✎y Velcro
Adattatore✎USB
✎y Adattatore✎LAN✎wireless✎Samsung
✎y Mini✎telecomando✎e✎batteria✎al✎litio✎
Touch[Control
✎y Istruzioni✎per✎l’utente
MUTE
CH
SOURCE
VOL
✎y Telecomando✎
Touch✎Control✎
✎✎
Per✎la✎migliore✎connessione✎via✎cavo✎a✎questo✎prodotto,✎utilizzare✎c avi✎del✎diametro✎massimo✎indica to✎di✎seguito:
✎y Cavo ✎y Adattatore✎di✎alimentazione
✎y Per✎modello✎con✎piedistallo
✎y Fascetta✎fermacavo✎(4EA)
(UE46C9000ZP,✎UE55C9000ZP)
✎y Diametro✎massimo✎-✎0,55✎pollici✎(14✎mm)
✎y Per✎modello✎con✎montaggio✎a✎parete
(UE46C9000ZP,✎UE55C9000ZP)
✎y Cavo✎di✎prolunga
✎y Batteria✎telecomando✎Touch✎
Control
Italiano
4
2_BN68-02820F-Ita.indd 4 2010-05-25 오후 7:30:18
Page 69
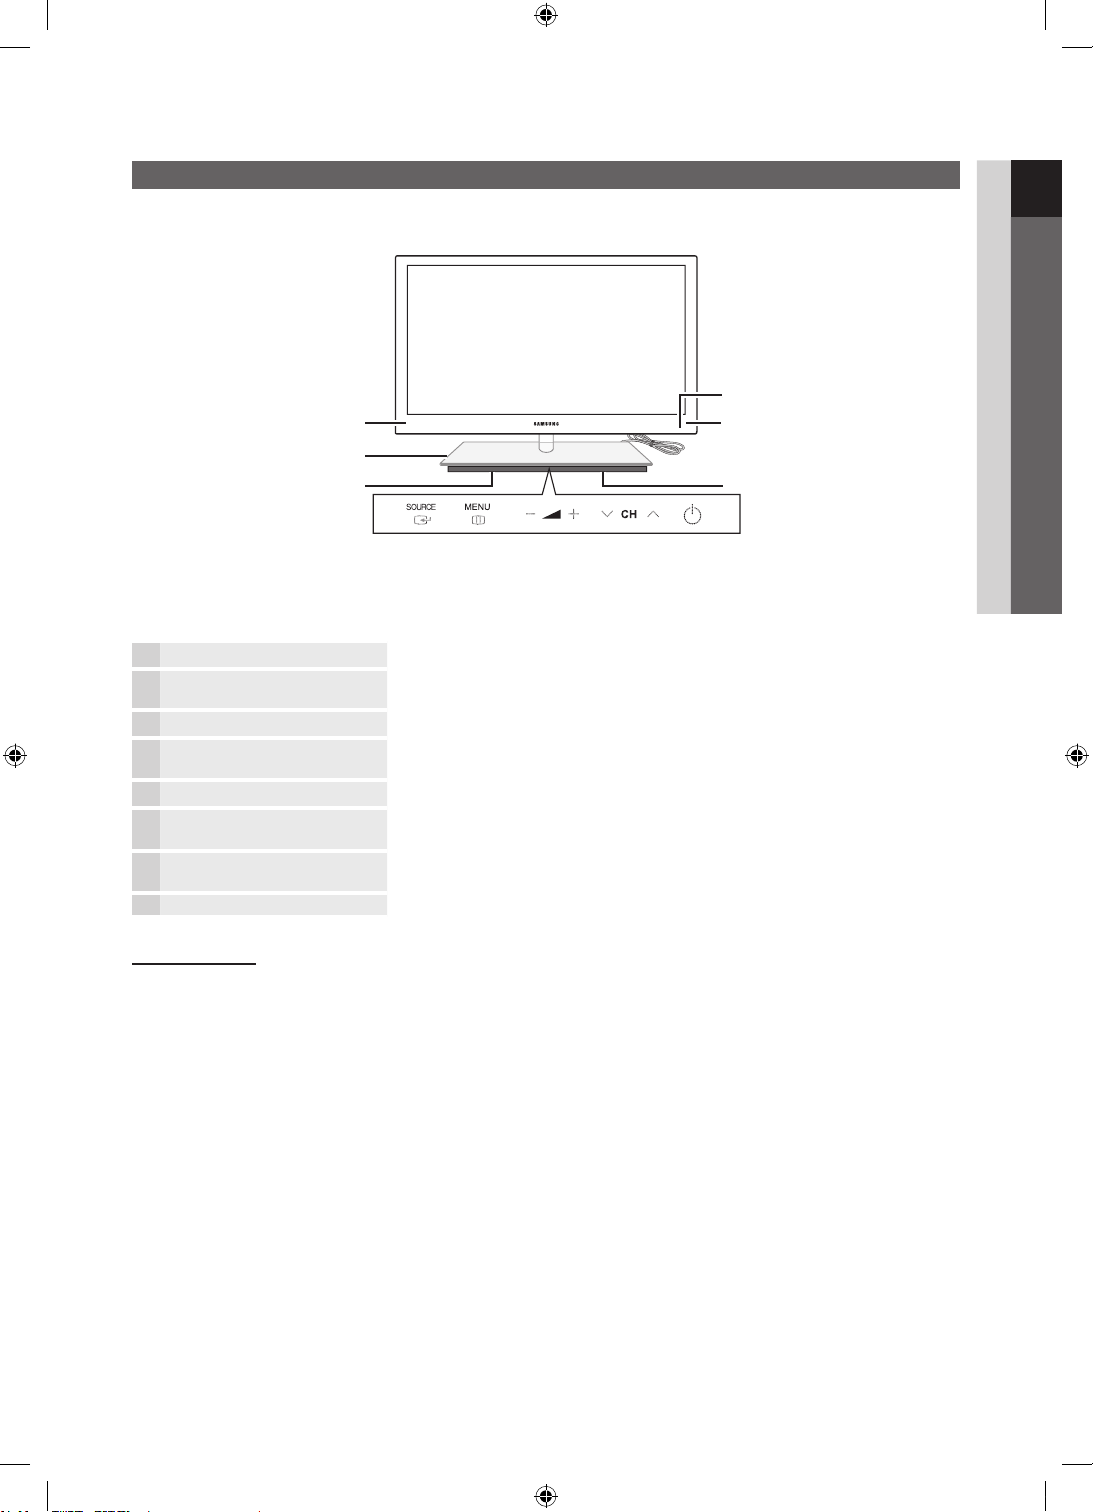
Vista del Pannello di controllo
✎
La forma e il colore del prodotto possono variare in base al modello.
Indicatore di alimentazione
Trasmettitore 3D
Woofer
Altoparlanti Altoparlanti
✎
Per controllare il televisore mediante il touch pad LED, toccare il touch pad LED posizionato al centro sotto il piedistallo.
Il touch pad si aprirà scorrendo automaticamente verso l’esterno. Se per un certo periodo di tempo il touch pad LED
non viene utilizzato, tornerà automaticamente nella posizione di chiusura originale.
Trasmettitore 3D Il LED del trasmettitore 3D lampeggia solo durante l’invio del segnale 3D.
Indicatore di alimentazione Lampeggia e si spegne quando l’alimentazione è attiva, si accende in modalità
Sensore del telecomando Puntare il telecomando in direzione di questo punto sul televisore.
SOURCE
MENU
(Alimentazione)
standby.
Alterna tutte le sorgenti d’ingresso disponibili. Nel menu OSD, utilizzare questo tasto
come si usa il tasto ENTER del telecomando.
Visualizza attraverso un menu OSD (on screen display) le funzioni del televisore.
Regola il volume. Nel menu OSD, utilizzare i tasti
◄ e ► del telecomando.
Cambia i canali. Nel menu OSD, utilizzare i tasti
▼ e ▲ del telecomando.
Spegne e accende il televisore.
Sensore del telecomando
così come si usano i tasti
così come si usano i tasti
01 Per iniziare
Modalità Standby
Non lasciare il televisore in modalità standby per un lungo periodo di tempo (quando si parte per le vacanze, ad esempio).
Anche quando il tasto di accensione è disattivo, l’apparecchio consuma una piccola quantità di energia elettrica. Si consiglia
quindi di scollegare il cavo di alimentazione.
Italiano
[UC9000]BN68-02820F-ZT.indb 5 2010-05-24 오후 5:25:32
5
Page 70
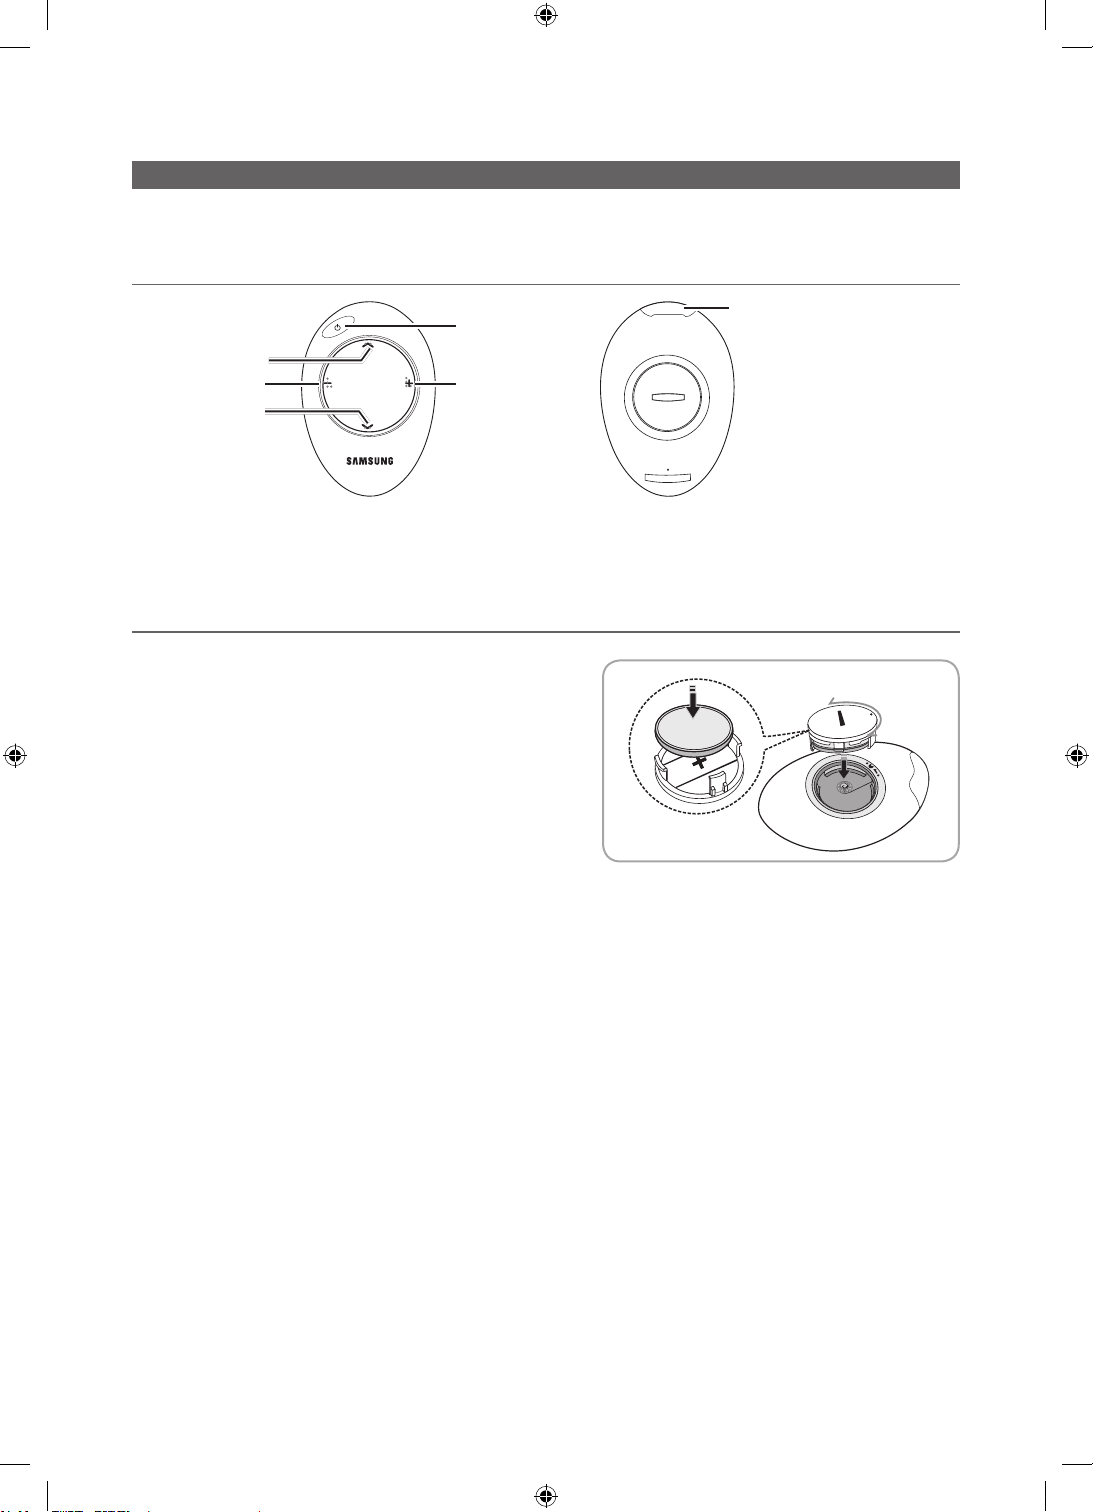
Per iniziare
OPEN
CLOSE
Mini telecomando
Questo Mini telecomando semplificato consente di accendere e spegnere l’apparecchio, selezionare i canali e regolare il
volume.
Descrizione
Canale successivo
Diminuzione volume
Canale precedente
✎
Questo speciale telecomando, progettato per aiutare chi ha problemi di vista, presenta punti in Braille sui tasti di
selezione canali e del volume.
Tasto di alimentazione
(On/Off)
Aumento volume
Trasmettitore IrDA
Per utilizzare il mini telecomando,
✎
puntare il trasmettitore IrDA verso il
televisore.
Inserimento delle batterie
1. Ruotare il coperchio del vano batteria in senso antiorario per
sbloccarlo e separarlo dall’unità.
2. Inserire una batteria al litio da 3V con il + rivolto verso il fondo
del coperchio del vano batteria.
3. Riposizionare il coperchio del vano batteria, allinearlo alle
scanalature laterali e ruotarlo in senso orario per bloccarlo.
✎
Se il telecomando non funziona, effettuare il seguente
controllo:
Il televisore è acceso?
x
I poli - e + delle batterie sono invertiti?
x
Le batterie sono esauste?
x
Si è verificata una interruzione di corrente o il cavo di alimentazione è scollegato?
x
È presente una luce a fluorescenza speciale o un neon nelle vicinanze?
x
Italiano
6
[UC9000]BN68-02820F-ZT.indb 6 2010-05-24 오후 5:25:33
Page 71
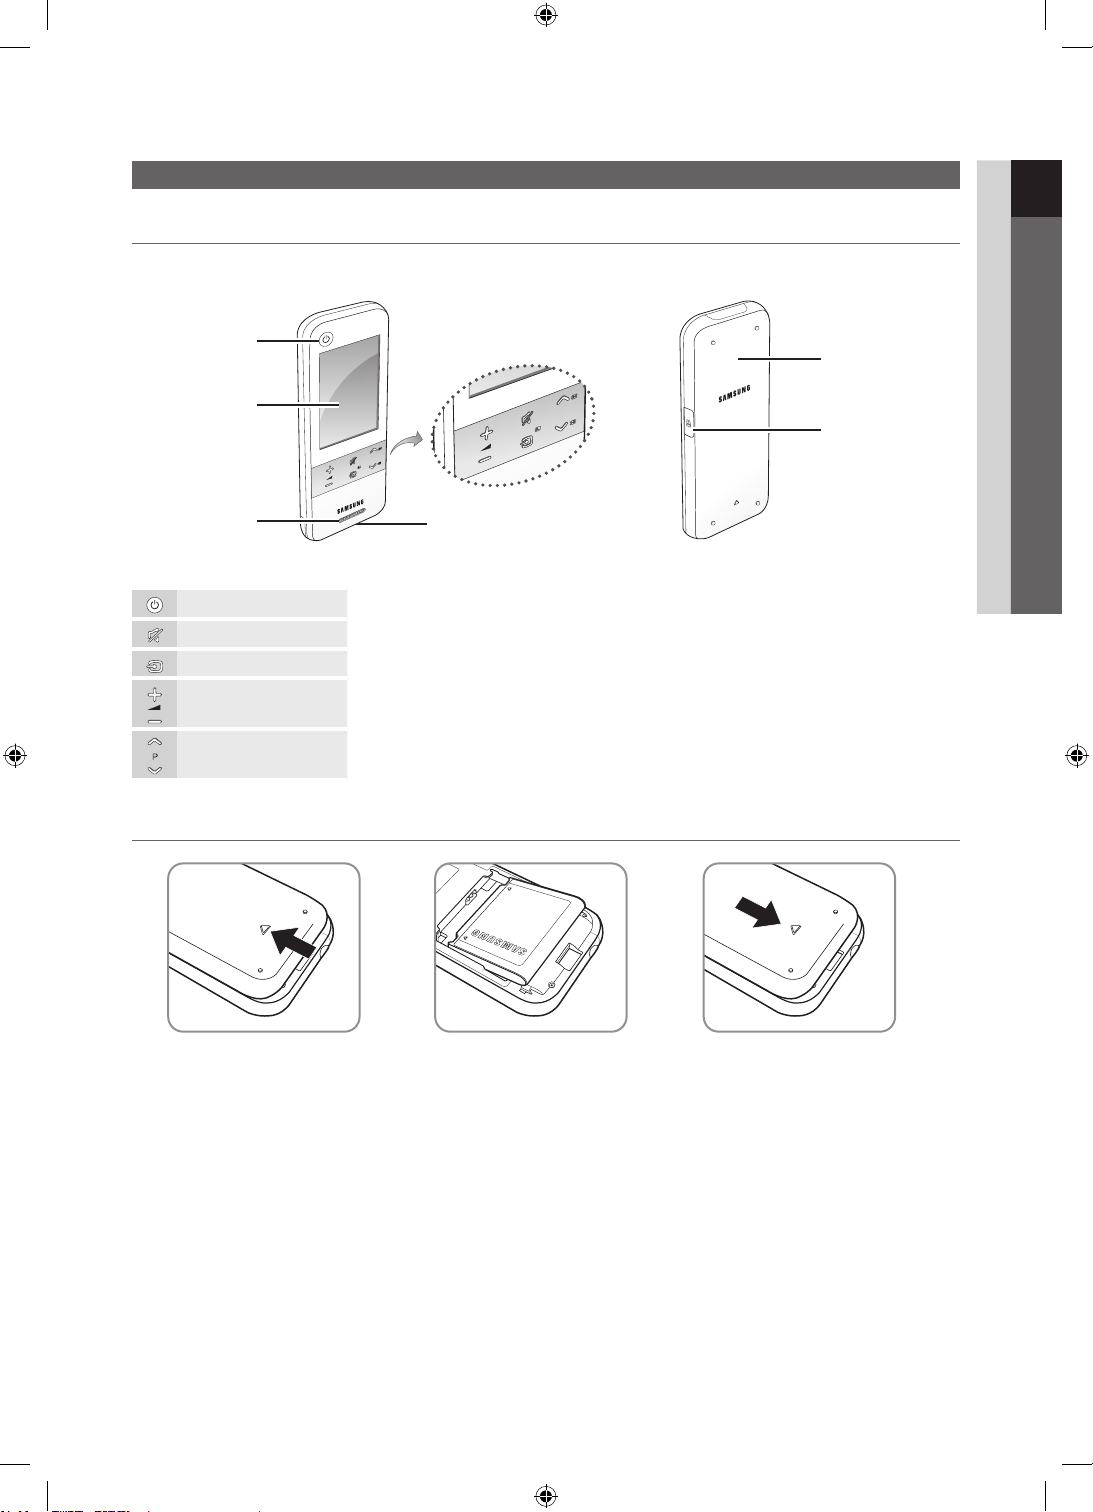
Descrizione
P
MUTE
SOURCE
Vista del telecomando Touch Control
01 Per iniziare
Vista anteriore Vista posteriore
Tasto di accensione TV
Touch screen
MUTE
P
SOURCE
Altoparlante
Jack cuffie
Alimentazione Spegne e accende il televisore.
MUTE Attiva o disattiva l'audio.
SOURCE Visualizza l'elenco delle sorgenti (TV, PC, ecc.) sullo schermo.
Volume Premere per regolare il volume.
Channel Premere per cambiare canale.
Inserimento delle batterie
Coperchio del vano
batterie
Porta di ricarica
1. Far scorrere e aprire il coperchio
del vano batterie nella direzione
indicata dalla freccia.
2. Inserire le batterie con il logo
Samsung rivolto verso l'alto.
3. Far scorrere e chiudere il
coperchio del vano batterie nella
direzione indicata dalla freccia.
Italiano
[UC9000]BN68-02820F-ZT.indb 7 2010-05-24 오후 5:25:34
7
Page 72
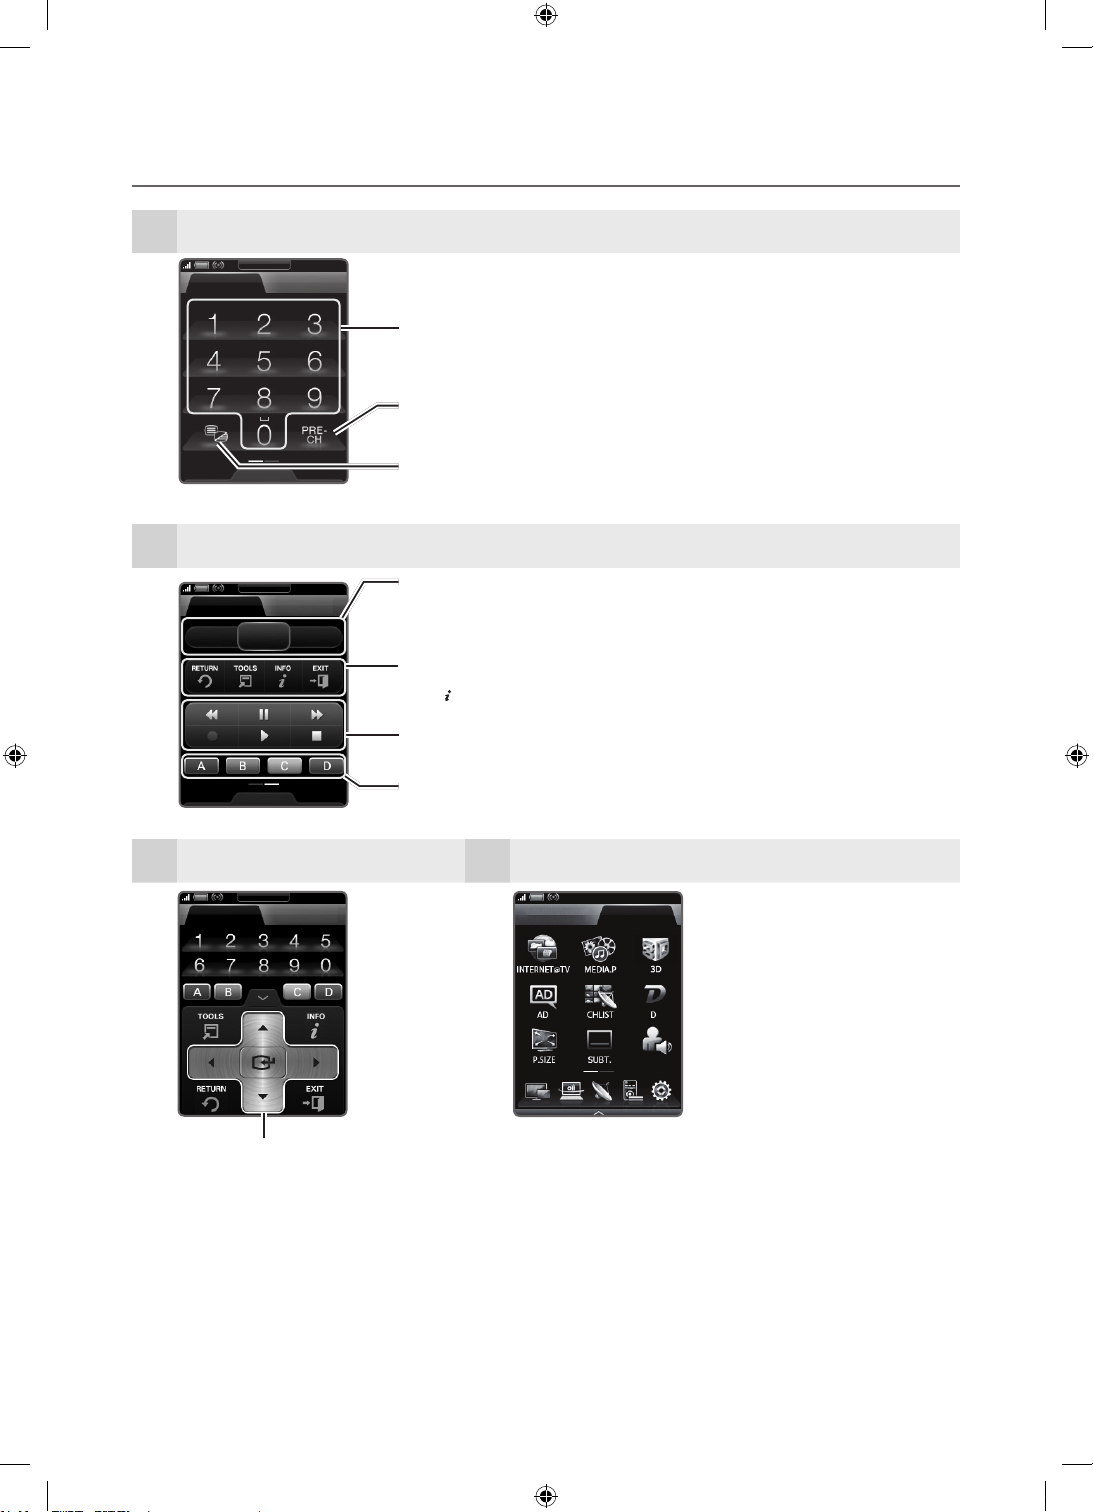
Per iniziare
.,;@
abc def
ghi jkl mno
pqrs tuv wxyz
I-II DUAL
Visualizzazione schermata telecomando
Schermata iniziale
1
Tastiera
Control TV Servizi
Premere i tasti numerici per accedere direttamente ai canali.
Ritorna al canale precedente.
Navigazione
Trascinare verso sinistra
2
Tastiera
Control TV Servizi
CONTENT MENU GUIDE
Navigazione
Toccare il tasto Navigazione o Menu.
3
Tastiera
Control TV Servizi
Seleziona le voci del menu OSD
e cambia i valori visualizzati sul
menu.
Seleziona alternativamente le modalità Teletext ON, Doppia, Mix o OFF.
CONTENT: Visualizza la Vista contenuti, che include le opzioni Guida, Internet@TV, Media Play, AllShare
e 3D.
MENU: Visualizza gli OSD.
GUIDE: Visualizza la EPG (Electronic Programme Guide).
RETURN
TOOLS: Scelta rapida delle funzioni usate più frequentemente.
INFO : Visualizza le informazioni sullo schermo TV.
EXIT
Usare questi tasti in modalità Media Play e Anynet+ (p. 40, 49).
(: Controlla la registrazione nei registratori Samsung dotati della funzione Anynet+)
Tasti dei menu Elenco canali, Internet@TV, Media Play, ecc.
: Ritorna al menu precedente.
: Esce dal menu.
Toccare Servizi.
4
Control TV Servizi
INTERNET@TV: Link a vari servizi internet (p. 53).
MEDIA.P: Visualizza Media Play (p. 40).
3D: Imposta la modalità 3D. (p. 22).
AD: Attiva/Disattiva la descrizione audio (p. 26).
Non disponibile in alcune nazioni.
CHLIST: Visualizza l’elenco canali sullo schermo
(p. 17).
D: (Servizio dati) Utilizzare questo tasto quando si
usa il servizio di trasmissione dati (p. 30).
P.SIZE: Seleziona la dimensione dell’immagine
(p. 21).-
SUBT.: Visualizza i sottotitoli digitali (p. 28).
I-II DUAL: Per la selezione degli effetti audio
(p. 27).
[UC9000]BN68-02820F-ZT.indb 8 2010-05-24 오후 5:25:35
8
Italiano
Page 73
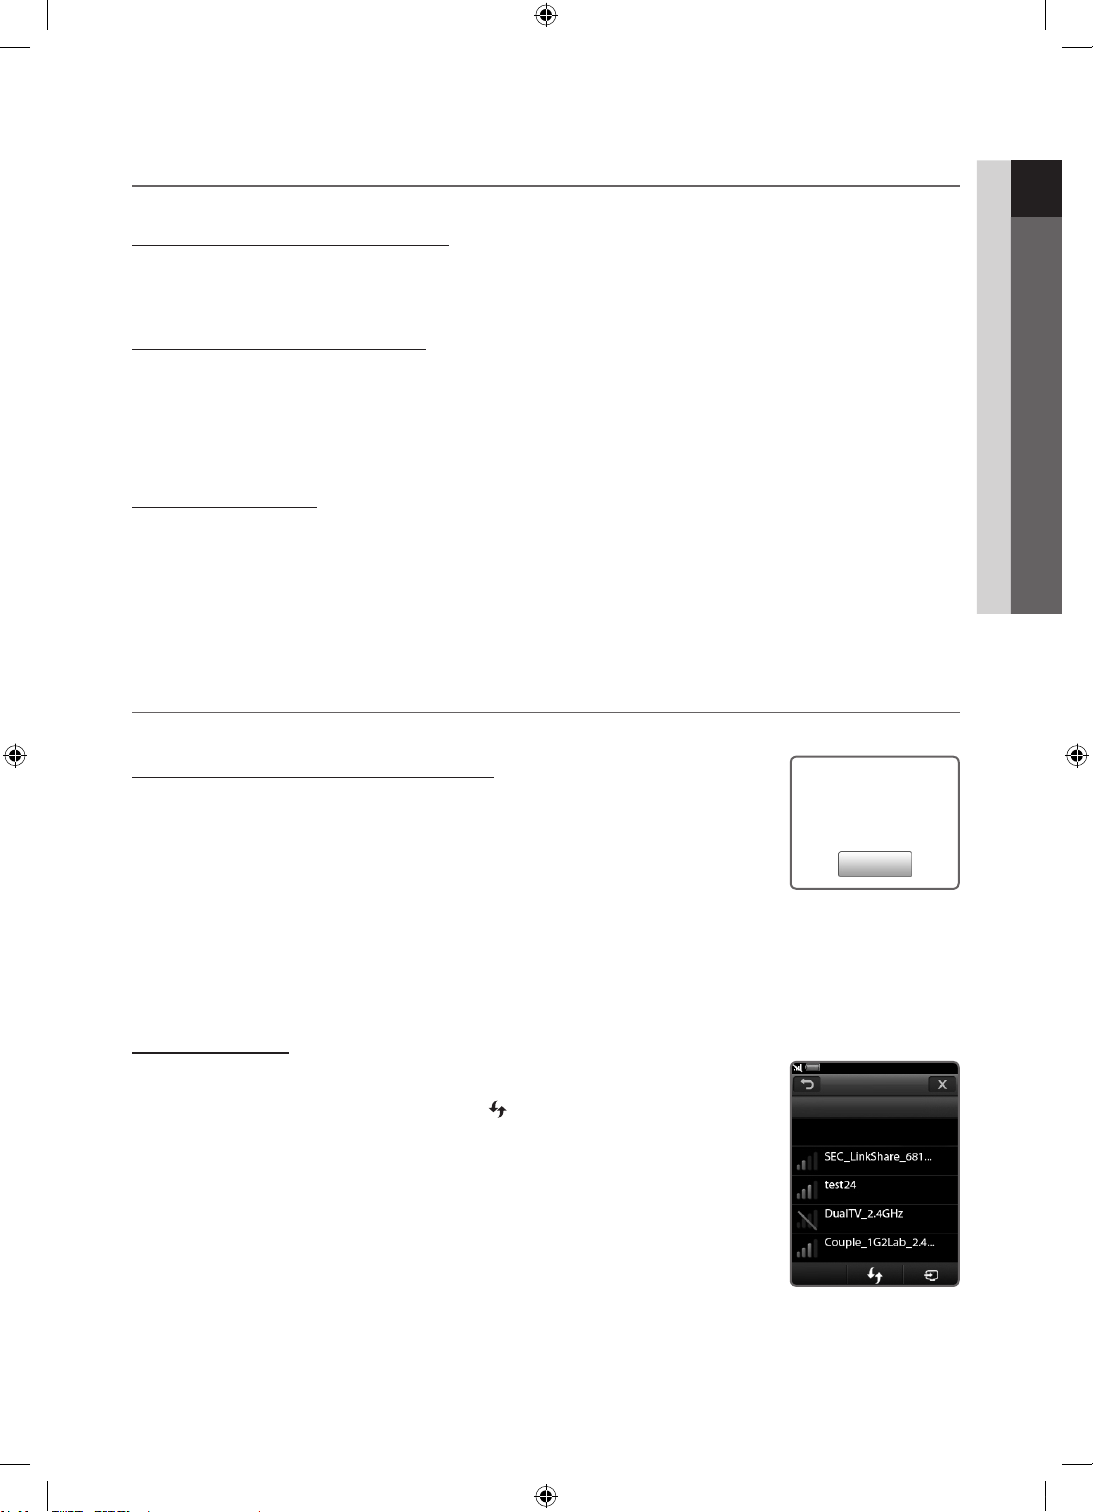
Configurazione del telecomando
E’ possibile impostare il telecomando con LCD da 3” in modo che controlli il televisore in tre modi diversi:
Come standard, telecomando a infrarossi (IR)
Come telecomando IR, il telecomando Touch Control LCD funziona esattamente come un normale telecomando a tasti, fatta
eccezione per il fatto che è necessario toccare le icone e i simboli visualizzati sul display LCD anziché premere fisicamente
i tasti del telecomando normale. L’uso del telecomando come telecomando IR non richiede ulteriori impostazioni rispetto ai
normali telecomandi e permette di accedere alle funzioni e alle caratteristiche del telecomando stesso.
Per distanze superiori, telecomando Wi-Fi
Per distanze superiori, in modalità Wi-Fi il telecomando Touch Control offre tutte le funzioni della modalità IR e, poiché utilizza le
microonde al posto dei segnali infrarossi, permette di controllare il televisore da distanze notevolmente superiori, perfino dietro
ostacoli come l’angolo di una stanza. Permette inoltre di accedere alla funzione Twin Display (Display doppio) che permette di
visualizzare sul display LCD del telecomando lo stesso programma o contenuto visualizzato sullo schermo TV. A causa della
lunga distanza, la modalità Wi-Fi richiede ulteriori impostazioni; eventualmente anche una nuova inizializzazione. Richiede
inoltre che l’adattatore LAN wireless Samsung (WIS09ABGN, WIS09ABGN2 o WIS10ABGN) sia collegato a una delle porte
USB del televisore.
In rete, telecomando Wi-Fi
Come telecomando Wi-Fi in rete, il telecomando Touch Control offre tutte le funzioni offerte dal normale telecomando IR, ma
opera a distanze superiori e permette l’accesso alla funzione Multimedia, che consente di ascoltare musica, guardare filmati
e immagini dal PC direttamente sullo schermo TV. E’ possibile inoltre scaricare gli aggiornamenti software del telecomando
Touch Control direttamente da Internet.
La modalità Wi-Fi da rete necessita di un’ulteriore configurazione. Inoltre, per utilizzare la modalità Wi-Fi da rete, è
necessaria una rete locale attiva e un router wireless. Richiede inoltre che l’adattatore LAN wireless Samsung (WIS09ABGN,
WIS09ABGN2 o WIS10ABGN) sia collegato a una delle porte USB del televisore. Per utilizzare la funzione Multimedia, è
necessario installare il programma PC Share Manager di Samsung sul PC. E’ possibile scaricare PC Share Manager dal sito
web http://www.samsung.com.
Configurazione di rete
Per il telecomando con display da 3 pollici è possibile impostare una rete wireless.
Procedura per la connessione mediante PBC (WPS)
Se il router è dotato di un tasto PBC (WPS), seguire questi passaggi:
1. Collegare il televisore alla LAN.
2. Sulla schermata Servizi, toccare Impostaz. → Impostazioni telecomando.
3. Toccare Rete.
4. Toccare PBC (WPS).
5. Se viene visualizzato il messaggio Premere il tasto PCB sull’access point entro 120 secondi., premere il tasto PBC sul
dispositivo per consentire la connessione.
✎
Per maggiori informazioni, vedere il manuale di impostazione della rete wireless del dispositivo da collegare.
6. Se il dispositivo è collegato in modo corretto al televisore dopo l’avvio del conteggio visualizzato nella finestra, questa si
chiuderà automaticamente.
✎
Se la connessione non riesce, riprovare dopo 2 minuti.
Collegamento alla rete
Per configurare la connessione wireless automaticamente, seguire questi passaggi:
1. Seguire i passaggi da 1 a 3 della “Procedura per la connessione mediante PBC (WPS)”.
✎
Se la rete non appare in elenco, selezionare per aprire nuovamente l’elenco delle
reti disponibili.
2. Selezionare una rete e collegarsi ad essa utilizzando il metodo di crittografia (PIN, chiave di
sicurezza, ad-hoc, ecc.) impostato per la rete.
3. Al completamento della connessione di rete, selezionare Test per eseguire il test di rete.
✎
Per l’IP automatico, l’AP definirà automaticamente i valori Indirizzo IP, Maschera
sottorete, Gateway e Server DNS.
✎
Per l’IP manuale, è possibile selezionare Modifica e immettere direttamente i valori
Indirizzo IP, Maschera sottorete, Gateway e Server DNS.
✎
Per maggiori informazioni sul telecomando Touch Control, leggere il manuale dell’utente del telecomando.
Premere il tasto PBC
sull’access point entro 120
secondi.
Tempo residuo: 112
Stop
Rete
Seleziona una rete
Congurazione automatica
Unsecured
Secured
Unsecured
Secured
PBC(WPS)
01 Per iniziare
Italiano
[UC9000]BN68-02820F-ZT.indb 9 2010-05-24 오후 5:25:36
9
Page 74
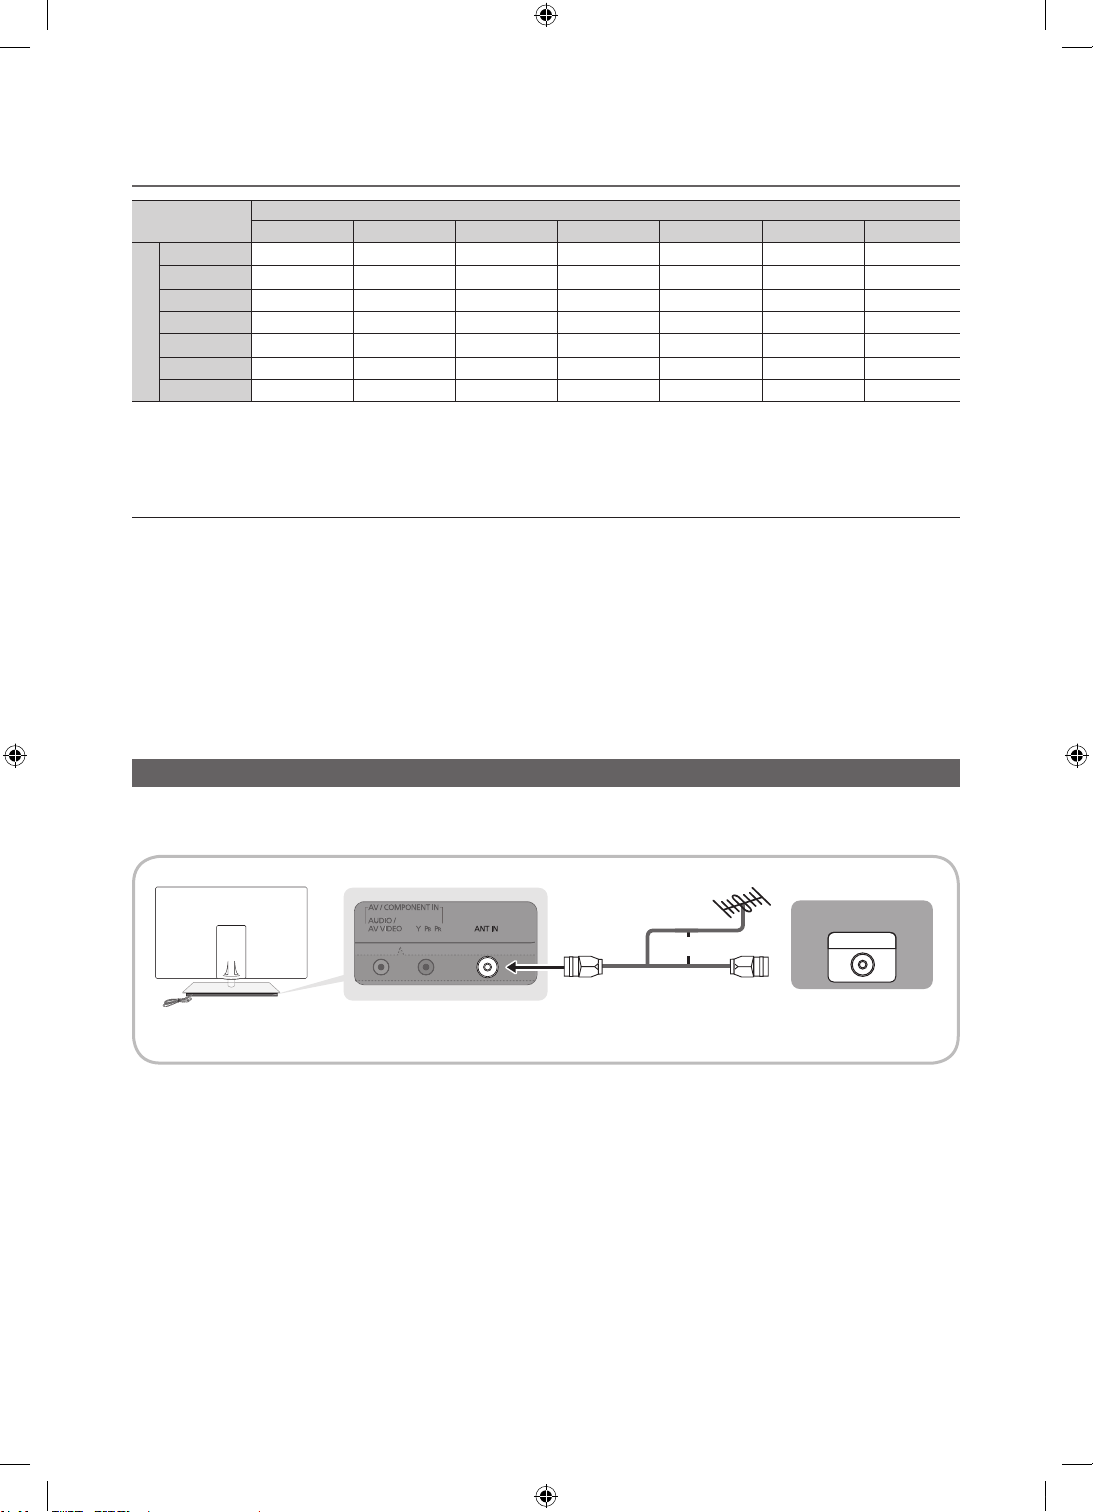
Per iniziare
Specifiche operative per la visualizzazione doppia
TV principale
DTV ATV Scart AV Comp. PC HDMI
DTV
Touch Control
ATV X
SCART X X
AV X X X
Comp. X X X X
PC X X X X X X X
HDMI X X X X X X
◎
: <Anteprima> e <Display doppio> sono abilitate. Si noti che solo i canali Gratuiti sono disponibili per il <Anteprima>.
●
: <Anteprima> abilitata: Sono disponibili solo i canali Gratuiti.
○
: <Anteprima> abilitata. Sono disponibili canali Gratuiti / Criptati.
△
: <Display doppio> abilitato.
X
: Disabilitato.
✎
Uscita Scart: disabilitata quando viene emesso un segnale dal Touch Control.
✎
Il display del telecomando Touch Control si bloccherà per qualche secondo durante il passaggio alla sorgente di
ingresso del televisore.
✎
Qualora le condizioni della rete siano scarse comparirà il messaggio “Modo non supportato”. Verificare la connessione
di rete e riprovare.
✎
<L’uso sul Touch Control delle funzioni <Display doppio> o <Anteprima> potrebbe essere limitato se una delle
seguenti funzioni o modalità risultano attive sul televisore:
Modalità PVR, Media Play, Internet@TV, AllShare, o PC.
x
◎ ● O O O O O
△
X X O O O
△
X X X X
△
X X X
△
X X
△
Collegamento all’antenna
Quando il televisore viene acceso per la prima volta, le impostazioni di base vengono visualizzate automaticamente.
✎
Preimpostato: Collegare l’alimentazione e l’antenna.
Antenna VHF/UHF
Cavo
o
ANT OUT
Italiano
10
[UC9000]BN68-02820F-ZT.indb 10 2010-05-24 오후 5:25:37
Page 75
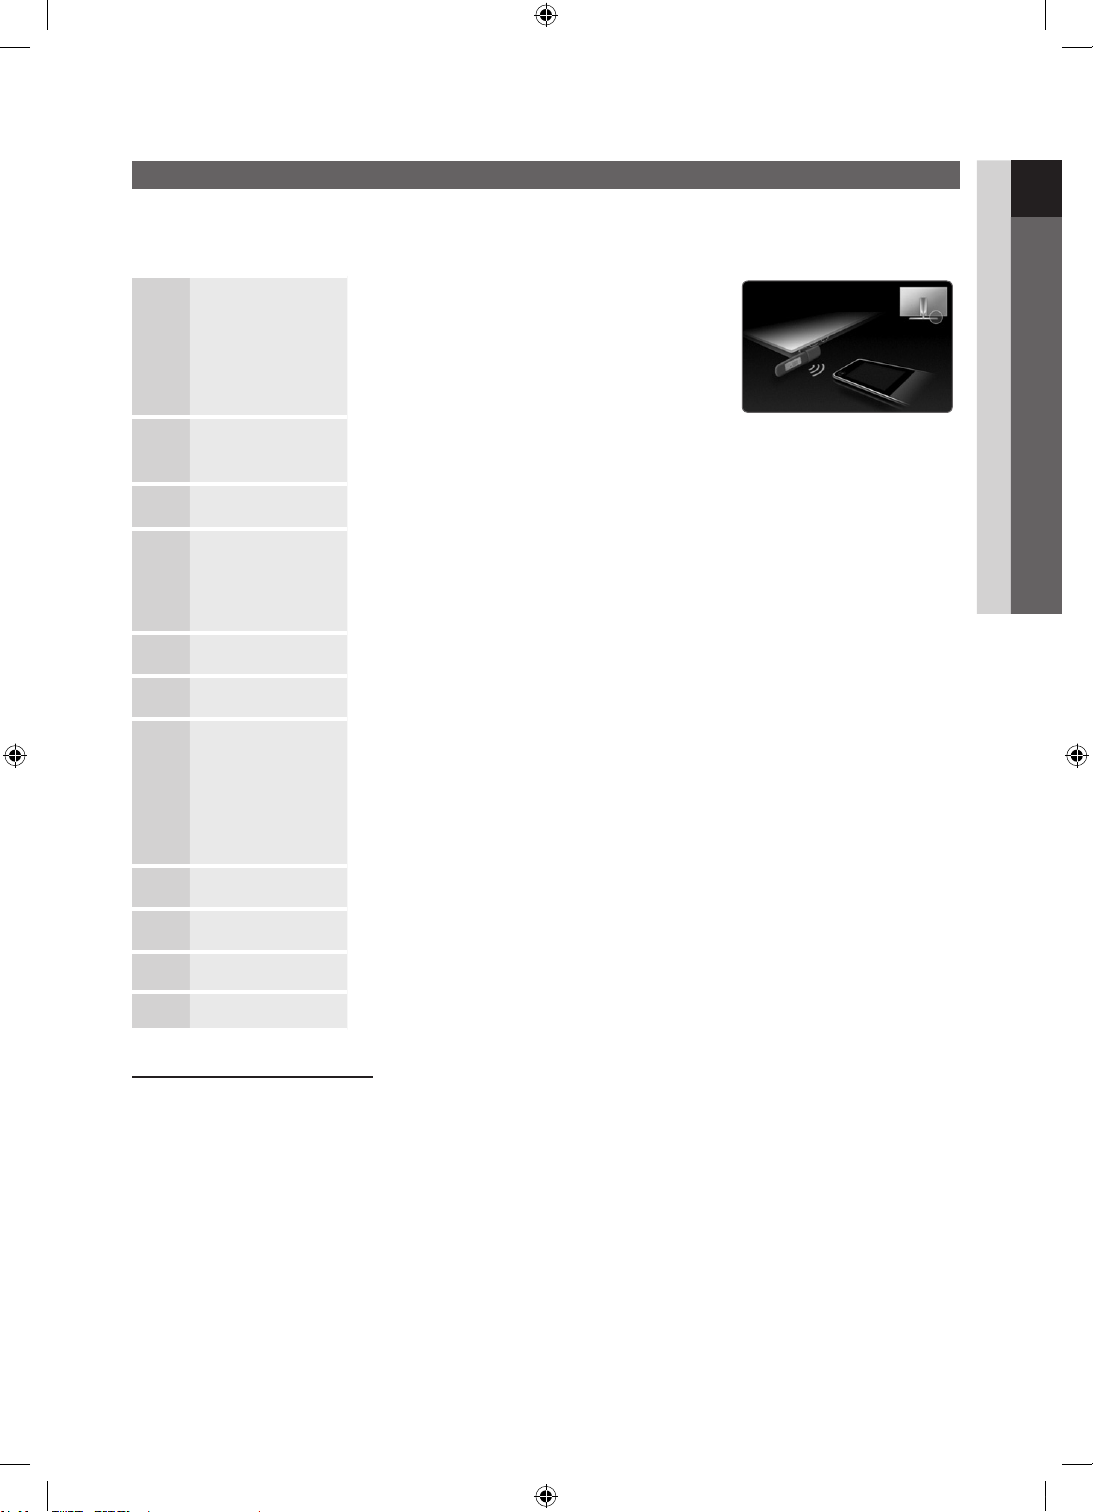
Plug & Play (Impostazione iniziale)
Alla prima accensione del televisore, vengono visualizzate alcune schermate che aiutano l’utente a configurare le impostazioni
di base. Premere il tasto POWER. Plug & Play è disponibile solo quando sul televisore è impostata la sorgente Ingressi.
✎
Per tornare al passaggio precedente, premere il tasto Rosso.
01 Per iniziare
Accendere il televisore
e il Touch Control.
1
Collegamento
dell'adattatore LAN
2
wireless Samsung
Selezione della lingua
3
Selezionare Demo
4
Negozio o Uso dom.
Selezionare la nazione
5
Selezionare una
6
antenna
Selezionare un canale
7
Impostare la Modalità
8
orologio
Fuso orario
9
Visualizzare la Guida
10
alla connessione HD.
Buona visione.
11
y Accendere il telecomando Touch Control quindi
toccare OK sul display del telecomando.
✎
La connessione wireless tra il televisore e il
telecomando Touch Control mediante adattatore
LAN wireless Samsung può richiedere un minuto di
tempo.
y Collegare l'adattatore LAN wireless Samsung al televisore. E' possibile collegare
l'adattatore LAN wireless Samsung utilizzando uno dei metodi descritti a pagina 36.
y In caso contrario, ricollegare l'adattatore LAN wireless Samsung e riprovare.
Premere il tasto ▲ o ▼, quindi premere ENTER
Selezionare la lingua OSD (On Screen Display) desiderata.
Premere il tasto ◄ o ►, quindi premere ENTER
y Selezionare la modalità Uso dom.. La modalità Demo Negozio è dedicata a un uso commerciale.
y Ripristinare le impostazioni dell’unità da Demo Negozio a Uso dom. (standard):
Premere il tasto Volume del televisore. Quando il menu Volume viene visualizzato a
schermo, tenere premuto il tasto MENU per 5 secondi.
Premere il tasto ▲ o ▼, quindi premere ENTER
Selezionare la nazione appropriata.
Premere il tasto ▲ o ▼, quindi premere ENTER
Selezionare Antenna o Cavo.
Premere il tasto ▲ o ▼, quindi premere ENTER
Selezionare la sorgente del canale da memorizzare. Quando si imposta la sorgente antenna
su Cavo, viene visualizzata una procedura che consente di impostare un valore per la
ricerca dei canali digitali (frequenza del canale). Per ulteriori informazioni, vedere Canale →
Memoriz. automatica (p. 18).
✎
Premere ENTERin qualsiasi momento per interrompere il processo di
memorizzazione.
Impostare la Modalità orologio automaticamente o manualmente.
Premere ▲ o ▼ per selezionare Automatico, quindi premere ENTER
Premere ▲ o ▼ per selezionare il fuso orario, quindi premere ENTER
nazione)
Viene quindi visualizzata la descrizione relativa al metodo di connessione che fornisce la
migliore qualitàdi visione HD.
Premere il tasto ENTER
.
.
.
.
.
.
.
. (in base alla
Per reimpostare questa funzione...
Selezionare Impostazione - Plug & Play (Impostazione iniziale) Digitare il PIN a quattro cifre. Il PIN preimpostato è “0-0-0-0”.
Per cambiare il codice PIN, utilizzare la funzione Cambia PIN.
Italiano
11
[UC9000]BN68-02820F-ZT.indb 11 2010-05-24 오후 5:25:38
Page 76
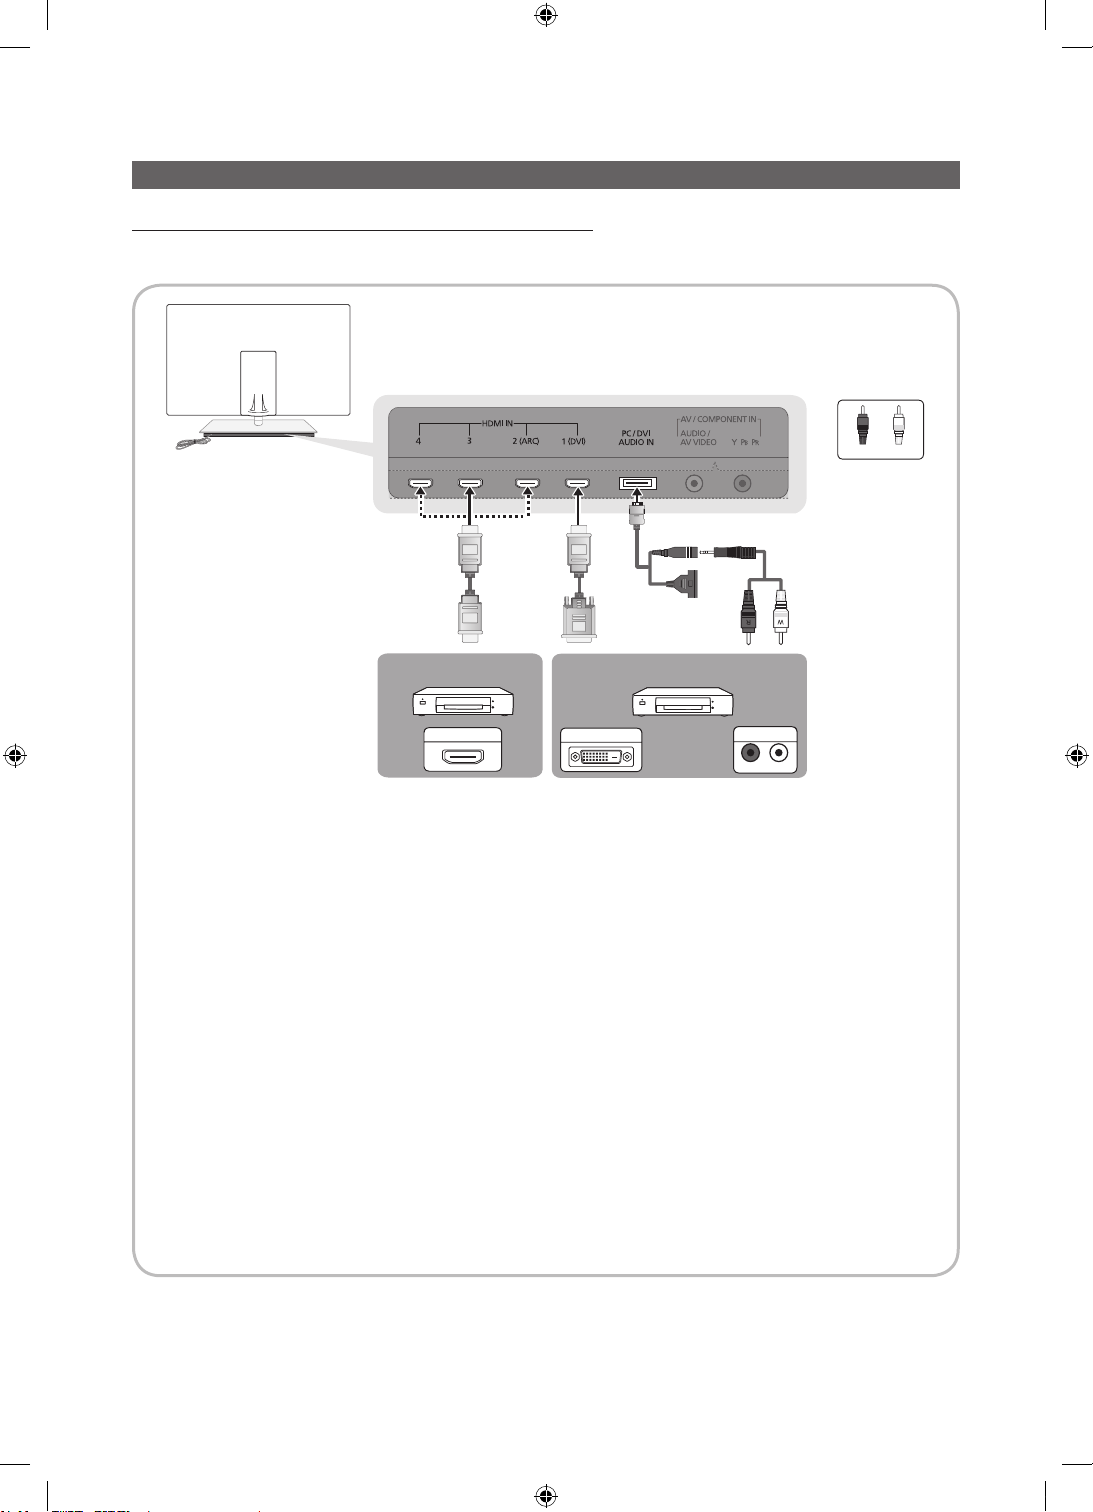
Collegamenti
R-AUDIO-L
Collegare un dispositivo AV
Uso di un cavo HDMI o HDMI/DVI: Connessione HD (fino a 1080p)
Dispositivi disponibili: Lettore DVD, Blu-ray, ricevitore via cavo HD, ricevitore satellitare HD STB (Set-Top-Box), ricevitore via
cavo, ricevitore satellitare
WR
BiancoRosso
Lettore DVD / Blu-ray Lettore DVD / Blu-ray
HDMI OUT
✎
HDMI IN 1(DVI), 2(ARC), 3, 4, PC/DVI AUDIO IN
Per una migliore qualità audio e immagine, effettuare il collegamento a un dispositivo digitale mediante un
x
cavo HDMI.
I cavi HDMI supportano i segnali video e audio e non richiedono un canale audio.
x
– Per collegare il televisore a un dispositivo digitale che non supporta una uscita HDMI, utilizzare cavi HDMI/DVI
e audio.
Se viene collegato al televisore un dispositivo esterno che supporta una versione HDMI precedente,
x
l’immagine a schermo potrebbe essere disturbata (o non essere visualizzata del tutto), oppure l’audio potrebbe
non essere riprodotto. In questo caso, chiedere al produttore del dispositivo esterno informazioni sulla
versione HDMI supportata e, se obsoleta, richiedere un aggiornamento.
Usare un cavo HDMI di max. 14 mm di spessore.
x
Acquistare un cavo HDMI certificato. In caso contrario, l’immagine potrebbe non apparire sullo schermo
x
oppure potrebbe verificarsi un errore di connessione.
Si consiglia l’uso di un cavo base HDMI ad alta velocità o ethernet. Questo prodotto non supporta la funzione
x
ethernet via HDMI.
Questo prodotto supporta le funzioni 3D e ARC (Audio Return Channel) attraverso cavo HDMI. Notare che la
x
funzione ARC è supportata solo dalla porta HDMI IN 2(ARC).
– Se Visualizz auto 3D è impostata su On, alcune funzioni quali Internet@TV non sono selezionabili. Per
renderle nuovamente disponibili, impostare Visualizz auto 3D o Modalità 3D su Off.
La funzione ARC consente l’uscita audio digitale attraverso la porta HDMI IN 2(ARC). Può essere attivata solo
x
quando il televisore è collegato a un ricevitore audio in grado di supportare la funzione ARC.
DVI OUT
AUDIO OUT
Italiano
12
[UC9000]BN68-02820F-ZT.indb 12 2010-05-24 오후 5:25:39
Page 77
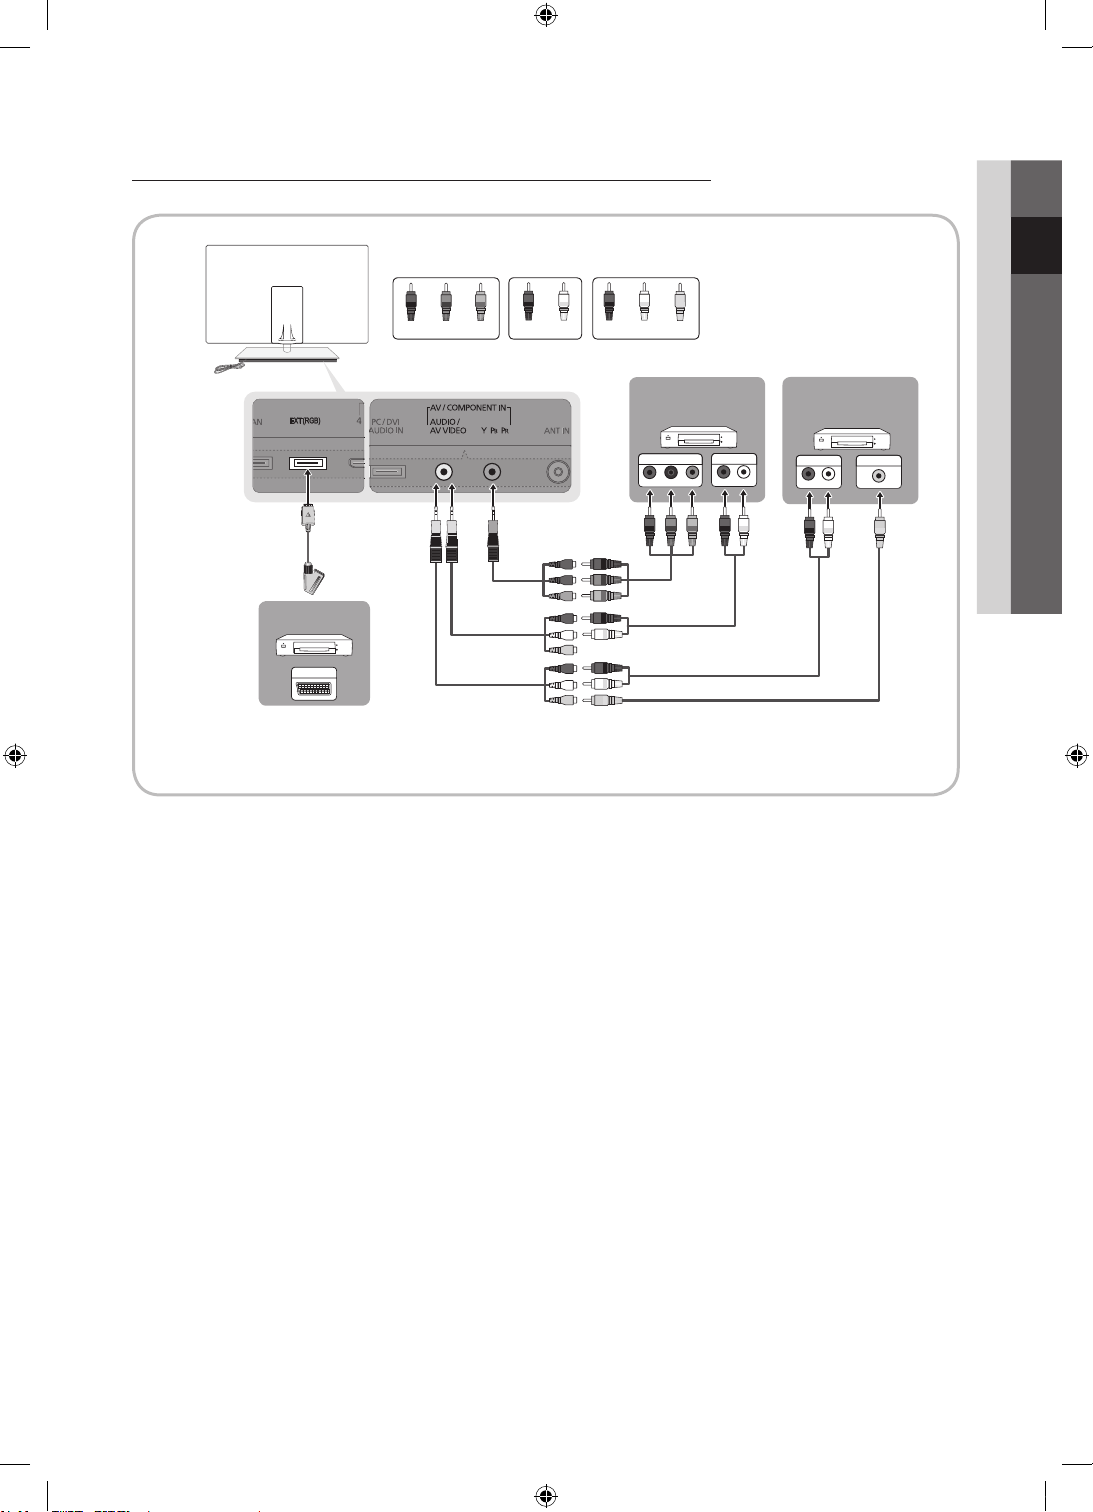
Usare un cavo Component (fino a 1080p) o Audio/Video (solo 480i) e un cavo Scart
Dispositivi disponibili: lettore DVD, Blu-ray, ricevitore via cavo, ricevitore satellitare STB, Videoregistratore
W
RGB
R
W
R
Y
RossoRosso BiancoBianco GialloRosso Blu Verde
02 Collegamenti
Lettore DVD /
Videoregistratore
Blu-ray
COMPONENT OUT
PR PB Y
R
R
B
Videoregistratore
EXT
✎
In modalità Est. l’uscita DTV supporta solo video e audio SD MPEG.
✎
Per ottenere la migliore qualità delle immagini, si consiglia l’uso della connessione Component rispetto alla
G
R
W WR
Y
AUDIO OUT
R-AUDIO-L
B
G
AUDIO OUT
WR
R-AUDIO-L
W Y
R
VIDEO OUT
connessione A/V.
Italiano
13
[UC9000]BN68-02820F-ZT.indb 13 2010-05-24 오후 5:25:40
Page 78
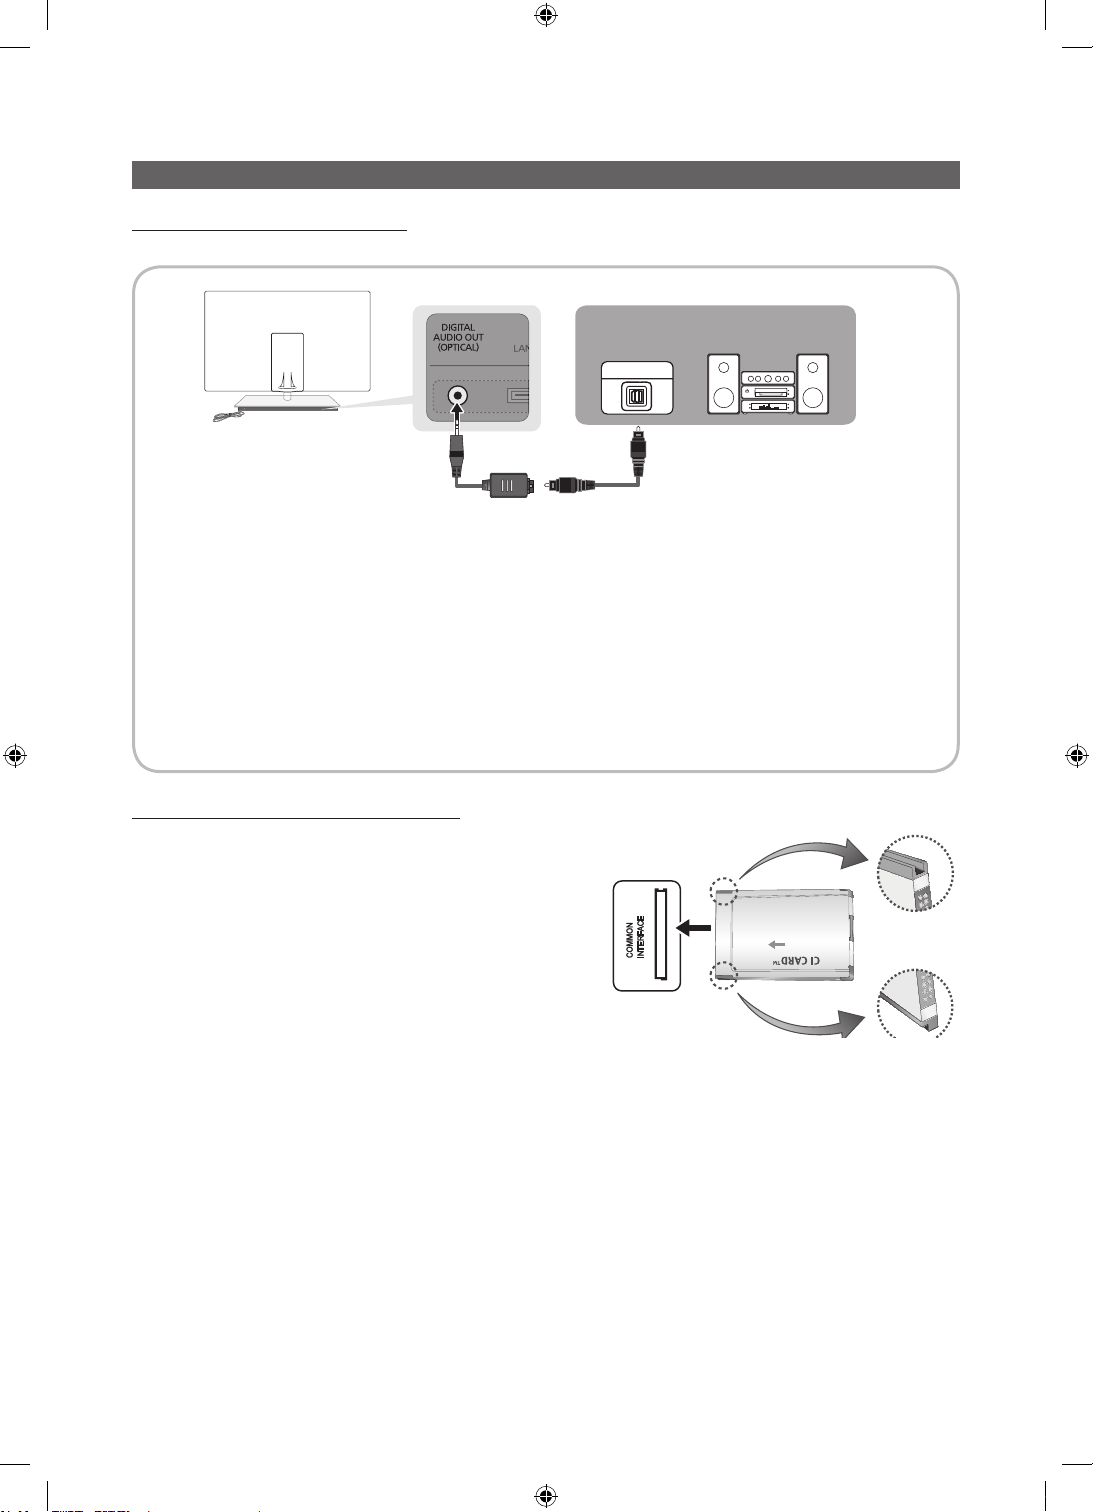
Collegamenti
Collegamento a un dispositivo audio
Uso di un collegamento ottico (digitale)
Dispositivi disponibili: sistema audio digitale, amplificatore, DVD home theatre
OPTICAL
✎
DIGITAL AUDIO OUT (OPTICAL)
Quando un sistema audio digitale è collegato alla porta DIGITAL AUDIO OUT (OPTICAL), ridurre il volume
x
sia del televisore sia del sistema.
L’audio 5,1 CH (canali) è disponibile quando il televisore è collegato a un dispositivo esterno che supporta lo
x
standard 5,1 CH.
Quando il ricevitore (home theatre) è impostato su On, è possibile udire l’audio proveniente dall’uscita ottica
x
del televisore. Quando il televisore visualizza un segnale DTV, invia l’audio a 5,1 canali al ricevitore Home
Theater. Se la sorgente è un componente digitale, come per es. un lettore DVD / Blu-ray / ricevitore via cavo
/ ricevitore satellitare (STB) ed è collegata al televisore mediante HDMI, saranno udibili solo 2 canali audio dal
ricevitore Home Theater. Per un audio a 5,1 canali, collegare il jack dell’uscita audio digitale del DVD / lettore
Blu-ray / ricevitore via cavo / ricevitore satellitare STB direttamente a un amplificatore o un home theatre.
sistema audio digitale
Slot per CONNESSIONI COMMON INTERFACE
Per visualizzare canali a pagamento, è necessario inserire una
“SCHEDA CI o CI+”.
y Se non si inserisce una “SCHEDA CI o CI+”, alcuni canali
visualizzeranno il messaggio “Segnale criptato”.
y Le informazioni di pairing che contengono un numero telefonico,
l’ID della “SCHEDA CI o CI+”, l’ID host e altri dati verranno
visualizzati entro 2~3 minuti. Se viene visualizzato un messaggio
di errore, contattare il fornitore del servizio.
y Quando la configurazione delle informazioni relative al canale è
stata completata, viene visualizzato il messaggio “Aggiornamento
completato”, a indicare che l’elenco dei canali è stato aggiornato.
✎
NOTA
È necessario richiedere una “SCHEDA CI o CI+” al fornitore del servizio locale.
x
Estrarre con delicatezza la “SCHEDA CI o CI+” tirandola con le dita e prestando attenzione a non farla cadere poiché
x
potrebbe subire danni.
Inserire la “SCHEDA CI o CI+” nella direzione indicata sulla scheda stessa.
x
La posizione dell’alloggiamento COMMON INTERFACE può variare in base al modello.
x
La “SCHEDA CI o CI+” non è supportata in alcune nazioni e regioni; controllare con il rivenditore autorizzato di zona.
x
In caso di problemi, contattare il fornitore del servizio.
x
Inserire la “SCHEDA CI o CI+” in grado di supportare le impostazioni antenna correnti. Lo schermo non visualizzerà le
x
immagini oppure queste saranno distorte.
Italiano
14
[UC9000]BN68-02820F-ZT.indb 14 2010-05-24 오후 5:25:41
Page 79
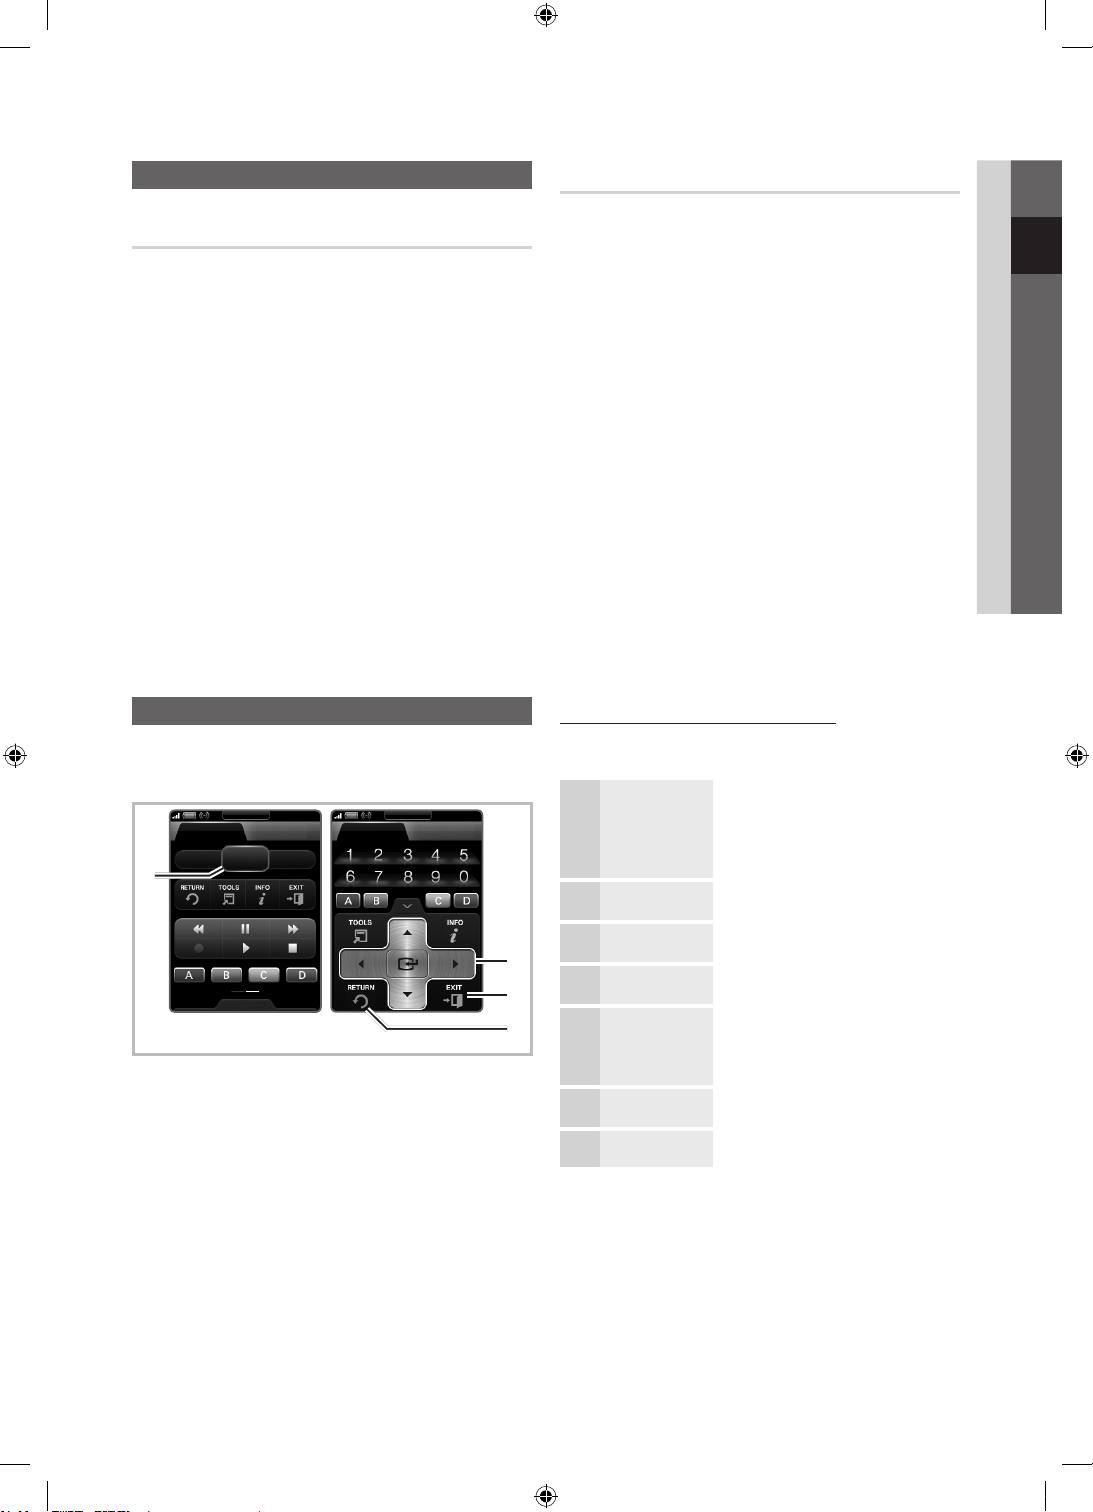
Cambiare la sorgente di ingresso
Elenco sorgenti
Questa funzione viene usata per selezionare il televisore o
un’altra sorgente di ingresso esterna come un lettore DVD
/ Blu-Ray / ricevitore via cavo / ricevitore satellitare STB
collegato al televisore.
■ TV / Est. / PC / AV / Comp. / HDMI1/DVI / HDMI2 /
HDMI3 / HDMI4 / USB
✎
In Elenco sorgenti, gli ingressi collegati vengono
evidenziati.
✎
Est. e PC sono sempre attivi.
Funzioni base
Modifica Nome
■ Videoregistratore / DVD / STB cavo / STB satellite /
STB PVR / Ricevitore AV / Giochi / Videocamera /
PC / DVI PC / Dispositivi DVI / TV / IPTV / Blu-ray
/ HD DVD / DMA: Assegnare un nome al dispositivo
collegato alle porte di ingresso per semplificare la
selezione della sorgente di ingresso.
✎
Quando un PC con una risoluzione di 1920 x 1080
a 60Hz viene collegato alla porta HDMI IN 1(DVI),
impostare la porta in modalità DVI PC nel campo
Modifica Nome.
✎
Quando si collega un cavo HDMI/DVI alla porta
HDMI IN 1(DVI), è necessario impostare la porta
in modalità DVI PC o Dispositivi DVI nel campo
Modifica Nome.
✎
Se un cavo HDMI è collegato alla porta
HDMI IN 1(DVI), l’audio potrebbe non funzionare.
In questo caso, collegarlo alla porta
PC/DVI AUDIO IN.
02 Collegamenti
Come scorrere i menu
Prima di utilizzare il televisore, seguire questi passaggi per
imparare a scorrere i menu, selezionando e regolando le
diverse funzioni.
Tastiera
Control TV Servizi
CONTENT MENU GUIDE
1
Navigazione
1 Tasto MENU: Visualizza il menu OSD principale.
2 ENTER
seleziona una voce. Conferma l’impostazione.
3 Tasto EXIT: Esce dal menu OSD.
4 Tasto RETURN: Ritorna al menu precedente.
/ Tasto di direzione: Sposta il cursore e
Tastiera
Control TV Servizi
Uso dei menu OSD (On Screen Display)
La procedura d’accesso può essere diversa a seconda del
menu selezionato.
MENU Sullo schermo vengono visualizzate
2
3
4
1
2
3
4
5
6
▲ / ▼
ENTER
▲ / ▼
◄ / ►
ENTER
EXIT
le opzioni del menu principale:
Immagine, Suono, Canale,
Impostazione, Ingressi,
Applicazione, Supporto.
Selezionare una icona con il tasto
▲ o ▼.
Premere ENTER per accedere
al menu secondario.
Selezionare il menu secondario
desiderato con il tasto ▲ o ▼.
Regolare il valore di un elemento
con il tasto ◄ o ►. La regolazione
nel menu OSD può differire in base
al menu selezionato.
Premere ENTER per completare
la configurazione.
Premere EXIT.
7
Italiano
15
[UC9000]BN68-02820F-ZT.indb 15 2010-05-24 오후 5:25:42
Page 80
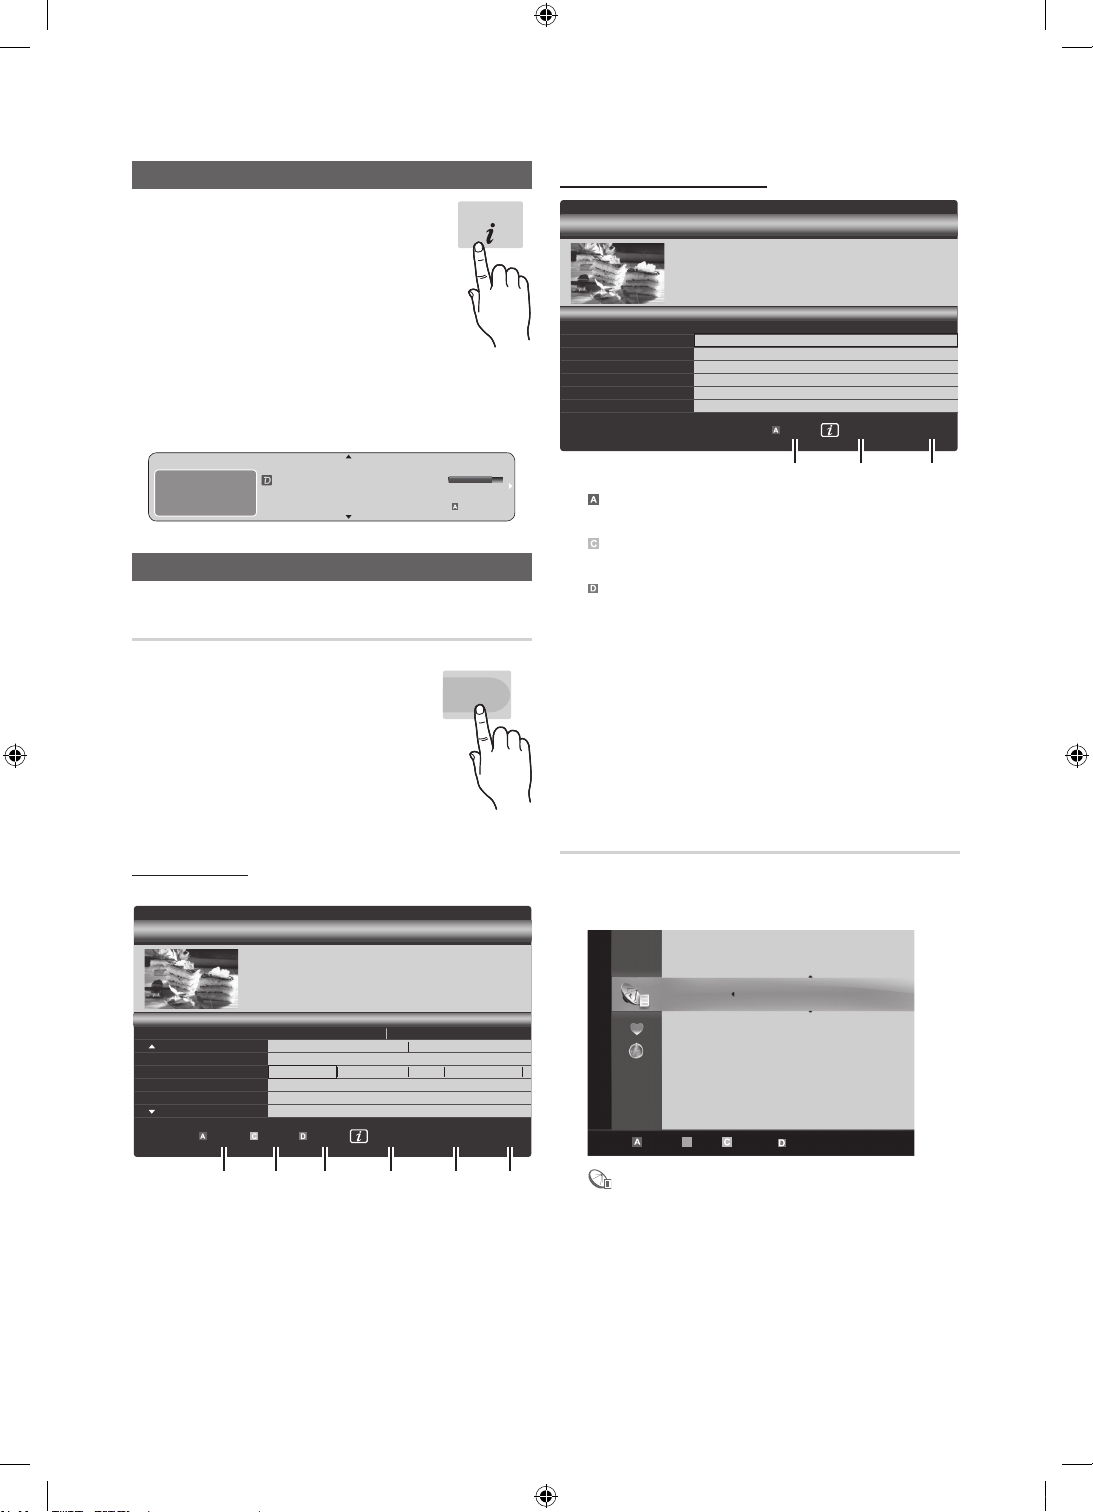
Uso del tasto INFO (Guida Now & Next)
Il display identifica il canale corrente e lo stato
di determinate impostazioni audio e video.
La guida Now & Next mostra le informazioni
relative alla programmazione giornaliera di
ogni canale in base all’orario di trasmissione.
y Scorrere ◄, ► per visualizzare
le informazioni di un determinato
programma durante la visione del canale
corrente.
y Scorrere ▲, ▼ per visualizzare le informazioni relative
ad altri canali. Se si desidera spostarsi sul canale
selezionato, premere ENTER
DEF
DTV Air
15
Life On Venus Avenu e
Unclass ified
No Det aild Inform ation
.
18:00 ~ 6:00
18:11 Gio 6 Jan
E
Guarda
Informazioni
Pianificare la visione
Guida
Le informazioni EPG (Electronic Programme Guide)
sono fornite dall’emittente. Usando la
programmazione fornita dalle emittenti,
è possibile specificare i programmi
da visualizzare in anticipo in modo da
passare automaticamente al canale
desiderato all’orario impostato. Le varie
voci dei programmi potranno non essere
visualizzate o non essere aggiornate in
base allo stato del canale.
Usare Vis. canali
Guida
18:00 - 19:00 19:00 - 20:00
American Chopper
Programmes resume at 06:00
Home and...
No Information
QVC Selection
No Information
)
Family Affairs
800 five
Vis. canali - TV
Oggi
27
28
800
24
16
6
DTV Air 800 five
Home and Away
18:00 - 18:30
Drama
Dani is devastated when scott makes clear his views on marriage...
Discovery
DiscoveryH&L
five
price-drop.tv
QVC
R4DTT
Mod vis. +24 ore Mod.CH Informazioni Pagina
GUIDE
Tine Team
Fiv...
)
2:10 Mar 1 Giu
Dark Angel
INFO
Guarda
Uso di Vista programmazione
800
800
2:10 Mar 1 Giu
five
five
Annulla
Guida
800 five
Vista programmazione
18:30
Oggi
19:15
Oggi
)
Family Affairs
)
Dark Angel
Mod vis. Informazioni
DTV Air 800 five
Family Affairs
18:00 - 18:30
Drama
Tanya confesses all to a stunned Babs. Conrad is anxious to hear...
1 4 6
1
Rosso (Mod vis.) : Visualizza l’elenco dei programmi
attualmente trasmessi o in programmazione.
2
Giallo (+24 ore): Visualizza l’elenco dei programmi da
trasmettere dopo 24 ore.
3
Blu (Mod. CH): Selezionare il tipo di canali da
visualizzare nella finestra Vis. canali. (Tutto, TV, Radio,
Dati/Altro, Mio canale 1~4)
4 Informazioni: Visualizza i dettagli del programma
selezionato.
5
(Pagina): Passa alla pagina precedente o successiva.
6 Tasto ENTER
– Selezionando il programma corrente, è possibile visualizzarlo.
– Selezionando un evento in programmazione, è possibile
prenotarne la visione. Per annullare la programmazione, premere
nuovamente il tasto ENTER quindi selezionare Annulla progr.
Gestione canali
Eliminare o impostare i canali preferiti e utilizzare la guida ai
programmi per le trasmissioni digitali. Selezionare un canale
nella schermata Canali, Miei canali o Programmato.
Canali
Tutto
TV
Radio
Dati/Altro
Analogico
Antenna Antenna B Zoom Seleziona Ordina PaginaStrumenti
c 1 1futech
2 * 24ore.tv
15 abc1
3 BBC World
23 bid-up.tv
33 Boonerang
32 Cartoon Nwk
5 Class News
4 \ Coming Soon
27 Discovery
r
1 2 3 4 5 6
Canali: Mostra l’elenco canali a seconda del tipo di
■
canale.
Italiano
16
[UC9000]BN68-02820F-ZT.indb 16 2010-05-24 오후 5:25:45
Page 81
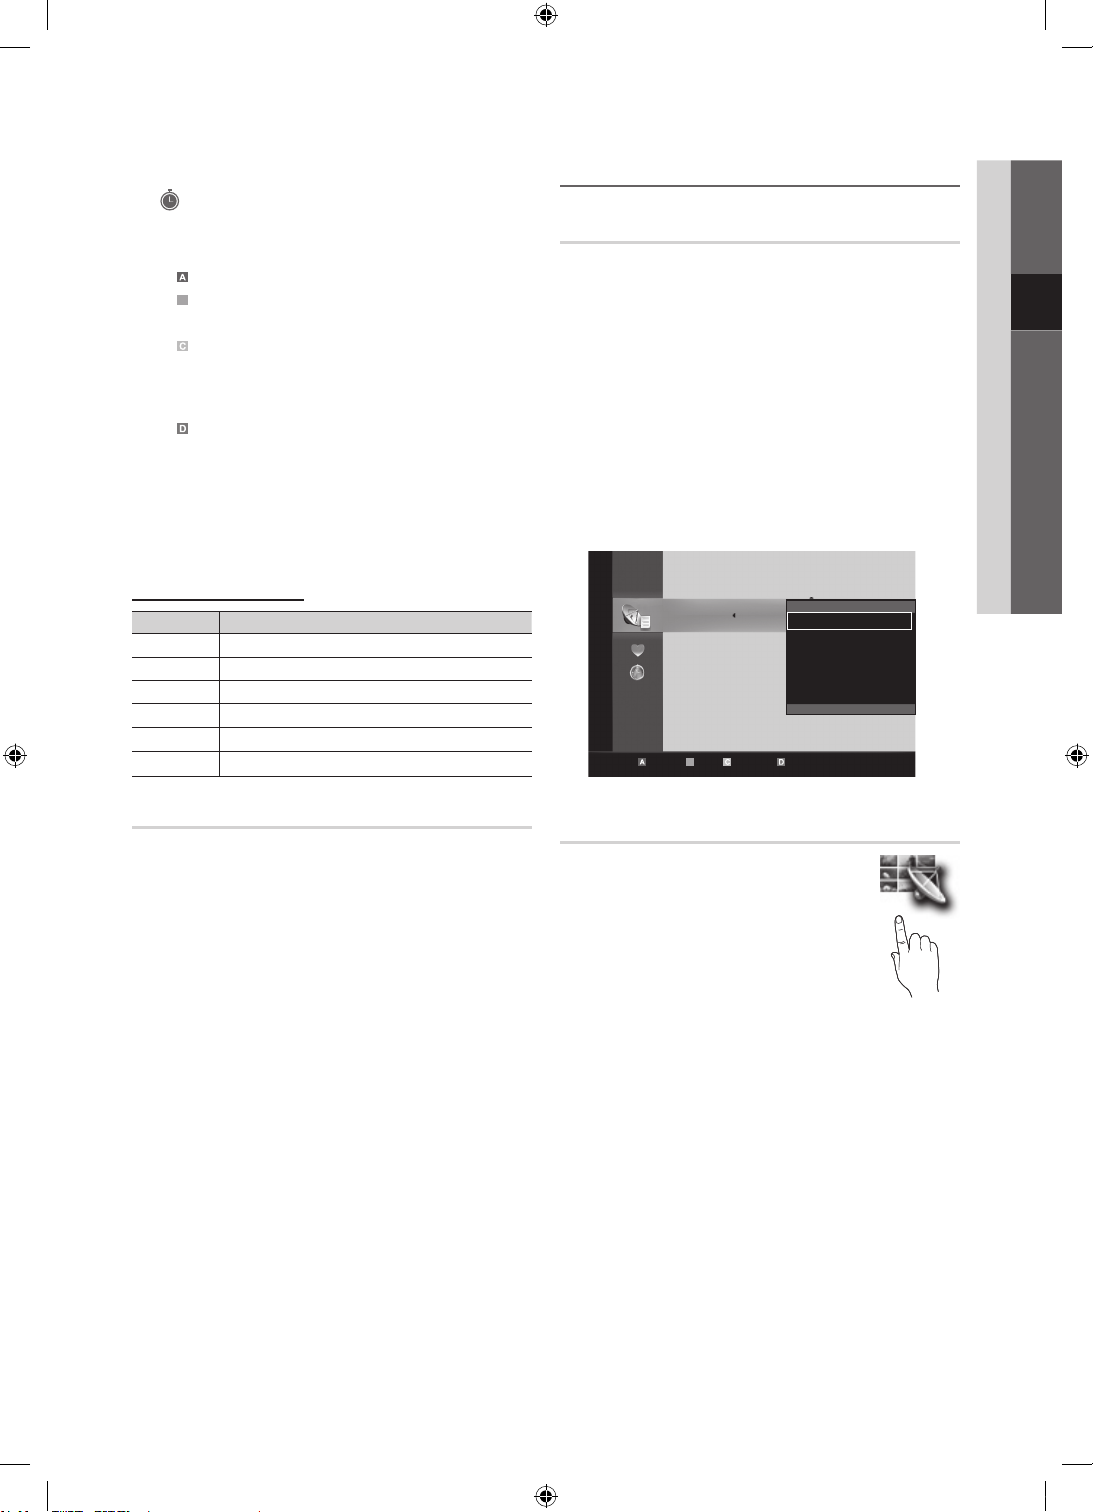
■ Miei canali: Mostra il gruppo del canale.
■
Programmato: Mostra tutti i programmi attualmente
prenotati.
✎
Uso dei tasti colorati in Gestione canali
Rosso (Antenna): Selezionare Antenna o Cavo.
x
B
Verde (Zoom) : Aumenta o diminuisce il numero di
x
un canale.
Giallo (Seleziona): Selezionare i canali desiderati
x
e premere il tasto giallo per impostare tutti i canali
selezionati contemporaneamente. Il simbolo
compare a sinistra dei canali selezionati.
Blu (Ordina) : Cambia l’elenco dei canali ordinati
x
per nome o numero del canale.
(Pagina): Passa alla pagina precedente o
x
successiva.
(Strumenti): Visualizza il menu dell’opzione
x
Gestione canali. (Il menu Opzioni può variare a
seconda della situazione.)
Icone di stato del canale
Icone Operazioni
Canale analogico.
Canale selezionato.
Canale impostato come Preferito.
Programma attualmente trasmesso.
Canale bloccato.
Programma prenotato.
Uso dei Canali Preferiti
Miei canali
(in Gestione canali)
Mostra tutti i canali preferiti.
Tutto
TV
Radio
Dati/Altro
Analogico
: E’ possibile impostare
c 1 1futech
2 * 24ore.tv
15 abc1
Modica Miei canali
Blocco
3 BBC World
Timer visione
23 bid-up.tv
Regist progr
33 Boonerang
Modica num canale
32 Cartoon Nwk
Elimina
5 Class News
4 \ Coming Soon
27 Discovery
r
■ Modifica Miei canali
i canali selezionati nel gruppo Mio canale.
✎
Il simbolo “” verrà evidenziato e il canale verrà
impostato nel gruppo Mio canale.
1. Selezionare un canale e premere il tasto TOOLS.
2. Aggiungere o eliminare un canale nei gruppi Mio
canale quali 1, 2, 3 e 4.
E’ possibile selezionare uno o più gruppi.
x
3. Una volta modificate le impostazioni, in Miei canali
sarà possibile visualizzare l’elenco dei canali di ogni
gruppo.
Canali
Antenna Antenna B Zoom Seleziona Ordina PaginaStrumenti
03 Funzioni base
Tipo di guida (Samsung / Guide Plus+)
(in base alla nazione)
E’ possibile selezionare il tipo di guida desiderato.
■ Samsung: Utilizza la guida fornita da Samsung.
■ Guide Plus+: Utilizza la guida fornita da Rovi
International Solutions. Per ulteriori informazioni visitare il
sito “www.europe.guideplus.com.”
Elenco canali
E’ possibile visualizzare tutti i canali ricercati.
CHLIST
Italiano
17
[UC9000]BN68-02820F-ZT.indb 17 2010-05-24 오후 5:25:47
Page 82

Funzioni base
Menu Canale
Ritorno ai canali
Antenna (Antenna / Cavo)
Seleziona l’antenna appropriata per trasmissioni digitali.
Nazione
Viene visualizzata la finestra di immissione del PIN. Digitare il
PIN a quattro cifre.
■ Canale digitale : Cambiare la nazione per i canali
digitali.
■ Canale analogico: Cambiare la nazione per i canali
analogici.
Memoriz. automatica
Ricerca i canali automaticamente e li memorizza sul
televisore.
✎
I numeri di programma assegnati automaticamente
potrebbero non corrispondere ai numeri di programma
effettivi o desiderati. Se un canale è stato bloccato
mediante la funzione Blocco canali, comparirà la
schermata di inserimento del PIN.
■ Sorgente antenna (Antenna / Cavo)
Selezionare la sorgente antenna da memorizzare.
■ Sorgente canale (Digitale e Analogico / Digitale /
Analogico) : Selezionare la sorgente del canale da
memorizzare.
Quando si seleziona Cavo → Digitale e Analogico
o Digitale : Inserire un valore per ricercare i canali via
cavo.
Mod ricerca (Completa / Rete / Rapida): Scorrere tutti
i canali per le stazioni emittenti attive e memorizzarli nella
memoria del televisore.
✎
Impostando Rapida, è possibile configurare
Rete, ID di rete, Frequenza, Modulazione e
Symbol Rate manualmente premendo il tasto sul
telecomando.
Rete (Automatico / Manuale): Seleziona la modalità di
impostazione ID di rete tra Automatico o Manuale.
ID di rete: Quando Rete è impostata su Manuale, è
possibile impostare ID di rete usando i tasti numerici.
Frequenza: Visualizza la frequenza del canale. (varia in
base alla nazione)
Modulazione: Visualizza i valori di modulazione
disponibili.
Symbol Rate: Visualizza i valori di symbol rate
disponibili.
:
Memorizzazione manuale
Esegue la scansione automatica di un canale e lo memorizza
nel televisore.
✎
Se un canale è stato bloccato mediante la funzione
Blocco canali, comparirà la schermata di inserimento
del PIN.
■ Canale digitale : Al termine della ricerca, i canali
vengono aggiornati nell’elenco dei canali.
✎
Selezionando Antenna → Antenna: Canale,
Frequenza, Larg. di banda
✎
Selezionando Antenna → Cavo: Frequenza,
Modulazione, Symbol Rate
■ Canale analogico (Programma, Sistema colore,
Sistema audio, Canale, Ricerca) : Se l’audio è
anomalo o assente, riselezionare lo standard audio
richiesto.
✎
Mod. Canale
P (modalità Programma): Una volta completata la
x
sintonizzazione, alle emittenti della propria area viene
assegnato un numero compreso tra P0 e P99. In
questa modalità, è possibile selezionare un canale
digitandone il numero corrispondente.
C (modalità canale antenna) / S (modalità canale
x
cavo): Queste due modalità permettono di
selezionarne un canale digitandone il numero ad
esso assegnato per ogni stazione via etere o canale
via cavo.
Modifica dei canali
Menu Opzioni di Gestione canali
(in Gestione canali)
1. Selezionare un canale e premere il tasto TOOLS.
2. Modificare il nome del canale o il numero usando
Modifica nome canale o il menu
Modifica num canale.
■ Modifica nome canale (solo canali analogici):
Assegnare il nome preferito al canale.
■ Modifica num canale (solo canali digitali): Modificare il
numero premendo i tasti numerici desiderati.
Altre funzioni
Opzione ricerca via cavo
(in base alla nazione)
Imposta ulteriori opzioni di ricerca quali frequenza e symbol
rate per ricerche network via cavo.
■ Frequenza inizio / Frequenza arresto: Impostare la
frequenza iniziale o finale (diversa per ogni nazione)
■ Symbol Rate: Visualizza i valori di symbol rate
disponibili.
■ Modulazione: Visualizza i valori di modulazione
disponibili.
Italiano
18
[UC9000]BN68-02820F-ZT.indb 18 2010-05-24 오후 5:25:47
Page 83
Gestione canali
Menu Opzioni di Gestione canali
Impostare ogni canale usando le opzioni del menu
Gestione canali (Blocco / Sblocco, Timer visione,
Regist progr, Ordina, Elimina, Seleziona tutto /
Deseleziona tutto). Gli elementi del menu Opzioni possono
differire in base allo stato del canale.
1. Selezionare un canale e premere il tasto TOOLS.
2. Selezionare una funzione e cambiarne le impostazioni.
■ Blocco / Sblocco: E’ possibile bloccare un canale in
modo che non possa essere selezionato e visualizzato.
✎
NOTA
Questa funzione è disponibile solo quando la
x
funzione Blocco canali è impostata su On.
Viene visualizzata la finestra di immissione del PIN.
x
Digitare il PIN a 4 cifre; il PIN predefinito è “0-0-0-0”.
Cambiare il PIN usando l’opzione Cambia PIN.
■ Timer visione: E’ possibile impostare la visualizzazione
automatica di un canale desiderato all’ora prestabilita.
Impostare l’orario corrente prima di usare questa
funzione.
✎
Quando un canale digitale viene selezionato
premere il tasto ► per visualizzare il programma
digitale.
■ Regist progr (solo canali digitali): Consente di registrare
un programma in onda o di prenotare la registrazione di
un programma futuro.
✎
Collegare al televisore un dispositivo USB con
almeno 4GB di memoria.
✎
Un dispositivo di memoria USB potrebbe non
essere in grado di registrare fino al completamento
del Test prestazioni dispositivo.
✎
In caso di HDD USB, oltre 5400 rpm
✎
In caso di chiavetta USB, USB 2.0 e SLC.
(Chiavetta USB minimo 2GB.)
✎
Per registrare, premere il tasto (REC) sul
telecomando. Premere due volte il tasto (REC)
per impostare la durata della registrazione.
■ Ordina (solo canali analogici): Questa operazione
consente di modificare i numeri di programma dei canali
memorizzati. Questa operazione può essere necessaria
dopo la memorizzazione automatica dei canali.
■ Elimina: E’ possibile eliminare un canale per visualizzare
i canali desiderati.
■ Seleziona tutto / Deseleziona tutto: Per selezionare o
deselezionare tutti i canali in gestione canali.
Trasferim. elenco canali
Viene visualizzata la finestra di immissione del PIN. Digitare
il PIN a quattro cifre. Importa o esporta la mappatura dei
canali. Collegare un dispositivo di memoria USB per utilizzare
questa funzione.
■ Importa da USB: Importa l’elenco canali dal dispositivo
USB.
■ Esporta in USB: Esporta l’elenco canali sul dispositivo
USB. Questa funzione è disponibile solo quando è
collegato un dispositivo USB.
Programmato
(in Gestione canali)
E’ possibile visualizzare, modificare o eliminare un
programma prenotato.
■ Modifica info: Per modificare un programma prenotato.
■ Annulla Programmazioni: Per annullare un programma
prenotato.
■ Informazioni: Per visualizzare un programma prenotato.
(E’ inoltre possibile modificare le informazioni relative alla
prenotazione.)
■ Seleziona tutto / Deseleziona tutto: Per selezionare o
deselezionare tutti i programmi prenotati.
Sintonia fine
(solo canali analogici)
Se il segnale risulta debole o distorto, può essere necessario
sintonizzare il canale manualmente.
✎
I canali per i quali si è effettuata la sintonia fine sono
contrassegnati con un asterisco “*”.
✎
Per reimpostare la sintonia, selezionare Reset.
Menu Immagine
Cambiare la modalità Immagine preimpostata
Modalità
Selezionare il tipo di immagine preferita.
■ Dinamica: Adatta per un ambiente illuminato.
■ Standard: Adatta per condizioni di luce normali.
■ Naturale: Adatta per ridurre l’affaticamento della vista.
✎
Naturale non è disponibile in modalità PC.
■ Film: Adatta per la visione di film in un ambiente poco
illuminato.
03 Funzioni base
Italiano
19
[UC9000]BN68-02820F-ZT.indb 19 2010-05-24 오후 5:25:48
Page 84
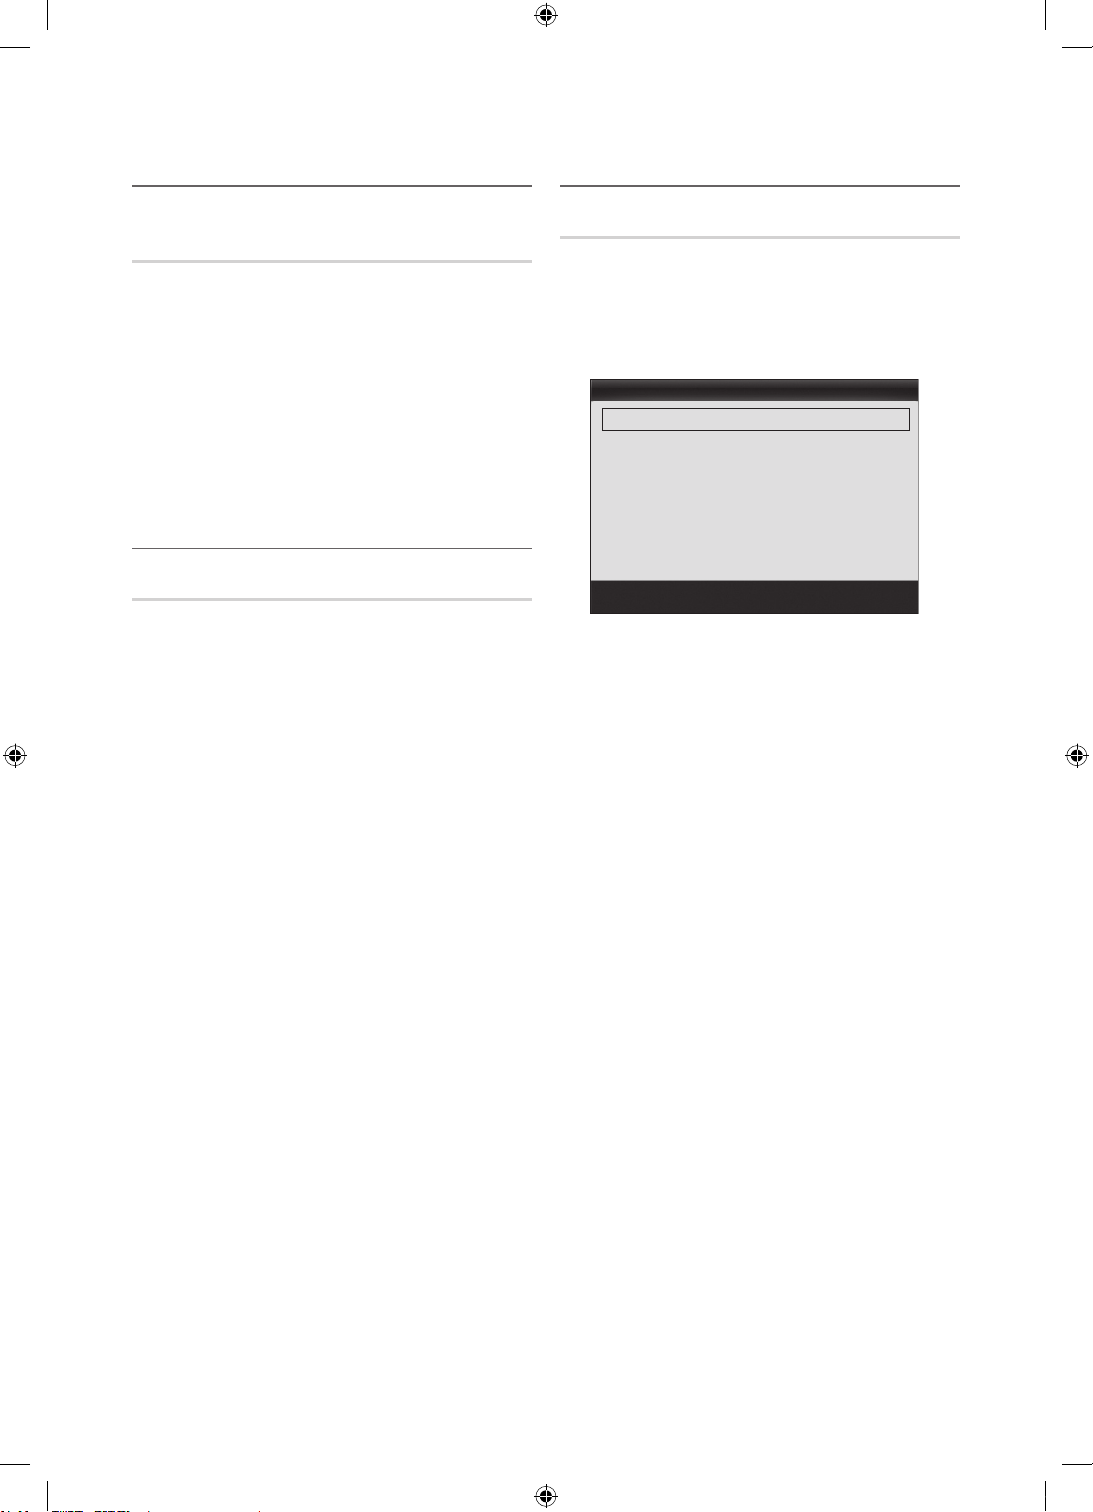
Funzioni base
Regolazione delle impostazioni delle immagini
Retroillumin / Contrasto / Luminosità /
Nitidezza / Colore / Tinta (V/R)
La televisione ha diverse opzioni di impostazione per il
controllo della qualità delle immagini.
✎
NOTA
Nelle modalità analogiche TV, Est., AV del sistema
x
PAL, non è possibile utilizzare la funzione
Tinta (V/R).
In modalità PC, è possibile modificare solo i
x
parametri Retroillumin, Contrasto e Luminosità.
Le impostazioni possono essere modificate e
x
memorizzate per ogni dispositivo esterno collegato
al televisore.
Soluzioni economiche
Soluzione Eco
■ Risp. energia (Off / Basso / Medio / Alto /
Immagine off / Automatico)
funzione regola la luminositàdel televisore in modo
da ridurre il consumo di energia. Selezionando
Immagine off, lo schermo viene disattivato, ma l’audio
rimane attivo. Premere un tasto qualsiasi per riattivare
nuovamente lo schermo.
■ Sensore Eco (Off / On) : Per migliorare le impostazioni
di risparmio energetico; le impostazioni delle immagini
vengono automaticamente adattate all’illuminazione
ambientale.
✎
Regolando la Retroillumin, il Sensore Eco verrà
impostato su Off.
Retroillumin min: Quando Sensore Eco è impostato
su On, l’illuminazione minima dello schermo può essere
regolata manualmente.
✎
Se Sensore Eco è impostato su On, la luminosità
del display potrebbe cambiare (diventando
leggermente più scura o più chiara) a seconda
dell’intensità della luce del locale.
■ No segnale stnd-by (Off / 15 min / 30 min / 60 min):
Per ridurre il consumo energetico, impostare il periodo di
tempo in cui il televisore rimarrà acceso senza ricevere
segnali.
✎
Disabilitata quando il PC è in modalità risparmio
energetico.
: Questa
Modifica delle Opzioni immagine
Impostazioni avanzate
(disponibile in modalità Standard / Film)
E’ possibile regolare le impostazioni avanzate dello schermo
compresi il colore e il contrasto.
✎
In modalità PC, è possibile modificare solo i parametri
Contrasto Dinamico, Gamma, Bilan bianco e
LED movim avanzato.
Impostazioni avanzate
Tonalità nero : Off ►
Contrasto Dinamico : Medio
Dettaglio ombra : -2
Gamma : 0
Schema avanzato : Off
Solo modalita RGB : Off
Spazio colore : Nativo
▼
Sposta
Conferma
Ritorna
■ Tonalità nero (Off / Scuro / Più scura / Extra scura):
Selezionare il livello di nero per regolare la profondità
dello schermo.
■ Contrasto Dinamico (Off / Basso / Medio / Alto): Per
regolare il contrasto dello schermo.
■ Dettaglio ombra (-2~+2): Per incrementare la luminosità
delle immagini scure.
■ Gamma: Per regolare l’intensità dei colori primari.
■ Schema avanzato (Off / Motivo1 / Schema2):
Eseguendo la funzione Schema avanzato, l’immagine
può essere calibrata senza l’uso di un generatore o di
un filtro. Se il menu OSD scompare dallo schermo o
viene aperto un altro menu diverso da Immagine, la
calibrazione viene memorizzata e la finestra Schema
avanzato si chiude.
✎
Durante l’esecuzione di Schema avanzato,
l’audio non viene riprodotto.
✎
Attivo sono in modalità DTV (ad eccezione dei
canali dati), Component e HDMI.
■ Solo modalità RGB (Off / Rosso / Verde / Blu): E’
possibile regolare i parametri Colore o Tinta (V/R) dei
valori Rosso, Verde o Blu per le immagini provenienti da
un dispositivo esterno (lettore DVD, home theatre, ecc.).
■ Spazio colore (Automatico / Nativo / Personale):
Regolare l’intervallo dei colori disponibili per creare
l’immagine. Per regolare Colore, Rosso, Verde, Blu e
Reset, impostare Spazio colore su Personalizza.
Italiano
20
[UC9000]BN68-02820F-ZT.indb 20 2010-05-24 오후 5:25:49
Page 85
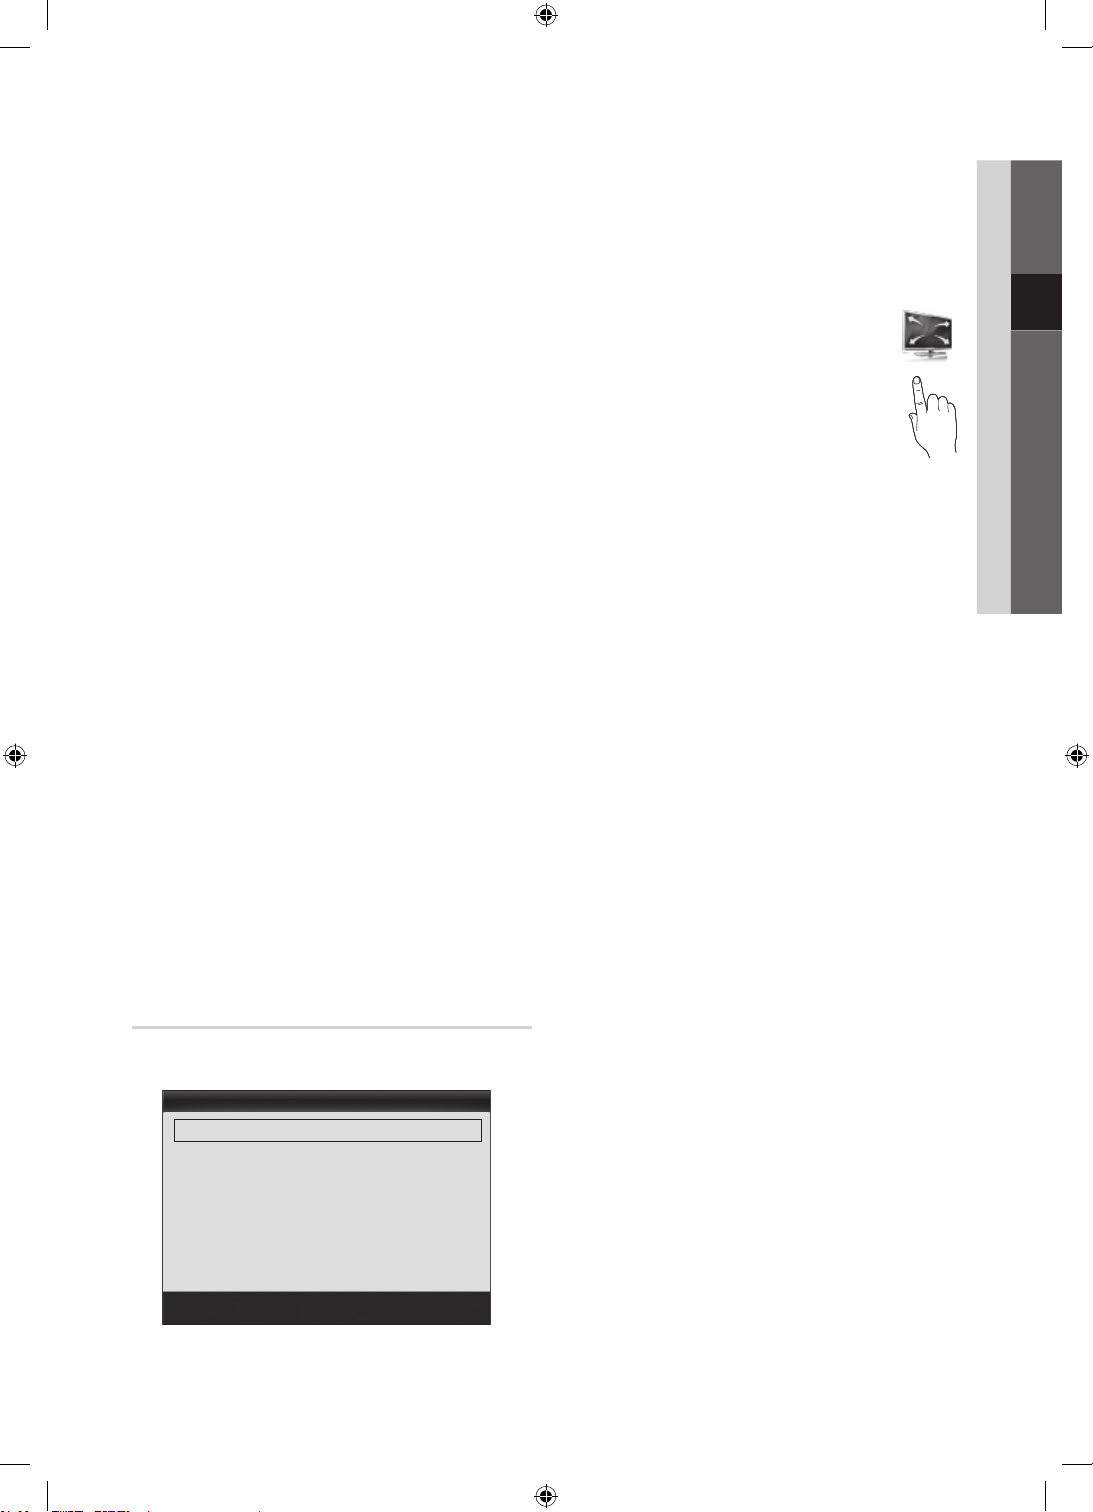
■ Bilan bianco: Regolare la temperatura colore per
ottenere immagini più naturali.
R-Offset / G-Offset / B-Offset: Regolare l’intensità di
ogni colore (rosso, verde, blu).
R-Gain / G-Gain / B-Gain: Regolare la luminosità di
ogni colore (rosso, verde, blu).
Reset: Ripristina il valore Bilan bianco alle impostazioni
predefinite.
■ Bilanc. bianco 10p (Off / On): Controlla il bilanciamento
del bianco in un intervallo di 10 punti regolando la
luminosità dei colori rosso, verde e blu.
✎
Disponibile quando la modalità immagine è
impostata su Film e l’ingresso esterno è impostato
su tutti.
✎
Alcuni dispositivi esterni potrebbero non
supportare questa funzione.
Intervallo: Seleziona l’intervallo da regolare.
Rosso: Regola il livello di rosso.
Verde: Regola il livello di verde.
Blu: Regola il livello di blu.
Reset: Ripristina il valore Bilanc. bianco 10p alle
impostazioni predefinite.
■ Incarnato : Enfatizza la tonalità rosa del valore
“Incarnato.”
■ Migliora imm bordi (Off / On): Enfatizza i contorni degli
oggetti.
■ xvYCC (Off / On): La modalità xvYCC migliora i dettagli
e lo spazio colore durante la visione di film trasmessi
da dispositivi esterni (per es attraverso un lettore DVD)
collegati alla porta HDMI o Component IN.
✎
Disponibile quando la modalitàimmagine è
impostata su Film e l’ingresso esterno è impostato
su HDMI o Comp.
✎
Alcuni dispositivi esterni potrebbero non
supportare questa funzione.
■ LED movim avanzato (Off / On): Elimina l’effetto
’trascinamento’ dalle scene in rapido movimento per
offrire una visione più nitida delle immagini.
Opzioni immagine
✎
In modalità PC, è possibile modificare solo i parametri
Toni colore, Dimensioni e Prot. Auto. dopo.
Opzioni immagine
Toni colore : Normale ►
Dimensioni : Auto Wide
Mod schermo : 16:9
Filtro disturbo digitale : Automatico
Filtro disturbo MPEG : Automatico
Livello di nero HDMI : Normale
Modalità Film : Off
▼
Sposta
Conferma
Ritorna
■ Toni colore (Freddo / Normale / Caldo1 / Caldo2)
✎
Le opzioni Caldo1 o Caldo2 verranno disattivate
se la modalità immagine è impostata su
Dinamica.
✎
Le impostazioni possono essere regolate e
memorizzate per ogni dispositivo esterno
collegato al televisore.
■ Dimensioni : Il ricevitore via cavo/satellitare
potrebbe anch’esso avere la propria serie
di dimensioni preimpostate. Tuttavia, si
consiglia vivamente di utilizzare la modalità
16:9 nella maggior parte dei casi.
Auto Wide: Regola automaticamente la
dimensione dell’immagine su un formato
16:9.
16:9 : Regola il formato dell’immagine a
16:9, appropriato per la visione di DVD o di trasmissioni
in formato wide.
Wide Zoom: Ingrandisce l’immagine a oltre 4:3.
✎
Regola la Posizione usando i tasti ▲, ▼.
Zoom: Ingrandisce il formato 16:9 per adattarlo alle
dimensioni verticali dello schermo.
✎
Regola la Posizione o le Dimensioni mediante i tasti ▲, ▼.
4:3 : Le impostazioni predefinite per un film o una
trasmissione normale.
✎
Non visualizzare a lungo trasmissioni in formato 4:3.
Le bande nere sulla sinistra e sulla desta dell’immagine
potrebbero causare immagini residue (bruciatura dello
schermo), un fenomeno non coperto dalla garanzia.
Adatta a schermo: Utilizzare questa funzione per
visualizzare l’immagine completa senza ritagli con segnali
HDMI (720p/1080i/1080p) o Comp. (1080i/1080p).
✎
NOTA
A seconda del tipo di sorgente di ingresso, le opzioni
x
relative alla dimensione dell’immagine possono variare.
Le voci disponibili variano in base alla modalità
x
selezionata.
In modalità PC, è possibile regolare solo i formati 16:9 e 4:3.
x
Le impostazioni possono essere modificate e
x
memorizzate per ogni dispositivo esterno collegato
al televisore.
Dopo aver selezionato l’opzione Adatta a schermo
x
in modalità HDMI (1080i / 1080p) o Comp. (1080i
/ 1080p): Regola la Posizione o le Dimensioni
mediante i tasti ▲, ▼, ◄, ►.
Usando la funzione Adatta a schermo con un
x
ingresso HDMI 720p, 1 riga verrà tagliata in alto, in
basso, a sinistra e a destra come nella funzione di
overscan.
■ Mod schermo (16:9 / Wide Zoom / Zoom / 4:3):
Disponibile solo quando la dimensione delle immagini
è impostata su Auto Wide. E’ possibile impostare la
dimensione delle immagini desiderata al formato 4:3
WSS (Wide Screen Service) o alla dimensione originale.
Ogni paese europeo ha le proprie dimensioni delle
immagini.
✎
Non disponibile in modalità PC, Comp. o HDMI.
P.SIZE
03 Funzioni base
Italiano
21
[UC9000]BN68-02820F-ZT.indb 21 2010-05-24 오후 5:25:50
Page 86
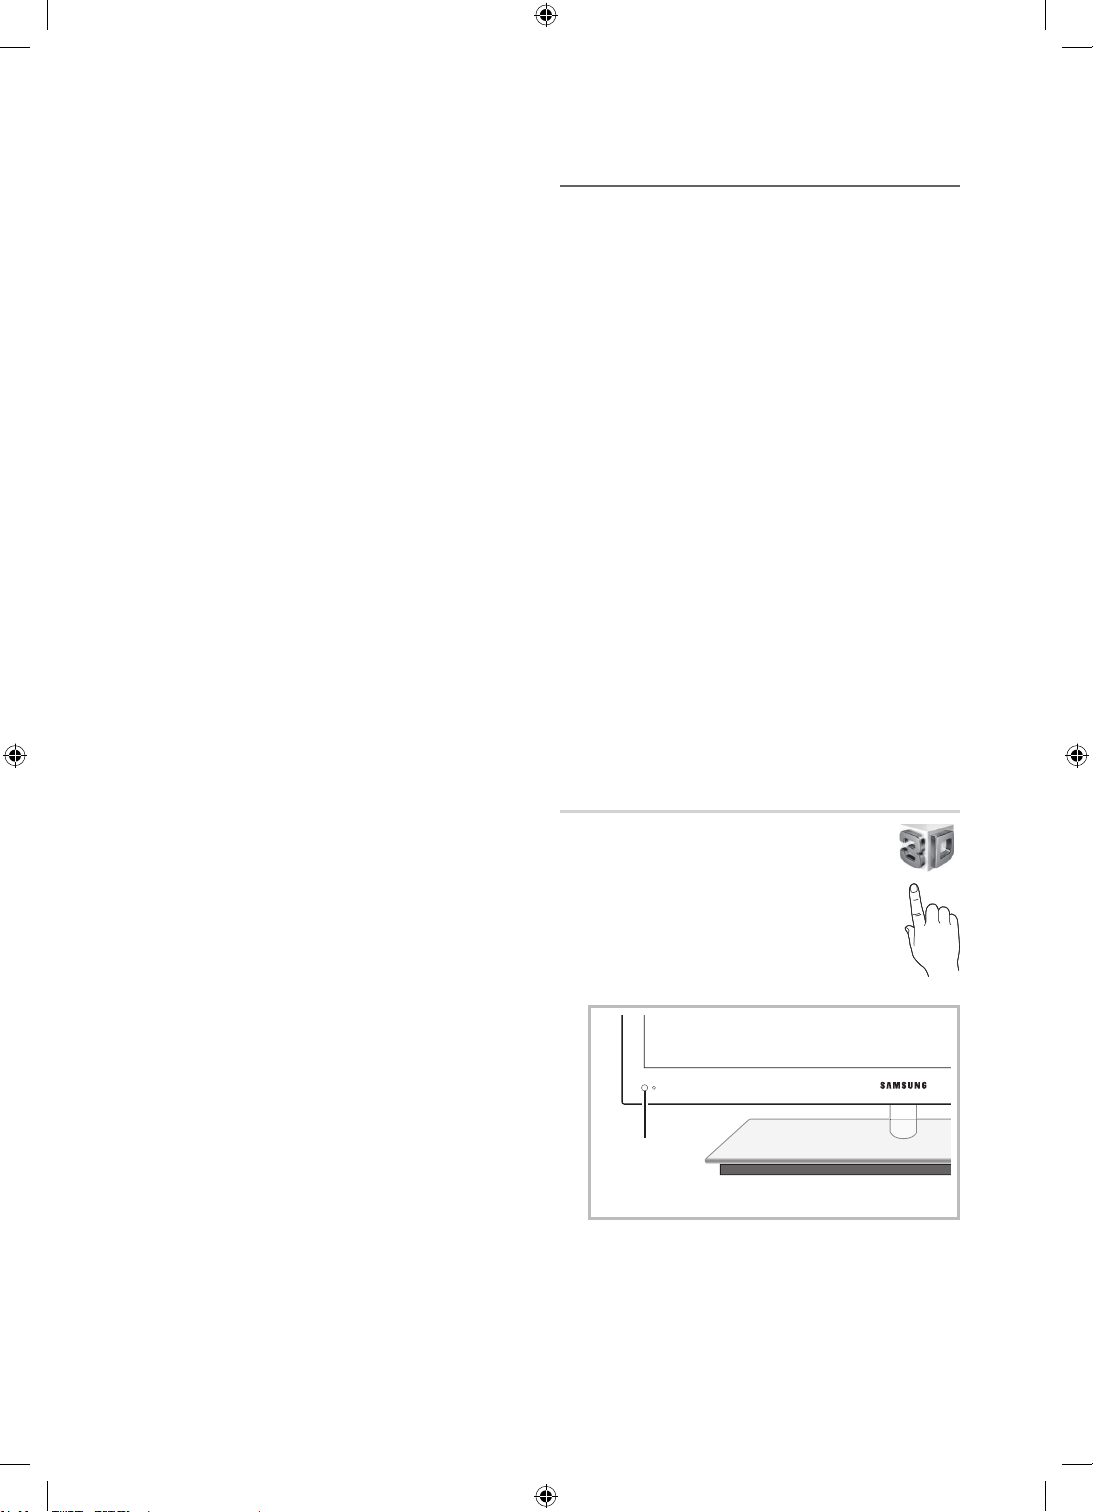
Funzioni base
■ Filtro disturbo digitale (Off / Basso / Medio / Alto /
Automatico / Visualiz automatica): Quando il segnale
è debole, possono comparire disturbi statici e ombre.
Selezionare una delle opzioni fino a ottenere la qualità
ottimale.
Visualiz automatica: Nel cambiare i canali analogici,
visualizza l’intensità del segnale corrente e definisce lo
schermo NF.
✎
Disponibile solo per i canali analogici.
■ Filtro disturbo MPEG (Off / Basso / Medio / Alto /
Automatico): Riduce il disturbo MPEG per una migliore
qualità delle immagini.
■ Livello di nero HDMI (Normale / Basso): Consente di
selezionare il livello di nero dello schermo per regolare la
profondità dell’immagine.
✎
Disponibile solo in modalità HDMI (segnali RGB).
■ Modalità Film (Off / Auto1 / Auto2): Il televisore può
essere impostato automaticamente per rilevare ed
elaborare i segnali dei film provenienti da tutte le sorgenti
e per regolare l’immagine in modo da ottenere una
visualizzazione ottimale.
✎
Disponibile in modalità TV, AV, COMP. (480i /
1080i) e HDMI (480i / 1080i).
■ Motion Plus (Off / Chiaro / Standard / Lineare /
Personalizza / Demo): Elimina l’effetto ’trascinamento’
dalle scene in rapido movimento per offrire una visione
più nitida delle immagini.
✎
Se lo schermo è disturbato, impostare la
modalità Motion Plus su Off. Se
impostata su Personalizza yè possibile impostare
manualmente le opzioni Riduz distorsioni, Riduz
vibrazioni o Reset.
✎
Impostando Motion Plus su Demo, è possibile
paragonare due schermate, una normale e una
con la modalità attivata.
Riduz distorsioni: Regola il livello di sfarfallio dalle
sorgenti video.
Riduz vibrazioni: Regola il livello di vibrazioni dalle
sorgenti video durante la riproduzione di un video.
Reset: Ripristina le impostazioni personalizzate.
■ Prot. Auto. dopo (2 ore / 4 ore / 8 ore / 10 ore /
Off): Se lo schermo rimane inattivo visualizzando una
immagine fissa per un certo periodo di tempo definito
dall’utente, lo screen saver si attiva per evitare la
formazione di immagini residue.
Motion Plus
è
Visione dei programmi TV in 3D
INFORMAZIONI IMPORTANTI PER LA SALUTE E LA
SICUREZZA PER LA VISIONE 3D.
Si prega di leggere e comprendere in ogni loro parte le
seguenti informazioni per la sicurezza prima dell’uso
della funzione 3D del televisore.
AVVERTENZA
Durante la visione di contenuti 3D sul televisore,
x
alcuni spettatori potrebbero avvertire vertigini,
nausea e mal di testa. In tal caso, interrompere
immediatamente la visione del contenuto 3D, togliere
gli occhiali 3D Active Glasses e riposare.
La visione prolungata di contenuti 3D può causare
x
affaticamento della vista. In tal caso, interrompere
immediatamente la visione del contenuto 3D, togliere
gli occhiali 3D Active Glasses e riposare.
Un adulto dovrebbe controllare frequentemente
x
i bambini che guardano contenuti 3D. In caso
di stanchezza agli occhi, mal di testa, vertigini o
nausea, interrompere la visione delle immagini 3D e
lasciare riposare i bambini.
Non utilizzare gli occhiali 3D Active Glasses per
x
uno scopo diverso da quello indicato (per es. come
occhiali generici, da sole, protettivi, ecc.)
Non utilizzare la funzione 3D o gli occhiali 3D Active
x
Glasses in movimento o mentre si cammina. L’uso
della funzione 3D o degi occhiali 3D Active Glasses
in movimento può provocare lesioni dovute a caduta,
inciampo o urto.
3D
Questa entusiasmante nuova funzione consente
la visione tridimensionale dei contenuti 3D. Per
vedere i video 3D, è necessario acquistare gli
occhiali 3D Samsung venduti separatamente
(SSG-2100AB, SSG-2200AR, SSG-2200KR).
Gli occhiali 3D Samsung sono venduti
separatamente. Per ulteriori informazioni,
contattare il rivenditore presso il quale è stato
acquistato il televisore.
3D
Trasmettitore 3D
✎
Se vi sono ostacoli tra l’emittente e gli occhiali 3D
Active Glasses, l’effetto tridimensionale potrebbe non
essere percepibile.
Italiano
22
[UC9000]BN68-02820F-ZT.indb 22 2010-05-24 오후 5:25:51
Page 87
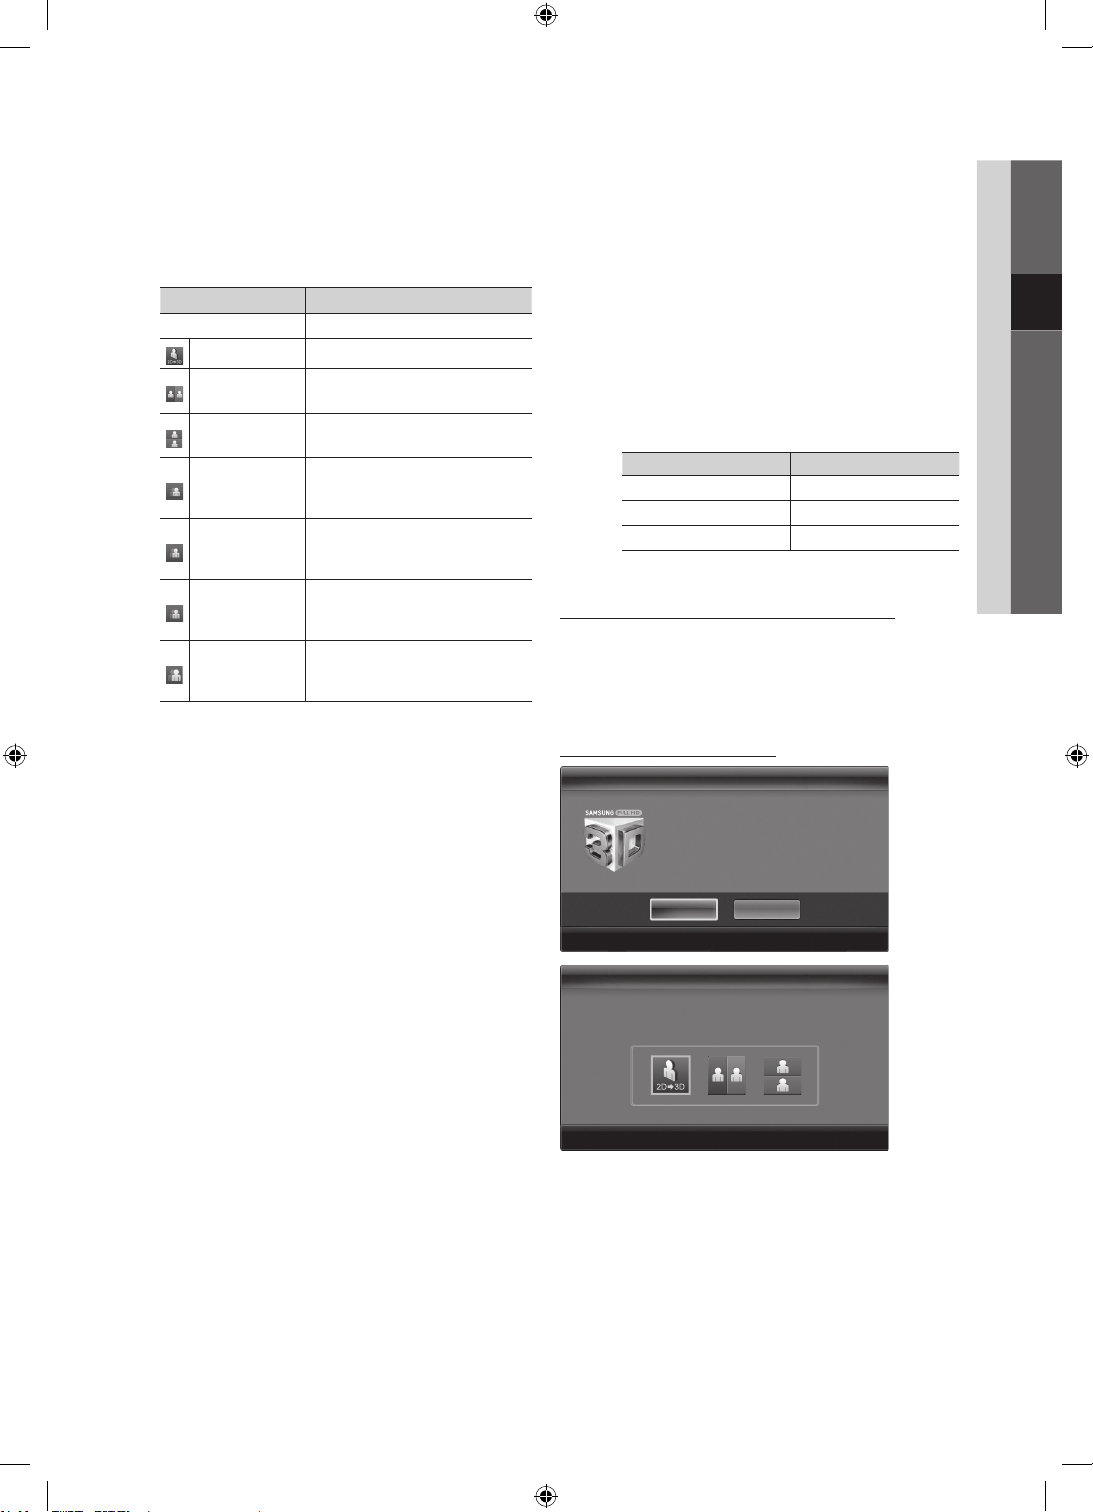
■ Modalità 3D: Selezionare il formato di ingresso 3D.
✎
Per una visione ottimale degli effetti 3D, indossare
gli occhiali 3D Active Glasses, quindi selezionare
la Modalità 3D dall’elenco sotto riportato.
✎
Per guardare immagini 3D, accendere gli occhiali
3D Active Glasses.
Modalità 3D Funzionamento
Off Disattiva la funzione 3D.
2D → 3D
A fianco
Superiore e
inferiore
Riga per riga
Strisce
verticali
A scacchi
Frequenza
✎
“A fianco” e “In alto e In basso” sono disponibili
con una risoluzione di 720p, 1080i e 1080p
in modalità DTV, HDMI e USB o in caso di
collegamento a un PC mediante cavo HDMI/DVI.
✎
“Striscia verticale”, “Riga per riga” e “Scacchiera”
sono disponibili quando la sorgente è impostata
su PC e il collegamento avviene mediante cavo
HDMI/DVI.
✎
“Frequenza” visualizza la frequenza (solo 60Hz)
quando la sorgente è impostata su PC.
■ 3D → 2D (Off / On): Visualizza l’immagine solo per
l’occhio sinistro.
✎
Questa funzione è disattiva quando Modalità 3D
è impostata su “2D → 3D” o Off.
■ Punto vista 3D:
✎
Questa funzione è disattiva quando Modalità 3D
è impostata su “2D → 3D” o su Off.
■ Profondità: Regola la messa a fuoco / la profondità in
modalità “2D → 3D”.
✎
Questa funzione è attiva solo quando la
Modalità 3D è impostata su “2D → 3D”.
Modifica una immagine 2D in 3D.
Visualizza due immagini una
vicina all’altra.
Visualizza una immagine sopra
l’altra.
Visualizza le immagini per
l’occhio sinistro e destro
alternativamente in righe.
Visualizza le immagini per
l’occhio sinistro e destro
alternativamente in colonne.
Visualizza le immagini per
l’occhio sinistro e destro
alternativamente in pixel.
Visualizza le immagini per
l’occhio sinistro e destro
alternativamente in fotogrammi.
Regolazione generale della prospettiva 3D.
■ Correz. immagine: Regola le immagini per l’occhio
sinistro e destro.
■ Visualizz auto 3D (Off / On): Se Visualizz auto 3D
è impostata su On, un segnale HDMI con immagini
“Affiancate” e una delle risoluzioni sotto riportate viene
automaticamente commutato in 3D. In questo caso,
informazioni 3D corrette devono essere inviate dal
formato HDMI 3D standard.
✎
Se si verifica un errore alla trasmissione 3D a
causa di errate informazioni 3D, impostare
Visualizz auto 3D su Off e selezionare
manualmente una Modalità 3D mediante il tasto
3D o il menu corrispondente.
✎
Risoluzioni supportate (solo 16:9)
Risoluzione Frequenza (Hz)
1280 x 720p 50 / 60 Hz
1920 x 1080i 50 / 60 Hz
1920 x 1080p 24 / 30 / 50 / 60 Hz
■ Ottimizz. 3D: Regolazione dell’effetto 3D complessivo.
Risoluzioni supportate per la modalità HDMI PC
La risoluzione in ingresso per la modalità PC HDMI è
ottimizzata a 1920 x 1080.
Una risoluzione in ingresso diversa da 1920 x 1080 potrebbe
non visualizzare in modo ottimale le immagini 3D o la
modalità pieno schermo.
Come guardare le immagini 3D
3D
Per la visione in 3D, indossare occhiali 3D
e premere puls di accens sugli occhiali.
La visione di lm TV in 3D per lunghi
periodi di tempo può affaticare la vista e/o
causare vertigini.
OK
Annulla
Sposta
Conferma
Esci
3D3D
Con i tasti SINISTRA / DESTRA sul telecomando,
Con i tasti SINISTRA / DESTRA sul telecomando,
selezionare l’icona idonea per l’immagine sullo schermo.
selezionare l’icona idonea per l’immagine sullo schermo.
Sposta
Conferma
Sposta
Conferma
Esci
Esci
03 Funzioni base
Italiano
23
[UC9000]BN68-02820F-ZT.indb 23 2010-05-24 오후 5:25:52
Page 88

Funzioni base
1. Premendo il tasto CONTENT viene visualizzato il menu
Vista contenuti.
2. Premere il tasto ◄ o ►, quindi selezionare 3D.
Per guardare le immagini 3D, indossare gli occhiali 3D
Active Glasses e premere il tasto di accensione sugli
occhiali.
3. Selezionare OK, quindi premere ENTER
4. Mediante i tasti ◄ o ► del telecomando, selezionare la
Modalità 3D dell’immagine che si desidera vedere.
✎
Alcune modalità 3D potrebbero non essere
disponibili a seconda della sorgente dell’immagine.
Formati supportati e specifiche operative per HDMI 3D standard
✎
I formati 3D indicati sotto sono consigliati
dall’associazione HDMI e devono essere supportati.
Formato del segnale sorgente Standard HDMI 1.4 3D
1920x1080p@24Hz x 2 1920x2205p@24Hz
1280x720p@60Hz x 2 1280x1470p@60Hz
1280x720p@50Hz x 2 1280x1470p@50Hz
La modalità viene commutata automaticamente in 3D per
l’ingresso video 3D in uno dei formati sopra riportati.
Per il formato HDMI 3D standard a 24Hz, il televisore è
ottimizzato come segue:
– Risoluzione prima modalità di visualizzazione: Se
Motion Plus è impostata su Off, Chiaro o Standard,
è possibile guardare il video in alta risoluzione
ottimizzata per la risoluzione del video sorgente.
– Modalità di visualizzazione per la riduzione delle
vibrazioni: Quando Motion Plus è impostata su
Lineare o Personalizza, è possibile guardare una
immagine omogenea senza interruzioni.
Prima di utilizzare la funzione 3D...
✎
NOTA
Guardando immagini 3D in un ambiente
x
scarsamente illuminato (per es. da una lampada
strobo), oppure illuminato da lampade a fluorescenza
(50Hz ~ 60Hz) o a lunghezza d’onda, si può
verificare un leggero sfarfallio dello schermo.
La modalità 3D si disattiva automaticamente
x
nei seguenti casi: cambiando canale o sorgente
d’ingresso, o accedendo a Media Play o Internet@
TV.
Alcune funzioni del menu Immagine non sono
x
disponibili in modalità 3D.
Il telecomando Touch Control non supporta le
x
immagini in 3D.
La trasmissione dati (MHEG / MHP) non è
x
supportata in modalità 3D.
.
L’uso di occhiali 3D Active Glasses di altre marche
x
non è supportato
All’accensione del televisore, la visualizzazione
x
ottimale delle immagini 3D potrebbe richiedere del
tempo.
Gli occhiali 3D Active Glasses potrebbeo non
x
funzionare in modo adeguato se nelle vicinanze
degli occhiali o del televisore è in funzione un altro
dispositivo elettronico o 3D. In caso di problemi,
allontanare il più possibile gli altri dispositivi
elettronici dagli occhiali 3D.
Visualizzando immagini da una sorgente 3D a 50Hz
x
con la modalità Giochi attiva, gli spettatori dotati
di una vista più sensibile potrebbero scorgere uno
sfarfallio guardando immagini chiare.
Le Foto in Media Play vengono visualizzate solo in
x
modalità “2D → 3D”.
Se l’utente guarda il televisore sdraiato su un lato,
x
potrebbe non riuscire a vedere l’effetto 3D delle
immagini.
Quando si guardano immagini 3D, posizionarsi entro
x
l’angolo e la distanza di visione del televisore.
– In caso contrario, la visione degli effetti 3D
potrebbe non essere ottimale.
La distanza ideale per la visione del televisore
x
dovrebbe corrispondere ad almeno tre volte l’altezza
dello schermo. Si consiglia di sedersi in modo da
avere gli occhi all’altezza dello schermo.
Reset immagine (OK / Annulla)
Ripristina la modalità corrente delle immagini ai valori predefiniti.
Configurazione del televisore con il PC
Impostare la sorgente di ingresso su PC.
Regolazione auto
Per regolare automaticamente i valori frequenza/posizioni e le
impostazioni di sintonizzazione.
✎
Non disponibile quando il televisore è collegato
mediante cavo HDMI/DVI.
Italiano
24
[UC9000]BN68-02820F-ZT.indb 24 2010-05-24 오후 5:25:53
Page 89
Schermo
■ Grossa / Fine: Rimuove o riduce eventuali disturbi
dalle immagini. Se non si riesce a eliminare il disturbo
mediante la sintonizzazione fine, regolare la frequenza
nel modo migliore possibile (Grossa) ed eseguire
nuovamente la sintonizzazione fine. Una volta ridotto
il disturbo, regolare l’immagine in modo che sia
perfettamente centrata sullo schermo.
■ Posizione : Regolare lo schermo del PC usano i tasti
freccia (▲ / ▼ / ◄ / ►).
■ Reset immagine : Ripristina l’immagine ai valori predefiniti.
Uso del televisore come uno schermo PC
Impostazione del software del PC (basato su Windows XP)
In base alla versione di Windows e alla scheda video in uso,
le schermate effettive del PC possono essere diverse; nel
caso, verranno quasi sempre applicate le stesse informazioni
di impostazione base. (In caso contrario, contattare la casa
costruttrice del computer oppure un rivenditore Samsung).
1. Fare clic sul “Pannello di controllo” nel menu Start di
Windows.
2. Fare clic su “Aspetto e temi” nel “Pannello di controllo”
per visualizzare una finestra di dialogo.
3. Fare clic su “Schermo” per visualizzare una finestra di
dialogo.
4. Fare clic sulla scheda ‘Impostazioni’ nella finestra di
dialogo.
y Impostazione della dimensione corretta (risoluzione)
[Ottimale: 1920 x 1080 pixel]
y Se la finestra di dialogo delle impostazioni contiene
un’opzione relativa alla frequenza verticale, il valore
corretto è “60” o “60 Hz”. In caso contrario, fare clic su
‘OK’ e uscire dalla finestra di dialogo.
Menu Suono
Cambiare la Modalità audio preimpostata
SRS TheaterSound
■ Standard: Seleziona la modalità audio normale.
■ Musica: Enfatizza la musica rispetto alle voci.
■ Film: Offre la migliore qualità audio per la visione di film.
■ Voce cristallina: Enfatizza le voci rispetto ad altri suoni.
■ Amplificazione : Aumenta l’intensità delle alte frequenze
per offrire alle persone con deficit uditivo un ascolto
migliore.
Regolare le impostazioni audio
Equalizzatore
Regola la modalità audio (solo modalità audio standard).
■ Bilanciamento L/R: Controlla il bilanciamento degli
altoparlanti sinistro e destro.
■ 100Hz / 300Hz / 1kHz / 3kHz / 10kHz (Regolazione
larghezza di banda): Regola il livello di specifiche
frequenze di banda.
■ Reset: Ripristina l’equalizzatore alle impostazioni
predefinite.
Sistemi audio, ecc.
03 Funzioni base
SRS TruSurround HD (Off / On)
(solo modalità audio standard)
Questa funzione produce un audio virtuale a 5.1 canali
surround attraverso una coppia di altoparlanti con tecnologia
HRTF (Head Related Transfer Function).
SRS TruDialog (Off / On)
(solo modalità audio standard)
Questa funzione permette di incrementare l’intensità della
voce rispetto alla musica di sottofondo o agli effetti audio
in modo che sia possibile udire meglio i dialoghi durante la
visione di un programma.
Italiano
25
[UC9000]BN68-02820F-ZT.indb 25 2010-05-24 오후 5:25:53
Page 90
Funzioni base
Lingua audio
(solo canali digitali)
Cambia la lingua predefinita per le lingue audio.
✎
Le lingue disponibili possono variare in base alla
trasmissione.
Formato audio
(solo canali digitali)
Quando l’audio è generato sia dall’altoparlante principale
sia dal ricevitore audio, potrebbe prodursi un effetto di eco a
causa della diversa velocità di decodifica dei due dispositivi.
In questo caso, attivare la funzione Altoparlante TV.
✎
L’opzione Formato audio può essere diversa in
base alla trasmissione. L’audio Dolby Digital 5.1ch è
disponibile solo quando viene collegato un altoparlante
esterno mediante un cavo ottico.
Descrizione audio
(non disponibile in tutti i paesi) (solo canali
digitali)
Questa funzione gestisce il flusso audio per
l’opzione AD (Audio Description), quando
è trasmesso insieme all’Audio principale
dall’emittente.
■ Descrizione audio (Off / On): Attiva e
disattiva la funzione Descrizione audio.
■ Volume: Regola il volume della
descrizione audio.
AD
Volume auto (Off / Normale / Notte)
Per equalizzare il volume di ogni canale, impostare su
Normale.
■ Notte : Questa modalità fornisce una migliore esperienza
audio rispetto alla modalità Normale, escludendo quasi
ogni rumore. Questa modalità è utile durante la notte.
Imp. supplementare
(solo canali digitali)
■ Livello audio DTV (MPEG / HE-AAC): Questa funzione
permette di ridurre la disparità di un segnale vocale (uno
dei segnali ricevuti durante una trasmissione TV digitale)
a un determinato livello.
✎
In base al tipo di segnale della trasmissione,
MPEG / HE-AAC può essere regolato tra -10dB
e 0dB.
✎
Per aumentare o diminuire il volume, regolare
rispettivamente tra 0 e -10.
■ Uscita SPDIF : SPDIF (Sony Philips Digital InterFace)
è usata per fornire un audio digitale riducendo le
interferenze agli altoparlanti e ai vari dispositivi digitali
come per esempio un lettore DVD.
Formato audio : Durante la ricezione di una
trasmissione TV digitale, è possibile selezionare il
formato uscita audio digitale (SPDIF) tra le opzioni
PCM o Dolby Digital.
Ritardo audio : Usata per correggere la mancata
corrispondenza audio-video durante la visione del
televisore o di un video e ascoltando una uscita da un
canale digitale mediante un dispositivo esterno come per
esempio un ricevitore AV (0ms ~ 250ms).
■ Comp Dolby Digital (Line / RF): Questa funzione
minimizza la disparità dei segnali tra un segnale dolby
digital e un segnale vocale (per es. audio MPEG,
HE-AAC, audio ATV).
✎
Selezionare Line per ottenere un audio dinamico,
e RF per ridurre la differenza tra i suoni alti e bassi
durante la notte.
Line : Impostare il livello di uscita dei segnali maggiori o
minori di -31dB (riferimento) su -20dB o -31dB.
RF : Impostare il livello di uscita dei segnali maggiori o
minori di -20dB (riferimento) su -10dB o -20dB.
Reset impostazioni audio (OK / Annulla)
Ripristina tutte le impostazione audio ai valori predefiniti.
Seleziona altoparlante (Altoparlante est /
Altoparlante TV)
A causa delle differenze di velocità nella decodifica tra
l’altoparlante principale e il ricevitore audio, è possibile
avvertire una eco del suono. In questo caso, attivare la
funzione Altoparlante est del televisore.
✎
Quando Seleziona altoparlante è impostato su
Altoparlante est, i tasti volume e MUTE non sono attivi
e le impostazioni audio sono limitate.
✎
Controllare che Seleziona altoparlante sia impostato
su Altoparlante est.
Altoparlante TV: Off, Altoparlante est: On
x
✎
Controllare che Seleziona altoparlante sia impostato
su Altoparlante TV.
Altoparlante TV: On, Altoparlante est: On
x
✎
In mancanza di segnale video, entrambi gli altoparlanti
saranno disattivi.
Italiano
26
[UC9000]BN68-02820F-ZT.indb 26 2010-05-24 오후 5:25:54
Page 91
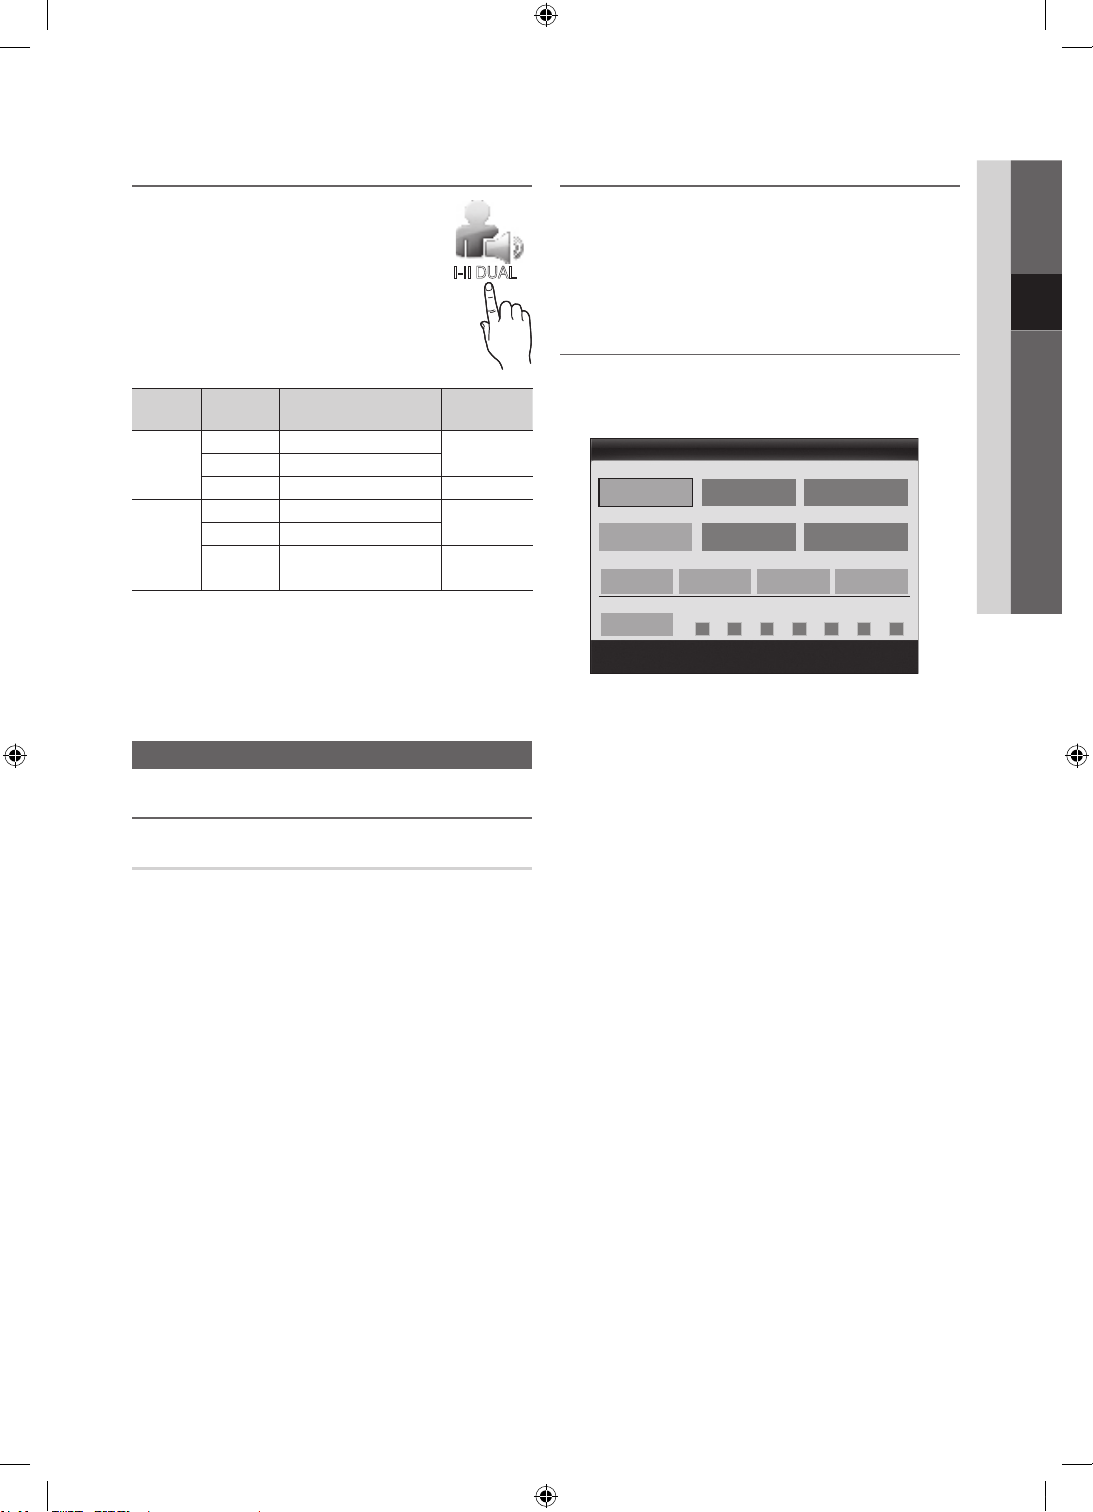
¦ Selezione della modalità audio
t
¦ Impostazione Timer stand-by
03 Funzioni base
Quando si imposta la modalità f-g Dual,
la modalitàaudio corrente viene visualizzata
sullo schermo.
I-II DUAL
Tipo di
audio
A2
Stereo
NICAM
Stereo
✎
Se il segnale stereo è debole e si verifica un cambio
automatico, passare alla modalità Mono.
✎
Attivata solo in caso di segnali audio stereo.
✎
Disponibile solo quando la sorgente Ingressi è
impostata su TV.
Mono Mono
Stereo
Dual
Mono Mono
Stereo
Dual
Dual
f-g
Stereo ↔ Mono
Dual
f
↔ Dual
Mono ↔ Stereo
Mono ↔ Dual
Dual g
g
f
Predefinito
Cambio
automatico
Dual f
Cambio
automatico
Dual
Menu Impostazione
¦ Impostazione dell’Ora
Ora
■ Orologio : L’impostazione dell’orario serve per utilizzare
le funzioni timer del televisore.
O
L’ora corrente appare ogni volta che si preme il
tasto INFO.
✎
Se il cavo di alimentazione viene scollegato, è
necessario impostare nuovamente l’orologio.
Modalità orologio (Automatico / Manuale)
✎
In base all’emittente e al segnale trasmesso,
l’impostazione automatica dell’orario potrebbe non
essere corretta. In questo caso, impostare l’orario
manualmente.
✎
Per l’impostazione automatica dell’orario è
necessario collegare l’antenna o il cavo.
Imposta Ora: Impostare Giorno, Mese, Anno, Ora e
Minuti manualmente.
✎
Disponibile solo quando Modalità orologio è
impostata su Manuale.
Fuso orario (in base alla nazione): Selezionare il fuso
orario della propria zona.
✎
E’ possibile utilizzare questa funzione quando
l’opzione Nazione è impostata su Altro.
✎
Questa funzione è disponibile solo quando la
funzione Modalità orologio è impostata su
Automatico.
■ Timer stand-by
il televisore dopo il periodo di tempo preimpostato. (30,
60, 90, 120, 150 e 180 minuti).
✎
Per annullare l’impostazione Timer stand-by,
selezionare Off.
t
: Spegne automaticamente
¦ Impostazione del Timer di accensione/spegnimento
■ Timer 1 / Timer 2 / Timer 3: Possono essere impostate
tre diverse opzioni del Timer. Prima è necessario
impostare l’orologio.
Orario TV on
▲
Disattiva
▼
Orario TV off
Disattiva
f
Volume
10 TV ATV 1
Ripetizione
1 volta
Orario TV on / Orario TV off: Per impostare l’ora e
i minuti e attivare / disattivare l’opzione. (Per attivare
il timer con l’impostazione desiderata, impostare su
Attiva.)
Volume: Selezionare il livello del volume desiderato.
Sorgente: Selezionare il contenuto TV o USB
da riprodurre quando il televisore viene acceso
automaticamente. (La modalità USB può essere
selezionata solo quando un dispositivo USB è collegato
al televisore)
Antenna (quando Sorgente è impostata su TV) :
Selezionare ATV o DTV.
Canale (quando Sorgente è impostata su TV) :
Selezionare il canale desiderato.
Contenuti (quando Sorgente è impostata su USB) :
Selezionare una cartella nel dispositivo USB contenente
i file musicali o le immagini da riprodurre quando il
televisore si accende automaticamente.
✎
NOTA
Se sul dispositivo USB non sono presenti file
x
musicali, oppure la cartella contenente file
musicali non è selezionata, l’opzione Timer non
funziona correttamente.
Nel caso ci sia una sola foto memorizzata sul
x
dispositivo USB, la funzione Slide Show non è
disponibile.
Se il nome della cartella è troppo lungo, la
x
cartella non è selezionabile.
A ogni dispositivo USB utilizzato viene
x
assegnata una cartella. In caso di più dispositivi
USB, verificare che le cartelle assegnate a ogni
USB abbiano nomi diversi.
Timer 1
00 00
00 00
Sorgente Antenna Canale
Dom Lun Mar Mer Gio Ven Sab
L
Sposta
U
Regola
E
Conferma
R
Ritorna
Italiano
27
2_BN68-02820F-Ita.indd 27 2010-05-25 오후 7:30:31
Page 92
Funzioni base
Ripetizione: Selezionare 1 volta, Ogni gg, Lun~Ven,
Lun~Sab, Sab~Dom o Manuale. Selezionando Manuale, è
possibile impostare il giorno che si desidera attivare il timer.
✎
Il simbolo indica che è stato selezionato il giorno.
✎
Spegnimento automatico (disponibile solo quando il
televisore si accende mediante il Timer): Il televisore
viene automaticamente spento dopo 3 ore di inattività
al fine di prevenirne il surriscaldamento.
Blocco programmi
Sicurezza
✎
Prima della schermata di impostazione compare la
schermata di inserimento del PIN.
✎
Digitare il PIN a 4 cifre; il PIN predefinito è “0-0-0-0”.
Cambiare il PIN usando l’opzione Cambia PIN.
■ Blocco canali (Off / On): Bloccare i canali in
Gestione canali per impedire a utenti non autorizzati,
per esempio i bambini, di visualizzare programmi non
adatti.
✎
Disponibile solo quando la sorgente Ingressi è
impostata su TV.
■ Blocco Canale (in base alla nazione): Impedisce a utenti
non autorizzati, per esempio i bambini, di visualizzare
programmi non adatti mediante l’inserimento di un
codice PIN a 4 cifre. Se il canale selezionato è bloccato,
comparirà il simbolo “
Cons tutto: Sblocca tutti i parametri TV impostati.
■ Cambia PIN : Cambiare l’ID personale per impostare il
televisore.
✎
Qualora si sia dimenticato il codice PIN, premere i
tasti del telecomando nella sequenza seguente per
ripristinare il codice PIN predefinito “0-0-0-0” : POWER
(spento) → MUTE → 8 → 2 → 4 → POWER (acceso).
”.
Altre funzioni
Lingua
■ Lingua menu : Imposta la lingua dei menu.
■ Lingua Teletext : Imposta la lingua desiderata per il
servizio Teletext.
✎
La lingua predefinita è l’inglese, nel caso in cui la
trasmissione non supporti la lingua selezionata.
■ Preferenze (Lingua principale audio /
Lingua secondaria audio / Lingua principale
sottotitoli / Lingua secondaria sottotitoli /
Lingua principale Teletext /
Lingua secondaria Teletext): Selezionare una lingua,
che sarà la lingua predefinita alla selezione di un canale.
Sottotitoli
Utilizzare questo menu per impostare la
modalità Sottotitoli.
■ Sottotitoli (Off / On): Attiva e disattiva
i sottotitoli.
■ Modalità (Normale / Non udenti):
Imposta la modalità dei sottotitoli.
■ Lingua Sottotitoli: Imposta la lingua
dei sottotitoli.
✎
Se il programma che si sta
guardando non supporta la funzione Non udenti,
si attiva automaticamente l’opzione Normale
anche se è selezionata la modalità Non udenti.
✎
La lingua predefinita è l’inglese, nel caso in cui la
trasmissione non supporti la lingua selezionata.
SUBT.
Testo digitale (Disabilita / Abilita)
(solo UK)
Se il programma è trasmesso con testo digitale, questa
funzione è attivata.
Rete (Tipo di rete / Impostazione rete / Test di rete /
SWL(Samsung Wireless Link) / Connessione SWL)
Per l’impostazione delle opzioni, vedere le istruzioni riportate
alla sezione “Connessione di rete” (p. 33).
Italiano
28
[UC9000]BN68-02820F-ZT.indb 28 2010-05-24 오후 5:25:56
Page 93

Generale
■ Modalità gioco (Off / On): Durante la connessione
a una console per videogiochi come PlayStation™
o Xbox™, il gioco sarà più realistico selezionando la
modalità gioco.
✎
NOTA
Precauzioni e limitazioni per la modalità gioco
x
– Per scollegare una console per videogiochi e
collegare un altro dispositivo esterno, impostare
Modalità gioco su Off nel menu di impostazione.
– Visualizzando il menu TV in Modalità gioco si
potrebbe verificare un leggero sfarfallio.
Modalità gioco non è disponibile quando la
x
sorgente d’ingresso è impostata su TV o PC.
Dopo il collegamento della console di gioco,
x
impostare Modalità gioco su On. Purtroppo
potrebbe verificarsi una riduzione nella qualità delle
immagini.
Se la Modalità gioco è impostata su On:
x
– Immagine è impostata su Standard e Suono è
impostata su Film.
– Equalizzatore non è disponibile.
■ BD Wise (Off / On): Fornisce la qualità ottimale delle
immagini per i prodotti SAMSUNG DVD, Blu-ray e Home
Theatre che supportano il formato BD Wise. Quando
BD Wise è impostato su On, la modalità immagine viene
automaticamente cambiata alla risoluzione ottimale.
✎
Disponibile in caso di connessione di prodotti
Samsung che supportano BD Wise mediante
cavo HDMI.
■ Trasparenza menu (Luminoso / Scuro): Imposta la
trasparenza del menu.
■ Tasto scorrev (Off / On): E’ possibile scegliere se utilizzare
o meno il touch pad LED, posizionato al centro sotto il
piedistallo.
■ Melodia (Off / Basso / Medio / Alto): Per riprodurre
una melodia all’accensione o allo spegnimento del
televisore.
✎
L’opzione Melodia è disattiva quando FastStart è
impostato su On.
■ FastStart (Off / On): A televisore acceso, questa
funzione consente di riattivare lo schermo rapidamente.
Interfaccia comune
■ Menu CI: Permette all’utente di accedere al menu del
modulo CAM. Selezionare il Menu CI in base alla scheda
PC.
■ Info sull’applicazione: Visualizza le informazioni
relative al modulo CAM inserito nell’alloggiamento CI e
nella “SCHEDA CI o CI+” inserita nel modulo CAM. È
possibile installare il modulo CAM in qualsiasi momento,
a televisore acceso o spento.
1. Acquistare il modulo CI CAM presso il rivenditore locale
o via telefono.
2. Inserire saldamente la “SCHEDA CI o CI+” nel modulo
CAM nella direzione indicata dalla freccia.
3. Inserire il modulo CAM con la “SCHEDA CI o CI+”
nell’alloggiamento common interface, nella direzione
indicata dalla freccia, in modo che sia parallela
all’alloggiamento.
4. Verificare la visione dell’immagine su un canale a segnale
criptato.
Telecomando wireless
Per accendere o spegnere il telecomando wireless o
consentirne l’accesso.
03 Funzioni base
Italiano
29
[UC9000]BN68-02820F-ZT.indb 29 2010-05-24 오후 5:25:56
Page 94
Funzioni base
Uso del Servizio dati
(solo per l’Italia)
Questo servizio consente all’utente di utilizzare
le informazioni (testo, fermo immagini,
grafica, documenti, software, ecc.) trasmesse
dall’emittente.
✎
Cambiando canale mentre è visualizzata
la finestra di trasmissione dati, la finestra
precedente potrebbe temporaneamente
comparire a schermo.
D
Esec auto Servizio dati (On / Off)
Imposta se eseguire automaticamente o meno il Servizio
dati. Esec auto Servizio dati esegue automaticamente il
Servizio dati senza l’intervento dell’utente.
✎
Se qualsiasi altra funzione secondaria è in esecuzione,
Esec auto Servizio dati potrebbe non funzionare.
Uso del Servizio dati
Se il canale su cui si è sintonizzati fornisce il Servizio dati,
è possibile utilizzare una serie di servizi semplicemente
premendo D o il tasto rosso.
✎
Le informazioni fornite attraverso il Servizio dati
possono variare a seconda dell’emittente.
✎
Quando si usa il Servizio dati, a seconda del servizio
scelto potrebbe non essere possibile cambiare canale
usando i tasti numerici.
1. Premere D. Selezionare un servizio premendo la
▲/▼/◄/► e OK
✎
Se Esec auto Servizio dati è On, il servizio dati
verrà automaticamente eseguito con il banner
di caricamento. In questo caso, il tasto D non
funziona.
2. Premere il tasto rosso. Verrà visualizzata la schermata
del Servizio dati.
3. Spostarsi sull’opzione scelta premendo la ▲/▼/◄/►
sulla schermata del Servizio dati, quindi premere OK
Viene avviato il servizio selezionato.
✎
Se il tasto colorato relativo a una determinata
funzione viene visualizzato a schermo,
premendolo è possibile utilizzare la funzione
corrispondente.
4. Premendo il tasto EXIT, il Servizio dati verrà chiuso.
.
Principali tasti del Servizio dati e loro funzioni
Tasto Funzionamento
Visualizza l’elenco Servizio dati e avvia
immediatamente la funzione Servizio
dati.
Ritorna alla schermata precedente.
Eseguono le funzioni corrispondenti
a ogni icona relativa ai tasti colorati
visualizzata a schermo durante il
Servizio dati.
✎
Le operazioni possono variare a
seconda del provider del servizio.
E’ possibile immettere del testo
utilizzando i tasti numerici e le lettere
stampate sopra e sotto i tasti numerici
del telecomando. Premendo uno alla
volta i tasti numerici del telecomando nel
punto in cui lampeggia il cursore nella
schermata di immissione testo, verranno
visualizzati i corrispondenti numeri,
caratteri speciali o lettere.
Per esempio, premendo il tasto
numerico 3 in rapida successione, le
lettere assegnate (D, E e F) e il numero
3 verranno visualizzati alternativamente
nell’ordine di immissione.
Passa in modalità Teletext o torna alla
schermata precedente.
✎
Le operazioni possono variare a
seconda del provider del servizio.
Sposta il menu Servizio dati su, giù, a
sinistra e a destra.
Esegue il comando selezionato.
Interrompe l’esecuzione del
Servizio dati.
.
(Servizio
dati)
BACK
Tasti colorati
Simbolo
TEXT
▲/▼/◄/►
OK
EXIT
Italiano
30
[UC9000]BN68-02820F-ZT.indb 30 2010-05-24 오후 5:25:57
Page 95
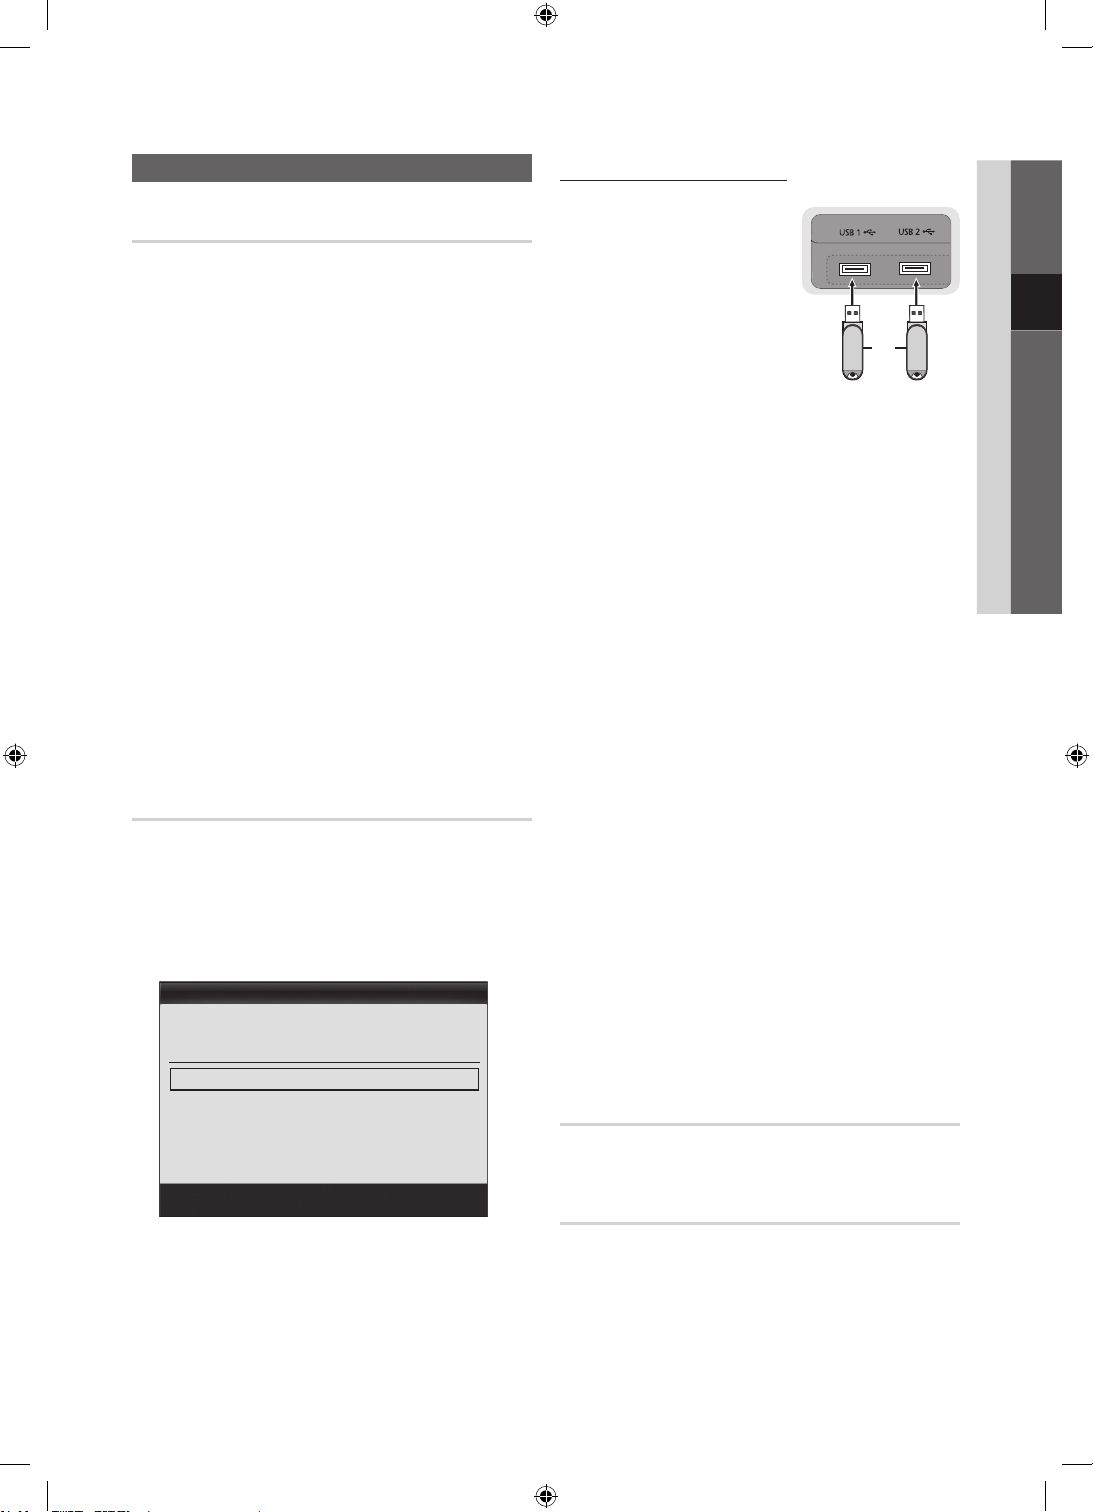
Menu Supporto
Auto diagnosi
✎
La funzione di auto diagnosi potrebbe richiedere
alcuni secondi; questa operazione rientra nel normale
funzionamento del televisore.
■ Test immagine (Sì / No): Utilizzato per controllare
eventuali problemi di visualizzazione delle immagini.
■ Test audio (Sì / No): Usare la melodia predefinita per
verificare eventuali problemi audio.
✎
Se non c’è ritorno audio dagli altoparlanti del
televisore, prima di eseguire il test audio verificare
che Seleziona altoparlante sia impostato su
Altoparlante TV nel menu Suono.
✎
E’ possibile ascoltare la melodia durante il test
anche se Seleziona altoparlante è impostato su
Altoparlante est oppure quando l’audio è stato
disattivato premendo il tasto MUTE.
■ Informazioni sul segnale: (solo canali digitali) La qualità
di ricezione dei canali HDTV è perfetta o i canali non
sono disponibili. Regolare l’antenna per aumentare la
forza del segnale.
■ Risoluzione dei problemi: Se il televisore presenta
problemi, consultare questa sezione.
✎
Se tra le varie descrizioni non è riportato il
problema riscontrato, contattare il Centro di
assistenza clienti Samsung.
Aggiornamento software
Aggiornamento software può essere eseguito mediante
un segnale di trasmissione o mediante il download del
più recente firmware dal sito “www.samsung.com” su un
dispositivo USB.
Versione corrente è il software già installato nel televisore.
✎
La versione del software è rappresentata come “Anno/
Mese/Giorno_Versione”.
Aggiornamento software
Versione corrente 2010/01/18_000001
Tramite USB ►
Online
Tramite canale
Aggiornamento mod Standby : Off
Software alternativo 2010/01/15_00000
Installare la versione più recente
■ Tramite USB : Inserire
un’unità USB contenente
l’aggiornamento del firmware
scaricato dal sito “www.
samsung.com” nel televisore.
Fare attenzione a non
scollegare l’alimentazione o
rimuovere l’unità USB mentre
l’aggiornamento è in corso.
Al termine dell’aggiornamento
del firmware, il televisore
si spegnerà e riaccenderà
automaticamente. Al termine dell’aggiornamento del
software, le impostazioni video e audio modificate
torneranno alle impostazioni predefinite. Si consiglia di
scrivere le impostazioni in modo da poterle facilmente
ripristinare dopo l’aggiornamento.
■ Online: Aggiornare il software mediante Internet.
✎
Per prima cosa, configurare la propria rete.
Per istruzioni dettagliate sull’uso dell’opzione
Impostazione rete, vedere la sezione
“Impostazione della rete”.
✎
Se la connessione a Internet non funziona
correttamente, potrebbe interrompersi. Riprovare.
Se il problema persiste, scaricare il file di
aggiornamento sul dispositivo USB e riprovare.
■ Tramite canale : Aggiorna il software mediante il
segnale trasmesso.
✎
Se la funzione viene selezionata durante il periodo
di trasmissione del software, il software verrà
automaticamente ricercato e scaricato.
✎
Il tempo necessario per scaricare il software è
determinato dallo stato del segnale.
■ Aggiornamento mod Standby : All’orario prestabilito
verrà eseguito automaticamente un aggiornamento
manuale. Poiché l’alimentazione dell’unità si attiva
internamente, lo schermo LED potrebbe attivarsi per
breve tempo. Questo fenomeno può continuare per più
di un’ora, fino al termine dell’aggiornamento software.
■ Software alternativo (backup): Visualizza la versione
software scaricata Online. Durante l’aggiornamento
software, se la procedura viene interrotta, questa
funzione verrà attivata.
Pannello laterale del piedistallo
o
Unità USB
Guida alla connessione HD
Consultare queste informazioni durante la connessione di
dispositivi esterni al televisore.
03 Funzioni base
Sposta
Conferma
Ritorna
[UC9000]BN68-02820F-ZT.indb 31 2010-05-24 오후 5:25:58
Contattare Samsung
Fare riferimento a queste informazioni in caso di
funzionamento anomalo del televisore o se si desidera
aggiornare il software. E’ possibile reperire le informazioni
riguardanti i nostri call centre, e come scaricare prodotti e
software.
Italiano
31
Page 96
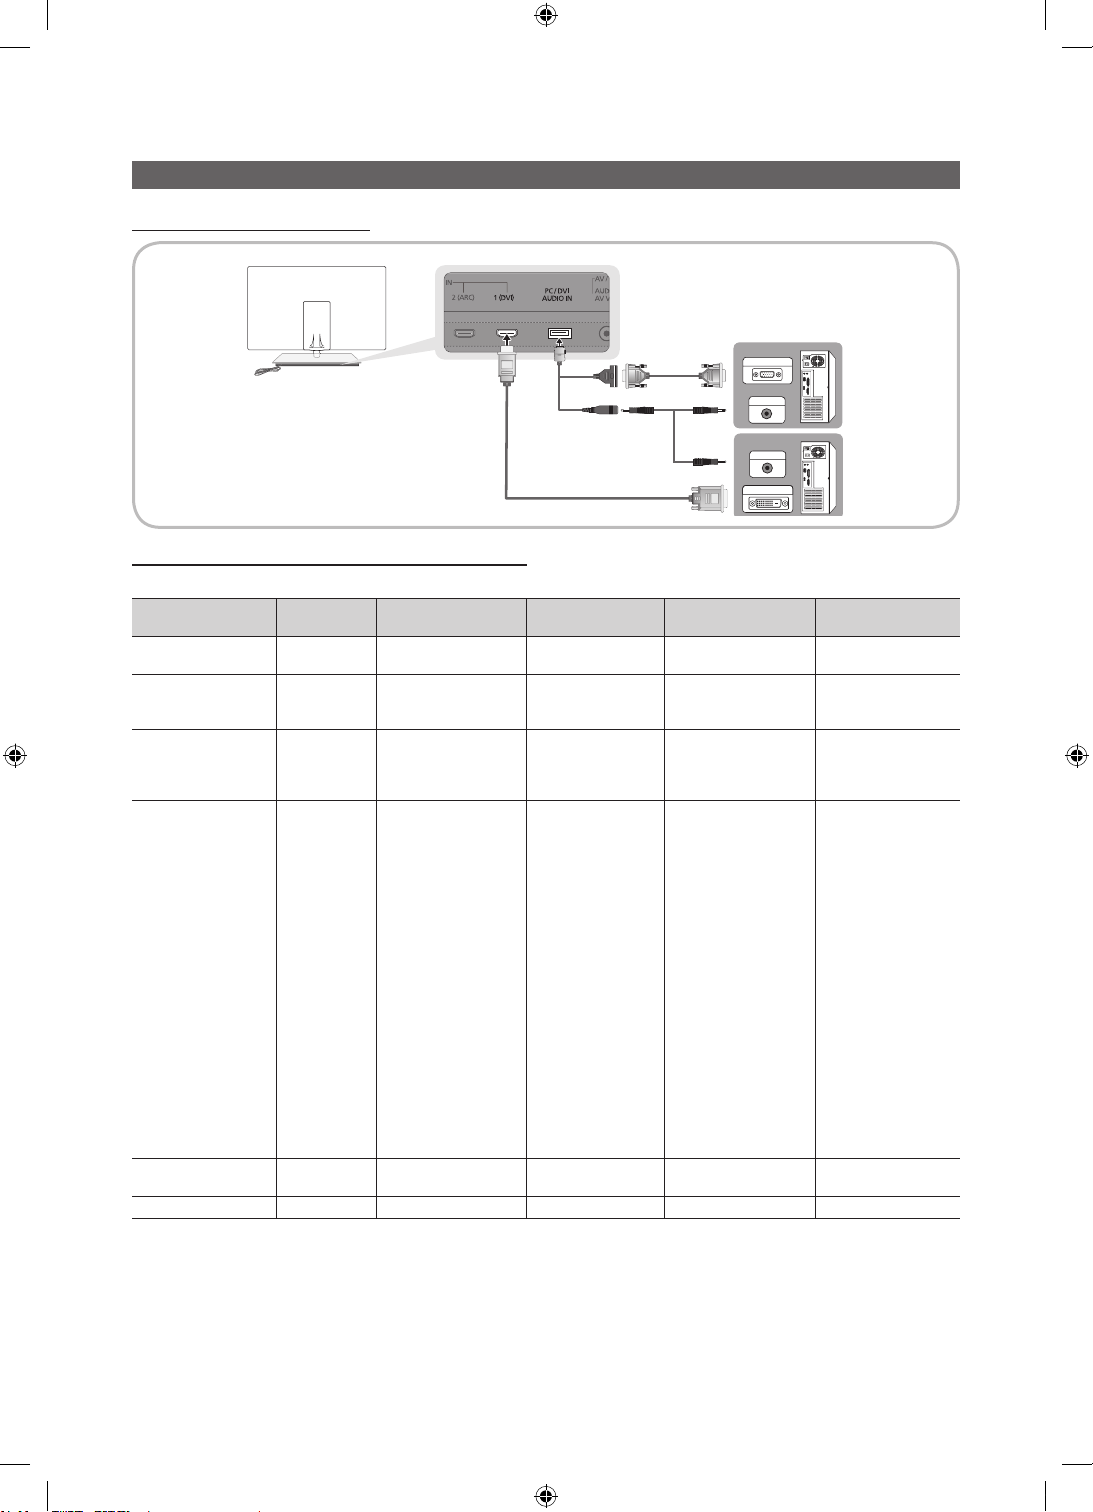
Funzioni avanzate
Collegamento a un PC
Uso di un Cavo HDMI/DVI / D-sub
Modalità di visualizzazione (ingresso D-Sub e HDMI/DVI)
La risoluzione ottimale è 1920 X 1080 a 60 Hz.
Modalità Risoluzione
IBM
MAC
VESA CVT
VESA DMT
VESA GTF
VESA DMT / DTV CEA
640 x 350
720 x 400
640 x 480
832 x 624
1152 x 870
720 x 576
1152 x 864
1280 x 720
1280 x 960
640 x 480
640 x 480
640 x 480
800 x 600
800 x 600
800 x 600
1024 x 768
1024 x 768
1024 x 768
1152 x 864
1280 x 1024
1280 x 1024
1280 x 720
1280 x 800
1280 x 800
1280 x 960
1360 x 768
1440 x 900
1440 x 900
1600 x 1200
1680 x 1050
1280 x 720
1280 x 1024
1920 x 1080p 67,500 60,000 148,500 +/+
Frequenza orizzontale
(KHz)
31,469
31,469
35,000
49,726
68,681
35,910
53,783
56,456
75,231
31,469
37,861
37,500
37,879
48,077
46,875
48,363
56,476
60,023
67,500
63,981
79,976
45,000
49,702
62,795
60,000
47,712
55,935
70,635
75,000
65,290
52,500
74,620
Frequenza verticale
(Hz)
70,086
70,087
66,667
74,551
75,062
59,950
59,959
74,777
74,857
59,940
72,809
75,000
60,317
72,188
75,000
60,004
70,069
75,029
75,000
60,020
75,025
60,000
59,810
74,934
60,000
60,015
59,887
74,984
60,000
59,954
70,000
70,000
PC OUT
AUDIO OUT
AUDIO OUT
DVI OUT
Frequenza di clock dei
pixel (MHz)
25,175
28,322
30,240
57,284
100,000
32,750
81,750
95,750
130,000
25,175
31,500
31,500
40,000
50,000
49,500
65,000
75,000
78,750
108,000
108,000
135,000
74,250
83,500
106,500
108,000
85,500
106,500
136,750
162,000
146,250
89,040
128,943
Polarità sync (O / V)
+/-
-/+
-/-
-/-
-/-
-/+
-/+
-/+
-/+
-/-
-/-
-/+/+
+/+
+/+
-/-
-/+/+
+/+
+/+
+/+
+/+
-/+
-/+
+/+
+/+
-/+
-/+
+/+
-/+
-/+
-/-
✎
NOTA
Quando si effettua una connessione mediante cavo HDMI/DVI, è necessario utilizzare il jack HDMI IN 1(DVI).
x
La modalità interlacciata non è supportata.
x
Questo dispositivo potrebbe non funzionare correttamente se si seleziona un formato video non standard.
x
Le modalitàSeparata e Composito sono supportate. La modalità SOG (Sync On Green) non è supportata.
x
Italiano
32
[UC9000]BN68-02820F-ZT.indb 32 2010-05-24 오후 5:26:00
Page 97
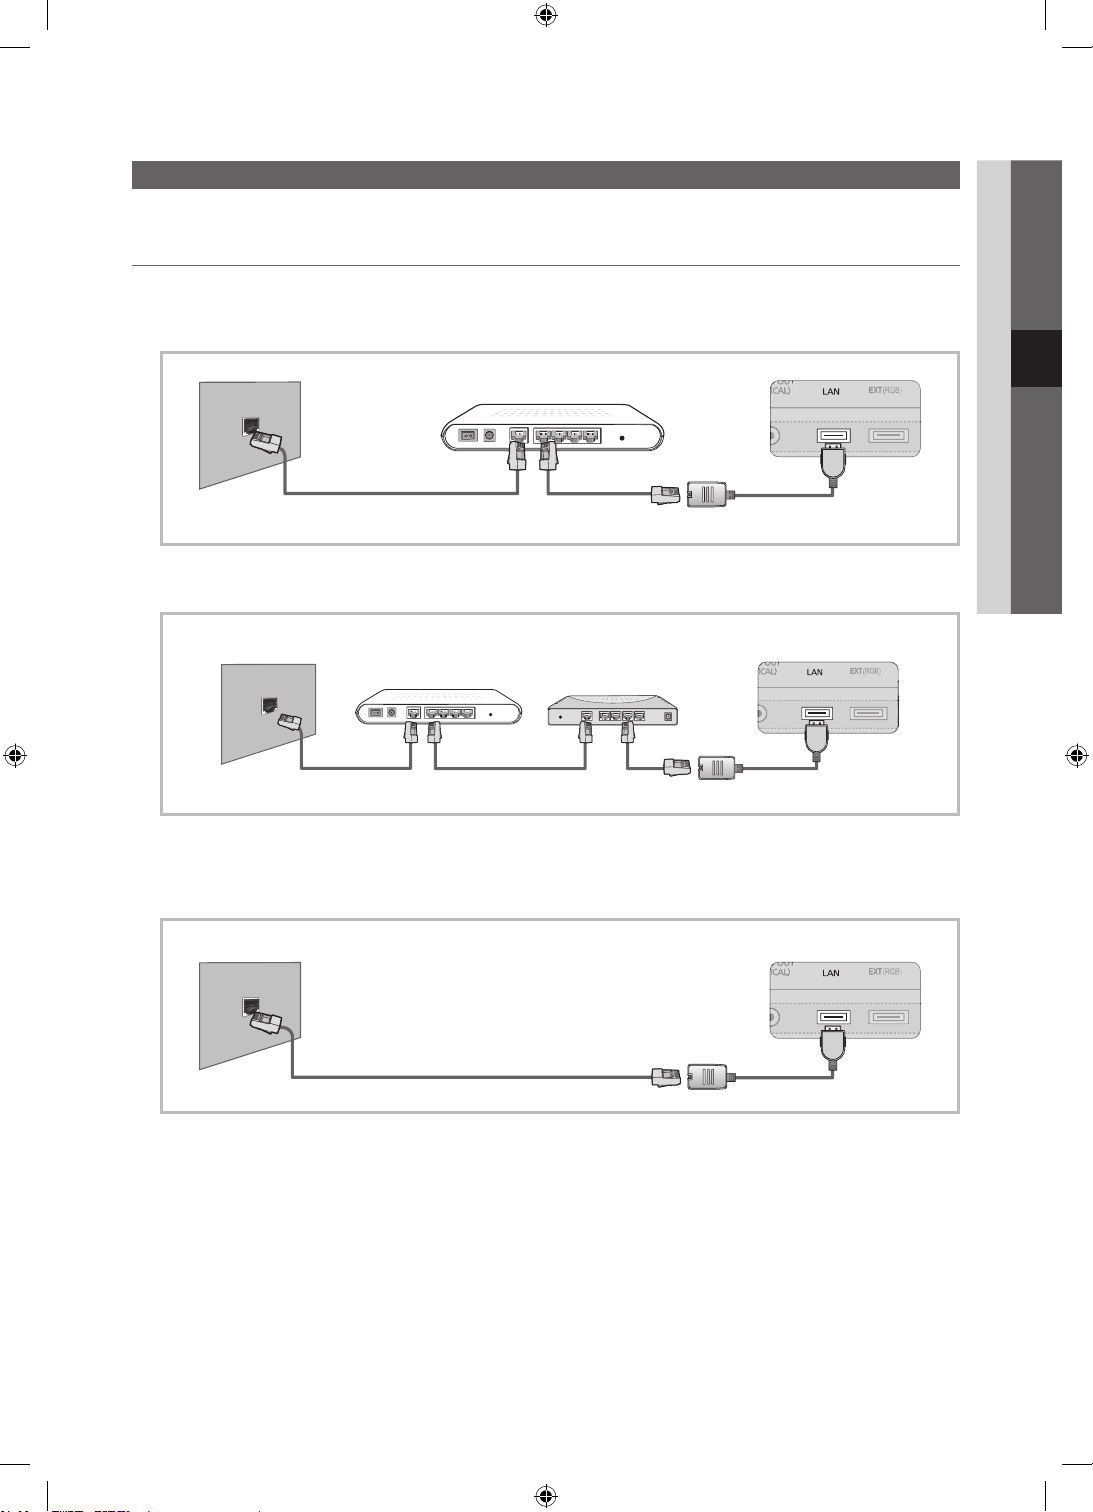
Connessione di rete
E’ possibile impostare il televisore in modo da poter accedere a Internet attraverso una LAN con un collegamento via cavo o wireless.
Collegamento a una rete cablata
Vi sono tre modi per collegare il televisore alla LAN via cavo:
y E’ possibile collegare il televisore alla LAN connettendo la porta LAN sul retro del televisore a un modem esterno mediante
un cavo Cat 5. Vedere lo schema riportato sotto.
04 Funzioni avanzate
Porta modem a parete
Cavo modem
Modem esterno
(ADSL / VDSL / TV via cavo)
Cavo LAN
Pannello laterale del piedistallo
Adattatore LAN
y E’ possibile collegare il televisore alla LAN connettendo la porta LAN sul retro del televisore al Router IP collegato a un
modem esterno. Usare un cavo Cat 5 per la connessione. Vedere lo schema riportato sotto.
Porta modem a parete
Modem esterno
(ADSL / VDSL / TV via cavo)
Cavo modem Cavo LAN
Router IP
(con server DHCP)
Pannello laterale del piedistallo
Adattatore LAN
y In base alla configurazione della LAN, potrebbe essere possibile collegare il televisore alla LAN connettendo la porta
LAN sul retro del televisore direttamente alla presa di rete a muro mediante un cavo Cat 5. Vedere lo schema riportato
sotto. Notare che la presa a muro è collegata a un modem o un router che potrebbe essere installato in qualsiasi punto
dell’abitazione.
Porta LAN a parete
Pannello laterale del piedistallo
Cavo LAN
Adattatore LAN
Se si dispone di una rete dinamica, è necessario utilizzare un modem ADSL o un router in grado di supportare il
protocollo DHCP (Dynamic Host Configuration Protocol). Modem e router che supportano il protocollo DHCP forniscono
automaticamente indirizzo IP, maschera di sottorete, gateway e DNS necessari al televisore per accedere a Internet, in
modo da non costringere l’utente a immetterli manualmente. La maggior parte delle reti domestiche sono di tipo dinamico.
Alcune reti richiedono un indirizzo IP statico. Se la rete richiede un indirizzo IP statico, immettere manualmente indirizzo IP,
maschera di sottorete, gateway e DNS nella schermata Impostazione rete del TV durante l’impostazione della connessione
di rete. Per ottenere indirizzo IP, maschera di sottorete, gateway e DNS contattare il proprio Internet Service Provider (ISP).
Se si usa un computer basato su Windows, è possibile ottenere tali valori anche via computer.
✎
E’ possibile utilizzare modem ADSL in grado di supportare il protocollo DHCP se la rete richiede un indirizzo IP
statico. I modem ADSL che supportano il protocollo DHCP permettono inoltre di usare indirizzi IP statici.
Italiano
33
[UC9000]BN68-02820F-ZT.indb 33 2010-05-24 오후 5:26:02
Page 98
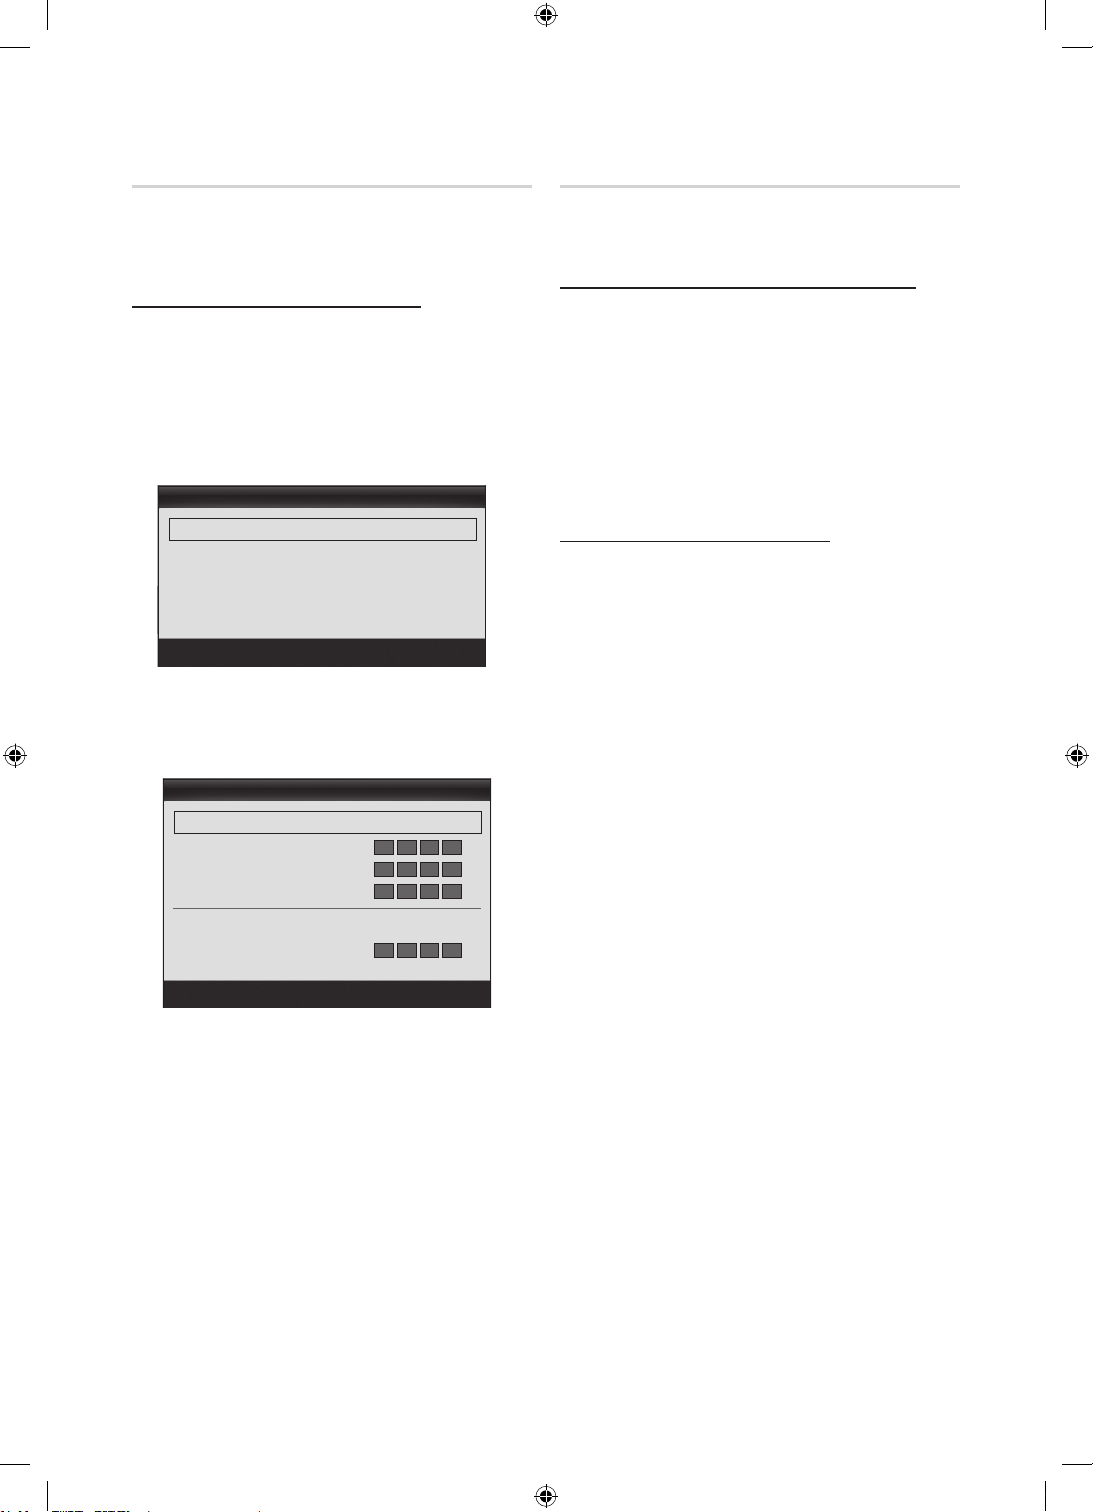
Funzioni avanzate
Impostazione rete (Automatico)
Durante la connessione del televisore a una rete che
supporta il protocollo DHCP, configurare Impostazione rete
su Auto. Per impostare automaticamente la connessione di
rete via cavo del televisore, seguire questi passaggi:
Procedura per l’impostazione automatica
1. Collegare il televisore alla LAN come descritto nella
sezione precedente.
2. Accendere il televisore, premere il tasto MENU sul
telecomando, usare il tasto ▲ o ▼ per selezionare
Impostazione, quindi premere ENTER
3. Usare il tasto ▲ o ▼ per selezionare Rete nel menu
Impostazione, quindi premere ENTER
schermo verrà visualizzata la schermata Rete.
Rete
Tipo di rete : Cavo ►
Impostazione rete
Test di rete
SWL(Samsung Wireless Link) : Off
Connessione SWL
Sposta
4. Nella schermata Rete, selezionare Tipo di rete.
5. Impostare Network Tipo di rete su Cavo.
6. Selezionare Impostazione rete. Verrà visualizzata la
schermata Impostazione rete.
Impostazione rete
Impostazione IP : Automatico ►
Indirizzo IP :
Maschera sottorete :
Gateway :
DNS : Automatico
Server DNS :
Conferma
.
. Sullo
Ritorna
Impostazione rete (Manuale)
Configurare Impostazione rete su Manuale quando si
collega il televisore a una rete che richiede un indirizzo IP
statico.
Ottenere le impostazioni per la connessione di rete
Per ottenere le impostazioni per la connessione di rete sulla
maggior parte dei computer basati su Windows, seguire
questi passaggi:
1. Cliccare con il tasto destro del mouse sull’icona Rete in
basso a destra dello schermo.
2. Nel menu a comparsa visualizzato, cliccare su Stato.
3. Nella finestra di dialogo, cliccare sulla scheda Supporto.
4. Nella scheda Supporto, cliccare su Dettagli. Sullo
schermo vengono visualizzate le impostazioni per la
connessione di rete.
Procedura per l’impostazione manuale
Per impostare manualmente la connessione di rete via cavo
del televisore, seguire questi passaggi:
1. Seguire i passaggi da 1 a 6 della “Procedura per
l’impostazione automatica”.
2. Impostare Impostazione IP su Manuale.
3. Premere il tasto ▼ del telecomando per passare al
primo campo da compilare.
4. Immettere le impostazioni Indirizzo IP,
Maschera sottorete, Gateway e Server DNS.
Per digitare i numeri utilizzare i tasti numerici del
telecomando, per spostarsi fra i campi utilizzare i tasti
freccia.
5. Al termine, premere il tasto RETURN sul telecomando.
6. Selezionare Test di rete per verificare la connettivitàa
Internet.
Sposta
Conferma
Ritorna
7. Impostare Impostazione IP su Automatico.
8. Automatico acquisisce e immette automaticamente le
impostazioni Internet necessarie.
9 Al termine, premere il tasto RETURN sul telecomando.
10. Se la funzione Rete non ha acquisito le impostazioni di
rete, passare alle istruzioni per la procedura Manuale.
Italiano
34
[UC9000]BN68-02820F-ZT.indb 34 2010-05-24 오후 5:26:02
Page 99
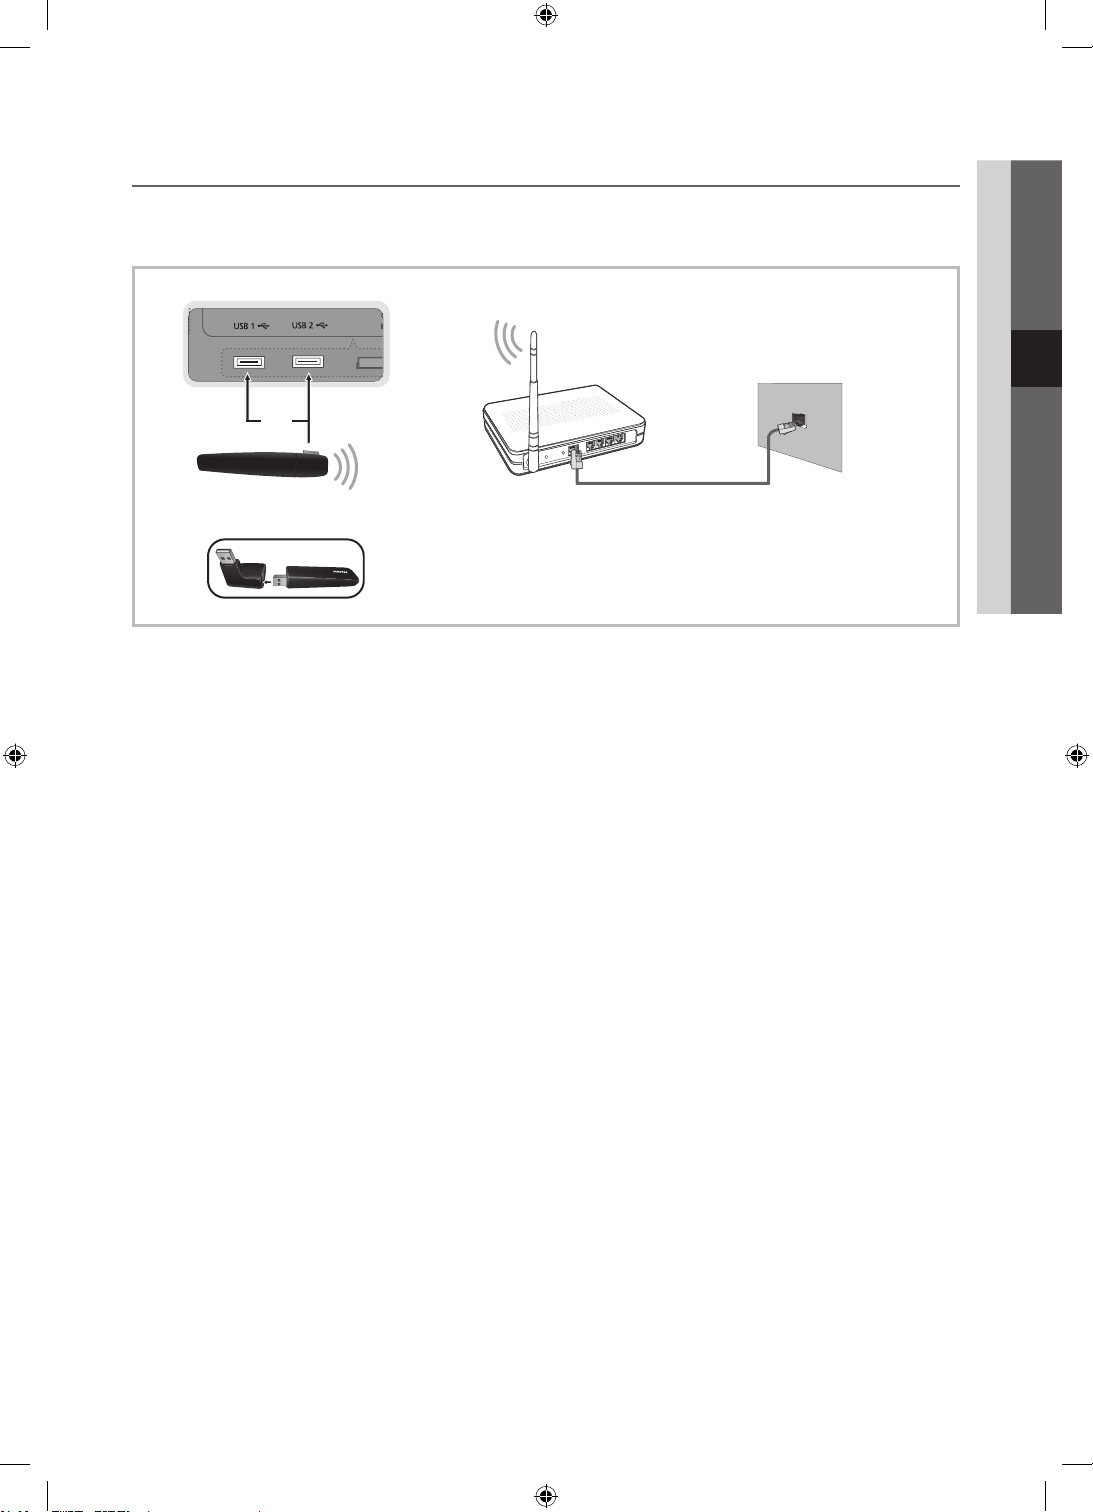
Collegamento a una rete wireless
Per collegare il televisore a una rete wireless, è necessario disporre di un router o di un modem wireless e di un adattatore LAN
wireless Samsung (WIS09ABGN2) da collegare al jack USB sul pannello posteriore o laterale del televisore. Vedere la figura
riportata sotto.
Pannello laterale del piedistallo
04 Funzioni avanzate
Router IP wireless
(AP con server DHCP)
o
Adattatore LAN wireless
Samsung
✎
Nel caso l’adattatore LAN wireless Samsung sia collegato alla porta USB 2,
potrebbe non essere possibile utilizzare la porta USB 1. Si consiglia pertanto
di collegare l’adattatore LAN wireless Samsung alla porta USB 1
L’adattatore LAN wireless Samsung supporta i protocolli di comunicazione IEEE 802.11A/B/G e N. Samsung consiglia di utilizzare il
protocollo IEEE 802.11N. La riproduzione di un video mediante connessione IEEE 802.11B/G potrebbe non essere fluida.
✎
NOTA
Per utilizzare una rete wireless è necessario utilizzare la scheda “Samsung Wireless LAN Adapter” (WIS09ABGN2).
x
Per utilizzare una rete wireless, il televisore deve essere collegato a un router IP wireless. Se il router IP wireless
x
supporta il protocollo DHCP, il televisore può utilizzare sia un indirizzo DHCP sia un indirizzo IP statico per collegarsi
alla rete in modalità wireless.
Selezionare un canale per il router IP wireless che non sia attualmente utilizzato. Se il canale impostato per il router
x
IP wireless è attualmente utilizzato da un altro dispositivo vicino, ciò comporterà interferenze e le comunicazioni
potrebbero interrompersi.
Sistemi di sicurezza diversi da quelli sotto elencati non sono compatibili con il televisore.
x
Selezionando la modalità Pure High-throughput (Greenfield) 802.11N con crittografia di tipo WEP, TKIP o TKIP-AES
x
(WPS2Mixed) per il proprio AP, i televisori Samsung non supporteranno una connessione conforme alle nuove
specifiche di certificazione Wi-Fi.
Se il proprio AP supporta WPS (Wi-Fi Protected Setup), è possibile collegarsi alla rete mediante PBC (Push Button
x
Configuration) o un PIN (Personal Identification Number). WPS configureràautomaticamente l’SSID e la chiave WPA
in entrambe le modalità.
Se il router, il modem o un dispositivo non è certificato, potrebbe non connettersi al televisore mediante l’adattatore
x
LAN wireless Samsung.
Metodi di connessione: Vi sono sei modi per impostare la connessione alla rete wireless.
x
– Configurazione automatica Samsung
– PBC (WPS)
– Impostazione automatica (mediante la funzione Ricerca rete automatica)
– Impostazione manuale
– SWL(Samsung Wireless Link)
– Ad-Hoc
L’adattatore LAN wireless Samsung potrebbe non essere riconosciuto in caso di connessione mediante hub USB o
x
cavo di prolunga USB diverso da quello fornito da Samsung.
Cavo LAN
Porta LAN a parete
Italiano
35
[UC9000]BN68-02820F-ZT.indb 35 2010-05-24 오후 5:26:04
Page 100
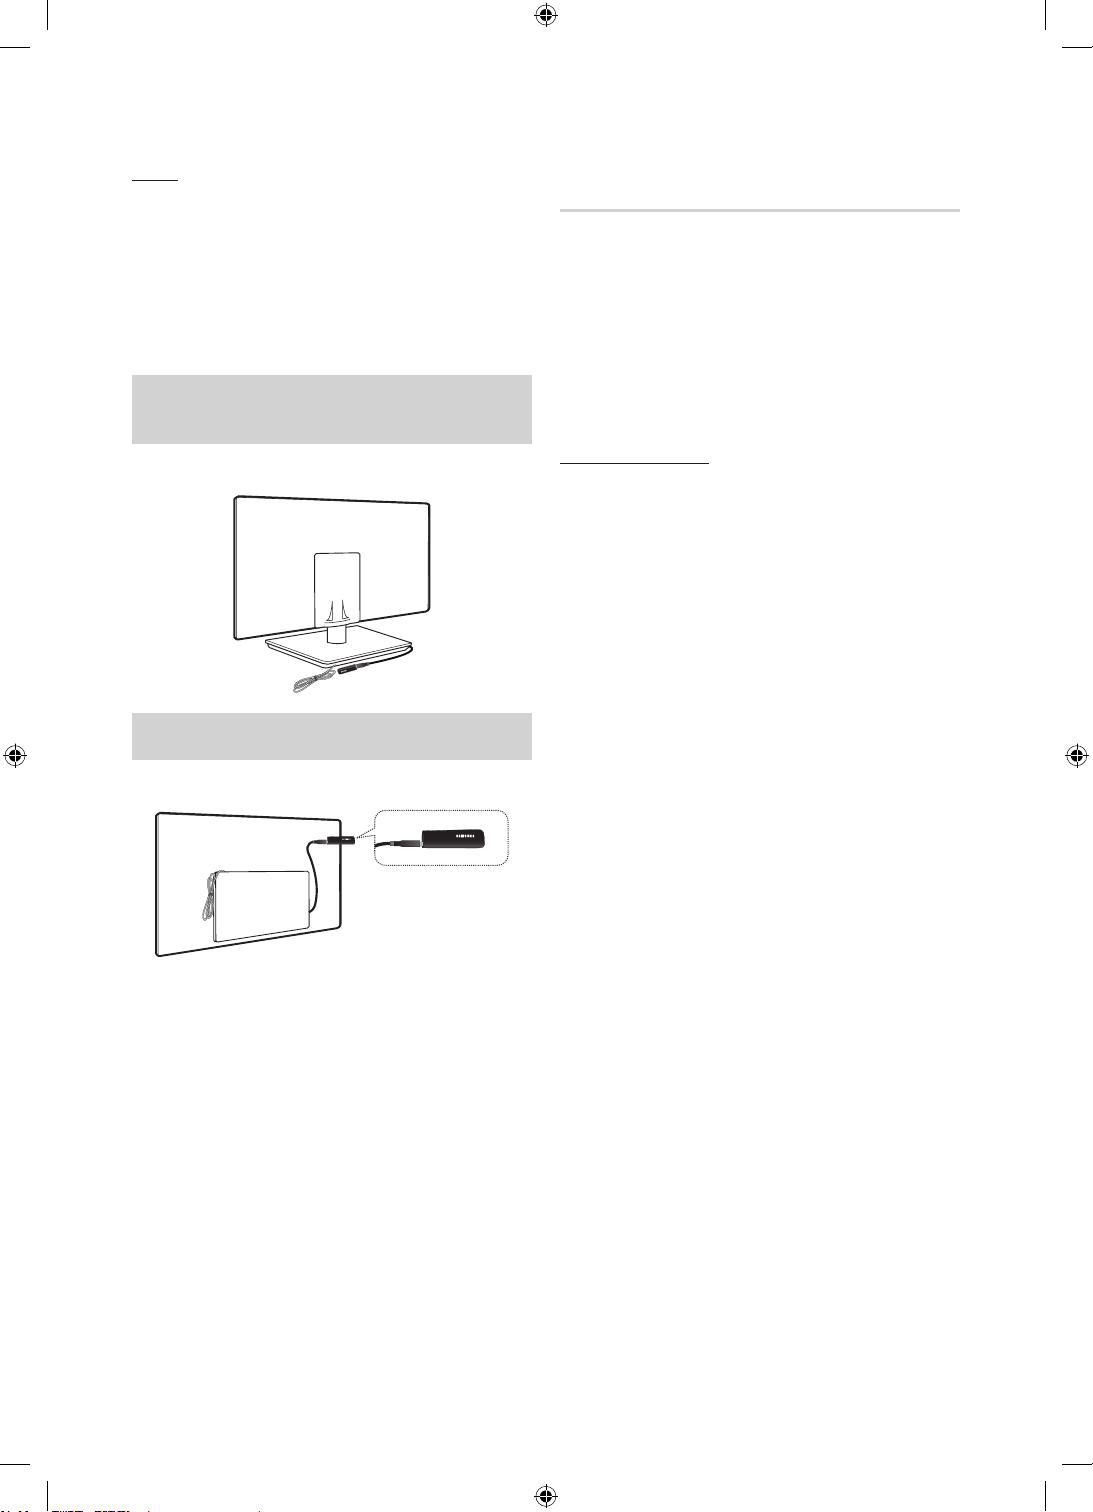
Funzioni avanzate
Avviso
In caso di collegamento del televisore con un adattatore
LAN wireless Samsung, alcuni canali potrebbero visualizzare
le immagini in modo anomalo o presentare scariche
statiche. In tal caso, collegare l’adattatore LAN wireless
Samsung mediante un cavo USB in un luogo libero da
radiointerferenze.
✎
Allo scopo di evitare interferenze tra l’adattatore e il
sintonizzatore, installare l’adattatore LAN wireless
Samsung in un’area libera da interferenze.
Metodo 1
UE46C9000SP, UE55C9000SP
UE46C9000ZP, UE55C9000ZP
✎
Componenti: Cavo di prolunga, Velcro
Metodo 2
UE46C9000ZP, UE55C9000ZP
✎
Componenti: Cavo di prolunga, Velcro
Impostazione rete
(Configurazione automatica Samsung)
Questa funzione è disponibile negli AP (Access Point) che
supportano la modalità Configurazione automatica Samsung.
Se il proprio AP non supporta questa modalità, è possibile
collegarsi tramite PBC (WPS), Automatico, o manualmente.
✎
Questa funzione è disponibile quando
SWL(Samsung Wireless Link) è impostato su Off.
✎
E’ possibile vedere l’elenco delle apparecchiature che
supportano la Configurazione automatica Samsung sul
sito www.samsung.com.
Procedura per l’impostazione mediante Configurazione
automatica Samsung
1. Posizionare AP e televisore vicini e accenderli entrambi.
✎
Poiché i tempi di avviamento delle applicazioni
sono diversi tra loro, potrebbe risultare necessario
attendere circa 2 minuti.
✎
Se il cavo LAN è collegato alla porta WAN
dell’AP durante la Configurazione automatica,
sarà possibile completare il test di connessione
Internet. Se la connessione non è disponibile, la
funzione Configurazione automatica Samsung
verificherà solo i dispositivi collegati all’AP (e non la
connessione Internet).
2. Dopo 2 minuti, collegare l’adattatore LAN wireless
Samsung al televisore. Una volta impostato l’adattatore
LAN wireless Samsung, verrà visualizzata la finestra a
comparsa.
3. Appena stabilita la connessione, posizionare l’AP di
fianco all’adattatore LAN wireless Samsung a una
distanza non superiore a 25 cm.
4. Attendere fino all’avvenuta connessione automatica.
✎
Se la funzione Configurazione automatica
Samsung non è in grado di collegare il televisore
all’AP, comparirà una schermata che avviserà
della mancata connessione. Reimpostare l’AP e
riprovare. Se la connessione ancora non riesce,
scegliere un altro metodo di connessione, PBC
(WPS), automatico o manuale.
5. Una volta stabilita la connessione, individuare il router
nella posizione desiderata.
✎
Se le impostazioni dell’AP sono cambiate o è la
prima volta che si utilizza l’AP dopo l’acquisto,
sarà necessario impostarlo nuovamente iniziando
dal passaggio 1.
Italiano
36
[UC9000]BN68-02820F-ZT.indb 36 2010-05-24 오후 5:26:04
 Loading...