

Page 1
LED TV
user manual
Thank you for purchasing this Samsung product.
To receive more complete service, please register
your product at
www.samsung.com/register
Model ___________ Serial No. ____________
Page 2

English - 2
Important Safety Instructions
Warning! Important Safety Instructions
(Please read the appropriate section that corresponds to the marking on your Samsung product before attempting to
install the product.)
CAUTION
CAUTION: TO REDUCE THE RISK OF ELECTRIC SHOCK,
DO NOT REMOVE COVER (OR BACK). THERE ARE
NO USER SERVICEABLE PARTS INSIDE. REFER ALL
SERVICING TO QUALIFIED PERSONNEL.
RISK OF ELECTRIC SHOCK DO NOT OPEN
This symbol indicates that high voltage is
present inside. It is dangerous to make any kind
of contact with any internal part of this product.
This symbol alerts you that important literature
concerning operation and maintenance has
been included with this product.
• The slots and openings in the cabinet and in the back or bottom are provided for necessary ventilation. To ensure reliable operation of this apparatus,
and to protect it from overheating, these slots and openings must never be blocked or covered.
− Do not cover this apparatus in a confined space, such as a bookcase, or built-in cabinet, unless proper ventilation is provided.
− Do not place this apparatus near or over a radiator or heat resistor, or where it is exposed to direct sunlight.
− Do not place a water containing vessel (vases etc.) on this apparatus, as this can result in a risk of fire or electric shock.
• Do not expose this apparatus to rain or place it near water (near a bathtub, washbowl, kitchen sink, or laundry tub, in a wet basement, or near a
swimming pool etc.). If this apparatus accidentally gets wet, unplug it and contact an authorised dealer immediately. Make sure to pull out the power
cord from the outlet before cleaning.
• This apparatus use batteries. In your community there might be regulations that require you to dispose of these batteries properly under
environmental considerations. Please contact your local authorities for disposal or recycling information.
• Do not overload wall outlets, extension cords or adaptors beyond their capacity, since this can result in fire or electric shock.
• Power-supply cords should be routed so that they are not likely to be walked on or pinched by items placed upon or against them, paying particular
attention to cords at plug end, adaptors and the point where they exit from the appliance.
• To protect this apparatus from a lightning storm, or when it is left unattended and unused for long periods of time, unplug it from the wall outlet and
disconnect the antenna or cable system. This will prevent damage to the set due to lightning and power line surges.
• Before connecting the AC power cord to the DC adaptor outlet, make sure the voltage designation of the DC adaptor corresponds to the local
electrical supply.
• Never insert anything metallic into the open parts of this apparatus. Doing so may create a danger of electric shock.
• To avoid electric shock, never touch the inside of this apparatus. Only a qualified technician should open this apparatus.
• Make sure to plug the power cord in until it is firmly inserted. When removing the power cord, make sure to hold the power plug when pulling the
plug from the outlet. Do not touch the power cord with wet hands.
• If this apparatus does not operate normally - in particular, if there are any unusual sounds or smells coming from it - unplug it immediately and
contact an authorised dealer or service centre.
• Be sure to pull the power plug out of the outlet if the TV is to remain unused or if you are to leave the house for an extended period of time (especially
when children, elderly or disabled people will be left alone in the house).
− Accumulated dust can cause an electric shock, an electric leakage or a fire by causing the power cord to generate sparks and heat or the
insulation to deteriorate.
• Be sure to contact an authorised service centre, when installing your set in a location with heavy dust, high or low temperatures, high humidity,
chemical substances or where it will operates for 24 hours a day such as in an airport, a train station, etc. Failure to do so may cause serious
damage to your set.
• Use only a properly grounded plug and receptacle.
• An improper ground may cause electric shock or equipment damage. (Class l Equipment only.)
• To disconnect the apparatus from the mains, the plug must be pulled out from the mains socket, therefore the mains plug shall be readily operable.
• Do not allow children to hang onto the product.
• Store the accessories (battery, etc.) in a location safely out of the reach of children.
• Do not install the product in an unstable location such as a shaky self, a slanted floor or a location exposed to vibration.
• Do not drop or impart any shock to the product. If the product is damaged, disconnect the power cord and contact a service centre.
• Unplug the power cord from the power outlet and wipe the product using a soft, dry cloth. Do not use any chemicals such as wax, benzene, alcohol,
thinners, insecticide, aerial freshener, lubricant or detergent. This may damage the appearance or erase the printing on the product.
• Apparatus shall not be exposed to dripping or splashing.
• Do not dispose of batteries in a fire.
• Do not short circuit, disassemble or overheat the batteries.
• Danger of explosion if battery is incorrectly replaced. Replace only with the same or equivalent type.
• WARNING - TO PREVENT THE SPREAD OF FIRE, KEEP CANDLES OR OTHER OPEN FLAMES AWAY FROM THIS PRODUCT AT
ALL TIMES.
Page 3
English
English - 3
Figures and illustrations in this User Manual are provided for reference only and may differ from actual product
appearance. Product design and specifications may be changed without notice.
CIS languages (Russian, Ukrainian, Kazakhs) are not available for this product, since this is manufactured for
customers in EU region.
Important Warranty Information Regarding Television
Format Viewing
1. Functionalities related to Digital TV (DVB) are only available in countries/areas where DVB-T (MPEG2 and MPEG4
AVC) digital terrestrial signals are broadcasted or where you are able to access to a compatible DVB-C (MPEG2 and
MPEG4 AAC) cable-TV service. Please check with your local dealer the possibility to receive DVB-T or DVB-C signal.
2. DVB-T is the DVB European consortium standard for the broadcast transmission of digital terrestrial television and
DVB-C is that for the broadcast transmission of digital TV over cable. However, some differentiated features like
EPG (Electric Programme Guide), VOD (Video On Demand) and so on, are not included in this specification. So, they
cannot be workable at this moment.
3. Although this TV set meets the latest DVB-T and DVB-C standards, as of [August, 2008], the compatibility with
future DVB-T digital terrestrial and DVB-C digital cable broadcasts cannot be guaranteed.
4. Depending on the countries/areas where this TV set is used some cable-TV providers may charge an additional fee
for such a service and you may be required to agree to terms and conditions of their business.
5. Some Digital TV functions might be unavailable in some countries or regions and DVB-C might not work correctly
with some cable service providers.
6. For more information, please contact your local Samsung customer care centre.
✎
The reception quality of TV may be affected due to differences in broadcasting method between the
countries. Please check the TV performance in the local SAMSUNG Authorised Dealer, or the Samsung Call
Centre whether it can be improved by reconfiguring TV setting or not.
Correct Disposal of This Product (Waste Electrical & Electronic Equipment)
(Applicable in the European Union and other European countries with separate collection systems)
This marking on the product, accessories or literature indicates that the product and its electronic
accessories (e.g. charger, headset, USB cable) should not be disposed of with other household waste
at the end of their working life. To prevent possible harm to the environment or human health from
uncontrolled waste disposal, please separate these items from other types of waste and recycle them
responsibly to promote the sustainable reuse of material resources. Household users should contact either
the retailer where they purchased this product, or their local government office, for details of where and
how they can take these items for environmentally safe recycling. Business users should contact their
supplier and check the terms and conditions of the purchase contract. This product and its electronic
accessories should not be mixed with other commercial wastes for disposal.
Correct disposal of batteries in this product
(Applicable in the European Union and other European countries with separate battery return
systems)
This marking on the battery, manual or packaging indicates that the batteries in this product should not
be disposed of with other household waste at the end of their working life. Where marked, the chemical
symbols Hg, Cd or Pb indicate that the battery contains mercury, cadmium or lead above the reference
levels in EC Directive 2006/66. If batteries are not properly disposed of, these substances can cause harm
to human health or the environment. To protect natural resources and to promote material reuse, please
separate batteries from other types of waste and recycle them through your local, free battery return
system.
Page 4
English - 4
List of Features
• Media Play: Allows you to play music files, pictures, and movies saved on a USB device.
• e-Manual: Allows you to read on screen full manual.
Accessories
✎
Please make sure the following items are included with your TV. If any items are missing, contact your dealer.
✎
The items’ colours and shapes may vary depending on the models.
✎
Cables not included in the package contents can be purchased separately.
[CAUTION: INSERT SECURELY LEST SHOULD BE DETACHED IN SET
• Remote Control & Batteries (AAA x 2) • Power Cord
• Regulatory Guide / Warranty Card • User Manual
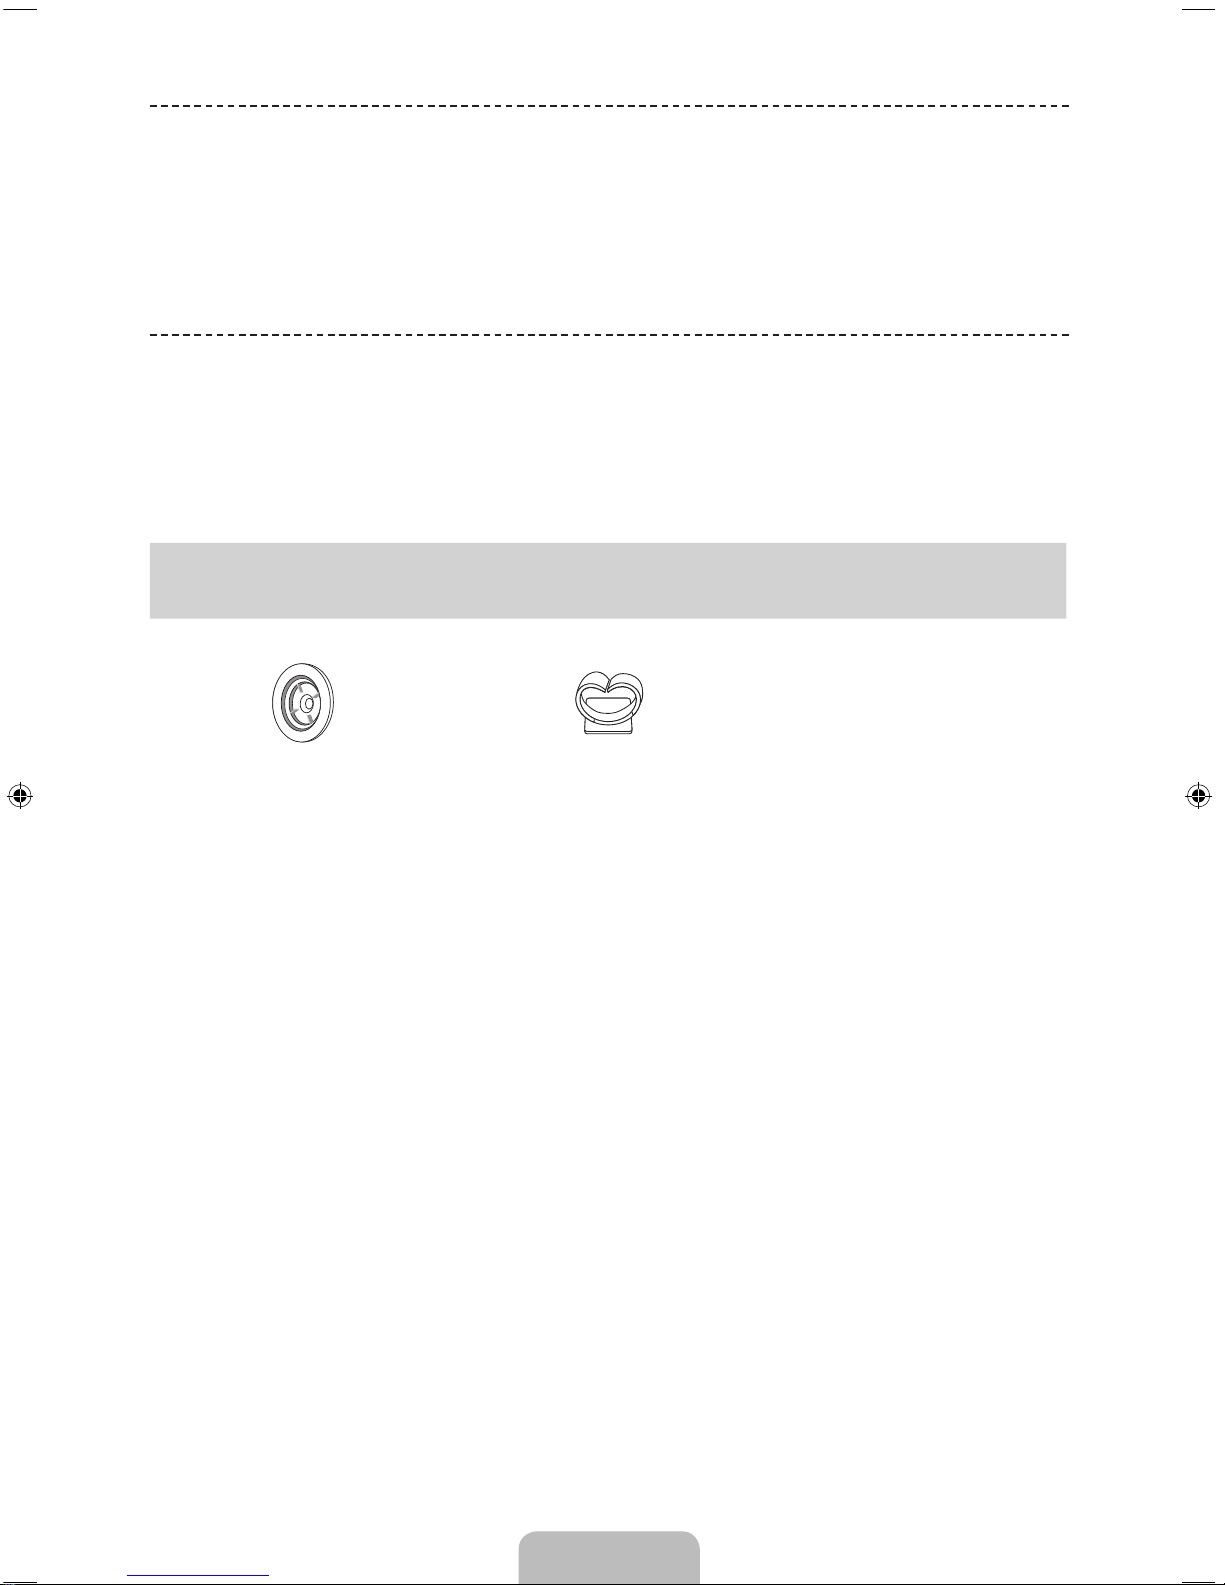
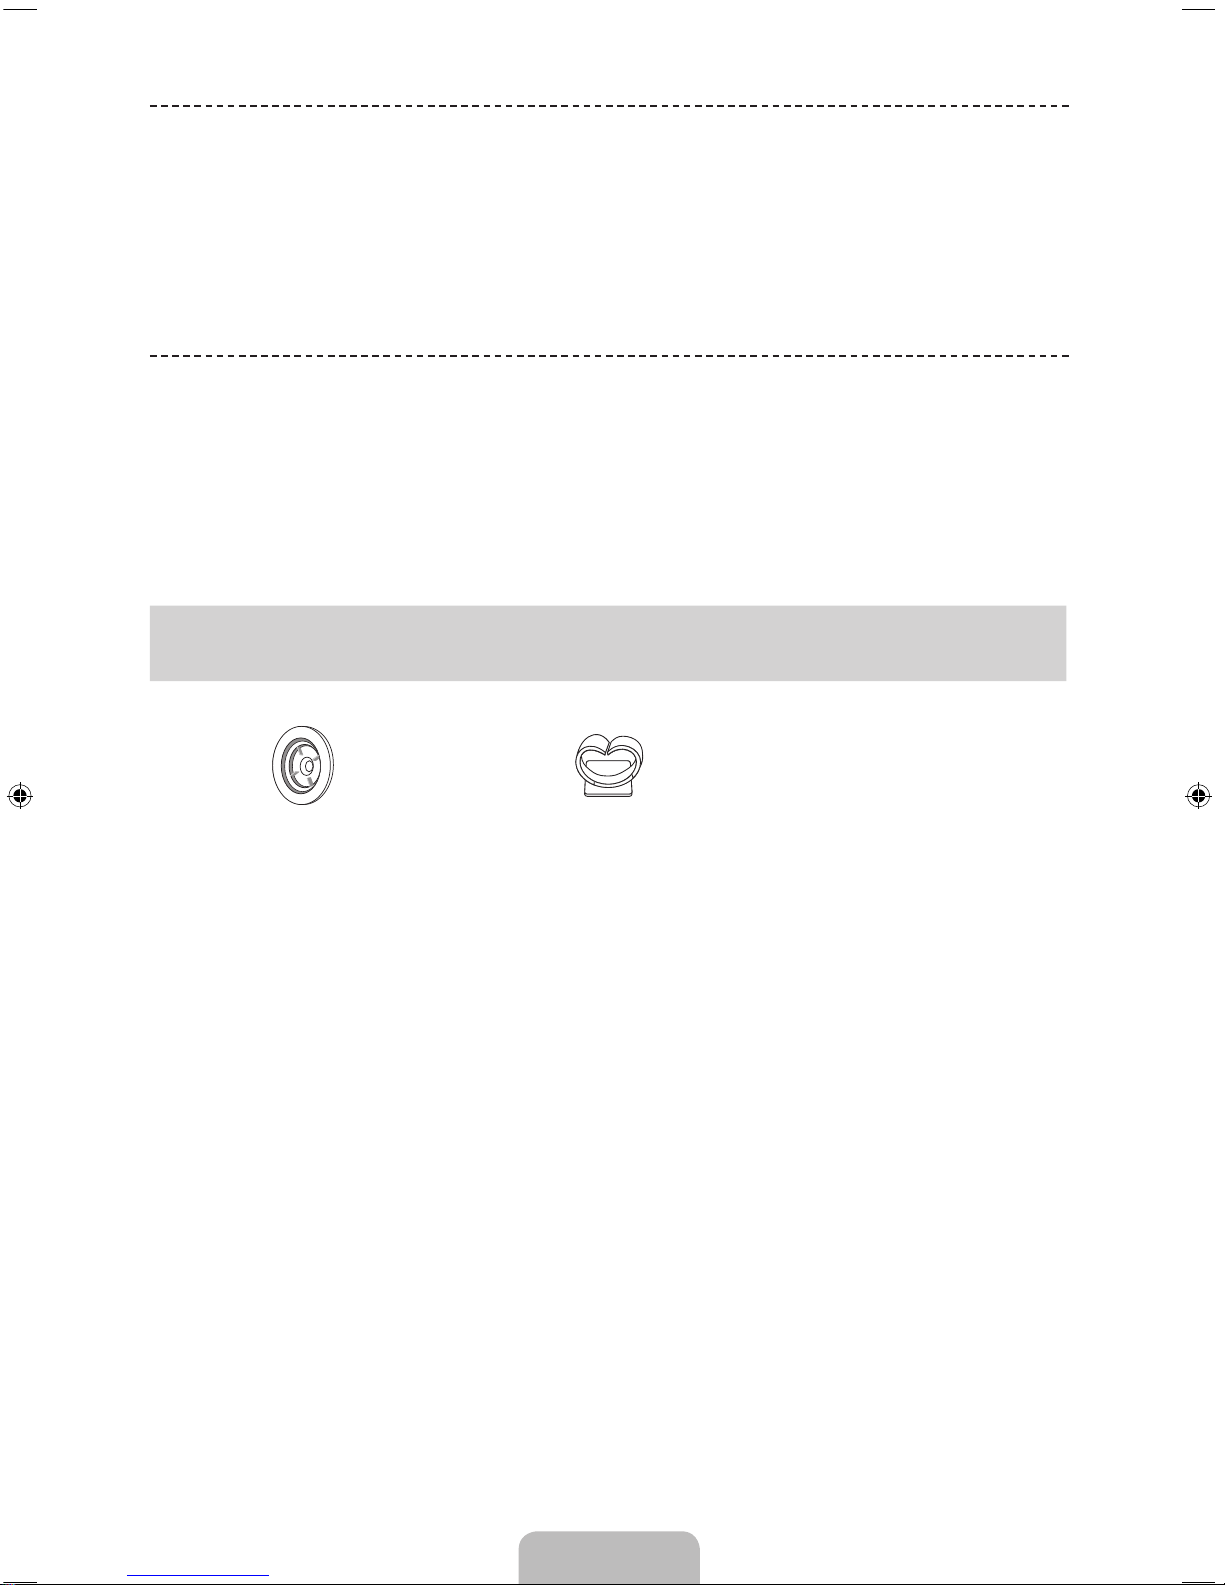
Wall mount Adapter
(Depending on the model)
Cable Guide
(Depending on the model)
✎
An administration fee may be charged if either
(a) an engineer is called out at your request and there is no defect in the product
(i.e. where you have failed to read this user manual)
(b) you bring the unit to a repair centre and there is no defect in the product
(i.e. where you have failed to read this user manual)
✎
The amount of such administration charge will be advised to you before any work or home visit is carried out.
Page 5
English
English - 5
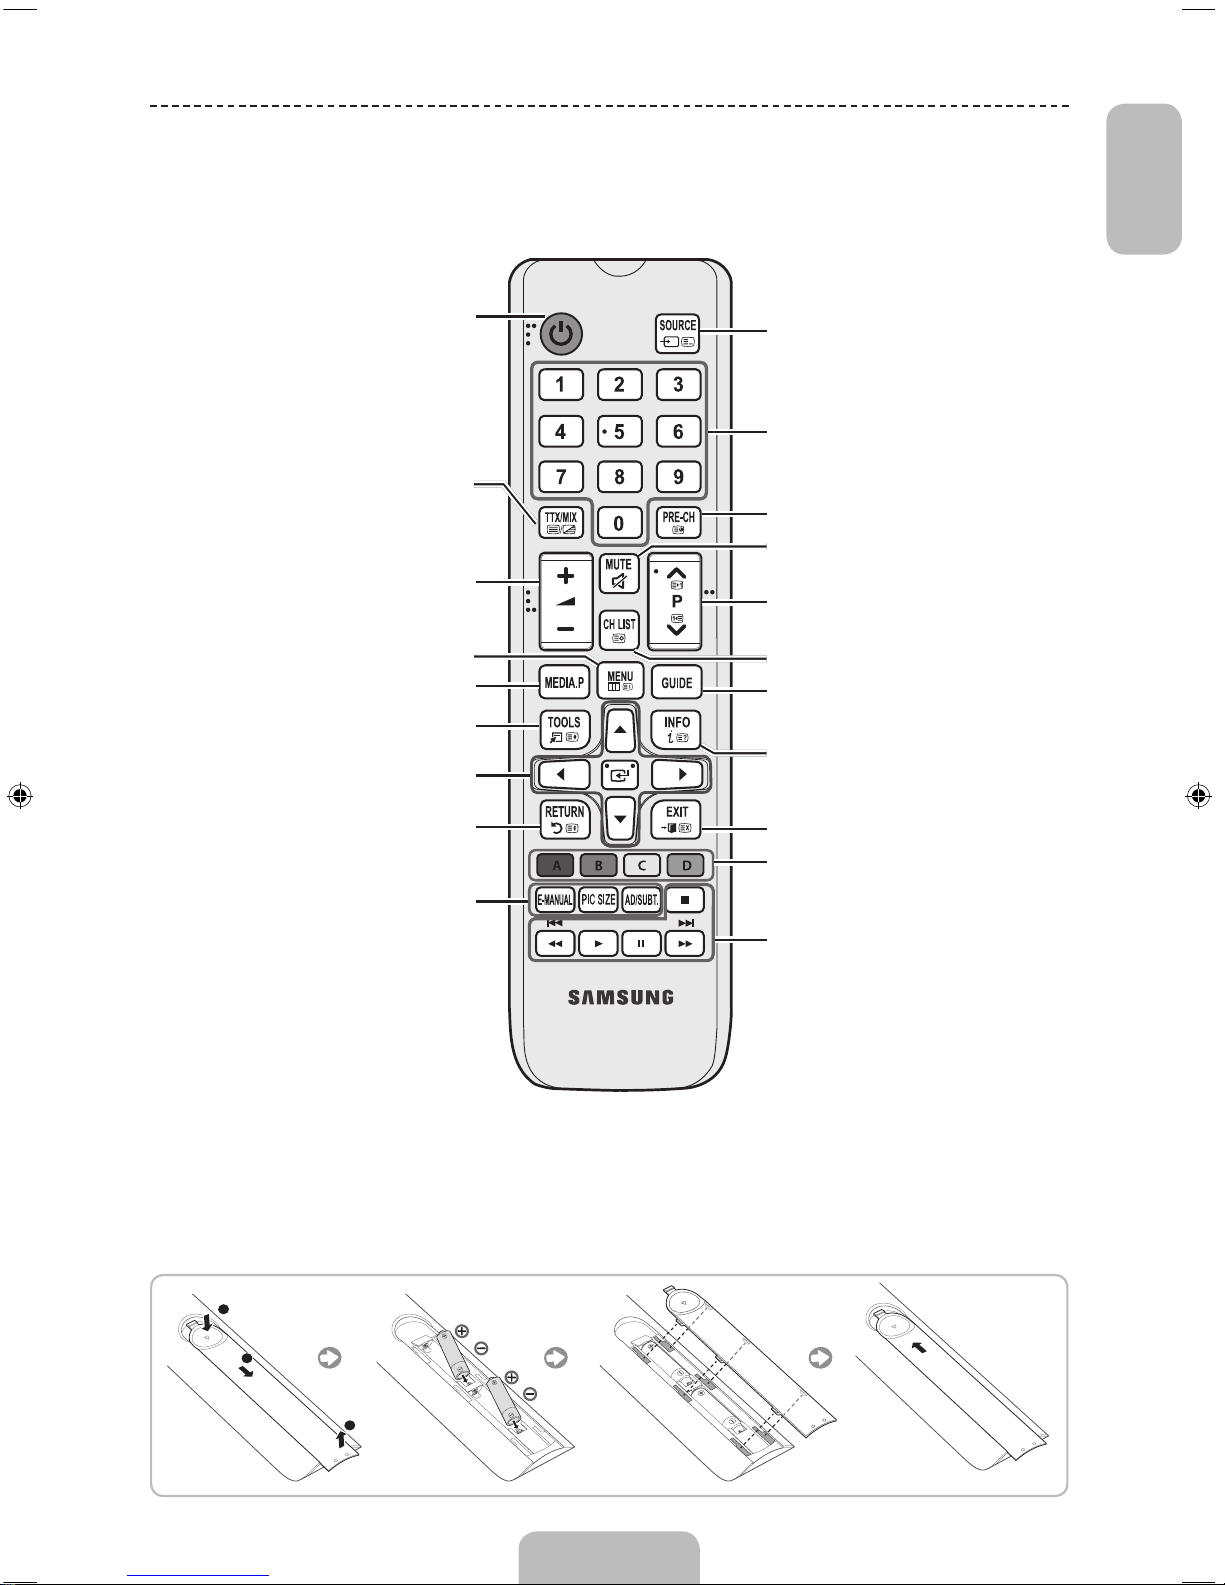
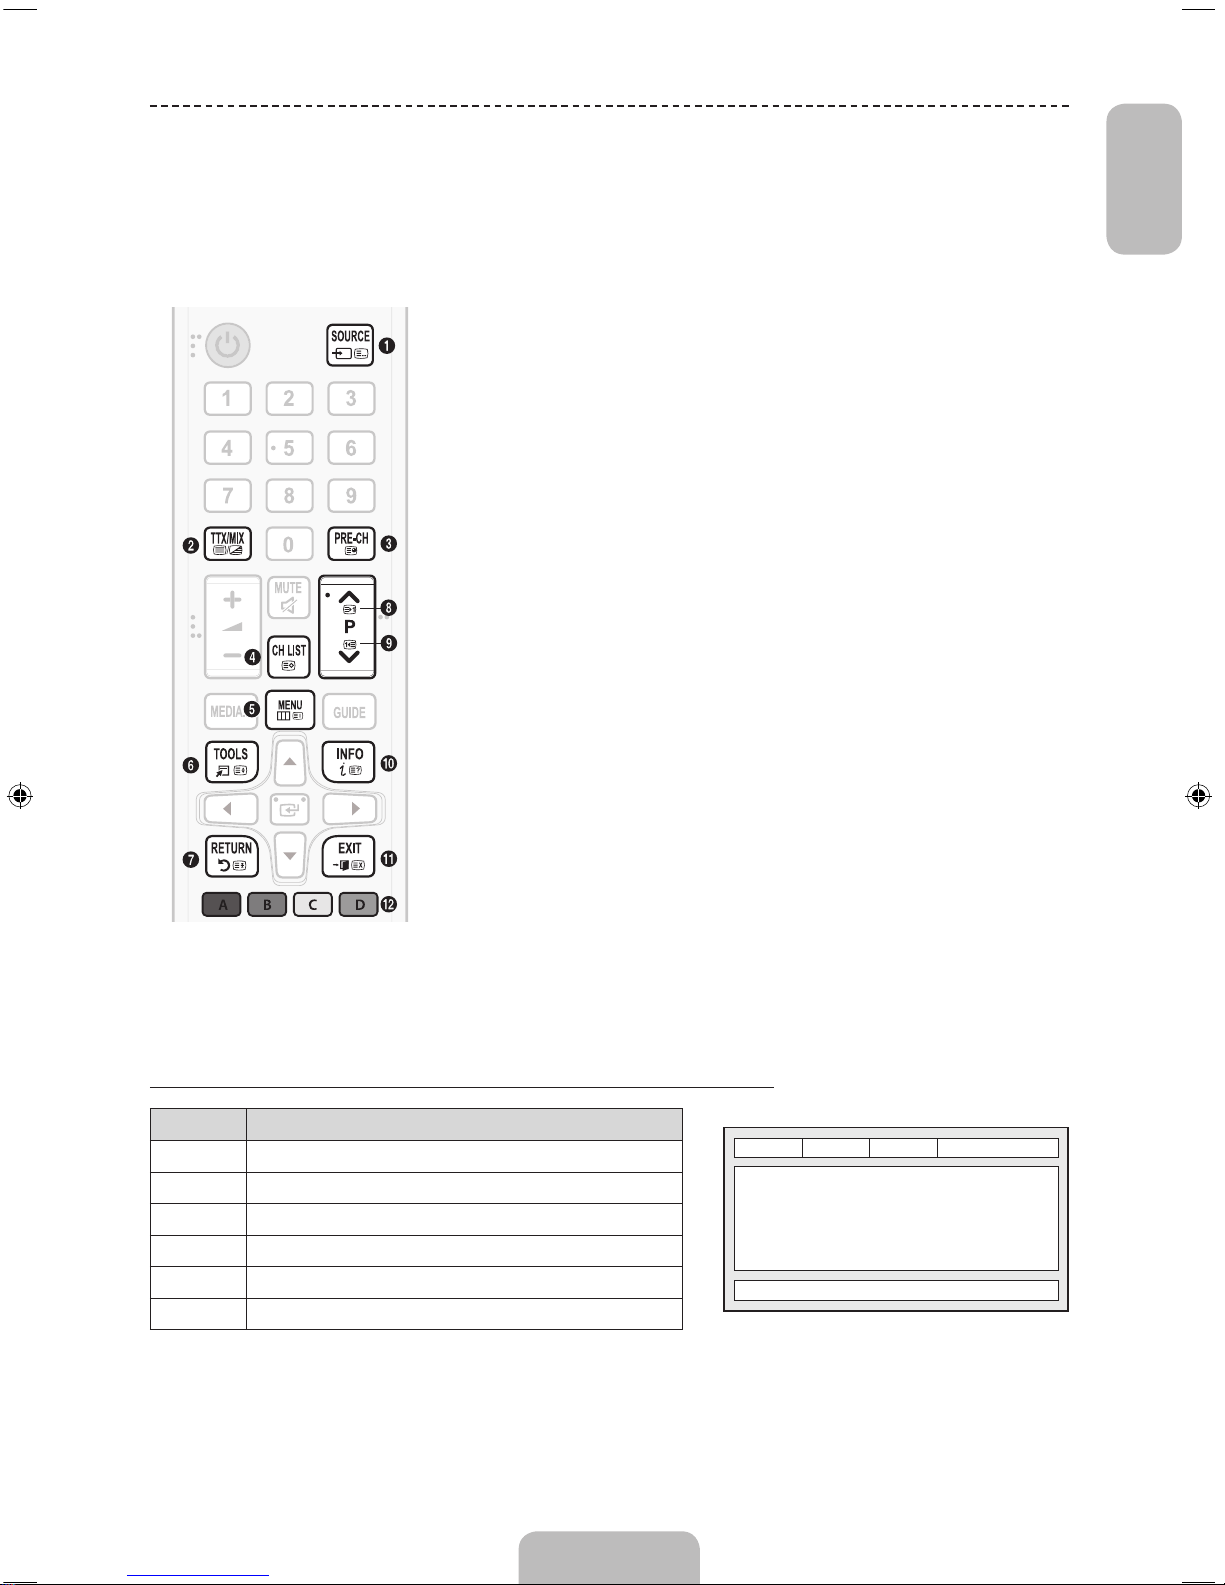
Viewing the Remote Control
✎
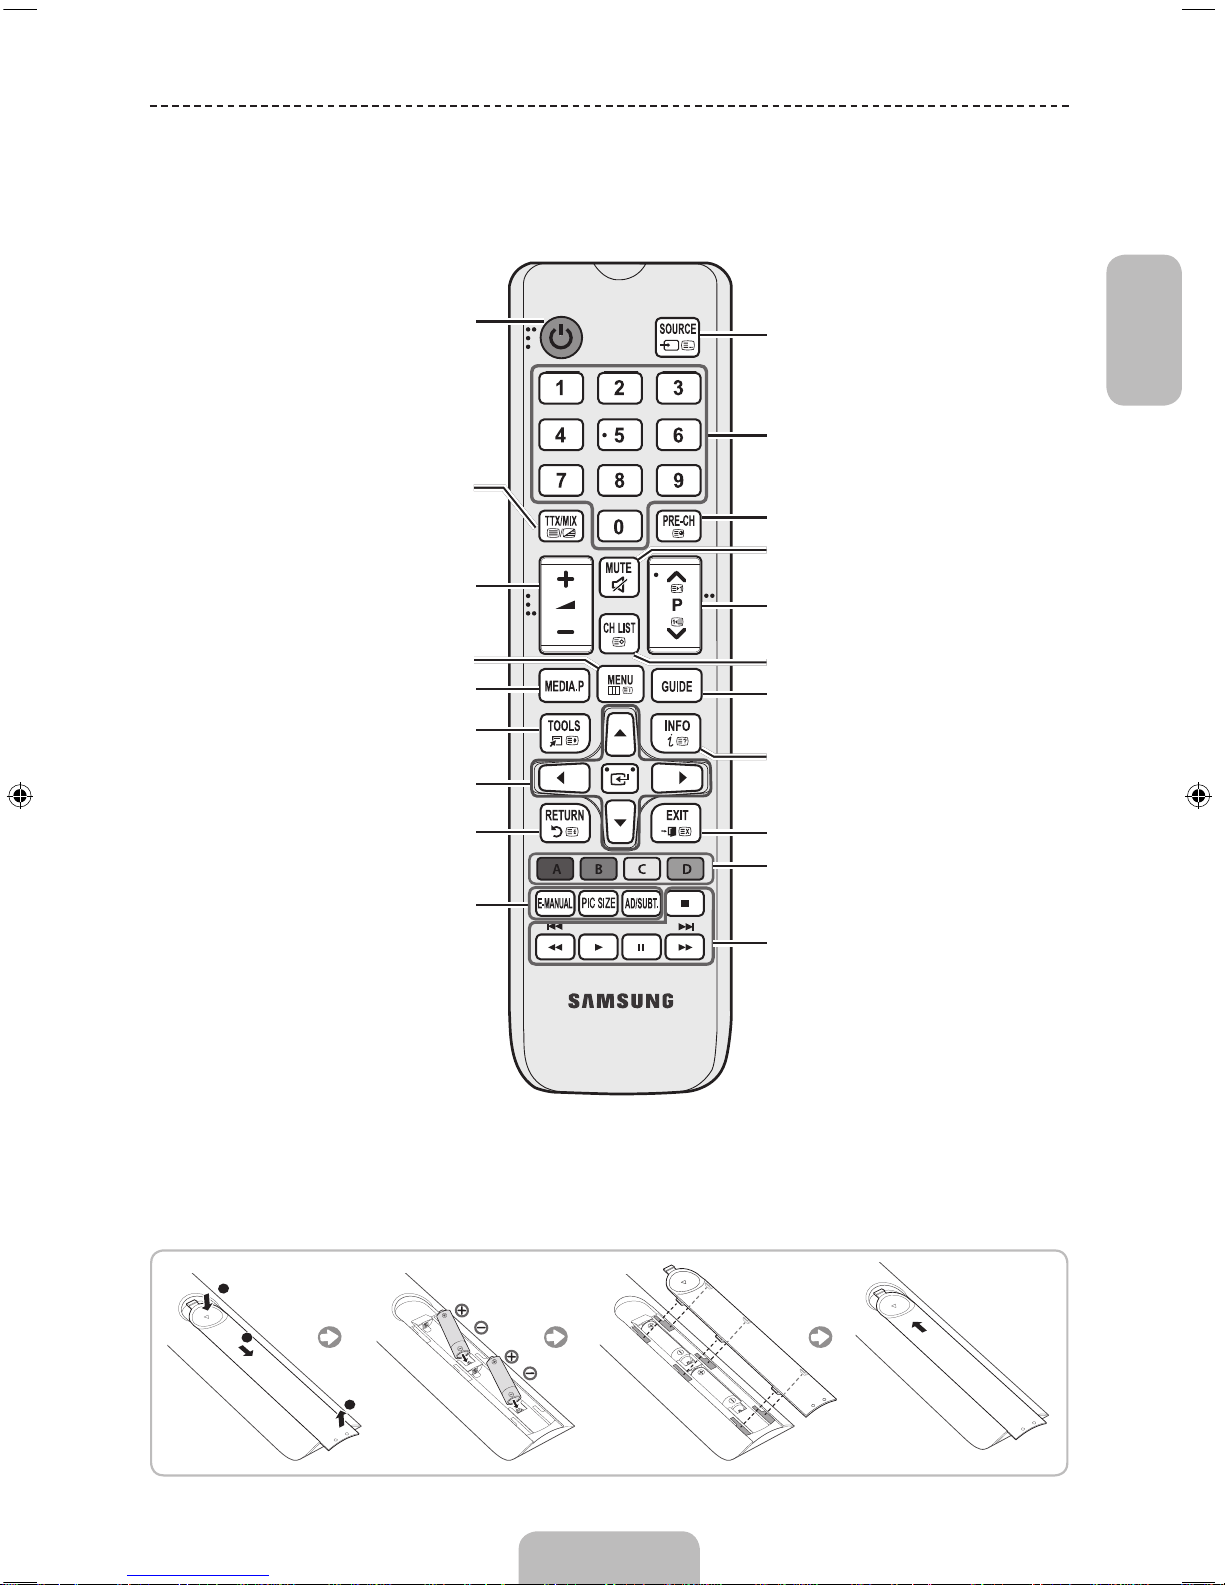
This remote control has Braille points on the Power, Channel, Volume, and Enter buttons and can be used by
visually impaired persons.
Turns the TV on and off.
Displays and selects the available video
sources.
Returns to the previous channel.
Cuts off the sound temporarily.
Changes channels.
Displays channel lists on the screen.
Displays the EPG (Electronic Programme
Guide).
Displays information on the TV screen.
Exits the menu.
Press to directly access to channels.
Adjusts the volume.
Alternately select Teletext ON, Double, Mix
or OFF.
Displays the main on-screen menu.
Quickly select frequently used functions.
Displays Media Play.
Returns to the previous menu.
Selects the on-screen menu items and
changes the values seen on the menu.
Use these buttons according to the
direction on screen.
Use these buttons in a specific feature.
For details, refer to the e-Manual.
E-MANUAL: Displays the e-Manual guide.
PIC SIZE: Lets you select the Picture Size.
AD/SUBT.: Audio Description selection. (Not
available in some locations) / Displays digital
subtitles.
N The button names above may be differ from the actual names.
Installing batteries (Battery size: AAA)
Page 6
English - 6
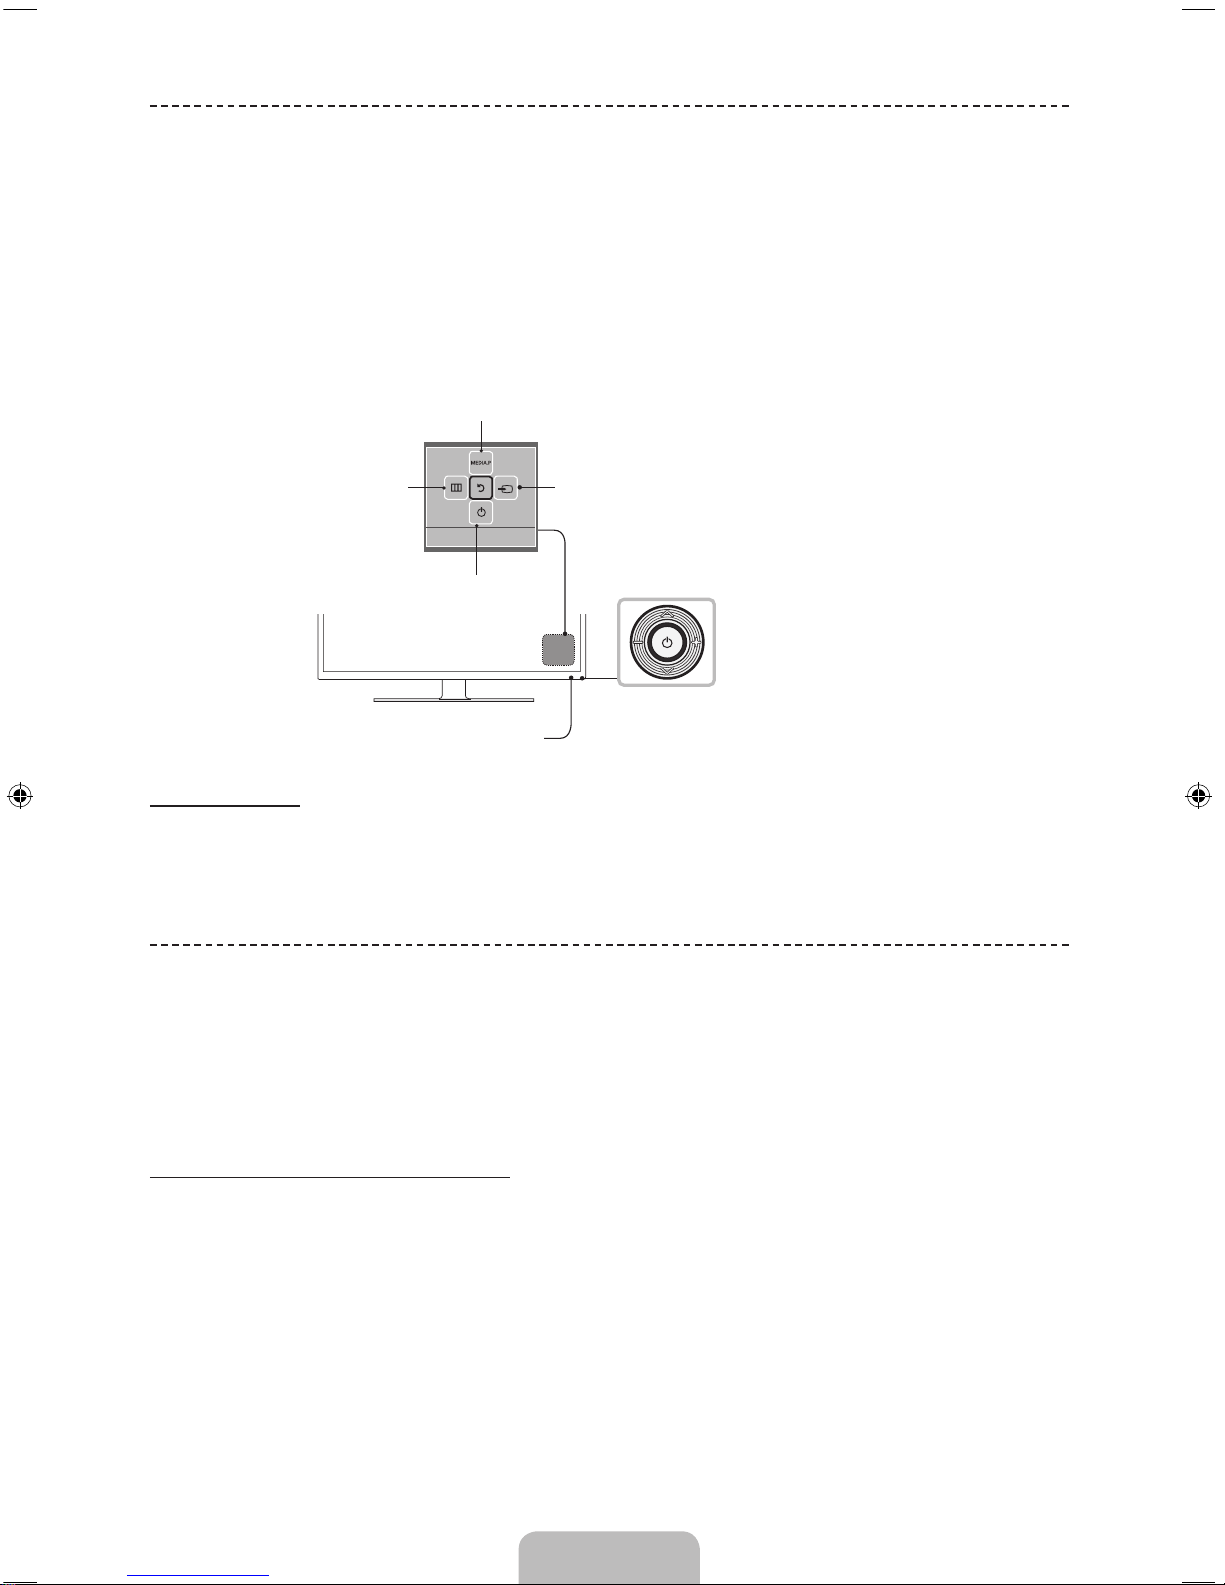
Using the TV’s Controller (Panel Key)
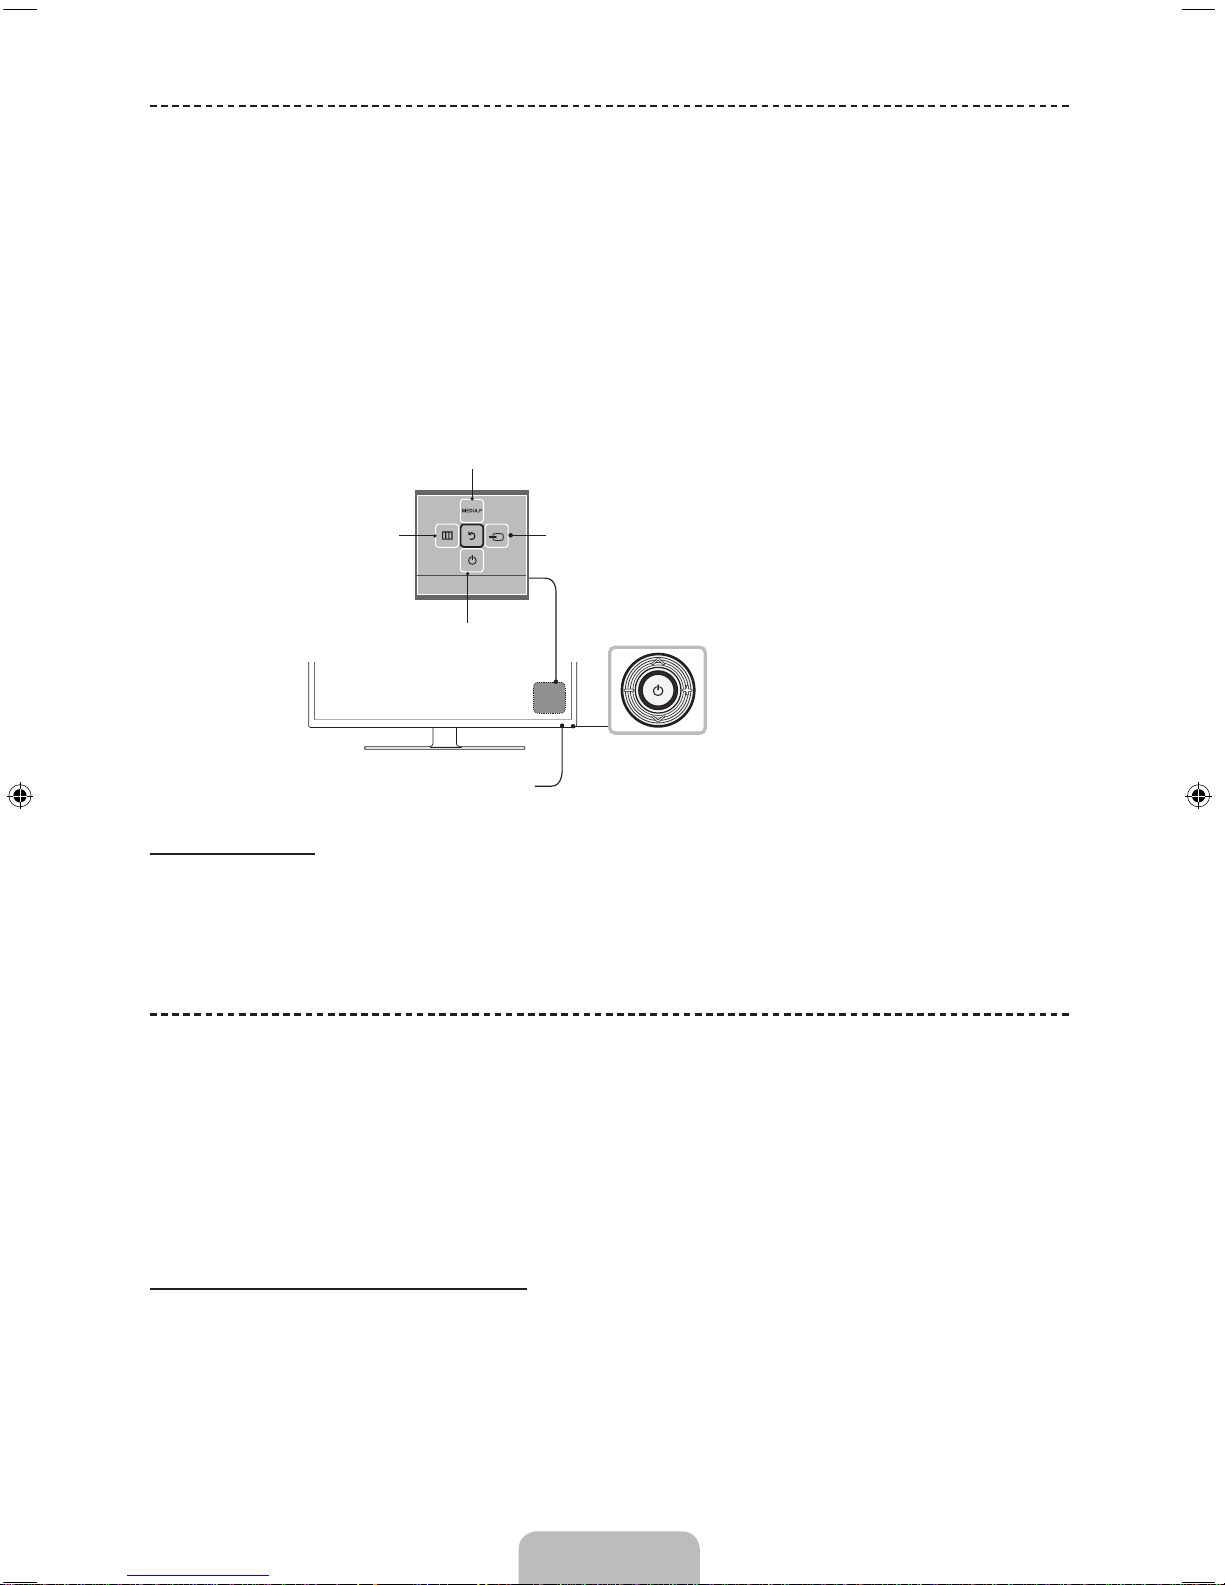
The TV's Controller, a small joy stick like button on the rear left side of the TV, lets you control the TV without the remote
control.
✎
Some functions which require a PIN code may not be available.
✎
The product colour and shape may vary depending on the model.
✎
Exits the menu when pressing the controller more than 1 second.
✎
When using the controller in the up/down/left/right directions, make sure you do not push the controller in first. If
you push the controller in first it will not move in the up/down/left right directions.
Remote control sensor
TV Controller
The image is drawn by facing
the front side of the TV.
Function menu
Return
Selecting the Media Play
Selecting a Source
Power off
Selecting the Menu
Standby mode
Do not leave your TV in standby mode for long periods of time (when you are away on a holiday, for example). A small
amount of electric power is still consumed even when the power button is turned off. It is best to unplug the power cord.
Initial Setup
When the TV is initially powered on, a sequence of on-screen prompts will assist in configuring basic settings. Press the
POWERP button. Setup is available only when the source is set to TV.
✎
If you connect any device to HDMI IN 1(STB) before starting the installation, Channel Source will be changed to
Set-top box automatically. If you do not want to select Set-top box, please select Aerial.
If You Want to Reset This Feature...
Select System - Setup (Initial Setup). Enter your 4 digit PIN number. The default password is "0-0-0-0". If you want to
change the PIN number, use the Change PIN function.
You should do Setup (MENU → System) again at home even though you did in shop already.
✎
If you forget the PIN code, press the remote control buttons in the following sequence in Standby mode, which
resets the PIN to “0-0-0-0”: MUTE → 8 → 2 → 4 → POWER (on)
Page 7
English
English - 7
Changing the Input Source
Source
TV / Ext. / HDMI1 / HDMI2/DVI / Component / AV
(Depending on the country and model)
Use to select TV or other external input sources such as DVD / Blu-ray players / cable box / STB satellite receiver
connected to the TV.
✎
Press the SOURCE button. In the displayed Source list, connected inputs will be highlighted.
✎
PC(D-Sub) input is not supported. If you want to connect PC to the TV, you can connect the HDMI to DVI cable
with the HDMI IN 2(DVI) port on the TV.
✎
Ext. always stays activated.
✎
Press the TOOLS button.
• Edit Name (Depending on the country and model)
You can set an external input source name you want.
− When connecting a PC to the HDMI IN 2(DVI) port with HDMI cable, you should set the TV to PC mode under
Edit Name.
− When connecting a PC to the HDMI IN 2(DVI) port with HDMI to DVI cable, you should set the TV to DVI PC
mode under Edit Name.
− When connecting an AV devices to the HDMI IN 2(DVI) port with HDMI to DVI cable, you should set the TV to
DVI Devices mode under Edit Name.
• Information
You can see detailed information about the connected external device.
Page 8
English - 8
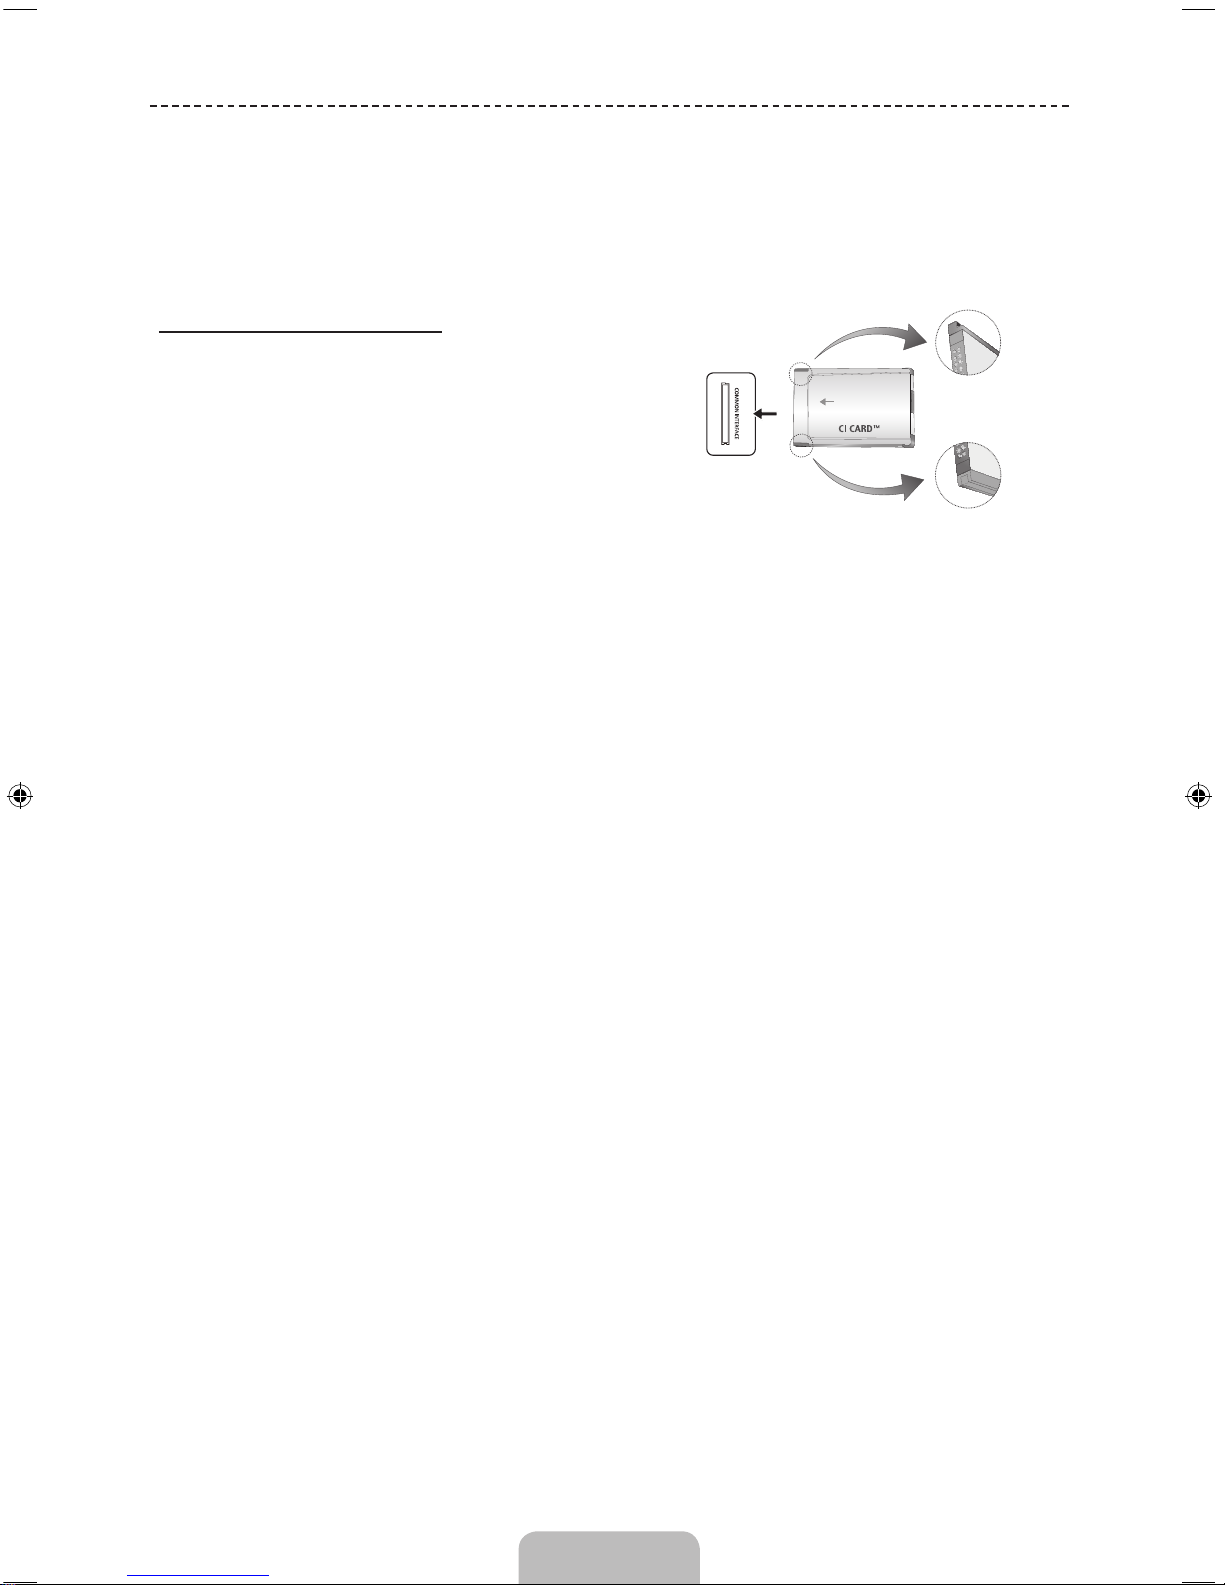
Connecting to a COMMON INTERFACE slot (Your TV
viewing Card Slot)
✎
Depending on the country and model.
✎
Turn the TV off to connect or disconnect a CI card.
Using the “CI or CI+ CARD”
To watch paid channels, the “CI or CI+ CARD” must be inserted.
• If you don’t insert the “CI or CI+ CARD”, some channels will
display the message “Scrambled Signal”.
• The pairing information containing a telephone number, the “CI or
CI+ CARD” ID the Host ID and other information will be displayed
in about 2~3 minutes. If an error message is displayed, please
contact your service provider.
• When the configuration of channel information has finished, the
message “Updating Completed” is displayed, indicating the
channel list is updated.
• The image may differ depending on the
model.
✎
NOTE
• You must obtain a “CI or CI+ CARD” from a local cable service provider.
• When removing the “CI or CI+ CARD”, carefully pull it out with your hands since dropping the “CI or CI+ CARD”
may cause damage to it.
• Insert the “CI or CI+ CARD” in the direction marked on the card.
• The location of the COMMON INTERFACE slot may be different depending on the model.
• “CI or CI+ CARD” is not supported in some countries and regions; check with your authorised dealer.
• If you have any problems, please contact a service provider.
• Insert the “CI or CI+ CARD” that supports the current aerial settings. The screen will be distorted or will not be
seen.
Page 9
English
English - 9
How to use the e-Manual
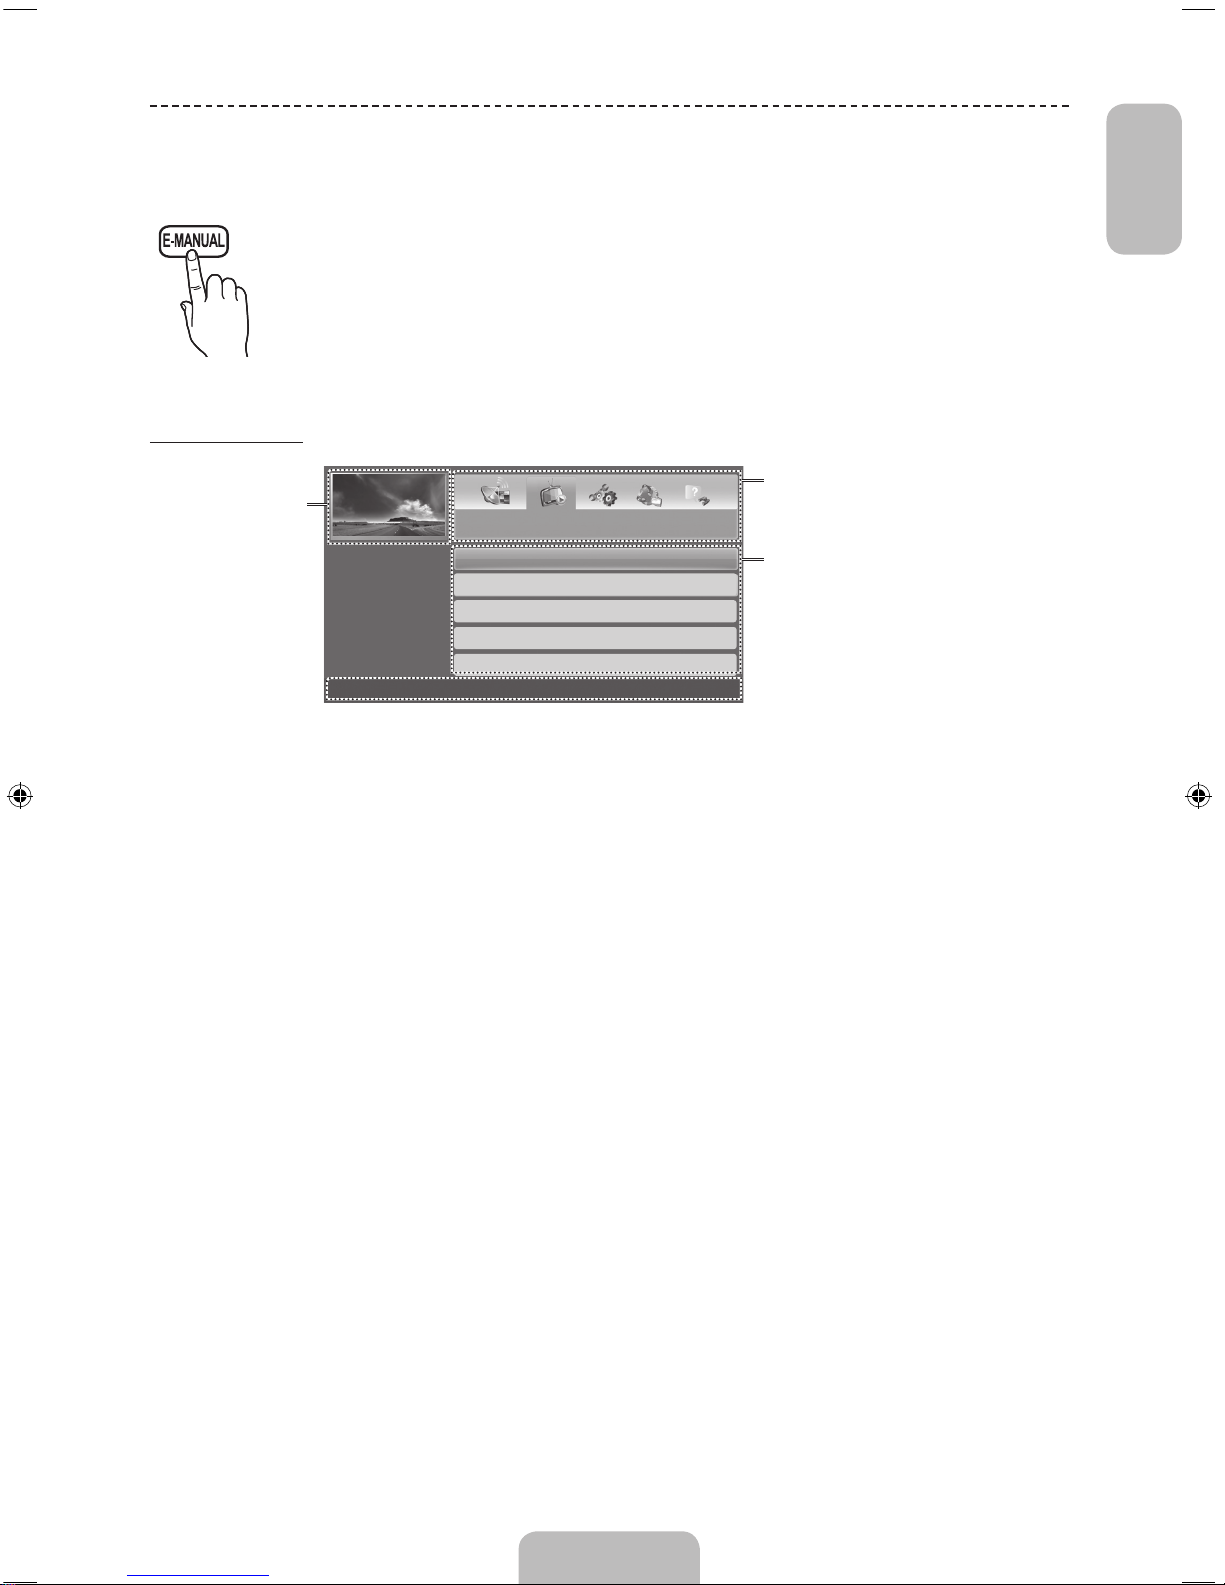
You can find instructions about your TV’s features in the e-Manual in your TV. To use, press the
E-MANUAL button on your remote. Move the cursor using the up/down/right/left buttons to highlight
a category, then a topic, and then press the ENTERE button. The e-Manual displays the page you
want to see.
You can also access it through the menu:
O MENU
m
→ Support → e-Manual → ENTER
E
✎
To return to the e-Manual main menu, press the E-MANUAL button on the remote.
Screen Display
Basic Features
Changing the Preset Picture Mode
Adjusting Picture Settings
Changing the Picture Options
Changing the Preset Sound Mode
Adjusting Sound Settings
} Index E Enter e Exit
Currently
displayed video,
TV Programme,
etc.
The category list. Press l or r button
to select the category you want.
Displays the sub-menu list. Use the
arrow buttons on your remote to move
the cursor. Press ENTERE button to
select the sub-menu you want.
Operation Buttons
} Index: Displays the index screen.
− Index available depending on the language.
E Enter: Selects a category or sub-menu.
e Exit: Exit the e-Manual.
<Viewing the Contents>
a Try now: Displays the OSD menu that corresponds to the topic. To return to the e-Manual screen, press the
E-MANUAL button.
b Home: Moves to the e-Manual home screen.
L Page: Moves to previous or next page.
{
Zoom: Magnifies a screen.
− Press the { (Zoom) button to magnify the screen. You can scroll through the magnified screen by using the u
or d buttons. To return to the screen to normal size, press the RETURN button.
Page 10
English - 10
How to toggle between an e-Manual topic and the corresponding OSD menu(s).
✎
This function is not enabled in some menus.
✎
You cannot use the Tr y now function if the menu is not activated.
Method 1 Method 2
1. If you want to use the menu that corresponds to an
e-Manual topic, press the red button to select Try now.
2. To return to the e-Manual screen, press the E-MANUAL
button.
1. Press the ENTERE button when a topic is displayed.
“Are you sure?” appears. Select Yes , and then press the
ENTERE button. The OSD window appears.
2. To return to the e-Manual screen, press the E-MANUAL
button.
How to search for a topic on the index page
✎
This function may not be supported depending on the language.
1. If you want to search a keyword, press the blue button to select Index.
2. Press the l or r button to select a character order you want.
3. Press the u or d button to select a keyword you want to see, and then press the ENTERE button.
4. You can view the corresponding e-Manual instruction screen.
✎
To close the Index screen, press the RETURN button.
Page 11
English
English - 11
Teletext Feature
The index page of the Teletext service gives you information on how to use the service. For Teletext information to be
displayed correctly, channel reception must be stable. Otherwise, information may be missing or some pages may not
be displayed.
✎
You can change Teletext pages by pressing the numeric buttons on the remote control.
1
0 (mode): Selects the Teletext mode (LIST/FLOF). If pressed during LIST
mode, switches the mode to List save mode. In List save mode, you can
save a Teletext page into a list using the 8(store) button.
2
/ (Full TTX/Double TTX/mix/off): Activates the Teletext mode for the
current channel. Press the button twice to overlap the Teletext mode with the
current broadcasting screen. Press it one more time to exit teletext.
3
1 (sub-page): Displays the available sub-page.
4
8 (store): Stores the Teletext pages.
5
6 (index): Displays the index (contents) page at any time while you are
viewing Teletext.
6
4 (size): Displays the teletext on the upper half of the screen in double-size.
To move the text to the lower half of the screen, press it again. For normal
display, press it once again.
7
9 (hold): Holds the display at the current page, in the case that there are
several secondary pages that follow automatically. To undo, press it again.
8
2 (page up): Displays the next Teletext page.
9
3 (page down): Displays the previous Teletext page.
0
5 (reveal): Displays the hidden text (answers to quiz games, for example).
To display the normal screen, press it again.
!
7 (cancel): Shrinks the Teletext display to overlap with the current
broadcast.
@
Colour buttons (red, green, yellow, blue): If the FASTEXT system is used by
the broadcasting company, the different topics on a Teletext page are colourcoded and can be selected by pressing the coloured buttons. Press the
colour corresponding to the topic of your choice. A new colour coded page
is displayed. Items can be selected in the same way. To display the previous
or next page, press the corresponding coloured button.
The Teletext pages are organised according to six categories
Part Contents
A
E
F
B C D
A Selected page number.
B Broadcasting channel identity.
C Current page number or search indications.
D Date and time.
E Text.
F Status information. FASTEXT information.
Page 12
English - 12
Troubleshooting
(Depending on the country and model)
If the TV seems to have a problem, first try this list of possible problems and solutions. If none of these troubleshooting
tips apply, visit “www.samsung.com”, then click on Support, or call Samsung customer service centre.
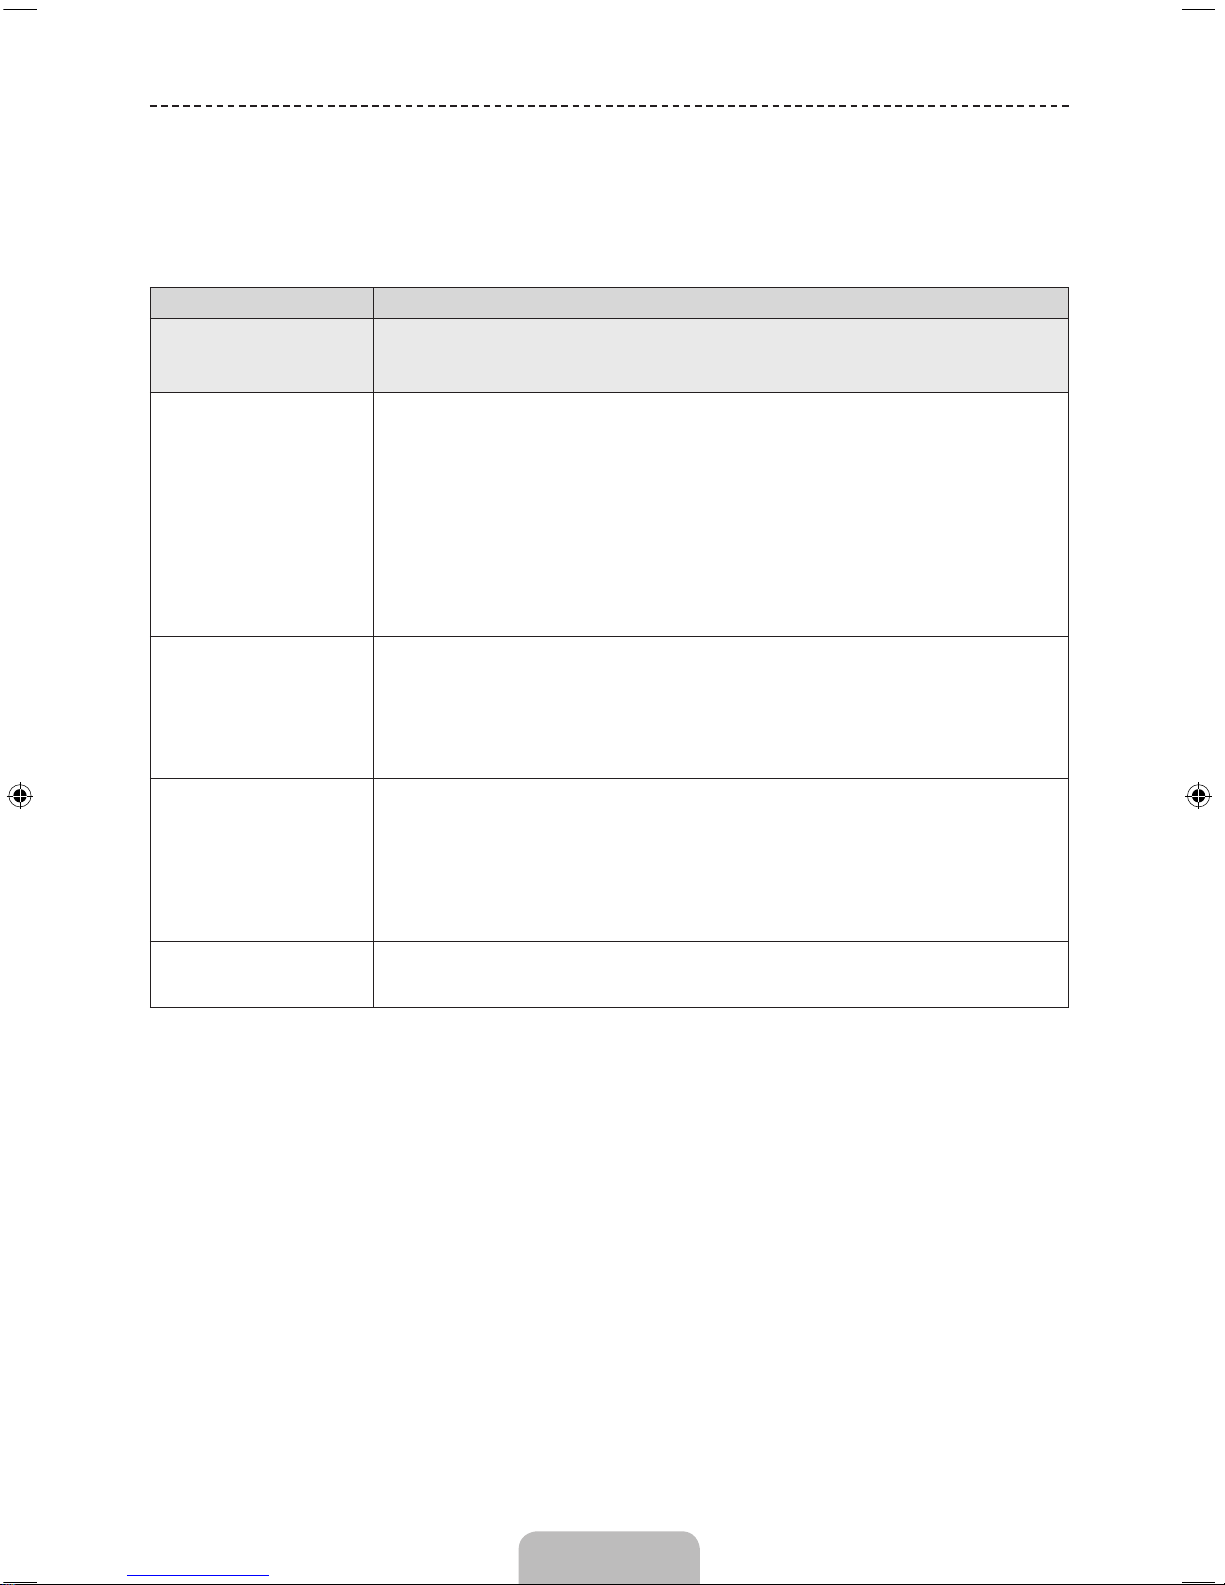
Issues Solutions and Explanations
Picture Quality
First of all, please perform the Picture Test and confirm that your TV is properly
displaying test image. (go to MENU - Support - Self Diagnosis - Picture Test) If the test
image is properly displayed, the poor picture may caused by the source or signal.
The TV image does not
look as good as it did in
the store.
• If you have an analogue cable/set top box, upgrade to a digital set top box. Use
HDMI cables to deliver HD (high definition) picture quality.
• Cable/Satellite subscribers: Try HD stations from the channel line up.
• Aerial connection: Try HD stations after performing Auto tuning.
• Many HD channels are up scaled from SD (Standard Definition) contents.
• Adjust the Cable/Set top box video output resolution to 1080i or 720p.
• Make sure you are watching the TV at the minimum recommended distance based
on the size and definition of the signal.
The picture is distorted:
macroblock error, small
block, dots, pixelization
• Compression of video contents may cause picture distortion especially in fast moving
pictures such as sports and action movies.
• Low signal level or bad quality can cause picture distortion. This is not a TV issue.
• Mobile phones used close to the TV (cca up to 1m) may cause noise in picture on
analogue and digital TV.
There is poor colour or
brightness.
• Adjust the Picture options in the TV menu. (go to Picture Mode / Colour /
Brightness / Sharpness)
• Adjust Energy Saving option in the TV menu. (go to MENU - System - Eco
Solution - Energy Saving)
• Try resetting the picture to view the default picture settings. (go to MENU - Picture -
Reset Picture)
There is a dotted line on
the edge of the screen.
• If the picture size is set to Screen Fit, change it to 16:9.
• Change cable/satellite box resolution.
Page 13
English
English - 13
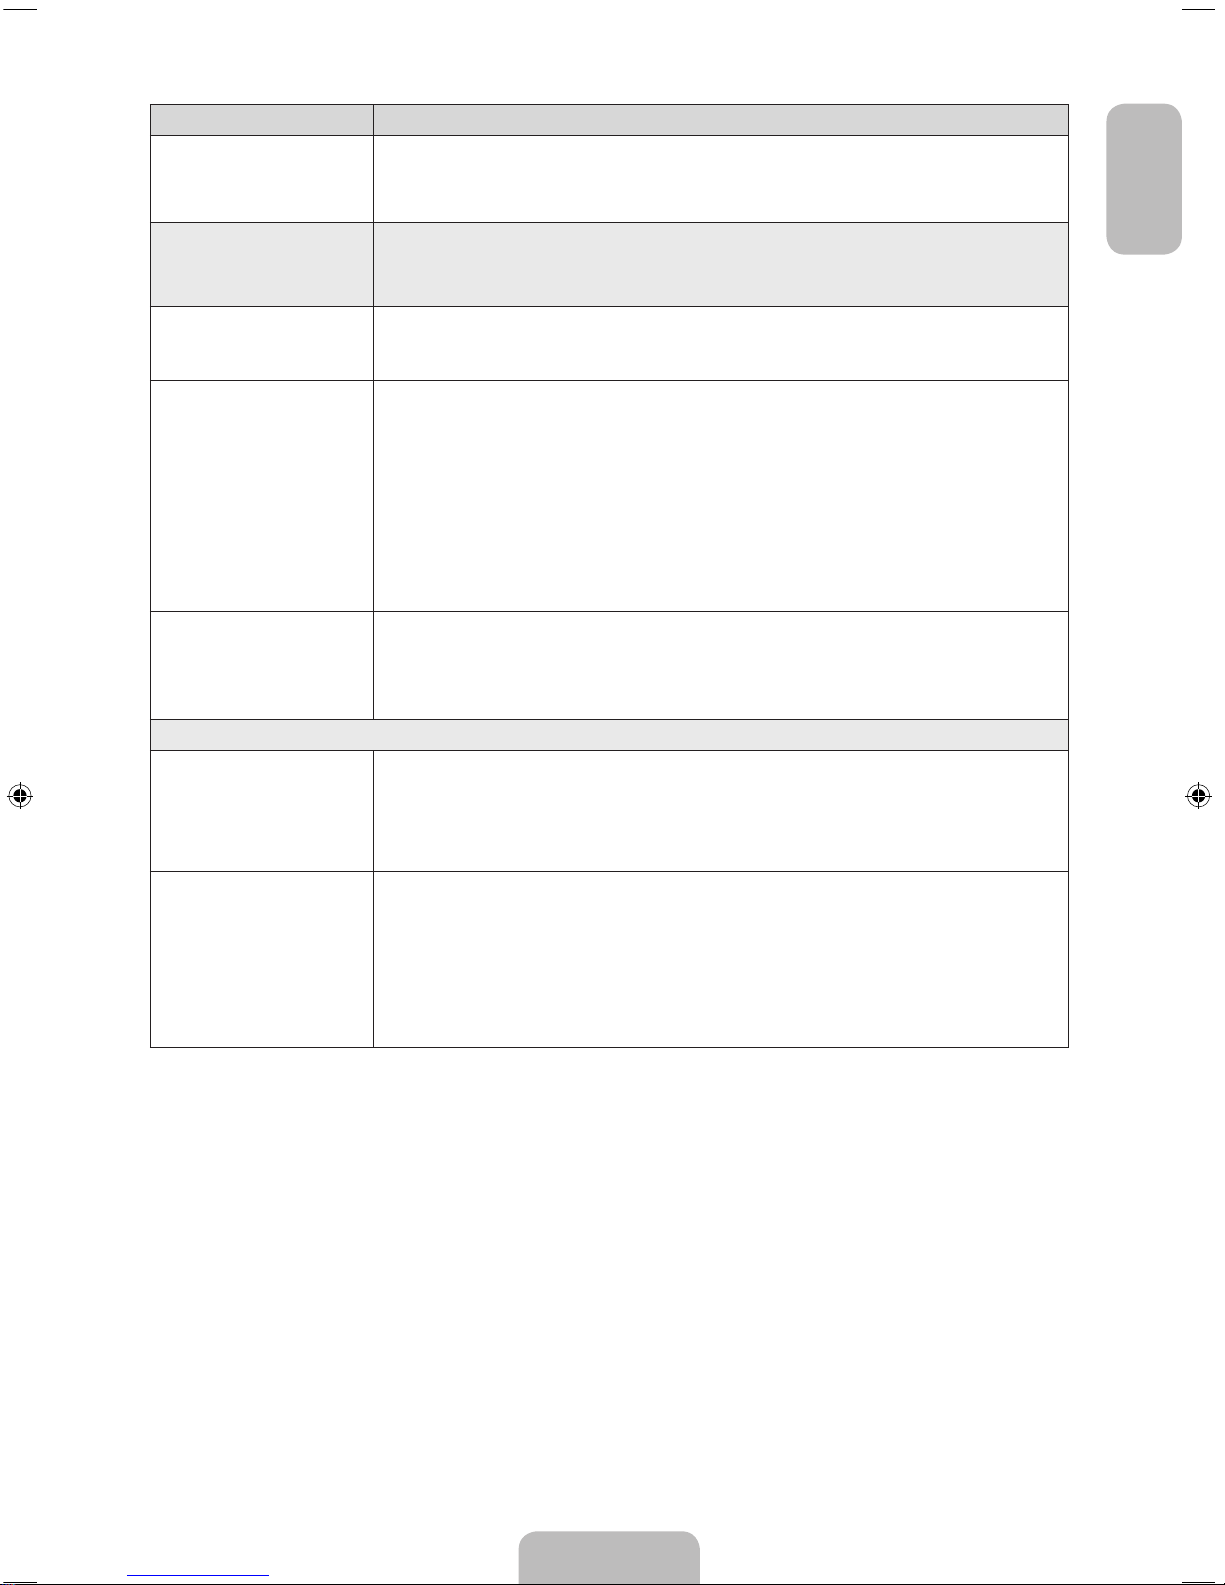
Issues Solutions and Explanations
When changing channels,
the picture freezes or is
distorted or delayed.
• If connected with a cable box, please try to reset the cable box. Reconnect the AC
cord and wait until the cable box reboots. It may take up to 20 minutes.
• Set the output resolution of the cable box to 1080i or 720p.
Sound Quality
First of all, please perform the Sound Test to confirm that your TV audio is properly
operating. (go to MENU - Support - Self Diagnosis - Sound Test)
If the audio is ok, the sound problem may be caused by the source or signal.
There is no sound or
the sound is too low at
maximum volume.
• Please check the volume of the device (Cable/Sat Box, DVD, Blu-ray etc) connected
to your TV.
The picture is good but
there is no sound.
• Set the Speaker Select option to TV Speaker in the sound menu.
• If you are using an external device, make sure the audio cables are connected to the
correct audio input jacks on the TV.
• If you are using an external device, check the device’s audio output option (ex. you
may need to change your cable box’s audio option to HDMI when you have a HDMI
connected to your TV).
• If you are using a DVI to HDMI cable, a separate audio cable is required.
• Reboot the connected device by reconnecting the device’s power cable.
The speakers are making
an inappropriate noise.
• Check the cable connections. Make sure a video cable is not connected to an audio
input.
• For aerial or cable connections, check the signal strength. Low signal level may
cause sound distortion.
No Picture, No Video
The TV will not turn on.
• Make sure the AC power cord is securely plugged in to the wall outlet and the TV.
• Make sure the wall outlet is working.
• Try pressing the P button on the TV to make sure the problem is not the remote. If
the TV turns on, refer to “The remote control does not work” below.
The TV turns off
automatically.
• Ensure the Sleep Timer is set to Off in the Time menu.
• If your PC is connected to the TV, check your PC power settings.
• Make sure the AC power cord is plugged in securely to the wall outlet and the TV.
• No Signal Power Off turns off the TV if no signal has been received by the TV for
a specified period time. Auto Power Off turns off the TV if there has been no user
input in four hours.
Page 14
English - 14
Issues Solutions and Explanations
There is no picture/video.
• Check cable connections (remove and reconnect all cables connected to the TV and
external devices).
• Set your external device’s (Cable/Set top Box, DVD, Blu-ray etc) video outputs to
match the connections to the TV input. For example, if an external device’s output is
HDMI, it should be connected to an HDMI input on the TV.
• Make sure your connected devices are powered on.
• Be sure to select the TV’s correct source by pressing the SOURCE button on the
remote control.
• Reboot the connected device by reconnecting the device’s power cable.
Aerial (Air/Cable) Connection
The TV is not receiving all
channels.
• Make sure the Aerial cable is connected securely.
• Please try Setup (Initial setup) to add available channels to the channel list. Go to
MENU - System - Setup (Initial setup) and wait for all available channels to be
stored.
• Verify the Aerial is positioned correctly.
The picture is distorted:
macro block error small
block, dots, pixelization
• Compression of video contents may cause picture distortion, especially on fast
moving pictures such as sports and action movies.
• A low signal can cause picture distortion. This is not a TV issue.
Others
The picture will not display
in full screen.
• HD channels will have black bars on either side of the screen when displaying up
scaled SD (4:3) contents.
• Black bars on the top and bottom will appear during movies that have aspect ratios
different from your TV.
• Adjust the picture size options on your external device or TV to full screen.
The remote control does
not work.
• Replace the remote control batteries with the poles (+/–) in the right direction.
• Clean the sensor’s transmission window on the remote.
• Try pointing the remote directly at the TV from 1.5~1.8 m away.
The cable/set top box
remote control doesn’t turn
the TV on or off, or adjust
the volume.
• Programme the Cable/Set top box remote control to operate the TV. Refer to the
Cable/Set top box user manual for the SAMSUNG TV code.
A “Mode Not Supported”
message appears.
• Check the supported resolution of the TV, and adjust the external device’s output
resolution accordingly.
There is a plastic smell
from the TV.
• This smell is normal and will dissipate over time.
The TV Signal Information
is unavailable in the Self
Diagnosis Test menu.
• This function is only available with digital channels from an Aerial / RF / Coax
connection.
TV is tilted to the right or
left side.
• Remove the stand base from the TV and reassemble it.
Page 15
English
English - 15
Issues Solutions and Explanations
There are difficulties
assembling the stand base.
• Make sure the TV is placed on a flat surface. If you cannot remove the screws from
the TV, please use a magnetized screw driver.
The Broadcasting menu is
grey out (unavailable).
• The Broadcasting menu is only available when the TV source is selected.
Your settings are lost after
5 minutes or every time the
TV is turned off.
• If the TV is in the Store Demo mode, it will reset audio and picture settings every 5
minutes. If you want to change the settings from Store Demo mode to Home Use,
press the SOURCE button to select TV mode, and go to MENU → Support → Use
Mode.
You have intermittent loss
of audio or video.
• Check the cable connections and reconnect them.
• Loss of audio or video can be caused by using overly rigid or thick cables. Make sure
the cables are flexible enough for long term use. If mounting the TV to the wall, we
recommend using cables with 90 degree connectors.
You see small particles
when you look closely at
the edge of the frame of
the TV.
• This is part of the product’s design and is not a defect.
The PIP menu is not
available.
• PIP functionality is only available when you are using a HDMI or components source.
You turned the TV off 45
minutes ago, and it turned
on again.
• It is normal. The TV operates the OTA (Over The Aerial) function itself to upgrade
firmware downloaded whilst your watching TV.
The message “Scrambled
Signal” or “Weak or No
Signal” appears.
• If you are using a CAM CARD (CI/CI+), check that it is installed into the common
interface slot.
• If there is still a problem, pull the CAM CARD out of the TV and insert it into the slot
again.
There are recurrent picture/
sound issues.
• Check and change the signal/source.
A reaction may occur
between the rubber
cushion pads on the base
stand and the top finish of
some furniture.
• To prevent this, use felt pads on any surface of the TV that comes in direct contact
with furniture.
The message “This file
may not be playable
properly.” appears.
• This may appear because of high bit rate of content. Content generally will play but
could experience some playability issue.
✎
You can keep your TV in optimum operating condition by upgrading to the latest firmware (www.samsung.com →
support) by USB.
✎
This TFT LED panel uses a panel consisting of sub pixels which require sophisticated technology to produce.
However, there may be a few bright or dark pixels on the screen. These pixels will have no impact on the
performance of the product.
Recommendation - EU Only
• Hereby, Samsung Electronics, declares that this LED TV is in compliance with the essential requirements and other
relevant provisions of Directive 1999/5/EC.
• This equipment may be operated in all EU countries.
• The official Declaration of Conformity may be found at http://www.samsung.com, go to Support > Search Product
Support and enter the model name.
Page 16
English - 16
Installing the Wall Mount
The wall mount kit (sold separately) allows you to mount the TV on the wall. For detailed information on installing the wall
mount, see the instructions provided with the wall mount. Contact a technician for assistance when installing the wall
mount bracket. We do not advice you to do it yourself.
Samsung Electronics is not responsible for any damage to the product or injury to yourself or others if you select to
install the TV on your own.
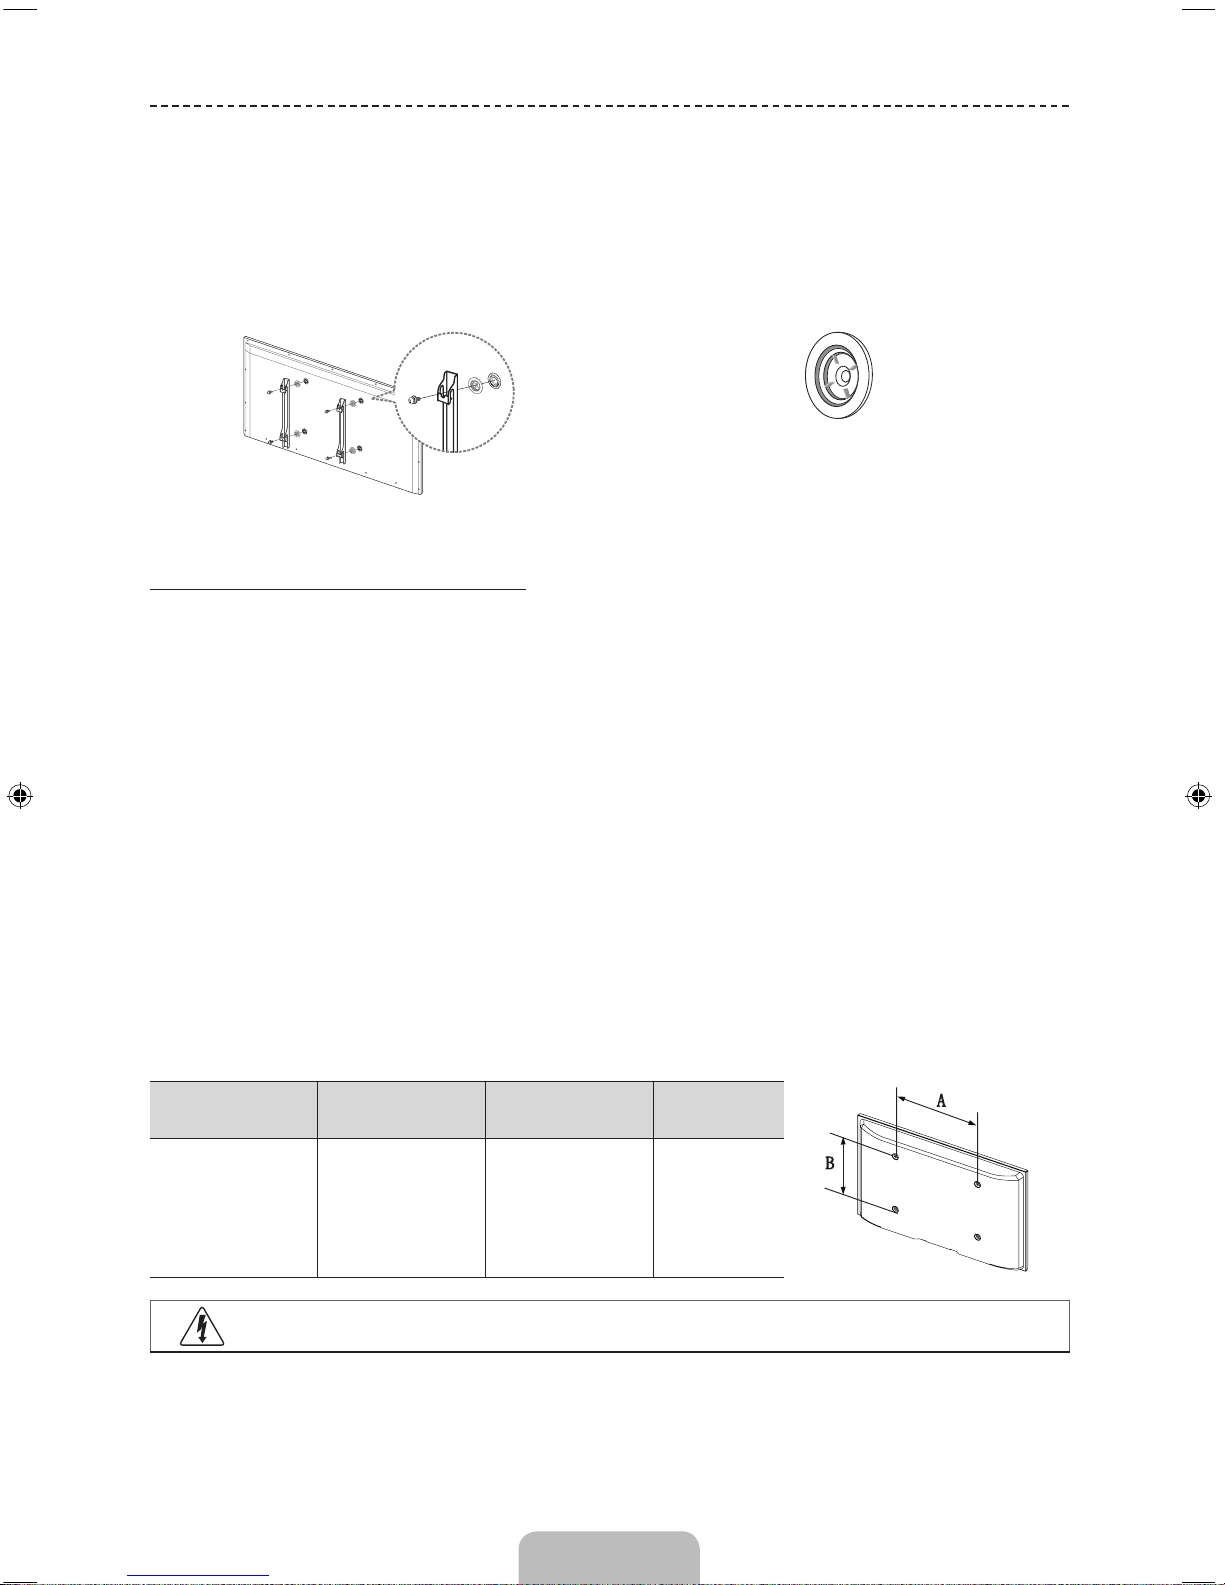
Wall mount Adapter
(Depending on the model)
Before installing any other wall mounting kit, assemble the wall mount adapter provided separately with the TV.
Wall Mount Kit Specifications (VESA)
✎
Wall mount kit is not supplied but sold separately.
✎
Install your wall mount on a solid wall perpendicular to the floor. When attaching to other building materials, please
contact your nearest dealer. If installed on a ceiling or slanted wall, it may fall and result in severe personal injury.
✎
NOTE
• Standard dimensions for wall mount kits are shown in the table below.
• When purchasing our wall mount kit, a detailed installation manual and all parts necessary for assembly are
provided.
• Do not use screws that do not comply with the VESA standard screw specifications.
• Do not use screws longer than the standard dimension, as they may cause damage to the inside of the TV set.
• For wall mounts that do not comply with the VESA standard screw specifications, the length of the screws may
differ depending on their specifications.
• Do not fasten the screws too strongly, this may damage the product or cause the product to fall, leading to
personal injury. Samsung is not liable for these kinds of accidents.
• Samsung is not liable for product damage or personal injury when a non-VESA or non-specified wall mount is
used or the consumer fails to follow the product installation instructions.
• Do not exceed 15 degrees tilt when mounting this TV.
inches VESA Spec. (A * B) Standard Screw Quantity
50 ~ 60 400 X 400 M8 4
Do not install your Wall Mount Kit while your TV is turned on. It may result in personal injury due to electric
shock.
Page 17
English
English - 17
Securing the TV to the Wall
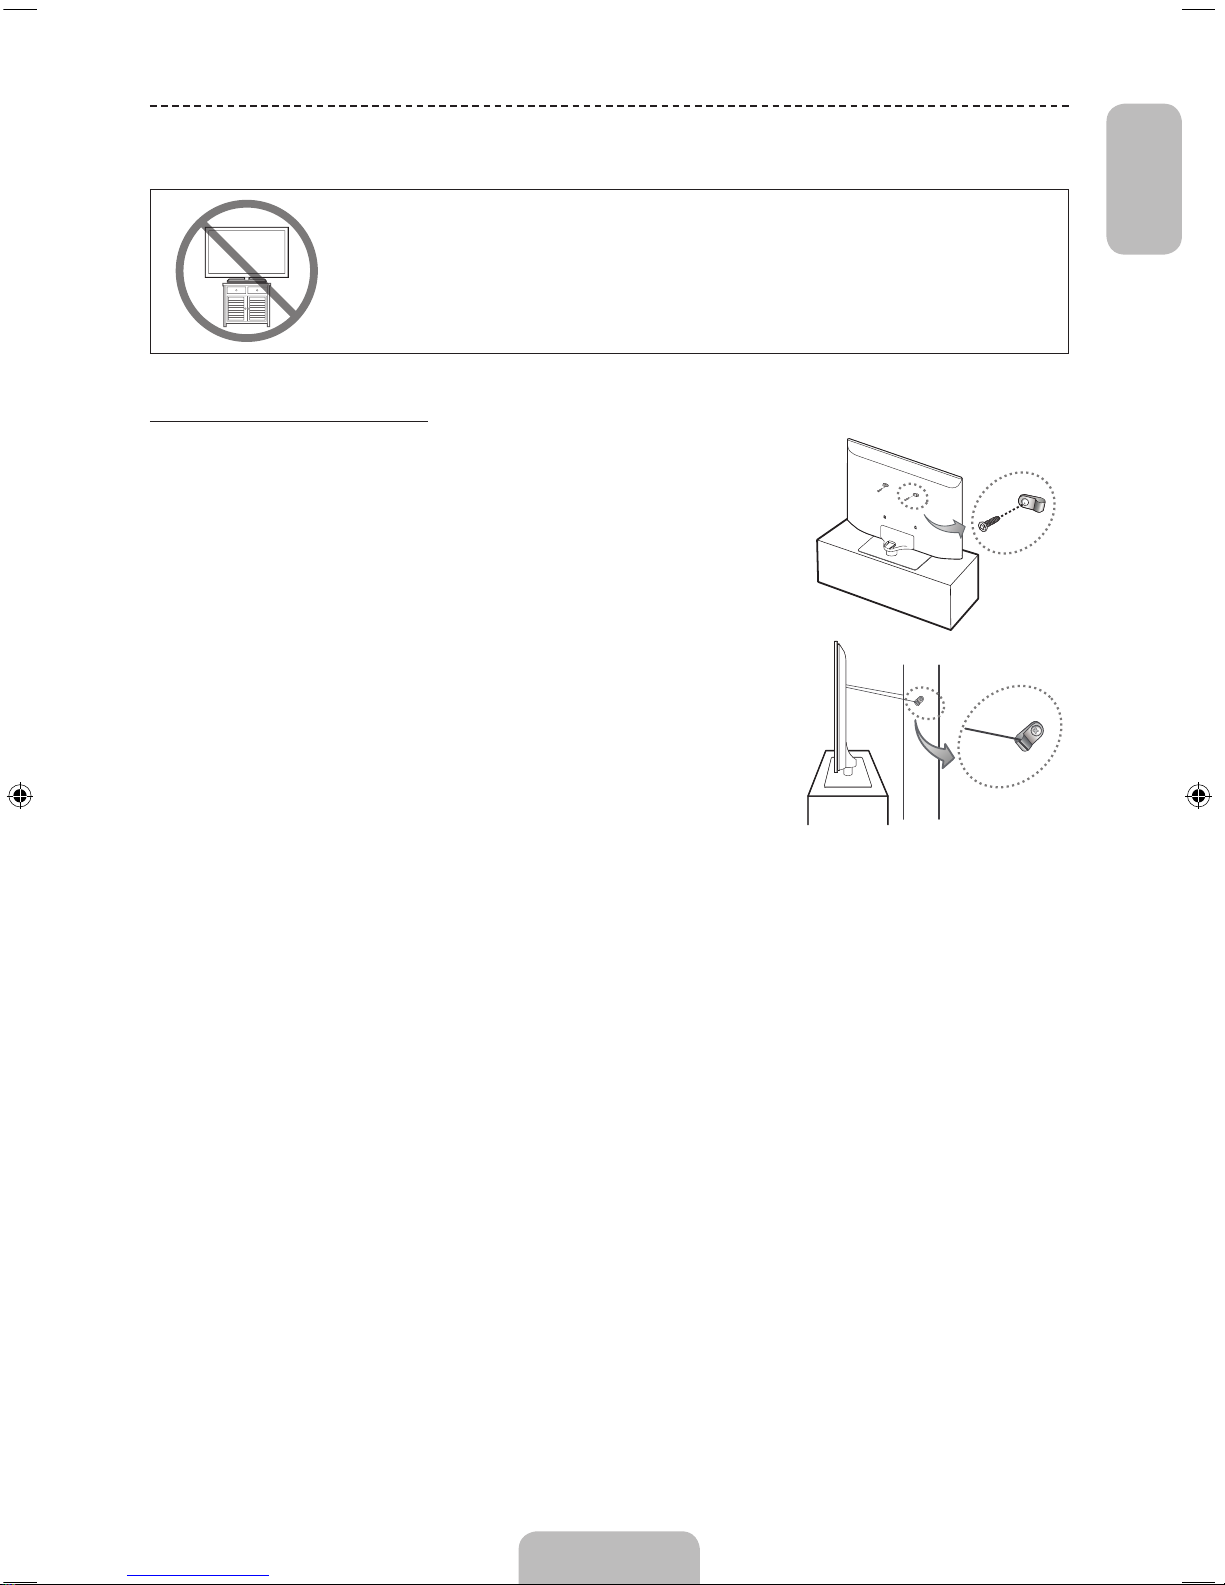
Caution: Pulling, pushing, or climbing on the TV may cause the TV to fall. In particular,
ensure your children do not hang on or destabilize the TV. Doing so may cause the TV to tip
over, causing serious injuries or death. Follow all safety precautions provided in the Safety
Flyer included with your TV. For added stability and safety, you can purchase and install the
anti-fall device as described below.
To avoid the TV from falling
1. Put the screws into the clamps and firmly fasten them onto the wall.
Confirm that the screws have been firmly installed onto the wall.
✎
You may need additional material such as an anchor depending
on the type of wall.
✎
Since the necessary clamps, screws, and string are not
supplied, please purchase these additionally.
2. Remove the screws from the centre back of the TV, put the screws
into the clamps, and then fasten the screws onto the TV again.
✎
Screw Specifications
• For a 50 ~ 60 inches: M8
3. Connect the clamps fixed onto the TV and the clamps fixed onto the
wall with a strong string and then tie the string tightly.
✎
NOTE
• Install the TV near to the wall so that it does not fall backwards.
• It is safe to connect the string so that the clamps fixed on the wall
are equal to or lower than the clamps fixed on the TV.
• Untie the string before moving the TV.
4. Verify all connections are properly secured. Periodically check
connections for any sign of fatigue for failure. If you have any doubt about
the security of your connections, contact a professional installer.
Wall
• The product colour and shape
may vary depending on the
model.
Page 18
English - 18
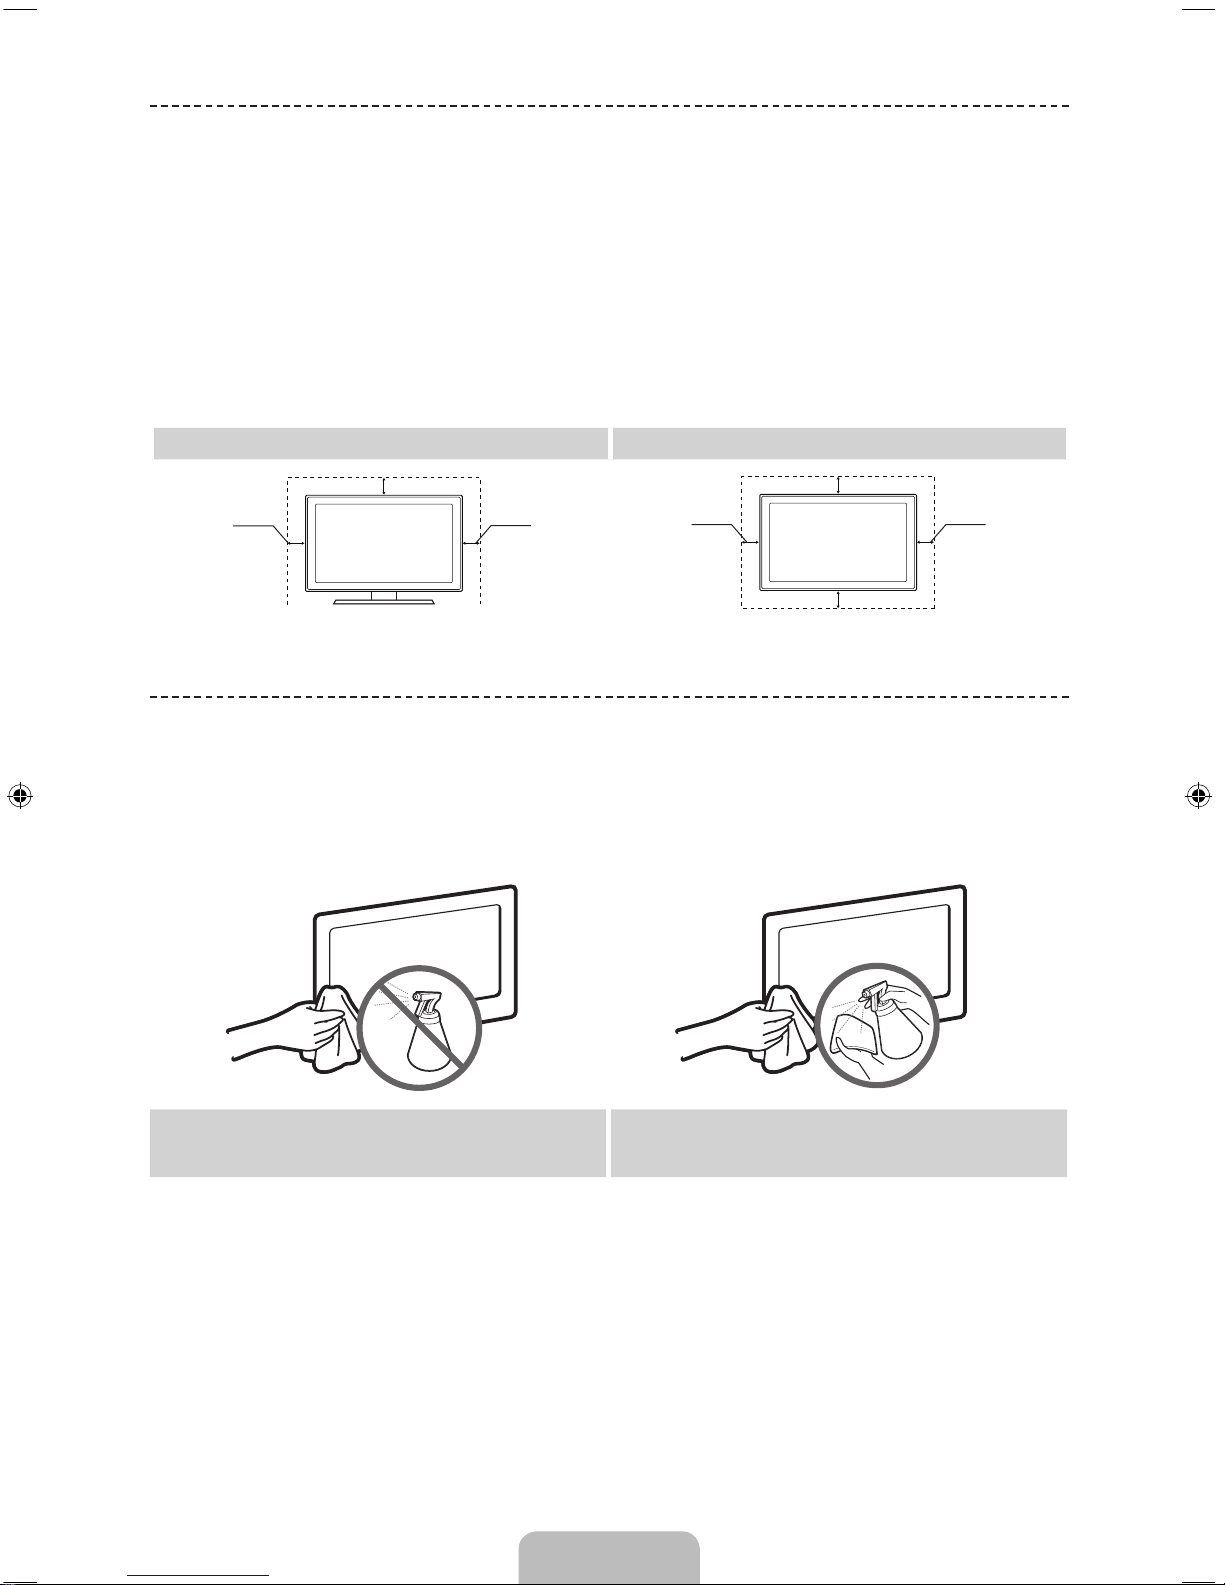
Securing the Installation Space
Keep the required distances between the product and other objects (e.g. walls) to ensure proper ventilation.
Failing to do so may result in fire or a problem with the product due to an increase in the internal temperature of the
product.
✎
When using a stand or wall-mount, use parts provided by Samsung Electronics only.
• If you use parts provided by another manufacturer, it may result in a problem with the product or an injury due to
the product falling.
✎
The appearance may differ depending on the product.
✎
Be careful when you contact the TV because some parts can be somewhat hot.
Installation with a stand. Installation with a wall-mount.
10 cm
10 cm
10 cm
10 cm
10 cm
10 cm
10 cm
Storage and Maintenance
✎
If you remove the attached sticker on the TV screen, clean the residues and then watch TV.
✎
The exterior and screen of the product can get scratched during cleaning. Be sure to wipe the exterior and screen
carefully using a soft cloth to prevent scratches.
Do not spray water directly onto the product. Any liquid
that goes into the product may cause a failure, fire, or
electric shock.
Clean the product with a soft cloth dampened with a
small amount of water. Do not use a flammable liquid (e.g.
benzene, thinners) or a cleaning agent.
Page 19
English
English - 19
Anti-theft Kensington Lock
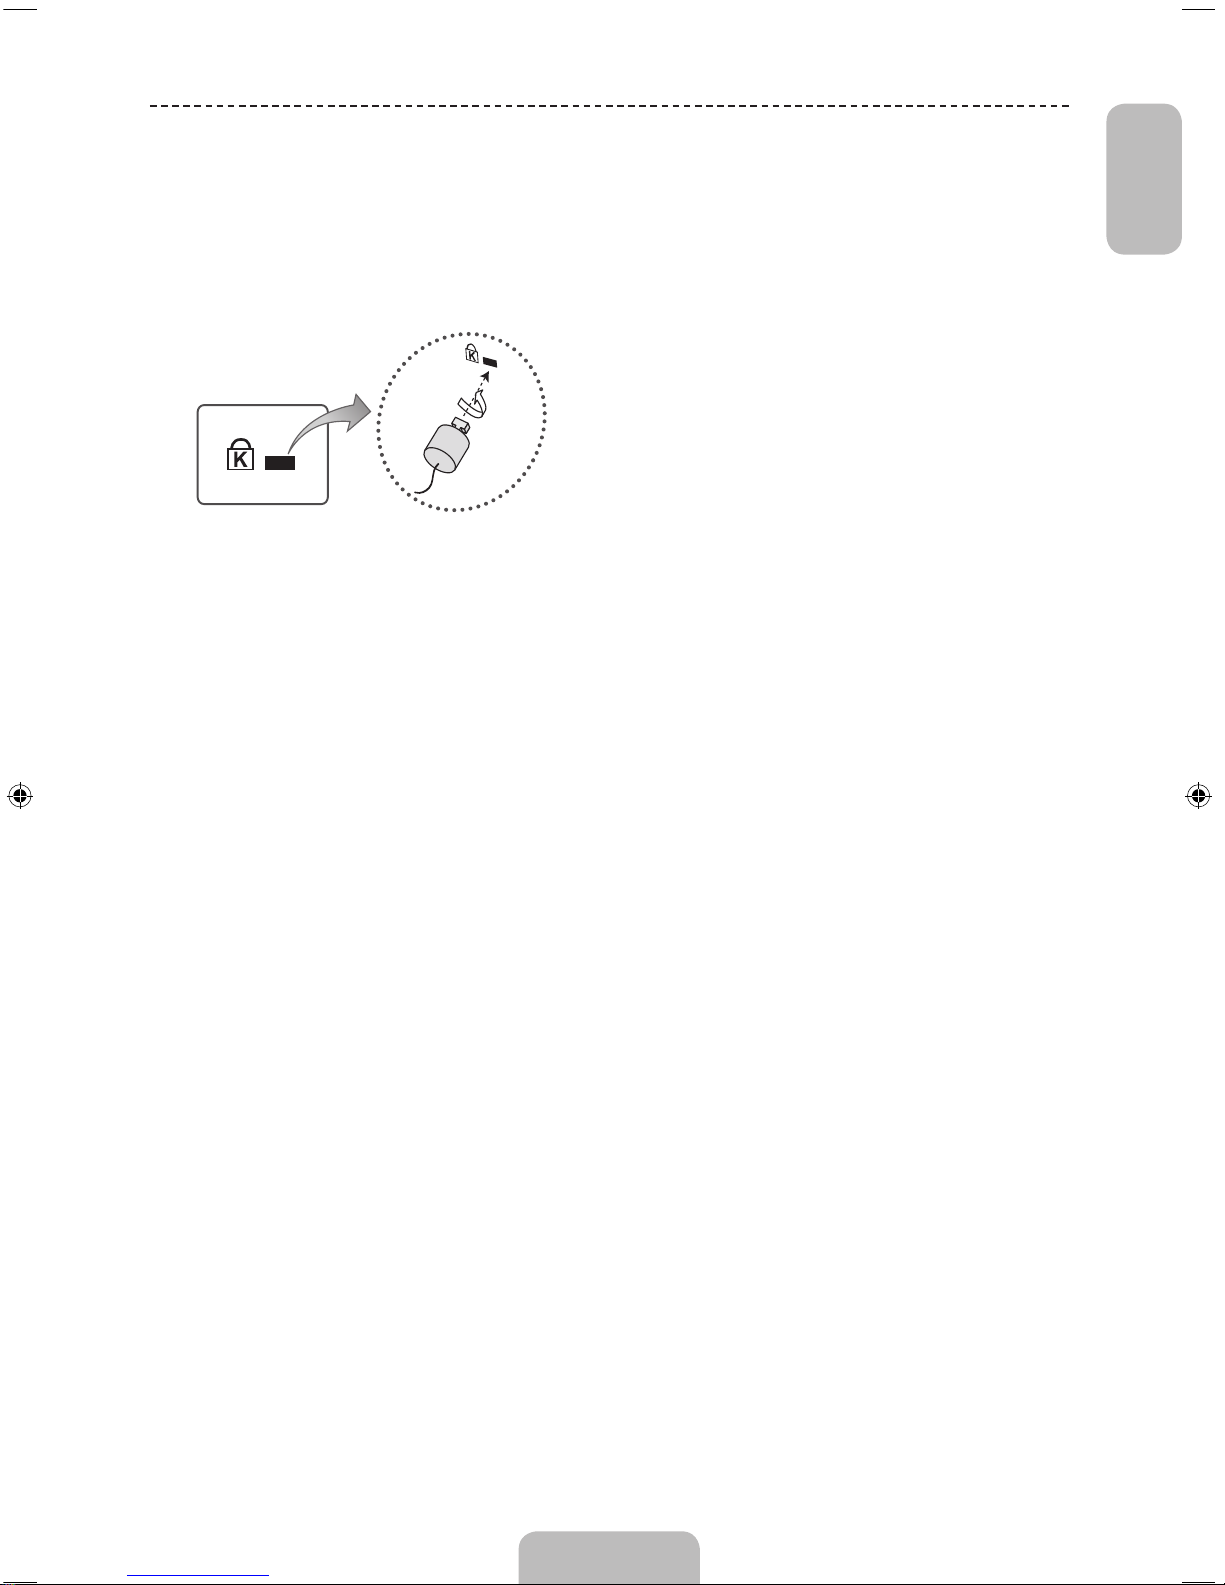
The Kensington Lock is not supplied by Samsung. It is a device used to physically fix the system when using it in a
public place. The appearance and locking method may differ from the illustration depending on the manufacturer. Refer
to the manual provided with the Kensington Lock for additional information on proper use.
✎
Please find a “K” icon on the rear of the TV. A kensington slot is beside the “K” icon.
✎
The position and colour may differ depending on the model.
<Optional>
To lock the product, follow these steps:
1. Wrap the Kensington lock cable around a large, stationary object such as desk or chair.
2. Slide the end of the cable with the lock attached through the looped end of the Kensington lock cable.
3. Insert the locking device into the Kensington slot on the product.
4. Lock the lock.
✎
These are general instructions. For exact instructions, see the User manual supplied with the locking device.
✎
The locking device has to be purchased separately.
Page 20
English - 20
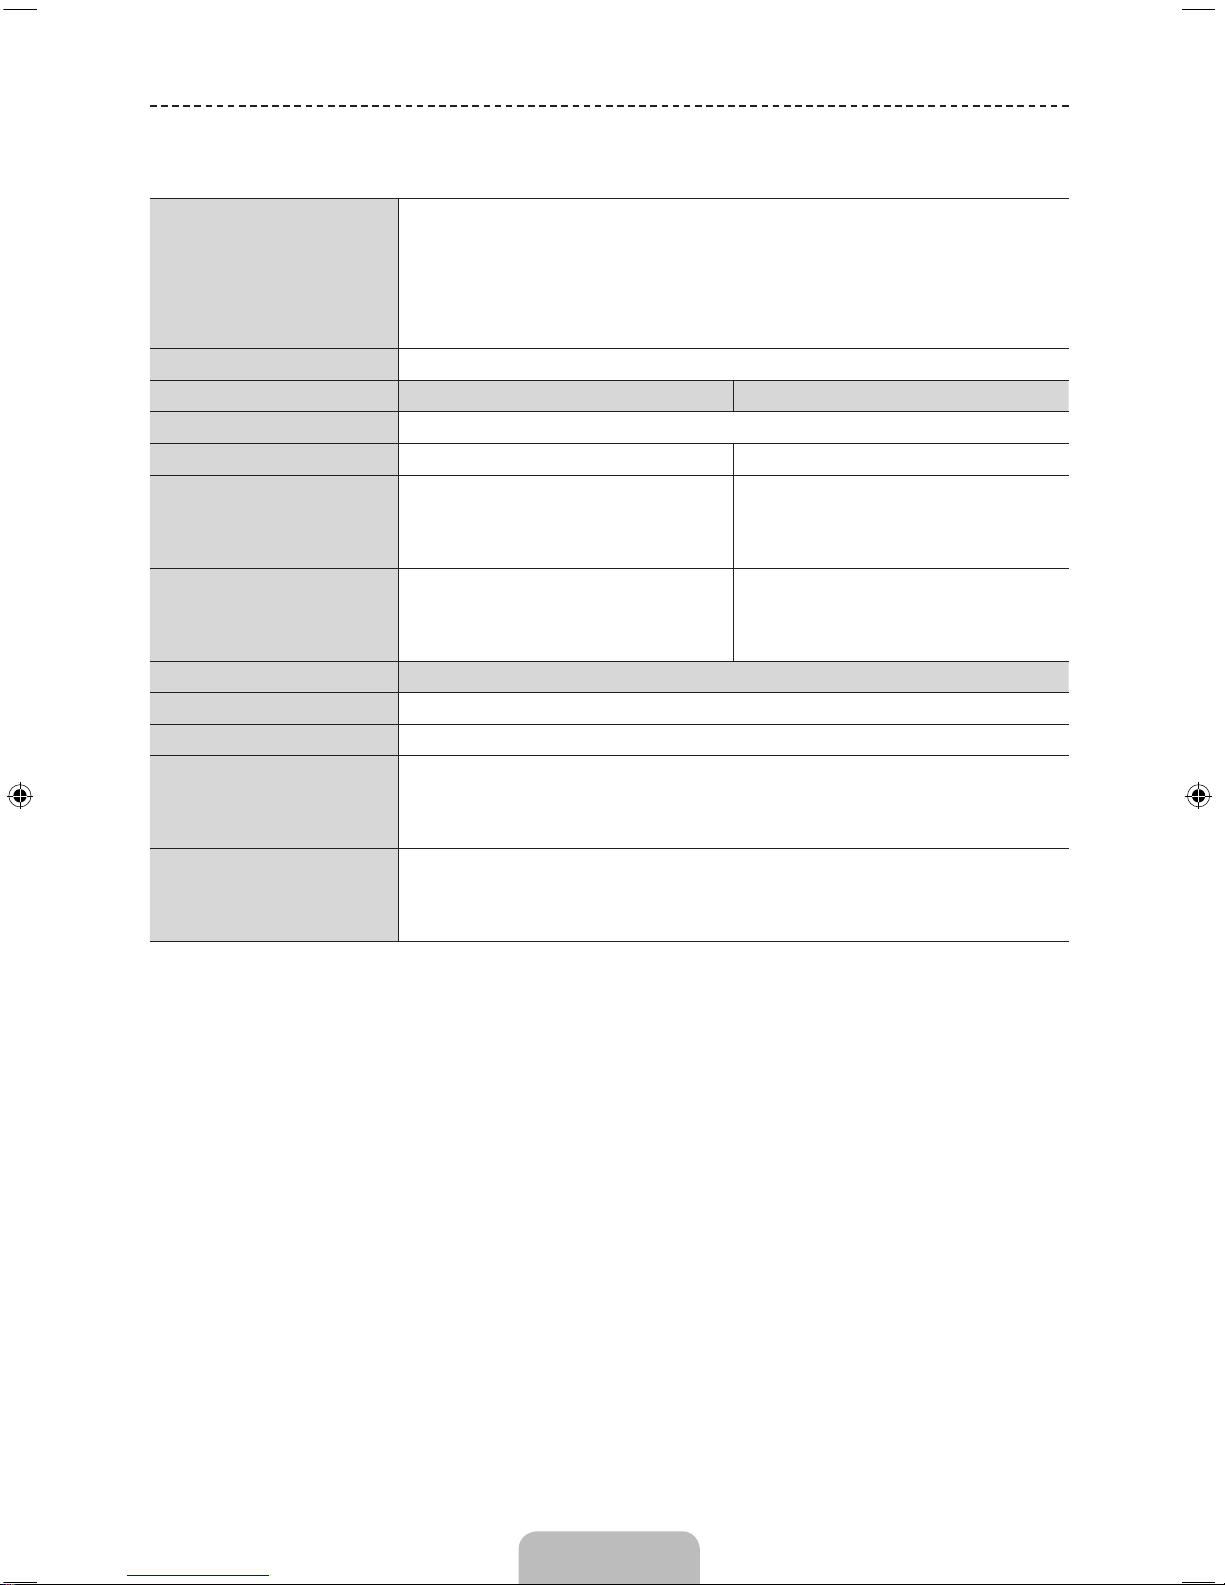
Specifications
Environmental
Considerations
Operating Temperature
Operating Humidity
Storage Temperature
Storage Humidity
10°C to 40°C (50°F to 104°F)
10% to 80%, non-condensing
-20°C to 45°C (-4°F to 113°F)
5% to 95%, non-condensing
Sound (Output)
10 W x 2
Model Name
UE50J6150 / UE50J6170 UE55J6150 / UE55J6170
Display Resolution
1920 x 1080
Screen Size
50 inches (125 cm) 55 inches (138 cm)
Dimensions (W x H x D)
Without Stand
With stand
1116.8 x 654.4 x 63.7 mm
1116.8 x 696.4 x 203.8 mm
1230.6 x 718.4 x 64.0 mm
1230.6 x 763.4 x 226.5 mm
Weight
Without Stand
With Stand
13.0 kg
14.1 kg
15.7 kg
18.6 kg
Model Name
UE60J6150 / UE60J6170
Display Resolution
1920 x 1080
Screen Size
60 inches (152 cm)
Dimensions (W x H x D)
Without Stand
With stand
1365.0 x 797.4 x 64.4 mm
1365.0 x 878.7 x 295.9 mm
Weight
Without Stand
With Stand
23.0 kg
27.4 kg
✎
Design and specifications are subject to change without prior notice.
✎
For information about power supply, and more about power consumption, refer to the label attached to the
product.
✎
Typical power consumption is measured according to IEC 62087 Ed.2
Page 21
English
English - 21
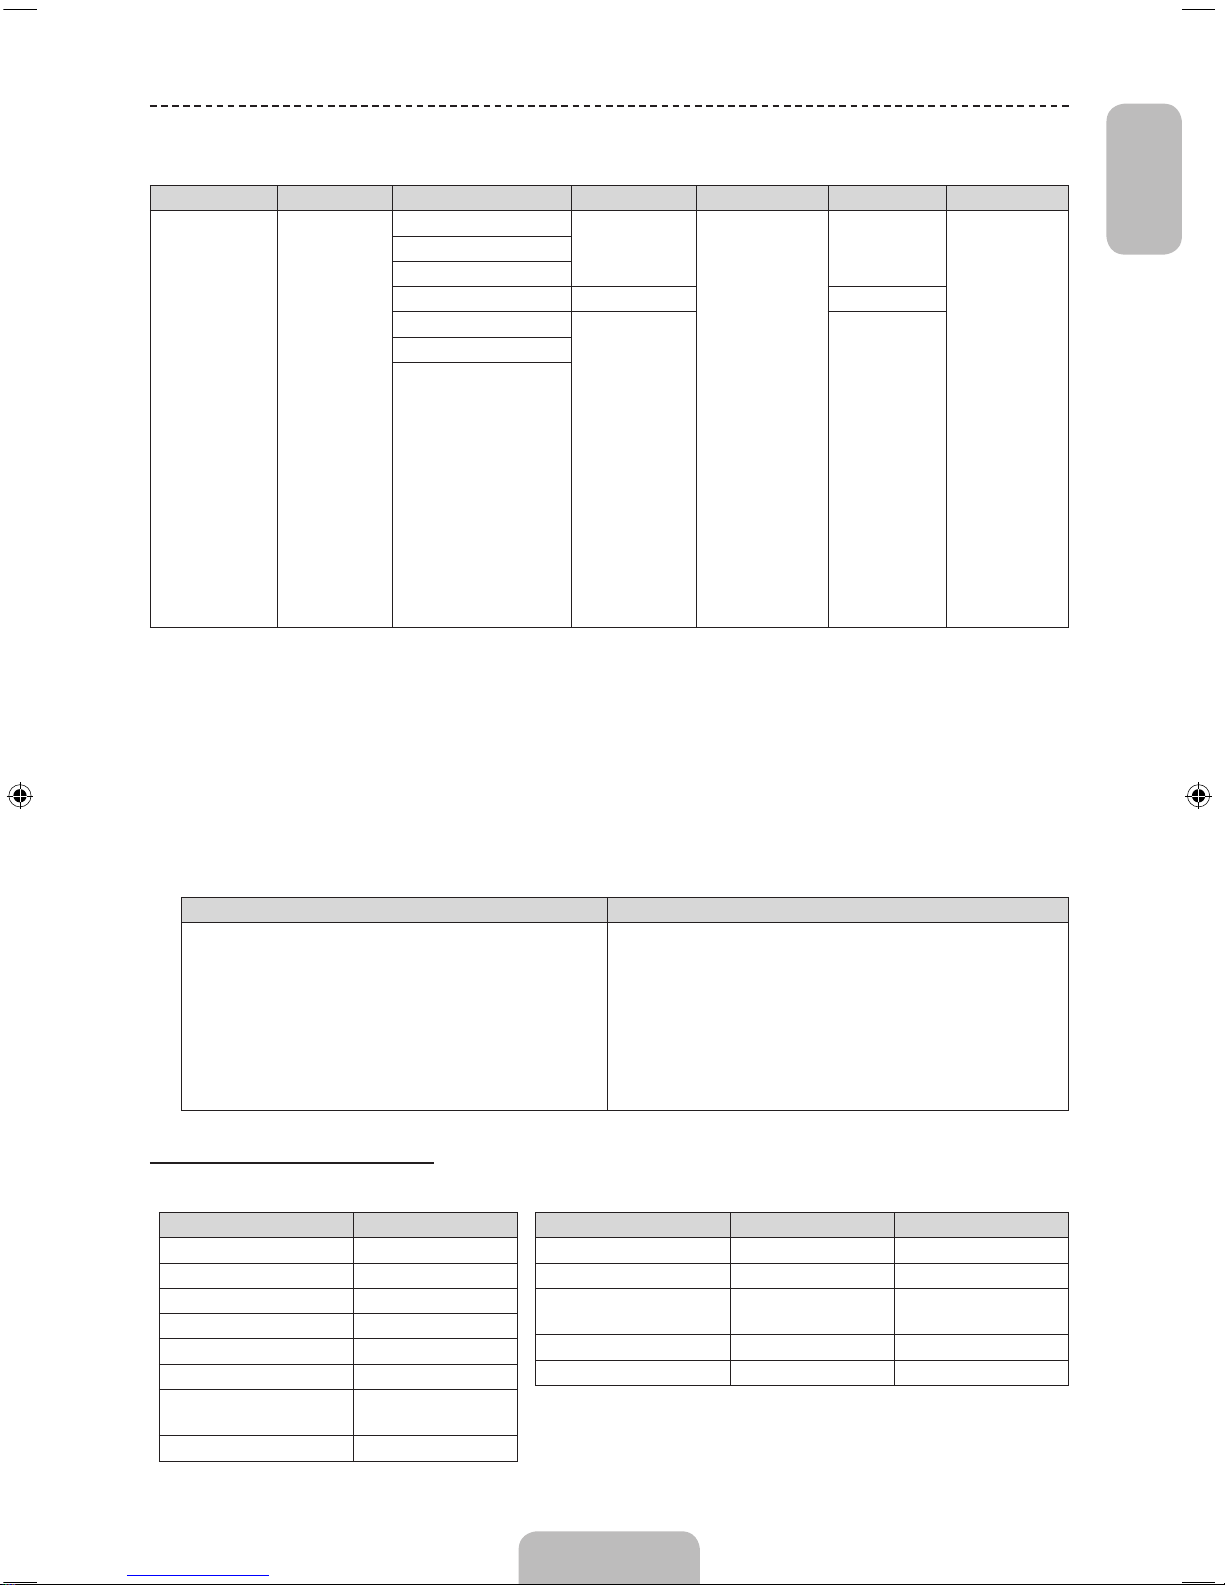
Supported Video Formats
File Extention Container Video Codec Resolution Frame rate (fps) Bit rate (Mbps) Audio Codec
*.avi
*.mkv
*.asf
*.wmv
*.mp4
*.3gp
*.vro
*.mpg
*.mpeg
*.ts
*.tp
*.trp
*.mov
*.flv
*.vob
*.svi
*.divx
AVI
MKV
ASF
MP4
3GP
VRO
VOB
PS
TS
DivX 3.11 / 4 / 5 / 6
1920 x 1080
6~30
30
Dolby Digital
LPCM
ADPCM (IMA,
MS)
AAC
HE-AAC
WMA
Dolby Digital
Plus
MPEG (MP3)
DTS (Core)
G.711 (A-Law,
μ-Law)
MPEG4 SP/ASP
H.264 BP/MP/HP
Motion JPEG 640 x 480 8
Window Media Video v9
1920 x 1080 30
MPEG2
MPEG1
✎
Other Restrictions
• Video content will not play, or not play correctly, if there is an error in the content or the container.
• Sound or video may not work if the contents have a standard bit rate/frame rate above the compatible Frame/sec
listed in the table.
• If the Index Table is in error, the Seek (Jump) function is not supported.
• Some USB/digital camera devices may not be compatible with the player.
• The menu can be displayed late if the video is over 10Mbps(bit rate).
Video decoder Audio decoder
• Supports up to H.264, Level 4.1 (FMO/ASO/RS
are not supported.)
• frame rate:
− Below 1280 x 720: 60 frame max
− Above 1280 x 720: 30 frame max
• VC1 AP L4 is not supported.
• GMC 2 or higher is not supported.
• WMA 10 Pro supports up to 5.1 channel and M2
profile.
• WMA lossless audio is not supported.
• Vorbis supports up to 2ch.
• Dolby Digital Plus supports up to 5.1 channel.
Supported Subtitle Formats
• External
Name File extension
MPEG-4 timed text .ttxt
SAMI .smi
SubRip .srt
SubViewer .sub
Micro DVD .sub or .txt
SubStation Alpha .ssa
Advanced SubStation
Alpha
.ass
Powerdivx .psb
• Internal
Name Container Format
Xsub AVI Picture Format
SubStation Alpha MKV Text Format
Advanced SubStation
Alpha
MKV Text Format
SubRip MKV Text Format
MPEG-4 Timed text MP4 Text Format
Page 22
English - 22
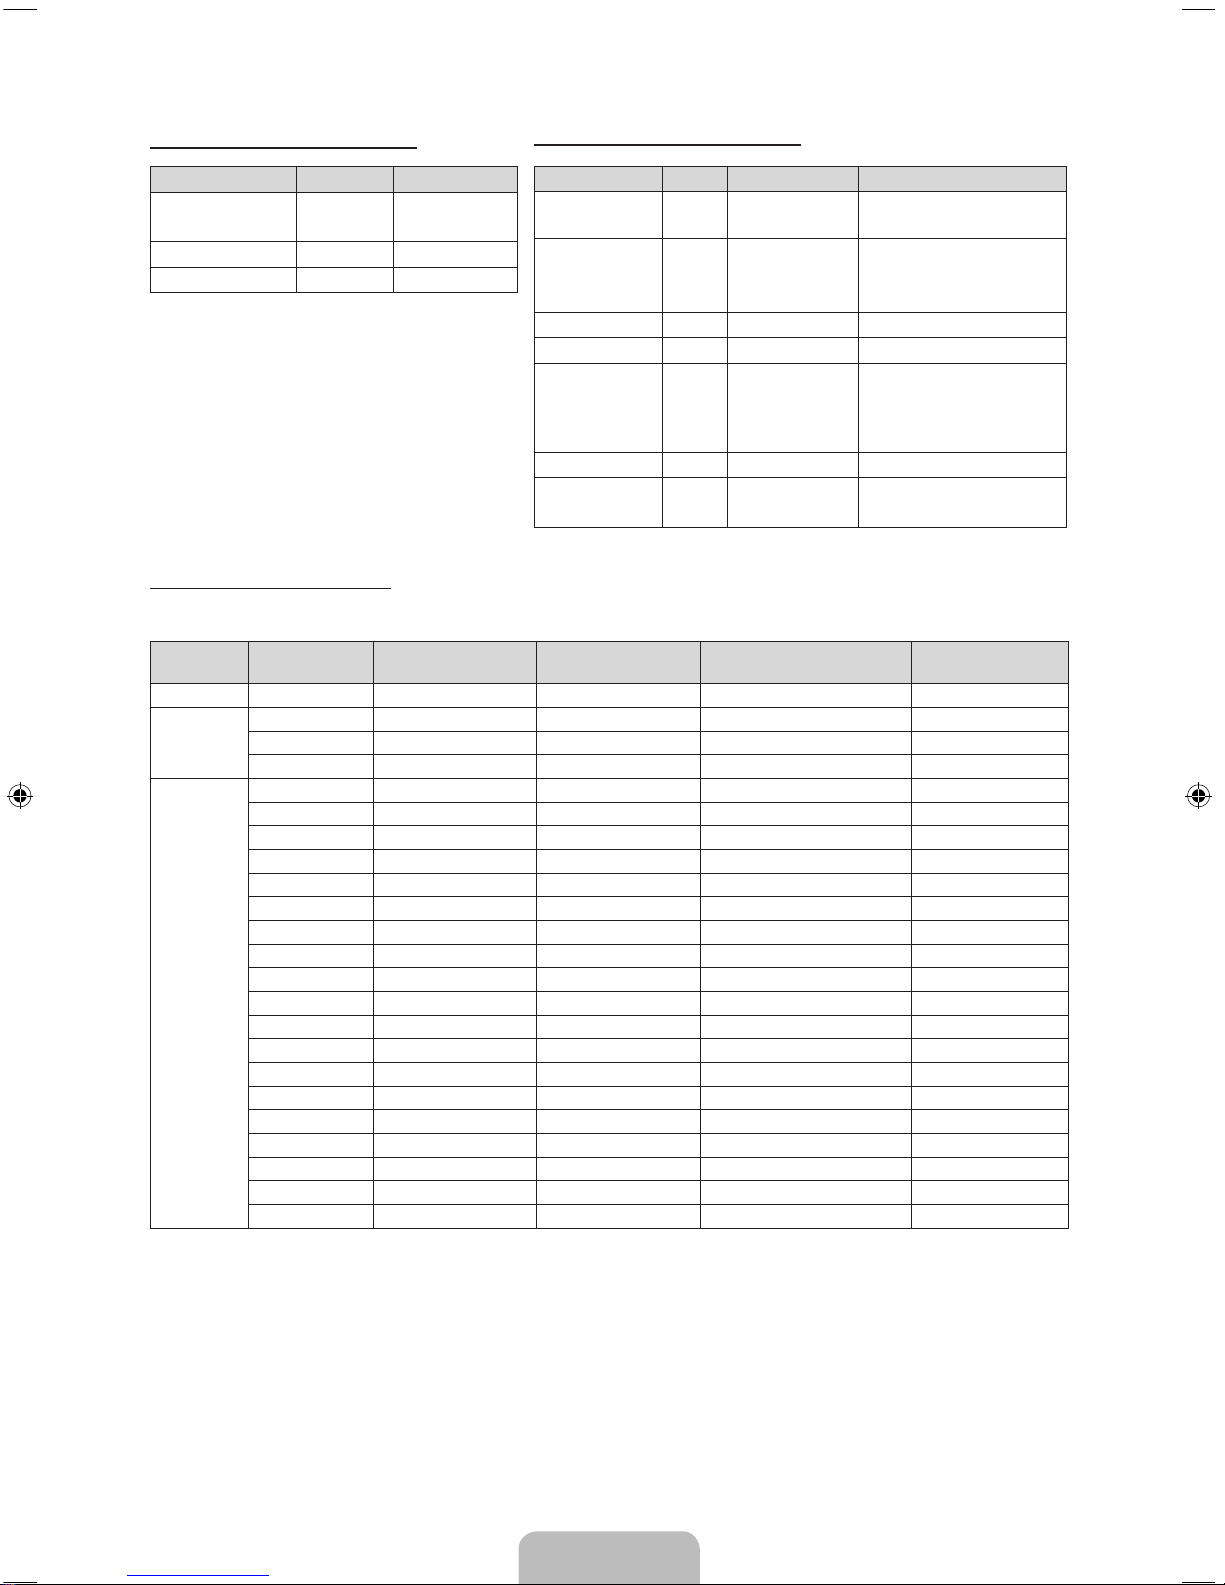
Supported Photo Formats
File Extension Type Resolution
*.jpg
*.jpeg
JPEG 15360 X 8640
*.bmp BMP 4096 X 4096
*.mpo MPO 15360 X 8640
✎
The MPO type file does not support Zoom, Rotate
and Slide Show Effect functions.
Supported Music Formats
File Extension Type Codec Remark
*.mp3 MPEG
MPEG1 Audio
Layer 3
*.m4a
*.mpa
*.aac
MPEG4 AAC
*.flac FLAC FLAC Supports up to 2ch.
*.ogg OGG Vorbis Supports up to 2ch.
*.wma WMA WMA
WMA 10 Pro supports up to
5.1 channel and M2 profile.
(WMA lossless audio is not
supported.)
*.wav wav wav
*.mid
*.midi
midi midi type 0 and type 1
Full available resolution
Optimal resolution is 1920 x 1080 @ 60Hz. See specification page for full available resolution.
Mode Resolution
Horizontal Frequency
(KHz)
Vertical Frequency (Hz) Pixel Clock Frequency (MHz) Sync Polarity (H / V)
IBM 720 x 400 31.469 70.087 28.322 -/+
MAC
640 x 480 35.000 66.667 30.240 -/832 x 624 49.726 74.551 57.284 -/-
1152 x 870 68.681 75.062 100.000 -/-
VESA DMT
640 x 480 31.469 59.940 25.175 -/640 x 480 37.861 72.809 31.500 -/640 x 480 37.500 75.000 31.500 -/800 x 600 37.879 60.317 40.000 +/+
800 x 600 48.077 72.188 50.000 +/+
800 x 600 46.875 75.000 49.500 +/+
1024 x 768 48.363 60.004 65.000 -/1024 x 768 56.476 70.069 75.000 -/1024 x 768 60.023 75.029 78.750 +/+
1152 x 864 67.500 75.000 108.000 +/+
1280 x 720 45.000 60.000 74.250 +/+
1280 x 800 49.702 59.810 83.500 -/+
1280 x 1024 63.981 60.020 108.000 +/+
1280 x 1024 79.976 75.025 135.000 +/+
1366 x 768 47.712 59.790 85.500 +/+
1440 x 900 55.935 59.887 106.500 -/+
1600 x 900RB 60.000 60.000 108.000 +/+
1680 x 1050 65.290 59.954 146.250 -/+
1920 x 1080 67.500 60.000 148.500 +/+
✎
NOTE
• The interlace mode is not supported.
• The set might operate abnormally if a non-standard video format is selected.
Page 23
English
English - 23
Licence
Manufactured under license from Dolby Laboratories.
Dolby and the double-D symbol are trademarks of Dolby Laboratories.
For DTS patents, see http://patents.dts.com. Manufactured under license from DTS, Inc. DTS, the
Symbol, DTS in combination with the Symbol, DTS Premium Sound|5.1, DTS Digital Surround,
DTS Express, and DTS Neo2:5 are registered trademarks or trademarks of DTS, Inc. in the United
States and/or other countries. © DTS, Inc. All Rights Reserved.
For DTS patents, see http://patents.dts.com. Manufactured under license from DTS Licensing
Limited. DTS, the Symbol, DTS in combination with the Symbol, and DTS Studio Sound are
registered trademarks or trademarks of DTS, Inc. in the United States and/or other countries.
© DTS, Inc. All Rights Reserved.
The terms HDMI and HDMI High-Definition Multimedia Interface, and the HDMI Logo are
trademarks or registered trademarks of HDMI Licensing LLC in the United States and other
countries.
This DivX Certified® device has passed rigorous testing to ensure it plays DivX® video.
To play purchased DivX movies, first register your device at vod.divx.com. Find your registration
code in the DivX VOD section of your device setup menu.
DivX Certified® to play DivX® video up to HD 1080p, including premium content.
DivX®, DivX Certified® and associated logos are trademarks of DivX, LLC and are used under
license.
Covered by one or more of the following U.S. patents: 7,295,673; 7,460,668; 7,515,710;
7,519,274.
This device supports DivX Plus Streaming® for enjoying HD movies and TV shows with advanced
features (multi-language subtitles, multiple audio tracks, chapters, smooth FF/RW, etc.) streamed
to your device.
Open Source Licence Notice
Open Source used in this product can be found on the following webpage. (http://opensource.samsung.com)
Open Source Licence Notice is written only English.
Still image warning
Avoid displaying still images (such as jpeg picture files), still image elements (such as TV channel logos, stock or news
bars at the screen bottom etc.), or programmes in panorama or 4:3 image format on the screen. Constantly displaying
still pictures can cause image burn-in on the LED screen, which will affect image quality. To reduce risk of this effect,
please follow the recommendations below:
• Avoid displaying the same TV channel for long periods.
• Always try to display any image in full screen. Use the TV set’s picture format menu for the best possible match.
• Reduce brightness and contrast to avoid the appearance of after-images.
• Use all TV features designed to reduce image retention and screen burn. Refer to the e-Manual for details.
Page 24

Adaptor information
Use following adapter to avoid hazard
Manufacturer: SAMSUNG
Adaptor model: A5919_FSM
To reduce the risk of fire or electric shock, do not expose this apparatus to rain or moisture.
Apparatus shall not be exposed to dripping or splashing and no objects filled with liquids, such as vases, shall
not be placed onthe apparatus.
For power cord use, see user manual.
ATENCION: SOLO PARA USO EN INTERIORES
Page 25

This page is intentionally
left blank.
Page 26
Deutsch - 2
Wichtige Sicherheitshinweise
Achtung! Wichtige Sicherheitshinweise
(Bitte lesen Sie den Ihrem Samsung Gerät entsprechenden Abschnitt, bevor Sie dieses
installieren.)
ACHTUNG
ACHTUN G: UM DIE GEFAHR EINES ELEKTRISCHEN SCHLAGES
ZU VERRINGERN, ENTFERNEN SIE NICHT DIE ABDECKUNG (ODER
RÜCKSEITE). ES BEFINDEN SICH IM INNEREN KEINE TEILE, DIE
VON BENUTZERN GEWARTET WERDEN KÖNNEN. LASSEN SIE
REPARATUREN NUR VON QUALIFIZIERTEM KUNDENDIENSTPERSONAL
DURCHFÜHREN.
STROMSCHLAGGEFAHR NICHT ÖFFNEN
Dieses Symbol weist auf eine hohe Spannung
im Inneren des Geräts hin. Es ist gefährlich, Teile
im Inneren dieses Geräts zu berühren.
Dieses Symbol weist darauf hin, dass diesem
Gerät wichtige Anweisungen zu Betrieb und
Wartung beigefügt sind.
• Die Schlitze und Öffnungen im Gehäuse und in der Rückwand oder im Boden sind für die Belüftung erforderlich. Um den zuverlässigen Betrieb des
Geräts zu gewährleisten und es vor Überhitzung zu schützen, dürfen diese Öffnungen keinesfalls blockiert oder bedeckt werden.
− Stellen Sie das Gerät nicht in abgeschlossene Räume wie z.B. in ein Bücherregal oder einen Einbauschrank. Dieser Einbau ist nur dann
zulässig, wenn für ausreichende Belüftung gesorgt wird.
− Außerdem darf das Gerät keinesfalls in der Nähe oder über einem Radiator oder Heizkörper aufgestellt werden, oder an Orten, an denen es
direkter Sonneneinstrahlung ausgesetzt ist.
− Stellen Sie keine mit Flüssigkeit gefüllte Behälter (Vasen usw.) auf das Gerät, da dies zu einem Brand oder Stromschlag führen kann.
• Setzen Sie das Gerät keinesfalls Regen aus und stellen Sie es nicht in der Nähe von Wasser auf (Badewanne, Küchenspüle, feuchter Keller,
Schwimmbecken usw.). Falls das Gerät dennoch Nässe ausgesetzt wurde, trennen Sie es von der Stromversorgung und wenden Sie sich umgehend
an Ihren örtlichen Vertreter. Ziehen Sie vor dem Reinigen des Geräts den Netzstecker aus der Steckdose.
• Für dieses Gerät benötigen Sie Akkus. Entsorgen Sie die Akkus gemäß den regionalen Umweltschutzbestimmungen. Bitte wenden Sie sich bei
Fragen zur ordnungsgemäßen Entsorgung an Ihre örtlichen Behörden.
• Überlasten Sie Steckdosen, Verlängerungskabel und Netzteile keinesfalls, da dies zu einem Brand oder Stromschlag führen kann.
• Netzkabel müssen so verlegt werden, dass niemand auf das Kabel treten kann oder es durch Gegenstände gequetscht wird, die auf dem Kabel
stehen oder gegen das Kabel drücken. Besondere Aufmerksamkeit muss den Bereichen um Stecker, Steckdosen und dem Punkt zukommen, an
dem das Netzkabel aus dem Gerät herausgeführt wird.
• Zum Schutz des Geräts bei einem Gewitter oder längerem Nichtbetrieb trennen Sie das Gerät vom Netz. Trennen Sie darüber hinaus das
Antennenkabel vom Gerät. Auf diese Weise werden Schäden durch Blitzschlag oder Spannungsstöße vermieden.
• Stellen Sie sicher, dass die Nennspannung des Gleichstromnetzteils für die örtliche Stromversorgung geeignet ist, bevor Sie das Netzkabel an die
Stromversorgung anschließen.
• Führen Sie niemals Metallgegenstände in die Öffnungen dieses Geräts ein. Dies kann zu Stromschlägen führen.
• Berühren Sie keinesfalls Bauteile im Geräteinneren, um Stromschläge zu vermeiden. Das Gerät darf nur von einem qualifizierten Techniker geöffnet
werden.
• Stellen Sie sicher, dass das Netzkabel fest in die Steckdose eingestöpselt wird. Fassen Sie das Netzkabel am Stecker an, wenn Sie es aus der
Wandsteckdose ziehen. Berühren Sie das Netzkabel niemals mit feuchten Händen.
• Wenn das Gerät nicht einwandfrei funktioniert, insbesondere beim Auftreten ungewöhnlicher Geräusche oder Gerüche aus dem Inneren, trennen Sie
es unverzüglich von der Stromversorgung und wenden Sie sich umgehend an Ihren örtlichen Vertreter oder das nächste Kundendienstzentrum.
• Ziehen Sie auf jeden Fall den Netzstecker aus der Steckdose, wenn das Fernsehgerät längere Zeit nicht verwendet werden soll, weil Sie
beispielsweise längere Zeit abwesend sind (besonders wenn Kinder und ältere Personen allein im Haus bleiben).
− Staubansammlungen können Stromschläge, Kurzschlüsse oder Brände verursachen, da am Netzkabel Funken auftreten oder die Hitze zu einer
Beschädigung der Isolierung führt.
• Wenden Sie sich an den autorisierten Kundendienst, wenn das Gerät an einem Ort mit hoher Konzentration von Staubpartikeln, außergewöhnlich
hoher oder geringer Raumtemperatur, extrem hoher Luftfeuchtigkeit, in unmittelbarer Nähe zu chemischen Lösungsmitteln oder für den Dauerbetrieb,
z. B. auf Bahnhöfen oder Flughäfen, aufgestellt werden soll. Eine nicht fachgerechte Aufstellung kann zu schweren Schäden am Gerät führen.
• Verwenden Sie nur ordnungsgemäß geerdete Stecker und Steckdosen.
• Eine fehlerhafte Erdung kann zu einem elektrischen Schlag oder Schäden an den Geräten führen. (Nur Geräte der Klasse I.)
• Wenn Sie das Gerät vom Stromnetz trennen möchten, müssen Sie den Netzstecker aus der Dose ziehen. Deshalb muss der Netzstecker jederzeit
leicht erreichbar sein.
• Achten Sie darauf, dass sich Kinder nicht an das Gerät hängen.
• Lagern Sie die Zubehörteile (Akku usw.) an einem sicheren Ort außerhalb der Reichweite von Kindern.
• Bringen Sie das Gerät nicht an einem instabilen Ort wie z.B. einem wackligen Regal, einem abschüssigen Boden oder einem Ort, der Vibrationen
ausgesetzt ist, an.
• Lassen Sie das Gerät nicht fallen, und vermeiden Sie Erschütterungen. Wenn das Gerät beschädigt ist, trennen Sie es vom Stromnetz, und wenden
Sie sich an ein Kundendienstcenter.
• Ziehen Sie den Netzstecker aus der Steckdose, und wischen Sie das Gerät mit einem weichen, trockenen Tuch ab. Verwenden Sie keine
Chemikalien wie Wachs, Benzol, Alkohol, Verdünner, Insektizide, Luftverbesserer, Schmiermittel oder Reinigungsmittel. Hierdurch kann das Aussehen
des Geräts beschädigt oder der Aufdruck gelöscht werden.
• Es dürfen keinesfalls Flüssigkeitstropfen oder-spritzer in das Gerät eindringen.
• Entsorgen Sie Batterien niemals in einem Feuer.
• Schließen Sie die Batterie nicht kurz, zerlegen und überhitzen Sie sie nicht.
• Explosionsgefahr bei unsachgemäßem Ersetzen von Batterien. Setzen Sie nur Batterien des gleichen oder eines gleichwertigen Typs ein.
• ACHTUNG: UM DIE AUSBREITUNG VON FEUER ZU VERHINDERN, SORGEN SIE JEDERZEIT DAFÜR, DASS DAS GERÄT NICHT
MIT KERZEN ODER OFFENEM FEUER IN BERÜHRUNG KOMMT.
Page 27
Deutsch
Deutsch - 3
Die Abbildungen und Illustrationen in diesem Handbuch dienen nur zur Information und können vom tatsächlichen
Aussehen des Geräts abweichen. Änderungen an Ausführung und technischen Daten vorbehalten.
Einige GUS-Sprachen (Russisch, Ukrainisch, Kasachisch) stehen für dieses Produkt nicht zur Verfügung, da das Gerät
für Kunden in der EU hergestellt wurde.
Wichtige Garantieinformationen zum
Bildschirmformat des Fernsehers
1. Die Funktionalitäten für Digitalfernsehen (DVB) stehen nur in Ländern/Regionen zur Verfügung, in denen digitale
terrestrische DVB-T-Signale (MPEG2 und MPEG4 AVC) gesendet werden oder in denen Sie Zugang zu einem
kompatiblen Kabelfernsehdienst mit DVB-C (MPEG2 und MPEG4 AAC) haben können. Fragen Sie Ihren örtlichen
Händler, wenn Sie Informationen über die Verfügbarkeit von DVB-T oder DVB-C in Ihrer Gegend benötigen.
2. DVB-T ist der Standard des europäischen DVB-Konsortiums für die terrestrische Versorgung mit digitalem
terrestrischem Fernsehen, und DVB-C ist das Konsortium für die Versorgung mit digitalem Kabelfernsehen.
Allerdings werden manche Unterscheidungsmerkmale wie EPG (elektrische Programmzeitschrift), VOD (Video on
Demand) usw. in dieser Spezifikation nicht berücksichtigt. Deshalb können sie zum jetzigen Zeitpunkt noch nicht
eingesetzt werden.
3. Zwar hält dieses Fernsehgerät die aktuellen Standards der DVB-T- und DVB-C-Spezifikationen [Version August
2008] ein, aber es kann nicht garantiert werden, dass die Kompatibilität mit zukünftigen digitalen terrestrischen
DVB-T und DBV-C-Signalen gewahrt bleibt.
4. In Abhängigkeit von den Ländern/Regionen, in denen dieses Fernsehgerät eingesetzt wird, verlangen manche
Kabelfernsehanbieter zusätzliche Gebühren für solch einen Dienst, und möglicherweise wird verlangt, dass Sie den
Vertragsbedingungen des Unternehmens zustimmen.
5. Manche Digitalfernsehfunktionen sind in einigen Ländern oder Regionen möglicherweise nicht verfügbar, und DVB-
C-Signale kann das Gerät bei manchen Kabelfernsehanbietern möglicherweise nicht fehlerfrei verarbeiten.
6. Für weitere Informationen setzen Sie sich bitte mit dem Samsung-Kundendienstzentrum in Verbindung.
✎
Die Empfangsqualität des Fernsehgeräts kann durch Unterschiede bei den Sendeverfahren in verschiedenen
Ländern beeinträchtigt werden. Kontrollieren Sie die Leistung des Fernsehgeräts bei Ihrem örtlichen
SAMSUNG-Händler oder wenden Sie sich an das Samsung-Callcenter um festzustellen, ob sich die
Empfangsqualität durch Ändern der Fernseheinstellungen verbessern lässt.
Ordnungsgemäße Entsorgung dieses Geräts (Elektro- und Elektronik-Altgeräte)
(Anwendbar in der Europäischen Union und anderen europäischen Staaten mit Systemen zur getrennten
Sammlung von Wertstoffen)
Diese Kennzeichnung auf dem Gerät, dem Zubehör oder der Dokumentation bedeutet, dass das Gerät sowie
das elektronische Zubehör (z. B. Ladegerät, Headset, USB-Kabel) am Ende ihrer Lebensdauer nicht im normalen
Hausmüll entsorgt werden dürfen. Entsorgen Sie diese Geräte bitte getrennt von anderen Abfällen, um der
Umwelt bzw. der menschlichen Gesundheit nicht durch unkontrollierte Müllbeseitigung zu schaden. Recyceln Sie
das Gerät, um die nachhaltige Wiederverwertung von stofflichen Ressourcen zu fördern. Private Nutzer sollten
den Händler, bei dem das Produkt gekauft wurde, oder die zuständigen Behörden kontaktieren, um in Erfahrung
zu bringen, wie sie das Gerät auf umweltfreundliche Weise recyceln können. Gewerbliche Benutzer wenden sich
an ihren Lieferanten und überprüfen die Konditionen Ihres Kaufvertrags. Dieses Gerät und seine elektronischen
Zubehörteile dürfen nicht zusammen mit anderem Gewerbemüll entsorgt werden.
Ordnungsgemäße Entsorgung der Batterien dieses Produkts
(Anzuwenden in den Ländern der Europäischen Union und anderen europäischen Ländern mit einem separaten
Sammelsystem für Batterien)
Diese Kennzeichnung auf der Batterie, dem Handbuch oder der Verpackung bedeutet, dass die Batterie
am Ende ihrer Lebensdauer nicht im normalen Hausmüll entsorgt werden darf. Die Kennzeichnung mit
den chemischen Symbolen für Hg, Cd oder Pb bedeutet, dass die Batterie Quecksilber, Cadmium oder
Blei in Mengen enthält, die die Grenzwerte der EU-Direktive 2006/66 übersteigen. Wenn Batterien nicht
ordnungsgemäß entsorgt werden, können diese Substanzen die Gesundheit von Menschen oder die Umwelt
gefährden. Zum Schutz der natürlichen Ressourcen und zur Förderung der Wiederverwertung von Materialien
trennen Sie die Batterien von anderem Müll und führen Sie sie Ihrem örtlichen Recyclingsystem zu.
Page 28
Deutsch - 4
Liste der Funktionen
• Media Play: Hiermit können Sie Musikdateien, Bilder und Filme abspielen, die auf einem USB-Gerät gespeichert
sind.
• e-Manual: Lesen des ganzen Handbuch auf dem Bildschirm.
Zubehör
✎
Vergewissern Sie sich, dass im Lieferumfang des Fernsehgeräts folgende Komponenten enthalten sind. Falls
irgendwelche Teile fehlen sollten, setzen Sie sich bitte mit Ihrem Händler in Verbindung.
✎
Die Farbe und die Form der Teile können sich je nach Modell unterscheiden.
✎
Kabel, die nicht zum Paketinhalt gehören, können gesondert erworben werden.
[ACHTUNG: STELLEN SIE DIE VERBINDUNG DAUERHAFT HER, DAMIT SIE NICHT VERSEHENTLICH
GETRENNT WERDEN KANN
• Fernbedienung und 2 Batterien (Typ AAA) • Netzkabel
• Vorschriftenhandbuch / Garantiekarte • Benutzerhandbuch
Adapter für die Wandhalterung
(Je nach modell)
Kabelführung
(Je nach modell)
✎
Verwaltungskosten werden abgerechnet, wenn:
(a) auf Ihren Wunsch ein Techniker gerufen wird und kein Defekt des Geräts vorliegt
(d.h. wenn Sie dieses Benutzerhandbuch nicht gelesen haben).
(b) Sie das Gerät in eine Reparaturwerkstatt bringen und kein Defekt des Geräts vorliegt
(d.h. wenn Sie dieses Benutzerhandbuch nicht gelesen haben).
✎
Der abgerechnete Betrag wird Ihnen mitgeteilt, ehe irgendwelche Arbeiten oder Kundenbesuche ausgeführt
werden.
Page 29
Deutsch
Deutsch - 5
Fernbedienung
✎
Die Tasten Ein/Aus, Sender, Lautstärke und Eingabe der Fernbedienung sind mit Braille-Punkten versehen und
können auch von Personen mit Sehbehinderung verwendet werden.
Ein- und Ausschalten des Fernsehgeräts.
Einstellen der Lautstärke.
Alternativ wählen Sie „Videotext ein“,
„Doppel“, „Mix“ oder „Aus“.
Anzeigen des Bildschirmmenüs.
Hiermit können Sie häufig verwendete
Funktionen schnell auswählen.
Hiermit zeigen Sie das Menü der Funktion
Media Play an.
Zurück zum vorherigen Menü.
Auswählen von Optionen im Bildschirmmenü
und Ändern von Menüwerten.
E-MANUAL: Anzeigen des e-Manuals.
PIC SIZE: Hiermit wählen Sie das
Bildformat auswählen.
AD/SUBT.: Auswahl von Audio für
Sehgeschädigte. (nicht überall verfügbar). /
Digitale Untertitel anzeigen
Anzeigen und Auswählen der verfügbaren
Videosignalquellen.
Zurück zum vorherigen Sender.
Drücken Sie diese Taste, um den Ton
vorübergehend auszuschalten.
Wechseln des Senders.
Anzeigen der Senderlisten auf dem
Bildschirm.
Anzeigen des elektronischen
Programmführers.
Anzeigen von Informationen auf dem
Bildschirm.
Schließen des Menüs.
Hiermit wechseln Sie direkt zu einem Kanal.
Verwenden Sie diese Tasten entsprechend
den Anweisungen auf dem Bildschirm.
Verwenden Sie diese Tasten innerhalb einer
bestimmten Funktion.
Einzelheiten entnehmen Sie dem e-Manual.
N Die obigen Tastennamen können von den tatsächlichen Bezeichnungen abweichen.
Einlegen von Batterien (Batteriegröße: AAA)
Page 30
Deutsch - 6
Verwenden des Bedienfelds für den Fernseher
(Bedienfeldtasten)
Mit Hilfe des TV-Controllers, einer kleinen Joystick-ähnlichen Taste links auf der Rückseite des Fernsehgeräts, können
Sie den Fernseher ohne Fernbedienung bedienen.
✎
Manche Funktionen, für die Sie eine PIN eingeben müssen, stehen möglicherweise nicht zur Verfügung.
✎
Form und Farbe des Geräts können sich je nach Modell unterscheiden.
✎
Wenn Sie den Steuerknopf länger als 1 Sekunde gedrückt halten, wird das Menü geschlossen.
✎
Achten Sie beim Bewegen des Controllers nach oben/unten/links/rechts darauf, nicht auf diesen zu drücken.
Wenn Sie auf den Controller drücken, können Sie ihn nicht mehr nach oben/unten/links/rechts bewegen.
Fernbedienungssensor
TV-Steuerknopf
Die Abbildung zeigt die
Vorderseite des Fernsehgeräts.
Funktionsmenü
Zurück
Öffnen von Media Play
Öffnen des Menüs Quelle
Ausschalten
Öffnen von Menü
Standby-Modus
Der Standby-Modus ist nicht für längere Phasen der Abwesenheit gedacht (z. B. wenn Sie verreist sind). Eine kleine
Menge Strom wird auch dann noch verbraucht, wenn das Gerät mit dem Netzschalter ausgeschaltet wurde. Es ist am
besten, das Netzkabel aus der Steckdose zu ziehen.
Startkonfiguration
Wenn das Fernsehgerät erstmals eingeschaltet wird, helfen eine Reihe aufeinander folgender Abfragen beim Durchführen
der Grundeinstellungen. Drücken Sie die POWERP. Einstell. ist nur dann verfügbar, wenn die Quelle auf TV eingestellt
ist.
✎
Wenn Sie vor der Installation ein Gerät an den Eingang HDMI IN 1(STB) anschließen, wechselt der Sendertyp
automatisch zu Set-Top-B ox. Wenn Sie die Option Set-Top-Box nicht verwenden möchten, wählen Sie
stattdessen TV-Empf. aus.
So setzen Sie diese Funktion zurück:
Wählen Sie System - Einstell. (Startkonfiguration). Geben Sie Ihre 4-stellige PIN ein. Das Standardkennwort lautet „0-00-0“. Wenn Sie die PIN ändern möchten, verwenden Sie die Funktion PIN ändern.
Sie sollten das Verfahren unter Einstell. (MENU → System) zu Hause erneut durchführen, auch wenn Sie es bereits im
Geschäft durchgeführt haben.
✎
Wenn Sie den PIN-Code vergessen haben, drücken Sie im Standbymodus die Fernbedienungstasten in der
angegebenen Reihenfolge, um die PIN auf „0-0-0-0“ zurückzusetzen: MUTE → 8 → 2 → 4 → POWER (Ein).
Page 31
Deutsch
Deutsch - 7
Ändern der Eingangsquelle
Quelle
TV / Ext. / HDMI1 / HDMI2/DVI / Component / AV
(Abhängig von Land und Region.)
Hiermit wählen Sie, ob das Fernsehgerät mit einem Fernsehsignal versorgt wird oder an andere externe Signaleingänge
wie z. B. DVD- / Blu-Ray-Player / Kabelreceiver / Satellitenreceiver (Set-Top Box) angeschlossen ist.
✎
Drücken Sie die Taste SOURCE. In der Liste Quelle sind die angeschlossenen Eingangsquellen hervorgehoben.
✎
Der PC(D-Sub)-Eingang wird nicht unterstützt. Wenn Sie das Fernsehgerät an einen PC anschließen möchten,
verbinden Sie das HDMI/DVI-Kabel mit dem Anschluss HDMI IN 2(DVI) am Fernsehgerät.
✎
Ext. bleibt immer aktiviert.
✎
Drücken Sie die Taste TOOLS.
• Name bearb. (Abhängig von Land und Region.)
Sie können für eine externe Eingangsquelle einen beliebigen Namen festlegen.
− Wenn Sie einen PC über ein HDMI-Kabel mit dem HDMI IN 2(DVI)-Anschluss verbinden, müssen Sie unter
Name bearb. den PC-Modus des Fernsehgeräts aktivieren.
− Wenn Sie einen PC über ein HDMI/DVI-Kabel mit dem HDMI IN 2(DVI)-Anschluss verbinden, müssen Sie unter
Name bearb. den DVI PC-Modus des Fernsehgeräts aktivieren.
− Wenn Sie ein AV-Gerät über ein HDMI/DVI-Kabel mit dem HDMI IN 2(DVI)-Anschluss verbinden, müssen Sie
unter Name bearb. den DVI-Geräte-Modus des Fernsehgeräts aktivieren.
• Information
Sie können detaillierte Informationen zum angeschlossenen externen Gerät anzeigen.
Page 32
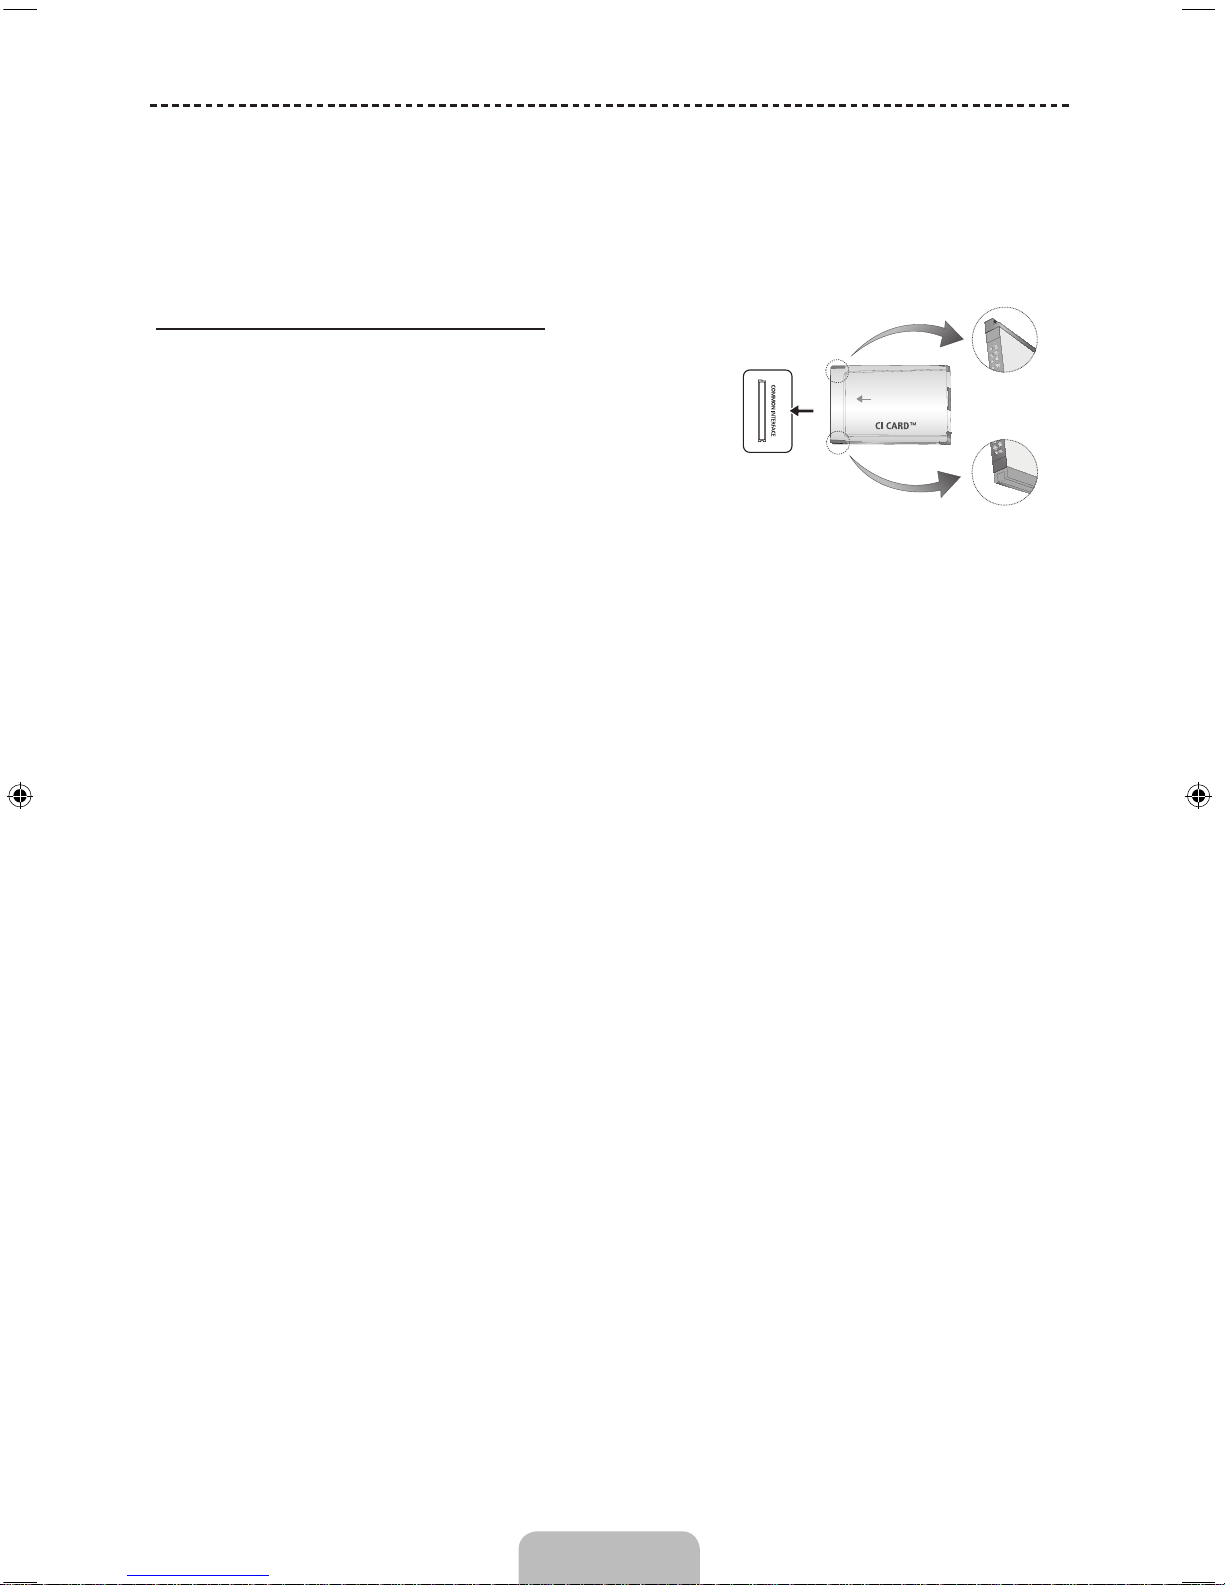
Deutsch - 8
Anschließen des COMMON INTERFACESteckplatzes (Fernsehen mit Ihrer PayTV-Karte)
✎
Abhängig von Land und Region.
✎
Schalten Sie den Fernseher aus, wenn Sie die CI-Karte einsetzen oder herausnehmen möchten.
Verwenden der „CI“- oder „CI+“-Karte
Um Bezahlsender zu sehen, müssen Sie eine „CI“ oder „CI+“-Karte
einsetzen.
• Wenn Sie keine „CI“ oder „CI+“-Karte einsetzen, wird bei einigen
Kanälen die Meldung „Gestörtes Signal“ angezeigt.
• Die Verbindungsinformationen mit Telefonnummer, Kennung der
„CI“- oder „CI+“-Karten und Hostkennung sowie anderen Angaben
werden nach ungefähr 2 bis 3 Minuten angezeigt. Wenn eine
Fehlermeldung angezeigt wird, wenden Sie sich bitte an Ihren
Dienstanbieter.
• Wenn das Konfigurieren der Kanalinformationen abgeschlossen
ist, wird die Meldung „Udating Completed“ (Aktualisierung
abgeschlossen) angezeigt. Dies bedeutet, dass die Kanalliste
aktualisiert ist.
• Das Bild kann je nach Modell
unterschiedlich sein.
✎
HINWEIS
• Sie können die „CI“ oder „CI+“-Karte bei einem der örtlichen Kabelnetzbetreiber erwerben.
• Ziehen Sie die „CI“ oder „CI+“-Karte vorsichtig mit den Händen heraus. Sie könnte beim Herunterfallen
ansonsten beschädigt werden.
• Die Richtung, in der Sie die „CI“ oder „CI+“-Karte einsetzen müssen, ist auf der Karte markiert.
• Die Position des COMMON INTERFACE-Steckplatzes ist modellabhängig.
• „CI“ oder „CI+“-Karten werden in einigen Ländern und Regionen nicht unterstützt. Fragen Sie diesbezüglich
Ihren offiziellen Händler.
• Bei Problemen wenden Sie sich an den Dienstanbieter.
• Setzen Sie eine „CI“ oder „CI+“-Karte ein, die für die aktuellen Antenneneinstellungen geeignet ist. Andernfalls ist
das Bild gestört oder es fällt aus.
Page 33
Deutsch
Deutsch - 9
So zeigen Sie das e-Manual an
Die Anweisungen zu den Funktionen Ihres Fernsehgeräts finden Sie im e-Manual. Drücken Sie dazu
die Taste E-MANUAL auf Ihrer Fernbedienung. Bewegen Sie den Cursor mithilfe der Pfeiltasten,
um eine Kategorie und ein Thema auszuwählen, und drücken Sie dann die Taste ENTERE. Die
gewünschte e-Manual-Seite wird angezeigt.
Sie können auch über das entsprechende Menü darauf zugreifen:
O MENU
m
→ Unterstützung → e-Manual → ENTER
E
✎
Drücken Sie die Taste E-MANUAL, um zum Hauptmenü des e-Manual zurückzukehren.
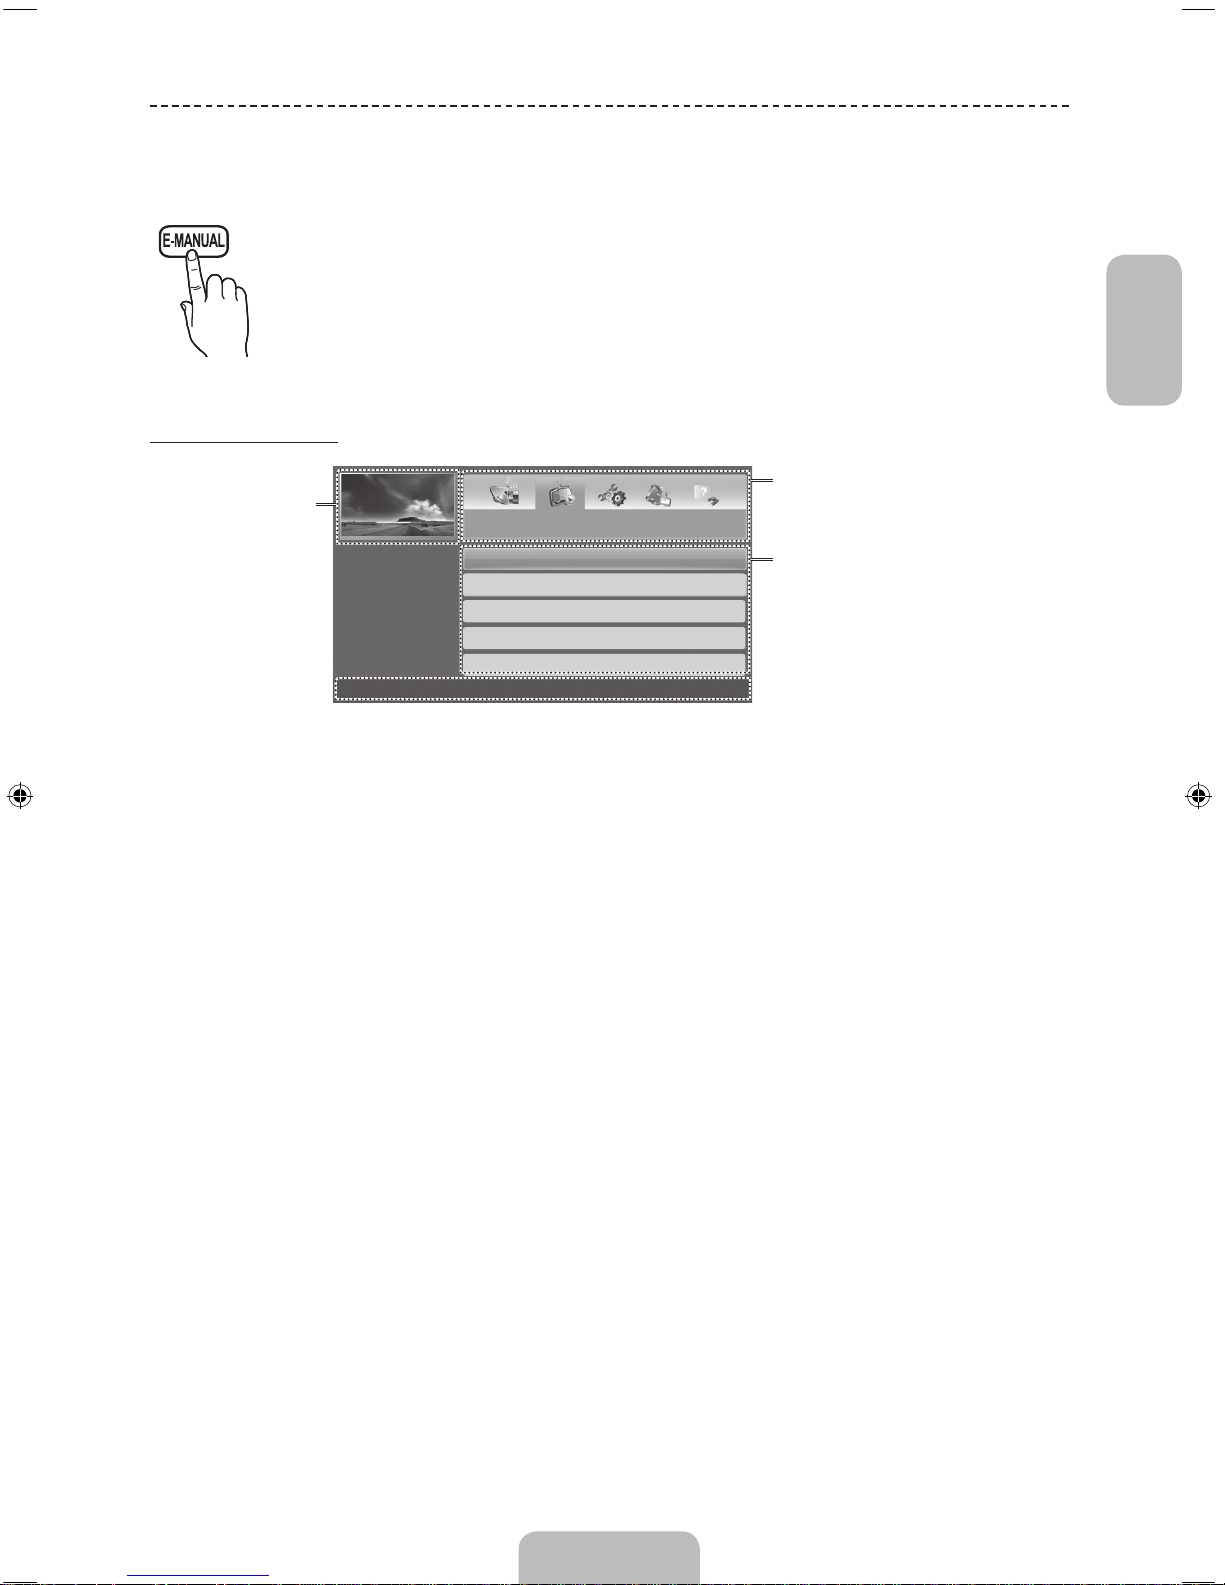
Bildschirmanzeige
Grundfunktionen
Ändern des voreingestellten Bildmodus
Anpassen der Bildeinstellungen
Ändern der Bildoptionen
Ändern des Tonmodus
Anpassen der Toneinstellungen
} Index E Eingabe e Beenden
Aktuell
angezeigtes Video,
Fernsehprogramm
usw.
Die Kategorieliste. Drücken Sie die
Taste l oder r, um die gewünschte
Kategorie auszuwählen.
Anzeigen der Untermenüliste. Bewegen
Sie den Cursor mithilfe der Pfeiltasten
auf Ihrer Fernbedienung. Drücken
Sie die Taste ENTERE, um das
gewünschte Untermenü auszuwählen.
Bedientasten
} Index: Anzeigen des Index-Fensters.
− Welcher Index verfügbar ist, hängt von der Sprache ab.
E Eingabe: Wählen Sie eine Kategorie oder ein Untermenü.
e Beenden: Schließen des e-Manuals.
<Anzeigen der Inhalte>
a Jetzt test.: Anzeigen des zum Thema passenden Bildschirmmenüs. Drücken Sie die Taste E-MANUAL, um zum
Fenster des e-Manuals zurückzukehren.
b Start: Wechseln zum Startfenster des e-Manuals.
L Seite: Wechseln zur vorherigen oder zur nächsten Seite.
{
Zoom: Vergrößern des Fensters.
− Drücken Sie zum Vergrößern des Bildschirms die Taste { (Zoom). Mit der Taste u oder d können Sie durch
das vergrößerte Fenster blättern. Drücken Sie die Taste RETURN, um das Fenster auf die normale Größe
zurückzusetzen.
Page 34
Deutsch - 10
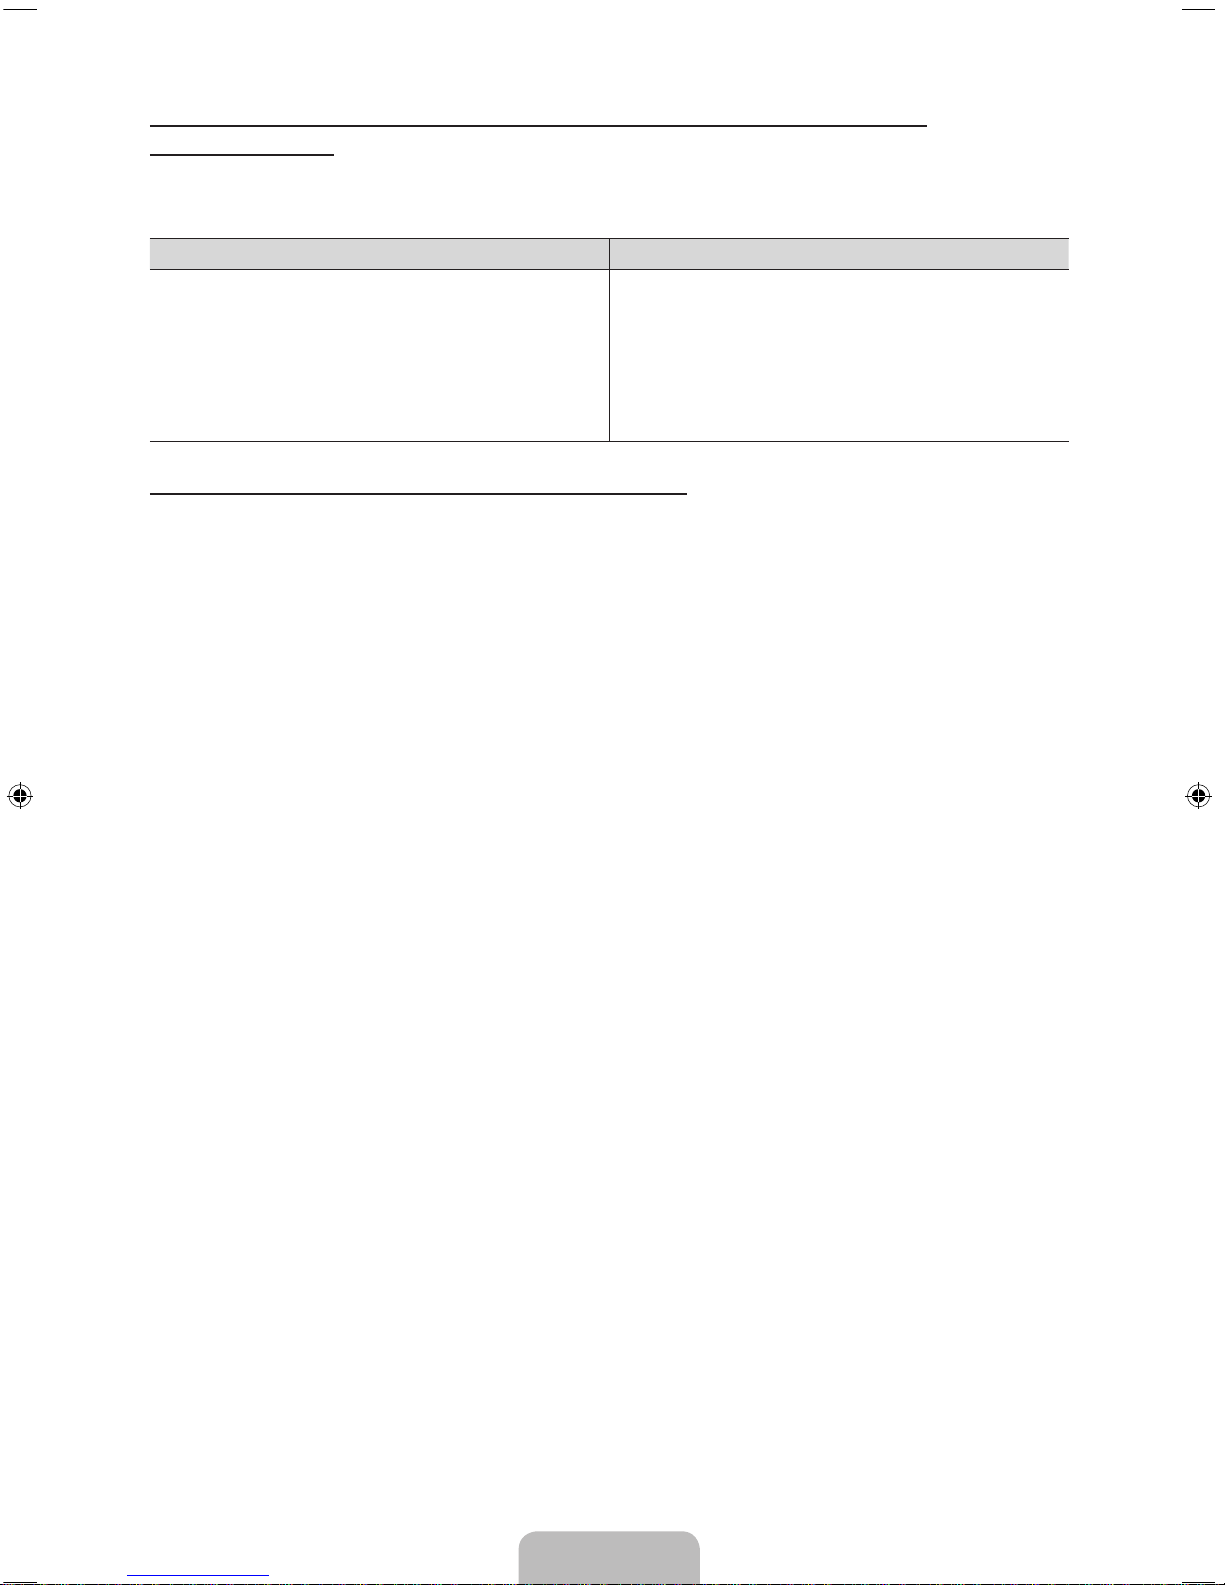
So wechseln Sie zwischen den e-Manual-Themen und den entsprechenden
Bildschirmmenüs.
✎
Diese Funktion ist in manchen Menüs nicht verfügbar.
✎
Wenn das Menü deaktiviert ist, können Sie die Funktion Jetzt test. nicht verwenden.
Methode 1 Methode 2
1. Wenn Sie das entsprechende Menü zu einem
Thema im e-Manual ausführen möchten, drücken
Sie die rote Taste, um Jetzt test. auszuwählen.
2. Drücken Sie die Taste E-MANUAL, um zum Fenster
des e-Manual zurückzukehren.
1. Drücken Sie die Taste ENTERE, wenn ein Thema
angezeigt wird. “Möchten Sie dies ausführen?”
wird angezeigt. Wählen Sie Ja, und drücken
Sie dann die Taste ENTERE. Das Fenster des
Bildschirmmenüs wird angezeigt.
2. Drücken Sie die Taste E-MANUAL, um zum Fenster
des e-Manual zurückzukehren.
So suchen Sie auf der Indexseite nach einem Thema
✎
Diese Funktion wird, je nach Sprache, möglicherweise nicht unterstützt.
1. Wenn Sie nach einem Stichwort suchen möchten, wählen Sie mit der blauen Taste Index.
2. Drücken Sie die Taste l oder r, um die gewünschte Zeichenfolge auszuwählen.
3. Wählen Sie mit der Taste u oder d das gewünschte Stichwort aus, und drücken Sie dann die Taste ENTERE.
4. Sie können das Fenster der entsprechenden Anweisung im e-Manual anzeigen.
✎
Drücken Sie die Taste RETURN, um das Index-Fenster zu schließen.
Page 35
Deutsch
Deutsch - 11
Videotextfunktion
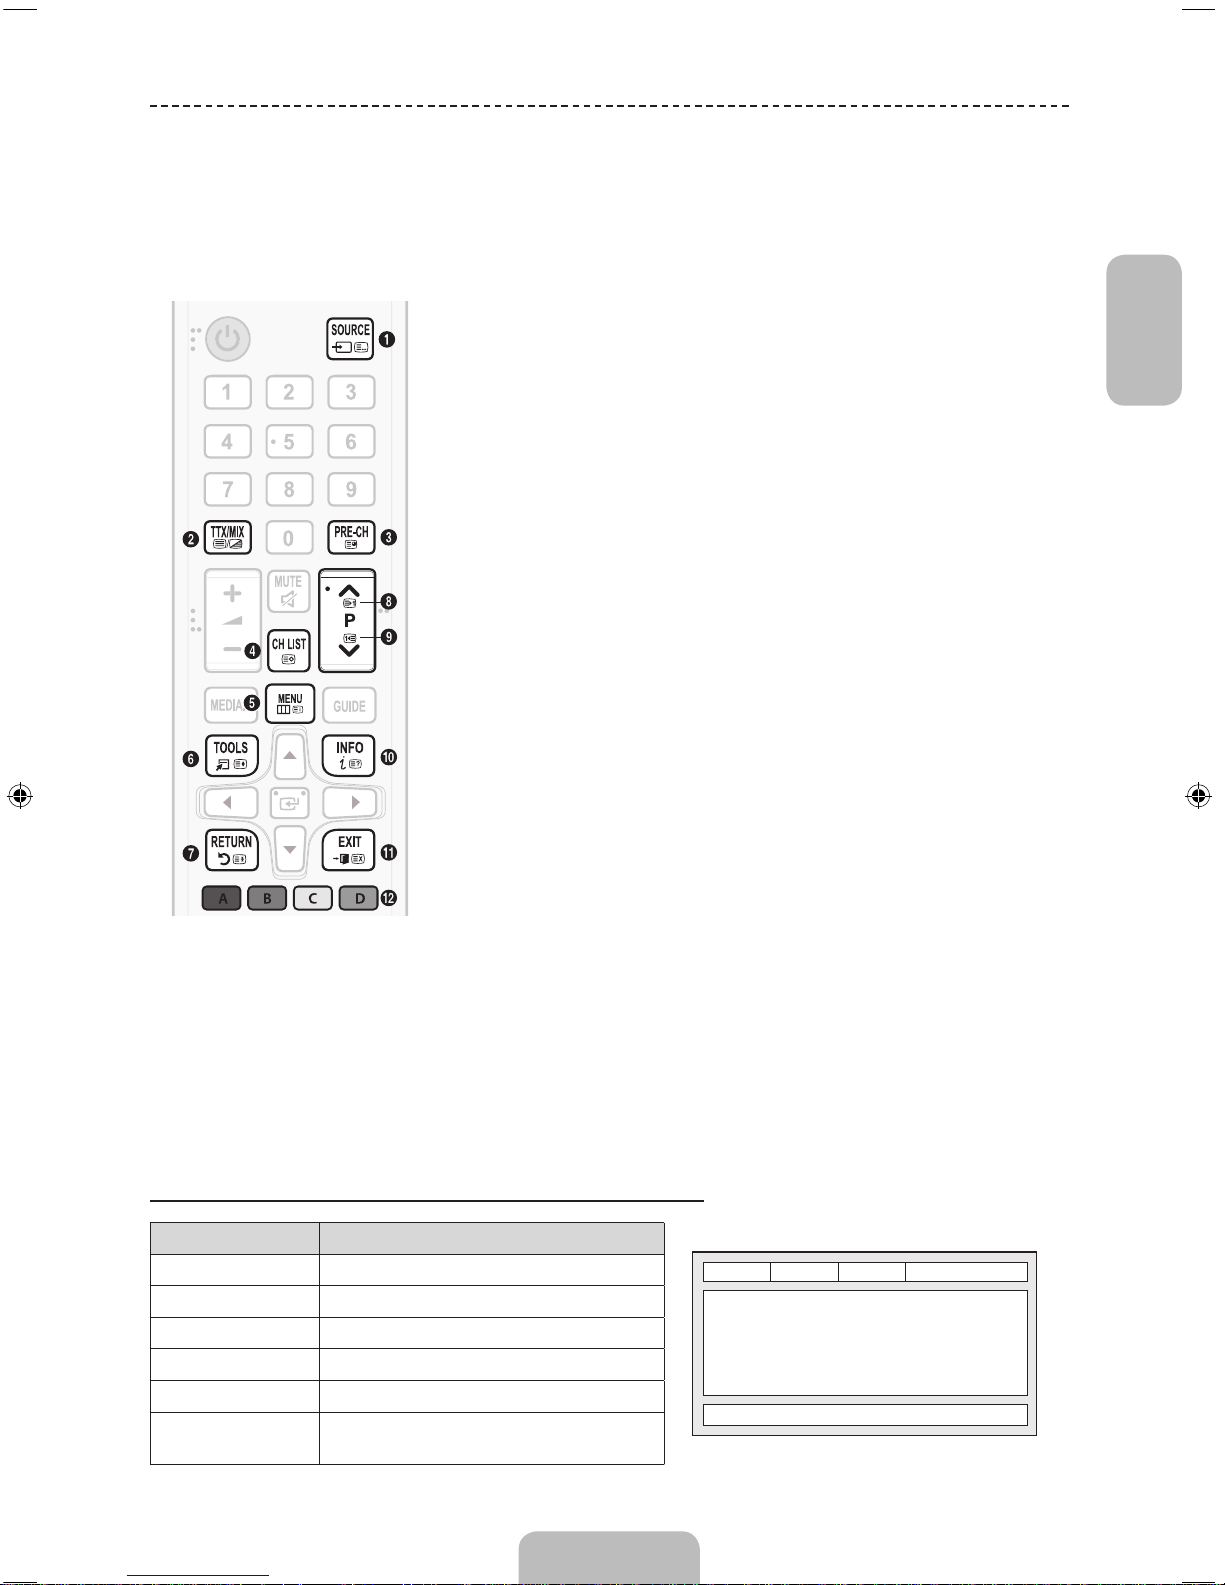
Auf der Videotext-Indexseite finden Sie Verwendungshinweise zum Videotext. Für die korrekte Anzeige von
Videotextinformationen muss der Empfang des Senders einwandfrei sein. Andernfalls können Informationen
unvollständig sein oder einige Seiten nicht angezeigt werden.
✎
Sie können die Videotextseiten durch Drücken der Zifferntasten auf der Fernbedienung wechseln.
1
0 (Modus): Auswählen des Videotextmodus (LISTE/FLOF). Wenn Sie
diese Taste im LIST-Modus drücken, wird in den Listenspeichermodus
umgeschaltet. Im Listenspeichermodus können Sie mit der Taste
8(Speichern) Videotextseiten in einer Liste speichern.
2
/ (Vollst. TTX/Doppel TTX/Mix/Aus): Aktivieren des Videotextmodus
für den aktuellen Sender. Drücken Sie die Taste zweimal, um die
Videotextinformationen gleichzeitig mit der aktuellen Sendung auf dem
Bildschirm anzuzeigen. Drücken Sie die Taste noch einmal, um den Videotext
zu beenden.
3
1 (Unterseite): Anzeigen einer verfügbaren Unterseite.
4
8 (Speichern): Speichern von Videotextseiten.
5
6 (index): Anzeigen der Videotext-Indexseite (Inhalt) während Sie den
Videotext verwenden.
6
4 (Größe): Anzeigen von Videotextinformationen in doppelter Größe in der
oberen Hälfte des Bildschirms. Drücken Sie die Taste erneut, um den Text in
die untere Hälfte des Bildschirms zu verschieben. Für die normale Anzeige
drücken Sie die Taste noch einmal.
7
9 (Halten): Falls die ausgewählte Seite mit Unterseiten verknüpft ist, wird
die Anzeige an der aktuellen Seite gehalten. Drücken Sie die Taste erneut,
um den Vorgang rückgängig zu machen.
8
2 (Nächste Seite anzeigen): Anzeigen der nächsten Videotextseite.
9
3 (Vorherige Seite anzeigen): Anzeigen der vorherigen Videotextseite.
0
5 (Verborgenen Inhalt einblenden): Anzeigen von verborgenem Text (z. B.
Antworten bei Quizsendungen). Drücken Sie die Taste erneut, um Videotext
auszublenden.
!
7 (Abbrechen): Verkleinern der Videotextanzeige, um sie gleichzeitig mit der
aktuellen Sendung anzeigen.
@
Farbtasten (rot, grün, gelb, blau): Wenn der Sender das FASTEXT-System
verwendet, sind die verschiedenen Themen auf den Videotextseiten farbig
gekennzeichnet und können mit den Farbtasten auf der Fernbedienung
ausgewählt werden. Treffen Sie Ihre Wahl mit der entsprechenden Farbtaste.
Eine neue farblich codierte Seite wird angezeigt. Die Auswahl der Elemente
kann auf dieselbe Weise erfolgen. Drücken Sie die entsprechende Farbtaste,
um die vorherige oder nächste Seite anzuzeigen.
Die Videotextseiten sind in sechs Kategorien unterteilt
Sportergebnisse Inhalt
A
E
F
B C D
A Gewählte Seitennummer.
B Senderkennung.
C Aktuelle Seitenzahl oder Suchhinweise.
D Datum und Uhrzeit.
E Text.
F
Statusinformation. FASTEXTInformationen.
Page 36
Deutsch - 12
Fehlerbehebung
(Abhängig von Land und Modell)
Wenn das Fernsehgerät scheinbar ein Problem aufweist, schlagen Sie zunächst in dieser Liste mit möglichen Problemen
nach und probieren Sie die beschriebenen Abhilfemaßnahmen aus. Wenn keiner dieser Tipps zur Fehlerbehebung
weiterhilft, öffnen Sie die Website „www.samsung.com“ und klicken Sie dort auf „Support“ (Unterstützung) oder wenden
Sie sich an ein Samsung-Kundendienstzentrum.
Probleme Lösungen und Erklärungen
Bildqualität
Führen Sie zu allererst den Bildtest durch, um zu bestätigen, dass Ihr Fernsehgerät das
Testbild korrekt anzeigt. (Navigieren Sie zu MENU - Unterstützung - Eigendiagnose
- Bildtest) Wenn das Testbild korrekt angezeigt wird, ist die schlechte Bildqualität
möglicherweise auf ein Problem mit der Signalquelle oder dem Signal selbst
zurückzuführen.
Das Fernsehbild ist nicht so
gut wie im Geschäft.
• Wenn Sie einen analogen Kabel-/Satellitenreceiver verwenden, ersetzen Sie diesen
durch einen digitalen. Verwenden Sie HDMI-Kabel, um eine Bildqualität in HD (hohe
Auflösung) zu ermöglichen.
• Kabel-/Satellitenanschluss: Probieren Sie HD-Sender aus der Senderliste.
• Antennenanschluss: Probieren Sie HD-Sender, nachdem Sie den automatischen
Sendersuchlauf durchgeführt haben.
• Viele HD-Sender senden aufbereitete SD-Inhalte (Standardauflösung).
• Stellen Sie den Kabelreceiver bzw. die Set-Top-Box auf eine Bildauflösung von 1080i
oder 720p ein.
• Achten Sie darauf, dass Sie beim Fernsehen den empfohlenen Mindestabstand
entsprechend der Größe des Fernsehgeräts und der Auflösung des angezeigten
Signals einhalten.
Das Bild ist verzerrt:
Macroblock-Fehler,
Smallblock-Fehler, Punkte,
Pixelfehler.
• Durch die Kompression der Videoinhalte kann es zu Bildverzerrungen kommen,
insbesondere bei schnellen Bildern wie bei Sportsendungen und Actionfilmen.
• Ein niedriger Signalpegel oder eine schlechte Qualität können Bildverzerrungen
verursachen. Das ist kein Problem des Fernsehgeräts.
• Mobiltelefone, die in der Nähe (bis ca. 1 m) eines Fernsehgeräts betrieben werden,
können bei Analog- und Digitalfernsehern Bildrauschen verursachen.
Schlechte Farbe oder
Helligkeit.
• Stellen Sie im Gerätemenü die Optionen unter Bild ein. (Navigieren Sie zu Bildmodus
/ Farbe / Helligkeit / Schärfe).
• Stellen Sie im Gerätemenü die Option Energiesparmod. ein. (Navigieren Sie zu
MENU - System - Öko-Lösung - Energiesparmod.)
• Versuchen Sie, die Bildeinstellungen auf die Standardwerte zurückzusetzen.
(Navigieren Sie zu MENU - Bild - Bild zurücksetzen)
Gepunktete Linie am
Bildschirmrand.
• Wenn das Bildformat auf Bildanpassung eingestellt ist, ändern Sie die Einstellung in
16:9.
• Ändern Sie die Auflösung des Kabel-/Satellitenreceivers.
Page 37
Deutsch
Deutsch - 13
Probleme Lösungen und Erklärungen
Beim Senderwechsel
friert das Bild ein bzw.
ist verzerrt, oder die
Bildanzeige erfolgt
verzögert.
• Wenn Sie einen Kabelreceiver angeschlossen haben, versuchen Sie diesen
zurückzusetzen. Schließen Sie das Netzkabel wieder an und warten Sie, bis der
Kabelreceiver neu startet. Dies kann bis zu 20 Minuten dauern.
• Stellen Sie die Bildauflösung des Kabelreceivers auf 1080i oder 720p ein.
Tonqualität
Führen Sie zunächst den Audiotest durch, um zu bestätigen, dass Ihr Fernsehgerät
den Ton korrekt ausgibt. (Navigieren Sie zu MENU - Unterstützung - Eigendiagnose -
Audiotest)
Wenn der Ton korrekt ausgegeben wird, ist die schlechte Tonqualität möglicherweise auf
ein Problem mit der Signalquelle oder dem Signal selbst zurückzuführen.
Kein Ton oder Ton zu leise
bei maximaler Lautstärke.
• Überprüfen Sie die Lautstärke des an Ihren Fernseher angeschlossenen Geräts
(Kabel/Satellitenreceiver, DVD-, Blu-ray-Player usw.).
Bild ist gut, aber kein Ton.
• Stellen Sie die Option Lautsprecher auswählen im Tonmenü auf TV-Lautsprecher
ein.
• Wenn Sie ein externes Gerät verwenden, vergewissern Sie sich, dass die Audiokabel
an die richtigen Audioeingänge am Fernsehgerät angeschlossen sind.
• Wenn Sie ein externes Gerät verwenden, überprüfen Sie die Einstellungen für die
Tonausgabe des Geräts (z.B. müssen Sie die Toneinstellungen Ihres Kabelreceivers
möglicherweise in „HDMI“ ändern, wenn Ihr Fernsehgerät über HDMI angeschlossen
ist).
• Wenn Sie ein DVI/HDMI-Kabel verwenden, ist ein separates Audiokabel erforderlich.
• Ziehen Sie kurzzeitig das Netzkabel des angeschlossenen Geräts, um es neu zu
starten.
Die Lautsprecher geben ein
unerwünschtes Geräusch
von sich.
• Überprüfen Sie die Kabelverbindungen. Vergewissern Sie sich, dass kein Videokabel
an einen Audioeingang angeschlossen ist.
• Überprüfen Sie die Signalstärke des Antennen-/Kabelanschlusses. Ein schwaches
Signal kann Tonverzerrungen verursachen.
Kein Bild, kein Video.
Das Fernsehgerät kann
nicht eingeschaltet werden.
• Vergewissern Sie sich, dass das Netzkabel sicher mit der Wandsteckdose und dem
Fernsehgerät verbunden ist.
• Vergewissern Sie sich, dass die Netzsteckdose Strom liefert.
• Drücken Sie die Taste P am Fernsehgerät, um zu prüfen, ob die Fernbedienung
richtig funktioniert. Wenn das Fernsehgerät eingeschaltet werden kann, lesen Sie den
Abschnitt „Die Fernbedienung funktioniert nicht“ weiter unten.
Das Fernsehgerät schaltet
sich automatisch aus.
• Stellen Sie im Menü Zeit sicher, dass die Funktion Sleep-Timer deaktiviert (auf Aus
eingestellt) ist.
• Wenn Sie Ihren PC an das Fernsehgerät angeschlossen haben, überprüfen Sie die
Energiespareinstellungen des PCs.
• Vergewissern Sie sich, dass das Netzkabel sicher mit der Wandsteckdose und dem
Fernsehgerät verbunden ist.
• Kein Sig. Standby schaltet das Fernsehgerät aus, wenn über einen festgelegten
Zeitraum kein Signal empfangen wird. Autom. Aussch. schaltet das Fernsehgerät
aus, wenn über einen Zeitraum von mehr als vier Stunden keine Benutzereingabe
erfolgt.
Page 38
Deutsch - 14
Probleme Lösungen und Erklärungen
Kein Bild/Video.
• Überprüfen Sie die Kabelverbindungen. Unterbrechen Sie kurzzeitig alle
Kabelverbindungen zwischen dem Fernsehgerät und den externen Geräten.
• Stellen Sie den Videoausgang Ihres externen Geräts (Kabel-/Satellitenreceiver,
DVD-/Blu-ray-Player) so ein, dass er zur Verbindung mit dem Fernsehgerät
passt. Zum Beispiel: Wenn der HDMI-Ausgang des externen Geräts verwendet
wird, schließen Sie es an den HDMI-Eingangs Ihres Fernsehers an.
• Stellen Sie sicher, dass die angeschlossenen Geräte eingeschaltet sind.
• Vergewissern Sie sich, dass die richtige Signalquelle für den Fernseher
eingestellt ist. Drücken Sie dazu die Taste SOURCE auf der Fernbedienung.
• Ziehen Sie kurzzeitig das Netzkabel des angeschlossenen Geräts, um es neu zu
starten.
Antennenverbindung (Terrestrisch/Kabel)
Das Fernsehgerät empfängt
nicht alle Sender.
• Stellen Sie sicher, dass das Antennenkabel richtig angeschlossen ist.
• Versuchen Sie die Einstell.-Funktion (Anfangseinstellung) durchzuführen, um
die verfügbaren Sender zur Senderliste hinzuzufügen. Navigieren Sie zu MENU
- System - Einstell. (Anfangseinstellung) und warten Sie, bis alle verfügbaren
Sender gespeichert sind.
• Prüfen Sie, ob die Antenne korrekt ausgerichtet ist.
Das Bild ist verzerrt:
Macroblock-Fehler, SmallblockFehler, Punkte, Pixelfehler.
• Durch die Kompression der Videoinhalte kann es zu Bildverzerrungen kommen,
insbesondere bei schnellen Bildern wie bei Sportsendungen und Actionfilmen.
• Ein schwaches Signal kann Bildverzerrungen verursachen. Das ist kein Problem
des Fernsehgeräts.
Sonstiges
Das Bild wird nicht als Vollbild
angezeigt.
• Bei HD-Sendern werden auf beiden Seiten schwarze Balken angezeigt, wenn
Sie aufbereitete SD-Inhalte (4:3) wiedergeben.
• Bei Filmen mit einem anderen Seitenverhältnis als am Fernsehgerät eingestellt
werden oben und unten schwarze Balken angezeigt.
• Stellen Sie das Bildformat an Ihrem externen Gerät oder den Fernseher auf
Vollbild ein.
Die Fernbedienung funktioniert
nicht.
• Ersetzen Sie die Batterien der Fernbedienung, und achten Sie dabei auf die
richtige Polung (+/-).
• Reinigen Sie das Sendefeld der Fernbedienung.
• Versuchen Sie, die Fernbedienung aus einer Entfernung von 1,5 bis 1,8 m aus
direkt auf das Fernsehgerät zu richten.
Mit der Fernbedienung des
Kabelreceivers bzw. der SetTop-Box kann das Gerät nicht
ein-/ausgeschaltet werden,
und die Lautstärke kann nicht
eingestellt werden.
• Programmieren Sie die Fernbedienung des Kabelreceivers bzw. der Set-Top-
Box so, dass sie das Fernsehgerät anspricht. Den Code für das SamsungFernsehgerät finden Sie in der Bedienungsanleitung des Kabelreceivers bzw. der
Set-Top-Box.
Die Meldung „Nicht
unterstützter Modus“ wird
angezeigt.
• Überprüfen Sie die unterstützte Auflösung des Fernsehgeräts, und stellen Sie
die Ausgangsauflösung des externen Geräts dementsprechend ein.
Aus dem Fernsehgerät tritt
Kunststoffgeruch aus.
• Dieser Geruch ist normal und verschwindet im Laufe der Zeit.
Die Option Signalinformation
steht für das Fernsehgerät im
Menü Eigendiagnose nicht zur
Verfügung.
• Diese Funktion ist nur bei digitalen Sendern mit Antennenanschluss (HF/Koax)
verfügbar.
Das Fernsehgerät ist zur rechten
oder linken Seite geneigt.
• Entfernen Sie den Standfuß vom Fernsehgerät und wiederholen Sie die
Montage.
Page 39
Deutsch
Deutsch - 15
Probleme Lösungen und Erklärungen
Es gibt Schwierigkeiten, den
Standfuß zu montieren.
• Stellen Sie sicher, dass Ihr Fernsehgerät auf einer ebenen Fläche steht. Wenn
Sie die Schrauben nicht vom Fernsehgerät lösen können, verwenden Sie einen
magnetischen Schraubendreher.
Das Menü Senderempfang wird
ausgegraut angezeigt (es ist
nicht verfügbar).
• Das Menü Senderempfang ist nur verfügbar, wenn als Quelle „TV“ ausgewählt
wird.
Ihre Einstellungen gehen nach
5 Minuten oder bei jedem
Ausschalten des Fernsehers
verloren.
• Wenn das Fernsehgerät im Modus Shop-Demo läuft, werden die Ton- und
Bildeinstellungen alle 5 Minuten zurückgesetzt. Wenn Sie die Einstellungen von
Shop-Demo in Privatgebrauch ändern möchten, wählen Sie durch Drücken
der Taste SOURCE den Modus TV aus und navigieren Sie dann zu MENU →
Unterstützung → Modusauswahl.
Vorübergehender Ausfall von
Bild oder Ton.
• Überprüfen Sie die Kabelanschlüsse und verbinden Sie sie neu.
• Der Ausfall von Ton oder Bild kann durch Einsatz übermäßig starrer oder
dicker Kabel verursacht werden. Vergewissern Sie sich, dass die Kabel für
langfristigen Gebrauch flexibel genug sind. Bei Wandmontage empfehlen wir die
Verwendung von Kabeln mit 90-Grad-Steckern.
Sie sehen kleine Partikel,
wenn Sie den Rahmen um das
Fernsehgerät herum genau
betrachten.
• Dies ist Teil des Produktdesigns und kein Defekt.
Das Menü PIP ist nicht
verfügbar.
• PIP -Funktionen stehen nur zur Verfügung, wenn Sie eine HDMI- oder
Component-Signalquelle verwenden.
Sie haben das Fernsehgerät
vor 45 Minuten ausgeschaltet,
es schaltet sich aber von selbst
wieder ein.
• Dies ist normal. Das Fernsehgerät aktiviert die OTA-Funktion (Over-the-Air)
selbst, um die Firmware für die Aktualisierung beim Fernsehen herunterzuladen.
Die Meldung „Verschlüsseltes
Signal“ oder „Kein Signal
oder schlechtes Signal“ wird
angezeigt.
• Wenn Sie ein CAM-Modul (mit „CI“- oder „CI+“-Karte) verwenden, überprüfen
Sie, ob es richtig in den Common Interface-Steckplatz eingesetzt wurde.
• Wenn das Problem fortbesteht, ziehen Sie das CAM-Modul zeitweilig aus dem
Fernsehgerät heraus und setzen Sie es dann wieder ein.
Es gibt wiederholte Bild-/
Tonprobleme.
• Überprüfen und ändern Sie das Signal/die Signalquelle.
Zwischen den Gummipolstern
des Standfußes und der
Oberfläche mancher Möbel kann
es zu einer Reaktion kommen.
• Um dies zu verhindern, bringen Sie Filzblöcke an jeder Fläche des
Fernsehgeräts an, die in direkten Kontakt mit Möbeln gerät.
Die Meldung „Datei k. vlt. n.
richtig wiedergeg. werd.“ wird
angezeigt.
• Dies ist möglicherweise auf die hohe Bitrate des Inhalts zurückzuführen. Der
Inhalt wird zwar generell abgespielt, aber möglicherweise nicht störungsfrei
wiedergegeben.
✎
Sie können den optimalen Zustand Ihres Fernsehgeräts erhalten, indem Sie die aktuelle Firmware per USB (www.
samsung.com → Support) herunterladen.
✎
Dieser TFT-LED-Bildschirm arbeitet mit Subpixeln, die mit Hilfe hochentwickelter Fertigungstechnologien
produziert werden. Allerdings kann es vorkommen, dass einige wenige Pixel zu hell oder zu dunkel sind. Diese
Pixelfehler haben keinen Einfluss auf die Geräteleistung.
Empfehlung - Nur EU
• Hiermit erklärt Samsung Electronics, dass dieses LED-Fernsehgerät mit allen wesentlichen Anforderungen und
sonstigen relevanten Bestimmungen der Richtlinie 1999/5/EG konform ist.
• Dieses Gerät kann in allen Ländern in der EU verwendet werden.
• Die offizielle Konformitätserklärung finden Sie unter http://www.samsung.com. Wechseln Sie zu Support >
Produktsuche, und geben Sie den Modellnamen ein.
Page 40
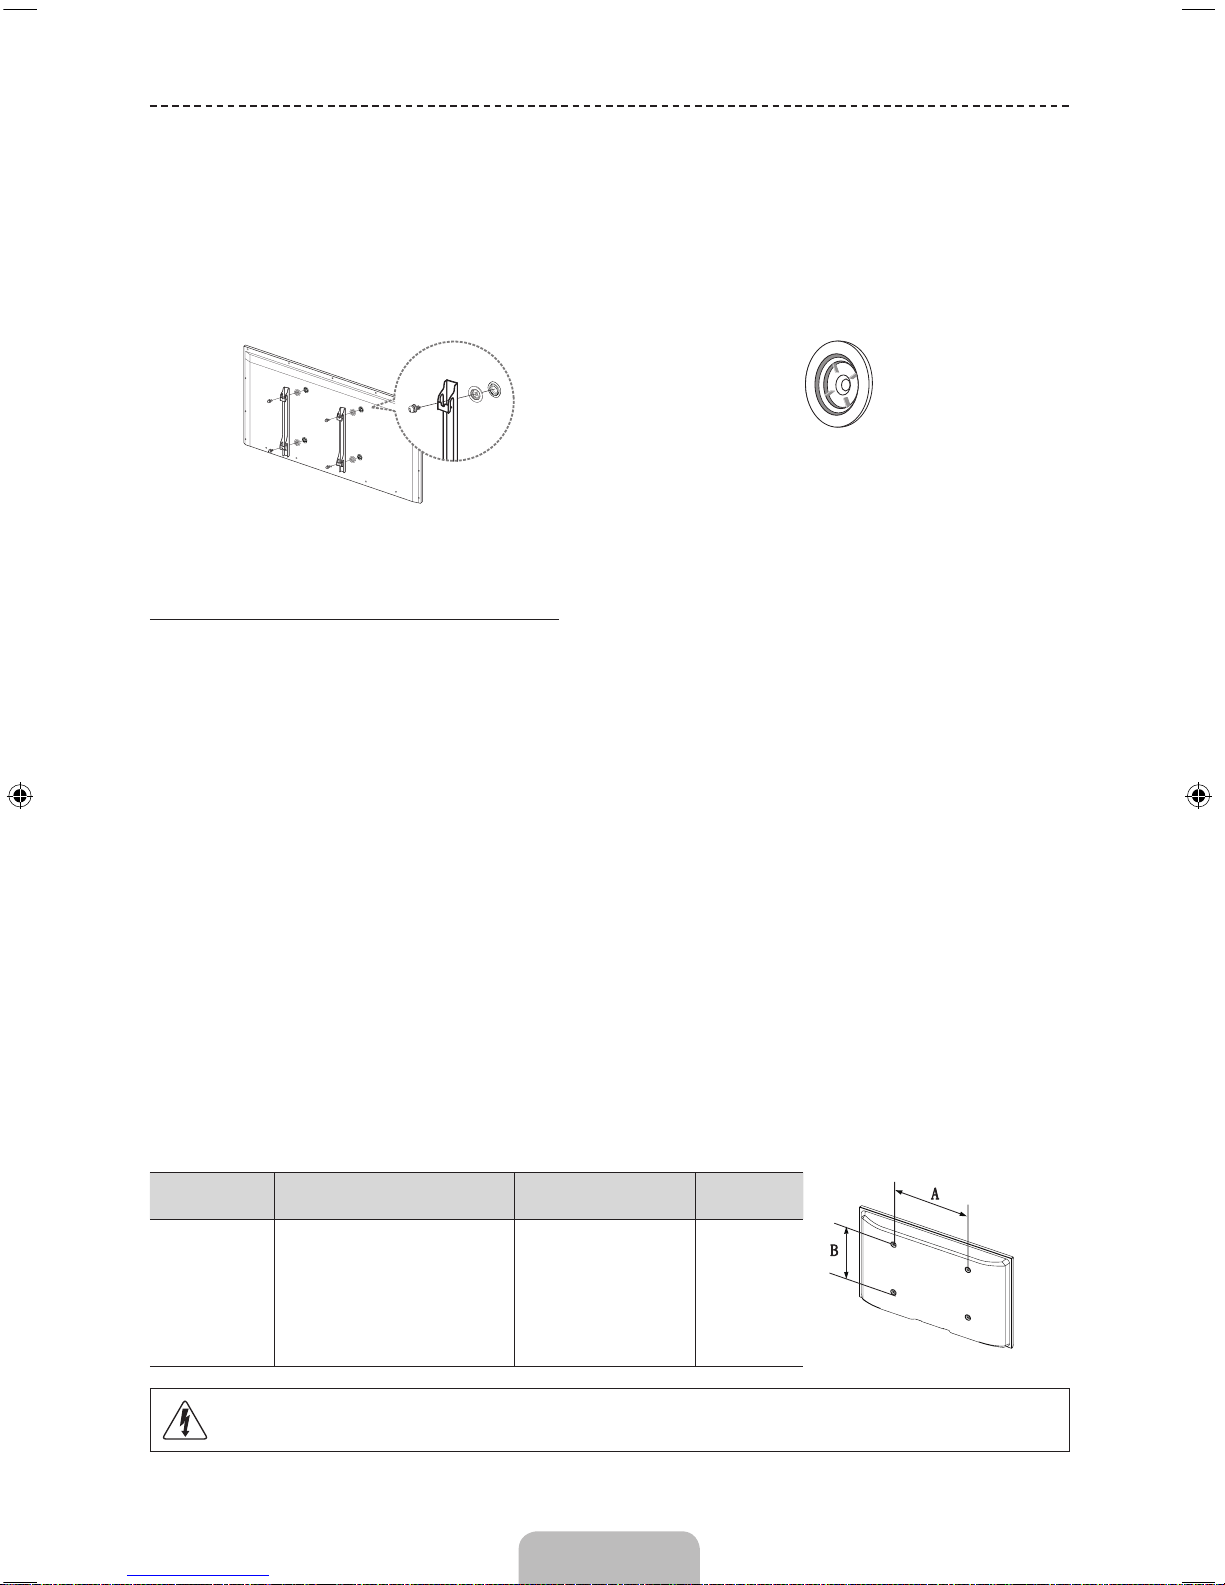
Deutsch - 16
Anbringen der Wandhalterung
Mit der (separat erhältlichen) Wandhalterung können Sie das Fernsehgerät an einer Wand befestigen. Detaillierte
Informationen zum Montieren der Wandhalterung finden Sie in den Anweisungen, die im Lieferumfang der
Wandhalterung enthalten sind. Lassen Sie sich beim Anbringen der Wandhalterung von einem Techniker helfen. Wir
raten Ihnen davon ab, dies selbst zu tun.
Samsung Electronics haftet nicht für Schäden an Gerät oder Personen, wenn die Montage vom Kunden selbst
durchgeführt wird.
Adapter für die Wandhalterung
(Je nach Modell)
Befestigen Sie vor der Montage einer anderen Wandhalterung den Wandhalterungsadapter, der separat für das Gerät
erhältlich ist.
Spezifikation (VESA) der Wandhalterung
✎
Die Wandhalterung wird nicht mitgeliefert, ist aber gesondert erhältlich.
✎
Montieren Sie die Wandhalterung an einer soliden Wand, die senkrecht zum Boden steht. Bei Installation auf
anderen Trägermaterialien wenden Sie sich bitte an Ihren Fachhändler. Bei Montage an einer Decke oder
schrägen Wand kann das Fernsehgerät herunterfallen und zu Verletzungen führen.
✎
HINWEIS
• Die Standardabmessungen der Wandhalterung finden Sie in der nachfolgenden Tabelle.
• Beim Kauf unserer Wandhalterung erhalten Sie ein detailliertes Installationshandbuch sowie alle für die Montage
erforderlichen Teile.
• Verwenden Sie keine Schrauben, die nicht der VESA-Standardspezifikation für Schrauben entsprechen.
• Verwenden Sie keine Schrauben, die länger sind als hier angegeben, da damit innen liegende Bauteile des
Fernsehers beschädigt werden können.
• Bei Wandhalterungen, die nicht der VESA-Standardspezifikation für Schrauben entsprechen, kann die Länge der
Schrauben je nach Spezifikation unterschiedlich sein.
• Ziehen Sie die Schrauben nicht zu fest an, weil Sie so möglicherweise das Gerät beschädigen, oder es dadurch
herunterfallen und Verletzungen verursachen könnte. Samsung haftet nicht bei derartigen Unfällen.
• Samsung haftet nicht für Geräteschäden oder Verletzungen, wenn eine Wandhalterung verwendet wird, die nicht
dem VESA-Standard entspricht oder nicht spezifiziert ist, oder wenn der Verbraucher die Installationsanleitung
für das Produkt nicht befolgt.
• Bei der Montage dieses Fernsehgeräts darf eine Neigung von 15 Grad nicht überschritten werden.
Zoll VESA-Spezifikation (A * B) Standardschraube Menge
50 ~ 60 400 X 400 M8 4
Installieren Sie die Wandhalterung nicht bei eingeschaltetem Fernsehgerät. Sie konnten dabei einen
Stromschlag erhalten und sich verletzen.
Page 41
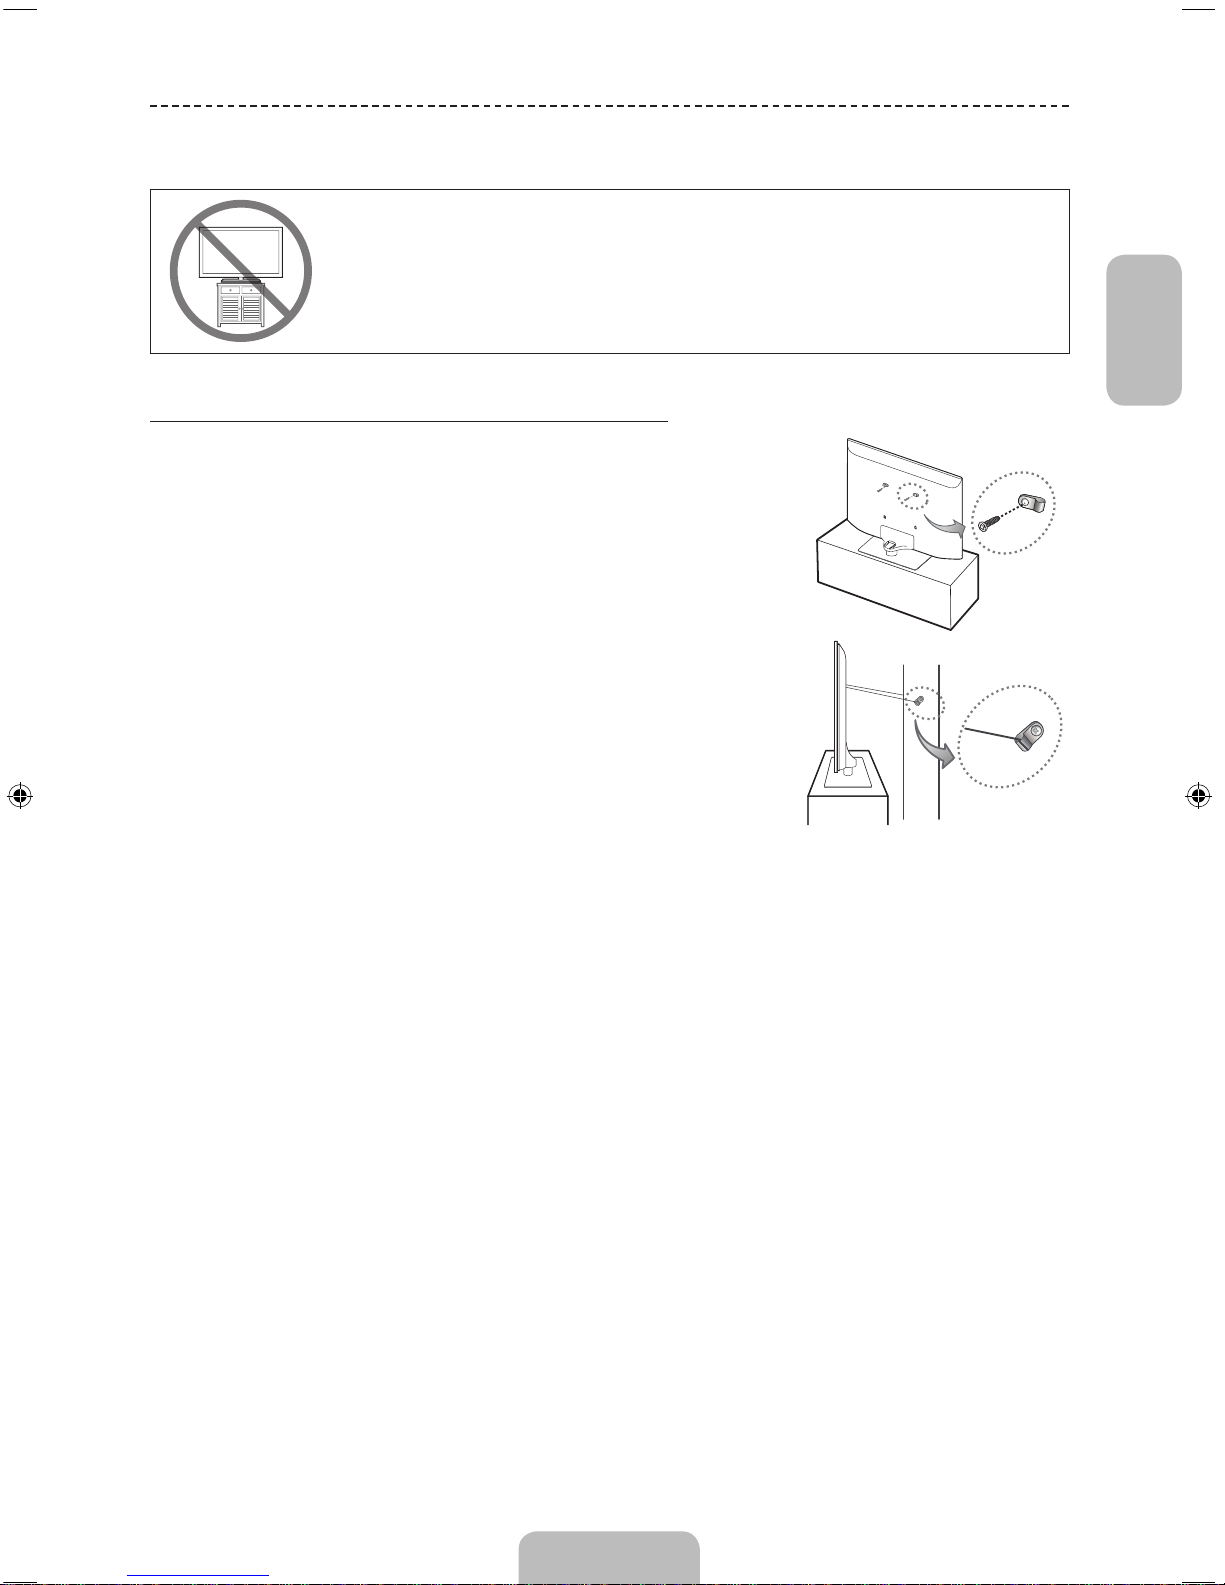
Deutsch
Deutsch - 17
Befestigen des Fernsehgeräts an der Wand
Achtung: Das Fernsehgerät kann hinfallen, wenn Sie daran ziehen, es schieben oder darauf
klettern. Sie insbesondere sicher, dass sich keine Kinder an das Gerät hängen oder es aus
dem Gleichgewicht bringen. Anderenfalls könnte das Gerät umkippen und zu schweren
Verletzungen oder dem Tod führen. Beachten Sie alle Anweisungen der beigefügten
Sicherheitshinweise. Noch mehr Stabilität erreichen Sie, wenn Sie den Kippschutz installieren.
Gehen Sie hierzu folgendermaßen vor.
So verhindern Sie, dass das Fernsehgerät umkippt
1. Stecken Sie die Schrauben durch die Halterungen und befestigen
Sie sie fest an der Wand. Stecken Sie die Schrauben durch die
Halterungen und befestigen Sie sie fest an der Wand.
✎
Je nach Ausführung der Wand benötigen Sie zum Befestigen
weiteres Material, wie z. B. Dübel.
✎
Da die benötigten Halterungen, Schrauben und das Band nicht
zum Lieferumfang gehören, müssen Sie diese Teile gesondert
erwerben.
2. Entfernen Sie die Schrauben in der Mitte der Geräterückseite. Setzen
Sie die Schrauben in die Halterungen ein und befestigen Sie die
Schrauben dann wieder am Fernsehgerät.
✎
Daten der Schrauben
• Bei einem 50 ~ 60 Zoll Gerät: M8
3. Verbinden Sie die Halterungen an der Wand und die Halterungen am
Fernsehgerät mit einem festen Band und ziehen Sie das Band dann
fest.
✎
HINWEIS
• Stellen Sie das Fernsehgerät in der Nähe der Wand auf, damit es
nicht nach hinten kippen kann.
• Es ist noch sicherer, wenn die Halterungen an der Wand niedriger als
die Halterungen am Fernsehgerät sind.
• Lösen Sie das Band, ehe Sie den Fernseher bewegen.
4. Kontrollieren Sie, ob alle Befestigungen ordnungsgemäß gesichert sind. Prüfen Sie regelmäßig die Verbindungen auf
Zeichen von Ermüdung oder Versagen. Bei Zweifeln hinsichtlich der Sicherheit Ihrer Halterungen wenden Sie sich an
einen professionellen Installationsbetrieb.
Wand
• Form und Farbe des Geräts
können sich je nach Modell
unterscheiden.
Page 42
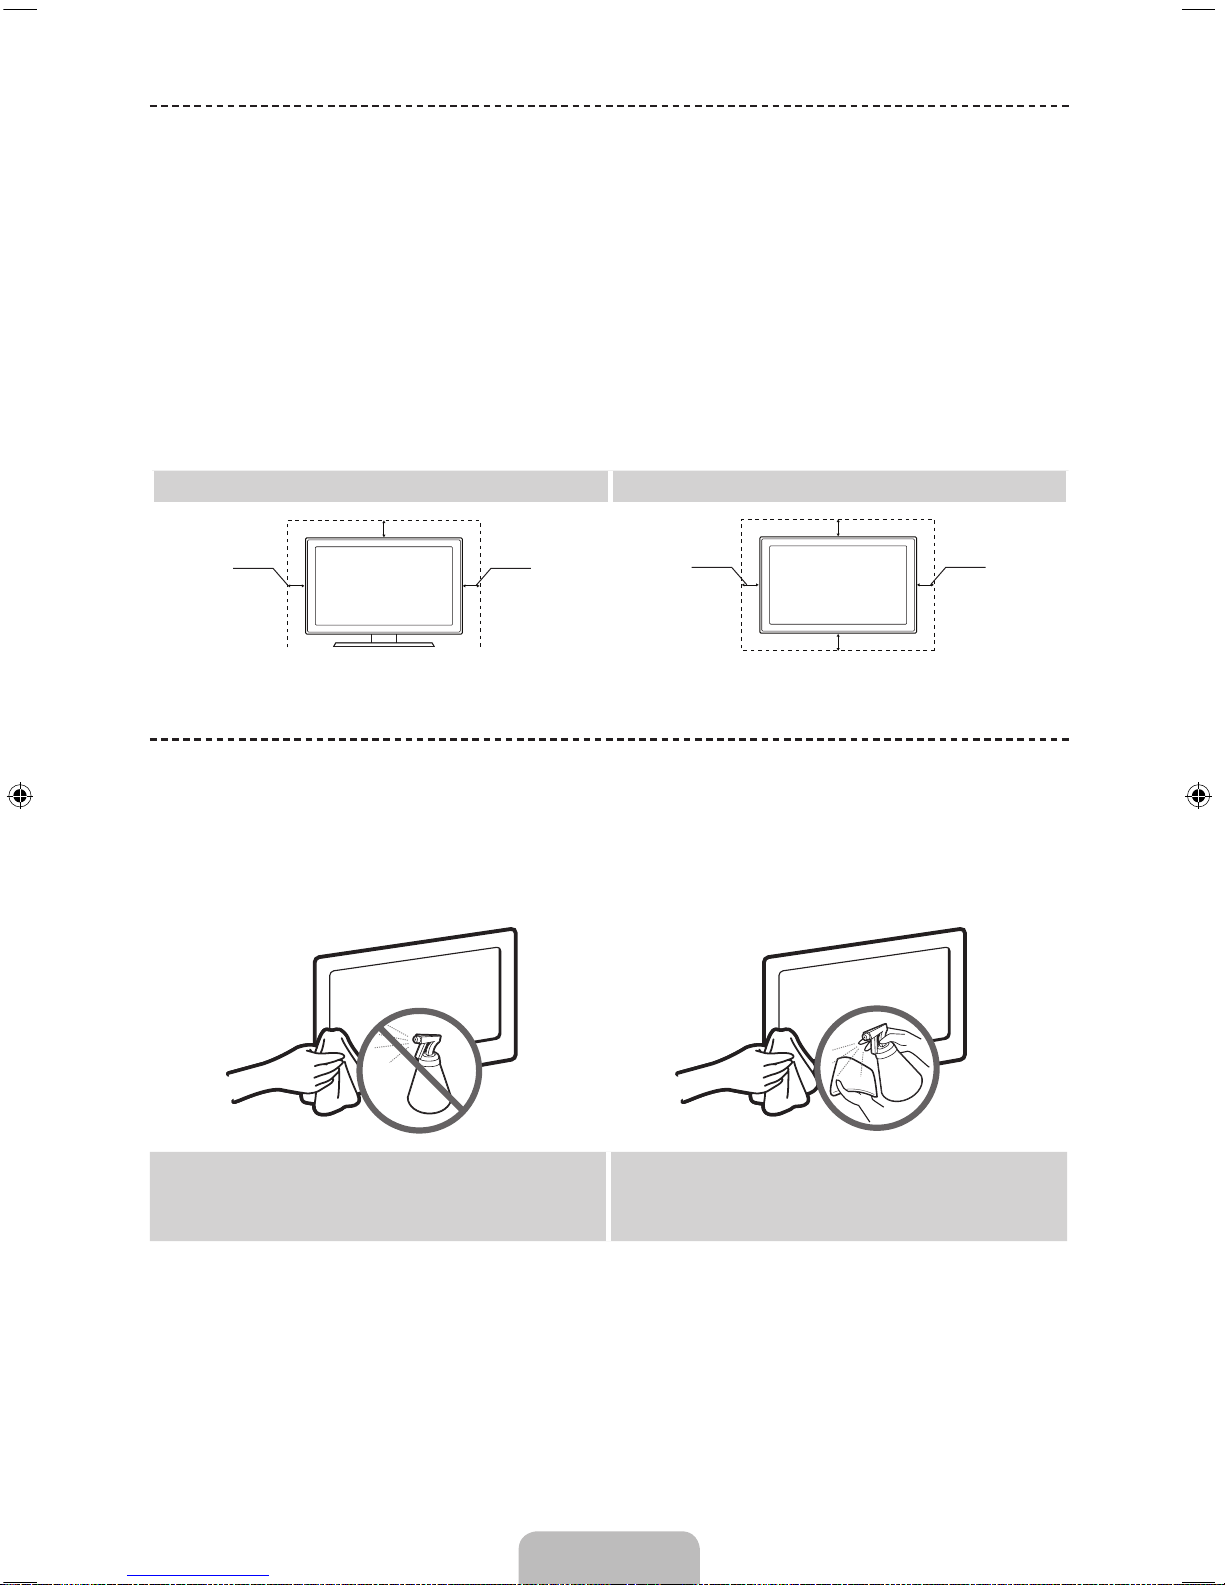
Deutsch - 18
Absichern des Aufstellbereichs
Halten Sie die erforderlichen Abstände zwischen dem Gerät und anderen Objekten (z.B. Wänden) ein, um eine
ausreichende Lüftung sicherzustellen.
Wenn Sie dies nicht tun, besteht die Gefahr, dass aufgrund eines Anstiegs der Temperatur im Innern des Geräts ein
Brand ausbricht oder andere Probleme mit dem Gerät auftreten.
✎
Wenn Sie einen Standfuß oder eine Wandhalterung einsetzen, verwenden Sie ausschließlich Teile von Samsung
Electronics.
• Wenn Sie Teile eines anderen Herstellers verwenden, kann es zu Problemen mit dem Gerät oder zu Verletzungen
kommen, weil das Gerät herunterfällt.
✎
Das Aussehen kann sich je nach Gerät unterscheiden.
✎
Gehen Sie beim Anschließen des Fernsehgeräts vorsichtig vor, da einige Teile warm werden können.
Aufstellen des Geräts mit dem Standfuß Installation des Geräts mit der Wandhalterung
10 cm
10 cm
10 cm
10 cm
10 cm
10 cm
10 cm
Lagerung und Wartung
✎
Wenn Sie den Aufkleber vom Bildschirm abnehmen, entfernen Sie die Kleberückstände, ehe Sie fernsehen.
✎
Beim Reinigen können Kratzer auf dem Gehäuse und dem Bildschirm des Produkts entstehen. Wischen Sie das
Gehäuse und den Bildschirm vorsichtig mit einem weichen Tuch ab, um Kratzer zu vermeiden.
Sprühen Sie kein Wasser direkt auf das Gerät. Jede
Flüssigkeit, die in das Gerät eindringt, kann zu einer
Funktionsstörung, einem Brand oder einem Stromschlag
führen.
Reinigen Sie das Gerät mit einem weichen Tuch, das
Sie vorher mit einer kleinen Menge Wasser anfeuchten.
Verwenden Sie keine entzündlichen Flüssigkeiten (z. B.
Benzol, Verdünner) oder ein Reinigungsmittel.
Page 43
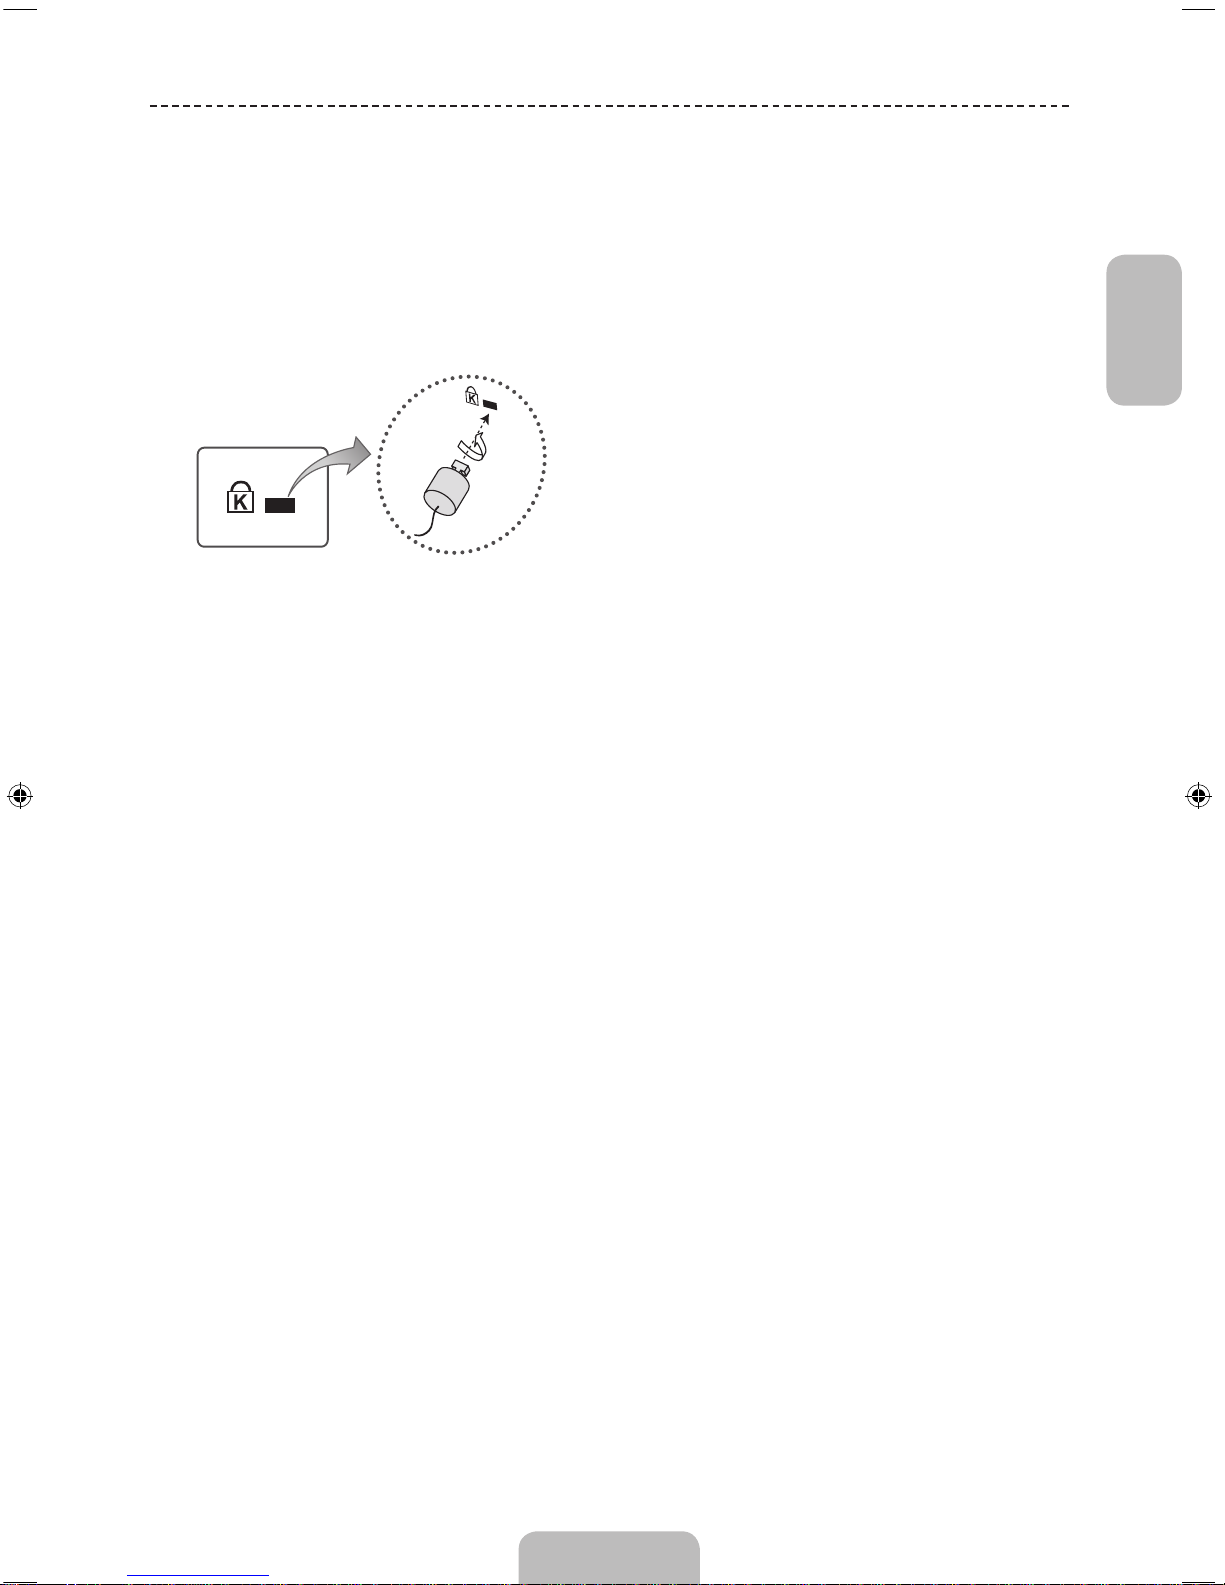
Deutsch
Deutsch - 19
Kensington Lock als Dienstahlsicherung
Das Kensington-Schloss gehört nicht zum Lieferumfang Ihres Samsung- Geräts. Ein Kensington-Schloss dient zur
physischen Sicherung des Systems bei Verwendung in öffentlichen Bereichen. Je nach Hersteller können Aussehen und
Verriegelungsverfahren von der Abbildung abweichen. Weitere Informationen zur richtigen Anwendung entnehmen Sie
bitte der Bedienungsanleitung des Kensington-Schlosses.
✎
Suchen Sie das Symbol „K“ auf der Rückseite des Fernsehgeräts. Neben diesem „K“-Symbol befindet sich der
Steckplatz für das Kensington-Schloss.
✎
Die Position und die Farbe können je nach Modell unterschiedlich sein.
<Opzionale>
Um das Gerät zu sperren, führen Sie die folgenden Schritte aus:
1. Wickeln Sie das Kabel des Kensington-Schlosses um ein großes feststehendes Objekt wie einen Tisch oder Stuhl.
2. Schieben Sie das Ende des Kabels mit dem Schloss durch die Schleife am anderen Ende des Kensington-Kabels.
3. Führen Sie das Schloss in den Kensington-Einschub am Gerät ein.
4. Versperren Sie das Schloss.
✎
Dies sind allgemeine Hinweise. Genaue Anweisungen erhalten Sie im Benutzerhandbuch, das zusammen mit
dem Schloss geliefert wird.
✎
Das Schloss muss separat erworben werden.
Page 44
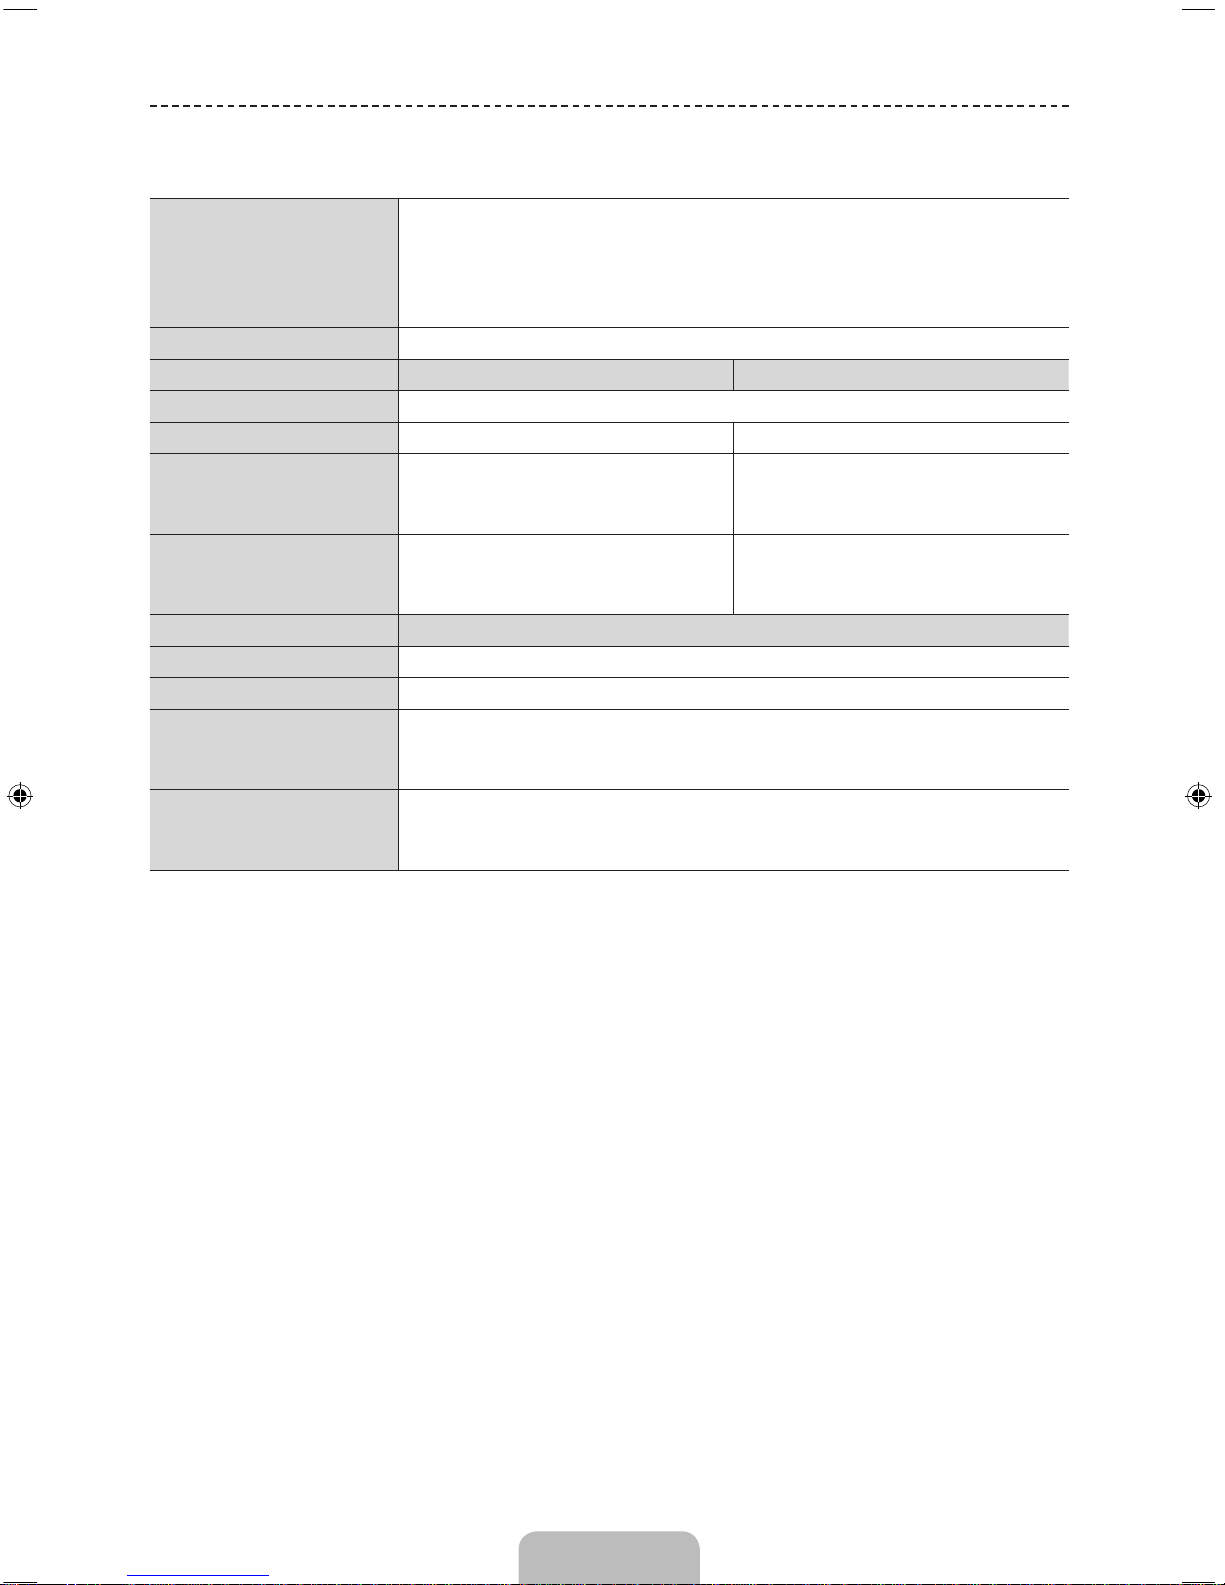
Deutsch - 20
Technische Daten
Umgebungsbedingungen
Betriebstemperatur
Luftfeuchtigkeit (bei Betrieb)
Temperatur (Lagerung)
Luftfeuchtigkeit (Lagerung)
10 bis 40°C (50°F bis 104°F)
10% bis 80%, nicht kondensierend
-20 bis 45°C (-4°F bis 113°F)
5 % bis 95 %, nicht kondensierend
Audio (Ausgang)
10 W x 2
Modellname
UE50J6150 / UE50J6170 UE55J6150 / UE55J6170
Anzeigeauflösung
1920 x 1080
Bildschirmgröße
50 Zoll (125 cm) 55 Zoll (138 cm)
Abmessungen (B × H × T)
Ohne Fuß
Mit Fuß
1116,8 x 654,4 x 63,7 mm
1116,8 x 696,4 x 203,8 mm
1230,6 x 718,4 x 64,0 mm
1230,6 x 763,4 x 226,5 mm
Gewicht
Ohne Fuß
Mit Fuß
13,0 kg
14,1 kg
15,7 kg
18,6 kg
Modellname
UE60J6150 / UE60J6170
Anzeigeauflösung
1920 x 1080
Bildschirmgröße
60 Zoll (152 cm)
Abmessungen (B × H × T)
Ohne Fuß
Mit Fuß
1365,0 x 797,4 x 64,4 mm
1365,0 x 878,7 x 295,9 mm
Gewicht
Ohne Fuß
Mit Fuß
23,0 kg
27,4 kg
✎
Änderungen der technischen Daten und des Geräte-Designs vorbehalten.
✎
Die technischen Daten zur benötigten Netzspannung und zum Energieverbrauch finden Sie auf dem Etikett am
Produkt.
✎
Der typische Stromverbrauch wird gemäß IEC 62087 Ed.2 gemessen.
Page 45
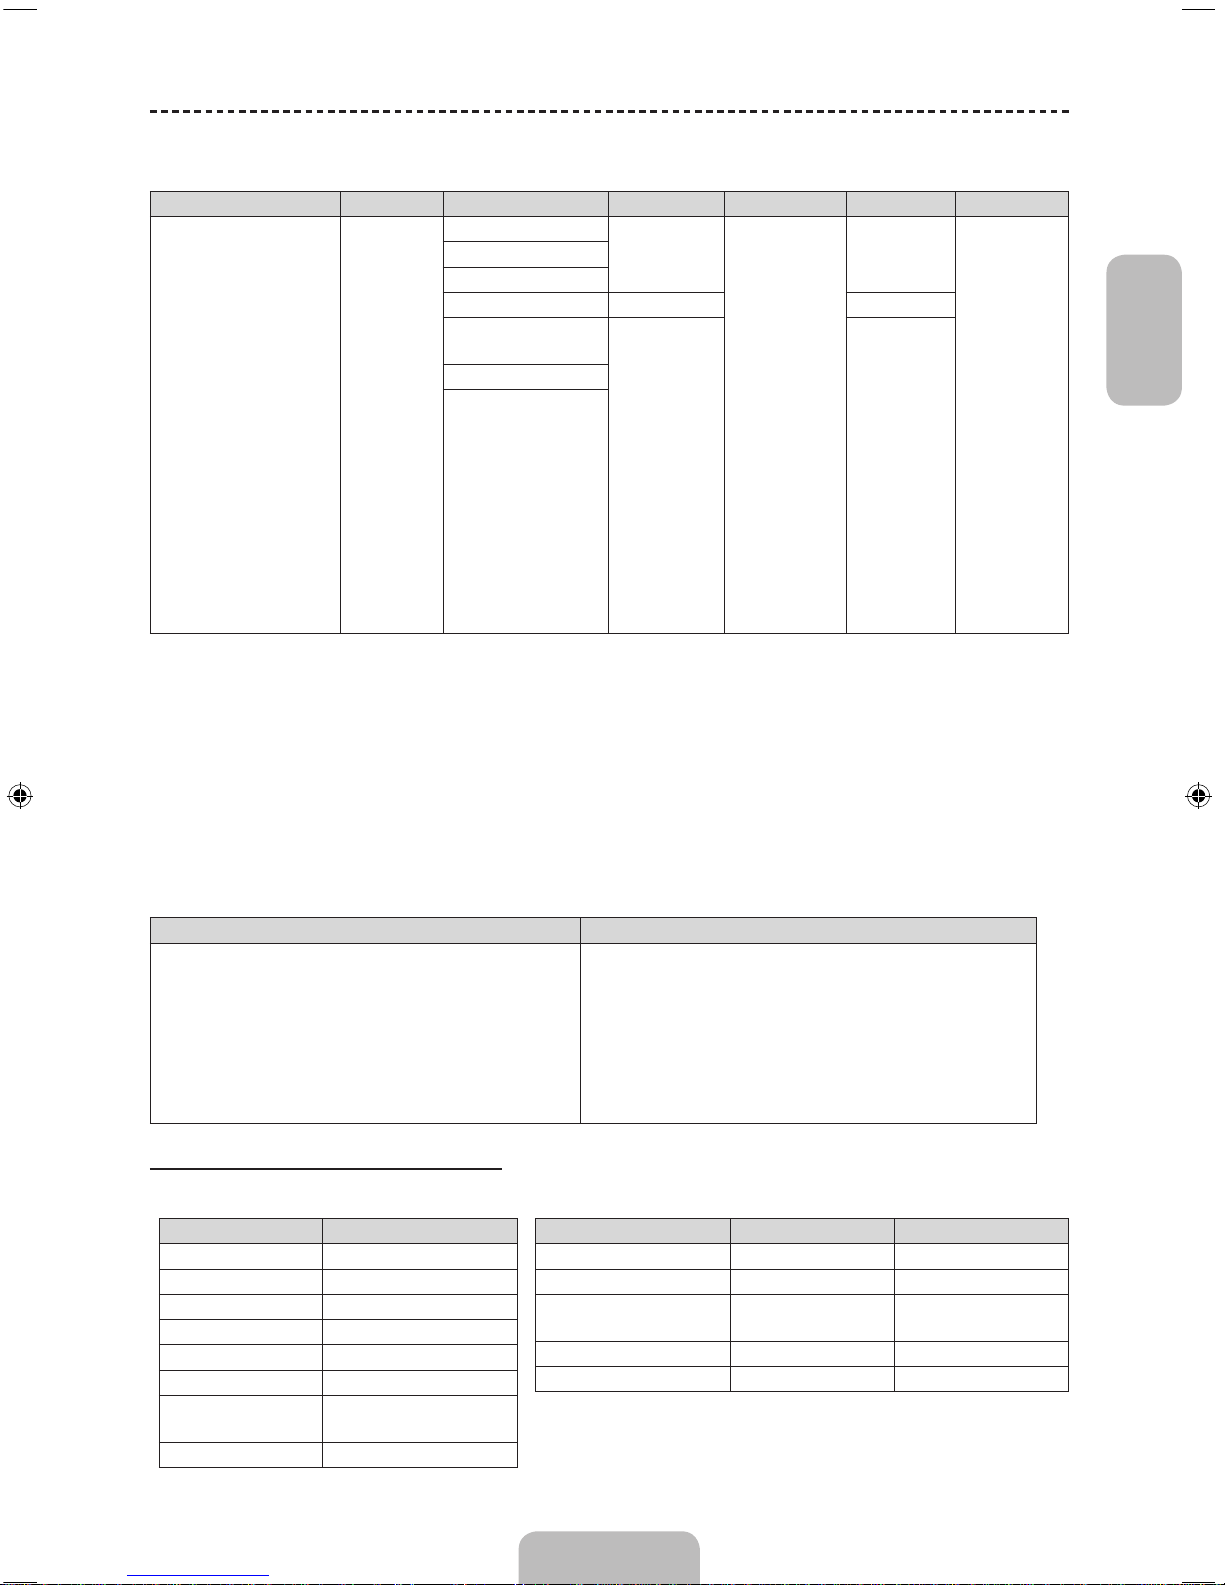
Deutsch
Deutsch - 21
Unterstützte Videoformate
Dateinamenserweiterung Container Videocodec Auflösung Framerate (f/s) Bitrate (Mbit/s) Audiocodec
*.avi
*.mkv
*.asf
*.wmv
*.mp4
*.3gp
*.vro
*.mpg
*.mpeg
*.ts
*.tp
*.trp
*.mov
*.flv
*.vob
*.svi
*.divx
AVI
MKV
ASF
MP4
3GP
VRO
VOB
PS
TS
DivX 3.11 / 4 / 5 / 6
1920 x 1080
6~30
30
Dolby Digital
LPCM
ADPCM (IMA,
MS)
AAC
HE-AAC
WMA
Dolby Digital
Plus
MPEG (MP3)
DTS (Core)
G.711 (A-Law,
μ-Law)
MPEG4 SP/ASP
H.264 BP/MP/HP
Motion JPEG 640 x 480 8
Window Media Video
v9
1920 x 1080 30
MPEG2
MPEG1
✎
Weitere Einschränkungen
• Wenn der Inhalt eines Videos oder der Container fehlerhaft sind, wird das Video nicht ordnungsgemäß oder
überhaupt nicht wiedergegeben.
• Ton und Bild stehen möglicherweise nicht zur Verfügung, wenn der Inhalt eine Standardbitrate/Framerate aufweist,
die über dem in der Tabelle aufgeführten Wert der kompatiblen Framerate (Frames/Sekunde) liegt.
• Wenn die Indextabelle einen Fehler aufweist, wird die Suchfunktion (Sprung) nicht unterstützt.
• Manche USB-Geräte/Digitalkameras sind mit diesem Gerät möglicherweise nicht kompatibel.
• Wenn das Video eine Bitrate von mehr als 10 Mbit/s hat, wird das Menü möglicherweise verzögert angezeigt.
Videodecoder Audiodecoder
• Unterstützt max. H.264, Level 4.1 (FMO/ASO/RS
wird nicht unterstützt.)
• Framerate
− weniger als 1280x720: max. 60 Frames
− mehr als 1280x720: max. 30 Frames
• VC1 AP L4 wird nicht unterstützt.
• GMC wird nicht unterstützt.
• WMA 10 Pro unterstützt maximal 5.1-Kanäle und M2-
Profile. (LBR-Modus von M0 wird nicht unterstützt)
• Verlustfreies WMA-Audio wird nicht unterstützt.
• Vorbis unterstützt maximal 2 Kanäle.
• Dolby Digital Plus unterstützt maximal 5.1-Kanäle.
Unterstützte Formate für Untertitel
• Extern
Name Dateinamenserweiterung
MPEG-4 timed text .ttxt
SAMI .smi
SubRip .srt
SubViewer .sub
Micro DVD .sub oder .txt
SubStation Alpha .ssa
Advanced SubStation
Alpha
.ass
Powerdivx .psb
• Intern
Name Container Format
Xsub AVI Bildformat
SubStation Alpha MKV Textformat
Advanced SubStation
Alpha
MKV Textformat
SubRip MKV Textformat
MPEG-4 Timed text MP4 Textformat
Page 46
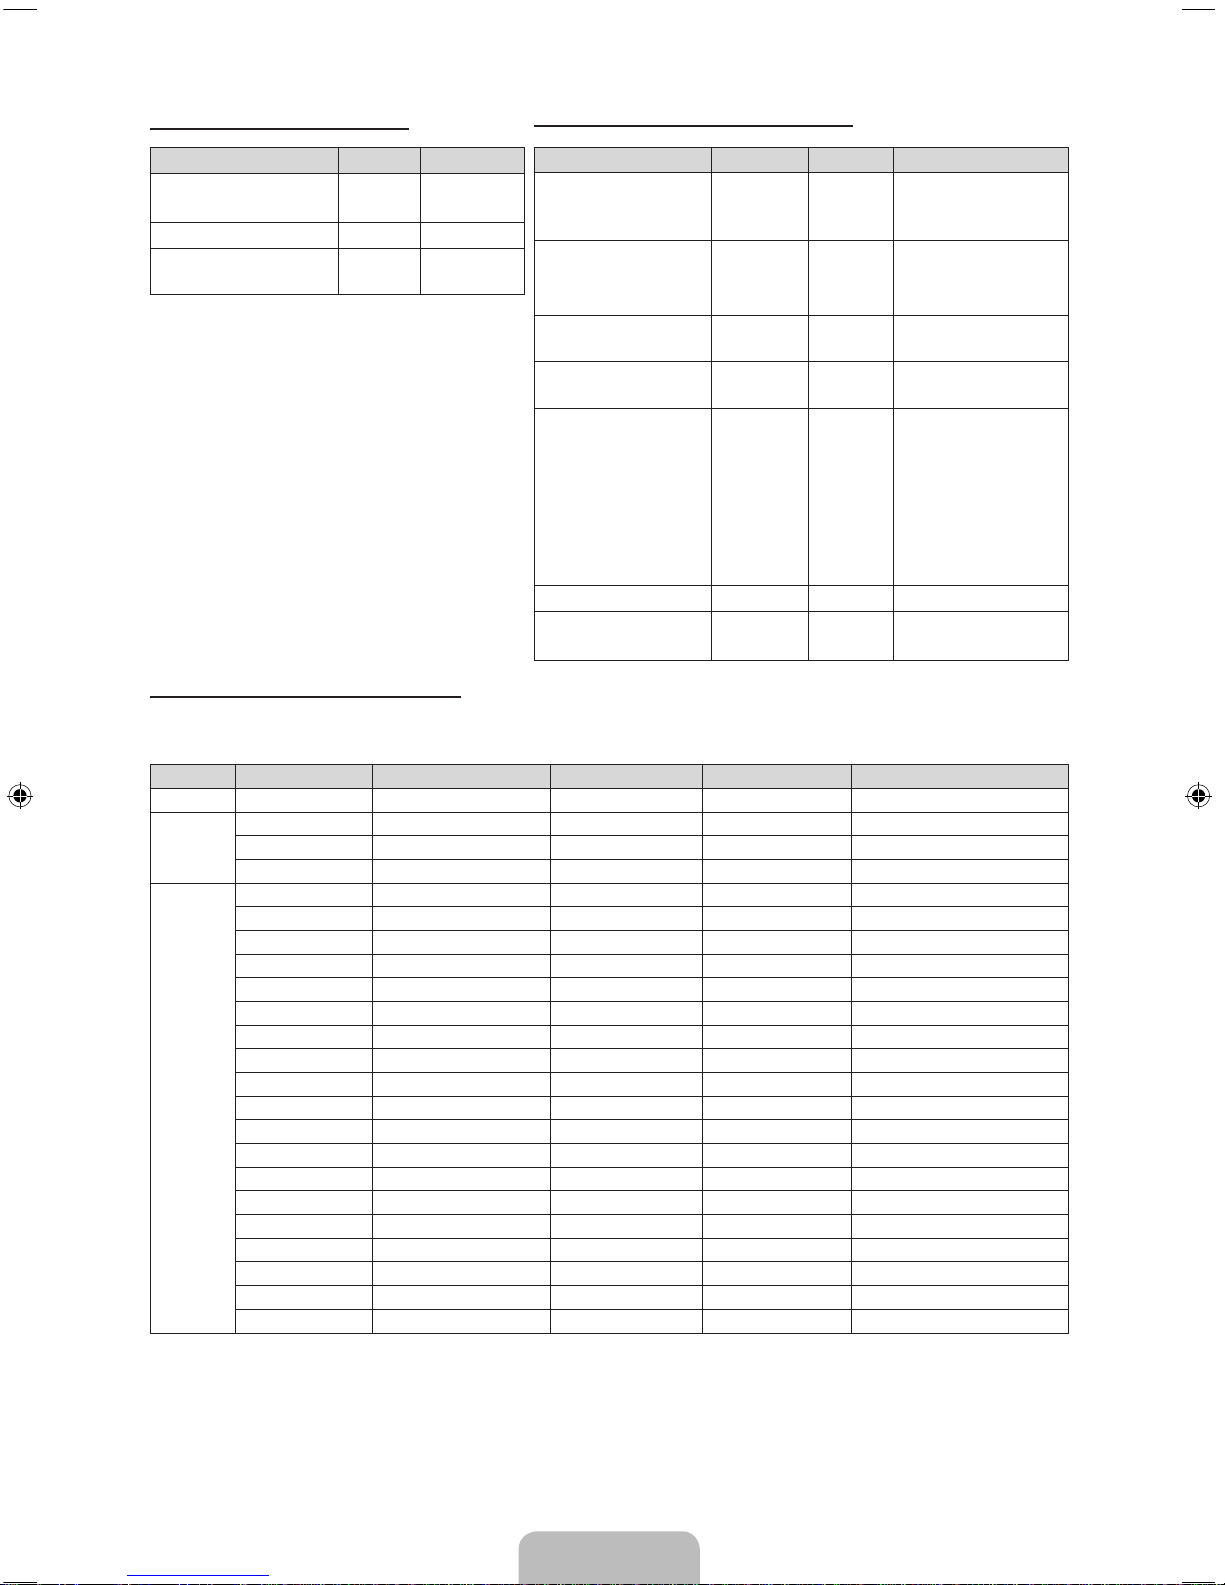
Deutsch - 22
Unterstützte Fotoformate
Dateinamenserweiterung Typ (Type) Auflösung
*.jpg
*.jpeg
JPEG
15360 X
8640
*.bmp BMP 4096 X 4096
*.mpo MPO
15360 X
8640
✎
Die Funktionen „Zoom“, „Drehen“ und
„Diashow-Effekt“ werden für MPO-Dateien
nicht unterstützt.
Unterstützte Formate für Musik
Dateinamenserweiterung Typ (Type) Codec Bemerkungen
MP3 MPEG
MPEG1
Audio
Layer 3
*.m4a
*.mpa
*.aac
MPEG4 AAC
*.flac FLAC FLAC
Unterstützt maximal 2
Kanäle
*.ogg OGG Vorbis
Unterstützt maximal 2
Kanäle
*.wma WMA WMA
WMA 10 Pro
unterstützt maximal
5.1-Kanäle und M2Profile. (Verlustfreies
WMA-Audio wird nicht
unterstützt.)
LBR-Modus ist nicht
verfügbar.
*.wav wav wav
*.mid
*.midi
midi midi Typ 0 und Typ 1
Höchste verfügbare Auflösung
Optionale Auflösung: für Modelle der 1920 x 1080 bei 60Hz. Informationen zur höchsten verfügbaren Auflösung finden
Sie auf der Seite mit den technischen Daten.
Modus Auflösung Horizontalfrequenz (kHz) Vertikalfrequenz (Hz) Pixeltakt (MHz) Synchronisationspolarität (H/V)
IBM 720 x 400 31.469 70.087 28.322 -/+
MAC
640 x 480 35.000 66.667 30.240 -/832 x 624 49.726 74.551 57.284 -/-
1152 x 870 68.681 75.062 100.000 -/-
VESA DMT
640 x 480 31.469 59.940 25.175 -/640 x 480 37.861 72.809 31.500 -/640 x 480 37.500 75.000 31.500 -/800 x 600 37.879 60.317 40.000 +/+
800 x 600 48.077 72.188 50.000 +/+
800 x 600 46.875 75.000 49.500 +/+
1024 x 768 48.363 60.004 65.000 -/1024 x 768 56.476 70.069 75.000 -/1024 x 768 60.023 75.029 78.750 +/+
1152 x 864 67.500 75.000 108.000 +/+
1280 x 720 45.000 60.000 74.250 +/+
1280 x 800 49.702 59.810 83.500 -/+
1280 x 1024 63.981 60.020 108.000 +/+
1280 x 1024 79.976 75.025 135.000 +/+
1366 x 768 47.712 59.790 85.500 +/+
1440 x 900 55.935 59.887 106.500 -/+
1600 x 900RB 60.000 60.000 108.000 +/+
1680 x 1050 65.290 59.954 146.250 -/+
1920 x 1080 67.500 60.000 148.500 +/+
✎
HINWEIS
• Das Zeilensprungverfahren wird nicht unterstützt.
• Das Fernsehgerät funktioniert möglicherweise nicht ordnungsgemäß, wenn kein Standardmodus ausgewählt
wird.
Page 47
Deutsch
Deutsch - 23
Lizenz
Hergestellt unter Lizenz von Dolby Laboratories.
Dolby sowie das Doppel-D-Symbol sind Marken von Dolby Laboratories.
For DTS patents, see http://patents.dts.com. Manufactured under license from DTS, Inc. DTS, the
Symbol, DTS in combination with the Symbol, DTS Premium Sound|5.1, DTS Digital Surround,
DTS Express, and DTS Neo2:5 are registered trademarks or trademarks of DTS, Inc. in the United
States and/or other countries. © DTS, Inc. All Rights Reserved.
For DTS patents, see http://patents.dts.com. Manufactured under license from DTS Licensing
Limited. DTS, the Symbol, DTS in combination with the Symbol, and DTS Studio Sound are
registered trademarks or trademarks of DTS, Inc. in the United States and/or other countries.
© DTS, Inc. All Rights Reserved.
The terms HDMI and HDMI High-Definition Multimedia Interface, and the HDMI Logo are
trademarks or registered trademarks of HDMI Licensing LLC in the United States and other
countries.
This DivX Certified® device has passed rigorous testing to ensure it plays DivX® video.
To play purchased DivX movies, first register your device at vod.divx.com. Find your registration
code in the DivX VOD section of your device setup menu.
DivX Certified® to play DivX® video up to HD 1080p, including premium content.
DivX®, DivX Certified® and associated logos are trademarks of DivX, LLC and are used under
license.
Covered by one or more of the following U.S. patents: 7,295,673; 7,460,668; 7,515,710;
7,519,274.
This device supports DivX Plus Streaming® for enjoying HD movies and TV shows with advanced
features (multi-language subtitles, multiple audio tracks, chapters, smooth FF/RW, etc.) streamed
to your device.
Open Source Licence Notice
Open Source used in this product can be found on the following webpage. (http://opensource.samsung.com)
Open Source Licence Notice is written only English.
Warnung bei Standbildern
Vermeiden Sie die Anzeige von Standbildern (wie z.B. JPEG-Bilddateien) oder Standbildelementen (wie z.B.
Senderlogos, Laufschriften mit Aktieninformationen oder Nachrichten am unteren Bildschirmrand usw.) und die Anzeige
von Programmen im Panorama- oder 4:3-Format auf dem Bildschirm Durch lang anhaltende Anzeige von Standbildern
kann es zum Einbrennen von Bildern auf dem LED-Bildschirm kommen, wodurch die Bildqualität beeinträchtigt wird. Um
die Gefahr dieses Effekts zu vermindern, befolgen Sie bitte die nachfolgenden Empfehlungen:
• Vermeiden Sie es, für lange Zeit denselben Fernsehsender anzuzeigen.
• Versuchen Sie immer, Bilder als Vollbild anzuzeigen. Verwenden Sie das Bildformat-Menü des Fernsehers, um
bestmögliche Übereinstimmung zu erzielen.
• Durch Reduzieren von Helligkeit und Kontrast tragen Sie dazu bei, das Entstehen von Nachbildern zu vermeiden.
• Nutzen Sie alle Funktionen Ihres Fernsehgeräts, mit denen Nachbilder und das Einbrennen von Bildern reduziert
werden. Weitere Informationen finden Sie im Benutzerhandbuch.
Page 48

Adaptor information
Um Gefahren zu vermeiden, verwenden Sie den folgenden Adapter
Manufacturer: SAMSUNG
Adaptor model: A5919_FSM
To reduce the risk of fire or electric shock, do not expose this apparatus to rain or moisture.
Apparatus shall not be exposed to dripping or splashing and no objects filled with liquids, such as vases, shall
not be placed onthe apparatus.
For power cord use, see user manual.
ATENCION: SOLO PARA USO EN INTERIORES
Page 49

This page is intentionally
left blank.
Page 50
Français - 2
Consignes de sécurité importantes
Avertissement! Consignes de sécurité importantes
(Avant toute installation de votre produit Samsung, veuillez lire les sections correspondant aux inscriptions qui figurent
sur ce dernier.)
ATTENTION
ATTENTION: POUR REDUIRE LES RISQUES
D'ELECTROCUTION, NE RETIREZ PAS LE COUVERCLE (NI
LE PANNEAU ARRIERE). AUCUNE DES PIECES SITUEES A
L'INTERIEUR DU PRODUIT NE PEUT ETRE REPAREE PAR
L'UTILISATEUR. POUR TOUT DEPANNAGE, ADRESSEZVOUS A UN SPECIALISTE.
RISQUE D'ELECTROCUTION-NE PAS OUVRIR
Ce symbole indique que ce produit est alimenté
par haute tension. Il est dangereux de toucher la
moindre pièce située à l'intérieur de ce produit.
Ce symbole vous prévient qu'une
documentation importante relative au
fonctionnement et à l'entretien est fournie avec
le produit.
• Les fentes et les ouvertures ménagées dans le boîtier ainsi qu'à l'arrière et au-dessous de l'appareil assurent la ventilation de ce dernier. Afin de
garantir le bon fonctionnement de l'appareil et éviter les risques de surchauffe, ces fentes et ouvertures ne doivent être ni obstruées ni couvertes.
− Ne placez pas l’appareil dans un environnement clos tel qu’une bibliothèque ou une armoire encastrée, sauf si une ventilation adéquate est
prévue.
− Ne placez pas l'appareil à proximité ou au-dessus d'un radiateur ou d'une résistance de chauffage, ni dans un endroit exposé à la lumière
directe du soleil.
− Ne placez aucun récipient d'eau (vases, etc.) sur l'appareil car cela entraîne un risque d'incendie ou de décharge électrique.
• N'exposez pas l'appareil à la pluie et ne le placez pas à proximité d'une source d'eau, par exemple une baignoire, un lavabo, un évier, un bac de
lavage, un sous-sol humide, une piscine, etc. Si l’appareil vient à être mouillé par accident, débranchez-le et contactez immédiatement un revendeur
agréé. Veillez à débrancher le cordon d'alimentation de la prise avant de nettoyer l'appareil.
• Cet appareil peut fonctionner sur piles. Dans un souci de préservation de l'environnement, la réglementation locale prévoit peut-être des mesures
spécifiques de mise au rebut des piles usagées. Veuillez donc contacter les autorités compétentes afin d'obtenir des informations sur la mise au
rebut ou le recyclage des piles.
• Evitez de surcharger les prises murales, les rallonges et les adaptateurs car cela entraîne un risque d'incendie ou de décharge électrique.
• Les cordons d'alimentation doivent être déroulés de sorte qu'aucun objet placé sur ou contre eux ne les chevauche ou les pince. Accordez une
attention particulière aux cordons au niveau de l'extrémité des fiches, des adaptateurs et de la sortie de l'appareil.
• En cas d'orage, ou bien lorsque vous vous absentez ou n'utilisez pas votre appareil pendant une longue période, débranchez celui-ci de la prise
murale et débranchez également l'antenne ou le connecteur au réseau câblé. Ces précautions éviteront que l'appareil ne soit endommagé par la
foudre ou par des surtensions.
• Avant de raccorder le cordon d'alimentation CA à la prise de l'adaptateur CC, vérifiez que la tension indiquée sur ce dernier correspond bien à la
tension délivrée par le réseau électrique local.
• N'insérez jamais d'objet métallique dans les parties ouvertes de cet appareil: vous risqueriez de recevoir une décharge électrique.
• Afin d'éviter tout risque d'électrocution, ne mettez jamais les doigts à l'intérieur de l'appareil. Seul un technicien qualifié est habilité à ouvrir cet
appareil.
• Veillez à enfoncer le cordon d'alimentation jusqu'à ce qu'il soit inséré correctement. Lorsque vous retirez le cordon d'alimentation, veillez à tenir la
fiche d'alimentation lorsque vous retirez la fiche de la prise. Ne touchez pas le cordon d'alimentation si vous avez les mains mouillées.
• Si l'appareil ne fonctionne pas normalement, en particulier s'il émet des odeurs ou des sons anormaux, débranchez-le immédiatement et contactez
un revendeur ou un centre de dépannage agréé.
• Si vous prévoyez de ne pas utiliser le téléviseur ou de vous absenter de chez vous pendant une période prolongée, veillez à retirer la fiche
d'alimentation de la prise (en particulier si des enfants, des personnes âgées ou des personnes handicapées restent seuls à la maison).
− L'accumulation de poussière peut amener le cordon d'alimentation à produire des étincelles et de la chaleur ou l'isolation à se détériorer,
entraînant un risque de fuite électrique, d'électrocution et d'incendie.
• Contactez un centre de service agréé si l'appareil est destiné à une installation dans des endroits exposés à la poussière, à des températures faibles
ou élevées, à une forte humidité, à des substances chimiques ou s'il a été prévu pour fonctionner 24h/24, comme dans des aéroports, des gares
ferroviaires, etc. Le non-respect de ce qui précède peut gravement endommager le téléviseur.
• N'utilisez que des prises correctement reliées à la terre.
• Une mise à la terre incorrecte peut entraîner des électrocutions ou endommager l'appareil (appareils de classe I uniquement).
• Pour débrancher l'appareil du secteur, la fiche doit être retirée de la prise secteur, raison pour laquelle la fiche secteur doit être accessible à tout
moment.
• Ne laissez pas des enfants se suspendre à l'appareil.
• Rangez les accessoires (batterie, etc.) dans un endroit hors de portée des enfants.
• N'installez pas l'appareil à un endroit instable, comme sur une étagère bancale, sur une surface inclinée ou à un endroit exposé à des vibrations.
• Evitez de laisser tomber le produit ou de lui faire subir des chocs. Si le produit est endommagé, débranchez le cordon d'alimentation et contactez un
centre de service.
• Retirez le cordon d'alimentation de la prise de courant et nettoyez le produit à l'aide d'un chiffon sec. N'utilisez aucune substance chimique, telle
que la cire, le benzène, l'alcool, des solvants, des insecticides, des désodorisants, des lubrifiants ou des détergents. Ces substances peuvent altérer
l'aspect du produit ou effacer les imprimés se trouvant sur celui-ci.
• L'appareil ne doit pas être exposé aux gouttes ou aux éclaboussures.
• Ne vous débarrassez pas des piles en les faisant brûler.
• Les piles ne doivent pas être court-circuitées, démontées ou subir de surchauffe.
• Le remplacement incorrect de la batterie entraîne un risque d'explosion. Ne la remplacez que par une batterie du même type.
• ATTENTION:POUR EVITER TOUT RISQUE D'INCENDIE, TENEZ TOUJOURS CE PRODUIT A DISTANCE DES BOUGIES OU
AUTRES FLAMMES OUVERTES.
Page 51
Français
Français - 3
Les figures et illustrations contenues dans ce mode d’emploi sont fournies pour référence uniquement. Elles peuvent
différer de l’aspect réel du produit. La conception et les spécifications du produit sont susceptibles d’être modifiées
sans préavis.
Les langues de la CEI (russe, ukrainien, kazakh) ne sont pas disponibles pour ce produit, fabriqué pour des clients de
l'UE.
Informations importantes relatives à la garantie de
votre moniteur (format d'affichage)
1. Les fonctions relatives à la télévision numérique (DVB) ne sont disponibles que dans les pays ou régions où des
signaux terrestres numériques de type DVB-T (MPEG2 et MPEG4 AVC) sont diffusés ou dans lesquels vous avez
accès à un service de télévision par câble compatible DVB-C (MPEG2 et MPEG4 AAC). Consultez votre distributeur
local pour connaître les possibilités en matière de réception des signaux DVB-T ou DVB-C.
2. DVB-T est la norme du consortium européen DVB pour la diffusion des signaux terrestres de télévision numérique.
La norme DVB-C est, quant à elle, prévue pour la diffusion des signaux de télévision numérique par câble. Certaines
fonctions particulières, telles que le guide électronique des programmes (Electric Program Guide - EPG) ou encore
la vidéo à la demande (Video On Demand - VOD), ne sont toutefois pas incluses dans cette spécification. Dès lors,
elles ne seront pas traitées pour l’instant.
3. Bien que ce téléviseur soit conforme aux dernières normes DVB-T et DVB-C (août 2008), il n’est pas garanti qu’il
soit compatible avec les futures diffusions de signaux numériques terrestres DVB-T et par câble DVB-C.
4. En fonction du pays ou de la région où vous vous trouvez, certains opérateurs de télévision par câble peuvent
facturer des frais supplémentaires pour un tel service. Il se peut également que vous deviez accepter les termes et
conditions de ces sociétés.
5. Il se peut que certaines fonctions de TV numérique ne soient pas disponibles dans certains pays ou certaines
régions et que la réception des signaux DVB-C ne soit pas correcte avec tous les opérateurs.
6. Pour plus d’informations, contactez votre service client Samsung.
✎
Les différentes méthodes de diffusion adoptées en fonction des pays peuvent affecter la qualité de réception
du téléviseur. Vérifiez le fonctionnement du téléviseur chez votre revendeur agréé SAMSUNG ou contactez le
centre d’appel de Samsung pour savoir s’il est possible d’en améliorer les performances en reconfigurant les
réglages.
Instructions de mise au rebut de ce produit (Déchets d'équipements électriques et électroniques)
(Applicable dans les pays de l'Union Européenne et dans d'autres pays européens pratiquant la
collecte sélective de déchets)
Ce symbole sur le produit, ses accessoires ou sa documentation indique que ni le produit, ni ses
accessoires électroniques usagés (chargeur, casque audio, câble USB, etc.) ne peuvent être jetés
avec les autres déchets ménagers. La mise au rebut incontrôlée des déchets présentant des risques
pour l'environnement et la santé publique, veuillez séparer vos produits et accessoires usagés des
autres déchets. Vous favoriserez ainsi le recyclage de la matière qui les compose dans le cadre d'un
développement durable. Les particuliers sont invités à contacter le magasin leur ayant vendu le produit
ou à se renseigner auprès des autorités locales pour connaître les procédures et les points de collecte de
ces produits en vue de leur recyclage. Les utilisateurs professionnels doivent contacter leur fournisseur et
consulter les conditions générales du contrat d'achat. Ce produit et ses accessoires ne peuvent être jetés
avec les autres déchets professionnels et commerciaux.
Élimination des batteries de ce produit
(Applicable aux pays de l'Union européenne et aux autres pays européens dans lesquels des
systèmes de collecte sélective sont mis en place.)
Le symbole sur la pile, le manuel ou l'emballage indique que les batteries de ce produit ne doivent pas être
éliminées en fin de vie avec les autres déchets ménagers. L'indication éventuelle des symboles chimiques
Hg, Cd ou Pb signifie que la pile ou l'accumulateur contient des quantités de mercure, de cadmium ou de
plomb supérieures aux niveaux de référence stipulés dans la directive CE 2006/66. Si les piles ne sont pas
correctement éliminées, ces substances peuvent porter préjudice à la santé humaine ou à l'environnement.
Afin de protéger les ressources naturelles et de favoriser la réutilisation du matériel, veillez à séparer les
batteries des autres types de déchets et à les recycler via votre système local de collecte gratuite des piles
et accumulateurs.
Page 52
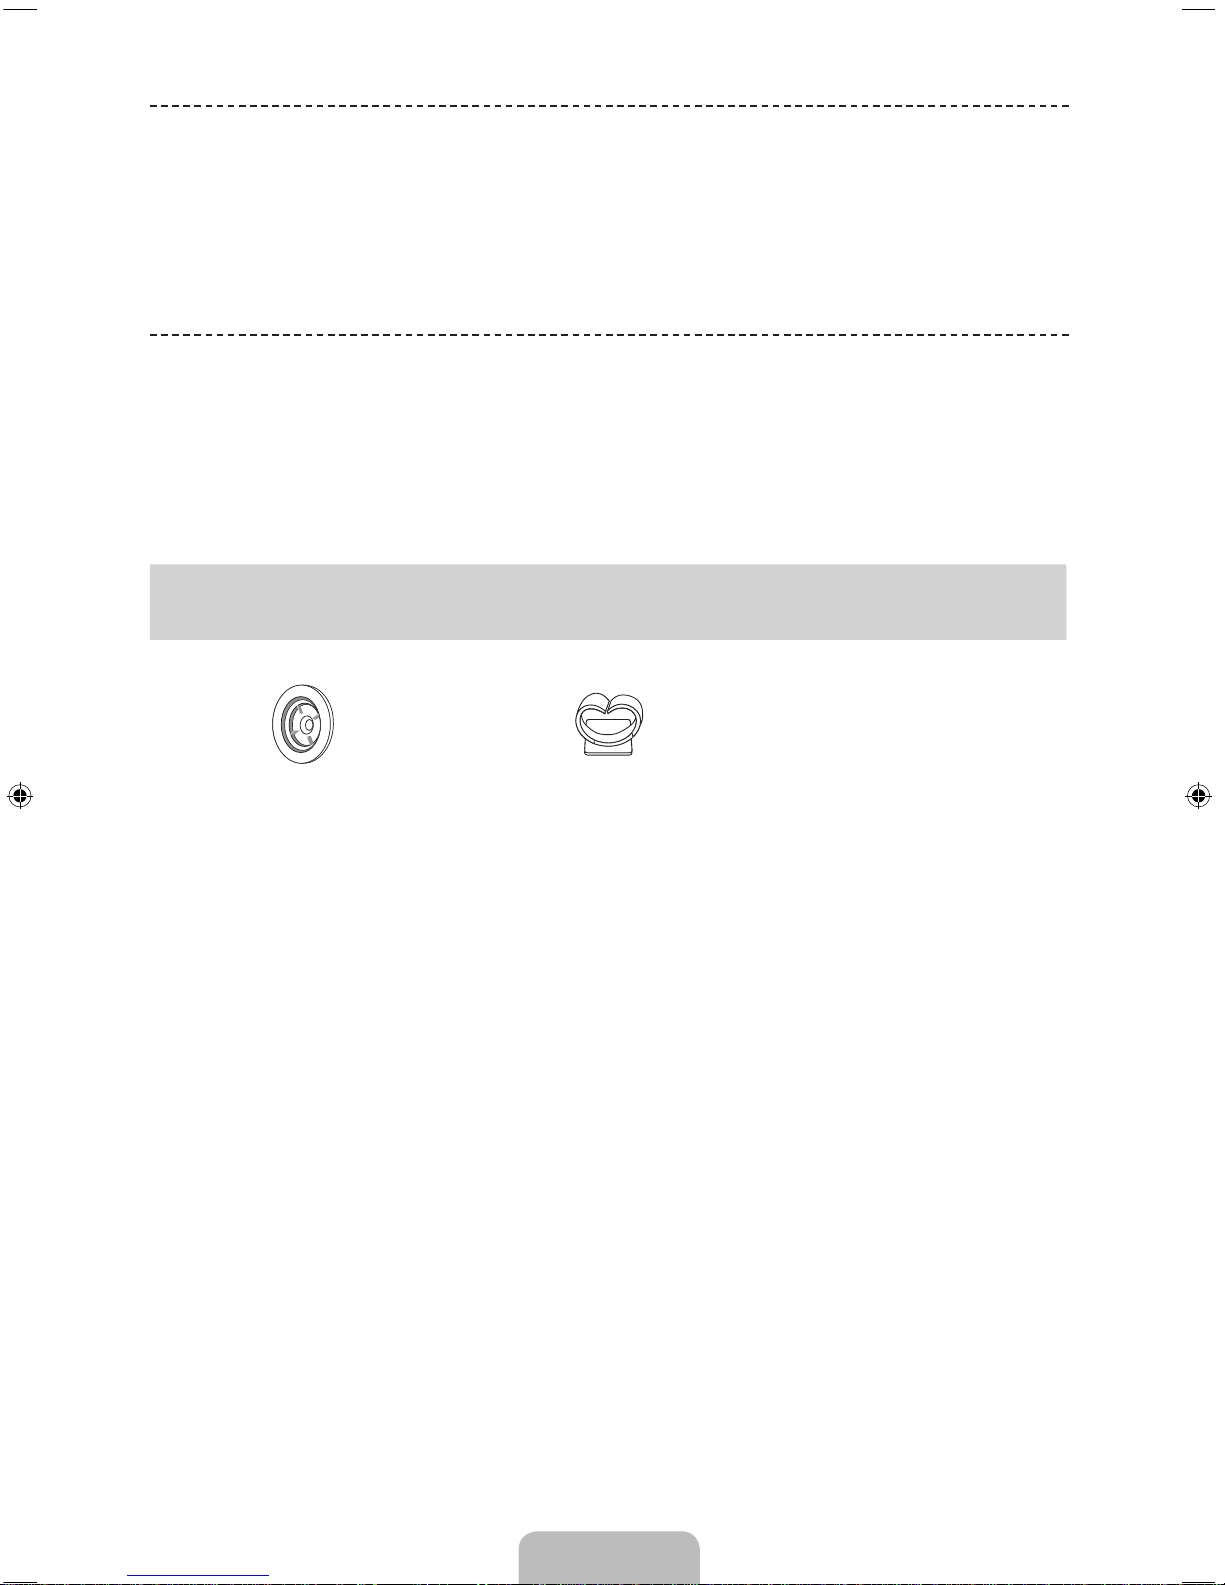
Français - 4
Liste des fonctions
• Media Play: Vous permet de lire des fichiers audio et des images sauvegardés sur un périphérique USB.
• e-Manual: Permet l’affichage des instructions sur les caractéristiques du téléviseur.
Accessoires
✎
Vérifiez que les éléments suivants sont inclus avec votre téléviseur. S’il manque des éléments, contactez votre
re ve n d e u r.
✎
La couleur et la forme des éléments peuvent varier en fonction du modèle.
✎
Les câbles qui ne se trouvent pas dans le contenu de l'emballage peuvent être achetés séparément.
[ATTENTION : INSEREZ FERMEMENT DE MANIERE A CE QU'IL NE SE DETACHE PAS
• Télécommande et piles (AAA x 2) • Cordon d'alimentation
• Guide réglementaire / Carte de garantie • Guide d'utilisation
Adaptateur pour support mural
(En fonction des modèles)
Guide de câblage
(En fonction des modèles)
✎
Des frais d'administration peuvent vous être facturés si:
(a) un technicien intervient à votre demande et que le produit ne comporte aucun défaut
(c.-à-d; si vous n'avez pas pris la peine de lire le présent manuel d'utilisation)
(b) vous amenez le produit dans un centre de réparation alors qu'il ne comporte aucun défaut
(c.-à-d; si vous n'avez pas pris la peine de lire le présent manuel d'utilisation)
✎
Le montant de ces frais d'administration vous sera signifié avant la réalisation de toute prestation ou visite à
domicile.
Page 53
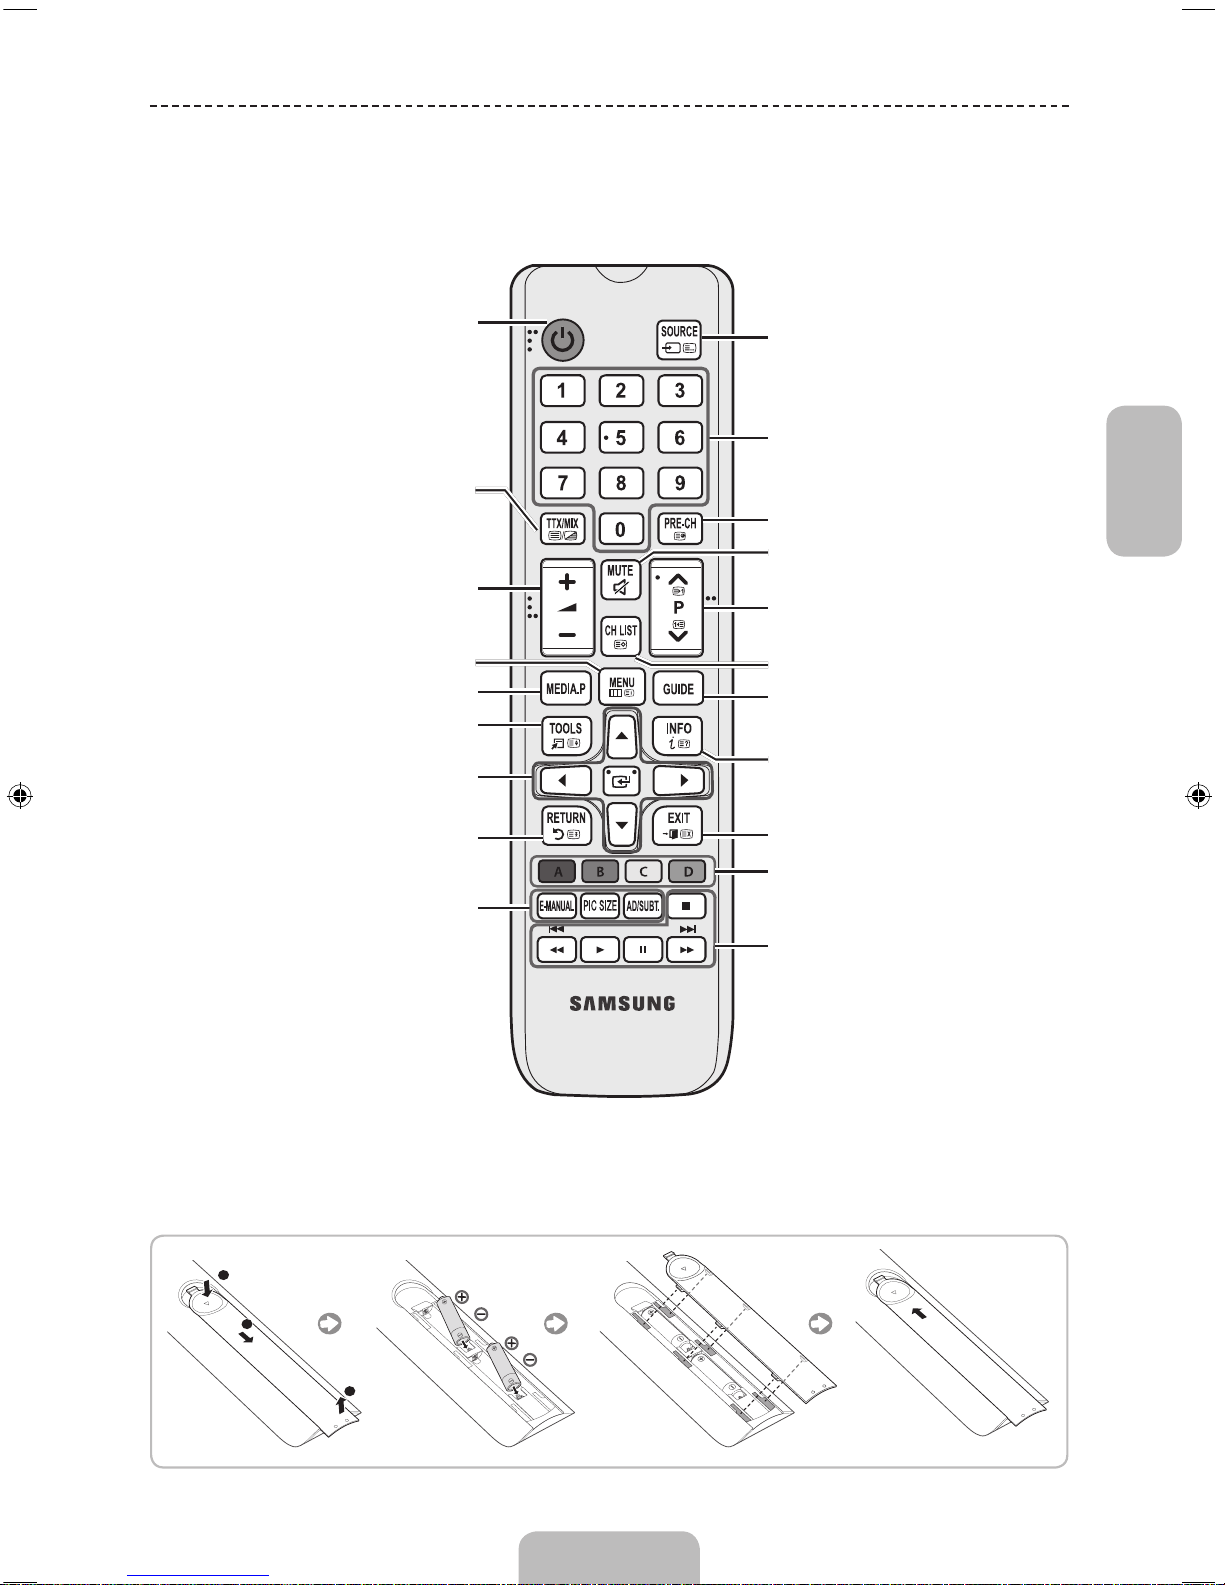
Français
Français - 5
Présentation de la télécommande
✎
Les boutons Alimentation, Canal, Volume, et Entrer de la télécommande étant annotés en braille, celle-ci peut
être utilisée par des personnes malvoyantes.
Permet d’allumer et éteindre la télévision.
Permet d’afficher et de sélectionner les
sources vidéo disponibles.
Permet de revenir à la chaîne précédente.
Permet de couper temporairement le son.
Permet de changer de chaîne.
Affiche la liste des chaînes à l’écran.
Permet d’afficher le Guide électronique des
programmes (EPG).
Permet d’afficher des informations sur
l’écran du téléviseur.
Permet de quitter le menu.
Appuyez pour atteindre les chaînes
directement.
permet de régler le volume.
Choisissez Teletext Activé, Double, Mix ou
ARRET.
Permet d’afficher le menu principal à l’écran.
Permet de sélectionner rapidement les
fonctions fréquemment utilisées.
Affiche Media Play.
Permet de revenir au menu précédent.
Permettent de sélectionner des éléments de
menu à l’écran et de modifier les valeurs des
menus.
Utilisez ces boutons conformément aux
instructions affichées à l'écran.
Ces boutons ont des fonctions spécifiques.
Pour plus d’informations, reportez-vous au
manuel électronique.
E-MANUAL: affiche le Guide e-Manual.
PIC SIZE: permet de sélectionner le Format
de l'image.
AD/SUBT.: Sélection de la description audio.
(Non disponible dans tous les pays) / permet
d'afficher les sous-titres numériques.
N Les noms des boutons qui figurent au-dessus peuvent être différents.
Installation des piles (type de pile : AAA)
Page 54
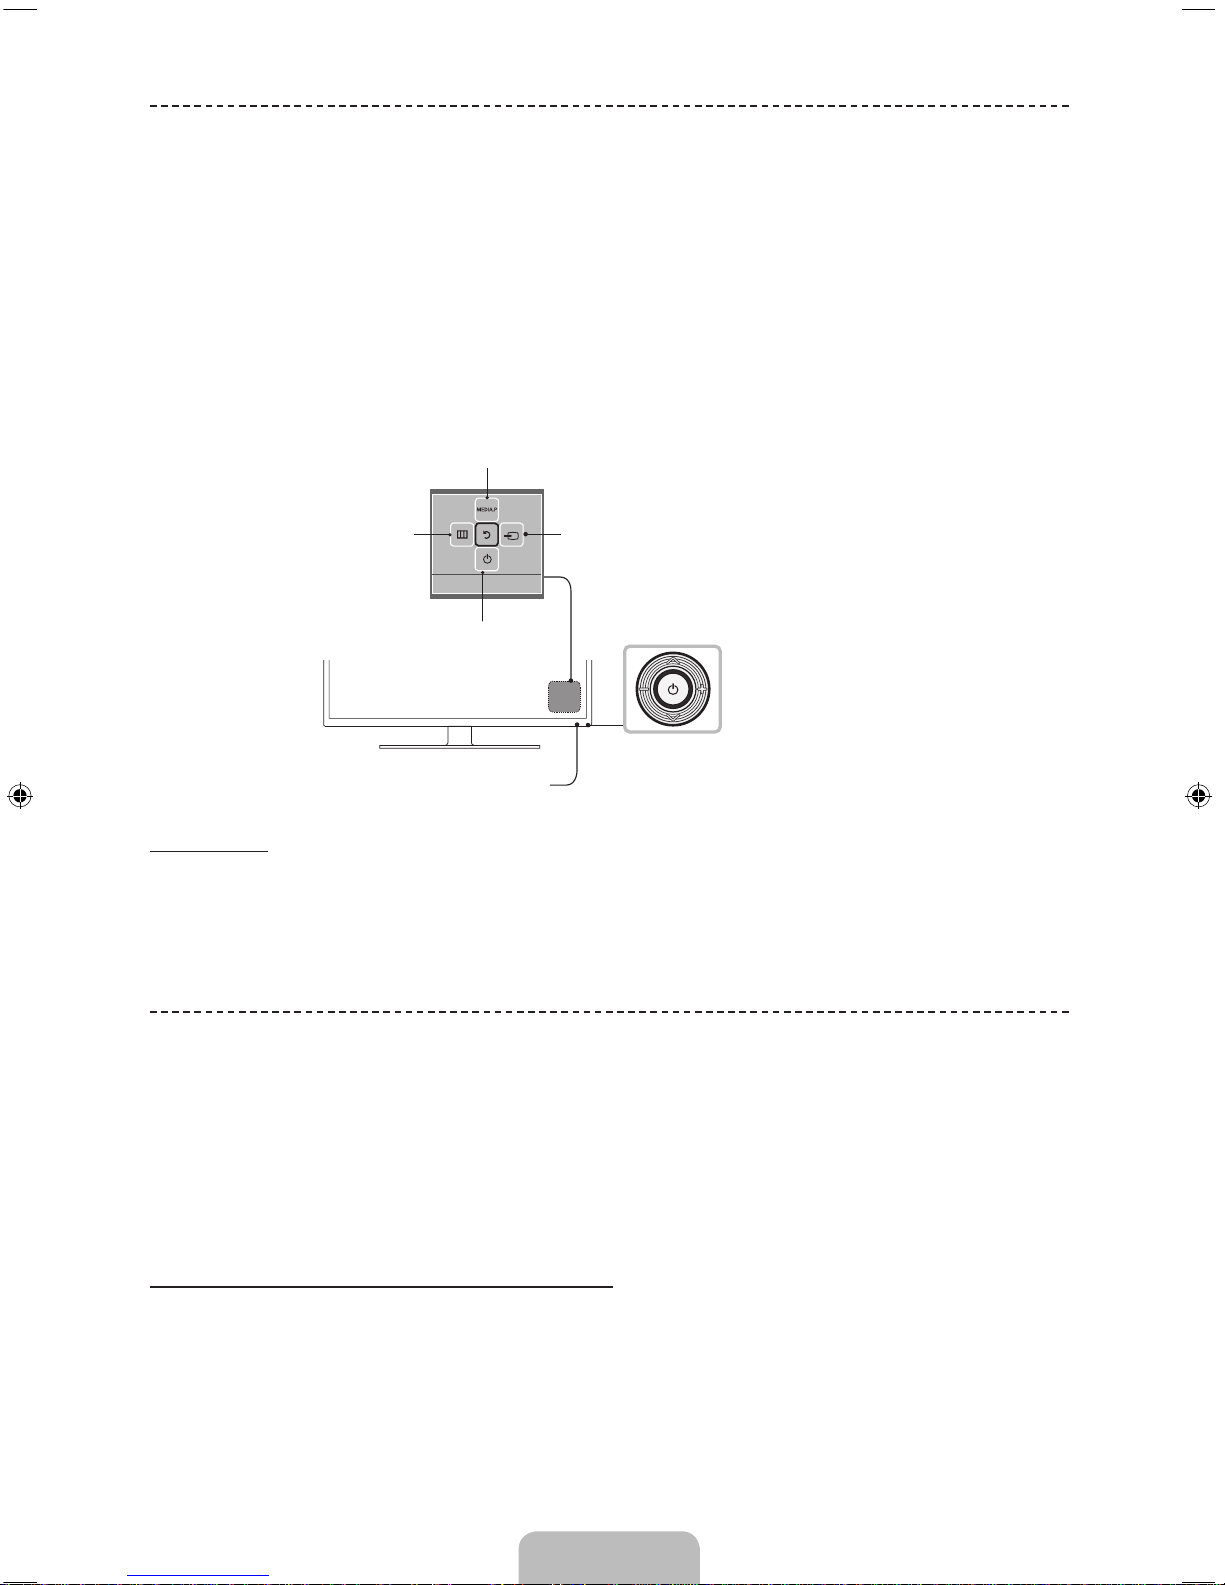
Français - 6
Utilisation du contrôleur du téléviseur
(touche de panneau)
Le contrôleur TV, petit bouton de la forme d'un joystick situé sur le côté gauche du téléviseur, à l'arrière, vous permet de
contrôler le téléviseur sans télécommande.
✎
Certaines fonctions exigeant un code PIN peuvent ne pas être disponibles.
✎
La couleur et la forme du produit peuvent varier en fonction du modèle.
✎
Pour quitter le menu, veuillez appuyer sur le bouton pendant plus d’une seconde.
✎
Lorsque vous déplacez la télécommande, veillez à ne pas appuyer préalablement dessus. Si vous appuyez
dessus d'abord, aucun déplacement ne sera possible.
Capteur de la télécommande
Contrôleur du téléviseur
L'image apparaît lorsque vous êtes
en face du moniteur.
Menu de fonction
Retour
Sélectionnez l'option Media Play
Sélection d'une Source
Arrêt
Sélectionnez l'option
Menu
Mode Veille
Ne laissez pas le téléviseur en mode Veille pendant de longues périodes (lorsque vous partez en vacances, par
exemple). L’appareil consomme toujours une petite quantité d’énergie, même lorsque le bouton marche/arrêt est en
position Off. Il est préférable de débrancher le cordon d’alimentation.
Configuration initiale
Lorsque le téléviseur est allumé pour la première fois, plusieurs invites s'affichent pour vous aider à configurer les
réglages de base. Appuyez sur le bouton POWERP. Configuration n'est disponible que lorsque la source est définie
sur TV.
✎
Si vous connectez un périphérique à HDMI IN 1(STB) avant de démarrer l'installation, Source des chaînes sera
automatiquement remplacé par Boîtier décodeur. Si vous ne voulez pas sélectionner Boîtier décodeur, veuillez
sélectionner Antenne.
Si vous souhaitez réinitialiser cette fonction...
Sélectionnez Système - Configuration (Configuration initiale). Le mot de passe par défaut est "0-0-0-0". Si vous
souhaitez modifier le code PIN, utilisez la fonction Modifier PIN.
Vous devez de nouveau effectuer la Configuration (MENU → Système) chez vous, bien que vous l'ayez déjà fait en
magasin.
✎
Si vous avez oublié le code PIN, appuyez sur les boutons de la télécommande dans l'ordre suivant en mode veille,
ce qui redéfinit le code sur "0-0-0-0": MUTE → 8 → 2 → 4 → POWER (activé)
Page 55
Français
Français - 7
Changement de la source d'entrée
Source
TV / Ext. / HDMI1 / HDMI2/DVI / Component / AV
(En fonction du pays et du modèle)
Permet de sélectionner le téléviseur ou d’autres sources d’entrée externes (telles qu’un lecteur DVD, un lecteur Blu-ray,
un décodeur câble ou un récepteur décodeur) connectées au téléviseur.
✎
Appuyez sur le bouton SOURCE. Les entrées connectées sont mises en surbrillance dans la liste Source affichée.
✎
L’entrée PC(D-Sub) n’est pas prise en charge. Pour connecter un ordinateur au téléviseur, vous pouvez brancher
le câble HDMI/DVI sur le port HDMI IN 2(DVI) du téléviseur.
✎
L’option Ext. reste activée en permanence.
✎
Appuyez sur le bouton TOOLS.
• Modif. Nom (En fonction du pays et du modèle)
Vous pouvez définir le nom de la source d'entrée externe de votre choix.
− Lorsque vous connectez un PC au port HDMI IN 2(DVI) avec un câble HDMI, vous devez définir le téléviseur en
mode PC sous Modif. Nom.
− Lorsque vous connectez un PC au port HDMI IN 2(DVI) avec un câble HDMI vers DVI, vous devez définir le
téléviseur en mode DVI PC sous Modif. Nom.
− Lorsque vous connectez un périphérique AV au port HDMI IN 2(DVI) avec un câble HDMI vers DVI, vous devez
définir le téléviseur en mode Périph.DVI sous Modif. Nom.
• Information
Vous pouvez afficher des informations détaillées sur le périphérique externe connecté.
Page 56
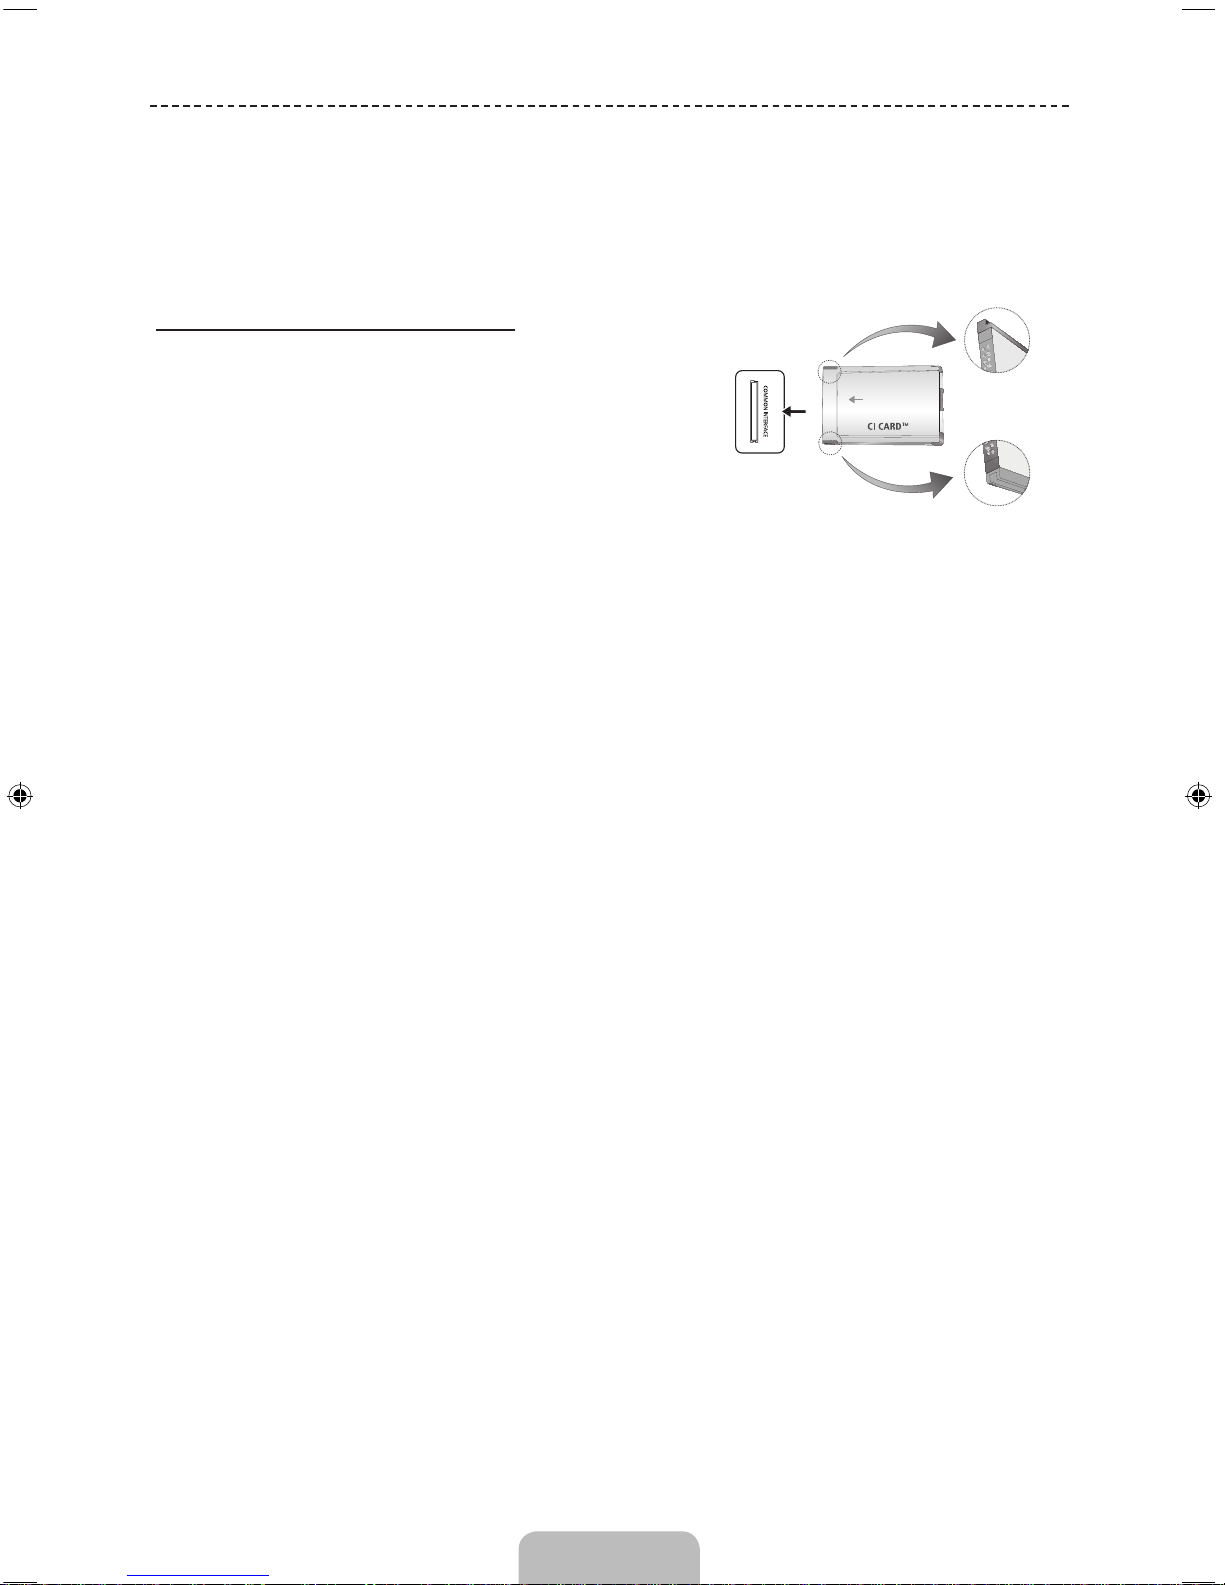
Français - 8
Connexion à un port INTERFACE COMMUNE (votre
fente de carte de visionnement TV)
✎
En fonction du pays et du modèle.
✎
Mettez le téléviseur hors tension pour connecter ou déconnecter une carte d'interface commune.
Utilisation de la "CARTE CI ou CI+"
Pour regarder les chaînes payantes, la carte d'interface commune CI ou
CI+ doit être insérée.
• Si vous ne l'insérez pas, certaines chaînes afficheront le message
"Signal brouillé".
• Les informations de pairage contenant un numéro de téléphone, l'ID
de la carte d'interface commune CI ou CI+, l'ID de l'hôte et d'autres
informations s'afficheront après 2 ou 3minutes. Si un message
d'erreur s'affiche, contactez votre fournisseur de services.
• Lorsque la configuration des informations sur les chaînes est
terminée, le message "Mise à jour terminée" s'affiche, indiquant que la
liste des chaînes est mise à jour.
• L'image peut varier en fonction du
modèle.
✎
REMARQUE
• Vous devez vous procurer une carte d'interface commune CI ou CI+ auprès d'un fournisseur local de diffusion
par câble.
• Lorsque vous sortez la carte d'interface commune CI ou CI+, tirez-la délicatement. Une chute pourrait en effet
l'endommager.
• Insérez la carte d'interface commune CI ou CI+ dans le sens indiqué sur celle-ci.
• L'emplacement de la fente COMMON INTERFACE peut varier en fonction du modèle.
• La carte d'interface commune CI ou CI+ n'est pas prise en charge dans certains pays et certaines régions;
vérifiez auprès de votre revendeur agréé.
• Si vous rencontrez des problèmes, contactez le fournisseur d'accès.
• Insérez la carte CI ou CI+ qui prend en charge les paramètres actifs de l'antenne. L'image sera déformée, voire
invisible.
Page 57
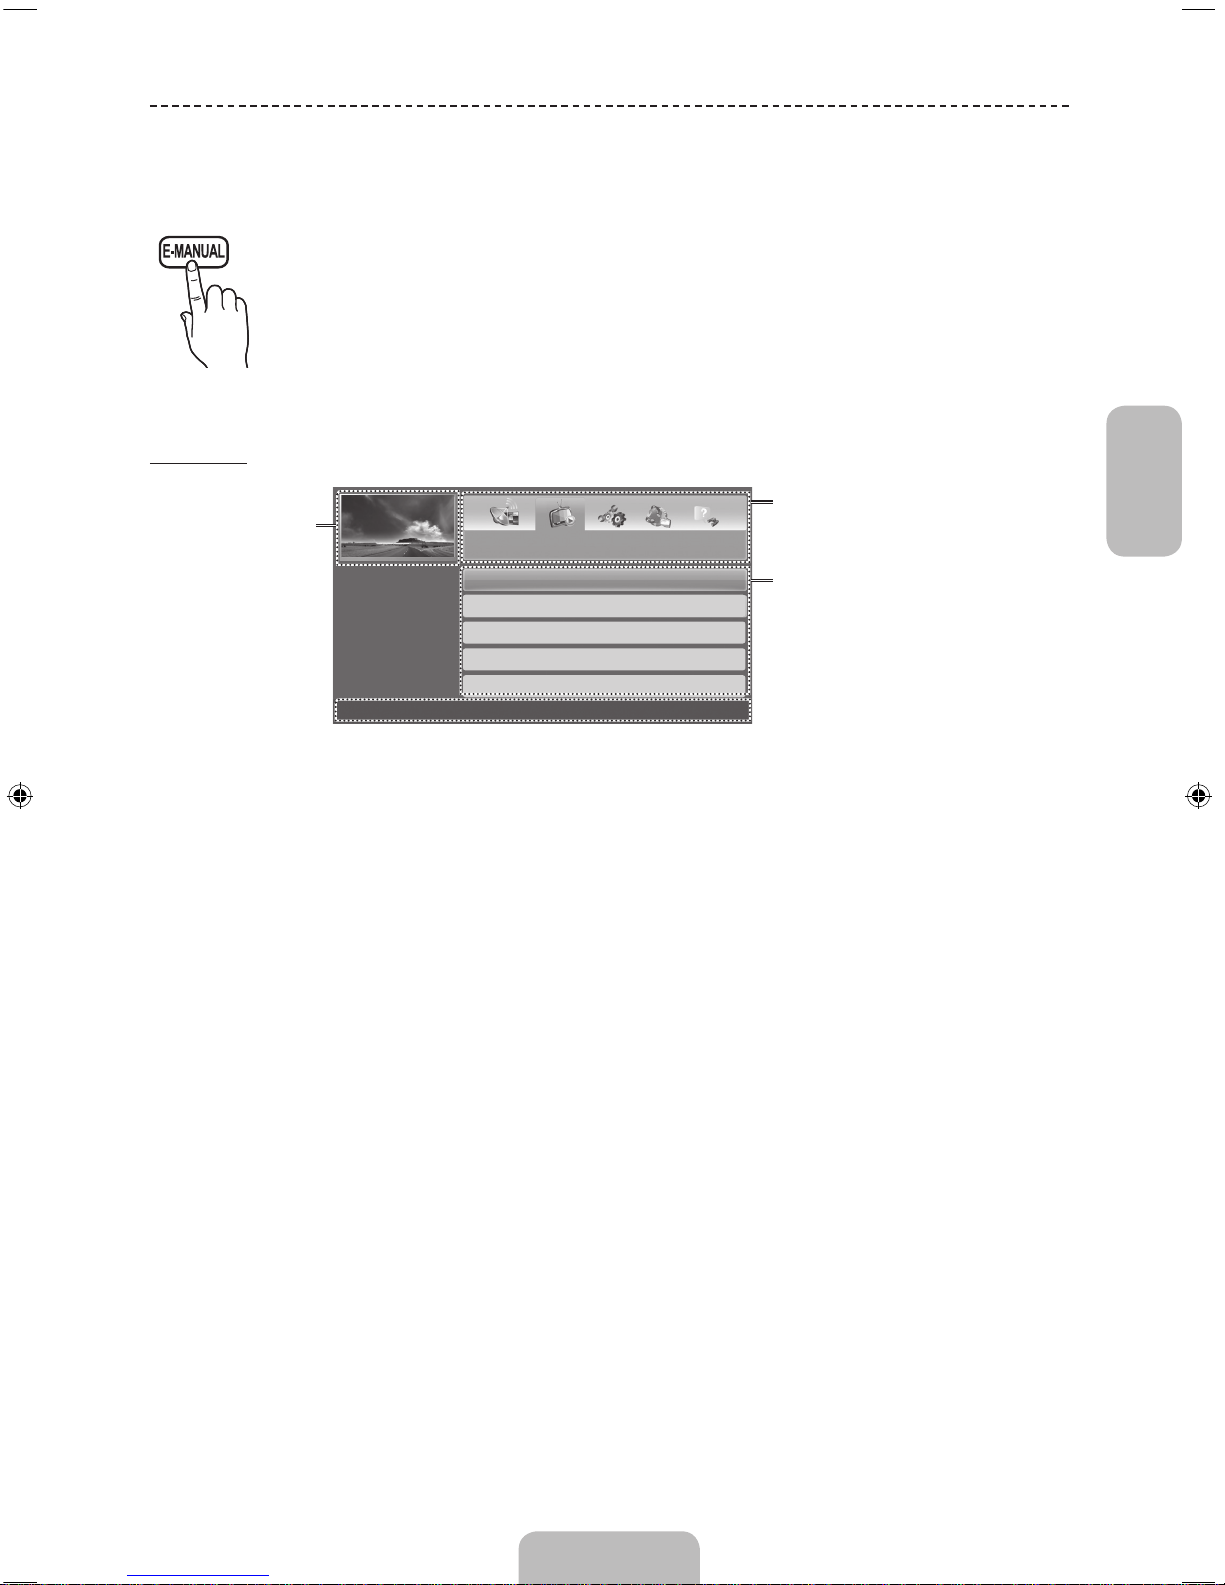
Français
Français - 9
Consultation du e-Manual
Vous trouverez des instructions sur les caractéristiques de votre téléviseur dans le e-Manual de ce
dernier. Pour l'utiliser, appuyez sur le bouton E-MANUAL de votre télécommande. Déplacez le curseur
à l'aide des boutons Haut/Bas/Gauche/Droite afin de mettre en surbrillance une catégorie, puis une
rubrique. Appuyez ensuite sur le bouton ENTERE. Le e-Manual affiche la page souhaitée.
Vous pouvez également y accéder via le menu:
O MENU
m
→ Assistance → e-Manual → ENTER
E
✎
Pour revenir au menu principal du e-Manual, appuyez sur le bouton E-MANUAL de la
télécommande.
Affichage
Vidéo, programme
télévisé, etc
actuellement
affiché.
Liste des catégories. Appuyez sur le
bouton ◄ ou ► pour sélectionner la
catégorie de votre choix.
Affiche la liste des sous-menus.
Utilisez les touches fléchées de
votre télécommande pour déplacer
le curseur. Appuyez sur le bouton
ENTER
E
pour sélectionner le sous-
menu de votre choix.
Boutons de fonctionnement
} Index: affiche l'écran d'index.
− Index disponible en fonction de la langue.
E Enter: sélectionne une catégorie ou un sous-menu.
e Quitter: permet de quitter le manuel électronique.
<Affichage du contenu>
a Essayer: affiche le menu à l'écran correspondant à la rubrique. Pour revenir à l'écran du manuel électronique,
appuyez sur le bouton E-MANUAL.
b Accueil: permet d'accéder à l'écran d'accueil du manuel électronique.
L Page: permet de passer à la page précédente ou suivante.
{
Zoom: agrandit l'écran.
− Appuyez sur le bouton { (Zoom) pour agrandir l’écran. Pour parcourir l'écran agrandi, utilisez le bouton ▲ ou
▼. Pour revenir à un affichage normal de l'écran, appuyez sur le bouton RETURN.
Changement du mode Image prédéfini
Réglages des paramètres de l’image
Modification des options d’image
Changement du mode Son prédéfini
Réglage des paramètres sonores
Fonctions de base
}
Index E Entrer e Quitter
Page 58
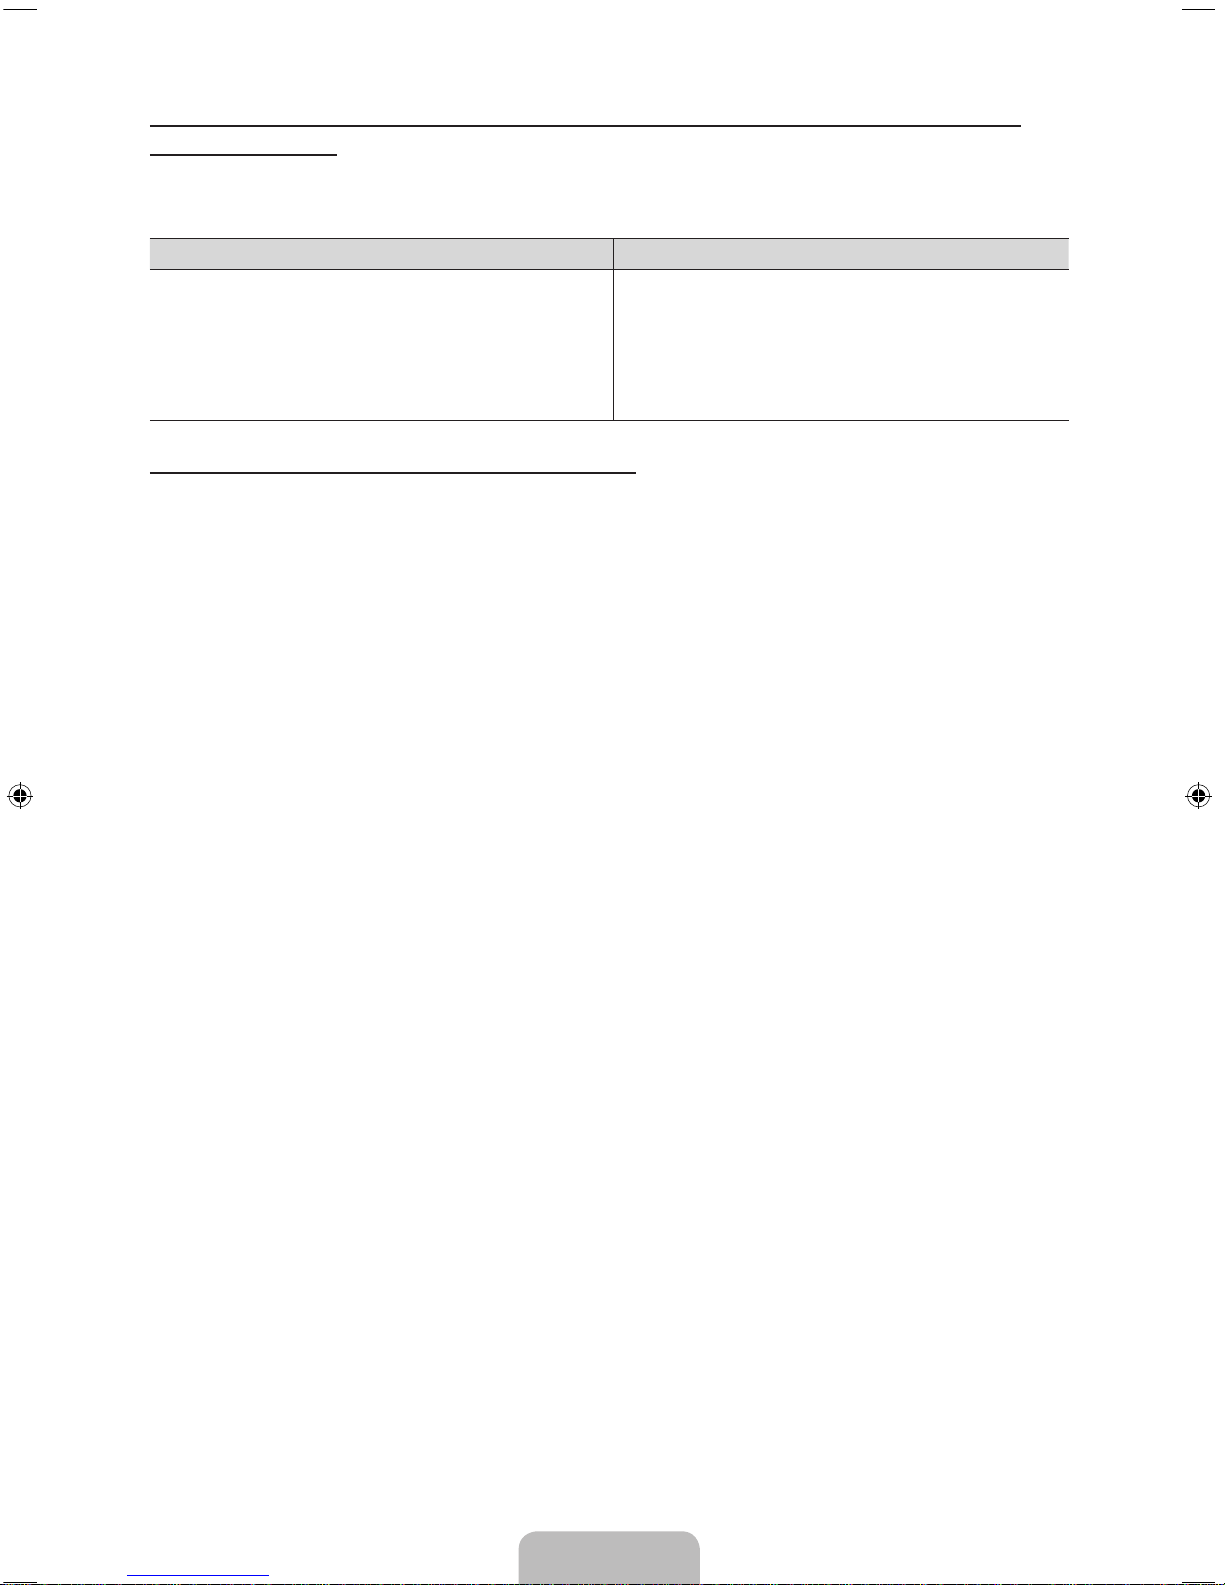
Français - 10
Comment basculer entre une rubrique du e-Manual et le(s) menu(s) correspondant(s)
affiché(s) à l'écran
✎
Cette fonction n’est pas disponible dans certains menus.
✎
Vous ne pouvez pas utiliser la fonction Essayer si le menu n'est pas activé.
Méthode 1 Méthode 2
1. Si vous souhaitez utiliser le menu correspondant à une
rubrique de l'e-Manual, appuyez sur le bouton rouge afin
de sélectionner l'option Essayer.
2. Pour revenir à l'écran du e-Manual, appuyez sur le bouton
E-MANUAL.
1. Appuyez sur le bouton
ENTERE lorsqu'une
rubrique s'affiche. Le message “Exécuter?” s'affiche.
Sélectionnez Oui, puis appuyez sur le bouton
ENTERE. La fenêtre des menus à l'écran s'affiche.
2. Pour revenir à l'écran du e-Manual, appuyez sur le
bouton E-MANUAL.
Recherche d’une rubrique dans la page d’index
✎
Cette fonction n’est peut-être pas prise en charge dans cette langue.
1. Si vous souhaitez rechercher un mot-clé, appuyez sur le bouton bleu afin d'ouvrir l'écran Index.
2. Appuyez sur le bouton l ou r pour sélectionner l'ordre des caractères de votre choix.
3. Appuyez sur le bouton u ou d pour sélectionner le mot-clé à afficher et appuyez ensuite sur ENTERE.
4. Vous accédez alors à l'écran d'instructions correspondant du manuel électronique.
✎
Pour fermer l’écran Index, appuyez sur le bouton RETURN.
Page 59
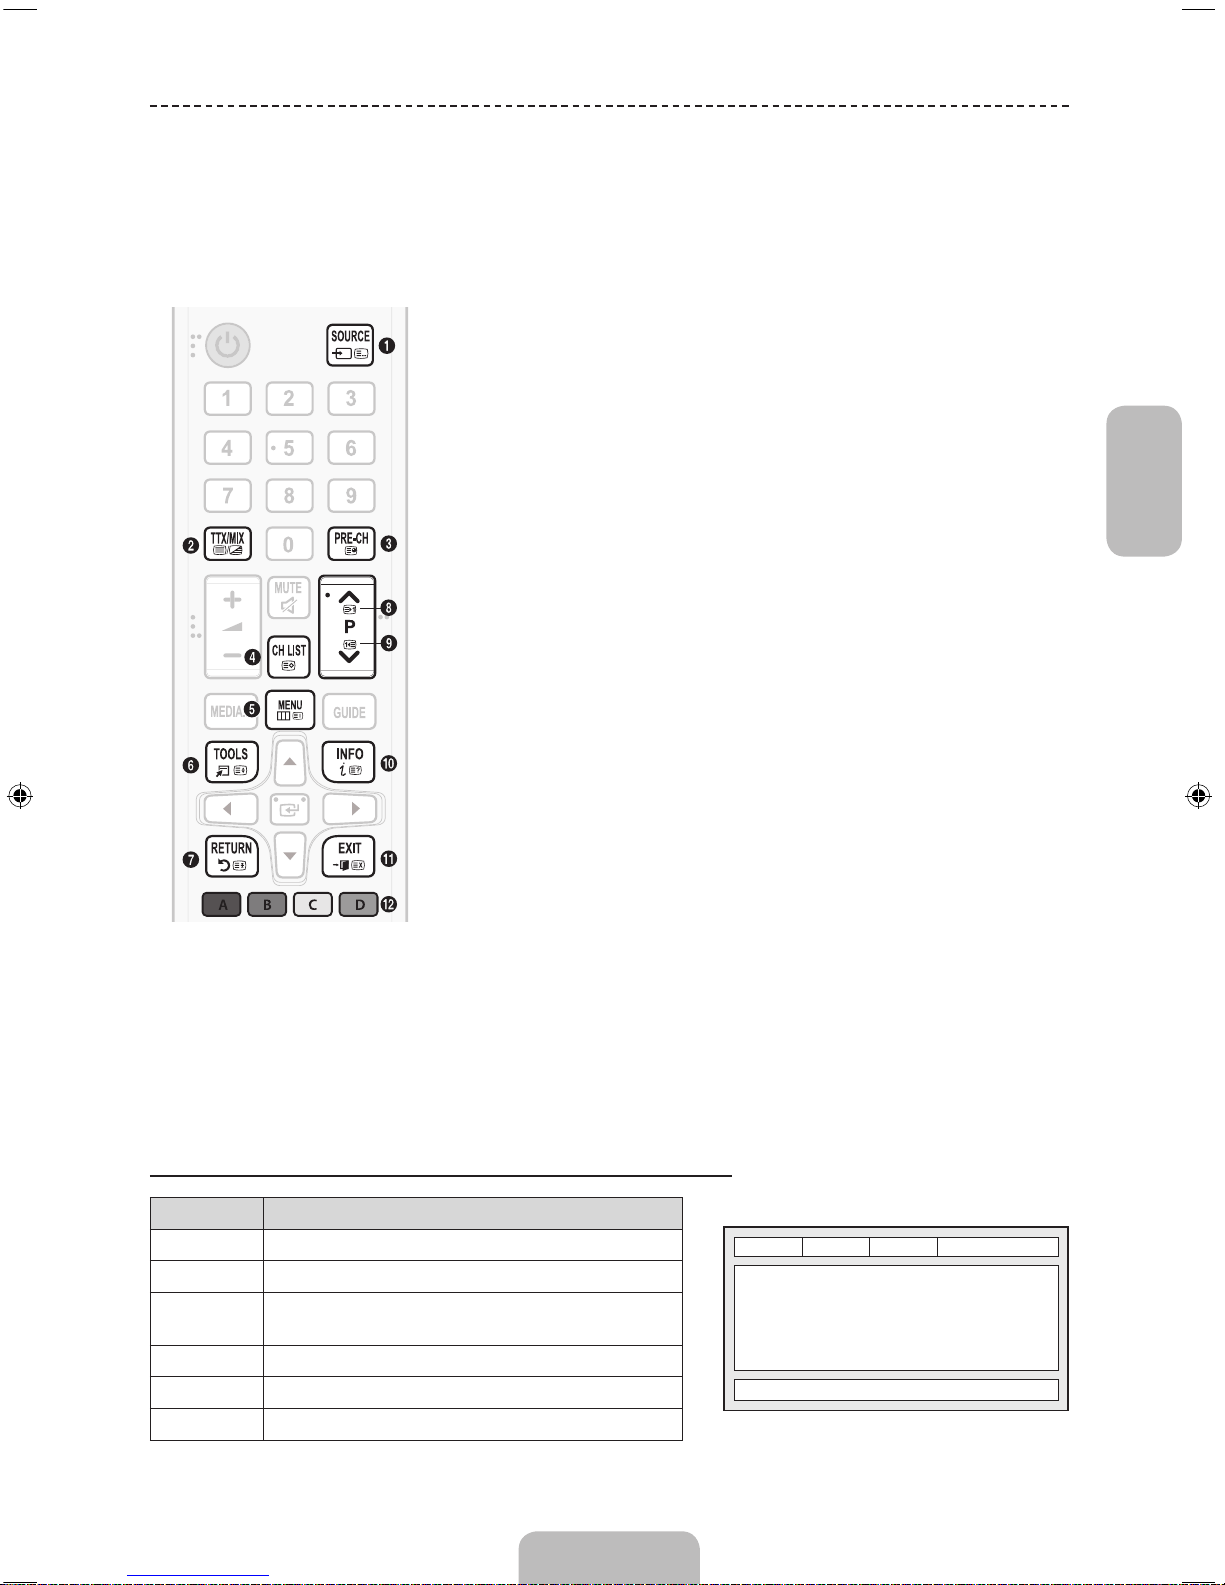
Français
Français - 11
Fonction Télétexte
La page d’index du télétexte contient des instructions sur l’utilisation du service. Pour que les informations du télétexte
s'affichent correctement, la réception des chaînes doit être stable. Autrement, des informations pourraient manquer ou
certaines pages ne pas s’afficher.
✎
Vous pouvez changer de page de télétexte en appuyant sur les boutons numériques de la télécommande.
1
0 (mode): permet de sélectionner le mode Télétexte (LISTE/FLOF). Si vous
appuyez sur ce bouton alors que le mode LISTE est sélectionné, il passe en
mode d'enregistrement de liste. Dans ce mode, vous pouvez enregistrer une
page télétexte dans une liste à l'aide du bouton 8(mémoriser).
2
/ (TTX complet/TTX double/mix/désactivé): active le mode télétexte
pour la chaîne choisie. Appuyez deux fois sur ce bouton pour superposer
le mode Télétexte à l'émission en cours de diffusion. Appuyez sur le bouton
une nouvelle fois pour quitter le système télétexte.
3
1 (sous-page): permet d'afficher une page secondaire.
4
8 (mémoriser): permet de mémoriser les pages télétexte.
5
6 (index): permet d'afficher la page d'index du télétexte (sommaire).
6
4 (taille): permet d'afficher la moitié supérieure de l'écran en caractères
deux fois plus grands. Pour afficher le texte dans la moitié inférieure de
l'écran, appuyez une nouvelle fois sur ce bouton. Pour rétablir l'affichage
normal, appuyez dessus une fois de plus.
7
9 (maintenir): arrête l'affichage sur la page en cours, au cas où plusieurs
pages secondaires suivraient automatiquement. Pour annuler, appuyez de
nouveau sur cette touche.
8
2 (page suivante): affiche la page suivante du télétexte.
9
3 (page précédente): affiche la page précédente du télétexte.
0
5 (révéler): affiche le texte masqué (les réponses à un questionnaire, par
exemple). Appuyez à nouveau sur ce bouton Appuyez à nouveau sur ce
bouton pour rétablir le mode d'affichage normal.
!
7 (annuler): réduit l'écran télétexte pour le superposer sur l'émission en
cours.
@
Boutons de couleur (rouge, vert, jaune, bleu): si la société de radiodiffusion
utilise le système FASTEXT, les différents sujets traités dans la page
télétexte disposent d'un code couleur et peuvent être sélectionnés à l'aide
des boutons de couleur de la télécommande. Appuyez sur la couleur
correspondant au sujet de votre choix. Une nouvelle page avec code couleur
est affichée. Les éléments peuvent être sélectionnés de la même manière.
Pour afficher la page précédente ou suivante, appuyez sur le bouton de
couleur correspondant.
Les pages de télétexte sont organisées en six catégories
Catégorie Contenu
A
E
F
B C D
A Numéro de la page sélectionnée.
B Identité de la chaîne émettrice.
C
Numéro de la page actuelle ou indications de
recherche.
D Date et heure.
E Texte.
F Informations sur l'état. Informations FASTEXT.
Page 60
Français - 12
Résolution des problèmes
(En fonction du pays et du modèle)
En cas de problème, commencez par vous reporter à la liste des problèmes potentiels et de leurs solutions. Si aucun de
ces conseils de dépannage ne s'applique, consultez la page «www.samsung.com/fr», puis cliquez sur Assistance, ou
contactez le centre de service clientèle de Samsung.
Problèmes Solutions et explications
Qualité de l'image.
Tout d'abord, effectuez le Test de l'image et confirmez que l'image de test s'affiche
correctement sur votre téléviseur. (accédez à MENU - Assistance - Diagnost. auto. -
Test de l'image) Si l'image de test s'affiche normalement, la piètre qualité d'image peut
être due à la source ou au signal.
Qualité d'image moins
bonne que dans le
magasin.
• Si vous possédez un décodeur câble/boîtier analogique, remplacez-le par un
décodeur numérique. Utilisez des câbles HDMI pour bénéficier d'une qualité d'image
HD (haute définition).
• Abonnés au câble/satellite: essayez les chaînesHD dans la liste des canaux.
• Connexion avec antenne: essayez les chaînes HD après avoir procédé à une
recherche automatique.
• De nombreuses chaînes HD sont mises à niveau à partir de contenus SD (définition
standard).
• Réglez la résolution de sortie vidéo du décodeur câble ou du boîtier décodeur sur
1080i ou 720p.
• Veillez à respecter la distance minimale recommandée (basée sur la taille et la
définition du signal) entre vous et le téléviseur.
L'image est déformée:
erreur de macroblocs, petit
bloc, points, pixellisation
• La compression de contenu vidéo peut entraîner une déformation de l'image, en
particulier pour les mouvements rapides comme le sport et les films d'action.
• Un signal faible ou de mauvaise qualité peut également causer une déformation de
l'image. Le problème ne provient pas du téléviseur.
• Utiliser un téléphone portable à proximité du téléviseur (à moins d'un mètre) peut être
source de parasites pour les téléviseurs analogiques et numériques.
Mauvaise qualité des
couleurs ou faible
luminosité.
• Dans le menu du téléviseur, réglez les options Image. (accédez à Mode Image /
Couleur / Luminosité / Netteté)
• Dans le menu du téléviseur, réglez l'option Mode éco.. (accédez à MENU - Système
- Solution Eco - Mode éco.)
• Essayez de réinitialiser les valeurs par défaut de l'image (accédez à MENU - Image -
Réinit. param. img)
Ligne pointillée sur le
pourtour de l'écran.
• Si le format d'image est défini sur Adapter à l’écran, réglez-le sur 16:9.
• Changez la résolution du décodeur câble ou du récepteur satellite.
Page 61
Français
Français - 13
Problèmes Solutions et explications
Lorsque vous changez de
chaîne, l'image se fige, est
déformée ou s'affiche avec
un décalage.
• Si vous êtes connecté par le biais d'un décodeur câble, essayez de le réinitialiser.
Rebranchez le câble d'alimentation secteur, puis patientez jusqu'au redémarrage du
décodeur. Cette opération peut prendre jusqu'à 20minutes.
• Réglez la résolution de sortie du décodeur câble sur 1080i ou 720p.
Qualité du son.
Tout d'abord, effectuez le Test du son pour confirmer que le son de votre téléviseur
fonctionne normalement. (accédez à MENU - Assistance - Diagnost. auto. - Test du
son)
Si le système audio fonctionne correctement, le problème de son peut provenir de la
source ou du signal.
Aucun son ou son trop
faible lorsque le volume est
au maximum.
• Vérifiez le volume du périphérique (décodeur câble ou récepteur satellite, DVD, Blu-
ray, etc.) connecté à votre téléviseur.
Image correcte mais pas
de son.
• Définissez l'option Sélection Haut-parleur sur Haut-parleur TV dans le menu audio.
• Si vous utilisez un appareil externe, assurez-vous que les câbles audio sont
raccordés aux prises d'entrée audio appropriées du téléviseur.
• Si vous utilisez un périphérique externe, vérifiez l'option de sortie audio de l'appareil
(vous devrez, par exemple, mettre l'option audio du décodeur câble sur HDMI
lorsqu'un câble HDMI est connecté au téléviseur).
• Si vous utilisez un câble DVI-HDMI, un câble audio distinct est requis.
• Redémarrez le périphérique connecté en reconnectant son câble d'alimentation.
Son étrange émis par les
haut-parleurs.
• Vérifiez le branchement des câbles. Assurez-vous qu'aucun câble vidéo n'est
branché à une entrée audio.
• Pour les connexions à un câble ou à une antenne, vérifiez l'intensité du signal. Un
signal faible peut provoquer une distorsion du son.
Pas d'image, pas de vidéo.
Le téléviseur ne s'allume
pas.
• Vérifiez que le câble d'alimentation secteur est branché correctement à la prise
murale et au téléviseur.
• Vérifiez que la prise murale est opérationnelle.
• Essayez d'appuyer sur le bouton P du téléviseur pour vous assurer que le problème
n'est pas dû à la télécommande. Si le téléviseur s'allume, reportez-vous au problème
«La télécommande ne fonctionne pas» ci-après.
Le téléviseur s'éteint
automatiquement.
• Assurez-vous que l'option Veille est définie sur Arrêt dans le menu Heure.
• Si votre PC est connecté au téléviseur, vérifiez les paramètres d'alimentation du PC.
• Vérifiez que le câble d'alimentation secteur est branché correctement à la prise
murale et au téléviseur.
• Veille si aucun signal met le téléviseur hors tension si ce dernier ne reçoit pas de
signal pendant une période définie. Hors ten. auto met le téléviseur hors tension en
l'absence d'interaction de l'utilisateur pendant quatre heures.
Page 62
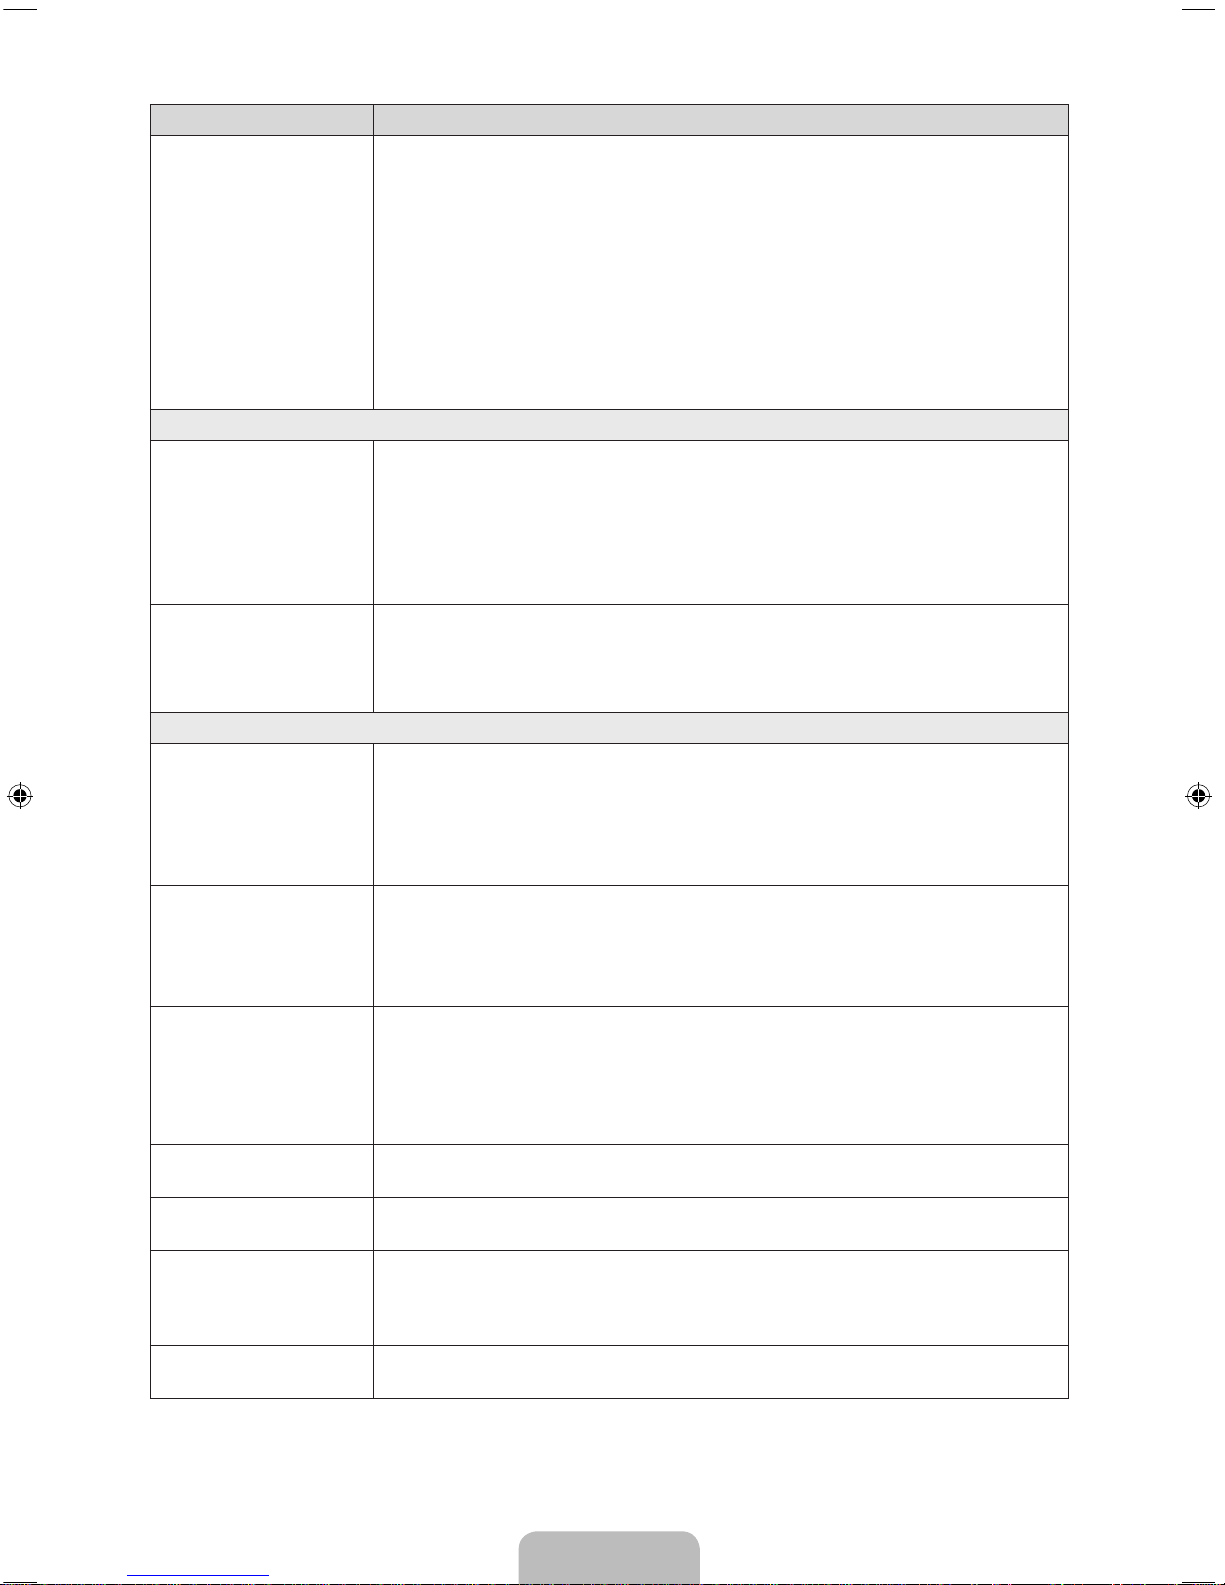
Français - 14
Problèmes Solutions et explications
Aucune image/vidéo.
• Vérifiez le branchement des câbles (débranchez et rebranchez tous les câbles reliés
au téléviseur et aux appareils externes).
• Faites correspondre les sorties vidéo de votre périphérique externe (décodeur câble/
boîtier décodeur, DVD, Blu-ray, etc.) avec les connexions d'entrée du téléviseur.
Par exemple, si la sortie d'un appareil externe est HDMI, vous devez établir une
connexion avec une entrée HDMI du téléviseur.
• Vérifiez que les appareils connectés sont sous tension.
• Veillez à sélectionner la source appropriée du téléviseur en appuyant sur le bouton
SOURCE de la télécommande.
• Redémarrez le périphérique connecté en reconnectant son câble d'alimentation.
Connexion à une antenne (hertzien/câble)
Le téléviseur ne reçoit pas
toutes les chaînes.
• Vérifiez si le câble de l'antenne est solidement connecté.
• Essayez d'exécuter la fonction Configuration (Configuration initiale) pour ajouter
des chaînes disponibles à la liste de chaînes. Accédez à MENU - Système -
Configuration (Configuration initiale) et attendez que toutes les chaînes disponibles
soient enregistrées.
• Vérifiez si l'antenne est positionnée correctement.
L'image est déformée:
erreur de macroblocs, petit
bloc, points, pixellisation
• La compression de contenu vidéo peut entraîner une déformation de l'image, en
particulier pour les mouvements rapides comme le sport et les films d'action.
• Un signal faible peut également causer une déformation de l'image. Le problème ne
provient pas du téléviseur.
Autres
L'image ne s'affiche pas en
mode Plein écran.
• Des barres noires apparaissent de part et d'autre de l'écran des chaînesHD lors de
l'affichage de contenuSD (4:3) mis à l'échelle.
• Des barres noires s'affichent en bas et en haut de l'écran pendant les films dont le
format d'image est différent de celui de votre téléviseur.
• Réglez le format d'image de l'appareil externe ou celui du téléviseur sur Plein écran.
La télécommande ne
fonctionne pas.
• Remplacez les piles de la télécommande en respectant la polarité (+/–).
• Nettoyez la lentille de la télécommande.
• Essayez de diriger directement la télécommande vers le téléviseur à une distance
comprise entre 1,5 et 1,8m.
La télécommande du
décodeur câble/boîtier
décodeur ne permet pas
d'allumer ou d'éteindre le
téléviseur, ni de régler le
volume.
• Programmez la télécommande du décodeur câble/boîtier décodeur de telle sorte
qu'elle puisse contrôler le téléviseur. Consultez le manuel de l'utilisateur du décodeur
câble/boîtier décodeur pour obtenir le code du téléviseur SAMSUNG.
Le message «Mode non
pris en charge» s'affiche.
• Vérifiez les résolutions prises en charge par le téléviseur et réglez la résolution de
sortie de l'appareil externe en conséquence.
Une odeur de plastique se
dégage du téléviseur.
• Cette odeur est normale et disparaîtra peu à peu.
Le téléviseur Informations
de signal n'est pas
accessible depuis le menu
de test Diagnost. auto..
• Cette fonction est uniquement disponible pour les chaînes numériques à partir d'une
connexion antenne / radiofréquence / coaxiale.
Le téléviseur penche vers
la droite ou la gauche.
• Retirez la base du socle du téléviseur et assemblez-la de nouveau.
Page 63
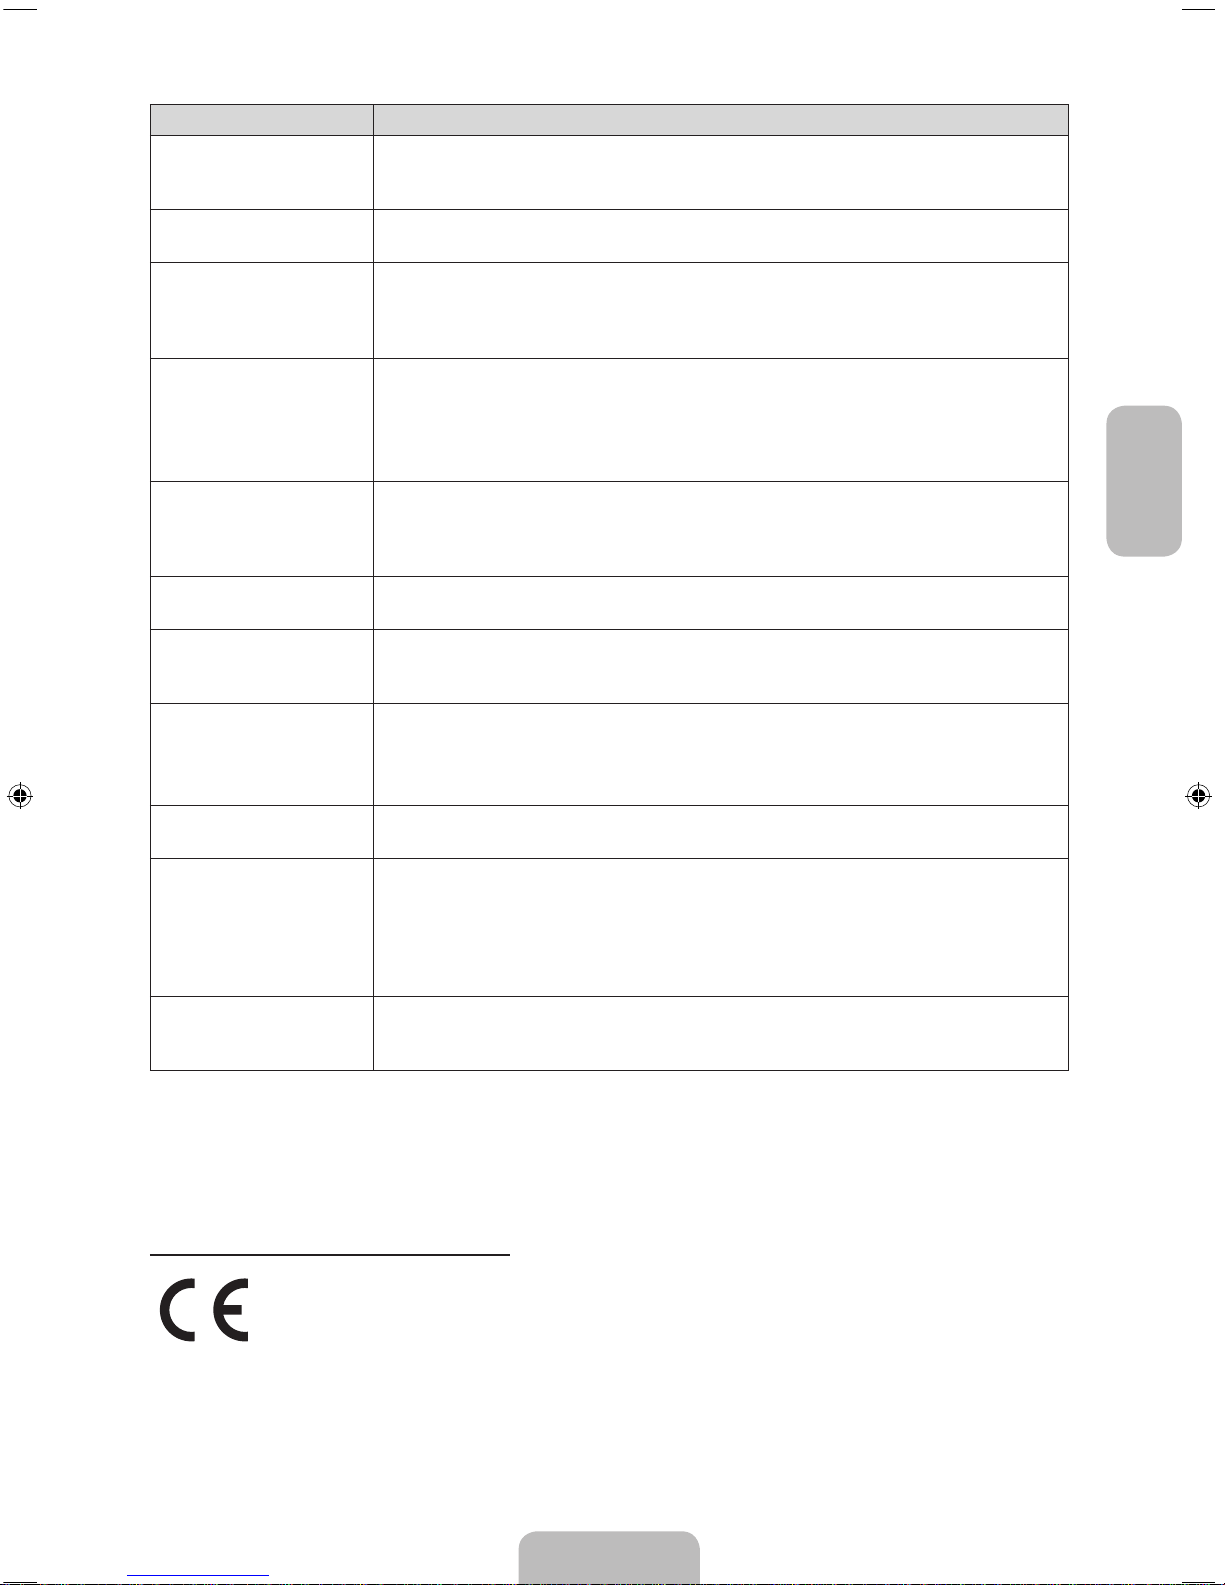
Français
Français - 15
Problèmes Solutions et explications
Vous ne réussissez pas
à assembler la base du
socle.
• Vérifiez que le téléviseur se trouve sur une surface plane. En cas d'impossibilité de
retirer les vis du téléviseur, utilisez un tournevis aimanté.
Le menu Diffusion est
grisé (non disponible).
• Le menu Diffusion est disponible uniquement quand la source du téléviseur est
sélectionnée.
Vous perdez vos réglages
après 5minutes ou à
chaque fois que vous
éteignez le téléviseur.
• Si le téléviseur est en mode Util. magasin, les paramètres audio et vidéo seront
réinitialisés toutes les 5 minutes. Pour modifier les paramètres du mode Util.
magasin au mode Util. domicile, appuyez sur le bouton SOURCE pour sélectionner
le mode TV, et accédez à MENU → Assistance → Mode Utilisation.
Perte intermittente du son
ou de l'image.
• Vérifiez le branchement des câbles et reconnectez-les si nécessaire.
• Cette perte peut résulter de l'utilisation de câbles trop rigides ou trop épais. Veillez
à ce que les câbles soient suffisamment souples pour une utilisation à long terme.
En cas d'installation du téléviseur en position murale, nous vous recommandons
d'utiliser des câbles munis de connecteurs à 90degrés.
Vous pouvez voir de petites
particules lorsque vous
regardez les bords du
téléviseur de près.
• Elles font partie de la conception du produit et ne constituent pas un défaut.
Le menu PIP n'est pas
disponible.
• La fonctionnalité PIP est disponible uniquement lorsque vous utilisez une source
HDMI ou Composant.
Le téléviseur s'est rallumé
45minutes après sa mise
hors tension.
• C'est normal. Le téléviseur exécute automatiquement la fonction de liaison radio
(OTA) pour mettre à niveau le microprogramme téléchargé au cours de son utilisation.
Le message «Signal
brouillé» ou «Signal
faible ou inexistant»
s'affiche.
• Si vous utilisez un module CAM CARD (CI/CI+), vérifiez qu'il est installé dans la fente
de l'interface commune.
• En cas de problème, retirez le module CAM CARD du téléviseur et ré-introduisez-le
dans la fente.
Problème de rémanence
d'image/de son.
• Vérifiez le signal/la source et changez-en si nécessaire.
Une réaction peut
se produire entre les
coussinets en caoutchouc
de la base du socle et le
revêtement de certains
meubles.
• Afin d'éviter ce problème, utilisez des coussinets en feutre sur les surfaces du
téléviseur en contact avec un meuble.
Le message «Fichier non
lisible.» apparaît.
• Cela peut se produire en raison du haut débit du contenu. Généralement, le contenu
sera lu, mais il pourrait être sujet à des problèmes de lisibilité.
✎
Vous pouvez maintenir votre téléviseur dans des conditions optimales d'utilisation en le mettant à niveau avec le
dernier micrologiciel (www.samsung.com/fr → Assistance) par le biais d'un périphérique USB.
✎
Ce téléviseur LED TFT est équipé d'un écran constitué de sous-pixels dont la fabrication nécessite une
technologie sophistiquée. Il se peut toutefois que quelques points clairs ou sombres apparaissent à l'écran. Ils
n'ont aucune incidence sur la performance du produit.
Recommandation - UE uniquement
• Par la présente, Samsung Electronics déclare que ce téléviseur LED satisfait aux exigences essentielles et aux
autres dispositions pertinentes de la directive 1999/5/EC.
• Cet équipement peut fonctionner dans tous les pays de l'UE.
• La déclaration de conformité est accessible à l'adresse http://www.samsung.com/fr, en cliquant sur Assistance,
puis en entrant le nom du modèle dans le champ de saisie Recherche d'assistance pour vos produits.
Page 64
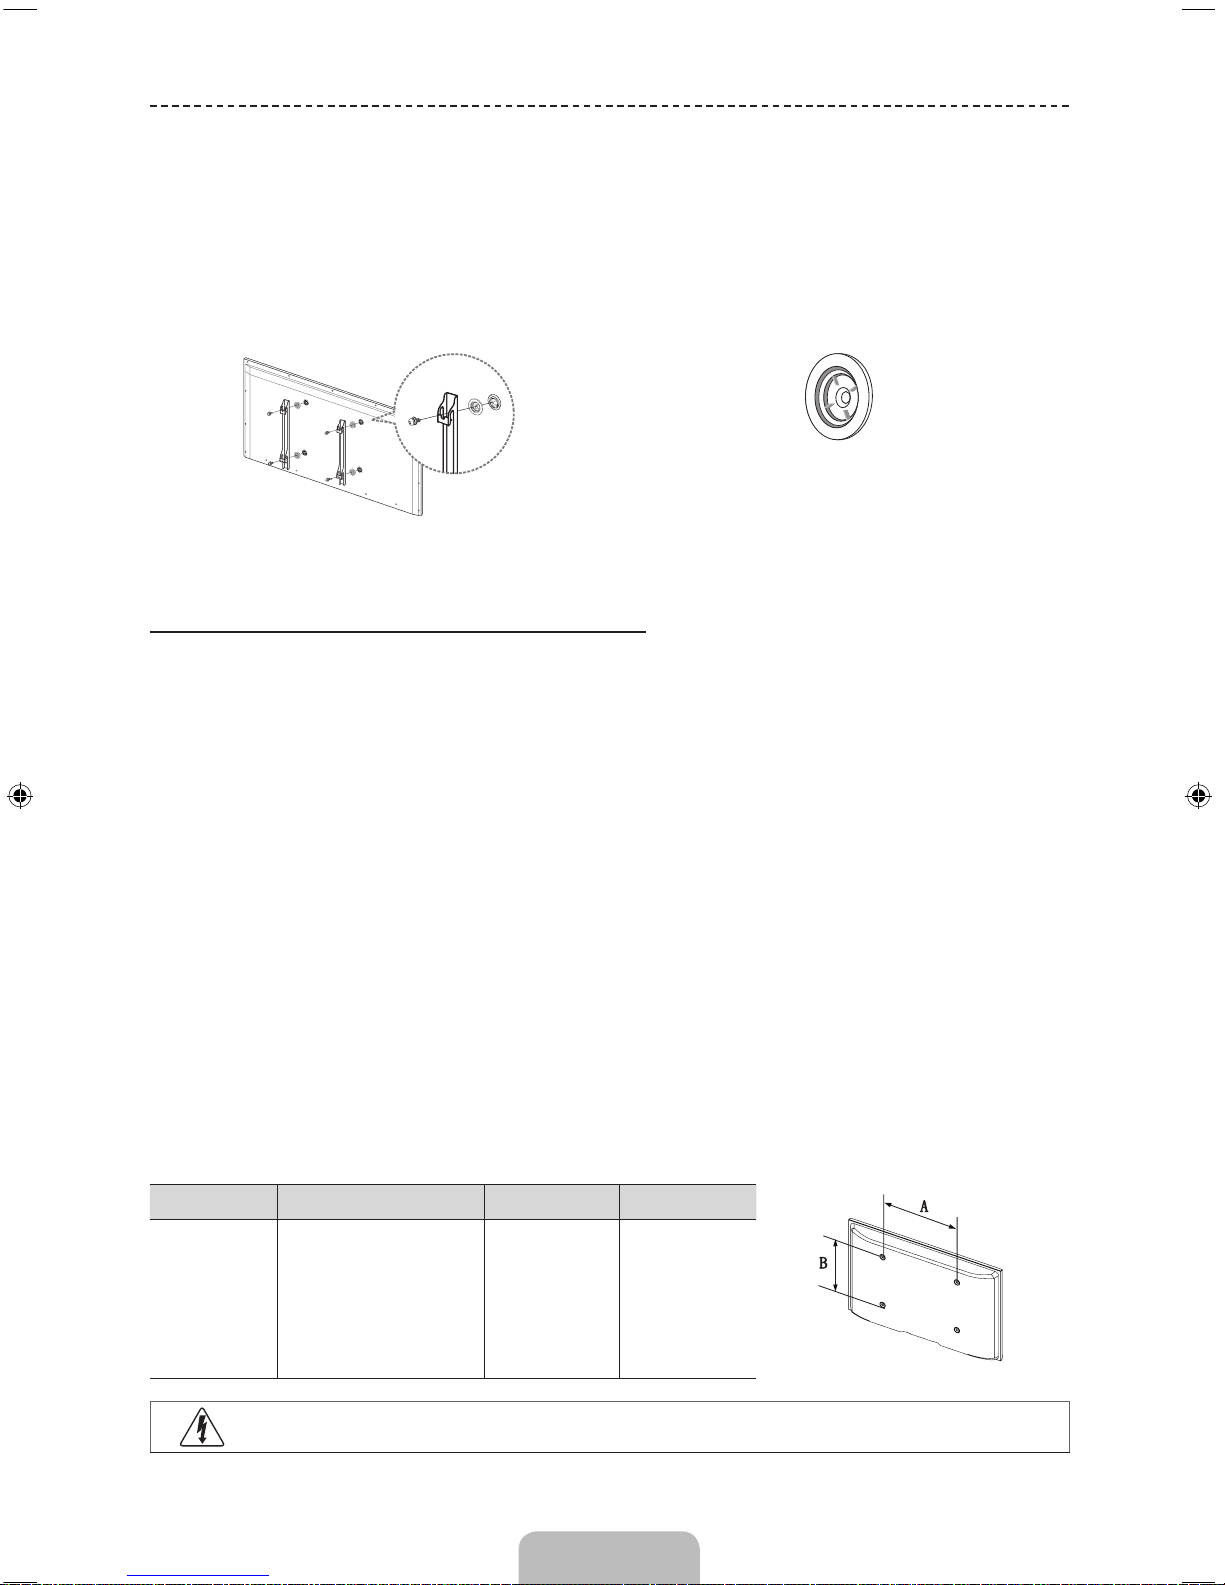
Français - 16
Installation du support mural
Les éléments du support mural (vendus séparément) permettent de fixer le téléviseur au mur. Pour plus d’informations
sur l’installation du support mural, reportez-vous aux instructions fournies avec les éléments du support mural. Faites
appel à un technicien pour installer la fixation murale. Nous ne vous conseillons pas de le faire vous-même.
Si vous choisissez d’effectuer vous-même l’installation murale, Samsung Electronics ne saurait être tenue responsable
des éventuels dommages matériels ou des éventuelles blessures dont vous, ou d’autres personnes, pourriez être
victimes.
Adaptateur pour support mural
(En fonction des modèles)
Avant d'installer un autre kit de montage mural, montez l'adaptateur pour support mural fourni séparément avec le
téléviseur.
Caractéristiques du kit de fixation murale (VESA)
✎
Le kit de fixation murale est vendu séparément.
✎
Installez votre fixation murale sur un mur solide perpendiculaire au sol. Si vous souhaitez la fixer sur d’autres
matériaux de construction, veuillez prendre contact avec votre revendeur le plus proche. Si vous l’installez au
plafond ou sur un mur non droit, la fixation risque de tomber et de provoquer de graves blessures.
✎
REMARQUE
• Les dimensions standard pour tous les kits de fixation murale sont indiquées dans le tableau ci-dessous.
• Le kit de fixation murale s’accompagne d’un manuel d’installation détaillé et de toutes les pièces nécessaires au
montage.
• N’utilisez pas de vis plus longues que la dimension standard, car elles pourraient endommager l’intérieur du
téléviseur.
• N’utilisez pas de vis non conformes aux spécifications des vis VESA standard.
• Pour les fixations murales non conformes aux spécifications des vis VESA standard, la longueur des vis peut
varier, selon leurs caractéristiques.
• Ne serrez pas trop les vis ; cela pourrait, en effet, endommager le produit ou provoquer sa chute, entraînant des
blessures. Samsung ne peut être tenue responsable de ce type d’accident.
• Samsung ne peut être tenue responsable de tout dommage au produit ou toute blessure corporelle dans le cas
de l’utilisation d’une fixation murale non-VESA ou non spécifiée, ou si l’utilisateur ne suit pas les instructions
d’installation du produit.
• Lors du montage, l’inclinaison du téléviseur ne doit pas dépasser 15 degrés.
pouces Spéc. VESA (A * B) Vis standard Quantité
50 ~ 60 400 X 400 M8 4
N’installez pas votre kit de fixation murale lorsque le téléviseur est allumé. Vous risqueriez de vous
électrocuter.
Page 65
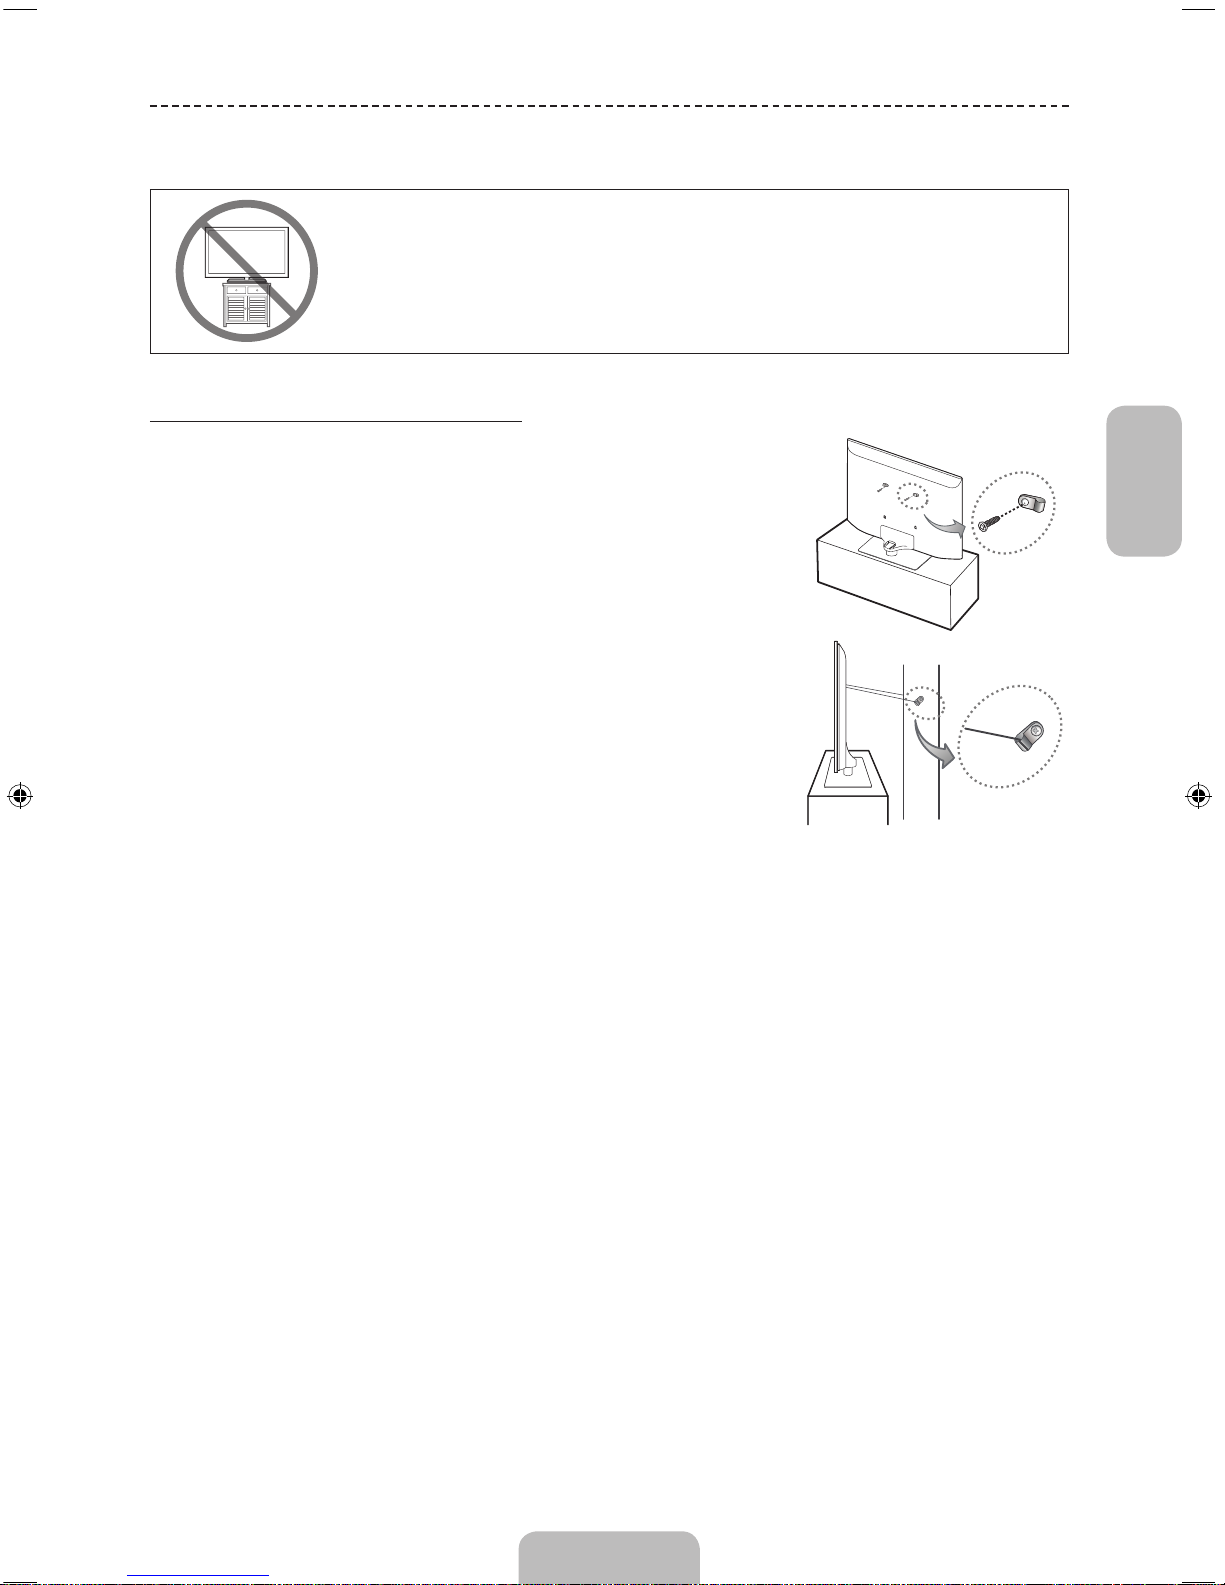
Français
Français - 17
Fixation du téléviseur au mur
Attention: si vous tirez ou poussez le téléviseur ou si vous grimpez dessus, il risque de
tomber. Veillez notamment à ce que vos enfants ne se suspendent pas au téléviseur, ni ne le
déséquilibrent, car cela pourrait le faire basculer et occasionner des blessures graves, voire
entraîner la mort. Respectez toutes les précautions de sécurité indiquées dans la brochure
relative à la sécurité. Pour une stabilité accrue, installez le dispositif antichute comme indiqué
ci-après.
Pour éviter toute chute du téléviseur
1. Placez les vis dans les colliers et fixez-les fermement au mur. Assurez-
vous que les vis ont été fermement fixées au mur.
✎
En fonction du type de mur, il est possible que vous ayez besoin
de matériel supplémentaire, tel que des chevilles.
✎
Les colliers, vis et chaînettes n’étant pas fournis, vous devez les
acheter séparément.
2. Retirez les vis situées sur la partie centrale arrière du téléviseur,
placez-les dans les colliers, puis fixez-les à nouveau sur le téléviseur.
✎
Caractéristiques des vis
• Pour un téléviseur de 50 ~ 60 pouces : M8
3. Reliez les colliers fixés au téléviseur et ceux fixés sur le mur à l’aide de
chaînettes, puis attachez-les fermement.
✎
REMARQUE
• Placez le téléviseur à proximité du mur afin qu’il ne bascule pas
vers l’arrière.
• Il est recommandé de placer la chaînette de façon à ce que les
colliers fixés au mur soient placés à la même hauteur ou plus bas
que ceux fixés au téléviseur.
• Détachez la chaînette avant de déplacer le téléviseur.
4. Vérifiez que toutes les connexions sont fixées correctement. Vérifiez
régulièrement que les connexions ne présentent aucun signe d’usure. Si vous avez un doute quant à la sécurité des
connexions, contactez un installateur professionnel.
Mur
• La couleur et la forme du produit
peuvent varier en fonction du
modèle.
Page 66
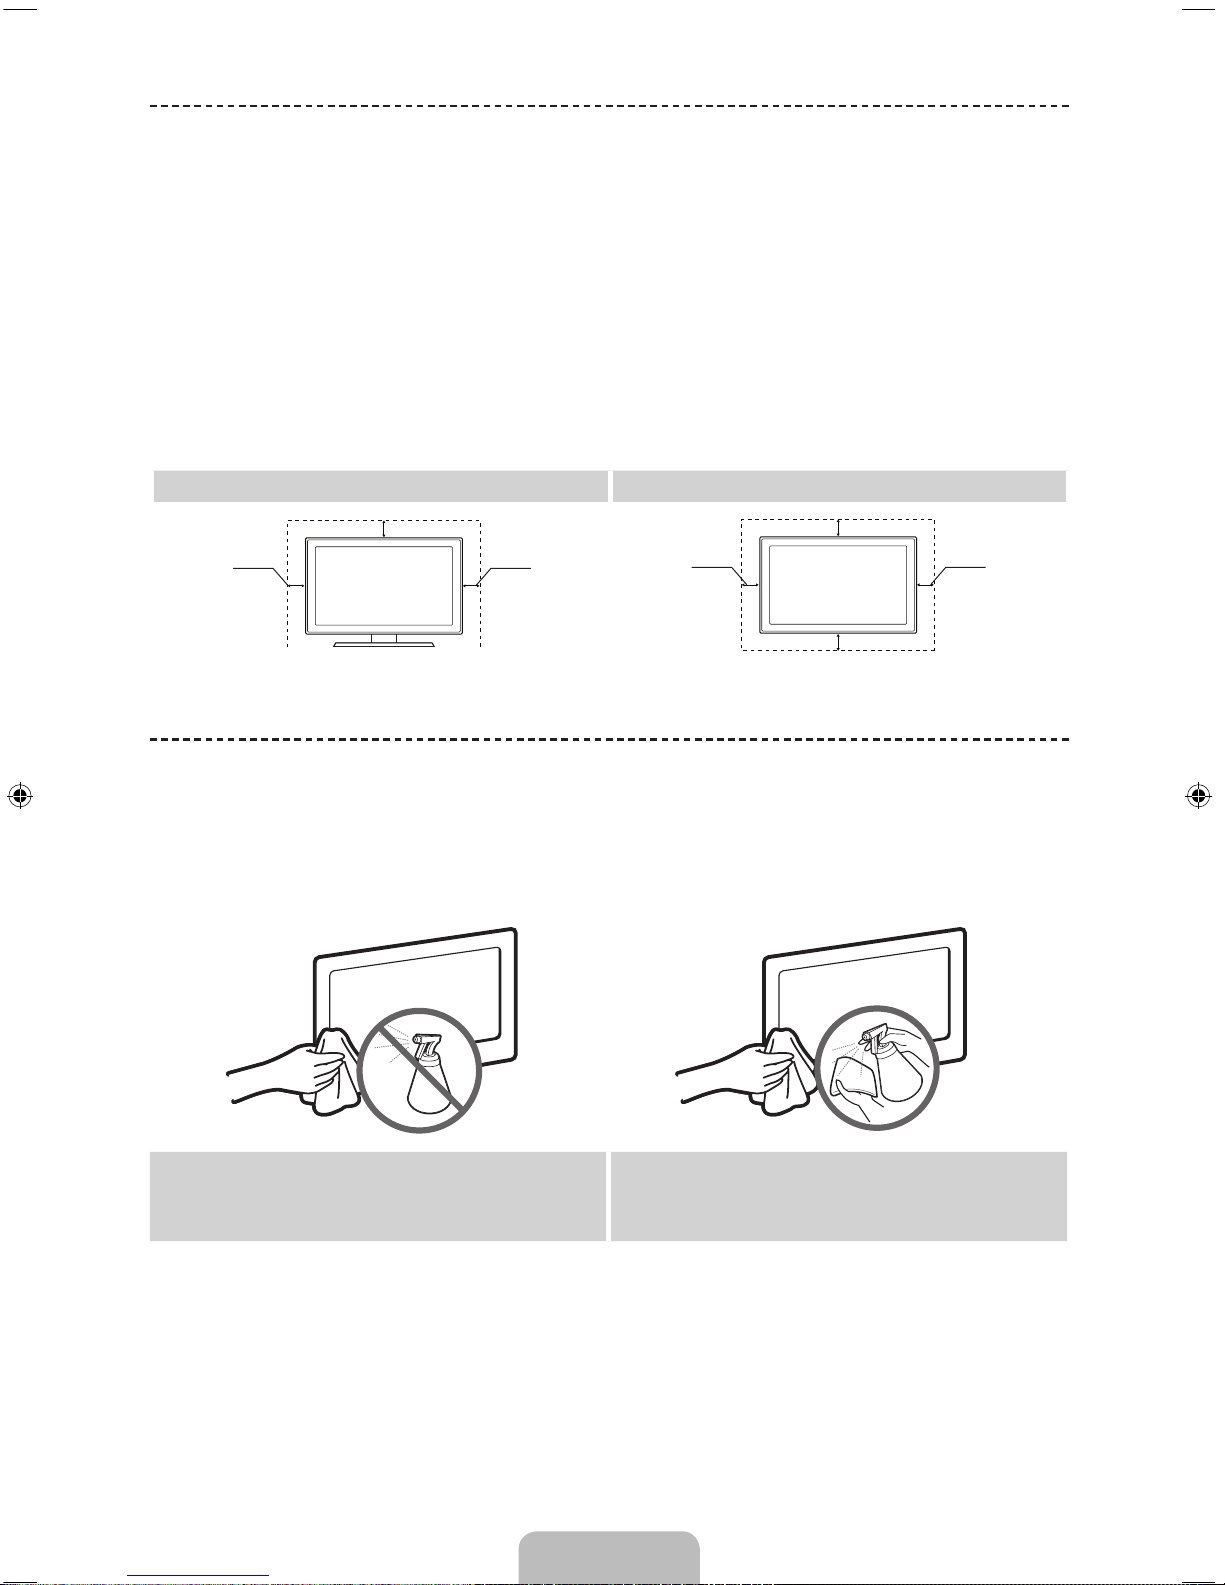
Français - 18
Sécurisation de l’espace d’installation
Maintenez les distances requises entre le produit et les autres objets (par exemple, les murs) afin de garantir une
ventilation adaptée.
Le non-respect de ces distances peut provoquer un incendie ou un problème au produit en raison d’une augmentation
de la température interne de celui-ci.
✎
Lors de l’utilisation d’un pied ou d’un support mural, utilisez uniquement les pièces fournies par Samsung
Electronics.
• L’utilisation de pièces fournies par un autre fabricant peut occasionner un problème au niveau du produit ou la
chute de celui-ci, ce qui pourrait vous blesser.
✎
L’aspect peut varier en fonction du produit.
✎
Soyez prudent lorsque vous touchez le téléviseur, car certaines parties peuvent être brûlantes.
Installation avec un pied. Installation avec un support de montage mural.
10 cm
10 cm
10 cm
10 cm
10 cm
10 cm
10 cm
Stockage et entretien
✎
Si vous enlevez l'autocollant appliqué sur l'écran du téléviseur, éliminez les traces puis nettoyez le téléviseur.
✎
Le nettoyage peut rayer le coffret et l’écran du produit. Veillez à les nettoyer avec précaution à l’aide d’un chiffon
doux pour éviter les rayures.
Ne projetez pas directement de l’eau sur l'appareil. Tout
liquide qui entre dans le produit peut engendrer une
défaillance, un incendie ou une électrocution.
Nettoyez le produit à l'aide d'un chiffon doux imprégné
d'une petite quantité d'eau. N'utilisez aucune substance
inflammable (p. ex. benzène ou dissolvant) ni aucun agent
nettoyant.
Page 67
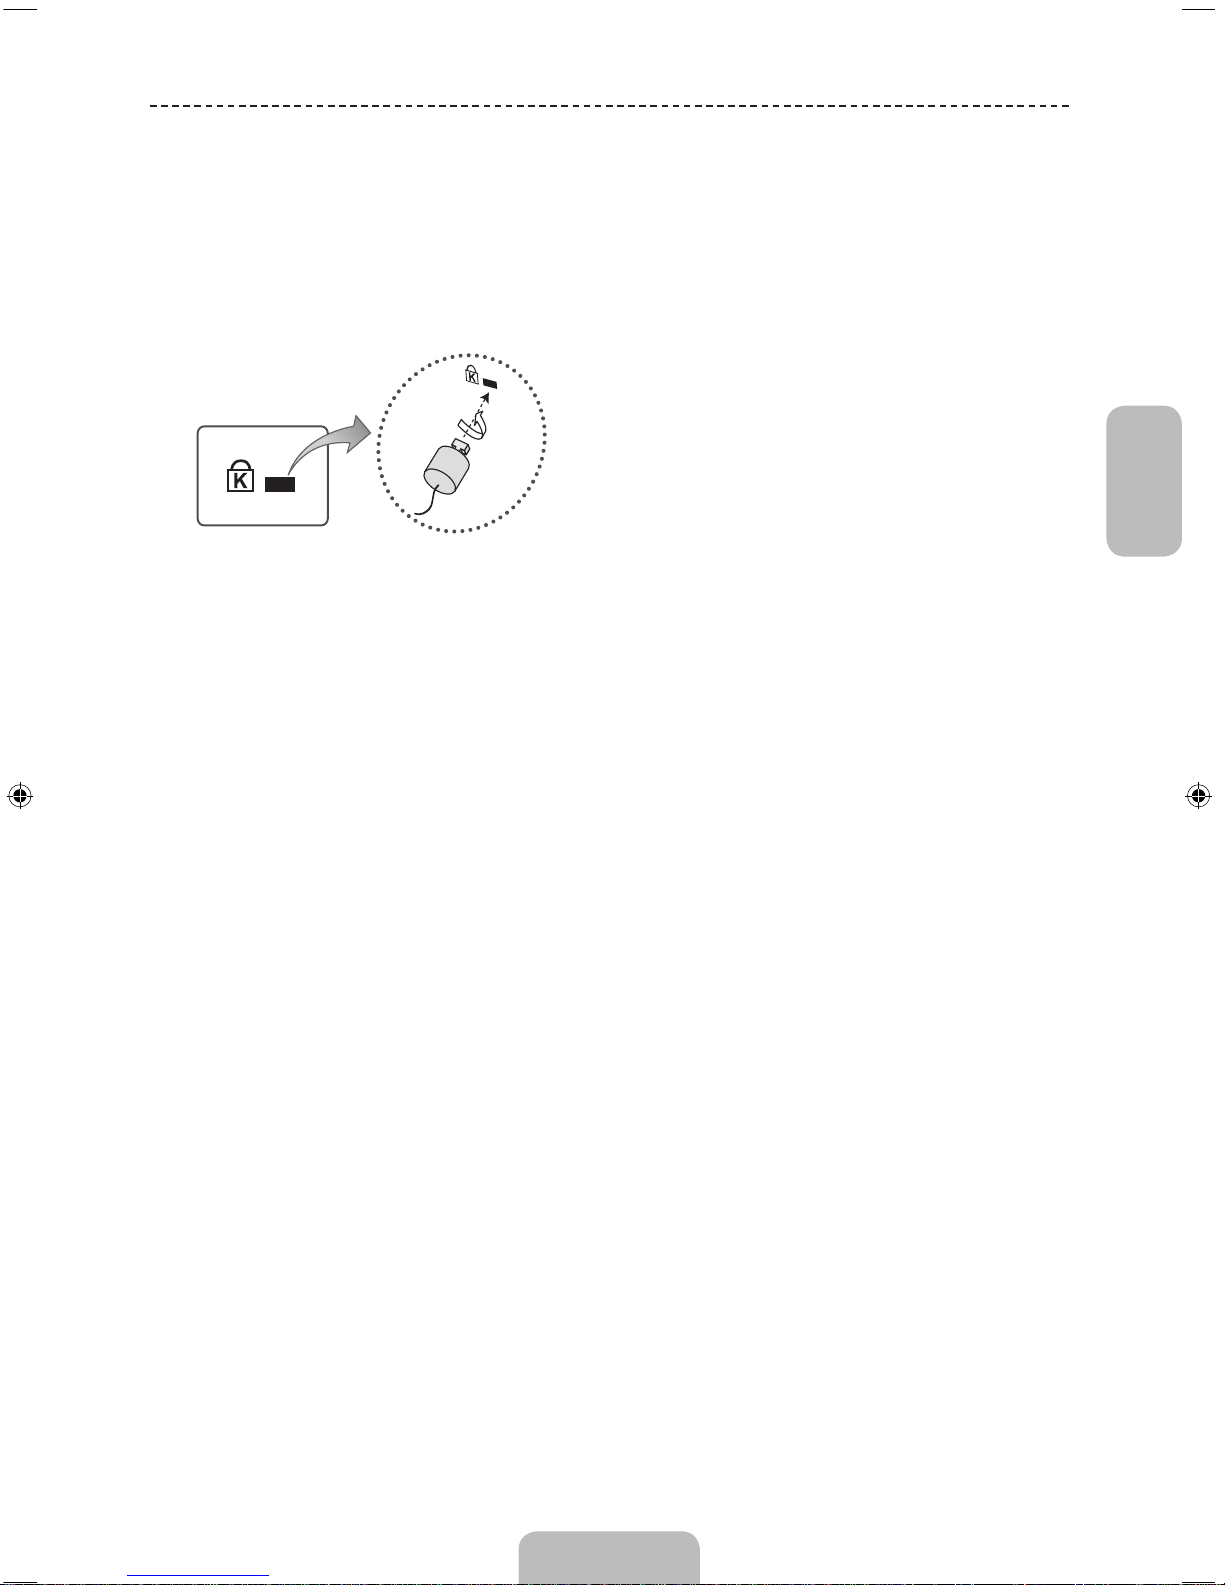
Français
Français - 19
Verrou antivol Kensington
Le verrou antivol Kensington n’est pas fourni par Samsung. L’antivol Kensington est un dispositif utilisé pour fixer
physiquement le système lorsqu’il est utilisé dans un endroit public. L’aspect du verrou et la méthode de verrouillage
peuvent différer de l’illustration en fonction du fabricant. Consultez le manuel fourni avec le verrou Kensington pour
obtenir des instructions d’utilisation supplémentaires.
✎
Une icône “K” est présente à l’arrière du téléviseur. Un verrou Kensington se trouve à côté de l’icône “K”.
✎
L’emplacement et la couleur peuvent varier en fonction du modèle.
<Optionnel>
Pour verrouiller l'appareil, procédez comme suit:
1. Enroulez le câble de verrouillage Kensington autour d’un objet large et fixe tel qu’un bureau ou une chaise.
2. Glissez le bout du câble auquel est attaché le verrou dans la boucle du câble de verrouillage Kensington.
3. Insérez le dispositif de verrouillage dans la fente Kensington de l’appareil.
4. Fermez le verrou.
✎
Ces instructions sont d’ordre général. Pour de plus amples informations, consultez le manuel d’utilisation fourni
avec le dispositif de verrouillage.
✎
Le dispositif de verrouillage est vendu séparément.
Page 68
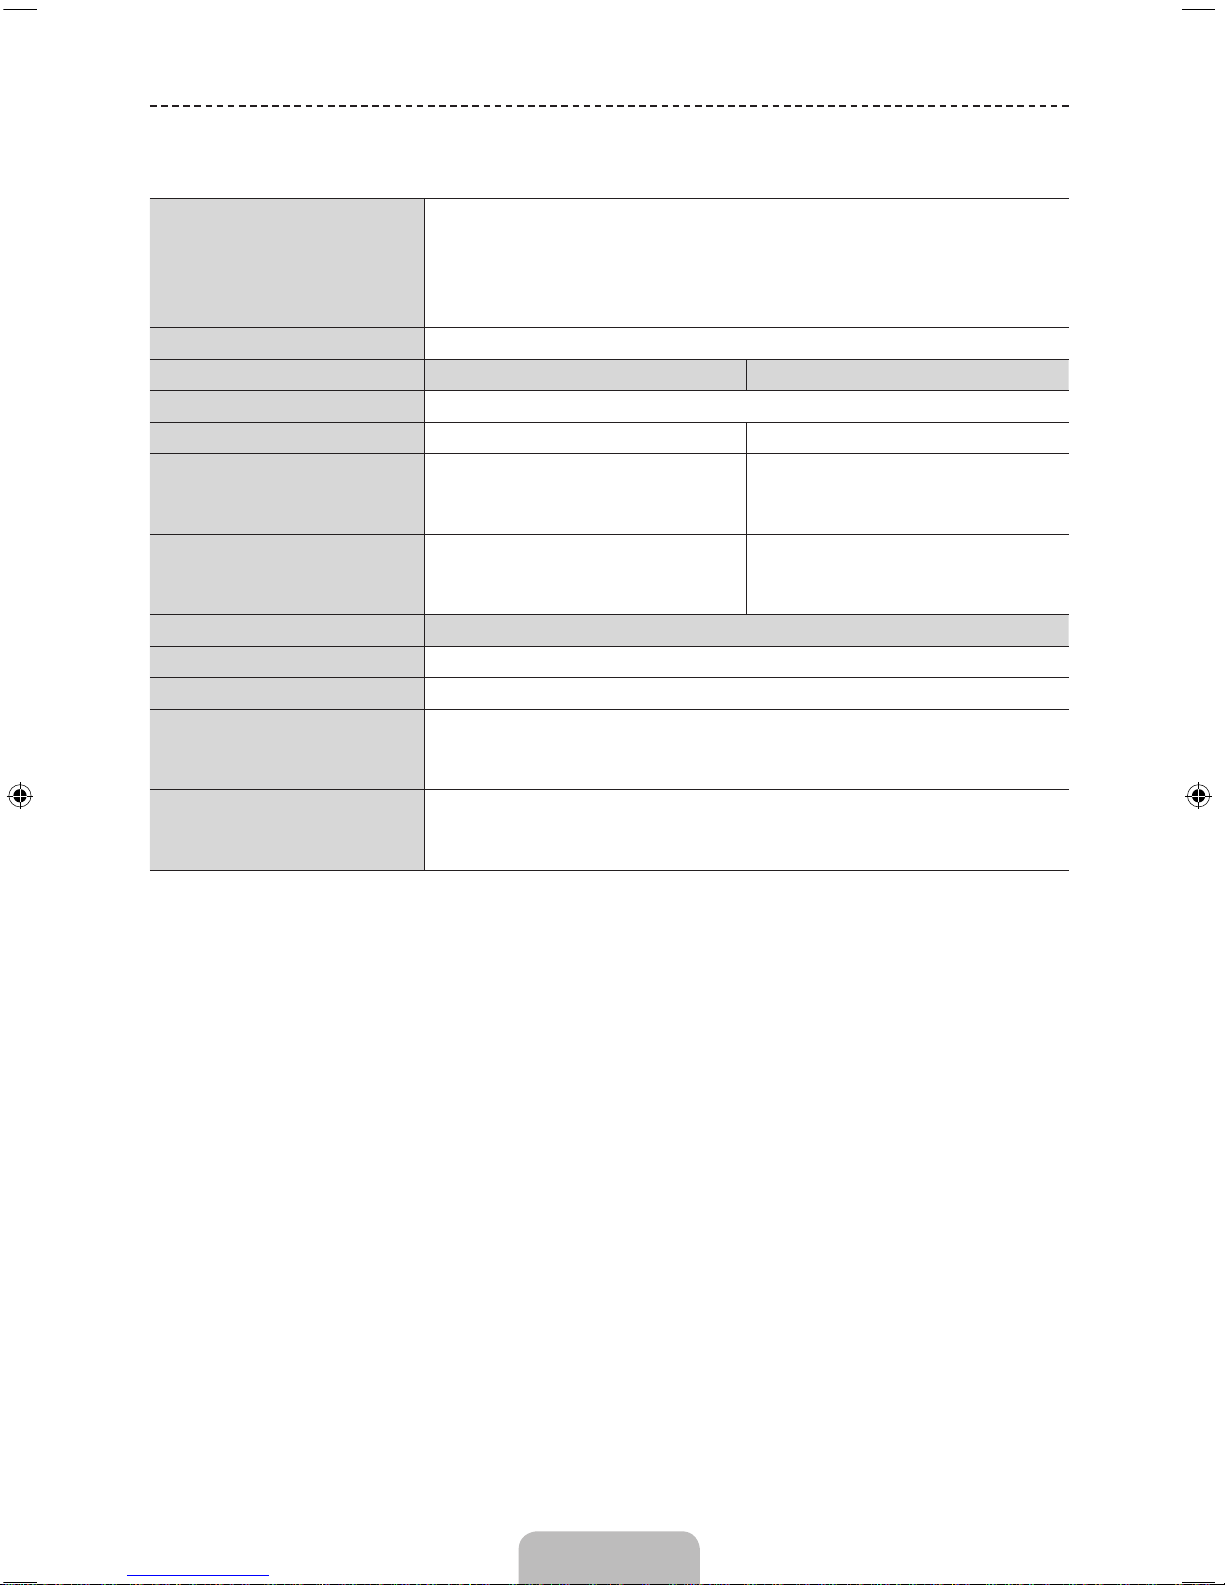
Français - 20
Caractéristiques
Conditions ambiantes
Température en service
Humidité en fonctionnement
Température de stockage
Humidité sur le lieu de stockage
10°C à 40°C (50°F à 104°F)
10%
à
80%, sans condensation
-20°C
à
45°C (-4°F à 113°F)
5%
à
95%, sans condensation
Son (Sortie)
10 W x 2
Nom du modèle
UE50J6150 / UE50J6170 UE55J6150 / UE55J6170
Résolution de l’affichage
1920 x 1080
Taille de l'écran (diagonale)
50 pouces (125 cm) 55 pouces (138 cm)
Dimensions (LxHxP)
Sans socle
Avec socle
1116,8 x 654,4 x 63,7 mm
1116,8 x 696,4 x 203,8 mm
1230,6 x 718,4 x 64,0 mm
1230,6 x 763,4 x 226,5 mm
Poids
Sans socle
Avec socle
13,0 kg
14,1 kg
15,7 kg
18,6 kg
Nom du modèle
UE60J6150 / UE60J6170
Résolution de l’affichage
1920 x 1080
Taille de l'écran (diagonale)
60 pouces (152 cm)
Dimensions (LxHxP)
Sans socle
Avec socle
1365,0 x 797,4 x 64,4 mm
1365,0 x 878,7 x 295,9 mm
Poids
Sans socle
Avec socle
23,0 kg
27,4 kg
✎
La conception et les spécifications peuvent être modifiées sans préavis.
✎
Pour plus d’informations sur les caractéristiques d’alimentation et de consommation électrique, reportez-vous à
l’étiquette fixée au produit.
✎
La consommation électrique typique est mesurée selon la norme CEI 62087 Ed.2
Page 69
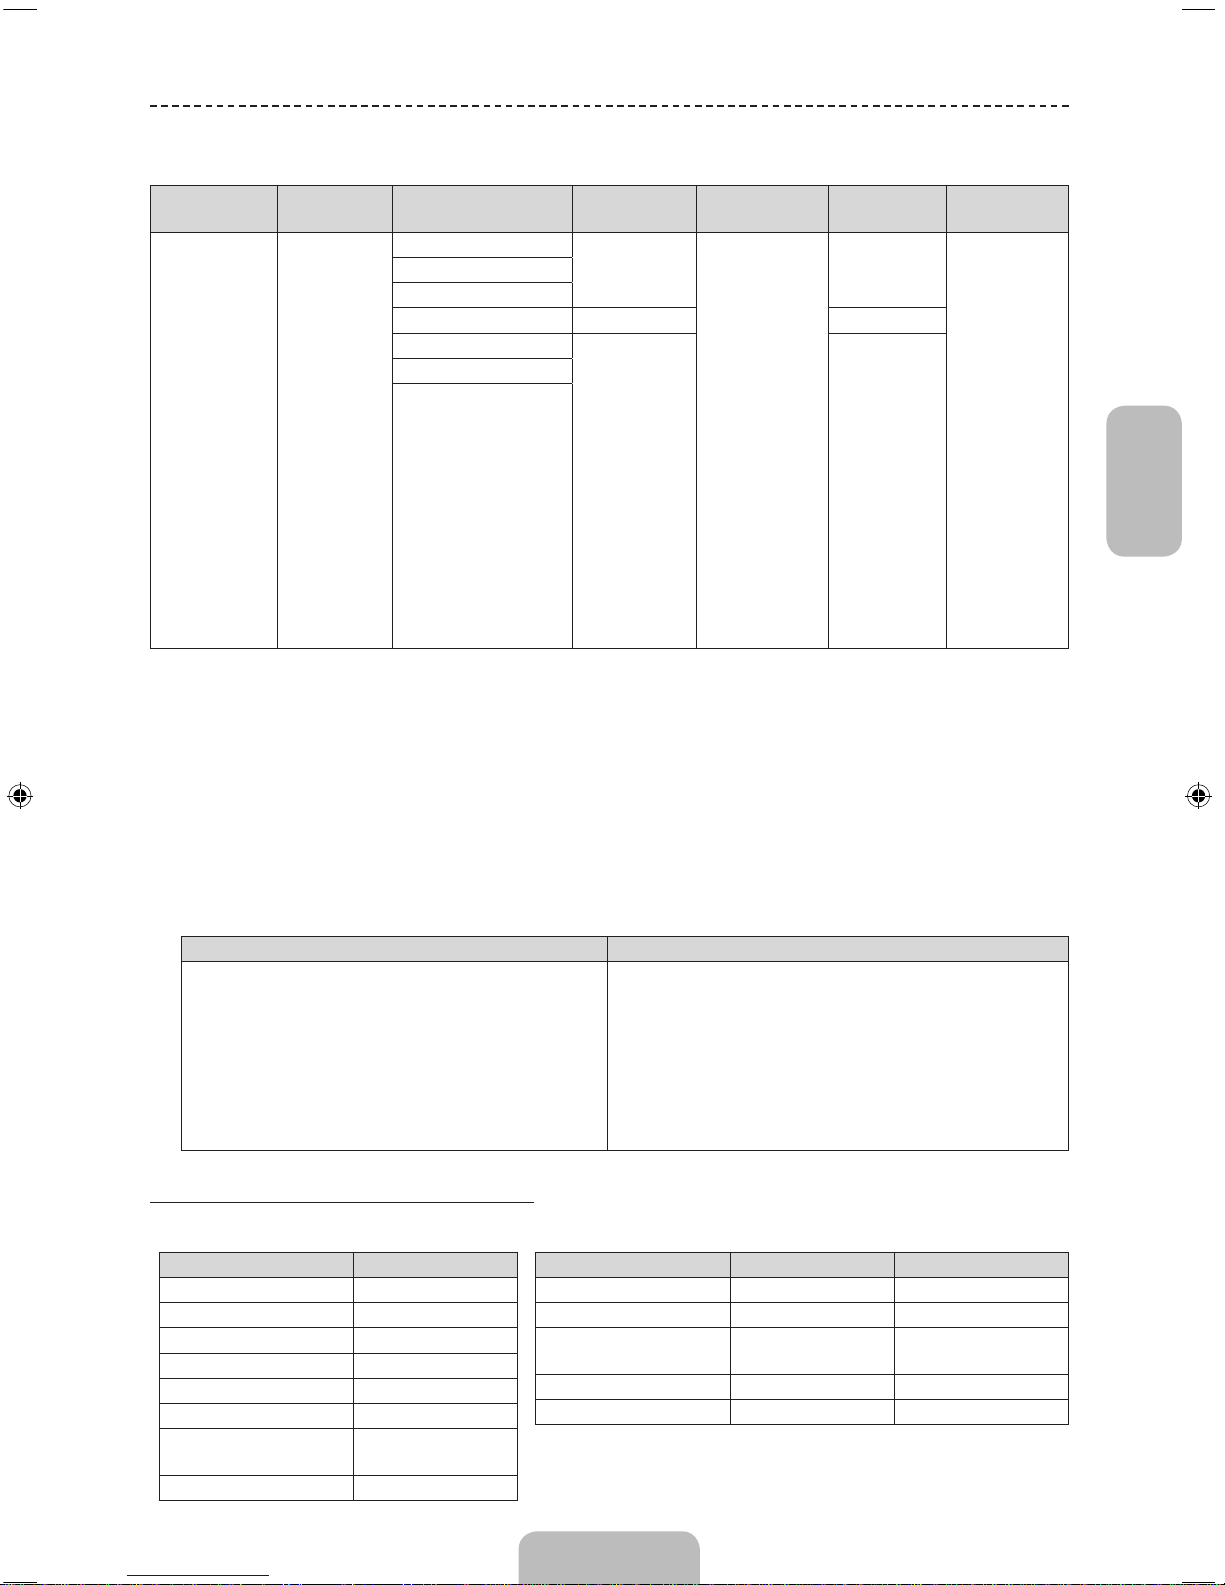
Français
Français - 21
Formats vidéo pris en charge
Extension de
fichier
Conteneur Codec vidéo Résolution
Fréquence
d'images (i/s)
Débit binaire
(Mbit/s)
Codec audio
*.avi
*.mkv
*.asf
*.wmv
*.mp4
*.3gp
*.vro
*.mpg
*.mpeg
*.ts
*.tp
*.trp
*.mov
*.flv
*.vob
*.svi
*.divx
AVI
MKV
ASF
MP4
3GP
VRO
VOB
PS
TS
DivX 3.11 / 4 / 5 / 6
1920 x 1080
6~30
30
Dolby Digital
LPCM
ADPCM (IMA,
MS)
AAC
HE-AAC
WMA
Dolby Digital
Plus
MPEG (MP3)
DTS (Core)
G.711 (A-Law,
μ-Law)
MPEG4 SP/ASP
H.264 BP/MP/HP
Motion JPEG 640 x 480 8
Window Media Video v9
1920 x 1080 30
MPEG2
MPEG1
✎
Autres restrictions
• Le contenu vidéo ne sera pas lu, ou ne sera pas lu correctement, si une erreur est présente dans le contenu ou sur
le suport.
• Le son ou la vidéo peuvent ne pas fonctionner si le contenu a un débit binaire/une fréquence d'images standard
supérieur(e) aux taux d'images par seconde indiqués dans le tableau.
• Si une erreur survient dans la table d'index, la fonction de recherche (saut) n'est pas prise en charge.
• Certains périphériques USB/caméra numériques peuvent ne pas être compatibles avec le lecteur.
• Le menu risque de s'afficher au bout d'un certain temps si la vidéo dépasse 10Mbit/s (débit binaire).
Décodeur vidéo Décodeur audio
• Prend en charge jusqu'à H.264, Level 4.1 (FMO/
ASO/RS non pris en charge).
• Fréquence image:
− Inférieure à 1280x720: 60 images max.
− Supérieure à 1280x720: 30 images max.
• La norme VC1 AP L4 n'est pas prise en charge.
• La norme GMC n'est pas prise en charge.
• WMA 10Pro prend en charge jusqu'au canal 5.1 et
au profil M2. (Le mode LBR de M0 n'est pas pris en
charge.)
• WMA Lossless audio n'est pas pris en charge.
• Vorbis prend en charge jusqu'à 2canaux.
• Dolby Digital Plus prend en charge jusqu'au canal 5.1.
Formats de sous-titres pris en charge
• Externe
Nom Extension de fichier
MPEG-4 timed text .ttxt
SAMI .smi
SubRip .srt
SubViewer .sub
Micro DVD .sub ou .txt
SubStation Alpha .ssa
Advanced SubStation
Alpha
.ass
Powerdivx .psb
• Interne
Nom Conteneur Format
Xsub AVI Picture Format
SubStation Alpha MKV Text Format
Advanced SubStation
Alpha
MKV Text Format
SubRip MKV Text Format
MPEG-4 Timed text MP4 Text Format
Page 70
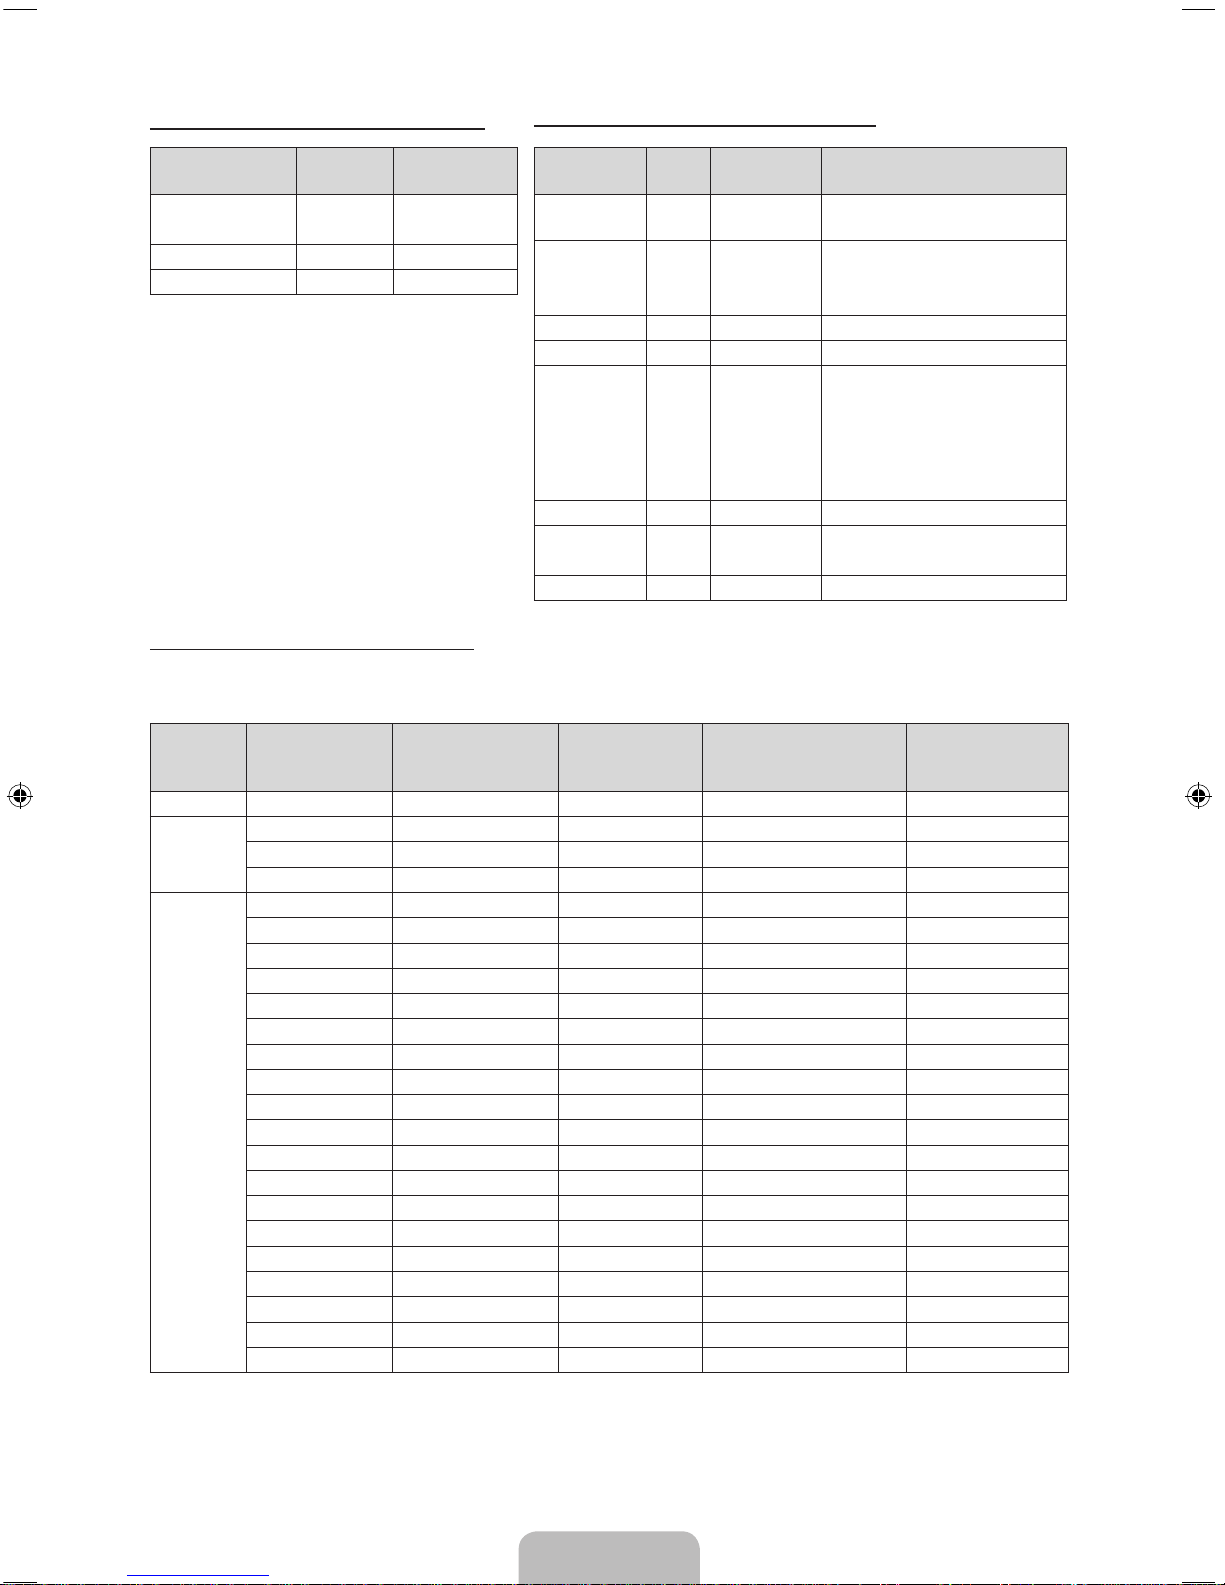
Français - 22
Formats de photo pris en charge
Extension de
fichier
Type Résolution
*.jpg
*.jpeg
JPEG 15360 X 8640
*.bmp BMP 4096 X 4096
*.mpo MPO 15360 X 8640
✎
Le fichier de type MPO ne prend pas en
charge les fonctions Zoom, Rotate (Pivoter)
et Slide Show Effect (Effet du diaporama).
Formats musicaux pris en charge
Extension de
fichier
Type Codec Remarque
*.mp3 MPEG
MPEG1 Audio
Layer 3
*.m4a
*.mpa
*.aac
MPEG4 AAC
*.flac FLAC FLAC Prise en charge jusqu'à 2canaux.
*.ogg OGG Vorbis Prise en charge jusqu'à 2canaux.
*.wma WMA WMA
WMA 10Pro prend en charge
jusqu'au canal 5.1 et au profil M2.
(WMA Lossless audio n'est pas
pris en charge.)
Le mode LBR n'est pas
disponible.
*.wav wav wav
*.mid
*.midi
midi midi type 0 et type 1
*.ape ape ape
Résolution complète disponible
La résolution optimale est 1920 x 1080 @ 60Hz. Reportez-vous à la page des caractéristiques techniques pour accéder
à la résolution complète.
Mode Résolution
Fréquence
horizontale (kHz)
Fréquence
verticale (Hz)
Fréquence d'horloge
pixels (MHz)
Polarité de
synchronisation
(H/V)
IBM 720 x 400 31.469 70.087 28.322 -/+
MAC
640 x 480 35.000 66.667 30.240 -/832 x 624 49.726 74.551 57.284 -/-
1152 x 870 68.681 75.062 100.000 -/-
VESA DMT
640 x 480 31.469 59.940 25.175 -/640 x 480 37.861 72.809 31.500 -/640 x 480 37.500 75.000 31.500 -/800 x 600 37.879 60.317 40.000 +/+
800 x 600 48.077 72.188 50.000 +/+
800 x 600 46.875 75.000 49.500 +/+
1024 x 768 48.363 60.004 65.000 -/1024 x 768 56.476 70.069 75.000 -/1024 x 768 60.023 75.029 78.750 +/+
1152 x 864 67.500 75.000 108.000 +/+
1280 x 720 45.000 60.000 74.250 +/+
1280 x 800 49.702 59.810 83.500 -/+
1280 x 1024 63.981 60.020 108.000 +/+
1280 x 1024 79.976 75.025 135.000 +/+
1366 x 768 47.712 59.790 85.500 +/+
1440 x 900 55.935 59.887 106.500 -/+
1600 x 900RB 60.000 60.000 108.000 +/+
1680 x 1050 65.290 59.954 146.250 -/+
1920 x 1080 67.500 60.000 148.500 +/+
✎
REMARQUE
• Le mode entrelacé n’est pas pris en charge.
• Le téléviseur peut fonctionner de façon anormale si le format vidéo sélectionné n’est pas standard.
Page 71
Français
Français - 23
Licence
Fabriqué sous licence de Dolby Laboratories.
Dolby et le symbole du double D sont des marques de Dolby Laboratories.
For DTS patents, see http://patents.dts.com. Manufactured under license from DTS, Inc. DTS, the
Symbol, DTS in combination with the Symbol, DTS Premium Sound|5.1, DTS Digital Surround,
DTS Express, and DTS Neo2:5 are registered trademarks or trademarks of DTS, Inc. in the United
States and/or other countries. © DTS, Inc. All Rights Reserved.
For DTS patents, see http://patents.dts.com. Manufactured under license from DTS Licensing
Limited. DTS, the Symbol, DTS in combination with the Symbol, and DTS Studio Sound are
registered trademarks or trademarks of DTS, Inc. in the United States and/or other countries.
© DTS, Inc. All Rights Reserved.
The terms HDMI and HDMI High-Definition Multimedia Interface, and the HDMI Logo are
trademarks or registered trademarks of HDMI Licensing LLC in the United States and other
countries.
This DivX Certified® device has passed rigorous testing to ensure it plays DivX® video.
To play purchased DivX movies, first register your device at vod.divx.com. Find your registration
code in the DivX VOD section of your device setup menu.
DivX Certified® to play DivX® video up to HD 1080p, including premium content.
DivX®, DivX Certified® and associated logos are trademarks of DivX, LLC and are used under
license.
Covered by one or more of the following U.S. patents: 7,295,673; 7,460,668; 7,515,710;
7,519,274.
This device supports DivX Plus Streaming® for enjoying HD movies and TV shows with advanced
features (multi-language subtitles, multiple audio tracks, chapters, smooth FF/RW, etc.) streamed
to your device.
Open Source Licence Notice
Open Source used in this product can be found on the following webpage. (http://opensource.samsung.com)
Open Source Licence Notice is written only English.
Avertissement d’image fixe
Evitez d'afficher sur l'écran des images fixes (telles que des photos au format JPEG) ou des éléments d'images
fixes (tels que des logos de programmes TV, un format d'image 4:3 ou panoramique, des bandeaux d'actualités ou
d'informations boursières au bas de l'écran, etc.). L'affichage permanent d'images fixes risque, en effet, d'entraîner
l'apparition d'images fantôme à l'écran, ce qui peut se traduire par une dégradation de la qualité d'image. Pour atténuer
les risques, suivez scrupuleusement les recommandations suivantes:
• Evitez d’afficher le même canal de télévision pendant de longues périodes.
• Essayez toujours d'afficher une image en mode plein écran. Pour y parvenir de la meilleure façon possible, utilisez le
menu de sélection de la taille d'image.
• Réduisez les valeurs de luminosité et de contraste au minimum requis pour obtenir la qualité d'image souhaitée.
L'utilisation de valeurs trop élevées accroît le risque de brûlure.
• Utilisez fréquemment toutes les fonctions du téléviseur conçues pour réduire les phénomènes de rémanence et de
brûlure d'écran. Pour plus d'informations à ce sujet, consultez la section correspondante du mode d'emploi.
Page 72

Adaptor information
Utilisez l'adaptateur suivant pour éviter tout risque
Manufacturer: SAMSUNG
Adaptor model: A5919_FSM
To reduce the risk of fire or electric shock, do not expose this apparatus to rain or moisture.
Apparatus shall not be exposed to dripping or splashing and no objects filled with liquids, such as vases, shall
not be placed onthe apparatus.
For power cord use, see user manual.
ATENCION: SOLO PARA USO EN INTERIORES
Page 73

This page is intentionally
left blank.
Page 74
Italiano - 2
Istruzioni importanti di sicurezza
Attenzione! Istruzioni importanti di sicurezza
(Leggere la sezione corrispondente al codice del prodotto Samsung acquistato prima di iniziare
l'installazione.)
ATTENZIONE
ATTENZIONE: PER RIDURRE IL RISCHIO DI SCOSSE
ELETTRICHE, NON RIMUOVERE IL COPERCHIO (O
IL PANNELLO POSTERIORE). NON CONTIENE PARTI
RIPARABILI DALL'UTENTE. RIVOLGERSI A UN TECNICO
DELL'ASSISTENZA QUALIFICATO.
RISCHIO DI SCOSSE ELETTRICHE, NON APRIRE
Questo simbolo indica che all'interno sono
presenti tensioni pericolose. E' pericoloso
toccare in qualsiasi modo le parti interne di
questo prodotto.
Questo simbolo indica la disponibilità di
informazioni importanti nella letteratura del
prodotto relative al funzionamento e alla
manutenzione del dispositivo.
• Sul retro o sul fondo del telaio sono presenti aperture di ventilazione. Per evitare il surriscaldamento del dispositivo e garantirne un funzionamento
ottimale, non ostruire o coprire in nessun caso le aperture di ventilazione.
− Non posizionare il prodotto all'interno di uno spazio confinato, come ad esempio una libreria o un vano a incasso, privo di adeguata aerazione.
− Non collocare il prodotto vicino o sopra un radiatore o una resistenza, né esporlo a luce solare diretta.
− Non collocare recipienti d'acqua (come vasi ecc...) sul prodotto; la mancata osservanza di questa precauzione può causare incendio o scosse
elettriche.
• Non esporre il prodotto alla pioggia né posizionarlo vicino all'acqua (come per esempio una vasca, un lavabo, un lavello, un lavatoio, su una
superficie bagnata, nei pressi di una piscina, ecc.). In caso di contatto con l'acqua, scollegare il prodotto dalla presa di corrente e rivolgersi
immediatamente a un rivenditore autorizzato. Scollegare il cavo di alimentazione dalla presa prima di eseguire la pulizia del prodotto.
• Questo prodotto utilizza batterie. Seguire le normative locali in vigore per il corretto smaltimento delle batterie. Contattare l'autorità locale per
richiedere informazioni sulle modalità di riciclo e smaltimento.
• Non sovraccaricare le prese a parete, le prolunghe e gli adattatori oltre la loro capacità per evitare rischi di incendio e scosse elettriche.
• Far correre i cavi di alimentazione in modo da non calpestarli o schiacciarli da o contro qualche oggetto, ponendo particolare attenzione in prossimità
di spine, adattatori e del punto in cui il cavo fuoriesce dall'apparecchio.
• Per proteggere l'apparecchio contro i fulmini, o nel caso sia stato lasciato incustodito o non utilizzato per un lungo periodo di tempo, scollegarlo dalla
presa a parete e disconnettere il sistema via cavo o antenna. Ciò impedirà l'insorgere di danni causati da fulmini e picchi di corrente.
• Prima di collegare il cavo di alimentazione CA all'adattatore CC, verificare che la tensione dell'adattatore CC corrisponda alla tensione erogata
localmente.
• Non inserire mai oggetti metallici nelle aperture dell'apparecchio. La mancata osservanza di questa precauzione può causare scosse elettriche.
• Per evitare il pericolo di scosse elettriche, non toccare mai le parti interne dell'apparecchio. L'apparecchio può essere aperto solo da un tecnico
qualificato.
• Inserire saldamente la spina del cavo di alimentazione nella presa elettrica. Per scollegare l'alimentazione, estrarre la spina dalla presa. Non toccare il
cavo di alimentazione con le mani bagnate.
• Se l'apparecchio funziona in modo anomalo, in particolare se emette odori o rumori insoliti, scollegarlo immediatamente dall'alimentazione e
contattare un rivenditore o un centro di assistenza autorizzato.
• Se il televisore rimane inutilizzato per diverso tempo, e in particolare se bambini, anziani o disabili vengono lasciati soli in casa senza supervisione,
scollegare la spina dalla presa di corrente.
− La polvere accumulata può causare scosse elettriche, perdite di corrente o incendio a causa del surriscaldamento o delle scintille generate dal
cavo di alimentazione o dal degrado della protezione isolante.
• Contattare un centro assistenza autorizzato quando si installa l'apparecchio in un locale che presenta elevate quantità di polvere, temperature alte o
basse, elevata umidità, sostanze chimiche o in caso di funzionamento 24 ore su 24, per esempio in aeroporti, stazioni ferroviarie, ecc..La mancata
osservanza di questa precauzione può causare gravi danni al prodotto.
• Utilizzare solo una spina e una presa opportunamente collegate a terra.
• Una messa a terra inadeguata può causare scosse elettriche o danni al prodotto. (Solo dispositivi di Classe 1.)
• Per escludere la corrente elettrica dal prodotto è necessario scollegare la spina dalla presa elettrica; assicurarsi quindi che la presa sia sempre
facilmente accessibile.
• Non lasciare che i bambini giocando si appendano al prodotto.
• Tenere gli accessori (come per es. le batterie) in un luogo sicuro lontano dalla portata dei bambini.
• Non installare il prodotto in una posizione instabile, come per esempio su una mensola non salda, una superficie inclinata o in un luogo soggetto a
vibrazioni.
• Non urtare né lasciare cadere il prodotto. Se il prodotto dovesse risultare danneggiato, scollegare il cavo di alimentazione e rivolgersi a un centro di
assistenza.
• Scollegare il cavo di alimentazione dalla presa di corrente e pulire il prodotto con un panno morbido e asciutto. Non usare prodotti chimici quali cera,
benzene, alcol, solventi, insetticidi, deodoranti per l'ambiente, lubrificanti o detergenti. In caso contrario la superficie potrebbe deteriorarsi e il testo
stampato sul prodotto potrebbe cancellarsi.
• Non esporre il prodotto a gocce o spruzzi d'acqua.
• Non gettare le batterie nel fuoco.
• Non disassemblare, surriscaldare o far entrare le batterie in cortocircuito.
• Una installazione scorretta delle batterie può causarne l'esplosione. Sostituire solo con batterie dello stesso tipo o equivalenti.
• AVVERTENZA - PER EVITARE IL PERICOLO DI INCENDIO, NON AVVICINARE MAI AL PRODOTTO CANDELE ACCESE O ALTRE
FIAMME LIBERE.
Page 75
Italiano
Italiano - 3
Le figure e le illustrazioni presenti in questo Manuale dell'utente sono fornite unicamente a titolo di riferimento
e possono differire da quelle del prodotto attuale. Le specifiche e il design del prodotto possono variare senza
preavviso.
Le lingue CSI (russo, ucraino, kazako) non sono disponibili per questo prodotto, destinato solo alla regione UE.
Importanti informazioni sulla garanzia relative al
formato del televisore
1. Le funzioni relative alla televisione digitale (DVB) sono disponibili solo nelle nazioni o nelle aree in cui viene trasmesso
il segnale digitale terrestre DVB-T (MPEG2 e MPEG4 AVC) o laddove si abbia accesso a un servizio TV via cavo
compatibile DVB-C (MPEG2 e MPEG4 AAC). Verificare con il rivenditore locale la possibilità di ricevere segnali
DVB-T o DVB-C.
2. DVB-T è lo standard del consorzio europeo DVB per la trasmissione della televisione digitale terrestre mentre DVB-C
è lo standard per la trasmissione della televisione digitale via cavo. Tuttavia, alcune funzioni quali EPG (Electronic
Program Guide), VOD (Video on Demand) e altre non sono incluse in queste specifiche. Per questo motivo, al
momento non sono disponibili.
3. Sebbene questo apparecchio TV soddisfi i più recenti standard DVB-T e DVB-C, aggiornati a [Agosto, 2008], la
compatibilità con future trasmissioni digitali via cavo DVB-C e terrestri DVB-T non può essere garantita.
4. In base al paese o all'area in cui si utilizza questo televisore, alcuni fornitori di trasmissioni TV via cavo potrebbero
applicare una tariffa aggiuntiva per tali servizi e richiedere all'utente di accettare i termini e le condizioni della loro
offerta.
5. Alcune funzioni della trasmissione TV digitale potrebbero non essere disponibili in alcune nazioni o regioni e DVB-C
potrebbe non funzionare correttamente con alcuni fornitori di servizi via cavo.
6. Per maggiori informazioni, contattare il locale centro assistenza clienti Samsung.
✎
La qualità di ricezione del televisore può essere influenzata dai diversi metodi di trasmissione esistenti nei
vari paesi. Verificare le prestazioni del televisore presso un Rivenditore autorizzato SAMSUNG o presso un
Call Centre Samsung per sapere se la qualità di ricezione può essere migliorata o meno riconfigurando le
impostazioni dell'apparecchio.
Corretto smaltimento di questo prodotto (WEEE/RAEE, Rifiuti da apparecchiature elettriche ed
elettroniche)
(applicabile nei paesi dell'Unione Europea e in quelli con sistema di raccolta differenziata)
Questo simbolo riportato sul prodotto, sugli accessori e sulla documentazione indica che il prodotto e
i suoi accessori elettronici (per es. caricatore, cuffie, cavo USB) non devono essere smaltiti unitamente
ai rifiuti domestici al termine del loro ciclo vitale. Per prevenire eventuali danni all'ambiente o alla salute
delle persone derivanti da uno smaltimento non appropriato, separarli da altri tipi di rifiuti e riciclarli in
modo responsabile per promuovere il riutilizzo sostenibile delle risorse materiali. Gli utenti residenziali
sono invitati a contattare il rivenditore presso il quale hanno acquistato il prodotto, o l'ufficio locale
preposto, per richiedere le informazioni relative alla raccolta differenziata e al riciclaggio di questo tipo
di prodotto. Gli utenti aziendali sono invitati a contattare il proprio fornitore e verificare i termini e le
condizioni del contratto d'acquisto. Questo prodotto e i suoi accessori elettronici non devono essere
smaltiti insieme agli altri rifiuti commerciali.
Corretto smaltimento delle batterie utilizzate in questo prodotto
(applicabile nei paesi dell'Unione Europea e in quelli con sistemi di raccolta differenziata delle
batterie)
Questo contrassegno posto sulla batteria, sul manuale o sull'imballaggio, indica che le batterie
contenute in questo prodotto non devono essere smaltite insieme ai rifiuti domestici una volta esauste.
Laddove presenti, i simboli chimici Hg, Cd o Pb indicano che le batterie contengono mercurio,
cadmio o piombo sopra i limiti stabiliti nell'ambito della Direttiva CE 2006/66. Se le batterie non
vengono smaltite in modo corretto, tali sostanze possono causare danni alla salute o all'ambiente. Per
proteggere le risorse naturali e promuovere il riutilizzo dei materiali, separare le batterie dagli altri rifiuti e
riciclarle utilizzando il sistema locale gratuito di ritiro delle batterie esauste.
Page 76
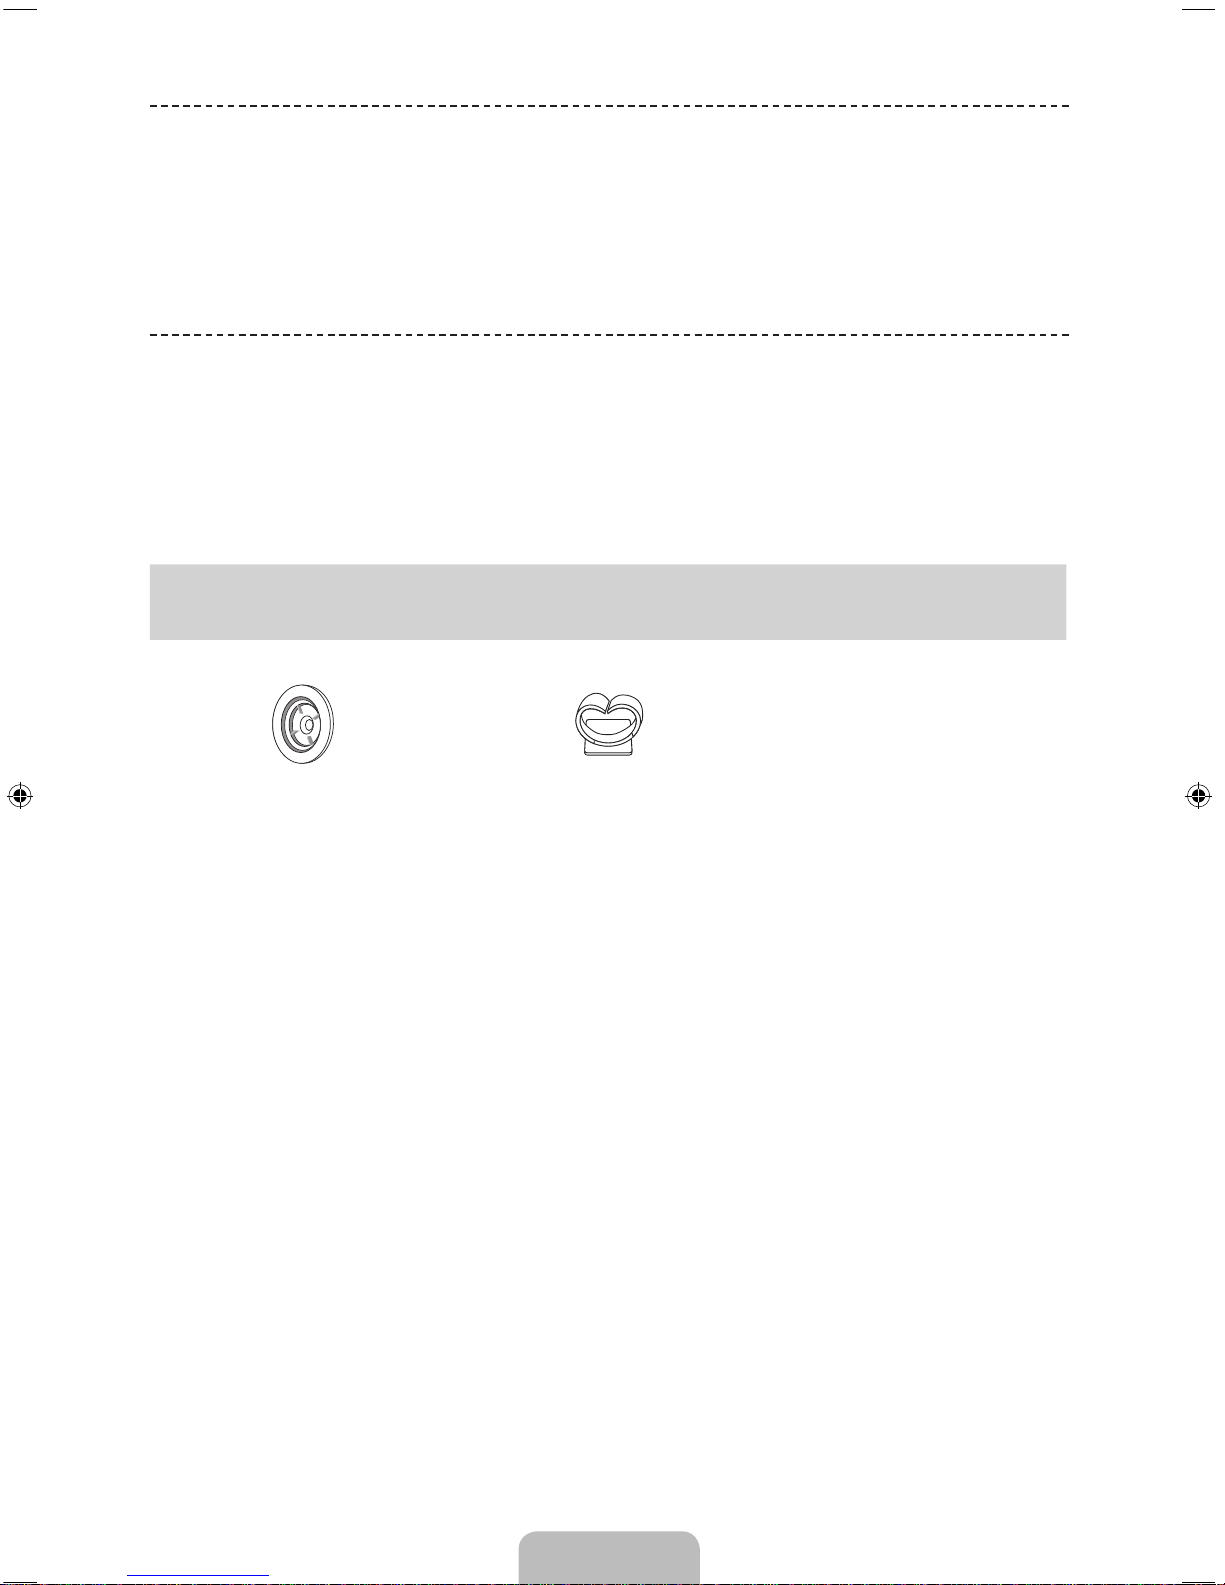
Italiano - 4
Elenco delle funzioni disponibili
•
Media Play:
Consente di riprodurre musica, immagini e film memorizzati su un dispositivo USB.
• e-Manual: Consente di leggere a schermo l'intero manuale.
Accessori
✎
Controllare che nell'imballaggio siano contenuti i seguenti componenti. Se eventuali componenti risultassero
mancanti, contattare il rivenditore.
✎
La forma e il colore dei componenti possono variare in base al modello.
✎
Eventuali cavi non forniti in dotazione possono essere acquistati separatamente.
[ATTENZIONE: INSERIRE SALDAMENTE PER EVITARE UNO SCOLLEGAMENTO ACCIDENTALE DALL'APPARECCHIO
• Telecomando e batterie (2 tipo AAA)
• Cavo di alimentazione
• Guida alle normative / Garanzia • Manuale dell'utente
Adattatore supporto a parete
(In base al modello)
Guida cavi
(In base al modello)
✎
Può essere richiesto un rimborso se
(a) l'uscita del tecnico in seguito a una chiamata non rileva difetti nel prodotto
(per es. nel caso l'utente abbia omesso di leggere il presente manuale)
(b) l'utente ha portato l'unità presso un centro di riparazione che non rileva difetti nel prodotto
(per es. nel caso l'utente abbia omesso di leggere il presente manuale)
✎
L'importo di tale rimborso verrà comunicato all'utente prima di eseguire una visita a domicilio o un eventuale
intervento di manutenzione.
Page 77
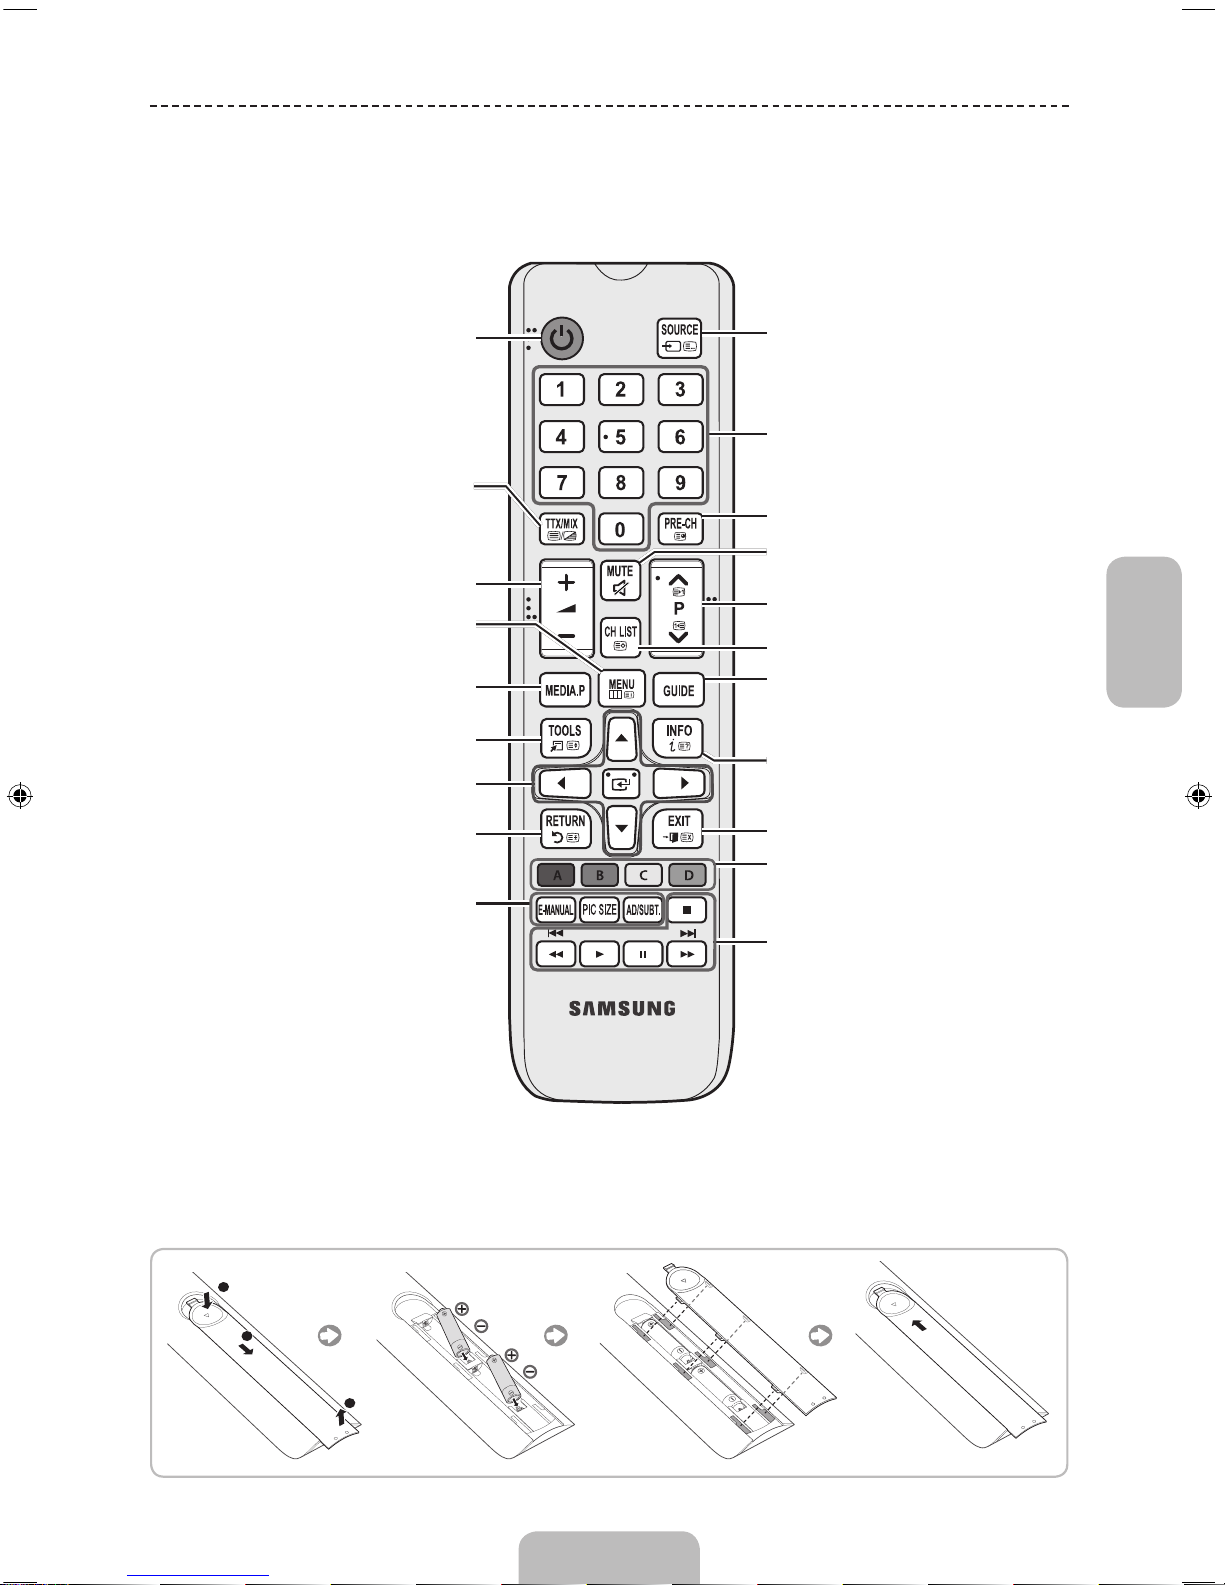
Italiano
Italiano - 5
Vista del telecomando
✎
Questo telecomando è dotato di punti in Braille sui tasti Accensione, Canale, Volume, e Conferma per
consentirne l'uso da parte di persone non vedenti.
Spegne e accende il televisore.
Visualizza e seleziona le sorgenti video
disponibili.
Ritorna al canale precedente.
Esclude temporaneamente l'audio.
Cambia i canali.
Visualizza l'elenco canali sullo schermo.
Visualizza la EPG (Electronic Programme
Guide).
Visualizza le informazioni sullo schermo TV.
Esce dal menu.
Premere per accedere direttamente ai
canali.
regola il volume.
Seleziona alternativamente le modalità
Teletext ON, Doppia, Mista o OFF.
Visualizza il menu OSD principale.
Scelta rapida delle funzioni usate più di
frequente.
Visualizza Media Play.
Ritorna al menu precedente.
Seleziona le voci del menu OSD e cambia i
valori visualizzati sul menu.
Utilizzare questi tasti seguendo le istruzioni
a schermo.
Utilizzare quesi tasti per funzioni specifiche.
Per maggiori informazioni, vedere il
manuale elettronico.
E-MANUAL: Visualizza la Guida e-Manual.
PIC SIZE: Consente di selezionare l'opzione
Formato immagin.
AD/SUBT.: Seleziona la Descrizione audio.
(Non disponibile in tutti i paesi) / Visualizza i
sottotitoli digitali.
N I nomi dei tasti sopra indicati possono differire dai nomi attuali.
Inserimento delle batterie (tipo: AAA)
Page 78
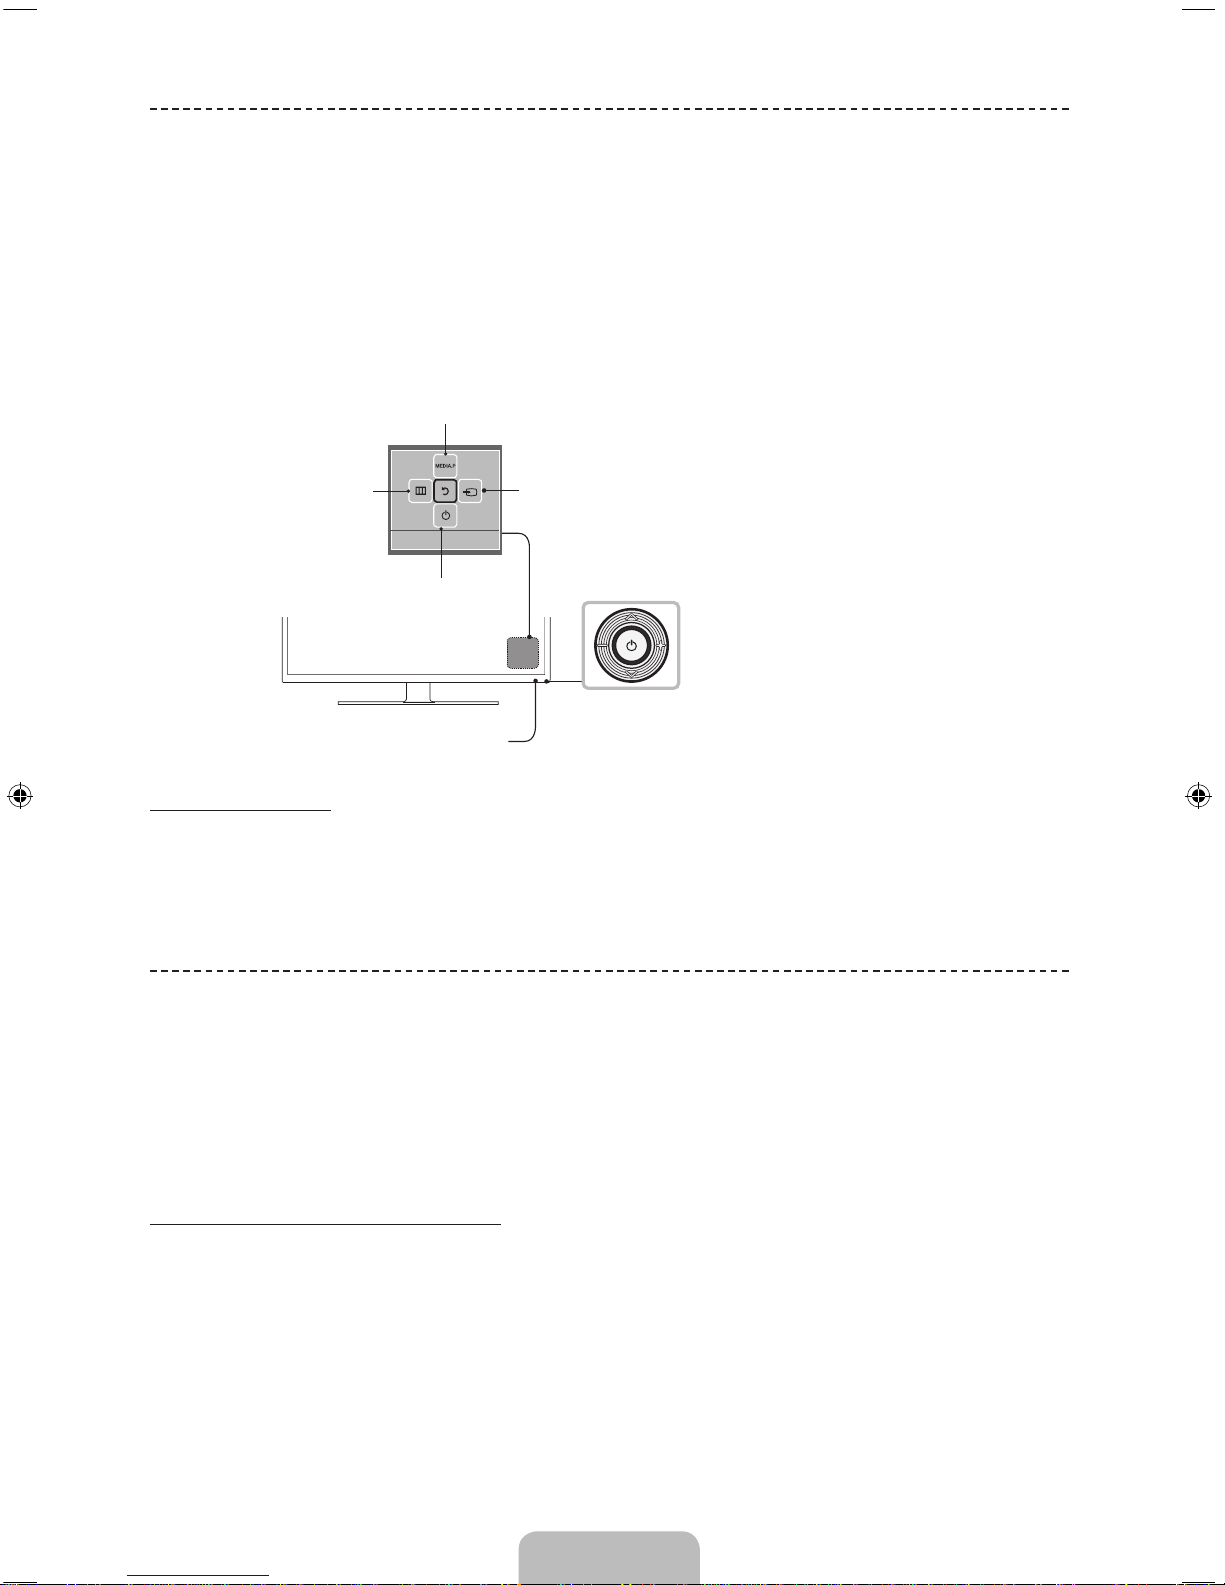
Italiano - 6
Uso del Controller TV (tasto pannello)
Il controller TV, un piccolo joy stick simile a un tasto posizionato sul retro a sinistra del televisore, consente di controllare
l'apparecchio TV senza telecomando.
✎
Alcune funzioni che richiedono l'immissione del PIN potrebbero non essere disponibili.
✎
La forma e il colore del prodotto possono variare in base al modello.
✎
Esce dal menu premendo il controller per oltre 1 secondo.
✎
Non premere subito sul controller se lo si vuole utilizzare per muoverlo in direzione su/giù/sinistra/destra.
Premendo sul controller, questo non si muoverà nella direzione desiderata (su/giù/sinistra/destra).
Sensore del telecomando
Controller TV
L'immagine ritratta è
quella visibile collocandosi
frontalmente rispetto al
televisore.
Menu funzione
Ritorna
Selezione del Media Play
Modalità Standby
Non lasciare il televisore in modalità standby per un lungo periodo di tempo (quando si parte per le vacanze, ad
esempio). Anche quando il tasto di accensione è disattivo, l'apparecchio consuma una piccola quantità di energia
elettrica. Si consiglia quindi di scollegare il cavo di alimentazione.
Impostazione iniziale
Alla prima accensione del televisore, vengono visualizzate alcune schermate che aiutano l'utente a configurare le
impostazioni di base. Premere il tasto POWERP. Impostazione è disponibile solo quando la sorgente è impostata su
TV.
✎
Collegando un dispositivo qualsiasi a HDMI IN 1 (STB) prima di iniziare l'installazione, la Sorgente canale verrà
impostata automaticamente su Set-top box. Se non si desidera selezionare Set-top box, scegliere Antenna
Per reimpostare questa funzione...
Selezionare Sistema - Impostazione (Impostazione iniziale). Digitare il PIN a 4 cifre. La password predefinita è "0-0-0-0"
. Per cambiare il codice PIN, utilizzare la funzione Cambia PIN.
Sebbene la procedura sia probabilmente già stata eseguita in negozio, eseguire nuovamente l'Impostazione (MENU →
Sistema) per l'uso domestico del prodotto.
✎
Nel caso si sia dimenticato il PIN, in modalità Standby premere la seguente sequenza di tasti sul telecomando per
ripristinare il PIN all’impostazione predefinita “0-0-0-0”: MUTE → 8 → 2 → 4 → POWER (accensione).
Page 79
Italiano
Italiano - 7
Modifica della sorgente di ingresso
Sorgente
TV / Est. / HDMI1 / HDMI2/DVI / Component / AV
(In base al paese e al modello)
Questa funzione viene usata per selezionare il televisore o un'altra sorgente di ingresso esterna come un lettore DVD /
Blu-Ray / ricevitore via cavo / ricevitore satellitare STB collegato al televisore.
✎
Premere il tasto SOURCE. Nell'elenco Sorgente, gli ingressi collegati risultano evidenziati.
✎
L’ingresso PC (D-Sub) non è supportato. Per collegare il PC al televisore, connettere il cavo HDMI-DVI alla porta
HDMI IN 2(DVI) sul televisore.
✎
Est. rimane sempre attiva.
✎
Premere il tasto TOOLS.
• Modifica Nome (In base al paese e al modello)
E' possibile impostare il nome della sorgente d'ingresso esterna desiderata.
− Quando si collega un PC alla porta HDMI IN 2(DVI) tramite cavo HDMI, impostare il televisore in modalità PC
nel menu Modifica Nome.
− Quando si collega un PC alla porta HDMI IN 2(DVI) tramite cavo HDMI-DVI, impostare il televisore in modalità
DVI PC nel menu Modifica Nome.
− Quando si collega un dispositivo AV alla porta HDMI IN 2(DVI) tramite cavo HDMI-DVI, impostare il televisore in
modalità Dispositivi DVI nel menu Modifica Nome.
• Informazioni
E' possibile visualizzare informazioni dettagliate sul dispositivo esterno collegato.
Page 80
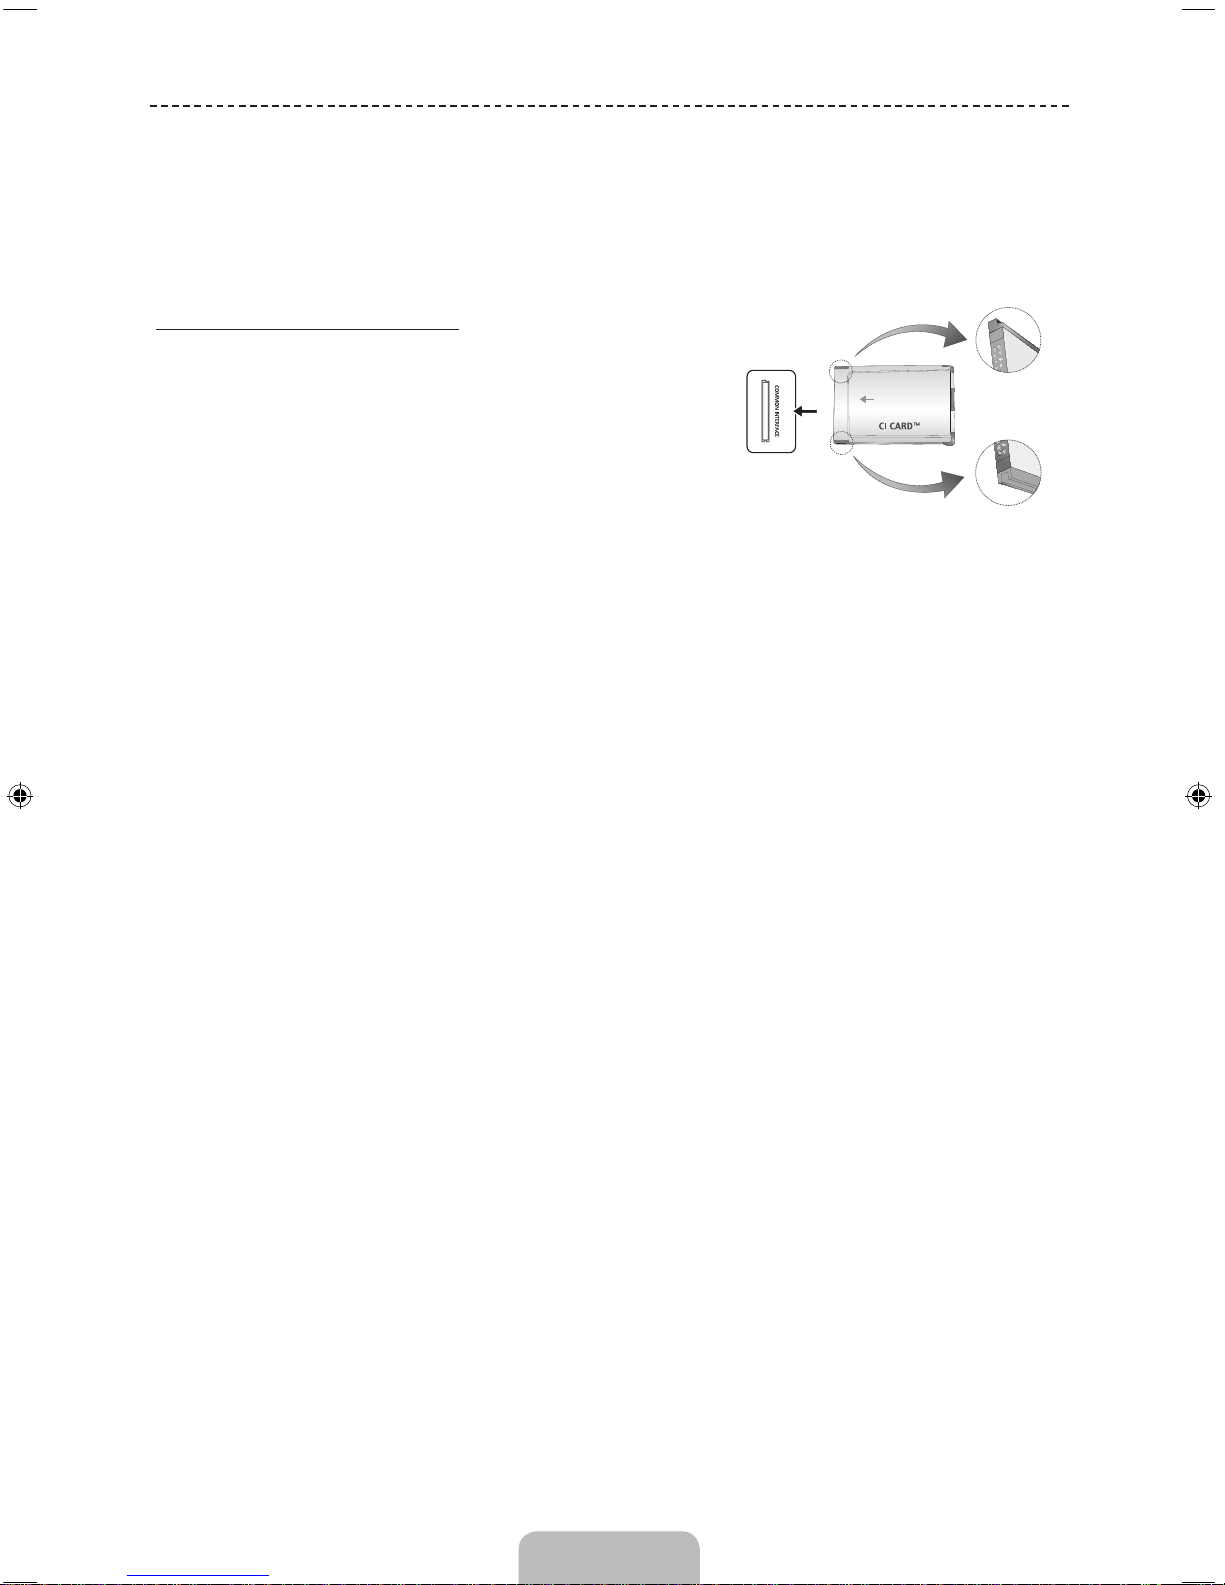
Italiano - 8
Connessione a uno slot COMMON INTERFACE
(alloggiamento scheda per la visione del televisore)
✎
In base al paese e al modello.
✎
Spegnere il televisore per inserire o rimuovere una scheda CI.
Uso della “SCHEDA CI o CI+”
Per visualizzare canali a pagamento, è necessario inserire una “SCHEDA CI
o CI+”.
• Non inserendo una "SCHEDA CI o CI+", alcuni canali visualizzeranno il
messaggio “Segnale criptato”.
• Le informazioni di pairing che contengono un numero telefonico, l'ID
della "SCHEDA CI o CI+", l'ID host e altri dati, verranno visualizzate
entro 2~3 minuti. Se viene visualizzato un messaggio di errore,
contattare il fornitore del servizio.
• Quando la configurazione delle informazioni relative al canale è
completata, viene visualizzato il messaggio “Updating Completed”
(Aggiornamento completato), a indicare che l'elenco dei canali è stato
aggiornato.
• L'immagine può differire in base al
modello.
✎
NOTA
• E' necessario richiedere una "SCHEDA CI o CI+" al fornitore del servizio locale.
• Estrarre con delicatezza la "SCHEDA CI o CI+" tirandola con le dita e prestando attenzione a non farla cadere
poiché potrebbe subire danni.
• Inserire la "SCHEDA CI o CI+" nella direzione indicata sulla scheda stessa.
• La posizione dell'alloggiamento COMMON INTERFACE può variare in base al modello.
• La "SCHEDA CI o CI+" non è supportata in alcune nazioni e regioni; controllare con il rivenditore autorizzato di
zona.
• In caso di problemi, contattare il fornitore del servizio.
• Inserire una “SCHEDA CI o CI+” in grado di supportare le impostazioni antenna correnti. Lo schermo non
visualizzale immagini oppure queste sono distorte.
Page 81
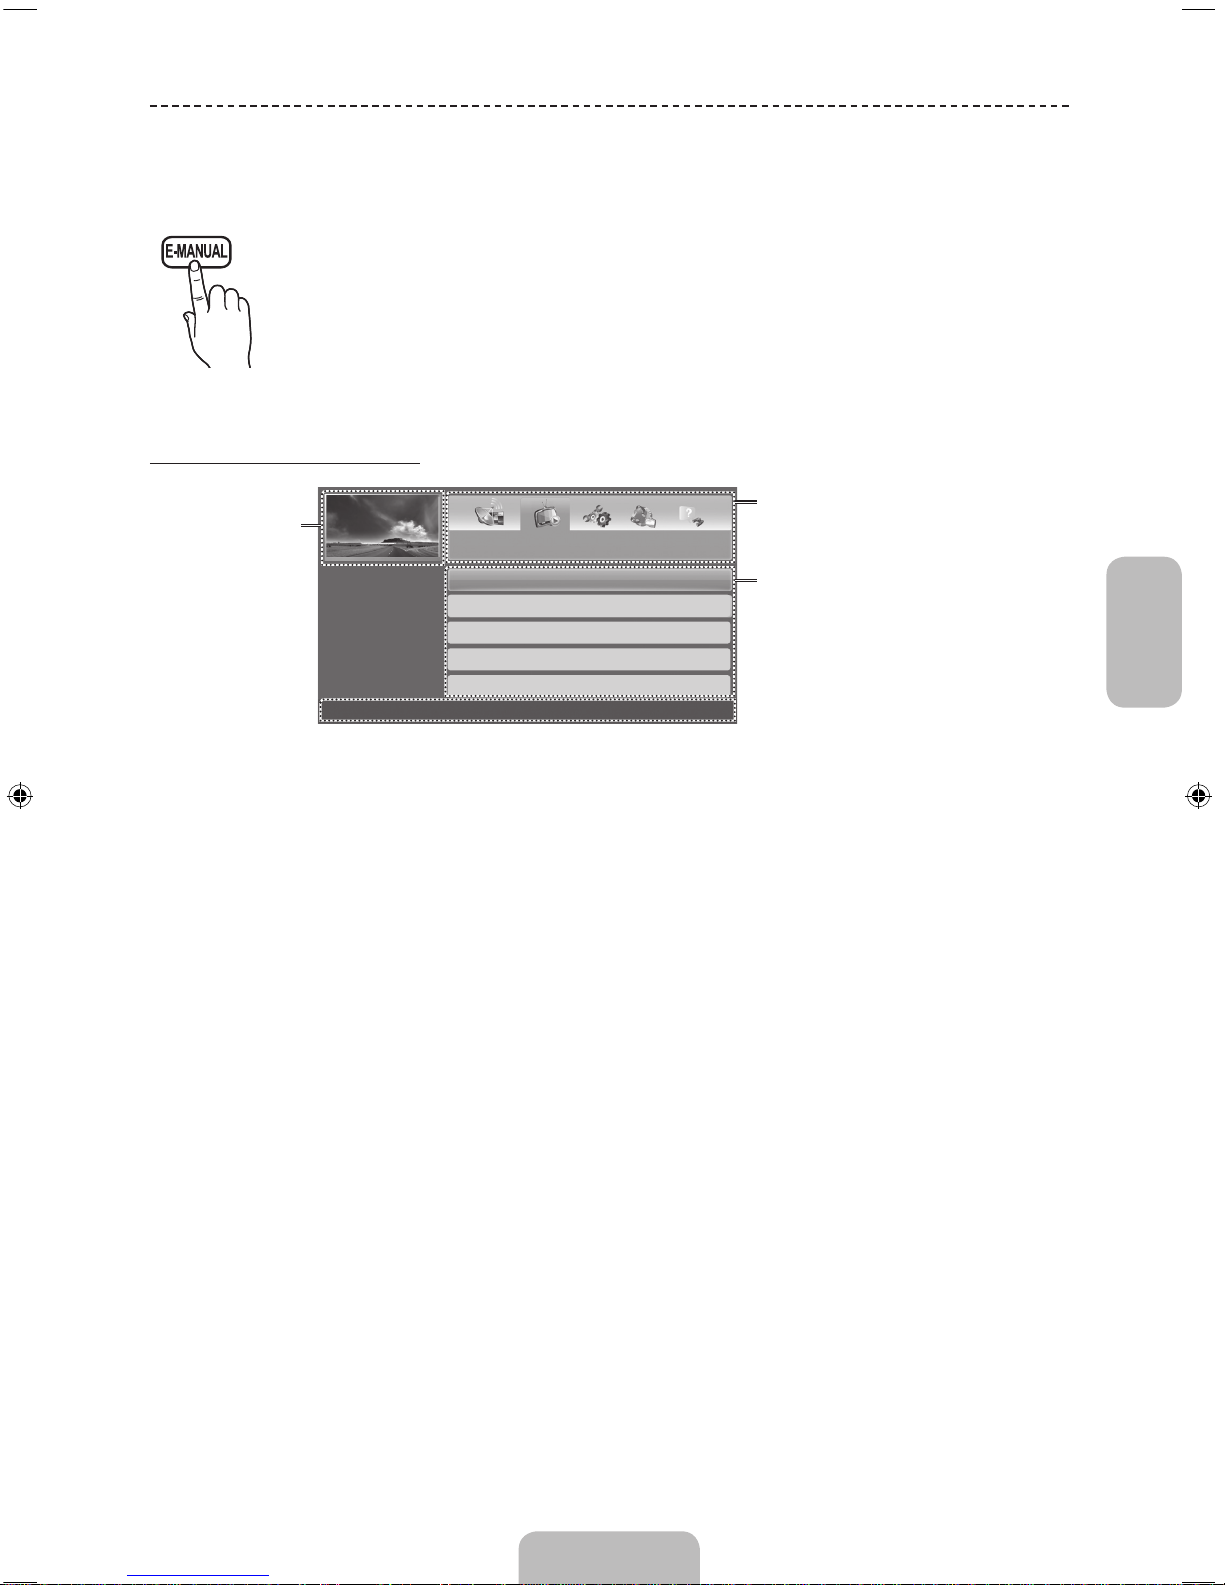
Italiano
Italiano - 9
Come visualizzare il manuale elettronico
E’ possibile reperire le istruzioni per l’uso delle funzioni TV consultando l’e-Manual disponibile sul
televisore stesso. Premere il tasto E-MANUAL sul telecomando. Spostare il cursore utilizzandoi tasti
freccia su/giù/sinistra/destra per evideziare una categoria e sucessivamente un argomento, quindi
premere ENTERE. Sull'e-Manual verrà visualizzata la pagina desiderata.
E’ inoltre possibile accedervi tramite menu:
O MENUm → Supporto → e-Manual → ENTERE
✎
Per tornare alla schermata principale del e-Manual, premere il tasto E-MANUAL sul
telecomando.
Visualizzazione a schermo
Funzioni base
Cambiare la modalità Immagine preimpostata
Regolazione delle impostazioni delle immagini
Modica delle Opzioni immagine
Cambiare la Modalità audio preimpostata
Regolazione delle impostazioni audio
} Indice E Conferma e Esci
Video, programmi
TV e altri eventi
correntemente
visualizzati.
Elenco categorie. Premere il tasto
l o r per selezionare la categoria
desiderata.
Visualizza l'elenco dei menu secondari.
Uso dei tasti freccia sul telecomando
per lo spostamento del cursore.
Premere ENTERE per selezionare il
menu secondario desiderato.
Tasti operativi
} Indice: Visualizza la schermata dell'indice.
− La disponibilità dell'indice dipende dalla lingua.
E Conferma: Seleziona una categoria o un menu secondario.
e Esci: Esce dal manuale elettronico.
<Visualizzazione dei contenuti>
a Prova ora: Visualizza il menu OSD corrispondente all'argomento. Per tornare alla schermata del manuale
elettronico premere E-MANUAL.
b Home: Passa alla pagina iniziale del manuale elettronico.
L Pagina: Passa alla pagina precedente o successiva.
{
Zoom: Ingrandisce la schermata.
− Premere il tasto { (Zoom) per ingrandire lo schermo. E' possibile scorrere la pagina ingrandita utilizzando i
tasti u o d. Per tornare alle dimensioni normali della pagina, premere RETURN.
Page 82
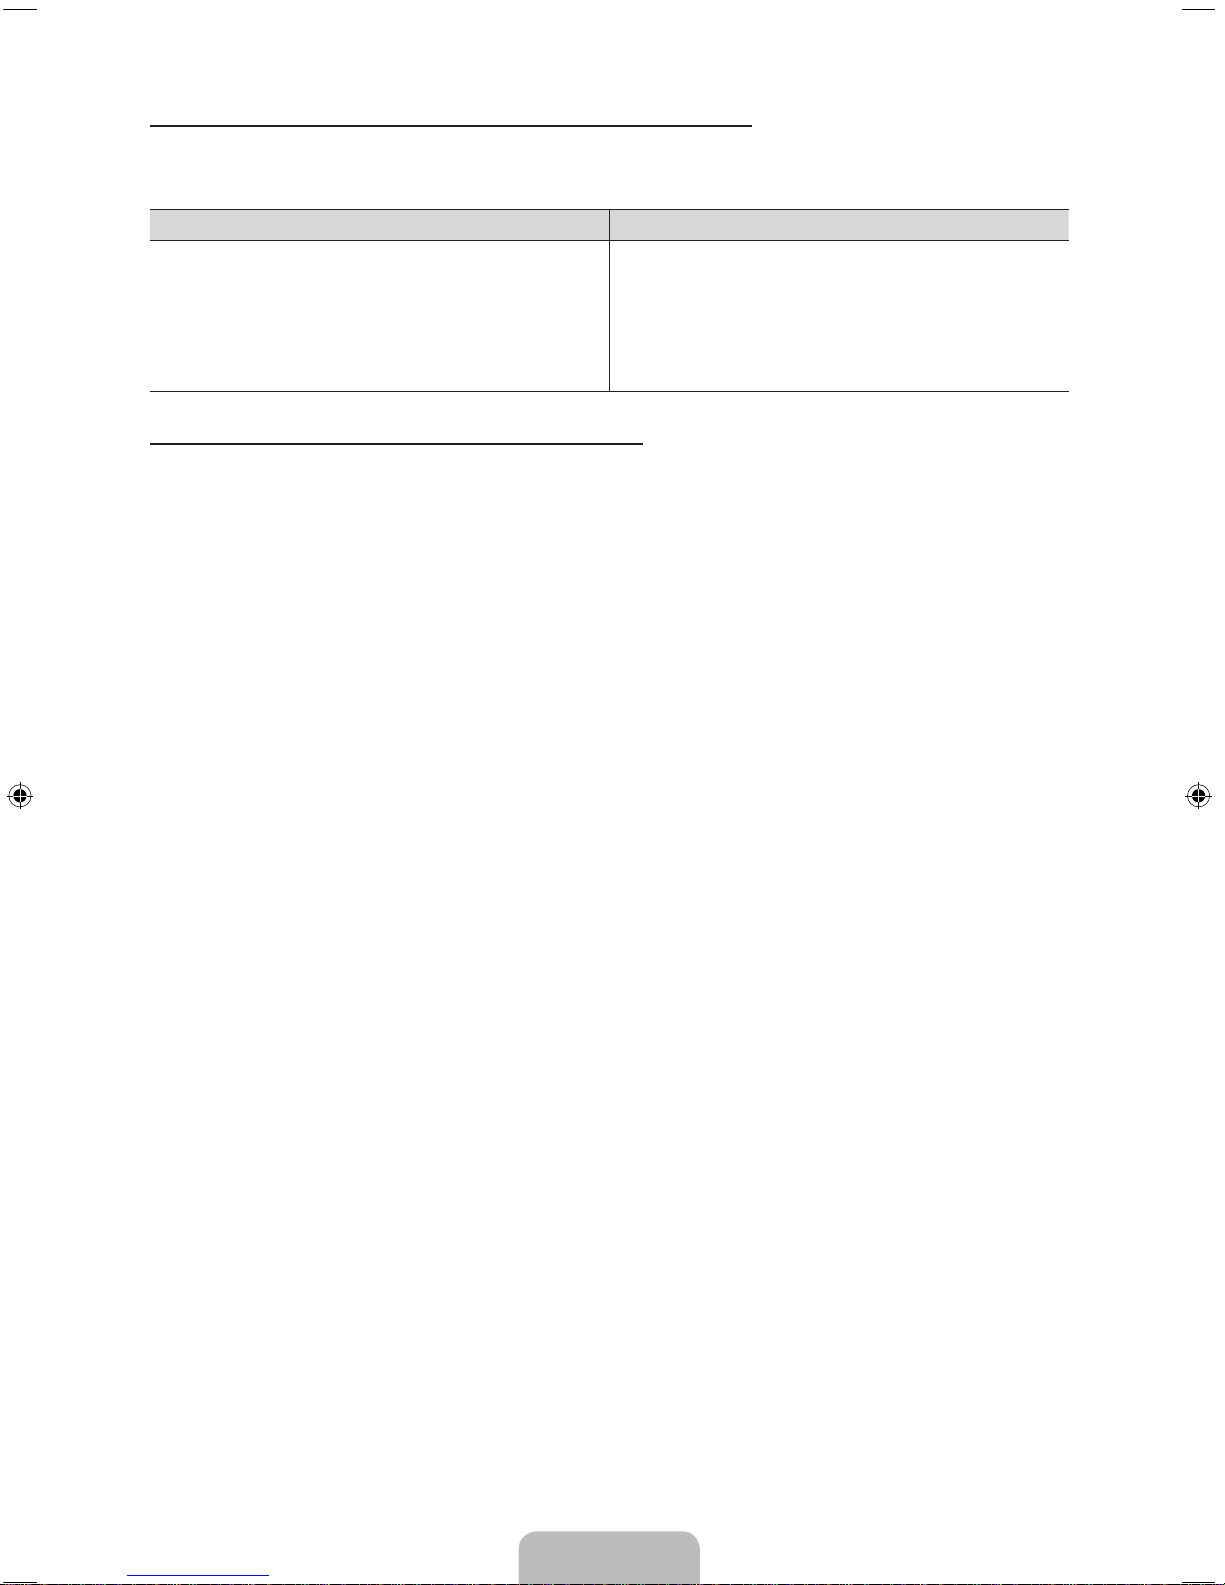
Italiano - 10
Passaggio dal manuale elettronico ai menu corrispondenti.
✎
Questa funzione non è disponibile in alcuni menu.
✎
Se il menu non è attivo, la funzione Prova ora non è disponibile.
Metodo 1 Metodo 2
1. Per utilizzare il menu corrispondente a un argomento
trattato nell'e-Manual, premere il tasto rosso per
selezionare Prova ora.
2. Per tornare alla schermata e-Manual premere
E-MANUAL.
1. Premere ENTERE alla visualizzazione di un
argomento. “Eseguire?” viene visualizzato a
schermo. Selezionare Sì, quindi premere ENTERE.
Comparirà la finestra degli OSD.
2. Per tornare alla schermata e-Manual premere
E-MANUAL.
Ricerca di un argomento sulla pagina dell'Indice
✎
Questa funzione potrebbe non essere supportata a seconda della lingua selezionata.
1. Per cercare una parola chiave, premere il tasto blu per selezionare Indice.
2. Premere il tasto l o r per selezionare l’ordine desiderato.
3. Premere u o d per selezionare una parola chiave da visualizzare, quindi premere ENTERE.
4. E’ possibile visualizzare la schermata di istruzioni corrispondente del manuale elettronico.
✎
Per chiudere la schermata Indice, premere RETURN.
Page 83
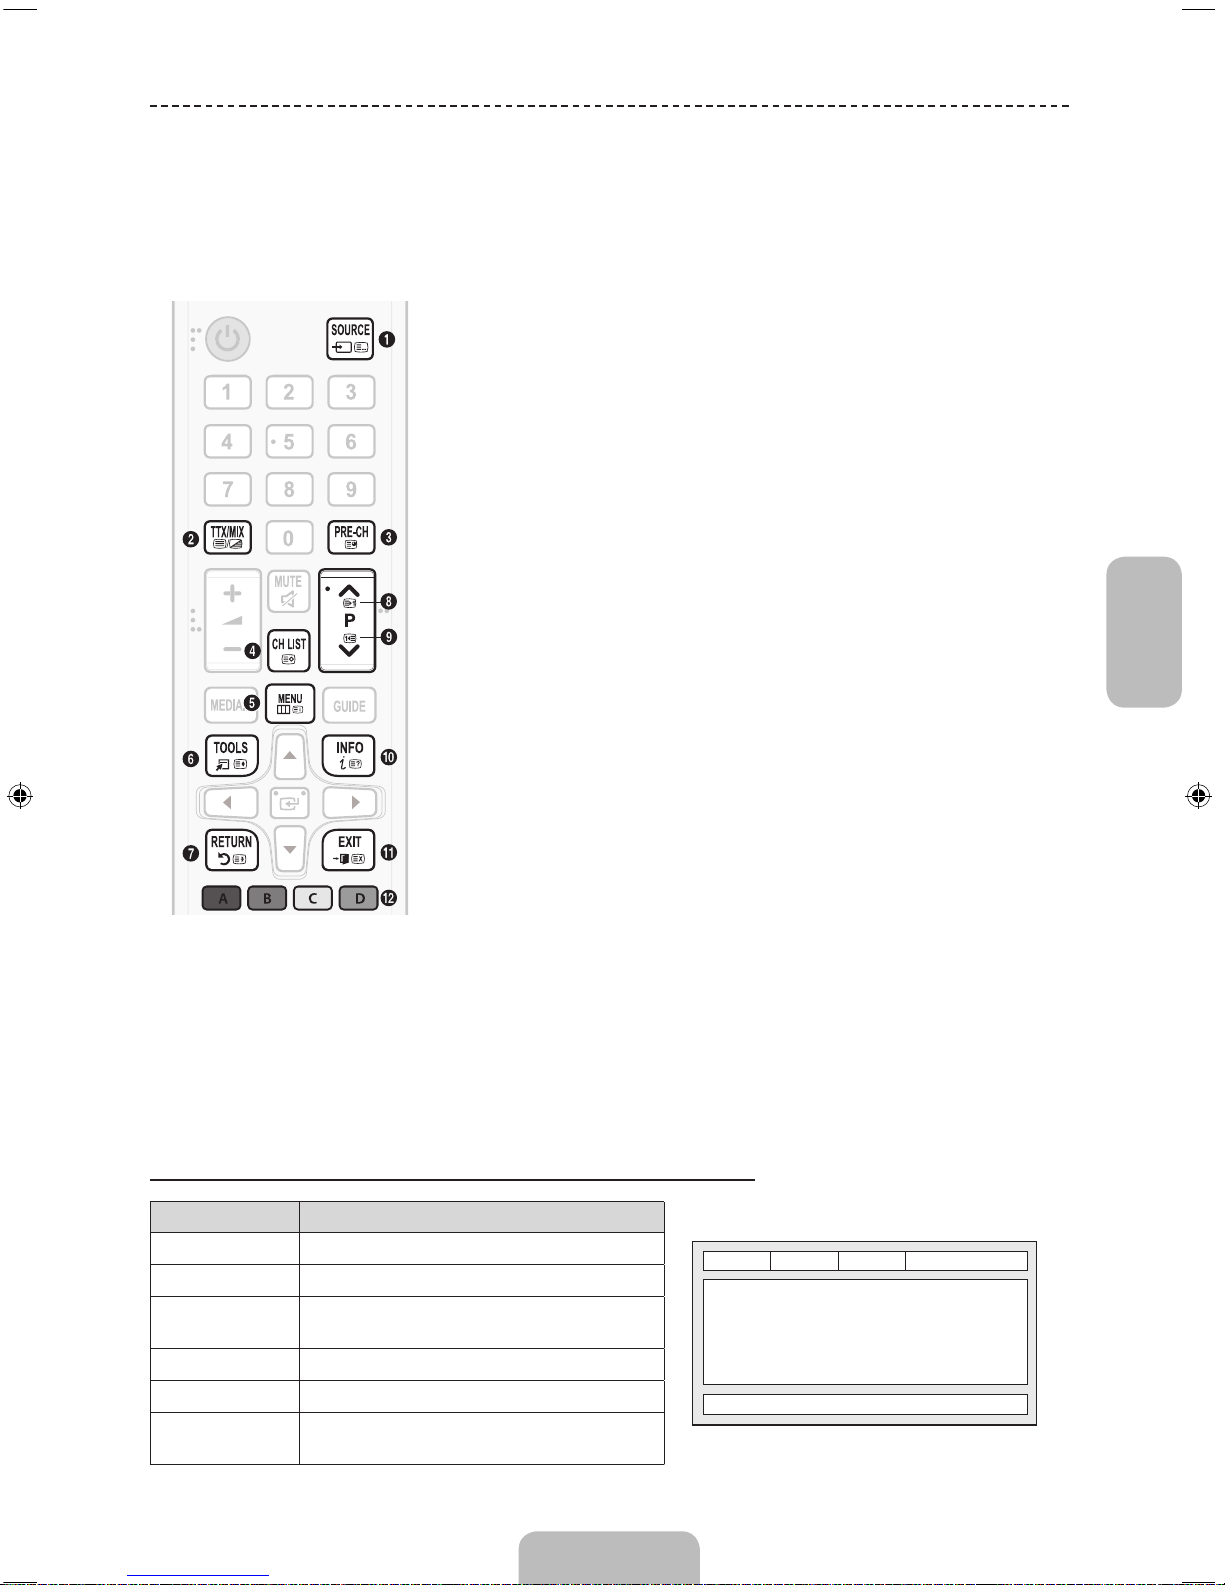
Italiano
Italiano - 11
Funzione Teletext
La pagina dell’indice del servizio Teletext contiene informazioni sull’uso del servizio. Per visualizzare correttamente
le informazioni del servizio Teletext, è necessario che la ricezione del canale sia stabile. In caso contrario, alcune
informazioni potrebbero essere perse o alcune pagine potrebbero non essere visualizzate correttamente.
✎
E’ possibile cambiare le pagine Teletext premendo i tasti numerici sul telecomando.
1
0 (modalità): Seleziona la modalità Teletext (LIST/FLOF). Se si preme
questo tasto in modalità LIST, commuta la modalità in Salvataggio elenco.
In modalità Salvataggio elenco, è possibile memorizzare la pagina Teletext
all'interno di un elenco utilizzando il tasto 8(memorizza).
2
/ (Completa TTX / Doppia TTX / mix / off): Attiva la modalità Teletext
per il canale corrente. Premere il tasto due volte per sovrapporre la modalità
Teletext alla trasmissione corrente. Premerlo di nuovo per uscire dalla
modalità Teletext.
3
1 (pagina secondaria): Visualizza la pagina secondaria disponibile.
4
8 (salva): Memorizza le pagine del Teletext.
5
6 (indice): In modalità Teletext, premere questo tasto in qualsiasi momento
per visualizzare la pagina dell'indice (contenuti).
6
4 (formato): Visualizza in dimensione doppia le informazioni Teletext sulla
metà superiore dello schermo. Premere di nuovo il tasto per spostare il testo
nella metà inferiore dello schermo. Per tornare alla modalità di visualizzazione
normale, premere di nuovo il tasto.
7
9 (mantieni): Mantiene la schermata della pagina corrente, nel caso siano
disponibili più pagine secondarie che scorrono automaticamente. Premerlo
nuovamente per riprendere la visualizzazione.
8
2 (pagina su): Visualizza la pagina successiva del Teletext.
9
3 (pagina giù): Visualizza la pagina precedente del Teletext.
0
5 (mostra): Consente di visualizzare eventuale testo nascosto (le risposte
ai quiz, per esempio). Per tornare alla modalità di visualizzazione normale,
premere di nuovo il tasto.
!
7 (annulla): Riduce lo schermo Teletext per sovrapporlo alla trasmissione
corrente.
@
Tasti colore (rosso, verde, giallo, blu): Se una emittente usa il sistema
FASTEXT, i vari argomenti trattati in una pagina Teletext vengono codificati
in base ai colori e possono essere selezionati premendo i tasti colore
corrispondenti. Premere il tasto colore corrispondente all'argomento
scelto. Viene visualizzata una nuova pagina con codice colore. E' possibile
selezionare le varie voci nello stesso modo. Per visualizzare la pagina
successiva o precedente, premere il tasto colorato corrispondente.
Le pagine Teletext sono organizzate in base a sei categorie
Parte Contenuti
A
E
F
B C D
A Numero della pagina selezionata.
B Identità della stazione emittente.
C
Numero della pagina corrente o stato della
ricerca.
D Data e ora.
E Testo.
F
Informazioni sullo stato. Informazioni
FASTEXT.
Page 84
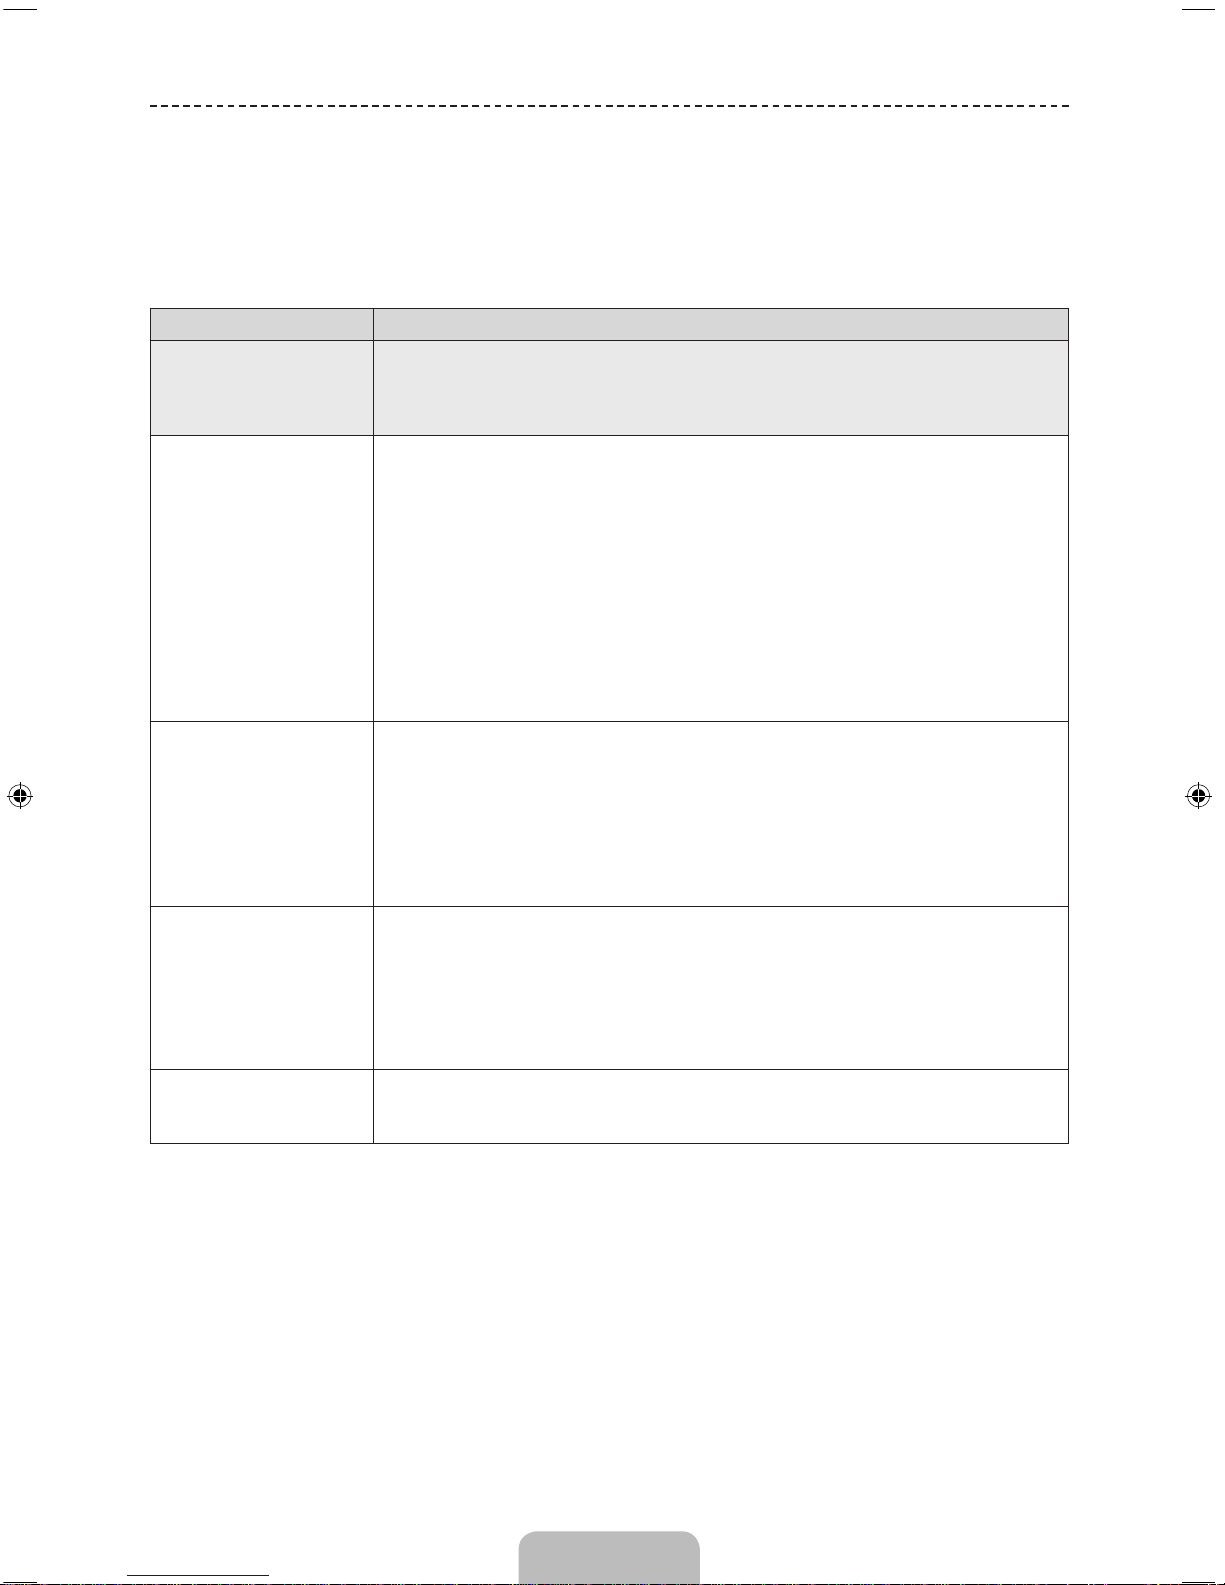
Italiano - 12
Risoluzione dei problemi
(In base al paese e al modello)
Se il televisore funziona in modo anomalo, controllare per prima cosa l'elenco dei problemi e delle soluzioni possibili. Se
nessuna delle soluzioni consigliate risolve il problema riscontrato, cliccare su Support (Supporto), oppure contattare il
centro assistenza clienti Samsung.
Problemi Soluzioni e spiegazioni
Qualità dell'immagine
Per prima cosa, eseguire il Test immagine per confermare che il televisore sia in grado
di visualizzare correttamente l'immagine di prova. (accedere a MENU - Supporto - Auto
diagnosi - Test immagine) Se l'immagine di prova viene visualizzata correttamente, la
scarsa qualità dell'immagine potrebbe essere causata dalla sorgente o dal segnale.
La qualità dell'immagine TV
non sembra all'altezza di
quella vista in negozio.
• Se si dispone di un ricevitore satellitare/via cavo analogico, eseguire l'aggiornamento
a un ricevitore digitale. Usare cavi HDMI per ottenere immagini HD.
• Abbonati servizi cavo/satellite: Provare le stazioni HD dal channel line up.
• Connessione Antenna: Provare le stazioni HD dopo avere eseguito la Sintonizzazione
automatica.
• Molti canali HD trasmettono contenuti SD (Standard Definition) aggiornati.
• Regolare la risoluzione di uscita video del ricevitore via cavo/satellitare su 1080i o
720p.
• Guardare il televisore mantenendosi entro la distanza minima raccomandata, basata
sulla dimensione dello schermo e la definizione del segnale visualizzato.
L'immagine è distorta:
sono visibili blocchi grandi,
blocchi piccoli, punti e pixel
• La compressione di contenuti video può causare la distorsione dell'immagine
specialmente nel caso di immagini caratterizzate da movimenti rapidi, come per
esempio eventi sportivi o film d'azione.
• Un segnale debole o di scarsa qualità può causare la distorsione dell'immagine.
Questo non è un problema del televisore.
• L'uso di telefoni cellulari vicino al televisore (fino a 1 m) può causare disturbi nella
trasmissione delle immagini in modalità analogica e digitale.
Scarsa luminosità o colore
non adeguato.
• Regolare le opzioni Immagine nel menu TV. (accedere a Modalità immagine /
Colore / Luminosità / Nitidezza)
• Regolare l'opzione Risparmio energia nel menu TV. (accedere a MENU - Sistema -
Soluzione Eco - Risparmio energia)
• Provare a reimpostare l'immagine visualizzandola con le impostazioni predefinite.
(accedere a MENU - Immagine - Reimposta immagine)
Sul bordo dello schermo
è visibile una linea
punteggiata.
• Se il formato immagine è impostato su Adatta a schermo, modificarlo in 16:9.
• Cambiare la risoluzione del ricevitore via cavo/satellitare.
Page 85
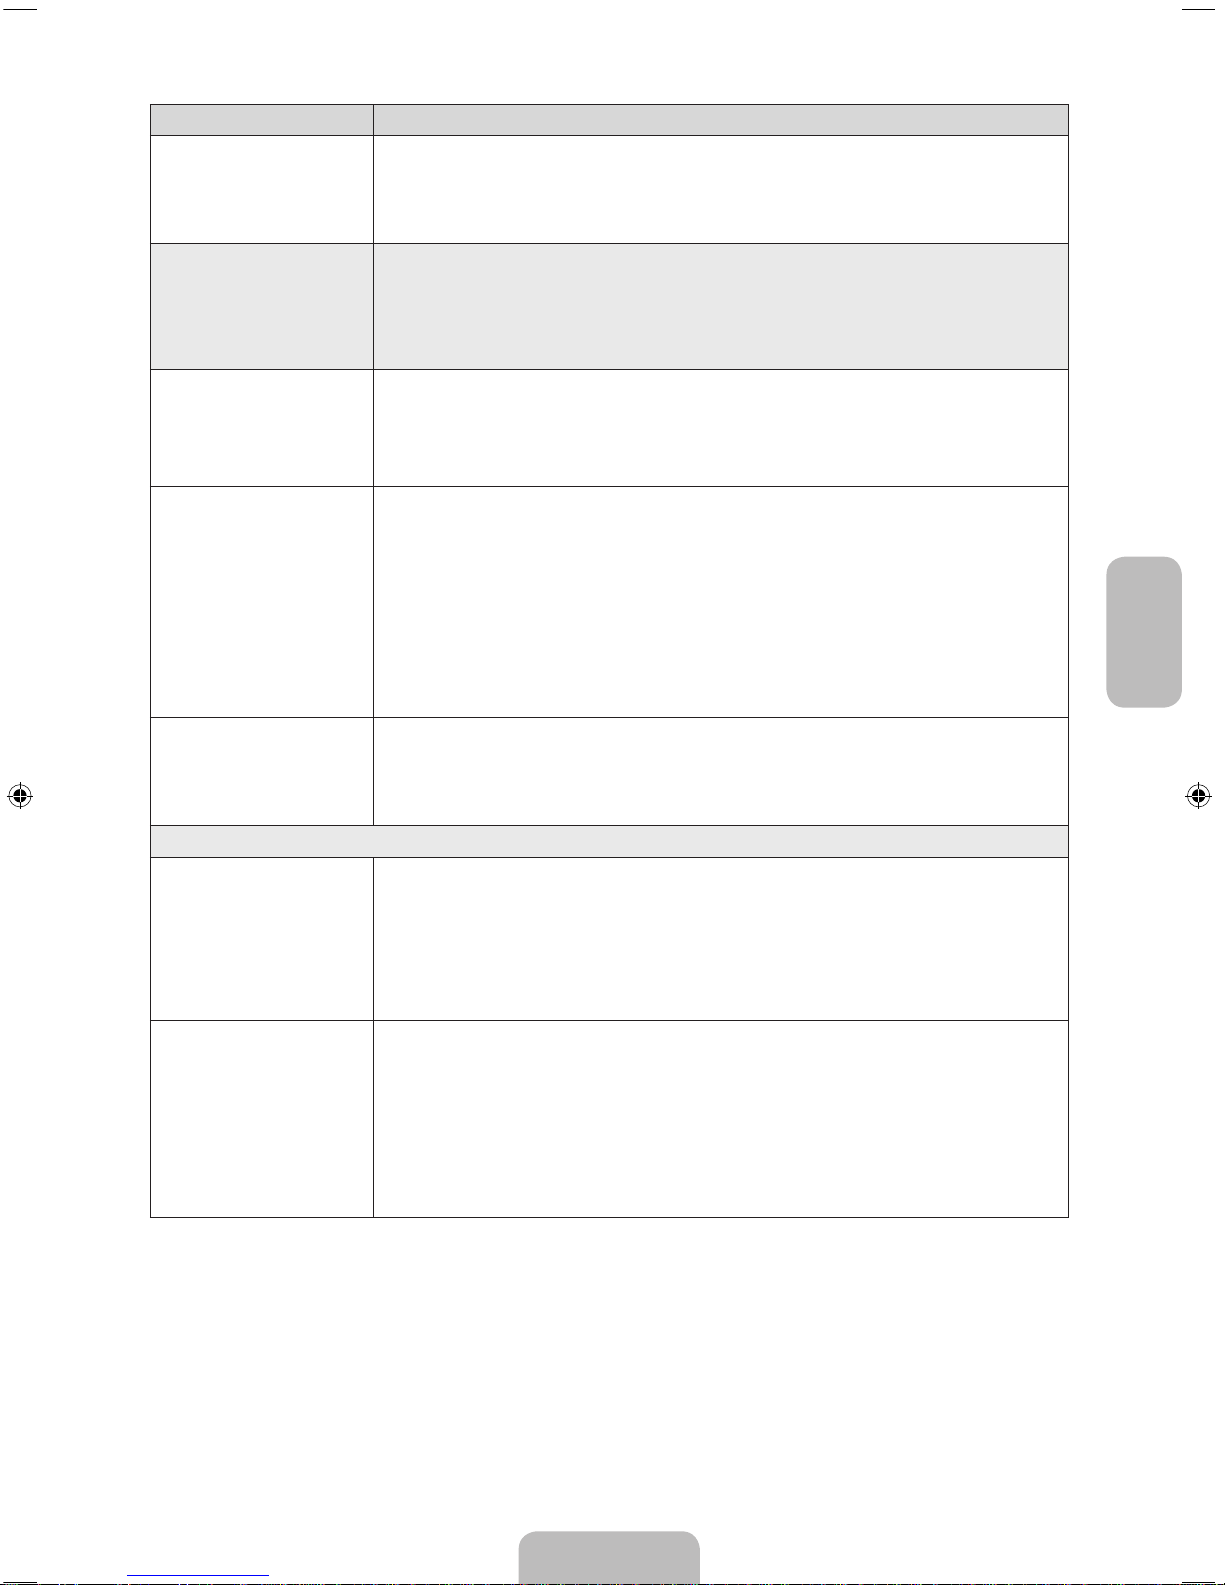
Italiano
Italiano - 13
Problemi Soluzioni e spiegazioni
Quando si cambia canale,
l'immagine risulta ferma,
distorta o in ritardo.
• Se il prodotto è connesso a un ricevitore via cavo, reimpostare il ricevitore.
Riconnettere il cavo CA e attendere fino al riavvio del ricevitore. L'operazione
potrebbe richiedere fino a 20 minuti.
• Impostare la risoluzione di uscita del ricevitore via cavo su 1080i o 720p.
Qualità audio
Per prima cosa, eseguire il Test audio per confermare che il sistema audio del televisore
funzioni in modo appropriato. (accedere a MENU - Supporto - Auto diagnosi - Test
audio)
Se l'audio viene riprodotto correttamente, il problema potrebbe essere causato dalla
sorgente o dal segnale.
L'audio non viene
riprodotto oppure il livello
del volume risulta troppo
basso anche se impostato
al valore massimo.
• Verificare il volume del dispositivo (ricevitore via cavo/satellitare, lettore DVD, Blu-ray,
ecc) collegato al televisore.
L'immagine è buona ma
senza audio.
• Impostare l'opzione Seleziona altoparlante su Altoparlante TV nel menu Suono.
• Se si sta usando un dispositivo esterno, verificare che i cavi audio siano collegati alle
porte di ingresso audio del televisore.
• Se si sta usando un dispositivo esterno, verificare l'opzione di uscita audio del
dispositivo (per es. potrebbe risultare necessario cambiare l'opzione audio del
ricevitore via cavo su HDMI in caso di collegamento HDMI al televisore).
• Se si usa un cavo DVI-HDMI, è necessario utilizzare un cavo audio separato.
• Riavviare il dispositivo dopo averne scollegato e ricollegato il cavo di alimentazione.
Il suono riprodotto dagli
altoparlanti è disturbato.
• Verificare le connessioni dei cavi. Verificare che il cavo video non sia connesso a un
ingresso audio.
• Per le connessioni Antenna o Cavo, verificare l'intensità del segnale. Un segnale
basso può causare la distorsione dell'audio.
Il video è vuoto e non vi è immagine
Il televisore non si accende.
• Verificare che la spina del cavo di alimentazione CA sia correttamente collegata alla
presa a parete e al televisore.
• Verificare che la presa a parete sia funzionante.
• Provare a premere il tasto P sul televisore per verificare che il problema non sia
il telecomando. Se il televisore si accende, vedere la sezione "Il telecomando non
funziona" riportata sotto.
Il televisore si spegne
automaticamente.
• Verificare che Timer stand-by sia impostato su Off nel menu Ora.
• Se il televisore è collegato al PC, verificare le impostazioni di alimentazione del PC.
• Verificare che la spina del cavo di alimentazione CA sia correttamente collegata a una
presa a muro e al televisore.
• No segnale std-by disattiva il televisore se l'apparecchio non riceve alcun segnale
per un determinato periodo di tempo. Spegnimento automatico disattiva il
televisore se l'apparecchio non riceve input dall'utente per quattro ore.
Page 86
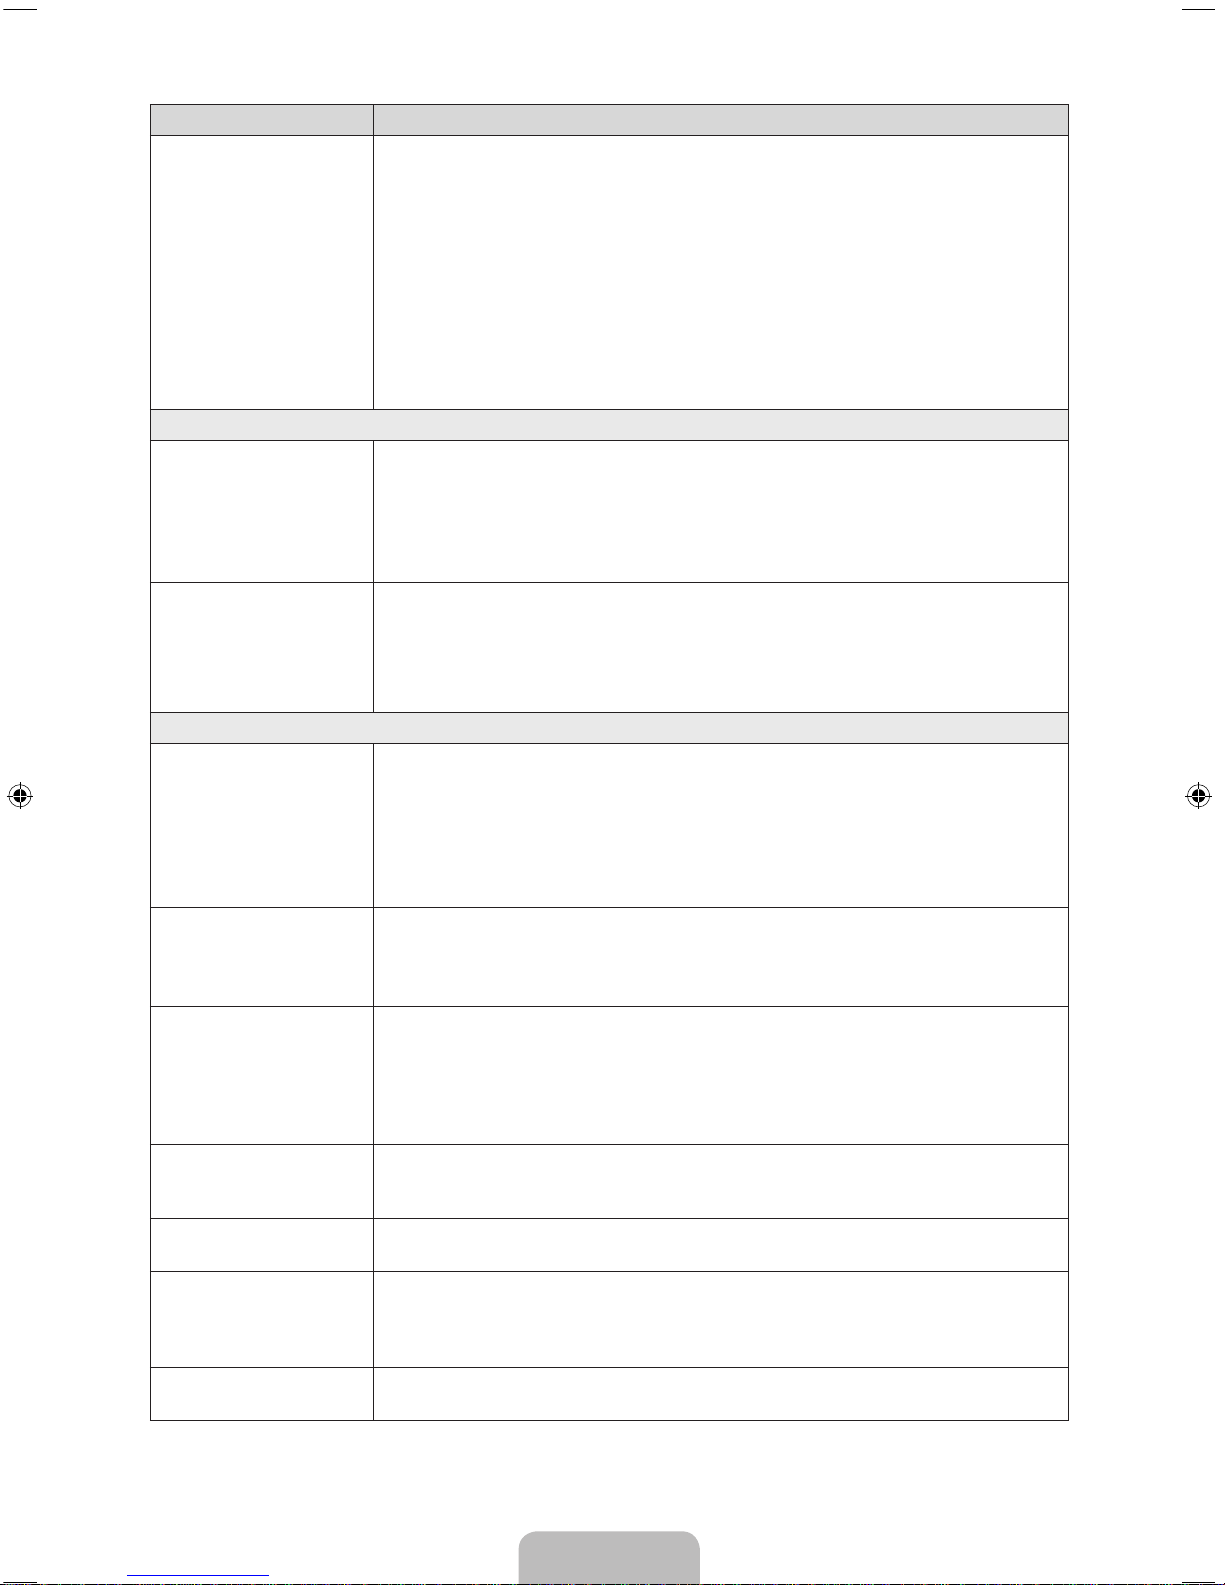
Italiano - 14
Problemi Soluzioni e spiegazioni
Nessuna immagine/video.
• Verificare le connessioni dei cavi (scollegare e ricollegare tutti i cavi del televisore e dei
dispositivi esterni).
• Impostare le uscite video dei dispositivi esterni (ricevitore via cavo/satellitare, lettore
DVD, Blu-ray, ecc) in modo che le connessioni corrispondano agli ingressi del
televisore. Ad esempio, se l'uscita di un dispositivo esterno è HDMI, deve essere
collegata a un ingresso HDMI sul televisore.
• Verificare che il dispositivo collegato sia acceso.
• Selezionare la corretta sorgente del televisore premendo il tasto SOURCE sul
telecomando.
• Riavviare il dispositivo dopo averne scollegato e ricollegato il cavo di alimentazione.
Connessione antenna (Antenna/Cavo)
Il televisore non sta
ricevendo tutti i canali.
• Verificare che il cavo dell'antenna sia correttamente collegato.
• Provare il menu Impostazione (Impostazione iniziale) per aggiungere canali all'elenco
dei canali disponibili. Accedere a MENU - Sistema - Impostazione (Impostazione
iniziale) e attendere la memorizzazione di tutti i canali disponibili.
• Verificare che l'antenna sia posizionata correttamente.
L'immagine è distorta:
sono visibili blocchi grandi,
blocchi piccoli, punti e pixel
• La compressione di contenuti video può causare la distorsione dell'immagine
specialmente nel caso di immagini caratterizzate da movimenti rapidi, come per
esempio eventi sportivi o film d'azione.
• Un segnale basso può causare la distorsione dell'immagine. Questo non è un
problema del televisore.
Altro
L'immagine non viene
visualizzata a pieno
schermo.
• I canali HD riporteranno barre scure verticali su entrambi i lati dello schermo durante
la visualizzazione di contenuti SD (4:3).
• Quando vengono trasmessi film con un rapporto d'immagine diverso da quello del
televisore, appaiono barre nere sui lati superiore e inferiore dello schermo.
• Regolare le opzioni del formato immagine sul dispositivo esterno o sul televisore per
visualizzare l'immagine a pieno schermo.
Il telecomando non
funziona.
• Sostituire le batterie prestando attenzione a rispettare le polarità (+/–).
• Pulire la finestra di trasmissione del sensore sul telecomando.
• Puntare il telecomando verso il televisore a una distanza di 1,5 ~1,8 m.
Il telecomando del
ricevitore via cavo/
satellitare non riesce ad
accendere o spegnere il
televisore o a regolare il
volume.
• Programmare il telecomando del ricevitore via cavo/satellitare in modo che possa
controllare le funzioni del televisore. Consultare il manuale dell'utente del ricevitore via
cavo/STB per il codice del televisore SAMSUNG.
Viene visualizzato il
messaggio “Modal non
supportata ”.
• Verificare la risoluzione del televisore supportata e regolare di conseguenza la
risoluzione di uscita del dispositivo esterno.
Il televisore emana odore di
plastica.
• Ciò è normale e l'odore si dissiperà nel corso del tempo.
La funzione Informazioni
sul segnale del televisore
non è disponibile nel menu
Auto diagnosi.
• Questa funzione è disponibile solo per canali digitali con connessione antenna / RF/
coassiale.
Il televisore è inclinato
verso destra o sinistra.
• Rimuovere la base del piedistallo dal televisore quindi rimontarla.
Page 87
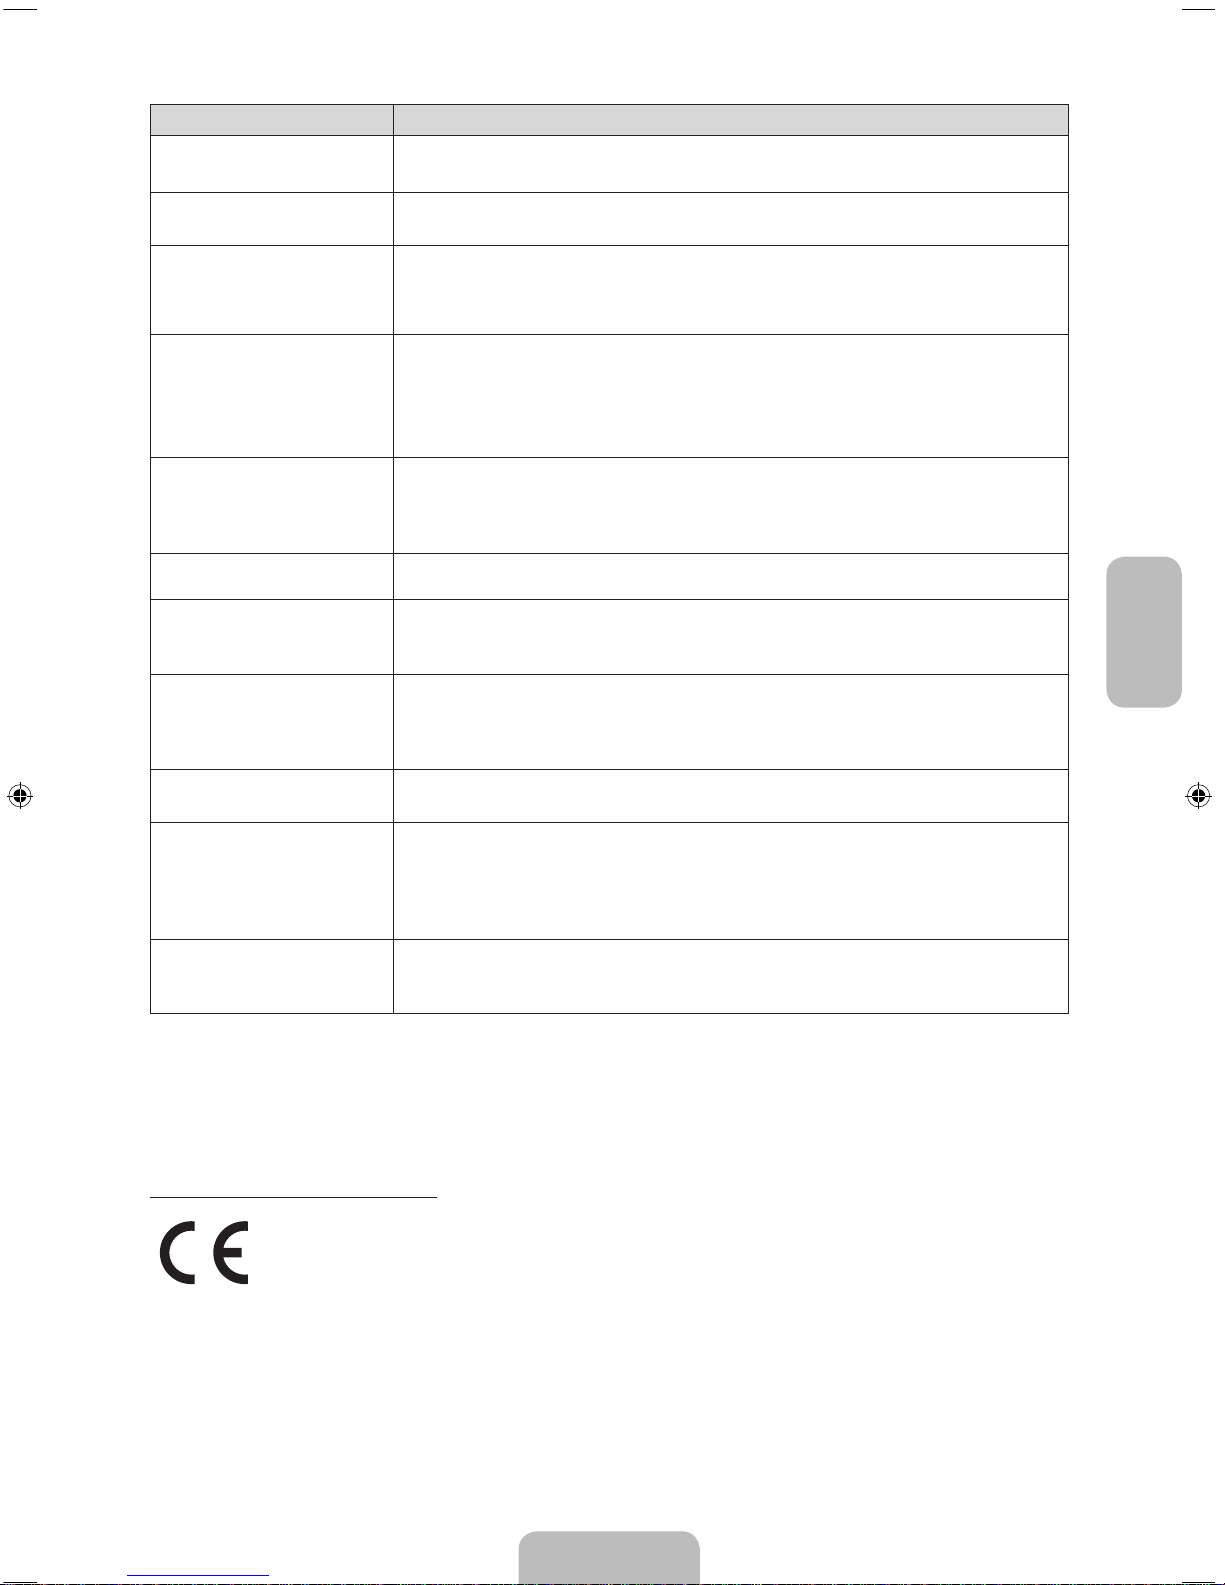
Italiano
Italiano - 15
Problemi Soluzioni e spiegazioni
Il rimontaggio della base del
piedistallo risulta difficoltoso.
• Verificare che il televisore sia posizionato su una superficie piana. Se non si riesce
a svitare le viti fissate al televisore, utilizzare un cacciavite magnetico.
Il menu Trasmissione è di
colore grigio (non disponibile).
• Il menu Trasmissione è disponibile solo se è selezionata la sorgente del televisore.
Le impostazioni andranno
perse dopo 5 minuti o ad ogni
spegnimento del televisore.
• Se il televisore è in modalità Demo Negozio, ogni 5 minuti verranno azzerate le
impostazioni audio e immagine. Per cambiare impostazioni da Demo Negozio a
Uso domestico, premere il tasto SOURCE per selezionare TV, quindi accedere a
MENU → Supporto → Modalità d'uso.
Perdita intermittente del
segnale audio o video.
• Verificare le connessioni e ricollegare i cavi.
• La perdita del segnale video o audio potrebbe essere causata dall'uso di cavi
troppo grossi o rigidi. Verificare che i cavi siano sufficientemente flessibili da
consentire un uso prolungato nel tempo. In caso di montaggio a parete del
televisore, si consiglia di utilizzare cavi con connettori a 90°.
Guardando da vicino il bordo
della cornice del televisore è
possibile notare delle piccole
particelle.
• Ciò non costituisce un difetto ma fa parte del design del prodotto.
Il menu PIP non è disponibile.
• La funzione PIP è disponibile solo quando il segnale proviene da una sorgente
HDMI o component.
Una volta spento, dopo 45
minuti il televisore si riaccende
automaticamente.
• Ciò è normale. Il televisore attiva automaticamente la funzione OTA (Over The Air)
per aggiornare il firmware scaricato durante la visione del televisore.
Viene visualizzato il
messaggio “Segnale
criptato” o “Segnale debole
o assente”.
• Se si sta utilizzando un modulo CAM CARD (CI/CI+), verificare che sia installato
nell'alloggiamento common interface.
• Se il problema persiste, estrarre il modulo CAM CARD dal televisore e reinserirlo.
Vi sono ricorrenti problemi di
immagine/audio.
• Verificare e modificare il segnale/la sorgente.
Potrebbe verificarsi una
reazione tra la gomma del
cuscinetto fissato alla base
del piedistallo e la finitura
superficiale di alcuni mobili.
• Per evitare questo inconveniente, collocare dei feltrini su ogni parte del televisore
che entra direttamente in contatto con il mobile.
Viene visualizzato il
messaggio “Il file potrebbe
non essere riproducibile.”.
• Ciò potrebbe essere dovuto a un elevato bit rate dei contenuti. Generalmente è
possibile riprodurre tali contenuti, ma potrebbero verificarsi problemi durante la
riproduzione.
✎
E' possibile mantenere il televisore in condizioni operative ottimali eseguendo l'upgrade via USB all'ultimo firmware
disponibile (www.samsung.com → support).
✎
Lo schermo LED TFT utilizza un pannello composto da sotto pixel la cui produzione richiede una speciale
tecnologia. Tuttavia, alcuni pixel potrebbero risultare più luminosi o più scuri sullo schermo. Questo fenomeno non
ha alcun impatto sulle prestazioni del prodotto.
Raccomandazioni - Solo UE
• Con la presente, Samsung Electronics dichiara che questo TV è conforme ai requisiti essenziali e alle altre clausole
pertinenti indicate nella Direttiva 1999/5/CE.
• La Dichiarazione di conformità ufficiale è reperibile all'indirizzo http://www.samsung.com, accendendo alla pagina
Supporto > Certificati CE, e immettendo i dati richiesti per l'identificazione del prodotto.
• L'uso di questa apparecchiatura è consentito in tutti i paesi europei.
Page 88
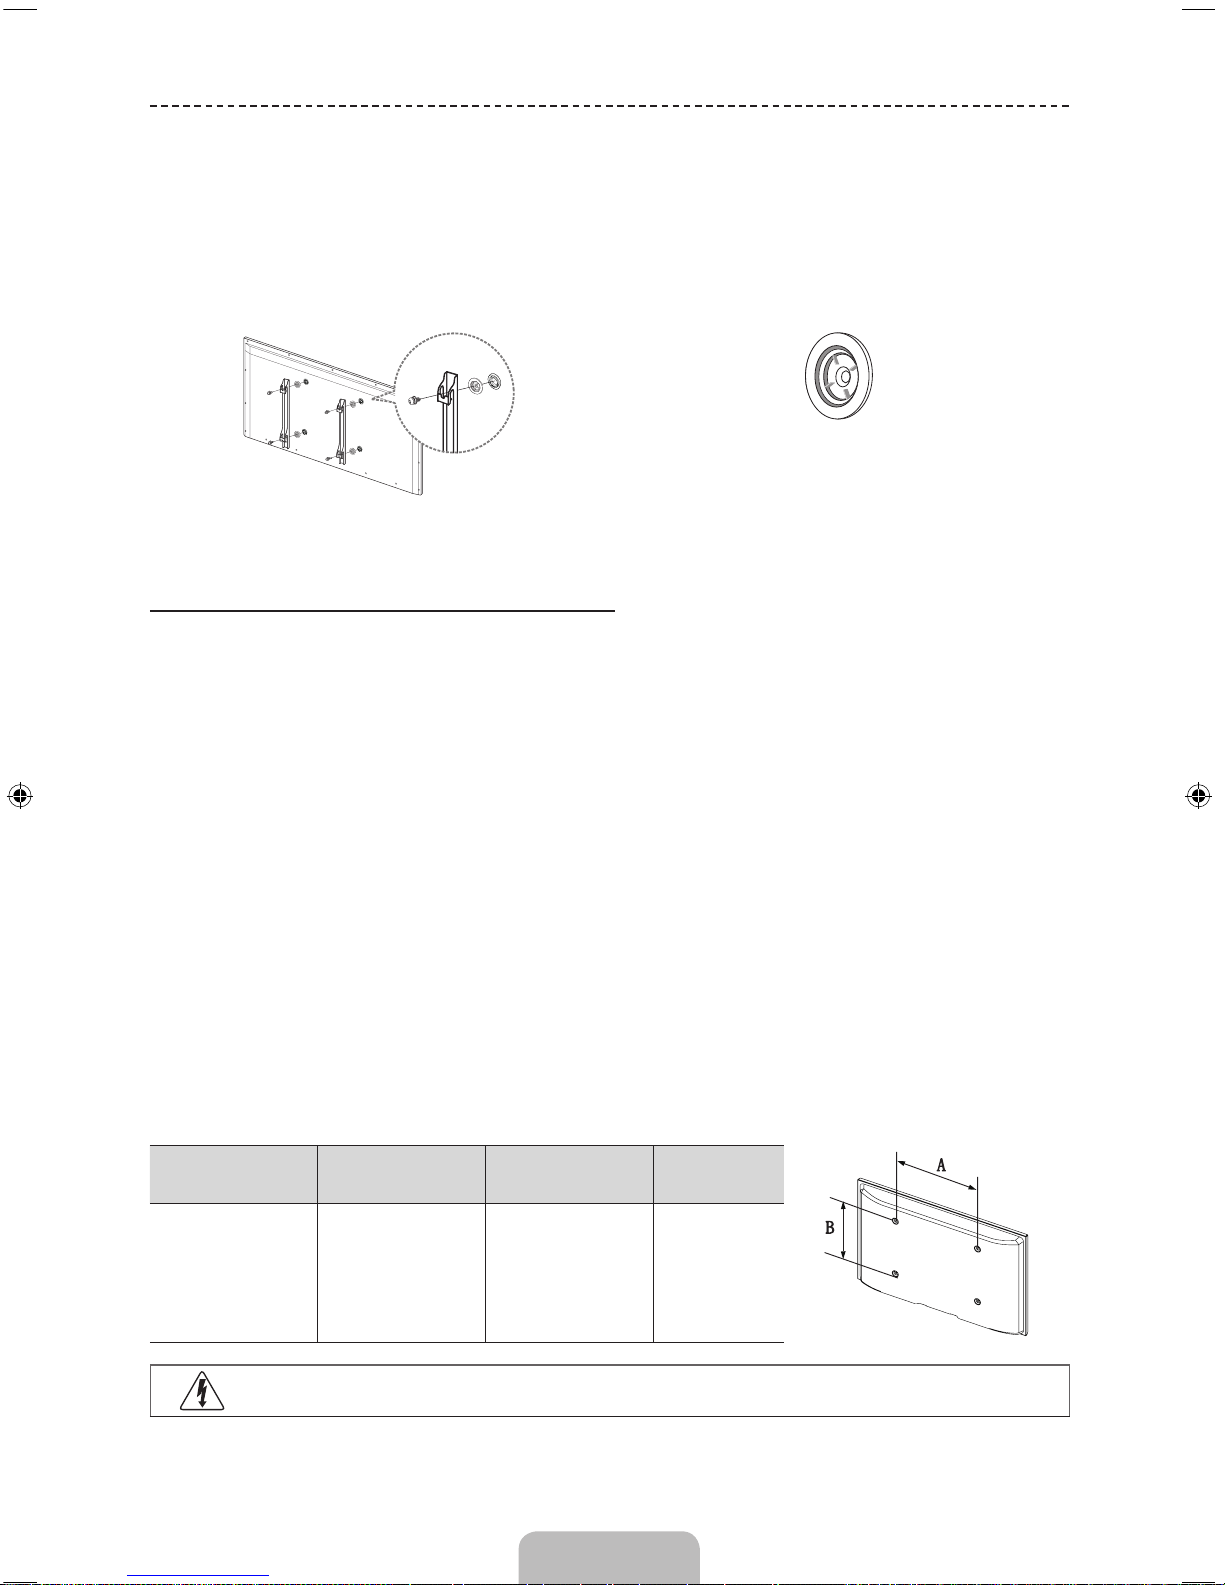
Italiano - 16
Installazione del supporto a parete
Il kit di supporto a parete (venduto separatamente) consente di montare il televisore direttamente a una parete. Per
informazioni dettagliate sull'installazione a parete, consultare le istruzioni fornite insieme al kit. Rivolgersi a un tecnico per
il montaggio della staffa a parete. Si sconsiglia di procedere autonomamente.
Samsung Electronics non può essere ritenuta responsabile per eventuali danni al prodotto o infortuni causati da una
installazione autonoma del televisore da parte dell'utente.
Adattatore supporto a parete
(In base al modello)
Prima di installare un kit di montaggio a parete di altra marca, assemblare l’adattatore per montaggio a parete fornito
separatamente dal televisore.
Specifiche del kit di supporto a parete (VESA)
✎
Il kit di montaggio a parete non è fornito in dotazione ma è venduto separatamente.
✎
Installare il supporto su una parete solida perpendicolare al pavimento. Se il supporto deve essere fissato ad altri
tipi di materiale, consultare il rivenditore di zona. Una installazione a soffitto o su pareti inclinate può provocare la
caduta dell'unità e lesioni personali.
✎
NOTA
• Nella tabella sotto riportata vengono indicate le dimensioni standard dei kit di supporto a parete.
• All'acquisto di un kit di supporto a parete, verrà fornita la guida all'installazione e tutte le parti necessarie per il
montaggio.
• Non utilizzare viti non conformi agli standard VESA.
• Non utilizzare viti di dimensioni diverse da quelle standard poiché potrebbero danneggiare l'interno del
televisore.
• Per i montaggi a parete non conformi alle specifiche delle viti standard VESA, la lunghezza delle viti potrebbe
differire in base alle loro specifiche.
• Non serrare eccessivamente le viti, in quanto potrebbero danneggiare il prodotto o causarne la caduta con
conseguente rischio di lesioni. Samsung non può essere ritenuta responsabile per tali incidenti.
• Samsung non può essere ritenuta responsabile per eventuali danni o lesioni personali qualora vengano usati kit
di supporto a parete non conformi allo standard VESA o l'utente non segua le istruzioni di installazione fornite.
• Non superare i 15 gradi di inclinazione durante il montaggio del televisore.
pollici Spec. VESA (A * B) Vite standard Quantità
50 ~ 60 400 X 400 M8 4
Non installare il kit di supporto a parete mentre il televisore è acceso. In caso contrario, potrebbero
verificarsi incidenti con lesioni personali causate da scosse elettriche.
Page 89
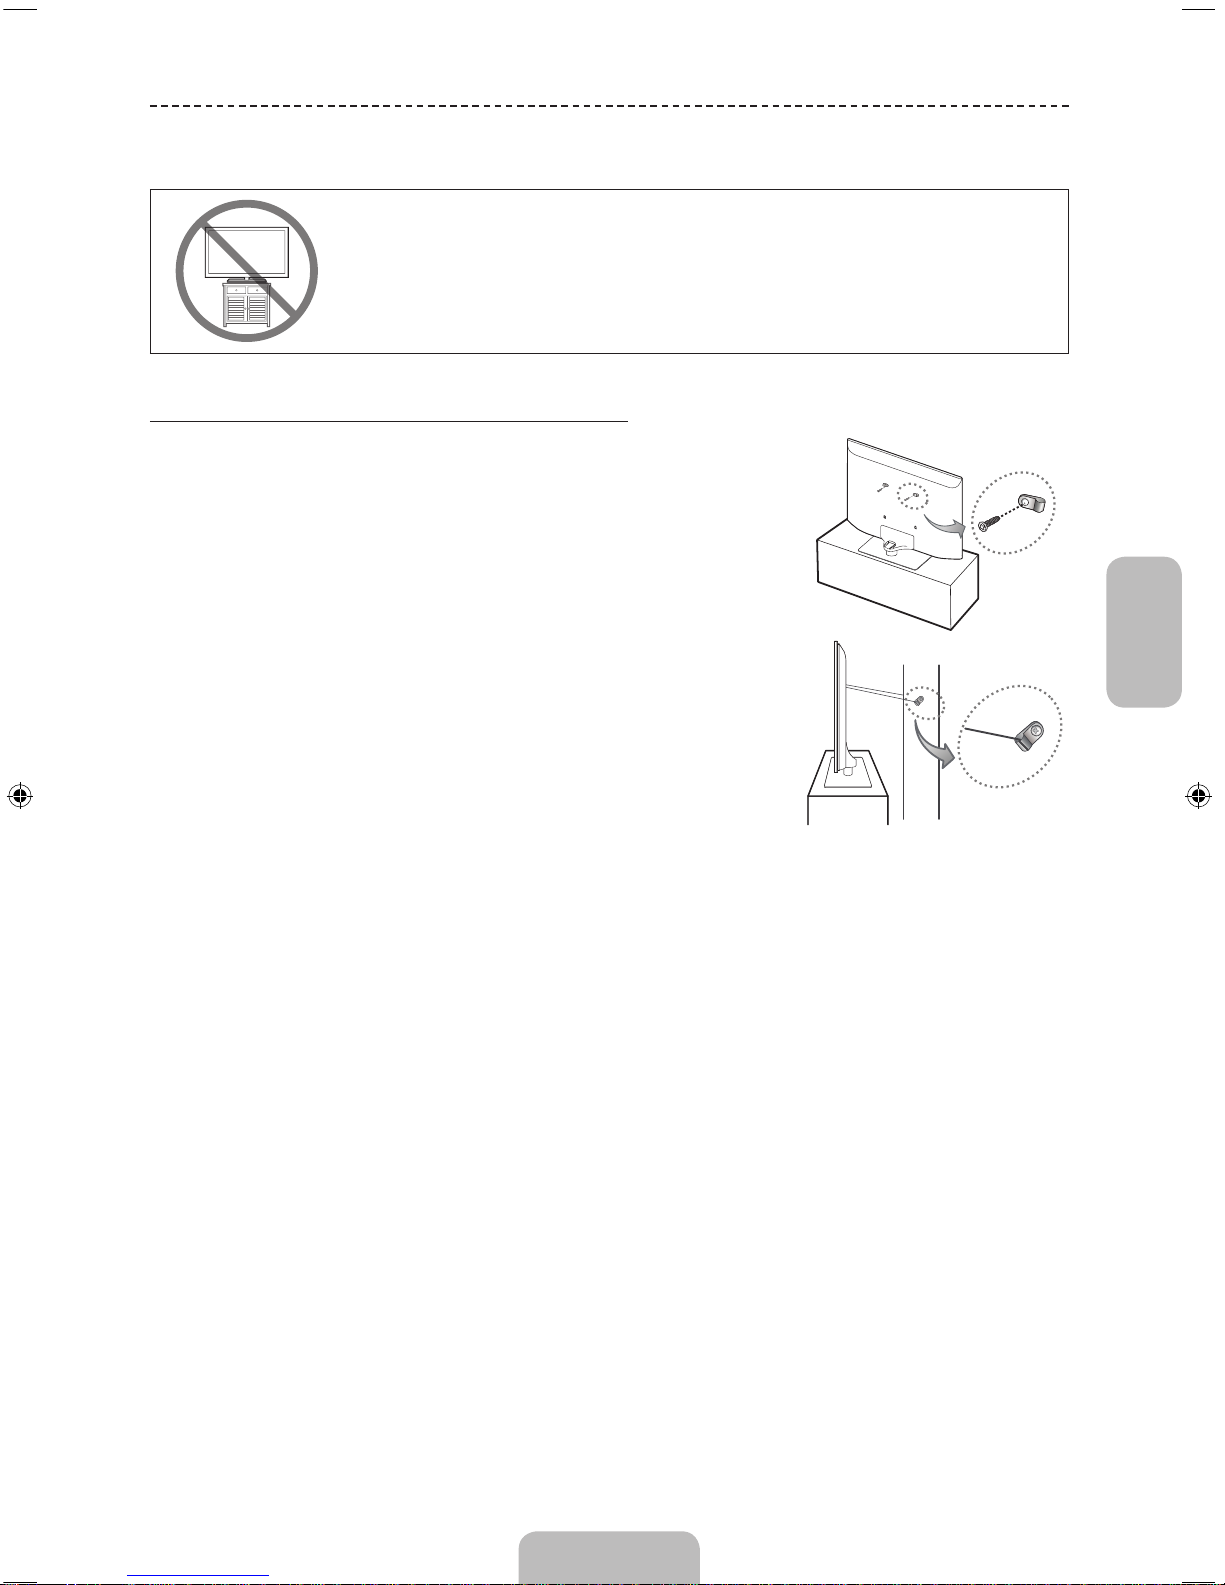
Italiano
Italiano - 17
Fissaggio del televisore alla parete
Attenzione: Tirare, spingere o arrampicarsi sul televisore sono azioni che possono
provocarne la caduta. Si raccomanda di non far giocare i bambini con il televisore poiché
potrebbero appendersi ad esso destabilizzandolo; se ciò dovesse verificarsi, il televisore
potrebbe cadere provocando lesioni personali gravi e perfino mortali. Seguire tutte le
precauzioni di sicurezza descritte della documentazione allegata. Per una maggiore stabilità
e sicurezza del prodotto, installare il dispositivo anticaduta come segue.
Per evitare una eventuale caduta del televisore
1. Avvitare saldamente i ganci alla parete. Verificare che le viti siano state
fissate saldamente alla pareti.
✎
A seconda del tipo di parete, potrebbe essere necessario
utilizzare anche un fisher.
✎
Poiché i ganci, le viti e il cavo di sicurezza non sono forniti in
dotazione, è necessario acquistare tali materiali separatamente.
2. Rimuovere le viti dal centro del pannello posteriore del televisore,
inserirle nei ganci, quindi avvitarle nuovamente al televisore.
✎
Specifiche delle viti
• Per i modelli da 50 ~ 60 pollici: M8
3. Collegare i ganci fissati al televisore a quelli fissati alla parete
utilizzando un cavo resistente, quindi legarlo strettamente.
✎
NOTA
• Installare il televisore il più vicino possibile alla parete in modo che
non possa cadere all'indietro.
• Collegare il cavo in modo che i ganci fissati alla parete si trovino
allineati o leggermente più in basso di quelli fissati al televisore.
• Slegare il cavo prima di spostare il televisore.
4. Accertarsi che tutte le connessioni siano adeguatamente fissate.
Controllare periodicamente le connessioni per verificarne l'eventuale
usura o rottura. Per qualsiasi dubbio relativo alla sicurezza delle connessioni effettuate, contattare un installatore
specializzato.
parete
• La forma e il colore del prodotto
possono variare in base al
modello.
Page 90
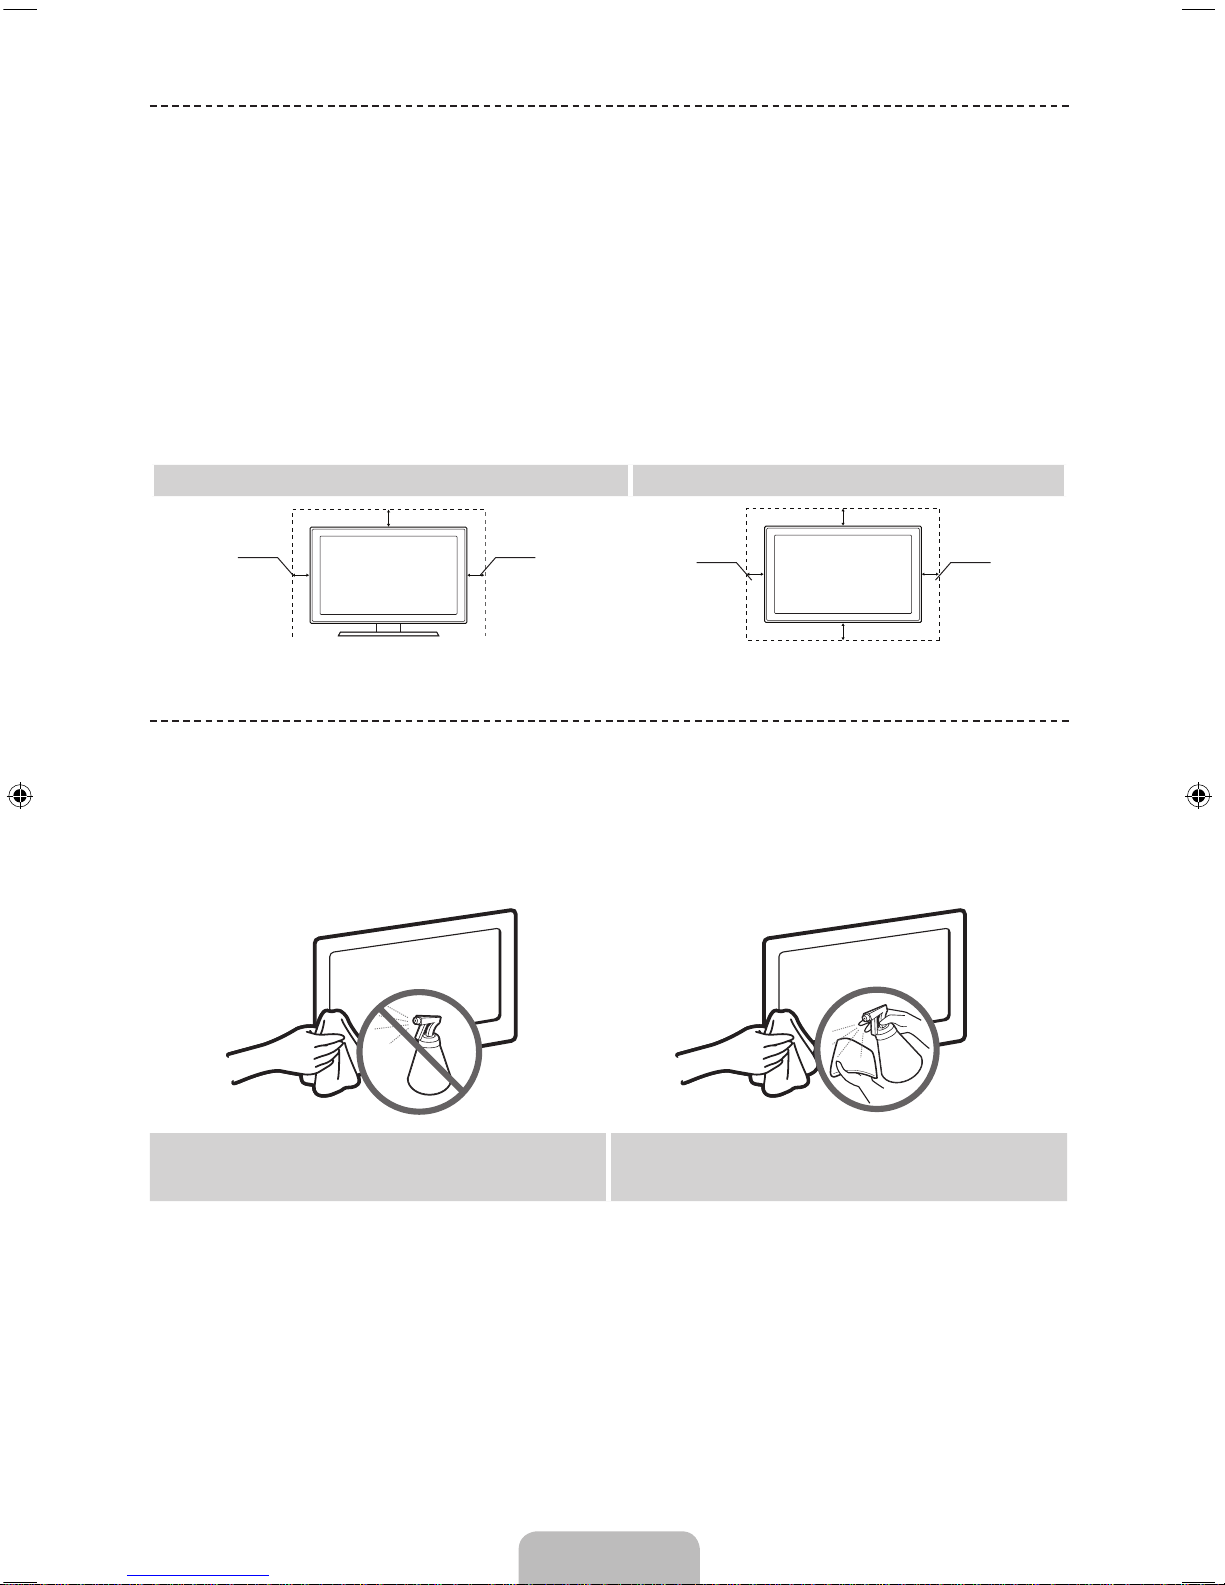
Italiano - 18
Messa in sicurezza della posizione di installazione
Mantenere le distanze indicate tra il prodotto e gli altri elementi presenti (per esempio le pareti) per garantire un'adeguata
ventilazione.
Il mancato rispetto di questa precauzione può comportare un incendio o un malfunzionamento provocato dall'aumento
della temperatura interna del prodotto.
✎
Se si usa un piedistallo o un sistema di montaggio a parete, utilizzare solo componenti forniti da Samsung
Electronics.
• L'uso di componenti di altri produttori può causare problemi di funzionamento del prodotto o lesioni provocate
dalla caduta del prodotto.
✎
L'aspetto del prodotto può differire in base al modello.
✎
Prestare attenzione quando si tocca il televisore poiché alcune parti potrebbero essere calde.
Installazione con piedistallo. Installazione con supporto a parete.
10 cm10 cm
10 cm
10 cm
10 cm
10 cm
10 cm
Conservazione e manutenzione
✎
Dopo la rimozione degli adesivi sullo schermo TV, pulire eventuali residui prima di visualizzare i programmi.
✎
Il telaio e lo schermo del prodotto possono graffiarsi durante la pulizia. Per la pulizia del telaio e dello schermo,
utilizzare un panno morbido per evitare di graffiare le superfici.
Non spruzzare acqua direttamente sul prodotto. Qualsiasi
liquido che penetri all'interno del prodotto può provocare
guasti, incendio o una scossa elettrica.
Pulire il prodotto con un panno morbido appena inumidito.
Non utilizzare liquidi infiammabili (come benzene e diluenti)
né soluzioni di pulizia.
Page 91
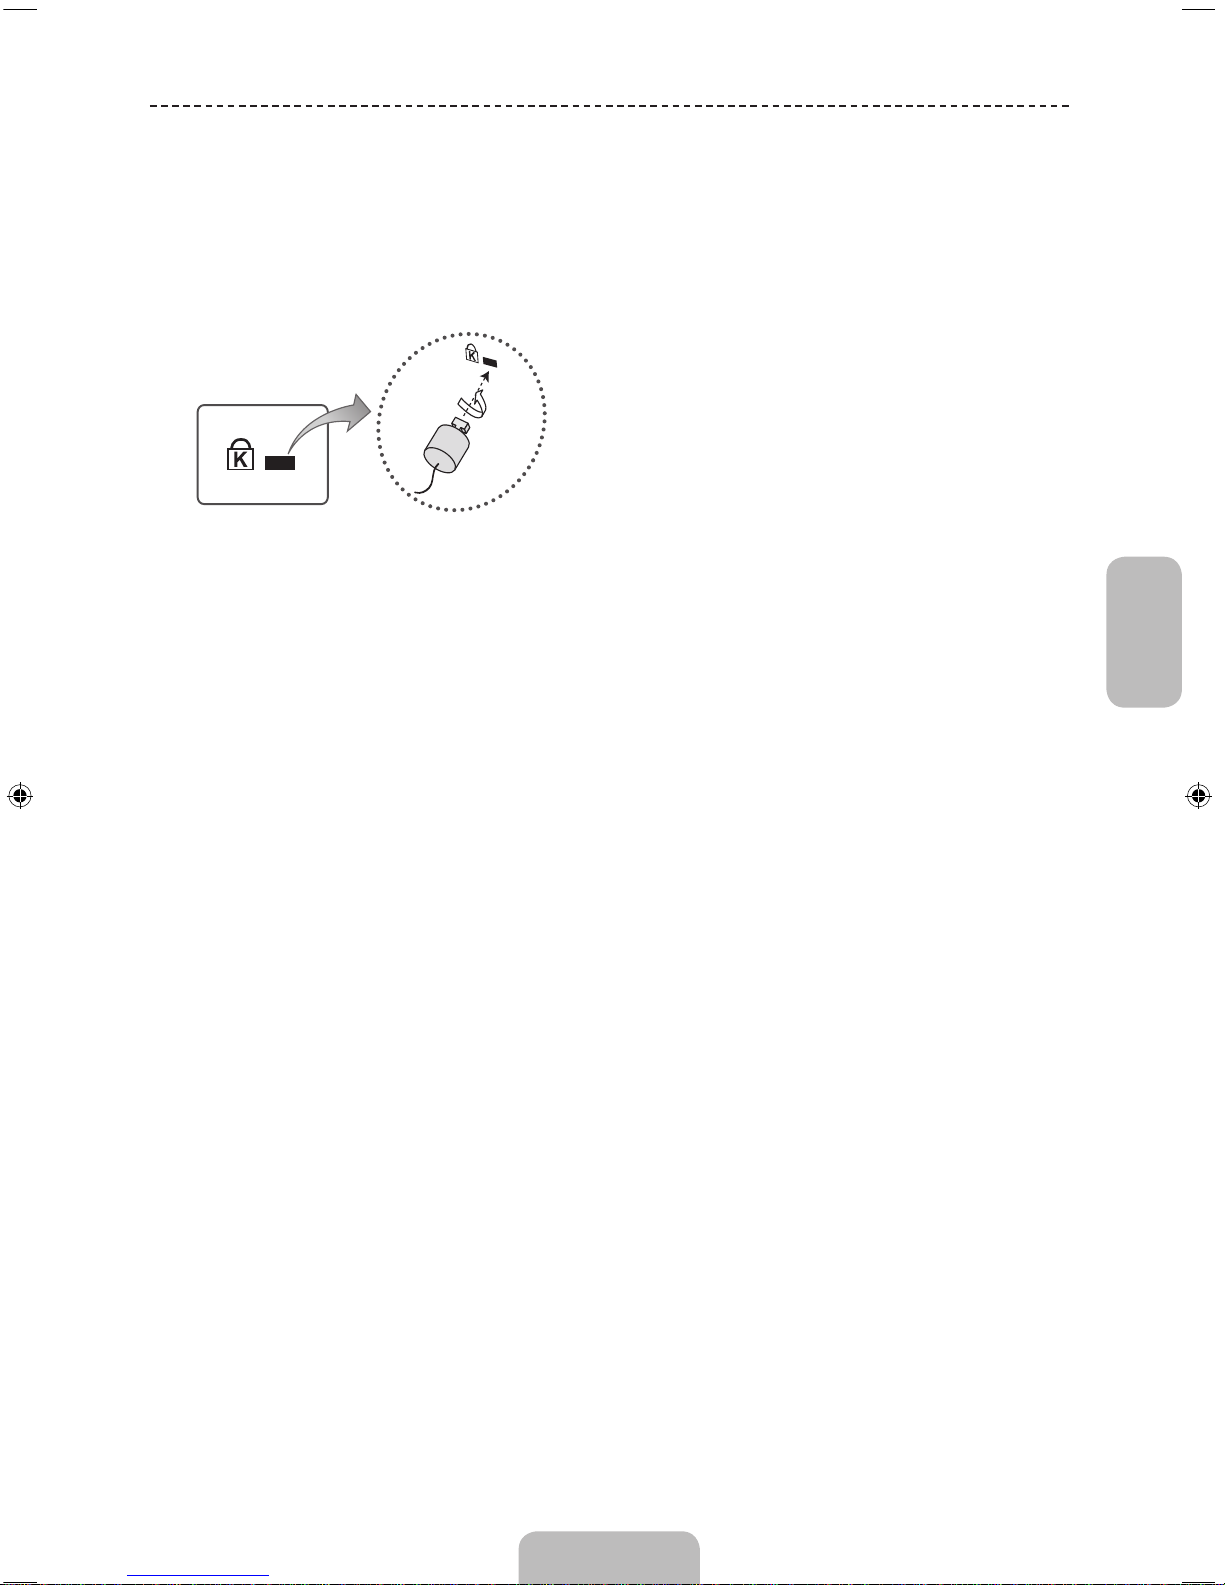
Italiano
Italiano - 19
Blocco antifurto Kensington
Il blocco Kensington non è fornito da Samsung. Si tratta di un dispositivo che assicura fisicamente il sistema qualora
utilizzato in luogo pubblico. L’aspetto del dispositivo e il metodo di blocco possono variare in base alla marca del
prodotto. Per informazioni sull’uso, consultare il manuale fornito insieme al blocco Kensington.
✎
Trovare l’icona “K” sul retro del televisore. L’alloggiamento del blocco Kensington si trova di fianco all’icona “K”.
✎
La posizione e il colore possono differire in base al modello.
<Opzionale>
Per bloccare il prodotto seguire questi passaggi:
1. Avvolgere il blocco Kensington intorno a un oggetto fisso di grandi dimensioni, come un tavolo o una sedia.
2. Far scorrere il terminale con il blocco attraverso il terminale ad anello del blocco Kensington.
3. Inserire il dispositivo di blocco nello slot Kensington sul prodotto.
4. Bloccare il dispositivo.
✎
Queste istruzioni sono da ritenersi generiche. Per istruzioni più dettagliate, consultare il manuale dell'utente fornito
insieme al dispositivo di blocco.
✎
Il dispositivo di blocco è in vendita separatamente.
Page 92
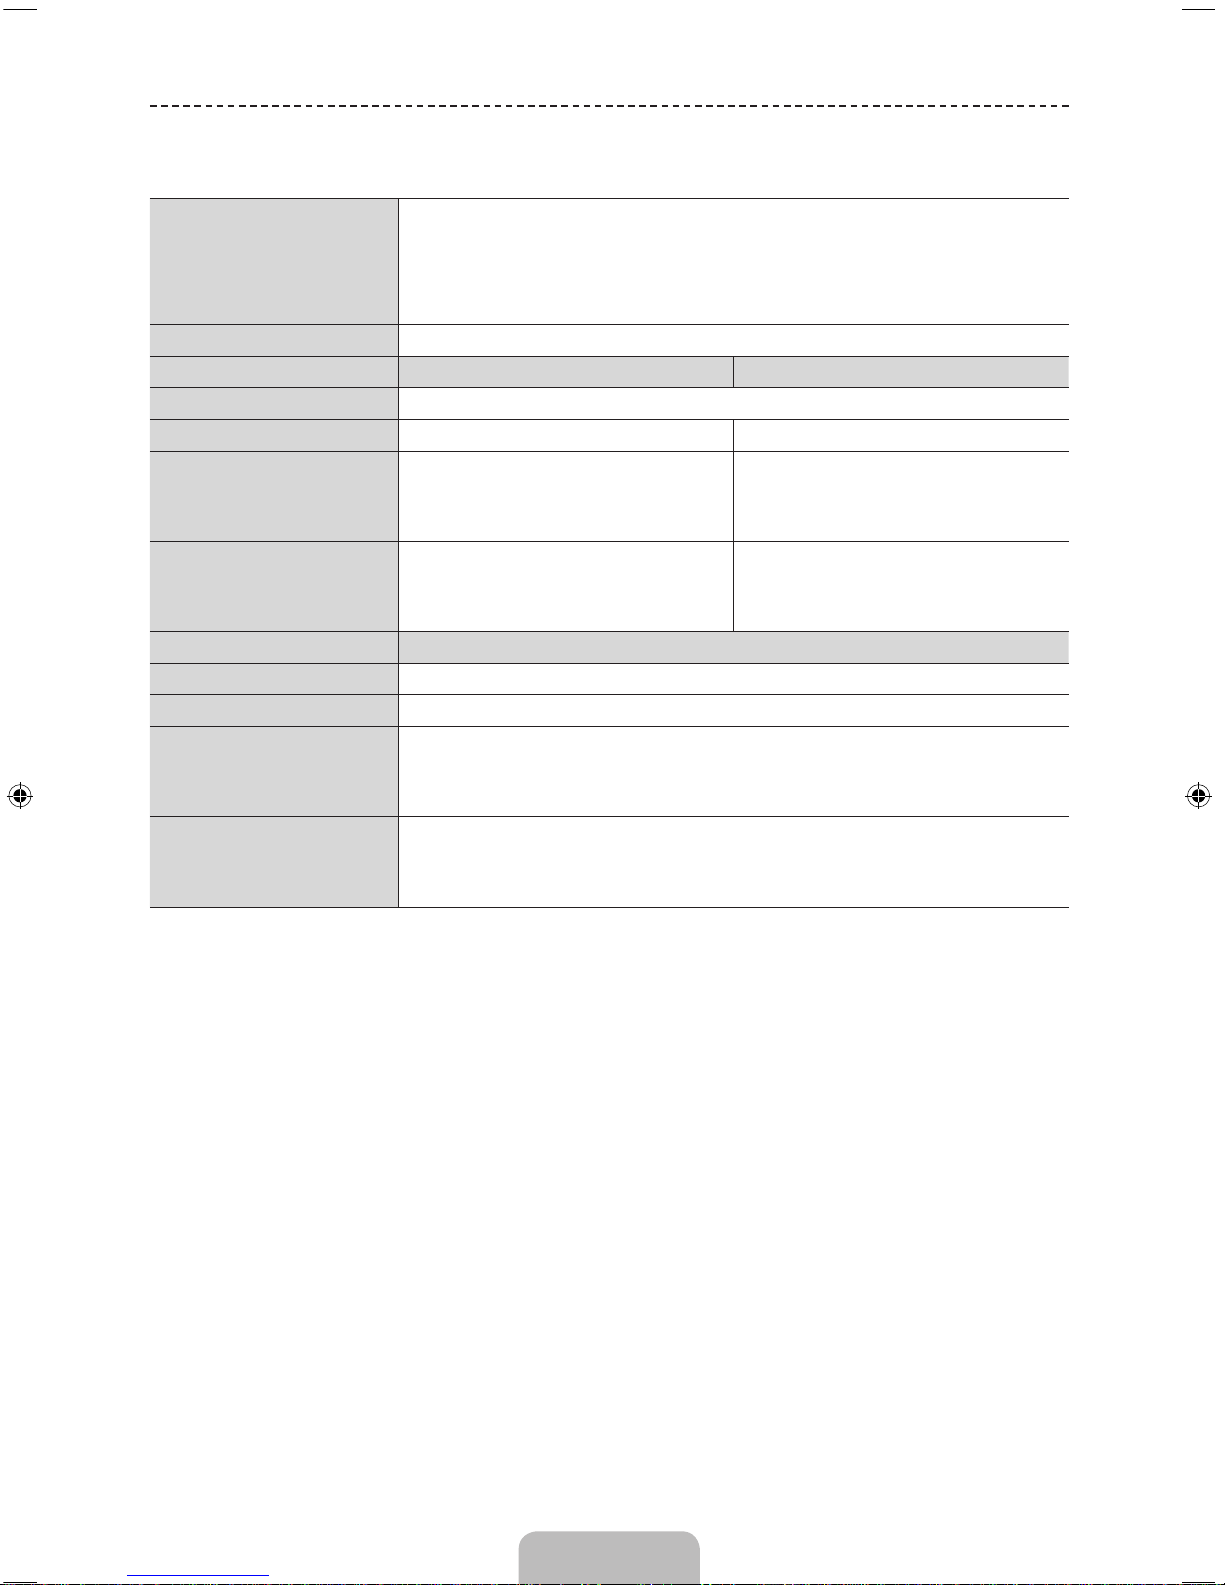
Italiano - 20
Specifiche
Caratteristiche ambientali
Temperatura di esercizio
Umidità di esercizio
Temperatura di stoccaggio
Umidità di stoccaggio
Da 10°C a 40°C (50°F a 104°F)
Dal 10% al 80%, senza condensa
Da -20°C a 45°C (-4 °F a 113 °F)
Dal 5% al 95%, senza condensa
Audio (Uscita)
10 W x 2
Nome modello
UE50J6150 / UE50J6170 UE55J6150 / UE55J6170
Risoluzione del display
1920 x 1080
Dimensione schermo
50 pollici (125 cm) 55 pollici (138 cm)
Dimensioni (Lar x Alt x Pro)
Senza piedistallo
Con piedistallo
1116,8 x 654,4 x 63,7 mm
1116,8 x 696,4 x 203,8 mm
1230,6 x 718,4 x 64,0 mm
1230,6 x 763,4 x 226,5 mm
Peso
Senza piedistallo
Con piedistallo
13,0 kg
14,1 kg
15,7 kg
18,6 kg
Nome modello
UE60J6150 / UE60J6170
Risoluzione del display
1920 x 1080
Dimensione schermo
60 pollici (152 cm)
Dimensioni (Lar x Alt x Pro)
Senza piedistallo
Con piedistallo
1365,0 x 797,4 x 64,4 mm
1365,0 x 878,7 x 295,9 mm
Peso
Senza piedistallo
Con piedistallo
23,0 kg
27,4 kg
✎
Design e specifiche sono soggetti a modifiche senza preavviso.
✎
Per l'alimentazione elettrica e il consumo di corrente, consultare l'etichetta apposta al prodotto.
✎
Il consumo di corrente tipico viene misurato secondo lo standard IEC 62087 Ed. 2
Page 93
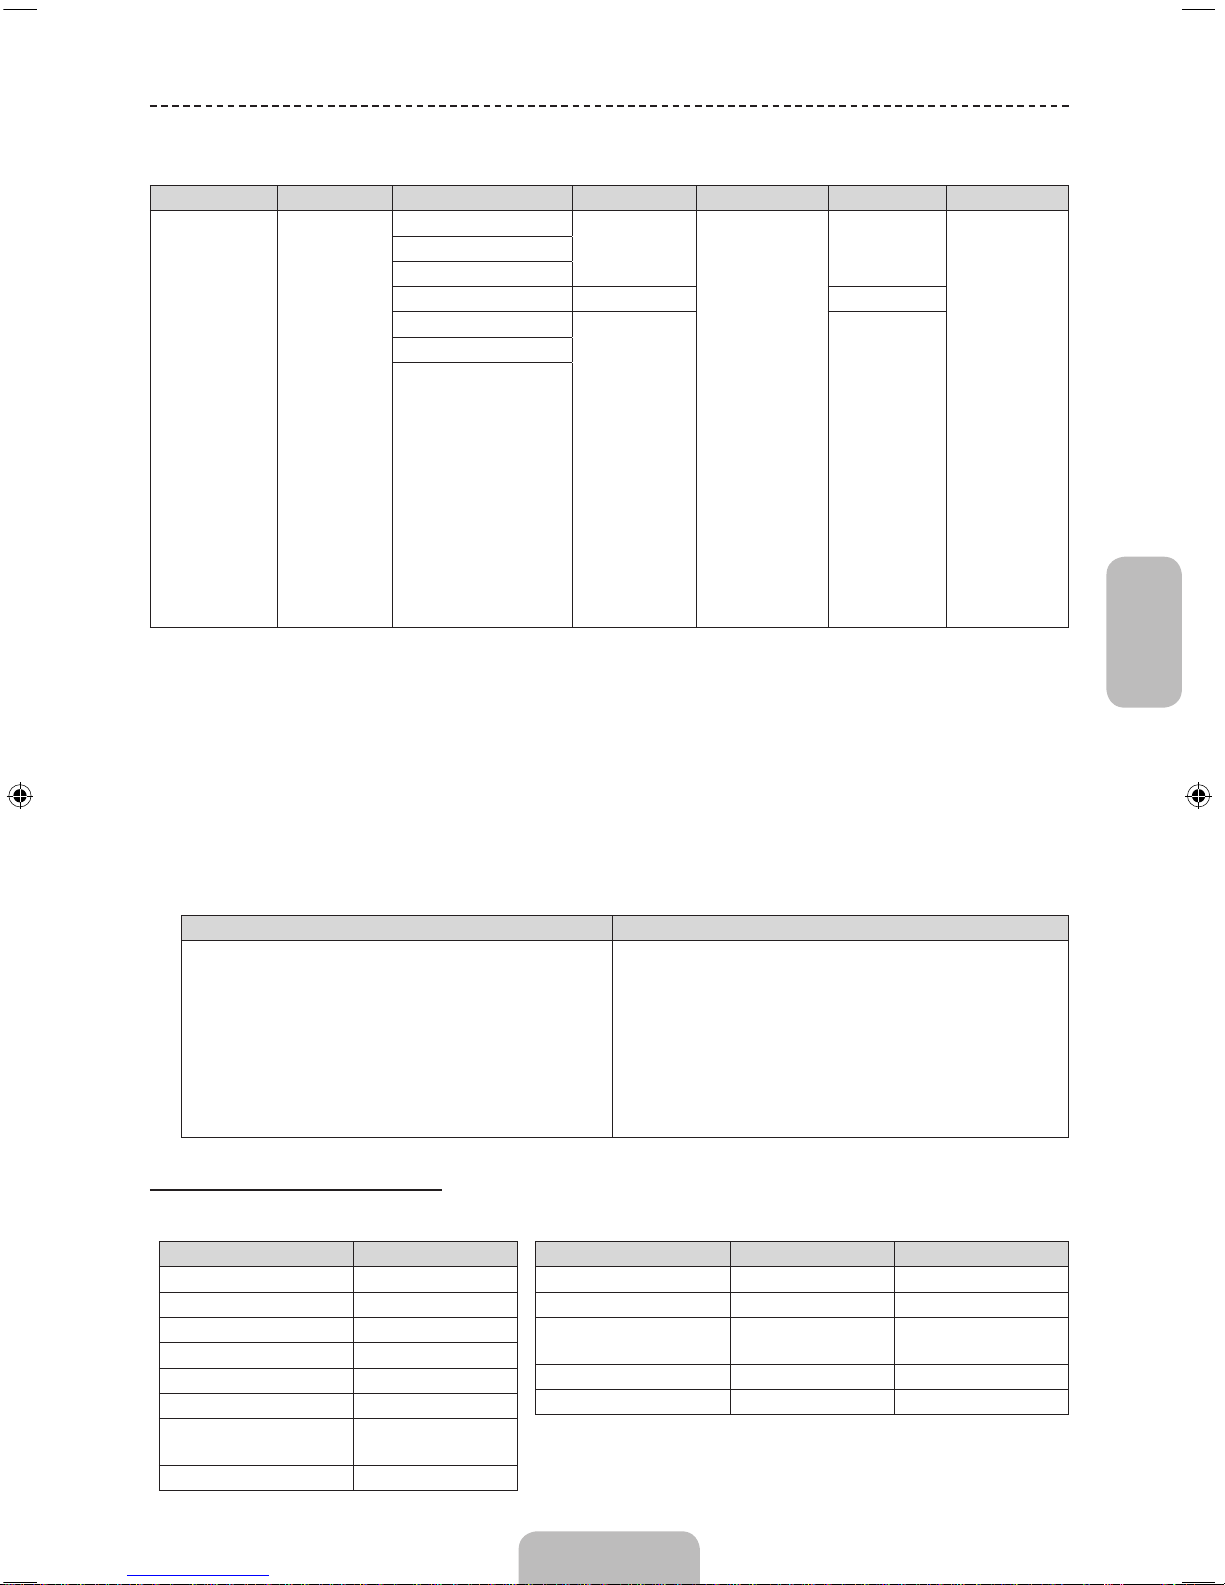
Italiano
Italiano - 21
Formati video supportati
Estensione file Contenitore Codec Video Risoluzione Frame rate (fps) Bit rate (Mbps) Codec audio
*.avi
*.mkv
*.asf
*.wmv
*.mp4
*.3gp
*.vro
*.mpg
*.mpeg
*.ts
*.tp
*.trp
*.mov
*.flv
*.vob
*.svi
*.divx
AVI
MKV
ASF
MP4
3GP
VRO
VOB
PS
TS
DivX 3.11 / 4 / 5 / 6
1920 x 1080
6~30
30
Dolby Digital
LPCM
ADPCM (IMA,
MS)
AAC
HE-AAC
WMA
Dolby Digital
Plus
MPEG (MP3)
DTS (Core)
G.711 (A-Law,
μ-Law)
MPEG4 SP/ASP
H.264 BP/MP/HP
Motion JPEG 640 x 480 8
Window Media Video v9
1920 x 1080 30
MPEG2
MPEG1
✎
Altre limitazioni
• In caso di errore nel contenuto o nel contenitore, non sarà possibile riprodurre il video o la sua riproduzione non sarà
corretta.
• Le funzioni audio e video potrebbero non funzionare se i contenuti hanno un bitrate/frame rate standard superiore al
Frame/sec compatibile riportato in tabella.
• Se la Index Table è in errore, la funzione Seek (Jump) non è supportata.
• Alcuni dispositivi USB/fotocamere digitali possono non essere compatibili con il lettore in uso.
• Il menu può presentare un ritardo nella visualizzazione se il video è superiore a 10Mbps (bit rate).
Decoder video Decoder audio
• Supporta fino a H.264, Level 4.1 (FMO/ASO/RS,
non supportati.)
• frame rate:
− Inferiore a 1280 x 720: 60 frame max
− Superiore a 1280 x 720: 30 frame max
• VC1 AP L4, non supportato.
• GMC 2 o superiore, non supportato.
• WMA 10 Pro supporta fino a 5.1 CH e profilo M2.
• L'audio WMA lossless non è supportato.
• Vorbis supporta fino a 2 CH.
• Dolby Digital Plus supporta fino a 5.1 CH.
Formati sottotitoli supportati
• Esterni
Nome Estensione file
MPEG-4 timed text .ttxt
SAMI .smi
SubRip .srt
SubViewer .sub
Micro DVD .sub o .txt
SubStation Alpha .ssa
Advanced SubStation
Alpha
.ass
Powerdivx .psb
• Interni
Nome Contenitore Formato
Xsub AVI Formato immagine
SubStation Alpha MKV Formato testo
Advanced SubStation
Alpha
MKV Formato testo
SubRip MKV Formato testo
MPEG-4 Timed text MP4 Formato testo
Page 94
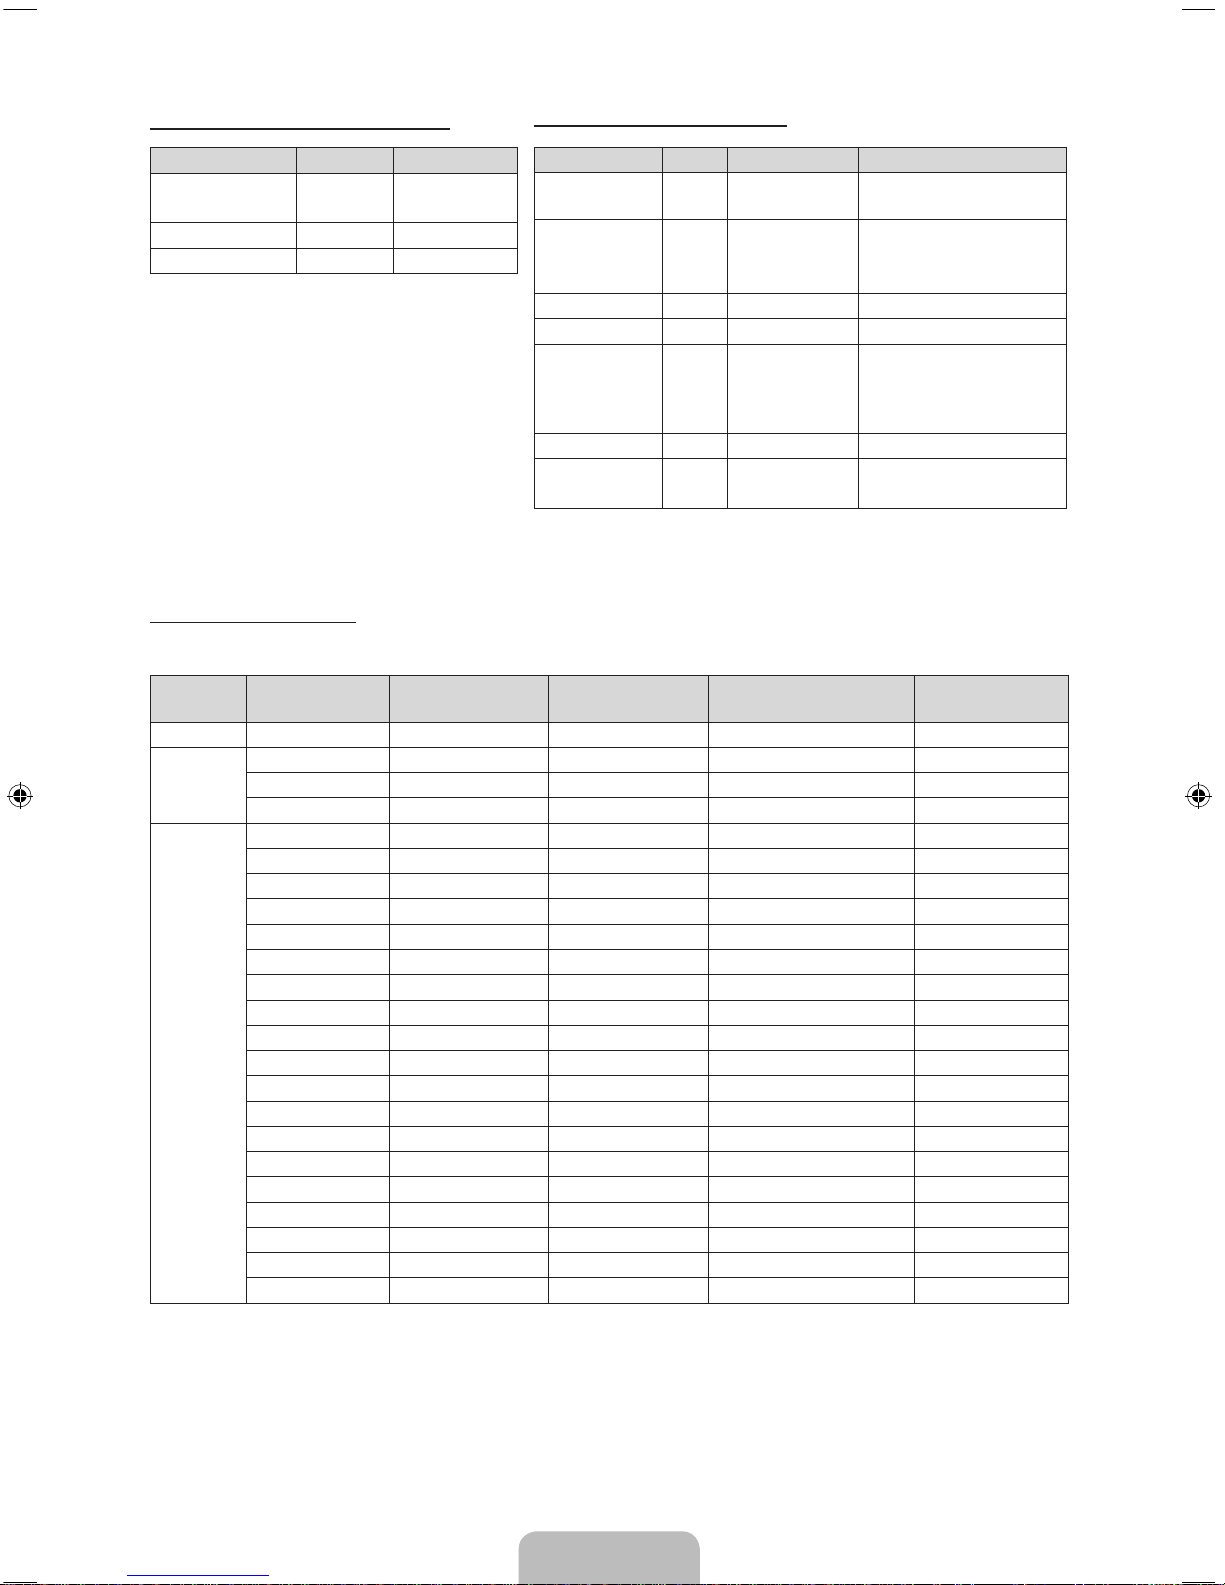
Italiano - 22
Formati fotografici supportati
Estensione file Tipo Risoluzione
*.jpg
*.jpeg
JPEG 15360 X 8640
*.bmp BMP 4096 X 4096
*.mpo MPO 15360 X 8640
✎
I file di tipo MPO non supportano le funzioni
Zoom, Ruota ed Effetto slide show.
Formati audio supportati
Estensione file Tipo Codec Nota
*.mp3 MPEG
MPEG1 Audio
Layer 3
*.m4a
*.mpa
*.aac
MPEG4 AAC
*.flac FLAC FLAC Supporta fino a 2 CH.
*.ogg OGG Vorbis Supporta fino a 2 CH.
*.wma WMA WMA
WMA 10 Pro supporta
fino a 5.1 CH e profilo M2.
(L'audio WMA lossless non è
supportato.)
*.wav wav wav
*.mid
*.midi
midi midi tipo 0 e tipo 1
Risoluzione migliore
La risoluzione ottimale per la 1920 x 1080 a 60Hz. Vedere la pagina delle specifiche per la risoluzione migliore.
Modalità Risoluzione
Frequenza
orizzontale (kHz)
Frequenza verticale
(Hz)
Frequenza di clock dei
pixel (MHz)
Polarità sync (O/V)
IBM 720 x 400 31.469 70.087 28.322 -/+
MAC
640 x 480 35.000 66.667 30.240 -/832 x 624 49.726 74.551 57.284 -/-
1152 x 870 68.681 75.062 100.000 -/-
VESA DMT
640 x 480 31.469 59.940 25.175 -/640 x 480 37.861 72.809 31.500 -/640 x 480 37.500 75.000 31.500 -/800 x 600 37.879 60.317 40.000 +/+
800 x 600 48.077 72.188 50.000 +/+
800 x 600 46.875 75.000 49.500 +/+
1024 x 768 48.363 60.004 65.000 -/1024 x 768 56.476 70.069 75.000 -/1024 x 768 60.023 75.029 78.750 +/+
1152 x 864 67.500 75.000 108.000 +/+
1280 x 720 45.000 60.000 74.250 +/+
1280 x 800 49.702 59.810 83.500 -/+
1280 x 1024 63.981 60.020 108.000 +/+
1280 x 1024 79.976 75.025 135.000 +/+
1366 x 768 47.712 59.790 85.500 +/+
1440 x 900 55.935 59.887 106.500 -/+
1600 x 900RB 60.000 60.000 108.000 +/+
1680 x 1050 65.290 59.954 146.250 -/+
1920 x 1080 67.500 60.000 148.500 +/+
✎
NOTA
• La modalità interlacciata non è supportata.
• Questo dispositivo potrebbe non funzionare correttamente se si seleziona un formato video non standard.
Page 95
Italiano
Italiano - 23
Licenza
Prodotto su licenza di Dolby Laboratories.
Dolby e il simbolo della doppia D sono marchi di Dolby Laboratories.
For DTS patents, see http://patents.dts.com. Manufactured under license from DTS, Inc. DTS, the
Symbol, DTS in combination with the Symbol, DTS Premium Sound|5.1, DTS Digital Surround,
DTS Express, and DTS Neo2:5 are registered trademarks or trademarks of DTS, Inc. in the United
States and/or other countries. © DTS, Inc. All Rights Reserved.
For DTS patents, see http://patents.dts.com. Manufactured under license from DTS Licensing
Limited. DTS, the Symbol, DTS in combination with the Symbol, and DTS Studio Sound are
registered trademarks or trademarks of DTS, Inc. in the United States and/or other countries.
© DTS, Inc. All Rights Reserved.
The terms HDMI and HDMI High-Definition Multimedia Interface, and the HDMI Logo are
trademarks or registered trademarks of HDMI Licensing LLC in the United States and other
countries.
This DivX Certified® device has passed rigorous testing to ensure it plays DivX® video.
To play purchased DivX movies, first register your device at vod.divx.com. Find your registration
code in the DivX VOD section of your device setup menu.
DivX Certified® to play DivX® video up to HD 1080p, including premium content.
DivX®, DivX Certified® and associated logos are trademarks of DivX, LLC and are used under
license.
Covered by one or more of the following U.S. patents: 7,295,673; 7,460,668; 7,515,710;
7,519,274.
This device supports DivX Plus Streaming® for enjoying HD movies and TV shows with advanced
features (multi-language subtitles, multiple audio tracks, chapters, smooth FF/RW, etc.) streamed
to your device.
Open Source Licence Notice
Open Source used in this product can be found on the following webpage. (http://opensource.samsung.com)
Open Source Licence Notice is written only English.
Avvertenza per la visualizzazione di immagini fisse
Evitare la visualizzazione di immagini fisse (per es. file jpeg) o di elementi grafici fissi (come ad esempio il logo di un
programma TV, il formato panorama o 4:3, la barra dei titoli di borsa o delle notizie nella parte inferiore dello schermo). La
visualizzazione continua di una immagine fissa può causare immagini residue sullo schermo LED e influenzare la qualità
della riproduzione. Per ridurre questo rischio, seguire questi consigli:
• Evitare di visualizzare lo stesso canale televisivo per un lungo periodo di tempo.
• Cercare sempre di visualizzare le immagini a pieno schermo; per fare ciò, utilizzare il menu del formato immagine per
avere le migliori opzioni disponibili.
• Ridurre la luminosità e il contrasto ai valori minimi necessari per ottenere la qualità dell'immagine desiderata; valori
troppo alti aumentano il rischio di incorrere nella bruciatura dello schermo.
• Usare frequentemente tutte le funzioni TV progettate per ridurre la ritenzione delle immagini e la bruciatura dello
schermo. Per maggiori informazioni consultare l'apposita sezione del manuale dell'utente.
Page 96

Adaptor information
Utilizzare il seguente adattatore per evitare rischi
Manufacturer: SAMSUNG
Adaptor model: A5919_FSM
To reduce the risk of fire or electric shock, do not expose this apparatus to rain or moisture.
Apparatus shall not be exposed to dripping or splashing and no objects filled with liquids, such as vases, shall
not be placed onthe apparatus.
For power cord use, see user manual.
ATENCION: SOLO PARA USO EN INTERIORES
Page 97

This page is intentionally
left blank.
Page 98

This page is intentionally
left blank.
Page 99

This page is intentionally
left blank.
Page 100
Contact SAMSUNG WORLD WIDE
If you have any questions or comments relating to Samsung products, please contact the SAMSUNG customer care centre.
Country
Customer Care Centre
Web Site
AUSTRIA 0800-SAMSUNG (0800-7267864) www.samsung.com/at/support
BELGIUM 02-201-24-18 www.samsung.com/be/support (Dutch)
www.samsung.com/be_fr/support (French)
BOSNIA 055 233 999 www.samsung.com/support
BULGARIA 800 111 31 , Безплатна телефонна линия www.samsung.com/bg/support
CROATIA 072 726 786 www.samsung.com/hr/support
CZECH 800 - SAMSUNG (800-726786) www.samsung.com/cz/support
Samsung Electronics Czech and Slovak, s.r.o. V Parku 2343/24, 148 00 - Praha 4
DENMARK 70 70 19 70 www.samsung.com/dk/support
FINLAND 030-6227 515 www.samsung.com/fi/support
FRANCE 01 48 63 00 00 www.samsung.com/fr/support
GERMANY 0180 6 SAMSUNG bzw.
0180 6 7267864*
(*0,20 €/Anruf aus dem dt. Festnetz, aus dem Mobilfunk
max. 0,60 €/Anruf)
www.samsung.com/de/support
CYPRUS 8009 4000 only from landline, toll free
www.samsung.com/gr/support
GREECE 80111-SAMSUNG (80111 726 7864) only from land line
(+30) 210 6897691 from mobile and land line
HUNGARY 0680SAMSUNG (0680-726-786)
0680PREMIUM (0680-773-648)
http://www.samsung.com/hu/support
ITALIA 800-SAMSUNG (726-7864) www.samsung.com/it/support
LUXEMBURG 261 03 710 www.samsung.com/support
MONTENEGRO 020 405 888 www.samsung.com/support
SLOVENIA 080 697 267 (brezplačna številka)
090 726 786 (0,39 EUR/min)
klicni center vam je na voljo od ponedeljka do petka od
9. do 18. ure.
www.samsung.com/si/support
NETHERLANDS 0900-SAMSUNG (0900-7267864) (€ 0,10/Min) www.samsung.com/nl/support
NORWAY 815 56480 www.samsung.com/no/support
POLAND 801-172-678* lub +48 22 607-93-33 *
* (koszt połączenia według taryfy operatora)
www.samsung.com/pl/support
PORTUGAL 808 20 7267 www.samsung.com/pt/support
ROMANIA 08008 726 78 64 (08008 SAMSUNG)
Apel GRATUIT
www.samsung.com/ro/support
SERBIA 011 321 6899 www.samsung.com/rs/support
SLOVAKIA 0800 - SAMSUNG (0800-726 786) www.samsung.com/sk/support
SPAIN 0034902172678 www.samsung.com/es/support
SWEDEN 0771 726 7864 (0771-SAMSUNG) www.samsung.com/se/support
SWITZERLAND 0800 726 78 64 (0800-SAMSUNG) www.samsung.com/ch/support (German)
www.samsung.com/ch_fr/support (French)
UK 0330 SAMSUNG (7267864) www.samsung.com/uk/support
EIRE 0818 717100 www.samsung.com/ie/support
LITHUANIA 8-800-77777 www.samsung.com/lt/support
LATVIA 8000-7267 www.samsung.com/lv/support
ESTONIA 800-7267 www.samsung.com/ee/support
TURKEY 444 77 11 www.samsung.com/tr/support
© 2015 Samsung Electronics Co., Ltd. All rights reserved.
BN68-07594B-00
 Loading...