

Page 1

E-MANUAL
Thank you for purchasing this Samsung product.
To receive more complete service, please register
your product at
www.samsung.com/register
Model______________ Serial No.______________
Page 2

Contents
Using Remote and Peripheral
Connecting Antenna and External
devices
Connecting - Aerial
Video Device Connection
3 Connecting - HDMI
4 Connecting - Component
5 Connecting - External Input
6 Connecting - SCART
TV Audio through the External Speakers
8 Connecting - Digital Audio (Optical)
9 Connecting - Audio Output
Connecting to a Computer
11 Connecting - HDMI Port
12 Connecting - HDMI (DVI) Port
13 Connecting - Home Network
Devices
Controlling the TV with a Keyboard
19 Connecting a Keyboard
19 Using the Keyboard
Controlling the TV with a Mouse
21 Connecting a Mouse
22 Using the Mouse
Entering Text Using QWERTY
23 Using Additional Functions
Internet Connection
Establishing a Wired Internet Connection
24 Connecting a LAN Cable
25 Connecting to a Wired Internet Network Automatically
Connecting with a Mobile Device
15 Connecting - MHL-to-HDMI Cable
16 Mobile Device Screen on TV (Screen Mirroring)
17 Connecting Mobile Devices without a Wireless Router
(Wi-Fi Direct)
17 Connecting - Home Network
18 Name of TV on Network
Input Signal Selection
25 Connecting to a Wired Internet Network Manually
Establishing a Wireless Internet Connection
27 Connecting to a Wireless Internet Network Automatically
28 Connecting to a Wireless Internet Network Manually
29 Connecting to a Wireless Internet Network with WPS
Troubleshooting Internet Connectivity Issues
30 Troubleshooting Wired Internet Connectivity Issues
31 Troubleshooting Wireless Internet Connectivity Issues
Mobile Network
32 Supported Telecom and Model Name
Checking the Internet Connection Status
Page 3

Smart Features
TV Viewing Features
Smart Hub
34 Testing Smart Hub connections
35 Opening the Home Screen
36 Moving to the Panel Screen
36 Using the Smart Hub Tutorial
36 Resetting Smart Hub
Using Smart Hub with Samsung Account
37 Creating a Samsung Account
39 Signing into Samsung Account
40 Linking My Samsung and App Accounts
41 Changing and Adding Information to Samsung Account
41 Deleting All Samsung Accounts from the TV
42 Using Pop-Up Menu Functions
43 Installing an App
44 Default Apps
44 Using Web Browser
47 Rearranging Apps on the SAMSUNG APPS Screen
Digital Broadcast Information at a Glance
58 Using the Guide
59 Checking the Current Programme Info
59 Change the Broadcast Signal
59 Digital Signal Info and Strength
Setting Up a Schedule Viewing
60 Setting Up Schedule Viewing
61 Managing the Schedule Viewing List
Using the Channel List
Registering, Removing, and Editing Channels
63 Registering and Removing Channels
63 Editing Registered Channels
64 Enabling/Disabling Password Protection on Channels
64 Changing Numbers
64 Locking/ Unlocking Channels
64 Edit Channel Number
48 Removing an App from the TV
48 Rating/Reviewing an App
49 Updating an App
49 SAMSUNG APPS Features
Playing Photos, Videos, and Music
51 Playing Media Content from a USB Device
52 Playing Multimedia Content Saved in a Computer/Mobile
Device
53 Playing Photos
54 Playing Videos
56 Playing Music
57 Functions on the Media Content List Screen
Creating a Personal Favourites List
65 Registering a Channel as Favourites
66 Viewing Favourites List Channels Only
66 Editing a Favourites List
Adding Realism to Sports
69 Enabling Sports Mode
69 Using the Sports Mode (for Russia)
70 Functions Available in Sports Mode
African Cinema Mode
70 Using the African Cinema Mode
TV-Viewing Support Features
71 Showing Subtitles
71 Subtitle Options
72 Changing Teletext Language
72 Digital Text
73 PIP Broadcast Viewing
74 Scanning for Available Channels
75 Selecting the Broadcast Audio Options
75 Audio Description
75 Genre Selection
75 Adult genre enabling
Page 4

Using the Channel Settings
76 Country (Area)
General
76 Manual Tuning
77 Fine-Tuning the Screen
78 Transfer Channel List
78 Delete CAM Operator Profile
78 Satellite System
80 Common Interface
Picture and Sound Settings
Changing the Picture Mode and Adjusting the Picture
Quality
81 Choosing the Right Picture Mode for the Viewing
Environment
82 Adjusting the Picture Quality for Each Picture Mode
83 Fine-Tuning Each Picture Mode (Advanced Settings)
85 Adjusting the Picture for Easier Viewing (Picture Options)
Picture Support Functions
86 PIP Broadcast Viewing
87 Changing the Picture Size and Position
88 Listening to Audio Only with the Screen Turned Off
(Picture Off)
88 Resetting the Picture Mode Settings
Changing the Sound Mode and Using Sound Effects
89 Choosing the Right Sound Mode for the Environment
90 Using Sound Effects
Sound Support Functions
91 Selecting Speakers
91 Designating the TV's Installation Type
91 Enabling the Sound (Additional Settings)
92 Resetting All Sound Settings
Setting the Time and Using the Timer
93 Setting the Current Time
94 Using the Timers
Using the Screen Burn Protection and Energy Saving
Features
96 Preventing Screen Burn
96 Using Energy Saving Features
Using Anynet+ (HDMI-CEC)
97 Setting Up Anynet+ (HDMI-CEC)
98 Using Anynet+ (HDMI-CEC)
Using the e-Manual
99 Launching the e-Manual
99 Additional e-Manual Features
100 Updating the e-Manual to the Latest Version
Updating the Software
101 Updating Software over the Internet
101 Updating Software using a USB connection
102 Enabling Automatic Software Updates
102 Software update via satellite channel
Protecting the TV from Hacking and malicious code
103 Checking the TV and Connected Storage Media
103 Automatically Scanning when the TV is Powered On
103 Automatically Adding malicious code to the Blocked List
Using Other Functions
104 Enabling the High Contrast
104 Adjusting the Menu Transparency
104 Expanding the Smart Hub's Focus Area
104 Changing the Menu Language
105 Checking Notifications
105 Setting Up a Password
106 Programme Rating Lock
106 Enabling Game Mode
106 Locking/Unlocking the Panel Keys
107 Showing/Hiding the Samsung Logo while Booting
Page 5

107 Registering the TV as a DivX-Certified Device (Watching
Paid DivX Movies)
Notes and Precautions
108 Restoring the TV to the Factory Settings
108 Turning the TV into a Display Model (for retail stores)
Connecting to a TV Viewing Card slot
109 To connect the CI CARD, follow these steps:
110 To connect the CI CARD Adapter, follow these steps:
Teletext Feature
Troubleshooting
Getting Support
114 Support through Remote Management
116 Finding the Information You Need for Service
There is a problem with the screen
116 Testing the Picture
I can't hear the sound clearly
119 Testing the Sound
There is a problem with the broadcast.
The computer won't connect.
Read Before Using SAMSUNG APPS
Web Browser Restrictions
Photo, Video, and Music File Limitations
128 Storage Device File Transfers
129 Supported External Subtitles
129 Supported Internal Subtitles
130 Supported Image Formats and Resolutions
130 Supported Music Formats and Codecs
131 Supported Video Codecs
Read After Installing the TV
133 Picture Sizes and Input Signals
133 Installing an Anti-Theft Kensington Lock
134 Read Before Setting Up a Wireless Internet Connection
Computer Connection Precautions
135 LED 5 series
135 IBM
135 MAC
136 VESA DMT
137 LED 4 series
I can't connect to the Internet.
Anynet+ (HDMI-CEC) isn't working.
I am having trouble launching/using apps.
My file won't play.
I want to reset the TV.
Other Issues
137 IBM
137 MAC
138 VESA DMT
Supported Video Resolutions
Licence
Glossary
Page 6
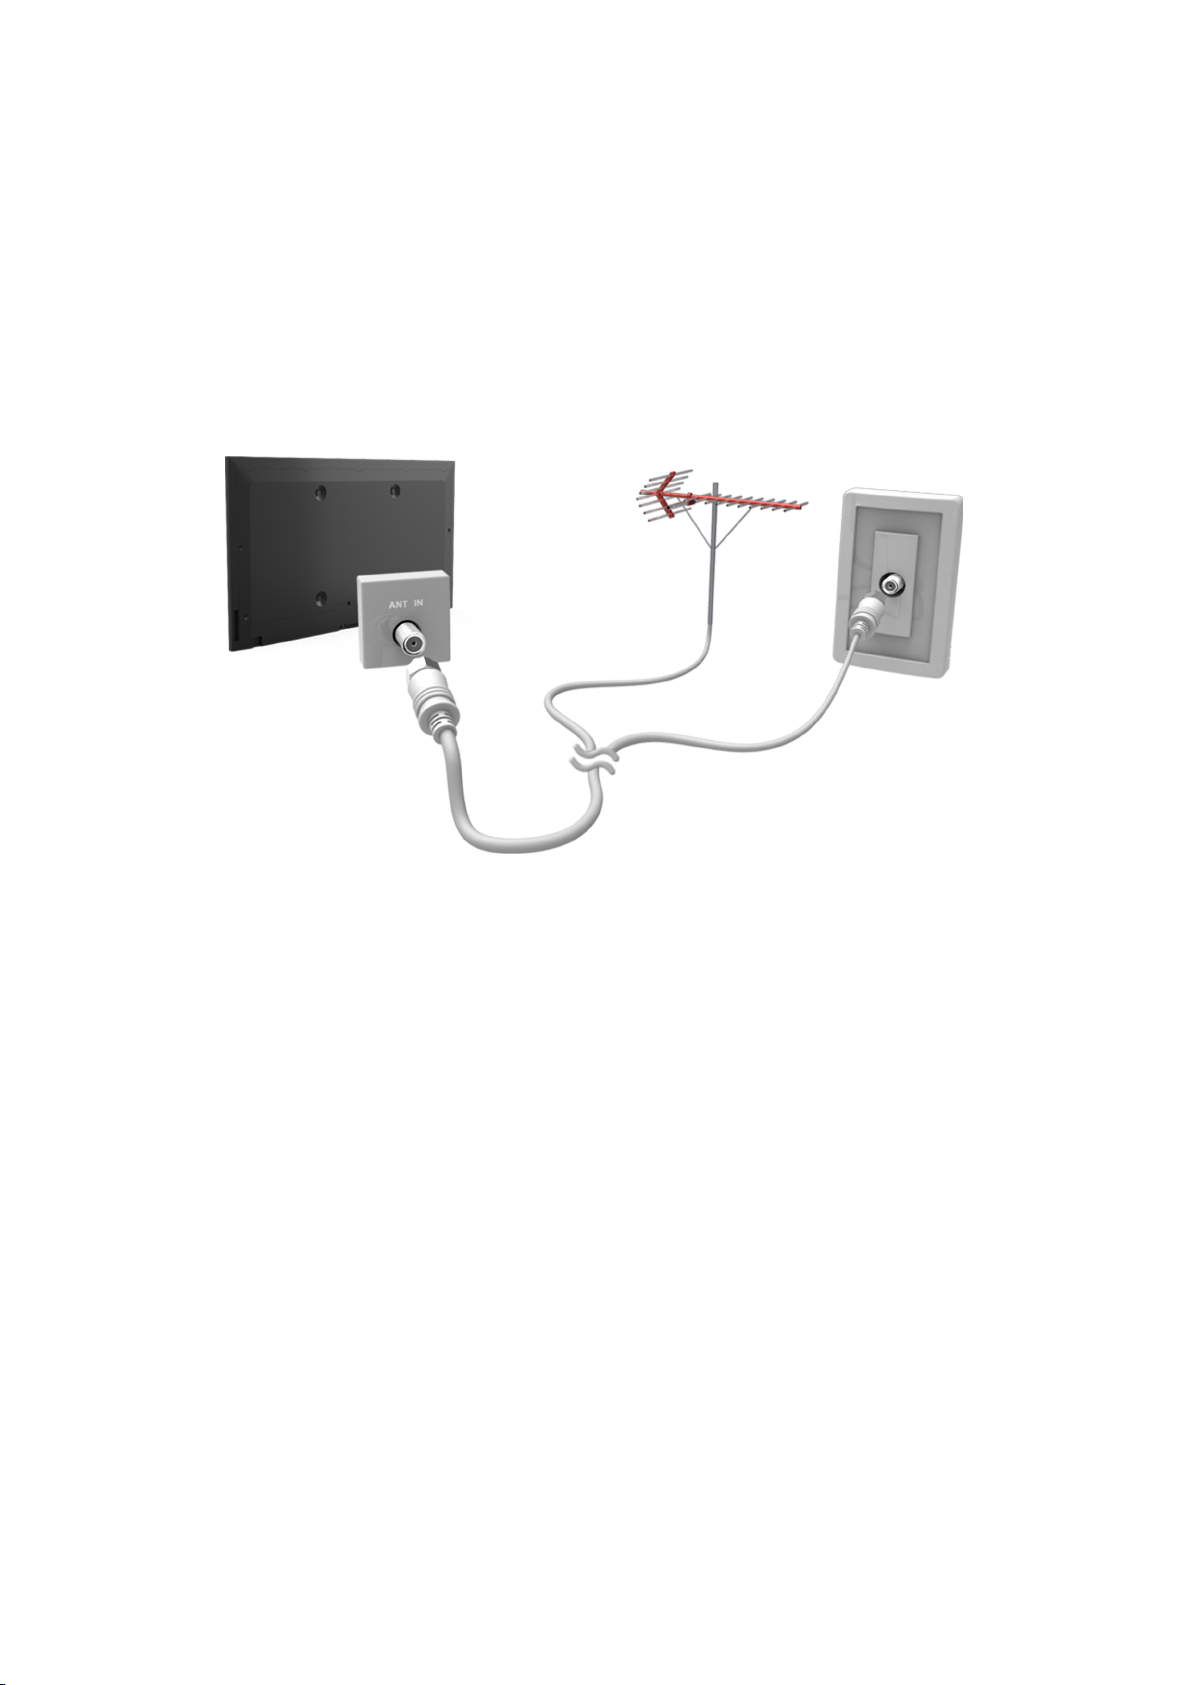
Connecting - Aerial
"
Availability depends on the specific model and area.
Before connecting any external devices and cables to the TV, first verify the model number. A sticker
containing the model number is attached to the back of the TV. The connection method varies
depending on the model.
An aerial must be connected to the TV in order to receive broadcast signals.
"
An aerial connection is not necessary when a cable box or satellite receiver is used.
Connect the correct aerial cable according to your viewing environment to the TV's aerial connector, as
shown in the diagram.
Page 7

Video Device Connection
"
Availability depends on the specific model and area.
Your TV has a variety of connectors for video input from external devices such as cable boxes, satellite
receivers, Blu-ray players, DVD players, camcorders, and gaming consoles. Below is a list of featured
connectors shown in descending order of picture quality.
HDMI
●
Component
●
External Input
●
Connect a video device to the TV via an HDMI connector for the best picture quality. If the device does
not have an HDMI connector, try a component connector to get the next best picture quality.
"
The number of connectors and their names and locations may vary depending on the model.
"
Refer to the external device's operating manual when connecting it to the TV. The number of external device
connectors and their names and locations may vary depending on the manufacturer.
Page 8
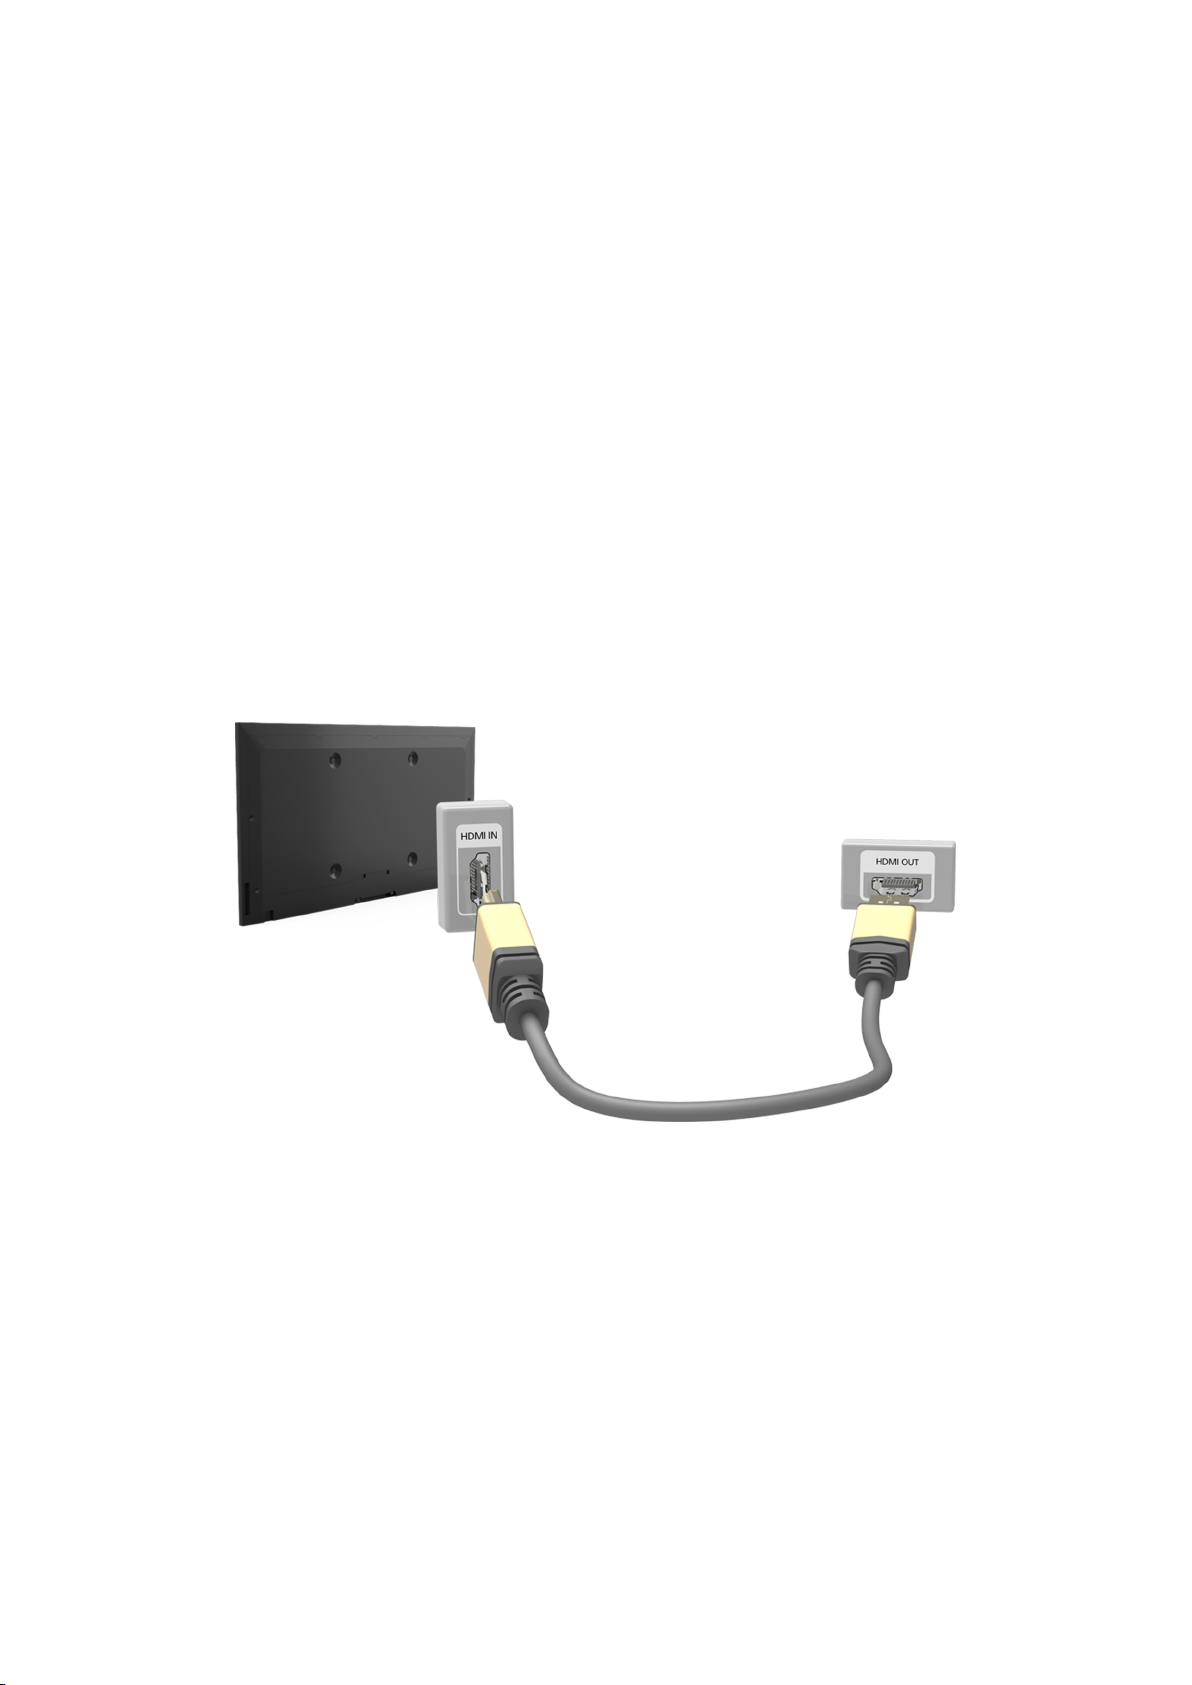
Connecting - HDMI
Before connecting any external device or cable to the TV, first verify the TV's model number. A
sticker containing the model number is attached to the back of the TV. The connection method varies
depending on the model.
The following types of HDMI cables are recommended:
High-Speed HDMI Cable
●
High-Speed HDMI Cable with Ethernet
●
HDMI cables have certain requirements:
"
Use an HDMI cable with a thickness of 14 mm or less.
"
Using a non-certified HDMI cable may result in a blank screen or a connection error.
"
Some HDMI cables and devices may not be compatible with the TV due to different HDMI specifications.
"
This TV does not support HDMI Ethernet Channel. Ethernet is a LAN (Local Area Network) built with coaxial
cables standardised by the IEEE.
Refer to the diagram and connect the HDMI cable to the video device's HDMI output connector and the
TV's HDMI input connector.
"
The number of connectors and their names and locations may vary depending on the model.
Once the connection has been made, you will be able to select the connected external device using
the SOURCE button.
Page 9
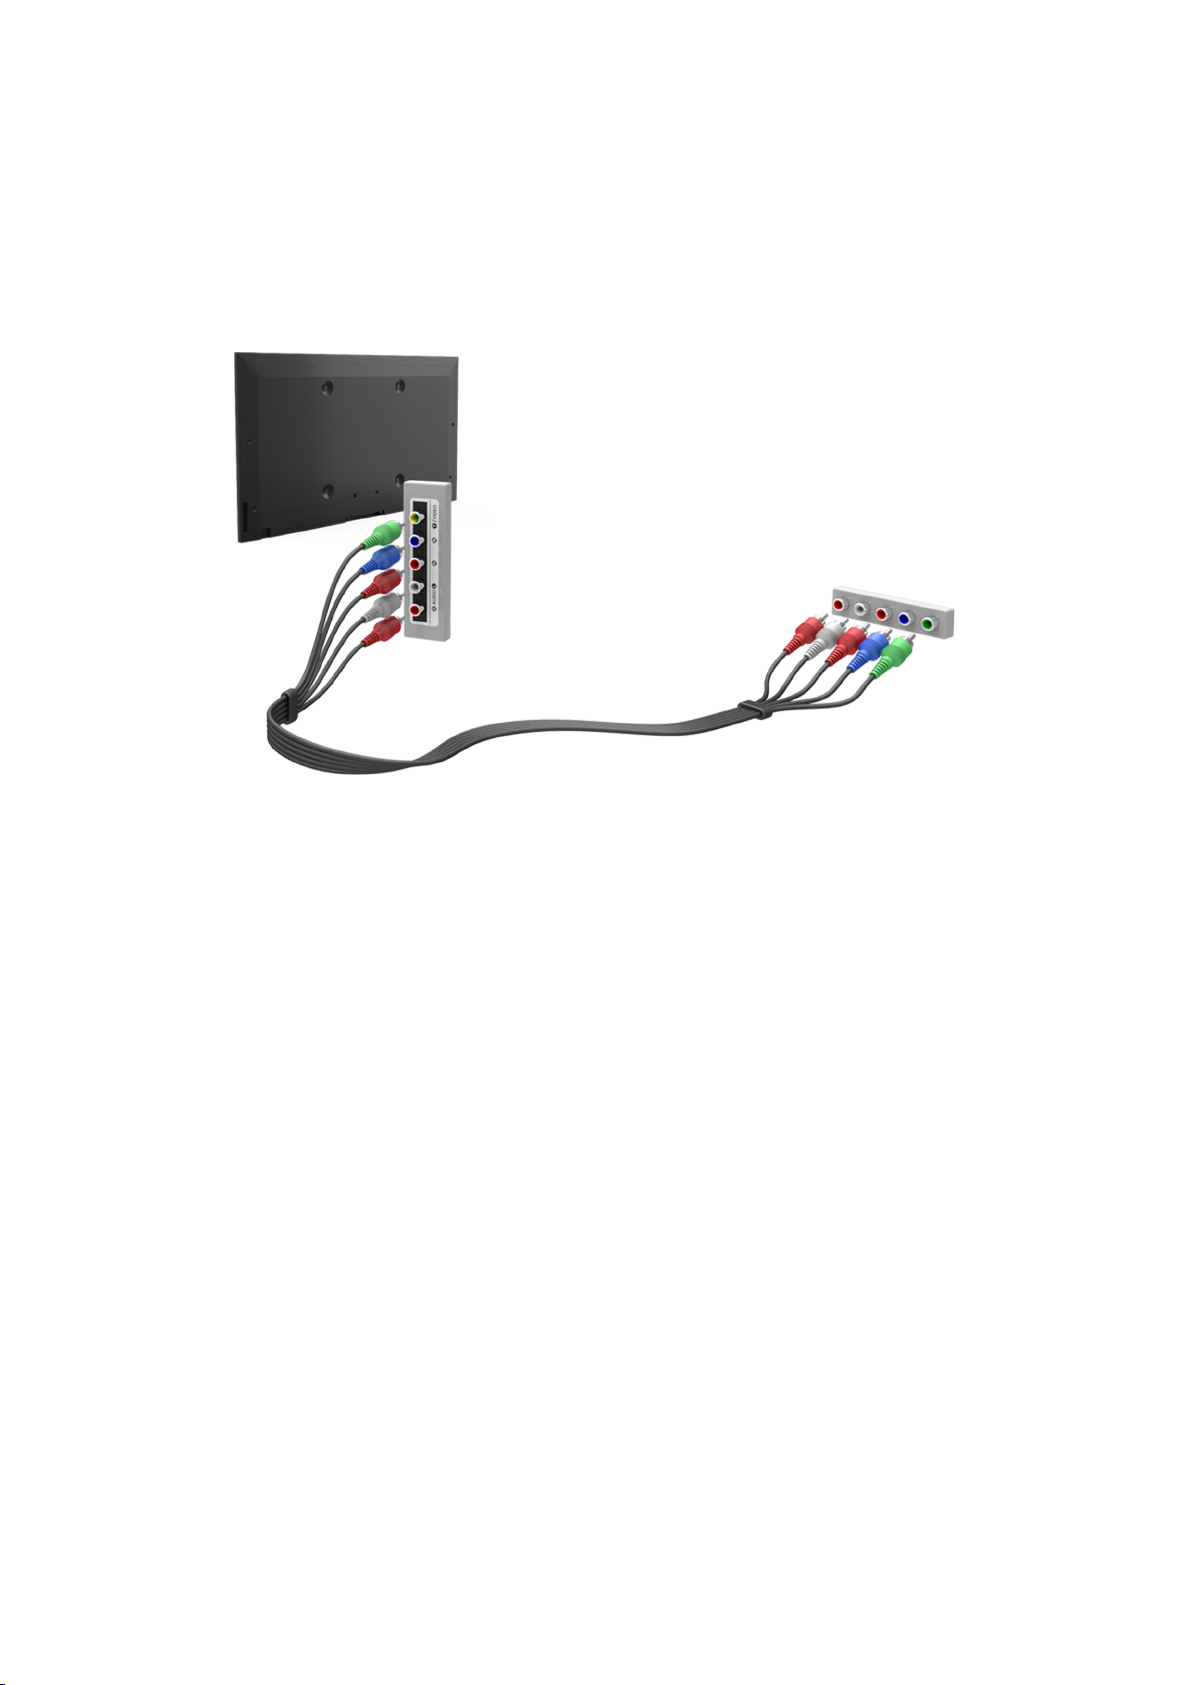
Connecting - Component
Before connecting any external devices and cables to the TV, first verify the model number of the
TV you purchased. A sticker containing the model number is attached to the back of the TV. The
connection method varies depending on the model.
Refer to the diagram and connect the Component cable to the TV's component input connectors and
the device's component output connectors.
Make sure the cable colours match the connector colours.
Once the connection has been made, you will be able to select the connected external device using
the SOURCE button.
Page 10
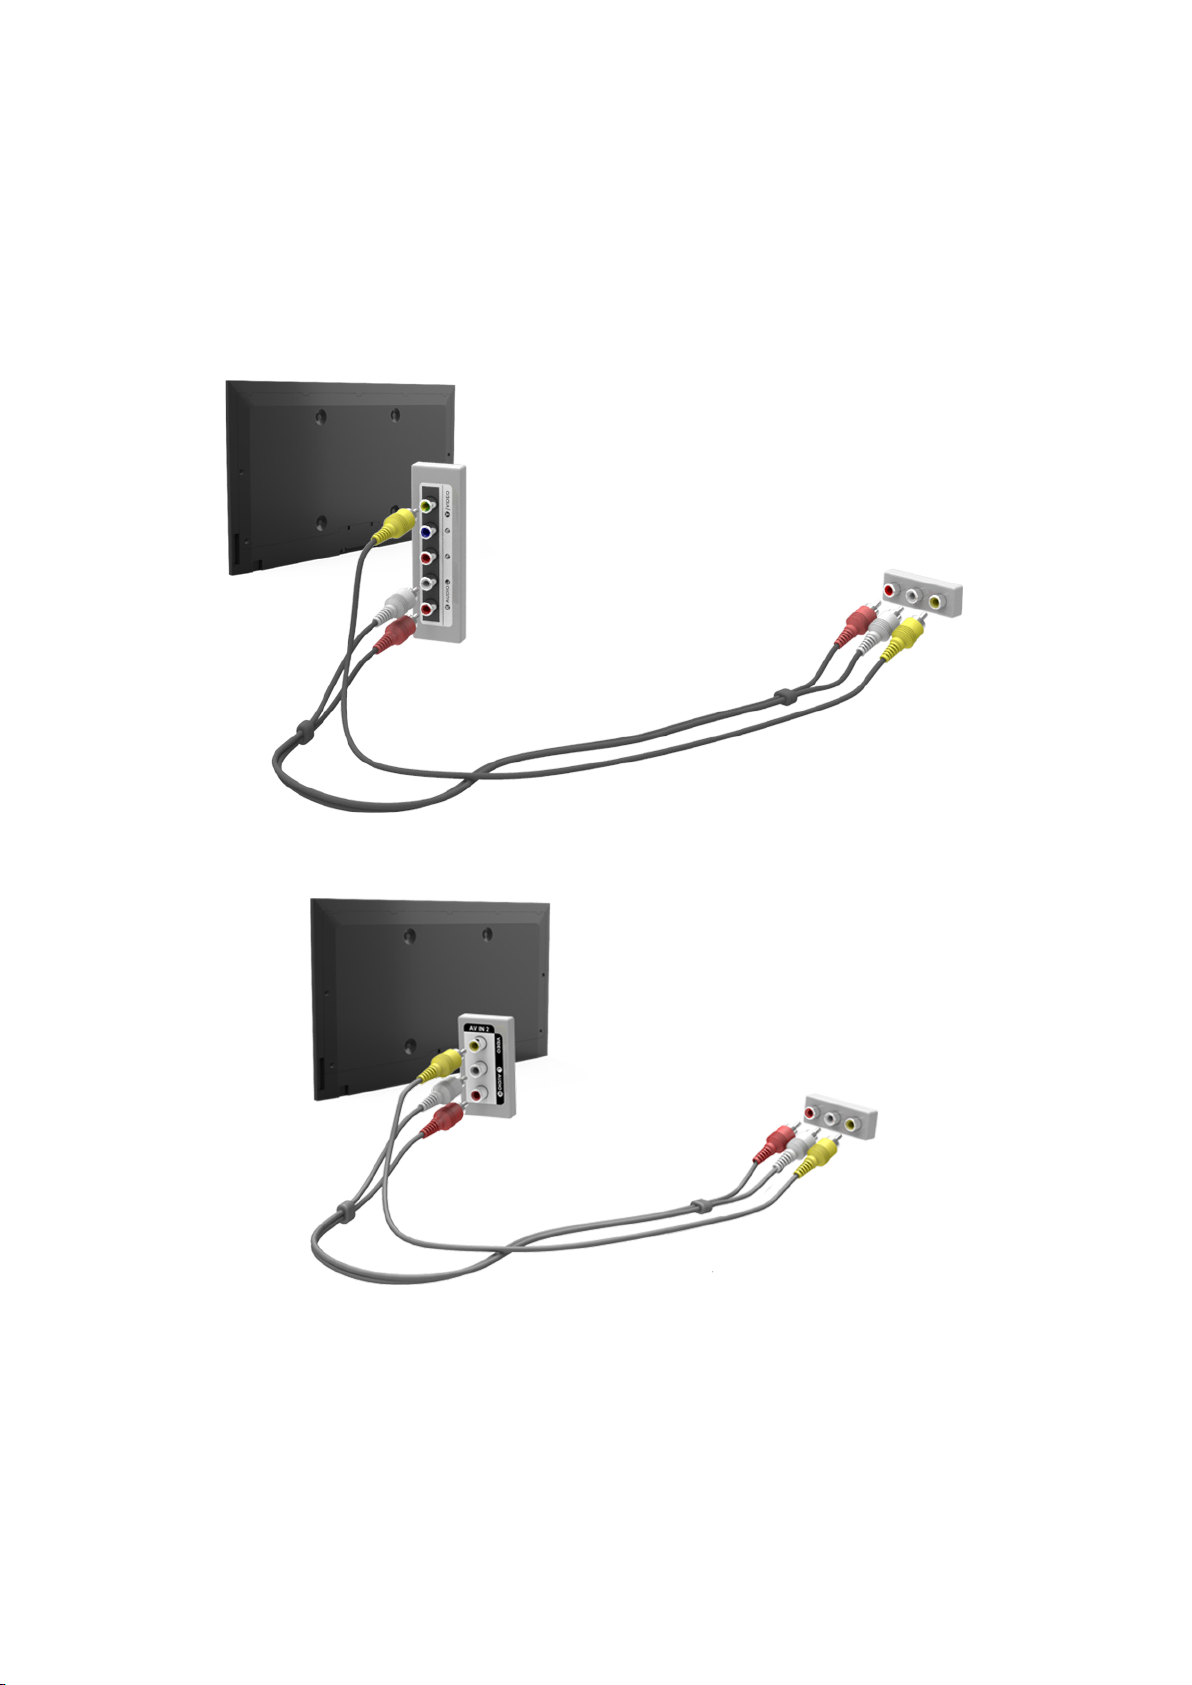
Connecting - External Input
Before connecting any external device or cable to the TV, first verify the TV's model number. A
sticker containing the model number is attached to the back of the TV. The connection method varies
depending on the model.
Refer to the diagram and connect the AV cable to the TV's AV input connectors and the device's AV
output connectors.
If you are using the TV's AV input connectors, connect the video cable to the Y connector. Some
models feature a video connector as well. In this case, connect the cable to the video connector.
Once the connection has been made, you will be able to select the connected external device using
the SOURCE button.
Page 11

Connecting - SCART
"
Availability depends on the specific model and area.
Before connecting any external devices and cables to the TV, first verify the model number of the
TV you purchased. A sticker containing the model number is attached to the back of the TV. The
connection method varies depending on the model.
Connect the TV’s SCART input connector to the device’s SCART output connector using a SCART
cable. An extra audio connection is not needed because SCART also carries audio.
"
SCART can only carry standard-definition video.
Page 12

TV Audio through the External Speakers
Your TV has a variety of connectors for audio input from devices such as Blu-ray players and DVD
players and for audio output to such devices as amplifiers. The connectors are listed below.
Digital Audio (Optical)
●
There are several issues to bear in mind when using audio input:
For better audio quality, it is a good idea to use an AV receiver.
●
The number of connectors and their names and locations may vary depending on the model.
●
Refer to the external device's operating manual when connecting it to the TV. The number
●
of external device connectors and their names and locations may vary depending on the
manufacturer.
Page 13

Connecting - Digital Audio (Optical)
"
Availability depends on the specific model and area.
Before connecting any external device or cable to the TV, first verify the TV's model number. A sticker
showing the model number is attached to the back of the TV. The connection method varies depending
on the model.
Connecting an AV receiver to the TV via a digital audio (optical) connector lets you listen to digital
audio.
Connecting a device using an optical cable does not automatically turn off the TV speakers. To turn off
the TV's speakers, set TV Sound Output (Sound > Speaker Settings > TV Sound Output) to something
other than TV Speaker.
Adjust the audio device's volume using its remote control.
"
An unusual noise coming from the audio device while you are using it may indicate a problem with the
audio device itself. If this occurs, ask for assistance from the audio device manufacturer.
"
Digital audio is only available with 5.1-channel broadcasts.
Refer to the diagram and connect the optical cable to the TV's digital audio output connector and the
device's digital audio input connector.
Page 14
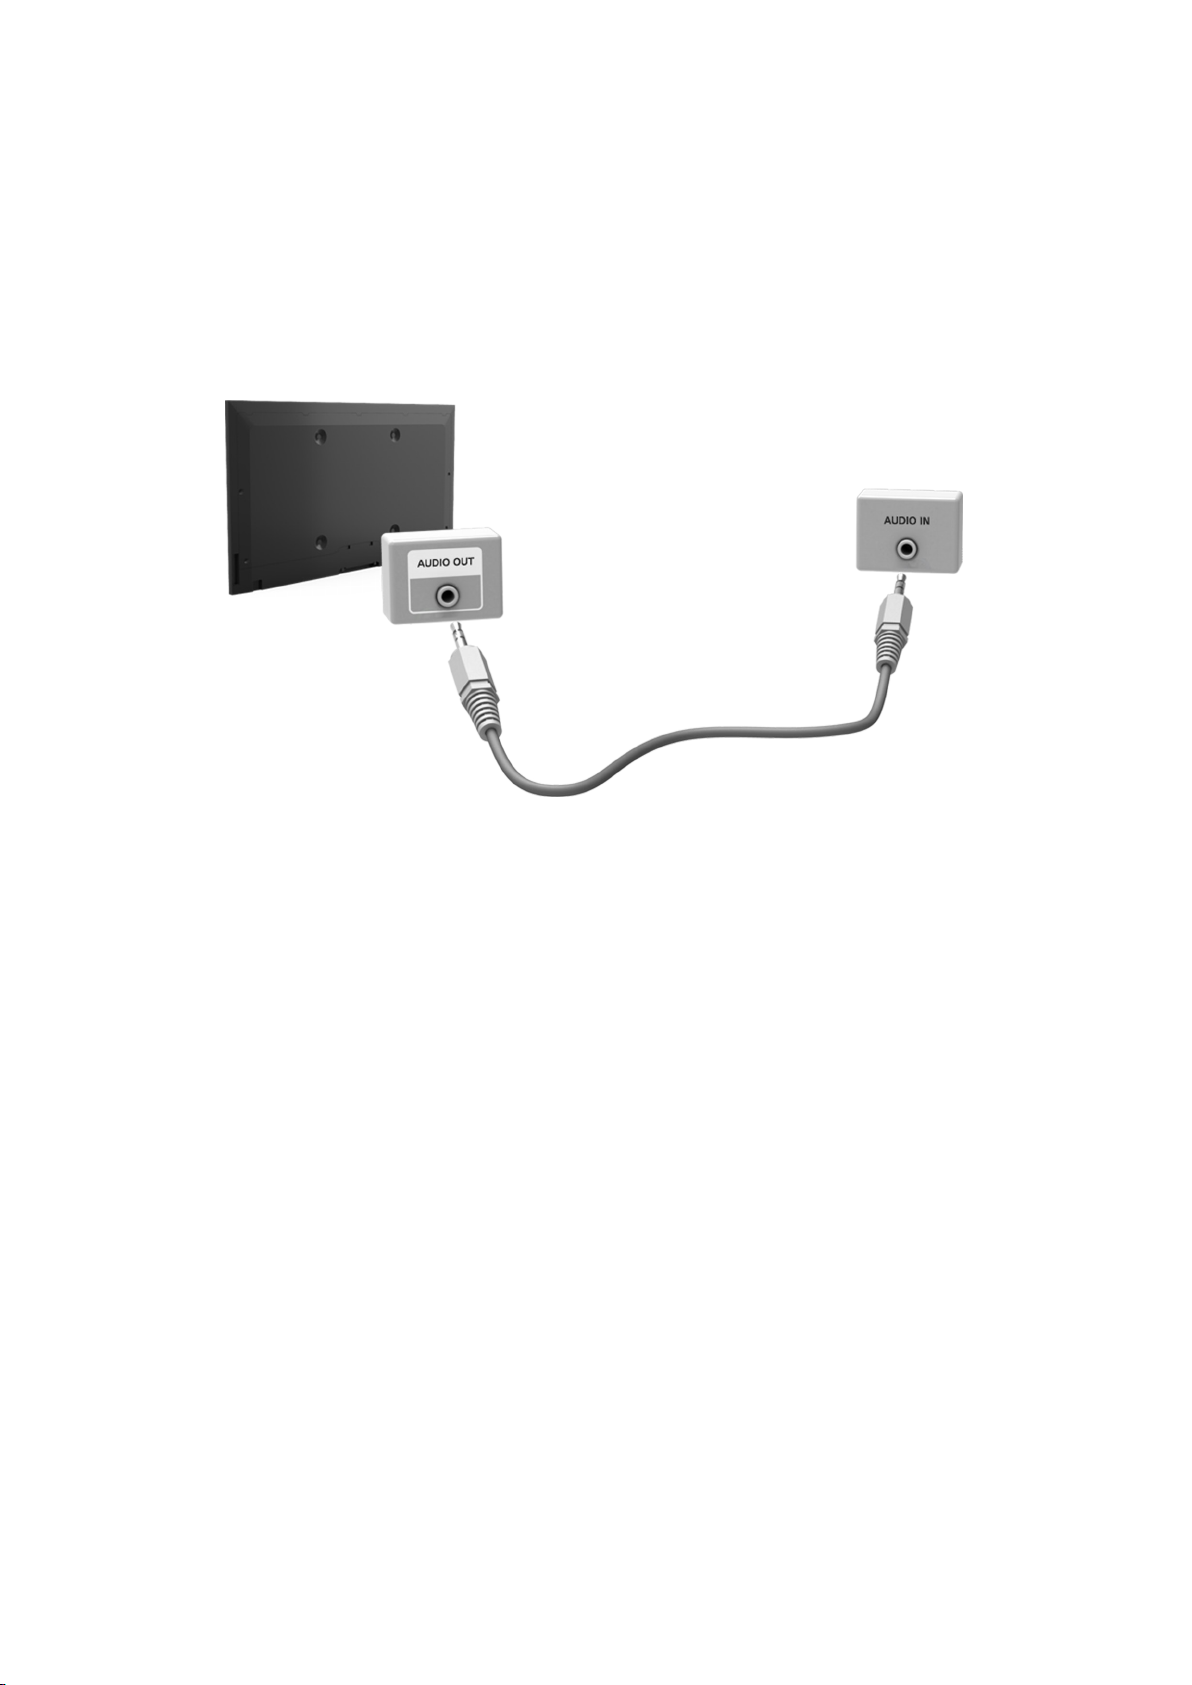
Connecting - Audio Output
"
Availability depends on the specific model.
Before connecting any external device or cable to the TV, first verify the TV's model number. A
sticker containing the model number is attached to the back of the TV. The connection method varies
depending on the model.
"
The connectors names and locations may vary depending on the model.
Refer to the diagram and connect the audio cable to the TV's audio output connector and the device's
audio input connector.
Page 15

Connecting to a Computer
You can directly connect a computer to the TV or to the network to view the computer screen or
content on the TV. Connect the computer to the TV as follows.
Connecting via HDMI Port
●
You can connect the computer to the TV using the HDMI cable to display the computer screen on
the TV.
Connecting with the HDMI (DVI) Port
●
You can connect a computer to the TV by connecting the computer's DVI port to the TV's HDMI
port with the DVI to HDMI cable to display the computer screen on the TV.
Connecting via Home Network
●
Quickly access the photo, video and music files saved on a computer by connecting the TV and
the computer to the same router or AP.
Page 16
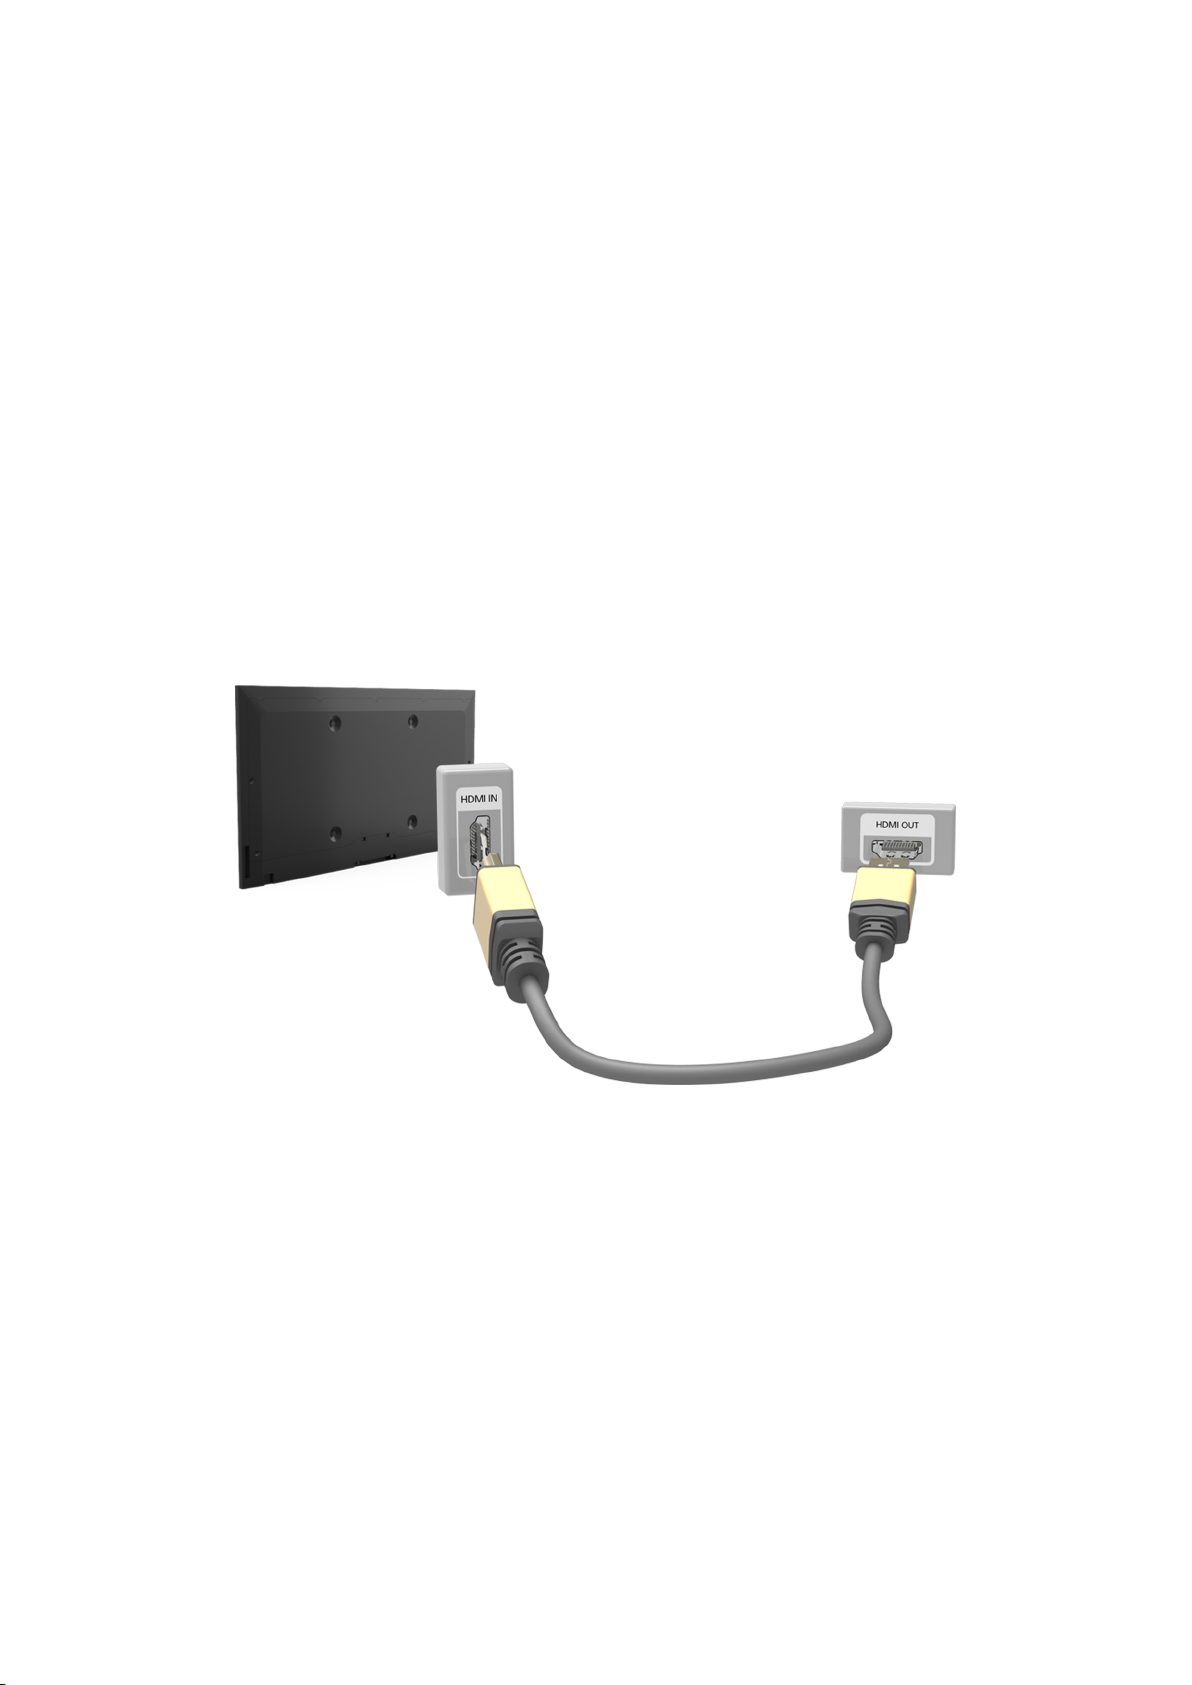
Connecting - HDMI Port
Before connecting any external device or cable to the TV, first verify the TV's model number. A sticker
showing the model number is attached to the back of the TV. The connection method varies depending
on the model.
For HDMI connection, one of the following HDMI cable types is recommended:
High-Speed HDMI Cable
●
High-Speed HDMI Cable with Ethernet
●
"
Use an HDMI cable with a thickness of 14 mm or less. Using a non-certified HDMI cable may result in a
blank screen or a connection error.
"
Some HDMI cables and devices may not be compatible with the TV due to different HDMI specifications.
"
This TV does not support HDMI Ethernet Channel. Ethernet is a LAN (Local Area Network) built on coaxial
cables standardised by the IEEE.
"
Some computers do not support HDMI interface, depending on its graphics adapter specifications. In this
case, use a DVI-to-HDMI cable to connect the computer to the TV.
Refer to the diagram and connect the HDMI cable to the external video device's HDMI output
connector and the TV's HDMI input connector.
Once the connection has been made, you will be able to select the connected external device using
the SOURCE button.
Page 17

Connecting - HDMI (DVI) Port
If the graphics adapter of your computer does not support HDMI interface, connect the computer to
the TV with the DVI (Digital Visual Interactive) to HDMI cable. However, DVI-to-HDMI connection is
supported by the HDMI port for DVI only and does not support audio signal transmission. To listen to
the computer sound, connect the external speaker to the computer's audio output connector.
"
For information on resolutions supported by the TV, refer to "Computer Connection Precautions".
Refer to the diagram and connect the DVI-to-HDMI cable to the TV's HDMI (DVI) port and the
computer's DVI output port.
Once the connection has been made, you will be able to select the connected external device using
the SOURCE button.
Page 18

Connecting - Home Network
Quickly access and view/play photo, video and music files from a computer on the TV screen.
Connect the TV and the computer to the same router or AP. A home network will be configured
1.
once the two connections are established.
"
Home Network enables content-sharing between the TV, computers and mobile devices connected to
the same wired or wireless router.
From the computer, select [Control Panel] > [Network and Internet] > [Network and Sharing
2.
Centre] > [Change advanced sharing settings] and select [Choose media streaming options...] to
activate media streaming.
From the list, set TV to [Allowed].
3.
Launch Windows Media Player from the computer, select [Settings] > [Library Management] and
4.
then add the location where the photo, video and music files are saved to view/play the files on
the TV screen.
"
It will be possible to view/play on the screen files moved to Windows Media Player's default folder.
"
As long as File Sharing is activated, unauthorised access may be allowed. Disable File Sharing if data
access is not required.
Page 19

Connecting with a Mobile Device
Connect mobile device such as a smartphone or tablet to the TV directly or indirectly over a shared
network and display the mobile device screen or content on the TV screen. Connect the mobile device
to the TV as follows.
Connecting with MHL-to-HDMI Cable
●
Connect the mobile device's USB port to the TV's HDMI port with the MHL-to-HDMI cable to
view the mobile device screen on the TV.
Mobile Device Screen on TV (Screen Mirroring)
●
Wirelessly connect the TV to the mobile device with the mirroring function to view the mobile
device's screen on the TV.
"
This option is available only with mobile devices that support mirroring.
"
Depending on the software in your mobile.
Connecting Mobile Devices without a Wireless Router (Wi-Fi Direct)
●
Wi-Fi Direct enables you to connect the TV to a mobile device without a router or AP. Quickly
access and play photo, video and music files from a connected mobile device on the TV screen.
"
This option is available only with mobile devices that support Wi-Fi Direct.
Connecting via Home Network
●
View/play on the TV photo, video and music files from a mobile device connected to the same
router or AP as the TV.
Page 20
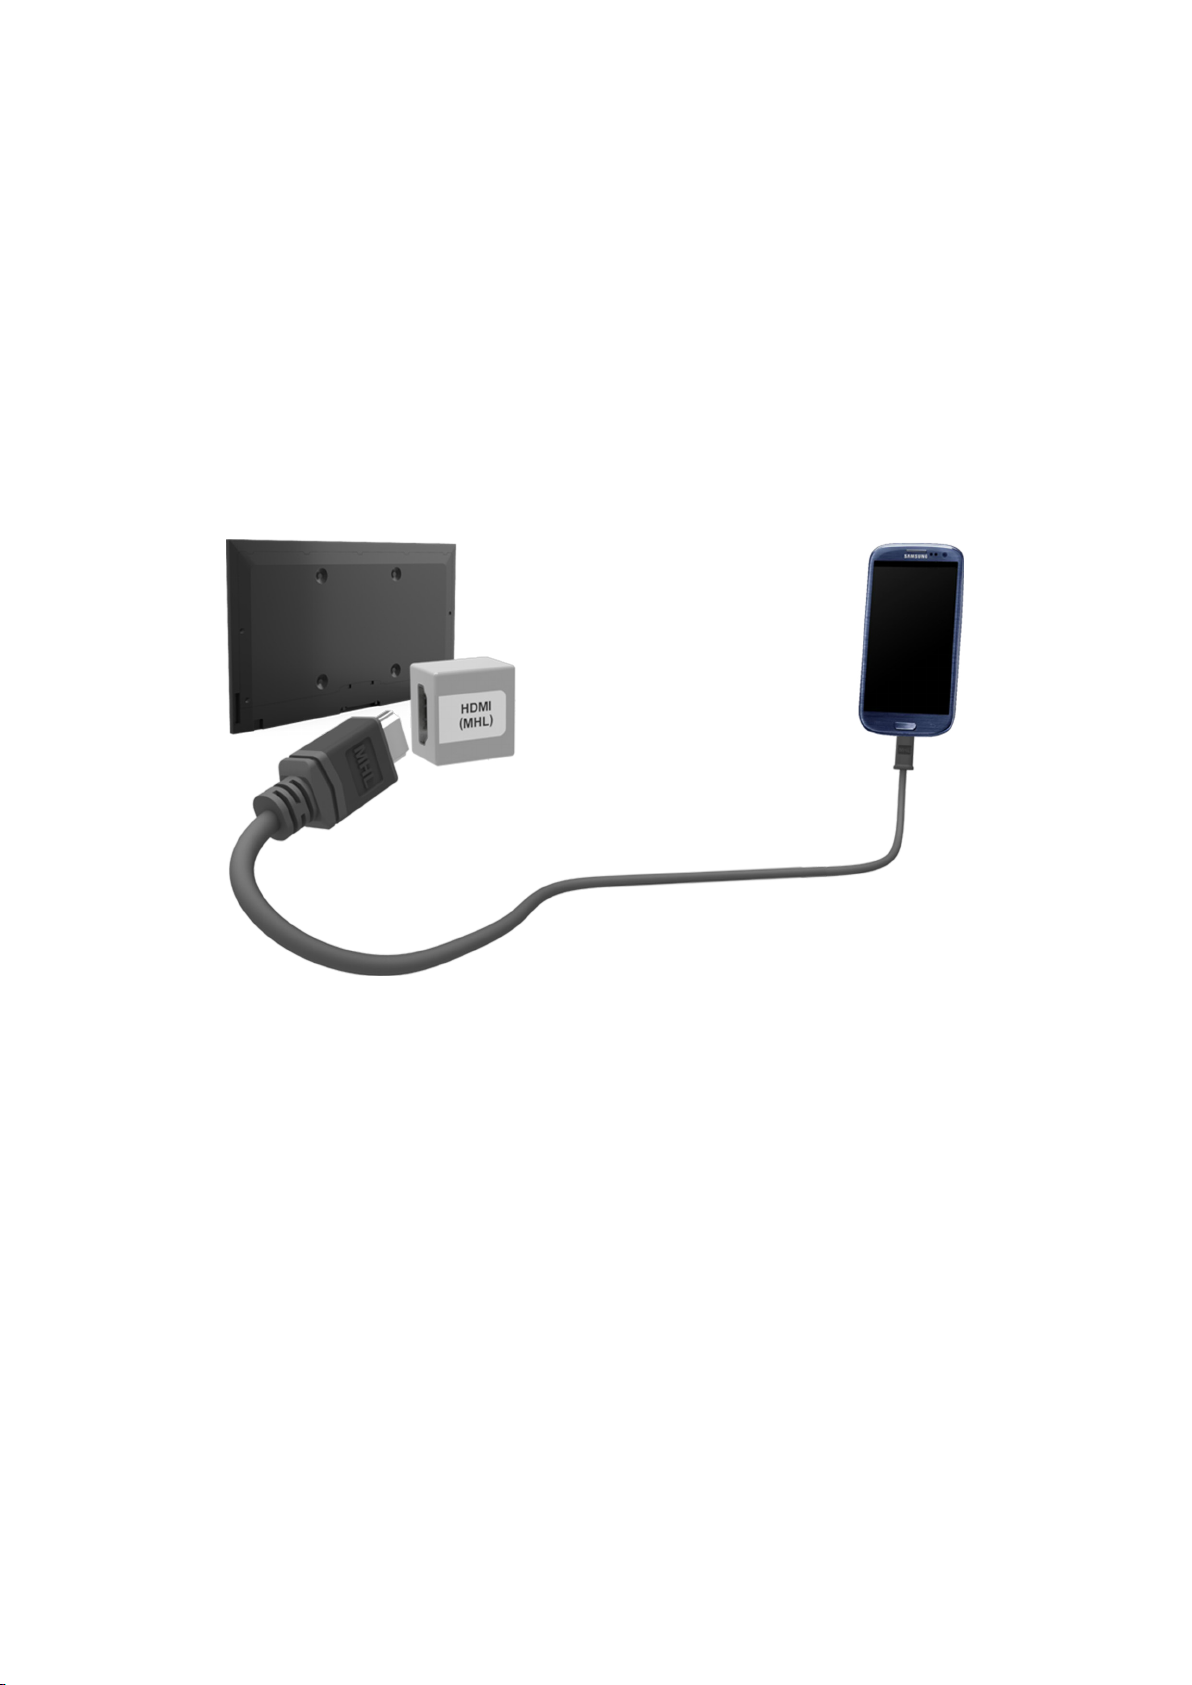
Connecting - MHL-to-HDMI Cable
Your TV supports MHL (Mobile High-definition Link) via an MHL cable. MHL enables viewing and
playing video, image, and audio files from mobile devices on the TV. However, MHL is only available
through the TV's HDMI (MHL) port and only when used in conjunction with an MHL-enabled mobile
device.
For information on configuring MHL on your mobile device, refer to the device's User Manual.
"
Connecting an MHL-to-HDMI cable automatically switches Picture Size to Screen Fit. This setting will not
change automatically if you are using an HDMI adapter. In this case, change the setting manually in the
menu.
"
If you are using an HDMI cable, the TV recognises the signal as an HDMI signal and may respond differently
than it would to an MHL-to-HDMI cable connection.
Refer to the diagram and connect an MHL-to-HDMI cable to the TV's HDMI (MHL) port and the mobile
device's USB port.
Once the connection has been made, you will be able to select the connected external device using
the SOURCE button.
Page 21

Mobile Device Screen on TV (Screen Mirroring)
"
Availability depends on the specific model and area.
"
Depending on the software in your mobile.
Network > Screen Mirroring
Wirelessly connect a mirroring-enabled mobile device to the TV and play the video and audio files
stored on the device on the TV. Mirroring refers to the function that plays the video and audio files
located on a mobile device on a TV and on the mobile device simultaneously.
"
To use the Screen Mirroring function, the mobile device must support a mirroring function such as AllShare
Cast or Screen Mirroring. To check whether your mobile device supports the mirroring function, please visit
the mobile device manufacturer's website.
"
The video or audio may intermittently stop depending on network conditions.
Try Now
Connecting via a mobile device
On the mobile device, run Screen Mirroring. The mobile device searches for available devices to
1.
connect to.
From the search result list, select TV. The TV displays a pop-up window.
2.
In the pop-up window, select Allow to connect the mobile device.
3.
"
All previously allowed mobile devices will automatically connect without needing approval.
"
If you select Deny, the device won't appear and can't be activated in this way. Navigate to Network >
Screen Mirroring > Device Manager to allow the previously denied mobile device.
Not searching for the TV on mobile devices...
Navigate to Network > Screen Mirroring to run Screen Mirroring. Also, you can select Screen
1.
Mirroring on a list by pressing SOURCE.
Run mirroring on the mobile device. Display a list while automatically searching for mobile
2.
devices.
Select the TV and it connects automatically.
3.
"
When the mobile devices cannot connect, try turning the TV off and on.
Allow/Reject the connection via mobile devices
"
This is only available for watching when mobile devices allow the connection.
Navigate to Network > Screen Mirroring > Device Manager to activate Device Manager. This
1.
displays a list of required mobile devices connection.
You can allow access or deny connections with mobile devices.
2.
Page 22

Connecting Mobile Devices without a Wireless Router (Wi-Fi
Direct)
Network > Wi-Fi Direct
Wi-Fi Direct lets you connect mobile devices directly to your TV using wireless technology. After
connecting a device to the TV using Wi-Fi Direct, it will be possible to view/play video, photo, and
music files from the device on the TV.
"
The mobile device must support Wi-Fi Direct. Make sure the mobile device you intend to use supports Wi-Fi
Direct.
Enable Wi-Fi Direct on the mobile device and then launch Wi-Fi Direct. The TV automatically
1.
scans for and displays a list of available devices. The TV's name also appears on the mobile
device.
Select the device from the list to initiate a connection. If a connection request is made by the TV,
2.
a permission message appears on the mobile device and vice versa.
Allow the connection. This completes the connection process.
3.
Try Now
Connecting - Home Network
View/play photo, video and music files from a mobile device on the TV.
Connect both the TV and the mobile device to the same router or AP. A home network will be
1.
configured once the connections are established.
"
Home Network enables content-sharing between the TV, computers and mobile devices connected to
the same wired or wireless router.
Enable File Sharing on the mobile device. The mobile device's shared content can be viewed/
2.
played on the TV.
"
As long as File Sharing is activated, unauthorised access may be allowed. Disable File Sharing if data
access is not required.
Page 23

Name of TV on Network
Network > Device Name
Choose or enter a TV name to be displayed on the network.
Select Device Name from the Network menu. A list will appear.
1.
Choose a name from the list. Alternatively, select User Input to enter a name manually. You can
2.
view the specified TV name on the network.
Try Now
Input Signal Selection
You can select a connected external device using the SOURCE button.
For example, to switch to a gaming console connected to the second HDMI connector, press SOURCE.
From the Source list, select HDMI2 to change the input signal to HDMI mode. Connector names may
vary depending on the model.
The following options are available in the Source screen:
TOOLS Button
●
Select a port connected to an external device, and press and hold the Enter button. The following
functions are available:
"
Available options for each connector may vary.
Edit Name: Rename devices connected to the TV for easier identification of external sources.
–
For example, you can designate a computer connected to the TV via an HDMI-DVI cable as
DVI PC. Alternatively, simply designate a computer connected to the TV via an HDMI cable as
PC. You can also designate an AV device connected to the TV via an HDMI-DVI cable as DVI
Devices.
Information: View detailed information about the connected devices.
–
Disconnect USB Device: Used to safely remove a USB device connected to the TV.
–
"
This option is only available when a USB device has been selected.
Anynet+ (HDMI-CEC): Displays a list of Anynet+ (HDMI-CEC)-compliant devices that are
–
connected to the TV.
"
This option is only available when Anynet+ (HDMI-CEC) is set to On.
Page 24

Controlling the TV with a Keyboard
System > Device Manager > Keyboard Settings
You can use a keyboard to control the TV.
"
Certain models do not support USB HID class keyboards.
Try Now
Connecting a Keyboard
Connecting a USB Keyboard
Plug the keyboard cable into the TV's USB port. A connection message appears on the screen.
Using the Keyboard
Use the following remote features with the USB keyboard connected to the TV.
Arrow Keys (moving the focus), Windows Key (MENU Button), Menu List Key (TOOLS Button),
●
Enter Key (Select/run item), ESC (RETURN Button), Number Keys (Number Buttons)
F1 (a), F2 (b), F3 ({), F4 (}), F5 ( ), F6 (SOURCE Button), F7 (CH.LIST Button), F8 (MUTE
●
Button), F9/F10 (Volume Buttons), F11 / F12 (Channel Buttons)
Page Up/Page Down: Scroll web browser pages up/down.
●
Holding down the Enter key: On the Smart Hub screen, navigate to an item and hold down the
●
Enter key to display the Options menu.
"
The Options menu depends on the context.
Page 25

Changing Keyboards
"
Availability depends on the specific model and area.
Try Now
Select System > Device Manager > Keyboard Settings > Select Keyboard. Designate which keyboard
to use.
"
Only one keyboard can be used at a time.
Input Languages, Keyboard Type, and Switch Language Key
Try Now
Select System > Device Manager > Keyboard Settings > Keyboard Options. The following options are
available:
Keyboard Language
●
If the keyboard supports multiple languages, choose which language you want to use from the
list.
Keyboard type
●
Specify the type of language selected under Keyboard Language.
"
The Keyboard type list varies depending on which language was selected under Keyboard Language.
Switch Input Language
●
If the keyboard supports multiple languages, choose from the list which key to use to switch
between languages.
Page 26

Controlling the TV with a Mouse
System > Device Manager > Mouse Settings
This TV can be operated with ease using a mouse instead of a remote control.
"
Certain models do not support USB HID class mice.
Try Now
Connecting a Mouse
Connecting a USB Mouse
Plug the mouse cable into the TV's USB port. A connection message appears on the screen.
Page 27

Using the Mouse
Once a USB mouse is connected to the TV, a pointer will appear on the TV's screen. You can use this
pointer to control the TV as you would a computer.
Selecting and Running an Item
●
Left-click on the mouse.
Displaying the Volume, Mute, and Channel Buttons
●
Select the volume/channel icon on the screen while watching TV. Use the onscreen buttons to
adjust the volume or switch the channel.
"
Select the volume/channel icon again to hide the buttons.
Showing shortcut icons
●
Right-clicking shows the shortcut icons on the screen so that you can easily use the TV
functions.
"
The shortcut icons may vary depending on the function.
Displaying the Context-sensitive Menu on Smart Hub
●
On the Smart Hub screen, navigate to an item, and hold down the left mouse button for 1 second.
The Options menu available to the selected item appears.
"
The Options menu depends on the context.
Scrolling the TV Menu or Screen
●
Move the mouse wheel up or down. This scrolls the TV menu or screen up/down.
Exiting the TV Menu or Feature
●
Click on the X button. This closes the menu.
"
The X button appears when a mouse is being used. Left-clicking once while using a feature displays
the X button.
Changing Mice
Try Now
Select System > Device Manager > Mouse Settings > Select Mouse. Designate which mouse to use.
"
Only one mouse may be used at a time.
Changing Mouse Buttons and Pointer Speed
Try Now
Select System > Device Manager > Mouse Settings > Mouse Options. The following options are
available:
Primary Button
●
Choose which (left or right) button to use to select and run items.
Pointer Speed
●
Adjust the movement speed of the pointer that appears on the screen.
Page 28

Entering Text Using QWERTY
A QWERTY keypad appears when you need to enter text (entering the network password, logging into
your Samsung account, etc.), allowing you to enter text using your remote control.
Using Additional Functions
Select on the QWERTY keyboard screen. The following options are available:
Language
●
Select a language from the list.
Recommend text
●
Enable/disable the Recommended Text feature. Enabling the Recommend text feature allows you
to quickly enter text starting with the characters you typed in by displaying recommended words.
To enter the word "Internet," for example, all you have to do is enter "In" and select the word
"Internet" from the list of recommended words. The word is memorised so that you can enter the
same text again more easily.
Reset recommended text data
●
Delete both the recommended words and the memorised words to clear the list.
Predict Next Letter
●
Enable/disable the Text Prediction feature. Enabling the Text Prediction feature eliminates the
need to find and select individual character keys. To enter the word "Internet," for example, select
"I". A predicted word will then appear next to the I key. Simply select the predicted word to enter
"Internet".
"
This feature is limited to words that have previously been added to the dictionary.
Page 29
Establishing a Wired Internet Connection
Connecting the TV to the Internet gives you access to online services and SMART features, and lets
you update the TV's software quickly and easily through the Internet.
Connecting a LAN Cable
Use a LAN cable.
"
The TV will not be able to connect to the Internet if the network speed is below 10Mbps.
"
Use Cat 7 LAN cables to link your TV to the Internet Access Points.
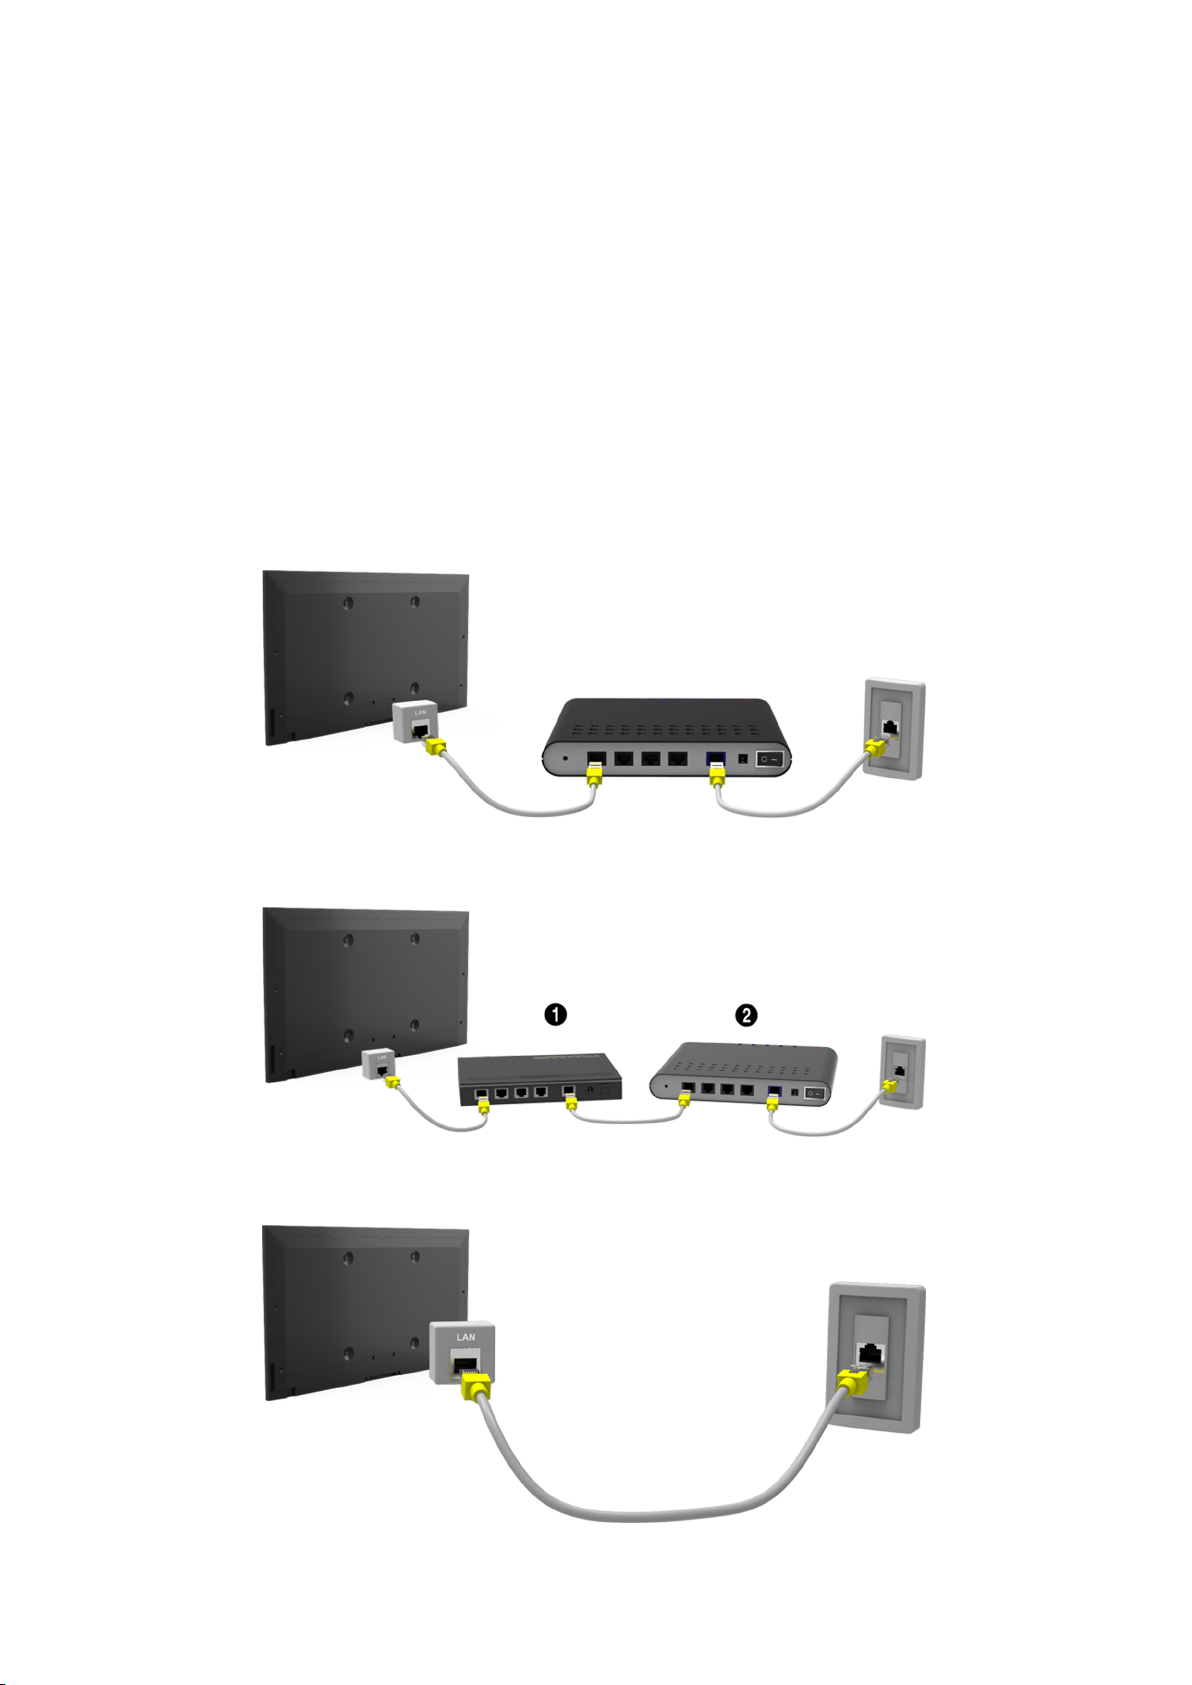
There are three ways to connect the TV to the Internet. Refer to the diagrams and connect the LAN
cable to the LAN connector on the back of the TV.
External Modem
●
① IP Router + ② External Modem
●
Wall-mounted LAN Outlet
●
Page 30
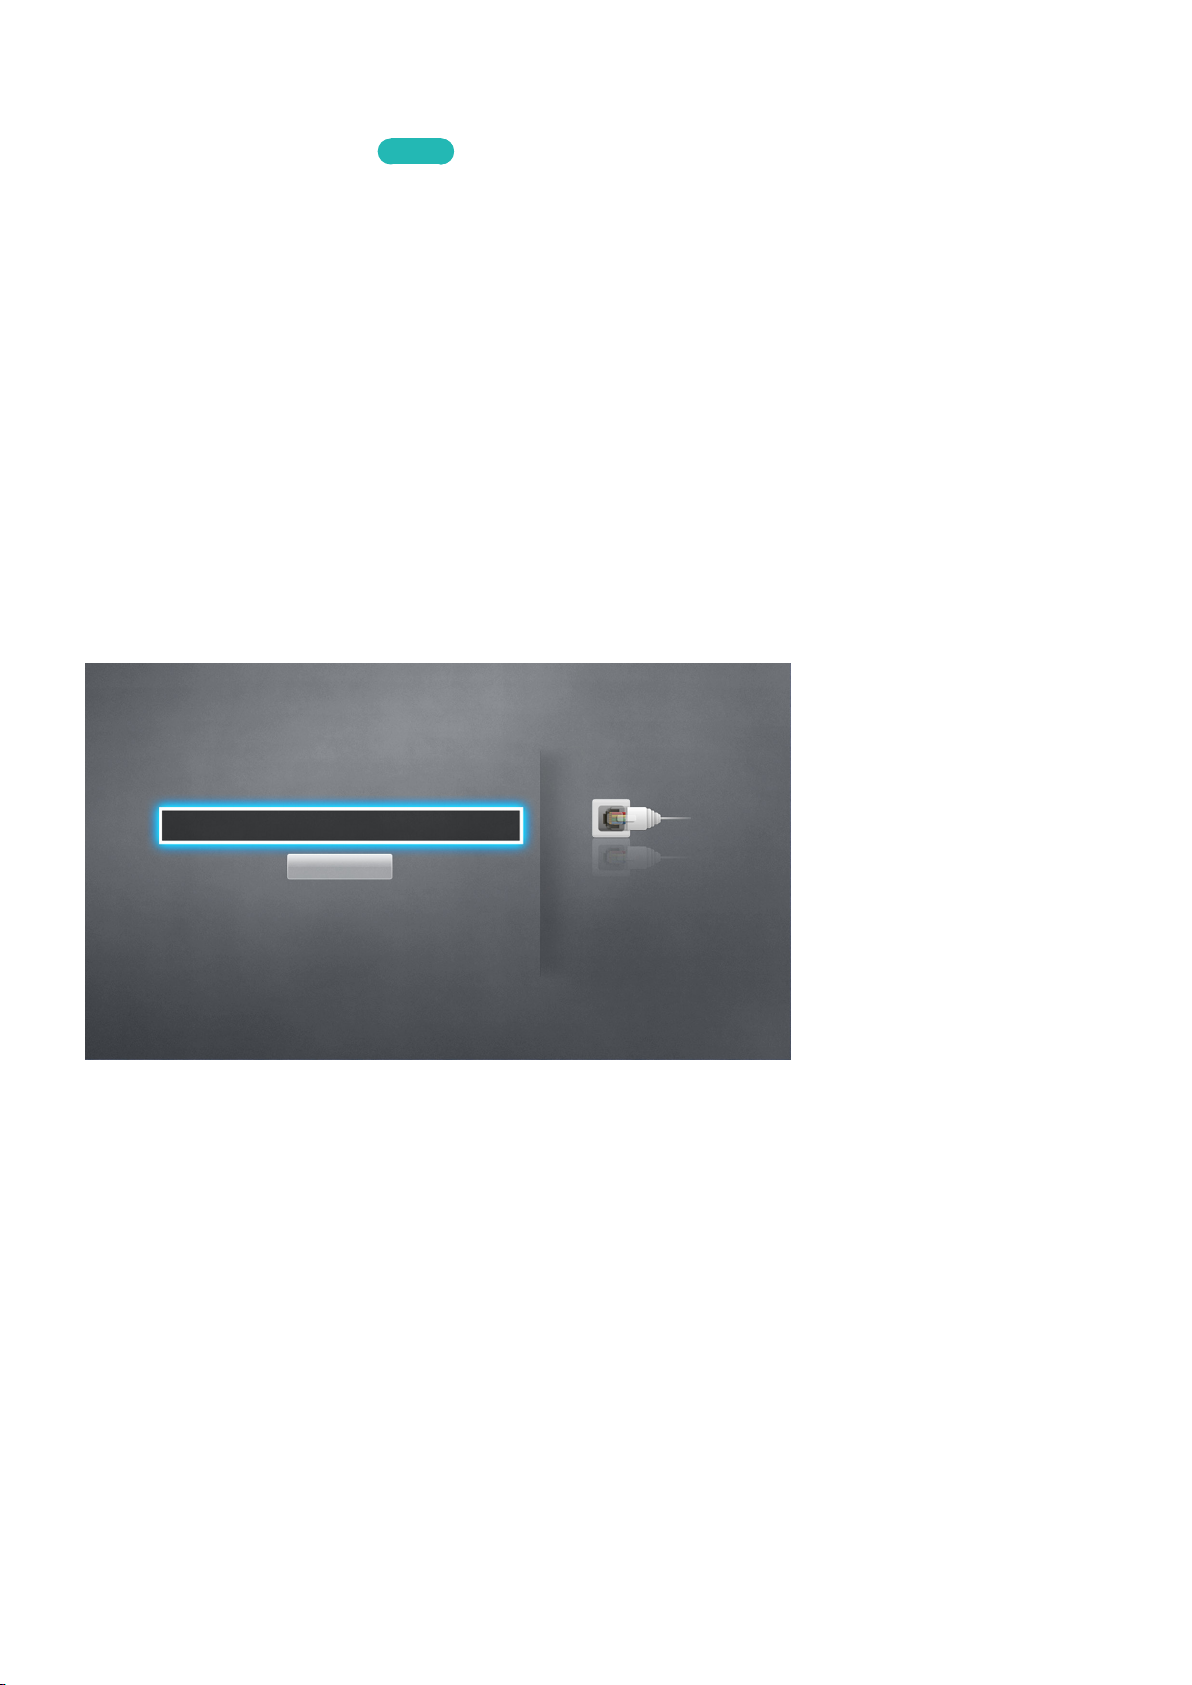
Connecting to a Wired Internet Network Automatically
Network > Network Settings
Try Now
Automatically connect to an available network.
Set the Network Type to Wired, and then select Connect.
1.
The TV attempts to connect to an available network. Once successful, you will see a confirmation
2.
message. Select OK. If the attempt fails, try again, or connect manually.
Connecting to a Wired Internet Network Manually
Network > Network Settings
With networks that require a static IP address, you will need to enter the IP address, subnet mask,
gateway, and DNS values manually to connect to the network. To get these values, contact your
Internet Service Provider (ISP).
"
Refer to the "Dynamic versus Static IP Addresses" section for more information on dynamic IP and static IP
addresses.
Set the Network Type to Wired, and then select Connect.
1.
Network Settings
Select your network type.
Network Type Wired
Connect
You can connect your TV
to the internet.
Page 31
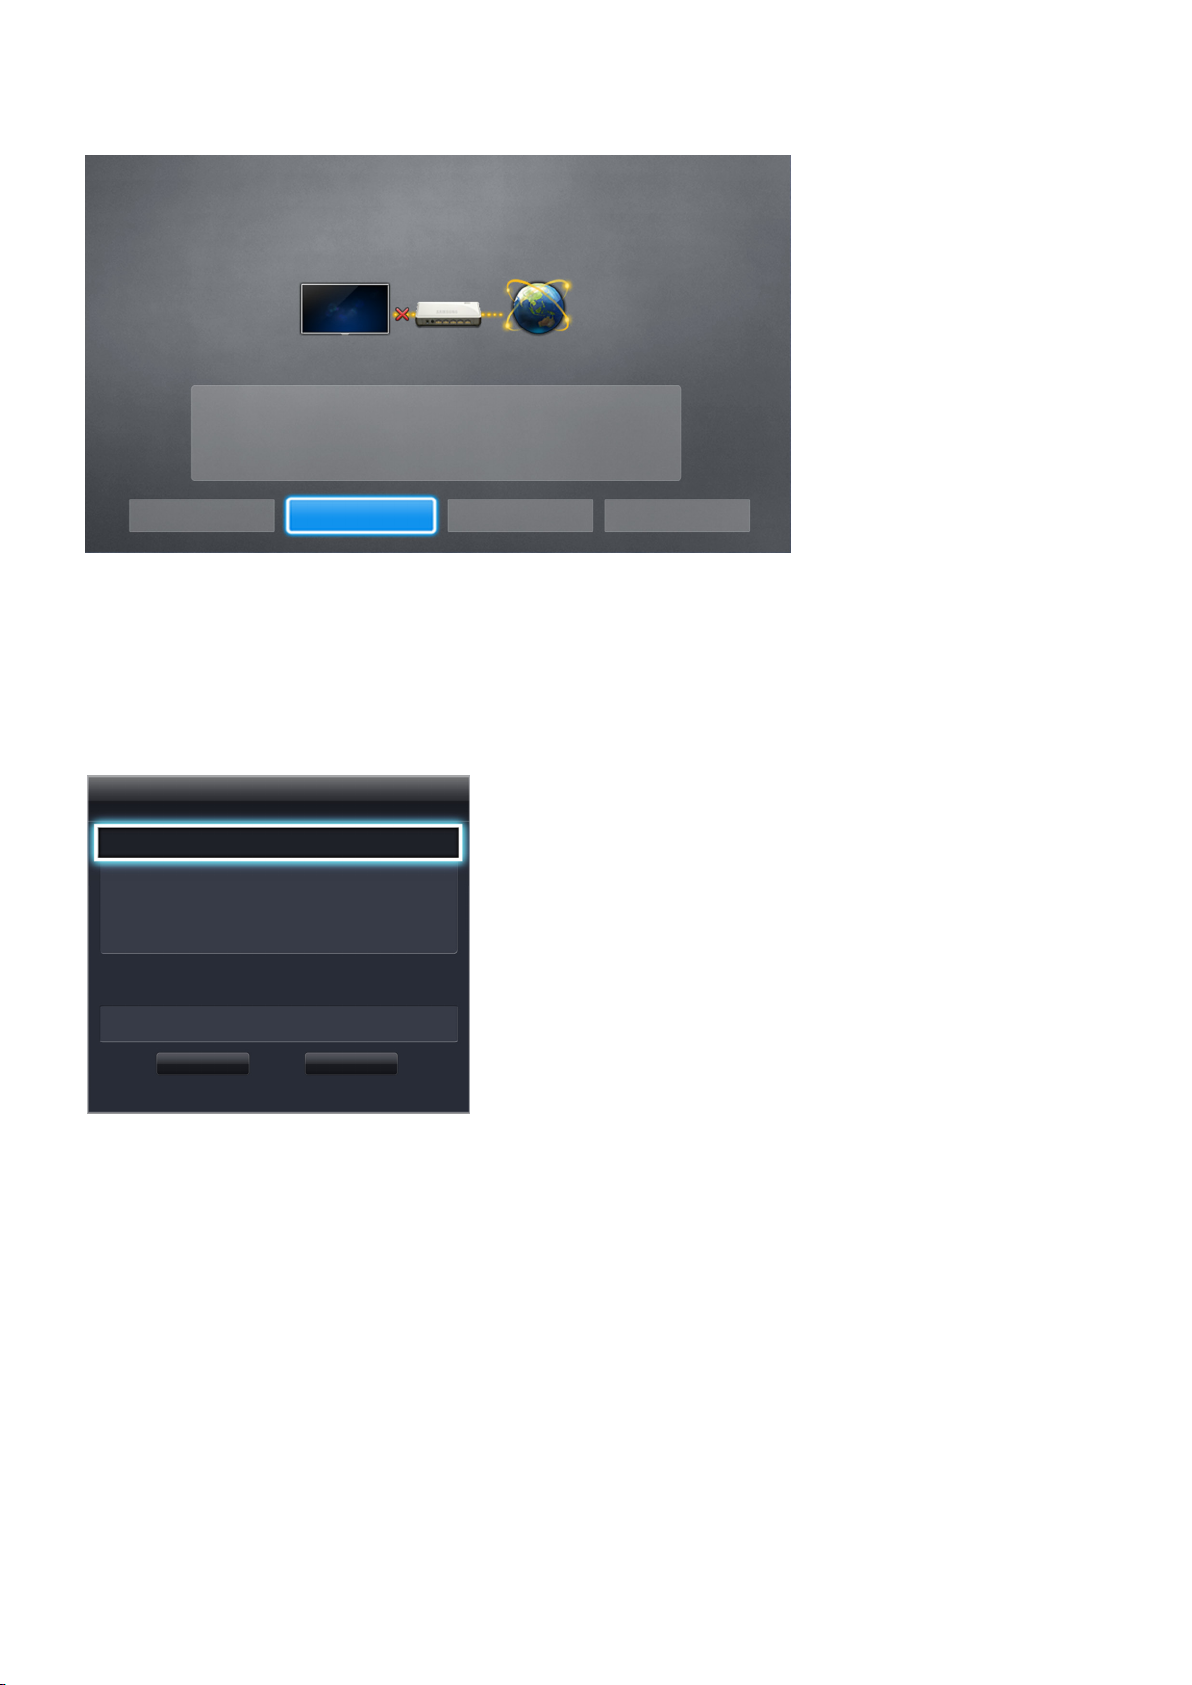
Select Stop when the TV attempts to connect to the network. Once the network connection has
2.
been interrupted, select IP Settings.
Network Settings
Connection verification cancelled.
Wired network connection test stopped.
Change Network IP Settings Retry Close
In the IP Settings screen, set the IP setting to Enter manually, enter the IP Address, Subnet
3.
Mask, Gateway, and DNS Server values, and then select OK.
Use one of the following methods to enter the numerical values.
●
Set the numbers using the u and d buttons.
Enter the numbers directly using numerical button.
IP Settings
IP setting Enter manually
IP Address 0.0.0.0
Subnet Mask 0.0.0.0
Gateway 0.0.0.0
DNS setting Enter manually
DNS Server 0.0.0.0
OK Cancel
The TV attempts to connect to the network again using the specified settings. A confirmation
4.
message appears once a connection is established. Select OK.
"
The network connection speed may differ depending on the DNS server settings.
"
For details on the DNS server settings, contact your Internet service provider (ISP).
Page 32
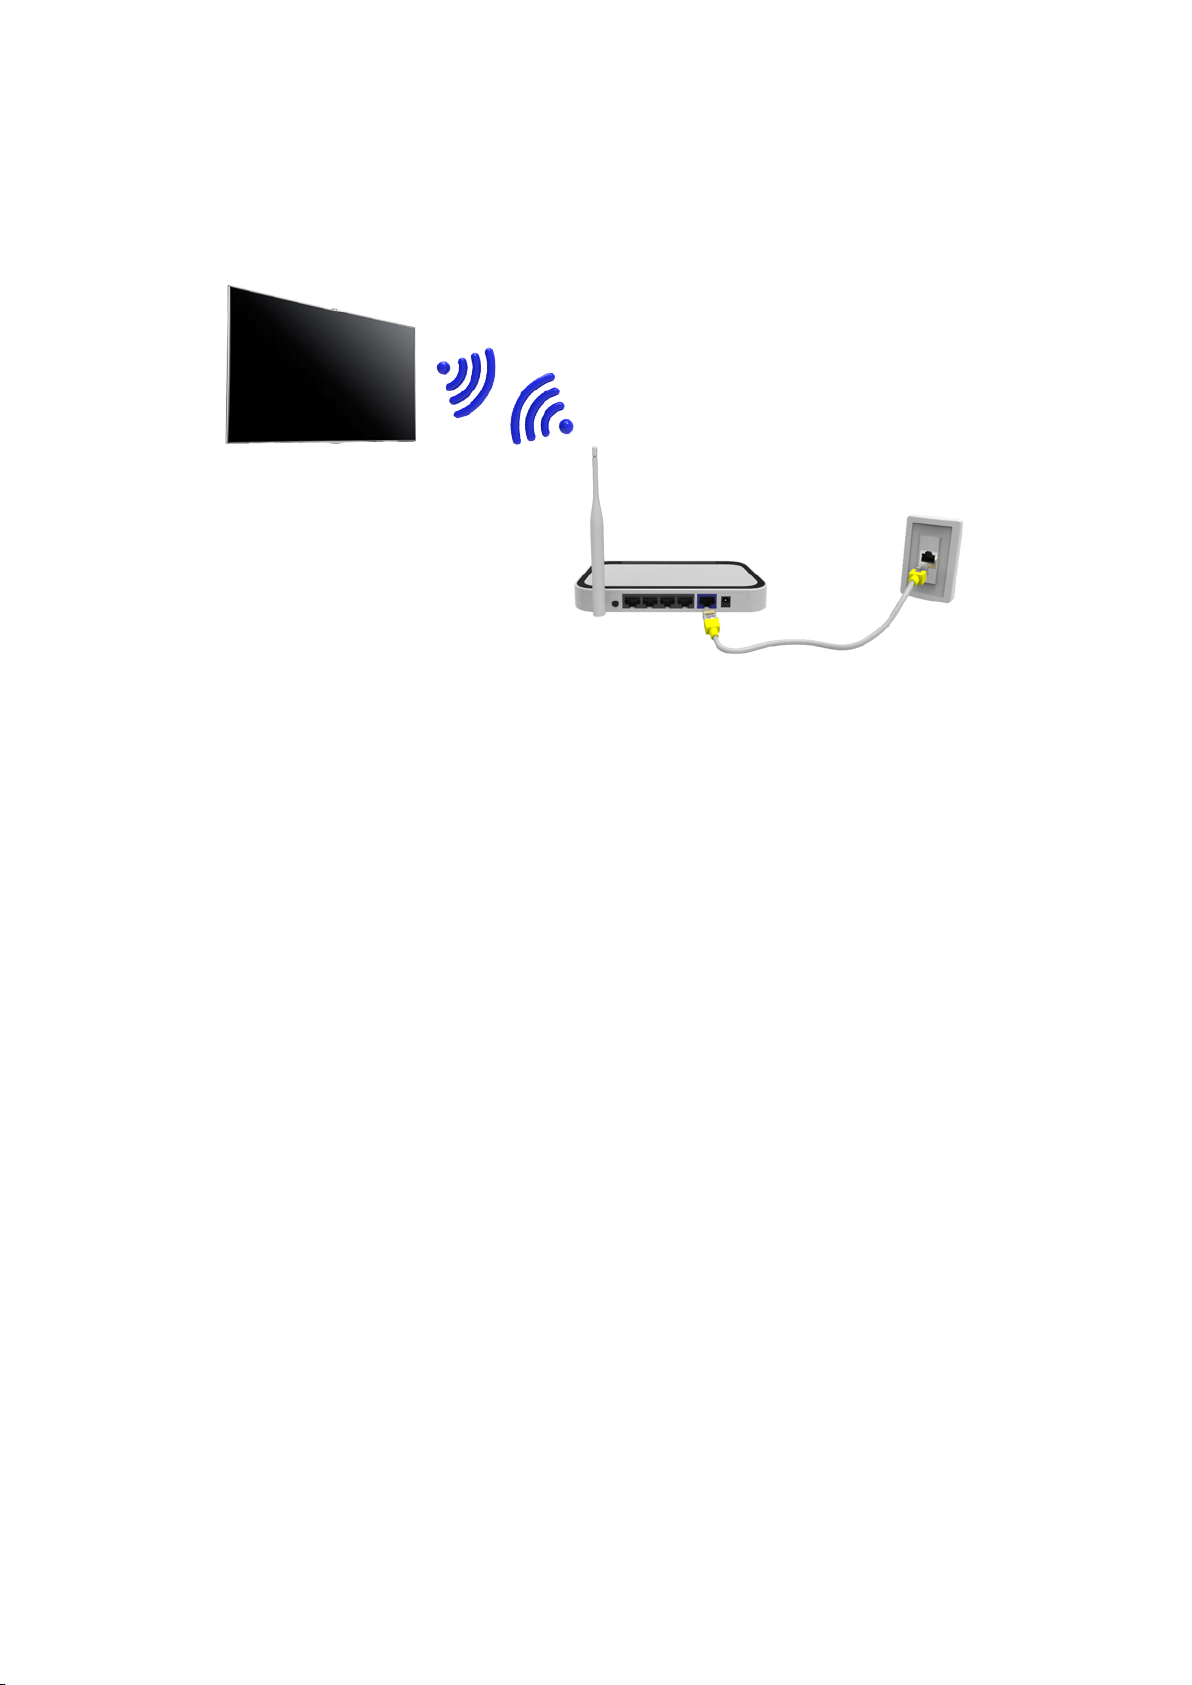
Establishing a Wireless Internet Connection
"
The connection method varies depending on the model.
Connecting the TV to the Internet gives you access to online services and SMART features, and lets
you update the TV's software quickly and easily through the Internet.
Connecting to a Wireless Internet Network Automatically
Network > Network Settings
Connect the TV to the Internet via a wireless router. Make sure you have the wireless router's SSID
(name) and security key settings before attempting to connect. The security key can be found on the
wireless router's configuration screen.
On the Network Settings screen, set Network Type to Wireless. The TV automatically displays a
1.
list of available wireless networks.
Select a network (SSID). If the network you want doesn't appear in the list, select Add Network,
2.
and enter the network's SSID manually.
Enter the security key and select Done. If the selected network is not security-enabled, the TV
3.
attempts to connect right away.
A network connection will be attempted. Once a connection is established, the TV displays a
4.
confirmation message. Select OK. If the attempt fails, try again, or connect manually.
Page 33
Connecting to a Wireless Internet Network Manually
Network > Network Settings
With networks that require a static IP address, you will need to enter the IP address, subnet mask,
gateway and DNS values manually to connect to the network. To get the IP address, subnet mask,
gateway and DNS values, contact your Internet Service Provider (ISP).
"
Refer to the "Dynamic versus Static IP Addresses" section for more information on dynamic IP and static IP
addresses.
Setting the Network Type to Wireless automatically displays a list of available wireless networks.
1.
Network Settings
Select your network type.
Network Type Wireless
Wireless network
AP0000
AP0001
Add Network
You can connect your TV to the
internet. Please select which
wireless network to use.
Refresh WPS(PBC)
Select the network (SSID) you want to connect to. If the wireless router doesn't appear in the list,
2.
select Add Network, and enter the network's SSID manually.
Enter the security key and select OK. If the selected network is not security-enabled, the TV
3.
attempts to connect right away.
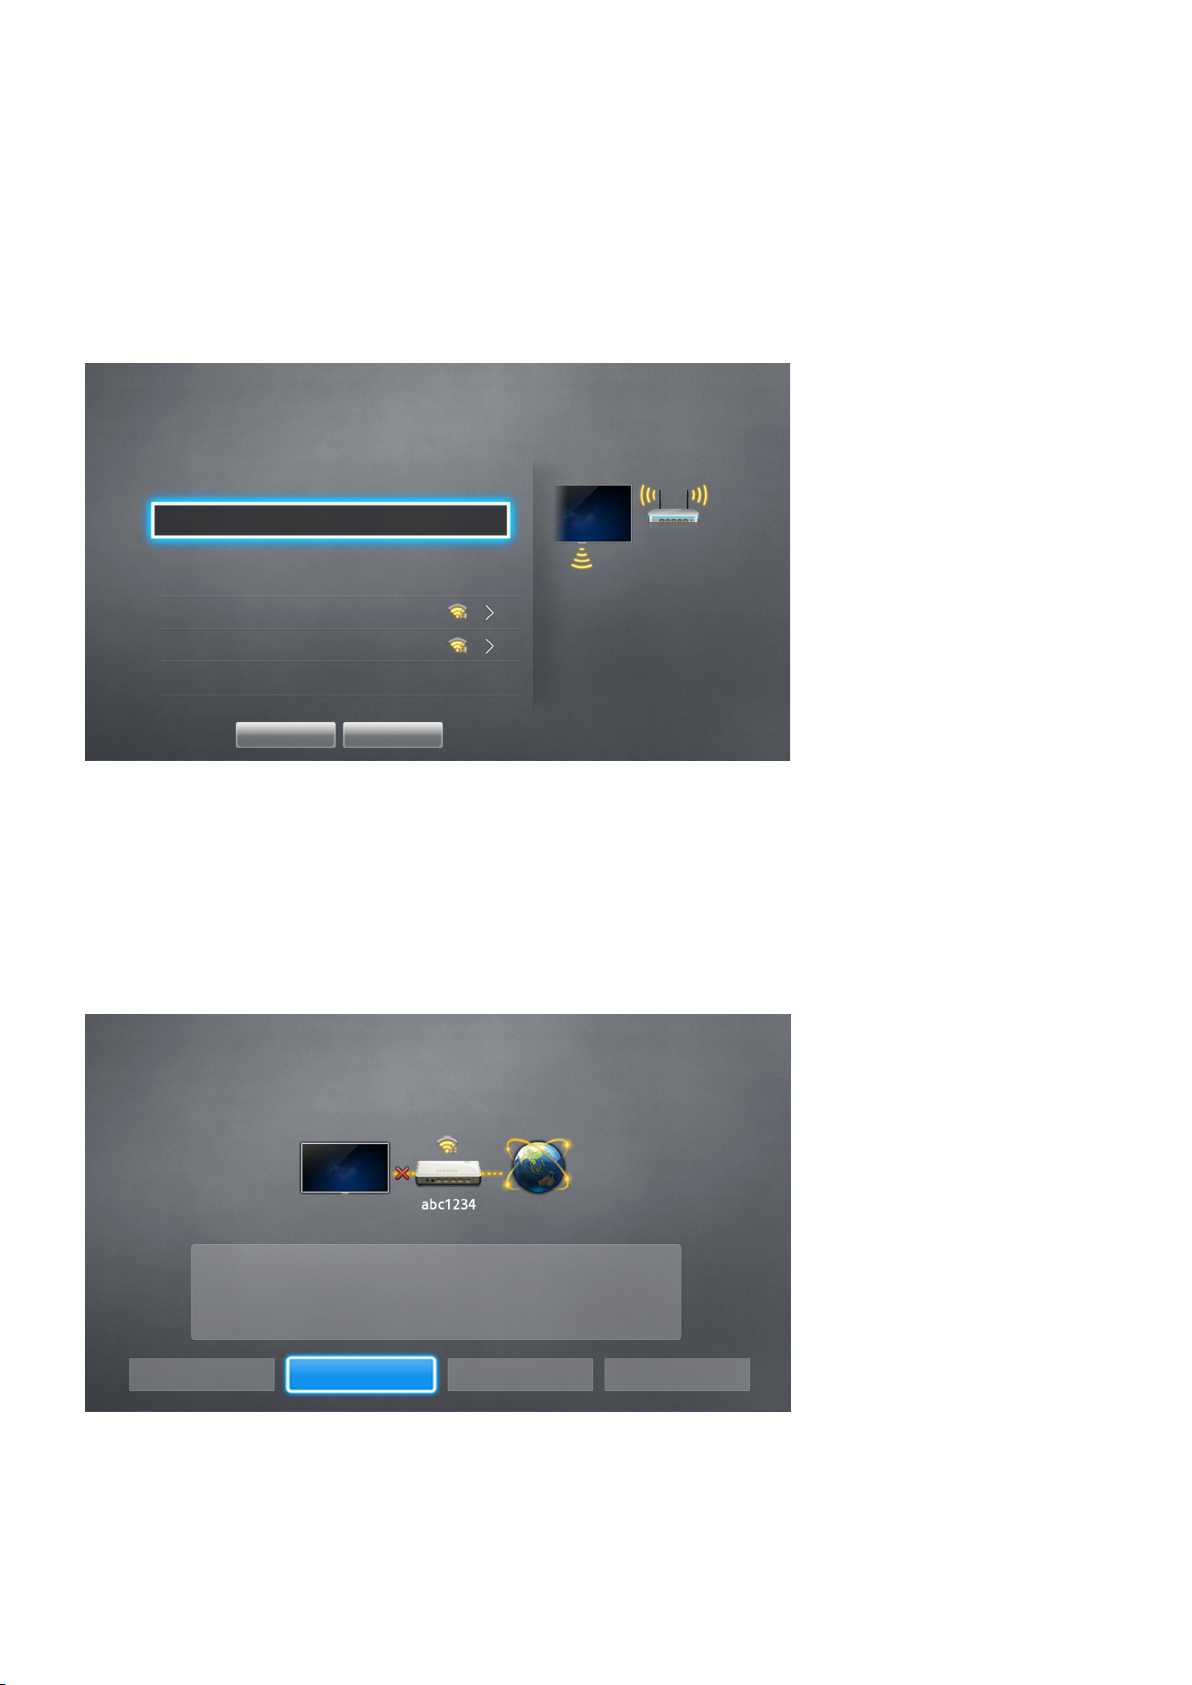
Select Stop when the TV attempts to connect to the network. Once the network connection has
4.
been interrupted, select IP Settings.
Network Settings
Connection verification cancelled.
Wireless network connection test stopped.
Change Network IP Settings Retry Close
Page 34
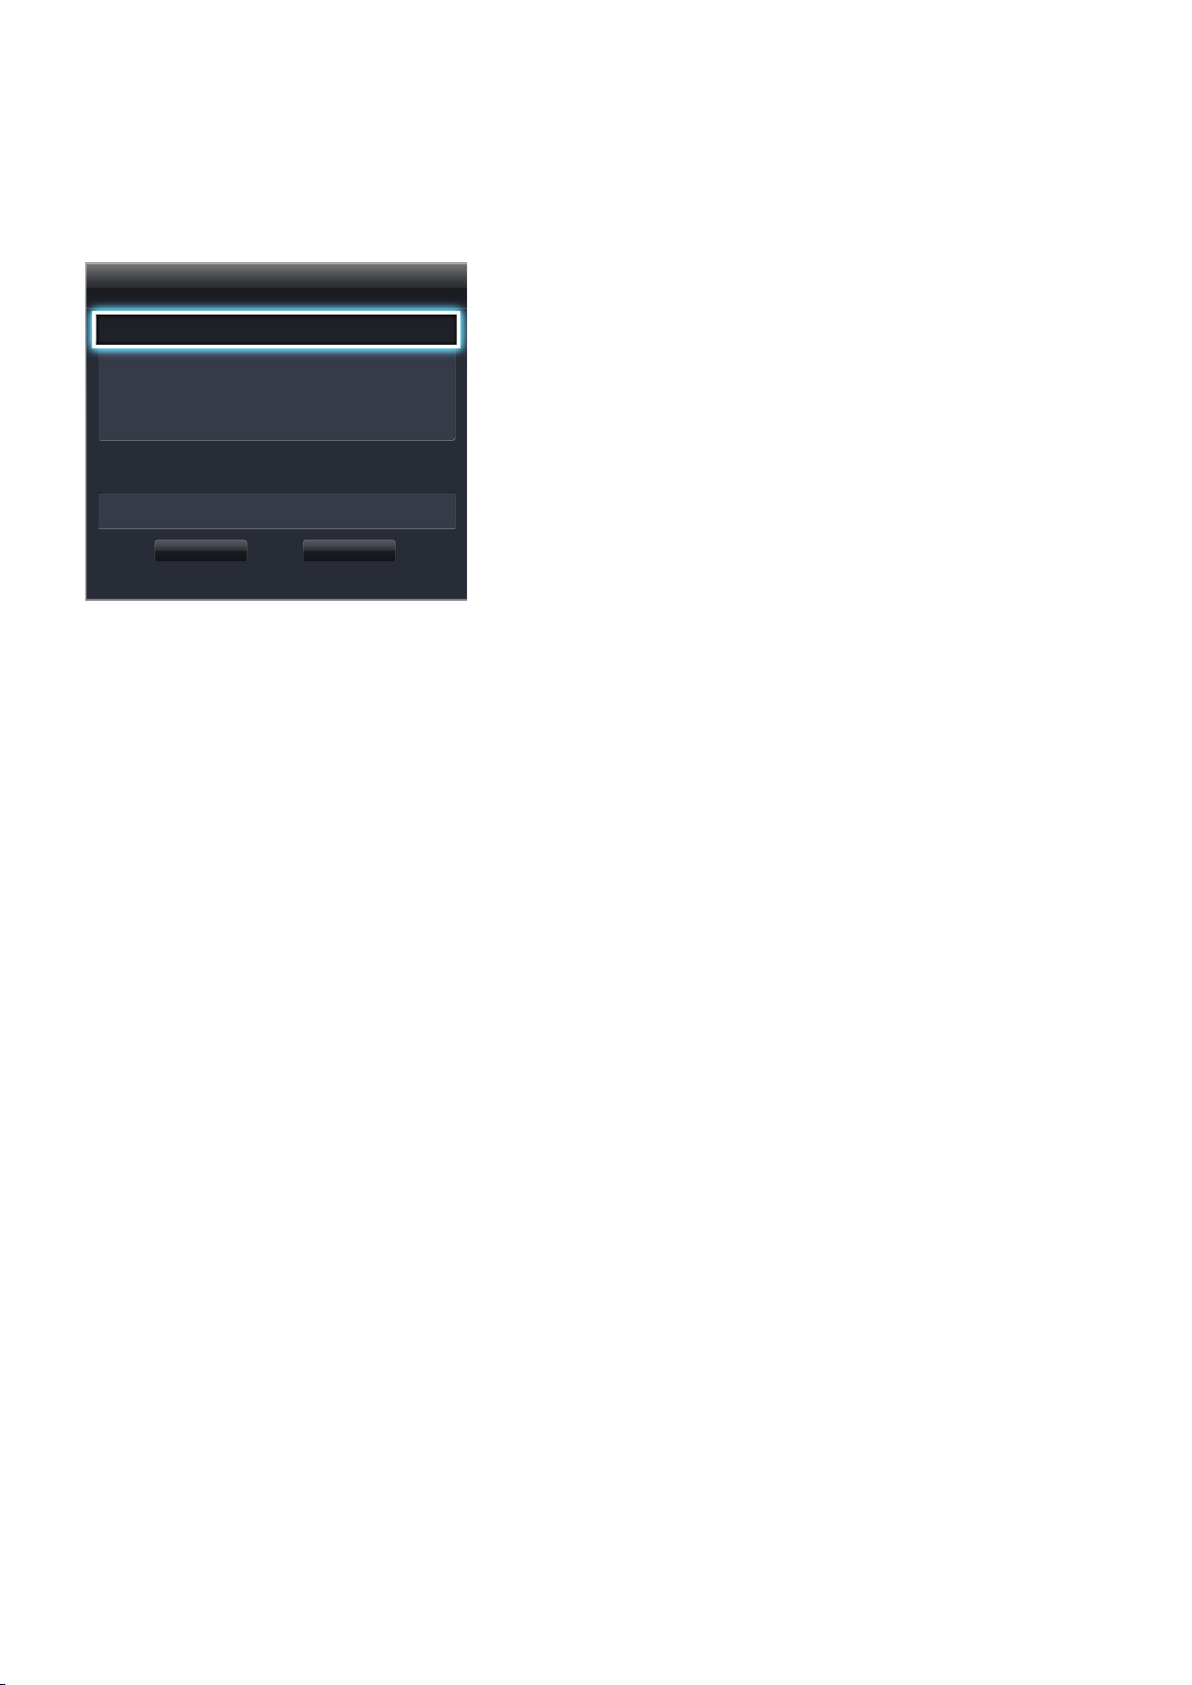
In the IP Settings screen, set the IP setting to Enter manually, enter the IP Address, Subnet
5.
Mask, Gateway, and DNS Server values, and then select OK.
Use one of the following methods to enter the numerical values.
●
Set the numbers using the u and d buttons.
Enter the numbers directly using numerical button.
IP Settings
IP setting Enter manually
IP Address 0.0.0.0
Subnet Mask 0.0.0.0
Gateway 0.0.0.0
DNS setting Enter manually
DNS Server 0.0.0.0
OK Cancel
The TV attempts to connect to the network again using the specified settings. A confirmation
6.
message appears once a connection is established. Select OK.
"
The network connection speed may differ depending on the DNS server settings.
"
For details on the DNS server settings, contact the Internet service provider (ISP).
Connecting to a Wireless Internet Network with WPS
Network > Network Settings
With wireless routers that support WPS (Wi-Fi Protected Setup) or PBC (Push Button Configuration),
it's possible to press a button on the router to connect the TV to the Internet.
"
This functionality is not available with wireless routers that do not support WPS. Check to see if your
wireless router supports WPS.
Setting the Network Type to Wireless automatically displays a list of available wireless networks.
1.
Select WPS(PBC) and then press the WPS or PBC button located on the wireless router within two
2.
minutes.
The TV exchanges the network name (SSID) and security key automatically and then attempts to
3.
connect to the Internet. A confirmation message appears once a connection is established. Select
OK.
Page 35

Troubleshooting Internet Connectivity Issues
If you are not able to connect the TV to the Internet, read the information below.
Troubleshooting Wired Internet Connectivity Issues
No network cable found
Make sure the network cable is plugged in. If it is connected, make sure the router is turned on. If it is
on, try turning it off and on again.
IP auto setting failed
Do the following or configure the IP Settings manually.
Ensure that the DHCP server is enabled on the router and reset the router.
1.
If this does not work, contact your Internet Service Provider for more information.
2.
Unable to connect to the network
Do the following:
Check all IP Settings.
1.
Ensure that the DHCP server is enabled on the router. Then, unplug the router and plug it back in.
2.
If this does not work, contact your Internet Service Provider for more information.
3.
Connected to a local network, but not to the Internet
Make sure that the Internet LAN cable is connected to the router's external LAN port.
1.
Check the DNS values in the IP Settings.
2.
If the problem persists, contact your Internet Service Provider.
3.
Network setup is complete, but unable to connect to the Internet
If the problem persists, contact your Internet Service Provider.
Page 36

Troubleshooting Wireless Internet Connectivity Issues
Wireless network connection failed
Selected wireless router not found. Go to Network Settings and select the correct router.
Unable to connect to a wireless router
Check the following:
Check if the router is turned on. If it is, turn it off and on again.
1.
Enter the correct security key if required.
2.
IP auto setting failed
Do the following or configure the IP Settings manually.
Make sure that the DHCP server is enabled on the router. Then, unplug the router and plug it back
1.
in.
Enter the correct security key if required.
2.
If this does not work, contact your Internet Service Provider for more information.
3.
Unable to connect to the network
Do the following:
Check all IP Settings.
1.
Enter the correct security key if required.
2.
If this does not work, contact your Internet Service Provider for more information.
3.
Connected to a local network, but not to the Internet
Make sure that the Internet LAN cable is connected to the router's external LAN port.
1.
Check the DNS values in the IP Settings.
2.
If the problem persists, contact your Internet Service Provider.
3.
Network setup is complete, but unable to connect to the Internet
If the problem persists, contact your Internet Service Provider.
Page 37
Mobile Network
"
Availability depends on the specific model and area.
While connecting to the mobile network, some functions might be unavailable.
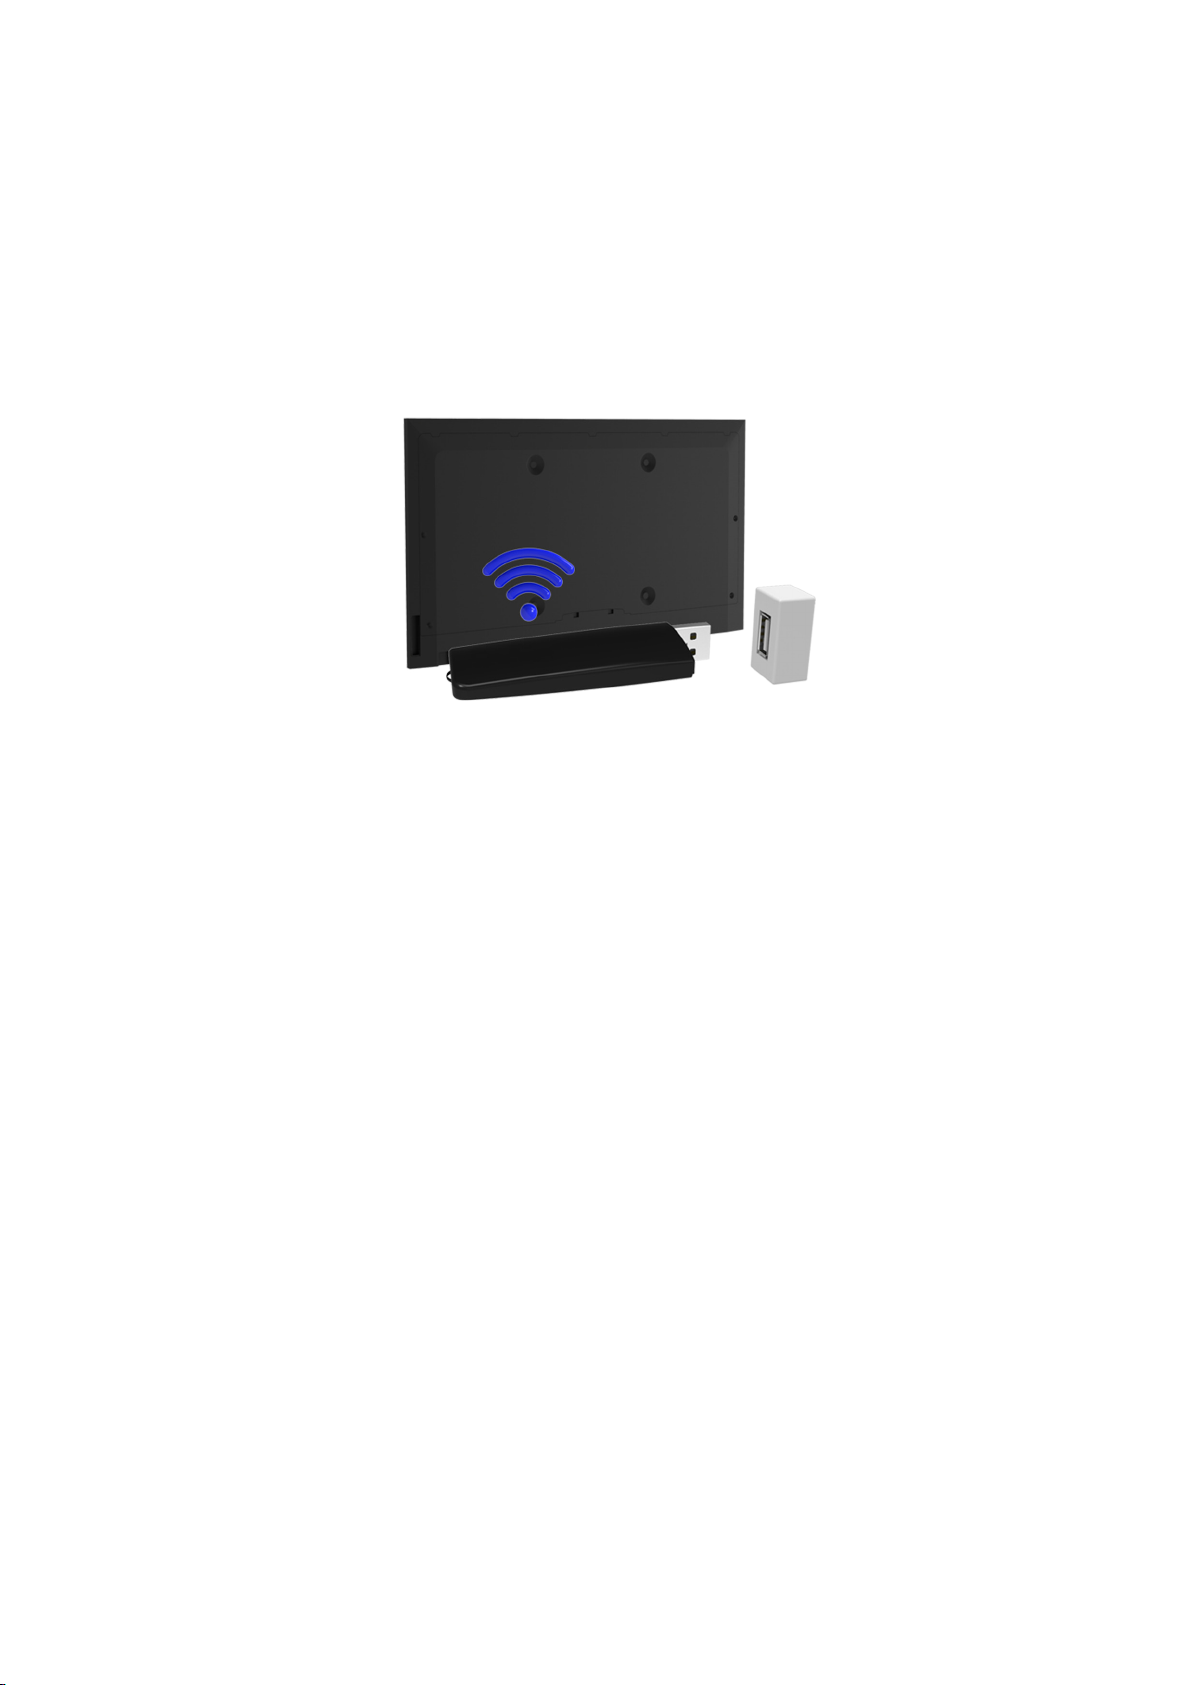
Refer to the diagram and insert the Mobile Dongle (sold separately) into the USB port. The Mobile
Dongle must be connected to the TV in order to connect to the mobile network. However, the Mobile
Dongle is sold separately and is not available from Samsung.
"
If you have any problems using online services, please contact your Internet service provider.
Supported Telecom and Model Name
Vodacom (Model No: K4605)
●
MTN (Model No: E3131S, E3251)
●
Safaricom (Model No: E303)
●
Page 38

Checking the Internet Connection Status
Network > Network Status
Try Now
Network
Network Status
Network Settings
Wi-Fi Direct
Multimedia Device Settings
Screen Mirroring
Device Name [TV]Samsung LE...
"
Actual menu screen may differ depending on the TV model.
View the current network and Internet status.
Page 39

Smart Hub
Smart Hub > Open Smart Hub
Try Now
With Smart Hub, you can surf the web, download apps. In addition, you can use photo, video, and
music files stored on external storage devices.
"
Some Smart Hub services are paid services. To purchase such a service, the service provider account or
Samsung Apps TV account (Samsung account) is required.
"
Make sure the TV is connected to the Internet. The TV must be connected to the Internet in order to use
Smart Hub.
"
Some features of Smart Hub require an Internet connection and may not be available depending on the
service provider, language, or region.
"
To use Smart Hub, you must agree to the end user agreement and privacy policy. Otherwise, you will not
be able to access the features and services related to them. You can view the entire content of the Terms &
Policy by navigating to Smart Hub > Terms & Policy. If you don't wish to use Smart Hub anymore, you can
withdraw the agreement. Try Now
"
Smart Hub service outages can be caused by disruptions in your Internet service.
Testing Smart Hub connections
Support > Self Diagnosis > Smart Hub Connection Test
"
Availability depends on the specific model and area.
If Smart Hub is not functioning, navigate to Support > Self Diagnosis > Smart Hub Connection Test.
Diagnose the problem by checking the internet connection, your ISP, the Samsung server and the
Samsung Apps panels.
"
After completing the test, if Smart Hub continues to have problems, contact your Internet Service Provider
or a Samsung Contact Centre.
Page 40

Opening the Home Screen
Press SMART HUB while watching TV to open the Home Screen.
On the Home Screen, search through favourites apps, channels or sources and access previously run
or frequently used functions.
Setting your favourite item
Press SMART HUB while watching TV to open the Home Screen, and move to a desired item.
1.
Press and hold the Enter button. The Options menu appears.
2.
In the Options menu, select Add to Favourites to add the selected item to the favourite list, which
3.
will move top of the list.
"
To delete a favourite item, select it and press and hold the Enter button to display the context menu.
Then, select Remove from Favourites.
Deleting browsing history
Press SMART HUB while watching TV to open the Home Screen, and select Clear All. You will be
1.
asked to confirm your selection.
Select Yes on the screen. Your browsing history is deleted completely.
2.
"
However, the Favourites list items will not be deleted.
"
You can also delete your browsing history by selecting Clear All in the Smart Hub > Home Screen
Settings menu.
Page 41

Moving to the Panel Screen
Press the SMART HUB button to open the Home Screen, and select the Panel icon. On the Panel
screen for each service panel, the following are available:
"
Usability depends on the specific model and local region.
SAMSUNG APPS
●
You can enjoy variety of free and paid news, sports, weather, and gaming apps on the TV as you
would on a smart phone or tablet.
Using the Smart Hub Tutorial
Support > Smart Hub Tutorial
From the Support menu, select Smart Hub Tutorial. This will familiarise yourself with the basics of
Smart Hub and panels.
Resetting Smart Hub
Smart Hub > Reset Smart Hub
Reset all saved information relating to Samsung accounts and linked service accounts, as well as
Smart Hub service agreements and applications.
Try Now
Page 42

Using Smart Hub with Samsung Account
Samsung Account
Log In
Edit profile
Link Service Accounts
Remove Accounts from TV
Create Account
Terms and Conditions, Privacy Policy
"
Actual menu screen may differ depending on the TV model.
Creating a Samsung Account
Smart Hub > Samsung Account
Try Now
Some Smart Hub services are paid services. To purchase such a service, the service provider account
or Samsung Apps TV account (Samsung account) is required.
You can create a Samsung Account using your email address.
"
To create a Samsung Account, you must agree to the Samsung Account end user agreement and privacy
policy. Otherwise, you cannot create a Samsung Account. You can view the entire content of the agreement
by navigating to Smart Hub > Samsung Account > Terms and Conditions, Privacy Policy.
"
Alternatively, you can create a Samsung Account at http://content.samsung.com. You can use one ID for
both the TV and the website.
Page 43

Creating a Samsung Account using Sign Up Samsung Account Menu
Navigate to Smart Hub > Samsung Account > Create Account and select Create a Samsung
1.
account.
Agree to use a Samsung Account and select Next.
2.
Create a Samsung Account according to the instructions on the Create Account screen.
3.
Once a Samsung Account is created, you will be automatically logged in to Smart Hub.
Creating a Samsung Account using a Facebook Account
A Facebook user can easily obtain necessary information from Facebook and create a Samsung
Account.
Navigate to Smart Hub > Samsung Account and select Log In.
1.
Select + and select the Create with Facebook.
2.
Enter your Facebook ID and password and select Sign In.
3.
Agree to use a Samsung Account and select Next.
4.
Create a Samsung Account according to the instructions on the Create Account screen. Once a
5.
Samsung Account is created, you will be automatically signed in.
"
If you create a Samsung Account using your Facebook account, they are automatically linked.
Page 44

Signing into Samsung Account
Smart Hub > Samsung Account > Log In
Logging into and Saving a Samsung Account
If you haven't logged into your Samsung Account on the TV, you must save your Samsung Account on
the TV.
Navigate to Smart Hub > Samsung Account and select Log In.
1.
Select + and select Sign In.
2.
Enter your ID and password and then select Sign In.
3.
"
Check the Sign me in automatically option if you wish to log into Smart Hub automatically.
"
If you forgot your password, select Reset password to receive password reset instructions via email.
Select an image to be used as the profile picture. The Samsung Account has been saved on the
4.
TV.
Select Done to log into your Samsung Account.
5.
Easily Logging Into Your Samsung Account Saved on the TV
Navigate to Smart Hub > Samsung Account and select Log In.
1.
Choose your Samsung Account and select Sign In.
2.
Using the login method configured for the selected Samsung Account, log into your Samsung
3.
Account.
Page 45

Linking My Samsung and App Accounts
Smart Hub > Samsung Account > Link Service Accounts
Linking your Samsung Account to accounts of apps installed on the TV lets you automatically log into
your linked app accounts when you log into your Samsung Account. For example, you can download
the Facebook app and link your Facebook account to your Samsung Account. In this case, logging into
your Samsung Account then automatically logs you into your Facebook account as well.
"
To use Link Service Accounts, you must first log into your Samsung Account.
Linking an App Account
Navigate to Smart Hub > Samsung Account and select Link Service Accounts. A list of apps that
1.
can be linked to your Samsung Account is shown.
Select an app from the list. The Link to other accounts window appears on the screen.
2.
Enter the current ID and password of the app to log in. When the login is complete, the app
3.
account is linked to the Samsung Account.
Disconnecting a Linked Account
Navigate to Smart Hub > Samsung Account, select Link Service Accounts. Select an app to
1.
unlink.
A confirmation dialog box appears. Select Yes to unlink the app.
2.
Page 46

Changing and Adding Information to Samsung Account
Smart Hub > Samsung Account
Using the Samsung Account menu, you can manage your Samsung Account.
"
To change the account information, you must be logged into your Samsung Account.
Navigate to Smart Hub > Samsung Account and select Edit profile.
1.
Enter the password and then select Done. The edit profile screen appears.
2.
The profile editing screen provides the following features.
Changing Profile Image
●
If you select Edit Profile Picture on the login screen, you can change the profile image.
Choosing a Samsung Account Login Method for TV
●
Select Sign-in Method on the login screen and choose a login method. You can determine how
to log into the TV with the saved Samsung Account.
Setting Auto Login
●
Check the Sign me in automatically option if you wish to log into Smart Hub automatically.
Entering Basic User Information
●
You can enter your given name, surname, and date of birth.
Receiving e-mail about Samsung services
●
You can determine whether to receive e-mail about Samsung services. Containing the latest
information.
Deleting All Samsung Accounts from the TV
Smart Hub > Samsung Account > Remove Accounts from TV
Navigate to Smart Hub > Samsung Account and select Remove Accounts from TV. The account and
password information saved on the TV is deleted, and the account information of any linked apps are
also deleted.
"
To delete your account information, you must be signed in with your Samsung Account.
Page 47

Using Pop-Up Menu Functions
Move the focus to an app and press and hold the Enter button. You can use the following functions:
Move
●
Relocates the selected app.
Delete
●
Removes the selected app.
Delete Multiple
●
Removes multiple apps at once.
View Details
●
Move to the detailed information of the selected app.
Change view
●
You can change view mode sort by Custom view or Most Played.
Lock/Unlock
●
You can lock or unlock a selected app from the screen.
Update apps
●
You can update the selected app.
Page 48

Installing an App
"
When the TV's internal memory is insufficient, you can install an app on a USB device.
"
Only when the USB device is connected are the app icons installed on the USB viewable on the SAMSUNG
APPS screen. You can use an app installed on a USB device only when the USB device is connected to the
TV. If the USB device is disconnected while the app is running, the app is terminated.
"
The app installed on the USB device is not available on a different TV, or a PC.
Quick Installation
On the SAMSUNG APPS screen, select Most Popular, What's New, or Categories.
1.
"
The Most Popular and What's New show the most popular and newest Samsung Apps. To view the
entire app list, select Categories. You can view all Samsung Apps classified by genre.
Move the focus to an app and press and hold the Enter button. A pop-up menu appears.
2.
On the pop-up menu on the screen, select Download.
3.
"
While an app is being installed, the progress bar appears at the bottom of the app icon so that you can
easily figure out the installation progress.
The selected app is installed on the TV.
4.
"
You can view installed apps on the SAMSUNG APPS screen.
Installing an App from the Detailed App Information Screen
On the SAMSUNG APPS screen, select Most Popular, What's New, or Categories.
1.
"
The Most Popular and What's New show the most popular and the newest Samsung apps. To view the
entire app list, select Categories. You can view all Samsung Apps by category.
Select an app from the list. Detailed information about your selection appears on the screen.
2.
Select Download on the detailed information screen to install the selected app on the TV.
3.
"
When an app is being installed, a progress bar appears underneath the app icon.
When the installation is complete, the Download button turns to Open.
4.
"
You can view installed apps on the SAMSUNG APPS screen.
Page 49

Launching an App
Select an app on the SAMSUNG APPS screen to launch it.
The icons indicate the following:
●
: The app is installed on a USB device.
Default Apps
e-Manual
The embedded e-Manual contains information.
Using Web Browser
Web Browser is an Internet browsing app.
"
Use a keyboard and mouse for a more convenient web browsing experience.
"
The browsing screen may differ from that on a PC.
Browsing Methods
Web Browser provides two browsing methods: Pointer Browsing and Link Browsing. Pointer
Browsing enables you to move the pointer for selection while Link Browsing allows using the direction
arrows to move the focus.
The default browsing method of Web Browser is Pointer Browsing. To enable Link Browsing, select
the Link Browsing icon.
Page 50

Command and Status Bar at a Glance
Open the Web Browser to display the command and status bar at the top of the screen. The following
items are available:
●
●
●
●
●
Back
Move to the previous page.
Forward
Move to the next page.
Bookmarks & History
Move to the Bookmarks & History screen. On this screen, add the current page to Bookmarks, or
move, edit, or delete a bookmarked page. Easily access visited pages by navigating the History
screen.
Home Page
Move to the main screen.
Address Bar
Check the address of the current page, or enter a web page address to move to the page.
●
Refresh / Stop
Reload the current page or stop reloading the current page.
●
Add to Bookmark
Add the current page to Bookmarks.
Search
●
Make a keyword search using the user-specified search engine.
"
To change the search engine, select the icon and then select a search engine in the Set Search
Engine menu.
Page 51

●
Zoom
Zoom in or out of the current web page.
●
PIP
Use Web Browser while watching a TV programme on the same screen.
"
Depending on the country and model.
●
Link Browsing / Pointer Browsing
Select one from two browsing methods supported by Web Browser.
●
Settings
Configure the Web Browser settings.
●
Close
Exit Web Browser.
New Tab
●
Open a new tab.
Browsing Preferences
Select the item on the screen. Configure the browsing settings to your needs or convenience.
"
Some items may not be available depending on the web page. Unavailable items are greyed out.
Enable Grabbing / Disable Grabbing
●
Press Enter and then the arrow keys on your remote to enable Grabbing. Press Enter again to
disable Grabbing after you have moved the items on screen to the position you want.
Approved Sites
●
To prevent children from accessing inappropriate web pages, limit access to pre-registered web
pages.
"
You will be asked to enter a password when selecting Approved Sites. Enter the password. The default
password is 0000.
Approved Sites feature: Enable/disable the Approved Sites feature.
Reset password for Approved Sites: Change the password.
Add current site: Add the current web page to Approved Sites.
Manage Approved Sites: Enter the address of the web page that you want to add to Approved
Sites, or select one from the list and delete it.
"
Enabling the Approved Sites feature with no web page listed will restrict access to any web page.
Page 52

Private browsing on / Private browsing off
●
Enable/disable the Private Browsing feature. Enabling Private Browsing will not save the
browsing history.
"
When enabling Private Browsing, the icon appears at the start of the address bar.
Set Search Engine
●
Set the default search engine from the list.
Web Browser Settings
●
Configure the Web Browser Settings, such as browsing behaviours or security.
Set as homepage: Select a web page and set it as the homepage.
Pop-up Block: Block or unblock pop-up windows.
Page Block: Block or unblock pages such as commercial pages. Manage a list of pages to block
by entering the address of a web page.
General: Delete browsing history or Internet usage information, or reset Web Browser. Set
Security Mode to On to restrict access by malicious codes or phishing sites.
Encoding: Set the Auto select to On, or select an encoding method from the list.
Pointer: Adjust the pointer speed in Pointer Browsing mode, or change the link access method.
Browser Information: Check the current version of Web Browser.
Help
●
This will familiarise yourself with the basics of Web Browser.
Rearranging Apps on the SAMSUNG APPS Screen
On the SAMSUNG APPS screen, move to the app you wish to change the order.
1.
Press and hold the Enter button. A pop-up menu appears.
2.
On the pop-up menu, select Move.
3.
Move an app to a desired location and select the app again.
4.
Page 53

Removing an App from the TV
"
Note that if an app is removed, the data related to the app is also deleted.
Removing an App
On the SAMSUNG APPS screen, move to the app you wish to remove.
1.
Press and hold the Enter button. A pop-up menu appears.
2.
On the pop-up menu on the screen, select Delete. A removal confirmation window appears.
3.
Select Yes . The selected app is removed.
Removing Multiple Apps
On the SAMSUNG APPS screen, move to the app you wish to remove.
1.
Press and hold the Enter button. A pop-up menu appears.
2.
On the pop-up menu on the screen, select Delete Multiple. A check box appears on the app
3.
icons.
Select all the apps you wish to remove and then select Delete. A removal confirmation window
4.
appears. Select Yes. Selected apps are removed.
Rating/Reviewing an App
On the detailed app information screen, you can rate the app or send a review to the app developer.
"
To rate or review an app, you must log into your Samsung Account. You can only rate or review with a TV
purchasing apps and games.
Page 54

Updating an App
On the SAMSUNG APPS screen, move to the app you wish to update.
1.
Press and hold the Enter button. A pop-up menu appears.
2.
On the pop-up menu on the screen, select Update apps. A pop-up window appears.
3.
Select all the apps you wish to update and then select Update. All the selected apps are updated
4.
to the latest versions.
Setting Auto App Update
Smart Hub > Apps Settings
To update apps automatically, navigate to Smart Hub > Apps Settings and set Auto update to On. The
apps installed on the TV are automatically updated as updates become available.
SAMSUNG APPS Features
Smart Hub > Apps Settings
You can configure the features related to the apps installed on your TV.
Try Now
Page 55

Setting Push Notification
Push notification function enables apps installed on the TV to send alerts and messages to the user.
Navigate to Smart Hub > Apps Settings > Push Notification Settings and set the Push
1.
Notification to On.
Set the Push Notification setting of apps you wish to receive push notifications from to On. Push
2.
notification function of the selected apps is activated.
"
The Push Notification app list only shows installed apps that support Push Notification Settings.
Using an App while Watching TV
If an app linked to a channel is installed on the TV, you can view programme information and use
related services offered by the app while watching TV.
Navigate to Smart Hub > Apps Settings and set Channel-Bound Apps to On.
"
This feature is only available with apps supporting Channel-Bound Apps installed on the TV.
Page 56

Playing Photos, Videos, and Music
"
You cannot play media content if the content or the storage device are not supported by the TV. For more
information, refer to "Photo, Video, and Music File Limitations".
"
Backup important files before connecting a USB device. Samsung shall not be held responsible for damaged
or lost files.
Playing Media Content from a USB Device
To use multimedia function, press the SOURCE button. The USB devices connected to the TV are
1.
listed.
Select the device you wish to access. Folders and files of the selected USB device are listed.
2.
Select the media content you wish to play. This plays the selected content.
3.
"
Alternatively, move to the media content to play and press the ∂ button to play the content.
"
If you connect a USB device to the TV while watching the TV, a pop-up window appears on the screen so
that you can easily navigate the folders and files of the USB device.
"
Alternatively, if you select a USB device on the Source screen, a pop-up window appears on the screen so
that you can easily navigate the folders and files of the USB device.
Safely Removing a USB Device
Press the SOURCE button. The Source screen appears.
1.
Navigate the USB device you wish to remove, and press and hold the Enter button. An options
2.
window appears.
Select Disconnect USB Device from the list.
3.
Page 57

Playing Multimedia Content Saved in a Computer/Mobile Device
Allowing Connection with a Computer/Mobile Device
To play multimedia content in a computer or mobile device on the TV, you need to allow the
connection with the computer on the TV.
"
You can connect to a computer or mobile device on any DMC device. This function enables users to connect
a mobile device to the TV, search for multimedia content and control play operations on the TV.
Navigate to Network > Multimedia Device Settings. Devices connected to the TV are listed.
1.
Try Now
Allow connection with the desired device you wish to connect to the TV. You can only play
2.
media files from devices that have been allowed to connect to the TV.
"
If a computer or mobile device requests the multimedia content play, the connection allowance
confirmation window appears on the TV so that you can easily connect the computer or mobile device.
When Connected through Home Network
"
To connect a computer through home network.
"
To connect a mobile device through home network.
"
However, the content shared by a computer of a mobile device may not play depending on the encoding
type and file format of the content. In addition, some functions may not be available.
"
The multimedia content may not smoothly play depending on the network status. If this is the case, use a
USB storage device.
Navigate to
1.
Select a device connected via the home network. Folders and files shared by the selected device
2.
will be listed.
Select a media content you wish to play from the list. This plays the selected content.
3.
"
Alternatively, move to the media content and press ∂ to play.
Network > Multimedia Device Settings. Devices connected to the TV are listed.
Page 58

Playing Photos
You can play photos.
Buttons and Functions Available while Viewing Photos
Press enter to access the following buttons. Pressing RETURN hides the playback buttons.
Pause / Play
●
Start or stop the slide show. The slide show feature displays all the photos contained in the
selected folder, one photo at a time.
Previous / Next
●
View the previous/next photo in the queue.
Settings
●
Function Description
Slideshow Settings
Rotate
Zoom
Picture Mode
Background Music
Sound Mode
Select Speakers
Send
Speed: Set the slide show speed.
Effects: Apply transition effects to the slide show.
Rotate the photo.
Zoom in by up to a factor of 4.
Change Picture Mode.
Listen to background music while viewing photos.
"
The music file must be located on the same device as the photo files.
"
A mini player appears on the screen when background music is played. Use the
mini player to pause the music or play a different music file.
Change Sound Mode.
"
This option is supported only when background music is playing.
Choose speakers for the background music.
"
This option is supported only when background music is playing.
This function is the same as the "Copy" function of a computer. Use this function to
send the current photo to another storage device.
"
For information on storage devices supported by this feature, refer to "Storage
Device File Transfers".
Information
View detailed information about the current photo.
Page 59

Playing Videos
You can play Videos.
Buttons and Functions Available while Watching Video
Press enter to access the following buttons. Pressing RETURN hides the playback buttons.
Pause / Play
●
Pause or play the video.
When the video is paused, you can use the following functions. However, audio will not be heard
while the video is paused.
Step: Press ∑ to scan the paused video one frame at a time.
–
Slow Motion: Select the … button to play the video at reduced speed (1/8, 1/4, 1/2).
–
Rewind / Fast Forward
●
Rewind or Fast Forward the video. Repeatedly select the button to make the rewind/fast forward
speed faster by up to 3 times. To restore normal playback speed, select ∂.
Previous / Next
●
Select € twice to play the previous video. Selecting € once reloads the current video from the
beginning.
To play the next video, select the ‚ button.
Page 60

Settings
●
Function Description
Chapter Titles: Select and play another video in the same folder.
Select Scene
Subtitles
Time Bar: You can use the l, r buttons to scan through the video in 10 seconds
intervals or enter a specific time value to jump to that point in the video.
Control the subtitle of the video.
Language: Turn the subtitles on or off.
Sync: When the video and the subtitles are not synchronised, you can adjust the
synchronisation.
Reset Sync: Reset the subtitle synchronisation adjustment to 0.
Size: Choose the font size for the subtitles.
Encoding: If the subtitles are broken, you can change the encoding language.
Repeat
Picture Size
Picture Mode
Sound Mode
Select Speakers
Audio Language
Information
Set the repeat mode. Repeat One repeats the current programme only. Repeat All
repeats all programmes contained in the folder.
Change the picture size. However, the supported picture size is determined by the
video content.
Change the Picture Mode setting.
Change the Sound Mode setting.
Choose a speaker to play the audio.
Choose a desired audio language. This option works only when the video supports
multi-track sound.
View detailed information about the video.
Page 61

Playing Music
You can play Music.
Buttons and Functions Available while Playing Music
Press enter to access the following buttons. Pressing RETURN hides the playback buttons.
Pause / Play
●
Pause or resume the music.
Rewind / Fast Forward
●
Rewind or fast forward the music. To restore normal playback speed, select ∂.
Previous / Next
●
Select € twice to play the previous music file. Selecting € once reloads the current music file
from the beginning.
To play the next music file, select the ‚ button.
Repeat
●
Set the repeat mode. Repeat One repeats the current music file only. Repeat All repeats all music
files contained in the folder.
Shuffle
●
Play the music files in order or randomly.
Select Speakers
●
Choose a speaker to play the audio.
Sound Mode
●
Change the Sound Mode setting.
Page 62

Functions on the Media Content List Screen
The media content screen for the selected storage device includes the following functions.
Filter
●
Use this option to filter the list to see only the photo, video, or music files contained in the
storage device.
Options
●
"
This function is not available when Filter is set to All.
Function Description
Slide Show
Play Selected
Send
Encoding
Rename Playlist
Delete Playlist
Add to Playlist
Start the slide show.
"
This option is available for photo files.
Play only the selected content.
This function is the same as the "Copy" function of a computer. Use this function to
send the media content to another storage device.
"
For information on storage devices supported by this feature, refer to "Storage
Device File Transfers".
If the media content's title is being displayed incorrectly, you can change the encoding
method.
"
This function is available only for music files.
Rename your playlist.
"
This function is available only when the media content is music.
Delete a playlist that you have created.
"
This function is available only for music files.
Add a file to an existing playlist or create a new playlist.
"
This function is available only for music files.
Page 63

Digital Broadcast Information at a Glance
Broadcasting > Guide
The Guide provides an overview of each digital channel's programme lineup. You can check the
programme schedules and set up a Schedule Viewing.
Press GUIDE to launch the guide.
"
The information in the Guide is for digital channels only. Analogue channels are not supported.
Using the Guide
Move to the programme schedule and then press and hold the Enter button. The following options are
available:
Changing the Channel List
●
If you select Channel Filter, you can change the channels displayed in the channel lists.
Navigating the Programme Schedule
●
Press to the †, … button to navigate the programme schedule by 24 hours. You can only view the
future programme schedule.
It is available for moving the page using the u, d button.
Moving to the Schedule Manager
●
You can move to the Schedule Manager screen.
Adding Favourites
●
Click Edit Favourite Channels to add the selected programme to the Favourites.
Viewing Detailed Information
●
View detailed information about the selected programme. The programme information may vary
depending on the type of incoming signal and may not be available at all for certain programmes.
Select a current programme on another channel and select View Details to Watch the
–
programme.
Select an upcoming programme and select View Details for Schedule Viewing.
–
Page 64

Checking the Current Programme Info
While watching TV, select INFO to view information about the current programme.
"
In order to view the programme info, you must first set the TV's clock. Set the Clock (System > Time >
Clock).
"
The programme information may vary depending on the type of incoming signal and may not be available
at all for certain programmes.
In addition, select right button to view information about the next programme, and press enter, to set
up a Schedule Viewing for the upcoming programme.
Change the Broadcast Signal
Broadcasting > Aerial
Choose your preferred method of receiving digital broadcasts.
Try Now
Digital Signal Info and Strength
Support > Self Diagnosis > Signal Information
Select Support > Self Diagnosis > Signal Information. Displays the digital channel's signal information
and strength.
"
If your TV is attached to a separate, over-the-aerial antenna, you can use the signal strength information to
adjust the antenna for increased signal strength and improved HD channel reception.
"
This is only available for digital channels.
Try Now
Page 65

Setting Up a Schedule Viewing
Configure the TV to show a specific channel or programme at a specific time and date. The icon
appears next to programmes that have been configured for a Schedule Viewing.
"
To set up a Schedule Viewing, you must first set the TV's clock. Go to Clock (System > Time > Clock).
Setting Up Schedule Viewing
Digital Channel Schedule Viewing
You can set up Schedule Viewing for programmes on digital channels on the following screens:
The Guide Screen
●
Select an upcoming programme from the Guide to set up a Schedule Viewing for it.
The Programme Info Screen
●
Select INFO to display information about the current programme. From the programme
information screen, select right button to view information about the next programme, and press
enter, to set up a Schedule Viewing for the upcoming programme.
Analogue Channel Schedule Viewing
Broadcasting > Schedule Manager
The Schedule Viewing function for programmes on analogue channels can be set up by specifying the
time and date.
Select Broadcasting > Schedule Manager.
1.
Select Schedule from the Schedule Manager to bring up a pop-up menu. Select Schedule
2.
Viewing.
Specify the Aerial, Channel, Repeat, and Start Time options for the programme you want to
3.
watch and then select OK to finish.
Try Now
Page 66

Managing the Schedule Viewing List
Broadcasting > Schedule Manager
You can change the settings of Schedule Viewing sessions or cancel scheduled sessions altogether.
Deleting Schedule Viewing Sessions
You can delete Schedule Viewing sessions.
Select Broadcasting > Schedule Manager.
1.
Select a session from the Schedule Manager. A pop-up window appears.
2.
Select Delete. This cancels the selected viewing session.
3.
Editing Schedule Viewing Sessions
You can change the settings of Schedule Viewing sessions. Select Broadcasting > Schedule
1.
Manager.
Select a session from the Schedule Manager. A pop-up window appears.
2.
Select Edit and change the settings of the selected session.
3.
Once finished, select OK. This applies the changes you made to the selected viewing session.
4.
Page 67
Using the Channel List
Broadcasting > Channel List
Try Now
Launch the Channel List while watching TV to change channels or to see what's on other channels.
Select a channel from the Channel List to jump to it right away. To quickly scroll through the list, use
the channel up/down buttons. This moves the focus one page at a time.
The Channel List screen contains the following icons:
–
–
–
●
: An analogue channel
: A favourites channel
: A locked channel
Using Options
Press l button to select Options. The following options are available:
Function Description
Aerial
Category
Choose between Terrestrial, Cable, and Satellite.
"
Availability depends on the specific model and area.
If you select a Category, its channels appear in the list among the TV's channels.
Sorting
Edit Favourites
Changing to Favourites
●
Sort the list by Channel Number or by Name (Digital channels only).
Designate favourites channels.
Press r button to select Favourites 1 through Favourites 5. This shows the selected list's
channels. However, a Favourites list can only be selected if it contains at least one favourites
channel. If you haven't created a Favourites list yet, you need to create one first.
Page 68

Registering, Removing, and Editing Channels
Broadcasting > Edit Channel
Remove channels from the index of channel restore removed channels, and rename analogue channels.
The Edit Channel screen icons indicate the following:
●
●
●
: An analogue channel
: A favourites channel
: A locked channel
Try Now
Registering and Removing Channels
Broadcasting > Edit Channel
Removing Registered Channels
Remove registered channels from the index.
Select the channels you want to remove. Unselect channels by choosing them again. To select all
1.
the channels, select Options from the bottom of the screen and then select Select All from the
list.
Once you have made your selection, select Delete from the bottom of the screen to remove the
2.
selected channels.
Editing Registered Channels
Broadcasting > Edit Channel
Select Options at the bottom of the screen to access the following options. However, the available
options may vary depending on the broadcast signal.
Select All
●
Selects all channels displayed in the Edit Channel screen.
Sorting
●
(Digital channels only)
Change the list ordered by Channel Name or Number.
Aerial
●
Choose between Terrestrial, Cable or Satellite.
"
Availability depends on the specific model and area.
Category
●
If you select a Category, its channels appear in the list among the TV's channels.
Edit Favourites
●
Organise favourites lists to find favourite channels and switch between channels more easily.
Page 69

Rename channel
●
Rename Analogue Channels. The new name can be up to 5 characters long.
Channel Info
●
Check the information of the channel.
Information
●
View detailed information about the current programme.
Enabling/Disabling Password Protection on Channels
Broadcasting > Edit Channel
You can lock channels you don't want your children to view.
"
To enable password protection, set Channel Lock to On. First, navigate to Broadcasting > Channel Lock and
set it to On. Try Now
Changing Numbers
Change the number of the channels in edit channels List. Select channels from the Edit Channel screen
and then select Change Number at the bottom of the screen.
Locking/ Unlocking Channels
Select channels from the Edit Channel screen and then select Lock or Unlock at the bottom of the
screen. When the password entry window appears, enter the password. This locks or unlocks the
selected channels.
Edit Channel Number
"
Availability depends on the specific model and area.
Broadcasting > Edit Channel Number
Use this to change channel number. When channel number is changed, channel information is not
updated automatically.
Page 70

Creating a Personal Favourites List
Broadcasting > Edit Favourites
You can designate frequently watched channels as favourites. Favourites channels are highlighted in
the Edit Channel and Channel List screens with the symbol. You can create up to 5 favourites
channel lists.
Try Now
Registering a Channel as Favourites
Broadcasting > Edit Favourites
Registering the Current Channel as a Favourites
Add the current channel to a Favourites list.
Select TOOLS while watching TV to display a list of options. Select Edit Favourites from the list.
1.
From the pop-up window, select all the Favourites lists you want to add the current channel to
2.
and then select OK.
This adds the current channel to the selected Favourites list(s). Select OK.
3.
Registering Multiple Channels as Favourites
It's possible to register multiple channels as favourites at the same time.
Select Broadcasting > Edit Favourites.
1.
Select Category from the bottom of the screen to change the channel list to the one containing
2.
that channels you want to register.
Select the channels from the list in the middle of the screen.
3.
Select Change Fav.. and then change the Favourites 1 to the Favourites 5 you want to use.
4.
Select Add.
5.
Page 71

Viewing Favourites List Channels Only
It's possible to flip through Favourites list channels using only the channel up/down buttons.
"
A Favourites list can only be selected if it contains at least one favourites channel.
Run Channel List. (Broadcasting > Channel List).
1.
Press r button to select Favourites 1 through Favourites 5.
2.
Choose a channel from the selected Favourites list. This changes the channels and Channel List
3.
changes to the selected Favourites channel.
Editing a Favourites List
Broadcasting > Edit Favourites
You can rename and edit Favourites lists.
Edit Favourites Features
Select Options from the bottom of the Edit Favourites screen to access the following options:
Copy to Favourites
●
Copy channels from one favourites channels list to another.
"
This can only be used when the focus has selected a channel registered to a Favourites list.
Rename Favourites
●
Rename an existing favourites channels list.
"
This can only be used when the focus has selected a channel registered to a Favourites list.
Sorting
●
Change the list ordered by Channel Name or Number. This function is not available on analogue
channel.
Aerial
●
Choose between Terrestrial, Cable or Satellite.
"
Availability depends on the specific model and area.
Edit Channel
●
You can manage the channels saved on the TV.
Information
●
View detailed information about the current programme.
Page 72

Removing Registered Channels from a Favourites List
Remove channels from a favourites channels list.
Select Change Fav. at the bottom of the screen and then change the Favourites list to the
1.
Favourites list you want to use.
Select the channels you want to remove from the selected Favourites list.
2.
Select Delete.
3.
Rearranging a Favourites List
Rearrange the order of the channels in a Favourites Channels List.
Select Change Fav. at the bottom of the screen and then change the Favourites list to the
1.
Favourites list you want to use.
From the selected Favourites list, select the channels you want to rearrange.
2.
Select Change order from the bottom of the screen and then rearrange the selected channels.
3.
Press enter to finish.
Page 73

Renaming a Favourites List
Rename an existing favourites channels list.
Select Change Fav. at the bottom of the screen and then change the Favourites list to the
1.
Favourites list you want to use.
Select Options. A list appears.
2.
Select Rename Favourites from the list. A pop-up window appears. Rename the list in the pop-
3.
up window. The new name can be up to 20 characters long.
Copying a Favourites List to a Different Favourites List
Copy channels from one favourites channels list to another.
Select Change Fav. and then change the Favourites list on the side of the screen to the Favourites
1.
list you want to use.
From the Favourites list displayed on the side of the screen, select all the channels you want to
2.
copy.
Select Options. A list appears.
3.
Select Copy to Favourites from the list. A pop-up window appears.
4.
From the pop-up window that appears on the screen, select the Favourites lists you want to copy
5.
the selected channels to. This copies the selected channels to the selected Favourites lists.
"
Copy to Favourites is only available when there are channels in the Favourites list.
Page 74

Adding Realism to Sports
"
Availability depends on the specific model and area.
System > Sports Mode
Sports Mode enables optimal picture and sound settings for sports events, making them appear and
sound as if you were actually there.
Try Now
Enabling Sports Mode
System > Sports Mode > Sports Mode
Select System > Sports Mode and then set Sports Mode to On. Picture and sound settings of the TV
are automatically optimised for sports events.
"
Enabling Sports Mode changes the Picture Mode to Stadium and the Sound Mode to Stadium, and disables
some Picture and Sound menus.
"
Press SPORTS while watching TV to activate/deactivate Sports Mode. If SPORTS is not available, then use
TOOLS to activate/deactivate Sports Mode.
Using the Sports Mode (for Russia)
System > Sports Mode Settings
You can use Sports Mode Settings to get optimal picture and sound settings for sports events, making
them appear and sound as if you are there.
Sports Mode
●
You can set Sports Mode to On to optimize the picture and sound modes of the TV automatically
for sporting events.
"
Enabling Sports Mode changes Picture Mode to Stadium and Sound Mode to Stadium, and disables
some Picture and Sound menus.
Sports Type
●
You can enjoy optimal picture and sound settings for a selected sports type. Select from Football
and Ice Hockey.
"
If you turn the TV off while watching Sports Mode, the Sports Mode will be disable.
"
Zoom doesn't operate in the following modes: PIP On, Media play videos
Page 75

Functions Available in Sports Mode
Press enter. The following buttons will appear.
Zoom
●
You can pause the current video and zoom in on one of 9 different sections of the screen. Pan
the zoomed-in image using u, d, l, r buttons.
"
You cannot use this function when PIP is active.
Information
●
Displays detailed information about the current programme.
African Cinema Mode
Using the African Cinema Mode
System > African Cinema Mode
When you set African Cinema Mode to On, the TV provides an optimal picture and sound for popular
content.
"
This function is only available on certain models in specific geographical areas.
Page 76

TV-Viewing Support Features
Showing Subtitles
System > Accessibility > Subtitle
Show subtitles. Subtitles will be displayed when watching a broadcast that supports subtitles.
Switches subtitles On or Off.
"
DVD subtitles are only available if the DVD player is connected to an external input connector.
Subtitle Mode
●
Set the subtitle mode.
Subtitle Language
●
Set the subtitle language.
"
The TV cannot control or modify DVD or Blu-ray subtitles. To control DVD or Blu-ray subtitles, use the
subtitle feature of the DVD or Blu-ray player and the player's remote control.
Try Now
Subtitle Options
System > Accessibility > Subtitle
Select a subtitle mode. The list of modes may vary depending on the broadcast.
Primary Subtitle
●
Set the primary subtitle language.
Secondary Subtitle
●
Set the secondary subtitle language.
Page 77

Changing Teletext Language
Broadcasting > Channel Settings > Teletext Language
"
Availability depends on the specific model and area.
Use this to set the teletext language.
Primary Teletext
●
Set the primary teletext language.
Secondary Teletext
●
Set the secondary teletext language.
Digital Text
This function is only available in UK.
Broadcasting > Channel Settings > Digital Text
"
Availability depends on the specific model and area.
If the programme broadcasts with digital text, this feature is enabled.
"
MHEG (Multimedia and Hypermedia Information Coding Experts Group) An International standard for data
encoding systems used in multimedia and hypermedia. This is at a higher level than the MPEG system which
includes data-linking hypermedia such as still images, character service, animation, graphic and video files
as well as multimedia data. MHEG is user runtime interaction technology and is being applied to various
fields including VOD (Video-On-Demand), ITV (Interactive TV), EC (Electronic Commerce), tele education,
teleconferencing, digital libraries and network games.
Page 78

PIP Broadcast Viewing
Picture > PIP
Try Now
Use the PIP (Picture-In-Picture) function to watch TV in a small window while also watching images
from an external source such as a DVD player, a Blu-ray player, or a computer in the background.
Select Picture > PIP to display the PIP settings window. This settings window contains the following
options:
PIP
●
Activates/deactivates PIP.
Aerial
●
Select the PIP sub-picture broadcast signal.
Channel
●
Select the PIP sub-picture channel.
Size
●
Select the PIP sub-picture size.
Position
●
Select the PIP sub-picture position.
Sound Select
●
Select the audio source.
PIP restrictions:
PIP cannot be used while Smart Hub is active.
●
Turning off the TV automatically disables PIP.
●
Playing a game or using the karaoke feature on the main screen can result in lower PIP picture
●
quality.
For PIP to work, the main screen's source must be Component or HDMI and the input resolution
●
must be less than Full HD (FHD - 1080p). The sub screen supports, analogue channels, and AV
only. However, analogue channels, AV may not be supported depending on the country or model.
Page 79

Scanning for Available Channels
"
Availability depends on the specific model and area.
Broadcasting > Auto Tuning
Try Now
Automatically scans and indexes all channels received through the TV's antenna input connector.
"
If there are saved channels, this feature deletes the existing list and then saves the newly scanned channels.
If the TV is connected to a cable box or satellite receiver, you do not need to do this.
Select Broadcasting > Auto Tuning.
1.
Select Start when prompted. This initiates the Auto Programme function. The process can take up
2.
to 30 minutes to complete.
Auto Tuning
●
Scans for channels automatically and stores them in the TV’s memory.
Cable Search Option (when the aerial was set to Cable)
●
"
Availability depends on the specific model and area.
Sets additional search options such as the frequency and symbol rate for a cable network search.
Standby Auto Tuning
●
"
Availability depends on the specific model and area.
Auto-tune channels while your TV is in standby mode.
Alarm
●
"
Availability depends on the specific model and area.
Schedule timer to turn the TV on and scan channels automatically.
Page 80

Selecting the Broadcast Audio Options
Broadcasting > Audio Options
Audio Language
●
(Digital channels only)
Change the default value for audio languages.
Primary Audio: Set the primary audio language.
Secondary Audio: Set the secondary audio language.
"
The available language may differ depending on the broadcast.
Audio Format
●
(Digital channels only)
Change a desired audio format. The supported audio format may vary depending on the
broadcast programme.
Try Now
Audio Description
System > Accessibility > Audio Description
(Digital channels only)
This function handles the Audio Stream for the AD (Audio Description) which is sent along with the
Main audio from the broadcaster.
"
Audio Description: Turn the audio description function on or off.
"
Volume: Adjust the audio description volume.
Genre Selection
Broadcasting > Genre Selection
"
Availability depends on the specific model and area.
Turn the channel genre selection feature on or off when using the guide.
Adult genre enabling
Broadcasting > Adult genre enabling
"
Availability depends on the specific model and area.
Enables or disables all adult services. When disables, adult services will not be available.
Page 81

Using the Channel Settings
Broadcasting > Channel Settings
Country (Area)
Broadcasting > Channel Settings > Country (Area)
Select your country so that the TV can correctly auto-tune the broadcasting channels. This depends
on the country or region.
When the PIN input screen appears, enter your 4 digit PIN number.
Digital Channel
●
Change the country for digital channels.
Analogue Channel
●
Change the country for analogue channels.
Manual Tuning
Broadcasting > Channel Settings > Manual Tuning
Scans for a channel manually and stores in the TV.
If a channel is locked using the Channel Lock function, the PIN input window appears.
This function depends on the country and region.
Page 82

When Aerial Source is set to Terrestrial or Cable
Digital Channel Tuning
●
Scans for a digital channel.
Select the New.
1.
"
When selecting Aerial → Terrestrial: Channel, Frequency, Bandwidth
"
When selecting Aerial → Cable: Frequency, Modulation, Symbol Rate
Select the Search. When scanning has finished, a channel is updated in the channel list.
2.
Analogue Channel Tuning
●
Scans for an analogue channel.
Select the New.
1.
Set the Programme, Colour System, Sound System, Channel and Search.
2.
Select the Store. When scanning has finished, a channel is updated in the channel list.
3.
Channel mode
P (programme mode)
●
When tuning is complete, the broadcasting stations in your area have been assigned to position
numbers from P0 to P99. You can select a channel by entering the position number in this mode.
C (aerial channel mode) / S (cable channel mode)
●
These two modes allow you to select a channel by entering the assigned number for each aerial
broadcasting station or cable channel.
Fine-Tuning the Screen
Broadcasting > Channel Settings > Fine Tune
"
Available for analogue broadcasts only.
Analogue pictures can become shaky and full of noise. If this happens, you can fine-tune the signal
and/or reduce noise to clear up the picture.
Select Channel Settings > Fine Tune. An adjustment bar appears on the screen.
1.
Press the l or r button to make adjustments. Select Save or Close to apply the new setting.
2.
Select Reset to reset the Fine-Tune operation.
Try Now
Page 83

Transfer Channel List
Broadcasting > Channel Settings > Transfer Channel List
Imports or exports the channel map. When the PIN input screen appears, enter the PIN.
You should connect a USB storage device to use this function.
Import from USB: Import channel list from USB.
●
Export to USB: Export channel list to USB. This function is available when USB is connected.
●
Try Now
Delete CAM Operator Profile
"
Availability depends on the specific model and area.
Broadcasting > Channel Settings > Delete CAM Operator Profile
Select the CAM operator to delete.
Satellite System
"
Availability depends on the specific model and area.
Broadcasting > Channel Settings > Satellite System
A set of satellite dish settings must be configured for each wanted satellite before performing a
channel scan.
Satellite System is available when Aerial is set to Satellite. When the PIN input screen appears, enter
the PIN.
Satellite Selection: You can choose the satellites for this TV.
●
LNB Power: Enables or disables the power supply for the LNB.
●
LNB Settings: Configures the outdoor equipment.
●
Satellite: Selects the satellite for receiving digital broadcasts.
Transponder: Selects a transponder from the list or adds a new transponder.
DiSEqC Mode: Selects DiSEqC mode for the selected LNB.
Lower LNB Oscillators: Sets the LNB oscillators to a lower frequency.
Upper LNB Oscillators: Sets the LNB oscillators to a higher frequency.
Tone 22 kHz: Selects the Tone 22 kHz depending on the LNB type. For a universal LNB it should
be Auto.
Page 84

Positioner Settings: Configures the aerial positioner.
●
Positioner: Enables or disables the positioned control.
Positioner Type: Sets the positioned type between DiSEqC 1.2 and USALS (Universal Satellite
Automatic Location System).
My Longitude: Sets the longitude for my location.
–
My Latitude: Sets the latitude for my location.
–
Satellite Longitude Settings: Sets the longitude of user defined satellites.
–
User Mode: Sets the position of satellite aerial according to each satellite.
If you store the current position of satellite aerial according to a certain satellite, when the signal
of that satellite is needed, the satellite aerial can be moved to pre-populated position.
Satellite: Selects the satellite to set the position for.
–
Transponder: Selects a transponder from the list for signal reception.
–
Moving Mode: Selects the movement mode between discrete and continuous movement.
–
Step Size: Adjusts the step size degrees for the aerial rotation. Step Size is available when
–
Moving Mode is set to Step.
Go To Stored Position: Rotates the aerial to the stored satellite position.
–
Aerial Position: Adjusts and stores the aerial position for the selected satellite.
–
Store Current Position: Stores current position as the selected positioner limit.
–
Installer Mode: Sets limits to the scope of movement of satellite aerial or reset the position.
Generally, installation guide uses this function.
Limit Position: Selects the direction of the positioner Limit.
–
Aerial Position: Adjusts and stores the aerial position for the selected satellite.
–
Store Current Position: Stores the current position as the selected positioner Limit.
–
Go to zero: Moves the aerial to the reference position.
–
Reset positioner limit: Allows the aerial to rotate over the full arc.
–
Reset all settings: All satellite settings will be reset to the initial values.
●
Page 85

Common Interface
"
Availability depends on the specific model and area.
Broadcasting > Common Interface
CI Menu
●
Enables the user to select from the CAM-provided menu. Select the CI menu based on the menu
PC Card.
CAM video transcoding
●
You can configure the setting to transcode the video codec from the CAM automatically. Turn it
Off if you do not want to use it.
"
You must use a CAM that supports video codec transcoding.
Application Info
●
View information about the CAM inserted into the CI slot and about the “CI or CI+ CARD”
inserted into the CAM. You can install the CAM any time, with or without the TV turned on.
Purchase a CI CAM module at your nearest dealer or by phone.
1.
Firmly insert the “CI or CI+ CARD” into the CAM in the direction of the arrow.
2.
Insert the CAM with the “CI or CI+ CARD” into the common interface slot, in the direction of the
3.
arrow so that it aligns parallel with the slot.
Check if you can see a picture on a scrambled signal channel.
4.
Page 86

Changing the Picture Mode and Adjusting the Picture
Quality
Choosing the Right Picture Mode for the Viewing Environment
Picture > Picture Mode
The following picture modes utilise different contrast and brightness settings to provide the best
viewing experience for the environment.
"
When a PC is connected to the TV, Standard and Entertain modes are only available.
Dynamic
●
If the ambient lighting is too bright and makes the screen blurry, use this mode to make the
picture clearer.
Standard
●
This is the default mode suitable for most environments.
Natural
●
This mode is useful for reducing eye strain.
"
Availability depends on the specific model and area.
Movie
●
Appropriate for darkened rooms, for watching movies, and when experiencing eye fatigue.
Darkens the screen and reduces glare.
Try Now
Entertain
●
Sharpens images for a more dynamic viewing experience.
"
When a PC is connected to the TV, Entertain mode is available. If Entertain mode is not available, set
Edit Name to DVI PC or PC.
Stadium
●
Setting Sports Mode (System > Sports Mode) to On automatically configures Picture Mode to
Stadium for a more realistic viewing experience.
"
Stadium cannot be selected by the user.
Page 87

Adjusting the Picture Quality for Each Picture Mode
Picture > Backlight, Contrast, Brightness, Sharpness, Colour or Tint (G/R)
Select one of the settings to display its slide bar. Change the adjustment value using l, r. Change the
item using u, d. Adjusted values are applied to the current source and picture mode.
"
The Colour and Tint (G/R) settings cannot be adjusted when the TV is connected to a computer via an HDMI
to DVI cable.
Choose a Picture Mode and then adjust the settings.
Backlight
●
Try Now
Adjusts the brightness of individual pixels. Decreasing the brightness reduces power
consumption.
Contrast
●
Try Now
Adjusts the screen contrast.
Brightness
●
Try Now
Adjusts the overall brightness.
Sharpness
●
Try Now
Sharpens or dulls the edges of objects.
●
Colour
Try Now
Adjusts the overall colour saturation.
Tint (G/R)
●
Try Now
Adjusts the ratio of green to red. Increase the green value to saturate the greens and the red
value to saturate the reds.
"
Adjusted values are saved by the TV for the current source and picture mode, and remain in effect
each time the source and picture mode are selected. Consequently, the TV can have different picture
settings for each external source.
Applying the Current Picture Settings to Other Input Sources
Picture > Apply Picture Mode
You can apply the picture quality setting that you configured for the TV to all external devices
connected to the TV or to the current source only.
To apply the setting to all external devices connected to the TV, select All Sources. To apply the
setting to the current input only, select Current Source.
Try Now
Page 88

Fine-Tuning Each Picture Mode (Advanced Settings)
Picture > Advanced Settings
Try Now
Select Picture > Advanced Settings to fine-tune how images are displayed on the TV screen for each
Picture Mode.
"
Advanced Settings is only available when the Picture Mode is set to Standard or Movie.
"
When the TV is connected to a computer via an HDMI-DVI cable, only White Balance and Gamma can be
adjusted.
Choose a Picture Mode and then adjust the settings.
Dynamic Contrast
●
Try Now
Automatically adjusts the screen contrast. Use this option to achieve the optimal contrast setting.
Black Tone
●
Try Now
Adjusts the black colour depth.
Flesh Tone
●
Try Now
Darkens or lightens skin tones.
RGB Only Mode
●
Try Now
Adjusts the red, green, and blue levels individually.
Colour Space
●
Try Now
Adjusts the range of colours that can be displayed on screen. Auto automatically adjusts the
colour space depending on the input signal. Native applies a range that is wider than the input
signal. Custom allows you to adjust the colour space manually.
"
The availability of Custom depends on the specific model and area.
Page 89

White Balance
●
Try Now
Adjusts the colour temperature of the picture to make white objects look white and the overall
picture appear natural.
"
Availability depends on the specific model and area.
Adjust each colour's luminosity with the offset menu and the brightness with the gain menu. To
restore the default values, select Reset.
R-Offset / G-Offset / B-Offset: Adjust each colour’s (red, green, blue) darkness.
R-Gain / G-Gain / B-Gain: Adjust each colour’s (red, green, blue) brightness.
Gamma
●
Try Now
Adjusts the primary colour intensity.
Motion Lighting
●
Try Now
Adjusts the brightness in response to on-screen movements to reduce power consumption.
"
Availability depends on the specific model and area.
"
This feature is only available when the Picture Mode is set to Standard.
"
Adjusting the Contrast, Brightness, and other picture quality settings deactivates the feature.
Page 90

Adjusting the Picture for Easier Viewing (Picture Options)
Picture > Picture Options
Try Now
Select Picture > Picture Options to make additional adjustments for an easier viewing experience.
"
When the TV is connected to a computer via an HDMI-DVI cable, only Colour Tone can be adjusted.
Choose a Picture Mode and then adjust the settings.
Colour Tone
●
Try Now
Adjusts the colour tone. The setting is applied on an individual Picture Mode basis. When a
Picture Mode is changed, the corresponding setting will be applied automatically.
"
If the Picture Mode is set to Dynamic, you will only be able to choose Cool or Standard.
Digital Clean View
●
Try Now
Reduces static and ghosting caused by a weak signal. Selecting Auto Visualisation displays the
signal strength at the bottom the screen. Green indicates the best possible signal.
"
Available for analogue channels only.
MPEG Noise Filter
●
Try Now
Reduces MPEG noise and improves video quality.
HDMI Black Level
●
Try Now
Some external devices connected to the TV via an HDMI cable can have issues, such as low
black level, low contrast, and dull colours. Use HDMI Black Level to adjust the black level to
compensate.
"
This is only available when the Input Signal, connected to the TV via an HDMI connector, is set to
RGB444.
Film Mode
●
Try Now
Optimises the picture quality for movies. Select this mode for watching movies.
"
This feature is only available when watching TV or when the input signal is AV, Component (480i,
1080i), or HDMI (1080i).
LED Clear Motion
●
"
Availability depends on the specific model and area.
Removes drag from fast scenes with a lot of movement to provide a clear picture.
"
When LED Clear Motion is On, the screen appears darker than when it is Off.
"
If LED Clear Motion is On at 60Hz video signal, the screen may flicker.
Page 91

Picture Support Functions
PIP Broadcast Viewing
Picture > PIP
Use the PIP ("Picture-In-Picture") function to watch TV in a small window while also watching content
from a DVD player, Blu-ray player, computer, or a different external device in the background.
Select Picture > PIP to display the PIP settings window. This settings window contains the following
options:
PIP
●
Activates/deactivates PIP.
Aerial
●
Select the PIP sub-picture broadcast signal.
Channel
●
Select the PIP sub-picture channel.
Size
●
Select the PIP sub-picture size.
Position
●
Select the PIP sub-picture position.
Sound Select
●
Select the audio source.
PIP restrictions:
PIP cannot be used while Smart Hub is active.
●
Turning off the TV automatically disables PIP.
●
Playing a game or using the karaoke feature on the main screen can result in lower PIP picture
●
quality.
For PIP to work, the main screen's source must be Component or HDMI and the input resolution
●
must be less than Full HD (FHD - 1080p). The sub screen supports, analogue channels, and AV
only. However, analogue channels, AV may not be supported depending on the country or model.
Page 92

Changing the Picture Size and Position
Choosing the Right Screen Size
Picture > Picture Size > Picture Size
Try Now
Most TV programmes and videos are displayed in full screen, but some programmes and videos are
larger or smaller. Change the screen size for such programmes and videos so that the picture fits the
screen better.
"
Supported screen sizes vary depending on the input signal. Refer to the "Picture Sizes and Input Signals"
section for more information about supported screen sizes.
Auto Wide
●
Automatically adjusts the picture size to the 16:9 aspect ratios.
16:9
●
Set the picture to the 16:9 wide-screen format.
Wide Zoom
●
Magnifies the picture size more than 4:3. A magnified picture can be moved up and down.
Zoom
●
Magnifies the 16:9 wide pictures vertically to fit the screen size. A magnified picture can be
moved up and down.
"
Zoom is not available when Picture Size set to Wide Zoom.
4:3
●
Sets the picture to basic 4:3 mode.
Do not leave the TV in 4:3 mode for an extended period. The dark borders displayed on the
[
left and right / top and bottom of the screen may cause image retention. This phenomenon can
appear on LED and PDP TVs. (Screen burn - this phenomenon can appear on PDP TVs.) This is
not covered by the warranty.
Screen Fit
●
Displays the full image without any cutoff.
Custom
●
Magnifies or shrinks 16:9 pictures vertically and/or horizontally. A magnified or shrunk picture can
be moved left, right, up, and down.
Page 93

Adjusting the Screen Position
Picture > Picture Size > Zoom/Position or Position
Adjusts the screen position.
This option is only available with Picture Size set to Wide Zoom, Zoom, or Screen Fit. When the TV is
tuned to a digital channel, the screen position cannot be adjusted if the Picture Size is set to Screen
Fit.
To adjust the screen's position, select Picture > Picture Size > Zoom/Position or Position. A pop-
1.
up window appears.
Select Zoom or Position again from the pop-up window.
2.
Adjust the screen. Once done, select Zoom or Position and then Close. Select Reset to reset the
3.
screen position.
Adjusting the 4:3 Screen Size
Picture > Picture Size > 4:3 Screen Size
Available only when picture size is set to Auto Wide. You can determine the desired picture size at
the 4:3 WSS (Wide Screen Service) size or the original size. Each European country requires different
picture size.
"
Not available in Component or HDMI mode.
Try Now
Listening to Audio Only with the Screen Turned Off (Picture Off)
Picture > Picture Off
Turns off the screen and plays audio through the speakers only. To turn the screen back on, press any
button other than the TV and VOLUME buttons.
Try Now
Resetting the Picture Mode Settings
Picture > Reset Picture
Use this option to reset the current Picture Mode to its factory settings. This does not affect the
settings of other Picture Modes.
Try Now
Page 94

Changing the Sound Mode and Using Sound Effects
Choosing the Right Sound Mode for the Environment
Sound > Sound Mode
Try Now
Sound modes apply preset adjustments to the sound output, optimised for different viewing and
listening circumstances.
"
The sound modes cannot be used when you are listening to audio through external speakers.
Standard
●
This is the normal sound mode.
Music
●
This mode emphasises normal music instead of voice.
Movie
●
This mode is calibrated to provide the best sound for movies.
Clear Voice
●
This mode emphasises voice.
Amplify
●
This mode increases the overall intensity of high-frequency sounds for a better listening
experience. It is designed for hearing-impaired listeners.
Stadium
●
Setting Sports Mode (System > Sports Mode) to On automatically configures Sound Mode to
Stadium for a more realistic viewing experience.
"
Stadium cannot be selected by the user.
Page 95

Using Sound Effects
Sound > Sound Effect
Try Now
Use sound effects to alter how the TV projects sound.
Restrictions:
Sound effects can only be used with the Sound Mode set to Standard.
●
Sound effects cannot be used when you are listening to audio through external speakers.
●
Choose a Sound Effect and then adjust the settings.
DTS TruSurround
●
Try Now
Produces sound that will make you feel like you are sitting in a movie theatre or concert hall.
DTS TruDialog
●
Try Now
Increases voice intensity to make dialog clearer.
Equaliser
●
Try Now
Lets you adjust the speaker balance and make bandwidth adjustments. Select Reset to reset the
settings.
Page 96

Sound Support Functions
Selecting Speakers
Sound > Speaker Settings > TV Sound Output
This lets you choose which speakers the TV uses for audio output. To listen to the audio through
the speakers of a connected receiver or home theatre only, select Receiver or Audio Out. To listen
to audio through the TV's speakers and the speakers of a connected AV receiver or home theatre
simultaneously, select TV Speaker. If this causes an echo effect, choose any speaker option other than
TV Speaker to mute the TV speakers, or turn off the receiver or home theatre.
"
Using external speakers alone disables the volume button and the mute function. In addition, certain Sound
options will also be disabled.
"
To listen to the audio through the speakers of a connected receiver or home theatre only, please connect
SPDIF cable.
Try Now
Designating the TV's Installation Type
Sound > Speaker Settings > TV Speaker > TV Installation Type
Specify the TV's installation type. Choose between Wall Mount and Stand to optimise the TV's sound
automatically.
Enabling the Sound (Additional Settings)
Sound > Additional Settings
Configure additional settings for optimum audio output.
DTV Audio Level
●
(Digital channels only)
The TV cannot freely control the volume of the digital audio that it sends to the AV receiver. Use
this to set the digital audio volume at a comfortable level.
"
According to the type of broadcast signal, MPEG / HE-AAC can be adjusted between -10dB and 0dB.
"
To increase or decrease the volume, adjust between the range 0 and -10 respectively.
Audio Format, Audio Delay
●
This Smart TV is SPDIF-enabled. The Sony Philips Digital Interface (SPDIF) provides digital audio
output to speakers and various digital devices, including A/V Receivers and home theatres.
Audio Format
Selects the Digital Audio output (SPDIF) format. The available Digital Audio output (SPDIF)
formats may vary depending on the input source.
Try Now
Try Now
Try Now
Page 97

Audio Delay
Try Now
This setting helps correct timing mismatches between the audio and video tracks when you are
watching TV and listening to audio through a digital audio device. Enabling the feature displays a
slide bar that you can use to adjust the delay by up to 250ms.
Dolby Digital Comp
●
Try Now
Some digital TV programmes provide 5.1-channel Dolby audio. This TV converts Dolby audio to
stereo audio so that it can play the sound through the TV’s speakers. There are two methods to
choose from. RF is for better sound at lower volumes, and Line is for higher volumes.
Auto Volume
●
Try Now
When you change channels, video sources, or content, Auto Volume automatically adjusts the
TV's volume level so that the volume level remains the same for all sources. For example, if you
switch from a streaming video application to a Blu-ray player or a favourite TV channel, Auto
Volume can modify the volume up to 12db to equalise the sound.
The Auto Volume function has two settings: Normal and Night. Normal applies a normal level
of volume adjustment. Night applies a slightly lower volume level and is ideal for late-night TV
viewing. If you want to use the volume control of a connected source device to control the sound,
deactivate the Auto Volume function. When you use the Auto Volume function with a source
device, the device's volume control may not function properly.
Resetting All Sound Settings
Sound > Reset Sound
Try Now
Use to reset all sound settings to the factory defaults.
Page 98

Setting the Time and Using the Timer
Setting the Current Time
System > Time > Clock
Try Now
Set the clock manually or automatically. Once the clock has been set, you can select the INFO button
to check the current time.
"
The clock must be reset every time the power is disconnected.
Setting the Clock using Digital Broadcast Info
System > Time > Clock > Clock Mode
Set Clock Mode to Auto. The TV automatically downloads the correct time from a digital channel. To
enable this option, the TV's Antenna jack must be connected to either an antenna or a cable output
and must be receiving digital broadcasts. The accuracy of the time information received may vary
depending on the channel and signal. If your TV is connected to a set-top-box or satellite box using
HDMI or Component connections, you must set the time manually.
"
Availability depends on the specific model and area.
Try Now
Time Offset
System > Time > Clock > Time Offset
Try Now
If the time set automatically is incorrect, you can offset the clock in 1-hour increments by as much as
-/+ 12 hours. Select System > Time > Clock > Time Offset and offset the clock to the correct time.
"
Time Offset adjusts the time through network connections and is only available if the Clock Mode is set to
Auto and the TV is connected to the Internet though a local area network.
"
Time Offset will adjust the time if the TV fails to receive time information through normal digital broadcast
signals.
Setting the Clock Manually
Manually enter the time. Set Clock Mode to Manual and then select Clock Set to enter the current
time and date.
Clock Set: Set the current Date and Time.
●
Time Zone: Select your time zone.
●
"
This function is only available when the Clock Mode is set to Auto.
DST: Switches the DST (Daylight Saving Time) function on or off.
●
"
This function is only available when the Clock Mode is set to Auto.
GMT: Selects your time zone.
●
"
When Country is set to others, you can use this function.
Page 99

Using the Timers
Using the Sleep Timer
System > Time > Sleep Timer
Try Now
This automatically shuts off the TV after a preconfigured period of time. Select System > Time > Sleep
Timer. You can set the timer up to 180 minutes in 30-minute increments.
Turning On the TV using On Timer
System > Time > On Timer
Set the On Timer so that the TV turns on automatically at a chosen time. Select System > Time > On
Timer. The timer configuration window appears. Configure the following settings:
"
The On Timer is only available if the Clock has been set.
Setup
●
Specify the dates and the duration. Use Manual to specify the days of the week.
Time
●
Set the time that the TV turns on automatically.
Volume
●
Specify the volume when the TV turns on.
Try Now
Source
●
Select the signal source from the list. Specify the channel or source to be displayed when the
TV turns on. To specify a USB device, a USB device must first be connected to the TV. To play
media from an HDMI or Component source such as a DVD player or Blu-ray player, the device
must already be turned on, and playing the media when the TV is turned on.
Page 100

Aerial
●
Set the Source to TV to select a broadcast signal.
Channel
●
Set the Source to TV to select a channel.
Music / Photo
●
Set the Source to USB to choose a USB folder that contains music or photo files. Selecting both
music and image files plays the music files and displays the images at the same time.
Restrictions:
This feature will not function properly if the selected USB device does not contain media files or
●
a folder has not been specified.
The slideshow will not start if there is only one image file on the USB device.
●
Folders with long names cannot be selected.
●
Always use different folder names for multiple USB devices.
●
Use a USB memory stick or multi-card reader. The On Timer may not work with certain battery-
●
powered USB devices, MP3 players, or PMPs because the TV may take too long to recognise the
device.
Turning Off the TV Using Off Timer
System > Time > Off Timer
Set the Off Timer to turn the TV off automatically at a specific time. Select System > Time > Off
Timer. The timer configuration window appears. Configure the following settings:
"
The Off Timer is only available if the Clock has been set.
Setup
●
Specify the dates and the duration. Use Manual to specify the days of the week.
Time
●
Set the time that the TV turns off automatically.
Try Now
 Loading...