

Page 1
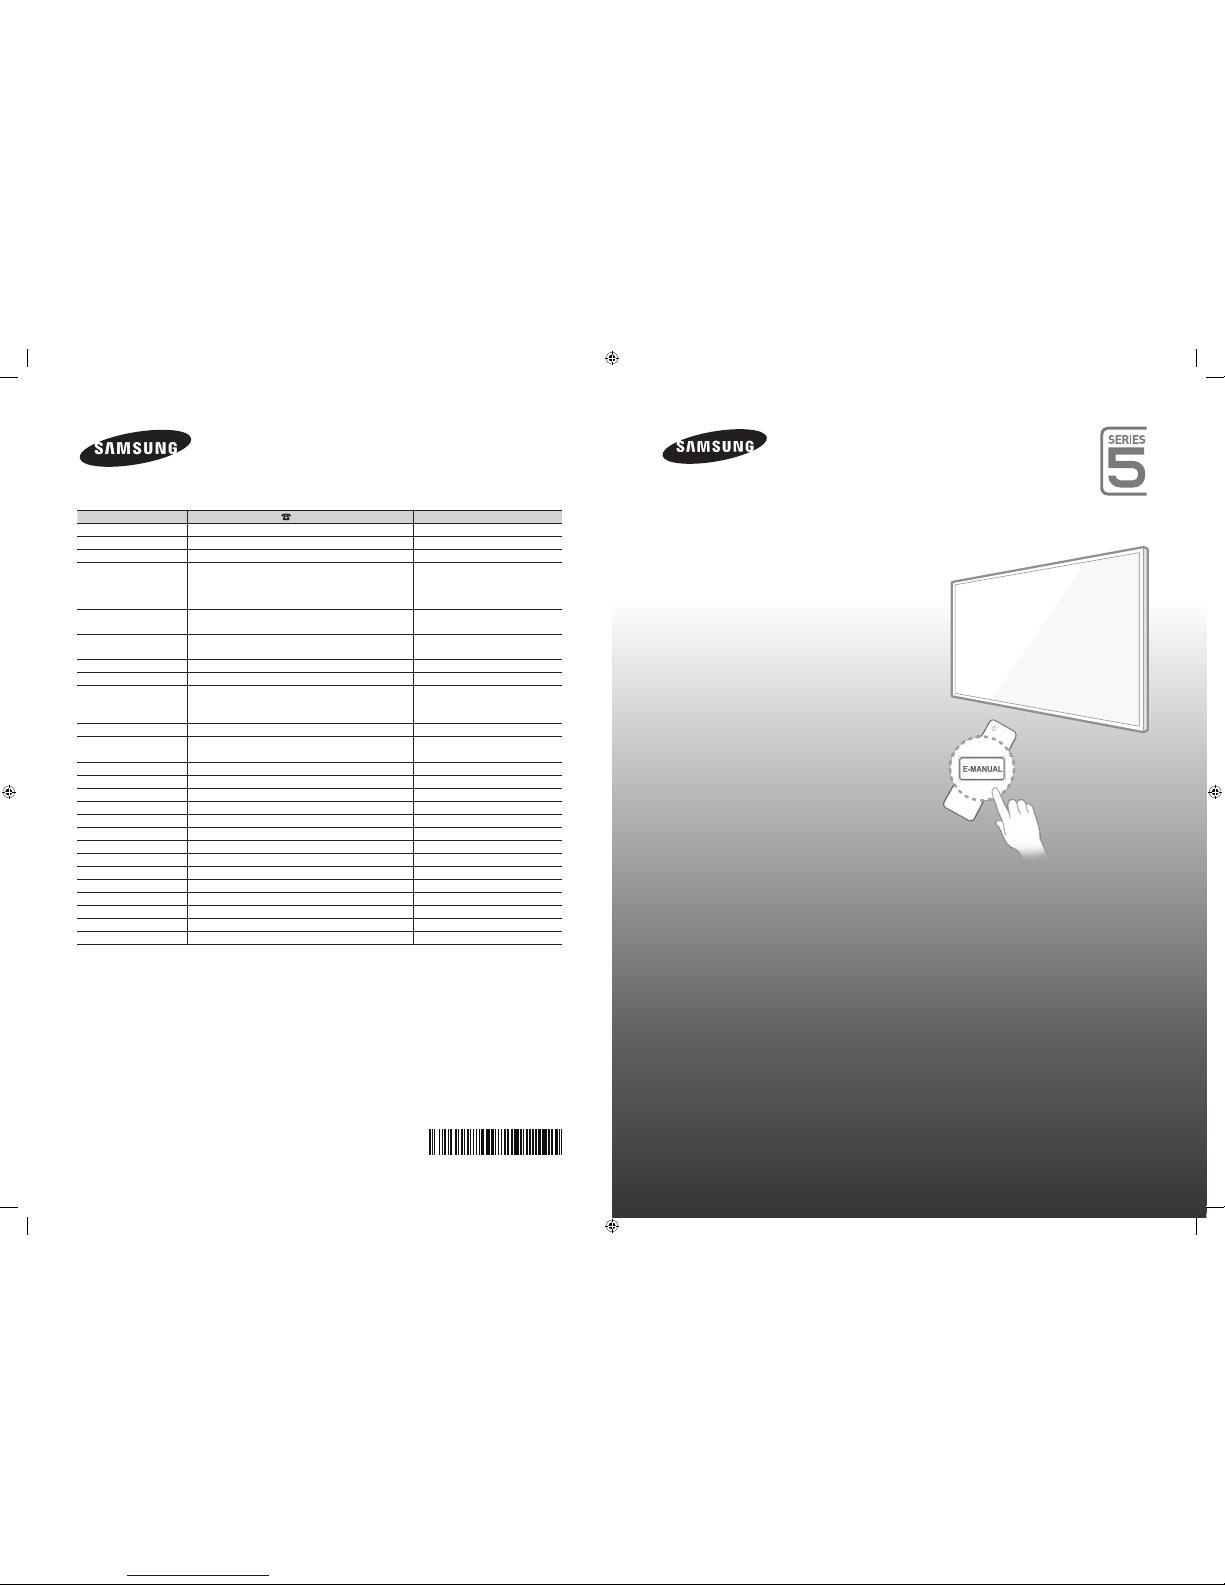
Contact SAMSUNG WORLD WIDE
If you have any questions or comments relating to Samsung products, please contact the SAMSUNG customer care centre.
Country
Customer Care Centre
Web Site
AUSTRALIA 1300 362 603 www.samsung.com/au/support
NEW ZEALAND 0800 SAMSUNG (0800 726 786) www.samsung.com/nz/support
CHINA 400-810-5858 www.samsung.com/cn/support
HONG KONG (852) 3698 4698 www.samsung.com/hk/support
(Chinese)
www.samsung.com/hk_en/support
(English)
INDIA 1800 3000 8282 - Toll Free
1800 266 8282 - Toll Free
www.samsung.com/in/support
INDONESIA 0800112888
021-56997777
www.samsung.com/id/support
JAPAN 0120-327-527 www.samsung.com/jp/support
MALAYSIA 1800-88-9999 www.samsung.com/my/support
PHILIPPINES 1-800-10-7267864 [PLDT]
1-800-8-7267864 [Globe landline and Mobile]
02-4222111 [Other landline]
www.samsung.com/ph/support
SINGAPORE 1800-SAMSUNG(726-7864) www.samsung.com/sg/support
THAILAND 0-2689-3232,
1800-29-3232
www.samsung.com/th/support
TAIWAN 0800-32-9999 www.samsung.com/tw/support
VIETNAM 1 800 588 889 www.samsung.com/vn/support
GEORGIA 0-800-555-555 www.samsung.com/support
ARMENIA 0-800-05-555 www.samsung.com/support
AZERBAIJAN 088-55-55-555 www.samsung.com/support
UZBEKISTAN 8-10-800-500-55-500 www.samsung.com/support
KYRGYZSTAN 8-10-800-500-55-500 www.samsung.com/kz_ru/support
TADJIKISTAN 8-10-800-500-55-500 www.samsung.com/support
MONGOLIA ‘7-800-555-55-55 www.samsung.com/support
BELARUS 810-800-500-55-500 www.samsung.com/support
MOLDOVA 0-800-614-40 www.samsung.com/support
ALGERIA 021 36 11 00 www.samsung.com/n_africa/support
PAKISTAN 0800-Samsung (72678) www.samsung.com/pk/support
TUNISIA 80-1000-12 www.samsung.com/n_africa/support
LED TV
user manual
Thank you for purchasing this Samsung product.
To receive more complete service, please register
your product at
www.samsung.com/register
Model _____________ Serial No. _____________
© 2014 Samsung Electronics Co., Ltd. All rights reserved.
BN68-06310U-00
[UH5200-ME]BN68-06310U-00ENG.indb 1 2014-06-25 1:22:43
Page 2

English - 2
Important Safety Instructions
Warning! Important Safety Instructions
(Please read the appropriate section that corresponds to the marking on your Samsung
product before attempting to install the product.)
CAUTION
CAUTION: TO REDUCE THE RISK OF ELECTRIC SHOCK,
DO NOT REMOVE COVER (OR BACK). THERE ARE
NO USER SERVICEABLE PARTS INSIDE. REFER ALL
SERVICING TO QUALIFIED PERSONNEL.
RISK OF ELECTRIC SHOCK DO NOT OPEN
This symbol indicates that high voltage is
present inside. It is dangerous to make any kind
of contact with any internal part of this product.
This symbol alerts you that important literature
concerning operation and maintenance has
been included with this product.
• The slots and openings in the cabinet and in the back or bottom are provided for necessary ventilation. To ensure reliable operation of this apparatus,
and to protect it from overheating, these slots and openings must never be blocked or covered.
− Do not cover this apparatus in a confined space, such as a bookcase, or built-in cabinet, unless proper ventilation is provided.
− Do not place this apparatus near or over a radiator or heat resistor, or where it is exposed to direct sunlight.
− Do not place a water containing vessel (vases etc.) on this apparatus, as this can result in a risk of fire or electric shock.
• Do not expose this apparatus to rain or place it near water (near a bathtub, washbowl, kitchen sink, or laundry tub, in a wet basement, or near a
swimming pool etc.). If this apparatus accidentally gets wet, unplug it and contact an authorised dealer immediately. Make sure to pull out the power
cord from the outlet before cleaning.
• This apparatus use batteries. In your community there might be regulations that require you to dispose of these batteries properly under
environmental considerations. Please contact your local authorities for disposal or recycling information.
• Do not overload wall outlets, extension cords or adaptors beyond their capacity, since this can result in fire or electric shock.
• Power-supply cords should be routed so that they are not likely to be walked on or pinched by items placed upon or against them, paying particular
attention to cords at plug end, adaptors and the point where they exit from the appliance.
• To protect this apparatus from a lightning storm, or when it is left unattended and unused for long periods of time, unplug it from the wall outlet and
disconnect the antenna or cable system. This will prevent damage to the set due to lightning and power line surges.
• Before connecting the AC power cord to the DC adaptor outlet, make sure the voltage designation of the DC adaptor corresponds to the local
electrical supply.
• Never insert anything metallic into the open parts of this apparatus. Doing so may create a danger of electric shock.
• To avoid electric shock, never touch the inside of this apparatus. Only a qualified technician should open this apparatus.
• Make sure to plug the power cord in until it is firmly inserted. When removing the power cord, make sure to hold the power plug when pulling the
plug from the outlet. Do not touch the power cord with wet hands.
• If this apparatus does not operate normally - in particular, if there are any unusual sounds or smells coming from it - unplug it immediately and
contact an authorised dealer or service centre.
• Be sure to pull the power plug out of the outlet if the TV is to remain unused or if you are to leave the house for an extended period of time (especially
when children, elderly or disabled people will be left alone in the house).
− Accumulated dust can cause an electric shock, an electric leakage or a fire by causing the power cord to generate sparks and heat or the
insulation to deteriorate.
• Be sure to contact an authorised service centre, when installing your set in a location with heavy dust, high or low temperatures, high humidity,
chemical substances or where it will operates for 24 hours a day such as in an airport, a train station, etc. Failure to do so may cause serious
damage to your set.
• Use only a properly grounded plug and receptacle.
• An improper ground may cause electric shock or equipment damage. (Class l Equipment only.)
• To disconnect the apparatus from the mains, the plug must be pulled out from the mains socket, therefore the mains plug shall be readily operable.
• Do not allow children to hang onto the product.
• Store the accessories (battery, etc.) in a location safely out of the reach of children.
• Do not install the product in an unstable location such as a shaky self, a slanted floor or a location exposed to vibration.
• Do not drop or impart any shock to the product. If the product is damaged, disconnect the power cord and contact a service centre.
• Unplug the power cord from the power outlet and wipe the product using a soft, dry cloth. Do not use any chemicals such as wax, benzene, alcohol,
thinners, insecticide, aerial freshener, lubricant or detergent. This may damage the appearance or erase the printing on the product.
• Apparatus shall not be exposed to dripping or splashing.
• Do not dispose of batteries in a fire.
• Do not short circuit, disassemble or overheat the batteries.
• Danger of explosion if battery is incorrectly replaced. Replace only with the same or equivalent type.
• WARNING - TO PREVENT THE SPREAD OF FIRE, KEEP CANDLES OR OTHER OPEN FLAMES AWAY FROM THIS PRODUCT AT
ALL TIMES.
Figures and illustrations in this User Manual are provided for reference only and may differ from actual product
appearance. Product design and specifications may be changed without notice.
[UH5200-ME]BN68-06310U-00ENG.indb 2 2014-06-25 1:22:43
Page 3

English - 3
List of Features
• Media Play: Allows you to play music files, pictures, and movies saved on a USB device.
• e-Manual: Allows you to read on screen full manual. (p. 7)
Accessories
✎
Please make sure the following items are included with your TV. If any items are missing, contact your dealer.
✎
The items’ colours and shapes may vary depending on the models.
✎
Cables not included in the package contents can be purchased separately.
• Remote Control & Batteries (AAA x 2) • Power Cord
• Regulatory Guide / Warranty Card • Owner’s Instructions
Cable Holder Assembling the Cable Holder
[UH5200-ME]BN68-06310U-00ENG.indb 3 2014-06-25 1:22:44
Page 4

English - 4
Viewing the Remote Control
✎
This remote control has Braille points on the Power, Channel, and Volume buttons and can be used by visually
impaired persons.
Installing batteries (Battery size: AAA)
AB CD
SLEEP
E-MANUAL
Turns the TV on and off.
Displays and selects the available video sources.
Returns to the previous channel.
Cuts off the sound temporarily.
Changes channels.
Displays channel lists on the screen.
Turns the Soccer Mode on or off.
Displays information on the TV screen.
Exits the menu.
Press to directly access to channels.
Adjusts the volume.
Alternately select Teletext ON, Double, Mix
or OFF.
Displays the main on-screen menu.
Quickly select frequently used functions.
Views the Media Play.
Returns to the previous menu.
Selects the on-screen menu items and
changes the values seen on the menu.
E-MANUAL: Displays the e-Manual guide.
(p.7)
: Provides a way to capture the images
and audio.
SLEEP: Automatically shuts off the TV at a
preset time.
Use these buttons in a specific feature.
Use these buttons according to the direction on
screen.
[UH5200-ME]BN68-06310U-00ENG.indb 4 2014-06-25 1:22:44
Page 5

English - 5
Using the TV’s Controller (Panel Key)
The TV's Controller, a small joy stick like button on the rear left side of the TV, lets you control the TV without the remote
control.
✎
Some functions which require a PIN code may not be available.
✎
The product colour and shape may vary depending on the model.
✎
Exits the menu when pressing the controller more than 1 second.
✎
When using the controller in the up/down/left/right directions, make sure you do not push the controller in first. If
you push the controller in first it will not move in the up/down/left right directions.
Remote control sensor
TV Controller
The image is drawn by facing
the front side of the TV.
Function menu
Return
Selecting the Media Play
Selecting a Source
Power off
Selecting the Menu
Standby mode
Do not leave your TV in standby mode for long periods of time (when you are away on a holiday, for example). A small
amount of electric power is still consumed even when the power button is turned off. It is best to unplug the power cord.
Initial Setup
When the TV is initially powered on, a sequence of on-screen prompts will assist in configuring basic settings. Press the
POWERP button. Setup is available only when the source is set to TV.
✎
If you connect any device to HDMI IN 1(STB) before starting the installation, Channel Source will be changed to
Set-top box automatically. If you do not want to select Set-top box, please select Aerial.
If You Want to Reset This Feature...
Select System - Setup (Initial Setup). Enter your 4 digit PIN number. The default password is “0-0-0-0”. If you want to
change the PIN number, use the Change PIN function.
You should do Setup (MENU → System) again at home even though you did in shop already.
✎
If you forget the PIN code, press the remote control buttons in the following sequence in Standby mode, which
resets the PIN to “0-0-0-0”: MUTE → 8 → 2 → 4 → POWER (on)
[UH5200-ME]BN68-06310U-00ENG.indb 5 2014-06-25 1:22:45
Page 6

English - 6
Changing the Input Source
Source
TV / HDMI1 / HDMI2/DVI / AV / Component
Use to select TV or other external input sources such as DVD / Blu-ray players / cable box / STB satellite receiver
connected to the TV.
✎
Press the SOURCE button. In the displayed Source list, connected inputs will be highlighted.
✎
PC(D-Sub) input is not supported. If you want to connect PC to the TV, you can connect the HDMI to DVI cable
with the HDMI IN 2(DVI) port on the TV.
✎
Press the TOOLS button.
• Edit Name
You can set an external input source name you want.
− When connecting a PC to the HDMI IN 2(DVI) port with HDMI cable, you should set the TV to PC mode under
Edit Name.
− When connecting a PC to the HDMI IN 2(DVI) port with HDMI to DVI cable, you should set the TV to DVI PC
mode under Edit Name.
− When connecting an AV devices to the HDMI IN 2(DVI) port with HDMI to DVI cable, you should set the TV to
DVI Devices mode under Edit Name.
• Information
You can see detailed information about the connected external device.
[UH5200-ME]BN68-06310U-00ENG.indb 6 2014-06-25 1:22:45
Page 7

English - 7
How to use the e-Manual
You can find instructions about your TV’s features in the e-Manual in your TV. To use, press the
E-MANUAL button on your remote. Move the cursor using the up/down/right/left buttons to highlight
a category, then a topic, and then press the ENTERE button. The e-Manual displays the page you
want to see.
You can also access it through the menu:
O MENUm → Support → e-Manual → ENTERE
✎
To return to the e-Manual main menu, press the E-MANUAL button on the remote.
Screen Display
Basic Features
Changing the Preset Picture Mode
Adjusting Picture Settings
Changing the Picture Options
Changing the Preset Sound Mode
Adjusting Sound Settings
}
Index E Enter e Exit
Currently displayed
video, TV
Programme, etc.
The category list. Press l or r button
to select the category you want.
Displays the sub-menu list. Use the
arrow buttons on your remote to move
the cursor. Press ENTERE button to
select the sub-menu you want.
Operation Buttons
} Index: Displays the index screen.
− Index available depending on the language.
E Enter: Selects a category or sub-menu.
e Exit: Exit the e-Manual.
<Viewing the Contents>
a Try now: Displays the OSD menu that corresponds to the topic. To return to the e-Manual screen, press the
E-MANUAL button.
b Home: Moves to the e-Manual home screen.
L Page: Moves to previous or next page.
{ Zoom: Magnifies a screen.
− Press the { (Zoom) button to magnify the screen. You can scroll through the magnified screen by using the u
or d buttons. To return to the screen to normal size, press the RETURN button.
[UH5200-ME]BN68-06310U-00ENG.indb 7 2014-06-25 1:22:46
Page 8
English - 8
How to toggle between an e-Manual topic and the corresponding OSD menu(s).
✎
This function is not enabled in some menus.
✎
You cannot use the Tr y n ow function if the menu is not activated.
Method 1 Method 2
1. If you want to use the menu that corresponds to an
e-Manual topic, press the red button to select Try
now.
2. To return to the e-Manual screen, press the
E-MANUAL button.
1. Press the ENTERE button when a topic is
displayed. “Are you sure?” appears. Select Yes ,
and then press the ENTERE button. The OSD
window appears.
2. To return to the e-Manual screen, press the
E-MANUAL button.
How to search for a topic on the index page
✎
This function may not be supported depending on the language.
1. If you want to search a keyword, press the blue button to select Index.
2. Press the l or r button to select a character order you want.
3. Press the u or d button to select a keyword you want to see, and then press the ENTERE button.
4. You can view the corresponding e-Manual instruction screen.
✎
To close the Index screen, press the RETURN button.
[UH5200-ME]BN68-06310U-00ENG.indb 8 2014-06-25 1:22:46
Page 9
English - 9
Teletext Feature
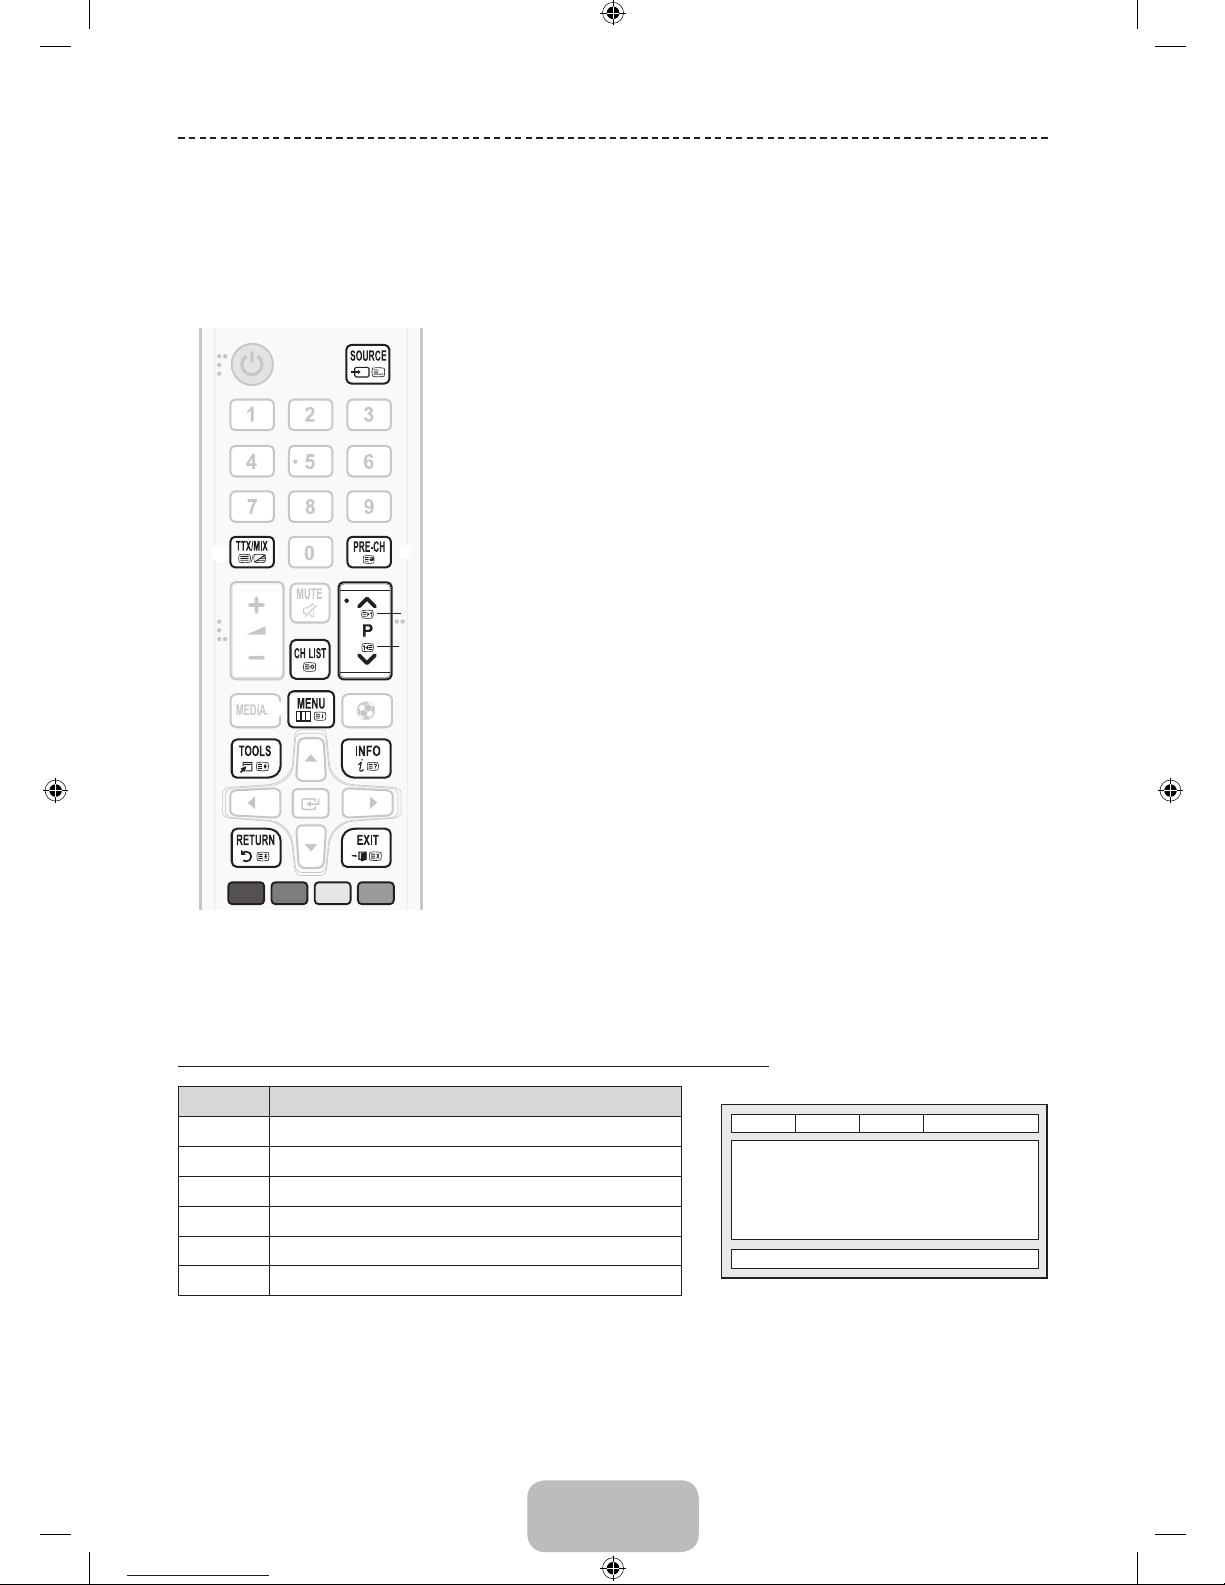
The index page of the Teletext service gives you information on how to use the service. For Teletext information to be
displayed correctly, channel reception must be stable. Otherwise, information may be missing or some pages may not
be displayed.
✎
You can change Teletext pages by pressing the numeric buttons on the remote control.
MEDIA.P
A B C D
1
4
6
0
7
@
!
8
9
2
3
5
1
0 (mode): Selects the Teletext mode (LIST/FLOF). If pressed during LIST
mode, switches the mode to List save mode. In List save mode, you can
save a Teletext page into a list using the 8(store) button.
2
/ (Full TTX/Double TTX/Mix/Off): Activates the Teletext mode for the
current channel. Press the button twice to overlap the Teletext mode with the
current broadcasting screen. Press it one more time to exit teletext.
3
1 (sub-page): Displays the available sub-page.
4
8 (store): Stores the Teletext pages.
5
6 (index): Displays the index (contents) page at any time while you are
viewing Teletext.
6
4 (size): Displays the teletext on the upper half of the screen in double-size.
To move the text to the lower half of the screen, press it again. For normal
display, press it once again.
7
9 (hold): Holds the display at the current page, in the case that there are
several secondary pages that follow automatically. To undo, press it again.
8
2 (page up): Displays the next Teletext page.
9
3 (page down): Displays the previous Teletext page.
0
5 (reveal): Displays the hidden text (answers to quiz games, for example).
To display the normal screen, press it again.
!
7 (cancel): Shrinks the Teletext display to overlap with the current
broadcast.
@
Colour buttons (red, green, yellow, blue): If the FASTEXT system is used by
the broadcasting company, the different topics on a Teletext page are colourcoded and can be selected by pressing the coloured buttons. Press the
colour corresponding to the topic of your choice. A new colour coded page
is displayed. Items can be selected in the same way. To display the previous
or next page, press the corresponding coloured button.
The Teletext pages are organised according to six categories
Part Contents
A
E
F
B C D
A Selected page number.
B Broadcasting channel identity.
C Current page number or search indications.
D Date and time.
E Text.
F Status information. FASTEXT information.
[UH5200-ME]BN68-06310U-00ENG.indb 9 2014-06-25 1:22:46
Page 10
English - 10
Troubleshooting
If the TV seems to have a problem, first try this list of possible problems and solutions. If none of these troubleshooting
tips apply, visit “www.samsung.com”, then click on Support, or call Samsung customer service centre.
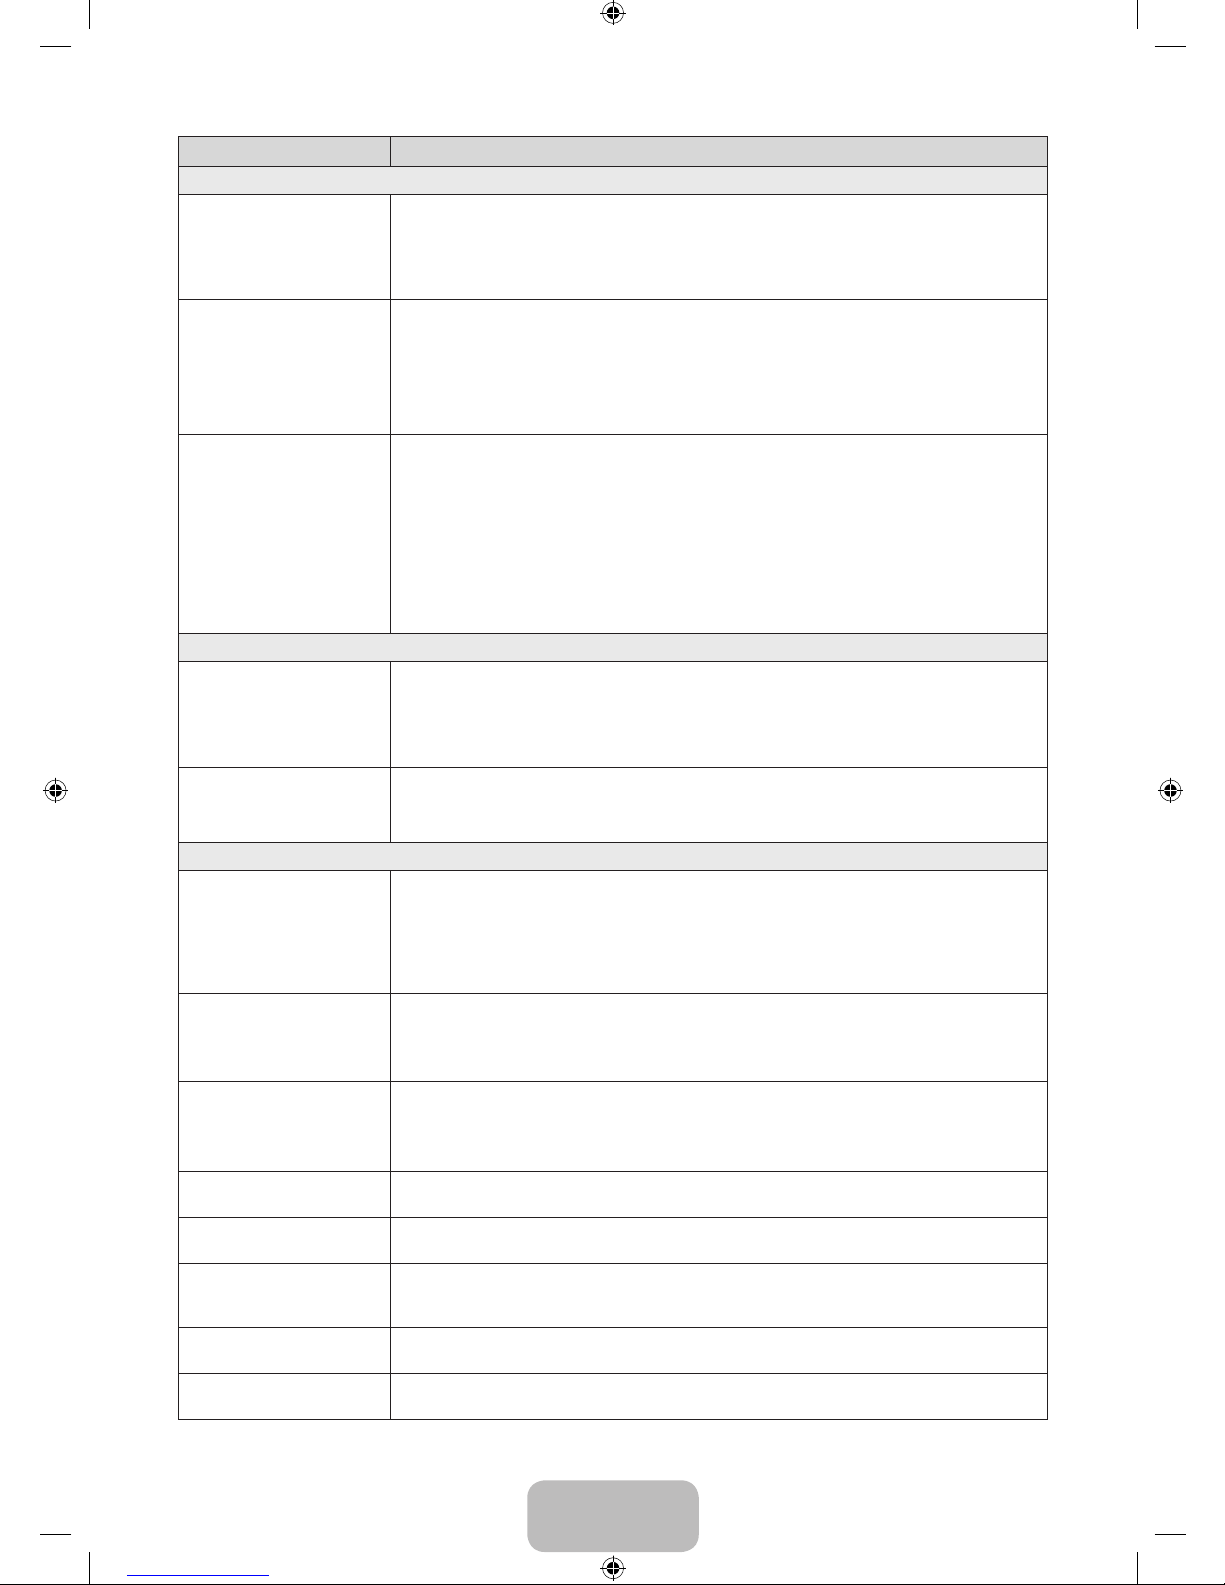
Issues Solutions and Explanations
Picture Quality
First of all, please perform the Picture Test and confirm that your TV is properly displaying test image.
(go to MENU - Support - Self Diagnosis - Picture Test) If the test image is properly displayed, the
poor picture may caused by the source or signal.
The TV image does not look as
good as it did in the store.
• If you have an analogue cable/set top box, upgrade to a digital set top box. Use HDMI or
Component cables to deliver HD (high definition) picture quality.
• Cable/Satellite subscribers: Try HD stations from the channel line up.
• Aerial connection: Try HD stations after performing Auto tuning.
• Many HD channels are up scaled from SD (Standard Definition) contents.
• Adjust the Cable/Set top box video output resolution to 1080i or 720p.
• Make sure you are watching the TV at the minimum recommended distance based on the size
and definition of the signal.
The picture is distorted:
macroblock error, small block,
dots, pixelization
• Compression of video contents may cause picture distortion especially in fast moving pictures
such as sports and action movies.
• Low signal level or bad quality can cause picture distortion. This is not a TV issue.
• Mobile phones used close to the TV (cca up to 1m) may cause noise in picture on analogue and
digital TV.
Colour is wrong or missing.
• If you’re using a component connection, make sure the component cables are connected to the
correct jacks. Incorrect or loose connections may cause colour problems or a blank screen.
There is poor colour or
brightness.
• Adjust the Picture options in the TV menu. (go to Picture Mode / Colour / Brightness /
Sharpness)
• Adjust Energy Saving option in the TV menu. (go to MENU - System - Eco Solution - Energy
Saving)
• Try resetting the picture to view the default picture settings. (go to MENU - Picture - Reset
Picture)
There is a dotted line on the
edge of the screen.
• If the picture size is set to Screen Fit, change it to 16:9.
• Change cable/satellite box resolution.
The picture is black and white.
• If you are using an AV composite input, connect the video cable (yellow) to the Green jack of
component input 1 on the TV.
When changing channels, the
picture freezes or is distorted
or delayed.
• If connected with a cable box, please try to reset the cable box. Reconnect the AC cord and wait
until the cable box reboots. It may take up to 20 minutes.
• Set the output resolution of the cable box to 1080i or 720p.
Sound Quality
First of all, please perform the Sound Test to confirm that your TV audio is properly operating. (go to
MENU - Support - Self Diagnosis - Sound Test)
If the audio is ok, the sound problem may be caused by the source or signal.
There is no sound or the sound
is too low at maximum volume.
• Please check the volume of the device (Cable/Sat Box, DVD, Blu-ray etc) connected to your TV.
The picture is good but there is
no sound.
• Set the Speaker Select option to TV Speaker in the sound menu.
• If you are using an external device, make sure the audio cables are connected to the correct
audio input jacks on the TV.
• If you are using an external device, check the device’s audio output option (ex. you may need to
change your cable box’s audio option to HDMI when you have a HDMI connected to your TV).
• If you are using a DVI to HDMI cable, a separate audio cable is required.
• Reboot the connected device by reconnecting the device’s power cable.
The speakers are making an
inappropriate noise.
• Check the cable connections. Make sure a video cable is not connected to an audio input.
• For aerial or cable connections, check the signal strength. Low signal level may cause sound
distortion.
[UH5200-ME]BN68-06310U-00ENG.indb 10 2014-06-25 1:22:47
Page 11
English - 11
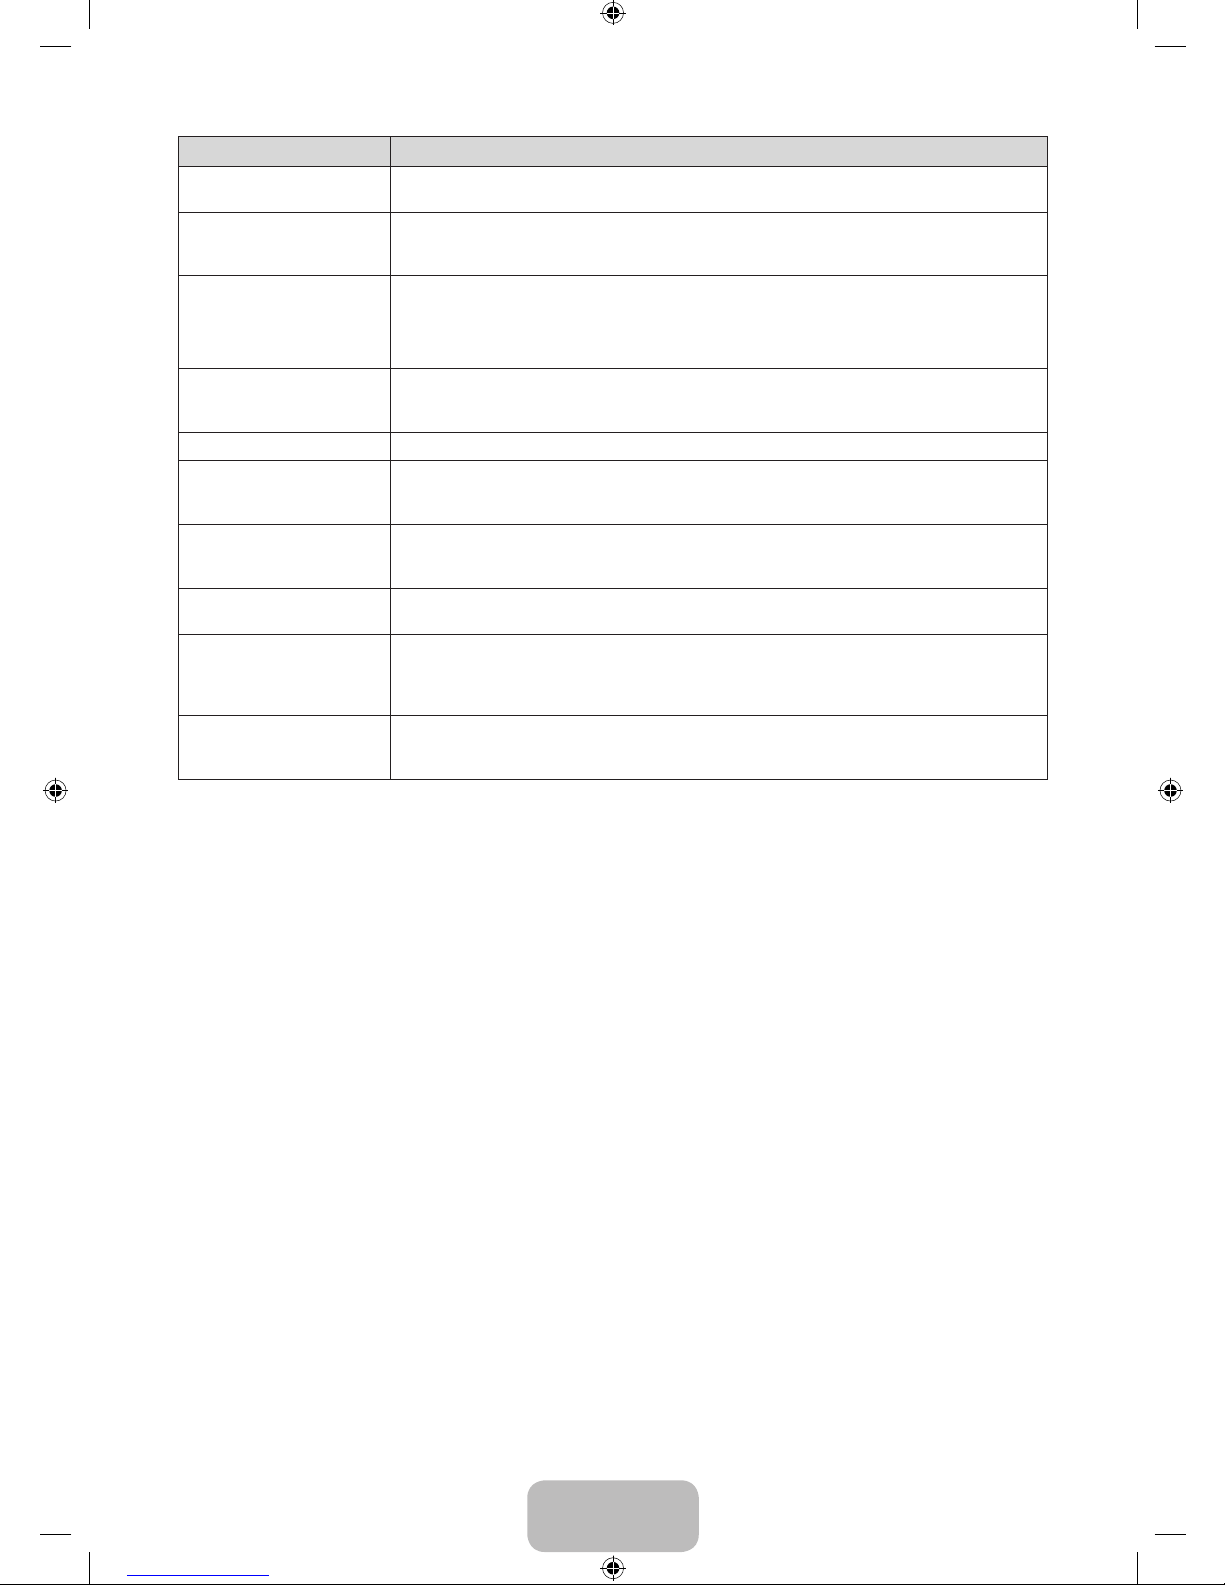
Issues Solutions and Explanations
No Picture, No Video
The TV will not turn on.
• Make sure the AC power cord is securely plugged in to the wall outlet and the TV.
• Make sure the wall outlet is working.
• Try pressing the POWER button on the TV to make sure the problem is not the remote. If the TV
turns on, refer to “The remote control does not work” below.
The TV turns off automatically.
• Ensure the Sleep Timer is set to Off in the Time menu.
• If your PC is connected to the TV, check your PC power settings.
• Make sure the AC power cord is plugged in securely to the wall outlet and the TV.
• When watching TV from an aerial or cable connection, the TV will turn off after 10 ~ 15 minutes if
there is no signal.
There is no picture/video.
• Check cable connections (remove and reconnect all cables connected to the TV and external
devices).
• Set your external device’s (Cable/Set top Box, DVD, Blu-ray etc) video outputs to match the
connections to the TV input. For example, if an external device’s output is HDMI, it should be
connected to an HDMI input on the TV.
• Make sure your connected devices are powered on.
• Be sure to select the TV’s correct source by pressing the SOURCE button on the remote control.
• Reboot the connected device by reconnecting the device’s power cable.
Aerial (Air/Cable) Connection
The TV is not receiving all
channels.
• Make sure the Aerial cable is connected securely.
• Please try Setup (Initial setup) to add available channels to the channel list. Go to MENU -
System - Setup (Initial setup) and wait for all available channels to be stored.
• Verify the Aerial is positioned correctly.
The picture is distorted: macro
block error small block, dots,
pixelization
• Compression of video contents may cause picture distortion, especially on fast moving pictures
such as sports and action movies.
• A low signal can cause picture distortion. This is not a TV issue.
Others
The picture will not display in
full screen.
• HD channels will have black bars on either side of the screen when displaying up scaled SD (4:3)
contents.
• Black bars on the top and bottom will appear during movies that have aspect ratios different from
your TV.
• Adjust the picture size options on your external device or TV to full screen.
The remote control does not
work.
• Replace the remote control batteries with the poles (+/–) in the right direction.
• Clean the sensor’s transmission window on the remote.
• Try pointing the remote directly at the TV from 1.5 ~ 1.8m away.
The cable/set top box remote
control doesn’t turn the TV on
or off, or adjust the volume.
• Programme the Cable/Set top box remote control to operate the TV. Refer to the Cable/Set top
box user manual for the SAMSUNG TV code.
A “Mode Not Supported”
message appears.
• Check the supported resolution of the TV, and adjust the external device’s output resolution
accordingly.
There is a plastic smell from
the TV.
• This smell is normal and will dissipate over time.
The TV Signal Information
is unavailable in the Self
Diagnosis Test menu.
• This function is only available with digital channels from an Aerial / RF / Coax connection.
TV is tilted to the right or left
side.
• Remove the stand base from the TV and reassemble it.
There are difficulties
assembling the stand base.
• Make sure the TV is placed on a flat surface. If you cannot remove the screws from the TV, please
use a magnetized screw driver.
[UH5200-ME]BN68-06310U-00ENG.indb 11 2014-06-25 1:22:47
Page 12
English - 12
Issues Solutions and Explanations
The Broadcasting menu is
grey out (unavailable).
• The Broadcasting menu is only available when the TV source is selected.
Your settings are lost after 5
minutes or every time the TV is
turned off.
• If the TV is in the Store Demo mode, it will reset audio and picture settings every 5 minutes. If
you want to change the settings from Store Demo mode to Home Use, press the SOURCE
button to select TV mode, and go to MENU → Support → Use Mode.
You have intermittent loss of
audio or video.
• Check the cable connections and reconnect them.
• Loss of audio or video can be caused by using overly rigid or thick cables. Make sure the cables
are flexible enough for long term use. If mounting the TV to the wall, we recommend using cables
with 90 degree connectors.
You see small particles when
you look closely at the edge of
the frame of the TV.
• This is part of the product’s design and is not a defect.
The PIP menu is not available. • PIP functionality is only available when you are using a HDMI or components source.
You turned the TV off 45
minutes ago, and it turned on
again.
• It is normal. The TV operates the OTA (Over The Aerial) function itself to upgrade firmware
downloaded whilst your watching TV.
The message “Scrambled
Signal” or “Weak or No
Signal” appears.
• If you are using a CAM CARD (CI/CI+), check that it is installed into the common interface slot.
• If there is still a problem, pull the CAM CARD out of the TV and insert it into the slot again.
There are recurrent picture/
sound issues.
• Check and change the signal/source.
A reaction may occur between
the rubber cushion pads on the
base stand and the top finish
of some furniture.
• To prevent this, use felt pads on any surface of the TV that comes in direct contact with furniture.
The message “This file may
not be playable properly.”
appears.
• This may appear because of high bit rate of content. Content generally will play but could
experience some playability issue.
✎
You can keep your TV in optimum operating condition by upgrading to the latest firmware (www.samsung.com →
support) by USB.
✎
This TFT LED panel uses a panel consisting of sub pixels which require sophisticated technology to produce.
However, there may be a few bright or dark pixels on the screen. These pixels will have no impact on the
performance of the product.
✎
Some functions and pictures shown in this manual are available on specific models only.
[UH5200-ME]BN68-06310U-00ENG.indb 12 2014-06-25 1:22:47
Page 13
English - 13
Installing the Wall Mount
The wall mount kit (sold separately) allows you to mount the TV on the wall. For detailed information on installing the wall
mount, see the instructions provided with the wall mount. Contact a technician for assistance when installing the wall
mount bracket. We do not advice you to do it yourself.
Samsung Electronics is not responsible for any damage to the product or injury to yourself or others if you select to
install the TV on your own.
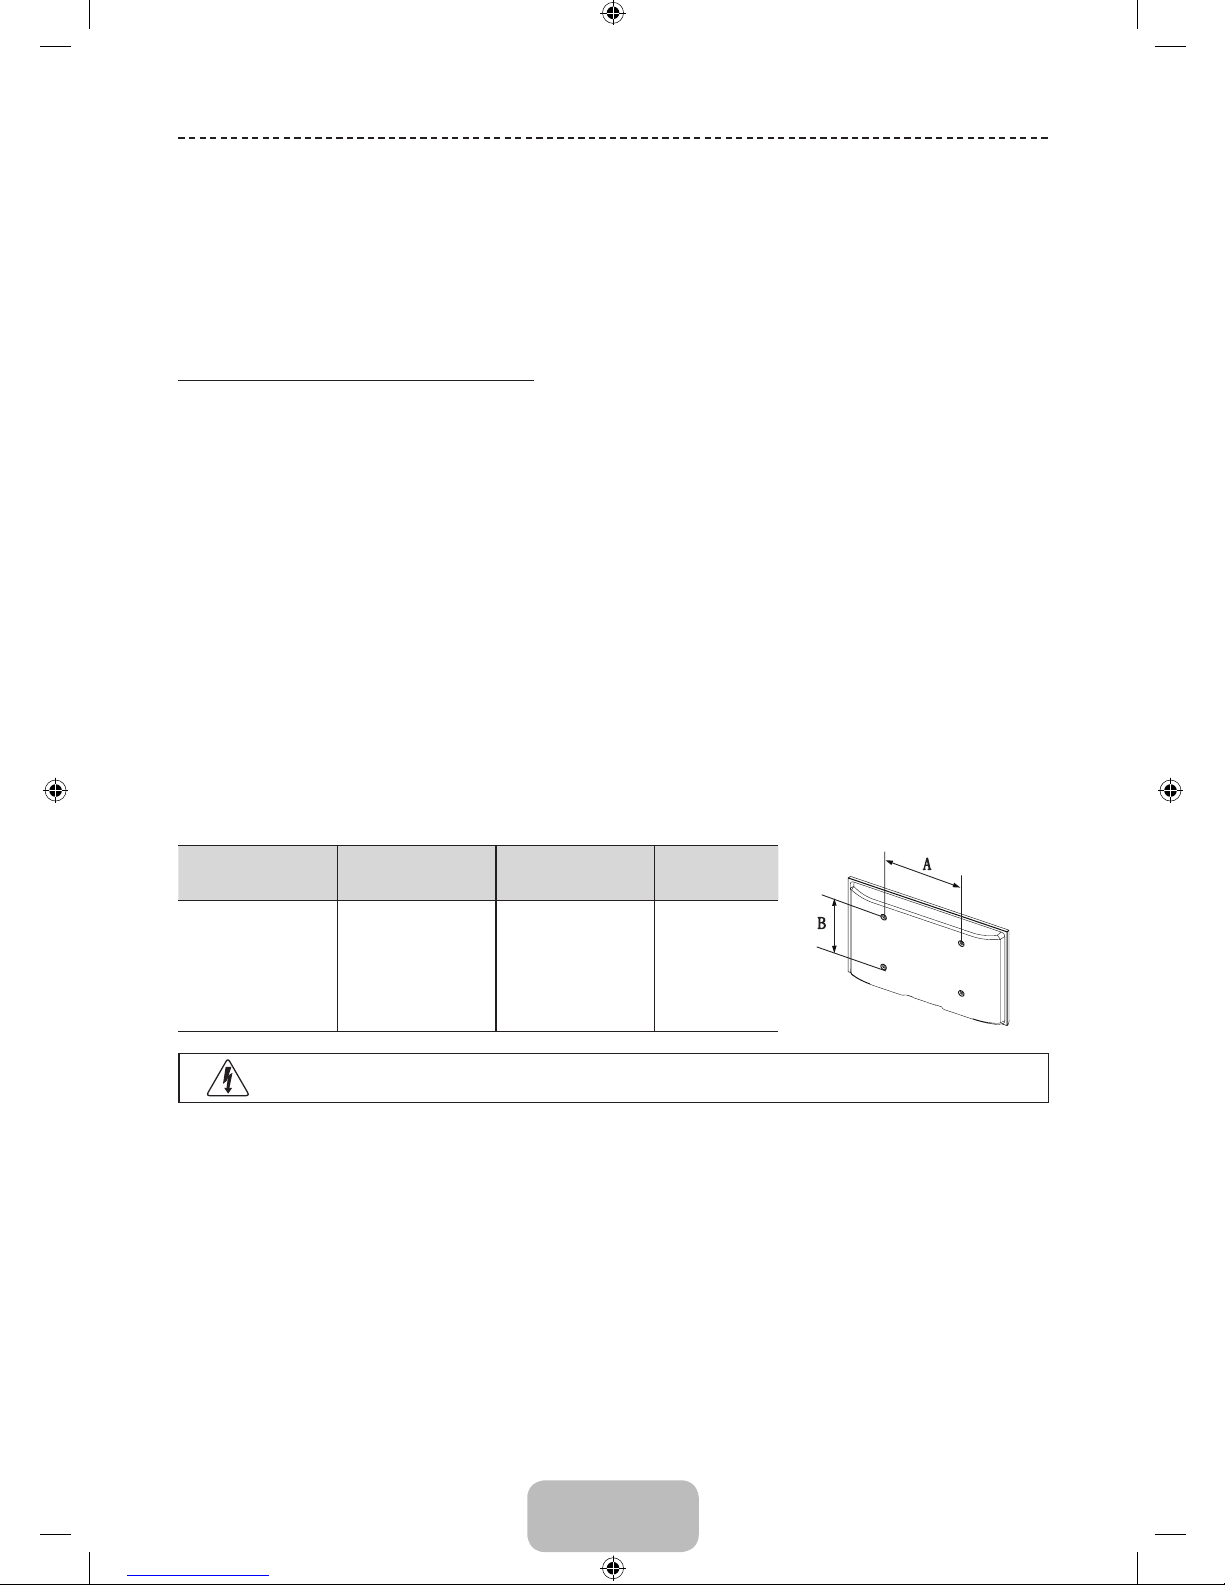
Wall Mount Kit Specifications (VESA)
✎
Wall mount kit is not supplied but sold separately.
✎
Install your wall mount on a solid wall perpendicular to the floor. When attaching to other building materials, please
contact your nearest dealer. If installed on a ceiling or slanted wall, it may fall and result in severe personal injury.
✎
NOTE
• Standard dimensions for wall mount kits are shown in the table below.
• When purchasing our wall mount kit, a detailed installation manual and all parts necessary for assembly are
provided.
• Do not use screws that do not comply with the VESA standard screw specifications.
• Do not use screws longer than the standard dimension, as they may cause damage to the inside of the TV set.
• For wall mounts that do not comply with the VESA standard screw specifications, the length of the screws may
differ depending on their specifications.
• Do not fasten the screws too strongly, this may damage the product or cause the product to fall, leading to
personal injury. Samsung is not liable for these kinds of accidents.
• Samsung is not liable for product damage or personal injury when a non-VESA or non-specified wall mount is
used or the consumer fails to follow the product installation instructions.
• Do not exceed 15 degrees tilt when mounting this TV.
inches VESA Spec. (A * B) Standard Screw Quantity
58 400 X 400 M8 4
Do not install your Wall Mount Kit while your TV is turned on. It may result in personal injury due to electric
shock.
[UH5200-ME]BN68-06310U-00ENG.indb 13 2014-06-25 1:22:48
Page 14
English - 14
Securing the TV to the Wall
Caution: Pulling, pushing, or climbing on the TV may cause the TV to fall. In particular,
ensure your children do not hang on or destabilize the TV. Doing so may cause the TV to tip
over, causing serious injuries or death. Follow all safety precautions provided in the Safety
Flyer included with your TV. For added stability and safety, you can purchase and install the
anti-fall device as described below.
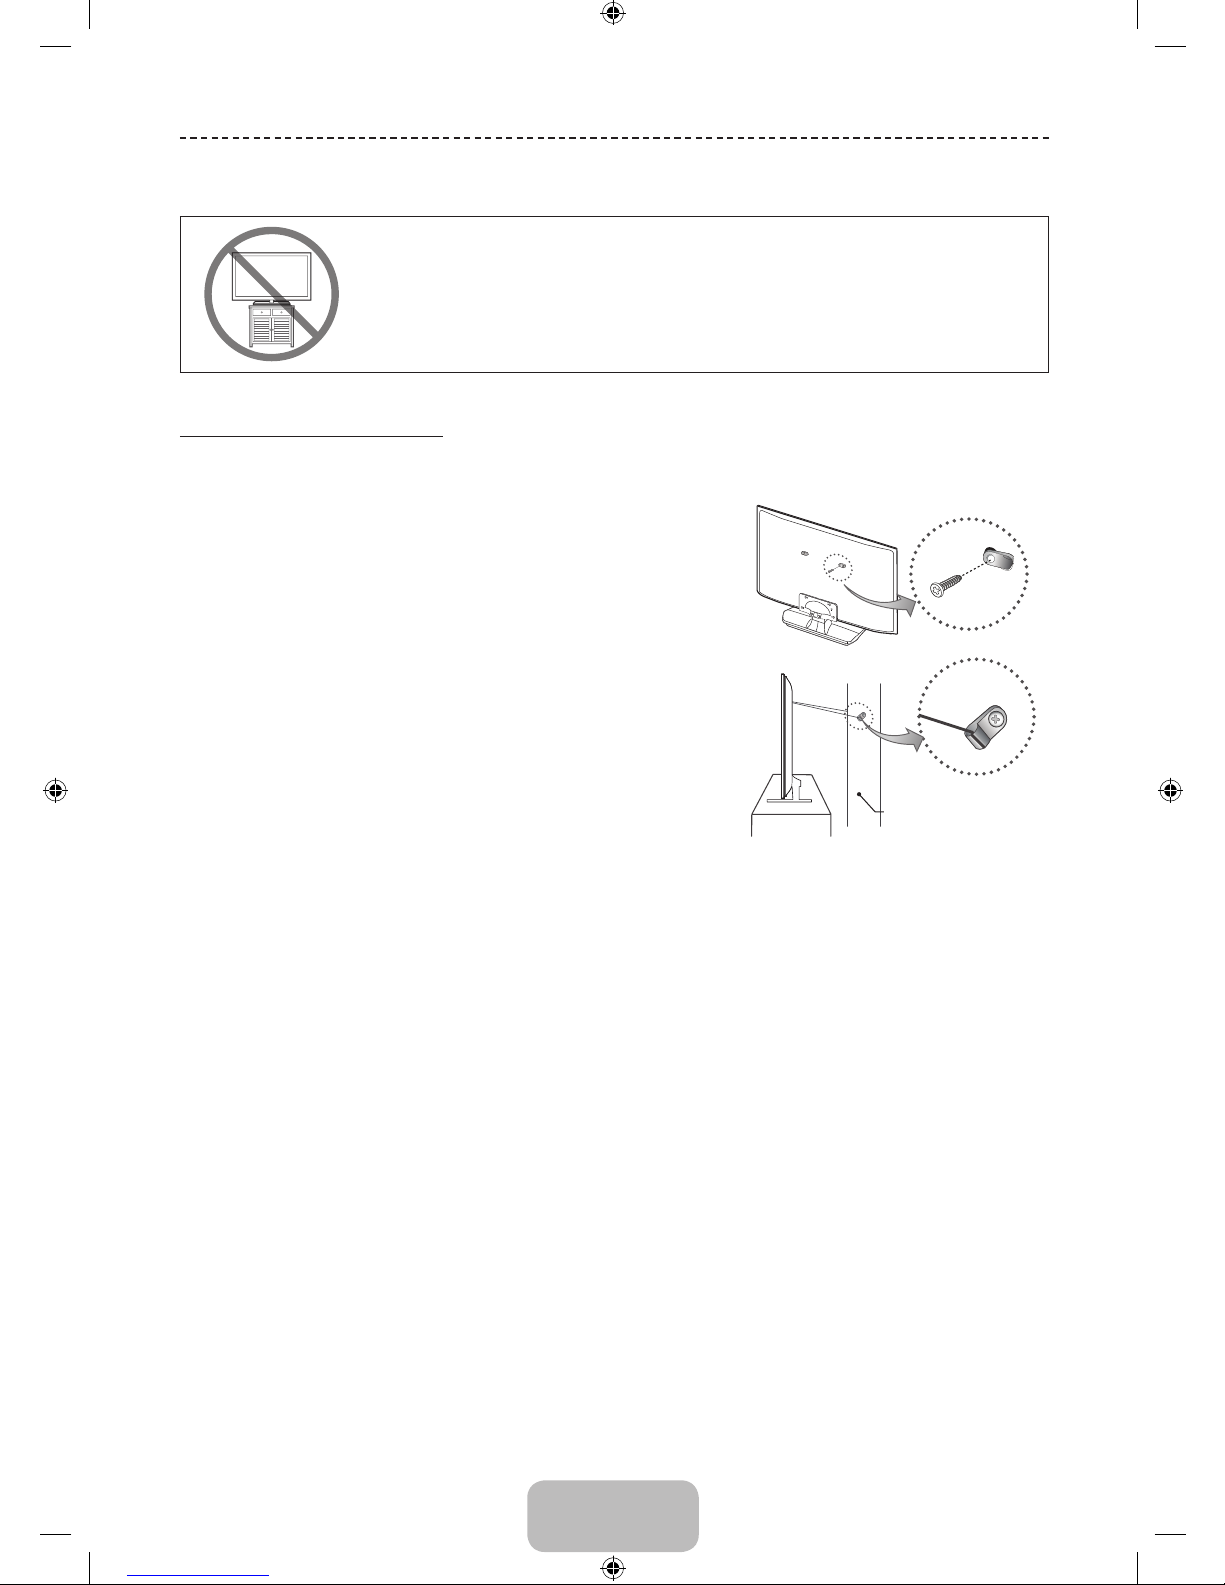
To avoid the TV from falling
1. Put the screws into the clamps and firmly fasten them onto the
wall. Confirm that the screws have been firmly installed onto the
wall.
✎
You may need additional material such as an anchor
depending on the type of wall.
✎
Since the necessary clamps, screws, and string are not
supplied, please purchase these additionally.
2. Remove the screws from the centre back of the TV, put the
screws into the clamps, and then fasten the screws onto the TV
again.
✎
Screw Specifications
• For a 58 inches: M8
3. Connect the clamps fixed onto the TV and the clamps fixed onto
the wall with a strong string and then tie the string tightly.
✎
NOTE
• Install the TV near to the wall so that it does not fall
backwards.
• It is safe to connect the string so that the clamps fixed on
the wall are equal to or lower than the clamps fixed on the
T V.
• Untie the string before moving the TV.
4. Verify all connections are properly secured. Periodically check
connections for any sign of fatigue for failure. If you have
any doubt about the security of your connections, contact a
professional installer.
Wall
• The product colour and shape may
vary depending on the model.
[UH5200-ME]BN68-06310U-00ENG.indb 14 2014-06-25 1:22:48
Page 15
English - 15
Securing the Installation Space
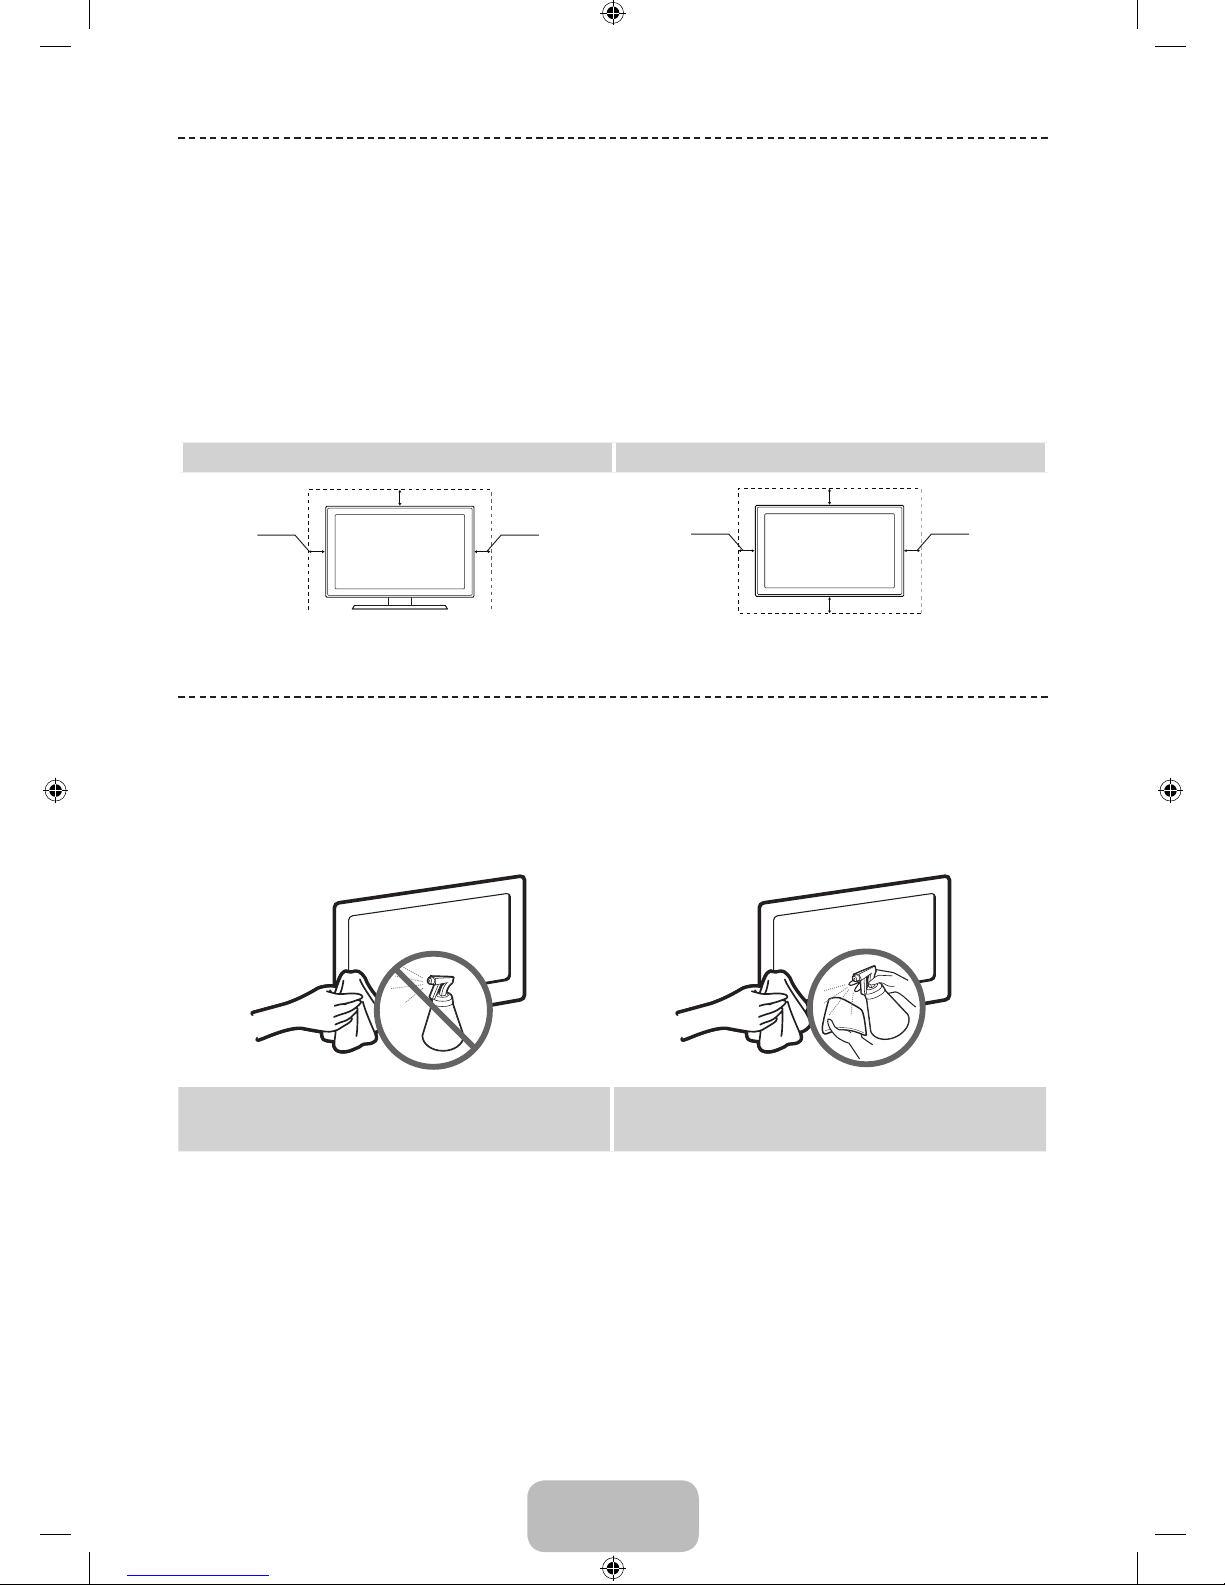
Keep the required distances between the product and other objects (e.g. walls) to ensure proper ventilation.
Failing to do so may result in fire or a problem with the product due to an increase in the internal temperature of the
product.
✎
When using a stand or wall-mount, use parts provided by Samsung Electronics only.
• If you use parts provided by another manufacturer, it may result in a problem with the product or an injury due to
the product falling.
✎
The appearance may differ depending on the product.
✎
Be careful when you contact the TV because some parts can be somewhat hot.
Installation with a stand. Installation with a wall-mount.
10 cm
10 cm
10 cm
10 cm
10 cm
10 cm
10 cm
Storage and Maintenance
✎
If you remove the attached sticker on the TV screen, clean the residues and then watch T V.
✎
The exterior and screen of the product can get scratched during cleaning. Be sure to wipe the exterior and screen
carefully using a soft cloth to prevent scratches.
Do not spray water directly onto the product. Any liquid
that goes into the product may cause a failure, fire, or
electric shock.
Clean the product with a soft cloth dampened with a
small amount of water. Do not use a flammable liquid (e.g.
benzene, thinners) or a cleaning agent.
[UH5200-ME]BN68-06310U-00ENG.indb 15 2014-06-25 1:22:49
Page 16
English - 16
Anti-theft Kensington Lock
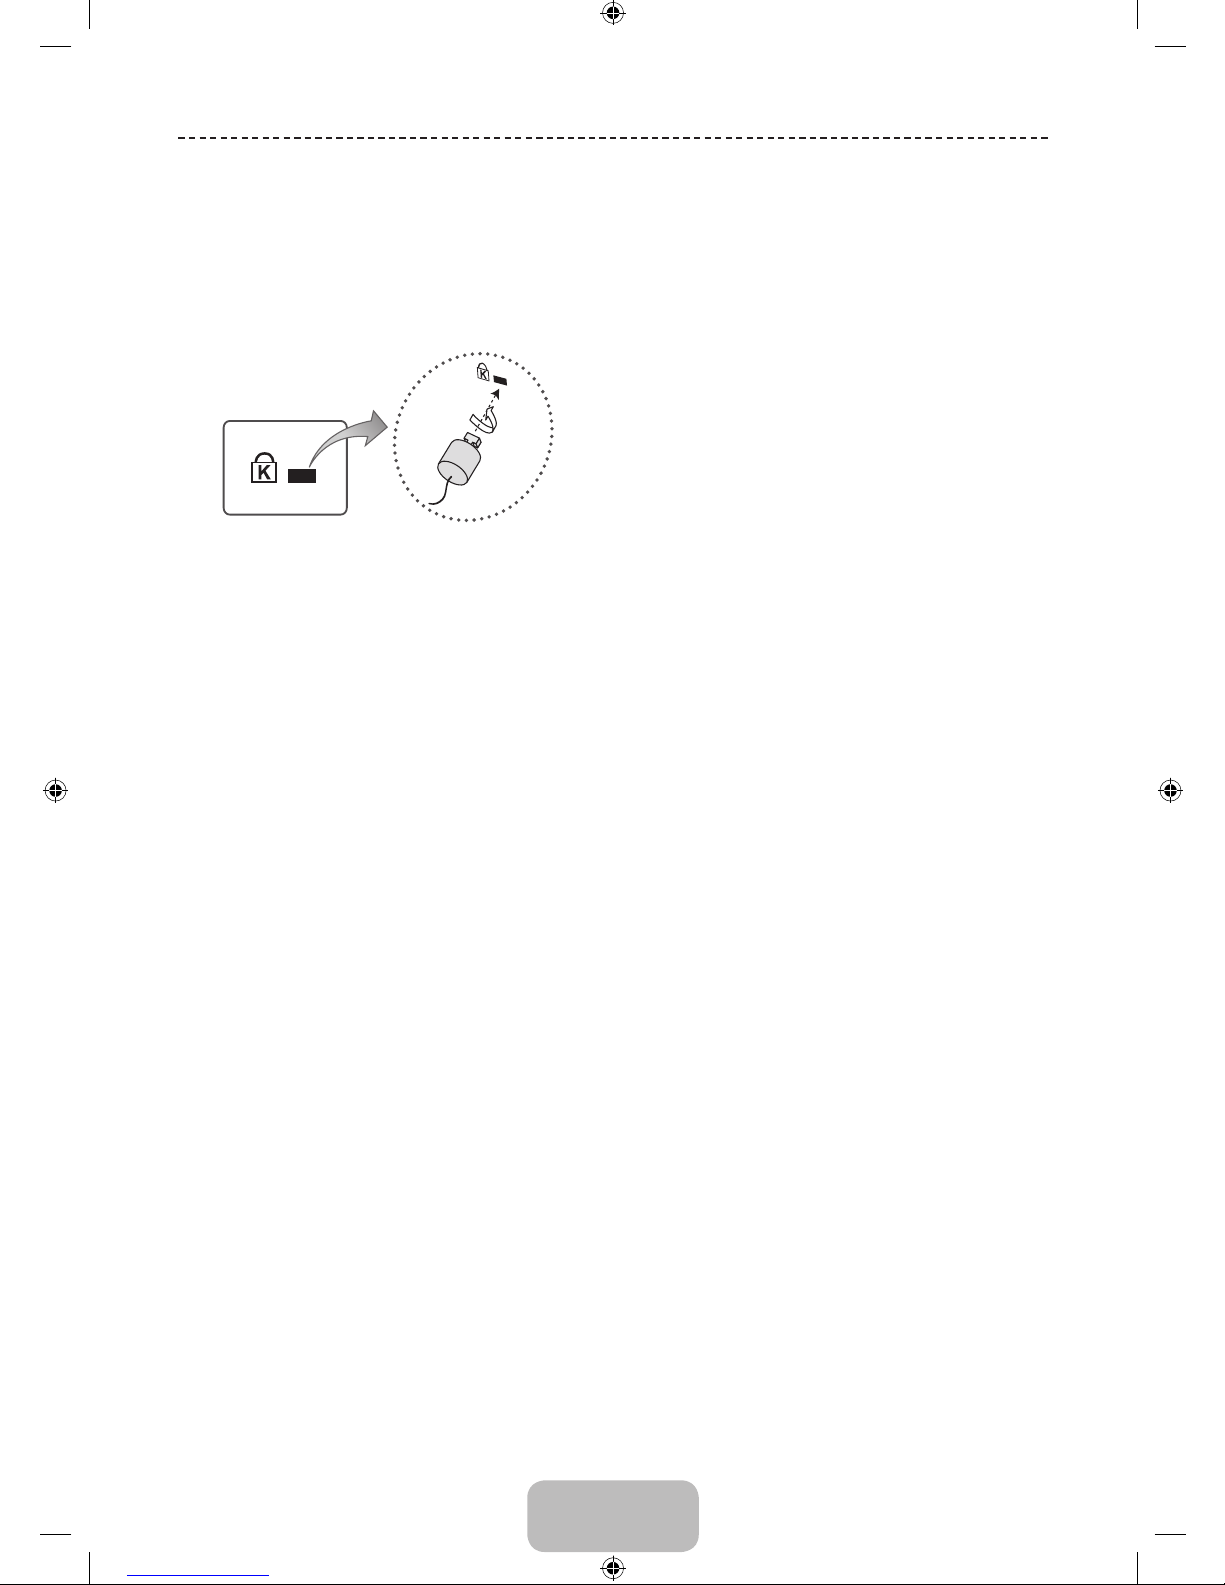
The Kensington Lock is not supplied by Samsung. It is a device used to physically fix the system when using it in a
public place. The appearance and locking method may differ from the illustration depending on the manufacturer. Refer
to the manual provided with the Kensington Lock for additional information on proper use.
✎
Please find a “K” icon on the rear of the TV. A kensington slot is beside the “K” icon.
✎
The position and colour may differ depending on the model.
<Optional>
To lock the product, follow these steps:
1. Wrap the Kensington lock cable around a large, stationary object such as desk or chair.
2. Slide the end of the cable with the lock attached through the looped end of the Kensington lock cable.
3. Insert the locking device into the Kensington slot on the product.
4. Lock the lock.
✎
These are general instructions. For exact instructions, see the User manual supplied with the locking device.
✎
The locking device has to be purchased separately.
[UH5200-ME]BN68-06310U-00ENG.indb 16 2014-06-25 1:22:49
Page 17
English - 17
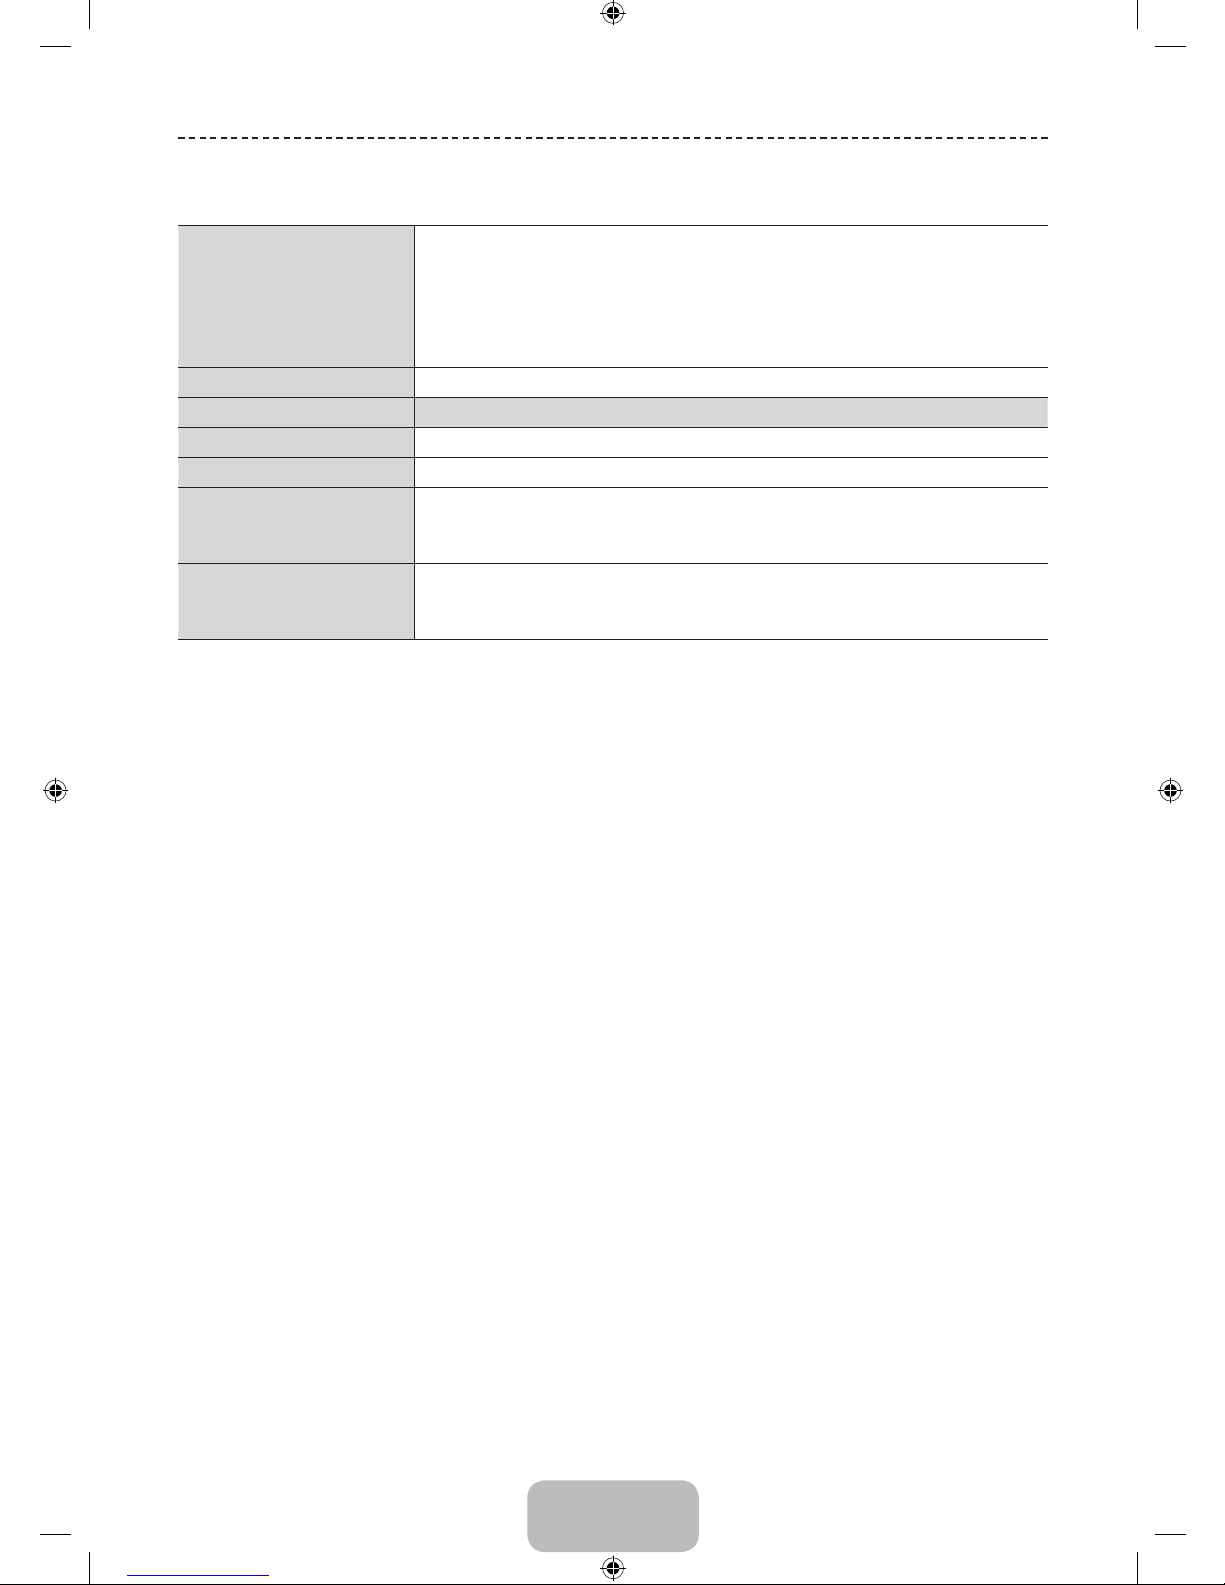
Specifications
Environmental
Considerations
Operating Temperature
Operating Humidity
Storage Temperature
Storage Humidity
10°C to 40°C (50°F to 104°F)
10% to 80%, non-condensing
-20°C to 45°C (-4°F to 113°F)
5% to 95%, non-condensing
Sound (Output)
10 W X 2
Model Name
UA58H5200
Display Resolution
1920 X 1080
Screen Size
146 cm
Dimensions (W x H x D)
Body
With stand
130.8 X 77.0 X 9.1 cm
130.8 X 84.3 X 29.5 cm
Weight
Without Stand
With Stand
17.2 kg
21.4 kg
✎
Design and specifications are subject to change without prior notice.
✎
For information about power supply, and more about power consumption, refer to the label attached to the
product.
[UH5200-ME]BN68-06310U-00ENG.indb 17 2014-06-25 1:22:49
Page 18
English - 18
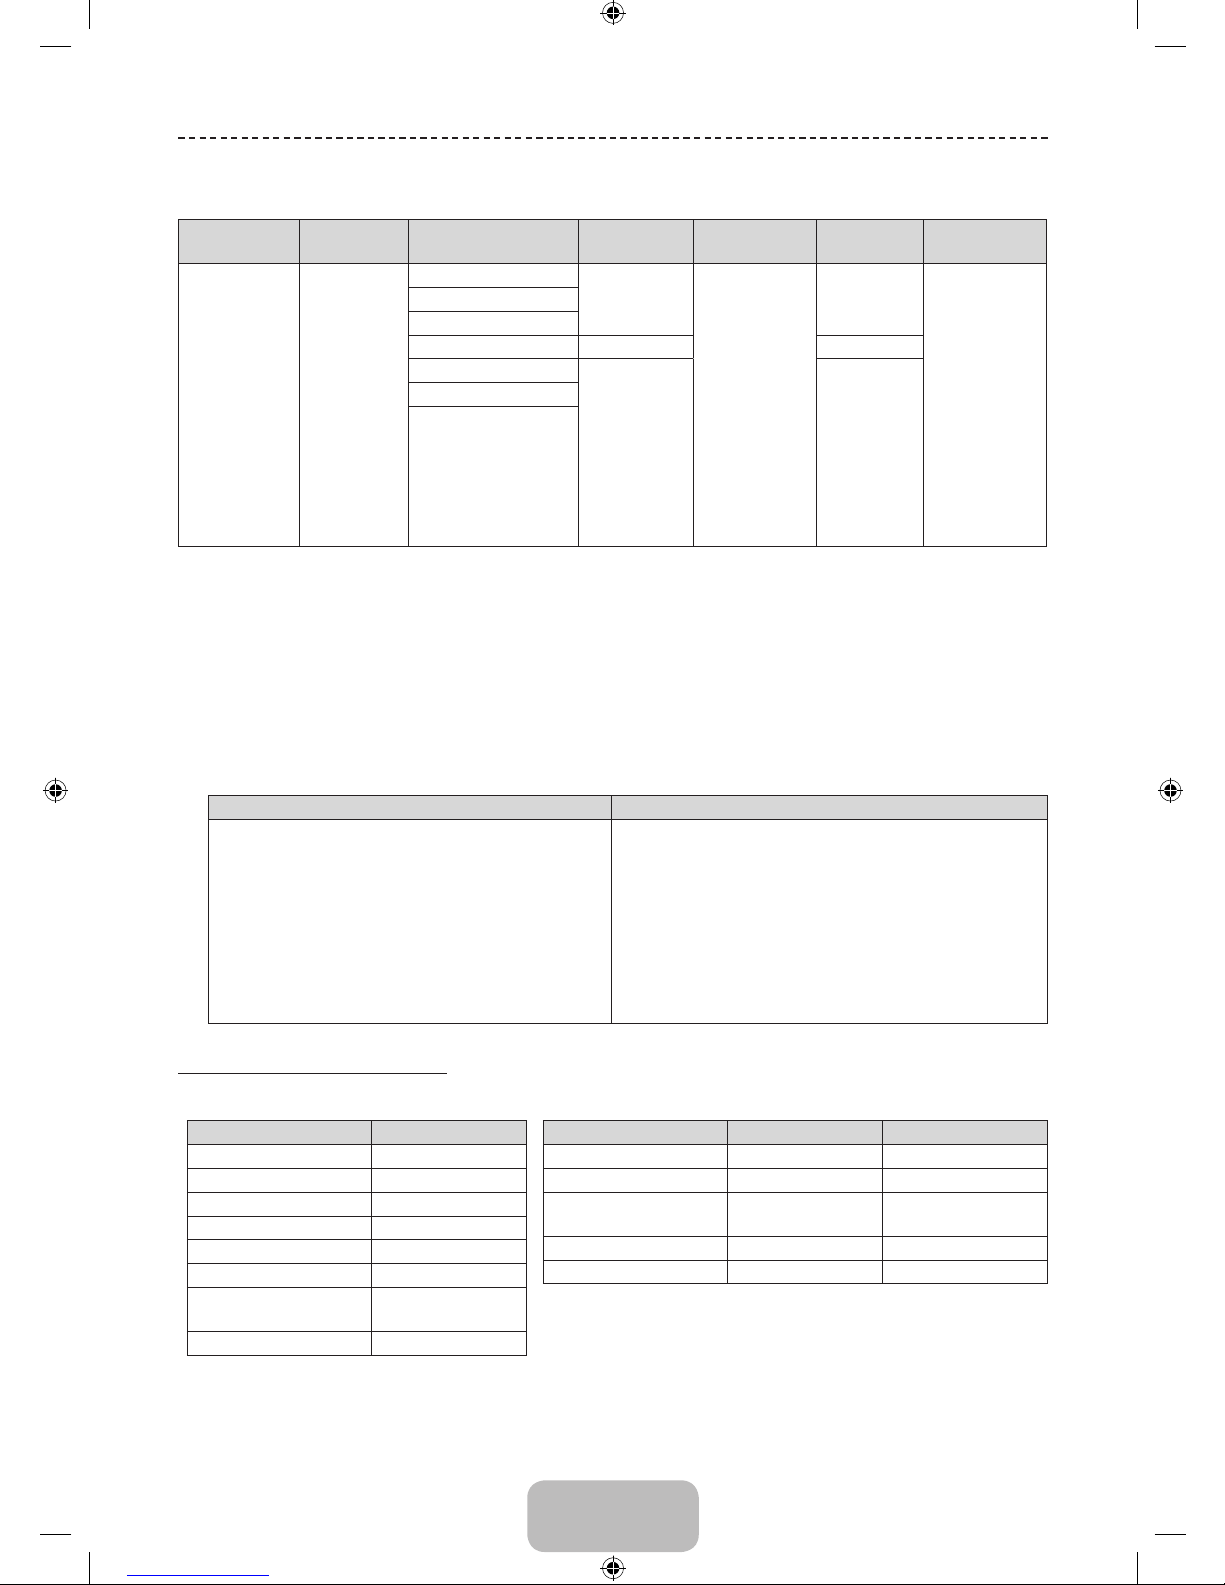
Supported Video Formats
File Extention Container Video Codec Resolution Frame rate (fps)
Bit rate
(Mbps)
Audio Codec
*.avi / *.mkv
*.asf / *.wmv
*.mp4 / *.3gp
*.vro / *.mpg
*.mpeg / *.ts
*.tp / *.trp
*.mov / *.flv
*.vob / *.svi
*.divx
AVI
MKV
ASF
MP4
3GP
MOV
FLV
VRO
VOB
PS
TS
DivX 3.11/4.x/5.x/6.x
1920 x 1080
6 ~ 30
30
Dolby Digital
LPCM
ADPCM
(IMA, MS)
AAC
HE-AAC
WMA
Dolby Digital Plus
MPEG (MP3)
DTS (Core)
G.711(A-Law,
μ-Law)
MPEG4 SP/ASP
H.264 BP/MP/HP
Motion JPEG 640 x 480 8
Window Media Video v9
1920 x 1080 30
MPEG2
MPEG1
✎
Other Restrictions
• Video content will not play, or not play correctly, if there is an error in the content or the container.
• Sound or video may not work if the contents have a standard bit rate/frame rate above the compatible Frame/sec
listed in the table.
• If the Index Table is in error, the Seek (Jump) function is not supported.
• Some USB/digital camera devices may not be compatible with the player.
• The menu can be displayed late if the video is over 10Mbps(bit rate).
Video decoder Audio decoder
• Supports up to H.264, Level 4.1 (FMO/ASO/RS
are not supported.)
• frame rate:
− Below 1280 x 720: 60 frame max
− Above 1280 x 720: 30 frame max
• VC1 AP L4 is not supported.
• GMC 2 or higher is not supported.
• WMA 10 Pro supports up to 5.1 channel and M2
profile.
• WMA lossless audio is not supported.
• Vorbis supports up to 2ch.
• Dolby Digital Plus supports up to 5.1 channel.
Supported Subtitle Formats
• External
Name File extension
MPEG-4 timed text .ttxt
SAMI .smi
SubRip .srt
SubViewer .sub
Micro DVD .sub or .txt
SubStation Alpha .ssa
Advanced SubStation
Alpha
.ass
Powerdivx .psb
• Internal
Name Container Format
Xsub AVI Picture Format
SubStation Alpha MKV Text Format
Advanced SubStation
Alpha
MKV Text Format
SubRip MKV Text Format
MPEG-4 Timed text MP4 Text Format
[UH5200-ME]BN68-06310U-00ENG.indb 18 2014-06-25 1:22:50
Page 19
English - 19
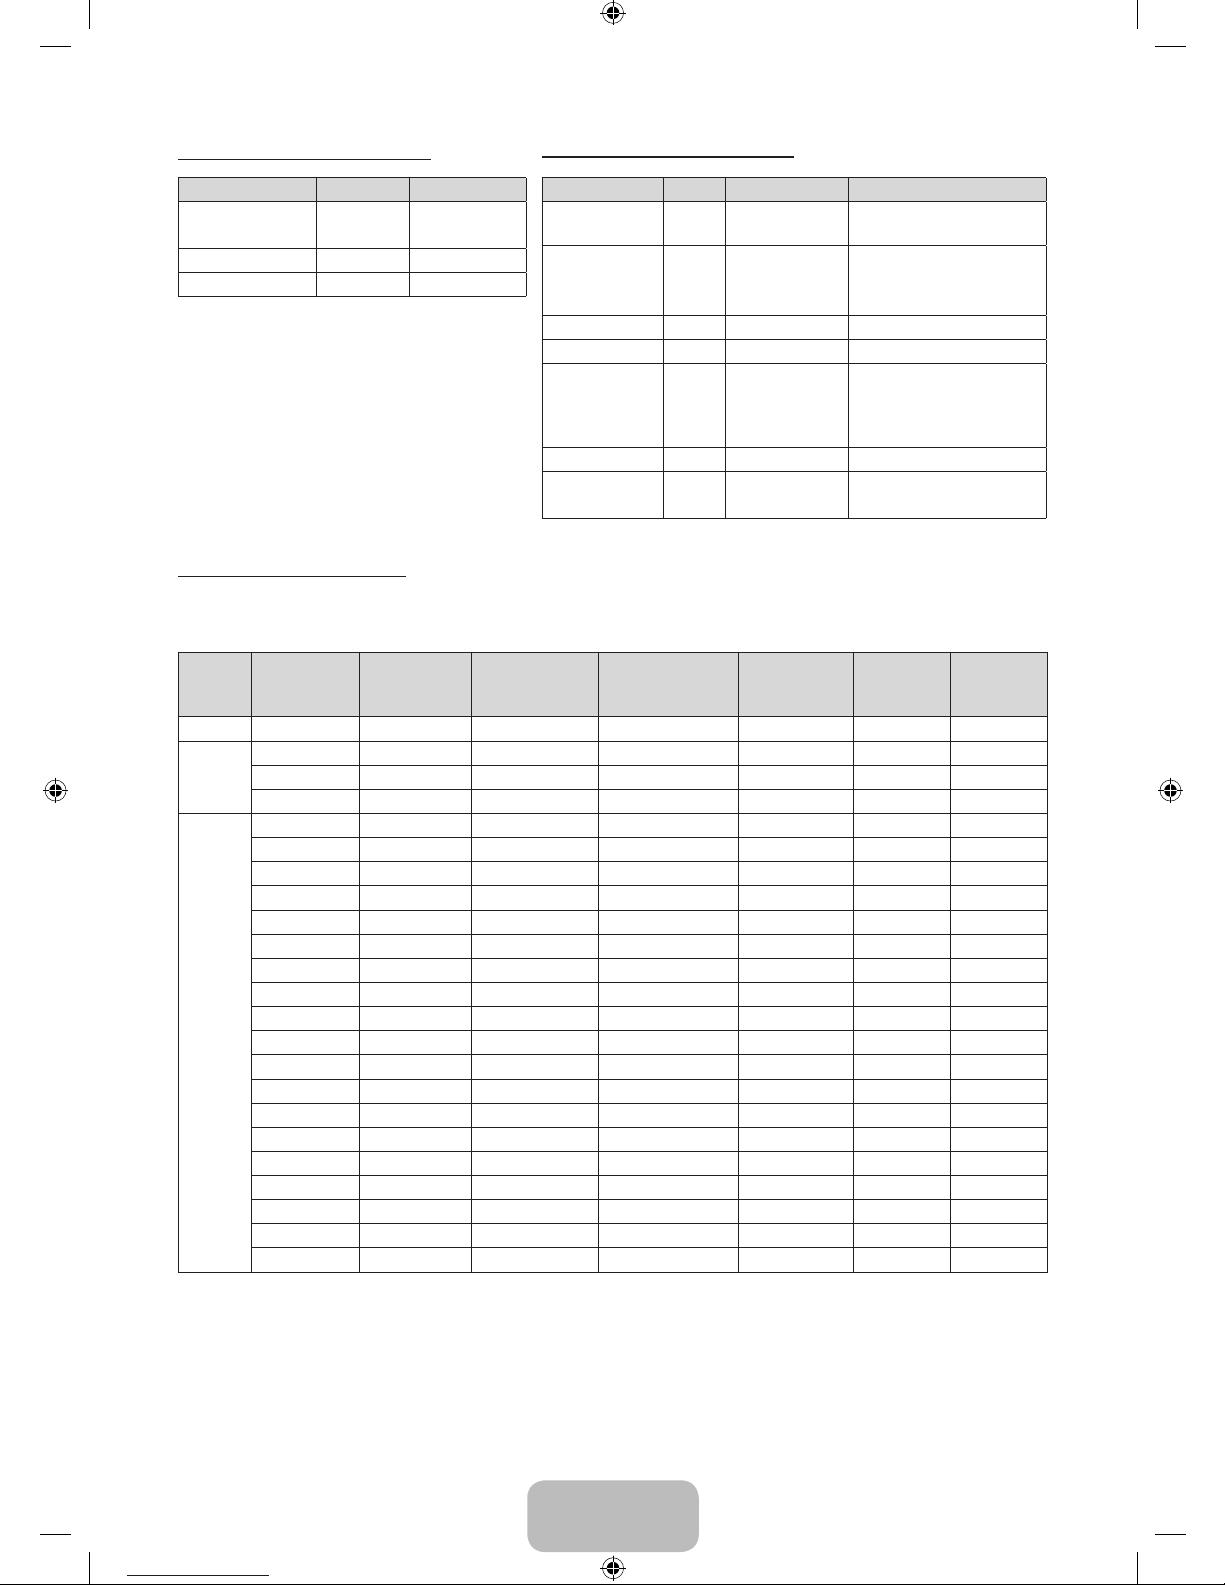
Supported Photo Formats
File Extension Type Resolution
*.jpg
*.jpeg
JPEG 15360 X 8640
*.bmp BMP 4096 X 4096
*.mpo MPO 15360 X 8640
✎
The MPO type file does not support Zoom, Rotate
and Slide Show Effect functions.
Supported Music Formats
File Extension Type Codec Remark
*.mp3 MPEG
MPEG1 Audio
Layer 3
*.m4a
*.mpa
*.aac
MPEG4 AAC
*.flac FLAC FLAC Supports up to 2ch.
*.ogg OGG Vorbis Supports up to 2ch.
*.wma WMA WMA
WMA 10 Pro supports up to
5.1 channel and M2 profile.
(WMA lossless audio is not
supported.)
*.wav wav wav
*.mid
*.midi
midi midi type 0 and type 1
Full available resolution
Optimal resolution for 5 series: 1920 x 1080@60Hz.
See specification page for full available resolution.
Mode Resolution
Horizontal
Frequency
(KHz)
Vertical
Frequency (Hz)
Pixel Clock
Frequency (MHz)
Sync Polarity
(H / V)
1366 x 768 1920 X 1080
IBM 720 x 400 31.469 70.087 28.322 -/+
c c
MAC
640 x 480 35.000 66.667 30.240 -/-
c c
832 x 624 49.726 74.551 57.284 -/-
c c
1152 x 870 68.681 75.062 100.000 -/-
c
VESA
DMT
640 x 480 31.469 59.940 25.175 -/-
c c
640 x 480 37.861 72.809 31.500 -/-
c c
640 x 480 37.500 75.000 31.500 -/-
c c
800 x 600 37.879 60.317 40.000 +/+
c c
800 x 600 48.077 72.188 50.000 +/+
c c
800 x 600 46.875 75.000 49.500 +/+
c c
1024 x 768 48.363 60.004 65.000 -/-
c c
1024 x 768 56.476 70.069 75.000 -/-
c c
1024 x 768 60.023 75.029 78.750 +/+
c c
1152 x 864 67.500 75.000 108.000 +/+
c
1280 x 720 45.000 60.000 74.250 +/+
c c
1280 x 800 49.702 59.810 83.500 -/+
c
1280 x 1024 63.981 60.020 108.000 +/+
c
1280 x 1024 79.976 75.025 135.000 +/+
c
1366 x 768 47.712 59.790 85.500 +/+
c c
1440 x 900 55.935 59.887 106.500 -/+
c
1600 x 900RB 60.000 60.000 108.000 +/+
c
1680 x 1050 65.290 59.954 146.250 -/+
c
1920 x 1080 67.500 60.000 148.500 +/+
c
✎
NOTE
• The interlace mode is not supported.
• The set might operate abnormally if a non-standard video format is selected.
[UH5200-ME]BN68-06310U-00ENG.indb 19 2014-06-25 1:22:50
Page 20
English - 20
Licence
Manufactured under license from Dolby Laboratories. Dolby and the double-D symbol are
trademarks of Dolby Laboratories.
Manufactured under a license from U.S. Patent No’s: 5,956,674, 5,974,380, 5,978,762, 6,487,535,
6,226,616, 7,212,872, 7,003,467, 7,272,567, 7,668,723, 7,392,195, 7,930,184, 7,333,929 and
7,548,853. DTS, the Symbol, and DTS and the Symbol together are registered trademarks & DTS
Premium Sound | 5.1 is a trademark of DTS, Inc. ©2012 DTS, Inc. All Rights Reserved.
Manufactured under a license from U.S. Patent No’s: 6,285,767, 8,027,477, 5,319,713, 5,333,201,
5,638,452, 5,771,295, 5,970,152, 5,912,976, 7,200,236, 7,492,907, 8,050,434, 7,720,240,
7,031,474, 7,907,736 and 7,764,802. DTS, the Symbol, and DTS and the Symbol together are
registered trademarks & DTS Studio Sound is a trademark of DTS, Inc. ©2012 DTS, Inc. All Rights
Reserved.
The terms HDMI and HDMI High-Definition Multimedia Interface, and the HDMI Logo are
trademarks or registered trademarks of HDMI Licensing LLC in the United States and other
countries.
DivX Certified® to play DivX® video up to HD 1080p, including premium content.
ABOUT DIVX VIDEO: DivX® is a digital video format created by DivX, LLC, a subsidiary of Rovi Corporation. This is an
official DivX Certified® device that has passed rigorous testing to verify that it plays DivX video. Visit divx.com for more
information and software tools to convert your files into DivX videos.
ABOUT DIVX VIDEO-ON-DEMAND: This DivX Certified® device must be registered in order to play purchased DivX
Video-on-Demand (VOD) movies. To obtain your registration code, locate the DivX VOD section in your device setup
menu. Go to vod.divx.com for more information on how to complete your registration.
DivX®, DivX Certified® and associated logos are trademarks of Rovi Corporation or its subsidiaries and are used
under license.
Covered by one or more of the following U.S. patents: 7,295,673; 7,460,668; 7,515,710; 7,519,274
Open Source Licence Notice
Open Source used in this product can be found on the following webpage. (http://opensource.samsung.com)
Open Source Licence Notice is written only English.
Recommendation - Jordan Only
Hereby, Samsung Electronics, declares that this equipment is in compliance with the essential requirements and other
relevant provisions of Directive 1999/5/EC.
The original Declaration of Conformity may be found at http://www.samsung.com, go to Support > Search Product
Support and enter the model name.
This equipment may be operated in Jordan.
[UH5200-ME]BN68-06310U-00ENG.indb 20 2014-06-25 1:22:51
Page 21
English - 21
Still image warning
Avoid displaying still images (such as jpeg picture files), still image elements (such as TV channel logos, stock or news
bars at the screen bottom etc.), or programmes in panorama or 4:3 image format on the screen. Constantly displaying
still pictures can cause image burn-in on the LED screen, which will affect image quality. To reduce risk of this effect,
please follow the recommendations below:
• Avoid displaying the same TV channel for long periods.
• Always try to display any image in full screen. Use the TV set’s picture format menu for the best possible match.
• Reduce brightness and contrast to avoid the appearance of after-images.
• Use all TV features designed to reduce image retention and screen burn. Refer to the e-Manual for details.
For India only
This product is RoHS compliant.
This marking on the product, accessories or literature indicates that the product and its electronic
accessories should not be disposed of with other household waste at the end of their working life.
To prevent possible harm to the environment or human health from uncontrolled waste disposal,
please separate these items from other types of waste and recycle them responsibly to promote the
sustainable reuse of material resources.
For more information on safe disposal and recycling visit our website www.samsung.com/in or contact our Helpline
numbers -18002668282, 180030008282.
[UH5200-ME]BN68-06310U-00ENG.indb 21 2014-06-25 1:22:51
 Loading...