

Page 1
Contact SAMSUNG WORLDWIDE
If you have any questions or comments relating to Samsung products, please contact the SAMSUNG customer care centre.
Country
AUSTRALIA 1300 362 603 www.samsung.com
NEW ZEALAND 0800 SAMSUNG (0800 726 786) www.samsung.com
CHINA 400-810-5858
HONG KONG (852) 3698-4698 www.samsung.com/hk
INDIA 3030 8282
INDONESIA 0800-112-8888
JAPAN 0120-327-527 www.samsung.com
MALAYSIA 1800-88-9999 www.samsung.com
PHILIPPINES 1-800-10-SAMSUNG(726-7864)
SINGAPORE 1800-SAMSUNG(726-7864) www.samsung.com
THAILAND 1800-29-3232
TAIWAN 0800-329-999 www.samsung.com
VIETNAM 1 800 588 889 www.samsung.com
Customer Care Centre
010-6475 1880
1800 110011
1800 3000 8282
1800 266 8282
021-5699-7777
1-800-3-SAMSUNG(726-7864)
1-800-8-SAMSUNG(726-7864)
02-5805777
02-689-3232
Web Site
www.samsung.com
www.samsung.com/hk_en/
www.samsung.com
www.samsung.com
www.samsung.com
www.samsung.com
LED TV
user manual
© 2010 Samsung Electronics Co., Ltd. All rights reserved.
imagine the possibilities
Thank you for purchasing this Samsung product.
To receive more complete service, please register
your product at
www.samsung.com/register
Model _____________ Serial No. _____________
BN68-02723A-00
Page 2

Figures and illustrations in this User Manual are provided for reference only and may differ from actual product appearance.
Product design and specifications may be changed without notice.
Still image warning
Avoid displaying still images (like jpeg picture files) or still image element (like TV programme logo, panorama or 4:3 image format, stock or news bar
at screen bottom etc.) on the screen. Constant displaying of still picture can cause uneven wear of screen phosphor, which will affect image quality. To
reduce risk of this effect, please follow below recommendations:
• Avoid displaying the same TV channel for long periods.
• Always try to display any image in full screen, use TV set picture format menu for best possible match.
• Reduce brightness and contrast values to minimum required level to achieve desired picture quality, exceeded values may speed up the burnout
process.
• Frequently use all TV features designed to reduce image retention and screen burnout, refer to proper user manual section for details.
Securing the Installation Space
Keep the required distance between the product and other objects (e.g. walls) to ensure proper ventilation.
Failing to do so may result in fire or a problem with the product due to an increase in the internal temperature of the product.
When using a stand or wall-mount, use parts provided by Samsung Electronics only.
✎
If you use parts provided by another manufacturer, it may result in a problem with the product or an injury due to the product falling.
x
The appearance may differ depending on the product.
✎
Installation with a stand. Installation with a wall-mount.
10 cm
10 cm
10 cm
10 cm
10 cm
10 cm
10 cm
2
English
Page 3
Contents
Getting Started
4
Connections
8
Basic Features
10
Advanced Features
22
4 Accessories
5 Viewing the Control Panel
6 Viewing the Remote Control
7 Connecting to an Antenna
7 Plug & Play (Initial Setup)
8 Connecting to an AV Device
9 Connecting to an Audio Device
10 Changing the Input Source
10 How to Navigate Menus
11 Using the INFO button (Now & Next guide)
11 Planning Your Viewing
13 Channel Menu
14 Picture Menu
17 Sound Menu
18 Setup Menu
21 Support Menu
22 Connecting to a PC
23 Media Play
29 Anynet+
ENGLISH
Other Information
TOOLS
This function can be used by
pressing the TOOLS button on the
remote control.
33
33 Analogue Channel Teletext Feature
34 Assembling the Cables
35 Installing the Wall Mount
36 Anti-theft Kensington Lock
37 Securing the TV to the wall
38 Troubleshooting
41 Specifications
42 Index
Check the Symbol!
Note One-Touch Button
English
3
Page 4

Getting Started
Accessories
✎
Please make sure the following items are included with your LED TV. If any items are missing, contact your dealer.
✎
The items’ colours and shapes may vary depending on the models.
y Remote Control & Batteries (AAA x 2)
y Owner’s Instructions
y Warranty Card / Safety Guide (Not available in some locations)
(M4 X L8)
y Cleaning Cloth
y Powaer Cord
y Blanking Bracket & Screw (X1)
(26 inches, 32 inches model Only)
y Power Code Clamp
(32 inches model Only)
y Component Adapter y AV Adapter y Audio Adapter
UA22C4000
See separate guide for installing the stand.
y Stand Base y Stand Body
UA26C4000, UA32C4000
See separate guide for installing the stand.
y Holder-Ring (4EA)
(26 inches, 32 inches model Only)
y Cable Tie y Holder-Wire (3EA)
y Holder-Wire stand
(26 inches, 32 inches model Only)
y Stand (1EA) y Guide Stand (1EA) y Screws (8EA) (26 inches model)
y Screws (10EA) (32 inch model)
✎
For best cable connection to this product, be sure to use cables with a maximum thickness as below:
y Maximum thickness - 0.55 inches (14mm)
English
4
M4 X L12
Page 5
Viewing the Control Panel
✎
The product colour and shape may vary depending on the model.
✎
LED light of the touch pad maybe accidentally lit up by external noise such as finger.
01 Getting Started
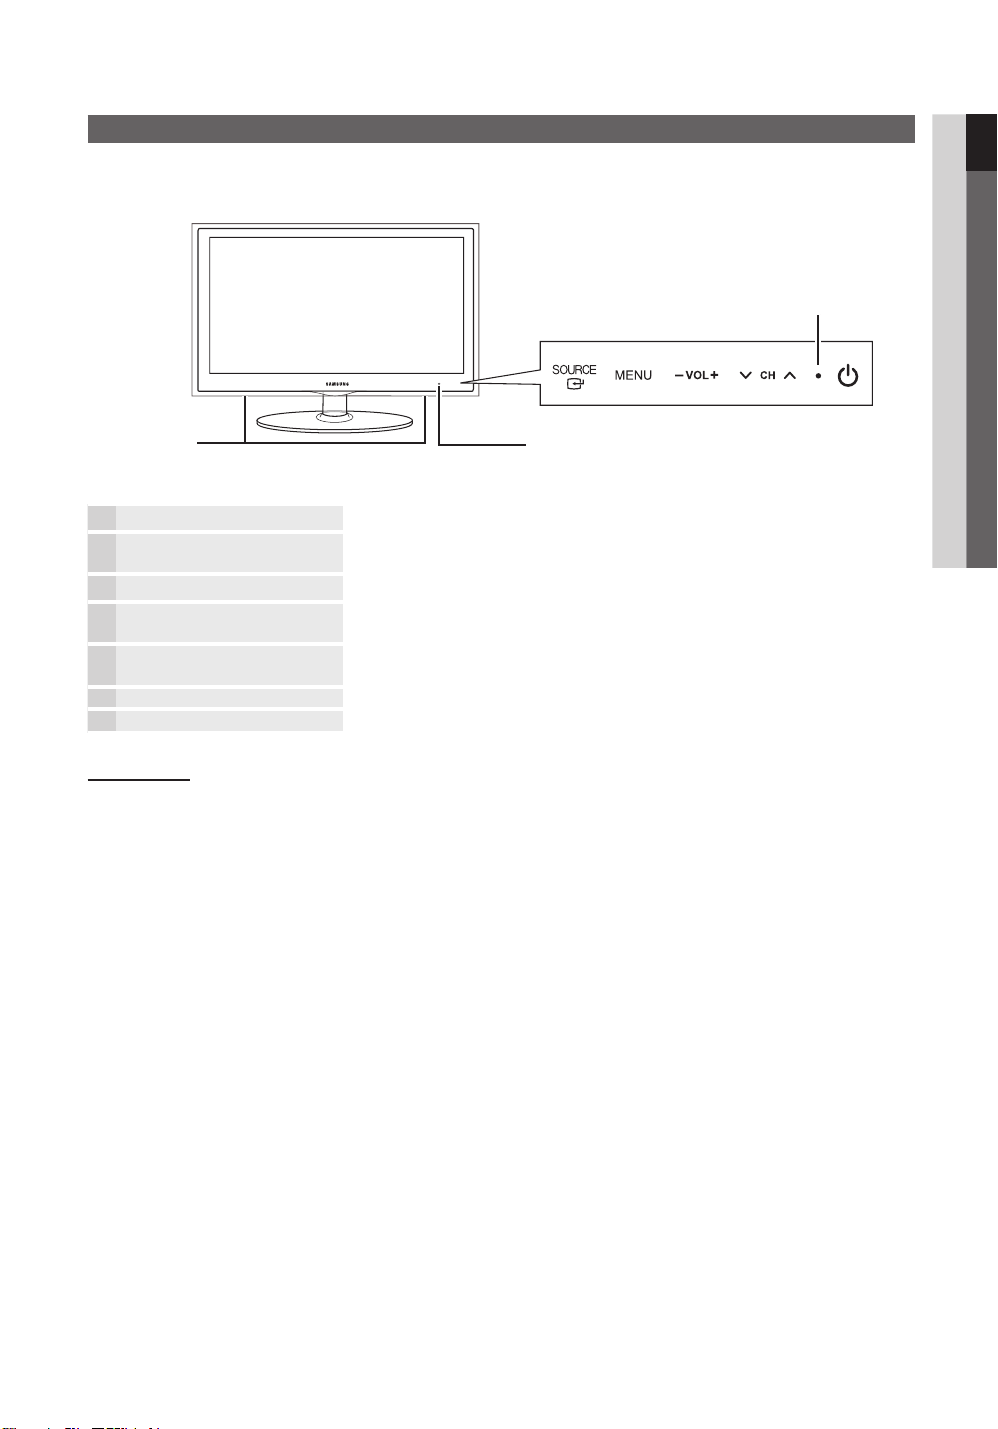
Power Indicator
Speakers
Remote control sensor Aim the remote control towards this spot on the TV.
SOURCE
MENU Displays an on-screen menu, the OSD (on screen display) of your TV’s features.
Power Indicator Blinks and turns off when the power is on and lights up in standby mode.
Standby mode
Do not leave your TV in standby mode for long periods of time (when you are away on a holiday, for example). A small amount
of electric power is still consumed even when the power button is turned off. It is best to unplug the power cord.
(Power)
Toggles between all the available input sources. In the on-screen menu, use this
button as you would use the ENTER button on the remote control.
Adjusts the volume. In the OSD, use the
◄ and ► buttons on the remote control.
Changes the channels. In the OSD, use the
▼ and ▲ buttons on the remote control.
Turns the TV on or off.
Remote control sensor
buttons as you would use the
buttons as you would use the
English
5
Page 6

Getting Started
Viewing the Remote Control
✎
This is a special remote control for the visually impaired persons and has Braille points on the Power, Channel and
Volume buttons.
Turns the TV on and off.
Selects the HDMI mode directly
Press to directly access to channels.
Alternately selects Teletext, Double or Mix.
Adjusts the volume.
Opens the OSD.
Displays the Media Play (p. 23).
Quickly select frequently used functions.
Selects the on-screen menu items and
changes the values seen on the menu.
Returns to the previous menu.
These buttons are for the
Channel Manager, Media Play (USB),
menu, etc.
Use these buttons in Media Play (USB)
and Anynet+ (HDMI-CEC) modes
(p. 23, 29).
(: Controls recording for Samsung
recorders that have the Anynet+ feature)
POWER
HDMI
TTX/MIX
CHLIST
MENU
MEDIA.P
TOOLS
RETURN
A B C D
P.MODE
S.MODE
AD
P.SIZE
SOURCE
PRE-CH
GUIDE
INFO
EXIT
I-II
DUAL
SUBT.
Displays and selects the available video
sources (p. 10).
Returns to the previous channel.
To mute all TV output sound.
Changes channels.
Displays channel lists on the screen
(p. 12).
Displays the EPG (Electronic Programme
Guide) (p. 11).
Displays information on the TV screen.
Exits the menu.
P.MODE: Press to select the picture
mode (p. 14).
S.MODE: Press to select the sound
mode (p. 17).
DUAL -:
AD: Turns the audio description on and
off (p. 17). This is not available in some
locations.
P.SIZE: Selects the picture size (p. 15).
SUBT.: Displays digital subtitles (p. 20).
Sound effect selection (p. 18).
Installing batteries (Battery size: AAA)
English
6
✎
NOTE
Use the remote control within 23 feet from the TV.
x
Bright light may affect the per formance of the remote control.
x
Avoid use when nearby fluorescent lights or neon signs.
The colour and shape may vary depending on the model.
x
Page 7

Connecting to an Antenna
When the TV is initially powered on, basic settings proceed automatically.
✎
Preset: Connecting the power cord and antenna.
UA22C4000 / UA26C4000 / UA32C4000
VHF/UHF Antenna
Cable
or
Power Input
Plug & Play (Initial Setup)
When the TV is initially powered on, a sequence of on-screen prompts will assist in configuring basic settings. Press the
POWER button. Plug & Play is available only when the Input source is set to TV.
✎
To return to the previous step, press the Red button.
Selecting Store Demo
1
or Home Use
Press the ◄ or ► button, then press the ENTER
y Select the Home Use mode. Store Demo Mode is for retail
environments.
y To return the unit’s settings from Store Demo to Home Use
(standard): Press the volume button on the TV. When you see the
volume OSD, press and hold MENU for 5 sec.
button.
ANT OUT
POWER
P
01 Getting Started
Selecting a country
2
Selecting an antenna
3
and channel source.
Setting the Clock Mode Set the Clock Mode automatically or manually.
4
Viewing the HD
5
Connection Guide.
Enjoy your TV.
Press the ▲ or ▼ button, then press the ENTER
Select the appropriate country.
Press the ▲ or ▼ button, then press the ENTER button.
After selecting the channel source to memorise, select Search. For more information, refer
to Channel → Auto Store. (p.13)
✎
Press the ENTER button at any time to interrupt the memorization process.
Press the ▲ or ▼ button to select Auto, then press the ENTER
y Auto: Allows you to select a time zone.
✎
Press the ▲ or ▼ button to highlight the time zone for your local area. Press the
ENTER button. (Australia only)
y Manual: Allows you to manually set the current date and time.
The connection method for the best HD screen quality is displayed.
Press the ENTER
button.
button.
button.
6
If You Want to Reset This Feature...
Select Setup - Plug & Play (Initial Setup). Enter your 4 digit PIN number. The default PIN number is “0-0-0-0.” If you want to
change the PIN number, use the Change PIN function.
English
7
Page 8

Connections
Connecting to an AV Device
Using an HDMI or HDMI/DVI cable: HD connection (up to 1080p)
Available devices: DVD, Blu-ray player, HD cable box, HD STB (Set-Top-Box) satellite receiver
UA22C4000
UA26C4000
UA32C4000
WR
Red White
WR
AUDIO OUT
R-AUDIO-L
DVI OUT
HDMI OUT
HDMI OUT
AUDIO OUT
WR
R-AUDIO-L
DVI OUT
DVD
DVD
DVD
DVD
✎
HDMI IN 1(DVI), 2, 3 PC/DVI AUDIO IN
When using an HDMI/DVI cable connection, you must use the HDMI IN 1(DVI) jack. For the DVI cable
x
connection, use a DVI to HDMI cable or DVI-HDMI (DVI to HDMI) adapter for video connection and the
PC/DVI AUDIO IN jacks for audio.
If an external device such as a DVD / Blu-ray player / cable box / STB satellite receiver supporting HDMI
x
versions older than 1.3 is connected, the T V may operate abnormally (e.g. no screen display / no sound /
annoying flicker / abnormal colour).
If there is no sound after connecting an HDMI cable, check the HDMI version of the external device. If you
x
suspect the version is older than 1.3, contact the provider of the device to confirm the HDMI version and
request an upgrade.
It is recommended you purchase an HDMI-certified cable. Otherwise, the screen may appear blank or a
x
connection error may occur.
English
8
HDMI OUT
DVI OUT
AUDIO OUT
WR
R-AUDIO-L
DVD
DVD
Page 9

Using a Component (up to 1080p) or Audio/Video (480i only) and Scart Cable
Available a devices: DVD, Blu-ray player, cable box, STB satellite receiver, VCR
UA22C4000 / UA26C4000 / UA32C4000
W
R
Y
Red Blue Green
DVD
VIDEO OUTAUDIO OUT
R-AUDIO-L
WR
Y
RGB
Red RedWhite WhiteYellow
Blu-ray player
AUDIO OUT
COMPONENT OUT
PR PB Y
R
B
R-AUDIO-L
G
02 Connections
W
R
DVD
VIDEO OUTAUDIO OUT
R-AUDIO-L
WR
WR
Y
Y
W R
✎
To obtain the best picture quality, the Component connection is recommended over the A/V connection.
R
B
G
W R
Y
Connecting to an Audio Device
Using an Optical (Digital) or Headphone Connection
Available devices: Digital Audio System, Amplifier, Home Theatre
UA32C4000
UA22C4000 / UA26C4000
OPTICAL
digital audio system
✎
DIGITAL AUDIO OUT (OPTICAL)
When a Digital Audio System is connected to the DIGITAL AUDIO OUT (OPTICAL) jack, decrease the volume
x
of both the TV and the system.
5.1 CH (channel) audio is available when the T V is connected to an external device supporting 5.1 CH.
x
When the receiver (amplifier or DV D home theatre) is set to on, you can hear sound output from the TV’s
x
optical jack. When the TV is receiving a DTV signal, the TV will send 5.1 CH sound to the amplifier or DVD
home theatre. When the source is a digital component such as a DVD / Blu-ray player / cable box / STB
(Set-Top-Box) satellite receiver and is connected to the T V via HDMI, only 2 CH audio will be heard from the
amplifier or DVD home theatre. If you want to hear 5.1 CH audio, connect the digital audio out jack from your
DVD / Blu-ray player / cable box / STB satellite receiver directly to an amplifier or home theatre.
✎
HEADPHONE : You can connect your headphones to the headphones output on your set. While the
headphones are connected, the sound from the built-in speakers will be disabled.
Sound function may be restricted when connecting headphone to the TV.
x
Headphones volume and TV volume are adjusted separately.
x
English
9
Page 10

Connections
SOURCE
CHLIST
POWER ON/OFF
PRE-CH
TTX/MIX
SOURCE
C
HLIST
POWE
R
ON/OFF
PRE-CH
CO
T
TOOLS
INFO
TTX/MI
X
SOURCE
Changing the Input Source
Source List
Use to select TV or an external input
sources such as a DVD / Blu-ray player /
cable box / STB satellite receiver.
■ TV / PC / AV / Component / HDMI/
DVI / USB
✎
In the Source List, connected
inputs will be highlighted.
✎
PC always stay activated.
Basic Features
How to Navigate Menus
Before using the TV, follow the steps below to learn how to
navigate the menu and select and adjust different functions.
MENU
GUIDE
1
2
3
1 MENU button: Displays the main on-screen menu.
2 ENTER
select an item. Confirm the setting.
3 RETURN button: Returns to the previous menu.
4 EXIT button: Exits the on-screen menu.
CONTENT
NTEN
TOOLS
RETURN
/ Direction button: Move the cursor and
GUIDE
INFO
EXIT
4
Edit Name
■ VCR / DVD / Cable STB / Satellite STB / PVR STB /
AV Receiver / Game / Camcorder / PC / DVI PC /
DVI Devices / TV / IPTV / Blu-ray / HD DVD / DMA:
Name the device connected to the input jacks to make
your input source selection easier.
✎
When a PC with a resolution of 1920 x 1080 @
60Hz is connected to the HDMI IN (DVI) port, you
should set to DVI PC mode under Edit Name.
✎
When connecting an HDMI/DVI cable to the HDMI
IN 1(DVI) port, you should set to DVI PC or DVI
Devices mode under Edit Name.
How to Operate the OSD (On Screen Display)
The access step may differ depending on the selected menu.
MENU
1
▲ / ▼ Select an icon with the ▲ or ▼
2
ENTER
3
▲ / ▼
4
◄ / ►
5
ENTER
6
EXIT
The main menu options appear on
the screen:
Picture, Sound, Channel, Setup,
Input, Application, Support.
button.
Press ENTER to access the
sub-menu.
Select the desired submenu with
the ▲ or ▼ button.
Adjust the value of an item with the
◄ or ► button. The adjustment in
the OSD may differ depending on
the selected menu.
Press ENTER to complete the
configuration.
Press EXIT.
7
English
10
Page 11

Using the INFO button (Now & Next guide)
The display identifies the current channel
and the status of certain audio-video
settings.
The Now & Next guide shows daily TV
programme information for each channel
according to the broadcasting time.
y Scroll ◄, ► to view information for a
desired programme while watching
the current channel.
y Scroll ▲, ▼ to view information for other channels. If you
want to move to the currently selected channel, press
the ENTER
DUWH
DTV
All
350
button.
Karl de r GroBe (2/ 3)
Dual
576i
Spiefilm Fr ankreich / It alien 1994 “Ka rl der GroBe” war der Wegber eiter
Europas, De r abenteuerli che dreiteilig e Fernsehfilm widmet sich de m ...
|
4:3
SD
Multi | Movie
4:45 - 6:20
INFO
5:46 Su n 2 May
E
Watch
Informat ion
Using Channel View
Guide
DTV Air 800 five
Home and Away
18:00 - 18:30
Drama
800 five
Channel View - All
Today 18:00 - 19:00 19:00 - 20:00
27
28
800
24
16
6
Dani is devastated when scott makes clear his views on marriage...
Discovery
DiscoveryH&L
five
price-drop.tv
QVC
R4DTT
View Mode +24 Hours Ch. Mode Information Page
1 2 3 4 5 6
Using Scheduled View
American Chopper
Programmes resume at 06:00
Home and...
No Information
QVC Selection
No Information
)
Family Affairs
Tine Team
Fiv...
)
2:10 Tue 1 Jun
Dark Angel
Watch
03 Basic Features
Planning Your Viewing
Guide
The EPG (Electronic Programme
Guide) information is provided by
broadcasters. Using programme
schedules provided by broadcasters,
you can specify programmes you
want to watch in advance so that the
channel automatically changes to the
selected programme channel at the
specified time. Programme entries
may appear blank or out of date
depending on a channel status.
GUIDE
Guide
800 five
Scheduled View
18:30
18:30
19:15
19:50
27
28
800
24
16
6
)
Family Affairs
)
Dark Angel
DTV Air 800 five
Family Affairs
18:00 - 18:30
Drama
Tanya confesses all to a stunned Babs. Conrad is anxious to hear...
Wed 29 Jul
Wed 29 Jul
Thu 24 Dec
Thu 24 Dec
Discovery
DiscoveryH&L
five
price-drop.tv
QVC
R4DTT
2:10 Tue 1 Jun
800
five
800
five
View Mode
1 6
1
Red (View Mode): View the list of programmes that
are playing now or coming up.
2
Yellow (+24 Hours): Viewing the list of programmes to
be broadcasted after 24 hours.
3
Blue (Ch. Mode):Select the type of channels you want
to display on the Channel View window. (All, TV, Radio,
Data/Other, My Channel 1~4)
4 Information: Displays details of the selected
programme.
5
(Page): Move to next or previous page.
6 ENTER
button.
– When selecting the current programme, you can
watch the selected programme.
– When selecting the future programme, you can
reserve to watch the selected programme. To cancel
the schedule, press the ENTER
button again and
select Cancel Schedules.
Cancel
English
11
Page 12

Basic Features
B
B
Channel Manager
Delete or set favourites channels and use the programme
guide for digital broadcasts. Select a channel in the
Channels, My Channels or Scheduled screen.
Channels
All
TV
Radio
Data/Other
Analogue
B Zoom Select Sort Page
■
Channels: Shows the channel list according to
channel type.
My Channels: Shows the group of the channel.
■
■
Scheduled: Shows all the currently reserved
programmes.
✎
Using the colour buttons with the Channel Manager.
Green (Zoom): Enlarges or shrinks a channel
x
number.
Yellow (Select): Select desired channels and press
x
the Yellow button to set all the selected channels at
the same time. The mark appears to the left of
the selected channels.
Blue (Sor t): Change the list ordered by channel
x
name or channel number.
(Page): Move to next or previous page.
x
(Tools): Displays the Channel Manager option
x
menu. (The options menus may differ depending on
the situation.)
Channel Status Display Icons
358 ORF1
359 ORF2 0
360 ORF2 S
361 * BBC World
728 \ bid-up.tv
c729 Boonerang
A
1 C1
A
2 C2
Tools
r
Using Favourite Channels
My Channels
(in Channel Manager)
Shows all favourite channels.
■ Edit My Channels
: You can set the selected
channels to desired my channels group.
Channels
All
TV
Radio
Data/Other
Analogue
Zoom Select Sort Page
✎
The “” symbol will be displayed and the channel will
358 ORF1
359 ORF2 0
Edit My Channels
360 ORF2 S
Lock
361 * BBC World
Timer Viewing
Edit Channel Number
728 \ bid-up.tv
Delete
c729 Boonerang
Select All
A
1 C1
A
2 C2
Tools
be set as a my channel.
1. Select a channel and press the TOOLS button.
2. Add or delete a channel in the my channel groups
you want among 1, 2, 3 and 4.
One or more groups can be selected.
x
3. After you have changed the settings, the channel list
for each group can be viewed in my channel.
Channel List
You can see all the channels searched.
CHLIST
CHLIST
r
Icons Operations
An analogue channel.
A channel selected.
A channel set as a Favourite.
A programme currently being broadcast.
A locked channel.
A reserved Programme.
English
12
Page 13

Channel Menu
Retuning Channels
Country
You can change the country. The PIN input screen appears.
Enter your 4 digit PIN number.
Auto Store
Scans for a channel automatically and stores in the TV.
✎
Automatically allocated programme numbers may not
correspond to actual or desired programme numbers. If
a channel is locked using the Child Lock function, the
PIN input window appears.
■ Channel Source (Digital & Analogue / Digital /
Analogue): Select the channel source to memorise.
Manual Store
Scans for a channel manually and stores in the TV.
✎
If a channel is locked using the Child Lock function,
the PIN input window appears.
■ Digital Channel (Channel, Frequency, Bandwidth):
When scanning has finished, channels are updated in
the channel list.
✎
The Bandwidth function is supported in New
zealand and Singapore only.
■ Analogue Channel (Programme, Colour System,
Sound System, Channel, Search): If there is abnormal
sound or no sound, reselect the sound standard
required.
✎
Channel mode
P (programme mode): When tuning is complete,
x
the broadcasting stations in your area have been
assigned to position numbers from P0 to P99. You
can select a channel by entering the position number
in this mode.
C (aerial channel mode) / S (cable channel mode):
x
These two modes allow you to select a channel
by entering the assigned number for each aerial
broadcasting station or cable channel.
Editing Channels
Channel Manager Option Menu
(in Channel Manager)
1. Select a channel and press the TOOLS button.
2. Edit the channel name or number using the Edit
Channel Name or Edit Channel Number menu.
■ Edit Channel Name (analogue channels only): Assign
your own channel name.
■ Edit Channel Number (digital channels only) (Australia,
Singapore only): Edit the number by pressing the
number buttons desired.
Other Features
Channel Manager
Channel Manager Option Menu
Set each channel using the Channel Manager menu options
(Lock / Unlock, Timer Viewing, Sort, Delete, Select All /
Deselect All). Option menu items may differ depending on
the channel status.
1. Select a channel and press the button.TOOLS
2. Select a function and change its settings.
■ Lock / Unlock: Lock a channel so that the channel
cannot be selected and viewed.
03 Basic Features
English
13
Page 14
Basic Features
✎
NOTE
This function is available only when the Child Lock
x
is set to On.
The PIN input screen appears. Enter your 4-digit PIN,
x
the default of which is “0-0-0-0.” Change the PIN
using the Change PIN option.
■ Timer Viewing: You can set a desired channel to be
displayed automatically at the reserved time. Set the
current time first to use this function.
✎
When a digital channel is selected, press the ►
button to view the digital Programme.
■ Sort (analogue channels only): This operation allows
you to change the programme numbers of the stored
channels. This operation may be necessary after using
the auto store.
■ Delete: You can delete a channel to display the channels
you want.
■ Select All / Deselect All: Select all the channels
or deselect all the selected channels in the channel
manager.
✎
To reset the fine-tuning, select Reset.
Picture Menu
Changing the Preset Picture Mode
Mode
Select your preferred picture type.
■ Dynamic: Suitable for a bright
room.
■ Standard: Suitable for a normal
environment.
■ Movie: Suitable for watching
movies in a dark room.
Adjusting Picture Settings
P.MODE
Channel List Transfer
The PIN input screen appears. Enter your 4 digit PIN number.
Imports or exports the channel map. You should connect a
USB storage to use this function.
■ Import from USB: Import channel list from USB.
■ Export to USB: Export channel list to USB. this function
is available when USB is connected.
Scheduled
(in Channel Manager)
You can view, modify or delete a show you have reserved to
watch.
■ Change Info: Change show you have reserved to
watch.
■ Cancel Schedules: Cancel a show you have reserved
to watch.
■ Information: Display a show you have reserved
to watch. (You can also change the reservation
information.)
■ Select All / Deselect All: Select or deselect all reserved
programmes.
Edit Channel Number (Disable / Enable)
(New Zealand only)
Edit the number by pressing the number buttons desired.
Backlight / Contrast / Brightness /
Sharpness / Colour / Tint (G/R)
Your television has several setting options for picture quality
control.
✎
NOTE
In analogue TV, AV modes of the PAL system, the
x
Tint (G/R) function is not available.
In PC mode, you can only make changes to
x
Backlight, Contrast and Brightness.
Settings can be adjusted and stored for each
x
external device connected to the TV.
Economical Solutions
Eco Solution
■ Energy Saving (Off / Low / Medium / High / Picture
Off / Auto)
TV in order to reduce power consumption. If you select
Picture Off, the screen is turned off, but the sound
remains on. Press any button except volume button to
turn on the screen.
■ No Signal Stand by (Off / 15 min / 30 min / 60 min):
To avoid unnecessary energy consumption, set how long
you want the TV to remain on if it’s not receiving a signal.
✎
Disabled when the PC is in power saving mode.
: This adjusts the brightness of the
Fine Tune
(analogue channels only)
If the signal is weak or distorted, fine tune the channel
manually.
✎
Fine tuned channels are marked with an asterisk “*”.
English
14
Page 15
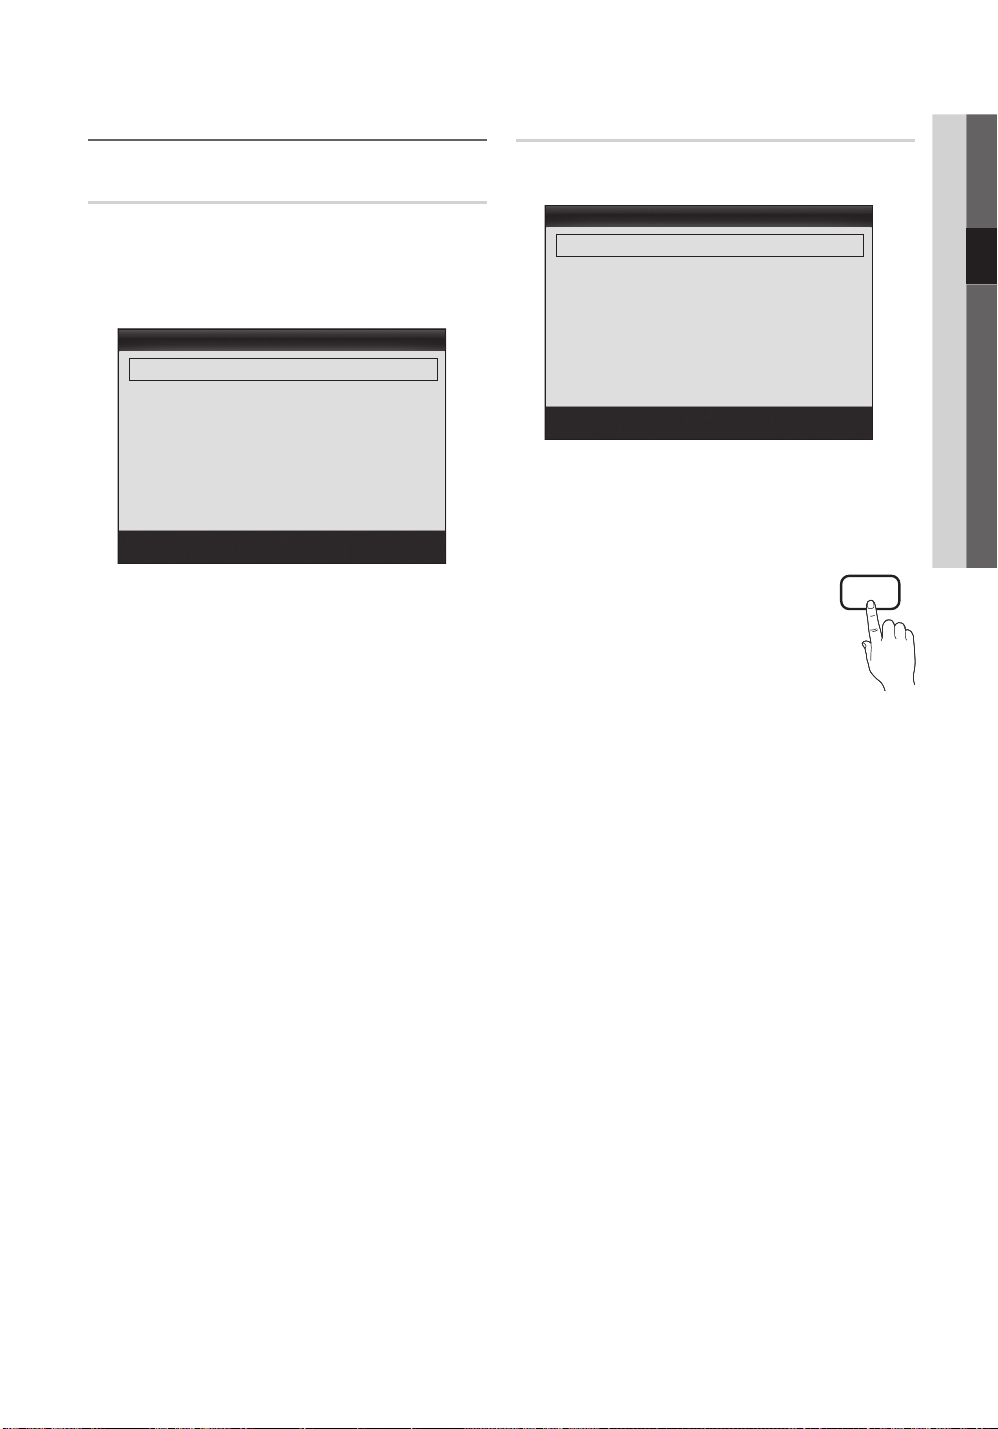
Changing the Picture Options
Advanced Settings
(available in Standard / Movie mode)
You can adjust the detailed setting for the screen including
colour and contrast.
✎
In PC mode, you can only make changes to
Dynamic Contrast, Gamma and White Balance.
Advanced Settings
Black Tone : Off ►
Dynamic Contrast : Medium
Shadow Detail : -2
Gamma : 0
RGB Only Mode : Off
Colour Space : Native
White Balance
■ Black Tone (Off / Dark / Darker / Darkest): Select the
black level to adjust the screen depth.
■ Dynamic Contrast (Off / Low / Medium / High): Adjust
the screen contrast.
■ Shadow Detail (-2~+2): Increase the brightness of dark
images.
■ Gamma: Adjust the primary colour intensity.
■ RGB Only Mode (Off / Red / Green / Blue): You can
adjust Colour or Tint of Red, Green or Blue for the
picture from an external device (DVD player, home
theatre, etc.).
■ Colour Space (Auto / Native): Adjust the range of
colours available to create the image.
■ White Balance: Adjust the colour temperature for a
more natural picture.
R-Offset / G-Offset / B-Offset: Adjust each colour’s
(red, green, blue) darkness.
R-Gain / G-Gain / B-Gain: Adjust each colour’s (red,
green, blue) brightness.
Reset: Resets the White Balance to it’s default settings.
■ Flesh Tone: Emphasize pink “Flesh Tone.”
■ Edge Enhancement (Off / On): Emphasize object
boundaries.
▼
Move
Enter
Return
Picture Options
✎
In PC mode, you can only make changes to the
Colour Tone, Size and Auto Protection Time.
Picture Options
Colour Tone : Normal ►
Size : 16:9
Digital Noise Filter : Auto
MPEG Noise Filter : Auto
HDMI Black Level : Normal
Film Mode : Off
Auto Protection Time : 2 Hours
Move
Enter
Return
■ Colour Tone (Cool / Normal / Warm1 / Warm2)
✎
Warm1 or Warm2 will be deactivated when the
picture mode is Dynamic.
✎
Settings can be adjusted and stored for each
external device connected to an input on the T V.
■ Size: Your cable box/satellite receiver
may have its own set of screen sizes as
well. However, we highly recommend you
use 16:9 mode most of the time.
Auto Wide (New Zealand, Singapore
only): Automatically adjusts the picture
size to the 16:9 aspect ratio.
16:9 : Adjusts the picture size to 16:9 for DVDs or wide
broadcasting.
Wide Zoom: Magnifies the picture size more than 4:3.
✎
Adjusts the Position by using ▲, ▼ buttons.
Zoom: Magnifies the 16:9 wide pictures vertically to fit
the screen size.
✎
Adjusts the Position or Size by using ▲, ▼
button.
4:3 : The default setting for a movie or normal
broadcasting.
✎
Do not watch in 4:3 format for a long time. Traces
of borders displayed on the left, right and centre
of the screen may cause image retention(screen
burn) which are not covered by the warranty.
Screen Fit: Displays the full image without any cut-off
when HDMI (720p / 1080i / 1080p) or Component
(1080i / 1080p) signals are inputted.
03 Basic Features
P.SIZE
English
15
Page 16

Basic Features
✎
NOTE
Depending on the input source, the picture size
x
options may vary.
The available items may differ depending on the
x
selected mode.
In PC mode, only 16:9 and 4:3 modes can be
x
adjusted.
Settings can be adjusted and stored for each
x
external device connected to an input on the T V.
After selecting Screen Fit in HDMI (1080i / 1080p)
x
or Component (1080i / 1080p) mode: Adjusts the
Position or Size by using ▲, ▼, ◄, ► button.
If you use the Screen Fit function with HDMI 720p
x
input, 1 line will be cut at the top, bottom, left and
right as in the overscan function.
■ Screen Mode (16:9 / Wide Zoom / Zoom / 4:3): (New
Zealand, Singapore only) Available only when picture
size is set to Auto Wide. You can determine the desired
picture size at the 4:3 WSS (Wide Screen Service) size
or the original size. Each European country requires
different picture size.
✎
Not available in PC, Component or HDMI mode.
■ Digital Noise Filter (Off / Low / Medium / High / Auto
/ Auto Visualization): When the broadcast signal is
weak, some static and ghosting may appear. Select one
of the options until the best picture is displayed.
Auto Visualization: When changing analogue channels,
displays the intensity of the current signal and defines
the screen noise filter.
✎
Only available for analogue channels.
■ MPEG Noise Filter (Off / Low / Medium / High /
Auto): Reduces MPEG noise to provide an improved
picture quality.
■ HDMI Black Level (Normal / Low): Selects the black
level on the screen to adjust the screen depth.
✎
Available only in HDMI mode (RGB signals).
■ Film Mode (Off / Auto1 / Auto2): Sets the TV to
automatically sense and process film signals from all
sources and adjust the picture for optimum quality.
✎
Available in TV(Digital TV for resolution 576i &
1080i and All Analongue TV), AV, COMPONENT
(480i / 1080i) and HDMI (480i / 1080i),
■ Auto Protection Time (2 hours / 4 hours / 8 hours /
10 hours / Off): If the screen remains idle with a still
image for a certain period of time defined by the user,
the screen saver is activated to prevent the formation of
ghost images on the screen.
Picture Reset (OK / Cancel)
Resets your current picture mode to its default settings.
Setting up the TV with Your PC
Set the input source to PC.
Auto Adjustment
Adjust frequency values/positions and fine tune the settings
automatically.
✎
Not available when connecting with an HDMI/DVI
cable.
Screen
■ Coarse / Fine: Removes or reduces picture noise. If the
noise is not removed by Fine-tuning alone, then adjust
the frequency as best as possible (Coarse) and Finetune again. After the noise has been reduced, readjust
the picture so that it is aligned to the centre of screen.
■ Position: Adjust the PC screen position with direction
button (▲ / ▼ / ◄ / ►).
■ Image Reset: Resets the image to default settings.
Using Your TV as a Computer (PC) Display
Setting Up Your PC Software (Based on Windows XP)
Depending on the version of Windows and the video card,
the actual screens on your PC may differ in which case the
same basic set-up information will almost always be applied
(If not, contact your computer manufacturer or Samsung
Dealer).
1. Click on “Control Panel” on the Windows start menu.
2. Click on “Appearance and Themes” in the “Control
Panel” window and a display dialog-box will appear.
3. Click on “Display” and a display dialog box will appear.
4. Navigate to the “Settings” tab on the display dialog-box.
y The correct size setting (resolution) [Optimum:
1920X1080 pixels]
y If a vertical-frequency option exists on your display
settings dialog box, the correct value is “60” or “60 Hz”.
Otherwise, just click “OK” and exit the dialog box.
16
English
Page 17
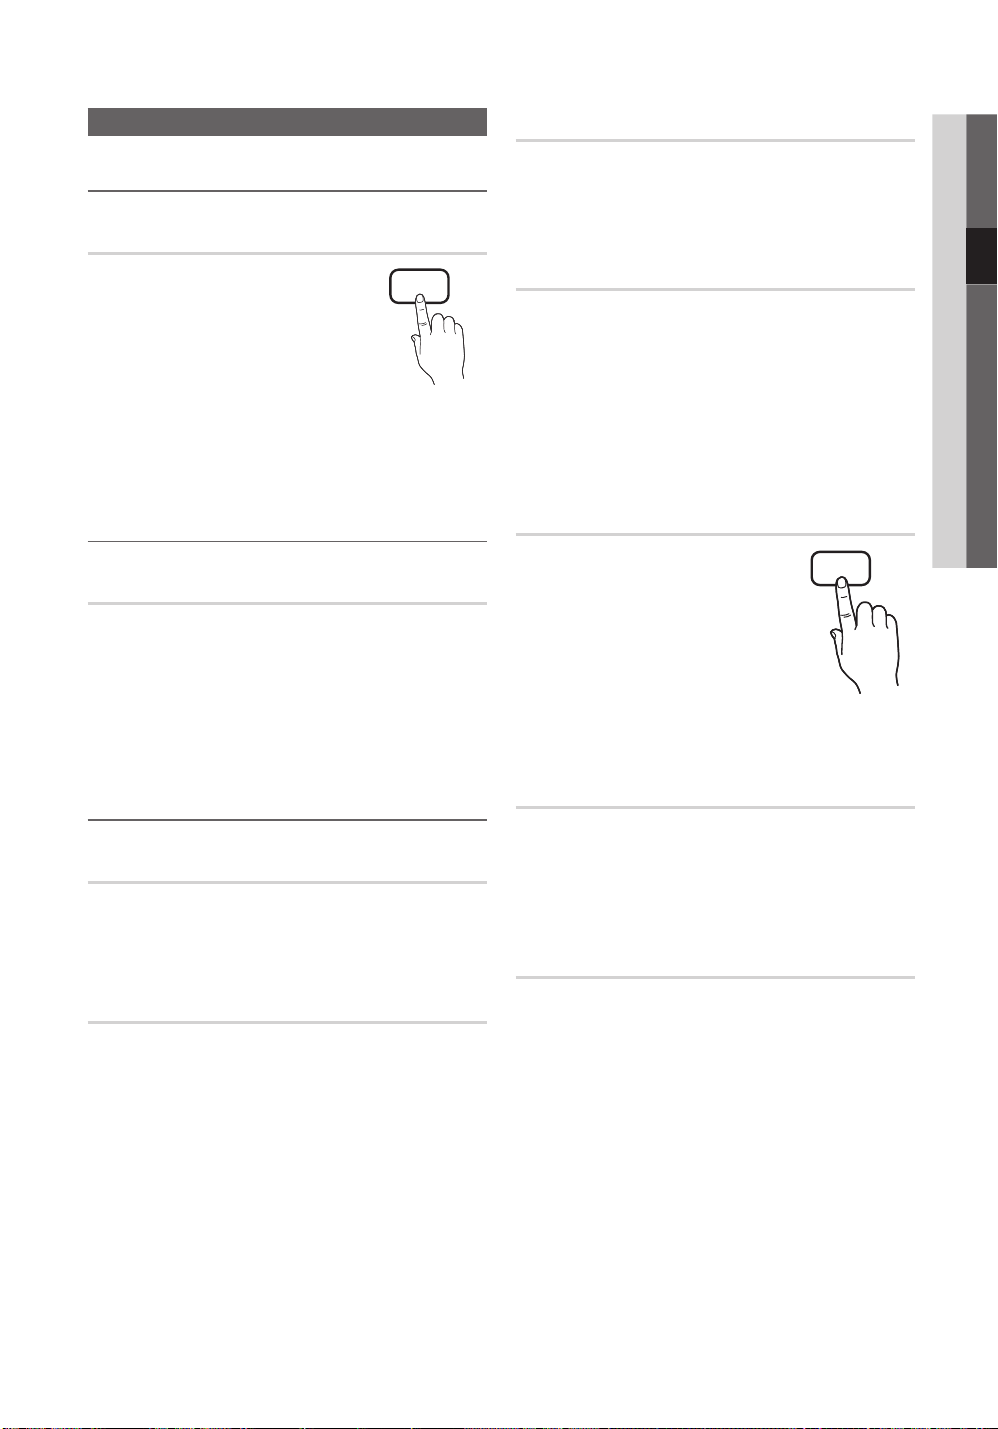
Sound Menu
Changing the Preset Sound Mode
Mode
■ Standard: Selects the normal
sound mode.
■ Music: Emphasizes music over
voices.
■ Movie: Provides the best sound for
movies.
■ Clear Voice: Emphasizes voices over other sounds.
■ Amplify: Increase the intensity of high-frequency sound
to allow a better listening experience for the hearing
impaired.
S.MODE
Audio Language
(digital channels only)
Change the default value for audio languages.
✎
The available language may dif fer depending on the
broadcast.
Audio Format
(digital channels only)
When sound is emitted from both the main speaker and the
audio receiver, a sound echo may occur due to the decoding
speed difference between the main speaker and the audio
receiver. In this case, use the TV Speaker function.
✎
Audio Format option may differ depending on the
broadcast. 5.1ch Dolby digital sound is only available
when connecting an external speaker through an
optical cable.
03 Basic Features
Adjusting Sound Settings
Equalizer
Adjusts the sound mode (standard sound mode only).
■ Balance L/R: Adjusts the balance between the right and
left speaker.
■ 100Hz / 300Hz / 1KHz / 3KHz / 10KHz (Bandwidth
Adjustment):Adjusts the level of specific bandwidth
frequencies.
■ Reset: Resets the equalizer to its default settings.
Sound Systems, Etc.
Virtual Surround (Off / On)
(standard sound mode only)
This function provides a virtual 5.1 channel surround sound
experience through a pair of speakers using HRTF (Head
Related Transfer Function) technology.
Dialog Clarity (Off / On)
(standard sound mode only)
This function allows you to increase the intensity of a voice
over background music or sound effects so that dialog can
be heard more clearly.
Audio Description
(not available in all locations) (digital
channels only)
This function handles the Audio Stream
for the AD (Audio Description) which is
sent along with the Main audio from the
broadcaster.
■ Audio Description (Off / On): Turn
the audio description function on
or off.
■ Volume: Adjust the audio description volume.
AD
Auto Volume (Off / Normal / Night)
To equalize the volume level on each channel, set to Normal.
■ Night: This mode provides an improved sound
experience compared to Normal mode, making almost
no noise. It is useful at night.
Speaker Select (External Speaker / TV
speaker)
A sound echo may occur due to a difference in decoding
speed between the main speaker and the audio receiver. In
this case, set the TV to External Speaker.
✎
When Speaker Select is set to External Speaker, the
volume and MUTE buttons will not operate and the
sound settings will be limited.
✎
When Speaker Select is set to External Speaker
TV Speaker: Off, External Speaker: On
x
English
17
Page 18
Basic Features
✎
When Speaker Select is set to TV Speaker
TV Speaker: On, External Speaker: On
x
✎
If there is no video signal, both speakers will be mute.
Additional Setting
■ DTV Audio Level (MPEG / HE-AAC): This function
allows you to reduce the disparity of a voice signal
(which is one of the signals received during a digital TV
broadcast) to a desired level.
✎
According to the type of broadcast signal, MPEG
/ HE-AAC can be adjusted between -10dB and
0dB.
✎
To increase or decrease the volume, adjust
between the range 0 and -10 respectively.
■ SPDIF Output: SPDIF (Sony Philips Digital InterFace)
is used to provide digital sound, reducing interference
going to speakers and various digital devices such as a
DVD player.
Audio Format: During the reception of a digital TV
broadcast, you can select the Digital Audio output
(SPDIF) format from the options PCM or Dolby Digital.
✎
By connecting to 5.1ch speakers in a Dolby
Digital setup, maximize your interactive 3D sound
experience.
Audio Delay: Correct audio-video sync problems, when
watching TV or video, and when listening to digital audio
output using an external device such as an AV receiver
(0ms ~ 250ms).
■ Dolby Digital Comp (Line / RF): This function minimizes
signal disparity between a dolby digital signal and a
voice signal (i.e. MPEG Audio, HE-AAC, ATV Sound).
✎
Select Line to obtain dynamic sound, and RF
to reduce the difference between loud and soft
sounds at night time.
Line: Set the output level for signals greater or less than
-31dB (reference) to either -20dB or -31dB.
RF: Set the output level for signals greater or less than
-20dB (reference) to either -10dB or -20dB.
Sound Reset (OK / Cancel)
Reset all sound settings to the factory defaults.
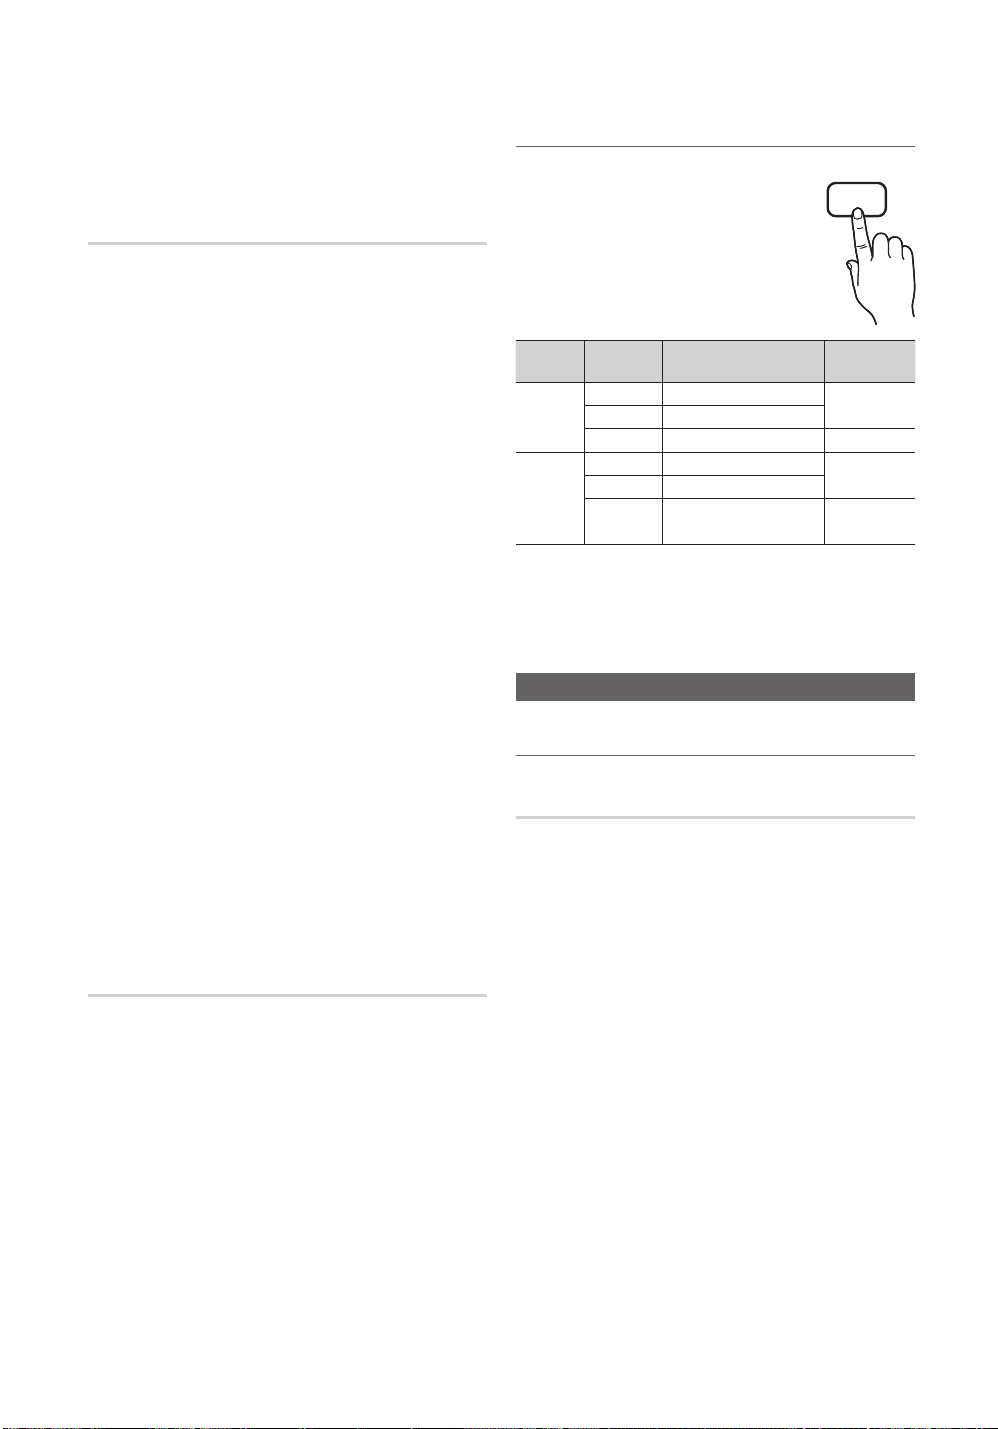
Selecting the Sound Mode
When you set to Dual -, the current
sound mode is displayed on the screen.
Audio
Type
A2
Stereo
NICAM
Stereo
✎
If the stereo signal is weak and an automatic switching,
occurs, then switch to the mono.
✎
Only activated in stereo sound signal.
✎
Only available when the Input source is set to TV.
Mono Mono
Stereo
Dual
Mono Mono
Stereo
Dual
Dual
-
Stereo Mono
Dual
Dual
Mono Stereo
Mono Dual
Dual
Setup Menu
Ⳓ ⳓ
DUAL
Automatic
Automatic
Setting the Time
Time
■ Clock: Setting the clock is for using various timer
features of the TV.
The current time will appear every time you press
the INFO button.
✎
If you disconnect the power cord, you have to set
the clock again.
Clock Mode (Auto / Manual)
✎
Depending on the broadcast station and signal,
the auto time set up may not be correct. In this
case, set the time manually.
✎
The antenna must be connected in order to set
the time automatically.
Clock Set: Set the Day, Month, Year, Hour and Minute
manually.
✎
Available only when Clock Mode is set to
Manual.
Time Zone (Australia only): Select your time zone.
✎
This function is only available when the Clock
Mode is set to Auto.
Default
change
Dual
change
Dual
18
English
Page 19
Using the Sleep Timer
■ Sleep Timer
after a preset period of time. (30, 60, 90, 120, 150 and
180 minutes).
✎
To cancel Sleep Timer, select Off.
: Automatically shuts off the TV
Setting the On / Off Timer
Repeat: Select Once, Everyday, Mon~Fri, Mon~Sat,
Sat~Sun or Manual to set at you convenience. If you
select Manual, you can set up the day you want to
activate the timer.
✎
The mark indicates the day is selected.
✎
Auto Power Off (available only when the TV is turned on
by Timer): The TV will be automatically turned off after 3
hours of being left idle to prevent overheating.
03 Basic Features
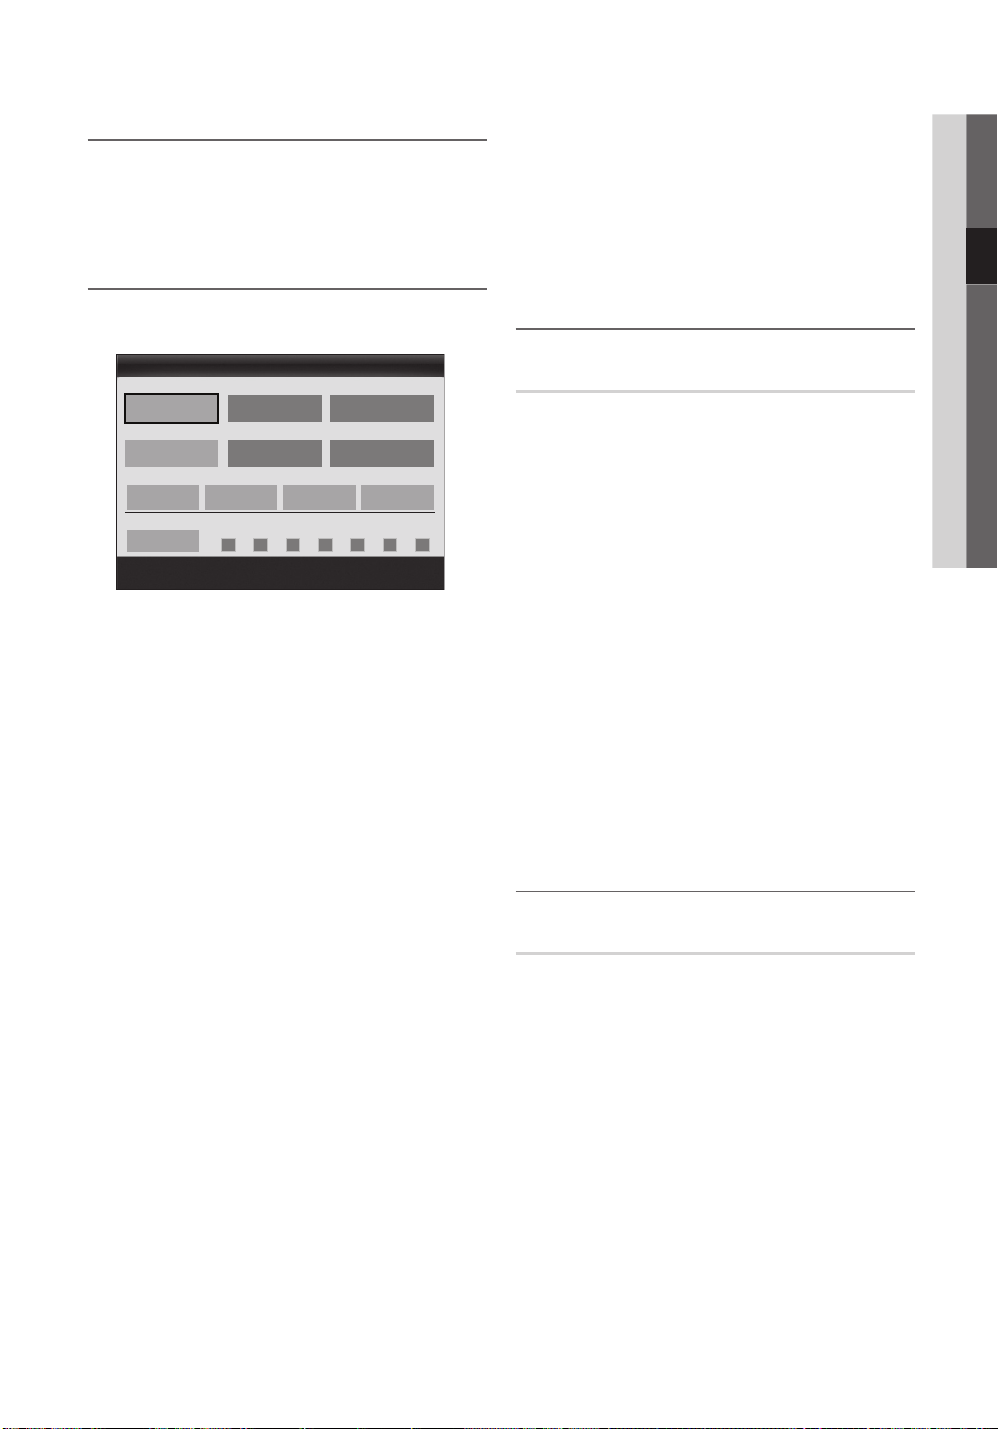
■ Timer 1 / Timer 2 / Timer 3: Three different on / off
timer settings can be made. You must set the clock first.
Timer 1
On Time
▲
Inactivate
▼
Off Time
Inactivate
Volume
Repeat
On Time / Off Time: Set the hour, minute, and activate
/ inactivate. (To activate timer with the setting you’ve
chosen, set to Activate.)
Volume: Set the desired volume level.
Source: Select TV or USB content to be played when
the TV is turned on automatically. (USB can be selected
only when a USB device is connected to the TV)
Antenna (when the Source is set to TV): Select ATV or
DTV.
Channel (when the Source is set to TV): Select the
desired channel.
Contents (when the Source is set to USB): Select a
folder in the USB device containing music or photo files
to be played when the TV is turned on automatically.
✎
Source Antenna Channel
10 TV ATV 1
Once
NOTE
If there is no music file on the USB device or the
x
folder containing a music file is not selected,
The Timer function does not operate correctly.
When there is only one photo file in the USB
x
device, the Slide Show will not play.
If a folder name is too long, the folder cannot be
x
selected.
Each USB you use is assigned its own folder.
x
When using more than one of the same type of
USB, make sure the folders assigned to each
USB have different names.
00 00
00 00
Sun Mon Tue Wed Thu Fri Sat
Move
Adjust
Enter
Return
Locking Programs
Security
✎
The PIN input screen appears before the setup screen.
✎
Enter your 4-digit PIN, the default of which is “0-0-0-0.”
Change the PIN using the Change PIN option.
■ Child Lock (Off / On): Lock channels in Channel
Manager, to prevent unauthorized users, such as
children, from watching unsuitable programme.
✎
Available only when the Input source is set to TV.
■ Parental Lock: Prevent unauthorized users, such as
children, from watching unsuitable programme with a
user-defined 4-digit PIN code. If the selected channel is
locked, the “
Allow All: Unlock all TV ratings.
■ Change PIN: Change your personal ID number required
to set up the TV.
” symbol will be displayed.
✎
The items of Parental Lock differs depending on
the country.
✎
If you forget the PIN code, press the remote
control buttons in the following sequence, which
resets the PIN to “0-0-0-0.”: POWER (off) →
MUTE → 8 → 2 → 4 → POWER (on).
Other Features
Language
■ Teletext Language: Set a desired language for teletext.
✎
English is the default in cases where the selected
language is unavailable in the broadcast.
■ Preference (Primary Audio Language / Secondary
Audio Language / Primary Subtitle Language /
Secondary Subtitle Language / Primary Teletext
Language / Secondary Teletext Language): Select
a language, which will be the default language when a
channel is selected.
English
19
Page 20
Basic Features
Subtitle
Use this menu to set the Subtitle
mode.
■ Subtitle (Off / On): Switches
subtitles on or off.
■ Mode (Normal / Hearing
Impaired): Sets the subtitle mode.
■ Subtitle Language: Sets the
subtitle language.
✎
If the programme you are watching does not
support the Hearing Impaired function, Normal
automatically activates even if the Hearing
Impaired mode is selected.
✎
English is the default in cases where the selected
language is unavailable in the broadcast.
SUBT.
Digital Text (Disable / Enable)
(New Zealand only)
If the programme broadcasts with digital text, this feature is
enabled.
General
■ Game Mode (Off / On): When connecting to a game
console such as PlayStation™ or Xbox™, you can enjoy
a more realistic gaming experience by selecting game
mode.
✎
NOTE
Precautions and limitations for game mode.
x
– To disconnect the game console and connect
another external device, set Game Mode to Off in
the setup menu.
– If you display the TV menu in Game Mode, the
screen shakes slightly.
Game Mode is not available when the input source
x
is set to TV or PC.
After connecting the game console, set Game Mode
x
to On. Unfortunately, you may notice reduced picture
quality.
If Game Mode is On:
x
– Picture mode is set to Standard and Sound mode
is set to Movie.
– Equalizer is not available.
■ Menu Transparency (Bright / Dark): Set the
Transparency of the menu.
■ Melody (Off / Low / Medium / High): Set so that a
melody plays when the TV is turned on or off.
Picture In Picture (PIP)
PIP
You can watch the TV tuner and one external video source
simultaneously. PIP (Picture-in-Picture) does not function in
the same mode.
✎
NOTE
For PIP sound, refer to the Sound Select
x
instructions.
If you turn the T V off while watching in PIP mode, the
x
PIP window will disappear.
You may notice that the picture in the PIP window
x
becomes slightly unnatural when you use the main
screen to view a game or karaoke.
PIP settings (UA22C4000)
x
Main picture Sub picture
Component, HDMI/DVI,
PC
PIP settings (UA26C4000)
x
Main picture Sub picture
Component, HDMI1/DVI,
HDMI2, HDMI3, PC
PIP settings (UA32C4000)
x
Main picture Sub picture
Component, HDMI1/DVI,
HDMI2, HDMI3, PC
■ PIP (Off / On): Activate or deactivate the PIP function.
■ Channel: Select the channel for the sub-screen.
■ Size (
■ Position (
sub-picture.
■ Sound Select (Main / Sub): You can choose the
desired sound (Main / Sub) in PIP mode.
/ ): Select a size for the sub-picture.
/ / / ): Select a position for the
TV
TV
TV
20
English
Page 21
Support Menu
✎
Self Diagnostic might take few seconds, this is part of
the normal operation of the TV
Self Diagnosis
■ Picture Test (Yes / No): Use to check for picture
problems.
■ Sound Test (Yes / No): Use the built-in melody sound to
check for sound problems.
✎
If you hear no sound from the TV’s speakers,
before per forming the sound test, make sure
Speaker Select is set to TV speaker in the
Sound menu.
✎
The melody will be heard during the test even if
Speaker Select is set to External Speaker or the
sound is muted by pressing the MUTE button.
■ Signal Information (digital channels only): HDTV
channel’s reception quality is either perfect or the
channels are unavailable. Adjust your antenna to
increase signal strength.
■ Troubleshooting: If the TV seems to have a problem,
refer to this description.
✎
If none of these troubleshooting tips apply, contact
the Samsung customer service centre.
Software Upgrade
Software Upgrade can be performed via a broadcasting
signal or downloading the latest firmware from “www.
samsung.com,” to a USB memory device.
Current Version the software already installed in the TV.
✎
Software is represented as “Year/Month/Day_Version”.
Software Upgrade
Current Version 2010/01/18_000001
By USB ►
By Channel
Standby Mode Upgrade : Off
Alternative Software 2010/01/15_00000
Move
Enter
Return
Installing the Latest Version
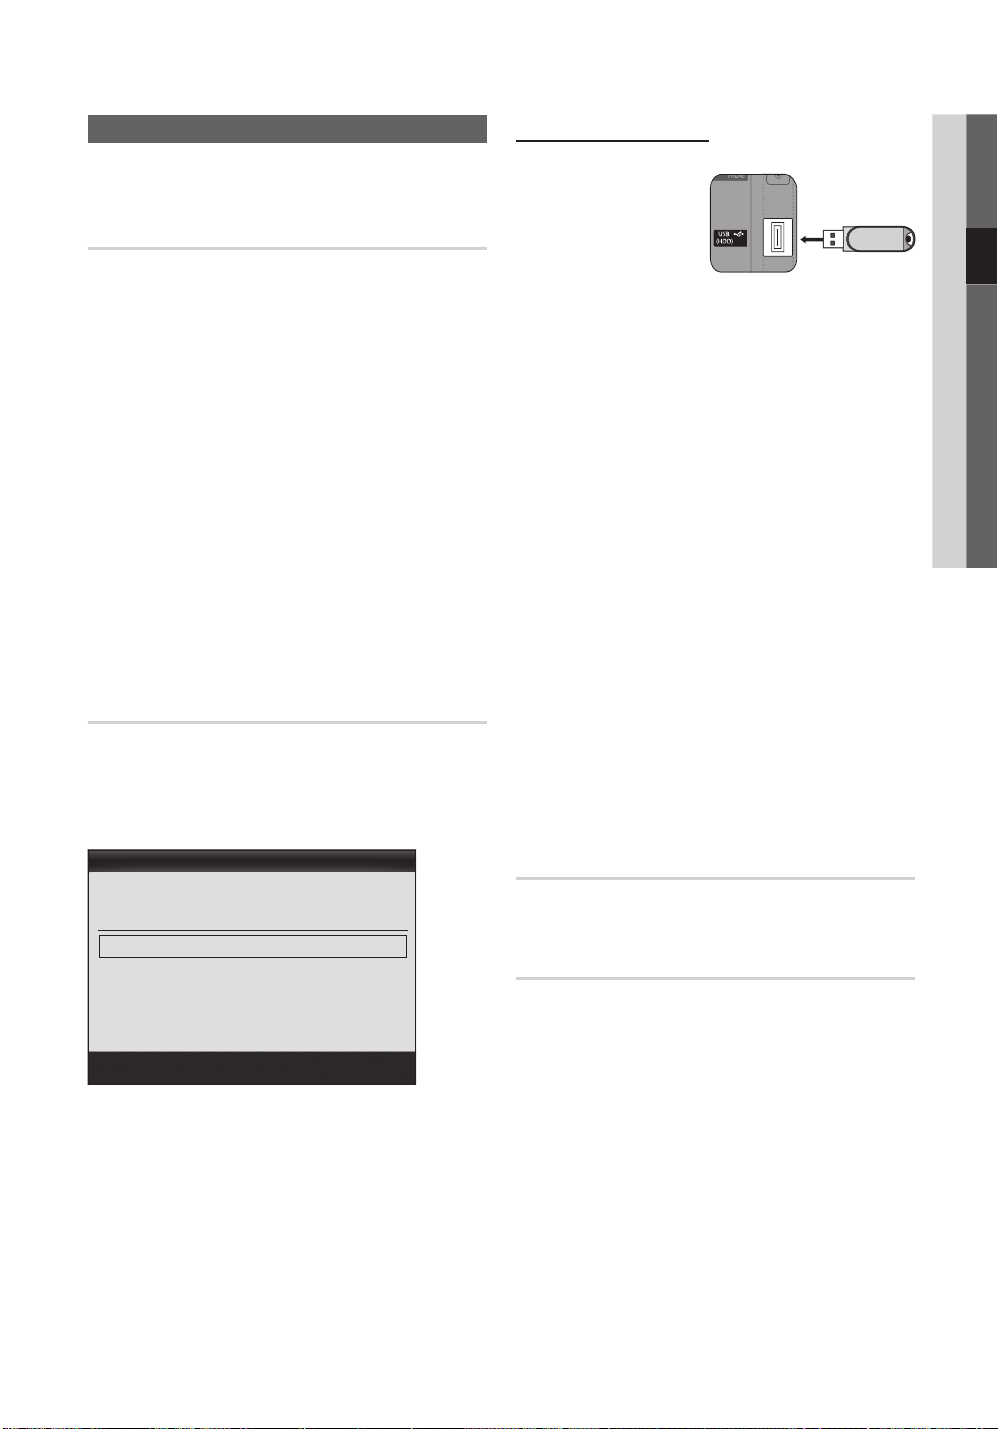
■ By USB: Insert a USB
drive containing the
firmware upgrade file,
downloaded from
“www.samsung.
com,” into the TV.
Please be careful
not to disconnect
the power or remove the USB drive until upgrades are
complete. The TV will be turned off and on automatically
after completing the firmware upgrade. When software is
upgraded, video and audio settings you have made will
return to their default settings. We advise you to to write
down your settings so that you can easily reset them
after the upgrade.
■ By Channel: Upgrade the software using the
broadcasting signal.
✎
If the function is selected during the software
transmission period, software will be automatically
searched and downloaded.
✎
The time required to download the software is
determined by the signal status.
■ Standby Mode Upgrade: A manual upgrade will be
automatically performed at selected time. Since the
power of the unit is turned on internally, the screen
may be turned on slightly for the LED product. This
phenomenon may continue for more than 1 hour until
the software upgrade is complete.
■ Alternative Software (backup): If there is an issue with
the new firmware and it is affecting operation, you can
change the software to the previous version.
✎
If the software was changed, existing software is
displayed.
TV Rear Panel
USB Drive
HD Connection Guide
Refer to this information when connecting external devices
to the TV.
Contact Samsung
View this information when your TV does not work properly
or when you want to upgrade the software. You can view the
information regarding the call centre, product and software
file download method.
03 Basic Features
English
21
Page 22
Advanced Features
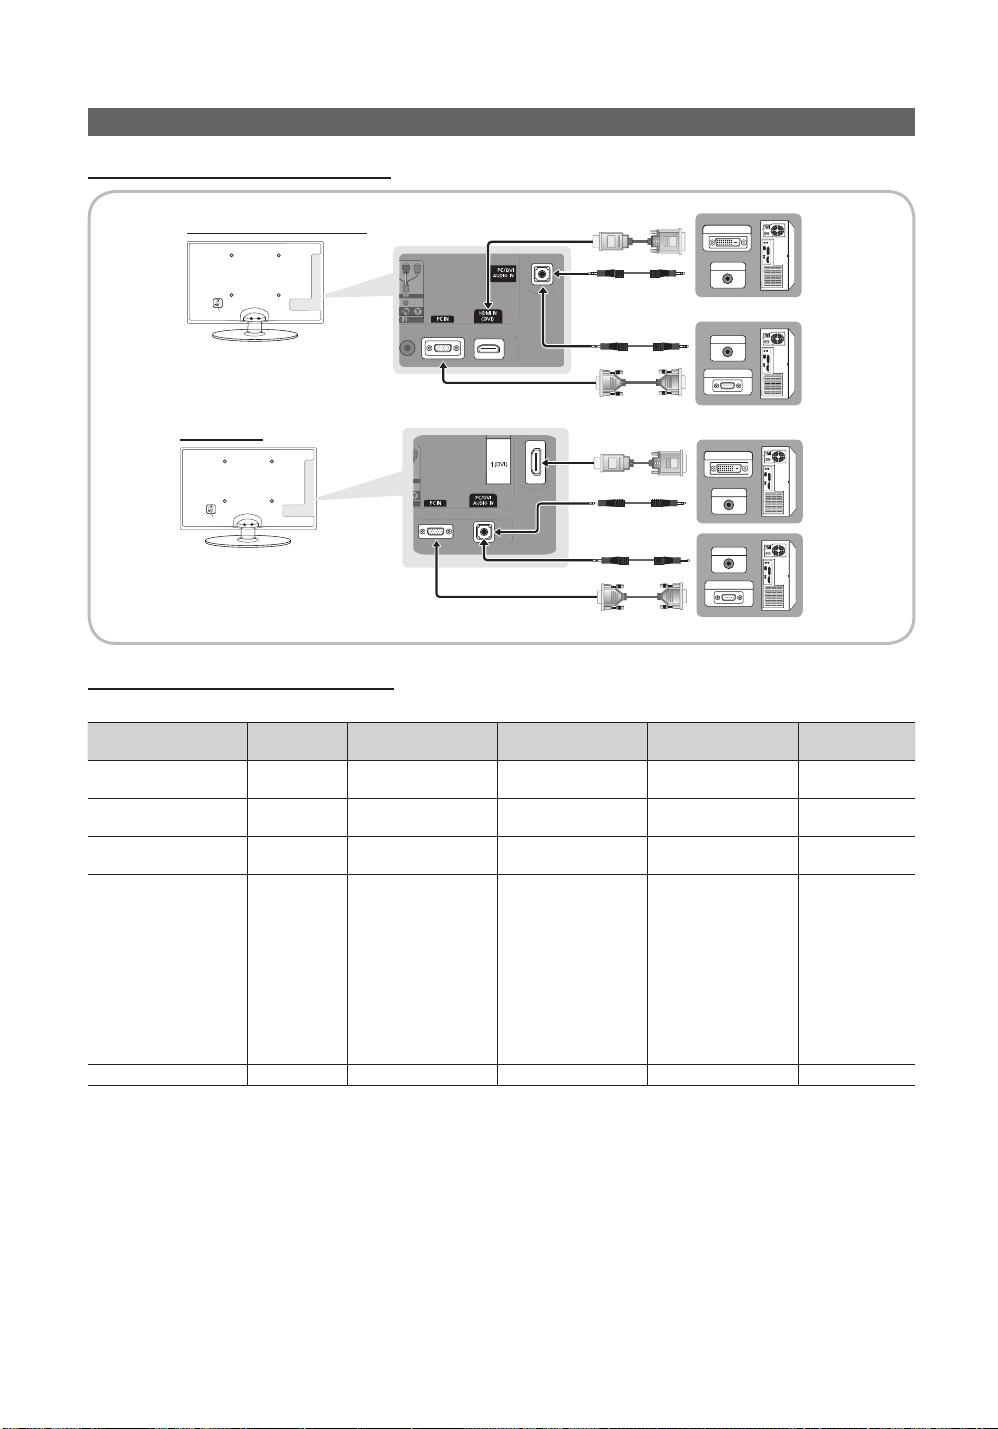
Using an HDMI/DVI Cable or a D-sub Cable
Connecting to a PC
UA22C4000 / UA26C4000
DVI OUT
AUDIO OUT
AUDIO OUT
PC OUT
UA32C4000
DVI OUT
AUDIO OUT
AUDIO OUT
PC OUT
Display Modes (D-Sub and HDMI/DVI Input)
Optimal resolution is 1360 x 768 @ 60 Hz.
Mode Resolution
IBM
MAC
VESA CVT
VESA DMT
VESA GTF 1280 x 720 52.500 70.000 89.040 -/+
640 x 350
720 x 400
640 x 480
832 x 624
720 x 576
1280 x 720
640 x 480
640 x 480
640 x 480
800 x 600
800 x 600
800 x 600
1024 x 768
1024 x 768
1024 x 768
1280 x 720
1360 x 768
Horizontal Frequency
(KHz)
31.469
31.469
35.000
49.726
35.910
56.456
31.469
37.500
37.861
37.879
46.875
48.077
48.363
56.476
60.023
45.000
47.712
Vertical Frequency
(Hz)
70.086
70.087
66.667
74.551
59.950
74.777
59.940
75.000
72.809
60.317
75.000
72.188
60.004
70.069
75.029
60.000
60.015
Pixel Clock Frequency
(MHz)
25.175
28.322
30.240
57.284
32.750
95.750
25.175
31.500
31.500
40.000
49.500
50.000
65.000
75.000
78.750
74.250
85.500
Sync Polarity
(H / V)
+/-
-/+
-/-
-/-
-/+
-/+
-/-
-/-
-/+/+
+/+
+/+
-/-
-/+/+
+/+
+/+
✎
NOTE
For HDMI/DVI cable connection, you must use the HDMI IN 1(DVI) jack.
x
The interlace mode is not supported.
x
The set might operate abnormally if a non-standard video format is selected.
x
Separate and Composite modes are supported. SOG(Sync On Green) is not supported.
x
English
22
Page 23
Media Play
SUM
04 Advanced Features
MEDIA.P
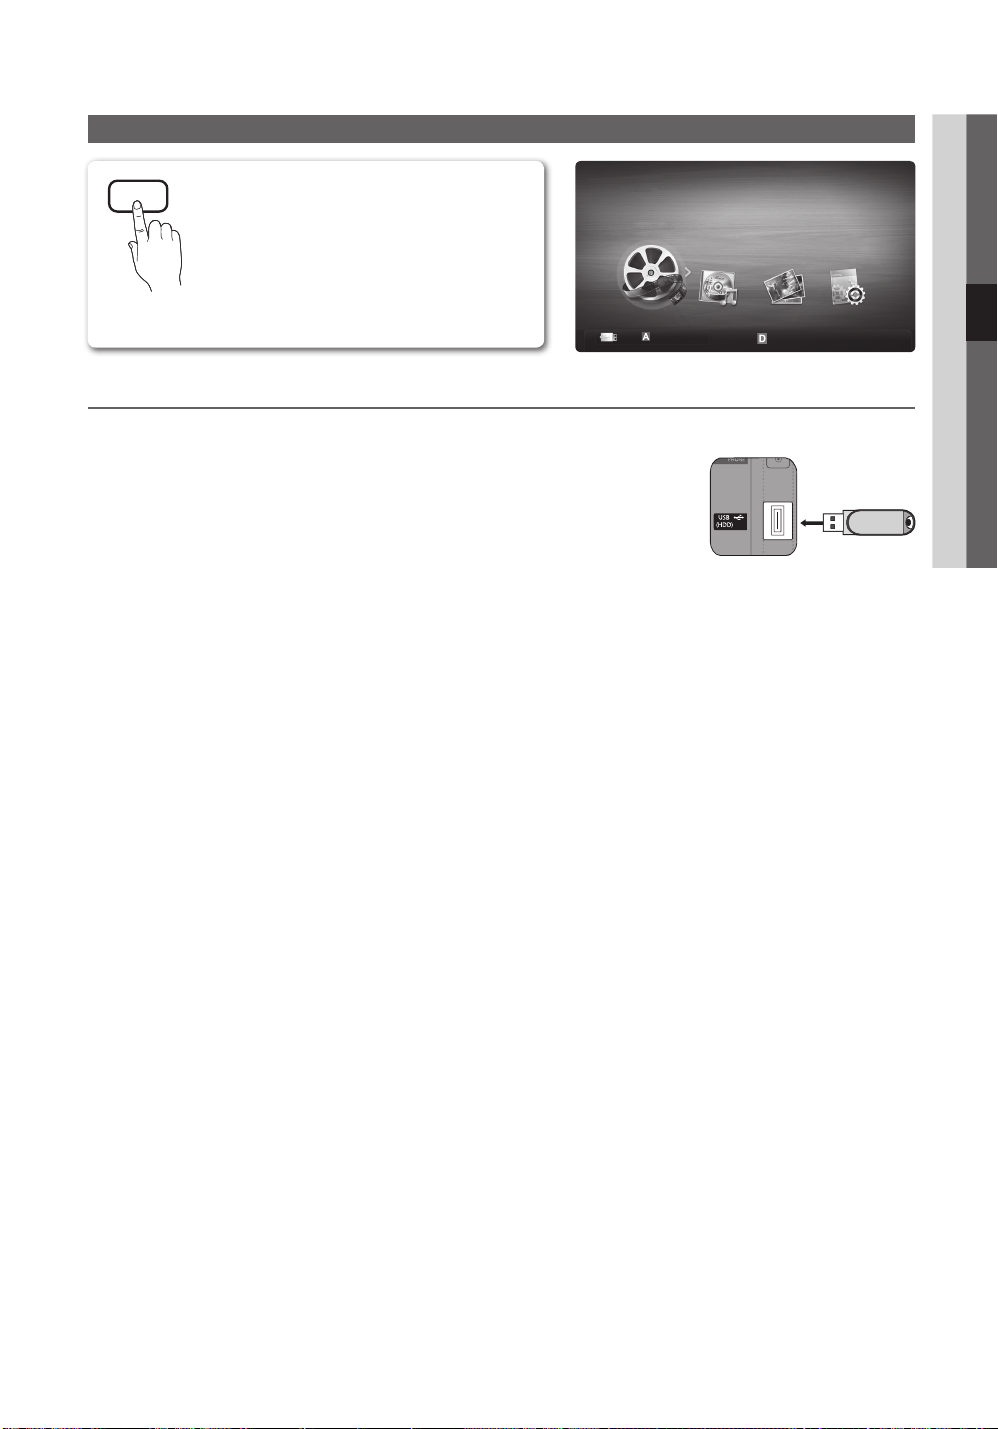
Enjoy photos, music and/or movie fi les saved on
a USB Mass Storage Class (MSC) device and/or
your PC.
MediaPlay
Videos
Change Device
View Devices
Connecting a USB Device
1. Turn on your TV.
2. Connect a USB device containing photo, music and/or movie fi les to the
USB (HDD) jack on the side of the TV.
3. When USB is connected to the TV, popup window appears. Then you can select
Media Play.
✎
It might not work properly with unlicenced multimedia files.
✎
Need-to-Know List before using Media Play (USB)
MTP (Media Transfer Protocol) is not supported.
x
The file system supports FAT16, FAT32 and NTFS.
x
Certain types of USB Digital camera and audio devices may not be compatible with this TV.
x
Media Play only supports USB Mass Storage Class (MSC) devices. MSC is a Mass Storage Class Bulk-Only
x
Transport device. Examples of MSC are Thumb drives, Flash Card Readers and USB HDD (USB HUB are not
supported). Devices should be connected directly to the TV’s USB port.
Before connecting your device to the TV, please back up your files to prevent them from damage or loss of data.
x
SAMSUNG is not responsible for any data file damage or data loss.
Connect a USB HDD to the dedicated port, USB 1 (HDD) port.
x
Do not disconnect the USB device while it is loading.
x
The higher the resolution of the image, the longer it takes to display on the screen.
x
The maximum supported JPEG resolution is 15360X8640 pixels.
x
For unsupported or corrupted files, the “Not Supported File Format” message is displayed.
x
If the files are sorted by Basic View, up to 1000 files can be displayed in each folder.
x
MP3 files with DRM that have been downloaded from a non-free site cannot be played. Digital Rights Management
x
(DRM) is a technology that supports the creation of content, the distribution and management of the content in an
integrated and comprehensive way, including the protection of the rights and interests of the content providers, the
prevention of the illegal copying of contents, as well as managing billings and settlements.
If more than 2 PTP devices are connected, you can only use one at a time.
x
If more than two MSC devices are connected, some of them may not be recognized. A USB device that requires high
x
power (more than 500mA or 5V) may not be supported.
If an over-power warning message is displayed while you are connecting or using a USB device, the device may not
x
be recognized or may malfunction.
If the TV has been no input during time set in Auto Protection Time, the Screensaver will run.
x
The power-saving mode of some external hard disk drives may be released automatically when connected to the T V.
x
If a USB extension cable is used, the USB device may not be recognized or the files on the device may not be read.
x
If a USB device connected to the TV is not recognized, the list of files on the device is corrupted or a file in the list is
x
not played, connect the USB device to the PC, format the device and check the connection.
If a file deleted from the PC is still found when Media Play is run, use the “Empty the Recycle Bin” function on the PC
x
to permanently delete the file.
TV Rear Panel
Enter
English
Return
USB Drive
23
Page 24
Advanced Features
B
Movie 01.avi
00:04:03 / 00:07:38 1/1
SUM
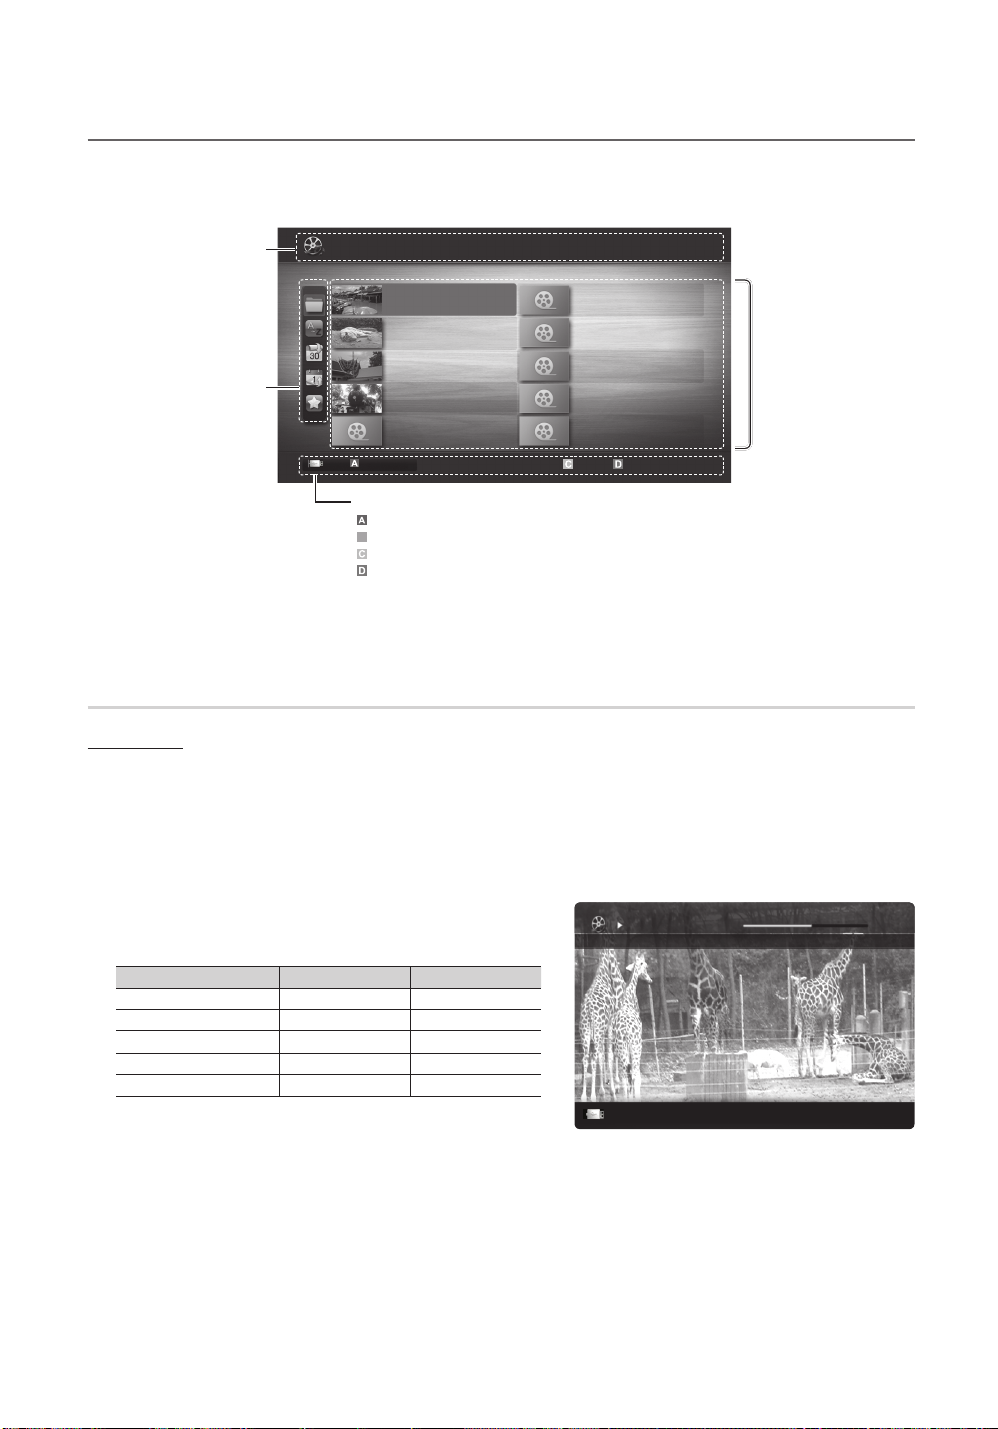
Screen Display
Move to the file you desired using the up/down/right/left buttons and then press the ENTER or (Play) button. The file is
played.
✎
Supports the View Devices and Home in Media Play homepage.
You can ascertain the selected
file name and the number of files
Displays sorting standard.
Sorting standard is
✎
different depending on the
contents.
Information:
and page.
Sort List Section:
Videos
SUM
Change Device
/Movie 01.avi 1/1
Movie 01.avi
Movie 03.avi
Movie 05.avi
Movie 07.avi
Movie 09.avi
Jan.10.2010
Jan.10.2010
Jan.10.2010
Jan.10.2010
Jan.10.2010
Movie 02.avi
Movie 04.avi
Movie 06.avi
Movie 08.avi
Movie 10.avi
Select Sorting
Jan.10.2010
Jan.10.2010
Jan.10.2010
Jan.10.2010
Jan.10.2010
Tools
Page
Operation Buttons
Red (Change Device): Selects a connected device.
Green (Preference): Sets the file preference. (not supported in Basic view)
Yellow (Select): Selects multiple files from file list. Selected files are marked with a symbol.
Blue (Sorting): Selects the sort list.
Tools: Displays the option menu.
Using the (REW) or (FF) button, file list can move to next or previous page.
✎
File List Section:
You can confirm the files
and groups that is sorted by
each category.
Videos
Playing Video
1. Press the ◄ or ► button to select Videos, then press the ENTER
2. Press the ◄/►/▲/▼ button to select the desired file in the file list.
3. Press the ENTER
– The selected file is displayed on the top with its playing time.
– If video time information is unknown, play time and progress bar are not displayed.
– During playing the video, you can search using the ◄ and ► button.
✎
In this mode, you can enjoy movie clips contained on a Game,
but you cannot play the Game itself.
y Supported Subtitle Formats
MPEG-4 time-based text .ttxt XML
SubViewer .sub string-based
Micro DVD .sub or .txt string-based
button or (Play) button.
Name File extension Format
SAMI .smi HTML
SubRip .srt string-based
button in the Media Play menu.
Pause
Jump
Tools
Return
English
24
Page 25
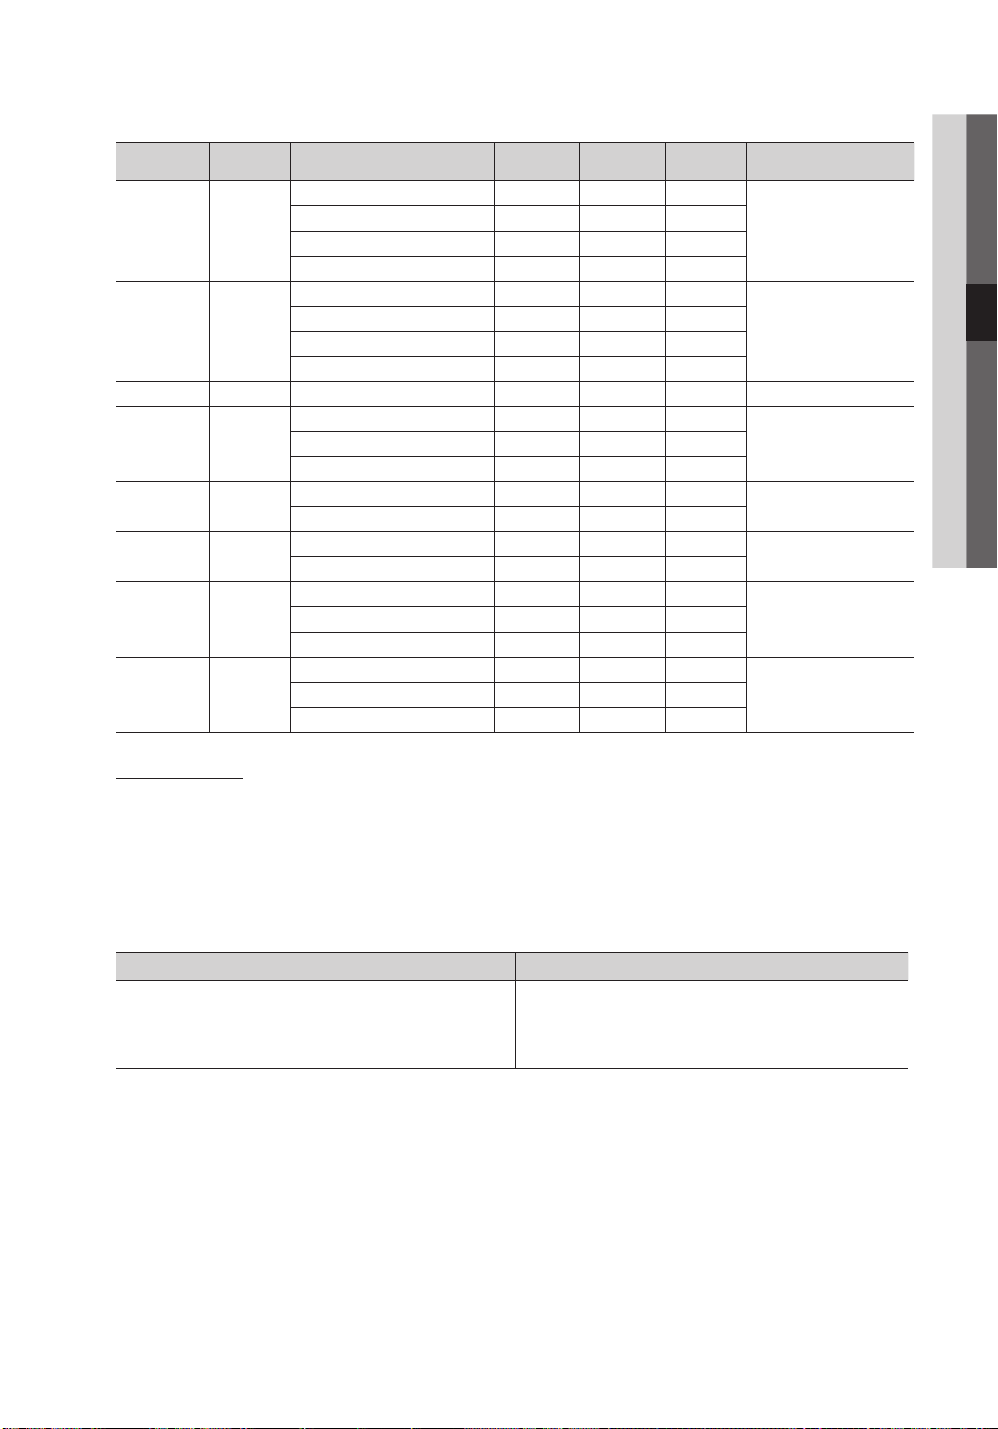
y Supported Video Formats
File Extension Container Video Codec Resolution
Divx 3.11 / 4.x / 5.1 / 6.0 1920x1080 6 ~ 30 8
*.avi
*.mkv
*.asf ASF
*.wmv ASF Window Media Video v9 1920x1080 6 ~ 30 25 WMA
*.mp4 MP4
*.3gp 3GPP
*.vro
*.mpg
*.mpeg
*.ts
*.tp
*.trp
AVI
MKV
VRO
VOB
PS
TS
XviD 1920x1080 6 ~ 30 8
H.264 BP / MP / HP 1920x1080 6 ~ 30 25
MPEG4 SP / ASP 1920x1080 6 ~ 30 8
Divx 3.11 / 4.x / 5.1 / 6.0 1920x1080 6 ~ 30 8
XviD 1920x1080 6 ~ 30 8
H.264 BP / MP / HP 1920x1080 6 ~ 30 25
MPEG4 SP / ASP 1920x1080 6 ~ 30 8
H.264 BP / MP / HP 1920x1080 6 ~ 30 25
XVID 1920x1080 6 ~ 30 8
H.264 BP / MP / HP 1920x1080 6 ~ 30 25
MPEG4 SP / ASP 1920x1080 6 ~ 30 8
MPEG1 1920x1080 24 / 25 / 30 30
MPEG2 1920x1080 24 / 25 / 30 30
MPEG1 1920x1080 24 / 25 / 30 30
H.264 1920x1080 6 ~ 30 25
MPEG2 1920x1080 24 / 25 / 30 30
H.264 1920x1080 6 ~ 30 25
VC1 1920x1080 6 ~ 30 25
Frame rate
(fps)
Bit rate
(Mbsp)
04 Advanced Features
Audio Codec
MP3 / AC3 / LPCM /
ADPCM / DTS Core
MP3 / AC3 / LPCM /
ADPCM / WMA
MP3 / ADPCM / AACMPEG4 SP / ASP 1920x1080 6 ~ 30 8
ADPCM / AAC / HE-AAC
AC3 / MPEG / LPCM
AC3 / MPEG / LPCM / AACMPEG2 1920x1080 24 / 25 / 30 30
AC3 / AAC / MP3 / DD+ /
HE-AAC
Other Restrictions
✎
NOTE
If there are problems with the contents of a codec, the codec will not be suppor ted.
x
If the information for a Container is incorrect and the file is in error, the Container will not be able to play
x
correctly.
Sound or video may not work if the contents have a standard bitrate/frame rate above the compatible Frame/sec
x
listed in the table above.
If the Index Table is in error, the Seek (Jump) function is not supported.
x
Video Decoder Audio Decoder
• Supports up to H.264, Level 4.1
• H.264 FMO / ASO / RS, VC1 SP / MP / AP L4 and AVCHD are not
supported.
• GMC is not supported.
• H.263 is not supported.
• Supports up to WMA 7, 8, 9, STD
• WMA 9 PRO does not support 2 channel excess multi channel or
lossless audio.
• WMA sampling rate 22050Hz mono is not supported.
English
25
Page 26
Advanced Features
Image1024.jpg 1024x768 2010/2/1 3/15
SUM
3/15
I Love you
Jhon
Music 1
No Singer
Music 2
No Singer
Music 3
No Singer
Music 4
No Singer
Music 5
No Singer
I Love You
Jhon
1st Album
Pop
2010
4.2MB
01:10 / 04:02
SUM
Movie 01.avi
00:04:03 / 00:07:38 1/1
SUM
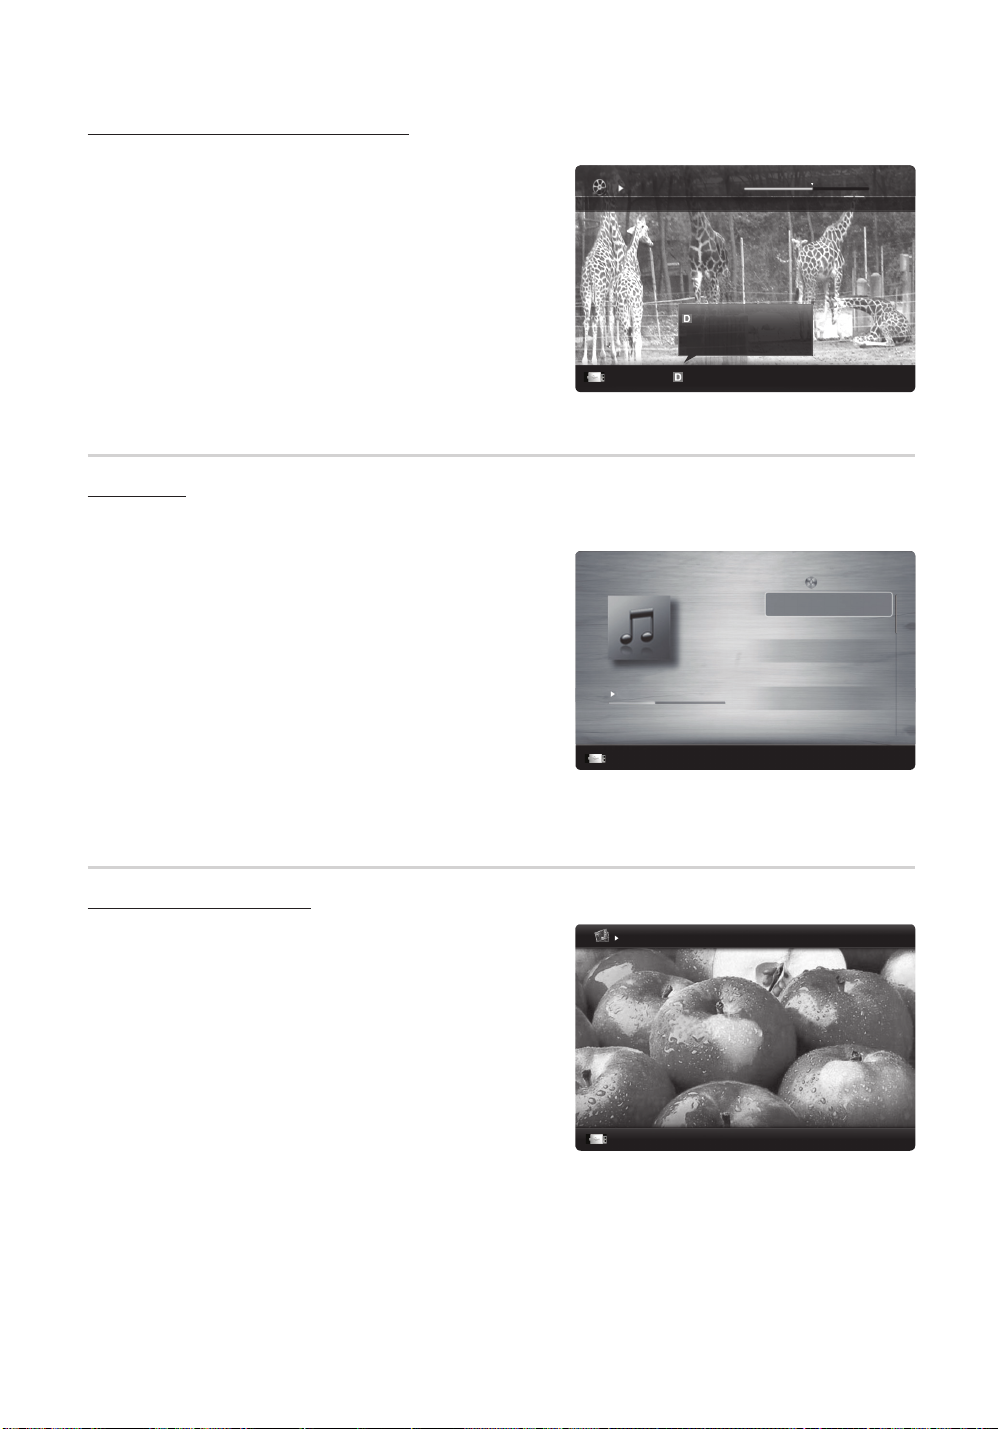
Playing movie file continuously (Resume Play)
If you exit the playing videos function, it can be played later from the point where it was stopped.
1. Select the movie file you want to play continuously by pressing
the ◄ or ► button to select it from the file list section.
2. Press the
3. Select Play Continuously (Resume Play) by pressing the Blue
button. The Movie will begin to play from where it was stopped.
Music
Playing Music
1. Press the ◄ or ► button to select Music, then press the
ENTER
2. Press the ◄/►/▲/▼ button to select the desired file in the file
list.
3. Press the ENTER
✎
Only displays the files with MP3 and PCM file extension. Other
file extensions are not displayed, even if they are saved on the
same USB device.
✎
If the sound is strange when playing MP3 files, adjust the
Equalizer in the Sound menu. (An over-modulated MP3 file
may cause a sound problem.)
(Play) / ENTER button.
✎
The Blue button is available when resuming play.
✎
If the Cont. movie play help function is set to On in the
Settings menu, a pop-up message will appear when you
resume play a movie file.
button in the Media Play menu.
button or (Play) button.
– During playing the music, you can search using the ◄ and ►
button.
– (REW) and µ (FF) buttons do not function during play.
Play continuously
Resumes playing from the last viewed
scene.
Play continuously
Pause
Pause
Jump
Jump
Playlist
Tools
Tools
Return
Return
Photos
Viewing a Photo (or Slide Show)
1. Press the ◄ or ► button to select Photos, then press the
ENTER
button in the Media Play menu.
2. Press the ◄/►/▲/▼ button to select the desired file in the file
list.
3. Press the ENTER
26
– While a photo list is displayed, press the
ENTER button on the remote control to start slide show.
– All files in the file list section will be displayed in the slide show.
– During the slide show, files are displayed in order from
currently being shown.
✎
Music files can be automatically played during the Slide Show if
the Background Music is set to On.
✎
The BGM Mode cannot be changed until the BGM has finished
loading.
English
button or (Play) button.
(Play) /
Normal
Pause
Previous/Next
Tools
Return
Page 27
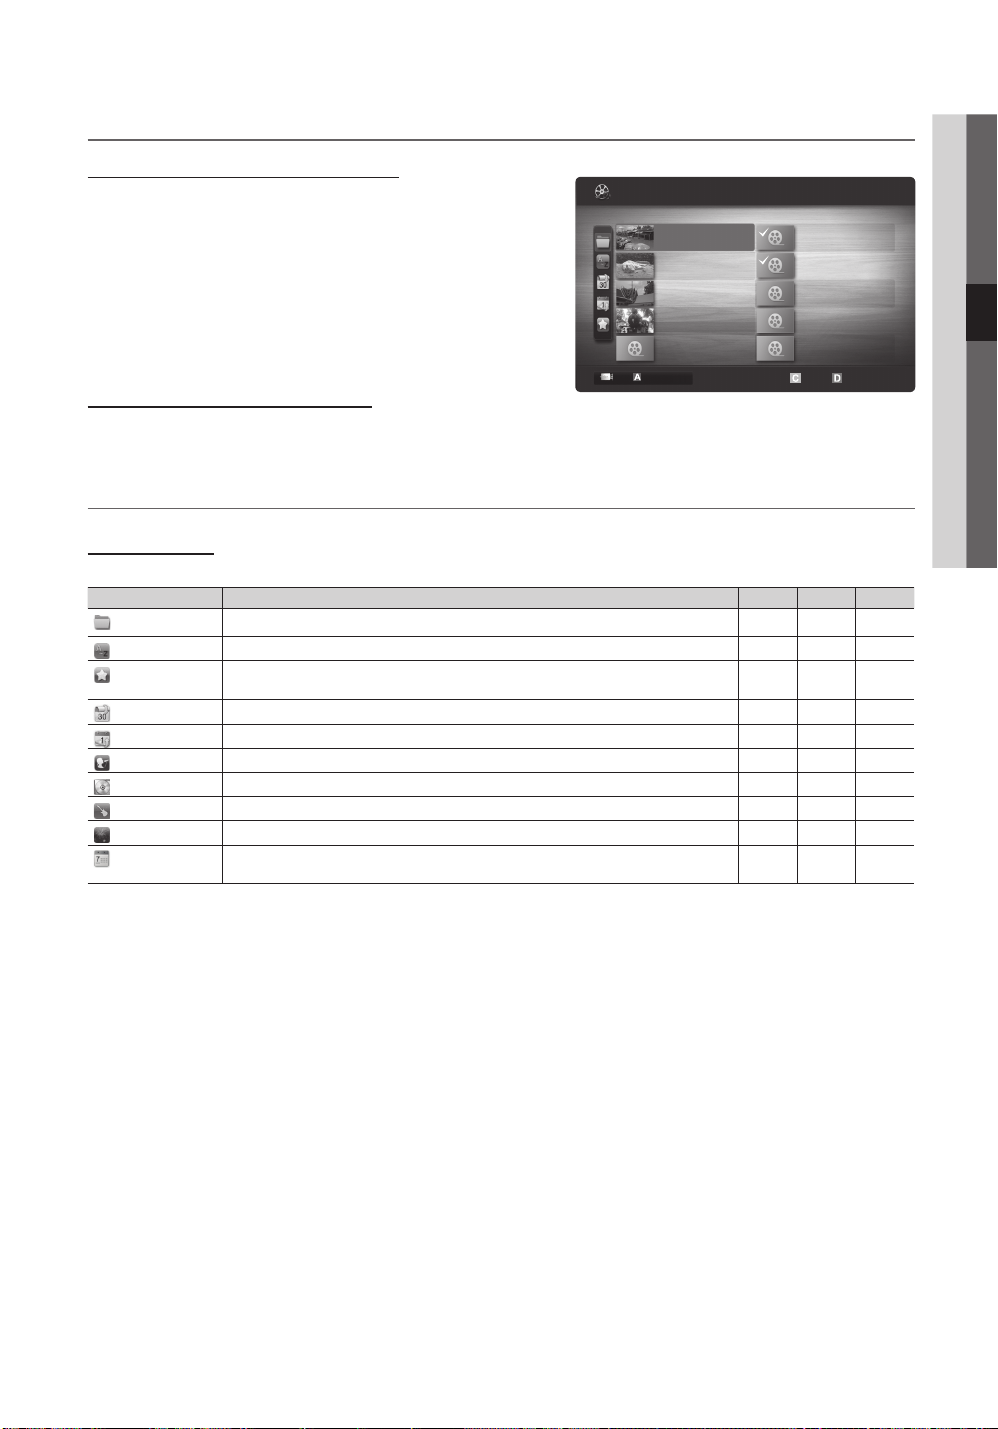
Playing the Multiple Files
1/1
/Movie 01.avi
SUM
Movie 01.avi
Jan.10.2010
Jan.10.2010
Jan.10.2010
Jan.10.2010
Jan.10.2010
Jan.10.2010
Jan.10.2010
Jan.10.2010
Jan.10.2010
Jan.10.2010
Movie 03.avi
Movie 05.avi
Movie 07.avi
Movie 09.avi
Movie 02.avi
Movie 04.avi
Movie 06.avi
Movie 08.avi
Movie 10.avi
Playing the selected video/music/photo files
1. Press the Yellow button in the file list to select the desired file.
Videos
2 les selected Page
2. Repeat the above operation to select multiple files.
✎
NOTE
The mark appears to the left of the selected files.
x
To cancel a selection, press the Yellow button again.
x
To deselect all selected files, press the TOOLS button
x
and select Deselect All.
3. Press the TOOLS button and select Play Selected Contents.
Change Device
Select Sorting
Playing the video/music/photo file group
1. While a file list is displayed, move to the any file in desired group.
2. Press the TOOLS button and select Play Current Group.
Media Play Additional Function
Sorting the file list
Press the Blue button in the file list to sort the files.
Category Operations Videos Music Photos
Basic View
Title
Preference
Latest Date
Earliest Date
Artist
Album
Genre
Mood
Monthly
It shows whole folder. You can view the photo by selecting the folder.
It sorts and displays the file title in Symbol/Number/Alphabet/Special order.
It sorts and displays the file by preference. You can change the file preference in the file list
section using the Green button.
It sorts and shows files by latest date.
It sorts and shows files by earliest date.
It sorts the music file by artist in alphabetical.
It sorts the music file by album in alphabetical order.
It sorts music files by the genre.
It sorts music files by the mood. You can change the music mood information.
It sorts and shows photo files by month. It sorts only by month (from January to December)
regardless of year.
04 Advanced Features
Tools
English
27
Page 28
Advanced Features
Videos/Music/Photos Play Option menu
During playing a file, press the TOOLS button.
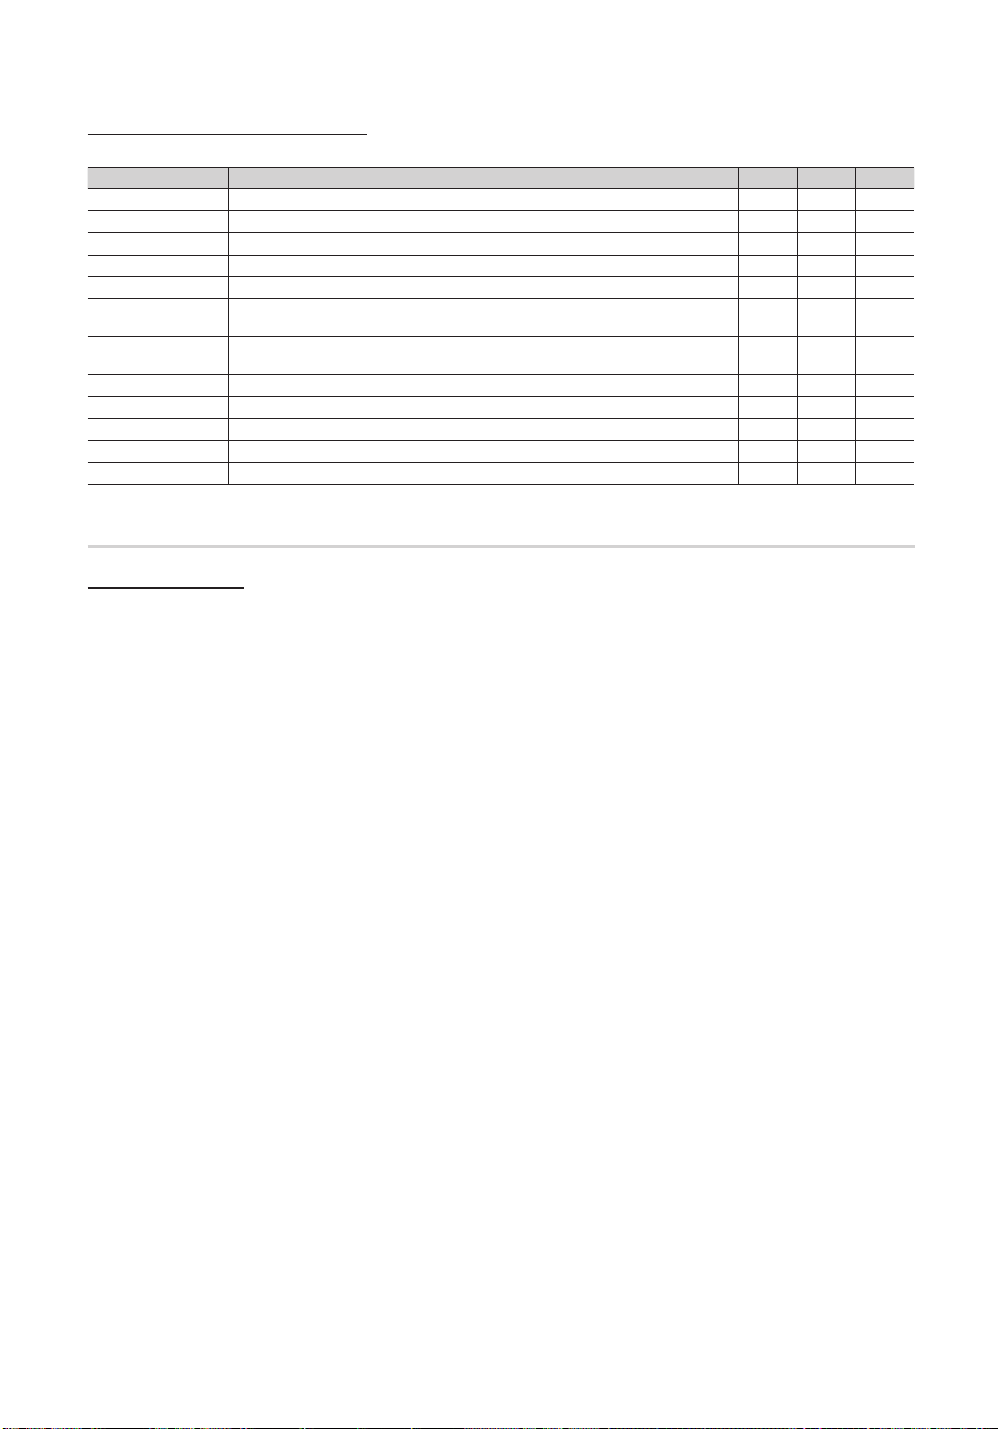
Category Operations Videos Music Photos
Title You can move the other file directly.
Repeat Mode You can play movie and music files repeatedly.
Picture Size You can adjust the picture size for preference.
Picture Setting You can adjust the picture setting. (p. 14, 15, 16)
Sound Setting You can adjust the sound setting. (p. 17, 18)
Subtitle Setting You can play the video file with Subtitle. This function only works if the subtitles are the same
Stop Slide Show /
Start Slide Show
Slide Show Speed You can select the slide show speed during the slide show.
Background Music You can set and select background music when watching a Slide Show.
Zoom You can zoom into images in full screen mode.
Rotate You can rotate images in full screen mode.
Information You can see detailed information about the played file.
file name as the video file.
You can start or stop a Slide Show.
Settings
Using the Setup Menu
■ Cont. movie play help (Resume Play) (On / Off): Select to display the help pop-up message for continuous movie
playback.
■ Get the DivX® VOD registration code: Shows the registration code authorized for the TV. If you connect to the DivX web
site and register the registration code with a personal account, you can download VOD registration file. If you play the VOD
registration using Media Play, the registration is completed.
✎
For more information on DivX® VOD, visit “www.DivX.com.”
■ Get the DivX® VOD deactivation code: When DivX® VOD is not registered, the registration deactivation code is
displayed. If you execute this function when DivX® VOD is registered, the current DivX® VOD registration is deactivated.
■ Information: Select to view information about the connected device.
28
English
Page 29
Anynet+
04 Advanced Features
What is Anynet+?
Anynet+ is a function that enables you to control all connected Samsung devices that support Anynet+ with your Samsung
TV’s remote. The Anynet+ system can be used only with Samsung devices that have the Anynet+ feature. To be sure your
Samsung device has this feature, check if there is an Anynet+ logo on it.
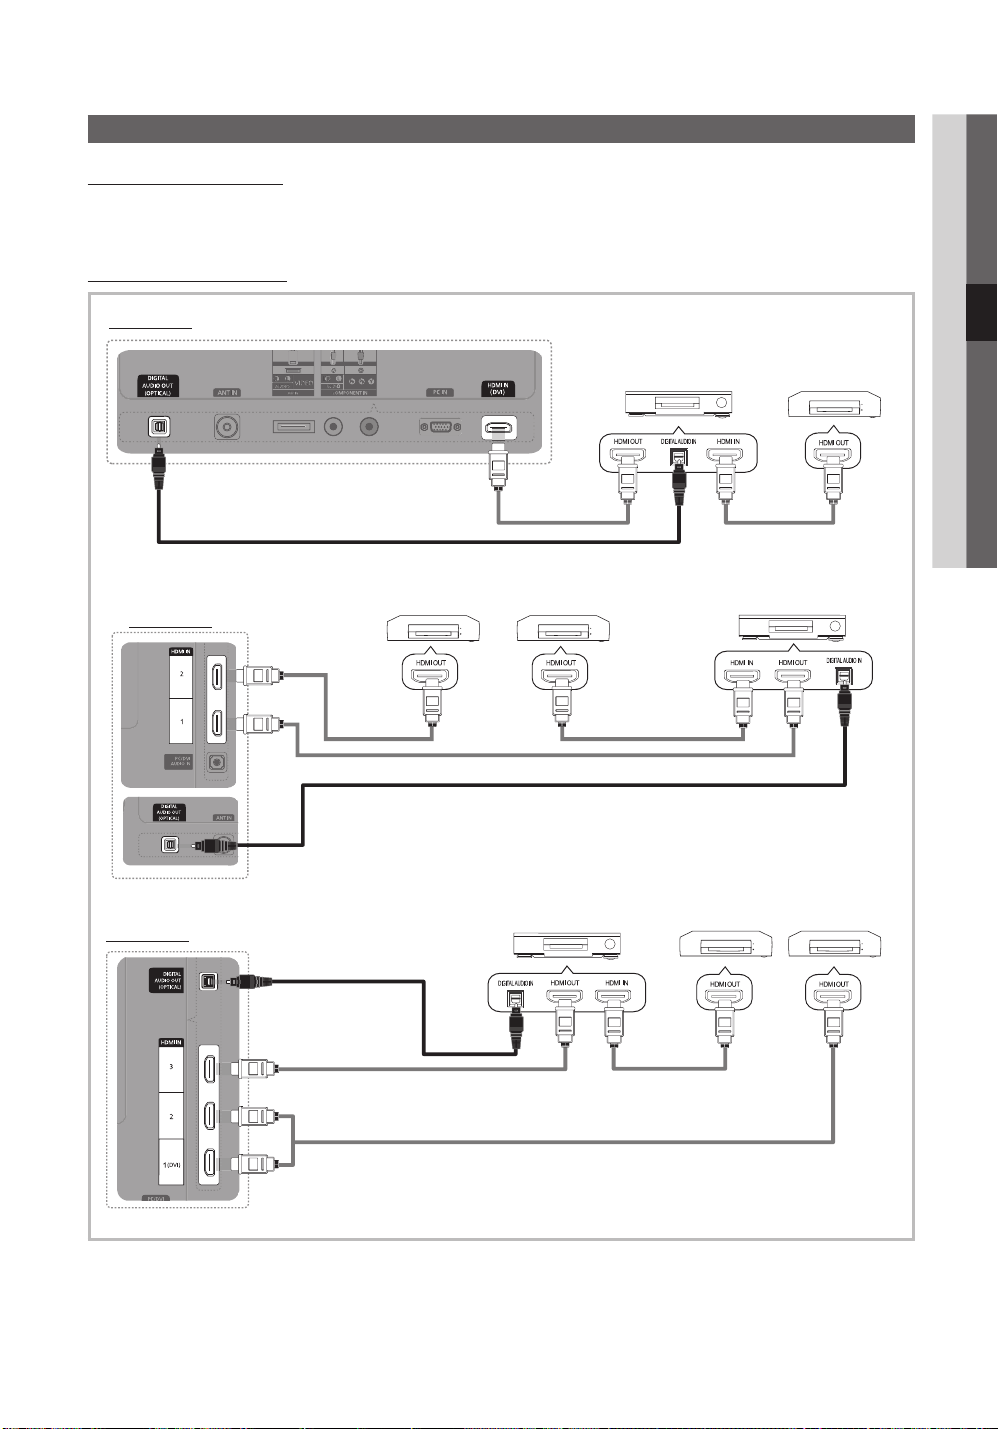
To connect to Home Theatre
UA22C4000
Home Theatre Anynet+ Device
HDMI Cable HDMI Cable
UA26C4000
HDMI Cable
HDMI Cable
Optical Cable
Home TheatreAnynet+ Device 2Anynet+ Device 1
HDMI Cable
Optical Cable
UA32C4000
Optical Cable
Home Theatre
Anynet+
Device 1
HDMI CableHDMI Cable
Anynet+ Device
HDMI Cable
2, 3
English
29
Page 30
Advanced Features
1. Connect the HDMI IN (1(DVI), 2, or 3) jack on the TV and the HDMI OUT jack of the corresponding Anynet+ device using
an HDMI cable. (UA32C4000)
✎
HDMI IN (DVI) (UA22C4000)
✎
HDMI IN (1 or 2) (UA26C4000)
2. Connect the HDMI IN jack of the home theatre and the HDMI OUT jack of the corresponding Anynet+ device using an
HDMI cable.
✎
NOTE
Connect the Optical cable between the DIGITAL AUDIO OUT (OPTICAL) jack on your TV and the Digital Audio Input
x
on the Home Theatre.
When following the connection above, the Optical jack only outputs 2 channel audio. You will only hear sound from
x
the Home Theatre’s Front, Left and Right speakers and the subwoofer. If you want to hear 5.1 channel audio, connect
the DIGITAL AUDIO OUT (OPTICAL) jack on the DVD / Satellite Box (i.e. Anynet Device 1 or 2) directly to the
Amplifier or Home Theatre, not the TV.
Connect only one Home Theatre.
x
You can connect an Anynet+ device using the HDMI cable. Some HDMI cables may not support Anynet+ functions.
x
Anynet+ works when the AV device supporting Anynet+ is in the standby or on status.
x
Anynet+ supports up to 12 AV devices in total. Note that you can connect up to 3 devices of the same type.
x
Anynet+ Menu
The Anynet+ menu changes depending on the type and status of the Anynet+ devices connected to the TV.
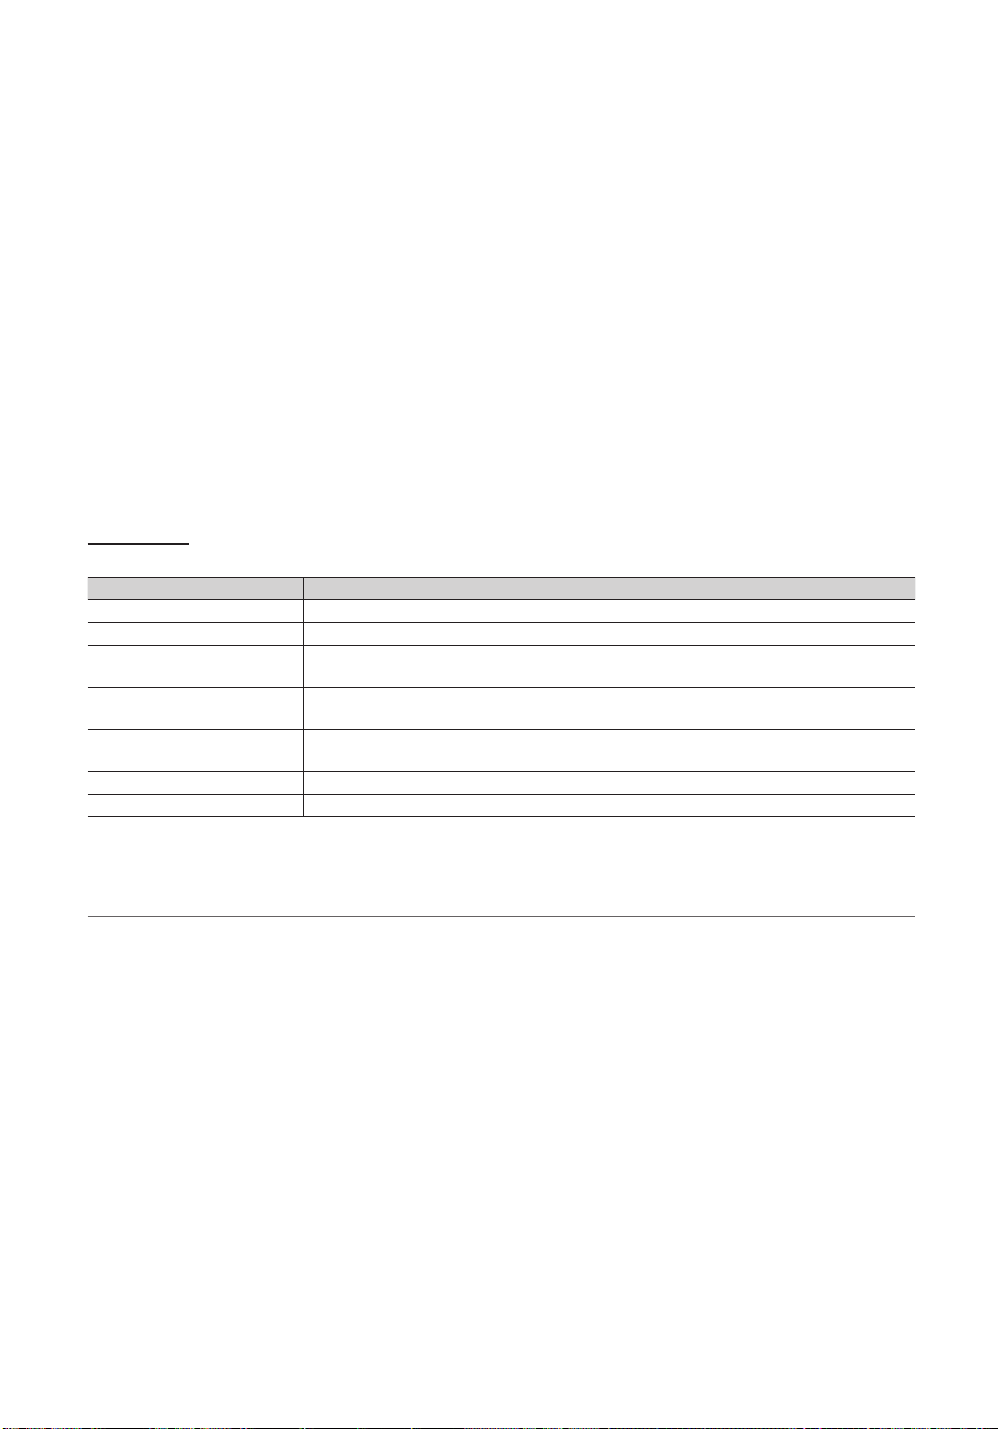
Anynet+ Menu Description
View TV Changes Anynet+ mode to TV broadcast mode.
Device List Shows the Anynet+ device list.
(device_name) MENU Shows the connected device menus. E.g. If a DVD recorder is connected, the disc menu of
(device_name) INFO Shows the play menu of the connected device. E.g. If a DVD recorder is connected, the
Recording: (*recorder) Starts recording immediately using the recorder. (This is only available for devices that
Stop Recording: (*recorder) Stops recording.
Receiver Sound is played through the receiver.
If more than one recording device is connected, they are displayed as (*recorder) and if only one recording device is
connected, it will be represented as (*device_name).
the DVD recorder will appear.
play menu of the DVD recorder will appear.
support the recording function.)
Setting Up Anynet+
■ Setup
Anynet+ (HDMI-CEC) (Off / On): To use the Anynet+ Function, Anynet+ (HDMI-CEC) must be set to On.
✎
When the Anynet+ (HDMI-CEC) function is disabled, all the Anynet+ related operations are deactivated.
Auto Turn Off (No / Yes): Setting an Anynet+ Device to turn off automatically when the TV is turned off.
✎
The active source on the T V must be set to TV to use the Anynet+ function.
✎
Even if an external device is still recording, it may turn off.
English
30
Page 31

Switching between Anynet+ Devices
1. Anynet+ devices connected to the TV are listed.
✎
If you cannot find a device you want, press the Red button to refresh the list.
2. Select a device and press the ENTER
✎
Only when you set Anynet+ (HDMI-CEC) to On in the Application menu, the Device List menu appears.
Switching to the selected device may take up to 2 minutes. You cannot cancel the operation during the switching
x
operation.
If you have selected external input mode by pressing the SOURCE button, you cannot use the Anynet+ function.
x
Make sure to switch to an Anynet+ device by using the Device List.
button. You can switch to the selected device.
Recording
You can make a recording of a TV Programme using a Samsung recorder.
1. Select Recording.
✎
When there are more than two recording devices
When multiple recording devices are connected, the recording devices are listed. Select one recording device in
x
the Device List.
✎
When the recording device is not displayed, select Device List and press the Red button to search devices.
2. Press the EXIT button to exit.
✎
You can record the source streams by selecting Recording: (device_name).
✎
Pressing the (REC) button will record whatever you are currently watching. If you are watching video from
another device, the video from the device is recorded.
✎
Before recording, check whether the antenna jack is properly connected to the recording device. To properly
connect an antenna to a recording device, refer to the recording device’s users manual.
04 Advanced Features
Listening through a Receiver
You can listen to sound through a receiver (i.e Home Theatre) instead of the TV Speaker.
1. Select Receiver and set to On.
2. Press the EXIT button to exit.
✎
If your receiver supports audio only, it may not appear in the device list.
✎
The receiver will work when you have properly connected the optical in jack of the receiver to the DIGITAL AUDIO
OUT (OPTICAL) jack of the TV.
✎
When the receiver (i.e Home Theatre) is set to On, you can hear sound output from the TV’s Optical jack. When the
TV is displaying a DTV (aerial) signal, the TV will send out 5.1 channel sound to the receiver. When the source is a
digital component such as a DVD and is connected to the TV via HDMI, only 2 channel sound will be heard from
the receiver.
✎
NOTE
You can only control Anynet+ devices using the TV remote control, not the buttons on the T V.
x
The TV remote control may not work under certain conditions. If this occurs, reselect the Anynet+ device.
x
The Anynet+ functions do not operate with other manufacturers’ products.
x
English
31
Page 32

Advanced Features
Troubleshooting for Anynet+
Problem Possible Solution
Anynet+ does not work. • Check if the device is an Anynet+ device. The Anynet+ system supports Anynet+ devices only.
I want to start Anynet+. • Check if the Anynet+ device is properly connected to the TV and check if the Anynet+ (HDMI-CEC) is set to
I want to exit Anynet+. • Select View TV in the Anynet+ menu.
The message “Connecting to
Anynet+ device...” appears on the
screen.
The Anynet+ device does not play. • You cannot use the play function when Plug & Play (Initial setup) is in progress.
• Connect only one receiver (home theatre).
• Check if the Anynet+ device power cord is properly connected.
• Check the Anynet+ device’s Video/Audio/HDMI cable connections.
• Check whether Anynet+ (HDMI-CEC) is set to On in the Anynet+ setup menu.
• Check whether the TV remote control is in TV mode.
• Check whether it is Anynet+ exclusive remote control.
• Anynet+ doesn’t work in certain situations. (Searching channels, operating Media Play (USB) or Plug & Play
(Initial setup), etc.)
• When connecting or removing the HDMI cable, please make sure to search devices again or turn your TV off
and on again.
• Check if the Anynet+ Function of Anynet+ device is set on.
On in the Anynet+ Setup menu.
• Press the TOOLS button to display the Anynet+ menu and select a menu you want.
• Press the SOURCE button on the TV remote control and select a device other than Anynet+ devices.
• Press P
• You cannot use the remote control when you are configuring Anynet+ or switching to a view mode.
• Use the remote control when the Anynet+ setting or switching to view mode is complete.
/
tuner-embedded Anynet+ device is not connected.)
, and PRE-CH to change the TV mode. (Note that the channel button operates only when a
The connected device is not
displayed.
The TV Programme cannot be
recorded.
The TV sound is not output
through the receiver.
• Check whether or not the device supports Anynet+ functions.
• Check whether or not the HDMI cable is properly connected.
• Check whether Anynet+ (HDMI-CEC) is set to On in the Anynet+ setup menu.
• Search Anynet+ devices again.
• You can connect an Anynet+ device using the HDMI cable only. Some HDMI cables may not support Anynet+
functions.
• If it is terminated by an abnormal situation such as disconnecting the HDMI cable or power cord or a power
failure, please repeat the device scan.
• Check whether the antenna jack on the recording device is properly connected.
• Connect the optical cable between TV and the receiver.
32
English
Page 33
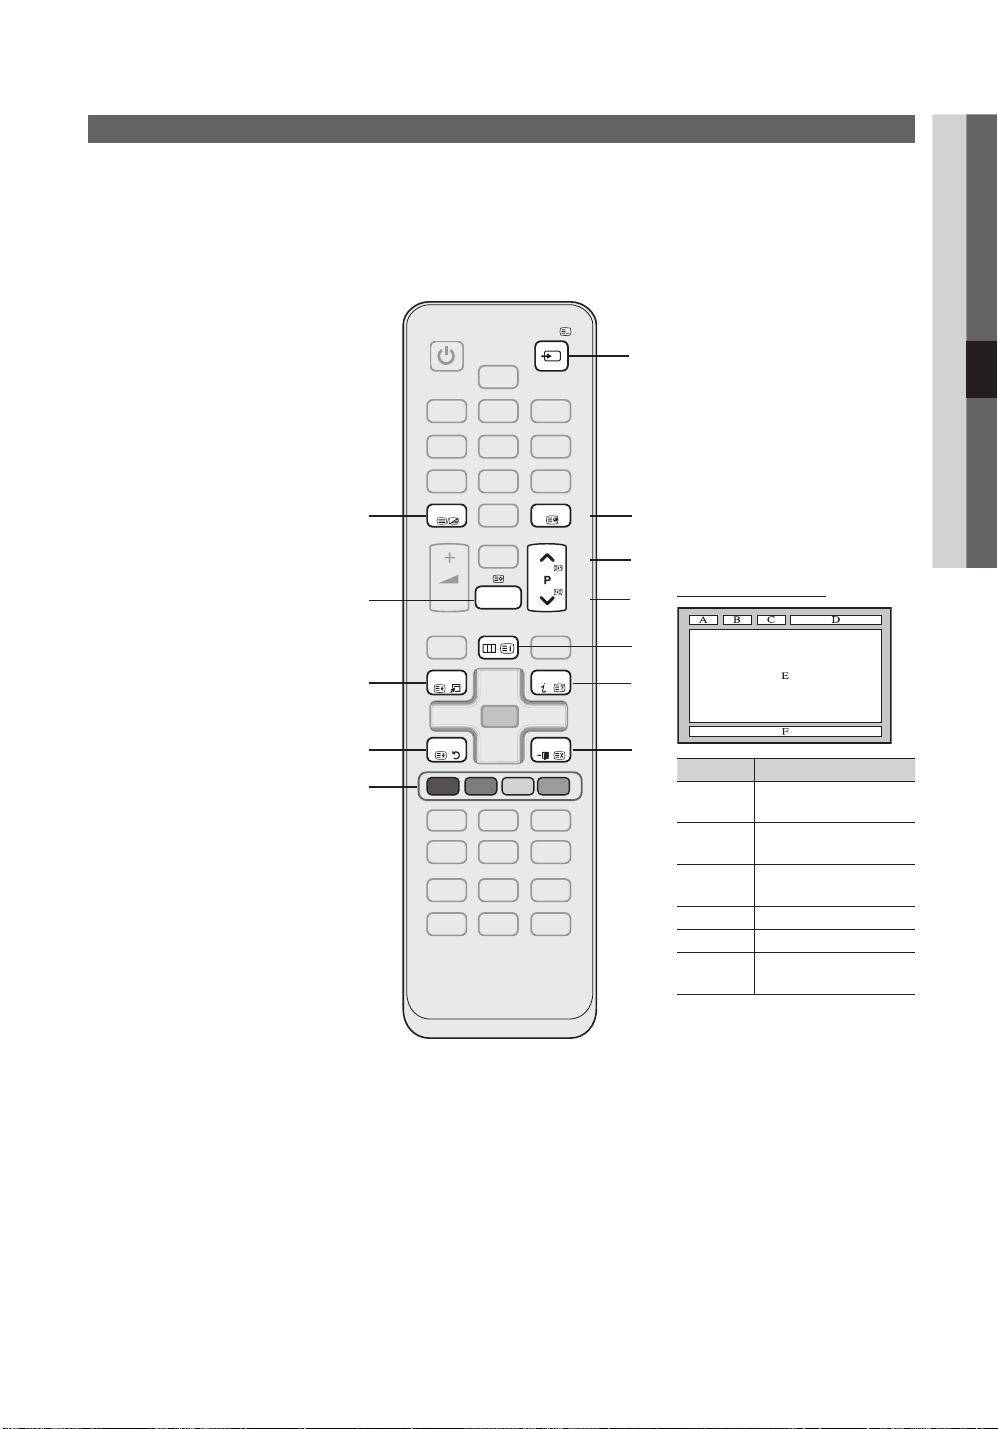
Other Information
Analogue Channel Teletext Feature
The index page of the Teletext service gives you information on how to use the service. For Teletext information to be displayed
correctly, channel reception must be stable. Otherwise, information may be missing or some pages may not be displayed.
✎
You can change Teletext pages by pressing the numeric buttons on the remote control.
1
(Teletext on/mix): Activates
the Teletext mode for the current
channel. Press it twice to overlap
the Teletext display onto the
current broadcasting screen.
(store): Stores the Teletext
2
pages.
(size): Displays the teletext
3
on the upper half of the screen in
double-size. To move the text to
the lower half of the screen, press
it again. For normal display, press
it once again.
(hold): Holds the display at
4
the current page, in the case that
there are several secondary pages
that follow automaticially. To undo,
press it again.
Colour buttons (red, green, yellow,
5
blue): If the FASTEXT system
is used by the broadcasting
company, the different topics on
a Teletext page are colour-coded
and can be selected by pressing
the coloured buttons. Press the
colour corresponding to the topic
of your choice. A new colourcoded page is displayed. Items
can be selected in the same way.
To display the previous or next
page, press the corresponding
coloured button.
(mode): Selects the Teletext
6
mode (LIST/ FLOF).
If pressed during LIST mode,
switches the mode to List save
mode. In List save mode, you can
save a Teletext page into a list
7
using the
(store) button.
(sub-page): Displays the
available sub-page.
1
2
3
4
5
TTX/MIX
CHLIST
MENU
TOOLS
RETURN
A B C D
SOURCE
PRE-CH
INFO
EXIT
(page up): Displays the next
Teletext page.
(page down): Displays the
previous Teletext page.
6
(index): Displays the index
(contents) page at any time while
you are viewing Teletext.
(reveal): Displays the hidden
text (answers to quiz games, for
example). To display the normal
screen, press it again.
7
8
9
0
!
@
(cancel): Shrinks the Teletext
display to overlap with the current
Typical Tetetext page
Part Contents
A Selected page
B Broadcasting channel
C Current page number
or search indications.
D Date and time.
E Text.
F Status information.
FASTEXT information.
8
9
0
!
@
broadcast.
number.
identity.
05 Other Information
English
33
Page 34
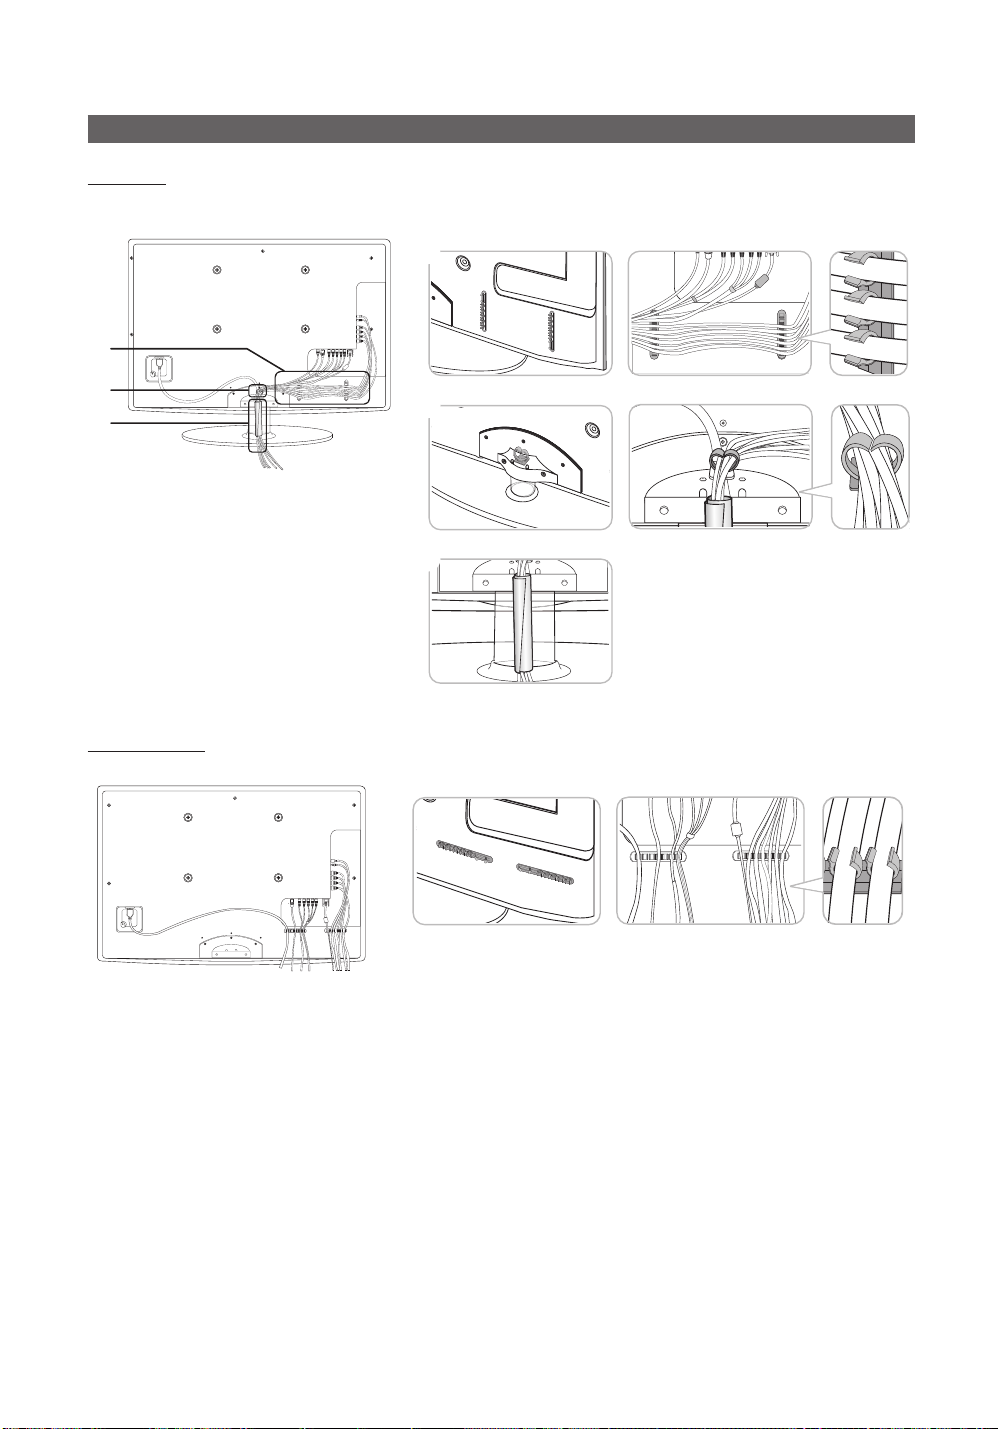
Other Information
Assembling the Cables
Stand Type
Enclose the cables in the Cable Tie so that the cables are not visible through the transparent stand.
1
1
2
3
Wall-Mount Type
2
3
✎
Do not pull the cables too hard when arranging them. This may cause damage to the product’s connection terminals.
English
34
Page 35
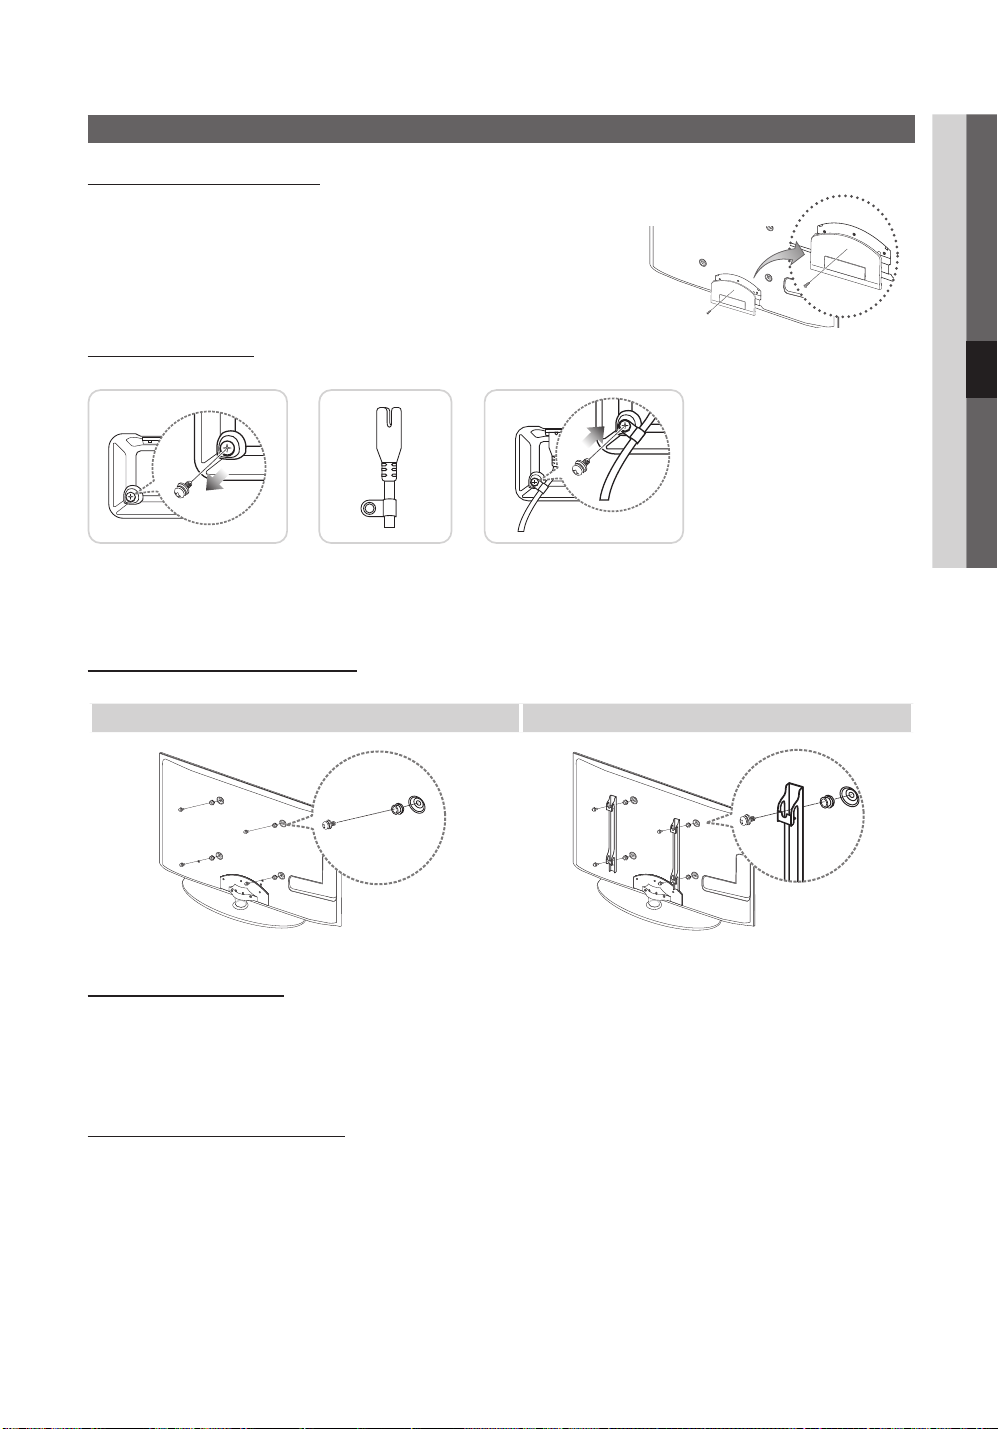
Installing the Wall Mount
Assembling the Blanking Bracket
When installing the TV onto a wall, attach the Blanking Bracket as shown.
Assenbling Power-Cord
When Installing the TV onto a wall, attach the Power-Cord as Shown.
1 2 3
1. Remove the screw shown in the first picture above.
2. Attach the power cord clip to the power cord.
3. Mount the power cord clip to the TV, using the removed screw, as shown.
Preparing before installing Wall-Mount
To install a wall-mount, use the Holder-Ring 1.
Case A. Installing the SAMSUNG Wall-Mount Case B. Installing another company’s Wall-Mount
05 Other Information
Blanking Bracket
1
Installing the Wall Mount Kit
The wall mount kit (sold separately) allows you to mount the TV on the wall.
For detailed information on installing the wall mount, see the instructions provided with the wall mount. Contact a technician for
assistance when installing the wall mount bracket.
Samsung Electronics is not responsible for any damage to the product or injury to yourself or others if you elect to install the
TV on your own.
Wall Mount Kit Specifications (VESA)
✎
The wall mount kit is not supplied, but sold separately.
Install your wall mount on a solid wall perpendicular to the floor. When attaching to other building materials, please contact
your nearest dealer. If installed on a ceiling or slanted wall, it may fall and result in severe personal injury.
1
English
35
Page 36
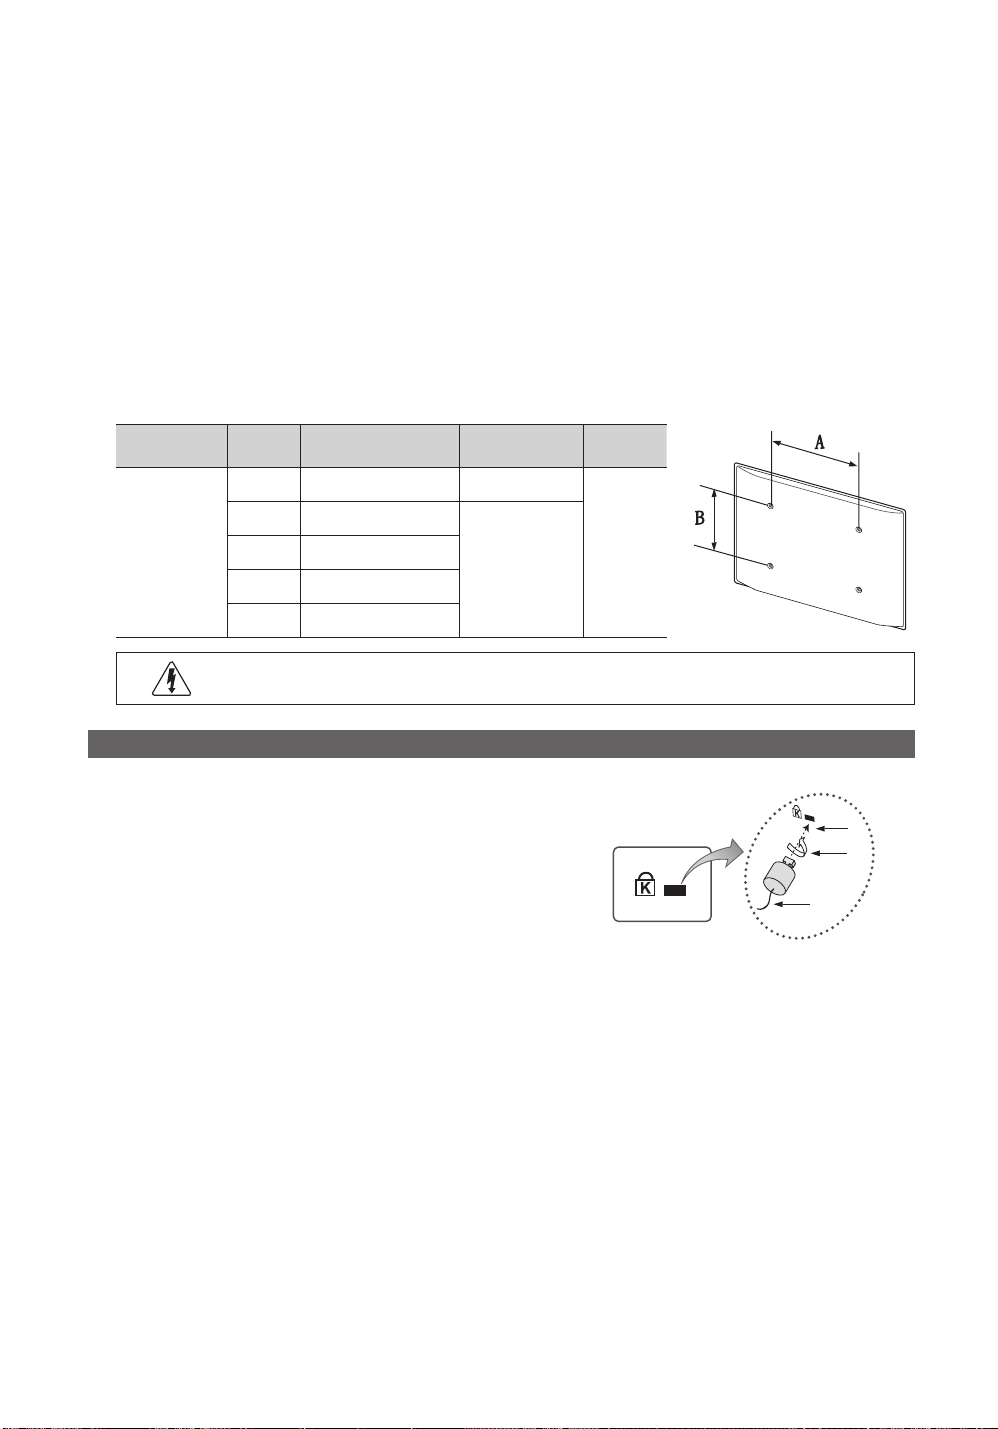
Other Information
✎
NOTE
Standard dimensions for wall mount kits are shown in the table below.
x
When purchasing our wall mount kit, a detailed installation manual and all parts necessary for assembly are provided.
x
Do not use screws that do not comply with the VESA standard screw specifications.
x
Do not use screws that are longer than the standard dimension or do not comply with the VESA standard screw
x
specifications. Screws that are too long may cause damage to the inside of the TV set.
For wall mounts that do not comply with the VESA standard screw specifications, the length of the screws may differ
x
depending on the wall mount specifications.
Do not fasten the screws that are too strongly; this may damage the product or cause the product to fall, leading to
x
personal injury. Samsung is not liable for these kinds of accidents.
Samsung is not liable for product damage or personal injury when a non-VESA or non-specified wall mount is used or
x
the consumer fails to follow the product installation instructions.
Do not mount the TV at more than a 15 degree tilt.
x
Product Family inches VESA Spec. (A * B) Standard Screw Quantity
19~22 75 X 75 M4
23~29 200 X 100
LED-TV
[Ultra-Slim]
32~37 200 X 200
M8
40~55 400 X 400
56~65 600 X 400
4
Do not install your Wall Mount Kit while your TV is turned on. It may result in personal injury due to
electric shock.
Anti-theft Kensington Lock
The Kensington Lock is not supplied by Samsung. It is a device used to
physically fix the system when using it in a public place. The appearance
and locking method may differ from the illustration depending on the
manufacturer. Refer to the manual provided with the Kensington Lock for
additional information on proper use.
✎
Please find a “” icon on the rear of the TV. A kensington slot is beside
the “” icon.
1. Insert the locking device into the Kensington slot 1 on the LED TV and
turn it as shown 2.
2. Connect the Kensington Lock cable 3.
3. Fix the Kensington Lock to a desk or a heavy stationary object.
✎
The locking device has to be purchased separately.
✎
The location of the Kensington slot may be different depending on the TV model.
TV Rear
1
2
3
<Optional>
36
English
Page 37
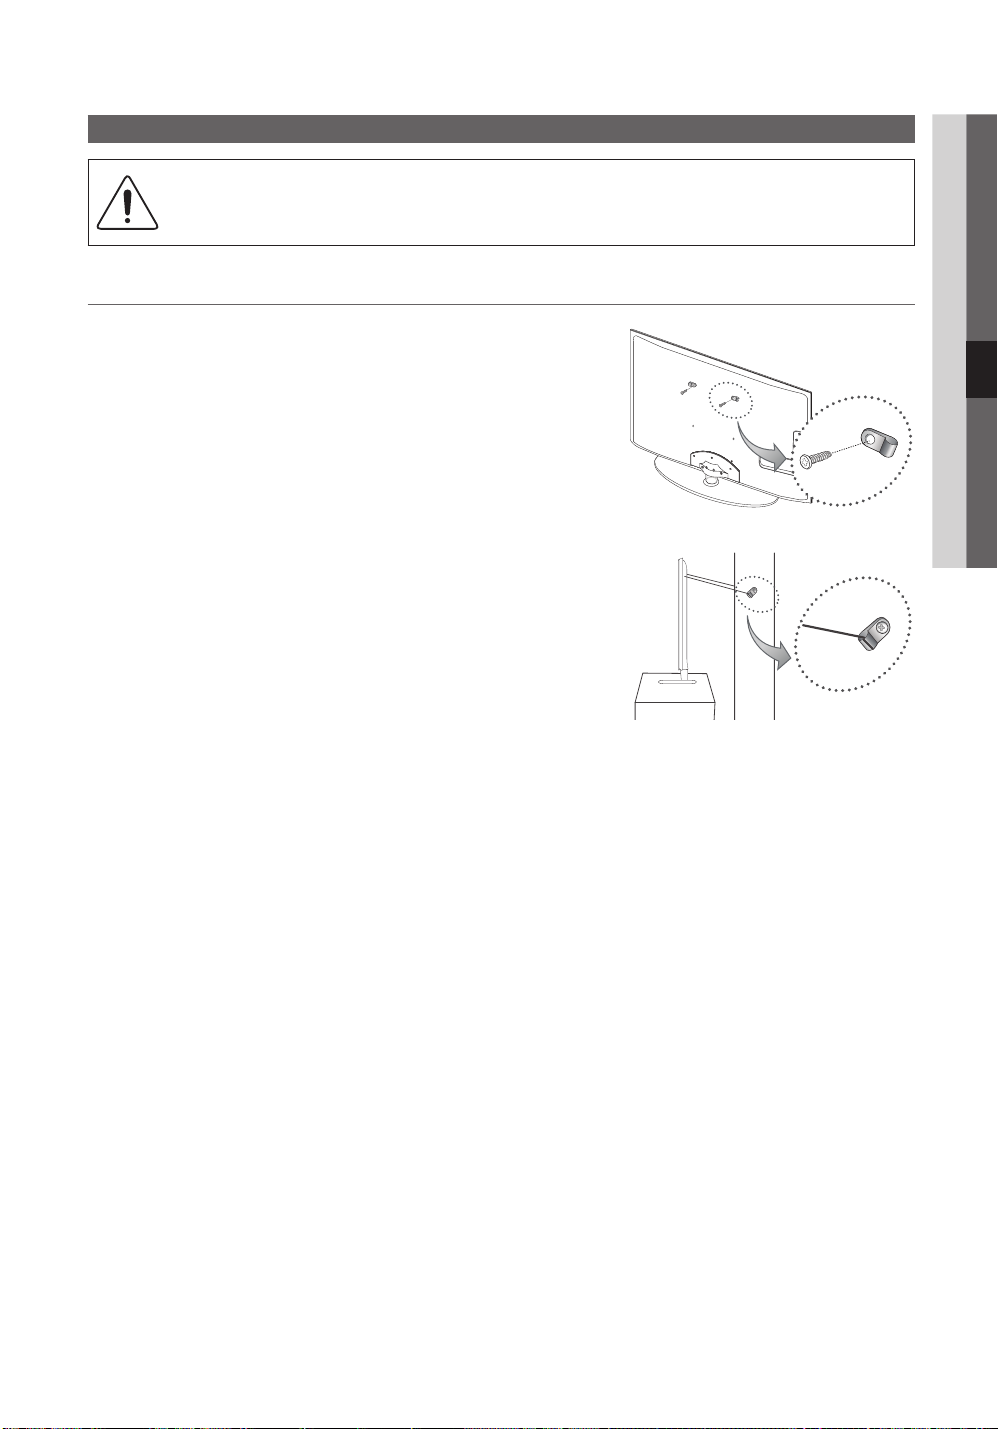
Securing the TV to the wall
Caution : Pulling, pushing, or climbing onto the TV may cause the TV to fall. In particular, ensure that your
children do not hang over or destabilize the TV; doing so may cause the TV to tip over, resulting in serious
injuries or death. Follow all safety precautions provided in the included Safety Flyer. For added stability and
safety, install the anti-fall device as follows.
To Avoid the TV from Falling
1. Put the screws into the clamps and firmly fasten them onto the wall.
Confirm that the screws have been firmly installed onto the wall.
✎
You may need additional material such as an anchor depending on
the type of wall.
✎
Since the necessary clamps, screws, and string are not supplied,
please purchase these additionally.
2. Remove the screws from the back centre of the TV, put the screws into
the clamps, and then fasten the screws onto the TV again.
✎
Screws may not be supplied with the product. In this case, please
purchase the screws of the following specifications.
✎
Screw Specifications
For a 19 ~ 22 inch: M4
x
For a 32 ~ 37 inch: M8
x
3. Connect the clamps fixed onto the TV and the clamps fixed onto the wall
with a strong cable and then tie the string tightly.
✎
NOTE
Install the TV near to the wall so that it does not fall backwards.
x
It is safe to connect the string so that the clamps fixed on the
x
wall are equal to or lower than the clamps fixed on the TV.
Untie the string before moving the TV.
x
4. Verify all connections are properly secured. Periodically check
connections for any sign of fatigue for failure. If you have any doubt about
the security of your connections, contact a professional installer.
05 Other Information
Wall
English
37
Page 38
Other Information
Troubleshooting
If you have any questions about the TV, first refer to this list. If none of these troubleshooting tips apply, please visit “www.
samsung.com,” then click on Support, or contact the call centre listed on the back-cover of this manual.
Issues Solutions and Explanations
Picture Quality First of all, please perform the Picture Test and confirm that your TV is properly displaying test image.
The TV image does not look as good as it
did in the store.
The picture is distorted: macroblock error,
small block, dots, pixelization
Colour is wrong or missing. • If you’re using a component connection, make sure the component cables are connected to the
There is poor colour or brightness. • Adjust the Picture options in the TV menu. (go to Picture mode / Colour / Brightness / Sharpness)
There is a dotted line on the edge of the
screen.
The picture is black and white. • If you are using an AV composite input, connect the video cable (yellow) to the Green jack of
When changing channels, the picture
freezes or is distorted or delayed.
Sound Quality First of all, please perform the Sound Test to confirm that your TV audio is properly operating.
There is no sound or the sound is too low
at maximum volume.
The picture is good but there is no sound. • Set the Speaker Select option to TV Speaker in the sound menu (p. 17).
The speakers are making an inappropriate
noise.
(go to MENU - Support - Self Diagnosis - Picture Test) (p. 21)
If the test image is properly displayed, the poor picture may caused by the source or signal.
• If you have an analogue cable/set top box, upgrade to a digital set top box. Use HDMI or Component
cables to deliver HD (high definition) picture quality.
• Cable/Satellite subscribers: Try HD stations from the channel line up.
• Antenna connection: Try HD stations after performing Auto programme.
Many HD channels are upscaled from SD(Standard Definition) contents.
✎
• Adjust the Cable/Set top box video output resolution to 1080i or 720p.
• Make sure you are watching the TV at the minimum recommended distance based on the size and
definition of the signal.
• Compression of video contents may cause picture distortion especially in fast moving pictures such
as sports and action movies.
• Low signal level or bad quality can cause picture distortion. This is not a TV issue.
correct jacks. Incorrect or loose connections may cause colour problems or a blank screen.
(p. 14)
• Adjust Energy Saving option in the TV menu. (go to MENU - Picture - Eco Solution -
Energy Saving) (p. 14)
• Try resetting the picture to view the default picture settings. (go to MENU - Picture - Picture Reset)
(p. 16)
• If the picture size is set to Screen Fit, change it to 16:9 (p. 15).
• Change cable/set top box resolution.
component input 1 on the TV.
• If connected with a cable box, please try to reset the cable box. Reconnect the AC cord and wait until
the cable box reboots. It may take up to 20 minutes.
• Set the output resolution of the cable box to 1080i or 720p.
(go to MENU - Support - Self Diagnosis - Sound Test) (p. 21)
If the audio is OK, the sound problem may caused by the source or signal.
• Please check the volume of the of external device connected to your TV.
• If you are using an external device, make sure the audio cables are connected to the correct audio
input jacks on the TV.
• If you are using an external device, check the device’s audio output option (ex. you may need to
change your cable box’s audio option to HDMI when you have a HDMI connected to your TV).
• If you are using a DVI to HDMI cable, a separate audio cable is required.
• If your TV has a headphone jack, make sure there is nothing plugged into it.
• Check cable connections. Make sure a video cable is not connected to an audio input.
• For antenna or cable connections, check the signal strength. Low signal level may cause sound
distortion.
38
English
Page 39
Issues Solutions and Explanations
No Picture, No Video
The TV won’t turn on. • Make sure the AC power cord is securely plugged in to the wall outlet and the TV.
The TV turns off automatically. • Ensure the Sleep Timer is set to Off in the Setup menu (p. 19).
There is no picture/Video. • Check cable connections (remove and reconnect all cables connected to the TV and external
RF(Cable/Antenna) Connection
The TV is not receiving all channels. • Make sure the Antenna cable is connected securely.
The picture is distorted: macroblock error
small block, dots, pixelization
PC Connection
A “Mode Not Supported” message
appears.
“PC” is always shown on the source list,
even if a PC is not connected.
The video is OK but there is no audio. • If you are using a HDMI connection, check the audio output setting on your PC.
• Make sure the wall outlet is working.
• Try pressing the POWER button on the TV to make sure the problem is not the remote. If the TV turns
on, refer to “The remote control does not work” below.
• If your PC is connected to the TV, check your PC power settings.
• Make sure the AC power cord is plugged in securely to the wall outlet and the TV.
• When watching TV from an antenna or cable connection, the TV will turn off after 10 ~ 15 minutes if
there is no signal.
devices).
• Set your external devices’ (Cable/Set top Box, DVD, Blu-ray etc) video outputs to match the
connections to the TV input. For example, if an external device’s output is HDMI, it should be connect
to an HDMI input on the TV.
• Make sure your connected devices are powered on.
• Be sure to select the TV’s correct source by pressing the SOURCE button on the TV remote.
• Please try Plug & Play (Initial setup) to add available channels to the channel list. Go to MENU -
Setup - Plug & Play (Initial setup) and wait for all avaiable channels to be stored (p. 7).
• Verify the Antenna is positioned correctly.
• Compression of video contents may cause picture distortion, especially with fast moving pictures
such as sports and action movies.
• A low signal can cause picture distortion. This is not a TV issue.
• Set your PC’s output resolution and frequency so they matche the resolutions supported by the TV
(p. 22).
• This is normal; “PC” is always shown on the source list, regardless of whether a PC is connected.
05 Other Information
Others
The picture won’t display in full screen. • HD channels will have black bars on either side of the screen when displaying upscaled SD (4:3)
The remote control does not work. • Replace the remote control batteries with the poles (+/–) in the right direction.
The cable/set top box remote control
doesn’t turn the TV on or off, or adjust the
volume.
A “Mode Not Supported” message
appears.
There is a plastic smell from the TV. This smell is normal and will dissipate over time.
The TV Signal Information is unavailable
in the Self Diagnostic Test menu.
The TV is tilted to the side. • Remove the base stand from the TV and reassemble it.
The channel menu is greyed out.
(unavailable)
contents.
• Black bars on the top and bottom will appear during movies that have aspect ratios different from
your TV.
• Adjust the picture size options on your external device or TV to full screen.
• Clean the sensor’s transmission window on the remote.
• Try pointing the remote directly at the TV from 5~6 feet away.
• Programme the Cable/Set top box remote control to operate the TV. Refer to the Cable/Set user
manual for the SAMSUNG TV code.
• Check the supported resolution of the TV, and adjust the external device’s output resolution
accordingly. Refer to the resolution settings on page 22 of this manual.
• This function is only available with digital channels from an Antenna / RF/Coax connection (p. 21).
• The Channel menu is only available when the TV source is selected.
English
39
Page 40
Other Information
Issues Solutions and Explanations
Your settings are lost after 30 minutes or
every time the TV is turned off.
You have intermittent loss of audio or
video.
You see small particles when you look
closely at the edge of the frame of the TV.
The PIP menu is not available. • PIP functionality is only available when you are using a HDMI, PC or components source (p. 20).
The message “Scramble signal” or “Weak
Signal/No Signal” appears.
You turned the TV off 45 minutes ago, and
it turned on again.
There are recurrent picture/sound issues. • Check and change the signal / source.
A reaction may occur between the rubber
cushion pads on the base stand and the
top finish of some furniture.
✎
This TFT LED panel uses a panel consisting of sub pixels which require sophisticated technology to produce. However,
there may be a few bright or dark pixels on the screen. These pixels will have no impact on the performance of the
product.
Licence
• If the TV is in the Store Demo mode, it will reset audio and picture settings every 30 minutes. Change
the settings from Store Demo mode to Home Use mode in the Plug & Play (Initial setup) procedure.
Press the SOURCE button to select TV mode, and go to MENU → Setup → Plug & Play. (Initial
setup) → ENTER (p. 7)
• Check the cable connections and reconnect them.
• Loss of audio or video can be caused by using overly rigid or thick cables. Make sure the cables are
flexible enough for long term use. If mounting the TV to the wall, we recommend using cables with 90
degree connectors.
• This is part of the product’s design and is not a defect.
• If you are using a CAM CARD (CI/CI+), check that it is installed into the common interface slot.
• If there is still a problem, pull the CAM CARD out of the TV and insert it into the slot again.
• It is normal. The TV operates the OTA (Over The Aerial) function itself to upgrade firmware
downloaded whilst your watching TV.
• To prevent this, use felt pads on any surface of the TV that comes in direct contact with furniture.
Manufactured under licence from Dolby Laboratories. Dolby and the double-D symbol are
trademarks of Dolby Laboratories.
Manufactured under license under U.S. Patent #’s: 5,451,942; 5,956,674; 5,974,380; 5,978,762;
6,487,535 & other U.S. and worldwide patents issued & pending. DTS and the Symbol are
registered trademarks. & DTS 2.0+ Digital Out and the DTS logos are trademarks of DTS, Inc.
Product Includes software. © DTS, Inc. All Rights Reserved.
DivX Certified to play DivX video up to HD 1080p, including premium content.
ABOUT DIVX VIDEO: DivX® is a digital video format created by DivX,Inc. This is an official DivX Certified device that
plays DivX video. Visit www.divx.com for more information and software tools to convert your files into DivX video.
ABOUT DIVX VIDEO-ON-DEMAND: This DivX Certified® device must be registered in order to play DivX Video-onDemand (VOD) content. To generate the registration code, locate the DivX VOD section in the device setup menu. Go
to vod.divx.com with this code to complete the registration process and learn more about DivX VOD.
Pat. 7,295,673; 7,460,688; 7,519,274
Open Source Licence Notice
In the case of using open source software, Open Source Licences are available on the product menu.
40
English
Page 41
Specifications
Panel native 1920 x 1080 @ 60 Hz
Environmental Considerations
Operating Temperature
Operating Humidity
Storage Temperature
Storage Humidity
Stand Swivel (Left / Right) -20˚ ~ 20˚
Model Name UA22C4000 UA26C4000 UA32C4000
Screen Size
(Diagonal) 22 inches 26 inches 32 inches
Sound
(Output) 3 W X 2 5 W X 2 10 W X 2
Dimensions (WxDxH)
Body
With stand
Weight
Without Stand
With Stand
✎
Design and specifications are subject to change without prior notice.
✎
For information about power supply, and more about power consumption, refer to the label attached to the product.
550 x 30 x 360 mm
550 x 190 x 412 mm
4 kg
5 kg
10°C to 40°C (50°F to 104°F)
10% to 80%, non-condensing
-20°C to 45°C (-4°F to 113°F)
5% to 95%, non-condensing
660 x 30 x 423 mm
660 x 212 x 480 mm
6 kg
7 kg
775 X 30 X 492 mm
775 X 255 X 550 mm
9 kg
10 kg
05 Other Information
English
41
Page 42

Other Information
Index
A
Amplify 17
Anynet+ 29
Auto Adjustment 16
Auto Volume 17
B
Background Music 28
Balance L/R 17
Basic View 27
Batteries 6
Black Tone 15
Blanking Bracket 35
Brightness 14
C
Cable Tie 4, 34
Change PIN 19
Channel Manager 12
Channel Menu 13
Clock 18
Colour Tone 15
Component 9
Connecting to a PC 22
Connecting to an Audio Device 9
D
DIGITAL AUDIO OUT 9, 29
DivX® VOD 28
D-sub 22
Dynamic 14
Dynamic Contrast 15
E
Edit Name 10
Editing Channels 13
Energy Saving 14
EPG (Electronic Programme Guide) 11
Equalizer 17
External Speaker 17
F
Fine Tune 14
Flesh Tone 15
Frequency 13
H
HDMI 8, 29
HEADPHONE 9
Home Theatre 9, 29
I
Installation Space 2
L
Language 19
Licence 40
Lock 13
M
Media Play 23
Melody 20
Menu Transparency 20
Music 26
N
Navigate 10
Now & Next guide 11
O
Optimal resolution 22
P
Photos 26
Picture Size 15, 28
PIP (Picture in Picture) 20
Plug & Play 7
Power Indicator 5
R
Receiver 31
Recording 31
Remote Control 6
Repeat Mode 28
RGB Only Mode 15
Rotate 28
S
Select All 14
Self Diagnosis 21
Sharpness 14
Signal Information 21
Sleep Timer 19
Slide Show 26
Software Upgrade 21
Source List 10
Speaker Select 17
Specifications 41
Standby mode 5
Subtitle 20
Symbol 3
T
Timer 19
Title 27
Tools 3
Troubleshooting 38
TV Speaker 17
U
USB Drive 21, 23
Using Channel View 11
Using Scheduled View 11
Using the Favourite Channels 12
V
VCR 9
Video Formats 25
Videos 24
Volume 5
42
W
Wall Mount 35
Warm 15
White Balance 15
English
Page 43

This page is intentionally
left blank.
 Loading...