

Samsung TXM3297HF, TXM3097WHF, TXM3298HF, TXM2797HF, TXM3098WHF Owner's Instructions Manual
...

Thank you fur choosing Samsung! -%mm: new Samsung -x-v represents the latest in television
technology We designed it with easy-to-use on-screen menus and closed captioning capabilities, making it one of the best products in its class. We are proud to offer you a product that
will prcwide convenient, dependable service and enj0~en.t far years to come.
Always be careful when using your TV recezver. To reduce the risk of fire, electtica1 shock,
and other injuries, keep these safety precaut~ms in mllnd where installing, using, and
maintaining your machine.
8 Read all safety and operating instructions before operating your TV:
@ Keep the safety and operating instructions Em future reference.
m Heed all warnings on the Tis receiver and in the operating instructiom.
* Follow all operating and use instructions.
e Unplug the TV receiver from the wall outlet befcxe cleaning. Use a damp cloth; do not use
liquid or aerosol cleaners*
@ Never add any attachmem amUm equipment without approval of the manufacU+es. Such
additions can increase the risk of fire, &ctric shock, or other personal injury
* DQ not use the TV receiver where contact with or immersion in water is a possibility, such as
near bath tubs, sinks, washing machines, swimming goals, etc.
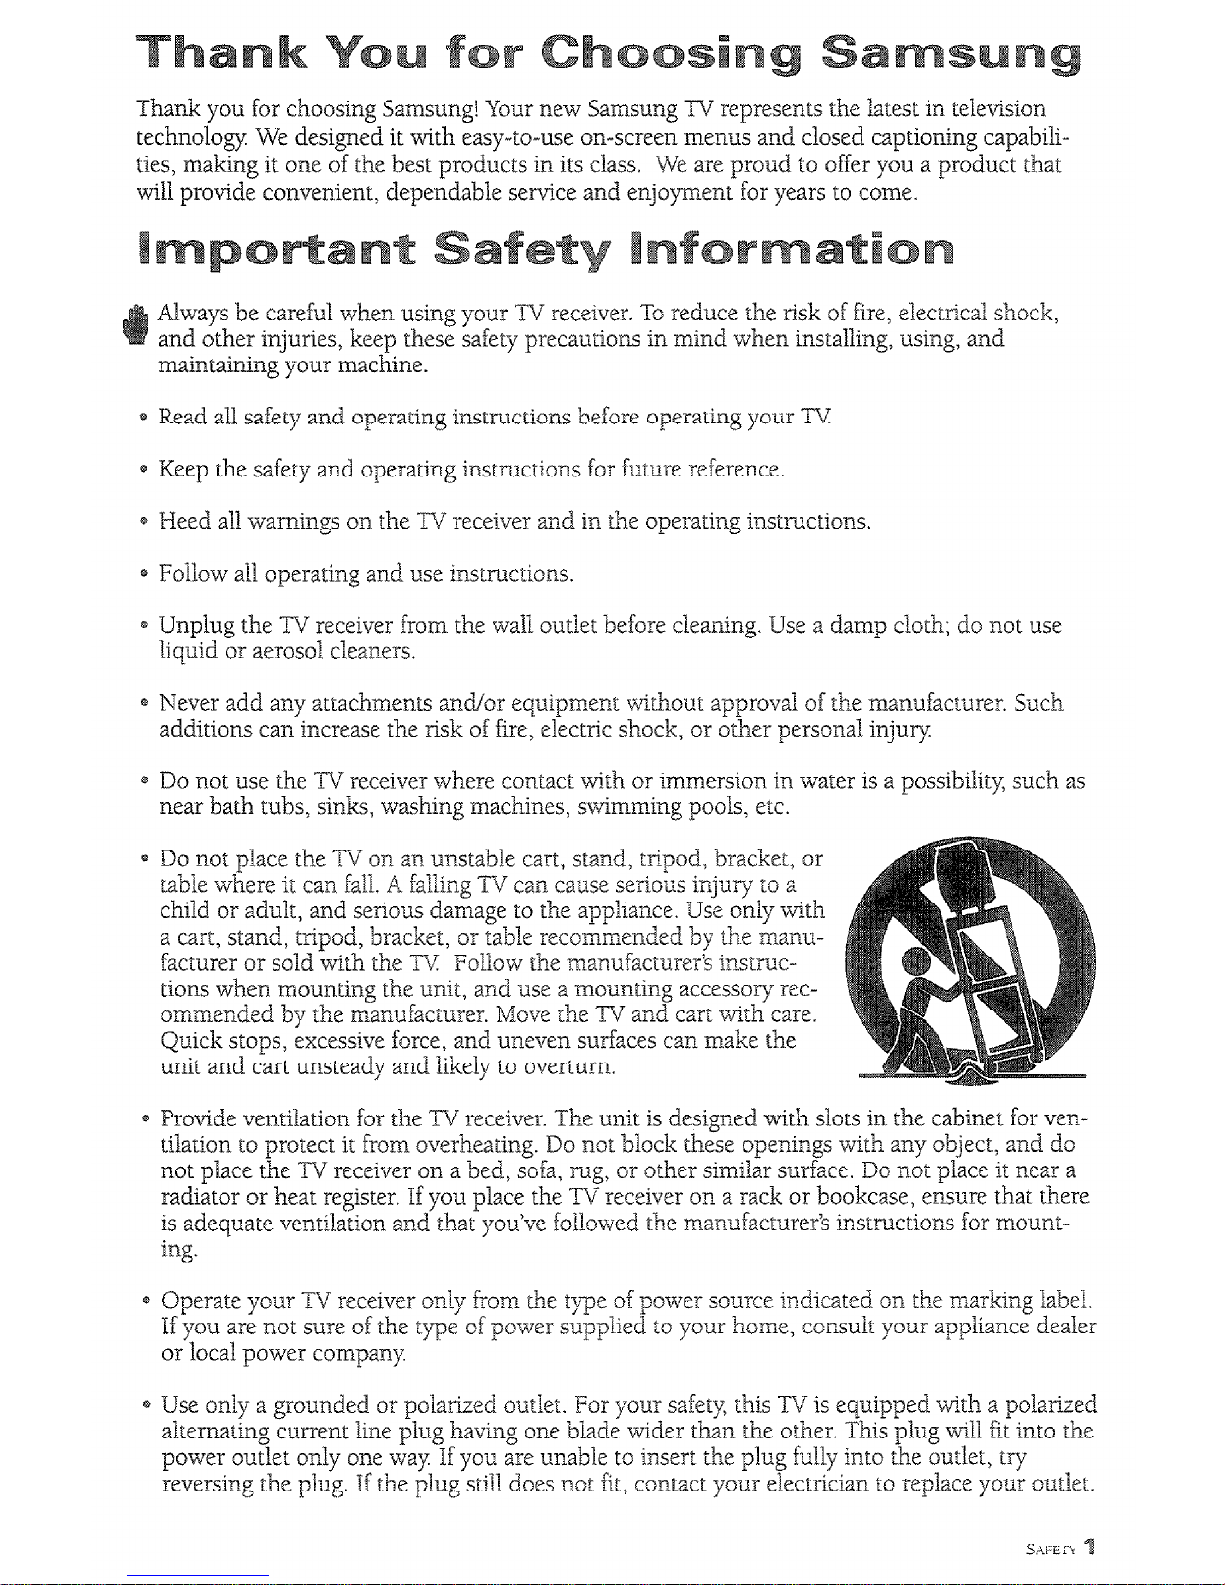
Q DQ nst place the TV on an unstable cart, stand, tripod7 bracket, or
rable where it can E&l, A fatling TV can cause serZous injury to a
child or adult, and serious damage m the appliance. Use only with
a cart, stand, tripod, bracket, or table reco~mmended by the manufacmer or salid with the TV Folk~w the manufacturer’s i~stxuctions when mounting the unit, and use a mounting accessmy xcommendsd by the mmufacturer. Move the TV and cart with care.
Quick stops, excessive force, and uneven surfaces can make the
unit and cart unsteady and likely to overturn.
e Provide venrilatbn for the TV receiver. The unit is designed with slots in the cabinet for ven-
tilation to protect it from overheating. Do not block these openings with any object, and do
n.ot place the TV receiver on a bed, sofa, rug, or other similar surface. Do not place it near a
radiator or heat register. If you place the TV receiver on a rack or bookcase, emure that there
is adequate ventilation a6?d that you’ve fc&m.ed the manufaeturrrer’s instructions for mounting.
Q Operate your TV receiver only from the type af power sou-m indicated on the marking label.
Xf you are not sure of the type af
pov;rer
supplied to your home, consult yours appliance dealer
0~ local power company.
*s Use only a gmunded or polarized outlet. For your safety, this TV is equipped with a polarized
alternating current line plug having me blade wider than the other, This plug till fit into the
power outlet only one way. If you are unable to insert the plug fully into the outlet, t;=y
reversing the plug. If the plug still dms raot fit, contact yoerr electrician TV replace your outlet.
* Protect the power cord. Power supply cords should be routed so that they won’t be walked
on or pinched by objects placed on or against them. Pay particular attention to cords at
plugs, convenience receptacles, and the point where they exit from the unit.
* Unplug the TV from the wall outlet and disconnect the antenna QT cable system during a
Iightning storm or when left unattended and unused for long periods of time. This will prevent damage to the unit due to lightning and power-line surges.
* Avoid overhead power lines. Au outside antenna system should not be placed in the vicinity
of overhead power lines or other electric light or power circuits or where it can fall into such
power lines or circuits. When instalhng an outside antenna system, be extremely careful to
keep from touching the power lines or circuits. Contact with such lines can be fatal.
a Do not overload the wali. outlet or extension cords. Overloading can result in fire or electric
shock.
0 Do not insert anything through the openings in the unit, where they can tuuch dangerous
voltage points or damage parts Never spill liquid of any kind on the TV:
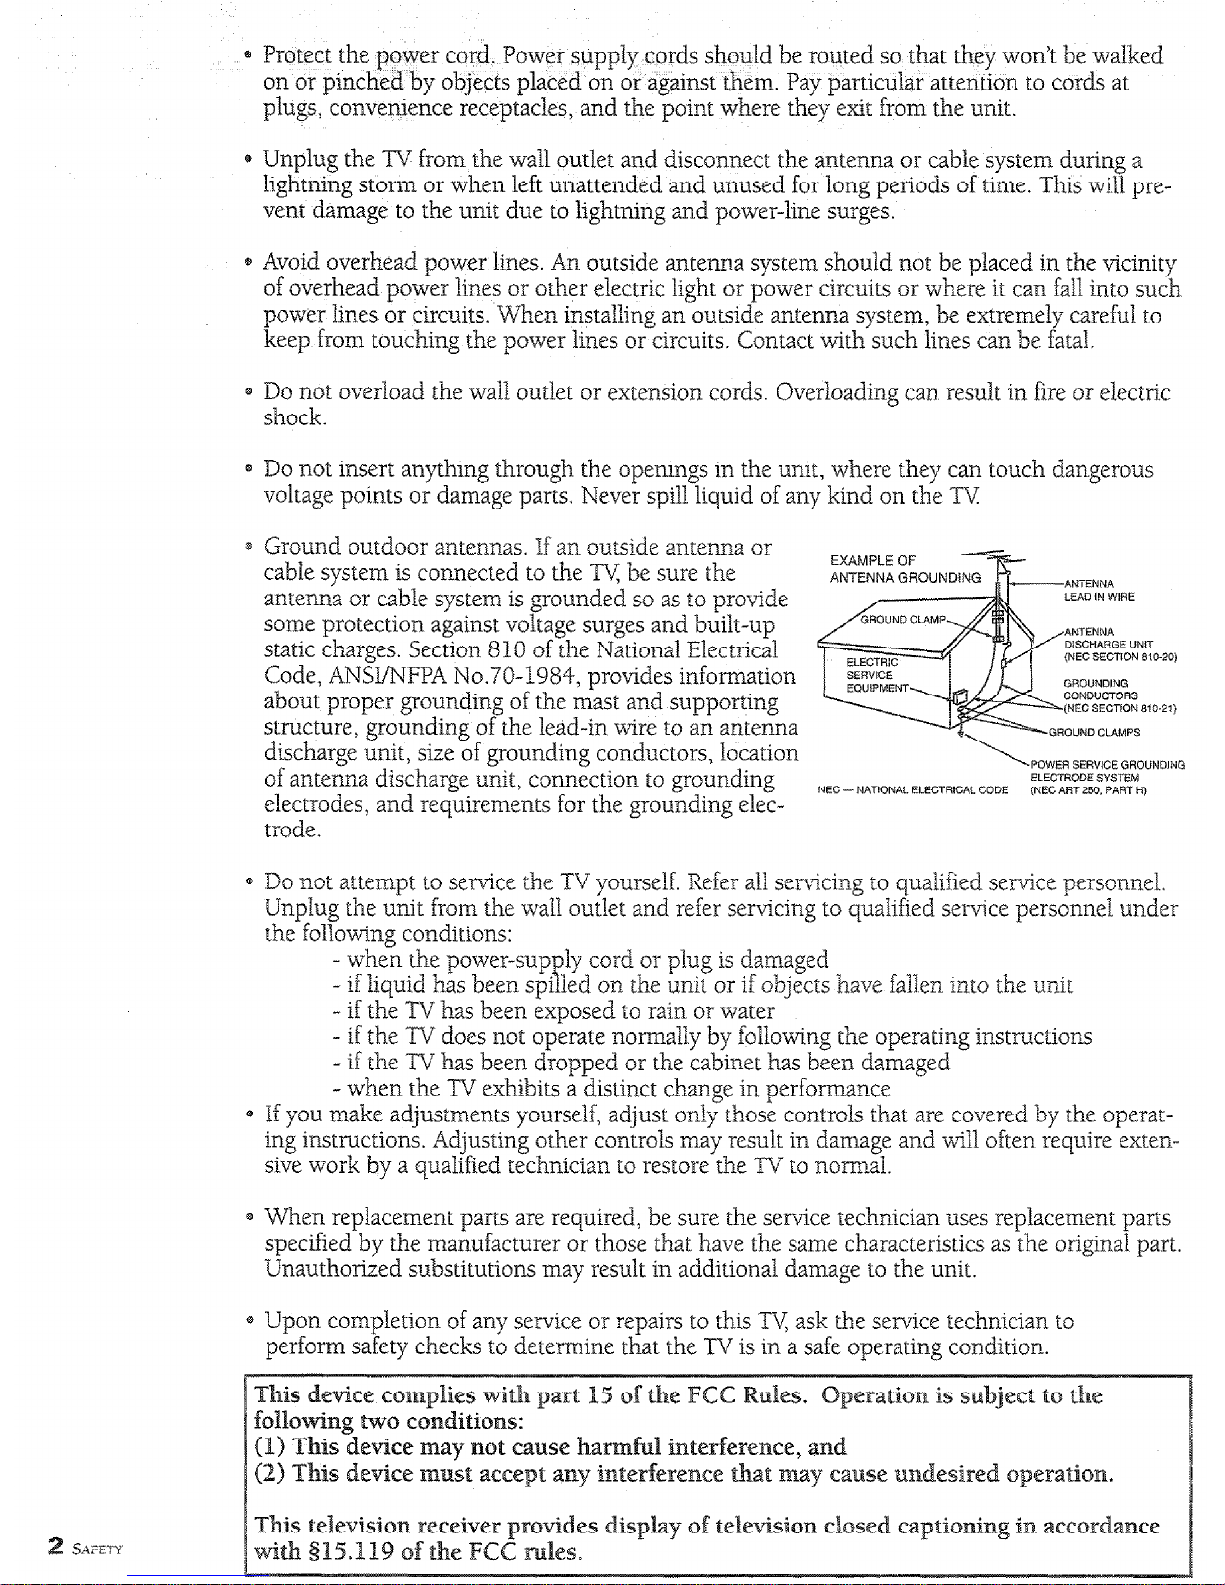
* Ground outdoor antennas. If an outside antenna or
cable system is connected to the Ty be sure the
EXAMPLE OF
ANTENNA GROUNDI
antenna or cable system is grounded so as to provide
some protection against voltage surges and built-up
static charges. Section 810 of the National Electrical
Code, ANSllNFPA No.70-1984, provides information
about proper grounding of the mast and supporting
structure, grounding of the lead-in wire to an antenna
discharge unit, size of grounding conductors, location
of antenna discharge unit, connection to grounding
POWER SERVICE GROUMDlNG
ELECTRODE SYSTENI
electrodes, and requirements for the grounding elec-
NEC -NATIONAL. ELECTRICAL CODE
(NEC ART 250. PART H)
trode,
0 Do not attempt to service the
TV yourselF. Refer all
servicing to qualified service personnel.
Unplug the unit from the wall outlet an.d refer servicing to qualified service personnel. tander
the foUoting conditions:
- when the power-supply cord or plug is damaged
- if liquid has been spilled on the unit or if objects have fallen into the unit
- if the TV has been exposed to rain OT water
- if the TV daes not operate normally by following the operating instmctions
- if the TV has been dropped or the cabinet has been damaged
- when the TV exhibits a distinct change in performance
e If you make adjustments yourself, adjust only those controls that are covered by the operar-
ing instructions. Adjusting other controls may result in damage and Will often require extensive work by a qualified technician to restore the TV to normal.
e When replacement parts are required, be sure the setice technician uses replacement parts
specified by the manufacturer or those that have the same characteristics as t’he original part.
Unautharized substitutions may result in additional damage to the unit.
61 Upon completion of any service or repairs to this TV, ask the service technician to
perform safety checks to deternine that the TV is in a safe operating condition.
Read these instructions.
Keep these instructions.
DOUBLE INSULATE’D - When servicing
use
m--d~7
identical replacement parts.
Heed all warnings.
Follow all instructions.
Do not use this apparatus near water.
Clean only with dry cloth.
Do not black any ventilation openings, IlnstaTl in accordance with the manufacturer5
instructions.
Do not install near any heat sources such as radiators, heat registers, or other apparatus
(induding amplifiers) that produce heat.
Do nut defeat the safety purpose of the polarized or grounding-type plug. A polatized
plug has two blades with one wider than the other. A grouradireg type plug has two blades
and a third grounding prong. The wide blade or the third prong are provided for your
safety If the provided plug does not fit into your outlet, consult an electrician for replacement of the obsolete outlet.
10) Protect the power cord from being fmn being walked on or pinched particularly at plugs,
convenience receptacles, and the point where they exit from the apparatus.
1 I) Only use attachments/accessories specified by the manufacturer.
12.) Use only with cart, stand, tripod, bracket, or table specified by the manufacturer, 01 sold
with the apparatus, V&en a used, caution when moving the cart/apparatus mmbination to
avoid injury from tip-over.
13) Unplug this apparatus, When a cart is used, use caution when moving the cart/apparatus
combination to avoid injury from tip-over.
14) Refer all servicing to qualified service personnel. Servicing is required when the apparatus
has been damaged in any way, such as power-supply cord QI plug is damaged, liquid has
been spilled or objects have fallen. into the apparatus: the apparatus has been exposed to
rain or moisture, does not operate normally, or has been dropped.
~m*mmImmlms~LTm
.” . . . . . . ‘...... ._.r.,,.f . . . .
Familiarizing mxself with The TV. . . . . . . . I . . , . . . . . . . . . . . . . . 12
Front Panel Buttons . * . , 1 . . . . . . . . . . . . . . . . . . * . . . . . 1.2
FrontPane.lJacks I . . . . . . , ‘ . I. * I. I,. . . . . . . . I.. * I 13
Rear Panel Jacks . . . . . . . . . . . . . . . . . . . . . . . . . . . . . . . . . 1.4
Remote Csntrd (Type: 1). , . I 1 . . . - 1 . * + I . * . 1 . , . I . . . 1.5
Remote Control (Type: 2) . . , . . . . . . . . . . . r . . . . . . . . . 1.7
I n pz s a m e 3 a m I I cc7 * I I
Antemas
, . . . , , . . ” . . . 1 * , . . . * . . . .
Antennas w-&h 300-ohm FZal Thin Leads . . . . . . . . . . . . . . 2.1
Antennas with 75ohm Kuund Leads 1 1 , . * * . * . , . . . . 22
Sepaxate VHF a-rid ‘UHF Antennas. . . . . ‘ . , . . . . . . . . . . . .2.2
connecting Cable TV . , . . , . , . , , . . , . . * . * * 1 1 . . . , . , . . ” , . . . . ,2.2
Cable without a Cable Box. . . . . . . . . . . . . . . . . , . . . . . . . 2.2
Connecting to a Cable Box that Descrambles All Channels . . . 2.3
Cannectiag to a Cable Box that Descrambles Some Charnels . . . 2.3
Gmnecting a VCR . . _ . . . , . , . . . . . . . . . . . . . . . . . , . . . . . . . .2.5
Connecting an S-WS VCR. . . . L . . , . . _ . . . + . .2.6
Connecting a Second VCR to Record frum the -I-v . . . . . . 2.7
Connecting a DVD Ptayer (48Oi/48Op) I . . * . . . , . * . . . . . . * . , f . 2.7
Connectilzg a Digital TV Set-Top Box (4ssp/nssoi> . . . . = . . . . . . . 2.8
Cannecting a Camcorder . . . . . . . . . . . . . . . . . . , . . . . . . . . . . . . . , 2.9
Installing Batteries in the Remote Control. . . . . . . . . . , . . . . . . . . 2.10
!ai?~~~~l~b2E*~Px$mm5lm
+IiEningtheTvOnand Off.. . . . . . . I.. . . . . . . . . . . . . . . . . . . . .3.x
Piug&PlayEearure.. . . . . . , . . . . . . . . . . . . . , . . . . . . . . , . .3.1
Vkw-ing the Menus and On-Screen Dis$ays. . _ . , . . . . . . . , . , . . 3.3
Vie\ving the Menus. . . . 1 . . . . . . , . . . , 1 , * . , * . . . . . . .3.3
Vie\v~ng the Display < . . , . . . . . . . . . . . . . . . . . . . . r . , 3.3
Selecting a Menu Lmguage. . . . . . . . , . * , . . . * , . ” . * * , . . . . 3.4
Memotizing the Channels. . . . . . . . , . . . . . . . r . . . r . 1 . . . . . . . 3.5
Selecting the Video Signal-source . . . . , . , . * . . , I . 3.5
Storing Channels in h/ierncllr>r $iutomatic Merhod) . . , . r . . 3.6
Adding and Erasing Channels (Mama2 Mzthsd) . * , 1 . . . 3.7
Changing Channels . . , . . , I . . . . . . . . . . . . _ . . . . , . . . . . - . .3.8
using the Channel Buttons. . * . I . . . * . . t I + . . 1 . + . . I + * .3.8
Directly Accessing Chanraels . . . . . . . . . . . . _ . . . . . _ . . . . . 3.8
Using the PKE-CM Bertton ta select the Pre~iou.5 Channel. . 3.8
Adjusting the Vo&me . . . . . . . . . . . , . . . . . . . . . . . . . . _ . . . . 3.8
Using Mute. . . . , . . , . , . . . , , . . . . . . . . . . . . . . . . . . . . .3.8
Labeling the Channels . . . , _ . . . . . . . . . , . . . . . . . . 1 . _ . . . . . 3.9
Setting the Clock . . . . * . r . . 1 . . . . 1 . . 1 . . . , . . . 1 . . . . . . . . . . 3.10
Option 1: Setting the Clock
bbnuallly
. < . + . < . . . < . . . . 3.1.0
Option 2; Using the Local PBS Channel to
Automaticallp Set the TV Clock < + . . . . . . . . . , . . . 3.11
Customizing the Picture . . . . . . . . . 1 . . I . . . . . . . . . . . . . . . . . 3.13
using Automatic Ficture Settings . . . * * + 1 * . . . I I * 1 . . . . . 1 . . 1 . . . 3.14
Customizing the Sound . . . . . . . . . . . . . . . . . . . . . . . . . , . . . . . I 3.15
Using Autom.atic Sound Settings. . . I . , . . , . . * . . . . * , . . , ~ , . . 3.16
Viewing an Exterd Signal Source , . . . . , . . . . . . . . . . . . . . . . . . , 3-17
q 1 m I I a I a * I1)1 II
. . . . . . . . . . . . . . . *, . . . .
Setting Up ‘iour Remote Control to Operate Your VCR or EWD . . 4. I
Setting Up Uour Remoee &antrol to Operate Your Cable Box . . . . 4.3
Fine Tuning Channeis. * . . . I . . . . I . . . . . . . . . . . . . I . . . . . . . I .4.4
LNA (Low Noise Amplifier) . . . . . . + , * I , . . I . , . . , . , . . . . . . . . .4.5
Tilt.........................................,........4.6
Digital Noise Reducrion . , . . . . . . _ . . . . . . . . . . . . . . . . . . . . . .4.7
Changing the Screen Size . . + . I _ + . . . 1 . . . . * . . + . . + 1 . , . . . . . I . .4.8
Changing the Color Tone . . , . . . . . . . . . . . . . . . . . . . . . . . . . . .4.9
Using the R.Surf Feature. . . . . . . . . . . . . . . . . . . . . . . . . . . . . .4.10
Yreezing the Picture . . . . . . . , . _ . . . . . , . . . , . . . . . . . . I . . a . . . + 4.10
Setting the On/OffTimer . . . , . . , . . + . . _ . , . . . . , + . , . . -4.11
Setting the Sleep Timer. . . _ . . . . . . . . . . . . . . _ . _ . . . I . , . , . .4.12
Sound Features. . . . , . . . . . . , . . . . . . . . . . . . . . . . . . . . . . . .4.B3
Choosing a Multi-Channel Sound (MTS) Soundtrack. . . , 4.13
Extra sound settings (Tu.rbo Souwrd, Surrou~.~d, Auto volume,
~~~~~~, BBE OT Worafe’E;r) . . , , . . . . . . . . , . . . , 1 .4.14
Viewing Closed Captions . . . . . . . . . . . . . . . . . . . . . . . . . . . . . .4.l6
Viewin.g Picture-in-Picture . . . . . _ . . . . . . . . . . . . . _ . . . . . 4.17
Activating Picture-in-Picrure . . _ . + . , . , _ , . , . , , . + 4.1 Ti
Selecting a Signal Source (External -A/V> for PIP . * . . + . . . 4,18
Chabng~~gt~eSimeolehePHPW~ndo~ . . . . . . , . . . . . . .4.19
Swapping the Contents of the PIP image and Main image .4.20
Changing the PIP Channel. . , . . . . . + . _ . . . . . + . . + , . . ,4+21
Using the V-Chip . . . . . . . _ , . . . . , . . . , . . . . . . . . , . . . . . . . . .4.22
Setting Up Your Personal ID Nur&er (PIN) . . . . . . . . . . . . 4.22
Wow to Enable/Disable the WXp . . . . . . . . . . . . , . . . . . 4.23
How to Set up Restrictions Using the “TV guidelines” . . . . 4.23
How to Set up RestricLions using the MPAA Ratings:
G,PG,PG-13,R:NGlT,X .I........ I . . . . . . . . . . . . . 4.25
How to Reset the TV after the V-Chip
%xks a ChanrA (“&qycy EXaFe”) . . . . . . . . . . . . . 4.26
ehe Demonstra”cion . . . , _ . . . . . . , . . . . . . . . . . .4.27
m ol e p1w * I4 I I I81
ems . . . . . . . . . . . . . . . 1 . . 1 . . . * . . . . . . . ..t . .
IBll~llsCn~OQrD*ml~l~~~~~~=
Cleaning and Maintaining Your I-V. . . . . . . . _ . . . _ . . . . . . , . . . . A. P
using Your TV in Another Couneq~ . I . . . . . . . . . . . . . . . . A. 1
Specifications . . , . . . . _ . . . . . . . . . . . . . . . . . . . . . . . . . . . . A. 1.
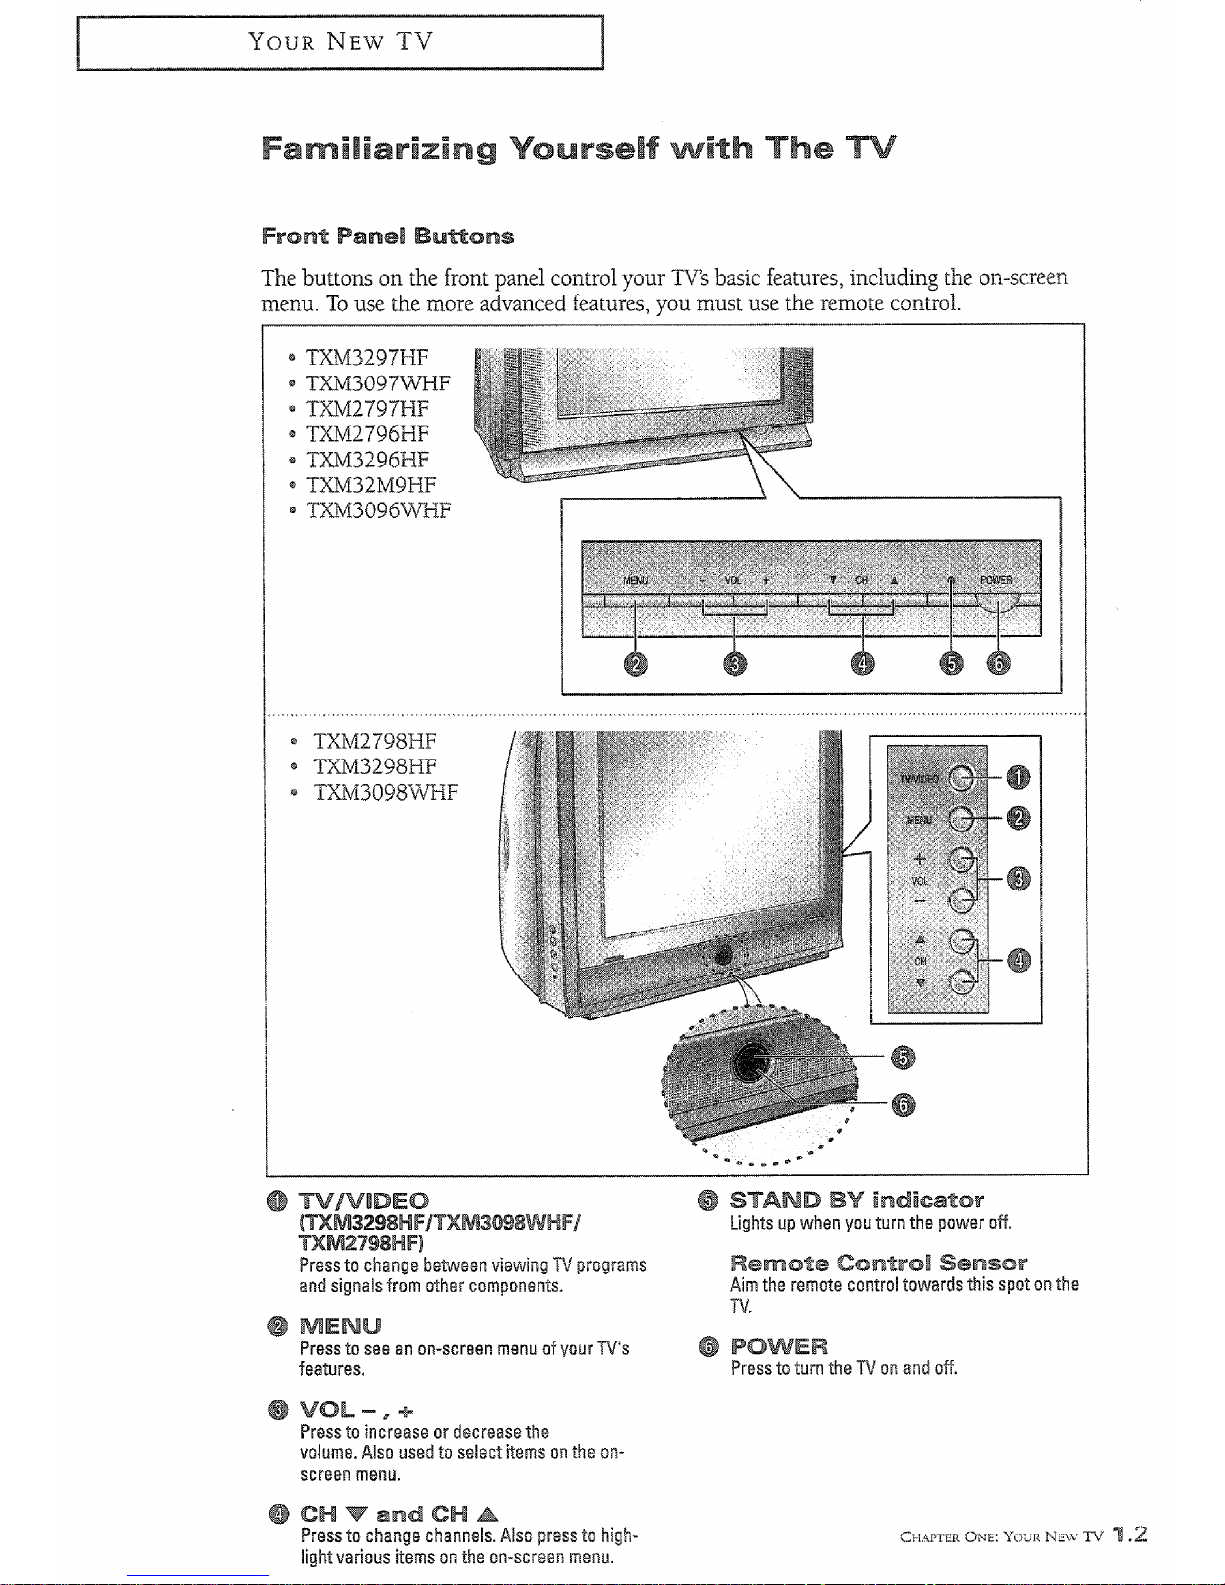
The buttons on the front panel control your TV’s basic features, including the on-screen
menu. To use the more advanced features, you must use the remote control.
@ TXM3297HF
0 TXM3097MrHF
@ TxM2797HF
e TXM279BHF
@ TXM3296I-P
@ TXM32M9MF
D TXM3096wYLF
@ TXM2798HF
e TXM3298HF
cs TXM3098WHF
Lights up when you turn the power off.
0 see an on-screen menu al’ your TV’s
features.
Press to tLml the TV ow and oft
.c;e:se or decrease the
vQlume. Also used to sekm %ems on the on-
screen menu.
Press to change channals. Also press to high-
light various items on the on-screen meg7u.
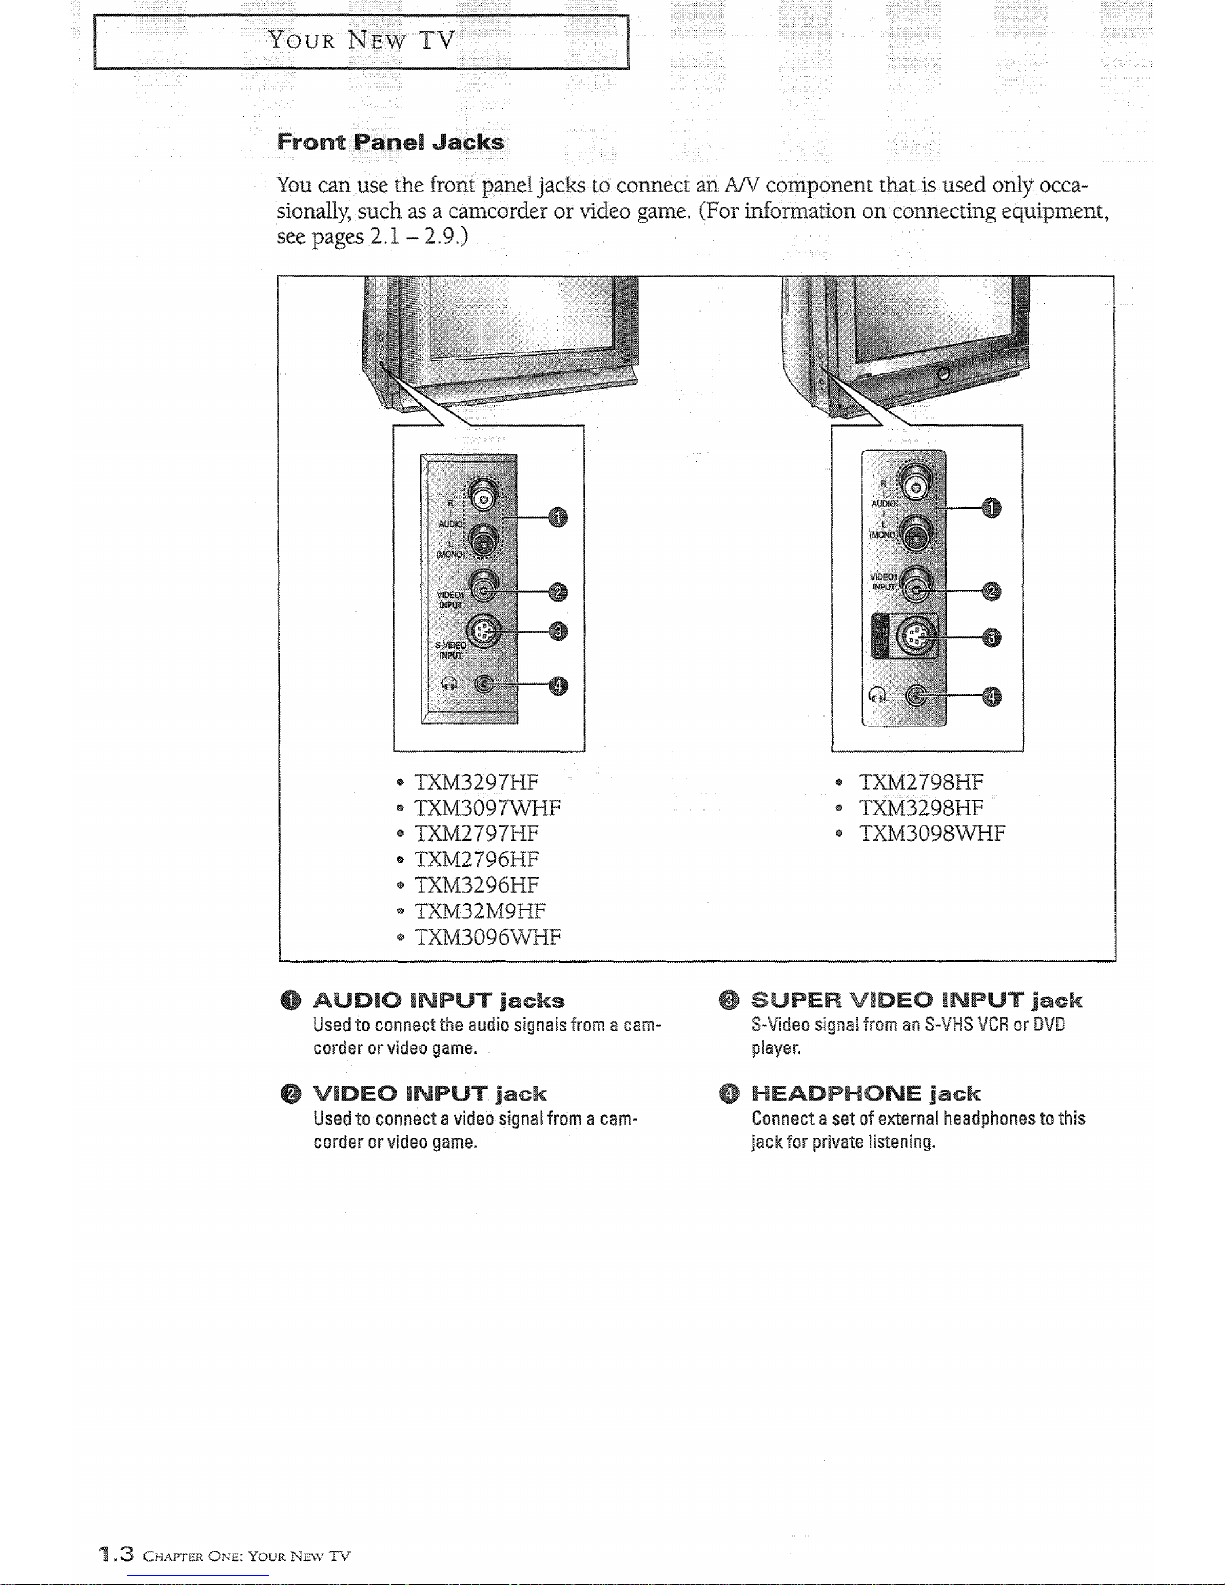
You can use the front panel jacks to cunmct an A/v component that is used only occa-
sionally, such. as a camcorder or video game. (For information cm connecting equipment,
see pages 2*1 - 2.9,)
* TXM3297’HF
@ TXM2798HF
@ TXM3097wHF
e TXM3298MF
* TXM279THF
Q TXM3098WHF
B, TXM2796,HF
* TXM3296HF
6p TXM32M9HF
* TXM309SWF
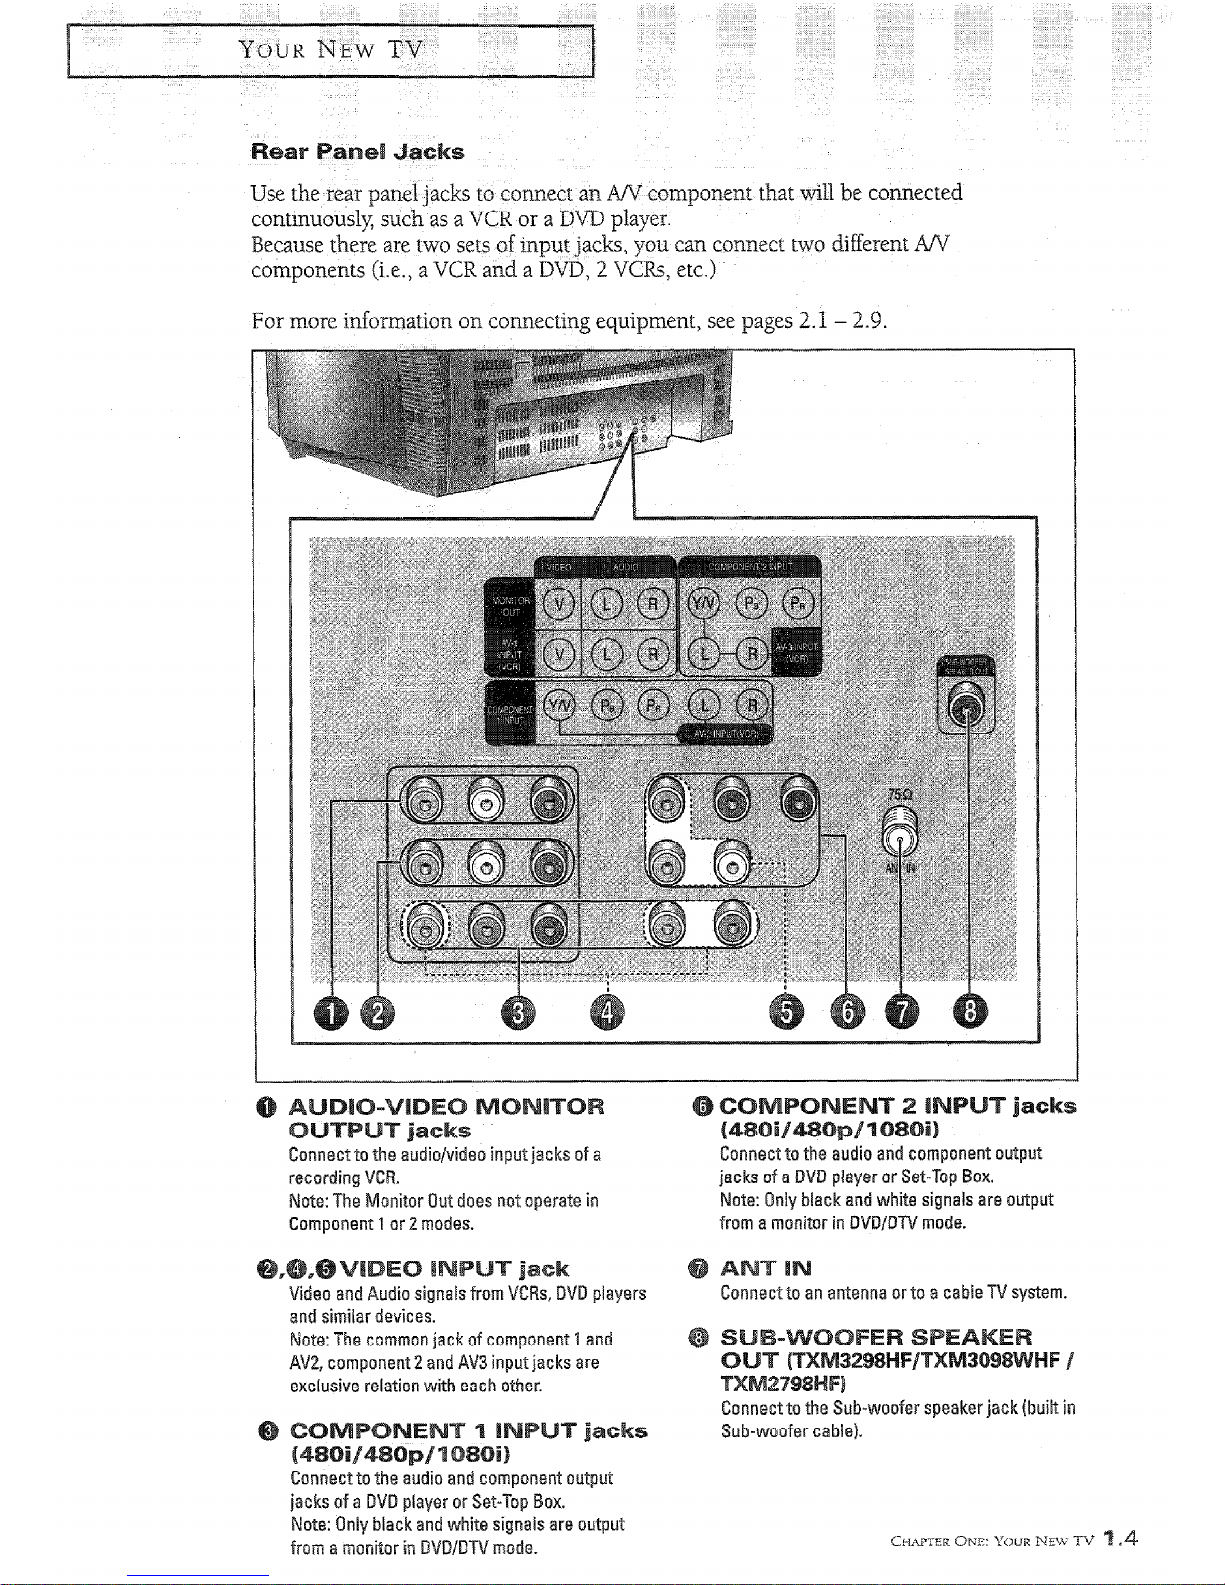
Use the rear panel jacks to connect an 14/v componmt that will be connected
continuously suclrl as a VCR or a DVD player.
Because there are two sets of input jacks, you can connect two differmt NV
compoazents (i.e., a VCR and a DVD, 2 VCRs, etc.)
For mm information on connecting equipment, see pages 2.1 - 2.9.
Note: The Monitor Out does not operate in
Cermponent 1 or 2 modes.
Video and Au&o signals from VCRs, DVD players
and similar devices.
Nate: The common jack of component 1 and
AV2, component 2 and AV3 input jacks are
exclusive relation v&h each other.
Ox-~nect to the audio and component aGprat
jacks af a DVD player or set-l-q3 Box.
Note: Only black and white signals are output
from a monitor in DVD/DTV mtade.
Ccnneetto the Sub-woofer speaker jack (built in
Sub-woofer cable).
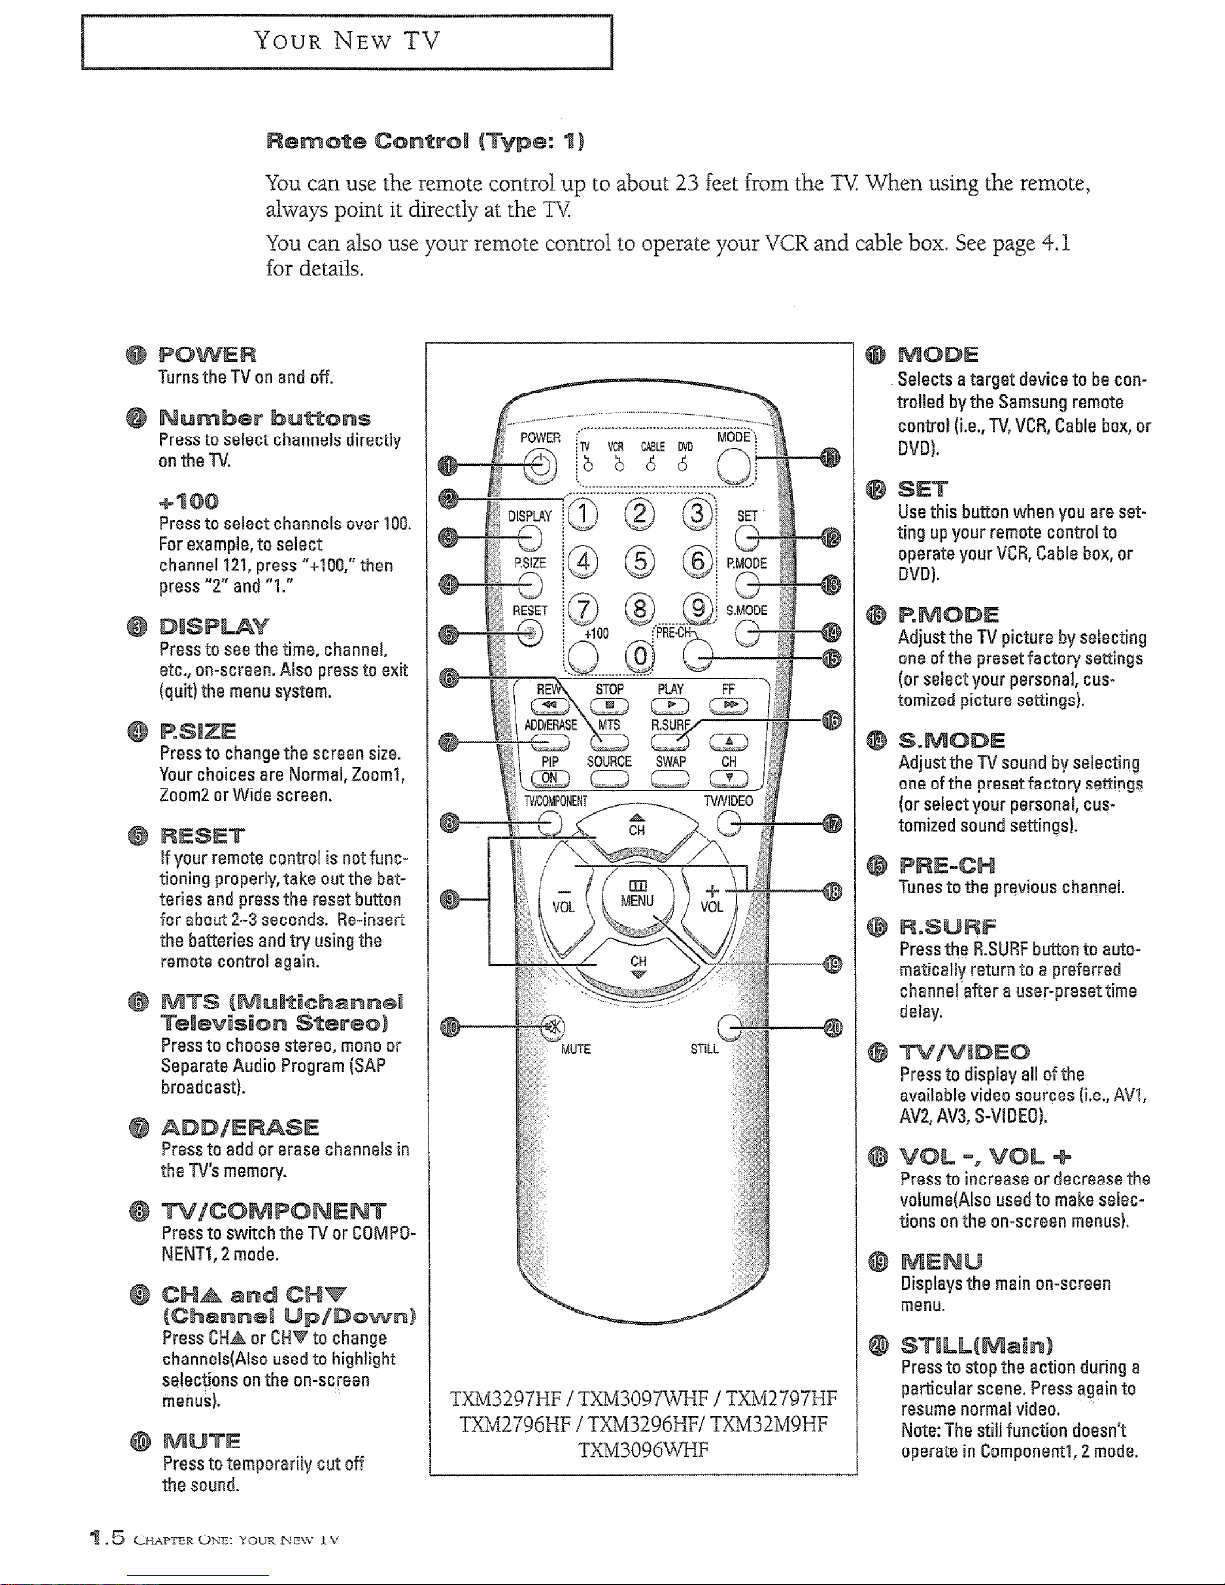
You can use the remote control up to about 23 feet ~I-CEII the TV When using the remote,
always point it directly at iAe TY
%X.I can also use your remote control to operate your VCR and cable box. See page 4.1
for details.
Turns the TV an and off.
s
Press to select channels directly
on the TV.
+
PI- select channels over loo*
For example, to select
channel 121, press “CIOQ,” then
press “2” and “1.”
Press to see the time, channel,
etc.,
on-screen.
Also press to exit
(quit) the menu system.
Press to change the screen size.
Your cheices are Normal, ZoomI,
Zoom2 QT Wide screen,
te control is notfunc-
tioning properiy, take out the batte~ies and press the reset but&~
for about 2-3 seconds. Ro-inser;
the batkries and try using the
remote control again.
Press to choose stereo, mono DB
Separate Audio Program (SAP
broadcast).
Press to add or erase charmels in
the TV3 memory.
Press to switch the TV or COMPONENTI, 2 mode.
channels(Also used m highlight
selectians on the on-scgW?n
menu&
Press to temporariiy CIA of!
the sound.
TXM3297HF / TXEGg3097WHF / TXM2797HF
TXM2796HFITXM3296HF/TXhlli32M9HF
TXM3096WHF
rget device to be con-
trolled bythe Samsung remote
control (i.e., TV, VCR, Cable box, or
DVD).
IS butbm when you are set-
ting up your remote control to
operate your VCR, Cable box, or
Dim).
picture by selecting
one of the preset factory settings
(or select your personal, cus-
tomized picture Wtings).
one of the presetfactory settings
(or select your personaI, customized sound settings).
URF button to auto-
matice& return to a
fN@fWFHi
channel’atier a user-presettime
delay.
II of the
available video sraurces li.e., /WI,
MC!, AV3, s-VlDEOi.
crease fhhl
volume(Also used to make selec-
tions 0n the m-wean menus)+
e main an-screen
menu.
Press to stop the action during a
particular scene. Press again to
resume normal video.
Note: The still function does&
operate in Companentl, 2 mode.
.5 c
H.&PER uh‘lz: YOUR NEW 17
YOUR NEW TV
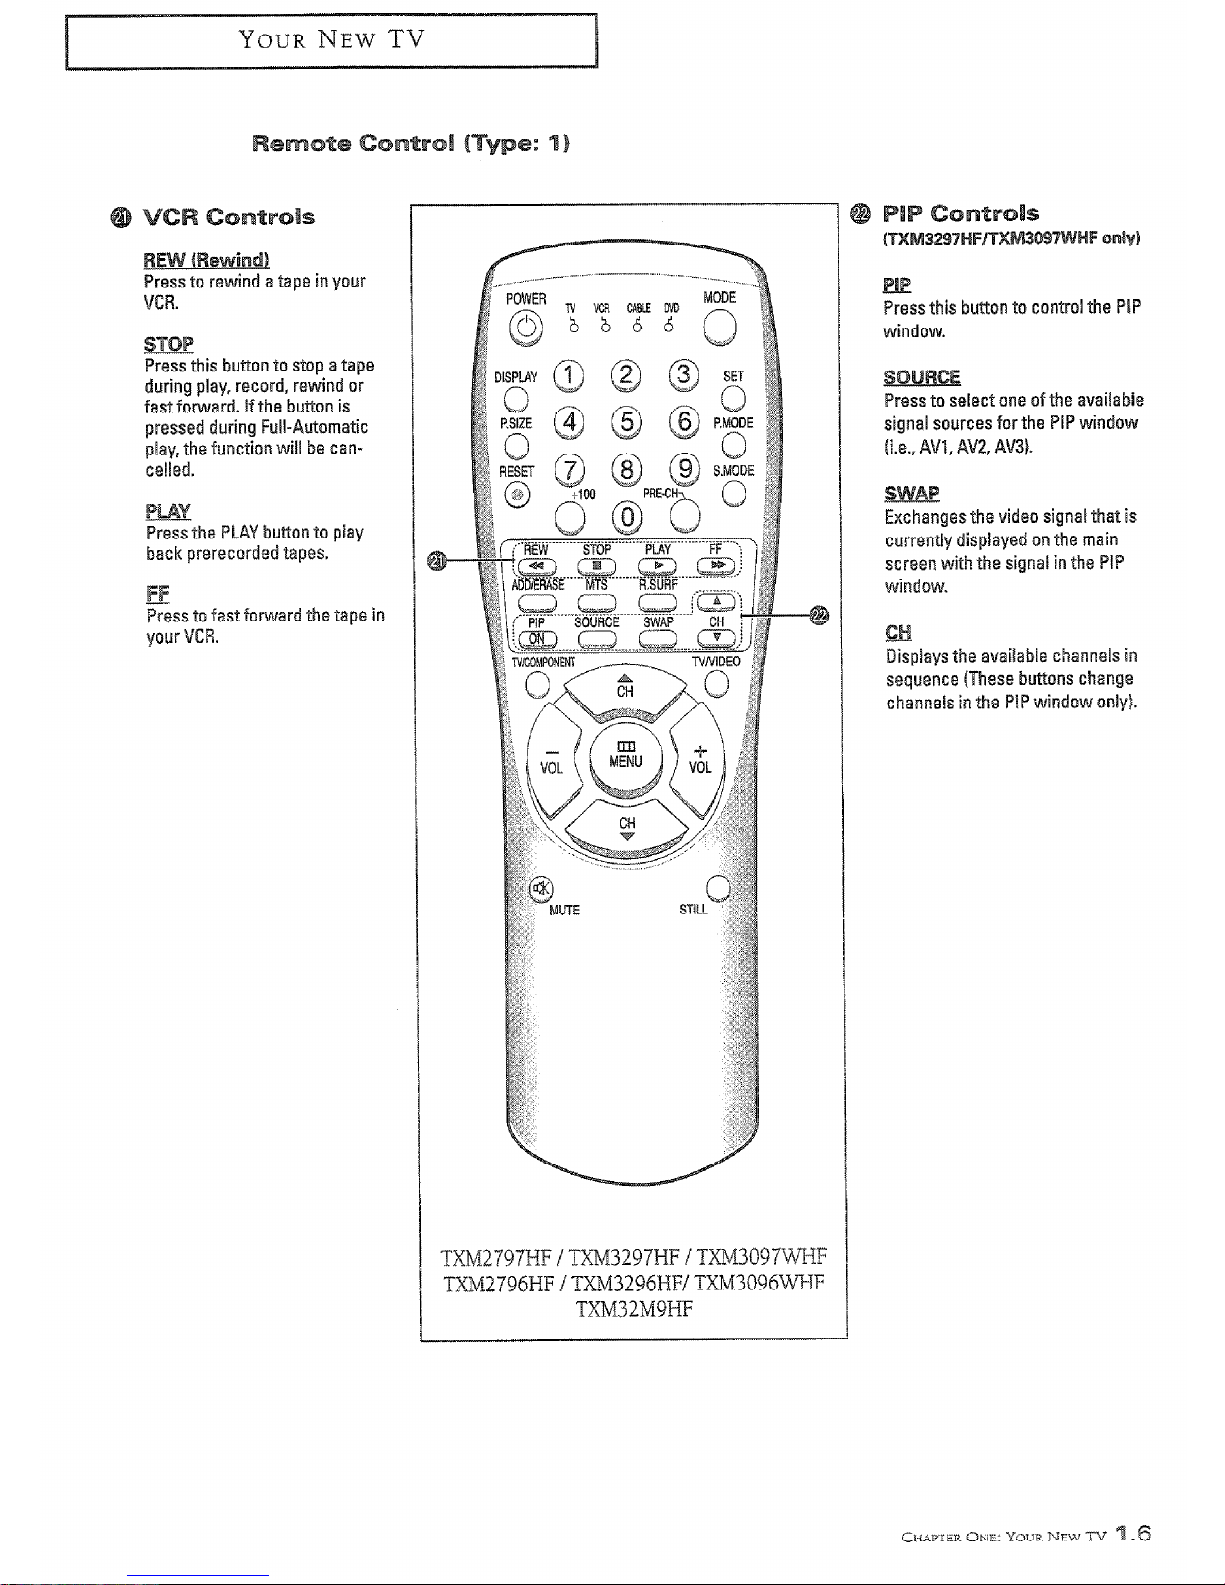
Press to rewind a tape in your
VCR.
Press this butTon to stop a tape
during play, record, rewind or
fast forward. If-the button is
pressed during Full-Automatic
play, rho function will be caflcelled.
Press the PLAY butteon to p&y
beck prerecorded tapes.
kss to fast forward the tape in
your VCW.
TXM2797HF / TXM3297HF / YXM3097MMF
TX~2796HE/TXM329~HF/~~3096~F
TXM32M9WF
sthis button lo control the PIP
window.
tect one of the availabie
signal sowces for the PIP window
(i.e., AVI, AK?, AW.
ges the video signal that is
currenely disphyed 061 the main
screen with the signal in the PIP
WiRd#W*
Displays the evailable eRameL in
sesguence(These$uttQnsc~arage
channels in the PIP window only).

Press ta
setec% channels directly
an the TV.
select chaff nels wer 100,
For example, to select
channel 121, press utlQQ,w then
press “2” and “I+”
setections on the BBn-scre@n
menus).
crease the
volume @itso used to make seiections kan the on-screan menus).
emporarily cut ofi
the soklnd.
ta sgect Equalizer menu
directly.
hange tile screen size.
YmJr choices are I\lormal, ZoomS,
foom2 OF Wide screen.
picture by selecting
one of the preset factory settings
(or select your personal, GUS-
%~mized picture sethgs~.
Adjus%the -Iv sound by selec%ng
one afthe prese::famry setthgs
(or select yaur personal, eus-
tomimed sound se%rings).
Sekxts a %arge% device %o be con-
fralled by the Samsung remote
csntrol {i.e., TV, VCR, Ceble box, or
OVD].
he main on-semen
menu.
B
stop the ac’sion during a
particular scene. Press again to
resume normat videa.
Nate: -be stilt Sunction doesn’t
sperm in Gamponene I, 2 mmde,
Press this button to con%rol the PIP
Wid?W.

If your remote control is not kmctioning praperly, take out the batteries and press the! reset button
for aboLe 2-3 secands. We-insert
the batieries and try using the
remote control again.
Press to sue the time, channel,
etc., on-screen. Also press to exit
(quit) the menu system.
Press to selw3 a presettime interval for auromatic shutoff.
Press this butkm to stop a tape
during pky, record, rewind or
Fast forward. If the but&n is
pressed during Full-Aut5matic
play, the func’fian will be cancelled.
play back prerecorded tapes or
peuse the tape.
TXM3298HFITXM309t3WHF /TXM2798HF
is btaml when you are set-
ting up ywr remote control to
operate your VCR, Cable box, QT
INI).
metically return to a preferred
channel after a user-pres&tSime
delay.
Press to select one of the avaifabk
signal swrces far the PIP windaw
(i.e., AW, AK?, AW.
Press ts stop the action durirlg a
particular scene. Press again to
resume normal video.
Note: The still iunction doesn’i:
opera$e in Componmt I, 2 mode.
Press ‘co mwe the PIP windawto
eny of ths four 03rners of the TV
screen.
Exchanges the vi&cl signal that is
current& displapled on the main
screen with the signal in the PIP
lMifldOW*
tea make the PIP window
small, large, dsuble screen QT
stocbficker window.
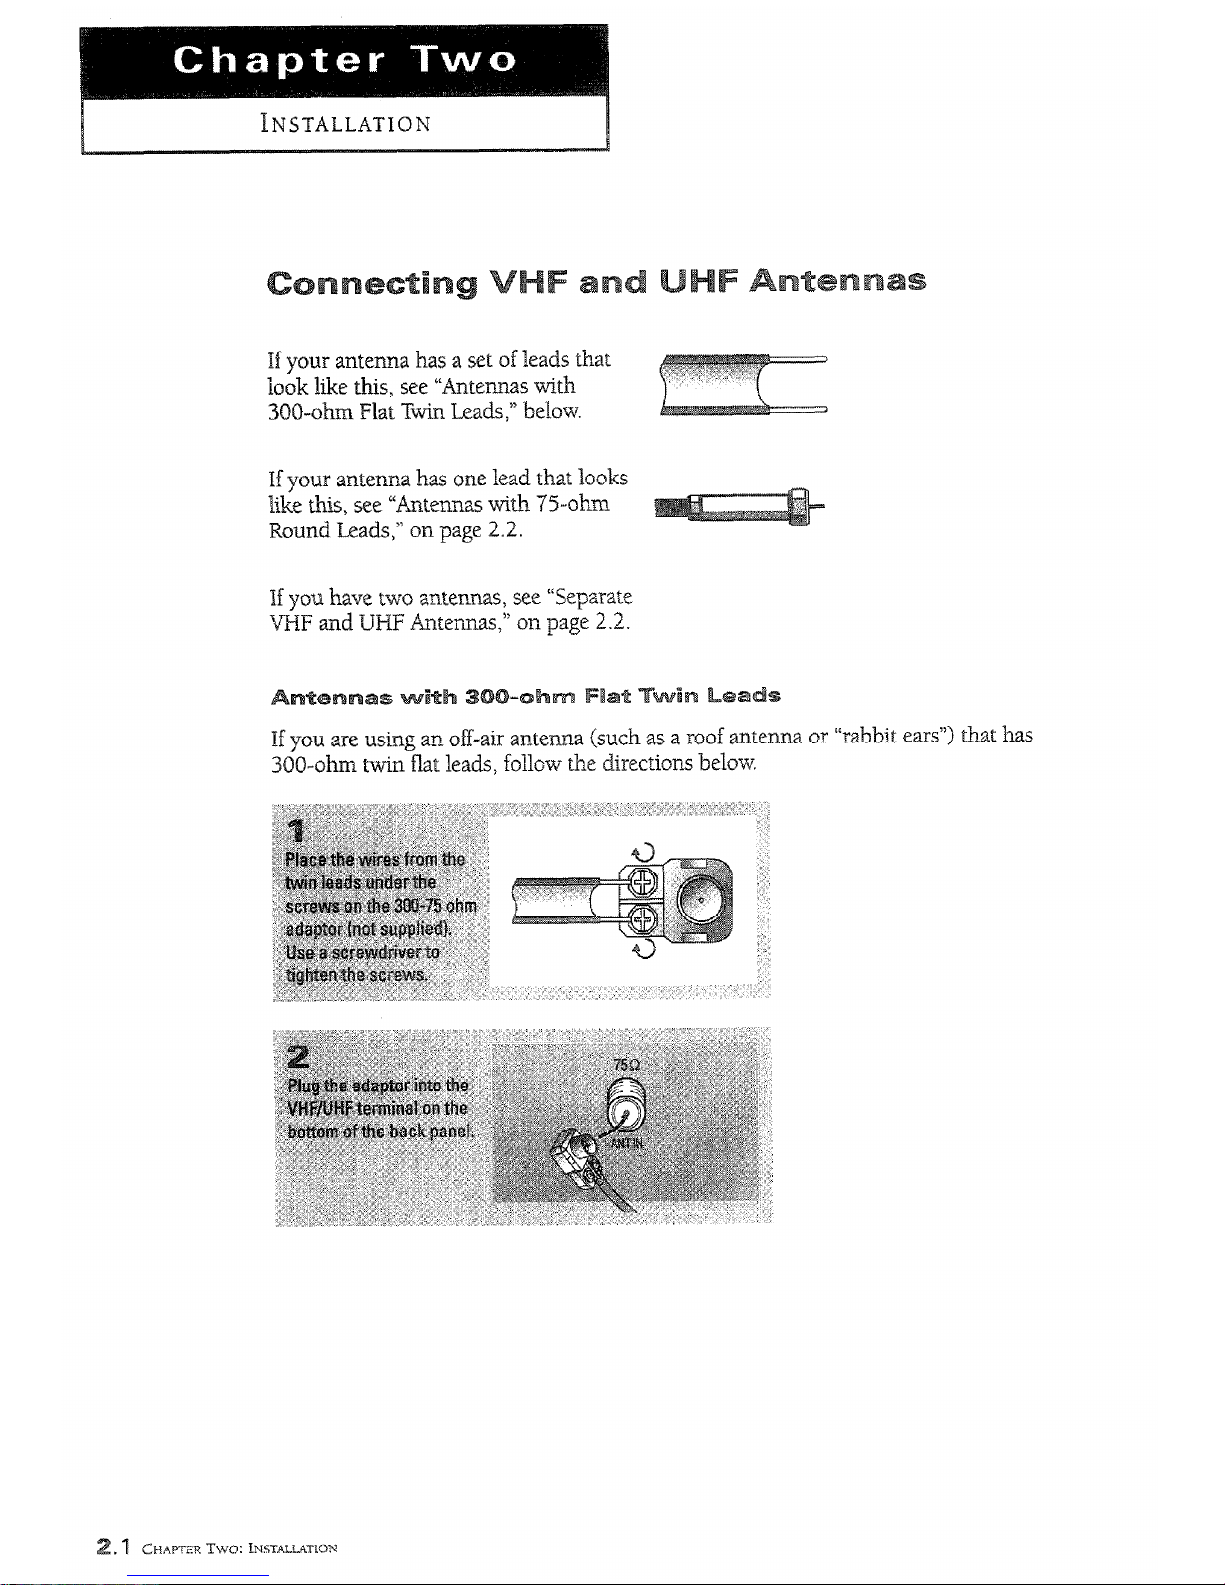
If your antema has a set of lleads that
look like this, see “‘Anterums v&h
XX?-ohm Flat Ttin Leads,” below.
If your antema has one lead that looks
like this, see “Antennas ~6th ‘IS-ohm
Round Leads,” on page 2.2.
%f you are using an off-air antenna (such as a roof antenna or ‘tabbit ears”) that has
XXI-ohm rtin flat leads, follow the directions below.
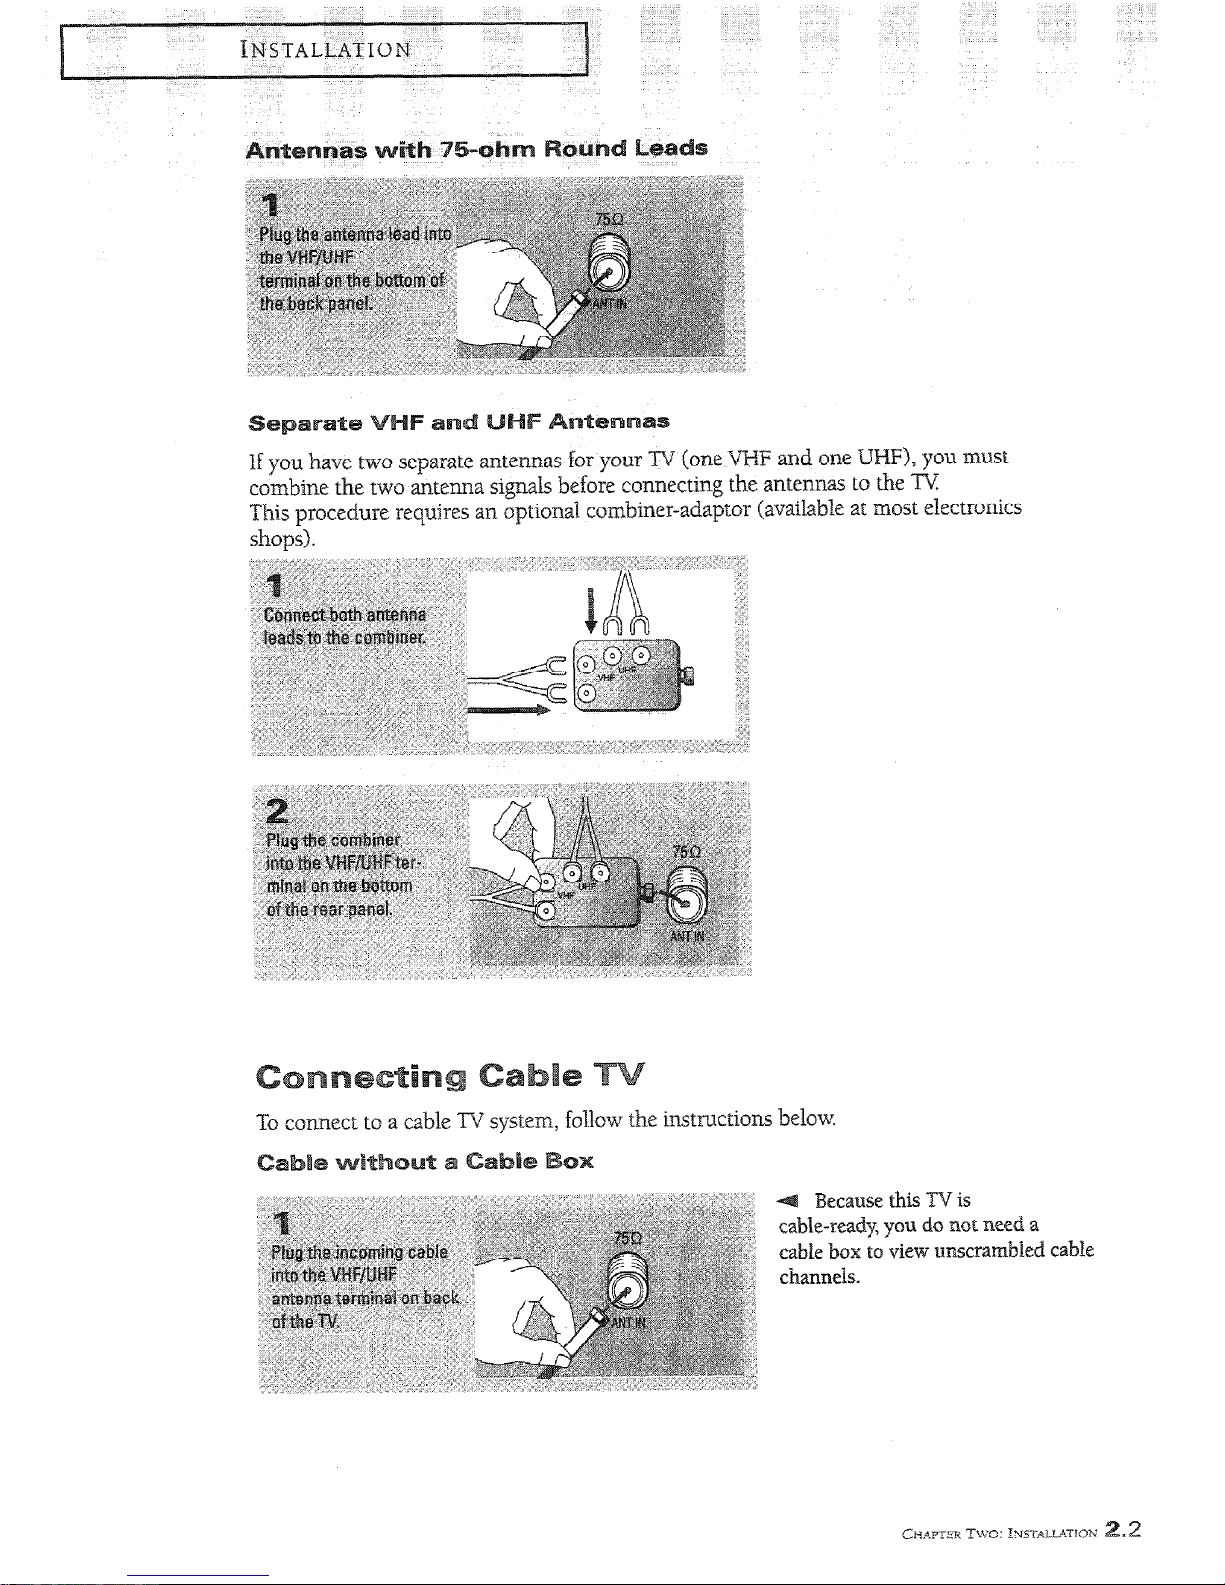
To
connect. to
a cab1
system,
follow the
instructions below.
INSTALLATION
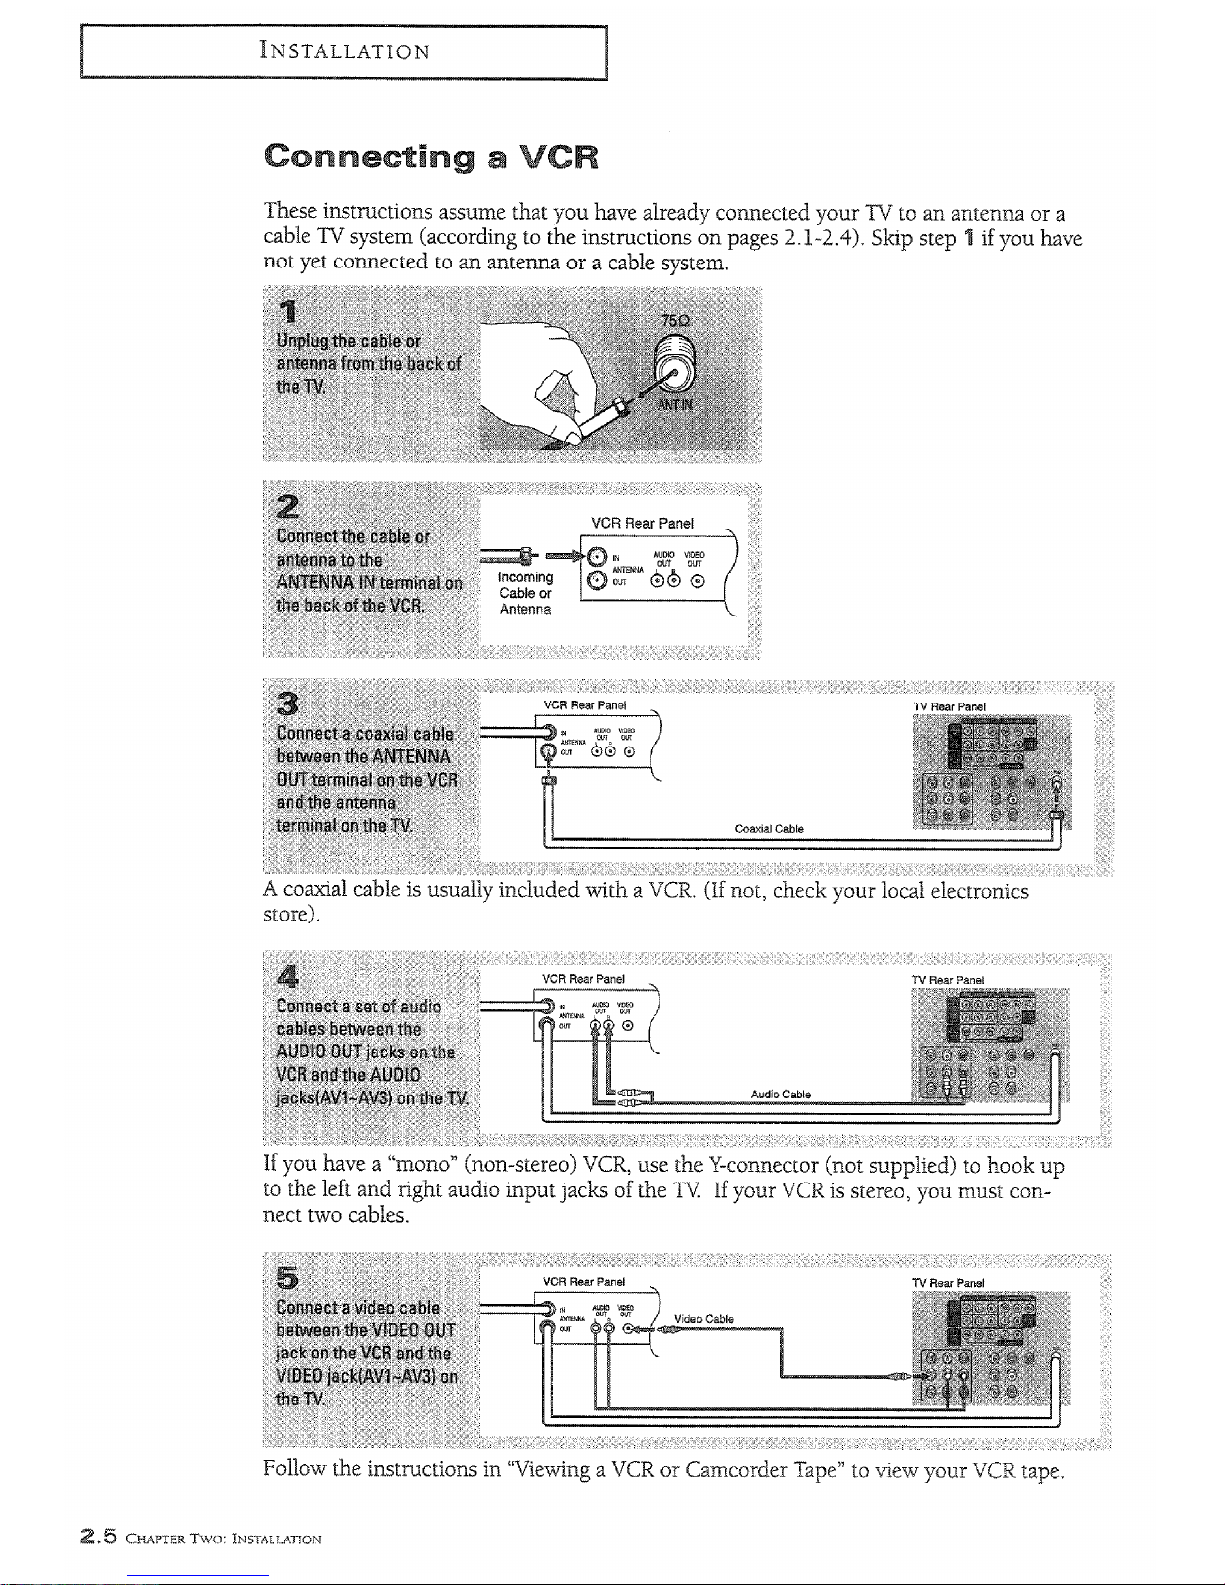
These instmctisns assume that you have already conmxted your TV to an antenna or a
cable TV system (according to the instructions on pages 2. I-2.4). Skip step
not yet connected to an antenna or a cable system.
If you have a “mono” (non-stereo) VCR, use the Y-connector (not supplied) to ho& up
to the left and tight audio input jacks of the TV If your VCR is stereo, you must ccmnect two cables.
Follow the instructions in “Viewing a VCR or Czmcorder %pe” to tiew your VCR tape.

bur TV can be connected to an S-Video signal from an S-VI-25 VCR.
(This connection delivers a better picture as compared to a standard VES VCR.)
Make sure the jacks you are using are underneath the number “1.”
An
S-video
cable is usually included with an S-VFS
VCR.
(If nor, check your local
elecCronics sore .>
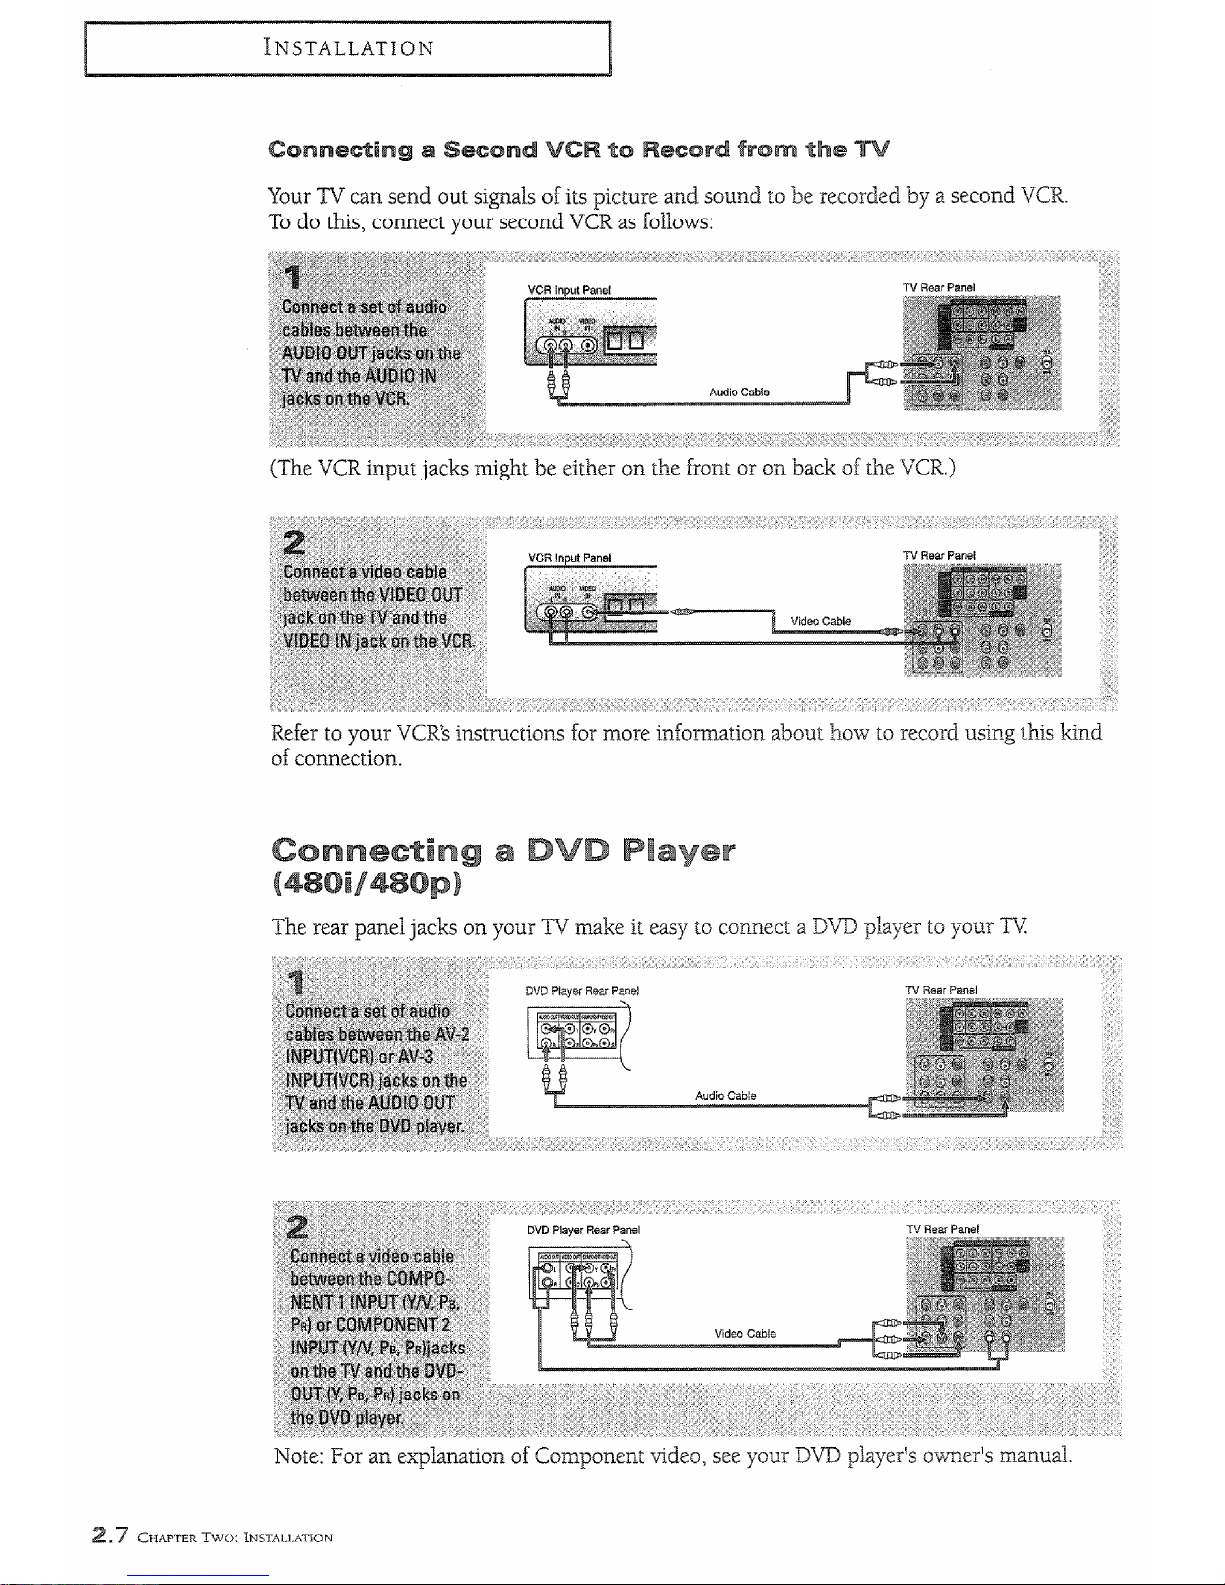
Your TV can send out signals of its picme and sound to be recorded by a second VCR.
To do this, connect your second VCR as follows:
(The VCR input jacks might be either on the fmnr or on back of the VCR.)
Refer to your VCR’s instructions foor more infobrmation about bow to record using this kind
of connection.
The rear panel jacks on your TV make it easy lo comect a DW player to your TV
Note: For an explanation of Component video, see your DVID p&q&s owner’s manual.
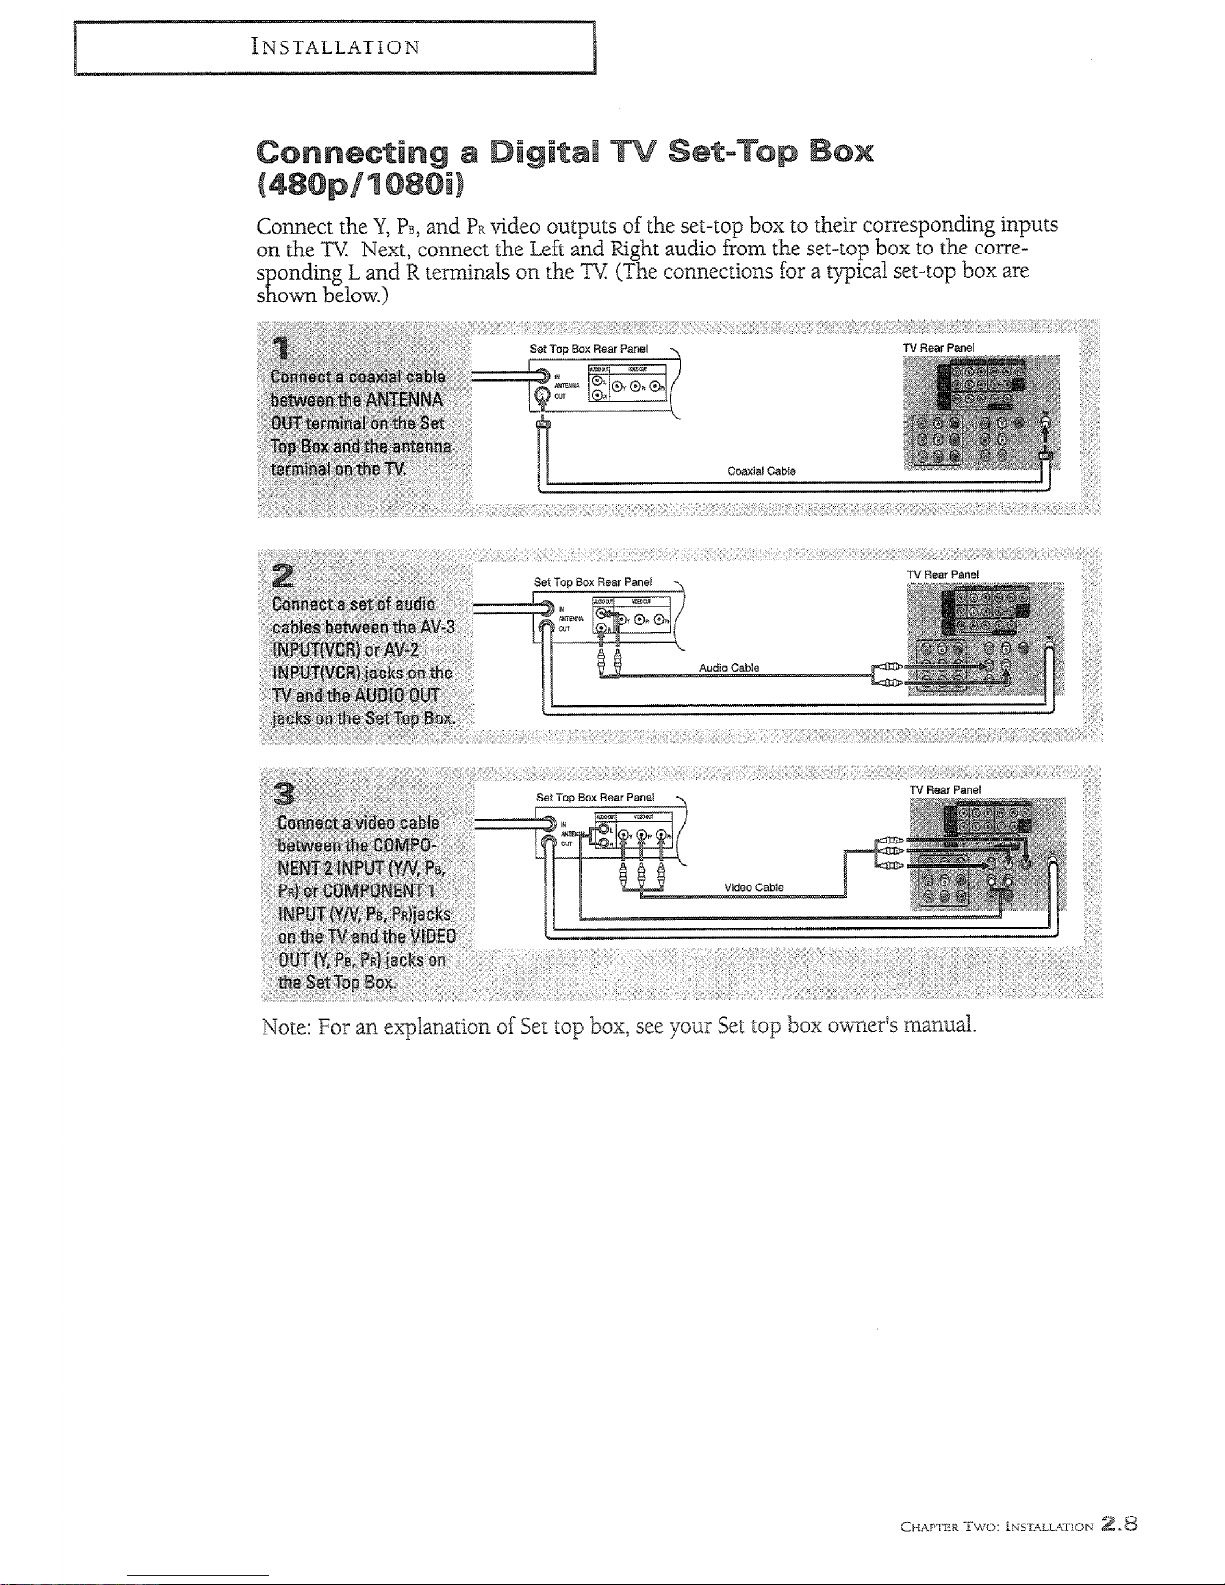
HNSTALLATION
Connect the
Y, PB, and PR videa autputs of the set-top
box to tbek corresponding inputs
on the TV+
Next,
connect the Left and Right audio fmm the set-top box to the corre-
spending
L and R terminals on
the TV (The connections for a typical set-top box are
shown below.)
Note: For an explanation of See top box: see your Set top box oxvixr’s manual.
 Loading...